Embed Size (px)
Citation preview
AN11876 AN11876 Starting Development with TapLinx SDK
Rev. 1.5.1 — 26 March 2019 Application note COMPANY PUBLIC
Document information Info Content Keywords TapLinx, Android SDK
Abstract This application note describes how to use the TapLinx Android SDK in an own project. It describes how to include a local AAR file, how to use the NXP TapLinx Maven repository, why the library must be registered and how include documentation from local or external resources.
NXP Semiconductors AN11876 Starting Development with TapLinx SDK
AN11876 All information provided in this document is subject to legal disclaimers. © NXP Semiconductors N.V. 20194. All rights reserved.
Application note COMPANY PUBLIC
Rev. 1.5.1 — 26 March 2019 2 of 37
Contact information For more information, please visit: http://www.nxp.com or send an email to [email protected]
Revision history Rev Date Description 0.9 20160802 Start of document
1.0 20160913 Document release 1.0
1.1 20160921 Section 6.1 changed (link to JavaDoc added)
1.2 20170619 Chapter 5 inserted
1.3 20180312 Section 3.2 inserted
1.4 20180723 Section 3.3 inserted
1.5 20181016 Section 3.4 (Release Notes for Version 1.5) added
1.5.1 20190326 Section 3.5 (Release Notes for Version 1.6) added

NXP Semiconductors AN11876 Starting Development with TapLinx SDK
AN11876 All information provided in this document is subject to legal disclaimers. © NXP Semiconductors N.V. 2019. All rights reserved.
Application note COMPANY PUBLIC
Rev. 1.5.1 — 26 March 2019 3 of 37
1. Introduction The TapLinx library allows you to communicate with NFC devices on an Android system easily. The library encapsulates all low-level communication as well as all device proprietary dependencies and offers a homogeneous interface.
This application note will help you to start with TapLinx and explains the steps which are required for integrating and using TapLinx with Android Studio. It will also explain how to register the library and how to start with your own app. In the last chapter you will find tips and tricks for typical use-cases for MIFARE products.
1.1 Where to Find the Code Snippets All code snippets in this application note can be found in the attachments of this PDF file. Please open the Attachments tab and save the complete Java files as shown in Fig 1.
Fig 1. Code snippets of this application note
The code snippets includes the Java files for the MainMactivity class and the Gradle project files.
1.2 Public Online Resources There is a public repository available where a user can download the JavaDoc as ZIP archive, a sample Android app as APK file or as source archive. The URL of the repo:
http://maven.taplinx.nxp.com/nexus/content/repositories/taplinxfiles/
Fig 2. Content of the public TapLinx repository
NXP Semiconductors AN11876 Starting Development with TapLinx SDK
AN11876 All information provided in this document is subject to legal disclaimers. © NXP Semiconductors N.V. 2019. All rights reserved.
Application note COMPANY PUBLIC
Rev. 1.5.1 — 26 March 2019 4 of 37
2. The First Time Online Registration When you login to the TapLinx server you can enter a package string of your app and you will receive a key string which you have to use in the source code of your software to enable the TapLinx library for unlimited use. The package key must be the same package key as your Manifest file. How to insert the key string is shown in Fig 6.
Register your app in order to enable the TapLinx library for your Android device. This must be done only once and is mandatory. After this registration the library is enabled, and you can use the library within your app without any limitation in time or usage.
TapLinx also supports apps which will never be connected to the Internet and therefore cannot be registered online. In this case, the online registration is paused. TapLinx works as expected until the device gets an Internet connection for the first time.
2.1 In Case of an Unsuccessful Registration Confirmation If the registration was not successful, two things may have gone wrong:
1. The key string was not inserted properly in the source code. This key must be a string for the second parameter of the method NfcNxpLib.registerActivity(). Please use the key string and do not add any other information like a version number etc. to it.
2. The package name you enter at the registration is different from the package name you used in your project. Please use the package key only for the registered project. If you want to start another Android project and you want to use the TapLinx library, please register the package name of this project. You will get a new package key for using with the new project.
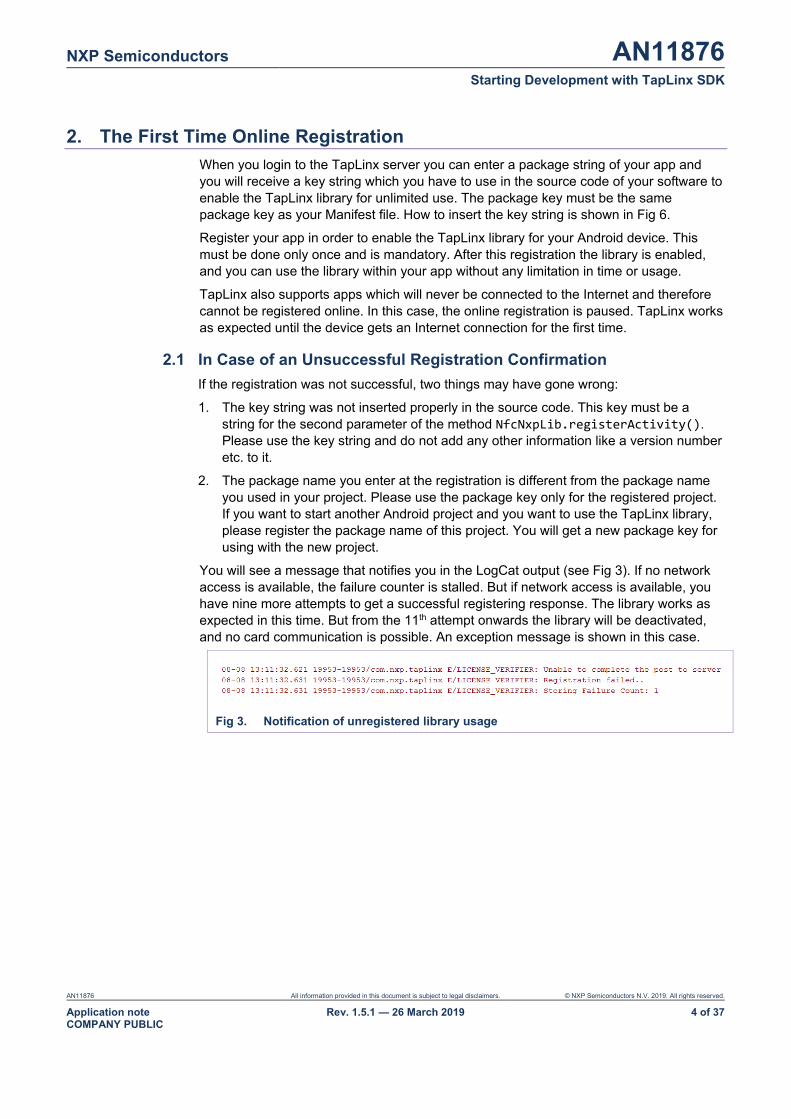
You will see a message that notifies you in the LogCat output (see Fig 3). If no network access is available, the failure counter is stalled. But if network access is available, you have nine more attempts to get a successful registering response. The library works as expected in this time. But from the 11th attempt onwards the library will be deactivated, and no card communication is possible. An exception message is shown in this case.
Fig 3. Notification of unregistered library usage
NXP Semiconductors AN11876 Starting Development with TapLinx SDK
AN11876 All information provided in this document is subject to legal disclaimers. © NXP Semiconductors N.V. 2019. All rights reserved.
Application note COMPANY PUBLIC
Rev. 1.5.1 — 26 March 2019 5 of 37
3. Setup TapLinx and the Required Libraries This chapter explains which preparation have to be done to use the TapLinx library with Android Studio. It shows the dependencies and explains which third-party components have to be included.
The build-in to load packages via Maven repositories is an integral part of Android Studio. Developing with Eclipse or Ant is no longer supported by Google and therefore the distribution of TapLinx standalone libraries (nxpnfclib.jar) is also not supported. Section 3.2 show how to include TapLinx as Android Studio AAR file into your project.
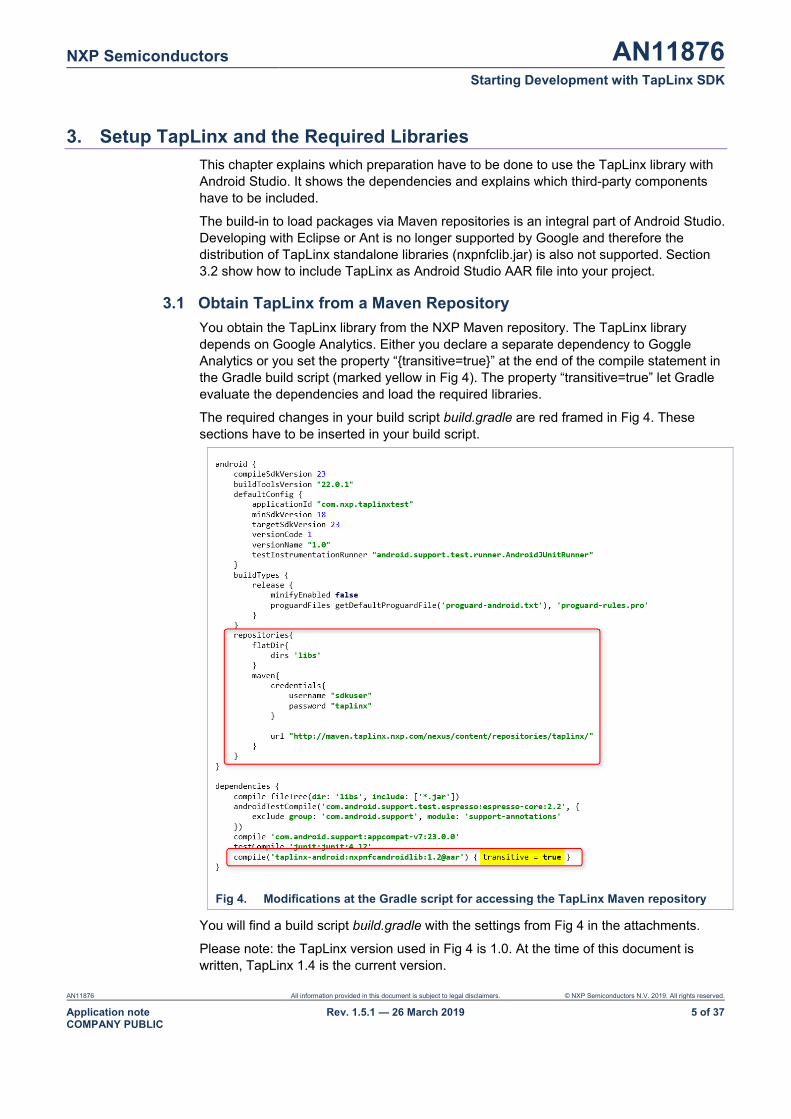
3.1 Obtain TapLinx from a Maven Repository You obtain the TapLinx library from the NXP Maven repository. The TapLinx library depends on Google Analytics. Either you declare a separate dependency to Goggle Analytics or you set the property “{transitive=true}” at the end of the compile statement in the Gradle build script (marked yellow in Fig 4). The property “transitive=true” let Gradle evaluate the dependencies and load the required libraries.
The required changes in your build script build.gradle are red framed in Fig 4. These sections have to be inserted in your build script.
Fig 4. Modifications at the Gradle script for accessing the TapLinx Maven repository
You will find a build script build.gradle with the settings from Fig 4 in the attachments.
Please note: the TapLinx version used in Fig 4 is 1.0. At the time of this document is written, TapLinx 1.4 is the current version.
NXP Semiconductors AN11876 Starting Development with TapLinx SDK
AN11876 All information provided in this document is subject to legal disclaimers. © NXP Semiconductors N.V. 2019. All rights reserved.
Application note COMPANY PUBLIC
Rev. 1.5.1 — 26 March 2019 6 of 37
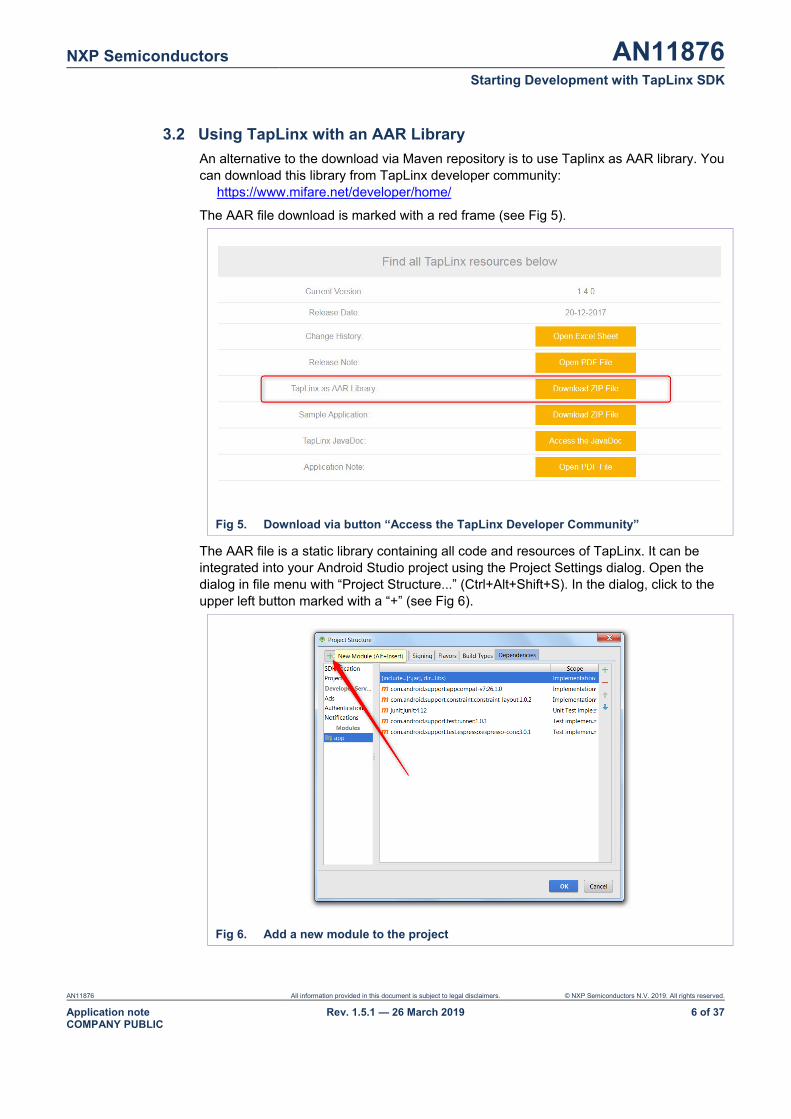
3.2 Using TapLinx with an AAR Library An alternative to the download via Maven repository is to use Taplinx as AAR library. You can download this library from TapLinx developer community: https://www.mifare.net/developer/home/
The AAR file download is marked with a red frame (see Fig 5).
Fig 5. Download via button “Access the TapLinx Developer Community”
The AAR file is a static library containing all code and resources of TapLinx. It can be integrated into your Android Studio project using the Project Settings dialog. Open the dialog in file menu with “Project Structure...” (Ctrl+Alt+Shift+S). In the dialog, click to the upper left button marked with a “+” (see Fig 6).
Fig 6. Add a new module to the project
NXP Semiconductors AN11876 Starting Development with TapLinx SDK
AN11876 All information provided in this document is subject to legal disclaimers. © NXP Semiconductors N.V. 2019. All rights reserved.
Application note COMPANY PUBLIC
Rev. 1.5.1 — 26 March 2019 7 of 37
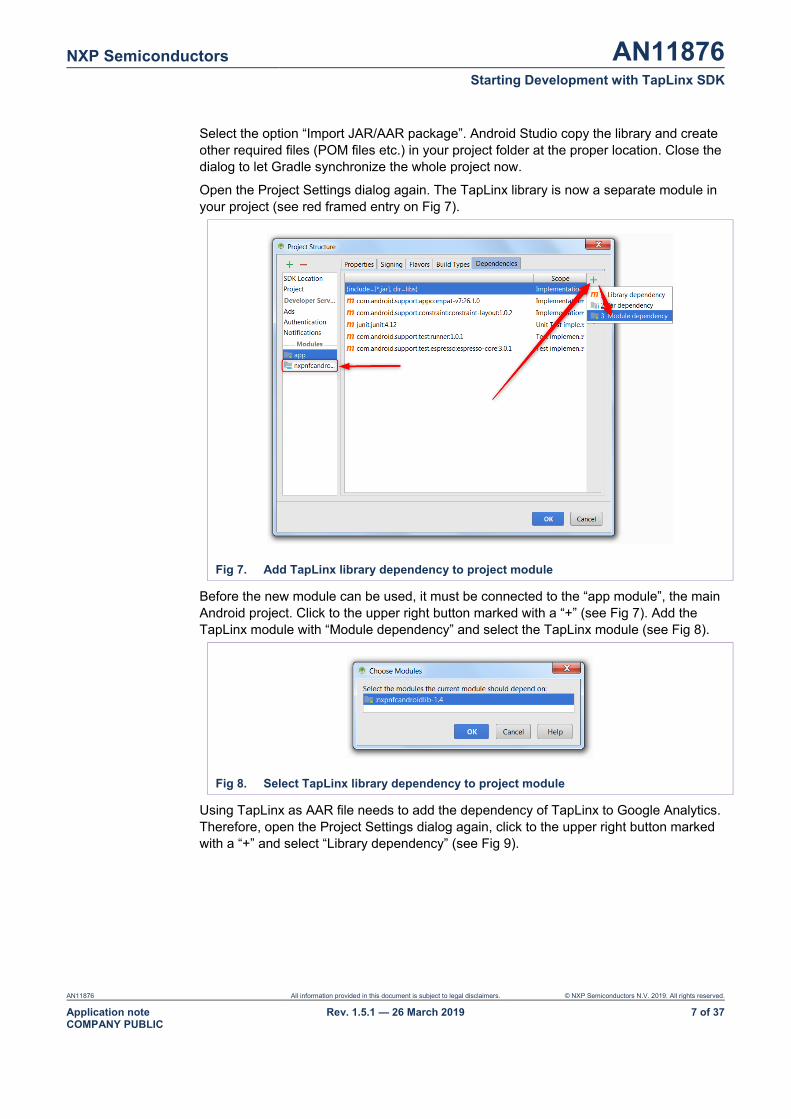
Select the option “Import JAR/AAR package”. Android Studio copy the library and create other required files (POM files etc.) in your project folder at the proper location. Close the dialog to let Gradle synchronize the whole project now.
Open the Project Settings dialog again. The TapLinx library is now a separate module in your project (see red framed entry on Fig 7).
Fig 7. Add TapLinx library dependency to project module
Before the new module can be used, it must be connected to the “app module”, the main Android project. Click to the upper right button marked with a “+” (see Fig 7). Add the TapLinx module with “Module dependency” and select the TapLinx module (see Fig 8).
Fig 8. Select TapLinx library dependency to project module
Using TapLinx as AAR file needs to add the dependency of TapLinx to Google Analytics. Therefore, open the Project Settings dialog again, click to the upper right button marked with a “+” and select “Library dependency” (see Fig 9).
NXP Semiconductors AN11876 Starting Development with TapLinx SDK
AN11876 All information provided in this document is subject to legal disclaimers. © NXP Semiconductors N.V. 2019. All rights reserved.
Application note COMPANY PUBLIC
Rev. 1.5.1 — 26 March 2019 8 of 37
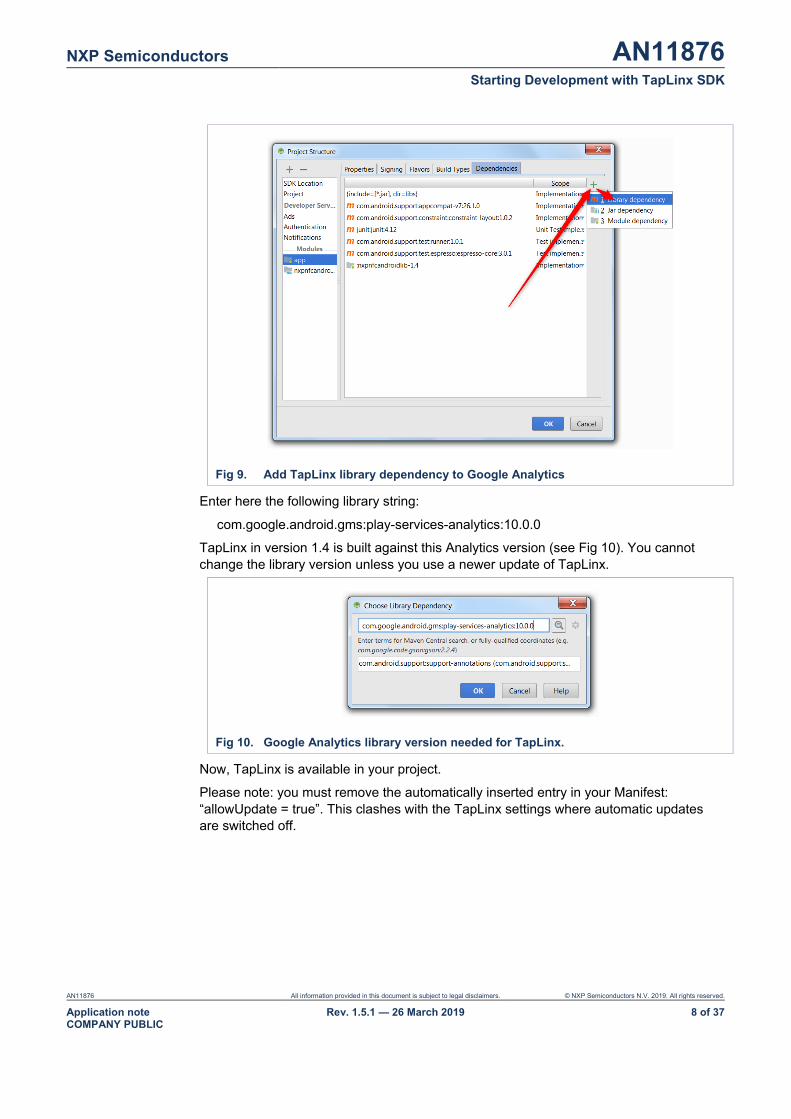
Fig 9. Add TapLinx library dependency to Google Analytics
Enter here the following library string:
com.google.android.gms:play-services-analytics:10.0.0
TapLinx in version 1.4 is built against this Analytics version (see Fig 10). You cannot change the library version unless you use a newer update of TapLinx.
Fig 10. Google Analytics library version needed for TapLinx.
Now, TapLinx is available in your project.
Please note: you must remove the automatically inserted entry in your Manifest: “allowUpdate = true”. This clashes with the TapLinx settings where automatic updates are switched off.
NXP Semiconductors AN11876 Starting Development with TapLinx SDK
AN11876 All information provided in this document is subject to legal disclaimers. © NXP Semiconductors N.V. 2019. All rights reserved.
Application noteCOMPANY PUBLIC
Rev. 1.5.1 — 26 March 2019 9 of 37
3.3 Release Notes for Version 1.4.1 The release version 1.4.1 update the internal reference to the Google Analytics library. With new libraries also, the internal build tools must be updated to use the updated Google libraries. The test apps for TapLinx use Gradle in version 3.1.3:
dependencies {
classpath 'com.android.tools.build:gradle:3.1.3'
}
3.3.1 Modification for using TapLinx via Maven repository For the case of reading TapLinx via Maven repo, only change the version number in the Gradle app file to:
implementation('taplinx-android:nxpnfcandroidlib:1.4.1@aar') { transitive = true }
With the statement “transitive = true” the updated Google library is loaded automatically with the correct version. Please note, Google has changed the Gradle syntax to express library dependencies with “implementation”. This was introduced with Android Studio 3.0.
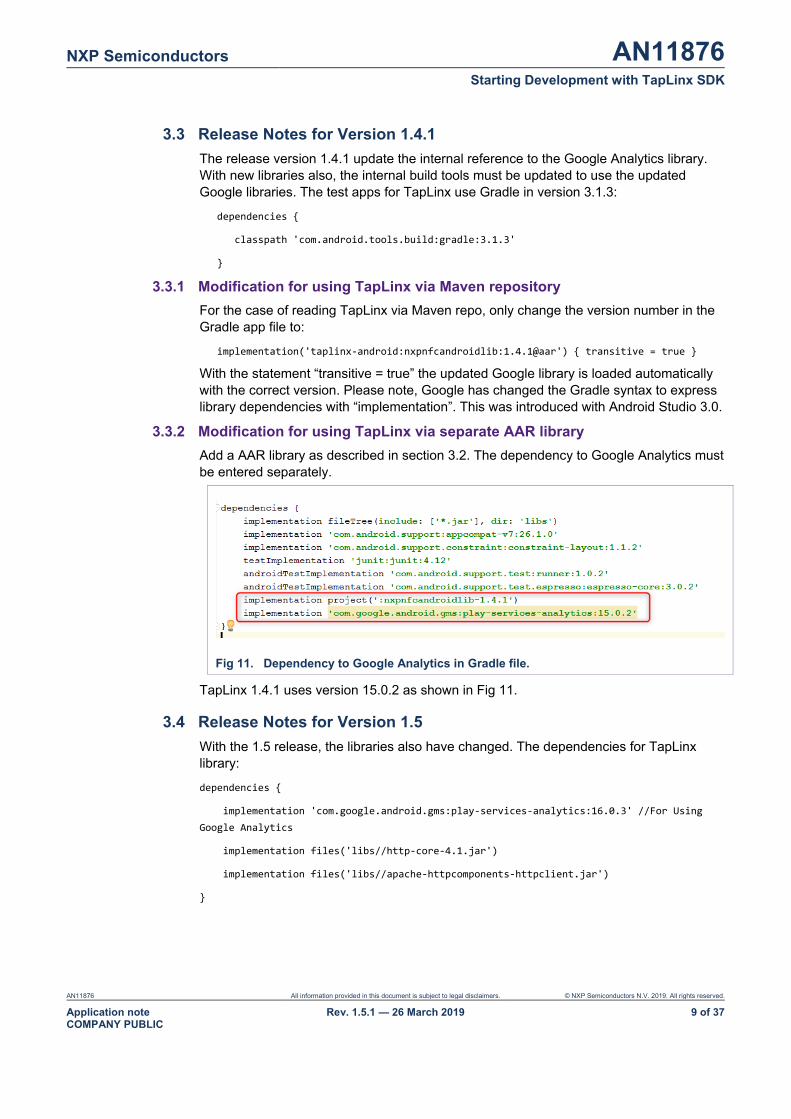
3.3.2 Modification for using TapLinx via separate AAR library Add a AAR library as described in section 3.2. The dependency to Google Analytics must be entered separately.
Fig 11. Dependency to Google Analytics in Gradle file.
TapLinx 1.4.1 uses version 15.0.2 as shown in Fig 11.
3.4 Release Notes for Version 1.5 With the 1.5 release, the libraries also have changed. The dependencies for TapLinx library:
dependencies {
implementation 'com.google.android.gms:play-services-analytics:16.0.3' //For Using Google Analytics
implementation files('libs//http-core-4.1.jar')
implementation files('libs//apache-httpcomponents-httpclient.jar')
}
NXP Semiconductors AN11876 Starting Development with TapLinx SDK
AN11876 All information provided in this document is subject to legal disclaimers. © NXP Semiconductors N.V. 2019. All rights reserved.
Application note COMPANY PUBLIC
Rev. 1.5.1 — 26 March 2019 10 of 37
The corresponding snippet from Sample App (uses Taplinx 1.5 library) use this build.gradle file:
dependencies {
implementation "com.android.support:appcompat-v7:$supportLibVersion"
implementation "com.android.support:design:$supportLibVersion"
implementation 'com.google.android.gms:play-services-analytics:16.0.3' //For Using Google Analytics
implementation 'com.google.firebase:firebase-core:16.0.3'
implementation 'com.google.firebase:firebase-messaging:17.3.2'
}
3.5 Release Notes for Version 1.6 This version comes with a new offline registration feature. This feature allows it to register an app with a special key instead of online registration if the app is started at the first time. If the online registration fails 10 times, TapLinx becomes unavailable. Offline registration is intent for users who use their app in private networks or networks with limit connectivity.
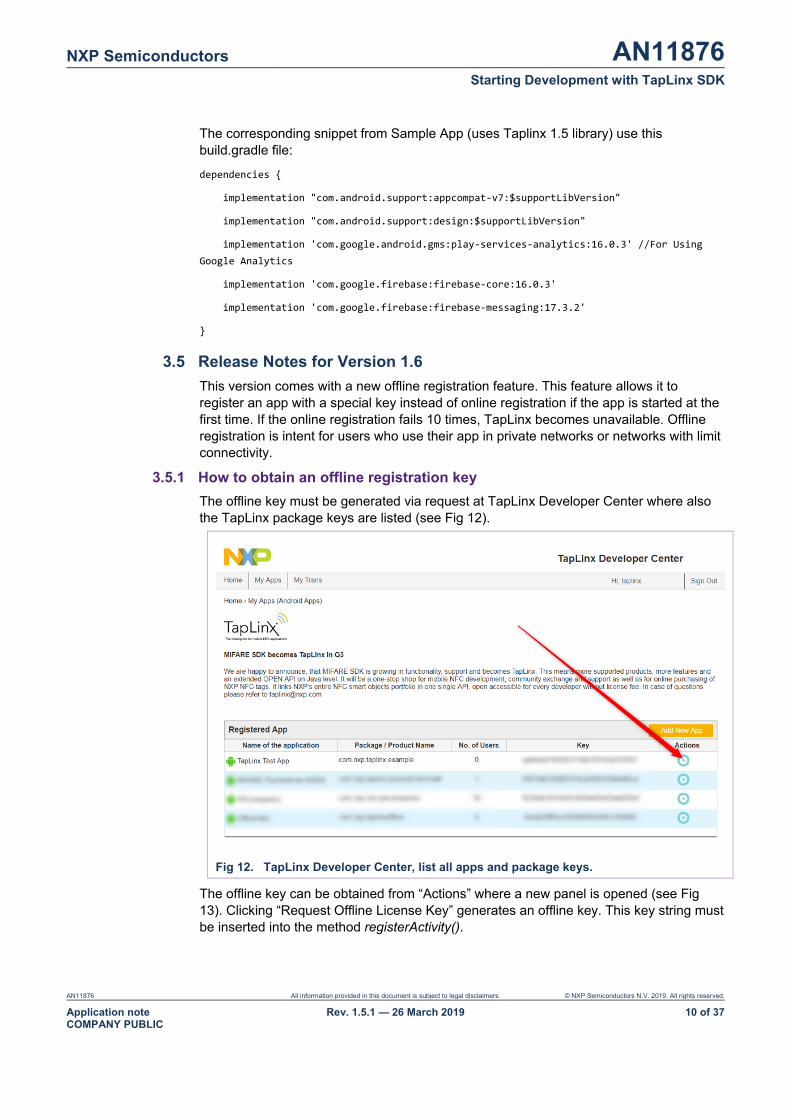
3.5.1 How to obtain an offline registration key The offline key must be generated via request at TapLinx Developer Center where also the TapLinx package keys are listed (see Fig 12).
Fig 12. TapLinx Developer Center, list all apps and package keys.
The offline key can be obtained from “Actions” where a new panel is opened (see Fig 13). Clicking “Request Offline License Key” generates an offline key. This key string must be inserted into the method registerActivity().
NXP Semiconductors AN11876 Starting Development with TapLinx SDK
AN11876 All information provided in this document is subject to legal disclaimers. © NXP Semiconductors N.V. 2019. All rights reserved.
Application note COMPANY PUBLIC
Rev. 1.5.1 — 26 March 2019 11 of 37
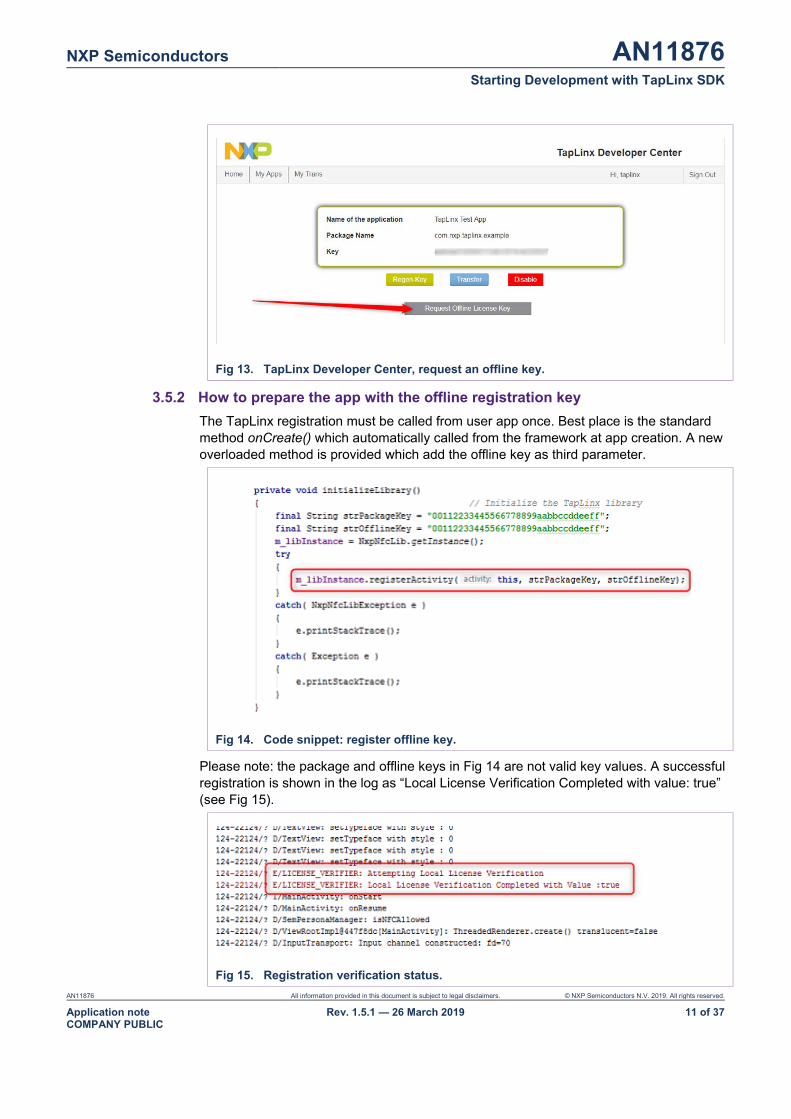
Fig 13. TapLinx Developer Center, request an offline key.
3.5.2 How to prepare the app with the offline registration key The TapLinx registration must be called from user app once. Best place is the standard method onCreate() which automatically called from the framework at app creation. A new overloaded method is provided which add the offline key as third parameter.
Fig 14. Code snippet: register offline key.
Please note: the package and offline keys in Fig 14 are not valid key values. A successful registration is shown in the log as “Local License Verification Completed with value: true” (see Fig 15).
Fig 15. Registration verification status.
NXP Semiconductors AN11876 Starting Development with TapLinx SDK
AN11876 All information provided in this document is subject to legal disclaimers. © NXP Semiconductors N.V. 2019. All rights reserved.
Application note COMPANY PUBLIC
Rev. 1.5.1 — 26 March 2019 12 of 37
4. How to Start Programming with the TapLinx Library The project must be prepared for use with the TapLinx library. This chapter shows the general preparation of the project source files and shows some typical use-cases with different MIFARE products.
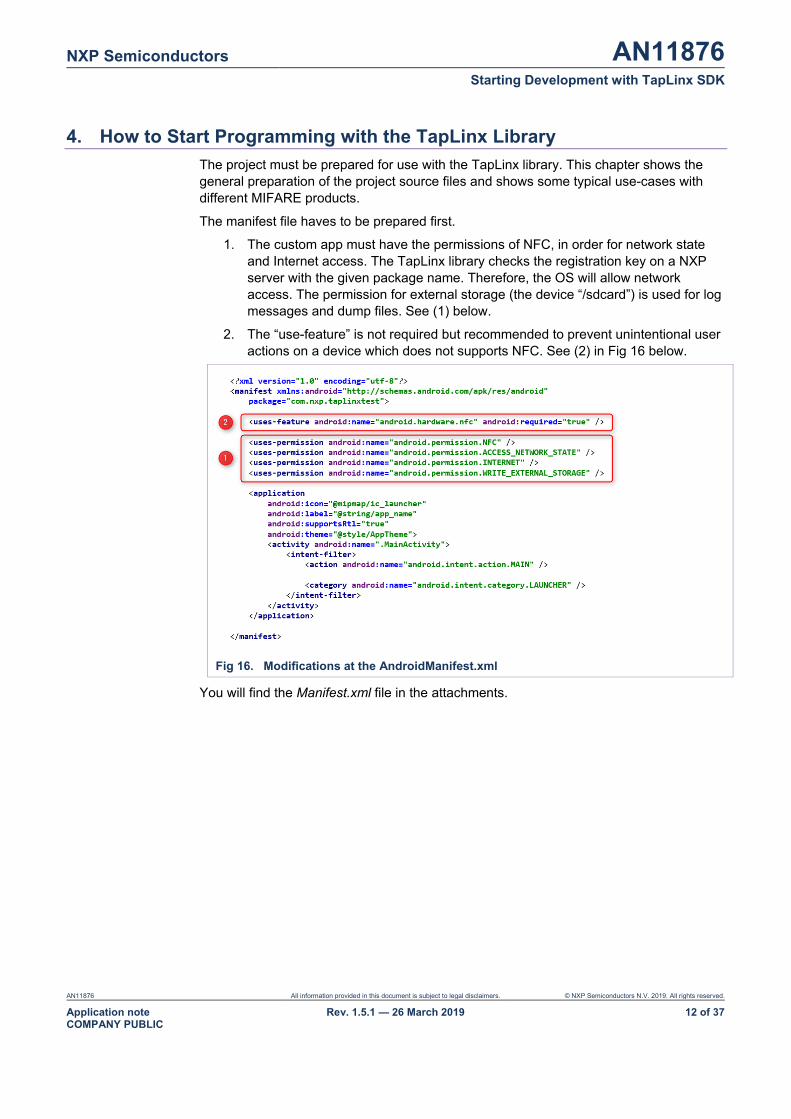
The manifest file haves to be prepared first.
1. The custom app must have the permissions of NFC, in order for network state and Internet access. The TapLinx library checks the registration key on a NXP server with the given package name. Therefore, the OS will allow network access. The permission for external storage (the device “/sdcard”) is used for log messages and dump files. See (1) below.
2. The “use-feature” is not required but recommended to prevent unintentional user actions on a device which does not supports NFC. See (2) in Fig 16 below.
Fig 16. Modifications at the AndroidManifest.xml
You will find the Manifest.xml file in the attachments.
NXP Semiconductors AN11876 Starting Development with TapLinx SDK
AN11876 All information provided in this document is subject to legal disclaimers. © NXP Semiconductors N.V. 2019. All rights reserved.
Application note COMPANY PUBLIC
Rev. 1.5.1 — 26 March 2019 13 of 37
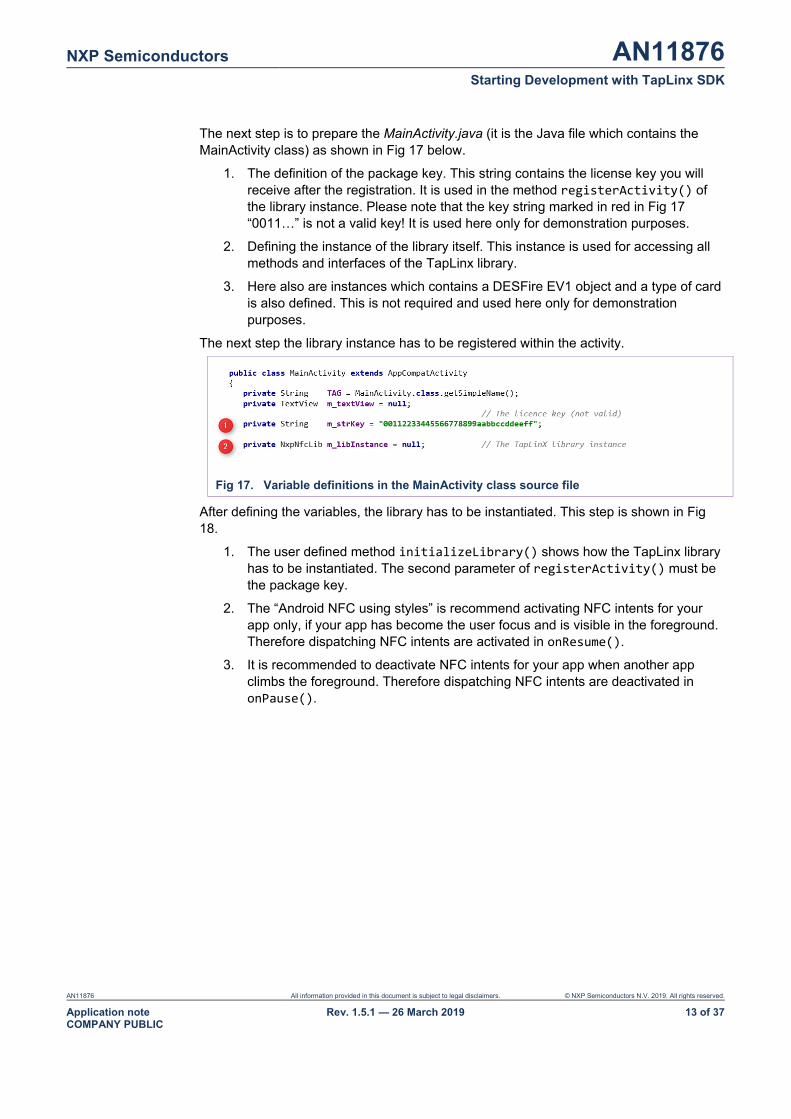
The next step is to prepare the MainActivity.java (it is the Java file which contains the MainActivity class) as shown in Fig 17 below.
1. The definition of the package key. This string contains the license key you will receive after the registration. It is used in the method registerActivity() of the library instance. Please note that the key string marked in red in Fig 17 “0011…” is not a valid key! It is used here only for demonstration purposes.
2. Defining the instance of the library itself. This instance is used for accessing all methods and interfaces of the TapLinx library.
3. Here also are instances which contains a DESFire EV1 object and a type of card is also defined. This is not required and used here only for demonstration purposes.
The next step the library instance has to be registered within the activity.
Fig 17. Variable definitions in the MainActivity class source file
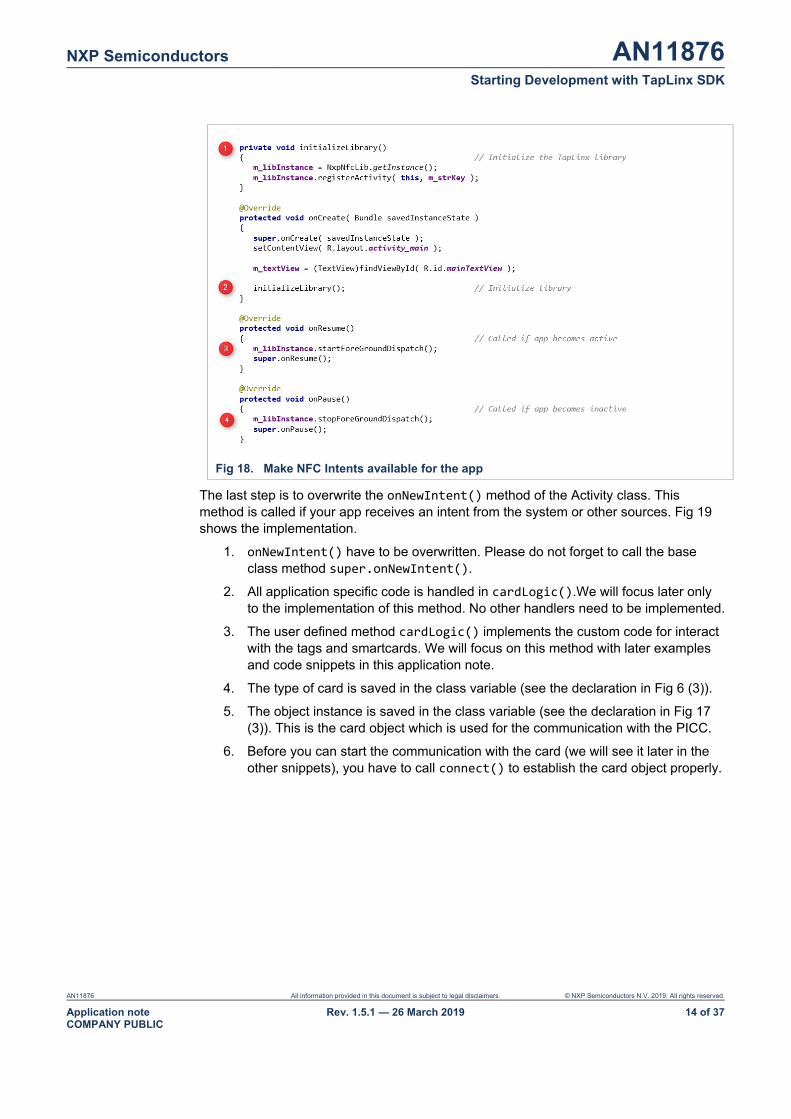
After defining the variables, the library has to be instantiated. This step is shown in Fig 18.
1. The user defined method initializeLibrary() shows how the TapLinx library has to be instantiated. The second parameter of registerActivity() must be the package key.
2. The “Android NFC using styles” is recommend activating NFC intents for your app only, if your app has become the user focus and is visible in the foreground. Therefore dispatching NFC intents are activated in onResume().
3. It is recommended to deactivate NFC intents for your app when another app climbs the foreground. Therefore dispatching NFC intents are deactivated in onPause().
NXP Semiconductors AN11876 Starting Development with TapLinx SDK
AN11876 All information provided in this document is subject to legal disclaimers. © NXP Semiconductors N.V. 2019. All rights reserved.
Application note COMPANY PUBLIC
Rev. 1.5.1 — 26 March 2019 14 of 37
Fig 18. Make NFC Intents available for the app
The last step is to overwrite the onNewIntent() method of the Activity class. This method is called if your app receives an intent from the system or other sources. Fig 19 shows the implementation.
1. onNewIntent() have to be overwritten. Please do not forget to call the base class method super.onNewIntent().
2. All application specific code is handled in cardLogic().We will focus later only to the implementation of this method. No other handlers need to be implemented.
3. The user defined method cardLogic() implements the custom code for interact with the tags and smartcards. We will focus on this method with later examples and code snippets in this application note.
4. The type of card is saved in the class variable (see the declaration in Fig 6 (3)).
5. The object instance is saved in the class variable (see the declaration in Fig 17 (3)). This is the card object which is used for the communication with the PICC.
6. Before you can start the communication with the card (we will see it later in the other snippets), you have to call connect() to establish the card object properly.

NXP Semiconductors AN11876 Starting Development with TapLinx SDK
AN11876 All information provided in this document is subject to legal disclaimers. © NXP Semiconductors N.V. 2019. All rights reserved.
Application noteCOMPANY PUBLIC
Rev. 1.5.1 — 26 March 2019 15 of 37
Fig 19. Implementing the callback for getting NFC intents
A word of what is happening in this code snippet. You will see the first commands of a typical sequence (we will see in other snippets the same prologue). If you know from the card type enumerator that a DESFire EV1 is detected, you have to retrieve the proper card object from the library—in our case a DESFire EV1 object. Before you can start to refer to this object, you have to call connect() to establish the content properly.
You will find the Java file SimpleConnectMainActivity.java which implements the snippet from Fig 19 in the attachments.
4.1 Setup Spongy Castle Libraries for Using in the Sample App Spongy Castle is used for storing the keys of the sample app. You can use Spongy Castle also for the encryption and decryption of data blocks. This subchapter explains how to prepare your app to use the Spongy Castle libraries.
The Spongy Castle library is not a must! You can use it, but you can decide also to use a different cryptographic provider or even no provider. Section 4.2 shows how to authenticate to a DESFire EV1 without Spongy Castle libraries.
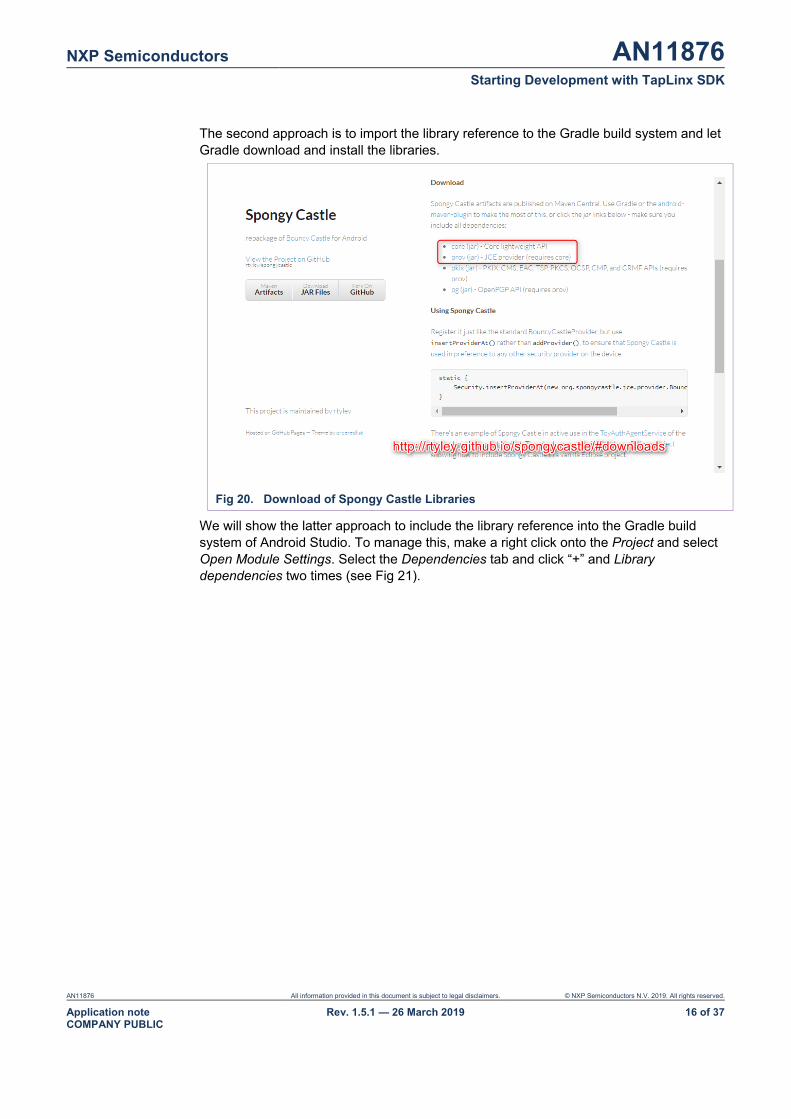
To include Spongy Castle into your project, there are two alternatives. First, download the JAR files directly from the site and include it into your project. The libraries are available from this URL:
https://rtyley.github.io/spongycastle/
For basic cryptography and using only the keystore, the JAR files core-1.54.0.0,jar and prov-1.54.0.0.jar (see Fig 20) are required.
NXP Semiconductors AN11876 Starting Development with TapLinx SDK
AN11876 All information provided in this document is subject to legal disclaimers. © NXP Semiconductors N.V. 2019. All rights reserved.
Application note COMPANY PUBLIC
Rev. 1.5.1 — 26 March 2019 16 of 37
The second approach is to import the library reference to the Gradle build system and let Gradle download and install the libraries.
Fig 20. Download of Spongy Castle Libraries
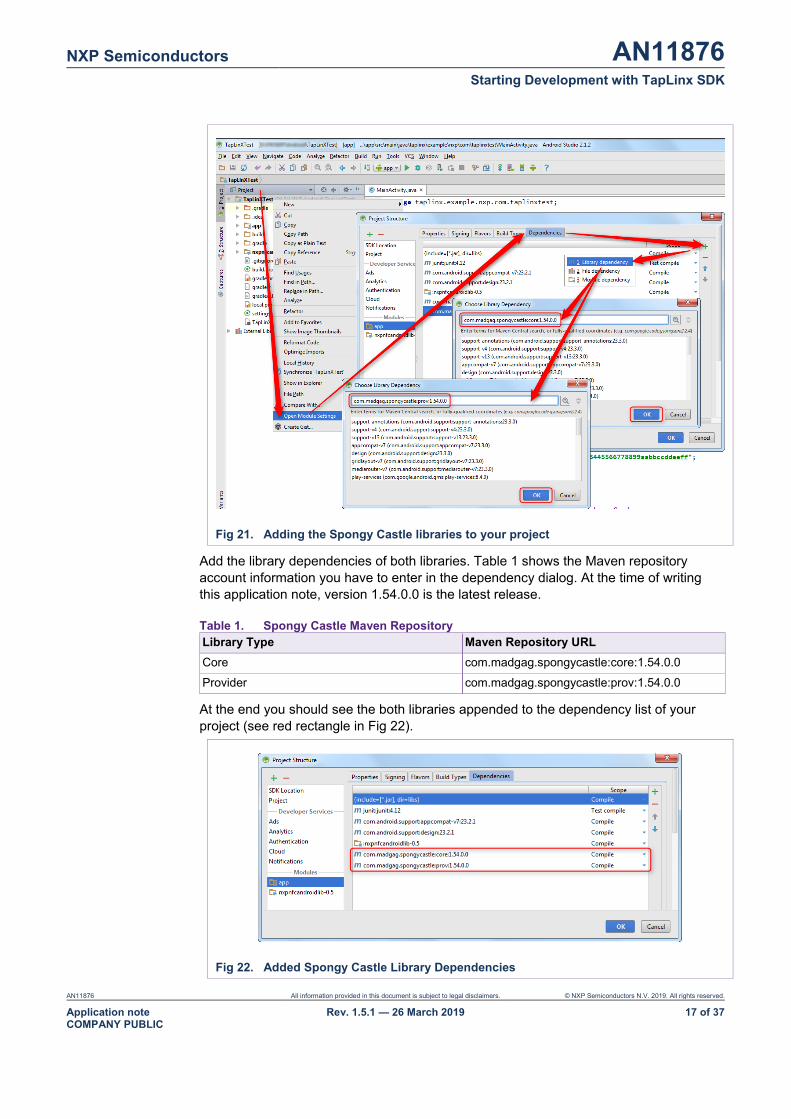
We will show the latter approach to include the library reference into the Gradle build system of Android Studio. To manage this, make a right click onto the Project and select Open Module Settings. Select the Dependencies tab and click “+” and Library dependencies two times (see Fig 21).
NXP Semiconductors AN11876 Starting Development with TapLinx SDK
AN11876 All information provided in this document is subject to legal disclaimers. © NXP Semiconductors N.V. 2019. All rights reserved.
Application note COMPANY PUBLIC
Rev. 1.5.1 — 26 March 2019 17 of 37
Fig 21. Adding the Spongy Castle libraries to your project
Add the library dependencies of both libraries. Table 1 shows the Maven repository account information you have to enter in the dependency dialog. At the time of writing this application note, version 1.54.0.0 is the latest release.
Table 1. Spongy Castle Maven Repository Library Type Maven Repository URL Core com.madgag.spongycastle:core:1.54.0.0
Provider com.madgag.spongycastle:prov:1.54.0.0
At the end you should see the both libraries appended to the dependency list of your project (see red rectangle in Fig 22).
Fig 22. Added Spongy Castle Library Dependencies
NXP Semiconductors AN11876 Starting Development with TapLinx SDK
AN11876 All information provided in this document is subject to legal disclaimers. © NXP Semiconductors N.V. 2019. All rights reserved.
Application note COMPANY PUBLIC
Rev. 1.5.1 — 26 March 2019 18 of 37
4.2 Authentication without the Spongy Castle Keystore Instead of the Spongy Castle keystore the key management of plain Java can be used. TapLinx provides a helper class for encapsulating raw key data:
com.nxp.nfclib.defaultimpl.KeyData
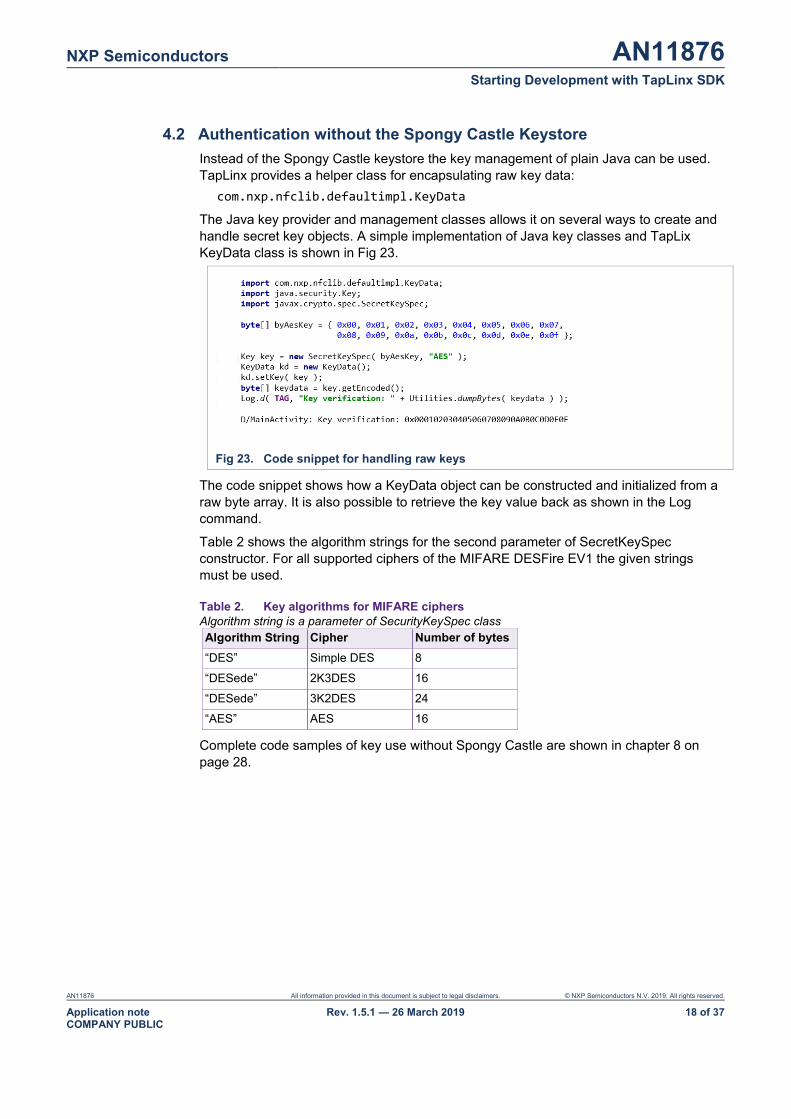
The Java key provider and management classes allows it on several ways to create and handle secret key objects. A simple implementation of Java key classes and TapLix KeyData class is shown in Fig 23.
Fig 23. Code snippet for handling raw keys
The code snippet shows how a KeyData object can be constructed and initialized from a raw byte array. It is also possible to retrieve the key value back as shown in the Log command.
Table 2 shows the algorithm strings for the second parameter of SecretKeySpec constructor. For all supported ciphers of the MIFARE DESFire EV1 the given strings must be used.
Table 2. Key algorithms for MIFARE ciphers Algorithm string is a parameter of SecurityKeySpec class Algorithm String Cipher Number of bytes “DES” Simple DES 8
“DESede” 2K3DES 16
“DESede” 3K2DES 24
“AES” AES 16
Complete code samples of key use without Spongy Castle are shown in chapter 8 on page 28.
NXP Semiconductors AN11876 Starting Development with TapLinx SDK
AN11876 All information provided in this document is subject to legal disclaimers. © NXP Semiconductors N.V. 2019. All rights reserved.
Application note COMPANY PUBLIC
Rev. 1.5.1 — 26 March 2019 19 of 37
5. Short Introduction into the MIFARE DESFire Architecture The classes and methods of the TapLinx SDK are built directly on the MIFARE DESFire native command set. To understand the methods of the TapLinx MIFARE DESFire interface and helper classes, a short overview of the architecture concept of the MIFARE DESFire EV1 is required. It helps to exploit fully the possibilities offered by TapLinx SDK.
5.1 MIFARE DESFire EV1 Architecture The overview in this section is an abstract of the documents:
• MIFARE DESFire EV1 Functionality of implementations on smart card controllers
• AN0945 MIFARE DESFire EV1 - Implementation hints and examples
Please ask your local NXP distributor for the documents if you want to go into more details. For both documents is a signed NDA required.
The MIFARE DESFire EV1 is a “multi-application product” which means that different entities can put their data securely without impair and touching the other data.
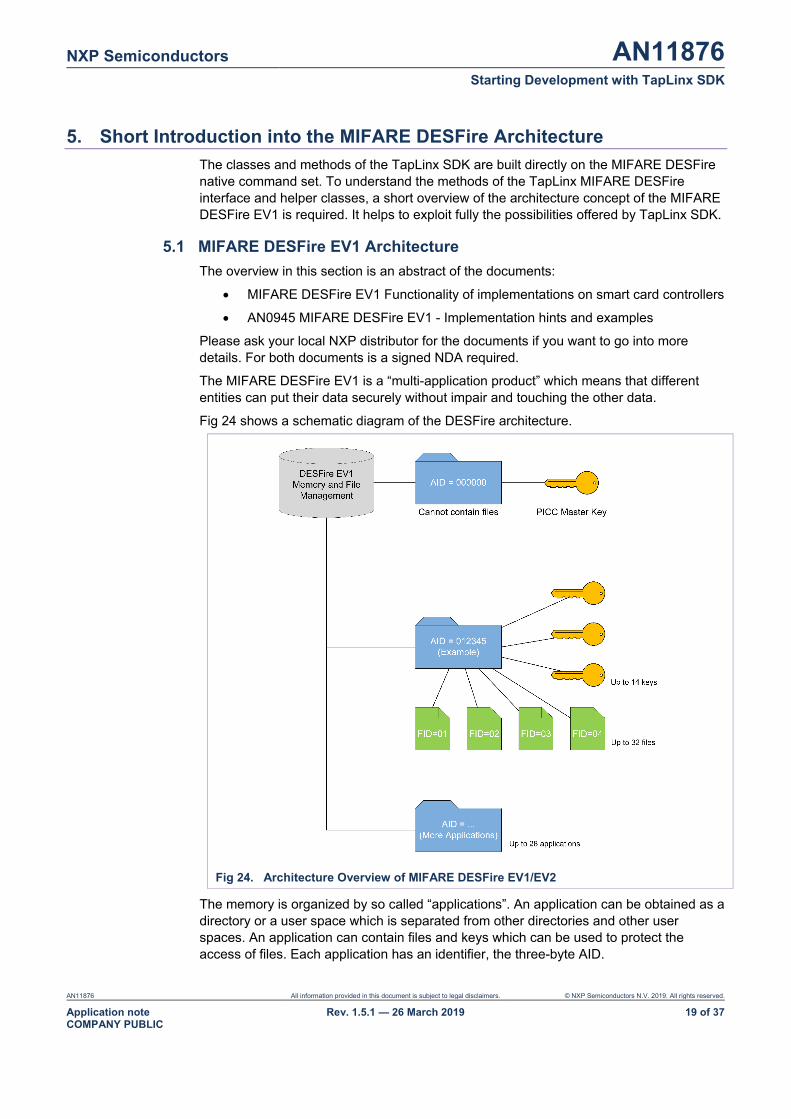
Fig 24 shows a schematic diagram of the DESFire architecture.
Fig 24. Architecture Overview of MIFARE DESFire EV1/EV2
The memory is organized by so called “applications”. An application can be obtained as a directory or a user space which is separated from other directories and other user spaces. An application can contain files and keys which can be used to protect the access of files. Each application has an identifier, the three-byte AID.
NXP Semiconductors AN11876 Starting Development with TapLinx SDK
AN11876 All information provided in this document is subject to legal disclaimers. © NXP Semiconductors N.V. 2019. All rights reserved.
Application noteCOMPANY PUBLIC
Rev. 1.5.1 — 26 March 2019 20 of 37
A new card is always delivered blank, without any installed applications. The root level of the card is called PICC level and is characterized through the AID = 0x000000. By selecting the application with AID = 0x000000, the PICC level (so the card root level) is selected.
On the PICC level, no files can be directly created, but it`s possible to create applications on the PICC level. Further on the PICC level offers the possibility to make multiple configuration settings and contains card management keys like the PICC Master Key.
The PICC Master Key is known by the card issuer and with the appropriate settings there is no reason to share this key with third party entities. If it is generally allowed (see the access permission list below) by card issuer, a third party can create its own application and used it for storing files in it.
Except for application AID = 0x000000 there exist no other applications on a blank card. The first thing to start is to create a user application with an AID different of 0x000000. While creating the application the following information must be defined:
• The number of keys used within this application.
• Application access permission settings.
o Define access key permissions
o Configuration is changeable without Master Key yes/no
o Free list directory allowed without Master Key yes/no
o Free create/delete files allowed without Master Key yes/no
o Allow change of the Master Key yes/no
• Define the crypto method of this application.
o DES or 2K3DES cipher
o 3K3DES cipher
o AES128 cipher
• Optionally an ISO/IEC 7816 DFName can be defined.
The PICC Master Key is available for authentication to the IC and is also important for all configuration and administration actions that can be taken on the IC. It has the key number 0x00 on PICC level. Also, on application level, the application key number 0x00 acts as the Application Master Key, having usually configuration purpose of the application. Each application can be created with a flexible number of keys, ranging from no keys to up to 14 keys per application.
The 2K3DES/3K3DES cipher is available to be compatible with former customer infrastructures. This cipher should not be used in new projects.
As a recommendation: AES128 is the strongest cipher on a DESFire EV1 and should always be preferred for a maximum protection!
After creating an application, in the next step files can be created within this application.
NXP Semiconductors AN11876 Starting Development with TapLinx SDK
AN11876 All information provided in this document is subject to legal disclaimers. © NXP Semiconductors N.V. 2019. All rights reserved.
Application noteCOMPANY PUBLIC
Rev. 1.5.1 — 26 March 2019 21 of 37
5.1.1 Select or change between applications To deal with applications it is elementary to understand the MIFARE DESFire architecture. So, all operations like creating files or read from files relate always to an application. This is very similar to the concept of a directory in a PC file system. The command createApplication() creates an application which then can be selected. Inside this application files can be created. Before any other command takes place, always a selectApplication() should be used to set the DESFire in a known state. If no applications exist, selectApplication(0x000000) should be used to address the PICC Master Key for a following authentication.
The command getApplicationIDs() retrieves all available applications on a card. This command allows it to check if the target application exists on the card. This command is helpful to prevent running into an error if a user taps a different MIFARE DESFire EV1 to the reader which does not contain the desired application.
5.1.2 Protected Access with an Authentication It is very important to understand the authentication concept for protecting the access to the application. An authentication uses always a key which is used for protecting the following communication. If the authentication fails, no other accessing method (reading or writing) can be executed. Only several commands like get key version or authenticate can be executed.
The authentication verifies that the participant knows the same secret as on the card (the authentication key) and can be trusted and allow him the next operations like change a key or remove a file.
To read a file in encrypted communication mode also it is necessary to authenticate with the correct key, according to the access right settings of the targeted file. This key is used for used for authentication and session keys are derived which are used for the following MAC and encryption operations. A typical sequence could be:
com.nxp.nfclib.desfire.IDESFireEV1 desfireObj = …
desfireObj.selectApplication(…); // Select user application
desfireObj.authenticate(…); // Authentication with encryption key
desfireObj.readData(…); // Read encrypted data
5.1.3 File Communication and Access Modes With the command createFile() on the one hand a communication mode must be defined and on the other hand an access permission of the file must be defined. Caution, the one affects the other!
A user can set individual access permissions for “read access”, “write access”, combined “read and write access” and “change access”. The permission is expressed with a byte 0x00 …0x0F. Hence the values 0x00 until 0x0D relate to the appropriate key numbers and 0x0E means “free access” and 0x0F “no access”. A total number of 14 keys can be used in a single MIFARE DESFire application.
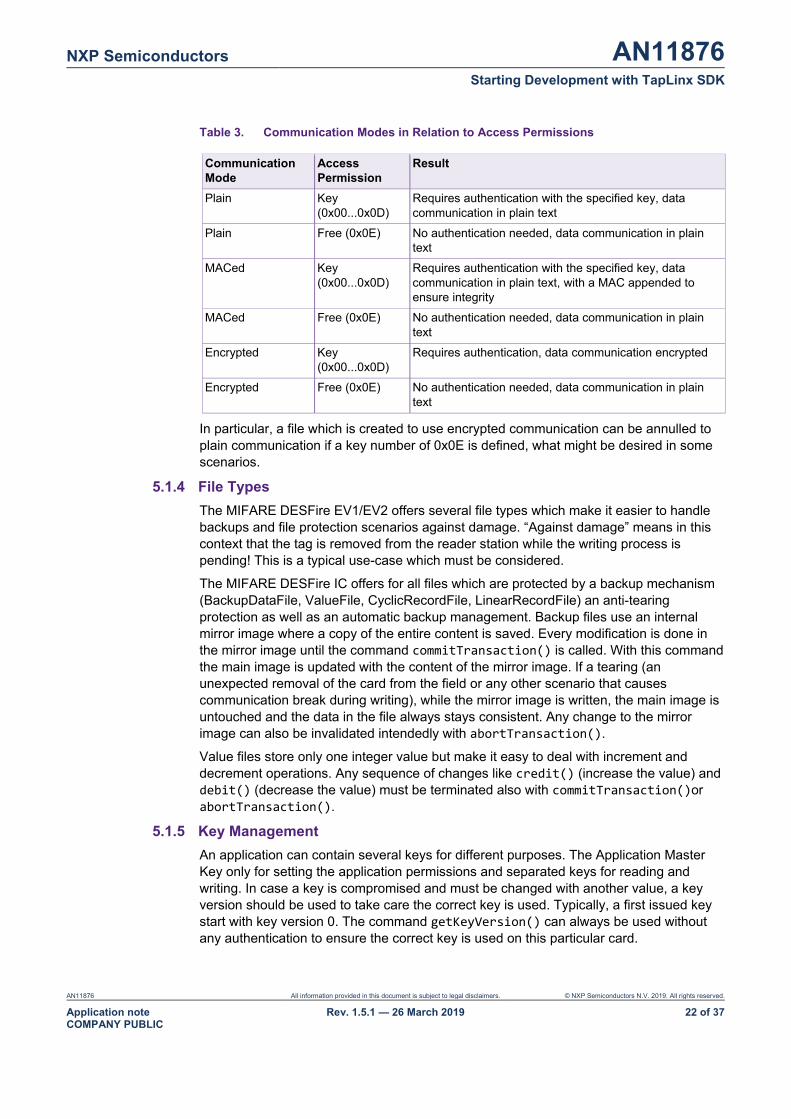
A user can also define the three communication modes “plain”, “MACed” and “fully encrypted”. Table 3 show this relation.
NXP Semiconductors AN11876 Starting Development with TapLinx SDK
AN11876 All information provided in this document is subject to legal disclaimers. © NXP Semiconductors N.V. 2019. All rights reserved.
Application note COMPANY PUBLIC
Rev. 1.5.1 — 26 March 2019 22 of 37
Table 3. Communication Modes in Relation to Access Permissions Communication Mode
Access Permission
Result
Plain Key (0x00...0x0D)
Requires authentication with the specified key, data communication in plain text
Plain Free (0x0E) No authentication needed, data communication in plain text
MACed Key (0x00...0x0D)
Requires authentication with the specified key, data communication in plain text, with a MAC appended to ensure integrity
MACed Free (0x0E) No authentication needed, data communication in plain text
Encrypted Key (0x00...0x0D)
Requires authentication, data communication encrypted
Encrypted Free (0x0E) No authentication needed, data communication in plain text
In particular, a file which is created to use encrypted communication can be annulled to plain communication if a key number of 0x0E is defined, what might be desired in some scenarios.
5.1.4 File Types The MIFARE DESFire EV1/EV2 offers several file types which make it easier to handle backups and file protection scenarios against damage. “Against damage” means in this context that the tag is removed from the reader station while the writing process is pending! This is a typical use-case which must be considered.
The MIFARE DESFire IC offers for all files which are protected by a backup mechanism (BackupDataFile, ValueFile, CyclicRecordFile, LinearRecordFile) an anti-tearing protection as well as an automatic backup management. Backup files use an internal mirror image where a copy of the entire content is saved. Every modification is done in the mirror image until the command commitTransaction() is called. With this command the main image is updated with the content of the mirror image. If a tearing (an unexpected removal of the card from the field or any other scenario that causes communication break during writing), while the mirror image is written, the main image is untouched and the data in the file always stays consistent. Any change to the mirror image can also be invalidated intendedly with abortTransaction().
Value files store only one integer value but make it easy to deal with increment and decrement operations. Any sequence of changes like credit() (increase the value) and debit() (decrease the value) must be terminated also with commitTransaction()or abortTransaction().
5.1.5 Key Management An application can contain several keys for different purposes. The Application Master Key only for setting the application permissions and separated keys for reading and writing. In case a key is compromised and must be changed with another value, a key version should be used to take care the correct key is used. Typically, a first issued key start with key version 0. The command getKeyVersion() can always be used without any authentication to ensure the correct key is used on this particular card.
NXP Semiconductors AN11876 Starting Development with TapLinx SDK
AN11876 All information provided in this document is subject to legal disclaimers. © NXP Semiconductors N.V. 2019. All rights reserved.
Application note COMPANY PUBLIC
Rev. 1.5.1 — 26 March 2019 23 of 37
The last step in a typical personalization process is to change the default keys against the customer values. As a recommendation: a key should always have generated from a true random generator. The command changeKey() changes the old key value with the new key value.
There is no way to read a key value from the MIFARE DESFire IC. Prior to changing a key, it is mandatory to authenticate. After a key change took place, an authentication can be executed to check if the key was updated correctly.
NXP Semiconductors AN11876 Starting Development with TapLinx SDK
AN11876 All information provided in this document is subject to legal disclaimers. © NXP Semiconductors N.V. 2019. All rights reserved.
Application note COMPANY PUBLIC
Rev. 1.5.1 — 26 March 2019 24 of 37
6. Coming from MIFARE SDK (Advanced/Lite) If you have already experience with the MIFARE SDK (Advanced or Lite), you can upgrade to TapLinx, but you must change your source files. The changes are moderate, most of the classes keep their names and the meaning. We will show the main differences in this chapter.
6.1 No built-in keystore in TapLinx The Mifare SDK Advanced provides an own keystore implementation which allows also to use a MIFARE SAM AV2 as hardware keystore. The SDK Lite uses a byte array (byte[]) as parameter type for the plain key values in all methods which needs a key. From the security point of view, using plain values as keys in an app is a potential risk.
TapLinx uses the Java key classes to contain key values and allows it to use any available third-party keystore in your app. The sample app uses Bouncy Castle as keystore, but any other or even no keystore can be used with TapLinx. The section 4.1 shows how to integrate Spongy Castle into your project and 4.2 shows how to authenticate with an on-the-fly generated key.
6.2 Modifications in the Android Intent Calling Mechanism In the MIFARE SDK you have to define the callback handler inside of the MainActivity class. A library filter method is called, and the callback handler is used to detect and handle card requests. This callback handler is now implemented as part of the TapLinx library and only a method must be provided to get notified with NFC intents as shown in Fig 8.
Coming from the Advanced or Lite SDK, the user implementation in MainActivity class is tidier and better maintainable now. Only one overwritten method and one user defined method have to be used for the own implementation.
NXP Semiconductors AN11876 Starting Development with TapLinx SDK
AN11876 All information provided in this document is subject to legal disclaimers. © NXP Semiconductors N.V. 2019. All rights reserved.
Application note COMPANY PUBLIC
Rev. 1.5.1 — 26 March 2019 25 of 37
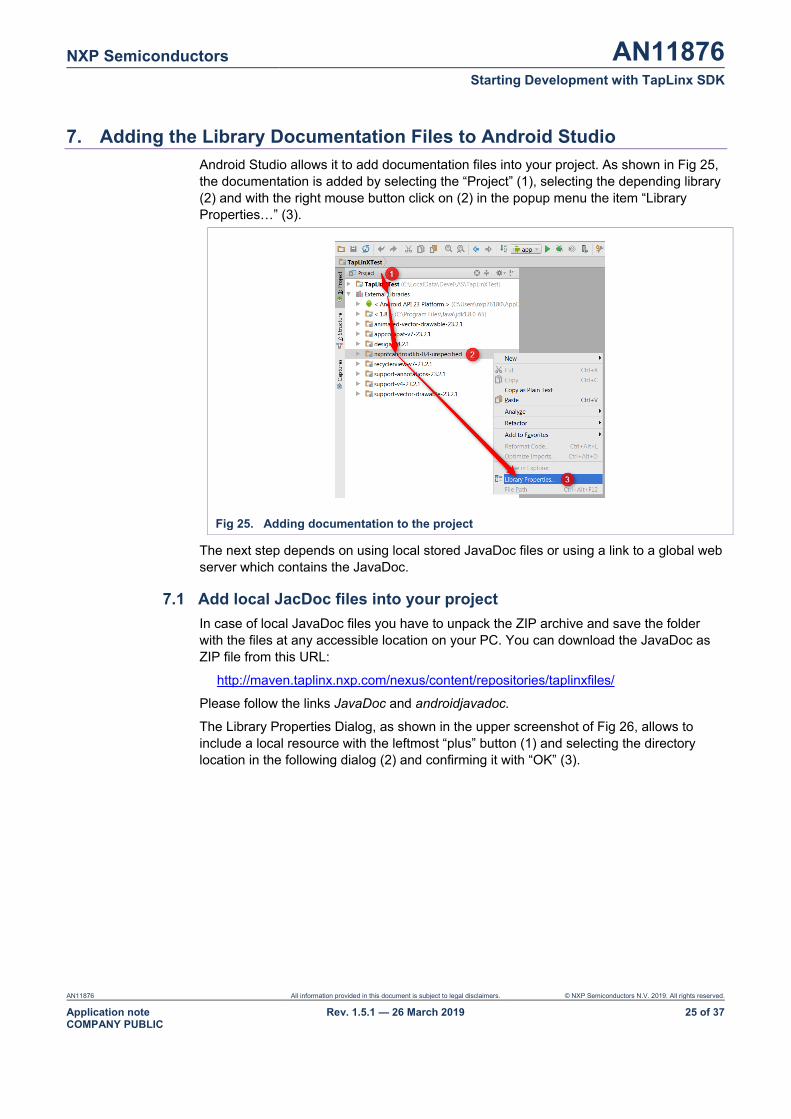
7. Adding the Library Documentation Files to Android Studio Android Studio allows it to add documentation files into your project. As shown in Fig 25, the documentation is added by selecting the “Project” (1), selecting the depending library (2) and with the right mouse button click on (2) in the popup menu the item “Library Properties…” (3).
Fig 25. Adding documentation to the project
The next step depends on using local stored JavaDoc files or using a link to a global web server which contains the JavaDoc.
7.1 Add local JacDoc files into your project In case of local JavaDoc files you have to unpack the ZIP archive and save the folder with the files at any accessible location on your PC. You can download the JavaDoc as ZIP file from this URL:
http://maven.taplinx.nxp.com/nexus/content/repositories/taplinxfiles/
Please follow the links JavaDoc and androidjavadoc.
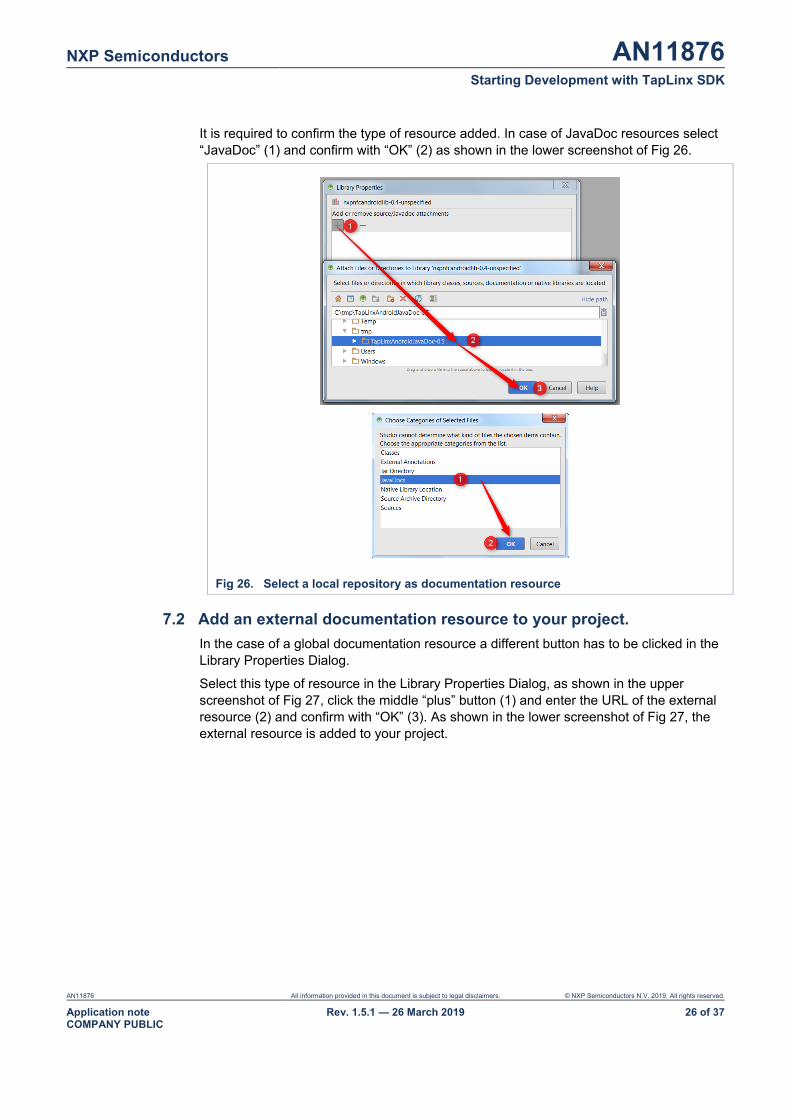
The Library Properties Dialog, as shown in the upper screenshot of Fig 26, allows to include a local resource with the leftmost “plus” button (1) and selecting the directory location in the following dialog (2) and confirming it with “OK” (3).
NXP Semiconductors AN11876 Starting Development with TapLinx SDK
AN11876 All information provided in this document is subject to legal disclaimers. © NXP Semiconductors N.V. 2019. All rights reserved.
Application note COMPANY PUBLIC
Rev. 1.5.1 — 26 March 2019 26 of 37
It is required to confirm the type of resource added. In case of JavaDoc resources select “JavaDoc” (1) and confirm with “OK” (2) as shown in the lower screenshot of Fig 26.
Fig 26. Select a local repository as documentation resource
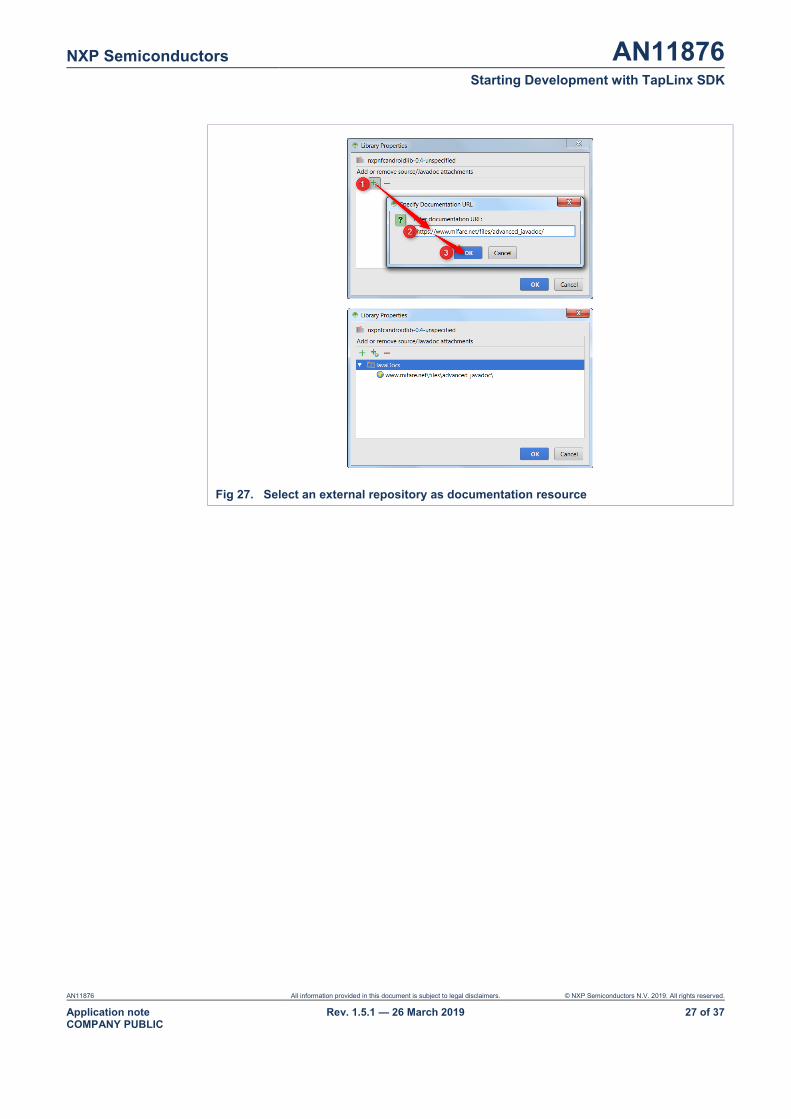
7.2 Add an external documentation resource to your project. In the case of a global documentation resource a different button has to be clicked in the Library Properties Dialog.
Select this type of resource in the Library Properties Dialog, as shown in the upper screenshot of Fig 27, click the middle “plus” button (1) and enter the URL of the external resource (2) and confirm with “OK” (3). As shown in the lower screenshot of Fig 27, the external resource is added to your project.
NXP Semiconductors AN11876 Starting Development with TapLinx SDK
AN11876 All information provided in this document is subject to legal disclaimers. © NXP Semiconductors N.V. 2019. All rights reserved.
Application note COMPANY PUBLIC
Rev. 1.5.1 — 26 March 2019 27 of 37
Fig 27. Select an external repository as documentation resource
NXP Semiconductors AN11876 Starting Development with TapLinx SDK
AN11876 All information provided in this document is subject to legal disclaimers. © NXP Semiconductors N.V. 2019. All rights reserved.
Application note COMPANY PUBLIC
Rev. 1.5.1 — 26 March 2019 28 of 37
8. Examples and Typical Use-cases This chapter collet some examples of typical use-cases. Only the implementation in the NFC intent callback is shown, all other files are remaining unchanged from the basic example app.
8.1 Change Card Key on a MIFARE Classic EV1 with Local Key Objects The MIFARE Classic EV1 store the key A and B and the access permission in the so called “sector trailer”, the last block in a sector. There is no difference to the legacy Classic (without EV1). The default values for Key A and B is 0xFFFFFFFFFFFF.
Please note that the MIFARE Classic uses a proprietary protocol ICE14443-3 which is not supported from all NFC reader devices! This support requires components implemented in hardware at the NFC reader and cannot be emulated in software. Unfortunately, there is no direct method where you can find out if your device supports a MIFARE Classic.
One alternative way is to install the NXP Android app “TagInfo” from Google Play. If TagInfo is able to detect the MIFARE Classic, then you know the device is able to operate on a MIFARE Classic properly.
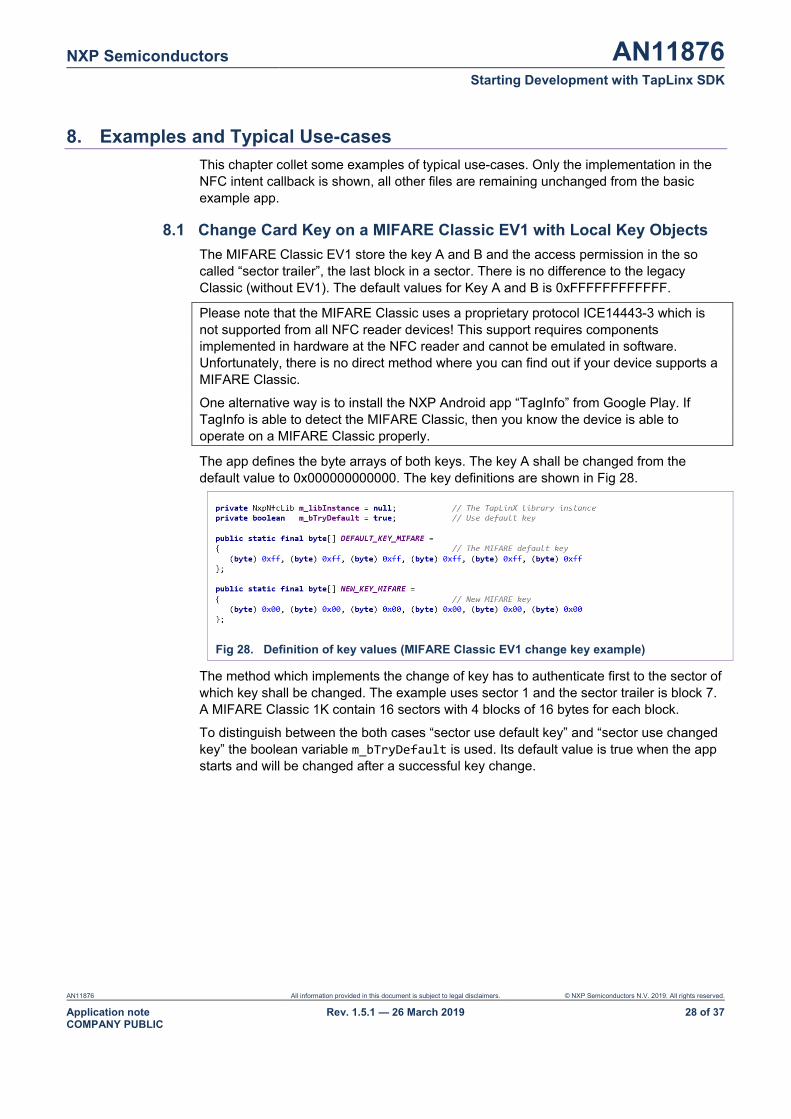
The app defines the byte arrays of both keys. The key A shall be changed from the default value to 0x000000000000. The key definitions are shown in Fig 28.
Fig 28. Definition of key values (MIFARE Classic EV1 change key example)
The method which implements the change of key has to authenticate first to the sector of which key shall be changed. The example uses sector 1 and the sector trailer is block 7. A MIFARE Classic 1K contain 16 sectors with 4 blocks of 16 bytes for each block.
To distinguish between the both cases “sector use default key” and “sector use changed key” the boolean variable m_bTryDefault is used. Its default value is true when the app starts and will be changed after a successful key change.
NXP Semiconductors AN11876 Starting Development with TapLinx SDK
AN11876 All information provided in this document is subject to legal disclaimers. © NXP Semiconductors N.V. 2019. All rights reserved.
Application note COMPANY PUBLIC
Rev. 1.5.1 — 26 March 2019 29 of 37
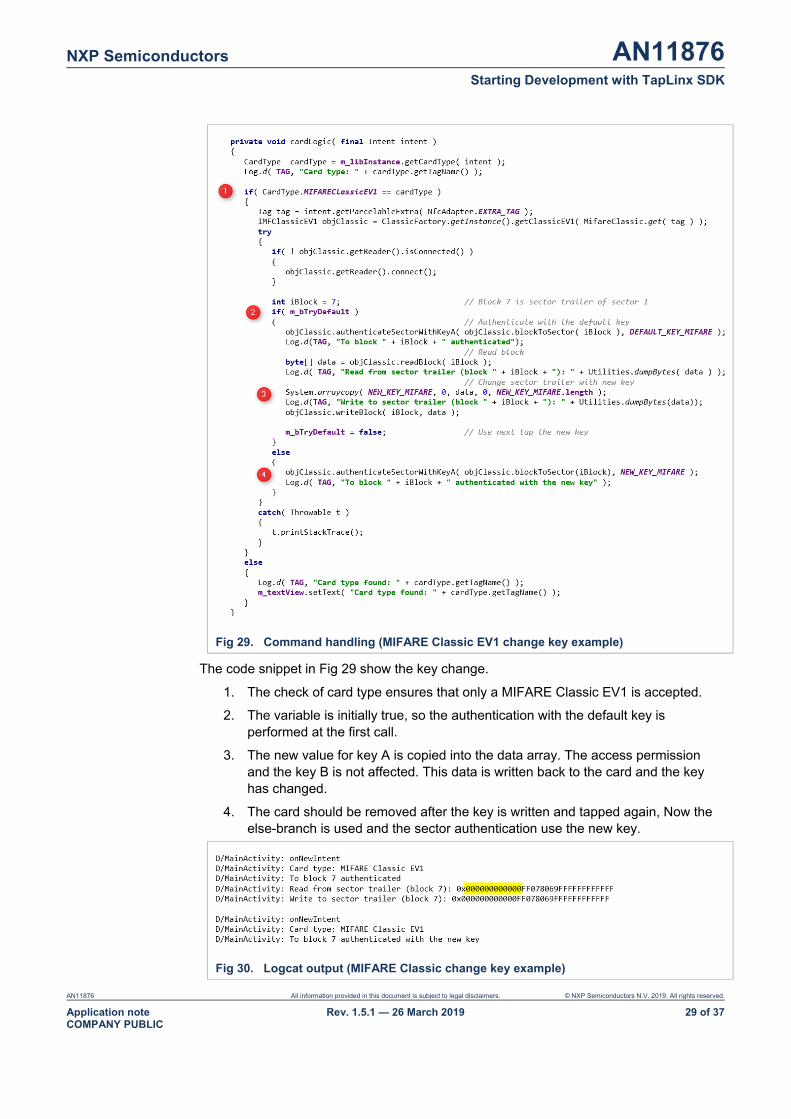
Fig 29. Command handling (MIFARE Classic EV1 change key example)
The code snippet in Fig 29 show the key change.
1. The check of card type ensures that only a MIFARE Classic EV1 is accepted.
2. The variable is initially true, so the authentication with the default key is performed at the first call.
3. The new value for key A is copied into the data array. The access permission and the key B is not affected. This data is written back to the card and the key has changed.
4. The card should be removed after the key is written and tapped again, Now the else-branch is used and the sector authentication use the new key.
Fig 30. Logcat output (MIFARE Classic change key example)
NXP Semiconductors AN11876 Starting Development with TapLinx SDK
AN11876 All information provided in this document is subject to legal disclaimers. © NXP Semiconductors N.V. 2019. All rights reserved.
Application note COMPANY PUBLIC
Rev. 1.5.1 — 26 March 2019 30 of 37
Fig 30 shows the Logcat output of the session. If no error occurs, no exception will be thrown. Please note that the value of key A is newer shown if you read the sector trailer. In this case zeros are inserted for the new key value (yellow marked).
8.2 Change Card Key on a MIFARE DESFire EV1 with Local Key Objects A MIFARE DESFire EV1 with factory settings contains a 2K3DES key with all bytes zero. Hence, the EV1 is compatible with the former MIFARE DESFire (without EV1). A very important step in the card personalization is to change the PICC Master Key from its default value to a secret one. It is also recommended to change the 2K3DES cipher to AES128. The code snippet below shows the required commands for this key change.
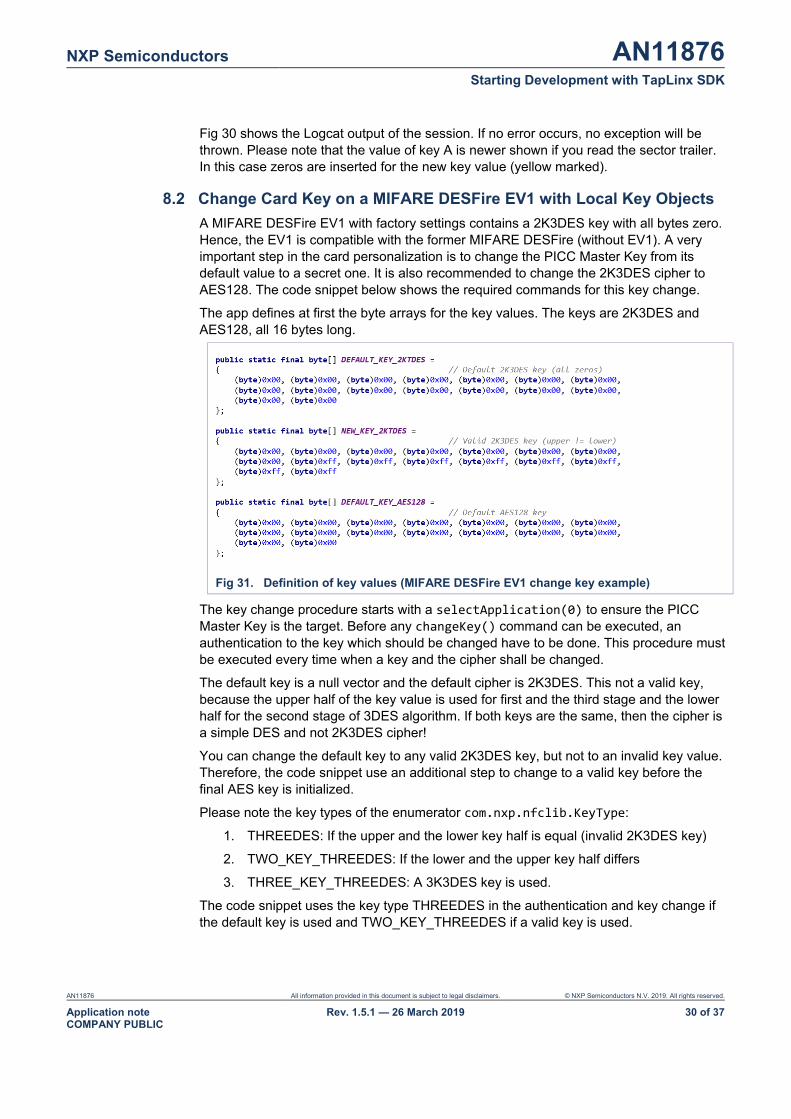
The app defines at first the byte arrays for the key values. The keys are 2K3DES and AES128, all 16 bytes long.
Fig 31. Definition of key values (MIFARE DESFire EV1 change key example)
The key change procedure starts with a selectApplication(0) to ensure the PICC Master Key is the target. Before any changeKey() command can be executed, an authentication to the key which should be changed have to be done. This procedure must be executed every time when a key and the cipher shall be changed.
The default key is a null vector and the default cipher is 2K3DES. This not a valid key, because the upper half of the key value is used for first and the third stage and the lower half for the second stage of 3DES algorithm. If both keys are the same, then the cipher is a simple DES and not 2K3DES cipher!
You can change the default key to any valid 2K3DES key, but not to an invalid key value. Therefore, the code snippet use an additional step to change to a valid key before the final AES key is initialized.
Please note the key types of the enumerator com.nxp.nfclib.KeyType:
1. THREEDES: If the upper and the lower key half is equal (invalid 2K3DES key)
2. TWO_KEY_THREEDES: If the lower and the upper key half differs
3. THREE_KEY_THREEDES: A 3K3DES key is used.
The code snippet uses the key type THREEDES in the authentication and key change if the default key is used and TWO_KEY_THREEDES if a valid key is used.

NXP Semiconductors AN11876 Starting Development with TapLinx SDK
AN11876 All information provided in this document is subject to legal disclaimers. © NXP Semiconductors N.V. 2019. All rights reserved.
Application note COMPANY PUBLIC
Rev. 1.5.1 — 26 March 2019 31 of 37
Fig 32. Command handling (MIFARE DESFire EV1 change key example)
If no error occurs, no exception will be thrown. The log of the session is shown in Fig 33.
Fig 33. Logcat output (MIFARE DESFire EV1 change key example)
NXP Semiconductors AN11876 Starting Development with TapLinx SDK
AN11876 All information provided in this document is subject to legal disclaimers. © NXP Semiconductors N.V. 2019. All rights reserved.
Application note COMPANY PUBLIC
Rev. 1.5.1 — 26 March 2019 32 of 37
9. FAQ / Tips and Tricks
9.1 An exception occurs while accessing to the PICC This may has several causes. But if you find in the LogCat output the following string:
Incomplete response received from PICC
then the current method takes too long time before a response can be verified. You can prevent such exception with a new timeout value. The code snippet in Fig 12 shows the usage of setting a new timeout value.
NXP Semiconductors AN11876 Starting Development with TapLinx SDK
AN11876 All information provided in this document is subject to legal disclaimers. © NXP Semiconductors N.V. 20194. All rights reserved.
Application note COMPANY PUBLIC
Rev. 1.5.1 — 26 March 2019 33 of 37
10. Legal information
10.1 Definitions Draft — The document is a draft version only. The content is still under internal review and subject to formal approval, which may result in modifications or additions. NXP Semiconductors does not give any representations or warranties as to the accuracy or completeness of information included herein and shall have no liability for the consequences of use of such information.
10.2 Disclaimers Limited warranty and liability — Information in this document is believed to be accurate and reliable. However, NXP Semiconductors does not give any representations or warranties, expressed or implied, as to the accuracy or completeness of such information and shall have no liability for the consequences of use of such information. NXP Semiconductors takes no responsibility for the content in this document if provided by an information source outside of NXP Semiconductors.
In no event shall NXP Semiconductors be liable for any indirect, incidental, punitive, special or consequential damages (including - without limitation - lost profits, lost savings, business interruption, costs related to the removal or replacement of any products or rework charges) whether or not such damages are based on tort (including negligence), warranty, breach of contract or any other legal theory.
Notwithstanding any damages that customer might incur for any reason whatsoever, NXP Semiconductors’ aggregate and cumulative liability towards customer for the products described herein shall be limited in accordance with the Terms and conditions of commercial sale of NXP Semiconductors.
Right to make changes — NXP Semiconductors reserves the right to make changes to information published in this document, including without limitation specifications and product descriptions, at any time and without notice. This document supersedes and replaces all information supplied prior to the publication hereof.
Suitability for use — NXP Semiconductors products are not designed, authorized or warranted to be suitable for use in life support, life-critical or safety-critical systems or equipment, nor in applications where failure or malfunction of an NXP Semiconductors product can reasonably be expected to result in personal injury, death or severe property or environmental damage. NXP Semiconductors and its suppliers accept no liability for inclusion and/or use of NXP Semiconductors products in such equipment or applications and therefore such inclusion and/or use is at the customer’s own risk.
Applications — Applications that are described herein for any of these products are for illustrative purposes only. NXP Semiconductors makes no representation or warranty that such applications will be suitable for the specified use without further testing or modification.
Customers are responsible for the design and operation of their applications and products using NXP Semiconductors products, and NXP Semiconductors accepts no liability for any assistance with applications or customer product design. It is customer’s sole responsibility to determine whether the NXP Semiconductors product is suitable and fit for the customer’s applications and products planned, as well as for the planned application and use of customer’s third party customer(s). Customers should
provide appropriate design and operating safeguards to minimize the risks associated with their applications and products.
NXP Semiconductors does not accept any liability related to any default, damage, costs or problem which is based on any weakness or default in the customer’s applications or products, or the application or use by customer’s third party customer(s). Customer is responsible for doing all necessary testing for the customer’s applications and products using NXP Semiconductors products in order to avoid a default of the applications and the products or of the application or use by customer’s third party customer(s). NXP does not accept any liability in this respect.
Export control — This document as well as the item(s) described herein may be subject to export control regulations. Export might require a prior authorization from competent authorities.
Translations — A non-English (translated) version of a document is for reference only. The English version shall prevail in case of any discrepancy between the translated and English versions.
Evaluation products — This product is provided on an “as is” and “with all faults” basis for evaluation purposes only. NXP Semiconductors, its affiliates and their suppliers expressly disclaim all warranties, whether express, implied or statutory, including but not limited to the implied warranties of non-infringement, merchantability and fitness for a particular purpose. The entire risk as to the quality, or arising out of the use or performance, of this product remains with customer.
In no event shall NXP Semiconductors, its affiliates or their suppliers be liable to customer for any special, indirect, consequential, punitive or incidental damages (including without limitation damages for loss of business, business interruption, loss of use, loss of data or information, and the like) arising out the use of or inability to use the product, whether or not based on tort (including negligence), strict liability, breach of contract, breach of warranty or any other theory, even if advised of the possibility of such damages.
Notwithstanding any damages that customer might incur for any reason whatsoever (including without limitation, all damages referenced above and all direct or general damages), the entire liability of NXP Semiconductors, its affiliates and their suppliers and customer’s exclusive remedy for all of the foregoing shall be limited to actual damages incurred by customer based on reasonable reliance up to the greater of the amount actually paid by customer for the product or five dollars (US$5.00). The foregoing limitations, exclusions and disclaimers shall apply to the maximum extent permitted by applicable law, even if any remedy fails of its essential purpose.
10.3 Patents Notice is herewith given that the subject device uses one or more of the following patents and that each of these patents may have corresponding patents in other jurisdictions.
<Patent ID> — owned by <Company name>
10.4 Trademarks Notice: All referenced brands, product names, service names and trademarks are property of their respective owners.
MIFARE — is a trademark of NXP Semiconductors N.V.
NXP Semiconductors AN11876 Starting Development with TapLinx SDK
AN11876 All information provided in this document is subject to legal disclaimers. © NXP Semiconductors N.V. 2019. All rights reserved.
Application note COMPANY PUBLIC
Rev. 1.5.1 — 26 March 2019 34 of 37
11. Index
C Code snippets .................................................................... 3
D DESFire Command
createApplication ........................................................ 21 getApplicationIDs ........................................................ 21 selectApplication ......................................................... 21, 30
L LogCat Error
Incomplete response received from PICC .................. 32
M Manifest file ........................................................................ 12 Manifest file, use-feature .................................................... 12
O Offline registration .............................................................. 10 Overwritten Method
onNewIntent() ............................................................. 14 onPause() ................................................................... 13 onResume() ................................................................ 13
P Public repository ................................................................ 3
S Snippet Source File
Manifest.xml ............................................................... 12 SimpleConnectMainActivity.java ................................. 15
Spongy Castle ................................................................... 15
T TapLinx
As standalone library .................................................. 5 TapLinx Method
connect() ..................................................................... 14, 15 registerActivity() .......................................................... 4, 13
NXP Semiconductors AN11876 Starting Development with TapLinx SDK
AN11876 All information provided in this document is subject to legal disclaimers. © NXP Semiconductors N.V. 2019. All rights reserved.
Application note COMPANY PUBLIC
Rev. 1.5.1 — 26 March 2019 35 of 37
12. List of figures
Fig 1. Code snippets of this application note .............. 3 Fig 2. Content of the public TapLinx repository ........... 3 Fig 3. Notification of unregistered library usage .......... 4 Fig 4. Modifications at the Gradle script for accessing
the TapLinx Maven repository ........................... 5 Fig 5. Download via button “Access the TapLinx
Developer Community” ..................................... 6 Fig 6. Add a new module to the project ....................... 6 Fig 7. Add TapLinx library dependency to project
module .............................................................. 7 Fig 8. Select TapLinx library dependency to project
module .............................................................. 7 Fig 9. Add TapLinx library dependency to Google
Analytics ............................................................ 8 Fig 10. Google Analytics library version needed for
TapLinx. ............................................................ 8 Fig 11. Dependency to Google Analytics in Gradle file. 9 Fig 12. TapLinx Developer Center, list all apps and
package keys. ................................................. 10 Fig 13. TapLinx Developer Center, request an offline
key. ................................................................. 11 Fig 14. Code snippet: register offline key. ................... 11 Fig 15. Registration verification status. ....................... 11 Fig 16. Modifications at the AndroidManifest.xml ........ 12 Fig 17. Variable definitions in the MainActivity class
source file ........................................................ 13 Fig 18. Make NFC Intents available for the app .......... 14 Fig 19. Implementing the callback for getting NFC
intents ............................................................. 15 Fig 20. Download of Spongy Castle Libraries ............. 16 Fig 21. Adding the Spongy Castle libraries to your
project ............................................................. 17 Fig 22. Added Spongy Castle Library Dependencies .. 17 Fig 23. Code snippet for handling raw keys ................ 18 Fig 24. Architecture Overview of MIFARE DESFire
EV1/EV2 ......................................................... 19 Fig 25. Adding documentation to the project ............... 25 Fig 26. Select a local repository as documentation
resource .......................................................... 26 Fig 27. Select an external repository as documentation
resource .......................................................... 27 Fig 28. Definition of key values (MIFARE Classic EV1
change key example) ...................................... 28 Fig 29. Command handling (MIFARE Classic EV1
change key example) ...................................... 29 Fig 30. Logcat output (MIFARE Classic change key
example) ......................................................... 29 Fig 31. Definition of key values (MIFARE DESFire EV1
change key example) ...................................... 30
Fig 32. Command handling (MIFARE DESFire EV1 change key example) ...................................... 31
Fig 33. Logcat output (MIFARE DESFire EV1 change key example) ................................................... 31
NXP Semiconductors AN11876 Starting Development with TapLinx SDK
AN11876 All information provided in this document is subject to legal disclaimers. © NXP Semiconductors N.V. 2019. All rights reserved.
Application note COMPANY PUBLIC
Rev. 1.5.1 — 26 March 2019 36 of 37
13. List of tables
Table 1. Spongy Castle Maven Repository ................... 17 Table 2. Key algorithms for MIFARE ciphers ................ 18 Table 3. Communication Modes in Relation to Access
Permissions .................................................... 22
NXP Semiconductors AN11876 Starting Development with TapLinx SDK
Please be aware that important notices concerning this document and the product(s) described herein, have been included in the section 'Legal information'.
© NXP Semiconductors N.V. 2019. All rights reserved.
For more information, visit: http://www.nxp.com
Date of release: 26 March 2019 Document identifier: AN11876
14. Contents
1. Introduction ......................................................... 3 1.1 Where to Find the Code Snippets ...................... 3 1.2 Public Online Resources .................................... 3 2. The First Time Online Registration .................... 4 2.1 In Case of an Unsuccessful Registration
Confirmation ....................................................... 4 3. Setup TapLinx and the Required Libraries ....... 5 3.1 Obtain TapLinx from a Maven Repository .......... 5 3.2 Using TapLinx with an AAR Library .................... 6 3.3 Release Notes for Version 1.4.1 ........................ 9 3.3.1 Modification for using TapLinx via Maven
repository ........................................................... 9 3.3.2 Modification for using TapLinx via separate AAR
library ................................................................. 9 3.4 Release Notes for Version 1.5 ........................... 9 3.5 Release Notes for Version 1.6 ......................... 10 3.5.1 How to obtain an offline registration key .......... 10 3.5.2 How to prepare the app with the offline
registration key ................................................. 11 4. How to Start Programming with the TapLinx
Library ................................................................ 12 4.1 Setup Spongy Castle Libraries for Using in the
Sample App ...................................................... 15 4.2 Authentication without the Spongy Castle
Keystore ........................................................... 18 5. Short Introduction into the MIFARE DESFire
Architecture ....................................................... 19 5.1 MIFARE DESFire EV1 Architecture ................. 19 5.1.1 Select or change between applications ............ 21 5.1.2 Protected Access with an Authentication ......... 21 5.1.3 File Communication and Access Modes .......... 21 5.1.4 File Types ......................................................... 22 5.1.5 Key Management ............................................. 22 6. Coming from MIFARE SDK (Advanced/Lite) ... 24 6.1 No built-in keystore in TapLinx ......................... 24 6.2 Modifications in the Android Intent Calling
Mechanism ....................................................... 24 7. Adding the Library Documentation Files to
Android Studio .................................................. 25 7.1 Add local JacDoc files into your project ............ 25 7.2 Add an external documentation resource to your
project. ............................................................. 26 8. Examples and Typical Use-cases .................... 28
8.1 Change Card Key on a MIFARE Classic EV1 with Local Key Objects ..................................... 28
8.2 Change Card Key on a MIFARE DESFire EV1 with Local Key Objects ..................................... 30
9. FAQ / Tips and Tricks ........................................ 32 9.1 An exception occurs while accessing to the PICC
......................................................................... 32 10. Legal information .............................................. 33 10.1 Definitions ........................................................ 33 10.2 Disclaimers ....................................................... 33 10.3 Patents ............................................................. 33 10.4 Trademarks ...................................................... 33 11. Index ................................................................... 34 12. List of figures ..................................................... 35 13. List of tables ...................................................... 36 14. Contents ............................................................. 37