Embed Size (px)
Citation preview
An Overview of Adult Mechanical Ventilation 2 Contact Hours Course Expires: 3/31/2020 First Published: 11/1/2013 Course Revised: 3/13/2017 Copyright © 2017 by RN.com All Rights Reserved Reproduction and distribution of these materials is prohibited without an Rn.com content licensing agreement. Acknowledgements RN.com acknowledges the valuable contributions of… ... Suzan Miller-Hoover
Conflict of Interest RN.com strives to present content in a fair and unbiased manner at all times, and has a full and fair disclosure policy that requires course faculty to declare any real or apparent commercial affiliation related to the content of this presentation. Note: Conflict of Interest is defined by ANCC as a situation in which an individual has an opportunity to affect educational content about products or services of a commercial interest with which he/she has a financial relationship. The author of this course does not have any conflict of interest to declare. The planners of the educational activity have no conflicts of interest to disclose. There is no commercial support being used for this course. Purpose and Objectives The purpose of Mechanical Ventilation for the Adult is to review the pulmonary system, indications for intubation, intubation, mechanical ventilation, complications, care of the patient on the ventilator, and extubation. It is important for healthcare providers who care for patients requiring mechanical ventilation understand how to properly care for the patient. After successful completion of this course, you will be able to: 1. Delineate the major components of ventilation 2. Analyze the indications and contraindications for intubation and mechanical ventilation 3. Compare modes of ventilation and the purpose of each mode 4. Summarize ventilation treatment goals 5. Differentiate complications and treatment modalities of mechanical ventilation 6. Describe ventilator alarms and treatment 7. Explain the weaning and extubation process Introduction Mechanically ventilated patients no longer stay exclusively in the intensive care environment. Chronically ventilated patients, especially those with a tracheostomy are often admitted to or transferred to a pulmonary unit specializing in mechanically ventilated patients. It is essential that nurses who care for these types of patients develop an awareness of the skills required to safely and effectively evaluate and treat the mechanically ventilated patient. Respiratory emergencies require immediate intervention; therefore, it is important to understand the pathophysiology, indications and contraindications for intubation and extubation; modes of mechanical ventilation, treatment modalities, and complications. The “before,” “during,” and “after” mechanical ventilation will be reviewed in this course. Physiologic Anatomy of the Pulmonary System The pulmonary system’s purpose is to provide gas exchange. Oxygen and carbon dioxide (CO2) are exchanged between the atmosphere and alveoli, the alveoli and pulmonary capillary blood, and the

systemic capillary blood and all the cells of the body (Murius, Blanch, & Lucangelo, 2014). Effective respiration requires gas exchange in the lungs (external respiration) and in the tissues (internal respiration). The processes for adequate oxygenation and acid-base balance are ventilation, pulmonary perfusion, and diffusion. There are four basic steps in the gas exchange process: 1. Ventilation: Process of moving air into and out of the lungs 2. Pulmonary Perfusion: Blood flow through the pulmonary capillaries. Through this process
alveolar gasses are moved across the alveolar-capillary membrane to the pulmonary capillary bed and vice versa
3. Transport: The carrying of oxygen bound by hemoglobin (Hgb) through the bloodstream to the end organ capillaries and carbon dioxide from the end organ capillaries back to the lungs. Approximately 97% of oxygen is transported in Hgb within the erythrocyte and 3% is carried dissolved in the plasma. PaO2 is a measurement of the oxygen carried in the plasma. PaCO2 is a measurement of the carbon dioxide carried in the plasma.
4. Diffusion between systemic capillary bed and body tissue cells: Movement of O2 and CO2 between the systemic capillaries, interstitial fluid, and cells.
(For more information about the pulmonary system, take the RN.Com course titled RN.com’s Assessment Series: Focused Pulmonary Assessment.) Assessing the Respiratory System Patients with respiratory issues should have a thorough examination and assessment of their respiratory system. This this assessment should contain:
• Inspection of the chest
• Percussion of the chest
• Auscultation of breath sounds
• Respiratory rate
• Work of breathing Interpretation of the following measurements should be done if these measurements are utilized:
• Pulse oximetry: Oxygen Saturation (SpO2)
• End-tidal CO2 (EtCO2)
• Arterial blood gases (ABG)
Monitoring Oxygen and Carbon Dioxide Levels Oxygen Monitoring Pulse oximetry is utilized to monitor oxygen saturation in peripheral capillaries. Peripheral capillary oxygen saturation (SpO2) is the percentage of oxygenated hemoglobin compared to the total amount of hemoglobin in the blood (oxygenated and non-oxygenated). SpO2 approximates arterial oxygen saturation (SaO2) and is measured indirectly. Normal SpO2 ranges between 95 and 100%. (Withings, 2017)

What are the oxygen numbers? Arterial partial pressure of oxygen (PaO2) directly measures the actual oxygen content in arterial blood via blood sampling through an arterial puncture.
• Normal: 90-100 mmHg • Hypoxia: A decrease in arterial oxygenation (less than 60 mmHg)
It is important to remember that these values reflect a healthy pulmonary/cardiac system. Patients with lung or heart disease may have a lower PaO2; which, is normal for them.
Did you know?
A SpO2 of 90% does not represent a PaO2 of 90 mmHg? A SpO2 of 90% corresponds to a PaO2 of 60 mmHg. This is the minimum oxygen concentration providing enough oxygen to prevent ischemia in tissues. Once the SpO2 falls below 90%, the PaO2 drops quickly becomes dangerously hypoxic as fewer oxygen molecules are bound to Hgb (Whitten, 2015).
Quick Review of End-tidal CO2 (EtCO2) Monitoring End-tidal capnography is a graphical measurement of carbon dioxide partial pressure during expiration. Developed in the 1930s; EtCO2 became assessable in the 1950s with the production of capnography monitors. Monitoring EtCO2 has become the standard of care for anesthesiologists during anesthesia and deep sedation. Additionally, EtCO2 monitoring is utilized in critical care and emergency medicine to monitor the effectiveness of mechanical ventilation and the weaning to extubation process (Press, Desai, Tanaka, & Macario, 2015). With new American Heart Association (2015) guidelines, EtCO2 capnography remains the standard of care during a cardiac arrest to evaluate the correct placement of an endotracheal tube, effectiveness of compressions and as a tool to evaluate when return of spontaneous circulation occurs. Carbon Dioxide Monitoring Carbon dioxide (CO2) is a by-product of cellular metabolism and is transported via venous blood to the lungs where it is eliminated during exhalation. End-tidal CO2 monitoring is utilized to monitor and indirectly measure carbon dioxide during exhalation. End-tidal CO2 is an essential tool when treating patients with respiratory distress or respiratory failure requiring intubation and mechanical ventilation. End-tidal CO2 gives the nurse and medical provider information surrounding: • Metabolism: how effectively CO2 is produced at the cellular level • Perfusion: how effectively CO2 is transported through the vascular system • Ventilation: how effectively CO2 is eliminated by the pulmonary system It is important to remember that these values reflect a healthy pulmonary/cardiac system. Patients with lung or heart disease may have a higher CO2; which, is normal for them.

What are the CO2 Numbers? • Normocapnia: Normal amount of CO2 (35 – 40 mmHg)
• Hypocapnia: Decreased level of CO2 in the blood (less than 30 mmHg)
• Hypercapnia: Abnormally high concentrations of CO2 (greater than 50 mmHg) Test Yourself What is the difference between pulse oximetry and capnography?
A. There is no difference. They both tell us about oxygenation only. B. Capnography ONLY provides instantaneous feedback about oxygenation. C. Pulse oximetry informs the healthcare provider on perfusion. D. Pulse oximetry provides feedback on oxygenation while capnography provides
information on ventilation, perfusion, and metabolism. Rationale: Pulse oximetry is utilized to monitor oxygen saturation in peripheral capillaries. Peripheral capillary oxygen saturation (SpO2) is the percentage of oxygenated hemoglobin compared to the total amount of hemoglobin in the blood (oxygenated and non-oxygenated). SpO2 approximates arterial oxygen saturation (SaO2) and is measured indirectly. End-tidal CO2 gives the nurse and medical provider information surrounding: • Metabolism: how effectively CO2 is produced at the cellular level • Perfusion: how effectively CO2 is transported through the vascular system • Ventilation: how effectively CO2 is eliminated by the pulmonary system
Measuring Oxygen and Carbon Dioxide Levels In the slides above, the discussion surrounded the indirect measurement of oxygen and carbon dioxide. While these methods show trends, they can be inaccurate due to many causes. It is an important, if not essential part of safe patient care to use invasive methods to accurately measure and compare actual oxygen and carbon dioxide levels to indirect measurement methods. The most common method used to directly measure oxygen and carbon dioxide levels is arterial blood sampling. Although, arterial sampling is the most accurate venous and capillary samples can also be used to measure oxygen and carbon dioxide levels. Venous and capillary samples are most commonly used in the pediatric and neonatal populations. Arterial Blood Gases (ABG) It is important for nurses to be familiar with normal arterial blood gas values. Normal values are listed below.

Normal Blood Gas Values pH - The normal pH of the body is slightly alkaline with a range of 7.35 to 7.45. Changes in the respiratory and the renal/metabolic systems will influence the total pH. Changes in the amount of hydrogen ions (H+) and bicarbonate (HCO3) ions will shift the pH.
• Acidosis: pH less than 7.35 • Alkalosis: pH greater than 7.45
PaCO2 - The PaCO2 is the respiratory component of the arterial blood gas. CO2 levels are controlled by the lungs and changes in CO2 can occur rapidly, within a minute, by increasing or decreasing respiration. The normal value is 35-45 millimeters of mercury (mmHg). An increase in PaCO2 indicates decreased ventilation of the alveoli. A decrease in PaCO2 indicates hyperventilation.
• Hypoventilation: PaCO2 greater than 45 • Hyperventilation: PaCO2 less than 35
HCO3 - HCO3 represents the metabolic or renal component of the ABG. HCO3 is controlled by the kidneys and changes in HCO3 excretion may take up to 24 hours. The normal value is 22-26 mEq/L.
• Acidosis: HCO3 less than 22 • Alkalosis: HCO3 greater than 26
Base Excess (BE) – Is a calculated value and indirectly reflects the bicarbonate concentration in the body; however, it is not essential for basic interpretation of arterial blood gases. Normal BE is ±2mEq/L.
• Acidosis: negative numbers • Alkalosis: positive numbers
O2 - Normal oxygenation status reflects an oxygen level of 80-100 millimeters of mercury (mmHg). Quick Arterial Blood Gas (ABG) Analysis
1. Is the "pH" normal? 2. Is the "PaCO2" normal? 3. Is the "HCO3" normal? 4. Match the"PaCO2" or the "HCO3" with the "pH” 5. Does the"PaCO2" or the "HCO3" go the opposite direction of the "pH”? 6. Are the "PaO2 and the "SaO2" saturation normal?
Respiratory Versus Metabolic
• Respiratory acidosis (decreased pH/increased CO2): pH less than 7.35/PaCO2 greater than 45 • Respiratory alkalosis (increased pH/increased CO2): pH greater than 7.45/PaCO2 less than 35 • Metabolic acidosis (decreased pH/decreased HCO3): pH less than 7.35/ HCO3 less than 22 • Metabolic alkalosis (increased pH/increased HCO3): pH greater than 7.45/ HCO3 greater than
26 Compensated Versus Uncompensated Interpreting ABGs becomes more complex when the body begins to compensate for the deviation. Does either the CO2 or HCO3 go in the opposite direction of the pH? If so, there is compensation by that system. For example, the pH is acidotic, the CO2 is acidotic, and the HCO3 is alkalotic. The CO2 matches the pH making the primary acid-based disorder respiratory acidosis the HCO3 is opposite of the pH and would be evidence of compensation from the metabolic system. If respiratory acidosis is present and the body begins to compensate metabolically, the blood gas results will reflect: • pH less than 7.35 • CO2 greater than45 • HCO3 greater than26 If metabolic alkalosis is present and the body begins to compensate through respirations, the blood gas result will reflect:
• pH greater than 7.45 • CO2 greater than 45 • HCO3 greater than 26 For additional guidance on ABG interpretation, please see RN.com’s course: Interpreting ABGs: The Basics. Test Yourself The following ABG is reported to the critical care nurse post-extubation: pH 7.20 CO2 55 HCO3 24 What is the interpretation?
A. Metabolic alkalemia B. Metabolic acidemia C. Respiratory alkalemia D. Respiratory acidosis
Rationale: The interpretation is respiratory acidosis: the pH is acidotic (less than 7.35) and the CO2 is acidotic (greater than 45). Review of Artificial Airways (Endotracheal and Tracheostomy Tubes)
Endotracheal Tubes (ETT) • Tubes inserted by a trained professional into the patient’s trachea through the oral or nasal route.
o Oral intubation is preferred and more common o Nasal intubation is associated with increased risk of sinus infections; often leading to ventilator
associated events • Have a radiopaque line on all tubes to aid in determining placement via chest x-ray • Common adult ETT sizes are 7.0 – 9.0 mm • Have centimeter markings along the side of the tube to indicate how far the tube is inserted to
allow the provider a mechanism to determine dislodgement • Can be left in place for up to several weeks, but tracheostomy is often considered following 10 –
14 days of intubation
Tracheostomy (Trachs) • Considered when mechanical ventilation is needed for an extended period • In general, better tolerated than the ETT • Cuffed tubes are typically used to prevent or limit aspiration of oral or gastric secretions • Keep the same sized and one smaller sized tracheostomy tube and tube obturator at the bedside
in case the tube must be reinserted emergently Complications of Artificial Airways Endotracheal Tube (oral & nasal) • Laryngeal and tracheal damage • Aspiration • Infection • Discomfort • Mucous membrane disruption • Tooth damage and/or dislodgement Tracheostomy Tube
• Hemorrhage from erosion of the innominate artery • Tracheal stenosis, malacia or perforation • Laryngeal nerve injury • Aspiration • Infection Test Yourself When deciding to place an artificial airway which of the following should be considered? A. Length of time the patient will need the artificial airway B. Patient comfort C. Ease of insertion D. Infection rate Rationale: Endotracheal Tubes (ETT) • Tubes inserted by a trained professional into the patient’s trachea through the oral or nasal route.
o Oral intubation is preferred and more common o Nasal intubation is associated with increased risk of sinus infections; often leading to ventilator
associated events • Have a radiopaque line on all tubes to aid in determining placement via chest x-ray • Common adult ETT sizes are 7.0 – 9.0 mm

• Have centimeter markings along the side of the tube to indicate how far the tube is inserted to allow the provider a mechanism to determine dislodgement
• Can be left in place for up to several weeks, but tracheostomy is often considered following 10 – 14 days of intubation
Tracheostomy (Trachs) • Considered when mechanical ventilation is needed for an extended period • In general, better tolerated than the ETT • Cuffed tubes are typically used to prevent or limit aspiration of oral or gastric secretions • Keep the same sized and one smaller sized tracheostomy tube and tube obturator at the bedside
in case the tube must be reinserted emergently Complications of Artificial Airways Endotracheal Tube (oral & nasal) • Laryngeal and tracheal damage • Aspiration • Infection • Discomfort • Mucous membrane disruption • Tooth damage and/or dislodgement Tracheostomy Tube
• Hemorrhage from erosion of the innominate artery • Tracheal stenosis, malacia or perforation • Laryngeal nerve injury • Aspiration • Infection Indications/Contraindications for Intubation Indications: 1. Is there a failure of airway maintenance or protection? 2. Is there failure of oxygenation? 3. Is there failure of ventilation? (Brown, 2013) Failure of Airway Maintenance or Protection A thorough assessment of the patient should be completed to confirm or deny the patient’s ability to maintain and protect their airway.
• An alert patient is at a less risk for aspiration because they demonstrate airway patency, adequate ventilation, vocal cord function, and cerebral perfusion with oxygenated blood
• A non-responsive patient is at risk of aspiration
• Loss of airway protective reflexes mandates tracheal intubation. An absent gag reflex or a Glasgow Coma Scale (GCS) less than 8, increases the need for intubation
• Is the patient able to swallow? Swallowing is a higher level of neurologic complexity. Inability to swallow with pooling secretions requires intubation
• Airway obstruction may require the patient to be intubated or a tracheostomy placed depending on
the place of obstruction (Brown, 2013) Failure of Oxygenation The inability to oxygenate mandates oxygen providing treatment, in the event that less invasive measures are not effective, intubation may become necessary. Tissues depend on oxygen for cellular respiration. Lack of oxygen to the tissue leads to ischemia (cell damage) and eventually infarction (cell death). What does the hypoxic patient look like?
• Restless • Agitated • Cyanotic • Confused • Somnolent • Obtunded • Pulse oximetry decreasing • Ineffective CPAP or BiPAP with noninvasive positive pressure ventilation (NIPPV)
(Brown, 2013) Failure of Ventilation Brown (2013) states that impaired ventilation from airway obstruction, muscular weakness, or drug-induced hypopnea will result in impaired CO2 elimination. What does this patient look like? • Capnography (when utilized): Increased past baseline • Ineffective CPAP or BiPAP with noninvasive positive pressure ventilation (NIPPV) • Somnolent • Obtunded
Contraindications: Absolute
• Patient indication that intubation is not to be performed Oral and Nasal Relative Contraindications
• Laryngeal edema • Epiglottitis • Laryngotracheobronchitis • Upper airway obstruction
Nasal Relative Contraindications • Basal skull fractures with cerebral spinal fluid rhinorrhea • Bleeding disorders • Nasal polyps • Previous nasal surgery
Upon reviewing these contraindications, the medical provider may determine that a tracheostomy is the preferred artificial airway. (Cashio & Hymel, ND)

Intubation Box or Intubation Kit The contents of an intubation kit typically include:
• Assorted adult sizes of endotracheal tubes from size 5.5mm to 9mm (using the smallest tube possible which will allow for decreased airway resistance and suctioning will help decrease laryngeal and tracheal trauma).
o An average adult female: 7mm to 8mm o Males or larger females: 8mm to 9mm o Small female: 6.5mm tube
• Endotracheal blade and handle: o Straight blade (Miller): Recommended for use in patients with short necks and obese
patients since the trachea may be located more anteriorly. The tip of the blade extends below the epiglottis to help lift and expose the opening (Murius et al., 2014).
o Curved blade (Macintosh): Recommended for intubation that exposes the glottis opening by advancing into the space between the base of the tongue and the epiglottis, the vallecula (Murius et al., 2014).
• Extra light bulb and batteries for the laryngoscope • Flexible stylet • Water soluble lubricant • 10mL syringe • End tidal CO2 detector • BVM • Commercial tube holder or tape (determine your institution’s preference for securing ETT) Preparing for Intubation • Prior to intubation, ventilate with a bag and mask providing 100% oxygen, unless contraindicated
by patient condition • Monitor vital signs and pulse oximetry • Ensure:
o IV access o Wall suction is working and on o Yankauer suction device attached and ready for use (it is convenient to place this by the
patient's head) o Correct ETT suctioning devices available and working o Head of the bed is flat with the pillow removed o The patient is supine with shoulders square; provider may request a rolled towel/blanket be
inserted under the shoulders to promote the sniffing position (the patient’s neck is flexed slightly forward and the head is extended up and back to open the upper airway)
o Bed is elevated to provider height preference o Personal protective equipment is readily available o A ventilator is available and settings are set per provider order
Rapid Sequence Intubation Caro (2013) states that rapid sequence intubation is the standard of care in emergency airway management for intubations not anticipated to be difficult. This procedure standardizes the intubation process and allows healthcare workers to become familiar with and prepare for intubations. Medications that are frequently used include:
• Versed (midazolam): Sedation or amnestic

• Ketalar (ketamine): Anesthetic • Diprivan (propofol: Anesthetic • Xylocaine (lidocaine): Local or regional Anesthetic; given to help counteract a possible increase in
intracranial pressure (ICP) • Amidate (etomidate): Hypnotic agent • Norcuron (vecuronium): Nondepolarizing muscle relaxant; administer two to three minutes prior to
paralyzing the patient to block fasciculations • Zemuron (rocuronium): Nondepolarizing muscle relaxant • Nimbex (cisatracurium): Nondepolarizing muscle relaxant • Fentanyl: Opioid • Anectine (succinylcholine): Neuromuscular blocking agent; may cause major muscle
fasciculations that can increase ICP, cause rhabdomyolysis, hyperkalemia and muscle pain. Fasiculations should be prevented by administering a small dose of nondepolarizing muscle relaxant.
• Atropine: Anticholinergic agent and muscarinic antagonist; decreases vagal stimulation from the administration of neuromuscular blocking agents such as succinylcholine and from laryngoscopy.
Intubation • Intubation is done by a trained and credentialed healthcare professional. The RN should monitor
vital signs and deliver sedation, pain medications, and paralytics as ordered.
• The provider may ask you to apply cricoid pressure (also known as the Sellick maneuver). To provide cricoid pressure, place gentle pressure with your thumb or fingers to the Adams apple area. This will facilitate intubation by helping to visualize the vocal cords.
• During the intubation process the provider will use the laryngoscope to visualize and insert the endotracheal tube through the vocal cords and into the trachea. Optimal placement is usually two to four centimeters above the carina (Murius et al., 2014).
• A successful intubation should not require more than a few seconds
• If the provider encounters difficulty with the placement, ventilation should not be interrupted for longer than ten to thirty seconds. The patient should be ventilated with 100% oxygen via the bag, valve, mask method (BVM) for a minimum of three to five minutes prior to another attempt (Murius et al., 2014).
• After the ETT is in place auscultate both sides of the chest and the abdomen
• After intubation, confirm correct placement by physical examination, bilateral chest excursion, or capnography. Properly document this information
• Secure the tube in place using a commercial device or tape
• Obtain a portable chest X-ray, with head of bed elevated to 30° unless contraindicated, to establish correct tube placement after the initial insertion.
• Place an OGT/NGT to decompress stomach
• Place a post-pyloric tube in preparation for enteral feedings if the intubation is expected to last longer than three days
Cuff Pressures The respiratory therapist and trained healthcare providers will assess and document cuff pressure as
per policy or hospital standards. The cuff pressure is:
• Maintained at 25 to 30 cm H2O or 18 to 25 mmHg
• Measured between positive pressure breaths Cuff pressure exceeding 25 mmHg or 30 cm H2O may lead to tracheal ischemia, necrosis and erosion where the cuff contacts the tracheal mucosa. (Murius et al., 2014) Mechanical Ventilation Indications for Mechanical Ventilation Respiratory Abnormalities Courey & Hyzy (2013) list common acute disorders which may require mechanical ventilation: • Alveolar filling processes: (pneumonitis, noncardiogenic pulmonary edema, ARDS, cardiogenic
pulmonary edema, pulmonary hemorrhage, tumor, alveolar proteinosis, intravascular volume overload of any cause)
• Pulmonary vascular disease (pulmonary thromboembolism, amniotic fluid embolism, tumor emboli)
• Diseases causing airway obstruction: central (tumor, laryngeal angioedema, tracheal stenosis) • Diseases causing airway obstruction: distal (acute exacerbation of chronic obstructive pulmonary
disease & acute, severe asthma) • Hypoventilation: decreased central drive (general anesthesia & drug overdose) • Hypoventilation: peripheral nervous system/respirator muscle dysfunction (amyotrophic lateral
sclerosis, cervical quadriplegia, Guillain-Barre syndrome, myasthenia gravis, tetanus, tick bite, ciguatera poisoning, toxins, muscular dystrophy, myotonic dystrophy, myositis)
• Hypoventilation: chest wall and pleural disease (kyphoscoliosis, trauma, massive pleural effusion, tension pneuomothorax, hemothorax)
• Increased ventilatory demand: (severe sepsis, septic shock, severe metabolic acidosis) Clinical Assessment: Apnea, stridor, severely depressed mental status, flail chest, inability to clear respiratory secretions, trauma to mandible, larynx, or trachea. Loss of Ventilatory Reserve: Respiratory rate greater than 35 breaths/min, tidal volume less than 5 mL/kg, vital capacity less than10 ml/kg, negative inspiratory force weaker than -25 cm H2O, minute ventilation less than10L/min, and rise in PaCO2 greater than10 mmHg. Refractory Hypoxemia: Alveolar-arterial gradient greater than 450, PaO2/PAO2 less than 0.15, and PaO2 with supplemental fractionated inspired oxygen (FiO2) less than 55 mmHg. Objectives of Mechanical Ventilation Brown (2013) states that there are physiologic and clinical objectives for mechanical ventilation. Physiologic Objectives:
1. Support pulmonary gas exchange based on alveolar ventilation and arterial oxygenation 2. Reduce the metabolic cost of breathing by unloading the ventilatory muscles 3. Minimize ventilator-induced lung injury

Clinical Objectives: 1. Reverse hypoxemia 2. Reverse acute respiratory acidosis 3. Relieve respiratory distress/failure 4. Prevent or reverse atelectasis 5. Reverse ventilatory muscle fatigue 6. Permit secretion removal 7. Permit sedation and/or neuromuscular blockade 8. Decrease systemic or myocardial oxygen consumption 9. Stabilize the chest wall
Basic Goals of Ventilation • Avoid mechanical ventilation if possible by using non-invasive treatment such as BiPAP or CPAP • Help the patient ventilate and oxygenate • Wean and extubate before any complications Review: CPAP & BiPAP-Non-invasive ventilation modes Bilevel Positive Airway Pressure (BiPAP): • Provides oxygenation and ventilation by applying an inspiratory and expiratory pressure • Utilizes a spontaneous breathing mode • Allows separate regulation of inspiratory positive airway pressure (IPAP) and expiratory positive
airway pressure
(Hyzy, 2013)
Continuous Positive Airway Pressure (CPAP): o Provides oxygenation utilizing the patient’s spontaneous breaths o Elevates end-expiratory pressure throughout the respiratory cycle to above atmospheric pressure
to increase lung volume and oxygenation o Can be used with intubated and non-intubated patients via mask (Hyzy, 2013) Test Yourself Goals of mechanical ventilation include which of the following?
A. Avoidance of intubation B. Maintaining optimal blood gas exchange C. Weaning/extubation before complications D. All the above Rationale:
• Avoid mechanical ventilation if possible by using non-invasive treatment such as BiPAP or CPAP • Help the patient ventilate and oxygenate • Wean and extubate before any complications

Nursing Care Considerations for the Intubated Patient In 2002, the Centers for Disease Control and Prevention (CDC), defined ventilator associated pneumonia (VAP), a bundle of practice was developed to prevent VAP, and the Centers for Medicare and Medicaid made VAP a never event. However, the use of the bundle and definition did not prove to be sensitive or specific for VAP. Recently, in response to the findings, the CDC established a task force to develop a surveillance strategy for reporting and benchmarking ventilator events. The taskforce work culminated in a new term, ventilator associated event (VAE). This new term groups all the conditions that result in a significant and sustained deterioration in oxygenation, defined as a greater than 20% increase in the daily minimum fraction of inspired oxygen or an increase of at least 3 cm H2O in the daily minimum positive end-expiratory pressure (PEEP) to maintain oxygenation. Both infectious and non-infectious conditions may fulfill this definition. A new bundle of care has also been developed by medical institutions across the nation. Components of this bundle may include:
• Head-of-bed elevation (30º to 45º) • Mouth/endotracheal tube care (oral cleansing with chlorhexidine) • Lung protective ventilator strategies (for acute respiratory distress syndrome [ARDS] and
non-ARDS patients) • Early discontinuation of mechanical ventilation • Appropriate analgesia and sedation (especially avoiding benzodiazepines) • Daily interruption of sedation • Early mobilization, with or without ambulation • Deep venous thrombosis prophylaxis • Gastrointestinal prophylaxis • Balanced intravenous fluid administration (Raoof & Baumann, 2014)
It is important to remember that this new bundle and definition has not been tested and there are issues that have been identified for modification. Continued surveillance is necessary to support the value of this new definition and bundle. Refer to your institutions standards of care for the bundle components used.
General Care Standards for Intubated Patients • Identify the centimeter marking of the ETT at the patient’s lip and document at change of shift
and whenever the ETT is moved or re-secured • Elevate head of bed at 30° or greater unless ordered otherwise • Provide frequent mouth care as defined by your institution’s policies and procedure • Maintain endotracheal cuff pressures between 25 to 30 cm H2O or 20 to 25 mmHg • Consider continuous analgesia and sedation for patients receiving mechanical ventilation • Consider a sedation “vacation”, appropriateness of sedation wake up and readiness to wean • Maintain standard precautions and utilize appropriate personal protection equipment, including
face shields for any procedure which may cause the release of fluids (suctioning, tracheostomy care, etc.)
• Suction patient as needed, not routinely • Assess patient’s ability to synchronize breathing with the ventilator • Use a dry erase board, pen and paper, or open letter board for communication if appropriate • Provide deep vein thrombosis prophylaxis by turning and repositioning frequently as dictated
by patient condition

Test Yourself The VAP definition and bundle of care is evidenced based and is proving to be sensitive and specific for reporting pneumonias.
A. True B. False
Rationale: In 2002, the Centers for Disease Control and Prevention (CDC), defined ventilator associated pneumonia (VAP), a bundle of practice was developed to prevent VAP, and the Centers for Medicare and Medicaid made VAP a never event. However, the use of the bundle and definition did not prove to be sensitive or specific for VAP. Recently, in response to the findings, the CDC established a task force to develop a surveillance strategy for reporting and benchmarking ventilator events. The taskforce work culminated in a new term, ventilator associated event (VAE). Ventilator Basics Types of Mechanical Ventilators The negative pressure ventilator (previously called “iron lung”) decreased intrathoracic pressure by applying negative pressure to the chest wall. Typically used for long-term noninvasive support when muscle strength is inadequate to support unassisted, spontaneous breathing. Today’s ventilators control for both pressure and volume. Did You Know? The role of the respiratory therapist and RNs in regards to care and manipulation of ventilators vary by state regulation and institutional policy and procedures? Always be sure to know your role by investigating the regulations and policies of the state and organization you work in. Ventilator Etiquette • Always keep the ventilated patient within view • Always respond quickly to ventilator alarms, your patient’s or other patients’ • Always plug ventilators into an emergency electrical outlet Standard Modes of Mechanical Ventilation This module will discuss six modes of ventilation. For ease of discussion they are broken down into two sections: volume limited ventilation and pressure limited ventilation. Terminology varies among institutions, be sure to learn the ventilator vocabulary in your institution. Volume Limited Ventilation: Volume control or volume cycled) require the clinician to set the peak flow, flow pattern, tidal volume, respiratory rate, positive end expiratory pressure (PEEP), and fraction of inspired oxygen (FiO2). The inspiratory phase ends when the “set tidal volume” is reached.
• Assist Control (AC) • Synchronized Intermittent Mandatory Ventilation (SIMV)
Pressure Limited Ventilation: Pressure cycled requires the clinician to set the inspiratory pressure level, I : E ratio (inspiratory: expiratory), respiratory rate, PEEP, and FiO2. The inspiratory phase ends when the “set pressure” is reached. • Pressure Support Ventilation (PSV)

• Pressure Regulated Volume Control (PRVC) • Bilevel • Proportional Assist Ventilation (PAV) There are some advanced modes of ventilation that will not be discussed. Test Yourself The main difference between volume limited ventilation and pressure limited ventilation is the determinant that ends each breath. Volume limited ventilation is ended when the set _______is reached: A. Pressure B. Inspiratory time C. Tidal volume D. Expiratory time Rationale: Volume Limited Ventilation: Inspiration ends when the “set” tidal volume is reached. Pressure Limited Ventilation: Inspiration ends when the “set” pressure is reached. Assist Control The clinician determines the minimal minute ventilation by setting the respiratory rate and tidal volume. The ventilator delivers a preset respiratory rate & preset tidal volume regardless of lung resistance and compliance. There is a set backup respiratory rate, but the patient may breathe at a rate above the set rate. When the patient takes an extra breath the set tidal volume will be delivered. Vent Settings Ordered
• Mode: AC • RR: 16 • TV: 450 mL • FiO2: 40% • Peep: 5 If the patient breathes at 20 each of the additional 4 breaths per minute will deliver 450mL of tidal volume. (Hyzy, 2013) Synchronized Intermittent Mandatory Ventilation • SIMV is synchronized intermittent mandatory ventilation. • A ventilatory mode that applies breaths at a set rate but permits the patient to breathe between
the set breaths at their own tidal volume and peak flow. • The ventilator attempts to synchronize the mandatory breaths with the patient initiated breaths. • Breaths may be initiated by the patient but are not delivered by the ventilator. • Patients breathe spontaneously at the depth and desired rate until next mandatory breath from
ventilator is delivered. (Hyzy, 2013) Spontaneous tidal volume are not set, they are completely generated by the patient. Test Yourself
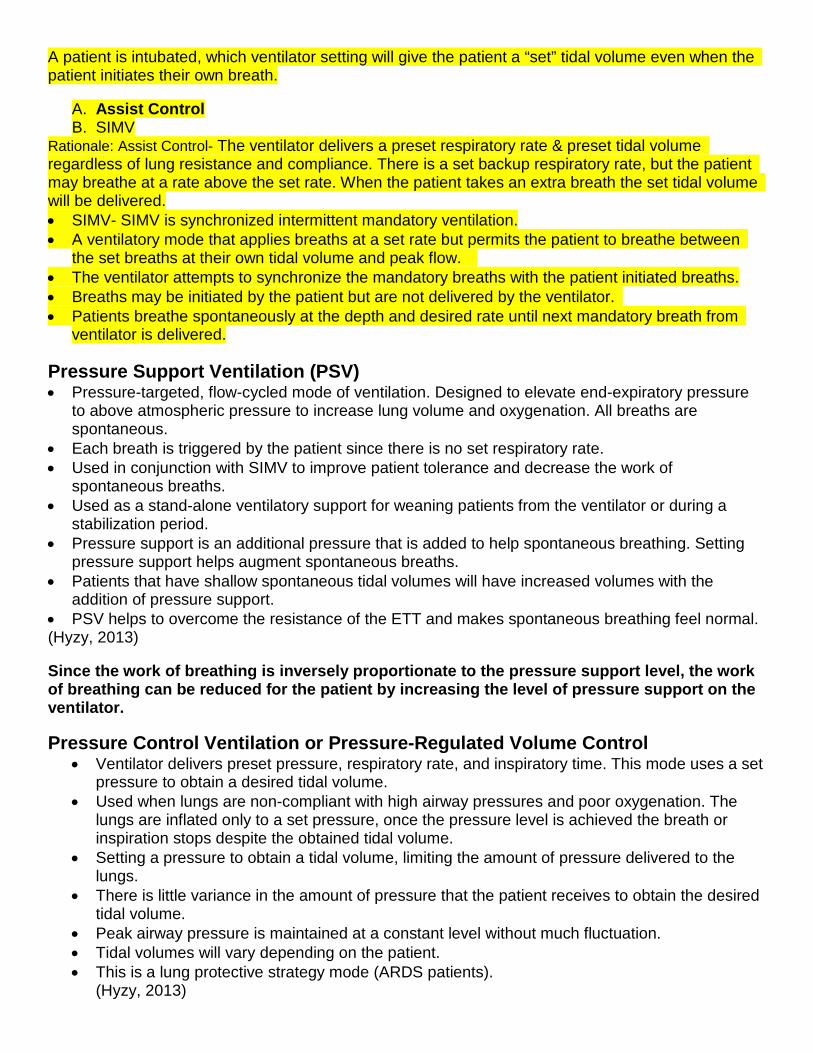
A patient is intubated, which ventilator setting will give the patient a “set” tidal volume even when the patient initiates their own breath.
A. Assist Control B. SIMV
Rationale: Assist Control- The ventilator delivers a preset respiratory rate & preset tidal volume regardless of lung resistance and compliance. There is a set backup respiratory rate, but the patient may breathe at a rate above the set rate. When the patient takes an extra breath the set tidal volume will be delivered. • SIMV- SIMV is synchronized intermittent mandatory ventilation. • A ventilatory mode that applies breaths at a set rate but permits the patient to breathe between
the set breaths at their own tidal volume and peak flow. • The ventilator attempts to synchronize the mandatory breaths with the patient initiated breaths. • Breaths may be initiated by the patient but are not delivered by the ventilator. • Patients breathe spontaneously at the depth and desired rate until next mandatory breath from
ventilator is delivered. Pressure Support Ventilation (PSV) • Pressure-targeted, flow-cycled mode of ventilation. Designed to elevate end-expiratory pressure
to above atmospheric pressure to increase lung volume and oxygenation. All breaths are spontaneous.
• Each breath is triggered by the patient since there is no set respiratory rate. • Used in conjunction with SIMV to improve patient tolerance and decrease the work of
spontaneous breaths. • Used as a stand-alone ventilatory support for weaning patients from the ventilator or during a
stabilization period. • Pressure support is an additional pressure that is added to help spontaneous breathing. Setting
pressure support helps augment spontaneous breaths. • Patients that have shallow spontaneous tidal volumes will have increased volumes with the
addition of pressure support. • PSV helps to overcome the resistance of the ETT and makes spontaneous breathing feel normal. (Hyzy, 2013) Since the work of breathing is inversely proportionate to the pressure support level, the work of breathing can be reduced for the patient by increasing the level of pressure support on the ventilator. Pressure Control Ventilation or Pressure-Regulated Volume Control
• Ventilator delivers preset pressure, respiratory rate, and inspiratory time. This mode uses a set pressure to obtain a desired tidal volume.
• Used when lungs are non-compliant with high airway pressures and poor oxygenation. The lungs are inflated only to a set pressure, once the pressure level is achieved the breath or inspiration stops despite the obtained tidal volume.
• Setting a pressure to obtain a tidal volume, limiting the amount of pressure delivered to the lungs.
• There is little variance in the amount of pressure that the patient receives to obtain the desired tidal volume.
• Peak airway pressure is maintained at a constant level without much fluctuation. • Tidal volumes will vary depending on the patient. • This is a lung protective strategy mode (ARDS patients).
(Hyzy, 2013)
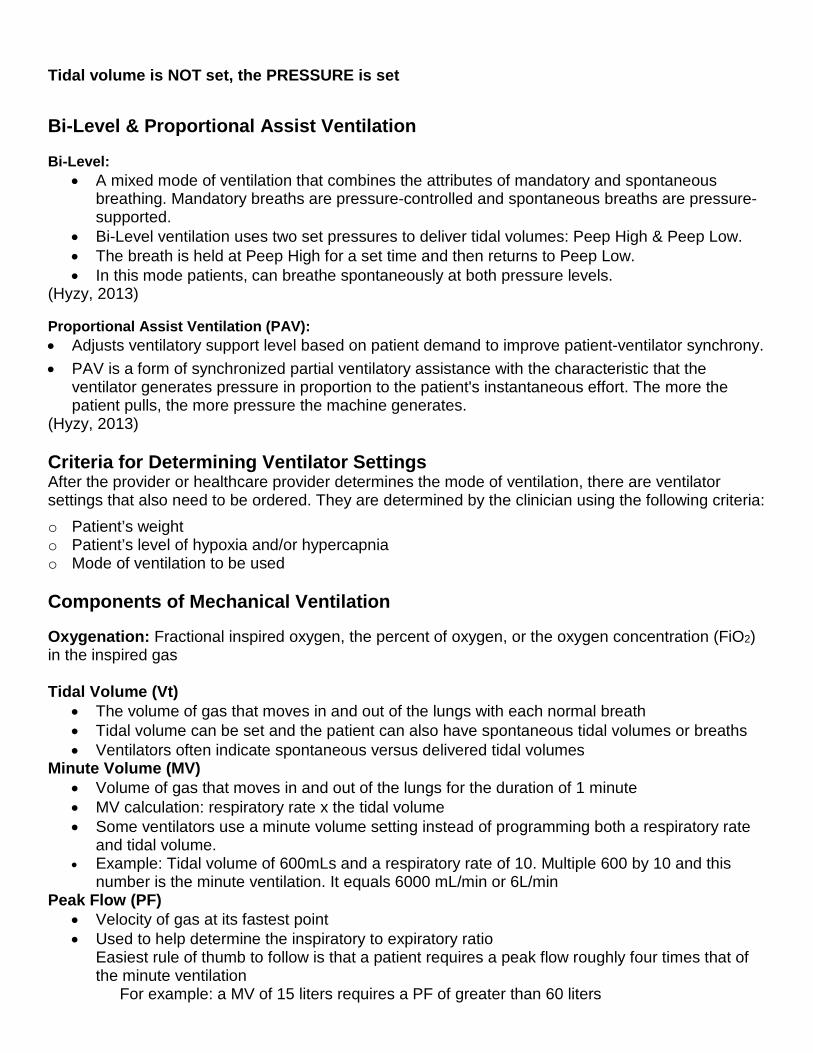
Tidal volume is NOT set, the PRESSURE is set Bi-Level & Proportional Assist Ventilation Bi-Level:
• A mixed mode of ventilation that combines the attributes of mandatory and spontaneous breathing. Mandatory breaths are pressure-controlled and spontaneous breaths are pressure-supported.
• Bi-Level ventilation uses two set pressures to deliver tidal volumes: Peep High & Peep Low. • The breath is held at Peep High for a set time and then returns to Peep Low. • In this mode patients, can breathe spontaneously at both pressure levels.
(Hyzy, 2013) Proportional Assist Ventilation (PAV): • Adjusts ventilatory support level based on patient demand to improve patient-ventilator synchrony. • PAV is a form of synchronized partial ventilatory assistance with the characteristic that the
ventilator generates pressure in proportion to the patient's instantaneous effort. The more the patient pulls, the more pressure the machine generates.
(Hyzy, 2013) Criteria for Determining Ventilator Settings After the provider or healthcare provider determines the mode of ventilation, there are ventilator settings that also need to be ordered. They are determined by the clinician using the following criteria: o Patient’s weight o Patient’s level of hypoxia and/or hypercapnia o Mode of ventilation to be used Components of Mechanical Ventilation Oxygenation: Fractional inspired oxygen, the percent of oxygen, or the oxygen concentration (FiO2) in the inspired gas Tidal Volume (Vt)
• The volume of gas that moves in and out of the lungs with each normal breath • Tidal volume can be set and the patient can also have spontaneous tidal volumes or breaths • Ventilators often indicate spontaneous versus delivered tidal volumes
Minute Volume (MV) • Volume of gas that moves in and out of the lungs for the duration of 1 minute • MV calculation: respiratory rate x the tidal volume • Some ventilators use a minute volume setting instead of programming both a respiratory rate
and tidal volume. • Example: Tidal volume of 600mLs and a respiratory rate of 10. Multiple 600 by 10 and this
number is the minute ventilation. It equals 6000 mL/min or 6L/min Peak Flow (PF)
• Velocity of gas at its fastest point • Used to help determine the inspiratory to expiratory ratio
Easiest rule of thumb to follow is that a patient requires a peak flow roughly four times that of the minute ventilation
For example: a MV of 15 liters requires a PF of greater than 60 liters
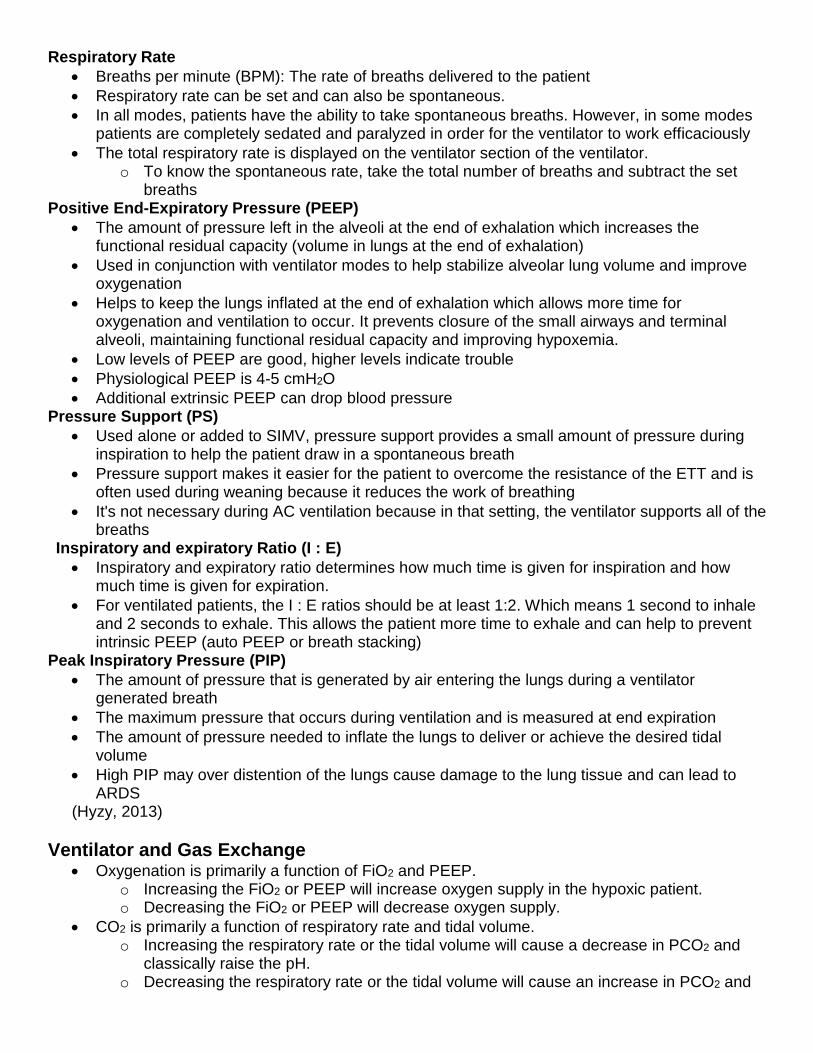
Respiratory Rate • Breaths per minute (BPM): The rate of breaths delivered to the patient • Respiratory rate can be set and can also be spontaneous. • In all modes, patients have the ability to take spontaneous breaths. However, in some modes
patients are completely sedated and paralyzed in order for the ventilator to work efficaciously • The total respiratory rate is displayed on the ventilator section of the ventilator.
o To know the spontaneous rate, take the total number of breaths and subtract the set breaths
Positive End-Expiratory Pressure (PEEP) • The amount of pressure left in the alveoli at the end of exhalation which increases the
functional residual capacity (volume in lungs at the end of exhalation) • Used in conjunction with ventilator modes to help stabilize alveolar lung volume and improve
oxygenation • Helps to keep the lungs inflated at the end of exhalation which allows more time for
oxygenation and ventilation to occur. It prevents closure of the small airways and terminal alveoli, maintaining functional residual capacity and improving hypoxemia.
• Low levels of PEEP are good, higher levels indicate trouble • Physiological PEEP is 4-5 cmH2O • Additional extrinsic PEEP can drop blood pressure
Pressure Support (PS) • Used alone or added to SIMV, pressure support provides a small amount of pressure during
inspiration to help the patient draw in a spontaneous breath • Pressure support makes it easier for the patient to overcome the resistance of the ETT and is
often used during weaning because it reduces the work of breathing • It's not necessary during AC ventilation because in that setting, the ventilator supports all of the
breaths Inspiratory and expiratory Ratio (I : E)
• Inspiratory and expiratory ratio determines how much time is given for inspiration and how much time is given for expiration.
• For ventilated patients, the I : E ratios should be at least 1:2. Which means 1 second to inhale and 2 seconds to exhale. This allows the patient more time to exhale and can help to prevent intrinsic PEEP (auto PEEP or breath stacking)
Peak Inspiratory Pressure (PIP) • The amount of pressure that is generated by air entering the lungs during a ventilator
generated breath • The maximum pressure that occurs during ventilation and is measured at end expiration • The amount of pressure needed to inflate the lungs to deliver or achieve the desired tidal
volume • High PIP may over distention of the lungs cause damage to the lung tissue and can lead to
ARDS (Hyzy, 2013)
Ventilator and Gas Exchange
• Oxygenation is primarily a function of FiO2 and PEEP. o Increasing the FiO2 or PEEP will increase oxygen supply in the hypoxic patient. o Decreasing the FiO2 or PEEP will decrease oxygen supply.
• CO2 is primarily a function of respiratory rate and tidal volume. o Increasing the respiratory rate or the tidal volume will cause a decrease in PCO2 and
classically raise the pH. o Decreasing the respiratory rate or the tidal volume will cause an increase in PCO2 and
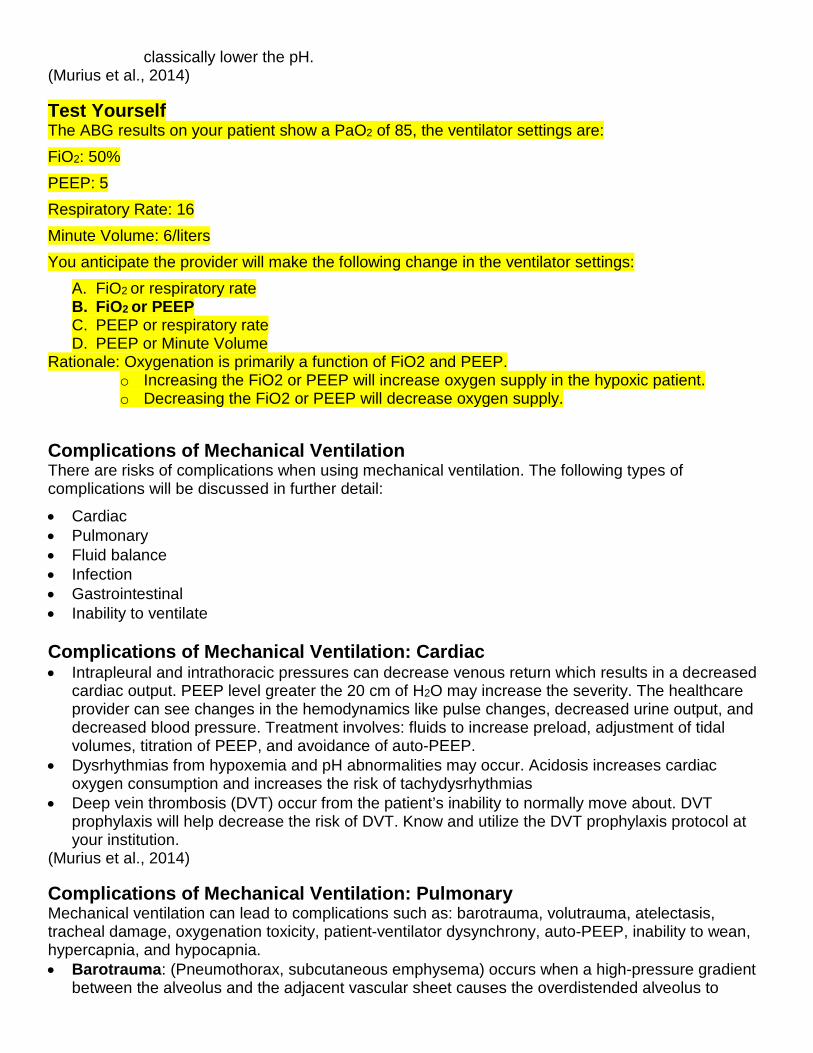
classically lower the pH. (Murius et al., 2014) Test Yourself The ABG results on your patient show a PaO2 of 85, the ventilator settings are: FiO2: 50% PEEP: 5 Respiratory Rate: 16 Minute Volume: 6/liters You anticipate the provider will make the following change in the ventilator settings:
A. FiO2 or respiratory rate B. FiO2 or PEEP C. PEEP or respiratory rate D. PEEP or Minute Volume
Rationale: Oxygenation is primarily a function of FiO2 and PEEP. o Increasing the FiO2 or PEEP will increase oxygen supply in the hypoxic patient. o Decreasing the FiO2 or PEEP will decrease oxygen supply.
Complications of Mechanical Ventilation There are risks of complications when using mechanical ventilation. The following types of complications will be discussed in further detail:
• Cardiac • Pulmonary • Fluid balance • Infection • Gastrointestinal • Inability to ventilate Complications of Mechanical Ventilation: Cardiac • Intrapleural and intrathoracic pressures can decrease venous return which results in a decreased
cardiac output. PEEP level greater the 20 cm of H2O may increase the severity. The healthcare provider can see changes in the hemodynamics like pulse changes, decreased urine output, and decreased blood pressure. Treatment involves: fluids to increase preload, adjustment of tidal volumes, titration of PEEP, and avoidance of auto-PEEP.
• Dysrhythmias from hypoxemia and pH abnormalities may occur. Acidosis increases cardiac oxygen consumption and increases the risk of tachydysrhythmias
• Deep vein thrombosis (DVT) occur from the patient’s inability to normally move about. DVT prophylaxis will help decrease the risk of DVT. Know and utilize the DVT prophylaxis protocol at your institution.
(Murius et al., 2014) Complications of Mechanical Ventilation: Pulmonary Mechanical ventilation can lead to complications such as: barotrauma, volutrauma, atelectasis, tracheal damage, oxygenation toxicity, patient-ventilator dysynchrony, auto-PEEP, inability to wean, hypercapnia, and hypocapnia. • Barotrauma: (Pneumothorax, subcutaneous emphysema) occurs when a high-pressure gradient
between the alveolus and the adjacent vascular sheet causes the overdistended alveolus to

rupture. Gas is forced into the interstitial tissue of the underlying perivascular sheet. Damage to the pulmonary system due to alveolar rupture from excessive airway pressures or over distention of alveolus.
• Volutrauma: Alveolar damage that results from high pressures resulting from large-volume ventilation in patients with acute respiratory distress syndrome. Volutrauma if different from barotrauma. Volutrauma results in alveolar fractures and flooding.
• Atelectasis: This is the collapse of lung parenchyma from occlusion of air passage, with reabsorption of gas distal to occlusion. The cause is from obstruction and possible lack of deep inflations in patients with small tidal volumes. It is diagnosed by diminished breath sounds or bronchial breath sounds, rales, or crackles, chest x-ray, and decreasing compliance. We can prevent this by use of adequate tidal volumes, humidity, tracheal suctioning, chest physical therapy, and repositioning.
• Tracheal Damage: The cause of tracheal damage is excessive cuff pressures due to over inflation or reduced tracheal blood flow causing ischemia. This can be avoided by proper monitoring of intracuff pressures or volumes.
• Oxygen Toxicity: Excessive oxygenation occurs from impaired surfactant activity, progressive capillary congestion, fibrosis, edema, and thickening of interstitial space. This can be prevented by careful monitoring of blood gases and the use of the lowest FiO2 possible for adequate oxygenation (PaO2 greater than or equal to 60 mmHg and SaO2 greater than or equal to 90%).
• Patient-Ventilator Dysynchrony: Difficulty synchronizing the patient’s ventilatory pattern to a mode of ventilation. May result in increase work of breathing, anxiety, and development of auto-PEEP because of insufficient expiratory time. Check patient and ventilator settings. Do not assume the patient will adjust to the ventilator. Also, provide calm reassurance and analgesia and/or sedatives as appropriate.
• Auto-PEEP: Auto PEEP occurs when a delivered breath is incompletely exhaled before the onset of the next inspiration. This gas trapping increases overall lung volume, inadvertently raising end-expiratory pressure in the alveoli.
• Inability to Wean: This can occur in any patient, particularly those with COPD, cystic fibrosis, debilitation, malnutrition, and musculoskeletal disorders. Mechanical ventilation eases the work of breathing for these patients, making the transition off the ventilator (weaning) difficult.
• Hypercapnia: This is respiratory acidosis. It is caused by the inadequate ventilation leading to acute retention of CO2 and decreased pH. This is corrected by improving alveolar ventilation and treating the underlying cause.
• Hypocapnia: This is respiratory alkalosis. It is caused by hyperventilation which increased elimination of CO2 and increased pH. The treatment is to decrease the respiratory rate, decrease the vital volume if inappropriately high, and add mechanical dead space.
(Murius et al., 2014) Complications of Mechanical Ventilation: Fluid Balance Fluid retention and dehydration are both complications from mechanical ventilation.
• Fluid retention is due to the overhydration by airway humidification and decreased urinary output because of possible ADH effects. Symptoms of fluid retention include: weight gain, intake greater than output, decreased compliance, and increased bronchial secretions.
• Dehydration is related to decreased enteral and parenteral intake in relation to urinary and/or gastrointestinal output, and over diuresis. Signs of dehydration include decrease skin turgor, intake less than combined outputs, decreased body weight, hemoconcentration of urine, and thick secretions. (Murius et al., 2014)
Did You Know

Insensible losses average 300-500 mL/day and these losses can increase with fever Complications of Mechanical Ventilation: Infection In general, patients on mechanical ventilator are at risk for infections. They are often the most vulnerable population. These patients often have central lines and urinary catheters. They can be improperly positioned so that aspiration is possible. Frequent suctioning, ventilator equipment, and aerosols can contribute to contamination from bacteria. A new term, ventilator associated events has replaced ventilator associated pneumonia. This new term groups all the conditions that result in a significant and sustained deterioration in oxygenation, defined as a greater than 20% increase in the daily minimum fraction of inspired oxygen or an increase of at least 3 cm H2O in the daily minimum positive end-expiratory pressure (PEEP) to maintain oxygenation. Both infectious and non-infectious conditions may fulfill this definition. A new bundle of care has also been developed. Components of this bundle may include:
• Head-of-bed elevation (30º to 45º) • Mouth/endotracheal tube care (oral cleansing with chlorhexidine) • Lung protective ventilator strategies (for acute respiratory distress syndrome [ARDS] and
non-ARDS patients) • Early discontinuation of mechanical ventilation • Appropriate analgesia and sedation (especially avoiding benzodiazepines) • Daily interruption of sedation • Early mobilization, with or without ambulation • Deep venous thrombosis prophylaxis • Gastrointestinal prophylaxis • Balanced intravenous fluid administration (Raoof & Baumann, 2014)
Complications of Mechanical Ventilation: Gastrointestinal Peptic ulcers may develop because of physiologic pressures, stress, and delayed enteral nutrition. Peptic Ulcer Disease (PUD) Prophylaxis: • Routine auscultation of bowel sounds • Stress ulcer reduction should be addressed pharmacologically by the provider: antacids or
histamine antagonists • Hemoccult or Gastroccult and pH stomach aspirate and stools • Report evidence of distention or ileus immediately • The need for nutritional support should be addressed (Murius et al., 2014) Complications of Mechanical Ventilation: Inability to Ventilate The inability to ventilate a patient is multifactorial. The most common cause is patient anxiety and the feeling that they cannot breathe. The size of the ETT is the culprit, making the patient feel as though they are breathing through a straw. Intermittent dosing of sedation will reduce the patient’s anxiety without increasing the ventilator support needed. Often, intermittent dosing is not adequate and a continuous sedative drip is necessary to provide efficacious ventilator support. However, it is important not to over sedate the patient and reduce the patient’s respiratory drive.
• Dexmedetomidine is quickly becoming a “drug of choice” for ventilated patients. This drug has
both sedative and analgesic effects, does not have the respiratory depressant effects, allows for a more awake patient, and has less delirium than other medications.
When patient requires assist-control ventilation or very high ventilator settings, it is often imperative to sedate and paralyze the patient so the patient is not fighting the ventilator and increasing the risk for barotrauma. Under these circumstances, the patient is given a cocktail of opioids, sedatives, and muscle relaxants. It is important to give the patient opioids and sedation with muscle relaxants as the use of muscle relaxants alone will cause increased anxiety as the patient knows he/she cannot breathe on their own. Sedation and opioids allow a dream-like state to reduce anxiety and fear. (Hou & Baez, 2013) While sedatives, opioids, and muscle relaxants are a necessary treatment it is essential that the rate and dosage of these drugs be monitored so the patient is receiving the smallest amount of medication to produce the desired state. Use of age appropriate pain and sedation scales will allow for objective assessment of the state of the patient. Test Yourself Patients receiving mechanical ventilation and muscle relaxant medications require which additional medications:
A. Opioids B. Sedation C. Opioids and sedation D. No other medication as muscle relaxants medicate all the patient’s needs
Rationale: Under these circumstances, the patient is given a cocktail of opioids, sedatives, and muscle relaxants. It is important to give the patient opioids and sedation with muscle relaxants as the use of muscle relaxants alone will cause increased anxiety as the patient knows he/she cannot breathe on their own. Sedation and opioids allow a dream-like state to reduce anxiety and fear. Ventilator Alarms Proper response and knowledge of ventilator alarms is imperative when working with intubated patients. All ventilator alarms should be responded to promptly and patient assessed. Most ventilators have different alarms for warning (yellow alarm) and immediate action needed (red alarm).
• When there is an alarm, always treat your patient first and the ventilator second! • Look at the patient and assess vital signs • Review the ventilator display to review the type of alarm • If necessary, ventilate patient with manual resuscitation bag and call for assistance Types of Alarms HIGH PRESSURE LIMIT: High pressure limit is reached before volume is delivered. Interventions: • Assess ETT for kinks, reposition, or use a bite block; check for kinks or condensation in ventilator
tubing • Assess oxygenation status, vital signs, breath sounds and suction airway as needed • Bronchodilators may be ordered to reduce bronchospasm • Assess the patient for pain, anxiety and synchrony with the ventilator; provide emotional support;
sedative may be required (nursing before narcotics) • Notify the provider and respiratory therapist with deterioration in patient status and/or unable to

troubleshoot the cause of alarm LOW INSPIRATORY PRESSURE: Not developing set pressure to deliver volume from circuit leak, disconnect, or change in compliance and resistance within the system. Interventions: • Check for a disconnect • Check the ETT for placement and cuff leak • Assess the patient for air leakage from the mouth or around the tube • Notify the provider and respiratory therapist with deterioration in patient status and/or unable to
troubleshoot the cause of alarm LOW PEEP: Pressure below set peep level Interventions: • Causes same as low inspiratory pressure • Incorrectly set peep LOW MINUTE VOLUME OR LOW TIDAL VOLUME: Patient is not exhaling at least 80% of mandatory or normal volume. Interventions: • Leak in circuit • Disconnect • High pressure limit reached Troubleshooting Alarms APNEA: Ventilator does not sense a breath during set delay period • Over sedation, or neurologic changes • Cardiopulmonary arrest • Assess the need for change in ventilator mode • Alarm interval synchrony • Rate increase • Remove from the vent and ventilate with a bag-valve as needed HIGH RESPIRATORY RATE: Respiratory rate higher than set limit • Change respiratory rate limits, mode of ventilation, or sedate patient LOW O2 INLET PRESSURE: Loss of oxygen pressure • Call for help • Monitor patient and bag patient if needed EXHALATION VALVE OPEN: Ventilator failure • Call for new ventilator • Monitor patient; remove patient from ventilator and bag, if needed LOW BATTERY or NO AC POWER: Battery for audible alarms weak • Plug in ventilator. If problem does not resolve, call respiratory therapy for new ventilator • Stay with patient and remove from ventilator and bag, if needed HEATER ALARM: Overheated humidifier • Call Respiratory Therapy to exchange water container or adjust settings Suctioning
When a patient is intubated they cannot clear their secretions by themselves. Clinical indicators of the need for suctioning include: coughing, visible secretions, increase in ventilator airway pressures, respiratory distress, decrease in arterial oxygen levels or SPO2, decreased breath sounds, adventitious sounds during chest auscultation, and assessment of airway patency. The use of an in-line suction catheter aids in quickly suctioning the patient. When suctioning a patient, maintain standard precautions. 1. Press 100% suction button on the ventilator or bag patient with bag-valve. Follow hospital policy. 2. Suction the patient with the in-line suction catheter or individual suction catheter. Each attempt
should last less than 10 seconds at less than 120 mmHg of pressure. During the suction monitor the patient’s hemodynamic status
3. Assess the need for further suctioning (e.g., auscultate, audible congestion, copious amounts of secretions, etc.)
4. Determine if SPO2 have returned to baseline within 5 minutes of suctioning. If not, continue to deliver 100% FiO2 until baseline levels have returned
5. Repeat suction process if necessary 6. Document procedure, patient response, and sputum character (Murius et al., 2014) Weaning from Mechanical Ventilation When the underlying disease process that necessitated mechanical ventilation has significantly improved or fully resolved, weaning procedures should begin. Studies indicate that protocols that wean sedation along with the ventilator spend less time on the ventilator, less time in the ICU, and less time in the hospital.
• Consider weaning from the ventilator when: o Patient can protect own airway o Patient is hemodynamically stable o Patient can follow simple commands o Sedation and opioids medications are reduced o Underlying pulmonary disorder or illness that led to mechanical ventilation has
sufficiently resolved or has stabilized • Unnecessary delays in weaning from the mechanical ventilator increase the likelihood of
complications such as: o Ventilator-induced lung injury o Pneumonia o Discomfort o Increase hospitalization costs
There are two parts that need to be done prior to extubation: readiness testing and weaning. These should be done on an awake patient. Sedation Wake Up or Daily Wake-Up As long as it is not contraindicated (e.g.: patient with open abdomen sedated and paralyzed or hemodynamically unstable), a sedation vacation or daily wake-up is recommended. It is performed by nursing staff and respiratory therapy. Together, they turn off sedation and do a spontaneous weaning trial screen such as the Rapid Spontaneous Breathing Index (RSBI). How is it done? Sedation is titrated down until the patient is able to perform three of the following four actions: • Open the eyes in response to a voice • Use the eyes to follow the investigator on request

• Squeeze a hand on request • Stick out the tongue on request Assessment of Readiness Most hospitals assessment of readiness to wean includes just three or four criteria for most short-term ventilator patients. • ABGs within normal limits on minimal to moderate support (FiO2 less than or equal to 50%; MV
less than or equal to 10L/min, PEEP less than or equal to 5 cmH2O • Negative inspiratory pressure less than or equal to negative 20 cmH2O • Spontaneous Vt greater than or equal to 5mL/kg • Vital Capacity greater than or equal to 10mL/kg • Respiratory Rate less than 30 breaths/min • Spontaneous rapid-shallow breathing index (RSBI) less than100 to 105 (Murius et al., 2014) Readiness Testing: Rapid Shallow Breathing Index (RSBI) Studies indicate that the ratio of respiratory frequency divided by tidal volume in liters is the best predictor of a patient’s readiness to breathe successfully off the ventilator (Epstein, 2013). The ratio is called rapid shallow breathing index (RSBI). Clinically accepted standard in assessing the readiness of a patient to be liberated from mechanical ventilation.
• A RSBI is monitored during and recorded at the end of the spontaneous breathing trial (SBT). o RSBI less than 80, extremely likely to be weaned o RSBI 80-105, an even chance to be weaned o RSBI greater than105, unlikely to be weaned
To calculate RSBI you need to divide the respiratory rate by the tidal volume. You can calculate the tidal volume from MV by dividing the MV by the number of breaths the patient takes. For example a patient with a MV of 5 L/min and respiratory rate of 20 has a tidal volume of: 0.25 L/min. Now dividing the rate of 20 by 0.25 L/min will give you a RSBI score of 80. The patient has an even chance of being extubated successfully. There are websites that quickly do the math for you! Click here. Test Yourself Patient is getting a RSBI done to evaluate whether or not he could be extubated. He is on 0 PEEP and 5 cm H2O PSV for 1 minute. His minute ventilation is 10 L/min. 20 breaths per minute. What is his RBSI? A. 20 B. 40 C. 60 D. 80 Rationale: Divide the minute ventilation by the breaths per minute to get the tidal volume. Then divide the breaths per minute by the tidal volume to get the RSBI score. 10 L/min divided by 20 breaths per minute equals 0.5 L/min. Dividing 20 breaths per minute by the tidal volume 0.5 L/min equals 40.

Is this patient ready to wean off the ventilator? A. Very likely to successfully wean B. Even chance to be weaned C. Unlikely to be weaned D. Don’t know
• Rationale: A RSBI is monitored during and recorded at the end of the spontaneous breathing trial (SBT).
o RSBI less than 80, extremely likely to be weaned o RSBI 80-105, an even chance to be weaned o RSBI greater than105, unlikely to be weaned
Strategies to Facilitate Weaning Seven strategies to facilitate weaning: 1. Explain the weaning process to the patient and family and maintain open communication
throughout weaning 2. Position to maximize ventilatory effort (sitting upright in bed or chair) 3. Administer analgesics to relieve pain and sedatives to control anxiety, if appropriate 4. Remain with the patient during the weaning trial and/or provide a highly vigilant presence 5. Frequently assess the patient’s response to the weaning trial 6. Avoid unnecessary physical exertion, painful procedures, and/or transports during the weaning
trial 7. Maximize the physical environment to be conductive to weaning (e.g.: temperature, noise, and
distractions) Common Weaning Methods The following are common weaning methods:
1. Spontaneous Breathing Trial (SBT) on Continuous Positive Airway Pressure (CPAP) or T-piece CPAP is the use of the ventilator to allow spontaneous breathing periods without mandated breaths. T-piece involves removing the patient from the ventilator and attaching an oxygen source to the ETT with a “T” piece. There is no ventilatory support with this device, the patient is breathing spontaneously. • Generally lasts 30 minutes to 120 minutes • Some prefer low levels of pressure support
2. Pressure Support Ventilation (PSV) Patients can spontaneously breathe on the ventilator with a small amount of ventilator support
3. Synchronized Intermittent Mandatory Ventilation (SIMV). This one of the most popular methods of weaning. It is when the therapist progressively decreases the number of mandated breaths delivered by the ventilator; therefore, the patient performs more of the work of breathing by increasing spontaneous breathing.
(Murius et al., 2014) Weaning Intolerance Weaning intolerance is the need to return to ventilatory support indicated by: • Increased respiratory rate, heart rate or blood pressure • Shallow breaths or decreasing spontaneous tidal volumes • Dyspnea • Accessory muscles use
• Decreased LOC • Diaphoresis • Fatigue or pain • Anxiety • Deterioration in PaO2, PaCO2, SpO2 or end-tidal CO2 (Murius et al., 2014) Planned Extubation After the patient is assessed as ready to wean and successfully weans, the next step is extubation. A qualified nurse, doctor, or respiratory therapy may extubate a patient with an order if an anesthesiologist or a qualified practitioner is available in-house for re-intubation, if needed. The procedure is extubation is: • Maintain standard precautions • Explain procedure to patient and family, what to expect and need to cough • Medicate for pain, if indicated • Set-up appropriate method for O2 delivery • Position patient to 30-45-degree head of bed elevation to improve diaphragmatic function. • Pre-oxygenate with 100% FiO2 for a minimum of 30-60 seconds • Suction patient's secretions from ETT, oral and nasopharynx • Allow a few minutes for the patient to rest after suctioning then remove tape or Velcro strap from
the ETT • Using a syringe, deflate the ETT cuff and auscultate for air movement around the cuff • Remove the tube slowly with an outward motion • After extubation, encourage the patient to take deep breaths and apply oxygen • Monitor patient post-extubation including: bronchospasm, tracheal damage, and aspiration • Monitor for stridor. Inspiratory stridor occurs from glottic and subglottic edema and may develop
immediately or take several hours • Document procedure (Murius et al., 2014) Unplanned Extubation If a patient accidently removes their airway, purposefully removes their airway, or someone dislodges an airway, there are three immediate steps that should be taken: 1. Apply 100% FiO2 and assess the patient's ability to breathe 2. Immediately notify the responsible practitioner and respiratory therapist 3. Constantly assess patient for stridor, immediately notifying anesthesia and responsible practitioner
if stridor presents (Murius et al., 2014). Conclusion When patients have difficultly ventilating or oxygenating, mechanical ventilation may be necessary. Managing a patient’s respiratory status and pulmonary needs are the first steps in preventing a respiratory arrest. But if necessary, mechanical ventilation may be needed; therefore, it is important for practitioners to be familiar with the intubation process, management of the advanced airway, the modes of ventilation, care of the intubated patient including complications, and proper steps to extubated. References
American Heart Association (2015). ACLS Provider Manual. Brown, C.A. (2013). The decision to intubate. Retrieved from: www.uptodate.com Caro, D. (2013). Sedation or induction agents or rapid sequence intubation in adults. Retrieved from: www.uptodate.com Casio, R. & Hymel, P. (ND). Endotracheal intubation. Retrieved from: http://www.medschool.lsuhsc.edu/medical_education/Undergraduate/csi/Procedure%20Manual/endotracheal.html Courey, A. & Hyzy, R. (2013). Overview of mechanical ventilation. Retrieved from: www.uptodate.com Hou, P. & Baez, A.A. (2013). Mechanical Ventilation of Adults in the Emergency Room. Retrieved from www.uptodate.com Hyzy, R. (2013). Modes of Mechanical Ventilation. Retrieved from: www.uptodate.com Slutsky, A.S. (1993). Mechanical ventilation: American College of Chest Providers’ Consensus Conference. Chest, 104, 1833. Kacmarek, R.M. (2017). Egan’s fundamentals of respiratory care (11h ed.). Elsevier Science: St. Louis, MO: Mosby. Murias, G., Blanch, L., & Lucangelo, U. (2014). The physiology of ventilation. Respiratory Care, 59 (11), 1795-1807. Retrieved from: http://rc.rcjournal.com/content/59/11/1795. Press, C., Desai, A., Tanaka, P., Macario, A. (2015). End-tidal Capnography. Retrieved from: http://emedicine.medscape.com/article/2116444-overview. Raoof, S. & Baumann, M. (2014). Ventilator-associated events: The new definition. American Journal of Critical Care, 23, 7-9. Retrieved from: http://ajcc.aacnjournals.org/content/23/1/7.full Withings. (2017). What does SpO2 mean? What is a normal SpO2 level? Retrieved from: https://help.withings.com/hc/en-us/articles/201494667-What-does-SpO2-mean-What-is-a-normal-SpO2-level Whitten, C. (2015). What is the difference between oxygen saturation and PaO2? Retrieved from: https://airwayjedi.com/2015/12/09/whats-the-difference-between-oxygen-saturation-and-pao2/ Disclaimer This publication is intended solely for the educational use of healthcare professionals taking this course, for credit, from RN.com, in accordance with RN.com terms of use. It is designed to assist healthcare professionals, including nurses, in addressing many issues associated with healthcare. The guidance provided in this publication is general in nature, and is not designed to address any specific situation. As always, in assessing and responding to specific patient care situations, healthcare professionals must use their judgment, as well as follow the policies of their organization and any applicable law. This publication in no way absolves facilities of their responsibility for the appropriate orientation of healthcare professionals. Healthcare organizations using this publication as a part of their own orientation processes should review the contents of this publication to ensure accuracy and compliance before using this publication. Healthcare providers, hospitals and facilities that use this publication agree to defend and indemnify, and shall hold RN.com, including its parent(s), subsidiaries, affiliates, officers/directors, and employees from liability resulting from the use of this publication. The contents of this publication may not be reproduced without written permission from RN.com.
Participants are advised that the accredited status of RN.com does not imply endorsement by the provider or ANCC of any products/therapeutics mentioned in this course. The information in the course is for educational purposes only. There is no “off label” usage of drugs or products discussed in this course. You may find that both generic and trade names are used in courses produced by RN.com. The use of trade names does not indicate any preference of one trade named agent or company over another. Trade names are provided to enhance recognition of agents described in the course. Note: All dosages given are for adults unless otherwise stated. The information on medications contained in this course is not meant to be prescriptive or all-encompassing. You are encouraged to consult with providers and pharmacists about all medication issues for your patients.


![Kiểmsoáthuyếtáptíchcực chohntmmttn.vn/Upload/File/DVC 13PM/[CD7.60] TS SY THA... · 138.2 ±14.7 mmHg 4.0 ±12.9 mmHg vs 10.0±13.1 mmHg *Nữ≥ 65t vànam ≥ 55t ≥ 1](https://img.pdfslide.us/doc/110x75/5ec3b7890708242197600d05/kifmsothuytptchcc-13pmcd760-ts-sy-tha-1382-147-mmhg-40.jpg)