Embed Size (px)
Citation preview

1AN INTRODUCTION TO PROGRAMMING AND VISUAL BASIC
Starting Point
Go to www.wiley.com/college/petroutsos to assess your knowledge of the basics of
programming and Visual Basic.
Determine where you need to concentrate your effort.
What You’ll Learn in This Chapter▲ Operations all computers perform▲ Basic control structures▲ Programming languages and the need for just-in-time compilation▲ Programming in Windows▲ Object-oriented programming▲ The programming process▲ The purpose and key features of the Visual Basic programming environment▲ The relationship between a solution and a project▲ How to create Windows application projects▲ Forms and form properties▲ Controls▲ The role of events in Windows programming and how to build a simple program that
responds to events▲ How to test code
After Studying This Chapter, You’ll Be Able To▲ Identify the types of operations a computer carries out in order to prepare to write a program▲ Identify the steps required to prepare to write a program▲ Install and get help in Visual Studio▲ Write pseudocode as preparation for creating a program▲ Create an IPO table as preparation for creating a program▲ Create a Windows application project▲ Use the Solution Explorer window to manage the files in a project▲ Customize the Visual Studio environment to make it easier to work in▲ Add a form to a project▲ Set form properties by using the Properties window▲ Add TextBox, Label, and Button controls to a form▲ Set control properties by using the Properties window▲ Add code to a form event▲ Add code to a control event▲ Test code by debugging
JWQD024_c01_001-049.qxd 1/27/07 2:56 PM Page 1
COPYRIG
HTED M
ATERIAL

2 AN INTRODUCTION TO PROGRAMMING AND VISUAL BASIC
INTRODUCTION
This chapter introduces the fundamentals of programming using Microsoft VisualStudio 2005 and Microsoft Visual Basic 2005. The first section introduces youto some basic programming concepts and the role that Visual Studio and VisualBasic play in program development. In the second section, you will learn aboutsolutions and projects and become familiar with the Visual Studio developmentenvironment. In the third section, you will learn about Windows Forms. A Win-dows form allows you to create the user interface for a Windows application. Inthe fourth section, you will look at the basic steps for adding user interface ele-ments, known as controls, to a Windows form. In the final section, you willlearn about event-driven programming and write your first code.
1.1 Getting Familiar with Programming
No doubt, you have used many applications. But have you thought about whatgoes on behind the scenes or the tools used to create that application? In thissection, you’ll discover the difference between source code and a compiled pro-gram. Next, you’ll learn some basics about the development environment youwill be using: Visual Studio. After that, you’ll learn the fundamental steps forpreparing to install and installing Visual Studio. Finally, you’ll learn about thedocumentation and help features available for learning about Visual Studio andVisual Basic.
1.1.1 An Introduction to Programming
Before you begin to think about creating a computer program, it’s useful tounderstand the six operations that all computers can carry out. Understandingthese operations will help you when you start writing programs. These are thesix operations a computer can perform:
1. Input data2. Store data in internal memory3. Perform arithmetic on data4. Compare two values and select one of two alternative actions5. Repeat a group of actions any number of times6. Output the results of processing
These six operations are depicted in Figure 1-1, where each operation is numbered.Let’s discuss each of these operations in a little more detail:
1. Input data: For a computer to be able to process data, it must first beable to accept input of data. Data is typically input from a keyboard or
JWQD024_c01_001-049.qxd 1/25/07 11:14 PM Page 2 epg Macintosh HD:Users:epg:Desktop:untitled folder:

1.1 GETTING FAMILIAR WITH PROGRAMMING 3
mouse, but it can also come from other sources, such as a bar-codereader like those used at checkout terminals. Input can also comefrom some type of sensor or from a data file on a computer disk. Forexample, with a word processor, the letters of the alphabet, numbers,and punctuation symbols form the data that is processed by the com-puter. New documents are created by entering data from the keyboard,and existing documents are loaded from a hard drive or flash memory.
2. Store data in memory: After data has been input, it is stored in internalmemory. Each memory location that holds data is assigned a name,which the instructions use to perform the processing. Because the valuesin a memory location can change as the process occurs, the memorylocations are called variables. For example, the current balance in yourchecking account would typically be stored in a single memory locationand be identified by a variable name. The instructions for processing thisdata are also stored in memory.
3. Perform arithmetic on data: Once data and instructions have beeninput and stored, arithmetic operations can be performed on the vari-ables that represent the data. This includes addition, subtraction, multi-plication, division, and raising to a power. The processing chip of thecomputer carries out these operations by retrieving the data from mem-ory and then performing the processing based on instructions from theprogrammer. How does a word processor or computer game work if allthe computer can do is perform arithmetic? The answer is that every-thing in a computer—numbers, letters, graphics, and so on—is repre-sented by numbers, and all processing is handled through some type ofarithmetic operation.
4. Compare two values and select one of two alternative actions: To doanything other than the simplest processing, a computer must be ableto choose between two sets of instructions to execute. It does this by
Data Information
Data
Processing Chip
Information
Memory1 6
2
PerformArithmetic
3 MakeDecisions
4 RepeatOperations
5
Figure 1-1
The six computer operations.
JWQD024_c01_001-049.qxd 1/25/07 11:14 PM Page 3 epg Macintosh HD:Users:epg:Desktop:untitled folder:

4 AN INTRODUCTION TO PROGRAMMING AND VISUAL BASIC
comparing the contents of two memory locations and, based on theresult of that comparison, executing one of two groups of instructions.For example, when you carry out the spell-checking operation, thecomputer checks each word to determine whether it matches a word inthe computer’s dictionary. Based on the result of this comparison, theword is accepted or flagged for you to consider changing.
5. Repeat a group of actions any number of times: Although you couldcarry out all the preceding operations with a typewriter or handheldcalculator, repeating actions is something the computer does better thanany person or any other type of machine. Because a computer nevertires or becomes bored, it can be instructed to repeat some action asmany times as needed, without fear of an error occurring due to theconstant repetition. The capability of a computer to repeat an opera-tion is what most clearly sets it apart from all other machines. Thespell-checking operation mentioned earlier is an example of a repeatedaction: The program repeatedly checks words until it comes to the endof the document.
6. Output the results of processing: After the processing has been com-pleted and the required information generated, to be of any use, theinformation must be output. Output of processed information can takemany forms: It can be displayed on a monitor, printed on paper, storedas files on a disk, and so on. Output is accomplished by retrieving infor-mation from a memory location and sending it to the output device. Forexample, when you complete your work with a word processor, theresulting information is displayed on your monitor and saved to a file,and you may also print it for distribution to others.
1.1.2 Programs and Programming
To carry out any of the six operations just discussed, you must be able to pro-vide instructions to the computer, in the form of a program. The most impor-tant thing about programming is that it is a form of problem solving, and theobjective is to develop the step-by-step process—the logic—that will solve theproblem. Step-by-step logic of this type is referred to as an algorithm. Youhave worked with algorithms before; a set of directions to a party is an algo-rithm, as is a recipe to make spaghetti sauce or to bake a cake. For a com-puter program, you must develop a set of instructions for solving a problem,using only the six operations of a computer. This is the most difficult part ofprogramming.
Many times, a program fails to work because the programmer attempts towrite the program before developing the correct algorithm for solving the prob-lem. Only after you have developed the logic of the solution can you consideractually writing the instructions for the computer.
JWQD024_c01_001-049.qxd 1/25/07 11:14 PM Page 4 epg Macintosh HD:Users:epg:Desktop:untitled folder:

1.1 GETTING FAMILIAR WITH PROGRAMMING 5
Control Structures
All computer programs are created using just three types of logic, or, as they areknown in programming, control structures: the sequence, decision, and repe-tition control structures.
The sequence control structure includes the input, storage, arithmetic, andoutput computer operations discussed earlier. It is so called because all four ofthese operations can be performed without any need to make a decision or repeatan operation. At its simplest, sequence means one program instruction followsanother, in order. The programmer must determine the proper sequence for theinstructions.
The decision control structure is the same as the decision-making com-puter operation discussed earlier. It enables the programmer to control the flowof operations by having the user or data determine which operation is to be per-formed next.
Finally, the repetition control structure is used to repeat one or more oper-ations. The number of repetitions depends on the user or the data, but the pro-grammer must include a way to terminate the repetition process.
All algorithms are created by performing the six operations of a computer,using combinations of these three control structures. When you learn how tocreate the logic for these three control structures, you will find that writing mean-ingful and useful programs is a matter of combining the structures to create morecomplex logic.
Programming Languages
When you have developed the logic for solving a problem, you can think aboutwriting the actual instructions that the computer will use in implementing the logic.Computer programs must be written in one of various programming languages,such as Visual Basic. Each of these languages uses a restricted vocabulary and avery structured syntax (similar to grammar) that the computer can understand.Although a great deal of research is ongoing to create computers that can acceptinstructions using conversational English, currently no computers can do so.
Within a computer, the data and instructions are represented in the binarynumber system as a series of 0s and 1s. This form of representation is usedbecause the computer has only two electrical states, on and off, correspond-ing to 1 and 0. Using a string of transistors that act as switches, the computercan represent a number, a character, or an instruction as a series of on/offstates. All processing is carried out in the binary number system. For exam-ple, a computer carries out all arithmetic in binary instead of in the decimalnumber system that humans use. The binary form of the instructions is calledmachine language because this is the language that computers use to carryout their operations. An example of the machine language statements neces-sary to sum the digits 1 to 100 for a computer using an Intel CPU chip isshown in Figure 1-2.
JWQD024_c01_001-049.qxd 1/25/07 11:14 PM Page 5 epg Macintosh HD:Users:epg:Desktop:untitled folder:

6 AN INTRODUCTION TO PROGRAMMING AND VISUAL BASIC
Programming the very first computers, which had to be done in binary, was verydifficult and time-consuming. Now, we have English-like programming languages,such as Visual Basic, that are referred to as high-level languages because they arecloser to the level of the human programmer than to the level of the machine. Beforethe statements in a high-level program can be used to direct the actions of a com-puter, they must be translated into machine language. Files on a Windows-basedcomputer with an .exe file extension are machine language programs that have beentranslated from some high-level language. They can be executed with no translationbecause they are already in a binary form. Until recently, this was a direct transla-tion from high-level language to machine language by a software program known asa compiler or an interpreter, depending on whether the code was translated as aunit or line by line; Figure 1-3 shows how the direct translation process works.
The problem with the direct translation approach is that different types of com-puters have different machine languages, so a program would have to be trans-lated differently for an Apple computer than for a Windows computer. To makeit possible for the same program to run on all types of computers, the concept of
Machine Language Command Explanation
10111000 00000000 00000000 Set Total Value to 010111001 00000000 01100100 Set Current Value to 10000000001 11001000 Add Current Value to Total Value01001001 Subtract 1 from Current Value01110101 11111011 If Current Value is not 0, repeat
Figure 1-2
A machine language program.
Total = 0 Current =100 do while current <> 0 Total = Total + Current Current = Current – 1 Loop
10111000 101110001 0000000 01100100 00000001 11001000 01001001 01110101 11111011
TranslationProgram
High-levellanguage program
Machine languageprogram
Figure 1-3
The direct translation process.
JWQD024_c01_001-049.qxd 1/25/07 11:14 PM Page 6 epg Macintosh HD:Users:epg:Desktop:untitled folder:
1.1 GETTING FAMILIAR WITH PROGRAMMING 7
the just-in-time (JIT) compiler was developed. With this approach, a high-levelprogram is translated or compiled into an intermediate form that is machineindependent. The two approaches to this use of a JIT compiler are Java fromSun Microsystems and the .NET Framework from Microsoft, of which VisualBasic 2005 is a part. In the case of Java, the intermediate form is called byte-code, and for the .NET Framework, it is called Microsoft Intermediate Lan-guage (MSIL). Once converted, a Visual Basic 2005 program is compiled intoMSIL; the JIT compiler on any computer can convert it into machine languagefor that particular machine. This process for MSIL is shown in Figure 1-4.
Whereas the Java approach works only for programs written in Java, the .NETFramework approach works for all languages that have been revised to workunder that framework. At this time, these include Visual Basic, C# (pronounced“c-sharp”), and C�� (pronounced “c plus plus”) .NET. This means that if youare using one of these languages, it can be compiled in MSIL and combined withother programs in MSIL and then sent to the JIT compiler, which for the .NETFramework is called the Common Language Runtime (CLR).
1.1.3 Programming in Windows
As you are probably aware, most personal computers today run some form of theMicrosoft Windows operating system, such as Windows 2000, Windows XP, or Win-dows Server 2003. With Windows being the primary operating system for personalcomputers, learning to program in the Windows environment has become a criti-cal skill for anybody who is interested in working in information systems. To pro-gram in Windows, you first need to understand a little about how Windows works.
JITcompiler
JITcompiler
JITcompiler
VisualBasic 2005
Convertto MSIL
Figure 1-4
Use of MSIL and JIT compilers.
JWQD024_c01_001-049.qxd 1/25/07 11:14 PM Page 7 epg Macintosh HD:Users:epg:Desktop:untitled folder:

8 AN INTRODUCTION TO PROGRAMMING AND VISUAL BASIC
To understand the workings of Windows, you need to understand threekey concepts: windows, events, and messages. A window is any rectangularregion on the screen that has its own boundaries. All visible components runin their own windows. For example, when you use a word processor, a doc-ument window displays the text you are entering and editing. When youretrieve a file, you do this from a dialog box that is a window that displayson top of other windows. Similarly, when an error message is displayed, itis done in a window. Figure 1-5 shows a Windows XP screen with severaltypes of windows displayed.
As a part of its operations, the Windows operating system constantly mon-itors all the windows on the screen for signs of activity, termed events. An eventcan be a mouse click or a double-click, a keypress, or a change in a windowcaused by an entry of text in it.
When an event occurs, the corresponding window sends a message to theoperating system, which processes the message and then broadcasts it to otherwindows. When they receive a message, the other windows take actions basedon their own sets of instructions. Programming in Windows requires that youlearn how to work with windows, events, and messages. For this reason, pro-gramming in Windows is usually termed event-driven programming because allactions are driven by events. Although this may sound complicated, languagessuch as Visual Basic make it easy to create Windows-based applications by pro-viding you with the necessary tools.
Figure 1-5
Windows in Windows XP.
JWQD024_c01_001-049.qxd 1/25/07 11:14 PM Page 8 epg Macintosh HD:Users:epg:Desktop:untitled folder:

1.1 GETTING FAMILIAR WITH PROGRAMMING 9
Event-driven programming is quite different from traditional approaches toprogramming, where the program itself controls the actions that take place andthe order in which those actions occur. With traditional programs, execution ofthe program starts with the first instruction and continues through the remain-ing instructions, making decisions as to which instructions will be executed,depending on the data that are input. The main program may use smaller sub-programs to handle parts of the processing. This type of programming isreferred to as procedural programming, and it works very well for such activ-ities as processing a large number of grades at the end of a term or printingpayroll checks at the end of a pay period. However, with the move toward wide-spread use of graphical user interfaces (GUIs), the trend is toward using event-driven programming.
Visual Basic is an event-driven language that does not follow a predefinedsequence of instructions; it responds to events to execute different sets of instruc-tions, depending on which event occurs. The order in which events—such asmouse clicks, keystrokes, or even other sets of instructions—occur controls theorder of events in Visual Basic and other event-driven languages. For that rea-son, an event-driven program can execute differently each time it is run, depend-ing on what events occur.
1.1.4 Introduction to Object-Oriented Programming
In addition to being event driven, Visual Basic is an object-oriented (OO) lan-guage. An OO language is one that encapsulates functionality into classes. Thebeauty of Visual Basic is that, unlike with many other OO languages, you do nothave to know how to create objects to use them. Visual Basic automatically cre-ates for you, the programmer, new instances of many objects from a wide vari-ety of built-in templates.
What distinguishes OO programming from earlier languages is that objectscombine programming instructions, or code, with data. Previous attempts tostructure programs in such a way that large problems could be broken downinto smaller problems separated the code from the data. The problem with thisapproach is that if the data changes, the code might not work with the new data.With OO programming, the combination of code and data avoids this problem.For example, instead of writing code to deal with customers and then using thatcode with different customer data for each customer, the code and data are com-bined into an object for each customer. The objects for multiple customers arevery similar, with the exception of the data component, so you can use them insimilar ways.
To understand OO programming, you need to understand a number of con-cepts and terminology. First, in order to create an object, you must first createa class—that is, a template with data and procedures from which objects arecreated. One way of looking at this is to think of a class as a cookie cutter and
JWQD024_c01_001-049.qxd 1/25/07 11:14 PM Page 9 epg Macintosh HD:Users:epg:Desktop:untitled folder:

10 AN INTRODUCTION TO PROGRAMMING AND VISUAL BASIC
the actual object as the resulting cookie.1 All the actual work in creating an objectis accomplished in creating the class; an object is created by defining it to bean instance of a class.
Objects have two key elements: properties and methods. Some objects alsohave events. Properties of objects are simply the attributes associated with theobject, such as the object’s name, color, and so on. Methods are a set of prede-fined activities that an object can carry out. For example, consider the customerobjects mentioned earlier; they could be instances of a class called DVDCustomer,which has have the properties and methods shown in Figure 1-6. Note that theDVDCustomer class has Name, Address, PhoneNumber, and LateFees properties.The class also has the Add and Delete methods to add and delete customers. Notethat there is also an object named DVDCustomer for a DVD rental store, andthere is an instance of this object for Ashley Hyatt that contains properties particular to her.
Three key characteristics of OO programming are encapsulation, inheri-tance, and polymorphism. Encapsulation refers to the requirement that itshould never be possible to work with variables in an object directly; the vari-ables must be addressed through the object’s properties and methods. Thisimplies a black-box view of an object, in which the programmer does not needto know what is going on inside the object but only needs to know how towork with the object’s methods and properties. For example, you would not beable to change the values of the DVDCustomer object without going throughthe properties of the object; you cannot get into the object except through theproperties.
Inheritance refers to the capability to create child classes that descend froma parent class. This capability makes it easier to build new child classes by hav-ing them inherit properties and methods from a parent class. For example, theclass DVDCustomer inherits the properties and methods from a more general
DVDCustomer
DVDCustomer Class DVDCustomer ObjectInstance of
DVDCustomer
NameAddressPhoneNumberLateFees
Add() Delete()
DVDCustomer Ashley Hyatt
155 St. Joseph Ct.Athens, GA 30602
706-555-8329
$4.10
NameAddressPhoneNumberLateFees
Add() Delete()
Figure 1-6
A class, an object, and an instance.
JWQD024_c01_001-049.qxd 1/29/07 4:38 PM Page 10

1.1 GETTING FAMILIAR WITH PROGRAMMING 11
Customer class, which itself inherits properties and methods from an even moregeneral Person class.
Finally, polymorphism is related to inheritance in that a child class caninherit all the characteristics and capabilities of the parent class but then add ormodify some of them so the child class is different from the parent class. Forexample, the DVDCustomer class inherits the Name, Address, and PhoneNum-ber properties from the Customer class and then adds the LateFees property thatis particular to DVDCustomer.
As another example of objects, consider a soccer ball. The SoccerBall classinherits properties and methods from the more general Ball class. These prop-erties include diameter, weight, color, and so on. Methods for the soccer ballinclude rolling and bouncing. If you apply the Kick event to the soccer ball,then, depending on the ball’s diameter and weight, it will roll and bounce a cer-tain distance. It is important to note that the instructions for a method arealready a part of Visual Basic, but the programmer must write the instructionsto tell the object how to respond to an event. You combine objects with prop-erties or methods by using a period, or dot, and you combine objects with eventsby using an underscore character. Continuing the soccer ball example, you mighthave a property definition through the following statement to define the colorof the ball:
Ball.Color = White
Similarly, the Roll method of the soccer ball is referenced by the dot property asshown here:
Ball.Roll
Finally, the Kick event is applied to the soccer ball as follows, causing the ballto roll:
Ball.Kick
Working with Visual Basic involves combining objects with the instructionson how each object should respond to a given event. For example, you mighthave a button for which the instructions are to display a message; instructionsfor another button might be to exit the program. These instructions are referredto as the code for the program
1.1.5 The Programming Process
Creating an application using an OO programming language such as Visual Basicis much easier than working with a traditional programming language. Insteadof having to develop the logic for the entire program as you would with a pro-cedural language, you can divide the program logic into small, easily handledparts by working with objects and events. For each object, you determine theevents that you want the object to respond to and then develop code to have
JWQD024_c01_001-049.qxd 1/25/07 11:14 PM Page 11 epg Macintosh HD:Users:epg:Desktop:untitled folder:
12 AN INTRODUCTION TO PROGRAMMING AND VISUAL BASIC
the object provide the desired response. All the necessary messages betweenobjects in Windows are handled by Visual Basic, thereby significantly reducingthe work you must do to create an application.
The manner in which you create a Visual Basic project is also different fromtraditional programming. Instead of having to create an entire program before test-ing any part of it, with Visual Basic, you can use interactive development tocreate an object, write the code for it, and test it before going on to other objects.For example, assume that a store named Vintage DVDs that rents only “old”movies on DVD has asked you to create a Visual Basic project that calculatestaxes on a DVD rental and sums the taxes and price to compute the amountdue. With Visual Basic, you can create the objects and code to calculate the taxesand amount due and test them to ensure their correctness before going on tothe rest of the project.
Although creating an application in Visual Basic is easier than working witha procedural language, you still need to follow a series of steps to ensure cor-rectness and completeness of the finished product:
1. Define the problem.2. Create an interface.3. Develop logic for action objects.4. Write and test code for action objects.5. Test the overall project.6. Document the project in writing.
Note that it may be necessary to repeat or iterate through these steps to arriveat an acceptable final solution to the original problem. The following sectionsdiscuss each of these steps and apply them to a part of the situation just men-tioned—that is, creating an application to calculate the taxes and amount dueon a DVD rental.
Step 1: Define the Problem
Before you can develop any computer application, it is absolutely necessary toclearly define your objective—that is, the problem to be solved. Only then canyou begin to develop the correct logic to solve the problem and incorporate thatlogic into a computer application. Ensuring that the correct problem is beingsolved requires careful study of why a problem exists. Maybe an organization iscurrently handling some repetitive process manually and wants to use a com-puter to automate it. Or perhaps management has a complicated mathematicalor financial problem that cannot be solved by hand. Or maybe a situation hasoccurred or will occur that cannot be handled by an existing program.
The problem identification step should include identification of the data to beinput to the program and the desired results to be output from the program. Often,
JWQD024_c01_001-049.qxd 1/25/07 11:14 PM Page 12 epg Macintosh HD:Users:epg:Desktop:untitled folder:

1.1 GETTING FAMILIAR WITH PROGRAMMING 13
these two items are specified by a person or an agency other than the program-mer. Much grief can be avoided if these input and output requirements are incor-porated into the programmer’s thinking at this early stage of program development.Unclear thinking at this stage may cause the programmer to write a program thatdoes not correctly solve the problem at hand, a program that correctly solves thewrong problem, or a combination of both. Therefore, the programmer must spendas much time as necessary to truly identify and understand the problem.
Because Visual Basic is a visual language, a good way to understand what isrequired to solve the problem is to sketch the interface, showing the various objectsthat will be part of the project. Not only does this help you understand the prob-lem, it is also a good way for you to communicate your understanding to otherpeople. As a part of this sketch, you should denote the input and output objectsand the objects for which code is needed to respond to events, the so-called actionobjects. A sketch of the proposed solution for the DVD rental problem is shownin Figure 1-7. In looking at the solution, you see one input—the price of theDVD—and two outputs—the taxes and the amount due. There are also two actionobjects—a calculation button and an exit button. If there are multiple forms, theyshould all be sketched, with input, output, and action objects.
Step 2: Create an Interface
After you have defined the problem and, using a sketch of the interface,decided on the objects that are necessary for your project, you are ready tocreate the interface. Creating the interface with Visual Basic is quite easy: Youselect objects from those available and place them on the form. This processshould follow the sketch done earlier. Although you have not yet been intro-duced to the wide variety of objects available for creating Visual Basic projects,you can work on the logic for the Vintage DVDs problem with just four typesof objects: the form, buttons for action, text boxes for input and output, andlabels for descriptors. The interface is shown in Figure 1-8.
Vintage DVDs
DVD Price
Taxes
Amount Due
Calculate Exit
Action Objects
Input
Output
Figure 1-7
A sketch of the interface for Vintage DVDs.
JWQD024_c01_001-049.qxd 1/25/07 11:14 PM Page 13 epg Macintosh HD:Users:epg:Desktop:untitled folder:

14 AN INTRODUCTION TO PROGRAMMING AND VISUAL BASIC
Step 3: Develop Logic for Action Objects
After you have clearly identified the problem and created the interface, thenext step is to develop the logic for the action objects in the interface. Thisis the step in the development process during which you have to think aboutwhat each action object must do in response to an event. No matter how goodyour interface, if you don’t develop the appropriate logic for the actionobjects, you will have great difficulty creating a project that solves the prob-lem defined earlier.
To help with this logical development for the action objects, there are twouseful tools for designing programming applications: IPO tables andpseudocode. IPO (input/processing/output) tables show the inputs to anobject, the required outputs for that object, and the processing that is neces-sary to convert the inputs into the desired outputs. When you have an IPOtable for an object, you can write a pseudocode procedure to complete thelogic development step.
Writing pseudocode involves writing the code for the object in structuredEnglish rather than in a computer language. After you have developed an IPOtable and the pseudocode for each object, it is easy to write a procedure inVisual Basic to carry out the necessary processing.
Let’s begin by developing the logic for the Calculate button, using an IPOtable. The IPO table for the Calculate button has as input the price of a DVD.The processing involves the calculation necessary to compute the desired
Figure 1-8
The interface for Vintage DVDs.
JWQD024_c01_001-049.qxd 1/25/07 11:14 PM Page 14 epg Macintosh HD:Users:epg:Desktop:untitled folder:

1.1 GETTING FAMILIAR WITH PROGRAMMING 15
output: the amount of the sale. As mentioned earlier, in many cases, the pro-gram designer has no control over the input and output, which are specifiedby somebody else—either the person for whom the application is being devel-oped or, if you are a member of a team and are working on one part of anoverall application, the overall design. After you are given the specified inputand output, your job is to determine the processing necessary to convert theinputs into desired outputs. Figure 1-9 shows the IPO table for the Calculatebutton. IPO tables are needed for all objects that involve input, output, andprocessing. (We won’t create an IPO table for the Exit button because it sim-ply terminates the project.)
After you have developed the IPO table for each action object, you shouldthen develop a pseudocode procedure for each one. Pseudocode is useful fortwo reasons. First, you can write the procedure for the object in English, with-out worrying about the special syntax and grammar of a computer language.Second, pseudocode provides a relatively direct link between the IPO table andthe computer code for the object because you use English to write instructionsthat can then be converted into program instructions. Often, this conversionfrom pseudocode statement to computer language instruction is virtually linefor line.
There are no set rules for writing pseudocode; you can personalize the methodyou use for going from the IPO table to the computer program. The pseudocodeshould be a set of clearly defined steps that enables a reader to see the next stepto be taken under any possible circumstance. Also, the language and syntax shouldbe consistent so that the programmer will be able to understand his or her ownpseudocode at a later time.
Let’s write a pseudocode procedure for the Vintage DVDs Calculate object.Note that this pseudocode program follows the information in the IPO tableshown in Figure 1-9:
Begin procedure
Input DVD Price
Taxes = 0.07 � DVD Price
Amount Due = DVD Price + Taxes
Output Taxes and Amount Due
End procedure
Input Processing Output
Video price Taxes � 0.07 � Price Taxes
Amount due � Price � Taxes Amount due
Figure 1-9
An IPO table for the Calculate button.
JWQD024_c01_001-049.qxd 1/25/07 11:14 PM Page 15 epg Macintosh HD:Users:epg:Desktop:untitled folder:

16 AN INTRODUCTION TO PROGRAMMING AND VISUAL BASIC
This small example has only one object for which an IPO table andpseudocode are needed. However, in most situations, there are numerous objectsfor which you need to develop the logic using these tools.
Step 4: Write and Test Code for Action Objects
After you have created the Visual Basic interface and developed the logic for theaction objects, using IPO tables and pseudocode, you must write procedures inVisual Basic for each action object. This code should provide instructions to thecomputer to carry out one or more of the six operations listed earlier. Althoughcreating the interface is important, writing the code is the essence of developingan application.
After you have written the code for an action object, the second part ofthis step is to test that object and correct any errors; you should not wait untilthe entire project is complete. You should use the interactive capabilities ofVisual Studio to test the code of each and every object as it is written. Thisprocess is referred to as debugging, and it involves trying to remove all of theerrors, or bugs.
Step 5: Test the Overall Project
After you have tested the code for each action object individually, the nextstep is to test the overall project and correct any errors that may still existor that may be the result of incorrect communication between objects. Atthis stage, it is necessary to determine whether the results obtained from theproject meet the objectives outlined in the problem definition step. If theproject does not meet the final user’s needs, then the developer must ana-lyze the results and the objectives to find out where they diverge. After theanalysis, the developer should trace through the program development pro-cedure and correct the algorithm, IPO tables, pseudocode, and final code forone or more objects to find the cause of the difference between the objec-tives and the final project.
Step 6: Document the Project in Writing
An important part of writing any computer software is the documentation of thesoftware. Documentation helps users by providing instructions and suggestionson using the software. Documentation helps other programmers who may needto make changes or correct the programs.
Internal documentation usually includes comments within the program thatare intermingled with the program statements to explain the purpose and logicof the program elements. This type of documentation is essential to the mainte-nance of software, especially by someone other than the original programmer. Bybeing able to read the original programmer’s purpose for a part of a program ora program statement, a different programmer can make any needed corrections
JWQD024_c01_001-049.qxd 1/25/07 11:14 PM Page 16 epg Macintosh HD:Users:epg:Desktop:untitled folder:

1.1 GETTING FAMILIAR WITH PROGRAMMING 17
FOR EXAMPLE
Creating an Area CalculatorSay that you work for a construction company. You need to build a pro-gram that can accept the length and width of a room, in feet and inches,and calculate its area in both inches and feet and inches. The program willbe a Windows application.
You analyze the program requirements. You determine that the applica-tion needs two actions: a Calculate action and an Exit action.
The Calculate action needs to accept four input values: WidthFeet,WidthInches, LengthFeet, and LengthInches. These values will be enteredby a user. You also determine that the program must output two values:TotalAreaInches and TotalAreaFeet. TotalAreaFeet is a decimal value that isthe area calculated in square feet. TotalAreaInches is a whole number thatis the area calculated in square inches.
You sketch the IPO table shown in Figure 1-10.
Input Processing Output
LengthFeet TotalLengthInches � LengthFeet � 12 � LengthInches AreaFeet
LengthInches TotalWidthInches � WidthFeet � 12 � WidthInches AreaInches
WidthFeet TotalAreaInches � TotalLengthInches � TotalWidthInches
WidthInches AreaFeet � TotalAreaInches/12
AreaInches � Remainder of TotalAreaInches/12
Figure 1-10
An IPO table for the area calculator.
or revisions. Without internal documentation, it can be extremely difficult foranyone to understand the purpose of parts of the program. And if a program-mer is unclear about what’s going on in the program, making needed changes isvery difficult
Written documentation includes books, manuals, and pamphlets that giveinstructions on using the software and also discuss the objectives and logic ofthe software. The documentation should include a user’s guide and programmerdocumentation. The user’s guide provides complete instructions on accessing thesoftware, entering data, interpreting output, and understanding error messages.The programmer documentation should include various descriptive documentsthat allow for maintenance of the software. These may include pseudocode ofsections of the program, a listing of the program, and a description of requiredinput values and the resulting output.
(Continued)
JWQD024_c01_001-049.qxd 1/25/07 11:14 PM Page 17 epg Macintosh HD:Users:epg:Desktop:untitled folder:

18 AN INTRODUCTION TO PROGRAMMING AND VISUAL BASIC
You write the following pseudocode for the procedure:
Begin Procedure
Input LengthFeet, LengthInches, WidthFeet, WidthInches
TotalLengthInches = LengthFeet * 12 + LengthInches
TotalWidthInches = WidthFeet * 12 + WidthInches
TotalAreaInches = TotalLengthInches * TotalWidthInches
TotalAreaFeet = TotalAreaInches / 144
End Procedure
You sketch the interface and identify four fields used for input, two fieldsuse for output, and two buttons.
You implement the interface by using a Visual Basic Windows form. Youadd TextBox controls for the Input fields and Label controls for the outputfields. You also add Label controls to identify each input field. Next, youwrite and test the code for both buttons. After testing all functionality, youcreate the documentation.
• Describe how an application written in Visual Basic 2005 is con-
verted to machine language.
• Compare a class, an object, and an instance.
• Define encapsulation.
• Identify the six steps in creating a Windows application.
S E L F - C H E C K
1.2 Working with Visual Studio
Visual Studio is the integrated development environment (IDE) used to cre-ate programs with Visual Basic. An IDE is an application that provides tools forcreating, debugging, and modifying application code. In the next sections, youwill learn how to install Visual Studio and how to use the online help system.
1.2.1 Installing Visual Studio
You can avoid frustrations when installing Visual Studio by first making sureyour system can run Visual Studio. You don’t want to begin the installation only
JWQD024_c01_001-049.qxd 1/29/07 4:38 PM Page 18

1.2 WORKING WITH VISUAL STUDIO 19
to have the Setup Wizard display the dreadful message that it cannot install theapplication because your computer is not capable of supporting it. Visual Stu-dio has the following hardware requirements:
▲ 600MHz or faster CPU▲ 192MB or more of RAM▲ 2GB of disk space
Your computer probably meets or surpasses these requirements if you purchasedit within the past few years.
Typically, software—not hardware—is at the center of installation troubles.Not everyone keeps up-to-date with Microsoft’s latest service packs. A servicepack is a group of enhancements to Windows that usually patch security gapsin the original Windows release. Visual Studio requires you to have certain ser-vice packs installed on your computer before running the Setup Wizard. You candownload service packs free of charge from www.microsoft.com. To install VisualStudio, you must be running one of the following:
▲ Windows 2000 with Service Pack 4 (SP4)▲ Windows XP with SP2▲ Windows Server 2003 with SP1
The installation of Visual Studio is straightforward and should take anhour to an hour and a half. You begin the installation by closing down anyapplications that are open on your computer. Next, you place Installation Disc 1into your CD drive, and Windows automatically starts the Setup Wizard,which walks you through the installation. You also use the Setup Wizard touninstall Visual Studio and to add or remove components to the installationthat have not yet been installed. During the installation process, you have theopportunity to install all the components, select the components you want toinstall, or accept the default components that Microsoft suggests you install.You probably want to install the components that are selected by default. Ifyou need a feature that you do not install now, sometime in the future, youcan use the Setup Wizard again to install any component that was not origi-nally installed. You will probably not need to add a new component later,however, because nearly all the components that you need are part of thedefault installation.
1.2.2 Getting Help with Visual Studio and Visual Basic
As you learn to program in Visual Basic, you may often need to look up howto do something in the documentation. This is normal. Even experienced pro-grammers rely heavily on the documentation to find the best way to accomplish
JWQD024_c01_001-049.qxd 1/25/07 11:14 PM Page 19 epg Macintosh HD:Users:epg:Desktop:untitled folder:

20 AN INTRODUCTION TO PROGRAMMING AND VISUAL BASIC
a task. The .NET Framework is a rich library with a huge number of objects.No one can be expected to remember how to use them all. Fortunately, Visual Stu-dio and Visual Basic provide powerful tools for gaining access to the informa-tion you need.
The most straightforward use of the documentation requires little morethan clicking on or in the object that you have a question about and pressingthe F1 key to launch context-sensitive help. For instance, in any project, youcan click somewhere on an object and press F1. The Microsoft DocumentExplorer launches documentation about that object loaded. The DocumentExplorer offers a sophisticated set of tools, mostly represented in the Docu-ment Explorer toolbar, shown in Figure 1-11. The tools you find there giveyou various ways to access the documentation, as follows. The toolbar’s firstsection has navigation buttons, a refresh button, and font size maintenance. Italso has the following buttons:
▲ How Do I: The How Do I button has preset questions that relate to theselected topic and may help with general queries about certain types ofdevelopment. If you are stuck, give it a try.
▲ Search: Clicking the Search button allows for phrase searching.▲ Index and Contents: The Index button and Contents button allow
browsing through the index or table of contents of the documentation.▲ Help Favorites: You can save favorites in the Help Favorites just as you
can in Internet Explorer. The double arrow is handy: It synchronizes theContents panel with the page you are currently viewing.
▲ Ask a Question: The Ask a Question button takes you directly to theNNTP Newsgroups (using a web-based viewer) hosted by Microsoft,where you can ask questions and have them answered by MicrosoftMVPs, authors, and other experts.
These options are only one part of the documentation in Visual Studio.IntelliSense shows information from the user documentation when you rest themouse cursor over a piece of code. The Properties window shows the docu-mentation for a property when it is selected. And don’t overlook the onlinetools that Microsoft provides. You can open the Help menu and select Tech-nical Support to access a wealth of information available on the Web, rightfrom inside Visual Studio.
Figure 1-11
The Document Explorer toolbar.
JWQD024_c01_001-049.qxd 1/29/07 4:38 PM Page 20

1.3 CREATING SOLUTIONS AND PROJECTS 21
1.3 Creating Solutions and Projects
When you create an application, you create multiple files. Some of these filescontain source code (the human-readable instructions the program will execute)and are compiled as part of your application. You might also create graphics files,documentation files, and data files. Visual Studio allows you to organize all thefiles associated with an application into a project.
A single project is suitable for a simple application, but a more complexapplication might include multiple projects. A solution allows you to organizethe files for one or more projects.
1.3.1 Creating a Windows Application Project
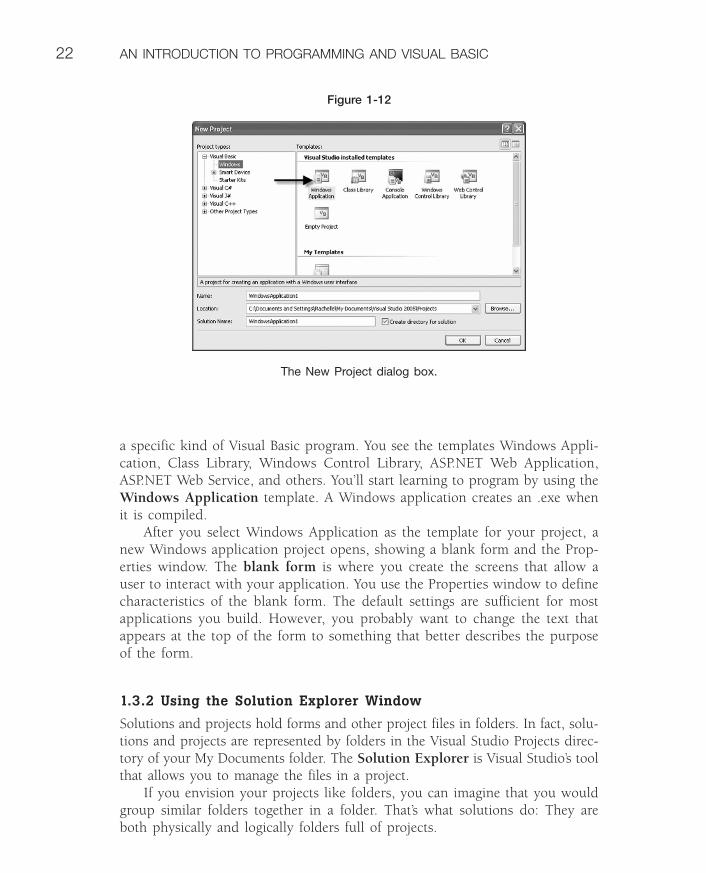
All applications are created as a project. It is fairly easy to create a new pro-ject, as you’ll learn shortly. You use the New Project dialog box (shown inFigure 1-12), in which you select a project type and template. Visual Studioenables you to create projects in Visual Basic and other programming lan-guages, as well. Here, you select Visual Basic as the project type.
In the New Project dialog box, several templates are displayed in theTemplates window. A template contains the basic ingredients needed to create
FOR EXAMPLE
Getting HelpSay you are creating an application and want to use a control you have neverused before. You drag the control onto your form and select it, and thenyou press F1. Visual Studio automatically goes out to the Internet to locatethe documentation for that control. Later, you decide you want to knowhow other developers have used the control, so you click Ask a Questionto go out to the NNTP Newsgroups.
• What must you do before you install Visual Studio?
• How can you easily obtain information about how to use an object?
• Why would you use the Index button to locate product documen-
tation?
S E L F - C H E C K
JWQD024_c01_001-049.qxd 1/25/07 11:14 PM Page 21 epg Macintosh HD:Users:epg:Desktop:untitled folder:
22 AN INTRODUCTION TO PROGRAMMING AND VISUAL BASIC
a specific kind of Visual Basic program. You see the templates Windows Appli-cation, Class Library, Windows Control Library, ASP.NET Web Application,ASP.NET Web Service, and others. You’ll start learning to program by using theWindows Application template. A Windows application creates an .exe whenit is compiled.
After you select Windows Application as the template for your project, anew Windows application project opens, showing a blank form and the Prop-erties window. The blank form is where you create the screens that allow auser to interact with your application. You use the Properties window to definecharacteristics of the blank form. The default settings are sufficient for mostapplications you build. However, you probably want to change the text thatappears at the top of the form to something that better describes the purposeof the form.
1.3.2 Using the Solution Explorer Window
Solutions and projects hold forms and other project files in folders. In fact, solu-tions and projects are represented by folders in the Visual Studio Projects direc-tory of your My Documents folder. The Solution Explorer is Visual Studio’s toolthat allows you to manage the files in a project.
If you envision your projects like folders, you can imagine that you wouldgroup similar folders together in a folder. That’s what solutions do: They areboth physically and logically folders full of projects.
Figure 1-12
The New Project dialog box.
JWQD024_c01_001-049.qxd 1/25/07 11:14 PM Page 22 epg Macintosh HD:Users:epg:Desktop:untitled folder:

1.3 CREATING SOLUTIONS AND PROJECTS 23
Figure 1-13 shows the important files in a project, along with a whole bunchof buttons above to help to manage them.
To open a file, you double-click the file’s icon or name. To rename, copy, ordelete a file, you right-click the file and choose the desired action from the con-text-sensitive menu that appears. In the Solution Explorer, you can also make anew folder and move files into it. And you can right-click a project to add anew form or support file.
The buttons above the files themselves are the most significant part of the Solution Explorer. They are, from left to right:
▲ Properties: Opens the Properties window.▲ Show All Files: Shows hidden files.
▲ Refresh: Checks the solution folder for new files that may have beenadded by another tool.
Figure 1-13
The Solution Explorer.
JWQD024_c01_001-049.qxd 1/25/07 11:14 PM Page 23 epg Macintosh HD:Users:epg:Desktop:untitled folder:

FOR EXAMPLE
Configuring Your EnvironmentSay you are creating an application and want to cause the Properties windowto float above other windows so you can move it to a convenient place. Youclick its title bar and drag it away from its docked position. Later, you decidethat you want it above the Solution Explorer window, so you move it overthe Solution Explorer window and highlight the arrow that points up.
24 AN INTRODUCTION TO PROGRAMMING AND VISUAL BASIC
▲ View Code: Opens the selected file in Code view. You use Code view towrite source code.
▲ View Designer: Opens the selected file in Design view. You use Designview to design what your application looks like.
▲ View Class Diagram: Opens the Class Designer for the project. TheClass Designer allows you to view how the classes in the project arerelated. You’ll learn about classes later in the book. For now, just thinkof them as being definitions for objects in a project.
1.3.3 Customizing the Visual Studio Environment
You can customize the Visual Studio environment to make it easier to work in.All the tools, windows, and views are part of an Integrated Development Envi-ronment (IDE) that each user can customize. This makes organization of yourpersonal development space a lot easier.
Most often, you will want to move around a tool window to put it in a moreconvenient spot. You can display a tool window in the following ways:
▲ Floating: A floating window is very mobile. You can drag it around byits handles to place it anywhere you want.
▲ Dockable: When you drag a dockable window, Visual Studio gives youthe option to dock the window. When you dock a window, you anchorit to an edge so that it always stays in that location. There are severaloptions for docking a window. If you drag the window over the top,bottom, left, or right arrow, it docks to that side. When a window isdocked, it has a thumbtack that you can pin or unpin. When pinned, itstays on the side, moving the Design view over. When unpinned, itslides out of the way, toward the side it is pinned to.
▲ Tabbed: You can drag a window to the center and have it become a tabat the top of the view window, like the Form1.vb and Form2.vb files inFigure 1-14. If you drag the window to the center of the four-pointedstar, it makes the window a tab in the other central windows.
JWQD024_c01_001-049.qxd 1/25/07 11:14 PM Page 24 epg Macintosh HD:Users:epg:Desktop:untitled folder:

1.4 UNDERSTANDING FORMS 25
Figure 1-14
Moving windows.
1.4 Understanding Forms
When you create a Windows application project, Visual Studio adds a defaultform to the project. You use a form to create the program’s user interface. Eachform in an application acts as a window or a dialog box.
In the following sections, you’ll learn how to set properties on the defaultform. You’ll also learn how to create additional forms in a project.
• Describe how a solution and a project are related.
• Describe a case in which you would create a folder inside a project.
• Compare and contrast the three ways to display windows in Visual
Studio.
S E L F - C H E C K
JWQD024_c01_001-049.qxd 1/25/07 11:14 PM Page 25 epg Macintosh HD:Users:epg:Desktop:untitled folder:

26 AN INTRODUCTION TO PROGRAMMING AND VISUAL BASIC
1.4.1 Defining a Form
A form is a member of the System.Windows.Forms.Form class. System.Windows.Forms is a namespace. The .Net Framework uses namespaces to orga-nize and group classes that are related. A form has all the properties, methods,and events defined by the Form class. For instance, the Form class has a Showmethod that allows you to display the form. Each object based on the Form classin a project has a name. You use that name when accessing the form in code.
1.4.2 Working with Forms in Design View
When you open a Windows application project, you see the Design view. TheDesign view is where the GUI work takes place. Generally speaking, anytimeyou are working with what the form looks like, not code, you are working withthe Design view. The term designer window refers to the actual place you dothe work. The term Design view refers to the state of the file.
In general, Design view is the core part of Visual Studio. Many of the othertools in Visual Studio depend on the Design view, in fact, and are disabled whenyou use another view, such as Code view, to work on a project.
The designer tabs have the word [Design] in the tab name, as shown inFigure 1-15, to indicate that you are using the Design view. Tabs are used in
Figure 1-15
A form in Design view.
JWQD024_c01_001-049.qxd 1/25/07 11:14 PM Page 26 epg Macintosh HD:Users:epg:Desktop:untitled folder:
1.4 UNDERSTANDING FORMS 27
the Design and Code views. A light gray tab represents views of files that areopen but not active. An asterisk (*) next to the filename means that you’vemade changes but not yet saved the file.
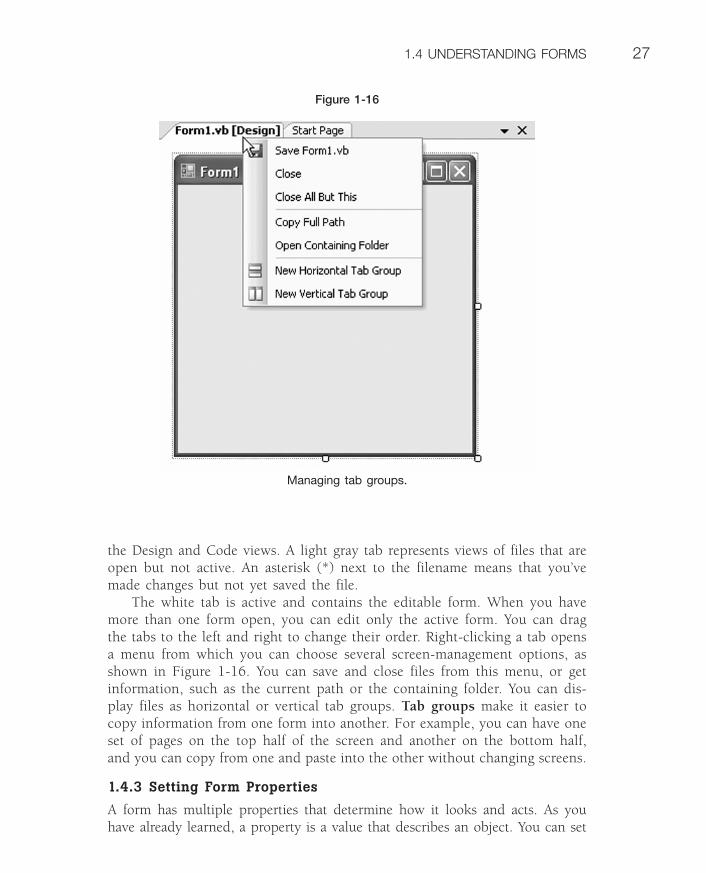
The white tab is active and contains the editable form. When you havemore than one form open, you can edit only the active form. You can dragthe tabs to the left and right to change their order. Right-clicking a tab opensa menu from which you can choose several screen-management options, asshown in Figure 1-16. You can save and close files from this menu, or getinformation, such as the current path or the containing folder. You can dis-play files as horizontal or vertical tab groups. Tab groups make it easier tocopy information from one form into another. For example, you can have oneset of pages on the top half of the screen and another on the bottom half,and you can copy from one and paste into the other without changing screens.
1.4.3 Setting Form Properties
A form has multiple properties that determine how it looks and acts. As youhave already learned, a property is a value that describes an object. You can set
Figure 1-16
Managing tab groups.
JWQD024_c01_001-049.qxd 1/25/07 11:14 PM Page 27 epg Macintosh HD:Users:epg:Desktop:untitled folder:

28 AN INTRODUCTION TO PROGRAMMING AND VISUAL BASIC
properties at design time or at runtime. Setting a property at design time meanssetting it when you are creating the application. Setting a property at runtime(runtime refers to the state an application is in when it is executing) means set-ting it by writing code.
You set a property at design time by using the Properties window. The Prop-erties window, shown in Figure 1-17, is usually on the right side of the screen.It contains all the editable values associated with a form. If the Properties win-dow isn’t on the right side of the screen, you can find it by opening the Viewmenu and choosing Properties, or you can press F4.
At the top of the Properties window, you see the form element whose prop-erties are listed. The Properties window has a toolbar. For now, just notice thatthe leftmost button causes the properties to be listed by type. The second but-ton causes the properties to be listed in alphabetical order. A description of theselected property is shown beneath the list of properties.
You set a property at runtime by using code like this:
form_name.propertyname = propertyvalue
Figure 1-17
The Properties window.
JWQD024_c01_001-049.qxd 1/25/07 11:14 PM Page 28 epg Macintosh HD:Users:epg:Desktop:untitled folder:

1.4 UNDERSTANDING FORMS 29
For example, to set the Text property of Form1 to “My First Program,” you usethe following code:
Form1.Text = "My First Program"
The Text property sets the text that displays in the form’s title bar. Notice that“My First Program” is enclosed in quotation marks. That’s because it is a stringliteral value. String is a programming term for textual data. A literal is a valuethat you type directly into code.
A form has a large number of properties. You’ll have a chance to use manyof them as you work your way through this book. For now, let’s just look at afew of the important ones:
▲ (Name): Specifies the name you will use to reference an object in code.The (Name) property is really not a property at all. You can change(Name) in the Properties window, but you cannot change it in code.
▲ BackColor: Sets the background color of the form.▲ ControlBox: Is set to True or False to determine whether the icon to the
left of the form’s title should be displayed. ControlBox shows aWindows-controlled menu when it is clicked.
▲ FormBorderStyle: Determines whether the form is resizable, a dialog, ora toolbox window.
▲ HelpButton: Determines whether a Help button appears on the title bar.▲ MaximizeBox: Determines whether the Maximize button appears on the
title bar.▲ MaximumSize: Determines the maximum size for the window.▲ MinimizeBox: Determines whether the Minimize button appears on the
title bar.▲ MiminumSize: Determines the minimum size for the window.▲ ShowInTaskbar: Determines whether the window should be listed in the
Windows taskbar.▲ Size: Determines the starting size of the window. Sets the height and width.▲ StartPosition: Determines where the form is displayed when it is first shown.
1.4.4 Adding a Form to a Project
Most Windows applications you build require multiple forms. For example, you mighthave an application that has a main form but that allows users to configure the appli-cation by using a Properties dialog. The Properties dialog would be a separate form.
To add a form to a project, you right-click the project name in SolutionExplorer, open the Add menu, and choose Windows Form. Visual Studio has anumber of templates for standard forms, as shown in Figure 1-18. You canchoose one of them or you can choose Windows Form to add a blank form. Yougive the form a name and click Add.
JWQD024_c01_001-049.qxd 1/25/07 11:14 PM Page 29 epg Macintosh HD:Users:epg:Desktop:untitled folder:

30 AN INTRODUCTION TO PROGRAMMING AND VISUAL BASIC
If your project has multiple forms, you need to designate one as the startupform. The startup form is the one that displays when the application firstlaunches. To designate a startup form, you right-click the project in SolutionExplorer and choose Properties. On the Application tab, you select the appro-priate form from the Startup Form drop-down list, as shown in Figure 1-19.
Figure 1-18
The Add New Item dialog box.
Figure 1-19
Setting the startup form.
JWQD024_c01_001-049.qxd 1/25/07 11:14 PM Page 30 epg Macintosh HD:Users:epg:Desktop:untitled folder:

1.5 USING CONTROLS 31
FOR EXAMPLE
Using Multiple FormsSay that you are writing an application that allows a user to perform varioustypes of measurement conversion. The main form has four buttons: Distance,Temperature, Volume, and Weight. Each button displays a form that performsthe relevant conversions. You configure the main form as the startup form.
You set the Text property and the (Name) property for each form asshown in Table 1-1.
Table 1-1: Form Property Settings
Form Text (Name)
Main form Measurement Converter frmMain
Distance calculations form Distance Calculator frmDistance
Temperature calculations form Temperature Calculator frmTemp
Volume calculations form Volume Calculator frmVolume
Weight calculations form Weight Calculator frmWeight
The forms do not require minimize or maximize buttons. Therefore, youset the MinimizeBox and MaximizeBox properties to False.
To show the Distance Calculator form, you use the following code:
frmDistance.Show
• List some reasons you might need multiple forms in a project.
• To enable users to minimize, maximize, and resize a window, what
properties should you set?
• Describe a situation in which you would set the Text property of a
form at runtime instead of at design time.
S E L F - C H E C K
1.5 Using Controls
Controls are special objects that allow you to add functionality to a form. Likeforms (and pretty much everything else in Visual Basic), they are defined byclasses. This means they have properties, methods, and events.
JWQD024_c01_001-049.qxd 1/25/07 11:14 PM Page 31 epg Macintosh HD:Users:epg:Desktop:untitled folder:

32 AN INTRODUCTION TO PROGRAMMING AND VISUAL BASIC
In the following sections, you’ll learn how to add controls to a form. Althougha large number of controls are available, the following sections focus on threesimple but commonly used controls: the Label, Textbox, and Button controls.
1.5.1 Using the Toolbox to Add Controls
On the left side of the project window is a tab called the toolbox that expandsinto a list of tools when you hover the mouse over it. You use these tools totransform a blank form into an interactive screen for an application. The toolsare organized into groups. You select the name of the group to see a list of toolsin that group. You are likely to use the Common Controls tool group (see Figure1-20) more than the other groups because it contains buttons, check boxes, andother controls that are frequently used in applications.
You can keep the toolbox open by first opening it with the mouse and thenclicking the pushpin icon at the top of the toolbox. You can then drag and droptools onto your form without having to open and close the toolbox each time.You click the pushpin icon again to return the toolbox to its tab position.
When you want to use a control on a form, you drag that control from thetoolbox and drop it onto the form. You can adjust the control on the form byfirst selecting the control. Sizing handles appear around the control. You canthen do any of the following:
Figure 1-20
The Common Controls tool group.
JWQD024_c01_001-049.qxd 1/25/07 11:14 PM Page 32 epg Macintosh HD:Users:epg:Desktop:untitled folder:

1.5 USING CONTROLS 33
▲ Change the size of the control by dragging the sizing handles.▲ Reposition the control on the blank form by dragging the center of the
control to the new location.▲ Remove a control by selecting it and pressing Delete.
You can adjust the size of a control on a form to fit your design by using the sizinghandles that appear when you select the control. Visual Basic changes the Heightand Width properties of the control to reflect the new size as you resize the control.
There are typically eight sizing handles around a control (see Figure 1-21).One sizing handle is in each corner of a control, and another is on each side ofthe control.
The right- and left-side sizing handles move the corresponding size out and into make the control wider or narrower. The top- and bottom-side sizing handlesmove the corresponding side up and down, making the control taller or shorter. Thecorner sizing handles resize the control in any direction. As a corner sizing handleis dragged on an angle, the sides of the control attached to that handle move up andout or down and in, depending on the direction that the sizing handle is dragged.
Professional developers usually keep the size of a type of control the samethroughout an application. For example, all Button controls are adjusted to thesize of the Button control that has the longest button text (i.e., the text thatappears on the button).
1.5.2 Setting Control Properties
Each control has a set of properties that define a characteristic or behavior ofthe control. The kinds of properties that are available depend on the type of con-trol. For example, the FontColor property of the Label control sets the color ofthe label. The list of properties appears in the Properties window when you select
Figure 1-21
Sizing handles.
JWQD024_c01_001-049.qxd 1/25/07 11:14 PM Page 33 epg Macintosh HD:Users:epg:Desktop:untitled folder:

34 AN INTRODUCTION TO PROGRAMMING AND VISUAL BASIC
the control. You can select a control from the drop-down list in the Propertieswindow, or you can select a control by clicking it on the form.
Like a form, each control you add to a form also has a name. You can setthe (Name) property for the control at design time through the Properties win-dow, but you cannot set it at runtime.
You can also set a control’s location on the form and the control’s size throughits properties. The control’s location on the form is set through the X and Y prop-erties. To access them in the Properties window, you expand Location. X and Y referto the coordinates of the control’s top-left corner in relation to the form’s top-leftcorner. You can adjust the size of a control by setting the Width and Height prop-erties, which are located in the Properties window under Size. You can also set themin code. However, to do so you use the Top property and the Left property:
lblName.Top = 40
lblName.Left = 10
This code sets the leftmost pixel of the control to 40 pixels from the edge of theform and the topmost pixel of the control to 10 pixels from the top of the form.
1.5.3 Adding a TextBox Control to a Form
A TextBox control enables a user to enter text into a field. Text can include let-ters, numbers, and other characters. You use a TextBox control anytime a userneeds to be able to type a value.
You should rename the TextBox control, using a name that reflects thecontent of the text box. For example, you might name a TextBox control txtCus-tomerFirstName if the text box will contain the first name of a customer. Nam-ing your TextBox controls in this way makes them more meaningful when yourefer to them in your code. Using a prefix that identifies the control as a TextBoxcontrol (e.g., txt) is also useful for helping you understand the code you havewritten. You can change the name of a TextBox control by selecting the control,right-clicking, and clicking Properties from the pop-up menu. Then you type thenew name in the (Name) property.
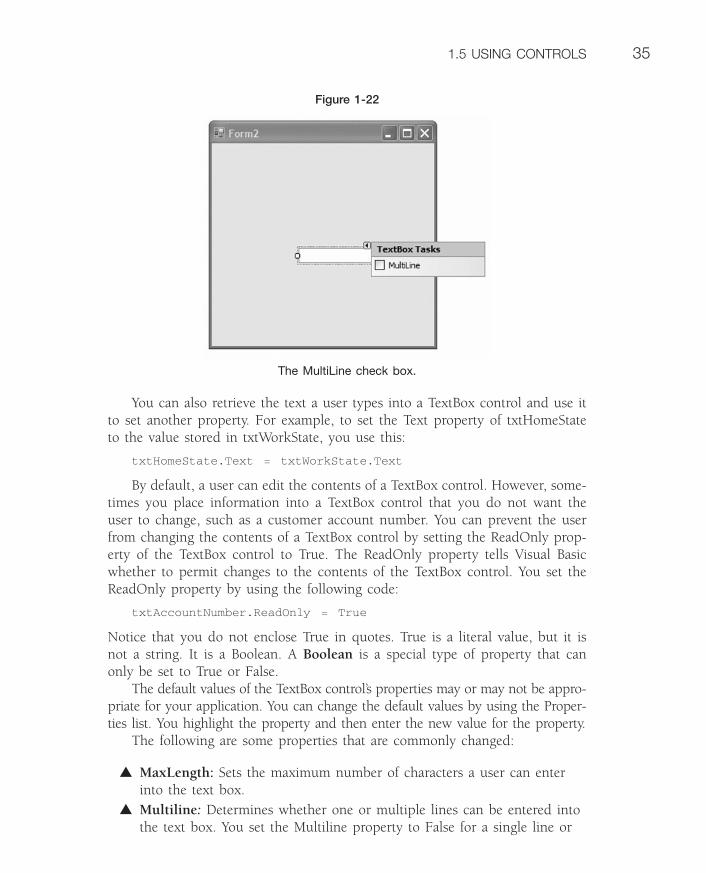
By default, the TextBox control accepts one line of text from the user andhas only the two horizontal sizing handles. However, you can have the user entermultiple lines into a TextBox control by selecting the right arrow located nearthe upper-right corner of the text box. The Tasks pop-up menu appears (seeFigure 1-22). You select the MultiLine check box to convert from a single-linetext box to a multiline text box. After you make this selection, the eight sizinghandles appear around the TextBox control. You can use them to resize theTextBox control to display multiple lines of text.
You access the text entered in a TextBox control by using the TextBox con-trol’s Text property. For example, to set the value of txtCustomerFirstName incode, you use this:
txtCustomerFirstName.Text = "John"
JWQD024_c01_001-049.qxd 1/25/07 11:14 PM Page 34 epg Macintosh HD:Users:epg:Desktop:untitled folder:
1.5 USING CONTROLS 35
You can also retrieve the text a user types into a TextBox control and use itto set another property. For example, to set the Text property of txtHomeStateto the value stored in txtWorkState, you use this:
txtHomeState.Text = txtWorkState.Text
By default, a user can edit the contents of a TextBox control. However, some-times you place information into a TextBox control that you do not want theuser to change, such as a customer account number. You can prevent the userfrom changing the contents of a TextBox control by setting the ReadOnly prop-erty of the TextBox control to True. The ReadOnly property tells Visual Basicwhether to permit changes to the contents of the TextBox control. You set theReadOnly property by using the following code:
txtAccountNumber.ReadOnly = True
Notice that you do not enclose True in quotes. True is a literal value, but it isnot a string. It is a Boolean. A Boolean is a special type of property that canonly be set to True or False.
The default values of the TextBox control’s properties may or may not be appro-priate for your application. You can change the default values by using the Proper-ties list. You highlight the property and then enter the new value for the property.
The following are some properties that are commonly changed:
▲ MaxLength: Sets the maximum number of characters a user can enterinto the text box.
▲ Multiline: Determines whether one or multiple lines can be entered intothe text box. You set the Multiline property to False for a single line or
Figure 1-22
The MultiLine check box.
JWQD024_c01_001-049.qxd 1/25/07 11:14 PM Page 35 epg Macintosh HD:Users:epg:Desktop:untitled folder:

36 AN INTRODUCTION TO PROGRAMMING AND VISUAL BASIC
True for multiple lines. If you are allowing multiple lines, you might alsowant to enable either horizontal or vertical scrollbars.
▲ ScrollBars: Determines whether horizontal scrollbars, vertical scrollbars,both, or neither are added to the text box.
▲ Font: Designates a font for text entered into the text box; you canchoose from a list of available fonts.
▲ ForeColor and BackColor: Sets the foreground and background colorsfor the text box, respectively; you can choose a color from a palette ofavailable colors.
▲ TextAlign: Aligns text within the text box; options are Left, Center, and Right.
1.5.4 Adding a Label Control to a Form
A Label control is used to display text on a form that identifies controls, pro-vides instructions for using the application, and generally communicates to theuser. For example, a label is typically used to identify a TextBox control; forexample, the text “Customer First Name:” could be a Label control placed to theleft or at the top of a TextBox control on a form.
You can modify the appearance of a Label control by changing its proper-ties in the Properties window. You can use the Text property to change the textof a Label control and the ForeColor and BackColor properties to change theforeground and background colors of a Label control, respectively. You use theFont property to change the font of the Label control’s text.
By default, a Label control’s AutoSize property is set to True. This means thatthe control is automatically resized horizontally as you enter text. You can move thecontrol, but you cannot change its size. When the AutoSize property is set to True,all text is displayed on a single line. If you want to wrap text or manage the size ofthe Label control yourself, you set the AutoSize property to False.
1.5.5 Adding a Button Control to a Form
A Button control simulates a push button on a form and is used to start, con-firm, or cancel an operation. For example, you can use an OK button on a dia-log box. The user confirms an action by clicking OK.
You should rename the Button control to reflect the action of the button(e.g., btnOK, btnCancel). You rename a Button control by setting its (Name)property.
You can modify the appearance of the label on a Button control by chang-ing other Button control properties. You change the text of the label on a But-ton control by using the Button control’s Text property. You change the font ofthe label by choosing a new value for the Font property. You click the Font prop-erty to display a list of other available fonts. You can reposition a label on aButton control by using the TextAlign property. You can click the TextAlign
JWQD024_c01_001-049.qxd 1/25/07 11:14 PM Page 36 epg Macintosh HD:Users:epg:Desktop:untitled folder:

1.5 USING CONTROLS 37
property to see a diagram that illustrates where you can position the text. Thechoices are top, middle, or bottom and left, center, or right. You specify valuesby using the ContentAlignment enumeration. An enumeration is a set ofdescriptive words mapped to numeric values. For example, to have the textaligned bottom center, you use this code:
btnSetLabel.TextAlign = ContentAlignment.BottomCenter
You can prevent a Button control from being accidentally pushed by settingthe Enabled property of the Button control to False. There are two ways to setthe Enabled property: You can either open the Properties window and change theEnabled property to False or, from you can use the following code:
btnOK.Enabled = False
In this case, btnOK is the Button control name, and Enabled is the name of theproperty. You enable the Button control by changing the Enabled property toTrue or by adding the following code:
btnOK.Enabled = True
FOR EXAMPLE
Designing a Temperature Conversion FormSay that you are writing an application that allows a user to perform vari-ous types of measurement conversion. The main form has four buttons: Dis-tance, Temperature, Volume, and Weight. Each button displays a form thatperforms the relevant conversions. You are designing the temperature con-version form. One way to design it would be to add one TextBox controlnamed txtTemp, one Label control named lblConvertedTemp, and two But-ton controls: btnConvertToCelsius and btnConvertToFahrenheit.
• Identify the properties you would use to reposition a control in code.
• Compare and contrast the Label control and the TextBox control.
Give examples of when you would use each.
• List some uses of the Button control.
• Describe the steps you would take to change the text of a Label
control in code.
S E L F - C H E C K
JWQD024_c01_001-049.qxd 1/25/07 11:14 PM Page 37 epg Macintosh HD:Users:epg:Desktop:untitled folder:

38 AN INTRODUCTION TO PROGRAMMING AND VISUAL BASIC
1.6 Writing an Event-Driven Program
A Visual Basic application is an event-driven application. As you have learned, anevent is something that happens when an application runs, such as the clickingof a button. You can write code to respond to an event that is important to anapplication and ignore other events because Visual Basic has a default responsefor every event.
For example, you can write code that executes when the user clicks a but-ton because that event is important to the application. You do not have to writecode that executes when a form is loaded unless you want something special tohappen when that event occurs.
1.6.1 Understanding Form Events
A form event is an event that occurs when something happens to a form. Thedefault form event is the Load event, which occurs when a form is loaded intomemory. An event is associated with a special type of subprocedure known asan event procedure or event handler. The syntax (i.e., the general grammarfor using a subprocedure, function, or method) for a form’s Load event proce-dure looks like this:
Private Sub frmMain_Load _
(ByVal sender As System.Object, ByVal e As _
System.EventArgs) Handles MyBase.Load
'Enter your code here
End Sub
In this case, the event belongs to a form named frmMain. Notice that the eventis named with the name of the form, an underscore, and then the name of theevent. A space and then an underscore character are used to wrap the text tothe next line. Visual Basic sees each line as a separate line of code unless anunderscore is used. In this case, we have to wrap to the next line so that thecode can fit on the page of the book. In the development environment, thereis no wrap.
Next, you see two arguments in parentheses. You shouldn’t worry too muchabout them for now. An argument is used to pass data to a procedure. In thiscase, the operating system is passing data to the frmMain_Load event procedure.You’ll learn more about arguments later in the book.
You know that this is an event procedure because of the Handles keyword.The Handles keyword identifies the event the procedure will handle. In thiscase, it will handle the Form class’s Load event. MyBase is a special word thatrefers to an object’s base class (i.e., the class on which the object is based). Thebase class for frmMain is System.Windows.Forms.Form.
The following line of code has been added:
'Enter your code here
JWQD024_c01_001-049.qxd 1/25/07 11:14 PM Page 38 epg Macintosh HD:Users:epg:Desktop:untitled folder:

1.6 WRITING AN EVENT-DRIVEN PROGRAM 39
This line is not really code; it is a comment. A comment is a line of code thatis not compiled and executed. Instead, you use it to document your code. InVisual Basic, you add a comment to your code by preceding the line with anapostrophe. A quick way to comment lines of code is to select them and clickthe Comment Out button on the toolbar (see Figure 1-23). The Uncommentbutton removes the comment apostrophes.
The event procedure terminates with End Sub. This tells the compiler thatthe subprocedure is over.
The following are some other form events you might use:
▲ Activated: Occurs when a form becomes the active form (i.e., is broughtinto the foreground).
▲ Shown: Occurs when a form displays.▲ Deactivated: Occurs when a different window becomes active.▲ FormClosing: Occurs before a form closes.▲ Move: Occurs when a user moves the window.
You add code to a form event if you want to do something in response to theevent. For example, you might want to display a dialog, asking a user to confirmwhether a form should close. To do so, you add code to the FormClosing event.
1.6.2 Using the Code Window
You place code that you want to execute in response to an event in the eventprocedure. When you double-click the form or a control, the event procedurefor the default event displays. If you have not added code to the default event,a new event procedure is created. You can avoid creating a new event procedureby clicking View Code. Visual Studio displays the code page without creating anew event procedure. The code window is shown in Figure 1-24.
If you add an event procedure for a control or a form and then change thatcontrol’s name, the name of the event procedure does not change automatically.You need to change the name in the event procedure manually.
The left drop-down box at the top of the window contains a list of objectson the form and the name of the form. If the object in the left box is a controlor a form’s events, the right drop-down box contains a list of events associated
Figure 1-23
The Comment and Uncomment buttons.
JWQD024_c01_001-049.qxd 1/25/07 11:14 PM Page 39 epg Macintosh HD:Users:epg:Desktop:untitled folder:

40 AN INTRODUCTION TO PROGRAMMING AND VISUAL BASIC
with the events in the left box. You can select an event from the list, and VisualBasic .NET displays the corresponding event procedure.
The problem with using Code view is that you need to know what to type.To help get started, you can use some very productive code-based tools, such asIntelliSense. When you type an object name and then a period, a special con-text-sensitive menu (the IntelliSense menu) appears, as shown in Figure 1-25.This menu shows the properties and methods the object supports.
1.6.3 Understanding Control Events
Most controls support events. One of those events is the default event, which is theevent procedure that is created when you double-click a control in Design view.The following are the default events for the controls we have discussed so far:
Figure 1-24
The code window.
Figure 1-25
Using IntelliSense.
JWQD024_c01_001-049.qxd 1/25/07 11:14 PM Page 40 epg Macintosh HD:Users:epg:Desktop:untitled folder:

1.6 WRITING AN EVENT-DRIVEN PROGRAM 41
▲ Button: The Click event occurs when the user clicks the left mouse button on the button.
▲ TextBox: The TextChanged event occurs each time the Text propertychanges.
▲ Label: The Click event occurs when the user clicks the left mouse but-ton on the label.
You add code to control events to cause something to happen when an eventoccurs. For example, to cause the Text property of the Label control to be setto the same value as the Text property in the Label control when a user clicksthe btnSetLabel Button control, you add the following code:
Private Sub btnSetLabel_Click _
(ByVal sender As System.Object, ByVal e As _
System.EventArgs) Handles btnSetLabel.Click
lblName.Text = txtName.Text
End Sub
Controls support other types of events as well. For example, the TextBoxcontrol supports a LostFocus event that occurs when the user moves focus awayfrom the control by pressing Tab or clicking somewhere else on the screen. Youmight want to use the LostFocus event to process the text entered instead ofusing the TextChanged event. The TextChanged event occurs each time a char-acter in the control is changed. It is important to understand the circumstancesunder which an event fires to make sure it is the best event to execute a spe-cific piece of code.
1.6.4 Testing Your Code
You can run an application inside the IDE to test it. This is known as debug-ging. To start the application, you either open the Debug menu and choose StartDebugging, click the Start Debugging icon on the toolbar (refer to Figure 1-16),or press F5. Your application starts, and you can test each feature where youhave added code to make sure it works the way it should.
When you have finished testing, you can return to the design environmentby doing one of the following:
▲ Close the application.
▲ Open the Debug menu and choose Stop Debugging.
▲ Press Ctrl�Alt�Break.
▲ Click the Stop Debugging button on the toolbar.
JWQD024_c01_001-049.qxd 1/29/07 4:38 PM Page 41
42 AN INTRODUCTION TO PROGRAMMING AND VISUAL BASIC
SUMMARY
In this chapter, you have learned the fundamental concepts and procedures nec-essary to begin programming in Visual Basic. You have learned about funda-mental programming concepts, including event-driven programming and object-oriented programming. You have also learned the steps you must take to createa program. You have learned that Visual Studio is an IDE that provides you withthe tools you need to write code and compile a Visual Basic application. Youhave also learned that Visual Studio uses projects to organize the files neededfor an application and solutions to group multiple related projects. You have alsolearned that forms are used to provide the user interface for a Windows appli-cation and that a form is actually an object of the System.Windows.Forms.Form
FOR EXAMPLE
Coding the Temperature Conversion FormSay you are writing an application that allows a user to perform varioustypes of measurement conversion. The main form has four buttons: Dis-tance, Temperature, Volume, and Weight. Each button displays a formthat performs the relevant conversions. On the Temperature Conversionform, you add one TextBox control named txtTemp, one Label controlnamed lblConvertedTemp, and two Button controls: btnConvertToCel-sius and btnConvertToFahrenheit. You add code to the Click event ofeach button to retrieve data from TextBox. Text, perform the necessarycalculation, and set the Text property of lblConvertedTemp to the con-verted value.
• List the steps you would take to view the code for the Click event
for btnStart.
• List the steps you would take to add code to an event procedure
that is not a control’s default event procedure.
• Describe how IntelliSense can help you program faster and more
accurately.
• Identify each part of the event procedure syntax.
• List the steps you would take to test the txtAddress_TextChanged
event procedure.
S E L F - C H E C K
JWQD024_c01_001-049.qxd 1/25/07 11:14 PM Page 42 epg Macintosh HD:Users:epg:Desktop:untitled folder:

KEY TERMS 43
class. You have learned how to add TextBox, Label, and Button controls to aform and set control properties to create a user interface. You have also learnedthat Windows programs are based on events, and you have learned how to writea simple event procedure.
KEY TERMS
Action object
Algorithm
Argument
Base class
Binary number system
Blank form
Boolean
Bug
Button control
Bytecode
Class
Class Designer
Code
Code view
Common Language Runtime (CLR)
Comment
Compiler
Control
Control structure
Debugging
Decision control structure
Design view
Designer window
Dialog box
Document Explorer
Dock
Encapsulation
Enumeration
Event
Event-driven programming
Event handler
Event procedure
Form
Form event
Handles keyword
High-level language
Inheritance
Input/Processing/Output (IPO) Table
Instance
Integrated Development Environment (IDE)
IntelliSense
Interactive development
IPO table
JIT compiler
Label control
Literal
Machine language
Method
Microsoft Intermediate Language
MSIL
MyBase
Namespace
.NET Framework
Object
Object-oriented language
Pinned
Polymorphism
JWQD024_c01_001-049.qxd 1/25/07 11:14 PM Page 43 epg Macintosh HD:Users:epg:Desktop:untitled folder:

44 AN INTRODUCTION TO PROGRAMMING AND VISUAL BASIC
Procedural programming
Procedure
Programming language
Project
Property
Pseudocode
Repetition control structure
Runtime
Sequence control structure
Service pack
Solution
Solution Explorer
Source code
Startup form
String
Syntax
Tab group
Template
TextBox control
Toolbox
Variable
Visual Basic
Visual Studio
Window
Windows Application
JWQD024_c01_001-049.qxd 1/25/07 11:14 PM Page 44 epg Macintosh HD:Users:epg:Desktop:untitled folder:

SUMMARY QUESTIONS 45
ASSESS YOUR UNDERSTANDING
Go to www.wiley.com/college/petroutsos to evaluate your knowledge of the basicsof programming and Visual Basic.Measure your learning by comparing pre-test and post-test results.
Summary Questions
1. Source code must be compiled before it can execute. True or False?2. A computer performs all processing through arithmetic. True or False?3. Which of the following is not a control structure?
(a) decision control structure(b) input control structure(c) repetition control structure(d) sequence control structure
4. Each bit of data in a computer is represented by a number in the base-10system. True or False?
5. Procedural programming is used for Windows applications that have aGUI. True or False?
6. A/an ______________ is an object loaded in memory.(a) class(b) procedure(c) instance(d) variable
7. When programming with Visual Basic, you must wait to test your appli-cation until every object has been coded. True or False?
8. Which of the following do you identify during the problem identificationstep?(a) action objects(b) controls you will add to the form(c) calculations you will perform
9. Creating an interface is the first step in the programming process. Trueor False?
10. When discussing program design, what does the acronym IPO stand for?(a) Internet public objects(b) input/processing/output(c) international programming organization(d) initial process organization
JWQD024_c01_001-049.qxd 1/26/07 1:59 AM Page 45 epg Macintosh HD:Users:epg:Desktop:Subhash_25/01:

46 AN INTRODUCTION TO PROGRAMMING AND VISUAL BASIC
11. If you have designed a good-looking interface, testing the code is notimportant. True or False?
12. At which stage of a project do you determine whether the resultsobtained meet the objectives outlined in the problem definition step?
(a) documentation
(b) coding
(c) testing the overall project
(d) designing the interface
13. If a program has enough comments, they are the only documentationrequired. True or False?
14. Which of the following provides a program written in Visual Studio 2005with access to operating system features and libraries for performing vari-ous functions?
(a) IntelliSense
(b) the CLR
(c) the .NET Framework
15. Which of the following operating system configurations will run VisualStudio 2005?
(a) Windows XP with SP1
(b) Windows Server 2003 with no service pack
(c) Windows 2000 Professional with SP4
16. You have added a control to a form. How can you easily get help onhow to use the control?
(a) Select the control and press F1.
(b) Right-click the control and choose Help.
(c) Right-click the control and choose View Code.
(d) Select the control and press F2.
17. A Windows application project creates a dynamic link library (DLL)when compiled. True or False?
18. The Solution Explorer window lists all the files in a project. True or False?
19. A docked window in Visual Studio can be pinned or unpinned. Trueor False?
20. Which namespace contains the Form object used in a Windowsapplication?
(a) System.Windows.Forms
(b) System.Forms
(c) Windows.Application.Forms
(d) Application.Forms
JWQD024_c01_001-049.qxd 1/25/07 11:14 PM Page 46 epg Macintosh HD:Users:epg:Desktop:untitled folder:

SUMMARY QUESTIONS 47
21. An asterisk (*) next to a filename in a tab means that you have notmade changes since you changed the file. True or False?
22. Which form property cannot be changed in code?
(a) Height
(b) BackColor
(c) (Name)
(d) ShowInTaskbar
23. A project can have only a single startup form. True or False?
24. Which sizing handle would you use to make a control both taller andwider?
(a) a corner handle
(b) the right handle
(c) the left handle
(d) the bottom handle
25. Which pair of properties do you use to set a control’s location on aform?
(a) Top, Left
(b) Bottom, Right
(c) X, Y
(d) PositionX, PositionY
26. By default, a TextBox control allows a user to enter multiple lines of text.True or False?
27. A Label control can wrap text only if the AutoSize property is set toTrue. True or False?
28. Which Button control property setting prevents a button from acciden-tally being pushed?
(a) Activated � False
(b) Enabled � False
(c) Deactivated � True
(d) Disabled � True
29. Which event is the default event for a form?
(a) FormClosing
(b) Activated
(c) Load
(d) Move
30. In Code view, you must select an object in the left-hand drop-down listbefore you can select an event. True or False?
JWQD024_c01_001-049.qxd 1/25/07 11:14 PM Page 47 epg Macintosh HD:Users:epg:Desktop:untitled folder:

48 AN INTRODUCTION TO PROGRAMMING AND VISUAL BASIC
31. What is the default event of the Label control?(a) Click(b) LostFocus(c) TextChanged(d) Change
32. Which key do you press to cause an application to start up?(a) F1(b) F3(c) F5(d) F7
Applying This Chapter
1. You are planning to install Visual Studio. Your computer has the follow-ing configuration: 800MHz processor, 512MB RAM, 20GB hard disk with1GB free disk space, and Windows 2000 Professional with SP3. Can youinstall Visual Studio? If not, what changes must you make?
2. You are building an application that will include several image files. Youwant to make the image files easy to find. What should you do?
3. What is wrong with the following code?
frmConfiguration.Text = Configuration Settings
4. You add a TextBox control to a form. You cannot increase its height.Why not?
5. You add the following code to a form:
Private Sub txtName_TextChanged _
(ByVal sender As System.Object, ByVal e As _
System.EventArgs) Handles txtName.TextChanged
txtName.ReadOnly = True
End Sub
You press F5 to run the application and type in the txtName field. Youcan enter only a single character. Why?
JWQD024_c01_001-049.qxd 1/25/07 11:14 PM Page 48 epg Macintosh HD:Users:epg:Desktop:untitled folder:

49
YOU TRY IT
Installing Visual Studio
You plan to install Visual Studio to support application
development using Visual Basic 2005. You do not plan
to develop any applications using Visual C# or Visual
C��. You have not yet decided whether you are going
to build Windows applications or web applications.
1. Discuss the benefits and drawbacks of installing
the Visual C# language component.
2. Discuss the benefits and drawbacks of installing
web development components.
3. What can you do if you do not install the web de-
velopment components and later decide to build
a web-based application?
Configuring a ProjectYou are creating an order entry application for a cus-
tomer. The customer has provided you with a require-
ments document and the Excel spreadsheet that is
currently used to enter orders.
1. Discuss the benefits of adding these files to your
project.
2. How would you ensure that these files were easy
to identify?
Creating FormsYou are creating an order entry application for a cus-
tomer. The application must allow users to view
customer details and inventory details as well as enter
orders. The application must also allow users to enter
configuration settings. It should also display an About
dialog box.
1. Identify the forms you need to add to the project.
2. Which form should you designate as the startup
form?
Designing a FormYou are creating a form that will be used in a customer
service application. The form will be used to enter
details about a service call. The form will retrieve infor-
mation from a database that stores customer informa-
tion, based on a customer’s name. The customer’s
name must not be modified after the data is retrieved.
However, any other information can. The form must
show the customer’s name, phone number, and
address. It must allow a user to enter a description of
the problem and the resolution. The user must be able
to submit the data to a database and print the data.
1. Sketch the form. Identify which types of con-
trols you should use for each element.
2. Will any of the controls be multiline?
3. Will any of the controls be ReadOnly at design
time?
Programming EventsYou are creating a form that will be used in a cus-
tomer service application. The form will be used to
enter details about a service call. The form will retrieve
information from a database that stores customer
information, based on a customer’s name. The cus-
tomer’s name must not be modified after the data is
retrieved. However, any other information can. The
form must show the customer’s name, phone number,
and address. It must allow a user to enter a descrip-
tion of the problem and the resolution. The phone
number field can contain only numeric characters. The
user must be able to submit the data to a database
and print the data. The user must be prompted when
to save data when the form is closed.
1. Identify the events procedures you need to
create to provide the needed functionality.
JWQD024_c01_001-049.qxd 1/29/07 4:38 PM Page 49