Embed Size (px)
Citation preview
8/9/2019 An Introduction to Multimedia Fusion Full Version
http://slidepdf.com/reader/full/an-introduction-to-multimedia-fusion-full-version 1/145
An Introduction toMultimedia Fusion 2
Lessons to Create 2D Games
Karen Hult, Multimedia Technology TeacherTerry Byfield, Curriculum Resource Specialist
8/9/2019 An Introduction to Multimedia Fusion Full Version
http://slidepdf.com/reader/full/an-introduction-to-multimedia-fusion-full-version 2/145
Table of Contents
An Introduction to Multimedia Fusion 2.....................................................................1
Playing Games in Multimedia Fusion 2.....................................................................2
Chapter One: Getting Started with a Space Shooter Game................................3
Chapter Two: Star Fighter Game ......................................................................25
Chapter Three: Adding Side Shooters and Sound to Your Game........................33
Chapter Four: Changing to a Moving Backgroundand Adding Scores and Lives .....................................................41
Chapter Five: Creating Power-Ups Using Alterable Values ..............................55
Chapter Six: The Ship Respawns (Recreating Star Fighter) ...........................67
Chapter Seven: Designing the Title Screenand Instruction Screen of Your Game.........................................75
Chapter Eight: Creating Waves of Enemies ......................................................87
Chapter Nine: Creating a Boss Enemy, Adding Transition
Screens and Adding Finishing Touches to Your Game..............93
Chapter Ten: A New Type of Game -- The Maze Game.................................105
Chapter Eleven: A New Game – The Platform/Side-Scroller Game....................121
Chapter Twelve: Breakout ...................................................................................133
Additional Resources ............................................................................................143
The exercises included in these chapters are to be used with Multimedia Fusion 2, Build R243. When thesoftware is first installed, allow the program to check through the internet for updates. There may be minordifferences depending upon the MMF2 Build Version that is currently installed on your computer.
Copyright 2007Shawnee Mission, Kansas
8/9/2019 An Introduction to Multimedia Fusion Full Version
http://slidepdf.com/reader/full/an-introduction-to-multimedia-fusion-full-version 3/145
An Introduction to Multimedia Fusion 2 Lessons to Create 2D Games
- 1 -
An Introduction to Multimedia Fusion 2
Have you ever wanted to create a computer game where you can let your creativity run wild andmake a game that others want to play? Maybe you have a unique idea for your game?
Welcome to the world of Multimedia Fusion 2 and two-dimensional game creation. MultimediaFusion 2 is an easy-to-use game authoring environment that will allow you to make wonderfully,creative games. It is an authoring tool that allows you to create many types of computer games,screensavers, educational programs, utilities or other applications, all quite easily.
The chapters in this book are specifically designed for students in a classroom situation usingMultimedia Fusion 2. The first nine chapters of instructions are designed to teach the basics of theMultimedia Fusion 2 program as you create your first game. The remaining chapters continuethrough different types of games with instruction in additional Multimedia Fusion 2 features.
Because Multimedia Fusion 2 is an object-oriented program, you do not need to learn a computerprogramming language. You work in a completely visual environment. You are bound only by your
creativity!
These chapters will assist you in learning important features of MMF2, and if you are interested inmaking other types of applications in MMF, you will find this guide invaluable for getting to know theprogram and how it works. Many of the principles explored are common to all types of applications.
After completing the exercises in the book, you can combine the features in endless ways to createnew and exciting games for others to enjoy.
Do not skip chapters or sections in a chapter. These units build upon one another. Once you havecompleted a chapter, the next chapter assumes you know the information. You can refer back tospecific chapters if you forget how to apply a specific feature in Multimedia Fusion 2.
Have fun creating your games!
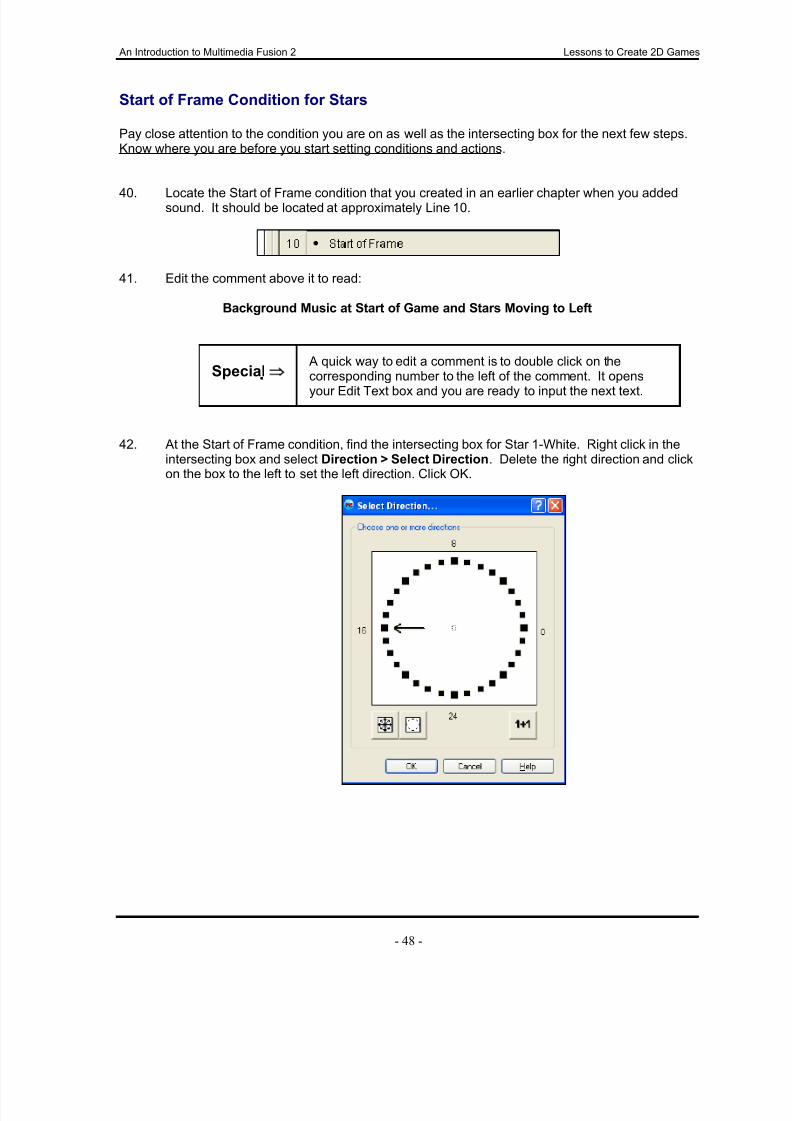
Karen Hult Terry ByfieldMultimedia Technology Teacher Career and Tech Ed Resource Specialist
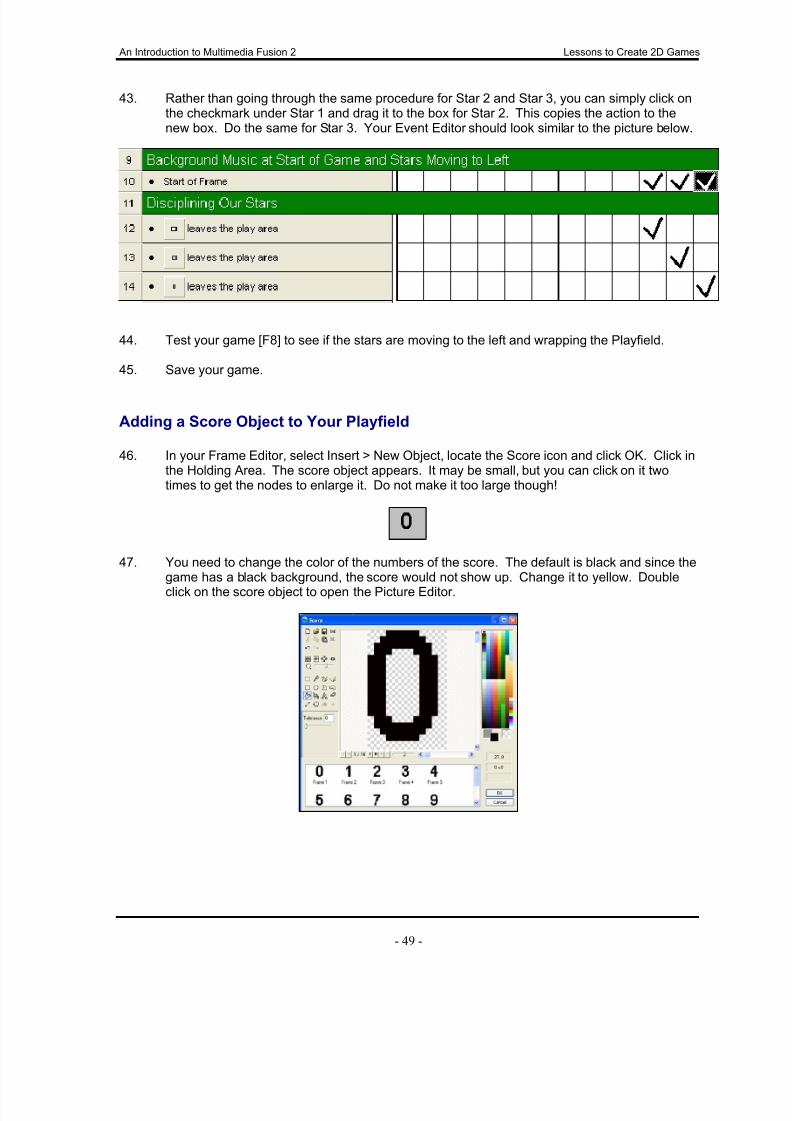
8/9/2019 An Introduction to Multimedia Fusion Full Version
http://slidepdf.com/reader/full/an-introduction-to-multimedia-fusion-full-version 4/145
8/9/2019 An Introduction to Multimedia Fusion Full Version
http://slidepdf.com/reader/full/an-introduction-to-multimedia-fusion-full-version 5/145
An Introduction to Multimedia Fusion 2 Lessons to Create 2D Games
- 3 -
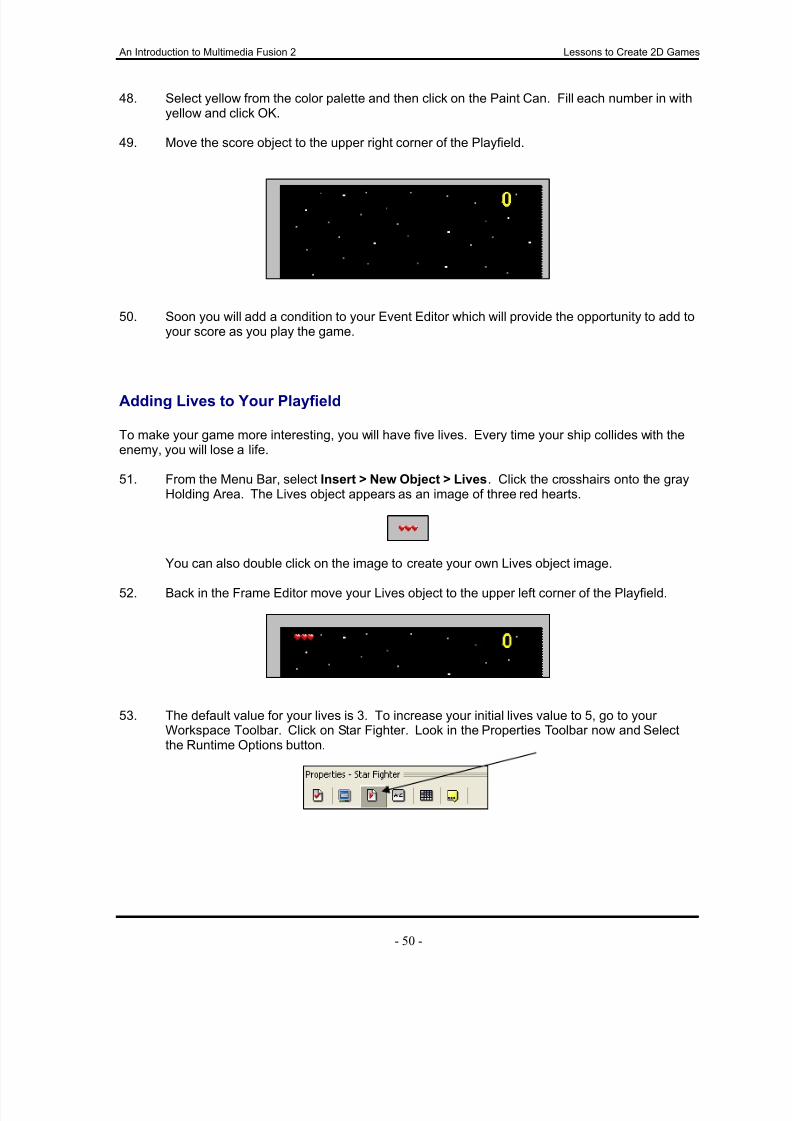
Chapter One: Getting Started with a Space Shooter Game
Objectives:
In Chapter One, you will:
Start a new application in Multimedia Fusion 2; Learn about features of the Workspace Toolbar and Editor Screens,
including the Storyboard Editor, Event Editor, Frame Editor, Animation Editorand Picture Editor;
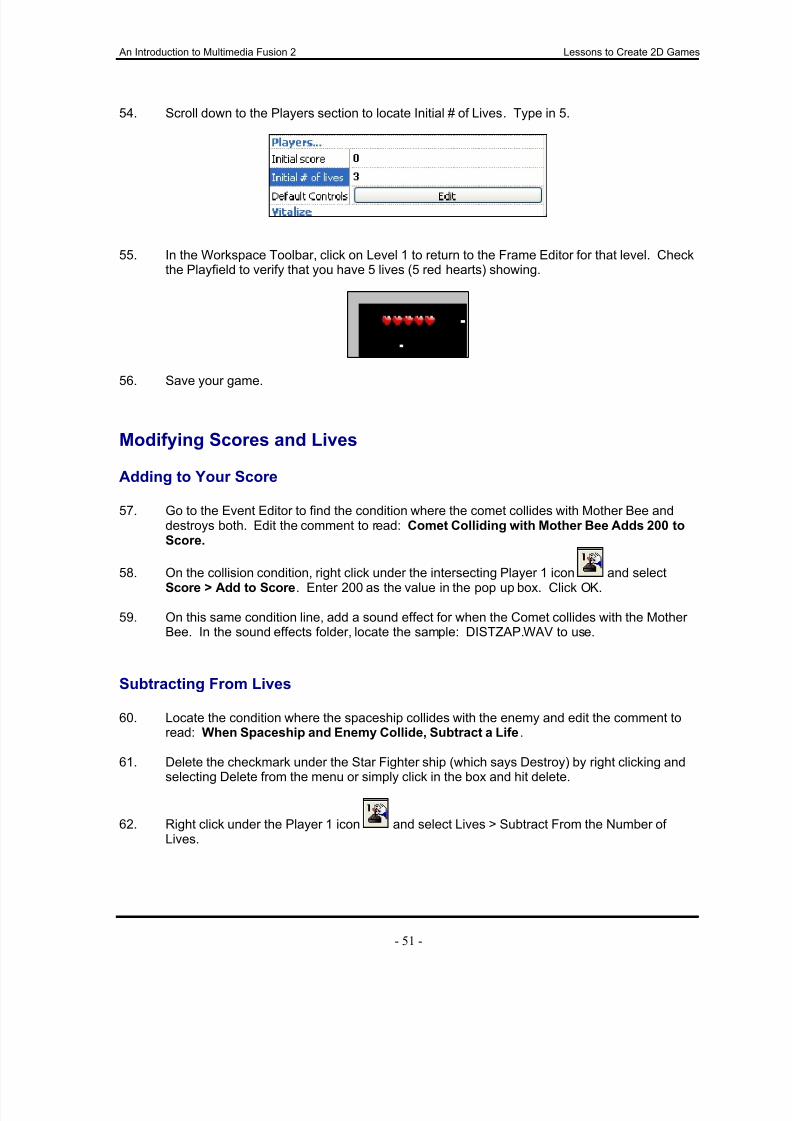
Learn features of the Holding Area and Object Window; Insert objects from the Library to the Playfield; Use the Toolbars; Change Preferences; Insert Comments in the Event Editor; Establish New Conditions in the Event Editor; and Test your Game.
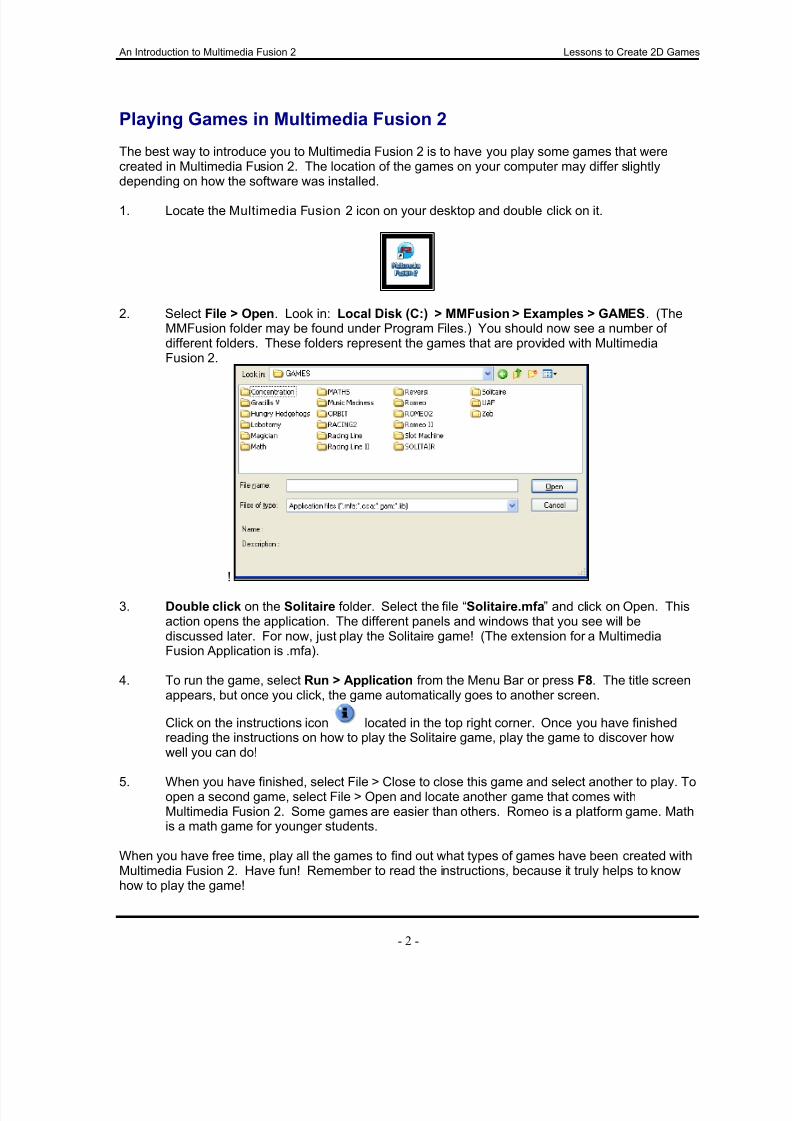
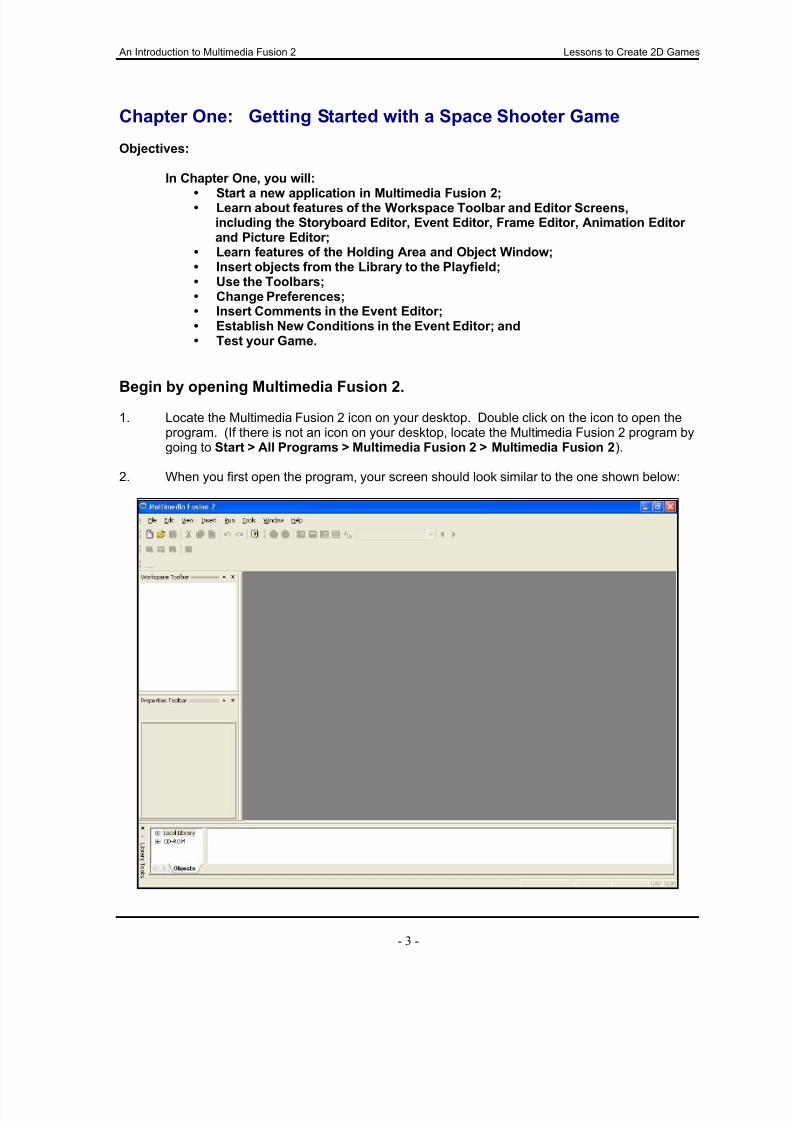
Begin by opening Multimedia Fusion 2.1. Locate the Multimedia Fusion 2 icon on your desktop. Double click on the icon to open the
program. (If there is not an icon on your desktop, locate the Multimedia Fusion 2 program bygoing to Start > All Programs > Multimedia Fusion 2 > Multimedia Fusion 2).
2. When you first open the program, your screen should look similar to the one shown below:
8/9/2019 An Introduction to Multimedia Fusion Full Version
http://slidepdf.com/reader/full/an-introduction-to-multimedia-fusion-full-version 6/145
An Introduction to Multimedia Fusion 2 Lessons to Create 2D Games
- 4 -
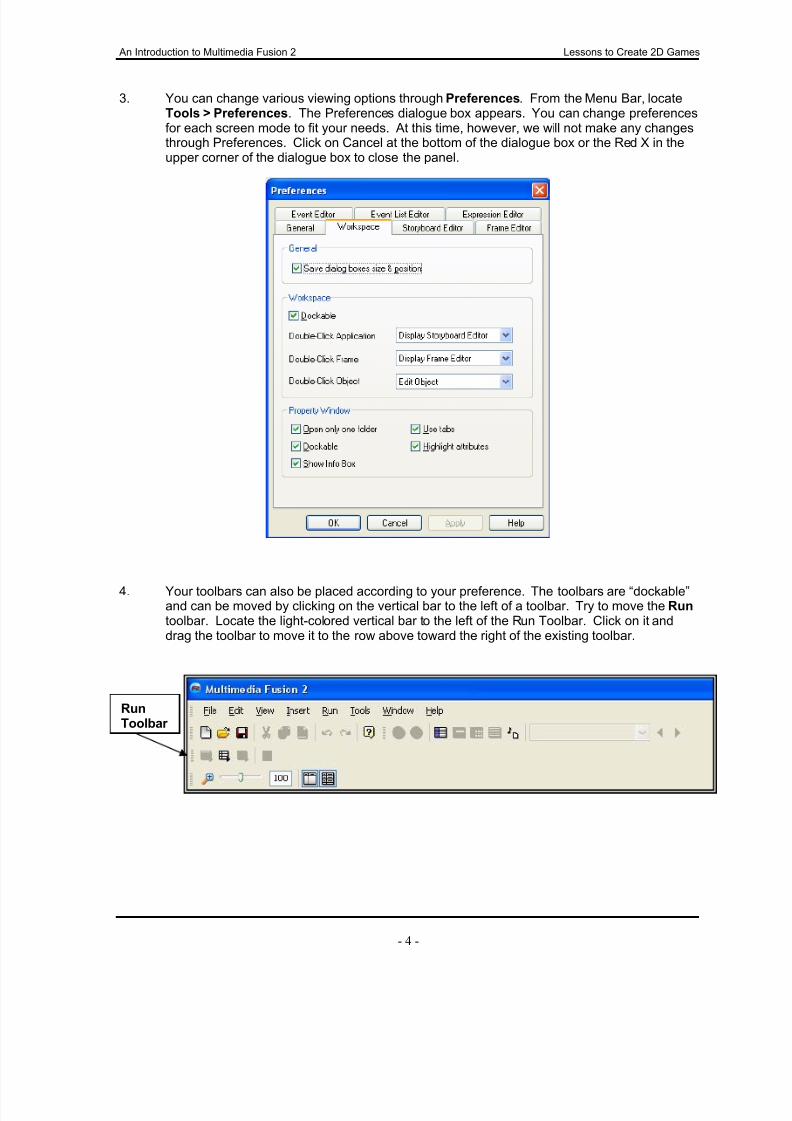
3. You can change various viewing options through Preferences. From the Menu Bar, locateTools > Preferences. The Preferences dialogue box appears. You can change preferencesfor each screen mode to fit your needs. At this time, however, we will not make any changesthrough Preferences. Click on Cancel at the bottom of the dialogue box or the Red X in theupper corner of the dialogue box to close the panel.
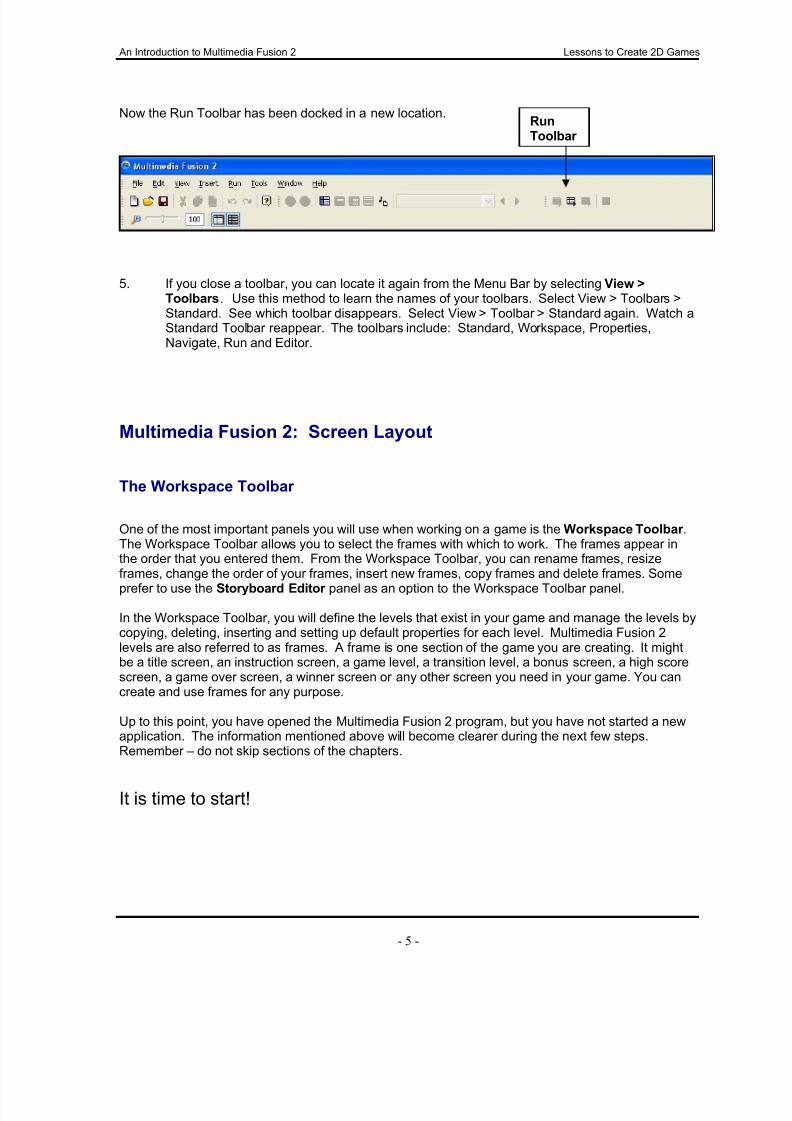
4. Your toolbars can also be placed according to your preference. The toolbars are “dockable”and can be moved by clicking on the vertical bar to the left of a toolbar. Try to move the Run toolbar. Locate the light-colored vertical bar to the left of the Run Toolbar. Click on it anddrag the toolbar to move it to the row above toward the right of the existing toolbar.
RunToolbar
8/9/2019 An Introduction to Multimedia Fusion Full Version
http://slidepdf.com/reader/full/an-introduction-to-multimedia-fusion-full-version 7/145
An Introduction to Multimedia Fusion 2 Lessons to Create 2D Games
- 5 -
Now the Run Toolbar has been docked in a new location.
5. If you close a toolbar, you can locate it again from the Menu Bar by selecting View >Toolbars. Use this method to learn the names of your toolbars. Select View > Toolbars >Standard. See which toolbar disappears. Select View > Toolbar > Standard again. Watch aStandard Toolbar reappear. The toolbars include: Standard, Workspace, Properties,Navigate, Run and Editor.
Multimedia Fusion 2: Screen Layout
The Workspace Toolbar
One of the most important panels you will use when working on a game is the Workspace Toolbar .The Workspace Toolbar allows you to select the frames with which to work. The frames appear inthe order that you entered them. From the Workspace Toolbar, you can rename frames, resizeframes, change the order of your frames, insert new frames, copy frames and delete frames. Some
prefer to use the Storyboard Editor panel as an option to the Workspace Toolbar panel.
In the Workspace Toolbar, you will define the levels that exist in your game and manage the levels bycopying, deleting, inserting and setting up default properties for each level. Multimedia Fusion 2levels are also referred to as frames. A frame is one section of the game you are creating. It mightbe a title screen, an instruction screen, a game level, a transition level, a bonus screen, a high scorescreen, a game over screen, a winner screen or any other screen you need in your game. You cancreate and use frames for any purpose.
Up to this point, you have opened the Multimedia Fusion 2 program, but you have not started a newapplication. The information mentioned above will become clearer during the next few steps.Remember – do not skip sections of the chapters.
It is time to start!
RunToolbar

8/9/2019 An Introduction to Multimedia Fusion Full Version
http://slidepdf.com/reader/full/an-introduction-to-multimedia-fusion-full-version 8/145
An Introduction to Multimedia Fusion 2 Lessons to Create 2D Games
- 6 -
6. Select File > New. Your Workspace Toolbar panel appears on the left side of the windowand your Storyboard Editor appears on the right side. Another panel, the Properties Toolbar,appears below the Workspace Toolbar.
You can resize the windows to your preference. To resize a window, click on the edge of thewindow until arrows appear, and then click to drag inward or outward to resize as desired.Try it now.
7. You can also rename an application. In the Workspace Toolbar, locate the default name Application1. Right click on the name and select Rename. Rename it “Star Fighter “. Thiswill be the name of first game also!
Renaming your application will help you keep organized if you have more than oneapplication at a time.
StoryboardEditor
PropertiesToolbar
WorkspaceToolbar
8/9/2019 An Introduction to Multimedia Fusion Full Version
http://slidepdf.com/reader/full/an-introduction-to-multimedia-fusion-full-version 9/145
An Introduction to Multimedia Fusion 2 Lessons to Create 2D Games
- 7 -
The Multimedia Fusion 2 Editor Screens
When creating games in Multimedia Fusion 2, you will work in four main editor screens. In theseeditors, you will create and edit various components of your game. An editor is a self-containedworking area that allows you to work on a specific element in your application. The four main editors
are:
The Storyboard Editor
The Frame Editor
The Event Editor
The Animation/Picture Editor
The Storyboard Editor
The Storyboard Editor is the central location in which all frames can be organized and accessed.This editor can be useful for looking at the frames in your game and viewing common settings foreach frame.
After you become familiar enough with creating games in Multimedia Fusion 2, you will notice that theWorkspace Toolbar and the Storyboard Editor provide similar information. Eventually it will become apersonal preference as to which window you want to use to accomplish the necessary tasks.
For these games, you will be using both the Storyboard Editor and the Workspace Toolbar, so youbecome familiar with both. After you are comfortable with the features, you can select Tools > Preferences to uncheck the Show Storyboard option on the Storyboard Editor tab.
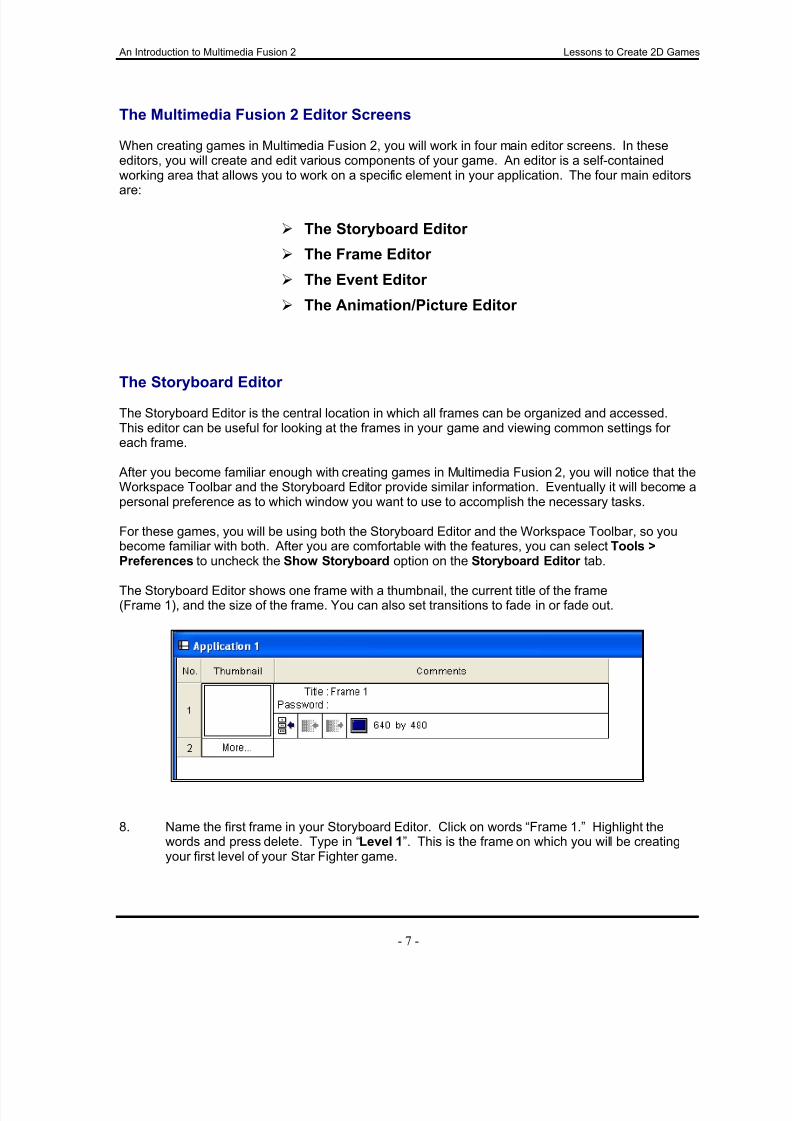
The Storyboard Editor shows one frame with a thumbnail, the current title of the frame(Frame 1), and the size of the frame. You can also set transitions to fade in or fade out.
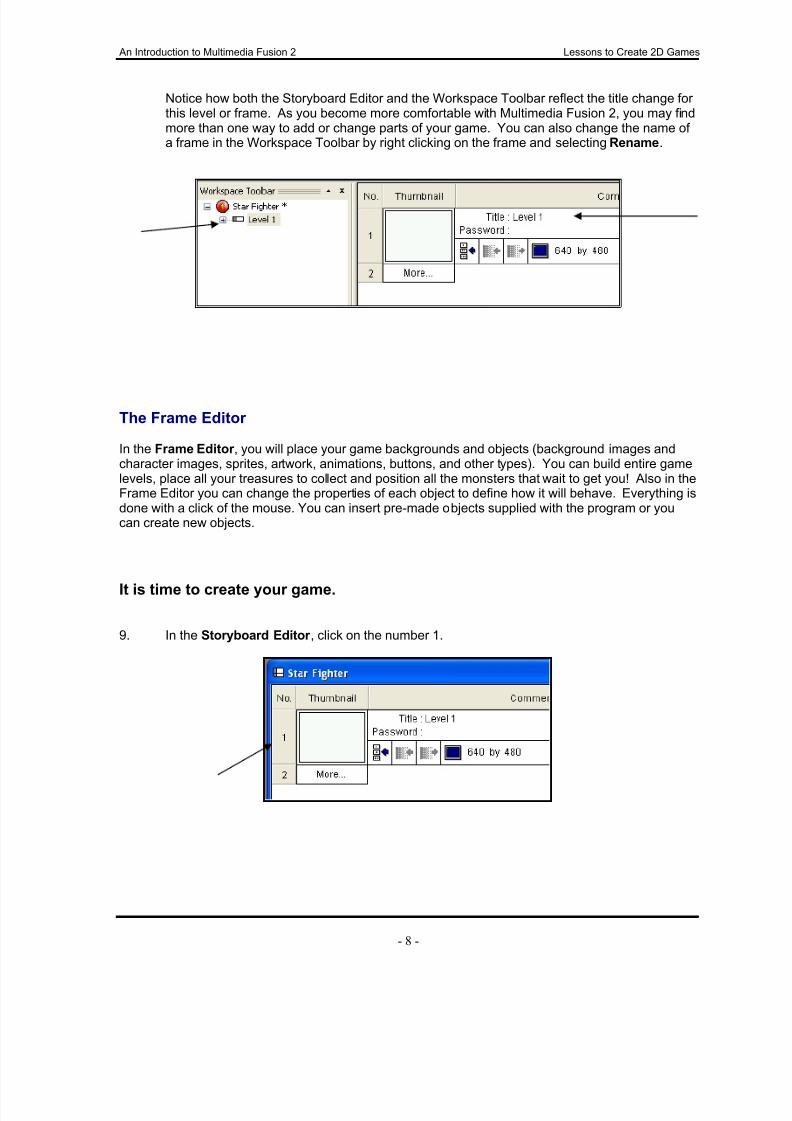
8. Name the first frame in your Storyboard Editor. Click on words “Frame 1.” Highlight thewords and press delete. Type in “Level 1”. This is the frame on which you will be creatingyour first level of your Star Fighter game.
8/9/2019 An Introduction to Multimedia Fusion Full Version
http://slidepdf.com/reader/full/an-introduction-to-multimedia-fusion-full-version 10/145
An Introduction to Multimedia Fusion 2 Lessons to Create 2D Games
- 8 -
Notice how both the Storyboard Editor and the Workspace Toolbar reflect the title change forthis level or frame. As you become more comfortable with Multimedia Fusion 2, you may findmore than one way to add or change parts of your game. You can also change the name ofa frame in the Workspace Toolbar by right clicking on the frame and selecting Rename.
The Frame Editor
In the Frame Editor , you will place your game backgrounds and objects (background images andcharacter images, sprites, artwork, animations, buttons, and other types). You can build entire gamelevels, place all your treasures to collect and position all the monsters that wait to get you! Also in theFrame Editor you can change the properties of each object to define how it will behave. Everything isdone with a click of the mouse. You can insert pre-made objects supplied with the program or youcan create new objects.
It is time to create your game.
9. In the Storyboard Editor , click on the number 1.
8/9/2019 An Introduction to Multimedia Fusion Full Version
http://slidepdf.com/reader/full/an-introduction-to-multimedia-fusion-full-version 11/145
An Introduction to Multimedia Fusion 2 Lessons to Create 2D Games
- 9 -
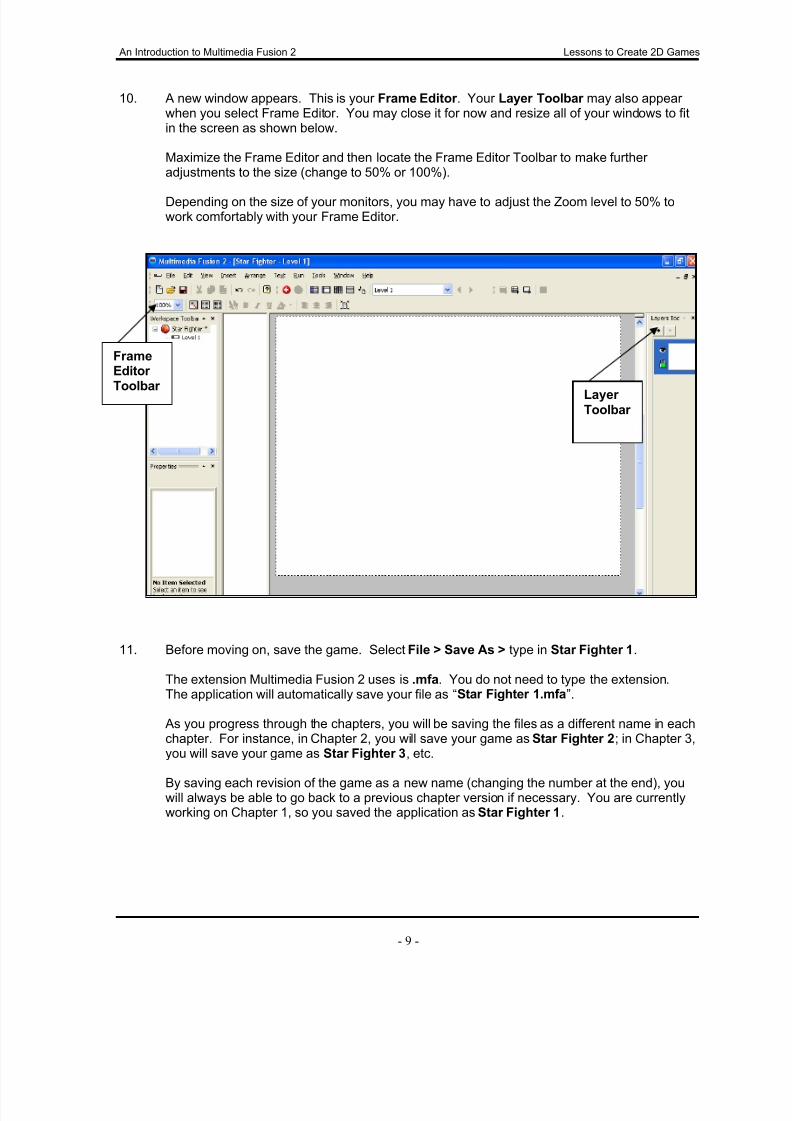
10. A new window appears. This is your Frame Editor . Your Layer Toolbar may also appearwhen you select Frame Editor. You may close it for now and resize all of your windows to fitin the screen as shown below.
Maximize the Frame Editor and then locate the Frame Editor Toolbar to make furtheradjustments to the size (change to 50% or 100%).
Depending on the size of your monitors, you may have to adjust the Zoom level to 50% towork comfortably with your Frame Editor.
11. Before moving on, save the game. Select File > Save As > type in Star Fighter 1.
The extension Multimedia Fusion 2 uses is .mfa. You do not need to type the extension.The application will automatically save your file as “Star Fighter 1.mfa”.
As you progress through the chapters, you will be saving the files as a different name in eachchapter. For instance, in Chapter 2, you will save your game as Star Fighter 2; in Chapter 3,you will save your game as Star Fighter 3, etc.
By saving each revision of the game as a new name (changing the number at the end), youwill always be able to go back to a previous chapter version if necessary. You are currentlyworking on Chapter 1, so you saved the application as Star Fighter 1.
FrameEditor
Toolbar LayerToolbar
8/9/2019 An Introduction to Multimedia Fusion Full Version
http://slidepdf.com/reader/full/an-introduction-to-multimedia-fusion-full-version 12/145
An Introduction to Multimedia Fusion 2 Lessons to Create 2D Games
- 10 -
Playfield
One of the most important parts of the Frame Editor is the Playfield. This is the white box thatoccupies the majority of the window.
Any objects placed in the Playfield area, such as characters, scores, lives or counters will be visible
on screen when running the game. It is possible to change the properties of the objects so they arenot visible when your game is playing. It is also possible to create scrolling games that have manyobjects not visible until the player scrolls to that point. The scrolling game will be covered in a laterchapter.
Again, it is helpful to size the Playfield to 50%, especially when adding a Backdrop. From your FrameEditor Toolbar, change from 100% to 50%.
Now for the fun!
The Multimedia Fusion 2 Library -- Adding a Backdrop
The Library for Multimedia Fusion 2 contains many options for backdrops, object sprites forcharacters or props, tiles for landscaping and platforms, and much more.
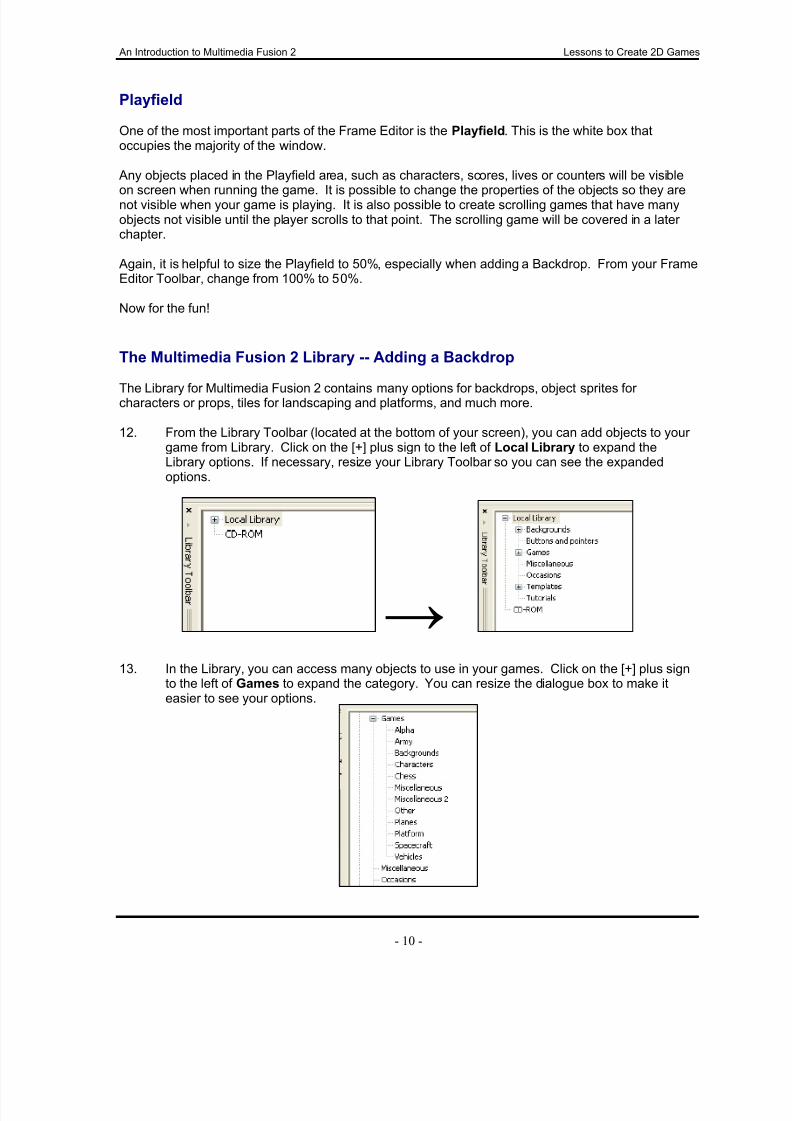
12. From the Library Toolbar (located at the bottom of your screen), you can add objects to yourgame from Library. Click on the [+] plus sign to the left of Local Library to expand theLibrary options. If necessary, resize your Library Toolbar so you can see the expandedoptions.
→ 13. In the Library, you can access many objects to use in your games. Click on the [+] plus sign
to the left of Games to expand the category. You can resize the dialogue box to make iteasier to see your options.
8/9/2019 An Introduction to Multimedia Fusion Full Version
http://slidepdf.com/reader/full/an-introduction-to-multimedia-fusion-full-version 13/145
An Introduction to Multimedia Fusion 2 Lessons to Create 2D Games
- 11 -
14. Under the Games category, click on Backgrounds to access the available backgroundoptions in the Library.
15. Double click on Games > Space – Backdrops. Locate Backdrop Object 7 and drag it to
the Playfield in the Frame Editor.
16. Position the space backdrop over the Playfield area (white canvas) so it fits nicely. If youhave not already done so, you might change the viewing size of the Playfield to 50%, so youcan be sure you are covering the entire Playfield area. Note: when you double click on anobject in the Library, it will display a larger view of the object.
17. Save your file again (File > Save).
Notice now that you see the backdrop to the left of the Playfield. Any object you include inyour game will appear in this area. This area is referred to as your Object Window. Youhave easy access to all objects on each level from the Object Window. That topic will becovered more soon. Notice also in the Workspace Toolbar under Level 1 that your backdrop
appears.
Adding an Object: A Spaceship
Now you are going to add a spaceship to your game – a ship that you will be able to control.
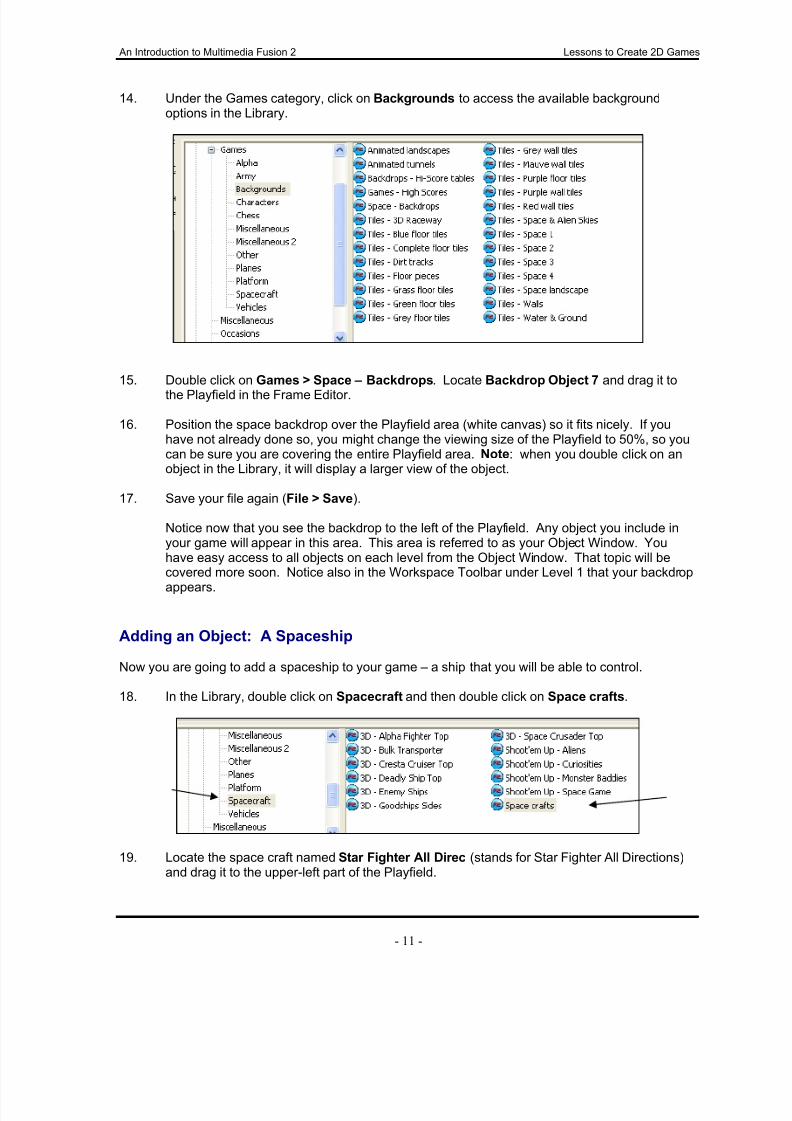
18. In the Library, double click on Spacecraft and then double click on Space crafts.
19. Locate the space craft named Star Fighter All Direc (stands for Star Fighter All Directions)and drag it to the upper-left part of the Playfield.
8/9/2019 An Introduction to Multimedia Fusion Full Version
http://slidepdf.com/reader/full/an-introduction-to-multimedia-fusion-full-version 14/145
An Introduction to Multimedia Fusion 2 Lessons to Create 2D Games
- 12 -
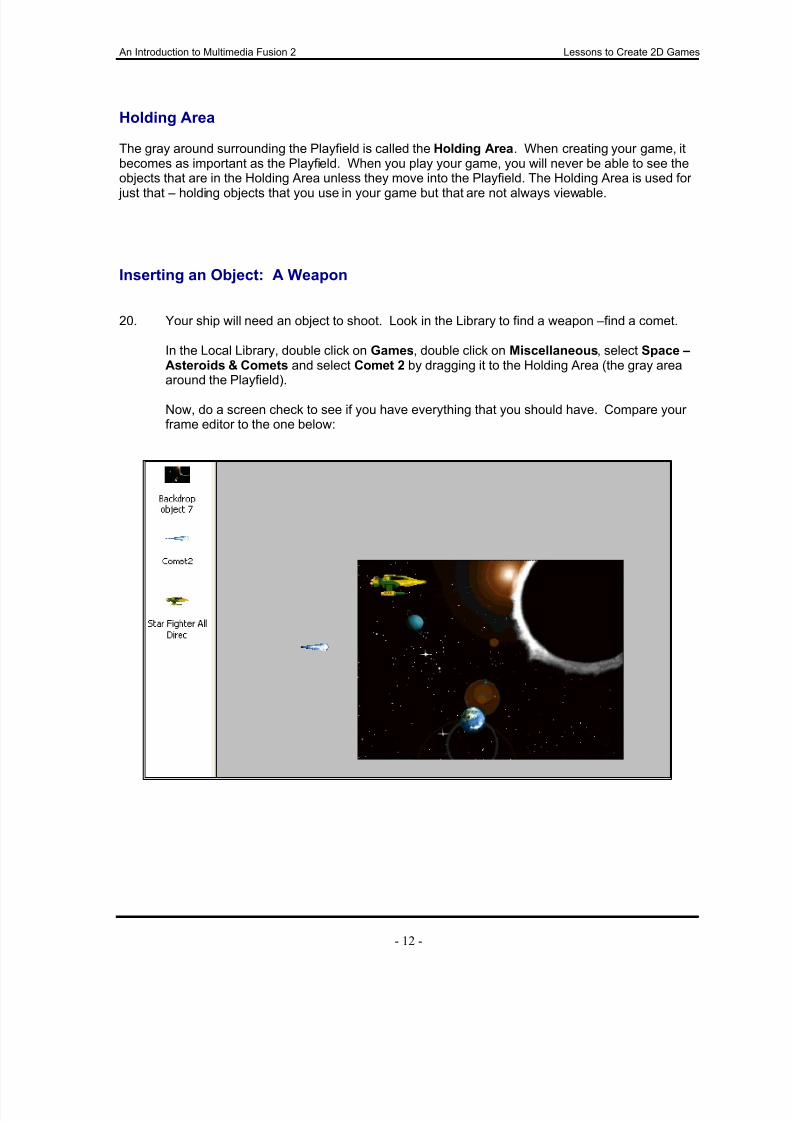
Holding Area
The gray around surrounding the Playfield is called the Holding Area. When creating your game, itbecomes as important as the Playfield. When you play your game, you will never be able to see theobjects that are in the Holding Area unless they move into the Playfield. The Holding Area is used for
just that – holding objects that you use in your game but that are not always viewable.
Inserting an Object: A Weapon
20. Your ship will need an object to shoot. Look in the Library to find a weapon –find a comet.
In the Local Library, double click on Games, double click on Miscellaneous, select Space –Asteroids & Comets and select Comet 2 by dragging it to the Holding Area (the gray areaaround the Playfield).
Now, do a screen check to see if you have everything that you should have. Compare yourframe editor to the one below:
8/9/2019 An Introduction to Multimedia Fusion Full Version
http://slidepdf.com/reader/full/an-introduction-to-multimedia-fusion-full-version 15/145
An Introduction to Multimedia Fusion 2 Lessons to Create 2D Games
- 13 -
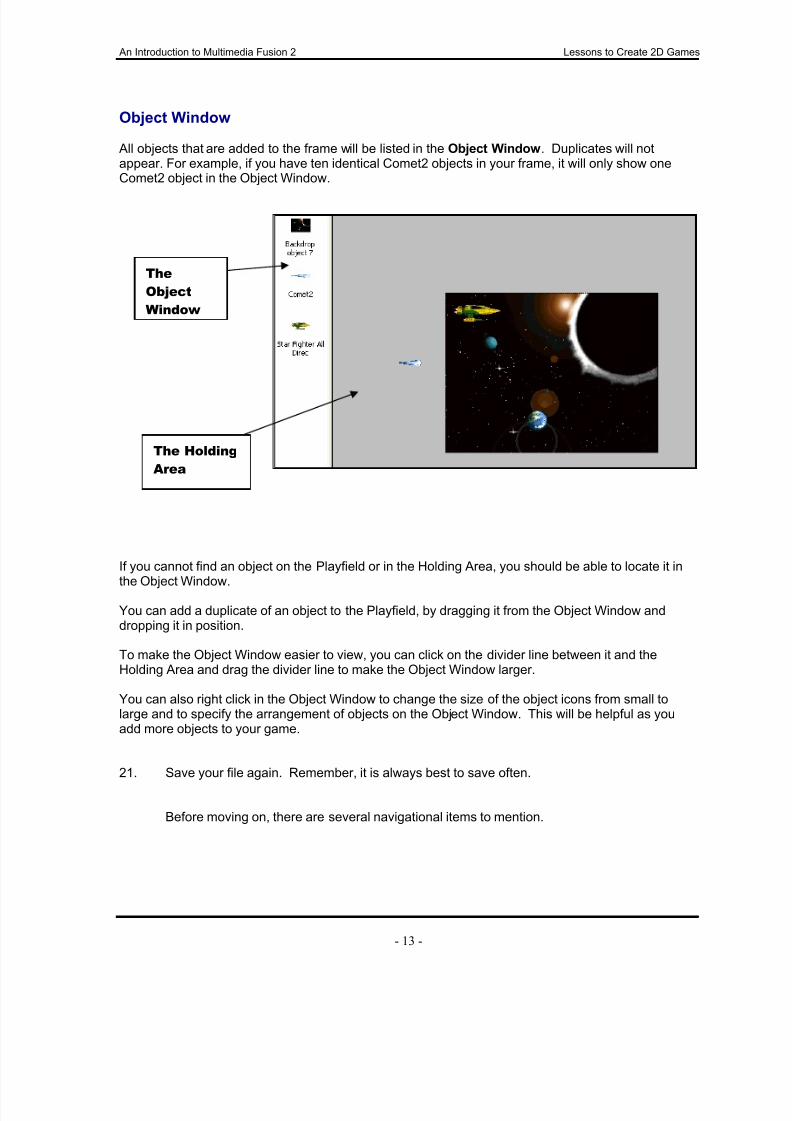
Object Window
All objects that are added to the frame will be listed in the Object Window. Duplicates will notappear. For example, if you have ten identical Comet2 objects in your frame, it will only show oneComet2 object in the Object Window.
If you cannot find an object on the Playfield or in the Holding Area, you should be able to locate it inthe Object Window.
You can add a duplicate of an object to the Playfield, by dragging it from the Object Window anddropping it in position.
To make the Object Window easier to view, you can click on the divider line between it and theHolding Area and drag the divider line to make the Object Window larger.
You can also right click in the Object Window to change the size of the object icons from small tolarge and to specify the arrangement of objects on the Object Window. This will be helpful as youadd more objects to your game.
21. Save your file again. Remember, it is always best to save often.
Before moving on, there are several navigational items to mention.
The Holding
Area
The
Object
Window
8/9/2019 An Introduction to Multimedia Fusion Full Version
http://slidepdf.com/reader/full/an-introduction-to-multimedia-fusion-full-version 16/145
An Introduction to Multimedia Fusion 2 Lessons to Create 2D Games
- 14 -
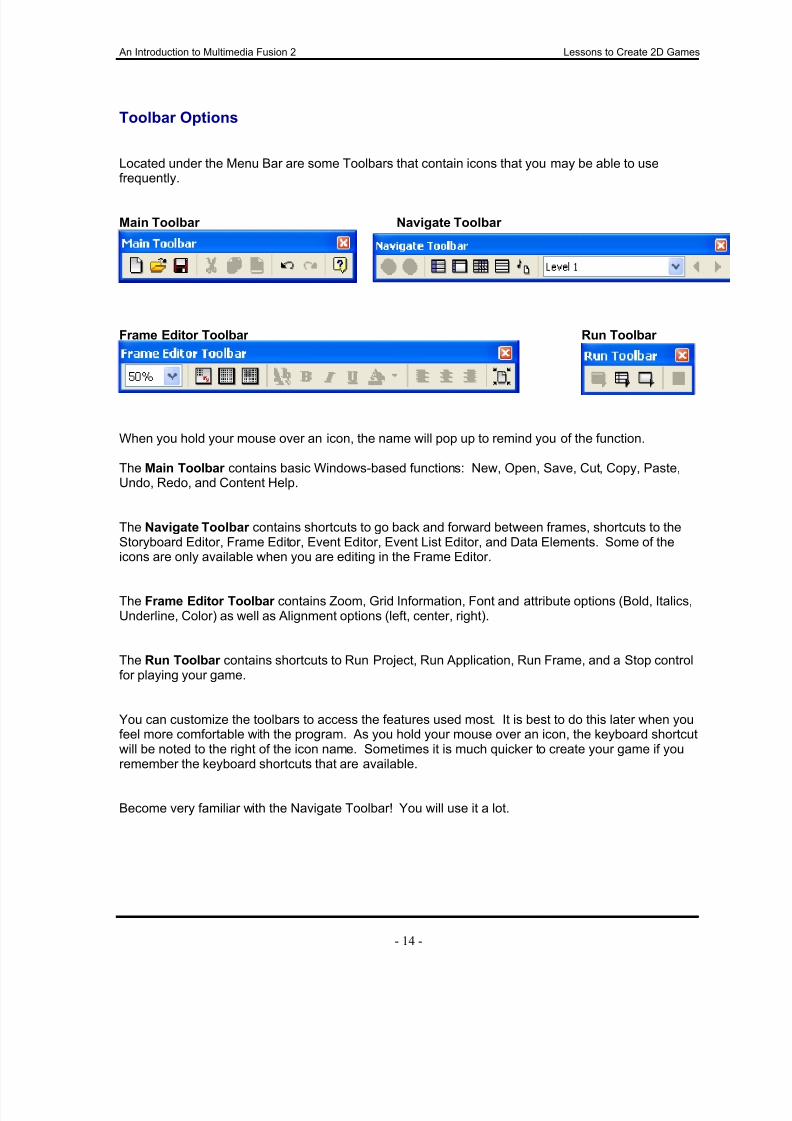
Toolbar Options
Located under the Menu Bar are some Toolbars that contain icons that you may be able to usefrequently.
Main Toolbar Navigate Toolbar
Frame Editor Toolbar Run Toolbar
When you hold your mouse over an icon, the name will pop up to remind you of the function.
The Main Toolbar contains basic Windows-based functions: New, Open, Save, Cut, Copy, Paste,Undo, Redo, and Content Help.
The Navigate Toolbar contains shortcuts to go back and forward between frames, shortcuts to theStoryboard Editor, Frame Editor, Event Editor, Event List Editor, and Data Elements. Some of theicons are only available when you are editing in the Frame Editor.
The Frame Editor Toolbar contains Zoom, Grid Information, Font and attribute options (Bold, Italics,Underline, Color) as well as Alignment options (left, center, right).
The Run Toolbar contains shortcuts to Run Project, Run Application, Run Frame, and a Stop controlfor playing your game.
You can customize the toolbars to access the features used most. It is best to do this later when youfeel more comfortable with the program. As you hold your mouse over an icon, the keyboard shortcutwill be noted to the right of the icon name. Sometimes it is much quicker to create your game if youremember the keyboard shortcuts that are available.
Become very familiar with the Navigate Toolbar! You will use it a lot.

8/9/2019 An Introduction to Multimedia Fusion Full Version
http://slidepdf.com/reader/full/an-introduction-to-multimedia-fusion-full-version 17/145
An Introduction to Multimedia Fusion 2 Lessons to Create 2D Games
- 15 -
The Event Editor
Objects are an element that you add to your game. Each object can have any number of events,conditions, actions, and functions associated with it. In the Event Editor you can define what shouldhappen when a particular condition is present. A condition is a test within your game that triggers
actions. When the condition is true, an action will execute. When a condition is false, the action willnot execute.
All events depend upon detecting a specific condition and executing an action. Collisions, movement,and visibility are all examples of conditions. If something is true, then something else happens. Forexample, if two objects collide, then one object might begin to bounce.
There are several ways to get to the Event Editor:
To move to the Event Editor from the Menu Bar, you select View > Event Editor.
You can right click on a frame name in the Workspace Toolbar and select
Event Editor.
You can use the keyboard shortcut CTRL+E.
Click the Event Editor icon on the Navigation Bar.
You will find it beneficial to learn the keyboard shortcuts to help you work faster. Use CTRL+E onthe keyboard to go to the Event Editor and CTRL+M to go back to the Frame Editor. Additionalkeyboard shortcuts appear in the Resource Section at the end of the booklet.
OKAY – It is time to get back to working on the game!
22. The Event Editor is where you make everything happen. This is the heart of your game.This is where you create all your actions. Let us say that you want your Star Fighter ship toshoot the comet. Go to the Event Editor by clicking on the icon located on the NavigateToolbar.
Across the top of the Event Editor are a number of boxes which contain different icons. Therows that appear in the Event Editor are the comments or conditions that you will specify asyou create your game. Clicking on New Condition will open up a dialogue box containingobjects that you will use to input conditions without needing to know a programming
language.

8/9/2019 An Introduction to Multimedia Fusion Full Version
http://slidepdf.com/reader/full/an-introduction-to-multimedia-fusion-full-version 18/145
An Introduction to Multimedia Fusion 2 Lessons to Create 2D Games
- 16 -
Inserting Comments in Your Event Editor
One of the most important tasks you can do as you enter information in your Event Editor is to includecomments. Comments will assist you and others in finding information more quickly about what isoccurring in your game and where it is happening. This will speed up the problem-solving process
later as well.
23. In the Event Editor, right click on the 1 to the left of the words New Condition.
24. Select Insert > A comment.
25. A new dialogue box appears.
26. Set the back color to dark green and set the font color to white. Leave the default alignmentof left and change your font size to a 12-point Arial. Type the following text in the box:
Star Fighter to Shoot Comet.
27. Select OK. The comment now appears on Line 1. Line 2 is ready to accept a new commentor a new condition.
8/9/2019 An Introduction to Multimedia Fusion Full Version
http://slidepdf.com/reader/full/an-introduction-to-multimedia-fusion-full-version 19/145
An Introduction to Multimedia Fusion 2 Lessons to Create 2D Games
- 17 -
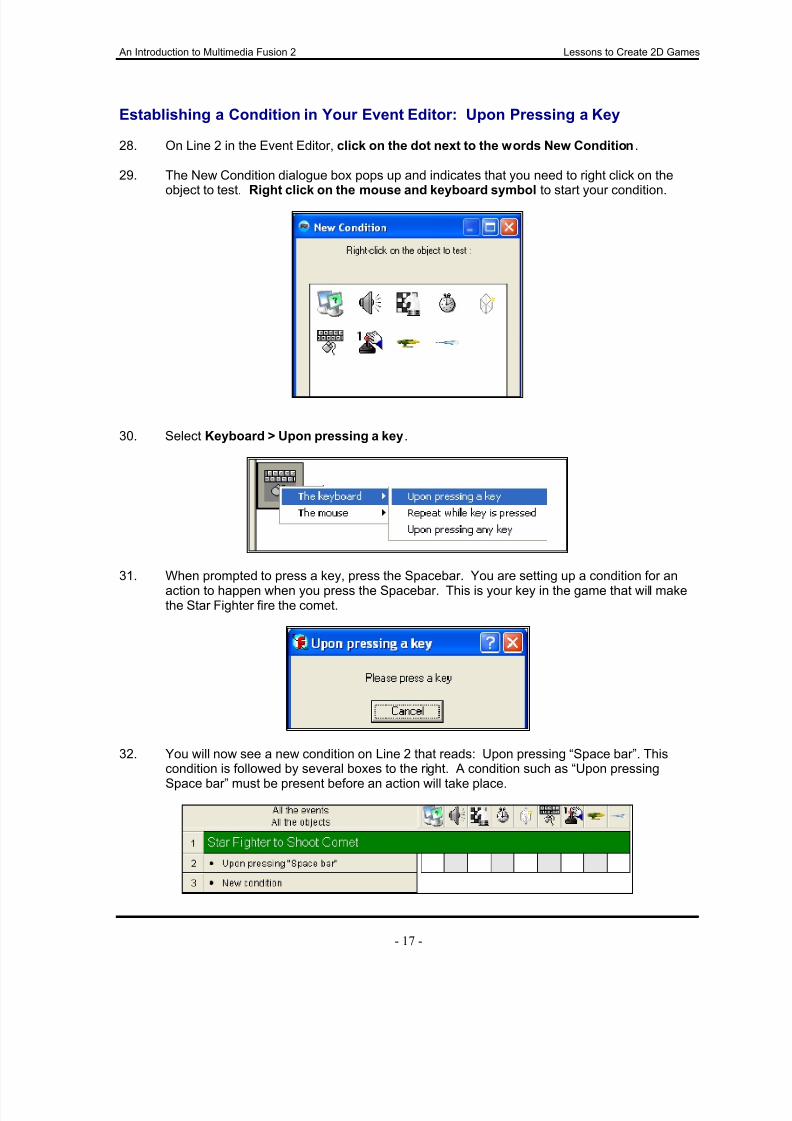
Establishing a Condition in Your Event Editor: Upon Pressing a Key
28. On Line 2 in the Event Editor, click on the dot next to the words New Condition.
29. The New Condition dialogue box pops up and indicates that you need to right click on the
object to test. Right click on the mouse and keyboard symbol to start your condition.
30. Select Keyboard > Upon pressing a key.
31. When prompted to press a key, press the Spacebar. You are setting up a condition for an
action to happen when you press the Spacebar. This is your key in the game that will makethe Star Fighter fire the comet.
32. You will now see a new condition on Line 2 that reads: Upon pressing “Space bar”. Thiscondition is followed by several boxes to the right. A condition such as “Upon pressing
Space bar” must be present before an action will take place.
8/9/2019 An Introduction to Multimedia Fusion Full Version
http://slidepdf.com/reader/full/an-introduction-to-multimedia-fusion-full-version 20/145
An Introduction to Multimedia Fusion 2 Lessons to Create 2D Games
- 18 -
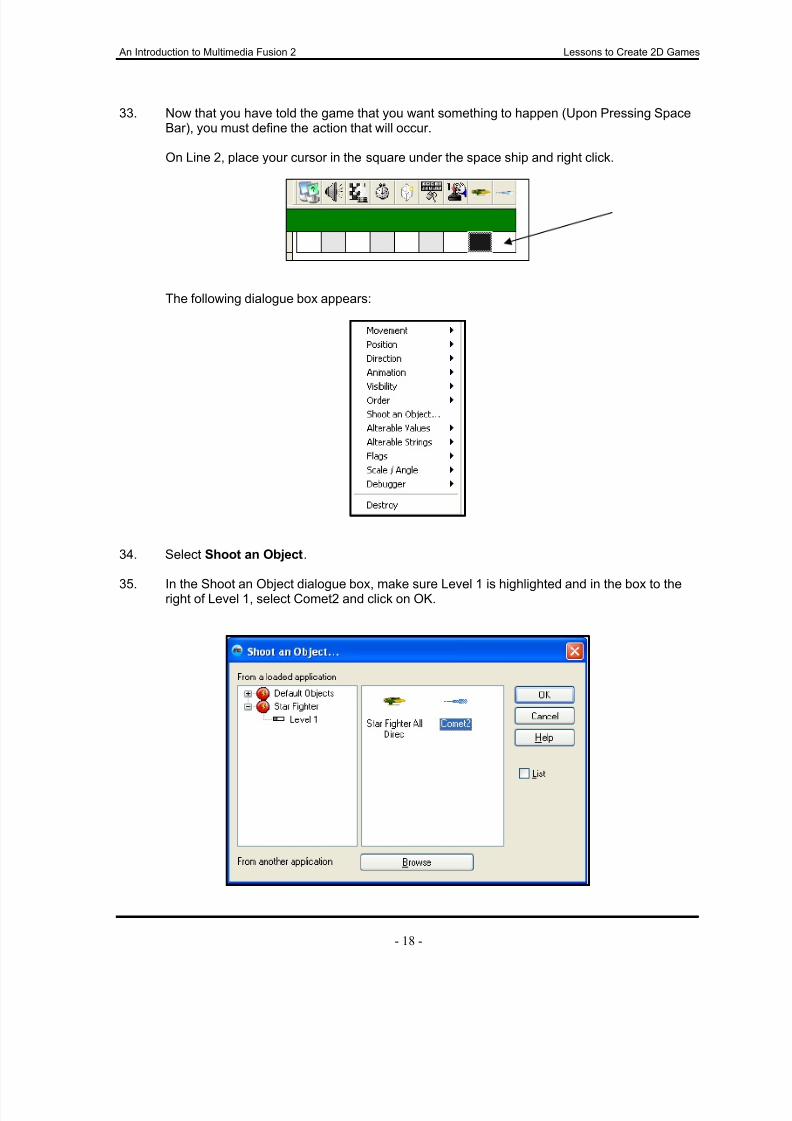
33. Now that you have told the game that you want something to happen (Upon Pressing SpaceBar), you must define the action that will occur.
On Line 2, place your cursor in the square under the space ship and right click.
The following dialogue box appears:
34. Select Shoot an Object.
35. In the Shoot an Object dialogue box, make sure Level 1 is highlighted and in the box to theright of Level 1, select Comet2 and click on OK.

8/9/2019 An Introduction to Multimedia Fusion Full Version
http://slidepdf.com/reader/full/an-introduction-to-multimedia-fusion-full-version 21/145
An Introduction to Multimedia Fusion 2 Lessons to Create 2D Games
- 19 -
36. Another dialogue box appears asking for the desired speed of the object and the directiondesired. For now, leave the speed set at 100, choose “Shoot in selected directions” and clickOK.
37. Another new dialogue box appears. Since you specified to “Shoot in selected directions,” you
need to specify those directions now. The default direction is up.
38. Locate the button that erases all directions and click on it to erase current directions.
8/9/2019 An Introduction to Multimedia Fusion Full Version
http://slidepdf.com/reader/full/an-introduction-to-multimedia-fusion-full-version 22/145
An Introduction to Multimedia Fusion 2 Lessons to Create 2D Games
- 20 -
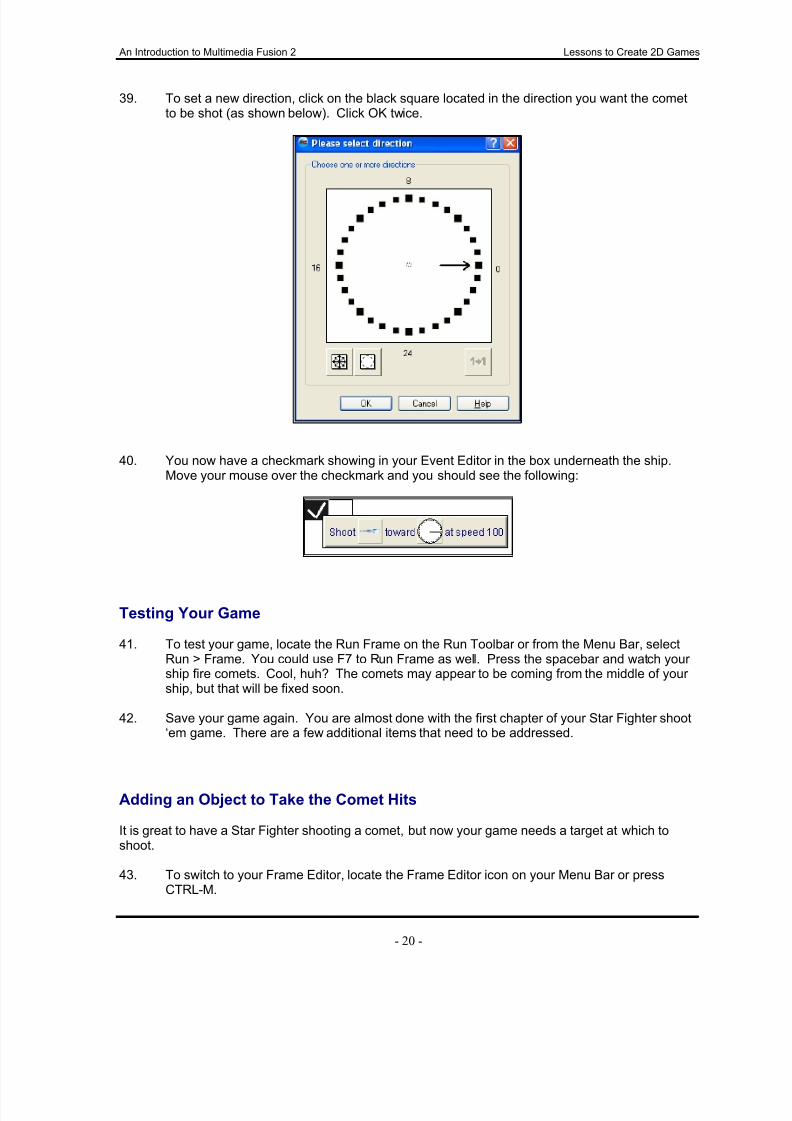
39. To set a new direction, click on the black square located in the direction you want the cometto be shot (as shown below). Click OK twice.
40. You now have a checkmark showing in your Event Editor in the box underneath the ship.Move your mouse over the checkmark and you should see the following:
Testing Your Game
41. To test your game, locate the Run Frame on the Run Toolbar or from the Menu Bar, selectRun > Frame. You could use F7 to Run Frame as well. Press the spacebar and watch yourship fire comets. Cool, huh? The comets may appear to be coming from the middle of yourship, but that will be fixed soon.
42. Save your game again. You are almost done with the first chapter of your Star Fighter shoot‘em game. There are a few additional items that need to be addressed.
Adding an Object to Take the Comet Hits
It is great to have a Star Fighter shooting a comet, but now your game needs a target at which toshoot.
43. To switch to your Frame Editor, locate the Frame Editor icon on your Menu Bar or pressCTRL-M.
8/9/2019 An Introduction to Multimedia Fusion Full Version
http://slidepdf.com/reader/full/an-introduction-to-multimedia-fusion-full-version 23/145
An Introduction to Multimedia Fusion 2 Lessons to Create 2D Games
- 21 -
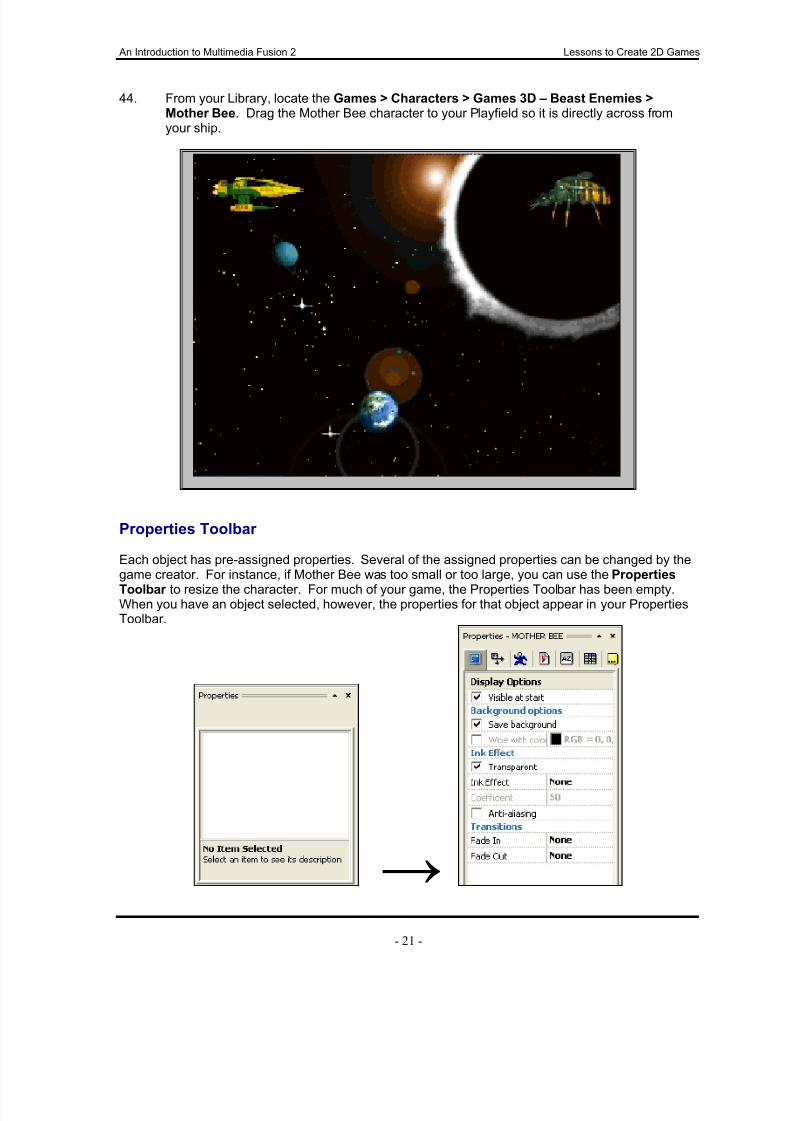
44. From your Library, locate the Games > Characters > Games 3D – Beast Enemies >Mother Bee. Drag the Mother Bee character to your Playfield so it is directly across fromyour ship.
Properties Toolbar
Each object has pre-assigned properties. Several of the assigned properties can be changed by thegame creator. For instance, if Mother Bee was too small or too large, you can use the Properties
Toolbar to resize the character. For much of your game, the Properties Toolbar has been empty.When you have an object selected, however, the properties for that object appear in your PropertiesToolbar.
→
8/9/2019 An Introduction to Multimedia Fusion Full Version
http://slidepdf.com/reader/full/an-introduction-to-multimedia-fusion-full-version 24/145
An Introduction to Multimedia Fusion 2 Lessons to Create 2D Games
- 22 -
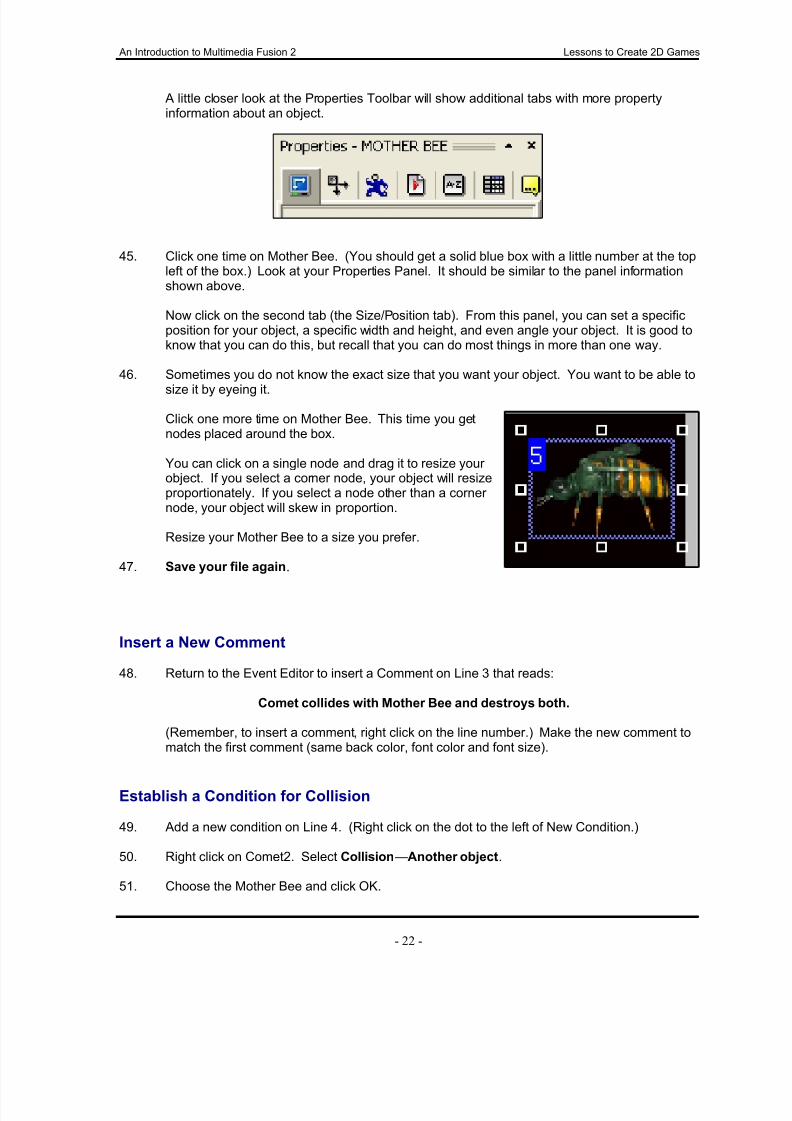
A little closer look at the Properties Toolbar will show additional tabs with more propertyinformation about an object.
45. Click one time on Mother Bee. (You should get a solid blue box with a little number at the topleft of the box.) Look at your Properties Panel. It should be similar to the panel informationshown above.
Now click on the second tab (the Size/Position tab). From this panel, you can set a specificposition for your object, a specific width and height, and even angle your object. It is good toknow that you can do this, but recall that you can do most things in more than one way.
46. Sometimes you do not know the exact size that you want your object. You want to be able to
size it by eyeing it.
Click one more time on Mother Bee. This time you getnodes placed around the box.
You can click on a single node and drag it to resize yourobject. If you select a corner node, your object will resizeproportionately. If you select a node other than a cornernode, your object will skew in proportion.
Resize your Mother Bee to a size you prefer.
47. Save your file again.
Insert a New Comment
48. Return to the Event Editor to insert a Comment on Line 3 that reads:
Comet collides with Mother Bee and destroys both.
(Remember, to insert a comment, right click on the line number.) Make the new comment tomatch the first comment (same back color, font color and font size).
Establish a Condition for Collision
49. Add a new condition on Line 4. (Right click on the dot to the left of New Condition.)
50. Right click on Comet2. Select Collision—Another object.
51. Choose the Mother Bee and click OK.
8/9/2019 An Introduction to Multimedia Fusion Full Version
http://slidepdf.com/reader/full/an-introduction-to-multimedia-fusion-full-version 25/145
An Introduction to Multimedia Fusion 2 Lessons to Create 2D Games
- 23 -
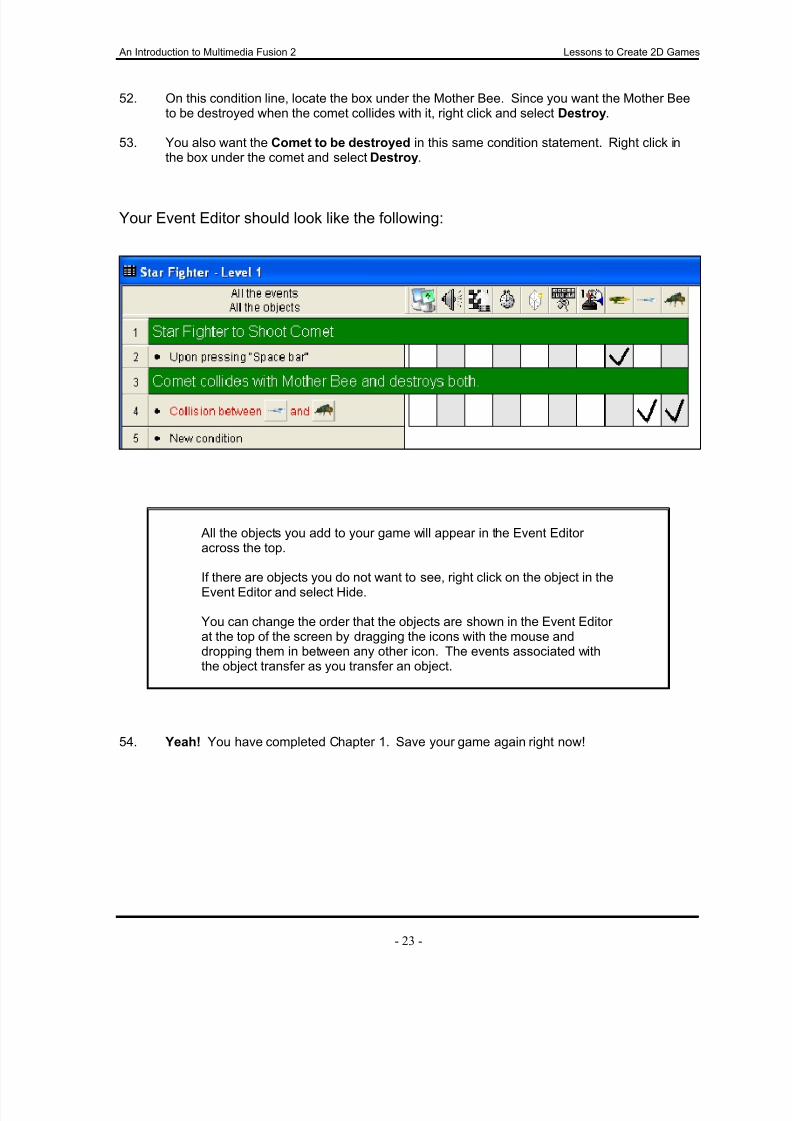
52. On this condition line, locate the box under the Mother Bee. Since you want the Mother Beeto be destroyed when the comet collides with it, right click and select Destroy.
53. You also want the Comet to be destroyed in this same condition statement. Right click inthe box under the comet and select Destroy.
Your Event Editor should look like the following:
All the objects you add to your game will appear in the Event Editoracross the top.
If there are objects you do not want to see, right click on the object in the
Event Editor and select Hide.
You can change the order that the objects are shown in the Event Editorat the top of the screen by dragging the icons with the mouse anddropping them in between any other icon. The events associated withthe object transfer as you transfer an object.
54. Yeah! You have completed Chapter 1. Save your game again right now!
8/9/2019 An Introduction to Multimedia Fusion Full Version
http://slidepdf.com/reader/full/an-introduction-to-multimedia-fusion-full-version 26/145
An Introduction to Multimedia Fusion 2 Lessons to Create 2D Games
- 24 -
Feel free to explore Multimedia Fusion 2 on your own, but please make sure thatyou save Chapter 1 as is and do not make any other changes to it until Chapter 2.
It is important to back up your work so that you have copies of your game in case anything should gowrong. You do not want to learn this lesson the hard way!
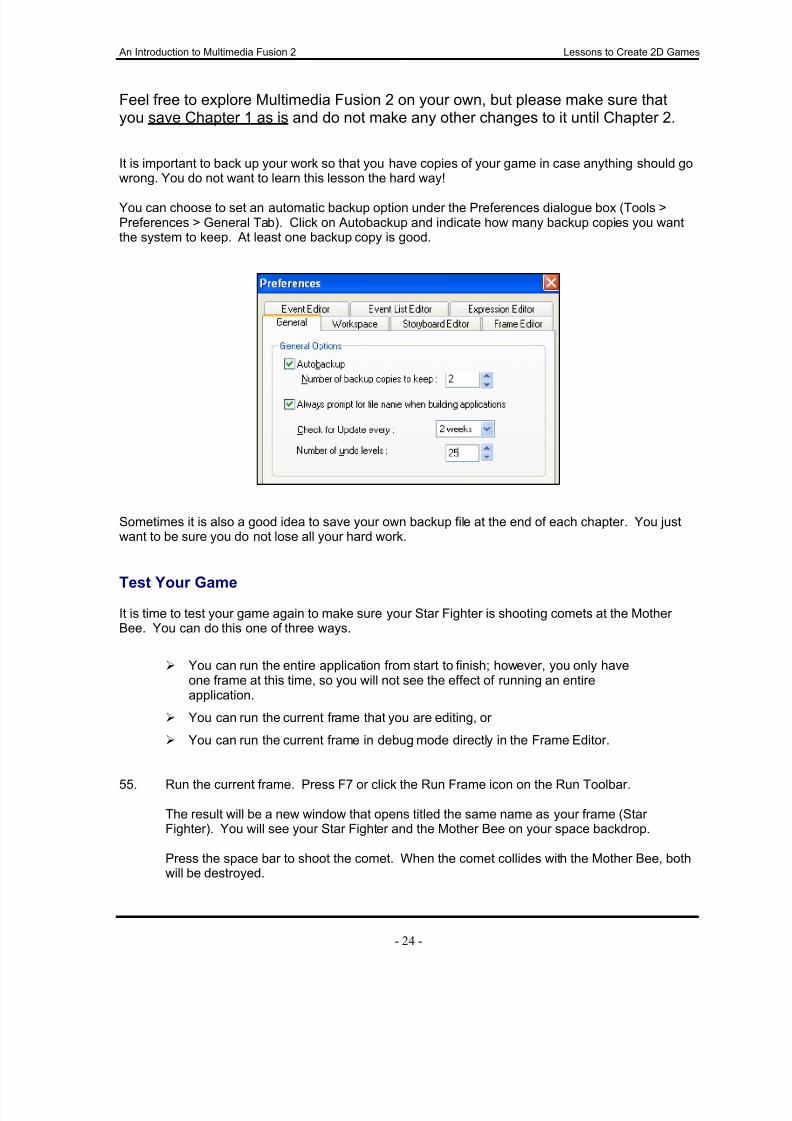
You can choose to set an automatic backup option under the Preferences dialogue box (Tools >Preferences > General Tab). Click on Autobackup and indicate how many backup copies you wantthe system to keep. At least one backup copy is good.
Sometimes it is also a good idea to save your own backup file at the end of each chapter. You justwant to be sure you do not lose all your hard work.
Test Your GameIt is time to test your game again to make sure your Star Fighter is shooting comets at the MotherBee. You can do this one of three ways.
You can run the entire application from start to finish; however, you only haveone frame at this time, so you will not see the effect of running an entireapplication.
You can run the current frame that you are editing, or
You can run the current frame in debug mode directly in the Frame Editor.
55. Run the current frame. Press F7 or click the Run Frame icon on the Run Toolbar.
The result will be a new window that opens titled the same name as your frame (StarFighter). You will see your Star Fighter and the Mother Bee on your space backdrop.
Press the space bar to shoot the comet. When the comet collides with the Mother Bee, bothwill be destroyed.
8/9/2019 An Introduction to Multimedia Fusion Full Version
http://slidepdf.com/reader/full/an-introduction-to-multimedia-fusion-full-version 27/145
An Introduction to Multimedia Fusion 2 Lessons to Create 2D Games
- 25 -
Chapter Two: Star Fighter Game
Objectives:
In Chapter Two, you will:
Establish an eight-directional movement for your spaceship; Use the Animation Editor to change the direction and action point of an
object; Establish a path movement for your enemy; Use the Event Editor to establish a collision condition.
In Chapter 1, you set up your ship to shoot a comet at Mother Bee (the enemy) and you destroyedthe enemy and the comet upon collision. Now it is time to take your game one step further toestablish movement for your spaceship as well as movement for the enemy Mother Bee.
1. Open Star Fighter 1.
2. Save it right now as Star Fighter 2. This step will make it so that you will be working in anew file called Star Fighter 2, and your Star Fighter 1 will remain in its original saved version.If you need to go back to it for any reason, you will be able to do so.
Movement for Your Spaceship: Eight Directions
These next steps make it so you will be able to move your spaceship around using the cursor keys.
3. Click on Star Fighter to select it. In the Properties Toolbar, locate and click on the Movement
icon.
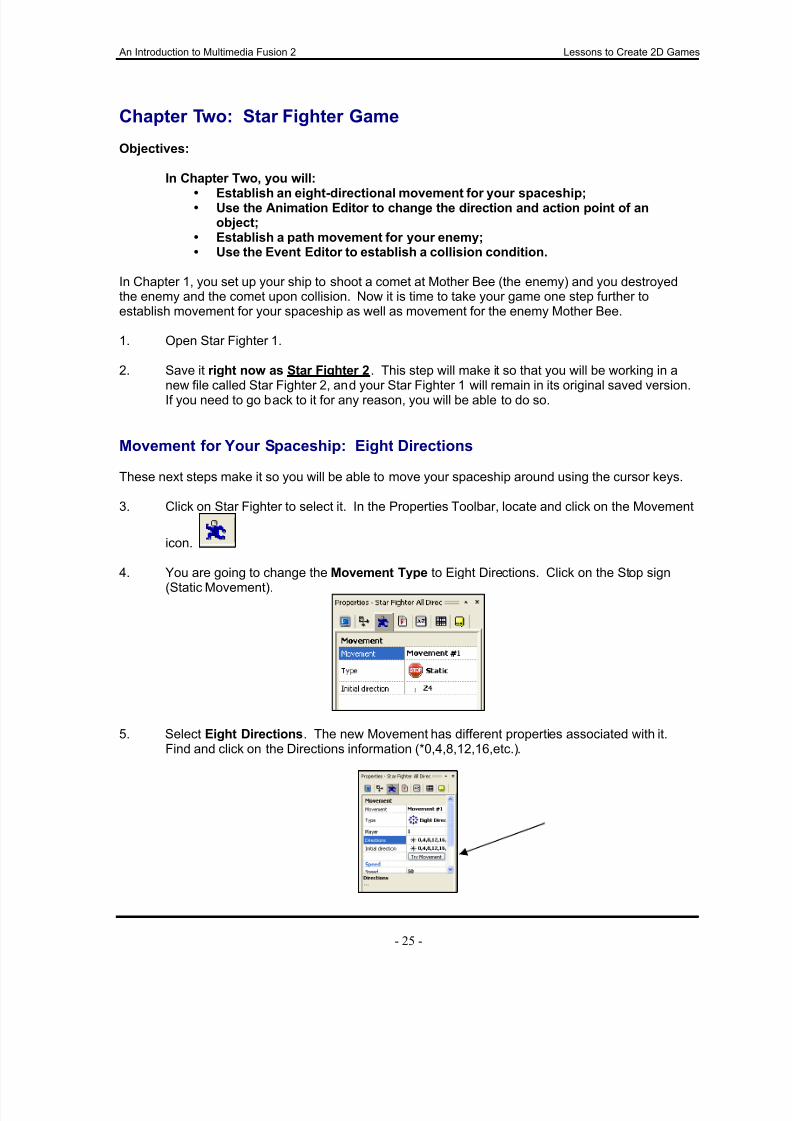
4. You are going to change the Movement Type to Eight Directions. Click on the Stop sign
(Static Movement).
5. Select Eight Directions. The new Movement has different properties associated with it.Find and click on the Directions information (*0,4,8,12,16,etc.).
8/9/2019 An Introduction to Multimedia Fusion Full Version
http://slidepdf.com/reader/full/an-introduction-to-multimedia-fusion-full-version 28/145
An Introduction to Multimedia Fusion 2 Lessons to Create 2D Games
- 26 -
6. The Eight Directions box appears. If you want the Star Fighter movement to go all eightdirections, then it will remain the same as the image above. If you only want up and down or
just left and right movement, you would take away the directions by click on the black squareassociated with the direction in which you do not want your object to move. Since you wantyour ship to move all eight directions, just click in the gray area to go back to move on.
7. You are doing great. Now, click Try Movement.
Another new window pops up. Stretch this new window as wide as necessary to see the ship
on your background. Use your cursor keys to move your ship, up, down, left and right. Takenotice that when you press left, your ship flips and faces a new direction. You will changethis direction soon.
After you have tested the movement for all four arrow keys, close this window by locating theSTOP window (in the upper left-hand corner of your screen) and pressing on the STOPbutton.
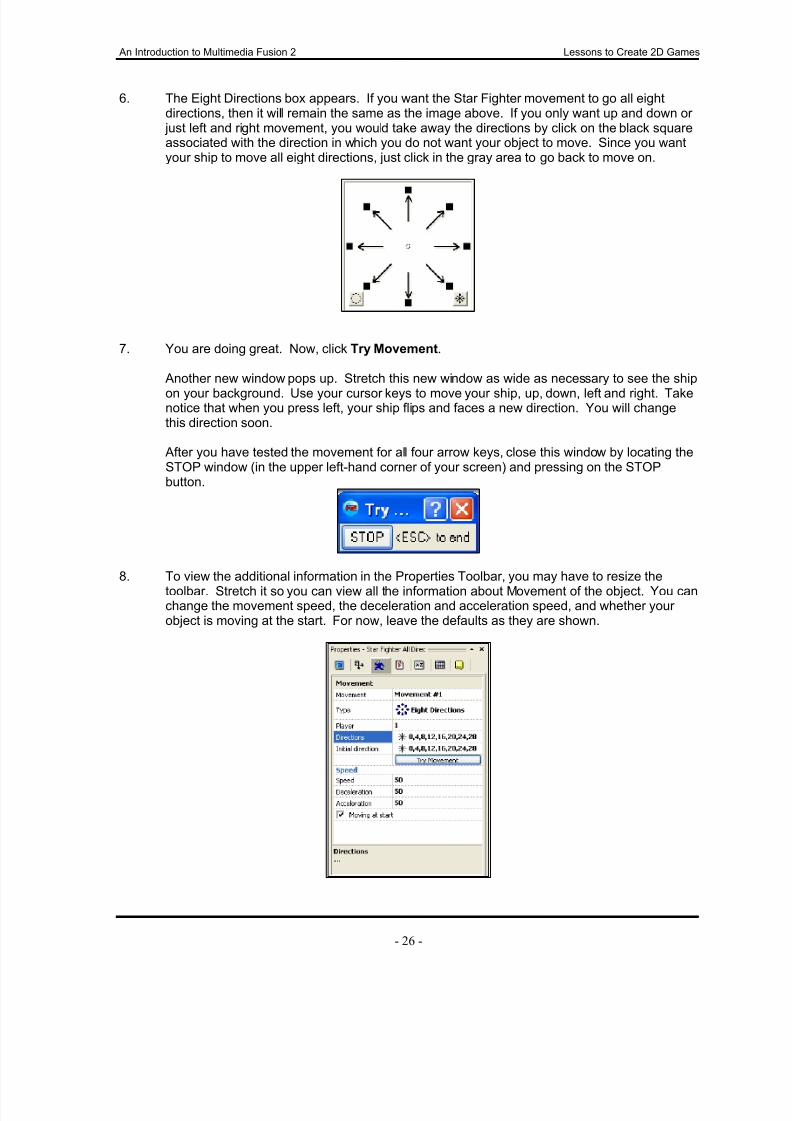
8. To view the additional information in the Properties Toolbar, you may have to resize the
toolbar. Stretch it so you can view all the information about Movement of the object. You canchange the movement speed, the deceleration and acceleration speed, and whether yourobject is moving at the start. For now, leave the defaults as they are shown.

8/9/2019 An Introduction to Multimedia Fusion Full Version
http://slidepdf.com/reader/full/an-introduction-to-multimedia-fusion-full-version 29/145
An Introduction to Multimedia Fusion 2 Lessons to Create 2D Games
- 27 -
Working in the Animation Editor: Ship Direction and Action Point
When you tested the left arrow key, the ship flipped itself to the left. You want to make sure the shipdoes not turn its back on the enemy creature when the left arrow key is pressed, so you have to makechanges.
9. Go back to the Frame Editor and select your ship.
10. Once the ship is selected, right click on it and select Edit. This will take you to the AnimationEditor. (A quick double click on the object also brings you to this point.)
Animation Editor
8/9/2019 An Introduction to Multimedia Fusion Full Version
http://slidepdf.com/reader/full/an-introduction-to-multimedia-fusion-full-version 30/145
An Introduction to Multimedia Fusion 2 Lessons to Create 2D Games
- 28 -
11. In the Animation Editor window, notice that there is a dot to the left of “Stopped” under Animations. The animation consists of two directions, right and left (noted by the darksquares to the left and right in the directions box). Click on left direction dark square. Thedirection of the ship in the Frames area now changes.
To delete this direction, select all the Frames from Frame 1 to Frame 12 (click on the firstFrame then scroll down to Frame 12, hold down Shift and click on Frame 12). This actionselects all the frames. Press the Delete key and click OK to confirm this action. You shouldhave one blank frame remaining.
12. Click back on the right direction dark square.
The Action Point
Remember when you ran your frame and pressed the space bar? The comet appeared to be comingfrom the middle of your ship. The Action Point determines where the comet exits from the ship.
13. You need to change the Action Point of the ship. By changing this, you can better controlyour game. Single click on the picture named Frame 1.
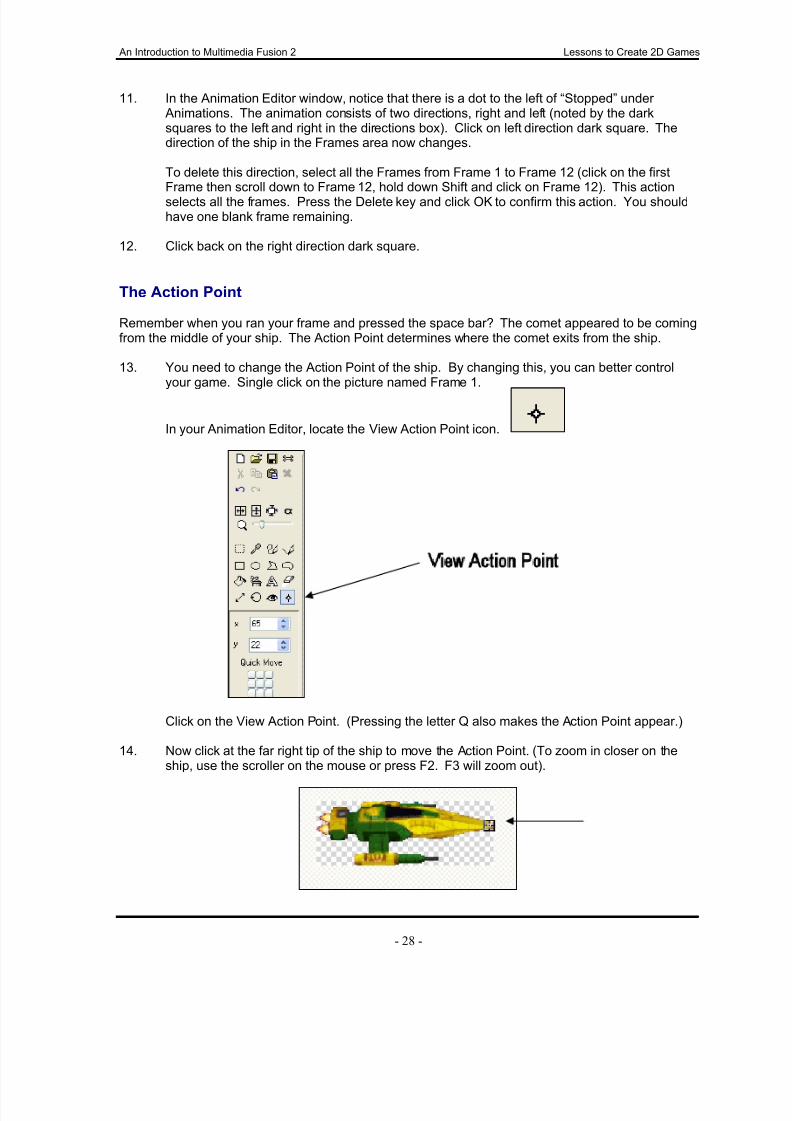
In your Animation Editor, locate the View Action Point icon.
Click on the View Action Point. (Pressing the letter Q also makes the Action Point appear.)
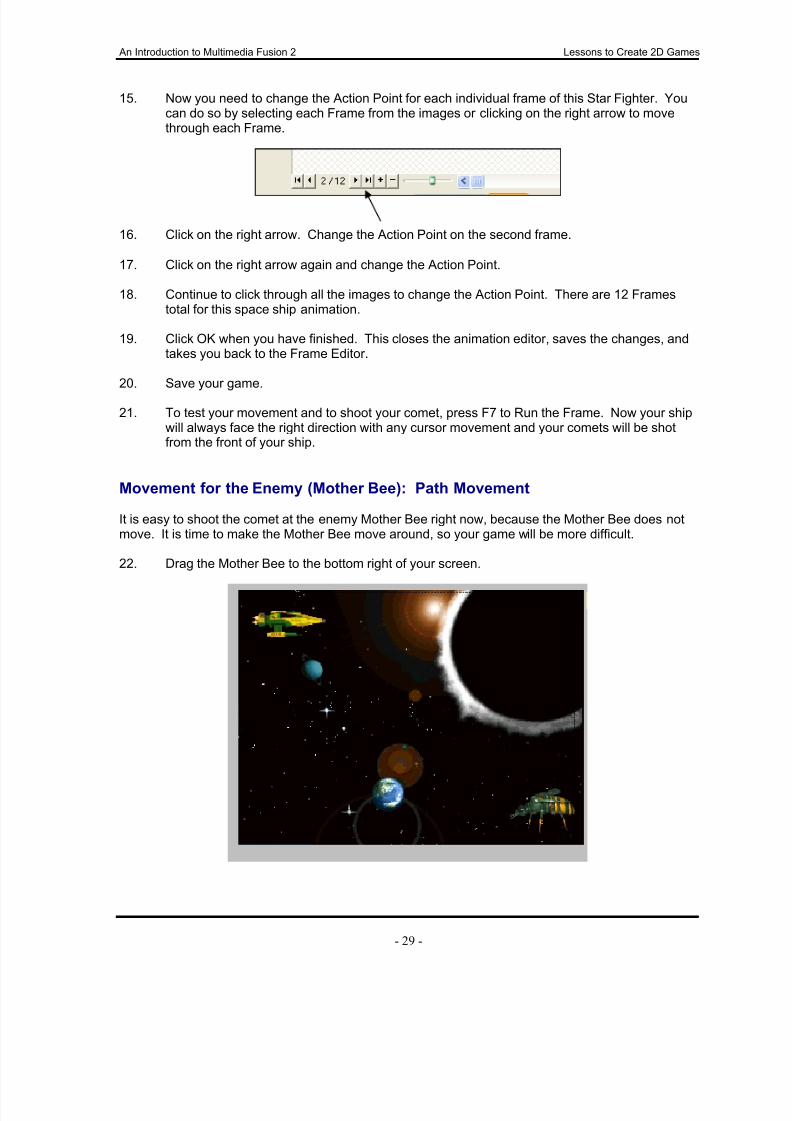
14. Now click at the far right tip of the ship to move the Action Point. (To zoom in closer on theship, use the scroller on the mouse or press F2. F3 will zoom out).
8/9/2019 An Introduction to Multimedia Fusion Full Version
http://slidepdf.com/reader/full/an-introduction-to-multimedia-fusion-full-version 31/145
An Introduction to Multimedia Fusion 2 Lessons to Create 2D Games
- 29 -
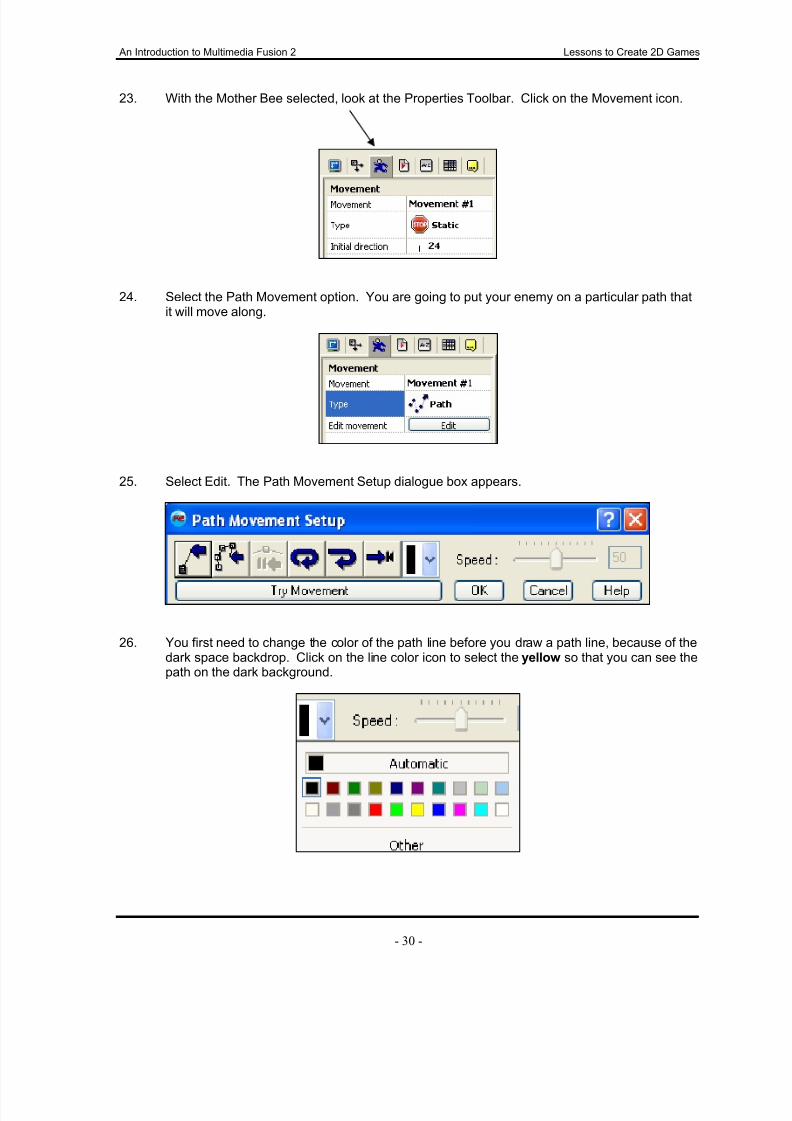
15. Now you need to change the Action Point for each individual frame of this Star Fighter. Youcan do so by selecting each Frame from the images or clicking on the right arrow to movethrough each Frame.
16. Click on the right arrow. Change the Action Point on the second frame.
17. Click on the right arrow again and change the Action Point.
18. Continue to click through all the images to change the Action Point. There are 12 Framestotal for this space ship animation.
19. Click OK when you have finished. This closes the animation editor, saves the changes, andtakes you back to the Frame Editor.
20. Save your game.
21. To test your movement and to shoot your comet, press F7 to Run the Frame. Now your shipwill always face the right direction with any cursor movement and your comets will be shotfrom the front of your ship.
Movement for the Enemy (Mother Bee): Path Movement
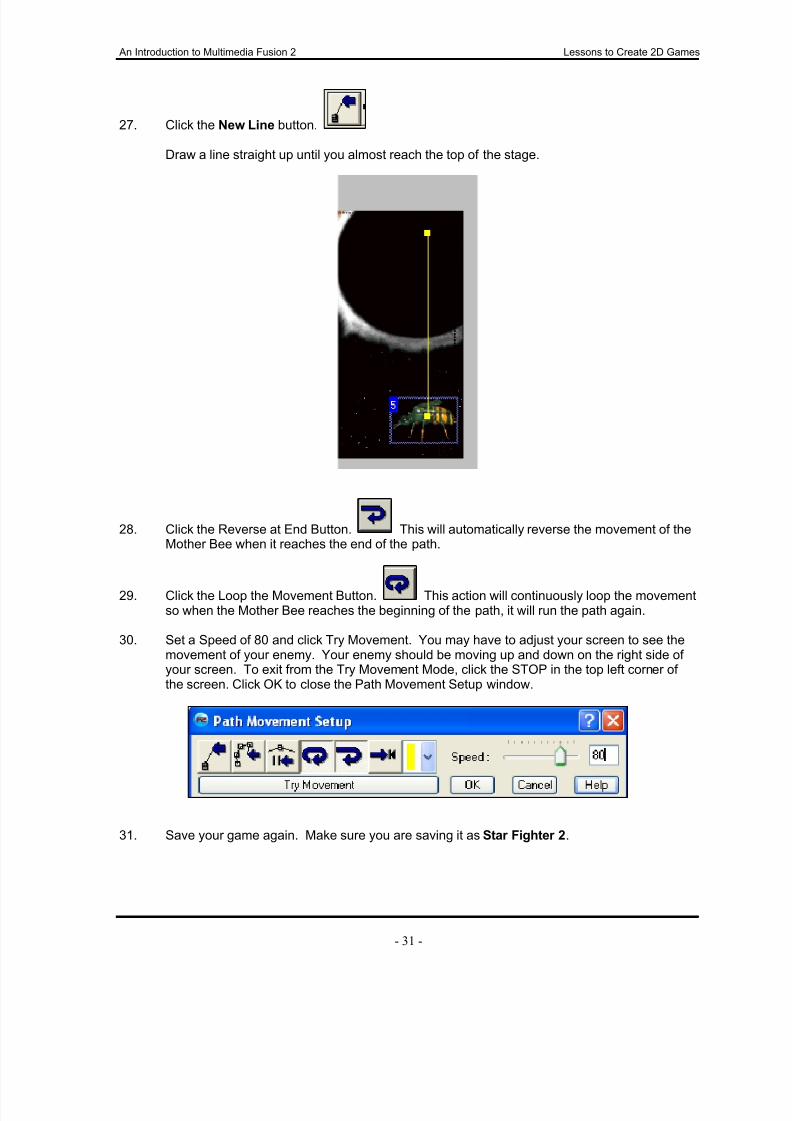
It is easy to shoot the comet at the enemy Mother Bee right now, because the Mother Bee does notmove. It is time to make the Mother Bee move around, so your game will be more difficult.
22. Drag the Mother Bee to the bottom right of your screen.
8/9/2019 An Introduction to Multimedia Fusion Full Version
http://slidepdf.com/reader/full/an-introduction-to-multimedia-fusion-full-version 32/145
An Introduction to Multimedia Fusion 2 Lessons to Create 2D Games
- 30 -
23. With the Mother Bee selected, look at the Properties Toolbar. Click on the Movement icon.
24. Select the Path Movement option. You are going to put your enemy on a particular path thatit will move along.
25. Select Edit. The Path Movement Setup dialogue box appears.
26. You first need to change the color of the path line before you draw a path line, because of thedark space backdrop. Click on the line color icon to select the yellow so that you can see thepath on the dark background.
8/9/2019 An Introduction to Multimedia Fusion Full Version
http://slidepdf.com/reader/full/an-introduction-to-multimedia-fusion-full-version 33/145
An Introduction to Multimedia Fusion 2 Lessons to Create 2D Games
- 31 -
27. Click the New Line button.
Draw a line straight up until you almost reach the top of the stage.
28. Click the Reverse at End Button. This will automatically reverse the movement of theMother Bee when it reaches the end of the path.
29. Click the Loop the Movement Button. This action will continuously loop the movementso when the Mother Bee reaches the beginning of the path, it will run the path again.
30. Set a Speed of 80 and click Try Movement. You may have to adjust your screen to see themovement of your enemy. Your enemy should be moving up and down on the right side ofyour screen. To exit from the Try Movement Mode, click the STOP in the top left corner ofthe screen. Click OK to close the Path Movement Setup window.
31. Save your game again. Make sure you are saving it as Star Fighter 2.
8/9/2019 An Introduction to Multimedia Fusion Full Version
http://slidepdf.com/reader/full/an-introduction-to-multimedia-fusion-full-version 34/145
An Introduction to Multimedia Fusion 2 Lessons to Create 2D Games
- 32 -
Establishing a New Collision Condition
It is time to establish a new condition that will destroy your spaceship if it collides with the enemy.
32. Click on the Event Editor icon or press CTRL+ E).
33. On Line 5, insert a comment that reads: “Destroy the Spaceship if it Collides with Enemy.”[Remember, right click on the number 5 and select Insert > A Comment. Make the back colorand the font color and size match the previous comments.]
34. Establish a New Condition. [Right click on dot to left of New Condition.] Right click on theStar Fighter ship and select Collisions > Another object.
35. Click on the enemy Mother Bee and click OK.
36. On this condition line, right click in the box under the spaceship and select Destroy. Now,when your spaceship collides with your enemy, the spaceship will be destroyed!
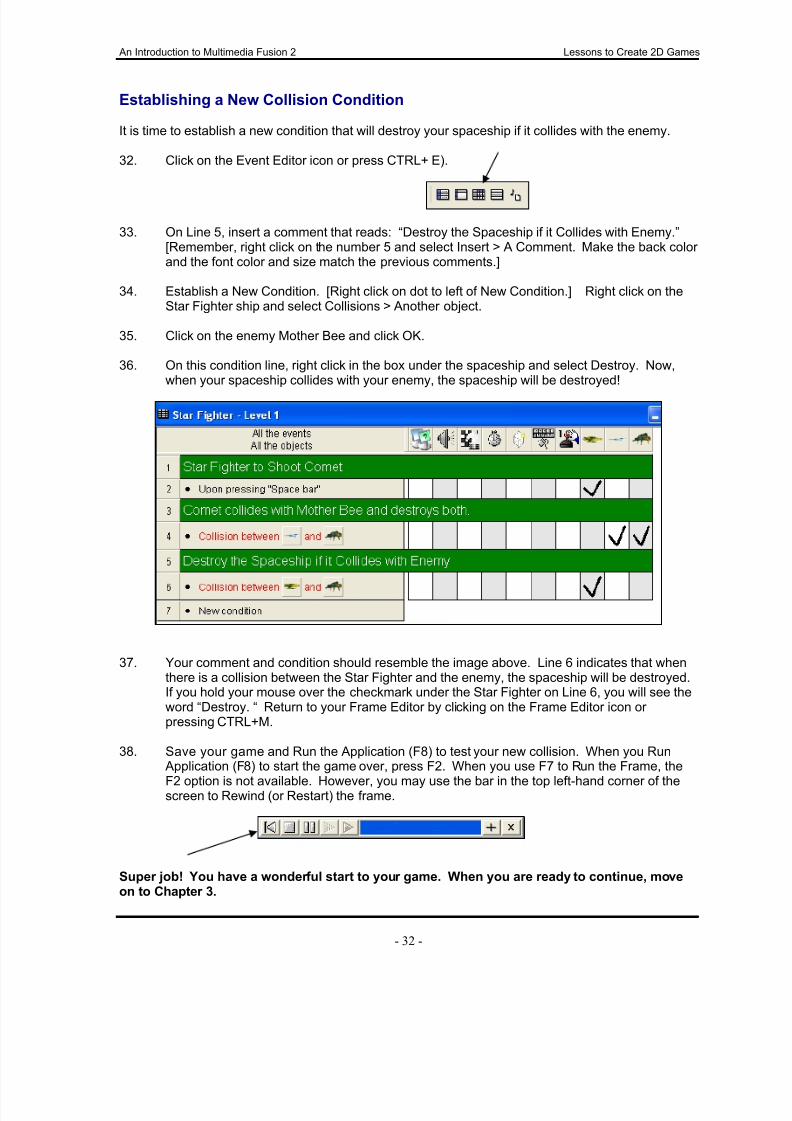
37. Your comment and condition should resemble the image above. Line 6 indicates that whenthere is a collision between the Star Fighter and the enemy, the spaceship will be destroyed.If you hold your mouse over the checkmark under the Star Fighter on Line 6, you will see theword “Destroy. “ Return to your Frame Editor by clicking on the Frame Editor icon orpressing CTRL+M.
38. Save your game and Run the Application (F8) to test your new collision. When you Run Application (F8) to start the game over, press F2. When you use F7 to Run the Frame, the
F2 option is not available. However, you may use the bar in the top left-hand corner of thescreen to Rewind (or Restart) the frame.
Super job! You have a wonderful start to your game. When you are ready to continue, moveon to Chapter 3.
8/9/2019 An Introduction to Multimedia Fusion Full Version
http://slidepdf.com/reader/full/an-introduction-to-multimedia-fusion-full-version 35/145
An Introduction to Multimedia Fusion 2 Lessons to Create 2D Games
- 33 -
Chapter Three: Adding Side Shooters and Sound to Your Game
Objectives:In Chapter 3, you will learn:
The Purpose of a Side Shooter
To Create a Side Shooter and Add Movement to It To Add Background Music and Sound Effects to Your Game
In the previous chapter, you created movement for your spaceship and the enemy. However, onceyou shoot the enemy, it is destroyed and disappears from your game. In this chapter, you will learn tocreate a side shooter that will shoot enemies at the ship. You will also add background music andsound effects to your game. This should make things a bit more interesting.
To Begin: Open Star Fighter 2.
Save the file as Star Fighter 3 before you begin this chapter.
What is a Side Shooter?
A Side Shooter is an object located off the Playfield that shoots a different object onto the Playfield.The side shooter can be an object of any shape. A colored square or diamond works great. You willuse an Active Object to create the Side Shooter. An Active Object will allow the assignment ofmovement and other properties.
Creating a Side Shooter
1. To create a Side Shooter, from the Menu Bar, select Insert > New Object.
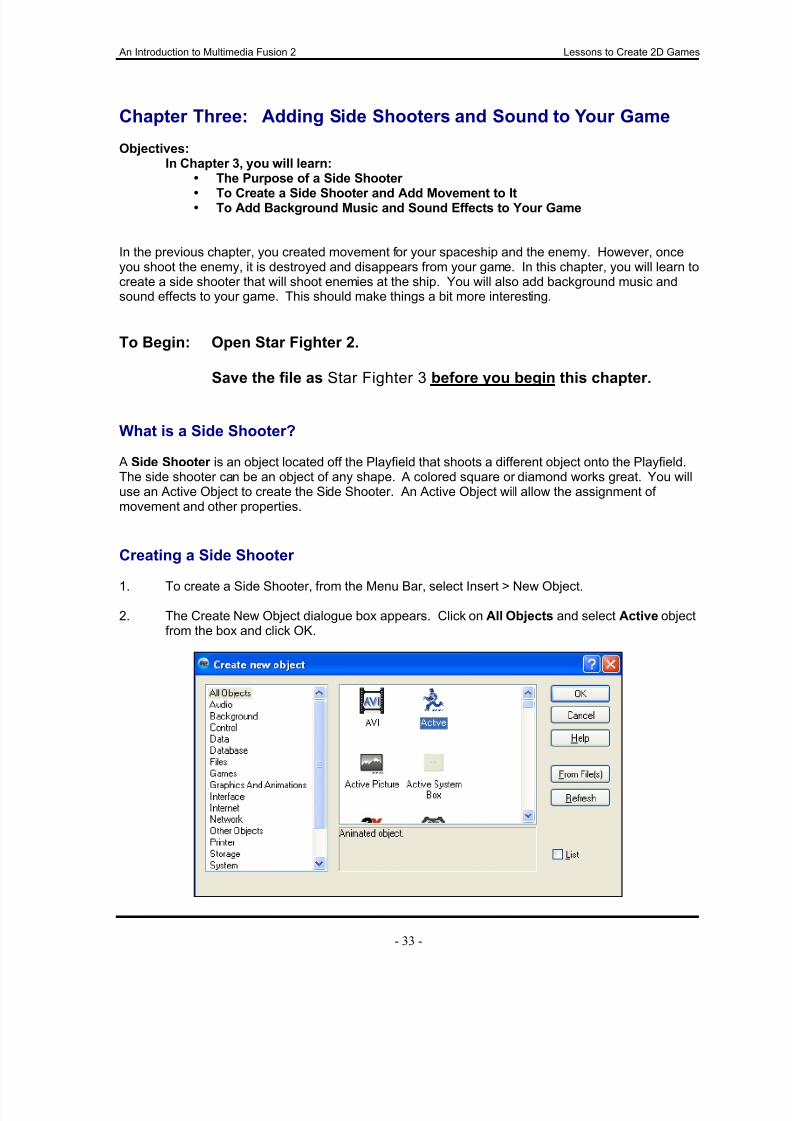
2. The Create New Object dialogue box appears. Click on All Objects and select Active objectfrom the box and click OK.
8/9/2019 An Introduction to Multimedia Fusion Full Version
http://slidepdf.com/reader/full/an-introduction-to-multimedia-fusion-full-version 36/145
An Introduction to Multimedia Fusion 2 Lessons to Create 2D Games
- 34 -
3. When the crosshair appears, click down in the gray Holding Area.
4. Double click on the Active Object (the green diamond). The Animation Editor appears.
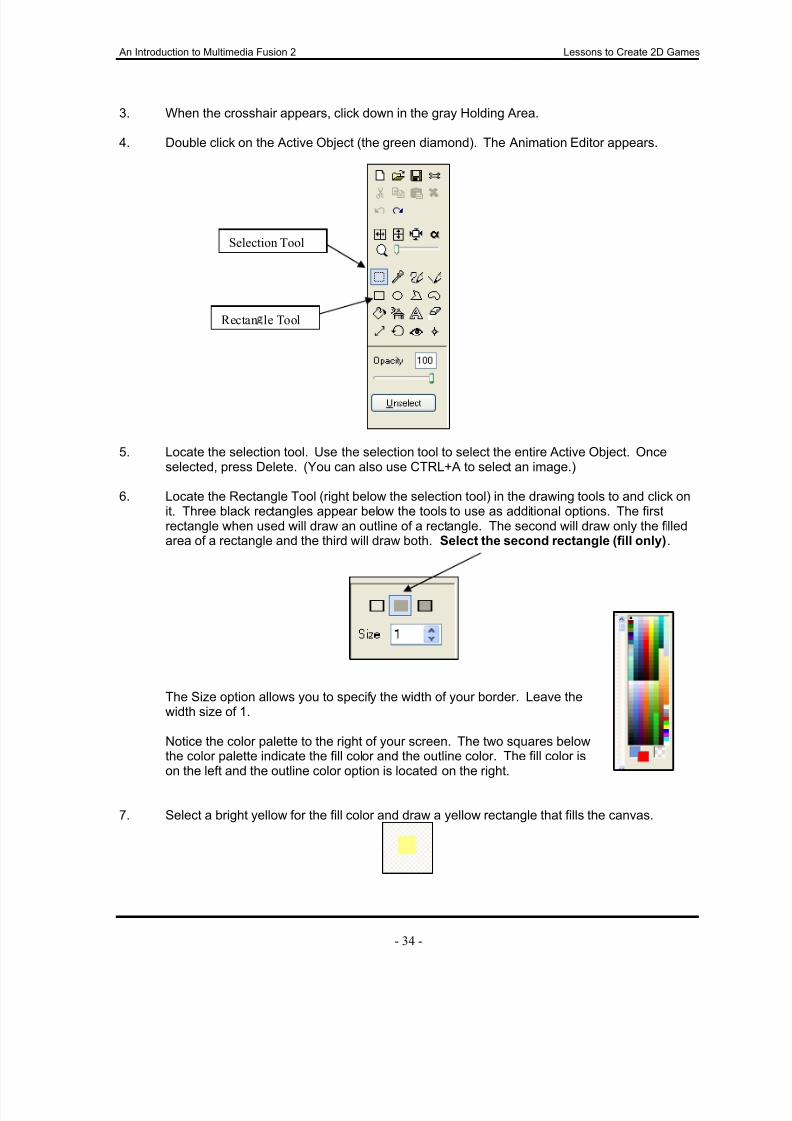
5. Locate the selection tool. Use the selection tool to select the entire Active Object. Onceselected, press Delete. (You can also use CTRL+A to select an image.)
6. Locate the Rectangle Tool (right below the selection tool) in the drawing tools to and click onit. Three black rectangles appear below the tools to use as additional options. The firstrectangle when used will draw an outline of a rectangle. The second will draw only the filledarea of a rectangle and the third will draw both. Select the second rectangle (fill only).
The Size option allows you to specify the width of your border. Leave thewidth size of 1.
Notice the color palette to the right of your screen. The two squares belowthe color palette indicate the fill color and the outline color. The fill color ison the left and the outline color option is located on the right.
7. Select a bright yellow for the fill color and draw a yellow rectangle that fills the canvas.
Selection Tool
Rectan le Tool
8/9/2019 An Introduction to Multimedia Fusion Full Version
http://slidepdf.com/reader/full/an-introduction-to-multimedia-fusion-full-version 37/145
An Introduction to Multimedia Fusion 2 Lessons to Create 2D Games
- 35 -
8. Click on the View Action Point icon and move the Action Point to the center of the object.
9. Click OK to close the object. Your Active Object green diamond is now an Active Objectyellow square. You can use many different Active Objects throughout your game.
10. Save your game. [You should be saving as Star Fighter 3.]
Using the Side Shooter
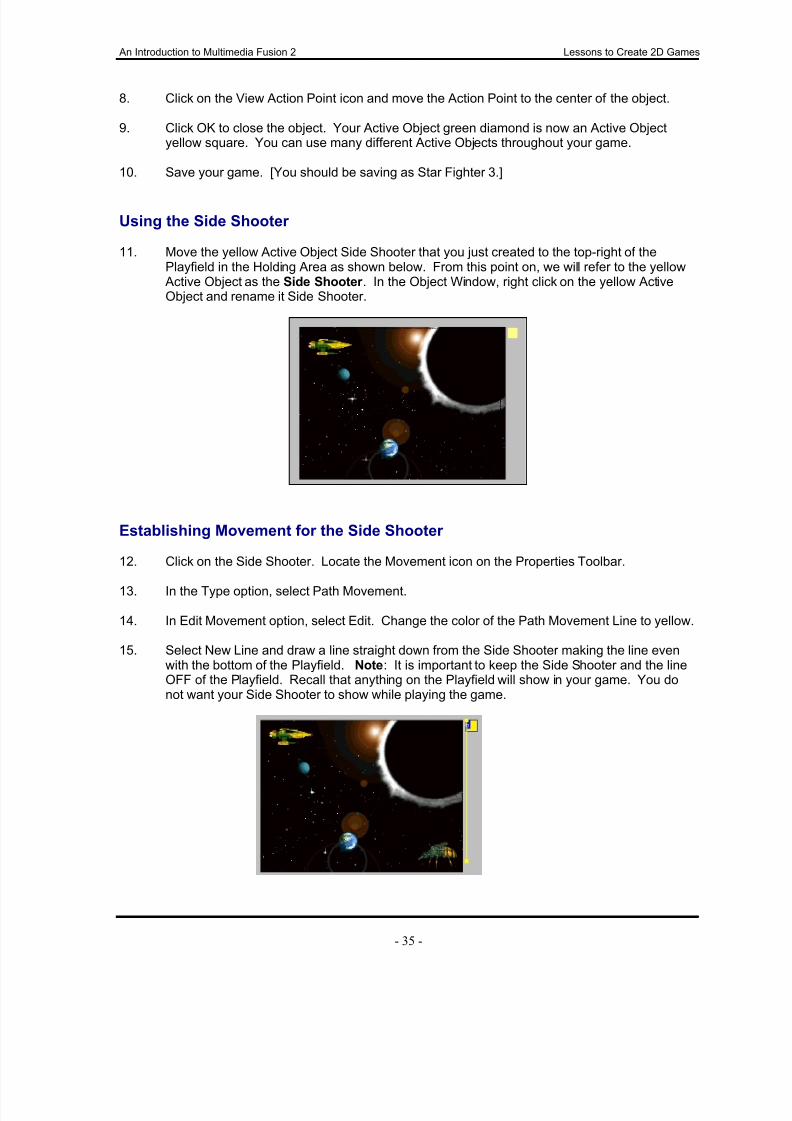
11. Move the yellow Active Object Side Shooter that you just created to the top-right of thePlayfield in the Holding Area as shown below. From this point on, we will refer to the yellow
Active Object as the Side Shooter . In the Object Window, right click on the yellow ActiveObject and rename it Side Shooter.
Establishing Movement for the Side Shooter
12. Click on the Side Shooter. Locate the Movement icon on the Properties Toolbar.
13. In the Type option, select Path Movement.
14. In Edit Movement option, select Edit. Change the color of the Path Movement Line to yellow.
15. Select New Line and draw a line straight down from the Side Shooter making the line evenwith the bottom of the Playfield. Note: It is important to keep the Side Shooter and the lineOFF of the Playfield. Recall that anything on the Playfield will show in your game. You donot want your Side Shooter to show while playing the game.
8/9/2019 An Introduction to Multimedia Fusion Full Version
http://slidepdf.com/reader/full/an-introduction-to-multimedia-fusion-full-version 38/145
An Introduction to Multimedia Fusion 2 Lessons to Create 2D Games
- 36 -
16. Click the Loop Movement and Reverse at End icons. Click OK to exit Path Movement Edit.If you opt to Try Movement, you will not see the path movement, since the side shooter is noton the Playfield.
17. Save your game again.
Removing the Enemy from the Playfield
18. Click the enemy Mother Bee. On the Properties Toolbar, select the Movement icon.
19. Click on Movement Type and select Static Movement (STOP Sign). You have just removedany movement you had assigned to the enemy Mother Bee. There is no longer a pathmovement on the Mother Bee.
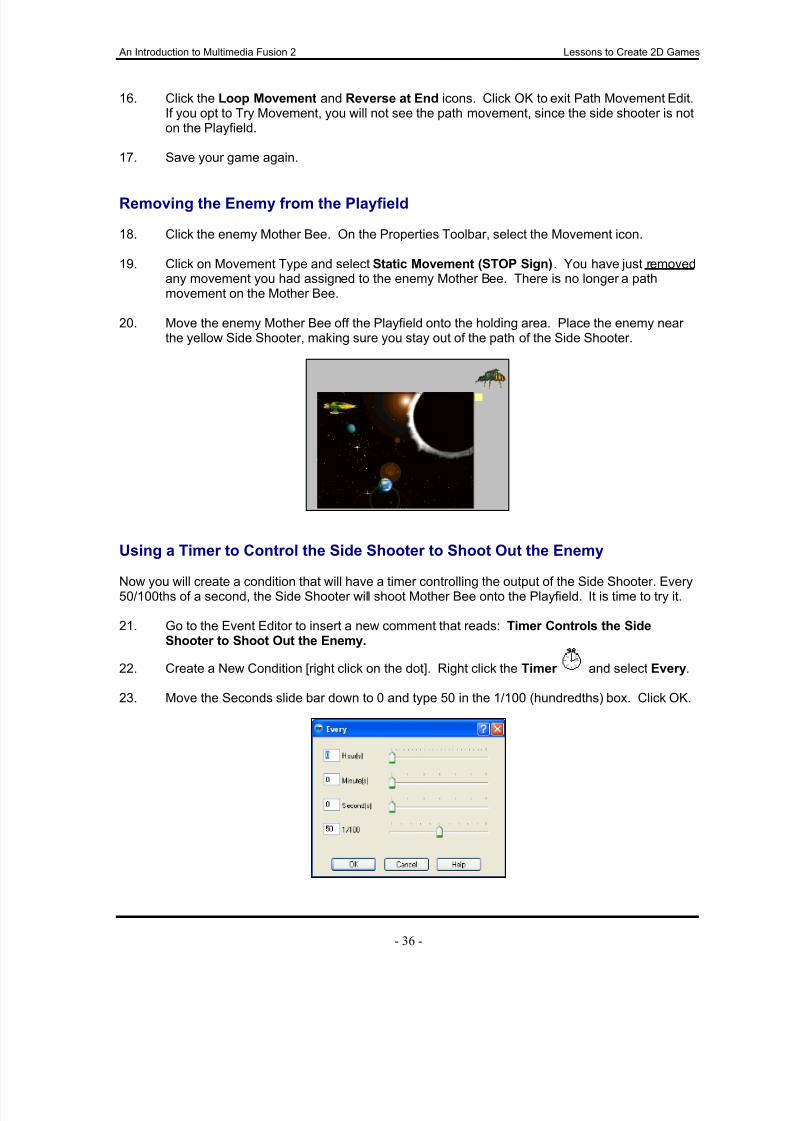
20. Move the enemy Mother Bee off the Playfield onto the holding area. Place the enemy nearthe yellow Side Shooter, making sure you stay out of the path of the Side Shooter.
Using a Timer to Control the Side Shooter to Shoot Out the Enemy
Now you will create a condition that will have a timer controlling the output of the Side Shooter. Every50/100ths of a second, the Side Shooter will shoot Mother Bee onto the Playfield. It is time to try it.
21. Go to the Event Editor to insert a new comment that reads: Timer Controls the SideShooter to Shoot Out the Enemy.
22. Create a New Condition [right click on the dot]. Right click the Timer and select Every.
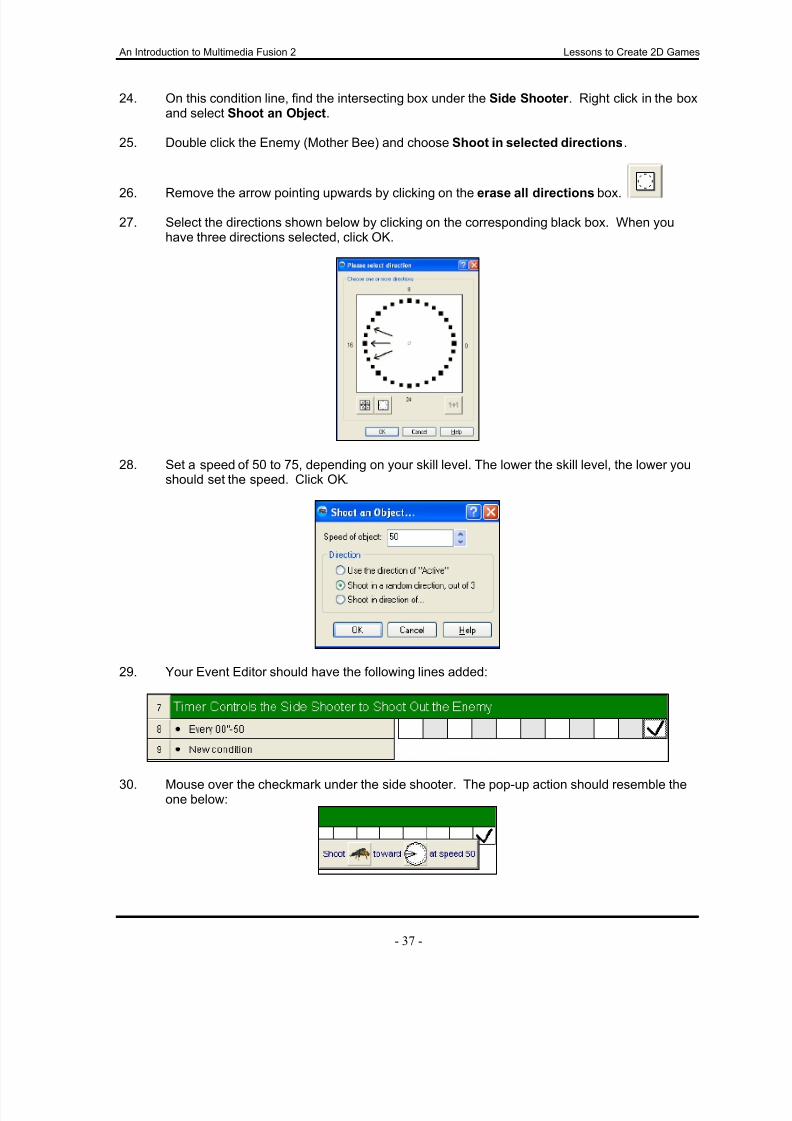
23. Move the Seconds slide bar down to 0 and type 50 in the 1/100 (hundredths) box. Click OK.
8/9/2019 An Introduction to Multimedia Fusion Full Version
http://slidepdf.com/reader/full/an-introduction-to-multimedia-fusion-full-version 39/145
An Introduction to Multimedia Fusion 2 Lessons to Create 2D Games
- 37 -
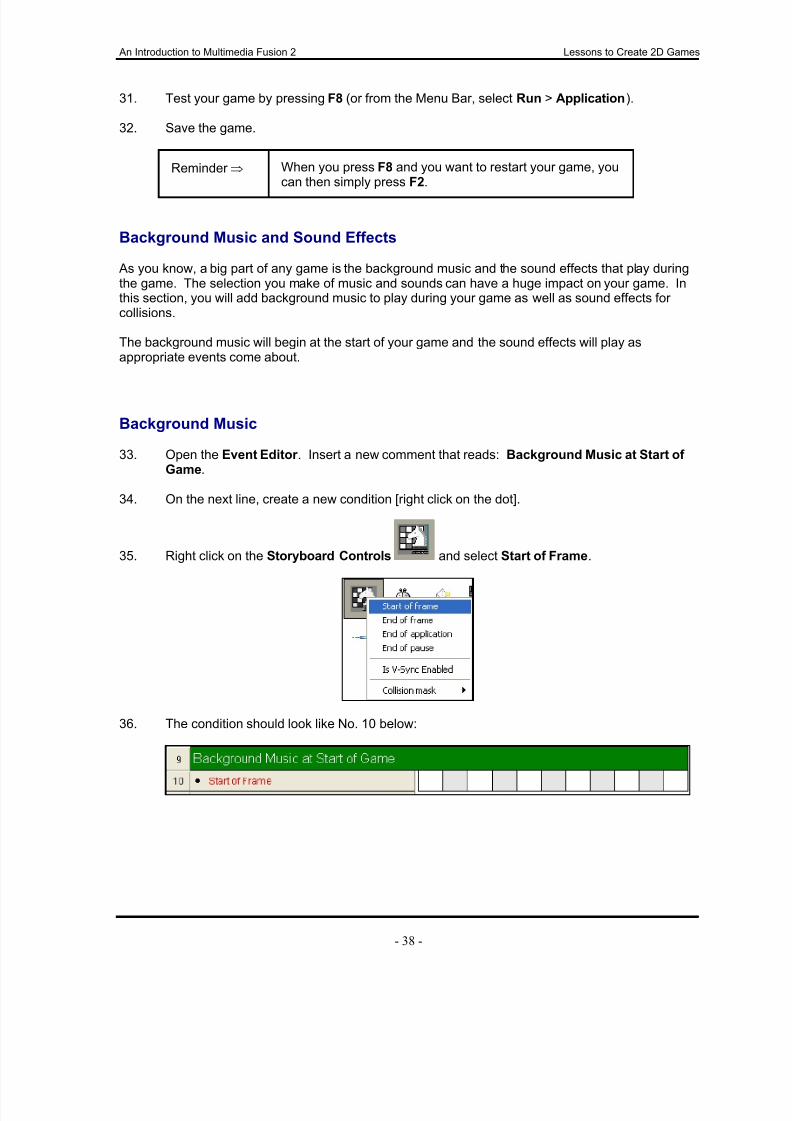
24. On this condition line, find the intersecting box under the Side Shooter . Right click in the boxand select Shoot an Object.
25. Double click the Enemy (Mother Bee) and choose Shoot in selected directions.
26. Remove the arrow pointing upwards by clicking on the erase all directions box.
27. Select the directions shown below by clicking on the corresponding black box. When youhave three directions selected, click OK.
28. Set a speed of 50 to 75, depending on your skill level. The lower the skill level, the lower youshould set the speed. Click OK.
29. Your Event Editor should have the following lines added:
30. Mouse over the checkmark under the side shooter. The pop-up action should resemble theone below:
8/9/2019 An Introduction to Multimedia Fusion Full Version
http://slidepdf.com/reader/full/an-introduction-to-multimedia-fusion-full-version 40/145
An Introduction to Multimedia Fusion 2 Lessons to Create 2D Games
- 38 -
31. Test your game by pressing F8 (or from the Menu Bar, select Run > Application).
32. Save the game.
Reminder⇒ When you press F8 and you want to restart your game, youcan then simply press F2.
Background Music and Sound Effects
As you know, a big part of any game is the background music and the sound effects that play duringthe game. The selection you make of music and sounds can have a huge impact on your game. Inthis section, you will add background music to play during your game as well as sound effects forcollisions.
The background music will begin at the start of your game and the sound effects will play asappropriate events come about.
Background Music
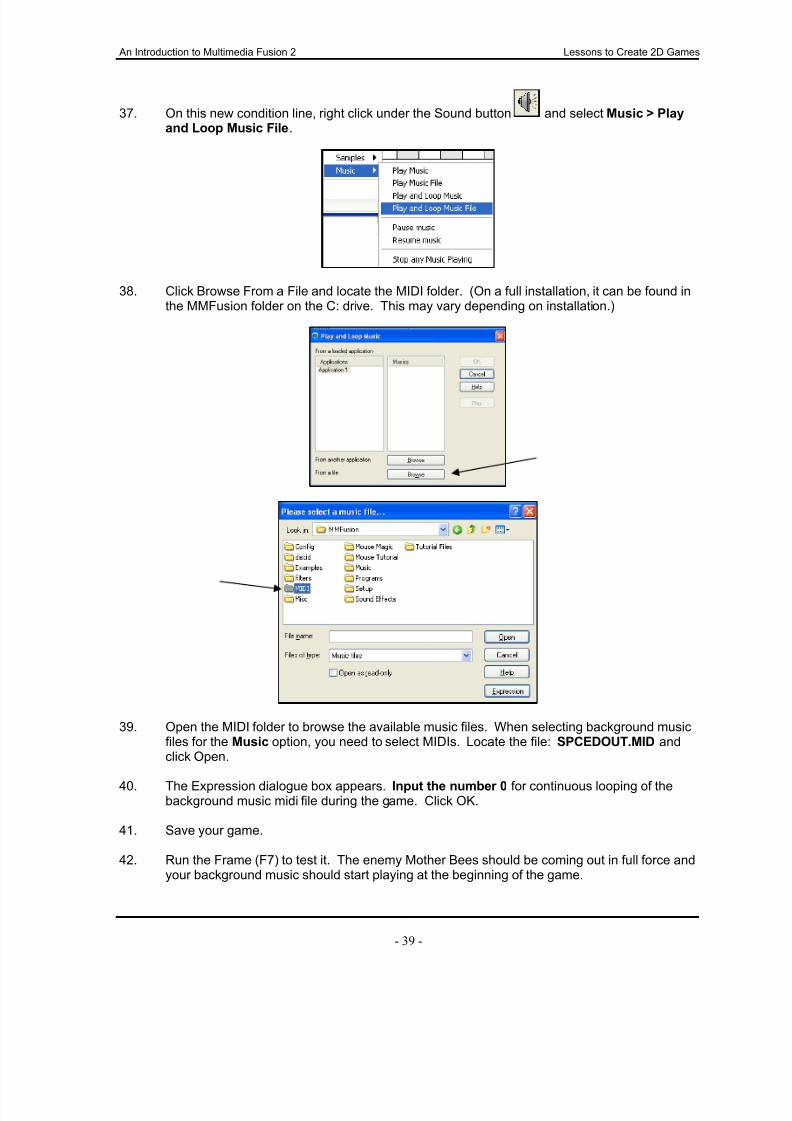
33. Open the Event Editor . Insert a new comment that reads: Background Music at Start ofGame.
34. On the next line, create a new condition [right click on the dot].
35. Right click on the Storyboard Controls and select Start of Frame.
36. The condition should look like No. 10 below:
8/9/2019 An Introduction to Multimedia Fusion Full Version
http://slidepdf.com/reader/full/an-introduction-to-multimedia-fusion-full-version 41/145
An Introduction to Multimedia Fusion 2 Lessons to Create 2D Games
- 39 -
37. On this new condition line, right click under the Sound button and select Music > Play and Loop Music File.
38. Click Browse From a File and locate the MIDI folder. (On a full installation, it can be found inthe MMFusion folder on the C: drive. This may vary depending on installation.)
39. Open the MIDI folder to browse the available music files. When selecting background musicfiles for the Music option, you need to select MIDIs. Locate the file: SPCEDOUT.MID andclick Open.
40. The Expression dialogue box appears. Input the number 0 for continuous looping of thebackground music midi file during the game. Click OK.
41. Save your game.
42. Run the Frame (F7) to test it. The enemy Mother Bees should be coming out in full force andyour background music should start playing at the beginning of the game.
8/9/2019 An Introduction to Multimedia Fusion Full Version
http://slidepdf.com/reader/full/an-introduction-to-multimedia-fusion-full-version 42/145
An Introduction to Multimedia Fusion 2 Lessons to Create 2D Games
- 40 -
Sound Effects
In Multimedia Fusion 2, sound effects use .wav files, also known as sample files.
43. Look through the comments in the Event Editor to find the condition where the Star Fighterfires the comet [Condition -- “Upon pressing Space bar“]. Right click in the square under the
Sound icon.
44. Select Samples > Play Sample.
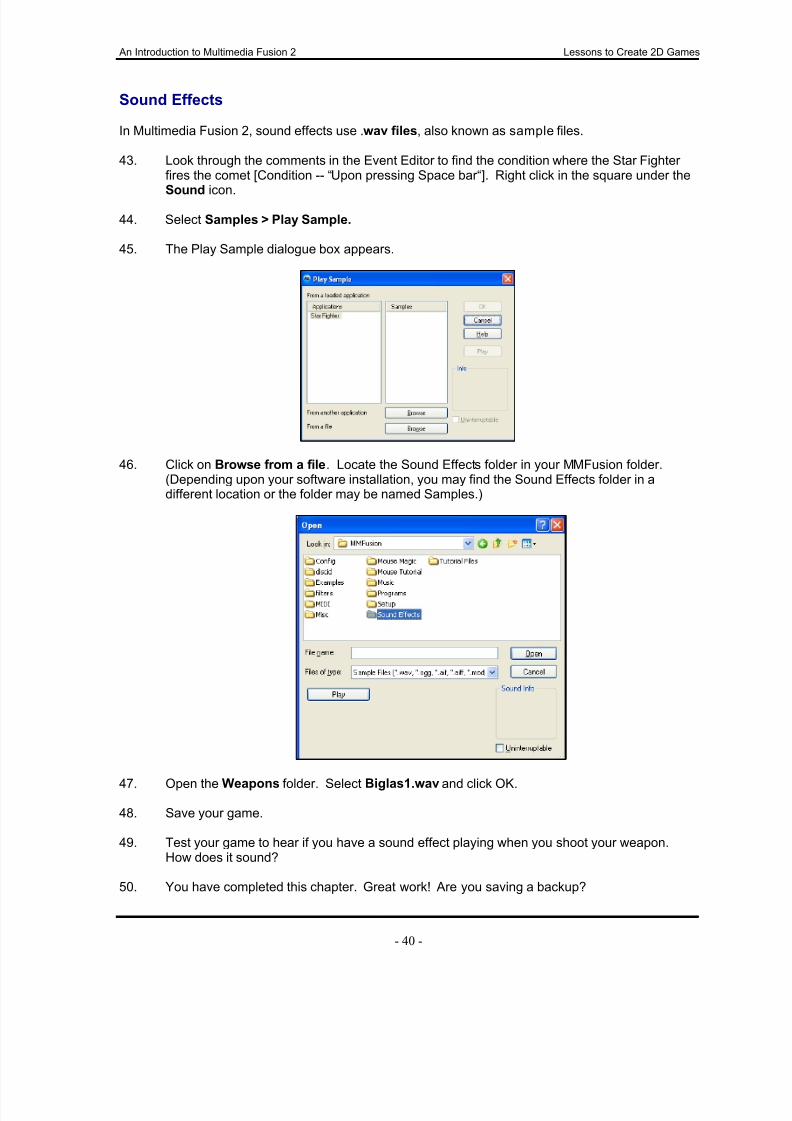
45. The Play Sample dialogue box appears.
46. Click on Browse from a file. Locate the Sound Effects folder in your MMFusion folder.(Depending upon your software installation, you may find the Sound Effects folder in adifferent location or the folder may be named Samples.)
47. Open the Weapons folder. Select Biglas1.wav and click OK.
48. Save your game.
49. Test your game to hear if you have a sound effect playing when you shoot your weapon.How does it sound?
50. You have completed this chapter. Great work! Are you saving a backup?
8/9/2019 An Introduction to Multimedia Fusion Full Version
http://slidepdf.com/reader/full/an-introduction-to-multimedia-fusion-full-version 43/145
An Introduction to Multimedia Fusion 2 Lessons to Create 2D Games
- 41 -
Chapter Four: Changing to a Moving Backgroundand Adding Scores and Lives
Objectives:In Chapter 4, you will:
Create a Moving Background Using the Bouncing Ball Movement Setup a Score Object and Add to and Subtract from the Score Set the Starting Number of Lives, Set a Condition to Subtract from Lives and
Set a Condition for When Lives Reaches Zero
You are going to delete your existing background in this chapter and create a new background withmoving stars. To do this, you will be using a new type of movement, the Bouncing Ball Movement.You will create boundaries for the stars to stay within. At the end of the chapter, you will set up
scoring and lives rules for your game.
Deleting the Current Background and Inserting a New One
1. Open the file named Star Fighter 3. Save it now as Star Fighter 4.
2. Click and drag your Star Fighter off the Playfield. You will put this back in the Playfield later.
3. Select the current background and press Delete. Your space backdrop will disappear.Notice that it has also been removed from the Object Window.
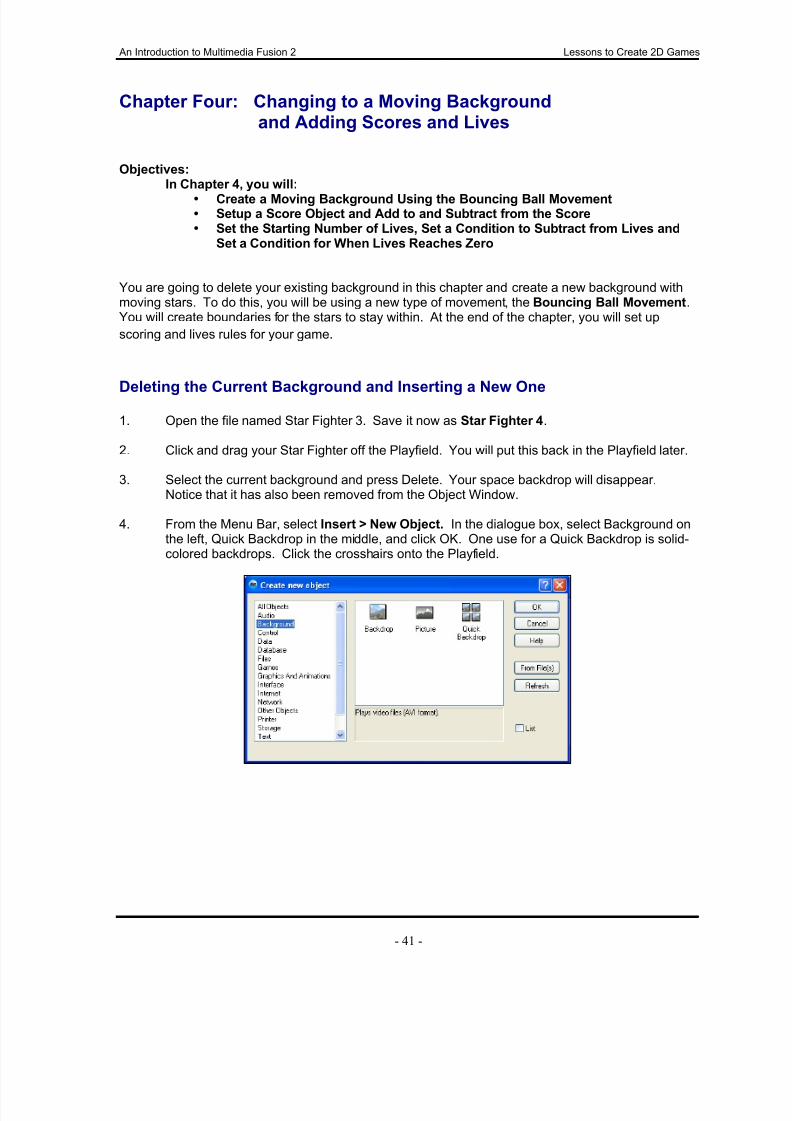
4. From the Menu Bar, select Insert > New Object. In the dialogue box, select Background onthe left, Quick Backdrop in the middle, and click OK. One use for a Quick Backdrop is solid-colored backdrops. Click the crosshairs onto the Playfield.
8/9/2019 An Introduction to Multimedia Fusion Full Version
http://slidepdf.com/reader/full/an-introduction-to-multimedia-fusion-full-version 44/145
An Introduction to Multimedia Fusion 2 Lessons to Create 2D Games
- 42 -
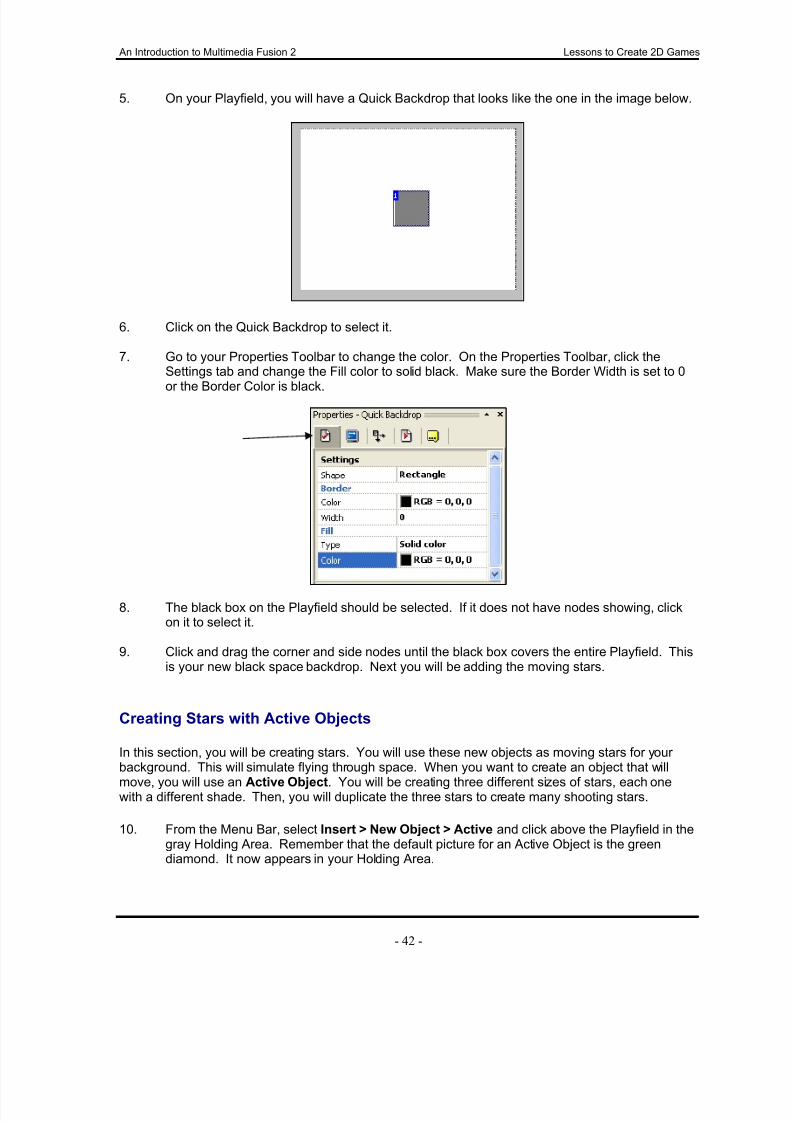
5. On your Playfield, you will have a Quick Backdrop that looks like the one in the image below.
6. Click on the Quick Backdrop to select it.
7. Go to your Properties Toolbar to change the color. On the Properties Toolbar, click theSettings tab and change the Fill color to solid black. Make sure the Border Width is set to 0
or the Border Color is black.
8. The black box on the Playfield should be selected. If it does not have nodes showing, clickon it to select it.
9. Click and drag the corner and side nodes until the black box covers the entire Playfield. Thisis your new black space backdrop. Next you will be adding the moving stars.
Creating Stars with Active Objects
In this section, you will be creating stars. You will use these new objects as moving stars for yourbackground. This will simulate flying through space. When you want to create an object that will
move, you will use an Active Object. You will be creating three different sizes of stars, each onewith a different shade. Then, you will duplicate the three stars to create many shooting stars.
10. From the Menu Bar, select Insert > New Object > Active and click above the Playfield in thegray Holding Area. Remember that the default picture for an Active Object is the greendiamond. It now appears in your Holding Area.
8/9/2019 An Introduction to Multimedia Fusion Full Version
http://slidepdf.com/reader/full/an-introduction-to-multimedia-fusion-full-version 45/145
An Introduction to Multimedia Fusion 2 Lessons to Create 2D Games
- 43 -
11. Double click the green diamond to enter the Animation Editor. Select All (CTRL-A) and pressthe Delete key to delete the green diamond.
12. Look at your color palette to the right of the screen. Change the fill color to white. Changethe border color to black.
Notice to the right of the fill and border color swatches under the color palette that you have athird swatch. It shows the checkered pattern. This is your transparent option. If you create acharacter for which you need to use a transparent background fill, select this swatch. Toselect a fill, you left click on the color or transparent swatch. For border, you right click on thetransparent swatch or a color.
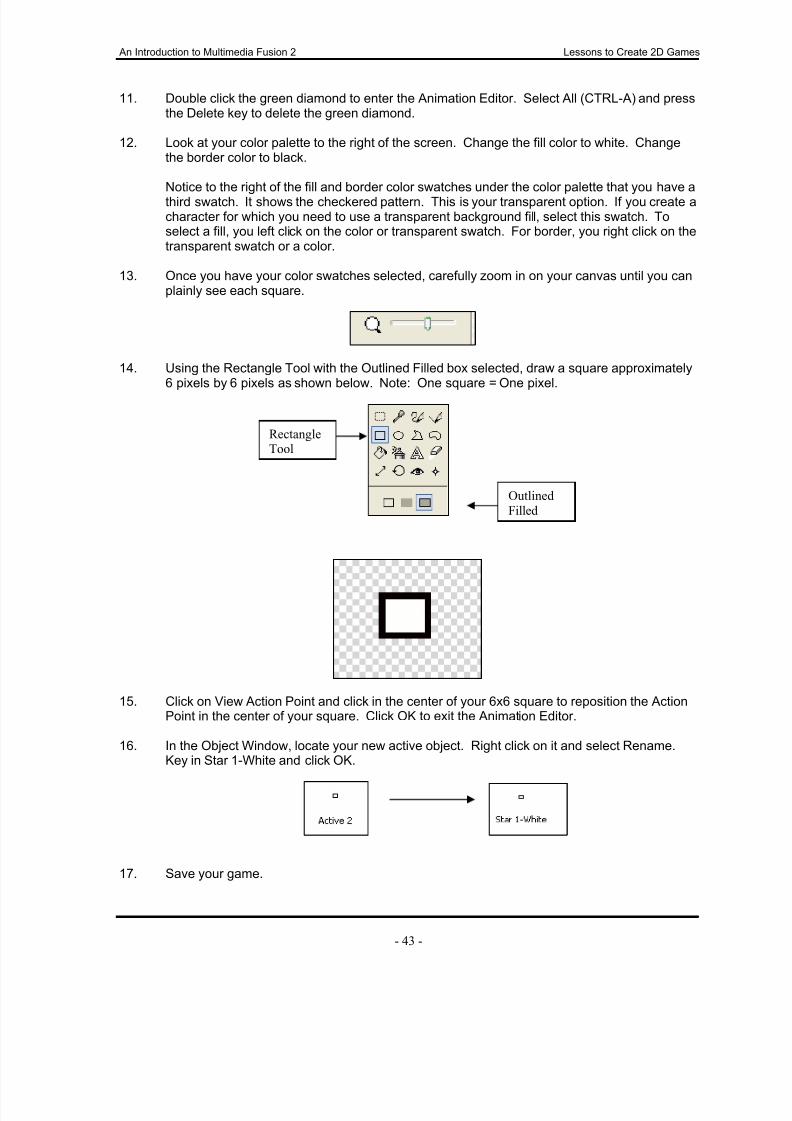
13. Once you have your color swatches selected, carefully zoom in on your canvas until you canplainly see each square.
14. Using the Rectangle Tool with the Outlined Filled box selected, draw a square approximately6 pixels by 6 pixels as shown below. Note: One square = One pixel.
15. Click on View Action Point and click in the center of your 6x6 square to reposition the ActionPoint in the center of your square. Click OK to exit the Animation Editor.
16. In the Object Window, locate your new active object. Right click on it and select Rename.Key in Star 1-White and click OK.
17. Save your game.
RectangleTool
Outlined
Filled
8/9/2019 An Introduction to Multimedia Fusion Full Version
http://slidepdf.com/reader/full/an-introduction-to-multimedia-fusion-full-version 46/145
An Introduction to Multimedia Fusion 2 Lessons to Create 2D Games
- 44 -
18. Keep your new Star 1-White object in the Holding Area for now. It will be duplicated andmoved later.
19. Create two additional active objects for Stars 2 and 3 following steps 10 through 18 above.
2nd
Star Object: Create a 5 x 5 pixel star with a medium gray outline and medium-to-darkgray fill. Rename it Star 2-Gray.
3rd
Star Object: Create a 3 x 3 pixel star with a dark gray outline and a darker gray fill.Rename it Star 3-Dark Gray.
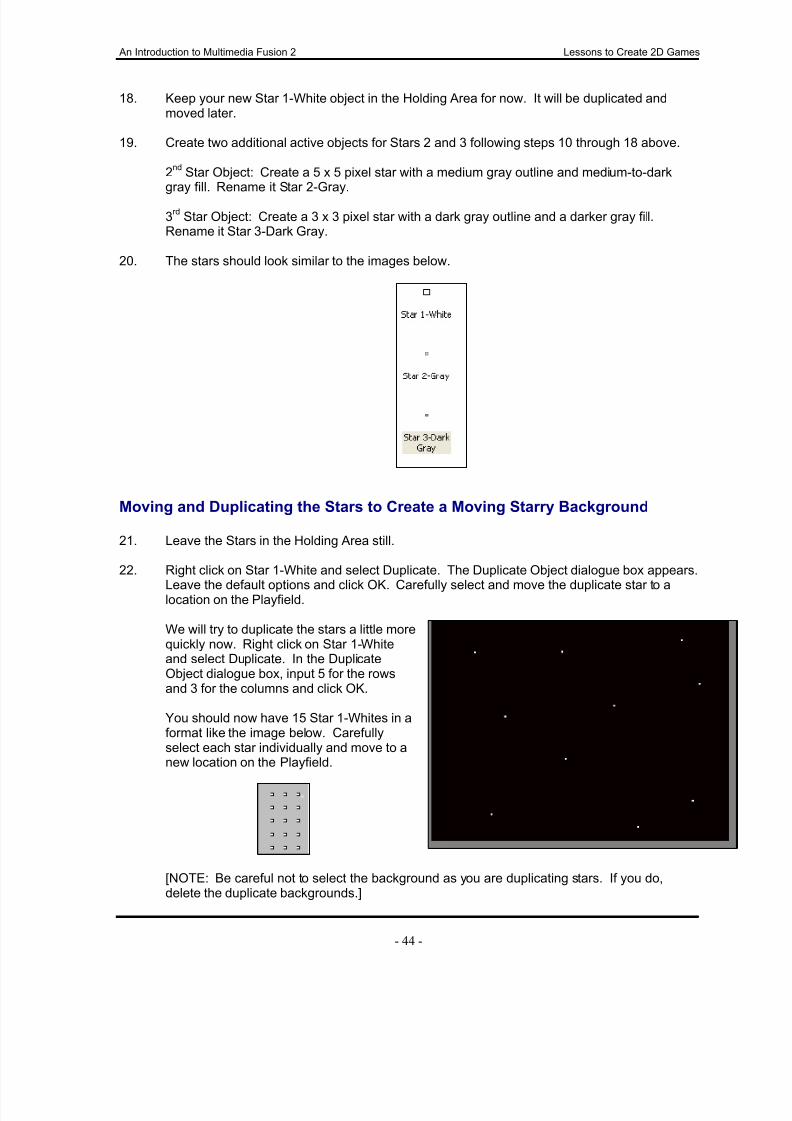
20. The stars should look similar to the images below.
Moving and Duplicating the Stars to Create a Moving Starry Background
21. Leave the Stars in the Holding Area still.
22. Right click on Star 1-White and select Duplicate. The Duplicate Object dialogue box appears.
Leave the default options and click OK. Carefully select and move the duplicate star to alocation on the Playfield.
We will try to duplicate the stars a little morequickly now. Right click on Star 1-Whiteand select Duplicate. In the DuplicateObject dialogue box, input 5 for the rowsand 3 for the columns and click OK.
You should now have 15 Star 1-Whites in aformat like the image below. Carefullyselect each star individually and move to anew location on the Playfield.
[NOTE: Be careful not to select the background as you are duplicating stars. If you do,delete the duplicate backgrounds.]
8/9/2019 An Introduction to Multimedia Fusion Full Version
http://slidepdf.com/reader/full/an-introduction-to-multimedia-fusion-full-version 47/145
An Introduction to Multimedia Fusion 2 Lessons to Create 2D Games
- 45 -
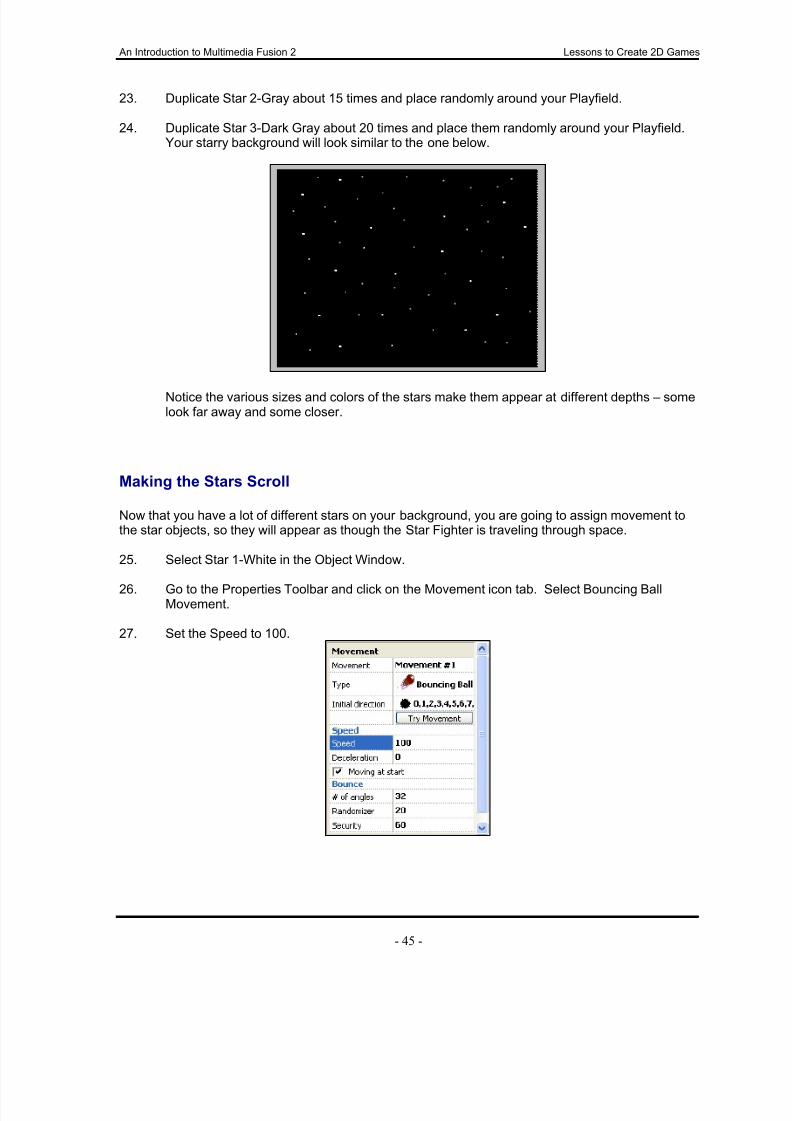
23. Duplicate Star 2-Gray about 15 times and place randomly around your Playfield.
24. Duplicate Star 3-Dark Gray about 20 times and place them randomly around your Playfield.Your starry background will look similar to the one below.
Notice the various sizes and colors of the stars make them appear at different depths – somelook far away and some closer.
Making the Stars Scroll
Now that you have a lot of different stars on your background, you are going to assign movement tothe star objects, so they will appear as though the Star Fighter is traveling through space.
25. Select Star 1-White in the Object Window.
26. Go to the Properties Toolbar and click on the Movement icon tab. Select Bouncing BallMovement.
27. Set the Speed to 100.
8/9/2019 An Introduction to Multimedia Fusion Full Version
http://slidepdf.com/reader/full/an-introduction-to-multimedia-fusion-full-version 48/145
An Introduction to Multimedia Fusion 2 Lessons to Create 2D Games
- 46 -
28. Establish the same Bouncing Ball Movement for the other two stars with the respectivespeeds as noted:
Star 2-Gray = 60 speed
Star 3-Dark Gray = 40 speed
29. Save your game and test it (F8). At this point, your stars will be flying all over the screen andthey will leave the Playfield. You will change that in the next section.
Disciplining the Stars
These next steps will get your stars to bounce in an orderly fashion and then wrap around thePlayfield to give the appearance of a moving background.
30. Go to the Event Editor.
31. Insert a comment that reads: Disciplining Our Stars
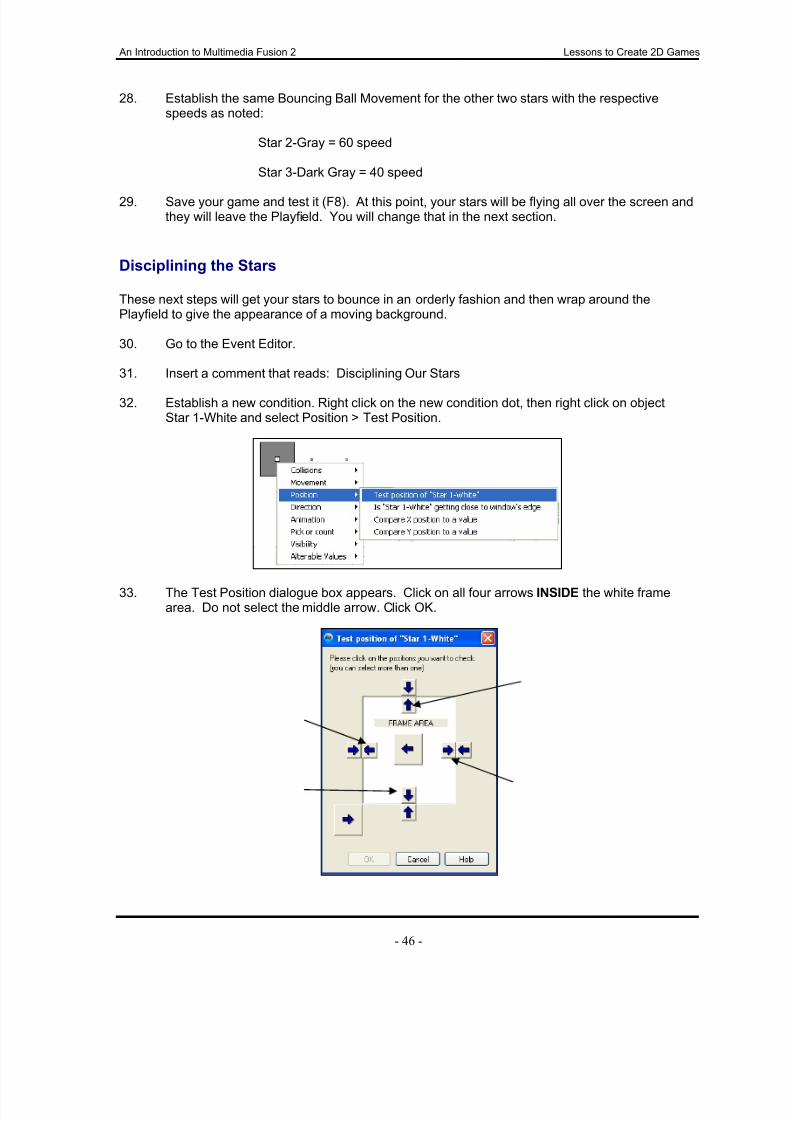
32. Establish a new condition. Right click on the new condition dot, then right click on objectStar 1-White and select Position > Test Position.
33. The Test Position dialogue box appears. Click on all four arrows INSIDE the white framearea. Do not select the middle arrow. Click OK.
8/9/2019 An Introduction to Multimedia Fusion Full Version
http://slidepdf.com/reader/full/an-introduction-to-multimedia-fusion-full-version 49/145
An Introduction to Multimedia Fusion 2 Lessons to Create 2D Games
- 47 -
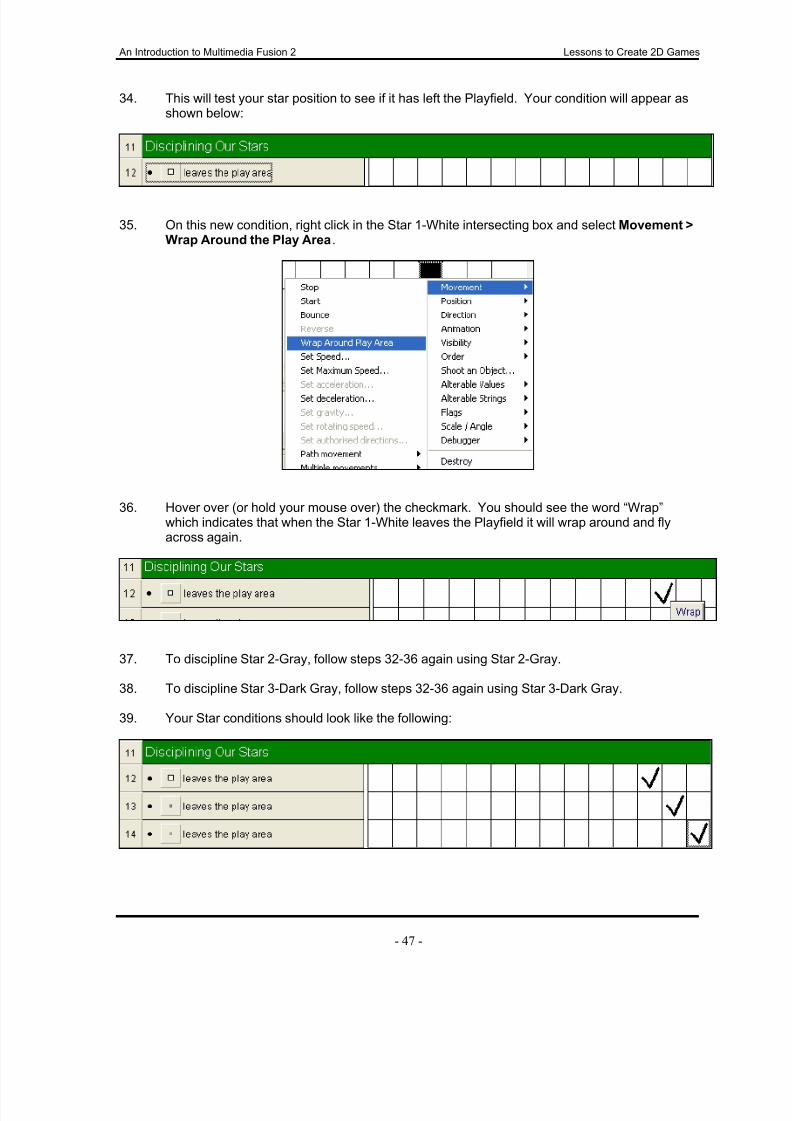
34. This will test your star position to see if it has left the Playfield. Your condition will appear asshown below:
35. On this new condition, right click in the Star 1-White intersecting box and select Movement >Wrap Around the Play Area.
36. Hover over (or hold your mouse over) the checkmark. You should see the word “Wrap”which indicates that when the Star 1-White leaves the Playfield it will wrap around and flyacross again.
37. To discipline Star 2-Gray, follow steps 32-36 again using Star 2-Gray.
38. To discipline Star 3-Dark Gray, follow steps 32-36 again using Star 3-Dark Gray.
39. Your Star conditions should look like the following:
8/9/2019 An Introduction to Multimedia Fusion Full Version
http://slidepdf.com/reader/full/an-introduction-to-multimedia-fusion-full-version 50/145
8/9/2019 An Introduction to Multimedia Fusion Full Version
http://slidepdf.com/reader/full/an-introduction-to-multimedia-fusion-full-version 51/145
An Introduction to Multimedia Fusion 2 Lessons to Create 2D Games
- 49 -
43. Rather than going through the same procedure for Star 2 and Star 3, you can simply click onthe checkmark under Star 1 and drag it to the box for Star 2. This copies the action to thenew box. Do the same for Star 3. Your Event Editor should look similar to the picture below.
44. Test your game [F8] to see if the stars are moving to the left and wrapping the Playfield.
45. Save your game.
Adding a Score Object to Your Playfield
46. In your Frame Editor, select Insert > New Object, locate the Score icon and click OK. Click inthe Holding Area. The score object appears. It may be small, but you can click on it twotimes to get the nodes to enlarge it. Do not make it too large though!
47. You need to change the color of the numbers of the score. The default is black and since thegame has a black background, the score would not show up. Change it to yellow. Double
click on the score object to open the Picture Editor.
8/9/2019 An Introduction to Multimedia Fusion Full Version
http://slidepdf.com/reader/full/an-introduction-to-multimedia-fusion-full-version 52/145
An Introduction to Multimedia Fusion 2 Lessons to Create 2D Games
- 50 -
48. Select yellow from the color palette and then click on the Paint Can. Fill each number in withyellow and click OK.
49. Move the score object to the upper right corner of the Playfield.
50. Soon you will add a condition to your Event Editor which will provide the opportunity to add toyour score as you play the game.
Adding Lives to Your Playfield
To make your game more interesting, you will have five lives. Every time your ship collides with theenemy, you will lose a life.
51. From the Menu Bar, select Insert > New Object > Lives. Click the crosshairs onto the grayHolding Area. The Lives object appears as an image of three red hearts.
You can also double click on the image to create your own Lives object image.
52. Back in the Frame Editor move your Lives object to the upper left corner of the Playfield.
53. The default value for your lives is 3. To increase your initial lives value to 5, go to yourWorkspace Toolbar. Click on Star Fighter. Look in the Properties Toolbar now and Selectthe Runtime Options button.
8/9/2019 An Introduction to Multimedia Fusion Full Version
http://slidepdf.com/reader/full/an-introduction-to-multimedia-fusion-full-version 53/145
An Introduction to Multimedia Fusion 2 Lessons to Create 2D Games
- 51 -
54. Scroll down to the Players section to locate Initial # of Lives. Type in 5.
55. In the Workspace Toolbar, click on Level 1 to return to the Frame Editor for that level. Checkthe Playfield to verify that you have 5 lives (5 red hearts) showing.
56. Save your game.
Modifying Scores and Lives
Adding to Your Score
57. Go to the Event Editor to find the condition where the comet collides with Mother Bee anddestroys both. Edit the comment to read: Comet Colliding with Mother Bee Adds 200 toScore.
58. On the collision condition, right click under the intersecting Player 1 icon and select
Score > Add to Score. Enter 200 as the value in the pop up box. Click OK.
59. On this same condition line, add a sound effect for when the Comet collides with the MotherBee. In the sound effects folder, locate the sample: DISTZAP.WAV to use.
Subtracting From Lives
60. Locate the condition where the spaceship collides with the enemy and edit the comment toread: When Spaceship and Enemy Collide, Subtract a Life.
61. Delete the checkmark under the Star Fighter ship (which says Destroy) by right clicking andselecting Delete from the menu or simply click in the box and hit delete.
62. Right click under the Player 1 icon and select Lives > Subtract From the Number ofLives.
8/9/2019 An Introduction to Multimedia Fusion Full Version
http://slidepdf.com/reader/full/an-introduction-to-multimedia-fusion-full-version 54/145
An Introduction to Multimedia Fusion 2 Lessons to Create 2D Games
- 52 -
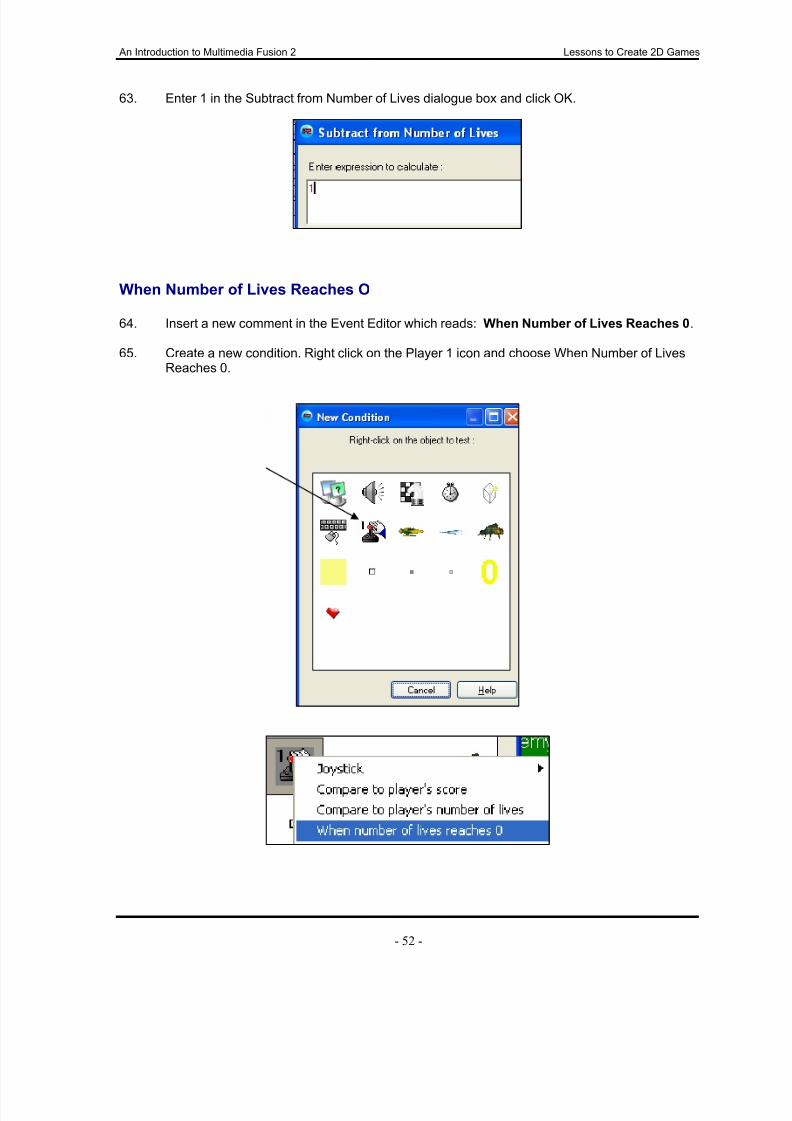
63. Enter 1 in the Subtract from Number of Lives dialogue box and click OK.
When Number of Lives Reaches O
64. Insert a new comment in the Event Editor which reads: When Number of Lives Reaches 0.
65. Create a new condition. Right click on the Player 1 icon and choose When Number of LivesReaches 0.
8/9/2019 An Introduction to Multimedia Fusion Full Version
http://slidepdf.com/reader/full/an-introduction-to-multimedia-fusion-full-version 55/145
An Introduction to Multimedia Fusion 2 Lessons to Create 2D Games
- 53 -
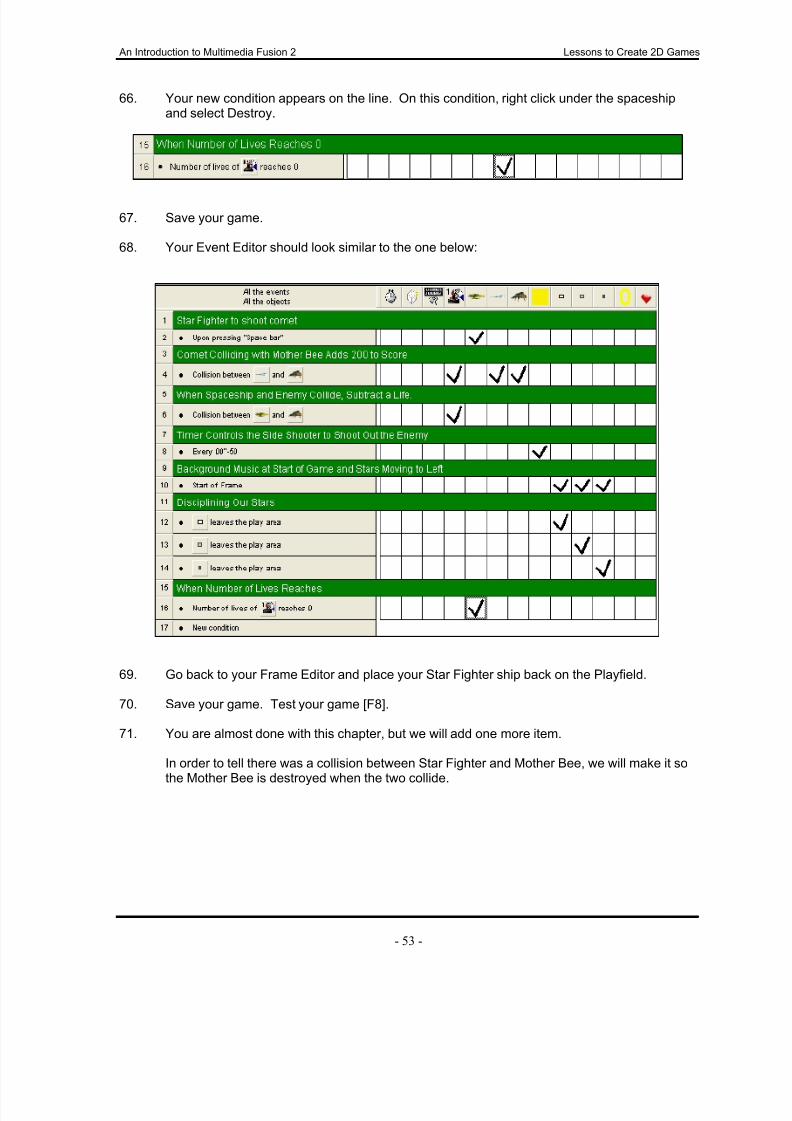
66. Your new condition appears on the line. On this condition, right click under the spaceshipand select Destroy.
67. Save your game.
68. Your Event Editor should look similar to the one below:
69. Go back to your Frame Editor and place your Star Fighter ship back on the Playfield.
70. Save your game. Test your game [F8].
71. You are almost done with this chapter, but we will add one more item.
In order to tell there was a collision between Star Fighter and Mother Bee, we will make it sothe Mother Bee is destroyed when the two collide.
8/9/2019 An Introduction to Multimedia Fusion Full Version
http://slidepdf.com/reader/full/an-introduction-to-multimedia-fusion-full-version 56/145
An Introduction to Multimedia Fusion 2 Lessons to Create 2D Games
- 54 -
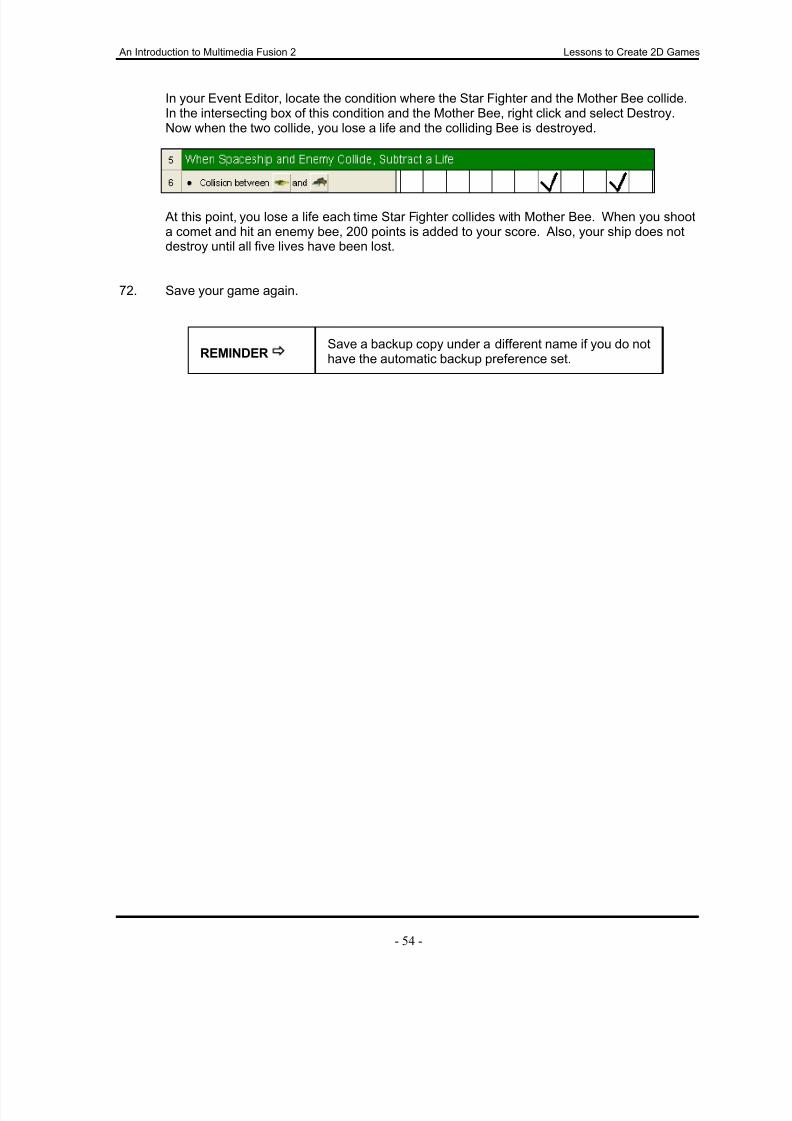
In your Event Editor, locate the condition where the Star Fighter and the Mother Bee collide.In the intersecting box of this condition and the Mother Bee, right click and select Destroy.Now when the two collide, you lose a life and the colliding Bee is destroyed.
At this point, you lose a life each time Star Fighter collides with Mother Bee. When you shoota comet and hit an enemy bee, 200 points is added to your score. Also, your ship does notdestroy until all five lives have been lost.
72. Save your game again.
REMINDERSave a backup copy under a different name if you do nothave the automatic backup preference set.
8/9/2019 An Introduction to Multimedia Fusion Full Version
http://slidepdf.com/reader/full/an-introduction-to-multimedia-fusion-full-version 57/145
An Introduction to Multimedia Fusion 2 Lessons to Create 2D Games
- 55 -
Chapter Five: Creating Power-Ups Using Alterable Values
Objectives:
In Chapter 5, you will: Understand the Purpose of a Power-Up and an Alterable Value Create a Power-Up Using Alterable Values Use a Counter to Keep Track of Power-Ups Collected
Understanding the Purpose of a Power-Up Object
Your game might get a little boring if the only challenge was to shoot the enemy, so to make it morechallenging, a Power-Up Object can be added. A Power-Up Object is an object that your spaceshipwill collide with, or collect, to gain more energy. Once a specific number of collisions have occurred,the spaceship will have enough energy to shoot a bigger and better weapon at the enemy.
The Power-Up uses an alterable value, which is a value that changes in response to certain eventsthat occur in the game. It is like a counter that is attached to an object in the game. In this instance,you will set up an Alterable Value on your Star Fighter ship. If your ship collides with or collects aLemon (the Power-up), the action in the Event Editor will add +1 to the alterable value of your ship.When the alterable value of your ship reaches 5, then you will obtain a bigger and better weapon.
To Begin: Open Star Fighter 4 and re-save now as Star Fighter 5.
Creating a Power-Up
1. Go to the Frame Editor.
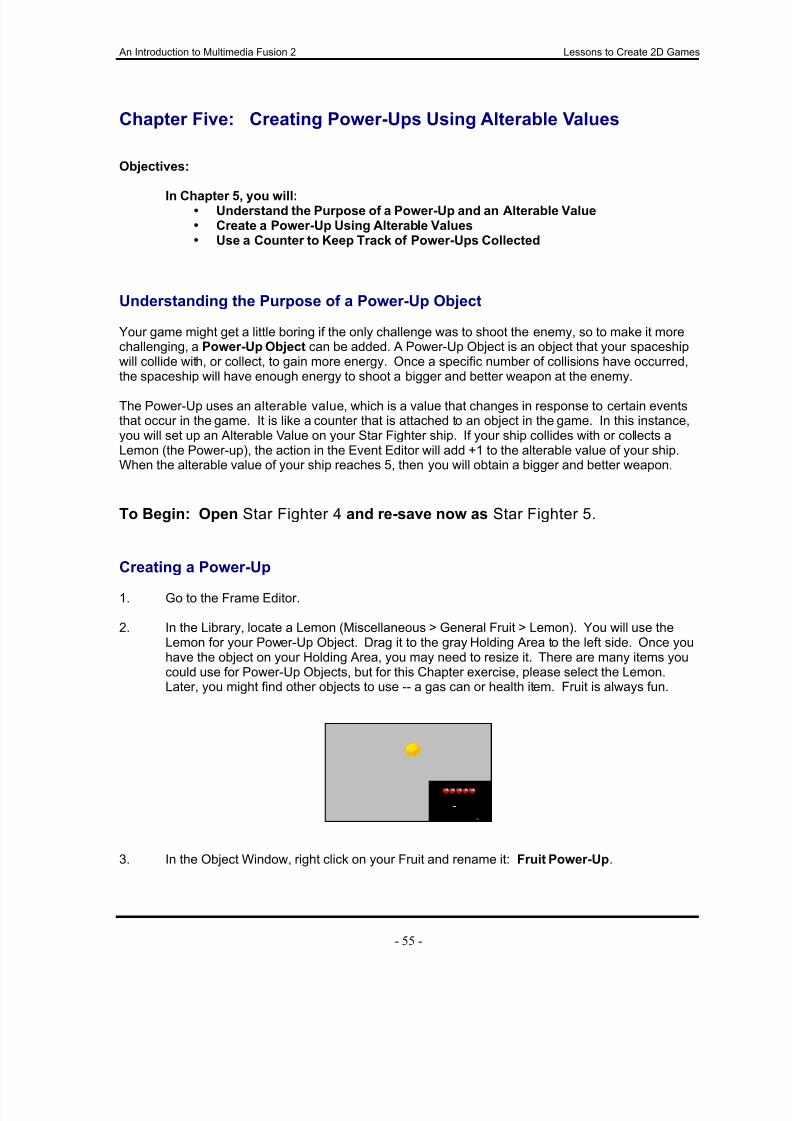
2. In the Library, locate a Lemon (Miscellaneous > General Fruit > Lemon). You will use theLemon for your Power-Up Object. Drag it to the gray Holding Area to the left side. Once youhave the object on your Holding Area, you may need to resize it. There are many items youcould use for Power-Up Objects, but for this Chapter exercise, please select the Lemon.Later, you might find other objects to use -- a gas can or health item. Fruit is always fun.
3. In the Object Window, right click on your Fruit and rename it: Fruit Power-Up.
8/9/2019 An Introduction to Multimedia Fusion Full Version
http://slidepdf.com/reader/full/an-introduction-to-multimedia-fusion-full-version 58/145
An Introduction to Multimedia Fusion 2 Lessons to Create 2D Games
- 56 -
4. Look through the Library to find a second type of weapon and place it in the Holding Areaabove the Playfield. (A good one is: Games > Miscellaneous > Shoot ‘em Up Bullets >Shoot 13). You may have to resize it to fit your game.
In the Object Window, rename it New Weapon.
These objects will now be referred to as Fruit Power-Up or New Weapon.
5. Create a second Side Shooter. Make sure it is a different color than the first yellow sideshooter that you created. Locate the new Side Shooter in the Object Window and rename itto Power-Up Side Shooter . Note: If you have forgotten how to create a Side Shooter, youneed to return to Chapter 3 for instructions.
Place the Side Shooter just above the playfield on the left-hand side.
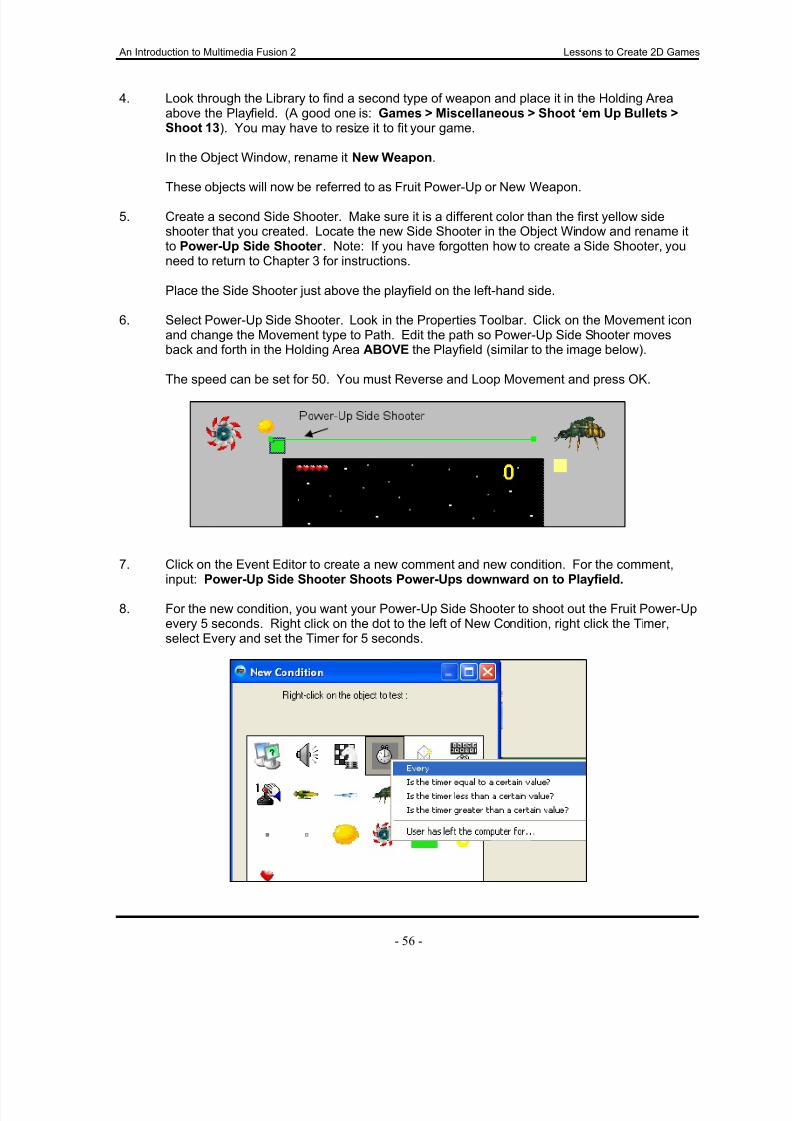
6. Select Power-Up Side Shooter. Look in the Properties Toolbar. Click on the Movement iconand change the Movement type to Path. Edit the path so Power-Up Side Shooter movesback and forth in the Holding Area ABOVE the Playfield (similar to the image below).
The speed can be set for 50. You must Reverse and Loop Movement and press OK.
7. Click on the Event Editor to create a new comment and new condition. For the comment,input: Power-Up Side Shooter Shoots Power-Ups downward on to Playfield.
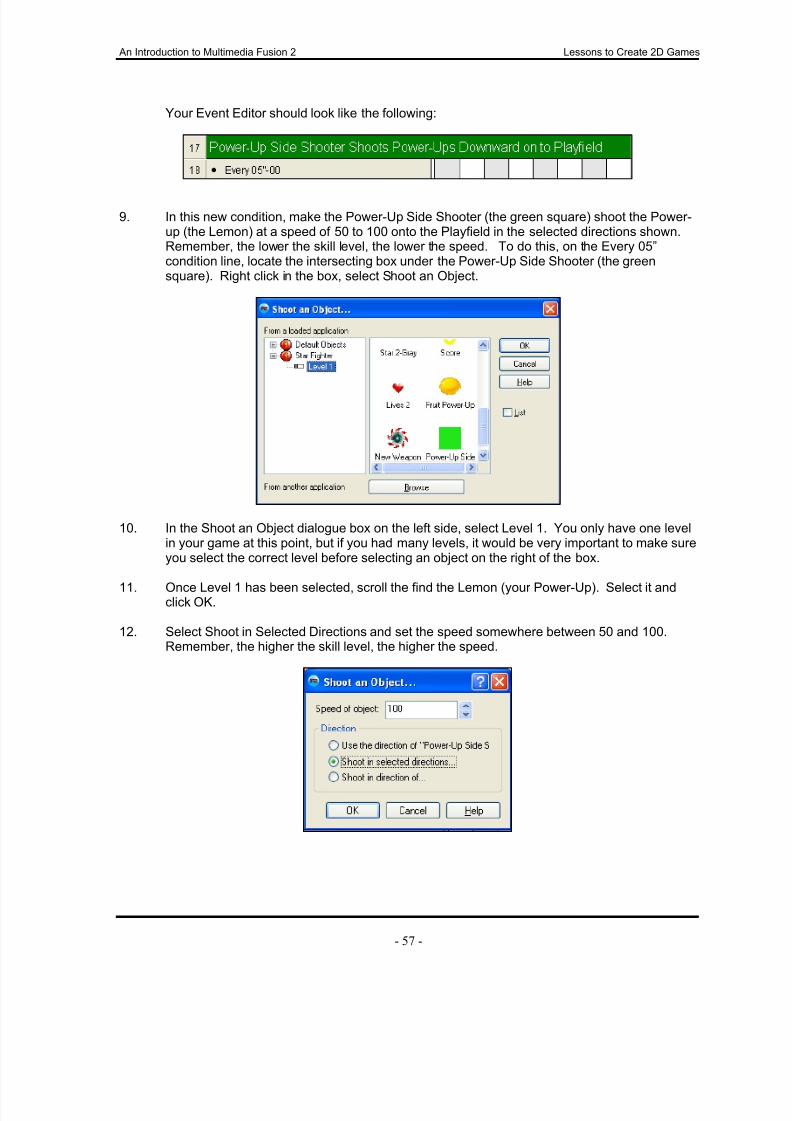
8. For the new condition, you want your Power-Up Side Shooter to shoot out the Fruit Power-Upevery 5 seconds. Right click on the dot to the left of New Condition, right click the Timer,select Every and set the Timer for 5 seconds.
8/9/2019 An Introduction to Multimedia Fusion Full Version
http://slidepdf.com/reader/full/an-introduction-to-multimedia-fusion-full-version 59/145
An Introduction to Multimedia Fusion 2 Lessons to Create 2D Games
- 57 -
Your Event Editor should look like the following:
9. In this new condition, make the Power-Up Side Shooter (the green square) shoot the Power-up (the Lemon) at a speed of 50 to 100 onto the Playfield in the selected directions shown.Remember, the lower the skill level, the lower the speed. To do this, on the Every 05”condition line, locate the intersecting box under the Power-Up Side Shooter (the greensquare). Right click in the box, select Shoot an Object.
10. In the Shoot an Object dialogue box on the left side, select Level 1. You only have one levelin your game at this point, but if you had many levels, it would be very important to make sureyou select the correct level before selecting an object on the right of the box.
11. Once Level 1 has been selected, scroll the find the Lemon (your Power-Up). Select it andclick OK.
12. Select Shoot in Selected Directions and set the speed somewhere between 50 and 100.Remember, the higher the skill level, the higher the speed.

8/9/2019 An Introduction to Multimedia Fusion Full Version
http://slidepdf.com/reader/full/an-introduction-to-multimedia-fusion-full-version 60/145
An Introduction to Multimedia Fusion 2 Lessons to Create 2D Games
- 58 -
13. Delete the up arrow that appears in the directions box and add three arrows in the positionsas indicated in the image below. Click OK.
14. Save your game. You should be saving as Star Fighter 5.
15. Run your game to test it. Your Power-Up Side Shooter should be shooting out a Power-upevery 5 seconds downward on to the Playfield.
Setting the Alterable Value of the Star Fighter to Count the Number of Power-Ups Collected
An alterable value is a counter assigned to a specific object. Many objects in Multimedia Fusion 2have alterable values associated with them. You can assign up to 26 alterable values to each ofthese objects. The values are named Alterable Value A through Alterable Value Z.
You are going to use the Alterable Value A to count the number of power-ups the Star Fightercollides with (or collects) as they drop from space. If the Star Fighter can get 5 power-ups, it will gainnew weapon to shoot at the enemy Mother Bees.
16. In the Event Editor, insert a new comment that reads: Collect 5 Power-Ups to ReceiveNew Weapon (Use Alterable Value A of Ship).
17. Create a new condition for the collision of the Star Fighter and your Fruit Power-Up.
18. Destroy the Fruit Power-Up when the two collide.
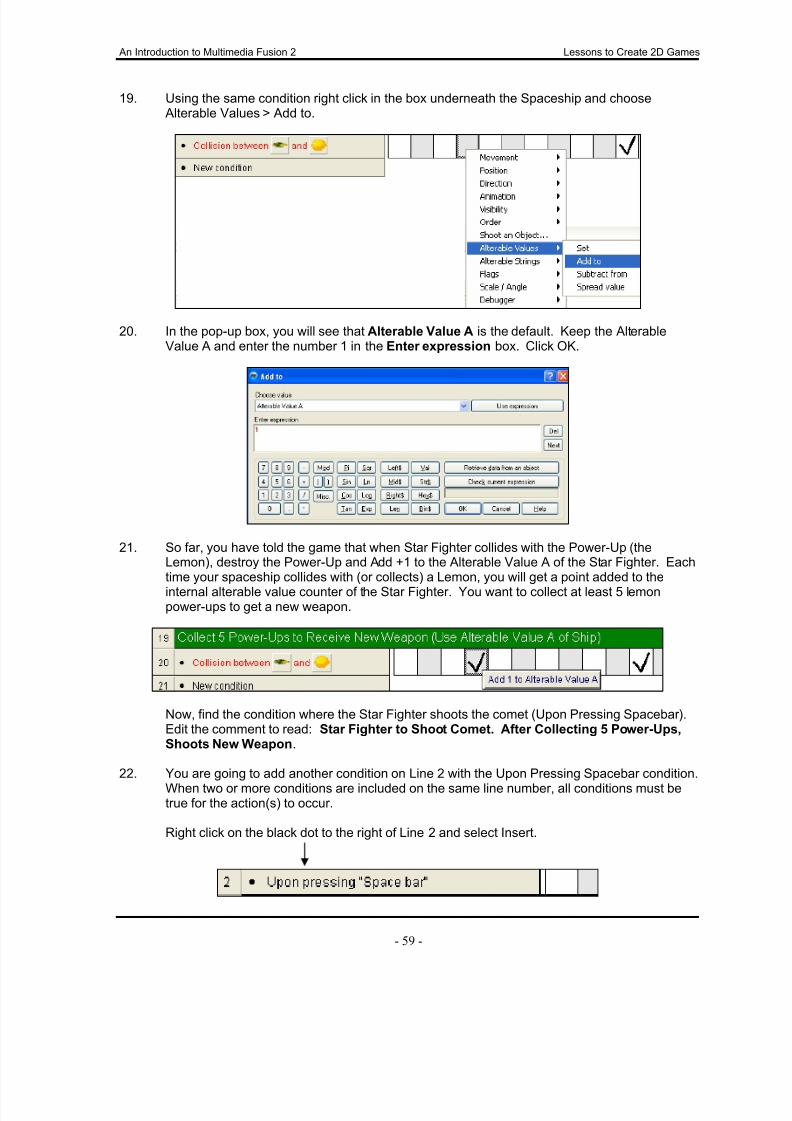
8/9/2019 An Introduction to Multimedia Fusion Full Version
http://slidepdf.com/reader/full/an-introduction-to-multimedia-fusion-full-version 61/145
An Introduction to Multimedia Fusion 2 Lessons to Create 2D Games
- 59 -
19. Using the same condition right click in the box underneath the Spaceship and choose Alterable Values > Add to.
20. In the pop-up box, you will see that Alterable Value A is the default. Keep the AlterableValue A and enter the number 1 in the Enter expression box. Click OK.
21. So far, you have told the game that when Star Fighter collides with the Power-Up (theLemon), destroy the Power-Up and Add +1 to the Alterable Value A of the Star Fighter. Eachtime your spaceship collides with (or collects) a Lemon, you will get a point added to the
internal alterable value counter of the Star Fighter. You want to collect at least 5 lemonpower-ups to get a new weapon.
Now, find the condition where the Star Fighter shoots the comet (Upon Pressing Spacebar ).Edit the comment to read: Star Fighter to Shoot Comet. After Collecting 5 Power-Ups,Shoots New Weapon.
22. You are going to add another condition on Line 2 with the Upon Pressing Spacebar condition.
When two or more conditions are included on the same line number, all conditions must betrue for the action(s) to occur.
Right click on the black dot to the right of Line 2 and select Insert.

8/9/2019 An Introduction to Multimedia Fusion Full Version
http://slidepdf.com/reader/full/an-introduction-to-multimedia-fusion-full-version 62/145
An Introduction to Multimedia Fusion 2 Lessons to Create 2D Games
- 60 -
23. Right click on Star Fighter and select Alterable Values > Compare to one of the alterablevalues.
24. In the dialogue box, select Alterable Value A in the Choose value box, Greater or equal in
the Comparison method box and 0 in the Enter expression box. Click OK.
Your Event Editor should contain the following:
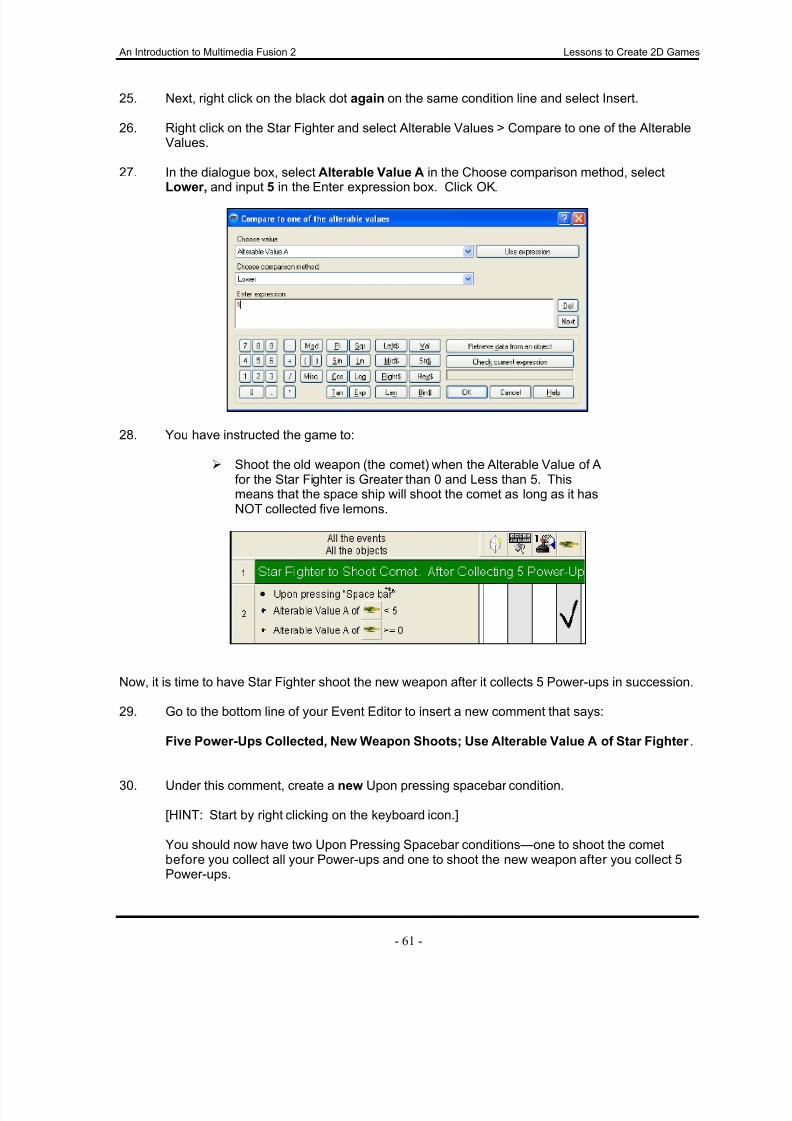
8/9/2019 An Introduction to Multimedia Fusion Full Version
http://slidepdf.com/reader/full/an-introduction-to-multimedia-fusion-full-version 63/145
An Introduction to Multimedia Fusion 2 Lessons to Create 2D Games
- 61 -
25. Next, right click on the black dot again on the same condition line and select Insert.
26. Right click on the Star Fighter and select Alterable Values > Compare to one of the AlterableValues.
27. In the dialogue box, select Alterable Value A in the Choose comparison method, selectLower, and input 5 in the Enter expression box. Click OK.
28. You have instructed the game to:
Shoot the old weapon (the comet) when the Alterable Value of Afor the Star Fighter is Greater than 0 and Less than 5. Thismeans that the space ship will shoot the comet as long as it hasNOT collected five lemons.
Now, it is time to have Star Fighter shoot the new weapon after it collects 5 Power-ups in succession.
29. Go to the bottom line of your Event Editor to insert a new comment that says:
Five Power-Ups Collected, New Weapon Shoots; Use Alterable Value A of Star Fighter .
30. Under this comment, create a new Upon pressing spacebar condition.
[HINT: Start by right clicking on the keyboard icon.]
You should now have two Upon Pressing Spacebar conditions—one to shoot the cometbefore you collect all your Power-ups and one to shoot the new weapon after you collect 5Power-ups.

8/9/2019 An Introduction to Multimedia Fusion Full Version
http://slidepdf.com/reader/full/an-introduction-to-multimedia-fusion-full-version 64/145
An Introduction to Multimedia Fusion 2 Lessons to Create 2D Games
- 62 -
31. Right click on this new condition and select Insert. Right click on the Star Fighter again andcompare the Alterable Value of A to be Greater or Equal to 5.
32. Next, create an action on this condition line to make the spaceship shoot an object (the NewWeapon) in the selected direction of right at a speed of 80 to 100. Add a sound for the newweapon.
33. Insert a new comment: When New Weapon and Bee Collide, Add 400 Points andDestroy Both. Create a new condition for when the New Weapon collides with the Bee.Destroy the bee and the weapon. Add 400 points to your score.
34. Save your game.
35. Locate the condition where the Star Fighter and the Mother Bee collide (approximately LineNo. 6). On this line, right click under the Star Fighter and select Alterable Value > Set > and
in the pop-up box, the value is Alterable Value A and the expression is 0. Click OK. This willreset the Alterable Value A of the Star Fighter to 0 when it is destroyed.
NOTE: By resetting the Alterable Value of the Star Fighter to 0 when it is hit by the enemyMother Bee, the count of any power-ups you collected is reset to 0. Each time the ship isdestroyed, the power-up count starts back at 0, making the game more difficult.
36. Save your game.
37. Test your game to see if you get the new weapon after collecting 5 Power-ups.
NOTE: If you are having trouble collecting the five power-ups, go back to the Event Editor.Right click on the “Every 5.00” condition and choose Edit. When the dialogue box pops up,change the 5 seconds to 2 seconds. This will make the Power-up Shooter shoot the Lemonout more frequently, giving you more opportunities to collect it.
Check your Event Editor. It should resemble the image below.
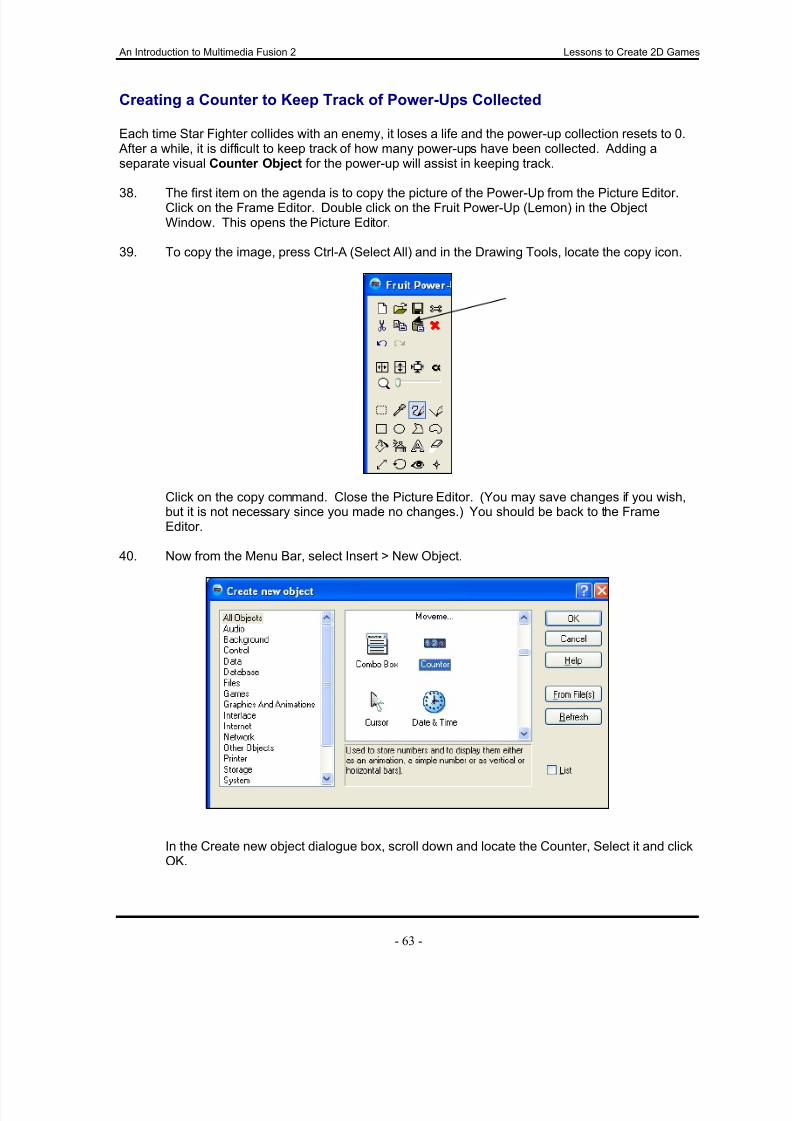
8/9/2019 An Introduction to Multimedia Fusion Full Version
http://slidepdf.com/reader/full/an-introduction-to-multimedia-fusion-full-version 65/145
An Introduction to Multimedia Fusion 2 Lessons to Create 2D Games
- 63 -
Creating a Counter to Keep Track of Power-Ups Collected
Each time Star Fighter collides with an enemy, it loses a life and the power-up collection resets to 0. After a while, it is difficult to keep track of how many power-ups have been collected. Adding aseparate visual Counter Object for the power-up will assist in keeping track.
38. The first item on the agenda is to copy the picture of the Power-Up from the Picture Editor.Click on the Frame Editor. Double click on the Fruit Power-Up (Lemon) in the ObjectWindow. This opens the Picture Editor.
39. To copy the image, press Ctrl-A (Select All) and in the Drawing Tools, locate the copy icon.
Click on the copy command. Close the Picture Editor. (You may save changes if you wish,but it is not necessary since you made no changes.) You should be back to the FrameEditor.
40. Now from the Menu Bar, select Insert > New Object.
In the Create new object dialogue box, scroll down and locate the Counter, Select it and clickOK.
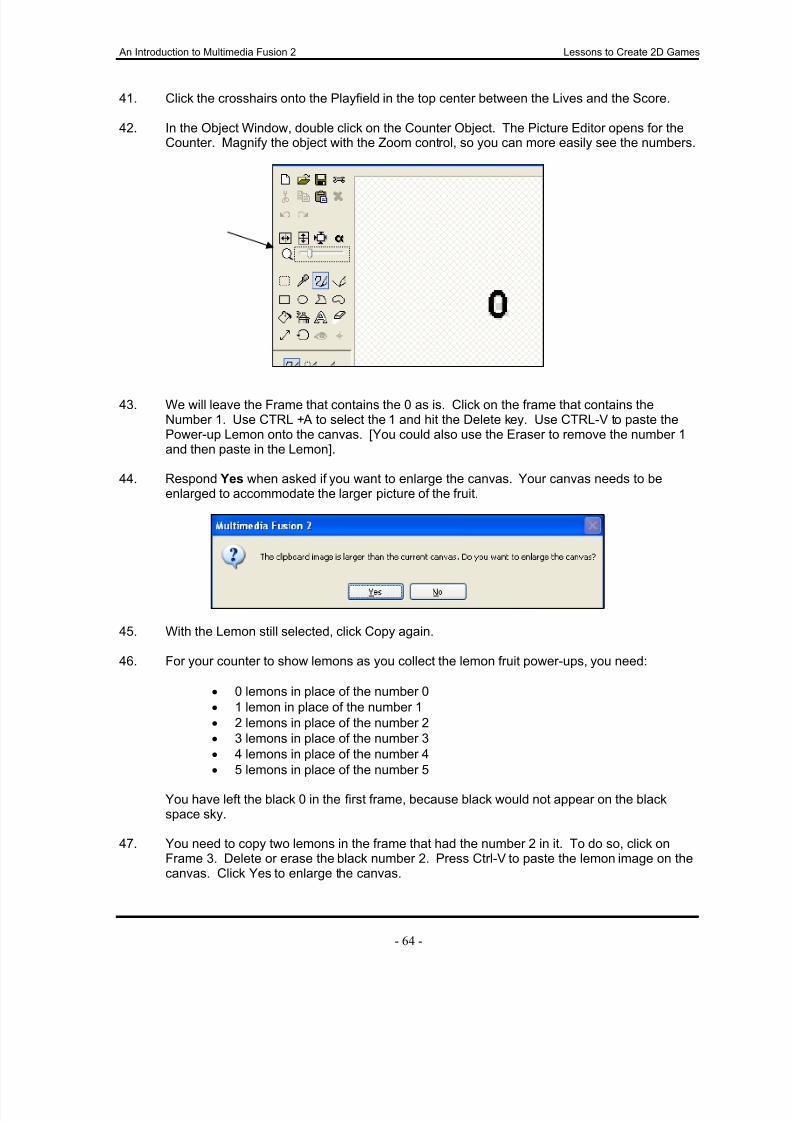
8/9/2019 An Introduction to Multimedia Fusion Full Version
http://slidepdf.com/reader/full/an-introduction-to-multimedia-fusion-full-version 66/145
An Introduction to Multimedia Fusion 2 Lessons to Create 2D Games
- 64 -
41. Click the crosshairs onto the Playfield in the top center between the Lives and the Score.
42. In the Object Window, double click on the Counter Object. The Picture Editor opens for theCounter. Magnify the object with the Zoom control, so you can more easily see the numbers.
43. We will leave the Frame that contains the 0 as is. Click on the frame that contains theNumber 1. Use CTRL +A to select the 1 and hit the Delete key. Use CTRL-V to paste thePower-up Lemon onto the canvas. [You could also use the Eraser to remove the number 1and then paste in the Lemon].
44. Respond Yes when asked if you want to enlarge the canvas. Your canvas needs to beenlarged to accommodate the larger picture of the fruit.
45. With the Lemon still selected, click Copy again.
46. For your counter to show lemons as you collect the lemon fruit power-ups, you need:
• 0 lemons in place of the number 0• 1 lemon in place of the number 1• 2 lemons in place of the number 2• 3 lemons in place of the number 3• 4 lemons in place of the number 4• 5 lemons in place of the number 5
You have left the black 0 in the first frame, because black would not appear on the blackspace sky.
47. You need to copy two lemons in the frame that had the number 2 in it. To do so, click onFrame 3. Delete or erase the black number 2. Press Ctrl-V to paste the lemon image on thecanvas. Click Yes to enlarge the canvas.
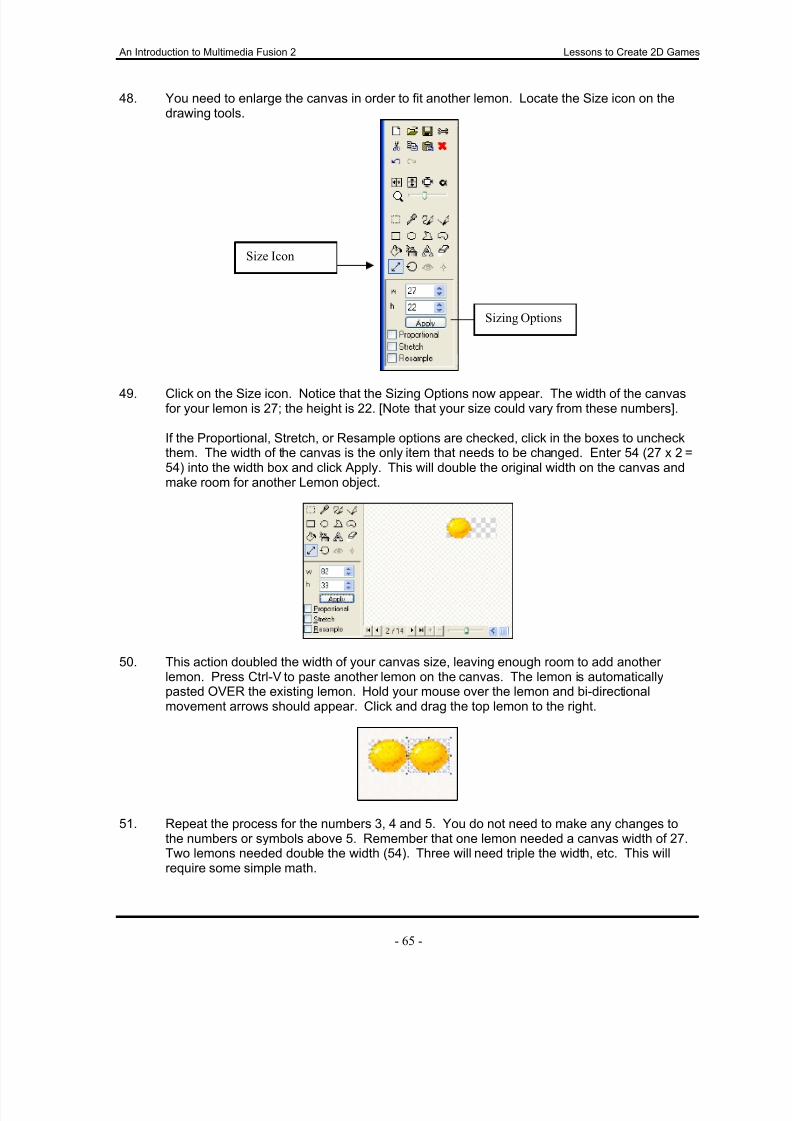
8/9/2019 An Introduction to Multimedia Fusion Full Version
http://slidepdf.com/reader/full/an-introduction-to-multimedia-fusion-full-version 67/145
An Introduction to Multimedia Fusion 2 Lessons to Create 2D Games
- 65 -
48. You need to enlarge the canvas in order to fit another lemon. Locate the Size icon on thedrawing tools.
49. Click on the Size icon. Notice that the Sizing Options now appear. The width of the canvasfor your lemon is 27; the height is 22. [Note that your size could vary from these numbers].
If the Proportional, Stretch, or Resample options are checked, click in the boxes to uncheckthem. The width of the canvas is the only item that needs to be changed. Enter 54 (27 x 2 =54) into the width box and click Apply. This will double the original width on the canvas andmake room for another Lemon object.
50. This action doubled the width of your canvas size, leaving enough room to add anotherlemon. Press Ctrl-V to paste another lemon on the canvas. The lemon is automaticallypasted OVER the existing lemon. Hold your mouse over the lemon and bi-directionalmovement arrows should appear. Click and drag the top lemon to the right.
51. Repeat the process for the numbers 3, 4 and 5. You do not need to make any changes tothe numbers or symbols above 5. Remember that one lemon needed a canvas width of 27.Two lemons needed double the width (54). Three will need triple the width, etc. This willrequire some simple math.
Sizing Options
Size Icon
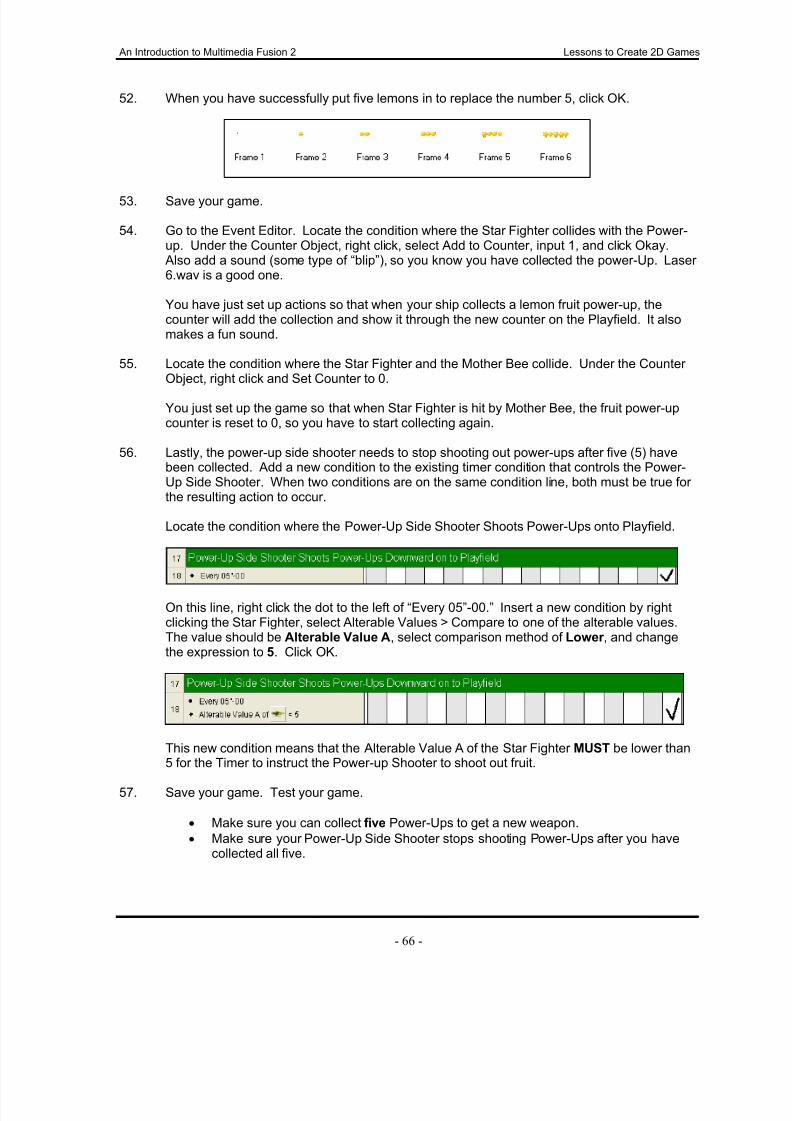
8/9/2019 An Introduction to Multimedia Fusion Full Version
http://slidepdf.com/reader/full/an-introduction-to-multimedia-fusion-full-version 68/145
An Introduction to Multimedia Fusion 2 Lessons to Create 2D Games
- 66 -
52. When you have successfully put five lemons in to replace the number 5, click OK.
53. Save your game.
54. Go to the Event Editor. Locate the condition where the Star Fighter collides with the Power-up. Under the Counter Object, right click, select Add to Counter, input 1, and click Okay.
Also add a sound (some type of “blip”), so you know you have collected the power-Up. Laser6.wav is a good one.
You have just set up actions so that when your ship collects a lemon fruit power-up, thecounter will add the collection and show it through the new counter on the Playfield. It alsomakes a fun sound.
55. Locate the condition where the Star Fighter and the Mother Bee collide. Under the CounterObject, right click and Set Counter to 0.
You just set up the game so that when Star Fighter is hit by Mother Bee, the fruit power-upcounter is reset to 0, so you have to start collecting again.
56. Lastly, the power-up side shooter needs to stop shooting out power-ups after five (5) havebeen collected. Add a new condition to the existing timer condition that controls the Power-Up Side Shooter. When two conditions are on the same condition line, both must be true forthe resulting action to occur.
Locate the condition where the Power-Up Side Shooter Shoots Power-Ups onto Playfield.
On this line, right click the dot to the left of “Every 05”-00.” Insert a new condition by rightclicking the Star Fighter, select Alterable Values > Compare to one of the alterable values.The value should be Alterable Value A, select comparison method of Lower , and changethe expression to 5. Click OK.
This new condition means that the Alterable Value A of the Star Fighter MUST be lower than5 for the Timer to instruct the Power-up Shooter to shoot out fruit.
57. Save your game. Test your game.
• Make sure you can collect five Power-Ups to get a new weapon.• Make sure your Power-Up Side Shooter stops shooting Power-Ups after you have
collected all five.

8/9/2019 An Introduction to Multimedia Fusion Full Version
http://slidepdf.com/reader/full/an-introduction-to-multimedia-fusion-full-version 69/145
An Introduction to Multimedia Fusion 2 Lessons to Create 2D Games
- 67 -
Chapter Six: The Ship Respawns (Recreating Star Fighter)
Objectives:In Chapter 6, you will:
Set Boundaries for Your Playfield Using Test Position Create an Explosion that Occurs When Your Ship is Destroyed Using the
Create Object Feature Recreate Your Ship When It Is Destroyed Using a Countdown Clock for Timing
Setting Boundaries on the Playfield for Your Spaceship
Currently, you have a game where the enemy is destroyed when colliding with a weapon, and theStar Fighter ship disappears after you lose five (5) lives. Now you are going to add conditions to thegame to destroy the Star Fighter after each collision. You will then insert conditions to make StarFighter respawn. You will create explosions that occur when the Star Fighter is destroyed and thenthe Star Fighter will be recreated.
1. Up to this point, you have been able to fly outside the boundaries of the Playfield. It is time toadd Playfield boundaries, so the Star Fighter must stay on the Playfield at all times. Yourship will be stopped if it tries to leave the Playfield. [The conditions are similar to theconditions set for the stars earlier.]
2. Open Star Fighter 5 and resave as Star Fighter 6.
In the Event Editor, insert a new comment that states: Ship Cannot Navigate Off Playfield.
Create a new condition to test the position of Star Fighter. Right click on Star Fighter andselect Position > Test Position of Star Fighter. Click on all four inside arrows and press OK.Your condition should look like the following:
3. On this new condition line, right click in the box under Star Fighter and select Movement >Stop.
4. Now test your game to make sure the Star Fighter stays on the Playfield.
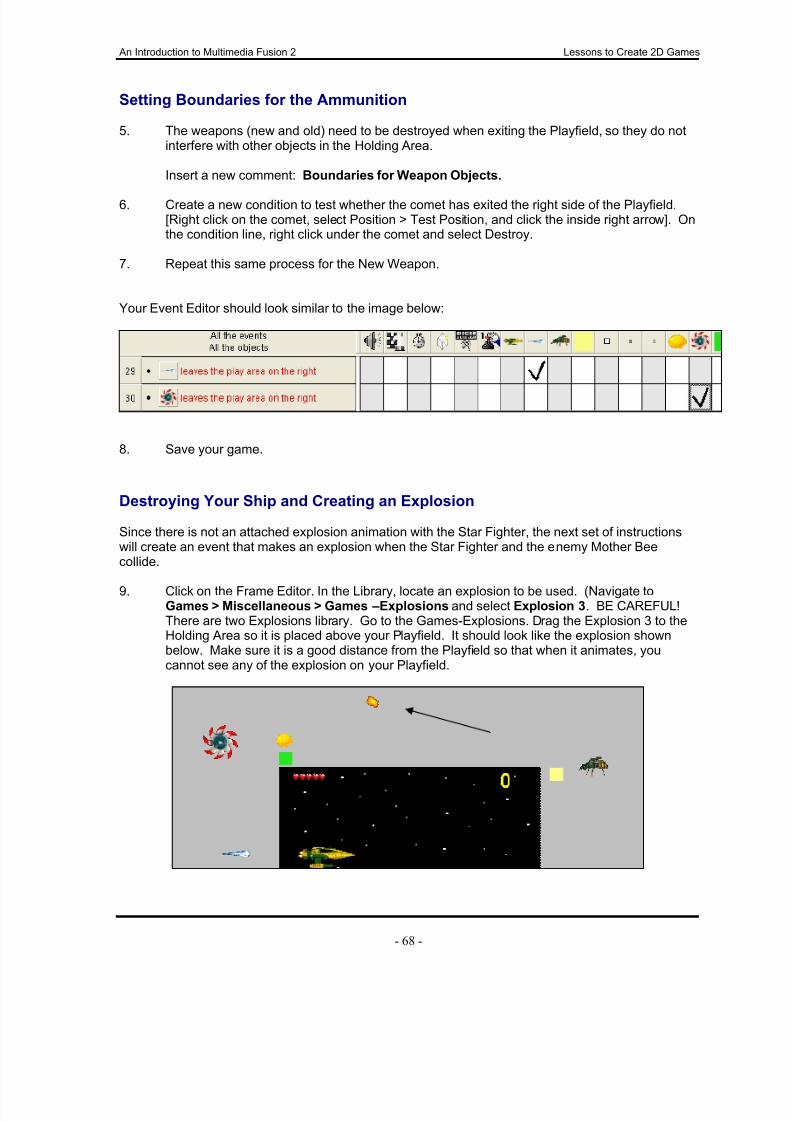
8/9/2019 An Introduction to Multimedia Fusion Full Version
http://slidepdf.com/reader/full/an-introduction-to-multimedia-fusion-full-version 70/145
An Introduction to Multimedia Fusion 2 Lessons to Create 2D Games
- 68 -
Setting Boundaries for the Ammunition
5. The weapons (new and old) need to be destroyed when exiting the Playfield, so they do notinterfere with other objects in the Holding Area.
Insert a new comment: Boundaries for Weapon Objects.
6. Create a new condition to test whether the comet has exited the right side of the Playfield.[Right click on the comet, select Position > Test Position, and click the inside right arrow]. Onthe condition line, right click under the comet and select Destroy.
7. Repeat this same process for the New Weapon.
Your Event Editor should look similar to the image below:
8. Save your game.
Destroying Your Ship and Creating an Explosion
Since there is not an attached explosion animation with the Star Fighter, the next set of instructionswill create an event that makes an explosion when the Star Fighter and the enemy Mother Beecollide.
9. Click on the Frame Editor. In the Library, locate an explosion to be used. (Navigate toGames > Miscellaneous > Games –Explosions and select Explosion 3. BE CAREFUL!There are two Explosions library. Go to the Games-Explosions. Drag the Explosion 3 to theHolding Area so it is placed above your Playfield. It should look like the explosion shownbelow. Make sure it is a good distance from the Playfield so that when it animates, youcannot see any of the explosion on your Playfield.
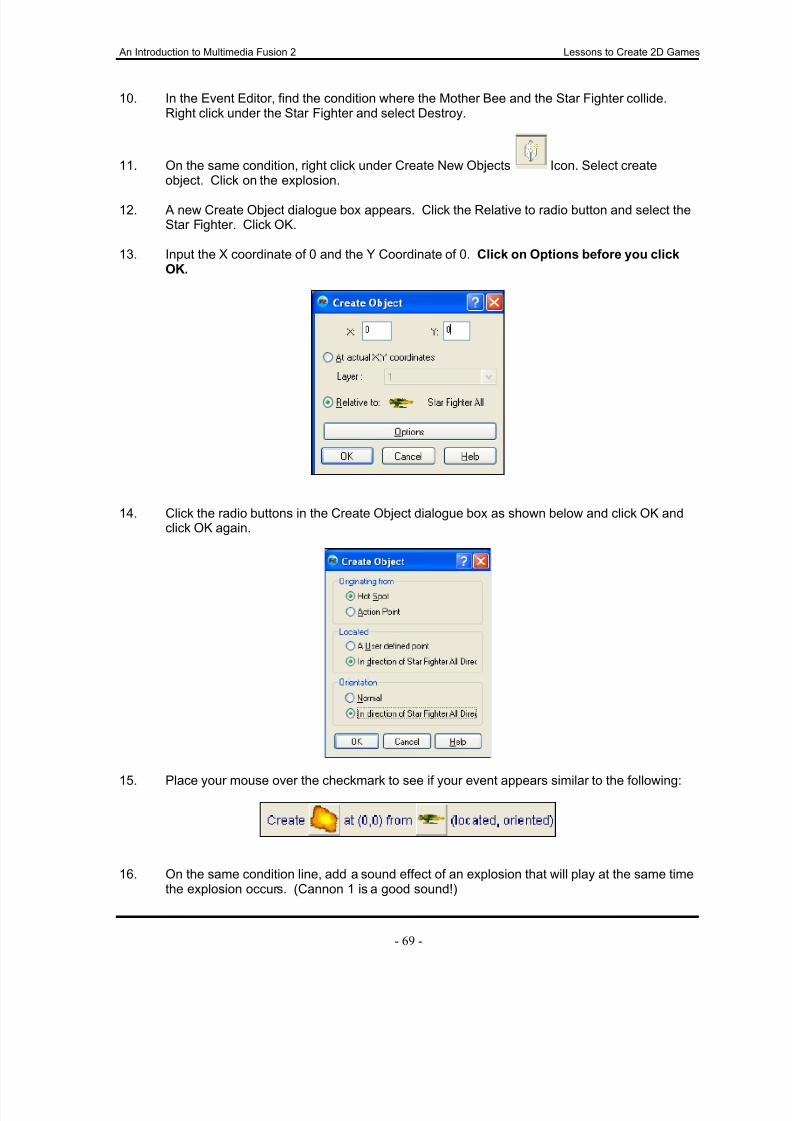
8/9/2019 An Introduction to Multimedia Fusion Full Version
http://slidepdf.com/reader/full/an-introduction-to-multimedia-fusion-full-version 71/145
An Introduction to Multimedia Fusion 2 Lessons to Create 2D Games
- 69 -
10. In the Event Editor, find the condition where the Mother Bee and the Star Fighter collide.Right click under the Star Fighter and select Destroy.
11. On the same condition, right click under Create New Objects Icon. Select createobject. Click on the explosion.
12. A new Create Object dialogue box appears. Click the Relative to radio button and select theStar Fighter. Click OK.
13. Input the X coordinate of 0 and the Y Coordinate of 0. Click on Options before you clickOK.
14. Click the radio buttons in the Create Object dialogue box as shown below and click OK andclick OK again.
15. Place your mouse over the checkmark to see if your event appears similar to the following:
16. On the same condition line, add a sound effect of an explosion that will play at the same timethe explosion occurs. (Cannon 1 is a good sound!)
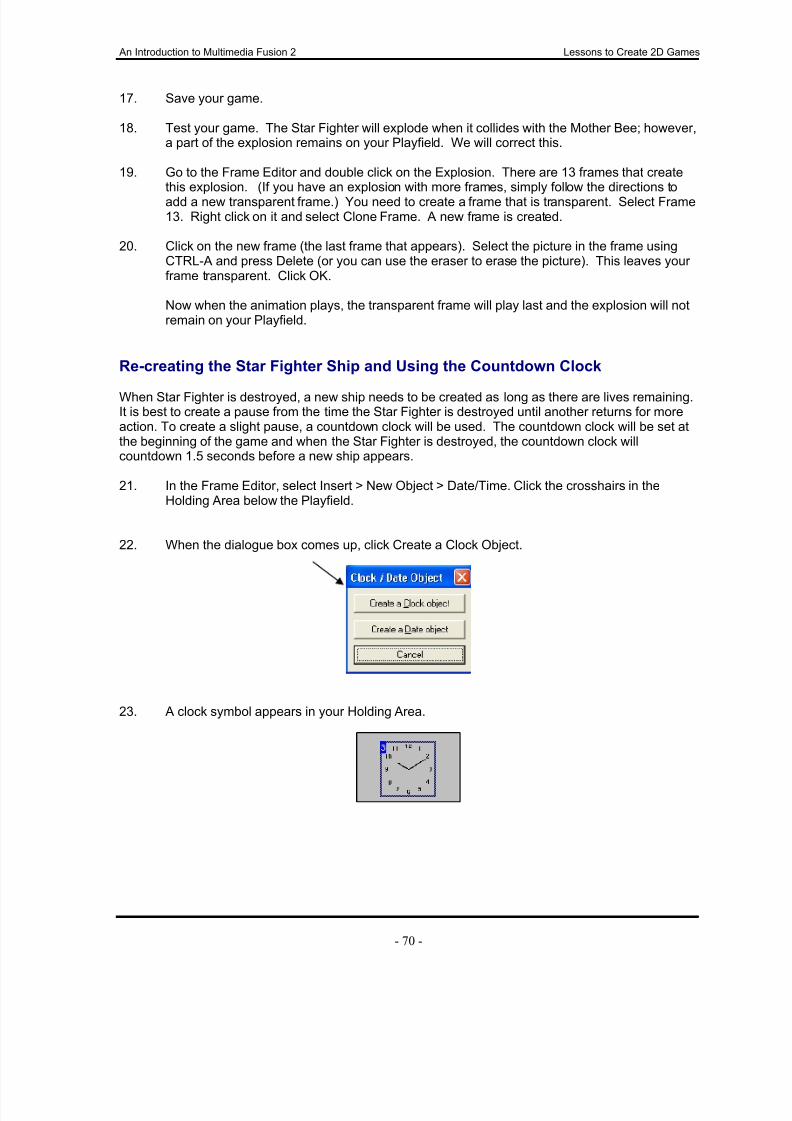
8/9/2019 An Introduction to Multimedia Fusion Full Version
http://slidepdf.com/reader/full/an-introduction-to-multimedia-fusion-full-version 72/145
An Introduction to Multimedia Fusion 2 Lessons to Create 2D Games
- 70 -
17. Save your game.
18. Test your game. The Star Fighter will explode when it collides with the Mother Bee; however,a part of the explosion remains on your Playfield. We will correct this.
19. Go to the Frame Editor and double click on the Explosion. There are 13 frames that createthis explosion. (If you have an explosion with more frames, simply follow the directions toadd a new transparent frame.) You need to create a frame that is transparent. Select Frame13. Right click on it and select Clone Frame. A new frame is created.
20. Click on the new frame (the last frame that appears). Select the picture in the frame usingCTRL-A and press Delete (or you can use the eraser to erase the picture). This leaves yourframe transparent. Click OK.
Now when the animation plays, the transparent frame will play last and the explosion will notremain on your Playfield.
Re-creating the Star Fighter Ship and Using the Countdown Clock
When Star Fighter is destroyed, a new ship needs to be created as long as there are lives remaining.It is best to create a pause from the time the Star Fighter is destroyed until another returns for moreaction. To create a slight pause, a countdown clock will be used. The countdown clock will be set atthe beginning of the game and when the Star Fighter is destroyed, the countdown clock willcountdown 1.5 seconds before a new ship appears.
21. In the Frame Editor, select Insert > New Object > Date/Time. Click the crosshairs in theHolding Area below the Playfield.
22. When the dialogue box comes up, click Create a Clock Object.
23. A clock symbol appears in your Holding Area.
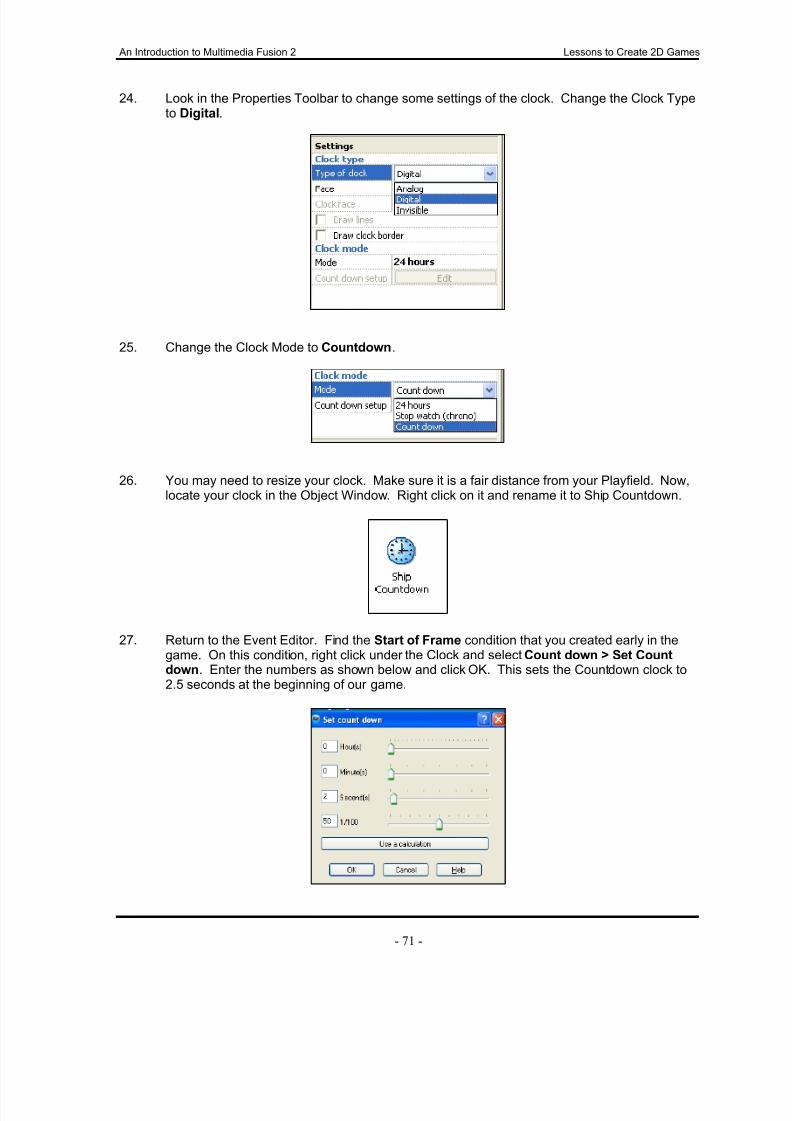
8/9/2019 An Introduction to Multimedia Fusion Full Version
http://slidepdf.com/reader/full/an-introduction-to-multimedia-fusion-full-version 73/145
An Introduction to Multimedia Fusion 2 Lessons to Create 2D Games
- 71 -
24. Look in the Properties Toolbar to change some settings of the clock. Change the Clock Typeto Digital.
25. Change the Clock Mode to Countdown.
26. You may need to resize your clock. Make sure it is a fair distance from your Playfield. Now,locate your clock in the Object Window. Right click on it and rename it to Ship Countdown.
27. Return to the Event Editor. Find the Start of Frame condition that you created early in thegame. On this condition, right click under the Clock and select Count down > Set Countdown. Enter the numbers as shown below and click OK. This sets the Countdown clock to2.5 seconds at the beginning of our game.
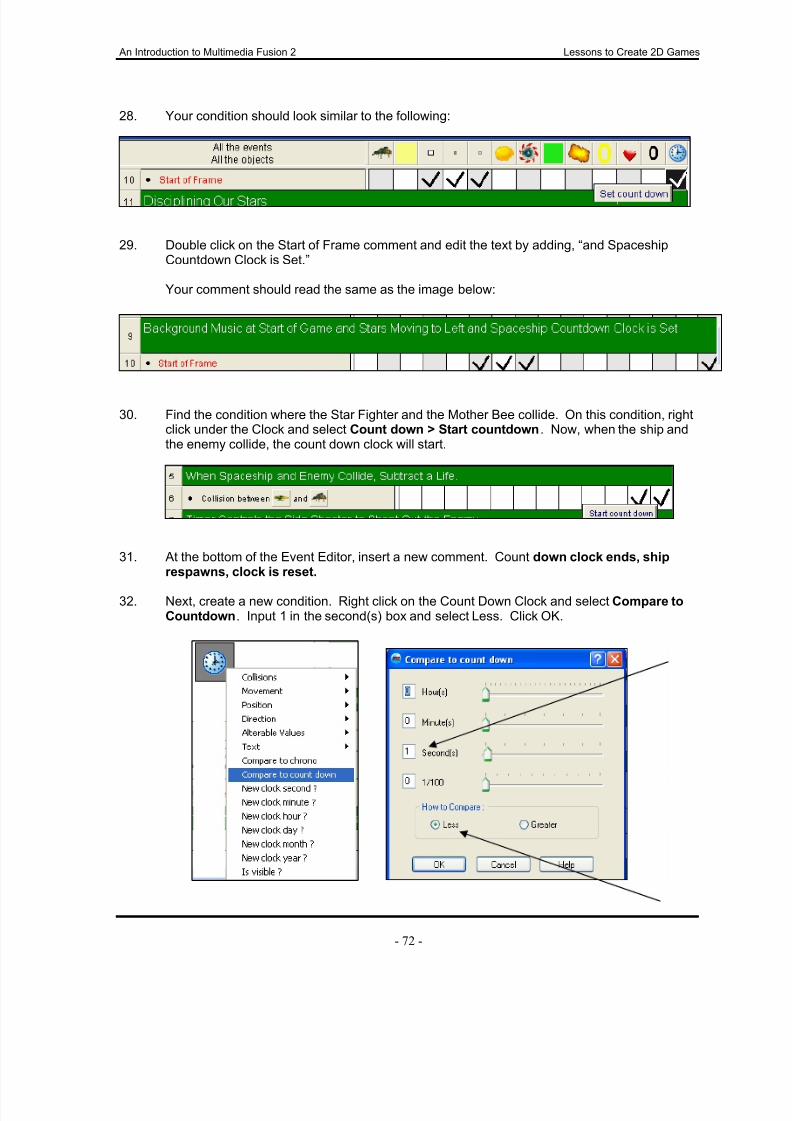
8/9/2019 An Introduction to Multimedia Fusion Full Version
http://slidepdf.com/reader/full/an-introduction-to-multimedia-fusion-full-version 74/145
An Introduction to Multimedia Fusion 2 Lessons to Create 2D Games
- 72 -
28. Your condition should look similar to the following:
29. Double click on the Start of Frame comment and edit the text by adding, “and SpaceshipCountdown Clock is Set.”
Your comment should read the same as the image below:
30. Find the condition where the Star Fighter and the Mother Bee collide. On this condition, rightclick under the Clock and select Count down > Start countdown. Now, when the ship andthe enemy collide, the count down clock will start.
31. At the bottom of the Event Editor, insert a new comment. Count down clock ends, shiprespawns, clock is reset.
32. Next, create a new condition. Right click on the Count Down Clock and select Compare toCountdown. Input 1 in the second(s) box and select Less. Click OK.
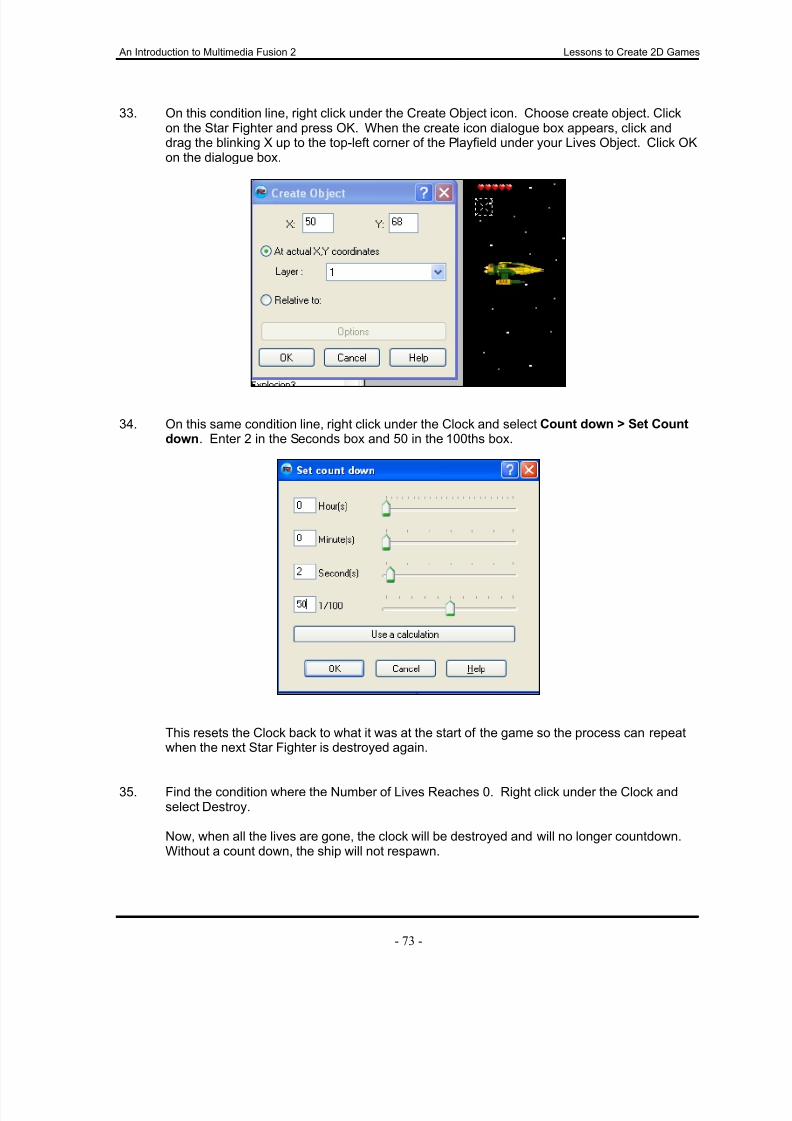
8/9/2019 An Introduction to Multimedia Fusion Full Version
http://slidepdf.com/reader/full/an-introduction-to-multimedia-fusion-full-version 75/145
An Introduction to Multimedia Fusion 2 Lessons to Create 2D Games
- 73 -
33. On this condition line, right click under the Create Object icon. Choose create object. Clickon the Star Fighter and press OK. When the create icon dialogue box appears, click anddrag the blinking X up to the top-left corner of the Playfield under your Lives Object. Click OKon the dialogue box.
34. On this same condition line, right click under the Clock and select Count down > Set Countdown. Enter 2 in the Seconds box and 50 in the 100ths box.
This resets the Clock back to what it was at the start of the game so the process can repeatwhen the next Star Fighter is destroyed again.
35. Find the condition where the Number of Lives Reaches 0. Right click under the Clock andselect Destroy.
Now, when all the lives are gone, the clock will be destroyed and will no longer countdown.Without a count down, the ship will not respawn.
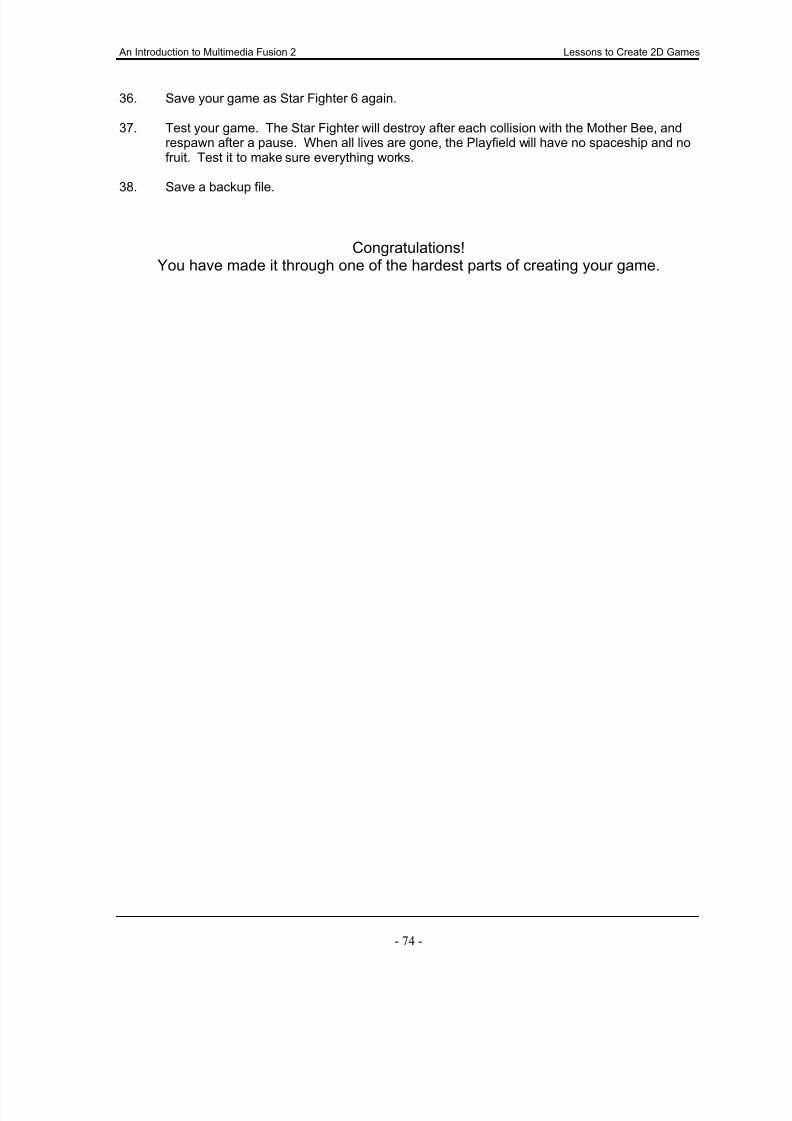
8/9/2019 An Introduction to Multimedia Fusion Full Version
http://slidepdf.com/reader/full/an-introduction-to-multimedia-fusion-full-version 76/145
An Introduction to Multimedia Fusion 2 Lessons to Create 2D Games
- 74 -
36. Save your game as Star Fighter 6 again.
37. Test your game. The Star Fighter will destroy after each collision with the Mother Bee, andrespawn after a pause. When all lives are gone, the Playfield will have no spaceship and nofruit. Test it to make sure everything works.
38. Save a backup file.
Congratulations!You have made it through one of the hardest parts of creating your game.
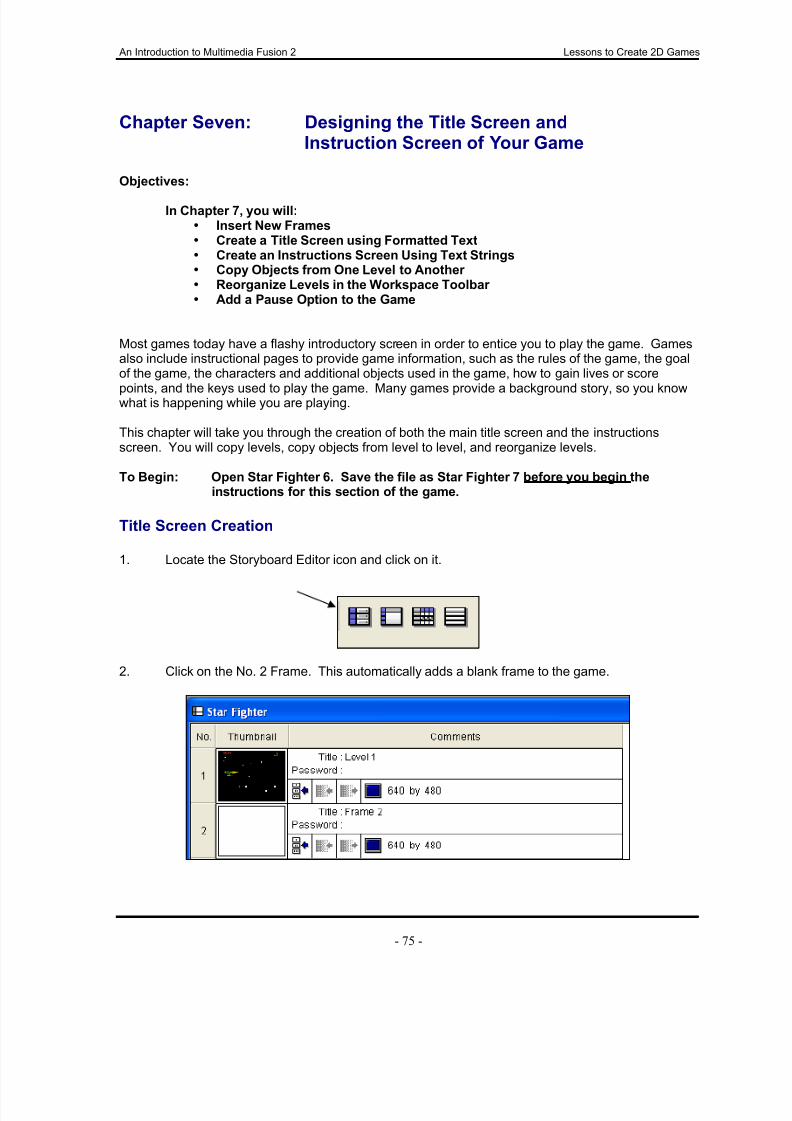
8/9/2019 An Introduction to Multimedia Fusion Full Version
http://slidepdf.com/reader/full/an-introduction-to-multimedia-fusion-full-version 77/145
An Introduction to Multimedia Fusion 2 Lessons to Create 2D Games
- 75 -
Chapter Seven: Designing the Title Screen andInstruction Screen of Your Game
Objectives:
In Chapter 7, you will: Insert New Frames Create a Title Screen using Formatted Text Create an Instructions Screen Using Text Strings Copy Objects from One Level to Another Reorganize Levels in the Workspace Toolbar Add a Pause Option to the Game
Most games today have a flashy introductory screen in order to entice you to play the game. Gamesalso include instructional pages to provide game information, such as the rules of the game, the goalof the game, the characters and additional objects used in the game, how to gain lives or score
points, and the keys used to play the game. Many games provide a background story, so you knowwhat is happening while you are playing.
This chapter will take you through the creation of both the main title screen and the instructionsscreen. You will copy levels, copy objects from level to level, and reorganize levels.
To Begin: Open Star Fighter 6. Save the file as Star Fighter 7 before you begin theinstructions for this section of the game.
Title Screen Creation
1. Locate the Storyboard Editor icon and click on it.
2. Click on the No. 2 Frame. This automatically adds a blank frame to the game.
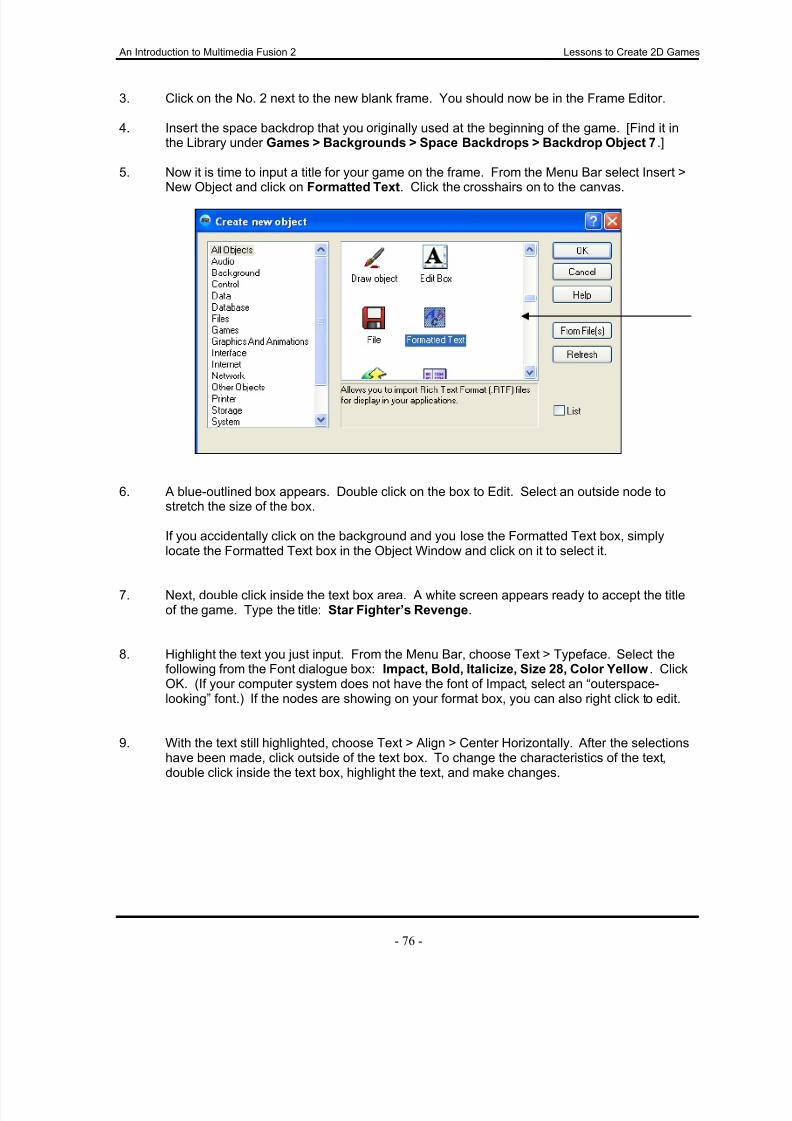
8/9/2019 An Introduction to Multimedia Fusion Full Version
http://slidepdf.com/reader/full/an-introduction-to-multimedia-fusion-full-version 78/145
An Introduction to Multimedia Fusion 2 Lessons to Create 2D Games
- 76 -
3. Click on the No. 2 next to the new blank frame. You should now be in the Frame Editor.
4. Insert the space backdrop that you originally used at the beginning of the game. [Find it inthe Library under Games > Backgrounds > Space Backdrops > Backdrop Object 7.]
5. Now it is time to input a title for your game on the frame. From the Menu Bar select Insert >New Object and click on Formatted Text. Click the crosshairs on to the canvas.
6. A blue-outlined box appears. Double click on the box to Edit. Select an outside node tostretch the size of the box.
If you accidentally click on the background and you lose the Formatted Text box, simplylocate the Formatted Text box in the Object Window and click on it to select it.
7. Next, double click inside the text box area. A white screen appears ready to accept the titleof the game. Type the title: Star Fighter’s Revenge.
8. Highlight the text you just input. From the Menu Bar, choose Text > Typeface. Select thefollowing from the Font dialogue box: Impact, Bold, Italicize, Size 28, Color Yellow. ClickOK. (If your computer system does not have the font of Impact, select an “outerspace-looking” font.) If the nodes are showing on your format box, you can also right click to edit.
9. With the text still highlighted, choose Text > Align > Center Horizontally. After the selectionshave been made, click outside of the text box. To change the characteristics of the text,double click inside the text box, highlight the text, and make changes.
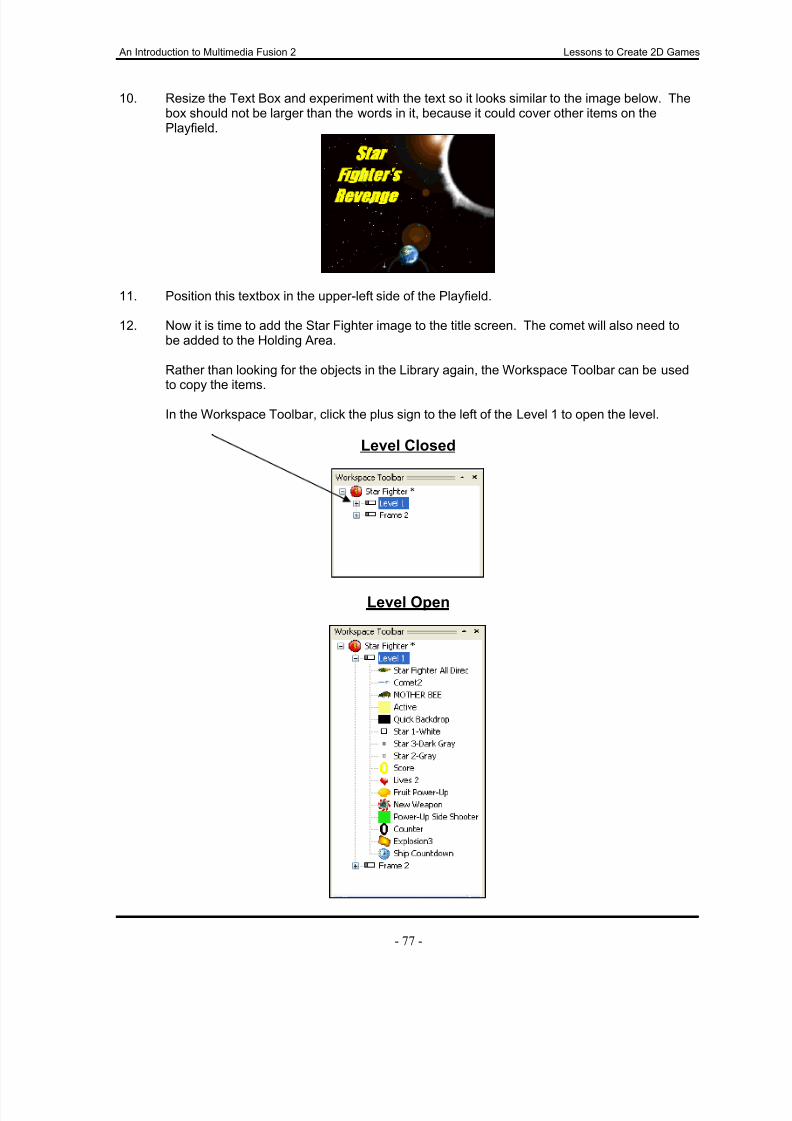
8/9/2019 An Introduction to Multimedia Fusion Full Version
http://slidepdf.com/reader/full/an-introduction-to-multimedia-fusion-full-version 79/145
An Introduction to Multimedia Fusion 2 Lessons to Create 2D Games
- 77 -
10. Resize the Text Box and experiment with the text so it looks similar to the image below. Thebox should not be larger than the words in it, because it could cover other items on thePlayfield.
11. Position this textbox in the upper-left side of the Playfield.
12. Now it is time to add the Star Fighter image to the title screen. The comet will also need tobe added to the Holding Area.
Rather than looking for the objects in the Library again, the Workspace Toolbar can be usedto copy the items.
In the Workspace Toolbar, click the plus sign to the left of the Level 1 to open the level.
Level Closed
Level Open
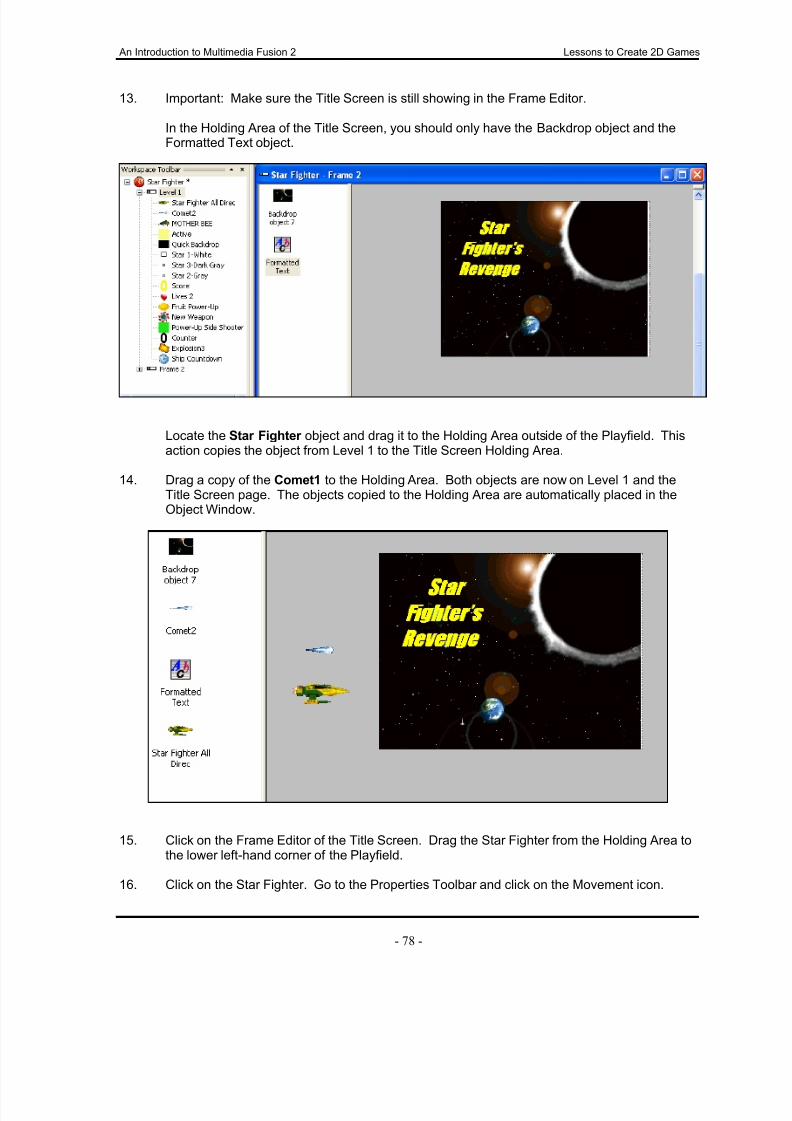
8/9/2019 An Introduction to Multimedia Fusion Full Version
http://slidepdf.com/reader/full/an-introduction-to-multimedia-fusion-full-version 80/145
An Introduction to Multimedia Fusion 2 Lessons to Create 2D Games
- 78 -
13. Important: Make sure the Title Screen is still showing in the Frame Editor.
In the Holding Area of the Title Screen, you should only have the Backdrop object and theFormatted Text object.
Locate the Star Fighter object and drag it to the Holding Area outside of the Playfield. Thisaction copies the object from Level 1 to the Title Screen Holding Area.
14. Drag a copy of the Comet1 to the Holding Area. Both objects are now on Level 1 and theTitle Screen page. The objects copied to the Holding Area are automatically placed in theObject Window.
15. Click on the Frame Editor of the Title Screen. Drag the Star Fighter from the Holding Area tothe lower left-hand corner of the Playfield.
16. Click on the Star Fighter. Go to the Properties Toolbar and click on the Movement icon.
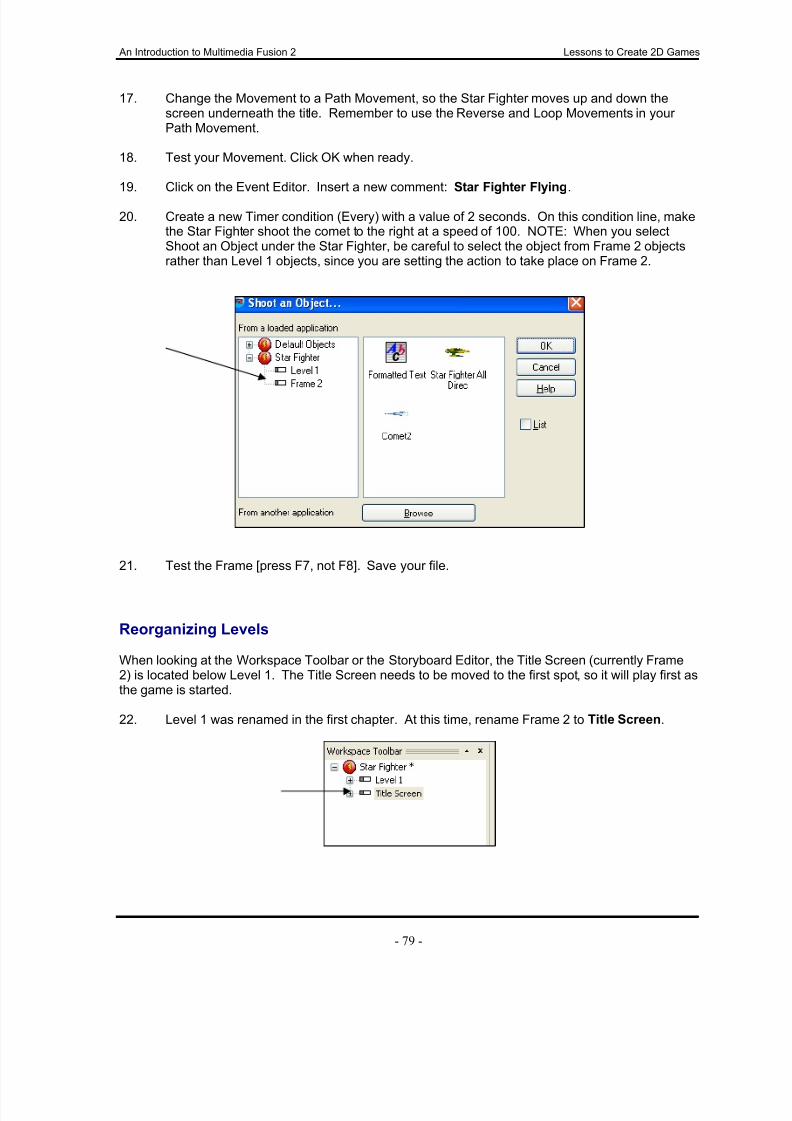
8/9/2019 An Introduction to Multimedia Fusion Full Version
http://slidepdf.com/reader/full/an-introduction-to-multimedia-fusion-full-version 81/145
An Introduction to Multimedia Fusion 2 Lessons to Create 2D Games
- 79 -
17. Change the Movement to a Path Movement, so the Star Fighter moves up and down thescreen underneath the title. Remember to use the Reverse and Loop Movements in yourPath Movement.
18. Test your Movement. Click OK when ready.
19. Click on the Event Editor. Insert a new comment: Star Fighter Flying.
20. Create a new Timer condition (Every) with a value of 2 seconds. On this condition line, makethe Star Fighter shoot the comet to the right at a speed of 100. NOTE: When you selectShoot an Object under the Star Fighter, be careful to select the object from Frame 2 objectsrather than Level 1 objects, since you are setting the action to take place on Frame 2.
21. Test the Frame [press F7, not F8]. Save your file.
Reorganizing Levels
When looking at the Workspace Toolbar or the Storyboard Editor, the Title Screen (currently Frame2) is located below Level 1. The Title Screen needs to be moved to the first spot, so it will play first asthe game is started.
22. Level 1 was renamed in the first chapter. At this time, rename Frame 2 to Title Screen.
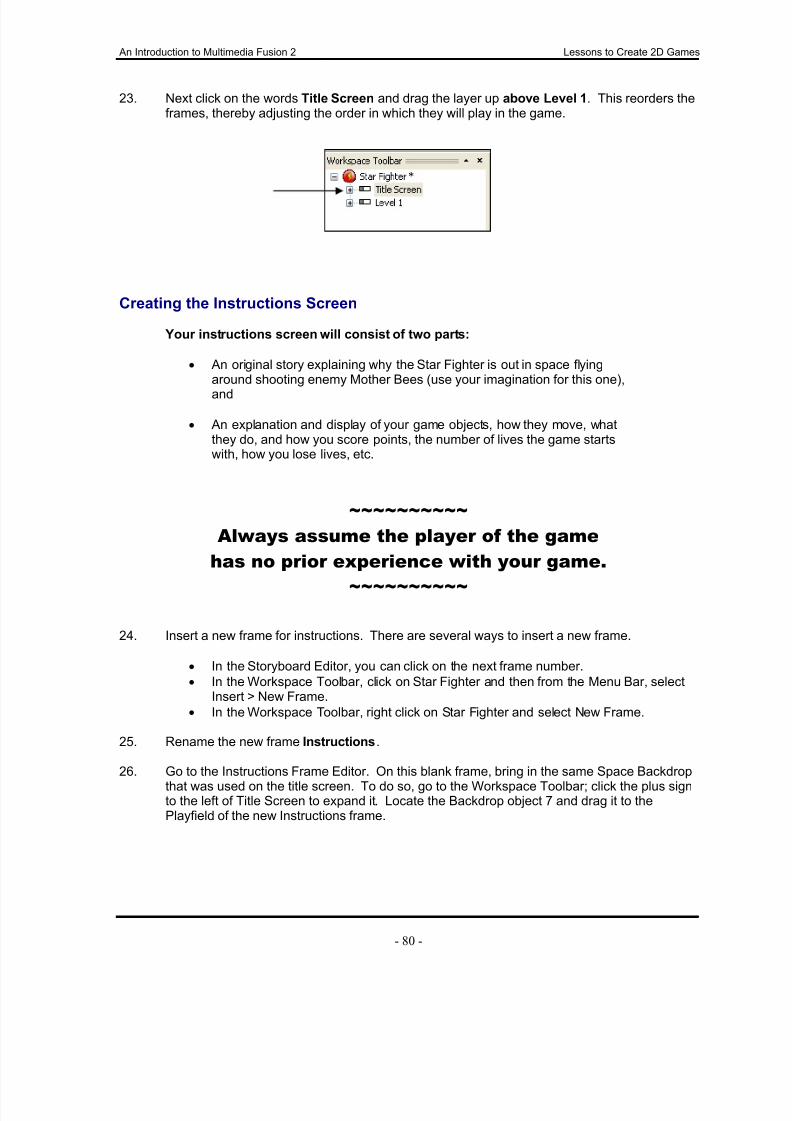
8/9/2019 An Introduction to Multimedia Fusion Full Version
http://slidepdf.com/reader/full/an-introduction-to-multimedia-fusion-full-version 82/145
An Introduction to Multimedia Fusion 2 Lessons to Create 2D Games
- 80 -
23. Next click on the words Title Screen and drag the layer up above Level 1. This reorders theframes, thereby adjusting the order in which they will play in the game.
Creating the Instructions Screen
Your instructions screen will consist of two parts:
• An original story explaining why the Star Fighter is out in space flyingaround shooting enemy Mother Bees (use your imagination for this one),
and
• An explanation and display of your game objects, how they move, whatthey do, and how you score points, the number of lives the game startswith, how you lose lives, etc.
~~~~~~~~~~
Always assume the player of the game
has no prior experience with your game.
~~~~~~~~~~
24. Insert a new frame for instructions. There are several ways to insert a new frame.
• In the Storyboard Editor, you can click on the next frame number.• In the Workspace Toolbar, click on Star Fighter and then from the Menu Bar, select
Insert > New Frame.• In the Workspace Toolbar, right click on Star Fighter and select New Frame.
25. Rename the new frame Instructions.
26. Go to the Instructions Frame Editor. On this blank frame, bring in the same Space Backdrop
that was used on the title screen. To do so, go to the Workspace Toolbar; click the plus signto the left of Title Screen to expand it. Locate the Backdrop object 7 and drag it to thePlayfield of the new Instructions frame.
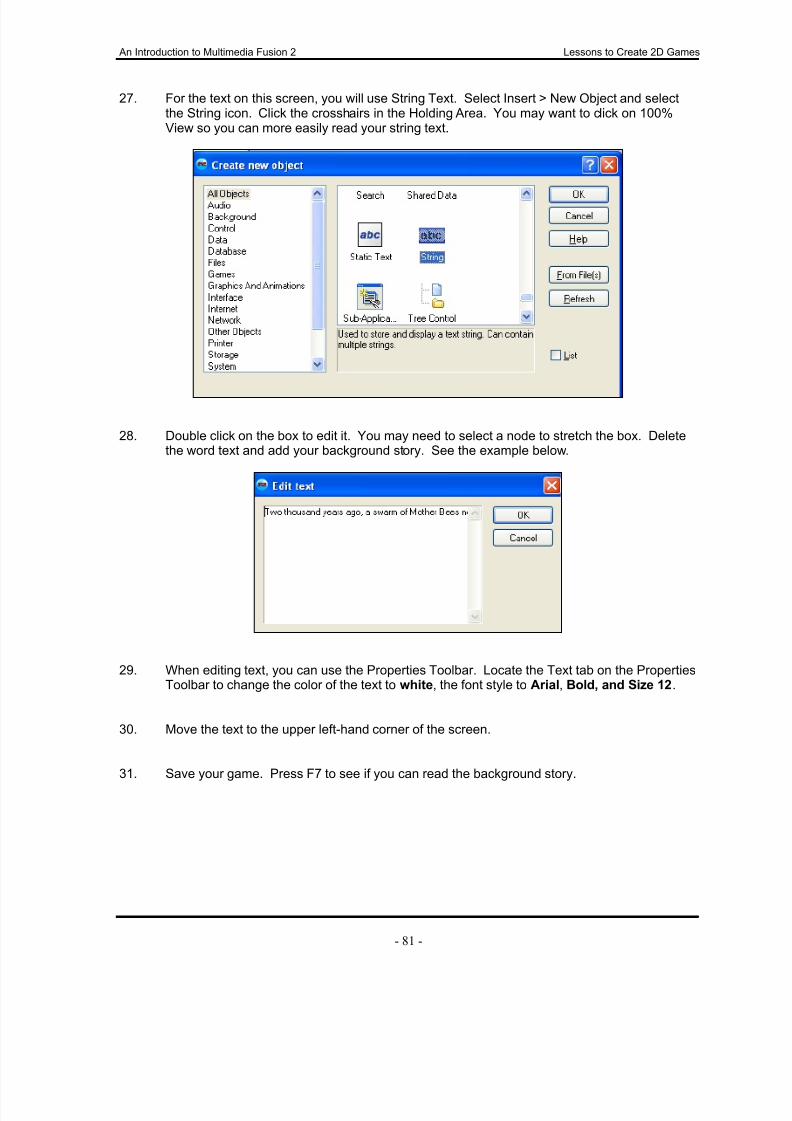
8/9/2019 An Introduction to Multimedia Fusion Full Version
http://slidepdf.com/reader/full/an-introduction-to-multimedia-fusion-full-version 83/145
An Introduction to Multimedia Fusion 2 Lessons to Create 2D Games
- 81 -
27. For the text on this screen, you will use String Text. Select Insert > New Object and selectthe String icon. Click the crosshairs in the Holding Area. You may want to click on 100%View so you can more easily read your string text.
28. Double click on the box to edit it. You may need to select a node to stretch the box. Deletethe word text and add your background story. See the example below.
29. When editing text, you can use the Properties Toolbar. Locate the Text tab on the PropertiesToolbar to change the color of the text to white, the font style to Arial, Bold, and Size 12.
30. Move the text to the upper left-hand corner of the screen.
31. Save your game. Press F7 to see if you can read the background story.
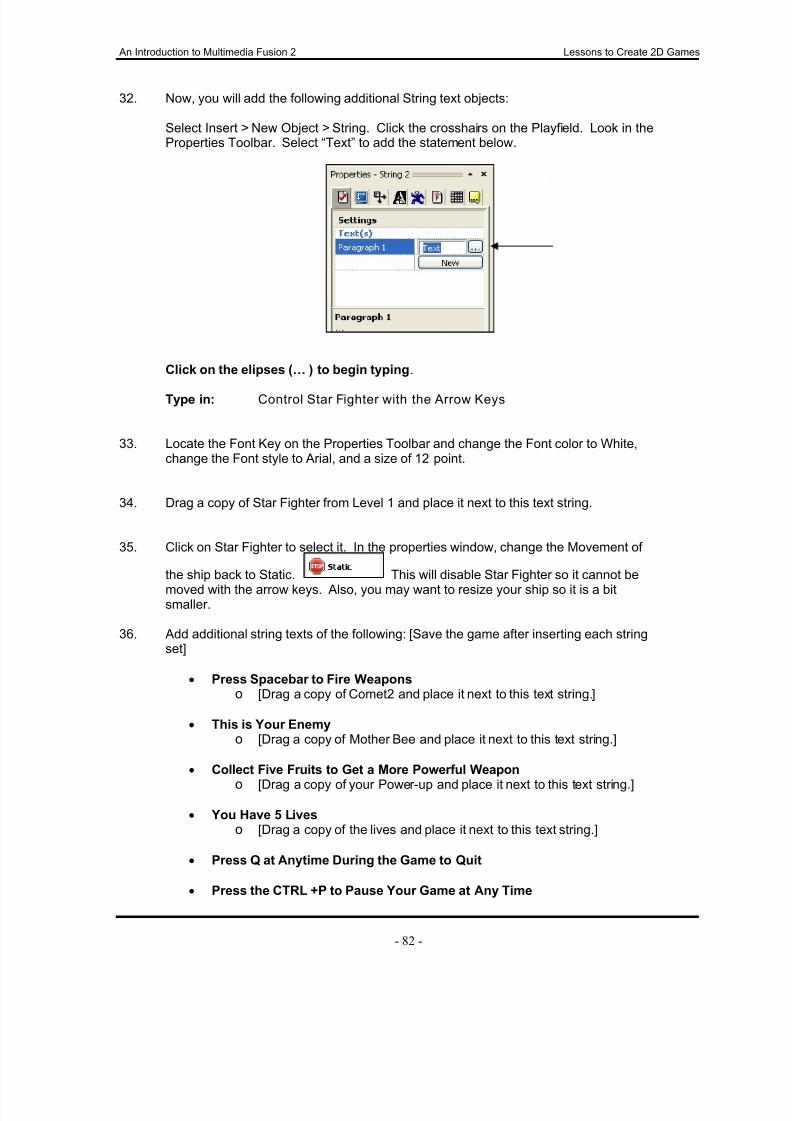
8/9/2019 An Introduction to Multimedia Fusion Full Version
http://slidepdf.com/reader/full/an-introduction-to-multimedia-fusion-full-version 84/145
An Introduction to Multimedia Fusion 2 Lessons to Create 2D Games
- 82 -
32. Now, you will add the following additional String text objects:
Select Insert > New Object > String. Click the crosshairs on the Playfield. Look in theProperties Toolbar. Select “Text” to add the statement below.
Click on the elipses (… ) to begin typing.
Type in: Control Star Fighter with the Arrow Keys
33. Locate the Font Key on the Properties Toolbar and change the Font color to White,change the Font style to Arial, and a size of 12 point.
34. Drag a copy of Star Fighter from Level 1 and place it next to this text string.
35. Click on Star Fighter to select it. In the properties window, change the Movement of
the ship back to Static. This will disable Star Fighter so it cannot be
moved with the arrow keys. Also, you may want to resize your ship so it is a bitsmaller.
36. Add additional string texts of the following: [Save the game after inserting each stringset]
• Press Spacebar to Fire Weaponso [Drag a copy of Comet2 and place it next to this text string.]
• This is Your Enemy o [Drag a copy of Mother Bee and place it next to this text string.]
• Collect Five Fruits to Get a More Powerful Weapon
o [Drag a copy of your Power-up and place it next to this text string.]
• You Have 5 Liveso [Drag a copy of the lives and place it next to this text string.]
• Press Q at Anytime During the Game to Quit
• Press the CTRL +P to Pause Your Game at Any Time
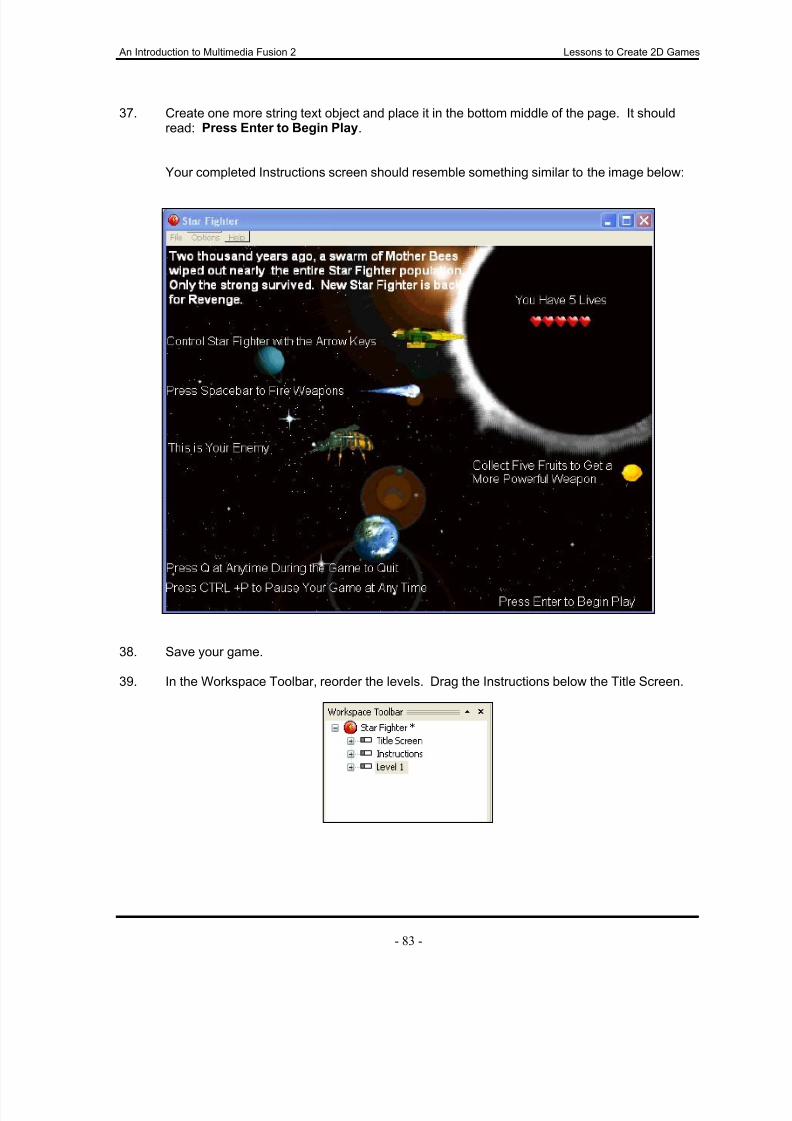
8/9/2019 An Introduction to Multimedia Fusion Full Version
http://slidepdf.com/reader/full/an-introduction-to-multimedia-fusion-full-version 85/145
An Introduction to Multimedia Fusion 2 Lessons to Create 2D Games
- 83 -
37. Create one more string text object and place it in the bottom middle of the page. It shouldread: Press Enter to Begin Play.
Your completed Instructions screen should resemble something similar to the image below:
38. Save your game.
39. In the Workspace Toolbar, reorder the levels. Drag the Instructions below the Title Screen.
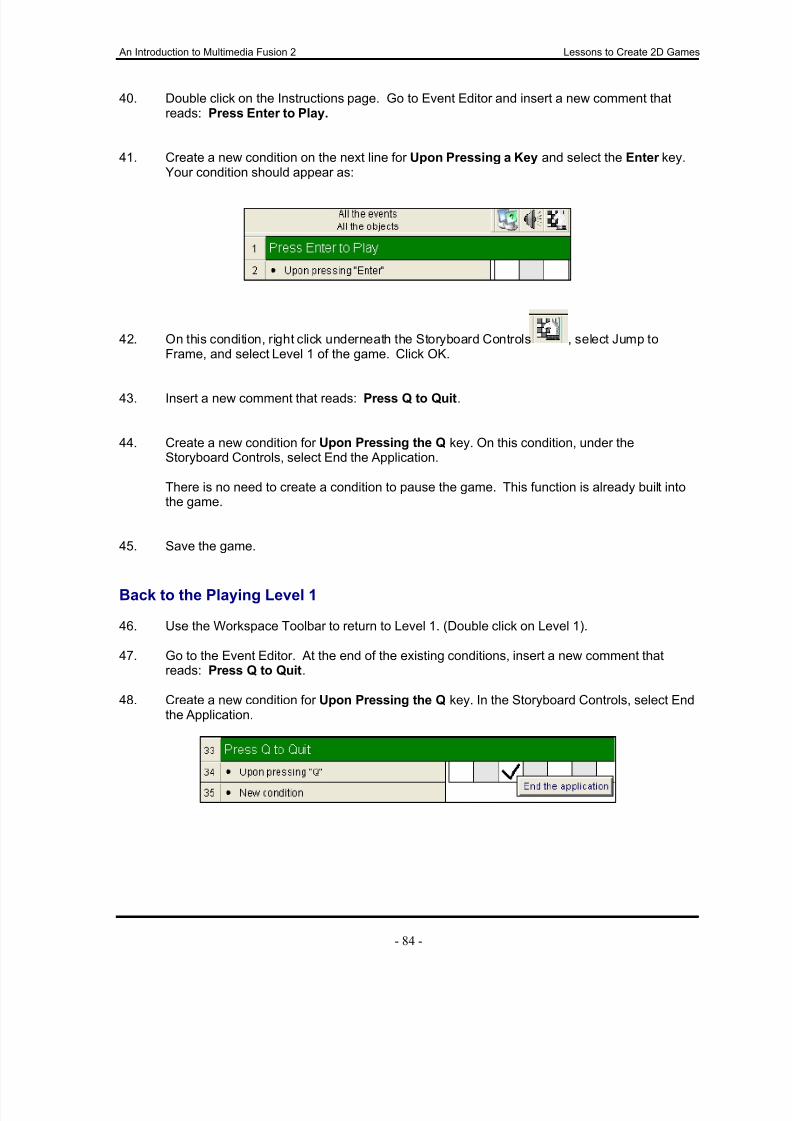
8/9/2019 An Introduction to Multimedia Fusion Full Version
http://slidepdf.com/reader/full/an-introduction-to-multimedia-fusion-full-version 86/145
An Introduction to Multimedia Fusion 2 Lessons to Create 2D Games
- 84 -
40. Double click on the Instructions page. Go to Event Editor and insert a new comment thatreads: Press Enter to Play.
41. Create a new condition on the next line for Upon Pressing a Key and select the Enter key.Your condition should appear as:
42. On this condition, right click underneath the Storyboard Controls , select Jump toFrame, and select Level 1 of the game. Click OK.
43. Insert a new comment that reads: Press Q to Quit.
44. Create a new condition for Upon Pressing the Q key. On this condition, under theStoryboard Controls, select End the Application.
There is no need to create a condition to pause the game. This function is already built intothe game.
45. Save the game.
Back to the Playing Level 1
46. Use the Workspace Toolbar to return to Level 1. (Double click on Level 1).
47. Go to the Event Editor. At the end of the existing conditions, insert a new comment thatreads: Press Q to Quit.
48. Create a new condition for Upon Pressing the Q key. In the Storyboard Controls, select Endthe Application.
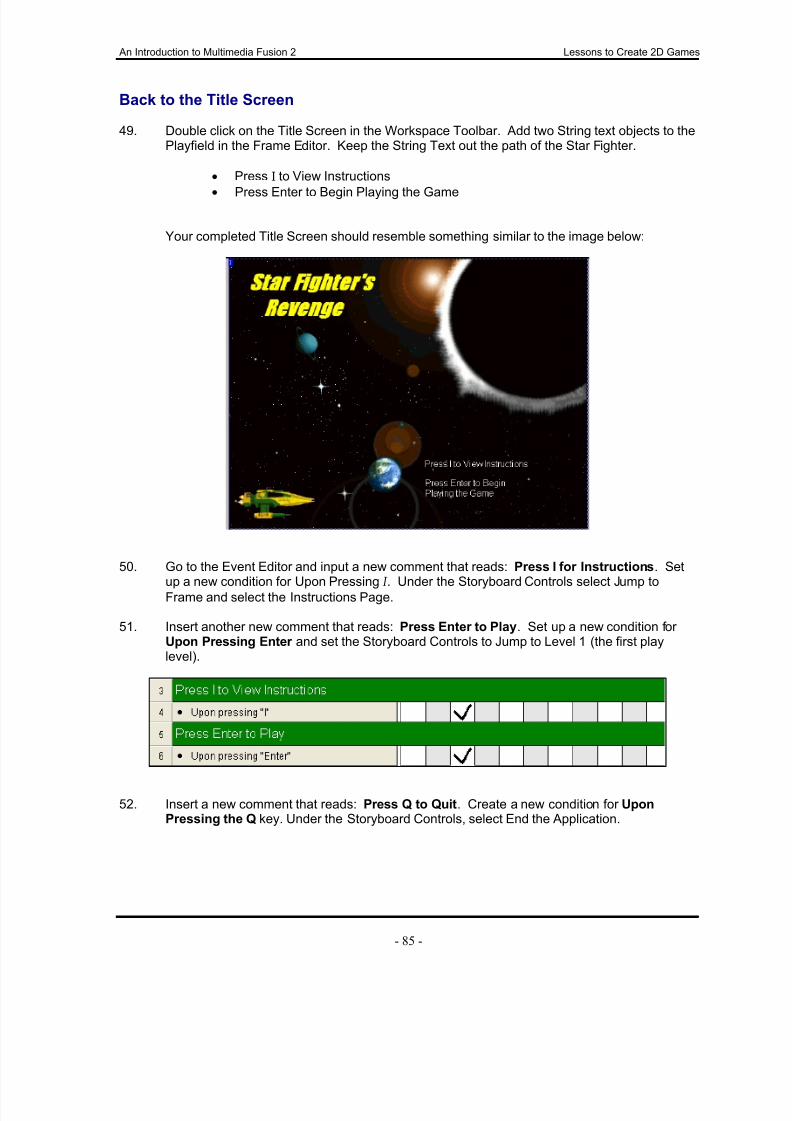
8/9/2019 An Introduction to Multimedia Fusion Full Version
http://slidepdf.com/reader/full/an-introduction-to-multimedia-fusion-full-version 87/145
An Introduction to Multimedia Fusion 2 Lessons to Create 2D Games
- 85 -
Back to the Title Screen
49. Double click on the Title Screen in the Workspace Toolbar. Add two String text objects to thePlayfield in the Frame Editor. Keep the String Text out the path of the Star Fighter.
• Press I to View Instructions•
Press Enter to Begin Playing the Game
Your completed Title Screen should resemble something similar to the image below:
50. Go to the Event Editor and input a new comment that reads: Press I for Instructions. Setup a new condition for Upon Pressing I . Under the Storyboard Controls select Jump toFrame and select the Instructions Page.
51. Insert another new comment that reads: Press Enter to Play. Set up a new condition forUpon Pressing Enter and set the Storyboard Controls to Jump to Level 1 (the first playlevel).
52. Insert a new comment that reads: Press Q to Quit. Create a new condition for UponPressing the Q key. Under the Storyboard Controls, select End the Application.
8/9/2019 An Introduction to Multimedia Fusion Full Version
http://slidepdf.com/reader/full/an-introduction-to-multimedia-fusion-full-version 88/145
An Introduction to Multimedia Fusion 2 Lessons to Create 2D Games
- 86 -
53. Save your Game. Test your game.
Since the game has more than one frame, use F8 to run the entire application from TitleScreen to Level 1. Double check again that the Upon pressing keys work from each level.For instance:
o the Q should work from any screen in the game
o the Enter key should start the game from the Title Screen or the Instructions Screen
o try pressing CTRL +P on Level 1
54. Make sure you have a backup of the game. It is too easy to skip this step, but do not skip it.The game is getting longer and if a glitch occurs at some point, a backup is nice to have!
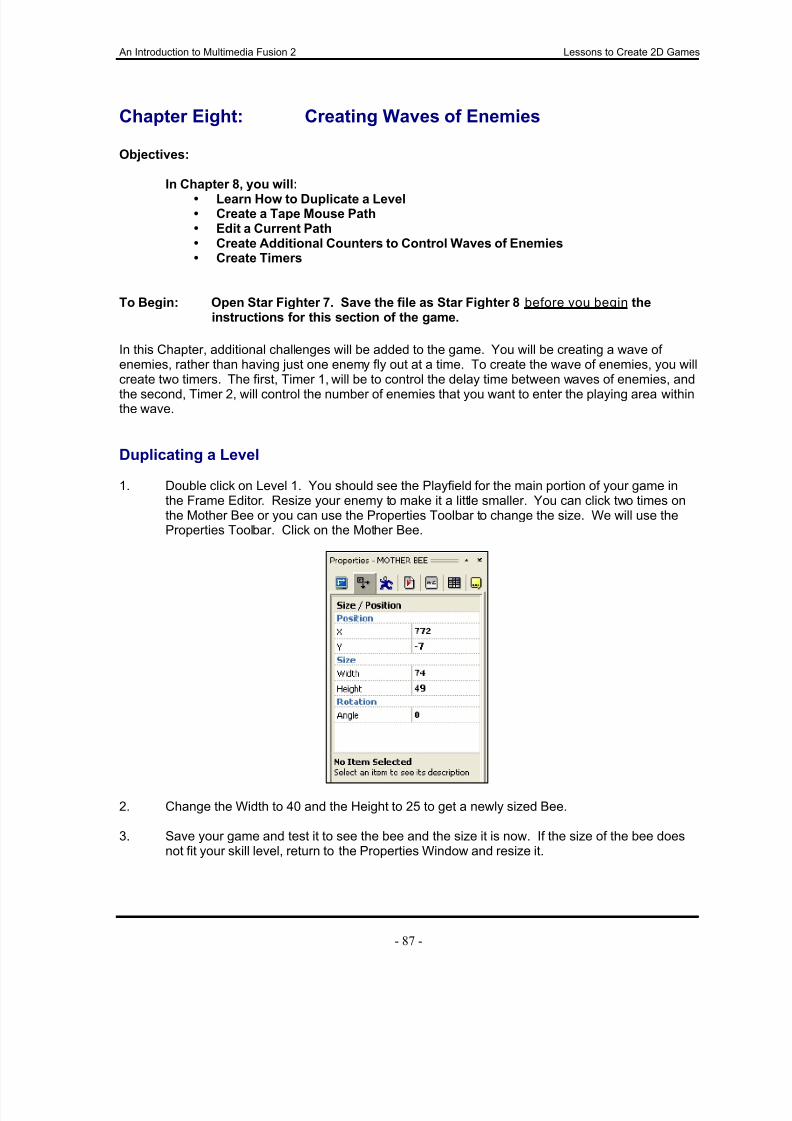
8/9/2019 An Introduction to Multimedia Fusion Full Version
http://slidepdf.com/reader/full/an-introduction-to-multimedia-fusion-full-version 89/145
An Introduction to Multimedia Fusion 2 Lessons to Create 2D Games
- 87 -
Chapter Eight: Creating Waves of Enemies
Objectives:
In Chapter 8, you will:
Learn How to Duplicate a Level Create a Tape Mouse Path Edit a Current Path Create Additional Counters to Control Waves of Enemies Create Timers
To Begin: Open Star Fighter 7. Save the file as Star Fighter 8 before you begin theinstructions for this section of the game.
In this Chapter, additional challenges will be added to the game. You will be creating a wave ofenemies, rather than having just one enemy fly out at a time. To create the wave of enemies, you willcreate two timers. The first, Timer 1, will be to control the delay time between waves of enemies, and
the second, Timer 2, will control the number of enemies that you want to enter the playing area withinthe wave.
Duplicating a Level
1. Double click on Level 1. You should see the Playfield for the main portion of your game inthe Frame Editor. Resize your enemy to make it a little smaller. You can click two times onthe Mother Bee or you can use the Properties Toolbar to change the size. We will use theProperties Toolbar. Click on the Mother Bee.
2. Change the Width to 40 and the Height to 25 to get a newly sized Bee.
3. Save your game and test it to see the bee and the size it is now. If the size of the bee doesnot fit your skill level, return to the Properties Window and resize it.
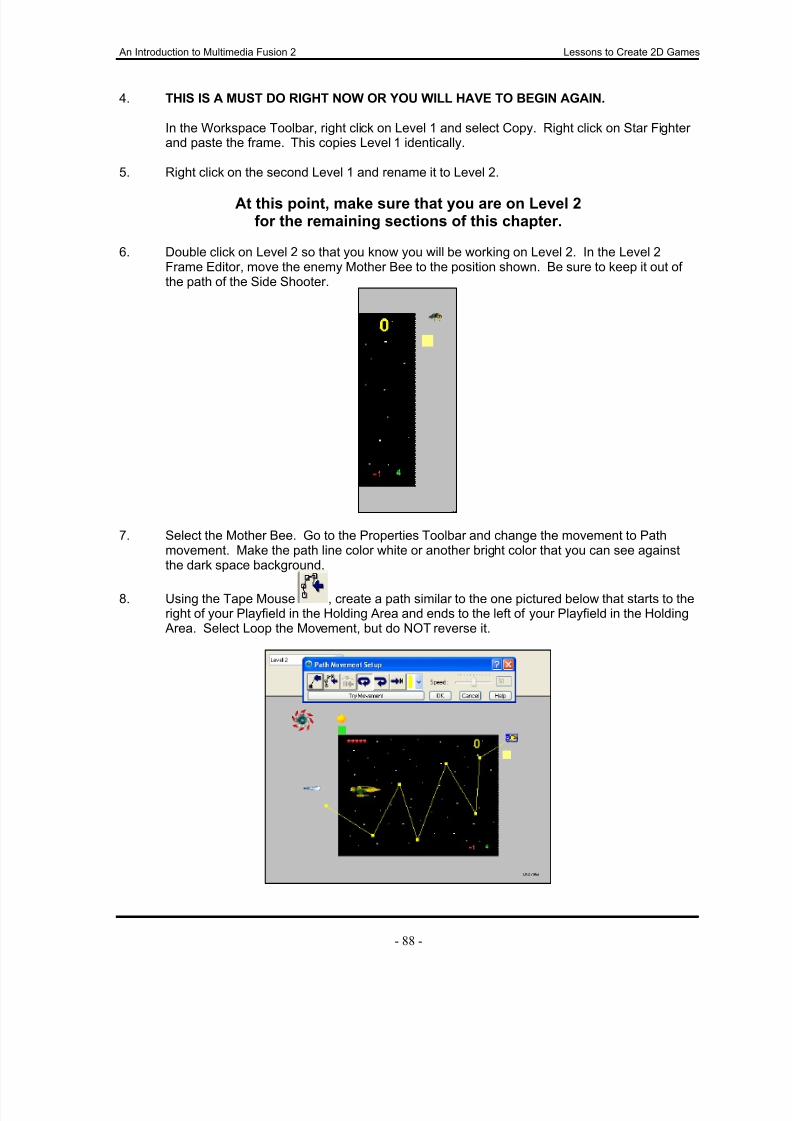
8/9/2019 An Introduction to Multimedia Fusion Full Version
http://slidepdf.com/reader/full/an-introduction-to-multimedia-fusion-full-version 90/145
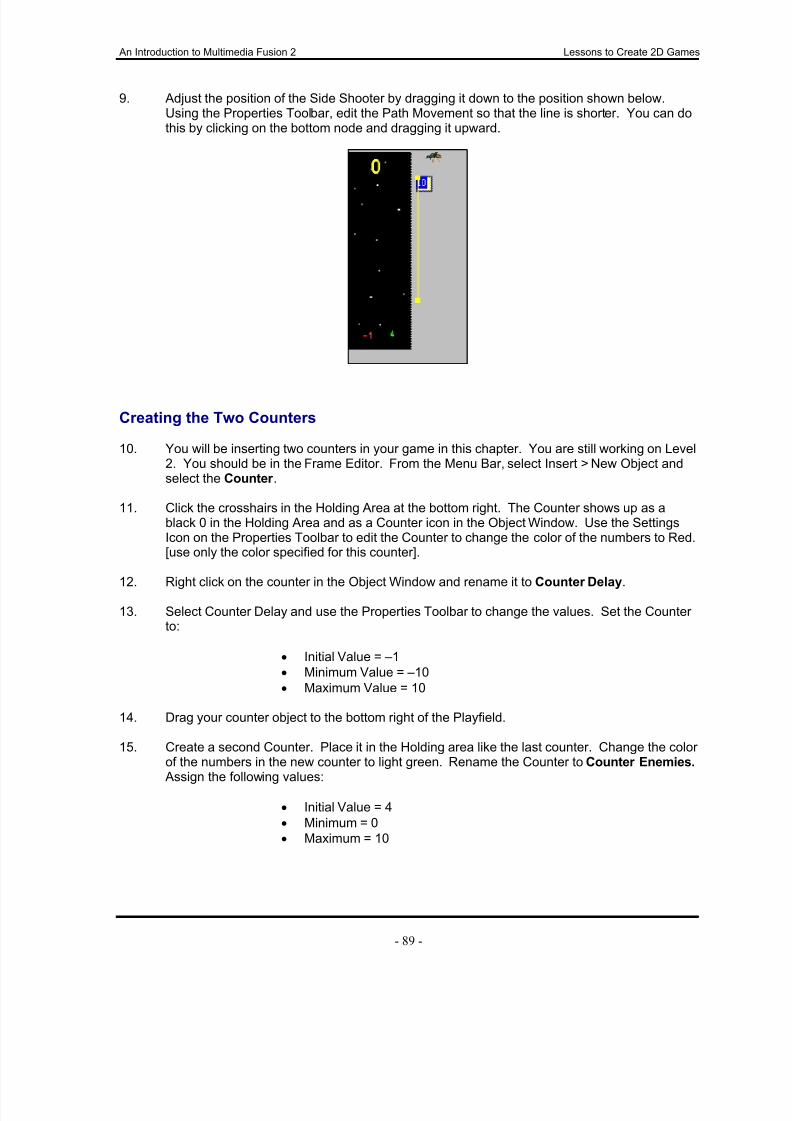
8/9/2019 An Introduction to Multimedia Fusion Full Version
http://slidepdf.com/reader/full/an-introduction-to-multimedia-fusion-full-version 91/145
An Introduction to Multimedia Fusion 2 Lessons to Create 2D Games
- 89 -
9. Adjust the position of the Side Shooter by dragging it down to the position shown below.Using the Properties Toolbar, edit the Path Movement so that the line is shorter. You can dothis by clicking on the bottom node and dragging it upward.
Creating the Two Counters
10. You will be inserting two counters in your game in this chapter. You are still working on Level2. You should be in the Frame Editor. From the Menu Bar, select Insert > New Object andselect the Counter .
11. Click the crosshairs in the Holding Area at the bottom right. The Counter shows up as ablack 0 in the Holding Area and as a Counter icon in the Object Window. Use the SettingsIcon on the Properties Toolbar to edit the Counter to change the color of the numbers to Red.[use only the color specified for this counter].
12. Right click on the counter in the Object Window and rename it to Counter Delay.
13. Select Counter Delay and use the Properties Toolbar to change the values. Set the Counterto:
• Initial Value = –1• Minimum Value = –10• Maximum Value = 10
14. Drag your counter object to the bottom right of the Playfield.
15. Create a second Counter. Place it in the Holding area like the last counter. Change the colorof the numbers in the new counter to light green. Rename the Counter to Counter Enemies.
Assign the following values:
• Initial Value = 4• Minimum = 0• Maximum = 10
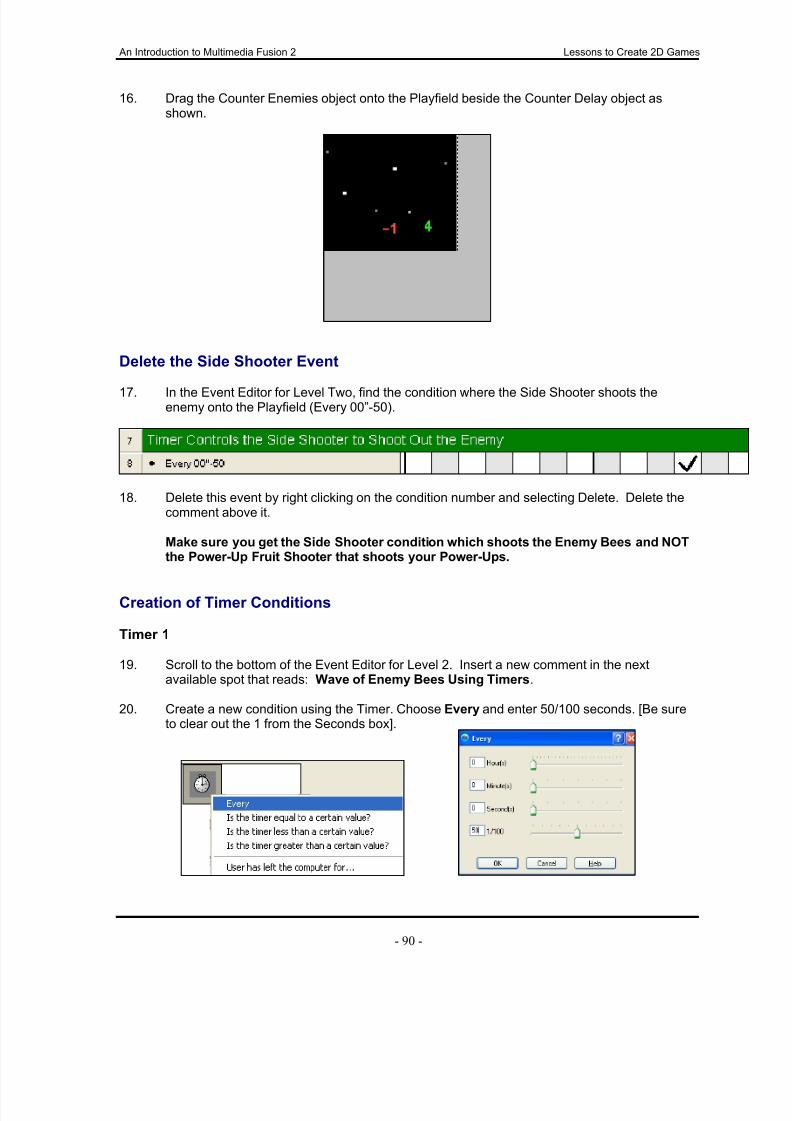
8/9/2019 An Introduction to Multimedia Fusion Full Version
http://slidepdf.com/reader/full/an-introduction-to-multimedia-fusion-full-version 92/145
An Introduction to Multimedia Fusion 2 Lessons to Create 2D Games
- 90 -
16. Drag the Counter Enemies object onto the Playfield beside the Counter Delay object asshown.
Delete the Side Shooter Event
17. In the Event Editor for Level Two, find the condition where the Side Shooter shoots theenemy onto the Playfield (Every 00”-50).
18. Delete this event by right clicking on the condition number and selecting Delete. Delete thecomment above it.
Make sure you get the Side Shooter condition which shoots the Enemy Bees and NOTthe Power-Up Fruit Shooter that shoots your Power-Ups.
Creation of Timer Conditions
Timer 1
19. Scroll to the bottom of the Event Editor for Level 2. Insert a new comment in the nextavailable spot that reads: Wave of Enemy Bees Using Timers.
20. Create a new condition using the Timer. Choose Every and enter 50/100 seconds. [Be sureto clear out the 1 from the Seconds box].
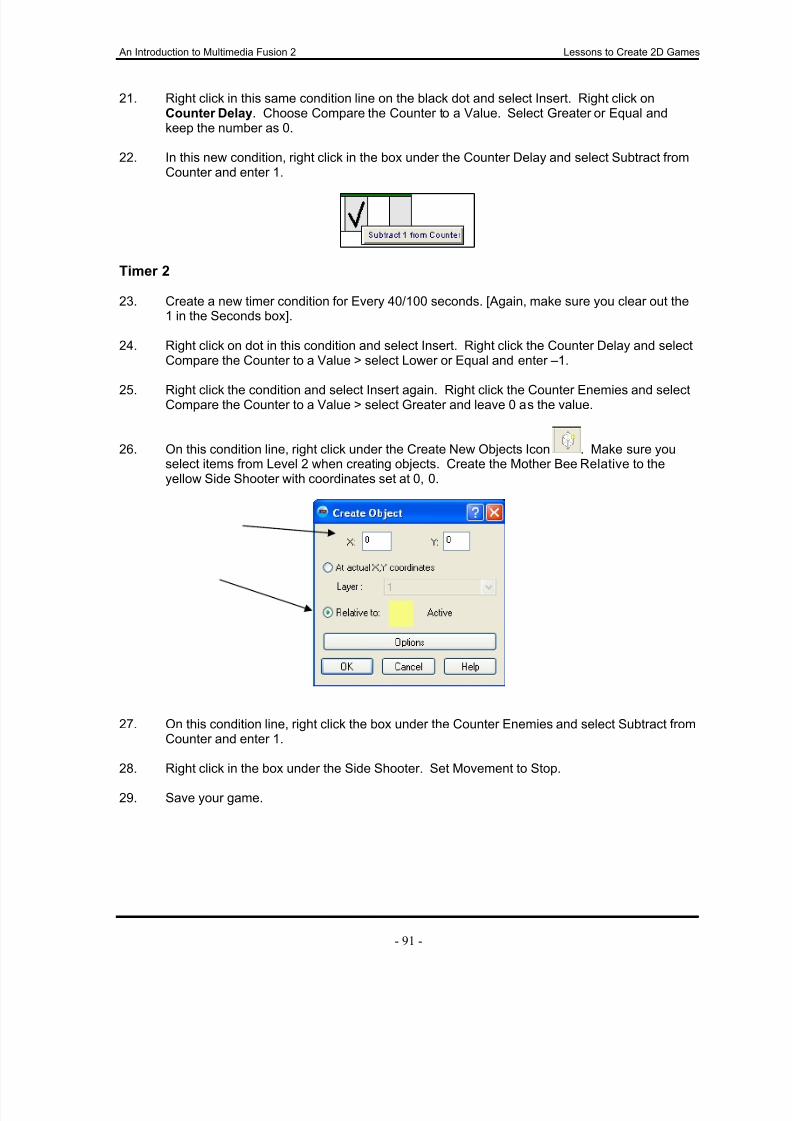
8/9/2019 An Introduction to Multimedia Fusion Full Version
http://slidepdf.com/reader/full/an-introduction-to-multimedia-fusion-full-version 93/145
An Introduction to Multimedia Fusion 2 Lessons to Create 2D Games
- 91 -
21. Right click in this same condition line on the black dot and select Insert. Right click onCounter Delay. Choose Compare the Counter to a Value. Select Greater or Equal andkeep the number as 0.
22. In this new condition, right click in the box under the Counter Delay and select Subtract fromCounter and enter 1.
Timer 2
23. Create a new timer condition for Every 40/100 seconds. [Again, make sure you clear out the1 in the Seconds box].
24. Right click on dot in this condition and select Insert. Right click the Counter Delay and selectCompare the Counter to a Value > select Lower or Equal and enter –1.
25. Right click the condition and select Insert again. Right click the Counter Enemies and selectCompare the Counter to a Value > select Greater and leave 0 as the value.
26. On this condition line, right click under the Create New Objects Icon . Make sure youselect items from Level 2 when creating objects. Create the Mother Bee Relative to theyellow Side Shooter with coordinates set at 0, 0.
27. On this condition line, right click the box under the Counter Enemies and select Subtract fromCounter and enter 1.
28. Right click in the box under the Side Shooter. Set Movement to Stop.
29. Save your game.
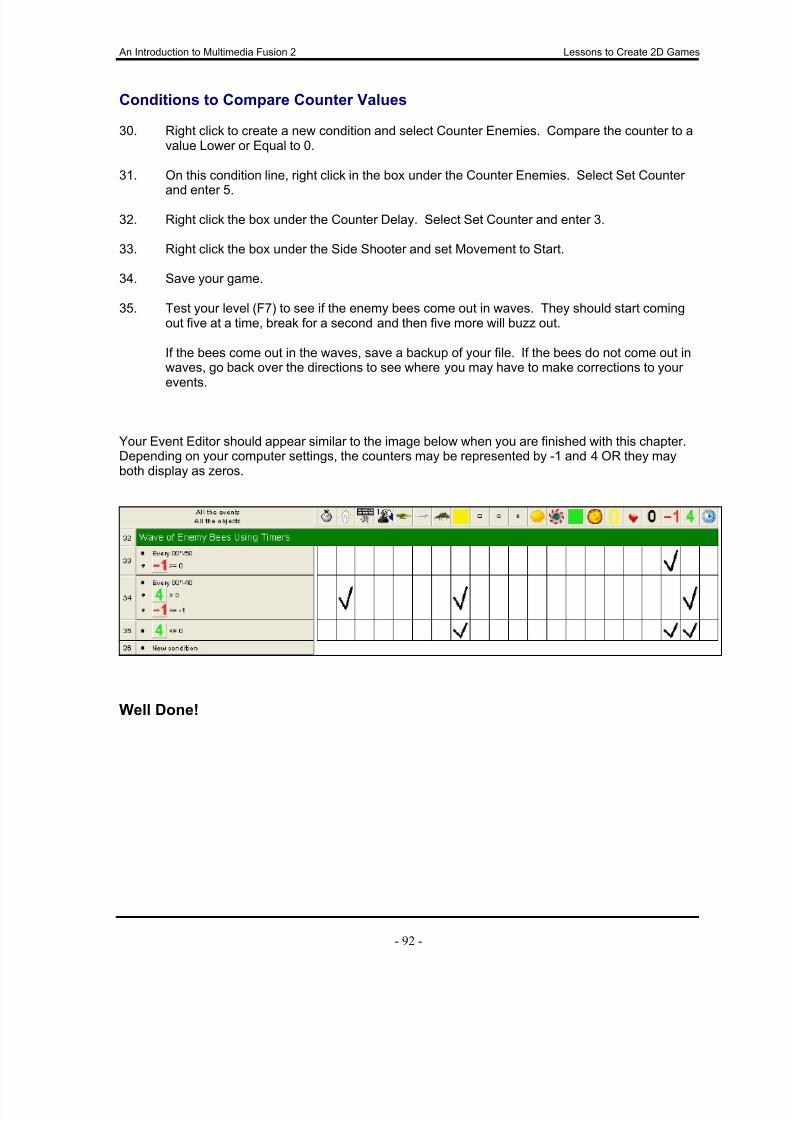
8/9/2019 An Introduction to Multimedia Fusion Full Version
http://slidepdf.com/reader/full/an-introduction-to-multimedia-fusion-full-version 94/145
An Introduction to Multimedia Fusion 2 Lessons to Create 2D Games
- 92 -
Conditions to Compare Counter Values
30. Right click to create a new condition and select Counter Enemies. Compare the counter to avalue Lower or Equal to 0.
31. On this condition line, right click in the box under the Counter Enemies. Select Set Counter
and enter 5.
32. Right click the box under the Counter Delay. Select Set Counter and enter 3.
33. Right click the box under the Side Shooter and set Movement to Start.
34. Save your game.
35. Test your level (F7) to see if the enemy bees come out in waves. They should start comingout five at a time, break for a second and then five more will buzz out.
If the bees come out in the waves, save a backup of your file. If the bees do not come out inwaves, go back over the directions to see where you may have to make corrections to yourevents.
Your Event Editor should appear similar to the image below when you are finished with this chapter.Depending on your computer settings, the counters may be represented by -1 and 4 OR they mayboth display as zeros.
Well Done!
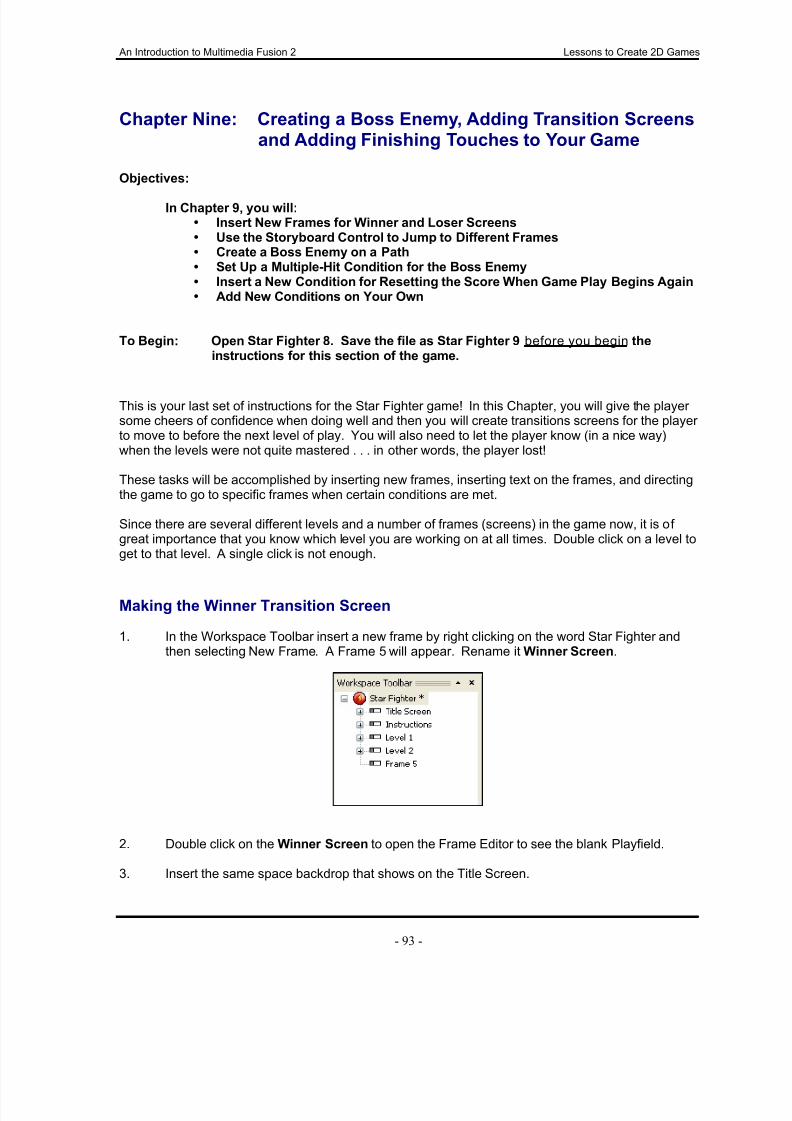
8/9/2019 An Introduction to Multimedia Fusion Full Version
http://slidepdf.com/reader/full/an-introduction-to-multimedia-fusion-full-version 95/145
An Introduction to Multimedia Fusion 2 Lessons to Create 2D Games
- 93 -
Chapter Nine: Creating a Boss Enemy, Adding Transition Screensand Adding Finishing Touches to Your Game
Objectives:
In Chapter 9, you will: Insert New Frames for Winner and Loser Screens Use the Storyboard Control to Jump to Different Frames Create a Boss Enemy on a Path Set Up a Multiple-Hit Condition for the Boss Enemy Insert a New Condition for Resetting the Score When Game Play Begins Again Add New Conditions on Your Own
To Begin: Open Star Fighter 8. Save the file as Star Fighter 9 before you begin theinstructions for this section of the game.
This is your last set of instructions for the Star Fighter game! In this Chapter, you will give the playersome cheers of confidence when doing well and then you will create transitions screens for the playerto move to before the next level of play. You will also need to let the player know (in a nice way)when the levels were not quite mastered . . . in other words, the player lost!
These tasks will be accomplished by inserting new frames, inserting text on the frames, and directingthe game to go to specific frames when certain conditions are met.
Since there are several different levels and a number of frames (screens) in the game now, it is ofgreat importance that you know which level you are working on at all times. Double click on a level toget to that level. A single click is not enough.
Making the Winner Transition Screen
1. In the Workspace Toolbar insert a new frame by right clicking on the word Star Fighter andthen selecting New Frame. A Frame 5 will appear. Rename it Winner Screen.
2. Double click on the Winner Screen to open the Frame Editor to see the blank Playfield.
3. Insert the same space backdrop that shows on the Title Screen.
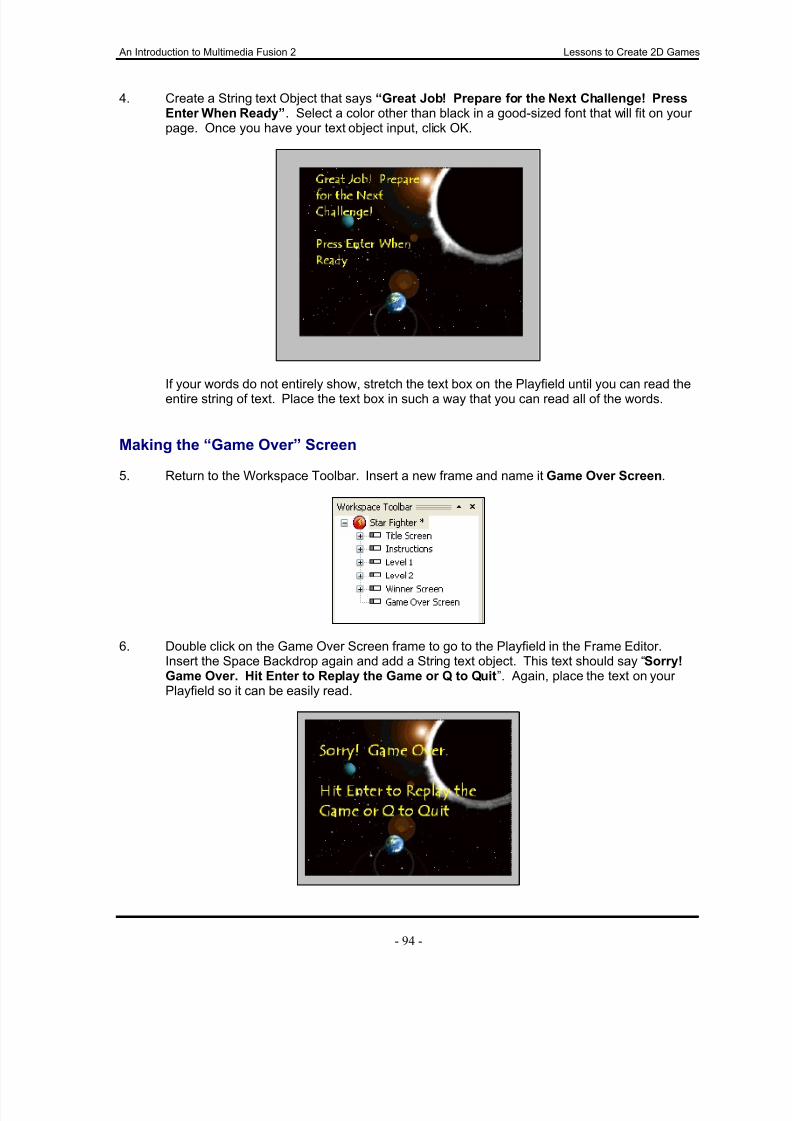
8/9/2019 An Introduction to Multimedia Fusion Full Version
http://slidepdf.com/reader/full/an-introduction-to-multimedia-fusion-full-version 96/145
An Introduction to Multimedia Fusion 2 Lessons to Create 2D Games
- 94 -
4. Create a String text Object that says “Great Job! Prepare for the Next Challenge! PressEnter When Ready”. Select a color other than black in a good-sized font that will fit on yourpage. Once you have your text object input, click OK.
If your words do not entirely show, stretch the text box on the Playfield until you can read theentire string of text. Place the text box in such a way that you can read all of the words.
Making the “Game Over” Screen
5. Return to the Workspace Toolbar. Insert a new frame and name it Game Over Screen.
6. Double click on the Game Over Screen frame to go to the Playfield in the Frame Editor.Insert the Space Backdrop again and add a String text object. This text should say “Sorry!Game Over. Hit Enter to Replay the Game or Q to Quit”. Again, place the text on yourPlayfield so it can be easily read.
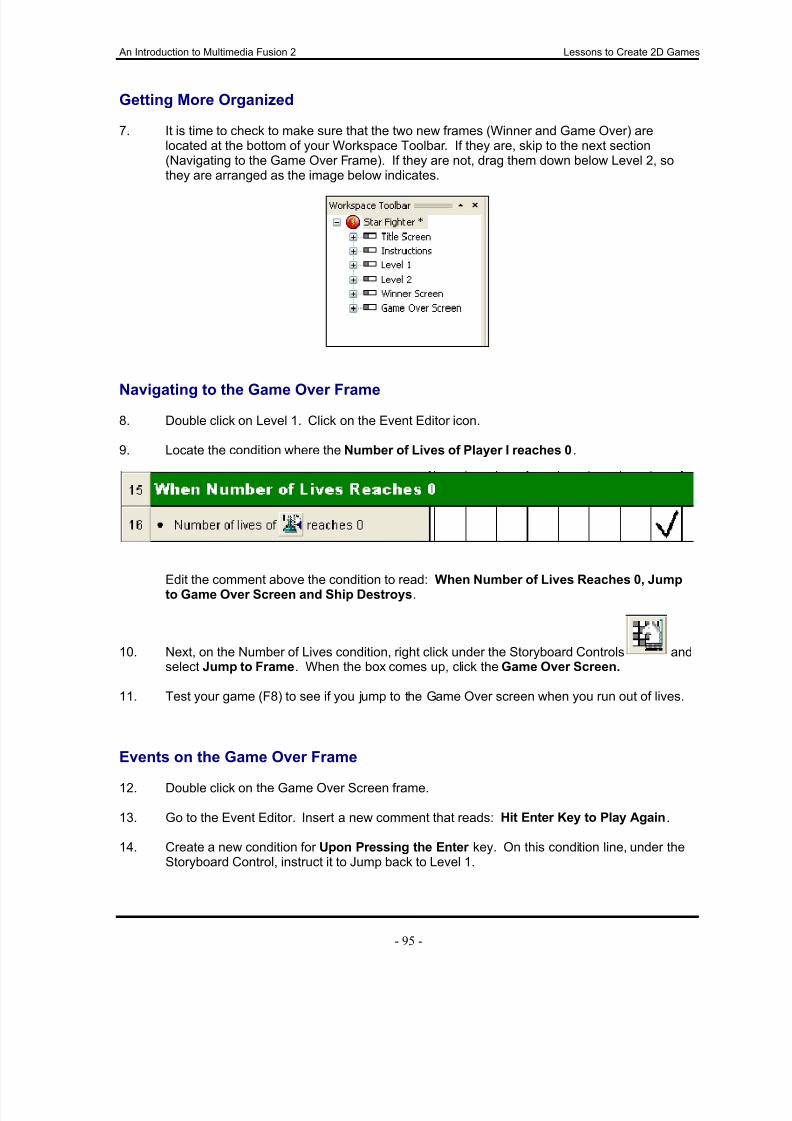
8/9/2019 An Introduction to Multimedia Fusion Full Version
http://slidepdf.com/reader/full/an-introduction-to-multimedia-fusion-full-version 97/145
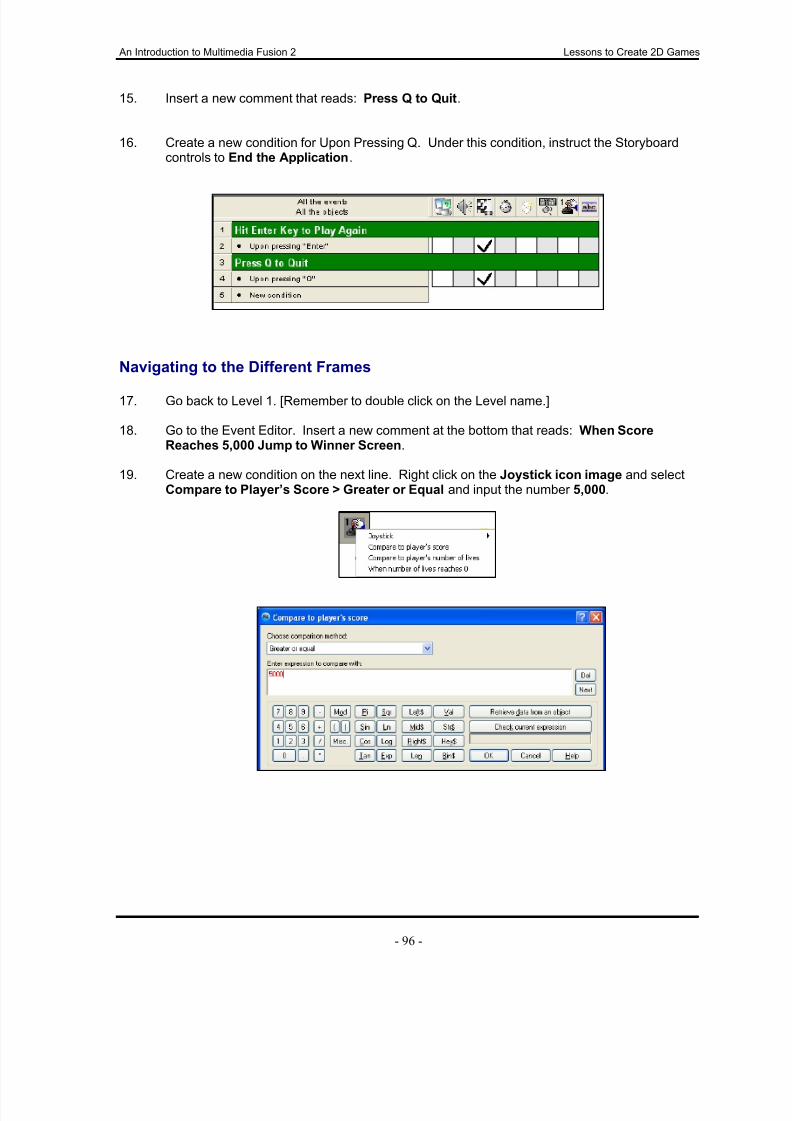
8/9/2019 An Introduction to Multimedia Fusion Full Version
http://slidepdf.com/reader/full/an-introduction-to-multimedia-fusion-full-version 98/145
An Introduction to Multimedia Fusion 2 Lessons to Create 2D Games
- 96 -
15. Insert a new comment that reads: Press Q to Quit.
16. Create a new condition for Upon Pressing Q. Under this condition, instruct the Storyboardcontrols to End the Application.
Navigating to the Different Frames
17. Go back to Level 1. [Remember to double click on the Level name.]
18. Go to the Event Editor. Insert a new comment at the bottom that reads: When ScoreReaches 5,000 Jump to Winner Screen.
19. Create a new condition on the next line. Right click on the Joystick icon image and selectCompare to Player’s Score > Greater or Equal and input the number 5,000.
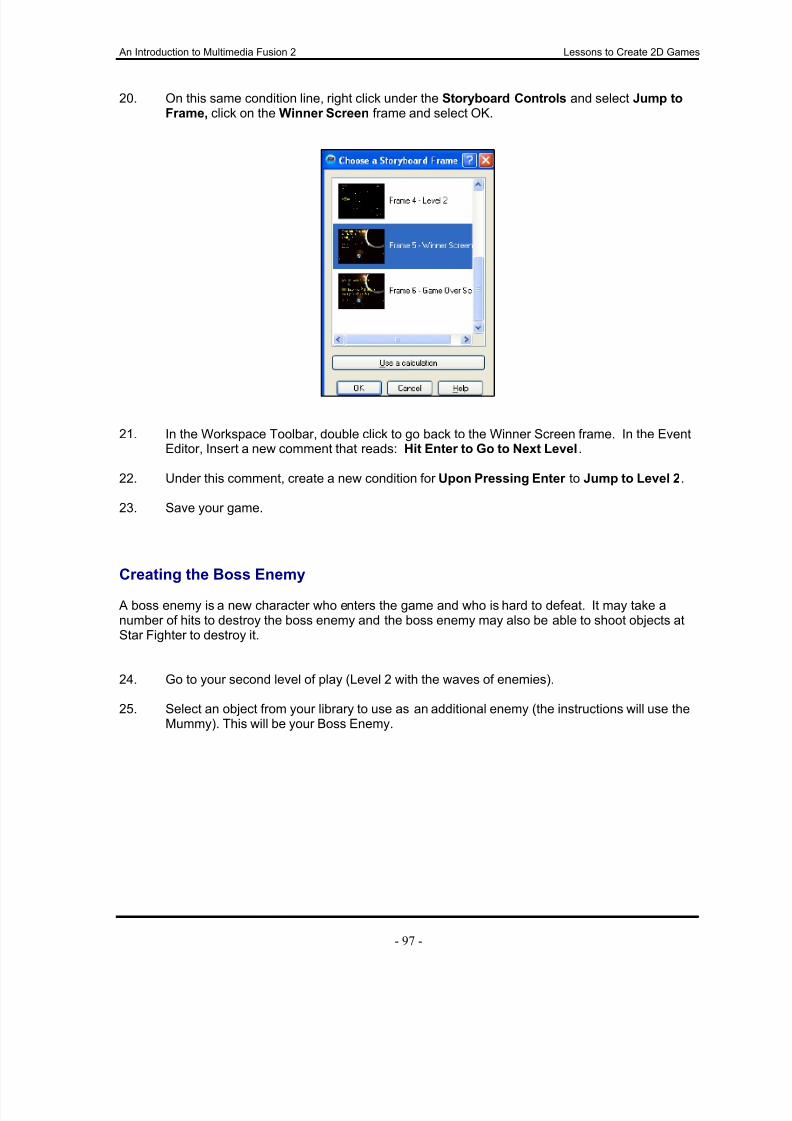
8/9/2019 An Introduction to Multimedia Fusion Full Version
http://slidepdf.com/reader/full/an-introduction-to-multimedia-fusion-full-version 99/145
An Introduction to Multimedia Fusion 2 Lessons to Create 2D Games
- 97 -
20. On this same condition line, right click under the Storyboard Controls and select Jump toFrame, click on the Winner Screen frame and select OK.
21. In the Workspace Toolbar, double click to go back to the Winner Screen frame. In the EventEditor, Insert a new comment that reads: Hit Enter to Go to Next Level.
22. Under this comment, create a new condition for Upon Pressing Enter to Jump to Level 2.
23. Save your game.
Creating the Boss Enemy
A boss enemy is a new character who enters the game and who is hard to defeat. It may take anumber of hits to destroy the boss enemy and the boss enemy may also be able to shoot objects atStar Fighter to destroy it.
24. Go to your second level of play (Level 2 with the waves of enemies).
25. Select an object from your library to use as an additional enemy (the instructions will use theMummy). This will be your Boss Enemy.
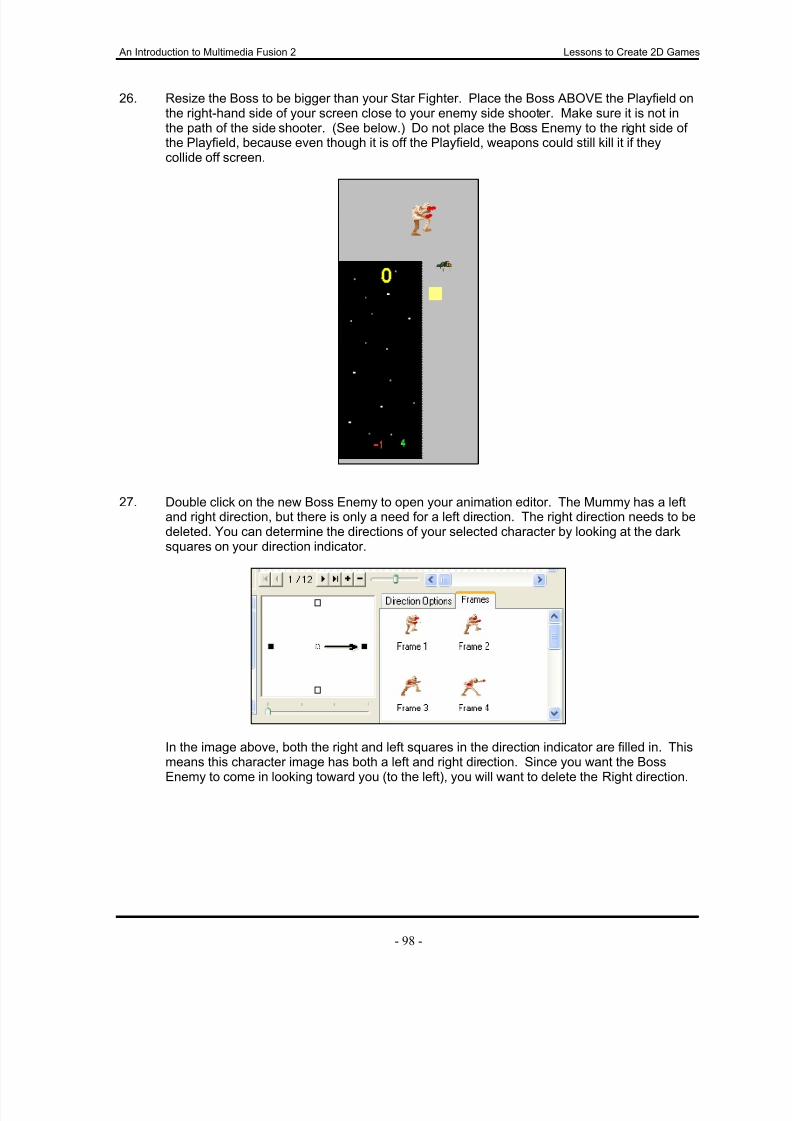
8/9/2019 An Introduction to Multimedia Fusion Full Version
http://slidepdf.com/reader/full/an-introduction-to-multimedia-fusion-full-version 100/145
An Introduction to Multimedia Fusion 2 Lessons to Create 2D Games
- 98 -
26. Resize the Boss to be bigger than your Star Fighter. Place the Boss ABOVE the Playfield onthe right-hand side of your screen close to your enemy side shooter. Make sure it is not inthe path of the side shooter. (See below.) Do not place the Boss Enemy to the right side ofthe Playfield, because even though it is off the Playfield, weapons could still kill it if theycollide off screen.
27. Double click on the new Boss Enemy to open your animation editor. The Mummy has a leftand right direction, but there is only a need for a left direction. The right direction needs to bedeleted. You can determine the directions of your selected character by looking at the darksquares on your direction indicator.
In the image above, both the right and left squares in the direction indicator are filled in. Thismeans this character image has both a left and right direction. Since you want the BossEnemy to come in looking toward you (to the left), you will want to delete the Right direction.
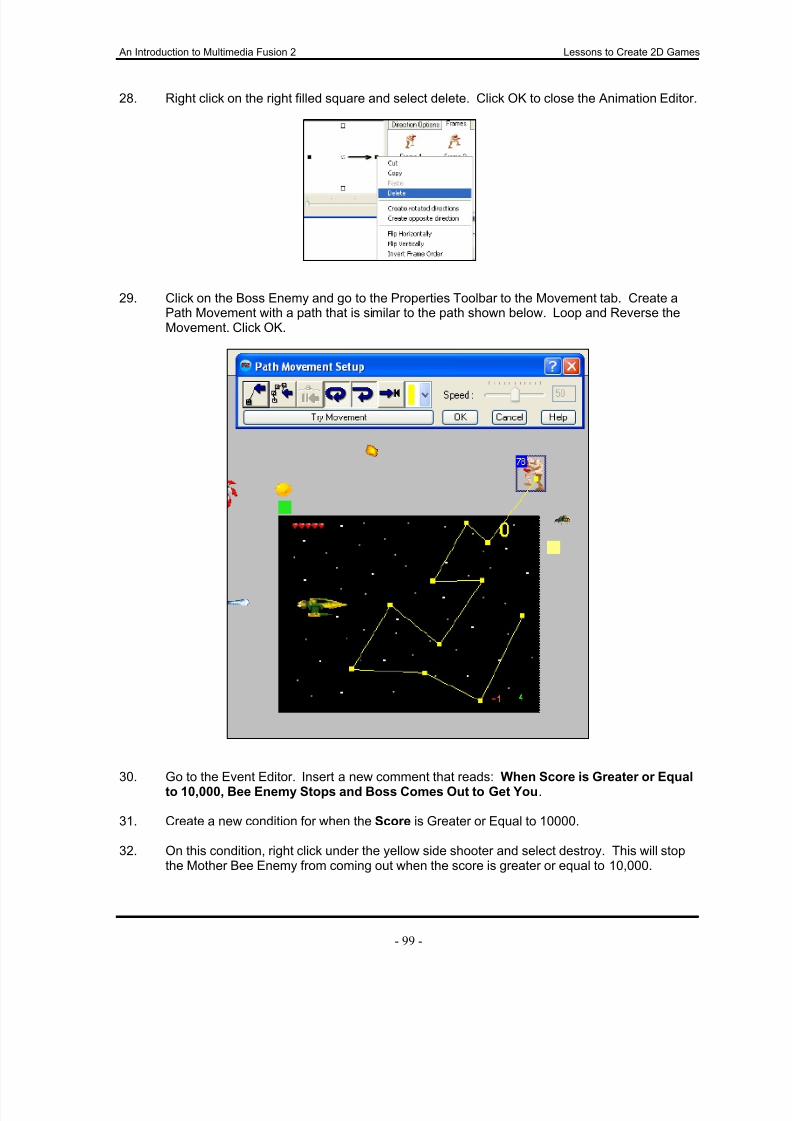
8/9/2019 An Introduction to Multimedia Fusion Full Version
http://slidepdf.com/reader/full/an-introduction-to-multimedia-fusion-full-version 101/145
An Introduction to Multimedia Fusion 2 Lessons to Create 2D Games
- 99 -
28. Right click on the right filled square and select delete. Click OK to close the Animation Editor.
29. Click on the Boss Enemy and go to the Properties Toolbar to the Movement tab. Create aPath Movement with a path that is similar to the path shown below. Loop and Reverse theMovement. Click OK.
30. Go to the Event Editor. Insert a new comment that reads: When Score is Greater or Equalto 10,000, Bee Enemy Stops and Boss Comes Out to Get You.
31. Create a new condition for when the Score is Greater or Equal to 10000.
32. On this condition, right click under the yellow side shooter and select destroy. This will stopthe Mother Bee Enemy from coming out when the score is greater or equal to 10,000.
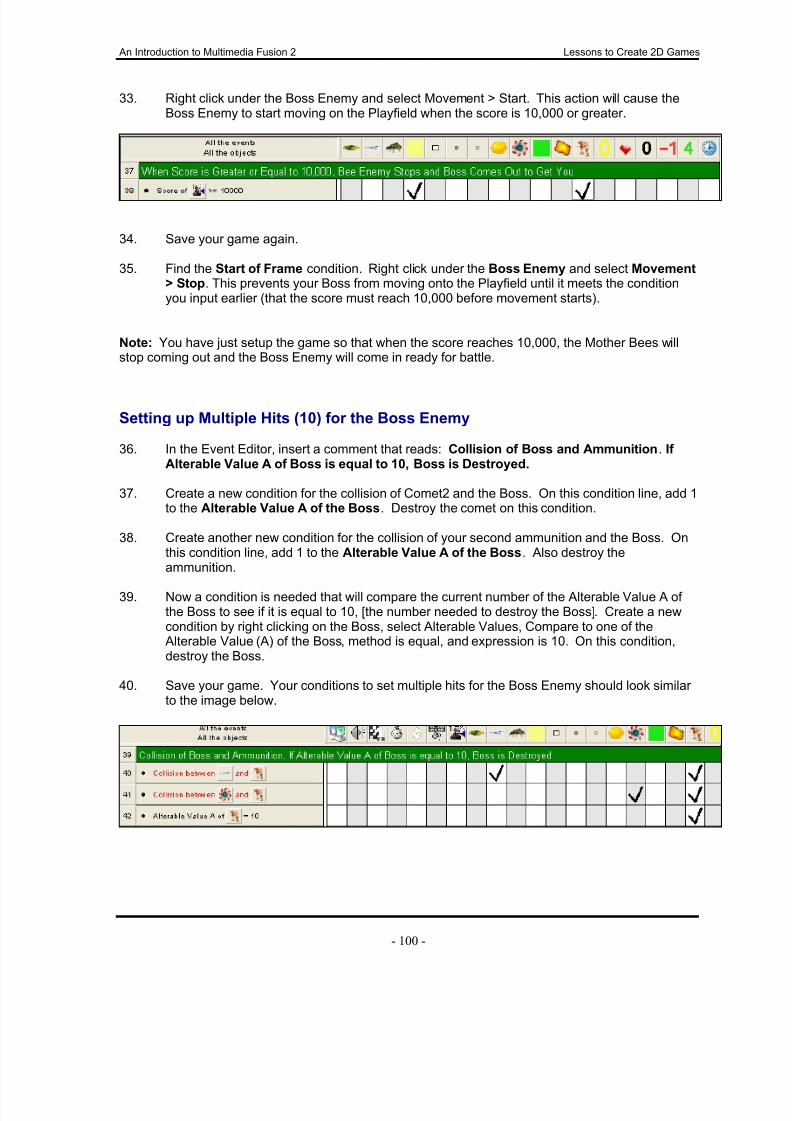
8/9/2019 An Introduction to Multimedia Fusion Full Version
http://slidepdf.com/reader/full/an-introduction-to-multimedia-fusion-full-version 102/145
An Introduction to Multimedia Fusion 2 Lessons to Create 2D Games
- 100 -
33. Right click under the Boss Enemy and select Movement > Start. This action will cause theBoss Enemy to start moving on the Playfield when the score is 10,000 or greater.
34. Save your game again.
35. Find the Start of Frame condition. Right click under the Boss Enemy and select Movement> Stop. This prevents your Boss from moving onto the Playfield until it meets the conditionyou input earlier (that the score must reach 10,000 before movement starts).
Note: You have just setup the game so that when the score reaches 10,000, the Mother Bees willstop coming out and the Boss Enemy will come in ready for battle.
Setting up Multiple Hits (10) for the Boss Enemy
36. In the Event Editor, insert a comment that reads: Collision of Boss and Ammunition. IfAlterable Value A of Boss is equal to 10, Boss is Destroyed.
37. Create a new condition for the collision of Comet2 and the Boss. On this condition line, add 1to the Alterable Value A of the Boss. Destroy the comet on this condition.
38. Create another new condition for the collision of your second ammunition and the Boss. Onthis condition line, add 1 to the Alterable Value A of the Boss. Also destroy theammunition.
39. Now a condition is needed that will compare the current number of the Alterable Value A ofthe Boss to see if it is equal to 10, [the number needed to destroy the Boss]. Create a newcondition by right clicking on the Boss, select Alterable Values, Compare to one of the
Alterable Value (A) of the Boss, method is equal, and expression is 10. On this condition,destroy the Boss.
40. Save your game. Your conditions to set multiple hits for the Boss Enemy should look similarto the image below.
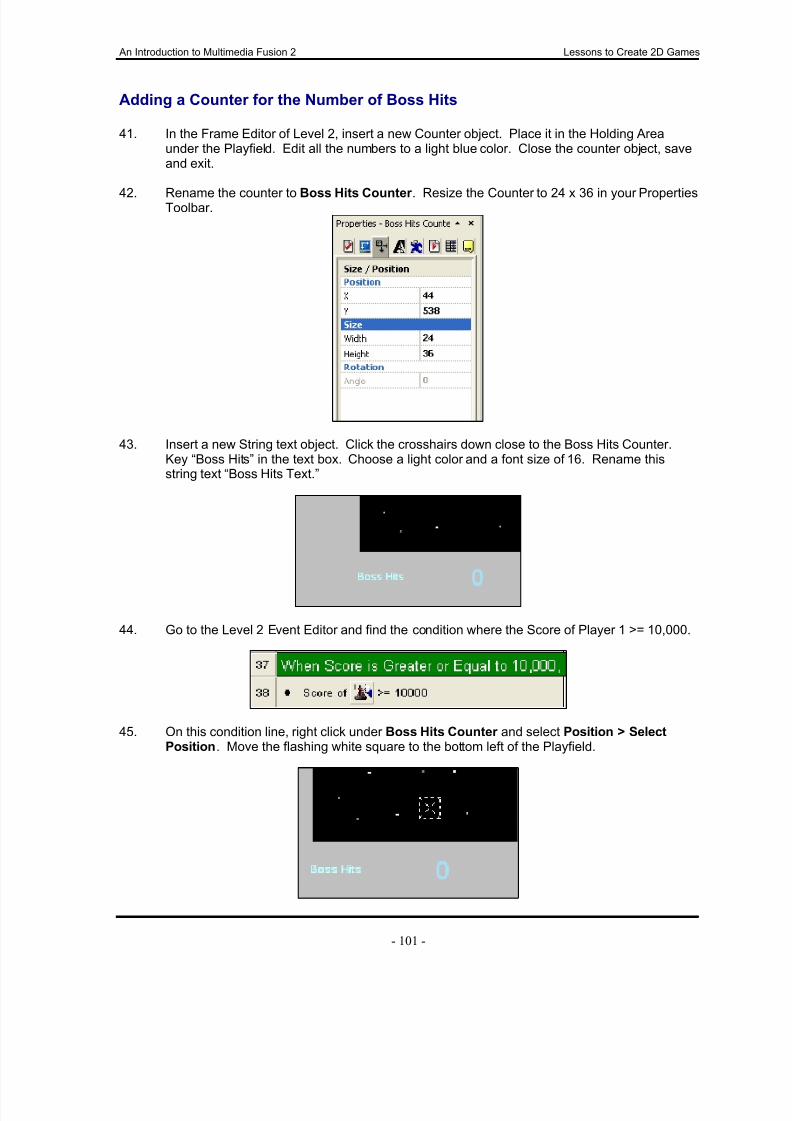
8/9/2019 An Introduction to Multimedia Fusion Full Version
http://slidepdf.com/reader/full/an-introduction-to-multimedia-fusion-full-version 103/145
An Introduction to Multimedia Fusion 2 Lessons to Create 2D Games
- 101 -
Adding a Counter for the Number of Boss Hits
41. In the Frame Editor of Level 2, insert a new Counter object. Place it in the Holding Areaunder the Playfield. Edit all the numbers to a light blue color. Close the counter object, saveand exit.
42. Rename the counter to Boss Hits Counter . Resize the Counter to 24 x 36 in your PropertiesToolbar.
43. Insert a new String text object. Click the crosshairs down close to the Boss Hits Counter.Key “Boss Hits” in the text box. Choose a light color and a font size of 16. Rename thisstring text “Boss Hits Text.”
44. Go to the Level 2 Event Editor and find the condition where the Score of Player 1 >= 10,000.
45. On this condition line, right click under Boss Hits Counter and select Position > SelectPosition. Move the flashing white square to the bottom left of the Playfield.
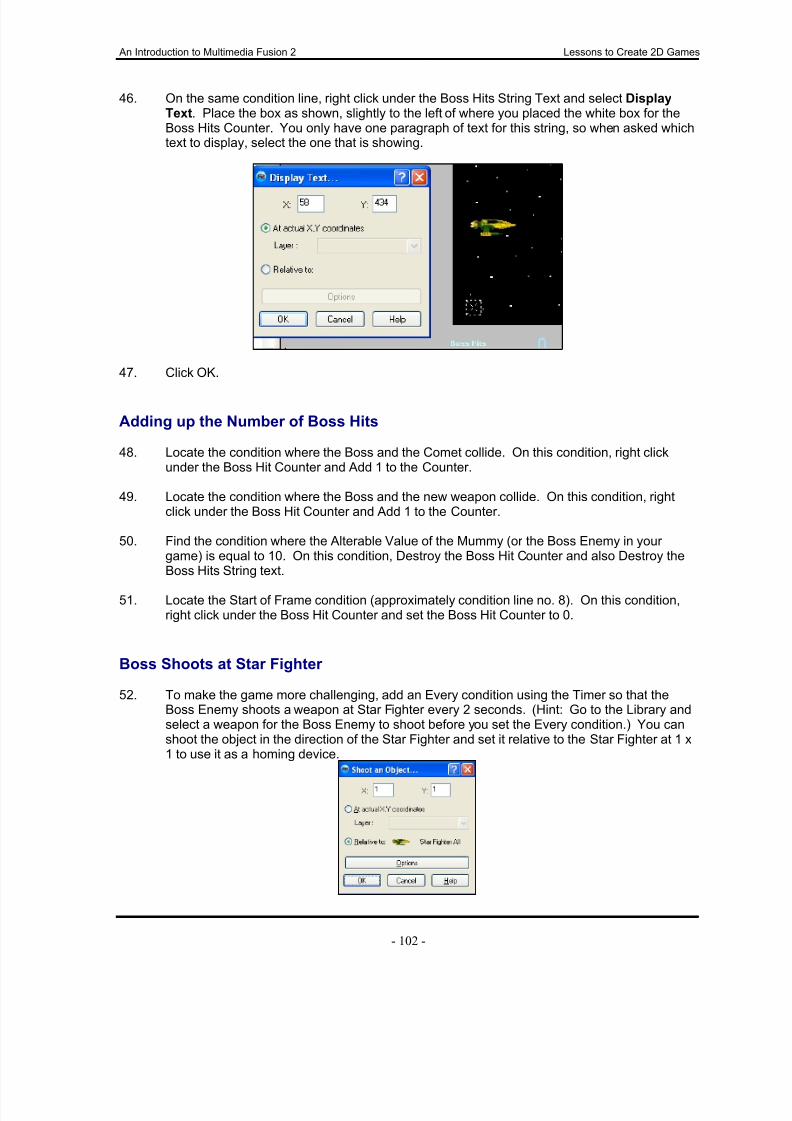
8/9/2019 An Introduction to Multimedia Fusion Full Version
http://slidepdf.com/reader/full/an-introduction-to-multimedia-fusion-full-version 104/145
An Introduction to Multimedia Fusion 2 Lessons to Create 2D Games
- 102 -
46. On the same condition line, right click under the Boss Hits String Text and select DisplayText. Place the box as shown, slightly to the left of where you placed the white box for theBoss Hits Counter. You only have one paragraph of text for this string, so when asked whichtext to display, select the one that is showing.
47. Click OK.
Adding up the Number of Boss Hits
48. Locate the condition where the Boss and the Comet collide. On this condition, right clickunder the Boss Hit Counter and Add 1 to the Counter.
49. Locate the condition where the Boss and the new weapon collide. On this condition, rightclick under the Boss Hit Counter and Add 1 to the Counter.
50. Find the condition where the Alterable Value of the Mummy (or the Boss Enemy in yourgame) is equal to 10. On this condition, Destroy the Boss Hit Counter and also Destroy theBoss Hits String text.
51. Locate the Start of Frame condition (approximately condition line no. 8). On this condition,right click under the Boss Hit Counter and set the Boss Hit Counter to 0.
Boss Shoots at Star Fighter
52. To make the game more challenging, add an Every condition using the Timer so that theBoss Enemy shoots a weapon at Star Fighter every 2 seconds. (Hint: Go to the Library andselect a weapon for the Boss Enemy to shoot before you set the Every condition.) You canshoot the object in the direction of the Star Fighter and set it relative to the Star Fighter at 1 x1 to use it as a homing device.
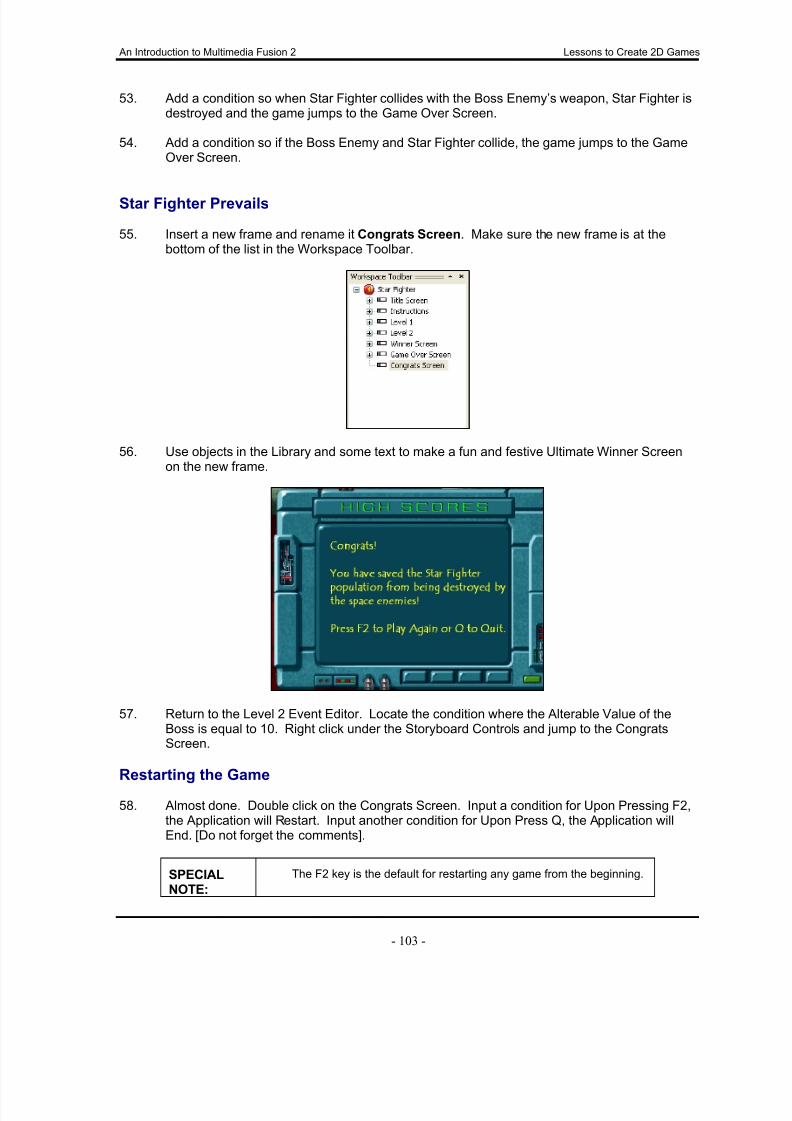
8/9/2019 An Introduction to Multimedia Fusion Full Version
http://slidepdf.com/reader/full/an-introduction-to-multimedia-fusion-full-version 105/145
An Introduction to Multimedia Fusion 2 Lessons to Create 2D Games
- 103 -
53. Add a condition so when Star Fighter collides with the Boss Enemy’s weapon, Star Fighter isdestroyed and the game jumps to the Game Over Screen.
54. Add a condition so if the Boss Enemy and Star Fighter collide, the game jumps to the GameOver Screen.
Star Fighter Prevails
55. Insert a new frame and rename it Congrats Screen. Make sure the new frame is at thebottom of the list in the Workspace Toolbar.
56. Use objects in the Library and some text to make a fun and festive Ultimate Winner Screenon the new frame.
57. Return to the Level 2 Event Editor. Locate the condition where the Alterable Value of theBoss is equal to 10. Right click under the Storyboard Controls and jump to the CongratsScreen.
Restarting the Game
58. Almost done. Double click on the Congrats Screen. Input a condition for Upon Pressing F2,the Application will Restart. Input another condition for Upon Press Q, the Application willEnd. [Do not forget the comments].
SPECIALNOTE:
The F2 key is the default for restarting any game from the beginning.
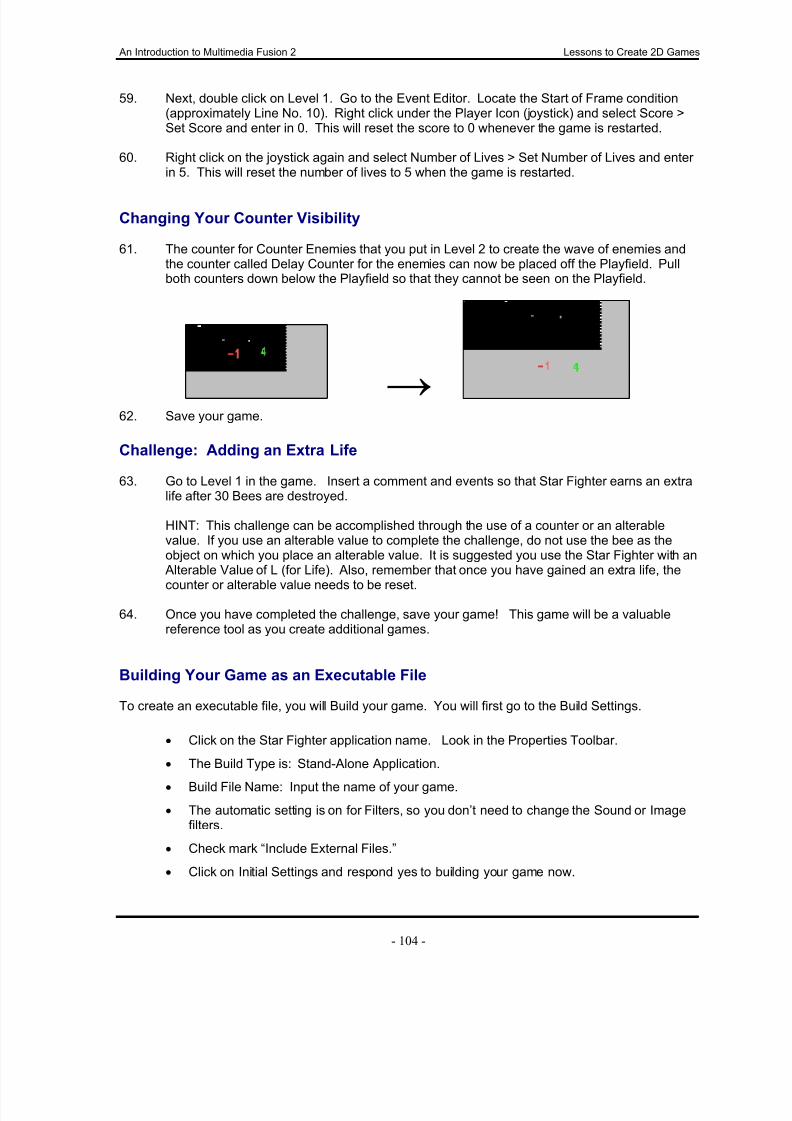
8/9/2019 An Introduction to Multimedia Fusion Full Version
http://slidepdf.com/reader/full/an-introduction-to-multimedia-fusion-full-version 106/145
An Introduction to Multimedia Fusion 2 Lessons to Create 2D Games
- 104 -
59. Next, double click on Level 1. Go to the Event Editor. Locate the Start of Frame condition(approximately Line No. 10). Right click under the Player Icon (joystick) and select Score >Set Score and enter in 0. This will reset the score to 0 whenever the game is restarted.
60. Right click on the joystick again and select Number of Lives > Set Number of Lives and enterin 5. This will reset the number of lives to 5 when the game is restarted.
Changing Your Counter Visibility
61. The counter for Counter Enemies that you put in Level 2 to create the wave of enemies andthe counter called Delay Counter for the enemies can now be placed off the Playfield. Pullboth counters down below the Playfield so that they cannot be seen on the Playfield.
→ 62. Save your game.
Challenge: Adding an Extra Life
63. Go to Level 1 in the game. Insert a comment and events so that Star Fighter earns an extralife after 30 Bees are destroyed.
HINT: This challenge can be accomplished through the use of a counter or an alterablevalue. If you use an alterable value to complete the challenge, do not use the bee as theobject on which you place an alterable value. It is suggested you use the Star Fighter with an
Alterable Value of L (for Life). Also, remember that once you have gained an extra life, the
counter or alterable value needs to be reset.
64. Once you have completed the challenge, save your game! This game will be a valuablereference tool as you create additional games.
Building Your Game as an Executable File
To create an executable file, you will Build your game. You will first go to the Build Settings.
• Click on the Star Fighter application name. Look in the Properties Toolbar.
• The Build Type is: Stand-Alone Application.
• Build File Name: Input the name of your game.
• The automatic setting is on for Filters, so you don’t need to change the Sound or Imagefilters.
• Check mark “Include External Files.”
• Click on Initial Settings and respond yes to building your game now.
8/9/2019 An Introduction to Multimedia Fusion Full Version
http://slidepdf.com/reader/full/an-introduction-to-multimedia-fusion-full-version 107/145
An Introduction to Multimedia Fusion 2 Lessons to Create 2D Games
- 105 -
Chapter Ten: A New Type of Game -- The Maze Game
Objectives:
In this Chapter, you will: Change the Display Window Size Draw a Maze Backdrop Identify a Backdrop as an Obstacle Import Graphic Images to Create a Character with Several Animations Identify and Insert Objects that Match the Storyline of this Maze Game Resize the Objects to Fit in and Maneuver through the Maze Add a Countdown Clock to Set a Time Limit
Background Storyline:
Little Baseball Boy wants to go to the stadium to watch a baseball game today. The
Boy only has one minute until game time, so he must hurry. As he runs through theneighborhood, he sees a number of his friends, including his skateboard friend, hisrunner friend, and his motorcycle friend. He asks them for money to buy a ticket tothe ball game by yelling, “Show Me the Money!” They all throw dollar bills his way forhim to catch.
If Little Baseball Boy catches ten of the dollar bills ($10), he will have enough cash toget through the stadium door. If Little Baseball Boy does not pay attention, however,he can get hit by homerun balls that are flying out of the stadium. When he gets hitby something other than the dollar bills, he loses all the cash he has collected, andhe must go back through the neighborhood to collect more cash.
Little Baseball Boy also wants to eat concessions at the game, so along the way, heneeds to find a baseball-related object in the neighborhood that will earn him aconcession coupon.
~ ~ ~ ~ ~ ~ ~ ~ ~ ~ ~
Your game must follow the story information presented above and it must include theadditional details listed below.
You will not always receive step-by-step instructions in this chapter. It is assumed that you havelearned how to do many of the tasks. If you need reminders on how to complete a task, use theprevious chapters as reference.
The Title Screen/Instructions: You create a name for the game. It should be baseball-related. The Title Screen should contain background information about the game for the player to read(use information from the storyline); instructions that the player will need to play the game; and anexplanation as to how to win the game. If you choose to create a separate instructions screen toconvey the information to the player, that would be more than acceptable.
The Maze Level: A maze design will be provided to you for use in the chapter. You will importthe maze in the picture editor or you are free to try to draw your own maze in the Picture Editorfollowing the instructions.
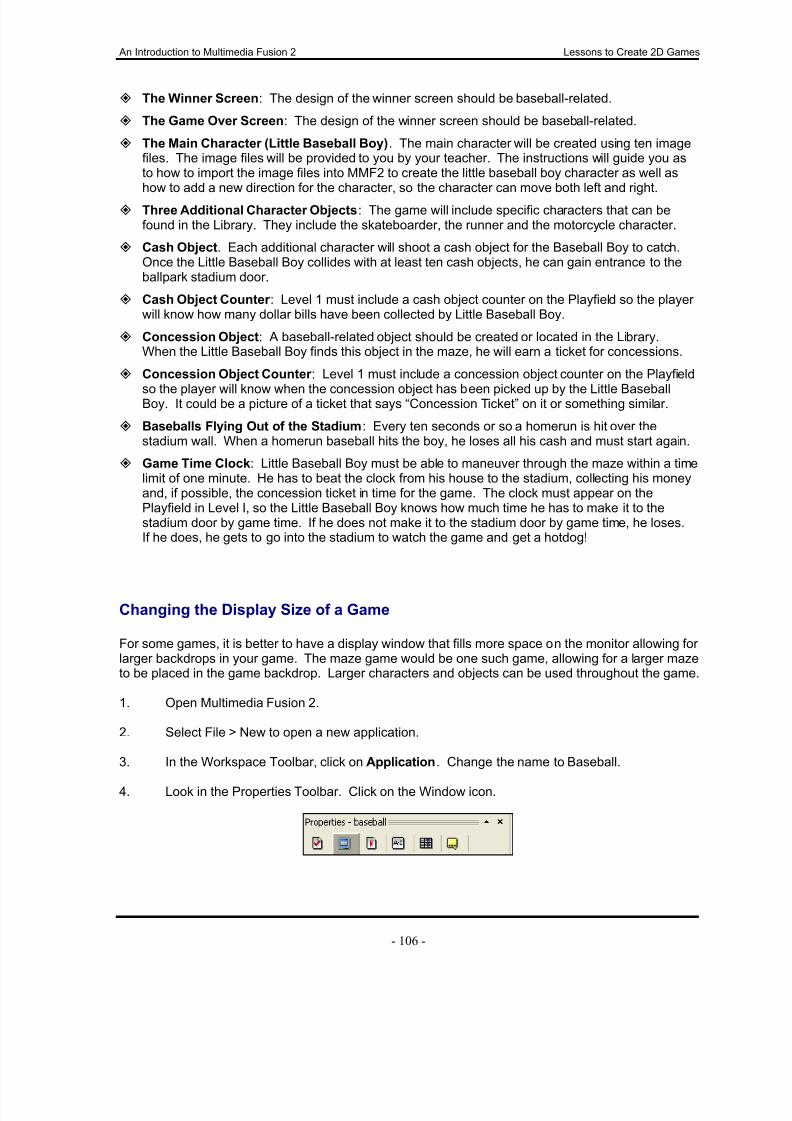
8/9/2019 An Introduction to Multimedia Fusion Full Version
http://slidepdf.com/reader/full/an-introduction-to-multimedia-fusion-full-version 108/145
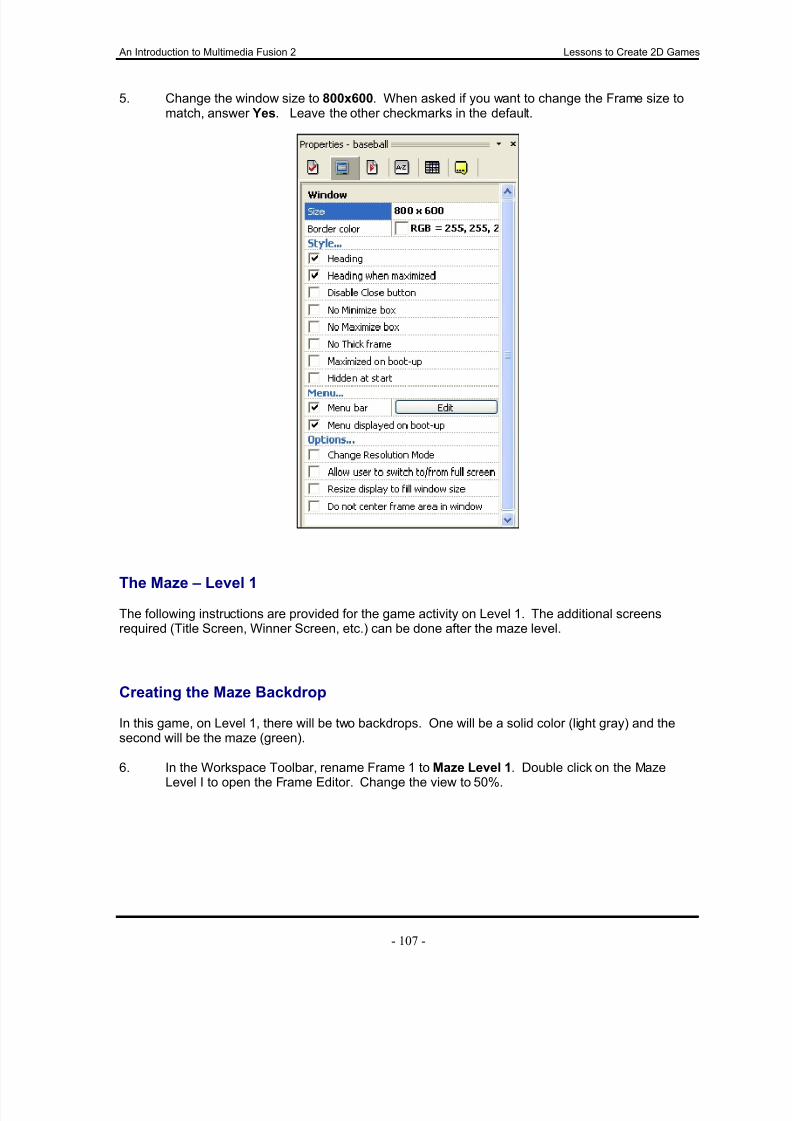
8/9/2019 An Introduction to Multimedia Fusion Full Version
http://slidepdf.com/reader/full/an-introduction-to-multimedia-fusion-full-version 109/145
An Introduction to Multimedia Fusion 2 Lessons to Create 2D Games
- 107 -
5. Change the window size to 800x600. When asked if you want to change the Frame size tomatch, answer Yes. Leave the other checkmarks in the default.
The Maze – Level 1
The following instructions are provided for the game activity on Level 1. The additional screensrequired (Title Screen, Winner Screen, etc.) can be done after the maze level.
Creating the Maze Backdrop
In this game, on Level 1, there will be two backdrops. One will be a solid color (light gray) and thesecond will be the maze (green).
6. In the Workspace Toolbar, rename Frame 1 to Maze Level 1. Double click on the Maze
Level I to open the Frame Editor. Change the view to 50%.
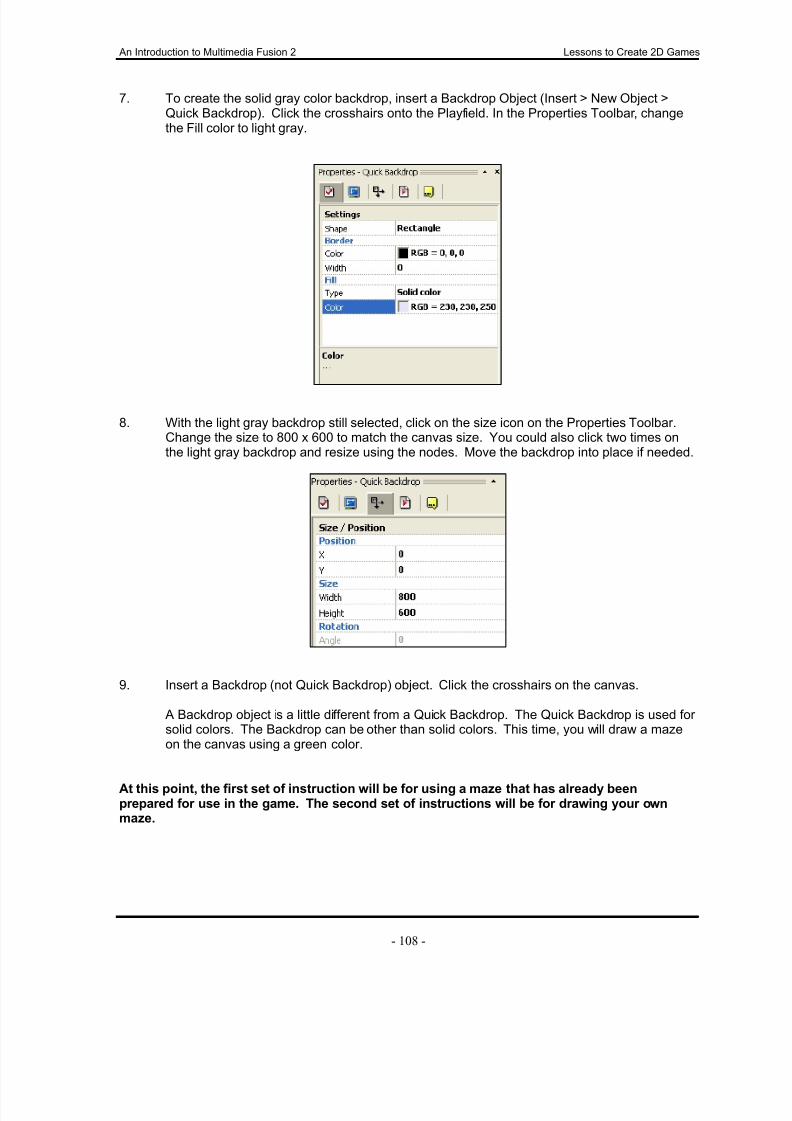
8/9/2019 An Introduction to Multimedia Fusion Full Version
http://slidepdf.com/reader/full/an-introduction-to-multimedia-fusion-full-version 110/145
An Introduction to Multimedia Fusion 2 Lessons to Create 2D Games
- 108 -
7. To create the solid gray color backdrop, insert a Backdrop Object (Insert > New Object >Quick Backdrop). Click the crosshairs onto the Playfield. In the Properties Toolbar, changethe Fill color to light gray.
8. With the light gray backdrop still selected, click on the size icon on the Properties Toolbar.Change the size to 800 x 600 to match the canvas size. You could also click two times onthe light gray backdrop and resize using the nodes. Move the backdrop into place if needed.
9. Insert a Backdrop (not Quick Backdrop) object. Click the crosshairs on the canvas.
A Backdrop object is a little different from a Quick Backdrop. The Quick Backdrop is used forsolid colors. The Backdrop can be other than solid colors. This time, you will draw a mazeon the canvas using a green color.
At this point, the first set of instruction will be for using a maze that has already beenprepared for use in the game. The second set of instructions will be for drawing your ownmaze.

8/9/2019 An Introduction to Multimedia Fusion Full Version
http://slidepdf.com/reader/full/an-introduction-to-multimedia-fusion-full-version 111/145
An Introduction to Multimedia Fusion 2 Lessons to Create 2D Games
- 109 -
Inserting a Prepared Maze
10. One of the files provided for use in this chapter is a maze that has already been drawn in apaint program and saved as a portable network graphic.
11. Double click on Backdrop. Erase or delete the image that is present.
12. In the Picture Editor, click on the Open File icon.
Locate the maze walls.png file provided by your teacher. Click on it and select Open.
13. When the Import dialogue box appears, click on the Pick button and then click on the whitearea of the maze. Click OK. Click OK to close the Picture Editor.
14. Slowly click two times to select the maze in the Frame Editor and use the nodes to stretch themaze to fit the canvas.
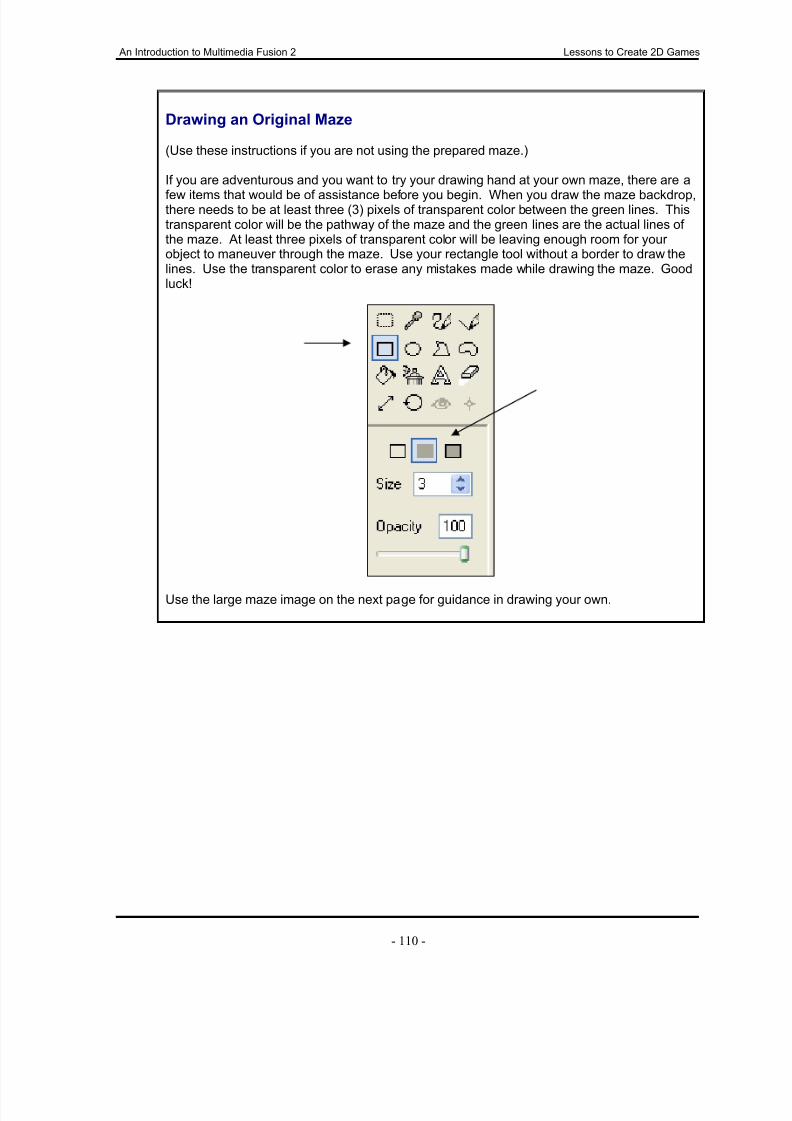
8/9/2019 An Introduction to Multimedia Fusion Full Version
http://slidepdf.com/reader/full/an-introduction-to-multimedia-fusion-full-version 112/145
An Introduction to Multimedia Fusion 2 Lessons to Create 2D Games
- 110 -
Drawing an Original Maze
(Use these instructions if you are not using the prepared maze.)
If you are adventurous and you want to try your drawing hand at your own maze, there are a
few items that would be of assistance before you begin. When you draw the maze backdrop,there needs to be at least three (3) pixels of transparent color between the green lines. Thistransparent color will be the pathway of the maze and the green lines are the actual lines ofthe maze. At least three pixels of transparent color will be leaving enough room for yourobject to maneuver through the maze. Use your rectangle tool without a border to draw thelines. Use the transparent color to erase any mistakes made while drawing the maze. Goodluck!
Use the large maze image on the next page for guidance in drawing your own.
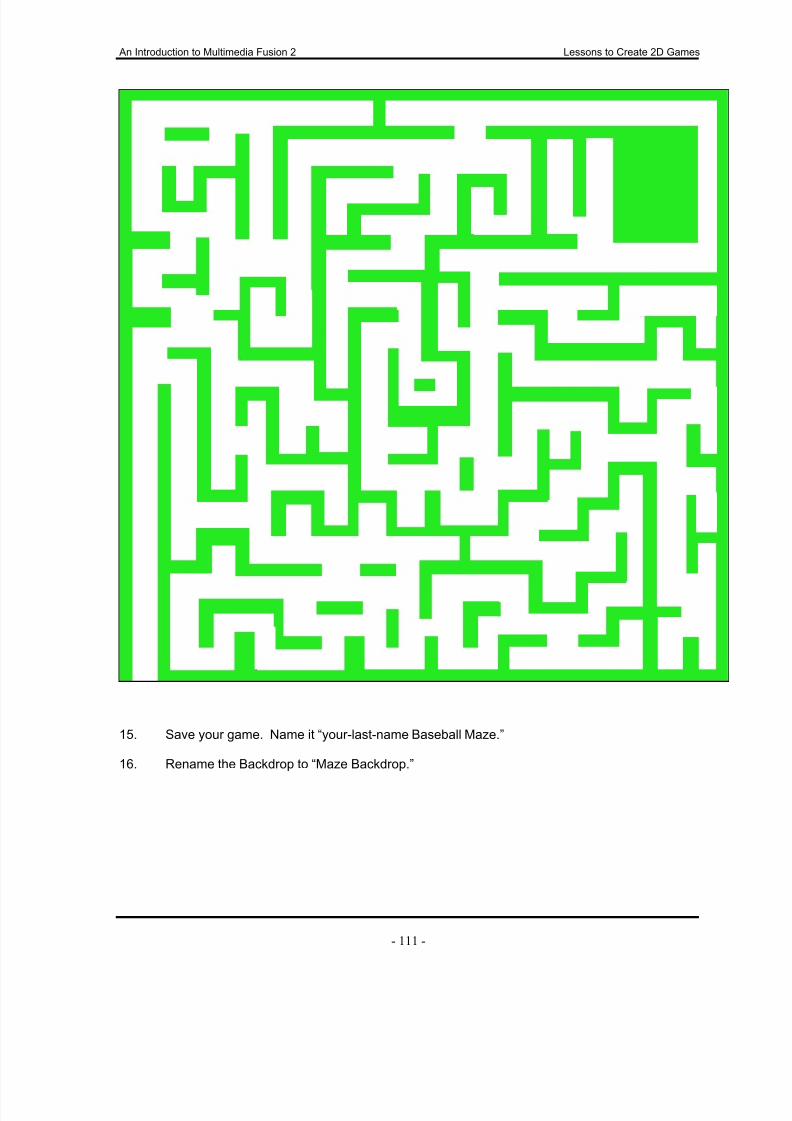
8/9/2019 An Introduction to Multimedia Fusion Full Version
http://slidepdf.com/reader/full/an-introduction-to-multimedia-fusion-full-version 113/145
An Introduction to Multimedia Fusion 2 Lessons to Create 2D Games
- 111 -
15. Save your game. Name it “your-last-name Baseball Maze.”
16. Rename the Backdrop to “Maze Backdrop.”
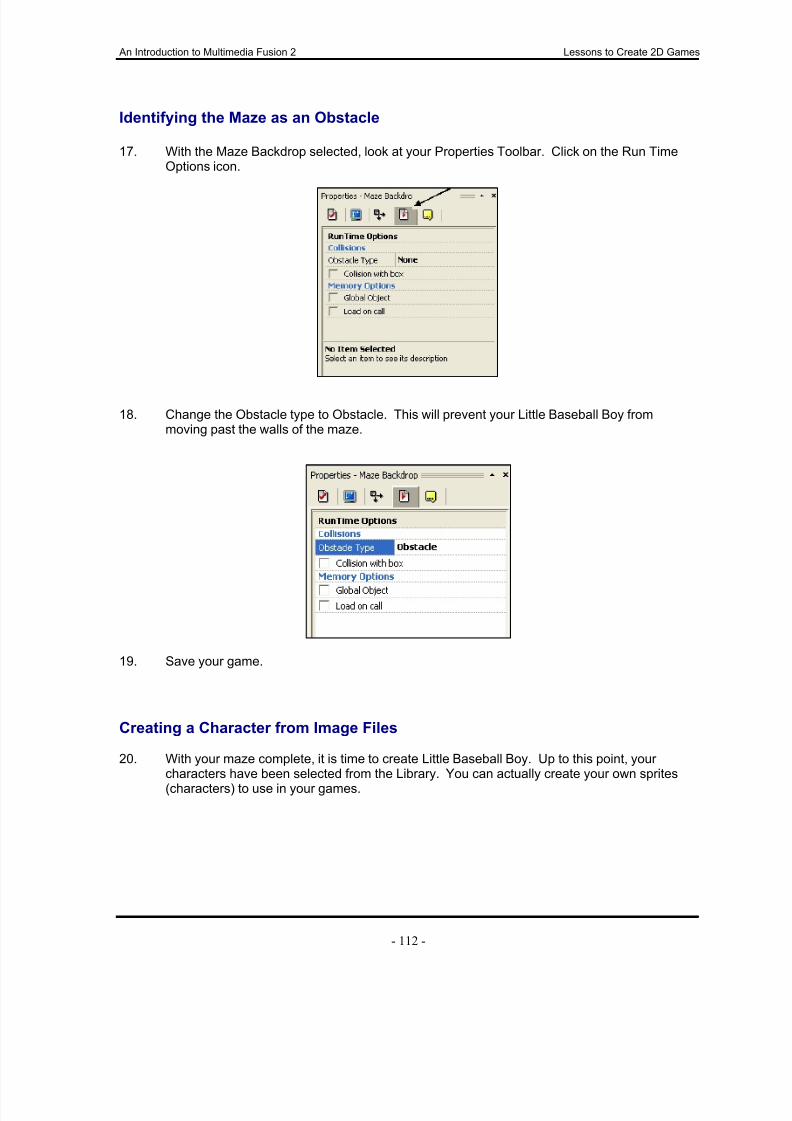
8/9/2019 An Introduction to Multimedia Fusion Full Version
http://slidepdf.com/reader/full/an-introduction-to-multimedia-fusion-full-version 114/145
An Introduction to Multimedia Fusion 2 Lessons to Create 2D Games
- 112 -
Identifying the Maze as an Obstacle
17. With the Maze Backdrop selected, look at your Properties Toolbar. Click on the Run TimeOptions icon.
18. Change the Obstacle type to Obstacle. This will prevent your Little Baseball Boy frommoving past the walls of the maze.
19. Save your game.
Creating a Character from Image Files
20. With your maze complete, it is time to create Little Baseball Boy. Up to this point, yourcharacters have been selected from the Library. You can actually create your own sprites
(characters) to use in your games.
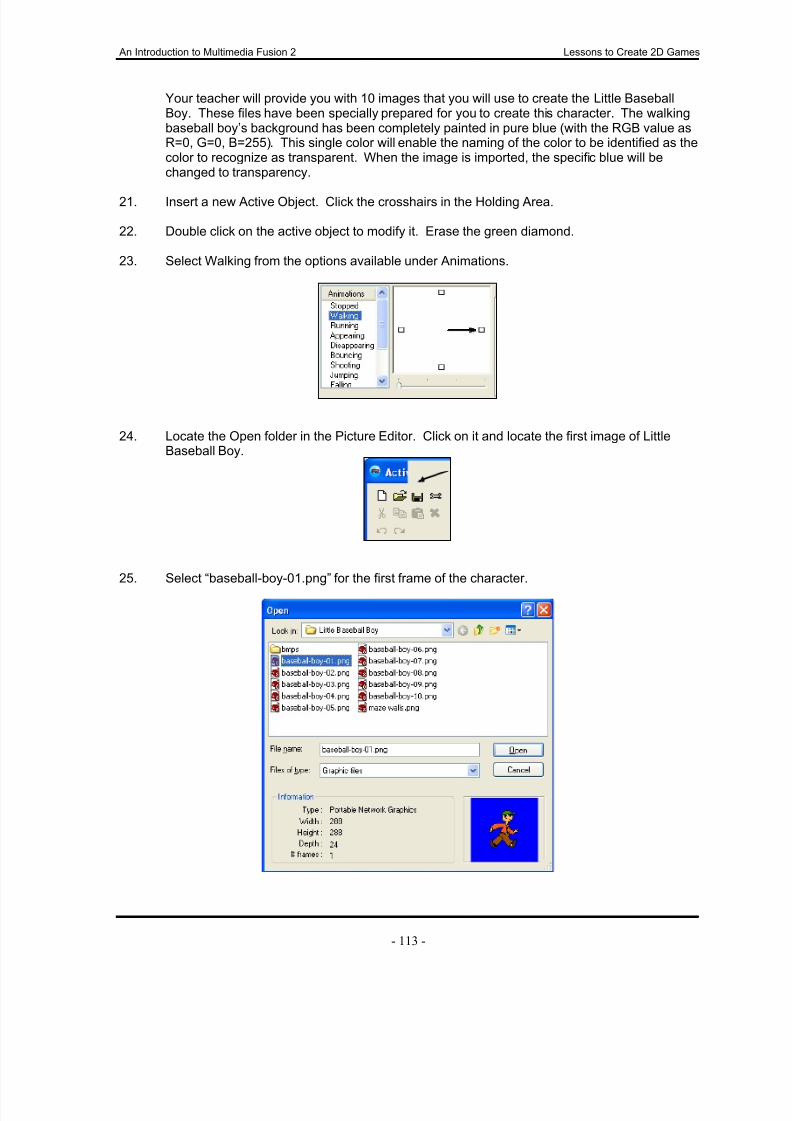
8/9/2019 An Introduction to Multimedia Fusion Full Version
http://slidepdf.com/reader/full/an-introduction-to-multimedia-fusion-full-version 115/145
An Introduction to Multimedia Fusion 2 Lessons to Create 2D Games
- 113 -
Your teacher will provide you with 10 images that you will use to create the Little BaseballBoy. These files have been specially prepared for you to create this character. The walkingbaseball boy’s background has been completely painted in pure blue (with the RGB value asR=0, G=0, B=255). This single color will enable the naming of the color to be identified as thecolor to recognize as transparent. When the image is imported, the specific blue will bechanged to transparency.
21. Insert a new Active Object. Click the crosshairs in the Holding Area.
22. Double click on the active object to modify it. Erase the green diamond.
23. Select Walking from the options available under Animations.
24. Locate the Open folder in the Picture Editor. Click on it and locate the first image of LittleBaseball Boy.
25. Select “baseball-boy-01.png” for the first frame of the character.
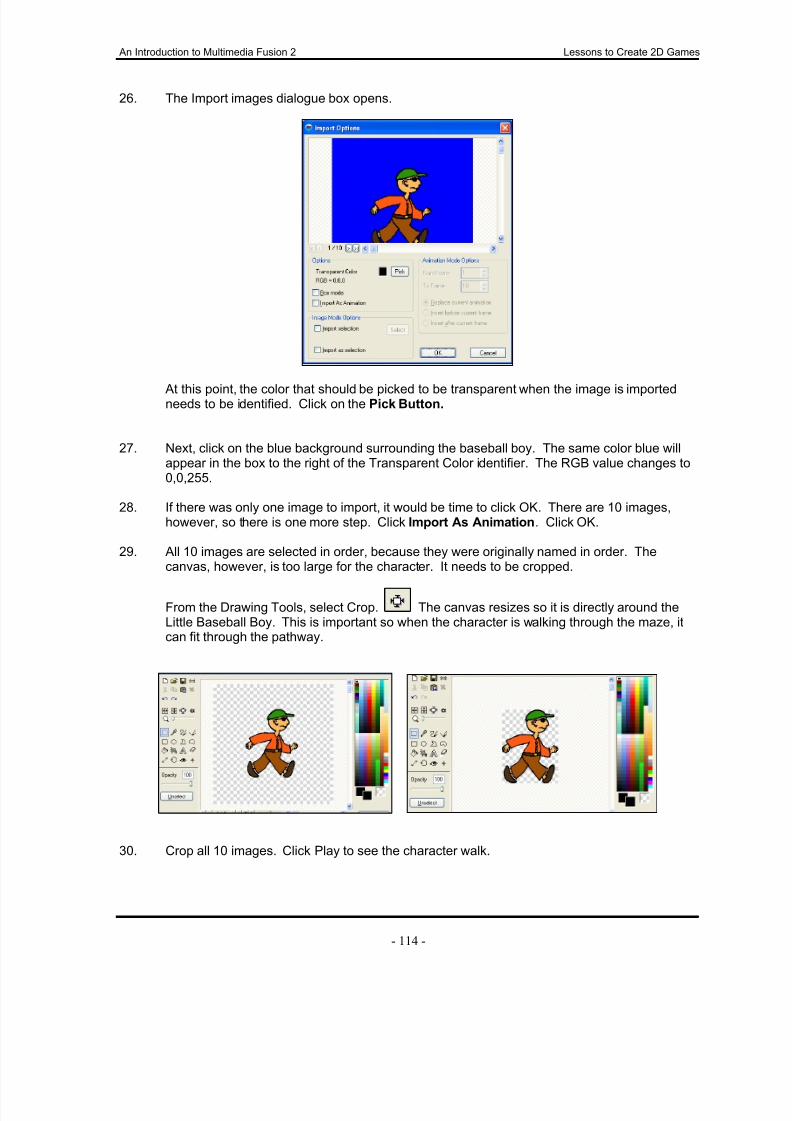
8/9/2019 An Introduction to Multimedia Fusion Full Version
http://slidepdf.com/reader/full/an-introduction-to-multimedia-fusion-full-version 116/145
An Introduction to Multimedia Fusion 2 Lessons to Create 2D Games
- 114 -
26. The Import images dialogue box opens.
At this point, the color that should be picked to be transparent when the image is importedneeds to be identified. Click on the Pick Button.
27. Next, click on the blue background surrounding the baseball boy. The same color blue willappear in the box to the right of the Transparent Color identifier. The RGB value changes to0,0,255.
28. If there was only one image to import, it would be time to click OK. There are 10 images,however, so there is one more step. Click Import As Animation. Click OK.
29. All 10 images are selected in order, because they were originally named in order. Thecanvas, however, is too large for the character. It needs to be cropped.
From the Drawing Tools, select Crop. The canvas resizes so it is directly around theLittle Baseball Boy. This is important so when the character is walking through the maze, itcan fit through the pathway.
30. Crop all 10 images. Click Play to see the character walk.
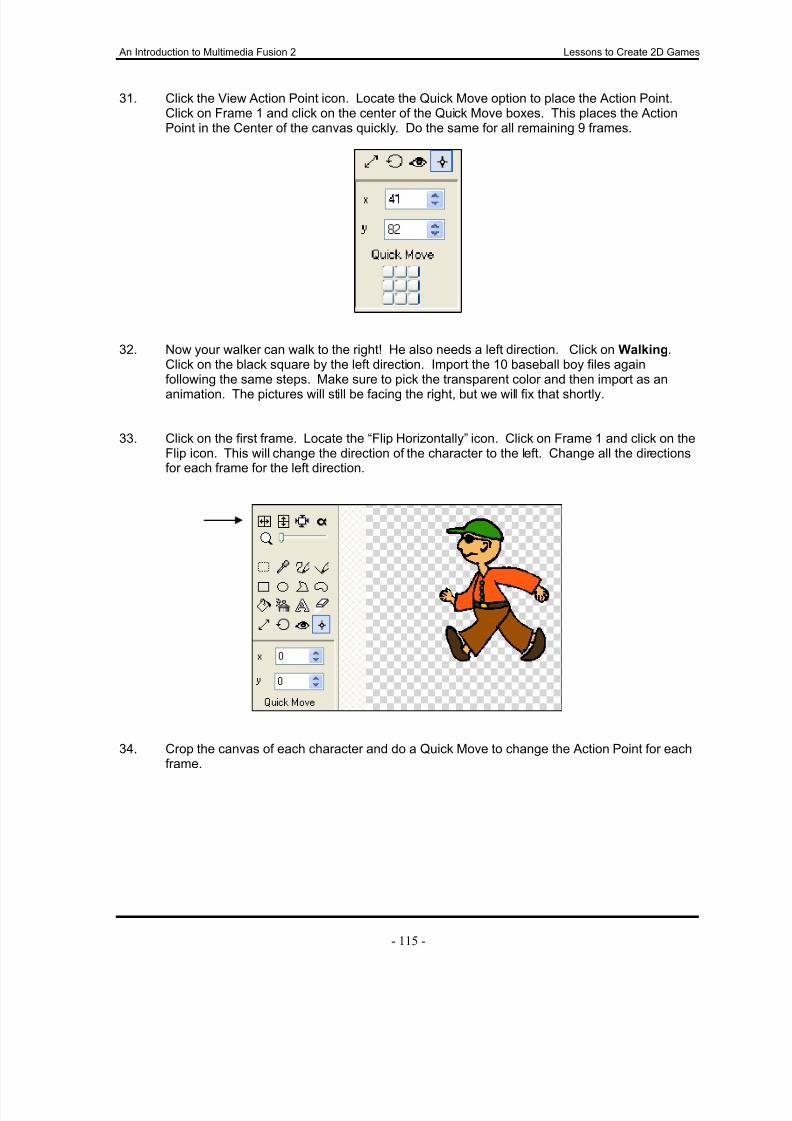
8/9/2019 An Introduction to Multimedia Fusion Full Version
http://slidepdf.com/reader/full/an-introduction-to-multimedia-fusion-full-version 117/145
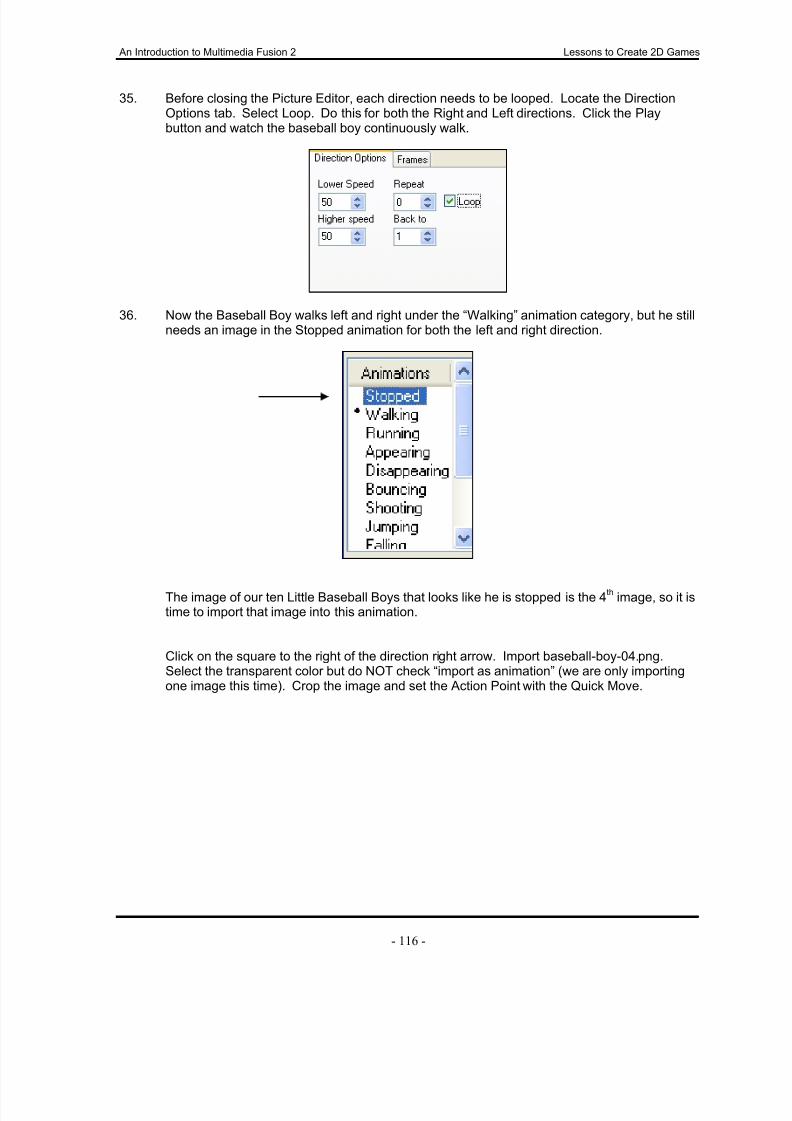
8/9/2019 An Introduction to Multimedia Fusion Full Version
http://slidepdf.com/reader/full/an-introduction-to-multimedia-fusion-full-version 118/145
An Introduction to Multimedia Fusion 2 Lessons to Create 2D Games
- 116 -
35. Before closing the Picture Editor, each direction needs to be looped. Locate the DirectionOptions tab. Select Loop. Do this for both the Right and Left directions. Click the Playbutton and watch the baseball boy continuously walk.
36. Now the Baseball Boy walks left and right under the “Walking” animation category, but he stillneeds an image in the Stopped animation for both the left and right direction.
The image of our ten Little Baseball Boys that looks like he is stopped is the 4th image, so it istime to import that image into this animation.
Click on the square to the right of the direction right arrow. Import baseball-boy-04.png.Select the transparent color but do NOT check “import as animation” (we are only importingone image this time). Crop the image and set the Action Point with the Quick Move.
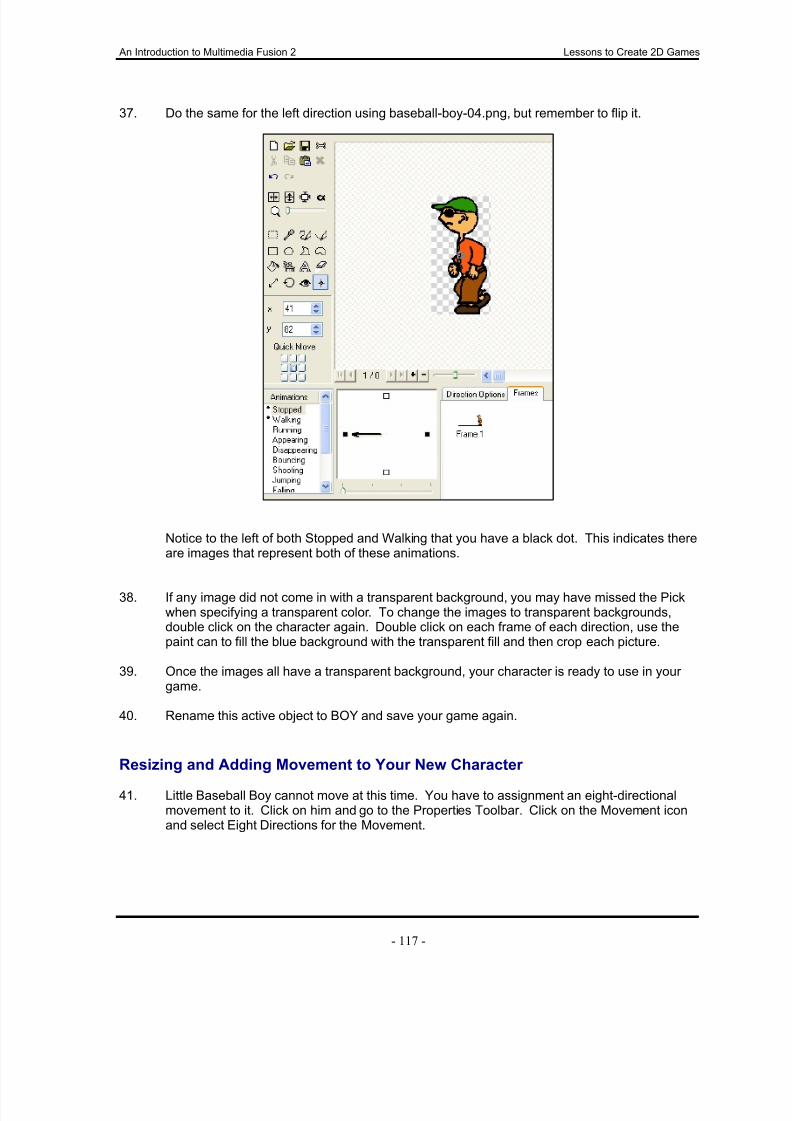
8/9/2019 An Introduction to Multimedia Fusion Full Version
http://slidepdf.com/reader/full/an-introduction-to-multimedia-fusion-full-version 119/145
An Introduction to Multimedia Fusion 2 Lessons to Create 2D Games
- 117 -
37. Do the same for the left direction using baseball-boy-04.png, but remember to flip it.
Notice to the left of both Stopped and Walking that you have a black dot. This indicates thereare images that represent both of these animations.
38. If any image did not come in with a transparent background, you may have missed the Pickwhen specifying a transparent color. To change the images to transparent backgrounds,double click on the character again. Double click on each frame of each direction, use thepaint can to fill the blue background with the transparent fill and then crop each picture.
39. Once the images all have a transparent background, your character is ready to use in yourgame.
40. Rename this active object to BOY and save your game again.
Resizing and Adding Movement to Your New Character
41. Little Baseball Boy cannot move at this time. You have to assignment an eight-directionalmovement to it. Click on him and go to the Properties Toolbar. Click on the Movement iconand select Eight Directions for the Movement.
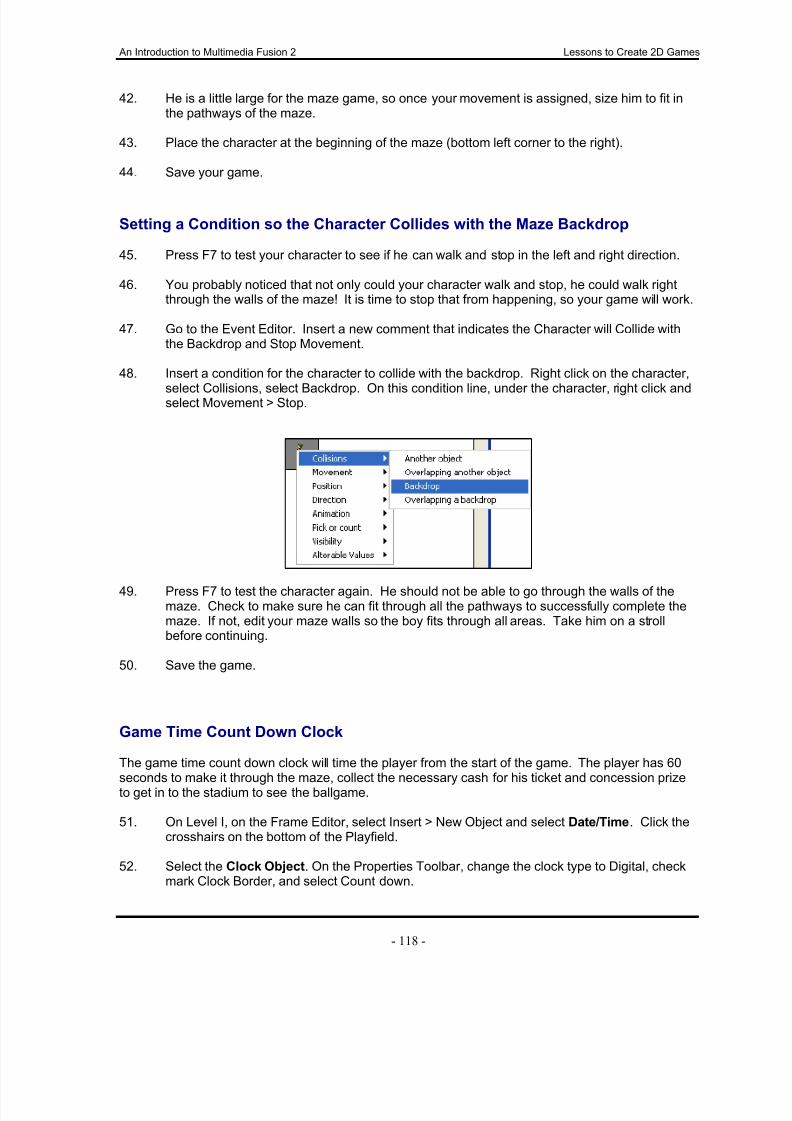
8/9/2019 An Introduction to Multimedia Fusion Full Version
http://slidepdf.com/reader/full/an-introduction-to-multimedia-fusion-full-version 120/145
An Introduction to Multimedia Fusion 2 Lessons to Create 2D Games
- 118 -
42. He is a little large for the maze game, so once your movement is assigned, size him to fit inthe pathways of the maze.
43. Place the character at the beginning of the maze (bottom left corner to the right).
44. Save your game.
Setting a Condition so the Character Collides with the Maze Backdrop
45. Press F7 to test your character to see if he can walk and stop in the left and right direction.
46. You probably noticed that not only could your character walk and stop, he could walk rightthrough the walls of the maze! It is time to stop that from happening, so your game will work.
47. Go to the Event Editor. Insert a new comment that indicates the Character will Collide withthe Backdrop and Stop Movement.
48. Insert a condition for the character to collide with the backdrop. Right click on the character,
select Collisions, select Backdrop. On this condition line, under the character, right click andselect Movement > Stop.
49. Press F7 to test the character again. He should not be able to go through the walls of themaze. Check to make sure he can fit through all the pathways to successfully complete themaze. If not, edit your maze walls so the boy fits through all areas. Take him on a strollbefore continuing.
50. Save the game.
Game Time Count Down Clock
The game time count down clock will time the player from the start of the game. The player has 60seconds to make it through the maze, collect the necessary cash for his ticket and concession prizeto get in to the stadium to see the ballgame.
51. On Level I, on the Frame Editor, select Insert > New Object and select Date/Time. Click thecrosshairs on the bottom of the Playfield.
52. Select the Clock Object. On the Properties Toolbar, change the clock type to Digital, checkmark Clock Border, and select Count down.
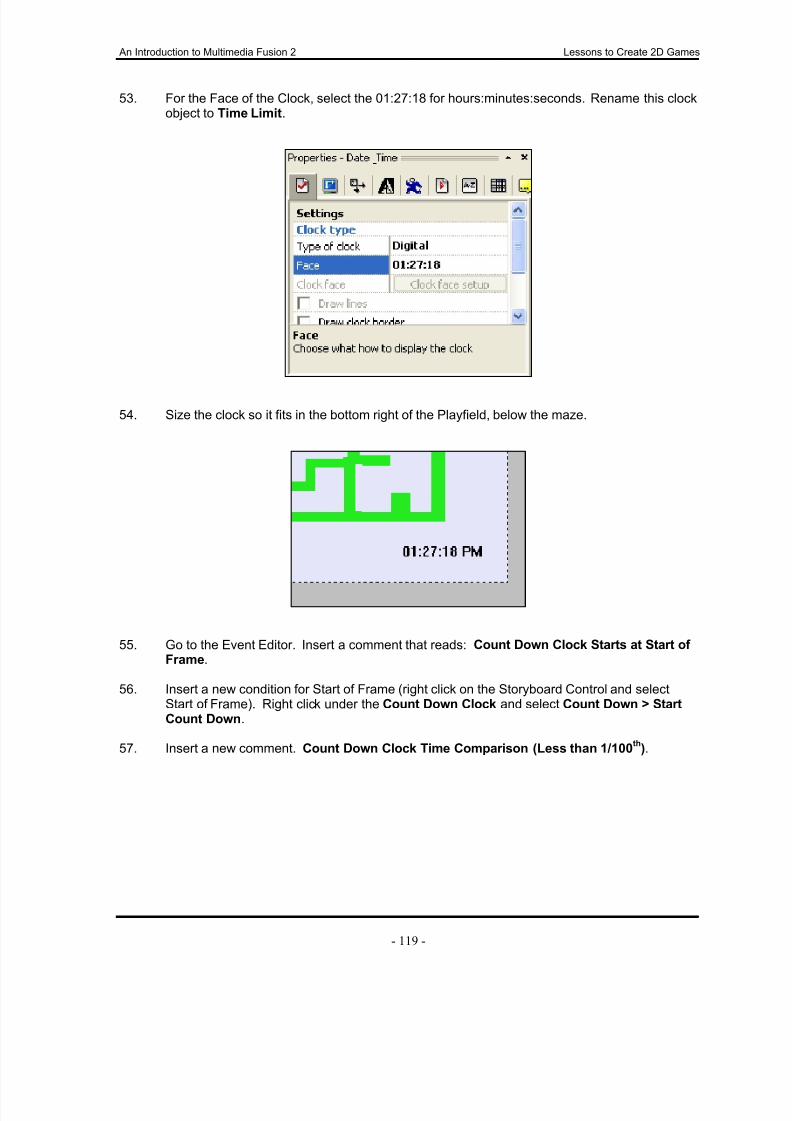
8/9/2019 An Introduction to Multimedia Fusion Full Version
http://slidepdf.com/reader/full/an-introduction-to-multimedia-fusion-full-version 121/145
An Introduction to Multimedia Fusion 2 Lessons to Create 2D Games
- 119 -
53. For the Face of the Clock, select the 01:27:18 for hours:minutes:seconds. Rename this clockobject to Time Limit.
54. Size the clock so it fits in the bottom right of the Playfield, below the maze.
55. Go to the Event Editor. Insert a comment that reads: Count Down Clock Starts at Start ofFrame.
56. Insert a new condition for Start of Frame (right click on the Storyboard Control and selectStart of Frame). Right click under the Count Down Clock and select Count Down > StartCount Down.
57. Insert a new comment. Count Down Clock Time Comparison (Less than 1/100th
).
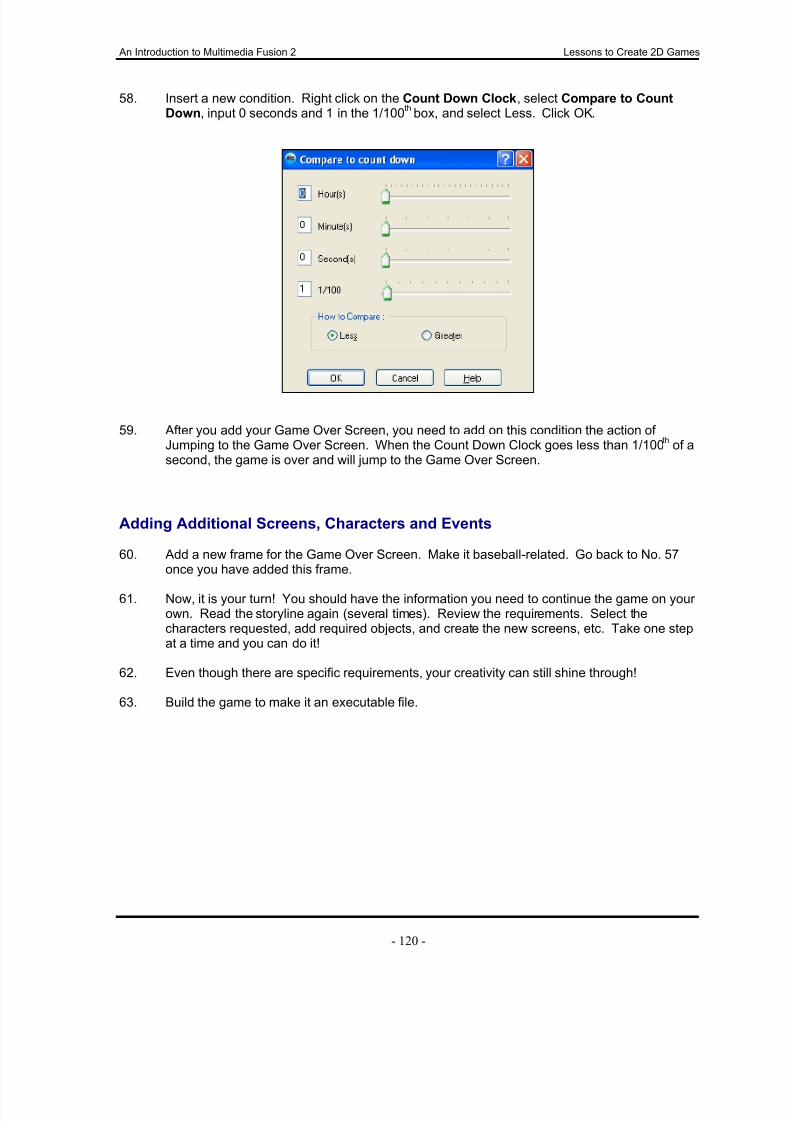
8/9/2019 An Introduction to Multimedia Fusion Full Version
http://slidepdf.com/reader/full/an-introduction-to-multimedia-fusion-full-version 122/145
An Introduction to Multimedia Fusion 2 Lessons to Create 2D Games
- 120 -
58. Insert a new condition. Right click on the Count Down Clock, select Compare to CountDown, input 0 seconds and 1 in the 1/100
thbox, and select Less. Click OK.
59. After you add your Game Over Screen, you need to add on this condition the action ofJumping to the Game Over Screen. When the Count Down Clock goes less than 1/100th of asecond, the game is over and will jump to the Game Over Screen.
Adding Additional Screens, Characters and Events
60. Add a new frame for the Game Over Screen. Make it baseball-related. Go back to No. 57once you have added this frame.
61. Now, it is your turn! You should have the information you need to continue the game on yourown. Read the storyline again (several times). Review the requirements. Select thecharacters requested, add required objects, and create the new screens, etc. Take one stepat a time and you can do it!
62. Even though there are specific requirements, your creativity can still shine through!
63. Build the game to make it an executable file.
8/9/2019 An Introduction to Multimedia Fusion Full Version
http://slidepdf.com/reader/full/an-introduction-to-multimedia-fusion-full-version 123/145
An Introduction to Multimedia Fusion 2 Lessons to Create 2D Games
- 121 -
Chapter Eleven: A New Game – The Platform/Side-ScrollerGame
Objectives:
In this Chapter, you will: Understand Attributes of a Platform Game Understand Attributes of a Side-Scroller Game Explain the Difference Between the Application Window Size in the
Workspace Toolbar and Properties Toolbar and the Frame Size onIndividual Levels
Change the Application Window Size and the Frame Size to Createthe Layout for a Side-Scroller Game
Insert a Quick Backdrop Insert Tile Objects, Building Bricks, or Other Platform Objects Insert a Character with a “Jump” or “Duck” Animation
Add the New Movement of Platform Set Collisions with Character and Platform Objects Assign the Scrolling Feature to your Platform Game
Object of the Game:
For this project, you will create a version of a side-scroller/platform game. The followingsteps will guide you in setting up the basics of this type of game. You will add uniquecharacters and obstacles which will make your game different from other student games.
Side-Scroller : A side-scroller will allow you to create a large canvas, while the player only sees aportion of it. As the player moves through the game, additional canvas, backgrounds, objects, etc.,
are displayed. You can set games to scroll horizontally or vertically or both.
Platform: A platform game allows specific tiles to be set as “platforms” that the characters can walkon, jump to, jump off, etc., in your game.
Creating the Backdrop Objects
1. Open Multimedia Fusion 2 to begin a new game. Select File > New.
2. Creating a scrolling platform game requires the Application Window Size to be changed aswell as the Frame Size on each level.
The Application as a whole has different properties from each Frame (or level). You will setthe size for both the Application Window and the Frame.
The Application Window Size is the VISIBLE AREA of the game that the playersees.
The Frame Size is the TOTAL AREA of the Frame, including the area that isnot visible to the player.
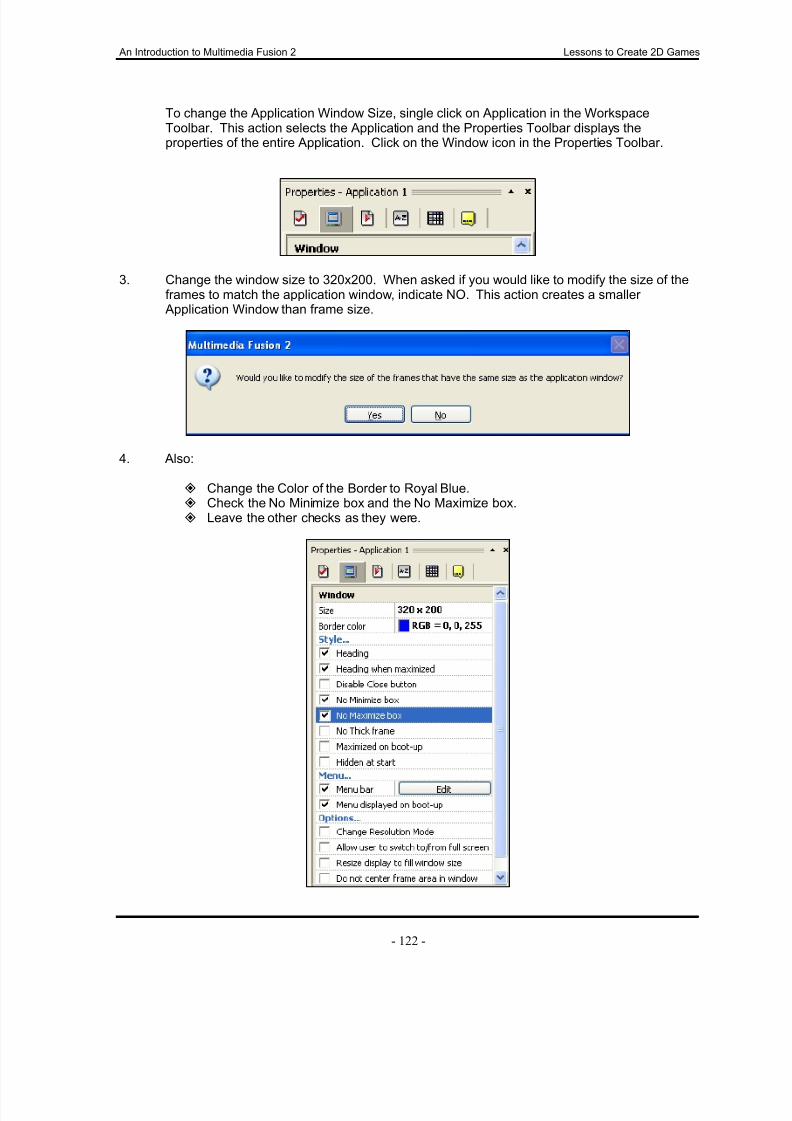
8/9/2019 An Introduction to Multimedia Fusion Full Version
http://slidepdf.com/reader/full/an-introduction-to-multimedia-fusion-full-version 124/145
An Introduction to Multimedia Fusion 2 Lessons to Create 2D Games
- 122 -
To change the Application Window Size, single click on Application in the WorkspaceToolbar. This action selects the Application and the Properties Toolbar displays theproperties of the entire Application. Click on the Window icon in the Properties Toolbar.
3. Change the window size to 320x200. When asked if you would like to modify the size of theframes to match the application window, indicate NO. This action creates a smaller
Application Window than frame size.
4. Also:
Change the Color of the Border to Royal Blue. Check the No Minimize box and the No Maximize box. Leave the other checks as they were.
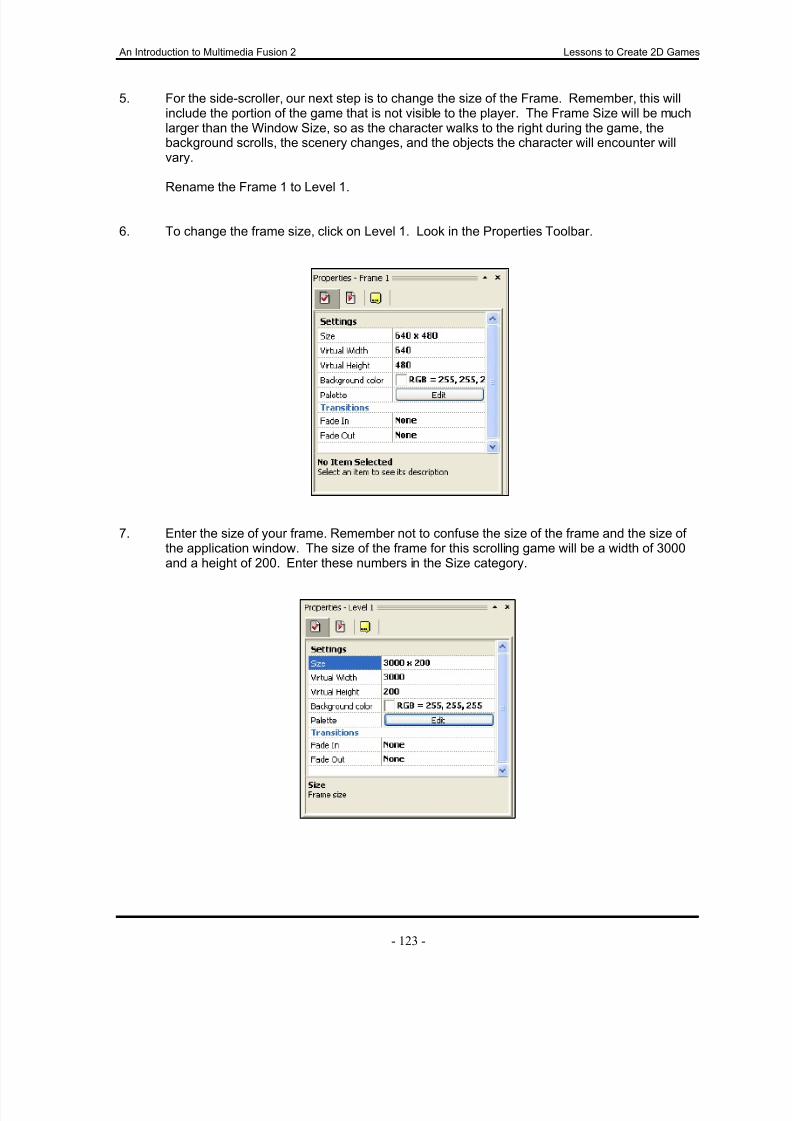
8/9/2019 An Introduction to Multimedia Fusion Full Version
http://slidepdf.com/reader/full/an-introduction-to-multimedia-fusion-full-version 125/145
An Introduction to Multimedia Fusion 2 Lessons to Create 2D Games
- 123 -
5. For the side-scroller, our next step is to change the size of the Frame. Remember, this willinclude the portion of the game that is not visible to the player. The Frame Size will be muchlarger than the Window Size, so as the character walks to the right during the game, thebackground scrolls, the scenery changes, and the objects the character will encounter willvary.
Rename the Frame 1 to Level 1.
6. To change the frame size, click on Level 1. Look in the Properties Toolbar.
7. Enter the size of your frame. Remember not to confuse the size of the frame and the size ofthe application window. The size of the frame for this scrolling game will be a width of 3000and a height of 200. Enter these numbers in the Size category.
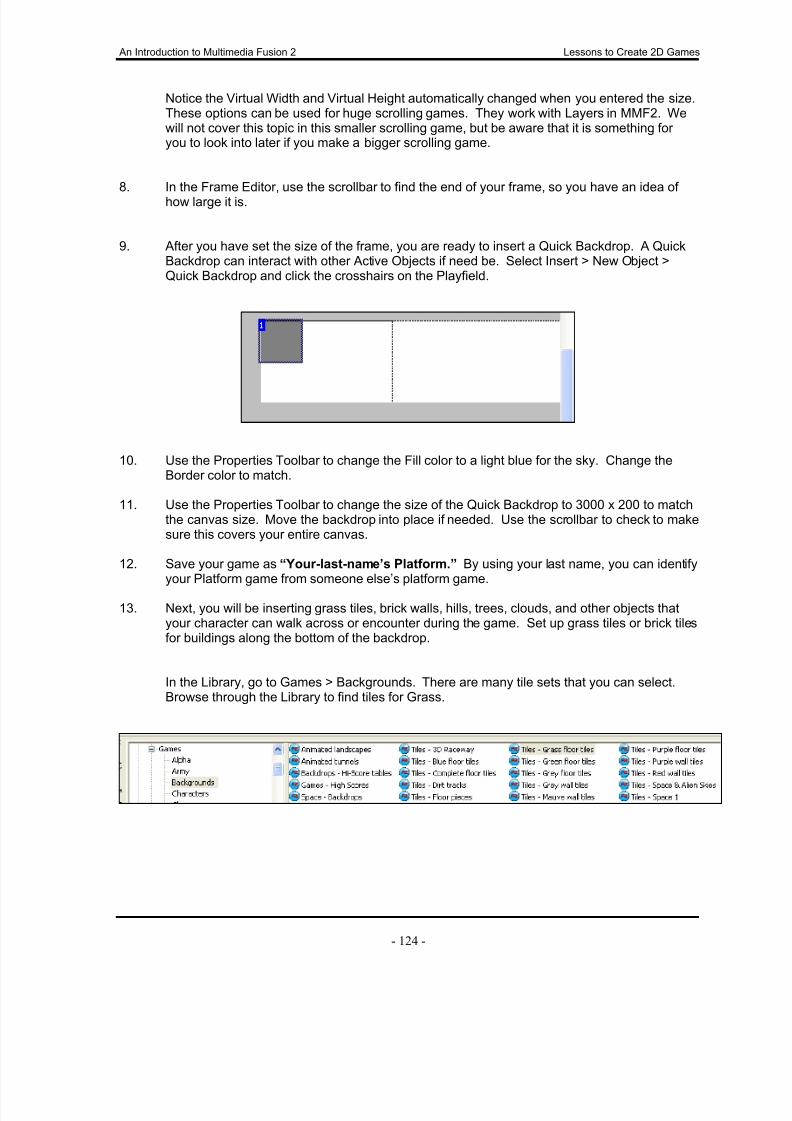
8/9/2019 An Introduction to Multimedia Fusion Full Version
http://slidepdf.com/reader/full/an-introduction-to-multimedia-fusion-full-version 126/145
An Introduction to Multimedia Fusion 2 Lessons to Create 2D Games
- 124 -
Notice the Virtual Width and Virtual Height automatically changed when you entered the size.These options can be used for huge scrolling games. They work with Layers in MMF2. Wewill not cover this topic in this smaller scrolling game, but be aware that it is something foryou to look into later if you make a bigger scrolling game.
8. In the Frame Editor, use the scrollbar to find the end of your frame, so you have an idea ofhow large it is.
9. After you have set the size of the frame, you are ready to insert a Quick Backdrop. A QuickBackdrop can interact with other Active Objects if need be. Select Insert > New Object >Quick Backdrop and click the crosshairs on the Playfield.
10. Use the Properties Toolbar to change the Fill color to a light blue for the sky. Change theBorder color to match.
11. Use the Properties Toolbar to change the size of the Quick Backdrop to 3000 x 200 to matchthe canvas size. Move the backdrop into place if needed. Use the scrollbar to check to makesure this covers your entire canvas.
12. Save your game as “Your-last-name’s Platform.” By using your last name, you can identifyyour Platform game from someone else’s platform game.
13. Next, you will be inserting grass tiles, brick walls, hills, trees, clouds, and other objects thatyour character can walk across or encounter during the game. Set up grass tiles or brick tilesfor buildings along the bottom of the backdrop.
In the Library, go to Games > Backgrounds. There are many tile sets that you can select.Browse through the Library to find tiles for Grass.
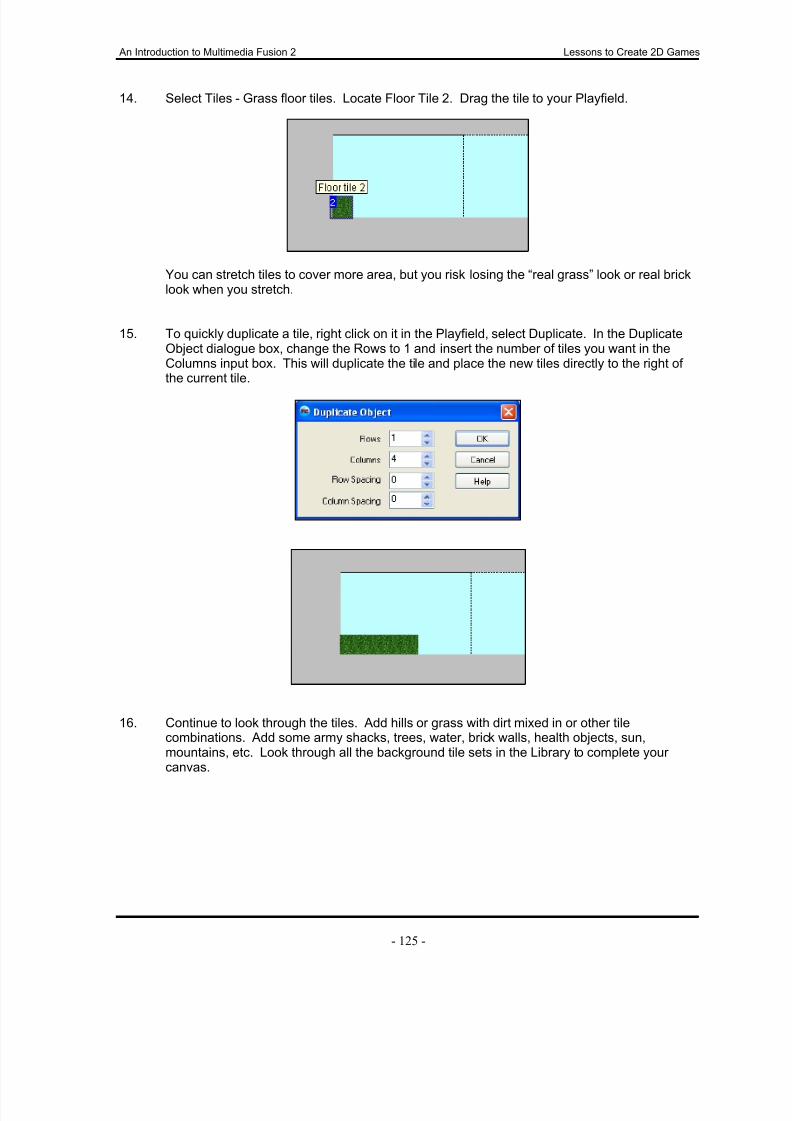
8/9/2019 An Introduction to Multimedia Fusion Full Version
http://slidepdf.com/reader/full/an-introduction-to-multimedia-fusion-full-version 127/145
An Introduction to Multimedia Fusion 2 Lessons to Create 2D Games
- 125 -
14. Select Tiles - Grass floor tiles. Locate Floor Tile 2. Drag the tile to your Playfield.
You can stretch tiles to cover more area, but you risk losing the “real grass” look or real bricklook when you stretch.
15. To quickly duplicate a tile, right click on it in the Playfield, select Duplicate. In the DuplicateObject dialogue box, change the Rows to 1 and insert the number of tiles you want in theColumns input box. This will duplicate the tile and place the new tiles directly to the right ofthe current tile.
16. Continue to look through the tiles. Add hills or grass with dirt mixed in or other tilecombinations. Add some army shacks, trees, water, brick walls, health objects, sun,mountains, etc. Look through all the background tile sets in the Library to complete yourcanvas.
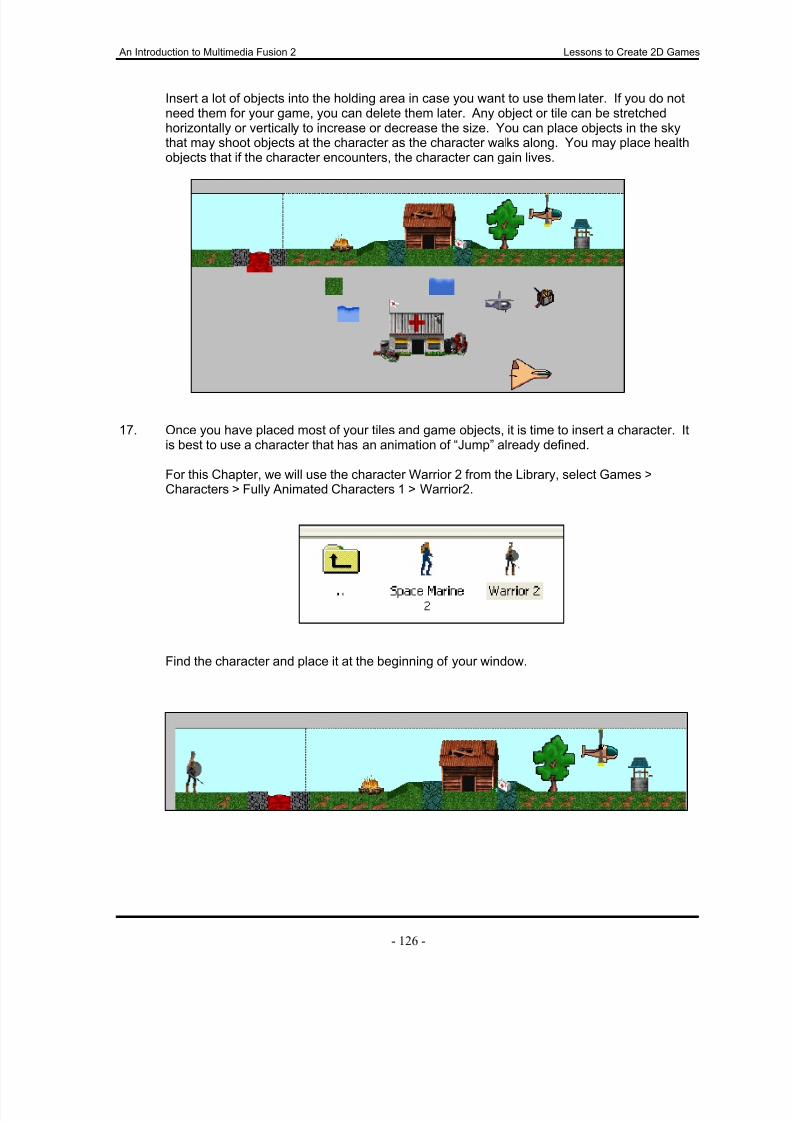
8/9/2019 An Introduction to Multimedia Fusion Full Version
http://slidepdf.com/reader/full/an-introduction-to-multimedia-fusion-full-version 128/145
An Introduction to Multimedia Fusion 2 Lessons to Create 2D Games
- 126 -
Insert a lot of objects into the holding area in case you want to use them later. If you do notneed them for your game, you can delete them later. Any object or tile can be stretchedhorizontally or vertically to increase or decrease the size. You can place objects in the skythat may shoot objects at the character as the character walks along. You may place healthobjects that if the character encounters, the character can gain lives.
17. Once you have placed most of your tiles and game objects, it is time to insert a character. Itis best to use a character that has an animation of “Jump” already defined.
For this Chapter, we will use the character Warrior 2 from the Library, select Games >Characters > Fully Animated Characters 1 > Warrior2.
Find the character and place it at the beginning of your window.
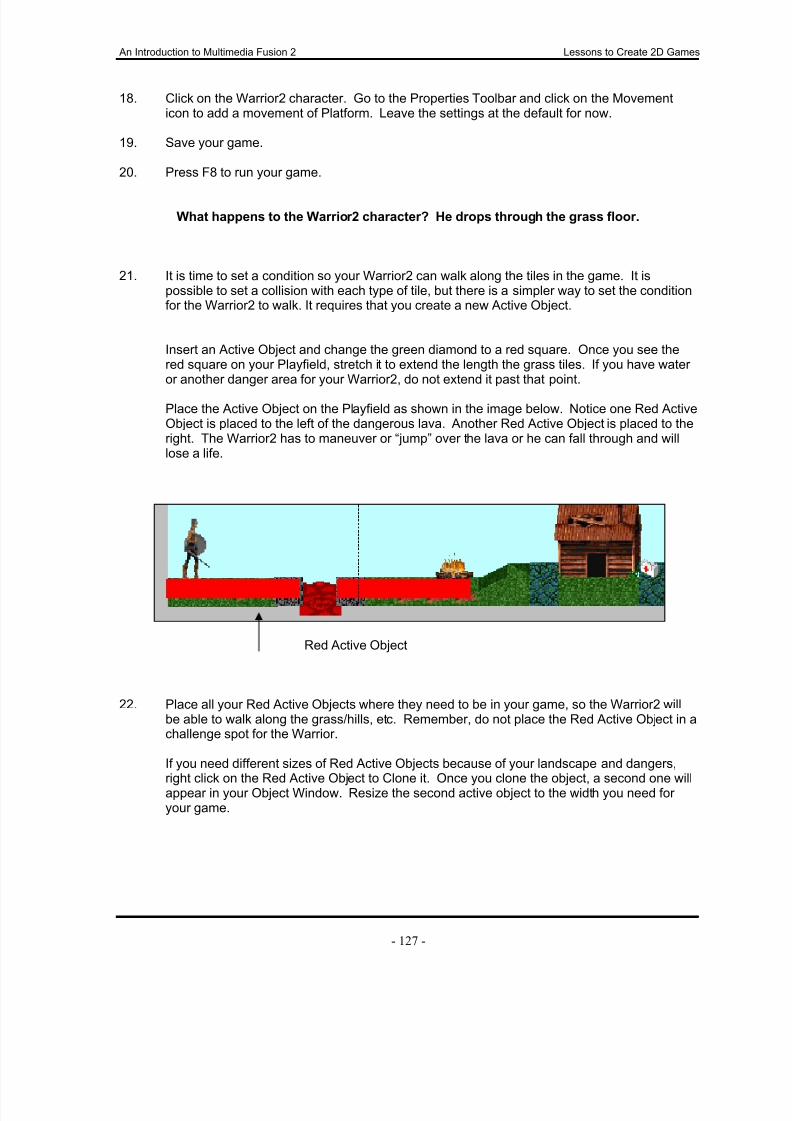
8/9/2019 An Introduction to Multimedia Fusion Full Version
http://slidepdf.com/reader/full/an-introduction-to-multimedia-fusion-full-version 129/145
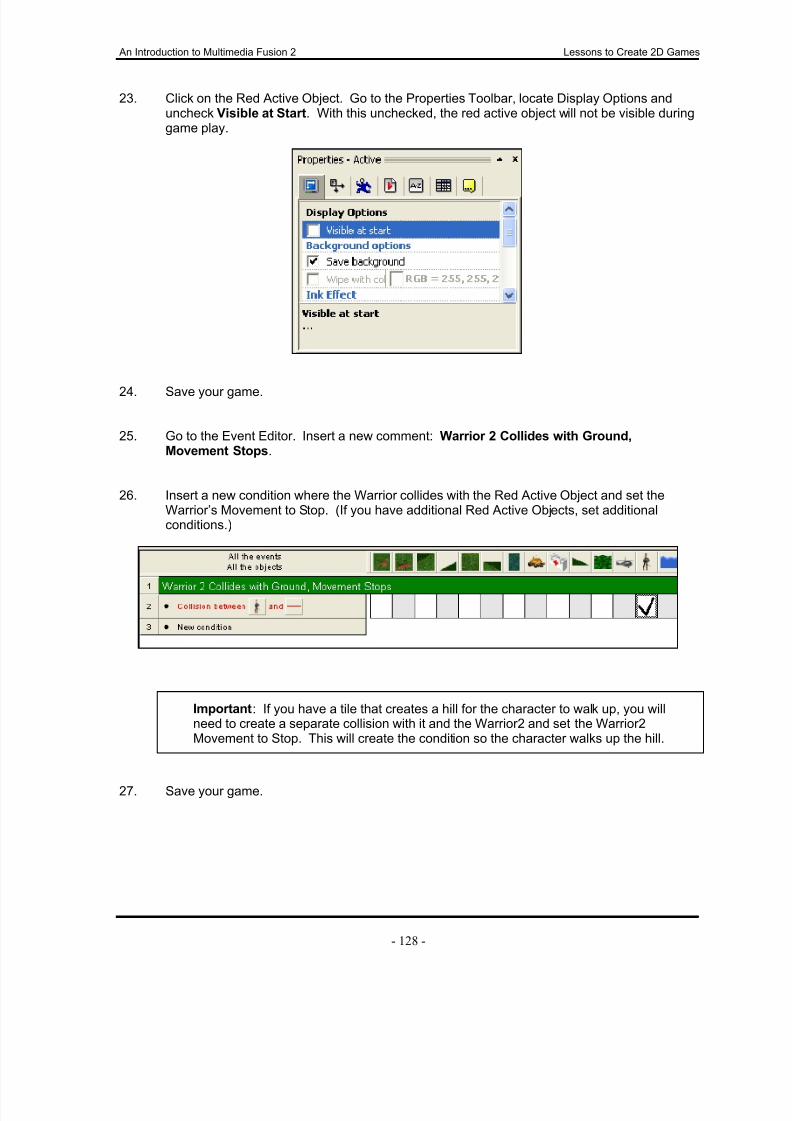
8/9/2019 An Introduction to Multimedia Fusion Full Version
http://slidepdf.com/reader/full/an-introduction-to-multimedia-fusion-full-version 130/145
An Introduction to Multimedia Fusion 2 Lessons to Create 2D Games
- 128 -
23. Click on the Red Active Object. Go to the Properties Toolbar, locate Display Options anduncheck Visible at Start. With this unchecked, the red active object will not be visible duringgame play.
24. Save your game.
25. Go to the Event Editor. Insert a new comment: Warrior 2 Collides with Ground,Movement Stops.
26. Insert a new condition where the Warrior collides with the Red Active Object and set theWarrior’s Movement to Stop. (If you have additional Red Active Objects, set additionalconditions.)
Important: If you have a tile that creates a hill for the character to walk up, you willneed to create a separate collision with it and the Warrior2 and set the Warrior2Movement to Stop. This will create the condition so the character walks up the hill.
27. Save your game.

8/9/2019 An Introduction to Multimedia Fusion Full Version
http://slidepdf.com/reader/full/an-introduction-to-multimedia-fusion-full-version 131/145
An Introduction to Multimedia Fusion 2 Lessons to Create 2D Games
- 129 -
Scrolling Option for Character
28. Before you get further along in your game, it is time to set the scrolling option so the gamewindow display follows the character. Go to the Event Editor. Insert a new comment thatreads: Scrolling Settings.
29. Insert a new condition by right clicking on Special (the computer monitors) and selectAlways.
30. On this condition line, go to the box under the Storyboard Controls, right click and selectScrollings. Choose Center horizontal position of window in frame
.

8/9/2019 An Introduction to Multimedia Fusion Full Version
http://slidepdf.com/reader/full/an-introduction-to-multimedia-fusion-full-version 132/145
An Introduction to Multimedia Fusion 2 Lessons to Create 2D Games
- 130 -
31. Select Retrieve Data from an Object. Right click on Warrior 2 and select Position >X Coordinate. Click OK.
This setting will always check the position of Warrior 2 when scrolling through the game, sothe game will never lose sight of Warrior 2.
Your condition should look like the one below.
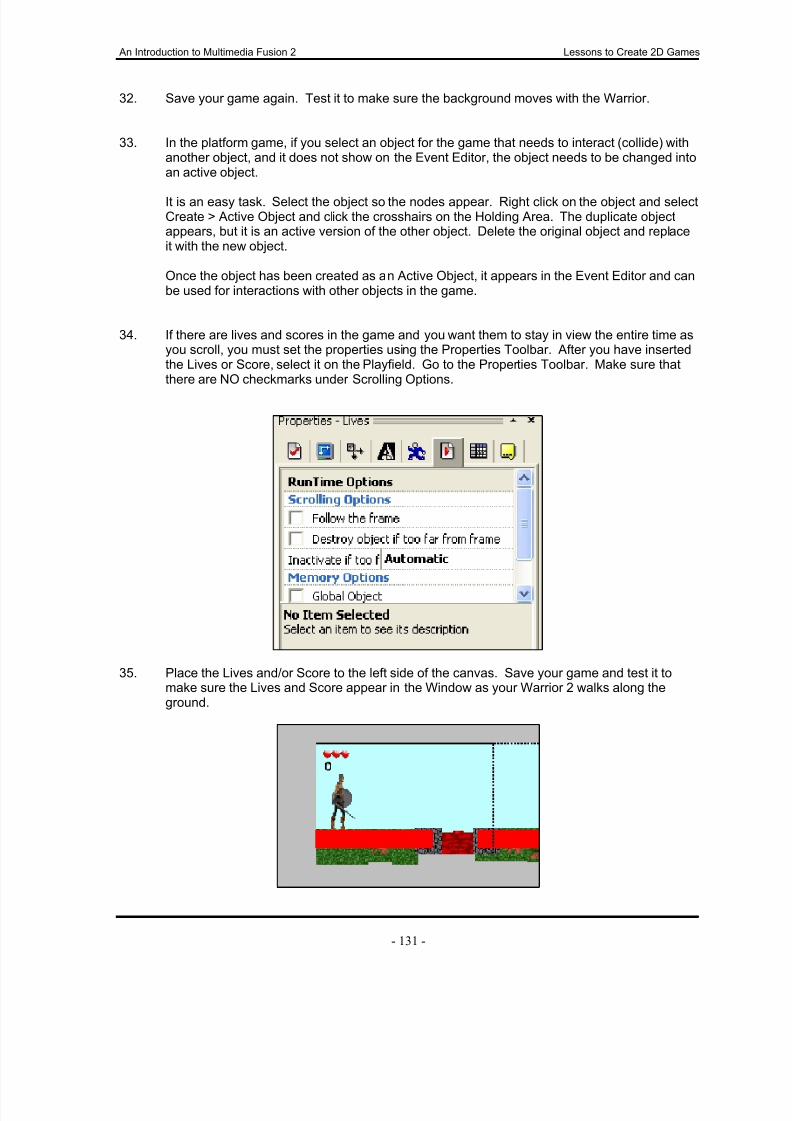
8/9/2019 An Introduction to Multimedia Fusion Full Version
http://slidepdf.com/reader/full/an-introduction-to-multimedia-fusion-full-version 133/145
An Introduction to Multimedia Fusion 2 Lessons to Create 2D Games
- 131 -
32. Save your game again. Test it to make sure the background moves with the Warrior.
33. In the platform game, if you select an object for the game that needs to interact (collide) withanother object, and it does not show on the Event Editor, the object needs to be changed intoan active object.
It is an easy task. Select the object so the nodes appear. Right click on the object and selectCreate > Active Object and click the crosshairs on the Holding Area. The duplicate objectappears, but it is an active version of the other object. Delete the original object and replaceit with the new object.
Once the object has been created as an Active Object, it appears in the Event Editor and canbe used for interactions with other objects in the game.
34. If there are lives and scores in the game and you want them to stay in view the entire time asyou scroll, you must set the properties using the Properties Toolbar. After you have insertedthe Lives or Score, select it on the Playfield. Go to the Properties Toolbar. Make sure thatthere are NO checkmarks under Scrolling Options.
35. Place the Lives and/or Score to the left side of the canvas. Save your game and test it tomake sure the Lives and Score appear in the Window as your Warrior 2 walks along theground.
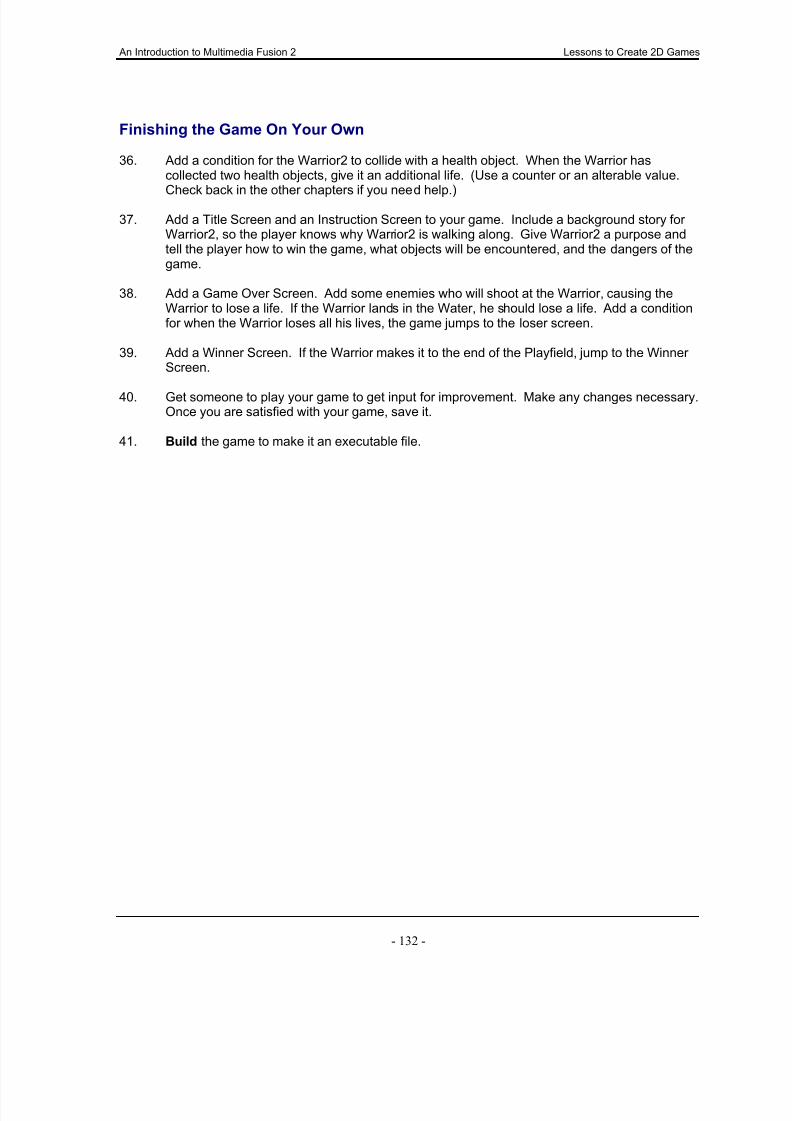
8/9/2019 An Introduction to Multimedia Fusion Full Version
http://slidepdf.com/reader/full/an-introduction-to-multimedia-fusion-full-version 134/145
An Introduction to Multimedia Fusion 2 Lessons to Create 2D Games
- 132 -
Finishing the Game On Your Own
36. Add a condition for the Warrior2 to collide with a health object. When the Warrior hascollected two health objects, give it an additional life. (Use a counter or an alterable value.
Check back in the other chapters if you need help.)
37. Add a Title Screen and an Instruction Screen to your game. Include a background story forWarrior2, so the player knows why Warrior2 is walking along. Give Warrior2 a purpose andtell the player how to win the game, what objects will be encountered, and the dangers of thegame.
38. Add a Game Over Screen. Add some enemies who will shoot at the Warrior, causing theWarrior to lose a life. If the Warrior lands in the Water, he should lose a life. Add a conditionfor when the Warrior loses all his lives, the game jumps to the loser screen.
39. Add a Winner Screen. If the Warrior makes it to the end of the Playfield, jump to the WinnerScreen.
40. Get someone to play your game to get input for improvement. Make any changes necessary.Once you are satisfied with your game, save it.
41. Build the game to make it an executable file.

8/9/2019 An Introduction to Multimedia Fusion Full Version
http://slidepdf.com/reader/full/an-introduction-to-multimedia-fusion-full-version 135/145
An Introduction to Multimedia Fusion 2 Lessons to Create 2D Games
- 133 -
Chapter Twelve: Breakout
Objectives:
In this Chapter, you will: Use Various Brush Tip Styles and Use the Slider Bar to Resize the Brush Create a Cursor-Controlled Object Paddle/Bat Create Collision Detection of Objects with a Ball Set Movement of Bounce to Redirect Paddle and Ball Objects Test Position of Objects Leaving Playfield Insert a Count Down Clock to Control Creating a New Ball Object
Game Play:
Breakout (sometimes called Smashout) is a simple game.
The player needs to keep the Ball in play with the paddle until the Ball is able tobounce off the top of the Playfield area.
The Player can hit the Ball using the keyboard cursor keys which move thepaddle.
When a Brick is hit, it is destroyed and points are added to the Player’s Score. When the Ball leaves the bottom of the Playfield, the game is over. When all the Bricks are destroyed and the Ball leaves the top of the Playfield, the
Player is a Winner of the Game.
Game Design:
One Level for Game, Title Screen, Winner Screen, Game Over Screen Text String “Score” Located at the Top of the Playfield with Score to Right Variety of Bricks Placed at the Top of the Playfield Below the Score Ball Placed in Center of the Level toward Bottom/Paddle Placed Below Ball Left-Side and Right-Side of Playfield Should Cause Ball to Bounce Top-Side of Playfield Opens Only When All Bricks are Gone
Setting Up the Title Screen and Instructions Page
1. Start a New Application. Change the Application Window Size to 640 x 480 (if needed). Inthe Properties Toolbar under Runtime options > Players, change the Initial # of lives to 10.
2. Rename Frame 1 to Title Screen. Insert a Backdrop (not a Quick Backdrop).
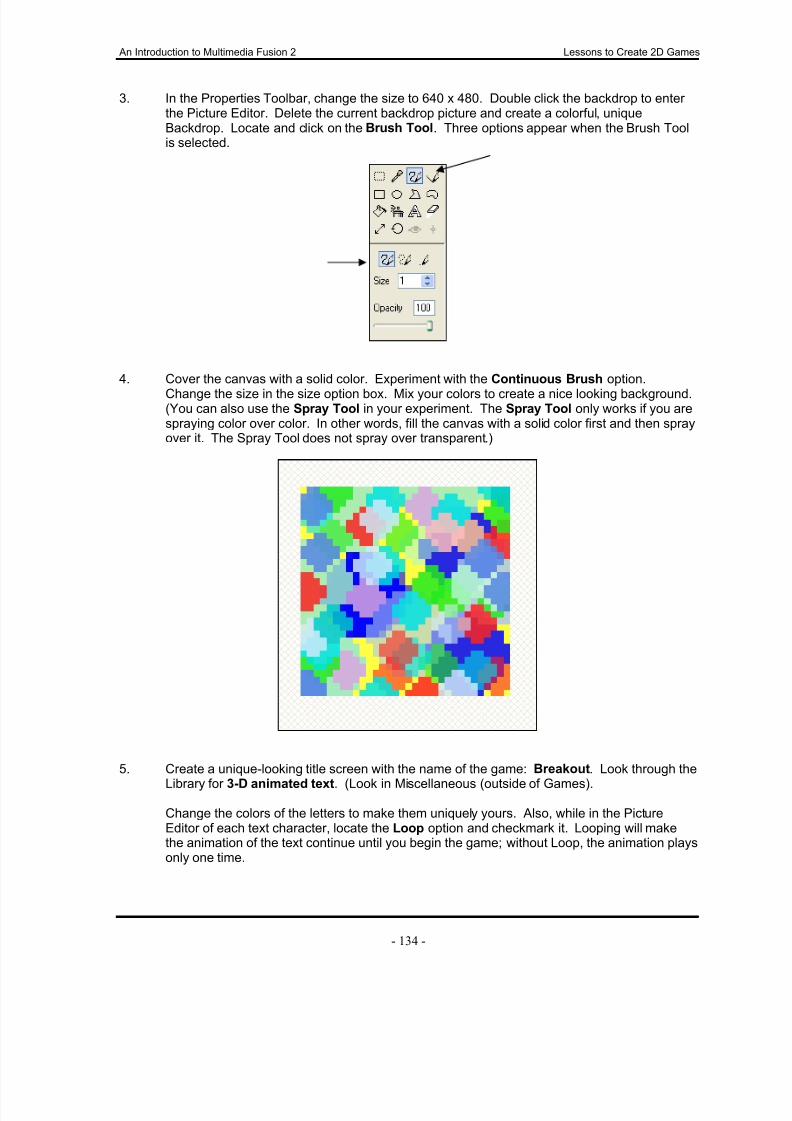
8/9/2019 An Introduction to Multimedia Fusion Full Version
http://slidepdf.com/reader/full/an-introduction-to-multimedia-fusion-full-version 136/145
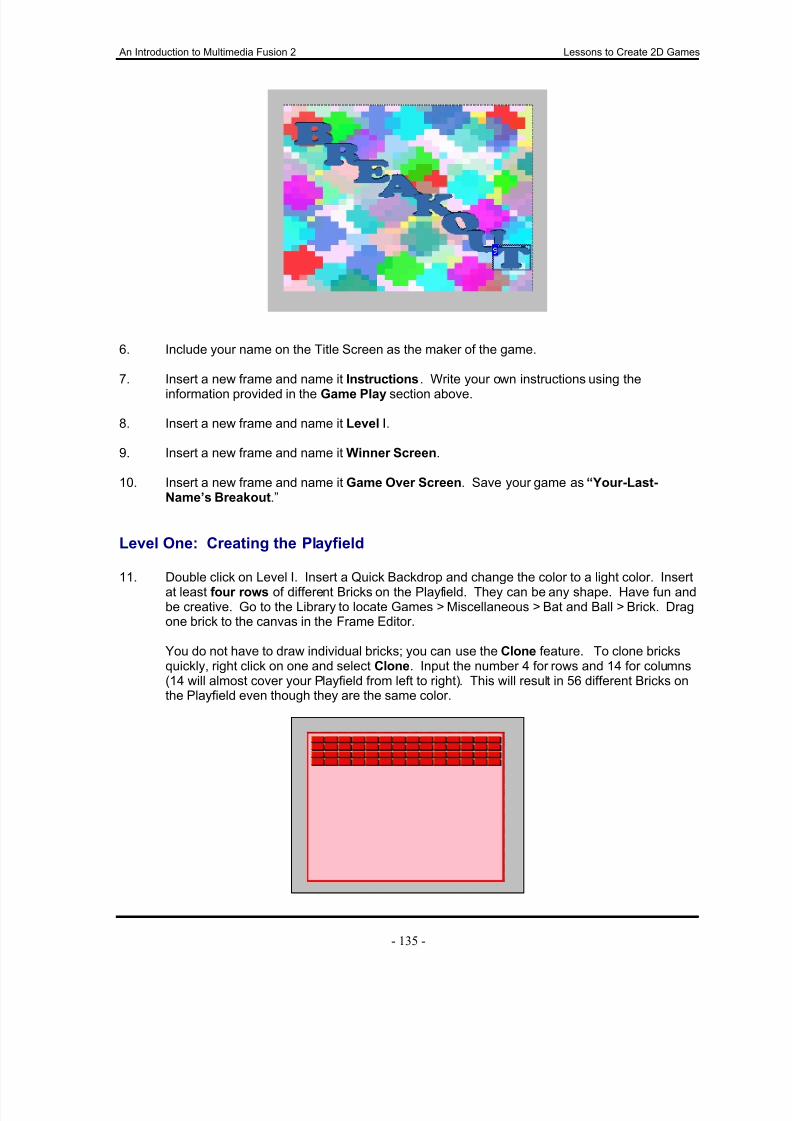
8/9/2019 An Introduction to Multimedia Fusion Full Version
http://slidepdf.com/reader/full/an-introduction-to-multimedia-fusion-full-version 137/145
An Introduction to Multimedia Fusion 2 Lessons to Create 2D Games
- 135 -
6. Include your name on the Title Screen as the maker of the game.
7. Insert a new frame and name it Instructions. Write your own instructions using the
information provided in the Game Play section above.
8. Insert a new frame and name it Level I.
9. Insert a new frame and name it Winner Screen.
10. Insert a new frame and name it Game Over Screen. Save your game as “Your-Last-Name’s Breakout.”
Level One: Creating the Playfield
11. Double click on Level I. Insert a Quick Backdrop and change the color to a light color. Insert
at least four rows of different Bricks on the Playfield. They can be any shape. Have fun andbe creative. Go to the Library to locate Games > Miscellaneous > Bat and Ball > Brick. Dragone brick to the canvas in the Frame Editor.
You do not have to draw individual bricks; you can use the Clone feature. To clone bricksquickly, right click on one and select Clone. Input the number 4 for rows and 14 for columns(14 will almost cover your Playfield from left to right). This will result in 56 different Bricks onthe Playfield even though they are the same color.
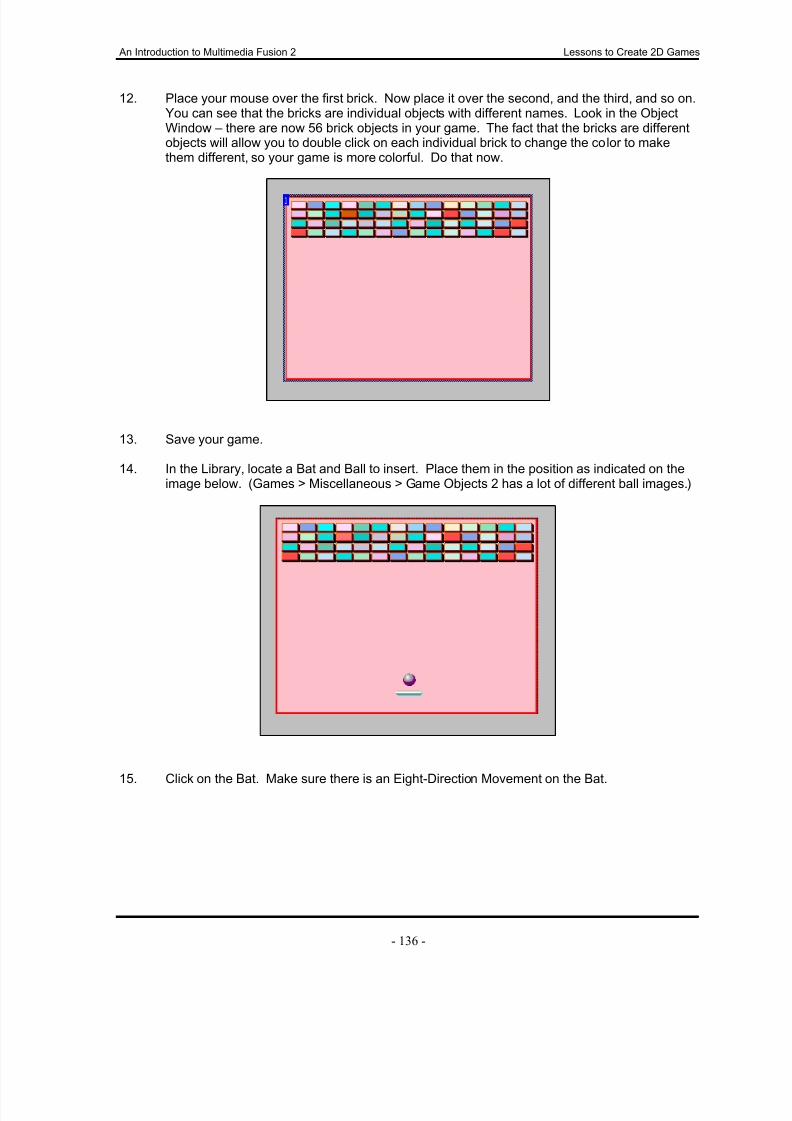
8/9/2019 An Introduction to Multimedia Fusion Full Version
http://slidepdf.com/reader/full/an-introduction-to-multimedia-fusion-full-version 138/145
An Introduction to Multimedia Fusion 2 Lessons to Create 2D Games
- 136 -
12. Place your mouse over the first brick. Now place it over the second, and the third, and so on.You can see that the bricks are individual objects with different names. Look in the ObjectWindow – there are now 56 brick objects in your game. The fact that the bricks are differentobjects will allow you to double click on each individual brick to change the color to makethem different, so your game is more colorful. Do that now.
13. Save your game.
14. In the Library, locate a Bat and Ball to insert. Place them in the position as indicated on theimage below. (Games > Miscellaneous > Game Objects 2 has a lot of different ball images.)
15. Click on the Bat. Make sure there is an Eight-Direction Movement on the Bat.
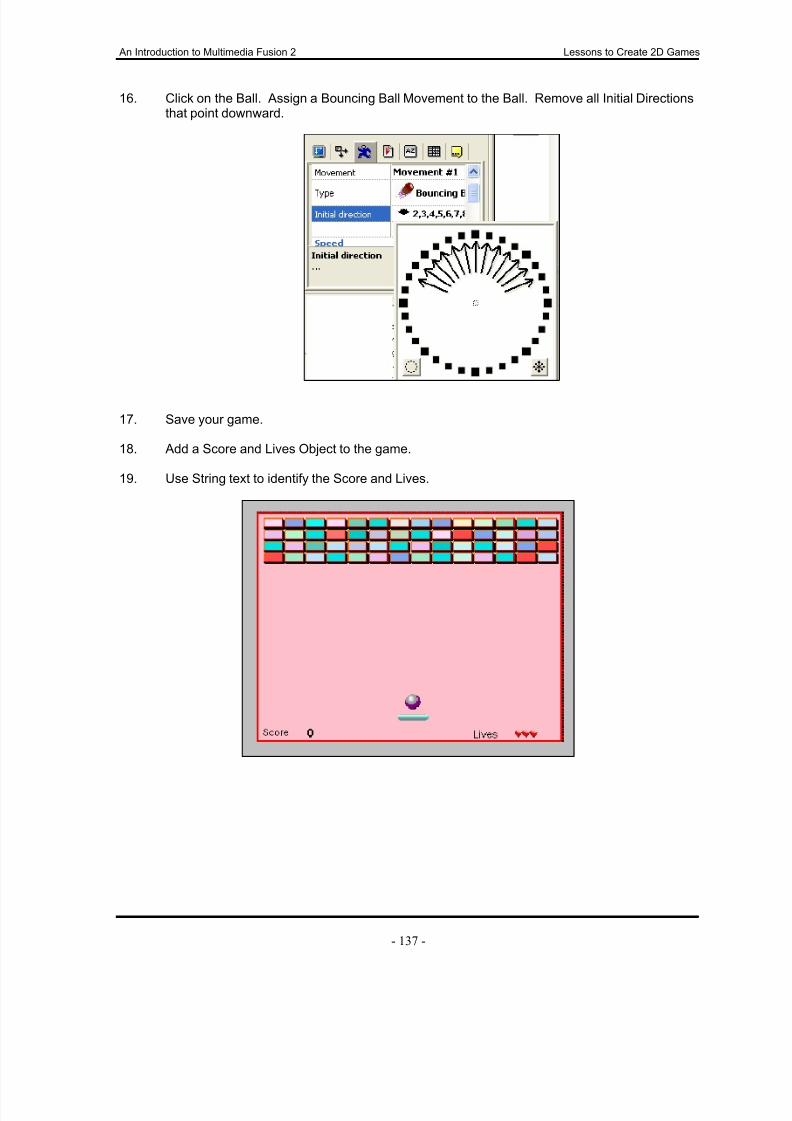
8/9/2019 An Introduction to Multimedia Fusion Full Version
http://slidepdf.com/reader/full/an-introduction-to-multimedia-fusion-full-version 139/145
An Introduction to Multimedia Fusion 2 Lessons to Create 2D Games
- 137 -
16. Click on the Ball. Assign a Bouncing Ball Movement to the Ball. Remove all Initial Directionsthat point downward.
17. Save your game.
18. Add a Score and Lives Object to the game.
19. Use String text to identify the Score and Lives.
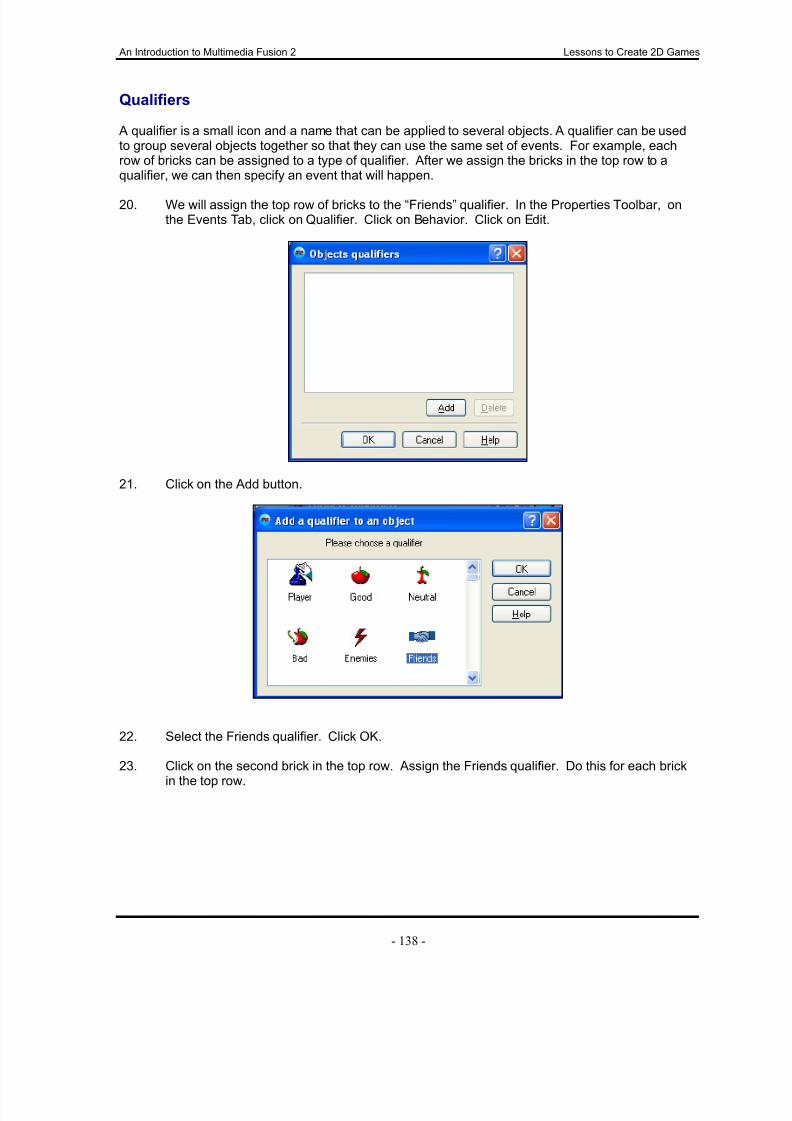
8/9/2019 An Introduction to Multimedia Fusion Full Version
http://slidepdf.com/reader/full/an-introduction-to-multimedia-fusion-full-version 140/145
An Introduction to Multimedia Fusion 2 Lessons to Create 2D Games
- 138 -
Qualifiers
A qualifier is a small icon and a name that can be applied to several objects. A qualifier can be usedto group several objects together so that they can use the same set of events. For example, eachrow of bricks can be assigned to a type of qualifier. After we assign the bricks in the top row to aqualifier, we can then specify an event that will happen.
20. We will assign the top row of bricks to the “Friends” qualifier. In the Properties Toolbar, onthe Events Tab, click on Qualifier. Click on Behavior. Click on Edit.
21. Click on the Add button.
22. Select the Friends qualifier. Click OK.
23. Click on the second brick in the top row. Assign the Friends qualifier. Do this for each brick
in the top row.
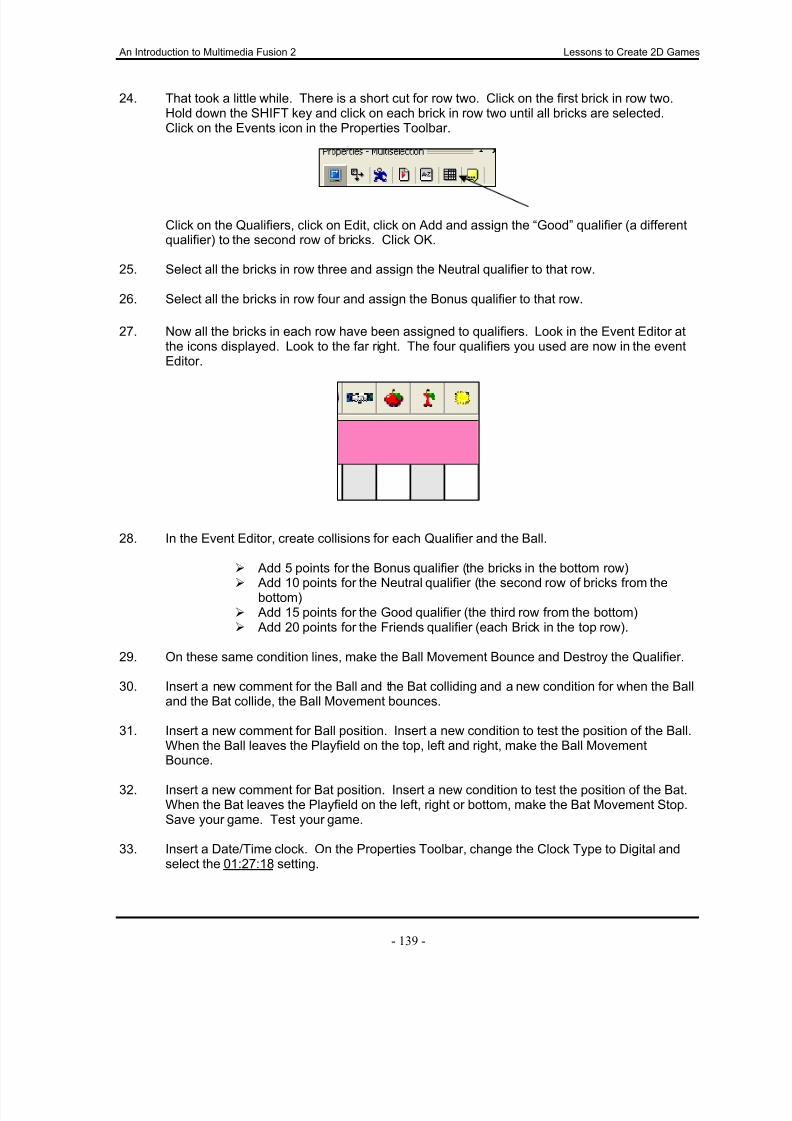
8/9/2019 An Introduction to Multimedia Fusion Full Version
http://slidepdf.com/reader/full/an-introduction-to-multimedia-fusion-full-version 141/145
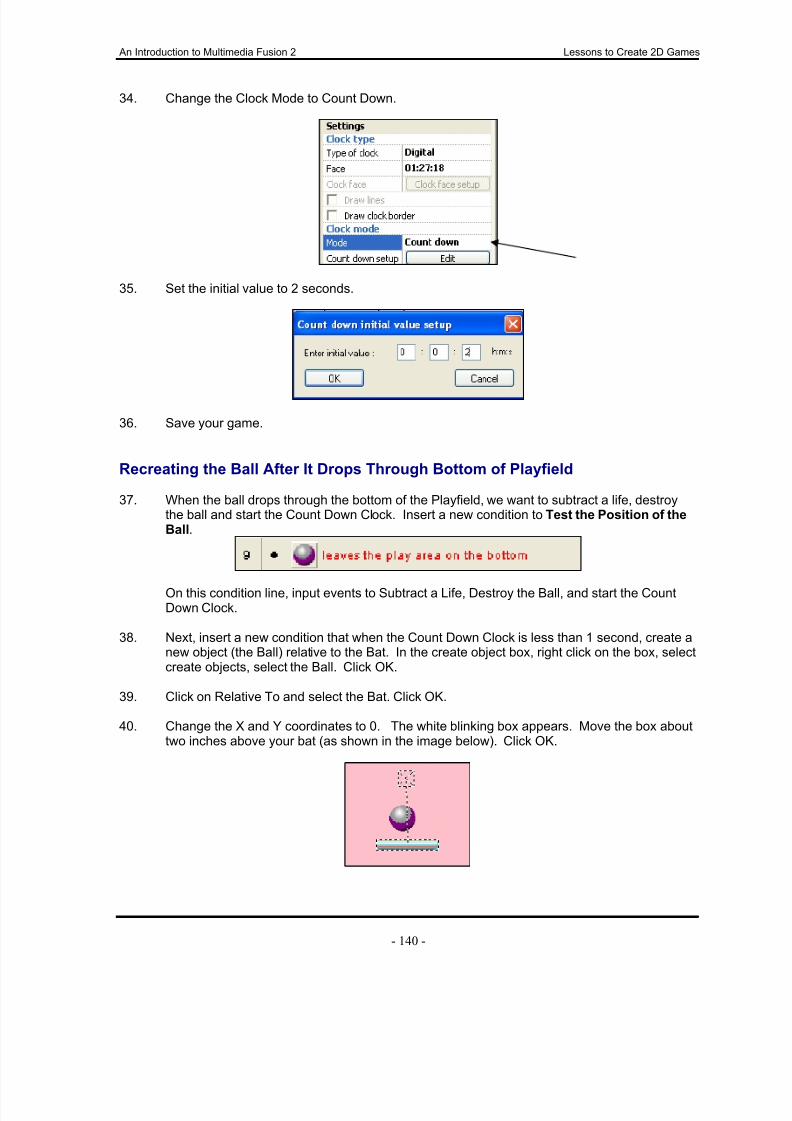
8/9/2019 An Introduction to Multimedia Fusion Full Version
http://slidepdf.com/reader/full/an-introduction-to-multimedia-fusion-full-version 142/145
An Introduction to Multimedia Fusion 2 Lessons to Create 2D Games
- 140 -
34. Change the Clock Mode to Count Down.
35. Set the initial value to 2 seconds.
36. Save your game.
Recreating the Ball After It Drops Through Bottom of Playfield
37. When the ball drops through the bottom of the Playfield, we want to subtract a life, destroythe ball and start the Count Down Clock. Insert a new condition to Test the Position of theBall.
On this condition line, input events to Subtract a Life, Destroy the Ball, and start the CountDown Clock.
38. Next, insert a new condition that when the Count Down Clock is less than 1 second, create anew object (the Ball) relative to the Bat. In the create object box, right click on the box, selectcreate objects, select the Ball. Click OK.
39. Click on Relative To and select the Bat. Click OK.
40. Change the X and Y coordinates to 0. The white blinking box appears. Move the box abouttwo inches above your bat (as shown in the image below). Click OK.
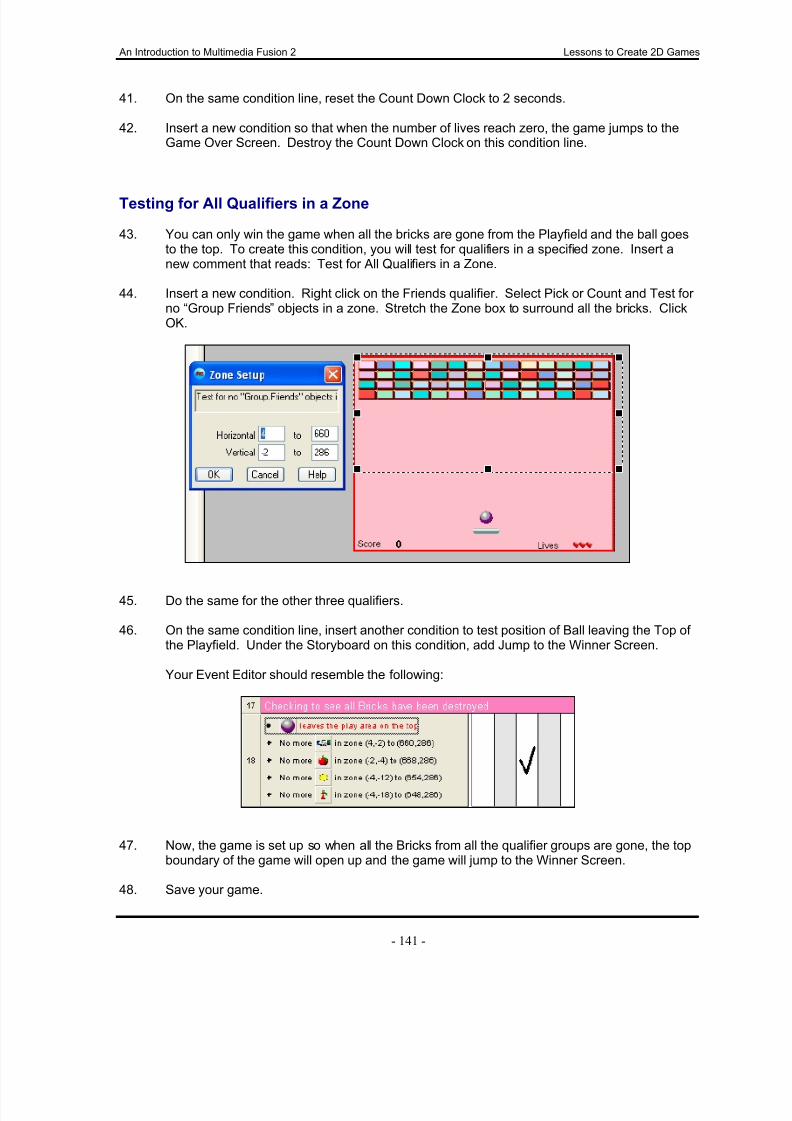
8/9/2019 An Introduction to Multimedia Fusion Full Version
http://slidepdf.com/reader/full/an-introduction-to-multimedia-fusion-full-version 143/145
An Introduction to Multimedia Fusion 2 Lessons to Create 2D Games
- 141 -
41. On the same condition line, reset the Count Down Clock to 2 seconds.
42. Insert a new condition so that when the number of lives reach zero, the game jumps to theGame Over Screen. Destroy the Count Down Clock on this condition line.
Testing for All Qualifiers in a Zone
43. You can only win the game when all the bricks are gone from the Playfield and the ball goesto the top. To create this condition, you will test for qualifiers in a specified zone. Insert anew comment that reads: Test for All Qualifiers in a Zone.
44. Insert a new condition. Right click on the Friends qualifier. Select Pick or Count and Test forno “Group Friends” objects in a zone. Stretch the Zone box to surround all the bricks. ClickOK.
45. Do the same for the other three qualifiers.
46. On the same condition line, insert another condition to test position of Ball leaving the Top ofthe Playfield. Under the Storyboard on this condition, add Jump to the Winner Screen.
Your Event Editor should resemble the following:
47. Now, the game is set up so when all the Bricks from all the qualifier groups are gone, the topboundary of the game will open up and the game will jump to the Winner Screen.
48. Save your game.
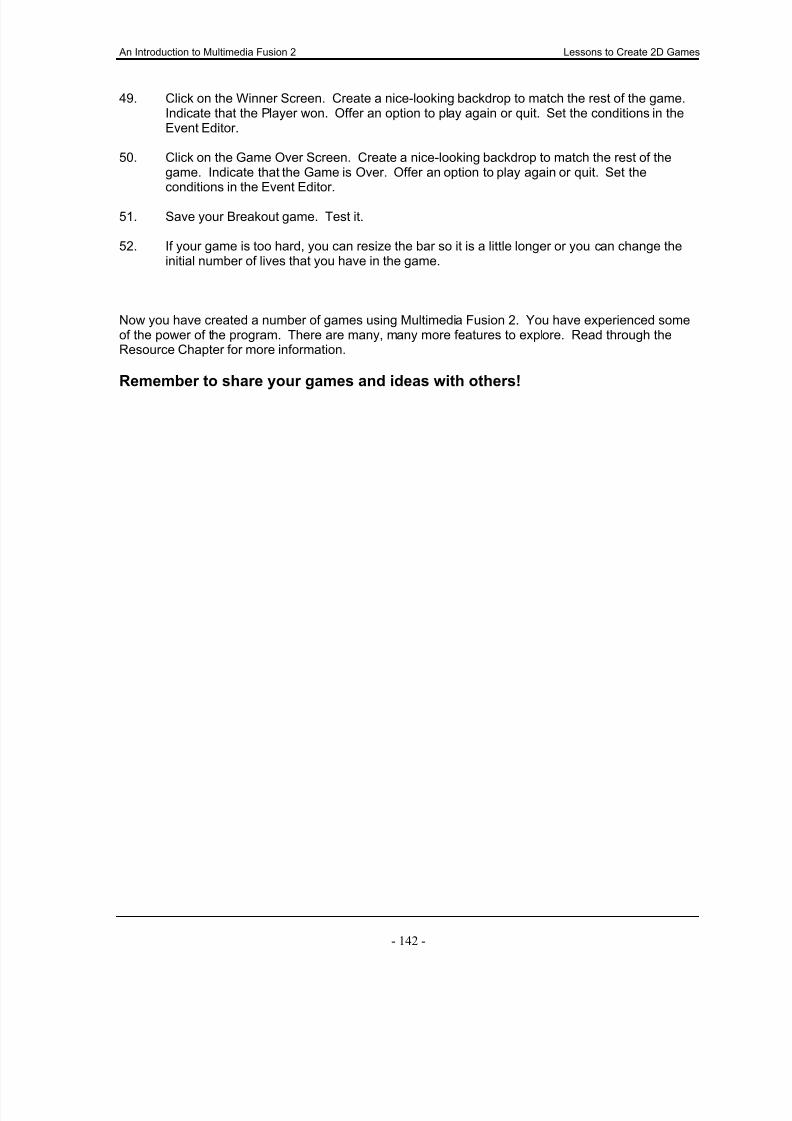
8/9/2019 An Introduction to Multimedia Fusion Full Version
http://slidepdf.com/reader/full/an-introduction-to-multimedia-fusion-full-version 144/145
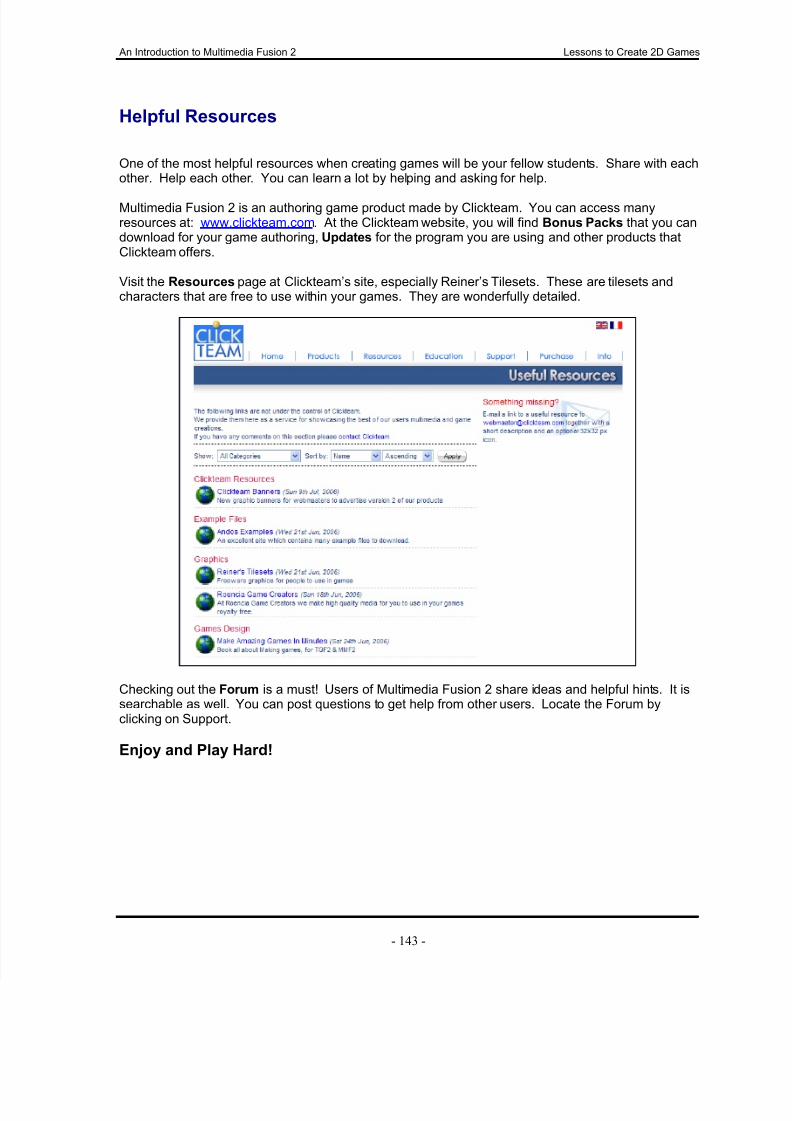
8/9/2019 An Introduction to Multimedia Fusion Full Version
http://slidepdf.com/reader/full/an-introduction-to-multimedia-fusion-full-version 145/145
An Introduction to Multimedia Fusion 2 Lessons to Create 2D Games
Helpful Resources
One of the most helpful resources when creating games will be your fellow students. Share with eachother. Help each other. You can learn a lot by helping and asking for help.
Multimedia Fusion 2 is an authoring game product made by Clickteam. You can access manyresources at: www.clickteam.com. At the Clickteam website, you will find Bonus Packs that you candownload for your game authoring, Updates for the program you are using and other products thatClickteam offers.
Visit the Resources page at Clickteam’s site, especially Reiner’s Tilesets. These are tilesets andcharacters that are free to use within your games. They are wonderfully detailed.