Embed Size (px)
Citation preview
[Not for Circulation]
Information Technology Services, UIS 1
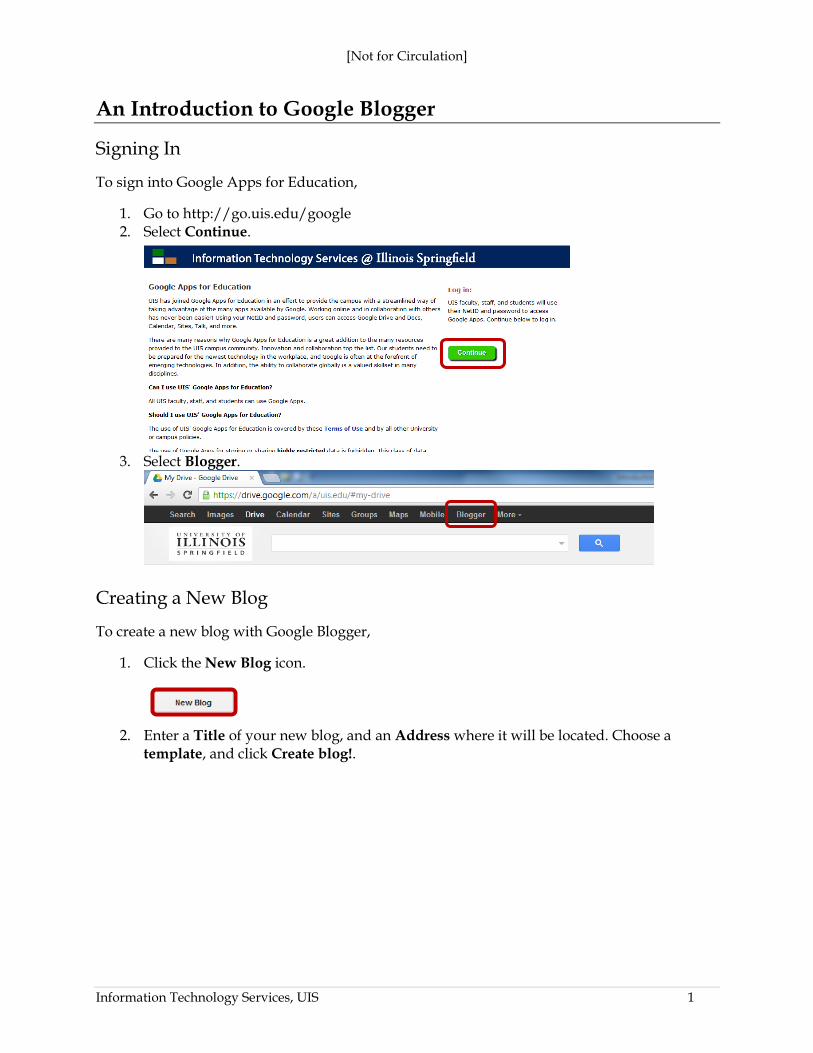
An Introduction to Google Blogger
Signing In
To sign into Google Apps for Education,
1. Go to http://go.uis.edu/google 2. Select Continue.
3. Select Blogger.
Creating a New Blog
To create a new blog with Google Blogger,
1. Click the New Blog icon.
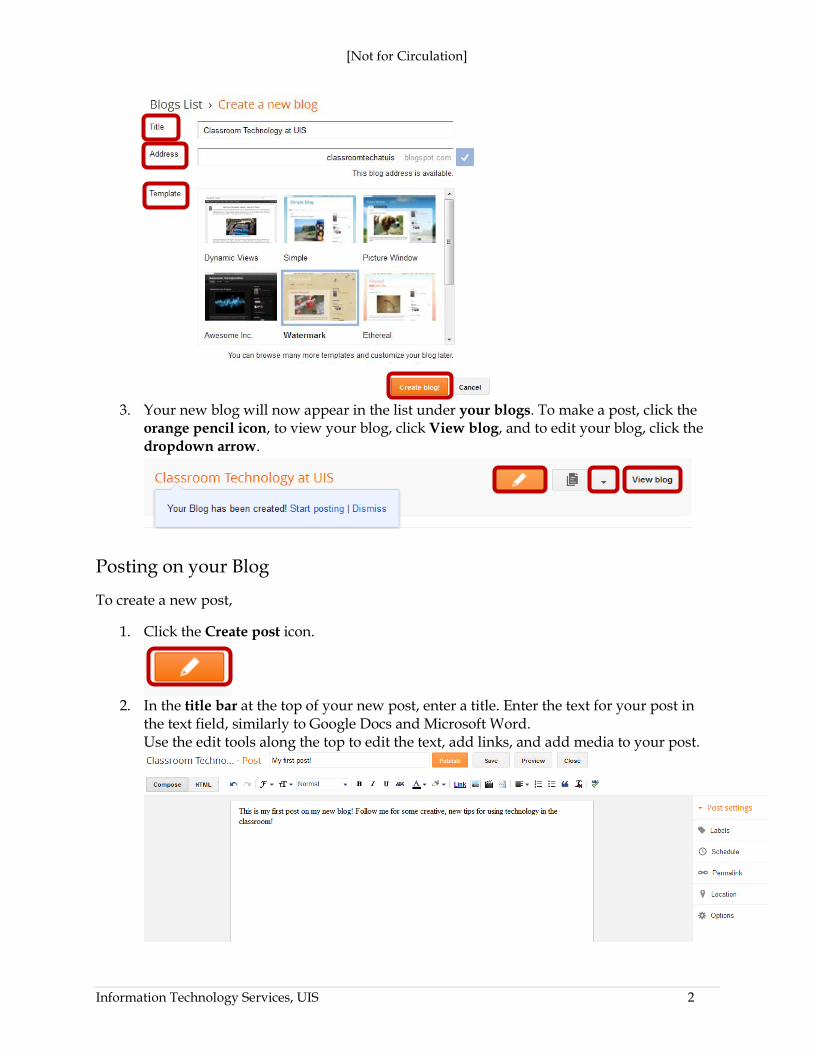
2. Enter a Title of your new blog, and an Address where it will be located. Choose a
template, and click Create blog!.
[Not for Circulation]
Information Technology Services, UIS 2
3. Your new blog will now appear in the list under your blogs. To make a post, click the
orange pencil icon, to view your blog, click View blog, and to edit your blog, click the dropdown arrow.
Posting on your Blog
To create a new post,
1. Click the Create post icon.
2. In the title bar at the top of your new post, enter a title. Enter the text for your post in
the text field, similarly to Google Docs and Microsoft Word. Use the edit tools along the top to edit the text, add links, and add media to your post.
[Not for Circulation]
Information Technology Services, UIS 3
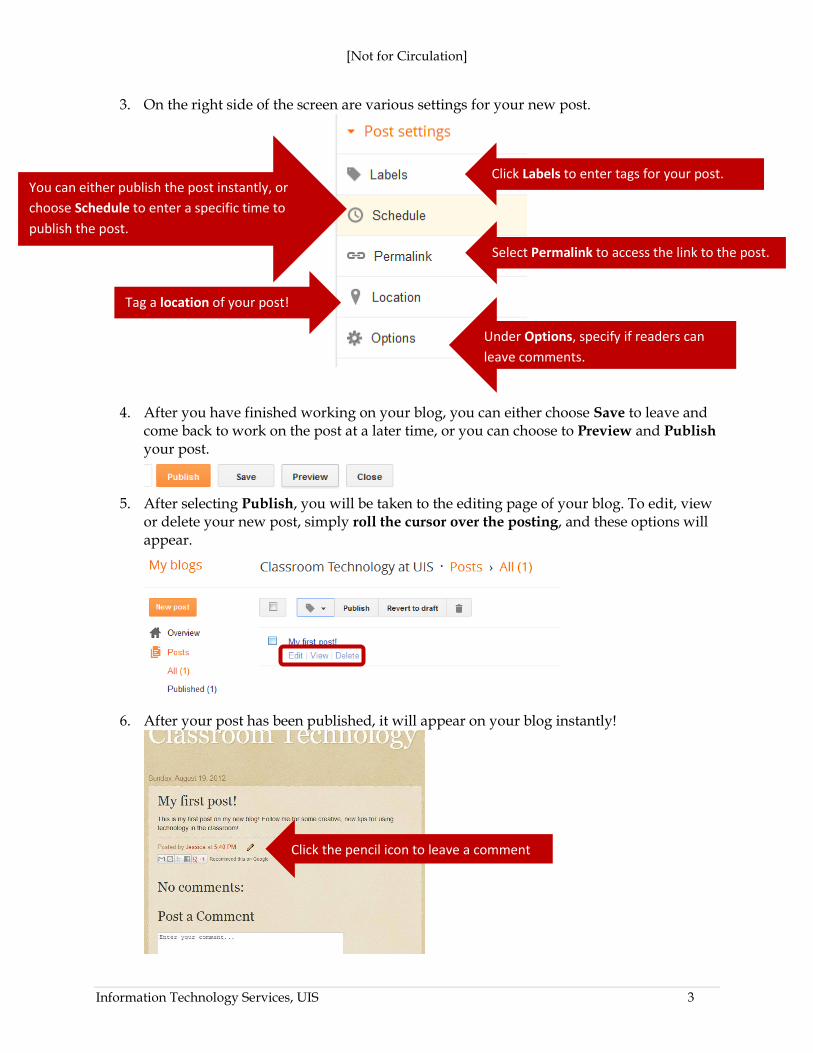
3. On the right side of the screen are various settings for your new post.
4. After you have finished working on your blog, you can either choose Save to leave and come back to work on the post at a later time, or you can choose to Preview and Publish
your post.
5. After selecting Publish, you will be taken to the editing page of your blog. To edit, view
or delete your new post, simply roll the cursor over the posting, and these options will appear.
6. After your post has been published, it will appear on your blog instantly!
Click Labels to enter tags for your post.
Select Permalink to access the link to the post.
Under Options, specify if readers can
leave comments.
You can either publish the post instantly, or
choose Schedule to enter a specific time to
publish the post.
Tag a location of your post!
Click the pencil icon to leave a comment
[Not for Circulation]
Information Technology Services, UIS 4
Adding Pages to your Blog
Not only can you add posts to your Google Blog, but you can also create pages. These pages can appear either along the top or side of your blog, and can help to organize the information and content of your blog. To create a page,
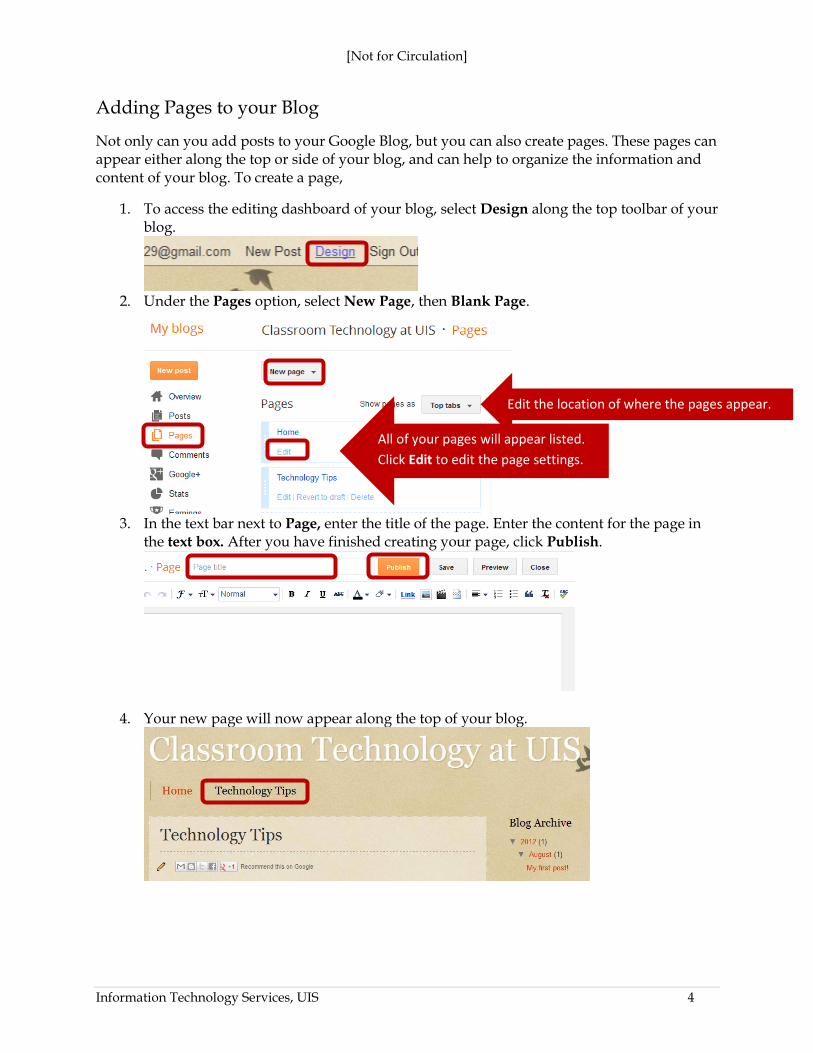
1. To access the editing dashboard of your blog, select Design along the top toolbar of your blog.
2. Under the Pages option, select New Page, then Blank Page.
3. In the text bar next to Page, enter the title of the page. Enter the content for the page in
the text box. After you have finished creating your page, click Publish.
4. Your new page will now appear along the top of your blog.
All of your pages will appear listed.
Click Edit to edit the page settings.
Edit the location of where the pages appear.
[Not for Circulation]
Information Technology Services, UIS 5
Working with your Blog
To get to the dashboard of your blog where you can edit, add posts, and more, select the Go to
Post List icon from your Google Blogger homepage, or the Design tab from your blog homepage (as we discussed previously).
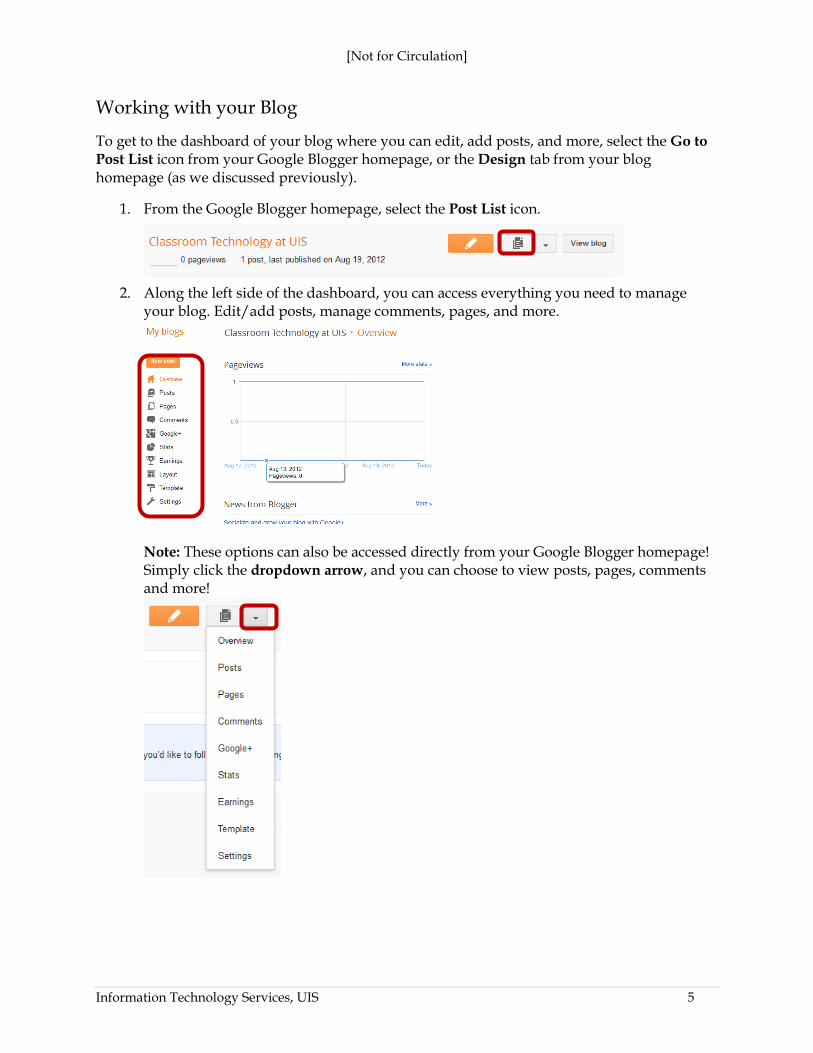
1. From the Google Blogger homepage, select the Post List icon.
2. Along the left side of the dashboard, you can access everything you need to manage
your blog. Edit/add posts, manage comments, pages, and more.
Note: These options can also be accessed directly from your Google Blogger homepage! Simply click the dropdown arrow, and you can choose to view posts, pages, comments and more!
[Not for Circulation]
Information Technology Services, UIS 6
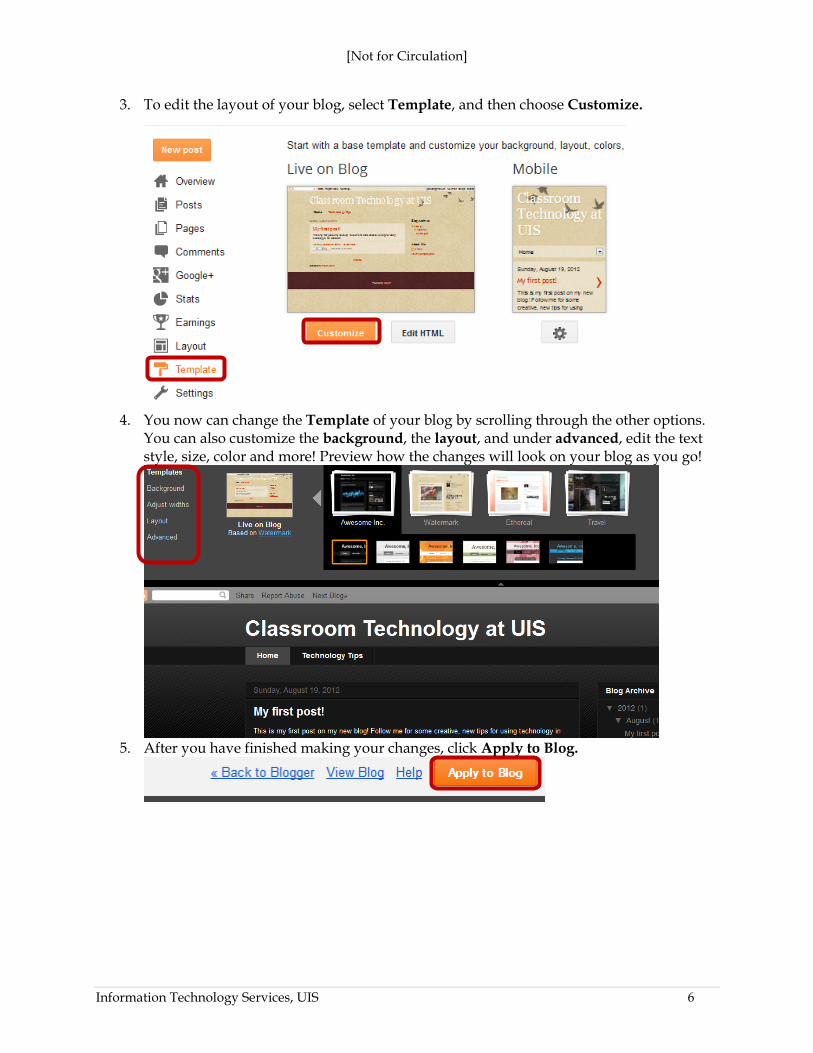
3. To edit the layout of your blog, select Template, and then choose Customize.
4. You now can change the Template of your blog by scrolling through the other options.
You can also customize the background, the layout, and under advanced, edit the text style, size, color and more! Preview how the changes will look on your blog as you go!
5. After you have finished making your changes, click Apply to Blog.
[Not for Circulation]
Information Technology Services, UIS 7
Managing Settings
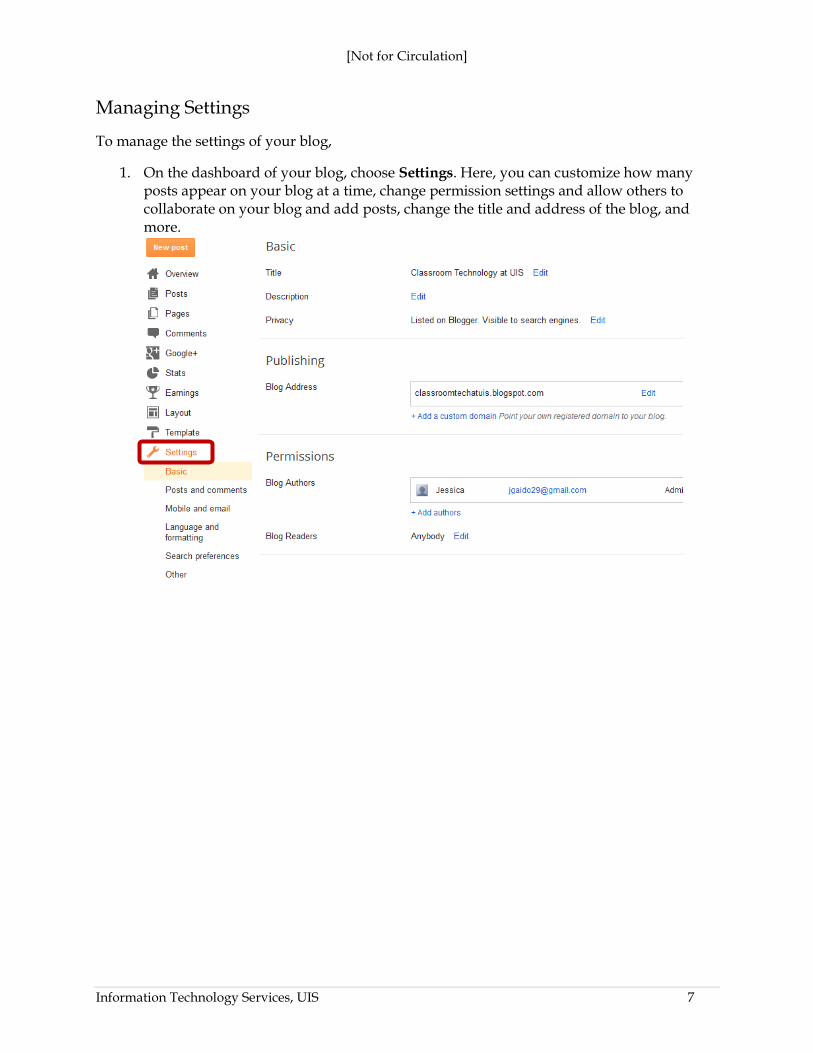
To manage the settings of your blog,
1. On the dashboard of your blog, choose Settings. Here, you can customize how many posts appear on your blog at a time, change permission settings and allow others to collaborate on your blog and add posts, change the title and address of the blog, and more.