Embed Size (px)
Citation preview

INFORMATION ISSN 1343-4500 Volume 8, Number 1, pp. 89-110 ©2005 International Information Institute
An interactive computer animation method for learning instrument grasp
Nicoletta Adamo-Villani,
Department of Computer Graphics Technology, Purdue University, West Lafayette, IN, USA .
Gerardo Beni,
Department of Electrical Engineering, University of California at Riverside, Riverside, CA, USA.
Abstract In this paper we present a new 3D animation method for virtual learning of manual skills. The method is an extension of the recently developed keyboard based technique (KUI) for configuration and animation of hand gestures in 3D. The main contributions of the paper are: (1) the extension of the KUI method to include the basic manipulation tasks of grasping and releasing; (2) a new grasp classification which reduces the grasp types to six, with variations; (3) the development of a new HCI (Human Computer Interface) for efficient animation of grasp and release actions; and (4) the application of the method to learning the basics of instrument grasp in periodontal instrumentation. Because of the simplicity of the interface and low bandwidth for transmission, the method is particularly suitable for teaching, via internet, dexterous skills, which are one of the main obstacles to medical and other science-technology training at distance.
1 Introduction Distance learning and self-teaching education are growing rapidly due to the internet
and the development of interactive technologies. The growth is mainly in areas where the material to be learned is verbal, numerical, and generally abstract. Learning of skills involving concrete actions is not easily implemented with computer-interactive methods. Concrete tasks require: (1) sensory perception, (2) dexterity (hands and/or feet), and (3) tools (instruments, devices, and materials). All these factors present difficulties for computer-interactive learning. Sensory perception can be simulated in the visual and auditory case. Tactile perception is significantly more difficult to simulate and the implementations, even in videogames, are much more limited.
Even more limited is the realization of simulated experience for developing dexterity
skills. In fact, of the very few dexterity skills which are effectively implemented in computer-interactive learning, the most notable is touch-typing. Computer-interactive learning of touch-typing is possible because of a readily available dexterity training tool, namely the keyboard. Other, more limited examples are computer-coupled instrument keyboards for learning how to play the piano and other musical instruments. With these few exceptions, the list of dexterity training programs for computer-interactive learning is

INFORMATION ISSN 1343-4500 Volume 8, Number 1, pp. 89-110 ©2005 International Information Institute
still very limited, due, as noted, to the difficulty of simulating, and practicing via simulation, the dexterous action itself.
Learning how to perform concrete tasks is limited, not only by difficulties in
simulating sensory perception and in practicing dexterous actions, but also by the difficult representations of the tools necessary for the tasks. In many cases the representation must be very realistic in order to be effective. An example is the learning of surgical skills. In such a case, the representations of the surgical instruments must be precise in order to practice the correct use of them. By 'precise' it is meant that the representation must be 3-dimensional, geometrically accurate, and correctly rendered so that the surface has the appearance (color, texture, etc.) of the real instrument as perceived by the surgeon under operating room lighting conditions. Such precise representations, fortunately, have become feasible because of readily available 3D modeling and animation software. The implementation is not always straightforward but it is doable; and this fact, coupled with the simulation of audio-visual sensory perception, has spurred much advance in the interactive video-game industry. It has also extended to applications in training for specialized concrete tasks, such as in military or police operations. The latter require simulated scenarios perceived primarily by audio-visual inputs, and realistic representation of weapons and other tools. Dexterity training remains much more limited even in these advanced applications. And it remains the main obstacle to the growth of learning via computer-interaction in both distance education and self-teaching mode.
How can this obstacle be removed? After all, practicing dexterous skills requires
manipulating something and this something must be coupled to the computer in order to obtain feedback on one's performance. Both the realization of a concrete object to be manipulated and its coupling to the computer require the development of specialized hardware (and software). But specialized hardware is costly and not transmittable at distance by internet, as software is. Clearly one searches for a software-only solution. But how can one practice dexterity skills simply by using software? The answer is that software cannot provide complete simulation of the manipulation experience but can provide various forms of feedback. For example, in the case of learning the dexterous skill of finger spelling in American Sign Language, it is possible to practice by watching simultaneously both the movement of one's hand and the correct movement realistically simulated on the computer screen. In fact, the simulation provides a correct orientation of the hand which cannot be achieved by watching one's hand in the mirror, as used to be done before software methods were developed [1]. In the finger-spelling case, however, the hand does not need to manipulate any tool.
But even if the hand needs to hold a tool, it is possible to obtain software feedback.
Consider in fact the case of learning how to use chopsticks. And suppose the only learning tool available, besides a pair of chopsticks, were a textbook. In such a case the feedback would be provided by a finite set of pictures in the book. Even if using a videotape, the feedback would be provided by comparison with a finite set of correct sequences. And if one wanted to test the degree of one's proficiency, how could this be done? The book (or the video) might have a set of multiple choice illustrations (or video-

INFORMATION ISSN 1343-4500 Volume 8, Number 1, pp. 89-110 ©2005 International Information Institute
sequences), asking the learner to select the correct one. Again this is necessarily a finite (usually small, for practical reasons) set of experiences; hence the training would be limited, often quite severely.
Even maintaining the same type of feedback, i.e., comparison with correct images (or
sequences), a computer-interactive method can provide an 'infinite' set to practice on. In fact, if the hand and chopsticks were modeled and animated (with realistic representations), simply changing the orientation (3D-rotation) of the scene would multiply the number of practicing images (sequences) by a very large factor. (For steps of 200 rotations about 3 axes we would have 5832 more sequences for each original sequence).
And this type of feedback has another advantage. In comparing one's performance
with the correct one, in any case (book, videotape or computer), it is necessary to have a measure of the error made. The simplest method is to provide the learner with multiple- choices with decreasing differences among the members of the set from which the choice has to be made. Clearly, the book or videotape methods, because of the small set of practice illustrations (sequences) cannot be adapted to this progressive narrowing of the differences among the possible choices. But this is a simple matter for the computer-interactive method. So the computer-interactive method is the only method that can provide a quantifiable feedback to the learner of a concrete skill. And this is done without need of any specialized hardware.
Besides this advantage (in the quantitative comparison with the correct handling) the
computer-interactive method can be used in a different mode, i.e., in the simulated construction of the correct handling image (sequence). In this activity the student does not practice the required manual skill but practices its formation. The situation is analogous to practicing drawing by using a painting software program. Certainly, this does not replace the actual practice of sketching but much can be learned from it. In using the painting program, one does not use the actual manual skills of handling the pencil or brush but learns how to produce a correct image. If one can make a portrait using a software painting program, it is likely that the skill will be ported, at least to a significant degree, to the skill of making portraits by using a pencil.
Similarly, if the student can 'draw' the correct handling of a surgical instrument in
cutting a tissue, it is likely that the skill of correctly handling that instrument will be ported to the actual cutting of the tissue. It is this mode of operation of a software program designed for learning concrete tasks that is emphasized in this paper. The particular application is dentistry, i.e., the handling of periodontal instruments, but the paper should be regarded as a first step to a general approach to computer-interactive learning of skills required by concrete tasks.
The paper focuses on two basic handling actions, i.e. grasp and release. These actions
are essential for practically any manual dexterity. The hand and instruments are realistically represented by 3D modeling/animation using state-of-the-art software (Maya 5.0). The practicing of 'drawing' the sequence of hand and finger motions to correctly

INFORMATION ISSN 1343-4500 Volume 8, Number 1, pp. 89-110 ©2005 International Information Institute
grasp, position and release periodontal instruments is made possible by a recently developed new method of controlling a computer animated hand via the standard keyboard. This method [2] [3] [4] [5] maps the 26 degrees of freedom of the human hand to the 26 letters of the alphabet in a logical way so that reconfiguring the hand becomes automatic, as touch-typing, after a short period of practice. Moreover, a new keyboard arrangement (in progress of development) can be used. The keys are arranged so that they correspond to the projection on a plane of the fingers rotational joints. Using this keyboard layout the reconfiguring of the hand is even faster.
So far the KUI method has been applied to hand reconfigurations but not to specific
handling tasks. However, most skills for handling tasks require the representation of basic actions such as: grasp, release, push, pull, hit, throw, catch, etc. As noted, in this work we focus on grasp and release -- two of the most common and useful actions in any purposeful hand motion. The extension of the KUI method to include these two operations is a main contribution of this paper.
In Section 2 we describe a new classification of pre-grasp configurations. In Section 3
we describe the interface. In section 4 we give an example of application of the method to learning periodontal instrumentation. Conclusive remarks and description of future work are in section 5.
2 Grasp taxonomy There is no definitive agreement on grasp taxonomies. Several classifications have
been proposed. They can be summed up into three types: taxonomies based (1) on the task to be accomplished by grasping, (2) on the shape of the object to be grasped, or (3) on the type of hand-contact in grasping
Taxonomies of type (1) consider primarily: (a) power and intensity of the grasp task
[6], (b) trajectory in the grasp task [7], and (c) configurations in specific grasp tasks [8][9][10]. Taxonomies of type (2) have been considered, e.g., by animators, to simplify the description and production of hand animation [11]. The objects considered were: thin cylinder, fat cylinder, small sphere, large sphere and a block. Taxonomies of type (3) were considered within the context of opposing forces by [12]. A tradeoff between flexibility and stability is negotiated by the pad opposition between the pad of the thumb, fingers, palm, and side. In [13][14] the concept of contact web was introduced. Contact web is a 3D graphical representation of the effective contact between the hand and the held object.
The classification presented here takes into account the three main classification types
described above but it is based primarily on shape of the object and type of hand contact, because of the kind of application considered, i.e., 3D animation. In our case (animation) the grasping task must be kept as general as possible; thus, the specific task should not be determining in specifying the grasp description. But, since our grasp description is mainly for animation while being applicable to robotic in imitation learning, we take into account
INFORMATION ISSN 1343-4500 Volume 8, Number 1, pp. 89-110 ©2005 International Information Institute
the robotic task description [9] in reducing the grasp types considered. Therefore our taxonomy should be compared primarily with the classifications for animation and robotics [11].
We note that our classification does not need to be complete since it is adjustable
after pre-grasping is performed. Actually, this classification should be considered primarily a 'pre-grasp' taxonomy. We reduce the basic pre-grasp configurations to six (Figure 1). For each pre-grasp configuration we can select intermediate configurations between a fully open and a fully closed grasp configuration. The program is set for automatic selection of any of 5 intermediate configurations (and can easily be extended to a finer degree of intermediate configurations.)
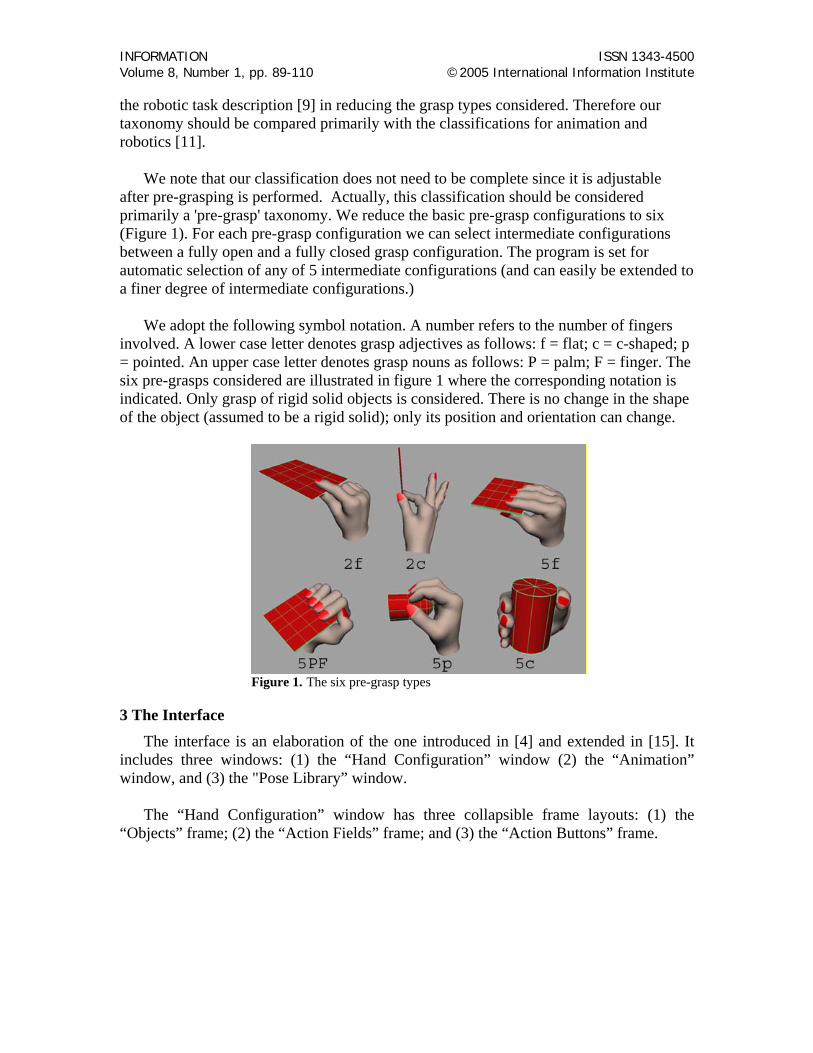
We adopt the following symbol notation. A number refers to the number of fingers
involved. A lower case letter denotes grasp adjectives as follows: f = flat; c = c-shaped; p = pointed. An upper case letter denotes grasp nouns as follows: P = palm; F = finger. The six pre-grasps considered are illustrated in figure 1 where the corresponding notation is indicated. Only grasp of rigid solid objects is considered. There is no change in the shape of the object (assumed to be a rigid solid); only its position and orientation can change.
Figure 1. The six pre-grasp types
3 The Interface
The interface is an elaboration of the one introduced in [4] and extended in [15]. It includes three windows: (1) the “Hand Configuration” window (2) the “Animation” window, and (3) the "Pose Library” window.
The “Hand Configuration” window has three collapsible frame layouts: (1) the
“Objects” frame; (2) the “Action Fields” frame; and (3) the “Action Buttons” frame.

INFORMATION ISSN 1343-4500 Volume 8, Number 1, pp. 89-110 ©2005 International Information Institute
Figure 2a. The “Hand Configuration” window
Figure 2b Detail of the Open menu
Figure 2c Detail of the Reset menu
The Open menu above the three frames opens the other two windows, and the Reset
menu returns the hand in its neutral position at the origin ("Neutral at Origin") or at the current translation/orientation point ("Neutral"). In the latter case only the rotations of the finger joints are reset to neutral. The neutral position of the hand is shown in Figure 4 in the top left frame. The upper frame is used to select the objects on which KUI actions are performed. In some applications the objects maybe the right hand, left hand, or face [16] In this case the KUI input can be applied to the right hand or to objects to be manipulated. For the object, only translation and rotation of solid objects are relevant-- thus only the keys uvwxyz (which control, respectively, translation xyz and rotation xyz) are used; the other keys control the rotation of the hand joints.
The middle frame (Action Fields) has an upper field in which hand-configuration
code can be typed in any form, raw or compacted, sorted; it also echoes the hotkeys used to configure the hand; the lower field of the middle frame contains an ordered, compact form of the hand-configuration code, in which letters are sorted alphabetically and each letter is followed by a number indicating the number of repetitions of that letter keystroke. Upper and lower case letters correspond to rotations or translations in opposite directions.
The "Action Buttons" frame contains six buttons. In the following, we refer to Figure
2a. The "compact/add code" button compacts the code from the upper field and writes it in the lower field. If code is present in the upper and lower fields the two are added

INFORMATION ISSN 1343-4500 Volume 8, Number 1, pp. 89-110 ©2005 International Information Institute
together. (Adding codes is useful in combining animation steps). The "Invert code" button inverts the code written in the lower field. (useful in retracing animation steps). The "Execute Code" button executes the compacted code in the lower field (the hand or the manipulated object, whichever has been selected in the "Objects" frame, reconfigures itself according to the code in the "compacted code" field; the reconfiguration is relative to the current position/orientation. The "ExecCode from 0" button, which applies only to the hand (not the manipulated objects) also executes the compacted code in the "compacted code" field; but the reconfiguration is relative to the neutral position at the origin. The "GRASP" and "RELEASE" buttons operate on the manipulated object identified in the text field between the button (In Figure 2a the object, as an example, is the object identified as "zipdisk"). The GRASP action results in the object being attached to the hand so that it will follow any rotation and/or translation of the hand. The RELEASE button terminates the attachment of the object to the hand.
The “Animation” window (see Figure 3a) opens from the “Animation” submenu of
the “Hand Configuration” window, menu "Open" (Figure 2b). The window consists of “File” and "Animation" menus, four buttons and an arbitrary number of text fields followed by a checkbox.
Figure 3a. The “Animation” window
Figure 3b Detail of the File menu
Figure 3c Detail of the Animation menu

INFORMATION ISSN 1343-4500 Volume 8, Number 1, pp. 89-110 ©2005 International Information Institute
The "File" menu item (“Save bookmarks”, Fig. 3b) saves all the hand codes written in
all the fields of the window to a text file set up at program start-up and retrievable by browsing. The “Load bookmarks" menu item reads hand codes written in a text file sequentially separated by blank spaces and loads them, one per text field, in the window “Animation”.
The “File” menu is used in conjunction with the writing of animation code. The process consists in writing in each text field one hand configuration code. Generally this is done by cutting and pasting from other files or the “Hand Configuration” window, and by directly reading ("load bookmarks") a text file in which hand configuration codes have been saved ("save bookmarks") .
The "Animation" menu (Figure 3c) has six submenus. The "set keyframe" submenu sets a keyframe for the hand in the configuration specified by the hand code with a box checked. The keyframes and all the animation is cleared by the "clear hand animation" submenu. Erasing a single keyframe can be accomplished by keyframing a blank field (which creates the neutral hand configuration) or repeating the previous frame. To erase only the grasping action the submenu "clear Grasp animation" is used. The "start grasp" and "end grasp" submenus operates as the GRASP and RELEASE buttons in the hand-configuration window. They can also be implemented by the hot keys "+" and "-". The "return grasped" submenu repositions the grasped object to where it was before the hand animation started.
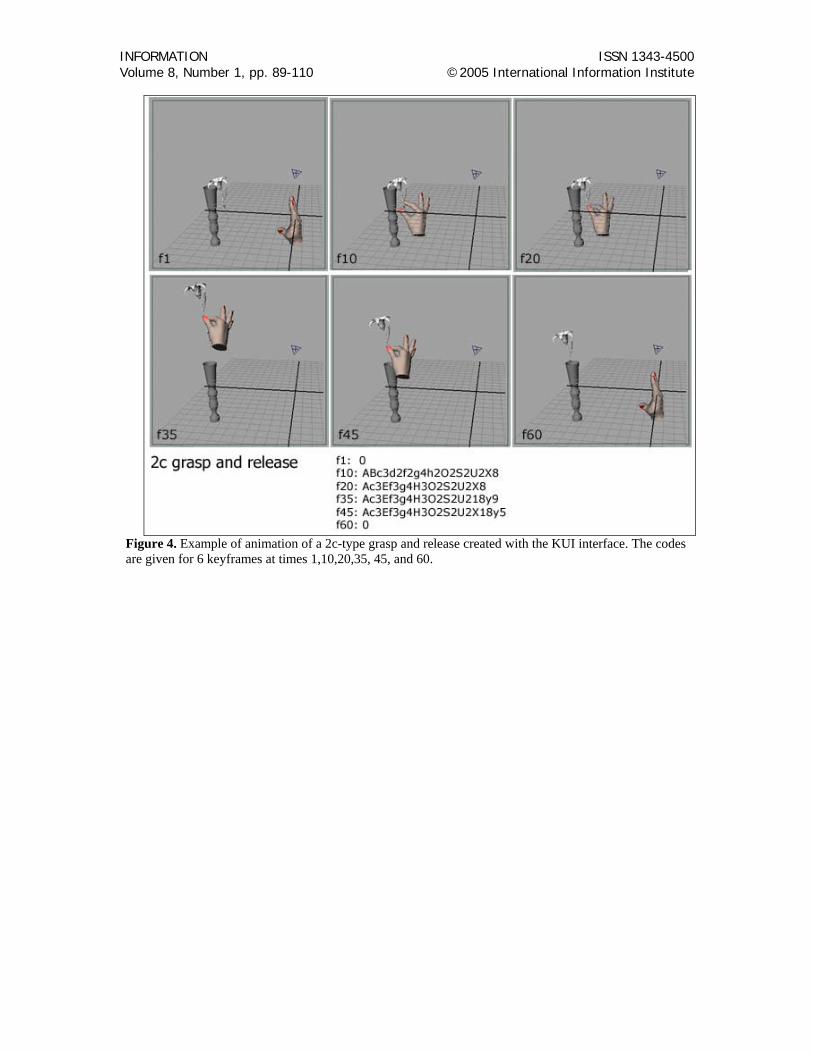
Figure 4 shows an example of grasp animation realized with the interface described in
this section. The description of what follows in the remainder of this section is helped by referring to this figure.
The "add field" button creates an additional text field and its checkbox. The "exec checked code" button executes the hand-configuration code written in the text field with its box checked. The code is executed starting from the finger (i.e., apart from translation/rotation of the wrist) neutral configuration. Hand configurations can be ‘added’ from top to bottom if their fields are checked. This is useful since ‘Adding’ two codes means that the second code is executed starting from the configuration of the first code. The "exec checked code from 0" button works as the "exec checked code" button but executes the codes from the neutral hand position at the origin. The "interpolate" button works as follows. By using the "add field" button, a number N of blank text fields are generated. Code is entered in the first field (field 1) and the last field (field N). The "interpolate" button produces N-2 codes, intermediate between the codes of field 1 and field N, which appear in the N-2 blank fields. N is also specified in the upper right box (0 in Figure 3c).
Interpolating codes, besides being useful in smoothing animation, provides a KUI
alternative to the automatic in-betweening created with the KUI interface—
INFORMATION ISSN 1343-4500 Volume 8, Number 1, pp. 89-110 ©2005 International Information Institute
Figure 4. Example of animation of a 2c-type grasp and release created with the KUI interface. The codes are given for 6 keyframes at times 1,10,20,35, 45, and 60.
INFORMATION ISSN 1343-4500 Volume 8, Number 1, pp. 89-110 ©2005 International Information Institute
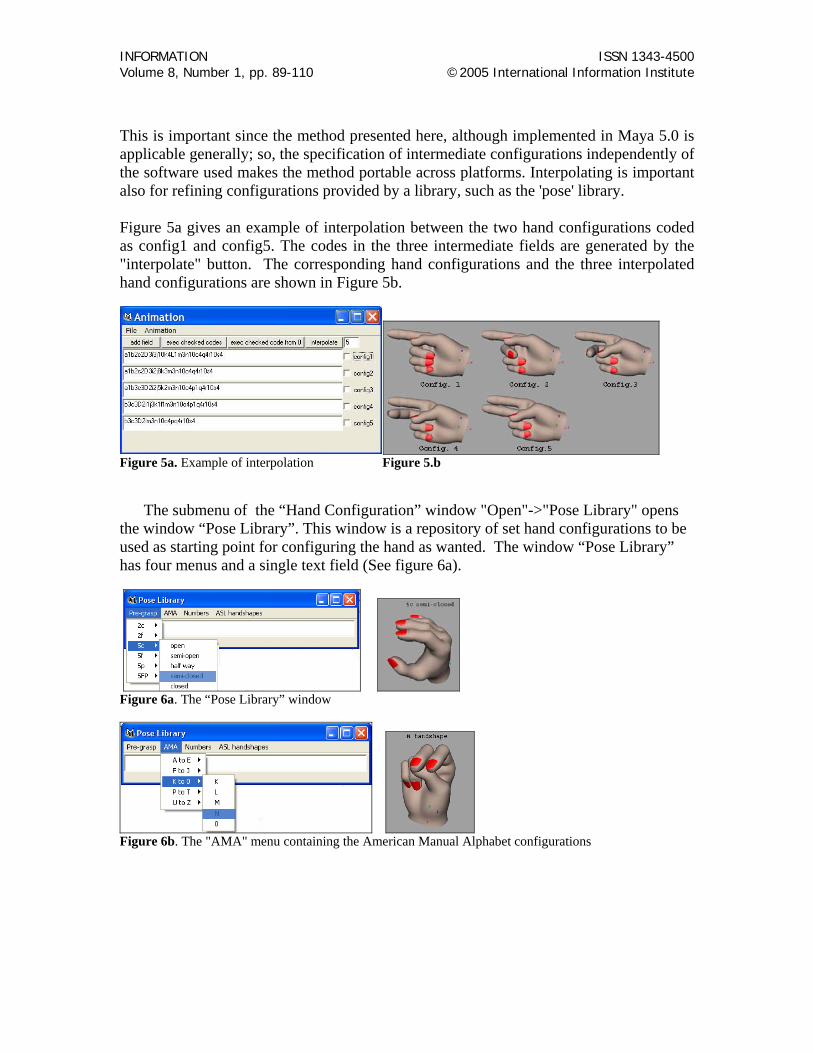
This is important since the method presented here, although implemented in Maya 5.0 is applicable generally; so, the specification of intermediate configurations independently of the software used makes the method portable across platforms. Interpolating is important also for refining configurations provided by a library, such as the 'pose' library. Figure 5a gives an example of interpolation between the two hand configurations coded as config1 and config5. The codes in the three intermediate fields are generated by the "interpolate" button. The corresponding hand configurations and the three interpolated hand configurations are shown in Figure 5b.
Figure 5a. Example of interpolation Figure 5.b
The submenu of the “Hand Configuration” window "Open"->"Pose Library" opens
the window “Pose Library”. This window is a repository of set hand configurations to be used as starting point for configuring the hand as wanted. The window “Pose Library” has four menus and a single text field (See figure 6a).
Figure 6a. The “Pose Library” window
Figure 6b. The "AMA" menu containing the American Manual Alphabet configurations

INFORMATION ISSN 1343-4500 Volume 8, Number 1, pp. 89-110 ©2005 International Information Institute
Figure 6c. The "Numbers" menu containing the ASL finger-spelled number configurations
Figure 6d. The "ASL handshapes" menu which contains eight hand configurations corresponding to the basic shapes used in ASL to complement the AMA handshapes and the finger-spelled numbers.
The text field contains the code after a pose is selected. The four menus correspond to four sub-libraries of poses. The first sub-library contains the 5 pre-grasp poses described in section 2, each in 5 different degrees of realization, as shown in the example of Figure 6a. In that case, the pre-grasp pose 5c is selected. If the submenu item "open" is selected, then the hand is configured as at the beginning of the grasp action 5c. If "close" is selected, the hand is configured as at the end of the grasp action. The three intermediate configurations correspond to linear increments from the "open" to the "close" configurations.
The sublibrary "AMA" contains the poses for the letter of the American Manual
Alphabet which is used, e.g., for finger-spelling in American Sign Language (ASL) (see figure 6b). These are also very useful and general starting points for hand configurations. Similarly, the sublibrary "Numbers" contains the poses for the 10 digits of the ASL fingerspelling. For some numbers, e.g., number 10 shown in the example of figure 6c, more than one configuration is given since the number is represented dynamically, with a movement. So several poses are given corresponding to the motion of the hand to signal the number. The same occurs for some letters of the alphabet in the AMA library, e.g., for J and Z. Finally, the sublibrary "Handshapes" contains eight poses commonly used [17] in ASL to complement letter and number configurations in the description of the ASL vocabulary (see figure 6d).
This pose library is clearly a first step toward a more comprehensive tool for hand
configuration construction but, in spite of its limitations, practically any hand configuration can be quickly obtained starting, with few refinements, from one of the pose library configurations.
In summary, the interface allows for quick realization of grasp configurations and animation. In a typical mode of use, the hand configurations are created by hotkeys and their codes are automatically recorded by the “Hand Configuration” window; the

INFORMATION ISSN 1343-4500 Volume 8, Number 1, pp. 89-110 ©2005 International Information Institute
configurations are usually created by starting from a library of poses and then slightly refined. The user then writes (by cut and paste) the codes sequentially in the “Animation” window text fields; after that, the user keyframes the configurations at chosen times to produce the desired animation. (Figure 4).
As a result of the interface described above, the time taken to realize the grasp
configurations/animations is significantly reduced with respect to the direct use of commercially available animation/modeling software. Clearly our interface 'sits on top' of some animation/modeling software (in the specific implementation, Maya 5.0) but the interface is easily ported, as described above.
A further simplification and speed increase is obtained by improving on the keyboard
input. Recently we have developed a new, more efficient input method for KUI based hand configuration. The input method uses a specialized keyboard which may be regarded as the first step toward the development of a hand shaped keyboard for accurate and efficient input/modeling of hand gestures and body postures [18]. The fundamental advantage of such keyboard lies in the location of the keys. All keyboards available on the market have a key layout designed for text input. The location of the keys is generally not optimized so that the key sites correspond to the layout of the movable joints of the object to be configured. Such optimized layout allows intuitive and natural input of hand gestures since the motion of the operator’s fingers mimics the motion of a hand guiding another hand placed under it. The prototype of the specialized keyboard, represented in figure 7, consists of an 8x8 matrix of key sites which can be occupied by alphabetically labeled keys in any order. For input of hand gestures, the position of the keys corresponds to the projection of the hand joints on the keyboard plane.
Figure 7. The prototype of the specialized keyboard
4 Example of Application
In general, while training in a subject that requires high level of dexterity, such as Periodontal Instrumentation, the student needs to: (1) learn theoretical concepts such as principles of positioning, anatomic descriptors, instrument design and components, etc; and (2) acquire the required manual skills through practice sessions in laboratory. The necessity of teaching manual skills via laboratory sessions has been, so far, one of the main obstacles to medical and technological training at distance.

INFORMATION ISSN 1343-4500 Volume 8, Number 1, pp. 89-110 ©2005 International Information Institute
The KUI technique, optimized by the hand shaped keyboard layout, provides an efficient method of teaching fine manual skills via the web. It allows for the creation of a virtual lab in which the students can practice the correct configuration, grasp and positioning of hands and instruments by manipulating realistic three dimensional models in real time. In the KUI virtual lab the manipulation of the hand and/or instrument model is achieved via keyboard input thus the student does not practice directly her own manual skills. Even if this is a limitation of the KUI virtual lab versus a real lab, the extremely realistic representation of the models, the fine level of control of hand joints rotation and instrument transformations, and the possibility of viewing the models from different points of view, enable the student to clearly understand hand configuration and instrument positioning and thus practice them correctly. This method, although not a complete manual practice, is far superior to watching videos passively or choosing among a fixed set of multiple choice alternatives.
As an illustrative example, we have applied the method to learning the fundamentals of periodontal instrumentation such as: grasp and wrist position (figures 8-11) and fulcrum (figure 12) [19] [20].
Successful instrumentation technique depends to a great degree on the precise placement of each finger of the dominant hand in the correct grasp configuration. With correct placement of the fingers the clinician is able to feel the vibrations transmitted from the working end of the instrument through the instrument shank and thus detect tooth irregularities. Proper wrist position during instrumentation is another important component in avoiding muscle discomfort and musculoskeletal injuries. Equally important is the stabilization of the clinician’s hand through the fulcrum. The fulcrum, usually represented by the ring finger, allows the clinician to control the movement of the instrument working end and therefore make precise instrumentation strokes against the tooth surface. Different stroke directions (vertical, horizontal and oblique) enable the clinician to reach different areas of the dentition and different surfaces of the tooth.
Figures 8-11 show examples of application of the KUI grasp and release method to learning instrument grasp and positioning in relation to different areas of the dentition. All figures present a consistent layout: the frame on the left contains different views of the hand/instrument grasp configuration, the middle-right frame contains keyframes showing progressive stages of the grasping action and instrument positioning.
Figure 8 illustrates the grasp and instrument handle placement for the Maxillary Anteriors area. To reach the final hand/instrument grasp configuration a student has used the 2f semi-closed pre-grasp type and refined the configuration of the fingers and hand orientation using KUI. The hand grasps the instrument at frame 20 and carries it to the maxillary anteriors area at frame 50. The animation data are represented by the five text codes (one per keyframe) shown in table 1. In all the examples below the finger joint rotations are quantized in steps of 10 degrees, the wrist rotations are quantized in steps of 20 degrees and the wrist translations in steps of 0.5 cm The instrument rotations are quantized in steps of 10 degrees and the instrument translations are quantized in 0.1 cm.

INFORMATION ISSN 1343-4500 Volume 8, Number 1, pp. 89-110 ©2005 International Information Institute
Figure 8
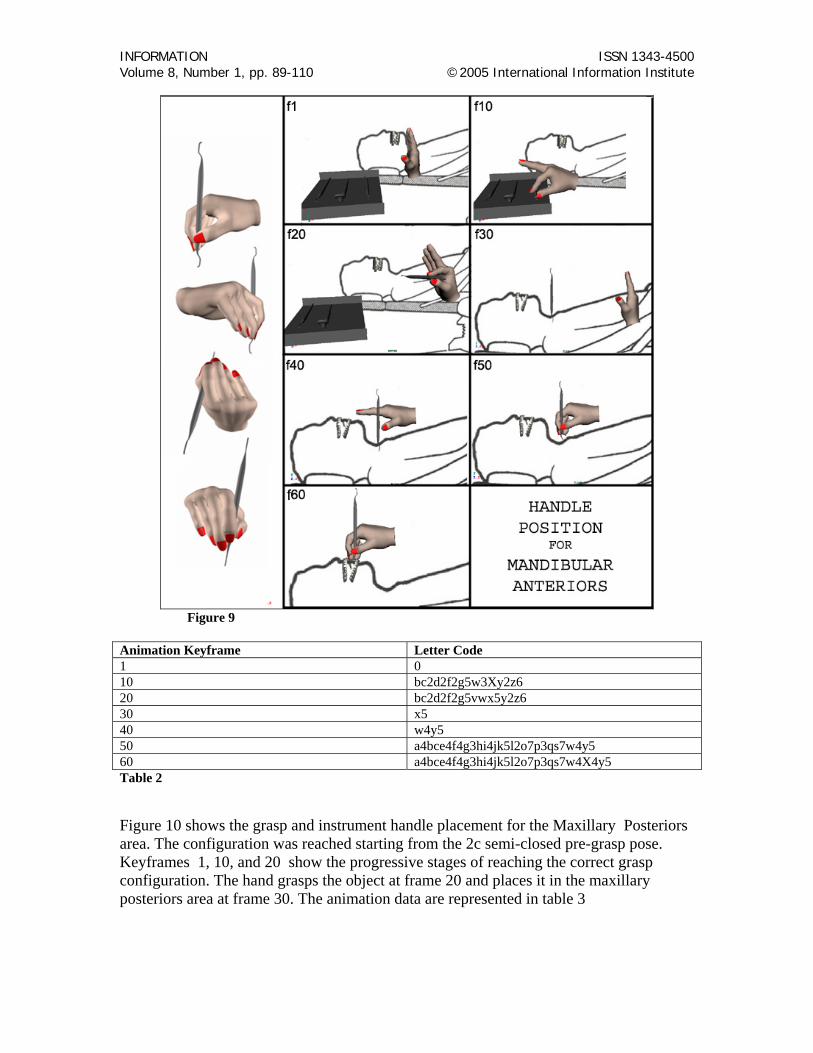
Table 1 Figure 9 shows the grasp and instrument handle placement for the Mandibular Anteriors area. The configuration was reached starting from the 5c semi-closed pre-grasp pose. Keyframes 1, 10, and 20 show the action of grasping the instrument from the instrument tray; keyframes 30, 40, and 50 show the progressive stages of reaching the correct grasp configuration. The hand grasps the object at frame 50 and places it in the mandibular anteriors area at frame 60. The animation data are represented in table 2.
Animation Keyframe Letter Code F1 0 F10 Bc3e2f6g2hi4k5l2M2o4p4Qs4t4 F20-30 Bc3e2f6g2hi4k5l2M2o4p4Qs4t4y3Z3 F40 Bc3e2f6g2hi4k5l2M2no6p5Qr2s6t4wx2y3Z3 F50 Bc3e2f6g2hi4k5l2M2no6p5Qr2s6t4wXy3Z3
INFORMATION ISSN 1343-4500 Volume 8, Number 1, pp. 89-110 ©2005 International Information Institute
Figure 9
Animation Keyframe Letter Code 1 0 10 bc2d2f2g5w3Xy2z6 20 bc2d2f2g5vwx5y2z6 30 x5 40 w4y5 50 a4bce4f4g3hi4jk5l2o7p3qs7w4y5 60 a4bce4f4g3hi4jk5l2o7p3qs7w4X4y5 Table 2 Figure 10 shows the grasp and instrument handle placement for the Maxillary Posteriors area. The configuration was reached starting from the 2c semi-closed pre-grasp pose. Keyframes 1, 10, and 20 show the progressive stages of reaching the correct grasp configuration. The hand grasps the object at frame 20 and places it in the maxillary posteriors area at frame 30. The animation data are represented in table 3

INFORMATION ISSN 1343-4500 Volume 8, Number 1, pp. 89-110 ©2005 International Information Institute
Figure 10
Animation Keyframe Letter Code 1 x10 10 x5y2 20 a5cf9gh3I3j7k3l5o2p6s3t5x5y2 30 a5cf9gh3I3j7k3l5o2p6s3t5xy Table 3 Figure 11 illustrates the grasp and instrument handle placement for the Mandibular Posteriors area. The configuration was reached starting from the 5c semi-closed pre-grasp pose. Keyframes 1, 10, and 20 show the progressive stages of reaching the correct grasp configuration. The hand grasps the object at frame 20 and places it in the mandibular posteriors area at frame 30. The animation data are represented in table 4.

INFORMATION ISSN 1343-4500 Volume 8, Number 1, pp. 89-110 ©2005 International Information Institute
Figure 11
Animation Keyframe Letter Code 1 0 10 w3x10y6Z 20 a4cf8gh4i3j4k3l6n4o4p6r3s5t5w3x10y6Z 30 a4cf8gh4i3j4k3l6n4o4p6r3s5t5w3x4y6Z Table 4 Figure 12 shows the instrument grasp and instrument stabilization using an intraoral fulcrum. The letter code corresponding to the hand /instrument configuration is displayed at the bottom of the figure.
Figure 12

INFORMATION ISSN 1343-4500 Volume 8, Number 1, pp. 89-110 ©2005 International Information Institute
Tables 1 through 4 show that the animation data can be stored in text files of minimum size therefore students, not only can practice instrument grasp in real time, but can also produce and save grasp configuration and animation sequences for later retrieval and study via web. In addition, for a distance learning course, an instructor can prepare a large number of grasp action sequences which can be quickly downloaded and viewed by the students within the web browser. 5 Conclusions and future work
In this paper we have extended the recently developed KUI method to include the basic manual operations of grasp and release. We have designed a new pre-grasp classification based on shape of the object to be grasped and type of hand contact. The new pre-grasp taxonomy, which is particularly suitable for 3D animation applications, reduces the pre-grasp types to six. For each pre-grasp configuration it is possible to select intermediate hand configurations between a fully open and fully closed grasp type and further refine the grasp pose via KUI.
Using MEL (Maya Encrypted Language) we have modified the previously introduced HCI to include the new pre-grasp poses and the tasks of grasp and release. The new Interface presents three main additions: (1) the “Pose Library” window which allows the user to quickly access four groups of hand configurations including the pre-grasp poses with relative intermediate configurations. (2) The GRASP and RELEASE buttons and menu items which operate on the object to be grasped (the GRASP action causes the grasped object to become a child of the hand and therefore follow the hand’s transformations in space; the RELEASE action terminates the parent- child relationship between hand and object). (3) The “Interpolate” button in the Animation window which returns intermediate N-2 codes between the codes of field 1 and field N and provides an interpolation alternative to the automatic in-betweening created with the KUI interface.
In addition, the KUI technique has been improved by the development of a specialized keyboard whose key layout has been optimized for input of hand gestures.
So far the method has been developed and tested within Alias Maya software. Future work includes: (1) the portability of the method to the web (possibly via Shockwave 3D and Macromedia Director MX), (2) the development of a web-accessible Interface, and (3) the application to other professional fields, such as surgery. In addition, to evaluate its efficiency, the method will be tested with a group of college students enrolled in the dentistry program.
The KUI technique, enhanced by the grasp and release actions and the specialized
keyboard, is suitable for teaching manual skills via the web. As an illustrative example we have applied the method to teaching the four basic grasp configurations used in periodontal instrumentation. Although the method does not provide the students with a direct hands-on training, it allows for the creation of a virtual laboratory in which students can efficiently practice fine manual skills by manipulating realistic 3D models of
INFORMATION ISSN 1343-4500 Volume 8, Number 1, pp. 89-110 ©2005 International Information Institute
hands and instruments in real time. The KUI web-deliverable virtual lab provides a solution to the problem of teaching manual skills at distance and it could be applied to a variety of distance learning training courses in professions that require high dexterity. References [1] Adamo-Villani, N. & Beni , G. (2004). Automated Fingerspelling by Highly Realistic 3D Animation. British Journal of Educational Technology, 35 (3), pp. 345-362 [2] Adamo-Villani, N. & Beni, G. (2003). Keyboard Encoding of Hand Gestures. Proceedings of HCI International – 10th International Conference on Human-Computer Interaction, Crete, vol. 2, pp.571-575. [3] Adamo-Villani, N. & Beni, G. (2003). Design and benchmarking of Human-Computer Interface for keyboard encoding of hand gestures. Proceedings of IEEE First International Workshop on Interactive Rich Media Content Production: Architectures, Technologies, Applications, Tools, Lausanne, Switzerland, pp. 149-159. [4] Adamo-Villani, N. & Beni , G. (2004). A new method of hand gesture configuration and animation. Journal of INFORMATION, 7 (3). [5] Adamo-Villani, N. & Beni, G. (2004). Keyboard Encoding of Facial Expressions. IEEE Proceedings of IV04 – 8th International Conference on Information Visualization-HCI Symposium, London. [6] Napier, J. (1956) "The prehensile movements of the human hand," Journal of Bone and Joint Surgery, Vol. 38B, No. 4, pp. 902-913 [7] Pressing, J. (1991). “Synthesizer performance and real-time techniques”. Madison, WI, USA: A-R editions [8] Cutkosky, M.R. and P.K. Wright (1986) "Modeling manufacturing grips and correlations with the design of robotic hands," Proc. IEEE Int'l Conf. on Robotics and Automation, pp. 1533-1539. [9] Kamakura, N. Te no ugoki. (1989). “Te no ugoki. Te no katachi” (Japanese). Ishiyaku Publishers, Inc. Tokyo, Japan [10] Sonoda, H., Bernardin, K., Ogawara, K., Kimura, H., Ikeuchi, K. (2003) “Robotic Recognition and Generation of Everyday Grasps” (in Japanese) CVIM-137 (Computer Vision Image Media) pp.61-68 [11] Sanso, R. M. and D. Thalmann (1994). “A Hand Control and Automatic Grasping System for Synthetic Actors”, Proceedings of Eurographics '94, pp.167-178 [12] Iberall, T. (1987). "The nature of human prehension: three dextrous hands in one," Proc. IEEE Int'l Conf. of Robotics and Automation, pp. 396-401
INFORMATION ISSN 1343-4500 Volume 8, Number 1, pp. 89-110 ©2005 International Information Institute
[13] Kang, S.B. and K. Ikeuchi (1993). "A grasp abstraction hierarchy for recognition of grasping tasks from observation," IEEE/RSJ Int'l Conf. on Intelligent Robots and Systems, Yokohama, Japan [14] Kang, S.B. and Ikeuchi, K. (1992) "Grasp recognition using the contact web," IEEE/RSJ Int'l Conf. on Intelligent Robots and Systems, Raleigh, NC [15] Adamo-Villani, N. & Beni, G. (2004). Grasp and Release using Keyboard User Interface. Proceedings of IMG04 – International Conference on Intelligent Manipulation and Grasping, Genova, Italy [16] Adamo-Villani, N. and Beni, G. (2004). "Keyboard-controlled signing semantroid". ICARCV-8th International Conference on Control, Automation, Robotics and Vision, Kumming, China (submitted) [17] Costello, E. (2003) “Getting started with signing”. Living Language [18] Adamo-Villani, N. & Beni, G. (2005) “Reconfigurable keyboard for input of hand gestures”. HCI International-11th International Conference on Human-Computer Interaction, Las Vegas. (to be submitted) [19] Nield-Gehrig, J.S. (2000) “Fundamentals of Periodontal Instrumentation”. Lippincott Williams & Wilkins Publishers [20] UCLA School of Dentistry – Periodontal Instrumentation. Available at: (http://www.dent.ucla.edu/sod/courses/DS442s/)
1 NICOLETTA ADAMO -VILLANI
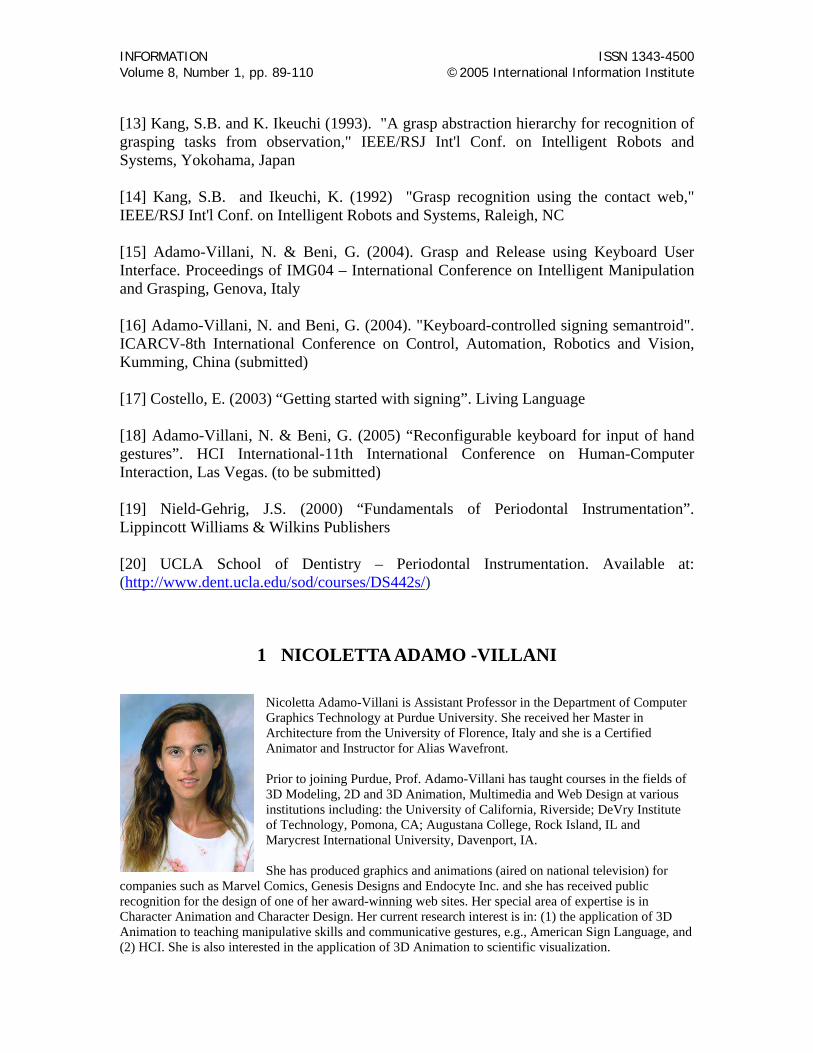
Nicoletta Adamo-Villani is Assistant Professor in the Department of Computer Graphics Technology at Purdue University. She received her Master in Architecture from the University of Florence, Italy and she is a Certified Animator and Instructor for Alias Wavefront. Prior to joining Purdue, Prof. Adamo-Villani has taught courses in the fields of 3D Modeling, 2D and 3D Animation, Multimedia and Web Design at various institutions including: the University of California, Riverside; DeVry Institute of Technology, Pomona, CA; Augustana College, Rock Island, IL and Marycrest International University, Davenport, IA. She has produced graphics and animations (aired on national television) for
companies such as Marvel Comics, Genesis Designs and Endocyte Inc. and she has received public recognition for the design of one of her award-winning web sites. Her special area of expertise is in Character Animation and Character Design. Her current research interest is in: (1) the application of 3D Animation to teaching manipulative skills and communicative gestures, e.g., American Sign Language, and (2) HCI. She is also interested in the application of 3D Animation to scientific visualization.
INFORMATION ISSN 1343-4500 Volume 8, Number 1, pp. 89-110 ©2005 International Information Institute
Nicoletta Adamo-Villani Department of Computer Graphics Technology Purdue University Knoy Hall of Technology 401 N. Grant St. West Lafayette, IN 47907-2021 Tel: 765-496-1297 Fax: 765-494-9267 E-mail: [email protected]
2 GERARDO BENI
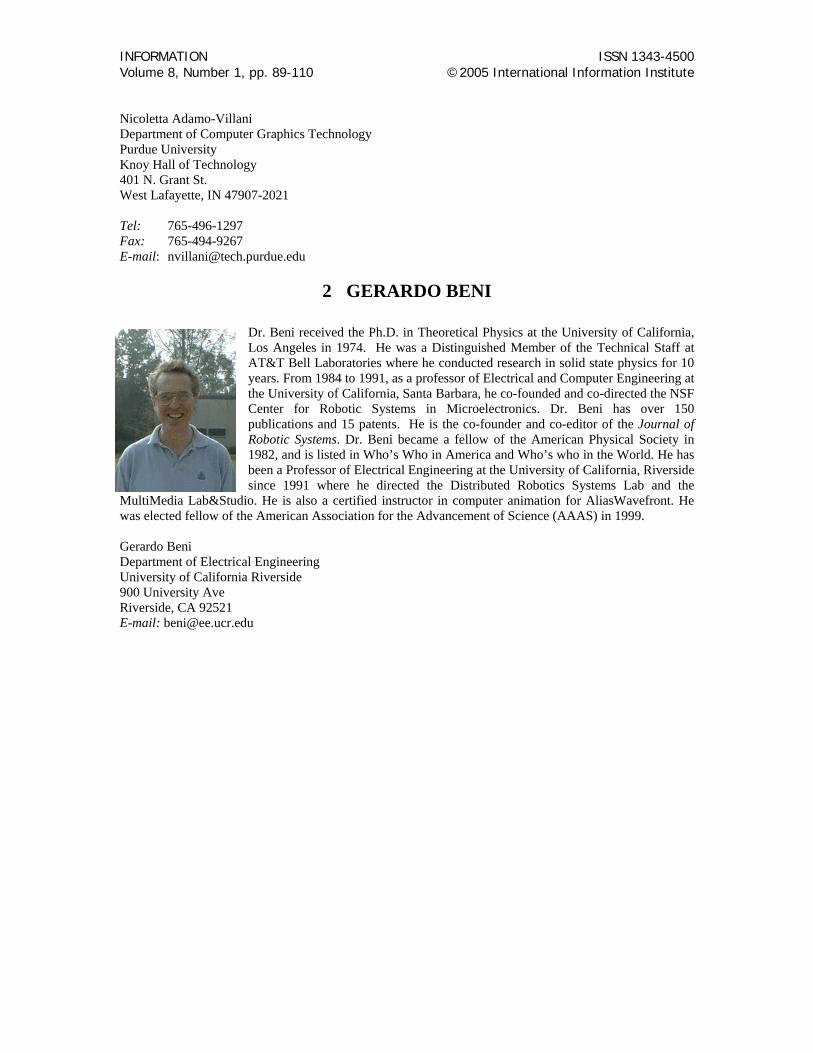
Dr. Beni received the Ph.D. in Theoretical Physics at the University of California, Los Angeles in 1974. He was a Distinguished Member of the Technical Staff at AT&T Bell Laboratories where he conducted research in solid state physics for 10 years. From 1984 to 1991, as a professor of Electrical and Computer Engineering at the University of California, Santa Barbara, he co-founded and co-directed the NSF Center for Robotic Systems in Microelectronics. Dr. Beni has over 150 publications and 15 patents. He is the co-founder and co-editor of the Journal of Robotic Systems. Dr. Beni became a fellow of the American Physical Society in 1982, and is listed in Who’s Who in America and Who’s who in the World. He has been a Professor of Electrical Engineering at the University of California, Riverside since 1991 where he directed the Distributed Robotics Systems Lab and the
MultiMedia Lab&Studio. He is also a certified instructor in computer animation for AliasWavefront. He was elected fellow of the American Association for the Advancement of Science (AAAS) in 1999. Gerardo Beni Department of Electrical Engineering University of California Riverside 900 University Ave Riverside, CA 92521 E-mail: [email protected]