Embed Size (px)
Citation preview

An Ebook Series By Coach Patrick Anderson
This Ebook Series Contains:
1. Basketball Team Offense 2. Basketball Zone Defense 3. Basketball Full Court Pressure 4. Basketball Inbounds Plays

��������������� ������������
© 2006 All Rights Reserved
Introduction Coaching basketball is one of the most challenging but rewarding of the team sports to instruct. With so many different variables and player combinations, you, as the coach need to be able to react quickly to what is going on, and to prepare your players for what lies ahead. Some of the basic basketball fundamentals are taught to players when they are in grade school. Dribbling, shooting, passing, etc., and now it is your responsibility to take those skills and hone them into a powerful unit. To do that you need a few extra weapons to help you along the way. That’s why I have put together this book. Inside you will find a guide to four different areas of basketball:
• Team offenses • Zone defenses • Full Court Pressure • Inbounds Plays
These are areas that every coach can use to make their team better. Once your team has mastered each of these different plays or formations, you can adjust them to better suit your needs, and create variations of your own. To help you with the instruction of these plays and formations, I have included basic diagrams to show you where your players will be, and then where they should go. Following is a brief legend to help you decipher the diagram:
• 1 – point guard • 2 – shooting guard • 3 – small forward • 4 – power forward • 5 – center
- Cut or move to this area
- Pass
- Screen
- Dribble
Best of luck to you in your coaching endeavors, and I hope this book provides you with valuable information on coaching basketball.

��������������� ������������
© 2006 All Rights Reserved

��������������� ������������
© 2006 All Rights Reserved
PPuuttttiinngg tthhee bbaallll iinnttoo ppllaayy The object of basketball, is to score as many points as possible, while preventing your opponent from doing the same to you. In this section, we are going to look at some of the offenses you can run with your basketball team, in order to complete one element of the game – scoring points! I am going to show you a few of the more popular offenses that are run in basketball today, along with a couple of the variations and the different options you have with each offense. The thing to keep in mind as a coach is that you will be changing and adapting these offenses when you see what a defense is doing during a game. Most of these offenses can accommodate adjustments to do just that. The offenses that we are going to take a look at are:
• Motion offense • Flex offense • Perimeter offense • Stack offense • Kentucky Pattern offense
Each of these offenses can be used as a standalone offense, or you can teach them all to your team for different situations during a game. None of them are that difficult to learn the basics, so you should have no problem getting the players on board. Keys to a good offense:
• Make sure the players know their assignments – practicing their movements in slow motion so they understand their responsibilities will usually do the trick.
• Quick passes
• Only dribble if you have to. The triple threat position is just that – a threat
– because a player can shoot, pass, or dribble from that position. If a player has lost their dribble, they could get into trouble. Coach this with your players. Dribbling during the offensive set is a last resort in most offenses.
• Use ball fakes to move the defense around. This is key to creating
passing lanes for your players to get the ball to their teammates.

��������������� ������������
© 2006 All Rights Reserved
MMoottiioonn OOffffeennssee –– BBaassiicc The motion offense is a generic term for any offense that uses court movement, cuts to the ball or the basket, and good screen setting. The one thing that separates the Motion offense from others is that it is quite flexible – you don’t have to have set plays every time you bring the ball down the court. Instead, the Motion Offense is focused on teaching players to use a basic set of rules for their movements, and then to react to what is being done defensively on the court. With the variation in defense, the motion offense has a variety of looks and several different options available. We’ll take a look at the basic 3 out – 2 in offense. The other variations of this offense are:
• The 4 out – 1 in • The 5 out • The 1-3-1 • The 1-4
… and in each of those there are variations. 3 out – 2 in This is a basic motion offense that you could see at any high school or even college level game. It will most often utilize one strong, ball handling point guard, 2 wingers (on the perimeter) and 2 post players. In the motion offense, you usually play to your skills and design your motion offense plays based on those strengths. It can be run against a zone defense, or a man-to-man. Here are a few basic rules of thumb for the motion offense:
• The point guard always bring the ball up because the offense is set off their direction. The point guard is always the last line of defense against the fast break and does not rebound (unless he or she drives the lane).
• The perimeter forward need to be versatile players that can either drive
the lane, set screens and be quick enough to find the open areas of the court. They also need to be ball-smart so they can read what a defender is doing and react according to the basic concepts of the motion offense.
• The post players need to be agile enough to set screens and cut to the
hoop off of a pick and roll, and tough enough to grind it out on the boards against some of the toughest man-to-man and zone defenses.

��������������� ������������
© 2006 All Rights Reserved
• This is more of a concept offense than a ‘set play’ offense. Once the players know how to read and react to an opposing defense, then a coach can design set plays based on the defensive alignment of his opposition.
• The key to this offense being successful is balance and spacing. Too
much crowding keeps the shooting lanes and driving lanes closed. Passes are easily intercepted and screens are ineffective.
Basic 3 out – 2 in alignment
These are the options that the players in the motion offense have. Dribbling is usually not an option unless a player is in trouble (because of a double team or trap), to open a passing or driving lane, or if they are in danger of having a 5 second violation. Otherwise, it is pass, screen, drive or cut to the hole. The 1 man (point guard) brings the ball up the court and has one of four options:
• Drive to the hoop • Pass to the 2 or 3 man • Pass to the post • Wait for a screen and run the offense from the corner of the perimeter
1
2 3
4 5

��������������� ������������
© 2006 All Rights Reserved
So, looking at the graphic on the previous page you will see that with the basic 3 out – 2 in motion offense you have plenty of options:
• The 1 man can pass to the 2 or 3 man on the outside, or as they are cutting to the hoop; either over the top of their defender, or back door. If the point guard passes it wide to the 2 or 3 man, he or she can cut through the key for a return pass.
• The 1 man can pass to the high post coming to the top of the key, or use the high post as a decoy to hit the back door wing route. If the guard hits the post with a pass, the wing can still cut back door and get a pass from the high post.
• The point guard can drive to the hoop on a screen from the wing, or use the screen to run the offense from the wing.
• The one post player can set a screen and the other can go back door or over the top (based on the defense) to get a pass from the point guard.
This is just the first step of the offense – done from the point guard position. Even though the graphic shows only one side, you can mirror the image and run the same offense on the other side. Also, with each pass around the perimeter you can set the offense from that point. The great thing about this offense is that it can be adapted to whatever defense is being run against you. Also, it is open to many different options at the coaches’ and players’ discretion. Keys to the Motion offense
• Don’t dribble unless you have to. It is a passing and moving offense. Each pass should be followed by a triple threat position.
• Your players need to learn to read and recognize where there are openings in a defense – and then exploit them. Once they understand the different options they have this offense can be quite successful.
• A good ball control and passing point guard is essential – they set the offense and make the first pass.
The motion offense is just that – full of motion. With each pass that is made, the players react to where the ball is going, and look for an opening to make a play. Once the wing gets the ball, they can pass to the post; when the post gets the ball it can pass to the back door cutting winger, etc. Motion offense is the first basic team offense you can look at.

��������������� ������������
© 2006 All Rights Reserved
BBaassiicc FFlleexx OOffffeennssee The Flex Offense is probably one of the most popular offensive sets used in basketball today. Similar to the Motion offense, the Flex offense uses a lot of movement by the players and screens to create open holes for lanes to the basket. What separates it from the Motion offense in many respects is that a coach will design set plays, or use one of the standard flex sets to run this offense. This is a man-to-man offense that has a basic 2 – 3 set up, with one side slightly unbalanced with the post on that side. The flex offense also has a few different variations:
• The Gonzaga Flex • The Flex stack • The Kentucky Flex • The flex-motion
But, these are simply variations of the same basic offensive idea. The 2 – 3 Flex Offense As mentioned earlier, this is similar to the motion offense – especially in the movement and the number of picks that are set. A few rules to remember will help your players figure out the flex offense. Everyone has a responsibility to remember these rules in order for this offense to work:
• Once you set a pick, you will receive a pick set for you. • When you get a pick, you will either set a pick or get a pass
• Once you pass, you will then go to set a pick
• If you catch a pass, you will then either shoot or make a pass (if pass, then
you will see rule #3). Further, in order to make this offense successful, you must teach your players the following:
• Set good, strong screens • Make crisp passes – and on time for the cuts • Be quick to make the move off a pick, but be patient enough to wait until
the screen is set.

��������������� ������������
© 2006 All Rights Reserved
These are important to making this offense work. The 2 – 3 Flex Offense – Basic alignment The following graphic shows the basic flex offense, however, there are several variations of it that a coach can employ.
The basics of the flex offense tell you that when you make a pass then you go to set a screen. So the 1 man makes a pass to the 2 man, and then goes to set a screen for the 5 man. Also, one of the rules says that once someone sets a screen for you, you must receive a pass or set a pick for someone else. As the 1 man cuts across the key, and the 5 man sets a screen for that player, they might receive a pass, or then the set a screen for the 3 man. So, after the first pass (which sets the offense in motion), a series of screens takes place. With each screen comes the potential for a pass, and then another screen. That is how the offense works. From the 2 man’s position, there are several options as the offense goes through its evolution:
1 2
3 5
4

��������������� ������������
© 2006 All Rights Reserved
• After the first pass from the 1 man to the 2 man, a return pass can be made to the 1 man, but a screen will usually be set for the 5 man. Simultaneously, the 3 man will be utilizing a screen from the 5 man. The 2 man can make this pass immediately if open.
• After the first stage, the 5 man gets a screen from the 1 man, and then cuts to the top of the key, or goes back door to receive a pass. If they don’t receive a pass, then come to the perimeter to reset the offense to the other side.
• The 2 man can also then decide to make a pass to the right-winger, after the screen from the left-winger coming across (after the screen from the post.).
• The right guard should not have dribbled to this point, waiting for the right opportunity to make a pass as the screens work out.
After the first few screens illustrated in the first diagram, you should end up with a configuration similar to the first one. If there is no pass made after one of the screens and no basket attempted, then the flex offense simply starts again.
So, what you will notice is that after the first few screens, the formation is very similar to the initial one – except that the winger is now the post on the right side of the key. The next step is the same as in the first part of the offense. The right guard (yellow) makes the pass to the post player, now on the perimeter. Then the left guard sets a pick for the winger down on the post. The winger on the post sets a screen for the winger on the right perimeter as they cut across the key.
5 2
1
4
3

��������������� ������������
© 2006 All Rights Reserved
After this second diagram, you should understand the basics of the flex offense. It ends up the same after each run through – if there is no pass or shot opportunity. The key to this offense is setting good screens, and making good cuts. And when the opportunity arises to make a pass that results in a clean shot! PPeerriimmeetteerr ““HHoorrsseesshhooee”” OOffffeennssee –– BBaassiicc The perimeter offense is a very basic, but often used offense. As the name states, it is an offense based around the perimeter of the offensive court – primarily run around the 3-point area. This offense can be used as the primary offense for a team, but doesn’t have very many options available to it, unless a coach designs new plays for a basic offense. However, it is a very valuable offense for specific situations in a game:
• Against a good zone defense • If you need a late game perimeter three pointer • If you are trying to kill the clock at the end of a game • As a change of pace
If you are running the perimeter offense, generally you should have your best shooters / passers on the floor. Depending on the game situation you are playing for, you will need a combination of players.
• If you are running a perimeter offense because you are playing a strong zone defense, I would suggest your quickest players on the floor. This is because one of the reasons you are running the perimeter offense against a zone defense is to make quick passes to open up shooting lanes or driving lanes. So, the players need to be quick to make passes and quick to hit the holes for shooting or driving.
• If you are running the perimeter offense because you need a late game
three-pointer, then you obviously need your best shooters on the floor.
• Trying to run the clock out at the end of the game requires your best passers and dribblers. There is a good chance your players will get fouled or they will be facing pressure defence, and they may need to dribble out of the trouble.
• If you are running the perimeter offense as a good change of pace to keep
the opposing team guessing when you are going to run a man-to-man offense, and a zone defense.

��������������� ������������
© 2006 All Rights Reserved
The perimeter offense would most often be considered a valuable ‘tool’ in a coaches’ toolbox. It is a versatile offense that you will find has a few options that can give it an added dimension. If you throw a post player in to the mix, you all of a sudden have a formidable threat to score the deep field goals, or buckets in the paint. The Basic 4 – 1 perimeter offense Just as the name states, this offense is run around the perimeter of the offensive shooting area. The diagram below shows the basic alignment:
The main idea of the perimeter offense is to create holes in the zone defense. This is done by:
• Stretching the zone and creating a hole through quick passes, including swinging the ball from one side to another. When good quick passes and changes in direction are made, an undisciplined zone is stretched.
• When a player drives into the key, most zones are designed to collapse
and create a mini-trap inside the key to prevent a drive. This almost
1 2
3 4
5

��������������� ������������
© 2006 All Rights Reserved
instantly opens up a shooting lane for another player in the area of the two players collapsing the zone around the driving player.
The way you will create the holes in the zone is by passing the ball. Quick passes need to be made between players – and that player needs to be ready for a return pass as the ball is changed direction to keep the defense on its toes. The 5 man will be active because they may be able to exploit a softness in the zone and get a quick pass in the paint for a score. This offense can be difficult to run with players who don’t understand the purpose or the options that are available. Often times this offense can be run very quickly and some players aren’t so quick to catch on to the fact that a pass may be coming back to them as quickly as they sent one away. But, a group of players who are on the ball can make the perimeter offense a potent one. In the diagram on the previous page, you will notice that the passing arrows are going both ways. This signifies the fact that passes can go around the perimeter in any direction at any time. But it is important to remember this one key to the perimeter offense:
• The passing needs to go around the perimeter from player to player in consecutive order. One of the dangers of trying a cross-court pass against a zone is that you can bypass one player in the zone with the pass, but there is usually a second person in the zone able to steal the pass.
The first option for all of the players is to shoot if they have an open shooting lane. This is the primary objective of the perimeter offense. The next option in the perimeter offense is the drive. The driver has three options when they hit the lane:
• They can take it to the hoop (if they have a good clear path) • They can dish it to the post as the inside zone players will collapse on the
player driving to the hoop. • One the drive begins and the zone defenders collapse on a mini-trap, the
driver can swing the ball back out to the open man on the perimeter for a shot in the open shooting lane.
The final option would be to stretch the offense with quick passes, to give the post player a soft area to receive a pass and make a quick post move in that spot. This is effective after you have taken a few perimeter shots in a row.

��������������� ������������
© 2006 All Rights Reserved
A coach can take the basic perimeter formation and add a few extra options to keep the zone defense in flux. If you want to add motion to the offense, you can simply rotate the players in a clockwise or counter-clockwise rotation so their position changes (while the post stays the same). Further, the post player can be utilized in several different ways if a coach chooses to design plays specifically for that position. TThhee SSttaacckk OOffffeennssee The stack offense is one of the oldest offenses that is still occasionally used in today’s game. This offense utilizes a strong ball control guard who quarterbacks the entire offensive set. The stack shouldn’t be run unless a team has a guard who has exceptional ball handling skills. This is a quick-hit offense that usually takes one or two passes, and maybe a bit of dribbling on the part of your ball handler in order to open up some of the plays. It is primarily played against a man-to-man defense. Although it takes a back seat to the flex offense nowadays, the stack does have some great advantages:
• It is tough to play man-to-man against this offense. If a team switches to zone on you during the game, it would be an opportune time to try out the perimeter defense from earlier in this book!
• Good offense for rebounding. You have four players in the key area, with
your big players usually there to get the second and third chances at the ball.
• This offense can be set up to exploit mismatches against the opposition. If
you change where a player plays their position, then this can provide problems for the defense. For example, if you move your big post player to an outside position, you can take one of the opposition’s big players out of the rebounding area.
• They say that if the players are able to execute this offense well, then it
would be impossible to not get a good shot. This is the first offense we have talked about that you should select players suited for the positions.

��������������� ������������
© 2006 All Rights Reserved
1 man – This player needs to be your best all-purpose player. He or she needs to be able to dribble, pass, make quick plays, shoot the deep ball, and also get back to play defense – quickly. 2 and 3 man – These players will be your best rebounders and inside shooters. They should be able to execute a variety of post manoeuvres, and also be strong defensive players. Boxing out on the offensive and defensive boards is essential if this offense is going to be successful. 4 and 5 man – These positions should be good outside jump shooters. The basic play structure for the stack offense provides for these players to get the ball in the 12 to 14 foot range. The Basic stack offense
Here’s how this offense works:
• The 1 man drives to the right, and the 5 man moves at a 45-degree angle out to get a pass. At the same time the 3 man seals the defender to the inside and prepares to potentially receive a pass. After the 1 man makes a pass, he or she goes down to the 4 man to set a screen.
• After this first step, the low post player that receives the first pass from the
guard has a few options:
1
3
5
2
4

��������������� ������������
© 2006 All Rights Reserved
- He or she can pass to the 3 man that has sealed off his defender. Then the player makes a post move for a shot.
- He or she can take a shot from the outside. All three of the other players down low crash the basket for a rebound.
- He or she can pass to the 4 man, who has rotated to the top of the key. This player can then square up to take a shot from the top of the key, or drive to the hoop.
• After setting the screen, the 1 man will rotate back to the perimeter
(outside the three point line) and wait to possibly reset the offense. Also, if the 4 man doesn’t receive the pass, he or she will head back down to their position to wait for the offense to reset, or to rebound the shot.
If there are no passing opportunities, the 5 man will hold the ball and return the pass to the guard sitting outside the perimeter area. The entire time it takes to run this offense should be minimal – maybe 10 to 12 seconds. The main success of this offense comes in its ability to surprise the opposition. If the ball does get back to the guard at the top of the half court, then the offense should be run the same way, just on the opposite side of the court. Here are a few more keys to the stack offense:
• The 4 and 5 man must be prepared to rebound. They will be rebounding short to medium range jumpers more often than drives and short hoops.
• Good post moves are essential to this offense. If you can get the ball to
the top post players, a good drop step or baby hook can almost guarantee two points.
• Since four players are down low on offense, they are quite susceptible to
the fast break. Players need to be acutely aware of when their team loses the rebound battle to hustle back on defense.
This is a great offense to use as a change of pace. It can be used as an offensive variation for the flex offense or the motion offense if the plays are adapted to work with those philosophies.

��������������� ������������
© 2006 All Rights Reserved
BBaassiicc KKeennttuucckkyy PPaatttteerrnn OOffffeennssee This offense is slightly more intricate than some of the others that we have talked about in this book, but still basic enough to be run by any youth or high school program. It does take a little bit more coaching of the specific tasks of each player, but it just forces the player to think a little more and to understand what is happening during a game. The Kentucky pattern can be run against both a zone and man-to-man, with only slight adjustments made between the two. Coaching is extremely important to this offense, as the player needs to understand the options they have when the plays are run. Coaches should take time to not only diagram the plays for the team, and then walk through them, but copies of the play calling system should be provided for the players. It should be clear to the players that this offense does have several set plays that can be run from it, and the more informed they are, the better they will do. Here are a few keys to the Kentucky pattern offense:
• Timing of screens and passes is crucial. • Players need to know the exact spot they need to move in order to
execute the offense effectively.
• Coaches need to instruct this offensive set one step at a time. If the preliminary options are not learned correctly, then the following options are not as effective.
• You need to have 5 smart, well-rounded players, with a good ball handling
guard to quarterback this offense. You need a player who can make quick passes and keep the offense running.
The 1 – 4 Kentucky Pattern offense Upon first glance, as you will note in the diagram on the next page, this offense does not seem like it penetrates well into the low post area. The first stages of this offense don’t go too far into the paint, but they simply set up the offense for the latter stages that work the ball down low.

��������������� ������������
© 2006 All Rights Reserved
It is key for coaches to also understand that this offense works in stages. Each stage is a takeoff of the previous stage. The top guard will carry the ball up the floor and make the initial pass, which sets up the offense. The other four players will line up on the foul line extended – as you will see in the following diagram.
Here are the first options to open this offense:
• Once the 1 man passes the ball to the outside 2 man, he cuts to the hoop. • The 5 man screens the 1 man’s defender to open the hole. • From here the 2 man can do one of three things:
- Take the three point shot - Pass to the cutting 1 man (give and go) - Drive to the hoop
If nothing is open for the 2 man, then the 5 man assumes the guard position at the top of the three-point line, and now the 1 man takes up a position down at the low post. The offense is reset, with the 2 man passing to the 5 man at the top of the three-point line.
1
2 5 4 3

��������������� ������������
© 2006 All Rights Reserved
The next step is for the 4 man to screen for the 3 man, and then take that players spot on the perimeter. The 5 man, who has occupied the 1 man’s original spot can make the quick back door pass to the 3 man, who is working off the screen.
• The next option if the back door pass doesn’t work, is for the 5 man (at the top of the three point line) to pass to the 4 man who just set the screen. Then the 5 man cuts to the hoop in anticipation of the return pass. Or, he can hit the 2 man who will be working off a screen from the 1 man, and cutting to the baseline.
• Alternately, the 5 man can take the three point shot. At this point, if the ball is passed to the 2 man the final options are realized, and then the offense will be reset.
• The 2 man can turn and shoot or make a post play. Can kick the ball out to the 1 man on the perimeter, or the 3 man and set a double screen for the 1 man to get back to the top of the key, where if yellow gets the pass he or she can shoot, or reset the offense.
1
2
5
4 3

��������������� ������������
© 2006 All Rights Reserved

��������������� ������������
© 2006 All Rights Reserved
Defending your side of the ball Aside from a standard man-to-man defense, many teams run zone defenses. The difference between the two (and it should be emphasized to players) is one guards a man, the other guards an area of the court. Too often inexperienced players don’t understand they are protecting an area rather than the man, and get burned by the opposing offense. In this section, we are going to go over several different zones defenses and some of the trapping plays that go along with them. We’ll take a look at:
• The 1-3-1 Zone with a corner trap • The 1-2-2 Basic zone defense • The 2-3 Zone defense with corner trap • The 2-2-1 Zone defense with post trap • The 2-1-2 Zone (box with man in middle
Each of these defenses is still in use today, most with minor modifications, but many in their pure form. They are effective when executed properly, and can cause your opponents a great deal of trouble on the offensive side of the ball. Finally, with any zone defense there are keys to being successful. Here are some of the things you need to emphasize to your players when playing a zone defense:
• Keep your hands up and moving at all times. If your players have their hands to their sides the passing and cutting lanes seem much wider and available to the other team. By simply having a hand or an arm in one of these lanes you can force the pass elsewhere.
• The purpose of a zone defense (in most cases) is to keep the offense on
the outside to take longer and lower percentage shots. The tougher it is to penetrate the interior of your defense, the greater success you will have.
• Constant communication is important so your players do not get caught
sleeping. They need to call out screens and players cutting through the zone so everyone on the offense can be accounted for.
• Do not play the man unless they are in your respective zone. This can
unnecessarily stretch the zone and create passing and driving lanes for the opposition. Stay disciplined.

��������������� ������������
© 2006 All Rights Reserved
1 – 3 – 1 Zone Defense (Corner Trap) This zone defense is a slight variation from the standard 1 – 3 – 1 defense, in that I have included a trap in the corner. The idea behind this defense is to clog up the middle, and keep the offense on the perimeter. Part of the beauty behind this defense is that you should be able to spring the trap on your opponent by surprise. Another benefit of using this defense is that you can switch back on forth between a trapping and non-trapping style, when it suits your needs. You can simply back off the trap, and go to a collapsing, help-style of zone defense. This defense has been around since the beginning of time. It utilizes a quick middle section (3) with a big person down near the basket. The 1 Man (Top) The job of this player (usually your point guard or shooting guard) is to put pressure on the opposing player who is bringing the ball up the court. The pressure should force the ball carrier to pass to the side. This is the first thing you want the 1 man to do. They should also follow the ball around the perimeter, to the foul line extended. By this time, the opposition guard should have passed the ball. Once the ball has been passed, the other players will go into action, and the role of the 1 man is changed from pursuit to lane coverage (as you will see in the diagrams on the following page). 2 and 3 man These defenders will help to force the ball carrier (after the ball has been passed) into the corner where the trap will be sprung. They need to be quick and agile to get to the corner without getting beaten, but big enough to defend if the ball goes quickly down to the low post. Between the 2, 3 and 5 men, their positioning resembles that of a sliding teeter-totter (as you will see in the following diagrams). As one side slides down to the corner, the other side comes to the top of the key – until the trap is set – then the 3 man will play the long pass across the court. 5 man
��������������� ������������
© 2006 All Rights Reserved
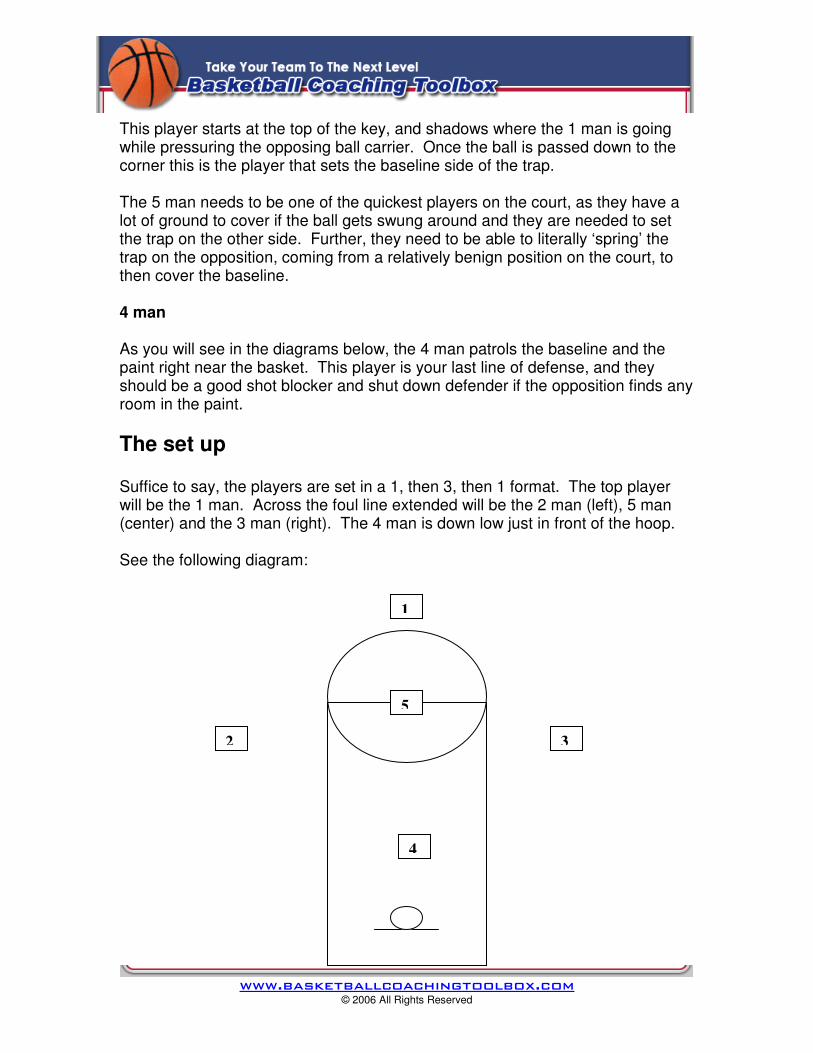
This player starts at the top of the key, and shadows where the 1 man is going while pressuring the opposing ball carrier. Once the ball is passed down to the corner this is the player that sets the baseline side of the trap. The 5 man needs to be one of the quickest players on the court, as they have a lot of ground to cover if the ball gets swung around and they are needed to set the trap on the other side. Further, they need to be able to literally ‘spring’ the trap on the opposition, coming from a relatively benign position on the court, to then cover the baseline. 4 man As you will see in the diagrams below, the 4 man patrols the baseline and the paint right near the basket. This player is your last line of defense, and they should be a good shot blocker and shut down defender if the opposition finds any room in the paint. The set up Suffice to say, the players are set in a 1, then 3, then 1 format. The top player will be the 1 man. Across the foul line extended will be the 2 man (left), 5 man (center) and the 3 man (right). The 4 man is down low just in front of the hoop. See the following diagram:
1
5
2 3
4

��������������� ������������
© 2006 All Rights Reserved
Above is the basic alignment for any 1 – 3 – 1 zone defense. There may be slight alterations a coach may make during a game, or in the scouting process, but for the purpose of this exercise, the above diagram is the base. From here, the defense simply shifts to where the ball goes – as do most zone defenses.
When the ball is at the top of the key, the zone defense simply shifts with the flow of the ball. But, when the ball is passed down to the side, the defense shifts into the trap.
• If the ball is passed down to the bottom left, then the 5 man immediately takes the baseline to set the trap. This is the most crucial aspect of this defense, and why the 5 man must be quick on the ball.
• The 1 man drops back to cover the pass back to the top of the key. • The 4 man comes outside the key to the side of the pass. • The 3 man drops to the far side of the key to cover any pass that comes
across. Once the trap is set, the idea of this defense is to force a bad pass to one of the lanes covered by your 3, 4 and 1 men. If the ball goes to the other side of the court, then the defense is a mirror image of the one you see here.
1 3
5
4 2

��������������� ������������
© 2006 All Rights Reserved
KKeeyyss ttoo ssuucccceessss
• All players should have their arms extended to cover the lanes • The defense must react quickly in order for the trap to be set • Players 1, 4 and 3 need to be prepared to rebound hard in the paint.
They are the only defenders available to cover the boards. The Basic 1 – 2 – 2 Zone Defense This is a very common defense, still used by many high school and college basketball teams. It is considered one of the hardest defenses to attack when it is executed properly. This is one of the truest of the zones defenses, with a player ‘owning’ a certain section of the defensive court. The key to this defense is making sure the players understand the zone they are supposed to cover. If the discipline of the team to cover their zone fails, then the zone itself will fail. The basic idea behind this defense is to meet the ball carrier at the perimeter, and then clog the passing lanes and cover the defenders that can immediately threaten on offense. 1 man The one man is going to be the key to forcing the pass one way or another. But, this position does not want to pressure the ball carrier too far past the three-point line. This can extend the zone too far and create an opening in the middle. This player need to be quick and alert, as many of the passes that try to break up this zone coverage will go through the middle. 2 and 3 man These players cover the largest area, being forced to play outside the three-point line, all of the way back to the basket. These players are essential to the proper protection of the zone defense, as they help defender the perimeter, but then fall back to the basket to prevent any passes down the center lane. The 2 and 3 man need to be very agile, but also big enough to defend down low when called upon. They will be called upon to rebound on many occasions, so crashing the boards should not be foreign to them. 4 and 5 man

��������������� ������������
© 2006 All Rights Reserved
These two men patrol the lower area of the defensive court. They do cover a great area, because they are also required to cover from the perimeter to the basket, like the 2 and 3 man. The coverage schemes between the two different levels of the zone are different, however. It is good to have two players who can rebound well, but still have the quickness to cover the perimeter. This is a similar responsibility to the 2 and 3 man. The major difference between the two positions is that the 4 and 5 man move mainly backward and forward, while the 2 and 3 men must move back and forth, and also laterally. The Set up The 1 – 2 – 2 is a very simple defensive set up, with a top man and two layers of two men each. See the diagram below:
At first glance, you would think this zone defense is soft in the middle. This isn’t the case. If the zone is run properly, the middle will be covered quite well, and is relatively impenetrable. Here are a few things you need to remember when running this zone defense:
• The 4 and 5 man overlap their coverage across to each other’s side of the key. As you will see in further diagrams, they will help each other patrol the middle so no one can make it through.
3
1
2
5 4

��������������� ������������
© 2006 All Rights Reserved
• The hands must be kept up at all times. To demonstrate the importance of this, have your players keep their hands at their sides. Show your defenders that they leave gaping passing lanes in the defense when their hands are down. With the hands up and moving, the offense will see the lanes fill up with hands and bodies, providing an illusion of impassability.
• The players have to understand that their zone is their priority. I will show
in the next diagram where each person needs to cover when a pass or dribble goes in a certain direction.
• In any zone, calling out cutters and shots is important so the defense can
react to what is going on around them.
After the first pass (or dribble), the following will take place:
• The 1 man will follow the dribbler (or the pass) to the outside of his or her own zone. Then, they will drop back to cover the center of the key to prevent any cross passes.
• The 2 man drops underneath the hoop to intercept any cross passes and to cover rebounds on the long distance shot.
• The 3 man picks up where the 1 man’s zone ends, and follows the pass or dribble to the end of their zone down to where number 5 picks up the man or the pass.
3
1
2
5 4

��������������� ������������
© 2006 All Rights Reserved
• The 4 man comes across to cover where the 5 man has left to cover the perimeter. This is important because an offense might try to put a man down low to counteract the 5 man leaving the key area.
• The 5 man picks up the man or the pass where the 3 man has come to the end of his or her zone.
• Once the ball gets down to the post, the3 man is going to retreat back up to the corner of the foul line to cover the lane back to the top of the key.
This is a basic zone defense that every team should learn. It is a great switch from a man-to-man defense, especially when you are getting beaten by a team shooting from the perimeter. Basic 2 – 3 Zone Defense This is another trapping zone defense, but it almost has a man-to-man element to it. The players in this zone defense have to be able to anticipate where the pass is going to go, and react quickly. The key to this defense is to force a lob pass across the court, that can easily be picked off by one of the off-side defenders. Passing lanes should be cluttered with waving and outstretched arms, as they would be in most zone defenses. One important thing this zone defense needs to remember is anyone under the basket must be covered. Very similar to a man-to-man defense. That is one strength of this defense – covering the lower post area. 1 and 2 man The 1 and 2 men must be aggressive, forcing the top man to pass the ball down to the sides. The pressure they put on the opposition point guard will dictate which side the offense passes or dribbles the ball – and ultimately where the trap gets set. These players don’t need to be the biggest players on the court, but they do need to be quick, aggressive and be able to play a man-to-man style of defense. They will essentially watch every move made by the players that are at the top of the key. The 1 and 2 men will be the ones who set the trap when the ball is pressured down low. 3 and 4 man

��������������� ������������
© 2006 All Rights Reserved
These two baseline defenders set the other half of the trap down low. They need to be quick and smart, as they have to be in the first ones to get to the player down on the low post. They also need to be big enough to cover the low post area. The 3 and 4 men are also the main interceptors of the long pass. They need to anticipate the pass going back to the top of the three-point line, or back door across the key, underneath the hoop. 5 man The 5 man handles business inside the paint. Anyone who threatens to go down low should have the 5 man pasted to them. They float all around the key with the flow of the play. If the ball is high along the perimeter, the 5 man goes covers the high key area. Once the ball goes low, the 5 man covers any passing lane involving players cutting through the key. The 5 man has to be a good rebounder, because they might often be the only ones collapsing down to crash the boards. The set up This defense is all about shifting with the passing or dribbling of the ball. Once the ball gets to the low post the trap is set and the other players fill the passing lanes.
2 1
4 5 3

��������������� ������������
© 2006 All Rights Reserved
The 1 and 2 men try to dictate where the ball is passed or dribbled. They can put pressure on the opposing point guard to get them to pass the ball to where they want in order to set up the trap. As you will see in the following diagram, your players will do the following:
• Get in between the ball and their man • Move as a unit • Flow toward the ball, not leaving any passing lanes
Here is how the 2-3 zone defense works:
• You will see at the top that the 1 man provides the initial pressure on the ball carrier. The intent is to force the pass to one side or the other, and to get the ball down to the person at the low post.
• The 2 man helps to provide pressure and continue to force the pass or dribble down to the baseline. Once the ball is down to the baseline, they provide the top side of the trap.
2 1
4 5
3

��������������� ������������
© 2006 All Rights Reserved
• In this diagram, the 3 man covers the lob pass. The 3 man is the interceptor if the ball goes to this side of the court. They need to anticipate the pass either going down low, or back to the top of the key.
• The 4 man sets the baseline side of the screen – simple enough. • The 5 man will cover the area underneath the hoop up to the middle of the
key. They will be the first to cover passing lanes in the middle, and up towards the key.
If the ball goes to the other side, you can mirror the diagram from above. KKeeyyss ttoo tthhee 22 –– 33 ddeeffeennssee
• Keep your hands up and moving around • Anticipate the passes • Make sure you are quick to set the trap and that the lanes are
covered. You can get burned by being beat in the key. The Basic 2 – 2 –1 Zone Defense Another in a long line of zone defenses, the 2 – 2 – 1 zone is also a trapping defense, but it is a little more specialized in that it works for teams that are small but quick. It is best at preventing baskets scored down at the low post, but it can be weak against long distance shooting. The top players must work together to force the ball in the direction they want. As in other zone defenses, it is important that the passing lanes are filled. But, the greatest strength is putting pressure on the men down low who try to post up on you. The idea of this defense is to try and either prevent the pass to the post, or to allow it and then trap and fill the passing lanes. Switching between the two might be an advantage to your team. One other note: because this defense has two men at the top of the key, it can be an excellent defense from which to run the fast break. 1 and 2 man The 1 and 2 man are going to be your point and shooting guard, and they are going to determine the side the ball is taken, and where the offense runs its plays. They are going to be the set up men to put the trap in place.

��������������� ������������
© 2006 All Rights Reserved
The one thing these players need to be aware of is the potential for the fast break. Once the ball is rebounded the two players can work a great breakout if they opportunity arises. 3 and 4 man The 3 and 4 men patrol the middle of the key area, and they are the ones who play the middle passing lanes, and they help to set the trap. These players are likely your forwards on offense – they do need to be a little bigger than the players who are up top, mainly because they are helping to set the traps. 5 man This defense is perfect for a big man who is just there to prevent baskets and crash the boards. They don’t have to move much, but they need to be aware of where the other players are on the court, so they can set the trap down low. It is a great trait for this person to be able to read and react to the game when they grab a rebound. If they can quickly identify their players breaking down the court, they might be able to spring a great fast break opportunity. The set up The 1 and 2 men need to be responsible for the following:
2 1
4 3
5

��������������� ������������
© 2006 All Rights Reserved
• Pressuring the point of attack. • Forcing the ball down to the post • Sagging and then reacting if the ball gets kicked out to the perimeter
again. • Fill potential passing lanes after trap
The 3 and 4 men are responsible for the following:
• Put pressure on the perimeter man that goes down low • Applies the top park of the screen • The one opposite the trap side fills a passing lane
The 5 man is responsible for the following:
• Setting the trap • Rebounding • Starting the fast break • Watching the backside pass
The defense works the following way: (pass indicated by a dotted line)
2 1
4 3
5

��������������� ������������
© 2006 All Rights Reserved
• The 1 man pressures the ball handler and forces them to dribble or pass down to the defense’s right. He or she follows the ball down halfway and then retreats to the right side of the foul line
• The 2 man shadows what the 1 man does, until the trap is set. Then they retreat back to the middle of the foul line circle. Both players are there to either wait for the fast break, or to intercept passes back out to the perimeter.
• The 3 man picks up where the 1 man leaves off, and then follows the pass or dribble down to the corner. Once the pass is made to the low post, the 3 man sets one half of the trap. If the ball is swung out to the corner again, the 3 man follows the pass.
• The 4 man watches the cross-court pass to start, and then covers underneath the hoop when the 5 man goes to set the trap. Should be ready to box out and rebound the ball.
• The 5 man protects the hoop, and when the ball gets down to the low post, he or she takes the baseline away and waits for the 3 man to set the top side of the trap.
This can be a very effective defense against a team that works the ball a lot to the low post. Once you show them you are going to trap, it might force them into longer-range shots. The Basic 2 – 1 – 2 Zone Defense (box with a man in the middle) This is the final zone defense that we will go over in this guide. It is one of the most commonly used zone defenses – especially when a team has smallish forwards and one very large person – who covers the middle. The reason this defense (or variations of it) is used is because it has several strengths. These strengths include:
• Strong in the rebounding triangle • Excellent underneath in preventing low post moves • The strong rebounding presence allows for one player to immediately
break down the court for the fast break. This defense is a little vulnerable against baseline jumpers, and if the ball is shifted down low, this opens up the top of the key. Appropriately executed, this zone defense can cause your opponents a great deal of headaches. 1 and 2 man

��������������� ������������
© 2006 All Rights Reserved
If you have two tenacious defensive guards, this might be the defense for you. Working together, these two players are responsible for protecting the perimeter from long distance shots. If they are caught out too far without help from the 5 man, they can make the defense vulnerable to the center lane pass. These players need to be quick in order to cover the large area around half of the perimeter. They also need to be able to make the burst long distance for the fast break. 3 and 4 man The 3 and 4 men in this defense differ from many of the other zone defenses. You need very strong rebounders at this position, and they also have to be able to move well around the floor. They too have a lot of area to cover, and they need to provide assistance to the 5 man when he or she is outnumbered. Strong players at these positions are crucial to the success of this defense. 5 man This is a position that requires the tallest player with the widest wingspan on the team. They are your primary defender and rebounder when the ball goes down low. The best way to describe the action of the 5 man is a circular motion that follows the direction of the pass. The set up
2 1
5
3 4

��������������� ������������
© 2006 All Rights Reserved
1
This defense look like the number five on dice, with the 5 man in the middle. One of the first lessons that you can teach your players with this defense is that you need to help one another in order to be successful. Aside from calling out screens and players cutting through the key, your players should be collapsing in the driving lanes to create a mini trap for any player trying to drive the ball to the hoop. Here are a few of the responsibilities of each player:
• The 1 and 2 man need to protect the perimeter. They are the first line of defense in this zone, and once they are beaten it leave the triangle of remaining players one their own. Tough, aggressive defense up top is crucial.
• The 3 and 4 man have to be ready to crash the boards hard. There are going to be a lot of medium to long-range shots resulting from this defense and the rebounds will be plenty.
• The 5 man needs to make sure nothing goes through the middle without being checked. If something gets by them, then it is usually an easy two points. This player needs to have his or her head on a swivel to keep on top of the action.
2
5
3 4

��������������� ������������
© 2006 All Rights Reserved
Here’s how this defense works:
• The 1 man pressures the ball carrier and follows them anywhere around the perimeter (on their half of the court). Once the ball has been passed they follow the pass until it goes down to the lower perimeter area. After that, the 1 man either retreats back close to the foul line, or waits to intercept a pass back around the perimeter.
• The 2 man covers the pass back to the top of the court, but then they follow the first pass, shadowing the one man. Once it goes down to the low perimeter, they drop back to the middle of the circle at the foul line.
• The 3 man (in this set up) simply protects the backside of the defense. They need to be very aware of cross-court passes that can leave the defense vulnerable.
• The 4 man meets the 1 man halfway up the key, but not too far to leave a low post person wide open underneath the hoop, or on the perimeter alone. They then shift down to the baseline to cover the shot or the drive, with help from the 5 man.
• The 5 man, as I mentioned earlier, looks like they float around in a circle. They will follow the ball and be the back up man should anyone try to cut across the middle. The need to be ready to pounce on rebounds and make outlet passes for the fast break.
The final thing this defense needs to be careful of is the cross-court pass. If a team goes from one side of the baseline to another, your defense could be stretched. Unless they can recover quickly, it could pose a problem.

��������������� ������������
© 2006 All Rights Reserved

��������������� ������������
© 2006 All Rights Reserved
A Full and Half Court Press It’s late in the game and you need to put pressure on the opposition – creating a turnover is the only way you are going to be able to put another couple baskets up on the scoreboard. You could go the foul route, but your opposition is shooting the lights out from the foul line. Most successful basketball teams have a pressure defense in their arsenal of attacks. While this isn’t a standard defense per se, it is what most of us in the basketball world refer to as a ‘press’. We are putting pressure on the opposing offensive players. Reasons for a press The press is commonly used for the following situations:
• To create a turnover • To disrupt an offense that is rolling along • To disrupt the timing of an offense • To try to create a 10-second violation
In order to succeed in making your press work, your players need to know the purpose of your press, and how to execute it properly. The instruction in this guide is going to help you provide proper direction for your players so your press works the way is should be. In this guide we will go over the following:
• The 1-3-1 Full court press • The 1-3-1 half court press • The 1-2-1-1 press • Man-to-man press • How to break a press
At the end you should be able to prepare your team to not only create an effective pressure defense, but also the basics on how to break one.

��������������� ������������
© 2006 All Rights Reserved
Basic 1 – 3 – 1 Press (Full court) We’ll start off with one of the most common presses that you have – the 1-3-1 trap press. This press can be used full court, three-quarter court and at half court – and can be successful at each place. But, the success lies with the players that execute the press, not with the set press itself. Players need to be aware of where the ball is on the court, and while they need to pressure, they cannot be over-aggressive or the press can easily be broken. Not all presses employ a trap, but most do. Like a defensive zone trap, the best way to do it is by surprise. Only the team doing the press should know when it is going to be sprung, because the element of surprise is extremely important. 1 man This is the most important player on the press. The success of the press lies in the success of the 1 man doing his or her job. This person is the front man for the press and they will influence the dribbler in the direction they want them to go to set up the trap. Tip: Try to force the dribbler to use their weaker dribbling hand to get away from the press – for most players this is the left hand side. 2 and 4 man These players set the bottom side of the trap (as you will see in the diagrams). It is imperative that these players are quick enough to get into position to set the trap. I have seen hundreds of presses broken because the 2 and 4 men could not get into position. When the trap goes to one side, the opposite side man acts as an interceptor of the return pass to the player who in-bounded the ball. It is important to pick this player up immediately, because the easiest way to break a press is to give and go down the court. 3 man This is the centerfielder of the bunch. This player guards the center of the court with their life. They mustn’t let any ball or player pass them uncontested, because then it leaves the 5 man to possible defend against a 3-on-1. This is not going to work in your favor.

��������������� ������������
© 2006 All Rights Reserved
5 man This is the last line of defense. In most cases the 5 man will be looking at 2 defenders down low. It will be very tempting for this player to want to try and intercept a long ball, but you should instruct them to defend first and intercept second. If the interception is missed, it is a sure 2-points for the opposition. If the 5 man is certain he or she can intercept a pass, they should go for it, otherwise, they should be instructed to stay at home and defend the basket. TThhee sseett uupp
1
4 3
2
5

��������������� ������������
© 2006 All Rights Reserved
Here’s how this press works:
• The 1 man will not pressure the inbounds player, but they play a sagging defense on the player receiving the inbounds pass. The intent is not to disrupt the pass, but rather to create the opportunity to trap and then intercept the pass.
The one man will attempt to influence the ball handler in one direction or the other (usually his weak hand), and once he or she drives this player to the sidelines, the 2 or 4 man should be there to set the trap. If this player gets beat on the trap and a pass is made up the middle, then they need to scurry back to recover on defense.
• The 2 and 4 men have one of two responsibilities:
- Set the trap - Intercept passes
Which side the trap is set determines the player who will trap and who will steal. In the diagram on the previous page, the trapper is the 2 man, and the 4 man should be lurking in the opposition’s backcourt waiting for a steal.
• The 3 man, as you can see by the diagram, essentially plays the field and
waits for an errant pass. In many cases, the opposing player being trapped will have no idea the 3 man is waiting to pounce on a poor pass in the middle, and they will be the benefactor of many interceptions.
It is important that the 3 man also be able to recognize if the trap is being broken, so he or she can get back on defense.
• The 5 man just sits back and waits as the press develops. They need to
make defense their number one priority. They can move any direction, usually favoring the side that the trap is being executed.
This is not a difficult press to teach your players, but it is one of the most effective. Practice it in slow motion at first, so each of the players knows their responsibilities, and then run it against a full speed backcourt to do any fine tuning.

��������������� ������������
© 2006 All Rights Reserved
Basic 1 – 3 – 1 Press (Half court) Of course, this is similar to the 1-3-1 full court press, but it does have a few additional features. One of the best features is the ability to disguise this press as a 1-3-1 zone defense. Here are some of the other reasons you should think of running the half court press as opposed to the full court:
• This press has less of a tendency to give up big baskets, but also provides pressure to the opposing ball handler.
• You can integrate this press into your normal defensive set up, and simply alternate when you decide to use the trap.
• It is not as easily broken as the full court press, because it is more compact.
But, it does have weaknesses, as well:
• No backcourt pressure • If beaten, leaves a 4 on 3 • Players must be quick and disciplined to make it work, or it will get beaten
all of the time. Still, integrated into a 1-3-1 zone defense, this press is widely used by basketball teams at all levels. 1 man Once again, this player draws the responsibility of influencing the dribbler to go one way or another. This is especially important in the half court press, because if they decides to go up the middle, then there may be a gaping hole left there because players are missing – trying to set up the trap. The 1 man is the key to getting this press to work. They must use their quickness and agility, and their deceptiveness to try to coax the opposition ball handler in the direction the want them to go. 2 and 4 man These players need to be on their toes in order to make this press work. Unlike the full court press, where it takes time to develop, this press must be put on immediately once the ball has reached the front court. If the 1 man is doing his or her job, then the 2 man should have no problem sealing off the sideline, preventing a drive or a pass.

��������������� ������������
© 2006 All Rights Reserved
These players have to be quick and they have to be able to read the play. They don’t want to give away the press by setting themselves up too quickly, but they do need to be in the right place at the right time to double team the ball handler. 3 man This is the center fielder once again in this press. When the press is at the top of the front court, the 3 man simply stays at home waiting for a pass that might try and go to one of the corners. In the half court press, the 3 man’s job is fairly straightforward – intercept passes. 5 man The 5 man has a unique responsibility, not initially, but once the half court press reaches it second stage, they will be called upon to trap down low on the perimeter. When the first press is being attempted, they may want to cheat to the side of the press, in order to cover the pass that may go down low. You will see the role of the 5 man in the diagrams following. TThhee sseett uupp
1
2 3
4
5

��������������� ������������
© 2006 All Rights Reserved
The first part of the trap is self-explanatory:
• The 1 man influences the ball carrier to go to one side or the other (preferably the weak hand side) and then sets the court side of the trap.
• The 2 man waits until the dribbler is in the corner (depicted by the dotted line) in order to spring the trap. It should be quick and decisive so it either forces an error in dribbling, or it forces a bad pass.
• The 3 man will be waiting in the center to intercept a pass that might be made through the center of the court. They should also watch the offside back corner to make sure no one gets through.
• The 4 man moves up to cover the pass back to the other guard, or small forward. This will often be the pass that the double-teamed ball handler will make
• The 5 man cheats to the side of the trap, waiting for a pass down low. If a pass is made to the low man on the perimeter, the press will shift into the second trap shown in the diagram below.
1
2 3
4
5

��������������� ������������
© 2006 All Rights Reserved
The transition is simple: 2 and 5 execute the trap, 3 covers the center pass, 4 covers the basket, and 1 covers the pass back to the perimeter. The Basic 1 – 2 – 1 – 1 Zone Press The purpose of any pressure defense is to disrupt the offense of your opposition. When you play a zone press, you sit back and wait for any of these opportunities:
• To trap or double team your opposition in their back court, possibly creating a 10-second violation, or;
• Forcing a bad pass that one of your players can intercept and take in for
an easy basket.
• As a surprise for your opposition The 1-2-1-1 press provides a solid trapping defense that will give your opponent headaches in their backcourt. If done successfully, it can create fantastic opportunities to score points off turnovers. This press stresses ball pressure right from the inbounding of the ball. It can be done at any time: after a score, out of bounds plays, and after a time out. 1 man This player should be your fastest player with the quickest hands. This will be a smaller player, and his or her job is to force the opponent to either dribble or pass to one side or another. If the press is broken, this person is going to be far out of position on defense and they need to get back to the top of the key. They are also available for quick passes back up court if one of the opposition passes are intercepted at mid court. 2 and 3 man These players are likely going to be your forwards. They should be larger players on your team, because are going to be the ones that set your trap when the ball is pressured in one direction. In most cases, the 2 man will be the more active player, because your opposition will try to take the ball towards their dominant side. Most players are right-hand dominant, so that is the side they will go to, so the 2 man will have to be athletic enough to set the press every time.

��������������� ������������
© 2006 All Rights Reserved
The 3 man needs to be able to anticipate what is going on in the backcourt. Is the pass going to return to the inbounds player, or is it going to move up floor? This is the question the 3 man should be asking. 4 man The 4 man is the centerfielder. They sit right at center court and they will cheat one way or another in order to stalk the opposition’s passes. This player needs to have great court sense so they can anticipate where the pass may go. In most cases, this player will be your shooting guard. They don’t have to be overly large, but they do have to be quick in order to cover the vast area in the center of the court. If they get beaten, it could leave a 2 or 3 on 1 for the 5 man to defend. 5 man In the 1-2-1-1 press, the 5 man’s primary responsibility is to prevent easy baskets and to be the last line of defense. This player needs to be the best rebounder and will likely be your biggest person on the court. You will also want the 5 man to be aware of long passes to the corner.
��������������� ������������
© 2006 All Rights Reserved
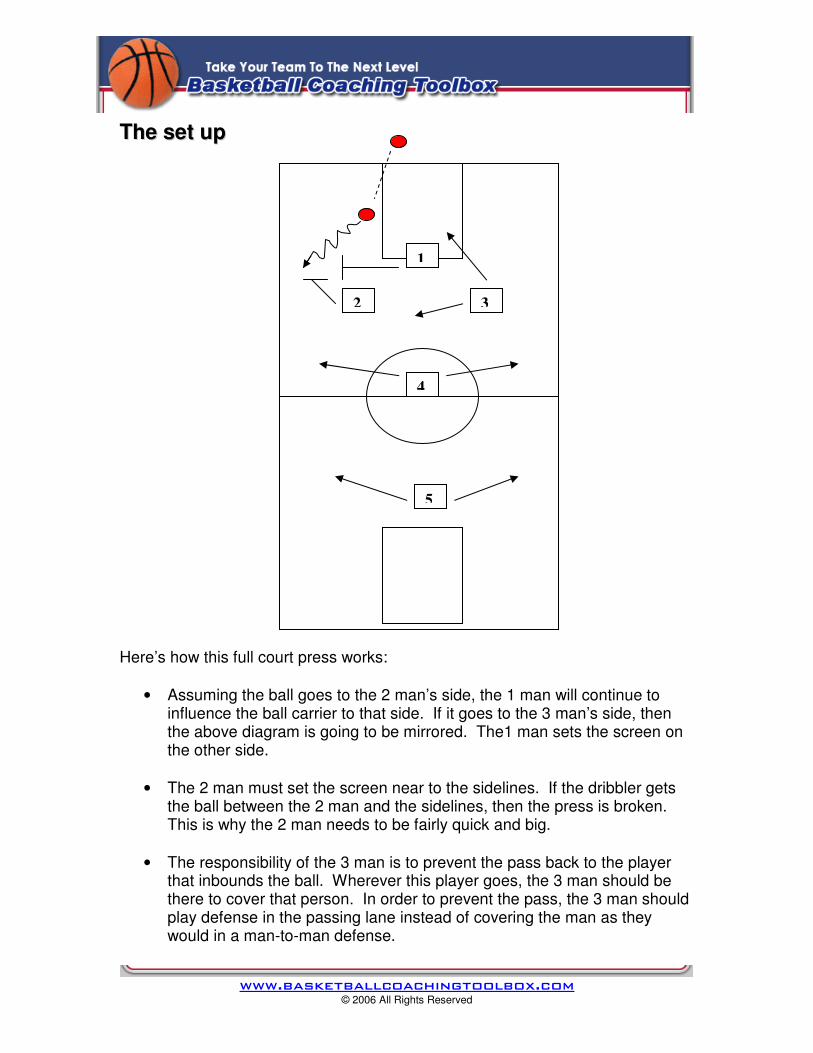
TThhee sseett uupp Here’s how this full court press works:
• Assuming the ball goes to the 2 man’s side, the 1 man will continue to influence the ball carrier to that side. If it goes to the 3 man’s side, then the above diagram is going to be mirrored. The1 man sets the screen on the other side.
• The 2 man must set the screen near to the sidelines. If the dribbler gets
the ball between the 2 man and the sidelines, then the press is broken. This is why the 2 man needs to be fairly quick and big.
• The responsibility of the 3 man is to prevent the pass back to the player
that inbounds the ball. Wherever this player goes, the 3 man should be there to cover that person. In order to prevent the pass, the 3 man should play defense in the passing lane instead of covering the man as they would in a man-to-man defense.
1
2 3
4
5

��������������� ������������
© 2006 All Rights Reserved
• The 4 man needs to go where the pass goes. They need to be able to
anticipate where the player being trapped is going to pass, and then they need to cover that passing lane. This is where you make or break the press.
• The 5 man needs to sit back and follow the flow of the play. If the ball is
going left, then the 5 man goes left. If the ball goes right, then the 5 man goes right. He or she just needs to remember that they need to cover the long pass to the corner, and that they are the last line of defense for if the press is broken. The 5 man cannot take any unnecessary risks to intercept balls.
Things to remember with the 1-2-1-1
• If the first player gets a pass over the head of the 1 man, then the four man and the 3 man (in this diagram) can set a trap on the player that receives the pass.
• Don’t let anyone beat your players to the sidelines. This is a sure way to have your trap broken every time.
• If the press is broken, your players need to rush back to get into position to play defense, or your 5 man will face a 2 or 3 on 1.
Man-to-Man Press If you choose to run a man-to-man press, then you better have a quick and smart team. Not only do they need to cover their checks closely, but they also need to be able to anticipate and react to what is going on. Not every team can run a man-to-man press, just like not every team can run a man-to-man defense. But, there is a good chance that if you run a man-to-man defense, you can run a man-to-man press. In order to run a solid man-to-man press, you need to be able to do the following:
• You need to be able to cover the passing lanes of the opposition players while covering the actual player. It cannot be played like a zone press, but you do have to protect an area rather than necessarily a player.
• Everyone on the court needs to know what is going on. Part of the
success of this press is for the players to help each other in covering all of the passing areas. You will see in the diagram how this works.

��������������� ������������
© 2006 All Rights Reserved
• Try to force passes to players that are not strong ball handlers.
• While you are preventing the pass to players that are covered, you need to
find a way to create pressure on the ball carrier. This is why getting the ball into the hands of a poor ball handler is better for this press.
1 man This player needs to be quick and aggressive. They will cover the inbound person, or the quickest person on the court in order to keep them under control. The 1 man should be your most aggressive defender and quick with their hands in order to try and make steals on the ball. 2 and 3 man The 2 and 3 men will cover the small forward and the shooting guard of the opposition. They need to be aware of how they are playing their checks, and they also need to be aware of guarding the passing lanes. While these players need to play a good prevent defense, they also need to attack the passing lanes if this press is going to be successful. 4 and 5 man These players are going to cover the big men on the other side. One of the 4 or 5 men might need to cover the big man from the opposition if they other team uses them to inbound the ball, or to receive the ball. This would force them to play in the backcourt for a spell. These players are likely going to be the biggest players on your team. They will also need to be quick and they need to anticipate some of the passes that are going to be made into their defensive zone. Each of these instances will be described in the following diagram.

��������������� ������������
© 2006 All Rights Reserved
TThhee sseett uupp Here’s how this press works:
• The 1 man will pressure the player who receives the ball on the inbounds play. They need to be aggressive and they need to pressure the ball handler into making a bad pass to one of their players.
• The 2 man and 3 man will cover their respective checks, but as you can
see from the diagram, instead of covering the man like they would in a
1
2 3
4 5

��������������� ������������
© 2006 All Rights Reserved
standard man-to-man defense, they will be covering the passing lane. This forces the ball handler to toss a pass over the head of the 2 and 3 man. This is a dangerous pass as you will see by what the 4 and 5 man have to do.
• The 4 and 5 man will have two responsibilities: first, they will be looking
for the pass that goes over the head of the 2 man and the 3 man. Next, they need to cover the passing lane of the men at the other end of the court.
Keys to running a successful man-to-man press
• You need to teach your players to be aware of what is going on around them.
• The players need to be able to switch between covering passing lanes on the press and playing the man when they are on defense.
• Coaching pressure man-to-man defense when they are trying to force the press.
• Force the pass to players that are not strong ball handlers. Breaking the press With the knowledge of how to apply the press, you should be able to figure out how to break the press. But, I have a couple of basic ways to break a press so your team doesn’t get caught making the bad passes and giving up easy baskets to the opposition. Knowing how to break a press is as important as being able to apply the press. Breaking a press can lead to easy baskets just as the application of the press can. Here are some of the basic rules to breaking the press:
• Quick, accurate passes will usually beat a press • A plan to break the press is effective • Be prepared for the press – so it doesn’t come as a surprise to your
players • Keep the ball in the middle of the court with the dribble – this prevents
traps. Pass to the outsides and then back to the middle to spread the press out.
1 man This player is usually going to be the player who brings the ball up the court. Your point guard most likely. If you want to increase your chance of breaking the

��������������� ������������
© 2006 All Rights Reserved
press, make sure this person is your best ball handler. Being able to dribble well out of tough situations is going to make breaking the press a lot easier. The 1 man also needs to be able to make quick passes to get out of the press situation. 2 and 3 man These players are important in breaking the press. They need to find open spots along the sidelines to receive passes and then move up the court. The success of the press break relies a great deal on their ability to break the press and move the ball towards the basket. They may also be required to set quick screens to break a man-to-man press so the one man can dribble the ball up the court. The 2 and 3 man need to be alert and able to make the most of a difficult situations. 4 and 5 man These are going to be your larger players. They are also going to be your outlets to move the ball quickly down the court. Since the object is quick passes, you need to have your 4 and 5 men ready to break into the open area to receive the ball.

��������������� ������������
© 2006 All Rights Reserved
TThhee sseett uupp Here is one way this press break works:
• The 1 man brings the ball in (inbounded from the 3 man) and dribbles up the middle of the court. It is important to make a quick pass to the 2 man to avoid the trap that could be coming.
• Once the 3 man sends the ball inbounds, he or she will loop around and
cut through the center to get the quick pass from the 2 man.
1
2 3
4
5

��������������� ������������
© 2006 All Rights Reserved
• If executed quickly and correctly, it should create a 3 on 2 in the offensive zone.
• From here, the 3 man, along with the 4 and 5 man can execute a quick 3
on 2 play for an easy basket. Or, if time management is important, they can slow the offense down and wait for the rest of their teammates to catch up, and then run their regular offense.
Other options for breaking the press In the diagram above, the 2 man (or 3 man) can set a screen for:
• Either the 2 man (or 3 man) to create an opening for a pass • Or, the 1 man to create an open lane for him or her to dribble
The 4 or 5 man can also come up to center court to create a numbers mismatch and an opening at center court. One of these players can also set a screen on the ball or off the ball to create an opening for a pass or a dribble. Another option for the press break is to dribble up the sideline and have the player (2 and 4 man, or 3 and 5 man) set a screen on the sideline for the 1 man. Breaking the press is as important as being able to set up a good press, as it can quickly turn the tide of the game in your favor. If broken, you almost automatically have an odd man rush down the court in your favor. This should lead to easy baskets. One intangible that you should understand is this: it is a tremendous psychological advantage for your team if you can both run and effective press, and break an effective press. Once you can do both well, watch the effect it has on the other team.

��������������� ������������
© 2006 All Rights Reserved

��������������� ������������
© 2006 All Rights Reserved
A Quick Two Points – out of bounds plays You only have a few seconds left on the clock and you need a basket for the win. A great out of bounds play would work wonders here. A nifty screen, a couple of quick passes and you have the two points you need. It sounds simple… but to execute out of bounds plays effectively, everyone has to be on the same page. When to use out of bounds plays Most of the time, you will simply be able to pass the ball in from the out of bounds area and then begin your offense. When your players are being covered tightly, or if the opposition is pressing you, you might need to run an out of bounds play. Out of bounds plays work especially well in the following situations:
• Against tight man-to-man defense • When the opposition is pressing you • When you need a quick basket near the end of a half or the game (having
a plan is always a good idea) • If you want to disrupt the opposition defense • To in bound the ball to a specific player to set the offense
If you want, you could design an out of bounds play for every time you in bound the ball. But, in most cases, they are specialty plays that you will use in certain situations during the game. Keys to bringing the ball into play
• Everyone needs to know what it going on. If one person doesn’t understand their assignment or responsibility, then it can foil the entire attempt to successfully in bound the ball.
• Quick and efficient – that’s how out of bounds plays need to be run. If you
are looking for a quick basket with only a couple of seconds left in the half or the game, you don’t have time to sit around with the ball looking for the picture perfect pass. Likewise, to take advantage of the element of surprise if you are trying to get the ball into a certain players hands.
In this guide, I am going to show you several different plays that you can run from out of bounds. You will see a combination of plays that can get you baskets, along with those that get the ball to a key player on the court. Whichever the case, if executed properly, they should all help you get the same result – a valuable two points.

��������������� ������������
© 2006 All Rights Reserved
We’ll look at both sideline and baseline plays in this guide! Baseline Out of Bounds Plays Baseline out of bounds plays are a great way to relieve the pressure defenses that you might face when the game gets tight. After your opponents score a basket, they may need to score again right away, so they are going to try to make it as difficult as possible for you to move the ball up the floor, and they are going to try to intercept your passes. You also may need to in bound the ball into the offensive court to try and score a quick basket of your own. The following baseline plays are just a handful of the different plays that are out there. As a coach, you can probably design a few of your own during a time out or at half time once you see what the other team is throwing at you. I have included a few of my favorite baseline out of bounds play in this section, and then we will get to a few of the sideline out of bounds plays later in the guide. To get as many of the plays in as possible, each play will start with a diagram then an explanation of how it works. Box 4 – backcourt or frontcourt
5
3
1
4
2

��������������� ������������
© 2006 All Rights Reserved
Here’s how the Box 4 works:
• With the 5 man in-bounding the ball, the 3 man located in the lower key area screens up to the 1 man. At the same time 4 comes up to screen for the 3 man.
• The 3 man then uses the screen set by the 4 man to swoop underneath
the hoop for the inbounds pass.
• This play can be run in both the backcourt and the frontcourt. If run in the backcourt, the 2 man can be used as a secondary outlet pass once the ball is inbounded to the 3 man. If in the frontcourt, the 5 man can make a quick pass to the 1 man for a jumper, or to the 3 man for an easy lay up.
• In the frontcourt, the 2 man is going to be the safety to prevent any fast
break opportunities. This is a simple and quick play that you can run in the frontcourt or the backcourt – either to score an easy basket off an inbound pass, or to relieve pressure from a press. 4 in the bucket – frontcourt or backcourt
1
3 4
5
2

��������������� ������������
© 2006 All Rights Reserved
On a diagram this play might look a little complicated, but it really is quite simple. Here’s how the 4 in the bucket works:
• The 3, 4, and 5 men start off across the foul line. Once the 1 man gives the indication to start the play, the 4 man goes forward to set a screen for both the 3 and 5 men, who cross in the key.
• The 4 man then checks back outside the key to the corner.
• The 2 man once again is the safety, or the 3-point option.
• The 1 man will then pass the ball to the 4 man on the inbounds, and then
the 4 man has several options:
- Drive or take the jumper - Pass to the 3 man - Pass to the 5 man - Bump it out to the 2 man and reset the offense - (Defensively) Take the ball up the court or; return pass to the 1 man
and then set the offense This is a good play to run that will set up a good offensive scoring opportunity. It will also work well against a man-to-man press. Key line 1
3
5
4
1
2

��������������� ������������
© 2006 All Rights Reserved
This is a commonly used inbounds play against a tight zone defense, and is primarily used to get a quick shot in the offensive zone. The diagram is self-explanatory, but here’s how the Key line 1 out of bounds play works:
• The 4 and 5 man screen inside the key to allow the 1 man to go in behind them to receive the pass.
• The 3 man should pass to the 1 man (who will be open 9 times out of 10
against a zone defense), and the 1 man can then take a short jumper.
• The 1 man can also find either the 4 or 5 man on a roll after the screen for a close in shot.
• The 1 man could pass the ball to the 2 man to either reset the offense, or
to take the deep 3-point shot. This screen can be used in the backcourt, but it is difficult to work the ball down the court when you have all of your players so tight together. A variation of this play can also be used from the sideline. Misdirection
1
2
3 4 5

��������������� ������������
© 2006 All Rights Reserved
There are a lot of different options that can be run out of this baseline play. In this particular diagram, the play is designed to open up the 4 man in the middle, the 3 man for a quick jumper, or to go to the 5 man at the 3-point line. Here’s how it works:
• With all of the players lined up along the foul line, the 2 man starts the play by turning to set a pick for the 3 man. The 3 man comes straight down, just outside the key, ready for a pass.
• The 4 man cuts directly through the key, and then off to the right. This is
the primary pass to make for the 1 man, because it should just be a quick post move for an easy hoop.
• The 5 man goes out to the perimeter, either to receive a pass, or to act as
the safety.
• Once the 2 man sets the pick for the 3 man, he or she should go to the top of they key in the middle of the foul line.
This play has several options for the 1 man. The 2 man can also roll to the hoop for a pass on the inbounds, or immediately after the 4 man receives the pass. 3 man pass back
3
1
5
4
2

��������������� ������������
© 2006 All Rights Reserved
This play can either be used to break a full court press, or it can be used to get an opportunity to set the offense in the front court. Here’s how it works:
• The 1 man will cut out towards the 3-point line to receive a pass from the 3 man outside the court.
• The 3 man will cut back through the key to outside of the 3 point line.
• The 4 and 5 man set a double screen to make sure the 3 man can make it
through the key. The 1 man returns the pass to the 3 man to reset the offense, or to take a shot from 3-point range.
• The 2 man rotates over to the corner opposite the 1 man, on the foul line
extended. This is a great play to get your offense on track and to reset it at the top of the 3-point arc. It is easy to run, and only involves two passes. You can use this one either in the frontcourt or the backcourt. Double screen
3
5 4
1
2

��������������� ������������
© 2006 All Rights Reserved
This is a great play to use to either break the full court press, or to set up for an easy jump shot or play under the hoop. Here is how the double screen inbounds play works:
• The 5 man starts the play by providing a screen for the 1 man. • The 1 man uses the screen and gets open for the pass from the 3 man,
who is out of bounds.
• The 4 man comes up and sets a pick for the 5 man, who uses it to cut to the hoop. Then the 4 man can roll from the pick to either rebound the shot from the 1 man or the 5 man, or to catch a quick pass.
• The 3 man can either pass immediately to the 1 man off the screen from
the 5 man, or he or she can wait until the 5 man gets to the hoop.
• Another alternative is for the 1 man to get the pass, and then to hit the 5 man underneath the basket.
• The 2 man will usually be open for the deep shot, or to reset the offense.
Use this player as an outlet if the other players are in trouble or covered. Key line 2
1
2
3
4
5

��������������� ������������
© 2006 All Rights Reserved
This play works in any situation, although the variations will be different for the situation. Instead of making a pass underneath the hoop (as you would in the front court), the 3 man will cut up the floor and get the pass from the 2 man. Aside from that, here’s how the Key line 2 works:
• The 4 man starts this play by cutting to the opposite side of the key and to the hoop. The 2 man moves out at the same time as the 3 man moves in.
• The 1 man passes to the 2 man on the outside.
• From here, the 2 man has the option of: taking the shot from the
perimeter, passing quickly to the 3 man underneath the hoop, or passing out to the 5 man on the perimeter if nothing is working.
• The 1 man should loop around and get to the top of the 3-point line, so the
opportunity to swing the ball to the top for a quick hit pass to the 4 man underneath the hoop, or to completely reset the offense.
This baseline inbounds play is another of the variations of the key line that works in both the frontcourt and the backcourt.

��������������� ������������
© 2006 All Rights Reserved
SSiiddeelliinnee oouutt ooff bboouunnddss ppllaayyss Sideline plays happen after every time the ball goes out of bounds. So, why not take advantage of the opportunity to run a new play that can help score a basket for your team. Sideline plays are a little different that baseline plays in that they are primarily used to create scoring opportunities, rather than to help break a press or move the ball up the court. Still, your players all need to be working off the same playbook for any of these following plays to work. Here are a few keys to sideline play success:
• Quick passes and move with a purpose. Set good screens and cut hard to the hoop.
• Don’t make bad passes – it will likely end up in an odd man rush on defense. That’s not exactly the way you want to finish the out of bounds play.
• Use fakes to get the defense to move one way or another before you pass the ball.
Now, here are a few great sideline out of bounds plays that you can teach to your team. Double Screen Cut
3
4
5
2 1

��������������� ������������
© 2006 All Rights Reserved
Here’s how this play works:
• The 2 man sets a screen for the 1 man, who drives toward the player inbounding the ball. The pass is made to the 1 man.
• From here, the 3 man cuts to the hoop, as does the 2 man. The 5 man
sets a screen for the 3 man coming across. The 4 man stays home and waits for the dish from either the 2 or 3 man.
• The 1 man can decide immediately to pass to the 2 man cutting through
the middle of the key, or to wait for the 3 man to cut in off the screen from the 5 man.
• The 1 man can also shoot the ball if he or she has a good shot
• The 1 man can drive the lane because the defensive players will be
collapsing around the cutting players. This is one of the easiest, and most effective plays to start with. Illinois out of bounds play
4 2 3 5 1

��������������� ������������
© 2006 All Rights Reserved
This play is a little more intricate, but it can generate a great deal of points if your opponent doesn’t catch on. Here’s how it works:
• The 5 man screens for the 1 man, so he or she can move towards the ball. The 3 man runs down to the corner as a decoy looking for the pass. The 2 man swings around all of the players looking for the rare deep back door pass.
• The ball should be passed to the 1 man, while the 4 man (inbounder) will
cut straight to the hoop off a screen from the 3 man.
• The 1 man will try to hit the 4 man with a pass, or he or she can pass it to the 2 man who should be cutting right toward the basket.
• If the ball goes to the 4 man, he or she has a couple of options:
- Drive to the hoop - Stop and take a quick jump shot - Dish the ball to the 2 man breaking in on the hoop
If all else fails, the ball is in the hands of the 1 man, ready to reset the offense on the perimeter. Zipper sideline play
1
2 3
5 4

��������������� ������������
© 2006 All Rights Reserved
This is another fairly basic play to run from the out of bounds, but it is effective, especially if you are running against a man-to-man offense. Here’s how the zipper works:
• The 4 man and the 5 man screen down for 2 and 3. The pass from the 1 man (out of bounds) will go to the 2 man.
• The 2 man will automatically look for either the 4 or 5 man posting up or
rolling in off of the screen towards the hoop.
• The 3 man will come up to the perimeter to balance out the top and bottom areas. At this point, the 2 man can pass to either the 3, 4 or 5 man to complete the play.
• Meanwhile, the 1 man will be swooping in from the other side of the court
to create a triangle that favors one side of the court.
• Last resort is to pass the ball to the 1 man and run your regular offense. Basic sideline out of bounds play
1 2 3 4 5

��������������� ������������
© 2006 All Rights Reserved
As the name states, this is one of the basic out of bounds plays that you can teach your team. It doesn’t really entail anything difficult, except breaking in different directions. Here’s how it works:
• The 2 man breaks straight to his or her left (don’t go across the half court line), the 5 man breaks at a 45 degree angle to the passer, the 3 man loops around, and the 4 man cuts straight to the hoop.
• The 1 man has three options for passes (in this order) 5 man, 3 man, and
2 man. The 4 man is a decoy to the hoop until later.
• If the 5 man or 3 man gets the ball, then they can stop to take the shot, drive to the hoop, or they can dump the ball to the 4 man underneath the hoop for the easy basket.
• Last resort is passing back to the 2 man, and then the offense can be
reset, or he or she can pass the ball back to the 1 man on the give and go. The Carolina Out of Bounds play
1
2
3
4
5

��������������� ������������
© 2006 All Rights Reserved
For our final sideline inbounds play, we get a little bit more intricate than the last one – mainly because there is a progression of reads on this play. Here’s how it works:
• The 2 man and 4 man double screen the defender on the 3 man. The 3 man comes up to the top of the key to await the pass. This is option number one for the 5 man (out of bounds)
• Next, the 2 man loops back door and uses a screen set by the one man
underneath the hoop. This is option number two for the 5 man.
• The final option is for the 1 man to cut straight back towards the 5 man inbounding the ball.
• If all of those options are exhausted the 2 man can go down and screen
for the 4 man, who should come back up towards the ball.