Embed Size (px)
Citation preview

2016
IT Department
APSACS SECRETARIAT
AMS BASICS

Copy Rights ©: All rights are reserved by APSACS SECTT Page 1
Chapter No1: School DBA
Chapter No2: Data Entry Operator and School Teacher
Chapter No3: Accounts
Chapter No4: Roles of Principal
Chapter No5: Roles of Section Head
Chapter No6: Library Management System
Chapter No7: Salient Features
TABLE OF CONTENT
Copy Rights ©: All rights are reserved by APSACS SECTT Page 2
INTRODUCTION
APSACS MANAGEMENT SYSTEM
Following are the modules that are currently implemented in the software
Maintenance of Student Record
Maintenance of Employee Records
Maintenance of Finance /Accounts Records
Result Generation and Compilation
Library Management System Management of Leave Records
Online Attendance
Lesson Planner
Time Table manager
LINK FOR AMS
http://apms.pk

Copy Rights ©: All rights are reserved by APSACS SECTT Page 3
Chapter 1: SCHOOL DBA
ROLES OF SCHOOL DBA
ACCOUNT CREATION:
STEP 1:
username and password of your DBA.
After logging in to the software you will create accounts for different roles i.eschool admin, teachers,
principal, accounts etc.
For example
Copy Rights ©: All rights are reserved by APSACS SECTT Page 4
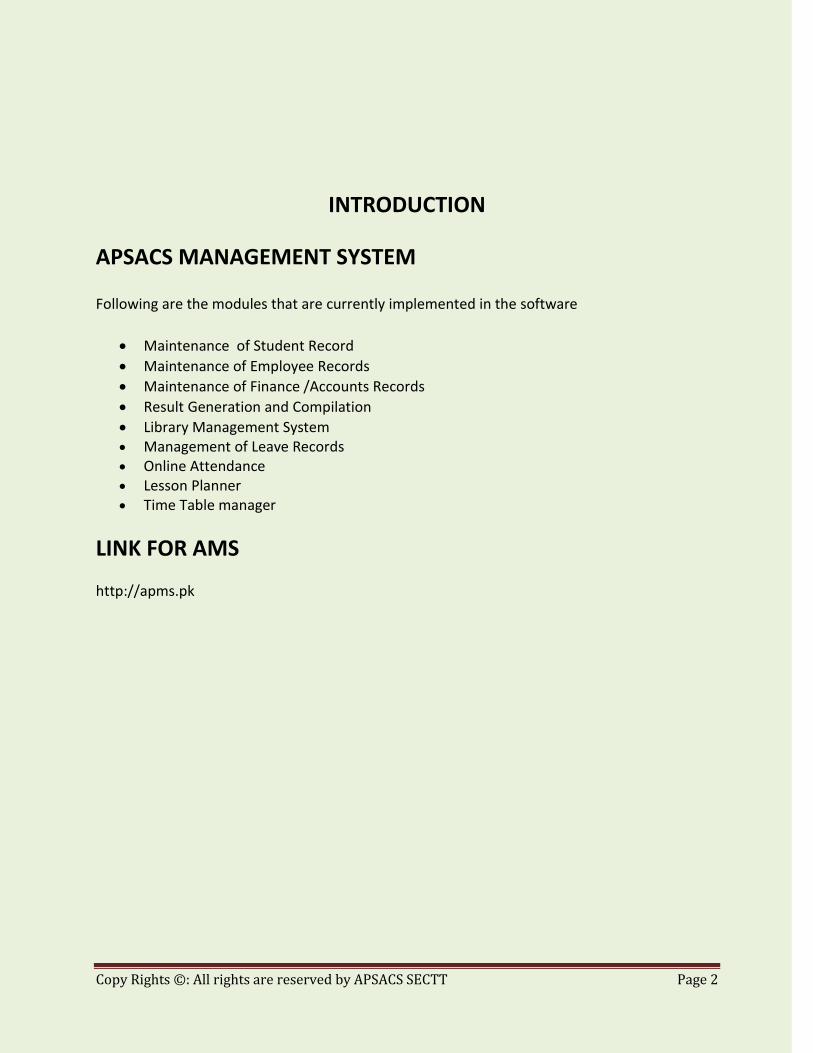
Username: Aps@123 Password: Aps@124
ADD button. It will create the user name and password.
Lost your password?

Copy Rights ©: All rights are reserved by APSACS SECTT Page 5
Want to delete account ?
ADD Section: STEP 2: Go to DBA-> Administrator -> Sections
Create Sections page will be displayed. Here you will add sections of the schools one by one. For ex-
ample if u have maximum five sections of each class from A-E. You will write A in the field and press
ADD button. Similarly add others. Sections can be named with colors, names, and alphabet. Add
here one by one.
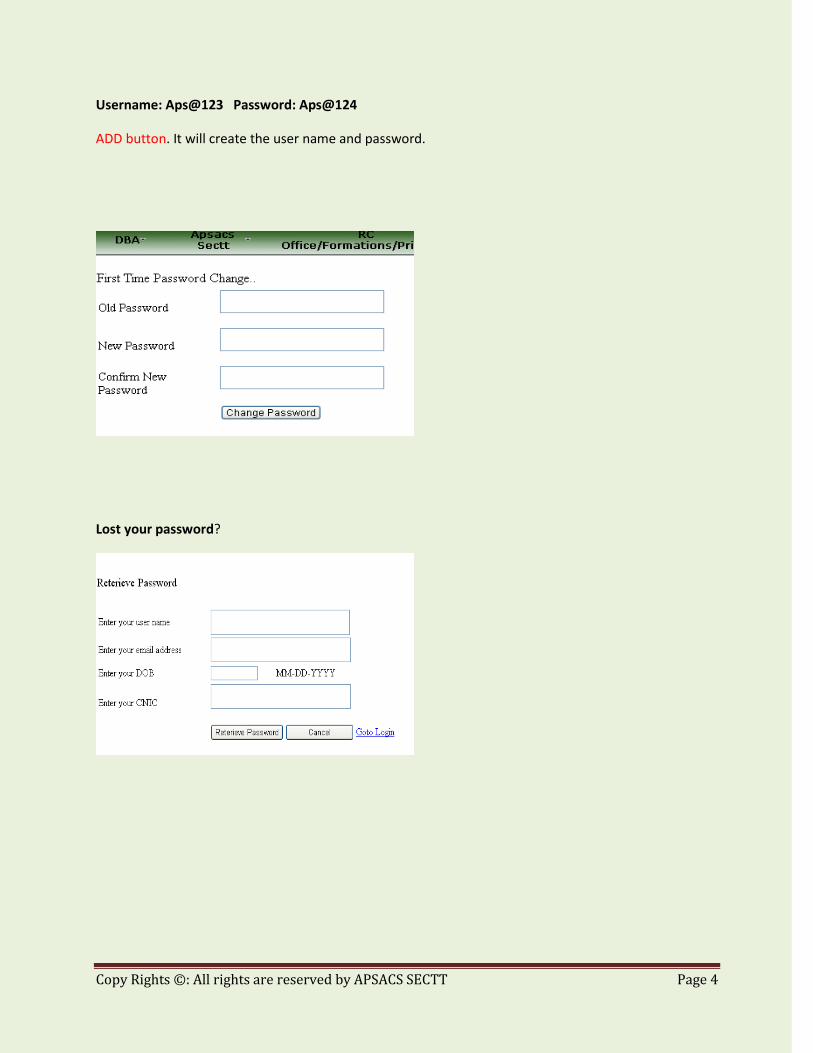
ADD Classes STEP 3: Go to DBA-> Administrator -> Classes
After adding the sections second step is to add classes. Enter the name of the class in class name
field. Select the section code of the class you have added earlier. Press ADD button after adding in
the required information. You can search the class by clicking on the search image or by class name
as well.
Copy Rights ©: All rights are reserved by APSACS SECTT Page 6
ADD Designation STEP 4: Go to DBA-> Administrator -> Designation
Add the designations like Doctor, Engineer, Civilian, Armed force serving, Armed Force retired, Of-
ficers serving Navy, others etc. It will help you in selecting the right option in the student infor-
mation form and accounts.
ADD Disease Info STEP 5: Go to DBA-> Administrator -> Disease info
Enter the name of diseases in forth step. For example Chicken Pox, Malaria, Typhoid etc Write the
name of disease in the field and press ADD button
Chapter 2: SCHOOL ADMIN AND TEACHER

Copy Rights ©: All rights are reserved by APSACS SECTT Page 7
ROLES OF SCHOOL ADMIN
Student Admission Form
When DBA will enter all the above information role of admin will be start. User will login from the user
name and password made for the admin for entering the data of students and teacher. Open Student
Admission form.
Go to School -> Student ->Admission -> Admission form
Click on the admission form link. This form will open and you have to enter all the required information
in the required field and required format.
There is a special format for which you need to fill all the information. First of all click the chose file but-
ton. And add the image of the student. Make sure the image file name must be changed every time. If
you upload image with same name it will not add the records. Press Store Filename. It will store the im-
age into the database. If u don’t have the image of particular student, upload a fake image don’t let it
empty it will not save your records.
Open the grid of Student Information by clicking on Student information. Start entering student infor-
mation. All the information is auto-filled as a sample. Just click on the field in which you want to enter
the data. If there is no data for that particular leave it or enter NA.
Enter the File Name of the student or the admission number (from your records). Don’t leave it empty
and never enter duplicate numbers in the file number. File numbers must be different for every record
entry. Start entering all the other information. If you don’t have any information regarding any field
doesn’t leave the space empty. Enter NA
Enter 00000 if you don’t know the zip code
Format of date is MM-DD-YYYY
Format of entering email address is [email protected]. You can also enter NA, if email is not availa-
ble.
Format of CNIC is 37201-2298764-0. Enter 00000-0000000-0 if you don’t know CNIC number

Copy Rights ©: All rights are reserved by APSACS SECTT Page 8
Format of entering telephone number is +92.33694934. Enter +00.000000 if u don’t know the exact
number.
Make sure not to leave any empty space behind. Fill all the information into proper format. Now open
the grid of student health record. Enter all the information. Similarly fill data in Mother Information,
Father Information and Guardian information. After adding up all the information recheck the whole
form and make sure that there is no empty space left. Click on ADD button. Message will be displayed of
“Saved Record”. If it did not display the message, there must be an error while filling up the form. Re-
check the whole form, it must show you the error.

Copy Rights ©: All rights are reserved by APSACS SECTT Page 9
Modify Student Data
Student registration form can be modified.
Go to School -> Student ->Admission -> Modify Student Data
All the student record will be displayed to you. Search the name of the student whom you want to modi-
fy the record. There will be a small + sign at the left most corner. Click on the sign. All the student in-
formation will be open in girds. Check the field you want to modify or reenter. There will be an edit link
at the end of each grid. Click the edit link. It will edit your required field. Re-enter your required infor-
mation and press the Update link. It will update the record of student in the database.

Copy Rights ©: All rights are reserved by APSACS SECTT Page 10
Student Profile Go to school -> Search record -> Student Profile
You can search student record in different ways. Click on the checkbox according to your need. If
you want to view record by searching class and section, click on Search by Students with Class and
Section. Or you can search by student name, File number. Father CNIC. Etc. You have links for quick
searching available as well. By clicking on Create Student List, you can create list of all the students
and export them into excel as well

Copy Rights ©: All rights are reserved by APSACS SECTT Page 11
For searching record of a particular student, click the checkbox search by student with class and sec-
tion. Select particular class and section. And click on the search icon.
Update Classes and Sections

Copy Rights ©: All rights are reserved by APSACS SECTT Page 12
These are 7 steps showing that how to update sections and classes (if entered wrong).
Teacher Information
Go to School -> Employee -> Teacher Information
This form will open and you have to enter all the required information in the required field and in re-
quired format. Open the grid of Employee Information by clicking on Employee information. Start en-
tering Employee Information. All the information is auto-filled. Just click on the field in which you want
to enter the data. Start entering all the other information. If you don’t have any information regarding
any field doesn’t leave the space empty. Enter NA. Enter 00000 if you don’t know the zip code. Format
of CNIC is 37201-2298764-0. If you don’t know CNIC number enters 00000-0000000-0. Format of enter-
ing telephone number is +92-33694934. Enter +00-000000 if u don’t know the exact number. Fill all data
into Employee information. After completing the grid open next grid which is Qualifications and compe-
tencies, there will be three sub grids in qualification.
Academic qualification
While adding academic qualifications the format of From Year – To Year will be DD-MM-YYYY. For
example: 22-12-2008. For adding more grids click on Add More.
Professional courses taken
In professional courses taken you need to write in first field whether the training was given or taken
by you. Attendance must be in numeric only.
Professional carrier
Format of service from – service to will be DD-MM-YYYY
For example: 22-12-2008.
After finishing up the entire information click on ADD button. If it displays message “Record Saved”
your data will be saved. If it don’t display recheck the whole form there must be some error in en-
tering the information. Software will notify that field automatically.
Teacher musts have to make their profile before using the marks entry module otherwise it won’t
display any data to the user.
Copy Rights ©: All rights are reserved by APSACS SECTT Page 13
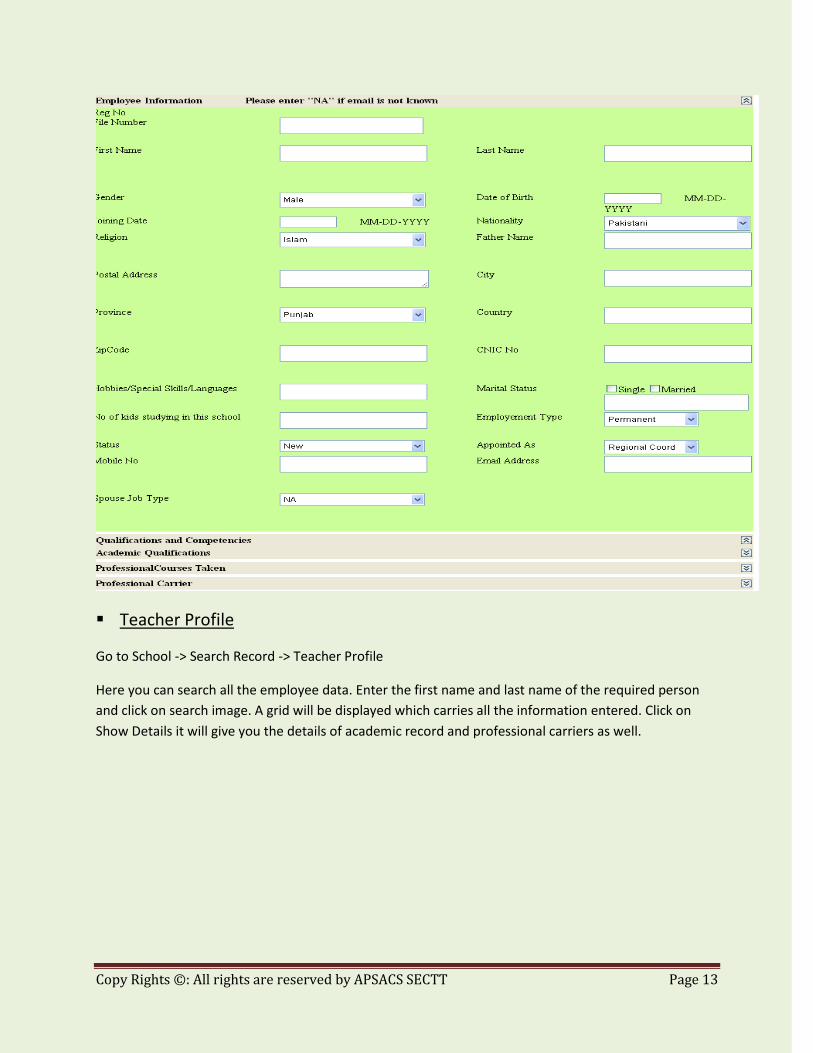
Teacher Profile
Go to School -> Search Record -> Teacher Profile
Here you can search all the employee data. Enter the first name and last name of the required person
and click on search image. A grid will be displayed which carries all the information entered. Click on
Show Details it will give you the details of academic record and professional carriers as well.

Copy Rights ©: All rights are reserved by APSACS SECTT Page 14
EMPLOYEE DATA Go to School -> Modify record -> Employee Data
Open employee data page it will display data of all the employees. If there is any mistake in entering
the data click on edit link. It will open a pop up window. Where you can reenter all the information
and then click on the Save button it will modify your record.

Copy Rights ©: All rights are reserved by APSACS SECTT Page 15
ROLES OF SCHOOL TEACHER
Define Subjects First step is to Login with the username and password of School Admin for accessing Define Subjects
module.
Go to DBA -> Administrator -> Subject Subject Name
Enter the name of the subject for example English, Urdu, Math, Science etc.
Class Name
Select the class name. It will associate the particular class with the particular subject. You will
have to associate every class with each subject one by one.
Teacher Name
Here we associate teacher with the class and subject. Select the teacher name for the particular
subject and class. You need to fill the employee information form for availability of teacher name
here. If you have not entered the teacher information, drop down list will not show the names.
Subject Total marks
Enter the total marks of the particular subject
Remarks
Give your remarks whether the subject is compulsory or anything you feel like
Copy Rights ©: All rights are reserved by APSACS SECTT Page 16
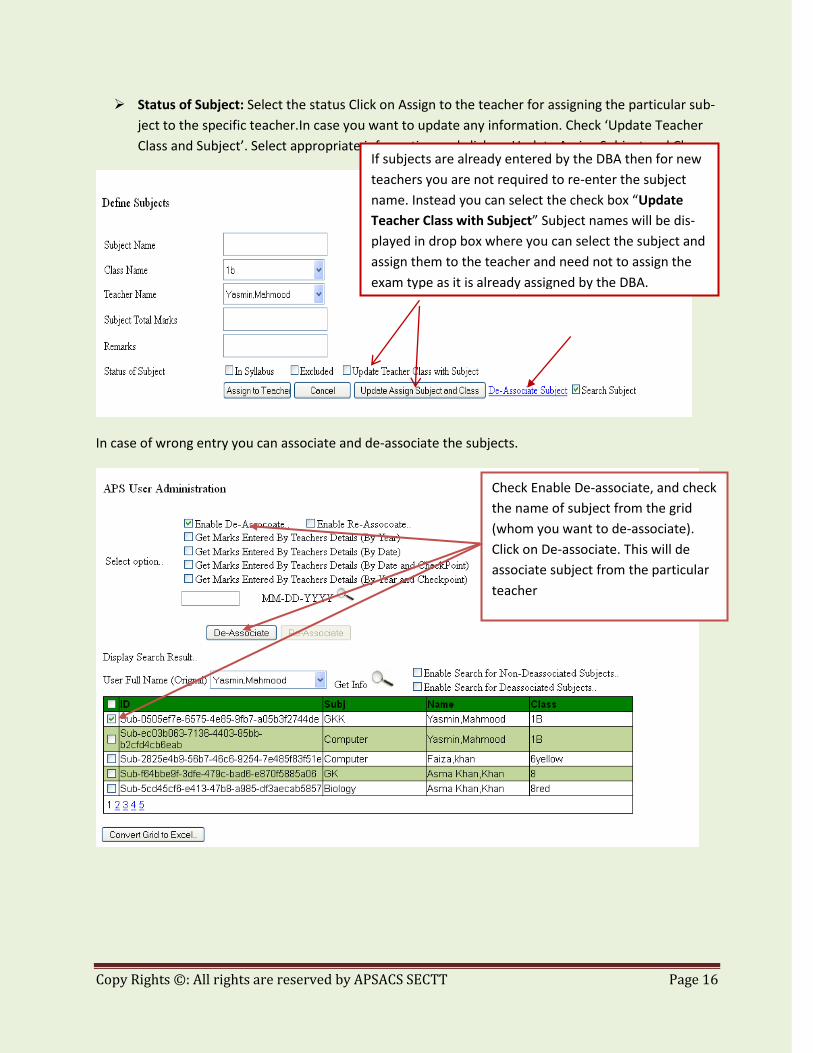
Status of Subject: Select the status Click on Assign to the teacher for assigning the particular sub-
ject to the specific teacher.In case you want to update any information. Check ‘Update Teacher
Class and Subject’. Select appropriate information and click on Update Assign Subject and Class.
In case of wrong entry you can associate and de-associate the subjects.
Check Enable De-associate, and check
the name of subject from the grid
(whom you want to de-associate).
Click on De-associate. This will de
associate subject from the particular
teacher
If subjects are already entered by the DBA then for new
teachers you are not required to re-enter the subject
name. Instead you can select the check box “Update
Teacher Class with Subject” Subject names will be dis-
played in drop box where you can select the subject and
assign them to the teacher and need not to assign the
exam type as it is already assigned by the DBA.

Copy Rights ©: All rights are reserved by APSACS SECTT Page 17
Exam Type First step is to Login with the username and password of School Admin for accessing Exam type
module.
Go to DBA -> Administrator -> Exam Type
This section is necessary to fill up for using Exam Module. You must need to fill up all the infor-
mation Type
In type you must select what is the type of exam going through. Whether it class assessments or
Exams
Sub Type
In sub type you will select whether it is Checkpoint1, Checkpoint2, Checkpoint3, Checkpoint4, or
class work + assessment etc.
Class Name
Class name will be displayed in the drop down list. They are the list of classes you have entered
earlier. Select the class name.
Subject Name
Select the subject name for the class you have selected earlier.
Total Marks
Select total marks of the subject from the drop down list.
Set Percentage
Set Percentage
Select the percentage and enter the values accordingly.
Select the percentage.Click on Search Section for searching all the data entered.
If DBA wants to see report of teacher
about checkpoints (marks entry),
he/she will select the option for viewing
the report either by year, date etc. Save
file option will appear by clicking the
checkbox.

Copy Rights ©: All rights are reserved by APSACS SECTT Page 18
STUDENTS MARKS ENTRY
Note: Marks entry form will not work without entering student data. First you need to enter student
information for working of this module.
Go to School -> Student -> Student Academic Record -> Enter Marks
This is the module for displaying all the exam result. Before you start working on it. First you need to
register all the students by entering their data in school admission form
Add student information here: (Go to School -> Student ->Admission -> Admission form)
Before using Exam module following forms must be filled as mentioned in detail above.
Class (Go to DBA-> Administrator -> Classes)
Sections (Go to DBA-> Administrator -> Sections)
Subject (Go to DBA -> Administrator -> Subject)
Exam type (Go to DBA -> Administrator -> Exam type)
Copy Rights ©: All rights are reserved by APSACS SECTT Page 19
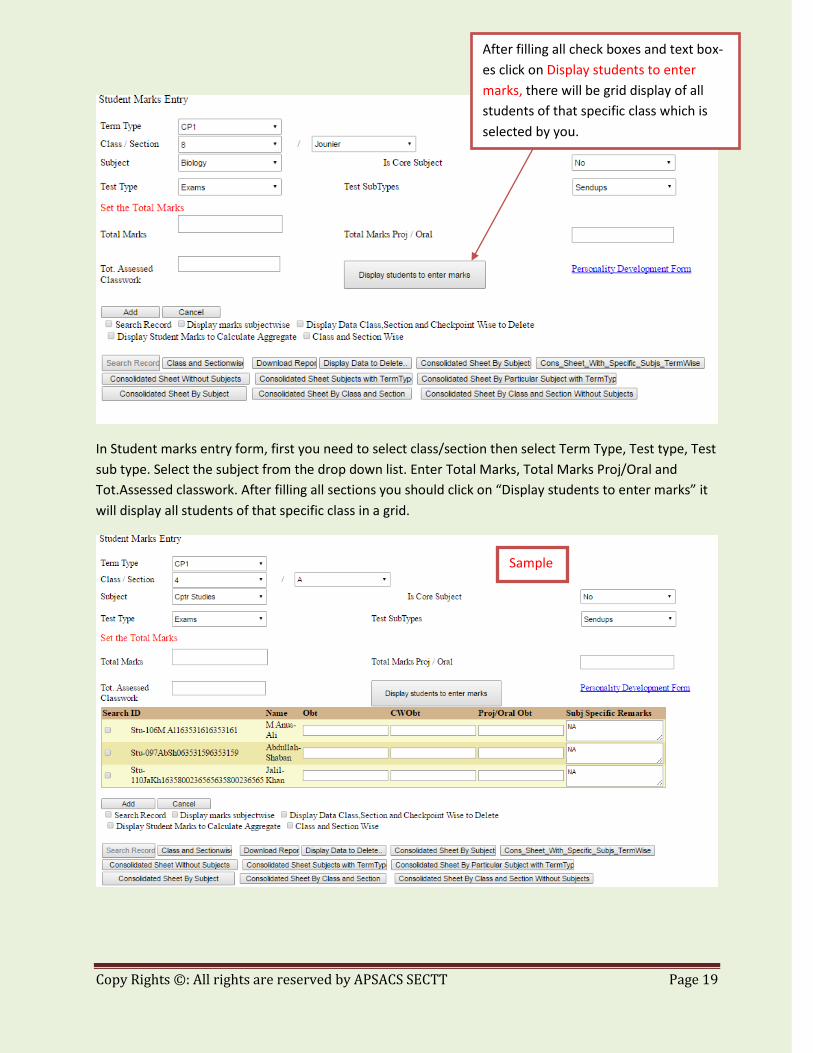
In Student marks entry form, first you need to select class/section then select Term Type, Test type, Test
sub type. Select the subject from the drop down list. Enter Total Marks, Total Marks Proj/Oral and
Tot.Assessed classwork. After filling all sections you should click on “Display students to enter marks” it
will display all students of that specific class in a grid.
After filling all check boxes and text box-
es click on Display students to enter
marks, there will be grid display of all
students of that specific class which is
selected by you.
Sample

Copy Rights ©: All rights are reserved by APSACS SECTT Page 20
there is any Project work, Practical, Oral etc. You will enter them in Total marks Proj / Oral. Assessed
CW marks at the end of the term will be entered in Total Assessed CW. At the end of the term Subject
specific remarks will be entered in the text box available for the remarks.
After filling up the entire required field, click onAdd button. It will save the information for the particu-
lar class against all students.
After clicking on Add button be patient because it will take some time to store data of all class at same
time.
Sample
Sample

Copy Rights ©: All rights are reserved by APSACS SECTT Page 21
Personality Development Report Go to Student marks entry from and click on the link Personality Development Form
Select name of student with respect to class and section. Add information as required by selecting
grades from drop down list in study skills, social skills and personality. Click on Add information, this
will save data for the current student.
For generating report, click on Gen-
erate for single student or generate
for all students. It will generate re-
port of PDR
You can download summary of result
reports from here as well. Just click on
the appropriate category and download
the result. Consolidated result for whole
class can also be downloaded from here

Copy Rights ©: All rights are reserved by APSACS SECTT Page 22
PDR for each student will be displayed like this. You can download this report
Edit Student Marks Go to School ->Student -> Student Academic Record -> Edit Student Marks If there is any mistake in filling up the marks of the students, you can edit and update the marks
record in edit student marks form. Search the name of the students by selecting class and section.
Grid will show you all the record. Click on edit link to edit the record. A pop up window will open
with all the edit record. Edit the marks and close the window. Your record will be updated. You can
delete record of the student by simply clicking on the link with update information.
Click here, it will open a dialogue box; select the format in which you want to save the
report. Report will be saved in word or whatever you have selected format. You can
take print out whenever you want.

Copy Rights ©: All rights are reserved by APSACS SECTT Page 23
Student Academic Report Go to School -> Reports -> Academic Report
Select class, sections and name. Click on ‘Display
Student Data’. It will display grid of selected stu-
dents. Click on Edit and it will edit the infor-
mation of the students marks.
Edit information as per requirement and update it. There is
also option of delete information. You can delete all un-
necessary data.

Copy Rights ©: All rights are reserved by APSACS SECTT Page 24
Here you can see the report format of the result generation. Check if you want to generate report by
student name, by percentage, by range of percentage etc. Click the checkbox and then select the in-
formation. Select class, section, student name. Enter percentage if you want to see a check the rec-
ord of students with specific range of percentage. Click on Generate Report button. It will generate
the Academic report. Now if you want to save this academic report. Select the format in which you
want to save it whether it is word, excel, PDF format. Click on Export Report button, it will automati-
cally save your selected report into your system. You can also print this report directly from here by
just clicking on Print Result.
For consolidated reports select class, section and name of the student. Select the Con. First term
and click the checkbox Consolidated report. Click on Generate report. It will generate the report.
For creating reports of the results, check
the checkbox ‘Show by Student Name’. For
classes KG to 7 select ‘KG-7’ and for classes
8 and above select ‘8 and above’
Select class and section, this will update
the names of the students. Select the
name of the student
To save report, click on this icon
it will give you option to save file

Copy Rights ©: All rights are reserved by APSACS SECTT Page 25
Similarly you can save reports of all students by selecting classes and sections. And for all
checkpoints and term results select the options and click on generate report. For consolidated result
select cons. First term and con. Second term, for classes IV-VIII and for classes I-III select First term
I,II,III and Second term I,II,III, clcik on checkbox consolidated result and after that click on generate
results.
Consolidated report will be displayed.

Copy Rights ©: All rights are reserved by APSACS SECTT Page 26
Comparative Result Comparative results can also be displayed. This is the graphical report of all the exams result of any
particular student. Select class, section and name from the drop down list. Click on Show Graphical
Display button. It will display graphs. First graph shows percentage of the results and second graph
shows marks obtained in all the sessions. Here you can easily compare all the results and marks of
students in each session.
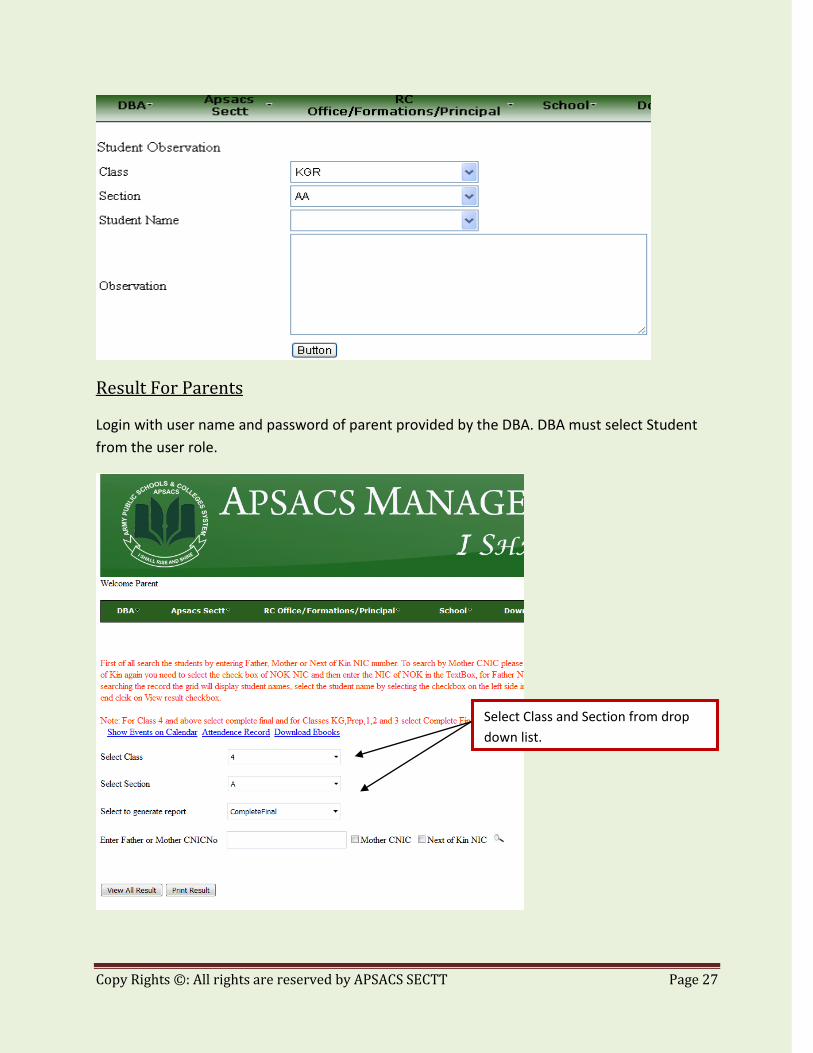
Student Observation Form
Go to School -> Student -> Student Academic Report -> Student Observation
Teacher can submit and save the observation of the students. Select the class name, section and student
name of your class. In observation field, enter the observation regarding particular student. Click on But-
ton to save the observation.
Copy Rights ©: All rights are reserved by APSACS SECTT Page 27
Result For Parents
Login with user name and password of parent provided by the DBA. DBA must select Student
from the user role.
Select Class and Section from drop
down list.

Copy Rights ©: All rights are reserved by APSACS SECTT Page 28
For Class 4 and above select complete final
and for Classes KG,Prep,1,2 and 3 select
Complete FinalI,II,III and for Matric select
Complete Matric
Enter Father CNIC. If entering mother
CNIC, click Checkbox Mother CNIC. If en-
tering Next of Kin CNIC, click Checkbox
Next of Kin CNIC

Copy Rights ©: All rights are reserved by APSACS SECTT Page 29
For Class 4 and above select complete
final and for Classes KG,Prep,1,2 and 3
select Complete FinalI,II,III and for Matric
select Complete Matric
Click on Search icon
Grid will be displayed showing student name
and ID. Click on the checkbox at the left most
corner and after that click on View result
checkbox

Copy Rights ©: All rights are reserved by APSACS SECTT Page 30
Result will be displayed by clicking on View Re-
sult checkbox

Copy Rights ©: All rights are reserved by APSACS SECTT Page 31
Chapter 3: Accounts
STUDENT FEE STRUCTURES
Note: Accounts form will not work without entering student data. First you need to enter student infor-
mation for working of this module.
Go to School -> Student -> Accounts -> Set fee structure.
Form will open where you can set fee structure for all categories first set Occupation Type select from
the drop down list.Select Class name, then set amount for desired occupation. Click ADD button to add
it into database. You can search all the categories by click on Search checkbox. This will help you in de-
fining the fee structure for all categories either it is Civilian, Armed forces etc. It will be done only once
for every category.
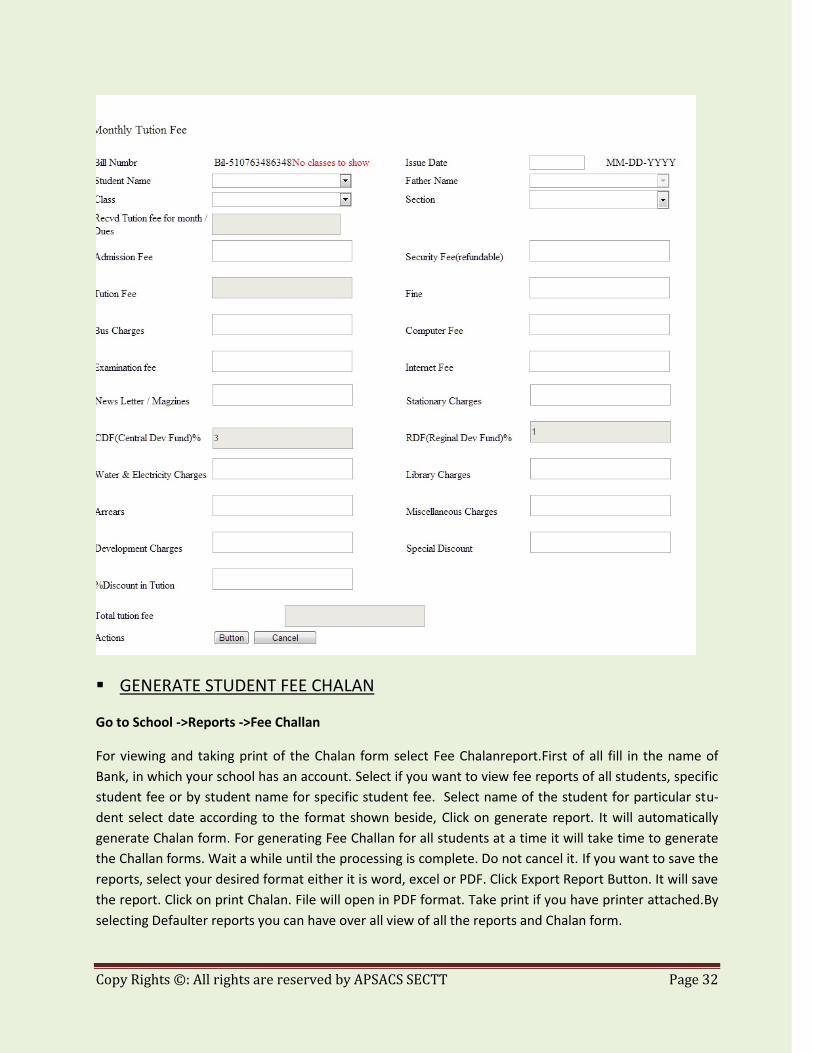
CREATE FEE CHALAN Now go to School -> Student -> Accounts -> Tuition Fee.
Monthly Tuition Fee form will be opened. First set Issue Date of the bill. Names of students are
available in drop down list. Select the desired student name. It will automatically select the father
name. Select Class and section of the selected student. Make sure you don’t select the wrong class
or section. Tuition Fee will fill automatically by checking the designation of the father. Add all re-
maining charges and if there is any other charges whose text box is not available in the form, add it
into the miscellaneous charges. There is a percent discount on tuition fee. You can set percent dis-
count by selecting “Percent Discount on Fee” form. Click ADD button. It will sum all charges and
save in to database.
Copy Rights ©: All rights are reserved by APSACS SECTT Page 32
GENERATE STUDENT FEE CHALAN
Go to School ->Reports ->Fee Challan
For viewing and taking print of the Chalan form select Fee Chalanreport.First of all fill in the name of
Bank, in which your school has an account. Select if you want to view fee reports of all students, specific
student fee or by student name for specific student fee. Select name of the student for particular stu-
dent select date according to the format shown beside, Click on generate report. It will automatically
generate Chalan form. For generating Fee Challan for all students at a time it will take time to generate
the Challan forms. Wait a while until the processing is complete. Do not cancel it. If you want to save the
reports, select your desired format either it is word, excel or PDF. Click Export Report Button. It will save
the report. Click on print Chalan. File will open in PDF format. Take print if you have printer attached.By
selecting Defaulter reports you can have over all view of all the reports and Chalan form.

Copy Rights ©: All rights are reserved by APSACS SECTT Page 33
This is snapshot of sample fee challan. There are three copies of it. It will be one for students, one for
office and one for bank respectively. Follow the procedure of sending one copy to bank.

Copy Rights ©: All rights are reserved by APSACS SECTT Page 34
CHALLAN FORM EDITING:
Here you modify the challan status after receiving the bank receipt from the bank. Search record by
class name and sections. Click on edit field and update.
EDIT INFORMATION OR CREATE NEW CHALLAN FORM
Go to School -> Modify record -> Student Fee
You can edit the challan form if there are any changes to make or you can create new challan form from
the existing ones. Click

Copy Rights ©: All rights are reserved by APSACS SECTT Page 35
Click on Update Button to make the changes and click on Save Button to create new challan form.

Copy Rights ©: All rights are reserved by APSACS SECTT Page 36
Chapter 4: ROLES OF PRINCIPAL
ROLES OF PRINCIPAL
Principal can perform different task. Principal can
Grant Leave
Go to RC Office/ Formation/ Principal -> Regional Coord -> Grant Leave
Leave module has been implemented. If teacher or any other employee wants to submit leave
online. He/ She will fill the leave form and submit it. For granting the leave open the grant leave
form. It will show the leave applications submitted earlier. Just click on GRANT link. It will notify the
employer that the leave is accepted.
When you click on Grant leave link, pop up window will open which shows all the previous record of
Leave application of the particular employee. If the application is applicable for the leave, select accept-
ed from the Granted drop down list. If the person is not applicable for the leave, select not granted from
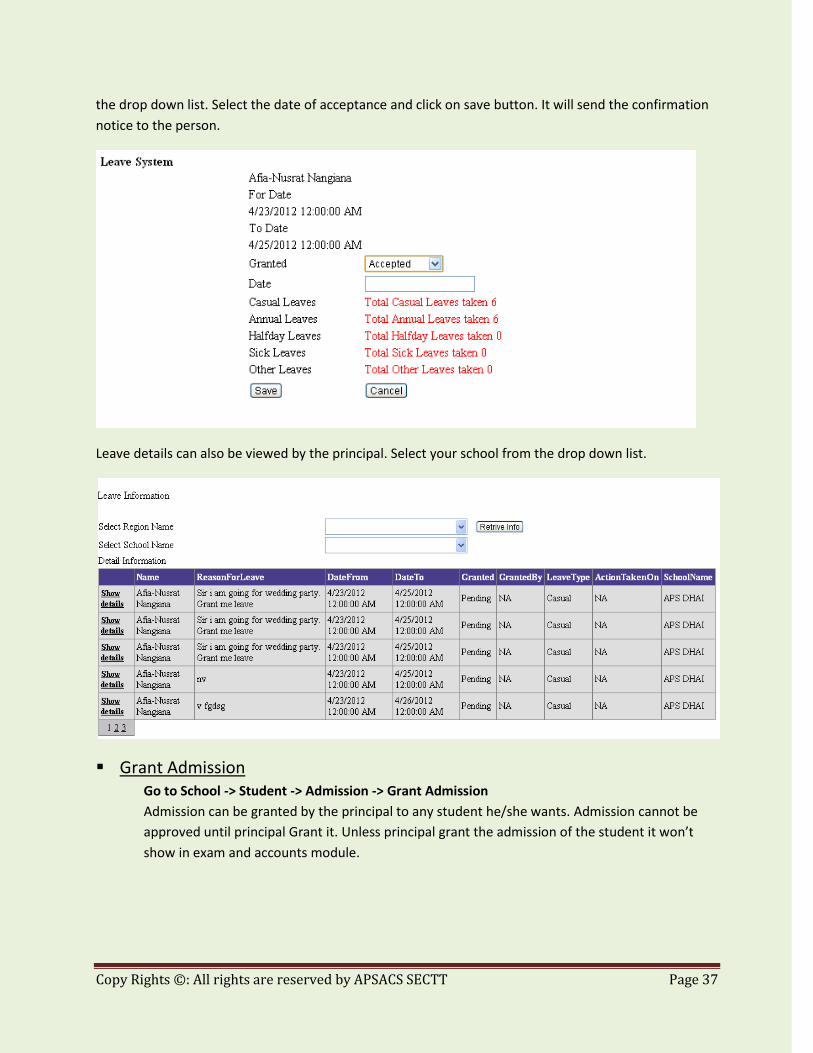
Copy Rights ©: All rights are reserved by APSACS SECTT Page 37
the drop down list. Select the date of acceptance and click on save button. It will send the confirmation
notice to the person.
Leave details can also be viewed by the principal. Select your school from the drop down list.
Grant Admission Go to School -> Student -> Admission -> Grant Admission
Admission can be granted by the principal to any student he/she wants. Admission cannot be
approved until principal Grant it. Unless principal grant the admission of the student it won’t
show in exam and accounts module.

Copy Rights ©: All rights are reserved by APSACS SECTT Page 38
Check Student Profile Go to School -> Search Record -> Student profile
Principal can check student profile, if he/she wants to see information of student. Just enter the first
name and last name of the student. Grid will display all the information of the specific student.

Copy Rights ©: All rights are reserved by APSACS SECTT Page 39
Check Teachers Profile Go to School -> Search Record -> Student profile
Principal can check teacher profile, if he/she wants to see information of employee. Just enter the
first name and last name of the employee. Grid will display all the information of the specific person.
The information will show the summary of the teacher’s profile which contains basic information re-
garding qualification, professional trainings, and professional carrier you can search by full name of
the teacher.
Promote Employees Go to School -> Employee -> Promotion
Employee promotion can also be done here. Select the name of the employee. Then select the pro-
motion. Click Add button to update the new status of the teacher.

Copy Rights ©: All rights are reserved by APSACS SECTT Page 40
Check the status of Employee Status of employees can also be checked by selecting the region, school and the status either it is
transfer case, working employees or Left etc.
Transfer Student Go to School -> Student -> Admission -> Transfer Student
This is to transfer all the data of students which are being studied in the particular school and going
to transfer to other. Principal can also handle the transfer case of the student. If any student is leav-
ing the school and going to join another APS school principal must have to transfer it from the data-
base as well. Go to the form Student transfer; fill in all the information regarding the student. Click
on ADD button. It will transfer the student from one school to the other. There are sub links in it for
grant admission to transfer case and confirm withdraw or school completion. Here you can approve
the transfer case and update the status of any student.
Promote Student
Student promotion to the next level is very easy step. When final term is finished and the
result is displayed the student has to go in nexlt class.
Search students by class and section
or by first and last name. Select the
checkbox of the particular student.
Select the name of school you are
going to transfer the student

Copy Rights ©: All rights are reserved by APSACS SECTT Page 41

Copy Rights ©: All rights are reserved by APSACS SECTT Page 42
CHAPTER 5: SECTION HEAD
ROLES OF SECTION HEAD
Section head can perform following tasks.
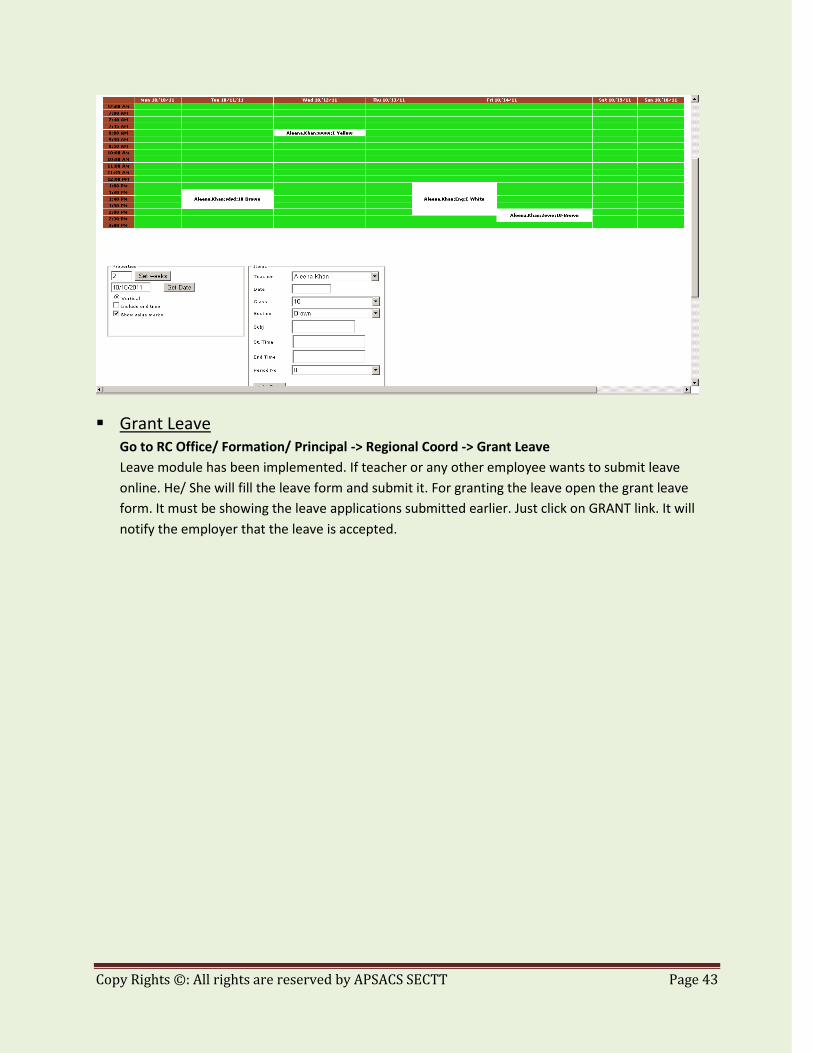
Create Time table
Go to School -> Time table -> Create/View
Creating time table can be only done by the Section Head. This Grid will be displayed only by selecting
the information displayed on the page. First set the number of weeks and date. It will help you in dis-
playing your grid according to the number of teachers and classes. Select the name of the teacher, class,
period number, start time of the period and end time of the period. Click on ADD button. It will display
your selected information in the grid. Now go on adding time table of different teachers in the grid.
View Time table
You can view timetable as well
Copy Rights ©: All rights are reserved by APSACS SECTT Page 43
Grant Leave Go to RC Office/ Formation/ Principal -> Regional Coord -> Grant Leave
Leave module has been implemented. If teacher or any other employee wants to submit leave
online. He/ She will fill the leave form and submit it. For granting the leave open the grant leave
form. It must be showing the leave applications submitted earlier. Just click on GRANT link. It will
notify the employer that the leave is accepted.

Copy Rights ©: All rights are reserved by APSACS SECTT Page 44
When you click on Grant leave link, pop up window will be open which shows all the previous record of
Leave application of the particular employee. If the applications are applicable for the leave, select ac-
cepted from the Granted drop down list. If the person is not applicable for the leave, select not granted
from the drop down list. Select the date o of acceptance and click on save button. It will send the con-
firmation notice to the person.
Leave details can also be viewed by the section head. Select your school from the drop down list

Copy Rights ©: All rights are reserved by APSACS SECTT Page 45
Teacher Profile
Go to School -> Search Record -> Student profile
Section head can check teacher profile, if he/she wants to see information of employee. Just enter
the first name and last name of the employee. Grid will display all the information of the specific
person.
Student Profile Go to School -> Search Record -> Student profile
Section head can check student profile, if he/she wants to see information of student. Just enter the
first name and last name of the student. Grid will display all the information of the specific student.

Copy Rights ©: All rights are reserved by APSACS SECTT Page 46
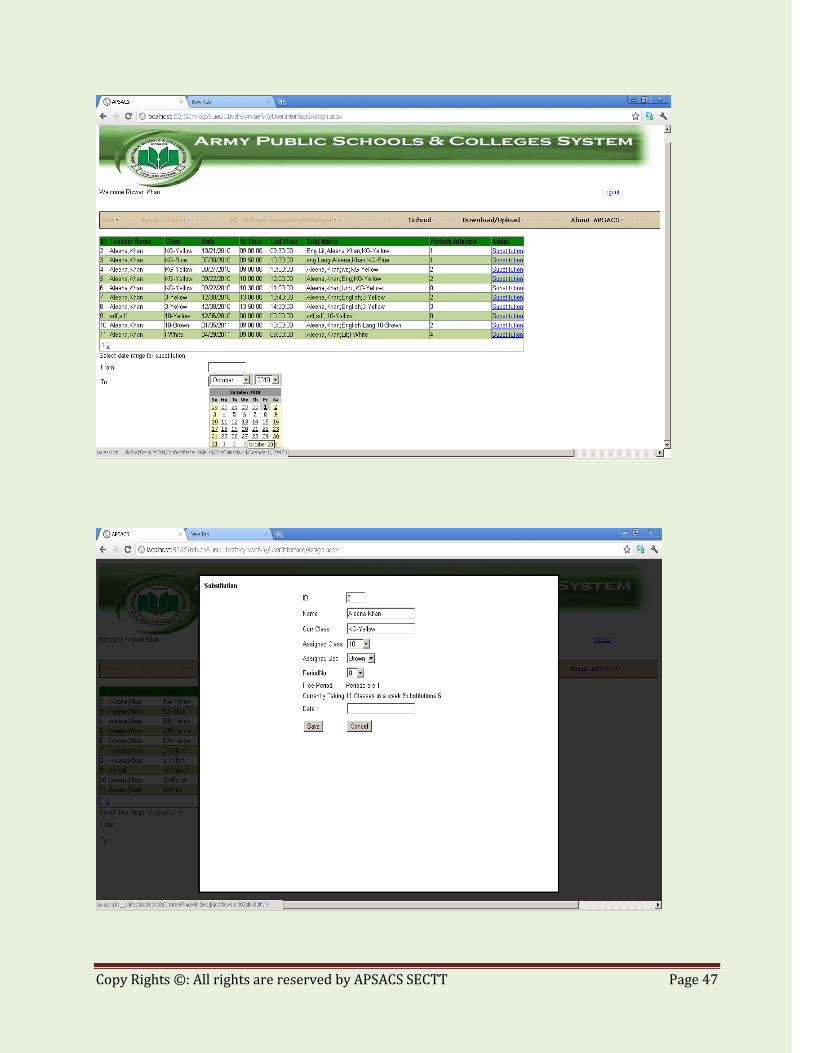
Substitutions Go to School -> Time Table-> Substitution
Section Head can add substitution for the teacher online.
Copy Rights ©: All rights are reserved by APSACS SECTT Page 47

Copy Rights ©: All rights are reserved by APSACS SECTT Page 48
CHAPTER 6: LIBRARY MANAGEMENT SYSTEM Categories
First of all login with username and password of librarian provided by the DBA.
Go to School -> Library Manager -> Category
Here you can enter the entire categories of the library books for example English fiction, Urdu fiction,
Islamic, History, Science, encyclopedia etc. Click on Save button it will add the record. You can search
the categories by clicking on the Search Category checkbox. It will display all the categories entered by
the librarian.
Books
Login with the username and password of librarian
Go to school -> Library manager -> Books
Here you can select the category and enter all the related books present in the library and the age level
for every book.

Copy Rights ©: All rights are reserved by APSACS SECTT Page 49
Issue Books and Receive Books Go to School -> Library Manager -> Issue Book There are two people who can login for library manager. First one is librarian and second one is class
teacher. Class teacher will enter all the books placed in class library and librarian will add all the li-
brary books. When teacher will login he/she has to click on In Class Library. Librarian has to check if
it is student or employee before issuing or receiving a book. After selecting librarian has to check
whether to issue book or receive book.
Library Reports The reports of the library can be generated with respect to the number of books and no of
Students issued books etc.

Copy Rights ©: All rights are reserved by APSACS SECTT Page 50
The exported data grid can be saved in Word and Excel format, Print out can be taken out as well.

Copy Rights ©: All rights are reserved by APSACS SECTT Page 51
Annual Grant Records for annual grant and the frequency of buying books as well as donation books handling rec-
ord can also be maintained.

Copy Rights ©: All rights are reserved by APSACS SECTT Page 52
CHAPTER 7: Regional Coordinator/Formation Searching:
Go to Regional Coord-> Searching -> Employee info
Select Region and Select name of the school. Click on Search icon it will display a grid containing all the
information regarding the employees of the school.
Go to Regional Coord -> Searching -> No of Teacher
Go to Regional Coord -> Searching -> No of Students
In this form select Region and School name click on retrieve info it will show you number of schools in
the region and number of teachers in the particular school.

Copy Rights ©: All rights are reserved by APSACS SECTT Page 53
Go to Regional Coord -> Searching -> No of schools in Region

Copy Rights ©: All rights are reserved by APSACS SECTT Page 54
CHAPTER 8: SALIENT FEATURES Record of Events
Go to School -> Events
Events related to the school can be updated and keep their records. Events can be your weekly
monthly and yearly events which are being performed in the school. For example Parents Day,
Sports Day, Annual Function, Art Exhibitions etc.Enter the name of the event in the Event Name
field. Select the date of event. Click the Add Event button it will add your event into the database.
Monthly view of events will be shown in calendar. For searching any event click on the Search Image or
enter the name of event in the textbox. It will display grid containing records of all the events. Grid
shows RegionCorpsName, SchoolName, Event, and EventDate

Copy Rights ©: All rights are reserved by APSACS SECTT Page 55
Event Viewer for Parents:
Parents can view the events created by the school. They have to login with the username and
password provided by the school (which is to be created with the role id of ‘Student’)
Leave Manager
Go to -> School -> Student -> Submit leave
Employees of APSACS can apply for leave online through this software. Login in to the software with
your username and password. Go to school option on menu bar. Select Employee from School. There is
a submit leave option in employee. Click Submit Leave. Leave application form will be open. Start filling
data in the text boxes. First of all you need to select the date. Date from and date to. Then select type of
your leave whether you are going for sick leave, casual leave, or annual leave. Then briefly add the rea-
son for taking leave in next text box. In the end select whom you want to send the application. If you are
principal you must select RC or formation. And if you are employee then you must select principal or
section head. Fill the form. Select ADD RECORD. If there is an error page then you must enter your in-
formation wrong. Go to back page and enter your information again properly. Select Add record only
single time. This will add your information and your leave will be forward to the desired person.
Attendance
Go to School -> Student -> Student academic records -> Mark attendance
1: Please check the Search by student check box then either enter the name of student or do
not enter student name and press mirror, records will be displayed in either case in the
gridview below. Those students who are/were present in the class select their name and those
who are/were absent do not select their names and then press mark attendance button. By do-
ing this all those students whose names were selected their status will be marked as present
and those whose names were not selected they will be marked absent.
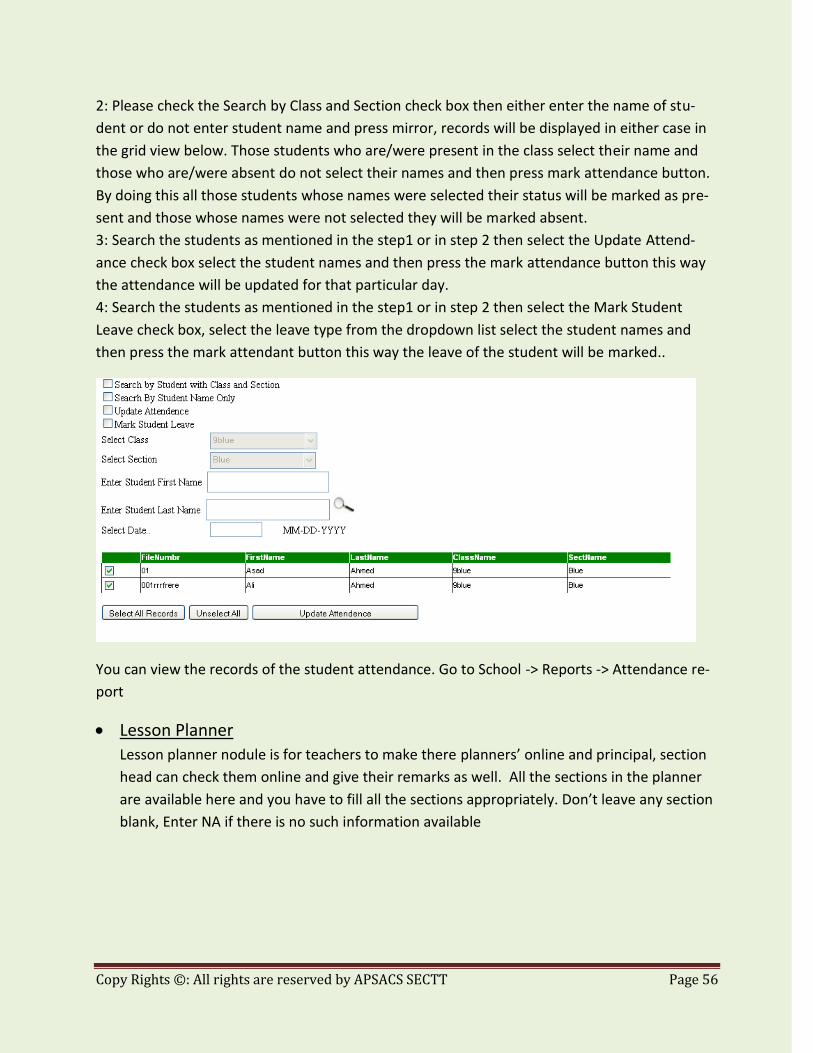
Copy Rights ©: All rights are reserved by APSACS SECTT Page 56
2: Please check the Search by Class and Section check box then either enter the name of stu-
dent or do not enter student name and press mirror, records will be displayed in either case in
the grid view below. Those students who are/were present in the class select their name and
those who are/were absent do not select their names and then press mark attendance button.
By doing this all those students whose names were selected their status will be marked as pre-
sent and those whose names were not selected they will be marked absent.
3: Search the students as mentioned in the step1 or in step 2 then select the Update Attend-
ance check box select the student names and then press the mark attendance button this way
the attendance will be updated for that particular day.
4: Search the students as mentioned in the step1 or in step 2 then select the Mark Student
Leave check box, select the leave type from the dropdown list select the student names and
then press the mark attendant button this way the leave of the student will be marked..
You can view the records of the student attendance. Go to School -> Reports -> Attendance re-
port
Lesson Planner
Lesson planner nodule is for teachers to make there planners’ online and principal, section
head can check them online and give their remarks as well. All the sections in the planner
are available here and you have to fill all the sections appropriately. Don’t leave any section
blank, Enter NA if there is no such information available

Copy Rights ©: All rights are reserved by APSACS SECTT Page 57
Go to About APSACS -> Email

Copy Rights ©: All rights are reserved by APSACS SECTT Page 58
Users of APSACS management system can also send email. Write email address of other person
(u want to send email) and your own email address in TO and FROM textboxes. Write Subject
and the detail of email in Body Textbox. U can also attach file up to 1mb. Click on Send Email
button to send the email.
Location
You can use Google map to look at the location of every APSACS present in Pakistan

Copy Rights ©: All rights are reserved by APSACS SECTT Page 59
Download forms
You can download application form for students and medical/injury form.
Go to Download/Upload -> Application form
Go to Download/Upload -> Medical form
Go to Download/Upload -> Injury form
Picture Album
You can upload your pictures related to the school and school events,
Go to About APSACS -> Picture Album
Copy Rights ©: All rights are reserved by APSACS SECTT Page 60
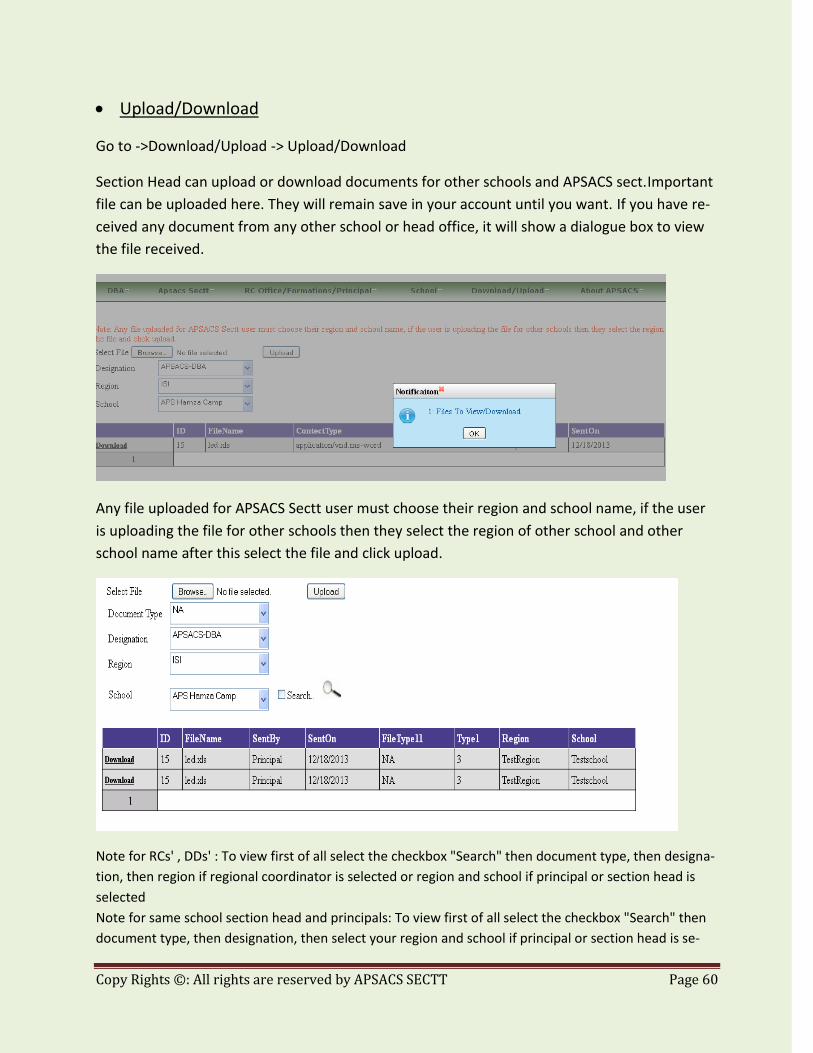
Upload/Download
Go to ->Download/Upload -> Upload/Download
Section Head can upload or download documents for other schools and APSACS sect.Important
file can be uploaded here. They will remain save in your account until you want. If you have re-
ceived any document from any other school or head office, it will show a dialogue box to view
the file received.
Any file uploaded for APSACS Sectt user must choose their region and school name, if the user
is uploading the file for other schools then they select the region of other school and other
school name after this select the file and click upload.
Note for RCs' , DDs' : To view first of all select the checkbox "Search" then document type, then designa-
tion, then region if regional coordinator is selected or region and school if principal or section head is
selected
Note for same school section head and principals: To view first of all select the checkbox "Search" then
document type, then designation, then select your region and school if principal or section head is se-

Copy Rights ©: All rights are reserved by APSACS SECTT Page 61
lected (of the same school or other school from other region) and then click on search button. If for ex-
ample DD Training is selected then you don't need to select the region or school. In the end press the
search button.