Embed Size (px)
Citation preview
PCR Kit POLYMERASE CHAIN REACTION:
Amplification of Alu PV92
Adapted from: Ah, Lou! There really are differences between us!
Maria Abilock, Bay Area Biotechnology Education Consortium Frank H. Stephenson, Applied Biosystems
Partnership for Biotechnology and Genomics Education Barbara Soots Linda Curro
Education Coordinator
University of California Davis
Assistant Education Coordinator
University of California Davis
530 752‐6552 530 752‐6613
530 754‐4410 (fax) 530 754‐4410 (fax)
[email protected] [email protected]
This program is made possible through the generous support of:
Biotechnology in the Classroom 2009 2 updated 9/23/2009
Teacher Information
POLYMERASE CHAIN REACTION Amplification of Alu PV92 Insert Introduction
Several recent studies suggest that a small piece of DNA, called an Alu element, found its way into the genome less than one million years ago. In a given group of individuals, some carry this 300 base pair insertion while others do not.
During this laboratory, students will extract their own DNA from a cell sample taken from the lining of their mouth. They will then use a powerful molecular biology technique, called the Polymerase Chain Reaction, to amplify this Alu region so that it can be visualized using gel electrophoresis.
Attached readings and activities will provide more information about the Alu region and help illustrate the process of PCR and its importance in modern day biology.
Objectives
1. Isolate DNA from cheek cells and prepare a reaction for PCR amplification.
2. List and explain the importance of each component of PCR.
3. Electrophorese the Alu repeat to determine your genotype for the Alu insertion.
4. Understand the difference between heterozygous and homozygous.
5. Calculate allele and genotype frequencies.
Materials
For Each Student gloves safety goggles* disposable transfer pipet two 1.5 ml microtubes 200 μl of 5% Chelex in a 1.5 ml tube 0.2 ml PCR tube with lid microtube cap lock paper cup with 10 ml of 0.9% NaCl *
For Each Lab Group
20 μl micropipet 100 μl micropipet box of 20 – 200 μl tips microtube rack PCR tube rack waterproof pen 80 μl master mix 80 μl primer mix 30 μl 0.9% NaCl * cup of crushed ice*
Common Materials
two dual gel boxes power supply carboy with 1X TBE solution 2.0% agarose gel microcentrifuge heat block & thermometer thermal cycler & 96 well PCR tray UV transilluminator MiniVisionary system PCR grid gel electrophoresis grid
Biotechnology in the Classroom 2009 3 updated 9/23/2009
Instructor Use
1000 μl micropipet 100 μl micropipet 20 μl micropipet box of 1000 μl tips box of 20 – 200 μl tips 100 bp ladder control DNA loading dye with SYBR® Green sterile water lab tape PCR and microcentrifuge tube rack 4 gel trays 4 10‐well combs 4 12 well combs
* Materials provided by instructor
Advance Preparation
DAY 1
1. Mix 4.5 g of non‐iodized table salt in a 500 ml bottle of drinking water to create a 0.9% NaCl solution.
Since students will be using the NaCl solution as a mouthwash, be sure to use containers and measuring equipment that is designated for use with “edible only” experiments.
2. For each student, aliquot 200 μl 5% Chelex
in a 1.5 ml tube.
Use a 1000 μl micropipet so the beads will not clog the tip and swirl the tube frequently to ensure each student gets a 5% solution.
3. For each lab group, aliquot 100 μl of 0.9%
NaCl solution. You may use some of the leftover 0.9% NaCl solution from Step 1.
4. Set heat block to 99°C (5.5 on the high dial) 5. For each student, aliquot 10 ml of 0.9%
NaCl solution in a paper cup
DAY 2:
1. Buy/prepare crushed ice for each lab station.
It is very important to keep the Master and Primer mix cold while students are preparing their PCR reactions.
2. For each lab group, aliquot:
a) 80 μl Master Mix (keep on ice)
b) 80 μl Primer Mix (keep on ice) 3. Prepare a positive and negative control
solution. a) Positive Control:
20 μl Master Mix 20 μl Primer Mix 10 μl control DNA
b) Negative Control: 20 μl Master Mix 20 μl Primer Mix 10 μl sterile water
4. Place the paper PCR grid copied from lab
manual next to the thermal cycler. Make sure the 96 well tray is in the themal cycler.
5. Follow the startup instructions on the
thermal cycler lid.
DAY 3:
1. Make a 1X TBE solution from 10X stock and place in carboy.
Figure on about 1L per class: M1V1=M2V2
(10X)(x) = (1X)(1,000 ml) x = 100 ml
Use 100 ml of (10X) buffer and add distilled water to bring the final
concentration to 1,000 ml
2. Pour four 2% agarose gels. Cover bench with lab paper prior to pouring gels.
Biotechnology in the Classroom 2009 4 updated 9/23/2009
3. Set up a gel run area with two dual gel boxes and one power supply. Tape the paper grid included in this packet near each box. Put gel trays in box.
4. Add 5 ul of loading dye to each of the
student sample tubes. Be sure to change tips for every tube.
Remember the SYBR Green DNA stain is in the loading dye.
DAY FOUR:
1. Retrieve gels from refrigerator.
2. Set up MiniVisionary photo system according to instructions included with system in the kit box.
Teaching Tips
CHELEX
Chelex is a resin containing organic chemicals that remove metal ions that might degrade the DNA during boiling.
USE OF MICROPIPETTES:
These extremely precise and expensive instruments need to be handled gently.
Do not wind the micropipet dial past the maximum amount indicated on the top of the plunger.
Always hold the micropipet in a vertical position.
Always change tips between aliquots to reduce risk of contamination.
USE OF THERMAL CYCLER
Make sure you have a tray installed in the heat block of the thermal cycler. Students’ tubes should be in this tray. Without a tray, the tubes may melt!
After the run is complete, tubes will be held at 4°C until you quit the procedure. Be sure to end the procedure prior to turning the power off.
Instructions for operating the thermal cycler are taped to the machine. All cycling protocols that you will need are pre‐programmed into the machine.
USE OF SYBR® GREEN:
SYBR® Green is a fluorescent dye used to stain DNA and RNA. Tests have found it to be less mutagenic than ethidium bromide. This dye has been pre‐added to the loading dye students add to the DNA sample and will fluoresce when exposed to UV light.
This chemical should never be handled without gloves. Used gels, tips, tubes, and TBE buffer should be returned to the Biotechnology in the Classroom program for proper disposal.
In this experiment, the agar is never touched without gloves. Please see enclosed safety binder for more information about SYBR® Green.
USE OF POWER SUPPLIES:
The power supply produces a voltage that is high enough to cause severe electrical shock if handled improperly.
Do NOT plug power supply into wall receptacle until the safety cover is positioned on the cell and all other electrical connections are properly made.
USE OF THE UV TRANSILLUMINATOR:
When students are ready to look at their gels, view them only through the UV blocking cover. Do not attempt to operate the transilluminator with the UV blocking cover raised. Any attempt to override the safety interlock and view the gel directly could result in serious eye and skin damage.
Do not use the transilluminator if the UV blocking cover becomes cracked or broken.
Biotechnology in the Classroom 2009 5 updated 9/23/2009
BUFFER SOLUTION: Tris/Borate/EDTA (TBE) buffer is commonly used in electrophoresis systems. This salt solution both conducts the electric current and controls the pH of the solution during separation of DNA fragments. Once the gels have run, the instructor should pour the used TBE solution down the drain.
DISTILLED WATER:
Minerals in regular tap water will quickly stain equipment. Please rinse and air‐dry both the gel trays and gel boxes in distilled water. Be careful not to dislodge the wiring at the base of the gel box.
USE OF THE MINIVISIONARY SYSTEM
Please review the enclosed instruction manual for setup of the MiniVisionary cables. Note that the camera hood should remain on the camera and that the SYBR® green filter is in place.
Do not remove the hood from the camera or the filter from the hood.
Follow these instructions when taking a picture of your gel electrophoresis results: 1. Plug in the power cords to both the
controller and the printer. Turn both pieces of equipment on.
2. Set the integration time to 100 using the buttons on top of the controller.
3. With the transilluminator OFF, place the gel tray directly on the platform. There is no need to remove the gel from the tray.
The camera hood is strictly for photographic purposes. Do not attempt to use the camera hood to view subjects on the transilluminator. Serious skin or eye injuries may result from improper use.
4. Turn on the transilluminator.
5. Print the image by using the large print button on the front panel of the controller. Do not use the small button on the front panel of the thermal printer.
6. Turn off the transilluminator. Remove and dispose of the gels in the regular trash.
Answers to Student Activity
1. Answers will vary with class data. 2. Answers will vary with class data 3. Answers will vary with class data 4. Yes, the results should add up to one. 5. Answers will vary with class data. 6. Answers will vary with class data 7. Answers will vary with class data 8. Answers will vary with class data 9. 68 10. 0.7 11. 0.8 12. 0.42
Biotechnology in the Classroom 2009 6 updated 9/23/2009
Laboratory POLYMERASE CHAIN REACTION Amplification of Alu PV92 Insert Background Reading
ALU REGION
Only three to ten percent of the nearly six billion base pairs of DNA in your body is actually used to directly code for proteins. The protein‐encoding regions are scattered throughout the genome and the genes may be separated by many thousands of base pairs. Furthermore, most genes are themselves broken into smaller protein‐encoding segments called exons and intervening regions with an ill‐defined or non‐essential role called introns. Whatever their function, examination of these introns has revealed the presence of unique genetic elements that can be found in a number of different locations within the genome. One of the first such repeating elements identified is Alu.
Alu repeats are approximately 300 base pairs in length. So named because most carry within them the base sequence AGCT, the recognition site for the Alu I restriction endonuclease, over 500,000 of these repeats are scattered throughout the human genome. On average, one can be found every 4,000 base pairs along a human DNA molecule. How they arose is still a matter of speculation but evidence suggests that the first one may have appeared in the genome of higher primates about 60 million years ago. Approximately every 100 years since then, a new Alu repeat has inserted itself in an additional location in the human genome. Alu repeats are inherited in a stable manner; they come intact in the DNA your mother and father contributed to your genome.
Some Alu repeats are fixed in a population, meaning all humans have that particular Alu repeat. Others are said to be dimorphic; different individuals may or may not carry a particular Alu sequence at a particular chromosomal location. In this lab we will be analyze a dimorphic Alu region.
PV92 is a human‐specific Alu insertion on chromosome 16. The PV92 genetic system has only two alleles indicating the presence (+) or absence (‐) of the Alu transposable element on each of the paired chromosomes. This results in three PV92 genotypes (++, +‐, or ‐‐). The + and ‐ alleles can be separated by size using gel electrophoresis.
POLYMERASE CHAIN REACTION
In order to analyze a particular gene out of the tens or hundreds of thousands of genes in a genomic DNA sample, sensitive and sequence specific techniques are needed. One such methodology, Polymerase Chain Reaction (PCR), has been developed to amplify specific DNA sequences in a DNA sample, even with minute amounts of starting material. The PCR technique is commonly used in the molecular analysis of genes, but it has also been used to amplify, and subsequently analyze, the DNA from many sources once thought impossible. For example, using PCR scientists have analyzed DNA from a single sperm, museum specimens of extinct animals and millions of year‐old plant and animal fossils. In addition, PCR can be used to analyze the DNA of a blood or skin sample that might be evidence in a criminal investigation. Following is a step‐by‐step description of the PCR process.
The hypothetical DNA segment below will be amplified through PCR. The ???????? may be a very long or short set of deoxyribonucleotides‐‐it doesn’t matter.
AATTGCCCCGGGAAATTT ???????????????????? AAATTTGGGCCCAA
TTAACGGGGCCCTTTAAA ???????????????????? TTTAAACCCGGGTT
Biotechnology in the Classroom 2009 7 updated 9/23/2009
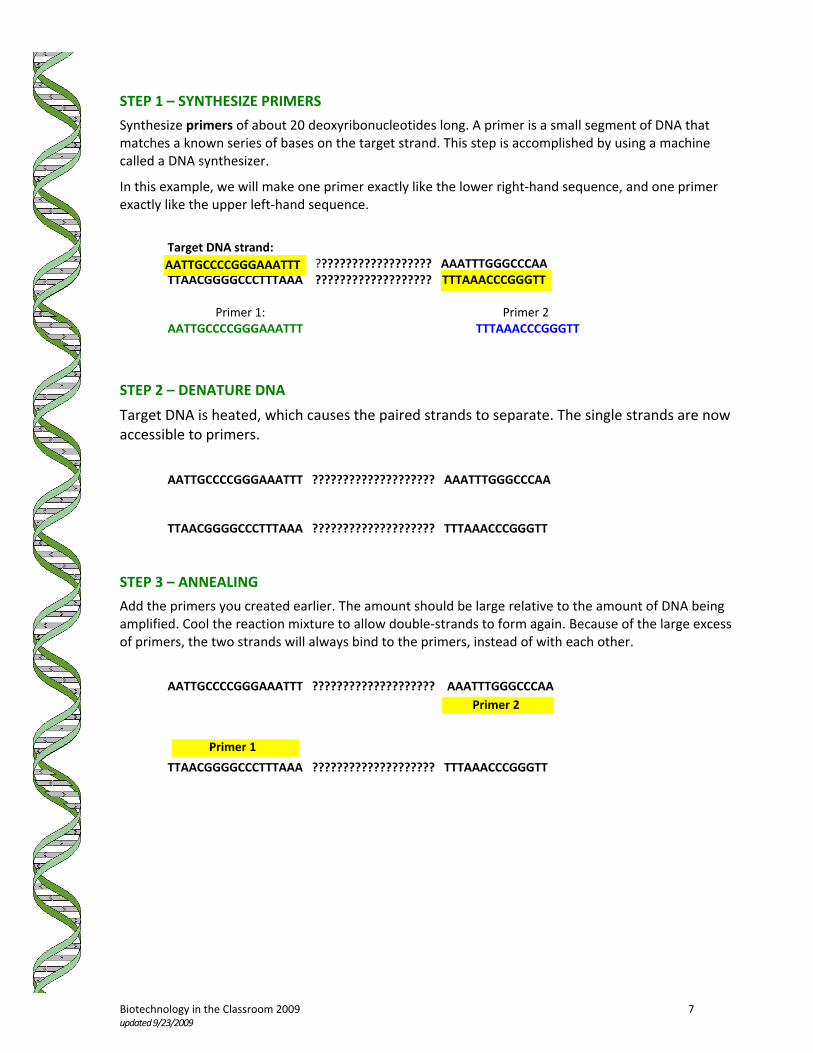
STEP 1 – SYNTHESIZE PRIMERS
Synthesize primers of about 20 deoxyribonucleotides long. A primer is a small segment of DNA that matches a known series of bases on the target strand. This step is accomplished by using a machine called a DNA synthesizer.
In this example, we will make one primer exactly like the lower right‐hand sequence, and one primer exactly like the upper left‐hand sequence.
Target DNA strand: ??????????????????? AAATTTGGGCCCAA TTAACGGGGCCCTTTAAA ???????????????????
Primer 1: Primer 2 AATTGCCCCGGGAAATTT TTTAAACCCGGGTT
STEP 2 – DENATURE DNA
Target DNA is heated, which causes the paired strands to separate. The single strands are now accessible to primers.
AATTGCCCCGGGAAATTT ???????????????????? AAATTTGGGCCCAA TTAACGGGGCCCTTTAAA ???????????????????? TTTAAACCCGGGTT
STEP 3 – ANNEALING
Add the primers you created earlier. The amount should be large relative to the amount of DNA being amplified. Cool the reaction mixture to allow double‐strands to form again. Because of the large excess of primers, the two strands will always bind to the primers, instead of with each other.
AATTGCCCCGGGAAATTT ???????????????????? AAATTTGGGCCCAA TTAACGGGGCCCTTTAAA ???????????????????? TTTAAACCCGGGTT
Primer 1
AATTGCCCCGGGAAATTT TTTAAACCCGGGTT
Primer 2
Biotechnology in the Classroom 2009 8 updated 9/23/2009
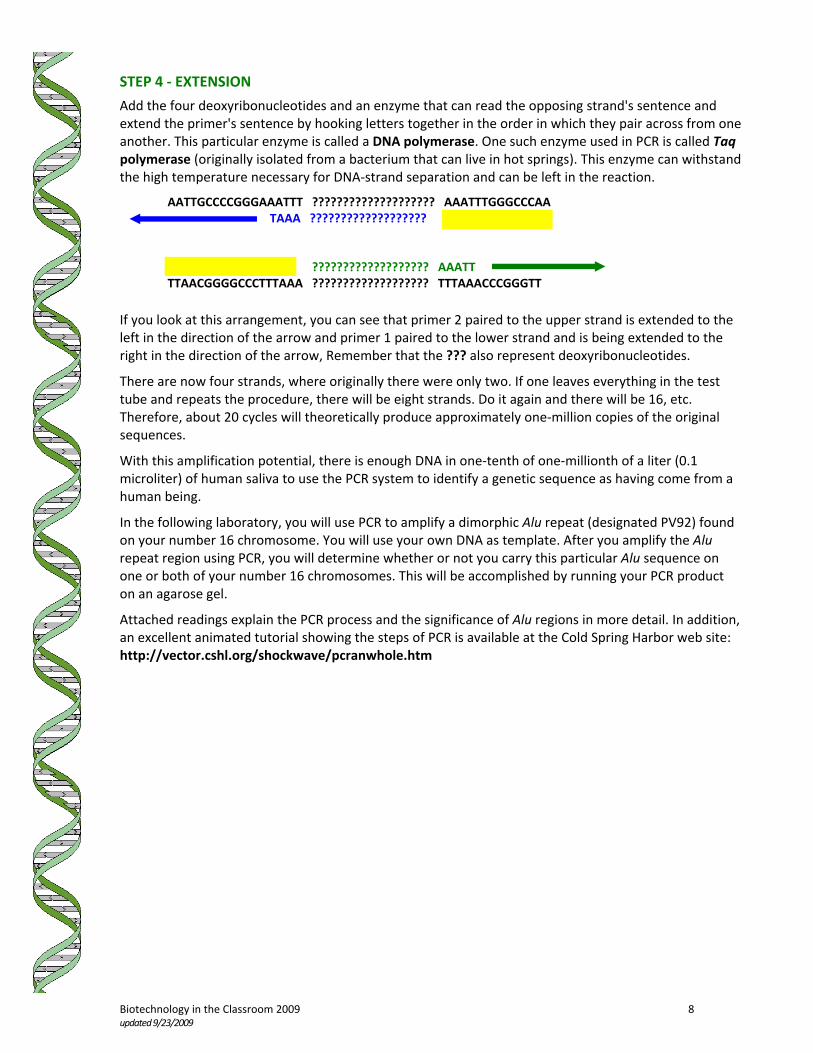
STEP 4 ‐ EXTENSION
Add the four deoxyribonucleotides and an enzyme that can read the opposing strand's sentence and extend the primer's sentence by hooking letters together in the order in which they pair across from one another. This particular enzyme is called a DNA polymerase. One such enzyme used in PCR is called Taq polymerase (originally isolated from a bacterium that can live in hot springs). This enzyme can withstand the high temperature necessary for DNA‐strand separation and can be left in the reaction.
AATTGCCCCGGGAAATTT ???????????????????? AAATTTGGGCCCAA TAAA ??????????????????? ??????????????????? AAATT TTAACGGGGCCCTTTAAA ??????????????????? TTTAAACCCGGGTT
If you look at this arrangement, you can see that primer 2 paired to the upper strand is extended to the left in the direction of the arrow and primer 1 paired to the lower strand and is being extended to the right in the direction of the arrow, Remember that the ??? also represent deoxyribonucleotides.
There are now four strands, where originally there were only two. If one leaves everything in the test tube and repeats the procedure, there will be eight strands. Do it again and there will be 16, etc. Therefore, about 20 cycles will theoretically produce approximately one‐million copies of the original sequences.
With this amplification potential, there is enough DNA in one‐tenth of one‐millionth of a liter (0.1 microliter) of human saliva to use the PCR system to identify a genetic sequence as having come from a human being.
In the following laboratory, you will use PCR to amplify a dimorphic Alu repeat (designated PV92) found on your number 16 chromosome. You will use your own DNA as template. After you amplify the Alu repeat region using PCR, you will determine whether or not you carry this particular Alu sequence on one or both of your number 16 chromosomes. This will be accomplished by running your PCR product on an agarose gel.
Attached readings explain the PCR process and the significance of Alu regions in more detail. In addition, an excellent animated tutorial showing the steps of PCR is available at the Cold Spring Harbor web site: http://vector.cshl.org/shockwave/pcranwhole.htm
Biotechnology in the Classroom 2009 9 updated 9/23/2009
Objectives
1. Isolate DNA from cheek cells and prepare a reaction for PCR amplification.
2. List and explain the importance of each component of PCR.
3. Electrophorese the Alu repeat to determine your genotype for the Alu insertion.
4. Understand the difference between heterozygous and homozygous.
5. Calculate allele and genotype frequencies.
Materials
For Each Student gloves safety goggles* disposable transfer pipet two 1.5 ml microtubes 200 μl of 5% Chelex in a 1.5 ml tube 0.2 ml PCR tube with lid microtube cap lock paper cup with 10 ml of 0.9% NaCl *
For Each Lab Group
20 μl micropipet 100 μl micropipet box of 20 – 200 μl tips microtube rack PCR tube rack waterproof pen 80 μl master mix 80 μl primer mix 30 μl 0.9% NaCl * cup of crushed ice*
Common Materials two dual gel boxes power supply carboy with 1X TBE solution 2.0% agarose gel microcentrifuge heat block & thermometer thermal cycler & 96 well PCR tray UV transilluminator MiniVisionary system PCR grid gel electrophoresis grid
Instructor Use
1000 μl micropipet 100 μl micropipet 20 μl micropipet box of 1000 μl tips box of 20 – 200 μl tips 100 bp ladder control DNA loading dye with SYBR® Green sterile water lab tape PCR and microcentrifuge tube rack 4 gel trays 4 10‐well combs 4 12 well combs
* Materials provided by instructor
Biotechnology in the Classroom 2009 10 updated 9/23/2009
Precautions
The SYBR® Green stain found in the loading dye is a hazardous chemical. Although it is present in an extremely low concentration, it still should not be touched. After electrophoresis, the gels should only be handled with gloves. Always leave gel in its tray.
When using the microcentrifuge, always make sure the tubes are loaded in the rotor symmetrically; each tube should be balanced by another tube directly opposite it. Never run the centrifuge with the lid open or the rotor missing. Never put hands in the rotor area unless the rotor is completely stopped.
Ultraviolet (UV) radiation can cause severe eye and skin damage! The camera hood is strictly for photographic purposes. Do not attempt to use the camera hood to view samples on the transilluminator. Make sure that the hood is seated correctly and there are no raised edges that would allow UV light to leak out.
If you choose to view the gel prior to making a photograph, be sure the UV blocking cover is down before turning the power on.
Follow your teacher’s instructions regarding micropipet handling.
The power supply produces a voltage that is high enough to cause severe electrical shock if handled improperly. Assure that you are thoroughly drilled in the procedures regarding the use of this unit, making electrical connections, and that the teacher directly supervises you.
Biotechnology in the Classroom 2009 11 updated 9/23/2009
Procedure
DNA PREPARATION USING A SALINE MOUTHWASH
1. Gather all required lab supplies and think of a 4 digit identification number (PIN) to write down on your lab sheet.
2. Get a paper cup with 10 ml of 0.9% NaCl solution from your instructor. Swirl the solution in
your mouth for 30 seconds. 3. Expel the NaCl solution back into the cup and swirl to mix the cells. 4. Label the cap of a 1.5 ml microtube with your PIN. Using a disposable pipet, transfer 1000 μl of
the saliva & NaCl solution into the tube. Close the cap tightly. Discard cup. 5. In a balanced microcentrifuge, spin sample for 1 minute to pellet the cells. 6. Observe your cell pellet at the bottom of the tube. Pour off and discard the supernatant, being
careful not to lose your cell pellet. Note: It is okay if some supernatant is left in the tube.
7. Resuspend your cell pellet in 30 μl of 0.9% NaCl. Make sure the entire cell pellet is thoroughly
mixed by pipetting up and down several times or “racking” your tube. Note: To “rack” your sample, be sure the top of the tube is closed, hold tube firmly at the top, and pull it across a microfuge rack 2‐3 times.
8. Label a 1.5 ml tube of 5% Chelex with your PIN number. 9. Withdraw 30 μl of the cheek cell suspension and add it to the Chelex tube.
Note: Do not pipet up and down at this step or else you will clog the tip with Chelex.
10. Secure your tube with a cap lock and place it in the 99°C heat block for 10 minutes. 11. Remove tube from heat block and take off your cap lock. Shake your tube well and then place it
in a balanced centrifuge. Spin for 1 minute. 12. Withdraw 60 μl of supernatant (no Chelex beads) to a clean tube, labeled with your PIN.
Discard all other tubes. Note: This stored sample is your “DNA” tube.
13. Clean up your lab station and wash your hands.
STOP POINT: Place your DNA tube in the class microtube rack so that your teacher can refrigerate your isolated DNA until you are ready to prepare your PCR amplification.
Biotechnology in the Classroom 2009 12 updated 9/23/2009
POLYMERASE CHAIN REACTION
1. Gather all required lab supplies and retrieve your DNA tube from the class microtube rack. 2. Label a 200 μl PCR tube with your 4 digit PIN. 3. Put a new tip on your 20 μl micropipet and dispense 20 μl of Master Mix into your PCR tube. 4. Change your pipet tip and add 20 μl of Primer Mix into your PCR tube. 5. Change your pipet tip and add 10 μl of your purified DNA into your PCR tube.
Note: Slowly pipet up and down several times to mix all the reagents in your reaction tube.
6. Your instructor has prepared two PCR control tubes:
Positive Control: 20 ul Master Mix 20 ul Primer Mix 10 ul Control DNA Negative Control 20 ul Master Mix 20 ul Primer Mix 10 ul sterile water
7. Place your reaction tube into the thermal cycler and record the location of your tube on the
grid provided by your teacher. 8. Your instructor will begin the thermal cycler. The cycling protocol for amplification of this Alu
region is:
95°C 10 minutes
94°C 30 seconds 60°C 30 seconds 72°C 2 minutes
72°C 10 minutes 4°C hold
Note: This process will take longer than your class period so your instructor will remove the tubes from the machine upon completion.
STOP POINT: Instructor – The thermal cycler may be left on overnight. Upon removal from the machine, place the amplified DNA tubes in the class PCR tube rack. Refrigerate the samples until you are ready to run your agarose gels
Repeat for 30 cycles }
Biotechnology in the Classroom 2009 13 updated 9/23/2009
ELECTROPHORESIS OF AMPLIFIED DNA
1. Gather necessary lab supplies and put on gloves and safety goggles. 2. Retrieve your PCR tube and tap it lightly on the counter to bring the liquid to the bottom of the
reaction tube. 3. Confirm that your instructor has already loaded 5 μl of loading dye to your PCR tube. 4. Carefully load 15 ‐ 20 μl of your reaction into a well on one of the gels your teacher has
prepared. On the grid next to the gel box, write down your PIN in the appropriate lane number. Note: Avoid poking the pipette tip throughout the bottom of the gel or spilling sample over the sides of the well. Use a new tip for each sample.
5. Your instructor will load 5 μl of the 100 bp ladder into one of the wells of each gel. 6. Your instructor will load one lane in each gel with 10 μl of a positive control and one lane with
10 μl of a negative control. 7. When all samples are loaded, your instructor will attach the electrodes from the gel box to the
power supply and electrophorese your samples at 125 volts for 45 – 50 minutes.
STOP POINT: Instructor – Gels may be stored in a Tupperware container filled with 70% ethanol or kept in the TBE buffer for one day before photographing
Biotechnology in the Classroom 2009 14 updated 9/23/2009
PHOTOGRAPHING AGAROSE GELS
1. Put on gloves and safety glasses. Retrieve your gel tray from your instructor 2. Make sure the power to the UV transilluminator is OFF. Lift the UV blocking cover and place gel
tray on the black platform. Close the lid completely before turning machine on. UV radiation can cause severe eye and skin damage.
3. Briefly observe the number, placement and relative brightness of the DNA bands. Turn the
transilluminator OFF. 4. With the transilluminator OFF, your instructor will place the hooded CCD camera over the black
platform. Make sure that the hood is seated correctly and there are no raised edges that would allow UV light to leak out.
5. Turn ON the transilluminator. Your instructor will print an image for each member of your lab
group. 6. Turn OFF the transilluminator. 7. Remove the CCD camera/hood from the transilluminator. 8. Follow your teacher’s instructions for clean up. Discard all gels into the plastic disposal bags. Do
not touch the gel! Gel boxes and plates must be rinsed in distilled or deionized water and air‐dried. Please take great care with the equipment so many more students may enjoy these experiments.
9. Wash hands and clean lab station. 10. Analyze your results and complete the attached student activity sheet.
Biotechnology in the Classroom 2009 15 updated 9/23/2009
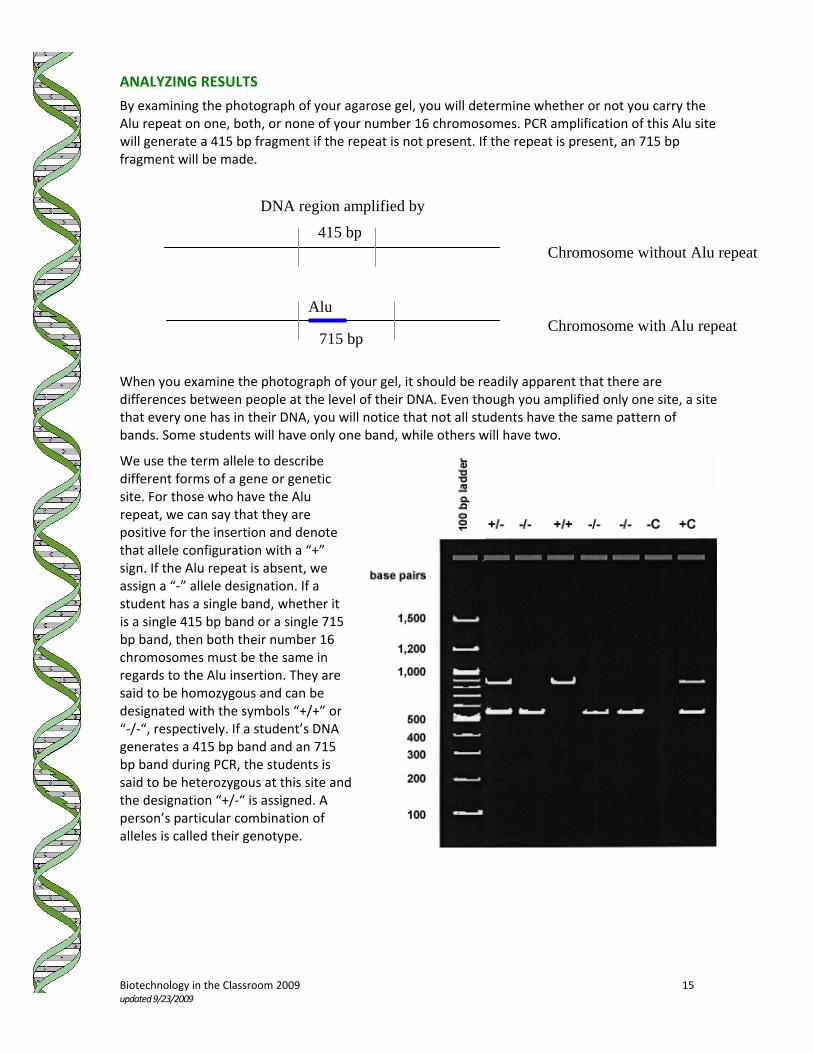
ANALYZING RESULTS
By examining the photograph of your agarose gel, you will determine whether or not you carry the Alu repeat on one, both, or none of your number 16 chromosomes. PCR amplification of this Alu site will generate a 415 bp fragment if the repeat is not present. If the repeat is present, an 715 bp fragment will be made.
When you examine the photograph of your gel, it should be readily apparent that there are differences between people at the level of their DNA. Even though you amplified only one site, a site that every one has in their DNA, you will notice that not all students have the same pattern of bands. Some students will have only one band, while others will have two.
We use the term allele to describe different forms of a gene or genetic site. For those who have the Alu repeat, we can say that they are positive for the insertion and denote that allele configuration with a “+” sign. If the Alu repeat is absent, we assign a “‐” allele designation. If a student has a single band, whether it is a single 415 bp band or a single 715 bp band, then both their number 16 chromosomes must be the same in regards to the Alu insertion. They are said to be homozygous and can be designated with the symbols “+/+” or “‐/‐“, respectively. If a student’s DNA generates a 415 bp band and an 715 bp band during PCR, the students is said to be heterozygous at this site and the designation “+/‐“ is assigned. A person’s particular combination of alleles is called their genotype.
Chromosome without Alu repeat Chromosome with Alu repeat
Alu
715 bp
415 bp
DNA region amplified by
Biotechnology in the Classroom 2009 16 updated 9/23/2009
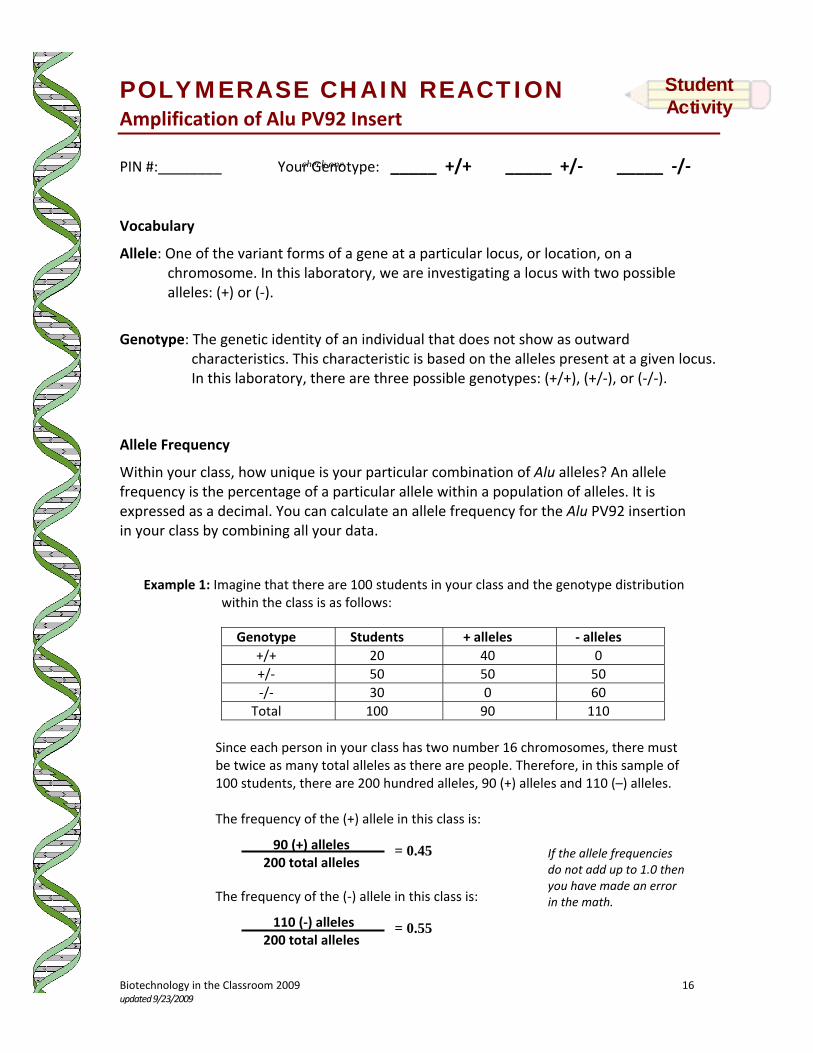
Student Activity
POLYMERASE CHAIN REACTION Amplification of Alu PV92 Insert PIN #:________ Your Genotype: _____ +/+ _____ +/‐ _____ ‐/‐ Vocabulary
Allele: One of the variant forms of a gene at a particular locus, or location, on a chromosome. In this laboratory, we are investigating a locus with two possible alleles: (+) or (‐).
Genotype: The genetic identity of an individual that does not show as outward
characteristics. This characteristic is based on the alleles present at a given locus. In this laboratory, there are three possible genotypes: (+/+), (+/‐), or (‐/‐).
Allele Frequency
Within your class, how unique is your particular combination of Alu alleles? An allele frequency is the percentage of a particular allele within a population of alleles. It is expressed as a decimal. You can calculate an allele frequency for the Alu PV92 insertion in your class by combining all your data.
Example 1: Imagine that there are 100 students in your class and the genotype distribution within the class is as follows:
Genotype Students + alleles ‐ alleles +/+ 20 40 0 +/‐ 50 50 50 ‐/‐ 30 0 60
Total 100 90 110
Since each person in your class has two number 16 chromosomes, there must be twice as many total alleles as there are people. Therefore, in this sample of 100 students, there are 200 hundred alleles, 90 (+) alleles and 110 (–) alleles. The frequency of the (+) allele in this class is:
90 (+) alleles 200 total alleles
The frequency of the (‐) allele in this class is:
110 (‐) alleles 200 total alleles
If the allele frequencies do not add up to 1.0 then you have made an error in the math.
check one
= 0.45
= 0.55
Biotechnology in the Classroom 2009 17 updated 9/23/2009
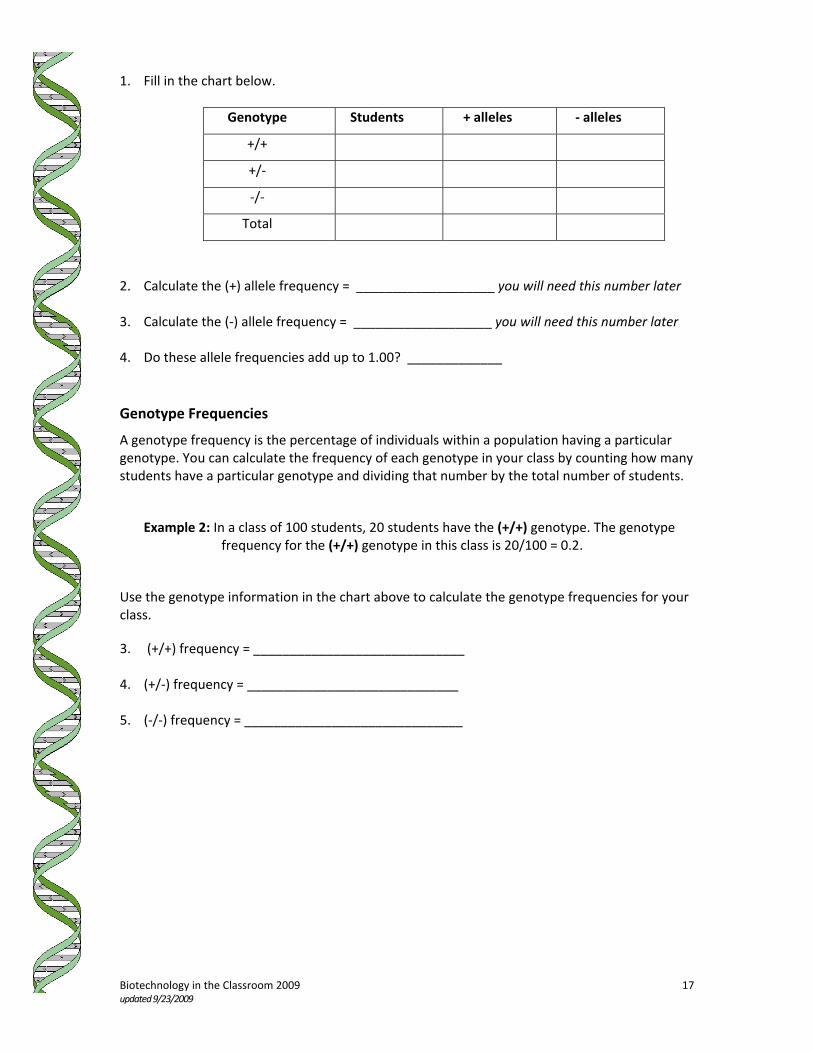
1. Fill in the chart below.
Genotype Students + alleles ‐ alleles
+/+
+/‐
‐/‐
Total
2. Calculate the (+) allele frequency = ___________________ you will need this number later 3. Calculate the (‐) allele frequency = ___________________ you will need this number later 4. Do these allele frequencies add up to 1.00? _____________ Genotype Frequencies
A genotype frequency is the percentage of individuals within a population having a particular genotype. You can calculate the frequency of each genotype in your class by counting how many students have a particular genotype and dividing that number by the total number of students.
Example 2: In a class of 100 students, 20 students have the (+/+) genotype. The genotype frequency for the (+/+) genotype in this class is 20/100 = 0.2.
Use the genotype information in the chart above to calculate the genotype frequencies for your class.
3. (+/+) frequency = _____________________________ 4. (+/‐) frequency = _____________________________ 5. (‐/‐) frequency = ______________________________
Biotechnology in the Classroom 2009 18 updated 9/23/2009
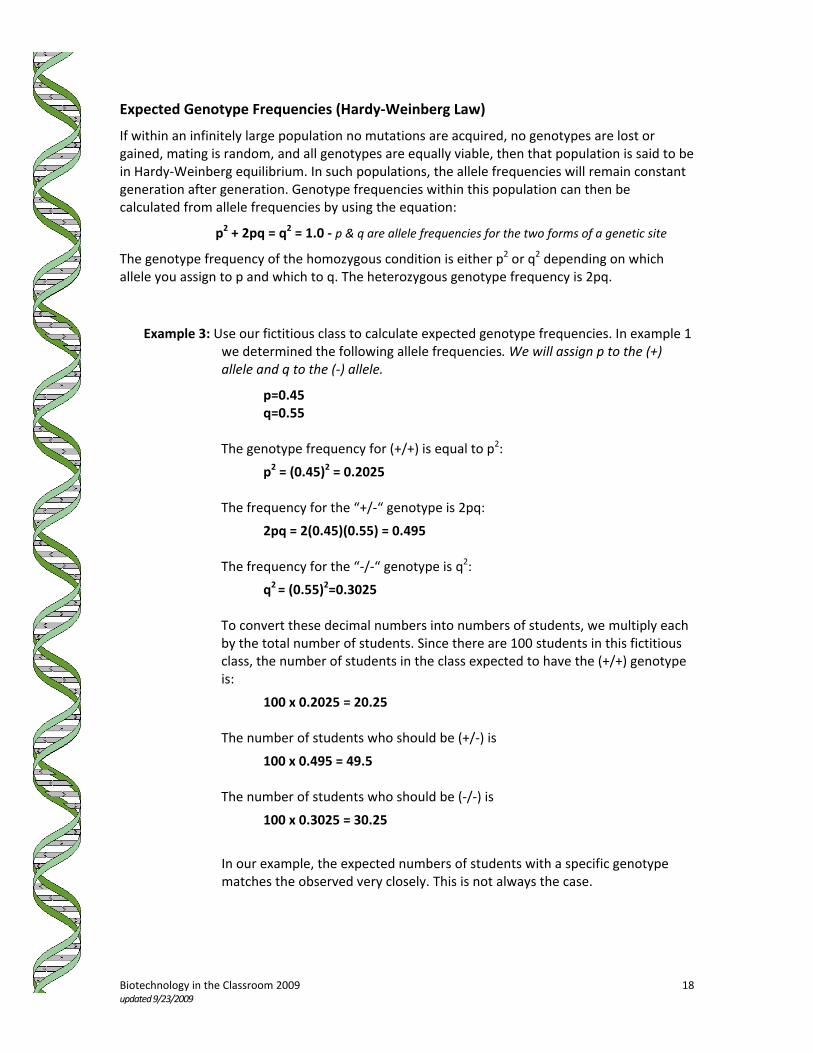
Expected Genotype Frequencies (Hardy‐Weinberg Law)
If within an infinitely large population no mutations are acquired, no genotypes are lost or gained, mating is random, and all genotypes are equally viable, then that population is said to be in Hardy‐Weinberg equilibrium. In such populations, the allele frequencies will remain constant generation after generation. Genotype frequencies within this population can then be calculated from allele frequencies by using the equation:
p2 + 2pq = q2 = 1.0 ‐ p & q are allele frequencies for the two forms of a genetic site
The genotype frequency of the homozygous condition is either p2 or q2 depending on which allele you assign to p and which to q. The heterozygous genotype frequency is 2pq.
Example 3: Use our fictitious class to calculate expected genotype frequencies. In example 1 we determined the following allele frequencies. We will assign p to the (+) allele and q to the (‐) allele.
p=0.45 q=0.55
The genotype frequency for (+/+) is equal to p2:
p2 = (0.45)2 = 0.2025
The frequency for the “+/‐“ genotype is 2pq:
2pq = 2(0.45)(0.55) = 0.495 The frequency for the “‐/‐“ genotype is q2:
q2 = (0.55)2=0.3025 To convert these decimal numbers into numbers of students, we multiply each by the total number of students. Since there are 100 students in this fictitious class, the number of students in the class expected to have the (+/+) genotype is:
100 x 0.2025 = 20.25
The number of students who should be (+/‐) is
100 x 0.495 = 49.5
The number of students who should be (‐/‐) is
100 x 0.3025 = 30.25
In our example, the expected numbers of students with a specific genotype matches the observed very closely. This is not always the case.
Biotechnology in the Classroom 2009 19 updated 9/23/2009
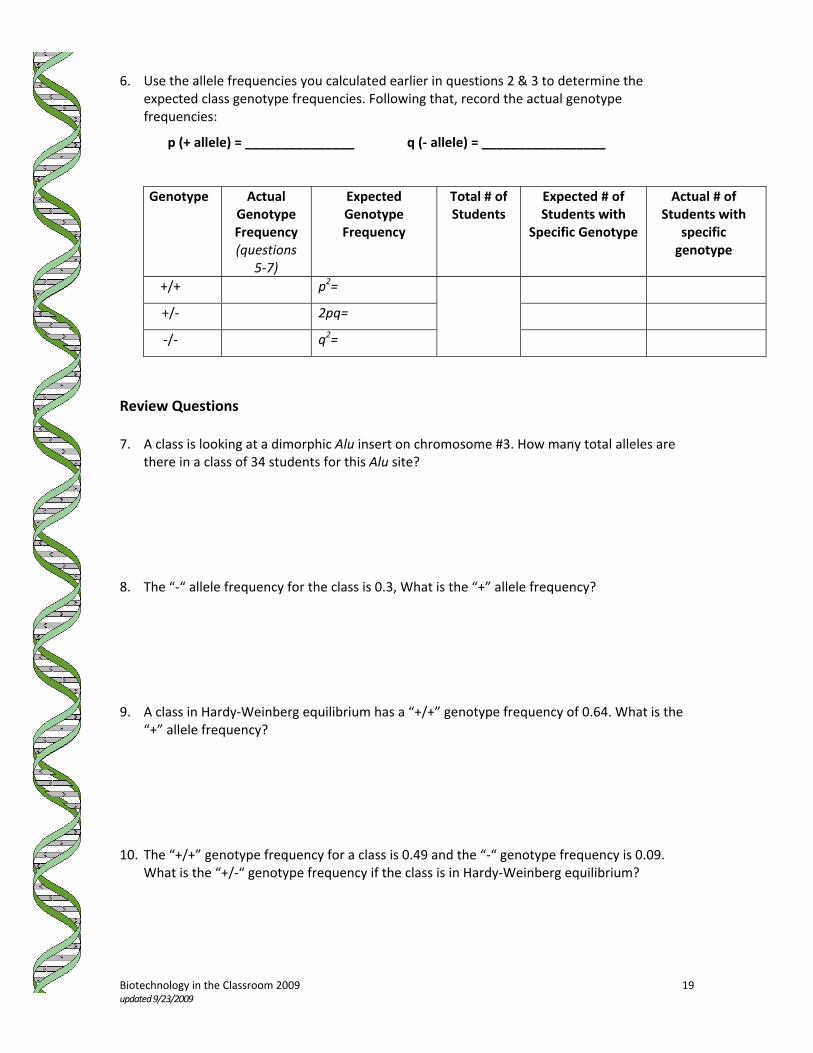
6. Use the allele frequencies you calculated earlier in questions 2 & 3 to determine the expected class genotype frequencies. Following that, record the actual genotype frequencies:
p (+ allele) = _______________ q (‐ allele) = _________________
Genotype Actual
Genotype Frequency (questions
5‐7)
Expected Genotype Frequency
Total # of Students
Expected # of Students with
Specific Genotype
Actual # of Students with
specific genotype
+/+ p2=
+/‐ 2pq=
‐/‐ q2=
Review Questions 7. A class is looking at a dimorphic Alu insert on chromosome #3. How many total alleles are
there in a class of 34 students for this Alu site? 8. The “‐“ allele frequency for the class is 0.3, What is the “+” allele frequency? 9. A class in Hardy‐Weinberg equilibrium has a “+/+” genotype frequency of 0.64. What is the
“+” allele frequency? 10. The “+/+” genotype frequency for a class is 0.49 and the “‐“ genotype frequency is 0.09.
What is the “+/‐“ genotype frequency if the class is in Hardy‐Weinberg equilibrium?