Embed Size (px)
Citation preview

AMHAY Horsemastership Achievement Program
Bulrush Level
Level 1
Youth Workbook
American Morgan Horse Association, Inc.
Youth Program
4066 Shelburne Road, Suite 5, Shelburne, VT 05482
(802) 985-4944
www.morganhorse.com Revised 3/17

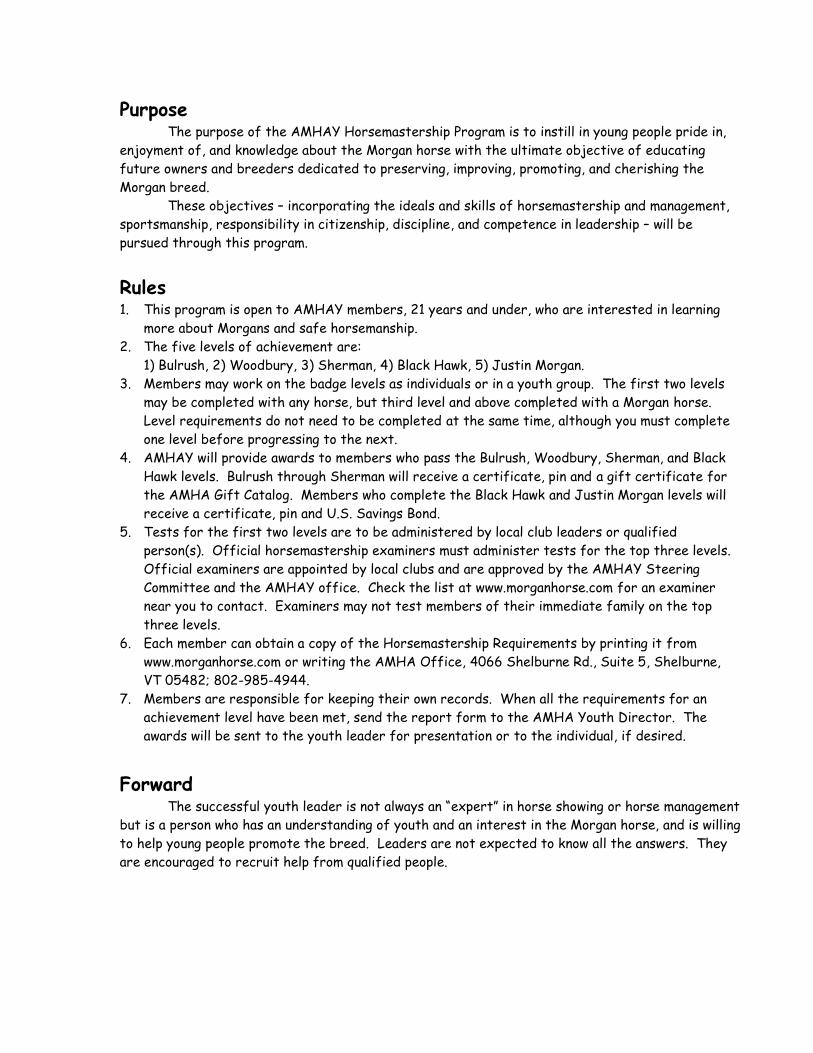
Purpose The purpose of the AMHAY Horsemastership Program is to instill in young people pride in,
enjoyment of, and knowledge about the Morgan horse with the ultimate objective of educating
future owners and breeders dedicated to preserving, improving, promoting, and cherishing the
Morgan breed.
These objectives – incorporating the ideals and skills of horsemastership and management,
sportsmanship, responsibility in citizenship, discipline, and competence in leadership – will be
pursued through this program.
Rules 1. This program is open to AMHAY members, 21 years and under, who are interested in learning
more about Morgans and safe horsemanship.
2. The five levels of achievement are:
1) Bulrush, 2) Woodbury, 3) Sherman, 4) Black Hawk, 5) Justin Morgan.
3. Members may work on the badge levels as individuals or in a youth group. The first two levels
may be completed with any horse, but third level and above completed with a Morgan horse.
Level requirements do not need to be completed at the same time, although you must complete
one level before progressing to the next.
4. AMHAY will provide awards to members who pass the Bulrush, Woodbury, Sherman, and Black
Hawk levels. Bulrush through Sherman will receive a certificate, pin and a gift certificate for
the AMHA Gift Catalog. Members who complete the Black Hawk and Justin Morgan levels will
receive a certificate, pin and U.S. Savings Bond.
5. Tests for the first two levels are to be administered by local club leaders or qualified
person(s). Official horsemastership examiners must administer tests for the top three levels.
Official examiners are appointed by local clubs and are approved by the AMHAY Steering
Committee and the AMHAY office. Check the list at www.morganhorse.com for an examiner
near you to contact. Examiners may not test members of their immediate family on the top
three levels.
6. Each member can obtain a copy of the Horsemastership Requirements by printing it from
www.morganhorse.com or writing the AMHA Office, 4066 Shelburne Rd., Suite 5, Shelburne,
VT 05482; 802-985-4944.
7. Members are responsible for keeping their own records. When all the requirements for an
achievement level have been met, send the report form to the AMHA Youth Director. The
awards will be sent to the youth leader for presentation or to the individual, if desired.
Forward The successful youth leader is not always an “expert” in horse showing or horse management
but is a person who has an understanding of youth and an interest in the Morgan horse, and is willing
to help young people promote the breed. Leaders are not expected to know all the answers. They
are encouraged to recruit help from qualified people.

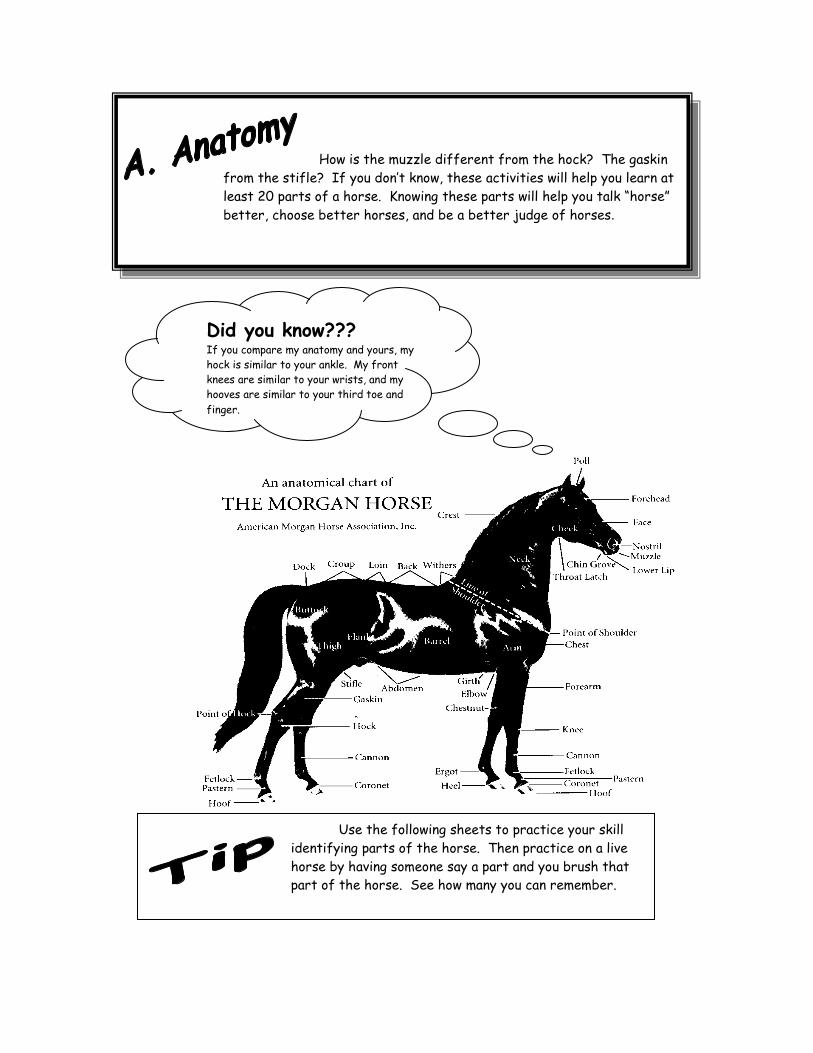
Use the following sheets to practice your skill
identifying parts of the horse. Then practice on a live
horse by having someone say a part and you brush that
part of the horse. See how many you can remember.
How is the muzzle different from the hock? The gaskin
from the stifle? If you don’t know, these activities will help you learn at
least 20 parts of a horse. Knowing these parts will help you talk “horse”
better, choose better horses, and be a better judge of horses.
Did you know??? If you compare my anatomy and yours, my
hock is similar to your ankle. My front
knees are similar to your wrists, and my
hooves are similar to your third toe and finger.
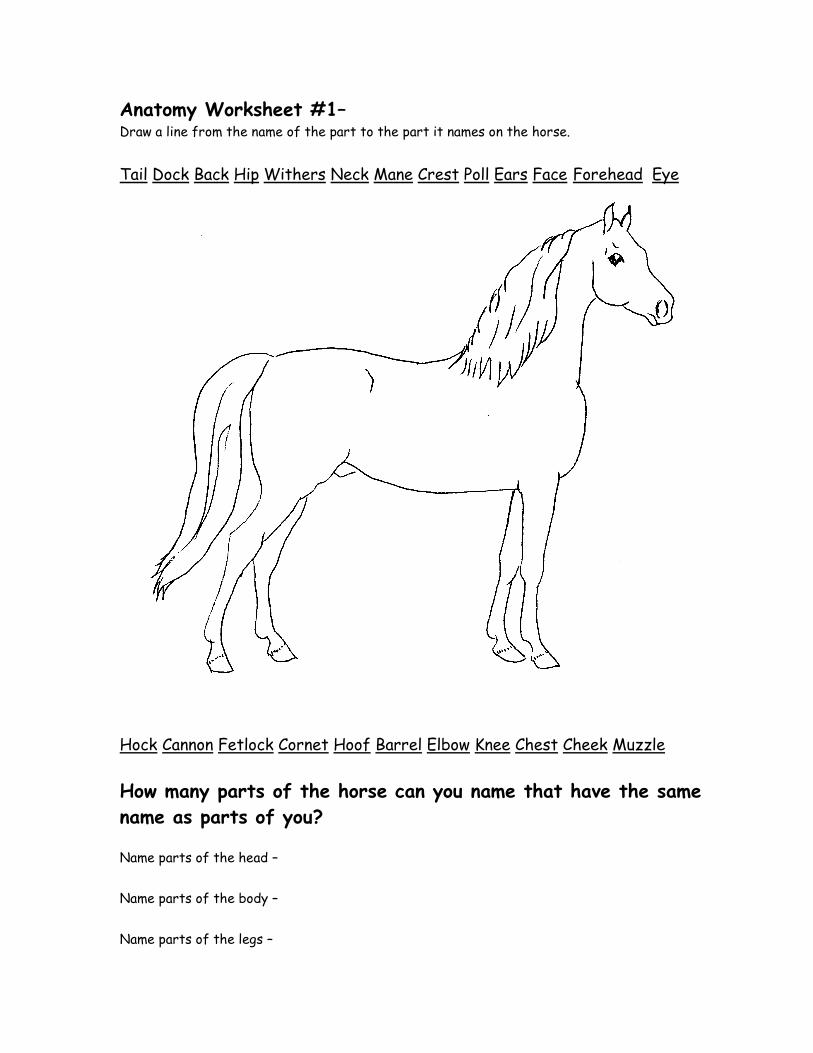
Anatomy Worksheet #1– Draw a line from the name of the part to the part it names on the horse.
Tail Dock Back Hip Withers Neck Mane Crest Poll Ears Face Forehead Eye
Hock Cannon Fetlock Cornet Hoof Barrel Elbow Knee Chest Cheek Muzzle
How many parts of the horse can you name that have the same
name as parts of you?
Name parts of the head –
Name parts of the body –
Name parts of the legs –
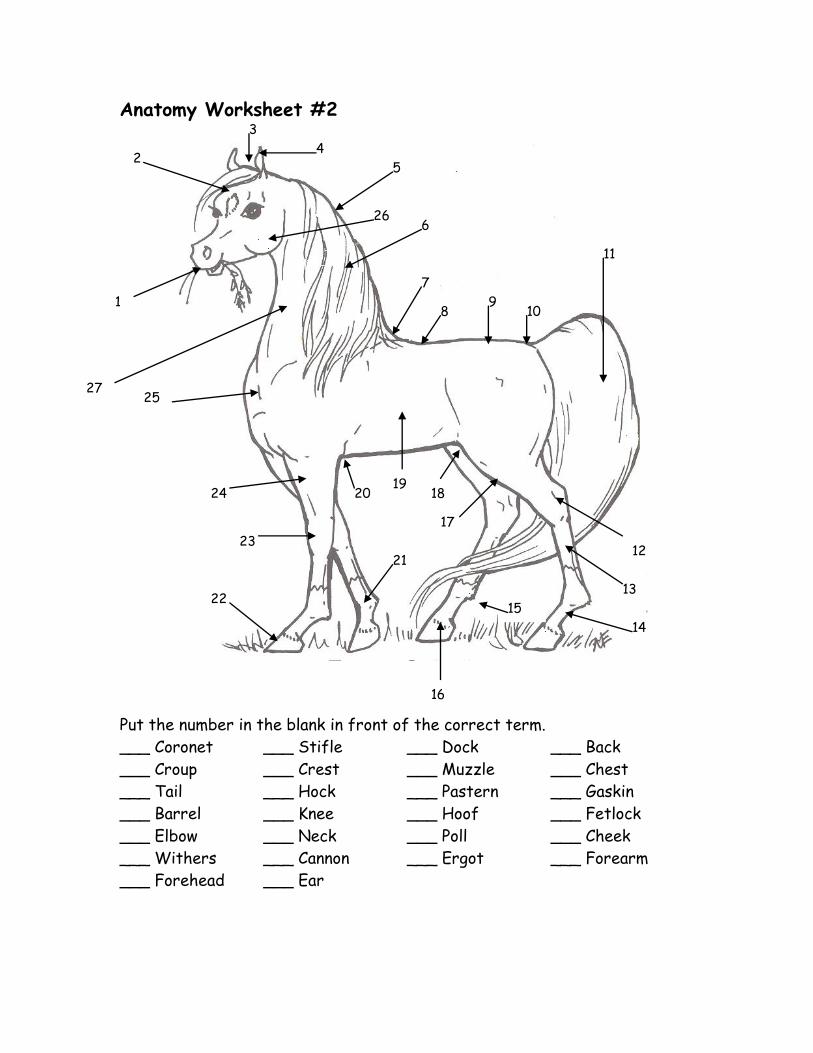
3 Anatomy Worksheet #2
Put the number in the blank in front of the correct term.
___ Coronet ___ Stifle ___ Dock ___ Back
___ Croup ___ Crest ___ Muzzle ___ Chest
___ Tail ___ Hock ___ Pastern ___ Gaskin
___ Barrel ___ Knee ___ Hoof ___ Fetlock
___ Elbow ___ Neck ___ Poll ___ Cheek
___ Withers ___ Cannon ___ Ergot ___ Forearm
___ Forehead ___ Ear
2
1
4
5
6
7
8 9
10
11
12
13
14
15
16
17
18 19
20
21
22
23
24
25
26
27
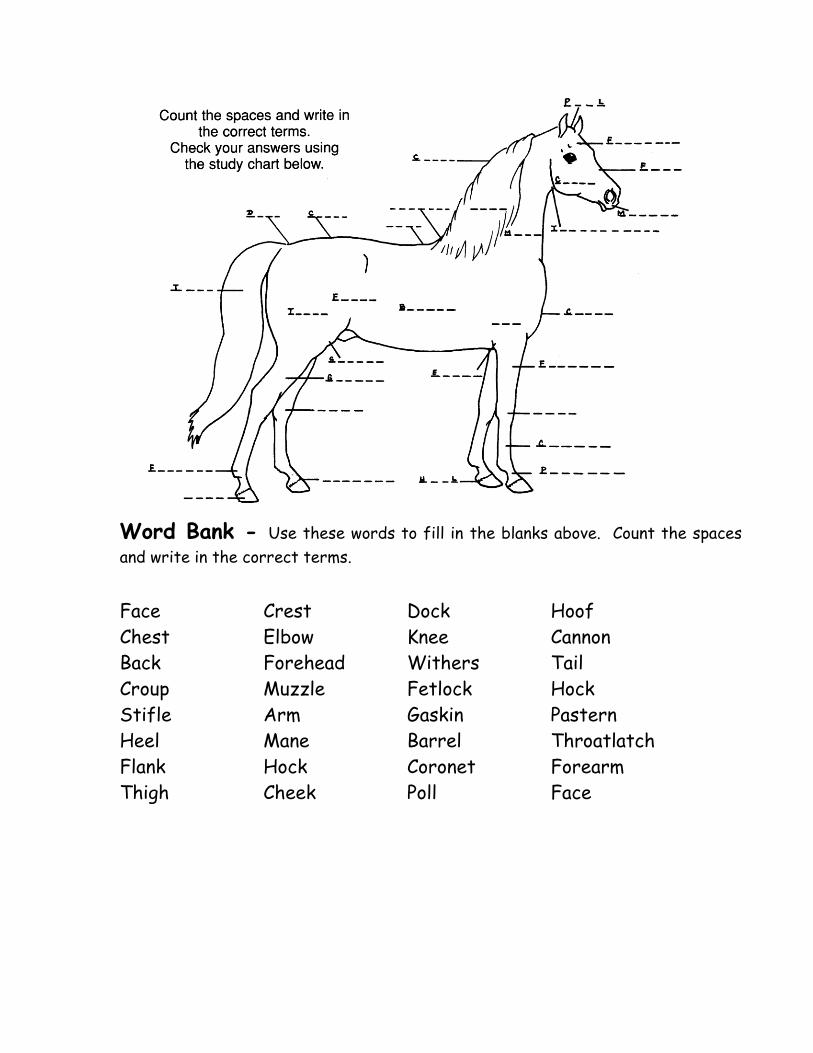
Word Bank - Use these words to fill in the blanks above. Count the spaces
and write in the correct terms.
Face Crest Dock Hoof
Chest Elbow Knee Cannon
Back Forehead Withers Tail
Croup Muzzle Fetlock Hock
Stifle Arm Gaskin Pastern
Heel Mane Barrel Throatlatch
Flank Hock Coronet Forearm
Thigh Cheek Poll Face
Anatomy Worksheet #3 Fill in the blanks using the word
bank below.
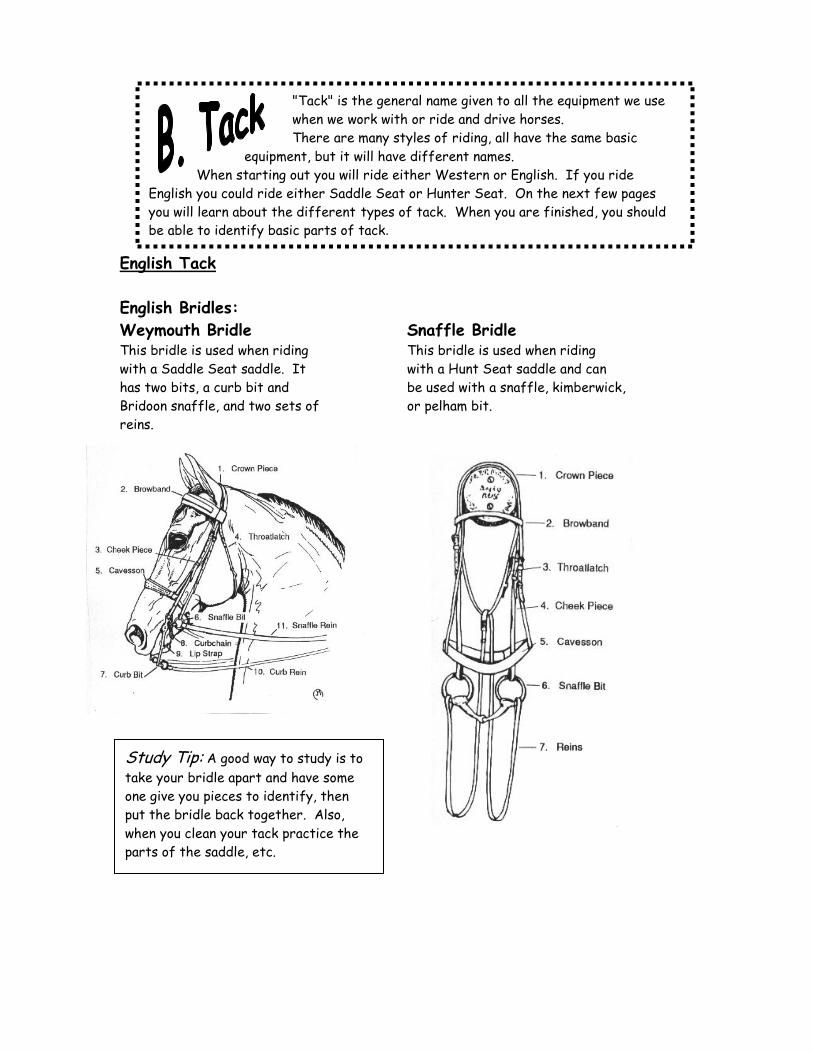
"Tack" is the general name given to all the equipment we use
when we work with or ride and drive horses.
There are many styles of riding, all have the same basic
equipment, but it will have different names.
When starting out you will ride either Western or English. If you ride
English you could ride either Saddle Seat or Hunter Seat. On the next few pages
you will learn about the different types of tack. When you are finished, you should
be able to identify basic parts of tack.
English Tack
English Bridles:
Weymouth Bridle Snaffle Bridle This bridle is used when riding This bridle is used when riding
with a Saddle Seat saddle. It with a Hunt Seat saddle and can
has two bits, a curb bit and be used with a snaffle, kimberwick,
Bridoon snaffle, and two sets of or pelham bit.
reins.
Study Tip: A good way to study is to
take your bridle apart and have some
one give you pieces to identify, then
put the bridle back together. Also,
when you clean your tack practice the
parts of the saddle, etc.
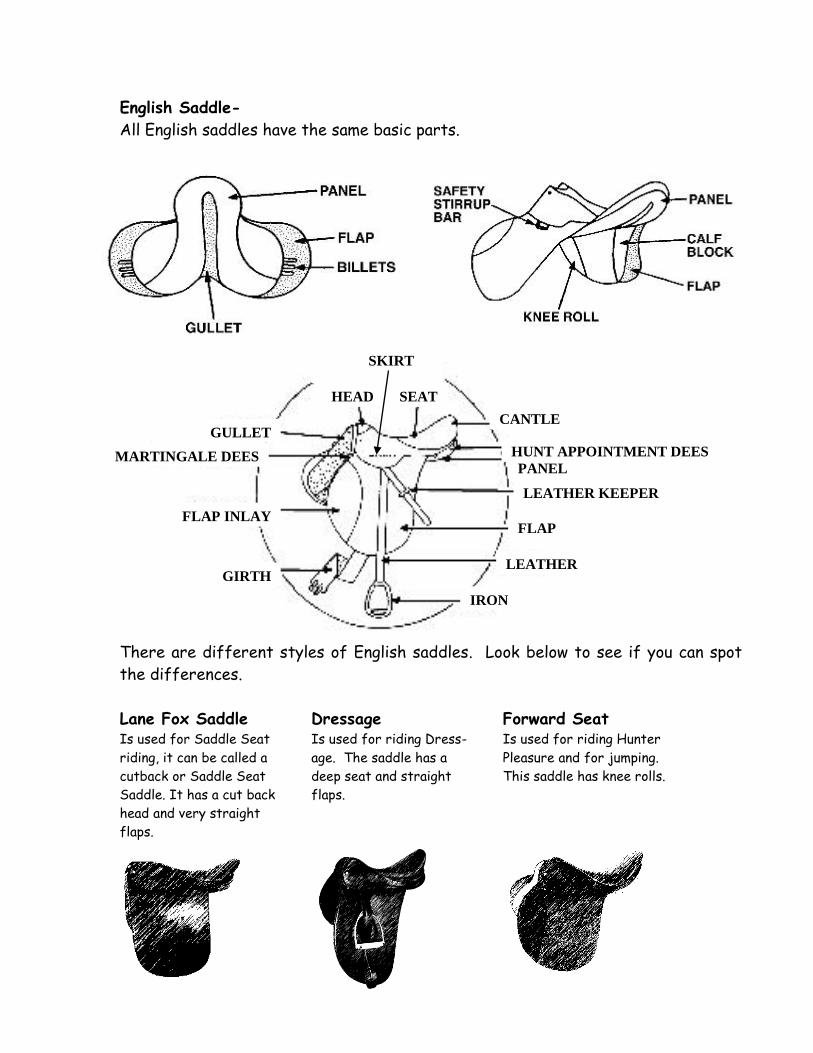
English Saddle-
All English saddles have the same basic parts.
There are different styles of English saddles. Look below to see if you can spot
the differences.
Lane Fox Saddle Dressage Forward Seat Is used for Saddle Seat Is used for riding Dress- Is used for riding Hunter
riding, it can be called a age. The saddle has a Pleasure and for jumping.
cutback or Saddle Seat deep seat and straight This saddle has knee rolls.
Saddle. It has a cut back flaps.
head and very straight
flaps.
HEAD SEAT
GULLET
MARTINGALE DEES
FLAP INLAY
GIRTH
IRON
LEATHER
FLAP
LEATHER KEEPER
PANEL
HUNT APPOINTMENT DEES
CANTLE
SKIRT
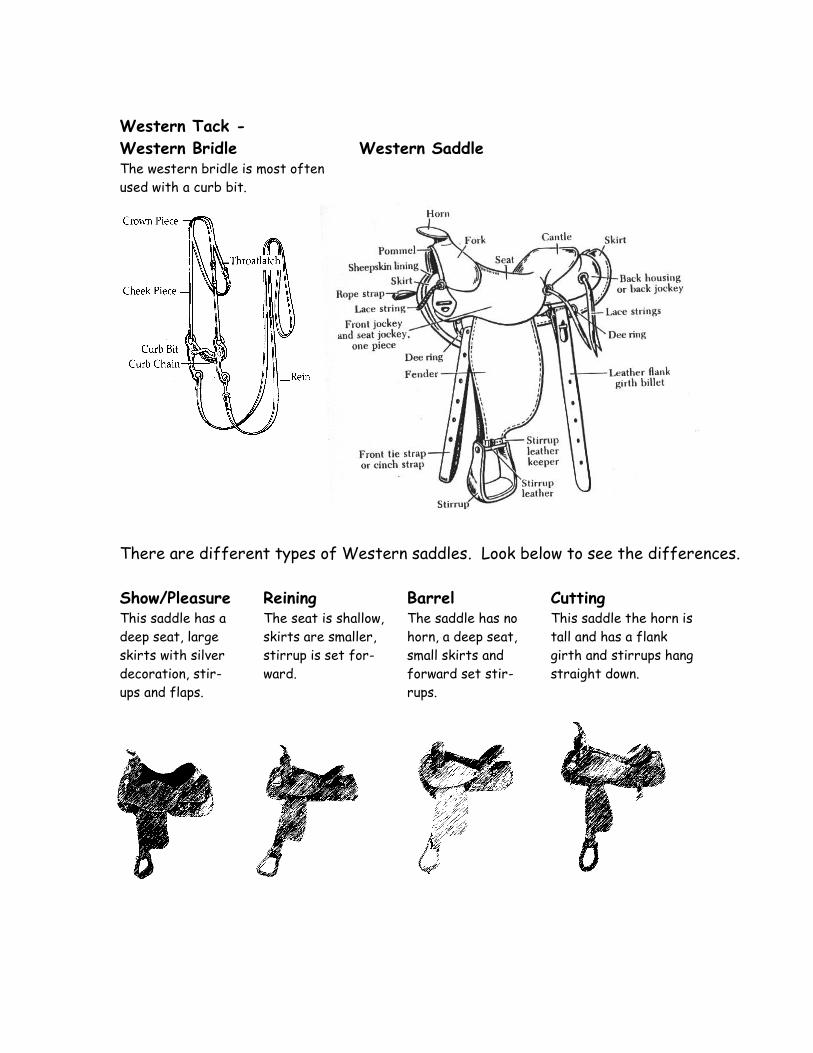
Western Tack -
Western Bridle Western Saddle The western bridle is most often
used with a curb bit.
There are different types of Western saddles. Look below to see the differences.
Show/Pleasure Reining Barrel Cutting This saddle has a The seat is shallow, The saddle has no This saddle the horn is
deep seat, large skirts are smaller, horn, a deep seat, tall and has a flank
skirts with silver stirrup is set for- small skirts and girth and stirrups hang
decoration, stir- ward. forward set stir- straight down.
ups and flaps. rups.
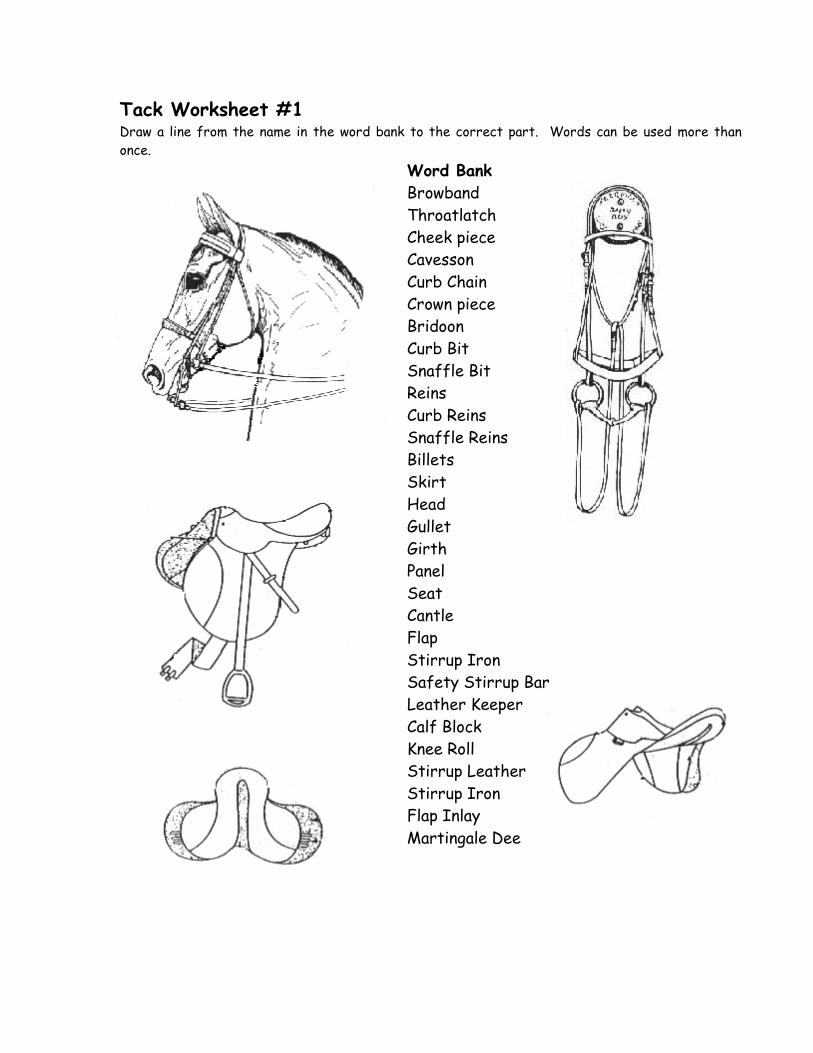
Tack Worksheet #1 Draw a line from the name in the word bank to the correct part. Words can be used more than
once.
Word Bank
Browband
Throatlatch
Cheek piece
Cavesson
Curb Chain
Crown piece
Bridoon
Curb Bit
Snaffle Bit
Reins
Curb Reins
Snaffle Reins
Billets
Skirt
Head
Gullet
Girth
Panel
Seat
Cantle
Flap
Stirrup Iron
Safety Stirrup Bar
Leather Keeper
Calf Block
Knee Roll
Stirrup Leather
Stirrup Iron
Flap Inlay
Martingale Dee
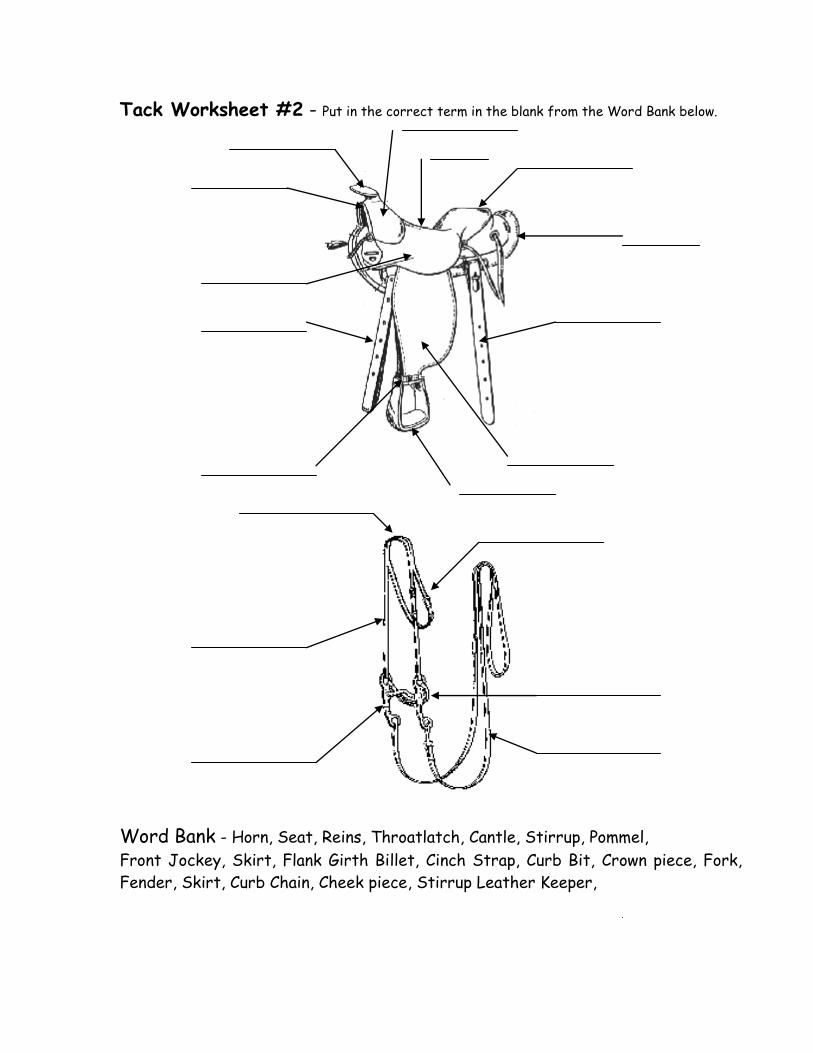
Tack Worksheet #2 - Put in the correct term in the blank from the Word Bank below.
Word Bank - Horn, Seat, Reins, Throatlatch, Cantle, Stirrup, Pommel,
Front Jockey, Skirt, Flank Girth Billet, Cinch Strap, Curb Bit, Crown piece, Fork,
Fender, Skirt, Curb Chain, Cheek piece, Stirrup Leather Keeper,
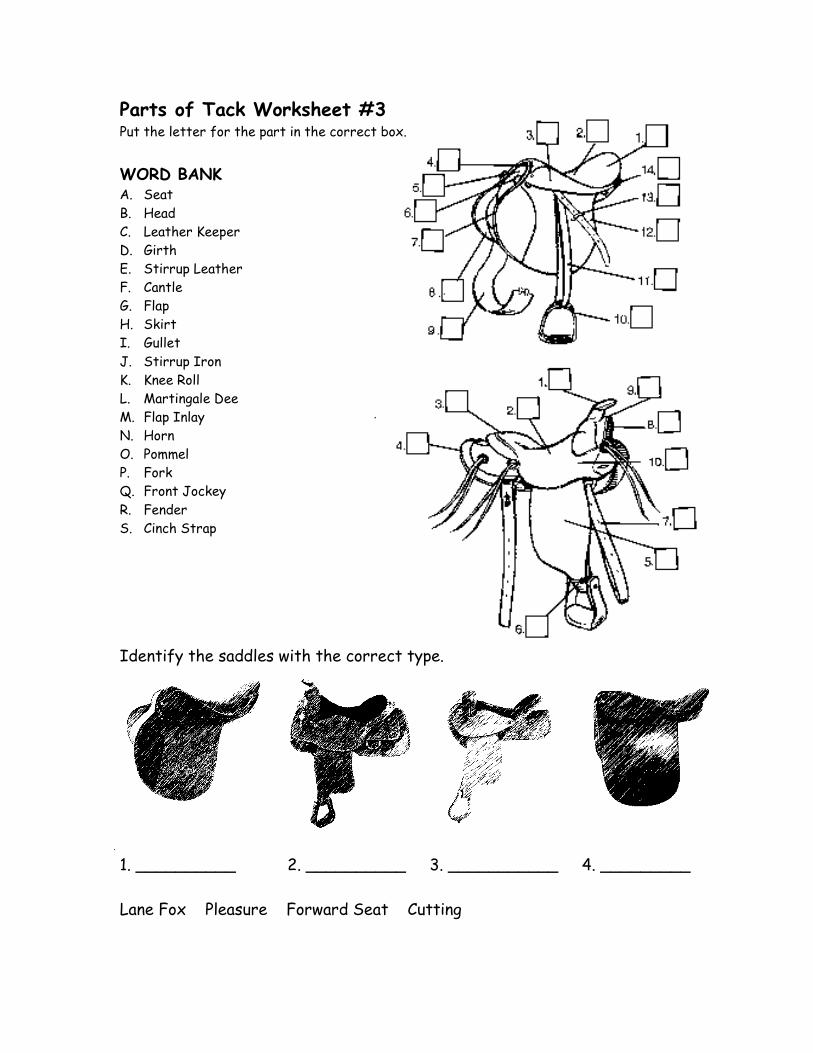
Parts of Tack Worksheet #3 Put the letter for the part in the correct box.
WORD BANK A. Seat
B. Head
C. Leather Keeper
D. Girth
E. Stirrup Leather
F. Cantle
G. Flap
H. Skirt
I. Gullet
J. Stirrup Iron
K. Knee Roll
L. Martingale Dee
M. Flap Inlay
N. Horn
O. Pommel
P. Fork
Q. Front Jockey
R. Fender
S. Cinch Strap
Identify the saddles with the correct type.
1. __________ 2. __________ 3. ___________ 4. _________
Lane Fox Pleasure Forward Seat Cutting
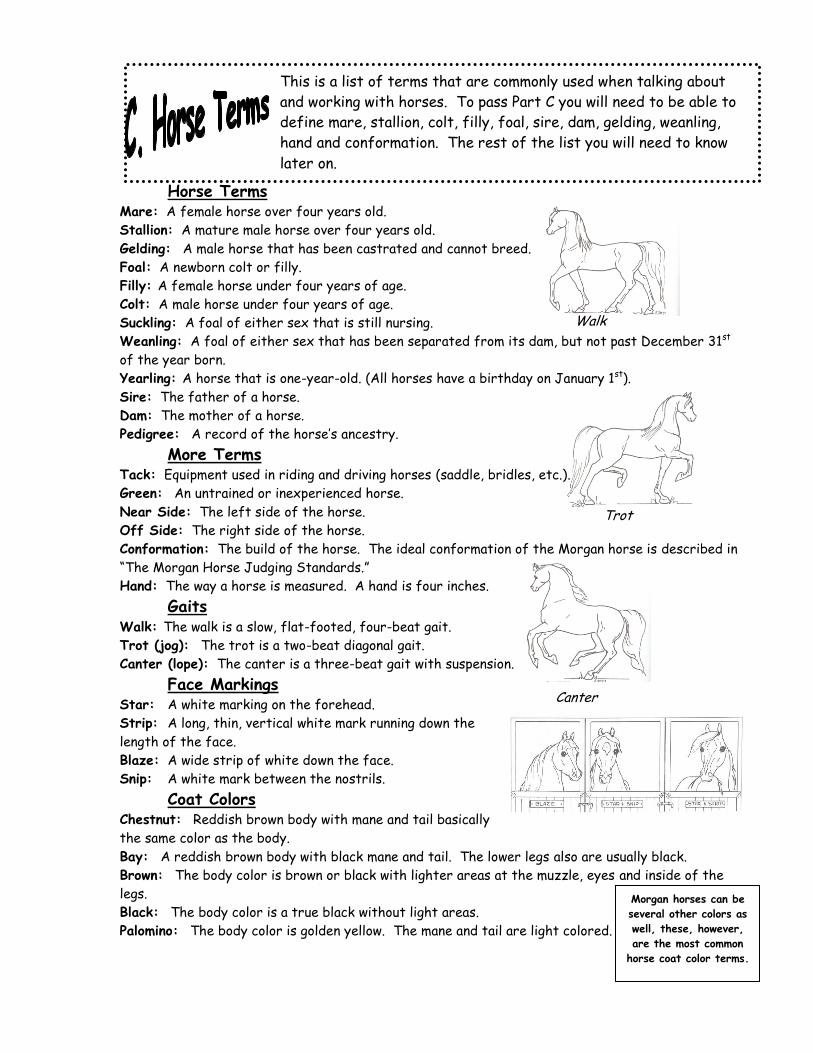
Horse Terms Mare: A female horse over four years old.
Stallion: A mature male horse over four years old.
Gelding: A male horse that has been castrated and cannot breed.
Foal: A newborn colt or filly.
Filly: A female horse under four years of age.
Colt: A male horse under four years of age.
Suckling: A foal of either sex that is still nursing.
Weanling: A foal of either sex that has been separated from its dam, but not past December 31st
of the year born.
Yearling: A horse that is one-year-old. (All horses have a birthday on January 1st).
Sire: The father of a horse.
Dam: The mother of a horse.
Pedigree: A record of the horse’s ancestry. More Terms Tack: Equipment used in riding and driving horses (saddle, bridles, etc.).
Green: An untrained or inexperienced horse.
Near Side: The left side of the horse.
Off Side: The right side of the horse.
Conformation: The build of the horse. The ideal conformation of the Morgan horse is described in
“The Morgan Horse Judging Standards.”
Hand: The way a horse is measured. A hand is four inches.
Gaits Walk: The walk is a slow, flat-footed, four-beat gait.
Trot (jog): The trot is a two-beat diagonal gait.
Canter (lope): The canter is a three-beat gait with suspension.
Face Markings Star: A white marking on the forehead.
Strip: A long, thin, vertical white mark running down the
length of the face.
Blaze: A wide strip of white down the face. Snip: A white mark between the nostrils.
Coat Colors Chestnut: Reddish brown body with mane and tail basically
the same color as the body.
Bay: A reddish brown body with black mane and tail. The lower legs also are usually black.
Brown: The body color is brown or black with lighter areas at the muzzle, eyes and inside of the
legs.
Black: The body color is a true black without light areas.
Palomino: The body color is golden yellow. The mane and tail are light colored.
Walk
Trot
Canter
This is a list of terms that are commonly used when talking about
and working with horses. To pass Part C you will need to be able to
define mare, stallion, colt, filly, foal, sire, dam, gelding, weanling,
hand and conformation. The rest of the list you will need to know
later on.
Morgan horses can be
several other colors as
well, these, however,
are the most common
horse coat color terms.
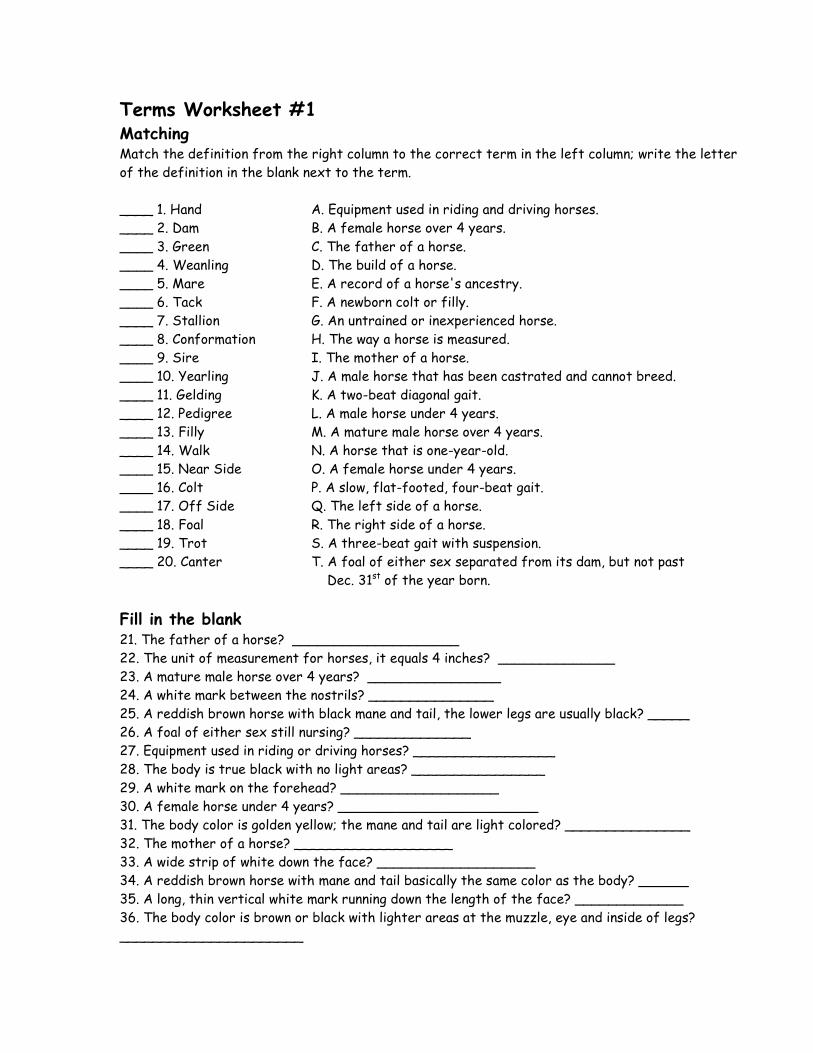
Terms Worksheet #1 Matching Match the definition from the right column to the correct term in the left column; write the letter
of the definition in the blank next to the term.
____ 1. Hand A. Equipment used in riding and driving horses.
____ 2. Dam B. A female horse over 4 years.
____ 3. Green C. The father of a horse.
____ 4. Weanling D. The build of a horse.
____ 5. Mare E. A record of a horse's ancestry.
____ 6. Tack F. A newborn colt or filly.
____ 7. Stallion G. An untrained or inexperienced horse.
____ 8. Conformation H. The way a horse is measured.
____ 9. Sire I. The mother of a horse.
____ 10. Yearling J. A male horse that has been castrated and cannot breed.
____ 11. Gelding K. A two-beat diagonal gait.
____ 12. Pedigree L. A male horse under 4 years.
____ 13. Filly M. A mature male horse over 4 years.
____ 14. Walk N. A horse that is one-year-old.
____ 15. Near Side O. A female horse under 4 years.
____ 16. Colt P. A slow, flat-footed, four-beat gait.
____ 17. Off Side Q. The left side of a horse.
____ 18. Foal R. The right side of a horse.
____ 19. Trot S. A three-beat gait with suspension.
____ 20. Canter T. A foal of either sex separated from its dam, but not past
Dec. 31st of the year born.
Fill in the blank
21. The father of a horse? ____________________
22. The unit of measurement for horses, it equals 4 inches? ______________
23. A mature male horse over 4 years? ________________
24. A white mark between the nostrils? _______________
25. A reddish brown horse with black mane and tail, the lower legs are usually black? _____
26. A foal of either sex still nursing? ______________
27. Equipment used in riding or driving horses? _________________
28. The body is true black with no light areas? ________________
29. A white mark on the forehead? ___________________
30. A female horse under 4 years? ________________________
31. The body color is golden yellow; the mane and tail are light colored? _______________
32. The mother of a horse? ___________________
33. A wide strip of white down the face? ___________________
34. A reddish brown horse with mane and tail basically the same color as the body? ______
35. A long, thin vertical white mark running down the length of the face? _____________
36. The body color is brown or black with lighter areas at the muzzle, eye and inside of legs?
______________________
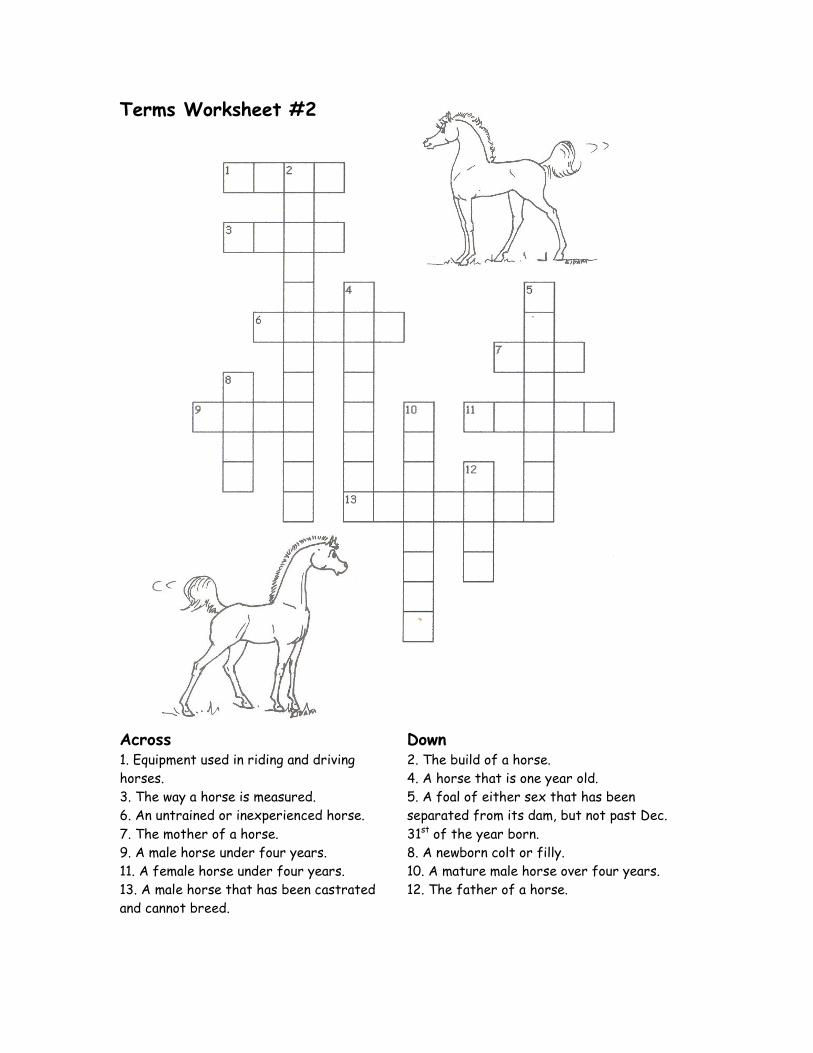
Terms Worksheet #2
Across Down 1. Equipment used in riding and driving 2. The build of a horse.
horses. 4. A horse that is one year old.
3. The way a horse is measured. 5. A foal of either sex that has been
6. An untrained or inexperienced horse. separated from its dam, but not past Dec.
7. The mother of a horse. 31st of the year born.
9. A male horse under four years. 8. A newborn colt or filly.
11. A female horse under four years. 10. A mature male horse over four years.
13. A male horse that has been castrated 12. The father of a horse.
and cannot breed.
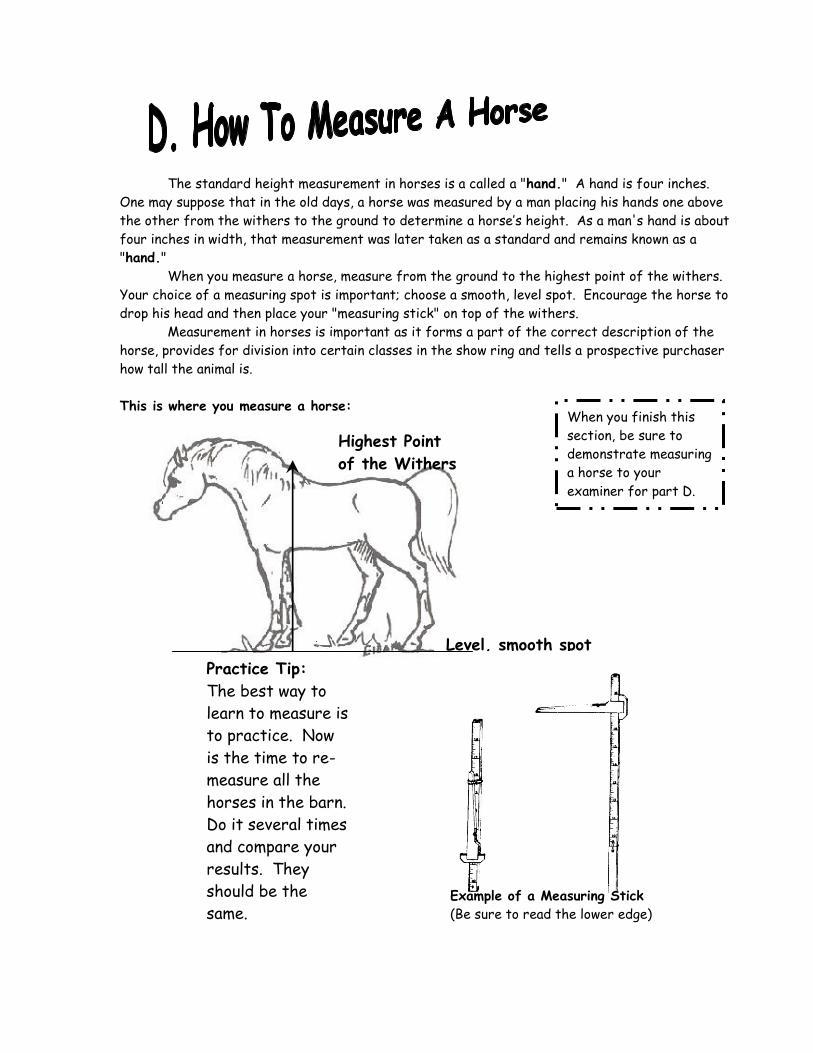
The standard height measurement in horses is a called a "hand." A hand is four inches.
One may suppose that in the old days, a horse was measured by a man placing his hands one above
the other from the withers to the ground to determine a horse’s height. As a man's hand is about
four inches in width, that measurement was later taken as a standard and remains known as a
"hand."
When you measure a horse, measure from the ground to the highest point of the withers.
Your choice of a measuring spot is important; choose a smooth, level spot. Encourage the horse to
drop his head and then place your "measuring stick" on top of the withers.
Measurement in horses is important as it forms a part of the correct description of the
horse, provides for division into certain classes in the show ring and tells a prospective purchaser
how tall the animal is.
This is where you measure a horse:
Level, smooth spot
Highest Point
of the Withers
Practice Tip:
The best way to
learn to measure is
to practice. Now
is the time to re-
measure all the
horses in the barn.
Do it several times
and compare your
results. They
should be the
same. Example of a Measuring Stick
(Be sure to read the lower edge)
When you finish this
section, be sure to
demonstrate measuring
a horse to your
examiner for part D.
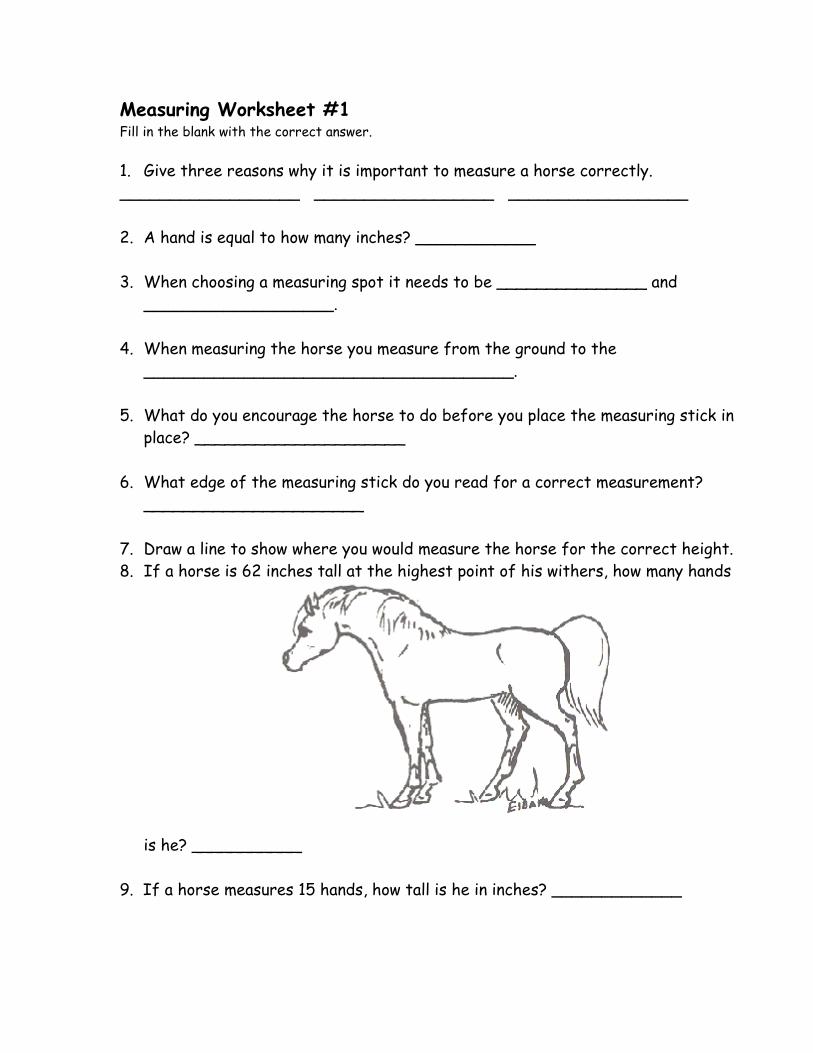
Measuring Worksheet #1 Fill in the blank with the correct answer.
1. Give three reasons why it is important to measure a horse correctly.
__________________ __________________ __________________
2. A hand is equal to how many inches? ____________
3. When choosing a measuring spot it needs to be _______________ and
___________________.
4. When measuring the horse you measure from the ground to the
_____________________________________.
5. What do you encourage the horse to do before you place the measuring stick in
place? _____________________
6. What edge of the measuring stick do you read for a correct measurement?
______________________
7. Draw a line to show where you would measure the horse for the correct height.
8. If a horse is 62 inches tall at the highest point of his withers, how many hands
is he? ___________
9. If a horse measures 15 hands, how tall is he in inches? _____________
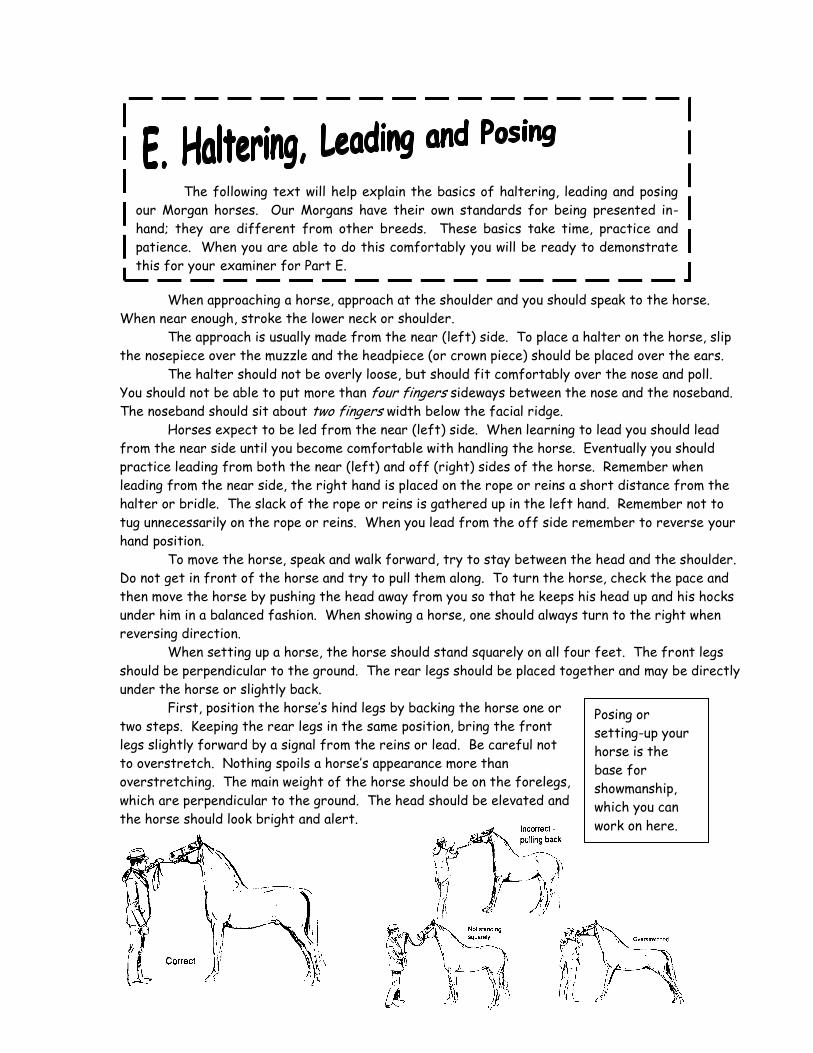
Posing or
setting-up your
horse is the
base for
showmanship,
which you can
work on here.
When approaching a horse, approach at the shoulder and you should speak to the horse.
When near enough, stroke the lower neck or shoulder.
The approach is usually made from the near (left) side. To place a halter on the horse, slip
the nosepiece over the muzzle and the headpiece (or crown piece) should be placed over the ears.
The halter should not be overly loose, but should fit comfortably over the nose and poll.
You should not be able to put more than four fingers sideways between the nose and the noseband.
The noseband should sit about two fingers width below the facial ridge.
Horses expect to be led from the near (left) side. When learning to lead you should lead
from the near side until you become comfortable with handling the horse. Eventually you should
practice leading from both the near (left) and off (right) sides of the horse. Remember when
leading from the near side, the right hand is placed on the rope or reins a short distance from the
halter or bridle. The slack of the rope or reins is gathered up in the left hand. Remember not to
tug unnecessarily on the rope or reins. When you lead from the off side remember to reverse your
hand position.
To move the horse, speak and walk forward, try to stay between the head and the shoulder.
Do not get in front of the horse and try to pull them along. To turn the horse, check the pace and
then move the horse by pushing the head away from you so that he keeps his head up and his hocks
under him in a balanced fashion. When showing a horse, one should always turn to the right when
reversing direction.
When setting up a horse, the horse should stand squarely on all four feet. The front legs
should be perpendicular to the ground. The rear legs should be placed together and may be directly
under the horse or slightly back.
First, position the horse’s hind legs by backing the horse one or
two steps. Keeping the rear legs in the same position, bring the front
legs slightly forward by a signal from the reins or lead. Be careful not
to overstretch. Nothing spoils a horse’s appearance more than
overstretching. The main weight of the horse should be on the forelegs,
which are perpendicular to the ground. The head should be elevated and
the horse should look bright and alert.
The following text will help explain the basics of haltering, leading and posing
our Morgan horses. Our Morgans have their own standards for being presented in-
hand; they are different from other breeds. These basics take time, practice and
patience. When you are able to do this comfortably you will be ready to demonstrate
this for your examiner for Part E.

Haltering, Leading and Posing Worksheet Identify the following pictures which one is correct and what is wrong in the ones that are not
correct.
A. ________________________ B. ________________________
C. ________________________ D. ________________________
Fill in the blank for the questions below.
1. When you put the halter on the horse the __________________ must be slipped over the
muzzle first.
2. When a halter is fitted properly the noseband should sit _____________________ width
below the facial ridge.
3. Most horses expect to be lead from the __________________ side.
4. When showing a horse in-hand or for showmanship you should always turn the horse to the
____________ when reversing direction.
5. When approaching a horse, approach at the shoulder and you should __________ to the horse.
6. You should not be able to put more than ____________________sideways between the nose
and the noseband.
7. To move the horse, speak and ___________________, try to stay between the head and the
shoulder.
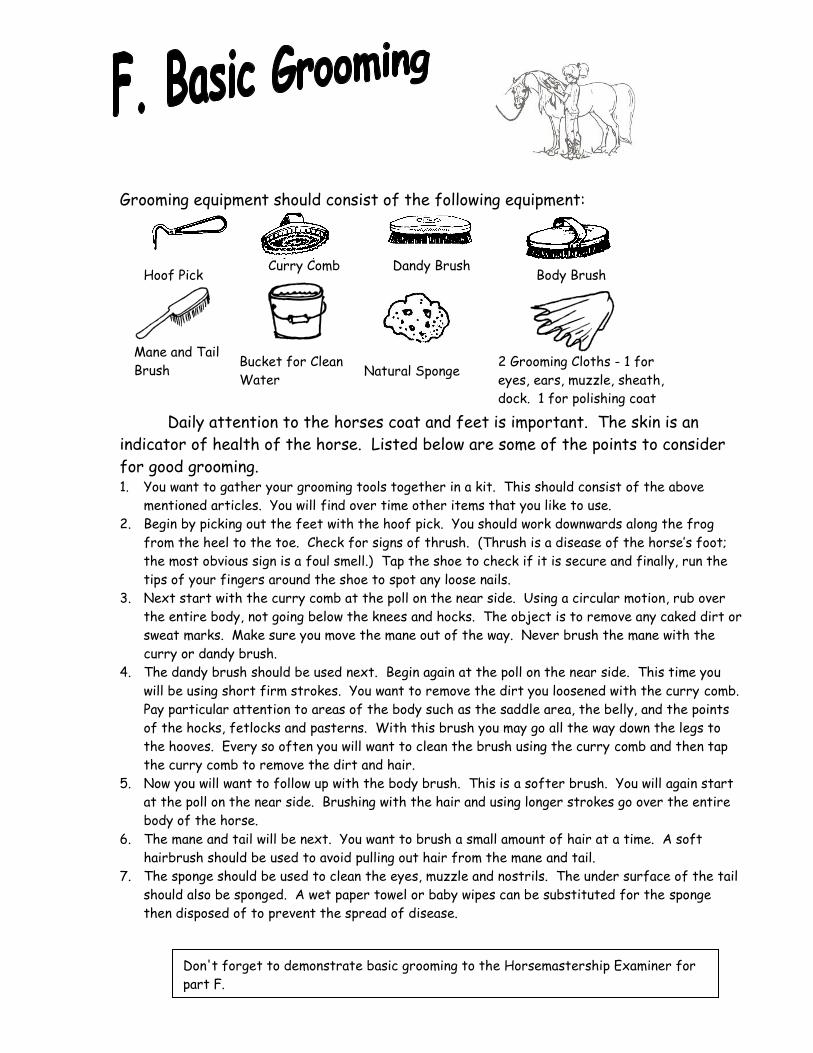
Grooming equipment should consist of the following equipment:
Daily attention to the horses coat and feet is important. The skin is an
indicator of health of the horse. Listed below are some of the points to consider
for good grooming. 1. You want to gather your grooming tools together in a kit. This should consist of the above
mentioned articles. You will find over time other items that you like to use.
2. Begin by picking out the feet with the hoof pick. You should work downwards along the frog
from the heel to the toe. Check for signs of thrush. (Thrush is a disease of the horse’s foot;
the most obvious sign is a foul smell.) Tap the shoe to check if it is secure and finally, run the
tips of your fingers around the shoe to spot any loose nails.
3. Next start with the curry comb at the poll on the near side. Using a circular motion, rub over
the entire body, not going below the knees and hocks. The object is to remove any caked dirt or
sweat marks. Make sure you move the mane out of the way. Never brush the mane with the
curry or dandy brush.
4. The dandy brush should be used next. Begin again at the poll on the near side. This time you
will be using short firm strokes. You want to remove the dirt you loosened with the curry comb.
Pay particular attention to areas of the body such as the saddle area, the belly, and the points
of the hocks, fetlocks and pasterns. With this brush you may go all the way down the legs to
the hooves. Every so often you will want to clean the brush using the curry comb and then tap
the curry comb to remove the dirt and hair.
5. Now you will want to follow up with the body brush. This is a softer brush. You will again start
at the poll on the near side. Brushing with the hair and using longer strokes go over the entire
body of the horse.
6. The mane and tail will be next. You want to brush a small amount of hair at a time. A soft
hairbrush should be used to avoid pulling out hair from the mane and tail.
7. The sponge should be used to clean the eyes, muzzle and nostrils. The under surface of the tail
should also be sponged. A wet paper towel or baby wipes can be substituted for the sponge
then disposed of to prevent the spread of disease.
Curry Comb Dandy Brush Hoof Pick Body Brush
Mane and Tail
Brush Bucket for Clean
Water
2 Grooming Cloths - 1 for
eyes, ears, muzzle, sheath,
dock. 1 for polishing coat
Natural Sponge
Don't forget to demonstrate basic grooming to the Horsemastership Examiner for
part F.
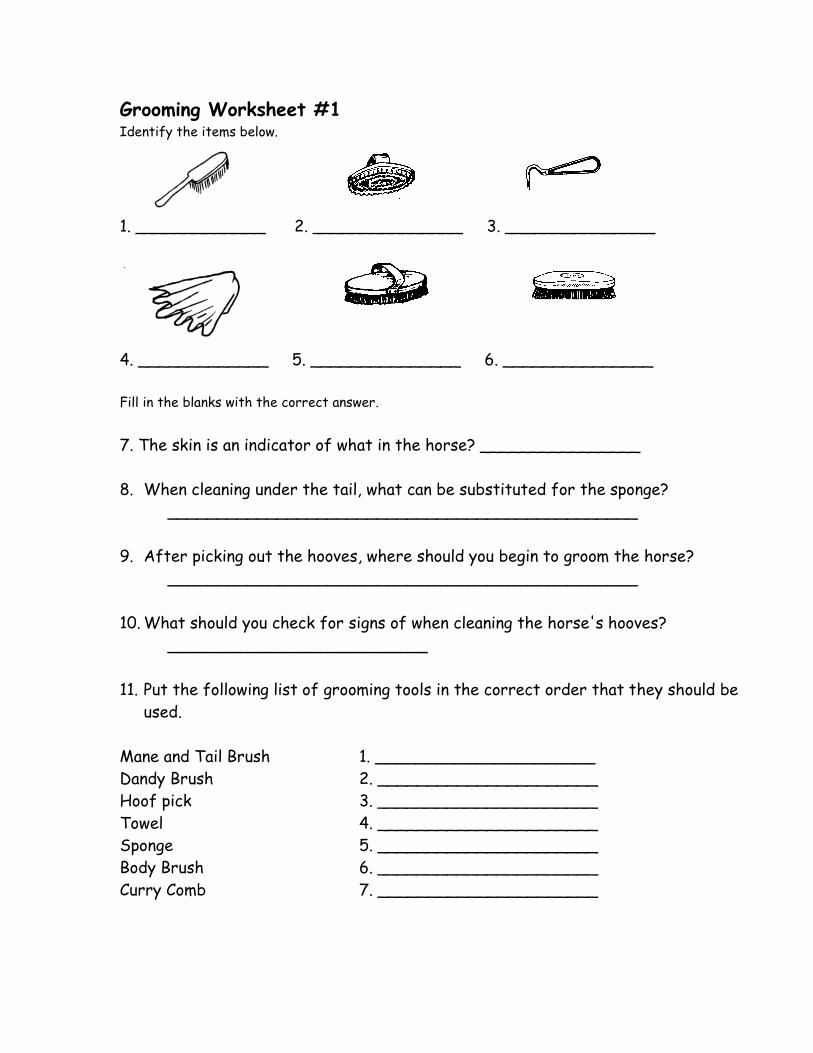
Grooming Worksheet #1 Identify the items below.
1. _____________ 2. _______________ 3. _______________
4. _____________ 5. _______________ 6. _______________
Fill in the blanks with the correct answer.
7. The skin is an indicator of what in the horse? ________________
8. When cleaning under the tail, what can be substituted for the sponge?
_______________________________________________
9. After picking out the hooves, where should you begin to groom the horse?
_______________________________________________
10. What should you check for signs of when cleaning the horse's hooves?
__________________________
11. Put the following list of grooming tools in the correct order that they should be
used.
Mane and Tail Brush 1. ______________________
Dandy Brush 2. ______________________
Hoof pick 3. ______________________
Towel 4. ______________________
Sponge 5. ______________________
Body Brush 6. ______________________
Curry Comb 7. ______________________
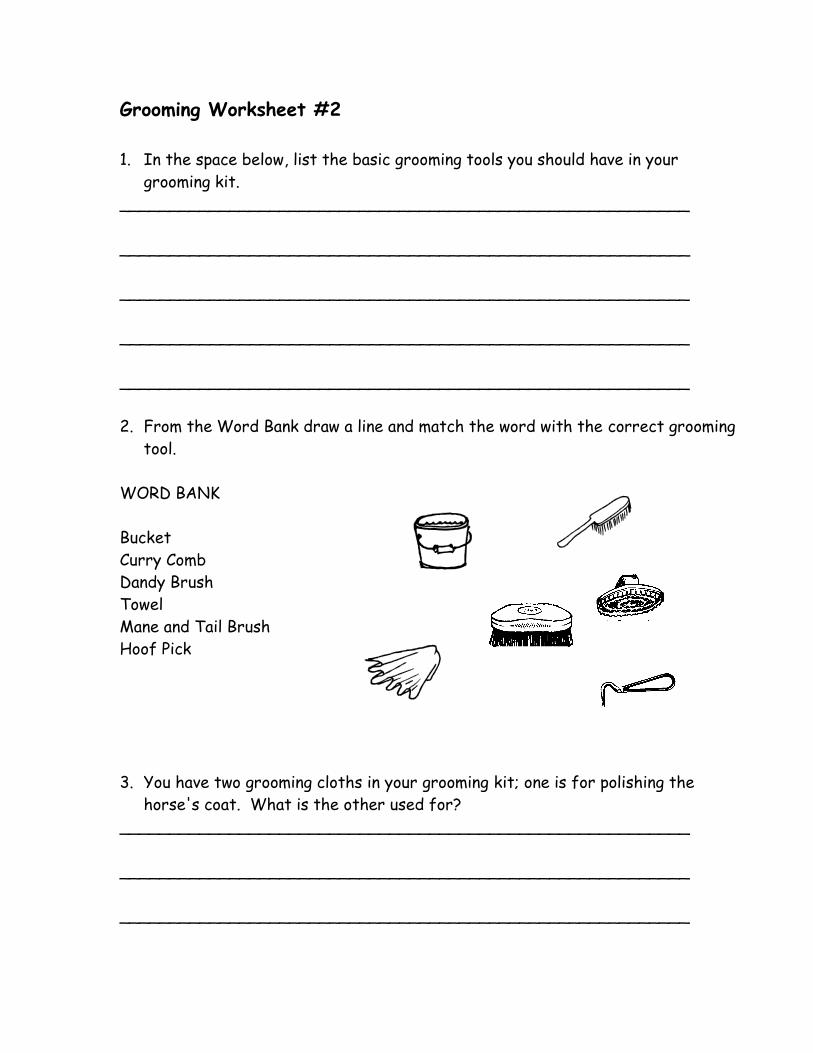
Grooming Worksheet #2
1. In the space below, list the basic grooming tools you should have in your
grooming kit.
_________________________________________________________
_________________________________________________________
_________________________________________________________
_________________________________________________________
_________________________________________________________
2. From the Word Bank draw a line and match the word with the correct grooming
tool.
WORD BANK
Bucket
Curry Comb
Dandy Brush
Towel
Mane and Tail Brush
Hoof Pick
3. You have two grooming cloths in your grooming kit; one is for polishing the
horse's coat. What is the other used for?
_________________________________________________________
_________________________________________________________
_________________________________________________________
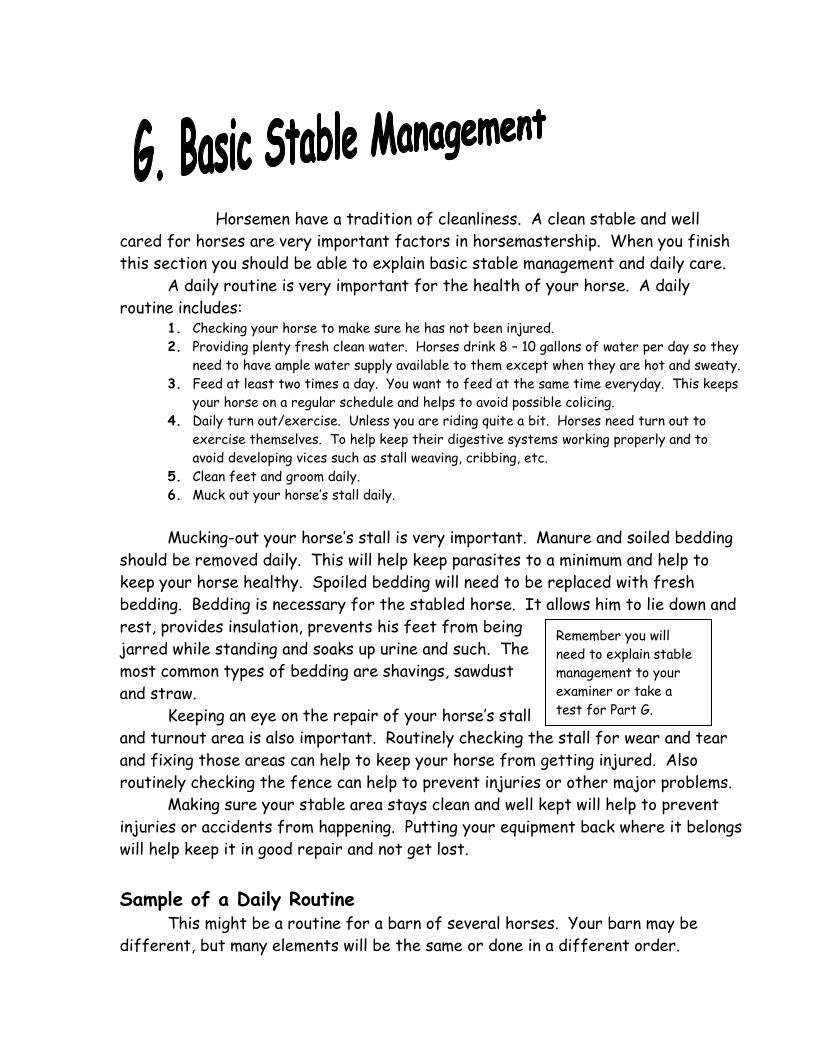
Remember you will
need to explain stable
management to your
examiner or take a
test for Part G.
Horsemen have a tradition of cleanliness. A clean stable and well
cared for horses are very important factors in horsemastership. When you finish
this section you should be able to explain basic stable management and daily care.
A daily routine is very important for the health of your horse. A daily
routine includes: 1. Checking your horse to make sure he has not been injured.
2. Providing plenty fresh clean water. Horses drink 8 – 10 gallons of water per day so they
need to have ample water supply available to them except when they are hot and sweaty. 3. Feed at least two times a day. You want to feed at the same time everyday. This keeps
your horse on a regular schedule and helps to avoid possible colicing. 4. Daily turn out/exercise. Unless you are riding quite a bit. Horses need turn out to
exercise themselves. To help keep their digestive systems working properly and to
avoid developing vices such as stall weaving, cribbing, etc.
5. Clean feet and groom daily.
6. Muck out your horse’s stall daily.
Mucking-out your horse’s stall is very important. Manure and soiled bedding
should be removed daily. This will help keep parasites to a minimum and help to
keep your horse healthy. Spoiled bedding will need to be replaced with fresh
bedding. Bedding is necessary for the stabled horse. It allows him to lie down and
rest, provides insulation, prevents his feet from being
jarred while standing and soaks up urine and such. The
most common types of bedding are shavings, sawdust
and straw.
Keeping an eye on the repair of your horse’s stall
and turnout area is also important. Routinely checking the stall for wear and tear
and fixing those areas can help to keep your horse from getting injured. Also
routinely checking the fence can help to prevent injuries or other major problems.
Making sure your stable area stays clean and well kept will help to prevent
injuries or accidents from happening. Putting your equipment back where it belongs
will help keep it in good repair and not get lost.
Sample of a Daily Routine This might be a routine for a barn of several horses. Your barn may be
different, but many elements will be the same or done in a different order.
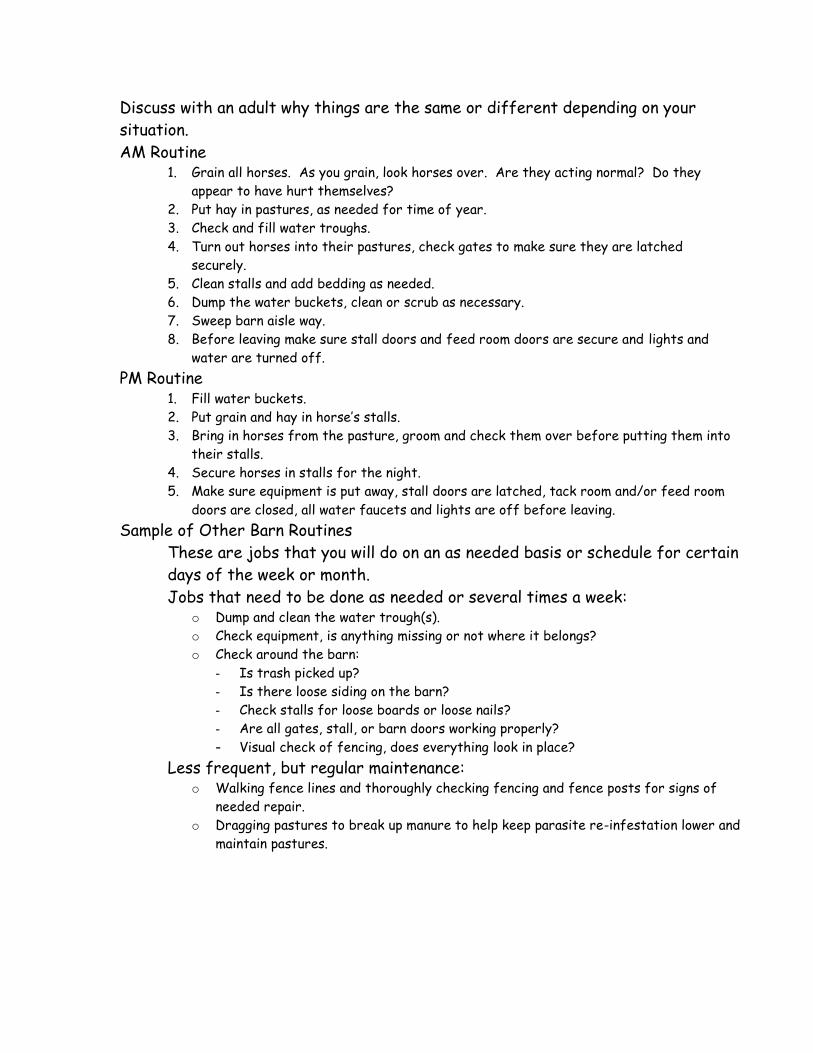
Discuss with an adult why things are the same or different depending on your
situation.
AM Routine 1. Grain all horses. As you grain, look horses over. Are they acting normal? Do they
appear to have hurt themselves?
2. Put hay in pastures, as needed for time of year.
3. Check and fill water troughs.
4. Turn out horses into their pastures, check gates to make sure they are latched
securely.
5. Clean stalls and add bedding as needed.
6. Dump the water buckets, clean or scrub as necessary.
7. Sweep barn aisle way.
8. Before leaving make sure stall doors and feed room doors are secure and lights and
water are turned off.
PM Routine 1. Fill water buckets.
2. Put grain and hay in horse’s stalls.
3. Bring in horses from the pasture, groom and check them over before putting them into
their stalls.
4. Secure horses in stalls for the night.
5. Make sure equipment is put away, stall doors are latched, tack room and/or feed room
doors are closed, all water faucets and lights are off before leaving.
Sample of Other Barn Routines
These are jobs that you will do on an as needed basis or schedule for certain
days of the week or month.
Jobs that need to be done as needed or several times a week: o Dump and clean the water trough(s).
o Check equipment, is anything missing or not where it belongs?
o Check around the barn:
- Is trash picked up?
- Is there loose siding on the barn?
- Check stalls for loose boards or loose nails?
- Are all gates, stall, or barn doors working properly?
- Visual check of fencing, does everything look in place? Less frequent, but regular maintenance:
o Walking fence lines and thoroughly checking fencing and fence posts for signs of
needed repair.
o Dragging pastures to break up manure to help keep parasite re-infestation lower and
maintain pastures.
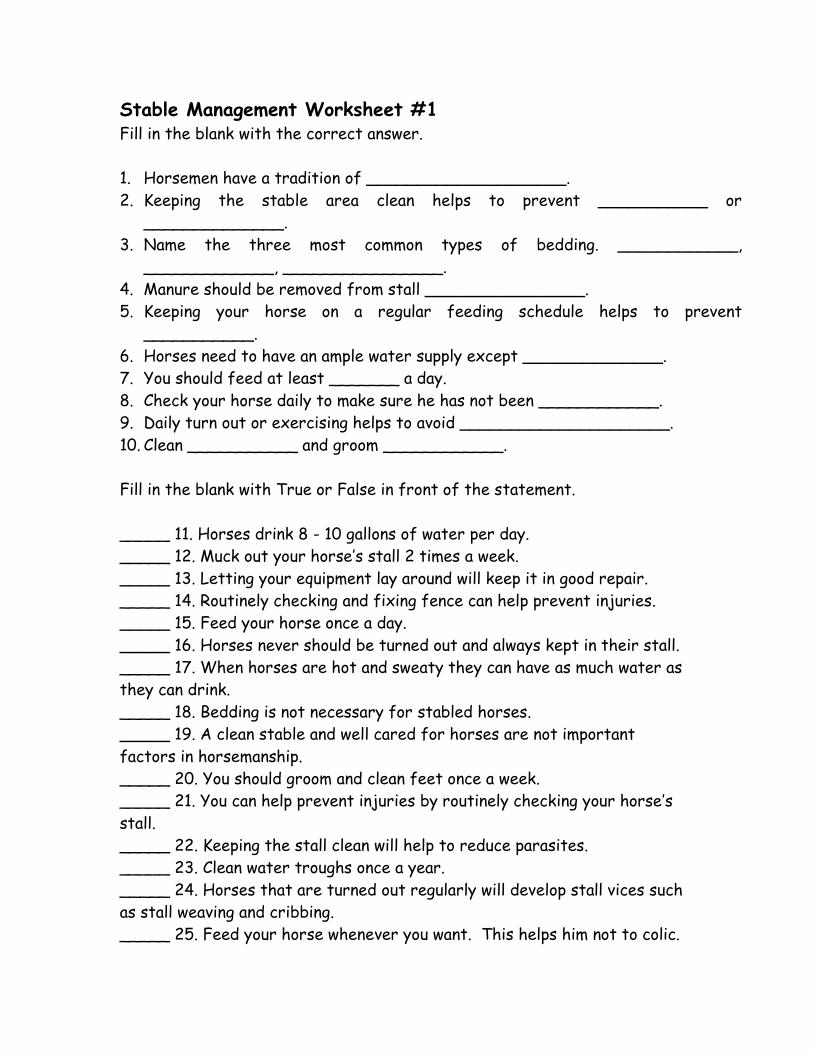
Stable Management Worksheet #1 Fill in the blank with the correct answer.
1. Horsemen have a tradition of ____________________.
2. Keeping the stable area clean helps to prevent ___________ or
______________.
3. Name the three most common types of bedding. ____________,
_____________, ________________.
4. Manure should be removed from stall ________________.
5. Keeping your horse on a regular feeding schedule helps to prevent
___________.
6. Horses need to have an ample water supply except ______________.
7. You should feed at least _______ a day.
8. Check your horse daily to make sure he has not been ____________.
9. Daily turn out or exercising helps to avoid _____________________.
10. Clean ___________ and groom ____________.
Fill in the blank with True or False in front of the statement.
_____ 11. Horses drink 8 - 10 gallons of water per day.
_____ 12. Muck out your horse’s stall 2 times a week.
_____ 13. Letting your equipment lay around will keep it in good repair.
_____ 14. Routinely checking and fixing fence can help prevent injuries.
_____ 15. Feed your horse once a day.
_____ 16. Horses never should be turned out and always kept in their stall.
_____ 17. When horses are hot and sweaty they can have as much water as
they can drink.
_____ 18. Bedding is not necessary for stabled horses.
_____ 19. A clean stable and well cared for horses are not important
factors in horsemanship.
_____ 20. You should groom and clean feet once a week.
_____ 21. You can help prevent injuries by routinely checking your horse’s
stall.
_____ 22. Keeping the stall clean will help to reduce parasites.
_____ 23. Clean water troughs once a year.
_____ 24. Horses that are turned out regularly will develop stall vices such
as stall weaving and cribbing.
_____ 25. Feed your horse whenever you want. This helps him not to colic.

Stable Management Worksheet #2
List three examples of jobs that need to be done around the barn several times a
week.
_________________________________________________________
_________________________________________________________
_________________________________________________________
List two jobs that need to be done around the farm once a month.
_________________________________________________________
_________________________________________________________
You now own two horses that you keep at home. You have a barn with two stalls, a
tack/feed room and hay storage area. You are going away on vacation for 1 week
and your friend Lisa is going to take care of your horses. Below you will create a
list of what she will need to do every day, morning and evening, to take care of your
horses.
_________________________________________________________
_________________________________________________________
_________________________________________________________
_________________________________________________________
_________________________________________________________
_________________________________________________________
_________________________________________________________
_________________________________________________________
_________________________________________________________
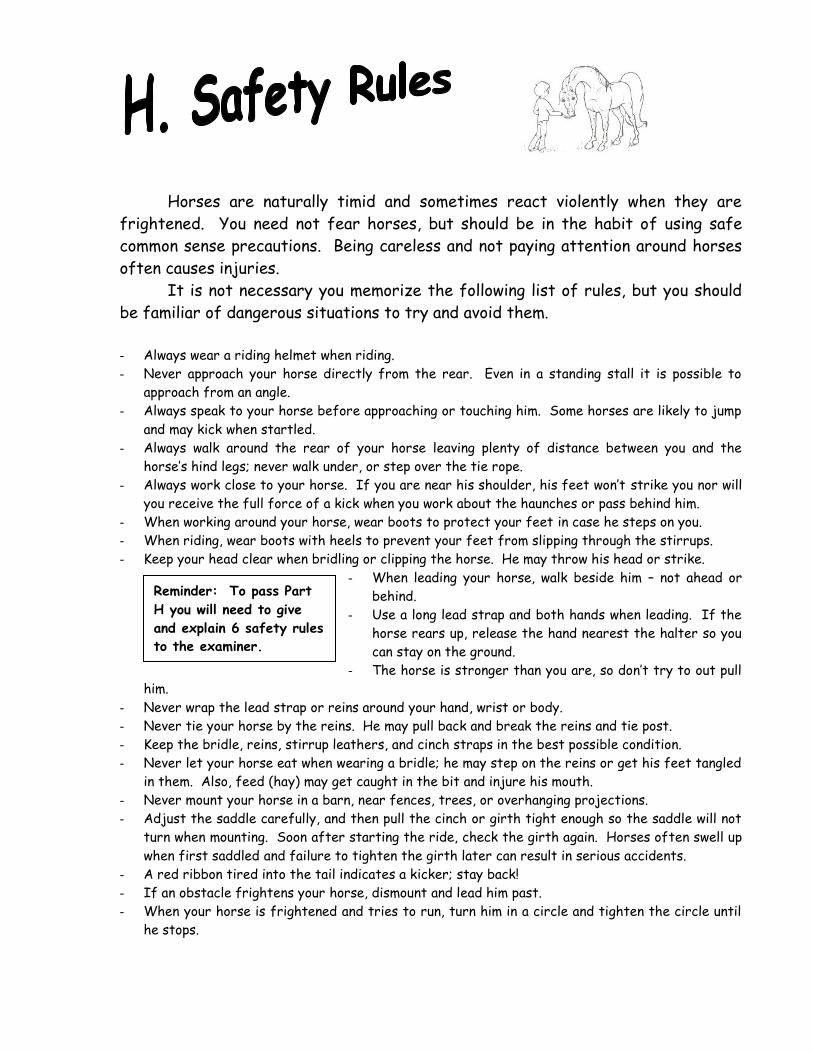
Reminder: To pass Part
H you will need to give
and explain 6 safety rules
to the examiner.
Horses are naturally timid and sometimes react violently when they are
frightened. You need not fear horses, but should be in the habit of using safe
common sense precautions. Being careless and not paying attention around horses
often causes injuries.
It is not necessary you memorize the following list of rules, but you should
be familiar of dangerous situations to try and avoid them.
- Always wear a riding helmet when riding.
- Never approach your horse directly from the rear. Even in a standing stall it is possible to
approach from an angle.
- Always speak to your horse before approaching or touching him. Some horses are likely to jump
and may kick when startled.
- Always walk around the rear of your horse leaving plenty of distance between you and the
horse’s hind legs; never walk under, or step over the tie rope.
- Always work close to your horse. If you are near his shoulder, his feet won’t strike you nor will
you receive the full force of a kick when you work about the haunches or pass behind him.
- When working around your horse, wear boots to protect your feet in case he steps on you.
- When riding, wear boots with heels to prevent your feet from slipping through the stirrups.
- Keep your head clear when bridling or clipping the horse. He may throw his head or strike.
- When leading your horse, walk beside him – not ahead or
behind.
- Use a long lead strap and both hands when leading. If the
horse rears up, release the hand nearest the halter so you
can stay on the ground.
- The horse is stronger than you are, so don’t try to out pull
him.
- Never wrap the lead strap or reins around your hand, wrist or body.
- Never tie your horse by the reins. He may pull back and break the reins and tie post.
- Keep the bridle, reins, stirrup leathers, and cinch straps in the best possible condition.
- Never let your horse eat when wearing a bridle; he may step on the reins or get his feet tangled
in them. Also, feed (hay) may get caught in the bit and injure his mouth.
- Never mount your horse in a barn, near fences, trees, or overhanging projections.
- Adjust the saddle carefully, and then pull the cinch or girth tight enough so the saddle will not
turn when mounting. Soon after starting the ride, check the girth again. Horses often swell up
when first saddled and failure to tighten the girth later can result in serious accidents.
- A red ribbon tired into the tail indicates a kicker; stay back!
- If an obstacle frightens your horse, dismount and lead him past.
- When your horse is frightened and tries to run, turn him in a circle and tighten the circle until
he stops.

- When riding in-groups, do not ride closer than one horse’s length to the horse in front of you
and be alert for tree branches.
- Reduce speed when riding on rough ground or in sand,
mud, ice, or snow, or where there is danger of the
mount falling or slipping. - Avoid paved roads. Slow your mount to a walk when
crossing such roads. If he is a spirited of young horse,
dismount and lead him across.
- Never tie you horse in the trailer before the tailgate
is closed. Always untie him before the tailgate is
opened.
Safety Worksheet #1 How Many Safety Rules can you think of? In the space below write as many safety rules you can think of that apply in your barn.
____________________________________________________________________
____________________________________________________________________
____________________________________________________________________
____________________________________________________________________
____________________________________________________________________
____________________________________________________________________
____________________________________________________________________
____________________________________________________________________
____________________________________________________________________
____________________________________________________________________
____________________________________________________________________
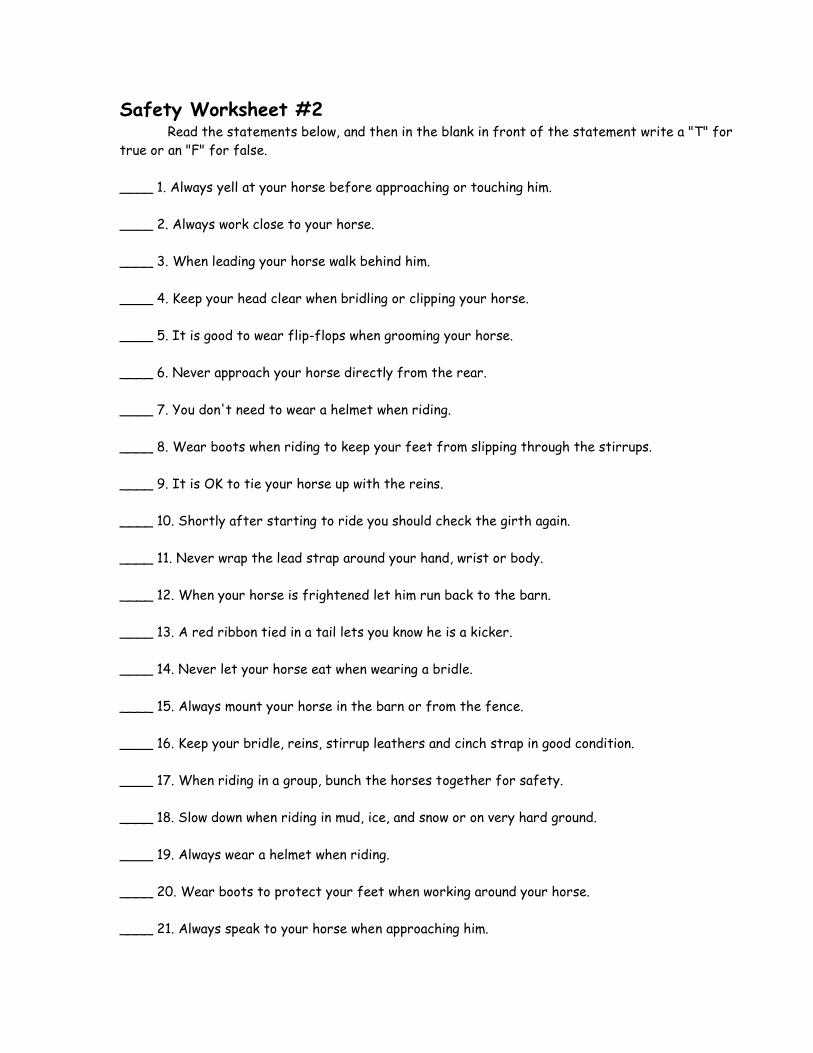
Safety Worksheet #2 Read the statements below, and then in the blank in front of the statement write a "T" for
true or an "F" for false.
____ 1. Always yell at your horse before approaching or touching him.
____ 2. Always work close to your horse.
____ 3. When leading your horse walk behind him.
____ 4. Keep your head clear when bridling or clipping your horse.
____ 5. It is good to wear flip-flops when grooming your horse.
____ 6. Never approach your horse directly from the rear.
____ 7. You don't need to wear a helmet when riding.
____ 8. Wear boots when riding to keep your feet from slipping through the stirrups.
____ 9. It is OK to tie your horse up with the reins.
____ 10. Shortly after starting to ride you should check the girth again.
____ 11. Never wrap the lead strap around your hand, wrist or body.
____ 12. When your horse is frightened let him run back to the barn.
____ 13. A red ribbon tied in a tail lets you know he is a kicker.
____ 14. Never let your horse eat when wearing a bridle.
____ 15. Always mount your horse in the barn or from the fence.
____ 16. Keep your bridle, reins, stirrup leathers and cinch strap in good condition.
____ 17. When riding in a group, bunch the horses together for safety.
____ 18. Slow down when riding in mud, ice, and snow or on very hard ground.
____ 19. Always wear a helmet when riding.
____ 20. Wear boots to protect your feet when working around your horse.
____ 21. Always speak to your horse when approaching him.
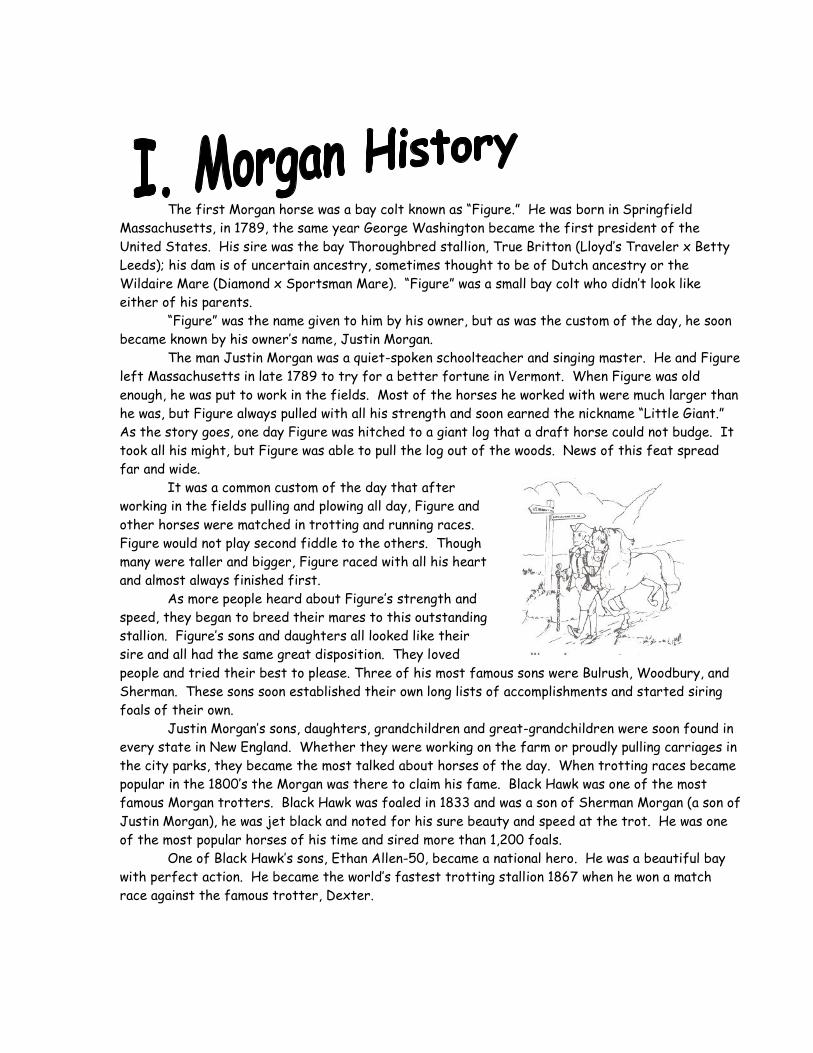
The first Morgan horse was a bay colt known as “Figure.” He was born in Springfield
Massachusetts, in 1789, the same year George Washington became the first president of the
United States. His sire was the bay Thoroughbred stallion, True Britton (Lloyd’s Traveler x Betty
Leeds); his dam is of uncertain ancestry, sometimes thought to be of Dutch ancestry or the
Wildaire Mare (Diamond x Sportsman Mare). “Figure” was a small bay colt who didn’t look like
either of his parents.
“Figure” was the name given to him by his owner, but as was the custom of the day, he soon
became known by his owner’s name, Justin Morgan.
The man Justin Morgan was a quiet-spoken schoolteacher and singing master. He and Figure
left Massachusetts in late 1789 to try for a better fortune in Vermont. When Figure was old
enough, he was put to work in the fields. Most of the horses he worked with were much larger than
he was, but Figure always pulled with all his strength and soon earned the nickname “Little Giant.”
As the story goes, one day Figure was hitched to a giant log that a draft horse could not budge. It
took all his might, but Figure was able to pull the log out of the woods. News of this feat spread
far and wide.
It was a common custom of the day that after
working in the fields pulling and plowing all day, Figure and
other horses were matched in trotting and running races.
Figure would not play second fiddle to the others. Though
many were taller and bigger, Figure raced with all his heart
and almost always finished first.
As more people heard about Figure’s strength and
speed, they began to breed their mares to this outstanding
stallion. Figure’s sons and daughters all looked like their
sire and all had the same great disposition. They loved
people and tried their best to please. Three of his most famous sons were Bulrush, Woodbury, and
Sherman. These sons soon established their own long lists of accomplishments and started siring
foals of their own.
Justin Morgan’s sons, daughters, grandchildren and great-grandchildren were soon found in
every state in New England. Whether they were working on the farm or proudly pulling carriages in
the city parks, they became the most talked about horses of the day. When trotting races became
popular in the 1800’s the Morgan was there to claim his fame. Black Hawk was one of the most
famous Morgan trotters. Black Hawk was foaled in 1833 and was a son of Sherman Morgan (a son of
Justin Morgan), he was jet black and noted for his sure beauty and speed at the trot. He was one
of the most popular horses of his time and sired more than 1,200 foals.
One of Black Hawk’s sons, Ethan Allen-50, became a national hero. He was a beautiful bay
with perfect action. He became the world’s fastest trotting stallion 1867 when he won a match
race against the famous trotter, Dexter.
You will need to pass a Morgan quiz on elementary breed information to get signed off on Part I.
In the mid 1800s gold was discovered in California. Many New England families packed their
belongings and headed for California with their Morgans. The trip was long and exhausting but as
was his nature the Morgan pushed on.
Then came the Civil War (1861 – 1865) and Morgans were found bravely carrying their
owners into battle. The famed Vermont Cavalry were mounted on Morgans along with units from
Massachusetts, Ohio and other states. General Philip Sheridan, the most outstanding Cavalry
officer from the North, rode Rienzi, his famous Morgan charger, to many courageous victories.
In the Indian Wars (circa 1860s – 1890s) Morgans
again proved their strength and intelligence. Another
fearless officer, Captain Michael Keog, rode his famous
Morgan, Comanche in many battles. Comanche is recognized
by historians as the symbol of the Battle of Little Big Horn and has been reported to have been the
only survivor.
It is interesting to note that the Morgan is the only registered breed of horse ever
perpetuated by the United States Government. In 1907, the United States Government
established a Morgan breeding farm in Weybridge, VT to breed Morgan stallions. The U.S. Cavalry
and the Remount Program, which provided Morgan stallions throughout the nation to improve the
native stock for farm, city, and military use, used the stallions. The farm’s foundation sire was
General Gates. The Morgan did so well in endurance tests that the War Department publicly
commended General Gates. This is an honor that has never before, nor since, been given to any
other stallion.
The Morgan is known for its versatility. Its role and service has adjusted to the changing
times. Today the Morgan horse is many things to many people. He excels in and out of the show
ring, under saddle or in harness, on the trail, in Dressage or jumping, and just working on the ranch,
but even more are quiet without fanfare teaching countless people to know and love a good horse.
For there is no better teacher of gentleness, responsibility and sound judgment than a good Morgan
horse.
Other Morgan Facts You Should Know………. - The maximum number of spaces and letters in a registered Morgan’s name is 25.
- The Morgan Horse Club was formed in 1909 at the Vermont State Fair.
- The Morgan Horse Club was renamed the American Morgan Horse Association in 1971.
- Morgan horses represented the US at the World Pairs Driving Championships for the first time
in 1985.
- The first Grand National Morgan Horse Show was held in Detroit, Michigan in 1973.
- In 1989 the Morgan breed celebrated its Bicentennial.
- In 1894 Colonel Joseph Battell published Volume I of the American Morgan Horse Register.
- “Figure,” Justin Morgan was foaled in 1789 and died in 1821.
- In 1951 the U.S. Morgan Horse Farm was taken over by the State of Vermont, becoming the
University of Vermont Morgan Horse Farm.
- Justin Morgan’s sons were Sherman (bright red chestnut), Woodbury (dark chestnut) and
Bulrush (dark bay)
Some Resources to Read… THE COMPLETE MORGAN HORSE - By Jeanne Mellin – very good book for history
THE MORGAN HORSE MAGAZINE – has great articles about horses and history, look for old
issues

Morgan History Worksheet #1 1. What horse survived the battle of Little Big Horn? __________________________
2. Who earned the nickname “Little Giant”? _________________________________
3. Who did Ethan Allen-50 beat in a matched race? ___________________________
4. How many foals did Black Hawk sire? ___________________________________
5. In what year did the U.S. Government establish a Morgan breeding farm? ________
6. In what state and what year was “Figure” born? ____________________________
7. Name the three most famous sons of Justin Morgan. 1._______________________
2. _________________________ 3. __________________________________
8. What horse did the US War department publicly commend? ___________________
9. What was Black Hawk’s relation to Justin Morgan? __________________________
10. What state did Justin Morgan move “Figure” to in late 1789? __________________
11. What famed cavalry unit was mounted on Morgan horses? ___________________
12. What was the name of General Philip Sheridan’s horse? ______________________
13. Where was the first Grand National Morgan Horse Show held? ________________
14. How many letters and spaces are allowed in a Morgan’s registered name? _______
15. What were the colors of Bulrush, Woodbury and Sherman? 1. __________________
2. _________________________ 3. _______________________________
16. Who was “Figure’s” sire? _____________________________________________
17. What did the Remount Program do? _____________________________________
___________________________________________________________________
18. In what year was the First Volume of the Morgan Horse Registry published and by whom?
____________________________________________________________________

Morgan History Worksheet #2 Use the space below to create and label a history timeline for the Morgan. Use your history pages
in the workbook to compile the dates and information.
1780
1990