Embed Size (px)
Citation preview

Bazooka® Automatic Taper
OperationThe Bazooka® Automatic Taper simultaneously applies tape and joint compound to any joint: walls, corners, and ceilings. It automatically dispenses the correct amount of joint compound under the tape, regardless of the tool user's speed.
The Bazooka uses tape 2 1/16 to 2 1/8 inches wide. Wider tape will not fit and narrower tape will have a tendency to jam. Install the tape by removing the tape bail (retaining wire) and placing the roll of tape on the spindle with the tape unwinding clockwise as you look at the roll. Feed the tape through the tape guide with the back side of the tape facing down. When correctly installed, the tape will curl over the drive wheel.
Fill the Bazooka with joint compound using the loading pump and the gooseneck adapter. Be sure that the gate control lever is in the closed position. Place the Bazooka on the gooseneck with the filler nozzle firmly seated against the nylon seal and move the pump handle to transfer joint compound from the pail to the Bazooka. Keep the mud pail full to avoid air being pumped into the taper. To avoid overfilling, place your fingers in the open end of the tube while filling. Stop pumping when the piston reaches your fingers (approximately 9 pumps when empty.)After loading the Bazooka, stand it on end and move the gate valve control lever to engage the drive mechanism. Now turn the key, located on the drive gear sprocket, until the joint compound covers the leading edge of the joint tape. This is necessary after each loading.
The Bazooka should be held with one hand on the control tube and the other hand at the bottom of the mud tube. Start taping with butt joints first and then sidewall and ceiling flat joints. For ceilings, use both drive wheels for the first 4 - 6 inches of tape to secure it to the ceiling, then tilt the Bazooka toward you at a slight angle leaving only one drive wheel on the drywall surface. Walk backwards, leading with the head of the tool.
To tape vertical joints, place the taper at the bottom of the joint, parallel to and slightly above the floor. Lead with the head of the taper, as soon as possible to make tracking easier. Remember to roll with only one wheel in contact with the wall until about three inches from the top. Stop completely, cut the tape, by pulling the control tube toward you, and roll to the end of the joint on both wheels. To start the next joint, move the drive wheels lightly against the surface of the wall, starting the compound flow while advancing a new end of the tape with the control tube.
To tape horizontal joints, advance the joint compound and about 1 1/2 inches of tape by pushing forward on the control tube while rolling the drive wheels on the wall. Place drive wheels on the wall and roll along the joint. Stop about 2 1/2 inches from the end of the joint and cut the tape. Roll out the last 2 1/2 inches of tape while feeding tape with the control tube. This will apply compound to the beginning of the tape for the next joint.
To tape inside angle joints, both wheels must run in contact with the adjacent wall surfaces, bisecting the angle with the Bazooka. Tracking must be in a straight line with the creaser wheel extended, using the trigger located near the trailing end of the Bazooka. The extended creaser wheel secures the tape to the angle and eases the rolling operation. Avoid twisting the taper as you move along the angle to insure that you bisect the angle correctly. Operating the taper at a 45 degree angle to the joint, as soon as it is practical, will aid in the prevention of the tape "creeping".
© 2017 AMES Taping Tools

Bazooka® Automatic Taper
MaintenanceThis tool must be washed with a brush and water (or a water hose) after each use. Pay close attention that all joint compound is flushed from under the cover plate and the tape advance mechanism. Complete the clean-up by lightly oiling all wear points. Use Ames® Bazooka® Oil or any light machine oil.
Blade Replacement1. Hold the key ring, pull down and turn key ring 90 degrees. Let the key ring slide into the cutter spring tube.2. Pull the cutter chain until cutter block and blade are clearly in view.3. Loosen the cutter block screw and remove the used blade.4. Insert a new blade. Tighten the screw, making sure the blade does not protrude through the bottom of the cutter block.5. Pull the cutter block back into the taper head channel.6. Pull the key ring down to the end of the spring tube. Turn it 90 degrees and lock it into the original position.7. Pull down on the control tube to make sure the blade travels freely through the taper head channel.
Cable Replacement1. Remove all the mud from the Bazooka.2. Remove the plunger stop from the end of the taper by lifting the locking strap and twisting the plunger stop counter-clockwise till it can be removed.3. Remove the cover plate by turning the lock screw ¼ turn counter-clockwise and lifting up the top edge of the cover. Gently pull the cover plate up and out to remove it. Close the gate valve and force the piston down with a thin piece of wood or a flattened piece of corner bead.4. Loosen the screw on the cable drum and remove the end of the cable from the drum.5. Remove the cable from the piston by removing the nut from the slotted stud.6. Clean the slotted stud of any mud, then thread the cable through the nut while holding it, and place the end of the cable into the slot. Screw the nut onto the slotted stud and tighten, to secure the cable to the piston.7. Drop the loose end on the cable into the tube followed by the piston. Replace the the plunger stop and the screws by reversing the steps used to remove it.8. Make sure the slot in the cable drum is clean and insert the loose end of the cable and tighten the screw.9. Wind the cable onto the cable drum by turning the drum key clockwise.10. Replace the cover plate and secure it by turning the lock screw ¼ turn to the closed position.
Gooser Needle ReplacementHolding onto the gooser needle assembly, loosen the screw and remove the gooser needle. Slide the entire gooser assembly to the bottom of the tape guide. Push the new gooser needle through the hole and out the bottom so that the point of the needle protrudes 1/16 inch through the tape in the slide. Hold the support assembly and tighten the screw. Insert tape through the tape guide and check for proper advancement of the tape.
© 2017 AMES Taping Tools

Bazooka® Encintador de Automatico
FucionamientoEl Bazooka® de Encintador de Automatico distribuye simultáneamente cinta y compuesto para junturas acualquier juntura de pared, esquina o techo. Distribuye automáticamente bajo la cinta, la cantidad correcta decompuesto para junturas, sea cual sea la velocidad de la herramienta del usuario.
El Bazooka utiliza una cinta entre 21/16” y 21/8” de ancho. Si la cinta es más ancha, no encajara bien, y si es másestrecha, tendera a atascarse. Instale la cinta, quitándole la cubierta (cable de retención) y colocando el rollo de cinta en el eje del carrete, con la cinta desenrollándose en el sentido de las manillas del reloj, y mirando al rollo. Introduzca la cinta a través de la guía de cinta, con su parte posterior mirando hacia abajo. Si se ha instalado correctamente, la cinta se enroscara sobre el rodillo.
Llene el Bazooka con el compuesto para junturas, mediante la bomba EasyClean® y el adaptador del cuello de ganso. Asegu-rase de que la palanca de la compuerta de control se halle en posición de cerrado. Coloque el Bazookade cinta sobre el cuello de ganso, con la boquilla de relleno firmemente apoyada contra el cierre de nailon, y mueva la empuñadura de la bomba para transferir el compuesto para junturas, desde el cubo, al Bazooka. Mantenga el cubo Lleno, para evitar que se bombee aire dentro del Bazooka. Para evitar que se Llene demasiado, ponga sus dedos en la apertura del tubo mientras este rellenando. Deje de bombear una vez que el pistón alcance a tocar sus dedos. (Bombee aproximadamente 9 veces cuando este vacío).
Después de cargar el Bazooka, manténgalo en posición vertical y mueva la palanca de control de la válvula decompuerta para engranar el mecanismo accionado. A continuación gire la Llave que se encuentra en el engranajeimpulsor, hasta que el compuesto para junturas cubra el extremo principal de la cinta para junturas. Hay que repetir este procedimiento después de cada carga. El Bazookadebería operarse con una mano en el tubo de control y la otra mano en la base del cubo.
Empiece a distribuir la cinta, primero con juntas a tope y después con pared lateral y juntas planas de techo. Para los techos, utilice ambos rodillos para las 4 o 6 primeras pulgadas de cinta, con el objeto de fijarla al techo. A continuación, incline hacia usted el Bazooka, ligeramente en ángulo, dejando solo un rodillo en la superficie de la pared seca. Retroceda, con la parte frontal de la herramienta hacia adelante.
Para pegar junturas verticales, coloque el Bazooka en la base de la juntura, paralelo al suelo, y ligeramente por encima de este. Diríjalo cuanto antes, con la parte frontal del Bazooka, para facilitar el recorrido. Recuerde que debe hacerlo girar, manteniendo un solo rodillo en contacto con la pared, hasta que se halle a unas tres pulgadas de distancia de la parte superi-or. Deténgase por completo, corte la cinta, tirando del tubo de control hacia usted, y haga que ruede hacia el final de la juntura, con ambos rodillos. Para pasar a la siguiente juntura, mueva los rodillos ligeramente contra la superficie de la pared, permitiendo que fluya el compuesto, al mismo tiempo que hace avanzar un nuevo extremo de cinta con el tubo controlador.
Para pegar superficies horizontales, haga que avancen el compuesto para junturas y una pulgada y media de cinta,empujando hacia adelante el tubo controlador al mismo tiempo que hace girar los rodillos contra la pared. Coloque los rodillos sobre la pared y hágalos pasar a 10 largo de la juntura. Deténgase a unas 2,5 pulgadas de distancia del final de la juntura y luego corte la cinta. Desenrolle las 2,5 pulgadas de cinta mientras la introduce en el tubo de control. Con ello distribuirá el compuesto hasta el principio de la cinta para la próxima juntura.
Para pegar junturas de ángulos interiores, ambos rodillos deben girar estando en contacto con la superficie de la pared contigua, y poder bisectar el ángulo con el Bazooka. El seguimiento debe hacerse en línea recta con la rueda ralladora extendida, valiéndose del gatillo situado cerca del extremo colgante de cinta del Bazooka. La rueda ralladora extendida sujeta la cinta al ángulo, facilitando el rodamiento. Trate de no torcer el Bazooka mientras recorre el ángulo para asegurarse de que 10 bisecta correctamente. El operar el Bazooka desde un ángulo de 45 grados respecto a la juntura, siempre y cuando sea practico, ayudara a prevenir que la cinta se arrugue.
© 2017 AMES Taping Tools
Bazooka® Encintador de Automatico
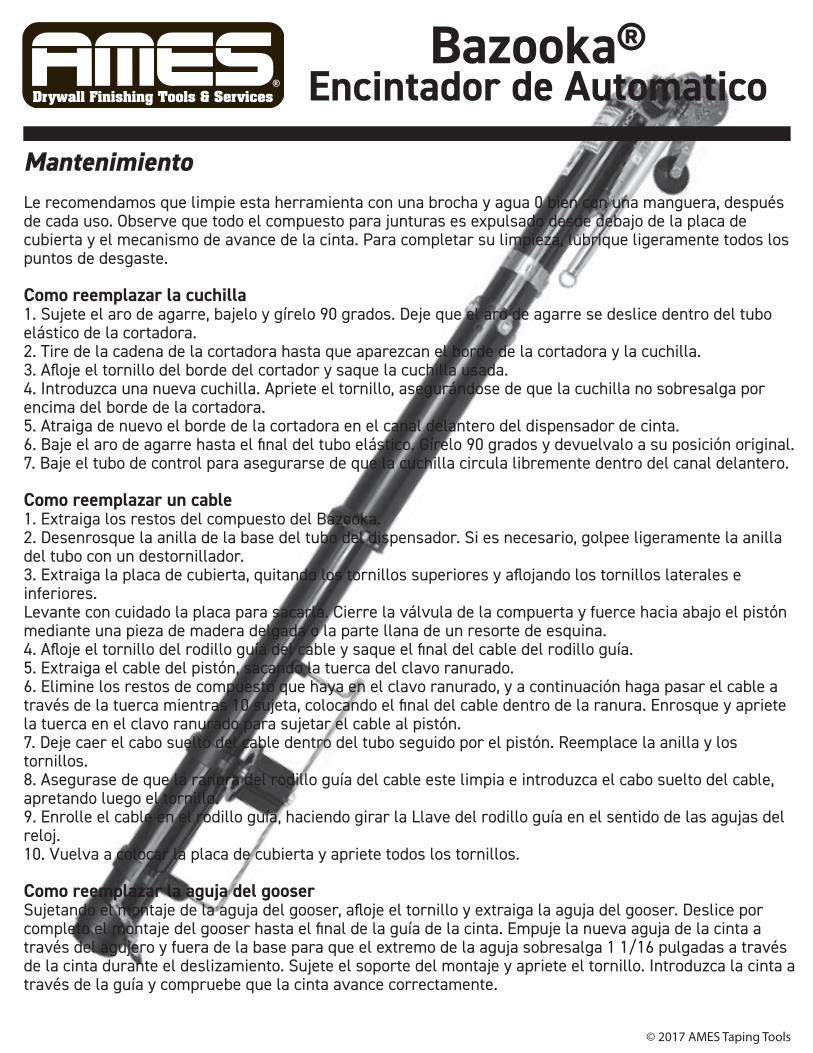
MantenimientoLe recomendamos que limpie esta herramienta con una brocha y agua 0 bien con una manguera, después de cada uso. Observe que todo el compuesto para junturas es expulsado desde debajo de la placa de cubierta y el mecanismo de avance de la cinta. Para completar su limpieza, lubrique ligeramente todos los puntos de desgaste.
Como reemplazar la cuchilla1. Sujete el aro de agarre, bajelo y gírelo 90 grados. Deje que el aro de agarre se deslice dentro del tubo elástico de la cortadora.2. Tire de la cadena de la cortadora hasta que aparezcan el borde de la cortadora y la cuchilla.3. Afloje el tornillo del borde del cortador y saque la cuchilla usada.4. Introduzca una nueva cuchilla. Apriete el tornillo, asegurándose de que la cuchilla no sobresalga por encima del borde de la cortadora.5. Atraiga de nuevo el borde de la cortadora en el canal delantero del dispensador de cinta.6. Baje el aro de agarre hasta el final del tubo elástico. Gírelo 90 grados y devuelvalo a su posición original.7. Baje el tubo de control para asegurarse de que la cuchilla circula libremente dentro del canal delantero.
Como reemplazar un cable1. Extraiga los restos del compuesto del Bazooka.2. Desenrosque la anilla de la base del tubo del dispensador. Si es necesario, golpee ligeramente la anilla del tubo con un destornillador.3. Extraiga la placa de cubierta, quitando los tornillos superiores y aflojando los tornillos laterales e inferiores.Levante con cuidado la placa para sacarla. Cierre la válvula de la compuerta y fuerce hacia abajo el pistónmediante una pieza de madera delgada o la parte llana de un resorte de esquina.4. Afloje el tornillo del rodillo guía del cable y saque el final del cable del rodillo guía.5. Extraiga el cable del pistón, sacando la tuerca del clavo ranurado.6. Elimine los restos de compuesto que haya en el clavo ranurado, y a continuación haga pasar el cable a través de la tuerca mientras 10 sujeta, colocando el final del cable dentro de la ranura. Enrosque y apriete la tuerca en el clavo ranurado para sujetar el cable al pistón.7. Deje caer el cabo suelto del cable dentro del tubo seguido por el pistón. Reemplace la anilla y los tornillos.8. Asegurase de que la ranura del rodillo guía del cable este limpia e introduzca el cabo suelto del cable, apretando luego el tornillo.9. Enrolle el cable en el rodillo guía, haciendo girar la Llave del rodillo guía en el sentido de las agujas del reloj.10. Vuelva a colocar la placa de cubierta y apriete todos los tornillos.
Como reemplazar la aguja del gooserSujetando el montaje de la aguja del gooser, afloje el tornillo y extraiga la aguja del gooser. Deslice por completo el montaje del gooser hasta el final de la guía de la cinta. Empuje la nueva aguja de la cinta a través del agujero y fuera de la base para que el extremo de la aguja sobresalga 1 1/16 pulgadas a través de la cinta durante el deslizamiento. Sujete el soporte del montaje y apriete el tornillo. Introduzca la cinta a través de la guía y compruebe que la cinta avance correctamente.
© 2017 AMES Taping Tools