Embed Size (px)
Citation preview

Product Guide / Guía del producto Model/Modelo 12301740
Tools needed for assembly:Phillips ScrewdriverTwo adjustable wrenches
FOR OUTDOOR USE ONLY
CAUTION:
Read and follow all safety statements, assembly instructions, and use and care directions before attempting to assemble and cook.
INSTALLER/ASSEMBLER:Leave this manual with consumer.
CONSUMER:Keep this manual for future reference.
WARNING:Failure to follow all manufacturer’s instructions could result in serious personal injury and/or property damage.
CAUTION:
Some parts may contain sharp edges. Wear protective gloves if necessary.
WARNING:CARBON MONOXIDE HAZARDBurning charcoal inside can kill you. It gives off carbon monoxide, which has no odor. NEVER burn charcoal inside homes, vehicles, or tents.
CAUTION:THIS UNIT IS HEAVY! DO NOT attempt to assemble without a helper.
If you have questions or need assistance during assembly, please call .To insure your satisfaction and for follow-up service, register your appliance online at www.charbroil.com/register
1-800-241-7548
42804804 - 09/16/11
Date Purchased
IMPORTANT: Fill out the product record information below.
American Gourmet600 Series
Si tiene alguna pregunta o necesita ayuda durante el armado, llámenos al 1-800-241-7548.
Para garantizar su satisfacción y para el servicio de seguimiento, inscriba su aparato en línea, en www.charbroil.com/register
PELIGRO DE MONÓXIDO DE CARBONOLa combustión de carbón en interiores puede ser fatal. Despide monóxido de carbono, que es inodoro. NUNCA queme carbón dentro de las casas, de los vehículos ni de las carpas.
ADVERTENCIA:
Conserve este manual para que lo pueda consultar en el futuro. AL CONSUMIDOR:
Antes de empezar a armar la parrilla y cocinar, lea y siga todas las indicaciones de seguridad, las instrucciones de armado y las instrucciones de uso y mantenimiento.
A LA PERSONA QUE INSTALE O ARME ESTA PARRILLA: Deje este manual al cliente.
ADVERTENCIA:
ADVERTENCIA:
El no cumplir con todas las instrucciones del fabricante puede ocasionar lesiones graves y/o daños materiales.
ADVERTENCIA:
Ciertas partes pueden tener bordes afilados. Si es necesario, use guantes protectores.
ADVERTENCIA: ¡ESTA UNIDAD ES PESADA! NO intente armarla sin la ayuda de otra persona.
ESTE JUEGO SÓLO SE PUEDE USAR EN EXTERIORES
Fecha de compra
IMPORTANTE: Llene la siguiente información de registro. Herramientas necesarias para el armado:Destornillador PhillipsDos llaves regulables
© 2011 Char-Broil, LLC Columbus, GA 31902 Impreso en China Instrucciones de montaje © 2011Printed in China Assembly instructions © 2011

DANGER
Safety SymbolsThe symbols and boxes shown below explain what each heading means. Read and follow all of the messages found throughout the manual.
DANGER: Indicates an imminently hazardous situation which, if not avoided, will result in death or serious injury.
WARNINGWARNING: Indicates an potentially hazardous situation which, if not avoided, could result in death or serious injury.
CAUTIONCAUTION: Indicates a potentially hazardous situation or unsafe practice which, if not avoided, may result in minor or moderate injury.
CAUTIONFor residential use only. Do not use for commercial cooking.
This instruction manual contains important information necessary for the proper assembly and safe use of the appliance.
Follow all warnings and instructions when using the appliance.
Product Record Information . . . . . . . . . . . . . . . . . . . . . . . . . . . . 1
Preparing to use your Grill . . . . . . . . . . . . . . . . . . . . . . . . . . . . . 3
Limited Warranty. . . . . . . . . . . . . . . . . . . . . . . . . . . . . . . . . . . . . 6
Safety Symbols. . . . . . . . . . . . . . . . . . . . . . . . . . . . . . . . . . . . . . 2
Grill Maintenance . . . . . . . . . . . . . . . . . . . . . . . . . . . . . . . . . . . . 3
Cooking Tips . . . . . . . . . . . . . . . . . . . . . . . . . . . . . . . . . . . . . . 4-5
Parts List/ Parts Diagram . . . . . . . . . . . . . . . . . . . . . . . . . . . . . . 7
Assembly . . . . . . . . . . . . . . . . . . . . . . . . . . . . . . . . . . . . . . . . 8-13
Hardware List . . . . . . . . . . . . . . . . . . . . . . . . . . . . . . . . . . . . . . 14
Registration Card . . . . . . . . . . . . . . . . . . . . . . . . . . . . . . . . . . . 32
Spanish Manual. . . . . . . . . . . . . . . . . . . . . . . . . . . . . . . . . . 17-31
TABLE OF CONTENTS - English
WARNINGCALIFORNIA PROPOSITION 651. Combustible by-products produced when using this product contains chemicals known to the State of California to cause cancer, birth defects, or other reproductive harm.
2. This product contains chemicals, including lead and lead compounds, known to the State of California to cause cancer, birth defects or other reproductive harm.
Wash your hands after handling this product.
WARNINGAll surfaces can be hot during use. Use protection as required to prevent burning.Do not use this unit on or near combustible surfaces or structures such as wood decks, dry leaves or grass, vinyl or wood siding, etc.SEE OWNERS MANUAL FOR IMPORTANT SAFETY INFORMATION.
WARNINGFAILURE TO READ AND FOLLOW INSTRUCTIONS FOR LIGHTING CHARCOAL MAY RESULT IN SERIOUS PERSONAL INJURY AND OR PROPERTY DAMAGE.
WARNING� Most surfaces on this unit are hot when in use.
Use extreme caution. Keep others away fromunit. Always wear protective clothing to preventinjury.
� Keep children and pets away.
� Do not move this unit during operation.
� Never substitute gasoline, kerosene or alcoholfor charcoal starter. In some states, the use ofcharcoal starter is prohibited by law. In thiscase, paraffin-based starter cubes can besubstituted for charcoal starter. Never usecharcoal starter fluid with an electric starter.
Page 2

GRILL MAINTENANCE
Frequency of clean up is determined by how often the grill is used. Make sure coals are completely extinguished before cleaning inside of the unit. Thoroughly rinse with water and allow to air dry before using again. Wipe out the interior of the unit with a cloth or paper towels.
When finished cooking, and the unit has adequately cooled, clean out all remaining ashes. Ashes collect moisture, which can lead to premature rusting and decay. Periodically coating the interior surfaces with vegetable oil will aid in the protection of your unit. Also, occasional touch up of the exterior paint will be required. Black, high-temperature spray paint is recommended. NEVER PAINT THE INTERIOR OF THE UNIT.
Cooking Surface: If a bristle brush is used to clean any of the grill cooking surfaces, ensure no loose bristles remain on cooking surfaces prior to grilling. It is not recommended to clean cooking surfaces while grill is hot.
PREPARING TO USE YOUR GRILLBefore cooking with your grill, the following steps should be closely followed to both cure the finish and season the interior steel. Failure to properly follow these steps may damage the finish and/or impart metallic flavors to your first foods.
�Brush all interior surfaces including grills and grates with vegetable cooking oil.�Build a small fire on the fire grate, being sure not to lay coals against the walls.�Close lid, position butterfly dampers at approximately one quarter turn open. This burn should be sustained for at least two hours. Begin increasing the temperature by opening the butterfly dampers halfway and adding more charcoal. Your grill is now ready for use.
Rust can appear on the inside of your grill. Maintaining a light coat of vegetable oil on the interior surfaces will aid in the protection of your grill. Exterior surfaces of the grill may need occasional touch up. We recommend the use of commercially available black high temperature spray paint. NEVER PAINT THE INTERIOR OF THE GRILL!
GRILLINGCharcoal is recommended, however, wood or a combination of both may be used as the fuel source for grilling with the fuel source placed and ignited on the fire grate. Do not build too large of a fire. We recommend starting a fire with no more than 4 pounds of charcoal (approximately 60 briquettes) and adding more as needed during cooking. After allowing the fire to burn down, place the cooking grate on the unit. Failure to read and follow instructions for lighting charcoal may result in serious personal injury and/or property damage.
Page 3

THE HEAT OF THE COALS
seconds you can hold the palm of
your hand 4 inches above the coals temperature range (Fº) visual cues
HOT COALS 2 400 to 450 barely covered with gray ash; deep red glow
MODERATELY HOT 375 to 450 thin coating of grayash; deep red glow
MODERATELY HOT COALS 4 325 to 375 significant coating of gray ash; red glow
MODERATELY COOL COALS 5 300 to 325 thick coating of gray ash; dull red glow
3
Building Your Fire1.) Stack charcoal briquettes or wood into a pyramid-shaped pile on top of the charcoal grate
or ash pan. We recommend using 4 pounds (approximately 60 briquettes) to start your fire, adding more as needed.
2.) If using lighter fluid, saturate the charcoal briquettes with lighter fluid and let it soak in for approximately 5 minutes. If using a chimney starter, electric starter, or other type of fire starter, light your fire according to the manufacturer's instructions.
3.) After allowing the lighter fluid to properly soak in, light the pile of briquettes in several locations to ensure an even burn. Always light the fire with the grill lid open.Leave lid open until briquettes are fully lit. Failure to do this could trap fumes from charcoal
lighter fluid in grill and may result in a flash fire when lid is opened.4.) Never add charcoal lighter fluid to hot or warm coals as flashbacks may occur causing
injury.5.) You are ready to begin cooking when the pile of briquettes ashes over and produces a red
glow (approximately 12 – 15 minutes). 6.) Depending on your cooking method, either leave the briquettes in a pile or spread evenly
across the charcoal grate using a long-handled poker.
*Always use caution when handling hot coals to prevent injury.
Know When Your Fire is ReadySuccessful charcoal grilling depends on a good fire. The general rule for knowing when your coals are ready for grilling is to make sure that 80 percent or more of the coals are ashy gray. If you have less than that, the coals are not ready, and if all of them are glowing red hot, the fire is probably too hot. Here are a few steps you can take to adjust the temperature of your fire:- If it is too hot, spread the coals out a bit more, which makes the fire less intense.- Raise or lower the adjustable charcoal grate.- Partially close the vents in the grill, which reduces the amount of oxygen that feeds the fire.- Use the indirect grilling method, with coals to either side of a drip pan and the food over the
pan rather than directly over the coals.- In the event of a severe flare-up, spray the flames with water from a squirt bottle. Be
careful, spraying with water tends to blow ashes around and make a mess. - Add briquettes 2 or 3 at a time to increase the burn time. Allow 10 minutes for coals to ash
over before adding more.
COOKING TIPS
TO HOT COALS
Page 4

Direct and Indirect Grilling
Direct Grilling - For most grilling, the ignited coals are spread in a single layer under the food. This is called direct grilling and is appropriate for relatively quick-cooking items such as hamburgers, steaks and most seafood. The single layer of coals emits even, steady heat, whether the grill lid is open or closed, and represents the way most people grill. For more control, pile some of the coals on one side of the grill where they will emit intense heat. You can move the food around on the grill, setting it over the very hot coals when you want to sear it or when a thick piece needs to cook a little more quickly. You can also use the adjustable charcoal grate and dampers to control the temperature in your grill.
Indirect Grilling - For items that take longer to cook, you will want to use indirect grilling. This method is for long, slow cooking in a covered grill. For indirect cooking, the coals are piled two or three coals deep on one side of the grill, or divided and piled on two sides. This leaves an empty space next to the coals or between them. Food cooked over indirect heat is often started over direct heat and then moved to the cooler (empty) part of the grill for even, slow cooking. To make the heat as even as possible, construct two piles of coals. It is common to place a metal drip pan in the empty space beside or between the coals, which is filled with water, wine, beer, broth, or a combination. Place the food directly over the drip pan. This injects a little extra moisture into the cooking environment and also catches dripping juices, which makes clean-up a little easier and reduces the possibility of flare-ups. (Remember to keep a spray bottle filled with water on hand to extinguish any flare-ups.) Once you get used to the indirect method, you may prefer to use it for more grilling tasks. Although it may take a little longer, it is an excellent cooking method and a sure way to prevent the food from burning and to promote even cooking.
Grilling with Wood Chips/Wood ChunksFor a more robust smoke flavor while using charcoal briquettes or lump charcoal, try adding wood chips or several wood chunks to the fire. Wood chunks are available in a variety of natural flavors, and can be used alone or in addition to charcoal. As a general rule, any hardwood that bears a fruit or nut is suitable for cooking. However, different woods have very different tastes. Experiment with different woods to determine your personal favorite, and always use well-seasoned wood. Green or fresh-cut wood can turn food black, and tastes bitter.
Our Recommendations:Chicken - Alder, Apple, Hickory, Mesquite, Sassafras, GrapevinesBeef - Hickory, Mesquite, Oak, GrapevinesPork - Fruitwoods, Hickory, Oak, SassafrasLamb - Fruitwoods, MesquiteVeal - Fruitwoods, GrapevinesSeafood - Alder, Mesquite, Sassafras, GrapevinesVegetables – Mesquite
Page 5
Ground MeatBeef, Pork, Veal, Lamb......................................160°FTurkey, Chicken.................................................165°F
Fresh Beef, Veal, LambMedium Rare.......................................................145°F
Medium................................................................160°FWell Done............................................................170°F
PoultryChicken & Turkey, whole.....................................165°FPoultry Parts.......................................................165°FDuck & Goose....................................................165°F
Fresh PorkMedium Rare......................................................145
Medium..............................................................160°FWell Done..........................................................170°F
(let stand 3 minutes before cutting)
°F(let stand 3 minutes before cutting)
Internal Cooking TemperaturesUSDA Recommended

This warranty only applies to units purchased from an authorized retailer. Manufacturer warrants to the original consumer-purchaser only that this product shall be free from defects in workmanship and materials after correct assembly and under normal and reasonable home use for the periods indicated below beginning on the date of purchase*. The manufacturer reserves the right to require that defective parts be returned, postage and or freight pre-paid by the consumer for review and examination.
*Note: A dated sales reciept WILL be required for warranty service.
The original consumer-purchaser will be responsible for all shipping charges for parts replaced under the terms of this limited warranty.
This limited warranty is applicable in the United States and Canada only, is only available to the original owner of the product and is not transferable. Manufacturer requires proof of your date of purchase. Therefore, you should retain your sales slip or invoice. Registering your product is not a substitute for proof of purchase and the manufacturer is not responsible for or required to retain proof of purchase records.
This limited warranty applies to the functionality of the product ONLY and does not cover cosmetic issues such as scratches, dents, corrosions or discoloring by heat, abrasive and chemical cleaners or any tools used in the assembly or installation of the appliance, surface rust, or the discoloration of stainless steel surfaces.
This limited warranty will not reimburse you for the cost of any inconvenience, food, personal injury or property damage.
ITEMS MANUFACTURER WILL NOT PAY FOR:1. Shipping cost, standard or expedited, for warranty and replacement parts 2. Service calls to your home.3. Repairs when your product is used for other than normal, single-family household or residential use.
acts of God, improper installation or maintenance, installation not in accordance with electrical or plumbing codes, or use of products not approved by the manufacturer.
5. Any food loss due to product failures or operating difficulties.6. Replacement parts or repair labor costs for units operated outside the United States or Canada.7. Pickup and delivery of your product.8. Repairs to parts or systems resulting from unauthorized modifications made to the product.9. The removal and/or reinstallation of your product. DISCLAIMER OF IMPLIED WARRANTIES and LIMITATION OF REMEDIES
Repair or replacement of defective parts is your exclusive remedy under the terms of this limited warranty. In the event of parts availability issues,
Manufacturer will not be responsible for any consequential or incidental damages arising from the breach of either this limited warranty or any applicable implied warranty, or for failure or damage resulting from acts of God, improper care and maintenance, grease fire, accident, alteration, replacement of parts by anyone other than Manufacturer, misuse, transportation, commercial use, abuse, hostile environments (inclement weather, acts of nature, animal tampering), improper installation or installation not in accordance with local codes or printed manufacturer instructions.
THIS LIMITED WARRANTY IS THE SOLE EXPRESS WARRANTY GIVEN BY THE MANUFACTURER. NO PRODUCT PERFORMANCE SPECIFICATION OR DESCRIPTION WHEREVER APPEARING IS WARRANTED BY MANUFACTURER EXCEPT TO THE EXTENT SET FORTH IN THIS LIMITED WARRANTY. ANY IMPLIED WARRANTY PROTECTION ARISING UNDER THE LAWS OF ANY STATE, INCLUDING IMPLIED WARRANTY OF MERCHANTABILITY OR FITNESS FOR A PARTICULAR PURPOSE OR USE, IS HEREBY LIMITED IN DURATION TO THE DURATION OF THIS LIMITED WARRANTY.
Neither dealers nor the retail establishment selling this product has any authority to make any additional warranties or to promise remedies in addition to or inconsistent with those stated above. Manufacturer's maximum liability, in any event, shall not exceed the purchase price of the product paid by the original consumer.
NOTE: Some states do not allow an exclusion or limitation of incidental or consequential damages, so some of the above limitations or exclusions may not apply to you. This limited warranty gives you specific legal rights as set foth herein. You may also have other rights which vary from state to state. In the state of California only, if refinishing or replacement of the product is not commercially practicable, the retailer selling this product or the Manufacturer will refund the purchase price paid for the product, less the amount directly attributable to use by the original consumer-purchaser prior to discovery of the nonconformity. In addition, in the state of California only, you may take the product to the retail establishment selling this product in order to obtain performance under this limited warranty.
If you wish to obtain performance of any obligation under this limited warranty, you should write to:
Consumer RelationsP. O. Box 1240
Columbus, GA 31902-1240Consumer returns will not be accepted unless a valid Return Authorization is first acquired. Authorized returns are clearly marked on the outside of the package with an RA number and the package is shipped freight/postage pre-paid. Consumer returns that do not meet these standards will be refused.
LIMITED WARRANTY
WS_1 Rev03
4. Damage, failures, or operating difficulties resulting from accident, alteration, careless handling, misuse, abuse, fire, flood,
RUST is not considered a manufacturing or materials defect.
the manufacturer reserves the right to substitute like or similar parts that are equally functional.
SCOPE OF COVERAGE PERIOD OF COVERAGE TYPE OF FAILURE COVERAGE
PERFORATION, MANUFACTURING,AND MATERIAL DEFECTS ONLY
All Parts 90 days from date of purchase*
Page 6

PARTS LIST
Page 7
Key QTY Description
15 1 Temperature Gauge
16 2 Wheel
17 1 Storage Rack
18 1 Lid Hinge Pin Kit
19 1 Smoke Stack
20 2 Handle Barrel Spring
21 1 Lid Handle
22 1
23
24
25 1
— 1 Hardware Pack
— 1 Assembly Instruction, English/Spanish
Firebox
2 Front Shelf Slat
1 Grease Cup Clip
Side Lift Handle
Key QTY Description
1 1 Lid Assembly
2 1 Swing-Away Grate
3 3 Cooking Grate
4 2 Fire Grate Hanger
5 1 Butterfly Damper
6 1 Fire Grate
7 1 Front Shelf Bracket, RH
8 1 Front Shelf Bracket, LH
9 2 Cart Brace
10 2 Long Leg
11 2 Short Leg
12 2 Whell Cap
13 1 Axle
14 2 Leg Cap

2
1ASSEMBLY
Page 8
2
1FIRST, GET A HELPER! This unit is heavy and requires a second person for lifting and moving. NEXT, pick a suitable location to work. Open the carton and slit the corners so that the carton lays flat. This will give you a protective surface during assembly.To begin assembly, build two leg assemblies by sliding the long leg sections into the short leg sections.
Attach cart braces to the outside of one leg assembly using 4 each 1/4-20x1 3/4" screws and 4 each 1/4-20 flange nuts. Do not fully tighten screws until Step 6 is complete.
Cart Brace
Cart Brace
1/4-20x1 3/4" Screw
1/4-20 Flange Nut
Page 9
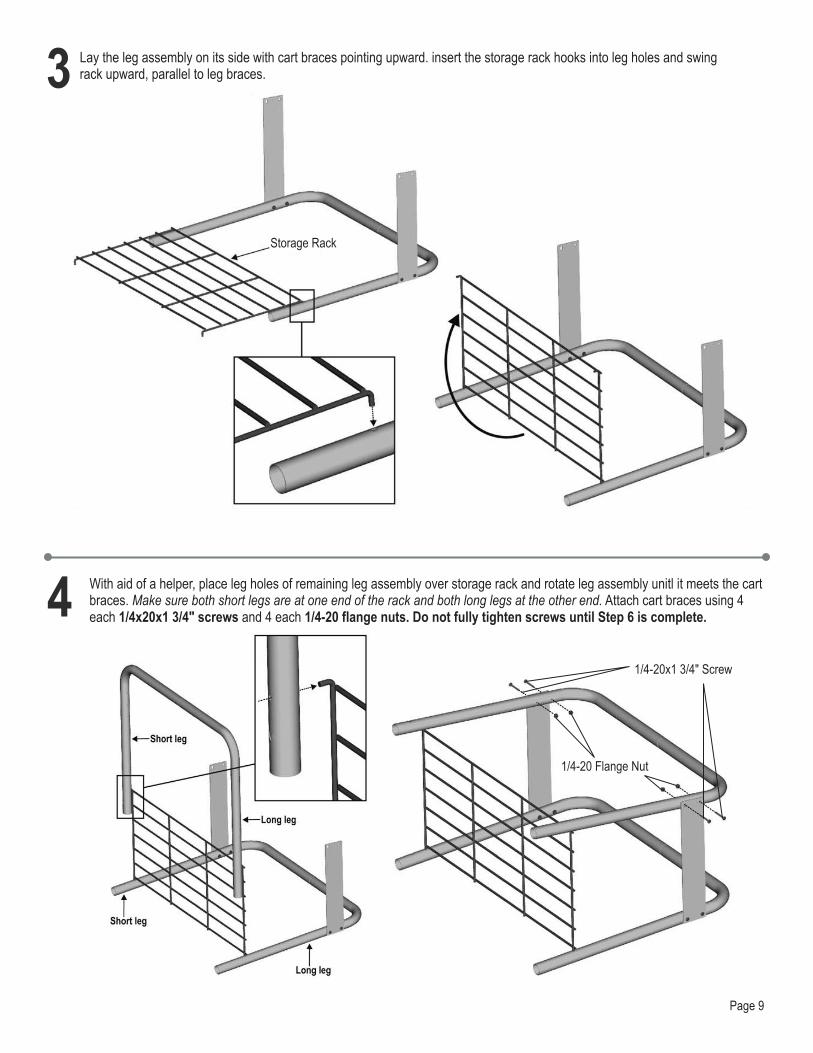
3
4 With aid of a helper, place leg holes of remaining leg assembly over storage rack and rotate leg assembly unitl it meets the cart braces. Make sure both short legs are at one end of the rack and both long legs at the other end. Attach cart braces using 4 each 1/4x20x1 3/4" screws and 4 each 1/4-20 flange nuts. Do not fully tighten screws until Step 6 is complete.
Lay the leg assembly on its side with cart braces pointing upward. insert the storage rack hooks into leg holes and swing rack upward, parallel to leg braces.
Storage Rack
1/4-20 Flange Nut
1/4-20x1 3/4" Screw

5
6
Insert a small Hitch Pin Clip into the hole at one end of the axle and bend the ends of the pin back so that it cannot be removed. Slide a wheel onto the axle. Slide the axle through the holes at the ends of the short legs. Slide the remaining wheel onto the axle and secure with the remaining Hitch Pin Clip.Finally, Push the wheel end caps onto each end of the axle.
Place the firebox onto the cart. The butterfly damper should be on your right hand side over wheels. Insert 4 each 1/4-20X1 3/4" screws through cart and firebox. Secure the firebox using 4 each 1/4-20 flange nuts. Insert screws from outside, flange nuts from inside chamber.
FULLY TIGHTEN ALL SCREWS AND NUTS AT THIS TIME.
Wheel End Cap
1/4-20 Flange Nut
1/4-20x1 3/4" Screw
Page 10
Small Hitch Pin Clip
Small Hitch Pin Clip
“Cone” side of wheel against leg
Small Hitch Pin Clip

7
8
• Attach LH and RH Front Shelf Brackets to the firebox using 4 each 1/4-20" Shoulder Bolts and 4 each 1/4-20 flange nuts.
• After the front shelf brackets are secured, attach the front shelf slats to the brackets using 4 each 1/4-20x1 1/4
1/4-20 Flange Nuts
1/4-20x1 1/4 Screws
1/4-20 ShoulderBolts
1/4-20 Flange Nuts
Page 11
• Attach Side Lift Handle Assembly to LH side of firebox using 2 each 1/4-20 Flange nuts.
screws and 4 each 1/4-20 flange nuts.
1/4-20 Flange Nut
Side Lift Handleand Barrel Spring

9
10
Page 12
Hinge Pin
Hair Pin Clip
Hinge Pin
Handle andBarrel Spring
1/4-20x3/4Screws
Install the Swing-Away Grate by inserting 2 each 1/4-20x2" screws (one for each side of the lid) into Grill Lid and s Place the wire loop in Swing-Away over the shaft of the bolt, as shown below.
Similarly secure the Swing-Away leg to the firebox using 2 each 1/4-20x3/4" screws and 2 each 1/4-20 flange nuts.
ecure with 2 each 1/4-20 flange nuts.
1/4-20Flange Nut
Damper Wheel
Flat Washer
1/4-20Flange Nut
1/4-20x 3/4 Screw
FlatWasher
Attach the butterfly damper wheel to the firebox using 1 each 1/4-20x3/4" screw, 2 each flat washers, 1 lock washer and one 1/4-20 flange nut. DO NOT FULLY TIGHTEN THE FLANGE NUT. This will allow for rotation of the damper wheel.
1/4-20x2" Screw
1/4-20x3/4" Screw
1/4-20 Flange NutsHinge Properly Installed
Lock Washer
Swing-Away Leg
Wire Loop
Lock Washer
Place Grill Lid on top of firebox assembly. Align hinge holes on back of unit. With the aid of a helper, attach Grill Lid to firebox using 2 each Hinge Pins. Once Hinge Pins are in place, insert Large Hitch Pin Clip into hole in Hinge Pin.Next, install Smokestack by inserting 2 each 1/4-20x3/4 screws though Grill Lid, insert Smokestack into Grill Lid hole, then secure using 2 each 1/4-20 flange nuts.Attach Handle to Grill Lid, secure with 2 each 1/4-20 flange nuts and 2 lock washers.
1213
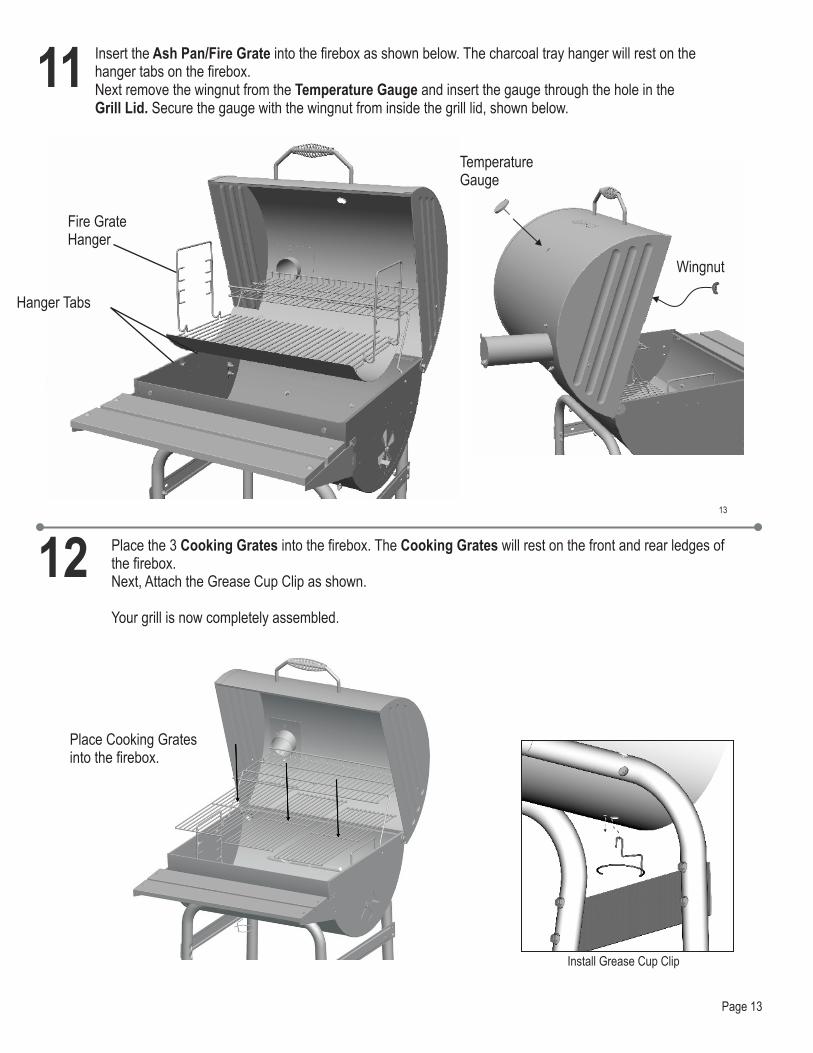
11
Page 13
Insert the Ash Pan/Fire Grate into the firebox as shown below. The charcoal tray hanger will rest on the hanger tabs on the firebox. Next remove the wingnut from the Temperature Gauge and insert the gauge through the hole in the Grill Lid. Secure the gauge with the wingnut from inside the grill lid, shown below.
Fire GrateHanger
Hanger Tabs
Temperature Gauge
Place the 3 Cooking Grates into the firebox. The Cooking Grates will rest on the front and rear ledges of the firebox. Next, Attach the Grease Cup Clip as shown.
Your grill is now completely assembled.
Install Grease Cup Clip
Wingnut
into the firebox.Place Cooking Grates

HARDWARE LISTHardware is shown actual size. You may have spare hardware after assembly is complete.
1/4-20Flange Nut
Qty. 31
1/4”Lock Washer
Qty. 3
1/4-20x3/4”Hex Screw
Qty. 5
1/4-20x1 3/4”Hex Screw
Qty. 12
1/4-20x2"Hex Screw
Qty. 2
Wheel CapQty. 2
Hinge PinQty. 2
Hitch Pin ClipQty. 2
1/4-20Shoulder Bolt
Qty. 4
1/4”Flat Washer
Qty. 2
LargeHitch Pin Clip
Qty. 2
Small
Page 14
1/4-20x1 1/4”Screw
Qty. 4


Page 16
ÍNDICE - Español
ADVERTENCIA Sólo para uso particular. No la use para fines comerciales.
ADVERTENCIA
ADVERTENCIA Todas las superficies pueden estar calientes durante el uso. Protéjase debidamente para no sufrir quemaduras.No use esta unidad en superficies ni en estructuras combustibles, ni cerca de ellas, tales como terrazas de madera, hojas o césped secos, revestimientos de vinilo o de madera, etc.LEA EN EL MANUAL DEL PROPIETARIO INFORMACIÓN IMPORTANTE SOBRE MEDIDAS DE SEGURIDAD.
ADVERTENCIA EL NO LEER Y SEGUIR LAS INSTRUCCIONES PARA ENCENDER EL CARBÓN, PUEDE OCASIONAR LESIONES GRAVES Y DAÑOS MATERIALES.
ADVERTENCIA • La mayoría de las superficies de esta unidad están
calientes cuando está en uso. Sea sumamente cuidadoso. No deje que las demás personas se acerquen a la unidad. Use siempre ropa protectora para evitar lesionarse.
• No deje a los niños ni a las mascotas acercarse a la unidad.
• No la mueva mientras esté en uso.
• Nunca use gasolina, queroseno ni alcohol para encender el carbón. En algunos estados, la ley prohíbe el uso de líquido para encender carbón. En estos casos, puede usar cubos a base de parafina en lugar del líquido para encender carbón. Nunca use líquido para encender carbón con un encendedor eléctrico.
PROPOSITION 65 DEL ESTADO DE CALIFORNIA 1. En el estado de California se sabe que los
subproductos de la combustión en este aparato, contienen substancias químicas que causan cáncer, defectos congénitos u otras lesiones al aparato reproductor.
2. Este producto contiene substancias químicas como el plomo y sus compuestos que, en el estado de California, se sabe que causan cáncer, defectos congénitos u otras lesiones al aparato reproductor.
Lávese las manos después de manipular este producto.
PELIGRO
Símbolos de seguridadLos símbolos y las casillas ilustradas más adelante explican lo que significa cada encabezado. Lea y cumpla todo lo indicado en los mensajes que se encuentran en el manual.
PELIGRO: Indica una situación peligrosa inminente que, de no evitarse, causará la muerte o lesiones graves.
ADVERTENCIA ADVERTENCIA: Indica una situación potencialmente peligrosa que, de no evitarse, podría causar la muerte o lesiones graves.
ADVERTENCIA ADVERTENCIA: Indica una situación potencialmente peligrosa o una práctica insegura que, de no evitarse, podría causar lesiones leves o menores.
Este manual de instrucciones contiene información importante, necesaria para armar el aparato adecuadamente y usarlo de manera segura.
Cuando use el aparato, siga todas las advertencias y las instrucciones.
Página 17
Información de inscripción de la garantía ....................................1
....................................................................2-16
Por su propia seguridad.............................................................17
Símbolos de seguridad ..............................................................17
Preparativos para usar su parrilla .............................................18
Mantenimiento de la parrilla.......................................................18
Consejos para cocinar..........................................................19-20
Garantía limitada .......................................................................21
Lista de piezas / vista esquemática ...........................................22
Armado ...............................................................................23-28
Lista de herrajes ........................................................................29
Tarjeta de inscripción .................................................................32
Manual de Inglés

MANTENIMIENTO DE LA PARRILLALa frecuencia de la limpieza depende de cuánto se use la parrilla. Antes de limpiar la unidad, verifique que el carbón esté completamente apagado dentro de la unidad. Lávela bien con agua y deje que se seque bien antes de volver a usarla. Limpie el interior de la parrilla con un paño o una toalla de papel.
Cuando haya terminado de cocinar, y la unidad se haya enfriado adecuadamente, limpie toda la ceniza restante. La ceniza absorbe humedad, lo que puede ocasionar la oxidación prematura y el deterioro de las piezas. El aplicar periódicamente una película de aceite vegetal en las superficies interiores de la unidad ayuda a protegerlas. Además, es necesario retocar la pintura ocasionalmente. Se recomienda pintura negra en aerosol resistente a temperaturas elevadas ¡NUNCA PINTE LA PARTE INTERIOR DE LA UNIDAD!
Superficie de cocción: Si utiliza un cepillo de cerdas para limpiar las superficies para cocinar, antes de usar la parrilla verifique que no queden cerdas sueltas sobre éstas. Se recomienda no limpiar las superficies para cocinar cuando la parrilla esté aún caliente.
PREPARACIÓN PARA USAR SU PARRILLA
Antes de cocinar con su parrilla, debe seguir al pie de la letra os siguientes pasos para curar el acabado y el acero del interior. Si no cumple con estos requisitos al pie de la letra, se puede dañar el interior de la parrilla y los primeros alimentos que cocine podrán tener un gusto metálico.1. Unte todas las superficies metálicas del interior, incluyendo las parrillas y las rejillas con aceite vegetal para cocinar.2. Encienda un fuego pequeño, no muy intenso, sobre la bandeja colectora de cenizas, asegurándose de no colocar los carbones
contra las paredes.3. Cierre la tapa. Ajuste los reguladores de tiro a casi un cuarto de su apertura total. Este nivel de fuego se deberá mantener durante
al menos dos horas. Comience a aumentar la temperatura abriendo los reguladores a la mitad de su apertura y añadiendo más carbón. Su parrilla está lista para usarla
Puede ser que se oxide la parte interior de su parrilla. El mantenimiento de las superficies interiores con una capa ligera de aceite vegetal ayudará . a proteger su parrilla. Las superficies exteriores de la parrilla pueden requerir un retoque de vez en cuando. Le sugerimos que use una pintura en aerosol resistente a temperaturas elevadas, que puede adquirir en cualquier tienda. ¡NUNCA PINTE LA PARTE INTERIOR DE LA UNIDAD!
PARA ASAR A LA PARRILLASe recomienda usar carbón. No obstante, se puede usar madera o una combinación de madera y carbón como combustible para asar, si se coloca y se enciende el combustible en la bandeja colectora de cenizas. No haga un fuego muy grande. Recomendamos comenzar a encender el fuego con no más de 4 libras de carbón (aproximadamente 60 briquetas) y añadir más según se necesite durante el proceso de de cocinar. Coloque la rejilla en la unidad después de dejar que el fuego se consuma. El no seguir las instrucciones del fabricante para encender el carbón, puede ocasionar lesiones graves y daños materiales.
Página 18
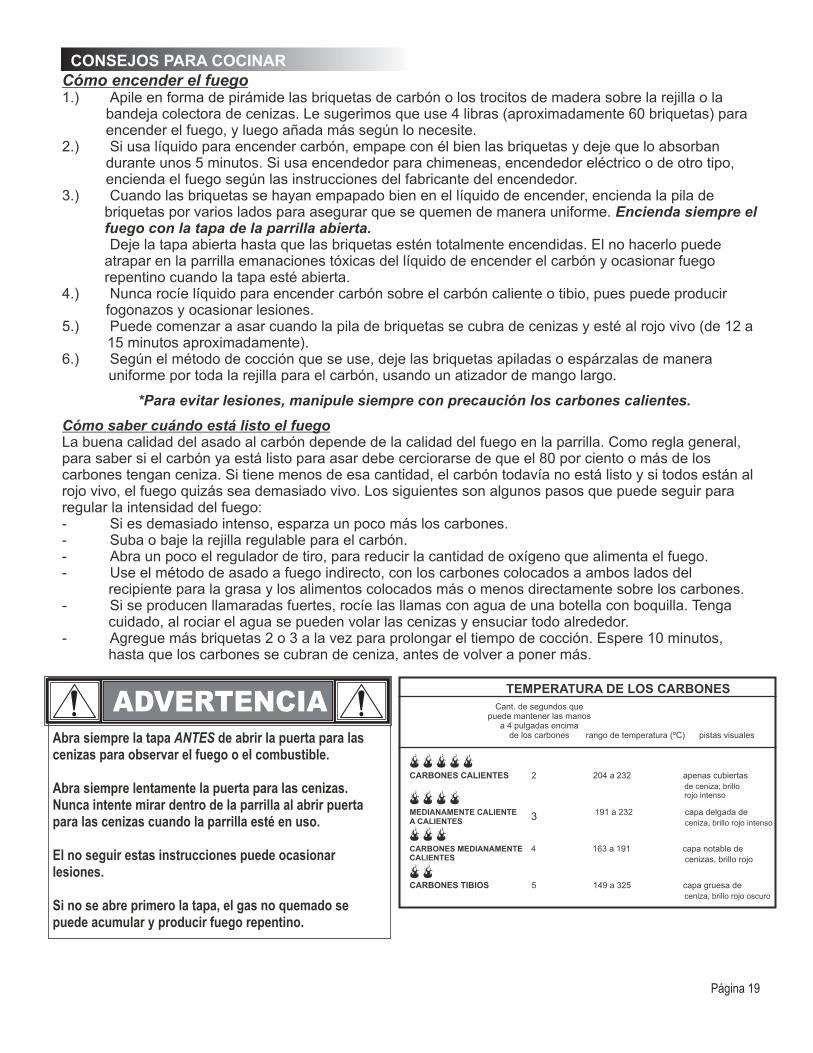
TEMPERATURA DE LOS CARBONES
Cant. de segundos quepuede mantener las manos
a 4 pulgadas encimade los carbones rango de temperatura (ºC) pistas visuales
CARBONES CALIENTES 2 204 a 232 apenas cubiertas
de ceniza; brillo rojo intenso
MEDIANAMENTE CALIENTE 191 a 232 capa delgada de
ceniza, brillo rojo intenso
CARBONES MEDIANAMENTE CALIENTES
4 163 a 191 capa notable de
cenizas, brillo rojo
CARBONES TIBIOS 5 149 a 325 capa gruesa de
ceniza, brillo rojo oscuro
3
Cómo encender el fuego1.) Apile en forma de pirámide las briquetas de carbón o los trocitos de madera sobre la rejilla o la
bandeja colectora de cenizas. Le sugerimos que use 4 libras (aproximadamente 60 briquetas) para encender el fuego, y luego añada más según lo necesite.
2.) Si usa líquido para encender carbón, empape con él bien las briquetas y deje que lo absorban durante unos 5 minutos. Si usa encendedor para chimeneas, encendedor eléctrico o de otro tipo, encienda el fuego según las instrucciones del fabricante del encendedor.
3.) Cuando las briquetas se hayan empapado bien en el líquido de encender, encienda la pila de briquetas por varios lados para asegurar que se quemen de manera uniforme. Encienda siempre el fuego con la tapa de la parrilla abierta.Deje la tapa abierta hasta que las briquetas estén totalmente encendidas. El no hacerlo puede
atrapar en la parrilla emanaciones tóxicas del líquido de encender el carbón y ocasionar fuego repentino cuando la tapa esté abierta.
4.) Nunca rocíe líquido para encender carbón sobre el carbón caliente o tibio, pues puede producir fogonazos y ocasionar lesiones.
5.) Puede comenzar a asar cuando la pila de briquetas se cubra de cenizas y esté al rojo vivo (de 12 a 15 minutos aproximadamente).
6.) Según el método de cocción que se use, deje las briquetas apiladas o espárzalas de manera uniforme por toda la rejilla para el carbón, usando un atizador de mango largo.
*Para evitar lesiones, manipule siempre con precaución los carbones calientes.
Cómo saber cuándo está listo el fuegoLa buena calidad del asado al carbón depende de la calidad del fuego en la parrilla. Como regla general, para saber si el carbón ya está listo para asar debe cerciorarse de que el 80 por ciento o más de los carbones tengan ceniza. Si tiene menos de esa cantidad, el carbón todavía no está listo y si todos están al rojo vivo, el fuego quizás sea demasiado vivo. Los siguientes son algunos pasos que puede seguir para regular la intensidad del fuego:- Si es demasiado intenso, esparza un poco más los carbones.- Suba o baje la rejilla regulable para el carbón.- Abra un poco el regulador de tiro, para reducir la cantidad de oxígeno que alimenta el fuego.- Use el método de asado a fuego indirecto, con los carbones colocados a ambos lados del
recipiente para la grasa y los alimentos colocados más o menos directamente sobre los carbones.- Si se producen llamaradas fuertes, rocíe las llamas con agua de una botella con boquilla. Tenga
cuidado, al rociar el agua se pueden volar las cenizas y ensuciar todo alrededor. - Agregue más briquetas 2 o 3 a la vez para prolongar el tiempo de cocción. Espere 10 minutos,
hasta que los carbones se cubran de ceniza, antes de volver a poner más.
CONSEJOS PARA COCINAR
A CALIENTES
Abra siempre la tapa ANTES de abrir la puerta para las cenizas para observar el fuego o el combustible.
Abra siempre lentamente la puerta para las cenizas. Nunca intente mirar dentro de la parrilla al abrir puerta para las cenizas cuando la parrilla esté en uso.
El no seguir estas instrucciones puede ocasionar lesiones.
Si no se abre primero la tapa, el gas no quemado se puede acumular y producir fuego repentino.
ADVERTENCIA
Página 19

Asado directo e indirecto
Asado directo - Durante la mayor parte del tiempo de asado, los carbones encendidos permanecen esparcidos bajo los alimentos en una capa de un solo carbón de alto. Este método se denomina asado directo y es el apropiado para asar alimentos relativamente rápido, como hamburguesas, bistec y la mayoría de los productos del mar. Una sola capa de carbón emite un calor uniforme, parejo, con la tapa abierta o cerrada y es la forma en que la mayoría de las personas hace sus asados. Para mejor control, apile varios carbones a un lado de la parrilla, donde emitirán menos calor. Puede cambiar los alimentos de lugar en la parrilla, colocándolos sobre los carbones más calientes si desea quemarlos un poco o si desea cocinar algún trozo grueso más rápido. Para controlar la temperatura de la parrilla, también puede usar la rejilla para el carbón y los reguladores de tiro.
Asado indirecto - Para los alimentos que se demoran más en cocinar, puede usar el asado indirecto. Este método se debe usar para cocer a fuego lento, con la tapa cerrada. En este caso, los carbones se apilan en capas de dos o tres carbones de alto, en un lado de la parrilla, o se dividen y se apilan en dos lados. Esto permite dejar un espacio vacío al lado o entre los carbones. A menudo, cuando se cocina de modo indirecto, los alimentos se cocinan primero a fuego directo y, luego, se mueven a un área más fría (vacía) de la parrilla, para cocerlos a fuego lento, de manera uniforme. Para que el calor sea lo más uniforme posible, haga dos pilas con el carbón. Con frecuencia, se coloca una bandeja metálica en el espacio vacío o entre los carbones, la cual se llena con agua, vino, cerveza o una combinación de los mismos. Coloque los alimentos directamente sobre la bandeja. Esto permite añadir humedad al área de cocción y recoger los jugos de los alimentos, lo que facilita la limpieza posterior y reduce la posibilidad de que se produzcan llamaradas. (Recuerde tener a mano una botella de agua con boquilla, para apagar las llamaradas.) Es posible que, cuando se acostumbre a asar a fuego indirecto, prefiera usar este método para asar en la mayoría de los casos. Aunque toma un poco más de tiempo, es un excelente método de cocción, y una manera de evitar que se quemen los alimentos y de propiciar la cocción uniforme.
Cómo asar con astillas/trocitos de maderaPara lograr un sabor ahumado más fuerte con briquetas o carbón de madera en bloques, pruebe poner varias astillas o varios trocitos de madera en el fuego. Los trocitos de madera se venden en diversos sabores naturales, y se pueden usar solos o como un agregado al carbón. Como regla general, toda madera dura de árboles frutales o de frutos secos es adecuada para cocinar. Sin embargo, las distintas maderas tienen distintos sabores. Pruebe con maderas diferentes para decidir cuál prefiere, y use siempre madera bien seca. La madera verde o recientemente cortada puede ennegrecer la comida, y tiene sabor amargo.
Nuestras sugerencias:Pollo - Aliso, manzano, nogal americano, mezquite, sasafrás, parraCarne de res - Nogal americano, mezquite, roble, parraCerdo - Madera de árboles frutales, nogal americano, roble, sasafrásCarnero - Madera de árboles frutales, mezquiteTernera - Madera de árboles frutales, parraPescado y mariscos - Aliso, mezquite , sasafrás, parraVerduras - Mezquite
Recomendadas por USDA
Temperaturas internas de cocción
ADVERTENCIA •
•
• • •
•
La mayoría de las superficies de esta unidad están calientes cuando está en uso.Sea sumamente cuidadoso. No permita que las demás personas se acerquen a la unidad. Use siempreropa protectora para evitar lesionarse.No deje a los niños ni a las mascotas acercarse a la unidad.No la mueva mientras esté en uso.Nunca use gasolina, queroseno ni alcohol para encender el carbón. En algunos estados, la ley prohíbe el uso de líquido para encender carbón. En estos casos, puede usar cubos a base de parafina en lugar del líquido para encender carbón. Nunca use líquido para encender carbón con un encendedor eléctrico.
Carne molidaCarne de vaca, cerdo, ternera, cordero...............................................71° CPavo, pollo...........................................................................................74° C
Carne fresca de vaca, ternera, corderoPoco cocido .........................................................................................63° C
Medio cocido .......................................................................................71° CBien cocido ..........................................................................................77° C
Aves de corralPollo y pavo, entero..............................................................................74°CTrozos de ave......................................................................................74° CPato y ganso........................................................................................74° C
Carne fresca de cerdoPoco cocido .........................................................................................63° C
Medio cocido .......................................................................................71° CBien cocido ..........................................................................................77° C
(con 3 minutos de reposo)
(con 3 minutos de reposo)
Página 20

Esta garantía es válida únicamente para las unidades adquiridas de los distribuidores autorizados. El fabricante le garantiza únicamente al consumidor-comprador original, que este producto no presentará defectos de mano de obra ni de materiales por el período indicado a continuación, contado desde la fecha de compra*, si se arma correctamente y se usa en el hogar, en condiciones normales y razonables. El fabricante se reserva el derecho de exigir la devolución de las piezas defectuosas, enviadas con el porte o el flete pagado por el consumidor, para ser revisadas y examinadas.
*Nota: A fecha de recibo de compra serán necesarios para el servicio de garantía.
Son de responsabilidad del consumidor-comprador original todos los gastos de envío de las piezas cambiadas en virtud de las condiciones de esta garantía limitada.
Esta garantía limitada es válida únicamente en Estados Unidos y en Canadá, se ofrece únicamente al propietario original del producto y es intransferible. El fabricante exige la presentación de evidencia de la fecha de la compra. Por tanto, debe conservar el recibo o la factura de la compra. La inscripción del producto no reemplaza al comprobante de compra, y el fabricante no se hace responsable ni está obligado a llevar un registro de dichos comprobantes.
Esta garantía limitada atañe ÚNICAMENTE al funcionamiento del producto y no ampara rayones, abolladuras, corrosión ni decoloración ocasionada por el calor, los productos de limpieza abrasivos y químicos, ni por las herramientas usadas en el armado o en la instalación del aparato, oxidación de las superficies ni decoloración de las superficies de acero inoxidable. RUST no se considera una de fabricación o materiales defecto.
Esta garantía limitada no ampara el costo en el que se incurra por inconvenientes, alimentos, lesiones ni daños a la propiedad.
EL FABRICANTE NO PAGARÁ LOS SIGUIENTES RUBROS:1. El costo de envío normal o acelerado de piezas y repuestos amparados por la garantía 2. Las llamadas de servicio técnico a domicilio.3. Reparaciones de productos que hayan sido usados para fines distintos a los normales, en casas de más de una familia o no domésticos. 4. Daños, fallas, o
dificultades para hacerlo funcionar, ocasionadas por accidentes, modificaciones, manipulación descuidada, uso indebido, abuso, incendio, inundación, casos fortuitos, instalación o mantenimiento inadecuados o que no se realicen de conformidad con las disposiciones de los códigos de instalaciones eléctricas o sanitarias, o uso de productos no autorizados por el fabricante.
5. Pérdida de alimentos debidos a fallas del producto o a la dificultad para hacerlo funcionar.6. El costo de las piezas de repuesto ni de la mano de obra para la reparación de unidades instaladas fuera de Estados Unidos o de Canadá.7. La recogida y el envío de su producto.8. Las reparaciones de piezas o de sistemas que hayan sufrido daños por alteraciones no autorizadas hechas en el producto.9. La remoción y/o la reinstalación de su producto.
ESTIPULACIONES DE EXONERACIÓN DE GARANTÍAS IMPLÍCITAS; LIMITACIÓN DE LOS RECURSOS
El único recurso del que usted dispone en virtud de esta garantía limitada es la reparación o el cambio de las piezas defectuosas. En cas de problèmes de disponibilité des pièces, le constructeur se réserve le droit de remplacer des pièces similaires qui sont également fonctionnels. El fabricante no será responsable por ningún tipo de daño accesorio o indirecto ocasionado por el incumplimiento de lo estipulado ya sea en esta garantía limitada o en alguna garantía implícita pertinente, ni por las fallas o los daños ocasionados por actos fortuitos, cuidado y mantenimiento inadecuados, fuego provocado por la grasa, accidentes, modificaciones, cambio de piezas por cualquier persona que no sea el fabricante, uso indebido, transporte, uso con fines comerciales, abuso, ambientes hostiles (condiciones inclementes del tiempo, fenómenos naturales, acción de los animales), instalación inadecuada o instalación que no se realice de conformidad con las disposiciones de los códigos locales o las instrucciones impresas del fabricante.
ESTA GARANTÍA LIMITADA ES LA ÚNICA GARANTÍA EXPLÍCITA OFRECIDA POR EL FABRICANTE. EL FABRICANTE NO GARANTIZA NINGUNA ESPECIFICACIÓN O DESCRIPCIÓN DE RENDIMIENTO DEL PRODUCTO, INDEPENDIENTEMENTE DEL LUGAR DONDE APAREZCAN, SALVO EN LA MEDIDA SEÑALADA EN ESTA GARANTÍA LIMITADA. POR EL PRESENTE, EL PLAZO DE VIGENCIA DE LA PROTECCIÓN QUE OTORGAN LAS GARANTÍAS IMPLÍCITAS, EN VIRTUD DE LAS LEYES DE CUALQUIER ESTADO, INCLUYENDO LA GARANTÍA IMPLÍCITA ACERCA DE LA IDONEIDAD DEL PRODUCTO PARA SU COMERCIALIZACIÓN O PARA ALGÚN PROPÓSITO DETERMINADO, QUEDA LIMITADO AL PLAZO DE VIGENCIA DE ESTA GARANTÍA LIMITADA.
Ni los distribuidores, ni el negocio minorista que vende este producto, están autorizados para ofrecer ninguna garantía ni para prometer recursos adicionales o incongruentes con los arriba indicados. En todo caso, el límite máximo de responsabilidad del fabricante no será mayor que el precio de compra pagado por el consumidor original.
NOTA: Algunos estados no permiten la exclusión ni la limitación de daños accesorios o indirectos, de manera que es posible que las limitaciones o exclusiones arriba señaladas no correspondan en su caso. Esta garantía le otorga derechos específicos, señalados aquí. Es posible que usted tenga otros derechos que pueden variar de un estado a otro. Sólo en el estado de California, en el caso en que no sea comercialmente viable reparar o cambiar el acabado del producto, el minorista que vende este producto o el fabricante le reembolsarán el precio de compra pagado por el mismo, menos la cantidad directamente atribuible al uso dado por el consumidor-comprador original, antes de haber descubierto la falla. Además, y únicamente en el estado de California, usted podrá llevar el producto al negocio minorista que venda este producto para solicitar servicios en virtud de esta garantía limitada.
Si desea obtener algún servicio en virtud de esta garantía limitada, debe dirigir su correspondencia a:
Consumer RelationsP. O. Box 1240
Columbus, GA 31902-1240No se aceptarán las devoluciones por parte del consumidor a menos que haya obtenido primero una autorización válida de devolución. Debe rotular de manera legible la parte exterior del paquete de devolución autorizada con su número de autorización de devolución y remitir dicho paquete con el flete o el
GARANTÍA LIMITADA
WS_1 SPAN Rev03
90 días a partir de la fecha de compra *Todas las piezas SOLO DEFECTOS DE PERFORACIÓN,DE FABRICACIÓN Y DE MATERIALES
ALCANCE DE LA COBERTURA PLAZO DE COBERTURA TIPO DE FALLA AMPARADA
Página 21

Lista de piezas
Página 22
Clave Cant. Descripción
1 1 Tapa
2 1 Haga pivotar-Lejos la rejilla
3 3 Cocinar la rejilla
4 2 Suspensión de la rejilla de fuego
5 1 Apagador de la mariposa
6 1 Rejilla de fuego
7 1 Soporte de estante delantero, RH
8 1 Soporte de estante delantero, LH
9 2 Apoyo del carro
10 2 Pierna larga
11 2 Pierna corta
12 2 Casquillo de rueda
13 1 Árbol
14 2 Casquillo de extremo de la pierna
Clave Cant. Descripción
15 1 Medidor de temperatura
16 2 Rueda
17 1 Estante del almacenaje
18 1 Pernos de bisagra de la tapa
19 1 Apilado de humo
20 2 Resorte del barril de la manija
21 1 Manija de la tapa
22 1
23
24
25 1
— 1 Paquete del hardware
— 1 Instruccione de asamblea, Inglés /
Caja de fuegos
2 Listone delanteros del estante
1 Clip de la taza de la grasa
.Español
Levantar lado de la manija

2
1ASAMBLEA
Página 23
2
1Primero, obtenga un ayudante! Esta unidad es pesado y requiere de una segunda persona para levantar y mover. SIGUIENTE, elija una ubicación adecuada para trabajar. Abra el cartón y corte las esquinas de manera que establece la caja plana. Esto le dará una superficie de protección durante el montaje.Para empezar el montaje, construcción de dos asambleas pierna deslizando el largo trayecto en el corto secciones pierna secciones.
Adjuntar pierna llaves en el exterior de una pierna de montaje con 4 cada 1/4-20x1 3 / 4 "tornillos y 4 tuercas de la brida de cada 1/4-20. No apriete totalmente los tornillos hasta que se complete el paso 6.
Apoyo del carro
Apoyo del carro
Agujero ranurado
Sección larga de la pierna
Sección corta de la pierna
1/4-20x1 3/4" tornillos
1/4-20 Tuerca del reborde

Página 24
3
4Con la ayuda de un ayudante, el lugar de los agujeros de la pierna restante pierna durante el montaje en rack de madera y girar la pierna unitl asamblea que se reúne la pierna tirantes. Asegúrese de que tanto a corto como a las piernas se encuentran en uno de los extremos del bastidor y las dos patas largas en el otro extremo. Adjuntar pierna tirantes con 4 cada 1/4x20x1 3 / 4 "tornillos y 4 tuercas de la brida de cada 1/4-20. No apriete totalmente los tornillos hasta que se complete el
Coloque el montaje de la pierna de su lado con las piernas hacia arriba tirantes. insertar el bastidor de madera ganchos en los agujeros de la pierna y swing rack hacia arriba, paralela a la pierna tirantes.
Estante del almacenaje
Pierna larga
Pierna larga
Pierna corta
Pierna corta
1/4-20x1 3/4" tornillos
1/4-20 Tuerca del reborde

5
6
Inserte un pequeño Cabello Patilla Clipinto el agujero en un extremo del eje y doble los extremos de los pines de modo que no se puede quitar. Deslice una rueda sobre el eje. Deslice el eje a través de los agujeros en los extremos de las piernas cortas. Deslice el resto de la rueda en el eje y segura con el resto de pines de pelo de clip. Por último, gorras Empuje la rueda en cada extremo del eje.
Coloque el fuego en el carro. La mariposa amortiguador debe estar en su derecha. 4 Inserte 1/4-20X1 cada 3 / 4 "y tornillos a través de la cesta de fuego. Asegure el fuego con 4 cada brida de 1/4-20 nueces. Inserte los tornillos desde el exterior, dentro de la brida de la cámara de los frutos secos.
Apriete todos los tornillos COMPLETAMENTE NUTS Y EN ESTE MOMENTO.
Clip delPin de pelo
1/4-20 Tuerca del reborde
1/4-20x1 3/4" tornillos
Página 25
Clip del Pin de pelo
Clip delPin de pelo
Árbol
El lado de la rueda que tiene la salientecónica debe quedar contra la pata

7
8
• Conecte y LH RH Soportes Frente a la Plataforma de fuego con 4 cada 1/4-20 "Pernos hombro y 4 de cada brida de 1/4-20 nueces. • Después de la primera plataforma entre paréntesis son garantizados, adjuntar la plataforma frente a los soportes listones con 4 cada 1/4-20x1 1 / 4 tornillos y 4 tuercas de la brida de cada 1/4-20.
1/4-20 tuerca del reborde
1/4-20x1 1/4 tornillos
1/4-20 pernos de hombro
1/4-20tuerca del reborde
Página 26
• 1/4-20 tuerca del reborde Adjuntar LH lado del fuego de cada brida . levantar lado de la manija1/4-20 tuerca del reborde
Levantar lado de la manija elresorte del barril

9
10
Página 27
Pin de bisagra
Clavija cabello clip
Pin de bisagra
Manija con elresorte del barril
1/4-20x1/2Tornillos
1/4-20tuerca del reborde
Una rueda más húmeda
Arandela plana
1/4-20tuerca del reborde
1/4-20x 3/4 Tornillos
Arandela plana
Fije la válvula de mariposa de la rueda de fuego utilizando 1 cada 1/4-20x3/4 "tornillo, 2 de cada uno de arandelas planas, 1 arandela de cierre y una brida de 1/4-20 tuerca. PLENAMENTE NO APRIETE TUERCA la brida. Esto permitirá para la rotación de la rueda amortiguador.
1/4-20x2" Tornillos
1/4-20x3/4" Tornillos
1/4-20 Tuercadel reborde
Bisagra correctamente instalado
Arandela de cerradura
Haga pivotar-Lejos la pierna
Anillo
Arandela de cerradura
Grill lugar en la parte superior de la tapa de fuego asamblea. Alinee los agujeros de la bisagra en la parte posterior de la unidad. Con la ayuda de un ayudante, adjuntar Grill tapa a fuego con 2 cada Bisagra Pins. Una vez Bisagra Pins están en su lugar, insertar Grande Cabello Patilla clip en el orificio en Patilla Bisagra. A continuación, instalar chimenea mediante la inserción de tornillos 2 de cada uno 1/4-20x3/4 Grill aunque la tapa, inserte la tapa de chimenea en Grill agujero, entonces seguro con 2 cada brida de 1/4-20 nueces. Asa para adjuntar Grill tapa, seguro con 2 cada brida 1/4-20 tuercas y 2 arandelas de bloqueo.
Instale el Swing-Lejos Ralle insertando 2 cada 1/4-20x2 "tornillos (uno para cada lado de la tapa) en la tapa Grill y segura con 2 cada brida de 1/4-20 nueces. Coloque el cable en el circuito de Swing-Ausente sobre el eje del perno, como se muestra a continuación. De igual manera segura el Swing-Lejos de fuego a la pierna con 2 cada 1/4-20x3/4 "y 2 tornillos de cada brida de 1/4-20 nueces.
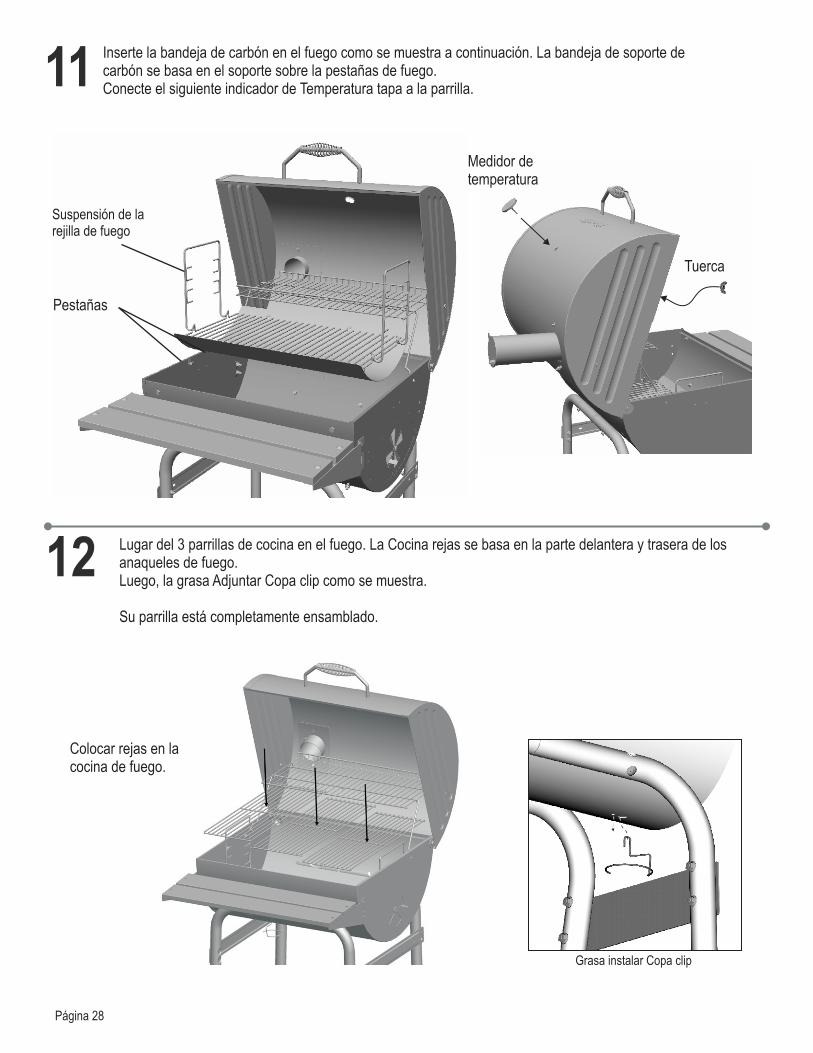
12
11Inserte la bandeja de carbón en el fuego como se muestra a continuación. La bandeja de soporte de carbón se basa en el soporte sobre la pestañas de fuego. Conecte el siguiente indicador de Temperatura tapa a la parrilla.
Suspensión de la rejilla de fuego
Pestañas
Medidor de temperatura
Lugar del 3 parrillas de cocina en el fuego. La Cocina rejas se basa en la parte delantera y trasera de los anaqueles de fuego. Luego, la grasa Adjuntar Copa clip como se muestra.
Su parrilla está completamente ensamblado.
Grasa instalar Copa clip
Tuerca
Página 28
Colocar rejas en la cocina de fuego.

1/4-20
Cant. 31
1/4”Arandela de cerradura
Cant. 3
1/4-20x3/4”
Cant. 5
1/4-20x1 3/4”
Cant. 12
1/4-20x2"
Cant. 2
Centro de la tapaCant. 2
Bisagra pinCant. 2
Clavija cabello clipCant. 2
Página 29
1/4-20Perno hombro
Cant. 4
1/4”
Cant.2
GrandesClavija cabello clip
Cant. 2
Pequeño
Contratuerca con brida
Tornillo Tornillo Tornillo
Arandela plana
LISTA DE HERRAJESLos herrajes se muestran en tamaño real. Es posible que le sobren piezas después que termine de armar la unidad.
1/4-20x1 1/4”Tornillo Cant. 4


*❶ First Name | Nombre | Prénom Initial | Inicial | Initiale Last Name | Apellido | Nom de Famillie
Address (number & street) | Dirección (número y calle) | Adresse (numéro et rue) Apt Number | Nºde apart | Nºd’appt.
City | Cludad | Ville State | Estado | Province Zip Code | Código Zip | Code Postal
*❷ E‐mail Address | Dirección de correo electrónico | Adresse électronique *❸ Phone Number | Número telefónico | Numéro de téléphone
*❹ Model Number | Número de modelo | Numéro de modèle
Serial Number | Número de serie| Numéro de série
❻ Date of Purchase | Fecha de compra | Date de l’achat ❼ Store Name | Nombre de la tienda | Nom du magasin
❽ Purchase Price | Precio de compra | Prix d’achat ❾ Your Gender | Sexo | Sexe:
cMale | Masculino | Masculin
cFemale | Femenino | Féminin
❿ Which product are you registering?
¿Qué producto está registrando?Quel produit enregistrez‐vous?
1. cGas Grill | Parrilla a gas | Gril au gaz2. cElectric Grill | Parrilla eléctrica | Gril électrique3. cSmoker | Ahumador | Fumoir4. cCharcoal Grill | Parrilla a carbón | Barbecue au charbon5. cCooker/Fryer | Cocina/freidora | Cuiseur/Friteuse6. cOther | Otro | Autre
Thank you for completing this questionnaire. | Gracias por completer este cuestionario. | Merci d’avoir bien voulu remplir ce questionnaire.
PLEASE FILL OUT THIS CARD AND ATTACH A COPY OF YOUR SALES RECEIPT. RETURN IT WITHIN 10 DAYS OF PURCHASE. FOR WARRANTY SERVICE PROOF OF PURCHASEWILL BE REQUIRED. THIS WARRANTY IS NON‐TRANSFERABLE.
LLENE ESTA TARJETA Y DEVUELVALA DENTRO DE LOS 10 DIAS DE LA COMPRA. PARA EL SERVICIO DE GARANTIA ES NECESARIO QUE PRESENTE SU COMPROBANTE DECOMPRA. CONSERVE LA FACTURA. ESTA GARANTIA ES INTRANSFERIBLE.
VEUILLEZ COMPLETER CETTE CARTE ET LA RETOURNER DANS LES 10 JOURS SUIVANT L’ACHAT. POUR OBTENIR LE SERVICE SOUS GARANTIE, UNE PREUVE D’ACHAT DOITETRE PRESENTEE. VEUILLEZ CONSERVER VOTRE FACTURE. LA PRESENTE GARANTIE N’EST PAS TRANSFERABLE.
Mail to: / Enviar a: / Envoyer à :
Char‐Broil Warranty Registration
P.O. Box 1240
Columbus, GA 31902‐1240
We respect your privacy. | Respetamos su privacidad. | Nous respectons votre vie privée.
=If you prefer not to receive special offers and promotions from Char‐Broil, please check here:
=Marque aquí si no desea recibir ofertas y promociones especiales de Char‐Broil:
=Si vous préférez ne pas recevoir d’informations concernant des offres spéciales et despromotions de Charbroil, veuillez cocher ici:
*❺Attach copy of your
sales receipt here.
Adjunte aqui la copia
de su recibo de
compra
Veuillez attacher une
copie de votre reçu
ici.
$
*Required | Necesario | Exigé ~ PLEASE PRINT ~ IMPRIMA POR FAVOR ~ S'IL VOUS PLAÎT IMPRIMER ~
REGTEMP REV06
STICKER ON PRODUCT
www.charbroil.com/register
Please register your product online at:Registre su producto en línea en:Veuillez enregistrer votre produit à l'adresse:
(If you register online, you do not need to send in this registration card.)(Si registra en línea, no es necesario enviar esta tarjeta de registro.)(Si vous enregistrez votre produit en ligne, il n'est pas nécessaire d'envoyer la carte d'enregistrement.)