Embed Size (px)
Citation preview

USER GUIDE
Ambulatory infusion pumpCrono PAR
NEW MODEL


Manual code: MAN 01/EN/01 CRONO PARPublication date: 06/13
CANè S.p.A. Medical TechnologyVia Cuorgnè 42/a 10098 Rivoli (TO) Italy
Tel.+39 011 9574872 - Fax +39 011 9598880www.canespa.it - [email protected]
3

4MAN 01/EN/01 CRONO PAR 06/13
SECTION 1Symbols and conventions................................................. Page 8
SECTION 2Introduction ....................................................................... Page 9WARNING: CONTRAINDICATIONS ................................ Page 10Information........................................................................ Page 10
SECTION 3Intended use ..................................................................... Page 11Pump description .............................................................. Page 13Technical features............................................................. Page 14
SECTION 4Supplied standard equipment ........................................... Page 16
SECTION 5Pump parts ....................................................................... Page 17Opening the wings ............................................................ Page 18Disassembling the wings .................................................. Page 19LED................................................................................... Page 20Control buttons ................................................................. Page 20Liquid Crystal Display (LCD) ............................................ Page 21Low battery alert ............................................................... Page 23Replacing the battery........................................................ Page 23
SECTION 6Settings lock ..................................................................... Page 27
SECTION 7Errors and faults ............................................................... Page 28Infusion set occlusion ....................................................... Page 31Post-occlusion bolus......................................................... Page 31
CONTENTS

5MAN 01/EN/01 CRONO PAR 06/13
CONTENTS
SECTION 8Pump initialisation............................................................. Page 32Selecting the pump mode ................................................. Page 32
SECTION 9Selected pump mode: FrEE ............................................. Page 34Factory settings ................................................................ Page 34
SECTION 10Quick reference FrEE ....................................................... Page 35
SECTION 11Pump settings sequence with the pump in the OFF or StoP state ....... Page 40Setting the bolus dose volume ......................................... Page 40Setting the interval between bolus doses ......................... Page 41Setting the first flow rate (F1) ........................................... Page 42Setting the second and third flow rates (F2 and F3)......... Page 43Setting the partial volume ................................................. Page 44Switching the pump on ..................................................... Page 46Priming the infusion line ................................................... Page 47Pump switched on ............................................................ Page 49Selecting the flow rates .................................................... Page 50Bolus dose ........................................................................ Page 51Restrictions on the administration of bolus doses ............ Page 52Displaying the number of administered bolus doses during an infusion and the number of infusions ........................... Page 52Withdrawing the pusher .................................................... Page 53Switching the pump off .................................................... Page 54
SECTION 12Selected pump mode: Auto ............................................. Page 55Factory settings ................................................................ Page 55

6MAN 01/EN/01 CRONO PAR 06/13
SECTION 13Quick reference Auto ....................................................... Page 56
SECTION 14Pump settings sequence .................................................. Page 61Setting the time................................................................. Page 63Setting the bolus dose volume ......................................... Page 64Setting the interval between bolus doses ......................... Page 65Setting the first flow rate (F1) ........................................... Page 66Setting the second and third flow rates (F2 and F3)......... Page 67Assigning the flow rates over a 24-hour period ................ Page 68Setting the partial volume ................................................. Page 69Switching the pump on ..................................................... Page 71Priming the infusion line ................................................... Page 72Pump switched on ............................................................ Page 74Bolus dose ........................................................................ Page 74Restrictions on the administration of bolus doses ............ Page 75Displaying the number of administered bolus doses during an infusion and the number of infusions ........................... Page 75Withdrawing the pusher .................................................... Page 76Switching the pump off ..................................................... Page 77Displaying the settings...................................................... Page 78
SECTION 15Reservoir parts ................................................................. Page 79Luer-Lock cap functions ................................................... Page 80Infusion set ....................................................................... Page 81Infusion set parts .............................................................. Page 81Filtrajet .............................................................................. Page 81Preparing the reservoir and connecting to the pump ....... Page 82Connecting the reservoir to the pump .............................. Page 83Infusion sites..................................................................... Page 85Preparing for the infusion ................................................. Page 85

7MAN 01/EN/01 CRONO PAR 06/13
SECTION 16How to use the supplied standard equipment .................. Page 88Fastening the collar strap to the pump ............................. Page 88Fastening the collar strap to the wings ............................. Page 89
SECTION 17GENERAL WARNINGS .................................................... Page 90Manual updates ................................................................ Page 91Maintenance ..................................................................... Page 91Storage ............................................................................. Page 91Disposal ............................................................................ Page 92Expected pump life ........................................................... Page 92Support ............................................................................ Page 92Guarantee ........................................................................ Page 93Regulatory compliance ..................................................... Page 95
APPENDICESAppendix 1........................................................................ Page 97Appendix 2........................................................................ Page 99Appendix 3........................................................................ Page 101Appendix 4........................................................................ Page 104Appendix 5........................................................................ Page 105Appendix 6........................................................................ Page 106Appendix 7........................................................................ Page 107Appendix 8........................................................................ Page 109Appendix 9........................................................................ Page 112Appendix 10...................................................................... Page 113Appendix 11 ...................................................................... Page 115

8MAN 01/EN/01 CRONO PAR 06/13
To assist you in using the manual, the following symbols and conven-tions are used:
Triangle containing an exclamation markThis "WARNING" icon indicates information that must always be taken into consideration for the safe use of the pump.NotepadThis icon indicates a "NOTE" containing additional information or useful tips about the use of the pump.
SYMBOLS AND CONVENTIONS
SECTION 1
This manual is divided into 6 parts:
Part 1 (red): sections 1 to 8, which cover general information, technical specifications and warnings.
Part 2 (blue): sections 9 to 11, which cover the pump operation in FrEE mode.
Part 3 (green): sections 12 to 14, which cover the pump operation in Auto mode.
Part 4 (orange): section 15, which covers the reservoir, its preparation and connection to the pump, the infusion sites and the preparation of infusions.
Part 5 (purple): sections 16 and 17, which cover the supplied standard equipment, general warnings, maintenance, disposal, support, guarantee and regulatory compliance.
Part 6 (grey): appendices pages 96 to 116.
Flashing symbolThe graphic symbol shown in the manual above the pictures of the pump display, indicates that the number or the character below is flashing.

9MAN 01/EN/01 CRONO PAR 06/13
INTRODUCTIONThank you for choosing the Crono PAR ambulatory infusion pump.
If any of the information is not clear, or in case of any doubts or questions, please contact the CANè S.p.A. Customer Support Service.
Incorrect use of the pump, or failure to follow the instructions and warnings provided in this manual could cause serious injury.
The provided instructions are only applicable to the Crono PAR ambulatory infusion pump. They are firstly intended for use by the medical and paramedical personnel who need to initially set up the pump, and subsequently by the patients if they are able to autonomously manage their own treatment, or else by their carers.
The pump can be set to two different programming modes:- FrEE mode allows the patient to freely select, during the day, one of the 3 available flow rates pre-programmed by the doctor;- Auto mode manages different flow rate values pre-programmed by the doctor, automatically switching among them over a 24-hour period.
The pump features a settings lock system (see page 27) which stops the set-tings from being modified by accident.
The Crono PAR pump allows the medical/paramedical and clinical engi-neering personnel, as well as the distributor, to set, if needed, the occlusion pressure level (PL).
Information on selecting the pressure level (PL) is available in APPENDIX 10 "ACCESSING THE RESERVED SECTION" together with instructions for resetting the infusions counter and programming the time and the calendar. It is possible to remove this information from the manual, as this information should not be disclosed to the patient (see pages 113 and 114).
The instructions provided in this manual are essential for the safe and correct use of the pump. Users are advised to read the whole manual before using the device and to keep it in a safe place for future reference.
SECTION 2

10MAN 01/EN/01 CRONO PAR 06/13
NOTES• To help achieve a greater level of completeness and accuracy, please report any errors or omissions to the following e-mail address: [email protected].
• CANè S.p.A. reserves the right to modify and/or update this manual at any time and without notice.
SECTION 2
INFORMATION
For further information on the Crono PAR pump, contact:
Servizio Assistenza Clienti (Customer Support Service)CANè S.p.A. Medical TechnologyVia Cuorgnè, 42/a 10098 Rivoli (Turin) - ItalyTel. +39.011.9574872Fax +39.011.9598880Website: www.canespa.it e-mail: [email protected]
Service available Monday to Friday from 8.30 to 17.00.
This pump should not be used autonomously by patients who are not able to follow and understand the instructions supplied herein or to perform the basic operations and regular maintenance of the pump.
WARNING: CONTRAINDICATIONS
The pump does not need installation, inspection or commissioning.
CANè S.p.A. reserves the right to modify the hardware and software specifi-cations described in this manual at any time and without notice.

11MAN 01/EN/01 CRONO PAR 06/13
SECTION 3
The Crono PAR ambulatory infusion pump is designed for the subcutaneous infusion of apomorphine (active ingredient) in the treatment of Parkinson’s disease.
CANè S.p.A. disclaims any liability for the administration of drugs by other methods and for different therapies.
The manufacturer accepts liability for the safety and correct operation of the device, provided that it is used in accordance with the instructions herein and that all required repairs and/or modifications are carried out by the manufacturer.
Using incorrect settings and/or incomplete understanding of the operational functions and of the alarms could cause serious harm to the patient.
The clock (hours and minutes) must be correctly set when the pump is in Auto mode, as the different administration flow rates are triggered based on the time over a 24-hour period.It is advisable to check the time by reading it on the display before every infusion and to reset the clock at the beginning and end of Daylight Saving Time (Summer Time), as well as when moving to a different time zone.
Before using the pump evaluate its appropriateness for use for the intended application and on the specific patient, taking into account the following characteristics:- the technical specifications of the pump;- the infusion sets which will be used;- whether multiple infusion sets and clamps are to be used on the infusion
line;- the cognitive and psycho-physical condition of the patient.With respect to clinical procedures, which fall under the responsibility of medical or paramedical personnel, the above list is solely provided for illustrative purposes and is by no means exhaustive.
NOTE
WARNINGS
INTENDED USE

12MAN 01/EN/01 CRONO PAR 06/13
The device must be used:- under medical supervision,- following appropriate procedures and adequate measures when dealing with patients who could suffer serious consequences (injury or death) in the event of accidental operation and/or breakdowns which cause interruptions to the drug administration.
Do not prime the infusion line when it is connected to the patient, because this could cause an overdose of the drug.
Before beginning an infusion, inspect the infusion line to ensure that no kinks, closed clamps or other occlusions are present along the line, and expel any air bubbles.
The level of precision and the amount of time needed to detect an occlusion may differ from the values indicated in this User guide based on the elements composing the infusion line.
Shall there be any suspicion that the pump has undergone any damage, for example due to liquid ingress or after being dropped, contact the Customer Support Service to check that the pump is correctly operational. Do not use a damaged pump.
In case of any doubts about the operation of the pump and/or errors or faults, stop using the device and contact the Customer Support Service.
CANè S.p.A. does not provide a replacement pump during the period needed for any repairs; such a service shall be supplied by the relevant medical structure or the local distributor.
Any liquid on the pump casing must be immediately removed with paper towels.
It is important to arrange for a backup procedure and/or system to be used in case any pump malfunction prevents the infusions. A secondary pump or an alternative system are both possible solutions.
It is recommended that the individuals who assist and/or live with the pump user are familiar with the pump operation and with the information contained in this user guide.
It is important to stop using the device after the indicated service life has expired and follow the instructions for its correct disposal.
SECTION 3

13MAN 01/EN/01 CRONO PAR 06/13
SECTION 3
Crono PAR is an ambulatory infusion pump which uses single-use reservoirs for the controlled subcutaneous administration of drugs containing apomorphine as the active ingredient, in the treatment of Parkinson’s disease.
Crono PAR uses specific 20 ml syringes called reservoirs.
Its smaller size and reduced weight make Crono PAR ideal for home use, thus giving the patient the freedom to engage in everyday activities during the treatment.
Below is a list of the main technical features of the pump.- The possibility of selecting two different operation modes: the FrEE mode, with base-level functions, and the Auto mode, with advanced functions for patients with greater therapeutic demands;- A clock allowing administration of different flow rates over a 24-hour period;- Twin microcontrollers making the device safer and more reliable;- Two wings to protect the reservoir.
The pusher mechanism acts directly on the pusher of the reservoir, allowing for an accurate administration of the drug.To improve the absorption of the drug, the pump administers 22 µl shots at intervals which depend on the chosen flow rate. If the programmed flow rate is increased, the time interval between the shots decreases proportionally.
Crono PAR features a liquid crystal display (LCD) which shows practical information about the settings, operation and diagnostics of the pump.
PUMP DESCRIPTION

14MAN 01/EN/01 CRONO PAR 06/13
SECTION 3
TECHNICAL FEATURESPump dimensions 76 x 49 x 29 mm (3.00 x 1.94 x 1.15 in).
Pump dimensions with protective wings 138 x 49 x 29 mm (5.43 x 1.94 x 1.15 in).
Pump weight (with protective wings) 127 g (4.46 oz.), including battery.
Battery Lithium CR 123A 3V (battery life approx. 100 infusions).
Single-use reservoir Dedicated, with 20 ml capacity and "Luer-Lock" universal safety fitting.
Administration doses Selectable, from 1 to 20 ml with 1 ml increments.
Flow rates in FrEE mode (F1, F2, F3) Programmable from: • 0.05 ml/h to 1.00 ml/h with 0.01 ml/h increments; • 1.00 ml/h to 3.00 ml/h with 0.02 ml/h increments; • 3.00 ml/h to 5.00 ml/h with 0.05 ml/h increments; • F2 and F3 may also be programmed to 0.00 ml/h or to oFF (flow rate display disabled).
Selectable flow rates in FrEE mode 3, all programmable. Flow rates in Auto mode (F1, F2, F3) Programmable from: • 0.05 ml/h to 1.00 ml/h with 0.01 ml/h increments; • 1.00 ml/h to 3.00 ml/h with 0.02 ml/h increments; • 3.00 ml/h to 5 ml/h with 0.05 ml/h increments; Selectable flow rates in Auto mode 4, of which 3 are programmable and 1 is fixed to 0 ml/h.
Bolus dose volume Programmable from 0.00 to 2.00 ml with 0.022 ml increments.
Interval between bolus doses Programmable from: • 5 minutes to 1 hour with 5 minute increments; • 1 hour to 24 hours with 15 minute increments. This function can be disabled by setting no,Lt (see pages 52 and 75)

15MAN 01/EN/01 CRONO PAR 06/13
Flow rate precision +/-2%.
Occlusion pressure 3 selectable values; for further information see APPENDICES 4-5-6. The pump is set to PL2 (4.0 bar +/-2).
Time needed to signal an occlusion See APPENDIX 4.
Post-occlusion bolus About 0.9 ml (in PL2 mode).
Electronic circuit Managed by twin microcontrollers with dedicated software.
Memory All selected values are automatically stored in a memory which is retained even if the battery is removed from the device.
Display Liquid crystal display (LCD) (dimensions 1.1 x 2.8 cm; 0.43 x 1.1 in).
Motor Coreless DC motor. The microcontroller controls the rotation speed using an infrared encoder.
Settings lock Two selectable levels.
Safety circuits They check that the device is correctly operational and trip in case of fault, generating acoustic signals and messages shown on the display.
Ingress protection rating IP 42 Pump operating conditions +10°C / +45°C. 30% / 75% RH. 700 hPa / 1060 hPa.
Pump storage conditions -10°C / +60°C. 10% / 85% RH. 500 hPa / 1060 hPa.
SECTION 3

16MAN 01/EN/01 CRONO PAR 06/13
SECTION 4
SUPPLIED STANDARD EQUIPMENT1. Crono PAR ambulatory infusion pump with reservoir.2. Infusion pump carry-case (Code: VAL/01R).3. Elastic belt (Code: CM/01).4. Collar strap (Code: CM/18D).5. Fabric case (Code: CM/02/L).6. 2 batteries, 1 of which is already fitted in the pump (Code: CR/123A).7. 1 User Guide.8. Battery-cover opening tool (Code: CA/02).
1
2
3
4
5 6
7
8

17MAN 01/EN/01 CRONO PAR 06/13
SECTION 5
PUMP PARTS
LED
Serial number
Anti-slip grooves
Display
The reservoir protective wings can be removed by unscrewing the 2 screws
Connection for the reservoir wings
Battery compartment cover
CE marking Quick reference
Reservoir protecting wings Pusher Buttons
18MAN 01/EN/01 CRONO PAR 06/13
SECTION 5
Collar strap eyelets
Opening for the connection of the infusion set
OPENING THE WINGS

19MAN 01/EN/01 CRONO PAR 06/13
SECTION 5
DISASSEMBLING THE WINGS
1
2
3

20MAN 01/EN/01 CRONO PAR 06/13
SECTION 5
CONTROL BUTTONSThe device has 3 control buttons.
The buttons have a built-in safety delay: in order for the command to be executed, they must be kept pressed for several seconds. Press the buttons using your fingertips only; do not use sharp objects.
The buttons make a clicking sound when pressed.
A short acoustic signal confirms the execution of a command.
The buttons perform different functions depending on whether the state the pump is set to:
- OFF
- StoP
- ON
WARNING
The red LED on the right of the display is lit in the following circumstances:
1 - when the battery is inserted during the device operation checks, see page 32;
2 - when an error occurs. For further information, see pages 28-29.
LED

21MAN 01/EN/01 CRONO PAR 06/13
SECTION 5
LIQUID CRYSTAL DISPLAY (LCD)The liquid crystal display shows text messages and icons to provide practical information about the settings, the operations being performed and any error conditions.
Arrowicon
Lockicon
Battery levelindicator
Dropicon
Four main digits
Two secondary digits
Four main digits of the displayDisplay main information on the set values, error conditions, etc.
Two secondary digits of the displayDisplay one of the following information:• reservoir volume; • time (if the pump is in Auto mode);• information related to the setting displayed on the four main digits;• unit of measure of the displayed setting.
Clocksymbol

22MAN 01/EN/01 CRONO PAR 06/13
"Clock" icon:Only displayed when in Auto mode (see related section on pages 55-78). When the clock icon is visible, the 2 secondary digits below indicate the current hour (when in OFF or StoP states) or the set flow rate (when in ON state).
"Low Battery" icon:Displayed when the battery is nearly drained (see related section on page 23).
"Drop" icon:Steady: separates integers from decimal digits.Flashing: hour/minute separator.
"Arrow" icon:• A downward arrow indicates that the pump is being programmed;
• A right arrow indicates that the displayed value for the setting is in ml/h units.
"Minute" indicator: • Flashes when the delivery time is displayed in minutes (less than 60 minutes left);
• Displayed when the interval between two bolus doses is shown in minutes.
"Lock" icon:Indicates that the settings are locked (L1), i.e. they can be viewed but cannot be changed (except the time).
SECTION 5
ml/hPROG

23MAN 01/EN/01 CRONO PAR 06/13
LOW BATTERY ALERT
The "LOW BATTERY" icon appears steady on the display when the battery is nearly drained.
If the alert persists for several consecutive infusions, the "BATTERY SPENT" message is displayed, accompanied by intermittent acoustic signals repeated approximately every 10 seconds.In this case the pump can no longer be used and the battery must be replaced.
• It is advisable to replace the battery after the "LOW BATTERY" alert is displayed.
• The battery must not be replaced:- during an infusion;- while the infusion set is connected to the patient.
WARNINGS
SECTION 5
REPLACING THE BATTERYUse a CR 123A 3 Volt Lithium battery.To replace the battery, ensure the pump is switched off (the display shows OFF or StoP), then proceed as follows:
1. open the battery compartment cover with the special tool supplied or with a paper clip;
2. pull the cover;
3. use the small ribbon strap (which lies under the battery) to facilitate the removal of the battery;
4. remove the discharged battery and dispose of it in the specially designed containers.

24MAN 01/EN/01 CRONO PAR 06/13
5. wait 10 seconds, then fit the new battery in the compartment over the ribbon strap, ensuring that the indicated polarity is observed;
6. close the cover after fitting the battery.
SECTION 5
CRONO PIDCRONO PID
CRONO PID
CRONO PI
D

25MAN 01/EN/01 CRONO PAR 06/13
SECTION 5
• The cover is supplied with a gasket which must remain in position as shown in the figure.
• After fitting the battery, the pump runs a self-diagnosis test during which it will emit short acoustic signals and display all of the icons and indicators.
• During the battery replacement, the pump retains the current settings in memory.
• Ensure that the battery compartment cover is closed correctly.
Gasket
NOTES
WARNINGS
In case the battery cannot be removed by pulling the ribbon strap, do not use any other tool to lever out the battery and proceed as follows:
• Hold the pump and the compartment cover firmly in one hand;
• Strike the palm of your other hand with the pump to jolt the battery from the compartment.
• Do not use rechargeable batteries.
• Using other types of battery than Lithium CR 123A batteries could cause the pump to malfunction.
• The battery life can be affected by its age and by the use and storage temperatures and conditions.
• Ensure a replacement battery is available for use at any time.
• It is advisable to remove the battery if the pump is to be left inactive for long periods (1-2 months).

26MAN 01/EN/01 CRONO PAR 06/13
PROG
PROG
SECTION 5
PROG
PROG
• The time is stored in the memory for about 36 hours even if the battery is removed from the device. If the battery is fitted in the device after 36 hours, the main digits on the display will be dashed, indicating that the following must be set: hours, minutes, day, month and year by pressing the or buttons.
By subsequently pressing the button, the two dashes on the right of the drop, representing minutes, will start flashing.
To set the date, press the button once more and the two left dashes representing the day will start flashing.
Press the button once again and the two right dashes representing the month will start flashing.
Press the button once again and the two digits and the dashes representing the year will start flashing.
PROG
PROG
PROG
PROG

27MAN 01/EN/01 CRONO PAR 06/13
SECTION 6
SETTINGS LOCK
WARNINGS
The Crono PAR pump has 2 access configurations:
- L0 (unlocked) - the control buttons grant full access to all settings, parame-ters and operational functions;
- L1 (locked) - the control buttons can be used to control the operational fun-ctions, but no parameter setting is allowed, except for the hours and minutes. When the pump is set to L1 the lock icon ( ) is lit.Before attempting to modify any of the pump settings, ensure that the selected access level is L0 (icon not displayed).
The settings can be locked or unlocked as follows:
1. with the pump set to either OFF or StoP, press the button for about 6 seconds: the display shows the number of bolus doses administered during the last infusion, followed by the number of completed infusions;
2. without releasing the button, press the button: the display shows either L0 or L1, with 0 or 1 flashing;
3. the settings can now be locked or unlocked by pressing either or .
• The set access level (L0 or L1) is stored in memory even if the battery is removed.
• When the access level is set to L1 (locked), any attempt to access the locked options will cause the pump to emit an intermittent acoustic signal and to display the flashing "lock" icon.

28MAN 01/EN/01 CRONO PAR 06/13
DISPLAY ACOUSTIC SIGNAL
ERROR DESCRIPTION
CORRECTIVE ACTION
Short and continuous acoustic signal. Operation not allowed. ---
Intermittent acou-stic signal repeated approximately every
10 secs.
Possible clockhardware fault
(Auto mode only).
Press the button; see warnings on page
30.
Continuous acoustic signal and flashing
LED.
Critical problem in the safety system. Press the button
Intermittent acou-stic signal repeated approximately every
10 secs.
Motor circuit fault. Press the button
Intermittent acou-stic signal repeated approximately every
10 secs.
Pusher mechanically blocked while withdra-wing (possibly caused by a foreign object pre-venting its retraction).
Eliminate the cause and initialise the pump
(see page 32).
Intermittent acou-stic signal repeated approximately every
10 secs.
Advancement system blocked. Press the button
Intermittent acou-stic signal repeated approximately every
10 secs.
Motor fault. Initialise the device (see page 32).
Intermittent acoustic signal repeated
approximately every 10 seconds (possibly
accompanied by flashing LED).
Communication error between the twin microcontrollers.
Press the button
ERRORS AND FAULTS
SECTION 7

29MAN 01/EN/01 CRONO PAR 06/13
DISPLAY ACOUSTIC SIGNAL
ERROR DESCRIPTION
CORRECTIVE ACTION
Intermittent acoustic signal repeated appro-ximately every 10 secs.
When a battery is fitted and at the start of every infusion, the device runs
a control algorithm on the parameters stored in the memory. If an error is found, the manufacturer
default settings are restored, the motor stops and an error is shown on
the display.
Initialise the device (see page 32) and reset the infusion settings.
Intermittent acoustic signal repeated appro-ximately every 10 secs.
Fault in the safety circuit driving the pump motor. If the test is failed, the pump is locked and an error is
indicated.
Initialise the device
(see page 32).
Intermittent acoustic signal repeated appro-ximately every 10 secs.
Fault in the advancement system.
Initialise the device
(see page 32).
Intermittent acoustic signal repeated appro-ximately every 10 secs.
Mechanical block due to an occlusion condition on
the infusion line.
Eliminate the cause and press
the button (see page 31).
Acoustic signal emitted when pressing the
button .
The bolus dose is set to 0.00 ml.
This function is not available (see pages 52 and 75).
Acoustic signal emitted when pressing the
button .
The bolus dose cannot be administered because the dose interval set by
the function has not been completed.
This function is not available (see pages 52 and 75).
SECTION 7

30MAN 01/EN/01 CRONO PAR 06/13
Error messages (from Er,1 to Er,11 and OCCL) are accompanied by an acou-stic signal and followed by a system stop.
• Following the display of error message Er,1 in the:- ON state (Auto mode) press the button to resume the drug delivery at the lowest of the programmed flow rates;- OFF state, press the button to set the pump back to OFF;- Battery fitting procedure, press the button to initialise the pump (as described on page 32).• The display will show the clock icon and flashing dashes on the two secon-dary digits until the time is reset.• The hours and minutes must be reset by accessing the settings as described in the "PUMP SETTINGS SEQUENCE" section on pages 40 and 61.• If at the time when Er,1 is signalled the hourly flow rate value is set to F0, the pump will NOT administer the drug until it is switched off and on again.• If the time is not reset, every time the pump starts or resumes an infusion, it will signal Er,1 and administer the drug for the whole delivery time at the lowest of the 3 programmed flow rates.• In case the time cannot be reset in the pump settings menu, contact the CANè S.p.A. Technical Support Service.• Error messages Er,2 and Er,7 are accompanied by the flashing red LED.• Following the display of error message Er,8 and the subsequent initialisation, the system restores the factory settings in FrEE mode (see pages 34 and 55): in this case the pump settings prescribed by the doctor must be programmed again.• The settings prescribed by the doctor must be noted on a copy of the patient settings record sheet on page 112 or the notes sheet on page 115.
WARNINGS
SECTION 7
NOTE

31MAN 01/EN/01 CRONO PAR 06/13
POST-OCCLUSION BOLUSAn occlusion alarm is signalled when the pump detects excessive back pressure on the infusion line. This overpressure must be removed without releasing a post-occlusion bolus, which could cause serious harm to the patient.
The volume of a Crono PAR, post-occlusion bolus, considering only the combined volume of the pump and the reservoir is about 0.9 ml (in PL2 mode).
• The volume of the bolus released after an occlusion condition can vary, depending on the infusion set and all the other infusion line components.• Another element that could affect the volume of the bolus released after an occlusion condition is the possible presence of air in the system.• After the occlusion alarm is signalled, take any and all measures appropriate to avoid the administration of a post-occlusion bolus, such as, for example, disconnecting the infusion set from the patient.
WARNINGS
SECTION 7
INFUSION SET OCCLUSIONThe pump is designed to recognise when the drug administration is interrupted by external causes, such as kinks on the infusion set tube with consequent occlusion.
In such cases the pump stops the infusion: the display indicates that there is an occlusion, accompanied by a short acoustic signal. The pump then emits acoustic signals every 10 seconds.
While the system is still occluded, the drug is not administered: to resume the infusion remove the cause of the occlusion, then press the button.
• The cause of the occlusion is to be found along the infusion line and at the point of injection.• To avoid or reduce the incidence of occlusions, it is advisable to use an in-fusion set with anti-kinking tubes.
NOTES

32MAN 01/EN/01 CRONO PAR 06/13
SELECTING THE PUMP MODE
PUMP INITIALISATION
1. runs a self-diagnostic test, emitting a series of short acoustic signals, flashing the red LED and displaying all the icons.
2. displays OFF at the end of the previous operations.
• The pump is supplied with a new battery already fitted.• To initialise the device, remove the battery and fit it back in after 10/15 seconds. If the error persists after the corrective action or the initialisation of the device, contact the CANè S.p.A. Technical Support Service• For instructions on how to install the battery, see page 23.• It is advisable to initialise the pump if it has been left inactive for long periods (1-2 months) with the battery installed.• If after fitting the battery (initialisation of the pump) the display does not show the above messages, remove the battery, then fit it back in.
SECTION 8
NOTES
The Crono PAR pump features, as a single device, two programming modes, namely FrEE and Auto, that make it suited to different therapeutic needs.The FrEE mode offers base-level functions that allow the patient to freely select, during the day, one of the 3 available flow rates pre-programmed by the doctor, the bolus dose and the drug volume contained in the reservoir.The Auto mode offers advanced functions allowing to program different flow rates over a 24-hour period, as well as other actions later described.
Upon fitting the battery, the pump runs the initialisation sequence, during which it:

33MAN 01/EN/01 CRONO PAR 06/13
To be able to select the mode of the pump, it must:• be in the OFF state (at the start of a new infusion, partial or total);• have the settings lock set to L0, ("lock" icon off).
SECTION 8
Procedure:1 - press the button for about 10 seconds, until the display shows the number of bolus doses administered during the last infusion, the number of completed infusions and finally the SEt message;
2 - when the SEt message is displayed, release the button and press the button. The display shows the Auto or FrEE flashing message and the arrow points to PROG indicating that the pump is ready to be programmed;
3 - press the button to switch from Auto to FrEE, or press the button to switch from FrEE to Auto;
4 - if the FrEE mode is selected, go to the next page. If the Auto mode is selected, go to page 55.
WARNINGS
• Always verify that the time is correctly set when switching pump mode from FrEE to Auto.
• It is not possible to change the pump mode when in the StoP state. Attempting to do so will cause the display to show the Err message.
PROG
PROG

34MAN 01/EN/01 CRONO PAR 06/13
FrEESELECTED PUMP MODE: FrEE
SECTION 9
FACTORY SETTINGSThe pump is supplied with the following default settings:
Dose 0.15 ml
Interval between doses no,Lt
Flow rate 1 0.50 ml/h (F1) Flow rate 2 oFF (F2)
Flow rate 3 oFF (F3)
Volume 20 cc
Number of administered bolus doses 0
Number of infusions 0
Access level (settings lock) L0

35MAN 01/EN/01 CRONO PAR 06/13
FrEE FrEEQUICK REFERENCE FrEEThe buttons have a built-in safety delay: in order for the command to be exe-cuted, they must be kept pressed for several seconds.
These quick reference instructions do not offer an alternative to reading the information provided in this manual. They only give a basic and rapid summary of the pump functions.
WARNING
SECTION 10
BUTTONS SELECTING THE PUMP MODE DISPLAY
• Pump set to OFF
• Number of bolus doses administered during the last infusion
• Displaying the number of completed infusions
• Pump mode selection stage
• Accessing the pump mode selection
• Selecting the pump mode (FrEE/Auto)
• Pump set to OFF
PUM
P SE
T TO
OFF
(keeppressed)
/PROG
(after 2 seconds)
(after 6 seconds)
(after 10 seconds)

36MAN 01/EN/01 CRONO PAR 06/13
FrEEBUTTONS CONFIGURING THE SETTINGS IN THE OFF STATE DISPLAY
• Pump set to OFF
• Setting the bolus dose volume (0.00 to 2.00 ml)
• Setting the interval between the bolus doses
(from "no,Lt" to 24 hours)
• Setting the F1 flow rate (0.05 to 5.00)
• Setting the F2 flow rate (0.00 to 5.00 - oFF - disabled)
• Setting the F3 flow rate (0.00 to 5.00 - oFF - disabled)
• Setting the partial volume (1 to 20 ml)
• Pump set to OFF
• Decrease/Increase the stored value
PUM
P SE
T TO
OFF
/
PROG
PROG
/
BUTTONS SETTING THE PARTIAL VOLUME DISPLAY
• Setting the partial volume
• Decrease/Increase
• Positioning the pusher to partial volume
• Pump set to OFF
PROG
PUM
P SE
T TO
OFF
/PROG
SECTION 10
PROG
partial volume
PROGml/h
PROGml/h
PROGml/h
(see the SETTING THE PARTIAL VOLUME table)

37MAN 01/EN/01 CRONO PAR 06/13
FrEE FrEE
BUTTONS ADMINISTRATION OF BOLUS DOSE DISPLAY
• Pump set to ON
• Administration of bolus dose
• Pump set to ON
PUM
P O
N
SECTION 10
BUTTONS SWITCHING OFF / StoP DISPLAY
• Delivery time
• Pump set to StoP
• Silence buzzer sound and flashing display
PUM
P O
N
BUTTONS SWITCHING ON / PRIMING DISPLAY
PUM
P SE
T TO
OFF • Dispense priming (1.5 ml available)
• Pump set to OFF
• Priming function
• Selecting the flow rates
(keep pressed)
• Start of infusion
• Switching the pump on
PROGml/h
• Pump set to OFF(priming dispensed; function still available - see pages 47/48 -)

38MAN 01/EN/01 CRONO PAR 06/13
FrEESECTION 10
BUTTONS SETTINGS LOCK DISPLAY
• Pump set to OFF or StoP
• Displaying the number of administered bolus doses
• Displaying the number of completed infusions
• Access settings lock
• Settings lock/unlock selection
• Pump set to OFF or StoP
PUM
P SE
T TO
OFF
/Sto
P
PROG PROG
(2 secs)
/
press withoutreleasing
(5 secs)
BUTTONS WITHDRAWAL OF THE PUSHER BEFORE THE END OF THE INFUSION DISPLAY
• Pump set to OFF/StoP
• Pump set to End
• Withdrawal of the pusher
• Pump set to OFF
PUM
P O
N +

39MAN 01/EN/01 CRONO PAR 06/13
FrEE FrEE SECTION 11
BUTTONS SCREENS DISPLAY
• Pump set to OFF
• Bolus dose volume
• Interval between the bolus doses
• F1 flow rate
• F2 flow rate
• F3 flow rate
• Partial volume
• Pump set to OFF
PUM
P SE
T TO
OFF
/Sto
P - L
1
BUTTONS END OF INFUSION DISPLAY
• Pump set to End
• Withdrawal of the pusher
• Pump set to OFF
PUM
P O
N
ml/h
ml/h
ml/h

40MAN 01/EN/01 CRONO PAR 06/13
FrEE
Proceed as follows:1. with the pump set to OFF or StoP press the button for a few seconds: the display shows the flashing BOLUS DOSE VOLUME indication;2. to change the value press, within 20 seconds, the button to decrease it or the button to increase it. Each change is confirmed by an acoustic signal;3. if no button is pressed for 20 seconds, the settings session is terminated and the OFF or StoP message is displayed;4. press the button before the OFF or StoP is displayed (while the bolus dose volume is still flashing) to proceed to the settings for the next parameter: SETTING THE INTERVAL BETWEEN BOLUS DOSES.
PUMP SETTINGS SEQUENCE WITH THE PUMP IN THE OFF OR StoP STATETo change the settings the pump must:• be set to OFF or StoP;• have the settings lock off (i.e. set to L0).
The bolus dose volume can be set from 0.00 to 2.00 ml with 0.022 ml increments.
PROG
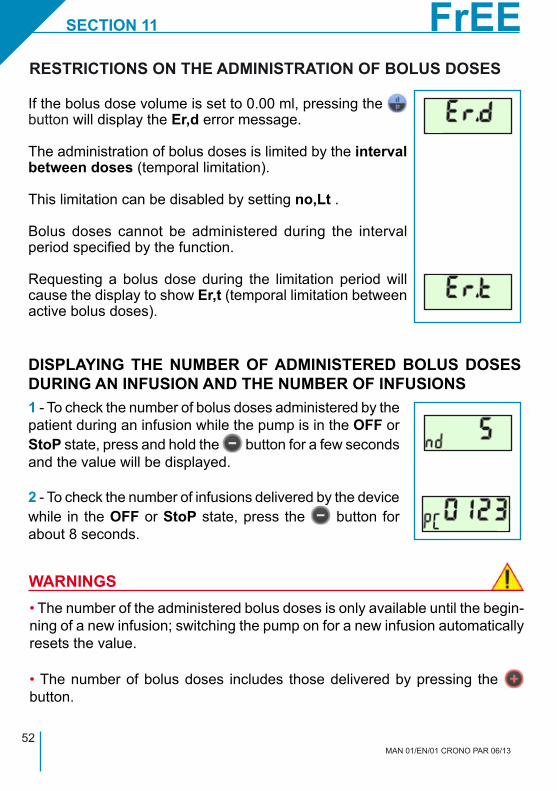
If the bolus dose volume is set to 0.00 ml, pressing the button during the infusion will display the Er, d error message.
NOTES
WARNING
• The bolus dose volume can be quickly changed by continuously pressing either the or button.• The bolus dose setting is automatically stored in the pump memory.• Press the button when the display indicates d0,02 to change the value to d0,00: this setting disables the bolus dose function.• If the settings lock is set to L1 (the display is showing the "lock" icon), pres-sing the button will display the current settings, which cannot be changed.
SETTING THE BOLUS DOSE VOLUME
PROG
SECTION 11

41MAN 01/EN/01 CRONO PAR 06/13
FrEE FrEESETTING THE INTERVAL BETWEEN BOLUS DOSES
The interval between bolus doses can be set to a value between no,Lt (function disabled) and 24 hours, in the following ways:
• from 5 minutes to 1 hour with 5 minute increments;• from 1 hour to 24 hours with 15 minute increments.This applies a temporal limit to the bolus dose function.
Proceed as follows:1. the bolus dose interval flashes on the display;
2. press the button to increase the value; press the button to decrease it. Each change is confirmed by an
acoustic signal;
3. if no button is pressed for 20 seconds, the settings session is terminated and the OFF or StoP message is displayed;
4. press the button before the OFF or StoP indication is displayed (while the bolus dose interval is still flashing) to proceed to the settings for the next parameter: SETTING THE FIRST FLOW RATE (F1).
• The interval between the bolus doses can be quickly changed by continuously pressing either the or button.
• The bolus dose interval setting is automatically stored in the pump memory.
• Press the button while the display shows it 5’ to switch to no,Lt: this setting disables the function that regulates the interval between bolus doses, and thus disables any time restrictions on the administration of bolus doses.
NOTES
PROG
PROG
PROG
SECTION 11
PROGml/h
42MAN 01/EN/01 CRONO PAR 06/13
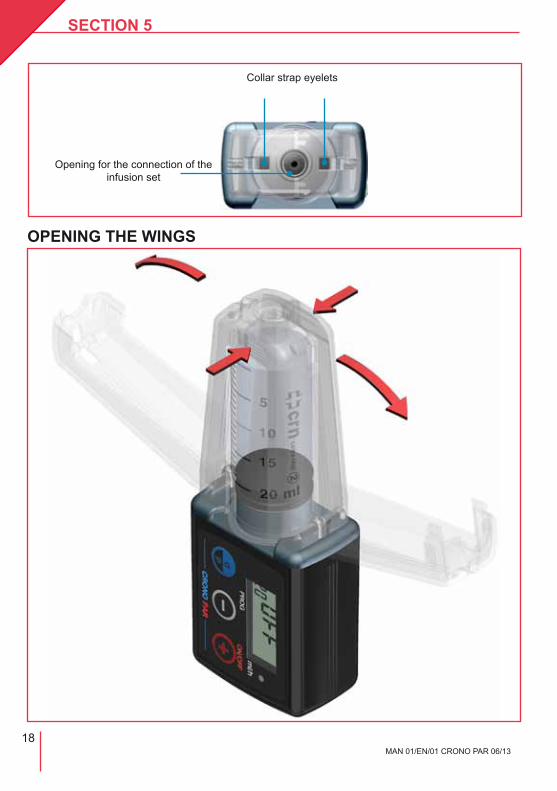
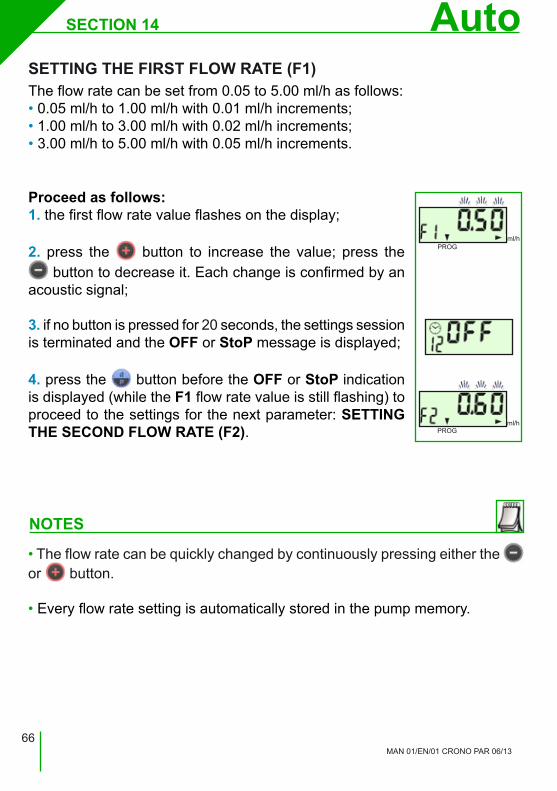
FrEESETTING THE FIRST FLOW RATE (F1)
The flow rate can be set from 0.05 to 5.00 ml/h as follows:• 0.05 ml/h to 1.00 ml/h with 0.01 ml/h increments;• 1.00 ml/h to 3.00 ml/h with 0.02 ml/h increments;• 3.00 ml/h to 5.00 ml/h with 0.05 ml/h increments.
Proceed as follows:1. the first flow rate value flashes on the display;
2. press the button to increase the value; press the button to decrease it. Each change is confirmed by an
acoustic signal;
3. if no button is pressed for 20 seconds, the settings session is terminated and the OFF or StoP message is displayed;
4. press the button before the OFF or StoP indication is displayed (while the F1 flow rate value is still flashing) to proceed to the settings for the next parameter: SETTING THE SECOND FLOW RATE (F2).
• The flow rate can be quickly changed by continuously pressing either the or button.
• Every flow rate setting is automatically stored in the pump memory.
NOTES
SECTION 11
PROGml/h
PROGml/h

43MAN 01/EN/01 CRONO PAR 06/13
FrEE FrEESETTING THE SECOND AND THIRD FLOW RATES (F2 AND F3)
The flow rate can be set from 0.00 to 5.00 ml/h as follows:• 0.00 ml/h to 1.00 ml/h with 0.01 ml/h increments;• 1.00 ml/h to 3.00 ml/h with 0.02 ml/h increments;• 3.00 ml/h to 5.00 ml/h with 0.05 ml/h increments.
The second and third flow rates are set in the same manner as the first.
After setting the third flow rate, press the button before the OFF or StoP indication is displayed (while the F3 hourly flow rate value is still flashing) to proceed to the settings for the next parameter: PARTIAL VOLUME.
• The flow rate can be quickly changed by continuously pressing either the or button.
• If the flow rate is programmed to 0.00 ml/h, the device will not deliver the drug via flow, but only through the administration of bolus doses.
• It is also possible to set the oFF condition for flow rates F2 and/or F3, so that the flow rates will not be displayed as ON.
NOTES
SECTION 11
PROG
PROG
PROGml/h
PROGml/h
PROGml/h

44MAN 01/EN/01 CRONO PAR 06/13
FrEESETTING THE PARTIAL VOLUME
The partial volume function is used when the therapy requires an infusion with less than 20 ml.
The partial volume can be set from 1 cc to 20 cc with 1 cc increments.To set this parameter, press the button again.The partial volume function can only be set before starting a new infusion, be it either a complete one (20 ml) or a partial one.
Proceed as follows:1. the display shows a flashing value for the volume, preceded by cc, which indicates the unit of volume (1 cc = 1 ml);
2. press the button to decrease the value, and the button to increase it. Each change is confirmed by an acoustic signal;
3. once all settings are completed, if no button is pressed for 20 seconds the display will show P,cc. Press the button while P,cc is shown to cancel the partial volume setting. The display shows the OFF indication; 4. the pump moves the pusher to the position corresponding to the set volume: during this operation an intermittent acoustic signal is emitted and the actual volume corresponding to the pusher position is shown in real time;
5. when the pusher reaches the correct position, the display shows OFF. The selected partial volume value will be shown on the secondary display.
PROG
PROG
SECTION 11

45MAN 01/EN/01 CRONO PAR 06/13
FrEE FrEENOTES
WARNINGS• This operation must not be carried out with the infusion set connected to the patient.
• A partial volume cannot be set while an infusion is in progress.
• The partial volume setting is stored in the pump memory even if the batte-ry is removed.
• If the battery is removed when the pump is set to OFF, the partial volume is stored in the memory and the pusher is not withdrawn.
• If the battery is removed when the device is in the ON state, the pusher is mechanically reset and then returned to the infusion start position, according to the partial volume value stored in the memory.
• The partial volume setting is automatically stored in the pump memory.
• At the end of an infusion, the pusher retracts to the position corresponding to the partial volume setting.
• The partial volume function can be interrupted by pressing the button. The pump switches off (the display shows OFF or StoP) and if the pusher is advancing, it stops and keep its position as soon as the interruption is triggered: the partial volume setting is not stored and the previous stored value becomes active.If, however, the pusher is retracting, the display alternates between OFF and P,cc. The only possible operation is to continue the withdrawal of the pusher, by pressing the button. The pusher withdraws to the position corresponding to the partial volume setting.
• When the device is set to StoP it is not possible to change the partial volume, and the pump displays Err.
SECTION 11

46MAN 01/EN/01 CRONO PAR 06/13
FrEE
Before starting an infusion:
• check that the reservoir is correctly connected;
• inspect the infusion line to ensure that no kinks, closed clamps or other occlusions are present along the line;
• expel any air bubbles.
WARNINGS
SECTION 11
SWITCHING THE PUMP ON
While in the OFFstate, press the button and the pump will emit a short acoustic signal and display the following in sequence:
• Pr (priming function);There are three options: a. Postpone the priming; b. Cancel the priming; c. Perform the priming.
• Switching the pump on and displaying the set flow rate;
• Delivery time and flow rate value display.

47MAN 01/EN/01 CRONO PAR 06/13
FrEE FrEEPRIMING THE INFUSION LINE
The priming procedure is as follows:
1. switch on the device as described in the relevant section;
2. the display shows the Pr indication. There are three op-tions:
a. Postpone the priming; b. Cancel the priming; c. Perform the priming.
a. Postpone the primingPress the and buttons simultaneously: the pump switches off and the display shows OFF. Alternatively, wait 10 seconds and the pump automatically switches off.
b. Cancel the primingPress the button; the pump begins the infusion and the display shows the time left to the end of the infusion.
SECTION 11
The priming function is used to fill the infusion line with the drug contained in the reservoir.
The volume available for priming is 1.5 ml.
The priming function is enabled when the device is switched on and the pusher is in the infusion start position, regardless of whether the settings lock is on.

48MAN 01/EN/01 CRONO PAR 06/13
FrEEc. Perform the primingPress and hold the button to deliver the priming dose; the priming function can be interrupted by releasing the button. The display shows a flashing Pr indication, followed by the number of millilitres delivered. The display then shows Pr again. This allows to choose whether to postpone, cancel or perform the priming function again. The procedure can be repeated until a maximum total of 1.5 ml has been delivered. At the end of this stage the pump returns to the OFF state.
• Every time the pump administers 0.5 ml of drug, it emits an acoustic signal and pauses for about one second.
• Continue with the priming until the drug flows out of the infusion set.
• If no button is pressed for 10 seconds after the priming indication is displayed, the display shows the OFF indication.
• Do not prime the infusion set with the line connected to the patient.
• The priming function must only be performed with the reservoir connected to the infusion set and before inserting the needle into the infusion site.
• Before beginning an infusion, check that no air bubbles are present in the fluid infusion line or expel any found bubbles. Alternatively, use a vented filter.
• If the display shows a flashing Pr, selection of the programming mode (FrEE/Auto) and/or the partial volume is not allowed.
NOTES
WARNINGS
SECTION 11

49MAN 01/EN/01 CRONO PAR 06/13
FrEE FrEEPUMP SWITCHED ONWhen the pump is ON, the display shows the delivery time in:
• hours with a flashing h;
• hours and minutes, with the "drop" icon flashing;
• minutes, if the time left is less than 1 hour, with the Minute indicator flashing.
If the device is switched off during an infusion and the display shows StoP, press the button to restart the infusion.
NOTE
SECTION 11
If a flow rate of 0.00 ml/h is set, the display shows F0,00 with a flashing letter F; in this case the drug can only be administered by means of a bolus dose request. ml/h

50MAN 01/EN/01 CRONO PAR 06/13
FrEESELECTING THE FLOW RATES
SECTION 11
This function allows the patients to change the flow rate during the day based on their demands, choosing among the 3 available values pre-programmed by the doctor.
Procedure:1 - with the pump on, press the button;
2 - the display shows the currently set flow rate flashing with the arrow indicating that the programming mode is active;
3 - press the button again and the display shows the other available flow rate values;
4 - after selecting the desired flow rate, do not press the button again. After a few seconds the value is stored in the memory and the pump will proceed with the infusion at the newly selected flow rate;
5 - during this selection the and buttons are disabled.
NOTES• If F2 and/or F3 are set to 0.00, the pump allows the selection of these flow rate values as an alternative to F1, with no administration being performed as the flow is equal to 0; selecting a 0 flow rate can be convenient to intentionally interrupt the administration for a set period, for instance during the night.
• If F2 and F3 are set to oFF, the pump allows the display and use of the F1 flow rate only.
The preset flow rate selection function is available even when the settings lock is on; to disable this option, set the F2 and F3 flow rates to oFF so as to force the pump to use the only available flow rate.
WARNING
PROGml/h
PROGml/h

51MAN 01/EN/01 CRONO PAR 06/13
FrEE FrEE
Administration of bolus doses
The procedure for the administration of a bolus dose is as follows:
1. press the button: the pump emits an acoustic signal and starts the administration of the bolus dose, during which a flashing letter d is shown on the secondary display, while the volume of the bolus dose being administered is shown on the main display. The pump pauses for about 1 second every 0.11 ml of drug administered;
2. at the end of the bolus dose administration, the pump emits an acoustic signal and the display shows the time left to the end of the infusion or the F0,00 indication if a 0.00 ml/h flow rate is set.
• The bolus dose administration can be interrupted by pressing the button.
• If the bolus dose volume is set to 0.00 ml, pressing the button will display the Er,d error message.
BOLUS DOSE
SECTION 11
NOTES
The bolus is a supplementary dose of the drug that the patient can request when it is needed.If the bolus dose volume is set to 0.00 ml, the bolus dose cannot be administered.
Bolus doses can only be administered while the pump is in the ON state.
ml/h
52MAN 01/EN/01 CRONO PAR 06/13
FrEE
DISPLAYING THE NUMBER OF ADMINISTERED BOLUS DOSES DURING AN INFUSION AND THE NUMBER OF INFUSIONS1 - To check the number of bolus doses administered by the patient during an infusion while the pump is in the OFF or StoP state, press and hold the button for a few seconds and the value will be displayed.
2 - To check the number of infusions delivered by the device while in the OFF or StoP state, press the button for about 8 seconds.
• The number of the administered bolus doses is only available until the begin-ning of a new infusion; switching the pump on for a new infusion automatically resets the value.
• The number of bolus doses includes those delivered by pressing the button.
WARNINGS
RESTRICTIONS ON THE ADMINISTRATION OF BOLUS DOSES
If the bolus dose volume is set to 0.00 ml, pressing the button will display the Er,d error message.
The administration of bolus doses is limited by the interval between doses (temporal limitation).
This limitation can be disabled by setting no,Lt .
Bolus doses cannot be administered during the interval period specified by the function.
Requesting a bolus dose during the limitation period will cause the display to show Er,t (temporal limitation between active bolus doses).
SECTION 11

53MAN 01/EN/01 CRONO PAR 06/13
FrEE FrEEWITHDRAWING THE PUSHER
• switch the pump off by pressing the button;
• press the and buttons simultaneously: the display shows End for 10 seconds, then the pusher starts to withdraw;• the withdrawal request can be cancelled during the 10 seconds when the display shows End by pressing the button.
2. Withdrawal of the pusher at the end of the infusionTen minutes before the end of the infusion, the device emits an intermittent acoustic signal that lasts for 2 seconds. This signal is repeated 5 minutes before the end of the infusion.
At the end of the infusion an acoustic signal is emitted and the display shows the End message.After a few seconds, the pusher starts withdrawing until it reaches the infusion start position.
SECTION 11
1. Withdrawal of the pusher before the end of the infusionThis function allows the interruption of an active infusion, withdrawing the pusher to the infusion start position. To stop an active infusion, proceed as follows:
• While the display shows End, the withdrawal function can be cancelled by pressing the button. The display shows StoP.
• The withdrawal function can be interrupted by pressing the button. The display then alternates between End and
OFF. While in this state, only the button is active. Press it to resume the withdrawal of the pusher.
NOTES

54MAN 01/EN/01 CRONO PAR 06/13
FrEE
Do not remove the reservoir until the pusher is withdrawn to the infusion start position.
WARNING
SWITCHING THE PUMP OFFPress the button to switch off the device and the display will show the StoP message. If the pump is switched off during an infusion, the device will emit a series of 10 short acoustic signals every 10 seconds, and the StoP message will flash on the display. To suppress the acoustic signals, press the button.
The pusher withdrawal time for a 20 ml volume is approximately 6 minutes and decreases proportionally for lower volumes.
SECTION 11
Pusher in motionWhile the pusher is in a continuous withdrawal motion, the display shows the "pusher continuous withdrawal" indication.
NOTE

55MAN 01/EN/01 CRONO PAR 06/13
AutoFrEESELECTED PUMP MODE: AUTO
SECTION 12
FACTORY SETTINGSThe pump is supplied with the following default settings:
Dose 0.15 ml
Interval between doses no,Lt
Flow rate 1 0.50 ml/h (F1) Flow rate 2 0.50 ml/h (F2)
Flow rate 3 0.50 ml/h (F3)
Flow rate over 24-hour period F2
Volume 20 cc
Number of administered bolus doses 0
Number of infusions 0
Access level (settings lock) L0
56MAN 01/EN/01 CRONO PAR 06/13
Auto
BUTTONS SELECTING THE PUMP MODE DISPLAY
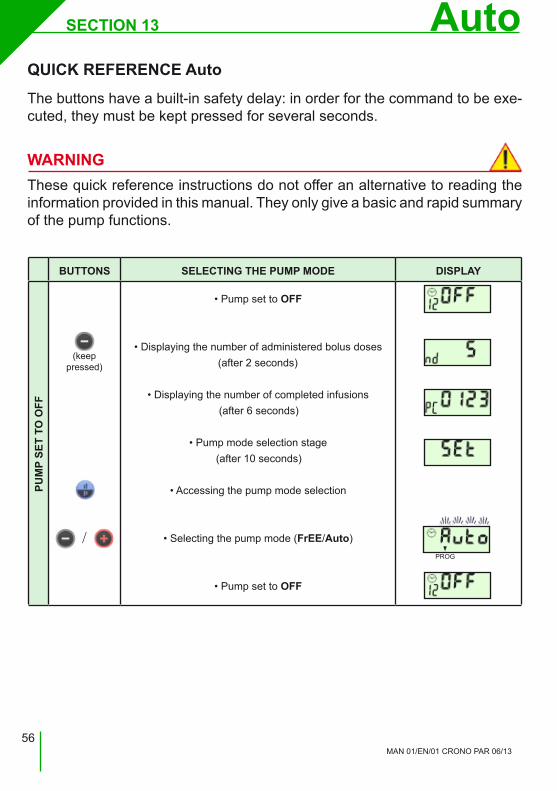
• Pump set to OFF
• Displaying the number of administered bolus doses
• Displaying the number of completed infusions
• Pump mode selection stage
• Accessing the pump mode selection
• Selecting the pump mode (FrEE/Auto)
• Pump set to OFF
PUM
P SE
T TO
OFF
SECTION 13
QUICK REFERENCE Auto
(keeppressed)
/PROG
The buttons have a built-in safety delay: in order for the command to be exe-cuted, they must be kept pressed for several seconds.
These quick reference instructions do not offer an alternative to reading the information provided in this manual. They only give a basic and rapid summary of the pump functions.
WARNING
(after 2 seconds)
(after 6 seconds)
(after 10 seconds)

57MAN 01/EN/01 CRONO PAR 06/13
AutoBUTTONS SETTINGS DISPLAY
PROG
PROG
PROG
PROG
PROG
PROG
PUM
P SE
T TO
OFF
• Pump set to OFF and L0
• Displaying the time
• Setting the minutes
• Setting the bolus dose volume (from 0.00 to 2.00 ml)
• Setting the interval between bolus doses
• Setting the F1 flow rate (0.05 to 5.00 ml/h)
• Setting the F2 flow rate (0.05 to 5.00 ml/h)
• Setting the F3 flow rate (0.05 to 5.00 ml/h)
• Assigning the flow rates over a 24-hour period
• Setting the partial volume (1 to 20 ml)
• Pump set to OFF (after about 20 seconds)
• Decrease/Increase the stored value/
SECTION 13
(from "no,Lt" to 24 hours)
and
PROGml/h
PROGml/h
PROGml/h
(see the SETTING THE PARTIAL VOLUME table)
(5 secs)Accessing the hour and minutes settings

58MAN 01/EN/01 CRONO PAR 06/13
AutoSECTION 13
BUTTONS SETTING THE PARTIAL VOLUME DISPLAY
• Setting the partial volume
• Decrease/Increase the partial volume
• Pump set to OFF
PUM
P SE
T TO
OFF PROG
PROG
BUTTONS SWITCHING ON / PRIMING DISPLAY
PUM
P SE
T TO
ON
• Dispense priming (1.5 ml available)
• Pump set to OFF
• Priming function
• Temporary switching between infusion time/flow
BUTTONS ADMINISTRATION OF BOLUS DOSE DISPLAY
• Pump set to ON
• Administration of bolus dose
• Pump set to ON
PUM
P O
N
/
(keeppressed)
• Start of infusion
• Switching the pump on
BUTTONS StoP DISPLAY
• Pump set to StoP
• Silence buzzer sound and flashing displayPUM
P O
N
• Pump set to OFF (priming dispensed; function still available - see pages 72/73 -)
• Positioning the pusher to partial volume
ml/h

59MAN 01/EN/01 CRONO PAR 06/13
AutoBUTTONS SETTINGS LOCK DISPLAY
• Pump set to OFF or StoP
• Displaying the number of administered bolus doses
• Displaying the number of completed infusions
• Access settings lock
• Settings lock/unlock selection
• Pump set to OFF or StoP
PUM
P SE
T TO
OFF
/Sto
P
PROG PROG
/
press withoutreleasing
SECTION 13
BUTTONS WITHDRAWAL OF THE PUSHER BEFORETHE END OF THE INFUSION DISPLAY
• Pump set to StoP
• Pump set to End
• Withdrawal of the pusher
• Pump set to OFF
PUM
P O
N +
BUTTONS END OF INFUSION DISPLAY
• Pump set to End
• Withdrawal of the pusher
• Pump set to OFF
(2 secs)
(5 secs)

60MAN 01/EN/01 CRONO PAR 06/13
AutoBUTTONS SCREENS DISPLAY
• Pump set to OFF and L1
• Setting the time see page 63
• Bolus dose
• Time interval between bolus doses
• F1 flow rate
• F2 flow rate
• F3 flow rate
• Flow rates over a 24-hour period
• Displaying the flow rates over a 24-hour period
• Partial volume
• Pump set to OFF
PUM
P SE
T TO
OFF
/Sto
P - L
1SECTION 14
ml/h
ml/h
ml/h

61MAN 01/EN/01 CRONO PAR 06/13
AutoPUMP SETTINGS SEQUENCE
Displaying/Setting the timeTo access the settings, press the button for about 4 seconds: the display will show the time.
Press the button for about 5 seconds to access the hour and minutes settings (see page 63).
Setting the minutesPress the button again to display and set the minutes (see page 63).
Setting the bolus dose volumePress the button again to display and set the bolus dose volume (see page 64).
Setting the interval between bolus dosesPress the button again to display and set the interval between the bolus doses (see page 65).
Setting the first flow rate (F1)Press the button again to display and set the first flow rate (see page 66).
Setting the second flow rate (F2)Press the button again to display and set the second flow rate (see page 67).
Setting the third flow rate (F3)Press the button again to display and set the third flow rate (see page 67).
SECTION 14
PROG
PROG
PROG
PROG
To change the settings the pump must:• be set to OFF or StoP;• have the settings lock off (i.e. set to L0).The parameter setting can be changed while the display is flashing using the
and buttons.
PROGml/h
PROGml/h
PROGml/h

62MAN 01/EN/01 CRONO PAR 06/13
AutoAssigning the 4 flow rates over a 24-hour periodPress the button again to display and assign the 4 flow rates over a 24-hour period (one of the values is the fixed F0 flow rate, set to 0.00 ml/h). Press the button to scroll the hours (the two digits left of the drop icon) and the button to select the different flow rates (second digit to the right of the drop icon) (see page 68).
Setting the partial volumePress the button again to display and set the partial volume. The partial volume can only be set if the pusher is at the infusion start position and the pump is set to OFF (see page 69).
• If the settings lock is on (set to L1 with the display showing the lock icon ), pressing the button will only allow the modification of the time but not the other parameters, which can, however, be displayed in sequence by pressing the button (see page 78).
• Press the button while the time is displayed to switch directly to the bolus dose settings.
• If no button is pressed for more than 5 seconds, the setting session is termi-nated and the pump returns to the OFF or StoP state.
NOTES
SECTION 14
PROG
PROG

63MAN 01/EN/01 CRONO PAR 06/13
AutoSETTING THE TIMEProceed as follows:1. with the pump set to either the OFF or StoP state, press the button for about 4 seconds: the display will show the time.
Press the button for about 5 seconds to access the hour and minutes settings.
2. press the button to increase the hour value; press the button to decrease it. Each change is confirmed by a
short acoustic signal;
3. if no button is pressed for 20 seconds, the settings session is terminated and the value shown on the display becomes steady, followed by the OFF or StoP indication;
4. press the button before the OFF or StoP is displayed (while the hour value is still flashing) to proceed to the settings for the minutes;
5. press the button to increase the minutes; press the button to decrease them. Each change is confirmed by
a short acoustic signal;
6. if no button is pressed for 20 seconds, the settings session is terminated and the value shown on the display becomes steady, followed by the OFF or StoP indication;
7. press the button before the OFF or StoP indication is displayed (while the minutes are still flashing) to proceed to the settings for the next parameter: SETTING THE BOLUS DOSE VOLUME.
SECTION 14
PROG
PROG
PROG
NOTEThe hours and minutes can be quickly changed by continuously pressing either the or button.

64MAN 01/EN/01 CRONO PAR 06/13
AutoSETTING THE BOLUS DOSE VOLUME
Proceed as follows:1. the letter d is shown on the secondary display and the volume of the bolus dose on the primary display. The numeric values are flashing but the d is steady;
2. press the button to increase the value; press the button to decrease it. Each change is confirmed by an
acoustic signal;
3. if no button is pressed for 20 seconds, the settings session is terminated and the OFF or StoP message is displayed;
4. press the button before the OFF or StoP indication is displayed (while the bolus dose volume is still flashing) to proceed to the settings for the next parameter: SETTING THE INTERVAL BETWEEN BOLUS DOSES.
• The bolus dose volume can be quickly changed by continuously pressing either the or button.• The bolus dose setting is automatically stored in the pump memory.• Press the button when the display indicates d0,02 to change the value to d0,00: this setting disables the bolus dose function.
NOTES
SECTION 14
PROG
PROG
If the bolus dose volume is set to 0.00 ml, pressing the button during the infusion will display the Er, d error message.
WARNING
The bolus dose volume can be set from 0.00 to 2.00 ml with 0.022 ml incre-ments.

65MAN 01/EN/01 CRONO PAR 06/13
AutoSETTING THE INTERVAL BETWEEN BOLUS DOSESThe interval between bolus doses can be set to a value between no,Lt (function disabled) and 24 hours, in the following ways:• from 5 minutes to 1 hour with 5 minute increments;• from 1 hour to 24 hours with 15 minute increments.This applies a temporal limit to the bolus dose function.
Proceed as follows:1. the bolus dose interval flashes on the display;
2. press the button to increase the value; press the button to decrease it. Each change is confirmed by an
acoustic signal;
3. if no button is pressed for 20 seconds, the settings session is terminated and the OFF or StoP message is displayed;
4. press the button before the OFF or StoP indication is displayed (while the bolus dose interval is still flashing) to proceed to the settings for the next parameter: SETTING THE FIRST FLOW RATE (F1).
• The interval between the bolus doses can be quickly changed by continuously pressing either the or button.
• The bolus dose interval setting is automatically stored in the pump memory.
• Press the button while the display shows it 5’ to switch to no,Lt: this setting disables the function that regulates the interval between bolus doses and thus disables any time restrictions on the administration of bolus doses.
NOTES
SECTION 14
PROG
PROG
PROG
PROGml/h
66MAN 01/EN/01 CRONO PAR 06/13
AutoSETTING THE FIRST FLOW RATE (F1)
Proceed as follows:1. the first flow rate value flashes on the display;
2. press the button to increase the value; press the button to decrease it. Each change is confirmed by an
acoustic signal;
3. if no button is pressed for 20 seconds, the settings session is terminated and the OFF or StoP message is displayed;
4. press the button before the OFF or StoP indication is displayed (while the F1 flow rate value is still flashing) to proceed to the settings for the next parameter: SETTING THE SECOND FLOW RATE (F2).
• The flow rate can be quickly changed by continuously pressing either the or button.
• Every flow rate setting is automatically stored in the pump memory.
NOTES
SECTION 14
The flow rate can be set from 0.05 to 5.00 ml/h as follows:• 0.05 ml/h to 1.00 ml/h with 0.01 ml/h increments;• 1.00 ml/h to 3.00 ml/h with 0.02 ml/h increments;• 3.00 ml/h to 5.00 ml/h with 0.05 ml/h increments.
PROGml/h
PROGml/h

67MAN 01/EN/01 CRONO PAR 06/13
AutoSETTING THE SECOND AND THIRD FLOW RATES (F2 AND F3)
The second and third flow rates are set in the same manner and within the same limits as the first.
After setting the third flow rate, press the button before the OFF or StoP indication is displayed (while the F3 hourly flow rate value is still flashing) to proceed to the settings for the next parameter: ASSIGNING THE FLOW RATES OVER A 24-HOUR PERIOD.
• The flow rate can be quickly changed by continuously pressing either the or button.
• The F0 flow, set to 0.00 ml/h, can be selected only when assigning the flow rates over a 24-hour period.
NOTES
SECTION 14
PROG
PROGml/h
PROGml/h

68MAN 01/EN/01 CRONO PAR 06/13
AutoASSIGNING THE FLOW RATES OVER A 24-HOUR PERIOD
Proceed as follows:1. the first two digits of the display show the hour (24-hour clock) while the last two show the selected flow rate for the corresponding time of the day. The first 3 digits are steady, while the numeric digit to the right of the F indicating the flow rate (0, 1, 2, 3), is flashing;
2. press the button to select the hour of the day, then press the button to set the required flow rate for the selected hour of the day. Each change is confirmed by an acoustic signal. Press the button again to switch to the next hour: press the button to set the required flow rate. Proceed in the same way to set the subsequent hourly flow rates;
3. if no button is pressed for 20 seconds, the settings session is terminated and the value shown on display becomes steady, followed by the OFF or StoP indication;
4. press the button before the OFF or StoP indication is displayed (while the hourly flow rate value is still flashing) to proceed to the settings for the next parameter: SETTING THE PARTIAL VOLUME.
If the F0 flow rate is set for any hour, during that hour no drug will be administered, as the flow rate will be 0.00 ml/h: the display shows the remaining time of the infusion, and pressing the button will temporarily display F0 with the value of 0.00 ml/h.
SECTION 14
NOTE
PROG
PROG
A different flow rate can be set for every hour of the day, chosen among the four available values (F0, F1, F2, F3).

69MAN 01/EN/01 CRONO PAR 06/13
AutoSETTING THE PARTIAL VOLUME
Proceed as follows:1. the display shows a flashing value for the volume, preceded by cc , which indicates the unit of volume(1 cc = 1 ml);
2. press the button to decrease the value, and the button to increase it. Each change is confirmed by an
acoustic signal;
3. once all settings are completed, if no button is pressed for 20 seconds the display will show P,cc;
4. the pump moves the pusher to the position corresponding to the set volume: during this operation an intermittent acoustic signal is emitted and the actual volume corresponding to the pusher position is shown in real time;
5. when the pusher is in the correct position the display shows OFF.
SECTION 14
PROG
PROG
The partial volume function is used when the therapy requires an infusion with less than 20 ml.
The partial volume can be set from 1 cc to 30 cc with 1 cc increments. To set this parameter, press the button again, while the previous parameter is flashing.The partial volume function can only be set before starting a new infusion, either a complete one (20 ml) or a partial one.

70MAN 01/EN/01 CRONO PAR 06/13
AutoNOTES
WARNINGS
SECTION 14
• This operation must not be carried out with the infusion set connected to the patient.
• A partial volume cannot be set while an infusion is in progress.
• The partial volume setting is stored in the pump memory even if the battery is removed.
• If the battery is removed when the pump is set to OFF, the partial volume is stored in the memory and the pusher is not withdrawn.
• If the battery is removed when the device is in the ON state, the pusher is mechanically reset and then returned to the infusion start position, according to the partial volume value stored in the memory.
• The partial volume setting is automatically stored in the pump memory.
• At the end of an infusion, the pusher retracts to the position corresponding to the partial volume setting.
• The partial volume function can be interrupted by pressing the button. The pump switches off (the display shows OFF or StoP) and if the pusher is advancing, it stops and keep its position as soon as the interruption is triggered: the partial volume setting is not stored and the previous stored value becomes active.However, if the pusher was withdrawing the display alternates between OFF and P,cc. The only possible operation is to continue the withdrawal of the pusher by pressing the button. The pusher withdraws to the position corresponding to the partial volume setting.
• When the device is set to StoP it is not possible to change the partial volume, and the pump displays Err.

71MAN 01/EN/01 CRONO PAR 06/13
Auto SECTION 14
SWITCHING THE PUMP ON
While in the OFF state, press the button. The pump will emit a short acoustic signal and display:
• Pr (priming function) There are three options: a. Postpone the priming; b. Cancel the priming; c. Perform the priming.
• Switching the pump on • After priming or switching the pump on when in the StoP state, the display shows the infusion time in hours or in hours and/or minutes or just minutes.
Press the button again, and the display shows the corresponding hourly flow rate value.
During the infusion, the time shown on the display is counted down:• hour by hour if the time shown on the display is expressed in hours, with a flashing letter h;
• minute by minute if the time shown on the display is expressed in hours and minutes or just minutes.
Before starting an infusion:• check that the reservoir is correctly connected;• Inspect the infusion line to ensure that no kinks, clamps or other occlusions are present along the line;• expel any air bubbles;• in case different hourly flow rates are used, check that the time is correctly set.
NOTES
WARNINGS
ml/h

72MAN 01/EN/01 CRONO PAR 06/13
AutoPRIMING THE INFUSION LINE
SECTION 14
The priming function is used to fill the infusion line with the drug contained in the reservoir.
The volume available for priming is 1.5 ml.
The priming function is enabled when the device is switched on and the pusher is in the infusion start position, regardless of whether the settings lock is on.
The priming procedure is as follows:
1. switch on the device as described in the relevant section;
2. the display shows the Pr indication. There are three op-tions:
a. Postpone the priming; b. Cancel the priming; c. Perform the priming.
a. Postpone the primingPress the and buttons simultaneously: the pump switches off and the display shows OFF. Alternatively, wait 10 seconds and the pump automatically switches off.
b. Cancel the primingPress the button; the pump starts the infusion and the display shows the time left to the end of the infusion, as well as the current flow rate.
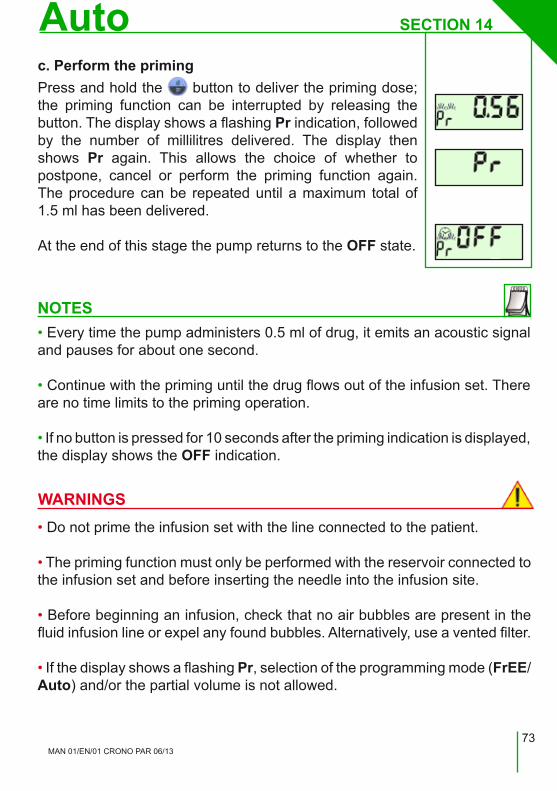
73MAN 01/EN/01 CRONO PAR 06/13
Auto SECTION 14
• Every time the pump administers 0.5 ml of drug, it emits an acoustic signal and pauses for about one second.
• Continue with the priming until the drug flows out of the infusion set. There are no time limits to the priming operation.
• If no button is pressed for 10 seconds after the priming indication is displayed, the display shows the OFF indication.
• Do not prime the infusion set with the line connected to the patient.
• The priming function must only be performed with the reservoir connected to the infusion set and before inserting the needle into the infusion site.
• Before beginning an infusion, check that no air bubbles are present in the fluid infusion line or expel any found bubbles. Alternatively, use a vented filter.
• If the display shows a flashing Pr, selection of the programming mode (FrEE/Auto) and/or the partial volume is not allowed.
NOTES
WARNINGS
c. Perform the primingPress and hold the button to deliver the priming dose; the priming function can be interrupted by releasing the button. The display shows a flashing Pr indication, followed by the number of millilitres delivered. The display then shows Pr again. This allows the choice of whether to postpone, cancel or perform the priming function again. The procedure can be repeated until a maximum total of 1.5 ml has been delivered.
At the end of this stage the pump returns to the OFF state.

74MAN 01/EN/01 CRONO PAR 06/13
AutoPUMP SWITCHED ONDuring the infusion the time indicated on the display is shown in hours (with a flashing letter h), or in hours and minutes with the flashing drop icon. If the infusion time left is less than 1 hour, the time is shown only in minutes with the flashing "Minute" indicator.
Press the button to temporarily switch the display between the delivery time and the programmed flow rate.
If the F0 flow is selected, the display shows F0 and 0,00. In this case the drug can only be administered by means of a bolus dose request.
1. Press the button; the pump emits an acoustic signal and starts the administration of the bolus dose, during which a flashing letter d is shown on the secondary display, while the volume of the bolus dose being administered is shown on the main display. The pump pauses for about 1 second every 0.11 ml of drug administered.
2. At the end of the bolus dose administration, the pump emits an acoustic signal and the display shows the time left to the end of the infusion or the F0,00 indication if a 0.00 ml/h flow rate is set.
BOLUS DOSE
SECTION 14
ml/h
The bolus is a supplementary dose of the drug that the patient can request when it is needed. If the bolus dose volume is set to 0.00 ml, the bolus dose cannot be administered.
Administration of bolus doseBolus doses can only be administered while the pump is in the ON state.
To administer a bolus dose, proceed as follows:
ml/h
ml/h

75MAN 01/EN/01 CRONO PAR 06/13
AutoThe bolus dose administration can be interrupted at any time by pressing the
button.
If the bolus dose volume is set to 0.00 ml, pressing the button will display the Er,d error message.
The administration of bolus doses is limited by the interval between doses (temporal limitation).This limitation can be disabled by setting no,Lt .Bolus doses cannot be administered during the interval period specified by the function.
Requesting a bolus dose during the limitation period will cause the display to show Er,t (temporal limitation between active bolus doses).
SECTION 14
NOTE
NOTEIf all the hourly flow rates are set to F0, the display shows F0,00 with a flashing F. Pressing the button temporarily displays F0 with 0.00 ml/h.
ml/h
RESTRICTIONS ON THE ADMINISTRATION OF BOLUS DOSES
DISPLAYING THE NUMBER OF ADMINISTERED BOLUS DOSES DURING AN INFUSION AND THE NUMBER OF INFUSIONS1 - To check the number of bolus doses administered by the patient during an infusion while the pump is in the OFF or StoP state, press and hold the button for a few seconds and the value will be displayed (nd = number of doses).
2 - To check the number of infusions delivered by the device (PC = partial counter) in the OFF or StoP state, press and hold the button for about 8 seconds.
ml/h

76MAN 01/EN/01 CRONO PAR 06/13
Auto
WITHDRAWING THE PUSHER
SECTION 14
To stop an active infusion, proceed as follows:
• switch the pump off by pressing the button;
• press the and buttons simultaneously: the display shows End for 10 seconds, then the pusher starts to withdraw;
• the withdrawal request can be cancelled during the 10 seconds when the display shows End by pressing the button.
2. Withdrawal of the pusher at the end of the infusionTen minutes before the end of the infusion, the device emits an intermittent acoustic signal that lasts for 2 seconds. This signal is repeated 5 minutes before the end of the infusion.
At the end of the infusion an acoustic signal is emitted and the display shows the End message.After a few seconds, the pusher starts withdrawing until it reaches the infusion start position.
• The number of the administered bolus doses is only available until the begin-ning of a new infusion; switching the pump on for a new infusion automatically resets the value.
• The number of bolus doses includes those delivered by pressing the button.
WARNINGS
1. Withdrawal of the pusher before the end of the infusionThis function allows the interruption of an active infusion, withdrawing the pusher to the infusion start position.

77MAN 01/EN/01 CRONO PAR 06/13
Auto SECTION 14
NOTES
• While the display shows End, the withdrawal function can be cancelled by pressing the button. The display shows StoP.
• The withdrawal function can be interrupted by pressing the button. The display then alternates between End and
OFF. While in this state, only the button is active. Press it to resume the withdrawal of the pusher.
Do not remove the reservoir until the pusher is withdrawn to the infusion start position.
WARNING
SWITCHING THE PUMP OFFPress the button to switch off the device and the display will show the StoP message. If the pump is switched off during an infusion, the device will emit a series of 10 short acoustic signals every 10 seconds, and the StoP message will flash on the display. To suppress the acoustic signals, press the button.
The pusher withdrawal time for a 20 ml volume is approximately 6 minutes and decreases proportionally for lower volumes.
Pusher in motionWhile the pusher is in a continuous withdrawal motion, the display shows the "pusher continuous withdrawal" indication.
NOTE

78MAN 01/EN/01 CRONO PAR 06/13
AutoDISPLAYING THE SETTINGSThis function displays the programmed pump settings.To display the pump settings, the pump must be set to OFF or StoP.
If the settings lock is set to L0 (off) the parameters flash, indicating that it is possible to change them. If the settings lock is set to L1 (on, with the lock icon shown on display) the parameters are steady and cannot be modified, except for the hour and minutes (see page 63).
SECTION 14
• When the settings lock is on (L1), the time settings can still be changed as follows:
1. press the button for about 1 second: the time is shown on the display;2. press the button. The hour value begins to flash and the hour and minute settings can be changed. This function can be used, for example, when moving to a different time zone.
• To display the flow rates assigned over a 24-hour period, press the button.
NOTES
Proceed as follows:1. press the button for about 4 seconds: the display will show the time.
2. press the button again to show the other settings in sequence: hour and minutes, bolus dose volume, interval between bolus doses, flow rates, flow rates over a 24-hour period, partial volume.
3. if no button is pressed for about 20 seconds, the settings session is terminated and the OFF or StoP message is displayed.

79MAN 01/EN/01 CRONO PAR 06/13
SECTION 15
For safety reasons, it is advisable to use original CRN® Crono® Réservoir reservoirs.
The use of any other type of reservoir could damage the pump and harm the patient.
CANè S.p.A. disclaims any liability if the device is used with a non-original reservoir different from that recommended.
WARNING
The Crono PAR pump uses dedicated 20 ml reservoirs , model CRN® CRO-NO® Syringe.
The reservoirs are: single-use, non-pyrogenic, usable only if the packaging is undamaged.
RESERVOIR PARTS
Reservoir body Pusher
Stem
Luer-Lock cap
Needle
Needle cover
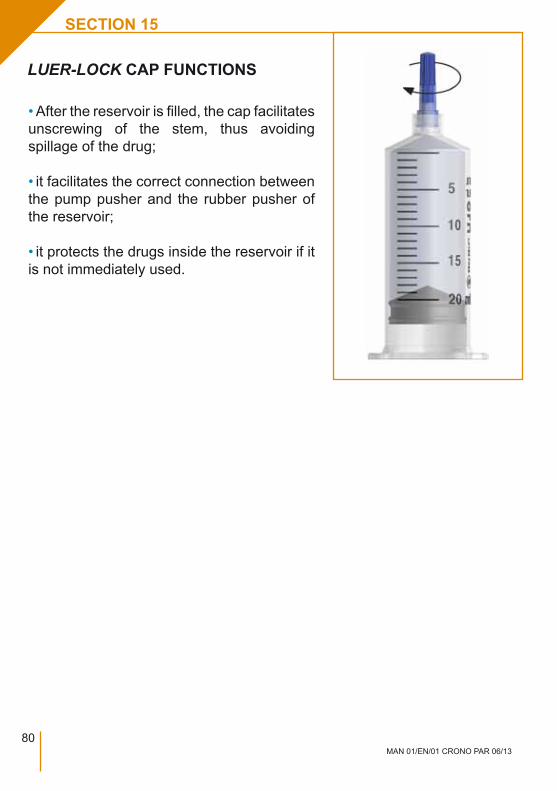
80MAN 01/EN/01 CRONO PAR 06/13
LUEr-LoCK CAP FUNCTIONS
• After the reservoir is filled, the cap facilitates unscrewing of the stem, thus avoiding spillage of the drug;
• it facilitates the correct connection between the pump pusher and the rubber pusher of the reservoir;
• it protects the drugs inside the reservoir if it is not immediately used.
SECTION 15

81MAN 01/EN/01 CRONO PAR 06/13
FILTRAJETFor a safe infusion it is advisable to use a filter in order to:
• prevent bacterial infections;• eliminate air from the reservoir and the infusion set;• capture micro-particles such as those from glass or plastic.
Male Luer-Lock cap
Female Luer-Lock connector Tube set @ 1 x 2.3 PVC-NO DOP
0.2 micron filter
Blue male Luer-Lock connector
Capsule
It is advisable to use an infusion set with the following characteristics:• internal volume of reduced tube (ideal 0.1 ml, maximum 0.62 ml);• tube length below 90 cm;• anti-kink tubing.
INFUSION SET
NOTEThe images show the NeriaTM, infusion set from Unomedical, a Convatec Company.
SECTION 15
Adhesive
Needle
Needle coverTube
Female Luer-Lock connector
INFUSION SET PARTS

82MAN 01/EN/01 CRONO PAR 06/13
PREPARING THE RESERVOIR1. Screw the needle clockwise into the reservoir and remove the needle co-ver;2. fill the reservoir, sucking the liquid slowly and checking that the quantity of drug does not exceed its capacity or any set partial volume;3. screw the Luer-Lock cap onto the reservoir (a), then unscrew the stem, rotating it counter-clockwise (b) with a fairly rapid movement;4. connect the reservoir to the pump; the rubber pusher will be fitted into the pusher. Rotate it clockwise by 90° until it clicks into secure position;5. attach the infusion set cone to the reservoir and close the protective wings.
1 42 5
a
b.
3
PREPARING THE RESERVOIR AND CONNECTING TO THE PUMP
SECTION 15

83MAN 01/EN/01 CRONO PAR 06/13
Connect the dedicated CRN reservoir to the pump and secure it by rotating it 90° clockwise until it clicks.
Front view of the pump without the protective reservoir wings
CONNECTING THE RESERVOIR TO THE PUMP
1
2
2 431
SECTION 15

84MAN 01/EN/01 CRONO PAR 06/13
1 - Before filling the reservoirUnscrew and screw back the pusher stem to facilitate its unscrewing after filling the reservoir.
2 - Filling the reservoirThe liquid must be sucked slowly.Do not fill the reservoir beyond the maximum level allowed of 20 ml.The stem must be unscrewed with a fairly rapid movement.
3 - Connecting the reservoir to the pumpTo avoid any drug leakage during the connection of the reservoir to the pump, the infusion set can be used as an alternative to the Luer- Lock cap indicated on page 80.
While connecting the reservoir to the pump, hold it as shown in the figure.
When connecting the two components, avoid exerting any pressure on the reservoir walls, because this could cause liquid to leak past the pusher rings.
While filling the reservoir and connecting it to the pump, some small leakage might occur between the first and second rings on the rubber pusher. This does compromises neither the correct operation of the reservoir nor the delivery of the liquid drug.
WARNING
SECTION 15

85MAN 01/EN/01 CRONO PAR 06/13
Before preparing for the infusion, it is advisable to observe the following precautions:
1. wash hands;
2. prepare a clean working environment.
OFF
MICROJ
ET CRO
NO
0.2 ml
d
h
min
PREPARING FOR THE INFUSION
WARNINGS
• Always work in antiseptic conditions to minimise the risk of infections.
• Note, apomorphine can stain clothes and objects.
FRONT BACK
INFUSION SITES
SECTION 15
The images below show the recommended infusion sites.It is advisable to change the infusion site after every infusion to avoid skin irritations.

86MAN 01/EN/01 CRONO PAR 06/13
The images refer to the NeriaTM infusion set from Unomedical, a Convatec Company.
Disinfect the infusion site following the instructions of the relevant medical personnel.Ensure that the area of the infusion site is dry before inserting the needle into the skin.
Connect the infusion set to the reservoir.
Hold the infusion set by the wings. Manually prime the infusion line or use the priming function of the pump (Auto). Ensure no air bubbles are present in the infusion line.
When priming the infusion line and preparing to insert the needle into the skin, hold the set with the needle pointing downwards to ensure that the drug does not come into contact with the protecting adhesive paper.
Remove the protective adhesive paper.
WARNING
SECTION 15

87MAN 01/EN/01 CRONO PAR 06/13
Before inserting the needle, carefully slide the needle cover off.
Be careful not to touch the NeriaTM needle when removing the cover.
It is important to lift a fold of skin, to reduce the risk of inserting the needle in a muscle. Pinch the skin with your fingers at the chosen infusion site before inserting the needle, then hold the protective wings of the infusion set with the other hand and insert the needle vertically.
Press firmly on the adhesive to fix it to the skin. Check the infusion site frequently to ensure that the needle remains in the correct position.
WARNING
SECTION 15
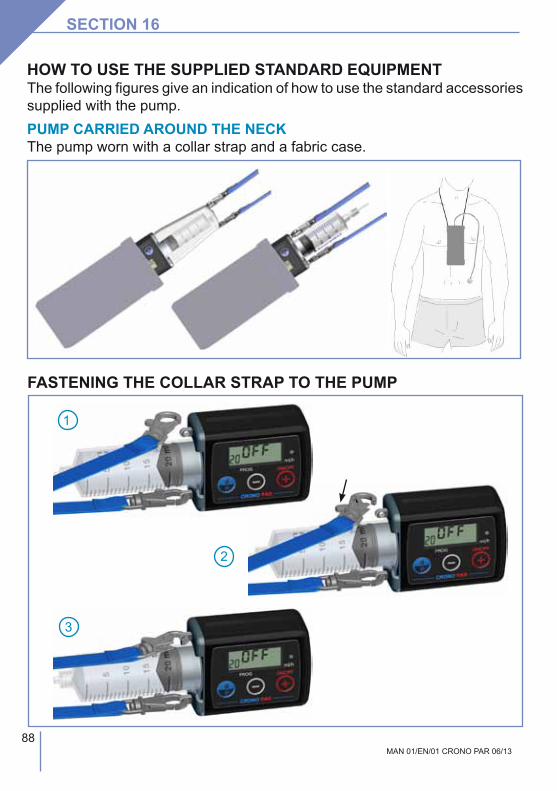
88MAN 01/EN/01 CRONO PAR 06/13
HOW TO USE THE SUPPLIED STANDARD EQUIPMENT
PUMP CARRIED AROUND THE NECKThe pump worn with a collar strap and a fabric case.
The following figures give an indication of how to use the standard accessories supplied with the pump.
SECTION 16
2
3
FASTENING THE COLLAR STRAP TO THE PUMP
1

89MAN 01/EN/01 CRONO PAR 06/13
PUMP WORN AT THE WAISTThe pump worn with an elastic belt and a fabric case.
SECTION 16
FASTENING THE COLLAR STRAP TO THE WINGS
1
2
3

90MAN 01/EN/01 CRONO PAR 06/13
GENERAL WARNINGS
The device can be damaged by ingress of liquids, hence it must not be kept on while in the bath or while showering, etc. If the device accidentally gets wet (for example due to drug drops or nocturnal enuresis), ensure it is checked by the CANè S.p.A. Service Centre.
The device must be kept away from:- sources of heat (radiators, stoves, heaters);- direct sunlight;- strong electromagnetic fields (magnets, loudspeakers, mobile devices), details are given in APPENDIX 6;- ionizing radiation;- ultrasound devices;- MRI devices.
The device does not need sterilising.
Do not freeze the CRN reservoir with the drug still contained in it.
The device must not be placed in a fridge or freezer.
The device must not be placed in an oven or microwave.
Reservoirs, infusion sets, needles, filters and all consumables must be dispo-sed of in an appropriate way, using specially designed containers.
Failure to observe the above warnings may cause device malfunction, with potentially serious consequences for the user.
SECTION 17

91MAN 01/EN/01 CRONO PAR 06/13
GENERAL WARNINGS
STORAGE
The technical features of the device make it extremely simple to maintain.
If the device is damaged, it is advisable to have it checked by the CANè S.p.A. Customer Support Service, before re-using it.
The external surfaces can be cleaned with a lightly dampened soft cloth, using a mild detergent or disinfectant.
• Do not immerse the pump in detergent solutions or water.• Avoid ingress on liquids into pump. If the device gets wet, immediately attempt to dry it with absorbent paper.• Do not clean the pump with acetone, solvents or abrasive detergents. • Do not sterilise the pump.
If the device is not used for periods of more than one or two months, it is advisable to remove the battery and store the pump in its case in a dry place at room temperature.
MANUAL UPDATESThe version and the date of publication of this User Guide are shown on every page. When a year has passed between the publication date (shown on page 3) and the use of the product, the doctor should contact CANè S.p.A. to determine if a more recent version of the manual has been published.
MAINTENANCE
SECTION 17

92MAN 01/EN/01 CRONO PAR 06/13
EXPECTED PUMP LIFE
DISPOSAL
The pump is expected to last for 4 (four) years from its purchase date. For safety reasons the use of pump must be discontinued after this period.
At the end of the expected pump life, contact CANè S.p.A. Customer Support Service to obtain the necessary instructions for the disposal of the device.
Reservoirs, infusion sets, needles, filters and all consumables must be disposed of in an appropriate way, using specially designed containers.
SUPPORT
The device must only be repaired by CANè S.p.A. Customer Support Service. It advisable, before sending the device, to contact:
• Servizio Assistenza Clienti (Customer Support Service) CANè S.p.A. Medical Technology Via Cuorgnè, 42/a 10098 Rivoli (Turin) - Italy Tel. +39.011.9574872 Fax +39.011.9598880 • CANè S.p.A. Online Website: www.canespa.it - E-mail: [email protected]
Service available Monday to Friday from 8.30 to 17.00.
SECTION 17

93MAN 01/EN/01 CRONO PAR 06/13
CANè S.p.A. guarantees that the product is free from any material or ma-nufacturing defects for a period of 2 (TWO) YEARS from the original date of purchase.
If any material or manufacturing defects are identified during the validity period of the guarantee, CANè S.p.A. will repair or substitute the defective components according to the terms and conditions herein, without any charge for labour or parts; the client shall bear the costs for the dispatch of the pump to the CANè S.p.A. Customer Support Service.
CANè S.p.A. reserves the right to change the features or the model of its devices, without being under any obligation to make corresponding modifications to devices already manufactured and sold.
Conditions:1. The guarantee is valid only if the defect is reported within the validity period.
2. This guarantee does not cover any costs and/or defects arising from modifications or adaptations made to the product without prior written authorisation by CANè S.p.A.CANè S.p.A. disclaims any liability either to the purchaser or to third parties for damages to persons or property as a result of improper operation or non-intended use of the device or due to non-compliance with the instructions provided in the User guide. The purchaser undertakes to relieve CANè S.p.A. from any claims by third parties with respect to the above.
3. This guarantee is not valid if the model or serial number of the product have been modified, erased, removed or have in any way been made illegible.
4. The following is not covered by the guarantee:• periodic maintenance interventions;• damage due to improper use, including but not limited to:- incorrect power supply;- use of the product for purposes other than those for which it is designed;- repairs performed by unauthorized personnel or by the Customer;• accidental and unintentional events, such as ingress of liquids and falls;• natural events and malicious or negligent actions;• the standard equipment supplied with the pump.
GUARANTEE
SECTION 17

94MAN 01/EN/01 CRONO PAR 06/13
5. CANè S.p.A. undertakes to perform repairs on the device for a period of not more than 4 (four) years from the date of purchase.
After this period, CANè S.p.A. has no further obligations to perform repairs. CANè S.p.A. disclaims any liability either to the purchaser or to third parties for damages to persons or property as a result of the use of the device after 4 (four) years from the date of purchase.
6. After the guarantee period is expired, support will be provided by CANè S.p.A. with the customer bearing the associated costs for replacement parts, labour and transport applicable at the moment of the request.
7. The company disclaims any liability with respect to the patient and/or third parties for any health problems and/or inconvenience resulting from the period when the device is being repaired.
8. The company disclaims any liability with respect to the patient and/or third parties for any problems and/or delays associated with the dispatch of the device.
SECTION 17

95MAN 01/EN/01 CRONO PAR 06/13
REGULATORY COMPLIANCE
0476The CANè S.p.A. company, with headquarters in Via Cuorgnè, 42/a 10098 Rivoli (Torino) - Italy, manufacturer of the medical electrical equipment Crono PAR ambulatory infusion pump with reservoir
Serial number
declares that the device is compliant with the essential requirements of the 93/42/EC Directive, Appendix I, amended by Directive 2007/47/EC, as per MED certificate 9813 issued by the Notifying Body no. 0476 according to Appendix II of the same Directive, and is marketed in compliance with the applicable laws of the single European Member States.
SECTION 17
Rivoli, 12/07/2012 The Chairman

96MAN 01/EN/01 CRONO PAR 06/13
APPENDICES

97MAN 01/EN/01 CRONO PAR 06/13
SYMBOLS PRINTED ON THE PUMP
Pump serial number
IP protection rating1st digit (4) = protection from solid objects larger than 1 mm.
2nd digit (2) = protection from water droplets sprayed at an angle up to 15º.
CE marking
Medical electrical equipmentType BF
Warning: read instructions before use
Separated waste collection of electrical and electronic equipment
In accordance with article 13 of Legislative Decree no. 151 of 25 July 2005 "Implementation of Directives 2002/95/EC, 2002/96/EC and 2003/108/EC concerning the restriction of the use of certain hazardous substances in electrical and electronic equipment,
as well as the disposal of waste."
SN
0476
The symbol of the crossed out waste bin on the product and its packaging indicates that at the end of its useful life, the product must be disposed of separately from other waste. Sorted waste disposal of products at the end of their life is organised and managed by the manufacturer. Users wishing to dispose of this device must therefore contact the manufacturer (or the appropriate local distributor) and follow the system devised to allow for the separate disposal of devices at the end of their life. A proper waste sorting system for the devices destined for recycling, treatment and environmentally compatible disposal helps reduce the potentially negative impact on the environment and health, and facilitates the re-use or recycling of the materials the device is made of. The illegal disposal of a product is punished by administrative penalties as provided in the applicable regulations.
Note: The symbol displayed on the product label is, for obvious size-related reasons, reduced and simplified with respect to the specifications in the reference standard CENELEC EN50419.
APPENDIX 1
IP 42

98MAN 01/EN/01 CRONO PAR 06/13
SYMBOLS PRINTED ON THE RESERVOIR BLISTER PACK
0123
i Read the instructions
CE marking
Recyclable
2PYROGEN
STERILE EO
PP
REF
LOT
NEEDLE
Single-use only
Non-pyrogenic
Keep dry
Keep away from sunlight
Expiry date
Sterilised with ethylene oxide
Polypropylene
Batch code
Reference number
Needle size
APPENDIX 1

99MAN 01/EN/01 CRONO PAR 06/13
APPENDIX 2
OPTIONAL ACCESSORIES AVAILABLE ON REQUEST1. Vertical leatherette case, similar to a mobile phone case.
Colours:
Dimensions: 16 x 5.5 x 4 cm
Weight: about 60 g
Item code:• CM/15/A case for pump without syringe protective wings• CM/28 case for pump with syringe protective wings
Detail of belt clip
Detail of opening system with hole to accommodate the infusion set

100MAN 01/EN/01 CRONO PAR 06/13
2. Horizontal leatherette case, similar to a spectacle case.
Colours:
Dimensions: 16 x 5.5 x 4 cm
Weight: about 50 g
Item code:
• CM/23/A case for pump without syringe protective wings
• CM/29 case for pump with syringe protective wings
Detail of belt clip
APPENDIX 2

101MAN 01/EN/01 CRONO PAR 06/13
3. Adjustable elastic belt with buckle.
1 2 3
Colour: blackDimensions: 110 cmWeight: about 50 gItem code: CM/31
APPENDIX 3

102MAN 01/EN/01 CRONO PAR 06/13
PRECISION TEST (TRUMPET CURVE)Tests have been conducted according to IEC 60601-2-24 standard, Medical electrical equipment, Part 2: Particular requirements for the safety of infusion pumps and controllers. The following graphs show the precision of the pump in the drug administration.
1.1 – Start-up flow rate• Flow rate setting: 1 ml/h.
APPENDIX 3
Elapsed time [min]
Flow
rate
[ml/h
]

103MAN 01/EN/01 CRONO PAR 06/13
1.2 - Flow rate error (trumpet curve)• Flow rate setting: 1 ml/h.
The actual precision level may differ from that indicated in this manual, depending on the type of accessories and extension tubes used for the drug administration line.
Legend:Ep(max.) = maximal percentage variations.Ep(min.) = minimal percentage variations.A(mean.) = mean percentage variations.
TRUMPET CURVE
APPENDIX 3
Flow
rate
err
or p
erce
ntag
e
Observation interval (min)

104MAN 01/EN/01 CRONO PAR 06/13
APPENDIX 4
PRESSURE LEVELS (PL)The Crono PAR pump allows the medical/paramedical and clinical engineering personnel, as well as the distributor, to set the occlusion pressure level (PL).
The device is provided with the occlusion pressure level set to PL2 (4 bar +/-2).
This level may be insufficient for the demands of the patient and/or for the technical specifications of the infusion line (e.g. the device signals constant occlusion conditions), or it may be too high (infusion line not designed for the set pressure value). In this case the pressure can be decreased by setting PL1 (2.5 bar +/- 1,5) or increased by setting PL3 (5.5 bar +/-2).
WARNINGS
• Information on the selection of the pressure level (PL) is available in the APPENDIX 10 "ACCESSING THE RESERVED SECTION", and must not be provided to the patient.
• Changing the occlusion pressure will vary the time needed to signal an occlusion and the post-occlusion bolus volume, as indicated in the enclosed tables.
LEVEL PRESSUREPL1 2.5 bar +/- 1.5.PL2 4 bar +/- 2.PL3 5.5 bar +/- 2.
NOTEPressure level summary table.

105MAN 01/EN/01 CRONO PAR 06/13
APPENDIX 2TIME NEEDED TO SIGNAL AN OCCLUSIONThe time needed to signal an occlusion is the interval between the beginning of the occlusion condition and its detection by the pump. This value depends on the flow rate, because the lower the flow rate, the longer will be the time needed by the pump to detect the occlusion condition. The values given herein refer to the time needed by the pump-reservoir as-sembly to signal the occlusion.
WARNINGS
APPENDIX 5
PL1Flow rate Time needed to signal an occlusion0.2 ml/h About 3 h 15 min1 ml/h About 40 minutes5 ml/h About 7 minutes
PL2Flow rate Time needed to signal an occlusion0.2 ml/h About 4 h 15 min1 ml/h About 50 minutes5 ml/h About 9 minutes
PL3Flow rate Time needed to signal an occlusion0.2 ml/h About 6 h 30 min1 ml/h About 1 h 5 min5 ml/h About 12 minutes
• The time needed to signal an occlusion is dependant on the flow rate, be-cause the lower the flow rate, the longer will be the time needed by the pump to activate the occlusion alarm.• The time needed to signal the occlusion can increase if there is air in the line, if you are using catheters, filters and extension tubes of other dimen-sions, or in an elastic material, or when the line from the pump is connected to other devices.• For patients who could suffer severe harm if there is an interruption in the administration of the drug by the pump, arrangements must be made for them to be under the strict supervision of a doctor who can take any immediate corrective action required.
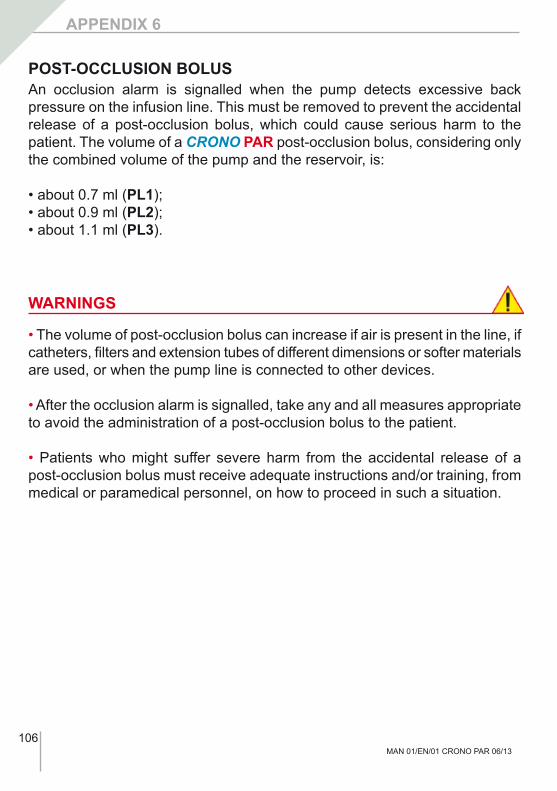
106MAN 01/EN/01 CRONO PAR 06/13
POST-OCCLUSION BOLUSAn occlusion alarm is signalled when the pump detects excessive back pressure on the infusion line. This must be removed to prevent the accidental release of a post-occlusion bolus, which could cause serious harm to the patient. The volume of a Crono PAR post-occlusion bolus, considering only the combined volume of the pump and the reservoir, is:
• about 0.7 ml (PL1);• about 0.9 ml (PL2);• about 1.1 ml (PL3).
• The volume of post-occlusion bolus can increase if air is present in the line, if catheters, filters and extension tubes of different dimensions or softer materials are used, or when the pump line is connected to other devices.
• After the occlusion alarm is signalled, take any and all measures appropriate to avoid the administration of a post-occlusion bolus to the patient.
• Patients who might suffer severe harm from the accidental release of a post-occlusion bolus must receive adequate instructions and/or training, from medical or paramedical personnel, on how to proceed in such a situation.
WARNINGS
APPENDIX 6

107MAN 01/EN/01 CRONO PAR 06/13
ELECTRO-MAGNETIC COMPATIBILITY
APPENDIX 7
Guide and declaration by the manufacturer - electromagnetic emissions
Crono PAR is designed to operate in the electromagnetic environment specified below. The client or user of the Crono PAR must ensure that it is operated in such an environment.
Emission test Compliance Electromagnetic environment - guide
CISPR 11 RF emissions Group 1
Crono PAR uses RF energy only for its internal operation. As a consequence, its RF emissions are very low and would thus not be expected to cause any interference to electronic devices in the vicinity.
CISPR 11 RF emissions Class B
Crono PAR is designed for use in all environments, including domestic environments and those environments directly linked to the low voltage mains supplying residential buildings.
IEC 61000-3-2 harmonic emissions N/A
IEC 61000-3-3 emissions in the event of voltage fluctuations or flicker
N/A
The electromagnetic compatibility tests were performed in compliance with the standards:• IEC 60601-2-24:2012, Medical electrical equipment, Part 2: Particular requirements for the safety of infusion pumps and controllers;• IEC EN 60601-1-2 Ed. 2, Medical electrical equipment, Part 1: General requirements for basic safety and essential performance – collateral standard: Electromagnetic compatibility – Requirements and tests.
Guide and declaration by the manufacturer - electromagnetic immunity
Crono PAR is designed to operate in the electromagnetic environment specified below. The client or user of the Crono PAR must ensure that it is operated in such an environment.
Immunity test IEC 60601 test level
Level of compliance Electromagnetic environment - guide
IEC 61000-4-2 electrostatic discharge
(ESD)
15 kV in air, 8 kV on contact
15 kV in air, 8 kV on
contactThe flooring material must be wood, concrete or ceramic. If the floor is covered in a synthetic material, the relative humidity must be at least 30%.Electromagnetic
field400 A/m
50 and 60 Hz
400 A/m50 and 60
Hz

108MAN 01/EN/01 CRONO PAR 06/13
APPENDIX 7
Guide and declaration by the manufacturer - electromagnetic immunity
Crono PAR is designed to operate in the electromagnetic environment specified below. The client or user of the Crono PAR must ensure that it is operated in such an environment.
Immunity test IEC 60601 test level Level of
complianceElectromagnetic
environment - guide
Radiated immunity
80-2500 MHz 10 V/m AM 80% 1 KHz 10 V/m
20-80 MHz 10 V/mAM 80% 1 KHz 10 V/m
Interference could occur in the vicinity of devices marked with the following symbol:
Recommended separation distance between mobile and portable radiocommunication devices and the Crono PAR
Crono PAR is designed to operate in an electromagnetic environment in which radiated RF disturbances are under control. The client or user of the Crono PAR can help prevent electromagnetic interference by ensuring a minimum distance between mobile and portable communication devices using RF (transmitters) and the Crono PAR as recommended below, depending on the maximum output power of the radio-communication devices.
Maximum specified output power of transmitter (W)
Separation distance at the transmitter frequency (m)
150 kHz to 80 MHz 80 MHz to 800 MHz
0.01 1.2 0.12
0.1 3.8 0.38
1 12 1.2
10 38 3.8
100 120 12

109MAN 01/EN/01 CRONO PAR 06/13
REFERENCE DIRECTIVES
• Council Directive 93/42/EEC: Medical devices.
• Legislative Decree no. 46, 24th February 1997. Implementation of Council Directive 93/42/EEC concerning medical devices.
• Directive 2007/47/EC of the European Parliament and of the Council: Amending Council Directive 90/385/EEC on the approximation of the laws of the Member States relating to active implantable medical devices, Council Directive 93/42/EEC concerning medical devices and Directive 98/8/EC con-cerning the placing of biocidal products on the market.
• Legislative Decree No. 37, 25 January 2010. Implementation of Directive 2007/47/EC.
APPENDIX 8

110MAN 01/EN/01 CRONO PAR 06/13
TECHNICAL STANDARDS
• IEC EN 60601-1:2007-05. Medical electrical equipment, Part 1: general requirements for basic safety and essential performance.
• IEC EN 60601-1/EC:2010-05. Medical electrical equipment, Part 1: general requirements for basic safety and essential performance.
• IEC EN 60601-1-1:2003-06. Medical electrical equipment, Part 1: general requirements for basic safety and essential performance – collateral standard: Safety requirements for electromedical systems.
• IEC EN 60601-1-2/A1:2006-10. Medical electrical equipment, Part 1: general requirements for basic safety and essential performance – collateral standard: Electromagnetic compatibility – Requirements and tests.
• IEC EN 60601-1-2:2010-01. Medical electrical equipment, Part 1: general requirements for basic safety and essential performance - collateral standard: Electromagnetic compatibility – Requirements and tests.
• IEC EN 60601-1-4:1997-08. Medical electrical equipment, Part 1: general requirements for basic safety and essential performance – 4. Collateral standard: Programmable electromedical systems.
• IEC EN 60601-1-4/A1: 2000-06. Medical electrical equipment, Part 1: general requirements for basic safety and essential performance – collateral standard: Programmable electromedical systems.
• IEC EN 60601-1-8:2009-11. Medical electrical equipment, Part 1: general requirements for basic safety and essential performance – collateral standard: Alarm systems - General requirements, tests and guidance for alarm systems in medical electrical equipment and electromedical systems.
• IEC EN 60601-1-11:2011-07. Medical electrical equipment, Part 1: General requirements for basic safety and essential performance - Collateral Standard: Requirements for medical electrical equipment and medical electrical systems used in the home healthcare environment.
APPENDIX 8

111MAN 01/EN/01 CRONO PAR 06/13
• IEC EN 60601-2-24:2012-10. Medical electrical equipment, Part 2: particular requirements for the safety of infusion pumps and controllers.
• IEC EN 60529: 1997-06. Degrees of protection provided by enclosures (IP Code).
• IEC 62-108: 2000-05. User guide to the maintenance of infusion pumps and control systems.
• IEC EN 62353:2008-11. Medical electrical equipment - recurrent checks and tests after repair of medical electrical equipment.
• IEC 62-122: 2002-07. User guide to acceptance testing and periodic maintenance of the safety and/or performance of medical devices powered by a specific power source.
• IEC 62-143: 2007-05. Table of correspondence between articles (clauses) in publication IEC 60601-1:2006 and those of its 1988 edition, and its subsequent modifications.
• IEC EN 62304:2006-10. Medical device software – Software life cycle processes.
APPENDIX 8

112MAN 01/EN/01 CRONO PAR 06/13
APPENDIX 9
SETTINGS

113MAN 01/EN/01 CRONO PAR 06/13
APPENDIX 10
ACCESSING RESERVED SECTIONThe pump also grants access to additional reserved functions, such as resetting the number of partial infusions, displaying the number of total infusions, displaying the firmware version, setting the occlusion pressure threshold, setting the date and time.
Procedure:1 - with the device set to OFF, press and hold the button for about 7 seconds, until the display subsequently shows the number of bolus doses administered (nd) during the last infusion, followed by the number of partial infusions (PC) delivered;
2 - press the button without releasing the button and the number of infusions starts to flash. Release both buttons and press the button again. The arrow indicating PROG is now displayed and the following options are available:
a) zero the partial infusion counter by pressing the or button, or,
b) continue programming or displaying the settings by pressing the button, as follows.
3 - Press the button again and the display will show the total number of infusions.
4 - Press the button again and the display will show the firmware version (release).
PROG

114MAN 01/EN/01 CRONO PAR 06/13
APPENDIX 10
5 - Press the button again to display the flashing occlusion pressure level: you can select one of the three available levels (PL1, PL2, PL3) by pressing buttons or .
6 - By pressing the button once more, it is possible to set the current time by changing the two flashing digits on the left of the drop icon.
Press the button again to set the two flashing digits on the right of the drop icon, that represent the minutes.
The hours and minutes can be set as desired by pressing the or buttons.
7 - By pressing the button once more, it is possible to set the date by changing the two flashing digits displayed on the left, which represent the day.
Press the again to set the two flashing digits on the right, that represent the month.
Press the button again to set the for flashing digits that represent the year.
The desired day, month and year can be set by pressing the or buttons.
8 - If no buttons are pressed for 20 seconds, the selected year (or any other previous parameter) becomes steady, the pump exits the reserved functions mode and the display shows the OFF/StoP indication.
PROG
PROG
PROG
PROG
PROG
PROG
NOTEThe hours and minutes can be quickly changed by continuously pressing either the or button.

115MAN 01/EN/01 CRONO PAR 06/13
APPENDIX 11
INFORMATION
For further information on the Crono PAR pump, contact:
Servizio Assistenza Clienti (Customer Support Service)CANè S.p.A. Medical TechnologyVia Cuorgnè, 42/a 10098 Rivoli (Turin) - ItalyTel. +39.011.9574872Fax +39.011.9598880Website: www.canespa.it E-mail: [email protected]
Service available Monday to Friday from 8.30 to 17.00.
NOTES

116MAN 01/EN/01 CRONO PAR 06/13