Embed Size (px)
Citation preview
Amazon ElastiCacheUser Guide
API Version 2015-02-02
Amazon ElastiCache: User GuideCopyright © 2015 Amazon Web Services, Inc. and/or its affiliates. All rights reserved.
AWS services or capabilities described in AWS Documentation may vary by region/location. Click Getting Started with Amazon AWSto see specific differences applicable to the China (Beijing) Region.
The following are trademarks of Amazon Web Services, Inc.: Amazon, Amazon Web Services Design, AWS, Amazon CloudFront,AWS CloudTrail, AWS CodeDeploy, Amazon Cognito, Amazon DevPay, DynamoDB, ElastiCache, Amazon EC2, Amazon ElasticCompute Cloud, Amazon Glacier, Amazon Kinesis, Kindle, Kindle Fire, AWS Marketplace Design, Mechanical Turk, Amazon Redshift,Amazon Route 53, Amazon S3, Amazon VPC, and Amazon WorkDocs. In addition, Amazon.com graphics, logos, page headers,button icons, scripts, and service names are trademarks, or trade dress of Amazon in the U.S. and/or other countries. Amazon'strademarks and trade dress may not be used in connection with any product or service that is not Amazon's, in any manner that islikely to cause confusion among customers, or in any manner that disparages or discredits Amazon.
All other trademarks not owned by Amazon are the property of their respective owners, who may or may not be affiliated with, connectedto, or sponsored by Amazon.
AWS services or capabilities described in AWS Documentation may vary by region/location. Click Getting Started with Amazon AWSto see specific differences applicable to the China (Beijing) Region.
Amazon ElastiCache User Guide
Table of ContentsWhat Is Amazon ElastiCache? ......................................................................................................... 1
Amazon ElastiCache Videos .................................................................................................... 2Introductory Videos ........................................................................................................ 2Advanced Videos .......................................................................................................... 2
Are You a First-Time ElastiCache User? .................................................................................... 3Data Model .......................................................................................................................... 4
Cache Nodes ................................................................................................................ 4Cache Cluster ............................................................................................................... 4Cache Parameter Groups ............................................................................................... 4Cache Replication Groups .............................................................................................. 4Security ....................................................................................................................... 5
Supported Operations ............................................................................................................ 5Cache Cluster Operations ............................................................................................... 5Cache Node Parameter Operations .................................................................................. 5Cache Replication Group Operations (Redis only) ............................................................... 6
Accessing Amazon ElastiCache ............................................................................................... 6Regions and Endpoints .................................................................................................. 6
Supported Regions ................................................................................................................ 6Getting Started with Amazon ElastiCache .......................................................................................... 8
Step 1: Before You Begin ........................................................................................................ 8Step 2: Launch a Cluster ........................................................................................................ 8
Step 2: Launch a Memcached Cluster ............................................................................... 9Step 2: Launch a Redis Cluster ...................................................................................... 12
Step 3: Authorize Access ...................................................................................................... 15You Launched Your Cluster into EC2-VPC ........................................................................ 16You Launched Your Cluster into EC2-Classic .................................................................... 17
Step 4: Connect to a Cluster Node .......................................................................................... 17Step 4: Connect to a Memcached Node ........................................................................... 18Step 4: Connect to a Redis Cluster ................................................................................. 19
Step 5: Delete Your Cache Cluster .......................................................................................... 21Where Do I Go From Here? ................................................................................................... 21
Best Practices for Implementing Amazon ElastiCache ........................................................................ 22Ensuring That You Have Sufficient Memory to Create a Redis Snapshot ........................................ 22
BGSAVE Process and Memory Usage ............................................................................ 22Avoiding Running Out of Memory When Executing BGSAVE ............................................... 23
Fault Tolerance: AOF or Multi-AZ? .......................................................................................... 24Enabling Redis AOF for Fault Tolerance ........................................................................... 24Enabling Redis Multi-AZ as a Better Approach to Fault Tolerance ......................................... 24
Configuring Your ElastiCache Client for Efficient Load Balancing .................................................. 24Consistent Hashing Using Java ...................................................................................... 25Consistent Hashing Using PHP ...................................................................................... 25Consistent Hashing Using .NET ..................................................................................... 25
ElastiCache Terminology and Concepts ........................................................................................... 26Nodes ................................................................................................................................ 26
Node Considerations for Memcached .............................................................................. 27Node Considerations for Redis ....................................................................................... 29Reserved Nodes .......................................................................................................... 29
Replication Groups and Read Replicas (Redis) ......................................................................... 30Primary Endpoint ......................................................................................................... 31Creating a Replication Group ......................................................................................... 31Adding a Redis Cache Cluster to a Replication Group ........................................................ 32
Multi-AZ with Redis Replication Groups ................................................................................... 32Notes on Multi-AZ with Redis Replication Groups .............................................................. 32Failure Scenarios and Multi-AZ Responses ...................................................................... 33Enabling Redis Multi-AZ ................................................................................................ 35
API Version 2015-02-02iii
Amazon ElastiCache User Guide

Backup and Restore for Redis Clusters .................................................................................... 38Constraints ................................................................................................................. 39Costs ......................................................................................................................... 39Automatic Snapshots ................................................................................................... 39Manual Snapshots ....................................................................................................... 39Performance Impact of Snapshots .................................................................................. 40Restoring From a Snapshot ........................................................................................... 40Deleting Snapshots ...................................................................................................... 41
Clusters ............................................................................................................................. 41Memcached Clusters .................................................................................................... 41Redis Clusters ............................................................................................................ 42
Regions and Availability Zones ............................................................................................... 43Locating Your Redis Read Replicas and Memcached Nodes ............................................... 43
Parameter Groups ............................................................................................................... 43Parameters for Memcached ........................................................................................... 44Parameters for Redis .................................................................................................... 48
Subnet Groups .................................................................................................................... 59Security Groups .................................................................................................................. 59ElastiCache and Amazon Virtual Private Cloud ......................................................................... 60
Overview of ElastiCache In an Amazon VPC .................................................................... 60Prerequisites .............................................................................................................. 62Routing and Security .................................................................................................... 62Amazon VPC Documentation ......................................................................................... 62
Cache Engine Version Management ........................................................................................ 63Maintenance Window ................................................................................................... 63
Using Cost Allocation Tags in ElastiCache ........................................................................................ 65Adding Tags to Your ElastiCache Resource .............................................................................. 66
ElastiCache Management Console ................................................................................. 66AWS CLI .................................................................................................................... 67ElastiCache API .......................................................................................................... 68
Listing the Tags for an ElastiCache Resource ........................................................................... 68ElastiCache Management Console ................................................................................. 69AWS CLI .................................................................................................................... 69ElastiCache API .......................................................................................................... 69
Modifying Tags on Your ElastiCache Resource .......................................................................... 70ElastiCache Console .................................................................................................... 70AWS CLI .................................................................................................................... 71ElastiCache API .......................................................................................................... 71
Removing Tags from Your ElastiCache Resource ....................................................................... 71ElastiCache Management Console ................................................................................. 72AWS CLI .................................................................................................................... 72ElastiCache API .......................................................................................................... 73
Copying Tags to Your ElastiCache Resources ........................................................................... 73CloudWatch Metrics with ElastiCache .............................................................................................. 74
Dimensions for ElastiCache Metrics ........................................................................................ 74Choosing Metric Statistics and Periods .................................................................................... 75Host-Level Metrics ............................................................................................................... 75Metrics for Memcached ......................................................................................................... 75Metrics for Redis ................................................................................................................. 78Which Metrics Should I Monitor? ............................................................................................ 79
Setting Up the ElastiCache Command Line Interface ......................................................................... 81Prerequisites ...................................................................................................................... 81
The Java Runtime Environment ...................................................................................... 81Getting the Command Line Tools ............................................................................................ 82Setting Up the Tools ............................................................................................................. 83Providing Credentials for the Tools .......................................................................................... 84Environmental Variables ........................................................................................................ 84
Managing ElastiCache .................................................................................................................. 86
API Version 2015-02-02iv
Amazon ElastiCache User Guide

Selecting a Cache Engine and Version .................................................................................... 87Memcached or Redis ................................................................................................... 87Memcached Versions ................................................................................................... 87Redis Versions ............................................................................................................ 88
Managing Clusters ............................................................................................................... 89Creating a Cluster ........................................................................................................ 89Adding or Removing Nodes ........................................................................................... 96Modifying a Cluster .................................................................................................... 104Managing Reserved Nodes .......................................................................................... 106Using Amazon SNS Notifications with ElastiCache ........................................................... 111Deleting a Cache Cluster ............................................................................................. 114
Managing Nodes ............................................................................................................... 116Node Auto Discovery (Memcached) .............................................................................. 116Actions You Can Take When a Node is Scheduled for Replacement .................................... 125
Managing Replication Groups .............................................................................................. 127Creating a Redis Replication Group .............................................................................. 127Adding a Read Replica To a Replication Group ............................................................... 133Promoting a Read Replica to the Primary Role ................................................................ 134Modifying an Existing Redis Replication Group ................................................................ 135Deleting a Read Replica .............................................................................................. 136Deleting a Replication Group ....................................................................................... 137
Managing Backup and Restore (Redis) .................................................................................. 139Enabling Automatic Snapshots on a New Cluster ............................................................. 139Enabling Automatic Snapshots for an Existing Cluster ...................................................... 143Enabling Automatic Snapshots for a Replication Group ..................................................... 144Creating a Manual Snapshot ........................................................................................ 146Displaying a List of Snapshots ...................................................................................... 148Copying a Snapshot ................................................................................................... 148Restoring a Snapshot to a New Cluster .......................................................................... 149Migrating Your Redis Cluster to ElastiCache .................................................................... 151Deleting Snapshots .................................................................................................... 153
Managing Cache Parameter Groups ...................................................................................... 155Creating a Cache Parameter Group .............................................................................. 155Listing Available Cache Parameter Groups ..................................................................... 157Viewing Parameter Values for a Cache Parameter Group .................................................. 158Modifying a Cache Parameter Group ............................................................................. 162
Using ElastiCache with Amazon Virtual Private Cloud (VPC) ..................................................... 164Creating a Virtual Private Cloud (VPC) ........................................................................... 164Creating a Cache Subnet Group ................................................................................... 166Creating a Cache Cluster in an Amazon VPC .................................................................. 167Connecting to a Cache Cluster Running in an Amazon VPC .............................................. 167
Managing Cache Subnet Groups .......................................................................................... 171Creating a Cache Subnet Group ................................................................................... 171Assigning a Cache Subnet Group to a Cache Cluster ....................................................... 172Modifying a Cache Subnet Group ................................................................................. 172Deleting a Cache Subnet Group ................................................................................... 174
Managing Cache Security Groups ......................................................................................... 175Creating a Cache Security Group ................................................................................. 175Listing Available Cache Security Groups ........................................................................ 176Viewing a Cache Security Group .................................................................................. 177Authorizing Network Access to an Amazon EC2 Security Group ......................................... 178
Viewing Cache Cluster and Cache Node Metrics ..................................................................... 180AWS Management Console ......................................................................................... 180CLI .......................................................................................................................... 180API .......................................................................................................................... 181
Viewing ElastiCache Events ................................................................................................. 182AWS Management Console ......................................................................................... 182CLI .......................................................................................................................... 182
API Version 2015-02-02v
Amazon ElastiCache User Guide
API .......................................................................................................................... 182Configuring ElastiCache Clients .................................................................................................... 184
Restricted Commands ........................................................................................................ 184Cache Node Endpoints and Port Numbers ............................................................................. 184
AWS Management Console ......................................................................................... 185CLI .......................................................................................................................... 185API .......................................................................................................................... 185Auto Discovery .......................................................................................................... 186
Connecting to Nodes in a Replication Group ........................................................................... 186AWS Management Console ......................................................................................... 186CLI .......................................................................................................................... 187API .......................................................................................................................... 187
DNS Names and Underlying IP ............................................................................................ 188Using the ElastiCache API ........................................................................................................... 189
Using the Query API ........................................................................................................... 189Query Parameters ...................................................................................................... 189Query Request Authentication ...................................................................................... 189
Available Libraries .............................................................................................................. 191Troubleshooting Applications ................................................................................................ 191
Retrieving Errors ........................................................................................................ 191Troubleshooting Tips ................................................................................................... 192
Event Notifications and Amazon SNS ............................................................................................ 193Logging Amazon ElastiCache API Calls Using AWS CloudTrail .......................................................... 196
ElastiCache Information in CloudTrail .................................................................................... 196Understanding ElastiCache Log File Entries ........................................................................... 197
Controlling ElastiCache Access with IAM ....................................................................................... 200About IAM ........................................................................................................................ 200ElastiCache Security Groups and IAM ................................................................................... 201ElastiCache Resources and IAM ........................................................................................... 201ElastiCache Actions and IAM ............................................................................................... 201
Example Action Patterns ............................................................................................. 202ElastiCache Keys ............................................................................................................... 202Example Policies for ElastiCache .......................................................................................... 203Failure to Retrieve Account Attributes ................................................................................... 204
Installing ElastiCache Cluster Clients ............................................................................................. 206Installing the ElastiCache Cluster Client for PHP ..................................................................... 206
Downloading the Installation Package ............................................................................ 206Installation Steps for New Users ................................................................................... 207For Users Who Already Have php-memcached Extension Installed ..................................... 210Removing the PHP Cluster Client ................................................................................. 210
Installing the ElastiCache Cluster Client for .NET ..................................................................... 210Installing .NET ........................................................................................................... 210Download the ElastiCache .NET Cluster Client for ElastiCache .......................................... 210Install AWS Assemblies with NuGet .............................................................................. 211
Document History ...................................................................................................................... 212AWS Glossary ........................................................................................................................... 216
API Version 2015-02-02vi
Amazon ElastiCache User Guide
What Is Amazon ElastiCache?
Welcome to the Amazon ElastiCache User Guide. ElastiCache is a web service that makes it easy to setup, manage, and scale a distributed in-memory cache environment in the cloud. It provides ahigh-performance, resizable, and cost-effective caching solution, while removing the complexity associatedwith deploying and managing a distributed cache environment.
With ElastiCache, you can quickly deploy your cache environment, without having to provision hardwareor install software.You can choose from Memcached or Redis protocol-compliant cache engine software,and let ElastiCache perform software upgrades and patch management for you automatically. For enhancedsecurity, ElastiCache runs in the Amazon Virtual Private Cloud (Amazon VPC) environment, giving youcomplete control over network access to your cache cluster.With just a few clicks in the AWS ManagementConsole, you can add resources to your ElastiCache environment, such as additional nodes or readreplicas, to meet your business needs and application requirements.
Existing applications that use Memcached or Redis can use ElastiCache with almost no modification;your applications simply need to know the host names and port numbers of the ElastiCache nodes thatyou have deployed.The ElastiCache Auto Discovery feature lets your applications identify all of the nodesin a cache cluster and connect to them, rather than having to maintain a list of available host names andport numbers; in this way, your applications are effectively insulated from changes to cache nodemembership.
ElastiCache has multiple features to enhance reliability for critical production deployments, such asautomatic detection of and recovery from cache node failures. ElastiCache also works together with otherAmazon Web Services (such as Amazon EC2, CloudWatch, and Amazon SNS) to provide a secure,high-performance and managed in-memory caching solution.
Topics
• Amazon ElastiCache Videos (p. 2)
• Are You a First-Time ElastiCache User? (p. 3)
• Data Model (p. 4)
• Supported Operations (p. 5)
• Accessing Amazon ElastiCache (p. 6)
• Supported Regions (p. 6)
API Version 2015-02-021
Amazon ElastiCache User Guide
Amazon ElastiCache VideosThis section contains videos to help you learn basic and advanced Amazon ElastiCache concepts. Forinformation about AWS Training, visit AWS Training & Certification.
Topics
• Introductory Videos (p. 2)
• Advanced Videos (p. 2)
Introductory VideosFor introductory videos about Amazon ElastiCache, see the following.
Topics
• Introduction to Amazon ElastiCache (p. 2)
• DAT207—Accelerating Application Performance with Amazon ElastiCache (AWS re:Invent2013) (p. 2)
Introduction to Amazon ElastiCacheIn this video, learn about key Amazon ElastiCache concepts. See a demo of creating and launching anAmazon ElastiCache cluster in the Amazon cloud, and then go practice with a free lab at Qwik Labs.
Introduction to Amazon ElastiCache.
DAT207—Accelerating Application Performance with AmazonElastiCache (AWS re:Invent 2013)In this video, learn how you can use Amazon ElastiCache to easily deploy a Memcached- orRedis-compatible in-memory caching system to speed up your application performance. We show youhow to use Amazon ElastiCache to improve your application latency and reduce the load on your databaseservers. We'll also show you how to build a caching layer that is easy to manage and scale as yourapplication grows. During this session, we go over various scenarios and use cases that can benefit byenabling caching, and discuss the features provided by Amazon ElastiCache.
DAT207 - Accelerating Application Performance with Amazon ElastiCache (re:Invent 2013)
Advanced VideosFor advanced videos about Amazon ElastiCache, see the following.
Topics
• DAT307—Deep Dive into Amazon ElastiCache Architecture and Design Patterns (re:Invent2013) (p. 3)
• SDD402—Amazon ElastiCache Deep Dive (re:Invent 2014) (p. 3)
API Version 2015-02-022
Amazon ElastiCache User GuideAmazon ElastiCache Videos
DAT307—Deep Dive into Amazon ElastiCache Architectureand Design Patterns (re:Invent 2013)In this video, we examine caching, caching strategies, scaling out, monitoring, and compare the Memcachedand Redis engines. During this session, we review best practices and design patterns related to AmazonElastiCache.
DAT307 - Deep Dive into Amazon ElastiCache Architecture and Design Patterns (AWS re:Invent 2013).
SDD402—Amazon ElastiCache Deep Dive (re:Invent 2014)In this video, we examine common caching use cases, the Memcached and Redis engines, patterns thathelp you determine which engine is better for your needs, consistent hashing, and more as means tobuilding fast, scalable applications. Frenk Wiebe, Principal Scientist at Adobe, details how Adobe usesAmazon ElastiCache to improve customer experience and scale their business.
DAT402—Amazon ElastiCache Deep Dive (re:Invent 2014)
Are You a First-Time ElastiCache User?If you are a first-time user of ElastiCache, we recommend that you begin by reading the following sections:
• Service Highlights and Pricing – The product detail page provides a general product overview ofElastiCache, service highlights, and pricing.
• Getting Started – The Getting Started with Amazon ElastiCache (p. 8) section includes an examplethat walks you through the process of creating a cache cluster, authorizing access to the cache cluster,connecting to a cache node, and deleting the cache cluster.
After you complete the Getting Started section, you can read these sections to learn more aboutElastiCache administration:
• ElastiCache Terminology and Concepts (p. 26)
This section explains the components of a cache cluster, including cache nodes, cache engines,replication groups, and cache cluster security.
• Creating a Cluster (p. 89)
This section provides instructions and examples for creating and maintaining cache clusters.You canperform these tasks from either the AWS Management Console or the ElastiCache command lineinterface (CLI).
If you want to use the ElastiCache CLI, these materials can help you get started:
• Setting Up the ElastiCache Command Line Interface (p. 81)
This section provides information on downloading the ElastiCache CLI, getting the CLI working on yoursystem, and providing your AWS credentials.
• Amazon ElastiCache Command Line Reference
This is a separate document with all of the ElastiCache CLI commands, including syntax and examples.
You can write application programs to leverage the ElastiCache API, using a variety of popular programminglanguages. Here are some resources:
API Version 2015-02-023
Amazon ElastiCache User GuideAre You a First-Time ElastiCache User?
• Tools for Amazon Web Services
Amazon Web Services provides a number of software development kits (SDKs) with support forElastiCache.You can code against ElastiCache using Java, .NET, PHP, Ruby, and other languages.These SDKs can greatly simplify your application development by formatting your requests toElastiCache, parsing responses, and providing retry logic and error handling.
• Using the ElastiCache API (p. 189)
If you don't want to use the AWS SDKs, you can interact with ElastiCache directly using the Query API.This section provides troubleshooting tips and information on creating and authenticating requests andhandling responses.
• Amazon ElastiCache API Reference
This is a separate document with all of the ElastiCache API operations, including syntax and examples.
Data ModelThe Amazon ElastiCache data model concepts include cache nodes, cache clusters, security configuration,and replication groups. The ElastiCache data model also includes resources for event notification andperformance monitoring; these resources complement the core concepts.
Cache NodesA cache node is the smallest building block of an ElastiCache deployment. Each node has its own memory,storage and processor resources, and runs a dedicated instance of cache engine software — eitherMemcached or Redis. ElastiCache provides a number of different cache node configurations for you tochoose from, depending on your needs.You can use these cache nodes on an on-demand basis, or takeadvantage of reserved cache nodes at significant cost savings.
Cache ClusterA cache cluster is a collection of one or more cache nodes, each of which runs its own instance ofsupported cache engine software.You can launch a new cache cluster with a single ElastiCache operation(CreateCacheCluster), specifying the number of cache nodes you want and the runtime parametersfor the cache engine software on all of the nodes. Each node in a cache cluster has the same compute,storage and memory specifications, and they all run the same cache engine software (Memcached orRedis).The ElastiCache API lets you control cluster-wide attributes, such as the number of cache nodes,security settings, version upgrades, and system maintenance windows.
Cache Parameter GroupsCache parameter groups are an easy way to manage runtime settings for supported cache enginesoftware. Both Memcached and Redis have many parameters to control memory usage, cache evictionpolicies, item sizes, and more; a cache parameter group is a named collection of Memcached- orRedis-specific parameters that you can apply to a cache cluster, thereby guaranteeing that all of thenodes in that cluster are configured in exactly the same way.
Cache Replication GroupsIf you are running a single-node Redis cache cluster, you can create a replication group for that cluster,and then add one or more read replicas. A replication group consists of one primary cache cluster forhandling read-write traffic, plus additional cache clusters that act as read-only replicas of the primary.ElastiCache ensures that the read replicas are continually synchronized with the primary and, in the event
API Version 2015-02-024
Amazon ElastiCache User GuideData Model

of a primary cache node failure, rebuilds the primary using data from one of the surviving read replicas.In this way, replication groups allow you to scale your read-only traffic, while guarding against data losscaused by hardware failure.
SecurityFor enhanced security, ElastiCache cache node access is restricted to applications running on "whitelisted"Amazon EC2 instances.You can control the Amazon EC2 instances that can access your cache clusterby using cache subnet groups and cache security groups.
By default, all new ElastiCache cache clusters are launched in an Amazon Virtual Private Cloud (AmazonVPC) environment.You can use cache subnet groups to grant cache cluster access from Amazon EC2instances running on specific subnets. If you choose to run your cache cluster outside of Amazon VPC,you can create cache security groups to authorize Amazon EC2 instances running within specific AmazonEC2 security groups.
Supported OperationsTo work with caching infrastructure components, ElastiCache offers a set of operations that you caninvoke from the AWS Management Console, the ElastiCache command line interface (CLI), or theElastiCache application programming interface (API).
Cache Cluster OperationsElastiCache provides operations to create, modify, and delete cache clusters.You can use theCreateCacheCluster operation to launch a new cache cluster, specifying the number and type of cachenodes, the cache engine software to use (Memcached or Redis), and other configuration parameters.Once the cache cluster is launched, you can use the DescribeCacheClusters operation to viewinformation about the cluster, including the host names and port numbers of the cache nodes; yourapplication can then connect to the cache nodes and begin using the cache.
While your cache cluster is running, you can use the ModifyCacheCluster operation to add or removecache nodes, modify the cache engine parameters, or change the security settings for all nodes in thecluster. If you decide that you no longer need the cache cluster, you can use the DeleteCacheClusteroperation to shut down all of the cache nodes and release all of the other resources associated with thecluster.
For more information, see Managing Clusters (p. 89)
For information on migrating your existing Redis cache clusters to ElastiCache, see Migrating Your RedisCluster to ElastiCache (p. 151)
Cache Node Parameter OperationsThe supported cache engines in ElastiCache provide several runtime parameters, which you can use tofine-tune your cache cluster's performance. The CreateCacheParameterGroup operation lets youcreate a "template" set of parameters that are compatible with the cache engine that you are using(Memcached or Redis).You can the use the ModifyCacheCluster operation to apply the parametersto all of the cache nodes; you can do so immediately, or wait for the next system maintenance windowfor your cache cluster.
For more information, see Managing Cache Parameter Groups (p. 155)
API Version 2015-02-025
Amazon ElastiCache User GuideSecurity

Cache Replication Group Operations (Redis only)If you have a single-node cache cluster running the Redis cache engine, you can define that cluster asthe primary node in a replication group.The API call CreateReplicationGroup creates a new replicationgroup, with your Redis cache cluster as the primary.To add read replicas, use the CreateCacheClusterAPI call to create additional single-node cache clusters, running in your new replication group. From thatpoint on, the read replicas will remain synchronized with the primary; your applications can performread-only operations on the replicas, and read-write operations on the primary. See Managing ReplicationGroups (p. 127) for more information on creating and adding Redis cache clusters to a replication groupusing the CLI or AWS console.
If you no longer need the replication group, you can use DeleteReplicationGroup to delete it. Thispowerful operation removes the cache nodes, cache clusters, and all of the other resources used by thereplication group.
For more information, see Managing Replication Groups (p. 127)
Accessing Amazon ElastiCacheThe AWS Management Console is the easiest way to manage Amazon ElastiCache. The console letsyou create cache clusters, add and remove cache nodes, and perform other administrative tasks withouthaving to write any code. The console also provides cache node performance graphs from CloudWatch,showing cache engine activity, memory and CPU utilization, and other metrics. For more information, goto the AWS Management Console.
You can also use the ElastiCache command line interface (CLI). The CLI makes it easy to performone-at-a-time operations, such as starting or stopping your cache cluster.You can also invoke ElastiCacheCLI commands from a scripting language of your choice, letting you automate repeating tasks. For moreinformation about the CLI, see Setting Up the ElastiCache Command Line Interface (p. 81).
If you want to access ElastiCache from an application, you can use one of the AWS software developmentkits (SDKs). The SDKs wrap the ElastiCache API calls, and insulate your application from the low-leveldetails of the ElastiCache API.You provide your credentials, and the SDK libraries take care ofauthentication and request signing. For more information about using the AWS SDKs, see Tools forAmazon Web Services.
You can also write application code directly against the ElastiCache web service API. When using theAPI, you must write the necessary code to construct and authenticate your HTTP requests, parse theresults from ElastiCache, and handle any errors. For more information about the API, see Using theElastiCache API (p. 189).
Regions and EndpointsBy default, the AWS SDKs and console for ElastiCache reference the US West (Oregon) region. AsElastiCache expands availability to new regions, new endpoints for these regions are also available touse in your own HTTP requests, the AWS SDKs, and the console. For a current list of supported regionsand endpoints, see Regions and Endpoints.
Supported RegionsAmazon ElastiCache is available in multiple regions so that you launch ElastiCache clusters in locationsthat meet your requirements, such as launching in the region closest to your customers or to meet certainlegal requirements.
API Version 2015-02-026
Amazon ElastiCache User GuideCache Replication Group Operations (Redis only)

Each region is designed to be completely isolated from the other regions. This achieves the greatestpossible fault tolerance.
Regions where ElastiCache is supported
Region NameRegion Code
Asia Pacific (Tokyo) regionap-northeast-1
Asia Pacific (Singapore) regionap-southeast-1
Asia Pacific (Sydney) regionap-southeast-2
China (Beijing) regioncn-north-1
EU (Frankfurt) regioneu-central-1
EU (Ireland) regioneu-west-1
AWS GovCloud (US) region
For information on using AWS GovCloud (US) withElastiCache, see Services in the AWS GovCloud(US) region: ElastiCache.
us-gov-west-1
South America (Sao Paulo)sa-east-1
US East (N. Virginia)us-east-1
US West (N. California)us-west-1
US West (Oregon)us-west-2
For a table of AWS products and services by region, see Products and Services by Region.
API Version 2015-02-027
Amazon ElastiCache User GuideSupported Regions
Getting Started with AmazonElastiCache
Topics
• Step 1: Before You Begin (p. 8)
• Step 2: Launch a Cluster (p. 8)
• Step 3: Authorize Access (p. 15)
• Step 4: Connect to a Cluster Node (p. 17)
• Step 5: Delete Your Cache Cluster (p. 21)
• Where Do I Go From Here? (p. 21)
Step 1: Before You BeginTo use ElastiCache, you need an AWS account. If you don't already have one, you'll be prompted tocreate one when you sign up.You're not charged for any AWS services that you sign up for unless youuse them.
To sign up for ElastiCache
1. Open http://www.amazonaws.cn/, and then click Sign Up.
2. Follow the on-screen instructions.
Part of the sign-up procedure involves receiving a phone call and entering a PIN using the phonekeypad.
Step 2: Launch a ClusterAfter you have signed up for ElastiCache, you can launch a cluster.
Amazon ElastiCache supports two engines, Redis and Memcached. To determine which engine will bestsuit your needs, go to Selecting a Cache Engine and Version (p. 87) in this guide.
API Version 2015-02-028
Amazon ElastiCache User GuideStep 1: Before You Begin

For more information on the Redis engine, see http://redis.io. For more information on the Memcachedengine, see http://memcached.org/.
The cluster you're about to launch will be live, and not running in a sandbox.You will incur the standardElastiCache usage fees for the instance until you delete it. The total charges will be minimal (typicallyless than a dollar) if you complete the exercise described here in one sitting and delete your cluster whenyou are finished. For more information about ElastiCache usage rates, go to http://aws.amazon.com/elasticache/.
The details in creating an ElastiCache cluster differ depending upon the engine and some options youchoose. In general, the steps are as follows:
1. Select the engine: Redis or Memcached.
2. Specify cluster details on the Cluster Details page.
3. Specify advanced settings on the Configure Advanced Settings page.
4. Review your selections and launch.
5. (Optional) Delete your cluster.
Topics
• Step 2: Launch a Memcached Cluster (p. 9)
• Step 2: Launch a Redis Cluster (p. 12)
Step 2: Launch a Memcached ClusterWhen you use the Memcached engine, Amazon ElastiCache supports horizontally partitioning your dataover multiple nodes. Memcached enables auto discovery so you don't need to keep track of the endpointsfor each node. Memcached tracks each node's endpoint, updating the endpoint list as nodes are addedand removed. All your application needs to interact with the cluster is the configuration endpoint. Formore information on auto discovery, see Node Auto Discovery (Memcached) (p. 116).
To create a new Memcached cluster, do the following:
Prerequisites1. Sign in to the AWS Management Console and open the Amazon ElastiCache console at https://
console.aws.amazon.com/elasticache/.
2. On the ElastiCache console dashboard, click Launch Cache Cluster to start the Launch CacheCluster wizard.
Step 1: Select the Memcached EngineBefore you proceed, be sure you have completed the Prerequisites section.
To select your cluster's engine:
1.On the Select Engine screen, click the Memcached tab.
2. Click Next.
Step 2: Specify Cluster DetailsBefore you proceed, be sure you have completed Step 1: Select the Memcached Engine.
API Version 2015-02-029
Amazon ElastiCache User GuideStep 2: Launch a Memcached Cluster

To configure your cluster's specifications and details:
1. In the Cluster Specifications section of the Cluster Details page, specify settings as shown following:
a. Engine: Memcached
b. Engine Version: From the list, select the version of the cache engine to run for this cluster.Unless you have a specific reason not to, we recommend you select the latest engine version.
c. Port: Type a new port number for your cluster, or leave it at its default value. For Memcached,the default port is 11211.
d. Parameter Group: From the list, select a parameter group for this cluster. Parameter groupscontrol the run-time parameters of your cluster. For more information on parameter groups, seeParameters for Memcached (p. 44).
2. In the Configuration section of the Specify Cluster Details page, specify settings as shown following:
a. Cluster Name: Type a meaningful name for this cluster.
Cluster name constraints are as follows:
• A name must contain from 1 to 20 alphanumeric characters or hyphens.
• The first character must be a letter.
• A name cannot end with a hyphen or contain two consecutive hyphens.
b. Node Type: From the list, select the node type you want to use for this cluster. For informationon node types, see Parameters for Memcached (p. 44).
c. Number of Nodes: Type in the number of nodes you want launched for this cluster. ForMemcached, you may have from 1 to 20 nodes in a cluster. If you want to use the MemcachedFlexible Zone Placement functionality, type a value between 2 and 20.You incur a charge foreach node.
3. Click Next.
Step 3: Configure Advanced SettingsBefore you proceed, be sure you have completed Step 2: Specify Cluster Details.
To configure your cluster's advanced settings:
1. In the Network & Security section of the Configure Advanced Settings page, specify settings asshown following:
a. Cache Subnet Group: From the dropdown list, select the subnet group you want this clusterassociated with.
• To launch this cluster in a VPC (recommended), select a VPC subnet group.
• To launch this cluster outside a VPC, click Not in VPC. The cluster will be launched in theAWS public cloud.
b. Availability Zones: From the drop down list, select how you want the availability zones for thenodes in this cluster determined.
API Version 2015-02-0210
Amazon ElastiCache User GuideStep 2: Launch a Memcached Cluster
• No Preference: ElastiCache will select the availability zone for your cluster's nodes. All nodesare launched in the same availability zone.
• Spread Nodes Across Zones: ElastiCache will select the availability zones for your cluster'snodes. The nodes will be distributed as evenly as practical across the availability zones thatsupport your node type.
• Specify Zones:The console expands to list all the availability zones in your region that supportthis cluster's node-type. Behind each zone is a text box. Type in the number of nodes youwant launched in that availability zone.
NoteThe total of the values you type into these text boxes must equal then number ofnodes you specified in the previous screen.
c. Cache Security Groups or VPC Security Groups: Select the security groups for this cluster.
If you selected a VPC, the list is of VPC security groups. If you select Not in VPC, the list is ofcache security groups.
For more information about Amazon VPC security groups, see http://docs.aws.amazon.com/AmazonVPC/latest/UserGuide/VPC_SecurityGroups.html.
For more information about ElastiCache security groups, see Security (p. 5) and ManagingCache Security Groups (p. 175).
2. In the Maintenance section of the Configure Advanced Settings page, specify settings as shownfollowing:
a. Maintenance Window: Select how you want the maintenance window selected.
• Select Window: Specify the day of the week to start maintenance, the UTC time to startmaintenance, and the duration in hours of the maintenance window.
• No Preference: ElastiCache selects the maintenance window. This setting is the default.
We recommend specifying a maintenance window so that downtime for maintenance will havethe least impact upon your business.
b. Topic for SNS Notification: From the list, select an existing Amazon Simple Notification Service(Amazon SNS) topic, or click Manual ARN input and type in the topic Amazon Resource Name(ARN). Amazon SNS allows you to push notifications to Internet-connected smart devices. Thedefault is to disable notifications. For more information, see http://aws.amazon.com/sns/.
3. Click Next.
Step 4: Review and LaunchBefore you continue, be sure you have completed Step 3: Configure Advanced Settings.
To review your settings and launch your cluster
1. Review all your settings to ensure each value is what you want.
2. If you need to make changes, click Previous to return to previous screens and make your changes;otherwise, click Launch Cache Cluster or Launch Replication Group to launch your cluster orreplication group.
3. To return to the Cache Clusters screen, click Close on the Success screen.
API Version 2015-02-0211
Amazon ElastiCache User GuideStep 2: Launch a Memcached Cluster
Your cluster will have the status creating while it is being created. When the status changes to available,it's ready for use.
NoteAs soon as your cluster becomes available, you're billed for each hour or partial hour that thecluster is active, even if you're not using it.
Step 5: Delete the Cluster (Optional)
To delete a cluster
As soon as the cluster status changes to deleted, you stop incurring charges for that cluster.
1. Sign in to the AWS Management Console and open the Amazon ElastiCache console at https://console.aws.amazon.com/elasticache/.
2. In the ElastiCache console dashboard, click Cache Clusters.
3. In the list of clusters, to select the cluster to delete, click the box to the left of the cluster's name.When selected, the box will have a colored center.
You can only delete one cluster at a time from the ElastiCache console. Selecting multiple clustersdisables the Delete button.
4. Click the Delete button.
The status of the cluster will change to deleting.
While this cluster is deleting, you can delete other clusters by repeating steps 1 through 4.
Step 2: Launch a Redis ClusterElastiCache supports replication when you use the Redis engine. To monitor the latency between whendata is written to a Redis read/write primary cluster and when it is propagated to a read-only secondarycluster, ElastiCache adds to the cluster a special key, ElastiCacheMasterReplicationTimestamp,which is the current Universal Coordinated Time (UTC) time. Because a Redis cluster might be addedto a replication group at a later time, this key is included in all Redis clusters, even if initially they are notmembers of a replication group. For more information on replication groups, see Replication Groups andRead Replicas (Redis) (p. 30).
To create a Redis cluster, do the following:
Prerequisites1. Sign in to the AWS Management Console and open the Amazon ElastiCache console at https://
console.aws.amazon.com/elasticache/.
2. On the ElastiCache console dashboard, click Launch Cache Cluster to start the Launch CacheCluster wizard.
Step 1: Select the Redis EngineBefore you proceed, be sure you have completed the Prerequisites section.
To select your cluster's engine:
1.On the Select Engine screen, click the Redis tab.
2. Click Next.
API Version 2015-02-0212
Amazon ElastiCache User GuideStep 2: Launch a Redis Cluster

Step 2: Specify Cluster DetailsBefore you proceed, be sure you have completed Step 1: Select the Redis Engine.
To configure your cluster's specifications and details:
1. In the Cluster Specifications section of the Specify Cluster Details page, specify settings as shownfollowing:
a. Engine: Redis
b. Engine Version: From the list, select the version of the cache engine to run for this cluster.Unless you have a specific reason not to, we recommend you select the latest engine version.
c. Cache Port: Type a new port number for your cluster, or leave it at its default value. For Redis,the default port is 6379.
d. Parameter Group: From the list, select a parameter group for this cluster. Parameter groupscontrol the run-time parameters of your cluster. For more information on parameter groups, seeNode Type-Specific Parameters for Redis (p. 57).
e. Enable Replication: To create a single Redis cluster, uncheck this check box.
To create a Redis replication group, see Creating a Redis Multiple Cluster ReplicationGroup (p. 127)
2. In the Configuration section of the Specify Cluster Details page, specify settings as shown following:
a. Cluster Name: Type a meaningful name for this cluster.
Cluster name constraints are as follows:
• A name must contain from 1 to 20 alphanumeric characters or hyphens.
• The first character must be a letter.
• A name cannot end with a hyphen or contain two consecutive hyphens.
b. Node Type: From the list, select the node type you want to use for this cluster. For informationon node types, see Node Type-Specific Parameters for Redis (p. 57) .
c. S3 Location of Redis RDB file: Amazon S3 location of the .rdb file used to seed this cluster.If this is left blank, this cluster will not be seeded upon creation. For more information on snapshotsand seeding a Redis cluster, see Backup and Restore for Redis Clusters (p. 38) and MigratingYour Redis Cluster to ElastiCache (p. 151).
3. Click Next.
Step 3: Configure Advanced SettingsBefore you proceed, be sure you have completed Step 2: Specify Cluster Details.
To configure your cluster's advanced settings:
1. In the Network & Security section of the Configure Advanced Settings page, specify settings asshown following:
a. Cache Subnet Group: From the dropdown list, select the subnet group you want this clusterassociated with.
API Version 2015-02-0213
Amazon ElastiCache User GuideStep 2: Launch a Redis Cluster
• To launch this cluster in a VPC (recommended), select a VPC subnet group.
• To launch this cluster outside a VPC, click Not in VPC. The cluster will be launched in theAWS public cloud.
b. Availability Zones: From the drop down list, select the availability zone for this cluster.
To have ElastiCache select the zone for you, select No Preference.
c. Cache Security Groups or VPC Security Groups: Select the security groups for this cluster.
If you selected a VPC, the list is of VPC security groups. If you select Not in VPC, the list is ofcache security groups.
For more information about Amazon VPC security groups, see http://docs.aws.amazon.com/AmazonVPC/latest/UserGuide/VPC_SecurityGroups.html.
For more information about ElastiCache security groups, see Security (p. 5) and ManagingCache Security Groups (p. 175).
2. In the Backup section of the Configure Advanced Settings page, specify settings as shownfollowing:
• Enable Automatic Backups: To schedule regular automatic backups of your cluster, check thischeck box.
• Unchecked: Default. Leaving this unchecked means that ElastiCache will not schedule automaticbackups of this cluster. If you want a backup, you must create a manual backup. For moreinformation, see Creating a Manual Snapshot (p. 146).
• Checked: Checking this checkbox causes ElastiCache to schedule regular automatic backupsof this cluster.You can also perform manual backups if you so choose.
When this checked box is checked, the console expands so you can specify the number of daysa backup is to be retained before deleting, and, optionally, specify when you want the automaticbackups scheduled. If you do not specify the schedule, automatic backups are created on aschedule set by ElastiCache.
3. In the Maintenance section of the Configure Advanced Settings page, specify settings as shownfollowing:
a. Maintenance Window: Select how you want the maintenance window selected.
• Select Window: The screen expands so you can, specify the day of the week to startmaintenance, the UTC time to start maintenance, and the duration in hours of the maintenancewindow.
• No Preference: ElastiCache selects the maintenance window. This setting is the default.
We recommend specifying a maintenance window so that downtime for maintenance will havethe least impact upon your business.
b. Topic for SNS Notification: From the list, select an existing Amazon Simple Notification Service(Amazon SNS) topic, or click Manual ARN input and type in the topic Amazon Resource Name(ARN). Amazon SNS allows you to push notifications to Internet-connected smart devices. Thedefault is to disable notifications. For more information, see http://aws.amazon.com/sns/.
4. Click Next.
API Version 2015-02-0214
Amazon ElastiCache User GuideStep 2: Launch a Redis Cluster
Step 4: Review and LaunchBefore you continue, be sure you have completed Step 3: Configure Advanced Settings.
To review your settings and launch your cluster
1. Review all your settings to ensure each value is what you want.
2. If you need to make changes, click Previous to return to previous screens and make your changes;otherwise, click Launch Cache Cluster or Launch Replication Group to create your cluster orreplication group.
3. To return to the Cache Clusters screen, click Close on the Success screen.
Your cluster will have the status creating while it is being created. When the status changes to available,it's ready for use.
NoteAs soon as your cluster becomes available, you're billed for each hour or partial hour that thecluster is active, even if you're not using it.
Step 5: Delete the Cluster (Optional)
To delete a cluster
As soon as the cluster status changes to deleted, you stop incurring charges for that cluster.
1. Sign in to the AWS Management Console and open the Amazon ElastiCache console at https://console.aws.amazon.com/elasticache/.
2. In the ElastiCache console dashboard, click Cache Clusters.
3. In the list of clusters, to select the cluster to delete, click the box to the left of the cluster's name.When selected, the box will have a colored center.
You can only delete one cluster at a time from the ElastiCache console. Selecting multiple clustersdisables the Delete button.
4. Click the Delete button.
The status of the cluster will change to deleting.
While this cluster is deleting, you can delete other clusters by repeating steps 1 through 4.
For information on creating Redis replication groups, see Creating a Redis Multiple Cluster ReplicationGroup (p. 127)
Step 3: Authorize AccessThis section assumes that you are familiar with launching and connecting to Amazon EC2 instances. Formore information, go to the Amazon EC2 Getting Started Guide.
All ElastiCache clusters can only be accessed from an Amazon EC2 instance. A cluster and its relatedAmazon EC2 instance must be in the same Amazon Virtual Private Cloud (VPC). If you must access anElastiCache cluster from somewhere other than an Amazon EC2 instance in the same VPC, as aworkaround you can set up one or more Amazon EC2 hosts inside the cache's VPC to act as a proxy forthe outside world. Setting up a host adds an extra network hop or extra Secure Sockets Layer (SSL)overhead and cost, or both. However, those costs are small for many use cases.You must grant theproxy Amazon EC2 instance access to your cluster.
API Version 2015-02-0215
Amazon ElastiCache User GuideStep 3: Authorize Access
By default, network access to your cluster is limited to the user account that was used to launch it. Beforeyou can connect to a cluster from an Amazon EC2 instance, you must authorize the Amazon EC2 instanceto access the cluster.The steps required depend upon whether you launched your cluster into an AmazonVPC environment.
Before you continue, determine whether you launched your cluster into EC2-VPC or EC2-Classic.
To determine whether you launched your cluster into EC2-VPC or EC2-Classic using theAWS Management Console
1. Sign in to the AWS Management Console and open the Amazon EC2 console at https://console.amazonaws.cn/ec2/.
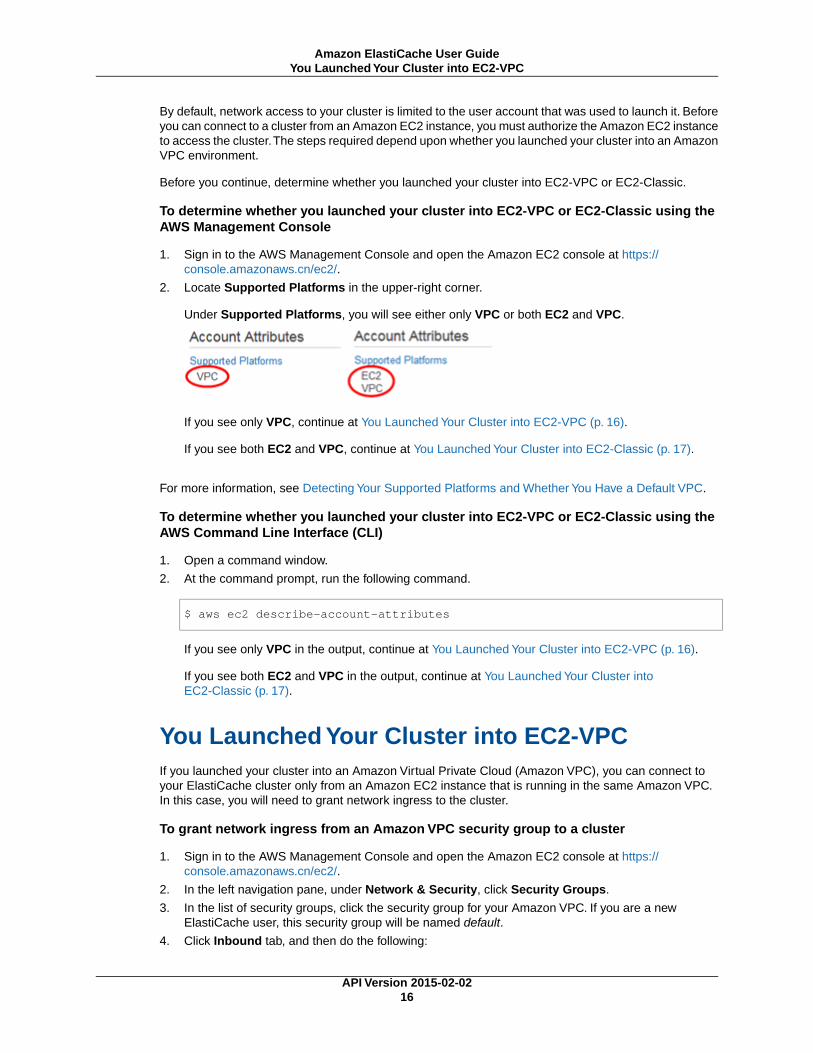
2. Locate Supported Platforms in the upper-right corner.
Under Supported Platforms, you will see either only VPC or both EC2 and VPC.
If you see only VPC, continue at You Launched Your Cluster into EC2-VPC (p. 16).
If you see both EC2 and VPC, continue at You Launched Your Cluster into EC2-Classic (p. 17).
For more information, see Detecting Your Supported Platforms and Whether You Have a Default VPC.
To determine whether you launched your cluster into EC2-VPC or EC2-Classic using theAWS Command Line Interface (CLI)
1. Open a command window.
2. At the command prompt, run the following command.
$ aws ec2 describe-account-attributes
If you see only VPC in the output, continue at You Launched Your Cluster into EC2-VPC (p. 16).
If you see both EC2 and VPC in the output, continue at You Launched Your Cluster intoEC2-Classic (p. 17).
You Launched Your Cluster into EC2-VPCIf you launched your cluster into an Amazon Virtual Private Cloud (Amazon VPC), you can connect toyour ElastiCache cluster only from an Amazon EC2 instance that is running in the same Amazon VPC.In this case, you will need to grant network ingress to the cluster.
To grant network ingress from an Amazon VPC security group to a cluster
1. Sign in to the AWS Management Console and open the Amazon EC2 console at https://console.amazonaws.cn/ec2/.
2. In the left navigation pane, under Network & Security, click Security Groups.
3. In the list of security groups, click the security group for your Amazon VPC. If you are a newElastiCache user, this security group will be named default.
4. Click Inbound tab, and then do the following:
API Version 2015-02-0216
Amazon ElastiCache User GuideYou Launched Your Cluster into EC2-VPC
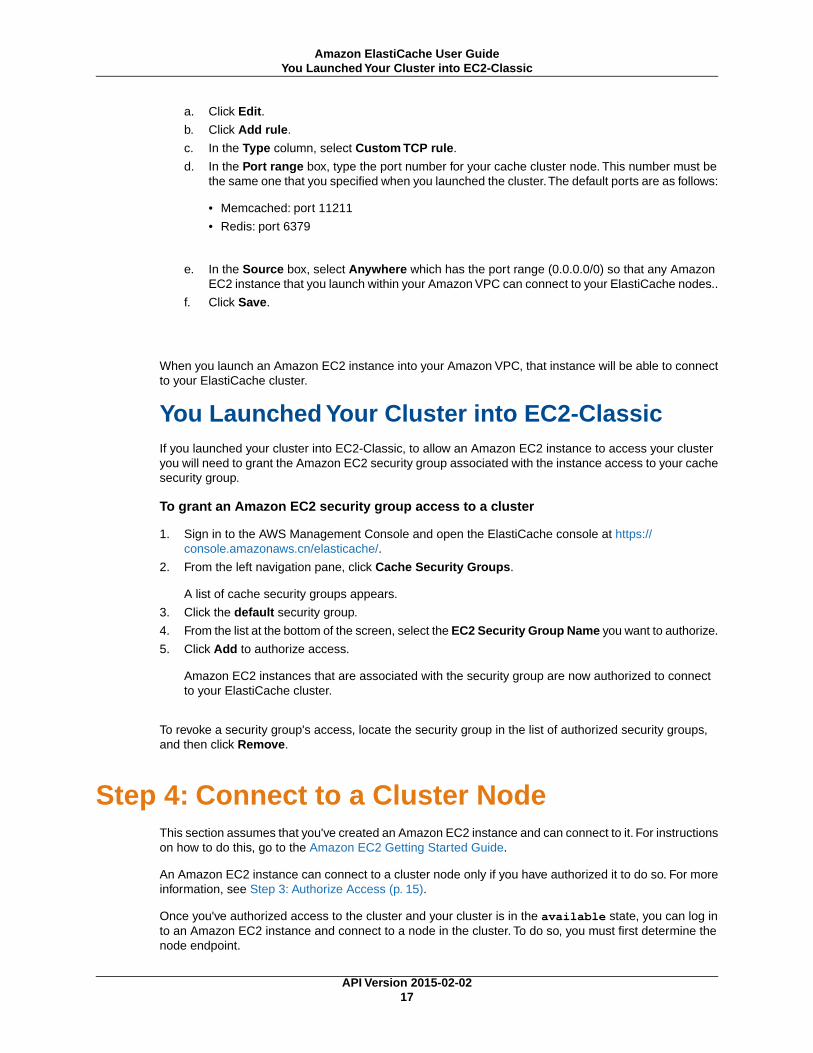
a. Click Edit.
b. Click Add rule.
c. In the Type column, select Custom TCP rule.
d. In the Port range box, type the port number for your cache cluster node. This number must bethe same one that you specified when you launched the cluster.The default ports are as follows:
• Memcached: port 11211
• Redis: port 6379
e. In the Source box, select Anywhere which has the port range (0.0.0.0/0) so that any AmazonEC2 instance that you launch within your Amazon VPC can connect to your ElastiCache nodes..
f. Click Save.
When you launch an Amazon EC2 instance into your Amazon VPC, that instance will be able to connectto your ElastiCache cluster.
You Launched Your Cluster into EC2-ClassicIf you launched your cluster into EC2-Classic, to allow an Amazon EC2 instance to access your clusteryou will need to grant the Amazon EC2 security group associated with the instance access to your cachesecurity group.
To grant an Amazon EC2 security group access to a cluster
1. Sign in to the AWS Management Console and open the ElastiCache console at https://console.amazonaws.cn/elasticache/.
2. From the left navigation pane, click Cache Security Groups.
A list of cache security groups appears.
3. Click the default security group.
4. From the list at the bottom of the screen, select the EC2 Security Group Name you want to authorize.
5. Click Add to authorize access.
Amazon EC2 instances that are associated with the security group are now authorized to connectto your ElastiCache cluster.
To revoke a security group's access, locate the security group in the list of authorized security groups,and then click Remove.
Step 4: Connect to a Cluster NodeThis section assumes that you've created an Amazon EC2 instance and can connect to it. For instructionson how to do this, go to the Amazon EC2 Getting Started Guide.
An Amazon EC2 instance can connect to a cluster node only if you have authorized it to do so. For moreinformation, see Step 3: Authorize Access (p. 15).
Once you've authorized access to the cluster and your cluster is in the available state, you can log into an Amazon EC2 instance and connect to a node in the cluster. To do so, you must first determine thenode endpoint.
API Version 2015-02-0217
Amazon ElastiCache User GuideYou Launched Your Cluster into EC2-Classic
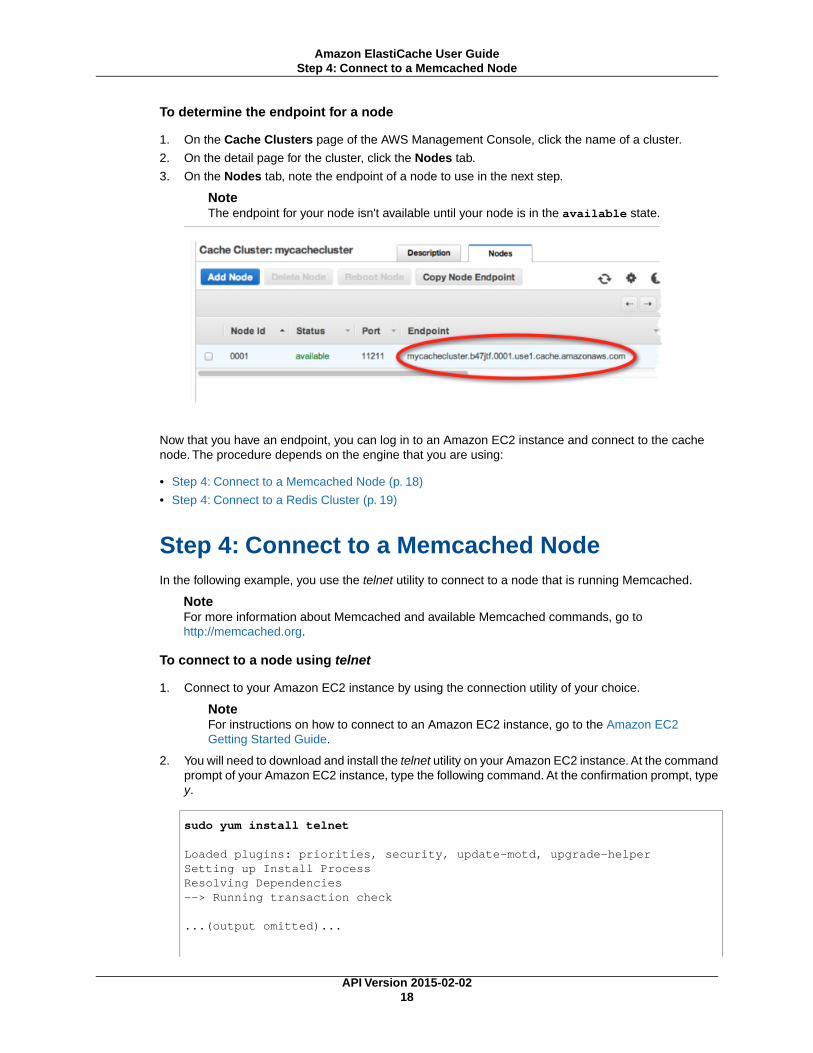
To determine the endpoint for a node
1. On the Cache Clusters page of the AWS Management Console, click the name of a cluster.
2. On the detail page for the cluster, click the Nodes tab.
3. On the Nodes tab, note the endpoint of a node to use in the next step.
NoteThe endpoint for your node isn't available until your node is in the available state.
Now that you have an endpoint, you can log in to an Amazon EC2 instance and connect to the cachenode. The procedure depends on the engine that you are using:
• Step 4: Connect to a Memcached Node (p. 18)
• Step 4: Connect to a Redis Cluster (p. 19)
Step 4: Connect to a Memcached NodeIn the following example, you use the telnet utility to connect to a node that is running Memcached.
NoteFor more information about Memcached and available Memcached commands, go tohttp://memcached.org.
To connect to a node using telnet
1. Connect to your Amazon EC2 instance by using the connection utility of your choice.
NoteFor instructions on how to connect to an Amazon EC2 instance, go to the Amazon EC2Getting Started Guide.
2. You will need to download and install the telnet utility on your Amazon EC2 instance. At the commandprompt of your Amazon EC2 instance, type the following command. At the confirmation prompt, typey.
sudo yum install telnet
Loaded plugins: priorities, security, update-motd, upgrade-helperSetting up Install ProcessResolving Dependencies--> Running transaction check
...(output omitted)...
API Version 2015-02-0218
Amazon ElastiCache User GuideStep 4: Connect to a Memcached Node

Total download size: 63 kInstalled size: 109 kIs this ok [y/N]: yDownloading Packages:telnet-0.17-47.7.amzn1.x86_64.rpm | 63 kB 00:00
...(output omitted)...
Complete!
3. At the command prompt of your Amazon EC2 instance, type the following command, substitutingthe endpoint of your node for the one shown in this example.
telnet mycachecluster.eaogs8.0001.usw2.cache.amazonaws.com 11211
You will see output similar to the following.
Trying 128.0.0.1...Connected to mycachecluster.eaogs8.0001.usw2.cache.amazonaws.com.Escape character is '^]'.>
You are now connected to a node, and you can run Memcached commands. The following is anexample.
set a 0 0 5 // Set key "a" with no expiration and 5 byte valuehello // Set value as "hello"STOREDget a // Get value for key "a"VALUE a 0 5helloENDget b // Get value for key "b" results in missEND>
Step 4: Connect to a Redis ClusterIn the following example, you use the redis-cli utility to connect to a cluster that is running Redis.
NoteFor more information about Redis and available Redis commands, go to http://redis.io/commands.
To connect to a Redis cluster using redis-cli
1. Connect to your Amazon EC2 instance using the connection utility of your choice.
API Version 2015-02-0219
Amazon ElastiCache User GuideStep 4: Connect to a Redis Cluster
NoteFor instructions on how to connect to an Amazon EC2 instance, go to the Amazon EC2Getting Started Guide.
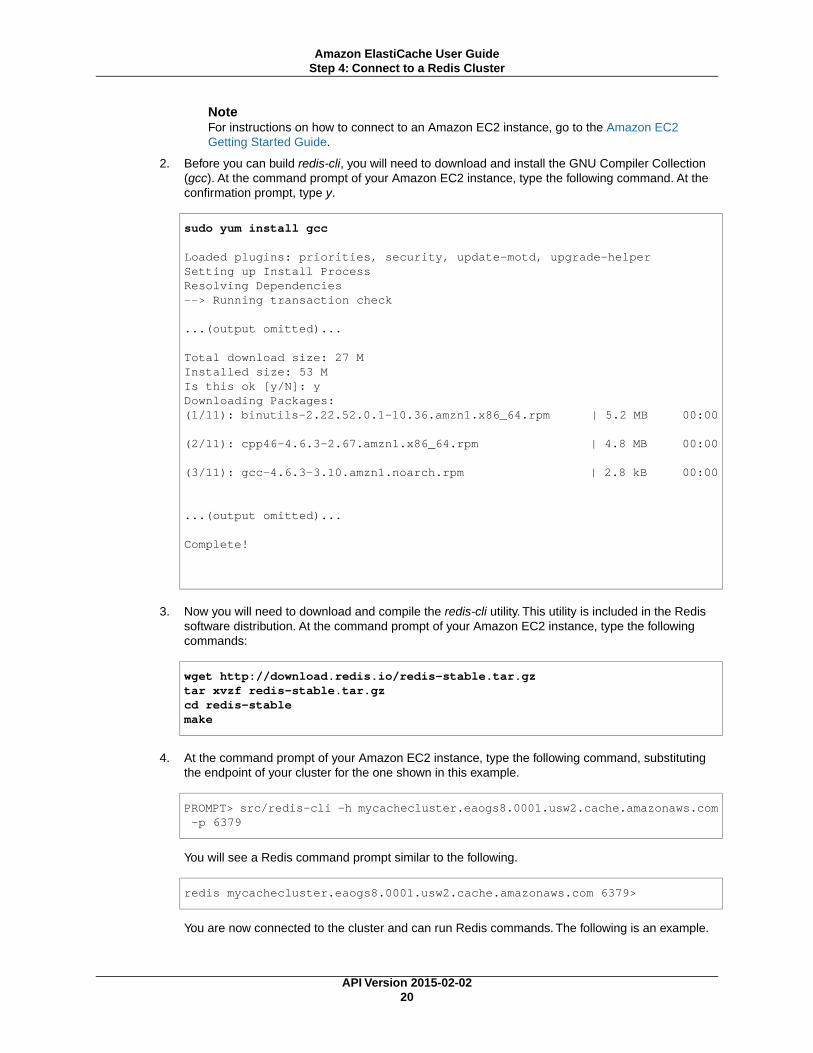
2. Before you can build redis-cli, you will need to download and install the GNU Compiler Collection(gcc). At the command prompt of your Amazon EC2 instance, type the following command. At theconfirmation prompt, type y.
sudo yum install gcc
Loaded plugins: priorities, security, update-motd, upgrade-helperSetting up Install ProcessResolving Dependencies--> Running transaction check
...(output omitted)...
Total download size: 27 MInstalled size: 53 MIs this ok [y/N]: yDownloading Packages:(1/11): binutils-2.22.52.0.1-10.36.amzn1.x86_64.rpm | 5.2 MB 00:00
(2/11): cpp46-4.6.3-2.67.amzn1.x86_64.rpm | 4.8 MB 00:00
(3/11): gcc-4.6.3-3.10.amzn1.noarch.rpm | 2.8 kB 00:00
...(output omitted)...
Complete!
3. Now you will need to download and compile the redis-cli utility. This utility is included in the Redissoftware distribution. At the command prompt of your Amazon EC2 instance, type the followingcommands:
wget http://download.redis.io/redis-stable.tar.gztar xvzf redis-stable.tar.gzcd redis-stablemake
4. At the command prompt of your Amazon EC2 instance, type the following command, substitutingthe endpoint of your cluster for the one shown in this example.
PROMPT> src/redis-cli -h mycachecluster.eaogs8.0001.usw2.cache.amazonaws.com -p 6379
You will see a Redis command prompt similar to the following.
redis mycachecluster.eaogs8.0001.usw2.cache.amazonaws.com 6379>
You are now connected to the cluster and can run Redis commands. The following is an example.
API Version 2015-02-0220
Amazon ElastiCache User GuideStep 4: Connect to a Redis Cluster

set a "hello" // Set key "a" with a string value and no expirationOKget a // Get value for key "a""hello"get b // Get value for key "b" results in miss(nil) quit // Exit from redis-cli
Step 5: Delete Your Cache ClusterTo delete a cluster
As soon as the cluster status changes to deleted, you stop incurring charges for that cluster.
1. Sign in to the AWS Management Console and open the Amazon ElastiCache console at https://console.aws.amazon.com/elasticache/.
2. In the ElastiCache console dashboard, click Cache Clusters.
3. In the list of clusters, to select the cluster to delete, click the box to the left of the cluster's name.When selected, the box will have a colored center.
You can only delete one cluster at a time from the ElastiCache console. Selecting multiple clustersdisables the Delete button.
4. Click the Delete button.
The status of the cluster will change to deleting.
While this cluster is deleting, you can delete other clusters by repeating steps 1 through 4.
Congratulations! You have successfully launched, authorized access to, connected to, and deleted acluster.
Where Do I Go From Here?Now that you have tried the getting started exercise, you can explore the following sections to learn moreabout ElastiCache.
• ElastiCache Terminology and Concepts (p. 26)
• Setting Up the ElastiCache Command Line Interface (p. 81)
• Managing ElastiCache (p. 86)
API Version 2015-02-0221
Amazon ElastiCache User GuideStep 5: Delete Your Cache Cluster
Best Practices for ImplementingAmazon ElastiCache
This topic identifies best practices for implementing Amazon ElastiCache.
Topics
• Ensuring That You Have Sufficient Memory to Create a Redis Snapshot (p. 22)
• Fault Tolerance: AOF or Multi-AZ? (p. 24)
• Configuring Your ElastiCache Client for Efficient Load Balancing (p. 24)
Ensuring That You Have Sufficient Memory toCreate a Redis Snapshot
When you work with Redis ElastiCache, Redis calls the BGSAVE command in a number of cases:
• When creating a snapshot for a backup/restore.
• When synchronizing a primary with replicas in a replication group.
• When enabling the append-only file feature (AOF) for Redis.
• When promoting a replica to master (which causes a primary/replica sync).
Whenever Redis executes BGSAVE, you must have sufficient available memory to accommodate theprocess overhead. Failure to have sufficient memory available will cause the process to fail. Because ofthis, it is important to select a node instance type that has sufficient memory when creating your Rediscluster.
BGSAVE Process and Memory UsageWhenever BGSAVE is called, Redis forks its process (remember, Redis is single threaded). One forkpersists your data to disk in a Redis .rdb snapshot file.The other fork services all read and write operations.In order to ensure that your snapshot is a point-in-time snapshot, all write operations are written to anarea of available memory separate from the data area.
API Version 2015-02-0222
Amazon ElastiCache User GuideEnsuring That You Have Sufficient Memory to Create a
Redis Snapshot
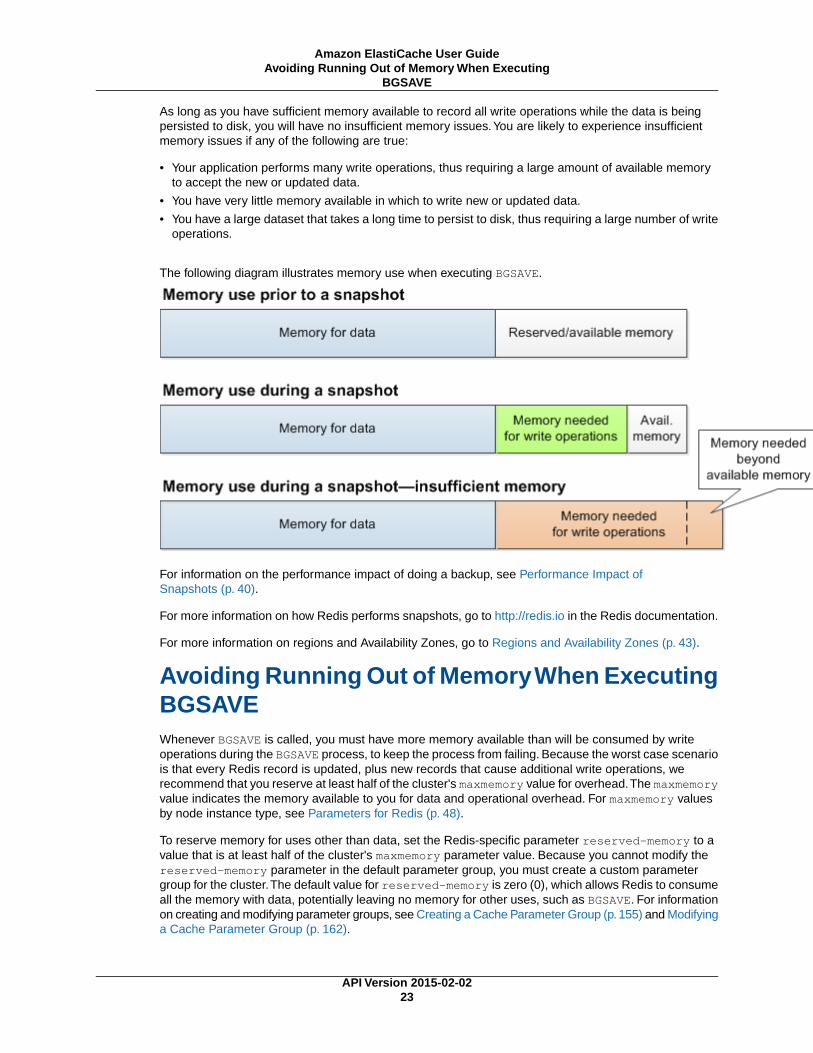
As long as you have sufficient memory available to record all write operations while the data is beingpersisted to disk, you will have no insufficient memory issues.You are likely to experience insufficientmemory issues if any of the following are true:
• Your application performs many write operations, thus requiring a large amount of available memoryto accept the new or updated data.
• You have very little memory available in which to write new or updated data.
• You have a large dataset that takes a long time to persist to disk, thus requiring a large number of writeoperations.
The following diagram illustrates memory use when executing BGSAVE.
For information on the performance impact of doing a backup, see Performance Impact ofSnapshots (p. 40).
For more information on how Redis performs snapshots, go to http://redis.io in the Redis documentation.
For more information on regions and Availability Zones, go to Regions and Availability Zones (p. 43).
Avoiding Running Out of Memory When ExecutingBGSAVEWhenever BGSAVE is called, you must have more memory available than will be consumed by writeoperations during the BGSAVE process, to keep the process from failing. Because the worst case scenariois that every Redis record is updated, plus new records that cause additional write operations, werecommend that you reserve at least half of the cluster's maxmemory value for overhead.The maxmemoryvalue indicates the memory available to you for data and operational overhead. For maxmemory valuesby node instance type, see Parameters for Redis (p. 48).
To reserve memory for uses other than data, set the Redis-specific parameter reserved-memory to avalue that is at least half of the cluster's maxmemory parameter value. Because you cannot modify thereserved-memory parameter in the default parameter group, you must create a custom parametergroup for the cluster.The default value for reserved-memory is zero (0), which allows Redis to consumeall the memory with data, potentially leaving no memory for other uses, such as BGSAVE. For informationon creating and modifying parameter groups, see Creating a Cache Parameter Group (p.155) and Modifyinga Cache Parameter Group (p. 162).
API Version 2015-02-0223
Amazon ElastiCache User GuideAvoiding Running Out of Memory When Executing
BGSAVE
For more information on Redis-specific parameters in ElastiCache, see Parameters for Redis (p. 48).
For more information on creating and modifying parameter groups, see Creating a Cache ParameterGroup (p. 155) and Modifying a Cache Parameter Group (p. 162).
Fault Tolerance: AOF or Multi-AZ?When AOF is enabled for Redis, every write operation received by the server is logged. AOFs can thusbecome very large, larger than the .rdb file for the dataset in question. Because ElastiCache relies onlocal storage (the instance store), which is limited in size, enabling AOF can cause out-of-disk spaceissues.
Enabling Redis AOF for Fault ToleranceYou enable AOF because an AOF file is useful in recovery scenarios. In case of a node restart or servicecrash, Redis will replay the updates from an AOF file, thereby recovering the data lost due to the restartor crash.
WarningAOF cannot protect against all failure scenarios. For example, if a node fails due to a hardwarefault in an underlying physical server, ElastiCache will provision a new node on a different server.In this case, the AOF file will no longer be available and cannot be used to recover the data.Thus, Redis will restart with a cold cache.
Enabling Redis Multi-AZ as a Better Approach toFault ToleranceIf you are enabling AOF to protect against data loss, consider using a replication group with Multi-AZenabled instead of AOF.When using a Redis replication group, if a replica fails, it is automatically replacedand synchronized with the primary cluster. If Multi-AZ is enabled on a Redis replication group and theprimary fails, it fails over to a read replica. This functionality is much faster than rebuilding the primaryfrom an AOF file. For greater reliability and faster recovery, we recommend that you create a replicationgroup with one or more read replicas in different availability zones and enable Multi-AZ instead of usingAOF. Because there is no need for AOF in this scenario, ElastiCache disables AOF on Multi-AZ replicationgroups.
For more information, see the following topics:
• Append-Only Files (AOF) (p. 58)
• Replication Groups and Read Replicas (Redis) (p. 30)
• Multi-AZ with Redis Replication Groups (p. 32)
Configuring Your ElastiCache Client for EfficientLoad Balancing
NoteThis section applies to multi-node Memcached clusters.
To effectively use multiple ElastiCache Memcached nodes, you need to be able to spread your cachekeys across the nodes. A simple way to load balance a cluster with n nodes is to calculate the hash of
API Version 2015-02-0224
Amazon ElastiCache User GuideFault Tolerance: AOF or Multi-AZ?

the object’s key and mod the result by n - hash(key) mod n. The resulting value (0 through n–1) isthe number of the node where you place the object.
This approach is simple and works well as long as the number of nodes (n) is constant. However, wheneveryou add or remove a node from the cluster, the number of keys that need to be moved is (n - 1) / n (wheren is the new number of nodes). Thus, this approach will result in a large number of keys being moved,which translates to a large number of initial cache misses, especially as the number of nodes gets large.Scaling from 2 to 3 nodes results in (2–1)/2 (50 percent) of the keys being moved, the best case. Scalingfrom 9 to 10 nodes results in (10–1)/10 (90 percent) of the keys being moved. If you're scaling up due toa spike in traffic, you don't want to have a large number of cache misses. A large number of cache missesresults in hits to the database, which is already overloaded due to the spike in traffic.
The solution to this dilemma is consistent hashing. Consistent hashing uses an algorithm such thatwhenever a node is added or removed from a cluster, the number of keys that must be moved is roughly1 / n (where n is the new number of nodes). Scaling from 1 to 2 nodes results in 1/2 (50 percent) of thekeys being moved, the worst case. Scaling from 9 to 10 nodes results in 1/10 (10 percent) of the keysbeing moved.
As the user, you control which hashing algorithm is used for multi-node clusters. We recommend thatyou configure your clients to use consistent hashing. Fortunately, there are many Memcached clientlibraries in most popular languages that implement consistent hashing. Check the documentation for thelibrary you are using to see if it supports consistent hashing and how to implement it.
If you are working in Java, PHP, or .NET, we recommend you use one of the Amazon ElastiCache clientlibraries.
Consistent Hashing Using JavaThe ElastiCache Memcached Java client is based on the open-source spymemcached Java client, whichhas consistent hashing capabilities built in. The library includes a KetamaConnectionFactory class thatimplements consistent hashing. By default, consistent hashing is turned off in spymemcached.
For more information, go to the KetamaConnectionFactory documentation at http://dustin.sallings.org/java-memcached-client/apidocs/net/spy/memcached/KetamaConnectionFactory.html.
Consistent Hashing Using PHPThe ElastiCache Memcached PHP client is a wrapper around the built-in Memcached PHP library. Bydefault, consistent hashing is turned off by the Memcached PHP library.
To turn consistent hashing on, in your php.ini file set the memcached.hash_strategy parameter to"consistent".You can set the memcached.hash_function to the hash function you prefer. Thedefault is crc32.
For more information, go to the run-time configuration documentation for Memcached PHP at http://php.net/manual/en/memcache.ini.php. Note specifically the memcached.hash_strategy andmemcached.hash_function parameters.
Consistent Hashing Using .NETThe ElastiCache Memcached .NET client is a wrapper around Enyim Memcached. By default, consistenthashing is turned on by the Enyim Memcached client.
For more information, go to the memcached/locator documentation at https://github.com/enyim/EnyimMemcached/wiki/MemcachedClient-Configuration#user-content-memcachedlocator.
API Version 2015-02-0225
Amazon ElastiCache User GuideConsistent Hashing Using Java
ElastiCache Terminology andConcepts
This chapter introduces you to ElastiCache terminology and concepts. Many of the concepts introducedin this chapter are explored in greater depth in later chapters.
Topics
• Nodes (p. 26)
• Replication Groups and Read Replicas (Redis) (p. 30)
• Multi-AZ with Redis Replication Groups (p. 32)
• Backup and Restore for Redis Clusters (p. 38)
• Clusters (p. 41)
• Regions and Availability Zones (p. 43)
• Parameter Groups (p. 43)
• Subnet Groups (p. 59)
• Security Groups (p. 59)
• ElastiCache and Amazon Virtual Private Cloud (p. 60)
• Cache Engine Version Management (p. 63)
NodesA node is the smallest building block of an ElastiCache deployment. It is a fixed-size chunk of secure,network-attached RAM. Each cache node runs an instance of either Memcached or Redis, dependingon what was selected when the cluster was created. Each cache node has its own Domain Name Service(DNS) name and port. Multiple types of cache nodes are supported, each with varying amounts ofassociated memory.
Topics
• Node Considerations for Memcached (p. 27)
• Node Considerations for Redis (p. 29)
• Reserved Nodes (p. 29)
API Version 2015-02-0226
Amazon ElastiCache User GuideNodes
NoteFor a complete list of cache node types and specifications, go to Amazon ElastiCache ProductFeatures and Details and either Cache Node Type-Specific Parameters for Memcached or CacheNode Type-Specific Parameters for Redis.
Node Considerations for MemcachedWith a cluster running Memcached, you can
• Easily select and change the amount of memory and compute capacity available in your cluster.
• Easily select the Availability Zone or zones for your cache nodes.
Node Size ConsiderationsThe total memory capacity of your cluster is calculated by multiplying the number of cache nodes in thecluster by the capacity of each node. The capacity of each cache node is based on the cache node type.
The number of cache nodes in the cluster is a key factor in the availability of your cluster runningMemcached. The failure of a single cache node can have an impact on the availability of your applicationand the load on your back-end database while ElastiCache provisions a replacement for the failed cachenode.You can reduce this potential availability impact by spreading your memory and compute capacityover a larger number of cache nodes, each with smaller capacity, rather than a fewer number of highcapacity nodes.
In a scenario where you want to have 40 GB of cache memory, you can set it up in one of the followingways:
• Use 13 cache.t2.medium cache nodes with 3.22 GB of memory each = 41.86 GB
• Use 7 cache.m3.large cache nodes with 6.05 GB of memory each = 42.35 GB
• Use 3 cache.r3.large cache nodes with 13.5GB of memory each = 40.5 GB
These options each provide you with similar memory capacity but different computational capacity foryour cluster.
NoteFor clusters running Memcached, some of the available memory on each cache node is usedfor connection overhead. For more information, see Understanding and Tuning MemcachedConnection Overhead (p. 46).
If you're unsure about how much capacity you need, we recommend starting with one cache.m3.mediumcache node type and monitoring the memory usage, CPU utilization, and cache hit rate with the ElastiCachemetrics that are published to CloudWatch.
If your cluster does not have the desired hit rate, you can easily add more nodes, thereby increasing thetotal available memory in your cluster.You will need to obtain an updated endpoint list from the ElastiCacheCLI, API or AWS Management Console, and configure your clients to use the additional node(s).
If your cluster turns out to be bound by CPU but has sufficient hit rate, then try setting up a new clusterwith a different cache node type.
ElastiCache supports adding or removing cache nodes from an existing cluster using the AWS ManagementConsole, the API, and the command line tools, allowing you to increase both the memory and computecapacity of the cluster at any time.
API Version 2015-02-0227
Amazon ElastiCache User GuideNode Considerations for Memcached
NoteElastiCache does not currently support dynamically changing the cache node type for a clusterafter it has been created. If you want to change the node type of a cluster, you will need to setup a new cluster with the desired node type and migrate your application to that cluster.
You can scale a Memcached cluster by adding or deleting nodes. For more information, see Adding orRemoving Nodes (p. 96).
Availability Zone ConsiderationsDistributing your Memcached nodes over multiple Availability Zones within a region helps protect youfrom the impact of a catastrophic failure, such as a power loss within an Availability Zone.
A Memcached cluster can have up to 20 nodes. When you create or add nodes to your Memcachedcluster, you can specify a single Availability Zone for all your nodes, allow ElastiCache to select a singleAvailability Zone for all your nodes, specify the Availability Zones for each node, or allow ElastiCache toselect an Availability Zone for each node. New nodes can be created in different Availability Zones asyou add them to an existing Memcached cluster. Once a cache node is created, its Availability Zonecannot be modified.
If you want a cluster in a single Availability Zone cluster to have its nodes distributed across multipleAvailability Zones, ElastiCache can create new nodes in the various Availability Zones.You can thendelete some or all of the original cache nodes. We recommend this approach.
To migrate Memcached nodes from a single Availability Zone to multiple Availability Zones
1. Modify your cluster by creating new cache nodes in the Availability Zones where you want them. Inyour request, do the following:
• Set AZMode (CLI: --az-mode) to cross-az.
• Set NumCacheNodes (CLI: --num-cache-nodes) to the number of currently active cache nodesplus the number of new cache nodes you want to create.
• Set NewAvailabilityZones (CLI: --new-availability-zones) to a list of the zones youwant the new cache nodes created in. To let ElastiCache determine the Availability Zone for eachnew node, don't specify a list.
• Set ApplyImmediately (CLI: --apply-immediately) to true.
NoteIf you are not using auto discovery, be sure to update your client application with the newcache node endpoints.
Before moving on to the next step, be sure the Memcached nodes are fully created and available.
2. Modify your cluster by removing the nodes you no longer want in the original Availability Zone. Inyour request, do the following:
• Set NumCacheNodes (CLI: --num-cache-nodes) to the number of active cache nodes you wantafter this modification is applied.
• Set CacheNodeIdsToRemove (CLI: --nodes-to-remove) to a list of the cache nodes you wantto remove from the cluster.
The number of cache node IDs listed must equal the number of currently active nodes minus thevalue in NumCacheNodes.
• (Optional) Set ApplyImmediately (CLI: --apply-immediately) to true.
If you don't set ApplyImmediately (CLI: --apply-immediately) to true, the node deletionswill take place at your next maintenance window.
API Version 2015-02-0228
Amazon ElastiCache User GuideNode Considerations for Memcached
For information about how to create or modify a Memcached cluster, see Managing Clusters. For moreinformation about using the command-line interface (CLI) and API, see the following topics:
• Using the CLI to create a new cluster: elasticache-create-cache-cluster
• Using the CLI to modify an existing cluster: elasticache-modify-cache-cluster
• Using the API to create a new cluster: CreateCacheCluster
• Using the API to modify an existing cluster: ModifyCacheCluster
For more information about regions and Availability Zones, see Regions and Availability Zones (p. 43).
Node Considerations for RedisNoteAt this time, ElastiCache supports single-node Redis clusters.
To determine the appropriate size for your cache node, we recommend that you estimate the total amountof memory that you will need for your Redis cache, and choose a cache node type that has enoughmemory for your requirements. For example, if you estimate that the total size of all your items will be 10GB, then you can use a cache.m3.xlarge node with 13.3 GB of memory or a cache.r3.large node with13.5 GB of memory.
If your application is write heavy and you intend to take snapshots, we recommend that you have at leastas much unused memory in your cluster as you have for your data. In this case you'd use either acache.m3.2xlarge with 27.9 GB of memory or a cache.r3.xlarge with 28.4 GB of memory. For an explanationof memory use during a Redis snapshot, go to Ensuring That You Have Sufficient Memory to Create aRedis Snapshot (p. 22).
While your cluster is running, you can monitor the memory usage, processor utilization, cache hits, andcache misses metrics that are published to CloudWatch. If your cluster does not have the desired hit rateor you notice that keys are being evicted too often, you can choose a different cache node size with largerCPU and memory specifications.You will need to obtain an updated endpoint list from the ElastiCacheCLI, API or console, and configure your clients to use this new node.
Reserved NodesReserved cache nodes let you make a one-time up-front payment for a cache node and reserve the cachenode for a one- or three-year term at significantly lower rates.
Reserved cache nodes are available in three varieties—Heavy Utilization, Medium Utilization, and LightUtilization—that enable you to optimize your ElastiCache costs based on your expected utilization.
You can use the command line tools, the API, or the AWS Management Console to list and purchaseavailable reserved cache node offerings. The three types of reserved cache node offerings are based onclass and duration.
Reserved Node OfferingsHeavy Utilization reserved cache nodes enable workloads that have a consistent baseline of capacity orrun steady-state workloads. Heavy Utilization reserved cache nodes require the highest up-frontcommitment, but if you plan to run more than 79 percent of the reserved cache node term you can earnthe largest savings (up to 70 percent off of the On-Demand price). Unlike the other reserved cache nodes,with Heavy Utilization reserved cache nodes you pay a one-time fee, followed by a lower hourly fee forthe duration of the term regardless of whether or not your cache node is running.
Medium Utilization reserved cache nodes are the best option if you plan to leverage your reserved cachenodes a substantial amount of the time, but you want either a lower one-time fee or the flexibility to stop
API Version 2015-02-0229
Amazon ElastiCache User GuideNode Considerations for Redis

paying for your cache node when you shut it off. Medium Utilization reserved cache nodes are a morecost-effective option when you plan to run more than 40 percent of the reserved cache nodes term. Thisoption can save you up to 64 percent off of the On-Demand price.With Medium Utilization reserved cachenodes, you pay a slightly higher one-time fee than with Light Utilization reserved cache nodes, and youreceive lower hourly usage rates when you run a cache node.
Light Utilization reserved cache nodes are ideal for periodic workloads that run only a couple of hours aday or a few days per week. Using Light Utilization reserved cache nodes, you pay a one-time fee followedby a discounted hourly usage fee when your cache node is running.You can start saving when yourcache node is running more than 17 percent of the reserved cache node term, and you can save up to56 percent off of the On-Demand rates over the entire term of your reserved cache node.
Remember that discounted usage fees for reserved cache node purchases are tied to cache node type.If you shut down a running cache node on which you have been getting a discounted rate as a result ofa reserved cache node purchase, and the term of the reserved cache node has not yet expired, you willcontinue to get the discounted rate if you launch another cache node with the same specifications duringthe term.
The following table summarizes the differences between the reserved cache nodes offering types.
Reserved Cache Node Offerings
AdvantageUsage FeeUp-Front CostOffering
Lowest overall cost ifyou plan to use your re-served cache nodesmore than 79 percent ofa 3-year term.
Lowest hourly fee. Ap-plied to the whole termwhether or not you'reusing the reservedcache node.
HighestHeavy Utilization
Suitable for elasticworkloads or when youexpect moderate usage,more than 40 percent ofa 3-year term.
Hourly usage feecharged for each houryou use the cache node.
AverageMedium Utilization
Highest overall cost ifyou plan to run all of thetime; however, lowestoverall cost if you anticip-ate you will use your re-served cache nodes in-frequently, more thanabout 15 percent of a 3-year term.
Hourly usage feecharged. Highest fees ofall the offering types, butfees apply only whenyou're using the re-served cache node.
LowestLight Utilization
For more information on working with reserved cache nodes, go to Managing Reserved Nodes (p. 106).
Replication Groups and Read Replicas (Redis)By default, cache clusters are stand-alone entities without any redundant data protection services.However, if your cache cluster is running on Redis, your cache cluster is a single node. A replicationgroup is a collection of nodes, with one primary read-write cluster and up to five secondary, read-onlyclusters, which are called read replicas. Each replica maintains a copy of the data from the primary cachecluster and uses asynchronous replication mechanisms to keep itself synchronized with the primary
API Version 2015-02-0230
Amazon ElastiCache User GuideReplication Groups and Read Replicas (Redis)

cluster. Applications can read from any cluster in the replication group. Read replicas enhance scalabilityand guard against data loss.
NoteAt this time, replication groups are supported only for cache clusters running Redis.
You can use replication groups to scale your Redis solution for Amazon ElastiCache to handle applicationsthat are highly read-intensive or to support large numbers of clients that simultaneously read from thesame cache.
All of the nodes in a replication group must reside in the same region. However, you can provision readreplicas in multiple Availability Zones within that region. When you add a read replica to a replicationgroup, all of the data from the primary cache cluster is copied to the read replica. From that point, wheneverdata is written to the primary, the changes are immediately propagated to the read replicas.Yourapplications can connect to the read replica and access data in the cache, although they cannot writeany data to the replica.
You can change the roles of the cache nodes within the replication group, with the primary cluster andone of the replicas exchanging roles.You might decide to do this for performance tuning reasons. Forexample, with a web application that has heavy write activity, you can choose the node that has the lowestnetwork latency. For more information, see Promoting a Read Replica to the Primary Role (p. 134).
Replication groups guard against potential data loss if a primary or secondary node is unexpectedlyterminated. For more information, see Multi-AZ with Redis Replication Groups (p. 32).
TipFor greater reliability and faster recovery, we recommend that you create one or more readreplicas in different availability zones for your cluster, and enable Multi-AZ on the replicationgroup instead of using AOF. AOF is disabled for Multi-AZ replication groups.
AOF is not supported for cache nodes of type cache.t1.micro. For more information on AOF and Multi-AZ,see and Multi-AZ with Redis Replication Groups (p. 32).
Primary EndpointAn application can connect to any node in a replication group, provided that it has the DNS endpoint andport number for that node. Read-only applications can connect to any node in the replication group, butall write activity must take place at the primary node.
Every replication group has a primary endpoint, which is a DNS name that always resolves to the primarynode in the replication group. The primary endpoint is immune to changes to your replication group, suchas promoting a read replica to the primary role. Even if you make changes to the replication group, suchas promoting a read replica to become the new primary node, the primary endpoint always points to theprimary node for the replication group.
For read-only activity, applications can connect to any node in the replication group. However, for writeactivity, we recommend that your applications connect to the primary endpoint instead of connectingdirectly to the primary node.
Creating a Replication GroupFor detailed guidance on creating a replication group, see Creating a Redis Replication Group (p. 127)
For detailed procedures on each step, see Managing Replication Groups (p. 127).
API Version 2015-02-0231
Amazon ElastiCache User GuidePrimary Endpoint
Adding a Redis Cache Cluster to a ReplicationGroupFor detailed guidance on adding a read replica to a replication group, see Adding a Read Replica To aReplication Group (p. 133)
Multi-AZ with Redis Replication GroupsAn ElastiCache for Redis replication group consists of a primary cluster and from one to five read replicas.When Multi-AZ is enabled for a replication group and a primary node fails, ElastiCache automaticallydetects the failure, selects a read replica and promotes it to primary, without any manual intervention.This functionality means you can resume writing to the primary node as soon as promotion is complete,generally in 3 to 4 minutes. ElastiCache replication groups with Multi-AZ enabled significantly reduce thetime span during which you cannot write to the read/write primary cluster during certain types of plannedmaintenance or in the unlikely event of a primary or Availability Zone failure.
As part of the failover process, ElastiCache also propagates the DNS address of the promoted replicaso that if your application is writing to the primary endpoint, no endpoint change will be required in yourapplication. However, because your application reads from individual endpoints, you will need to changethe read endpoint of the promoted replica to the replacement replica's endpoint.
The failover process generally takes 3 to 4 minutes.This process is much faster than replacing the primaryand syncing the data from a replica, which occurs in the event of a primary node failure if you don't enableMulti-AZ for your Redis replication group.
Notes on Multi-AZ with Redis Replication GroupsThe following points should be noted:
• Redis replication is asynchronous. Therefore, when a primary cluster fails over to a replica, a smallamount of data might be lost due to replication lag.
• When selecting the replica to promote to primary, ElastiCache selects the replica with the least replicationlag (the one that is most current).
• When you enable Multi-AZ on a replication group, a replica cluster cannot be manually promoted toprimary. Thus, if the primary in AZ-1 fails over to a replica in AZ-2, the primary cluster stays in AZ-2.To promote the new replica in AZ-1 to primary, you must first disable Multi-AZ on the replication group,then do the promotion, and finally re-enable Multi-AZ.
• ElastiCache Multi-AZ and append-only file (AOF) are mutually exclusive. If you enable one you cannotenable the other.
For more information, see Fault Tolerance: AOF or Multi-AZ? (p. 24).
• In the case where a cluster's failure is caused by the rare event of an entire Availability Zone failing,the replica replacing the failed primary is created only when the Availability Zone is back up. Forexample, if the primary cluster is in AZ-1 with replicas in AZ-2 and AZ-3, if the primary cluster fails thereplica with the least replication lag is promoted to primary. ElastiCache then creates a new replica inAZ-1 (where the failed primary was) only when AZ-1 is back up and available.
• Rebooting a primary cluster does not trigger auto failover. When the primary node is rebooted, it iscleared of data when it comes back online. When the read replicas see the cleared primary, they cleartheir copy of the data, incurring data loss.
• Once a read replica has been promoted, the other replicas sync with their new primary. After the initialsync, the replicas’ content is deleted and they sync the data from the new primary, causing a briefinterruption during which the replicas are not accessible. This sync process also causes temporary
API Version 2015-02-0232
Amazon ElastiCache User GuideAdding a Redis Cache Cluster to a Replication Group
load on the primary while syncing with the replicas. This behavior is native to Redis and isn’t uniqueto ElastiCache Multi-AZ. For more details regarding this Redis behavior, go to http://redis.io/topics/replication.
• Multi-AZ is supported on Redis version 2.8.6 and later.
• Multi-AZ is not supported on t1 and t2 cache nodes.
ImportantConnecting an external Redis replica to an ElastiCache Redis replication group that is Multi-AZenabled is an unsupported configuration that can create issues that prevent ElastiCache fromproperly performing failover and recovery. If you need to connect an external Redis replica toan ElastiCache replication group, make sure that Multi-AZ is disabled before you make theconnection.
You can enable Multi-AZ using the Amazon ElastiCache console, API, or command-line interface (CLI).
We recommend creating the primary node and read replicas in different Availability Zones to best protectyourself from data loss in the unlikely case of a complete Availability Zone failure.
Topics
• Failure Scenarios and Multi-AZ Responses (p. 33)
• Enabling Redis Multi-AZ (p. 35)
Failure Scenarios and Multi-AZ ResponsesElastiCache detects and replaces a replication group's failed nodes by recreating and reprovisioning thefailed node. When Multi-AZ is enabled for a replication group, a failed primary cluster instead fails overto one of the existing replicas. A replica is selected and automatically promoted to the primary role, whichis much faster than recreating and reprovisioning the primary cluster. The failover process usually takes2 to 3 minutes, after which you can again write to the read/write primary cluster.
When Multi-AZ is enabled, ElastiCache continually monitors the state of the primary cluster. If the primarycluster fails, one of the following actions is performed.
Whenever ElastiCache detects a failed primary node and fails over to a secondary node, the followingevents are reported and may be observed using any of the methods described at Viewing ElastiCacheEvents (p. 182).
• Failover from master node <name> to replica node <name> completed.
• Recovering cache nodes <name>.
• Finished recovery for cache nodes <name>.
Multi-AZ if Only the Primary Node FailsIf only the primary node fails, ElastiCache performs the following process.
1. ElastiCache takes the failed primary cluster offline.
2. ElastiCache promotes one of the replicas to the primary role.
Write operations can resume as soon as the promotion process is complete, typically 3 to 4 minutes.You don't need to change the endpoint for write operations because ElastiCache propagates the DNSaddress of the promoted replica.
3. ElastiCache creates and provisions a replacement replica.
API Version 2015-02-0233
Amazon ElastiCache User GuideFailure Scenarios and Multi-AZ Responses
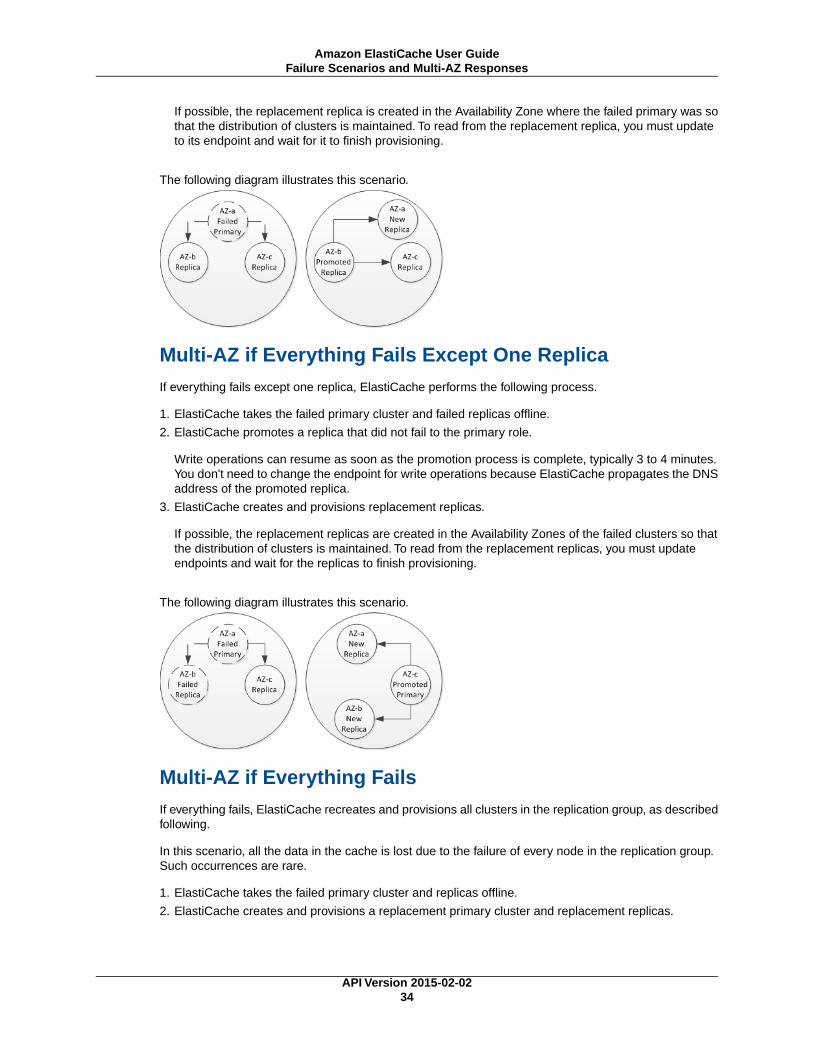
If possible, the replacement replica is created in the Availability Zone where the failed primary was sothat the distribution of clusters is maintained. To read from the replacement replica, you must updateto its endpoint and wait for it to finish provisioning.
The following diagram illustrates this scenario.
Multi-AZ if Everything Fails Except One ReplicaIf everything fails except one replica, ElastiCache performs the following process.
1. ElastiCache takes the failed primary cluster and failed replicas offline.
2. ElastiCache promotes a replica that did not fail to the primary role.
Write operations can resume as soon as the promotion process is complete, typically 3 to 4 minutes.You don't need to change the endpoint for write operations because ElastiCache propagates the DNSaddress of the promoted replica.
3. ElastiCache creates and provisions replacement replicas.
If possible, the replacement replicas are created in the Availability Zones of the failed clusters so thatthe distribution of clusters is maintained. To read from the replacement replicas, you must updateendpoints and wait for the replicas to finish provisioning.
The following diagram illustrates this scenario.
Multi-AZ if Everything FailsIf everything fails, ElastiCache recreates and provisions all clusters in the replication group, as describedfollowing.
In this scenario, all the data in the cache is lost due to the failure of every node in the replication group.Such occurrences are rare.
1. ElastiCache takes the failed primary cluster and replicas offline.
2. ElastiCache creates and provisions a replacement primary cluster and replacement replicas.
API Version 2015-02-0234
Amazon ElastiCache User GuideFailure Scenarios and Multi-AZ Responses
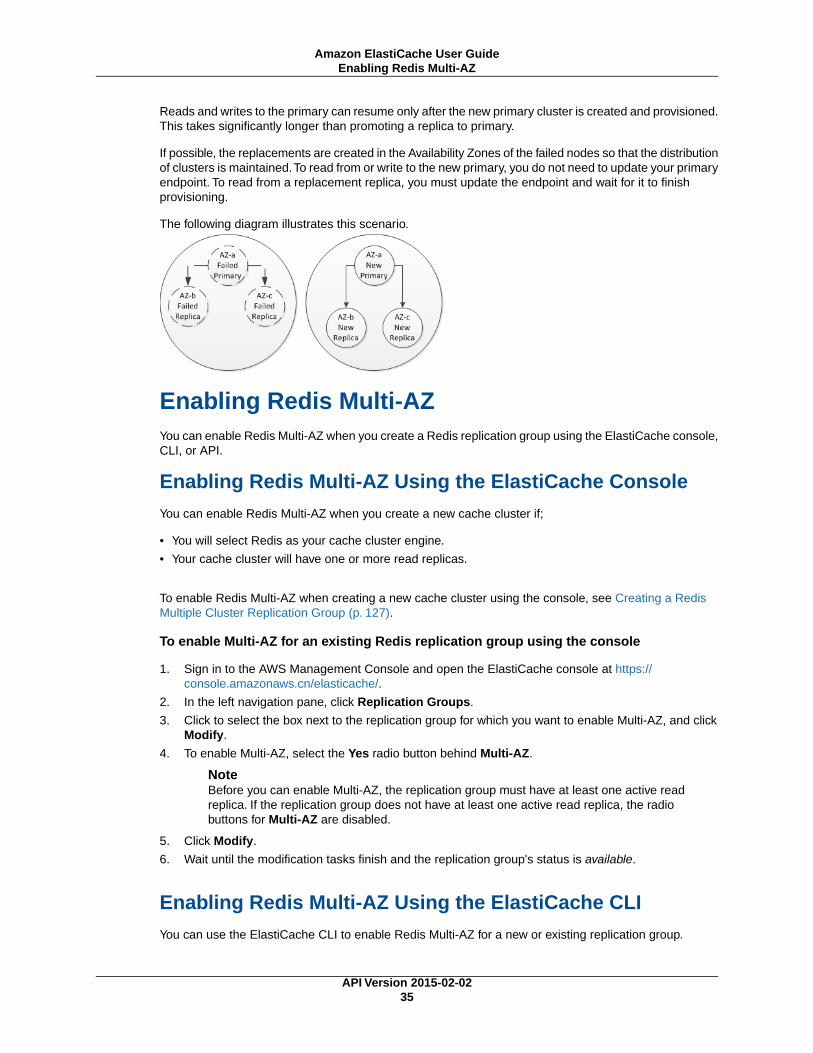
Reads and writes to the primary can resume only after the new primary cluster is created and provisioned.This takes significantly longer than promoting a replica to primary.
If possible, the replacements are created in the Availability Zones of the failed nodes so that the distributionof clusters is maintained.To read from or write to the new primary, you do not need to update your primaryendpoint. To read from a replacement replica, you must update the endpoint and wait for it to finishprovisioning.
The following diagram illustrates this scenario.
Enabling Redis Multi-AZYou can enable Redis Multi-AZ when you create a Redis replication group using the ElastiCache console,CLI, or API.
Enabling Redis Multi-AZ Using the ElastiCache ConsoleYou can enable Redis Multi-AZ when you create a new cache cluster if;
• You will select Redis as your cache cluster engine.
• Your cache cluster will have one or more read replicas.
To enable Redis Multi-AZ when creating a new cache cluster using the console, see Creating a RedisMultiple Cluster Replication Group (p. 127).
To enable Multi-AZ for an existing Redis replication group using the console
1. Sign in to the AWS Management Console and open the ElastiCache console at https://console.amazonaws.cn/elasticache/.
2. In the left navigation pane, click Replication Groups.
3. Click to select the box next to the replication group for which you want to enable Multi-AZ, and clickModify.
4. To enable Multi-AZ, select the Yes radio button behind Multi-AZ.
NoteBefore you can enable Multi-AZ, the replication group must have at least one active readreplica. If the replication group does not have at least one active read replica, the radiobuttons for Multi-AZ are disabled.
5. Click Modify.
6. Wait until the modification tasks finish and the replication group's status is available.
Enabling Redis Multi-AZ Using the ElastiCache CLIYou can use the ElastiCache CLI to enable Redis Multi-AZ for a new or existing replication group.
API Version 2015-02-0235
Amazon ElastiCache User GuideEnabling Redis Multi-AZ

Using the ElastiCache CLI to Enable Redis Multi-AZ for a New ReplicationGroup
The following example creates the Multi-AZ enabled replication group myReplGroup using the activeRedis cluster myPrimaryCluster as its primary cluster. It then adds the read replicamyReplicaCluster00 to the replication group.
1. Create the replication group, specifying the primary cache cluster and enabling Multi-AZ by using acommand like the following.
$PROMPT>elasticache-create-replication-group myReplGroup -d "cli demo" -p myPrimaryCluster -a true
2. Add a replica Redis cache cluster to the replication group by using a command like the following.You can perform this step up to five times, changing only the name of the cluster.
$PROMPT>elasticache-create-cache-cluster myReplicaCluster00 -rg myReplGroup -e redis -c cache.m1.small -n 1
If you don't have an active Redis cache cluster to use as the primary cluster, you can create the replicationgroup and its associated cache clusters with a single command. The following example creates theMulti-AZ enabled replication group my-rg with 3 cache clusters; the primary cluster my-rg001 and tworeplicas, my-rg002 and my-rg003.
$PROMPT>elasticache-create-replication-group my-rg -d "My replication group"-n 3 -e redis -c cache.m3.large -a true
When you create the clusters and replication group as shown in this example, the names of the clustersare created by adding a three digit sequential number starting at 001 to the end of the replication group'snames.
For more information, see http://docs.aws.amazon.com/AmazonElastiCache/latest/CommandLineReference/CLIReference-cmd-CreateCacheCluster.html and http://docs.aws.amazon.com/AmazonElastiCache/latest/CommandLineReference/CLIReference-cmd-CreateReplicationGroup.html.
Using the ElastiCache CLI to Enable Redis Multi-AZ for an ExistingReplication Group
The following code example uses the ElastiCache CLI to enable Multi-AZ for the replication groupmyReplGroup.
$PROMPT>elasticache-modify-replication-group myReplGroup --apply-immediately --automatic-failover-enabled true
For more information, see http://docs.aws.amazon.com/AmazonElastiCache/latest/CommandLineReference/CLIReference-cmd-ModifyReplicationGroup.html.
Enabling Redis Multi-AZ using the ElastiCache APIYou can use the ElastiCache API to enable Redis Multi-AZ for a new or existing replication group.
API Version 2015-02-0236
Amazon ElastiCache User GuideEnabling Redis Multi-AZ

Using the ElastiCache API to Enable Redis Multi-AZ for a New ReplicationGroup
The following example creates the Multi-AZ enabled replication group myReplGroup using the activeRedis cluster myPrimaryCluster as its primary cluster. It then adds the read replicamyReplicaCluster00 to the replication group.
1. Create the replication group, specifying the primary cache cluster and enabling Multi-AZ as shownin the following example that creates the replication group myReplGroup, enables Multi-AZ, andspecifies myPrimaryCluster as the primary cluster..
https://elasticache.us-west-2.amazonaws.com/ ?Action=CreateReplicationGroup &AutomaticFailover=true &Description=My replication group &PrimaryClusterId=myPrimaryCluster &ReplicationGroupId=myReplGroup &Version=2014-12-01 &SignatureVersion=4 &SignatureMethod=HmacSHA256 &Timestamp=20141201T192317Z &X-Amz-Credential=<credential>
2. Add a replica Redis cache cluster to the replication group. as shown in the following example thatcreates myReplicaCluster00 as a read replica in the myReplGroup replication group.You canperform this step up to five times, changing only the name of the cluster.
https://elasticache.us-west-2.amazonaws.com/ ?Action=CreateCacheCluster &CacheClusterId=myReplicaCluster00 &ReplicationGroupId=myReplGroup &SignatureMethod=HmacSHA256 &SignatureVersion=4 &Version=2014-12-01 &X-Amz-Algorithm=AWS4-HMAC-SHA256 &X-Amz-Credential=[your-access-key-id]/20140721/us-west-2/elastic ache/aws4_request &X-Amz-Date=20141201T170651Z &X-Amz-SignedHeaders=content-type;host;user-agent;x-amz-content-sha256;x-amz-date &X-Amz-Signature=[signature-value]
If you don't have an active Redis cache cluster to use as the primary cluster, you can create the replicationgroup and its associated cache clusters with a single command. The following example creates theMulti-AZ enabled replication group my-rg with 3 cache clusters; the primary cluster my-rg001 and tworeplicas, my-rg002 and my-rg003.
https://elasticache.us-west-2.amazonaws.com/ ?Action=CreateReplicationGroup &AutomaticFailover=true &CacheNodeType=cache.m3.large &Engine=redis
API Version 2015-02-0237
Amazon ElastiCache User GuideEnabling Redis Multi-AZ
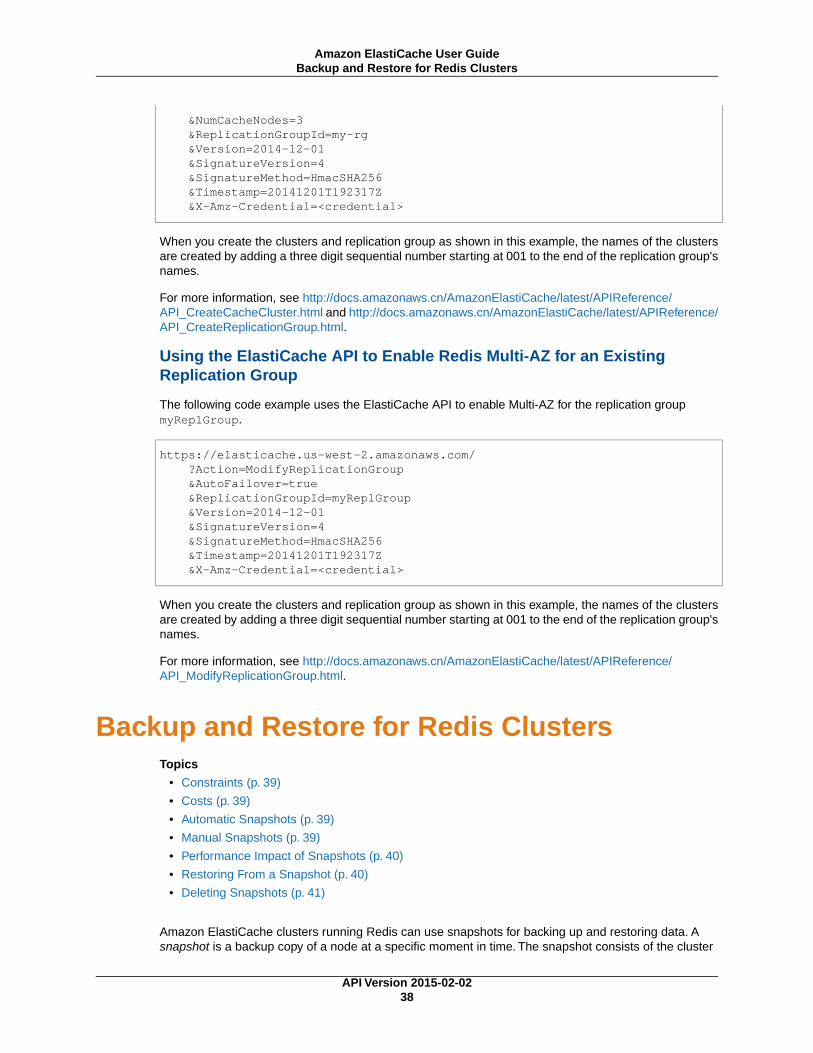
&NumCacheNodes=3 &ReplicationGroupId=my-rg &Version=2014-12-01 &SignatureVersion=4 &SignatureMethod=HmacSHA256 &Timestamp=20141201T192317Z &X-Amz-Credential=<credential>
When you create the clusters and replication group as shown in this example, the names of the clustersare created by adding a three digit sequential number starting at 001 to the end of the replication group'snames.
For more information, see http://docs.amazonaws.cn/AmazonElastiCache/latest/APIReference/API_CreateCacheCluster.html and http://docs.amazonaws.cn/AmazonElastiCache/latest/APIReference/API_CreateReplicationGroup.html.
Using the ElastiCache API to Enable Redis Multi-AZ for an ExistingReplication Group
The following code example uses the ElastiCache API to enable Multi-AZ for the replication groupmyReplGroup.
https://elasticache.us-west-2.amazonaws.com/ ?Action=ModifyReplicationGroup &AutoFailover=true &ReplicationGroupId=myReplGroup &Version=2014-12-01 &SignatureVersion=4 &SignatureMethod=HmacSHA256 &Timestamp=20141201T192317Z &X-Amz-Credential=<credential>
When you create the clusters and replication group as shown in this example, the names of the clustersare created by adding a three digit sequential number starting at 001 to the end of the replication group'snames.
For more information, see http://docs.amazonaws.cn/AmazonElastiCache/latest/APIReference/API_ModifyReplicationGroup.html.
Backup and Restore for Redis ClustersTopics
• Constraints (p. 39)
• Costs (p. 39)
• Automatic Snapshots (p. 39)
• Manual Snapshots (p. 39)
• Performance Impact of Snapshots (p. 40)
• Restoring From a Snapshot (p. 40)
• Deleting Snapshots (p. 41)
Amazon ElastiCache clusters running Redis can use snapshots for backing up and restoring data. Asnapshot is a backup copy of a node at a specific moment in time. The snapshot consists of the cluster
API Version 2015-02-0238
Amazon ElastiCache User GuideBackup and Restore for Redis Clusters

metadata, along with all of the data in the node. All snapshots are written to Amazon Simple StorageService (Amazon S3), which provides durable storage. At any time, you can restore your data by creatinga new Redis cluster and populating it with data from a snapshot. ElastiCache lets you manage snapshotsusing the AWS Management Console, the ElastiCache command line interface (CLI), and the ElastiCacheapplication programming interface (API).
This section provides an overview of working with backup and restore for clusters running on Redis.
ConstraintsAt this time, backup and restore is supported only for clusters running on Redis.
Backup and restore is not supported on cache.t1.micro or cache.t2.* cache nodes. All other cachenode types are supported.
CostsElastiCache allows you to store one snapshot for each active Redis cluster, free of charge. Storage spacefor additional snapshots is charged at a rate of $0.085/GB per month for all regions. There are no datatransfer fees for creating a snapshot, or for restoring data from a snapshot to a Redis cluster.
Automatic SnapshotsFor any Redis cluster, you can enable automatic snapshots, where ElastiCache creates a snapshot ofthe cluster on a daily basis. Automatic snapshots can help guard against data loss: In the event of a nodefailure, you can create a new cluster, restoring all of your data from the most recent snapshot. The resultis a warm-started Redis cluster, pre-loaded with your data and ready for use.
When you configure an automatic snapshot, you should consider the following settings:
• Snapshot window—A period during each day when ElastiCache will begin creating a snapshot. Theminimum length for the snapshot window is 60 minutes.You can set the snapshot window for any timewhen it's most convenient for you, or for a time of day that avoids doing snapshots during a particularlyhigh-utilization period.
If you do not specify a backup window, ElastiCache will assign one automatically.
• Snapshot retention limit—The number of days the snapshot will be retained in Amazon S3. Forexample, if you set the retention limit to 5, then a snapshot taken today would be retained for 5 days.When the retention limit expires, the snapshot is automatically deleted.
The maximum snapshot retention limit is 35 days.The minimum is 0, meaning that automatic snapshotsare disabled for the cluster.
For more information, see Managing Backup and Restore (Redis) (p. 139)
Manual SnapshotsIn addition to automatic snapshots, you can create a manual snapshot at any time. For example, if anautomatic snapshot is nearing its snapshot retention limit, you can make a copy of that snapshot andkeep the copy until you decide to delete it.
Manual snapshots are also useful for archiving purposes. For example, suppose that you've developeda set of baseline data for testing purposes; you can create a manual snapshot of the data and restore itwhenever you want. After you test an application that modifies the data, you can reset the data by creating
API Version 2015-02-0239
Amazon ElastiCache User GuideConstraints
a new cluster and restoring from your baseline snapshot. When the cluster is ready, you can test yourapplications against the baseline data again—and repeat this process as often as needed.
You can create a manual snapshot in one of the following ways:
• Create a snapshot of a cluster. This is in addition to any automatic snapshots you have enabled on thecluster.
• Make a copy of an existing snapshot. It does not matter whether the source snapshot was createdautomatically or manually.
• Take a final snapshot immediately before deleting a cluster or replication group.
There is a limit in place on the rate of manual snapshot creation: During any contiguous 24-hour period,you can create no more than 20 manual snapshots per cluster.
Manual snapshots do not have retention limits, and ElastiCache does not automatically delete them. Evenif you delete a cluster, any manual snapshots from that cluster will be retained. If you no longer want tokeep a manual snapshot, you must explicitly delete it yourself.
For more information, see Creating a Manual Snapshot (p. 146)
Performance Impact of SnapshotsSnapshots are created using Redis' native BGSAVE command: The Redis process on the cache nodespawns a child process to write all the data from the cache to a Redis RDB file. It can take up to tenseconds to spawn the child process, and during this time the parent process is unable to accept incomingapplication requests. After the child process is running independently, the parent process resumes normaloperations. The child process exits when the snapshot operation is complete.
While the snapshot is being written, additional cache node memory is used for new writes. If this additionalmemory usage exceeds the available memory on the node, processing can become slow due to excessivepaging.
The following are guidelines for improving snapshotting performance.
• Set the reserved-memory parameter—To mitigate excessive paging, we recommend that you set thereserved-memory parameter. This parameter prevents Redis from consuming all of the availablememory on the node, and can help reduce the amount of paging.You might also see performanceimprovements by simply using a larger node. For more information about the reserved-memory parameterand node memory sizes, see Parameters for Redis (p. 48).
• Create snapshots on a read replica—If you are running Redis in a node group with more than onenode, you can take a snapshot from the primary node or one of the read replicas. Because of thesystem resources required during a BGSAVE, we recommend that you create snapshots on one of theread replicas, rather than the primary. While the snapshot is being created on the replica, the primarynode remains unaffected by BGSAVE resource requirements, and can continue serving requestswithout slowing down.
If you delete a replication group and request a final snapshot, ElastiCache will always take the snapshotat the primary node.This ensures that you capture the very latest Redis data, before the replication groupis deleted.
Restoring From a SnapshotYou can restore the data from a snapshot into a new cluster at any time. By default, the new cluster willhave the same configuration that the source cluster did when the snapshot was created; however, youcan override some of the parameters, such as node size.
API Version 2015-02-0240
Amazon ElastiCache User GuidePerformance Impact of Snapshots
During the restore operation, ElastiCache creates the new cluster, and then populates the Redis cachewith data from the snapshot file. When this process is complete, the Redis cache is warmed up and thecluster is ready to accept requests.
For more information, see Restoring a Snapshot to a New Cluster (p. 149).
Deleting SnapshotsAn automatic snapshot is automatically deleted when its retention limit expires. If you delete a cluster, allof its automatic snapshots are also deleted. If you delete a replication group, all of the automatic snapshotsfrom the clusters in that group are also deleted.
NoteWhen you delete a cluster or a replication group, you have the option of taking a final snapshotbefore the deletion begins. In the case of a replication group, the snapshot is taken at the primarynode.
ElastiCache provides a deletion API that lets you delete a snapshot at any time, regardless of whetherthe snapshot was created automatically or manually. (Since manual snapshots do not have a retentionlimit, manual deletion is the only way to remove them.)
For more information, see Deleting Snapshots (p. 153).
ClustersA cluster is a collection of one or more cache nodes, all of which run an instance of supported cacheengine software. When you create a cache cluster, you specify the cache engine that all of the nodes willuse.
Most ElastiCache operations are performed at the cluster level.You can set up a cache cluster with aspecific number of cache nodes and a cache parameter group that controls the properties for each cachenode. All cache nodes within a cluster are designed to be of the same node type and have the sameparameter and security group settings.
Every cluster must have a cluster identifier. The cluster identifier is a customer-supplied "name" for thecluster. This identifier specifies a particular cluster when interacting with the ElastiCache API andcommands. The cluster identifier must be unique for that customer in an AWS region.
The following are descriptions of supported cache engine software for ElastiCache.
Memcached ClustersMemcached is a distributed caching solution that uses using client-side hashing to distribute data evenlyacross one or more cache nodes.You can scale up a Memcached cluster by adding more cache nodes.For more information go to http://memcached.org.
ElastiCache supports the following versions of Memcached:
Memcached 1.4.14
Memcached 1.4.14 adds several bug fixes and new features, including:
• Ability to rebalance and fine-tune slab memory—Use the slab_automove and slab_reassignparameters to change the way that Memcached manages slab memory.
• New touch commands and counters.
API Version 2015-02-0241
Amazon ElastiCache User GuideDeleting Snapshots

Memcached 1.4.5
Memcached 1.4.5 was the first release supported by ElastiCache.
Redis ClustersRedis is a key-value store that supports abstract data types and optional data durability. A Redis clusterconsists of a single cache node; you can scale up by using a larger cache node. For more information,go to http://redis.io.
ElastiCache supports the following versions of Redis:
Redis 2.8.19
Redis 2.8.19 adds several bug fixes and new features since 2.8.6.
• HyperLogLog—In processing data, determining the exact cardinality of a data set is proportional tothe size of the data set.When processing big data, the memory requirements for determining the exactcardinality is prohibitive. HyperLogLog estimates cardinality with a variance of 0.81% (0.0081) whileusing only 12K of memory (plus a little bit for overhead). HyperLogLog is supported with the Rediscommands, PFADD, PFCOUNT, and PFMERGE.
• Lexicographical range queries—When querying a sorted set of strings, you can use ZRANGEBYLEXto retrieve all the values in a range, for example, all the names between Abdul and Barak. Othercommands that support Lexicographic range queries include ZLEXCOUNT and ZREMRANGEBYLEX.
• Bug fixes—Including preventing a primary node from sending stale data to replica nodes by failing themaster SYNC when a background save (bgsave) child process terminates unexpectedly.
Redis 2.8.6
Redis 2.8.6 adds several bug fixes and new features, including:
• Partial resynchronization (psync)—In a replication group, the primary cache node maintains abacklog, which is a buffer that holds data that has not yet been sent to the read replicas. If a replica isdisconnected from the primary node, then write requests will continue to accumulate in the primary'sbacklog. When a replica re-establishes contact with the primary, it can request a psync to obtain onlythe portion of backlog data that the replica missed while it was disconnected. In general, a psync ismuch faster than a full sync, so a replica can quickly catch up with the primary.You can control thesize of the backlog buffer.You can also control the time-to-live attribute of the backlog. If the replica isunavailable for an extended period of time, exceeding the backlog time-to-live, then the backlog isdiscarded and the replica must perform a full sync when it reconnects.
• Primary node only allows write operations if there are enough available replicas—In normalcircumstances, each read replica pings the primary once every second. By default, if the primary doesnot receive a ping from a replica, then it will still continue accepting write operations from clients.However, this can lead to write operation loss as data cannot be sent to the replicas.You can nowchange this behavior, so that the primary can stop accepting write operations if the number of availablereplicas drops below a user-specified threshold. Redis 2.8.6 lets you specify the minimum number ofreplicas that must be available.You can also specify the number of seconds within which the primarymust receive pings from the replica, or else stop accepting write operations.
• Event notifications with Redis publish-and-subscribe—Redis clients can subscribe to server-sideevents of interest, for example, when an item is added to the cache. When an event of interest occurs,Redis publishes notifications to clients that are subscribed to these events.You can specify the typesof events that Redis publishes. For more information, go to http://redis.io/topics/notifications.
Redis 2.6.13
Redis 2.6.13 was the first release supported by ElastiCache.
API Version 2015-02-0242
Amazon ElastiCache User GuideRedis Clusters
Regions and Availability ZonesAWS cloud computing resources are housed in highly available data center facilities.To provide additionalscalability and reliability, these data center facilities are located in several different physical locations.These locations are categorized by regions and Availability Zones.
Regions are large and widely dispersed into separate geographic locations. Availability Zones are distinctlocations within a region that are engineered to be isolated from failures in other Availability Zones andprovide inexpensive, low latency network connectivity to other Availability Zones in the same region.
ImportantEach region is completely independent. Any ElastiCache activity you initiate (for example, creatingclusters) runs only in your current default region. The default region can be changed by settingthe EC2_REGION environment variable, or be overridden by using the --url parameter withthe command line interface. For more information, see Common Options for API Tools.
To create or work with a cluster in a specific region, use the corresponding regional service endpoint.
For a listing of ElastiCache endpoints, go to the "Regions and Endpoints" section of the Amazon WebServices General Reference.
Locating Your Redis Read Replicas andMemcached NodesAmazon ElastiCache supports specifying in which Availability Zone you create your clusters. If your Redisreplication group will have multiple clusters, or your Memcached cache cluster will have multiple nodes,you have the option to locate all the clusters (Redis) or nodes (Memcached) in a single Availability Zoneor locate them across different Availability Zones. By locating the clusters or nodes in different AvailabilityZones, you eliminate the chance that a failure, such as a power outage, in one Availability Zone will causeyour entire system to fail.Testing has demonstrated that there is no significant latency difference betweenlocating all nodes in one Availability Zone or spreading them across multiple Availability Zones.
To specify an Availability Zone for your Memcached nodes, create a Memcached cluster as you normallydo. On the Cluster Details page of the Launch Cluster wizard, use the Preferred Zone list to specify anAvailability Zone for this node.
To specify an Availability Zone for your Redis read replica, you first create a replication group and thenadd from one to five read replicas to the replication group.You can specify a different Availability Zonefor each read replica. For more information on creating a Redis read replica in an Availability Zone differentfrom the primary Redis cache cluster, see Creating a Redis Replication Group (p. 127) and Adding a RedisCache Cluster to a Replication Group (p. 32).
Parameter GroupsWith Amazon ElastiCache, you can use parameter groups to control the runtime parameters of yournodes. A parameter group represents a combination of specific values for each parameter that is passedto the cache engine software during startup. These values determine how the cache engine processeson each node will behave at runtime. The parameter values on a specific parameter group apply to allnodes that are associated with the group, regardless of which cluster they belong to.
Topics
• Parameters for Memcached (p. 44)
• Parameters for Redis (p. 48)
API Version 2015-02-0243
Amazon ElastiCache User GuideRegions and Availability Zones
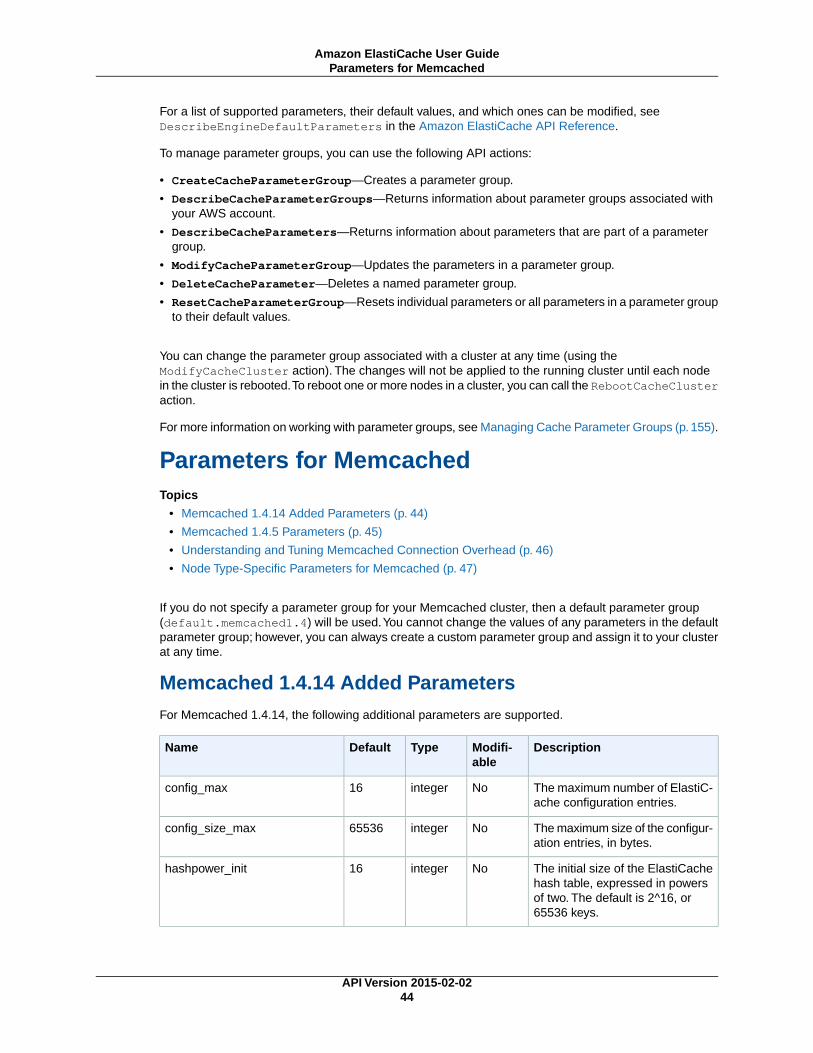
For a list of supported parameters, their default values, and which ones can be modified, seeDescribeEngineDefaultParameters in the Amazon ElastiCache API Reference.
To manage parameter groups, you can use the following API actions:
• CreateCacheParameterGroup—Creates a parameter group.
• DescribeCacheParameterGroups—Returns information about parameter groups associated withyour AWS account.
• DescribeCacheParameters—Returns information about parameters that are part of a parametergroup.
• ModifyCacheParameterGroup—Updates the parameters in a parameter group.
• DeleteCacheParameter—Deletes a named parameter group.
• ResetCacheParameterGroup—Resets individual parameters or all parameters in a parameter groupto their default values.
You can change the parameter group associated with a cluster at any time (using theModifyCacheCluster action). The changes will not be applied to the running cluster until each nodein the cluster is rebooted.To reboot one or more nodes in a cluster, you can call the RebootCacheClusteraction.
For more information on working with parameter groups, see Managing Cache Parameter Groups (p. 155).
Parameters for MemcachedTopics
• Memcached 1.4.14 Added Parameters (p. 44)
• Memcached 1.4.5 Parameters (p. 45)
• Understanding and Tuning Memcached Connection Overhead (p. 46)
• Node Type-Specific Parameters for Memcached (p. 47)
If you do not specify a parameter group for your Memcached cluster, then a default parameter group(default.memcached1.4) will be used.You cannot change the values of any parameters in the defaultparameter group; however, you can always create a custom parameter group and assign it to your clusterat any time.
Memcached 1.4.14 Added ParametersFor Memcached 1.4.14, the following additional parameters are supported.
DescriptionModifi-able
TypeDefaultName
The maximum number of ElastiC-ache configuration entries.
Nointeger16config_max
The maximum size of the configur-ation entries, in bytes.
Nointeger65536config_size_max
The initial size of the ElastiCachehash table, expressed in powersof two. The default is 2^16, or65536 keys.
Nointeger16hashpower_init
API Version 2015-02-0244
Amazon ElastiCache User GuideParameters for Memcached
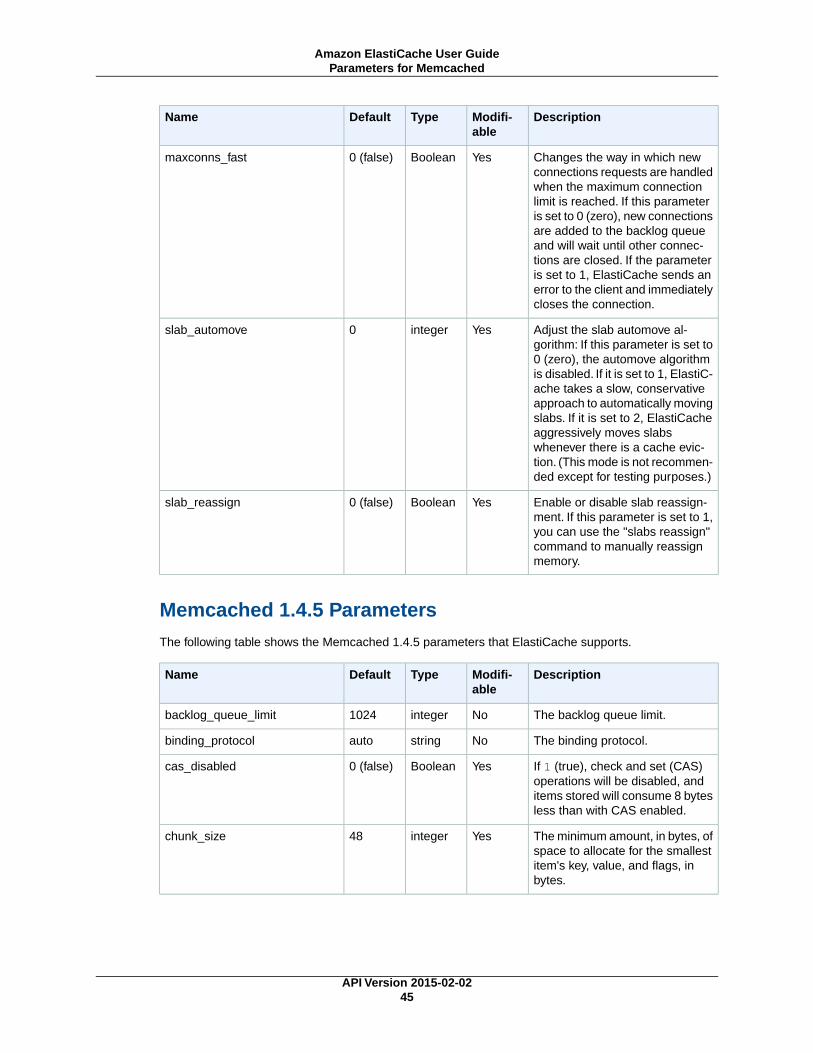
DescriptionModifi-able
TypeDefaultName
Changes the way in which newconnections requests are handledwhen the maximum connectionlimit is reached. If this parameteris set to 0 (zero), new connectionsare added to the backlog queueand will wait until other connec-tions are closed. If the parameteris set to 1, ElastiCache sends anerror to the client and immediatelycloses the connection.
YesBoolean0 (false)maxconns_fast
Adjust the slab automove al-gorithm: If this parameter is set to0 (zero), the automove algorithmis disabled. If it is set to 1, ElastiC-ache takes a slow, conservativeapproach to automatically movingslabs. If it is set to 2, ElastiCacheaggressively moves slabswhenever there is a cache evic-tion. (This mode is not recommen-ded except for testing purposes.)
Yesinteger0slab_automove
Enable or disable slab reassign-ment. If this parameter is set to 1,you can use the "slabs reassign"command to manually reassignmemory.
YesBoolean0 (false)slab_reassign
Memcached 1.4.5 ParametersThe following table shows the Memcached 1.4.5 parameters that ElastiCache supports.
DescriptionModifi-able
TypeDefaultName
The backlog queue limit.Nointeger1024backlog_queue_limit
The binding protocol.Nostringautobinding_protocol
If 1 (true), check and set (CAS)operations will be disabled, anditems stored will consume 8 bytesless than with CAS enabled.
YesBoolean0 (false)cas_disabled
The minimum amount, in bytes, ofspace to allocate for the smallestitem's key, value, and flags, inbytes.
Yesinteger48chunk_size
API Version 2015-02-0245
Amazon ElastiCache User GuideParameters for Memcached
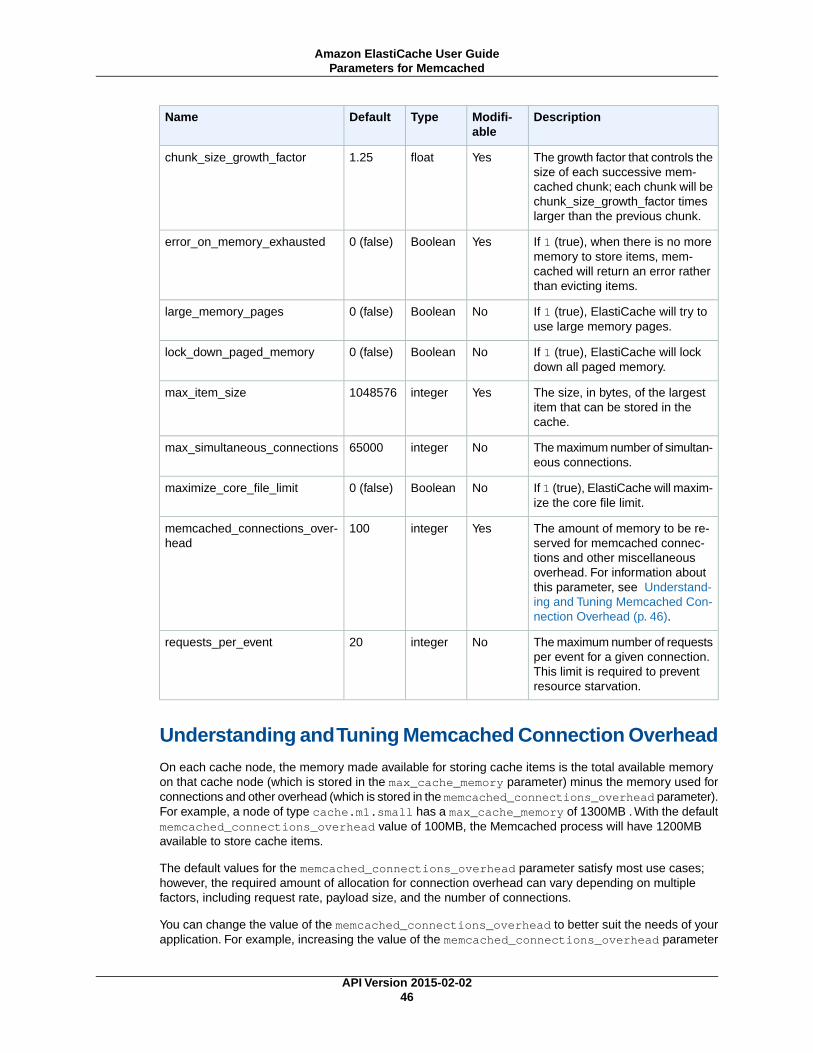
DescriptionModifi-able
TypeDefaultName
The growth factor that controls thesize of each successive mem-cached chunk; each chunk will bechunk_size_growth_factor timeslarger than the previous chunk.
Yesfloat1.25chunk_size_growth_factor
If 1 (true), when there is no morememory to store items, mem-cached will return an error ratherthan evicting items.
YesBoolean0 (false)error_on_memory_exhausted
If 1 (true), ElastiCache will try touse large memory pages.
NoBoolean0 (false)large_memory_pages
If 1 (true), ElastiCache will lockdown all paged memory.
NoBoolean0 (false)lock_down_paged_memory
The size, in bytes, of the largestitem that can be stored in thecache.
Yesinteger1048576max_item_size
The maximum number of simultan-eous connections.
Nointeger65000max_simultaneous_connections
If 1 (true), ElastiCache will maxim-ize the core file limit.
NoBoolean0 (false)maximize_core_file_limit
The amount of memory to be re-served for memcached connec-tions and other miscellaneousoverhead. For information aboutthis parameter, see Understand-ing and Tuning Memcached Con-nection Overhead (p. 46).
Yesinteger100memcached_connections_over-head
The maximum number of requestsper event for a given connection.This limit is required to preventresource starvation.
Nointeger20requests_per_event
Understanding and Tuning Memcached Connection OverheadOn each cache node, the memory made available for storing cache items is the total available memoryon that cache node (which is stored in the max_cache_memory parameter) minus the memory used forconnections and other overhead (which is stored in the memcached_connections_overhead parameter).For example, a node of type cache.m1.small has a max_cache_memory of 1300MB . With the defaultmemcached_connections_overhead value of 100MB, the Memcached process will have 1200MBavailable to store cache items.
The default values for the memcached_connections_overhead parameter satisfy most use cases;however, the required amount of allocation for connection overhead can vary depending on multiplefactors, including request rate, payload size, and the number of connections.
You can change the value of the memcached_connections_overhead to better suit the needs of yourapplication. For example, increasing the value of the memcached_connections_overhead parameter
API Version 2015-02-0246
Amazon ElastiCache User GuideParameters for Memcached
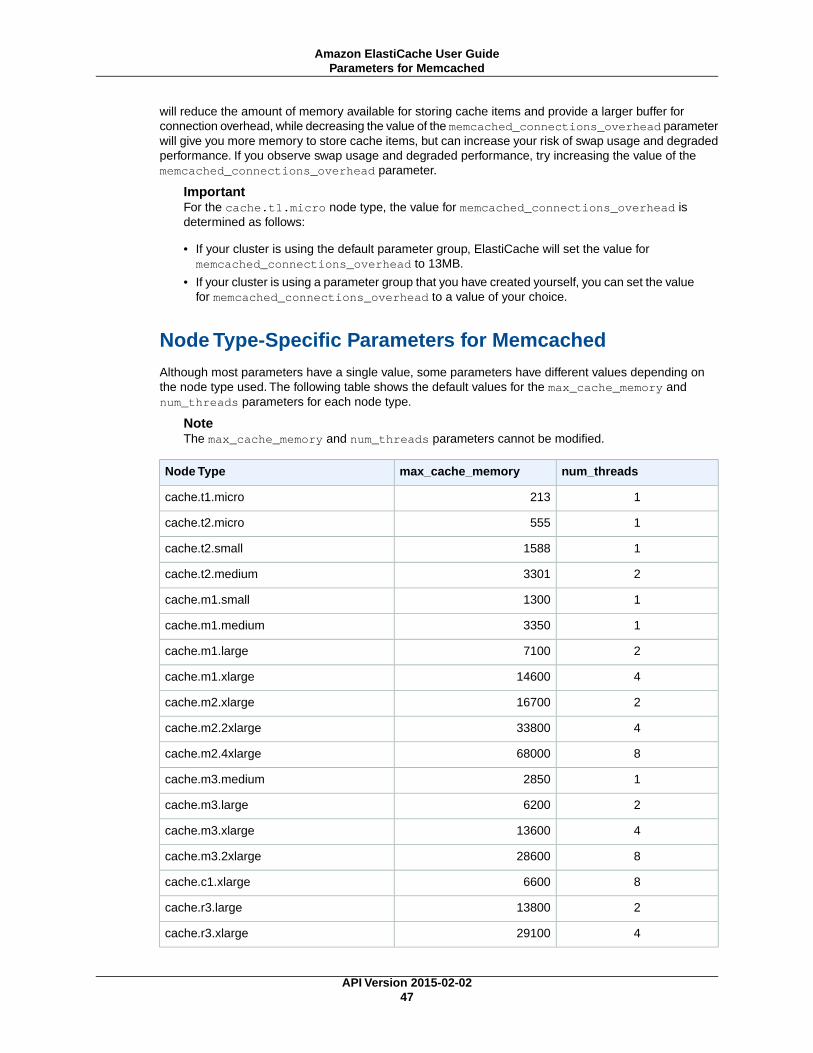
will reduce the amount of memory available for storing cache items and provide a larger buffer forconnection overhead, while decreasing the value of the memcached_connections_overhead parameterwill give you more memory to store cache items, but can increase your risk of swap usage and degradedperformance. If you observe swap usage and degraded performance, try increasing the value of thememcached_connections_overhead parameter.
ImportantFor the cache.t1.micro node type, the value for memcached_connections_overhead isdetermined as follows:
• If your cluster is using the default parameter group, ElastiCache will set the value formemcached_connections_overhead to 13MB.
• If your cluster is using a parameter group that you have created yourself, you can set the valuefor memcached_connections_overhead to a value of your choice.
Node Type-Specific Parameters for MemcachedAlthough most parameters have a single value, some parameters have different values depending onthe node type used. The following table shows the default values for the max_cache_memory andnum_threads parameters for each node type.
NoteThe max_cache_memory and num_threads parameters cannot be modified.
num_threadsmax_cache_memoryNode Type
1213cache.t1.micro
1555cache.t2.micro
11588cache.t2.small
23301cache.t2.medium
11300cache.m1.small
13350cache.m1.medium
27100cache.m1.large
414600cache.m1.xlarge
216700cache.m2.xlarge
433800cache.m2.2xlarge
868000cache.m2.4xlarge
12850cache.m3.medium
26200cache.m3.large
413600cache.m3.xlarge
828600cache.m3.2xlarge
86600cache.c1.xlarge
213800cache.r3.large
429100cache.r3.xlarge
API Version 2015-02-0247
Amazon ElastiCache User GuideParameters for Memcached
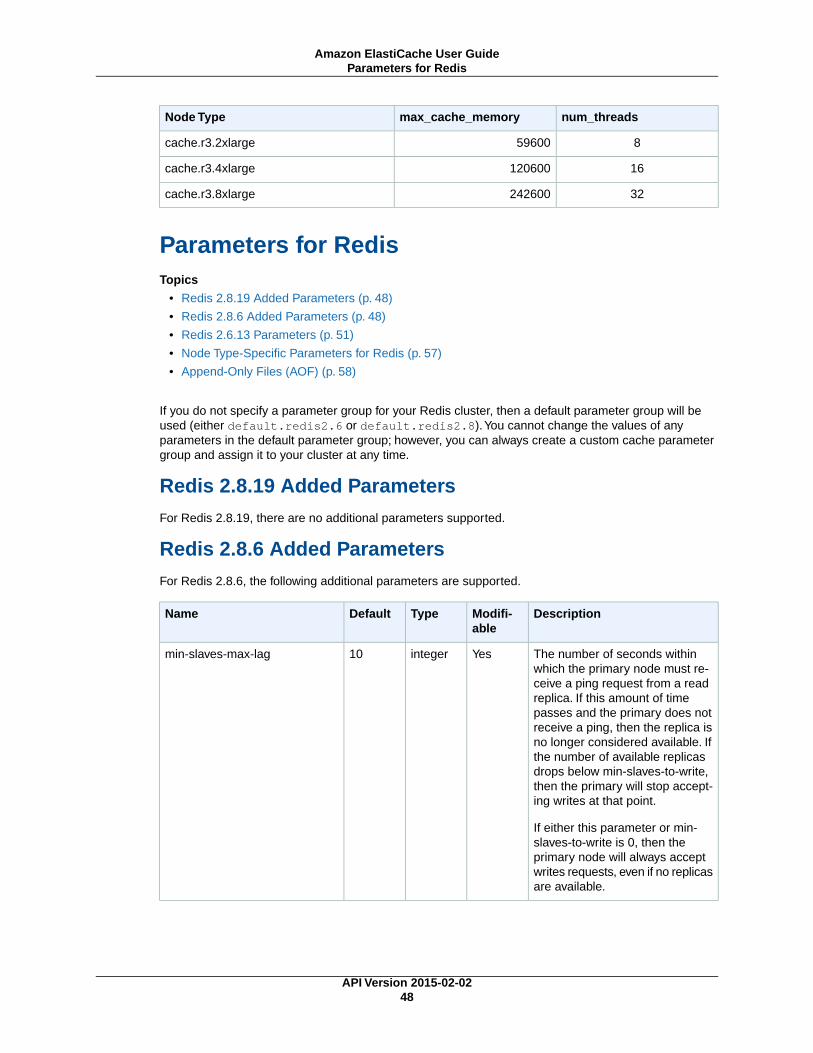
num_threadsmax_cache_memoryNode Type
859600cache.r3.2xlarge
16120600cache.r3.4xlarge
32242600cache.r3.8xlarge
Parameters for RedisTopics
• Redis 2.8.19 Added Parameters (p. 48)
• Redis 2.8.6 Added Parameters (p. 48)
• Redis 2.6.13 Parameters (p. 51)
• Node Type-Specific Parameters for Redis (p. 57)
• Append-Only Files (AOF) (p. 58)
If you do not specify a parameter group for your Redis cluster, then a default parameter group will beused (either default.redis2.6 or default.redis2.8).You cannot change the values of anyparameters in the default parameter group; however, you can always create a custom cache parametergroup and assign it to your cluster at any time.
Redis 2.8.19 Added ParametersFor Redis 2.8.19, there are no additional parameters supported.
Redis 2.8.6 Added ParametersFor Redis 2.8.6, the following additional parameters are supported.
DescriptionModifi-able
TypeDefaultName
The number of seconds withinwhich the primary node must re-ceive a ping request from a readreplica. If this amount of timepasses and the primary does notreceive a ping, then the replica isno longer considered available. Ifthe number of available replicasdrops below min-slaves-to-write,then the primary will stop accept-ing writes at that point.
If either this parameter or min-slaves-to-write is 0, then theprimary node will always acceptwrites requests, even if no replicasare available.
Yesinteger10min-slaves-max-lag
API Version 2015-02-0248
Amazon ElastiCache User GuideParameters for Redis
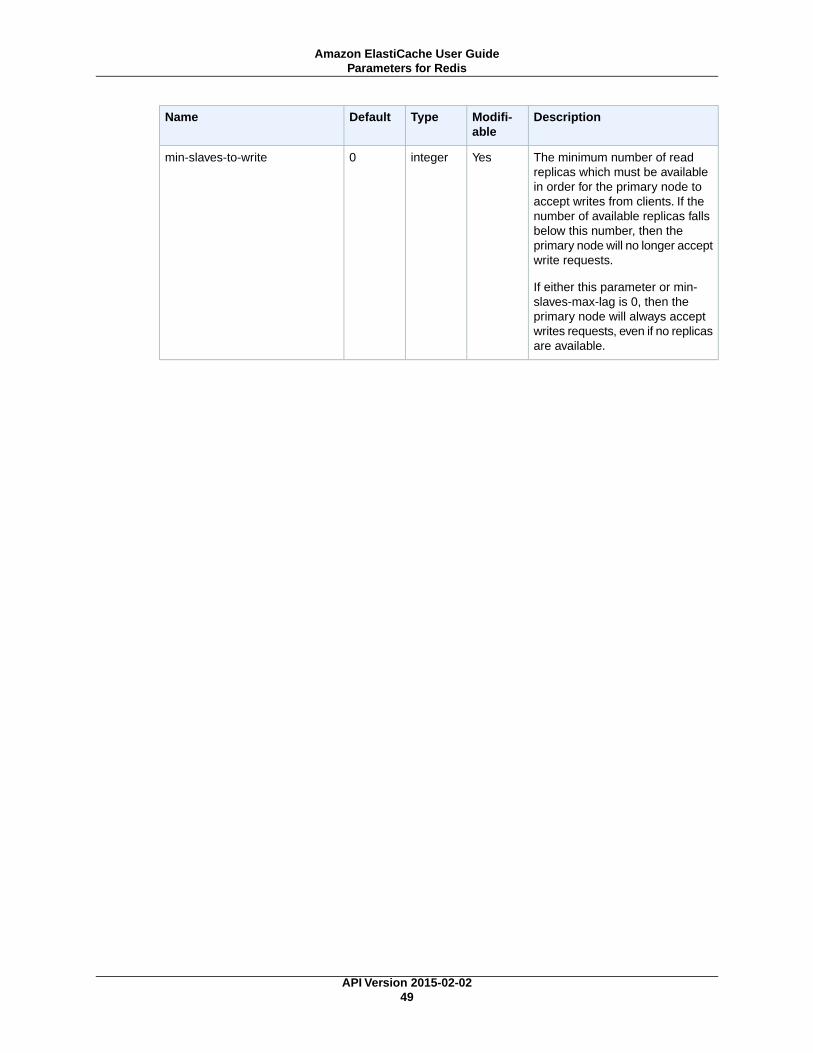
DescriptionModifi-able
TypeDefaultName
The minimum number of readreplicas which must be availablein order for the primary node toaccept writes from clients. If thenumber of available replicas fallsbelow this number, then theprimary node will no longer acceptwrite requests.
If either this parameter or min-slaves-max-lag is 0, then theprimary node will always acceptwrites requests, even if no replicasare available.
Yesinteger0min-slaves-to-write
API Version 2015-02-0249
Amazon ElastiCache User GuideParameters for Redis
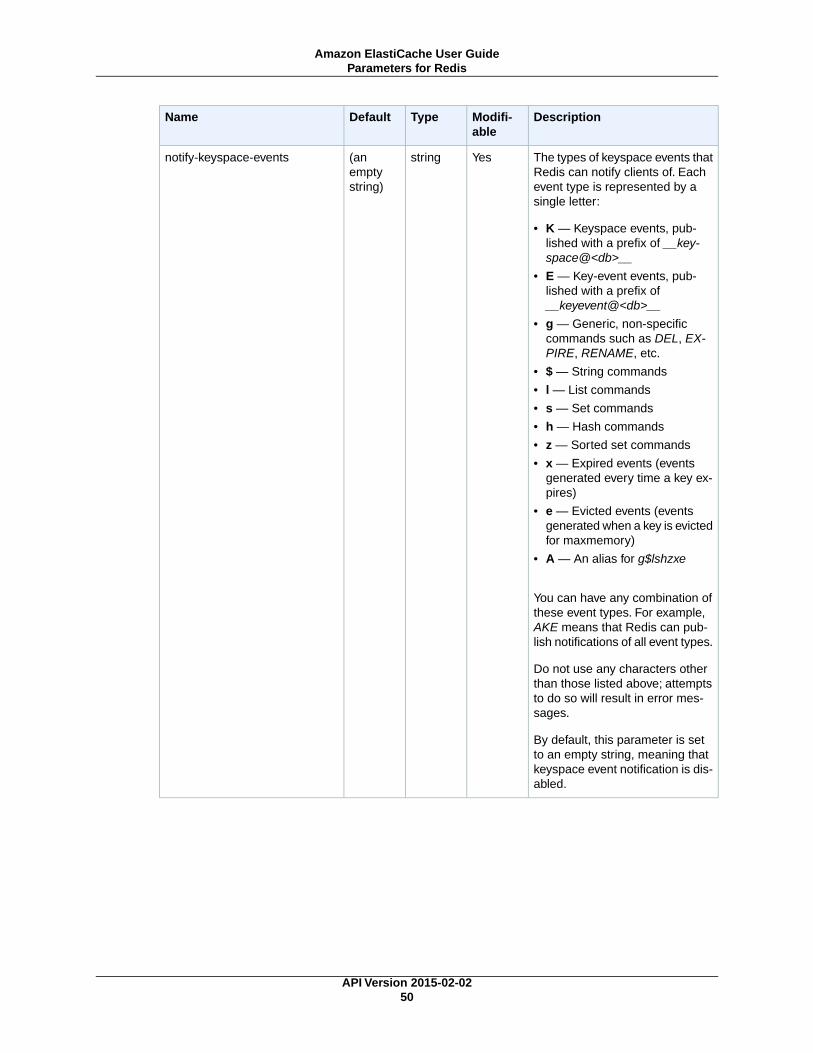
DescriptionModifi-able
TypeDefaultName
The types of keyspace events thatRedis can notify clients of. Eachevent type is represented by asingle letter:
• K — Keyspace events, pub-lished with a prefix of __key-space@<db>__
• E — Key-event events, pub-lished with a prefix of__keyevent@<db>__
• g — Generic, non-specificcommands such as DEL, EX-PIRE, RENAME, etc.
• $ — String commands
• l — List commands
• s — Set commands
• h — Hash commands
• z — Sorted set commands
• x — Expired events (eventsgenerated every time a key ex-pires)
• e — Evicted events (eventsgenerated when a key is evictedfor maxmemory)
• A — An alias for g$lshzxe
You can have any combination ofthese event types. For example,AKE means that Redis can pub-lish notifications of all event types.
Do not use any characters otherthan those listed above; attemptsto do so will result in error mes-sages.
By default, this parameter is setto an empty string, meaning thatkeyspace event notification is dis-abled.
Yesstring(anemptystring)
notify-keyspace-events
API Version 2015-02-0250
Amazon ElastiCache User GuideParameters for Redis
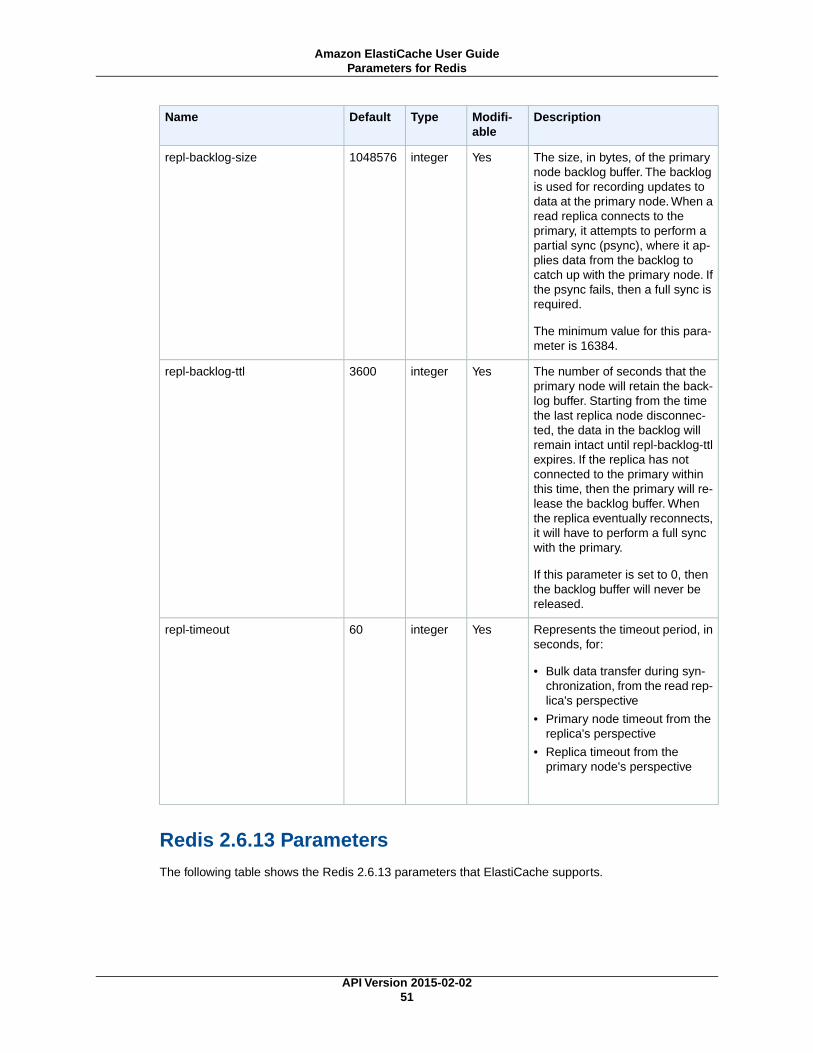
DescriptionModifi-able
TypeDefaultName
The size, in bytes, of the primarynode backlog buffer. The backlogis used for recording updates todata at the primary node. When aread replica connects to theprimary, it attempts to perform apartial sync (psync), where it ap-plies data from the backlog tocatch up with the primary node. Ifthe psync fails, then a full sync isrequired.
The minimum value for this para-meter is 16384.
Yesinteger1048576repl-backlog-size
The number of seconds that theprimary node will retain the back-log buffer. Starting from the timethe last replica node disconnec-ted, the data in the backlog willremain intact until repl-backlog-ttlexpires. If the replica has notconnected to the primary withinthis time, then the primary will re-lease the backlog buffer. Whenthe replica eventually reconnects,it will have to perform a full syncwith the primary.
If this parameter is set to 0, thenthe backlog buffer will never bereleased.
Yesinteger3600repl-backlog-ttl
Represents the timeout period, inseconds, for:
• Bulk data transfer during syn-chronization, from the read rep-lica's perspective
• Primary node timeout from thereplica's perspective
• Replica timeout from theprimary node's perspective
Yesinteger60repl-timeout
Redis 2.6.13 ParametersThe following table shows the Redis 2.6.13 parameters that ElastiCache supports.
API Version 2015-02-0251
Amazon ElastiCache User GuideParameters for Redis
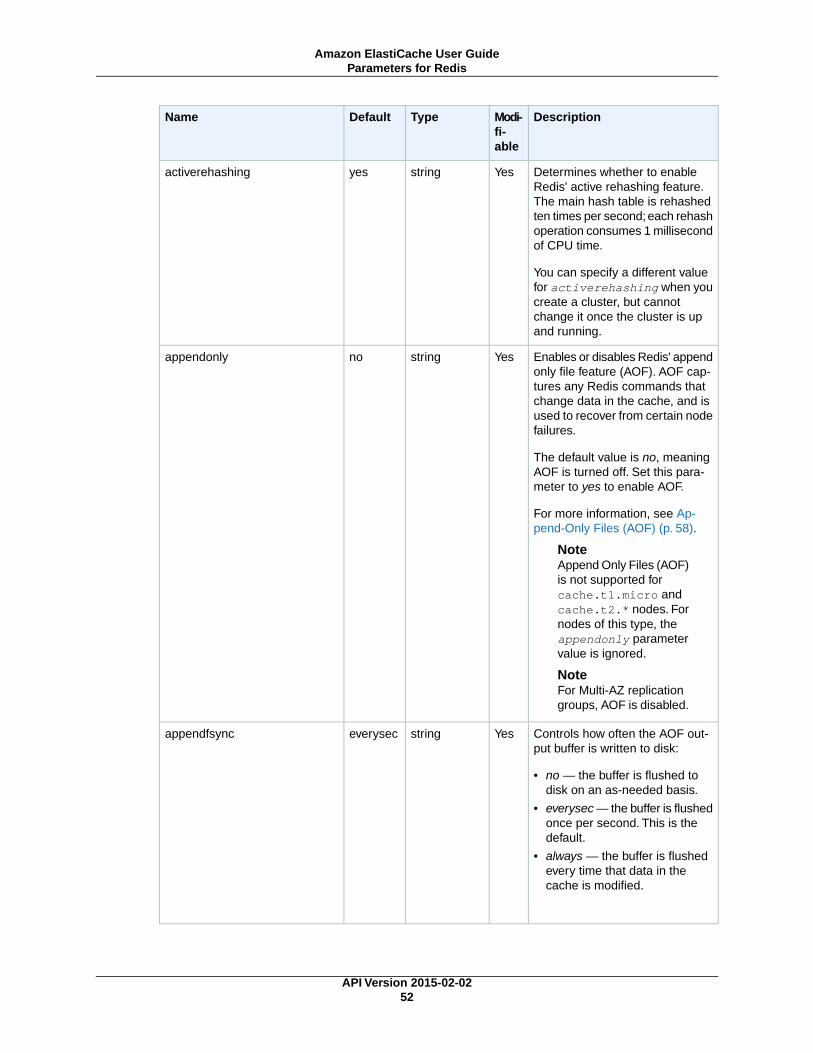
DescriptionModi-fi-able
TypeDefaultName
Determines whether to enableRedis' active rehashing feature.The main hash table is rehashedten times per second; each rehashoperation consumes 1 millisecondof CPU time.
You can specify a different valuefor activerehashing when youcreate a cluster, but cannotchange it once the cluster is upand running.
Yesstringyesactiverehashing
Enables or disables Redis' appendonly file feature (AOF). AOF cap-tures any Redis commands thatchange data in the cache, and isused to recover from certain nodefailures.
The default value is no, meaningAOF is turned off. Set this para-meter to yes to enable AOF.
For more information, see Ap-pend-Only Files (AOF) (p. 58).
NoteAppend Only Files (AOF)is not supported forcache.t1.micro andcache.t2.* nodes. Fornodes of this type, theappendonly parametervalue is ignored.
NoteFor Multi-AZ replicationgroups, AOF is disabled.
Yesstringnoappendonly
Controls how often the AOF out-put buffer is written to disk:
• no — the buffer is flushed todisk on an as-needed basis.
• everysec — the buffer is flushedonce per second. This is thedefault.
• always — the buffer is flushedevery time that data in thecache is modified.
Yesstringeverysecappendfsync
API Version 2015-02-0252
Amazon ElastiCache User GuideParameters for Redis

DescriptionModi-fi-able
TypeDefaultName
If a client's output buffer reachesthe specified number of bytes, theclient will be disconnected. Thedefault is zero (no hard limit).
Yesinteger0client-output-buffer-limit-normal-hard-limit
If a client's output buffer reachesthe specified number of bytes, theclient will be disconnected, butonly if this condition persists forclient-output-buffer-lim-it-normal-soft-seconds.Thedefault is zero (no soft limit).
Yesinteger0client-output-buffer-limit-normal-soft-limit
If a client's output buffer remainsat client-output-buffer-limit-normal-soft-limitbytes for longer than this numberof seconds, the client will be dis-connected.The default is zero (notime limit).
Yesinteger0client-output-buffer-limit-normal-soft-seconds
For Redis publish/subscribe cli-ents: If a client's output bufferreaches the specified number ofbytes, the client will be disconnec-ted.
Yesinteger33554432client-output-buffer-limit-pubsub-hard-limit
For Redis publish/subscribe cli-ents: If a client's output bufferreaches the specified number ofbytes, the client will be disconnec-ted, but only if this condition per-sists for client-output-buf-fer-limit-pubsub-soft-seconds.
Yesinteger8388608client-output-buffer-limit-pubsub-soft-limit
For Redis publish/subscribe cli-ents: If a client's output buffer re-mains at client-output-buf-fer-limit-pubsub-soft-limit bytes for longer than thisnumber of seconds, the client willbe disconnected.
Yesinteger60client-output-buffer-limit-pubsub-soft-seconds
For Redis read replicas: If a cli-ent's output buffer reaches thespecified number of bytes, the cli-ent will be disconnected.
Nointeger268435456client-output-buffer-limit-slave-hard-limit
API Version 2015-02-0253
Amazon ElastiCache User GuideParameters for Redis

DescriptionModi-fi-able
TypeDefaultName
For Redis read replicas: If a cli-ent's output buffer reaches thespecified number of bytes, the cli-ent will be disconnected, but onlyif this condition persists for cli-ent-output-buffer-limit-slave-soft-seconds.
Nointeger67108864client-output-buffer-limit-slave-soft-limit
For Redis read replicas: If a cli-ent's output buffer remains atclient-output-buffer-lim-it-slave-soft-limit bytesfor longer than this number ofseconds, the client will be discon-nected.
Nointeger60client-output-buffer-limit-slave-soft-seconds
The number of databases.
You can specify a different valuefor databases when you create acluster, but cannot change it oncethe cluster is available.
Nointeger16databases
Determines the amount ofmemory used for hashes. Hasheswith fewer than the specifiednumber of entries are stored usinga special encoding that savesspace.
Yesinteger512hash-max-ziplist-entries
Determines the amount ofmemory used for hashes. Hasheswith entries that are smaller thanthe specified number of bytes arestored using a special encodingthat saves space.
Yesinteger64hash-max-ziplist-value
Determines the amount ofmemory used for lists. Lists withfewer than the specified numberof entries are stored using a spe-cial encoding that saves space.
Yesinteger512list-max-ziplist-entries
Determines the amount ofmemory used for lists. Lists withentries that are smaller than thespecified number of bytes arestored using a special encodingthat saves space.
Yesinteger64list-max-ziplist-value
API Version 2015-02-0254
Amazon ElastiCache User GuideParameters for Redis

DescriptionModi-fi-able
TypeDefaultName
The maximum execution time fora Lua script, in milliseconds, be-fore ElastiCache takes action tostop the script.
If lua-time-limit is exceeded,all Redis commands will return anerror of the form ____-BUSY.Since this state can cause interfer-ence with many essential Redisoperations, ElastiCache will firstissue a SCRIPT KILL command.If this is unsuccessful, ElastiCachewill forcibly restart Redis.
Nointeger5000lua-time-limit
The maximum number of clientsthat can be connected at one time.
Nointeger65000maxclients
The eviction policy for keys whenmaximum memory usage isreached. Valid values are:
volatile-lru | allkeys-lru| volatile-random |allkeys-random | volatile-ttl | noeviction
Yesstringvolatile-lru
maxmemory-policy
For least-recently-used (LRU) andtime-to-live (TTL) calculations, thisparameter represents the samplesize of keys to check. By default,Redis chooses 3 keys and usesthe one that was used least re-cently.
Yesinteger3maxmemory-samples
Determines the amount ofmemory used for certain kinds ofsets (strings that are integers inradix 10 in the range of 64 bitsigned integers). Such sets withfewer than the specified numberof entries are stored using a spe-cial encoding that saves space.
Yesinteger512set-max-intset-entries
API Version 2015-02-0255
Amazon ElastiCache User GuideParameters for Redis

DescriptionModi-fi-able
TypeDefaultName
The amount of memory, in bytes,reserved for non-cache usage. Bydefault, the Redis cache will growuntil it consumes the node'smaxmemory (see Node Type-Specific Parameters for Re-dis (p. 57)) before it starts evictingitems or rejecting writes based onthe maxmemory-policy. Redisuses additional memory for fea-tures such as snapshots, readreplicas, and append-only files(AOF). If these features are activewhen maxmemory is exhausted,node performance will likely sufferdue to excessive memory paging.If you increase reserved-memory, you lower the memoryallocated to Redis cache items tohelp reduce the amount of paging.
For example, suppose you havea cache.m1.small node, with amaxmemory of 900MB bytes. Ifyou set reserved-memory to 200MB, then Redis allows 700MB tobe used for cache item storagebefore applying the eviction policy;the 200MB is available for Redisbackground saves, replication,and AOF.
Consider increasing the reserved-memory parameter if you are us-ing read replicas, append-onlyfiles (AOF), or other Redis fea-tures that consume more memory.
NoteThis parameter is specif-ic to ElastiCache, and isnot part of the standardRedis distribution.
Yesinteger0reserved-memory
Determines whether a read replicain Redis can have read replicas ofits own.
Nostringnoslave-allow-chaining
The maximum execution time, inmicroseconds, for commands tobe logged by the Redis Slow Logfeature.
Yesinteger10000slowlog-log-slower-than
API Version 2015-02-0256
Amazon ElastiCache User GuideParameters for Redis
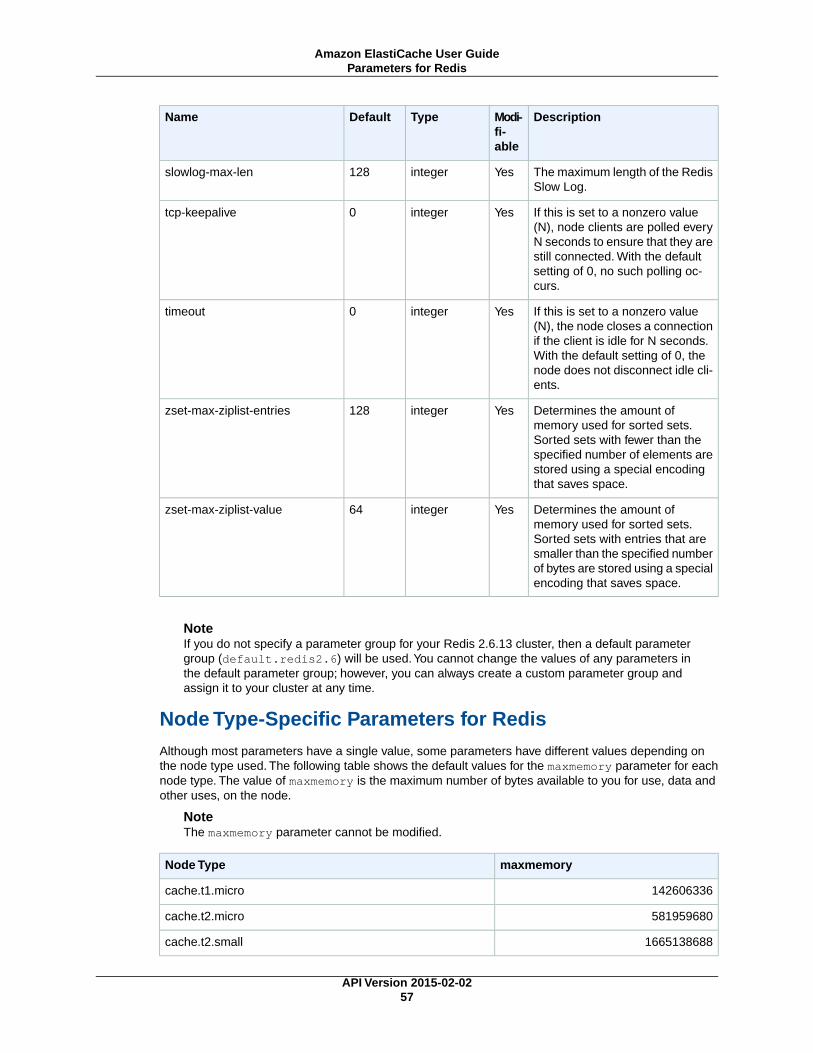
DescriptionModi-fi-able
TypeDefaultName
The maximum length of the RedisSlow Log.
Yesinteger128slowlog-max-len
If this is set to a nonzero value(N), node clients are polled everyN seconds to ensure that they arestill connected. With the defaultsetting of 0, no such polling oc-curs.
Yesinteger0tcp-keepalive
If this is set to a nonzero value(N), the node closes a connectionif the client is idle for N seconds.With the default setting of 0, thenode does not disconnect idle cli-ents.
Yesinteger0timeout
Determines the amount ofmemory used for sorted sets.Sorted sets with fewer than thespecified number of elements arestored using a special encodingthat saves space.
Yesinteger128zset-max-ziplist-entries
Determines the amount ofmemory used for sorted sets.Sorted sets with entries that aresmaller than the specified numberof bytes are stored using a specialencoding that saves space.
Yesinteger64zset-max-ziplist-value
NoteIf you do not specify a parameter group for your Redis 2.6.13 cluster, then a default parametergroup (default.redis2.6) will be used.You cannot change the values of any parameters inthe default parameter group; however, you can always create a custom parameter group andassign it to your cluster at any time.
Node Type-Specific Parameters for RedisAlthough most parameters have a single value, some parameters have different values depending onthe node type used. The following table shows the default values for the maxmemory parameter for eachnode type. The value of maxmemory is the maximum number of bytes available to you for use, data andother uses, on the node.
NoteThe maxmemory parameter cannot be modified.
maxmemoryNode Type
142606336cache.t1.micro
581959680cache.t2.micro
1665138688cache.t2.small
API Version 2015-02-0257
Amazon ElastiCache User GuideParameters for Redis

maxmemoryNode Type
3461349376cache.t2.medium
943718400cache.m1.small
3093299200cache.m1.medium
7025459200cache.m1.large
14889779200cache.m1.xlarge
17091788800cache.m2.xlarge
35022438400cache.m2.2xlarge
70883737600cache.m2.4xlarge
2988441600cache.m3.medium
6501171200cache.m3.large
14260633600cache.m3.xlarge
29989273600cache.m3.2xlarge
6501171200cache.c1.xlarge
14470348800cache.r3.large
30513561600cache.r3.xlarge
62495129600cache.r3.2xlarge
126458265600cache.r3.4xlarge
254384537600cache.r3.8xlarge
Notet2 instances do not support Redis backup/restore.
Append-Only Files (AOF)NoteAppend-only files (AOF) are not supported for cache.t1.micro and cache.t2.* nodes. Fornodes of these types, the appendonly parameter value is ignored.
NoteFor Multi-AZ replication groups, AOF is disabled.
By default, the data in a Redis node on ElastiCache resides only in memory, and is not persistent. If anode is rebooted, or if the underlying physical server experiences a hardware failure, the data in the cacheis lost.
If you require data durability, you can enable the Redis append-only file feature (AOF). When this feature,the node writes all of the commands that change cache data to an append-only file. When a node isrebooted, the AOF is "replayed" when the Redis cache engine starts; the result is a warm Redis cachewith all of the data intact.
AOF is disabled by default. To enable AOF for a cluster running Redis, you must create a parametergroup with the appendonly parameter set to yes, and then assign that parameter group to your cluster.(You can also modify the appendfsync parameter to control how often Redis writes to the AOF file.)
API Version 2015-02-0258
Amazon ElastiCache User GuideParameters for Redis

For more information, see the following sections:
• Parameter Groups (p. 43)
• Parameters for Redis (p. 48)
• Managing Cache Parameter Groups (p. 155)
WarningAOF cannot protect against all failure scenarios. For example, if a node fails due to a hardwarefault in an underlying physical server, ElastiCache will provision a new node on a different server.In this case, the AOF file will no longer be available and cannot be used to recover the data.Thus, Redis will restart with a cold cache.
TipFor greater reliability and faster recovery, we recommend that you create one or more readreplicas in different availability zones for your cluster, and enable Multi-AZ on the replicationgroup instead of using AOF. AOF is disabled for Multi-AZ replication groups.For more information, see the following sections:
• Fault Tolerance: AOF or Multi-AZ? (p. 24)
• Replication Groups and Read Replicas (Redis) (p. 30)
• Managing Replication Groups (p. 127)
Subnet GroupsA subnet group is a collection of subnets (typically private) that you can designate for your clusters runningin an Amazon Virtual Private Cloud (VPC) environment.
If you create a cluster in an Amazon VPC, then you must specify a cache subnet group. ElastiCache usesthat cache subnet group to select a subnet and IP addresses within that subnet to associate with yourcache nodes.
For more information about cache subnet group usage in an Amazon VPC environment, see UsingElastiCache with Amazon Virtual Private Cloud (VPC) (p. 164) and Step 3: Authorize Access (p. 15).
Security GroupsNoteSecurity groups are only applicable to clusters that are not running in an Amazon Virtual PrivateCloud environment (VPC).If you are running your ElastiCache nodes in an Amazon VPC, you control access to your cacheclusters with Amazon VPC security groups, which are different from ElastiCache security groups.For more information on using ElastiCache in an Amazon VPC, see ElastiCache and AmazonVirtual Private Cloud (p. 60) and Using ElastiCache with Amazon Virtual Private Cloud(VPC) (p. 164).
ElastiCache allows you to control access to your clusters using security groups. A security group actslike a firewall, controlling network access to your cluster. By default, network access is turned off to yourclusters. If you want your applications to access your cluster, you must explicitly enable access fromhosts in specific Amazon EC2 security groups. Once ingress rules are configured, the same rules applyto all clusters associated with that security group.
To allow network access to your cluster, create a security group and use theAuthorizeCacheSecurityGroupIngress API or CLI command to authorize the desired Amazon EC2
API Version 2015-02-0259
Amazon ElastiCache User GuideSubnet Groups

security group (which in turn specifies the Amazon EC2 instances allowed). The security group can beassociated with your cluster at the time of creation, or using a ModifyCacheCluster command.
ImportantIP-range based access control is currently not enabled for clusters. All clients to a cluster mustbe within the EC2 network, and authorized via security groups as described previously.
For more information about working with security groups, see Managing Cache Security Groups (p. 175).
ElastiCache and Amazon Virtual Private CloudNoteElastiCache is fully integrated with Amazon Virtual Private Cloud (VPC). For ElastiCache users,this means the following:
• If your AWS account supports only the EC2-VPC platform, ElastiCache will always launchyour cluster in a VPC.
• If you're new to ElastiCache, your clusters will be deployed into a VPC. A default VPC will becreated for you automatically.
• If you have a default VPC and don't specify a subnet when you launch a cluster, the clusterlaunches into your default VPC.
• You can launch clusters into your default VPC without needing to know anything about AmazonVPC.Your experience with clusters that you launch is the same whether you have a defaultVPC or not.
For more information, see Detecting Your Supported Platforms and Whether You Have a DefaultVPC.
With Amazon Virtual Private Cloud, you can create a virtual network in the AWS cloud that closelyresembles a traditional data center.You can configure your Amazon VPC, including selecting its IPaddress range, creating subnets, and configuring route tables, network gateways, and security settings.
The basic functionality of ElastiCache is the same in a virtual private cloud; ElastiCache manages softwareupgrades, patching, failure detection and recovery whether your clusters are deployed inside or outsidean Amazon VPC.
ElastiCache cache nodes deployed outside an Amazon VPC are assigned an IP address to which theendpoint/DNS name resolves. This provides connectivity from Amazon Elastic Compute Cloud (AmazonEC2) instances. When you launch an ElastiCache cluster into an Amazon VPC private subnet, everycache node is assigned a private IP address within that subnet.
For guidance on using ElastiCache with an Amazon Virtual Private Cloud see Using ElastiCache withAmazon Virtual Private Cloud (VPC) (p. 164).
Overview of ElastiCache In an Amazon VPCThe following diagram and table describe the Amazon VPC environment, along with ElastiCache clustersand Amazon EC2 instances that are launched in the Amazon VPC.
API Version 2015-02-0260
Amazon ElastiCache User GuideElastiCache and Amazon Virtual Private Cloud

The Amazon VPC is an isolated portion of the AWS cloud that is assigned its own block of IPaddresses.
An Internet gateway connects your Amazon VPC directly to the Internet and provides access toother AWS resources such as Amazon Simple Storage Service (Amazon S3) that are runningoutside your Amazon VPC.
An Amazon VPC subnet is a segment of the IP address range of an Amazon VPC where youcan isolate AWS resources according to your security and operational needs.
A routing table in the Amazon VPC directs network traffic between the subnet and the Internet.The Amazon VPC has an implied router, which is symbolized in this diagram by the circle withthe R.
An Amazon VPC security group controls inbound and outbound traffic for your ElastiCacheclusters and Amazon EC2 instances.
API Version 2015-02-0261
Amazon ElastiCache User GuideOverview of ElastiCache In an Amazon VPC

You can launch an ElastiCache cluster in the subnet.The cache nodes have private IP addressesfrom the subnet's range of addresses.
You can also launch Amazon EC2 instances in the subnet. Each Amazon EC2 instance has aprivate IP address from the subnet's range of addresses.The Amazon EC2 instance can connectto any cache node in the same subnet.
For an Amazon EC2 instance in your Amazon VPC to be reachable from the Internet, you needto assign a static, public address called an Elastic IP address to the instance.
PrerequisitesIn order to create an ElastiCache cluster within an Amazon VPC, your Amazon VPC must meet thefollowing requirements:
• The Amazon VPC must allow nondedicated Amazon EC2 instances.You cannot use ElastiCache inan Amazon VPC that is configured for dedicated instance tenancy.
• A cache subnet group must be defined for your Amazon VPC. ElastiCache uses that cache subnetgroup to select a subnet and IP addresses within that subnet to associate with your cache nodes.
• A cache security group must be defined for your Amazon VPC, or you can use the default provided.
• CIDR blocks for each subnet must be large enough to provide spare IP addresses for ElastiCache touse during maintenance activities.
Routing and SecurityYou can configure routing in your Amazon VPC to control where traffic flows (for example, to the Internetgateway or virtual private gateway). With an Internet gateway, your Amazon VPC has direct access toother AWS resources that are not running in your Amazon VPC. If you choose to have only a virtualprivate gateway with a connection to your organization's local network, you can route your Internet-boundtraffic over the VPN and use local security policies and firewall to control egress. In that case, you incuradditional bandwidth charges when you access AWS resources over the Internet.
You can use Amazon VPC security groups to help secure the ElastiCache clusters and Amazon EC2instances in your Amazon VPC. Security groups act like a firewall at the instance level, not the subnetlevel.
Clusters in an Amazon VPC can be accessed by Amazon EC2 instances in the same Amazon VPC. Ifthese Amazon EC2 instances are deployed in a public subnet with associated Elastic IPs, you can accessthe Amazon EC2 instances via the Internet.
NoteWe strongly recommend that you use DNS names to connect to your cache nodes, as theunderlying IP address can change if you reboot the cache node.
For more information about using ElastiCache with Amazon VPC, see Using ElastiCache with AmazonVirtual Private Cloud (VPC) (p. 164).
Amazon VPC DocumentationAmazon VPC has its own set of documentation to describe how to create and use your Amazon VPC.The following table gives links to the Amazon VPC guides.
API Version 2015-02-0262
Amazon ElastiCache User GuidePrerequisites
DocumentationDescription
Amazon VPC Getting Started GuideHow to get started using Amazon VPC
Amazon VPC User GuideHow to use Amazon VPC through the AWS Man-agement Console
Amazon EC2 Command Line Reference
(the Amazon VPC commands are part of theAmazon EC2 reference)
Complete descriptions of all the Amazon VPCcommands
Amazon EC2 API Reference
(the Amazon VPC API actions are part of theAmazon EC2 reference)
Complete descriptions of the Amazon VPC APIactions, data types, and errors
Amazon VPC Network Administrator GuideInformation for the network administrator whoneeds to configure the gateway at your end of anoptional IPsec VPN connection
For more detailed information about Amazon Virtual Private Cloud, go to http://www.amazonaws.cn/vpc.
Cache Engine Version ManagementYou can control if and when the protocol-compliant software powering your cache cluster is upgraded tonew versions that are supported by ElastiCache.This level of control enables you to maintain compatibilitywith specific Memcached or Redis versions, test new versions with your application before deploying inproduction, and perform version upgrades on your own terms and timelines.
Because version upgrades involve some compatibility risk, they will not occur automatically and must beinitiated by you.You initiate version upgrades to your cluster by modifying the cluster and specifying anew engine version.
NoteAlthough cache engine version management functionality is intended to give you as much controlas possible over how patching occurs, ElastiCache reserves the right to patch your cluster onyour behalf in the event of a critical security vulnerability in the system or cache software.
WarningChanging a cache engine version is a disruptive process which clears all cache data in thecluster.
Maintenance WindowEvery cluster has a weekly maintenance window during which any system changes are applied. If youdon't specify a preferred maintenance window when you create or modify a cache cluster, ElastiCacheassigns a 60-minute maintenance window on a randomly selected day of the week.
The 60-minute maintenance window is selected at random from an 8-hour block of time per region. Thefollowing table lists the time blocks for each region from which the default maintenance windows areassigned.
API Version 2015-02-0263
Amazon ElastiCache User GuideCache Engine Version Management
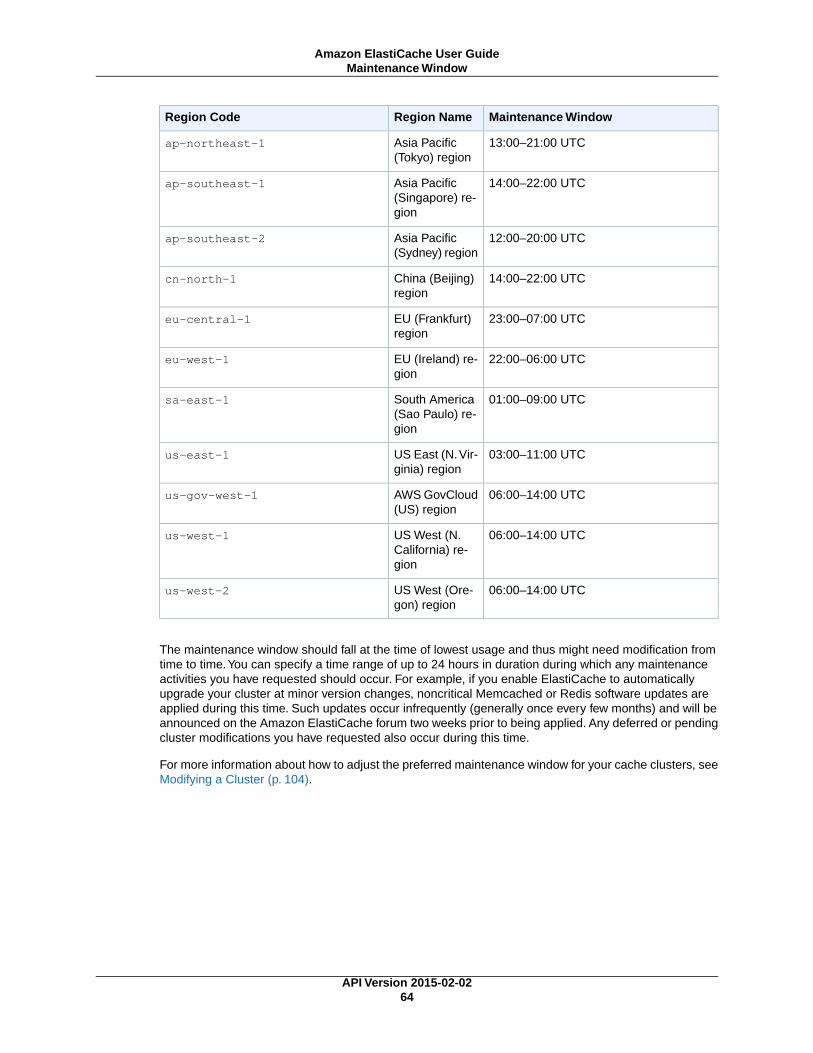
Maintenance WindowRegion NameRegion Code
13:00–21:00 UTCAsia Pacific(Tokyo) region
ap-northeast-1
14:00–22:00 UTCAsia Pacific(Singapore) re-gion
ap-southeast-1
12:00–20:00 UTCAsia Pacific(Sydney) region
ap-southeast-2
14:00–22:00 UTCChina (Beijing)region
cn-north-1
23:00–07:00 UTCEU (Frankfurt)region
eu-central-1
22:00–06:00 UTCEU (Ireland) re-gion
eu-west-1
01:00–09:00 UTCSouth America(Sao Paulo) re-gion
sa-east-1
03:00–11:00 UTCUS East (N.Vir-ginia) region
us-east-1
06:00–14:00 UTCAWS GovCloud(US) region
us-gov-west-1
06:00–14:00 UTCUS West (N.California) re-gion
us-west-1
06:00–14:00 UTCUS West (Ore-gon) region
us-west-2
The maintenance window should fall at the time of lowest usage and thus might need modification fromtime to time.You can specify a time range of up to 24 hours in duration during which any maintenanceactivities you have requested should occur. For example, if you enable ElastiCache to automaticallyupgrade your cluster at minor version changes, noncritical Memcached or Redis software updates areapplied during this time. Such updates occur infrequently (generally once every few months) and will beannounced on the Amazon ElastiCache forum two weeks prior to being applied. Any deferred or pendingcluster modifications you have requested also occur during this time.
For more information about how to adjust the preferred maintenance window for your cache clusters, seeModifying a Cluster (p. 104).
API Version 2015-02-0264
Amazon ElastiCache User GuideMaintenance Window
Using Cost Allocation Tags inElastiCache
When you add cost allocation tags to your resources in Amazon ElastiCache, you can track costs bygrouping expenses on your invoices by resource tag values.
An ElastiCache cost allocation tag is a key-value pair that you define and associate with an ElastiCacheresource. The key and value are case-sensitive. A tag key can be used to define a category, and the tagvalue can be an item in that category. For example, you might define a tag key of CostCenter and atag value of 10010, indicating that the resource is assigned to the 10010 cost center.You can also usetags to designate resources as being used for test or production by using a key such as Environmentand values such as test or production. We recommend that you use a consistent set of tag keys tomake it easier to track costs associated with your resources.
Use cost allocation tags to organize your AWS bill to reflect your own cost structure. To do this, sign upto get your AWS account bill with tag key values included. Then, to see the cost of combined resources,organize your billing information according to resources with the same tag key values. For example, youcan tag several resources with a specific application name, and then organize your billing information tosee the total cost of that application across several services.
You can also combine tags to track costs at a greater level of detail. For example, to track your servicecosts by region you might use the tag keys Service and Region. On one resource you might have thevalues ElastiCache and Asia Pacific (Singapore), and on another resource the valuesElastiCache and EU (Frankfurt).You can then see your total ElastiCache costs, but also see thembroken out by region. For more information, go to Use Cost Allocation Tags in the AWS Billing and CostManagement User Guide.
You can add ElastiCache cost allocation tags to clusters and snapshots. When you add, list, modify,copy, or remove a tag, the action is applied only to the specified cluster or snapshot, even if it is a clusterin a replication group.
Tags added to snapshots are not used for cost allocation reports. Tags on snapshots are used to retainor restore tags on clusters.When you create a snapshot, the tags on the cluster are copied to the snapshot.When you restore from a snapshot, the tags on the snapshot are copied to the cluster.
The following list describes the characteristics of an ElastiCache cost allocation tag key and value.
• The tag key is the required name of the tag. The key's string value can be from 1 to 128 Unicodecharacters long and cannot be prefixed with "aws:". The string can contain only the set of Unicodeletters, digits, white-space, '_', '.', ':', '/', '=', '+', '-', and '@'.
API Version 2015-02-0265
Amazon ElastiCache User Guide

• The tag value is the required value of the tag. The value's string value can be from 1 to 256 Unicodecharacters in length and cannot be prefixed with "aws:". The string can contain only the set of Unicodeletters, digits, white-space, '_', '.', ':', '/', '=', '+', '-', and '@'.
Values do not have to be unique in a tag set. For example, you can have a tag set where the keysService and Application both have the value ElastiCache.
AWS does not apply any semantic meaning to your tags; tags are interpreted strictly as character strings.AWS does not automatically set any tags on any ElastiCache resource.
You can add, list, modify, or remove tags from an ElastiCache resource by using the ElastiCachemanagement console, AWS CLI, or ElastiCache API.
ImportantAmazon ElastiCache tagging is not supported by the ElastiCache CLI. Use the AWS CLI instead.
Topics
• Adding Tags to Your ElastiCache Resource (p. 66)
• Listing the Tags for an ElastiCache Resource (p. 68)
• Modifying Tags on Your ElastiCache Resource (p. 70)
• Removing Tags from Your ElastiCache Resource (p. 71)
• Copying Tags to Your ElastiCache Resources (p. 73)
Adding Tags to Your ElastiCache ResourceYou can add tags to an ElastiCache resource by using the ElastiCache management console, AWS CLI,or ElastiCache API.
Topics
• ElastiCache Management Console (p. 66)
• AWS CLI (p. 67)
• ElastiCache API (p. 68)
ElastiCache Management ConsoleYou can use the ElastiCache management console to add tags to an ElastiCache resource. A resourcecan have a maximum of 10 tags.
To add a tag to an ElastiCache resource using the ElastiCache management console
1. Sign in to the AWS Management Console and open the Amazon ElastiCache console at https://console.aws.amazon.com/elasticache/.
2. Depending what ElastiCache resource you want to add a tag to, click Clusters or Snapshots.
3. Select the ElastiCache resource you want to add a tag to.
After you select the resource, you can see the tag names and values currently on this resource atthe bottom of the details area.
4. Click Manage Tags at the top of the screen.
5. To add a tag to this resource, do the following in the Manage Tags dialog box:
1. In the Key column, type a key name in the text box that displays Add key.
API Version 2015-02-0266
Amazon ElastiCache User GuideAdding Tags to Your ElastiCache Resource
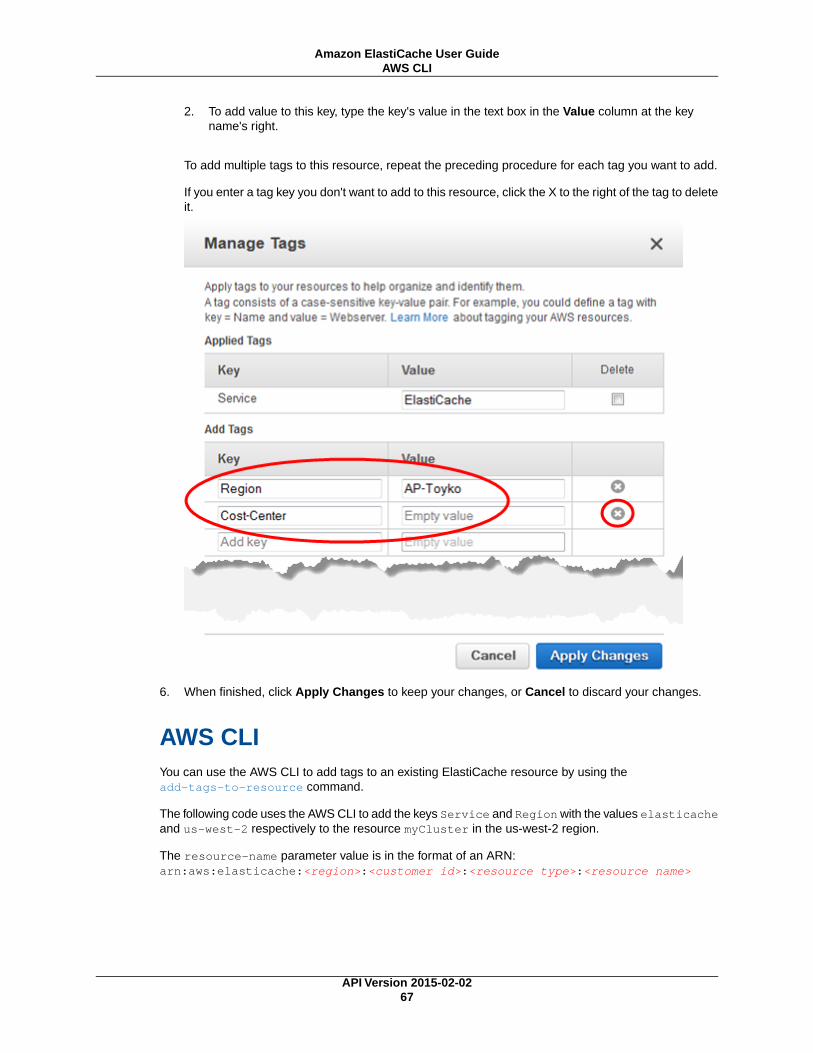
2. To add value to this key, type the key's value in the text box in the Value column at the keyname's right.
To add multiple tags to this resource, repeat the preceding procedure for each tag you want to add.
If you enter a tag key you don't want to add to this resource, click the X to the right of the tag to deleteit.
6. When finished, click Apply Changes to keep your changes, or Cancel to discard your changes.
AWS CLIYou can use the AWS CLI to add tags to an existing ElastiCache resource by using theadd-tags-to-resource command.
The following code uses the AWS CLI to add the keys Service and Region with the values elasticacheand us-west-2 respectively to the resource myCluster in the us-west-2 region.
The resource-name parameter value is in the format of an ARN:arn:aws:elasticache:<region>:<customer id>:<resource type>:<resource name>
API Version 2015-02-0267
Amazon ElastiCache User GuideAWS CLI

PROMPT> aws elasticache add-tags-to-resource --resource-name arn:aws:elastic ache:us-west-2:0123456789:cluster:myCluster --tags Key=Service,Value=elasticache Key=Region,Value=us-west-2
You can also use the AWS CLI to add tags to a cluster when you create a new cluster by using thecommand create-cache-cluster, or when you create a new replication group by using the commandcreate-replication-group. Note that you cannot add tags during resource creation with the ElastiCachemanagement console. After the cluster or replication group is created, you can then use the console toadd tags to the resource.
ElastiCache APIYou can use the ElastiCache API to add tags to an existing ElastiCache resource by using theAddTagsToResource action.
The following code uses the ElastiCache API to add the keys Service and Region with the valueselasticache and us-west-2 respectively to the resource myCluster in the us-west-2 region.
The ResourceName parameter value is in the format of an ARN:arn:aws:elasticache:<region>:<customer id>:<resource type>:<resource name>
https://elasticache.us-west-2.amazonaws.com/ ?Action=AddTagsToResource &ResourceName=arn:aws:elasticache:us-west-2:0123456789:cluster:myCluster &SignatureVersion=4 &SignatureMethod=HmacSHA256 &Tags.member.1.Key=Service &Tags.member.1.Value=elasticache &Tags.member.2.Key=Region &Tags.member.2.Value=us-west-2 &Version=2015-02-02 &Timestamp=20150202T192317Z &X-Amz-Credential=<credential>
For more information, see AddTagsToResource in the ElastiCache API documentation.
You can also use the ElastiCache API to add tags to a cluster when you create a new cluster by usingthe CreateCacheCluster action. Similarly, you can use the ElastiCache API to add tags to a replicationgroup when you create a new replication group by using the CreateReplicationGroup action. Notethat you cannot add tags during resource creation using the ElastiCache management console. After acluster or replication group is created, you can then use the ElastiCache management console to addtags to the resource.
Listing the Tags for an ElastiCache ResourceYou can use the ElastiCache management console, AWS CLI, or ElastiCache API to list all the tags ona specified resource.
Topics
• ElastiCache Management Console (p. 69)
• AWS CLI (p. 69)
• ElastiCache API (p. 69)
API Version 2015-02-0268
Amazon ElastiCache User GuideElastiCache API
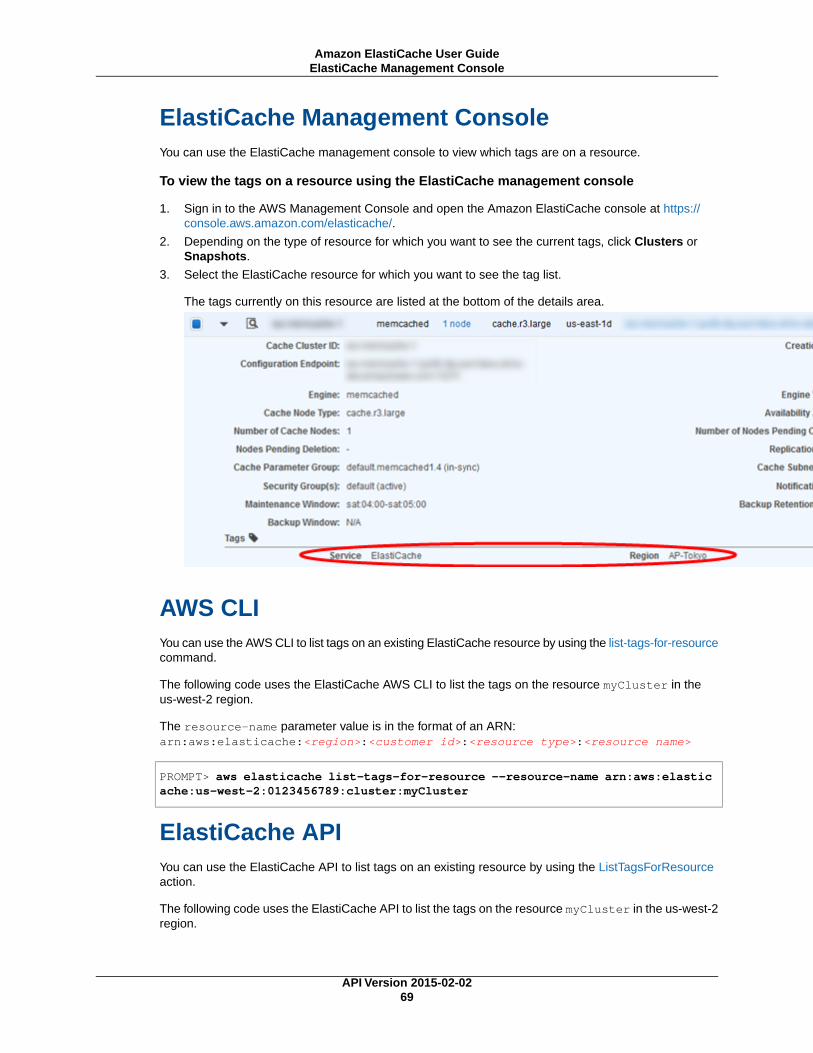
ElastiCache Management ConsoleYou can use the ElastiCache management console to view which tags are on a resource.
To view the tags on a resource using the ElastiCache management console
1. Sign in to the AWS Management Console and open the Amazon ElastiCache console at https://console.aws.amazon.com/elasticache/.
2. Depending on the type of resource for which you want to see the current tags, click Clusters orSnapshots.
3. Select the ElastiCache resource for which you want to see the tag list.
The tags currently on this resource are listed at the bottom of the details area.
AWS CLIYou can use the AWS CLI to list tags on an existing ElastiCache resource by using the list-tags-for-resourcecommand.
The following code uses the ElastiCache AWS CLI to list the tags on the resource myCluster in theus-west-2 region.
The resource-name parameter value is in the format of an ARN:arn:aws:elasticache:<region>:<customer id>:<resource type>:<resource name>
PROMPT> aws elasticache list-tags-for-resource --resource-name arn:aws:elastic ache:us-west-2:0123456789:cluster:myCluster
ElastiCache APIYou can use the ElastiCache API to list tags on an existing resource by using the ListTagsForResourceaction.
The following code uses the ElastiCache API to list the tags on the resource myCluster in the us-west-2region.
API Version 2015-02-0269
Amazon ElastiCache User GuideElastiCache Management Console
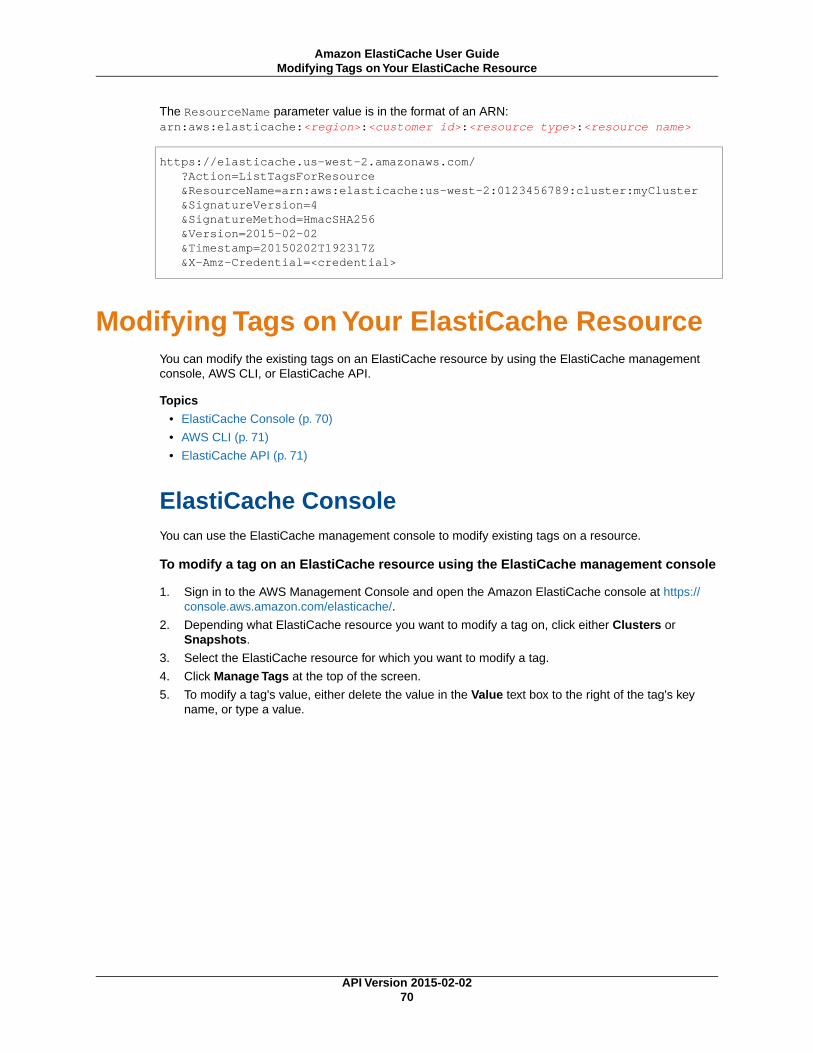
The ResourceName parameter value is in the format of an ARN:arn:aws:elasticache:<region>:<customer id>:<resource type>:<resource name>
https://elasticache.us-west-2.amazonaws.com/ ?Action=ListTagsForResource &ResourceName=arn:aws:elasticache:us-west-2:0123456789:cluster:myCluster &SignatureVersion=4 &SignatureMethod=HmacSHA256 &Version=2015-02-02 &Timestamp=20150202T192317Z &X-Amz-Credential=<credential>
Modifying Tags on Your ElastiCache ResourceYou can modify the existing tags on an ElastiCache resource by using the ElastiCache managementconsole, AWS CLI, or ElastiCache API.
Topics
• ElastiCache Console (p. 70)
• AWS CLI (p. 71)
• ElastiCache API (p. 71)
ElastiCache ConsoleYou can use the ElastiCache management console to modify existing tags on a resource.
To modify a tag on an ElastiCache resource using the ElastiCache management console
1. Sign in to the AWS Management Console and open the Amazon ElastiCache console at https://console.aws.amazon.com/elasticache/.
2. Depending what ElastiCache resource you want to modify a tag on, click either Clusters orSnapshots.
3. Select the ElastiCache resource for which you want to modify a tag.
4. Click Manage Tags at the top of the screen.
5. To modify a tag's value, either delete the value in the Value text box to the right of the tag's keyname, or type a value.
API Version 2015-02-0270
Amazon ElastiCache User GuideModifying Tags on Your ElastiCache Resource
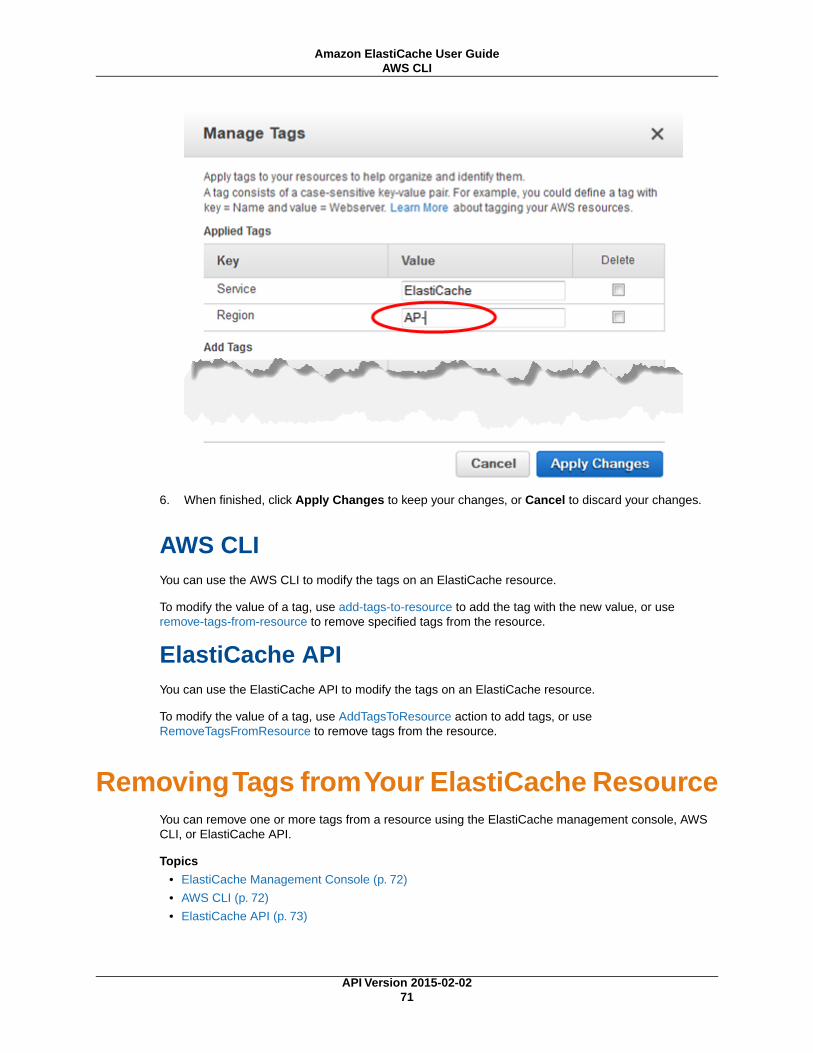
6. When finished, click Apply Changes to keep your changes, or Cancel to discard your changes.
AWS CLIYou can use the AWS CLI to modify the tags on an ElastiCache resource.
To modify the value of a tag, use add-tags-to-resource to add the tag with the new value, or useremove-tags-from-resource to remove specified tags from the resource.
ElastiCache APIYou can use the ElastiCache API to modify the tags on an ElastiCache resource.
To modify the value of a tag, use AddTagsToResource action to add tags, or useRemoveTagsFromResource to remove tags from the resource.
Removing Tags from Your ElastiCache ResourceYou can remove one or more tags from a resource using the ElastiCache management console, AWSCLI, or ElastiCache API.
Topics
• ElastiCache Management Console (p. 72)
• AWS CLI (p. 72)
• ElastiCache API (p. 73)
API Version 2015-02-0271
Amazon ElastiCache User GuideAWS CLI
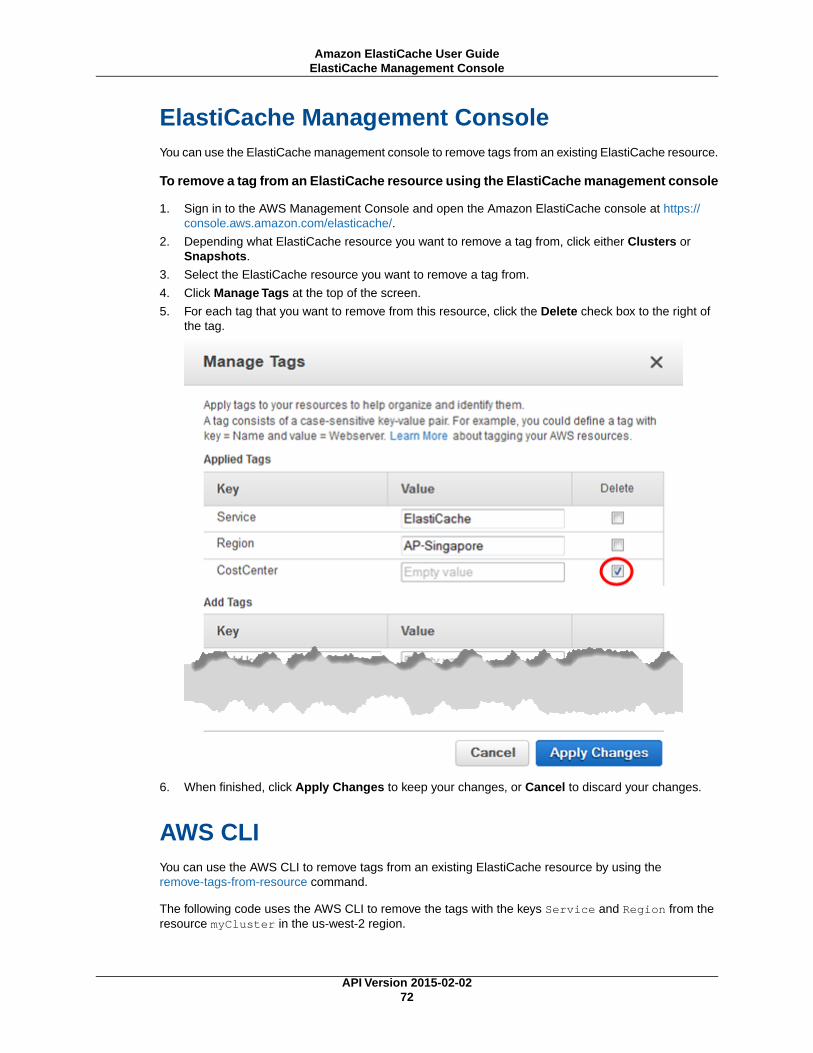
ElastiCache Management ConsoleYou can use the ElastiCache management console to remove tags from an existing ElastiCache resource.
To remove a tag from an ElastiCache resource using the ElastiCache management console
1. Sign in to the AWS Management Console and open the Amazon ElastiCache console at https://console.aws.amazon.com/elasticache/.
2. Depending what ElastiCache resource you want to remove a tag from, click either Clusters orSnapshots.
3. Select the ElastiCache resource you want to remove a tag from.
4. Click Manage Tags at the top of the screen.
5. For each tag that you want to remove from this resource, click the Delete check box to the right ofthe tag.
6. When finished, click Apply Changes to keep your changes, or Cancel to discard your changes.
AWS CLIYou can use the AWS CLI to remove tags from an existing ElastiCache resource by using theremove-tags-from-resource command.
The following code uses the AWS CLI to remove the tags with the keys Service and Region from theresource myCluster in the us-west-2 region.
API Version 2015-02-0272
Amazon ElastiCache User GuideElastiCache Management Console
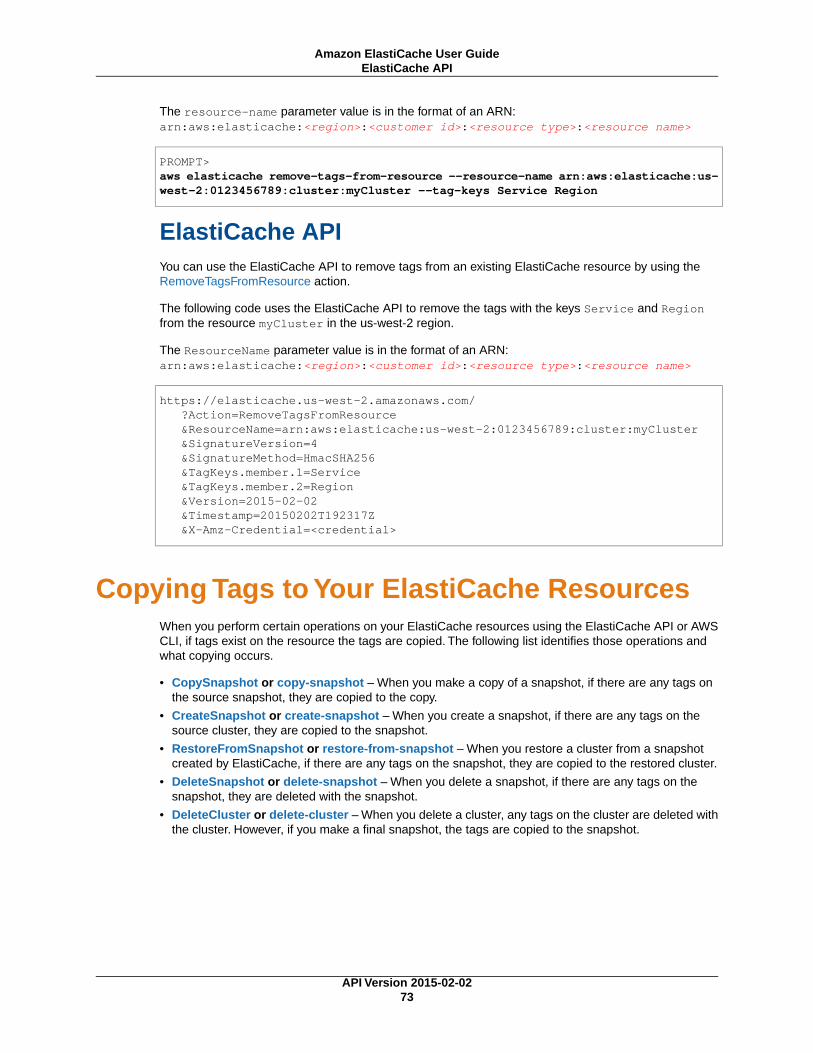
The resource-name parameter value is in the format of an ARN:arn:aws:elasticache:<region>:<customer id>:<resource type>:<resource name>
PROMPT> aws elasticache remove-tags-from-resource --resource-name arn:aws:elasticache:us-west-2:0123456789:cluster:myCluster --tag-keys Service Region
ElastiCache APIYou can use the ElastiCache API to remove tags from an existing ElastiCache resource by using theRemoveTagsFromResource action.
The following code uses the ElastiCache API to remove the tags with the keys Service and Regionfrom the resource myCluster in the us-west-2 region.
The ResourceName parameter value is in the format of an ARN:arn:aws:elasticache:<region>:<customer id>:<resource type>:<resource name>
https://elasticache.us-west-2.amazonaws.com/ ?Action=RemoveTagsFromResource &ResourceName=arn:aws:elasticache:us-west-2:0123456789:cluster:myCluster &SignatureVersion=4 &SignatureMethod=HmacSHA256 &TagKeys.member.1=Service &TagKeys.member.2=Region &Version=2015-02-02 &Timestamp=20150202T192317Z &X-Amz-Credential=<credential>
Copying Tags to Your ElastiCache ResourcesWhen you perform certain operations on your ElastiCache resources using the ElastiCache API or AWSCLI, if tags exist on the resource the tags are copied. The following list identifies those operations andwhat copying occurs.
• CopySnapshot or copy-snapshot – When you make a copy of a snapshot, if there are any tags onthe source snapshot, they are copied to the copy.
• CreateSnapshot or create-snapshot – When you create a snapshot, if there are any tags on thesource cluster, they are copied to the snapshot.
• RestoreFromSnapshot or restore-from-snapshot – When you restore a cluster from a snapshotcreated by ElastiCache, if there are any tags on the snapshot, they are copied to the restored cluster.
• DeleteSnapshot or delete-snapshot – When you delete a snapshot, if there are any tags on thesnapshot, they are deleted with the snapshot.
• DeleteCluster or delete-cluster – When you delete a cluster, any tags on the cluster are deleted withthe cluster. However, if you make a final snapshot, the tags are copied to the snapshot.
API Version 2015-02-0273
Amazon ElastiCache User GuideElastiCache API
CloudWatch Metrics withElastiCache
Topics
• Dimensions for ElastiCache Metrics (p. 74)
• Choosing Metric Statistics and Periods (p. 75)
• Host-Level Metrics (p. 75)
• Metrics for Memcached (p. 75)
• Metrics for Redis (p. 78)
• Which Metrics Should I Monitor? (p. 79)
ElastiCache provides metrics that enable you to monitor your cache clusters.You can access thesemetrics through CloudWatch. For more information on CloudWatch, go to the CloudWatch documentation.
ElastiCache provides both host-level metrics (for example, CPU usage) and metrics that are specific tothe cache engine software (for example, cache gets and cache misses). These metrics are measuredand published for each Cache node in 60-second intervals.
ImportantYou should consider setting CloudWatch alarms on certain key metrics, so that you will be notifiedif your cache cluster's performance starts to degrade. For more information, see Which MetricsShould I Monitor? (p. 79)
Dimensions for ElastiCache MetricsAll ElastiCache metrics use the "AWS/ElastiCache" namespace and provide metrics for a single dimension,the CacheNodeId, which is the automatically-generated identifier for each cache node in the cache cluster.You can find out what these values are for your cache nodes using the DescribeCacheClusters APIor elasticache-describe-cache-clusters command line utility.
Each metric is published under a single set of dimensions.When retrieving metrics, you must supply boththe CacheClusterId and CacheNodeId dimensions.
See Also
API Version 2015-02-0274
Amazon ElastiCache User GuideDimensions for ElastiCache Metrics
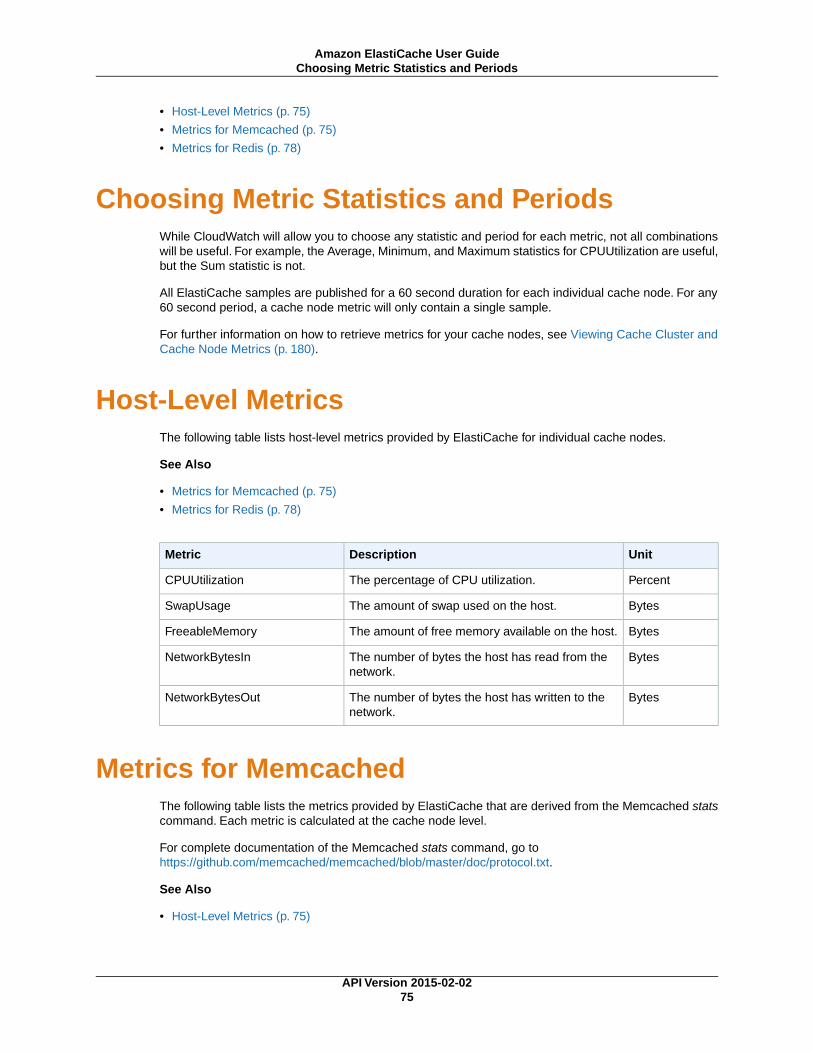
• Host-Level Metrics (p. 75)
• Metrics for Memcached (p. 75)
• Metrics for Redis (p. 78)
Choosing Metric Statistics and PeriodsWhile CloudWatch will allow you to choose any statistic and period for each metric, not all combinationswill be useful. For example, the Average, Minimum, and Maximum statistics for CPUUtilization are useful,but the Sum statistic is not.
All ElastiCache samples are published for a 60 second duration for each individual cache node. For any60 second period, a cache node metric will only contain a single sample.
For further information on how to retrieve metrics for your cache nodes, see Viewing Cache Cluster andCache Node Metrics (p. 180).
Host-Level MetricsThe following table lists host-level metrics provided by ElastiCache for individual cache nodes.
See Also
• Metrics for Memcached (p. 75)
• Metrics for Redis (p. 78)
UnitDescriptionMetric
PercentThe percentage of CPU utilization.CPUUtilization
BytesThe amount of swap used on the host.SwapUsage
BytesThe amount of free memory available on the host.FreeableMemory
BytesThe number of bytes the host has read from thenetwork.
NetworkBytesIn
BytesThe number of bytes the host has written to thenetwork.
NetworkBytesOut
Metrics for MemcachedThe following table lists the metrics provided by ElastiCache that are derived from the Memcached statscommand. Each metric is calculated at the cache node level.
For complete documentation of the Memcached stats command, go tohttps://github.com/memcached/memcached/blob/master/doc/protocol.txt.
See Also
• Host-Level Metrics (p. 75)
API Version 2015-02-0275
Amazon ElastiCache User GuideChoosing Metric Statistics and Periods

UnitDescriptionMetric
BytesThe number of bytes used to store cache items.BytesUsedForCacheItems
BytesThe number of bytes that have been read from thenetwork by the cache node.
BytesReadIntoMemcached
BytesThe number of bytes that have been written to thenetwork by the cache node.
BytesWrittenOutFromMem-cached
CountThe number of CAS (check and set) requests thecache has received where the Cas value did notmatch the Cas value stored.
CasBadval
CountThe number of Cas requests the cache has re-ceived where the requested key was found and theCas value matched.
CasHits
CountThe number of Cas requests the cache has re-ceived where the key requested was not found.
CasMisses
CountThe number of flush commands the cache has re-ceived.
CmdFlush
CountThe number of get commands the cache has re-ceived.
CmdGet
CountThe number of set commands the cache has re-ceived.
CmdSet
CountA count of the number of connections connectedto the cache at an instant in time. Note that due tothe design of Memcached, this will always returna minimum count of 10.
CurrConnections
CountA count of the number of items currently stored inthe cache.
CurrItems
CountThe number of decrement requests the cache hasreceived where the requested key was found.
DecrHits
CountThe number of decrement requests the cache hasreceived where the requested key was not found.
DecrMisses
CountThe number of delete requests the cache has re-ceived where the requested key was found.
DeleteHits
CountThe number of delete requests the cache has re-ceived where the requested key was not found.
DeleteMisses
CountThe number of non-expired items the cache evictedto allow space for new writes.
Evictions
CountThe number of get requests the cache has receivedwhere the key requested was found.
GetHits
CountThe number of get requests the cache has receivedwhere the key requested was not found.
GetMisses
CountThe number of increment requests the cache hasreceived where the key requested was found.
IncrHits
API Version 2015-02-0276
Amazon ElastiCache User GuideMetrics for Memcached

UnitDescriptionMetric
CountThe number of increment requests the cache hasreceived where the key requested was not found.
IncrMisses
CountThe number of expired items the cache evicted toallow space for new writes.
Reclaimed
For Memcached 1.4.14, the following additional metrics are provided.
UnitDescriptionMetric
BytesThe number of bytes currently used by hash tables.BytesUsedForHash
CountThe cumulative number of "config get" requests.CmdConfigGet
CountThe cumulative number of "config set" requests.CmdConfigSet
CountThe cumulative number of "touch" requests.CmdTouch
CountThe current number of configurations stored.CurrConfig
CountThe number of valid items evicted from the leastrecently used cache (LRU) which were nevertouched after being set.
EvictedUnfetched
CountThe number of expired items reclaimed from theLRU which were never touched after being set.
ExpiredUnfetched
CountThe total number of slab pages that have beenmoved.
SlabsMoved
CountThe number of keys that have been touched andwere given a new expiration time.
TouchHits
CountThe number of items that have been touched, butwere not found.
TouchMisses
The following table describes the available calculated cache level metrics.
UnitDescriptionMetric
CountThe number of new connections the cache has re-ceived. This is derived from the memcachedtotal_connections statistic by recording the changein total_connections across a period of time. Thiswill always be at least 1, due to a connection re-served for a ElastiCache.
NewConnections
CountThe number of new items the cache has stored.This is derived from the memcached total_itemsstatistic by recording the change in total_itemsacross a period of time.
NewItems
BytesThe amount of unused memory the cache can useto store items.This is derived from the memcachedstatistics limit_maxbytes and bytes by subtractingbytes from limit_maxbytes.
UnusedMemory
API Version 2015-02-0277
Amazon ElastiCache User GuideMetrics for Memcached
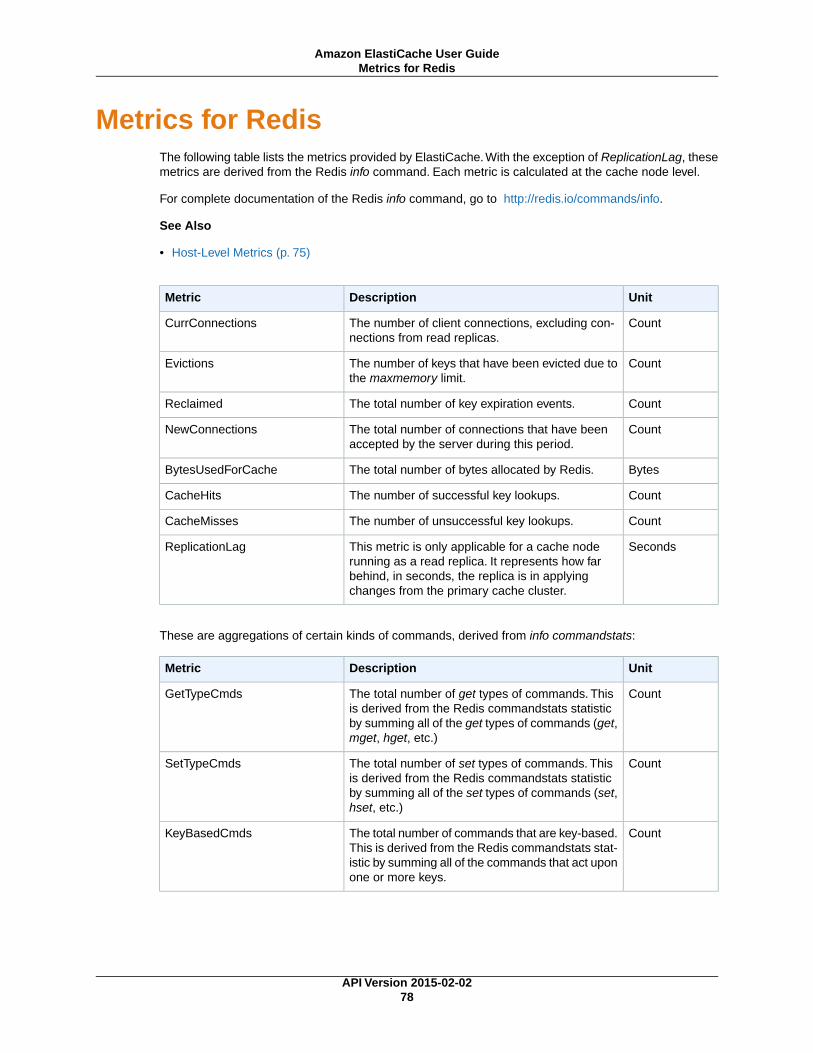
Metrics for RedisThe following table lists the metrics provided by ElastiCache. With the exception of ReplicationLag, thesemetrics are derived from the Redis info command. Each metric is calculated at the cache node level.
For complete documentation of the Redis info command, go to http://redis.io/commands/info.
See Also
• Host-Level Metrics (p. 75)
UnitDescriptionMetric
CountThe number of client connections, excluding con-nections from read replicas.
CurrConnections
CountThe number of keys that have been evicted due tothe maxmemory limit.
Evictions
CountThe total number of key expiration events.Reclaimed
CountThe total number of connections that have beenaccepted by the server during this period.
NewConnections
BytesThe total number of bytes allocated by Redis.BytesUsedForCache
CountThe number of successful key lookups.CacheHits
CountThe number of unsuccessful key lookups.CacheMisses
SecondsThis metric is only applicable for a cache noderunning as a read replica. It represents how farbehind, in seconds, the replica is in applyingchanges from the primary cache cluster.
ReplicationLag
These are aggregations of certain kinds of commands, derived from info commandstats:
UnitDescriptionMetric
CountThe total number of get types of commands. Thisis derived from the Redis commandstats statisticby summing all of the get types of commands (get,mget, hget, etc.)
GetTypeCmds
CountThe total number of set types of commands. Thisis derived from the Redis commandstats statisticby summing all of the set types of commands (set,hset, etc.)
SetTypeCmds
CountThe total number of commands that are key-based.This is derived from the Redis commandstats stat-istic by summing all of the commands that act uponone or more keys.
KeyBasedCmds
API Version 2015-02-0278
Amazon ElastiCache User GuideMetrics for Redis
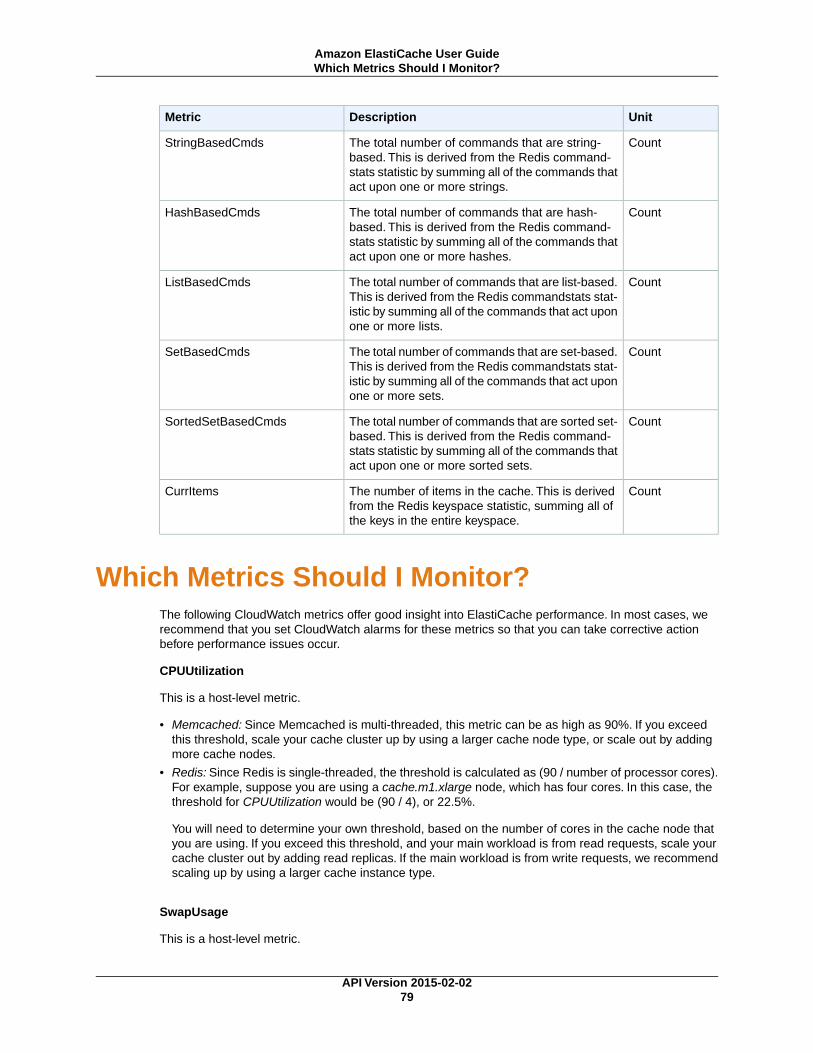
UnitDescriptionMetric
CountThe total number of commands that are string-based. This is derived from the Redis command-stats statistic by summing all of the commands thatact upon one or more strings.
StringBasedCmds
CountThe total number of commands that are hash-based. This is derived from the Redis command-stats statistic by summing all of the commands thatact upon one or more hashes.
HashBasedCmds
CountThe total number of commands that are list-based.This is derived from the Redis commandstats stat-istic by summing all of the commands that act uponone or more lists.
ListBasedCmds
CountThe total number of commands that are set-based.This is derived from the Redis commandstats stat-istic by summing all of the commands that act uponone or more sets.
SetBasedCmds
CountThe total number of commands that are sorted set-based. This is derived from the Redis command-stats statistic by summing all of the commands thatact upon one or more sorted sets.
SortedSetBasedCmds
CountThe number of items in the cache. This is derivedfrom the Redis keyspace statistic, summing all ofthe keys in the entire keyspace.
CurrItems
Which Metrics Should I Monitor?The following CloudWatch metrics offer good insight into ElastiCache performance. In most cases, werecommend that you set CloudWatch alarms for these metrics so that you can take corrective actionbefore performance issues occur.
CPUUtilization
This is a host-level metric.
• Memcached: Since Memcached is multi-threaded, this metric can be as high as 90%. If you exceedthis threshold, scale your cache cluster up by using a larger cache node type, or scale out by addingmore cache nodes.
• Redis: Since Redis is single-threaded, the threshold is calculated as (90 / number of processor cores).For example, suppose you are using a cache.m1.xlarge node, which has four cores. In this case, thethreshold for CPUUtilization would be (90 / 4), or 22.5%.
You will need to determine your own threshold, based on the number of cores in the cache node thatyou are using. If you exceed this threshold, and your main workload is from read requests, scale yourcache cluster out by adding read replicas. If the main workload is from write requests, we recommendscaling up by using a larger cache instance type.
SwapUsage
This is a host-level metric.
API Version 2015-02-0279
Amazon ElastiCache User GuideWhich Metrics Should I Monitor?

• Memcached: This metric should not exceed 50 MB. If it does, we recommend that you increase theConnectionOverhead parameter value.
• Redis: At this time, we have no recommendation for this parameter; you do not need to set a CloudWatchalarm for it.
Evictions
This is a cache engine metric, published for both Memcached and Redis cache clusters. We recommendthat you determine your own alarm threshold for this metric based on your application needs.
• Memcached: If your exceed your chosen threshold, scale you cache cluster up by using a larger cachenode type, or scale out by adding more cache nodes.
• Redis: If you exceed your chosen threshold, scale your cache cluster out by adding read replicas.
CurrConnections
This is a cache engine metric, published for both Memcached and Redis cache clusters. We recommendthat you determine your own alarm threshold for this metric based on your application needs.
Whether you are running Memcached or Redis, an increasing number of CurrConnections might indicatea problem with your application; you will need to investigate the application behavior to address this issue.
API Version 2015-02-0280
Amazon ElastiCache User GuideWhich Metrics Should I Monitor?
Setting Up the ElastiCacheCommand Line Interface
This section describes the prerequisites for running the command line tools, where to get the commandline tools, how to set up the tools and their environment, and includes a series of common examples oftool usage.
ImportantThe Amazon ElastiCache Command Line Interface (CLI) does not support any ElastiCacheimprovements after API version 2014-09-30. To use newer ElastiCache functionality from thecommand line, use the AWS Command Line Interface.
Topics
• Prerequisites (p. 81)
• Getting the Command Line Tools (p. 82)
• Setting Up the Tools (p. 83)
• Providing Credentials for the Tools (p. 84)
• Environmental Variables (p. 84)
PrerequisitesThis document assumes that you can work in a Linux/UNIX or Windows environment. The AmazonElastiCache command line tools also work on Mac OS X, which is a UNIX-based environment; however,no specific Mac OS X instructions are included in this guide.
As a convention, all command line text is prefixed with a generic PROMPT> command line prompt. Theactual command line prompt on your machine is likely to be different. We also use $ to indicate aLinux/UNIX specific command and C:\> for a Windows specific command.The example output resultingfrom the command is shown immediately thereafter without any prefix.
The Java Runtime EnvironmentThe command line tools used in this guide require Java version 5 or later to run. Either a JRE or JDKinstallation is acceptable. To view and download JREs for a range of platforms, including Linux/UNIX andWindows, go to Java SE Downloads.
API Version 2015-02-0281
Amazon ElastiCache User GuidePrerequisites
Setting the Java Home VariableThe command line tools depend on an environment variable (JAVA_HOME) to locate the Java Runtime.This environment variable should be set to the full path of the directory that contains a subdirectory namedbin which in turn contains the executable java (on Linux and UNIX) or java.exe (on Windows)executable.
To set the Java Home variable
1. Set the Java Home variable.
• On Linux and UNIX, enter the following command:
$ export JAVA_HOME=<PATH>
• On Windows, enter the following command:
C:\> set JAVA_HOME=<PATH>
2. Confirm the path setting by running $JAVA_HOME/bin/java -version and checking the output.
• On Linux/UNIX, you will see output similar to the following:
$ $JAVA_HOME/bin/java -versionjava version "1.6.0_23"Java(TM) SE Runtime Environment (build 1.6.0_23-b05)Java HotSpot(TM) Client VM (build 19.0-b09, mixed mode, sharing)
• On Windows, you will see output similar to the following:
C:\> %JAVA_HOME%\bin\java -versionjava version "1.6.0_23"Java(TM) SE Runtime Environment (build 1.6.0_23-b05)Java HotSpot(TM) Client VM (build 19.0-b09, mixed mode, sharing)
Getting the Command Line ToolsThe command line tools are available as a ZIP file on the ElastiCache Developer Tools web site. Thesetools are written in Java, and include shell scripts for Windows 2000/XP/Vista/Windows 7, Linux/UNIX,and Mac OSX. The ZIP file is self-contained and no installation is required; simply download the zip fileand unzip it to a directory on your local machine.
API Version 2015-02-0282
Amazon ElastiCache User GuideGetting the Command Line Tools
Setting Up the ToolsThe command line tools depend on an environment variable (AWS_ELASTICACHE_HOME) to locatesupporting libraries.You need to set this environment variable before you can use the tools. Set it to thepath of the directory you unzipped the command line tools into. This directory is namedElastiCacheCli-A.B.nnnn (A, B and n are version/release numbers), and contains subdirectories namedbin and lib.
To set the AWS_ELASTICACHE_HOME environment variable
• Open a command line window and enter one of the following commands to set theAWS_ELASTICACHE_HOME environment variable.
• On Linux and UNIX, enter the following command:
$ export AWS_ELASTICACHE_HOME=<path-to-tools>
• On Windows, enter the following command:
C:\> set AWS_ELASTICACHE_HOME=<path-to-tools>
To make the tools easier to use, we recommend that you add the tools' BIN directory to your systemPATH. The rest of this guide assumes that the BIN directory is in your system path.
To add the tools' BIN directory to your system path
• Enter the following commands to add the tools' BIN directory to your system PATH.
• On Linux and UNIX, enter the following command:
$ export PATH=$PATH:$AWS_ELASTICACHE_HOME/bin
• On Windows, enter the following command:
C:\> set PATH=%PATH%;%AWS_ELASTICACHE_HOME%\bin
NoteThe Windows environment variables are reset when you close the command window.You mightwant to set them permanently. Consult the documentation for your version of Windows for moreinformation.
NotePaths that contain a space must be wrapped in double quotes, for example:"C:\Program Files\Java"
API Version 2015-02-0283
Amazon ElastiCache User GuideSetting Up the Tools

Providing Credentials for the ToolsThe command line tools need the AWS Access Key and Secret Access Key provided with your AWSaccount.You can get them using the command line or from a credential file located on your local system.
The deployment includes a template file ${AWS_ELASTICACHE_HOME}/credential-file-path.templatethat you need to edit with your information. Following are the contents of the template file:
AWSAccessKeyId=<Write your AWS access ID>AWSSecretKey=<Write your AWS secret key>
ImportantOn UNIX, limit permissions to the owner of the credential file:
$ chmod 600 <the file created above>
With the credentials file setup, you'll need to set the AWS_CREDENTIAL_FILE environment variable sothat the ElastiCache tools can find your information.
To set the AWS_CREDENTIAL_FILE environment variable
1. Set the environment variable:
• On Linux and UNIX, update the variable using the following command:
$ export AWS_CREDENTIAL_FILE=<the file created above>
• On Windows, set the variable using the following command:
C:\> set AWS_CREDENTIAL_FILE=<the file created above>
2. Check that your setup works properly, run the following command:
elasticache --help
You should see the usage page for all ElastiCache commands.
Environmental VariablesEnvironment variables can be useful for scripting, configuring defaults or temporarily overriding them.
In addition to the AWS_CREDENTIAL_FILE environment variable, most API tools included with theElastiCache Command Line Interface support the following variables:
• EC2_REGION — The AWS region to use.
• AWS_ELASTICACHE_URL — The URL to use for the service call. Not required to specify a differentregional endpoint if EC2_REGION is specified or the --region parameter is passed.
API Version 2015-02-0284
Amazon ElastiCache User GuideProviding Credentials for the Tools

The following examples show how to set the environmental variable EC2_REGION to configure the regionused by the API tools:
Linux, OS X, or Unix
$ export EC2_REGION=us-west-1
Windows
C:\> set EC2_REGION=us-west-1
API Version 2015-02-0285
Amazon ElastiCache User GuideEnvironmental Variables

Managing ElastiCache
Topics
• Selecting a Cache Engine and Version (p. 87)
• Managing Clusters (p. 89)
• Managing Nodes (p. 116)
• Managing Replication Groups (p. 127)
• Managing Backup and Restore (Redis) (p. 139)
• Managing Cache Parameter Groups (p. 155)
• Using ElastiCache with Amazon Virtual Private Cloud (VPC) (p. 164)
• Managing Cache Subnet Groups (p. 171)
• Managing Cache Security Groups (p. 175)
• Viewing Cache Cluster and Cache Node Metrics (p. 180)
• Viewing ElastiCache Events (p. 182)
This section covers the ElastiCache operations you are most likely to use, and provides proceduralinstruction and examples.
API Version 2015-02-0286
Amazon ElastiCache User Guide
Selecting a Cache Engine and VersionAmazon ElastiCache supports two cache engines, Memcached and Redis. Each engine provides someadvantages. Use the information in this topic to help you select the engine that best meets yourrequirements.
Memcached or RedisOn the surface, Memcached and Redis look similar. Both are in-memory key stores. However, in practicethere are significant differences.
Select Memcached if you have these requirements:
• You want the simplest model possible.
• You need to run large nodes with multiple cores or threads.
• You need the ability to scale out, adding and removing nodes as demand on your system increasesand decreases.
• You want to shard your data across multiple nodes.
• You need to cache objects, such as a database.
Select Redis if you have these requirements:
• You need complex data types, such as strings, hashes, lists, and sets.
• You need to sort or rank in-memory data-sets.
• You want persistence of your key store.
• You want to replicate your data from the primary to one or more read replicas for availability.
• You need automatic failover if any of your primary nodes fail.
• You want publish and subscribe (pub/sub) capabilities–the client being informed of events on the server.
• You want backup and restore capabilities.
Once you select the engine for your application, we recommend that you use the most recent version ofthat engine. The following sections highlight major differences between the various versions.
Memcached VersionsElastiCache supports two versions of Memcached: 1.4.14 and 1.4.5.
Topics
• Memcached Version 1.4.14 (p. 87)
• Memcached Version 1.4.5 (p. 88)
Memcached Version 1.4.14Memcached improvements added since version 1.4.5 include the following:
• Enhanced slab rebalancing capability.
• Performance and scalability improvement.
• Introduced the ?touch? command to update the expiration time of an existing item without fetching it.
• Auto discovery—the ability for client programs to automatically determine all of the cache nodes in acluster, and to initiate and maintain connections to all of these nodes.
API Version 2015-02-0287
Amazon ElastiCache User GuideSelecting a Cache Engine and Version
Memcached Version 1.4.5Memcached version 1.4.5 was the initial engine and version supported by Amazon ElastiCache.
Redis VersionsElastiCache supports three versions of Redis: 2.8.19, 2.8.6, and 2.6.13.
Topics
• Redis Version 2.8.19 (p. 88)
• Redis Version 2.8.6 (p. 88)
• Redis Version 2.6.13 (p. 88)
Redis Version 2.8.19Redis improvements added since version 2.8.6 include the following:
• Support for HyperLogLog. For more information, go to Redis new data structure: HyperLogLog.
• The sorted set data type has now support for lexicographic range queries with the new commandsZRANGEBYLEX, ZLEXCOUNT, and ZREMRANGEBYLEX.
• To prevent a primary node from sending stale data to replica nodes, the master SYNC fails if abackground save (bgsave) child process is aborted.
Redis Version 2.8.6Redis improvements added since version 2.6.13 include the following:
• Improved resiliency and fault tolerance for read replicas.
• Support for partial resynchronization.
• Support for user-defined minimum number of read replicas that must be available at all times.
• Full support for pub/sub—notifying clients of events on the server.
• Automatic detection of a primary node failure and failover of your primary node to a secondary node.
Redis Version 2.6.13Redis version 2.6.13 was the initial version of Redis supported by Amazon ElastiCache.
API Version 2015-02-0288
Amazon ElastiCache User GuideRedis Versions
Managing ClustersThis section covers operations on clusters.
Topics
• Creating a Cluster (p. 89)
• Adding or Removing Nodes (p. 96)
• Modifying a Cluster (p. 104)
• Managing Reserved Nodes (p. 106)
• Using Amazon SNS Notifications with ElastiCache (p. 111)
• Deleting a Cache Cluster (p. 114)
Creating a ClusterWhen you create a new cluster, you need to name it, specify the engine software to use (Memcached orRedis), and choose the number and type of nodes.
If you are creating a Redis cluster, you can seed it with data from ElastiCache for Redis snapshots orfrom your own .rdb files stored in Amazon Simple Storage Service. For more information, see MigratingYour Redis Cluster to ElastiCache (p. 151).
If you are creating a Memcached cluster or a Redis replication group, you can specify whether you wantall the clusters or nodes in a single availability zone or in multiple availability zones. For more informationon availability zones, see Locating Your Redis Read Replicas and Memcached Nodes (p. 43).
AWS Management ConsoleThe following topics show you how to create a cluster using the Amazon ElastiCache console.
Topics
• Creating a Memcached cluster (p. 89) using the AWS Management Console
• Creating a single Redis cluster (p. 93) using the AWS Management Console
Creating a Memcached clusterWhen you use the Memcached engine, Amazon ElastiCache supports horizontally partitioning your dataover multiple nodes. Memcached enables auto discovery so you don't need to keep track of the endpointsfor each node. Memcached tracks each node's endpoint, updating the endpoint list as nodes are addedand removed. All your application needs to interact with the cluster is the configuration endpoint. Formore information on auto discovery, see Node Auto Discovery (Memcached) (p. 116).
To create a new Memcached cluster, do the following:
Prerequisites
1. Sign in to the AWS Management Console and open the Amazon ElastiCache console at https://console.aws.amazon.com/elasticache/.
2. On the ElastiCache console dashboard, click Launch Cache Cluster to start the Launch CacheCluster wizard.
API Version 2015-02-0289
Amazon ElastiCache User GuideManaging Clusters

Step 1: Select the Memcached Engine
Before you proceed, be sure you have completed the Prerequisites section.
To select your cluster's engine:
1.On the Select Engine screen, click the Memcached tab.
2. Click Next.
Step 2: Specify Cluster Details
Before you proceed, be sure you have completed Step 1: Select the Memcached Engine.
To configure your cluster's specifications and details:
1. In the Cluster Specifications section of the Cluster Details page, specify settings as shown following:
a. Engine: Memcached
b. Engine Version: From the list, select the version of the cache engine to run for this cluster.Unless you have a specific reason not to, we recommend you select the latest engine version.
c. Port: Type a new port number for your cluster, or leave it at its default value. For Memcached,the default port is 11211.
d. Parameter Group: From the list, select a parameter group for this cluster. Parameter groupscontrol the run-time parameters of your cluster. For more information on parameter groups, seeParameters for Memcached (p. 44).
2. In the Configuration section of the Specify Cluster Details page, specify settings as shown following:
a. Cluster Name: Type a meaningful name for this cluster.
Cluster name constraints are as follows:
• A name must contain from 1 to 20 alphanumeric characters or hyphens.
• The first character must be a letter.
• A name cannot end with a hyphen or contain two consecutive hyphens.
b. Node Type: From the list, select the node type you want to use for this cluster. For informationon node types, see Parameters for Memcached (p. 44).
c. Number of Nodes: Type in the number of nodes you want launched for this cluster. ForMemcached, you may have from 1 to 20 nodes in a cluster. If you want to use the MemcachedFlexible Zone Placement functionality, type a value between 2 and 20.You incur a charge foreach node.
3. Click Next.
Step 3: Configure Advanced Settings
Before you proceed, be sure you have completed Step 2: Specify Cluster Details.
API Version 2015-02-0290
Amazon ElastiCache User GuideCreating a Cluster

To configure your cluster's advanced settings:
1. In the Network & Security section of the Configure Advanced Settings page, specify settings asshown following:
a. Cache Subnet Group: From the dropdown list, select the subnet group you want this clusterassociated with.
• To launch this cluster in a VPC (recommended), select a VPC subnet group.
• To launch this cluster outside a VPC, click Not in VPC. The cluster will be launched in theAWS public cloud.
b. Availability Zones: From the drop down list, select how you want the availability zones for thenodes in this cluster determined.
• No Preference: ElastiCache will select the availability zone for your cluster's nodes. All nodesare launched in the same availability zone.
• Spread Nodes Across Zones: ElastiCache will select the availability zones for your cluster'snodes. The nodes will be distributed as evenly as practical across the availability zones thatsupport your node type.
• Specify Zones:The console expands to list all the availability zones in your region that supportthis cluster's node-type. Behind each zone is a text box. Type in the number of nodes youwant launched in that availability zone.
NoteThe total of the values you type into these text boxes must equal then number ofnodes you specified in the previous screen.
c. Cache Security Groups or VPC Security Groups: Select the security groups for this cluster.
If you selected a VPC, the list is of VPC security groups. If you select Not in VPC, the list is ofcache security groups.
For more information about Amazon VPC security groups, see http://docs.aws.amazon.com/AmazonVPC/latest/UserGuide/VPC_SecurityGroups.html.
For more information about ElastiCache security groups, see Security (p. 5) and ManagingCache Security Groups (p. 175).
2. In the Maintenance section of the Configure Advanced Settings page, specify settings as shownfollowing:
a. Maintenance Window: Select how you want the maintenance window selected.
• Select Window: Specify the day of the week to start maintenance, the UTC time to startmaintenance, and the duration in hours of the maintenance window.
• No Preference: ElastiCache selects the maintenance window. This setting is the default.
We recommend specifying a maintenance window so that downtime for maintenance will havethe least impact upon your business.
b. Topic for SNS Notification: From the list, select an existing Amazon Simple Notification Service(Amazon SNS) topic, or click Manual ARN input and type in the topic Amazon Resource Name(ARN). Amazon SNS allows you to push notifications to Internet-connected smart devices. Thedefault is to disable notifications. For more information, see http://aws.amazon.com/sns/.
API Version 2015-02-0291
Amazon ElastiCache User GuideCreating a Cluster

3. Click Next.
Step 4: Review and Launch
Before you continue, be sure you have completed Step 3: Configure Advanced Settings.
To review your settings and launch your cluster
1. Review all your settings to ensure each value is what you want.
2. If you need to make changes, click Previous to return to previous screens and make your changes;otherwise, click Launch Cache Cluster or Launch Replication Group to launch your cluster orreplication group.
3. To return to the Cache Clusters screen, click Close on the Success screen.
Your cluster will have the status creating while it is being created. When the status changes to available,it's ready for use.
NoteAs soon as your cluster becomes available, you're billed for each hour or partial hour that thecluster is active, even if you're not using it.
When you no longer need the cluster, you can delete it. See, Deleting a Cache Cluster (p. 114).
CLITo create a cluster, use the elasticache-create-cache-cluster command.The following examplecreates a Memcached cluster named my-cache-cluster that has three nodes.
PROMPT> elasticache-create-cache-cluster my-cache-cluster -n 3 -c cache.m1.large -e memcached -sg default
This command should produce output similar to the following:
CACHECLUSTER my-cache-cluster https://console.aws.amazon.com/elastic ache/home#client-download: cache.m1.large memcached creating 3 1.4.14 CACHESECURITYGROUP default active CACHEPARAMETERGROUP default.memcached1.4 in-sync
APITo create a cluster, use the CreateCacheCluster action. The following example creates a single nodeRedis cluster named my-redis-primary and seeds it with a snapshot file that has been copied to AmazonS3.
API Version 2015-02-0292
Amazon ElastiCache User GuideCreating a Cluster
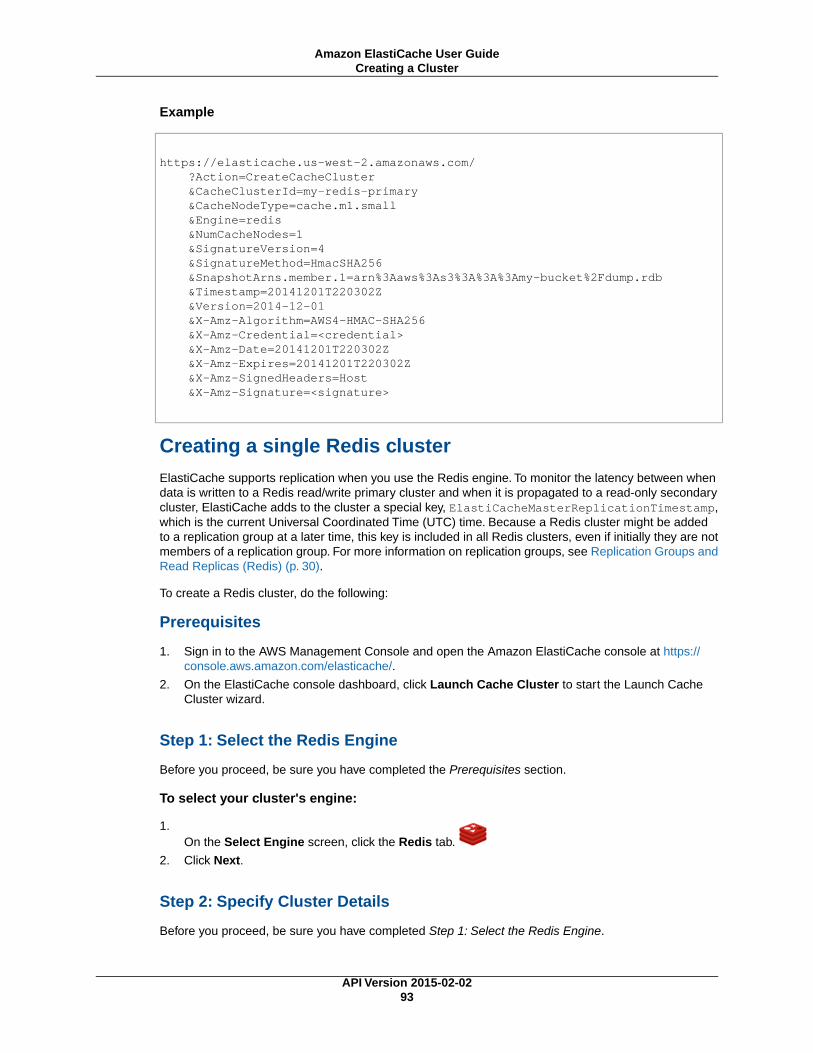
Example
https://elasticache.us-west-2.amazonaws.com/ ?Action=CreateCacheCluster &CacheClusterId=my-redis-primary &CacheNodeType=cache.m1.small &Engine=redis &NumCacheNodes=1 &SignatureVersion=4 &SignatureMethod=HmacSHA256 &SnapshotArns.member.1=arn%3Aaws%3As3%3A%3A%3Amy-bucket%2Fdump.rdb &Timestamp=20141201T220302Z &Version=2014-12-01 &X-Amz-Algorithm=AWS4-HMAC-SHA256 &X-Amz-Credential=<credential> &X-Amz-Date=20141201T220302Z &X-Amz-Expires=20141201T220302Z &X-Amz-SignedHeaders=Host &X-Amz-Signature=<signature>
Creating a single Redis clusterElastiCache supports replication when you use the Redis engine. To monitor the latency between whendata is written to a Redis read/write primary cluster and when it is propagated to a read-only secondarycluster, ElastiCache adds to the cluster a special key, ElastiCacheMasterReplicationTimestamp,which is the current Universal Coordinated Time (UTC) time. Because a Redis cluster might be addedto a replication group at a later time, this key is included in all Redis clusters, even if initially they are notmembers of a replication group. For more information on replication groups, see Replication Groups andRead Replicas (Redis) (p. 30).
To create a Redis cluster, do the following:
Prerequisites
1. Sign in to the AWS Management Console and open the Amazon ElastiCache console at https://console.aws.amazon.com/elasticache/.
2. On the ElastiCache console dashboard, click Launch Cache Cluster to start the Launch CacheCluster wizard.
Step 1: Select the Redis Engine
Before you proceed, be sure you have completed the Prerequisites section.
To select your cluster's engine:
1.On the Select Engine screen, click the Redis tab.
2. Click Next.
Step 2: Specify Cluster Details
Before you proceed, be sure you have completed Step 1: Select the Redis Engine.
API Version 2015-02-0293
Amazon ElastiCache User GuideCreating a Cluster
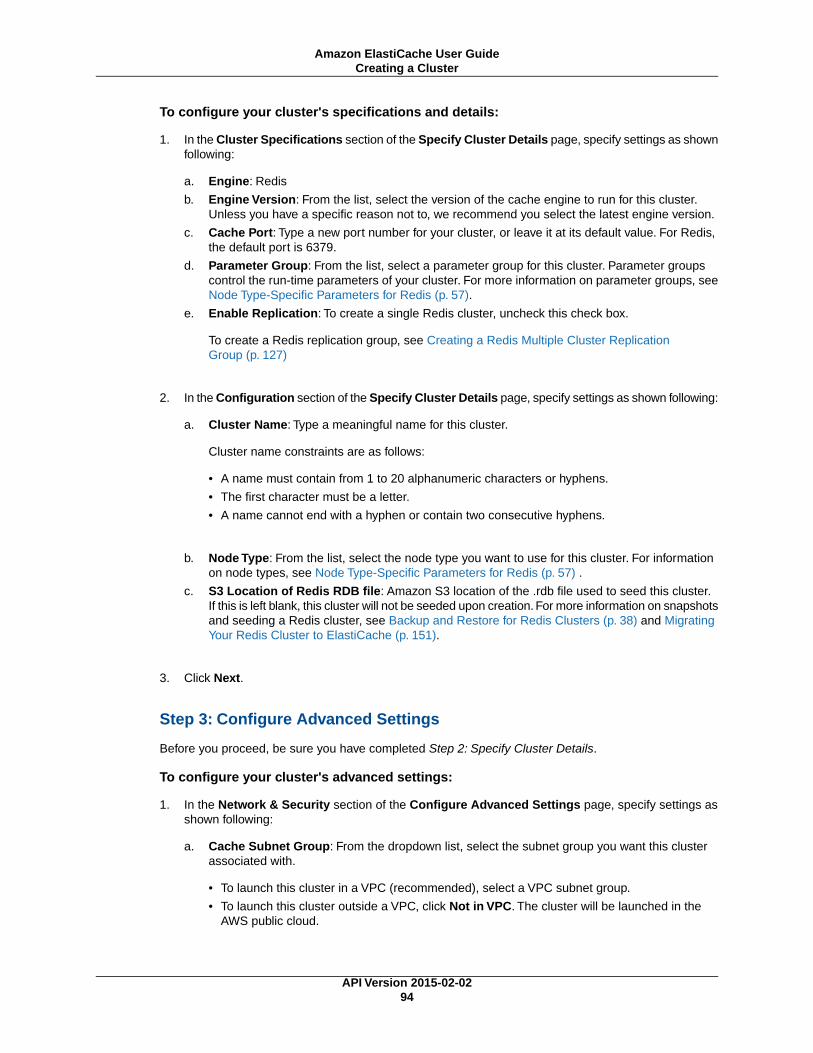
To configure your cluster's specifications and details:
1. In the Cluster Specifications section of the Specify Cluster Details page, specify settings as shownfollowing:
a. Engine: Redis
b. Engine Version: From the list, select the version of the cache engine to run for this cluster.Unless you have a specific reason not to, we recommend you select the latest engine version.
c. Cache Port: Type a new port number for your cluster, or leave it at its default value. For Redis,the default port is 6379.
d. Parameter Group: From the list, select a parameter group for this cluster. Parameter groupscontrol the run-time parameters of your cluster. For more information on parameter groups, seeNode Type-Specific Parameters for Redis (p. 57).
e. Enable Replication: To create a single Redis cluster, uncheck this check box.
To create a Redis replication group, see Creating a Redis Multiple Cluster ReplicationGroup (p. 127)
2. In the Configuration section of the Specify Cluster Details page, specify settings as shown following:
a. Cluster Name: Type a meaningful name for this cluster.
Cluster name constraints are as follows:
• A name must contain from 1 to 20 alphanumeric characters or hyphens.
• The first character must be a letter.
• A name cannot end with a hyphen or contain two consecutive hyphens.
b. Node Type: From the list, select the node type you want to use for this cluster. For informationon node types, see Node Type-Specific Parameters for Redis (p. 57) .
c. S3 Location of Redis RDB file: Amazon S3 location of the .rdb file used to seed this cluster.If this is left blank, this cluster will not be seeded upon creation. For more information on snapshotsand seeding a Redis cluster, see Backup and Restore for Redis Clusters (p. 38) and MigratingYour Redis Cluster to ElastiCache (p. 151).
3. Click Next.
Step 3: Configure Advanced Settings
Before you proceed, be sure you have completed Step 2: Specify Cluster Details.
To configure your cluster's advanced settings:
1. In the Network & Security section of the Configure Advanced Settings page, specify settings asshown following:
a. Cache Subnet Group: From the dropdown list, select the subnet group you want this clusterassociated with.
• To launch this cluster in a VPC (recommended), select a VPC subnet group.
• To launch this cluster outside a VPC, click Not in VPC. The cluster will be launched in theAWS public cloud.
API Version 2015-02-0294
Amazon ElastiCache User GuideCreating a Cluster
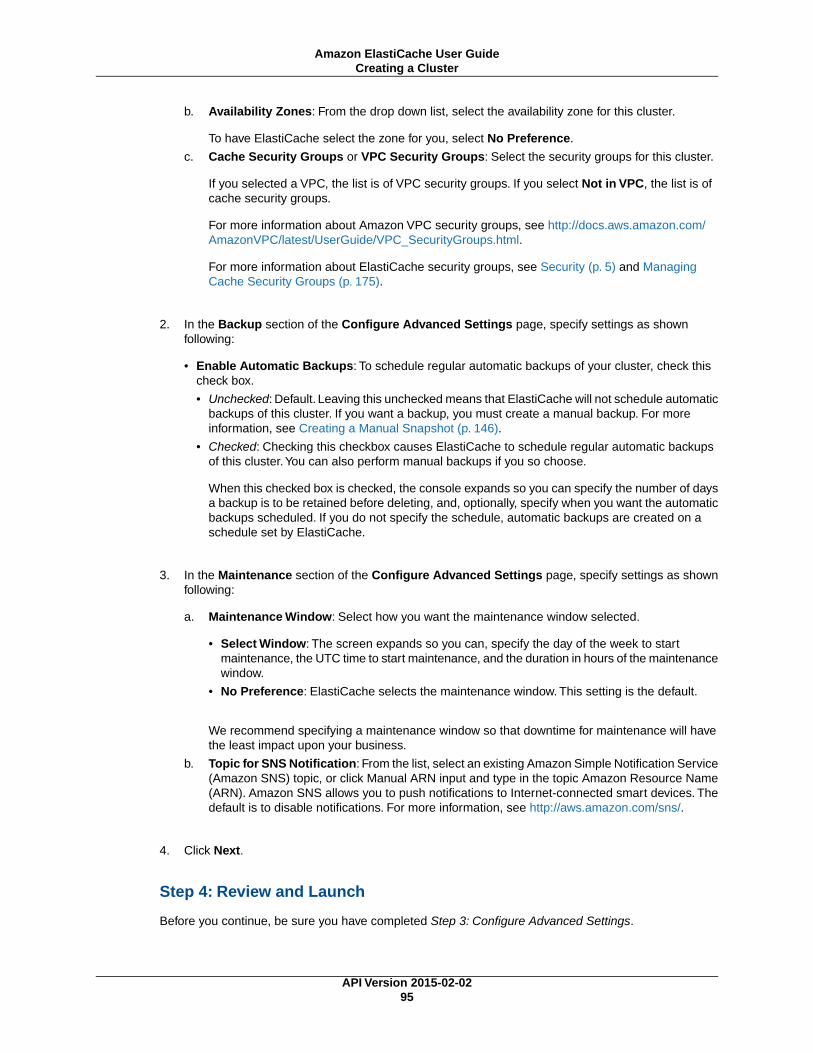
b. Availability Zones: From the drop down list, select the availability zone for this cluster.
To have ElastiCache select the zone for you, select No Preference.
c. Cache Security Groups or VPC Security Groups: Select the security groups for this cluster.
If you selected a VPC, the list is of VPC security groups. If you select Not in VPC, the list is ofcache security groups.
For more information about Amazon VPC security groups, see http://docs.aws.amazon.com/AmazonVPC/latest/UserGuide/VPC_SecurityGroups.html.
For more information about ElastiCache security groups, see Security (p. 5) and ManagingCache Security Groups (p. 175).
2. In the Backup section of the Configure Advanced Settings page, specify settings as shownfollowing:
• Enable Automatic Backups: To schedule regular automatic backups of your cluster, check thischeck box.
• Unchecked: Default. Leaving this unchecked means that ElastiCache will not schedule automaticbackups of this cluster. If you want a backup, you must create a manual backup. For moreinformation, see Creating a Manual Snapshot (p. 146).
• Checked: Checking this checkbox causes ElastiCache to schedule regular automatic backupsof this cluster.You can also perform manual backups if you so choose.
When this checked box is checked, the console expands so you can specify the number of daysa backup is to be retained before deleting, and, optionally, specify when you want the automaticbackups scheduled. If you do not specify the schedule, automatic backups are created on aschedule set by ElastiCache.
3. In the Maintenance section of the Configure Advanced Settings page, specify settings as shownfollowing:
a. Maintenance Window: Select how you want the maintenance window selected.
• Select Window: The screen expands so you can, specify the day of the week to startmaintenance, the UTC time to start maintenance, and the duration in hours of the maintenancewindow.
• No Preference: ElastiCache selects the maintenance window. This setting is the default.
We recommend specifying a maintenance window so that downtime for maintenance will havethe least impact upon your business.
b. Topic for SNS Notification: From the list, select an existing Amazon Simple Notification Service(Amazon SNS) topic, or click Manual ARN input and type in the topic Amazon Resource Name(ARN). Amazon SNS allows you to push notifications to Internet-connected smart devices. Thedefault is to disable notifications. For more information, see http://aws.amazon.com/sns/.
4. Click Next.
Step 4: Review and Launch
Before you continue, be sure you have completed Step 3: Configure Advanced Settings.
API Version 2015-02-0295
Amazon ElastiCache User GuideCreating a Cluster
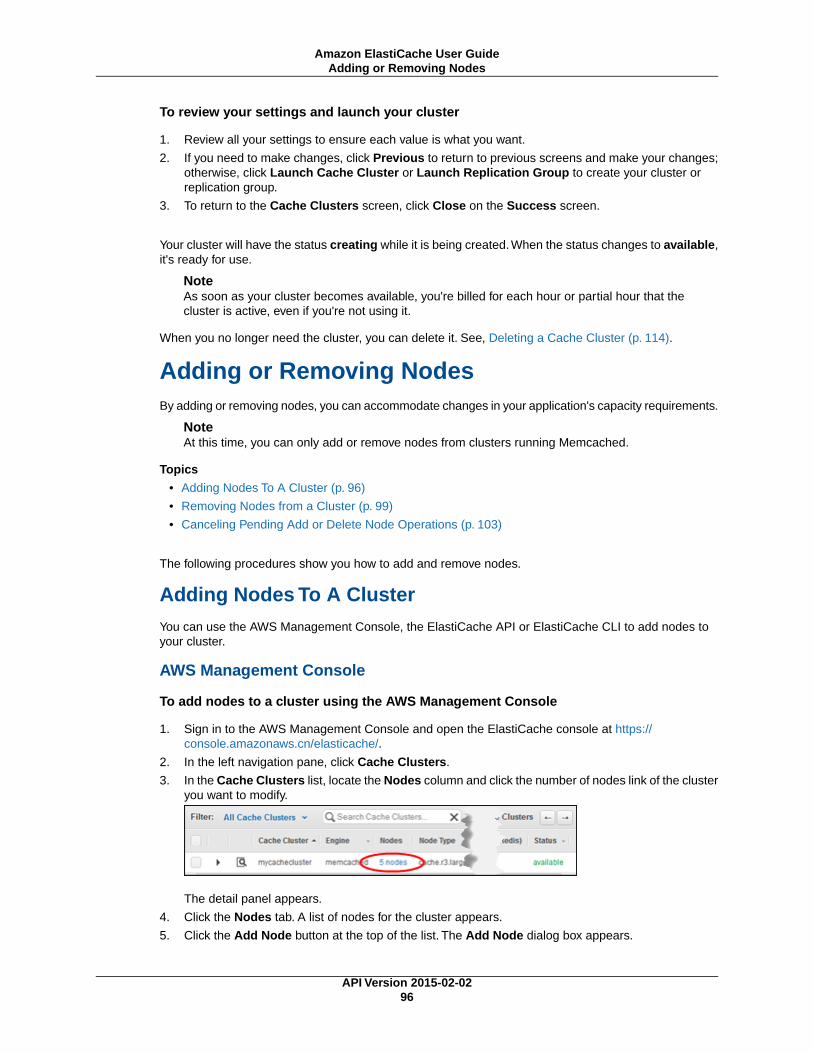
To review your settings and launch your cluster
1. Review all your settings to ensure each value is what you want.
2. If you need to make changes, click Previous to return to previous screens and make your changes;otherwise, click Launch Cache Cluster or Launch Replication Group to create your cluster orreplication group.
3. To return to the Cache Clusters screen, click Close on the Success screen.
Your cluster will have the status creating while it is being created. When the status changes to available,it's ready for use.
NoteAs soon as your cluster becomes available, you're billed for each hour or partial hour that thecluster is active, even if you're not using it.
When you no longer need the cluster, you can delete it. See, Deleting a Cache Cluster (p. 114).
Adding or Removing NodesBy adding or removing nodes, you can accommodate changes in your application's capacity requirements.
NoteAt this time, you can only add or remove nodes from clusters running Memcached.
Topics
• Adding Nodes To A Cluster (p. 96)
• Removing Nodes from a Cluster (p. 99)
• Canceling Pending Add or Delete Node Operations (p. 103)
The following procedures show you how to add and remove nodes.
Adding Nodes To A ClusterYou can use the AWS Management Console, the ElastiCache API or ElastiCache CLI to add nodes toyour cluster.
AWS Management Console
To add nodes to a cluster using the AWS Management Console
1. Sign in to the AWS Management Console and open the ElastiCache console at https://console.amazonaws.cn/elasticache/.
2. In the left navigation pane, click Cache Clusters.
3. In the Cache Clusters list, locate the Nodes column and click the number of nodes link of the clusteryou want to modify.
The detail panel appears.
4. Click the Nodes tab. A list of nodes for the cluster appears.
5. Click the Add Node button at the top of the list. The Add Node dialog box appears.
API Version 2015-02-0296
Amazon ElastiCache User GuideAdding or Removing Nodes

6. In the Number of Nodes to Add box, type the number of nodes you want to add.
7. From the list, select No Preference, Spread Nodes Across Zones, or Specify Zones.
• No Preference: If your existing nodes are all in the same Availability Zone, ElastiCache createsall new nodes in the same Availability Zone. If your existing nodes are spread across differentAvailability Zones, ElastiCache spreads the new nodes across different Availability Zones.
• Spread Nodes Across Zones: ElastiCache selects the Availability Zones in which to create yournew nodes.
• Specify Zones:You specify how to distribute the new nodes across Availability Zones.
If you select Specify Zones, the wizard expands with a list of usable Availability Zones. Type thenumber of new nodes to create in that zone. The sum of these numbers must equal the value youentered in the Number of Nodes to Add box.
8. Select the Apply Immediately - Yes radio button to apply this change immediately, or select No topostpone the change until your next maintenance window.
Impact of New Add and Remove Requests on Pending Requests
ResultsNew Re-quest
PendingOperation
Scenarios
The new delete request, pending or immediate, replacesthe pending delete request.
DeleteDeleteScenario 1
The new create request, pending or immediate, replacesthe pending delete request.
CreateDeleteScenario 2
The new delete request, pending or immediate, replacesthe pending create request.
DeleteCreateScenario 3
The new create request is added to the pending createrequest.
Important: If the new create request is set to Apply Im-mediately - Yes, all create requests are performed im-mediately. If the new create request is set to Apply Im-mediately - No, all create requests are pending.
CreateCreateScenario 4
API Version 2015-02-0297
Amazon ElastiCache User GuideAdding or Removing Nodes
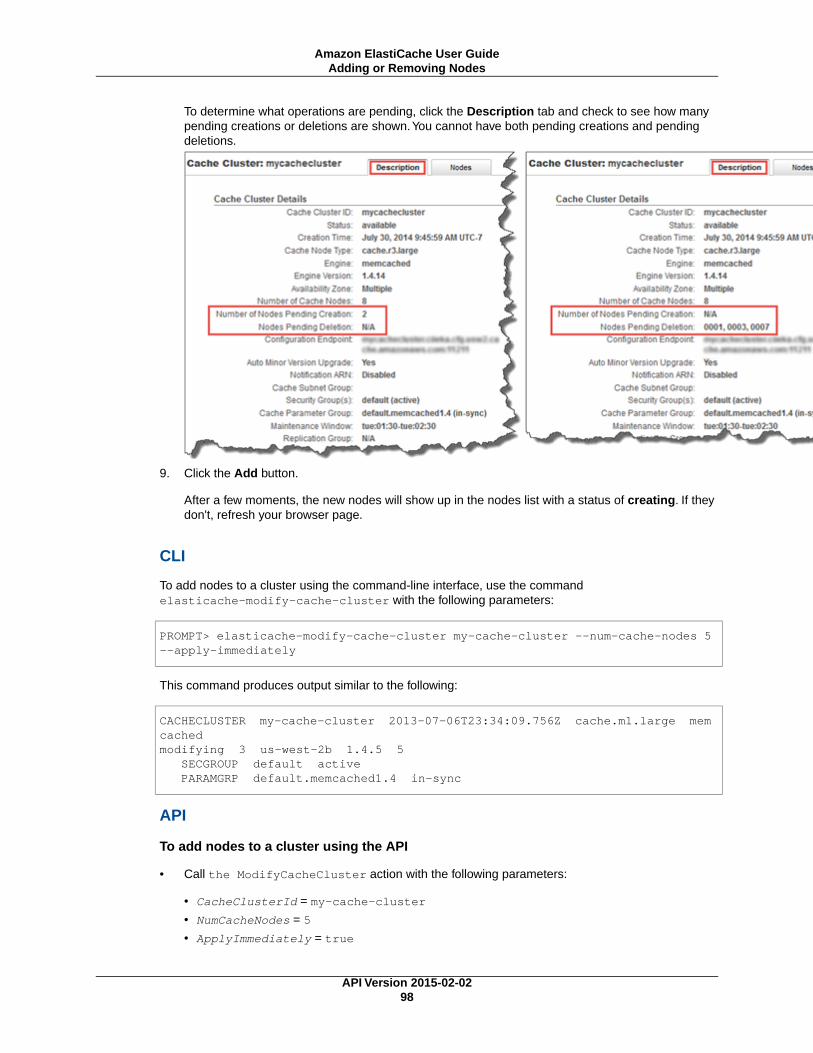
To determine what operations are pending, click the Description tab and check to see how manypending creations or deletions are shown.You cannot have both pending creations and pendingdeletions.
9. Click the Add button.
After a few moments, the new nodes will show up in the nodes list with a status of creating. If theydon't, refresh your browser page.
CLI
To add nodes to a cluster using the command-line interface, use the commandelasticache-modify-cache-cluster with the following parameters:
PROMPT> elasticache-modify-cache-cluster my-cache-cluster --num-cache-nodes 5 --apply-immediately
This command produces output similar to the following:
CACHECLUSTER my-cache-cluster 2013-07-06T23:34:09.756Z cache.m1.large mem cachedmodifying 3 us-west-2b 1.4.5 5 SECGROUP default active PARAMGRP default.memcached1.4 in-sync
API
To add nodes to a cluster using the API
• Call the ModifyCacheCluster action with the following parameters:
• CacheClusterId = my-cache-cluster
• NumCacheNodes = 5
• ApplyImmediately = true
API Version 2015-02-0298
Amazon ElastiCache User GuideAdding or Removing Nodes
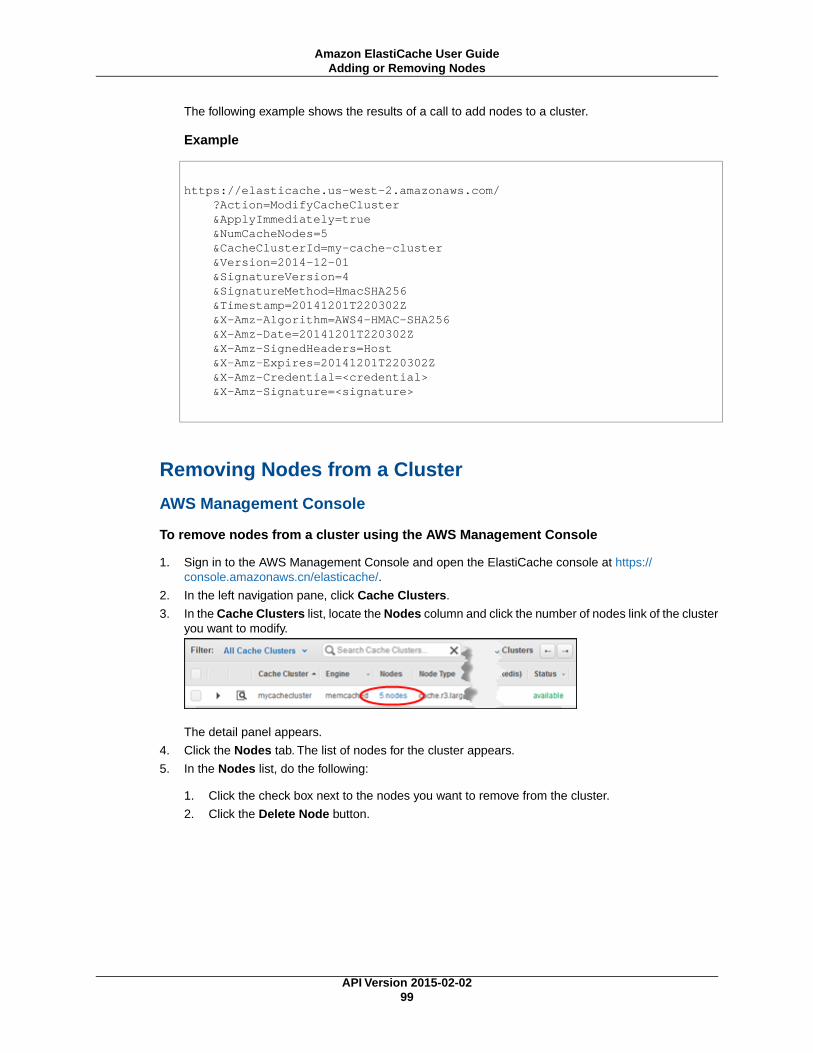
The following example shows the results of a call to add nodes to a cluster.
Example
https://elasticache.us-west-2.amazonaws.com/ ?Action=ModifyCacheCluster &ApplyImmediately=true &NumCacheNodes=5 &CacheClusterId=my-cache-cluster &Version=2014-12-01 &SignatureVersion=4 &SignatureMethod=HmacSHA256 &Timestamp=20141201T220302Z &X-Amz-Algorithm=AWS4-HMAC-SHA256 &X-Amz-Date=20141201T220302Z &X-Amz-SignedHeaders=Host &X-Amz-Expires=20141201T220302Z &X-Amz-Credential=<credential> &X-Amz-Signature=<signature>
Removing Nodes from a Cluster
AWS Management Console
To remove nodes from a cluster using the AWS Management Console
1. Sign in to the AWS Management Console and open the ElastiCache console at https://console.amazonaws.cn/elasticache/.
2. In the left navigation pane, click Cache Clusters.
3. In the Cache Clusters list, locate the Nodes column and click the number of nodes link of the clusteryou want to modify.
The detail panel appears.
4. Click the Nodes tab. The list of nodes for the cluster appears.
5. In the Nodes list, do the following:
1. Click the check box next to the nodes you want to remove from the cluster.
2. Click the Delete Node button.
API Version 2015-02-0299
Amazon ElastiCache User GuideAdding or Removing Nodes
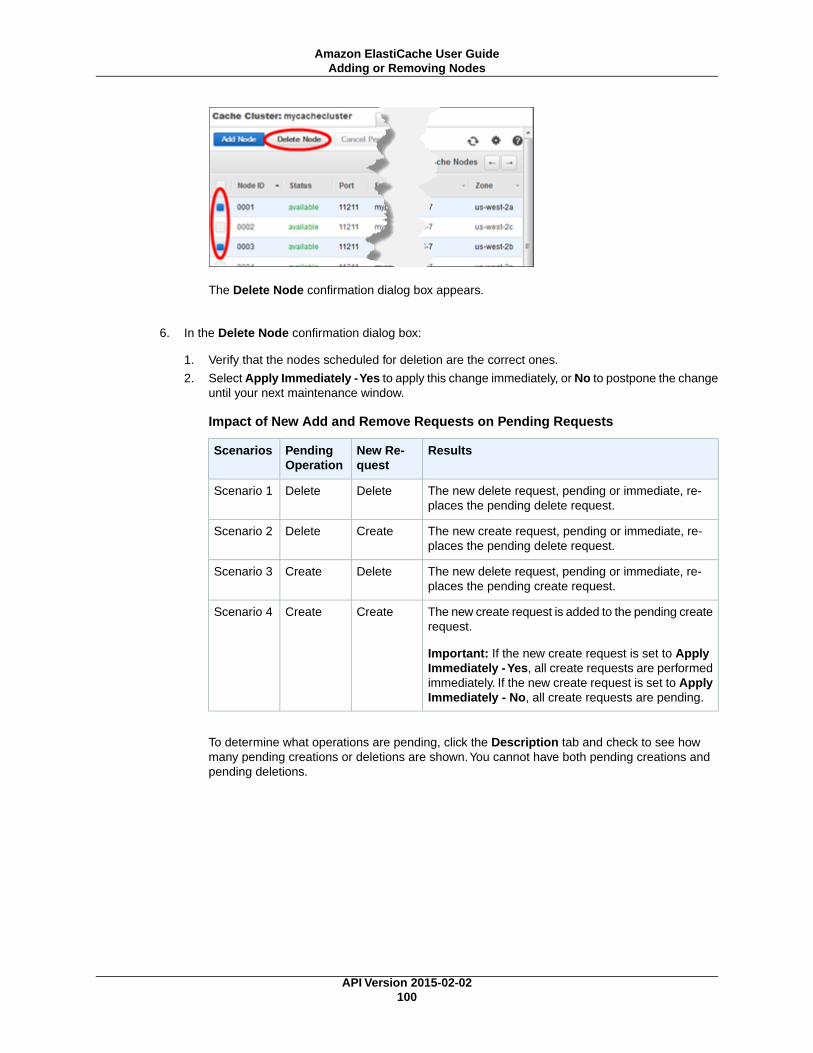
The Delete Node confirmation dialog box appears.
6. In the Delete Node confirmation dialog box:
1. Verify that the nodes scheduled for deletion are the correct ones.
2. Select Apply Immediately - Yes to apply this change immediately, or No to postpone the changeuntil your next maintenance window.
Impact of New Add and Remove Requests on Pending Requests
ResultsNew Re-quest
PendingOperation
Scenarios
The new delete request, pending or immediate, re-places the pending delete request.
DeleteDeleteScenario 1
The new create request, pending or immediate, re-places the pending delete request.
CreateDeleteScenario 2
The new delete request, pending or immediate, re-places the pending create request.
DeleteCreateScenario 3
The new create request is added to the pending createrequest.
Important: If the new create request is set to ApplyImmediately - Yes, all create requests are performedimmediately. If the new create request is set to ApplyImmediately - No, all create requests are pending.
CreateCreateScenario 4
To determine what operations are pending, click the Description tab and check to see howmany pending creations or deletions are shown.You cannot have both pending creations andpending deletions.
API Version 2015-02-02100
Amazon ElastiCache User GuideAdding or Removing Nodes
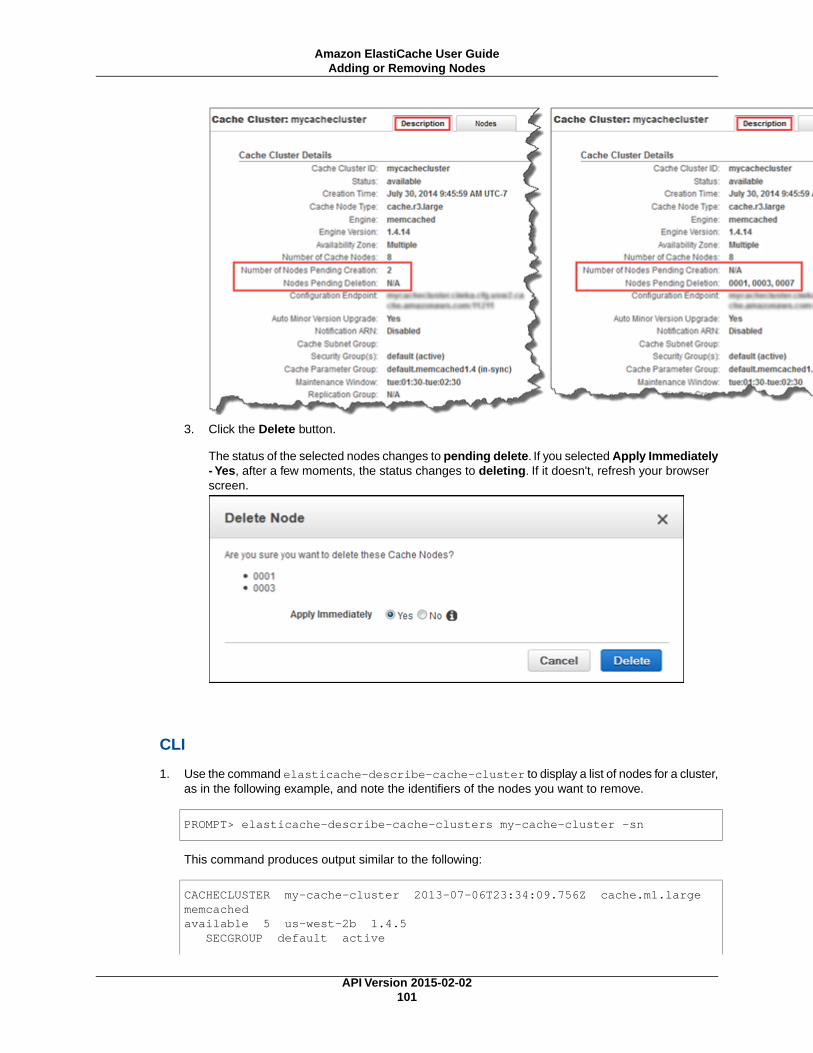
3. Click the Delete button.
The status of the selected nodes changes to pending delete. If you selected Apply Immediately- Yes, after a few moments, the status changes to deleting. If it doesn't, refresh your browserscreen.
CLI
1. Use the command elasticache-describe-cache-cluster to display a list of nodes for a cluster,as in the following example, and note the identifiers of the nodes you want to remove.
PROMPT> elasticache-describe-cache-clusters my-cache-cluster -sn
This command produces output similar to the following:
CACHECLUSTER my-cache-cluster 2013-07-06T23:34:09.756Z cache.m1.large memcachedavailable 5 us-west-2b 1.4.5 SECGROUP default active
API Version 2015-02-02101
Amazon ElastiCache User GuideAdding or Removing Nodes
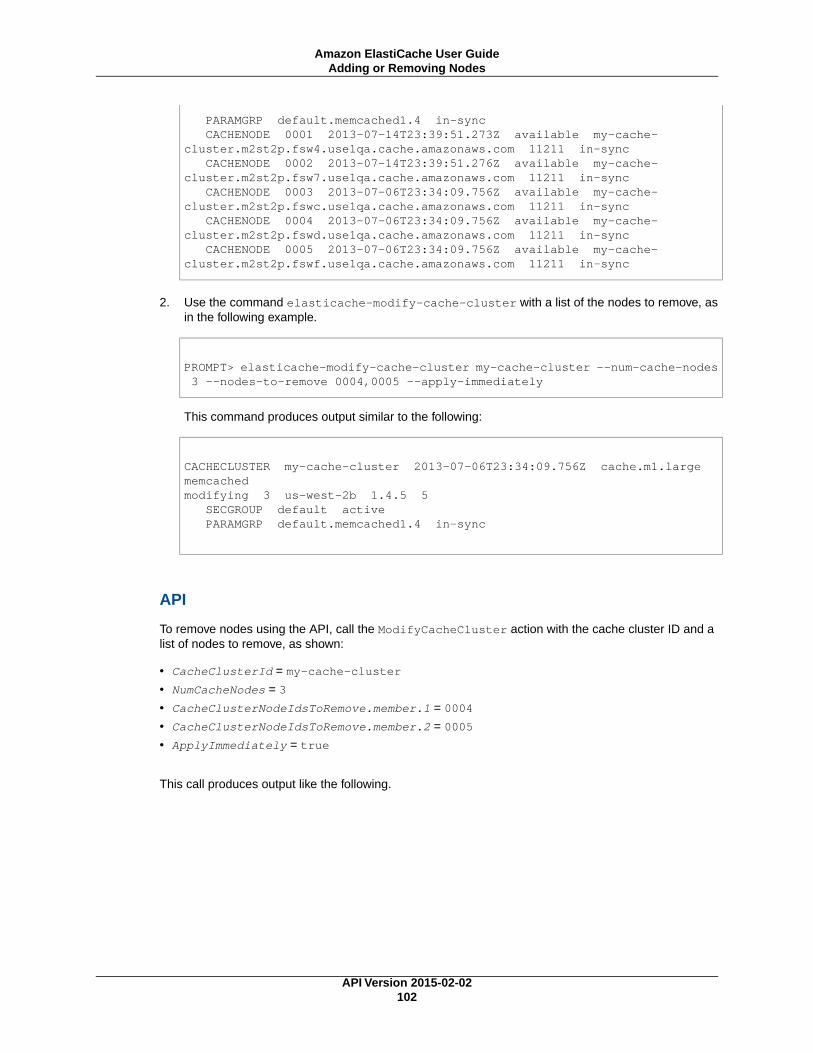
PARAMGRP default.memcached1.4 in-sync CACHENODE 0001 2013-07-14T23:39:51.273Z available my-cache-cluster.m2st2p.fsw4.use1qa.cache.amazonaws.com 11211 in-sync CACHENODE 0002 2013-07-14T23:39:51.276Z available my-cache-cluster.m2st2p.fsw7.use1qa.cache.amazonaws.com 11211 in-sync CACHENODE 0003 2013-07-06T23:34:09.756Z available my-cache-cluster.m2st2p.fswc.use1qa.cache.amazonaws.com 11211 in-sync CACHENODE 0004 2013-07-06T23:34:09.756Z available my-cache-cluster.m2st2p.fswd.use1qa.cache.amazonaws.com 11211 in-sync CACHENODE 0005 2013-07-06T23:34:09.756Z available my-cache-cluster.m2st2p.fswf.use1qa.cache.amazonaws.com 11211 in-sync
2. Use the command elasticache-modify-cache-cluster with a list of the nodes to remove, asin the following example.
PROMPT> elasticache-modify-cache-cluster my-cache-cluster --num-cache-nodes 3 --nodes-to-remove 0004,0005 --apply-immediately
This command produces output similar to the following:
CACHECLUSTER my-cache-cluster 2013-07-06T23:34:09.756Z cache.m1.large memcachedmodifying 3 us-west-2b 1.4.5 5 SECGROUP default active PARAMGRP default.memcached1.4 in-sync
API
To remove nodes using the API, call the ModifyCacheCluster action with the cache cluster ID and alist of nodes to remove, as shown:
• CacheClusterId = my-cache-cluster
• NumCacheNodes = 3
• CacheClusterNodeIdsToRemove.member.1 = 0004
• CacheClusterNodeIdsToRemove.member.2 = 0005
• ApplyImmediately = true
This call produces output like the following.
API Version 2015-02-02102
Amazon ElastiCache User GuideAdding or Removing Nodes
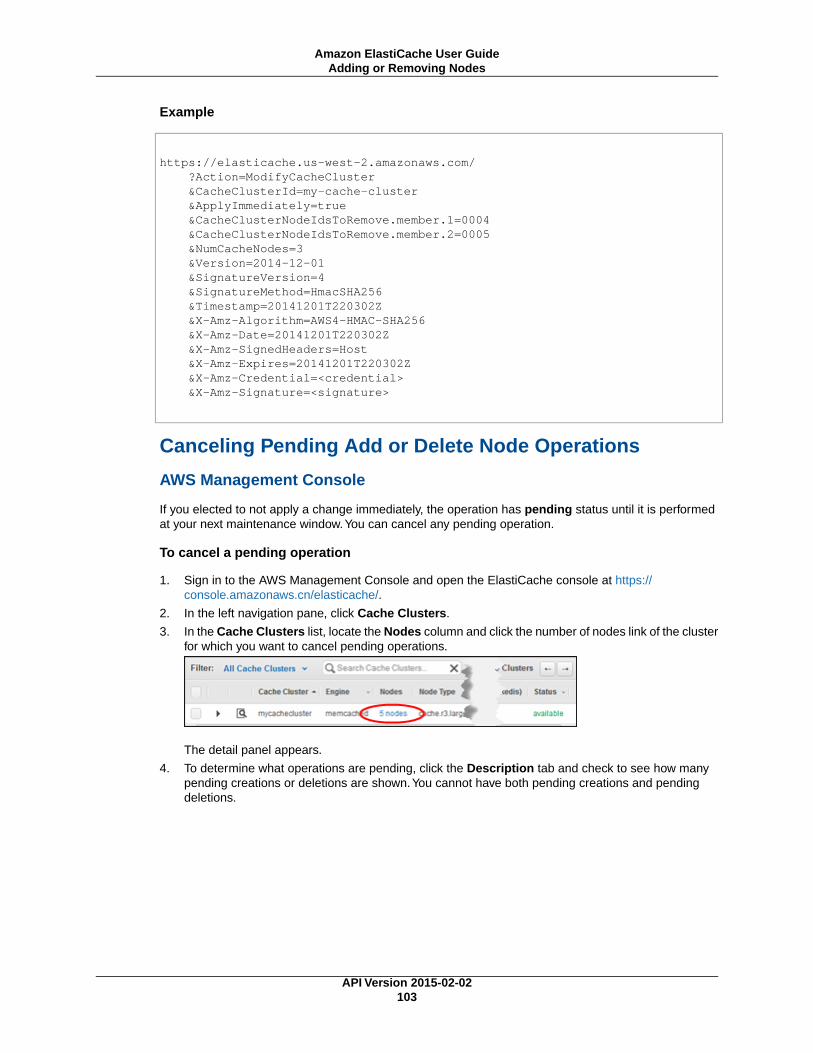
Example
https://elasticache.us-west-2.amazonaws.com/ ?Action=ModifyCacheCluster &CacheClusterId=my-cache-cluster &ApplyImmediately=true &CacheClusterNodeIdsToRemove.member.1=0004 &CacheClusterNodeIdsToRemove.member.2=0005 &NumCacheNodes=3 &Version=2014-12-01 &SignatureVersion=4 &SignatureMethod=HmacSHA256 &Timestamp=20141201T220302Z &X-Amz-Algorithm=AWS4-HMAC-SHA256 &X-Amz-Date=20141201T220302Z &X-Amz-SignedHeaders=Host &X-Amz-Expires=20141201T220302Z &X-Amz-Credential=<credential> &X-Amz-Signature=<signature>
Canceling Pending Add or Delete Node Operations
AWS Management Console
If you elected to not apply a change immediately, the operation has pending status until it is performedat your next maintenance window.You can cancel any pending operation.
To cancel a pending operation
1. Sign in to the AWS Management Console and open the ElastiCache console at https://console.amazonaws.cn/elasticache/.
2. In the left navigation pane, click Cache Clusters.
3. In the Cache Clusters list, locate the Nodes column and click the number of nodes link of the clusterfor which you want to cancel pending operations.
The detail panel appears.
4. To determine what operations are pending, click the Description tab and check to see how manypending creations or deletions are shown.You cannot have both pending creations and pendingdeletions.
API Version 2015-02-02103
Amazon ElastiCache User GuideAdding or Removing Nodes
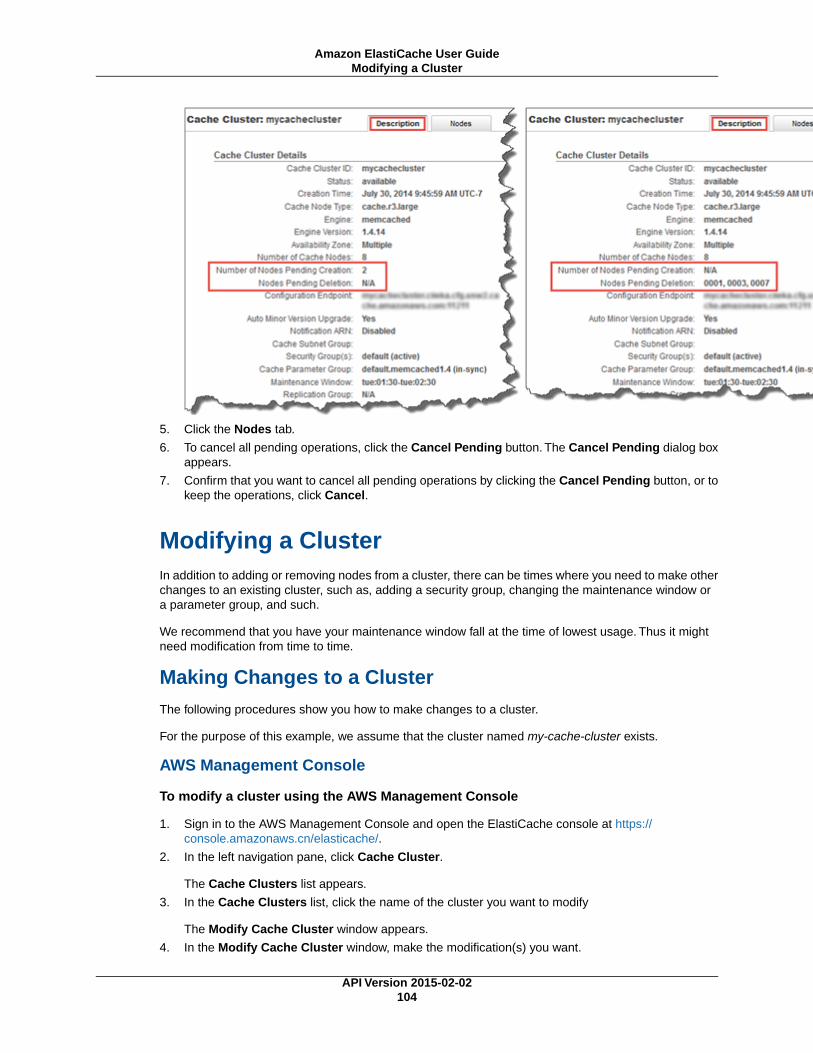
5. Click the Nodes tab.
6. To cancel all pending operations, click the Cancel Pending button. The Cancel Pending dialog boxappears.
7. Confirm that you want to cancel all pending operations by clicking the Cancel Pending button, or tokeep the operations, click Cancel.
Modifying a ClusterIn addition to adding or removing nodes from a cluster, there can be times where you need to make otherchanges to an existing cluster, such as, adding a security group, changing the maintenance window ora parameter group, and such.
We recommend that you have your maintenance window fall at the time of lowest usage. Thus it mightneed modification from time to time.
Making Changes to a ClusterThe following procedures show you how to make changes to a cluster.
For the purpose of this example, we assume that the cluster named my-cache-cluster exists.
AWS Management Console
To modify a cluster using the AWS Management Console
1. Sign in to the AWS Management Console and open the ElastiCache console at https://console.amazonaws.cn/elasticache/.
2. In the left navigation pane, click Cache Cluster.
The Cache Clusters list appears.
3. In the Cache Clusters list, click the name of the cluster you want to modify
The Modify Cache Cluster window appears.
4. In the Modify Cache Cluster window, make the modification(s) you want.
API Version 2015-02-02104
Amazon ElastiCache User GuideModifying a Cluster
5. Click Modify.
The modifications are made immediately and you return to the Cache Clusters screen.
CLITo modify a cluster, use the elasticache-modify-cache-cluster command.The following exampleuses the parameter --preferred-maintenance-window to modify my-cache-cluster so itsmaintenance window is each Tuesday from 4:00P to 5:00P UTC.
PROMPT> elasticache-modify-cache-cluster my-cache-cluster --preferred-mainten ance-window Tue:04:00-Tue:05:00
This command produces output similar to the following.
CACHECLUSTER my-cache-cluster 2013-07-06T23:34:09.756Z cache.m1.large mem cachedavailable 3 us-west-2b 1.4.5 SECGROUP default active PARAMGRP default.memcached1.4 in-sync
For more information on elasticache-modify-cache-cluster, see http://docs.aws.amazon.com/AmazonElastiCache/latest/CommandLineReference/CLIReference-cmd-ModifyCacheCluster.html.
APITo modify a cluster, call the ModifyCacheCluster action.
Example
The following code sets the number of days a snapshot is retained before deleting(SnapshotRetentionLimit) on my-cache-cluster to 8.
https://elasticache.us-west-2.amazonaws.com/ ?Action=ModifyCacheCluster &CacheClusterId=my-cache-cluster &SignatureVersion=4 &SignatureMethod=HmacSHA256 &SnapshotRetentionLimit=8 &Timestamp=20141201T220302Z &X-Amz-Algorithm=AWS4-HMAC-SHA256 &X-Amz-Date=20141201T220302Z &X-Amz-SignedHeaders=Host &X-Amz-Expires=20141201T220302Z &X-Amz-Credential=<credential> &X-Amz-Signature=<signature>
For more information on ModifyCacheCluster, see http://docs.aws.amazon.com/AmazonElastiCache/latest/APIReference/API_ModifyCacheCluster.html.
API Version 2015-02-02105
Amazon ElastiCache User GuideModifying a Cluster
Managing Reserved NodesReserved nodes let you make a one-time, up-front payment for a cluster, reserve the cluster for a one-or three-year term, and pay a significantly lower rate for each hour you run that cluster. Reserved nodesare available in three varieties—Heavy Utilization, Medium Utilization, and Light Utilization—that enableyou to optimize your ElastiCache costs based on your expected utilization.You can use the commandline or the API to list and purchase available reserved cluster offerings. Reserved cluster offerings arebased on the cluster class and duration.
In the following example, you see how to view available reserved cluster offerings, purchase an availablereserved cluster offering, and list reserved nodes for your account.
Topics
• Describing Your Reserved nodes (p. 106)
• Describing Available Reserved Cache Node Offerings (p. 107)
• Purchasing a Reserved Cluster (p. 109)
Describing Your Reserved nodesYou can get information about reserved nodes for your AWS account as described following.
AWS Management Console
1. Sign in to the AWS Management Console and open the ElastiCache console at https://console.amazonaws.cn/elasticache/.
2. In the navigation list, click the Reserved Cache Nodes link.
The reserved cache nodes for your account appear in the Reserved Cache Nodes list.You can clickany of the reserved cache nodes in the list to see detailed information about the reserved cachenode in the detail pane at the bottom of the console.
CLI
To get information about reserved nodes for your AWS account, type the following command at a commandprompt:
PROMPT> elasticache-describe-reserved-cache-nodes --headers
This command should return output similar to the following:
RESERVATION ReservationId Class Start Time Duration Fixed Price Usage Price Count State Description Offering TypeRESERVATION ki-real-ri-test5 cache.m1.small 2013-07-09T23:37:44.720Z 1y 455.00 USD 0.092 USD 1 retired memcached Medium Utiliza tion
API
To get information about reserved nodes for your AWS account, call the DescribeReservedCacheNodesaction.
API Version 2015-02-02106
Amazon ElastiCache User GuideManaging Reserved Nodes
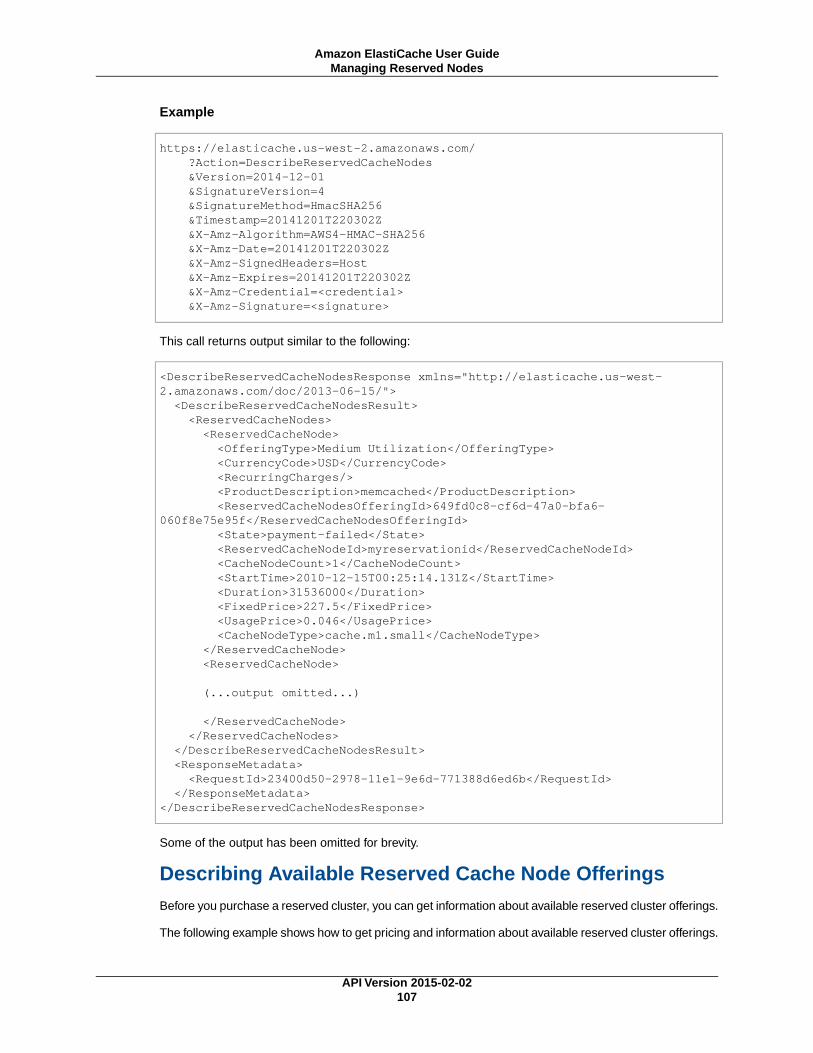
Example
https://elasticache.us-west-2.amazonaws.com/ ?Action=DescribeReservedCacheNodes &Version=2014-12-01 &SignatureVersion=4 &SignatureMethod=HmacSHA256 &Timestamp=20141201T220302Z &X-Amz-Algorithm=AWS4-HMAC-SHA256 &X-Amz-Date=20141201T220302Z &X-Amz-SignedHeaders=Host &X-Amz-Expires=20141201T220302Z &X-Amz-Credential=<credential> &X-Amz-Signature=<signature>
This call returns output similar to the following:
<DescribeReservedCacheNodesResponse xmlns="http://elasticache.us-west-2.amazonaws.com/doc/2013-06-15/"> <DescribeReservedCacheNodesResult> <ReservedCacheNodes> <ReservedCacheNode> <OfferingType>Medium Utilization</OfferingType> <CurrencyCode>USD</CurrencyCode> <RecurringCharges/> <ProductDescription>memcached</ProductDescription> <ReservedCacheNodesOfferingId>649fd0c8-cf6d-47a0-bfa6-060f8e75e95f</ReservedCacheNodesOfferingId> <State>payment-failed</State> <ReservedCacheNodeId>myreservationid</ReservedCacheNodeId> <CacheNodeCount>1</CacheNodeCount> <StartTime>2010-12-15T00:25:14.131Z</StartTime> <Duration>31536000</Duration> <FixedPrice>227.5</FixedPrice> <UsagePrice>0.046</UsagePrice> <CacheNodeType>cache.m1.small</CacheNodeType> </ReservedCacheNode> <ReservedCacheNode>
(...output omitted...)
</ReservedCacheNode> </ReservedCacheNodes> </DescribeReservedCacheNodesResult> <ResponseMetadata> <RequestId>23400d50-2978-11e1-9e6d-771388d6ed6b</RequestId> </ResponseMetadata></DescribeReservedCacheNodesResponse>
Some of the output has been omitted for brevity.
Describing Available Reserved Cache Node OfferingsBefore you purchase a reserved cluster, you can get information about available reserved cluster offerings.
The following example shows how to get pricing and information about available reserved cluster offerings.
API Version 2015-02-02107
Amazon ElastiCache User GuideManaging Reserved Nodes
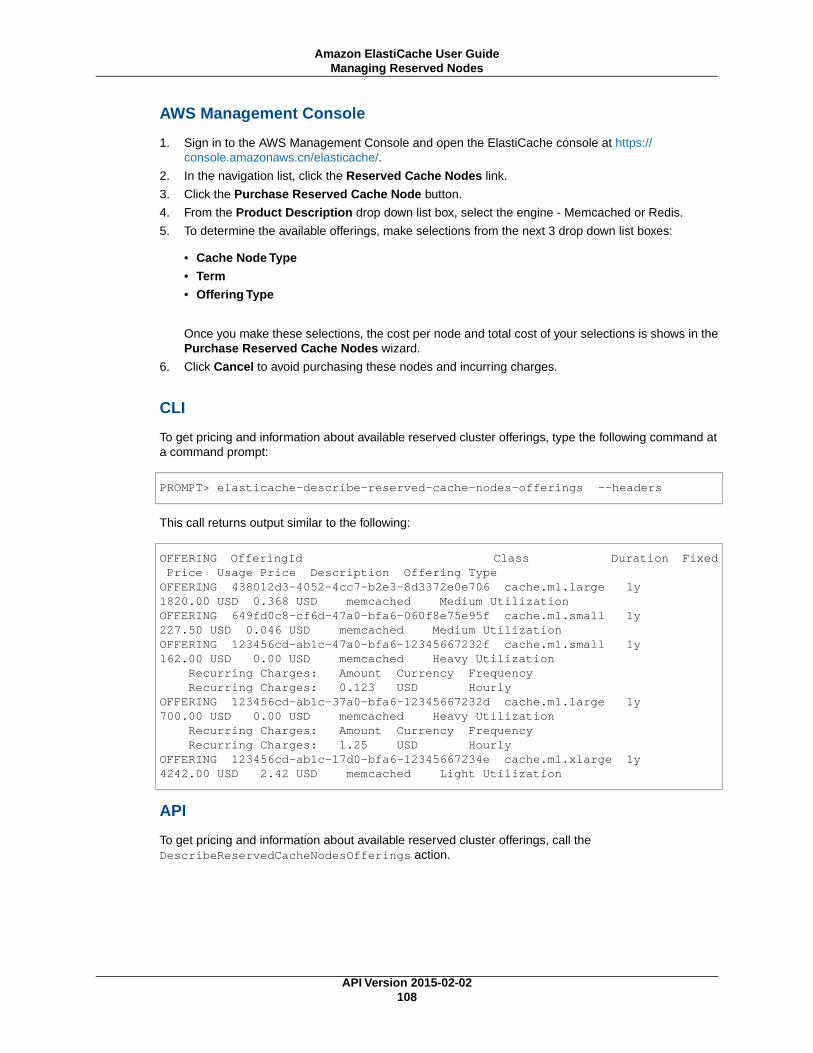
AWS Management Console
1. Sign in to the AWS Management Console and open the ElastiCache console at https://console.amazonaws.cn/elasticache/.
2. In the navigation list, click the Reserved Cache Nodes link.
3. Click the Purchase Reserved Cache Node button.
4. From the Product Description drop down list box, select the engine - Memcached or Redis.
5. To determine the available offerings, make selections from the next 3 drop down list boxes:
• Cache Node Type
• Term
• Offering Type
Once you make these selections, the cost per node and total cost of your selections is shows in thePurchase Reserved Cache Nodes wizard.
6. Click Cancel to avoid purchasing these nodes and incurring charges.
CLI
To get pricing and information about available reserved cluster offerings, type the following command ata command prompt:
PROMPT> elasticache-describe-reserved-cache-nodes-offerings --headers
This call returns output similar to the following:
OFFERING OfferingId Class Duration Fixed Price Usage Price Description Offering TypeOFFERING 438012d3-4052-4cc7-b2e3-8d3372e0e706 cache.m1.large 1y 1820.00 USD 0.368 USD memcached Medium UtilizationOFFERING 649fd0c8-cf6d-47a0-bfa6-060f8e75e95f cache.m1.small 1y 227.50 USD 0.046 USD memcached Medium UtilizationOFFERING 123456cd-ab1c-47a0-bfa6-12345667232f cache.m1.small 1y 162.00 USD 0.00 USD memcached Heavy Utilization Recurring Charges: Amount Currency Frequency Recurring Charges: 0.123 USD HourlyOFFERING 123456cd-ab1c-37a0-bfa6-12345667232d cache.m1.large 1y 700.00 USD 0.00 USD memcached Heavy Utilization Recurring Charges: Amount Currency Frequency Recurring Charges: 1.25 USD HourlyOFFERING 123456cd-ab1c-17d0-bfa6-12345667234e cache.m1.xlarge 1y 4242.00 USD 2.42 USD memcached Light Utilization
API
To get pricing and information about available reserved cluster offerings, call theDescribeReservedCacheNodesOfferings action.
API Version 2015-02-02108
Amazon ElastiCache User GuideManaging Reserved Nodes
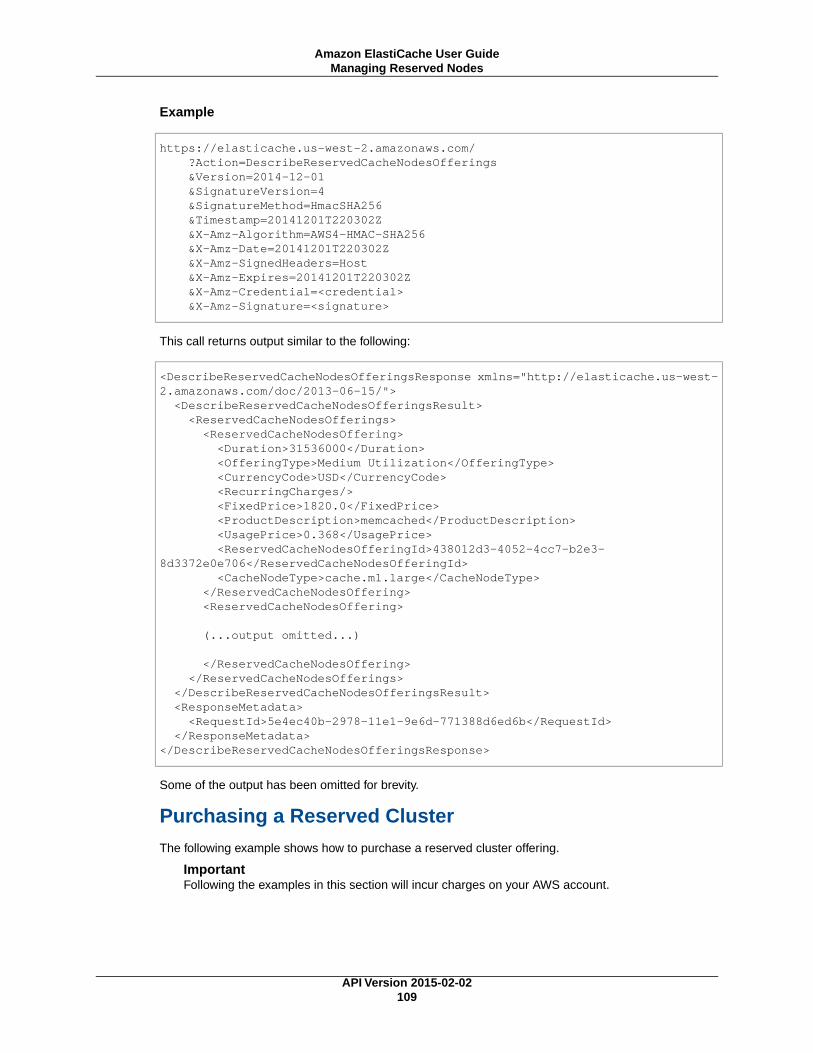
Example
https://elasticache.us-west-2.amazonaws.com/ ?Action=DescribeReservedCacheNodesOfferings &Version=2014-12-01 &SignatureVersion=4 &SignatureMethod=HmacSHA256 &Timestamp=20141201T220302Z &X-Amz-Algorithm=AWS4-HMAC-SHA256 &X-Amz-Date=20141201T220302Z &X-Amz-SignedHeaders=Host &X-Amz-Expires=20141201T220302Z &X-Amz-Credential=<credential> &X-Amz-Signature=<signature>
This call returns output similar to the following:
<DescribeReservedCacheNodesOfferingsResponse xmlns="http://elasticache.us-west-2.amazonaws.com/doc/2013-06-15/"> <DescribeReservedCacheNodesOfferingsResult> <ReservedCacheNodesOfferings> <ReservedCacheNodesOffering> <Duration>31536000</Duration> <OfferingType>Medium Utilization</OfferingType> <CurrencyCode>USD</CurrencyCode> <RecurringCharges/> <FixedPrice>1820.0</FixedPrice> <ProductDescription>memcached</ProductDescription> <UsagePrice>0.368</UsagePrice> <ReservedCacheNodesOfferingId>438012d3-4052-4cc7-b2e3-8d3372e0e706</ReservedCacheNodesOfferingId> <CacheNodeType>cache.m1.large</CacheNodeType> </ReservedCacheNodesOffering> <ReservedCacheNodesOffering>
(...output omitted...)
</ReservedCacheNodesOffering> </ReservedCacheNodesOfferings> </DescribeReservedCacheNodesOfferingsResult> <ResponseMetadata> <RequestId>5e4ec40b-2978-11e1-9e6d-771388d6ed6b</RequestId> </ResponseMetadata></DescribeReservedCacheNodesOfferingsResponse>
Some of the output has been omitted for brevity.
Purchasing a Reserved ClusterThe following example shows how to purchase a reserved cluster offering.
ImportantFollowing the examples in this section will incur charges on your AWS account.
API Version 2015-02-02109
Amazon ElastiCache User GuideManaging Reserved Nodes
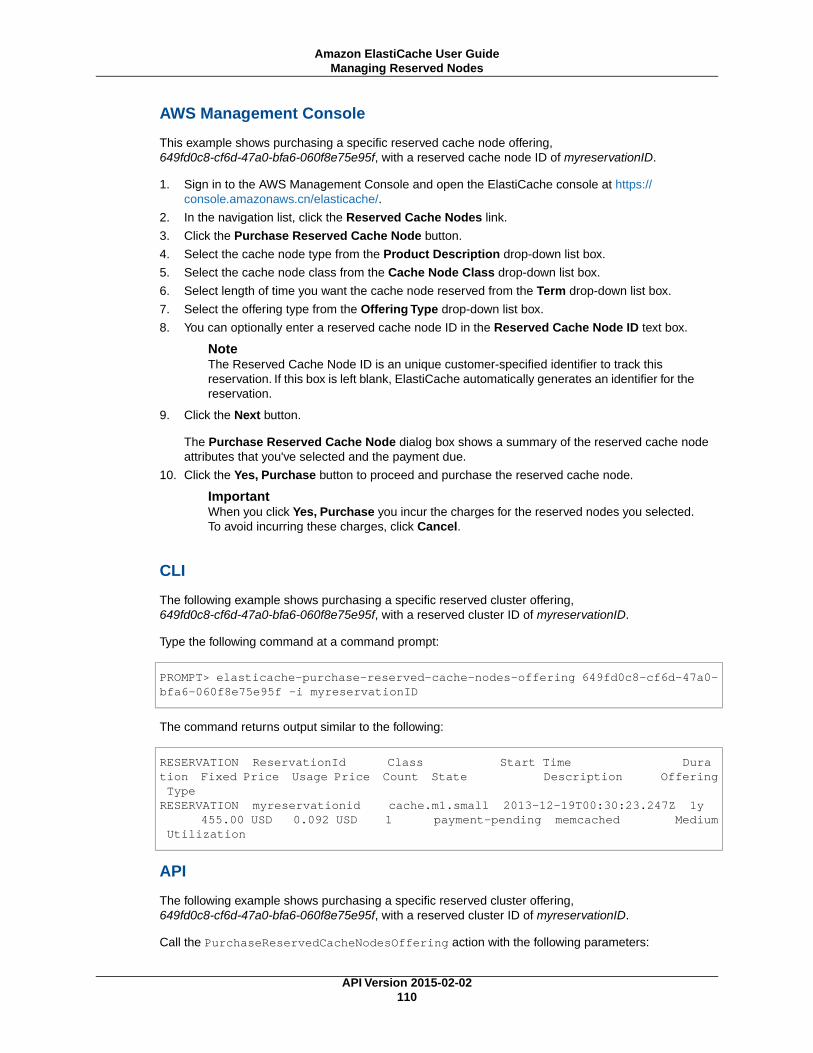
AWS Management Console
This example shows purchasing a specific reserved cache node offering,649fd0c8-cf6d-47a0-bfa6-060f8e75e95f, with a reserved cache node ID of myreservationID.
1. Sign in to the AWS Management Console and open the ElastiCache console at https://console.amazonaws.cn/elasticache/.
2. In the navigation list, click the Reserved Cache Nodes link.
3. Click the Purchase Reserved Cache Node button.
4. Select the cache node type from the Product Description drop-down list box.
5. Select the cache node class from the Cache Node Class drop-down list box.
6. Select length of time you want the cache node reserved from the Term drop-down list box.
7. Select the offering type from the Offering Type drop-down list box.
8. You can optionally enter a reserved cache node ID in the Reserved Cache Node ID text box.
NoteThe Reserved Cache Node ID is an unique customer-specified identifier to track thisreservation. If this box is left blank, ElastiCache automatically generates an identifier for thereservation.
9. Click the Next button.
The Purchase Reserved Cache Node dialog box shows a summary of the reserved cache nodeattributes that you've selected and the payment due.
10. Click the Yes, Purchase button to proceed and purchase the reserved cache node.
ImportantWhen you click Yes, Purchase you incur the charges for the reserved nodes you selected.To avoid incurring these charges, click Cancel.
CLI
The following example shows purchasing a specific reserved cluster offering,649fd0c8-cf6d-47a0-bfa6-060f8e75e95f, with a reserved cluster ID of myreservationID.
Type the following command at a command prompt:
PROMPT> elasticache-purchase-reserved-cache-nodes-offering 649fd0c8-cf6d-47a0-bfa6-060f8e75e95f -i myreservationID
The command returns output similar to the following:
RESERVATION ReservationId Class Start Time Dura tion Fixed Price Usage Price Count State Description Offering TypeRESERVATION myreservationid cache.m1.small 2013-12-19T00:30:23.247Z 1y 455.00 USD 0.092 USD 1 payment-pending memcached Medium Utilization
API
The following example shows purchasing a specific reserved cluster offering,649fd0c8-cf6d-47a0-bfa6-060f8e75e95f, with a reserved cluster ID of myreservationID.
Call the PurchaseReservedCacheNodesOffering action with the following parameters:
API Version 2015-02-02110
Amazon ElastiCache User GuideManaging Reserved Nodes
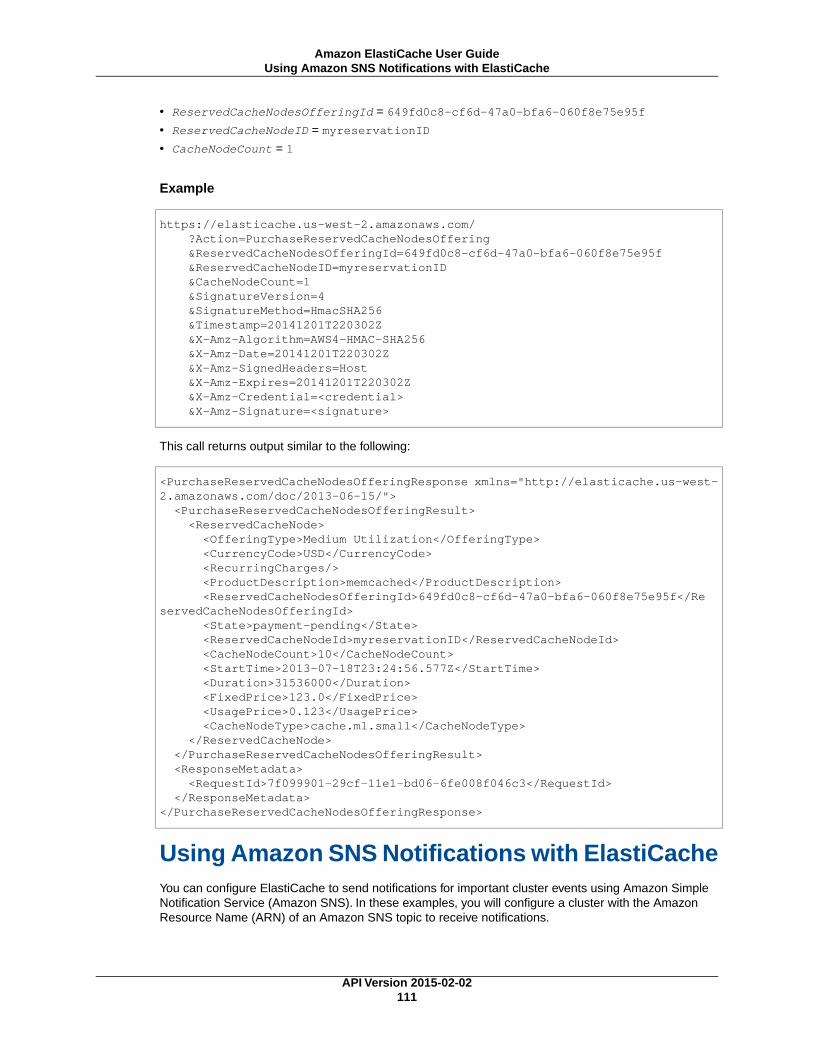
• ReservedCacheNodesOfferingId = 649fd0c8-cf6d-47a0-bfa6-060f8e75e95f
• ReservedCacheNodeID = myreservationID
• CacheNodeCount = 1
Example
https://elasticache.us-west-2.amazonaws.com/ ?Action=PurchaseReservedCacheNodesOffering &ReservedCacheNodesOfferingId=649fd0c8-cf6d-47a0-bfa6-060f8e75e95f &ReservedCacheNodeID=myreservationID &CacheNodeCount=1 &SignatureVersion=4 &SignatureMethod=HmacSHA256 &Timestamp=20141201T220302Z &X-Amz-Algorithm=AWS4-HMAC-SHA256 &X-Amz-Date=20141201T220302Z &X-Amz-SignedHeaders=Host &X-Amz-Expires=20141201T220302Z &X-Amz-Credential=<credential> &X-Amz-Signature=<signature>
This call returns output similar to the following:
<PurchaseReservedCacheNodesOfferingResponse xmlns="http://elasticache.us-west-2.amazonaws.com/doc/2013-06-15/"> <PurchaseReservedCacheNodesOfferingResult> <ReservedCacheNode> <OfferingType>Medium Utilization</OfferingType> <CurrencyCode>USD</CurrencyCode> <RecurringCharges/> <ProductDescription>memcached</ProductDescription> <ReservedCacheNodesOfferingId>649fd0c8-cf6d-47a0-bfa6-060f8e75e95f</Re servedCacheNodesOfferingId> <State>payment-pending</State> <ReservedCacheNodeId>myreservationID</ReservedCacheNodeId> <CacheNodeCount>10</CacheNodeCount> <StartTime>2013-07-18T23:24:56.577Z</StartTime> <Duration>31536000</Duration> <FixedPrice>123.0</FixedPrice> <UsagePrice>0.123</UsagePrice> <CacheNodeType>cache.m1.small</CacheNodeType> </ReservedCacheNode> </PurchaseReservedCacheNodesOfferingResult> <ResponseMetadata> <RequestId>7f099901-29cf-11e1-bd06-6fe008f046c3</RequestId> </ResponseMetadata></PurchaseReservedCacheNodesOfferingResponse>
Using Amazon SNS Notifications with ElastiCacheYou can configure ElastiCache to send notifications for important cluster events using Amazon SimpleNotification Service (Amazon SNS). In these examples, you will configure a cluster with the AmazonResource Name (ARN) of an Amazon SNS topic to receive notifications.
API Version 2015-02-02111
Amazon ElastiCache User GuideUsing Amazon SNS Notifications with ElastiCache
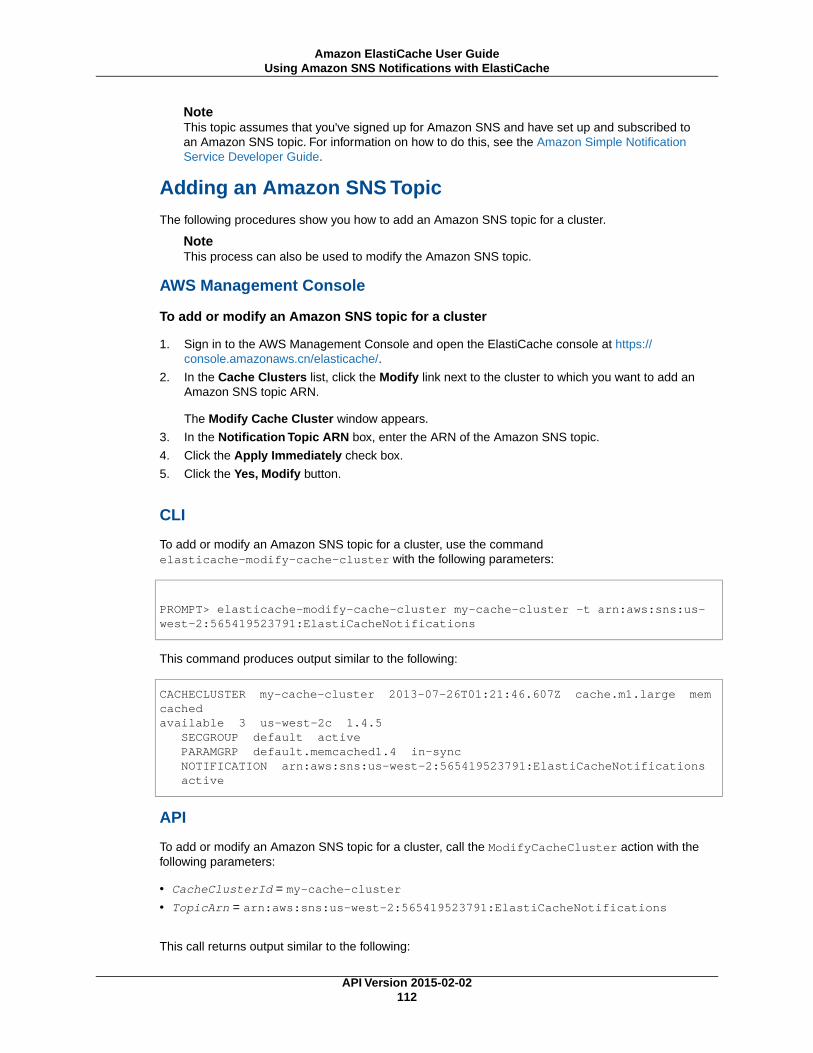
NoteThis topic assumes that you've signed up for Amazon SNS and have set up and subscribed toan Amazon SNS topic. For information on how to do this, see the Amazon Simple NotificationService Developer Guide.
Adding an Amazon SNS TopicThe following procedures show you how to add an Amazon SNS topic for a cluster.
NoteThis process can also be used to modify the Amazon SNS topic.
AWS Management Console
To add or modify an Amazon SNS topic for a cluster
1. Sign in to the AWS Management Console and open the ElastiCache console at https://console.amazonaws.cn/elasticache/.
2. In the Cache Clusters list, click the Modify link next to the cluster to which you want to add anAmazon SNS topic ARN.
The Modify Cache Cluster window appears.
3. In the Notification Topic ARN box, enter the ARN of the Amazon SNS topic.
4. Click the Apply Immediately check box.
5. Click the Yes, Modify button.
CLI
To add or modify an Amazon SNS topic for a cluster, use the commandelasticache-modify-cache-cluster with the following parameters:
PROMPT> elasticache-modify-cache-cluster my-cache-cluster -t arn:aws:sns:us-west-2:565419523791:ElastiCacheNotifications
This command produces output similar to the following:
CACHECLUSTER my-cache-cluster 2013-07-26T01:21:46.607Z cache.m1.large mem cachedavailable 3 us-west-2c 1.4.5 SECGROUP default active PARAMGRP default.memcached1.4 in-sync NOTIFICATION arn:aws:sns:us-west-2:565419523791:ElastiCacheNotifications active
API
To add or modify an Amazon SNS topic for a cluster, call the ModifyCacheCluster action with thefollowing parameters:
• CacheClusterId = my-cache-cluster
• TopicArn = arn:aws:sns:us-west-2:565419523791:ElastiCacheNotifications
This call returns output similar to the following:
API Version 2015-02-02112
Amazon ElastiCache User GuideUsing Amazon SNS Notifications with ElastiCache

Example
https://elasticache.amazon.com/ ?Action=ModifyCacheCluster &ApplyImmediately=false &CacheClusterId=my-cache-cluster &NotificationTopicArn=arn%3Aaws%3Asns%3Aus-west-2%3A565419523791%3AElastiC acheNotifications &Version=2014-12-01 &SignatureVersion=4 &SignatureMethod=HmacSHA256 &Timestamp=20141201T220302Z &X-Amz-Algorithm=AWS4-HMAC-SHA256 &X-Amz-Date=20141201T220302Z &X-Amz-SignedHeaders=Host &X-Amz-Expires=20141201T220302Z &X-Amz-Credential=<credential> &X-Amz-Signature=<signature>
Enabling and Disabling Amazon SNS NotificationsYou can turn notifications on or off for a cluster. The following procedures show you how to disableAmazon SNS notifications.
AWS Management Console
To disable Amazon SNS notifications using the AWS Management Console
1. Sign in to the AWS Management Console and open the ElastiCache console at https://console.amazonaws.cn/elasticache/.
2. In the Cache Clusters list, click the Modify link next to the cluster to which you want to disable anAmazon SNS topic ARN.
The Modify Cache Cluster window appears.
3. In the Notification Topic Status list, click inactive.
4. Select the Apply Immediately check box.
5. Click the Yes, Modify button.
CLI
To disable Amazon SNS notifications, use the command elasticache-modify-cache-cluster withthe following parameters:
PROMPT> elasticache-modify-cache-cluster my-cache-cluster -ts inactive
This command produces output similar to the following:
CACHECLUSTER my-cache-cluster 2013-07-26T01:21:46.607Z cache.m1.large mem cachedavailable 3 us-west-2c 1.4.5 SECGROUP default active PARAMGRP default.memcached1.4 in-sync
API Version 2015-02-02113
Amazon ElastiCache User GuideUsing Amazon SNS Notifications with ElastiCache
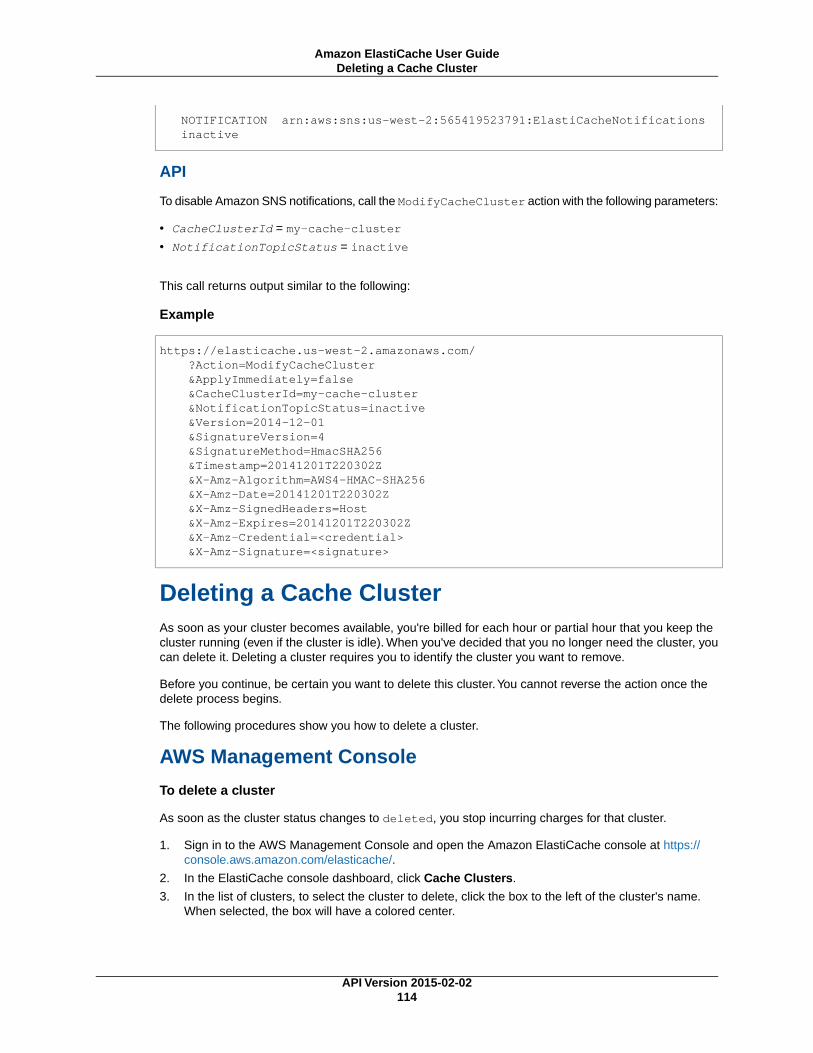
NOTIFICATION arn:aws:sns:us-west-2:565419523791:ElastiCacheNotifications inactive
API
To disable Amazon SNS notifications, call the ModifyCacheCluster action with the following parameters:
• CacheClusterId = my-cache-cluster
• NotificationTopicStatus = inactive
This call returns output similar to the following:
Example
https://elasticache.us-west-2.amazonaws.com/ ?Action=ModifyCacheCluster &ApplyImmediately=false &CacheClusterId=my-cache-cluster &NotificationTopicStatus=inactive &Version=2014-12-01 &SignatureVersion=4 &SignatureMethod=HmacSHA256 &Timestamp=20141201T220302Z &X-Amz-Algorithm=AWS4-HMAC-SHA256 &X-Amz-Date=20141201T220302Z &X-Amz-SignedHeaders=Host &X-Amz-Expires=20141201T220302Z &X-Amz-Credential=<credential> &X-Amz-Signature=<signature>
Deleting a Cache ClusterAs soon as your cluster becomes available, you're billed for each hour or partial hour that you keep thecluster running (even if the cluster is idle). When you've decided that you no longer need the cluster, youcan delete it. Deleting a cluster requires you to identify the cluster you want to remove.
Before you continue, be certain you want to delete this cluster.You cannot reverse the action once thedelete process begins.
The following procedures show you how to delete a cluster.
AWS Management Console
To delete a cluster
As soon as the cluster status changes to deleted, you stop incurring charges for that cluster.
1. Sign in to the AWS Management Console and open the Amazon ElastiCache console at https://console.aws.amazon.com/elasticache/.
2. In the ElastiCache console dashboard, click Cache Clusters.
3. In the list of clusters, to select the cluster to delete, click the box to the left of the cluster's name.When selected, the box will have a colored center.
API Version 2015-02-02114
Amazon ElastiCache User GuideDeleting a Cache Cluster

You can only delete one cluster at a time from the ElastiCache console. Selecting multiple clustersdisables the Delete button.
4. Click the Delete button.
The status of the cluster will change to deleting.
While this cluster is deleting, you can delete other clusters by repeating steps 1 through 4.
CLITo delete a cluster, use the command elasticache-delete-cache-cluster:
PROMPT> elasticache-delete-cache-cluster my-cache-cluster --force
This command will produce output similar to the following:
CACHECLUSTER my-cache-cluster https://console.aws.amazon.com/elastic ache/home#client-download: my-cache-cluster.q68zge.cfg.use1.cache.amazonaws.com 11211 2013-07-22T20:29:54.663Z cache.m1.large memcached deleting 3 us-west-2a 1.4.14 CACHESECURITYGROUP default active CACHEPARAMETERGROUP default.memcached1.4 in-sync
APITo delete a cluster, call the DeleteCacheCluster action with the following parameter:CacheClusterId= my-cache-cluster
This call returns output similar to the following:
Example
https://elasticache.us-west-2.amazonaws.com/ ?Action=DeleteCacheCluster &CacheClusterId=my-cache-cluster &SignatureVersion=4 &SignatureMethod=HmacSHA256 &Timestamp=20141201T220302Z &X-Amz-Algorithm=AWS4-HMAC-SHA256 &X-Amz-Date=20141201T220302Z &X-Amz-SignedHeaders=Host &X-Amz-Expires=20141201T220302Z &X-Amz-Credential=<credential> &X-Amz-Signature=<signature>
API Version 2015-02-02115
Amazon ElastiCache User GuideDeleting a Cache Cluster
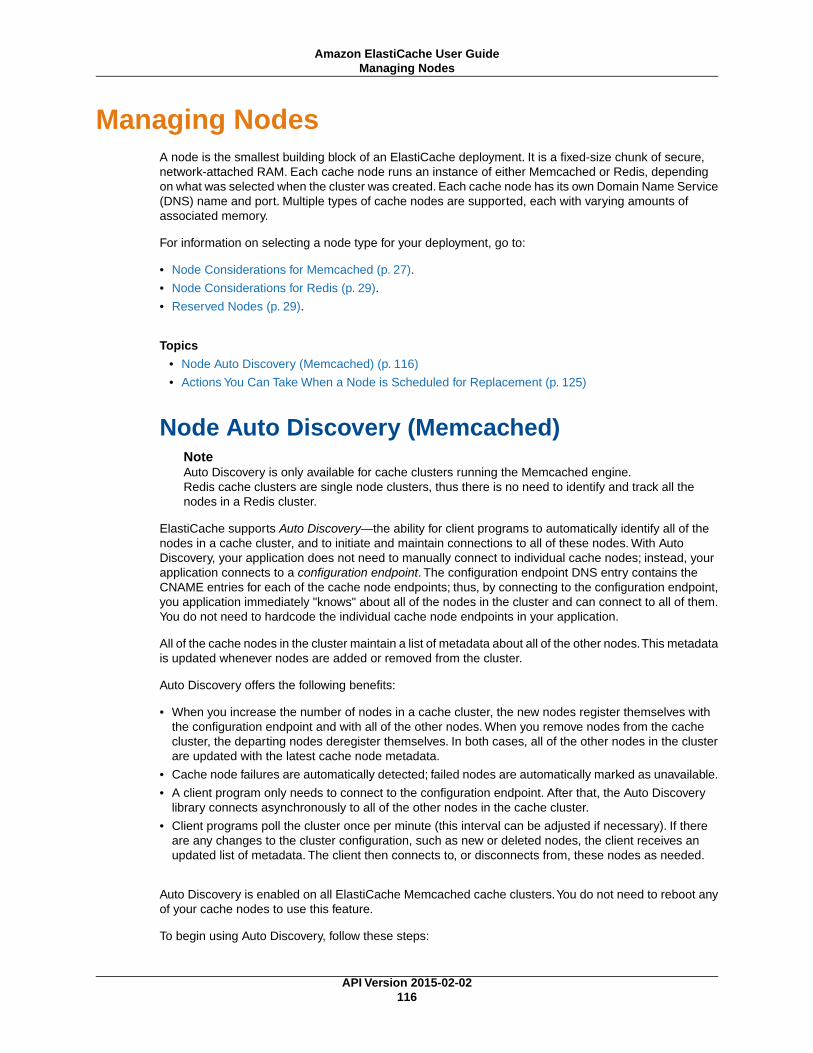
Managing NodesA node is the smallest building block of an ElastiCache deployment. It is a fixed-size chunk of secure,network-attached RAM. Each cache node runs an instance of either Memcached or Redis, dependingon what was selected when the cluster was created. Each cache node has its own Domain Name Service(DNS) name and port. Multiple types of cache nodes are supported, each with varying amounts ofassociated memory.
For information on selecting a node type for your deployment, go to:
• Node Considerations for Memcached (p. 27).
• Node Considerations for Redis (p. 29).
• Reserved Nodes (p. 29).
Topics
• Node Auto Discovery (Memcached) (p. 116)
• Actions You Can Take When a Node is Scheduled for Replacement (p. 125)
Node Auto Discovery (Memcached)NoteAuto Discovery is only available for cache clusters running the Memcached engine.Redis cache clusters are single node clusters, thus there is no need to identify and track all thenodes in a Redis cluster.
ElastiCache supports Auto Discovery—the ability for client programs to automatically identify all of thenodes in a cache cluster, and to initiate and maintain connections to all of these nodes. With AutoDiscovery, your application does not need to manually connect to individual cache nodes; instead, yourapplication connects to a configuration endpoint. The configuration endpoint DNS entry contains theCNAME entries for each of the cache node endpoints; thus, by connecting to the configuration endpoint,you application immediately "knows" about all of the nodes in the cluster and can connect to all of them.You do not need to hardcode the individual cache node endpoints in your application.
All of the cache nodes in the cluster maintain a list of metadata about all of the other nodes.This metadatais updated whenever nodes are added or removed from the cluster.
Auto Discovery offers the following benefits:
• When you increase the number of nodes in a cache cluster, the new nodes register themselves withthe configuration endpoint and with all of the other nodes. When you remove nodes from the cachecluster, the departing nodes deregister themselves. In both cases, all of the other nodes in the clusterare updated with the latest cache node metadata.
• Cache node failures are automatically detected; failed nodes are automatically marked as unavailable.
• A client program only needs to connect to the configuration endpoint. After that, the Auto Discoverylibrary connects asynchronously to all of the other nodes in the cache cluster.
• Client programs poll the cluster once per minute (this interval can be adjusted if necessary). If thereare any changes to the cluster configuration, such as new or deleted nodes, the client receives anupdated list of metadata. The client then connects to, or disconnects from, these nodes as needed.
Auto Discovery is enabled on all ElastiCache Memcached cache clusters.You do not need to reboot anyof your cache nodes to use this feature.
To begin using Auto Discovery, follow these steps:
API Version 2015-02-02116
Amazon ElastiCache User GuideManaging Nodes
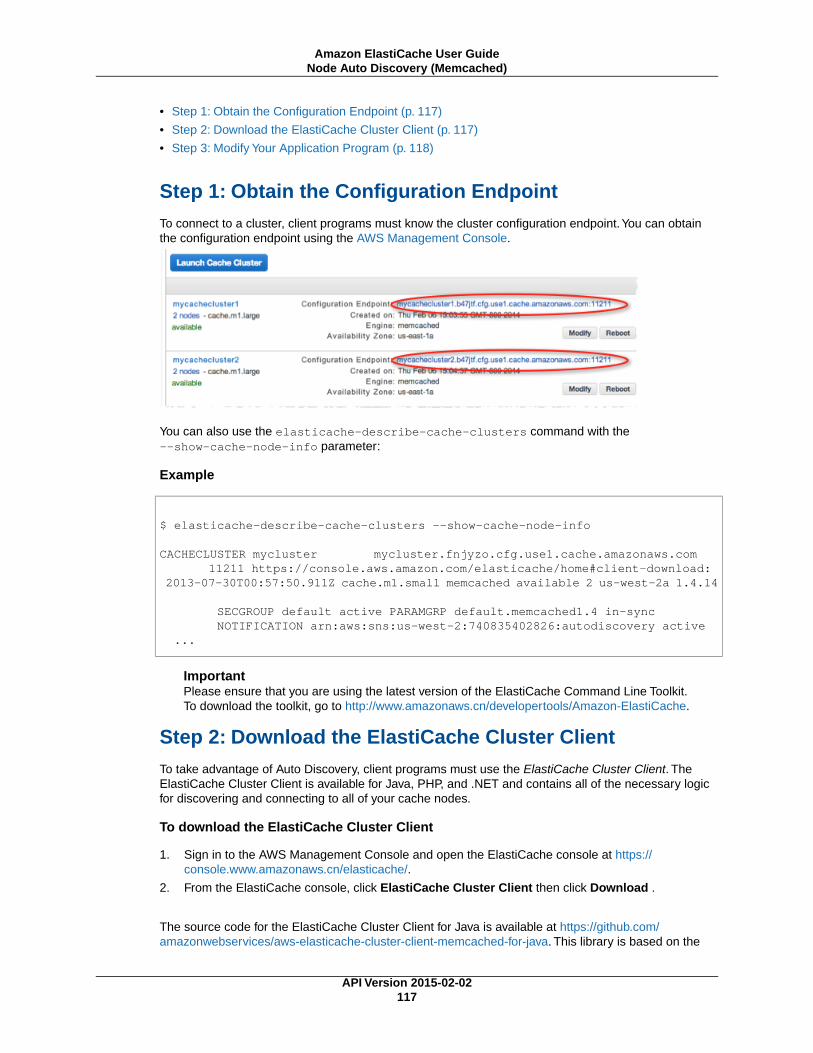
• Step 1: Obtain the Configuration Endpoint (p. 117)
• Step 2: Download the ElastiCache Cluster Client (p. 117)
• Step 3: Modify Your Application Program (p. 118)
Step 1: Obtain the Configuration EndpointTo connect to a cluster, client programs must know the cluster configuration endpoint.You can obtainthe configuration endpoint using the AWS Management Console.
You can also use the elasticache-describe-cache-clusters command with the--show-cache-node-info parameter:
Example
$ elasticache-describe-cache-clusters --show-cache-node-info
CACHECLUSTER mycluster mycluster.fnjyzo.cfg.use1.cache.amazonaws.com 11211 https://console.aws.amazon.com/elasticache/home#client-download: 2013-07-30T00:57:50.911Z cache.m1.small memcached available 2 us-west-2a 1.4.14
SECGROUP default active PARAMGRP default.memcached1.4 in-sync NOTIFICATION arn:aws:sns:us-west-2:740835402826:autodiscovery active ...
ImportantPlease ensure that you are using the latest version of the ElastiCache Command Line Toolkit.To download the toolkit, go to http://www.amazonaws.cn/developertools/Amazon-ElastiCache.
Step 2: Download the ElastiCache Cluster ClientTo take advantage of Auto Discovery, client programs must use the ElastiCache Cluster Client. TheElastiCache Cluster Client is available for Java, PHP, and .NET and contains all of the necessary logicfor discovering and connecting to all of your cache nodes.
To download the ElastiCache Cluster Client
1. Sign in to the AWS Management Console and open the ElastiCache console at https://console.www.amazonaws.cn/elasticache/.
2. From the ElastiCache console, click ElastiCache Cluster Client then click Download .
The source code for the ElastiCache Cluster Client for Java is available at https://github.com/amazonwebservices/aws-elasticache-cluster-client-memcached-for-java. This library is based on the
API Version 2015-02-02117
Amazon ElastiCache User GuideNode Auto Discovery (Memcached)
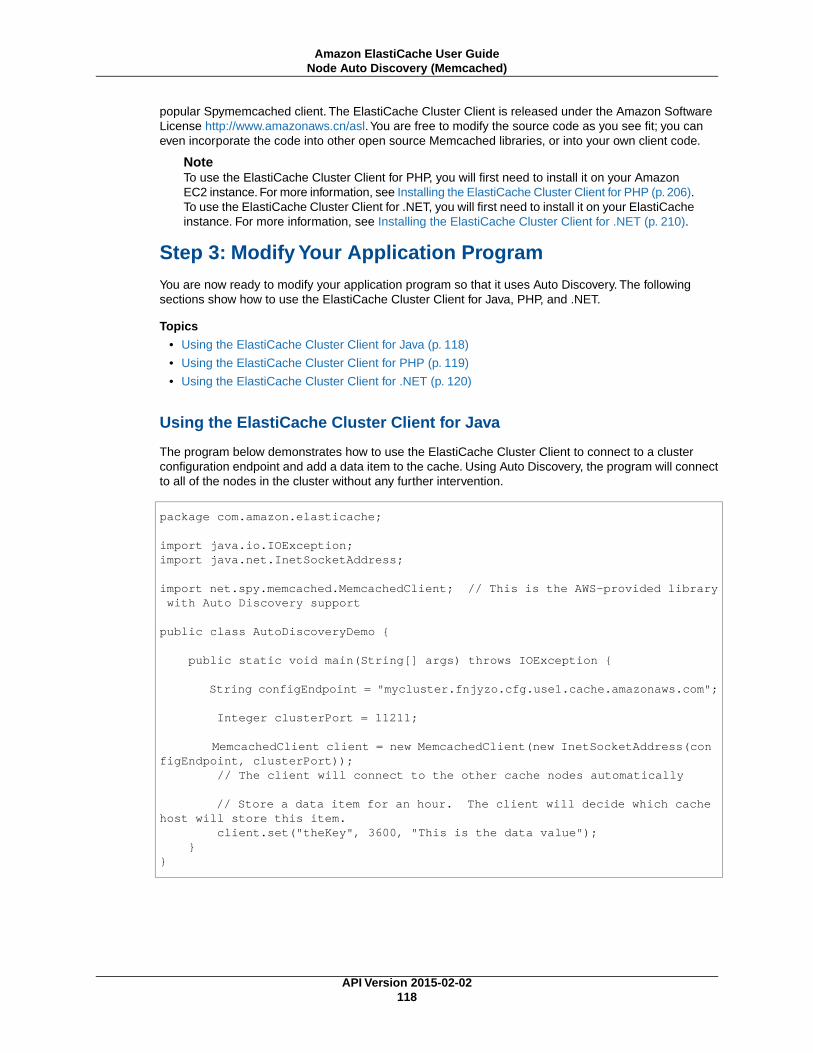
popular Spymemcached client. The ElastiCache Cluster Client is released under the Amazon SoftwareLicense http://www.amazonaws.cn/asl.You are free to modify the source code as you see fit; you caneven incorporate the code into other open source Memcached libraries, or into your own client code.
NoteTo use the ElastiCache Cluster Client for PHP, you will first need to install it on your AmazonEC2 instance. For more information, see Installing the ElastiCache Cluster Client for PHP (p. 206).To use the ElastiCache Cluster Client for .NET, you will first need to install it on your ElastiCacheinstance. For more information, see Installing the ElastiCache Cluster Client for .NET (p. 210).
Step 3: Modify Your Application ProgramYou are now ready to modify your application program so that it uses Auto Discovery. The followingsections show how to use the ElastiCache Cluster Client for Java, PHP, and .NET.
Topics
• Using the ElastiCache Cluster Client for Java (p. 118)
• Using the ElastiCache Cluster Client for PHP (p. 119)
• Using the ElastiCache Cluster Client for .NET (p. 120)
Using the ElastiCache Cluster Client for Java
The program below demonstrates how to use the ElastiCache Cluster Client to connect to a clusterconfiguration endpoint and add a data item to the cache. Using Auto Discovery, the program will connectto all of the nodes in the cluster without any further intervention.
package com.amazon.elasticache;
import java.io.IOException;import java.net.InetSocketAddress;
import net.spy.memcached.MemcachedClient; // This is the AWS-provided library with Auto Discovery support
public class AutoDiscoveryDemo {
public static void main(String[] args) throws IOException {
String configEndpoint = "mycluster.fnjyzo.cfg.use1.cache.amazonaws.com";
Integer clusterPort = 11211;
MemcachedClient client = new MemcachedClient(new InetSocketAddress(con figEndpoint, clusterPort)); // The client will connect to the other cache nodes automatically
// Store a data item for an hour. The client will decide which cache host will store this item. client.set("theKey", 3600, "This is the data value"); }}
API Version 2015-02-02118
Amazon ElastiCache User GuideNode Auto Discovery (Memcached)
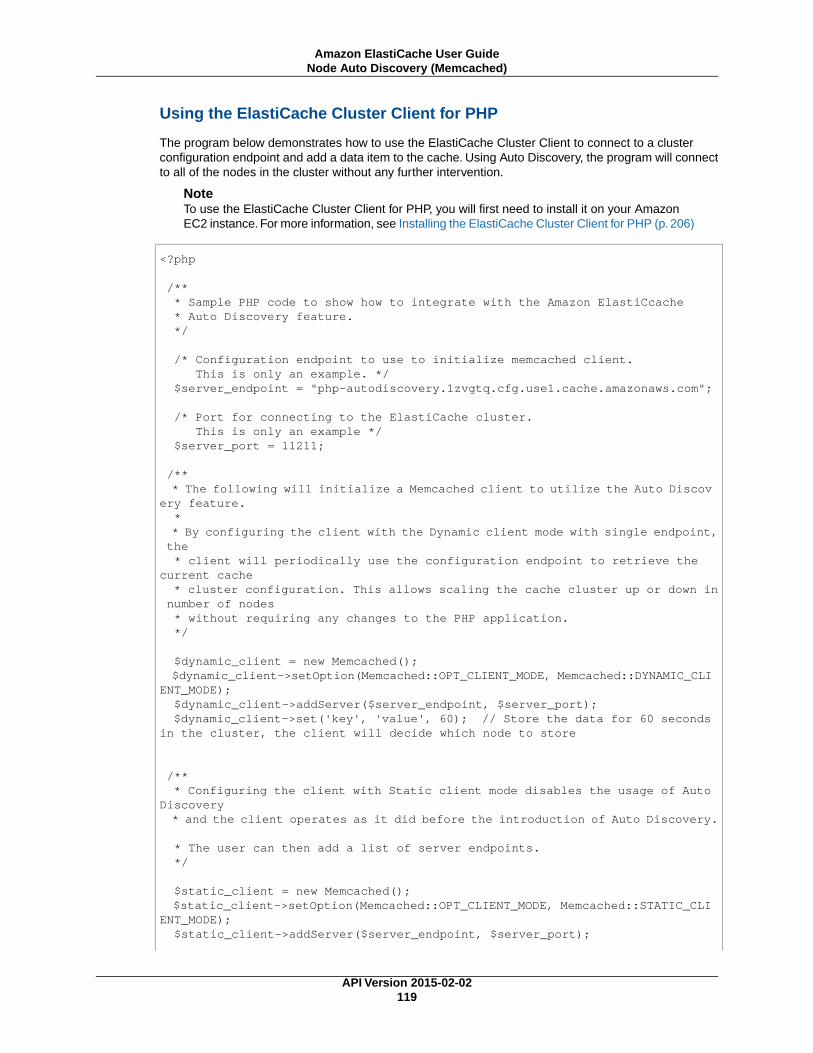
Using the ElastiCache Cluster Client for PHP
The program below demonstrates how to use the ElastiCache Cluster Client to connect to a clusterconfiguration endpoint and add a data item to the cache. Using Auto Discovery, the program will connectto all of the nodes in the cluster without any further intervention.
NoteTo use the ElastiCache Cluster Client for PHP, you will first need to install it on your AmazonEC2 instance. For more information, see Installing the ElastiCache Cluster Client for PHP (p. 206)
<?php
/** * Sample PHP code to show how to integrate with the Amazon ElastiCcache * Auto Discovery feature. */
/* Configuration endpoint to use to initialize memcached client. This is only an example. */ $server_endpoint = "php-autodiscovery.1zvgtq.cfg.use1.cache.amazonaws.com";
/* Port for connecting to the ElastiCache cluster. This is only an example */ $server_port = 11211;
/** * The following will initialize a Memcached client to utilize the Auto Discov ery feature. * * By configuring the client with the Dynamic client mode with single endpoint, the * client will periodically use the configuration endpoint to retrieve the current cache * cluster configuration. This allows scaling the cache cluster up or down in number of nodes * without requiring any changes to the PHP application. */
$dynamic_client = new Memcached(); $dynamic_client->setOption(Memcached::OPT_CLIENT_MODE, Memcached::DYNAMIC_CLI ENT_MODE); $dynamic_client->addServer($server_endpoint, $server_port); $dynamic_client->set('key', 'value', 60); // Store the data for 60 seconds in the cluster, the client will decide which node to store
/** * Configuring the client with Static client mode disables the usage of Auto Discovery * and the client operates as it did before the introduction of Auto Discovery.
* The user can then add a list of server endpoints. */
$static_client = new Memcached(); $static_client->setOption(Memcached::OPT_CLIENT_MODE, Memcached::STATIC_CLI ENT_MODE); $static_client->addServer($server_endpoint, $server_port);
API Version 2015-02-02119
Amazon ElastiCache User GuideNode Auto Discovery (Memcached)
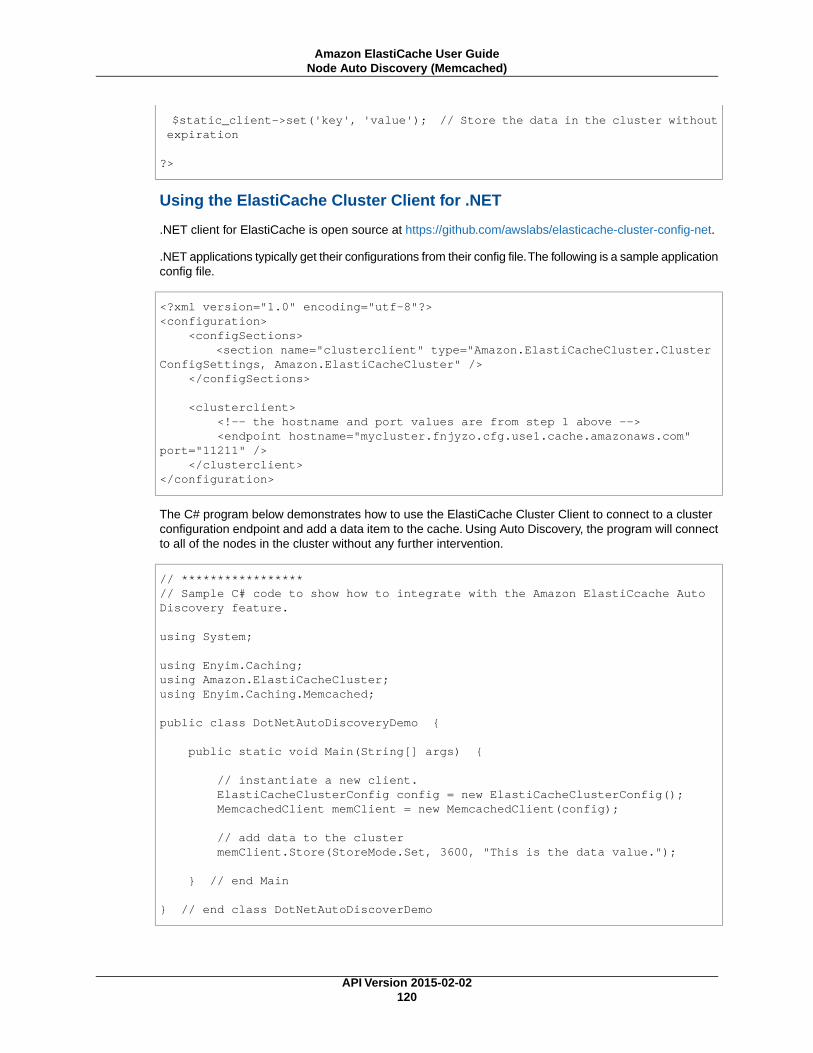
$static_client->set('key', 'value'); // Store the data in the cluster without expiration
?>
Using the ElastiCache Cluster Client for .NET
.NET client for ElastiCache is open source at https://github.com/awslabs/elasticache-cluster-config-net.
.NET applications typically get their configurations from their config file.The following is a sample applicationconfig file.
<?xml version="1.0" encoding="utf-8"?><configuration> <configSections> <section name="clusterclient" type="Amazon.ElastiCacheCluster.Cluster ConfigSettings, Amazon.ElastiCacheCluster" /> </configSections>
<clusterclient> <!-- the hostname and port values are from step 1 above --> <endpoint hostname="mycluster.fnjyzo.cfg.use1.cache.amazonaws.com" port="11211" /> </clusterclient></configuration>
The C# program below demonstrates how to use the ElastiCache Cluster Client to connect to a clusterconfiguration endpoint and add a data item to the cache. Using Auto Discovery, the program will connectto all of the nodes in the cluster without any further intervention.
// *****************// Sample C# code to show how to integrate with the Amazon ElastiCcache Auto Discovery feature.
using System;
using Enyim.Caching;using Amazon.ElastiCacheCluster;using Enyim.Caching.Memcached;
public class DotNetAutoDiscoveryDemo {
public static void Main(String[] args) {
// instantiate a new client. ElastiCacheClusterConfig config = new ElastiCacheClusterConfig(); MemcachedClient memClient = new MemcachedClient(config);
// add data to the cluster memClient.Store(StoreMode.Set, 3600, "This is the data value.");
} // end Main
} // end class DotNetAutoDiscoverDemo
API Version 2015-02-02120
Amazon ElastiCache User GuideNode Auto Discovery (Memcached)
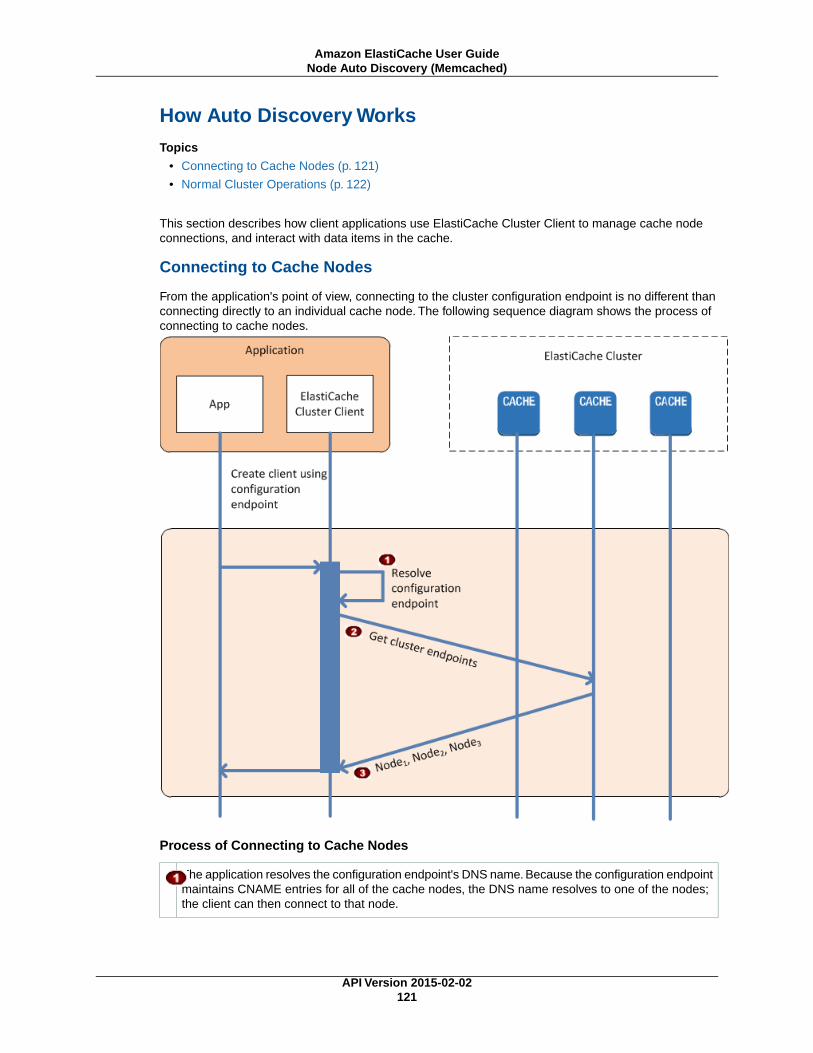
How Auto Discovery WorksTopics
• Connecting to Cache Nodes (p. 121)
• Normal Cluster Operations (p. 122)
This section describes how client applications use ElastiCache Cluster Client to manage cache nodeconnections, and interact with data items in the cache.
Connecting to Cache Nodes
From the application's point of view, connecting to the cluster configuration endpoint is no different thanconnecting directly to an individual cache node. The following sequence diagram shows the process ofconnecting to cache nodes.
Process of Connecting to Cache Nodes
The application resolves the configuration endpoint's DNS name. Because the configuration endpointmaintains CNAME entries for all of the cache nodes, the DNS name resolves to one of the nodes;the client can then connect to that node.
API Version 2015-02-02121
Amazon ElastiCache User GuideNode Auto Discovery (Memcached)

The client requests the configuration information for all of the other nodes. Since each node maintainsconfiguration information for all of the nodes in the cluster, any node can pass configuration inform-ation to the client upon request.
The client receives the current list of cache node hostnames and IP addresses. It can then connectto all of the other nodes in the cluster.
NoteThe client program refreshes its list of cache node hostnames and IP addresses once per minute.This polling interval can be adjusted if necessary.
Normal Cluster Operations
When the application has connected to all of the cache nodes, ElastiCache Cluster Client determineswhich nodes should store individual data items, and which nodes should be queried for those data itemslater. The following sequence diagram shows the process of normal cluster operations.
Process of Normal Cluster Operations
The application issues a get request for a particular data item, identified by its key.
API Version 2015-02-02122
Amazon ElastiCache User GuideNode Auto Discovery (Memcached)

The client uses a hashing algorithm against the key to determine which cache node contains thedata item.
The data item is requested from the appropriate node.
The data item is returned to the application.
Connecting to Cache Nodes ManuallyIf your client program does not use Auto Discovery, it can manually connect to each of the cache nodes.This is the default behavior for Memcached clients.
You can obtain a list of cache node hostnames and port numbers from the AWS Management Console.You can also use the elasticache-describe-cache-clusters command with the--show-cache-node-info parameter.
Example
The following Java code snippet shows how to connect to all of the nodes in a four-node cache cluster:
...
ArrayList<String> cacheNodes = new ArrayList<String>( Arrays.asList( "mycachecluster.fnjyzo.0001.use1.cache.amazonaws.com:11211", "mycachecluster.fnjyzo.0002.use1.cache.amazonaws.com:11211", "mycachecluster.fnjyzo.0003.use1.cache.amazonaws.com:11211", "mycachecluster.fnjyzo.0004.use1.cache.amazonaws.com:11211"));
MemcachedClient cache = new MemcachedClient(AddrUtil.getAddresses(cacheNodes));
...
ImportantIf you scale up or scale down your cache cluster by adding or removing nodes, you will need toupdate the list of nodes in the client code.
Adding Auto Discovery To Your Client LibraryThe configuration information for Auto Discovery is stored redundantly in each cache cluster node. Clientapplications can query any cache node and obtain the configuration information for all of the nodes inthe cluster.
The way in which an application does this depends upon the cache engine version:
• If the cache engine version is 1.4.14 or higher, use the config command.
• If the cache engine version is lower than 1.4.14, use the get AmazonElastiCache:clustercommand.
The outputs from these two commands are identical, and are described in the Output Format (p. 124)section below.
API Version 2015-02-02123
Amazon ElastiCache User GuideNode Auto Discovery (Memcached)
Cache Engine Version 1.4.14 or Higher
For cache engine version 1.4.14 or higher, use the config command. This command has been addedto the Memcached ASCII and binary protocols by ElastiCache, and is implemented in the ElastiCacheCluster Client. If you want to use Auto Discovery with another client library, then that library will need tobe extended to support the config command.
NoteThe following documentation pertains to the ASCII protocol; however, the config commandsupports both ASCII and binary. If you want to add Auto Discovery support using the binaryprotocol, refer to the source code for the ElastiCache Cluster Client.
Syntax
config [sub-command] [key]
Options
RequiredDescriptionName
YesThe sub-command used to interact with a cache node. For Auto Discov-ery, this sub-command is get.
sub-com-mand
YesThe key under which the cluster configuration is stored. For Auto Discov-ery, this key is named cluster.
key
To get the cluster configuration information, use the following command:
config get cluster
Cache Engine Version Lower Than 1.4.14
To get the cluster configuration information, use the following command:
get AmazonElastiCache:cluster
NoteWe recommend that you do not tamper with the "AmazonElastiCache:cluster" key, since this iswhere the cluster configuration information resides. If you do overwrite this key, then the clientmay be incorrectly configured for a brief period of time (no more than 15 seconds) beforeElastiCache automatically and correctly updates the configuration information.
Output Format
Whether you use config get cluster or get AmazonElastiCache:cluster, the reply consistsof two lines:
• The version number of the configuration information. Each time a node is added or removed from thecache cluster, the version number increases by one.
• A list of cache nodes. Each node in the list is represented by a hostname|ip-address|port group, andeach node is delimited by a space.
A carriage return and a linefeed character (CR + LF) appears at the end of each line.
A cache cluster containing three nodes would be represented as follows:
API Version 2015-02-02124
Amazon ElastiCache User GuideNode Auto Discovery (Memcached)
configversion\r\nhostname|ip-address|port hostname|ip-address|port hostname|ip-address|port\r\n
Each node is shown with both the CNAME and the private IP address.The CNAME will always be present;if the private IP address is not available, it will not be shown; however, the pipe characters "|" will still beprinted.
Example
Here is an example of the payload returned when you query the configuration information:
CONFIG cluster 0 147\r\n12\r\nmyCluster.pc4ldq.0001.use1.cache.amazonaws.com|10.82.235.120|11211 myC luster.pc4ldq.0002.use1.cache.amazonaws.com|10.80.249.27|11211\n\r\nEND\r\n
NoteThe second line indicates that the configuration information has been modified twelve times sofar.In the third line, the list of nodes is in alphabetical order by hostname. This ordering might be ina different sequence from what you are currently using in your client application.
Actions You Can Take When a Node is Scheduledfor Replacement
Memcached• Do nothing: Doing nothing will result in the node being replaced as scheduled. ElastiCache will
automatically replace the node with a new node that will initially be empty.
• Manually replace the node:
1. Delete the node scheduled for replacement. For instructions, go to Removing Nodes from aCluster (p. 99).
2. Add a new node to the cluster. For instructions, go to Adding Nodes To A Cluster (p. 96).
3. If you are not using Node Auto Discovery (Memcached) (p. 116) on this cluster, in your application,replace the old node's endpoint with the new node's endpoint.
If you manually replace the node there will be redistribution of keys and resulting cache misses.
Redis• Do nothing: Doing nothing will result in the node being replaced as scheduled. ElastiCache will
automatically replace the node with a new node. If the cluster is a standalone cluster it will initially beempty. If the cluster is a member of a replication group, it will sync with the primary cluster.
• Replace a read-replica: If the cluster is a read-replica in a replication group, replace the cluster.
1. Delete the cluster that is scheduled for replacement. For instructions, go to Deleting a CacheCluster (p. 114).
2. Add a new replica to replace the one you just deleted. For instructions, go to Adding a Read ReplicaTo a Replication Group (p. 133).
API Version 2015-02-02125
Amazon ElastiCache User GuideActions You Can Take When a Node is Scheduled for
Replacement

3. In your application, replace the old cluster's endpoint with the new cluster's endpoint.
• Replace the primary: If the cluster is a primary cluster in a replication group, promote a read-replicato primary, then delete the cluster.
1. Promote a read-replica to primary. For instructions, go to Promoting a Read Replica to the PrimaryRole (p. 134).
2. Delete the cluster that is scheduled for replacement (the old primary). For instructions, go to Deletinga Cache Cluster (p. 114).
3. Add a new replica to replace the one you just deleted. For instructions, go to Adding a Read ReplicaTo a Replication Group (p. 133).
4. In your application, replace the old cluster's endpoint with the new cluster's endpoint.
• Replace a stand alone cluster: If the cluster is not a member of a replication group, you have twooptions to replace a stand alone cluster:
Option 1: Replace the cluster using backup and restore
1. Create a snapshot of the cluster. For instructions, go to Creating a Manual Snapshot (p. 146).
2. Create a new cluster seeding it from the snapshot. For instructions, go to Restoring a Snapshotto a New Cluster (p. 149).
3. In your application, replace the old cluster's endpoint with the new cluster's endpoint.
4. Delete the cluster scheduled for replacement. For instructions, go to Deleting a CacheCluster (p. 114).
Option 2: Replace the cluster using replication
1. Create a replication group with the cluster scheduled for replacement as the primary. Forinstructions, go to Creating a Redis Replication Group (p. 127).
2. Add a read-replica to the replication group. For instructions, go to Adding a Read Replica To aReplication Group (p. 133).
3. Promote the read-replica to primary. For instructions, go to Promoting a Read Replica to the PrimaryRole (p. 134).
4. In your application, replace the old cluster's endpoint with the new cluster's endpoint.
5. Delete the cluster scheduled for replacement. For instructions, go to Deleting a CacheCluster (p. 114).
API Version 2015-02-02126
Amazon ElastiCache User GuideActions You Can Take When a Node is Scheduled for
Replacement

Managing Replication GroupsThis section covers creating and managing replication groups.
Topics
• Creating a Redis Replication Group (p. 127)
• Adding a Read Replica To a Replication Group (p. 133)
• Promoting a Read Replica to the Primary Role (p. 134)
• Modifying an Existing Redis Replication Group (p. 135)
• Deleting a Read Replica (p. 136)
• Deleting a Replication Group (p. 137)
NoteAt this time, replication groups are supported only for cache clusters that are running Redis.
Creating a Redis Replication GroupA Redis replication group is comprised of one primary read/write cluster and from one to five secondaryread-only clusters. All write operations are performed on the primary cluster. New or changed data isasynchronously propagated from the primary to the read replicas. Because updates to the secondaryclusters are asynchronous, there can be some latency between when something is written to the primaryand when it is available from a secondary. Read operations can be performed on any of the clusters.
By default, Amazon ElastiCache automatically replaces any failed read replicas in a Redis replicationgroup. If you want your replication group's primary to automatically failover to a read replica, you mustenable Multi-AZ, either when you create the replication group or, later by modifying the replication group.For more information on Multi-AZ enabled replication groups, see Multi-AZ with Redis ReplicationGroups (p. 32).
To create a Redis replication group, you have the following options:
• Create a Redis replication group by creating the primary cluster, secondary cluster(s), and replicationgroup at the same time from the ElastiCache management console; for guidance, see Creating a RedisMultiple Cluster Replication Group (p. 127).
CLI: see the --automatic-failover-enabled (-a) option in elasticache-create-replication-group.
API: see the AutomaticFailoverEnabled optional parameter in CreateReplicationGroup
• Create a replication group using an existing Redis cluster as the primary cluster; for guidance see AWSManagement Console (p. 131), or CLI (p. 132), or API (p. 132) sections of this topic.
Then modify the replication group to enable Multi-AZ; for guidance, see Modifying an Existing RedisReplication Group (p. 135).
Creating a Redis Multiple Cluster Replication GroupIf you already have a Redis cache cluster that you want to use as the primary cluster in a replicationgroup, the best way to create the replication group is using the create replication group process. See theAWS Management Console (p. 131), or CLI (p. 132), or API (p. 132) sections of this topic.
If, on the other hand, you need to create a replication group from scratch, the best way to do that is tocreate the primary cluster, replication group, and secondary clusters at the same time from CacheClusters:Launch Cache Cluster using the AWS Management Console. This is the subject of this topic.
API Version 2015-02-02127
Amazon ElastiCache User GuideManaging Replication Groups
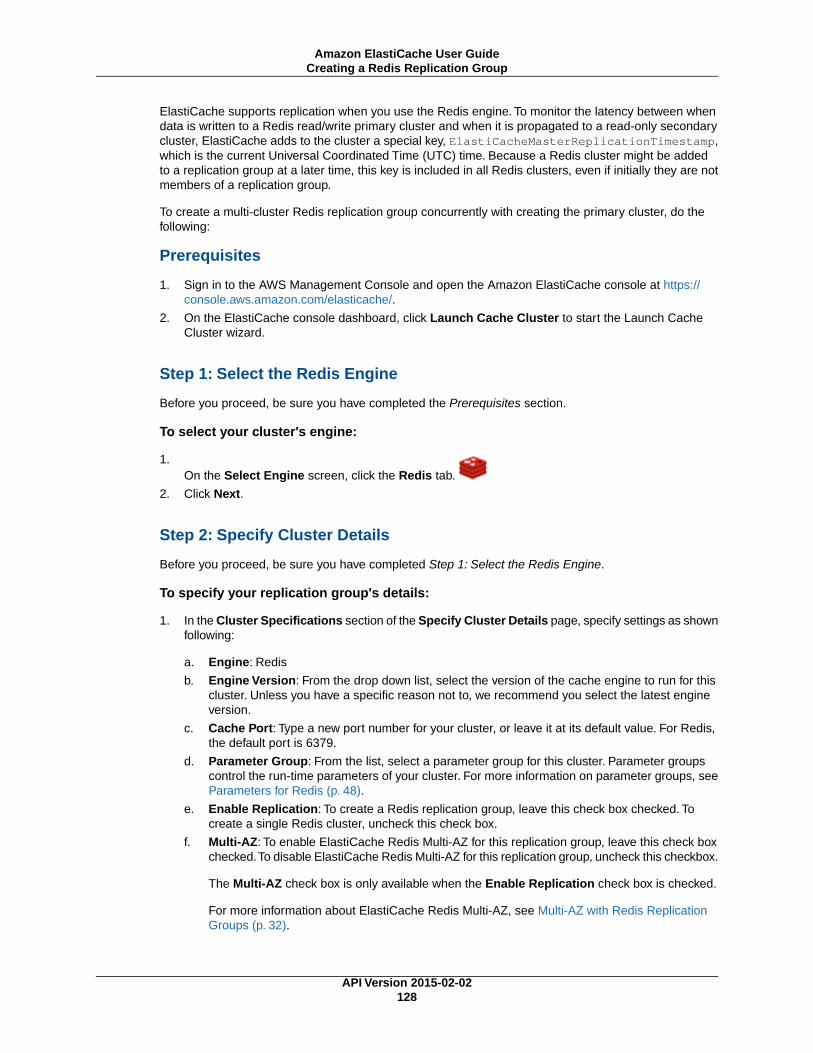
ElastiCache supports replication when you use the Redis engine. To monitor the latency between whendata is written to a Redis read/write primary cluster and when it is propagated to a read-only secondarycluster, ElastiCache adds to the cluster a special key, ElastiCacheMasterReplicationTimestamp,which is the current Universal Coordinated Time (UTC) time. Because a Redis cluster might be addedto a replication group at a later time, this key is included in all Redis clusters, even if initially they are notmembers of a replication group.
To create a multi-cluster Redis replication group concurrently with creating the primary cluster, do thefollowing:
Prerequisites
1. Sign in to the AWS Management Console and open the Amazon ElastiCache console at https://console.aws.amazon.com/elasticache/.
2. On the ElastiCache console dashboard, click Launch Cache Cluster to start the Launch CacheCluster wizard.
Step 1: Select the Redis Engine
Before you proceed, be sure you have completed the Prerequisites section.
To select your cluster's engine:
1.On the Select Engine screen, click the Redis tab.
2. Click Next.
Step 2: Specify Cluster Details
Before you proceed, be sure you have completed Step 1: Select the Redis Engine.
To specify your replication group's details:
1. In the Cluster Specifications section of the Specify Cluster Details page, specify settings as shownfollowing:
a. Engine: Redis
b. Engine Version: From the drop down list, select the version of the cache engine to run for thiscluster. Unless you have a specific reason not to, we recommend you select the latest engineversion.
c. Cache Port: Type a new port number for your cluster, or leave it at its default value. For Redis,the default port is 6379.
d. Parameter Group: From the list, select a parameter group for this cluster. Parameter groupscontrol the run-time parameters of your cluster. For more information on parameter groups, seeParameters for Redis (p. 48).
e. Enable Replication: To create a Redis replication group, leave this check box checked. Tocreate a single Redis cluster, uncheck this check box.
f. Multi-AZ: To enable ElastiCache Redis Multi-AZ for this replication group, leave this check boxchecked.To disable ElastiCache Redis Multi-AZ for this replication group, uncheck this checkbox.
The Multi-AZ check box is only available when the Enable Replication check box is checked.
For more information about ElastiCache Redis Multi-AZ, see Multi-AZ with Redis ReplicationGroups (p. 32).
API Version 2015-02-02128
Amazon ElastiCache User GuideCreating a Redis Replication Group
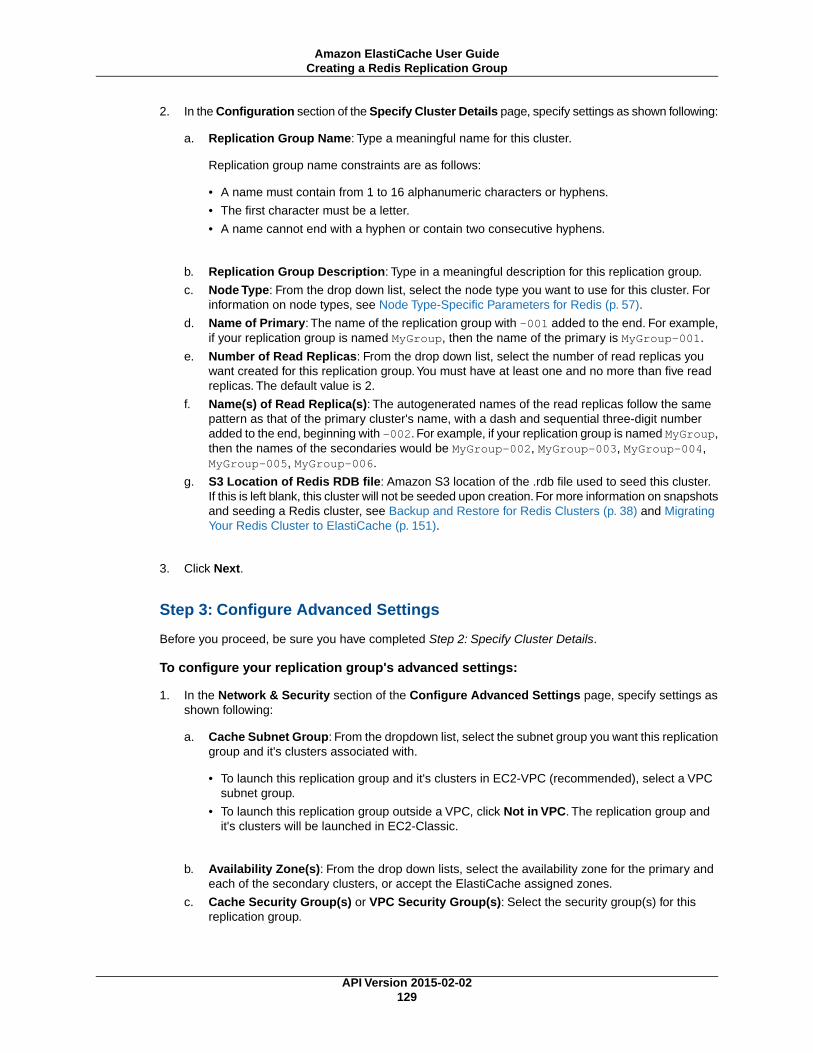
2. In the Configuration section of the Specify Cluster Details page, specify settings as shown following:
a. Replication Group Name: Type a meaningful name for this cluster.
Replication group name constraints are as follows:
• A name must contain from 1 to 16 alphanumeric characters or hyphens.
• The first character must be a letter.
• A name cannot end with a hyphen or contain two consecutive hyphens.
b. Replication Group Description: Type in a meaningful description for this replication group.
c. Node Type: From the drop down list, select the node type you want to use for this cluster. Forinformation on node types, see Node Type-Specific Parameters for Redis (p. 57).
d. Name of Primary: The name of the replication group with -001 added to the end. For example,if your replication group is named MyGroup, then the name of the primary is MyGroup-001.
e. Number of Read Replicas: From the drop down list, select the number of read replicas youwant created for this replication group.You must have at least one and no more than five readreplicas. The default value is 2.
f. Name(s) of Read Replica(s): The autogenerated names of the read replicas follow the samepattern as that of the primary cluster's name, with a dash and sequential three-digit numberadded to the end, beginning with -002. For example, if your replication group is named MyGroup,then the names of the secondaries would be MyGroup-002, MyGroup-003, MyGroup-004,MyGroup-005, MyGroup-006.
g. S3 Location of Redis RDB file: Amazon S3 location of the .rdb file used to seed this cluster.If this is left blank, this cluster will not be seeded upon creation. For more information on snapshotsand seeding a Redis cluster, see Backup and Restore for Redis Clusters (p. 38) and MigratingYour Redis Cluster to ElastiCache (p. 151).
3. Click Next.
Step 3: Configure Advanced Settings
Before you proceed, be sure you have completed Step 2: Specify Cluster Details.
To configure your replication group's advanced settings:
1. In the Network & Security section of the Configure Advanced Settings page, specify settings asshown following:
a. Cache Subnet Group: From the dropdown list, select the subnet group you want this replicationgroup and it's clusters associated with.
• To launch this replication group and it's clusters in EC2-VPC (recommended), select a VPCsubnet group.
• To launch this replication group outside a VPC, click Not in VPC. The replication group andit's clusters will be launched in EC2-Classic.
b. Availability Zone(s): From the drop down lists, select the availability zone for the primary andeach of the secondary clusters, or accept the ElastiCache assigned zones.
c. Cache Security Group(s) or VPC Security Group(s): Select the security group(s) for thisreplication group.
API Version 2015-02-02129
Amazon ElastiCache User GuideCreating a Redis Replication Group

If you selected a VPC, the list is of VPC security groups. If you select Not in VPC, the list is ofcache security groups.
For more information about Amazon VPC security groups, see http://docs.aws.amazon.com/AmazonVPC/latest/UserGuide/VPC_SecurityGroups.html.
For more information about ElastiCache security groups, see Security (p. 5) and ManagingCache Security Groups (p. 175).
2. In the Backup section of the Configure Advanced Settings page, specify settings as shownfollowing:
• Enable Automatic Backups: To schedule regular automatic backups of your cluster, checkthis check box.
When checked, the console expands so you can specify how many days to keep an automaticbackup before deleting, when to start and how long for the backup window, or allow ElastiCacheselect the time and duration.
NoteBy default, ElastiCache designates your first read replica,<replicationGroupName>-002, as the cluster from which backups are made.Youmay modify this after the replication group is available. For information on modifying areplication group, see Modifying an Existing Redis Replication Group (p. 135).
3. In the Maintenance section of the Configure Advanced Settings page, specify settings as shownfollowing:
a. Maintenance Window: Select how you want the maintenance window selected.
• Select Window: The screen expands so you can, specify the day of the week to startmaintenance, the UTC time to start maintenance, and the duration in hours of the maintenancewindow.
• No Preference: ElastiCache selects the maintenance window. This setting is the default.
We recommend specifying a maintenance window so that downtime for maintenance will havethe least impact upon your business.
b. Topic for SNS Notification: From the list, select an existing Amazon Simple Notification Service(Amazon SNS) topic, or click Manual ARN input and type in the topic Amazon Resource Name(ARN). Amazon SNS allows you to push notifications to Internet-connected smart devices. Thedefault is to disable notifications. For more information, see http://aws.amazon.com/sns/.
4. Click Next.
Step 4: Review and Launch
Before you continue, be sure you have completed Step 3: Configure Advanced Settings.
To review your settings and launch your cluster
1. Review all your settings to ensure each value is what you want.
2. If you need to make changes, click Previous to return to previous screens and make your changes;otherwise, click Launch Cache Cluster or Launch Replication Group to create your cluster orreplication group.
API Version 2015-02-02130
Amazon ElastiCache User GuideCreating a Redis Replication Group
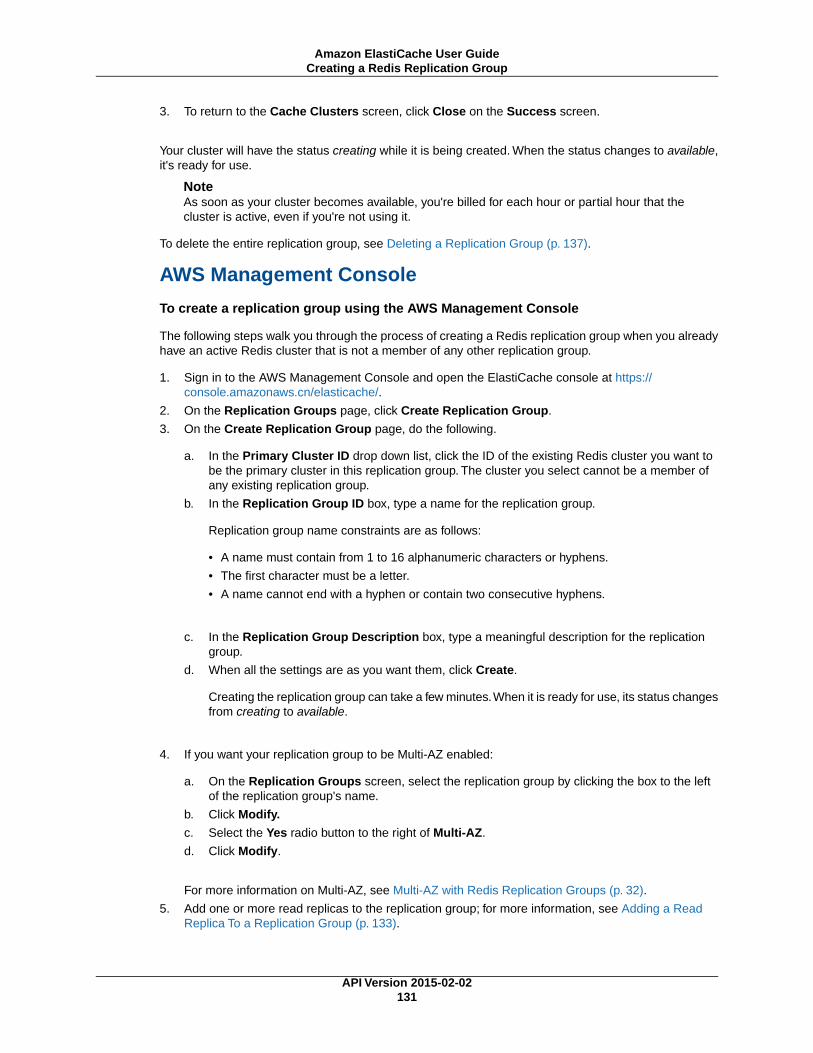
3. To return to the Cache Clusters screen, click Close on the Success screen.
Your cluster will have the status creating while it is being created. When the status changes to available,it's ready for use.
NoteAs soon as your cluster becomes available, you're billed for each hour or partial hour that thecluster is active, even if you're not using it.
To delete the entire replication group, see Deleting a Replication Group (p. 137).
AWS Management Console
To create a replication group using the AWS Management Console
The following steps walk you through the process of creating a Redis replication group when you alreadyhave an active Redis cluster that is not a member of any other replication group.
1. Sign in to the AWS Management Console and open the ElastiCache console at https://console.amazonaws.cn/elasticache/.
2. On the Replication Groups page, click Create Replication Group.
3. On the Create Replication Group page, do the following.
a. In the Primary Cluster ID drop down list, click the ID of the existing Redis cluster you want tobe the primary cluster in this replication group. The cluster you select cannot be a member ofany existing replication group.
b. In the Replication Group ID box, type a name for the replication group.
Replication group name constraints are as follows:
• A name must contain from 1 to 16 alphanumeric characters or hyphens.
• The first character must be a letter.
• A name cannot end with a hyphen or contain two consecutive hyphens.
c. In the Replication Group Description box, type a meaningful description for the replicationgroup.
d. When all the settings are as you want them, click Create.
Creating the replication group can take a few minutes.When it is ready for use, its status changesfrom creating to available.
4. If you want your replication group to be Multi-AZ enabled:
a. On the Replication Groups screen, select the replication group by clicking the box to the leftof the replication group's name.
b. Click Modify.
c. Select the Yes radio button to the right of Multi-AZ.
d. Click Modify.
For more information on Multi-AZ, see Multi-AZ with Redis Replication Groups (p. 32).
5. Add one or more read replicas to the replication group; for more information, see Adding a ReadReplica To a Replication Group (p. 133).
API Version 2015-02-02131
Amazon ElastiCache User GuideCreating a Redis Replication Group
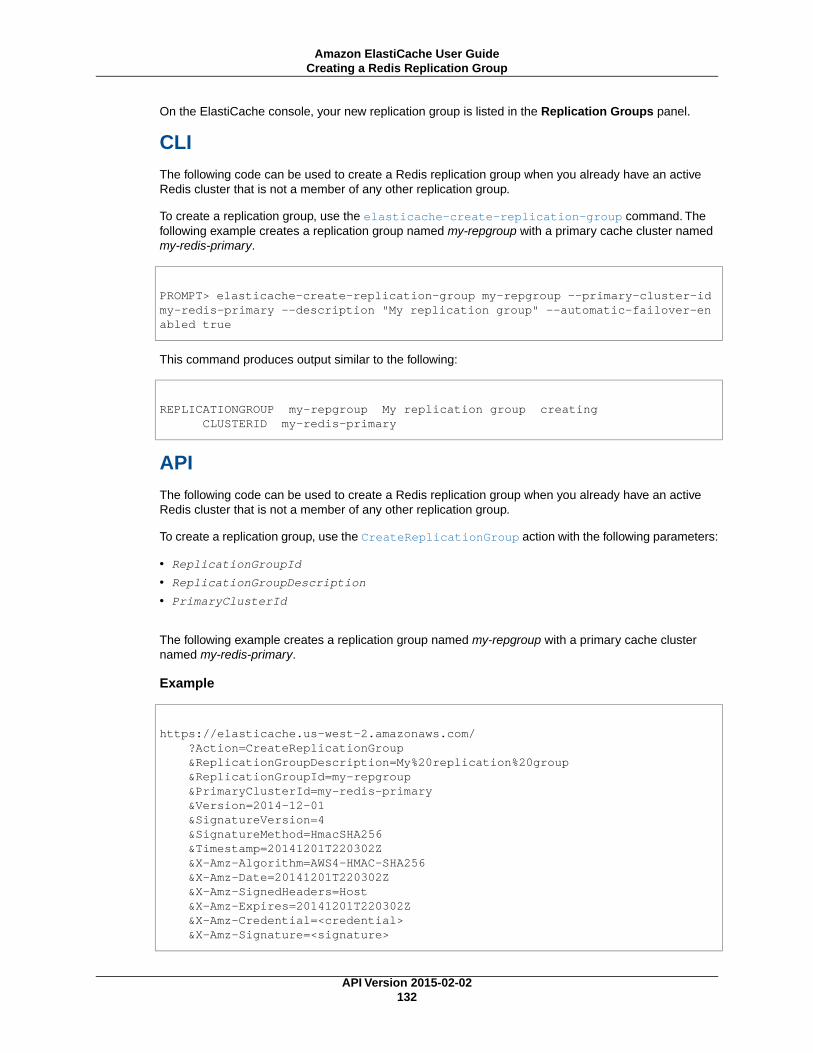
On the ElastiCache console, your new replication group is listed in the Replication Groups panel.
CLIThe following code can be used to create a Redis replication group when you already have an activeRedis cluster that is not a member of any other replication group.
To create a replication group, use the elasticache-create-replication-group command. Thefollowing example creates a replication group named my-repgroup with a primary cache cluster namedmy-redis-primary.
PROMPT> elasticache-create-replication-group my-repgroup --primary-cluster-id my-redis-primary --description "My replication group" --automatic-failover-en abled true
This command produces output similar to the following:
REPLICATIONGROUP my-repgroup My replication group creating CLUSTERID my-redis-primary
APIThe following code can be used to create a Redis replication group when you already have an activeRedis cluster that is not a member of any other replication group.
To create a replication group, use the CreateReplicationGroup action with the following parameters:
• ReplicationGroupId
• ReplicationGroupDescription
• PrimaryClusterId
The following example creates a replication group named my-repgroup with a primary cache clusternamed my-redis-primary.
Example
https://elasticache.us-west-2.amazonaws.com/ ?Action=CreateReplicationGroup &ReplicationGroupDescription=My%20replication%20group &ReplicationGroupId=my-repgroup &PrimaryClusterId=my-redis-primary &Version=2014-12-01 &SignatureVersion=4 &SignatureMethod=HmacSHA256 &Timestamp=20141201T220302Z &X-Amz-Algorithm=AWS4-HMAC-SHA256 &X-Amz-Date=20141201T220302Z &X-Amz-SignedHeaders=Host &X-Amz-Expires=20141201T220302Z &X-Amz-Credential=<credential> &X-Amz-Signature=<signature>
API Version 2015-02-02132
Amazon ElastiCache User GuideCreating a Redis Replication Group
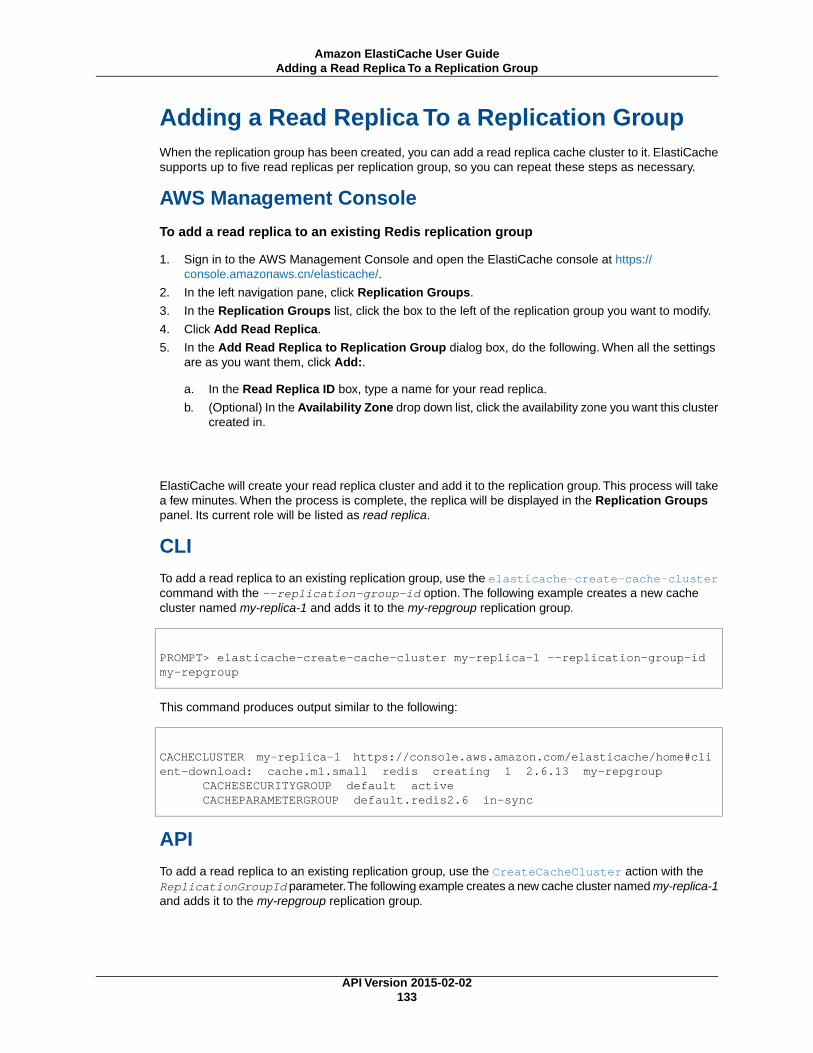
Adding a Read Replica To a Replication GroupWhen the replication group has been created, you can add a read replica cache cluster to it. ElastiCachesupports up to five read replicas per replication group, so you can repeat these steps as necessary.
AWS Management Console
To add a read replica to an existing Redis replication group
1. Sign in to the AWS Management Console and open the ElastiCache console at https://console.amazonaws.cn/elasticache/.
2. In the left navigation pane, click Replication Groups.
3. In the Replication Groups list, click the box to the left of the replication group you want to modify.
4. Click Add Read Replica.
5. In the Add Read Replica to Replication Group dialog box, do the following. When all the settingsare as you want them, click Add:.
a. In the Read Replica ID box, type a name for your read replica.
b. (Optional) In the Availability Zone drop down list, click the availability zone you want this clustercreated in.
ElastiCache will create your read replica cluster and add it to the replication group. This process will takea few minutes. When the process is complete, the replica will be displayed in the Replication Groupspanel. Its current role will be listed as read replica.
CLITo add a read replica to an existing replication group, use the elasticache-create-cache-clustercommand with the --replication-group-id option. The following example creates a new cachecluster named my-replica-1 and adds it to the my-repgroup replication group.
PROMPT> elasticache-create-cache-cluster my-replica-1 --replication-group-id my-repgroup
This command produces output similar to the following:
CACHECLUSTER my-replica-1 https://console.aws.amazon.com/elasticache/home#cli ent-download: cache.m1.small redis creating 1 2.6.13 my-repgroup CACHESECURITYGROUP default active CACHEPARAMETERGROUP default.redis2.6 in-sync
APITo add a read replica to an existing replication group, use the CreateCacheCluster action with theReplicationGroupId parameter.The following example creates a new cache cluster named my-replica-1and adds it to the my-repgroup replication group.
API Version 2015-02-02133
Amazon ElastiCache User GuideAdding a Read Replica To a Replication Group
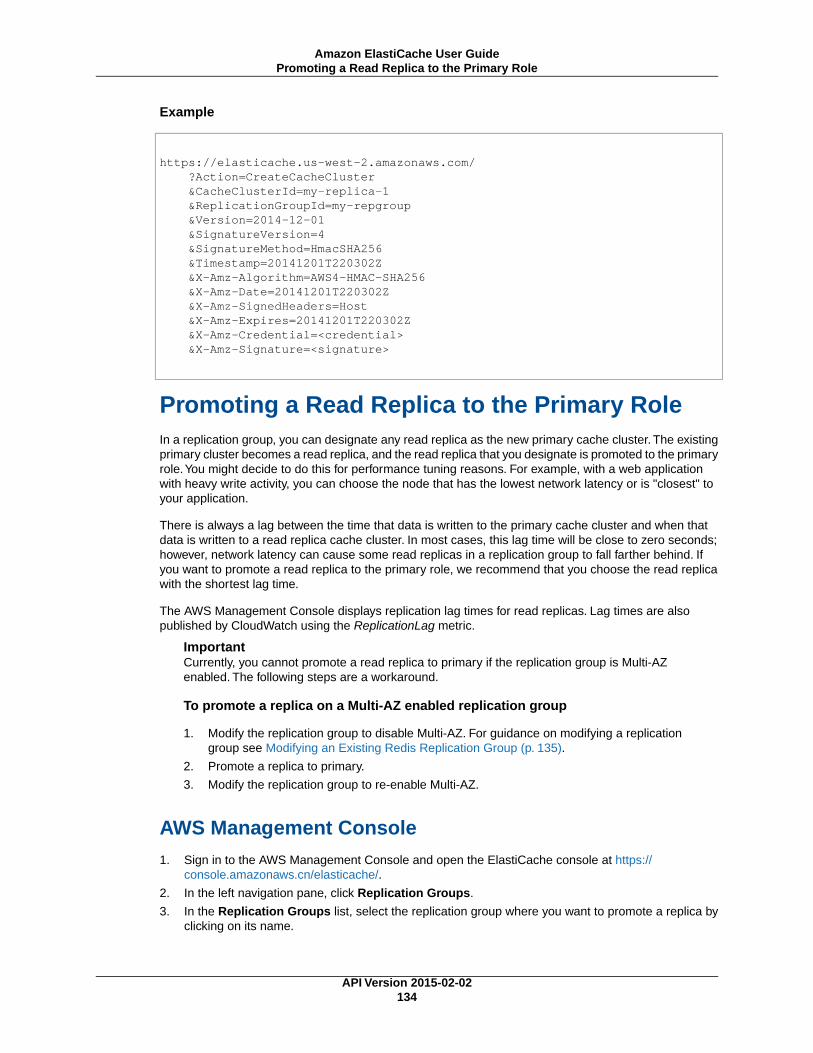
Example
https://elasticache.us-west-2.amazonaws.com/ ?Action=CreateCacheCluster &CacheClusterId=my-replica-1 &ReplicationGroupId=my-repgroup &Version=2014-12-01 &SignatureVersion=4 &SignatureMethod=HmacSHA256 &Timestamp=20141201T220302Z &X-Amz-Algorithm=AWS4-HMAC-SHA256 &X-Amz-Date=20141201T220302Z &X-Amz-SignedHeaders=Host &X-Amz-Expires=20141201T220302Z &X-Amz-Credential=<credential> &X-Amz-Signature=<signature>
Promoting a Read Replica to the Primary RoleIn a replication group, you can designate any read replica as the new primary cache cluster. The existingprimary cluster becomes a read replica, and the read replica that you designate is promoted to the primaryrole.You might decide to do this for performance tuning reasons. For example, with a web applicationwith heavy write activity, you can choose the node that has the lowest network latency or is "closest" toyour application.
There is always a lag between the time that data is written to the primary cache cluster and when thatdata is written to a read replica cache cluster. In most cases, this lag time will be close to zero seconds;however, network latency can cause some read replicas in a replication group to fall farther behind. Ifyou want to promote a read replica to the primary role, we recommend that you choose the read replicawith the shortest lag time.
The AWS Management Console displays replication lag times for read replicas. Lag times are alsopublished by CloudWatch using the ReplicationLag metric.
ImportantCurrently, you cannot promote a read replica to primary if the replication group is Multi-AZenabled. The following steps are a workaround.
To promote a replica on a Multi-AZ enabled replication group
1. Modify the replication group to disable Multi-AZ. For guidance on modifying a replicationgroup see Modifying an Existing Redis Replication Group (p. 135).
2. Promote a replica to primary.
3. Modify the replication group to re-enable Multi-AZ.
AWS Management Console1. Sign in to the AWS Management Console and open the ElastiCache console at https://
console.amazonaws.cn/elasticache/.
2. In the left navigation pane, click Replication Groups.
3. In the Replication Groups list, select the replication group where you want to promote a replica byclicking on its name.
API Version 2015-02-02134
Amazon ElastiCache User GuidePromoting a Read Replica to the Primary Role
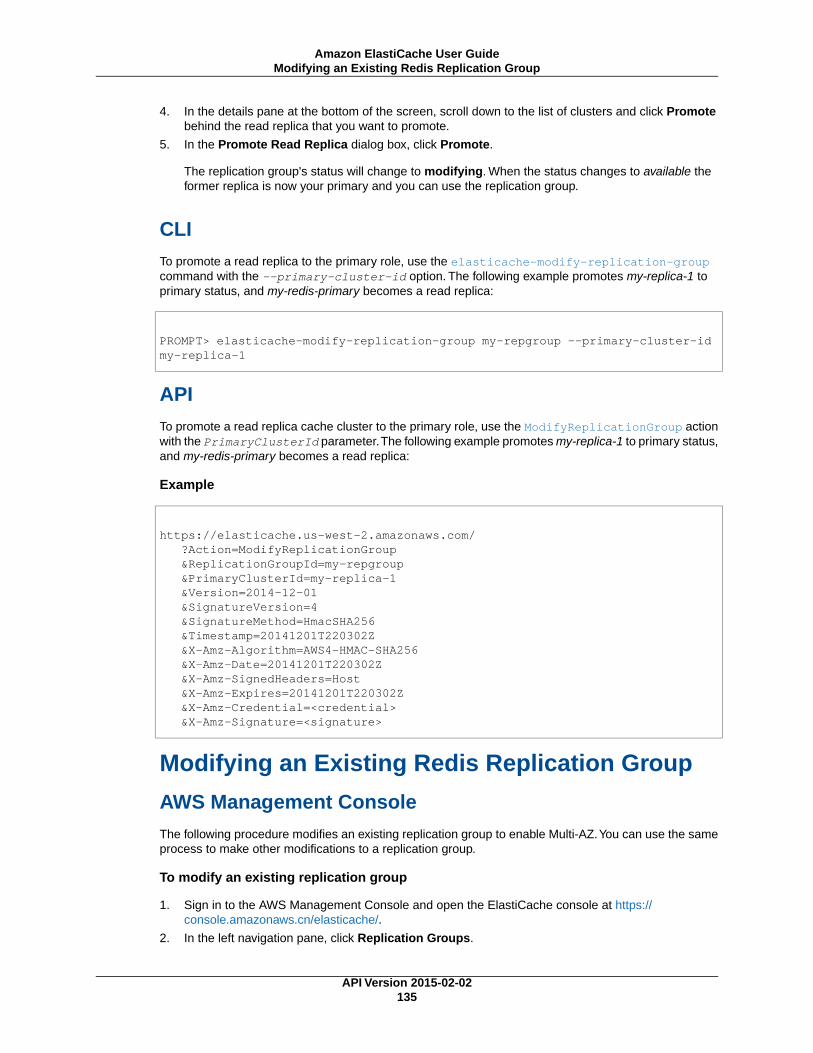
4. In the details pane at the bottom of the screen, scroll down to the list of clusters and click Promotebehind the read replica that you want to promote.
5. In the Promote Read Replica dialog box, click Promote.
The replication group's status will change to modifying. When the status changes to available theformer replica is now your primary and you can use the replication group.
CLITo promote a read replica to the primary role, use the elasticache-modify-replication-groupcommand with the --primary-cluster-id option. The following example promotes my-replica-1 toprimary status, and my-redis-primary becomes a read replica:
PROMPT> elasticache-modify-replication-group my-repgroup --primary-cluster-id my-replica-1
APITo promote a read replica cache cluster to the primary role, use the ModifyReplicationGroup actionwith the PrimaryClusterId parameter.The following example promotes my-replica-1 to primary status,and my-redis-primary becomes a read replica:
Example
https://elasticache.us-west-2.amazonaws.com/ ?Action=ModifyReplicationGroup &ReplicationGroupId=my-repgroup &PrimaryClusterId=my-replica-1 &Version=2014-12-01 &SignatureVersion=4 &SignatureMethod=HmacSHA256 &Timestamp=20141201T220302Z &X-Amz-Algorithm=AWS4-HMAC-SHA256 &X-Amz-Date=20141201T220302Z &X-Amz-SignedHeaders=Host &X-Amz-Expires=20141201T220302Z &X-Amz-Credential=<credential> &X-Amz-Signature=<signature>
Modifying an Existing Redis Replication Group
AWS Management ConsoleThe following procedure modifies an existing replication group to enable Multi-AZ.You can use the sameprocess to make other modifications to a replication group.
To modify an existing replication group
1. Sign in to the AWS Management Console and open the ElastiCache console at https://console.amazonaws.cn/elasticache/.
2. In the left navigation pane, click Replication Groups.
API Version 2015-02-02135
Amazon ElastiCache User GuideModifying an Existing Redis Replication Group

3. To select the replication group to modify, from the list of replication groups, click the name of thereplication group you want to modify.
4. Click Modify.
5. Select Yes for Multi-AZ, and then click Modify.
The status of the replication group will change to modifying.The modifications can take several minutes.When the replication group's status returns to available the modifications are complete and the replicationgroup is ready to use.
CLIThe following CLI command modifies an existing Redis replication group to enable Multi-AZ.You canuse the same command to make other modifications to a replication group.
PROMPT> elasticache-modify-replication-group my-repgroup --automatic-failover-enabled true
APIThe following API call modifies an existing Redis replication group to enable Multi-AZ.You can use thesame API call to make other modifications to a replication group.
https://elasticache.us-west-2.amazonaws.com/ ?Action=ModifyReplicationGroup &AutomaticFailoverEnabled=true &ReplicationGroupId=my-repgroup &SignatureVersion=4 &SignatureMethod=HmacSHA256 &Timestamp=20141201T220302Z &Version=2014-12-01 &X-Amz-Algorithm=AWS4-HMAC-SHA256 &X-Amz-Date=20141201T220302Z &X-Amz-SignedHeaders=Host &X-Amz-Expires=20141201T220302Z &X-Amz-Credential=<credential> &X-Amz-Signature=<signature>
Deleting a Read ReplicaYou can add and delete read replicas; however, you cannot delete the primary cluster in a replicationgroup.
To delete a cluster
As soon as the cluster status changes to deleted, you stop incurring charges for that cluster.
1. Sign in to the AWS Management Console and open the Amazon ElastiCache console at https://console.aws.amazon.com/elasticache/.
2. In the ElastiCache console dashboard, click Cache Clusters.
3. In the list of clusters, to select the cluster to delete, click the box to the left of the cluster's name.When selected, the box will have a colored center.
API Version 2015-02-02136
Amazon ElastiCache User GuideDeleting a Read Replica
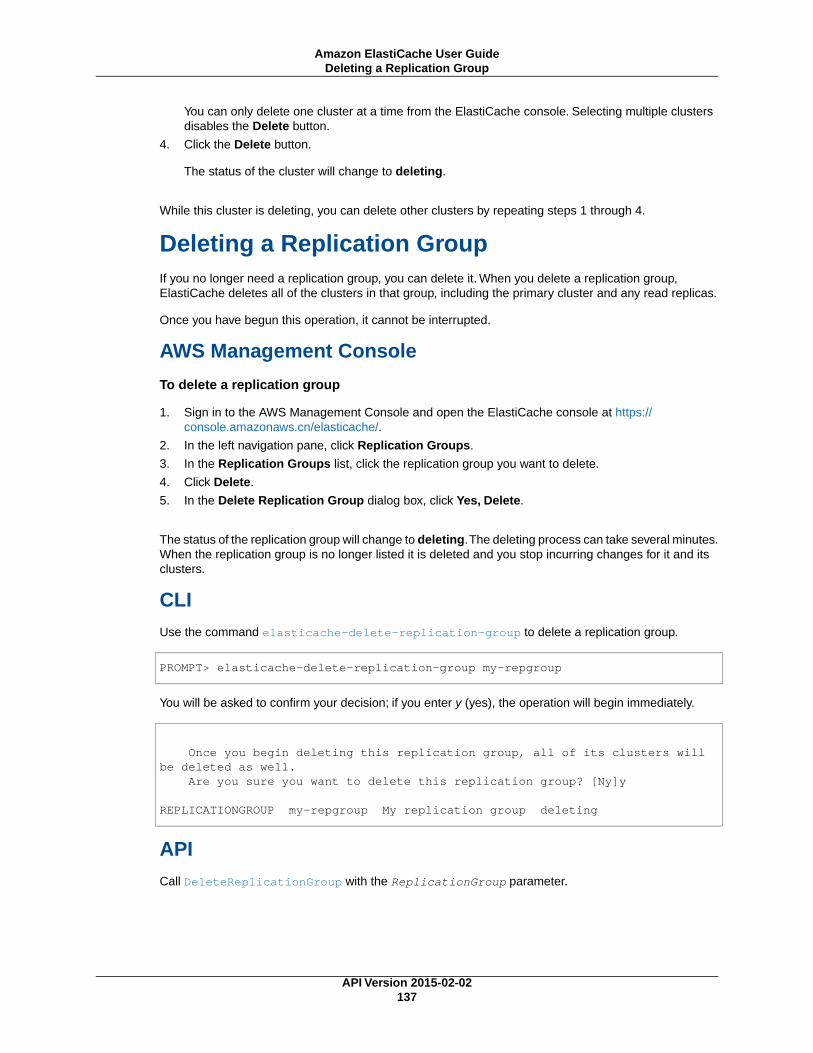
You can only delete one cluster at a time from the ElastiCache console. Selecting multiple clustersdisables the Delete button.
4. Click the Delete button.
The status of the cluster will change to deleting.
While this cluster is deleting, you can delete other clusters by repeating steps 1 through 4.
Deleting a Replication GroupIf you no longer need a replication group, you can delete it. When you delete a replication group,ElastiCache deletes all of the clusters in that group, including the primary cluster and any read replicas.
Once you have begun this operation, it cannot be interrupted.
AWS Management Console
To delete a replication group
1. Sign in to the AWS Management Console and open the ElastiCache console at https://console.amazonaws.cn/elasticache/.
2. In the left navigation pane, click Replication Groups.
3. In the Replication Groups list, click the replication group you want to delete.
4. Click Delete.
5. In the Delete Replication Group dialog box, click Yes, Delete.
The status of the replication group will change to deleting.The deleting process can take several minutes.When the replication group is no longer listed it is deleted and you stop incurring changes for it and itsclusters.
CLIUse the command elasticache-delete-replication-group to delete a replication group.
PROMPT> elasticache-delete-replication-group my-repgroup
You will be asked to confirm your decision; if you enter y (yes), the operation will begin immediately.
Once you begin deleting this replication group, all of its clusters will be deleted as well. Are you sure you want to delete this replication group? [Ny]y
REPLICATIONGROUP my-repgroup My replication group deleting
APICall DeleteReplicationGroup with the ReplicationGroup parameter.
API Version 2015-02-02137
Amazon ElastiCache User GuideDeleting a Replication Group

Example
https://elasticache.us-west-2.amazonaws.com/ ?Action=DeleteReplicationGroup &ReplicationGroupId=my-repgroup &Version=2014-12-01 &SignatureVersion=4 &SignatureMethod=HmacSHA256 &Timestamp=20141201T220302Z &X-Amz-Algorithm=AWS4-HMAC-SHA256 &X-Amz-Date=20141201T220302Z &X-Amz-SignedHeaders=Host &X-Amz-Expires=20141201T220302Z &X-Amz-Credential=<credential> &X-Amz-Signature=<signature>
NoteIf you set the RetainPrimaryCluster parameter to true, all of the read replicas will bedeleted, but the primary cache cluster will be retained.
API Version 2015-02-02138
Amazon ElastiCache User GuideDeleting a Replication Group
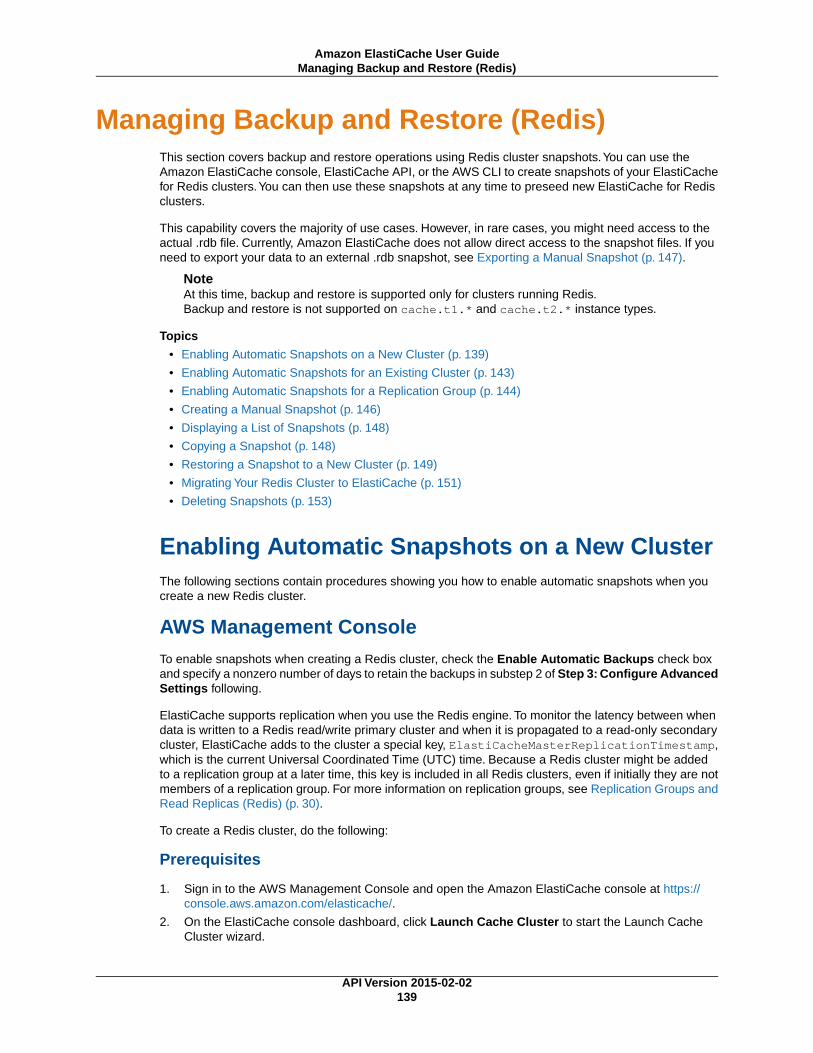
Managing Backup and Restore (Redis)This section covers backup and restore operations using Redis cluster snapshots.You can use theAmazon ElastiCache console, ElastiCache API, or the AWS CLI to create snapshots of your ElastiCachefor Redis clusters.You can then use these snapshots at any time to preseed new ElastiCache for Redisclusters.
This capability covers the majority of use cases. However, in rare cases, you might need access to theactual .rdb file. Currently, Amazon ElastiCache does not allow direct access to the snapshot files. If youneed to export your data to an external .rdb snapshot, see Exporting a Manual Snapshot (p. 147).
NoteAt this time, backup and restore is supported only for clusters running Redis.Backup and restore is not supported on cache.t1.* and cache.t2.* instance types.
Topics
• Enabling Automatic Snapshots on a New Cluster (p. 139)
• Enabling Automatic Snapshots for an Existing Cluster (p. 143)
• Enabling Automatic Snapshots for a Replication Group (p. 144)
• Creating a Manual Snapshot (p. 146)
• Displaying a List of Snapshots (p. 148)
• Copying a Snapshot (p. 148)
• Restoring a Snapshot to a New Cluster (p. 149)
• Migrating Your Redis Cluster to ElastiCache (p. 151)
• Deleting Snapshots (p. 153)
Enabling Automatic Snapshots on a New ClusterThe following sections contain procedures showing you how to enable automatic snapshots when youcreate a new Redis cluster.
AWS Management ConsoleTo enable snapshots when creating a Redis cluster, check the Enable Automatic Backups check boxand specify a nonzero number of days to retain the backups in substep 2 of Step 3: Configure AdvancedSettings following.
ElastiCache supports replication when you use the Redis engine. To monitor the latency between whendata is written to a Redis read/write primary cluster and when it is propagated to a read-only secondarycluster, ElastiCache adds to the cluster a special key, ElastiCacheMasterReplicationTimestamp,which is the current Universal Coordinated Time (UTC) time. Because a Redis cluster might be addedto a replication group at a later time, this key is included in all Redis clusters, even if initially they are notmembers of a replication group. For more information on replication groups, see Replication Groups andRead Replicas (Redis) (p. 30).
To create a Redis cluster, do the following:
Prerequisites
1. Sign in to the AWS Management Console and open the Amazon ElastiCache console at https://console.aws.amazon.com/elasticache/.
2. On the ElastiCache console dashboard, click Launch Cache Cluster to start the Launch CacheCluster wizard.
API Version 2015-02-02139
Amazon ElastiCache User GuideManaging Backup and Restore (Redis)

Step 1: Select the Redis Engine
Before you proceed, be sure you have completed the Prerequisites section.
To select your cluster's engine:
1.On the Select Engine screen, click the Redis tab.
2. Click Next.
Step 2: Specify Cluster Details
Before you proceed, be sure you have completed Step 1: Select the Redis Engine.
To configure your cluster's specifications and details:
1. In the Cluster Specifications section of the Specify Cluster Details page, specify settings as shownfollowing:
a. Engine: Redis
b. Engine Version: From the list, select the version of the cache engine to run for this cluster.Unless you have a specific reason not to, we recommend you select the latest engine version.
c. Cache Port: Type a new port number for your cluster, or leave it at its default value. For Redis,the default port is 6379.
d. Parameter Group: From the list, select a parameter group for this cluster. Parameter groupscontrol the run-time parameters of your cluster. For more information on parameter groups, seeNode Type-Specific Parameters for Redis (p. 57).
e. Enable Replication: To create a single Redis cluster, uncheck this check box.
To create a Redis replication group, see Creating a Redis Multiple Cluster ReplicationGroup (p. 127)
2. In the Configuration section of the Specify Cluster Details page, specify settings as shown following:
a. Cluster Name: Type a meaningful name for this cluster.
Cluster name constraints are as follows:
• A name must contain from 1 to 20 alphanumeric characters or hyphens.
• The first character must be a letter.
• A name cannot end with a hyphen or contain two consecutive hyphens.
b. Node Type: From the list, select the node type you want to use for this cluster. For informationon node types, see Node Type-Specific Parameters for Redis (p. 57) .
c. S3 Location of Redis RDB file: Amazon S3 location of the .rdb file used to seed this cluster.If this is left blank, this cluster will not be seeded upon creation. For more information on snapshotsand seeding a Redis cluster, see Backup and Restore for Redis Clusters (p. 38) and MigratingYour Redis Cluster to ElastiCache (p. 151).
3. Click Next.
API Version 2015-02-02140
Amazon ElastiCache User GuideEnabling Automatic Snapshots on a New Cluster
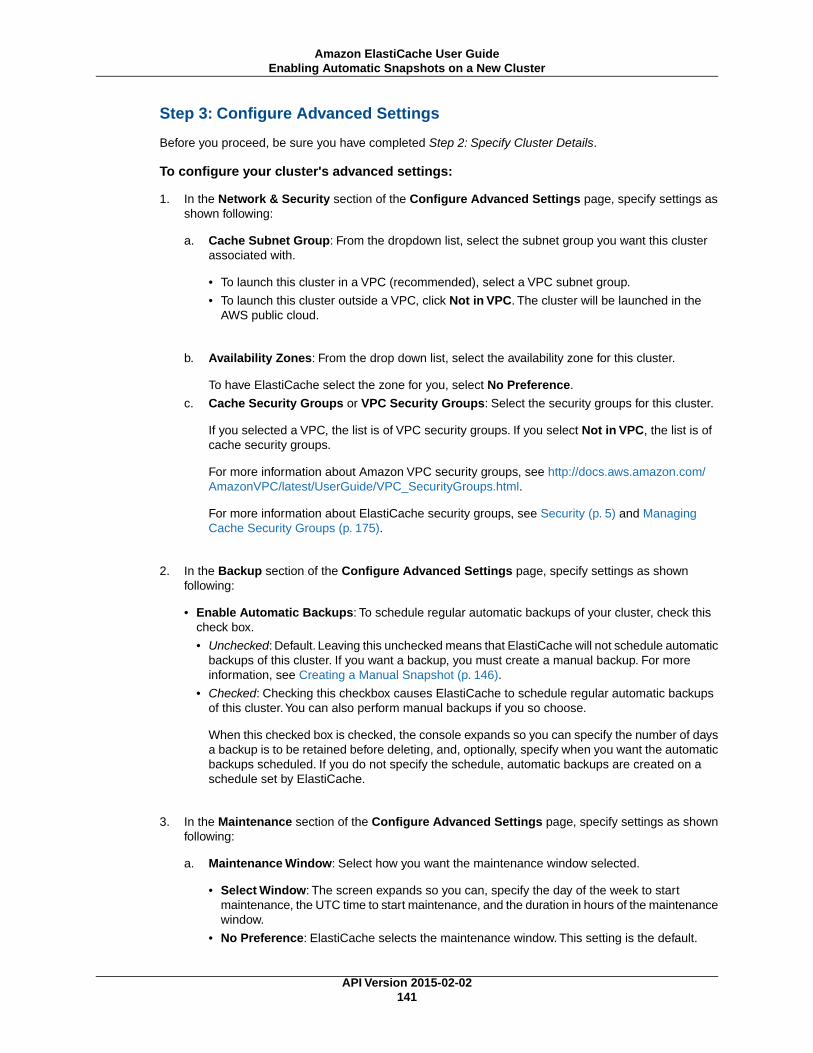
Step 3: Configure Advanced Settings
Before you proceed, be sure you have completed Step 2: Specify Cluster Details.
To configure your cluster's advanced settings:
1. In the Network & Security section of the Configure Advanced Settings page, specify settings asshown following:
a. Cache Subnet Group: From the dropdown list, select the subnet group you want this clusterassociated with.
• To launch this cluster in a VPC (recommended), select a VPC subnet group.
• To launch this cluster outside a VPC, click Not in VPC. The cluster will be launched in theAWS public cloud.
b. Availability Zones: From the drop down list, select the availability zone for this cluster.
To have ElastiCache select the zone for you, select No Preference.
c. Cache Security Groups or VPC Security Groups: Select the security groups for this cluster.
If you selected a VPC, the list is of VPC security groups. If you select Not in VPC, the list is ofcache security groups.
For more information about Amazon VPC security groups, see http://docs.aws.amazon.com/AmazonVPC/latest/UserGuide/VPC_SecurityGroups.html.
For more information about ElastiCache security groups, see Security (p. 5) and ManagingCache Security Groups (p. 175).
2. In the Backup section of the Configure Advanced Settings page, specify settings as shownfollowing:
• Enable Automatic Backups: To schedule regular automatic backups of your cluster, check thischeck box.
• Unchecked: Default. Leaving this unchecked means that ElastiCache will not schedule automaticbackups of this cluster. If you want a backup, you must create a manual backup. For moreinformation, see Creating a Manual Snapshot (p. 146).
• Checked: Checking this checkbox causes ElastiCache to schedule regular automatic backupsof this cluster.You can also perform manual backups if you so choose.
When this checked box is checked, the console expands so you can specify the number of daysa backup is to be retained before deleting, and, optionally, specify when you want the automaticbackups scheduled. If you do not specify the schedule, automatic backups are created on aschedule set by ElastiCache.
3. In the Maintenance section of the Configure Advanced Settings page, specify settings as shownfollowing:
a. Maintenance Window: Select how you want the maintenance window selected.
• Select Window: The screen expands so you can, specify the day of the week to startmaintenance, the UTC time to start maintenance, and the duration in hours of the maintenancewindow.
• No Preference: ElastiCache selects the maintenance window. This setting is the default.
API Version 2015-02-02141
Amazon ElastiCache User GuideEnabling Automatic Snapshots on a New Cluster
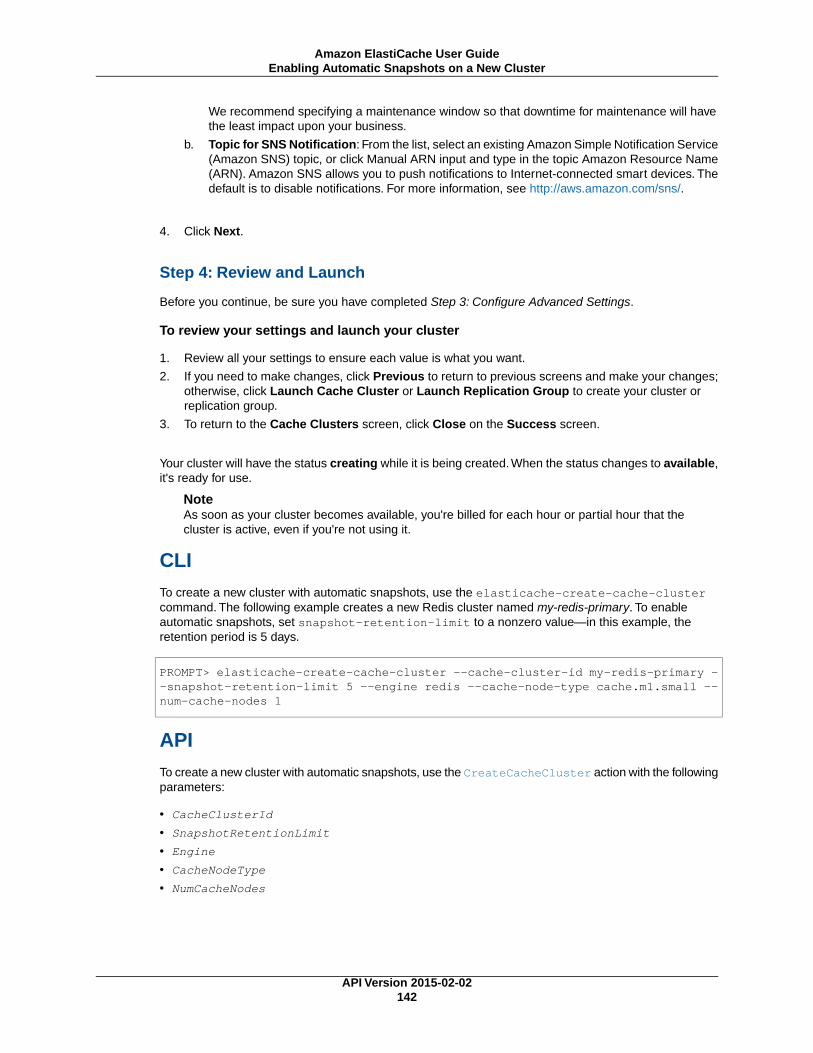
We recommend specifying a maintenance window so that downtime for maintenance will havethe least impact upon your business.
b. Topic for SNS Notification: From the list, select an existing Amazon Simple Notification Service(Amazon SNS) topic, or click Manual ARN input and type in the topic Amazon Resource Name(ARN). Amazon SNS allows you to push notifications to Internet-connected smart devices. Thedefault is to disable notifications. For more information, see http://aws.amazon.com/sns/.
4. Click Next.
Step 4: Review and Launch
Before you continue, be sure you have completed Step 3: Configure Advanced Settings.
To review your settings and launch your cluster
1. Review all your settings to ensure each value is what you want.
2. If you need to make changes, click Previous to return to previous screens and make your changes;otherwise, click Launch Cache Cluster or Launch Replication Group to create your cluster orreplication group.
3. To return to the Cache Clusters screen, click Close on the Success screen.
Your cluster will have the status creating while it is being created. When the status changes to available,it's ready for use.
NoteAs soon as your cluster becomes available, you're billed for each hour or partial hour that thecluster is active, even if you're not using it.
CLITo create a new cluster with automatic snapshots, use the elasticache-create-cache-clustercommand. The following example creates a new Redis cluster named my-redis-primary. To enableautomatic snapshots, set snapshot-retention-limit to a nonzero value—in this example, theretention period is 5 days.
PROMPT> elasticache-create-cache-cluster --cache-cluster-id my-redis-primary --snapshot-retention-limit 5 --engine redis --cache-node-type cache.m1.small --num-cache-nodes 1
APITo create a new cluster with automatic snapshots, use the CreateCacheCluster action with the followingparameters:
• CacheClusterId
• SnapshotRetentionLimit
• Engine
• CacheNodeType
• NumCacheNodes
API Version 2015-02-02142
Amazon ElastiCache User GuideEnabling Automatic Snapshots on a New Cluster
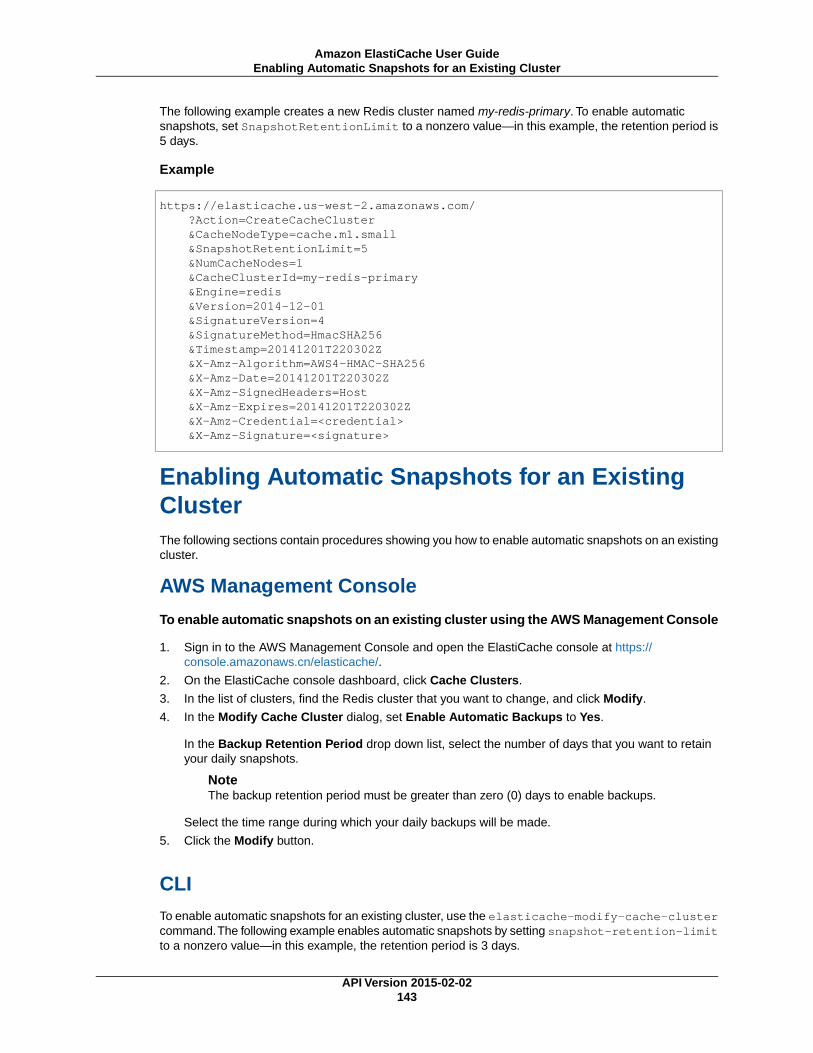
The following example creates a new Redis cluster named my-redis-primary. To enable automaticsnapshots, set SnapshotRetentionLimit to a nonzero value—in this example, the retention period is5 days.
Example
https://elasticache.us-west-2.amazonaws.com/ ?Action=CreateCacheCluster &CacheNodeType=cache.m1.small &SnapshotRetentionLimit=5 &NumCacheNodes=1 &CacheClusterId=my-redis-primary &Engine=redis &Version=2014-12-01 &SignatureVersion=4 &SignatureMethod=HmacSHA256 &Timestamp=20141201T220302Z &X-Amz-Algorithm=AWS4-HMAC-SHA256 &X-Amz-Date=20141201T220302Z &X-Amz-SignedHeaders=Host &X-Amz-Expires=20141201T220302Z &X-Amz-Credential=<credential> &X-Amz-Signature=<signature>
Enabling Automatic Snapshots for an ExistingClusterThe following sections contain procedures showing you how to enable automatic snapshots on an existingcluster.
AWS Management Console
To enable automatic snapshots on an existing cluster using the AWS Management Console
1. Sign in to the AWS Management Console and open the ElastiCache console at https://console.amazonaws.cn/elasticache/.
2. On the ElastiCache console dashboard, click Cache Clusters.
3. In the list of clusters, find the Redis cluster that you want to change, and click Modify.
4. In the Modify Cache Cluster dialog, set Enable Automatic Backups to Yes.
In the Backup Retention Period drop down list, select the number of days that you want to retainyour daily snapshots.
NoteThe backup retention period must be greater than zero (0) days to enable backups.
Select the time range during which your daily backups will be made.
5. Click the Modify button.
CLITo enable automatic snapshots for an existing cluster, use the elasticache-modify-cache-clustercommand.The following example enables automatic snapshots by setting snapshot-retention-limitto a nonzero value—in this example, the retention period is 3 days.
API Version 2015-02-02143
Amazon ElastiCache User GuideEnabling Automatic Snapshots for an Existing Cluster
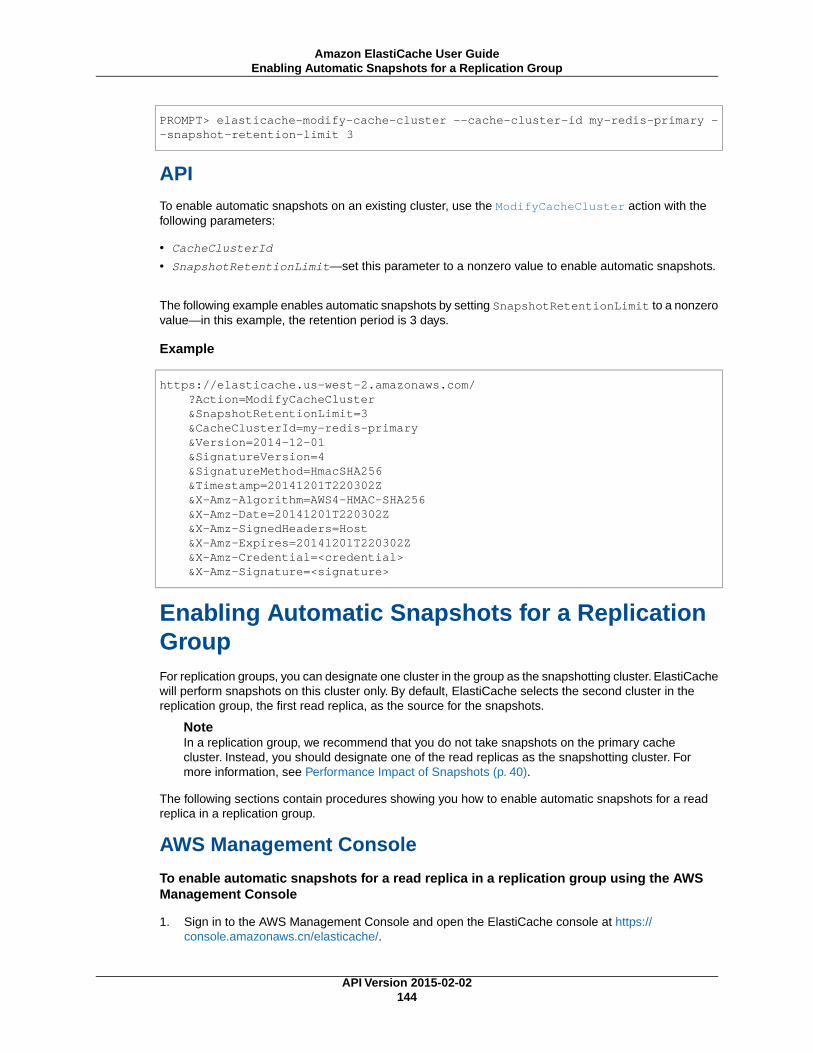
PROMPT> elasticache-modify-cache-cluster --cache-cluster-id my-redis-primary --snapshot-retention-limit 3
APITo enable automatic snapshots on an existing cluster, use the ModifyCacheCluster action with thefollowing parameters:
• CacheClusterId
• SnapshotRetentionLimit—set this parameter to a nonzero value to enable automatic snapshots.
The following example enables automatic snapshots by setting SnapshotRetentionLimit to a nonzerovalue—in this example, the retention period is 3 days.
Example
https://elasticache.us-west-2.amazonaws.com/ ?Action=ModifyCacheCluster &SnapshotRetentionLimit=3 &CacheClusterId=my-redis-primary &Version=2014-12-01 &SignatureVersion=4 &SignatureMethod=HmacSHA256 &Timestamp=20141201T220302Z &X-Amz-Algorithm=AWS4-HMAC-SHA256 &X-Amz-Date=20141201T220302Z &X-Amz-SignedHeaders=Host &X-Amz-Expires=20141201T220302Z &X-Amz-Credential=<credential> &X-Amz-Signature=<signature>
Enabling Automatic Snapshots for a ReplicationGroupFor replication groups, you can designate one cluster in the group as the snapshotting cluster. ElastiCachewill perform snapshots on this cluster only. By default, ElastiCache selects the second cluster in thereplication group, the first read replica, as the source for the snapshots.
NoteIn a replication group, we recommend that you do not take snapshots on the primary cachecluster. Instead, you should designate one of the read replicas as the snapshotting cluster. Formore information, see Performance Impact of Snapshots (p. 40).
The following sections contain procedures showing you how to enable automatic snapshots for a readreplica in a replication group.
AWS Management Console
To enable automatic snapshots for a read replica in a replication group using the AWSManagement Console
1. Sign in to the AWS Management Console and open the ElastiCache console at https://console.amazonaws.cn/elasticache/.
API Version 2015-02-02144
Amazon ElastiCache User GuideEnabling Automatic Snapshots for a Replication Group
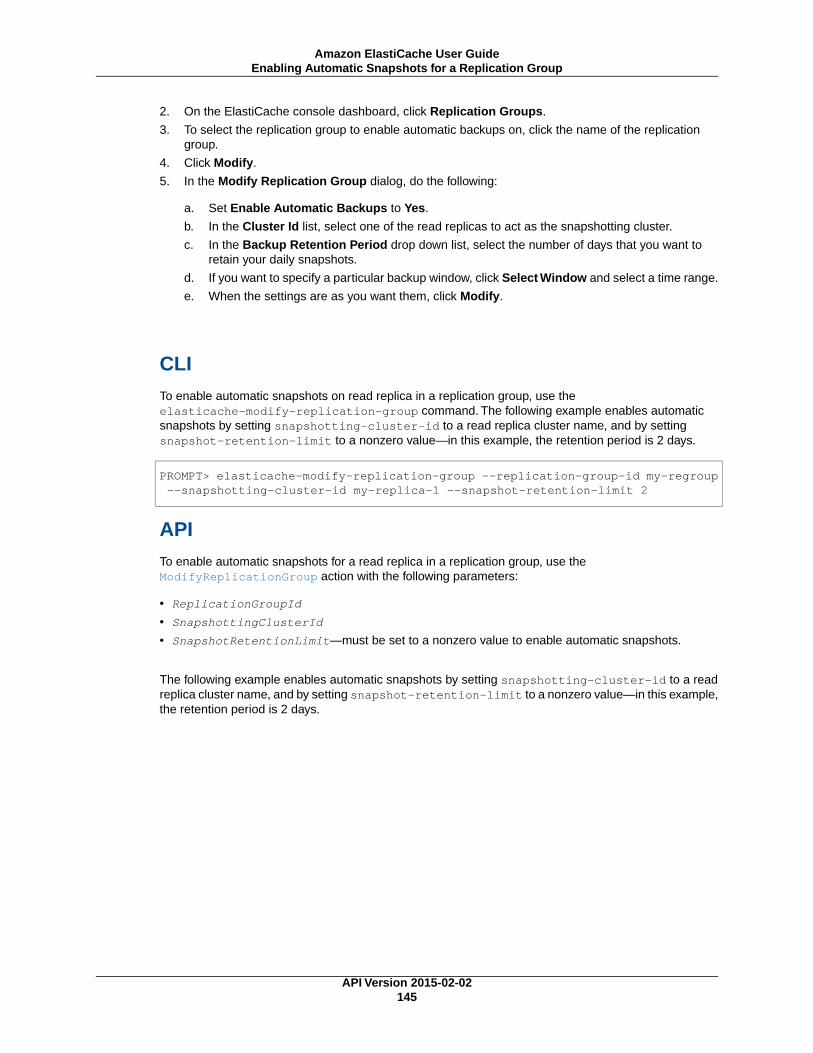
2. On the ElastiCache console dashboard, click Replication Groups.
3. To select the replication group to enable automatic backups on, click the name of the replicationgroup.
4. Click Modify.
5. In the Modify Replication Group dialog, do the following:
a. Set Enable Automatic Backups to Yes.
b. In the Cluster Id list, select one of the read replicas to act as the snapshotting cluster.
c. In the Backup Retention Period drop down list, select the number of days that you want toretain your daily snapshots.
d. If you want to specify a particular backup window, click Select Window and select a time range.
e. When the settings are as you want them, click Modify.
CLITo enable automatic snapshots on read replica in a replication group, use theelasticache-modify-replication-group command. The following example enables automaticsnapshots by setting snapshotting-cluster-id to a read replica cluster name, and by settingsnapshot-retention-limit to a nonzero value—in this example, the retention period is 2 days.
PROMPT> elasticache-modify-replication-group --replication-group-id my-regroup --snapshotting-cluster-id my-replica-1 --snapshot-retention-limit 2
APITo enable automatic snapshots for a read replica in a replication group, use theModifyReplicationGroup action with the following parameters:
• ReplicationGroupId
• SnapshottingClusterId
• SnapshotRetentionLimit—must be set to a nonzero value to enable automatic snapshots.
The following example enables automatic snapshots by setting snapshotting-cluster-id to a readreplica cluster name, and by setting snapshot-retention-limit to a nonzero value—in this example,the retention period is 2 days.
API Version 2015-02-02145
Amazon ElastiCache User GuideEnabling Automatic Snapshots for a Replication Group

Example
https://elasticache.us-west-2.amazonaws.com/ ?Action=ModifyReplicationGroup &ApplyImmediately=false &SnapshotRetentionLimit=2 &SnapshottingClusterId=my-replica-1 &ReplicationGroupId=myreplgroup &Version=2014-12-01 &SignatureVersion=4 &SignatureMethod=HmacSHA256 &Timestamp=20141201T220302Z &X-Amz-Algorithm=AWS4-HMAC-SHA256 &X-Amz-Date=20141201T220302Z &X-Amz-SignedHeaders=Host &X-Amz-Expires=20141201T220302Z &X-Amz-Credential=<credential> &X-Amz-Signature=<signature>
Creating a Manual SnapshotYou can create a manual snapshot at any time.You must provide the name of the source cluster and aname for the snapshot.
The following procedures show you how to create a manual snapshot.
Topics
• AWS Management Console (p. 146)
• CLI (p. 147)
• API (p. 147)
• Exporting a Manual Snapshot (p. 147)
AWS Management Console
To create a manual snapshot using the AWS Management Console
1. Sign in to the AWS Management Console and open the ElastiCache console at https://console.amazonaws.cn/elasticache/.
2. On the ElastiCache console dashboard, click Snapshots.
3. At the top of the screen, click Create Snapshot.
4. In the Create Cache Snapshot dialog:
a. From the Cache Cluster drop down list, select the name of the source cluster.
b. In the Snapshot Name text box, type a name for the snapshot.
c. Click Create.
The new snapshot will be listed in the list of snapshots. Its status will be creating while it is being created.This process can take several minutes. When the status changes to available it is created and you canuse it.
API Version 2015-02-02146
Amazon ElastiCache User GuideCreating a Manual Snapshot

CLITo create a manual snapshot, use the elasticache-create-snapshot command. The followingexample creates a snapshot of a cluster named my-redis-primary.
PROMPT> elasticache-create-snapshot my-manual-snapshot --cache-cluster-id my-redis-primary
APITo create a manual snapshot, use the CreateSnapshot action with the following parameters:
• CacheClusterId
• SnapshotName
The following example creates a manual snapshot named my-manual-snapshot from a cluster namedmy-redis-primary.
Example
https://elasticache.us-west-2.amazonaws.com/ ?Action=CreateSnapshot &CacheClusterId=my-redis-primary &SnapshotName=my-manual-snapshot &Version=2014-12-01 &SignatureVersion=4 &SignatureMethod=HmacSHA256 &Timestamp=20141201T220302Z &X-Amz-Algorithm=AWS4-HMAC-SHA256 &X-Amz-Date=20141201T220302Z &X-Amz-SignedHeaders=Host &X-Amz-Expires=20141201T220302Z &X-Amz-Credential=<credential> &X-Amz-Signature=<signature>
Exporting a Manual SnapshotCurrently, Amazon ElastiCache does not allow direct access to ElastiCache snapshot .rdb files. If youneed to export your data to an external .rdb snapshot which you can access, following is a procedurethat will create a snapshot in your self-managed Amazon Elastic Compute Cloud (Amazon EC2)environment.
Because you are working outside of ElastiCache, you cannot use the ElastiCache console or API or AWSCLI to create an external .rdb snapshot.
For information on using Redis commands, go to the Redis Documentation.
To manually create a snapshot you can access directly
1. Create an EC2 instance. Go to Amazon Elastic Compute Cloud Documentation for guidance.
2. Install the Redis engine on this EC2 instance.
3. Connect this instance, as a read replica, to the primary node of your ElastiCache replication group.
API Version 2015-02-02147
Amazon ElastiCache User GuideCreating a Manual Snapshot

We discourage creating external replicas as part of your normal workload, because ElastiCachecannot fail over to external replicas.
4. Take a snapshot of this external read replica using the asynchronous Redis BGSAVE command.
5. Store the .rdb file.
6. Shut down Redis on your EC2 instance.
Displaying a List of SnapshotsThe following procedures show you how to display a list of your snapshots.
AWS Management Console
To display snapshots using the AWS Management Console
1. Sign in to the AWS Management Console and open the ElastiCache console at https://console.amazonaws.cn/elasticache/.
2. On the ElastiCache console dashboard, click Snapshots.
3. Use the Filter field to display manual, automatic, or all snapshots.
CLITo display a list of snapshots, use the elasticache-describe-snapshots command. The followingexample displays a list describing all of the snapshots in the current AWS account.
PROMPT> elasticache-describe-snapshots
APITo display a list of snapshots, use the DescribeSnapshots action.
The following example displays a list of all of the snapshots in the current AWS account.
Example
https://elasticache.us-west-2.amazonaws.com/ ?Action=DescribeSnapshots &Version=2014-12-01 &SignatureVersion=4 &SignatureMethod=HmacSHA256 &Timestamp=20141201T220302Z &X-Amz-Algorithm=AWS4-HMAC-SHA256 &X-Amz-Date=20141201T220302Z &X-Amz-SignedHeaders=Host &X-Amz-Expires=20141201T220302Z &X-Amz-Credential=<credential> &X-Amz-Signature=<signature>
Copying a SnapshotYou can make a copy of any snapshot, whether it was created automatically or manually. The followingprocedures show you how to copy a snapshot.
API Version 2015-02-02148
Amazon ElastiCache User GuideDisplaying a List of Snapshots

AWS Management Console
To copy a snapshot using the AWS Management Console
1. Sign in to the AWS Management Console and open the ElastiCache console at https://console.amazonaws.cn/elasticache/.
2. On the ElastiCache console dashboard, click Snapshots.
3. In the list of snapshots, select the one that you want to copy, and then click Copy Snapshot.
4. In the New Cache Snapshot Identifier text box, type a name for your new snapshot, and then clickCopy.
CLITo copy a snapshot, use the elasticache-copy-snapshot command. The following example makesa copy of an automatic snapshot.
PROMPT> elasticache-copy-snapshot automatic.my-redis-primary-2014-03-27-03-15 my-snapshot-copy
APITo copy a snapshot, use the CopySnapshot action with the following parameters:
• SourceSnapshotName
• TargetSnapshotName
The following example makes a copy of an automatic snapshot.
Example
https://elasticache.us-west-2.amazonaws.com/ ?Action=CopySnapshot &TargetSnapshotName=my-snapshot-copy &SourceSnapshotName=automatic.my-redis-primary-2014-03-27-03-15 &Version=2014-12-01 &SignatureVersion=4 &SignatureMethod=HmacSHA256 &Timestamp=20141201T220302Z &X-Amz-Algorithm=AWS4-HMAC-SHA256 &X-Amz-Date=20141201T220302Z &X-Amz-SignedHeaders=Host &X-Amz-Expires=20141201T220302Z &X-Amz-Credential=<credential> &X-Amz-Signature=<signature>
Restoring a Snapshot to a New ClusterTo restore your data from a snapshot, ElastiCache must first create a new cluster, and then copy thedata from the snapshot into the new cluster's Redis cache.When this process is complete, your applicationscan access the data in the new cluster.
The following procedures show you how to restore a snapshot to a new cluster.
API Version 2015-02-02149
Amazon ElastiCache User GuideRestoring a Snapshot to a New Cluster
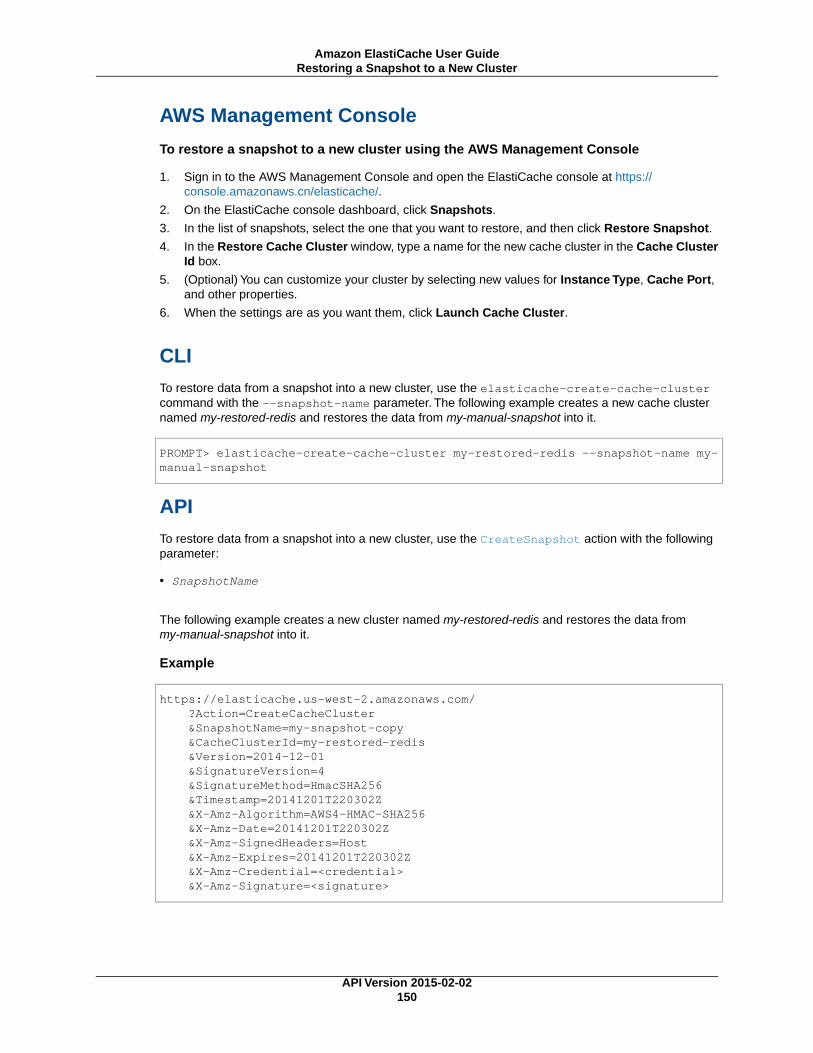
AWS Management Console
To restore a snapshot to a new cluster using the AWS Management Console
1. Sign in to the AWS Management Console and open the ElastiCache console at https://console.amazonaws.cn/elasticache/.
2. On the ElastiCache console dashboard, click Snapshots.
3. In the list of snapshots, select the one that you want to restore, and then click Restore Snapshot.
4. In the Restore Cache Cluster window, type a name for the new cache cluster in the Cache ClusterId box.
5. (Optional) You can customize your cluster by selecting new values for Instance Type, Cache Port,and other properties.
6. When the settings are as you want them, click Launch Cache Cluster.
CLITo restore data from a snapshot into a new cluster, use the elasticache-create-cache-clustercommand with the --snapshot-name parameter. The following example creates a new cache clusternamed my-restored-redis and restores the data from my-manual-snapshot into it.
PROMPT> elasticache-create-cache-cluster my-restored-redis --snapshot-name my-manual-snapshot
APITo restore data from a snapshot into a new cluster, use the CreateSnapshot action with the followingparameter:
• SnapshotName
The following example creates a new cluster named my-restored-redis and restores the data frommy-manual-snapshot into it.
Example
https://elasticache.us-west-2.amazonaws.com/ ?Action=CreateCacheCluster &SnapshotName=my-snapshot-copy &CacheClusterId=my-restored-redis &Version=2014-12-01 &SignatureVersion=4 &SignatureMethod=HmacSHA256 &Timestamp=20141201T220302Z &X-Amz-Algorithm=AWS4-HMAC-SHA256 &X-Amz-Date=20141201T220302Z &X-Amz-SignedHeaders=Host &X-Amz-Expires=20141201T220302Z &X-Amz-Credential=<credential> &X-Amz-Signature=<signature>
API Version 2015-02-02150
Amazon ElastiCache User GuideRestoring a Snapshot to a New Cluster
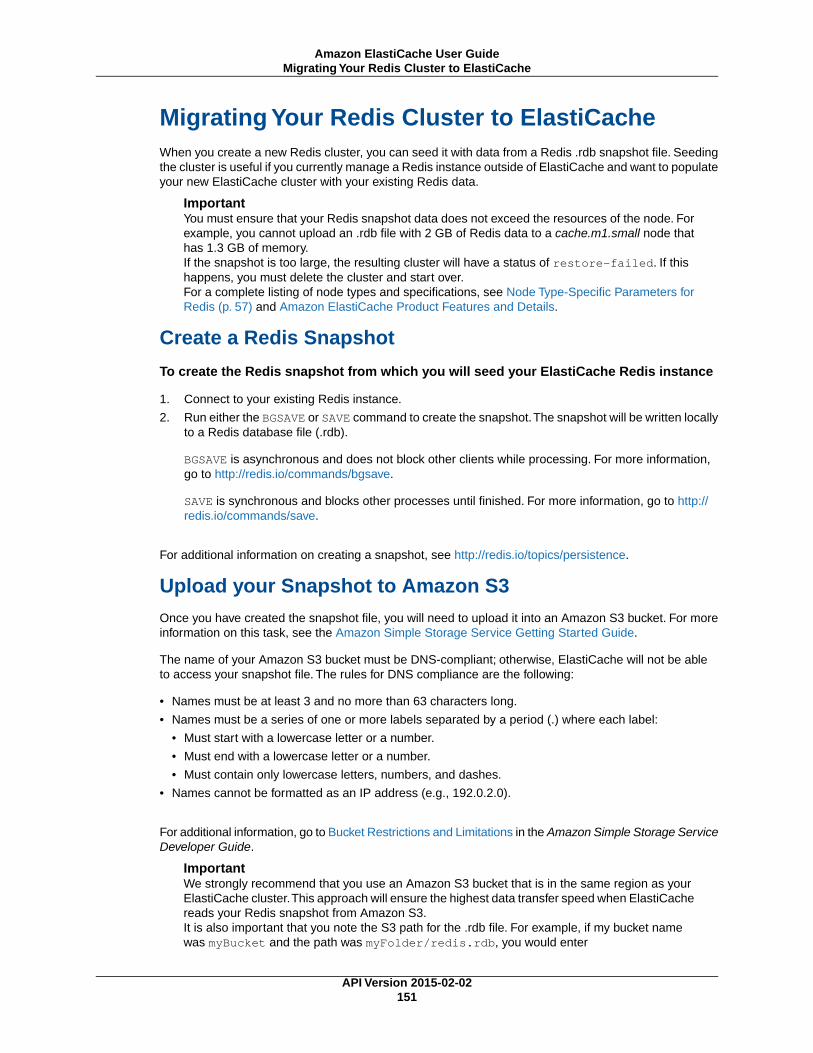
Migrating Your Redis Cluster to ElastiCacheWhen you create a new Redis cluster, you can seed it with data from a Redis .rdb snapshot file. Seedingthe cluster is useful if you currently manage a Redis instance outside of ElastiCache and want to populateyour new ElastiCache cluster with your existing Redis data.
ImportantYou must ensure that your Redis snapshot data does not exceed the resources of the node. Forexample, you cannot upload an .rdb file with 2 GB of Redis data to a cache.m1.small node thathas 1.3 GB of memory.If the snapshot is too large, the resulting cluster will have a status of restore-failed. If thishappens, you must delete the cluster and start over.For a complete listing of node types and specifications, see Node Type-Specific Parameters forRedis (p. 57) and Amazon ElastiCache Product Features and Details.
Create a Redis Snapshot
To create the Redis snapshot from which you will seed your ElastiCache Redis instance
1. Connect to your existing Redis instance.
2. Run either the BGSAVE or SAVE command to create the snapshot.The snapshot will be written locallyto a Redis database file (.rdb).
BGSAVE is asynchronous and does not block other clients while processing. For more information,go to http://redis.io/commands/bgsave.
SAVE is synchronous and blocks other processes until finished. For more information, go to http://redis.io/commands/save.
For additional information on creating a snapshot, see http://redis.io/topics/persistence.
Upload your Snapshot to Amazon S3Once you have created the snapshot file, you will need to upload it into an Amazon S3 bucket. For moreinformation on this task, see the Amazon Simple Storage Service Getting Started Guide.
The name of your Amazon S3 bucket must be DNS-compliant; otherwise, ElastiCache will not be ableto access your snapshot file. The rules for DNS compliance are the following:
• Names must be at least 3 and no more than 63 characters long.
• Names must be a series of one or more labels separated by a period (.) where each label:
• Must start with a lowercase letter or a number.
• Must end with a lowercase letter or a number.
• Must contain only lowercase letters, numbers, and dashes.
• Names cannot be formatted as an IP address (e.g., 192.0.2.0).
For additional information, go to Bucket Restrictions and Limitations in the Amazon Simple Storage ServiceDeveloper Guide.
ImportantWe strongly recommend that you use an Amazon S3 bucket that is in the same region as yourElastiCache cluster.This approach will ensure the highest data transfer speed when ElastiCachereads your Redis snapshot from Amazon S3.It is also important that you note the S3 path for the .rdb file. For example, if my bucket namewas myBucket and the path was myFolder/redis.rdb, you would enter
API Version 2015-02-02151
Amazon ElastiCache User GuideMigrating Your Redis Cluster to ElastiCache

myBucket/myFolder/redis.rdb.You need this path to seed the new cluster with the datain this snapshot.
Grant ElastiCache Read Access to the .rdb FileThe next step is to grant ElastiCache read access to the snapshot file you copied to Amazon S3.
To grant ElastiCache read access to the snapshot copied to Amazon S3
1. Sign in to the AWS Management Console and open the Amazon S3 console at https://console.amazonaws.cn/s3/.
2. Click All Buckets, and then click the name of the Amazon S3 bucket that contains your .rdb file.
3. Click the name of the folder that contains your .rdb file.
4. Click the name of your .rdb file, click the Actions drop-down menu, and then select Properties.
5. Click Permissions, and then click Add more permissions.
6. In the Grantee box, enter this canonical ID:b14d6a125bdf69854ed8ef2e71d8a20b7c490f252229b806e514966e490b8d83.
7. Click Open/Download, and then click Save.
Seed a Cluster With .rdb File DataNow you are ready to create your new cluster. To do this, follow the instructions at Creating aCluster (p. 89).
Be sure to select Redis as your cluster engine.
How you tell ElastiCache where to find the Redis snapshot that you uploaded to Amazon S3 depends onthe method you use to create the cluster:
• AWS Management Console
If you use the AWS Management Console, in the Configuration section of the Specifiy Cluster Detailsscreen, type the S3 path for the snapshot you copied to your Amazon S3 bucket in the previous sectionin the S3 Location of Redis RDB file text box. The S3 path will look something likemyS3bucket/myFolder/mySnapshotFilename.rdb, where myS3bucket is the name of the AmazonS3 bucket you have access to, myFolder is the folder you saved the .rdb file in, andmySnapshotFilename is the name of the .rdb backup/snapshot file.
• CLI
If you use the create-cache-cluster command, use the --snapshot-arns parameter to specifya fully qualified ARN, such as arn:aws:s3:::my-bucket/my-folder/my-snapshot-filename.The ARN must resolve to the snapshot file that you stored in Amazon Amazon S3.
• API
If you use the CreateCacheCluster API, use the SnapshotArns parameter to specify a fully qualifiedARN, such as arn:aws:s3:::my-bucket/my-folder/my-snapshot-filename. The ARN mustresolve to the snapshot file that you stored in Amazon Amazon S3.
During the process of creating your cluster, the data in your Redis snapshot will be written to the cluster.You can monitor the progress of this operation by viewing the ElastiCache event messages. To do this,go to the ElastiCache console and click Cache Events.You can also use the ElastiCache command lineinterface or API to obtain event messages. For more information, see Viewing ElastiCache Events (p. 182).
API Version 2015-02-02152
Amazon ElastiCache User GuideMigrating Your Redis Cluster to ElastiCache
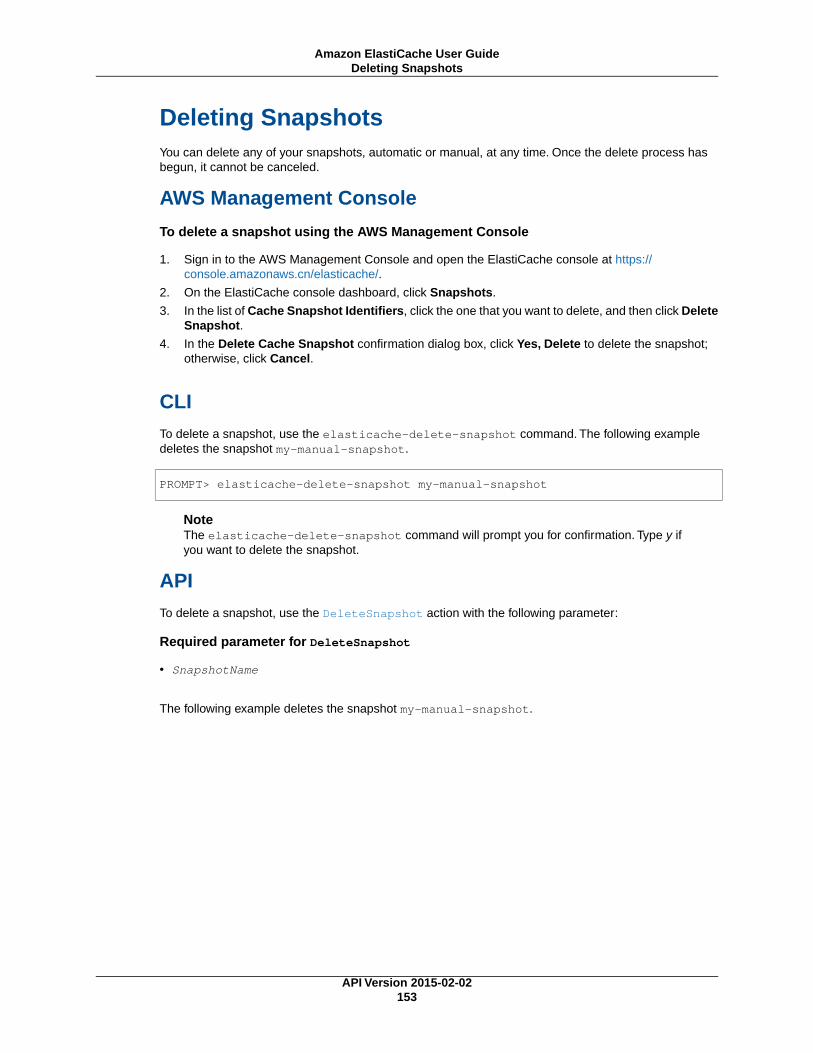
Deleting SnapshotsYou can delete any of your snapshots, automatic or manual, at any time. Once the delete process hasbegun, it cannot be canceled.
AWS Management Console
To delete a snapshot using the AWS Management Console
1. Sign in to the AWS Management Console and open the ElastiCache console at https://console.amazonaws.cn/elasticache/.
2. On the ElastiCache console dashboard, click Snapshots.
3. In the list of Cache Snapshot Identifiers, click the one that you want to delete, and then click DeleteSnapshot.
4. In the Delete Cache Snapshot confirmation dialog box, click Yes, Delete to delete the snapshot;otherwise, click Cancel.
CLITo delete a snapshot, use the elasticache-delete-snapshot command. The following exampledeletes the snapshot my-manual-snapshot.
PROMPT> elasticache-delete-snapshot my-manual-snapshot
NoteThe elasticache-delete-snapshot command will prompt you for confirmation. Type y ifyou want to delete the snapshot.
APITo delete a snapshot, use the DeleteSnapshot action with the following parameter:
Required parameter for DeleteSnapshot
• SnapshotName
The following example deletes the snapshot my-manual-snapshot.
API Version 2015-02-02153
Amazon ElastiCache User GuideDeleting Snapshots

Example
https://elasticache.us-west-2.amazonaws.com/ ?Action=DeleteSnapshot &SnapshotName=my-manual-snapshot &Version=2014-12-01 &SignatureVersion=4 &SignatureMethod=HmacSHA256 &Timestamp=20141201T220302Z &X-Amz-Algorithm=AWS4-HMAC-SHA256 &X-Amz-Date=20141201T220302Z &X-Amz-SignedHeaders=Host &X-Amz-Expires=20141021T220302Z &X-Amz-Credential=<credential> &X-Amz-Signature=<signature>
API Version 2015-02-02154
Amazon ElastiCache User GuideDeleting Snapshots
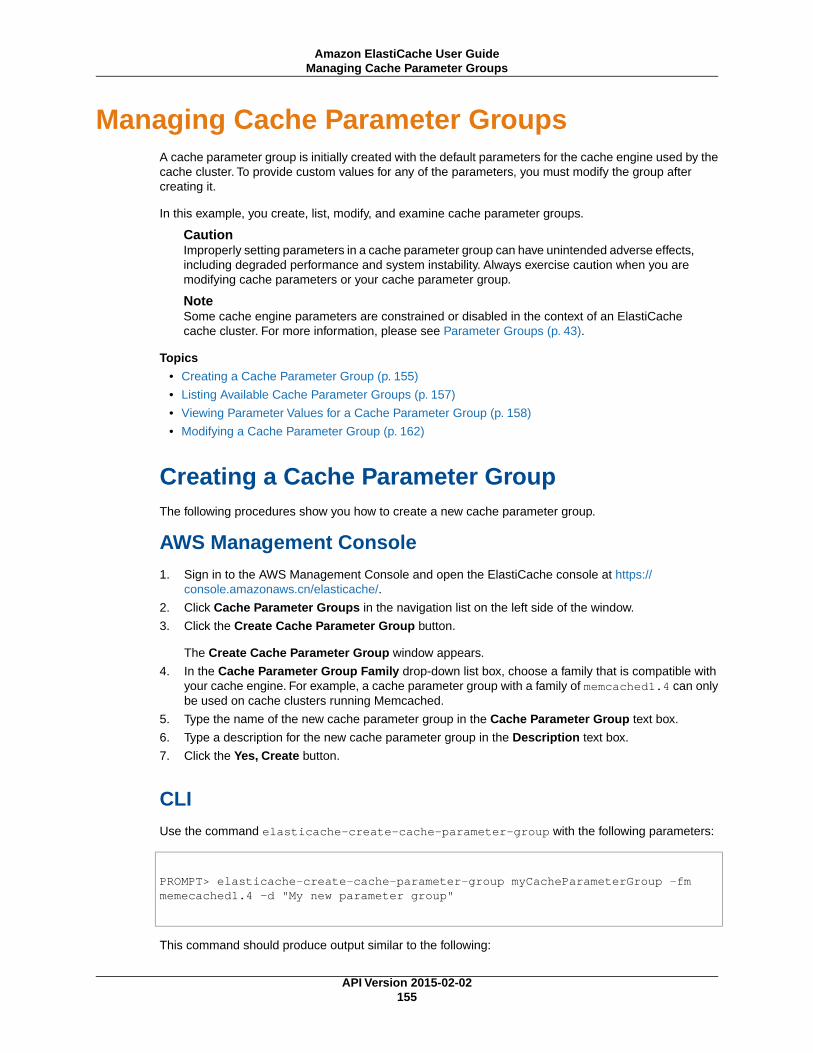
Managing Cache Parameter GroupsA cache parameter group is initially created with the default parameters for the cache engine used by thecache cluster. To provide custom values for any of the parameters, you must modify the group aftercreating it.
In this example, you create, list, modify, and examine cache parameter groups.
CautionImproperly setting parameters in a cache parameter group can have unintended adverse effects,including degraded performance and system instability. Always exercise caution when you aremodifying cache parameters or your cache parameter group.
NoteSome cache engine parameters are constrained or disabled in the context of an ElastiCachecache cluster. For more information, please see Parameter Groups (p. 43).
Topics
• Creating a Cache Parameter Group (p. 155)
• Listing Available Cache Parameter Groups (p. 157)
• Viewing Parameter Values for a Cache Parameter Group (p. 158)
• Modifying a Cache Parameter Group (p. 162)
Creating a Cache Parameter GroupThe following procedures show you how to create a new cache parameter group.
AWS Management Console1. Sign in to the AWS Management Console and open the ElastiCache console at https://
console.amazonaws.cn/elasticache/.
2. Click Cache Parameter Groups in the navigation list on the left side of the window.
3. Click the Create Cache Parameter Group button.
The Create Cache Parameter Group window appears.
4. In the Cache Parameter Group Family drop-down list box, choose a family that is compatible withyour cache engine. For example, a cache parameter group with a family of memcached1.4 can onlybe used on cache clusters running Memcached.
5. Type the name of the new cache parameter group in the Cache Parameter Group text box.
6. Type a description for the new cache parameter group in the Description text box.
7. Click the Yes, Create button.
CLIUse the command elasticache-create-cache-parameter-group with the following parameters:
PROMPT> elasticache-create-cache-parameter-group myCacheParameterGroup -fm memecached1.4 -d "My new parameter group"
This command should produce output similar to the following:
API Version 2015-02-02155
Amazon ElastiCache User GuideManaging Cache Parameter Groups
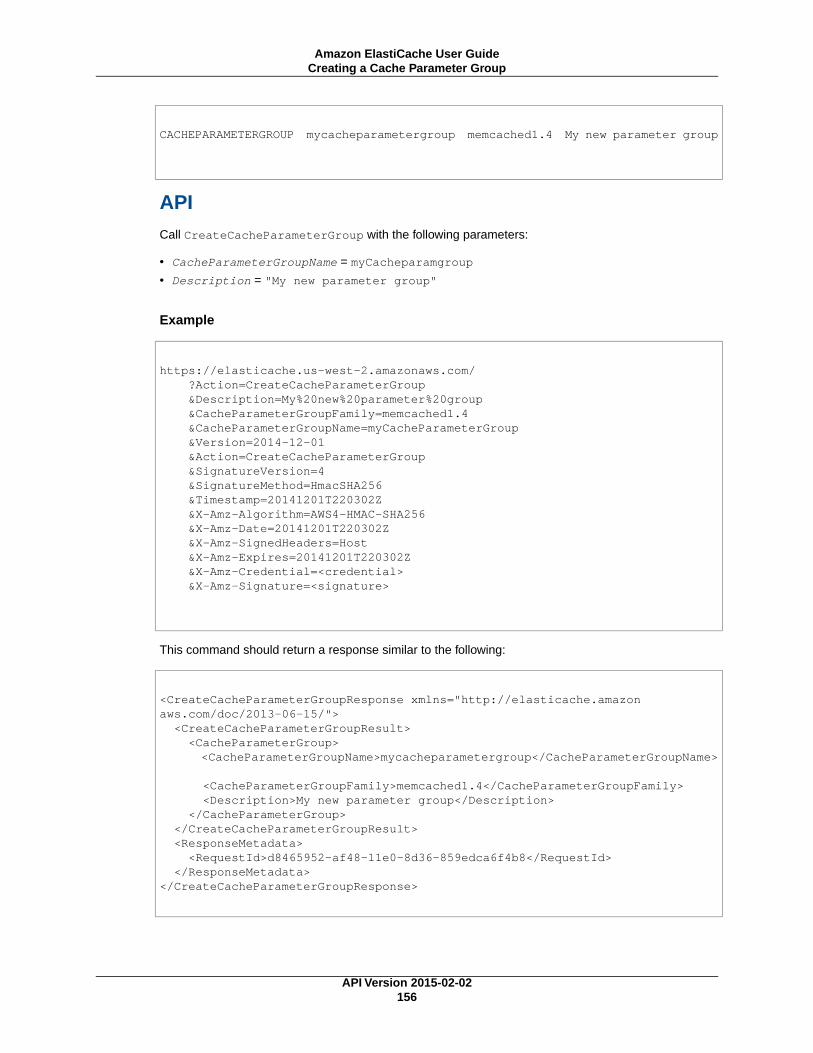
CACHEPARAMETERGROUP mycacheparametergroup memcached1.4 My new parameter group
APICall CreateCacheParameterGroup with the following parameters:
• CacheParameterGroupName = myCacheparamgroup
• Description = "My new parameter group"
Example
https://elasticache.us-west-2.amazonaws.com/ ?Action=CreateCacheParameterGroup &Description=My%20new%20parameter%20group &CacheParameterGroupFamily=memcached1.4 &CacheParameterGroupName=myCacheParameterGroup &Version=2014-12-01 &Action=CreateCacheParameterGroup &SignatureVersion=4 &SignatureMethod=HmacSHA256 &Timestamp=20141201T220302Z &X-Amz-Algorithm=AWS4-HMAC-SHA256 &X-Amz-Date=20141201T220302Z &X-Amz-SignedHeaders=Host &X-Amz-Expires=20141201T220302Z &X-Amz-Credential=<credential> &X-Amz-Signature=<signature>
This command should return a response similar to the following:
<CreateCacheParameterGroupResponse xmlns="http://elasticache.amazon aws.com/doc/2013-06-15/"> <CreateCacheParameterGroupResult> <CacheParameterGroup> <CacheParameterGroupName>mycacheparametergroup</CacheParameterGroupName>
<CacheParameterGroupFamily>memcached1.4</CacheParameterGroupFamily> <Description>My new parameter group</Description> </CacheParameterGroup> </CreateCacheParameterGroupResult> <ResponseMetadata> <RequestId>d8465952-af48-11e0-8d36-859edca6f4b8</RequestId> </ResponseMetadata></CreateCacheParameterGroupResponse>
API Version 2015-02-02156
Amazon ElastiCache User GuideCreating a Cache Parameter Group
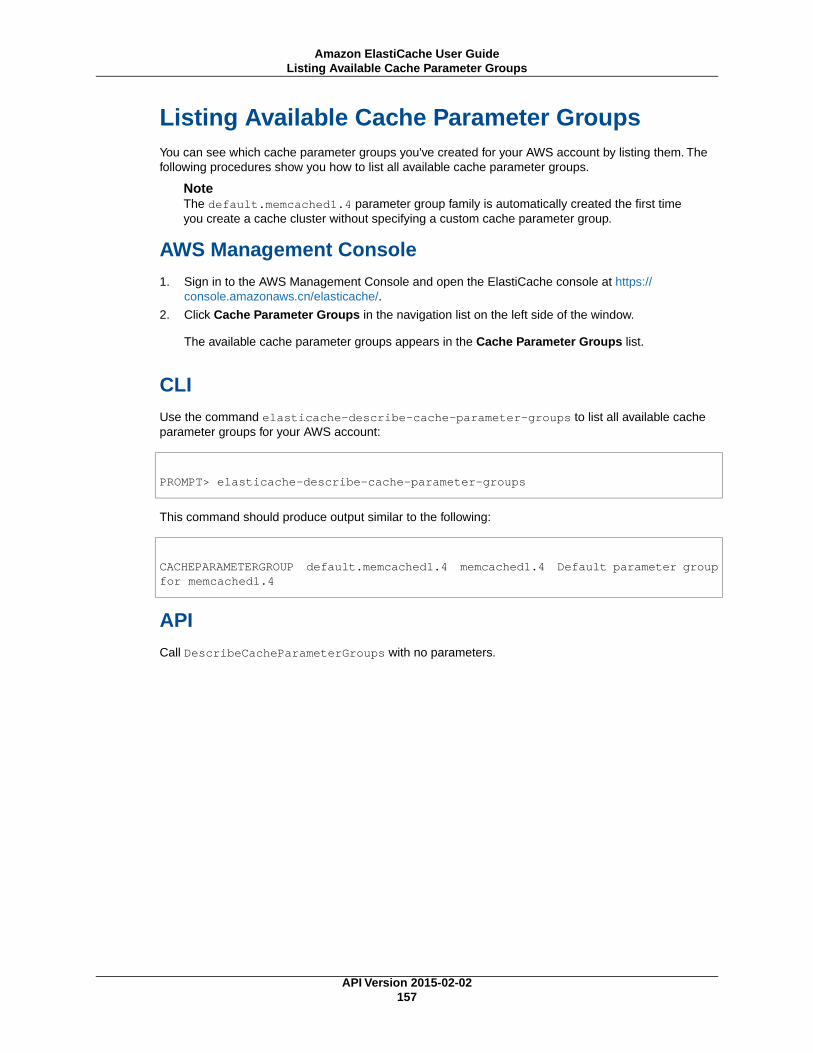
Listing Available Cache Parameter GroupsYou can see which cache parameter groups you've created for your AWS account by listing them. Thefollowing procedures show you how to list all available cache parameter groups.
NoteThe default.memcached1.4 parameter group family is automatically created the first timeyou create a cache cluster without specifying a custom cache parameter group.
AWS Management Console1. Sign in to the AWS Management Console and open the ElastiCache console at https://
console.amazonaws.cn/elasticache/.
2. Click Cache Parameter Groups in the navigation list on the left side of the window.
The available cache parameter groups appears in the Cache Parameter Groups list.
CLIUse the command elasticache-describe-cache-parameter-groups to list all available cacheparameter groups for your AWS account:
PROMPT> elasticache-describe-cache-parameter-groups
This command should produce output similar to the following:
CACHEPARAMETERGROUP default.memcached1.4 memcached1.4 Default parameter groupfor memcached1.4
APICall DescribeCacheParameterGroups with no parameters.
API Version 2015-02-02157
Amazon ElastiCache User GuideListing Available Cache Parameter Groups
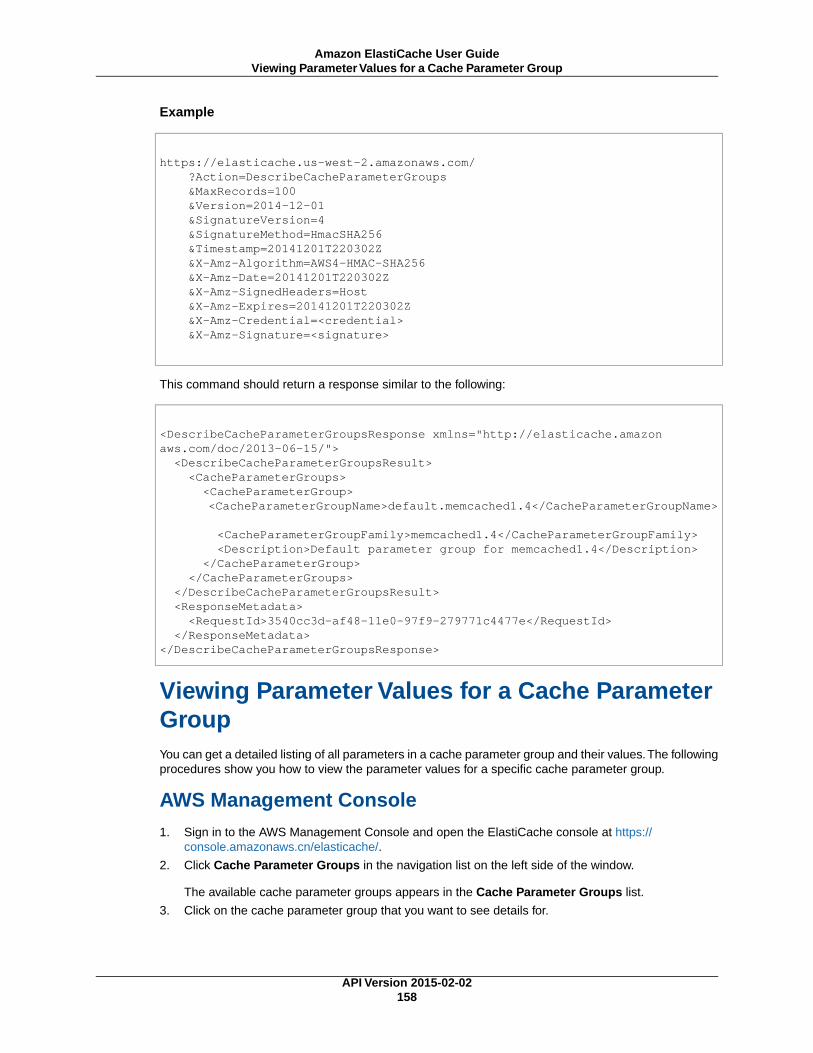
Example
https://elasticache.us-west-2.amazonaws.com/ ?Action=DescribeCacheParameterGroups &MaxRecords=100 &Version=2014-12-01 &SignatureVersion=4 &SignatureMethod=HmacSHA256 &Timestamp=20141201T220302Z &X-Amz-Algorithm=AWS4-HMAC-SHA256 &X-Amz-Date=20141201T220302Z &X-Amz-SignedHeaders=Host &X-Amz-Expires=20141201T220302Z &X-Amz-Credential=<credential> &X-Amz-Signature=<signature>
This command should return a response similar to the following:
<DescribeCacheParameterGroupsResponse xmlns="http://elasticache.amazon aws.com/doc/2013-06-15/"> <DescribeCacheParameterGroupsResult> <CacheParameterGroups> <CacheParameterGroup> <CacheParameterGroupName>default.memcached1.4</CacheParameterGroupName>
<CacheParameterGroupFamily>memcached1.4</CacheParameterGroupFamily> <Description>Default parameter group for memcached1.4</Description> </CacheParameterGroup> </CacheParameterGroups> </DescribeCacheParameterGroupsResult> <ResponseMetadata> <RequestId>3540cc3d-af48-11e0-97f9-279771c4477e</RequestId> </ResponseMetadata></DescribeCacheParameterGroupsResponse>
Viewing Parameter Values for a Cache ParameterGroupYou can get a detailed listing of all parameters in a cache parameter group and their values.The followingprocedures show you how to view the parameter values for a specific cache parameter group.
AWS Management Console1. Sign in to the AWS Management Console and open the ElastiCache console at https://
console.amazonaws.cn/elasticache/.
2. Click Cache Parameter Groups in the navigation list on the left side of the window.
The available cache parameter groups appears in the Cache Parameter Groups list.
3. Click on the cache parameter group that you want to see details for.
API Version 2015-02-02158
Amazon ElastiCache User GuideViewing Parameter Values for a Cache Parameter Group
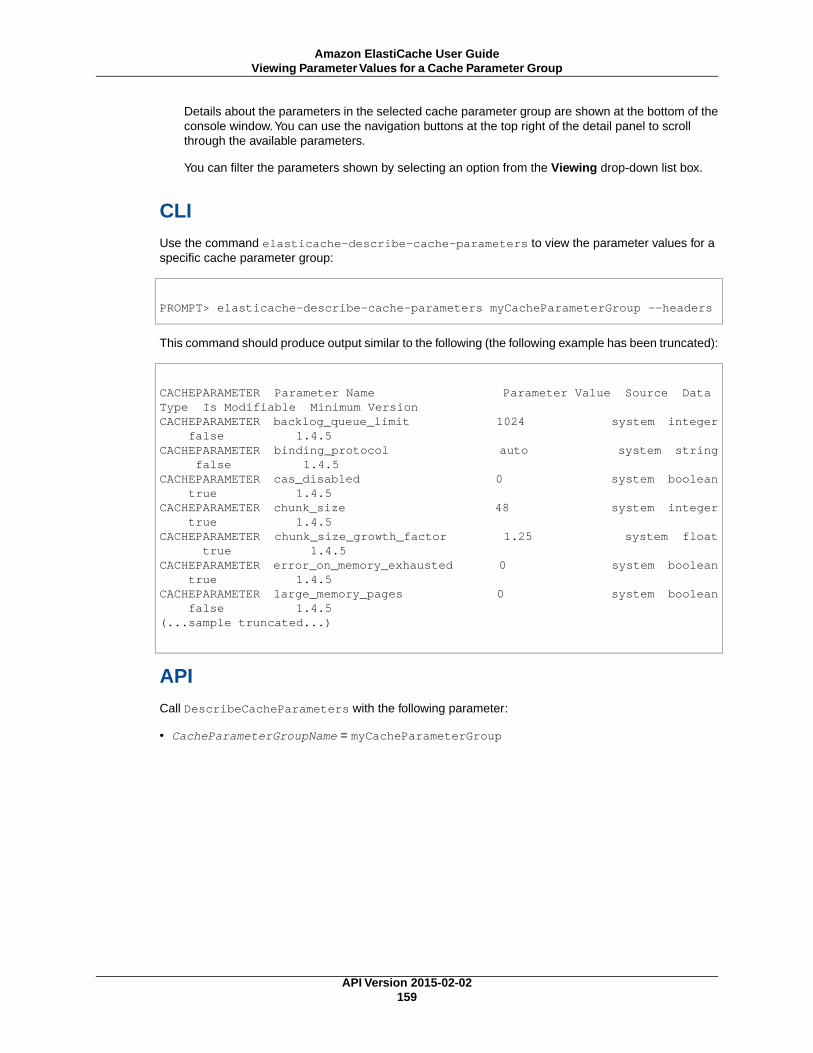
Details about the parameters in the selected cache parameter group are shown at the bottom of theconsole window.You can use the navigation buttons at the top right of the detail panel to scrollthrough the available parameters.
You can filter the parameters shown by selecting an option from the Viewing drop-down list box.
CLIUse the command elasticache-describe-cache-parameters to view the parameter values for aspecific cache parameter group:
PROMPT> elasticache-describe-cache-parameters myCacheParameterGroup --headers
This command should produce output similar to the following (the following example has been truncated):
CACHEPARAMETER Parameter Name Parameter Value Source Data Type Is Modifiable Minimum VersionCACHEPARAMETER backlog_queue_limit 1024 system integer false 1.4.5CACHEPARAMETER binding_protocol auto system string false 1.4.5CACHEPARAMETER cas_disabled 0 system boolean true 1.4.5CACHEPARAMETER chunk_size 48 system integer true 1.4.5CACHEPARAMETER chunk_size_growth_factor 1.25 system float true 1.4.5CACHEPARAMETER error_on_memory_exhausted 0 system boolean true 1.4.5CACHEPARAMETER large_memory_pages 0 system boolean false 1.4.5(...sample truncated...)
APICall DescribeCacheParameters with the following parameter:
• CacheParameterGroupName = myCacheParameterGroup
API Version 2015-02-02159
Amazon ElastiCache User GuideViewing Parameter Values for a Cache Parameter Group
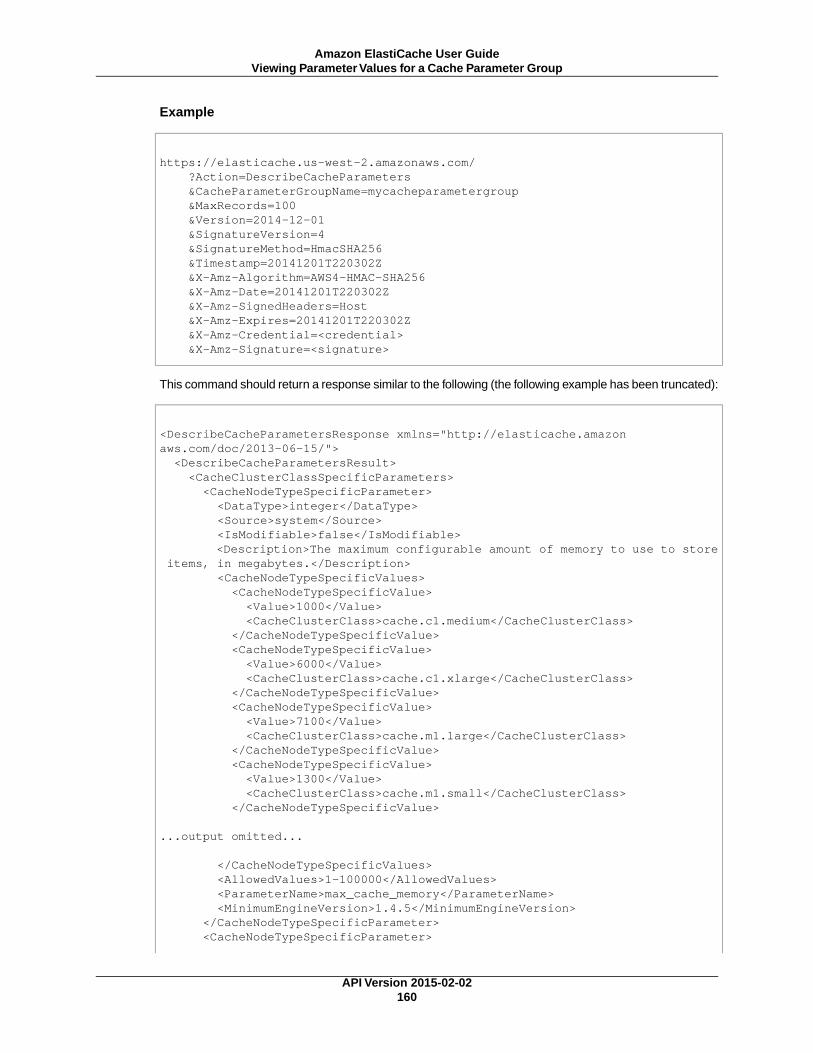
Example
https://elasticache.us-west-2.amazonaws.com/ ?Action=DescribeCacheParameters &CacheParameterGroupName=mycacheparametergroup &MaxRecords=100 &Version=2014-12-01 &SignatureVersion=4 &SignatureMethod=HmacSHA256 &Timestamp=20141201T220302Z &X-Amz-Algorithm=AWS4-HMAC-SHA256 &X-Amz-Date=20141201T220302Z &X-Amz-SignedHeaders=Host &X-Amz-Expires=20141201T220302Z &X-Amz-Credential=<credential> &X-Amz-Signature=<signature>
This command should return a response similar to the following (the following example has been truncated):
<DescribeCacheParametersResponse xmlns="http://elasticache.amazon aws.com/doc/2013-06-15/"> <DescribeCacheParametersResult> <CacheClusterClassSpecificParameters> <CacheNodeTypeSpecificParameter> <DataType>integer</DataType> <Source>system</Source> <IsModifiable>false</IsModifiable> <Description>The maximum configurable amount of memory to use to store items, in megabytes.</Description> <CacheNodeTypeSpecificValues> <CacheNodeTypeSpecificValue> <Value>1000</Value> <CacheClusterClass>cache.c1.medium</CacheClusterClass> </CacheNodeTypeSpecificValue> <CacheNodeTypeSpecificValue> <Value>6000</Value> <CacheClusterClass>cache.c1.xlarge</CacheClusterClass> </CacheNodeTypeSpecificValue> <CacheNodeTypeSpecificValue> <Value>7100</Value> <CacheClusterClass>cache.m1.large</CacheClusterClass> </CacheNodeTypeSpecificValue> <CacheNodeTypeSpecificValue> <Value>1300</Value> <CacheClusterClass>cache.m1.small</CacheClusterClass> </CacheNodeTypeSpecificValue>
...output omitted...
</CacheNodeTypeSpecificValues> <AllowedValues>1-100000</AllowedValues> <ParameterName>max_cache_memory</ParameterName> <MinimumEngineVersion>1.4.5</MinimumEngineVersion> </CacheNodeTypeSpecificParameter> <CacheNodeTypeSpecificParameter>
API Version 2015-02-02160
Amazon ElastiCache User GuideViewing Parameter Values for a Cache Parameter Group
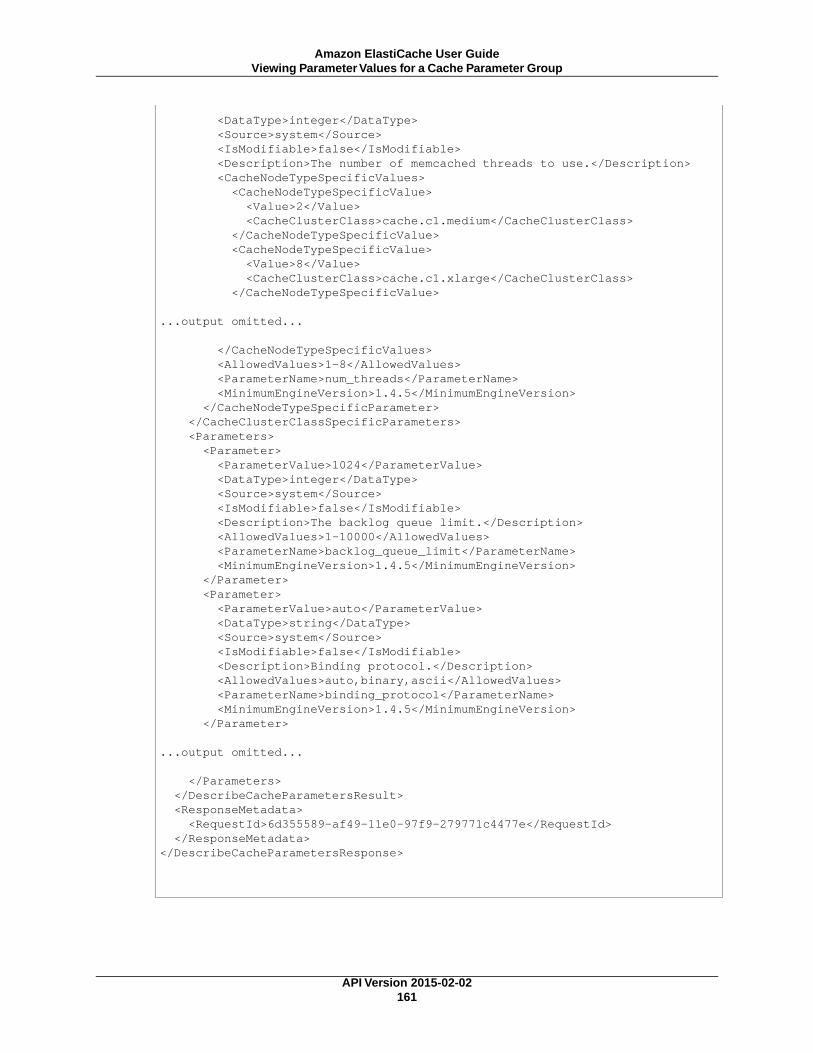
<DataType>integer</DataType> <Source>system</Source> <IsModifiable>false</IsModifiable> <Description>The number of memcached threads to use.</Description> <CacheNodeTypeSpecificValues> <CacheNodeTypeSpecificValue> <Value>2</Value> <CacheClusterClass>cache.c1.medium</CacheClusterClass> </CacheNodeTypeSpecificValue> <CacheNodeTypeSpecificValue> <Value>8</Value> <CacheClusterClass>cache.c1.xlarge</CacheClusterClass> </CacheNodeTypeSpecificValue>
...output omitted...
</CacheNodeTypeSpecificValues> <AllowedValues>1-8</AllowedValues> <ParameterName>num_threads</ParameterName> <MinimumEngineVersion>1.4.5</MinimumEngineVersion> </CacheNodeTypeSpecificParameter> </CacheClusterClassSpecificParameters> <Parameters> <Parameter> <ParameterValue>1024</ParameterValue> <DataType>integer</DataType> <Source>system</Source> <IsModifiable>false</IsModifiable> <Description>The backlog queue limit.</Description> <AllowedValues>1-10000</AllowedValues> <ParameterName>backlog_queue_limit</ParameterName> <MinimumEngineVersion>1.4.5</MinimumEngineVersion> </Parameter> <Parameter> <ParameterValue>auto</ParameterValue> <DataType>string</DataType> <Source>system</Source> <IsModifiable>false</IsModifiable> <Description>Binding protocol.</Description> <AllowedValues>auto,binary,ascii</AllowedValues> <ParameterName>binding_protocol</ParameterName> <MinimumEngineVersion>1.4.5</MinimumEngineVersion> </Parameter>
...output omitted...
</Parameters> </DescribeCacheParametersResult> <ResponseMetadata> <RequestId>6d355589-af49-11e0-97f9-279771c4477e</RequestId> </ResponseMetadata></DescribeCacheParametersResponse>
API Version 2015-02-02161
Amazon ElastiCache User GuideViewing Parameter Values for a Cache Parameter Group

Modifying a Cache Parameter GroupYou can modify parameters in a cache parameter group. These parameters are applied to cache clustersassociated with the cache parameter group when the cache cluster is rebooted.
NoteThe default.memcached1.4 parameter group family is automatically created the first timeyou create a cache cluster without specifying a custom cache parameter group.You cannotmodify the default.memcached1.4 parameter group.
In this example, you modify a parameter in a cache parameter group.
AWS Management ConsoleThe AWS Management Console does not support this functionality. Please refer to the command lineinterface example.
CLIUse the command elasticache-modify-cache-parameter-group to modify a cache parametergroup.
PROMPT> elasticache-modify-cache-parameter-group myCacheParameterGroup --para meters "name=chunk_size, value=64,name=chunk_size_growth_factor,value=1.02"
APICall ModifyingCacheParameterGroup with the following parameters:
• CacheParameterGroupName = mycacheparametergroup
• Parameters.member.1.ParameterName = chunk_size
• Parameters.member.1.ParameterValue = 64
• Parameters.member.2.ParameterName = chunk_size_growth_factor
• Parameters.member.2.ParameterValue = 1.02
API Version 2015-02-02162
Amazon ElastiCache User GuideModifying a Cache Parameter Group
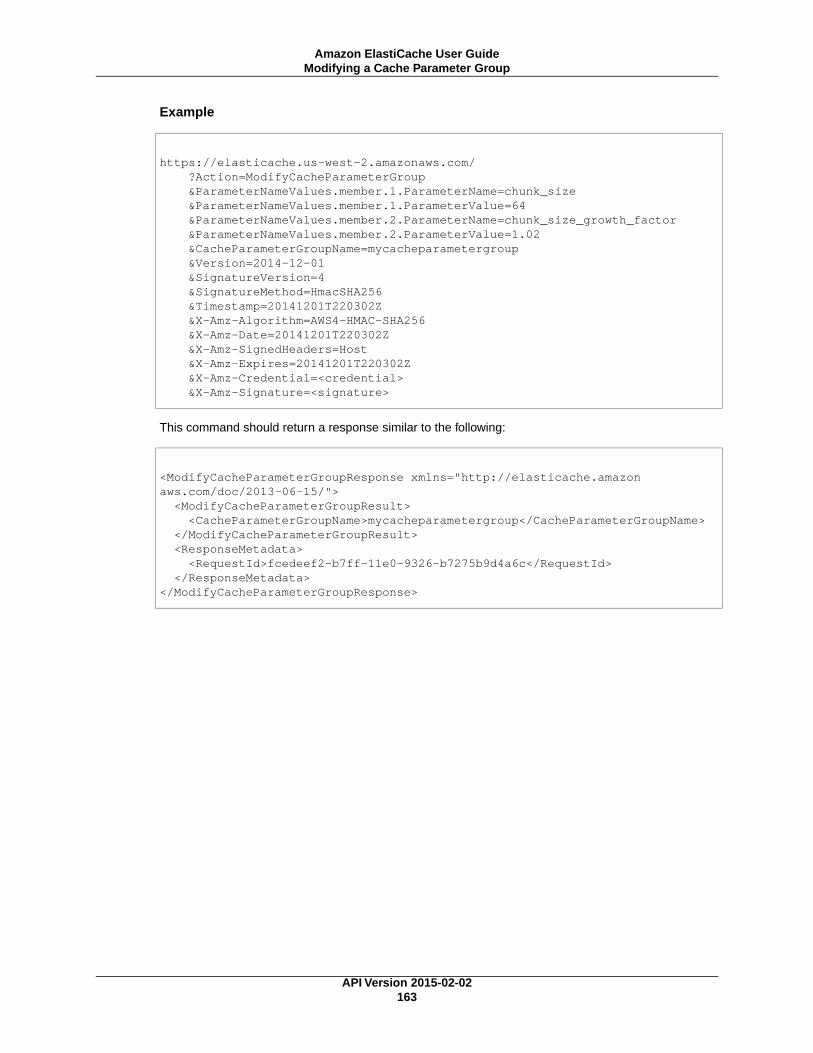
Example
https://elasticache.us-west-2.amazonaws.com/ ?Action=ModifyCacheParameterGroup &ParameterNameValues.member.1.ParameterName=chunk_size &ParameterNameValues.member.1.ParameterValue=64 &ParameterNameValues.member.2.ParameterName=chunk_size_growth_factor &ParameterNameValues.member.2.ParameterValue=1.02 &CacheParameterGroupName=mycacheparametergroup &Version=2014-12-01 &SignatureVersion=4 &SignatureMethod=HmacSHA256 &Timestamp=20141201T220302Z &X-Amz-Algorithm=AWS4-HMAC-SHA256 &X-Amz-Date=20141201T220302Z &X-Amz-SignedHeaders=Host &X-Amz-Expires=20141201T220302Z &X-Amz-Credential=<credential> &X-Amz-Signature=<signature>
This command should return a response similar to the following:
<ModifyCacheParameterGroupResponse xmlns="http://elasticache.amazon aws.com/doc/2013-06-15/"> <ModifyCacheParameterGroupResult> <CacheParameterGroupName>mycacheparametergroup</CacheParameterGroupName> </ModifyCacheParameterGroupResult> <ResponseMetadata> <RequestId>fcedeef2-b7ff-11e0-9326-b7275b9d4a6c</RequestId> </ResponseMetadata></ModifyCacheParameterGroupResponse>
API Version 2015-02-02163
Amazon ElastiCache User GuideModifying a Cache Parameter Group
Using ElastiCache with Amazon Virtual PrivateCloud (VPC)
The Amazon Virtual Private Cloud (VPC) service defines a virtual network that closely resembles atraditional data center.You can configure your Amazon VPC you can select its IP address range, createsubnets, and configure route tables, network gateways, and security settings.You can add a cache clusterto the virtual network, and you can control access to the cache cluster by using Amazon VPC securitygroups.
The Amazon VPC must allow non-dedicated Amazon EC2 instances.You cannot use ElastiCache in anAmazon VPC that is configured for dedicated instance tenancy.
NoteElastiCache is fully integrated with Amazon Virtual Private Cloud (VPC). For ElastiCache users,this means the following:
• If your AWS account supports only the EC2-VPC platform, ElastiCache will always launchyour cluster in a VPC.
• If you're new to ElastiCache, your clusters will be deployed into a VPC. A default VPC will becreated for you automatically.
• If you have a default VPC and don't specify a subnet when you launch a cluster, the clusterlaunches into your default VPC.
• You can launch clusters into your default VPC without needing to know anything about AmazonVPC.Your experience with clusters that you launch is the same whether you have a defaultVPC or not.
For more information, see Detecting Your Supported Platforms and Whether You Have a DefaultVPC.
This section explains how to manually configure an ElastiCache cluster in an Amazon VPC.This informationis intended for users who want a deeper understanding of how ElastiCache and Amazon VPC worktogether.
Topics
• Creating a Virtual Private Cloud (VPC) (p. 164)
• Creating a Cache Subnet Group (p. 166)
• Creating a Cache Cluster in an Amazon VPC (p. 167)
• Connecting to a Cache Cluster Running in an Amazon VPC (p. 167)
Creating a Virtual Private Cloud (VPC)In this example, you will create an Amazon VPC with a private subnet for each Availability Zone.
AWS Management Console
To create an ElastiCache cache cluster inside an Amazon Virtual Private Cloud
1. Sign in to the AWS Management Console, and open the Amazon VPC console at https://console.www.amazonaws.cn/vpc/.
2. Create a new Amazon VPC by using the Amazon Virtual Private Cloud wizard:
a. In the navigation list, click VPC Dashboard.
API Version 2015-02-02164
Amazon ElastiCache User GuideUsing ElastiCache with Amazon Virtual Private Cloud
(VPC)
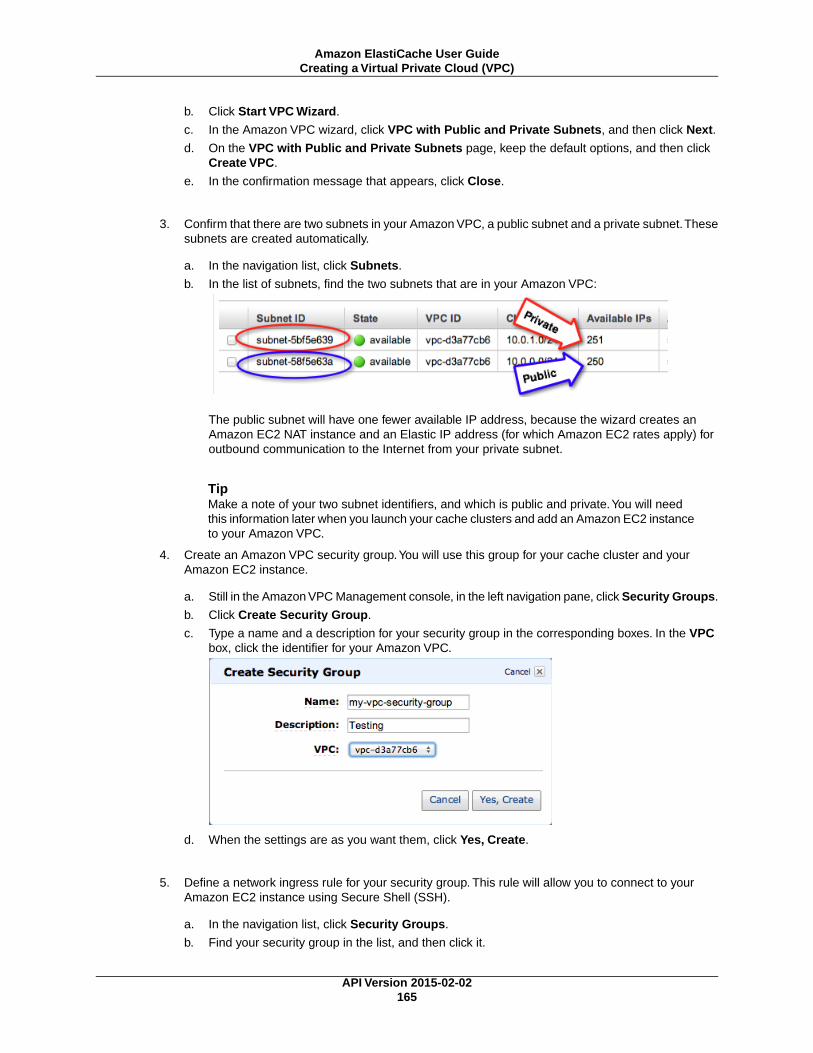
b. Click Start VPC Wizard.
c. In the Amazon VPC wizard, click VPC with Public and Private Subnets, and then click Next.
d. On the VPC with Public and Private Subnets page, keep the default options, and then clickCreate VPC.
e. In the confirmation message that appears, click Close.
3. Confirm that there are two subnets in your Amazon VPC, a public subnet and a private subnet.Thesesubnets are created automatically.
a. In the navigation list, click Subnets.
b. In the list of subnets, find the two subnets that are in your Amazon VPC:
The public subnet will have one fewer available IP address, because the wizard creates anAmazon EC2 NAT instance and an Elastic IP address (for which Amazon EC2 rates apply) foroutbound communication to the Internet from your private subnet.
TipMake a note of your two subnet identifiers, and which is public and private.You will needthis information later when you launch your cache clusters and add an Amazon EC2 instanceto your Amazon VPC.
4. Create an Amazon VPC security group.You will use this group for your cache cluster and yourAmazon EC2 instance.
a. Still in the Amazon VPC Management console, in the left navigation pane, click Security Groups.
b. Click Create Security Group.
c. Type a name and a description for your security group in the corresponding boxes. In the VPCbox, click the identifier for your Amazon VPC.
d. When the settings are as you want them, click Yes, Create.
5. Define a network ingress rule for your security group. This rule will allow you to connect to yourAmazon EC2 instance using Secure Shell (SSH).
a. In the navigation list, click Security Groups.
b. Find your security group in the list, and then click it.
API Version 2015-02-02165
Amazon ElastiCache User GuideCreating a Virtual Private Cloud (VPC)
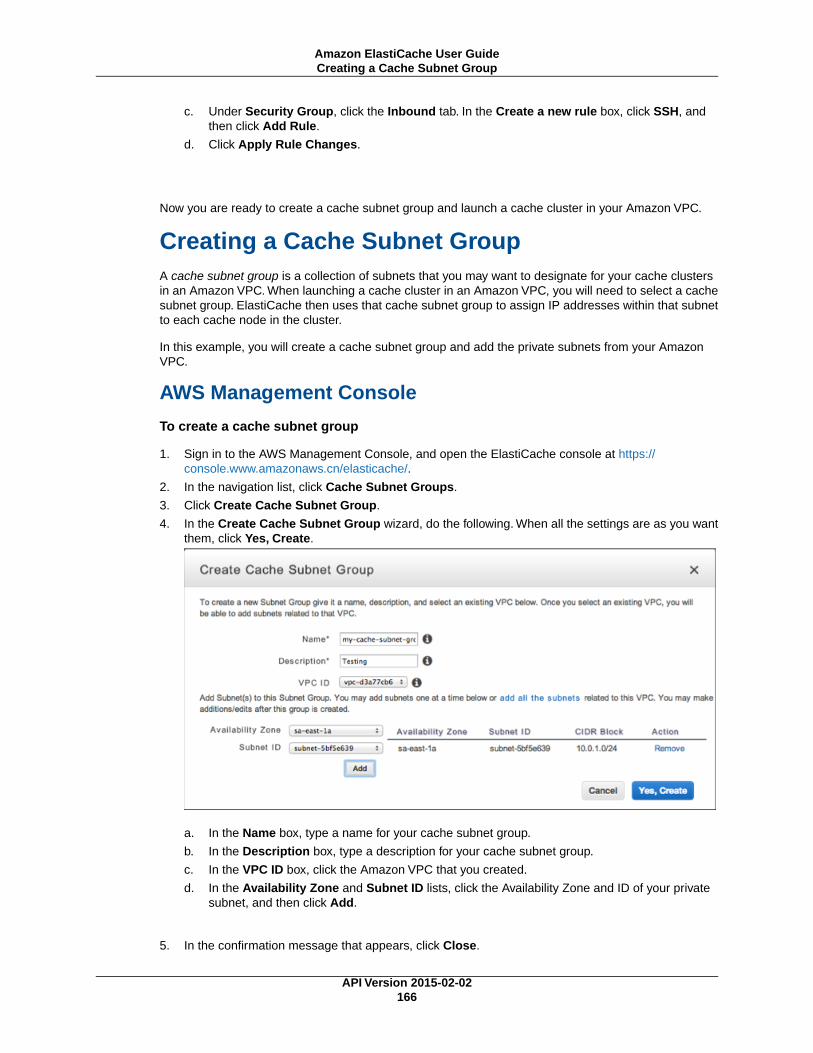
c. Under Security Group, click the Inbound tab. In the Create a new rule box, click SSH, andthen click Add Rule.
d. Click Apply Rule Changes.
Now you are ready to create a cache subnet group and launch a cache cluster in your Amazon VPC.
Creating a Cache Subnet GroupA cache subnet group is a collection of subnets that you may want to designate for your cache clustersin an Amazon VPC. When launching a cache cluster in an Amazon VPC, you will need to select a cachesubnet group. ElastiCache then uses that cache subnet group to assign IP addresses within that subnetto each cache node in the cluster.
In this example, you will create a cache subnet group and add the private subnets from your AmazonVPC.
AWS Management Console
To create a cache subnet group
1. Sign in to the AWS Management Console, and open the ElastiCache console at https://console.www.amazonaws.cn/elasticache/.
2. In the navigation list, click Cache Subnet Groups.
3. Click Create Cache Subnet Group.
4. In the Create Cache Subnet Group wizard, do the following. When all the settings are as you wantthem, click Yes, Create.
a. In the Name box, type a name for your cache subnet group.
b. In the Description box, type a description for your cache subnet group.
c. In the VPC ID box, click the Amazon VPC that you created.
d. In the Availability Zone and Subnet ID lists, click the Availability Zone and ID of your privatesubnet, and then click Add.
5. In the confirmation message that appears, click Close.
API Version 2015-02-02166
Amazon ElastiCache User GuideCreating a Cache Subnet Group
Your new cache subnet group appears in the Cache Subnet Groups list of the ElastiCache console.You can click on the subnet group to see details, such as all of the subnets associated with this group,at the bottom of the window.
Now that you've created a cache subnet group, you can launch a cache cluster to run in your AmazonVPC. Continue to the next topic Creating a Cache Cluster in an Amazon VPC (p. 167).
Creating a Cache Cluster in an Amazon VPCIn this example, you will create a cache cluster in your Amazon VPC.
AWS Management Console• To launch a Redis cache cluster, see Step 2: Launch a Redis Cluster (p. 12). On the Step 4: Configure
Advanced Settings screen, select a VPC subnet group.
• To launch a Memcached cache cluster, see Step 2: Launch a Memcached Cluster (p. 9). On the Step4: Configure Advanced Settings screen, select a VPC subnet group.
You have now launched a cache cluster inside an Amazon VPC. For an example of one way to connectto your new cache cluster running in the Amazon VPC, continue to Connecting to a Cache Cluster Runningin an Amazon VPC (p. 167).
Connecting to a Cache Cluster Running in anAmazon VPCThis example shows how to launch an Amazon EC2 instance in your Amazon VPC.You can then log into this instance and access the ElastiCache cluster that is running in the Amazon VPC.
AWS Management ConsoleIn this example, you create an Amazon EC2 instance in your Amazon VPC.You can use this AmazonEC2 instance to connect to cache nodes running in the Amazon VPC.
NoteFor information about using Amazon EC2, go to the Amazon EC2 Getting Started Guide in theAmazon EC2 documentation.
To create an Amazon EC2 instance in your Amazon VPC
Sign in to the AWS Management Console and open the Amazon EC2 console at https://console.amazonaws.cn/ec2/.
In the console, click Launch Instance and follow these steps:
1. On the Choose an Amazon Machine Image (AMI) page, choose the 64-bit Amazon Linux AMI, andthen click Select.
2. On the Choose an Instance Type page, click Next: Configure Instance Details.
3. On the Configure Instance Details page, make the following selections:
a. In the Network list, choose your Amazon VPC.
b. In the Subnet list, choose your public subnet.
API Version 2015-02-02167
Amazon ElastiCache User GuideCreating a Cache Cluster in an Amazon VPC

When the settings are as you want them, click Next: Add Storage.
4. On the Add Storage Page, click Next:Tag Instance.
5. On the Tag Instance page, type a name for your Amazon EC2 instance, and then click Next:Configure Security Group.
6. On the Configure Security Group page, click Select an existing security group.
Click the name of your Amazon VPC security group, and then click Review and Launch.
7. On the Review Instance and Launch page, click Launch.
A new window appears: Select an existing key pair or create a new key pair. In this window, specifya key pair that you want to use with this instance.
NoteFor information about managing key pairs, go to the Amazon EC2 Getting Started Guide.
When you are ready to launch your Amazon EC2 instance, click Launch Instances.
You can now assign an Elastic IP address to the Amazon EC2 instance that you just created.You willneed to use this IP address to connect to the Amazon EC2 instance.
To assign an Elastic IP address
1. Open the Amazon VPC console at https://console.www.amazonaws.cn/vpc/.
2. In the navigation list, click Elastic IPs.
3. Click Allocate New Address.
4. In the Allocate New Address dialog box, in the EIP used in box, click VPC, and then click Yes,Allocate.
5. Select the Elastic IP address that you just allocated from the list and click Associate Address.
6. In the Associate Address dialog box, in the Instance box, click the ID of the Amazon EC2 instancethat you launched, and then click Yes, Associate.
API Version 2015-02-02168
Amazon ElastiCache User GuideConnecting to a Cache Cluster Running in an Amazon
VPC

You can now use SSH to connect to the Amazon EC2 instance using the Elastic IP address that youcreated.
TipFor instructions about using SSH to connect to a Linux/UNIX instance, go to Connect to YourLinux/UNIX Instance in the Amazon EC2 Getting Started Guide.
To connect to your Amazon EC2 instance
1. Open a command window. At the command prompt, issue the following command. Replacemykeypair.pem with the name of your key pair file, and replace 54.207.55.251 with your Elastic IPaddress.
ssh -i mykeypair.pem [email protected]
2. Do not log out of your Amazon EC2 instance yet.
You are now ready to interact with your ElastiCache cluster. Before you can do that, you will need toinstall the telnet utility if you haven't already done so.
To install telnet and interact with your cache cluster
1. Open a command window. At the command prompt, issue the following command. At the confirmationprompt, type y.
sudo yum install telnetLoaded plugins: priorities, security, update-motd, upgrade-helperSetting up Install ProcessResolving Dependencies--> Running transaction check
...(output omitted)...
API Version 2015-02-02169
Amazon ElastiCache User GuideConnecting to a Cache Cluster Running in an Amazon
VPC
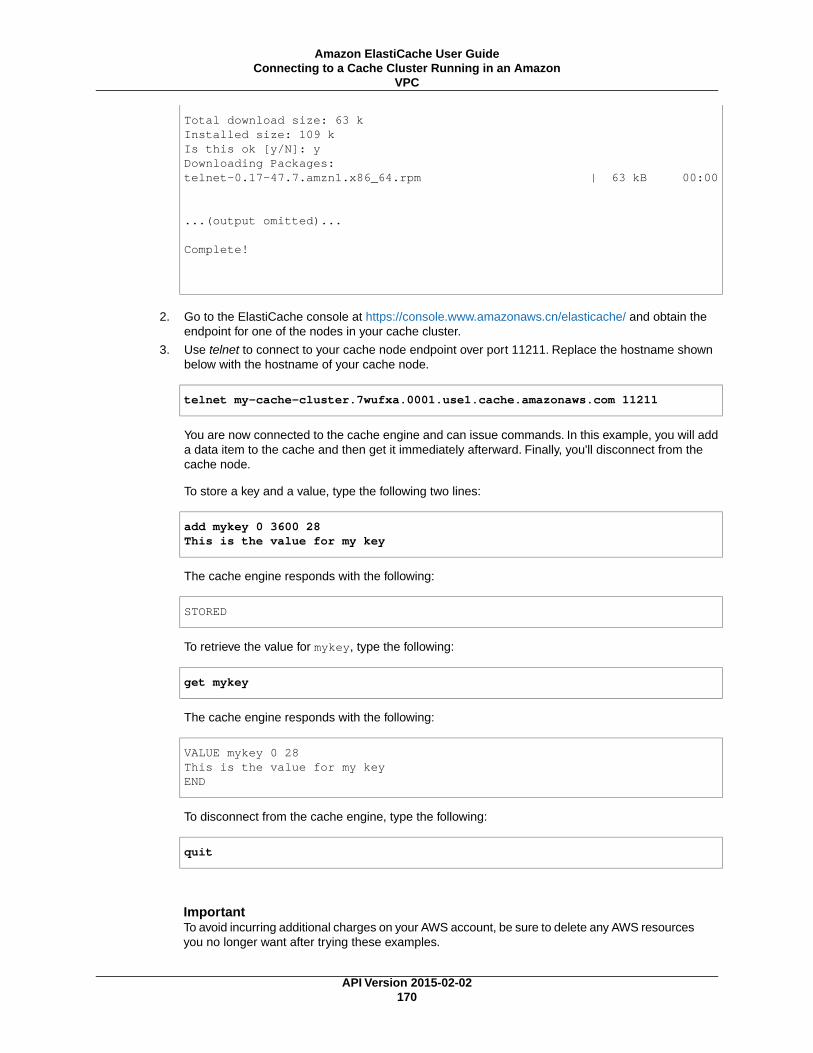
Total download size: 63 kInstalled size: 109 kIs this ok [y/N]: yDownloading Packages:telnet-0.17-47.7.amzn1.x86_64.rpm | 63 kB 00:00
...(output omitted)...
Complete!
2. Go to the ElastiCache console at https://console.www.amazonaws.cn/elasticache/ and obtain theendpoint for one of the nodes in your cache cluster.
3. Use telnet to connect to your cache node endpoint over port 11211. Replace the hostname shownbelow with the hostname of your cache node.
telnet my-cache-cluster.7wufxa.0001.use1.cache.amazonaws.com 11211
You are now connected to the cache engine and can issue commands. In this example, you will adda data item to the cache and then get it immediately afterward. Finally, you'll disconnect from thecache node.
To store a key and a value, type the following two lines:
add mykey 0 3600 28This is the value for my key
The cache engine responds with the following:
STORED
To retrieve the value for mykey, type the following:
get mykey
The cache engine responds with the following:
VALUE mykey 0 28This is the value for my keyEND
To disconnect from the cache engine, type the following:
quit
ImportantTo avoid incurring additional charges on your AWS account, be sure to delete any AWS resourcesyou no longer want after trying these examples.
API Version 2015-02-02170
Amazon ElastiCache User GuideConnecting to a Cache Cluster Running in an Amazon
VPC

Managing Cache Subnet GroupsThis section covers operations on cache subnet groups. Cache subnet groups are required for cacheclusters running inside of an Amazon Virtual Private Cloud (VPC) environment.
Topics
• Creating a Cache Subnet Group (p. 171)
• Assigning a Cache Subnet Group to a Cache Cluster (p. 172)
• Modifying a Cache Subnet Group (p. 172)
• Deleting a Cache Subnet Group (p. 174)
Creating a Cache Subnet GroupThe following procedures show you how to create a cache subnet group called mycachesubnetgroup.
AWS Management Console1. Sign in to the AWS Management Console and open the ElastiCache console at https://
console.amazonaws.cn/elasticache/.
2. In the left navigation pane, click Cache Subnet Groups.
3. Click Create Cache Subnet Group.
4. In the Name box, type a name for your cache subnet group.
5. In the Description box, type a short description for your cache subnet group.
6. In the VPC ID box, select the identifier for the VPC to be associated with this cache subnet group.
7. In the Availability Zone box, select the Availability Zone to associate with this cache subnet group.
8. In the Subnet ID box, select one of the subnets in your VPC and then click Add.You can repeat thisstep as many times as necessary to add more subnets to your cache subnet group.
9. Click the Yes, Create button.Your cache subnet group is now ready to use.
CLIUse the command elasticache-create-cache-subnet to create a cache subnet group.
PROMPT> elasticache-create-cache-subnet-group mycachesubnetgroup --description "Testing" --subnet-ID-list subnet-53df9c3a
This command should produce output similar to the following:
SUBNETGROUP mycachesubnetgroup Testing vpc-5a2e4c35 SUBNET subnet-53df9c3a us-west-2b
APICall CreateCacheSubnetGroup with the following parameters:
• CacheSubnetGroupName = mycachesubnetgroup
API Version 2015-02-02171
Amazon ElastiCache User GuideManaging Cache Subnet Groups
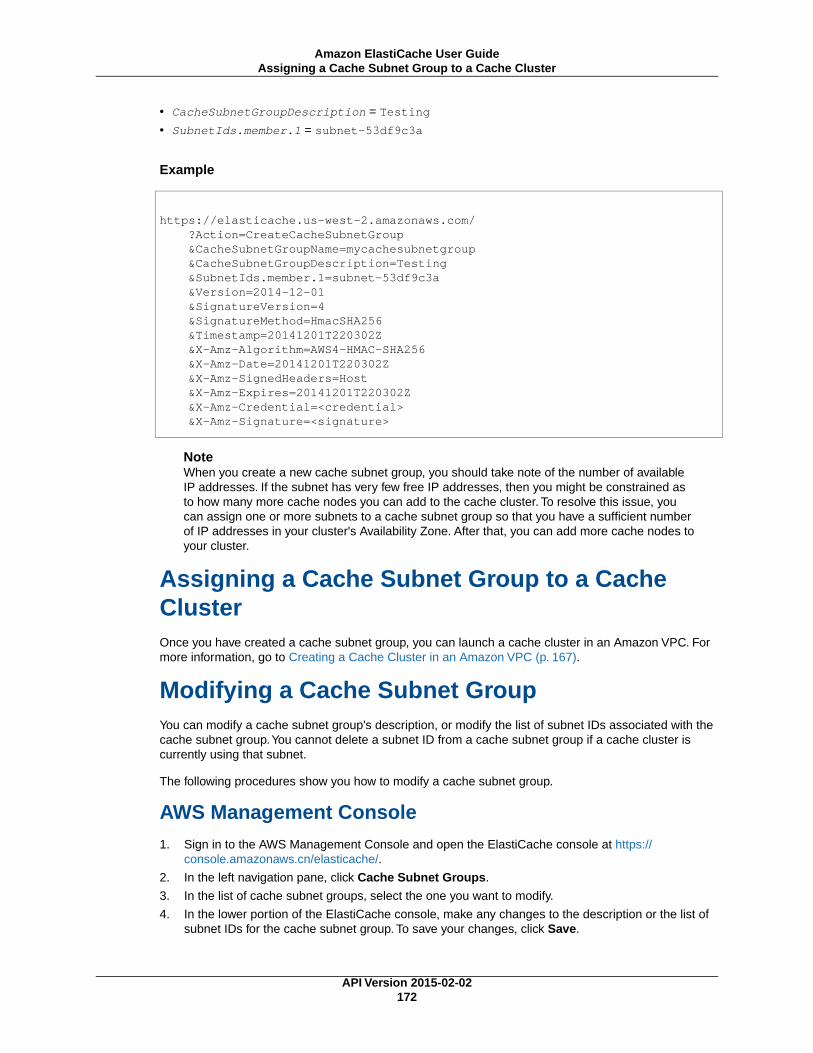
• CacheSubnetGroupDescription = Testing
• SubnetIds.member.1 = subnet-53df9c3a
Example
https://elasticache.us-west-2.amazonaws.com/ ?Action=CreateCacheSubnetGroup &CacheSubnetGroupName=mycachesubnetgroup &CacheSubnetGroupDescription=Testing &SubnetIds.member.1=subnet-53df9c3a &Version=2014-12-01 &SignatureVersion=4 &SignatureMethod=HmacSHA256 &Timestamp=20141201T220302Z &X-Amz-Algorithm=AWS4-HMAC-SHA256 &X-Amz-Date=20141201T220302Z &X-Amz-SignedHeaders=Host &X-Amz-Expires=20141201T220302Z &X-Amz-Credential=<credential> &X-Amz-Signature=<signature>
NoteWhen you create a new cache subnet group, you should take note of the number of availableIP addresses. If the subnet has very few free IP addresses, then you might be constrained asto how many more cache nodes you can add to the cache cluster. To resolve this issue, youcan assign one or more subnets to a cache subnet group so that you have a sufficient numberof IP addresses in your cluster's Availability Zone. After that, you can add more cache nodes toyour cluster.
Assigning a Cache Subnet Group to a CacheClusterOnce you have created a cache subnet group, you can launch a cache cluster in an Amazon VPC. Formore information, go to Creating a Cache Cluster in an Amazon VPC (p. 167).
Modifying a Cache Subnet GroupYou can modify a cache subnet group's description, or modify the list of subnet IDs associated with thecache subnet group.You cannot delete a subnet ID from a cache subnet group if a cache cluster iscurrently using that subnet.
The following procedures show you how to modify a cache subnet group.
AWS Management Console1. Sign in to the AWS Management Console and open the ElastiCache console at https://
console.amazonaws.cn/elasticache/.
2. In the left navigation pane, click Cache Subnet Groups.
3. In the list of cache subnet groups, select the one you want to modify.
4. In the lower portion of the ElastiCache console, make any changes to the description or the list ofsubnet IDs for the cache subnet group. To save your changes, click Save.
API Version 2015-02-02172
Amazon ElastiCache User GuideAssigning a Cache Subnet Group to a Cache Cluster
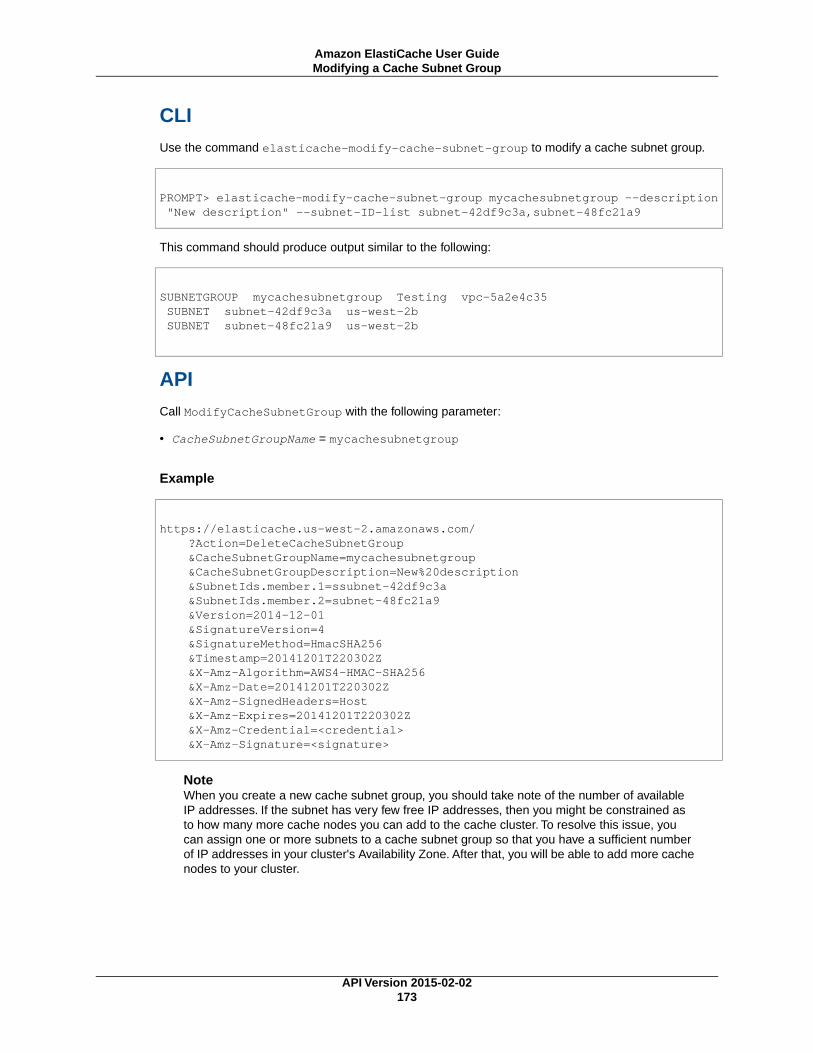
CLIUse the command elasticache-modify-cache-subnet-group to modify a cache subnet group.
PROMPT> elasticache-modify-cache-subnet-group mycachesubnetgroup --description "New description" --subnet-ID-list subnet-42df9c3a,subnet-48fc21a9
This command should produce output similar to the following:
SUBNETGROUP mycachesubnetgroup Testing vpc-5a2e4c35 SUBNET subnet-42df9c3a us-west-2b SUBNET subnet-48fc21a9 us-west-2b
APICall ModifyCacheSubnetGroup with the following parameter:
• CacheSubnetGroupName = mycachesubnetgroup
Example
https://elasticache.us-west-2.amazonaws.com/ ?Action=DeleteCacheSubnetGroup &CacheSubnetGroupName=mycachesubnetgroup &CacheSubnetGroupDescription=New%20description &SubnetIds.member.1=ssubnet-42df9c3a &SubnetIds.member.2=subnet-48fc21a9 &Version=2014-12-01 &SignatureVersion=4 &SignatureMethod=HmacSHA256 &Timestamp=20141201T220302Z &X-Amz-Algorithm=AWS4-HMAC-SHA256 &X-Amz-Date=20141201T220302Z &X-Amz-SignedHeaders=Host &X-Amz-Expires=20141201T220302Z &X-Amz-Credential=<credential> &X-Amz-Signature=<signature>
NoteWhen you create a new cache subnet group, you should take note of the number of availableIP addresses. If the subnet has very few free IP addresses, then you might be constrained asto how many more cache nodes you can add to the cache cluster. To resolve this issue, youcan assign one or more subnets to a cache subnet group so that you have a sufficient numberof IP addresses in your cluster's Availability Zone. After that, you will be able to add more cachenodes to your cluster.
API Version 2015-02-02173
Amazon ElastiCache User GuideModifying a Cache Subnet Group
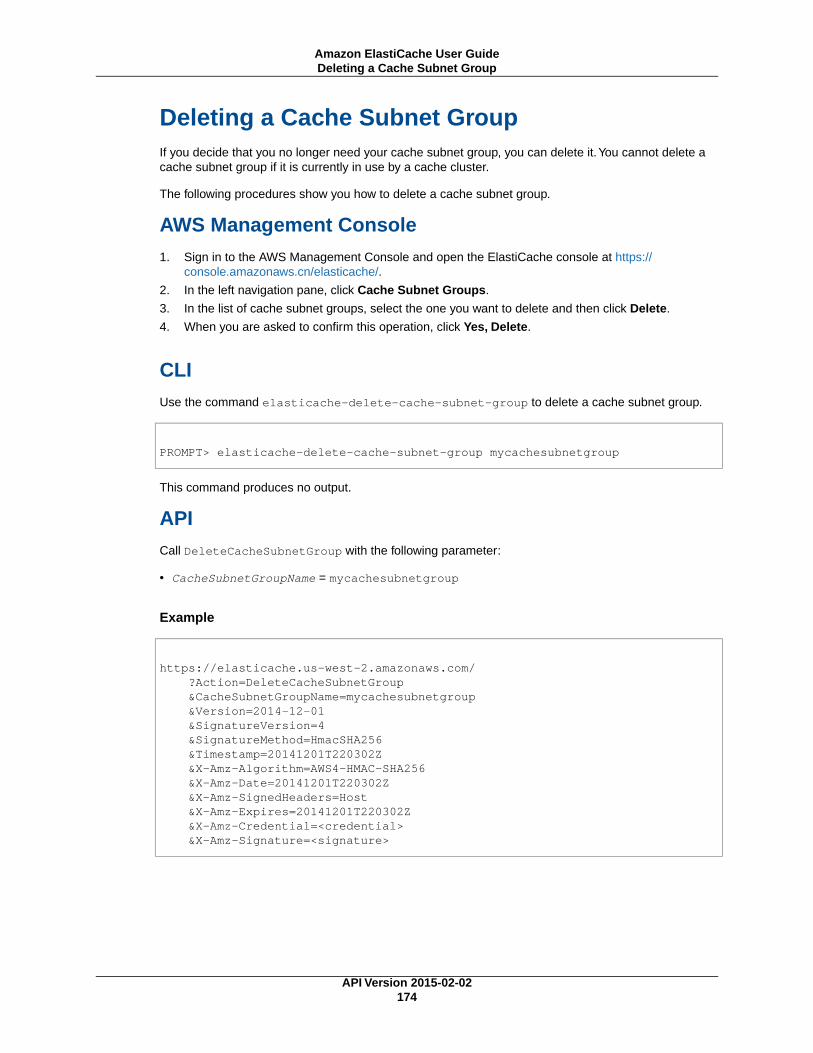
Deleting a Cache Subnet GroupIf you decide that you no longer need your cache subnet group, you can delete it.You cannot delete acache subnet group if it is currently in use by a cache cluster.
The following procedures show you how to delete a cache subnet group.
AWS Management Console1. Sign in to the AWS Management Console and open the ElastiCache console at https://
console.amazonaws.cn/elasticache/.
2. In the left navigation pane, click Cache Subnet Groups.
3. In the list of cache subnet groups, select the one you want to delete and then click Delete.
4. When you are asked to confirm this operation, click Yes, Delete.
CLIUse the command elasticache-delete-cache-subnet-group to delete a cache subnet group.
PROMPT> elasticache-delete-cache-subnet-group mycachesubnetgroup
This command produces no output.
APICall DeleteCacheSubnetGroup with the following parameter:
• CacheSubnetGroupName = mycachesubnetgroup
Example
https://elasticache.us-west-2.amazonaws.com/ ?Action=DeleteCacheSubnetGroup &CacheSubnetGroupName=mycachesubnetgroup &Version=2014-12-01 &SignatureVersion=4 &SignatureMethod=HmacSHA256 &Timestamp=20141201T220302Z &X-Amz-Algorithm=AWS4-HMAC-SHA256 &X-Amz-Date=20141201T220302Z &X-Amz-SignedHeaders=Host &X-Amz-Expires=20141201T220302Z &X-Amz-Credential=<credential> &X-Amz-Signature=<signature>
API Version 2015-02-02174
Amazon ElastiCache User GuideDeleting a Cache Subnet Group
Managing Cache Security GroupsNoteCache security groups are only applicable to cache clusters that are not running in an AmazonVirtual Private Cloud environment (VPC).For more information on using ElastiCache with Amazon VPCs, see Using ElastiCache withAmazon Virtual Private Cloud (VPC) (p. 164).
A cache security group allows you to control access to your cache clusters. A cache security group actslike a firewall controlling network access to your cache cluster. By default, network access is disabled fora new cache security group; you must specifically authorize access to an Amazon EC2 security groupafter the cache security group is created.
Note that Amazon EC2 instances running in an Amazon VPC are unable to connect to ElastiCache cacheclusters in EC2-Classic.
Creating a Cache Security GroupTo create a cache security group, you need to provide a name and a description.
The following procedures show you how to create a new cache security group.
AWS Management Console1. Sign in to the AWS Management Console and open the ElastiCache console at https://
console.amazonaws.cn/elasticache/.
2. In the left navigation pane, click Cache Security Groups.
3. Click Create Cache Security Group.
The Create Cache Security Group window appears.
4. Type the name of the new cache security group in the Cache Security Group text box.
5. Type a description for the new cache security group in the Description text box.
6. Click Create.
CLIUse the command elasticache-create-cache-security-group with the following parameters:
PROMPT> elasticache-create-cache-security-group mycachesecuritygroup -d "My new security group"
APICall CreateCacheSecurityGroup with the following parameters:
• CacheSecurityGroupName = mycachesecuritygroup
• Description = "My new security group"
API Version 2015-02-02175
Amazon ElastiCache User GuideManaging Cache Security Groups
Example
https://elasticache.us-west-2.amazonaws.com / ?Action=CreateCacheSecurityGroup &CacheSecurityGroupName=mycachesecuritygroup &Description=My%20cache%20security%20group &Version=2014-12-01 &SignatureVersion=4 &SignatureMethod=HmacSHA256 &Timestamp=20141201T220302Z &X-Amz-Algorithm=AWS4-HMAC-SHA256 &X-Amz-Date=20141201T220302Z &X-Amz-SignedHeaders=Host &X-Amz-Expires=20141201T220302Z &X-Amz-Credential=<credential> &X-Amz-Signature=<signature>
Listing Available Cache Security GroupsYou can list which cache security groups have been created for your AWS account.
The following procedures show you how to list the available cache security groups for your AWS account.
AWS Management Console1. Sign in to the AWS Management Console and open the ElastiCache console at https://
console.amazonaws.cn/elasticache/.
2. In the left navigation pane, click Cache Security Groups.
The available cache security groups appear in the Cache Security Groups list.
CLIUse the command elasticache-describe-cache-security-groups to list all available cachesecurity groups for your AWS account.
PROMPT> elasticache-describe-cache-security-groups
APICall DescribeCacheSecurityGroups with no parameters.
API Version 2015-02-02176
Amazon ElastiCache User GuideListing Available Cache Security Groups
Example
https://elasticache.us-west-2.amazonaws.com/ ?Action=DescribeCacheSecurityGroups &MaxRecords=100 &Version=2014-12-01 &SignatureVersion=4 &SignatureMethod=HmacSHA256 &Timestamp=20141201T220302Z &X-Amz-Algorithm=AWS4-HMAC-SHA256 &X-Amz-Date=20141201T220302Z &X-Amz-SignedHeaders=Host &X-Amz-Expires=20141201T220302Z &X-Amz-Credential=<credential> &X-Amz-Signature=<signature>
Viewing a Cache Security GroupYou can view detailed information about your cache security group.
The following procedures show you how to view the properties of a cache security group.
AWS Management Console1. Sign in to the AWS Management Console and open the ElastiCache console at https://
console.amazonaws.cn/elasticache/.
2. In the left navigation pane, click Cache Security Groups.
The available cache security groups appear in the Cache Security Groups list.
3. Select a cache security group from the Cache Security Groups list.
The list of authorizations defined for the cache security group appears in the detail section at thebottom of the window.
CLIUse the elasticache-describe-cache-security-groups to view a cache security group.
PROMPT> elasticache-describe-cache-security-groups mycachesecuritygroup
APICall DescribeCacheSecurityGroups with the following parameter:
• CacheSecurityGroupName = mycachesecuritygroup
API Version 2015-02-02177
Amazon ElastiCache User GuideViewing a Cache Security Group
Example
https://elasticache.amazonaws.com/ ?Action=DescribeCacheSecurityGroups &CacheParameterGroupName=mycachesecuritygroup &Version=2014-12-01 &SignatureVersion=4 &SignatureMethod=HmacSHA256 &Timestamp=20141201T220302Z &X-Amz-Algorithm=AWS4-HMAC-SHA256 &X-Amz-Date=20141201T220302Z &X-Amz-SignedHeaders=Host &X-Amz-Expires=20141201T220302Z &X-Amz-Credential=<credential> &X-Amz-Signature=<signature>
Authorizing Network Access to an Amazon EC2Security GroupIf you want to access your cache cluster from an Amazon EC2 instance, you must grant access to theAmazon EC2 security group that the EC2 instance belongs to. The following procedures show you howto grant access to an Amazon EC2 Security Group.
ImportantAuthorizing an Amazon EC2 security group only grants access to your cache clusters from theEC2 instances belonging to the Amazon EC2 security group.
AWS Management Console1. Sign in to the AWS Management Console and open the ElastiCache console at https://
console.amazonaws.cn/elasticache/.
2. In the left navigation pane, select Cache Security Groups.
3. In the Cache Security Groups list, select the check box next to the cache security group that youwant to grant access to.
4. At the bottom of the window, in the EC2 Security Group Name list, select your Amazon EC2 securitygroup.
5. Click the Add button.
NoteIt takes approximately one minute for changes to access permissions to take effect.
CLIUse the command elasticache-authorize-cache-security-group-ingress to grant access toan Amazon EC2 security group
PROMPT> elasticache-authorize-cache-security-group-ingress default --ec2-secur ity-group-name myec2group --ec2-security-group-owner-id 987654321021
API Version 2015-02-02178
Amazon ElastiCache User GuideAuthorizing Network Access to an Amazon EC2 Security
Group
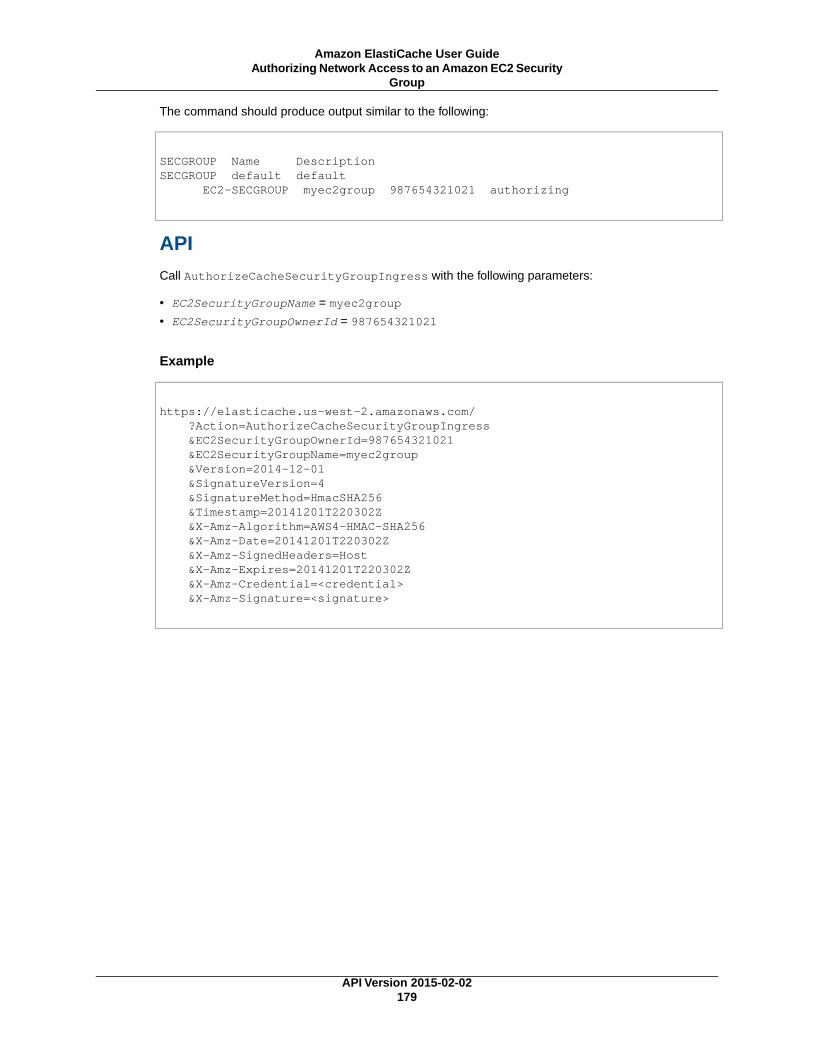
The command should produce output similar to the following:
SECGROUP Name Description SECGROUP default default EC2-SECGROUP myec2group 987654321021 authorizing
APICall AuthorizeCacheSecurityGroupIngress with the following parameters:
• EC2SecurityGroupName = myec2group
• EC2SecurityGroupOwnerId = 987654321021
Example
https://elasticache.us-west-2.amazonaws.com/ ?Action=AuthorizeCacheSecurityGroupIngress &EC2SecurityGroupOwnerId=987654321021 &EC2SecurityGroupName=myec2group &Version=2014-12-01 &SignatureVersion=4 &SignatureMethod=HmacSHA256 &Timestamp=20141201T220302Z &X-Amz-Algorithm=AWS4-HMAC-SHA256 &X-Amz-Date=20141201T220302Z &X-Amz-SignedHeaders=Host &X-Amz-Expires=20141201T220302Z &X-Amz-Credential=<credential> &X-Amz-Signature=<signature>
API Version 2015-02-02179
Amazon ElastiCache User GuideAuthorizing Network Access to an Amazon EC2 Security
Group
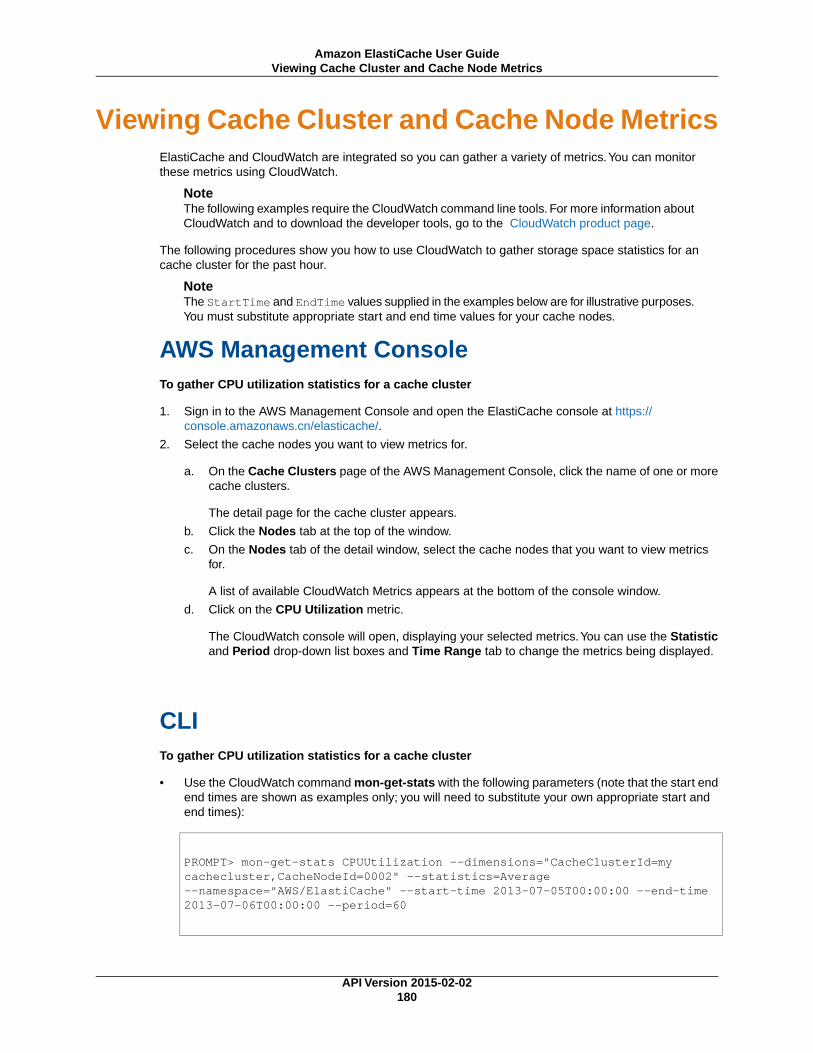
Viewing Cache Cluster and Cache Node MetricsElastiCache and CloudWatch are integrated so you can gather a variety of metrics.You can monitorthese metrics using CloudWatch.
NoteThe following examples require the CloudWatch command line tools. For more information aboutCloudWatch and to download the developer tools, go to the CloudWatch product page.
The following procedures show you how to use CloudWatch to gather storage space statistics for ancache cluster for the past hour.
NoteThe StartTime and EndTime values supplied in the examples below are for illustrative purposes.You must substitute appropriate start and end time values for your cache nodes.
AWS Management ConsoleTo gather CPU utilization statistics for a cache cluster
1. Sign in to the AWS Management Console and open the ElastiCache console at https://console.amazonaws.cn/elasticache/.
2. Select the cache nodes you want to view metrics for.
a. On the Cache Clusters page of the AWS Management Console, click the name of one or morecache clusters.
The detail page for the cache cluster appears.
b. Click the Nodes tab at the top of the window.
c. On the Nodes tab of the detail window, select the cache nodes that you want to view metricsfor.
A list of available CloudWatch Metrics appears at the bottom of the console window.
d. Click on the CPU Utilization metric.
The CloudWatch console will open, displaying your selected metrics.You can use the Statisticand Period drop-down list boxes and Time Range tab to change the metrics being displayed.
CLITo gather CPU utilization statistics for a cache cluster
• Use the CloudWatch command mon-get-stats with the following parameters (note that the start endend times are shown as examples only; you will need to substitute your own appropriate start andend times):
PROMPT> mon-get-stats CPUUtilization --dimensions="CacheClusterId=my cachecluster,CacheNodeId=0002" --statistics=Average --namespace="AWS/ElastiCache" --start-time 2013-07-05T00:00:00 --end-time 2013-07-06T00:00:00 --period=60
API Version 2015-02-02180
Amazon ElastiCache User GuideViewing Cache Cluster and Cache Node Metrics
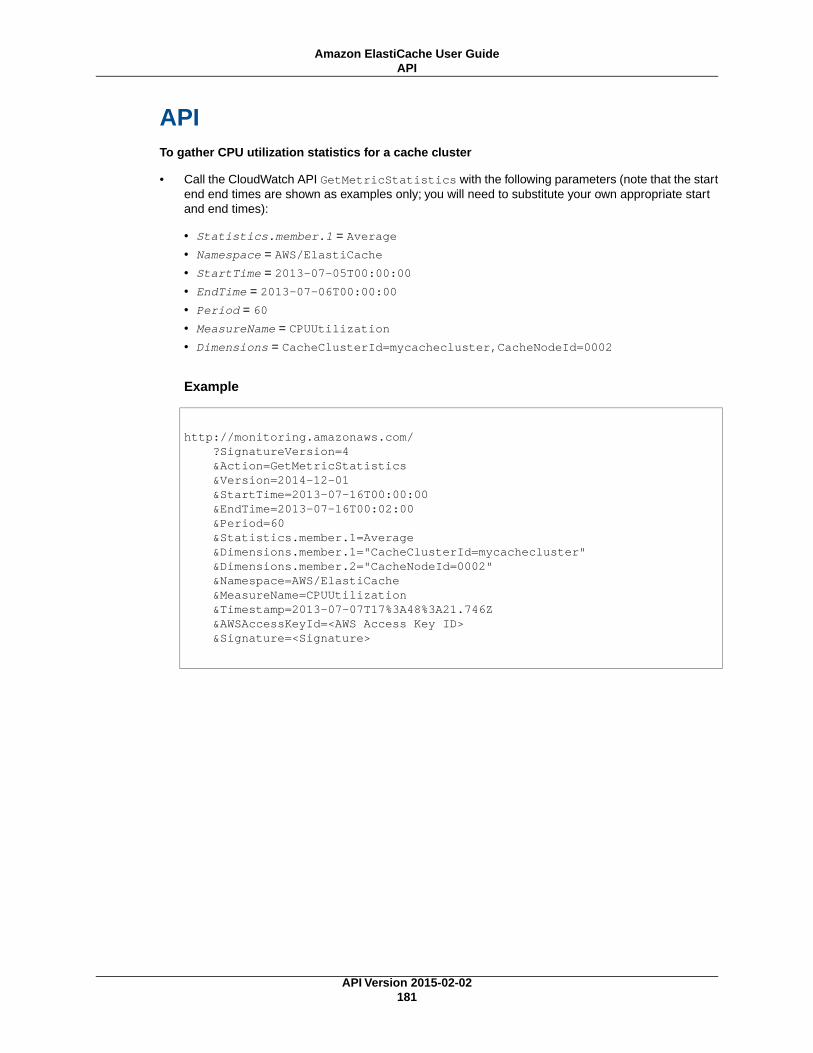
APITo gather CPU utilization statistics for a cache cluster
• Call the CloudWatch API GetMetricStatistics with the following parameters (note that the startend end times are shown as examples only; you will need to substitute your own appropriate startand end times):
• Statistics.member.1 = Average
• Namespace = AWS/ElastiCache
• StartTime = 2013-07-05T00:00:00
• EndTime = 2013-07-06T00:00:00
• Period = 60
• MeasureName = CPUUtilization
• Dimensions = CacheClusterId=mycachecluster,CacheNodeId=0002
Example
http://monitoring.amazonaws.com/ ?SignatureVersion=4 &Action=GetMetricStatistics &Version=2014-12-01 &StartTime=2013-07-16T00:00:00 &EndTime=2013-07-16T00:02:00 &Period=60 &Statistics.member.1=Average &Dimensions.member.1="CacheClusterId=mycachecluster" &Dimensions.member.2="CacheNodeId=0002" &Namespace=AWS/ElastiCache &MeasureName=CPUUtilization &Timestamp=2013-07-07T17%3A48%3A21.746Z &AWSAccessKeyId=<AWS Access Key ID> &Signature=<Signature>
API Version 2015-02-02181
Amazon ElastiCache User GuideAPI
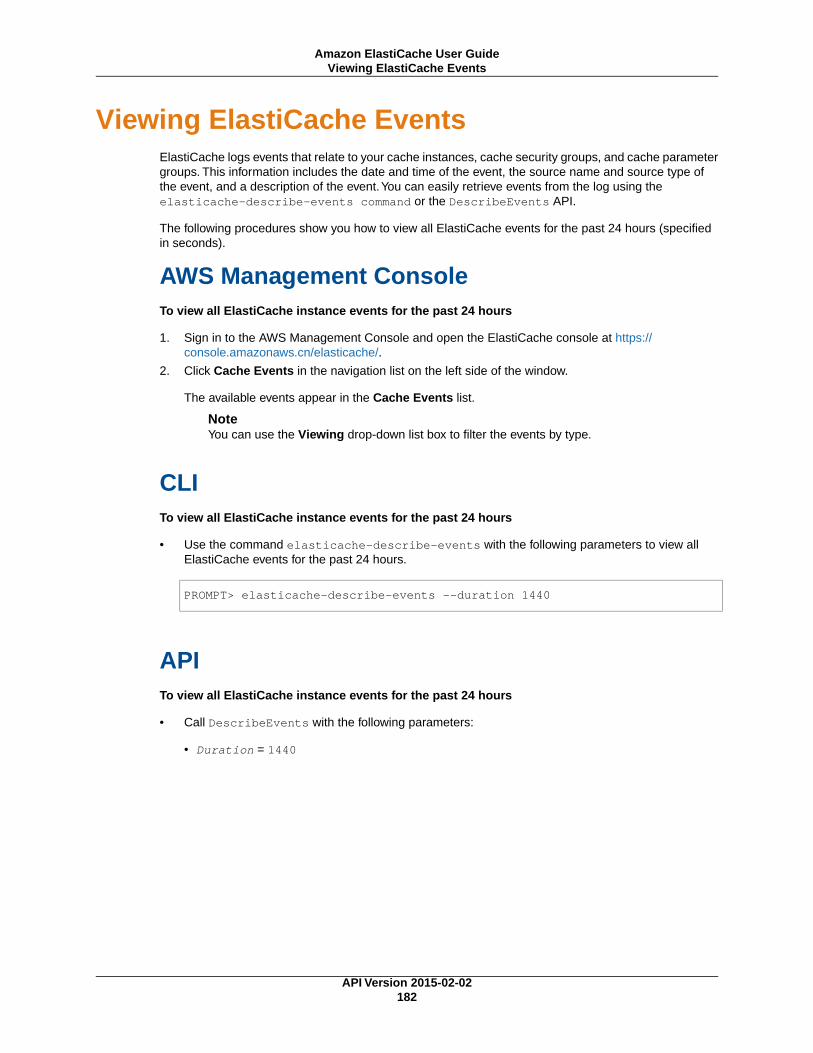
Viewing ElastiCache EventsElastiCache logs events that relate to your cache instances, cache security groups, and cache parametergroups. This information includes the date and time of the event, the source name and source type ofthe event, and a description of the event.You can easily retrieve events from the log using theelasticache-describe-events command or the DescribeEvents API.
The following procedures show you how to view all ElastiCache events for the past 24 hours (specifiedin seconds).
AWS Management ConsoleTo view all ElastiCache instance events for the past 24 hours
1. Sign in to the AWS Management Console and open the ElastiCache console at https://console.amazonaws.cn/elasticache/.
2. Click Cache Events in the navigation list on the left side of the window.
The available events appear in the Cache Events list.
NoteYou can use the Viewing drop-down list box to filter the events by type.
CLITo view all ElastiCache instance events for the past 24 hours
• Use the command elasticache-describe-events with the following parameters to view allElastiCache events for the past 24 hours.
PROMPT> elasticache-describe-events --duration 1440
APITo view all ElastiCache instance events for the past 24 hours
• Call DescribeEvents with the following parameters:
• Duration = 1440
API Version 2015-02-02182
Amazon ElastiCache User GuideViewing ElastiCache Events
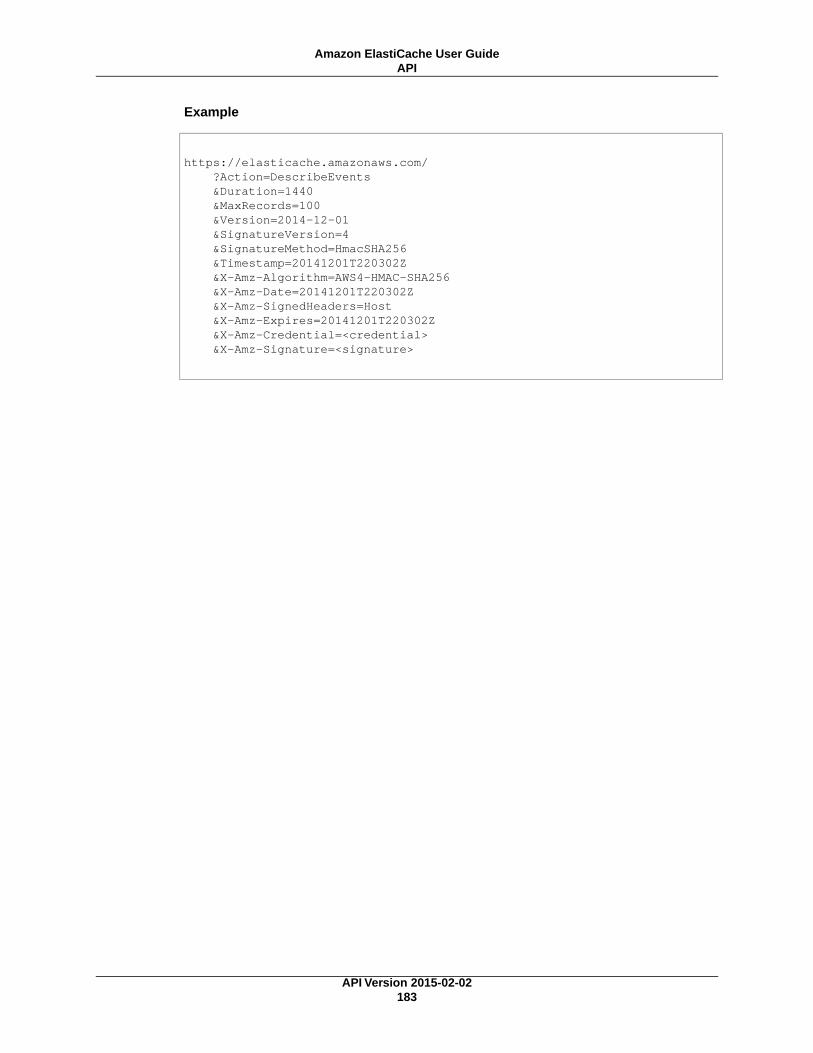
Example
https://elasticache.amazonaws.com/ ?Action=DescribeEvents &Duration=1440 &MaxRecords=100 &Version=2014-12-01 &SignatureVersion=4 &SignatureMethod=HmacSHA256 &Timestamp=20141201T220302Z &X-Amz-Algorithm=AWS4-HMAC-SHA256 &X-Amz-Date=20141201T220302Z &X-Amz-SignedHeaders=Host &X-Amz-Expires=20141201T220302Z &X-Amz-Credential=<credential> &X-Amz-Signature=<signature>
API Version 2015-02-02183
Amazon ElastiCache User GuideAPI
Configuring ElastiCache Clients
Topics
• Restricted Commands (p. 184)
• Cache Node Endpoints and Port Numbers (p. 184)
• Connecting to Nodes in a Replication Group (p. 186)
• DNS Names and Underlying IP (p. 188)
An ElastiCache cluster is protocol-compliant with Memcached or Redis, depending on which cache enginewas selected when the cluster was created. The code, applications, and most popular tools that you usetoday with your existing Memcached or Resdis environments will work seamlessly with the service.
This section discusses specific considerations for connecting to cache nodes in ElastiCache.
Restricted CommandsIn order to deliver a managed service experience, ElastiCache restricts access to certain cacheengine-specific commands that require advanced privileges.
• For cache clusters running Memcached, there are no restricted commands.
• For cache clusters running Redis, the following commands are unavailable:
• bgrewriteaof
• bgsave
• config
• debug
• migrate
• save
• slaveof
• shutdown
Cache Node Endpoints and Port NumbersTo connect to a cache node, your application needs to know the endpoint and port number for that node.
API Version 2015-02-02184
Amazon ElastiCache User GuideRestricted Commands
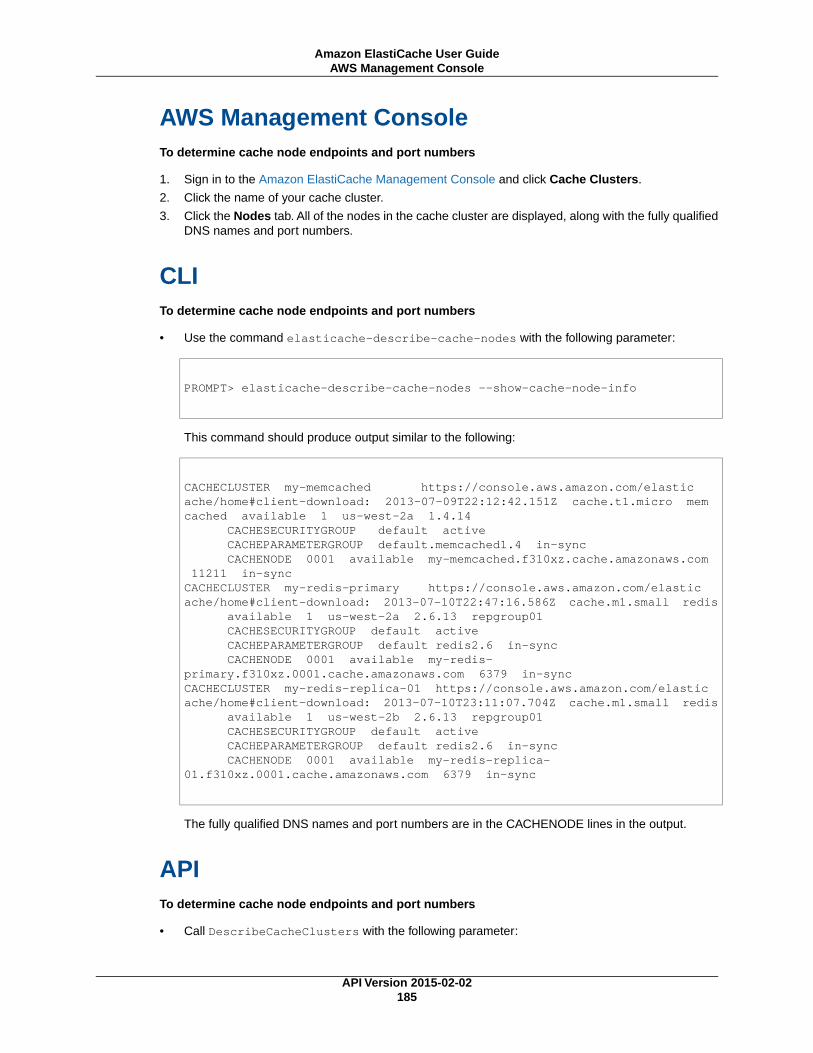
AWS Management ConsoleTo determine cache node endpoints and port numbers
1. Sign in to the Amazon ElastiCache Management Console and click Cache Clusters.
2. Click the name of your cache cluster.
3. Click the Nodes tab. All of the nodes in the cache cluster are displayed, along with the fully qualifiedDNS names and port numbers.
CLITo determine cache node endpoints and port numbers
• Use the command elasticache-describe-cache-nodes with the following parameter:
PROMPT> elasticache-describe-cache-nodes --show-cache-node-info
This command should produce output similar to the following:
CACHECLUSTER my-memcached https://console.aws.amazon.com/elastic ache/home#client-download: 2013-07-09T22:12:42.151Z cache.t1.micro mem cached available 1 us-west-2a 1.4.14 CACHESECURITYGROUP default active CACHEPARAMETERGROUP default.memcached1.4 in-sync CACHENODE 0001 available my-memcached.f310xz.cache.amazonaws.com 11211 in-syncCACHECLUSTER my-redis-primary https://console.aws.amazon.com/elastic ache/home#client-download: 2013-07-10T22:47:16.586Z cache.m1.small redis available 1 us-west-2a 2.6.13 repgroup01 CACHESECURITYGROUP default active CACHEPARAMETERGROUP default redis2.6 in-sync CACHENODE 0001 available my-redis-primary.f310xz.0001.cache.amazonaws.com 6379 in-syncCACHECLUSTER my-redis-replica-01 https://console.aws.amazon.com/elastic ache/home#client-download: 2013-07-10T23:11:07.704Z cache.m1.small redis available 1 us-west-2b 2.6.13 repgroup01 CACHESECURITYGROUP default active CACHEPARAMETERGROUP default redis2.6 in-sync CACHENODE 0001 available my-redis-replica-01.f310xz.0001.cache.amazonaws.com 6379 in-sync
The fully qualified DNS names and port numbers are in the CACHENODE lines in the output.
APITo determine cache node endpoints and port numbers
• Call DescribeCacheClusters with the following parameter:
API Version 2015-02-02185
Amazon ElastiCache User GuideAWS Management Console
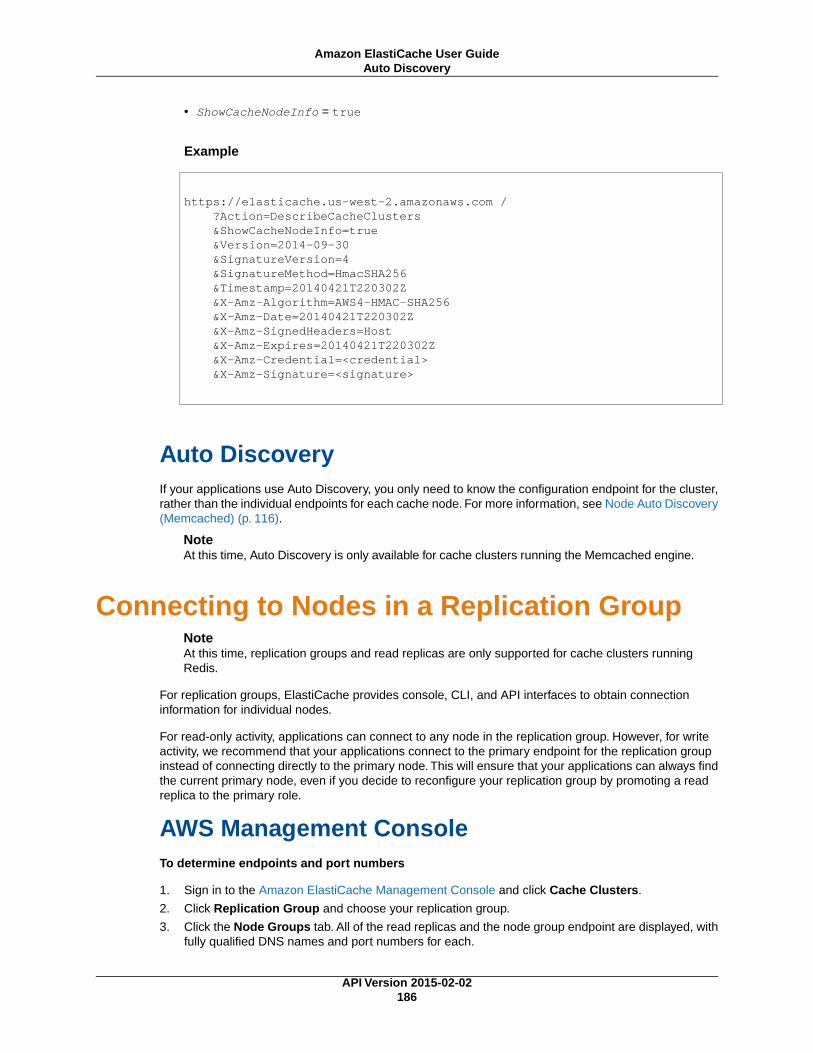
• ShowCacheNodeInfo = true
Example
https://elasticache.us-west-2.amazonaws.com / ?Action=DescribeCacheClusters &ShowCacheNodeInfo=true &Version=2014-09-30 &SignatureVersion=4 &SignatureMethod=HmacSHA256 &Timestamp=20140421T220302Z &X-Amz-Algorithm=AWS4-HMAC-SHA256 &X-Amz-Date=20140421T220302Z &X-Amz-SignedHeaders=Host &X-Amz-Expires=20140421T220302Z &X-Amz-Credential=<credential> &X-Amz-Signature=<signature>
Auto DiscoveryIf your applications use Auto Discovery, you only need to know the configuration endpoint for the cluster,rather than the individual endpoints for each cache node. For more information, see Node Auto Discovery(Memcached) (p. 116).
NoteAt this time, Auto Discovery is only available for cache clusters running the Memcached engine.
Connecting to Nodes in a Replication GroupNoteAt this time, replication groups and read replicas are only supported for cache clusters runningRedis.
For replication groups, ElastiCache provides console, CLI, and API interfaces to obtain connectioninformation for individual nodes.
For read-only activity, applications can connect to any node in the replication group. However, for writeactivity, we recommend that your applications connect to the primary endpoint for the replication groupinstead of connecting directly to the primary node. This will ensure that your applications can always findthe current primary node, even if you decide to reconfigure your replication group by promoting a readreplica to the primary role.
AWS Management ConsoleTo determine endpoints and port numbers
1. Sign in to the Amazon ElastiCache Management Console and click Cache Clusters.
2. Click Replication Group and choose your replication group.
3. Click the Node Groups tab. All of the read replicas and the node group endpoint are displayed, withfully qualified DNS names and port numbers for each.
API Version 2015-02-02186
Amazon ElastiCache User GuideAuto Discovery
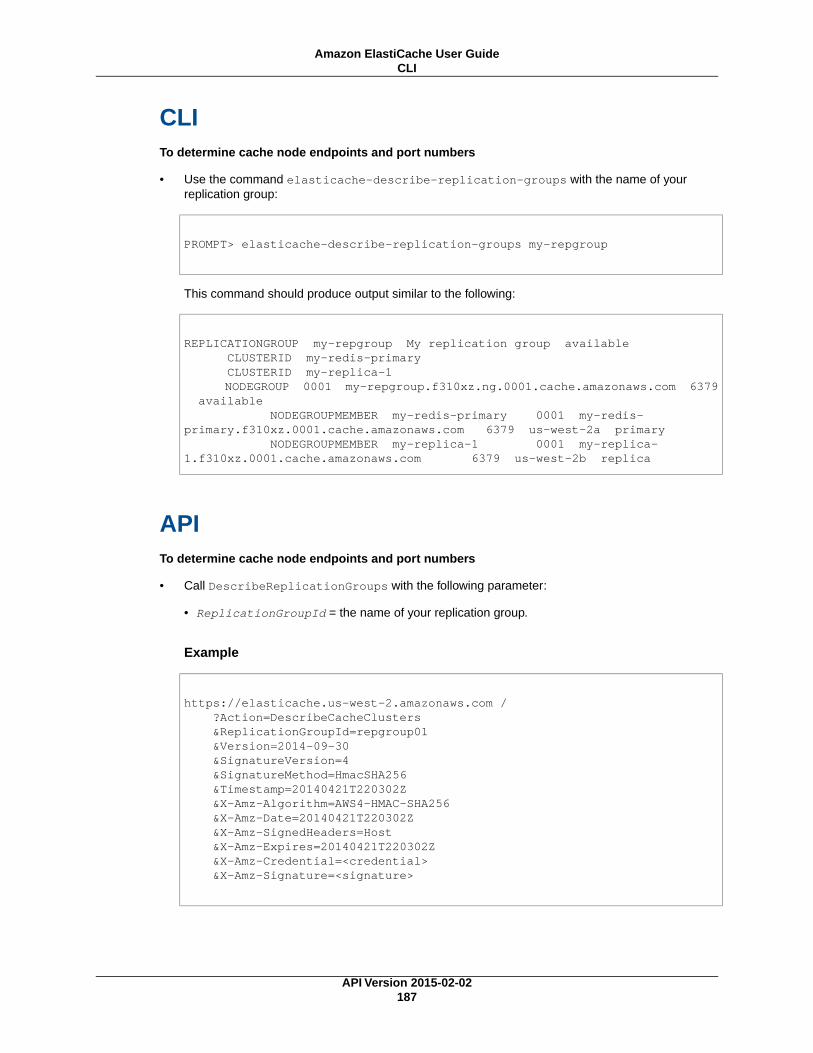
CLITo determine cache node endpoints and port numbers
• Use the command elasticache-describe-replication-groups with the name of yourreplication group:
PROMPT> elasticache-describe-replication-groups my-repgroup
This command should produce output similar to the following:
REPLICATIONGROUP my-repgroup My replication group available CLUSTERID my-redis-primary CLUSTERID my-replica-1 NODEGROUP 0001 my-repgroup.f310xz.ng.0001.cache.amazonaws.com 6379 available NODEGROUPMEMBER my-redis-primary 0001 my-redis-primary.f310xz.0001.cache.amazonaws.com 6379 us-west-2a primary NODEGROUPMEMBER my-replica-1 0001 my-replica-1.f310xz.0001.cache.amazonaws.com 6379 us-west-2b replica
APITo determine cache node endpoints and port numbers
• Call DescribeReplicationGroups with the following parameter:
• ReplicationGroupId = the name of your replication group.
Example
https://elasticache.us-west-2.amazonaws.com / ?Action=DescribeCacheClusters &ReplicationGroupId=repgroup01 &Version=2014-09-30 &SignatureVersion=4 &SignatureMethod=HmacSHA256 &Timestamp=20140421T220302Z &X-Amz-Algorithm=AWS4-HMAC-SHA256 &X-Amz-Date=20140421T220302Z &X-Amz-SignedHeaders=Host &X-Amz-Expires=20140421T220302Z &X-Amz-Credential=<credential> &X-Amz-Signature=<signature>
API Version 2015-02-02187
Amazon ElastiCache User GuideCLI
DNS Names and Underlying IPMemcached and Redis clients maintain a server list containing the addresses and ports of the serversholding the cache data. When using ElastiCache, the DescribeCacheClusters API (or theelasticache-describe-cache-clusters command line utility) returns a fully qualified DNS entry and portnumber that can be used for the server list.
ImportantIt is important that client applications are configured to frequently resolve DNS names of cachenodes when they attempt to connect to a cache node endpoint.
ElastiCache will ensure that the DNS name of a cache node is unchanged when cache nodes are recoveredin case of failure; however, the underlying IP address of the cache node can change.
Most Memcached and Redis client libraries support persistent cache node connections by default, andwe recommend using persistent cache node connections when using ElastiCache. Client-side DNScaching can occur in multiple places, including client libraries, the language runtime, or the client operatingsystem.You should review your application configuration at each layer to ensure that you are frequentlyresolving IP addresses for your cache nodes.
API Version 2015-02-02188
Amazon ElastiCache User GuideDNS Names and Underlying IP
Using the ElastiCache API
Topics
• Using the Query API (p. 189)
• Available Libraries (p. 191)
• Troubleshooting Applications (p. 191)
This section provides task-oriented descriptions of how to use and implement ElastiCache operations.For a complete description of these operations, see the Amazon ElastiCache API Reference
For information about ElastiCache regions and endpoints, go to Regions and Endpoints in the AmazonWeb Services General Reference.
Using the Query API
Query ParametersHTTP Query-based requests are HTTP requests that use the HTTP verb GET or POST and a Queryparameter named Action.
Each Query request must include some common parameters to handle authentication and selection ofan action.
Some operations take lists of parameters. These lists are specified using the param.n notation. Valuesof n are integers starting from 1.
Query Request AuthenticationYou can only send Query requests over HTTPS and you must include a signature in every Query request.This section describes how to create the signature. The method described in the following procedure isknown as signature version 4.
The following are the basic steps used to authenticate requests to AWS.This assumes you are registeredwith AWS and have an Access Key ID and Secret Access Key.
API Version 2015-02-02189
Amazon ElastiCache User GuideUsing the Query API
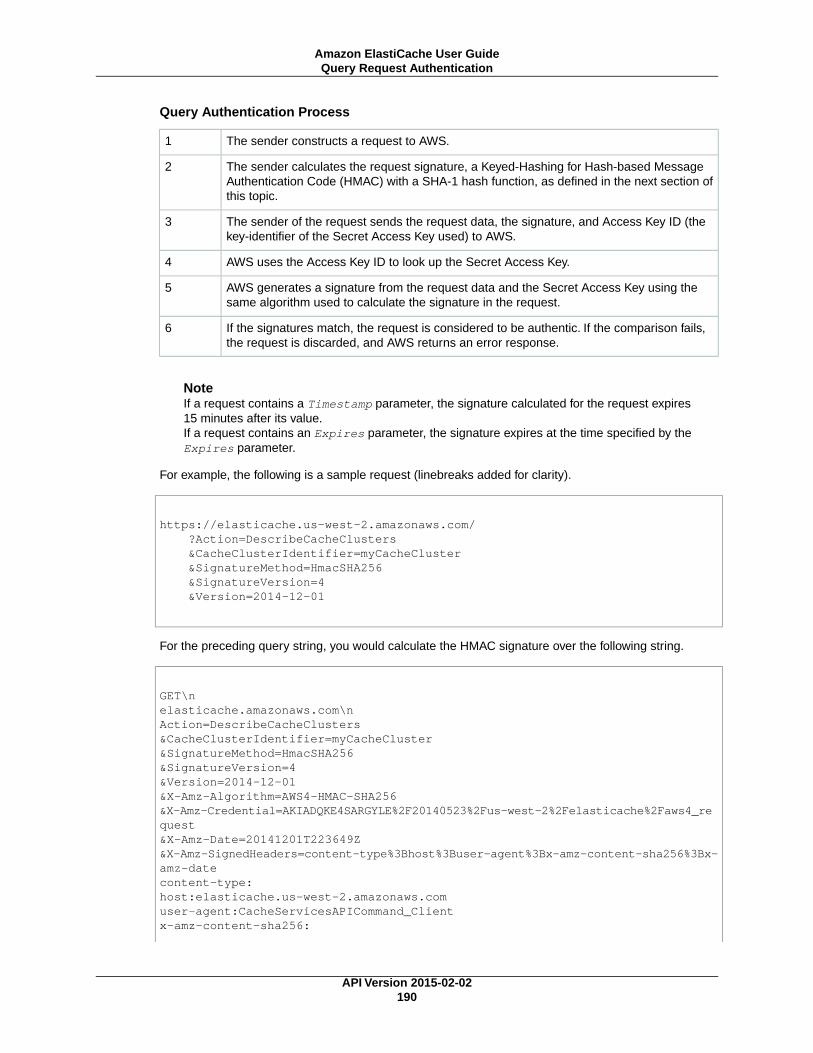
Query Authentication Process
The sender constructs a request to AWS.1
The sender calculates the request signature, a Keyed-Hashing for Hash-based MessageAuthentication Code (HMAC) with a SHA-1 hash function, as defined in the next section ofthis topic.
2
The sender of the request sends the request data, the signature, and Access Key ID (thekey-identifier of the Secret Access Key used) to AWS.
3
AWS uses the Access Key ID to look up the Secret Access Key.4
AWS generates a signature from the request data and the Secret Access Key using thesame algorithm used to calculate the signature in the request.
5
If the signatures match, the request is considered to be authentic. If the comparison fails,the request is discarded, and AWS returns an error response.
6
NoteIf a request contains a Timestamp parameter, the signature calculated for the request expires15 minutes after its value.If a request contains an Expires parameter, the signature expires at the time specified by theExpires parameter.
For example, the following is a sample request (linebreaks added for clarity).
https://elasticache.us-west-2.amazonaws.com/ ?Action=DescribeCacheClusters &CacheClusterIdentifier=myCacheCluster &SignatureMethod=HmacSHA256 &SignatureVersion=4 &Version=2014-12-01
For the preceding query string, you would calculate the HMAC signature over the following string.
GET\nelasticache.amazonaws.com\nAction=DescribeCacheClusters&CacheClusterIdentifier=myCacheCluster&SignatureMethod=HmacSHA256&SignatureVersion=4&Version=2014-12-01&X-Amz-Algorithm=AWS4-HMAC-SHA256&X-Amz-Credential=AKIADQKE4SARGYLE%2F20140523%2Fus-west-2%2Felasticache%2Faws4_re quest&X-Amz-Date=20141201T223649Z&X-Amz-SignedHeaders=content-type%3Bhost%3Buser-agent%3Bx-amz-content-sha256%3Bx-amz-datecontent-type:host:elasticache.us-west-2.amazonaws.comuser-agent:CacheServicesAPICommand_Clientx-amz-content-sha256:
API Version 2015-02-02190
Amazon ElastiCache User GuideQuery Request Authentication
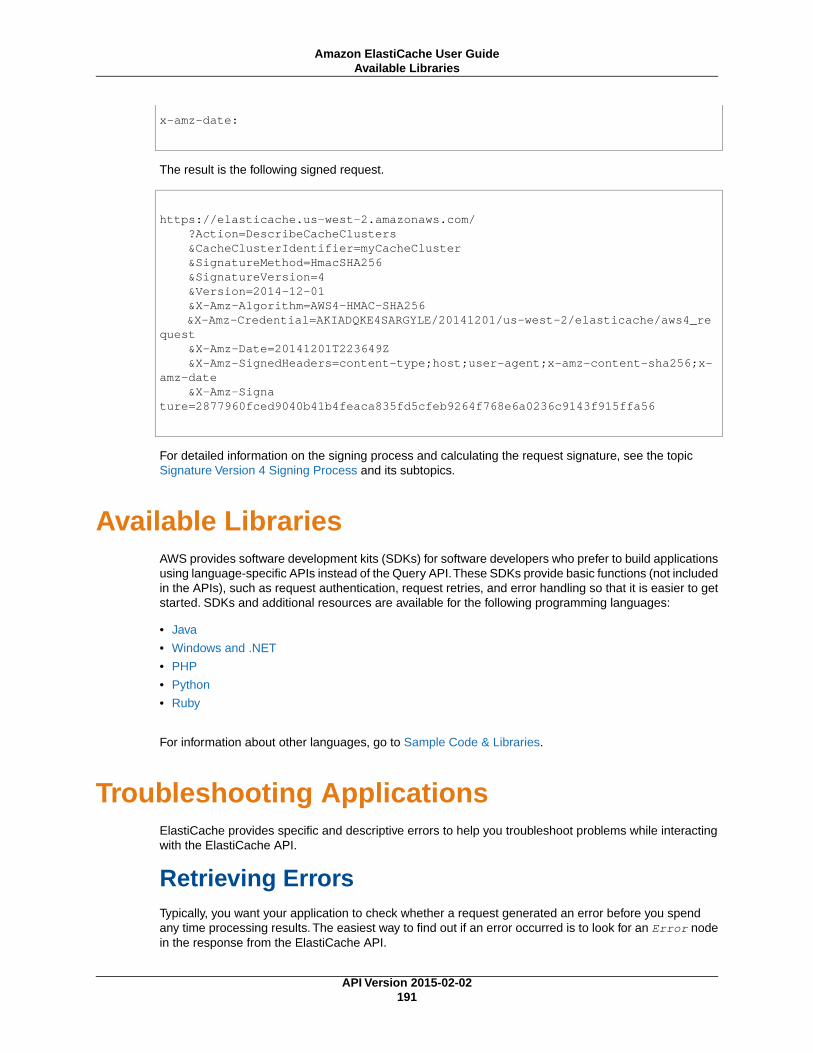
x-amz-date:
The result is the following signed request.
https://elasticache.us-west-2.amazonaws.com/ ?Action=DescribeCacheClusters &CacheClusterIdentifier=myCacheCluster &SignatureMethod=HmacSHA256 &SignatureVersion=4 &Version=2014-12-01 &X-Amz-Algorithm=AWS4-HMAC-SHA256 &X-Amz-Credential=AKIADQKE4SARGYLE/20141201/us-west-2/elasticache/aws4_re quest &X-Amz-Date=20141201T223649Z &X-Amz-SignedHeaders=content-type;host;user-agent;x-amz-content-sha256;x-amz-date &X-Amz-Signa ture=2877960fced9040b41b4feaca835fd5cfeb9264f768e6a0236c9143f915ffa56
For detailed information on the signing process and calculating the request signature, see the topicSignature Version 4 Signing Process and its subtopics.
Available LibrariesAWS provides software development kits (SDKs) for software developers who prefer to build applicationsusing language-specific APIs instead of the Query API.These SDKs provide basic functions (not includedin the APIs), such as request authentication, request retries, and error handling so that it is easier to getstarted. SDKs and additional resources are available for the following programming languages:
• Java
• Windows and .NET
• PHP
• Python
• Ruby
For information about other languages, go to Sample Code & Libraries.
Troubleshooting ApplicationsElastiCache provides specific and descriptive errors to help you troubleshoot problems while interactingwith the ElastiCache API.
Retrieving ErrorsTypically, you want your application to check whether a request generated an error before you spendany time processing results. The easiest way to find out if an error occurred is to look for an Error nodein the response from the ElastiCache API.
API Version 2015-02-02191
Amazon ElastiCache User GuideAvailable Libraries

XPath syntax provides a simple way to search for the presence of an Error node, as well as an easyway to retrieve the error code and message. The following code snippet uses Perl and the XML::XPathmodule to determine if an error occurred during a request. If an error occurred, the code prints the firsterror code and message in the response.
use XML::XPath; my $xp = XML::XPath->new(xml =>$response); if ( $xp->find("//Error") ) {print "There was an error processing your request:\n", " Error code: ", $xp->findvalue("//Error[1]/Code"), "\n", " ", $xp->findvalue("//Error[1]/Message"), "\n\n"; }
Troubleshooting TipsWe recommend the following processes to diagnose and resolve problems with the ElastiCache API.
• Verify that ElastiCache is running correctly
To do this, simply open a browser window and submit a query request to the ElastiCache service (suchas https://elasticache.amazonaws.com). A MissingAuthenticationTokenException or 500 Internal ServerError confirms that the service is available and responding to requests.
• Check the structure of your request
Each ElastiCache operation has a reference page in the ElastiCache API Reference. Double-checkthat you are using parameters correctly. In order to give you ideas regarding what might be wrong, lookat the sample requests or user scenarios to see if those examples are doing similar operations.
• Check the forum
ElastiCache has a discussion forum where you can search for solutions to problems others haveexperienced along the way. To view the forum, go to
https://forums.aws.csdn.net/ .
API Version 2015-02-02192
Amazon ElastiCache User GuideTroubleshooting Tips

Event Notifications and AmazonSNS
ElastiCache can publish messages using Amazon Simple Notification Service (SNS) when significantevents happen on a cache cluster. This feature can be used to refresh the server-lists on client machinesconnected to individual cache node endpoints of a cache cluster.
NoteFor more information on Amazon Simple Notification Service (SNS), including information onpricing and links to the Amazon SNS documentation, go to the Amazon SNS product page.
Notifications are published to a specified Amazon SNS topic. Only one topic can be configured forElastiCache notifications, and the AWS account that owns the Amazon SNS topic must be the sameaccount that owns the cache cluster on which notifications are enabled.
The following ElastiCache events trigger Amazon SNS notifications:
DescriptionEvent Name
A cache node has been added to the cache clusterand is ready for use.
ElastiCache:AddCacheNodeComplete
A cache node could not be added because thereare not enough available IP addresses.
ElastiCache:AddCacheNodeFailed due to insuffi-cient free IP addresses
One or more cache cluster parameters have beenchanged.
ElastiCache:CacheClusterParametersChanged
The provisioning of a cache cluster is completed,and the cache nodes in the cache cluster are readyto use.
ElastiCache:CacheClusterProvisioningComplete
An attempt was made to launch a new cachecluster into a nonexistent virtual private cloud(VPC).
ElastiCache:CacheClusterProvisioningFailed dueto incompatible network state
API Version 2015-02-02193
Amazon ElastiCache User Guide
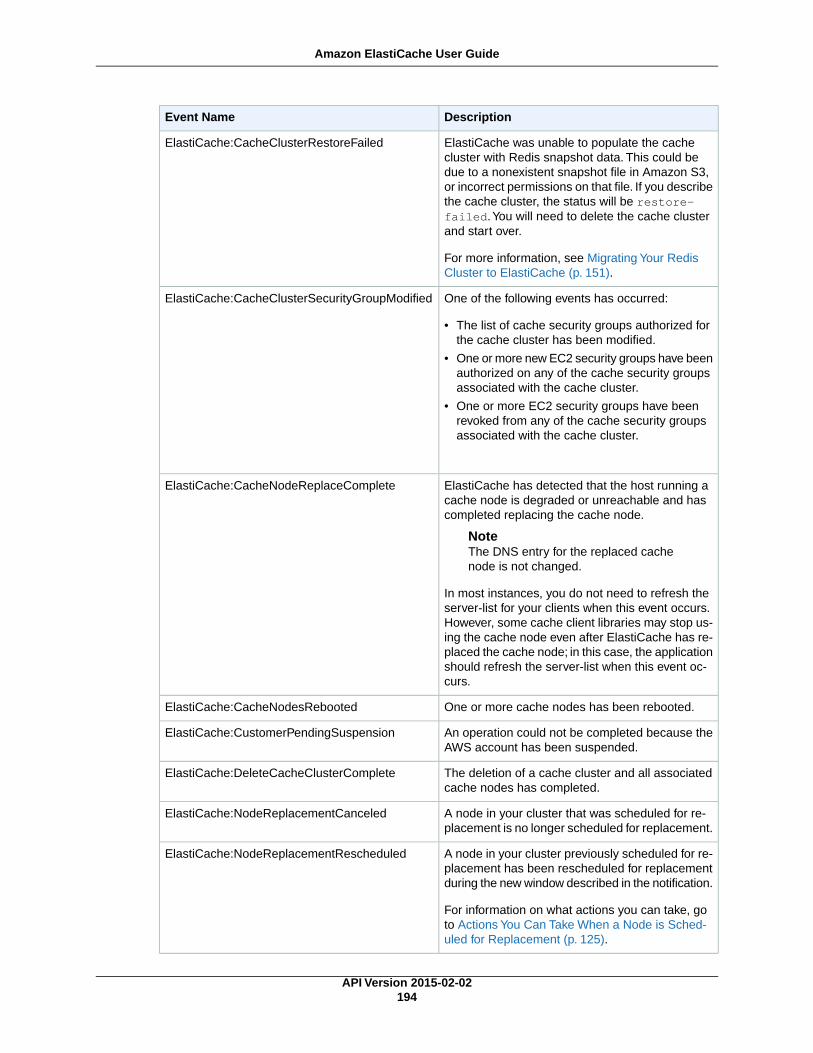
DescriptionEvent Name
ElastiCache was unable to populate the cachecluster with Redis snapshot data. This could bedue to a nonexistent snapshot file in Amazon S3,or incorrect permissions on that file. If you describethe cache cluster, the status will be restore-failed.You will need to delete the cache clusterand start over.
For more information, see Migrating Your RedisCluster to ElastiCache (p. 151).
ElastiCache:CacheClusterRestoreFailed
One of the following events has occurred:
• The list of cache security groups authorized forthe cache cluster has been modified.
• One or more new EC2 security groups have beenauthorized on any of the cache security groupsassociated with the cache cluster.
• One or more EC2 security groups have beenrevoked from any of the cache security groupsassociated with the cache cluster.
ElastiCache:CacheClusterSecurityGroupModified
ElastiCache has detected that the host running acache node is degraded or unreachable and hascompleted replacing the cache node.
NoteThe DNS entry for the replaced cachenode is not changed.
In most instances, you do not need to refresh theserver-list for your clients when this event occurs.However, some cache client libraries may stop us-ing the cache node even after ElastiCache has re-placed the cache node; in this case, the applicationshould refresh the server-list when this event oc-curs.
ElastiCache:CacheNodeReplaceComplete
One or more cache nodes has been rebooted.ElastiCache:CacheNodesRebooted
An operation could not be completed because theAWS account has been suspended.
ElastiCache:CustomerPendingSuspension
The deletion of a cache cluster and all associatedcache nodes has completed.
ElastiCache:DeleteCacheClusterComplete
A node in your cluster that was scheduled for re-placement is no longer scheduled for replacement.
ElastiCache:NodeReplacementCanceled
A node in your cluster previously scheduled for re-placement has been rescheduled for replacementduring the new window described in the notification.
For information on what actions you can take, goto Actions You Can Take When a Node is Sched-uled for Replacement (p. 125).
ElastiCache:NodeReplacementRescheduled
API Version 2015-02-02194
Amazon ElastiCache User Guide

DescriptionEvent Name
A node in your cluster is scheduled for replacementduring the window described in the notification.
For information on what actions you can take, goto Actions You Can Take When a Node is Sched-uled for Replacement (p. 125).
ElastiCache:NodeReplacementScheduled
A cache node has been removed from the cachecluster.
ElastiCache:RemoveCacheNodeComplete
A cache snapshot has completed successfully.ElastiCache:SnapshotComplete
A cache snapshot has failed. See the cluster’scache events for more a detailed cause.
If you describe the snapshot, see DescribeSnap-shots, the status will be failed.
ElastiCache:SnapshotFailed
For more information on using Amazon SNS notifications with ElastiCache, see Using Amazon SNSNotifications with ElastiCache (p. 111).
API Version 2015-02-02195
Amazon ElastiCache User Guide

Logging Amazon ElastiCache APICalls Using AWS CloudTrail
Amazon ElastiCache is integrated with AWS CloudTrail, a service that captures API calls made by or onbehalf of ElastiCache in your AWS account and delivers the log files to an Amazon S3 bucket that youspecify. CloudTrail captures API calls from the ElastiCache console, the ElastiCache API, or theElastiCache CLI. Using the information collected by CloudTrail, you can determine what request wasmade to ElastiCache, the source IP address from which the request was made, who made the request,when it was made, and so on.
To learn more about CloudTrail, including how to configure and enable it, go to the AWS CloudTrail UserGuide.
ElastiCache Information in CloudTrailWhen CloudTrail logging is enabled in your AWS account, API calls made to ElastiCache actions aretracked in log files. For example, calls to the CreateCacheCluster, DescribeCacheCluster, andModifyCacheCluster APIs generate entries in the CloudTrail log files. All of the ElastiCache actions arelogged. For a full list of ElastiCache actions, go to http://docs.amazonaws.cn/AmazonElastiCache/latest/APIReference/.
Each log file contains not only ElastiCache records but also other AWS service records. CloudTraildetermines when to create and write to a new log file based on a time period and file size.
Every log entry contains information about who generated the request. The user identity information inthe log helps you determine whether the request was made with root or IAM user credentials, withtemporary security credentials for a role or federated user, or by another AWS service. For moreinformation, go to the documentation for the userIdentity field in the CloudTrail Event Reference.
You can store your log files in your bucket for as long as you want.You can also define Amazon S3lifecycle rules to archive or delete log files automatically. By default, your log files are encrypted usingAmazon S3 server-side encryption (SSE).
If you want to take quick action upon log file delivery, you can have CloudTrail publish Amazon SNSnotifications when new log files are delivered. For more information, see Configuring Amazon SNSNotifications.
API Version 2015-02-02196
Amazon ElastiCache User GuideElastiCache Information in CloudTrail
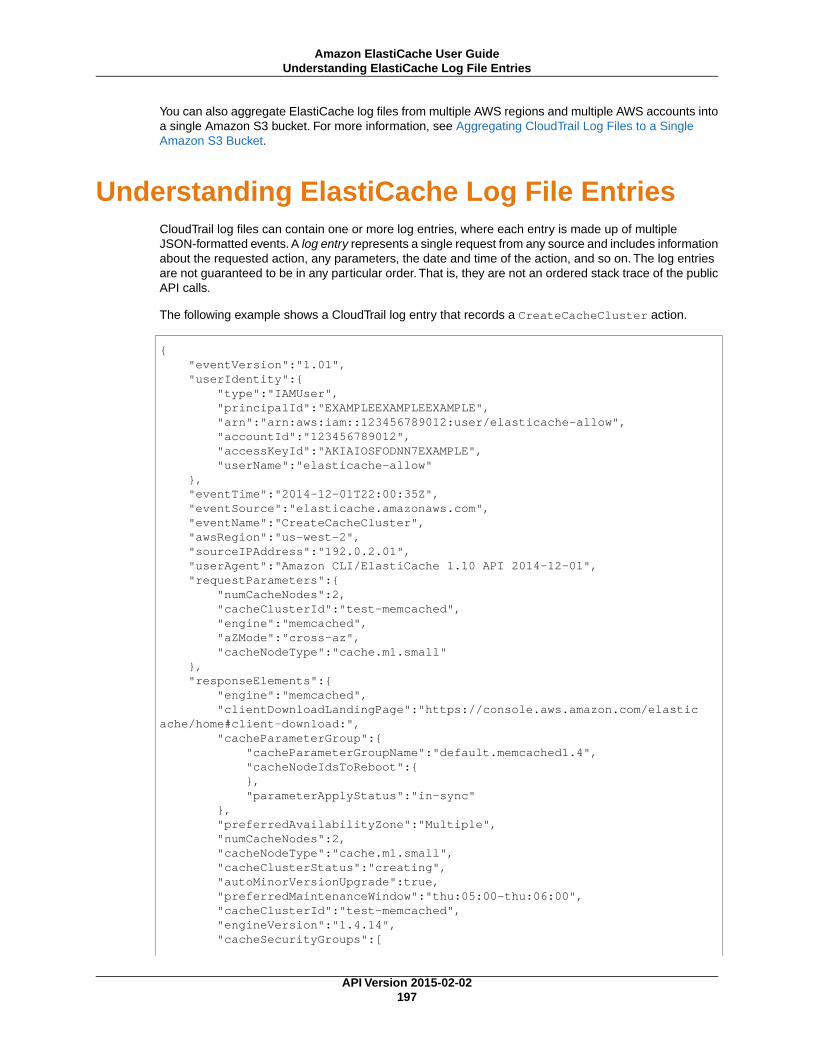
You can also aggregate ElastiCache log files from multiple AWS regions and multiple AWS accounts intoa single Amazon S3 bucket. For more information, see Aggregating CloudTrail Log Files to a SingleAmazon S3 Bucket.
Understanding ElastiCache Log File EntriesCloudTrail log files can contain one or more log entries, where each entry is made up of multipleJSON-formatted events. A log entry represents a single request from any source and includes informationabout the requested action, any parameters, the date and time of the action, and so on. The log entriesare not guaranteed to be in any particular order. That is, they are not an ordered stack trace of the publicAPI calls.
The following example shows a CloudTrail log entry that records a CreateCacheCluster action.
{ "eventVersion":"1.01", "userIdentity":{ "type":"IAMUser", "principalId":"EXAMPLEEXAMPLEEXAMPLE", "arn":"arn:aws:iam::123456789012:user/elasticache-allow", "accountId":"123456789012", "accessKeyId":"AKIAIOSFODNN7EXAMPLE", "userName":"elasticache-allow" }, "eventTime":"2014-12-01T22:00:35Z", "eventSource":"elasticache.amazonaws.com", "eventName":"CreateCacheCluster", "awsRegion":"us-west-2", "sourceIPAddress":"192.0.2.01", "userAgent":"Amazon CLI/ElastiCache 1.10 API 2014-12-01", "requestParameters":{ "numCacheNodes":2, "cacheClusterId":"test-memcached", "engine":"memcached", "aZMode":"cross-az", "cacheNodeType":"cache.m1.small" }, "responseElements":{ "engine":"memcached", "clientDownloadLandingPage":"https://console.aws.amazon.com/elastic ache/home#client-download:", "cacheParameterGroup":{ "cacheParameterGroupName":"default.memcached1.4", "cacheNodeIdsToReboot":{ }, "parameterApplyStatus":"in-sync" }, "preferredAvailabilityZone":"Multiple", "numCacheNodes":2, "cacheNodeType":"cache.m1.small", "cacheClusterStatus":"creating", "autoMinorVersionUpgrade":true, "preferredMaintenanceWindow":"thu:05:00-thu:06:00", "cacheClusterId":"test-memcached", "engineVersion":"1.4.14", "cacheSecurityGroups":[
API Version 2015-02-02197
Amazon ElastiCache User GuideUnderstanding ElastiCache Log File Entries

{ "status":"active", "cacheSecurityGroupName":"default" } ], "pendingModifiedValues":{ } }, "requestID":"104f30b3-3548-11e4-b7b8-6d79ffe84edd", "eventID":"92762127-7a68-42ce-8787-927d2174cde1" }
The following example shows a CloudTrail log entry that records a DescribeCacheCluster action.Note that for all ElastiCache Describe calls (Describe*), the ResponseElements section is removedand appears as null.
{ "eventVersion":"1.01", "userIdentity":{ "type":"IAMUser", "principalId":"EXAMPLEEXAMPLEEXAMPLE", "arn":"arn:aws:iam::123456789012:user/elasticache-allow", "accountId":"123456789012", "accessKeyId":"AKIAIOSFODNN7EXAMPLE", "userName":"elasticache-allow" }, "eventTime":"2014-12-01T22:01:00Z", "eventSource":"elasticache.amazonaws.com", "eventName":"DescribeCacheClusters", "awsRegion":"us-west-2", "sourceIPAddress":"192.0.2.01", "userAgent":"Amazon CLI/ElastiCache 1.10 API 2014-12-01", "requestParameters":{ "showCacheNodeInfo":false, "maxRecords":100 }, "responseElements":null, "requestID":"1f0b5031-3548-11e4-9376-c1d979ba565a", "eventID":"a58572a8-e81b-4100-8e00-1797ed19d172"}
The following example shows a CloudTrail log entry that records a ModifyCacheCluster action.
{ "eventVersion":"1.01", "userIdentity":{ "type":"IAMUser", "principalId":"EXAMPLEEXAMPLEEXAMPLE", "arn":"arn:aws:iam::123456789012:user/elasticache-allow", "accountId":"123456789012", "accessKeyId":"AKIAIOSFODNN7EXAMPLE", "userName":"elasticache-allow"
API Version 2015-02-02198
Amazon ElastiCache User GuideUnderstanding ElastiCache Log File Entries
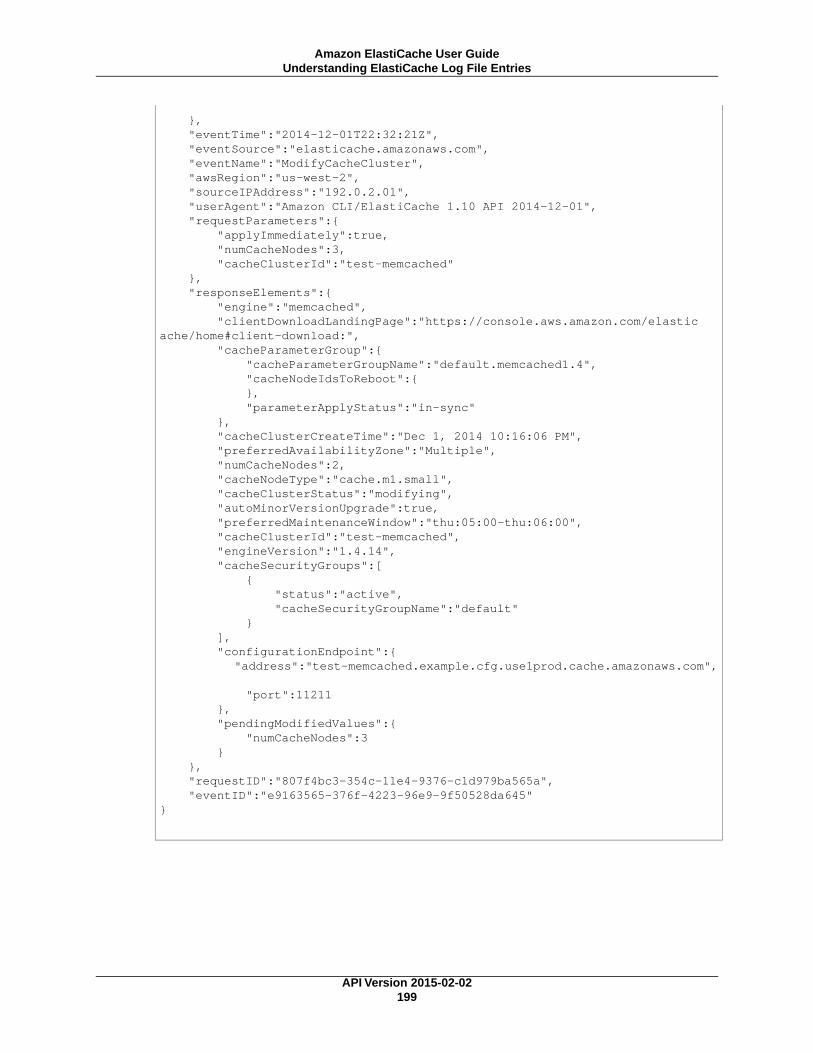
}, "eventTime":"2014-12-01T22:32:21Z", "eventSource":"elasticache.amazonaws.com", "eventName":"ModifyCacheCluster", "awsRegion":"us-west-2", "sourceIPAddress":"192.0.2.01", "userAgent":"Amazon CLI/ElastiCache 1.10 API 2014-12-01", "requestParameters":{ "applyImmediately":true, "numCacheNodes":3, "cacheClusterId":"test-memcached" }, "responseElements":{ "engine":"memcached", "clientDownloadLandingPage":"https://console.aws.amazon.com/elastic ache/home#client-download:", "cacheParameterGroup":{ "cacheParameterGroupName":"default.memcached1.4", "cacheNodeIdsToReboot":{ }, "parameterApplyStatus":"in-sync" }, "cacheClusterCreateTime":"Dec 1, 2014 10:16:06 PM", "preferredAvailabilityZone":"Multiple", "numCacheNodes":2, "cacheNodeType":"cache.m1.small", "cacheClusterStatus":"modifying", "autoMinorVersionUpgrade":true, "preferredMaintenanceWindow":"thu:05:00-thu:06:00", "cacheClusterId":"test-memcached", "engineVersion":"1.4.14", "cacheSecurityGroups":[ { "status":"active", "cacheSecurityGroupName":"default" } ], "configurationEndpoint":{ "address":"test-memcached.example.cfg.use1prod.cache.amazonaws.com",
"port":11211 }, "pendingModifiedValues":{ "numCacheNodes":3 } }, "requestID":"807f4bc3-354c-11e4-9376-c1d979ba565a", "eventID":"e9163565-376f-4223-96e9-9f50528da645"}
API Version 2015-02-02199
Amazon ElastiCache User GuideUnderstanding ElastiCache Log File Entries
Controlling ElastiCache Accesswith IAM
Topics
• About IAM (p. 200)
• ElastiCache Security Groups and IAM (p. 201)
• ElastiCache Resources and IAM (p. 201)
• ElastiCache Actions and IAM (p. 201)
• ElastiCache Keys (p. 202)
• Example Policies for ElastiCache (p. 203)
• Failure to Retrieve Account Attributes (p. 204)
ElastiCache allows you to control access to your cache clusters using cache security groups. A cachesecurity group acts like a firewall controlling network access to your cache cluster.
ImportantElastiCache uses cache security groups to control who has access to specific ElastiCache cacheclusters. There's no way in the IAM system to allow or deny access to a specific cache cluster.
For more information about using security groups with ElastiCache, refer to the Amazon ElastiCacheUser Guide.
About IAMAmazon ElastiCache integrates with AWS Identity and Access Management (IAM), a service that enablesyou to do the following:
• Create users and groups under your AWS account
• Easily share your AWS resources between the users in your AWS account
• Assign unique security credentials to each user
• Control each user's access to services and resources
• Get a single bill for all users in your AWS account
API Version 2015-02-02200
Amazon ElastiCache User GuideAbout IAM
For example, you can use IAM with ElastiCache to control which Users in your AWS Account can createor modify cache clusters for your AWS Account.
For more information about IAM, see the following:
• Identity and Access Management (IAM)
• IAM Getting Started Guide
• Using IAM
For more information on using IAM with ElastiCache, see Controlling ElastiCache Access with IAM (p. 200).
ElastiCache Security Groups and IAMUsing IAM with ElastiCache doesn't change how you use ElastiCache cache security groups to grantaccess to cache clusters. However, you can use IAM policies to specify which ElastiCache actions a Userin your AWS Account can use with ElastiCache resources in general. Because you can't specify a particularcache cluster in the policy, you must specify * as the resource to indicate all cache clusters in the AWSAccount.
Example
You could create a policy that gives the Developers group permission to use only these APIs:CreateCacheCluster, DescribeCacheClusters, ModifyCacheCluster, RebootCacheCluster,DeleteCacheCluster, DescribeEvents. They could then use those APIs with any cache cluster thatbelongs to your AWS Account.
For examples of IAM policies that cover ElastiCache actions, see Example Policies for ElastiCache (p. 203).
ElastiCache Resources and IAMWhen you create an IAM policy for ElastiCache, you can't use an ElastiCache Amazon Resourc Name(ARN) to scope your policy to particular ElastiCache resources. In the Resource section of the policy,you must use the wildcard character, "*", which applies the policy permissions to all your ElastiCacheresources. Instead, you scope your policy to specific actions, as described following.
For more information about IAM, go to the Using IAM documentation.
ElastiCache Actions and IAMWhen you create an IAM policy for ElastiCache, your policy is scoped to specific actions, not resources.The policy is attached to specific users or groups and applies the policy permissions to all your ElastiCacheresources. In the Action portion of the IAM policy for ElastiCache, you scope your policy by specifyingany or all ElastiCache actions that you want to control access to. When writing a policy to control accessto ElastiCache actions, use "elastiCache:actionName" to specify which action or actions the policyis controlling, for example: "elastiCache:DescribeCacheClusters". To control access to multipleactions, list the actions in a comma delimited list. Each action name in the list must be prefixed withelastiCache:, for example: "elastiCache:ModifyCacheCluster","elastiCache:DescribeCacheClusters".
For a list of all ElastiCache actions, go to the Query API Actions in the Amazon ElastiCache API Reference.
API Version 2015-02-02201
Amazon ElastiCache User GuideElastiCache Security Groups and IAM
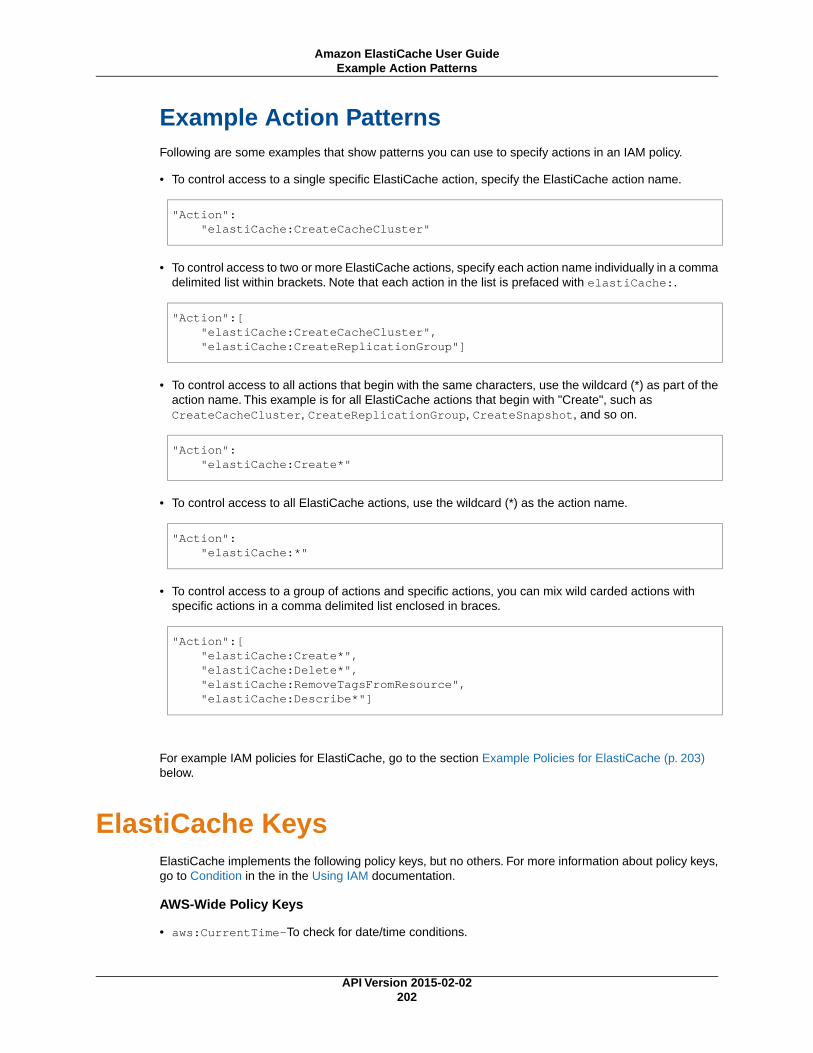
Example Action PatternsFollowing are some examples that show patterns you can use to specify actions in an IAM policy.
• To control access to a single specific ElastiCache action, specify the ElastiCache action name.
"Action": "elastiCache:CreateCacheCluster"
• To control access to two or more ElastiCache actions, specify each action name individually in a commadelimited list within brackets. Note that each action in the list is prefaced with elastiCache:.
"Action":[ "elastiCache:CreateCacheCluster", "elastiCache:CreateReplicationGroup"]
• To control access to all actions that begin with the same characters, use the wildcard (*) as part of theaction name. This example is for all ElastiCache actions that begin with "Create", such asCreateCacheCluster, CreateReplicationGroup, CreateSnapshot, and so on.
"Action": "elastiCache:Create*"
• To control access to all ElastiCache actions, use the wildcard (*) as the action name.
"Action": "elastiCache:*"
• To control access to a group of actions and specific actions, you can mix wild carded actions withspecific actions in a comma delimited list enclosed in braces.
"Action":[ "elastiCache:Create*", "elastiCache:Delete*", "elastiCache:RemoveTagsFromResource", "elastiCache:Describe*"]
For example IAM policies for ElastiCache, go to the section Example Policies for ElastiCache (p. 203)below.
ElastiCache KeysElastiCache implements the following policy keys, but no others. For more information about policy keys,go to Condition in the in the Using IAM documentation.
AWS-Wide Policy Keys
• aws:CurrentTime—To check for date/time conditions.
API Version 2015-02-02202
Amazon ElastiCache User GuideExample Action Patterns

• aws:EpochTime—To check for date/time conditions using a date in epoch or UNIX time.
• aws:principaltype—To check the type of principal (user, account, federated user, etc.) for the currentrequest.
• aws:SecureTransport—To check whether the request was sent using SSL. For services that useonly SSL, such as Amazon RDS and Amazon Route 53, the aws:SecureTransport key has nomeaning.
• aws:SourceArn—To check the source of the request, using the Amazon Resource Name (ARN) ofthe source. (This value is available for only some services. For more information, see Amazon ResourceName (ARN) under "Element Descriptions" in the Amazon Simple Queue Service Developer Guide.)
• aws:SourceIp—To check the IP address of the requester. Note that if you use aws:SourceIp, andthe request comes from an Amazon EC2 instance, the public IP address of the instance is evaluated.
• aws:UserAgent—To check the client application that made the request.
• aws:userid—To check the user ID of the requester.
• aws:username—To check the user name of the requester, if available.
NoteKey names are case sensitive.
Example Policies for ElastiCacheThis section shows a few simple policies for controlling user access to Amazon ElastiCache.
NoteIn the future, ElastiCache might add new actions that should logically be included in one of thefollowing policies, based on the policy’s stated goals.
Example 1: Allow a Network Admin group to only be able to access the APIs related toElastiCache security groups
In this example, we create a policy that gives access to the relevant actions and attach it to the group.The resource is stated as "*", because you can't specify a particular ElastiCache resource in an IAMpolicy.
{ "Version": "2012-10-17", "Statement":[{ "Effect":"Allow", "Action":[ "elasticache:CreateCacheSecurityGroup", "elasticache:DeleteCacheSecurityGroup", "elasticache:DescribeCacheSecurityGroup", "elasticache:AuthorizeCacheSecurityGroupIngress", "elasticache:RevokeCacheSecurityGroupIngress"], "Resource":"*" } ]}
API Version 2015-02-02203
Amazon ElastiCache User GuideExample Policies for ElastiCache
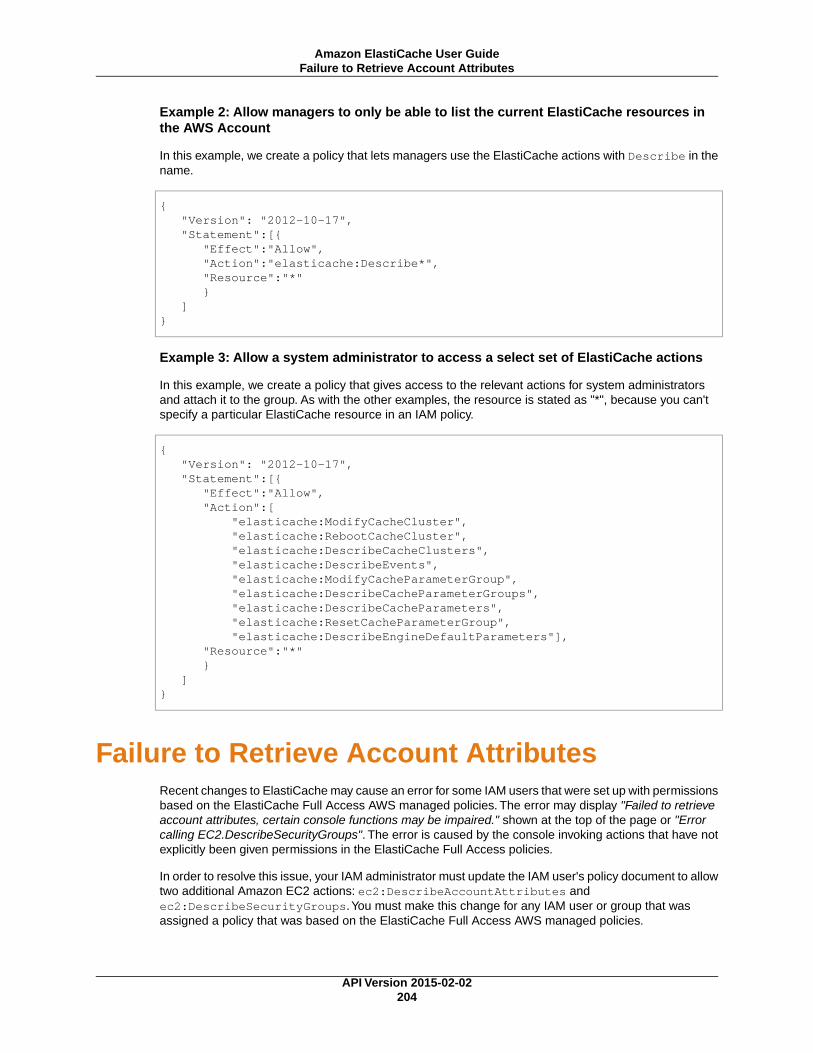
Example 2: Allow managers to only be able to list the current ElastiCache resources inthe AWS Account
In this example, we create a policy that lets managers use the ElastiCache actions with Describe in thename.
{ "Version": "2012-10-17", "Statement":[{ "Effect":"Allow", "Action":"elasticache:Describe*", "Resource":"*" } ]}
Example 3: Allow a system administrator to access a select set of ElastiCache actions
In this example, we create a policy that gives access to the relevant actions for system administratorsand attach it to the group. As with the other examples, the resource is stated as "*", because you can'tspecify a particular ElastiCache resource in an IAM policy.
{ "Version": "2012-10-17", "Statement":[{ "Effect":"Allow", "Action":[ "elasticache:ModifyCacheCluster", "elasticache:RebootCacheCluster", "elasticache:DescribeCacheClusters", "elasticache:DescribeEvents", "elasticache:ModifyCacheParameterGroup", "elasticache:DescribeCacheParameterGroups", "elasticache:DescribeCacheParameters", "elasticache:ResetCacheParameterGroup", "elasticache:DescribeEngineDefaultParameters"], "Resource":"*" } ]}
Failure to Retrieve Account AttributesRecent changes to ElastiCache may cause an error for some IAM users that were set up with permissionsbased on the ElastiCache Full Access AWS managed policies. The error may display "Failed to retrieveaccount attributes, certain console functions may be impaired." shown at the top of the page or "Errorcalling EC2.DescribeSecurityGroups". The error is caused by the console invoking actions that have notexplicitly been given permissions in the ElastiCache Full Access policies.
In order to resolve this issue, your IAM administrator must update the IAM user's policy document to allowtwo additional Amazon EC2 actions: ec2:DescribeAccountAttributes andec2:DescribeSecurityGroups.You must make this change for any IAM user or group that wasassigned a policy that was based on the ElastiCache Full Access AWS managed policies.
API Version 2015-02-02204
Amazon ElastiCache User GuideFailure to Retrieve Account Attributes
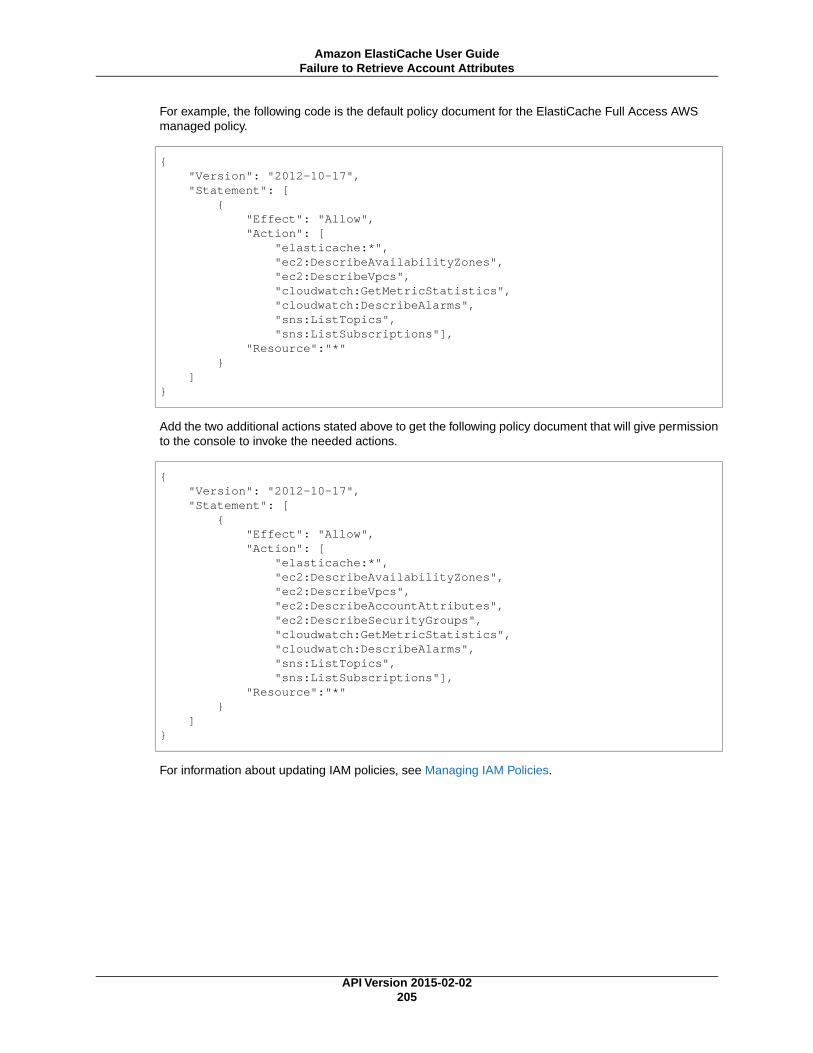
For example, the following code is the default policy document for the ElastiCache Full Access AWSmanaged policy.
{ "Version": "2012-10-17", "Statement": [ { "Effect": "Allow", "Action": [ "elasticache:*", "ec2:DescribeAvailabilityZones", "ec2:DescribeVpcs", "cloudwatch:GetMetricStatistics", "cloudwatch:DescribeAlarms", "sns:ListTopics", "sns:ListSubscriptions"], "Resource":"*" } ]}
Add the two additional actions stated above to get the following policy document that will give permissionto the console to invoke the needed actions.
{ "Version": "2012-10-17", "Statement": [ { "Effect": "Allow", "Action": [ "elasticache:*", "ec2:DescribeAvailabilityZones", "ec2:DescribeVpcs", "ec2:DescribeAccountAttributes", "ec2:DescribeSecurityGroups", "cloudwatch:GetMetricStatistics", "cloudwatch:DescribeAlarms", "sns:ListTopics", "sns:ListSubscriptions"], "Resource":"*" } ]}
For information about updating IAM policies, see Managing IAM Policies.
API Version 2015-02-02205
Amazon ElastiCache User GuideFailure to Retrieve Account Attributes
Installing ElastiCache ClusterClients
Topics
• Installing the ElastiCache Cluster Client for PHP (p. 206)
• Installing the ElastiCache Cluster Client for .NET (p. 210)
Installing the ElastiCache Cluster Client for PHPTopics
• Downloading the Installation Package (p. 206)
• Installation Steps for New Users (p. 207)
• For Users Who Already Have php-memcached Extension Installed (p. 210)
• Removing the PHP Cluster Client (p. 210)
This section describes how to install, update, and remove the PHP components for the ElastiCacheCluster Client on Amazon EC2 instances. For more information about Auto Discovery, see Node AutoDiscovery (Memcached) (p. 116). For sample PHP code to use the client, see Using the ElastiCacheCluster Client for PHP (p. 119).
Downloading the Installation PackageTo ensure that you use the correct version of the ElastiCache Cluster Client for PHP, you will need toknow what version of PHP is installed on your Amazon EC2 instance.You will also need to know whetheryour Amazon EC2 instance is running a 64-bit or 32-bit version of Linux.
To determine the PHP version installed on your Amazon EC2 instance
• At the command prompt, run the following command:
$ php -v
The PHP version will be shown in the output, as in this example:
API Version 2015-02-02206
Amazon ElastiCache User GuideInstalling the ElastiCache Cluster Client for PHP

PHP 5.4.10 (cli) (built: Jan 11 2013 14:48:57) Copyright (c) 1997-2012 The PHP GroupZend Engine v2.4.0, Copyright (c) 1998-2012 Zend Technologies
To determine your Amazon EC2 AMI architecture (64-bit or 32-bit)
1. Sign in to the AWS Management Console and open the Amazon EC2 console at https://console.amazonaws.cn/ec2/.
2. In the Instances list, click your Amazon EC2 instance.
3. In the Description tab, look for the AMI: field. A 64-bit instance should have x86_64 as part of thedescription; for a 32-bit instance, look for i386 or i686 in this field.
You are now ready to download the ElastiCache Cluster Client.
To download the ElastiCache Cluster Client for PHP
1. Sign in to the AWS Management Console and open the ElastiCache console at https://console.amazonaws.cn/elasticache/.
2. From the ElastiCache console, click Download ElastiCache Cluster Client.
3. Choose the ElastiCache Cluster Client that matches your PHP version and AMI architecture, andclick the Download ElastiCache Cluster Client button.
Installation Steps for New UsersTo install on an Amazon Linux AMI 2014.03 (64-bit and 32-bit)
1. Launch an Amazon Linux instance (either 64-bit or 32-bit) and log into it.
2. Install PHP dependencies:
$ sudo yum install gcc-c++ php php-pear
3. Download the correct php-memcached package for your Amazon EC2 instance and PHP version.For more information, see Downloading the Installation Package (p. 206).
4. Install php-memcached. The URI should be the download path for the installation package:
$ sudo pecl install <package download path>
Here is a sample installation command for PHP 5.4, 64-bit Linux. In this sample, replace X.Y.Z withthe actual version number:
$ sudo pecl install /home/AmazonElastiCacheClusterClient-X.Y.Z-PHP54-64bit.tgz
NotePlease use the latest version of the install artifact.
5. With root/sudo permission, add a new file named memcached.ini in the /etc/php.d directory,and insert "extension=amazon-elasticache-cluster-client.so" in the file:
API Version 2015-02-02207
Amazon ElastiCache User GuideInstallation Steps for New Users
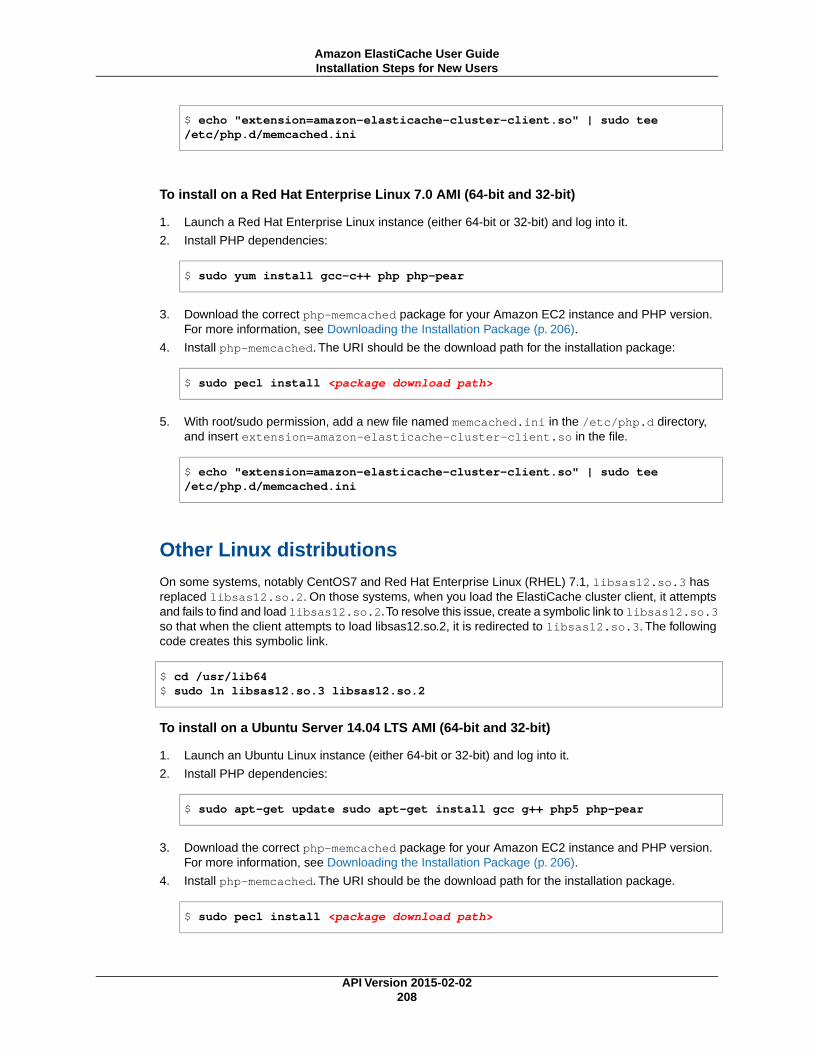
$ echo "extension=amazon-elasticache-cluster-client.so" | sudo tee /etc/php.d/memcached.ini
To install on a Red Hat Enterprise Linux 7.0 AMI (64-bit and 32-bit)
1. Launch a Red Hat Enterprise Linux instance (either 64-bit or 32-bit) and log into it.
2. Install PHP dependencies:
$ sudo yum install gcc-c++ php php-pear
3. Download the correct php-memcached package for your Amazon EC2 instance and PHP version.For more information, see Downloading the Installation Package (p. 206).
4. Install php-memcached. The URI should be the download path for the installation package:
$ sudo pecl install <package download path>
5. With root/sudo permission, add a new file named memcached.ini in the /etc/php.d directory,and insert extension=amazon-elasticache-cluster-client.so in the file.
$ echo "extension=amazon-elasticache-cluster-client.so" | sudo tee /etc/php.d/memcached.ini
Other Linux distributionsOn some systems, notably CentOS7 and Red Hat Enterprise Linux (RHEL) 7.1, libsas12.so.3 hasreplaced libsas12.so.2. On those systems, when you load the ElastiCache cluster client, it attemptsand fails to find and load libsas12.so.2.To resolve this issue, create a symbolic link to libsas12.so.3so that when the client attempts to load libsas12.so.2, it is redirected to libsas12.so.3. The followingcode creates this symbolic link.
$ cd /usr/lib64$ sudo ln libsas12.so.3 libsas12.so.2
To install on a Ubuntu Server 14.04 LTS AMI (64-bit and 32-bit)
1. Launch an Ubuntu Linux instance (either 64-bit or 32-bit) and log into it.
2. Install PHP dependencies:
$ sudo apt-get update sudo apt-get install gcc g++ php5 php-pear
3. Download the correct php-memcached package for your Amazon EC2 instance and PHP version.For more information, see Downloading the Installation Package (p. 206).
4. Install php-memcached. The URI should be the download path for the installation package.
$ sudo pecl install <package download path>
API Version 2015-02-02208
Amazon ElastiCache User GuideInstallation Steps for New Users

NoteThis installation step installs the build artifact amazon-elasticache-cluster-client.sointo the /usr/lib/php5/20121212* directory. Please verify the absolute path of the buildartifact because it is needed by the next step.
If the previous command doesn't work, you need to manually extract the PHP client artifactamazon-elasticache-cluster-client.so from the downloaded *.tgz file, and copy it to the/usr/lib/php5/20121212* directory.
$ tar -xvf <package download path>cp amazon-elasticache-cluster-client.so /usr/lib/php5/20121212/
5. With root/sudo permission, add a new file named memcached.ini in the /etc/php5/cli/conf.ddirectory, and insert "extension=<absolute path to amazon-elasticache-cluster-client.so>" in the file.
$ echo "extension=<absolute path to amazon-elasticache-cluster-client.so>" | sudo tee /etc/php5/cli/conf.d/memcached.ini
To install for SUSE Linux Enterprise Server 11 AMI (64-bit or 32-bit)
1. Launch a SUSE Linux instance (either 64-bit or 32-bit) and log into it.
2. Install PHP dependencies:
$ sudo zypper install gcc php53-devel
3. Download the correct php-memcached package for your Amazon EC2 instance and PHP version.For more information, see Downloading the Installation Package (p. 206).
4. Install php-memcached. The URI should be the download path for the installation package.
$ sudo pecl install <package download path>
5. With root/sudo permission, add a new file named memcached.ini in the /etc/php5/conf.ddirectory, and insert extension=amazon-elasticache-cluster-client.so in the file.
$ echo "extension=amazon-elasticache-cluster-client.so" | sudo tee /etc/php5/conf.d/memcached.ini
NoteIf Step 5 doesn't work for any of the previous platforms, please verify the install path foramazon-elasticache-cluster-client.so, and specify the full path of the binary in theextension. Also, verify that the PHP in use is a supported version. We support versions 5.3through 5.5.
API Version 2015-02-02209
Amazon ElastiCache User GuideInstallation Steps for New Users
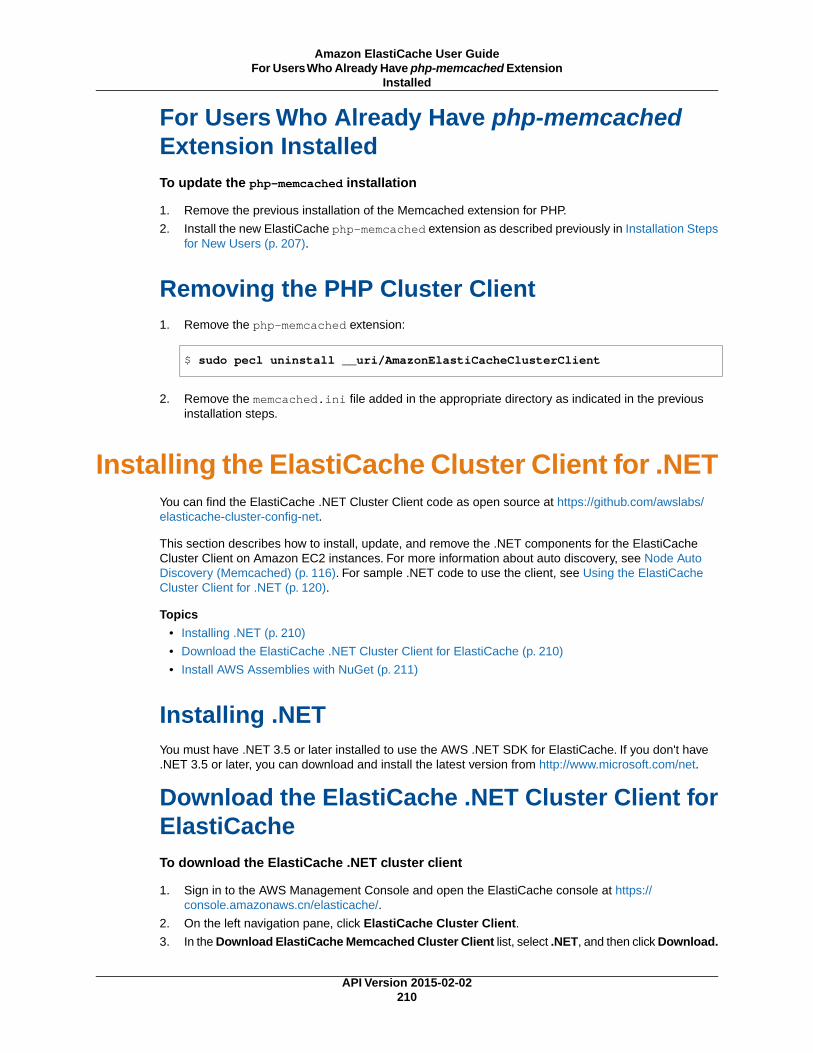
For Users Who Already Have php-memcachedExtension InstalledTo update the php-memcached installation
1. Remove the previous installation of the Memcached extension for PHP.
2. Install the new ElastiCache php-memcached extension as described previously in Installation Stepsfor New Users (p. 207).
Removing the PHP Cluster Client1. Remove the php-memcached extension:
$ sudo pecl uninstall __uri/AmazonElastiCacheClusterClient
2. Remove the memcached.ini file added in the appropriate directory as indicated in the previousinstallation steps.
Installing the ElastiCache Cluster Client for .NETYou can find the ElastiCache .NET Cluster Client code as open source at https://github.com/awslabs/elasticache-cluster-config-net.
This section describes how to install, update, and remove the .NET components for the ElastiCacheCluster Client on Amazon EC2 instances. For more information about auto discovery, see Node AutoDiscovery (Memcached) (p. 116). For sample .NET code to use the client, see Using the ElastiCacheCluster Client for .NET (p. 120).
Topics
• Installing .NET (p. 210)
• Download the ElastiCache .NET Cluster Client for ElastiCache (p. 210)
• Install AWS Assemblies with NuGet (p. 211)
Installing .NETYou must have .NET 3.5 or later installed to use the AWS .NET SDK for ElastiCache. If you don't have.NET 3.5 or later, you can download and install the latest version from http://www.microsoft.com/net.
Download the ElastiCache .NET Cluster Client forElastiCacheTo download the ElastiCache .NET cluster client
1. Sign in to the AWS Management Console and open the ElastiCache console at https://console.amazonaws.cn/elasticache/.
2. On the left navigation pane, click ElastiCache Cluster Client.
3. In the Download ElastiCache Memcached Cluster Client list, select .NET, and then click Download.
API Version 2015-02-02210
Amazon ElastiCache User GuideFor Users Who Already Have php-memcached Extension
Installed

Install AWS Assemblies with NuGetNuGet is a package management system for the .NET platform. NuGet is aware of assembly dependenciesand installs all required files automatically. NuGet installed assemblies are stored with your solution,rather than in a central location such as Program Files, so you can install versions specific to anapplication without creating compatibility issues.
Installing NuGetNuGet can be installed from the Installation Gallery on MSDN; go to https://visualstudiogallery.msdn.microsoft.com/27077b70-9dad-4c64-adcf-c7cf6bc9970c. If you are using VisualStudio 2010 or later, NuGet is automatically installed.
You can use NuGet from either Solution Explorer or Package Manager Console.
Using NuGet from Solution Explorer
To use NuGet from Solution Explorer in Visual Studio 2010
1. From the Tools menu, select Library Package Manager.
2. Click Package Manager Console.
To use NuGet from Solution Explorer in Visual Studio 2012 or Visual Studio 2013
1. From the Tools menu, select NuGet Package Manager.
2. Click Package Manager Console.
From the command line, you can install the assemblies using Install-Package, as shown following.
Install-Package Amazon.ElastiCacheCluster
To see a page for every package that is available through NuGet, such as the AWSSDK andAWS.Extensions assemblies, go to the NuGet website at http://www.nuget.org.The page for each packageincludes a sample command line for installing the package using the console and a list of the previousversions of the package that are available through NuGet.
For more information on Package Manager Console commands, go to http://nuget.codeplex.com/wikipage?title=Package%20Manager%20Console%20Command%20Reference%20%28v1.3%29.
API Version 2015-02-02211
Amazon ElastiCache User GuideInstall AWS Assemblies with NuGet

Document History
The following table describes the important changes to the documentation since the last release of theAmazon ElastiCache User Guide.
• API version: 2015-02-02
• Latest documentation update: June 11, 2015
Date ChangedDescriptionChange
June 11, 2015ElastiCache added three messages pertaining to sched-uled node replacement. ElastiCache:NodeReplace-mentScheduled, ElastiCache:NodeReplacementRes-cheduled, and ElastiCache:NodeReplacement-Canceled.
For more information and actions you can take when anode is scheduled for replacement, go to ElastiCache'sEvent Notifications and Amazon SNS (p. 193).
Node replacementmessages added
March 11, 2015ElastiCache added support for Redis version 2.8.19 andRedis improvements since version 2.8.6. This support in-cludes support for:
• The HyperLogLog data structure, with the Redis com-mands PFADD, PFCOUNT, and PFMERGE.
• Lexicographic range queries with the new commandsZRANGEBYLEX, ZLEXCOUNT, and ZREMRANGEBYLEX.
• Introduced a number of bug fixes, namely preventing aprimary node from sending stale data to replica nodesby failing the master SYNC when a background save(bgsave) child process terminates unexpectedly.
For more information on HyperLogLog, go to Redis newdata structure: the HyperLogLog. For more information onPFADD, PFCOUNT, and PFMERGE, go to the Redis Docu-mentation and click HyperLogLog.
Support for Redis v.2.8.19.
API Version 2015-02-02212
Amazon ElastiCache User Guide
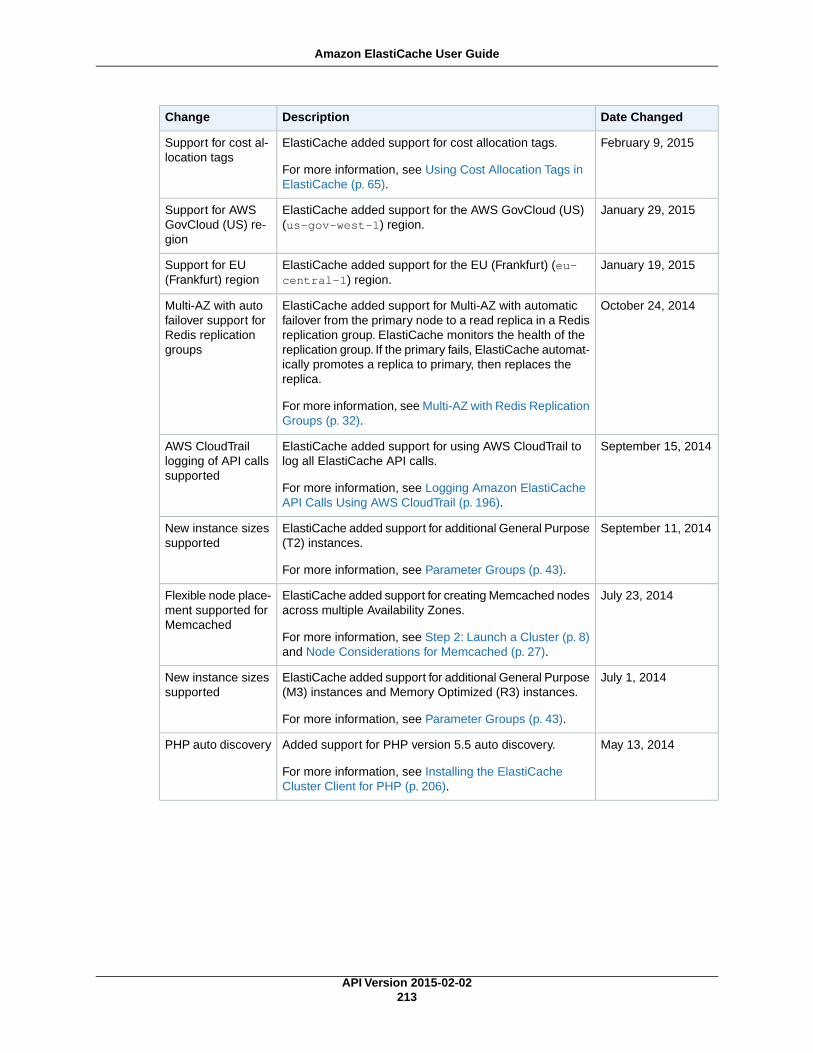
Date ChangedDescriptionChange
February 9, 2015ElastiCache added support for cost allocation tags.
For more information, see Using Cost Allocation Tags inElastiCache (p. 65).
Support for cost al-location tags
January 29, 2015ElastiCache added support for the AWS GovCloud (US)(us-gov-west-1) region.
Support for AWSGovCloud (US) re-gion
January 19, 2015ElastiCache added support for the EU (Frankfurt) (eu-central-1) region.
Support for EU(Frankfurt) region
October 24, 2014ElastiCache added support for Multi-AZ with automaticfailover from the primary node to a read replica in a Redisreplication group. ElastiCache monitors the health of thereplication group. If the primary fails, ElastiCache automat-ically promotes a replica to primary, then replaces thereplica.
For more information, see Multi-AZ with Redis ReplicationGroups (p. 32).
Multi-AZ with autofailover support forRedis replicationgroups
September 15, 2014ElastiCache added support for using AWS CloudTrail tolog all ElastiCache API calls.
For more information, see Logging Amazon ElastiCacheAPI Calls Using AWS CloudTrail (p. 196).
AWS CloudTraillogging of API callssupported
September 11, 2014ElastiCache added support for additional General Purpose(T2) instances.
For more information, see Parameter Groups (p. 43).
New instance sizessupported
July 23, 2014ElastiCache added support for creating Memcached nodesacross multiple Availability Zones.
For more information, see Step 2: Launch a Cluster (p. 8)and Node Considerations for Memcached (p. 27).
Flexible node place-ment supported forMemcached
July 1, 2014ElastiCache added support for additional General Purpose(M3) instances and Memory Optimized (R3) instances.
For more information, see Parameter Groups (p. 43).
New instance sizessupported
May 13, 2014Added support for PHP version 5.5 auto discovery.
For more information, see Installing the ElastiCacheCluster Client for PHP (p. 206).
PHP auto discovery
API Version 2015-02-02213
Amazon ElastiCache User Guide
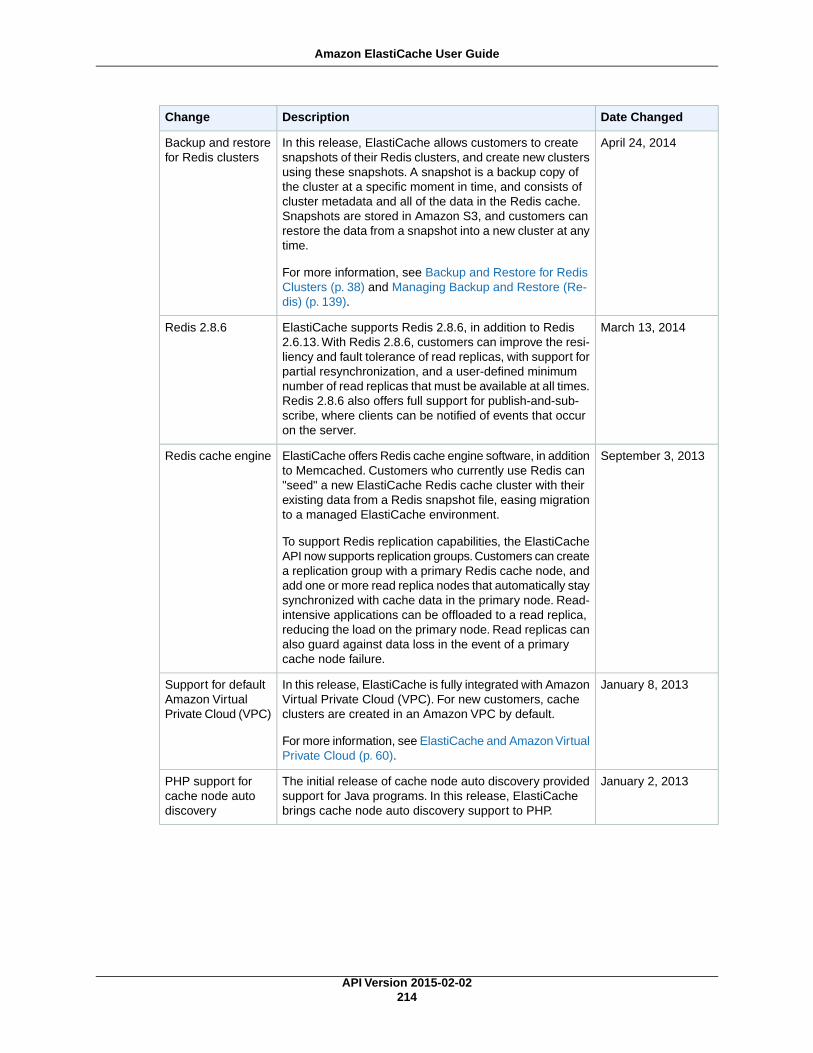
Date ChangedDescriptionChange
April 24, 2014In this release, ElastiCache allows customers to createsnapshots of their Redis clusters, and create new clustersusing these snapshots. A snapshot is a backup copy ofthe cluster at a specific moment in time, and consists ofcluster metadata and all of the data in the Redis cache.Snapshots are stored in Amazon S3, and customers canrestore the data from a snapshot into a new cluster at anytime.
For more information, see Backup and Restore for RedisClusters (p. 38) and Managing Backup and Restore (Re-dis) (p. 139).
Backup and restorefor Redis clusters
March 13, 2014ElastiCache supports Redis 2.8.6, in addition to Redis2.6.13. With Redis 2.8.6, customers can improve the resi-liency and fault tolerance of read replicas, with support forpartial resynchronization, and a user-defined minimumnumber of read replicas that must be available at all times.Redis 2.8.6 also offers full support for publish-and-sub-scribe, where clients can be notified of events that occuron the server.
Redis 2.8.6
September 3, 2013ElastiCache offers Redis cache engine software, in additionto Memcached. Customers who currently use Redis can"seed" a new ElastiCache Redis cache cluster with theirexisting data from a Redis snapshot file, easing migrationto a managed ElastiCache environment.
To support Redis replication capabilities, the ElastiCacheAPI now supports replication groups. Customers can createa replication group with a primary Redis cache node, andadd one or more read replica nodes that automatically staysynchronized with cache data in the primary node. Read-intensive applications can be offloaded to a read replica,reducing the load on the primary node. Read replicas canalso guard against data loss in the event of a primarycache node failure.
Redis cache engine
January 8, 2013In this release, ElastiCache is fully integrated with AmazonVirtual Private Cloud (VPC). For new customers, cacheclusters are created in an Amazon VPC by default.
For more information, see ElastiCache and Amazon VirtualPrivate Cloud (p. 60).
Support for defaultAmazon VirtualPrivate Cloud (VPC)
January 2, 2013The initial release of cache node auto discovery providedsupport for Java programs. In this release, ElastiCachebrings cache node auto discovery support to PHP.
PHP support forcache node autodiscovery
API Version 2015-02-02214
Amazon ElastiCache User Guide
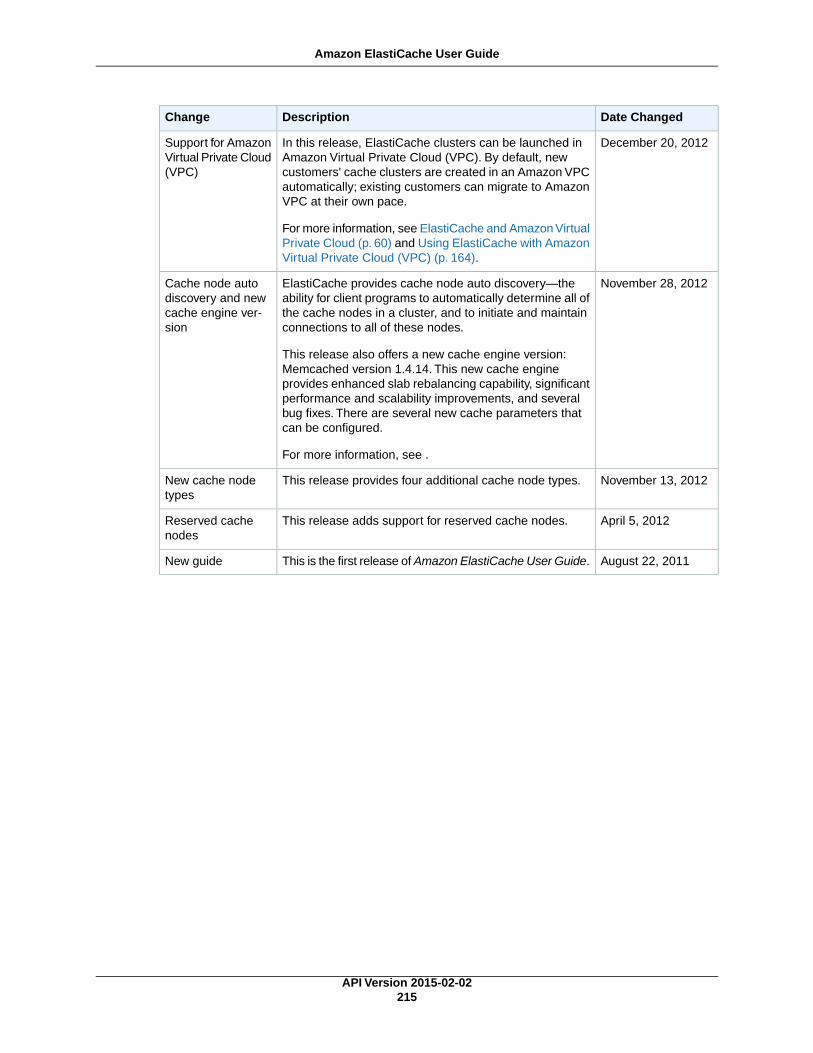
Date ChangedDescriptionChange
December 20, 2012In this release, ElastiCache clusters can be launched inAmazon Virtual Private Cloud (VPC). By default, newcustomers' cache clusters are created in an Amazon VPCautomatically; existing customers can migrate to AmazonVPC at their own pace.
For more information, see ElastiCache and Amazon VirtualPrivate Cloud (p. 60) and Using ElastiCache with AmazonVirtual Private Cloud (VPC) (p. 164).
Support for AmazonVirtual Private Cloud(VPC)
November 28, 2012ElastiCache provides cache node auto discovery—theability for client programs to automatically determine all ofthe cache nodes in a cluster, and to initiate and maintainconnections to all of these nodes.
This release also offers a new cache engine version:Memcached version 1.4.14. This new cache engineprovides enhanced slab rebalancing capability, significantperformance and scalability improvements, and severalbug fixes. There are several new cache parameters thatcan be configured.
For more information, see .
Cache node autodiscovery and newcache engine ver-sion
November 13, 2012This release provides four additional cache node types.New cache nodetypes
April 5, 2012This release adds support for reserved cache nodes.Reserved cachenodes
August 22, 2011This is the first release of Amazon ElastiCache User Guide.New guide
API Version 2015-02-02215
Amazon ElastiCache User Guide

AWS Glossary
For the latest AWS terminology, see the AWS Glossary in the AWS General Reference.
API Version 2015-02-02216
Amazon ElastiCache User Guide