Embed Size (px)
Citation preview

Amadeus Pro Printer User Guide for Amadeus VISTA
& Amadeus Pro WEB
TRAVEL OFFICE Products & Solutions
Systems Integration Ticketing
Document Revision: 4.2P1-B
May 9th
, 2005
DOCUMENT REVISION HISTORY
Document
Version
Date Comments
2.4P4-B August 11th, 1999 First version published.
2.5P1-A October 14th, 1999 New version of Pro Printer that integrates the certificates.
2.5P1-B November 3rd, 1999 Added error and warning messages related to security and
certificates.
2.5P1-C November 25th, 1999 Add description of the certificates revocation and expiration and
warnings with Microsoft Winsock2 and Windows NT.
2.6 P1-B February 2nd, 2000 Add description of the new version 2.6 P1.
2.6 P1-C February 7th, 2000 Change of NS Office ID to Amadeus Office ID
2.6 P1-D February 28th, 2000 Specify clear steps to substitute old certificates by new ones.
2.6P1-E April 27th, 2000 Change the URLs in the Pro Printer Communication Adapter
settings.
2.8P1-A August 29th, 2000 Add SNMP configuration in Com Adapter.
Include N (3-letter month) in the file output configuration.
2.8P1-C November 3rd, 2000. Adapt chapters organization and new OS/IE table compatibility.
2.8P1-D November 3rd, 2000.
J. Alperi STP chapters, and split of chapters into specific hyperlinks.
2.8P1-E November 29th, 2000
F.Felix Add STP Start chapter.
3.2P1-A May 28th,
J. Remirez - New PP version 3.2: Proxy support, etc - Remove chapter for Certificate expiration - Change references to “Web print services“ by “DDIP”
4.2P1-A March 30th, 2005. Migration to Auto Update / Web Conf. / Security Gateway
4.2P1-B May 9th, 2005
Ph. Carbon Concatenation of the documentation in pdf format. Documentation formatting. Minor modifications.
Copyright © AMADEUS GLOBAL TRAVEL DISTRIBUTION
All Rights reserved
Microsoft is a registered trademark of Microsoft Corporation.
Author:
Distributed Systems
Published by: AMADEUS Development Company 455 Route du Pin Montard B.P. 69 06902 Sophia Antipolis FRANCE

3
PREFACE............................................................................................................................6
BEFORE YOU START ........................................................................................................7
PLATFORMS SUPPORTED ...............................................................................................8
PRINTER CIDS: ................................................................................................................10
If you are upgrading from Pro Printer version 2.8, 3.2, 3.4…: .................................................................................. 10
View the CIDs associated to your HWID in Web Conf:.............................................................................................. 11
Error and warning messages during CIDs registration .............................................................................................. 12
Pro Printer client authentication: ................................................................................................................................. 12
INSTALLING AMADEUS PRO PRINTER ON YOUR PC: ................................................14
Web Conf: ....................................................................................................................................................................... 14
Configuration:................................................................................................................................................................. 14
Authorization:................................................................................................................................................................. 16
Installation: ..................................................................................................................................................................... 18
UNINSTALL PROCEDURE...............................................................................................20
FALL-BACK PROCEDURE ..............................................................................................23
CONFIGURING THE NETWORK CONNECTION AND PRINTERS ATID:.......................24
Configuring the Communication Adapter.................................................................................................................... 24 Basic configuration ....................................................................................................................................................... 24 SNMP Configuration .................................................................................................................................................... 26 Proxy Configuration...................................................................................................................................................... 27
Configuring the printers: ............................................................................................................................................... 28
CONFIGURING A NON TICKET PRINTER (HARDCOPY, INVOICE, ITINERARIES): ....31
CONFIGURING A TICKET PRINTER: ..............................................................................32
CONFIGURING THE A.I.R. STORAGE: ...........................................................................33
Details on the A.I.R Formatter:..................................................................................................................................... 34
The parameters:.............................................................................................................................................................. 34
A.I.R. files naming conventions for Back-offices: ........................................................................................................ 35

4
AMADEUS PRO PRINTER USER INTERFACE:..............................................................37 Communication Adapter icon: ...................................................................................................................................... 37 Printer icon: .................................................................................................................................................................. 38
TROUBLE SHOOTING .....................................................................................................39
Pro printer 2.5P1: ........................................................................................................................................................... 39 Pro printer 2.5P1 & Microsoft Winsock 2: ................................................................................................................... 39 Pro Printer 2.5P1 & Windows NT:............................................................................................................................... 39 Upgrading Pro Printer 2.5P1 to 2.6P1: ......................................................................................................................... 39
Pro Printer Communication Adapter window ............................................................................................................. 40 Connection with the Central System Status: ................................................................................................................. 40 Communication with the Central System:..................................................................................................................... 42 Network Traffic Statistics ............................................................................................................................................. 42 Messages....................................................................................................................................................................... 42 Maintenance Mode ...................................................................................................................................................... 43
Pro Printer Instance Status window ............................................................................................................................. 43 Input and output status .................................................................................................................................................. 43 Input module information ............................................................................................................................................. 44 Messages....................................................................................................................................................................... 44
Windows NT Event Log ................................................................................................................................................. 45
Summary ......................................................................................................................................................................... 45
ERROR MESSAGES.........................................................................................................46
Communication Adapter errors .................................................................................................................................... 47
Pro Printer instance errors ............................................................................................................................................ 48 Input module errors (link with the Communication Adapter) ....................................................................................... 48 Output modules errors .................................................................................................................................................. 50 Formatter modules errors.............................................................................................................................................. 54
Loader errors .................................................................................................................................................................. 55
Security Warnings and Error Messages ....................................................................................................................... 55
TECHNICAL INFORMATION ON ISDN CONFIGURATIONS...........................................57
Status on different ISDN platforms: ............................................................................................................................. 57
Various configurations technical descriptions: ............................................................................................................ 57
IDSN ROUTERS: ........................................................................................................................................................... 58 ISDN Router - If the ISDN inactivity timeout is very short (some seconds): ............................................................... 59 ISDN Router - If the print request is done from a PC that is not connected to the same ISDN router as Pro Printer
(remote ticketing):......................................................................................................................................................... 59
ISDN MODEMS:............................................................................................................................................................ 60 ISDN Modem - If Amadeus Pro Printer’s keep-alive does not allow the Windows dial-up connection to disconnect
(by inactivity) the ISDN line:........................................................................................................................................ 60 ISDN Modem - If the dial-up inactivity timeout is very short (some seconds):............................................................ 61 ISDN Modem - If the print request is done from a PC that is not connected to the same ISDN modem as Pro Printer
(remote ticketing):......................................................................................................................................................... 61
5
Special cases with ISDN modem- MS Internet Communication Sharing .................................................................. 61
BEFORE YOU START AMADEUS PRO PRINTER INTERNET STP: ..............................63
DOWNLOAD AMADEUS PRO PRINTER INTERNET STP: .............................................64
Download page: .............................................................................................................................................................. 64
INTERNET STP NETWORK CONFIGURATION ..............................................................66
SATELLITE TICKET PRINTING - USER INTERFACE:....................................................68
STP SPECIFIC ERROR MESSAGES ...............................................................................72
Certificate validation errors. ......................................................................................................................................... 72
ComCore related messages ............................................................................................................................................ 74

6
PPrreeffaaccee
This document is intended to guide the installer in the installation and configuration of the Amadeus printing application for Amadeus VISTA and Amadeus Pro WEB in a browser-based environment. This documentation can be accessed directly from the Amadeus Pro Printer download page available under Vista and Pro Web sites.

7
BBeeffoorree yyoouu ssttaarrtt
This document is intended to guide the installer in the installation and configuration of the Amadeus printing application for VISTA and Pro WEB in a browser-based environment.
This application will be named Amadeus Pro Printer in this manual. Installation, configuration and troubleshooting sections will allow the users to get a better understanding of the browser based configuration environment. This document describes the standard settings, and does not intend to fully cover very specific cases such as back-office transfer. The complete technical documentation of all Amadeus Pro Printer possible features are described in the manual titled Amadeus Pro Printer - User Guide. Before you install and configure the Amadeus printers, you must first ensure that the following elements are available: 1) You have a PC using Windows 95, 98 , ME, NT4 or 2000.
Microsoft Internet Explorer 5.01 is required for Windows NT, and eventually for Windows 95 and 98 platforms using several Windows users Amadeus Automatic Update 2.4 is required for the installation of Amadeus Pro Printer.
2) If you are installing a ticket printer, ensure that you have the printer correctly pre-configured to comply with your BSP stock specifications.
3) If you are installing a printer for itineraries, invoices and hardcopies ensure that the printer has been already defined in your Windows configuration.
4) You have registered the CIDs for all the printers that will be configured on the PC The next steps will consist in: 1) Registering the Printer CIDs to the Security Gateway registration site. 2) Deploying and installing Amadeus printing application.
3) Configuring the printing application for all your printers.

8
PPllaattffoorrmmss ssuuppppoorrtteedd
Platform settings
Operating System &
Internet Explorer
Printing
Supported
Comments
Windows Millennium (ME)
IE 5.5
Yes The previous version 2.6P1 is not supported on Win ME.
Windows 95/98
IE 5.01 or higher
Yes
Windows 95/98
IE 4.0 to 5.0
Yes, with
limitations
(see comment 1)
Printing works normally,
as long as the PC is logged with the Windows user that downloaded the printer certificates 1.
If any other Windows user is logged,
printing will not work.
If the logon dialog box is dismissed by
pressing the Escape key or clicking on the
Cancel button, printing will not work.
Windows 2000
IE 5.01 or 5.5
Yes
Windows NT 4
IE 5.01 or 5.5
Yes
Windows NT 4
IE 5.0 or lower
NO Printing does not work in this kind of
platform.
In consequence, the certificate download site will not allow downloading the printer
certificates2.
Windows XP
IE 6.0 SP1
Yes Latest hotfixes from Microsoft may be required.
Please note that:
• This description applies only to printer certificates, and not to Amadeus Vista/Pro Web terminal
certificates.
• Single-user Windows 95/98 platforms do NOT require Internet Explorer 5.01, and can use MS Internet
Explorer 4.0 or higher (the user must log-on to Windows).
• For a multi-user (a single PC shared by several users) environment, MS Internet Explorer 5.01 is
required to download the printer certificates. That is, if certificates are downloaded with a previous
version, upgrading to 5.01 at a later stage will not make the change (unless certificates are re-
downloaded, of course).
The old Amadeus Pro Printer version 2.4P4 that is not using printer certificates will work with any Internet Explorer version higher or equal to 4.0.

9
MS Internet Explorer 5.0 (or previous versions) does not allow to assign the downloaded certificate to the PC. They are always assigned to the user logged on to Windows when the certificate download takes
place. This behaviour forces that user to be logged with that same user in order to print.
Because of the same reason as described in footnote 1, Windows NT platforms require certificates to be assigned to the PC (Pro Printer is a system service and cannot access user certificates). Because of this, certificate downloading is inhibited for NT platforms with MS Internet Explorer 5.0 or lower.

10
PPrriinntteerr CCIIDDss::
The registration of the printer CIDs is performed in the Security Gateway registration portal. If you have a new CID defined in EUM, you have to go to the following website to be registered in Security Gateway:
http://certificates.amadeusvista.com/sgwadmin
Enter your CID and click on “Submit request”. The CID you entered will be added to Web Conf Production as associated to your HWID.
IIff yyoouu aarree uuppggrraaddiinngg ffrroomm PPrroo PPrriinntteerr vveerrssiioonn 22..88,, 33..22,, 33..44……::
If you are currently using Pro Printer 2.8, 3.2 or 3.4, you do not need to request new CIDs for your devices, the printer certificates already installed on your machine will be migrated to be associated to your HWID in Web Conf. This migration will be triggered by the first start of either the new Pro Printer version or its configuration tool.
The printer certificates migration does not remove the certificates from your machine, so that in case the migration should fail, Pro Printer would still be able to use these certificates to authenticate the devices.
11
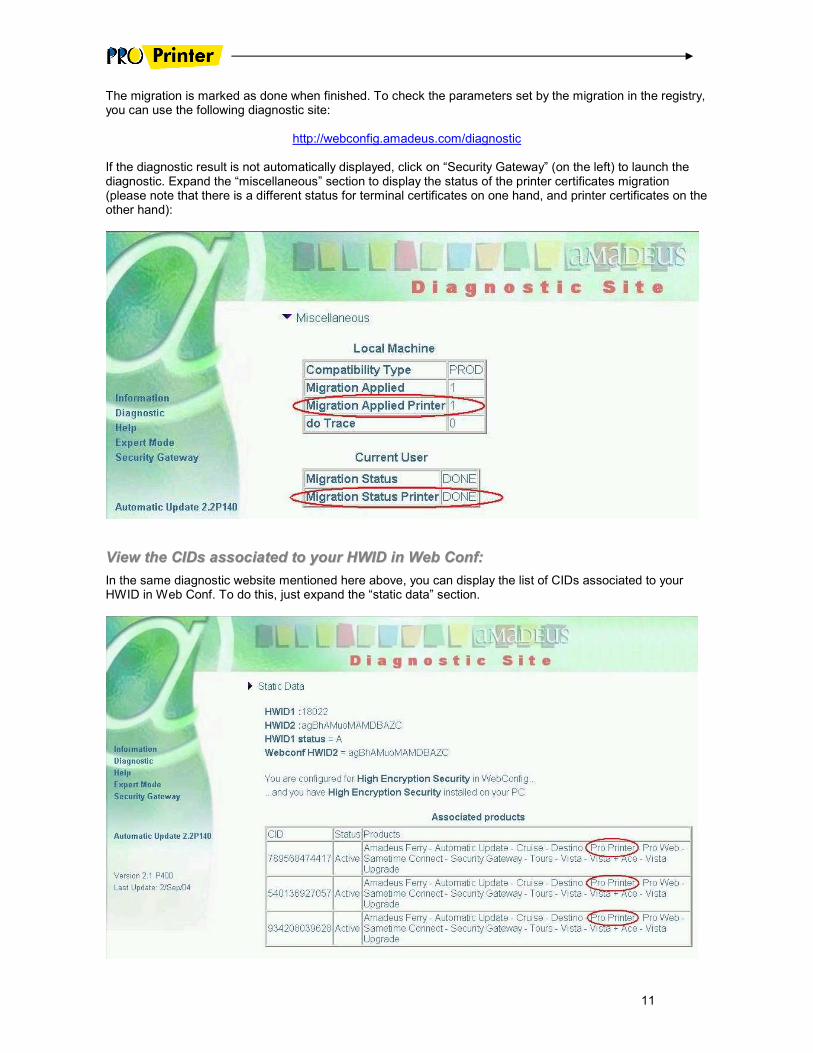
The migration is marked as done when finished. To check the parameters set by the migration in the registry, you can use the following diagnostic site:
http://webconfig.amadeus.com/diagnostic If the diagnostic result is not automatically displayed, click on “Security Gateway” (on the left) to launch the diagnostic. Expand the “miscellaneous” section to display the status of the printer certificates migration (please note that there is a different status for terminal certificates on one hand, and printer certificates on the other hand):
VViieeww tthhee CCIIDDss aassssoocciiaatteedd ttoo yyoouurr HHWWIIDD iinn WWeebb CCoonnff::
In the same diagnostic website mentioned here above, you can display the list of CIDs associated to your HWID in Web Conf. To do this, just expand the “static data” section.

12
EErrrroorr aanndd wwaarrnniinngg mmeessssaaggeess dduurriinngg CCIIDDss rreeggiissttrraattiioonn
If the registration fails with the following error:
It means that the format of your CID is invalid (extra blanks before or after the 12 digits, more or less than 12 digits…). Erase everything written in the text box and type it again.
If the registration fails with the following error:
It means that either the CID is already active (it was already installed on the same or another PC) or the certificate is revoked, in which case a new CID should be provided to the user.
PPrroo PPrriinntteerr cclliieenntt aauutthheennttiiccaattiioonn::
The way the client authentication is performed depends on the device having its CID associated to the HWID of the machine in Web Conf, or having an associated certificate physically installed on the client machine.
Case of a device whose CID is associated to the HWID of the machine in Web Conf: This case corresponds to a newly created device, or to an old one that was successfully migrated (i.e. its CID was imported in Web Conf and associated to the machine’s HWID). When Pro Printer is loaded, it queries Web Conf using Security Gateway, which returns a string containing all of the Atids associated to the HWID of the machine on which this Pro Printer is running. If the Atid of the device is one of those returned by Security Gateway, the client is authenticated.
For such devices, the Atid is stored in a dedicated encrypted file. This file has the same name as the device configuration file, with the ‘cry’ extension instead of ‘ini’. To make client support easier, and for information purposes only, the atid also appears as plain text in the device configuration file. In addition to the authentication that looks for the atid present inside the encrypted file in the list returned by Security Gateway, Pro Printer also checks that the Atid in the device configuration file matches the one in the encrypted file. If this is not the case, the Communication Adapter will exit and an error message is inserted in
its log file. So be careful not to delete the encrypted file as well as not to modify the atid in the
configuration file.
Case of a device not known in Web Conf

13
This case corresponds either to an old device for which the migration failed, or to a test certificates (today, Security Gateway is only handling production certificates). Here the authentication is still performed using the printer certificate, like in the former versions of Pro Printer:
1. When Pro Printer is loaded (generally at PC power on), the ATIDs for each printer are retrieved from the certificates before connecting to the D.D.IP server, and used afterwards during the connection negotiation with it.
2. Each night (random time between 3 AM to 5 AM, local client time), the Pro Printer clients transmit the printer certificates to the D.D.IP server, who validates them against the Amadeus Certificate Authority.
The security process checks the certificate validity with a comparison of the Certificate Authority that has issued the client certificate, with the Amadeus Certificate Authority. If all the checks are positive, the certificate is accepted and the user can use the printer for that certificate.

14
IInnssttaalllliinngg AAmmaaddeeuuss PPrroo PPrriinntteerr oonn yyoouurr PPCC::
The Amadeus Printing application is a Windows product that will be installed on your PC and will execute as a background task. Its installation is managed in the Web Configurator and performed by Automatic Update.
WWeebb CCoonnff::
The Web Configurator already manages the deployment and upgrade of many Amadeus front office software packages. Based on a database, it defines the Amadeus software configuration an office should have. It allows vendors to control the software distribution and upgrades by obtaining detailed, regular and accurate data on installed Amadeus software. It also schedules software migration. For a given product version, Web Conf allows:
• To configure the product installation
• To set the product deployment at different levels (vendor, office group, office, CID).
CCoonnffiigguurraattiioonn::
Pro Printer is seen in the product list like the others products. There are several Pro Printer packages: for the French market (FR), for the German market (DE), the PCB International version (EN), and the generic version for all other markets (CO).
15
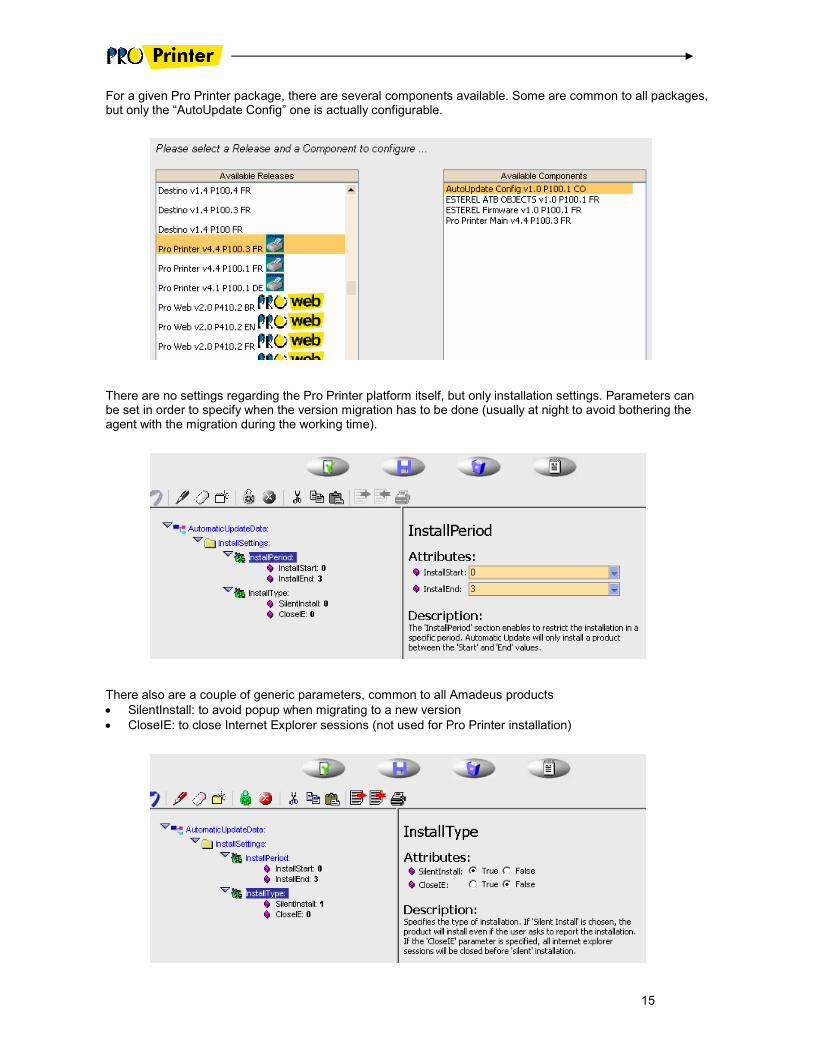
For a given Pro Printer package, there are several components available. Some are common to all packages, but only the “AutoUpdate Config” one is actually configurable.
There are no settings regarding the Pro Printer platform itself, but only installation settings. Parameters can be set in order to specify when the version migration has to be done (usually at night to avoid bothering the agent with the migration during the working time).
There also are a couple of generic parameters, common to all Amadeus products
• SilentInstall: to avoid popup when migrating to a new version
• CloseIE: to close Internet Explorer sessions (not used for Pro Printer installation)
16
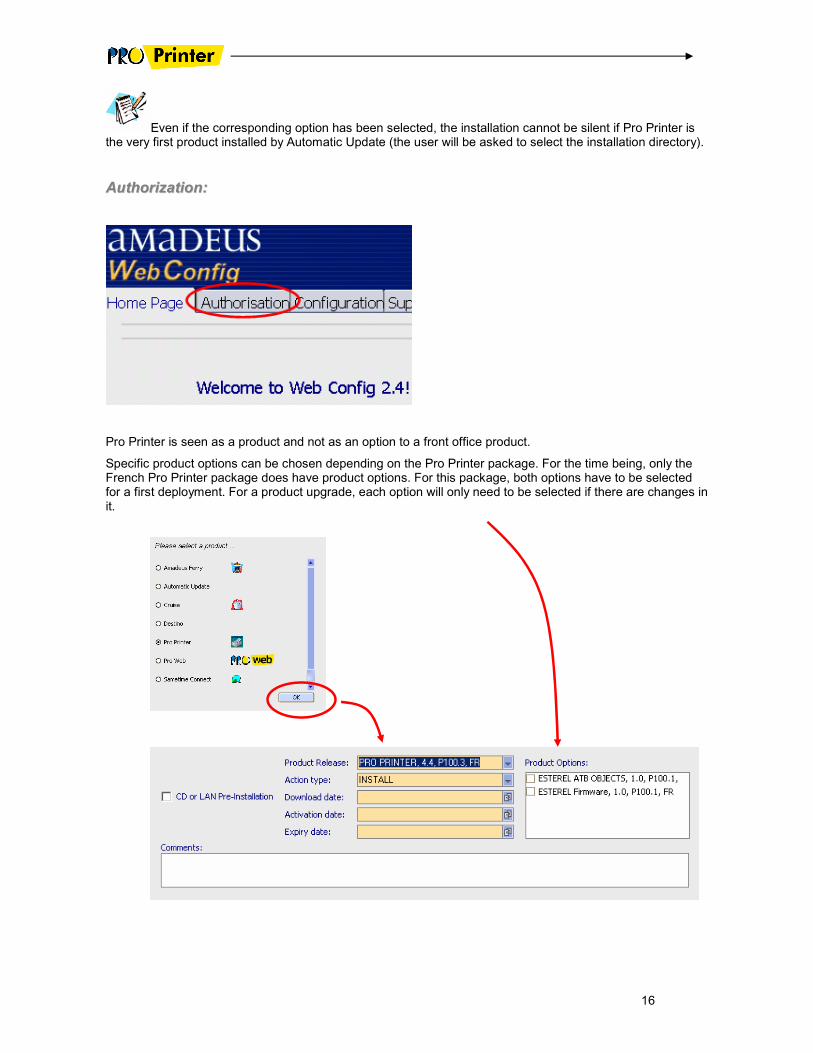
Even if the corresponding option has been selected, the installation cannot be silent if Pro Printer is the very first product installed by Automatic Update (the user will be asked to select the installation directory).
AAuutthhoorriizzaattiioonn::
Pro Printer is seen as a product and not as an option to a front office product.
Specific product options can be chosen depending on the Pro Printer package. For the time being, only the French Pro Printer package does have product options. For this package, both options have to be selected for a first deployment. For a product upgrade, each option will only need to be selected if there are changes in it.

17
You can specify a download date and an activation date. The former is the date the product and its installation files are going to be downloaded on the client machine (but the product won’t be installed); the latter is the date the product is actually going to be installed and activated on the client machine.
18
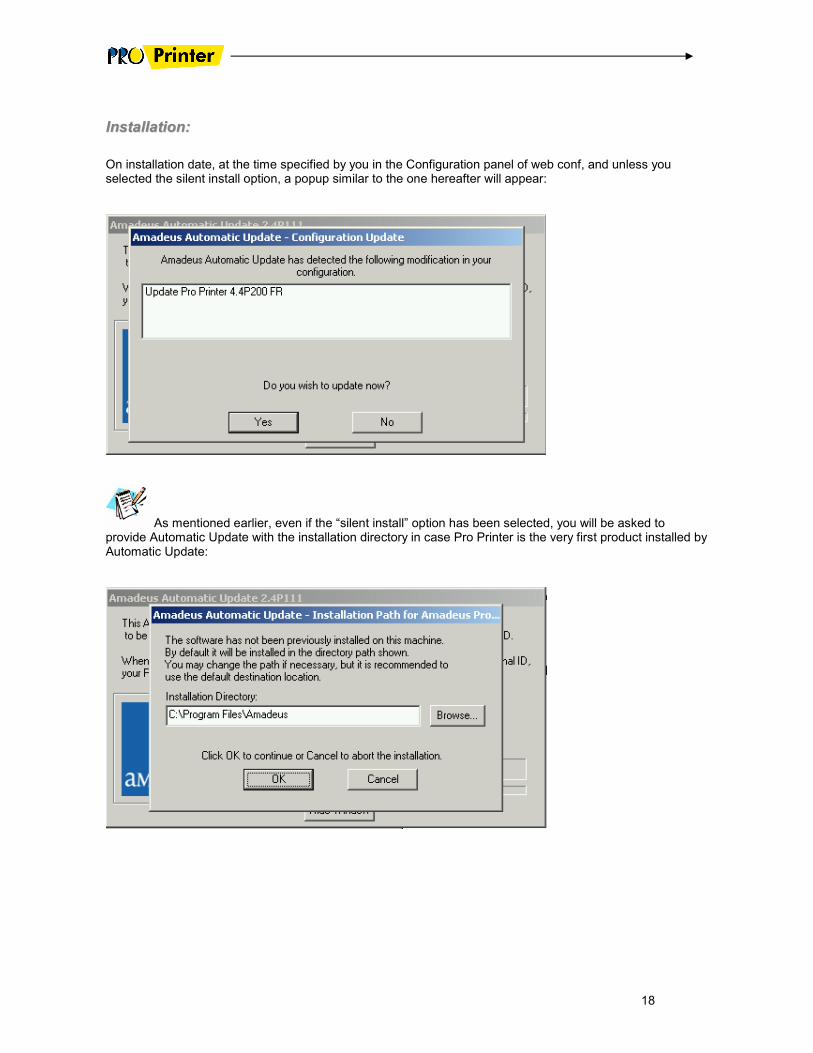
IInnssttaallllaattiioonn::
On installation date, at the time specified by you in the Configuration panel of web conf, and unless you selected the silent install option, a popup similar to the one hereafter will appear:
As mentioned earlier, even if the “silent install” option has been selected, you will be asked to provide Automatic Update with the installation directory in case Pro Printer is the very first product installed by Automatic Update:
19
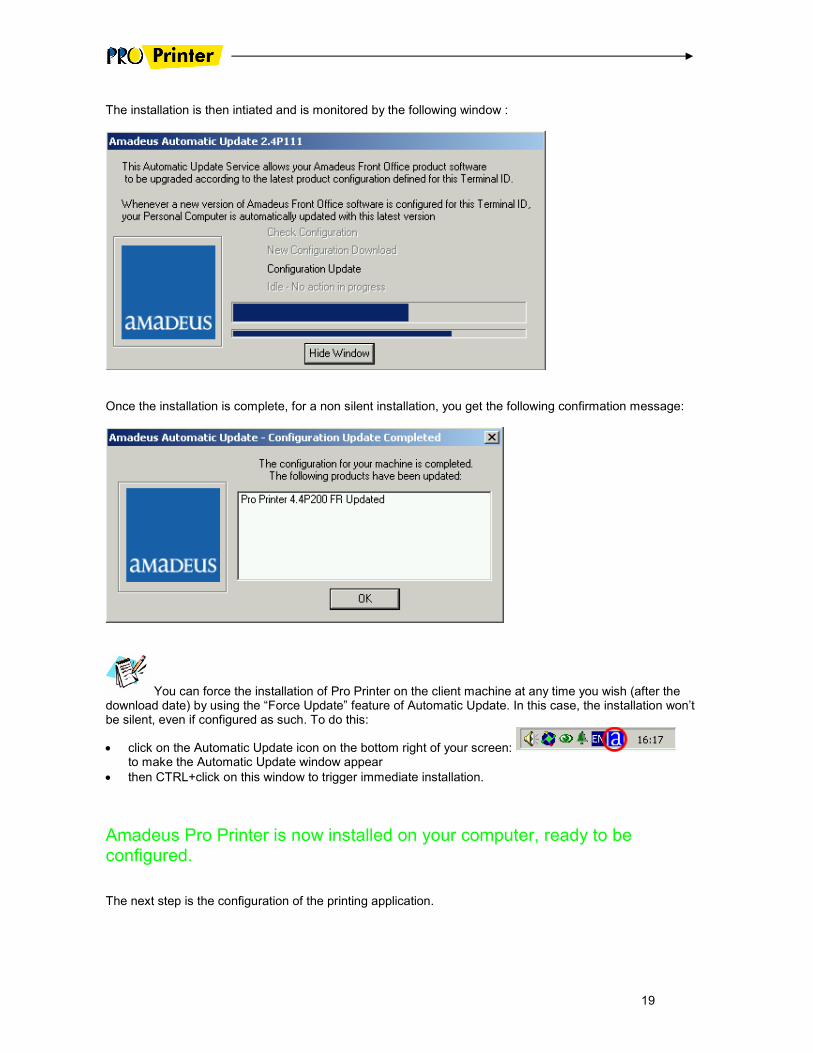
The installation is then intiated and is monitored by the following window :
Once the installation is complete, for a non silent installation, you get the following confirmation message:
You can force the installation of Pro Printer on the client machine at any time you wish (after the download date) by using the “Force Update” feature of Automatic Update. In this case, the installation won’t be silent, even if configured as such. To do this:
• click on the Automatic Update icon on the bottom right of your screen: to make the Automatic Update window appear
• then CTRL+click on this window to trigger immediate installation.
Amadeus Pro Printer is now installed on your computer, ready to be configured. The next step is the configuration of the printing application.
20
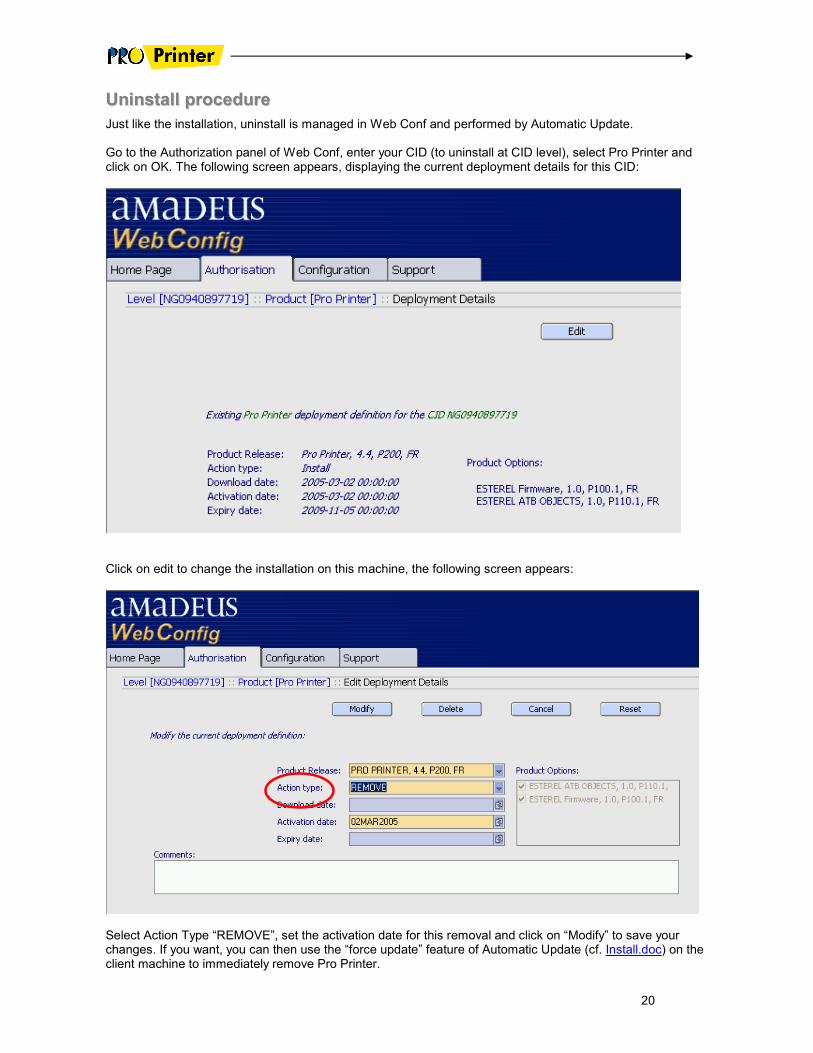
UUnniinnssttaallll pprroocceedduurree
Just like the installation, uninstall is managed in Web Conf and performed by Automatic Update. Go to the Authorization panel of Web Conf, enter your CID (to uninstall at CID level), select Pro Printer and click on OK. The following screen appears, displaying the current deployment details for this CID:
Click on edit to change the installation on this machine, the following screen appears:
Select Action Type “REMOVE”, set the activation date for this removal and click on “Modify” to save your changes. If you want, you can then use the “force update” feature of Automatic Update (cf. Install.doc) on the client machine to immediately remove Pro Printer.
21
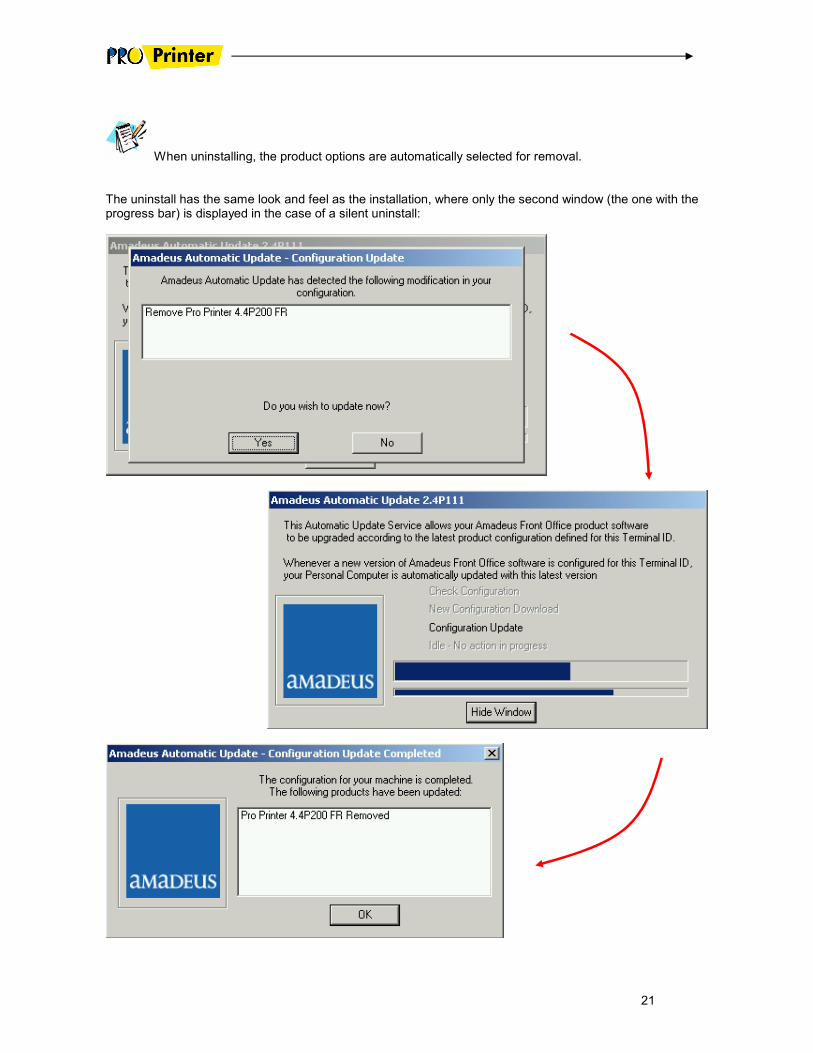
When uninstalling, the product options are automatically selected for removal. The uninstall has the same look and feel as the installation, where only the second window (the one with the progress bar) is displayed in the case of a silent uninstall:

22
Starting with version 4.x of Pro Printer, the “Uninstall” shortcut in the Start menu is no longer created. Moreover, if such a shortcut was present (created by a previous Pro Printer version) it will be removed when version 4.x is installed.
It might be that Pro Printer still appears as removable in the Add/Remove Programs feature in the Control panel, but the corresponding uninstall keys in the registry are normally removed when version 4.x is installed. If not, they will correspond to an old Pro Printer version anyway, not to the new one installed by
Automatic Update. Pro Printer should not be removed using “Add/Remove Programs”, but only by
Automatic Update, after setting the removal in Web Conf.
23
FFaallll--BBaacckk pprroocceedduurree
Just like the installation and uninstall, fallbacks are managed in Web Conf and performed by Automatic
Update. Indeed, a fallback will merely consist in installing an older version over the current one.
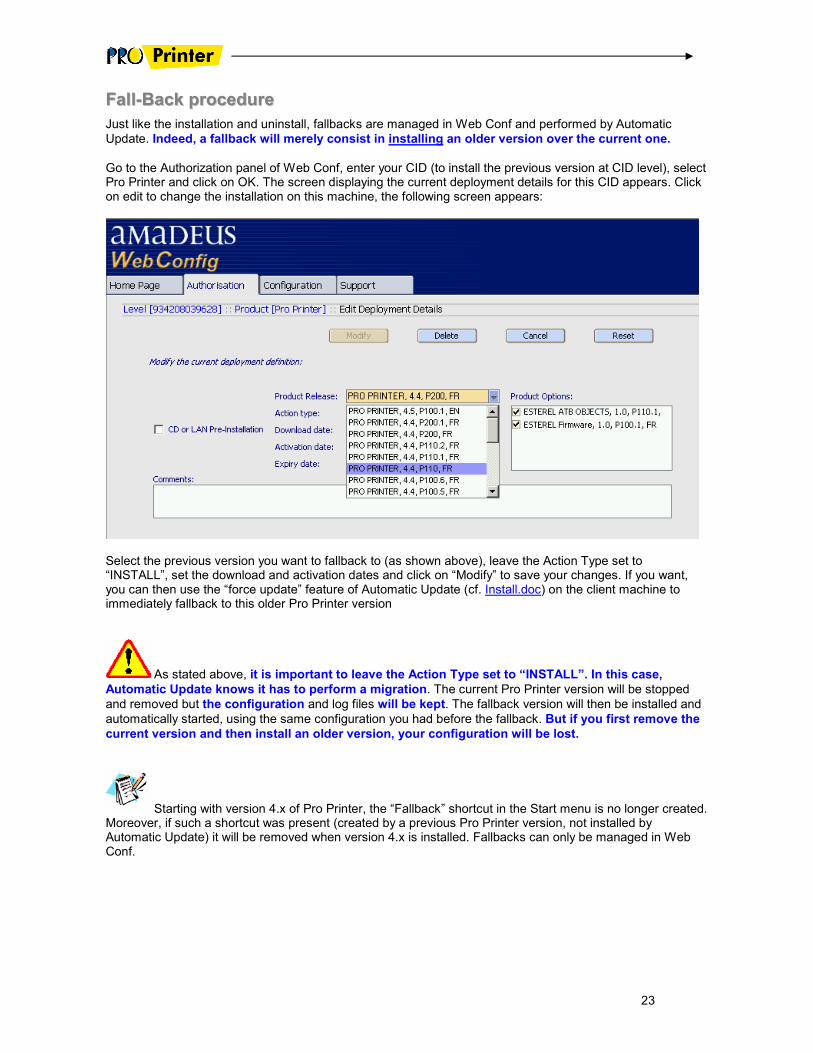
Go to the Authorization panel of Web Conf, enter your CID (to install the previous version at CID level), select Pro Printer and click on OK. The screen displaying the current deployment details for this CID appears. Click on edit to change the installation on this machine, the following screen appears:
Select the previous version you want to fallback to (as shown above), leave the Action Type set to “INSTALL”, set the download and activation dates and click on “Modify” to save your changes. If you want, you can then use the “force update” feature of Automatic Update (cf. Install.doc) on the client machine to immediately fallback to this older Pro Printer version
As stated above, it is important to leave the Action Type set to “INSTALL”. In this case,
Automatic Update knows it has to perform a migration. The current Pro Printer version will be stopped
and removed but the configuration and log files will be kept. The fallback version will then be installed and
automatically started, using the same configuration you had before the fallback. But if you first remove the
current version and then install an older version, your configuration will be lost.
Starting with version 4.x of Pro Printer, the “Fallback” shortcut in the Start menu is no longer created. Moreover, if such a shortcut was present (created by a previous Pro Printer version, not installed by Automatic Update) it will be removed when version 4.x is installed. Fallbacks can only be managed in Web Conf.
24
CCoonnffiigguurriinngg tthhee NNeettwwoorrkk ccoonnnneeccttiioonn aanndd PPrriinntteerrss AATTIIDD::
Once you have downloaded Amadeus Pro Printer, the next step consists in configuring two major elements: 1. The connection of the printers to the Amadeus Central System, defined by the Communication
Adapter.
2. The definitions of all the printers that will be used with Amadeus (Ticketing, Hardcopy, Invoice, Itineraries …).
In order to perform these two actions, you will access to the Amadeus Pro Printer administration tool from the
Windows Start Menu, select: Programs>Amadeus Pro Printer>Administration.
CCoonnffiigguurriinngg tthhee CCoommmmuunniiccaattiioonn AAddaapptteerr
BBaassiicc ccoonnffiigguurraattiioonn
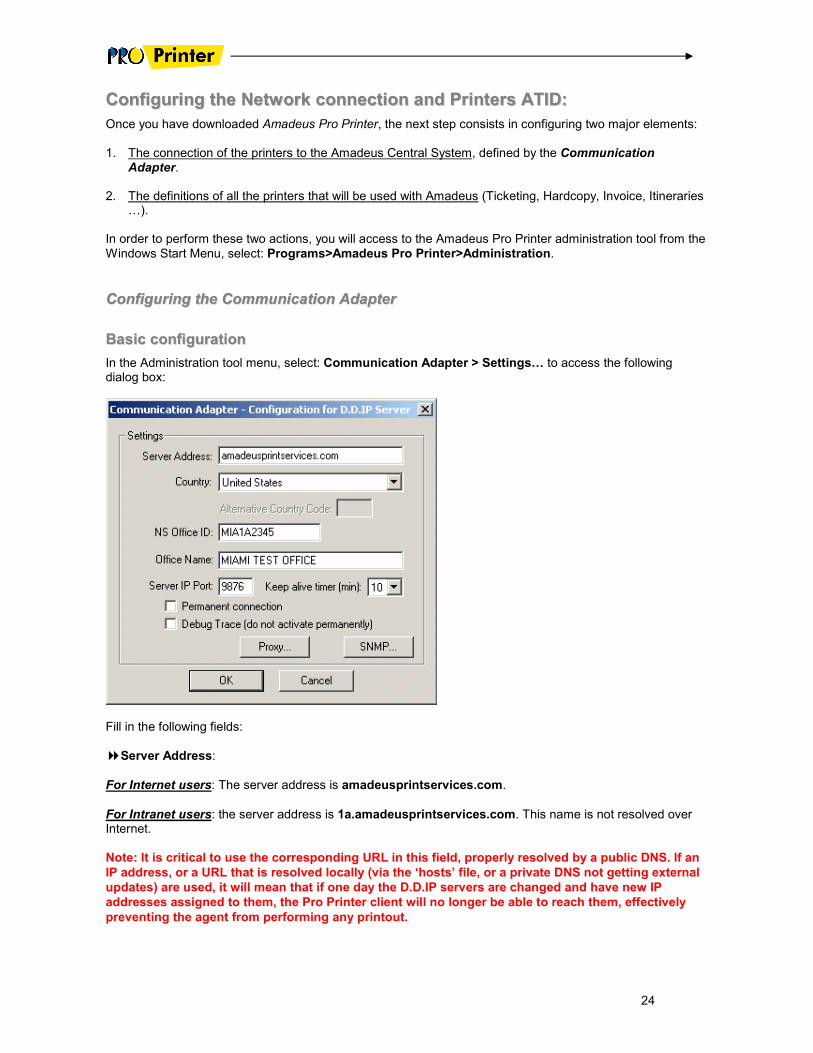
In the Administration tool menu, select: Communication Adapter > Settings… to access the following dialog box:
Fill in the following fields:
�Server Address:
For Internet users: The server address is amadeusprintservices.com.
For Intranet users: the server address is 1a.amadeusprintservices.com. This name is not resolved over Internet.
Note: It is critical to use the corresponding URL in this field, properly resolved by a public DNS. If an
IP address, or a URL that is resolved locally (via the ‘hosts’ file, or a private DNS not getting external
updates) are used, it will mean that if one day the D.D.IP servers are changed and have new IP
addresses assigned to them, the Pro Printer client will no longer be able to reach them, effectively
preventing the agent from performing any printout.

25
� Country: Select your country from the list. If your country does not appear in the list, select the first entry (“* Unlisted country code”), and type the IATA 2 letter country code in the field below (“Alternative Country Code”).
� Amadeus Office ID: this is your office ID (should be 9 characters). If you don’t know it, you can retrieve it from your Amadeus screen session with the entry PV, into the field "AMADEUS OFFICE ID".
� Office Name: this is a comment on you office name on 23 characters maximum.
If you don’t know it, you can retrieve it from your Amadeus screen session with the entry PV, into the field " NAM*OFFICE NAME".
� Server IP Port: This parameter must be left unchanged. Do not change the default value, which is set to 9876. This is the TCP/IP port that is used to establish the connection to the Print Server. It has no relation with the Ports that are defined into the central systems TRMTs of the printers.
Important Note: If the connection to Amadeus is done through routers or firewalls, ensure that the
TCP/IP port 9876 is allowed. Otherwise, alternative ports 80 and 443 can be used.
� Keep Alive Timer: Normally, this parameter must not be changed (default value is 10 minutes). This is
the timer that Pro Printer uses to periodically send a Keep Alive packet to the server, with the objective of detecting if the connection is still available (dialup connections do not properly close the TCPIP sockets when the modem is disconnected, and Pro Printer, due to it’s “listening” nature, needs to use this keep-alive to check if the connection is still up).
� Permanent connection: Select this checkbox if you are using some kind of permanent connection
(ADSL, Cable, intranet…). If not selected, Pro Printer will not try to connect to the D.D.IP server if the internet connection is reported by the system as down. If selected, Pro Printer will connect unconditionally, which could be an issue if the ISP charges based on connected time.
� Debug Trace: This parameter must be activated only if requested by technical support.
� SNMP: This button displays the SNMP (Simple Network Management Protocol) configuration dialog box. SNMP configuration must be enabled only if an SNMP-compatible ISDN router is used to connect to the D.D.IP server (see precise conditions in the description of the ‘ISDN Router used’ parameter). This feature avoids that Pro Printer keeps the ISDN line permanently connected, by only allowing Pro Printer transactions when the router’s ISDN line is already connected.
It is important to note that, for this feature to work correctly, Pro Printer’s ‘keep alive’ timer must be
greater than the router’s inactivity timer. Else, the ISDN line would be kept always connected by the
Pro Printer’s ‘keep alive’ packet sent to the D.D.IP server.
Note: The SNMP feature has been validated for a Cisco series 800 router. Other routers may require separate validations.
Further below in this page you can find the details for the SNMP configuration.
� Proxy: This button displays the Proxy settings dialog box. It will allow you to route the Pro Printer traffic via an external proxy, thus allowing the integration of Pro Printer in a secured environment. Proxies supported include HTTP and SOCKS. Details on how to configure the Proxy settings can be found below in this page.
26
SSNNMMPP CCoonnffiigguurraattiioonn
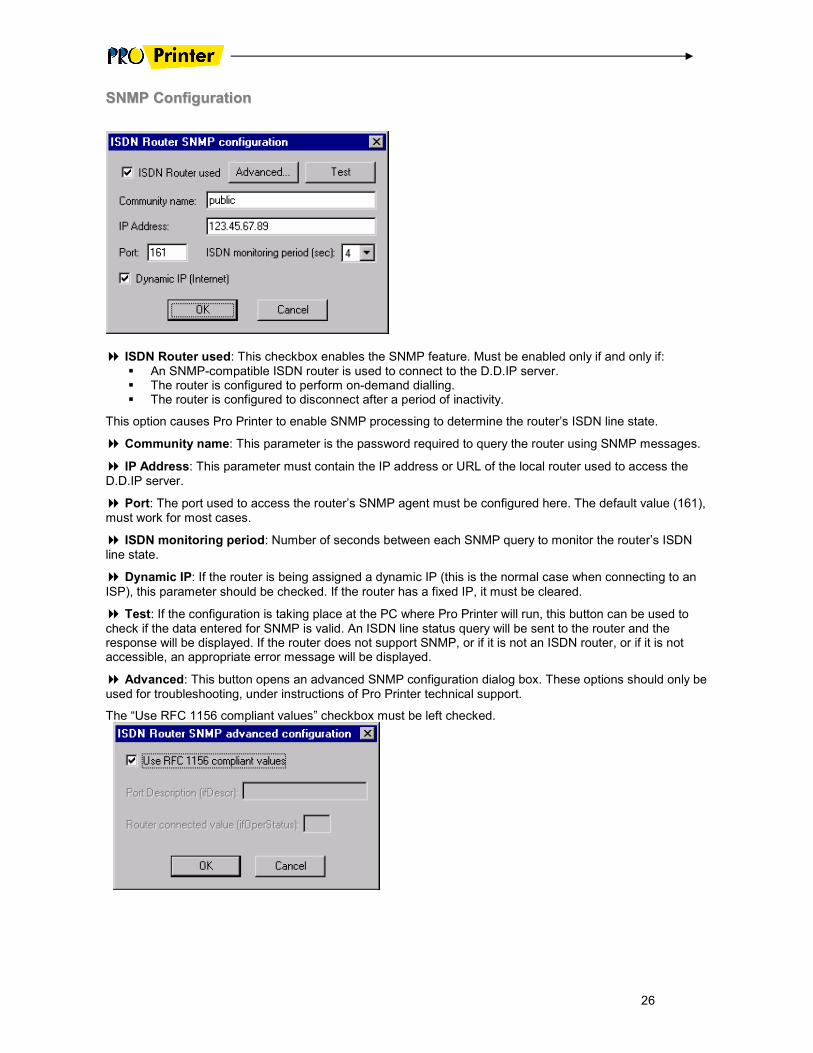
� ISDN Router used: This checkbox enables the SNMP feature. Must be enabled only if and only if: � An SNMP-compatible ISDN router is used to connect to the D.D.IP server. � The router is configured to perform on-demand dialling. � The router is configured to disconnect after a period of inactivity.
This option causes Pro Printer to enable SNMP processing to determine the router’s ISDN line state.
� Community name: This parameter is the password required to query the router using SNMP messages.
� IP Address: This parameter must contain the IP address or URL of the local router used to access the D.D.IP server.
� Port: The port used to access the router’s SNMP agent must be configured here. The default value (161), must work for most cases.
� ISDN monitoring period: Number of seconds between each SNMP query to monitor the router’s ISDN line state.
� Dynamic IP: If the router is being assigned a dynamic IP (this is the normal case when connecting to an
ISP), this parameter should be checked. If the router has a fixed IP, it must be cleared.
� Test: If the configuration is taking place at the PC where Pro Printer will run, this button can be used to check if the data entered for SNMP is valid. An ISDN line status query will be sent to the router and the response will be displayed. If the router does not support SNMP, or if it is not an ISDN router, or if it is not accessible, an appropriate error message will be displayed.
� Advanced: This button opens an advanced SNMP configuration dialog box. These options should only be used for troubleshooting, under instructions of Pro Printer technical support.
The “Use RFC 1156 compliant values” checkbox must be left checked.

27
PPrrooxxyy CCoonnffiigguurraattiioonn
� Use a Proxy server: This checkbox, when enabled, tells Pro Printer to connect to the D.D.IP server via a Proxy.
� Address: This is the Proxy IP address or host name.
� Port: This is the IP port where the proxy listens for connections.
� Authentication required: Select this checkbox if the proxy requires authentication. In such case, the next two parameters will become available to be filled.
� User Id: User Id to use for proxy authentication.
� Password: Password to use for proxy authentication.
� Note: If the user id or password is changed at the proxy afterwards, Pro Printer will detect it at the next connection, and will prompt the user to type in the new values.
� Proxy protocol: Proxy protocol to use (depends on the proxy used. HTTP is the most common one).
� Import Internet Explorer settings: This button allows you to import the Internet Explorer proxy settings for the user currently logged in, that will be used to fill the “Address” and “Port” values. This is done in order to allow a default configuration that will be fine in most cases, but that can be changed if a different proxy Address/Port is desired.
The Communication Adapter is now configured.
28
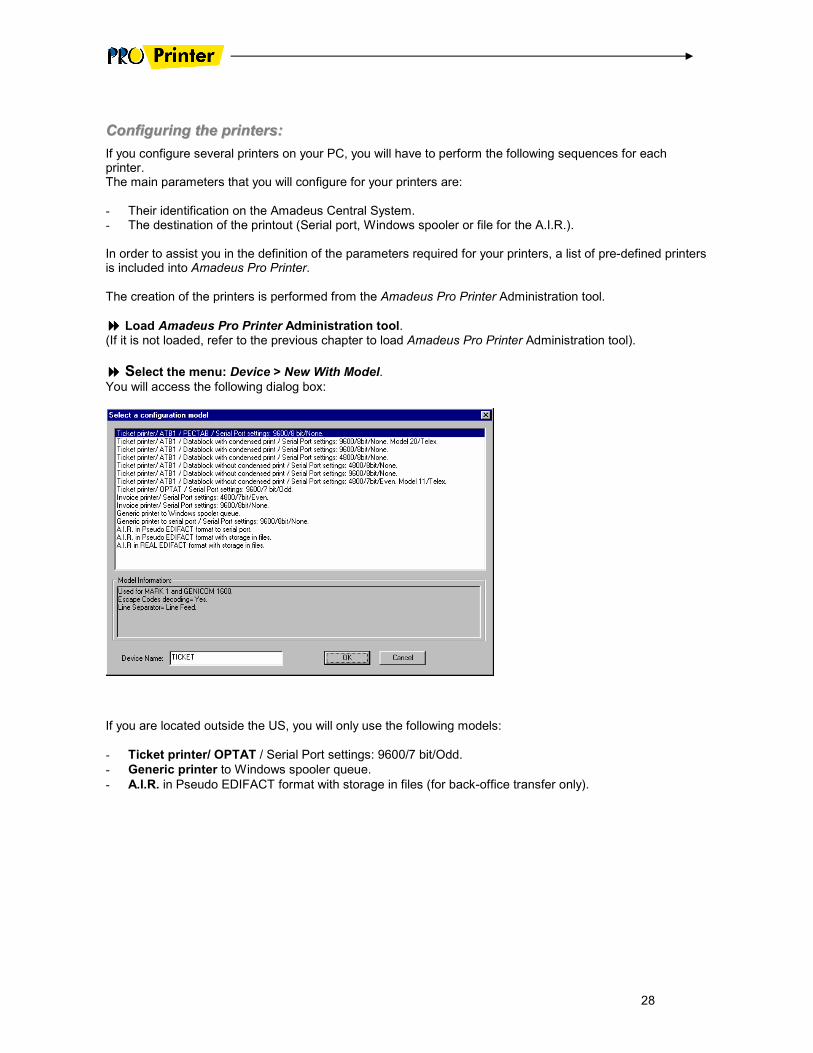
CCoonnffiigguurriinngg tthhee pprriinntteerrss::
If you configure several printers on your PC, you will have to perform the following sequences for each printer. The main parameters that you will configure for your printers are: - Their identification on the Amadeus Central System. - The destination of the printout (Serial port, Windows spooler or file for the A.I.R.). In order to assist you in the definition of the parameters required for your printers, a list of pre-defined printers is included into Amadeus Pro Printer. The creation of the printers is performed from the Amadeus Pro Printer Administration tool.
���� Load Amadeus Pro Printer Administration tool. (If it is not loaded, refer to the previous chapter to load Amadeus Pro Printer Administration tool).
���� Select the menu: Device > New With Model.
You will access the following dialog box:
If you are located outside the US, you will only use the following models:
- Ticket printer/ OPTAT / Serial Port settings: 9600/7 bit/Odd.
- Generic printer to Windows spooler queue.
- A.I.R. in Pseudo EDIFACT format with storage in files (for back-office transfer only).
29
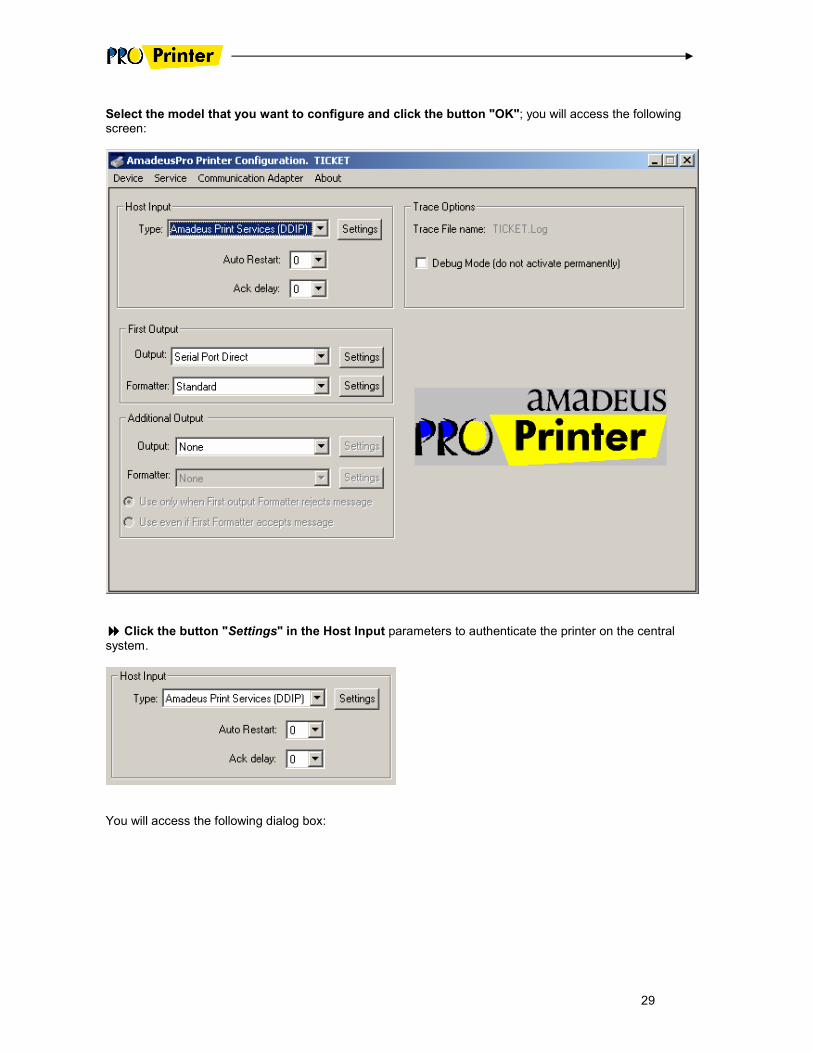
Select the model that you want to configure and click the button "OK"; you will access the following screen:
���� Click the button "Settings" in the Host Input parameters to authenticate the printer on the central system.
You will access the following dialog box:
30
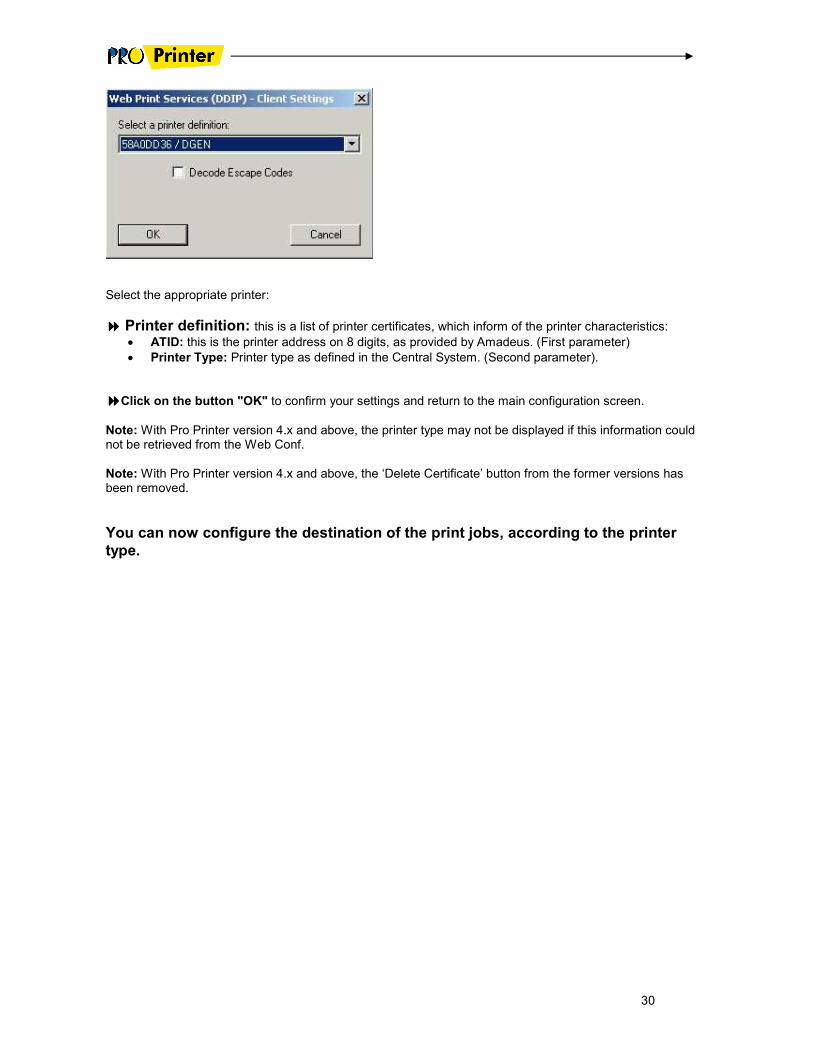
Select the appropriate printer:
���� Printer definition: this is a list of printer certificates, which inform of the printer characteristics: • ATID: this is the printer address on 8 digits, as provided by Amadeus. (First parameter)
• Printer Type: Printer type as defined in the Central System. (Second parameter).
����Click on the button "OK" to confirm your settings and return to the main configuration screen.
Note: With Pro Printer version 4.x and above, the printer type may not be displayed if this information could not be retrieved from the Web Conf.
Note: With Pro Printer version 4.x and above, the ‘Delete Certificate’ button from the former versions has been removed.
You can now configure the destination of the print jobs, according to the printer
type.
31
CCoonnffiigguurriinngg aa nnoonn ttiicckkeett pprriinntteerr ((hhaarrddccooppyy,, iinnvvooiiccee,, iittiinneerraarriieess))::
The generic documents printer can be used to print central system documents such as hardcopies, itineraries, invoices, and others. Amadeus Pro Printer is sending these documents to a Windows printer, as any other Windows program, such as a word processor.
PRE-REQUISITE: Before configuring the Amadeus printer, you must have configured and tested your
Windows printer with your printer manual.
���� In Amadeus Pro Printer Administration tool, you must have initiated the configuration of a new
printer using the model:
Generic printer to Windows spooler queue. Refer to the previous chapter if you have not yet performed this step.
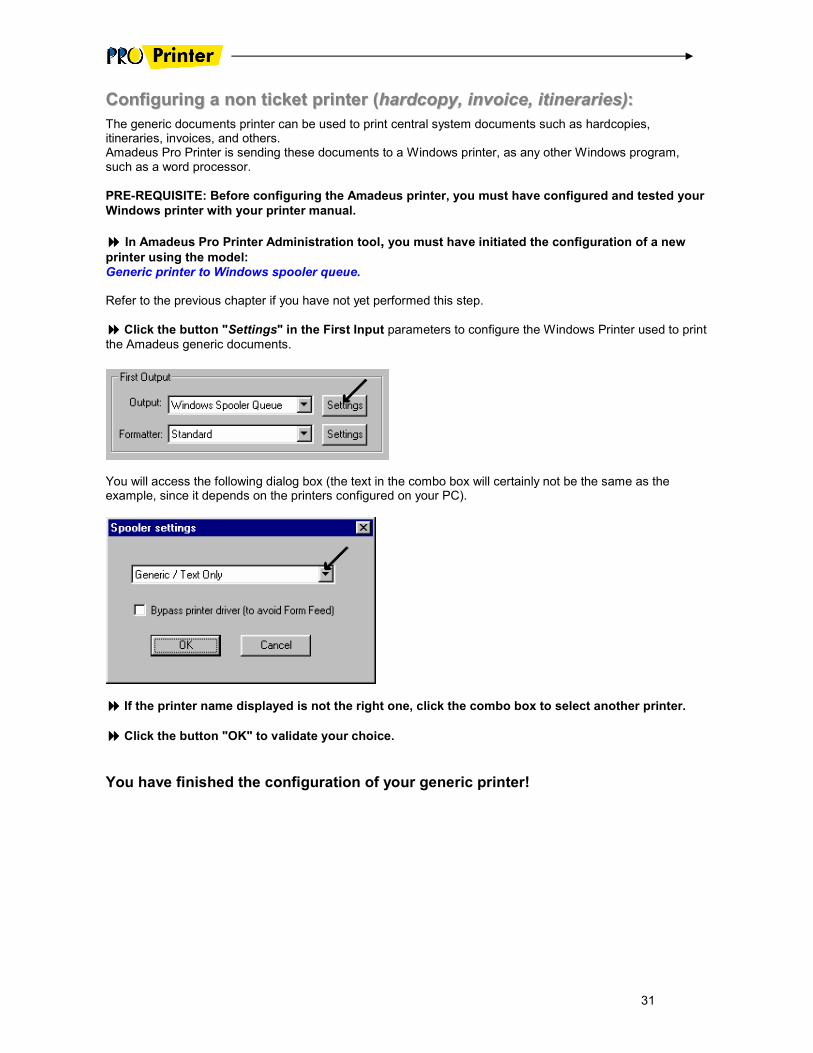
���� Click the button "Settings" in the First Input parameters to configure the Windows Printer used to print
the Amadeus generic documents.
You will access the following dialog box (the text in the combo box will certainly not be the same as the example, since it depends on the printers configured on your PC).
���� If the printer name displayed is not the right one, click the combo box to select another printer.
���� Click the button "OK" to validate your choice.
You have finished the configuration of your generic printer!
32
CCoonnffiigguurriinngg aa ttiicckkeett pprriinntteerr::
The rules defined by the BSPs and ARC impose a high security on the tickets delivery, and specially do not allow the spooling of the tickets through a standard Windows printer. This is why Amadeus Pro Printer is interfacing directly with the ticket printer through the RS232 serial port (named COM1or COM2 on your PC). You must have a ticket printer that is already configured with the right paper size, margins, and serial port communication parameters. This should be pre-configured by Amadeus technicians. If your printer is not yet connected to your PC, it is recommended to connect it in order to know in advance which serial port it will be used in the Amadeus Pro Printer configuration.
���� Connect the printer to your PC with the cable provided with the printer. The default serial port defined in the model is "COM1". If this port is already used by another device, you can plug the printer to another free port: COM2 or COM3, COM4 if you have serial port extensions.
���� In Amadeus Pro Printer Administration tool, you must have initiated the configuration of a new
printer using the model:
Ticket printer/ OPTAT / Serial Port settings: 9600/7 bit/Odd. Refer to the previous chapter if you have not yet performed this step.
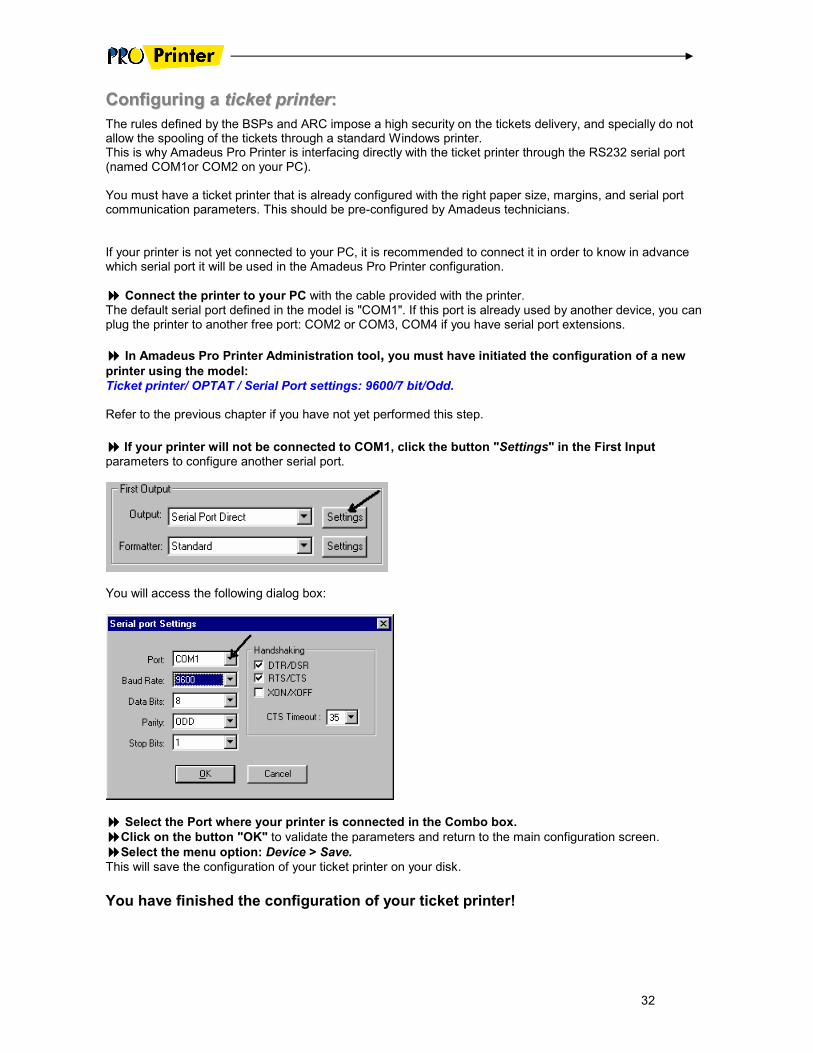
���� If your printer will not be connected to COM1, click the button "Settings" in the First Input parameters to configure another serial port.
You will access the following dialog box:
���� Select the Port where your printer is connected in the Combo box.
����Click on the button "OK" to validate the parameters and return to the main configuration screen.
����Select the menu option: Device > Save.
This will save the configuration of your ticket printer on your disk.
You have finished the configuration of your ticket printer!
33
CCoonnffiigguurriinngg tthhee AA..II..RR.. ssttoorraaggee::
The A.I.R. stands for Amadeus Interface Record; is used to transfer accounting data to mid or back-offices. Even if the A.I.R. are not printed on a printer, they are considered as a printing going to a file instead of a printer. They follow the same central system definition and delivery process; this is why they are also supported by Amadeus Pro Printer.
���� In Amadeus Pro Printer Administration tool, you must have initiated the configuration of a new
output using the model:
A.I.R. in Pseudo EDIFACT format with storage in files. Refer to the previous chapter if you have not yet performed this step.
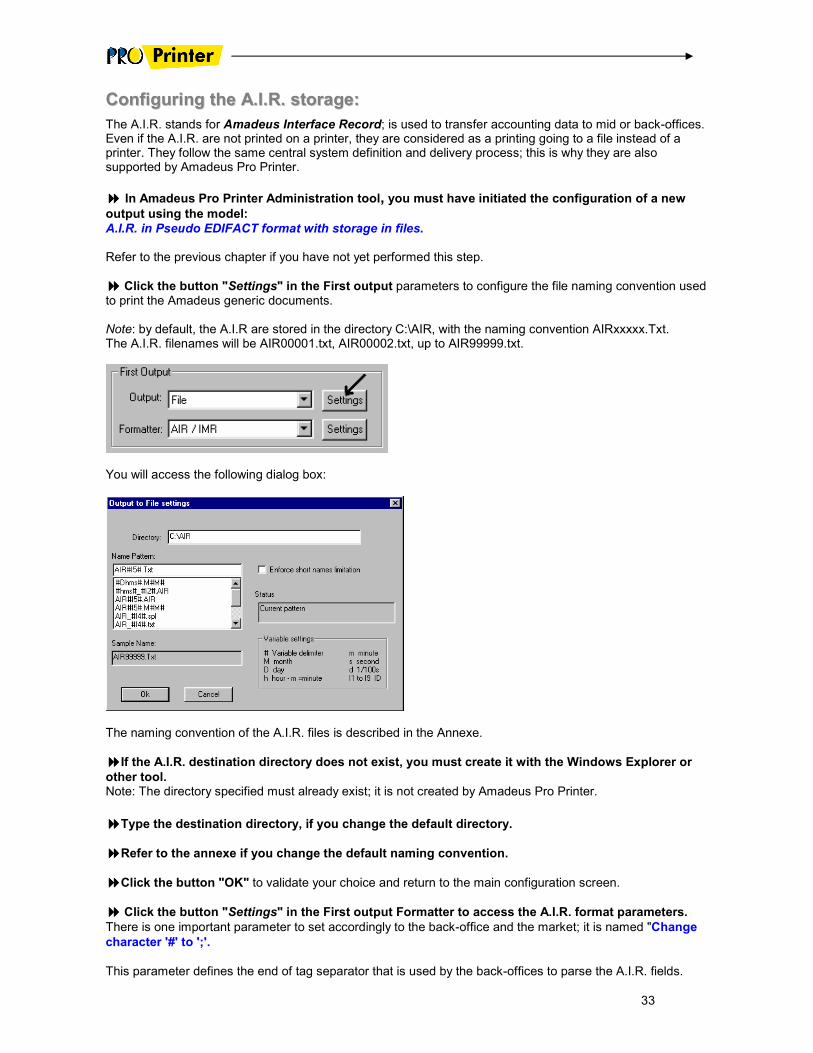
���� Click the button "Settings" in the First output parameters to configure the file naming convention used to print the Amadeus generic documents. Note: by default, the A.I.R are stored in the directory C:\AIR, with the naming convention AIRxxxxx.Txt. The A.I.R. filenames will be AIR00001.txt, AIR00002.txt, up to AIR99999.txt.
You will access the following dialog box:
The naming convention of the A.I.R. files is described in the Annexe.
����If the A.I.R. destination directory does not exist, you must create it with the Windows Explorer or
other tool. Note: The directory specified must already exist; it is not created by Amadeus Pro Printer.
����Type the destination directory, if you change the default directory.
����Refer to the annexe if you change the default naming convention.
����Click the button "OK" to validate your choice and return to the main configuration screen.
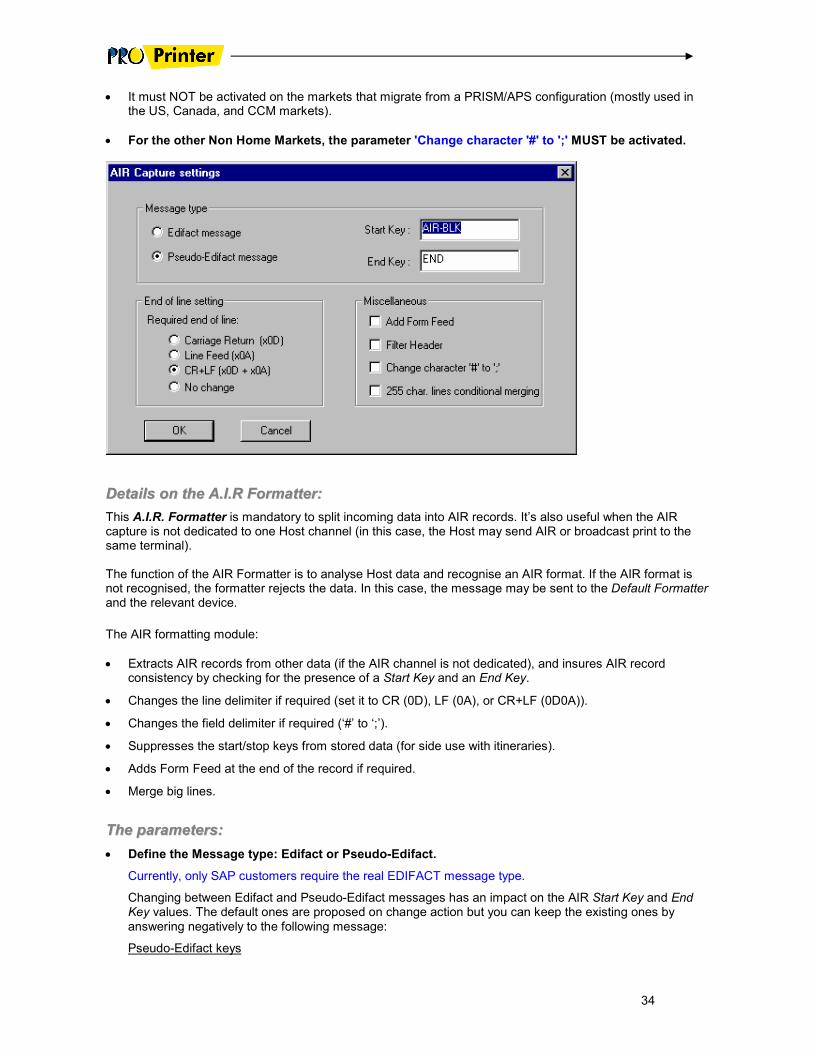
���� Click the button "Settings" in the First output Formatter to access the A.I.R. format parameters.
There is one important parameter to set accordingly to the back-office and the market; it is named "Change
character '#' to ';'.
This parameter defines the end of tag separator that is used by the back-offices to parse the A.I.R. fields.
34
• It must NOT be activated on the markets that migrate from a PRISM/APS configuration (mostly used in the US, Canada, and CCM markets).
• For the other Non Home Markets, the parameter 'Change character '#' to ';' MUST be activated.
DDeettaaiillss oonn tthhee AA..II..RR FFoorrmmaatttteerr::
This A.I.R. Formatter is mandatory to split incoming data into AIR records. It’s also useful when the AIR capture is not dedicated to one Host channel (in this case, the Host may send AIR or broadcast print to the same terminal). The function of the AIR Formatter is to analyse Host data and recognise an AIR format. If the AIR format is not recognised, the formatter rejects the data. In this case, the message may be sent to the Default Formatter and the relevant device.
The AIR formatting module:
• Extracts AIR records from other data (if the AIR channel is not dedicated), and insures AIR record consistency by checking for the presence of a Start Key and an End Key.
• Changes the line delimiter if required (set it to CR (0D), LF (0A), or CR+LF (0D0A)).
• Changes the field delimiter if required (‘#’ to ‘;’).
• Suppresses the start/stop keys from stored data (for side use with itineraries).
• Adds Form Feed at the end of the record if required.
• Merge big lines.
TThhee ppaarraammeetteerrss::
• Define the Message type: Edifact or Pseudo-Edifact.
Currently, only SAP customers require the real EDIFACT message type.
Changing between Edifact and Pseudo-Edifact messages has an impact on the AIR Start Key and End Key values. The default ones are proposed on change action but you can keep the existing ones by answering negatively to the following message:
Pseudo-Edifact keys
35
While the Start Key should always be set to “AIR-BLK”, the End Key can be either “ENDX” or “END”. It depends on whether all AIR records sub-blocks (ended by “END”) are to be placed in one stored record, or in separate records. Both fields are mandatory.
Edifact keys
The Start Key should always be set to “ORG+1A”, but the End Key can be either “ENDX” or “END” as for Pseudo-Edifact messages. Both fields are mandatory.
• End of line setting:
The end of line in the incoming AIR message is auto-detected (from CR, LF or CR+LF) for Pseudo-Edifact messages and supposed to be “ ‘ “ (a simple quote) in Edifact messages.
The required End-of-line option defines what will be the End-of-line character in the output buffer. It can be kept as is, or changed to CR, LF, or CR+LF.
Warning: this parameter is critical for the back-offices. Some of them require CR+LF, others only
LF or only CR. If the back-office rejects the AIR, check this parameter.
• Add a Form Feed at the end of each record.
• Suppress the Start Key and End Key lines in the output data with the Filter Header option.
• Change any ‘#’ character to ‘;’ (USA market dedicated option- see previous section).
• Merge 255 characters long lines: This option should be used when the incoming messages can’t hold lines longer than 255 characters. The only configuration known today is with IBM PCOM, and does not apply to Vista / Pro Web.
AA..II..RR.. ffiilleess nnaammiinngg ccoonnvveennttiioonnss ffoorr BBaacckk--ooffffiicceess::
In the definition of the destination of the A.I.R (Amadeus Interface Record), it is possible to define a specific pattern for the generic name of AIR records files. This pattern is based on the following parameters:
• Fixed characters (except ‘*’, ‘?’ and ‘\’)
• A timestamp:
• M for the month (2 digits)
• D for the day of the month (2 digits)
• N three-letter month name (3 characters)
• h for the hour (2 digits)
• m for the minutes (2 digits)
• s for the seconds (2 digits)
• d for the 1/100s (2 digits)
• A counter of 1 to 9 digits (only one by pattern): I1 to I9 Any variable in the name must be enclosed by ‘#’ delimiters. Example:
#hms#_#I2#.M#M#
#hms#’ is a variable part leading to ‘hhmmss’ display inside the name.
‘_’ is a fixed character
‘#I2#’ is a 2 digits counter
‘.M’ are fixed characters
‘#M#’ is the month index
36
The result could be: 165225_12.M08 for the 12th file created at 16:52:25 during the month 08. The choice of the variable part depends on the AIR flow density and the polling interval of the BOS. It is the responsibility of the administrator to select a name that will not lead to duplicates over an extended period. A basic syntax checking is made any time the Name Pattern entry field is modified. The result appears in the Test Result entry field. Some examples of potential errors are:
• ERROR: File name is empty
• ERROR: File name contains 2 numerical IDs
• ERROR: File name contains no variables
• ERROR: File name contains invalid characters (*?\)
• ERROR: File name contains an odd number of separators (#)
• ERROR: File name contains an invalid character as a variable
• ERROR: File name contains an invalid number of digits for the numerical ID If the Enforce Short Names Limitation (for FAT partitions) is checked then the following error responses are also possible:
• ERROR: File name body is greater than 8 characters
• ERROR: File name extension is greater than 3 characters
• ERROR: File name contains more than one '.' character The Sample Name is updated each time there is no error and “Generic Name Validated” will be displayed in the Test Result field. The timestamp of the sample is based on the current date and time and the counter digits set to ‘9’.
Important Note: The directory specified must already exist; it is not created by Amadeus Pro Printer.
You have finished the configuration of the A.I.R. storage!

37
AAmmaaddeeuuss PPrroo PPrriinntteerr UUsseerr IInntteerrffaaccee::
Once all the printers have been configured, you can test your configuration by activating your definitions. If you shutdown and restart your computer:
Amadeus Pro Printer will be automatically loaded as a background task. If you want to start Amadeus Pro Printer for the first time, without rebooting your computer:
You must access the Amadeus Pro Printer Administration tool (as described in the previous chapters), and select the menu option: Service > Start. When Amadeus Pro Printer is started, several icons appear in the Windows taskbar:
for the Amadeus Pro Printer Communication Adapter.
for each Amadeus Pro Printer instance (i.e. each Amadeus printer or A.I.R. transfer) In the example below, two Pro Printer instances are running, as well as the Communication Adapter. These icons are normally permanently present, even if you are not connected or not working on Amadeus.
The following colour code is used for Pro Printer icons:
• Green stands for ready: everything is OK
• Red stands for not ready: there is a problem
• Blue stands for “data processing” When clicking on an icon, the related process window is opened: Pro Printer Communication adapter window or instance window. This window provides detailed information on the adapter or the instance.
CCoommmmuunniiccaattiioonn AAddaapptteerr iiccoonn::
The Communication Adapter icon in the task bar indicates the current status of the Network TCP/IP connection with the Central System. The icon color can change according to the connection status and activity:
A green icon indicated that the connection to the Central System is operational. The terminal is ready to receive data.
A red icon indicates that the connection to the Central System is out of order. It is impossible to print any document as long as this icon remains red.
A blue icon indicates that data are currently exchanged with the Central System. When positioning the mouse pointer over this icon, the text of the connection status is displayed. It can be:
• Amadeus Pro Printer - Communication with Central System is UP
• Amadeus Pro Printer - Communication with Central System is DOWN !

38
As stated before, when clicking on the icon, the user accesses to the Communication Adapter window. It provides detailled information on the connection to the Central System.
PPrriinntteerr iiccoonn::
The Pro Printer instance icon indicates the current status of the different modules of the Pro Printer instance. Different symbols are used to represent the different modules:
• The “network connection line” symbol represents the Network TCP/IP connection with the Central System (through the communication adapter). This is called the input module.
• The “printer paper” symbol represents the output module.
• The printer symbol (i.e. central part) represents the printer activity The colour of the different symbols allow to know the general status of each module::
When all the colors are green, the printer is operational and ready to print.
When the printer icon is blue, there is data exchanged with the Central System.
When the network symbol is red, the output is ready but the network is out of order.
When the printer output is red, the printer is not ready to print. This can be due to an incorrect connection between the PC and the printer, or because the printer is not on line.
When all the symbols are red, both the network and the printer are not operational.

39
TTrroouubbllee SShhoooottiinngg
In case of problem, Amadeus Pro Printer provides several diagnostic methods and powerful status indicators that help the user in the problem resolution. This chapter is an advanced description of Amadeus Pro Printer modules and supposes that the reader as a good experience in computer software.
PPrroo pprriinntteerr 22..55PP11::
PPrroo pprriinntteerr 22..55PP11 && MMiiccrroossoofftt WWiinnssoocckk 22::
Pro Printer 2.5P1 requires by default the TCP/IP interface winsock 2. If Pro Printer is installed on a PC where the winsock 2 is not installed, the following error message will appear: " Unable to locate WS2_32.DLL".
The problem can be avoided by applying SP-011299, or installing the Microsoft Winsock 2 from the URL:
http://www.microsoft.com/windows95/downloads/contents/wuadmintools/s_wunetworkingtools/w95sockets2.
Note: The new Pro printer version (2.6P1) does not require the Winsock 2.
PPrroo PPrriinntteerr 22..55PP11 && WWiinnddoowwss NNTT::
Pro Printer 2.5P1 supports Windows 95 and Windows 98 operating systems, but not Windows NT. This limitation is due to Windows NT security rules that do not allow a Windows NT service to access user certificates as they are downloaded with the current (as of PP2.5p1) certificate download method. The support of Windows NT is included in the last Pro Printer version (2.6P1).
UUppggrraaddiinngg PPrroo PPrriinntteerr 22..55PP11 ttoo 22..66PP11::
Although one of the major changes in Pro Printer 2.6p1 is that certificates are assigned to the PC, instead of the user, this new version is still compatible with certificates assigned to the user (with the limitations already noticed). This means that existing platforms using Pro Printer 2.5p1 would be able to upgrade to 2.6p1 without re-installing the printer certificates.
To benefit the new printer certificates handling (printing supported for all the Windows users), it will
be necessary to delete the existing printer certificates and download new printer certificates.
40
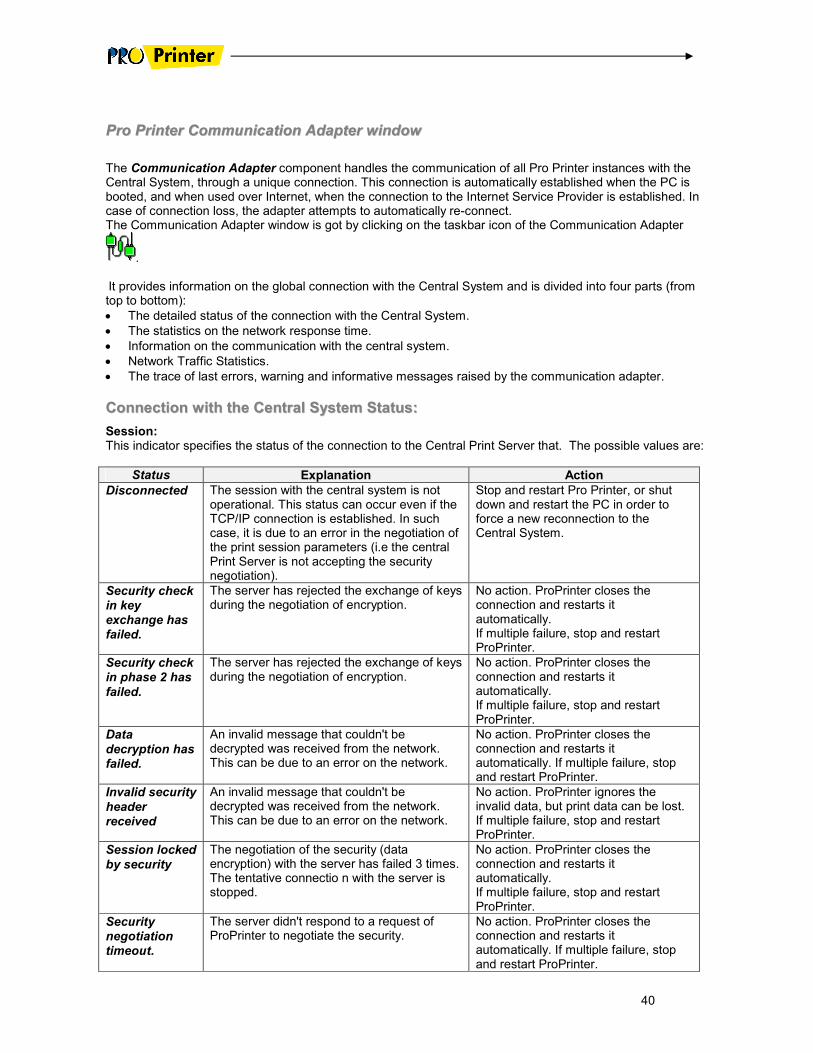
PPrroo PPrriinntteerr CCoommmmuunniiccaattiioonn AAddaapptteerr wwiinnddooww
The Communication Adapter component handles the communication of all Pro Printer instances with the Central System, through a unique connection. This connection is automatically established when the PC is booted, and when used over Internet, when the connection to the Internet Service Provider is established. In case of connection loss, the adapter attempts to automatically re-connect. The Communication Adapter window is got by clicking on the taskbar icon of the Communication Adapter
. It provides information on the global connection with the Central System and is divided into four parts (from top to bottom):
• The detailed status of the connection with the Central System.
• The statistics on the network response time.
• Information on the communication with the central system.
• Network Traffic Statistics.
• The trace of last errors, warning and informative messages raised by the communication adapter.
CCoonnnneeccttiioonn wwiitthh tthhee CCeennttrraall SSyysstteemm SSttaattuuss::
Session: This indicator specifies the status of the connection to the Central Print Server that. The possible values are:
Status Explanation Action
Disconnected The session with the central system is not operational. This status can occur even if the TCP/IP connection is established. In such case, it is due to an error in the negotiation of the print session parameters (i.e the central Print Server is not accepting the security negotiation).
Stop and restart Pro Printer, or shut down and restart the PC in order to force a new reconnection to the Central System.
Security check in key exchange has failed.
The server has rejected the exchange of keys during the negotiation of encryption.
No action. ProPrinter closes the connection and restarts it automatically. If multiple failure, stop and restart ProPrinter.
Security check in phase 2 has
failed.
The server has rejected the exchange of keys during the negotiation of encryption.
No action. ProPrinter closes the connection and restarts it automatically. If multiple failure, stop and restart ProPrinter.
Data
decryption has failed.
An invalid message that couldn't be decrypted was received from the network. This can be due to an error on the network.
No action. ProPrinter closes the connection and restarts it automatically. If multiple failure, stop and restart ProPrinter.
Invalid security
header received
An invalid message that couldn't be decrypted was received from the network. This can be due to an error on the network.
No action. ProPrinter ignores the invalid data, but print data can be lost. If multiple failure, stop and restart ProPrinter.
Session locked
by security
The negotiation of the security (data encryption) with the server has failed 3 times. The tentative connectio n with the server is stopped.
No action. ProPrinter closes the connection and restarts it automatically. If multiple failure, stop and restart ProPrinter.
Security negotiation timeout.
The server didn't respond to a request of ProPrinter to negotiate the security.
No action. ProPrinter closes the connection and restarts it automatically. If multiple failure, stop and restart ProPrinter.

41
Secure network session is active.
The connection is fully established with the Central System and printing can be received.
Verify that the current Windows
logon user is the owner of the certificate
Printer certificate was downloaded with MS Internet Explorer 5.0 or previous version, and a user other that the one that downloaded the certificate is logged on to Windows.
Log off current user and log on using the userid that was used to download the printer certificate.
42
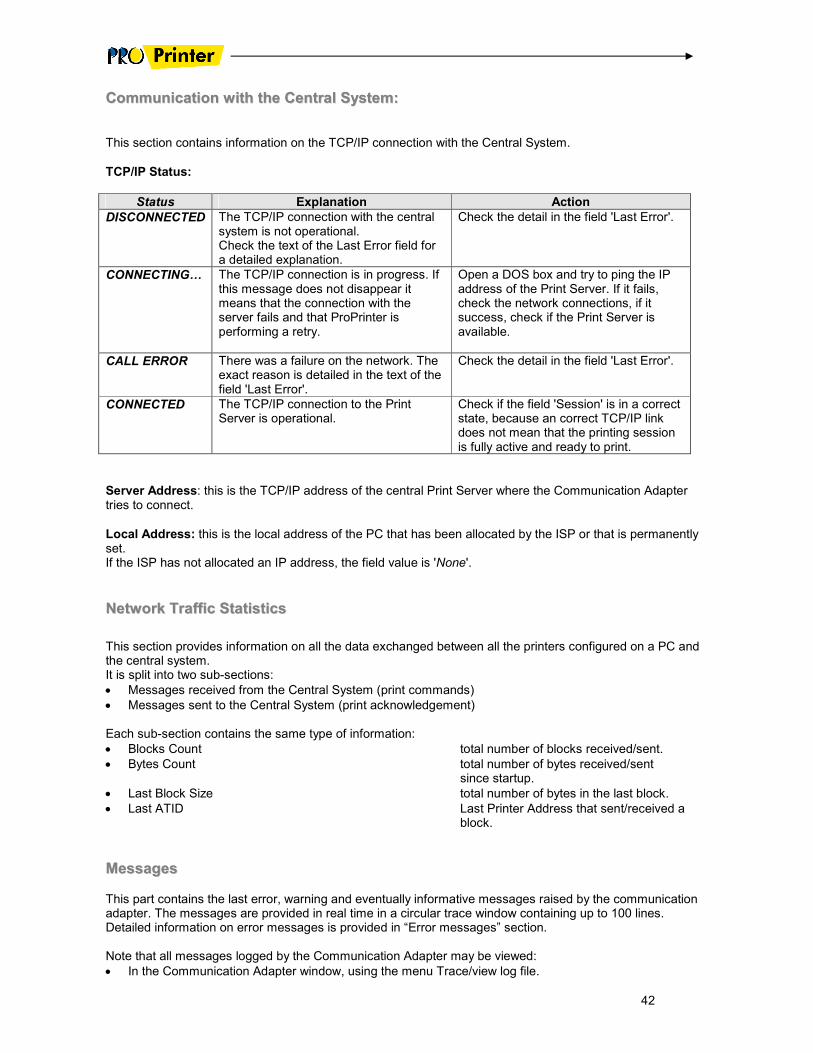
CCoommmmuunniiccaattiioonn wwiitthh tthhee CCeennttrraall SSyysstteemm::
This section contains information on the TCP/IP connection with the Central System.
TCP/IP Status:
Status Explanation Action
DISCONNECTED The TCP/IP connection with the central system is not operational. Check the text of the Last Error field for a detailed explanation.
Check the detail in the field 'Last Error'.
CONNECTING… The TCP/IP connection is in progress. If this message does not disappear it means that the connection with the server fails and that ProPrinter is performing a retry.
Open a DOS box and try to ping the IP address of the Print Server. If it fails, check the network connections, if it success, check if the Print Server is available.
CALL ERROR There was a failure on the network. The exact reason is detailed in the text of the field 'Last Error'.
Check the detail in the field 'Last Error'.
CONNECTED The TCP/IP connection to the Print Server is operational.
Check if the field 'Session' is in a correct state, because an correct TCP/IP link does not mean that the printing session is fully active and ready to print.
Server Address: this is the TCP/IP address of the central Print Server where the Communication Adapter tries to connect.
Local Address: this is the local address of the PC that has been allocated by the ISP or that is permanently set. If the ISP has not allocated an IP address, the field value is 'None'.
NNeettwwoorrkk TTrraaffffiicc SSttaattiissttiiccss
This section provides information on all the data exchanged between all the printers configured on a PC and the central system. It is split into two sub-sections:
• Messages received from the Central System (print commands)
• Messages sent to the Central System (print acknowledgement) Each sub-section contains the same type of information:
• Blocks Count total number of blocks received/sent.
• Bytes Count total number of bytes received/sent since startup.
• Last Block Size total number of bytes in the last block.
• Last ATID Last Printer Address that sent/received a block.
MMeessssaaggeess
This part contains the last error, warning and eventually informative messages raised by the communication adapter. The messages are provided in real time in a circular trace window containing up to 100 lines. Detailed information on error messages is provided in “Error messages” section. Note that all messages logged by the Communication Adapter may be viewed:
• In the Communication Adapter window, using the menu Trace/view log file.
43
• In the Configurator, using the button Communication Adapter Trace/View trace.
• Directly editing the related log file: ComAdapter.log file in the software directory (c:\amaprt by default).
MMaaiinntteennaannccee MMooddee
This main menu option activates some events to be sent to the Web Print Services when trouble shooting.
It is mandatory to activate the option so that the Help Desk can perform a remote maintenance on Pro Printer in Write mode (to update the configuration remotely for example).
Starting from the version 2.8P1, this activation is require ONLY FOR THE INTERNET connections.
Starting from the version 2.8P1, all the Pro Printer clients that connect to the server using a URL starting with "1a", are considered as safe and the "Maintenance Mode" does not need to be activated.
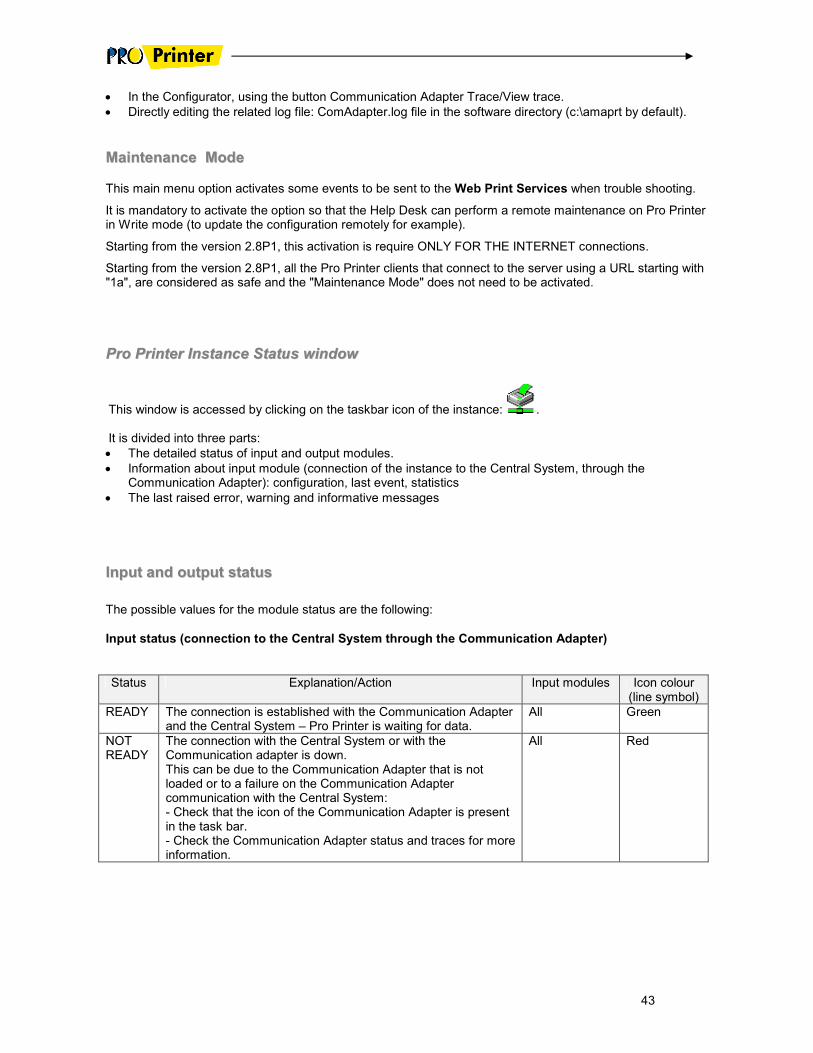
PPrroo PPrriinntteerr IInnssttaannccee SSttaattuuss wwiinnddooww
This window is accessed by clicking on the taskbar icon of the instance: . It is divided into three parts:
• The detailed status of input and output modules.
• Information about input module (connection of the instance to the Central System, through the Communication Adapter): configuration, last event, statistics
• The last raised error, warning and informative messages
IInnppuutt aanndd oouuttppuutt ssttaattuuss
The possible values for the module status are the following:
Input status (connection to the Central System through the Communication Adapter)
Status Explanation/Action Input modules Icon colour (line symbol)
READY The connection is established with the Communication Adapter and the Central System – Pro Printer is waiting for data.
All Green
NOT READY
The connection with the Central System or with the Communication adapter is down. This can be due to the Communication Adapter that is not loaded or to a failure on the Communication Adapter communication with the Central System: - Check that the icon of the Communication Adapter is present in the task bar. - Check the Communication Adapter status and traces for more information.
All Red
44
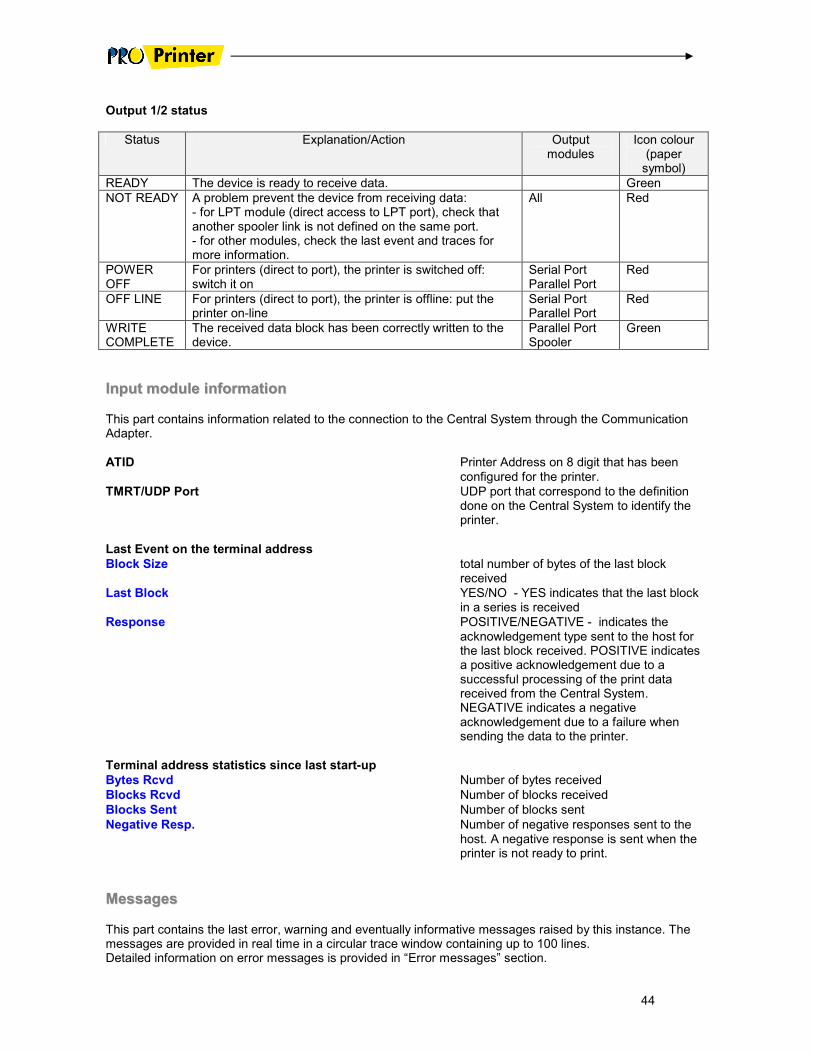
Output 1/2 status
Status Explanation/Action Output modules
Icon colour (paper symbol)
READY The device is ready to receive data. Green
NOT READY A problem prevent the device from receiving data: - for LPT module (direct access to LPT port), check that another spooler link is not defined on the same port. - for other modules, check the last event and traces for more information.
All Red
POWER OFF
For printers (direct to port), the printer is switched off: switch it on
Serial Port Parallel Port
Red
OFF LINE For printers (direct to port), the printer is offline: put the printer on-line
Serial Port Parallel Port
Red
WRITE COMPLETE
The received data block has been correctly written to the device.
Parallel Port Spooler
Green
IInnppuutt mmoodduullee iinnffoorrmmaattiioonn
This part contains information related to the connection to the Central System through the Communication Adapter.
ATID Printer Address on 8 digit that has been configured for the printer.
TMRT/UDP Port UDP port that correspond to the definition done on the Central System to identify the printer.
Last Event on the terminal address
Block Size total number of bytes of the last block received
Last Block YES/NO - YES indicates that the last block in a series is received
Response POSITIVE/NEGATIVE - indicates the acknowledgement type sent to the host for the last block received. POSITIVE indicates a positive acknowledgement due to a successful processing of the print data received from the Central System. NEGATIVE indicates a negative acknowledgement due to a failure when sending the data to the printer.
Terminal address statistics since last start-up
Bytes Rcvd Number of bytes received
Blocks Rcvd Number of blocks received
Blocks Sent Number of blocks sent
Negative Resp. Number of negative responses sent to the host. A negative response is sent when the printer is not ready to print.
MMeessssaaggeess
This part contains the last error, warning and eventually informative messages raised by this instance. The messages are provided in real time in a circular trace window containing up to 100 lines. Detailed information on error messages is provided in “Error messages” section.
45
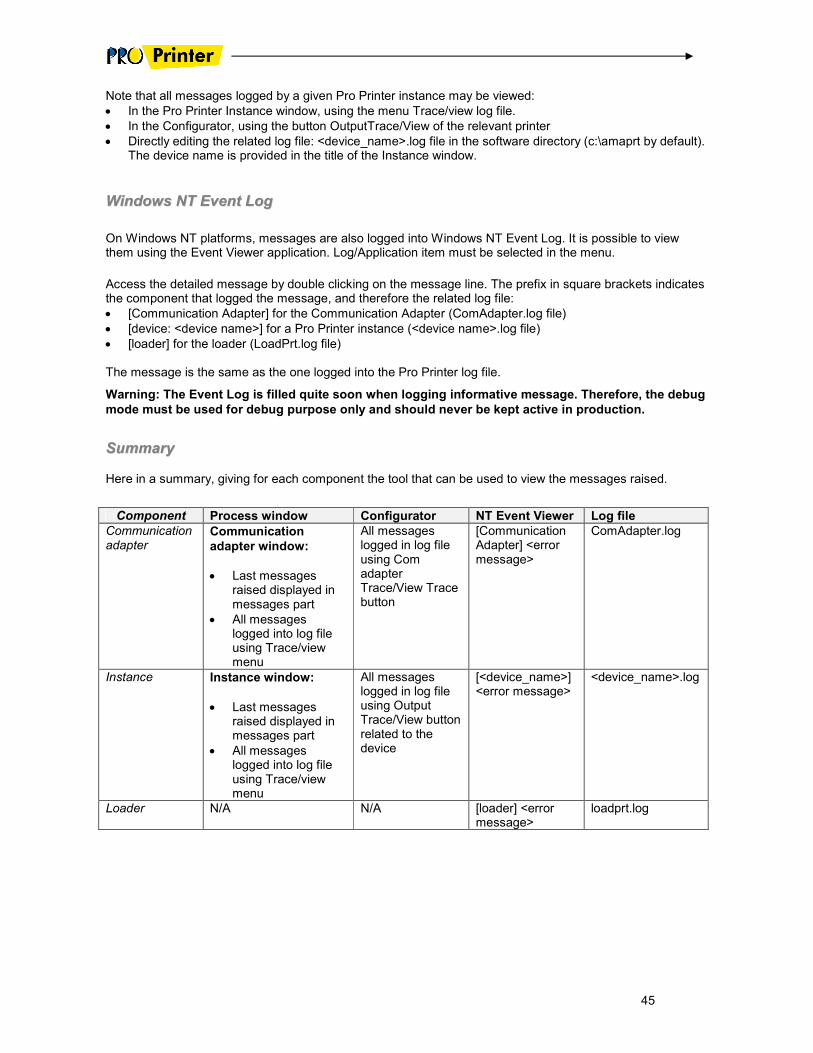
Note that all messages logged by a given Pro Printer instance may be viewed:
• In the Pro Printer Instance window, using the menu Trace/view log file.
• In the Configurator, using the button OutputTrace/View of the relevant printer
• Directly editing the related log file: <device_name>.log file in the software directory (c:\amaprt by default). The device name is provided in the title of the Instance window.
WWiinnddoowwss NNTT EEvveenntt LLoogg
On Windows NT platforms, messages are also logged into Windows NT Event Log. It is possible to view them using the Event Viewer application. Log/Application item must be selected in the menu.
Access the detailed message by double clicking on the message line. The prefix in square brackets indicates the component that logged the message, and therefore the related log file:
• [Communication Adapter] for the Communication Adapter (ComAdapter.log file)
• [device: <device name>] for a Pro Printer instance (<device name>.log file)
• [loader] for the loader (LoadPrt.log file) The message is the same as the one logged into the Pro Printer log file.
Warning: The Event Log is filled quite soon when logging informative message. Therefore, the debug
mode must be used for debug purpose only and should never be kept active in production.
SSuummmmaarryy
Here in a summary, giving for each component the tool that can be used to view the messages raised.
Component Process window Configurator NT Event Viewer Log file
Communication adapter
Communication
adapter window:
• Last messages raised displayed in messages part
• All messages logged into log file using Trace/view menu
All messages logged in log file using Com adapter Trace/View Trace button
[Communication Adapter] <error message>
ComAdapter.log
Instance Instance window:
• Last messages raised displayed in messages part
• All messages logged into log file using Trace/view menu
All messages logged in log file using Output Trace/View button related to the device
[<device_name>] <error message>
<device_name>.log
Loader N/A N/A [loader] <error message>
loadprt.log

46
EERRRROORR MMeessssaaggeess
As stated before, error messages may be logged by the Pro Printer loader, the Communication Adapter, by a specific Pro Printer instance or the loader An error message is structured as follows:
{<time stamp>} (!ERROR!) <error text> - <extended error> For messages logged by a Pro Printer instance, the error text is prefixed by <module type>. It indicates the module for which the problem occurred: input, formatter or device (i.e. output). <extended error text> is also an optional part which gives more detailed information about the error. Example:
{12/15 16:23:29} (!ERROR!) Device - FATAL ERROR - - Open returned - Port already in use
error text = Device - FATAL ERROR –
extended error = Open returned - Port already in use In the error list provided hereunder, the messages are first grouped according to the component that logged the error: communication adapter, instance, loader. For the errors logged by an instance, a specific section is provided for each module type: Input, formatter, output modules. In the error tables, the <module type> - <error text> is presented in bold. Possible extended parts are then listed in the next pages.
47
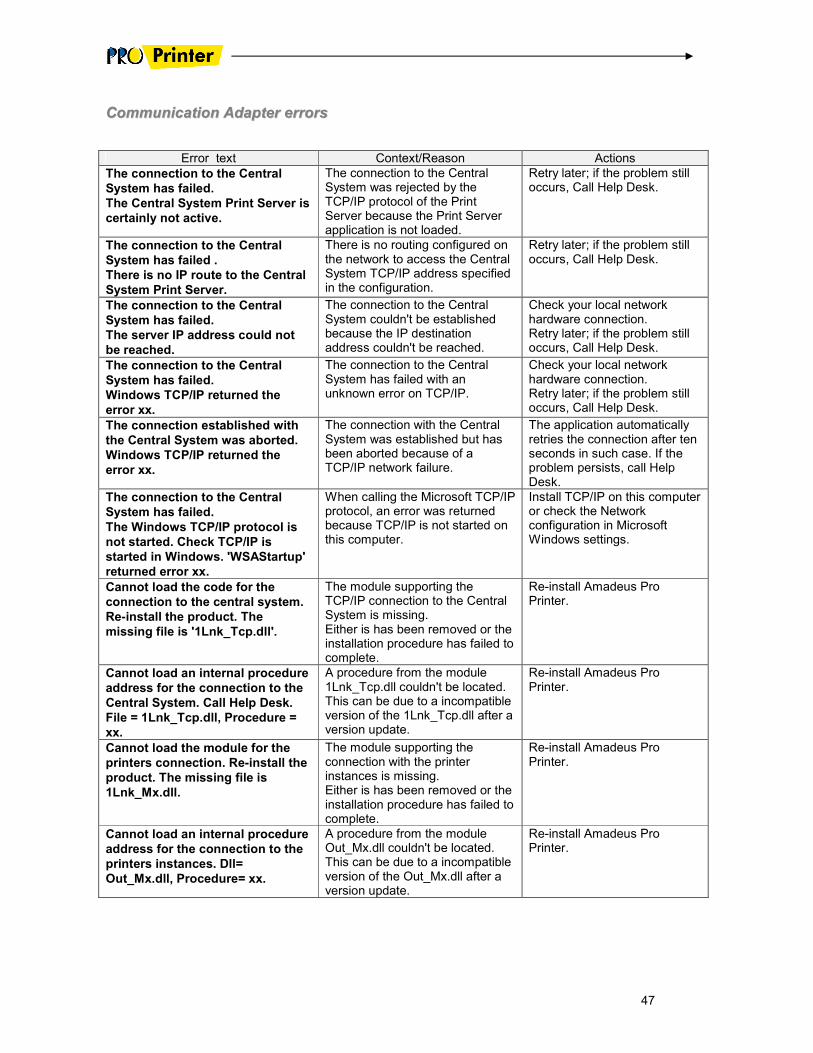
CCoommmmuunniiccaattiioonn AAddaapptteerr eerrrroorrss
Error text Context/Reason Actions
The connection to the Central
System has failed.
The Central System Print Server is
certainly not active.
The connection to the Central System was rejected by the TCP/IP protocol of the Print Server because the Print Server application is not loaded.
Retry later; if the problem still occurs, Call Help Desk.
The connection to the Central
System has failed .
There is no IP route to the Central
System Print Server.
There is no routing configured on the network to access the Central System TCP/IP address specified in the configuration.
Retry later; if the problem still occurs, Call Help Desk.
The connection to the Central
System has failed.
The server IP address could not
be reached.
The connection to the Central System couldn't be established because the IP destination address couldn't be reached.
Check your local network hardware connection. Retry later; if the problem still occurs, Call Help Desk.
The connection to the Central
System has failed.
Windows TCP/IP returned the
error xx.
The connection to the Central System has failed with an unknown error on TCP/IP.
Check your local network hardware connection. Retry later; if the problem still occurs, Call Help Desk.
The connection established with
the Central System was aborted.
Windows TCP/IP returned the
error xx.
The connection with the Central System was established but has been aborted because of a TCP/IP network failure.
The application automatically retries the connection after ten seconds in such case. If the problem persists, call Help Desk.
The connection to the Central
System has failed.
The Windows TCP/IP protocol is
not started. Check TCP/IP is
started in Windows. 'WSAStartup'
returned error xx.
When calling the Microsoft TCP/IP protocol, an error was returned because TCP/IP is not started on this computer.
Install TCP/IP on this computer or check the Network configuration in Microsoft Windows settings.
Cannot load the code for the
connection to the central system.
Re-install the product. The
missing file is '1Lnk_Tcp.dll'.
The module supporting the TCP/IP connection to the Central System is missing. Either is has been removed or the installation procedure has failed to complete.
Re-install Amadeus Pro Printer.
Cannot load an internal procedure
address for the connection to the
Central System. Call Help Desk.
File = 1Lnk_Tcp.dll, Procedure =
xx.
A procedure from the module 1Lnk_Tcp.dll couldn't be located. This can be due to a incompatible version of the 1Lnk_Tcp.dll after a version update.
Re-install Amadeus Pro Printer.
Cannot load the module for the
printers connection. Re-install the
product. The missing file is
1Lnk_Mx.dll.
The module supporting the connection with the printer instances is missing. Either is has been removed or the installation procedure has failed to complete.
Re-install Amadeus Pro Printer.
Cannot load an internal procedure
address for the connection to the
printers instances. Dll=
Out_Mx.dll, Procedure= xx.
A procedure from the module Out_Mx.dll couldn't be located. This can be due to a incompatible version of the Out_Mx.dll after a version update.
Re-install Amadeus Pro Printer.
48
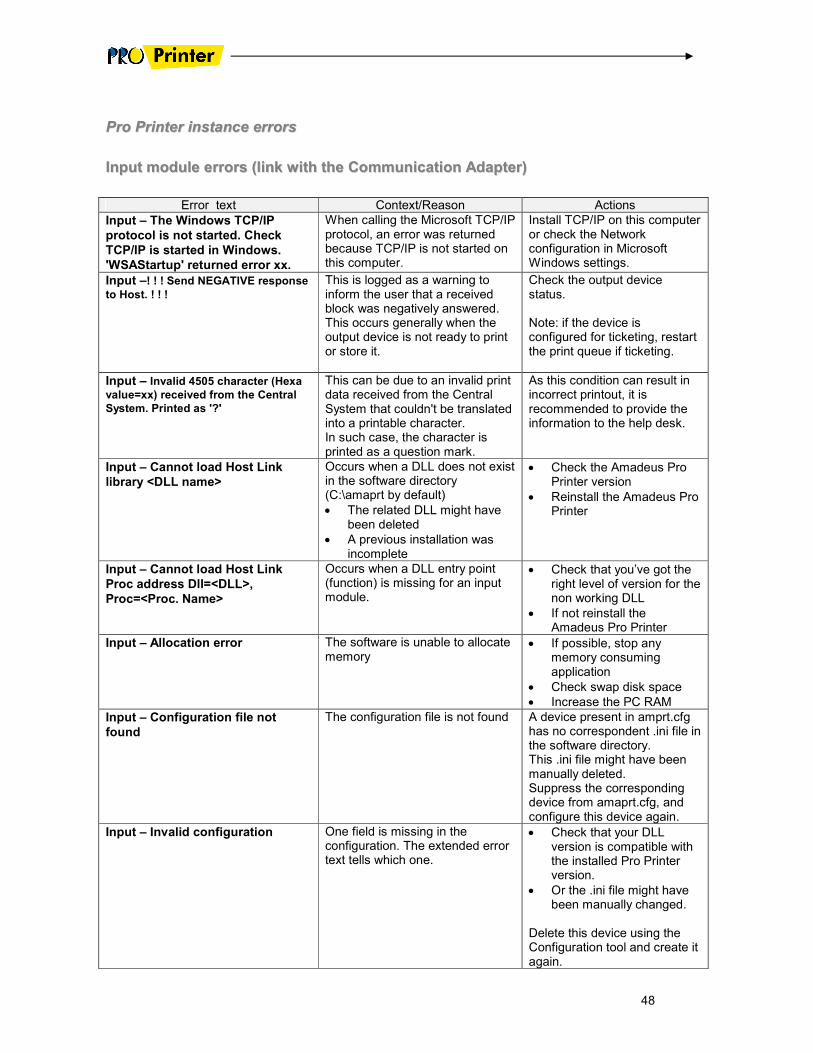
PPrroo PPrriinntteerr iinnssttaannccee eerrrroorrss
IInnppuutt mmoodduullee eerrrroorrss ((lliinnkk wwiitthh tthhee CCoommmmuunniiccaattiioonn AAddaapptteerr))
Error text Context/Reason Actions
Input – The Windows TCP/IP
protocol is not started. Check
TCP/IP is started in Windows.
'WSAStartup' returned error xx.
When calling the Microsoft TCP/IP protocol, an error was returned because TCP/IP is not started on this computer.
Install TCP/IP on this computer or check the Network configuration in Microsoft Windows settings.
Input –! ! ! Send NEGATIVE response
to Host. ! ! !
This is logged as a warning to inform the user that a received block was negatively answered. This occurs generally when the output device is not ready to print or store it.
Check the output device status. Note: if the device is configured for ticketing, restart the print queue if ticketing.
Input – Invalid 4505 character (Hexa
value=xx) received from the Central
System. Printed as '?'
This can be due to an invalid print data received from the Central System that couldn't be translated into a printable character. In such case, the character is printed as a question mark.
As this condition can result in incorrect printout, it is recommended to provide the information to the help desk.
Input – Cannot load Host Link
library <DLL name>
Occurs when a DLL does not exist in the software directory (C:\amaprt by default)
• The related DLL might have been deleted
• A previous installation was incomplete
• Check the Amadeus Pro Printer version
• Reinstall the Amadeus Pro Printer
Input – Cannot load Host Link
Proc address Dll=<DLL>,
Proc=<Proc. Name>
Occurs when a DLL entry point (function) is missing for an input module.
• Check that you’ve got the right level of version for the non working DLL
• If not reinstall the Amadeus Pro Printer
Input – Allocation error The software is unable to allocate memory
• If possible, stop any memory consuming application
• Check swap disk space
• Increase the PC RAM
Input – Configuration file not
found
The configuration file is not found A device present in amprt.cfg has no correspondent .ini file in the software directory. This .ini file might have been manually deleted. Suppress the corresponding device from amaprt.cfg, and configure this device again.
Input – Invalid configuration One field is missing in the configuration. The extended error text tells which one.
• Check that your DLL version is compatible with the installed Pro Printer version.
• Or the .ini file might have been manually changed.
Delete this device using the Configuration tool and create it again.
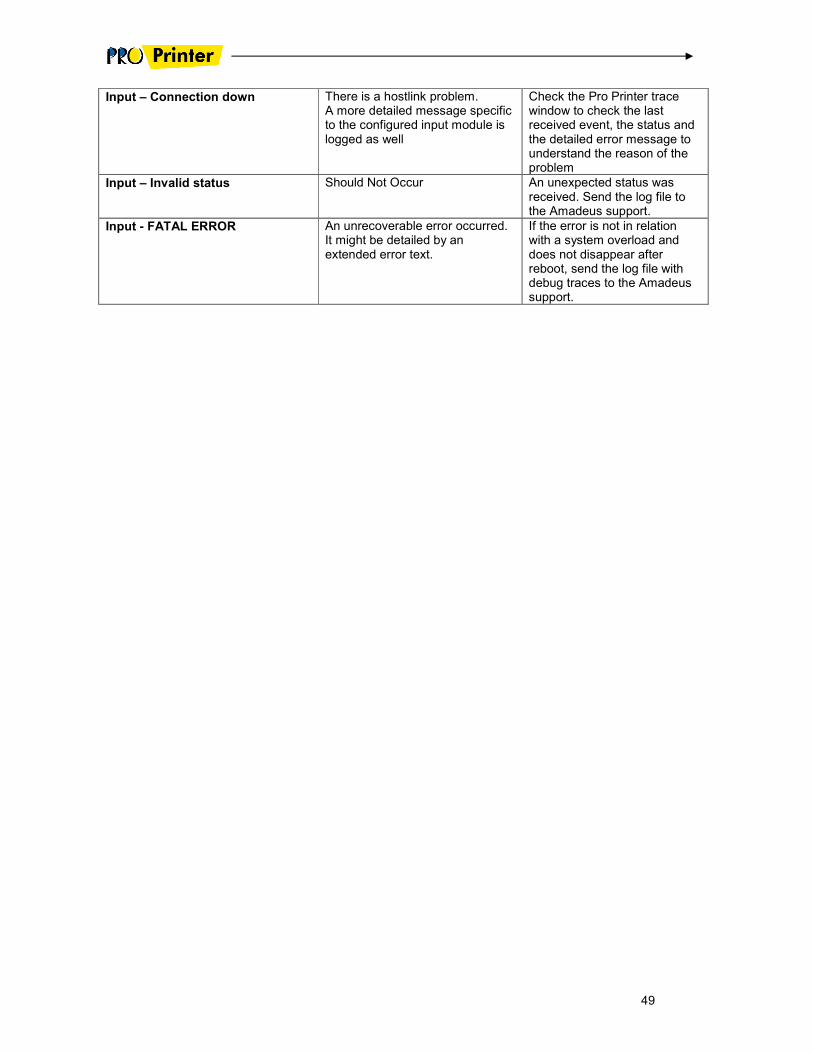
49
Input – Connection down There is a hostlink problem. A more detailed message specific to the configured input module is logged as well
Check the Pro Printer trace window to check the last received event, the status and the detailed error message to understand the reason of the problem
Input – Invalid status Should Not Occur An unexpected status was received. Send the log file to the Amadeus support.
Input - FATAL ERROR An unrecoverable error occurred. It might be detailed by an extended error text.
If the error is not in relation with a system overload and does not disappear after reboot, send the log file with debug traces to the Amadeus support.
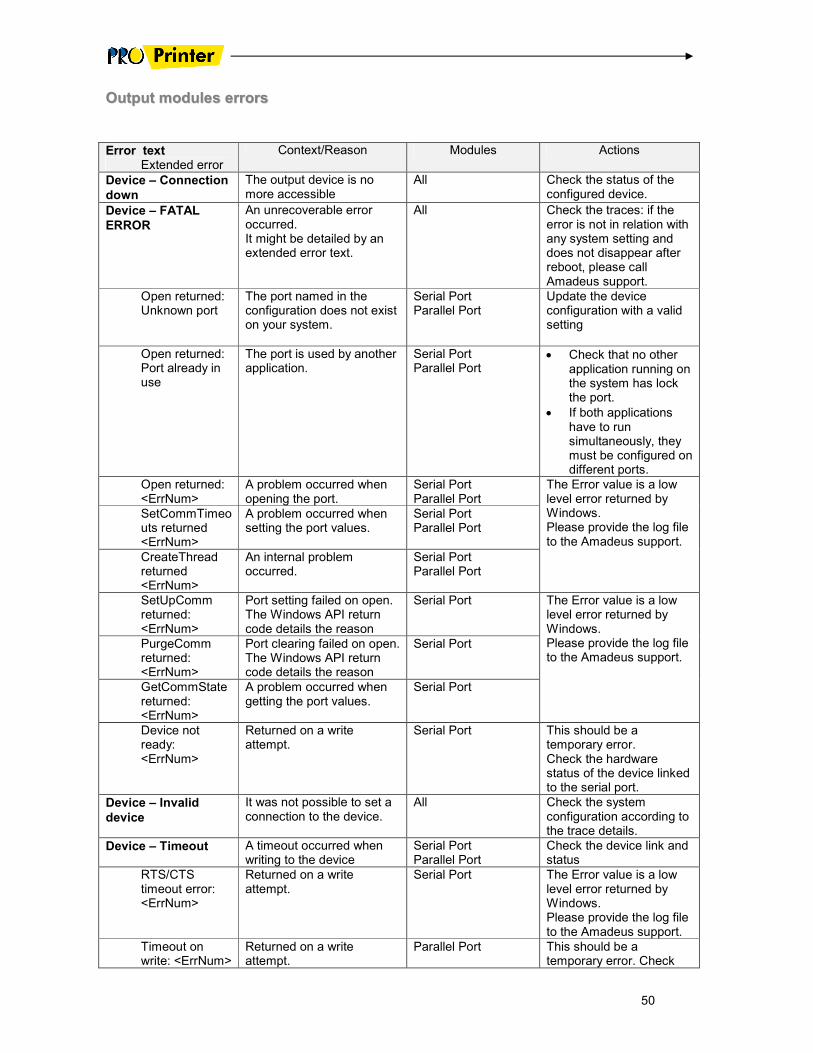
50
OOuuttppuutt mmoodduulleess eerrrroorrss
Error text Extended error
Context/Reason Modules Actions
Device – Connection
down
The output device is no more accessible
All Check the status of the configured device.
Device – FATAL
ERROR
An unrecoverable error occurred. It might be detailed by an extended error text.
All Check the traces: if the error is not in relation with any system setting and does not disappear after reboot, please call Amadeus support.
Open returned: Unknown port
The port named in the configuration does not exist on your system.
Serial Port Parallel Port
Update the device configuration with a valid setting
Open returned: Port already in use
The port is used by another application.
Serial Port Parallel Port
• Check that no other application running on the system has lock the port.
• If both applications have to run simultaneously, they must be configured on different ports.
Open returned: <ErrNum>
A problem occurred when opening the port.
Serial Port Parallel Port
SetCommTimeouts returned <ErrNum>
A problem occurred when setting the port values.
Serial Port Parallel Port
CreateThread returned <ErrNum>
An internal problem occurred.
Serial Port Parallel Port
The Error value is a low level error returned by Windows. Please provide the log file to the Amadeus support.
SetUpComm returned: <ErrNum>
Port setting failed on open. The Windows API return code details the reason
Serial Port
PurgeComm returned: <ErrNum>
Port clearing failed on open. The Windows API return code details the reason
Serial Port
GetCommState returned: <ErrNum>
A problem occurred when getting the port values.
Serial Port
The Error value is a low level error returned by Windows. Please provide the log file to the Amadeus support.
Device not ready: <ErrNum>
Returned on a write attempt.
Serial Port This should be a temporary error. Check the hardware status of the device linked to the serial port.
Device – Invalid
device
It was not possible to set a connection to the device.
All Check the system configuration according to the trace details.
Device – Timeout A timeout occurred when writing to the device
Serial Port Parallel Port
Check the device link and status
RTS/CTS timeout error: <ErrNum>
Returned on a write attempt.
Serial Port The Error value is a low level error returned by Windows. Please provide the log file to the Amadeus support.
Timeout on write: <ErrNum>
Returned on a write attempt.
Parallel Port This should be a temporary error. Check
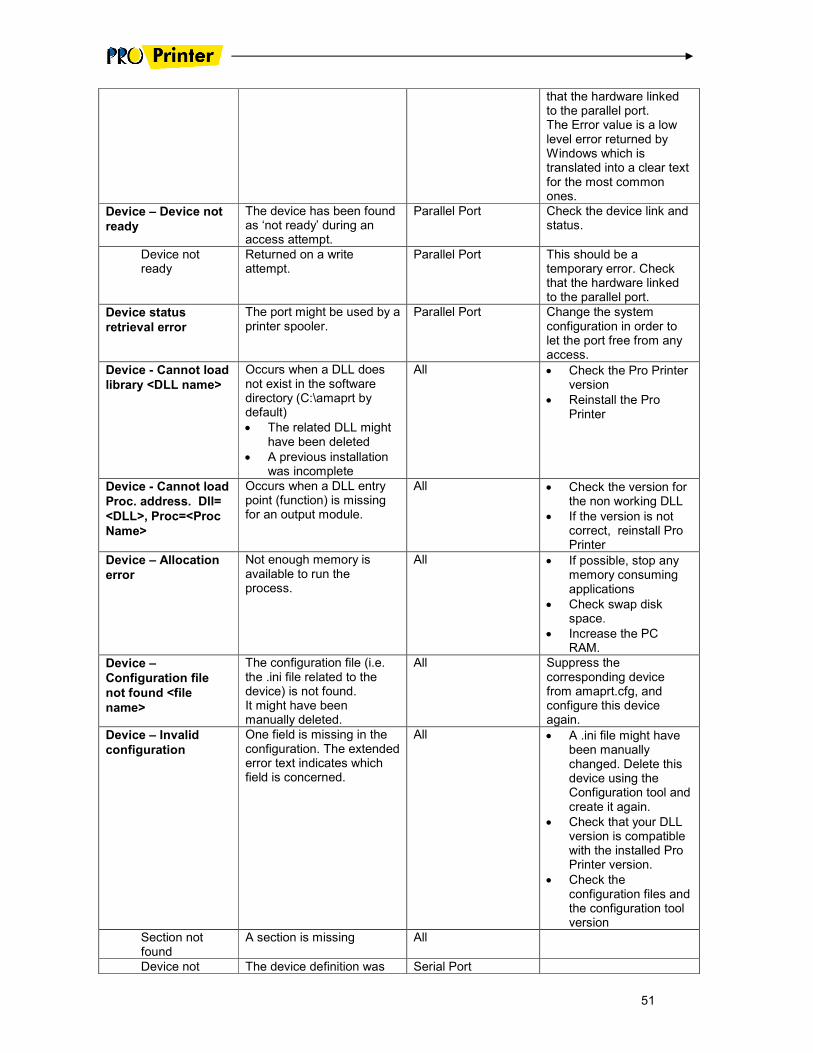
51
that the hardware linked to the parallel port. The Error value is a low level error returned by Windows which is translated into a clear text for the most common ones.
Device – Device not
ready
The device has been found as ‘not ready’ during an access attempt.
Parallel Port Check the device link and status.
Device not ready
Returned on a write attempt.
Parallel Port This should be a temporary error. Check that the hardware linked to the parallel port.
Device status
retrieval error
The port might be used by a printer spooler.
Parallel Port Change the system configuration in order to let the port free from any access.
Device - Cannot load
library <DLL name>
Occurs when a DLL does not exist in the software directory (C:\amaprt by default)
• The related DLL might have been deleted
• A previous installation was incomplete
All • Check the Pro Printer version
• Reinstall the Pro Printer
Device - Cannot load
Proc. address. Dll=
<DLL>, Proc=<Proc
Name>
Occurs when a DLL entry point (function) is missing for an output module.
All • Check the version for the non working DLL
• If the version is not correct, reinstall Pro Printer
Device – Allocation
error
Not enough memory is available to run the process.
All • If possible, stop any memory consuming applications
• Check swap disk space.
• Increase the PC RAM.
Device –
Configuration file
not found <file
name>
The configuration file (i.e. the .ini file related to the device) is not found. It might have been manually deleted.
All Suppress the corresponding device from amaprt.cfg, and configure this device again.
Device – Invalid
configuration
One field is missing in the configuration. The extended error text indicates which field is concerned.
All • A .ini file might have been manually changed. Delete this device using the Configuration tool and create it again.
• Check that your DLL version is compatible with the installed Pro Printer version.
• Check the configuration files and the configuration tool version
Section not found
A section is missing All
Device not The device definition was Serial Port
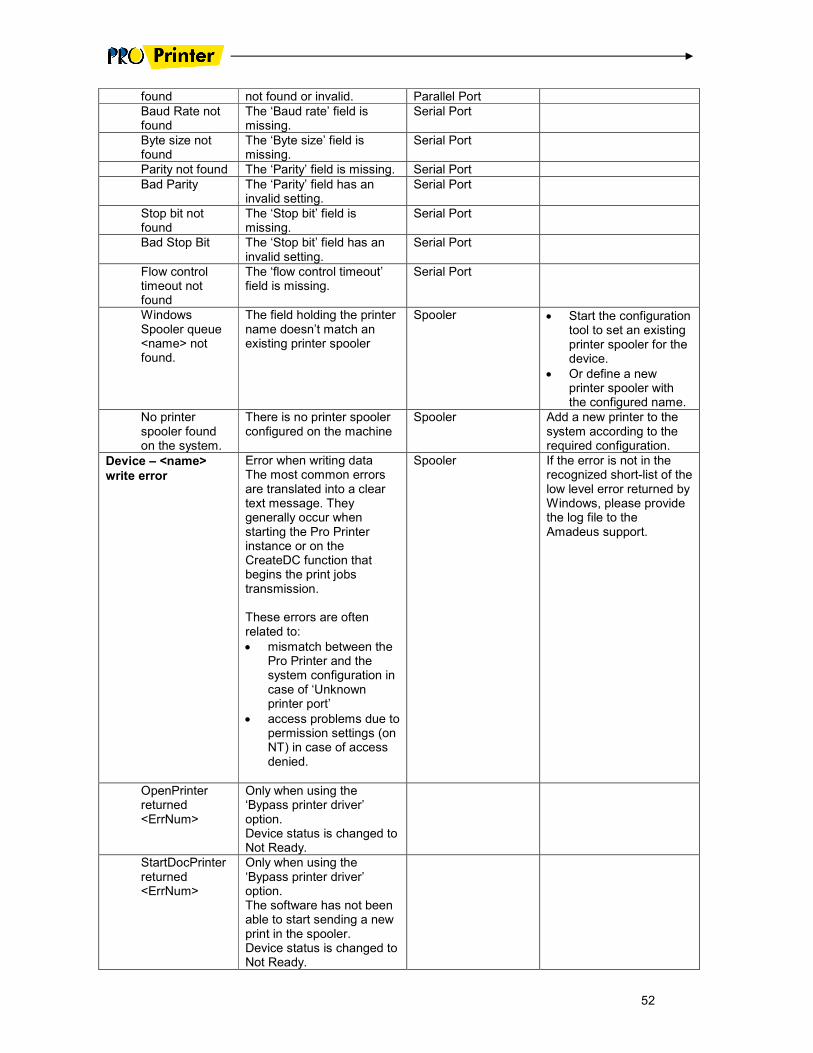
52
found not found or invalid. Parallel Port
Baud Rate not found
The ‘Baud rate’ field is missing.
Serial Port
Byte size not found
The ‘Byte size’ field is missing.
Serial Port
Parity not found The ‘Parity’ field is missing. Serial Port
Bad Parity The ‘Parity’ field has an invalid setting.
Serial Port
Stop bit not found
The ‘Stop bit’ field is missing.
Serial Port
Bad Stop Bit The ‘Stop bit’ field has an invalid setting.
Serial Port
Flow control timeout not found
The ‘flow control timeout’ field is missing.
Serial Port
Windows Spooler queue <name> not found.
The field holding the printer name doesn’t match an existing printer spooler
Spooler • Start the configuration tool to set an existing printer spooler for the device.
• Or define a new printer spooler with the configured name.
No printer spooler found on the system.
There is no printer spooler configured on the machine
Spooler Add a new printer to the system according to the required configuration.
Device – <name>
write error
Error when writing data The most common errors are translated into a clear text message. They generally occur when starting the Pro Printer instance or on the CreateDC function that begins the print jobs transmission. These errors are often related to:
• mismatch between the Pro Printer and the system configuration in case of ‘Unknown printer port’
• access problems due to permission settings (on NT) in case of access denied.
Spooler If the error is not in the recognized short-list of the low level error returned by Windows, please provide the log file to the Amadeus support.
OpenPrinter returned <ErrNum>
Only when using the ‘Bypass printer driver’ option. Device status is changed to Not Ready.
StartDocPrinter returned <ErrNum>
Only when using the ‘Bypass printer driver’ option. The software has not been able to start sending a new print in the spooler. Device status is changed to Not Ready.
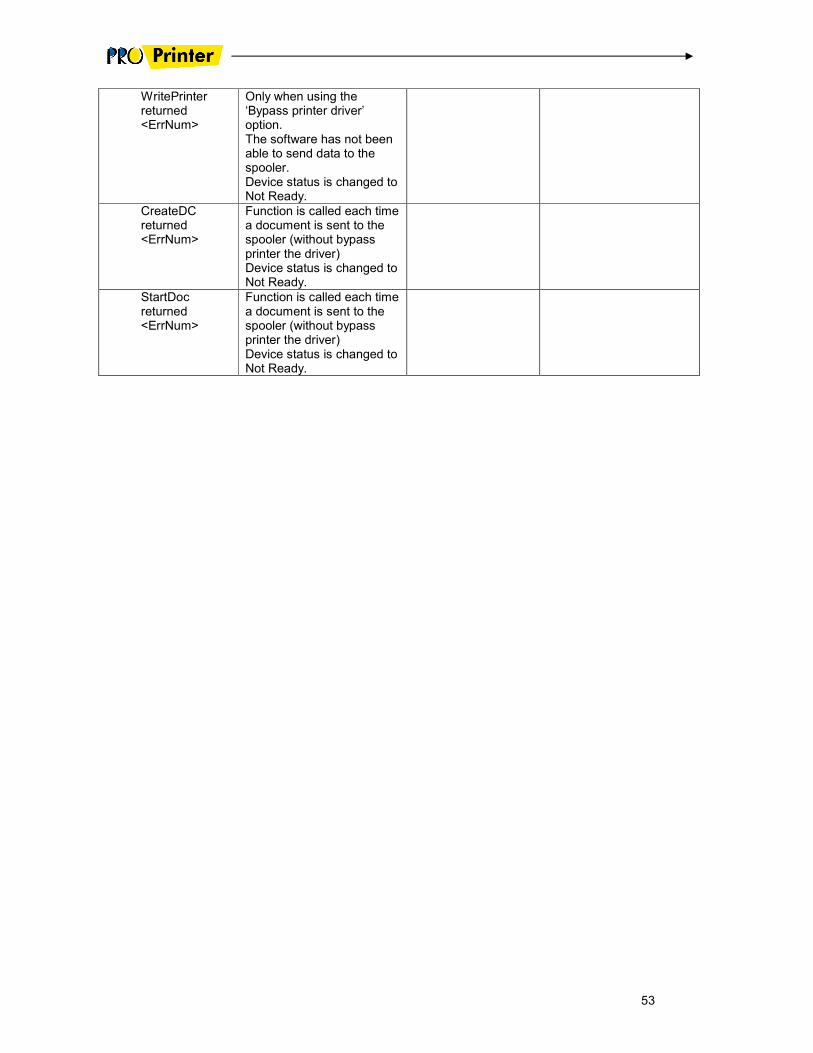
53
WritePrinter returned <ErrNum>
Only when using the ‘Bypass printer driver’ option. The software has not been able to send data to the spooler. Device status is changed to Not Ready.
CreateDC returned <ErrNum>
Function is called each time a document is sent to the spooler (without bypass printer the driver) Device status is changed to Not Ready.
StartDoc returned <ErrNum>
Function is called each time a document is sent to the spooler (without bypass printer the driver) Device status is changed to Not Ready.
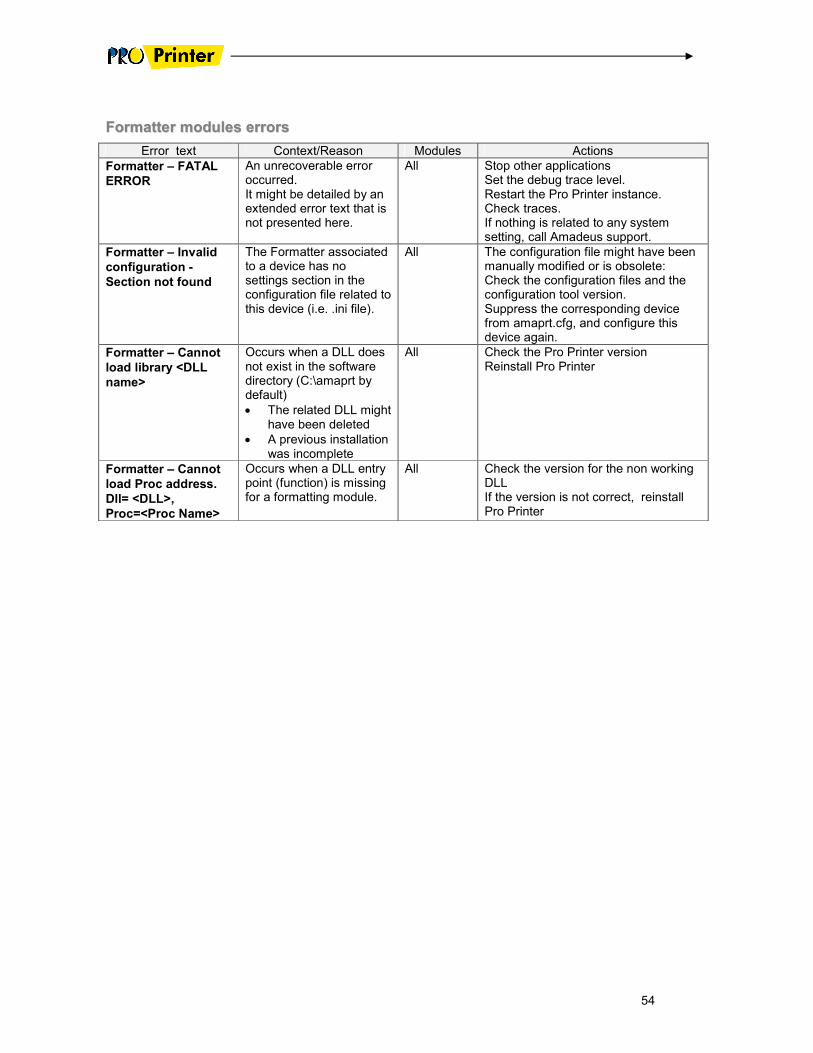
54
FFoorrmmaatttteerr mmoodduulleess eerrrroorrss
Error text Context/Reason Modules Actions
Formatter – FATAL
ERROR
An unrecoverable error occurred. It might be detailed by an extended error text that is not presented here.
All Stop other applications Set the debug trace level. Restart the Pro Printer instance. Check traces. If nothing is related to any system setting, call Amadeus support.
Formatter – Invalid
configuration -
Section not found
The Formatter associated to a device has no settings section in the configuration file related to this device (i.e. .ini file).
All The configuration file might have been manually modified or is obsolete: Check the configuration files and the configuration tool version. Suppress the corresponding device from amaprt.cfg, and configure this device again.
Formatter – Cannot
load library <DLL
name>
Occurs when a DLL does not exist in the software directory (C:\amaprt by default)
• The related DLL might have been deleted
• A previous installation was incomplete
All Check the Pro Printer version Reinstall Pro Printer
Formatter – Cannot
load Proc address.
Dll= <DLL>,
Proc=<Proc Name>
Occurs when a DLL entry point (function) is missing for a formatting module.
All Check the version for the non working DLL If the version is not correct, reinstall Pro Printer
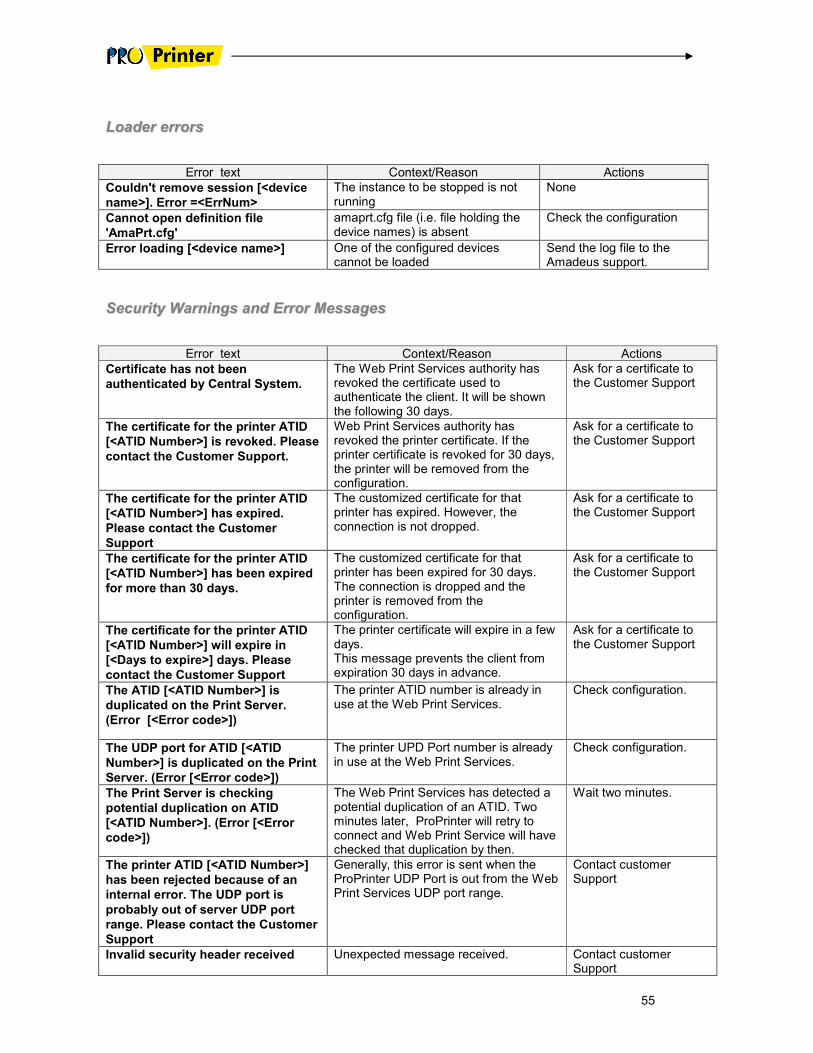
55
LLooaaddeerr eerrrroorrss
Error text Context/Reason Actions
Couldn't remove session [<device
name>]. Error =<ErrNum>
The instance to be stopped is not running
None
Cannot open definition file
'AmaPrt.cfg'
amaprt.cfg file (i.e. file holding the device names) is absent
Check the configuration
Error loading [<device name>] One of the configured devices cannot be loaded
Send the log file to the Amadeus support.
SSeeccuurriittyy WWaarrnniinnggss aanndd EErrrroorr MMeessssaaggeess
Error text Context/Reason Actions
Certificate has not been
authenticated by Central System.
The Web Print Services authority has revoked the certificate used to authenticate the client. It will be shown the following 30 days.
Ask for a certificate to the Customer Support
The certificate for the printer ATID
[<ATID Number>] is revoked. Please
contact the Customer Support.
Web Print Services authority has revoked the printer certificate. If the printer certificate is revoked for 30 days, the printer will be removed from the configuration.
Ask for a certificate to the Customer Support
The certificate for the printer ATID
[<ATID Number>] has expired.
Please contact the Customer
Support
The customized certificate for that printer has expired. However, the connection is not dropped.
Ask for a certificate to the Customer Support
The certificate for the printer ATID
[<ATID Number>] has been expired
for more than 30 days.
The customized certificate for that printer has been expired for 30 days. The connection is dropped and the printer is removed from the configuration.
Ask for a certificate to the Customer Support
The certificate for the printer ATID
[<ATID Number>] will expire in
[<Days to expire>] days. Please
contact the Customer Support
The printer certificate will expire in a few days. This message prevents the client from expiration 30 days in advance.
Ask for a certificate to the Customer Support
The ATID [<ATID Number>] is
duplicated on the Print Server.
(Error [<Error code>])
The printer ATID number is already in use at the Web Print Services.
Check configuration.
The UDP port for ATID [<ATID
Number>] is duplicated on the Print
Server. (Error [<Error code>])
The printer UPD Port number is already in use at the Web Print Services.
Check configuration.
The Print Server is checking
potential duplication on ATID
[<ATID Number>]. (Error [<Error
code>])
The Web Print Services has detected a potential duplication of an ATID. Two minutes later, ProPrinter will retry to connect and Web Print Service will have checked that duplication by then.
Wait two minutes.
The printer ATID [<ATID Number>]
has been rejected because of an
internal error. The UDP port is
probably out of server UDP port
range. Please contact the Customer
Support
Generally, this error is sent when the ProPrinter UDP Port is out from the Web Print Services UDP port range.
Contact customer Support
Invalid security header received Unexpected message received. Contact customer Support
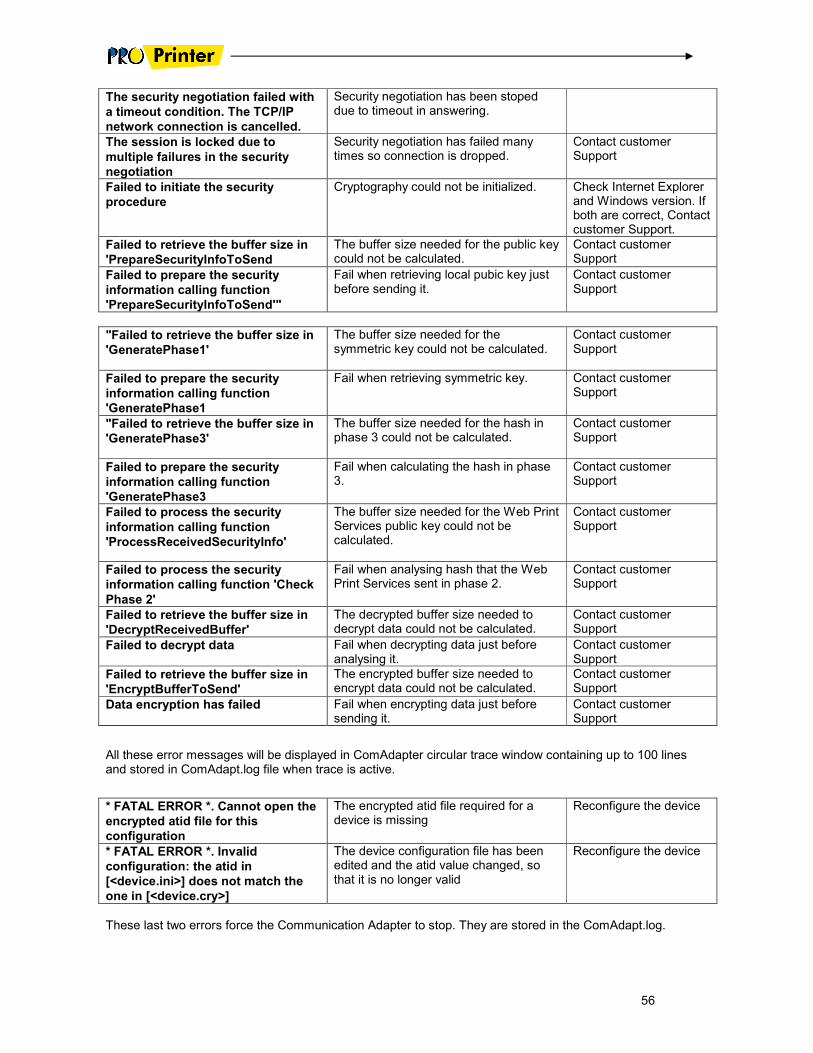
56
The security negotiation failed with
a timeout condition. The TCP/IP
network connection is cancelled.
Security negotiation has been stoped due to timeout in answering.
The session is locked due to
multiple failures in the security
negotiation
Security negotiation has failed many times so connection is dropped.
Contact customer Support
Failed to initiate the security
procedure
Cryptography could not be initialized. Check Internet Explorer and Windows version. If both are correct, Contact customer Support.
Failed to retrieve the buffer size in
'PrepareSecurityInfoToSend
The buffer size needed for the public key could not be calculated.
Contact customer Support
Failed to prepare the security
information calling function
'PrepareSecurityInfoToSend'"
Fail when retrieving local pubic key just before sending it.
Contact customer Support
"Failed to retrieve the buffer size in
'GeneratePhase1'
The buffer size needed for the symmetric key could not be calculated.
Contact customer Support
Failed to prepare the security
information calling function
'GeneratePhase1
Fail when retrieving symmetric key. Contact customer Support
"Failed to retrieve the buffer size in
'GeneratePhase3'
The buffer size needed for the hash in phase 3 could not be calculated.
Contact customer Support
Failed to prepare the security
information calling function
'GeneratePhase3
Fail when calculating the hash in phase 3.
Contact customer Support
Failed to process the security
information calling function
'ProcessReceivedSecurityInfo'
The buffer size needed for the Web Print Services public key could not be calculated.
Contact customer Support
Failed to process the security
information calling function 'Check
Phase 2'
Fail when analysing hash that the Web Print Services sent in phase 2.
Contact customer Support
Failed to retrieve the buffer size in
'DecryptReceivedBuffer'
The decrypted buffer size needed to decrypt data could not be calculated.
Contact customer Support
Failed to decrypt data Fail when decrypting data just before analysing it.
Contact customer Support
Failed to retrieve the buffer size in
'EncryptBufferToSend'
The encrypted buffer size needed to encrypt data could not be calculated.
Contact customer Support
Data encryption has failed Fail when encrypting data just before sending it.
Contact customer Support
All these error messages will be displayed in ComAdapter circular trace window containing up to 100 lines and stored in ComAdapt.log file when trace is active.
* FATAL ERROR *. Cannot open the
encrypted atid file for this
configuration
The encrypted atid file required for a device is missing
Reconfigure the device
* FATAL ERROR *. Invalid
configuration: the atid in
[<device.ini>] does not match the
one in [<device.cry>]
The device configuration file has been edited and the atid value changed, so that it is no longer valid
Reconfigure the device
These last two errors force the Communication Adapter to stop. They are stored in the ComAdapt.log.
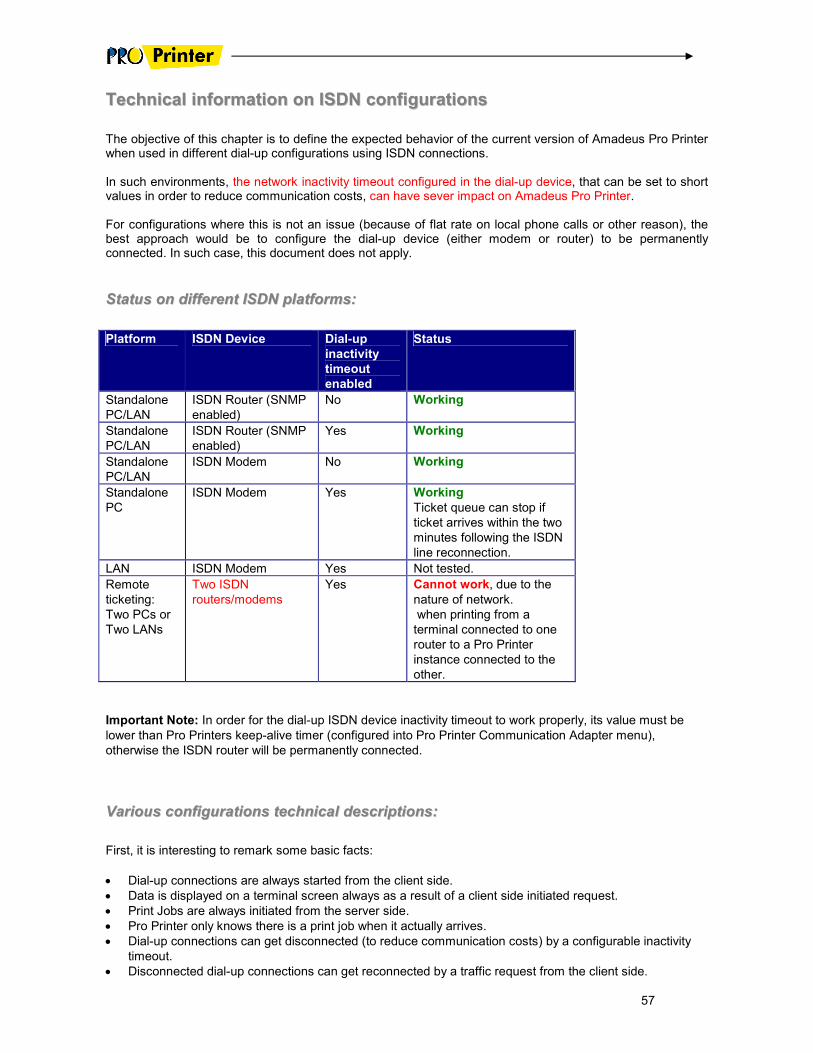
57
TTeecchhnniiccaall iinnffoorrmmaattiioonn oonn IISSDDNN ccoonnffiigguurraattiioonnss
The objective of this chapter is to define the expected behavior of the current version of Amadeus Pro Printer when used in different dial-up configurations using ISDN connections. In such environments, the network inactivity timeout configured in the dial-up device, that can be set to short values in order to reduce communication costs, can have sever impact on Amadeus Pro Printer. For configurations where this is not an issue (because of flat rate on local phone calls or other reason), the best approach would be to configure the dial-up device (either modem or router) to be permanently connected. In such case, this document does not apply.
SSttaattuuss oonn ddiiffffeerreenntt IISSDDNN ppllaattffoorrmmss::
Platform ISDN Device Dial-up
inactivity
timeout
enabled
Status
Standalone
PC/LAN
ISDN Router (SNMP
enabled)
No Working
Standalone
PC/LAN
ISDN Router (SNMP
enabled)
Yes Working
Standalone
PC/LAN
ISDN Modem No Working
Standalone
PC
ISDN Modem Yes Working
Ticket queue can stop if
ticket arrives within the two
minutes following the ISDN
line reconnection.
LAN ISDN Modem Yes Not tested.
Remote
ticketing:
Two PCs or
Two LANs
Two ISDN
routers/modems
Yes Cannot work, due to the
nature of network.
when printing from a
terminal connected to one
router to a Pro Printer
instance connected to the
other.
Important Note: In order for the dial-up ISDN device inactivity timeout to work properly, its value must be
lower than Pro Printers keep-alive timer (configured into Pro Printer Communication Adapter menu),
otherwise the ISDN router will be permanently connected.
VVaarriioouuss ccoonnffiigguurraattiioonnss tteecchhnniiccaall ddeessccrriippttiioonnss::
First, it is interesting to remark some basic facts:
• Dial-up connections are always started from the client side.
• Data is displayed on a terminal screen always as a result of a client side initiated request.
• Print Jobs are always initiated from the server side.
• Pro Printer only knows there is a print job when it actually arrives.
• Dial-up connections can get disconnected (to reduce communication costs) by a configurable inactivity
timeout.
• Disconnected dial-up connections can get reconnected by a traffic request from the client side.
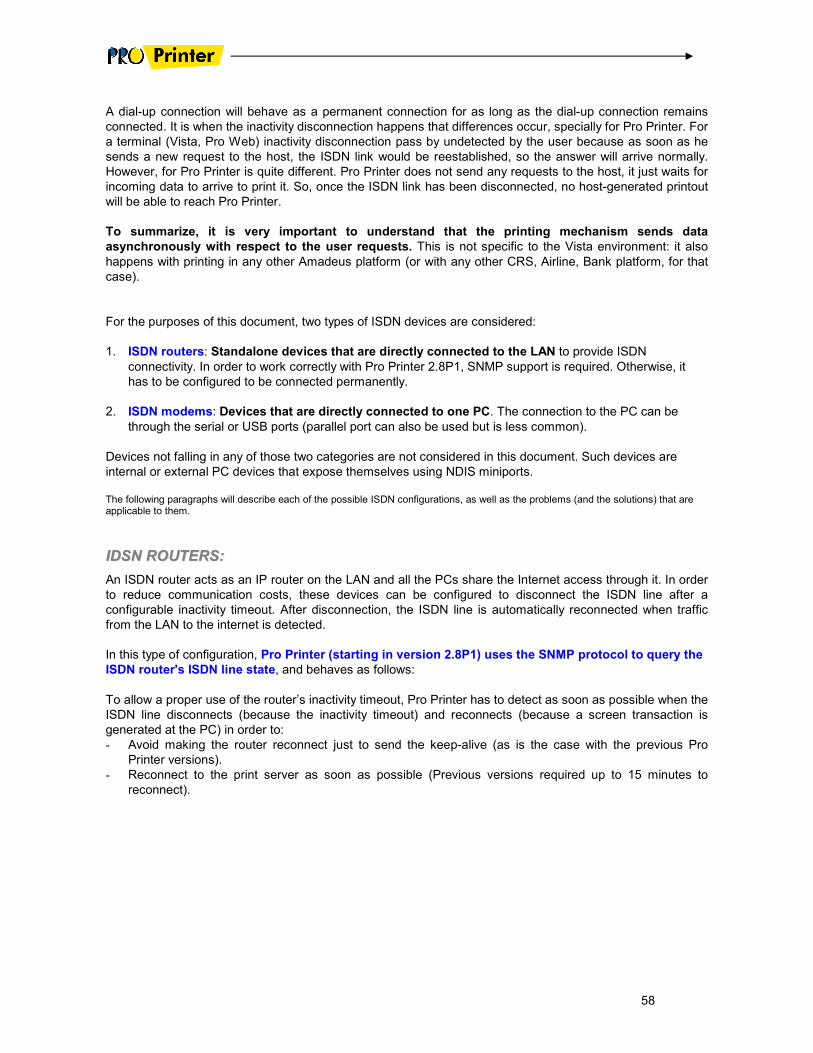
58
A dial-up connection will behave as a permanent connection for as long as the dial-up connection remains
connected. It is when the inactivity disconnection happens that differences occur, specially for Pro Printer. For
a terminal (Vista, Pro Web) inactivity disconnection pass by undetected by the user because as soon as he
sends a new request to the host, the ISDN link would be reestablished, so the answer will arrive normally.
However, for Pro Printer is quite different. Pro Printer does not send any requests to the host, it just waits for
incoming data to arrive to print it. So, once the ISDN link has been disconnected, no host-generated printout
will be able to reach Pro Printer.
To summarize, it is very important to understand that the printing mechanism sends data
asynchronously with respect to the user requests. This is not specific to the Vista environment: it also
happens with printing in any other Amadeus platform (or with any other CRS, Airline, Bank platform, for that
case).
For the purposes of this document, two types of ISDN devices are considered:
1. ISDN routers: Standalone devices that are directly connected to the LAN to provide ISDN
connectivity. In order to work correctly with Pro Printer 2.8P1, SNMP support is required. Otherwise, it
has to be configured to be connected permanently.
2. ISDN modems: Devices that are directly connected to one PC. The connection to the PC can be
through the serial or USB ports (parallel port can also be used but is less common).
Devices not falling in any of those two categories are not considered in this document. Such devices are
internal or external PC devices that expose themselves using NDIS miniports.
The following paragraphs will describe each of the possible ISDN configurations, as well as the problems (and the solutions) that are applicable to them.
IIDDSSNN RROOUUTTEERRSS::
An ISDN router acts as an IP router on the LAN and all the PCs share the Internet access through it. In order
to reduce communication costs, these devices can be configured to disconnect the ISDN line after a
configurable inactivity timeout. After disconnection, the ISDN line is automatically reconnected when traffic
from the LAN to the internet is detected.
In this type of configuration, Pro Printer (starting in version 2.8P1) uses the SNMP protocol to query the
ISDN router's ISDN line state, and behaves as follows:
To allow a proper use of the router’s inactivity timeout, Pro Printer has to detect as soon as possible when the
ISDN line disconnects (because the inactivity timeout) and reconnects (because a screen transaction is
generated at the PC) in order to:
- Avoid making the router reconnect just to send the keep-alive (as is the case with the previous Pro
Printer versions).
- Reconnect to the print server as soon as possible (Previous versions required up to 15 minutes to
reconnect).
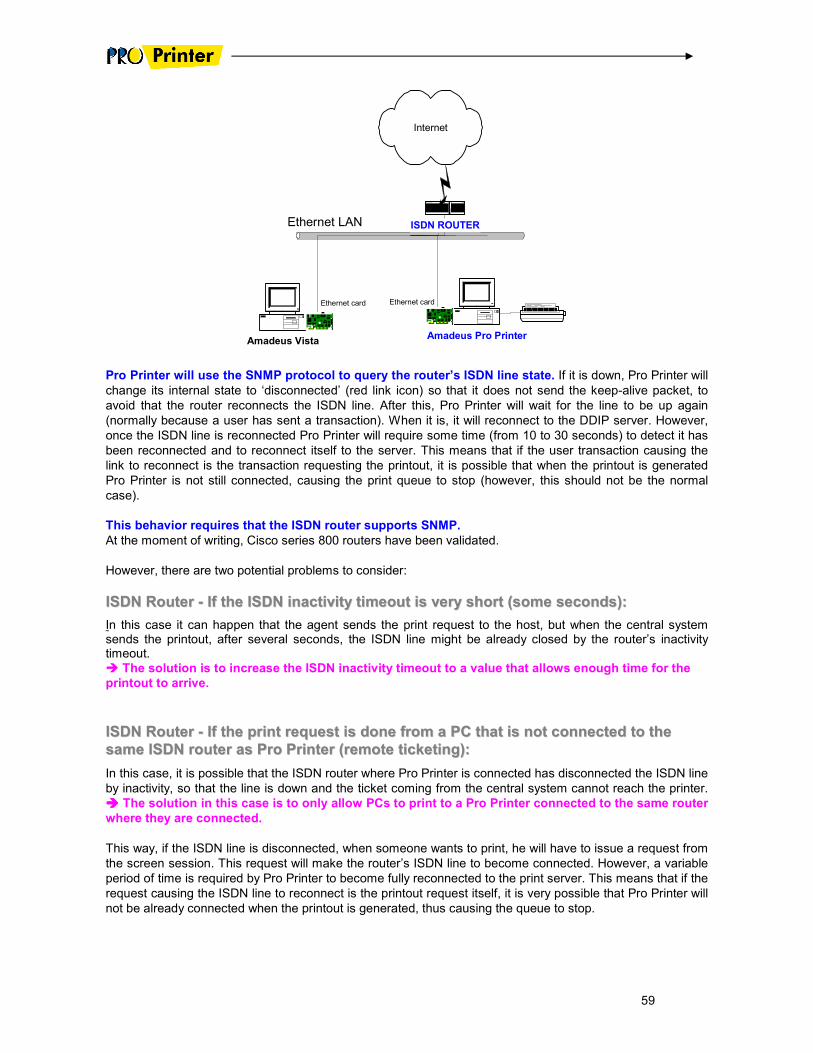
59
Internet
ISDN ROUTER
Amadeus Pro PrinterAmadeus Vista
Ethernet LAN
Ethernet card Ethernet card
Pro Printer will use the SNMP protocol to query the router’s ISDN line state. If it is down, Pro Printer will
change its internal state to ‘disconnected’ (red link icon) so that it does not send the keep-alive packet, to
avoid that the router reconnects the ISDN line. After this, Pro Printer will wait for the line to be up again
(normally because a user has sent a transaction). When it is, it will reconnect to the DDIP server. However,
once the ISDN line is reconnected Pro Printer will require some time (from 10 to 30 seconds) to detect it has
been reconnected and to reconnect itself to the server. This means that if the user transaction causing the
link to reconnect is the transaction requesting the printout, it is possible that when the printout is generated
Pro Printer is not still connected, causing the print queue to stop (however, this should not be the normal
case).
This behavior requires that the ISDN router supports SNMP.
At the moment of writing, Cisco series 800 routers have been validated.
However, there are two potential problems to consider:
IISSDDNN RRoouutteerr -- IIff tthhee IISSDDNN iinnaaccttiivviittyy ttiimmeeoouutt iiss vveerryy sshhoorrtt ((ssoommee sseeccoonnddss))::
In this case it can happen that the agent sends the print request to the host, but when the central system sends the printout, after several seconds, the ISDN line might be already closed by the router’s inactivity timeout.
� The solution is to increase the ISDN inactivity timeout to a value that allows enough time for the
printout to arrive.
IISSDDNN RRoouutteerr -- IIff tthhee pprriinntt rreeqquueesstt iiss ddoonnee ffrroomm aa PPCC tthhaatt iiss nnoott ccoonnnneecctteedd ttoo tthhee
ssaammee IISSDDNN rroouutteerr aass PPrroo PPrriinntteerr ((rreemmoottee ttiicckkeettiinngg))::
In this case, it is possible that the ISDN router where Pro Printer is connected has disconnected the ISDN line
by inactivity, so that the line is down and the ticket coming from the central system cannot reach the printer.
���� The solution in this case is to only allow PCs to print to a Pro Printer connected to the same router
where they are connected.
This way, if the ISDN line is disconnected, when someone wants to print, he will have to issue a request from
the screen session. This request will make the router’s ISDN line to become connected. However, a variable
period of time is required by Pro Printer to become fully reconnected to the print server. This means that if the
request causing the ISDN line to reconnect is the printout request itself, it is very possible that Pro Printer will
not be already connected when the printout is generated, thus causing the queue to stop.
60
IISSDDNN MMOODDEEMMSS::
ISDN Modems are considered by Windows as a standard dialup modem. Windows dial-up connections can
be configured with an inactivity timeout, so similar problems to the ones described for ISDN routers can
happen with ISDN modems. However, it would not be exactly the same since the current version of Pro
Printer already includes some special treatment for modem dial-up connections.
Also, since ISDN modems are connected through a PC local port (serial, USB), their use is normally
restricted to single-PC configurations. However, ICS (Internet Connection Sharing, included with Windows 98
Second Edition) or third party solutions can allow to share a modem connection among several PCs in a
LAN. In such case, Pro Printer must be installed on the same PC where the modem is connected.
Pro Printer does not make any distinction between PSTN and ISDN modems, so the following consideration
can be also applied to both types of modems.
Internet
Amadeus Pro Printer
ISDN MODEM
Serial/USB
Port
In order to detect if the dial-up connection is established, Pro Printer queries the operating system to retrieve the dial-up connection state. If the connection is down, Pro Printer will not try to connect. If it was already connected, it will sent its internal state to disconnected, so that the keep-alive is not sent, avoiding to force the reconnection.
In this type of configuration, potential problems (and their solutions with the current version of Pro Printer)
are:
IISSDDNN MMooddeemm -- IIff AAmmaaddeeuuss PPrroo PPrriinntteerr’’ss kkeeeepp--aalliivvee ddooeess nnoott aallllooww tthhee WWiinnddoowwss ddiiaall--
uupp ccoonnnneeccttiioonn ttoo ddiissccoonnnneecctt ((bbyy iinnaaccttiivviittyy)) tthhee IISSDDNN lliinnee::
Pro Printer needs to send a keep-alive packet in order to detect, in a reasonable amount of time, when the host connection is down. One keep-alive packet is sent every 10 minutes, so if the dial-up inactivity timeout is greater than 10 minutes, the modem will never disconnect the ISDN line, since Pro Printer will not allow for more than 10 minutes of inactivity. If it is smaller, Pro Printer will detect when the ISDN line is disconnected, changing its internal state to disconnected. When the ISDN line becomes connected again, Pro Printer will reconnect to the D.D.IP server.
���� If costs-saving is not an issue, it is recommended that the dial-up inactivity timer be disabled, so
that the connection becomes permanent, allowing for a better operation of Pro Printer.
If cost-saving is a must, then the dial-up inactivity timer can be enabled, with a timeout lower than 10 minutes.
In this case, Pro Printer will require two minutes to reconnect to the D.D.IP server after the ISDN line is up
again. Printouts generated during that time may cause the print queue to stop.
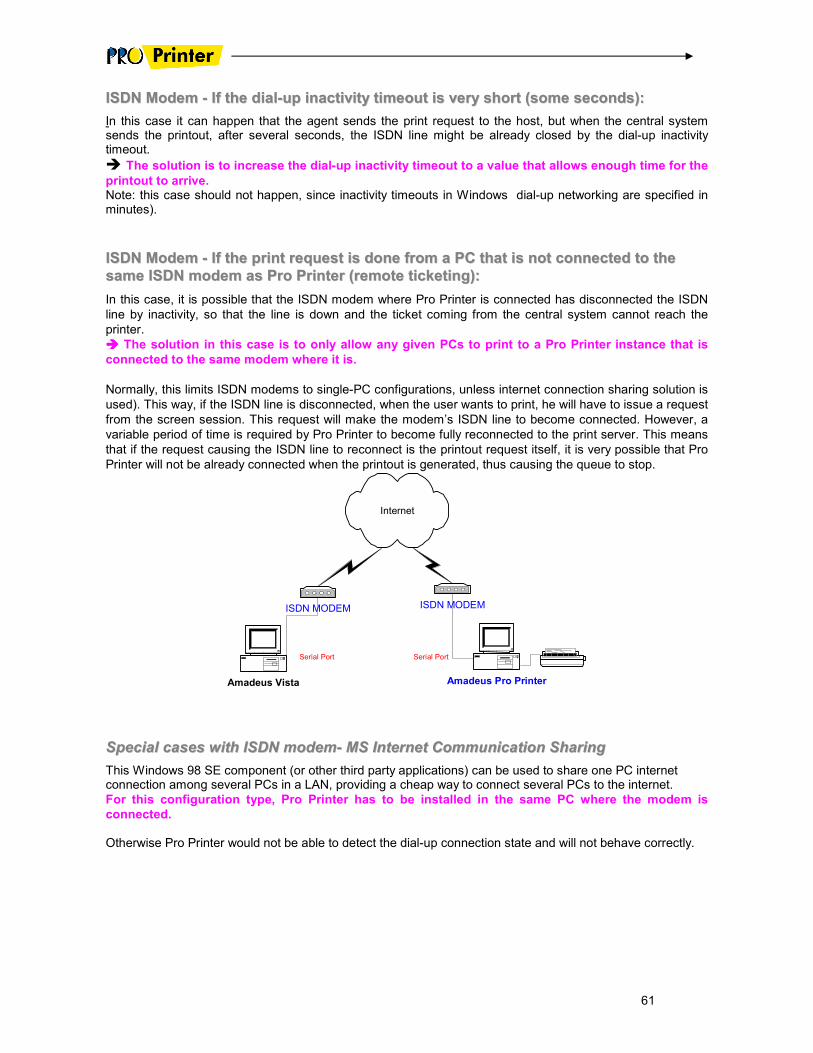
61
IISSDDNN MMooddeemm -- IIff tthhee ddiiaall--uupp iinnaaccttiivviittyy ttiimmeeoouutt iiss vveerryy sshhoorrtt ((ssoommee sseeccoonnddss))::
In this case it can happen that the agent sends the print request to the host, but when the central system sends the printout, after several seconds, the ISDN line might be already closed by the dial-up inactivity timeout.
� The solution is to increase the dial-up inactivity timeout to a value that allows enough time for the
printout to arrive. Note: this case should not happen, since inactivity timeouts in Windows dial-up networking are specified in minutes).
IISSDDNN MMooddeemm -- IIff tthhee pprriinntt rreeqquueesstt iiss ddoonnee ffrroomm aa PPCC tthhaatt iiss nnoott ccoonnnneecctteedd ttoo tthhee
ssaammee IISSDDNN mmooddeemm aass PPrroo PPrriinntteerr ((rreemmoottee ttiicckkeettiinngg))::
In this case, it is possible that the ISDN modem where Pro Printer is connected has disconnected the ISDN
line by inactivity, so that the line is down and the ticket coming from the central system cannot reach the
printer.
���� The solution in this case is to only allow any given PCs to print to a Pro Printer instance that is
connected to the same modem where it is.
Normally, this limits ISDN modems to single-PC configurations, unless internet connection sharing solution is
used). This way, if the ISDN line is disconnected, when the user wants to print, he will have to issue a request
from the screen session. This request will make the modem’s ISDN line to become connected. However, a
variable period of time is required by Pro Printer to become fully reconnected to the print server. This means
that if the request causing the ISDN line to reconnect is the printout request itself, it is very possible that Pro
Printer will not be already connected when the printout is generated, thus causing the queue to stop.
Internet
Amadeus Pro PrinterAmadeus Vista
ISDN MODEMISDN MODEM
Serial PortSerial Port
SSppeecciiaall ccaasseess wwiitthh IISSDDNN mmooddeemm-- MMSS IInntteerrnneett CCoommmmuunniiccaattiioonn SShhaarriinngg
This Windows 98 SE component (or other third party applications) can be used to share one PC internet connection among several PCs in a LAN, providing a cheap way to connect several PCs to the internet.
For this configuration type, Pro Printer has to be installed in the same PC where the modem is
connected. Otherwise Pro Printer would not be able to detect the dial-up connection state and will not behave correctly.
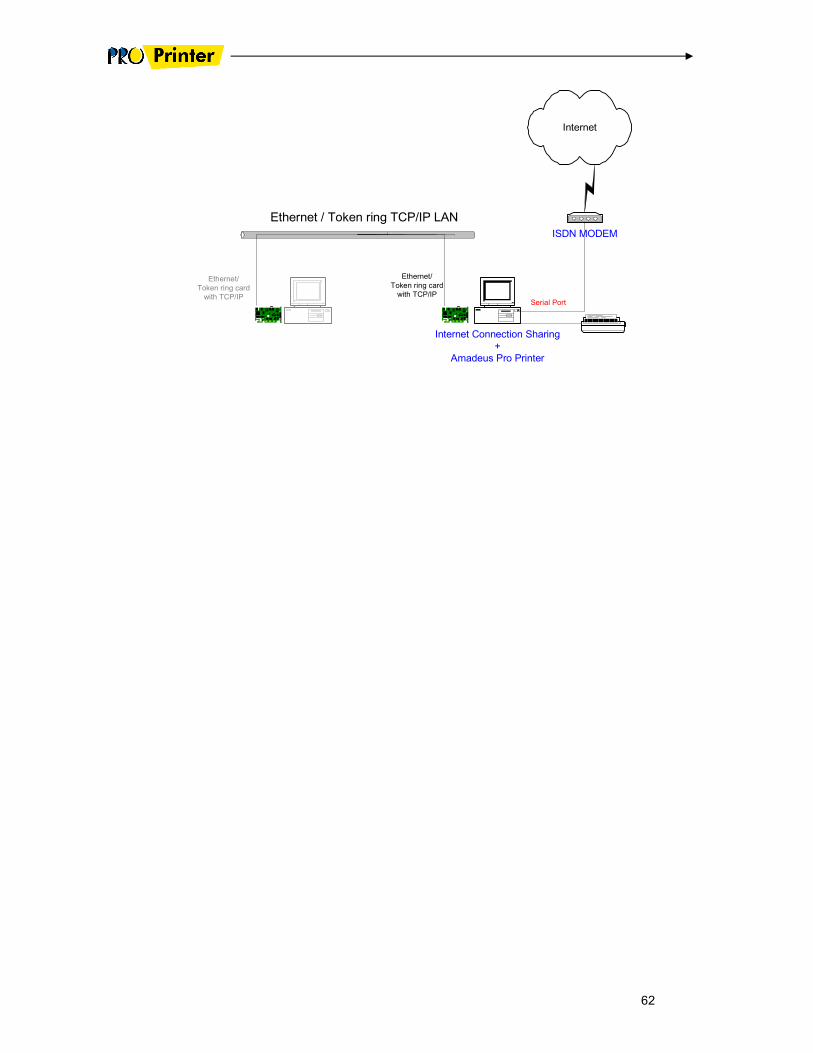
62
Internet
Internet Connection Sharing
+
Amadeus Pro Printer
Ethernet / Token ring TCP/IP LAN
Ethernet/
Token ring card
with TCP/IP
ISDN MODEM
Serial Port
Ethernet/
Token ring card
with TCP/IP
63
BBeeffoorree yyoouu ssttaarrtt AAmmaaddeeuuss PPrroo PPrriinntteerr IInntteerrnneett SSTTPP::
This document is intended to guide the installer in the installation and configuration of the Amadeus Pro
Printer Internet STP.
This product relies for a large part on the standard product Amadeus Pro Printer. Therefore, many chapters of the Internet STP documentation are the standard Amadeus Pro Printer chapters. The Internet STP can be considered as a standard Pro Web (or Vista ) ticketing platform, but with no visible screen session.
• All the printers are configured exactly as for a standard Pro Web ticketing platform. This product support printing of tickets and also invoices and itineraries in the STP location.
• The Internet STP manages an internal screen session, that is defined as a standard Pro Web session on the central system. This session simulates agent entries to start and check the printer queues (such as TZSTART, TZD, NI GEN ).
Before you install and configure the Internet STP, you must first check the following pre-requisite: 5) For this STP site, in EUM ACE tool, you have created the printer definitions and one screen definition, as
a standard Pro Web agency.
6) All the central system definitions are correct (Central Ticketing DPR, EOS agreements, Document banks, …).
7) You have a PC with Windows 95, 98 , ME, NT, 2000 and an Internet connection.
8) If you are installing a ticket printer, ensure that you have the printer correctly pre-configured to comply
with your BSP stock specifications.
9) If you are installing a printer for itineraries, invoices and hardcopies ensure that you have the printer already configured into your Windows configuration.
10) You have installed the certificates for all the printers that will be configured on the PC (see the standard Vista or Pro WEB certificate installation documentation).
11) You have installed the screen certificate for the internal screen session used by the Internet STP to restart the queue.

64
DDoowwnnllooaadd AAmmaaddeeuuss PPrroo PPrriinntteerr IInntteerrnneett SSTTPP::
To download the Amadeus Pro Printer Internet STP application on your PC, you must connect to
AmadeusProWeb.com/InternetSTP.
DDoowwnnllooaadd ppaaggee::
� Click the Install button in the home page to download the application or update from a previous version that was not supporting the auto-update:
• If a previous version of Amadeus Pro Printer Internet STP was already installed, the following message box will appear:
• If Amadeus Pro Printer Internet STP was not installed on the PC, the following message will appear:
You can install the product in the same version, or select another directory by clicking the "Browse" button or typing another destination name.
Once you have confirmed the download request, the download fromn the server will be intiated and monitored by the following window:
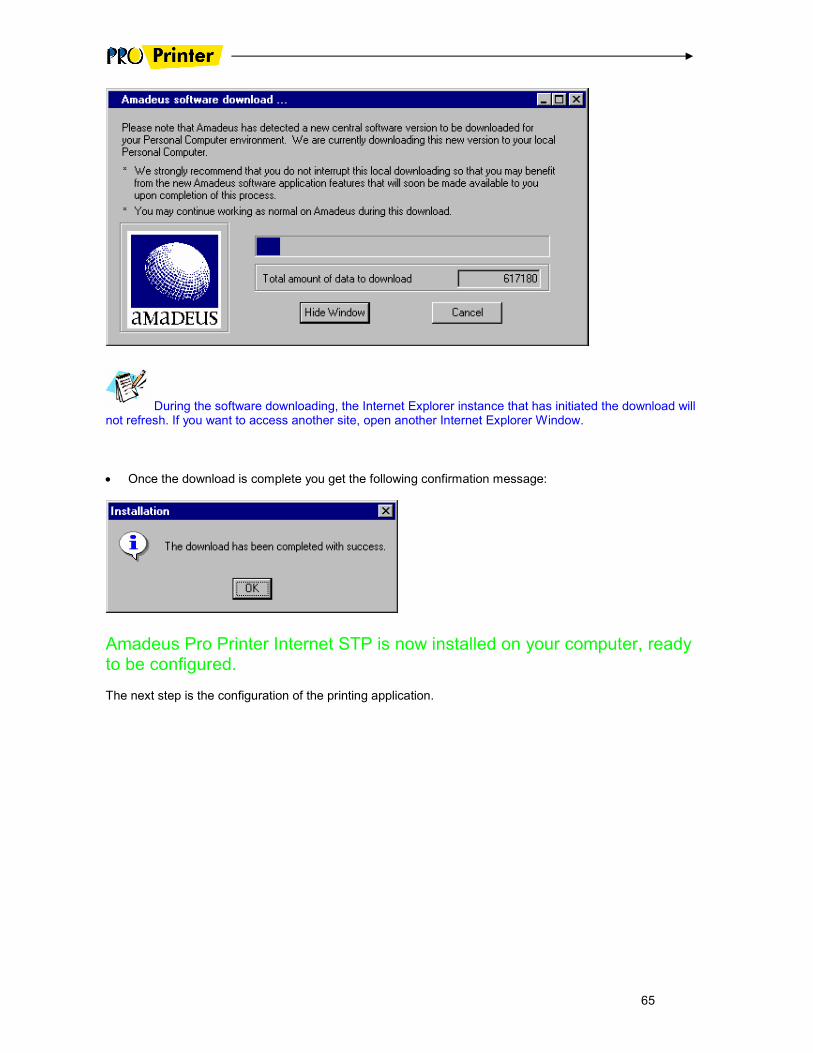
65
During the software downloading, the Internet Explorer instance that has initiated the download will not refresh. If you want to access another site, open another Internet Explorer Window.
• Once the download is complete you get the following confirmation message:
Amadeus Pro Printer Internet STP is now installed on your computer, ready to be configured. The next step is the configuration of the printing application.
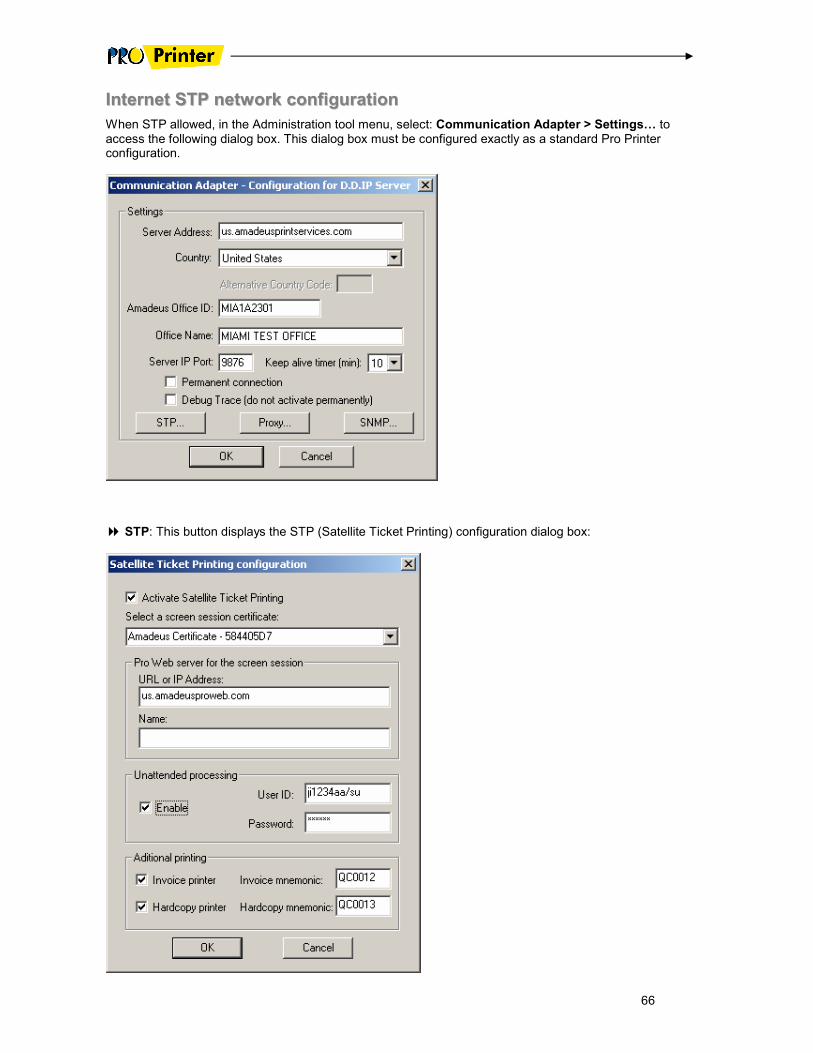
66
IInntteerrnneett SSTTPP nneettwwoorrkk ccoonnffiigguurraattiioonn
When STP allowed, in the Administration tool menu, select: Communication Adapter > Settings… to access the following dialog box. This dialog box must be configured exactly as a standard Pro Printer configuration.
� STP: This button displays the STP (Satellite Ticket Printing) configuration dialog box:
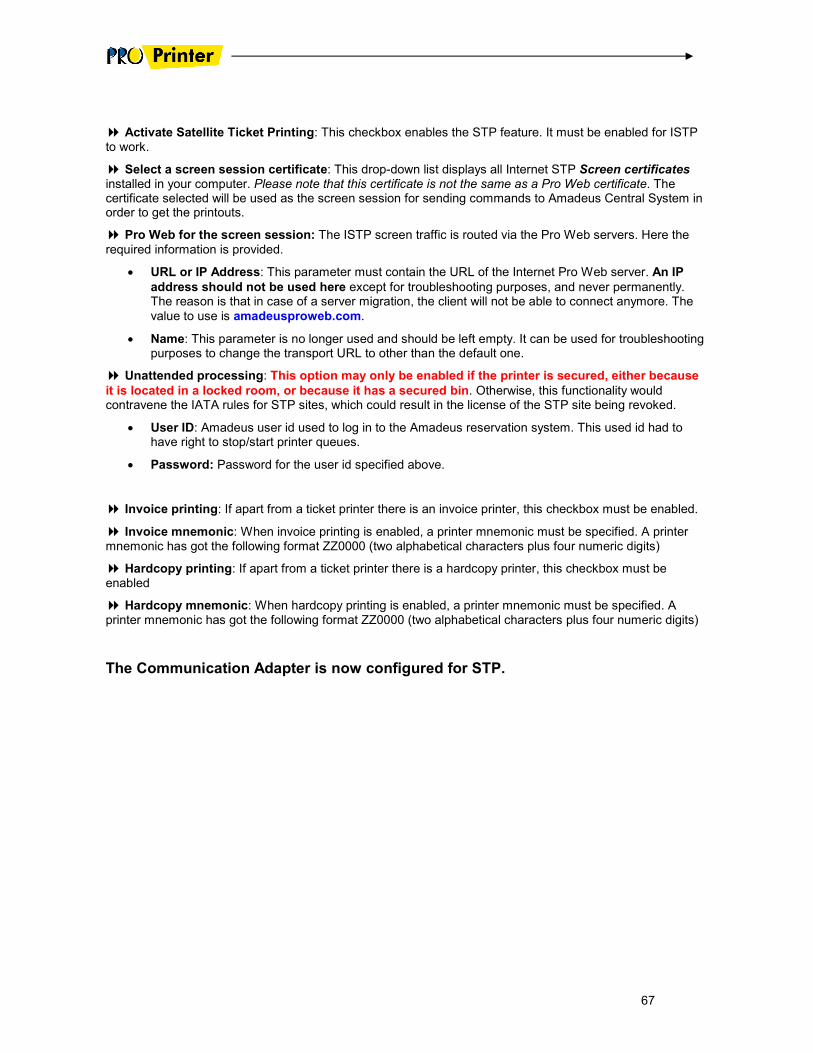
67
� Activate Satellite Ticket Printing: This checkbox enables the STP feature. It must be enabled for ISTP to work.
� Select a screen session certificate: This drop-down list displays all Internet STP Screen certificates installed in your computer. Please note that this certificate is not the same as a Pro Web certificate. The certificate selected will be used as the screen session for sending commands to Amadeus Central System in order to get the printouts.
� Pro Web for the screen session: The ISTP screen traffic is routed via the Pro Web servers. Here the
required information is provided.
• URL or IP Address: This parameter must contain the URL of the Internet Pro Web server. An IP
address should not be used here except for troubleshooting purposes, and never permanently. The reason is that in case of a server migration, the client will not be able to connect anymore. The
value to use is amadeusproweb.com.
• Name: This parameter is no longer used and should be left empty. It can be used for troubleshooting purposes to change the transport URL to other than the default one.
� Unattended processing: This option may only be enabled if the printer is secured, either because
it is located in a locked room, or because it has a secured bin. Otherwise, this functionality would contravene the IATA rules for STP sites, which could result in the license of the STP site being revoked.
• User ID: Amadeus user id used to log in to the Amadeus reservation system. This used id had to have right to stop/start printer queues.
• Password: Password for the user id specified above.
� Invoice printing: If apart from a ticket printer there is an invoice printer, this checkbox must be enabled.
� Invoice mnemonic: When invoice printing is enabled, a printer mnemonic must be specified. A printer mnemonic has got the following format ZZ0000 (two alphabetical characters plus four numeric digits)
� Hardcopy printing: If apart from a ticket printer there is a hardcopy printer, this checkbox must be enabled
� Hardcopy mnemonic: When hardcopy printing is enabled, a printer mnemonic must be specified. A printer mnemonic has got the following format ZZ0000 (two alphabetical characters plus four numeric digits)
The Communication Adapter is now configured for STP.
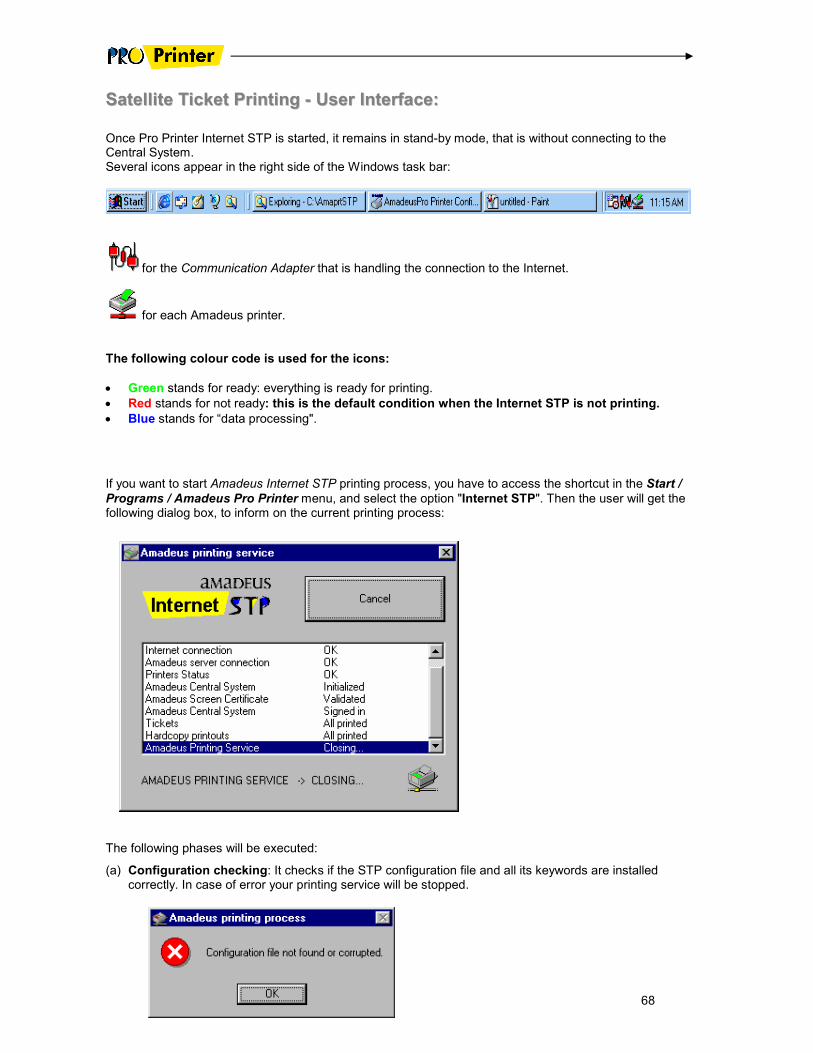
68
SSaatteelllliittee TTiicckkeett PPrriinnttiinngg -- UUsseerr IInntteerrffaaccee::
Once Pro Printer Internet STP is started, it remains in stand-by mode, that is without connecting to the Central System. Several icons appear in the right side of the Windows task bar:
for the Communication Adapter that is handling the connection to the Internet.
for each Amadeus printer.
The following colour code is used for the icons:
• Green stands for ready: everything is ready for printing.
• Red stands for not ready: this is the default condition when the Internet STP is not printing.
• Blue stands for “data processing".
If you want to start Amadeus Internet STP printing process, you have to access the shortcut in the Start /
Programs / Amadeus Pro Printer menu, and select the option "Internet STP". Then the user will get the following dialog box, to inform on the current printing process:
The following phases will be executed:
(a) Configuration checking: It checks if the STP configuration file and all its keywords are installed correctly. In case of error your printing service will be stopped.
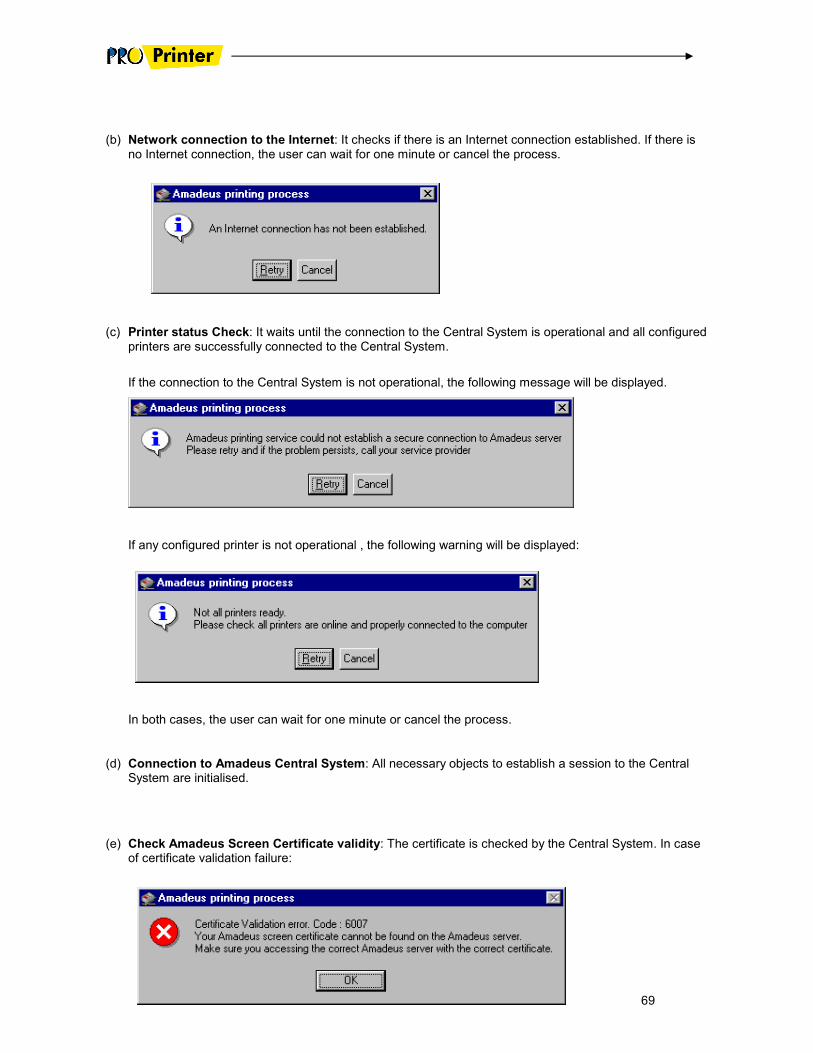
69
(b) Network connection to the Internet: It checks if there is an Internet connection established. If there is no Internet connection, the user can wait for one minute or cancel the process.
(c) Printer status Check: It waits until the connection to the Central System is operational and all configured printers are successfully connected to the Central System.
If the connection to the Central System is not operational, the following message will be displayed.
If any configured printer is not operational , the following warning will be displayed:
In both cases, the user can wait for one minute or cancel the process.
(d) Connection to Amadeus Central System: All necessary objects to establish a session to the Central System are initialised.
(e) Check Amadeus Screen Certificate validity: The certificate is checked by the Central System. In case of certificate validation failure:
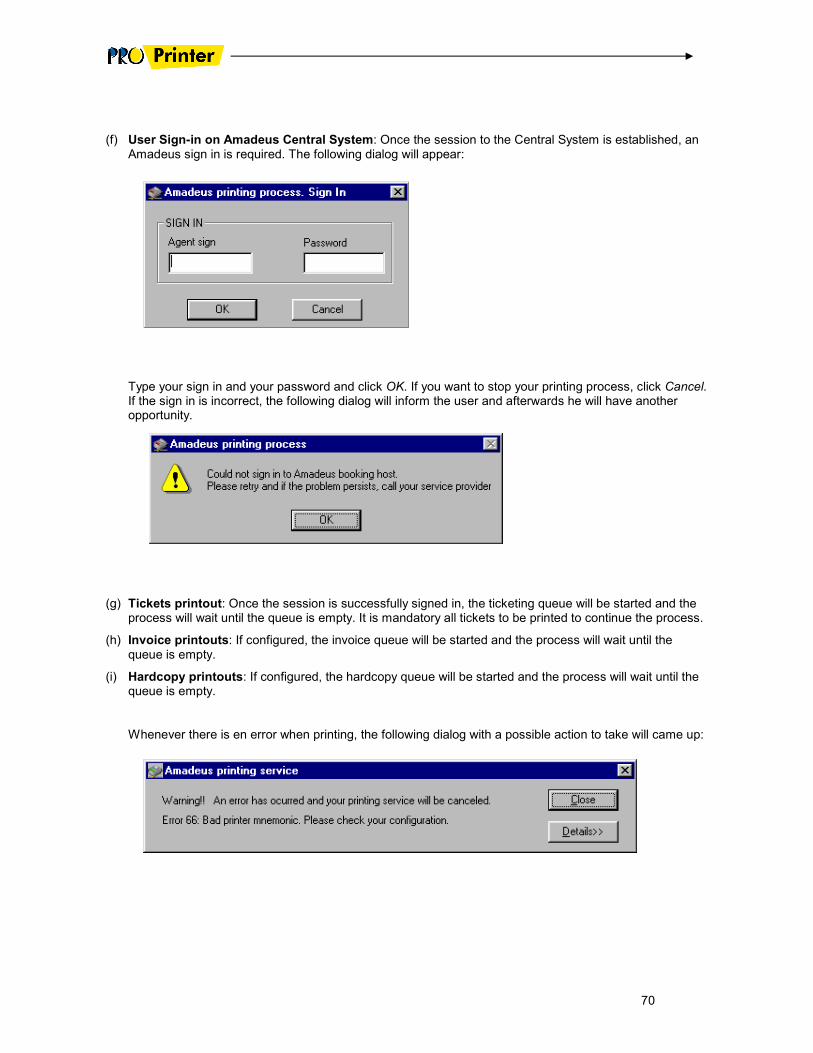
70
(f) User Sign-in on Amadeus Central System: Once the session to the Central System is established, an Amadeus sign in is required. The following dialog will appear:
Type your sign in and your password and click OK. If you want to stop your printing process, click Cancel. If the sign in is incorrect, the following dialog will inform the user and afterwards he will have another opportunity.
(g) Tickets printout: Once the session is successfully signed in, the ticketing queue will be started and the process will wait until the queue is empty. It is mandatory all tickets to be printed to continue the process.
(h) Invoice printouts: If configured, the invoice queue will be started and the process will wait until the queue is empty.
(i) Hardcopy printouts: If configured, the hardcopy queue will be started and the process will wait until the queue is empty.
Whenever there is en error when printing, the following dialog with a possible action to take will came up:
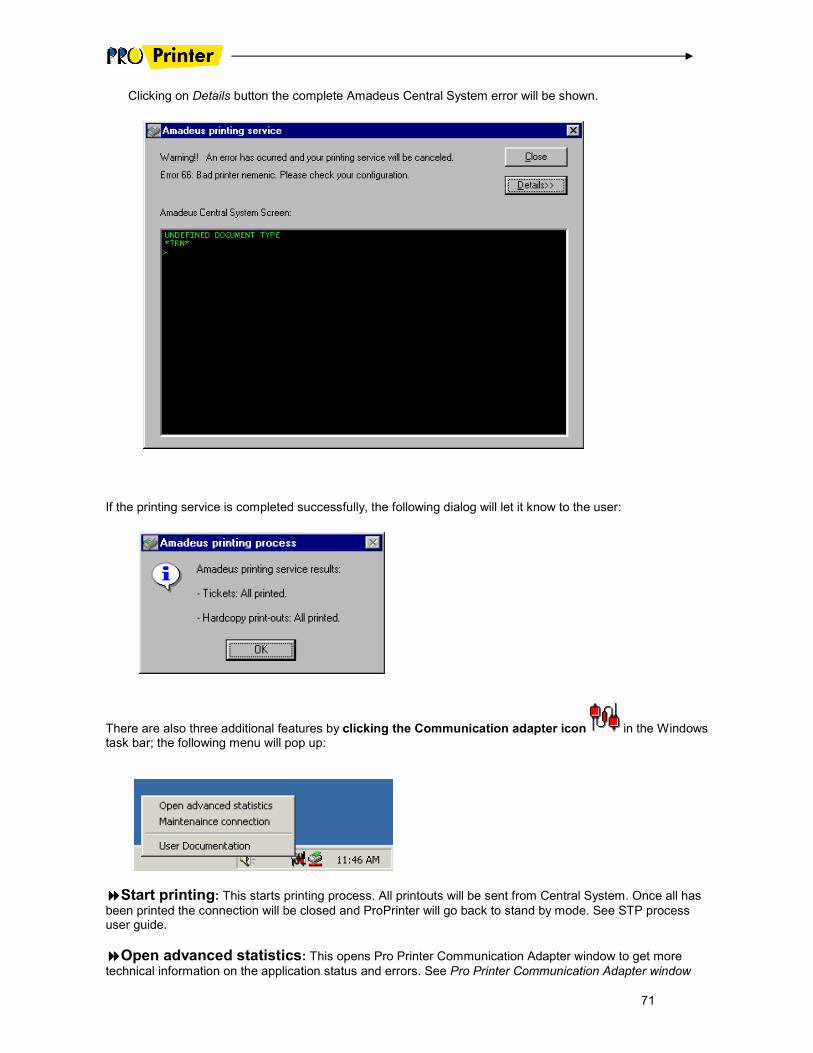
71
Clicking on Details button the complete Amadeus Central System error will be shown.
If the printing service is completed successfully, the following dialog will let it know to the user:
There are also three additional features by clicking the Communication adapter icon in the Windows task bar; the following menu will pop up:
����Start printing: This starts printing process. All printouts will be sent from Central System. Once all has
been printed the connection will be closed and ProPrinter will go back to stand by mode. See STP process user guide.
����Open advanced statistics: This opens Pro Printer Communication Adapter window to get more
technical information on the application status and errors. See Pro Printer Communication Adapter window
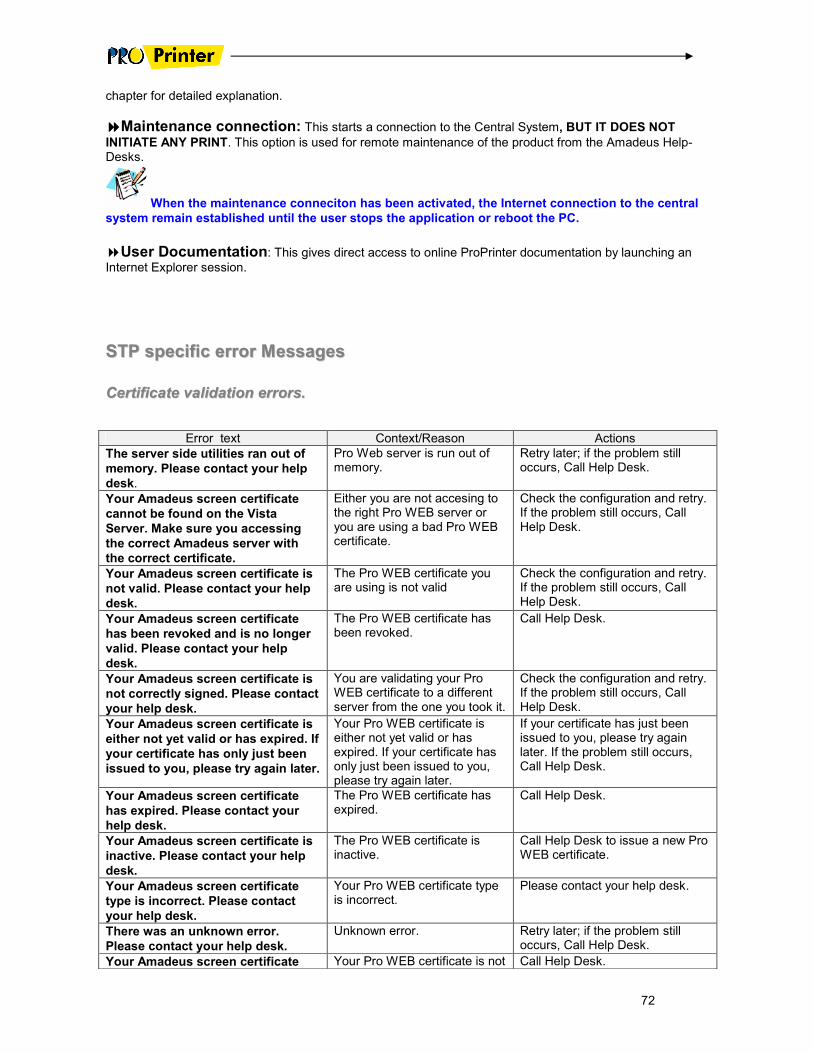
72
chapter for detailed explanation.
����Maintenance connection: This starts a connection to the Central System, BUT IT DOES NOT
INITIATE ANY PRINT. This option is used for remote maintenance of the product from the Amadeus Help-Desks.
When the maintenance conneciton has been activated, the Internet connection to the central
system remain established until the user stops the application or reboot the PC.
�User Documentation: This gives direct access to online ProPrinter documentation by launching an Internet Explorer session.
SSTTPP ssppeecciiffiicc eerrrroorr MMeessssaaggeess
CCeerrttiiffiiccaattee vvaalliiddaattiioonn eerrrroorrss..
Error text Context/Reason Actions
The server side utilities ran out of
memory. Please contact your help
desk.
Pro Web server is run out of memory.
Retry later; if the problem still occurs, Call Help Desk.
Your Amadeus screen certificate
cannot be found on the Vista
Server. Make sure you accessing
the correct Amadeus server with
the correct certificate.
Either you are not accesing to the right Pro WEB server or you are using a bad Pro WEB certificate.
Check the configuration and retry. If the problem still occurs, Call Help Desk.
Your Amadeus screen certificate is
not valid. Please contact your help
desk.
The Pro WEB certificate you are using is not valid
Check the configuration and retry. If the problem still occurs, Call Help Desk.
Your Amadeus screen certificate
has been revoked and is no longer
valid. Please contact your help
desk.
The Pro WEB certificate has been revoked.
Call Help Desk.
Your Amadeus screen certificate is
not correctly signed. Please contact
your help desk.
You are validating your Pro WEB certificate to a different server from the one you took it.
Check the configuration and retry. If the problem still occurs, Call Help Desk.
Your Amadeus screen certificate is
either not yet valid or has expired. If
your certificate has only just been
issued to you, please try again later.
Your Pro WEB certificate is either not yet valid or has expired. If your certificate has only just been issued to you, please try again later.
If your certificate has just been issued to you, please try again later. If the problem still occurs, Call Help Desk.
Your Amadeus screen certificate
has expired. Please contact your
help desk.
The Pro WEB certificate has expired.
Call Help Desk.
Your Amadeus screen certificate is
inactive. Please contact your help
desk.
The Pro WEB certificate is inactive.
Call Help Desk to issue a new Pro WEB certificate.
Your Amadeus screen certificate
type is incorrect. Please contact
your help desk.
Your Pro WEB certificate type is incorrect.
Please contact your help desk.
There was an unknown error.
Please contact your help desk.
Unknown error. Retry later; if the problem still occurs, Call Help Desk.
Your Amadeus screen certificate Your Pro WEB certificate is not Call Help Desk.
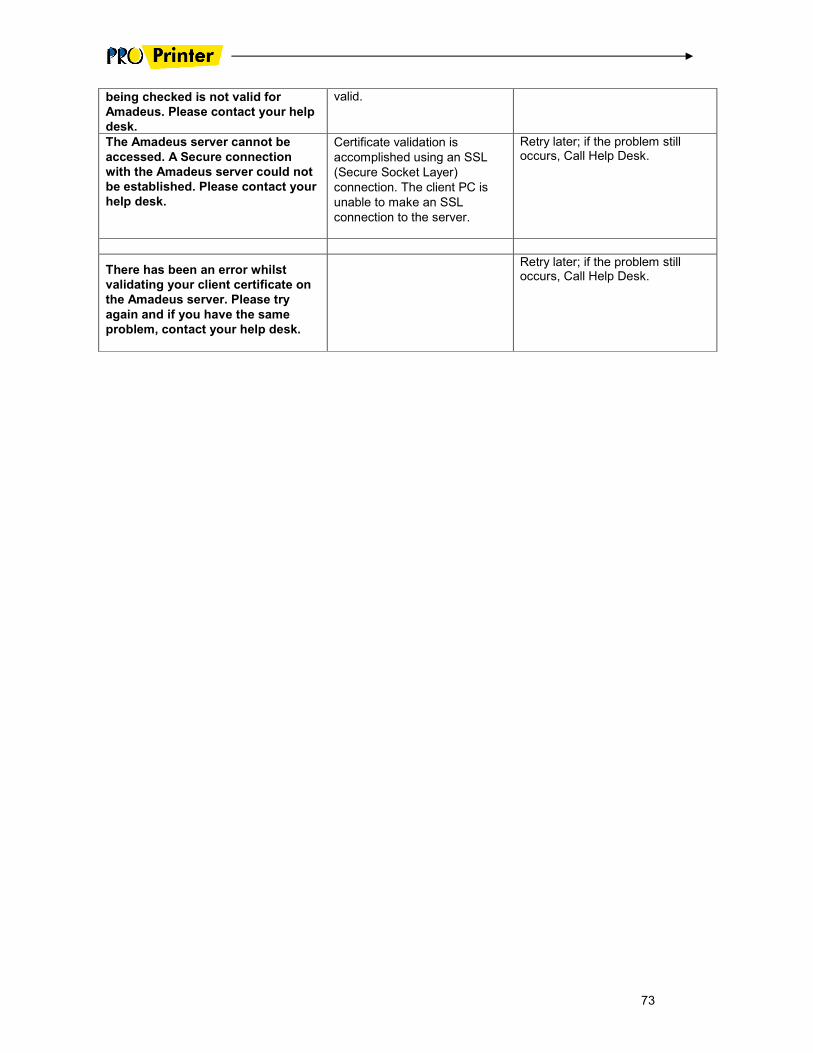
73
being checked is not valid for
Amadeus. Please contact your help
desk.
valid.
The Amadeus server cannot be
accessed. A Secure connection
with the Amadeus server could not
be established. Please contact your
help desk.
Certificate validation is
accomplished using an SSL
(Secure Socket Layer)
connection. The client PC is
unable to make an SSL
connection to the server.
Retry later; if the problem still occurs, Call Help Desk.
There has been an error whilst
validating your client certificate on
the Amadeus server. Please try
again and if you have the same
problem, contact your help desk.
Retry later; if the problem still occurs, Call Help Desk.
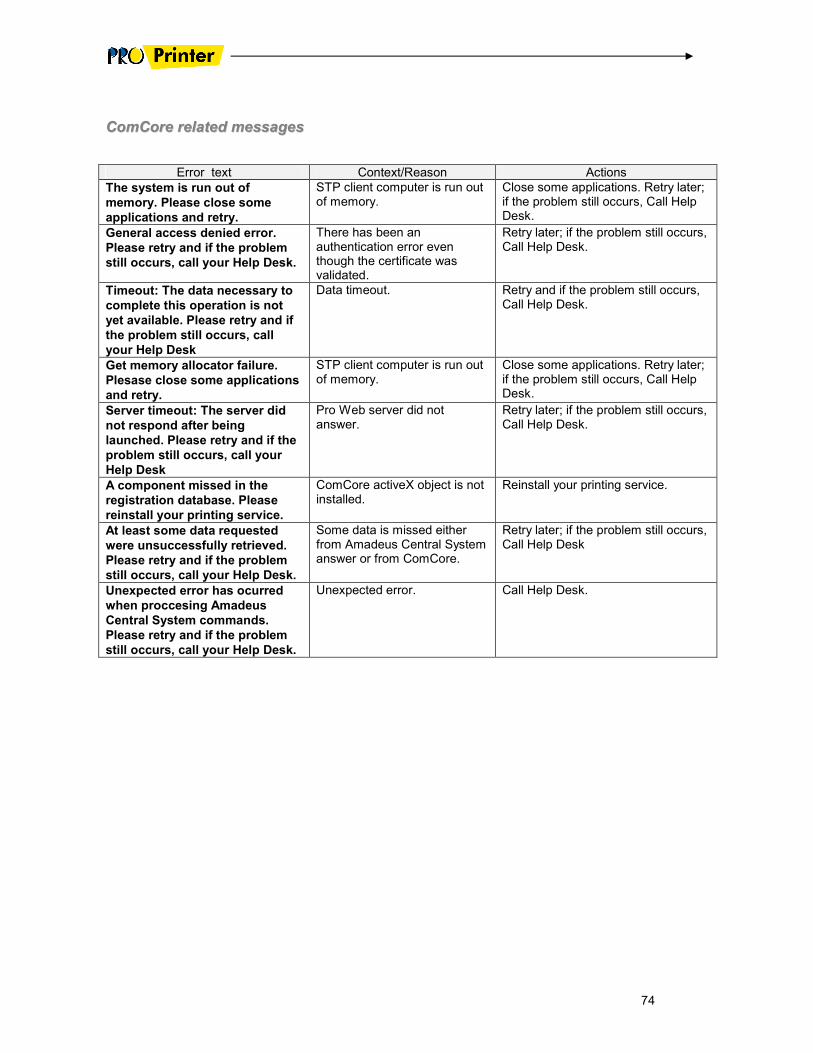
74
CCoommCCoorree rreellaatteedd mmeessssaaggeess
Error text Context/Reason Actions
The system is run out of
memory. Please close some
applications and retry.
STP client computer is run out of memory.
Close some applications. Retry later; if the problem still occurs, Call Help Desk.
General access denied error.
Please retry and if the problem
still occurs, call your Help Desk.
There has been an authentication error even though the certificate was validated.
Retry later; if the problem still occurs, Call Help Desk.
Timeout: The data necessary to
complete this operation is not
yet available. Please retry and if
the problem still occurs, call
your Help Desk
Data timeout. Retry and if the problem still occurs, Call Help Desk.
Get memory allocator failure.
Plesase close some applications
and retry.
STP client computer is run out of memory.
Close some applications. Retry later; if the problem still occurs, Call Help Desk.
Server timeout: The server did
not respond after being
launched. Please retry and if the
problem still occurs, call your
Help Desk
Pro Web server did not answer.
Retry later; if the problem still occurs, Call Help Desk.
A component missed in the
registration database. Please
reinstall your printing service.
ComCore activeX object is not installed.
Reinstall your printing service.
At least some data requested
were unsuccessfully retrieved.
Please retry and if the problem
still occurs, call your Help Desk.
Some data is missed either from Amadeus Central System answer or from ComCore.
Retry later; if the problem still occurs, Call Help Desk
Unexpected error has ocurred
when proccesing Amadeus
Central System commands.
Please retry and if the problem
still occurs, call your Help Desk.
Unexpected error. Call Help Desk.