Embed Size (px)
Citation preview
Always-On Outbound Customer EngagementSTUDENT GUIDE
Ó Copyright 2021Pegasystems Inc., Cambridge, MA
All rights reserved.
This document describes products and services of Pegasystems Inc. It may contain trade secrets and proprietary information. The document and product are protected by copyright and distributed under licenses restricting their use, copying, distribution, or transmittal in any form without prior written authorization of Pegasystems Inc.
This document is current as of the date of publication only. Changes in the document may be made from time to time at the discretion of Pegasystems. This document remains the property of Pegasystems and must be returned to it upon request. This document does not imply any commitment to offer or deliver the products or services provided.
This document may include references to Pegasystems product features that have not been licensed by your company. If you have questions about whether a particular capability is included in your installation, please consult your Pegasystems service consultant.
PegaRULES, Process Commander, SmartBPM® and the Pegasystems logo are trademarks or registered trademarks of Pegasystems Inc. All other product names, logos and symbols may be registered trademarks of their respective owners.
Although Pegasystems Inc. strives for accuracy in its publications, any publication may contain inaccuracies or typographical errors. This document or Help System could contain technical inaccuracies or typographical errors. Changes are periodically added to the information herein. Pegasystems Inc. may make improvements and/or changes in the information described herein at any time.
This document is the property of:Pegasystems Inc.1 Rogers StreetCambridge, MA 02142Phone: (617) 374-9600Fax: (617) 374-9620www.pega.com
Mission: Always-On Outbound Customer Engagement
Product: Pega Customer Decision Hub™ 8.6
URL: https://academy.pega.com/mission/always-outbound-customer-engagement/v3
Date: 28 January 2021
ContentsEssentials of always on outbound....................................................................................................4
Working of the always-on brain in outbound..............................................................................5
Traditional marketing versus always-on outbound..................................................................10
Business use case: Always-on outbound customer engagement..........................................15
Sending offer emails.........................................................................................................................18
Sending offer emails.....................................................................................................................19
Defining the starting population.....................................................................................................28
Segmentation.................................................................................................................................29
Creating a segment.......................................................................................................................31
Defining an action for outbound....................................................................................................42
Creating an email treatment........................................................................................................43
Defining the action flow...............................................................................................................60
Avoiding overexposure of actions on outbound..........................................................................64
Avoid sending the same action for a time period.....................................................................68
Limiting action volume on outbound.............................................................................................73
Volume constraints.......................................................................................................................74
Configuring a volume constraint.................................................................................................77
Sharing action details with third-party distributors.....................................................................84
File and database templates........................................................................................................85
Writing action details to a file or database................................................................................90
Essentials of always on outboundDescriptionLearn about the principles of always-on outbound customer engagement and its similaritiesand differences with traditional outbound marketing. Gain an overview of how the brain works in outbound customer engagement. Study a typical always-on outbound business scenario.
Learning objectives Describe the principals of always-on 1:1 customer engagement
Compare and contrast traditional marketing concepts with always-on outbound
Describe a typical always-on business use case in the outbound channel
4
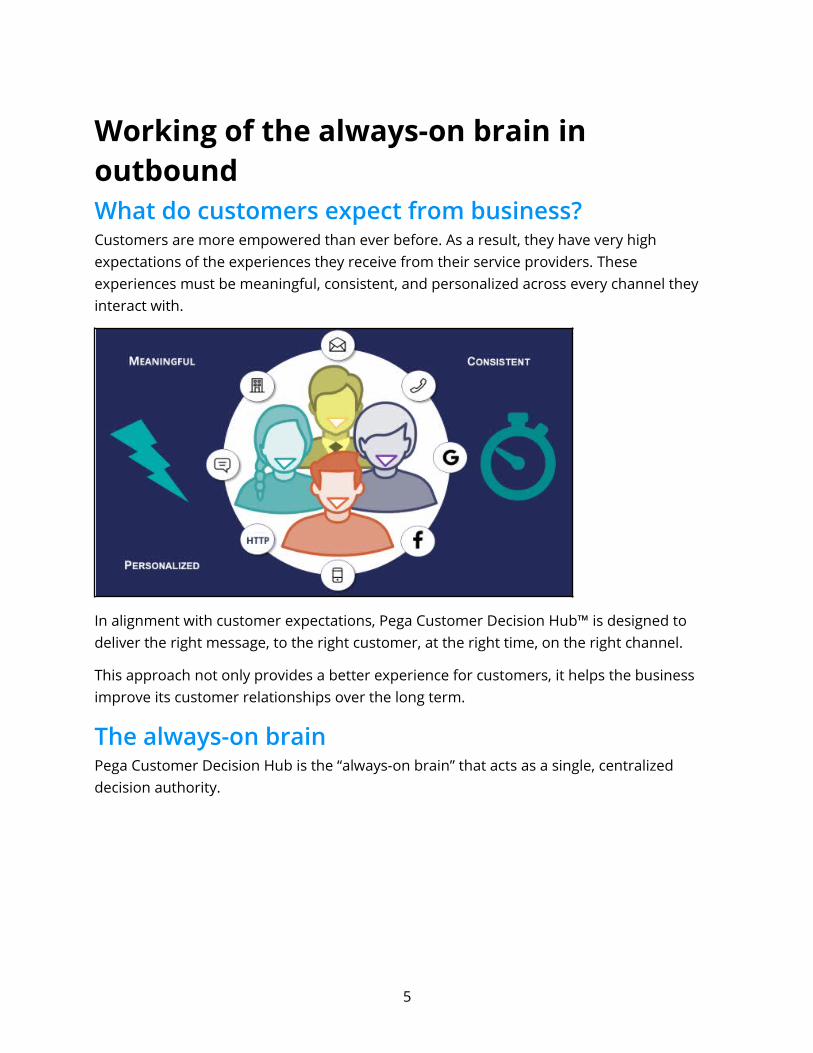
Working of the always-on brain in outboundWhat do customers expect from business?Customers are more empowered than ever before. As a result, they have very high expectations of the experiences they receive from their service providers. These experiences must be meaningful, consistent, and personalized across every channel they interact with.
In alignment with customer expectations, Pega Customer Decision Hub™ is designed to deliver the right message, to the right customer, at the right time, on the right channel.
This approach not only provides a better experience for customers, it helps the business improve its customer relationships over the long term.
The always-on brainPega Customer Decision Hub is the “always-on brain” that acts as a single, centralized decision authority.
5
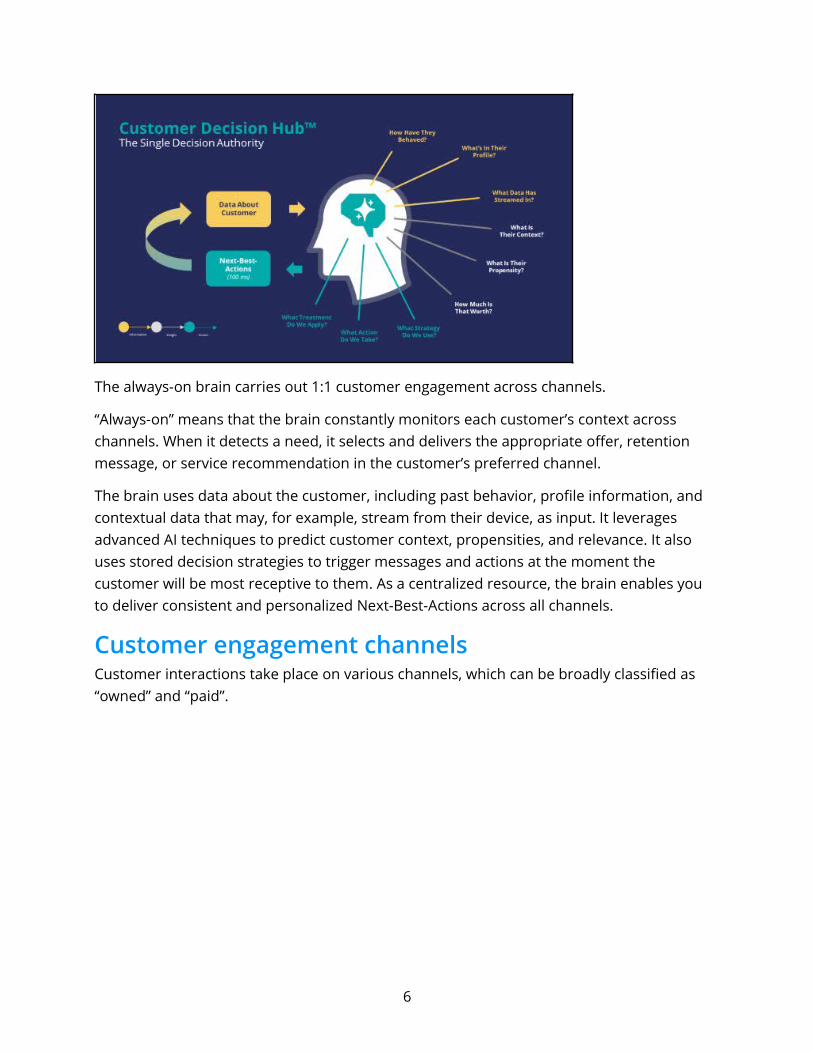
The always-on brain carries out 1:1 customer engagement across channels.
“Always-on” means that the brain constantly monitors each customer’s context across channels. When it detects a need, it selects and delivers the appropriate offer, retention message, or service recommendation in the customer’s preferred channel.
The brain uses data about the customer, including past behavior, profile information, and contextual data that may, for example, stream from their device, as input. It leverages advanced AI techniques to predict customer context, propensities, and relevance. It also uses stored decision strategies to trigger messages and actions at the moment the customer will be most receptive to them. As a centralized resource, the brain enables you to deliver consistent and personalized Next-Best-Actions across all channels.
Customer engagement channelsCustomer interactions take place on various channels, which can be broadly classified as “owned” and “paid”.
6
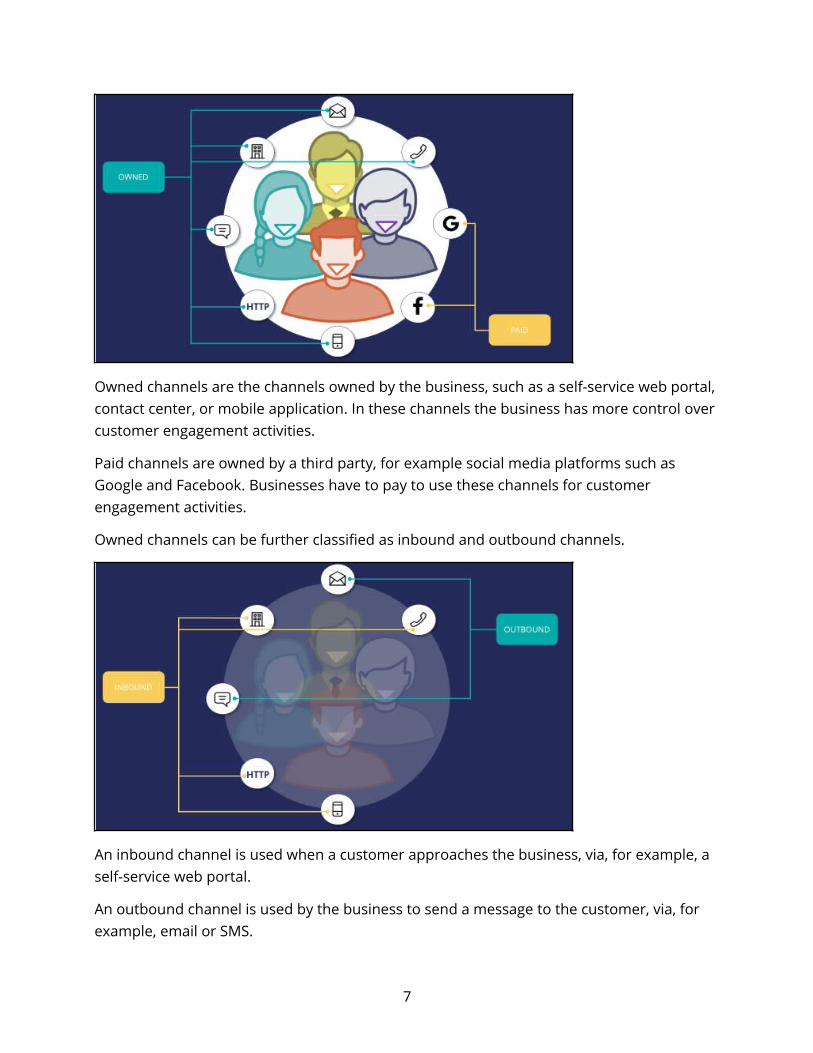
Owned channels are the channels owned by the business, such as a self-service web portal, contact center, or mobile application. In these channels the business has more control over customer engagement activities.
Paid channels are owned by a third party, for example social media platforms such as Google and Facebook. Businesses have to pay to use these channels for customer engagement activities.
Owned channels can be further classified as inbound and outbound channels.
An inbound channel is used when a customer approaches the business, via, for example, a self-service web portal.
An outbound channel is used by the business to send a message to the customer, via, for example, email or SMS.
7

The flow of information and the mechanics of delivering Next-Best-Actions is different in inbound and outbound channels.
Inbound interactionsWhen a customer interaction takes place on an inbound channel, the channel identifies the customer, then the brain evaluates the Next-Best-Action for that customer and sends the result back to the same channel, in real-time. The customer’s response to the action is recorded by the system, and the cycle repeats.
Outbound interactionsAlways-on outbound means that the brain sends outbound messages, via email or SMS, to customers only when it’s appropriate.
This can happen in three ways:
1) Scheduled update: The brain is configured to proactively send out messages on a scheduled basis when relevant. It evaluates the Next-Best-Action for each customer identified in a segment, which contains the potential list of customers to whom you want to send messages. In most cases, customer responses arrive after the message has been sent.When customers respond, the responses are recorded in the system and used in the subsequent Next-Best-Action evaluation.
8
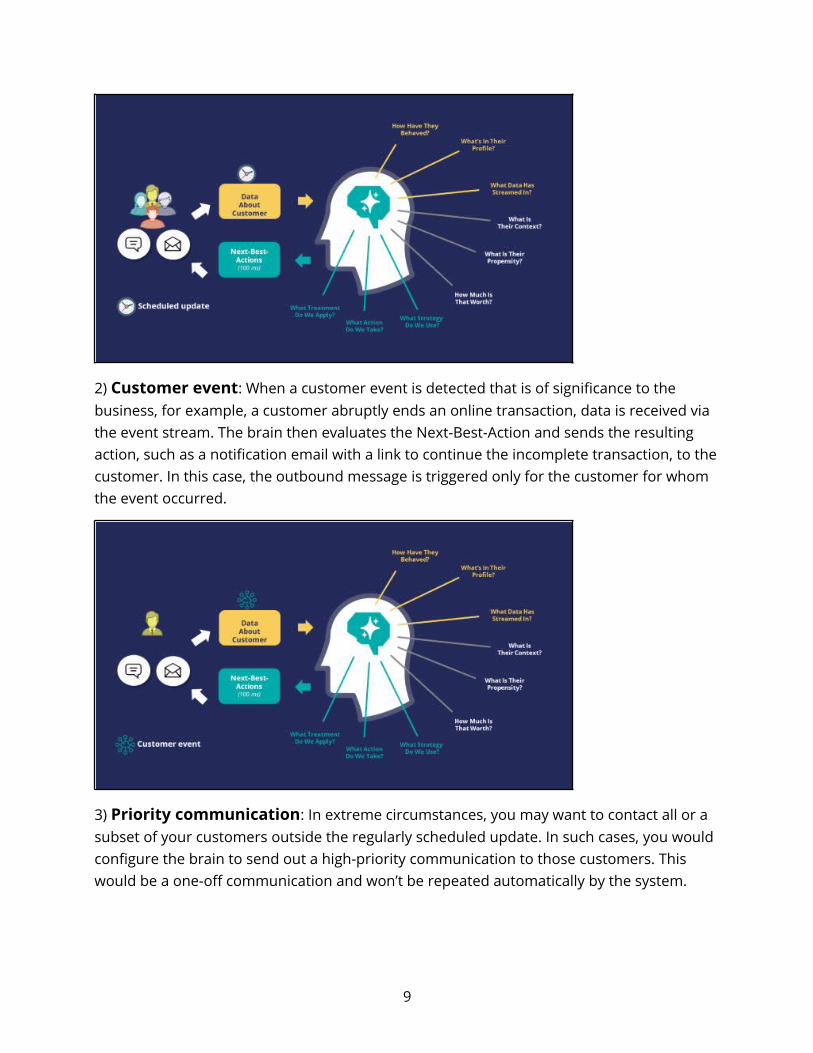
2) Customer event: When a customer event is detected that is of significance to the business, for example, a customer abruptly ends an online transaction, data is received via the event stream. The brain then evaluates the Next-Best-Action and sends the resulting action, such as a notification email with a link to continue the incomplete transaction, to thecustomer. In this case, the outbound message is triggered only for the customer for whom the event occurred.
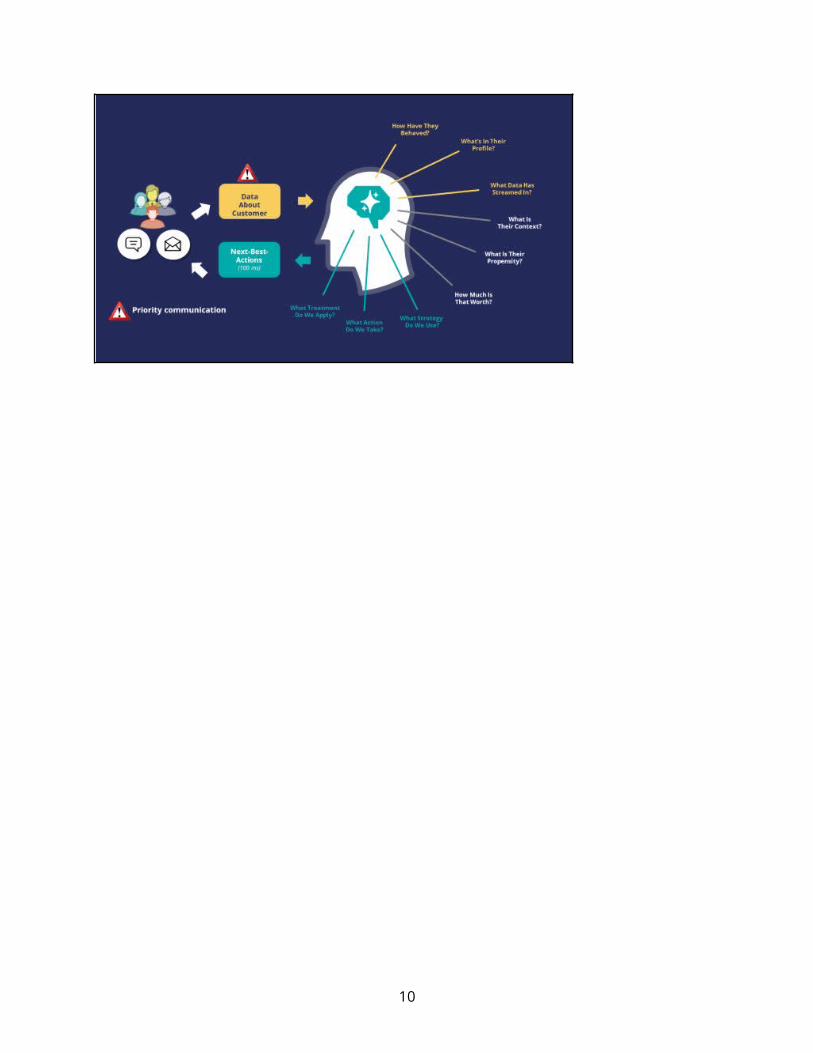
3) Priority communication: In extreme circumstances, you may want to contact all or a subset of your customers outside the regularly scheduled update. In such cases, you would configure the brain to send out a high-priority communication to those customers. This would be a one-off communication and won’t be repeated automatically by the system.
9
10
Traditional marketing versus always-on outboundOverviewAs more organizations switch from traditional marketing approaches to 1:1 customer engagement, there is a need to compare and contrast the terminologies used in the two approaches.
Here are some key terminologies and concepts used in traditional marketing, translated into concepts in the always-on, Next-Best-Action approach.
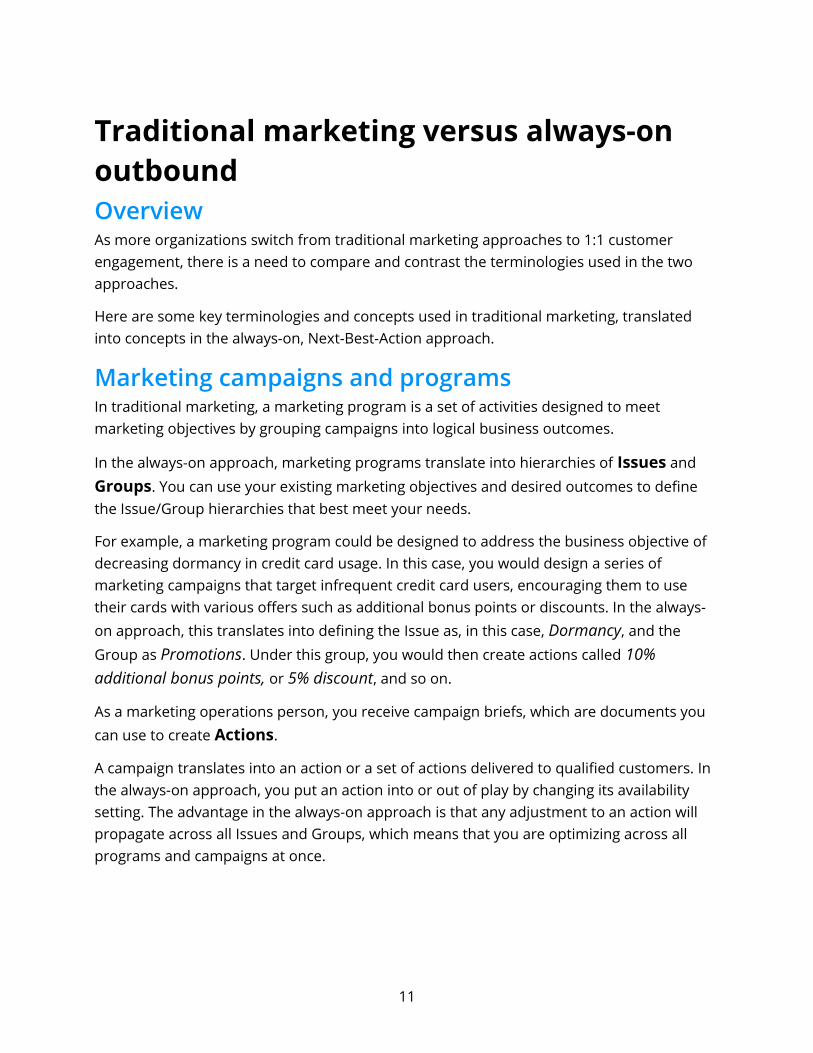
Marketing campaigns and programsIn traditional marketing, a marketing program is a set of activities designed to meet marketing objectives by grouping campaigns into logical business outcomes.
In the always-on approach, marketing programs translate into hierarchies of Issues and Groups. You can use your existing marketing objectives and desired outcomes to define the Issue/Group hierarchies that best meet your needs.
For example, a marketing program could be designed to address the business objective of decreasing dormancy in credit card usage. In this case, you would design a series of marketing campaigns that target infrequent credit card users, encouraging them to use their cards with various offers such as additional bonus points or discounts. In the always-on approach, this translates into defining the Issue as, in this case, Dormancy, and the Group as Promotions. Under this group, you would then create actions called 10% additional bonus points, or 5% discount, and so on.
As a marketing operations person, you receive campaign briefs, which are documents you can use to create Actions.
A campaign translates into an action or a set of actions delivered to qualified customers. In the always-on approach, you put an action into or out of play by changing its availability setting. The advantage in the always-on approach is that any adjustment to an action will propagate across all Issues and Groups, which means that you are optimizing across all programs and campaigns at once.
11
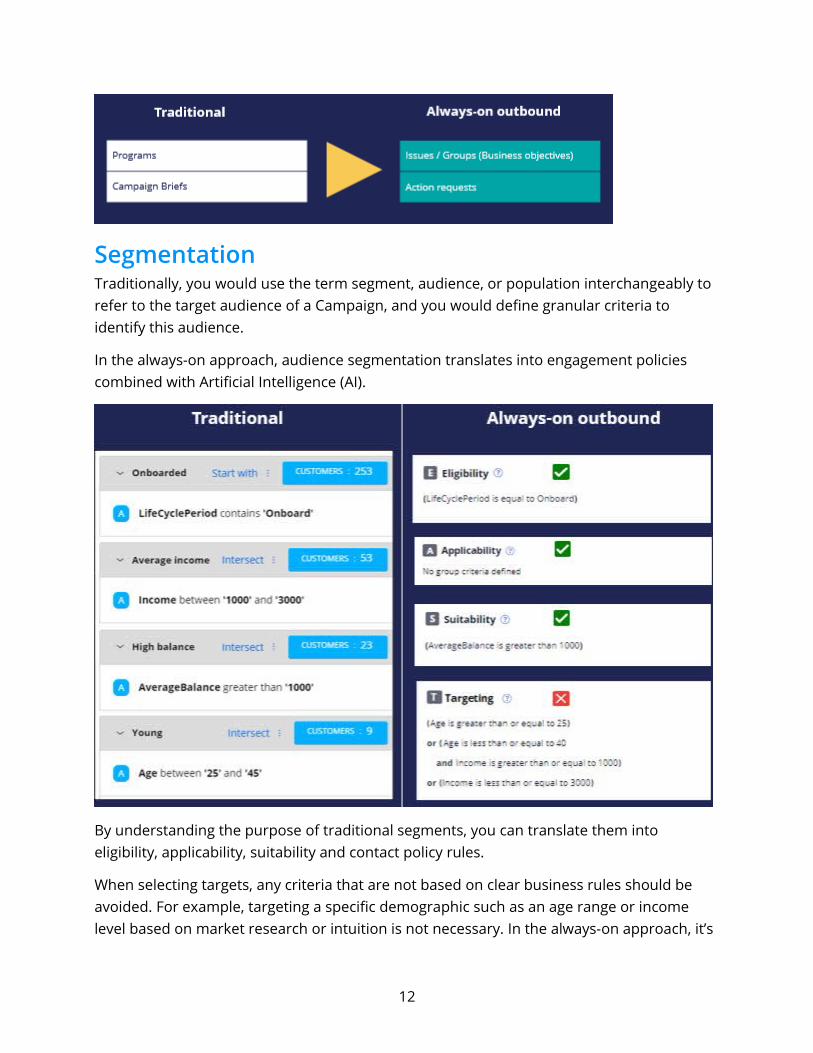
SegmentationTraditionally, you would use the term segment, audience, or population interchangeably to refer to the target audience of a Campaign, and you would define granular criteria to identify this audience.
In the always-on approach, audience segmentation translates into engagement policies combined with Artificial Intelligence (AI).
By understanding the purpose of traditional segments, you can translate them into eligibility, applicability, suitability and contact policy rules.
When selecting targets, any criteria that are not based on clear business rules should be avoided. For example, targeting a specific demographic such as an age range or income level based on market research or intuition is not necessary. In the always-on approach, it’s
12
the job of the AI to choose the right action for each customer, once all disqualified actions are filtered out.
In the above example, the lifecycle period criterion is translated into an eligibility condition as it a definite requirement of the business. The Average balance criterion is translated into a suitability condition as the business thinks the group of actions will be appropriate for customers who have such a balance. However, targeting an age range or income-based demographic are not clear business requirements. These conditions in the traditional approach are coming more from intuition and some offline analysis. Therefore, in the new always-on outbound approach, these conditions are not part of engagement conditions butare left to the AI. The AI will take care of finding the right customer segments that are more likely to have a positive response to the configured offers.
Segments, in the new approach, are used only to identify the starting population for an always-on outbound schedule. For example, the starting population could be all customers who have opted in to receive promotional messages.
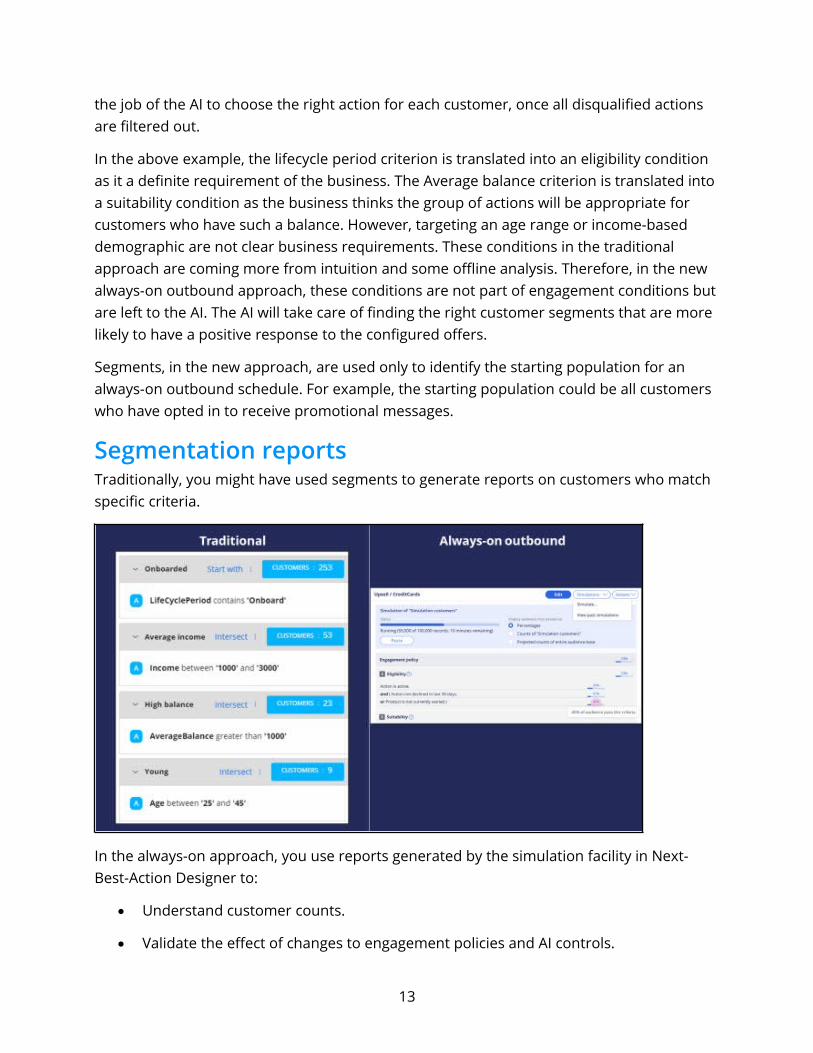
Segmentation reportsTraditionally, you might have used segments to generate reports on customers who match specific criteria.
In the always-on approach, you use reports generated by the simulation facility in Next-Best-Action Designer to:
Understand customer counts.
Validate the effect of changes to engagement policies and AI controls.
13
Visualize the action mix.
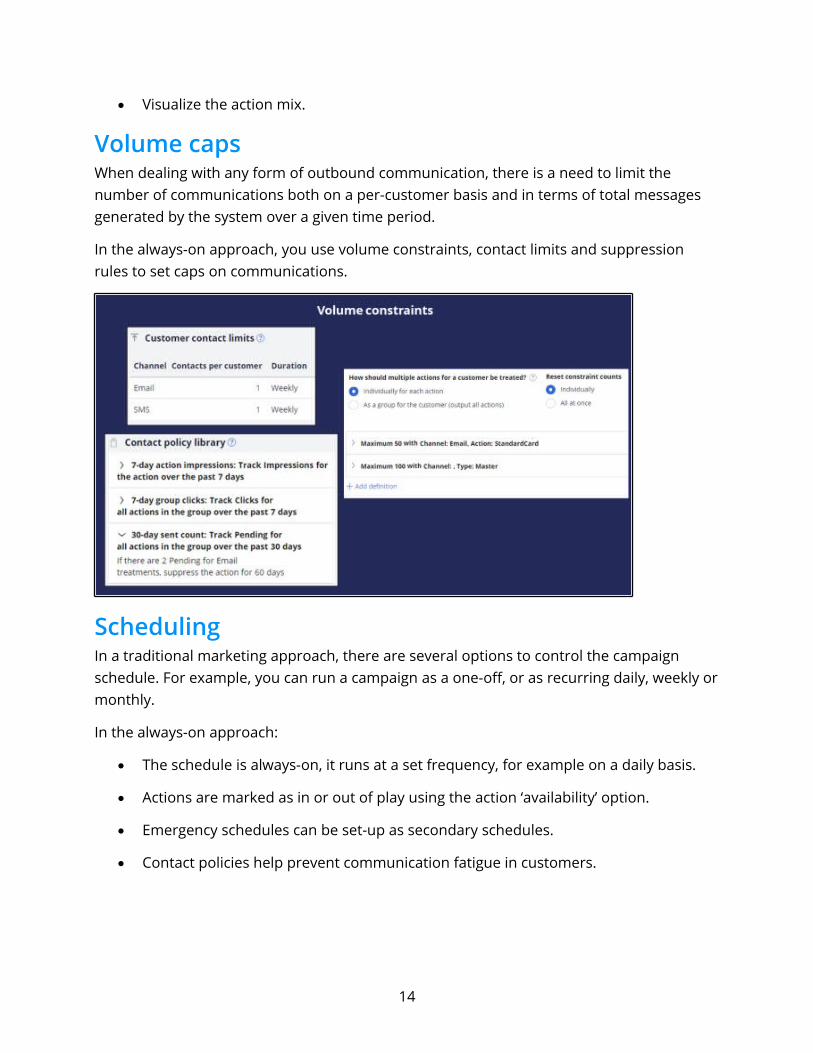
Volume capsWhen dealing with any form of outbound communication, there is a need to limit the number of communications both on a per-customer basis and in terms of total messages generated by the system over a given time period.
In the always-on approach, you use volume constraints, contact limits and suppression rules to set caps on communications.
SchedulingIn a traditional marketing approach, there are several options to control the campaign schedule. For example, you can run a campaign as a one-off, or as recurring daily, weekly ormonthly.
In the always-on approach:
The schedule is always-on, it runs at a set frequency, for example on a daily basis.
Actions are marked as in or out of play using the action ‘availability’ option.
Emergency schedules can be set-up as secondary schedules.
Contact policies help prevent communication fatigue in customers.
14
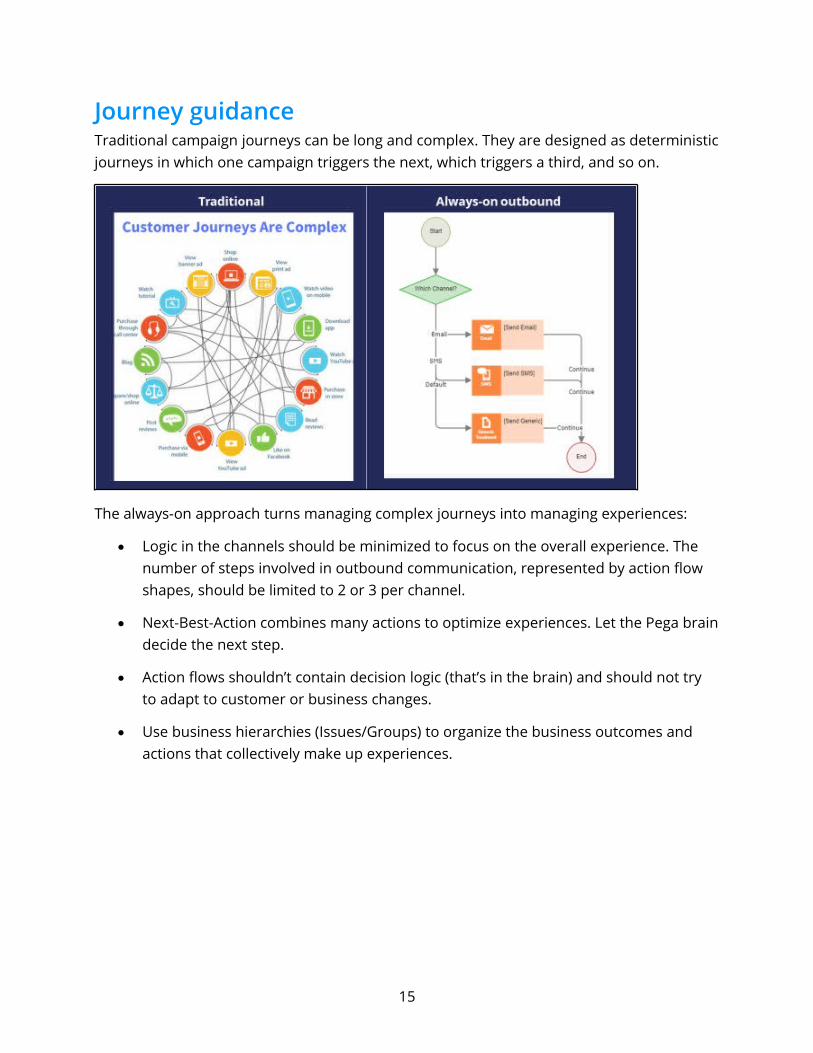
Journey guidanceTraditional campaign journeys can be long and complex. They are designed as deterministicjourneys in which one campaign triggers the next, which triggers a third, and so on.
The always-on approach turns managing complex journeys into managing experiences:
Logic in the channels should be minimized to focus on the overall experience. The number of steps involved in outbound communication, represented by action flow shapes, should be limited to 2 or 3 per channel.
Next-Best-Action combines many actions to optimize experiences. Let the Pega braindecide the next step.
Action flows shouldn’t contain decision logic (that’s in the brain) and should not try to adapt to customer or business changes.
Use business hierarchies (Issues/Groups) to organize the business outcomes and actions that collectively make up experiences.
15
Business use case: Always-on outbound customer engagementIntroductionU+ Bank has recently implemented the cross-sell on the web microjourney with the goal to increase the engagement with their customers on the web channel. The bank uses Pega Customer Decision Hub™ to recommend relevant banner ads to its customers when they visit their personal portal.
Customer Decision Hub combines customer information, information about their past communications with the bank, current contextual information, business rules and the predicted customer behavior, as calculated by Artificial Intelligence (AI) to select the Next-Best-Action, which in this case is the best sales offer for each customer.
Satisfied with the results of the first microjourney, the bank now wants to extend these Next-Best-Action recommendations to be delivered via one of their outbound communication channels, email.
In this microjourney, the main intent of U+ is to increase the customer engagement on email channel. This can be measured by the click-through rate. A click-through metric is recorded when the customer clicks on the ‘APPLY TODAY’ button in the email received.
16

Implementation phasesThe marketing operations team plans to implement the requirement in multiple phases.
17
The first phase is a proof-of-concept phase. In this phase, the goal is to send a credit card offer via email to qualified customers. This requires adding an email treatment and configuring the flow to an existing action, enabling the email channel, and configuring the always-on outbound schedule.
As a result of this phase, the Standard card offer details will be sent to qualified customers in an email. For example, if a customer, Stephen John, qualifies for the Standard card offer, the always-on outbound will send him an email with the offer details. He can click on the ‘APPLY TODAY’ button, it takes him to the credit cards page on the bank’s website where he can read more details about the offer and apply for it, if interested.
In the second phase, the bank plans to include more credit card offers to be promoted via email. For example, if a customer is eligible for more than one credit card offer, he will be presented with the top offer he qualifies for. The prioritization uses AI and other factors such as business weights and levers to select the top offer for a customer.
In the third phase, the bank would like to introduce contact policy rules to ensure that a customer does not receive the same offer message twice within a period of time. For example, a customer will not receive an offer email for 60 days if one was sent in the past 30 days.
In the fourth phase, the bank would like to apply some limitations on the outbound volume due to certain operational constraints. The IT department of the bank has imposed a restriction on the number of emails that can be sent in a day. The marketing team has beenasked to apply some limitations on the outbound volumes of the email.
The fifth phase is to share action details with a third-party email distributor. To comply with the security and spamming regulations, the bank has decided to use a third-party email delivery service instead of using the inhouse email server. As a result, the action details need to be written to a database table. The action details will then be shared with a third-party email distributor.
In summary, you will learn more about how U+ bank will leverage the always-on outbound capability in this phase of the project.
18
Sending offer emailsDescriptionLearn how to send offer emails to qualified customers. Reuse existing actions and customerengagement policies configured in Next-Best-Action Designer and extend them for outbound customer engagement in the email channel.
Learning objectives Configure the always-on brain to send offer emails
19
Sending offer emailsTo market your offers, you can send offer emails to qualified customers. Pega Customer Decision™ Hub enables you to re-use existing actions and customer engagement policies configured in Next-Best-Action Designer and extend them for outbound customer engagement in the email channel.
TranscriptThis demo shows you how to send offer emails to qualified customers.
U+, a retail bank, wants to use Pega Customer Decision Hub to send emails related to a credit card offer to qualified customers.
The email contains the offer details and a call to action. When a customer clicks the APPLY TODAY call to action in the email, they are directed to the credit cards page on the bank’s website, where they can learn more about the offer and apply if interested.
This is the Pega Customer Decision Hub portal. Before configuring an action to send offer emails to qualified customers, look at the Next-Best-Action Designer configured by U+.
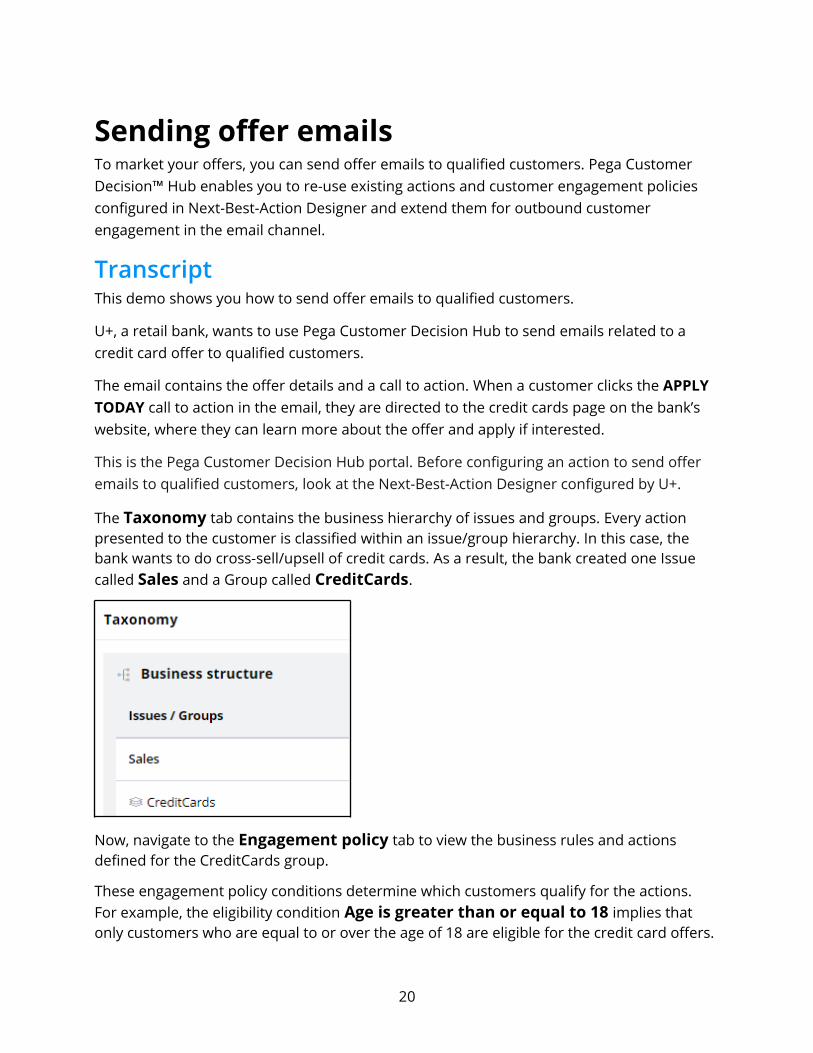
The Taxonomy tab contains the business hierarchy of issues and groups. Every action presented to the customer is classified within an issue/group hierarchy. In this case, the bank wants to do cross-sell/upsell of credit cards. As a result, the bank created one Issue called Sales and a Group called CreditCards.
Now, navigate to the Engagement policy tab to view the business rules and actions defined for the CreditCards group.
These engagement policy conditions determine which customers qualify for the actions. For example, the eligibility condition Age is greater than or equal to 18 implies that only customers who are equal to or over the age of 18 are eligible for the credit card offers.
20
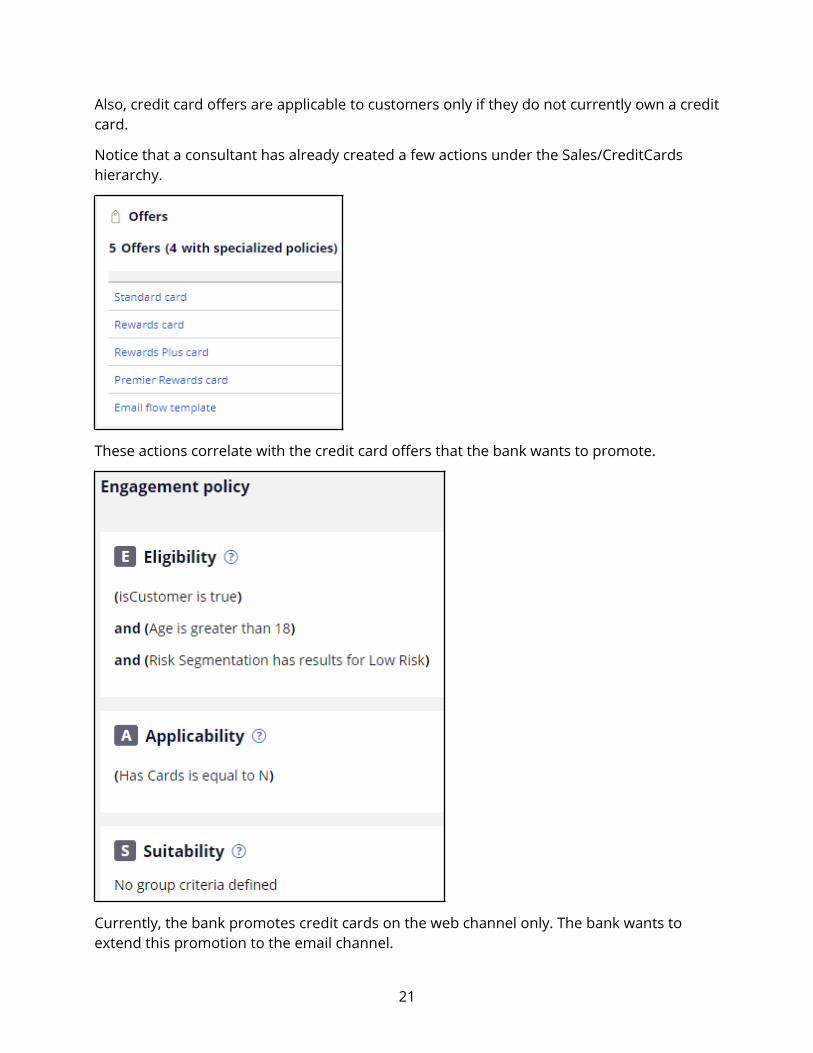
Also, credit card offers are applicable to customers only if they do not currently own a creditcard.
Notice that a consultant has already created a few actions under the Sales/CreditCards hierarchy.
These actions correlate with the credit card offers that the bank wants to promote.
Currently, the bank promotes credit cards on the web channel only. The bank wants to extend this promotion to the email channel.
21
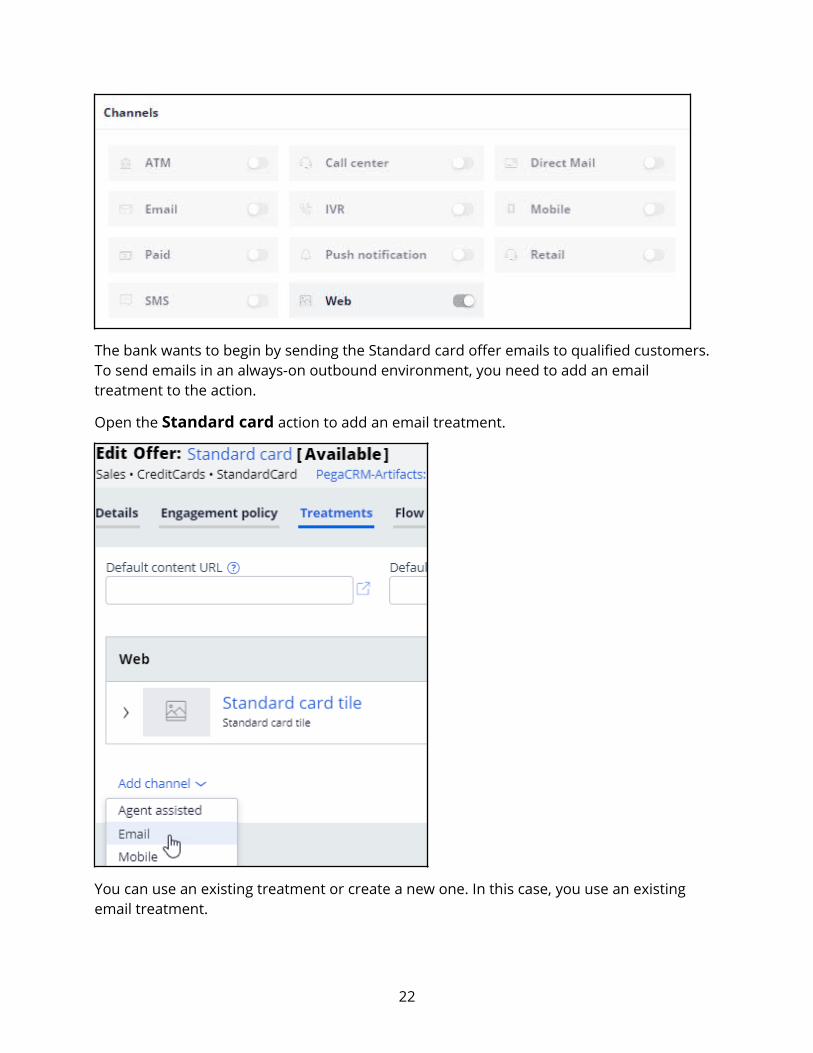
The bank wants to begin by sending the Standard card offer emails to qualified customers. To send emails in an always-on outbound environment, you need to add an email treatment to the action.
Open the Standard card action to add an email treatment.
You can use an existing treatment or create a new one. In this case, you use an existing email treatment.
22
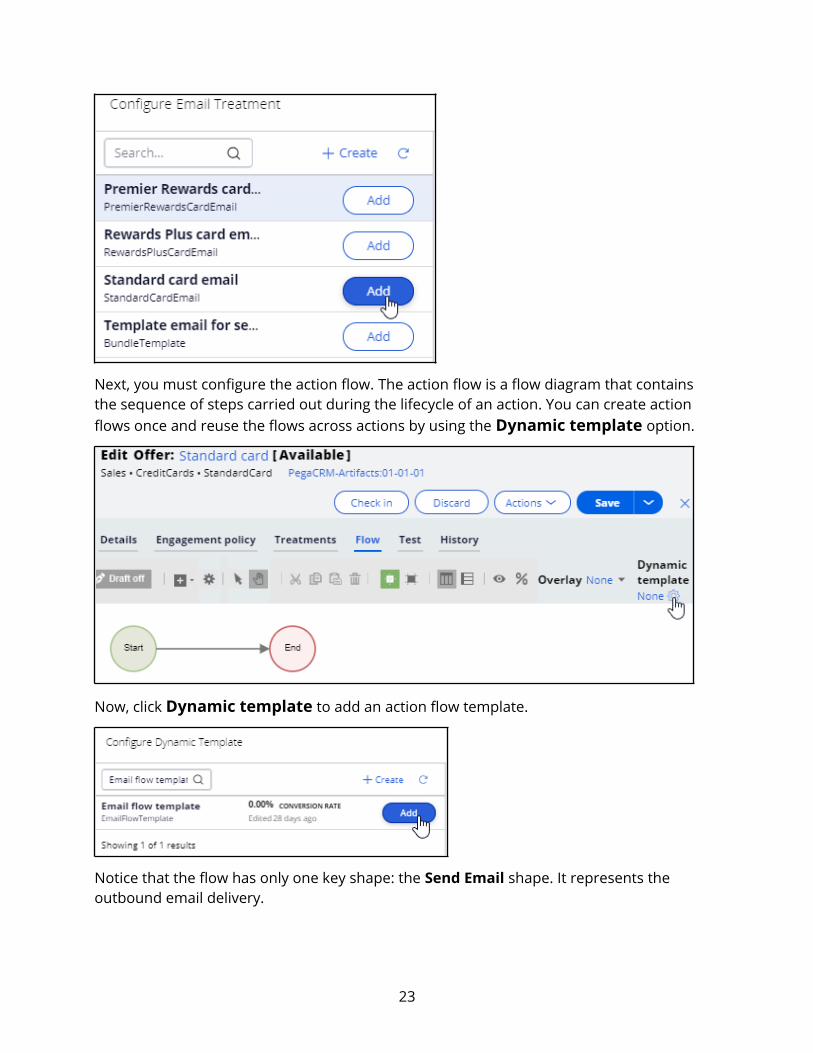
Next, you must configure the action flow. The action flow is a flow diagram that contains the sequence of steps carried out during the lifecycle of an action. You can create action flows once and reuse the flows across actions by using the Dynamic template option.
Now, click Dynamic template to add an action flow template.
Notice that the flow has only one key shape: the Send Email shape. It represents the outbound email delivery.
23

Now, on the Channels tab, you can enable the channels and triggers that invoke a Next-Best-Action evaluation.
In this case, as U+ wants to send out emails, enable the Email channel.
In the always-on outbound paradigm, the brain evaluates the next best action for each customer identified in a segment, which contains the potential list of customers to whom you want to send messages. The system can send these messages at a regular frequency (for example, daily). You configure the Primary schedule to set the frequency.
The schedule has two mandatory configurations: Recurrence and Starting population.
To configure an outbound schedule, first, set the required Recurrence frequency. In this case, retain the default frequency, Daily. Then, select the Refresh the audience check
24
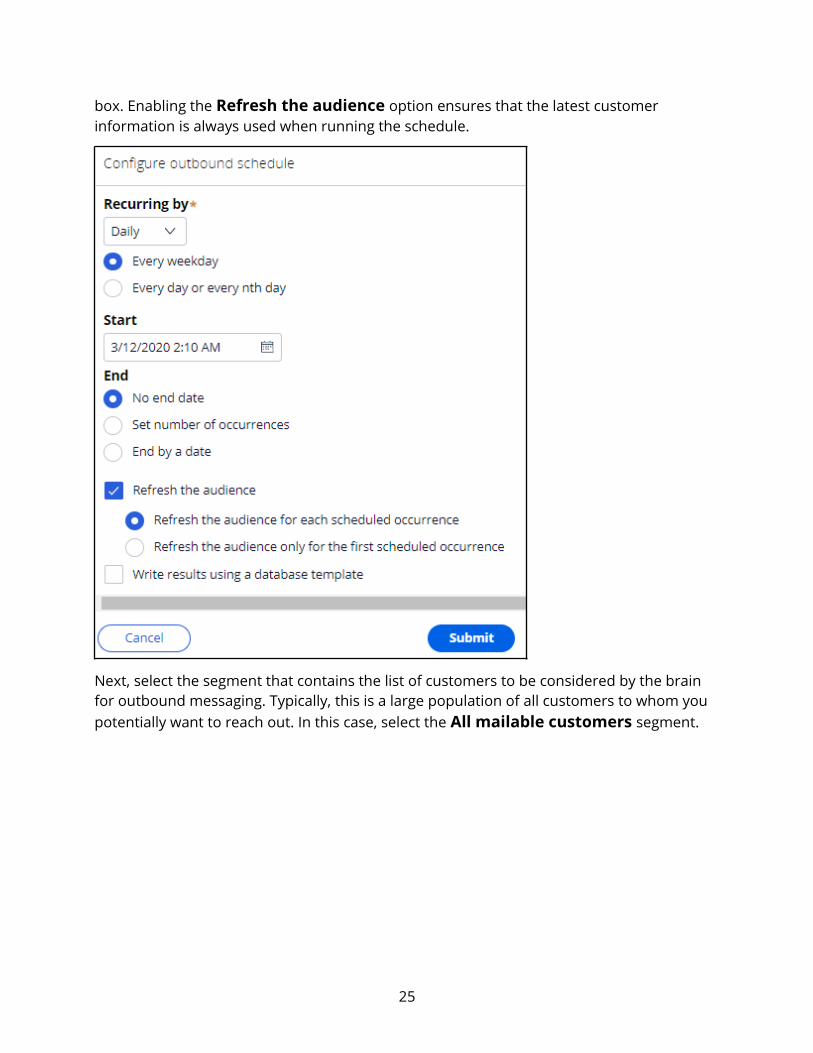
box. Enabling the Refresh the audience option ensures that the latest customer information is always used when running the schedule.
Next, select the segment that contains the list of customers to be considered by the brain for outbound messaging. Typically, this is a large population of all customers to whom you potentially want to reach out. In this case, select the All mailable customers segment.
25
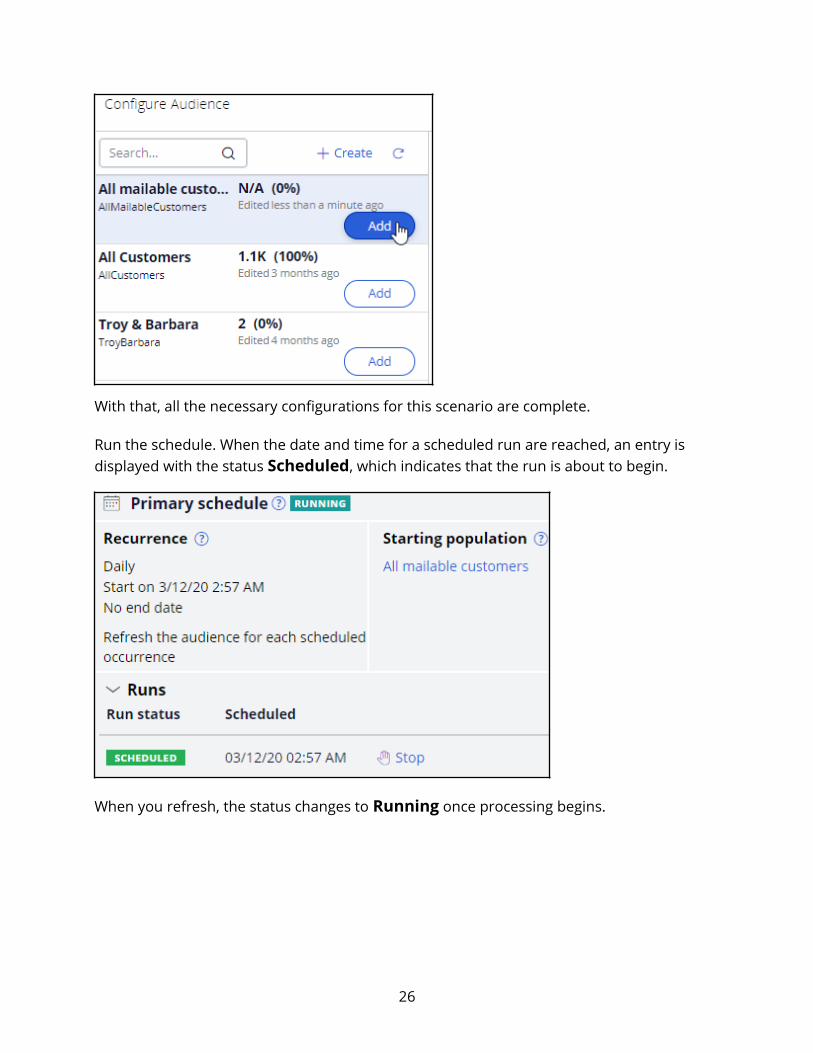
With that, all the necessary configurations for this scenario are complete.
Run the schedule. When the date and time for a scheduled run are reached, an entry is displayed with the status Scheduled, which indicates that the run is about to begin.
When you refresh, the status changes to Running once processing begins.
26
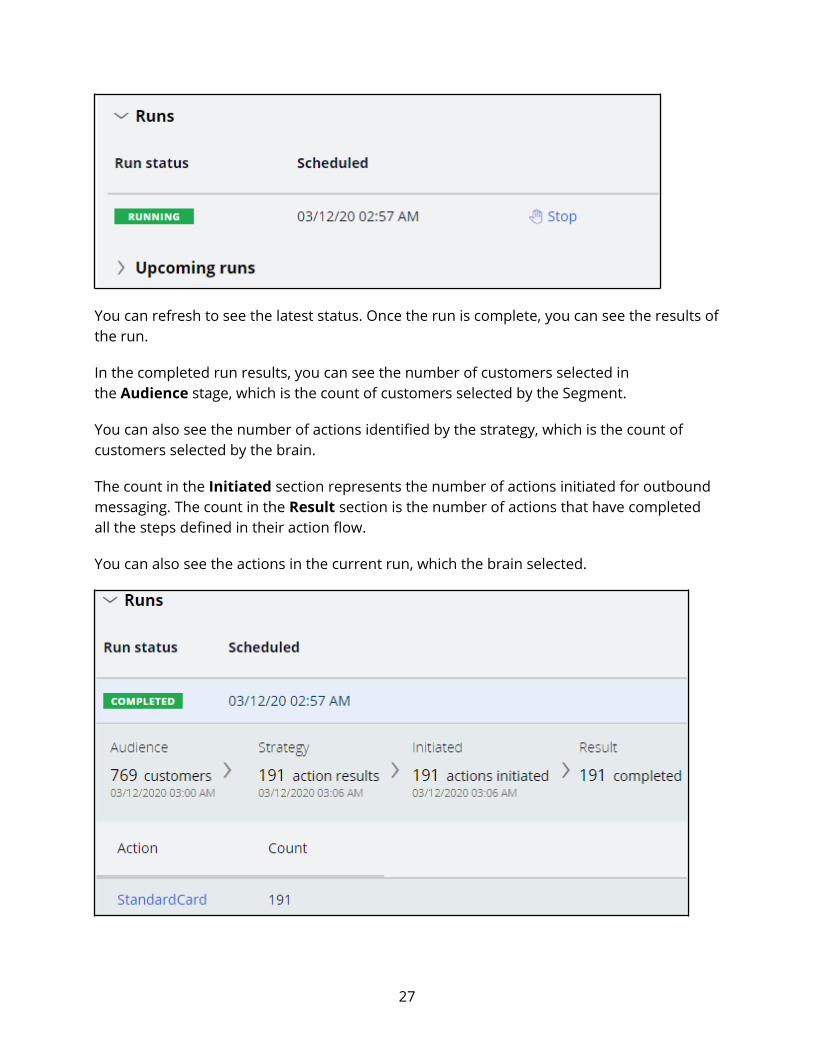
You can refresh to see the latest status. Once the run is complete, you can see the results ofthe run.
In the completed run results, you can see the number of customers selected in the Audience stage, which is the count of customers selected by the Segment.
You can also see the number of actions identified by the strategy, which is the count of customers selected by the brain.
The count in the Initiated section represents the number of actions initiated for outbound messaging. The count in the Result section is the number of actions that have completed all the steps defined in their action flow.
You can also see the actions in the current run, which the brain selected.
27
Qualified customers receive the email. When they click the APPLY TODAY call to action, they are taken to the preconfigured URL, which, in this scenario, is the Credit Cards landing page on the bank’s website.
This demo has concluded. What did it show you?
How to enable the email channel in Next-Best-Action Designer.
How to add an email treatment to an action to have an email offer available for the outbound run.
How to schedule and run an outbound run.
28
Defining the starting populationDescriptionThe starting population is the potential list of customers you want the brain to consider for always-on outbound customer engagement. Learn how to create a segment and configure it with basic criteria to identify the starting population for Next-Best-Action outbound runs.
Learning objectives Describe the concept of segmentation
Explain how to create a segment for the starting population of an outbound run
29
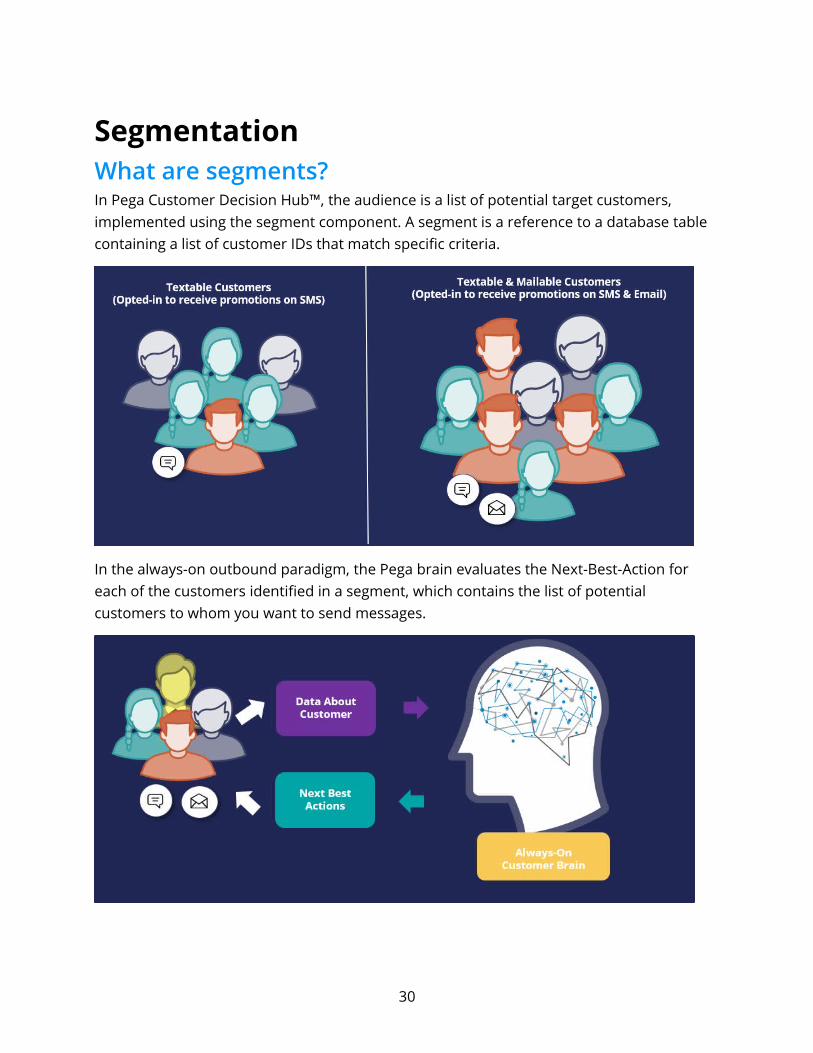
SegmentationWhat are segments?In Pega Customer Decision Hub™, the audience is a list of potential target customers, implemented using the segment component. A segment is a reference to a database table containing a list of customer IDs that match specific criteria.
In the always-on outbound paradigm, the Pega brain evaluates the Next-Best-Action for each of the customers identified in a segment, which contains the list of potential customers to whom you want to send messages.
30
This set of customers is known as the starting population. The customers in this group will be further qualified through eligibility, applicability, and suitability criteria configured in Next-Best-Action Designer.
Criteria in a segmentTo select a starting population, you apply a few high-level criteria to a segment. It’s best practice not to get too granular at the segment level, rather use eligibility, applicability, and suitability rules configured in Next-Best-Action Designer to fine-tune your criteria once the starting population has been selected.
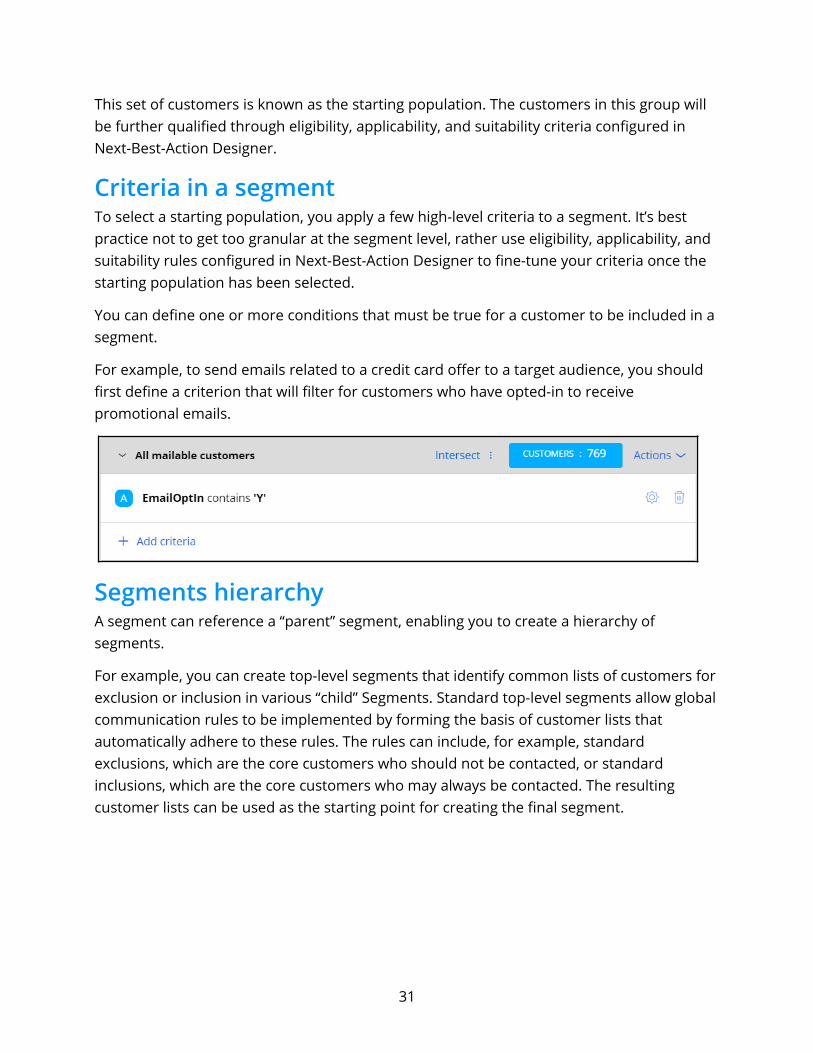
You can define one or more conditions that must be true for a customer to be included in a segment.
For example, to send emails related to a credit card offer to a target audience, you should first define a criterion that will filter for customers who have opted-in to receive promotional emails.
Segments hierarchyA segment can reference a “parent” segment, enabling you to create a hierarchy of segments.
For example, you can create top-level segments that identify common lists of customers forexclusion or inclusion in various “child” Segments. Standard top-level segments allow globalcommunication rules to be implemented by forming the basis of customer lists that automatically adhere to these rules. The rules can include, for example, standard exclusions, which are the core customers who should not be contacted, or standard inclusions, which are the core customers who may always be contacted. The resulting customer lists can be used as the starting point for creating the final segment.
31
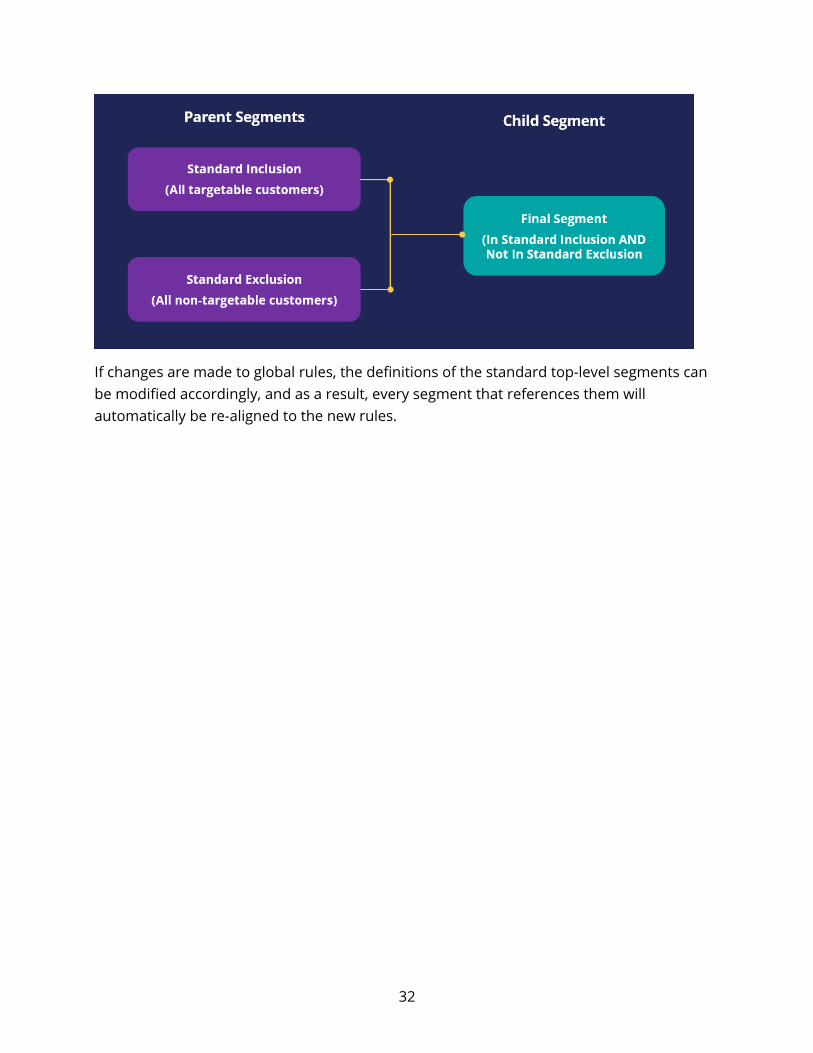
If changes are made to global rules, the definitions of the standard top-level segments can be modified accordingly, and as a result, every segment that references them will automatically be re-aligned to the new rules.
32
Creating a segmentBusiness scenarioU+, a retail bank, wants to use the always-on outbound approach to send promotional emails to qualified customers. As the starting population for the outbound schedule, the bank wants to include all customers who have opted in to receive promotional emails.
Creating a segmentTo meet the business requirement, you need to create a segment with two criteria.
1. A criterion to reference the existing top-level segment, All Customers, which contains a list of all customers in the customer base.
2. A criterion to check if customers have opted in to receive promotional emails.
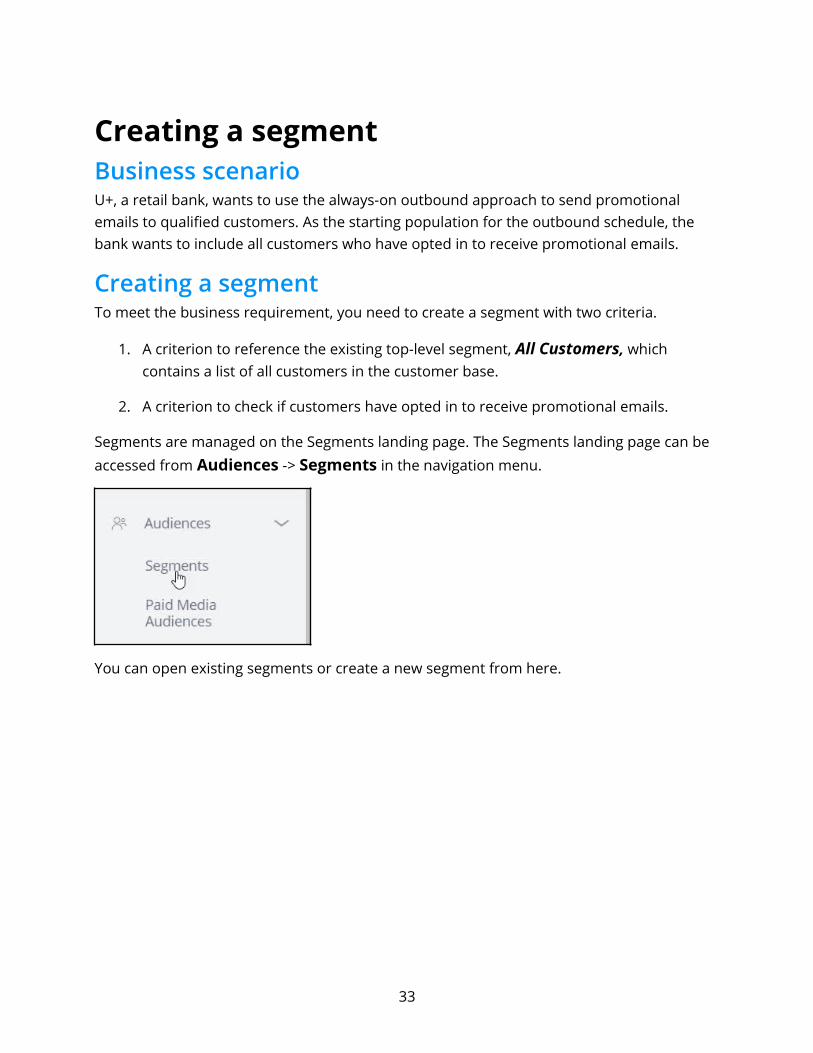
Segments are managed on the Segments landing page. The Segments landing page can be accessed from Audiences -> Segments in the navigation menu.
You can open existing segments or create a new segment from here.
33
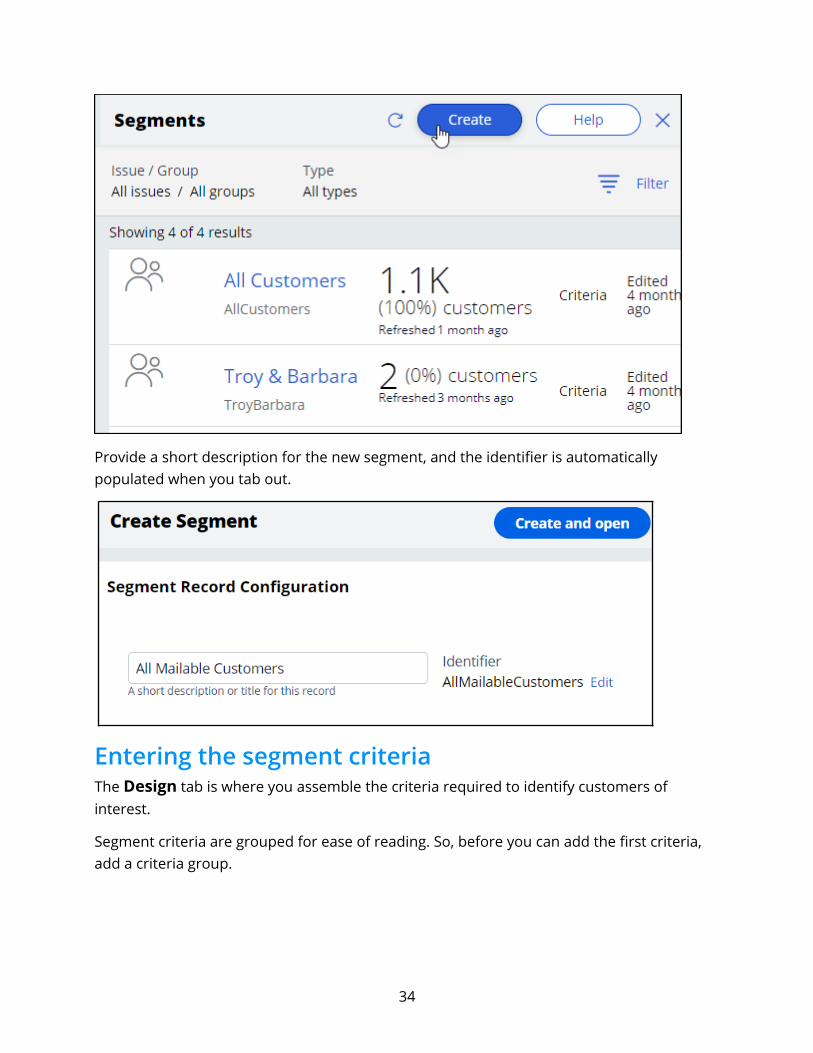
Provide a short description for the new segment, and the identifier is automatically populated when you tab out.
Entering the segment criteriaThe Design tab is where you assemble the criteria required to identify customers of interest.
Segment criteria are grouped for ease of reading. So, before you can add the first criteria, add a criteria group.
34
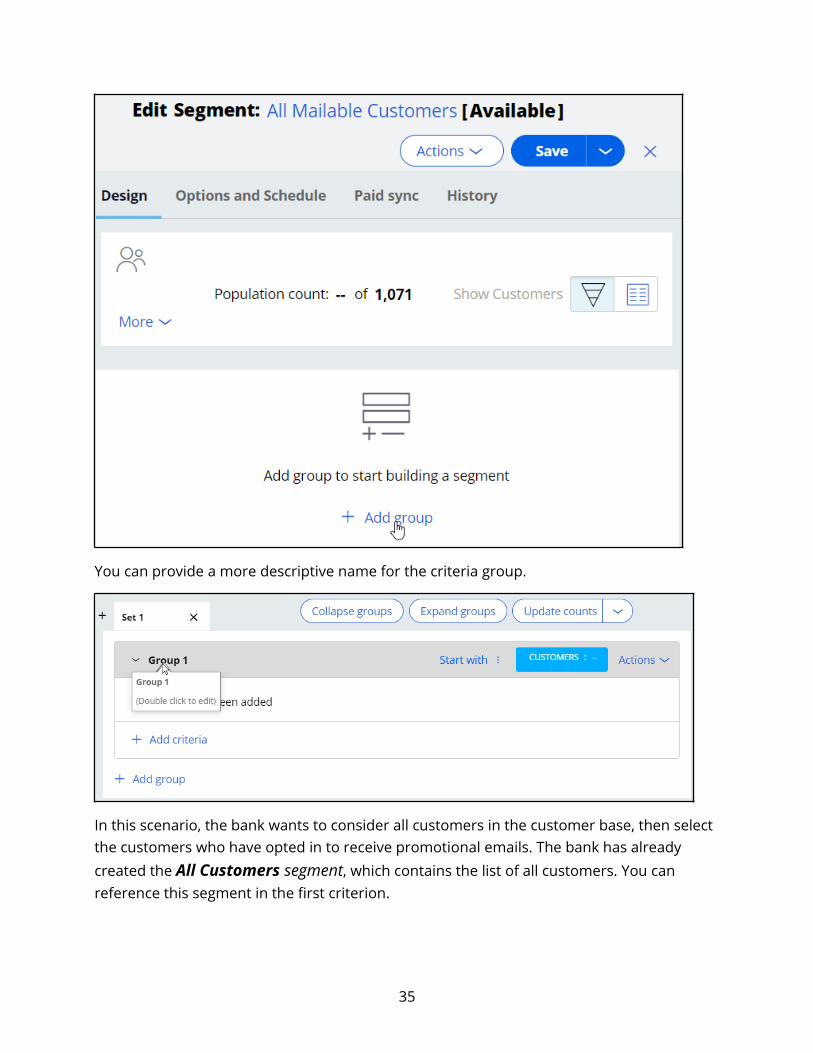
You can provide a more descriptive name for the criteria group.
In this scenario, the bank wants to consider all customers in the customer base, then select the customers who have opted in to receive promotional emails. The bank has already created the All Customers segment, which contains the list of all customers. You can reference this segment in the first criterion.
35
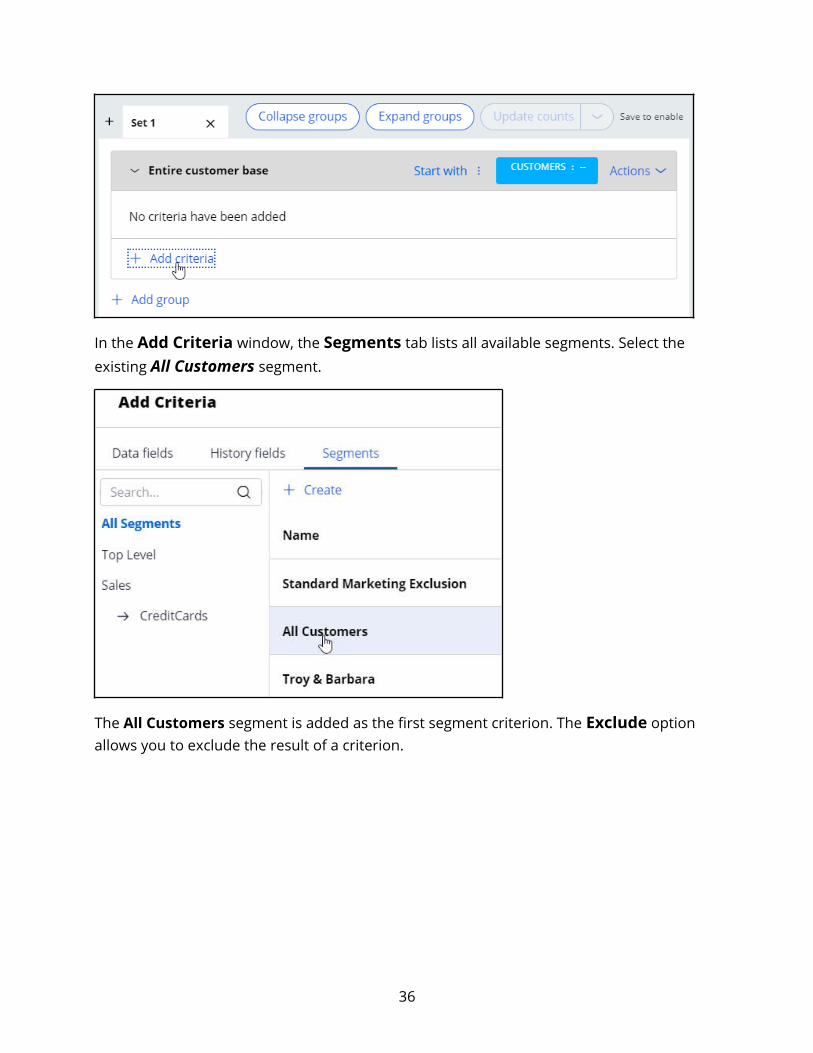
In the Add Criteria window, the Segments tab lists all available segments. Select the existing All Customers segment.
The All Customers segment is added as the first segment criterion. The Exclude option allows you to exclude the result of a criterion.
36
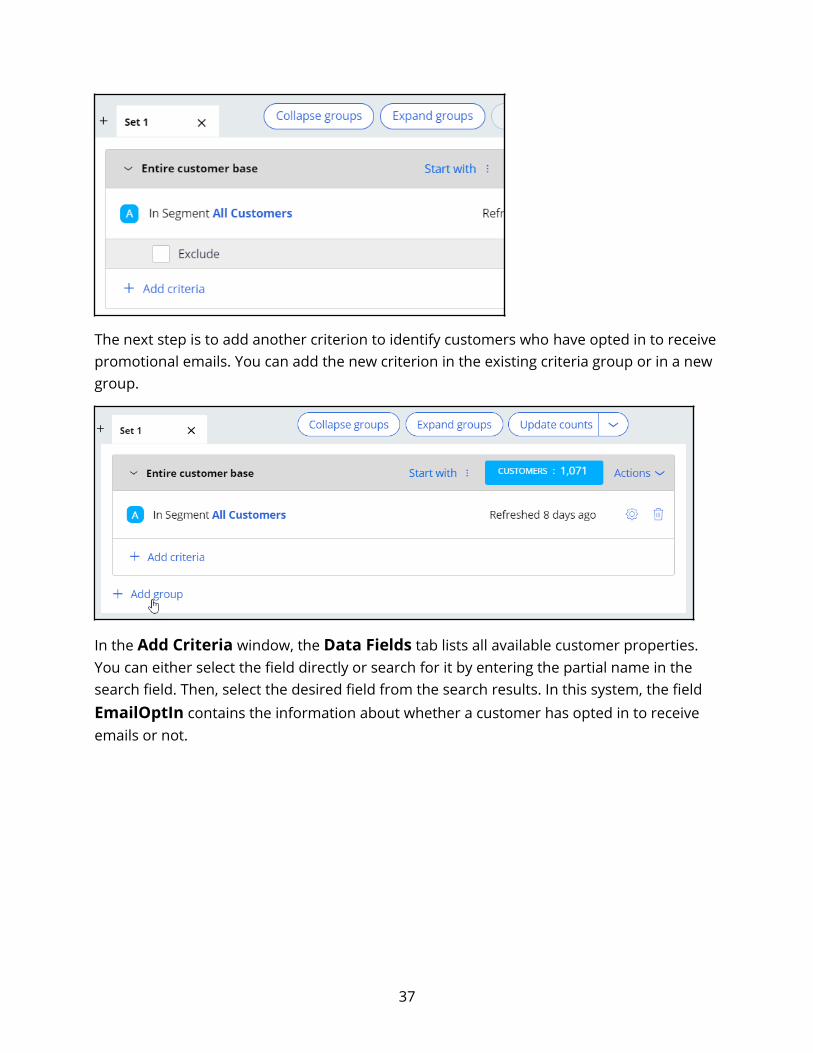
The next step is to add another criterion to identify customers who have opted in to receivepromotional emails. You can add the new criterion in the existing criteria group or in a new group.
In the Add Criteria window, the Data Fields tab lists all available customer properties. You can either select the field directly or search for it by entering the partial name in the search field. Then, select the desired field from the search results. In this system, the field EmailOptIn contains the information about whether a customer has opted in to receive emails or not.
37
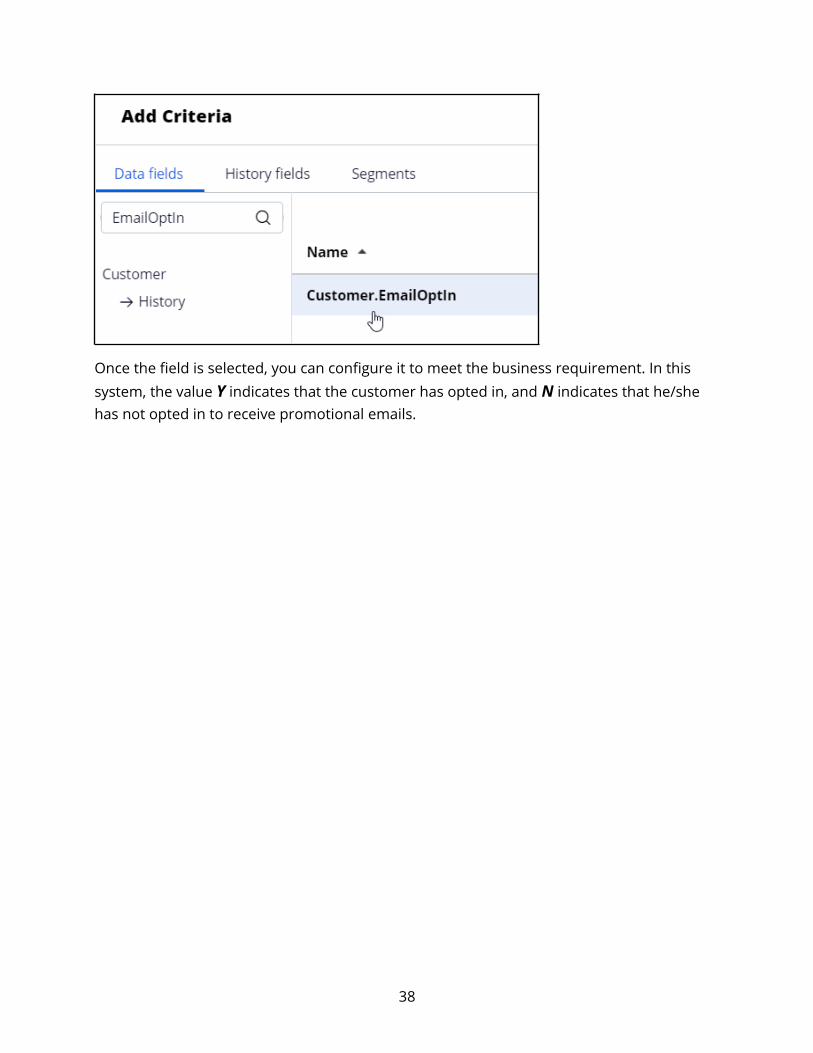
Once the field is selected, you can configure it to meet the business requirement. In this system, the value Y indicates that the customer has opted in, and N indicates that he/she has not opted in to receive promotional emails.
38
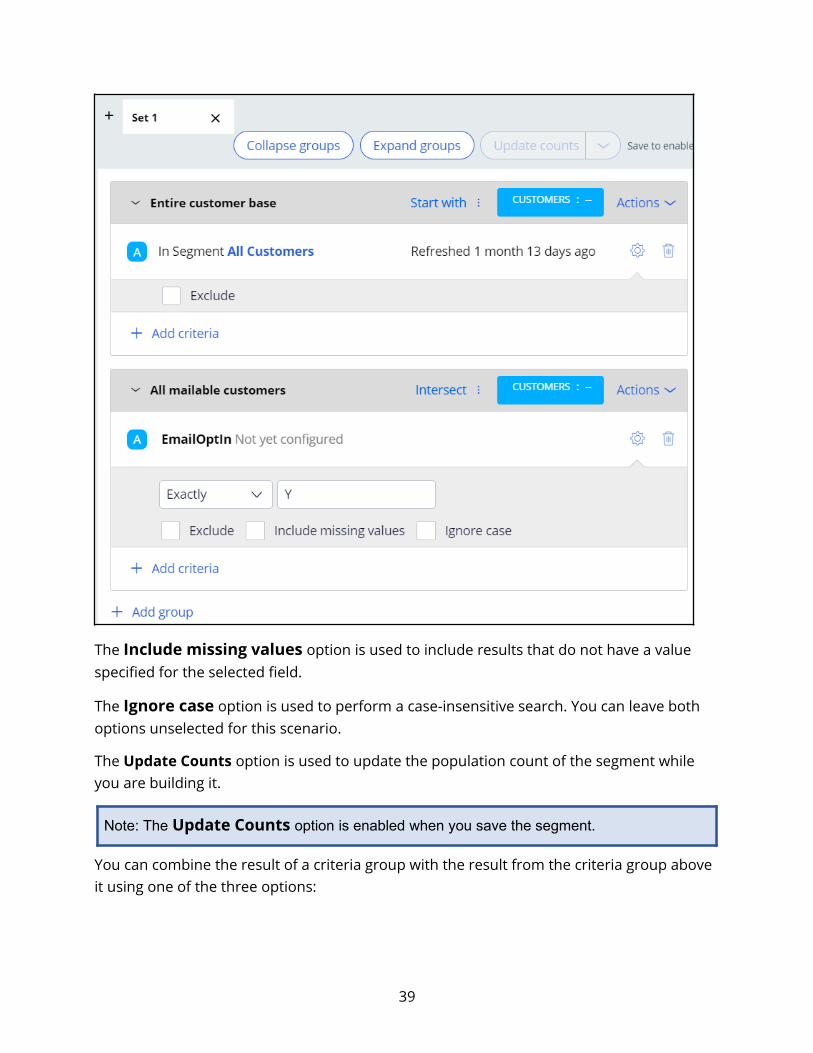
The Include missing values option is used to include results that do not have a value specified for the selected field.
The Ignore case option is used to perform a case-insensitive search. You can leave both options unselected for this scenario.
The Update Counts option is used to update the population count of the segment while you are building it.
Note: The Update Counts option is enabled when you save the segment.
You can combine the result of a criteria group with the result from the criteria group above it using one of the three options:
39
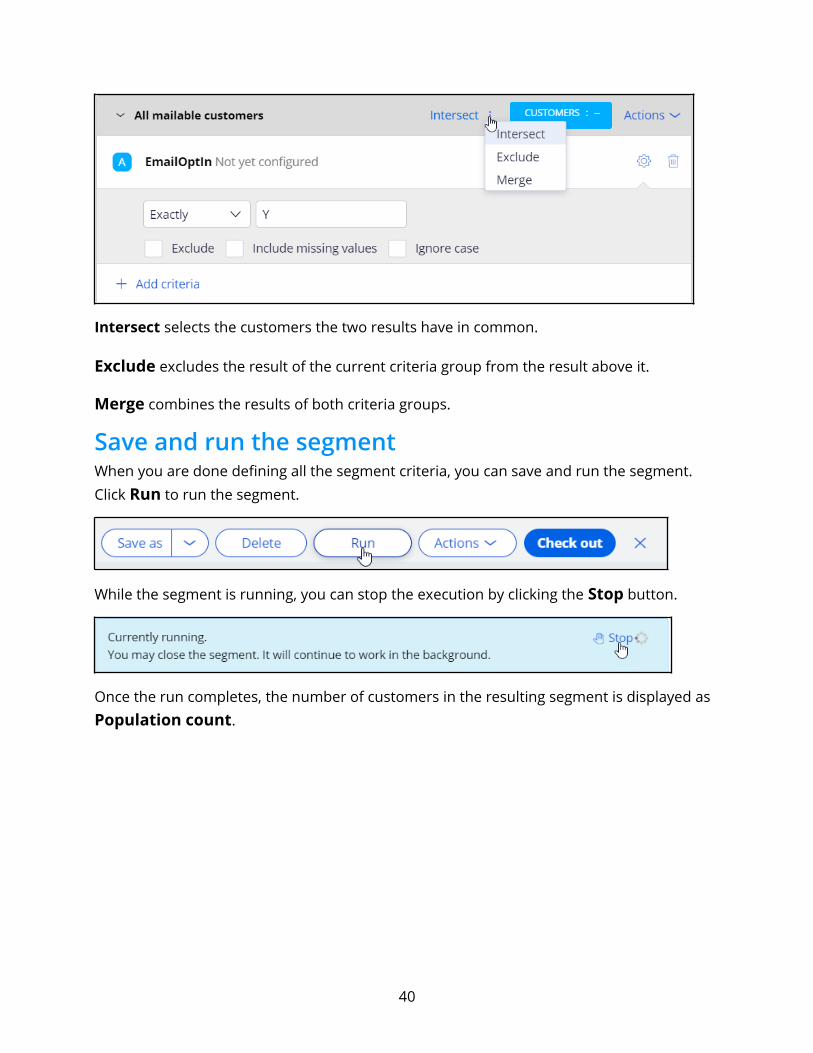
Intersect selects the customers the two results have in common.
Exclude excludes the result of the current criteria group from the result above it.
Merge combines the results of both criteria groups.
Save and run the segmentWhen you are done defining all the segment criteria, you can save and run the segment. Click Run to run the segment.
While the segment is running, you can stop the execution by clicking the Stop button.
Once the run completes, the number of customers in the resulting segment is displayed as Population count.
40
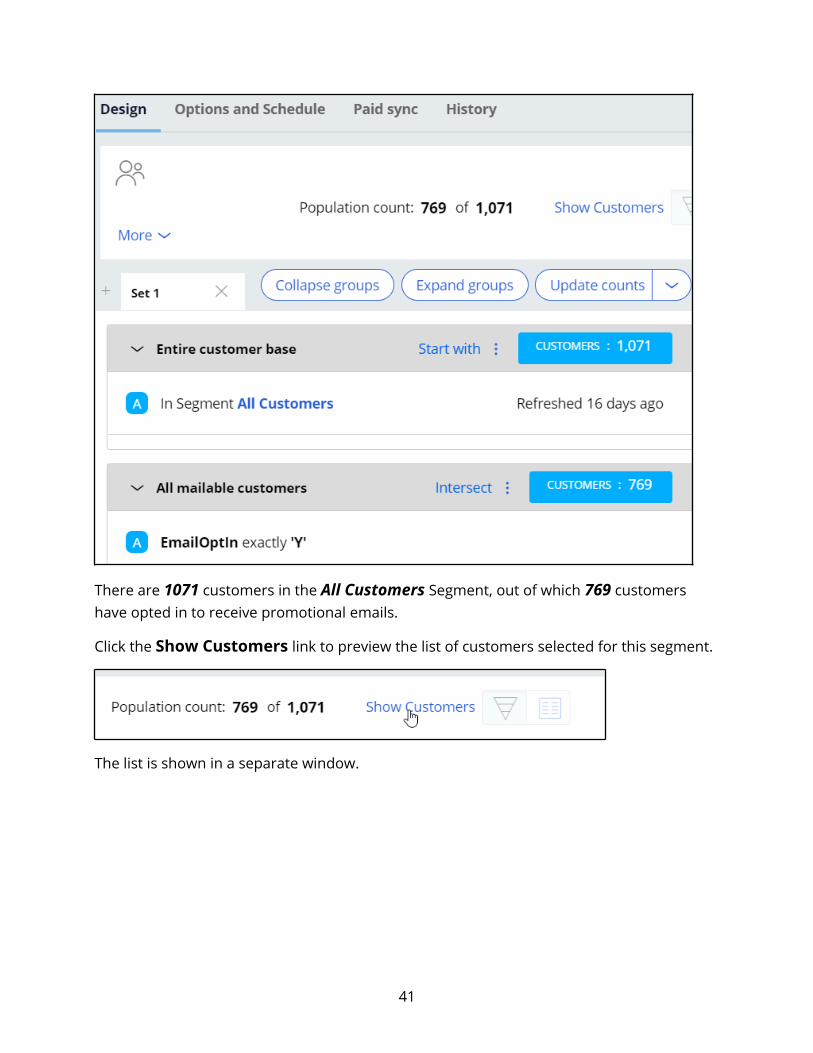
There are 1071 customers in the All Customers Segment, out of which 769 customers have opted in to receive promotional emails.
Click the Show Customers link to preview the list of customers selected for this segment.
The list is shown in a separate window.
41
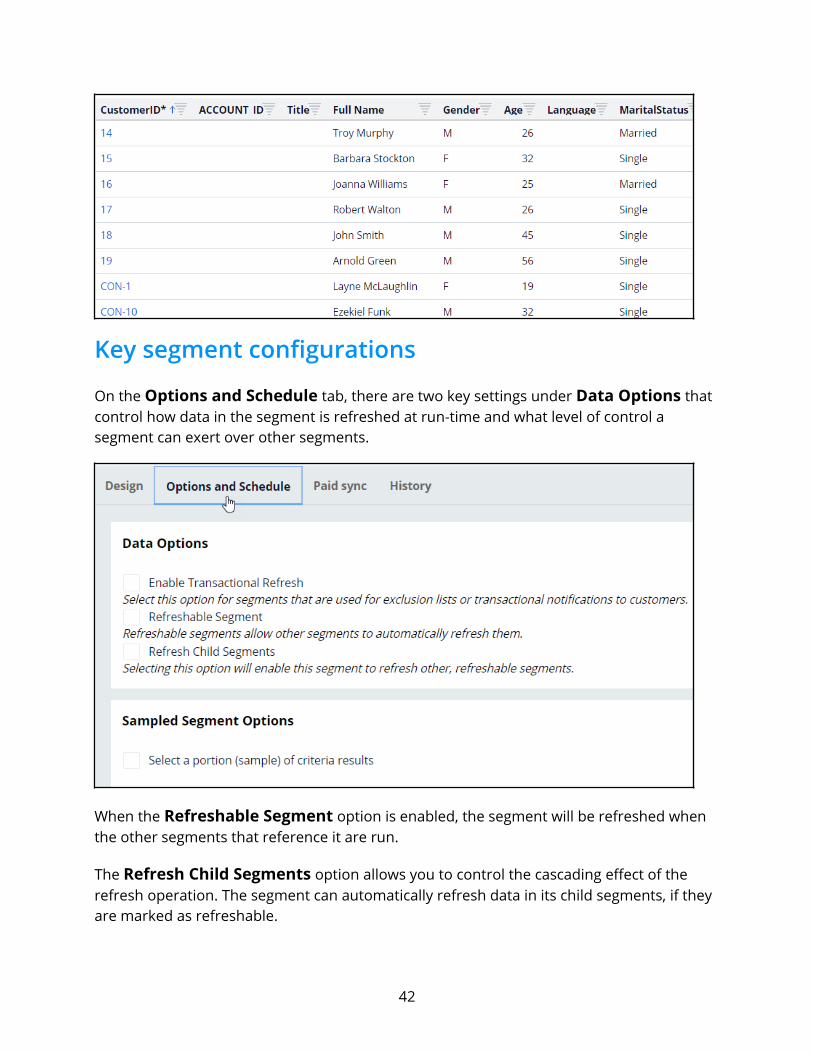
Key segment configurations
On the Options and Schedule tab, there are two key settings under Data Options that control how data in the segment is refreshed at run-time and what level of control a segment can exert over other segments.
When the Refreshable Segment option is enabled, the segment will be refreshed when the other segments that reference it are run.
The Refresh Child Segments option allows you to control the cascading effect of the refresh operation. The segment can automatically refresh data in its child segments, if they are marked as refreshable.
42
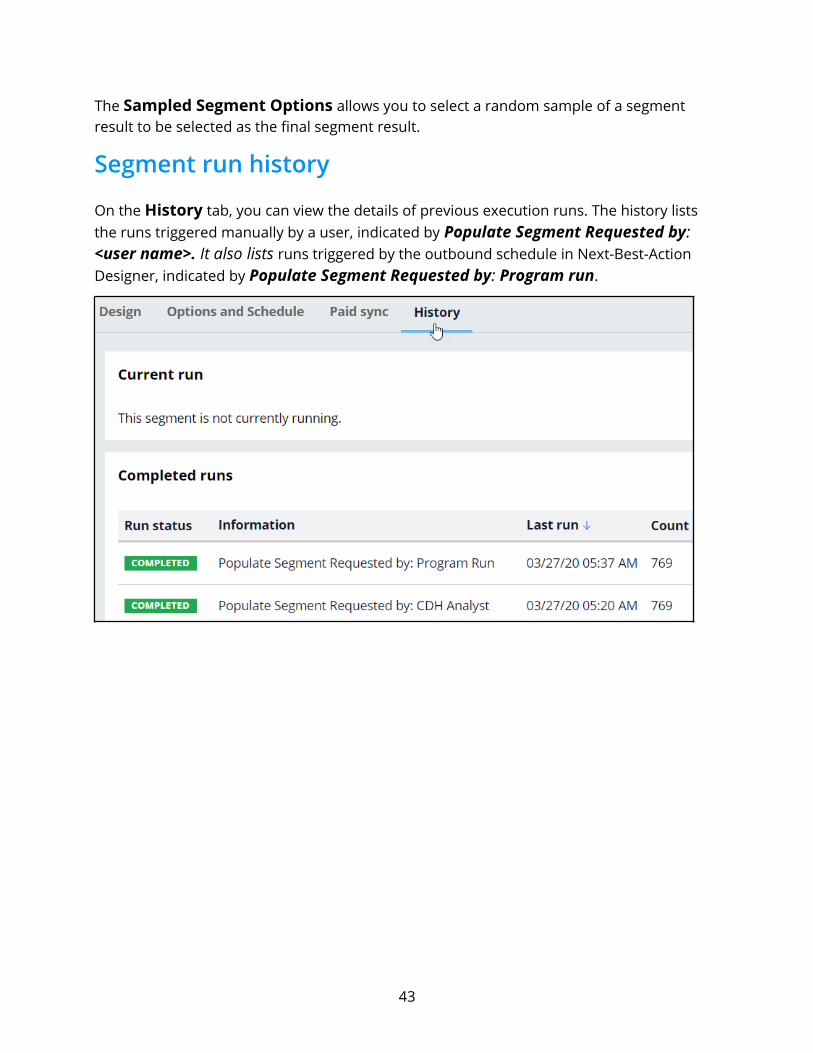
The Sampled Segment Options allows you to select a random sample of a segment result to be selected as the final segment result.
Segment run history
On the History tab, you can view the details of previous execution runs. The history lists the runs triggered manually by a user, indicated by Populate Segment Requested by: <user name>. It also lists runs triggered by the outbound schedule in Next-Best-Action Designer, indicated by Populate Segment Requested by: Program run.
43
Defining an action for outboundDescriptionA Next-Best-Action is selected by the brain after it considers customer engagement policies,business objectives and recommendations from the AI. An action can be presented to the customer on various inbound and outbound channels. Learn how to configure an action to make it suitable for outbound customer engagement and design a visually appealing email message using easy-to-use templates. Also, learn how to configure an action flow, which contains the steps involved in delivering an action to a customer.
Learning objectives Create an email treatment
Design visually appealing emails using templates
Configure actions with re-usable action flows
44
Creating an email treatmentYou can send offer emails to qualified customers in an always-on outbound environment using email treatments. An email treatment helps to design a visually appealing email message for customers.
TranscriptThis demo shows you how to create an email treatment to present offer details in an email.
U+, a retail bank, wants to promote their Rewards credit card via email. They want to send the email to qualified customers in an always-on outbound environment.
The email is personalized and contains the offer details and a call to action. When customers click the APPLY TODAY call to action in the email, they are directed to the credit cards page on the bank’s website to learn more about the offer and apply for it if interested.
45
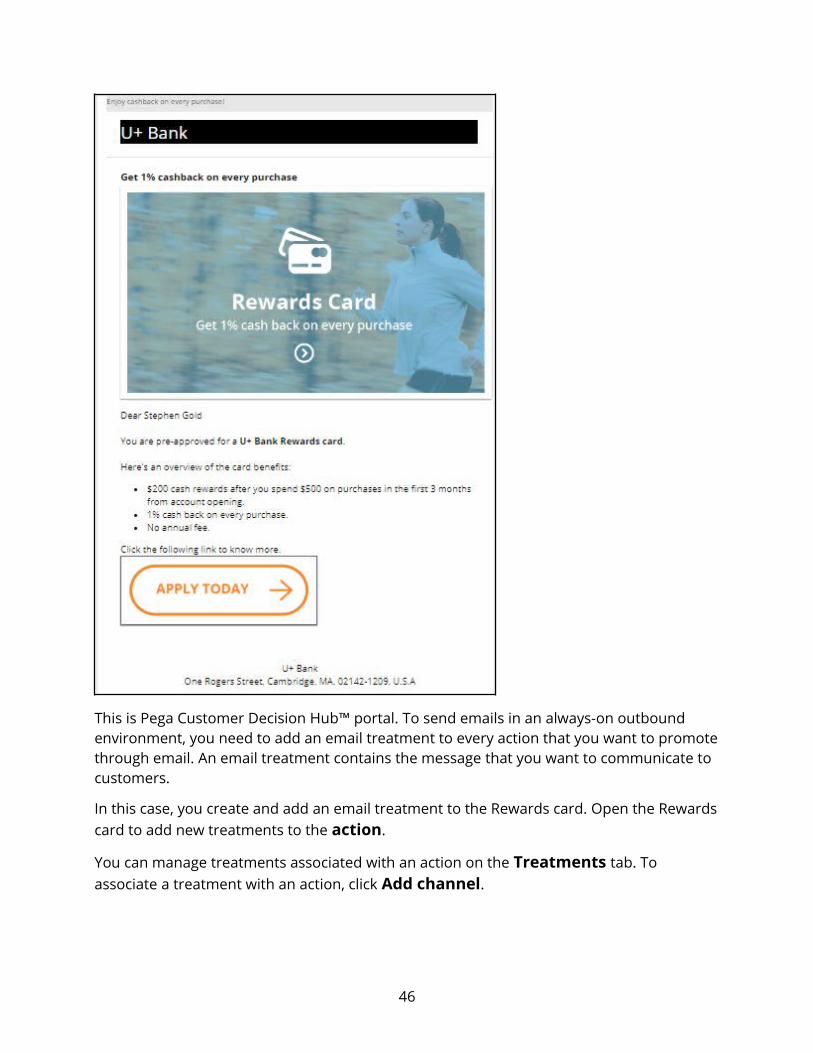
This is Pega Customer Decision Hub™ portal. To send emails in an always-on outbound environment, you need to add an email treatment to every action that you want to promotethrough email. An email treatment contains the message that you want to communicate to customers.
In this case, you create and add an email treatment to the Rewards card. Open the Rewardscard to add new treatments to the action.
You can manage treatments associated with an action on the Treatments tab. To associate a treatment with an action, click Add channel.
46
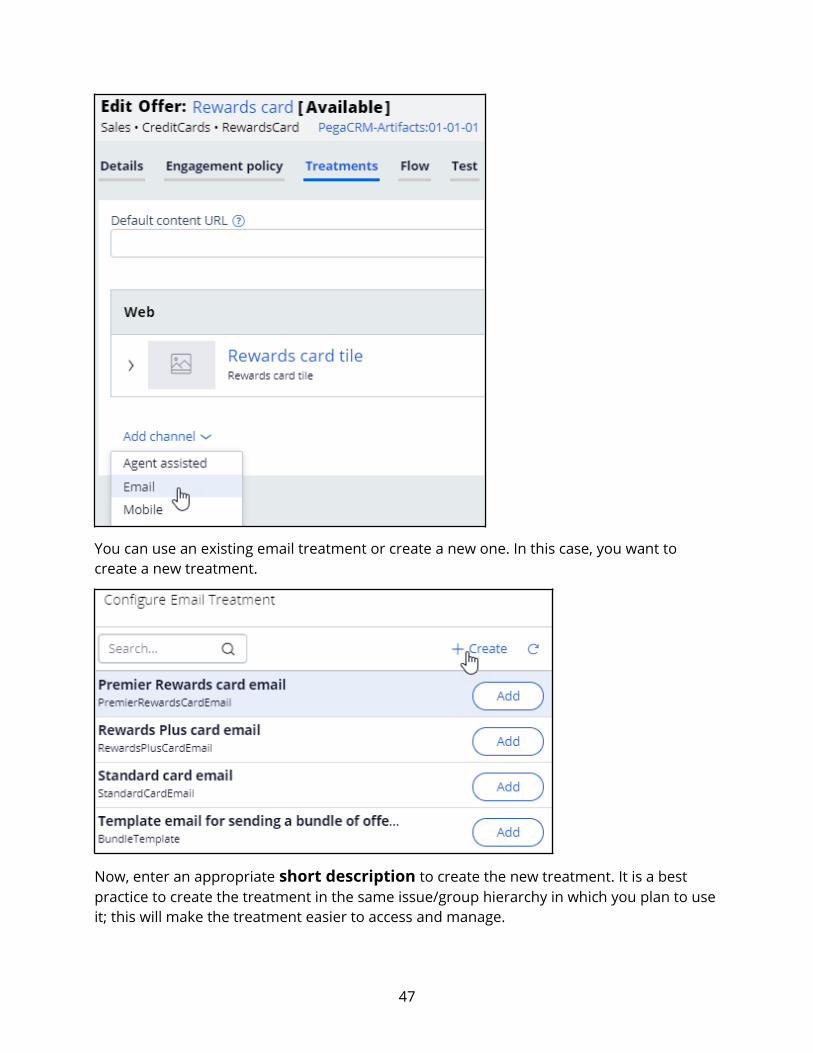
You can use an existing email treatment or create a new one. In this case, you want to create a new treatment.
Now, enter an appropriate short description to create the new treatment. It is a best practice to create the treatment in the same issue/group hierarchy in which you plan to useit; this will make the treatment easier to access and manage.
47

Then, enter the email content.
First, enter the email subject. You can include both static text and dynamic placeholders in the subject.
48
To access dynamic placeholders, start typing dot followed by Customer to access customer properties or OfferData to access action properties.
Dynamic placeholders allow you to personalize the subject. You can construct the placeholders with both customer and offer attribute properties.
At runtime, the properties are replaced with the real values. For example, if the customer’s first name is Stephen, the generated subject line reads: Hi Stephen, here’s your U+ Bank card.
Then, enter an appropriate keycode. When the Track Email Open Rate option is enabled, the system records an impression when a customer opens an email.
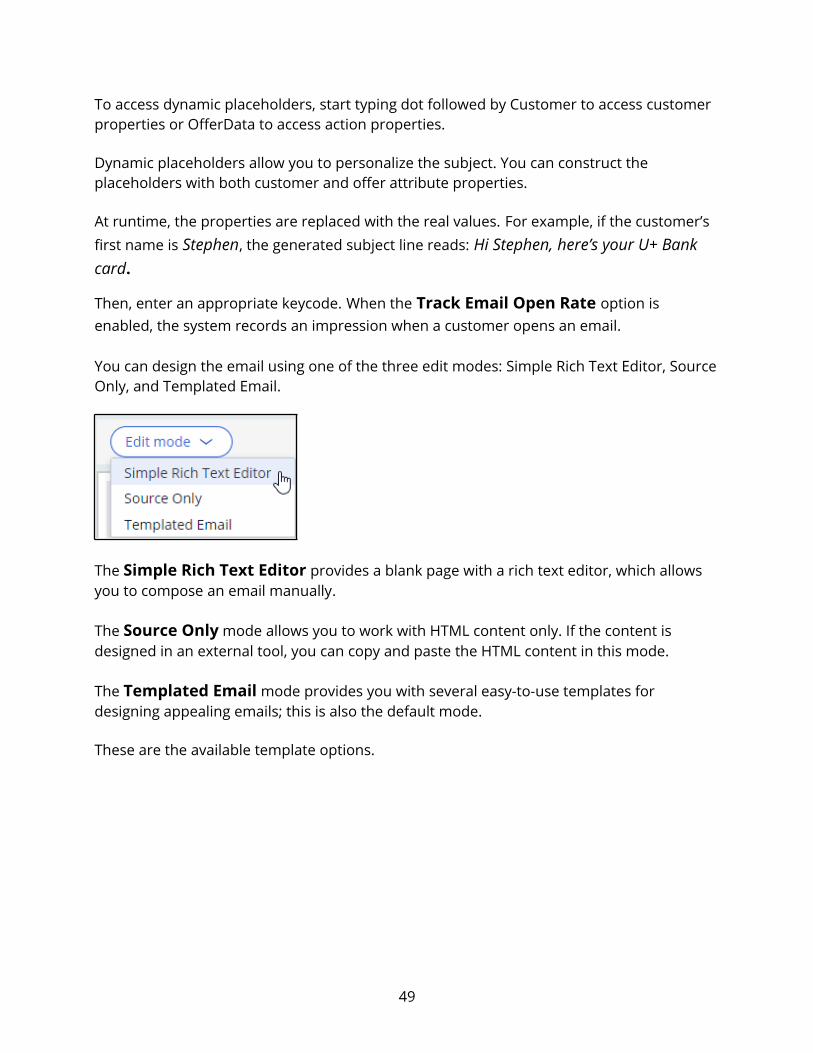
You can design the email using one of the three edit modes: Simple Rich Text Editor, SourceOnly, and Templated Email.
The Simple Rich Text Editor provides a blank page with a rich text editor, which allows you to compose an email manually.
The Source Only mode allows you to work with HTML content only. If the content is designed in an external tool, you can copy and paste the HTML content in this mode.
The Templated Email mode provides you with several easy-to-use templates for designing appealing emails; this is also the default mode.
These are the available template options.
49
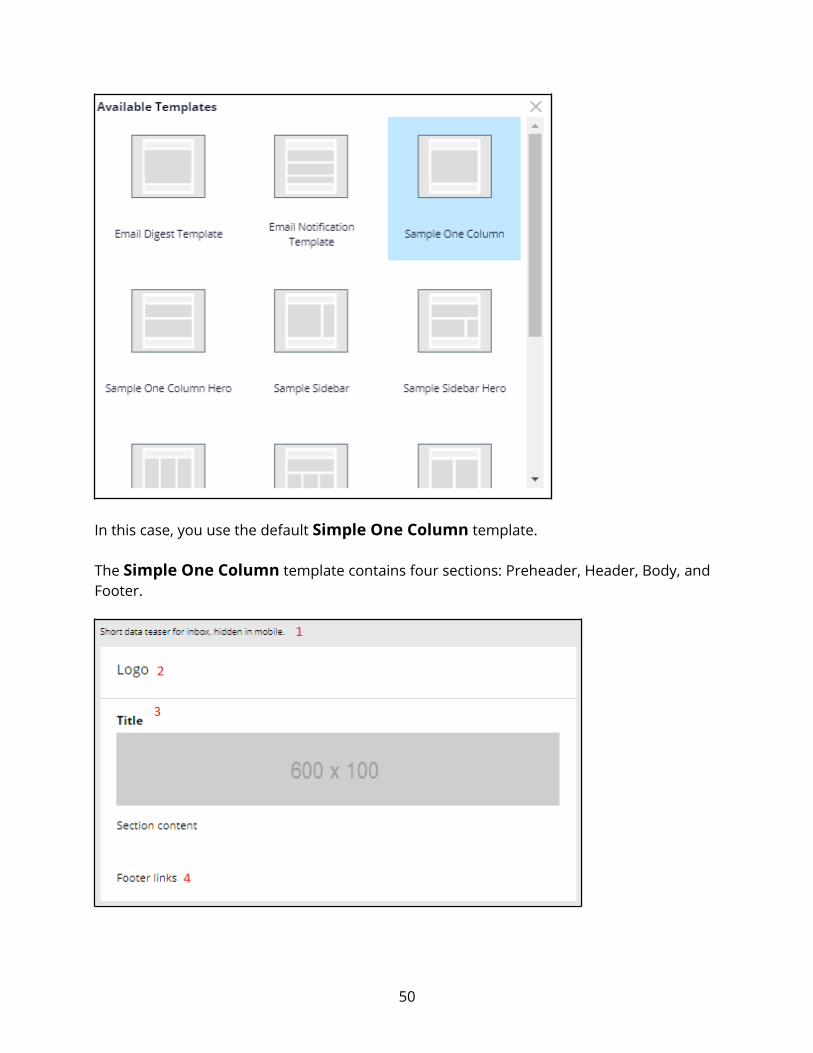
In this case, you use the default Simple One Column template.
The Simple One Column template contains four sections: Preheader, Header, Body, and Footer.
50
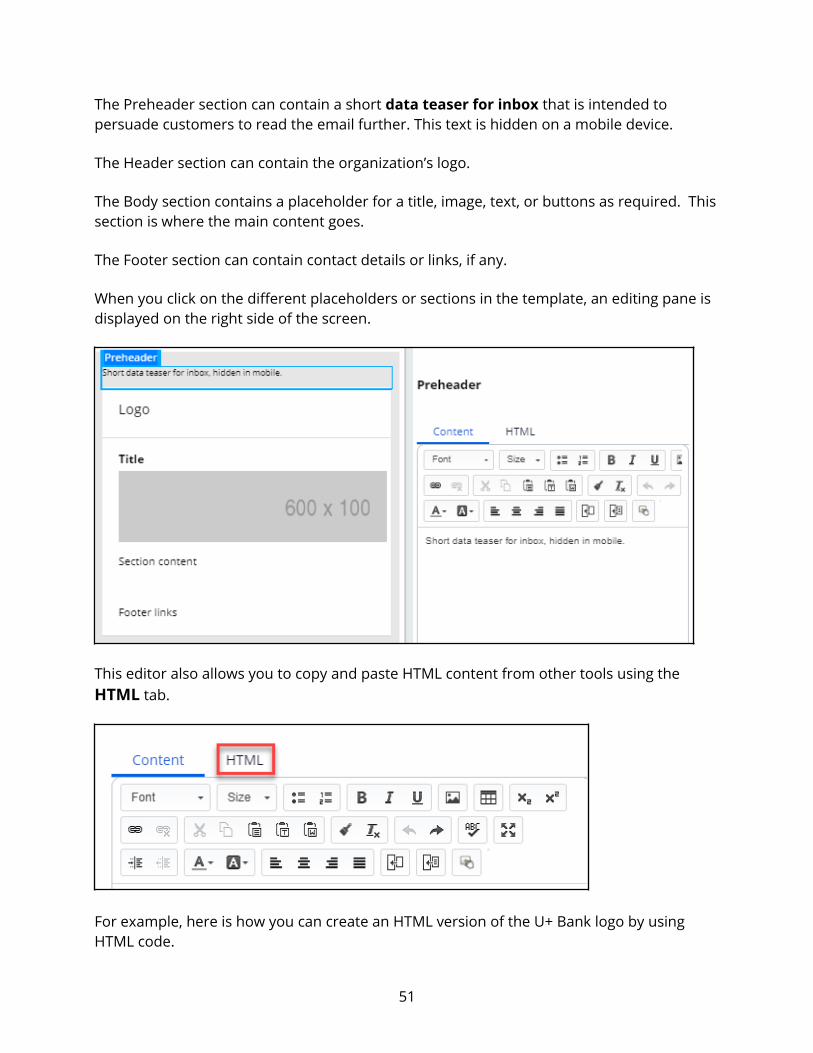
The Preheader section can contain a short data teaser for inbox that is intended to persuade customers to read the email further. This text is hidden on a mobile device.
The Header section can contain the organization’s logo.
The Body section contains a placeholder for a title, image, text, or buttons as required. Thissection is where the main content goes.
The Footer section can contain contact details or links, if any.
When you click on the different placeholders or sections in the template, an editing pane is displayed on the right side of the screen.
This editor also allows you to copy and paste HTML content from other tools using the HTML tab.
For example, here is how you can create an HTML version of the U+ Bank logo by using HTML code.
51
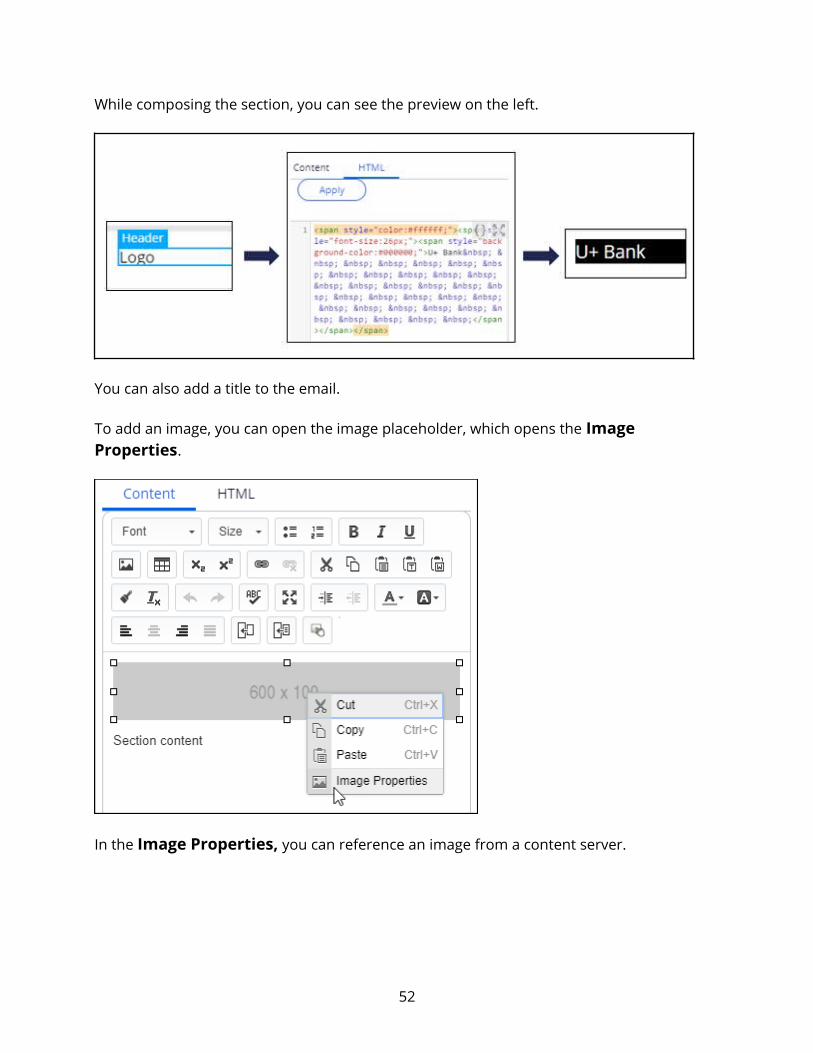
While composing the section, you can see the preview on the left.
You can also add a title to the email.
To add an image, you can open the image placeholder, which opens the Image Properties.
In the Image Properties, you can reference an image from a content server.
52

It is best practice to host an image on an external server and reference it in the email. Do not embed images directly in the email, as it makes the email bulky.
In the email content, you can add static content and dynamic placeholders to personalize the message.
For example, the property .Customer.pyFirstName can be added as a placeholder. The customer’s real first name will replace the placeholder at the time of email delivery.
To add a customer or offer attribute as a dynamic placeholder, use the Insert Property button.
53
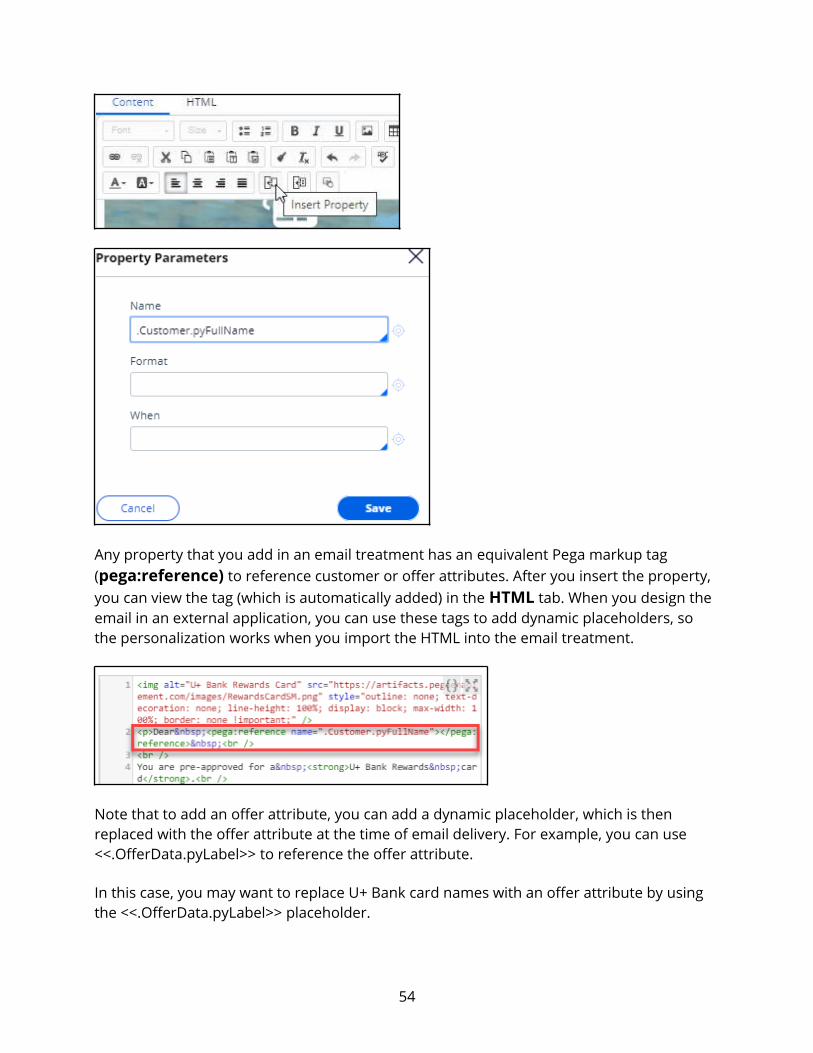
Any property that you add in an email treatment has an equivalent Pega markup tag (pega:reference) to reference customer or offer attributes. After you insert the property, you can view the tag (which is automatically added) in the HTML tab. When you design the email in an external application, you can use these tags to add dynamic placeholders, so the personalization works when you import the HTML into the email treatment.
Note that to add an offer attribute, you can add a dynamic placeholder, which is then replaced with the offer attribute at the time of email delivery. For example, you can use <<.OfferData.pyLabel>> to reference the offer attribute.
In this case, you may want to replace U+ Bank card names with an offer attribute by using the <<.OfferData.pyLabel>> placeholder.
54
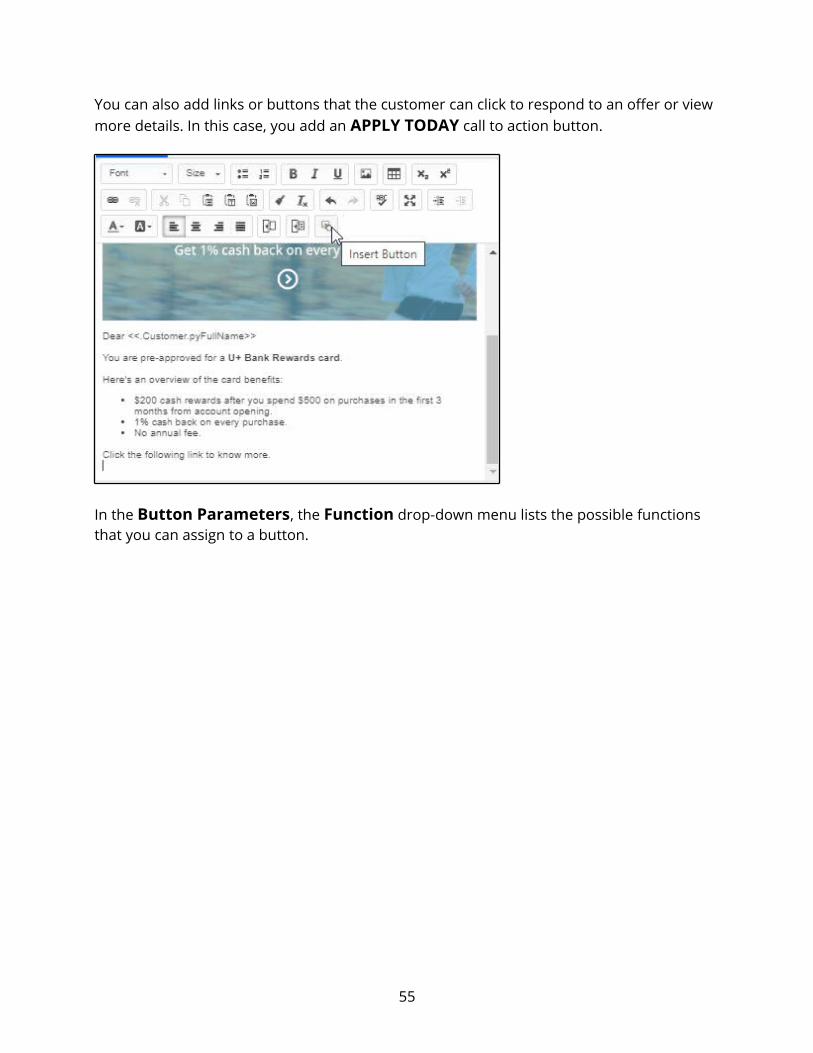
You can also add links or buttons that the customer can click to respond to an offer or view more details. In this case, you add an APPLY TODAY call to action button.
In the Button Parameters, the Function drop-down menu lists the possible functions that you can assign to a button.
55
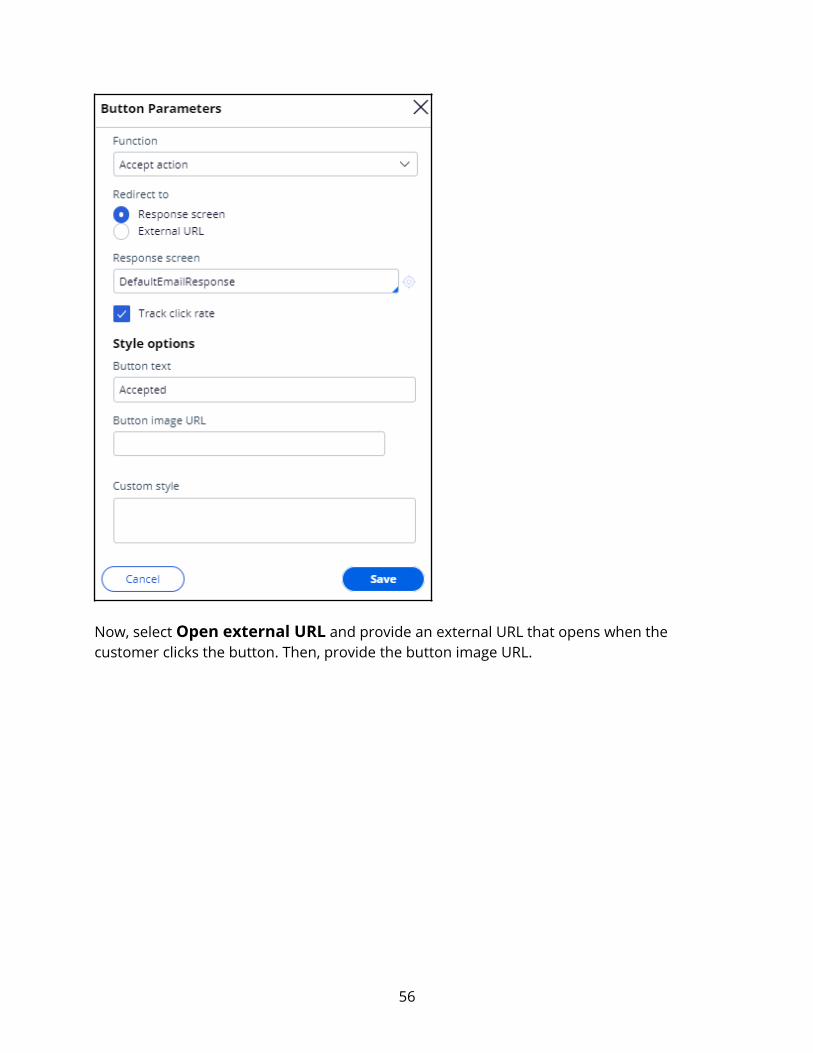
Now, select Open external URL and provide an external URL that opens when the customer clicks the button. Then, provide the button image URL.
56
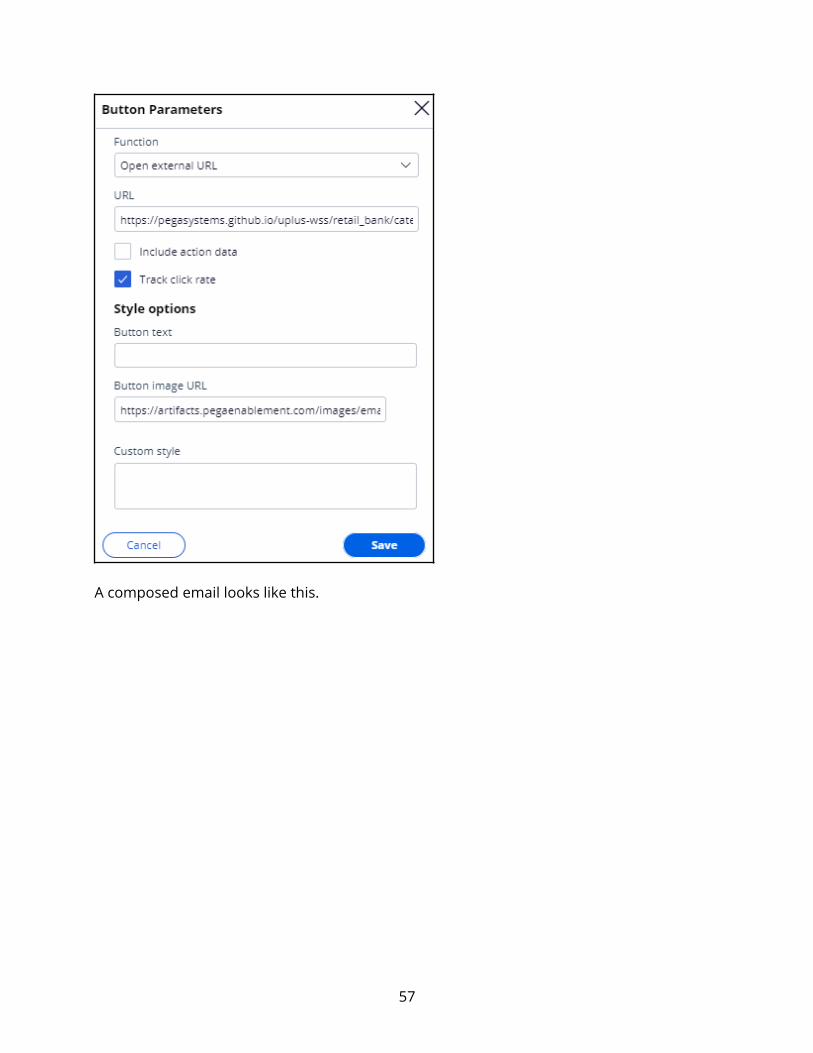
A composed email looks like this.
57
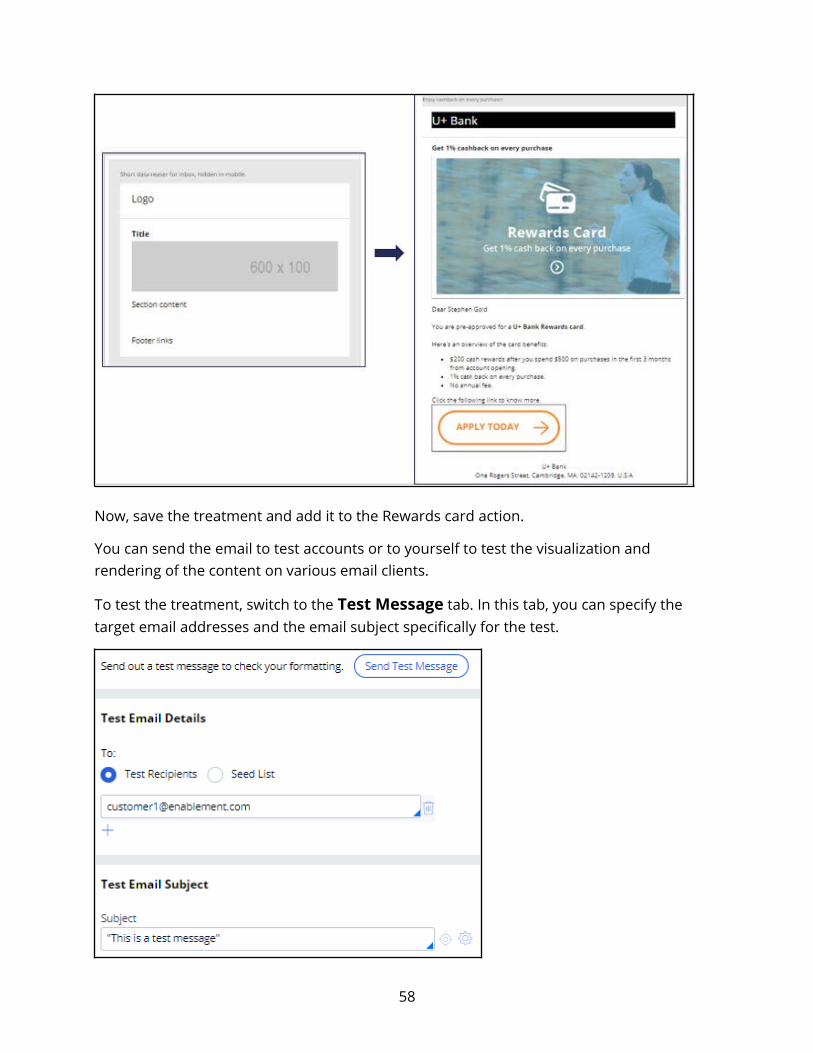
Now, save the treatment and add it to the Rewards card action.
You can send the email to test accounts or to yourself to test the visualization and rendering of the content on various email clients.
To test the treatment, switch to the Test Message tab. In this tab, you can specify the target email addresses and the email subject specifically for the test.
58
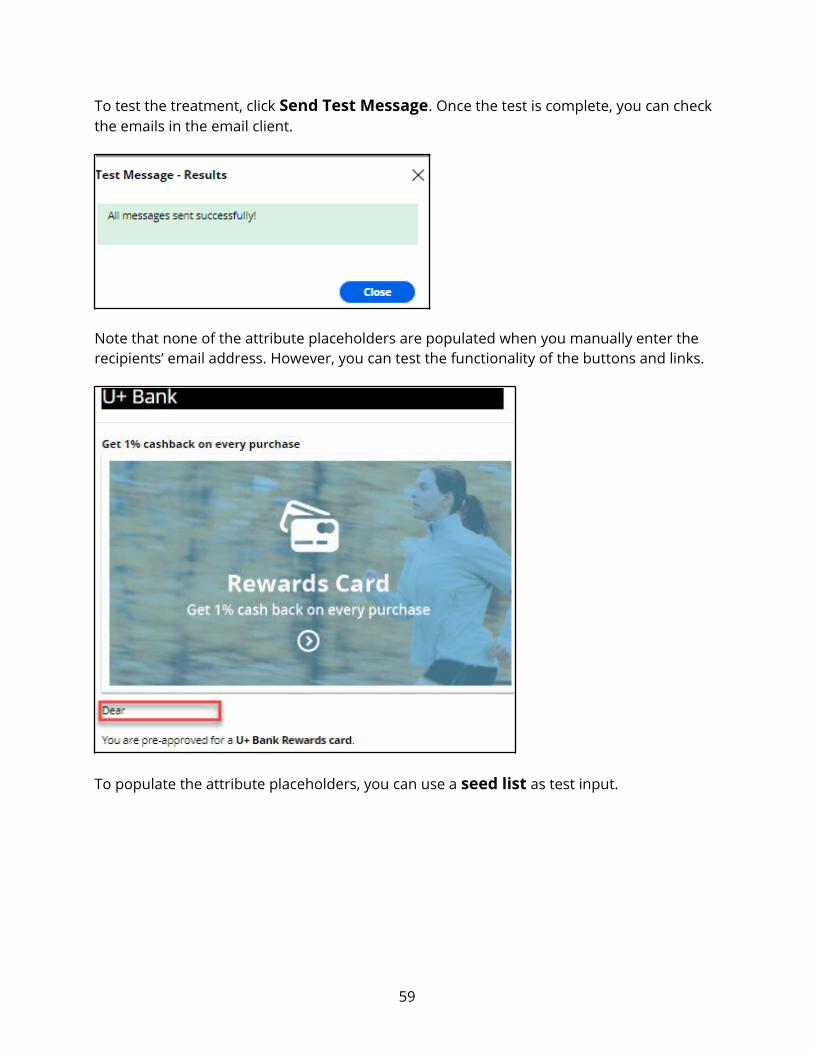
To test the treatment, click Send Test Message. Once the test is complete, you can check the emails in the email client.
Note that none of the attribute placeholders are populated when you manually enter the recipients’ email address. However, you can test the functionality of the buttons and links.
To populate the attribute placeholders, you can use a seed list as test input.
59
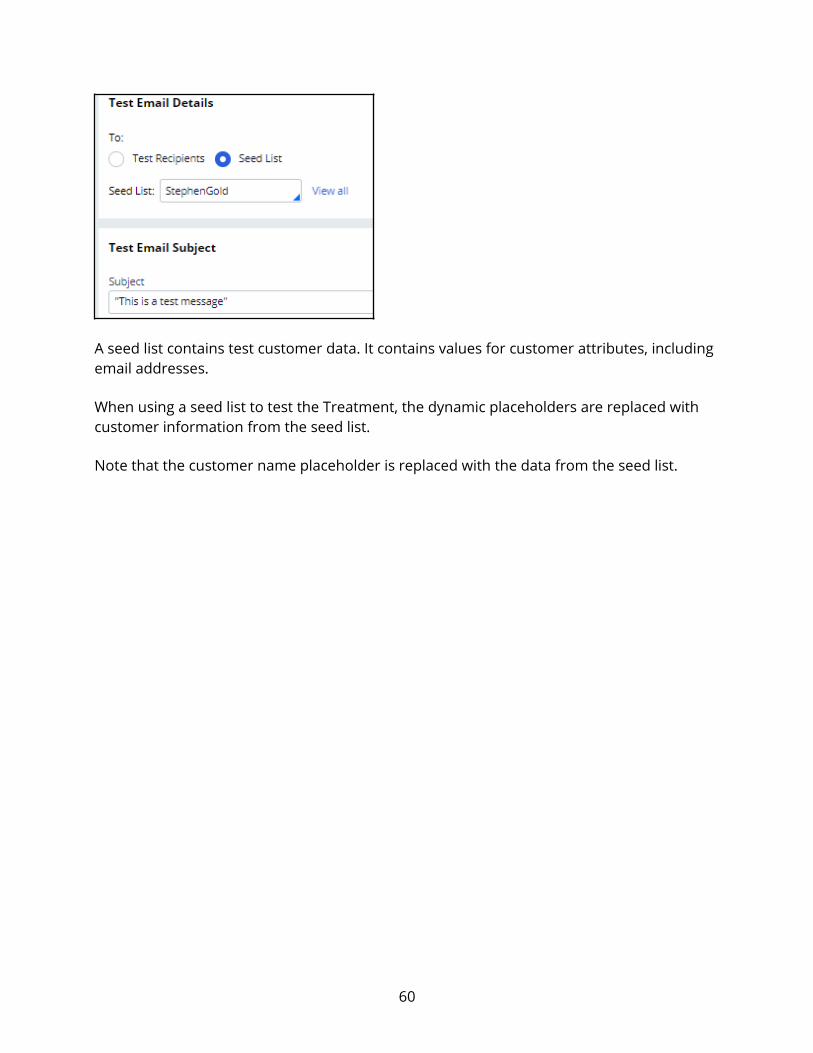
A seed list contains test customer data. It contains values for customer attributes, including email addresses.
When using a seed list to test the Treatment, the dynamic placeholders are replaced with customer information from the seed list.
Note that the customer name placeholder is replaced with the data from the seed list.
60

ss
This demo has concluded. What did it show you?
- How to add an email treatment to an action
- How to use dynamic placeholders to populate the customer and offer attributes in an email treatment
- How to use HTML code to generate content in an email treatment
- How to use an image from an external server in an email treatment
- How to add a button to an email treatment
- How to send emails to test accounts to test the visualization and rendering of the email content
- How to use seed lists to test the dynamic placeholders
61

62
Defining the action flowBusiness scenarioU+, a retail bank, has designed a new email treatment to promote the Rewards Card offer. Now, an action flow must be created to ensure that the email is delivered when this action is selected for a customer.
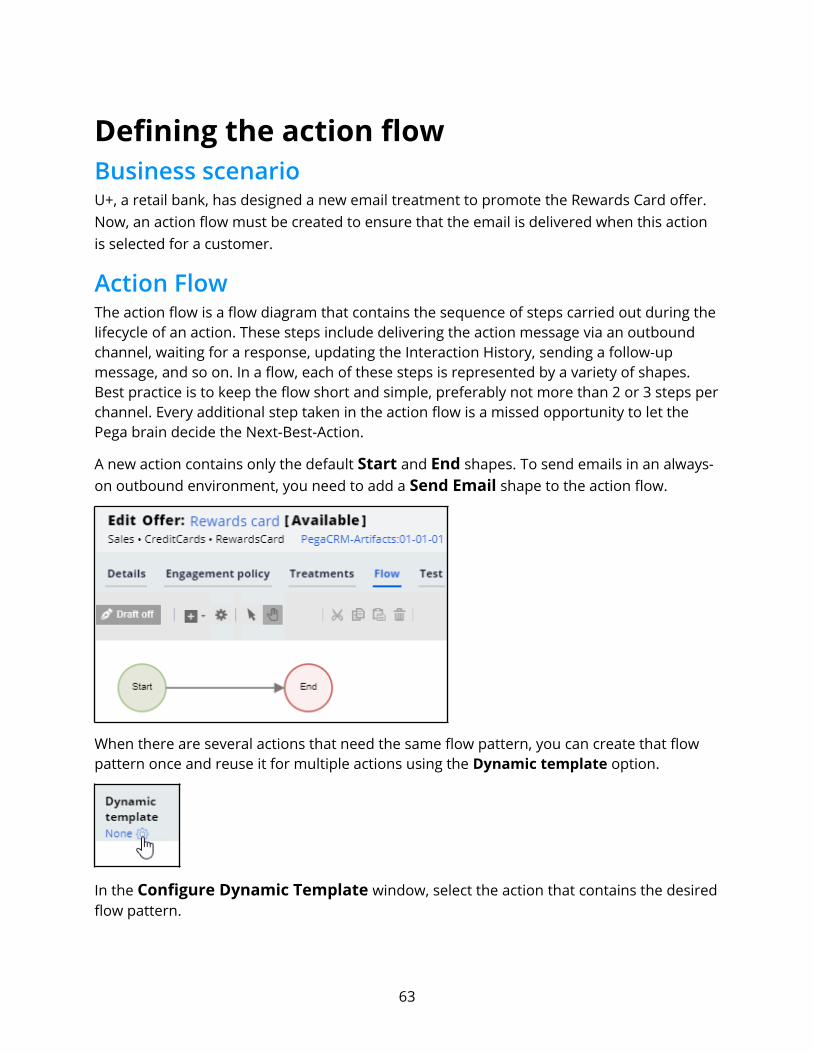
Action FlowThe action flow is a flow diagram that contains the sequence of steps carried out during thelifecycle of an action. These steps include delivering the action message via an outbound channel, waiting for a response, updating the Interaction History, sending a follow-up message, and so on. In a flow, each of these steps is represented by a variety of shapes. Best practice is to keep the flow short and simple, preferably not more than 2 or 3 steps perchannel. Every additional step taken in the action flow is a missed opportunity to let the Pega brain decide the Next-Best-Action.
A new action contains only the default Start and End shapes. To send emails in an always-on outbound environment, you need to add a Send Email shape to the action flow.
When there are several actions that need the same flow pattern, you can create that flow pattern once and reuse it for multiple actions using the Dynamic template option.
In the Configure Dynamic Template window, select the action that contains the desiredflow pattern.
63
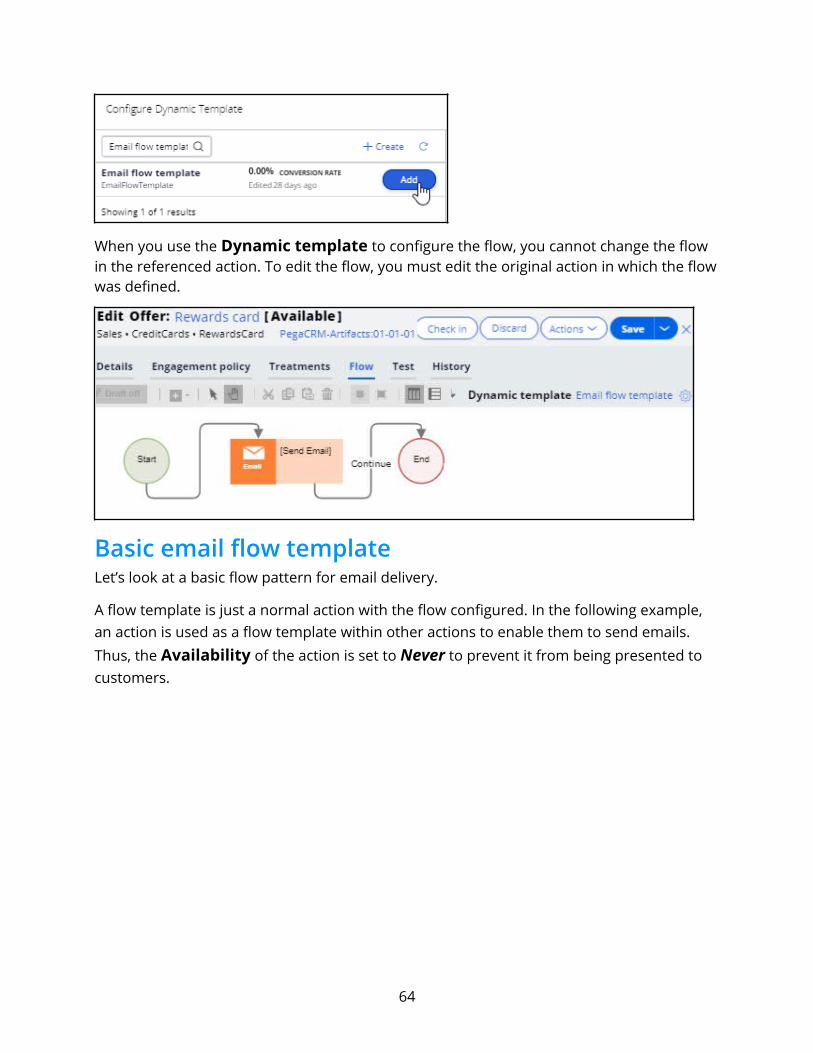
When you use the Dynamic template to configure the flow, you cannot change the flow in the referenced action. To edit the flow, you must edit the original action in which the flowwas defined.
Basic email flow template Let’s look at a basic flow pattern for email delivery.
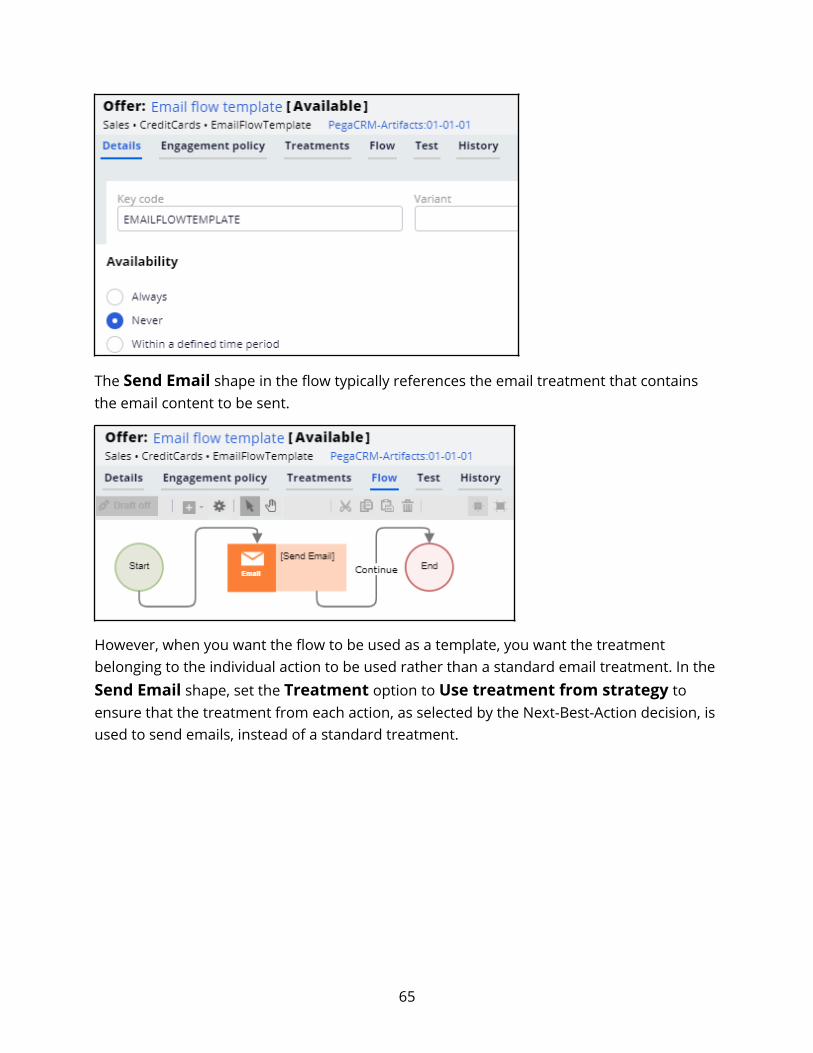
A flow template is just a normal action with the flow configured. In the following example, an action is used as a flow template within other actions to enable them to send emails. Thus, the Availability of the action is set to Never to prevent it from being presented to customers.
64
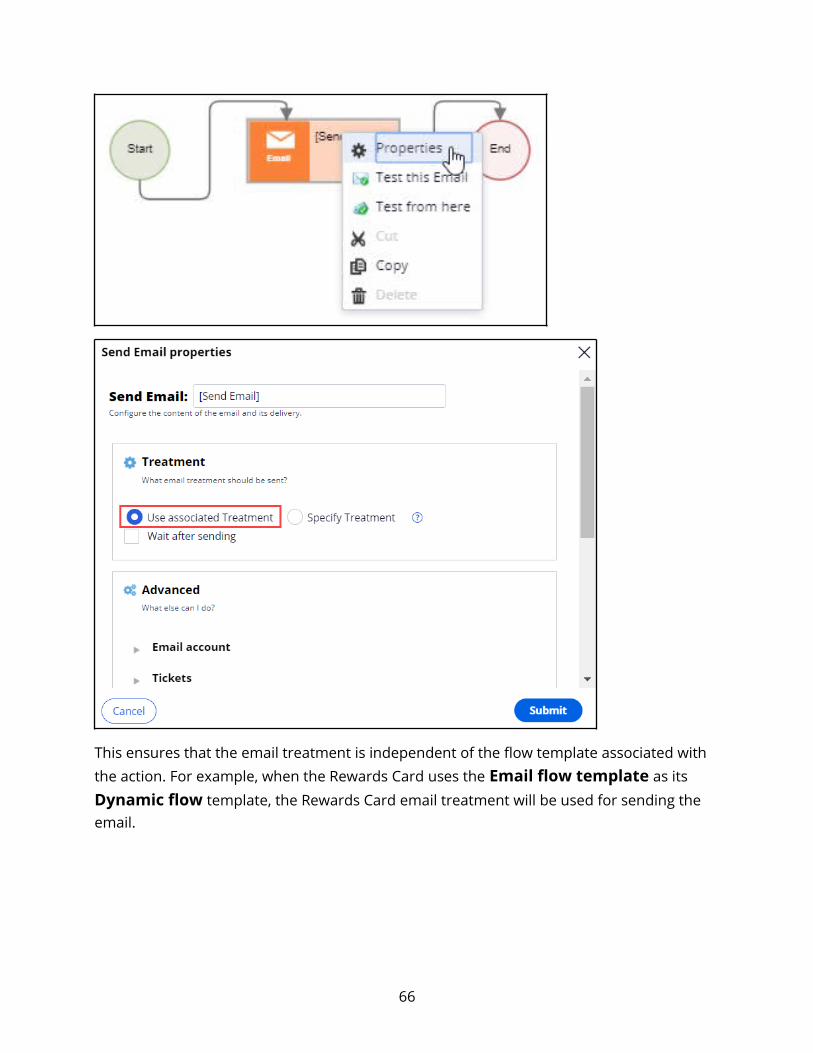
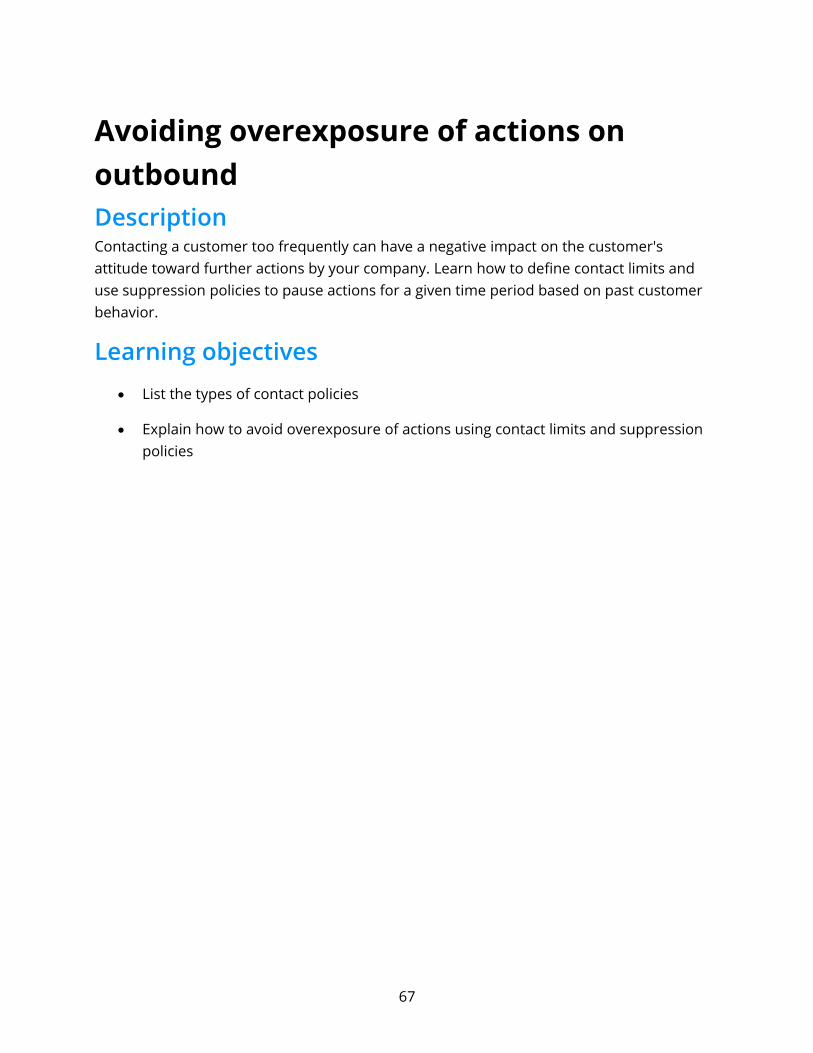
The Send Email shape in the flow typically references the email treatment that contains the email content to be sent.
However, when you want the flow to be used as a template, you want the treatment belonging to the individual action to be used rather than a standard email treatment. In the Send Email shape, set the Treatment option to Use treatment from strategy to ensure that the treatment from each action, as selected by the Next-Best-Action decision, is used to send emails, instead of a standard treatment.
65
This ensures that the email treatment is independent of the flow template associated with the action. For example, when the Rewards Card uses the Email flow template as its Dynamic flow template, the Rewards Card email treatment will be used for sending the email.
66
Avoiding overexposure of actions on outboundDescriptionContacting a customer too frequently can have a negative impact on the customer's attitude toward further actions by your company. Learn how to define contact limits and use suppression policies to pause actions for a given time period based on past customer behavior.
Learning objectives List the types of contact policies
Explain how to avoid overexposure of actions using contact limits and suppression policies
67
Contact policy typesTypes of constraintsToo many contact attempts over a short period of time can have a negative impact on a customer's attitude toward further actions by your company. To maximize the lifetime value of every customer relationship, organizations must prevent outreach fatigue by optimizing the number of actions taken.
In Pega Customer Decision Hub™, there are two types of contact limits that allow you to limit actions over a given period of time.
1. Customer contact limits2. Suppression policies
Customer contact limitsCustomer contact limits allow you to limit the number of actions that a customer can receive over a given period of time on a specific channel. These customer contact limits prevent an action from reaching a customer on a specific channel, irrespective of past responses to that action by the customer.
For example, you can decide that you do not want your customers to receive more than twopromotional emails per month.
68
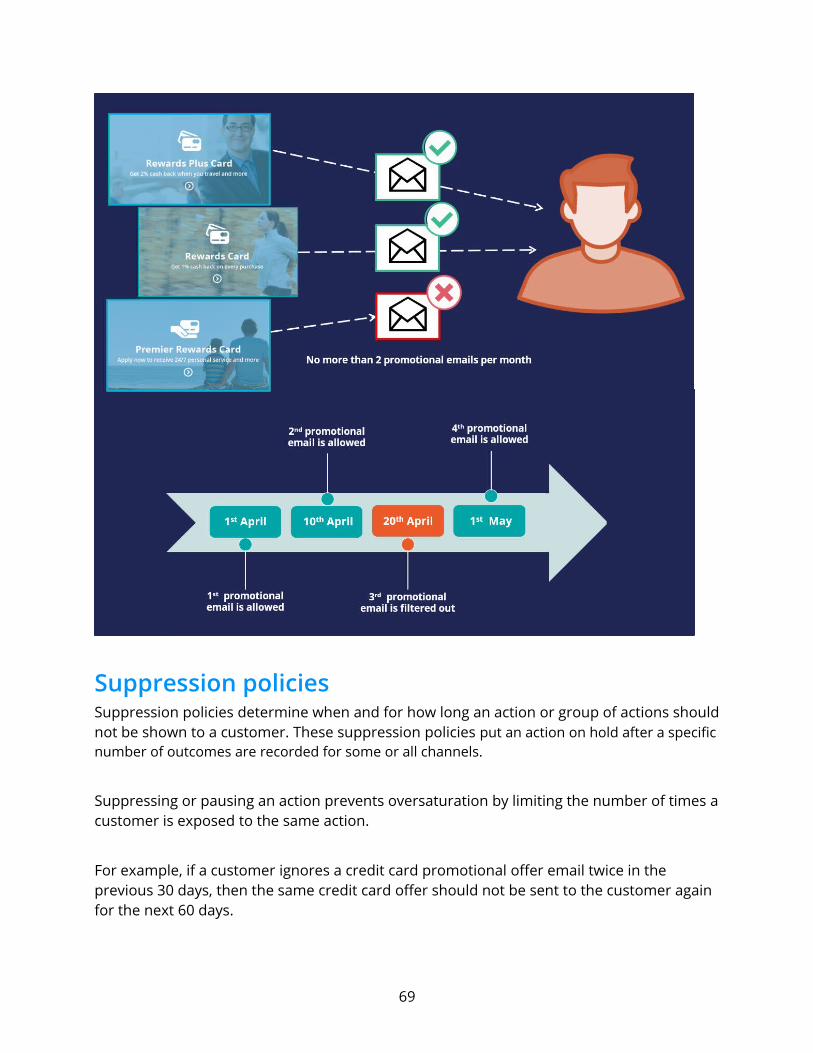
Suppression policiesSuppression policies determine when and for how long an action or group of actions shouldnot be shown to a customer. These suppression policies put an action on hold after a specificnumber of outcomes are recorded for some or all channels.
Suppressing or pausing an action prevents oversaturation by limiting the number of times acustomer is exposed to the same action.
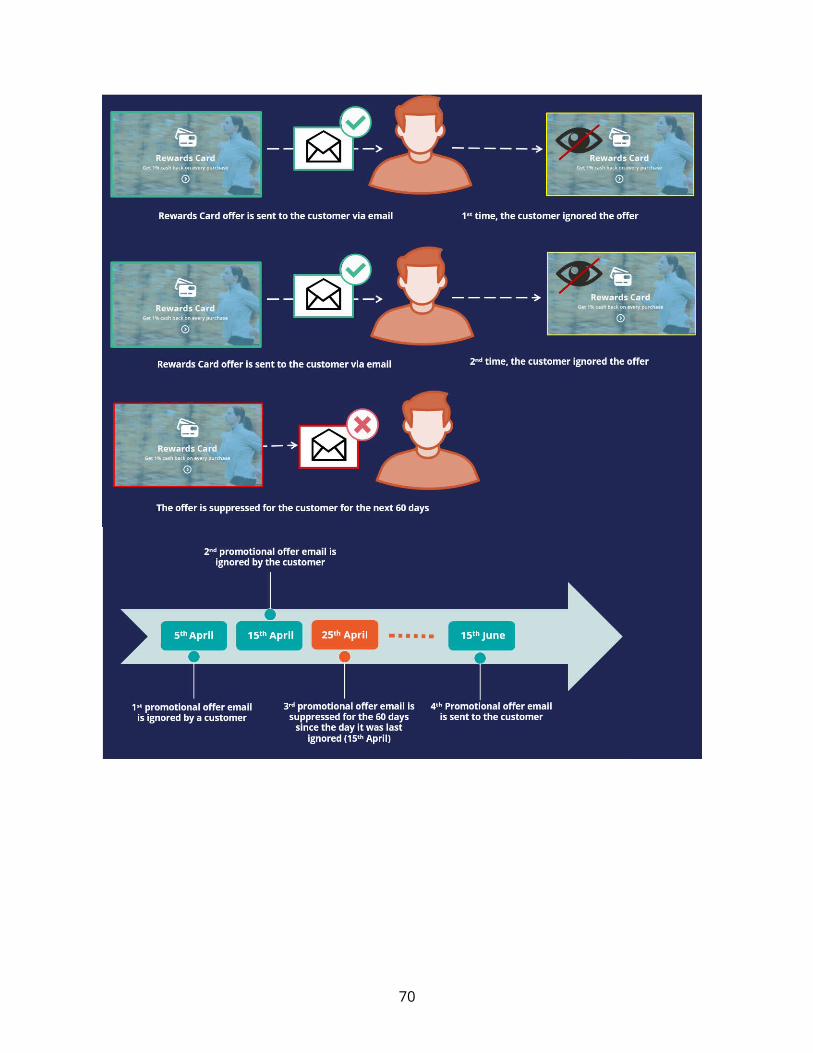
For example, if a customer ignores a credit card promotional offer email twice in the previous 30 days, then the same credit card offer should not be sent to the customer again for the next 60 days.
69
70
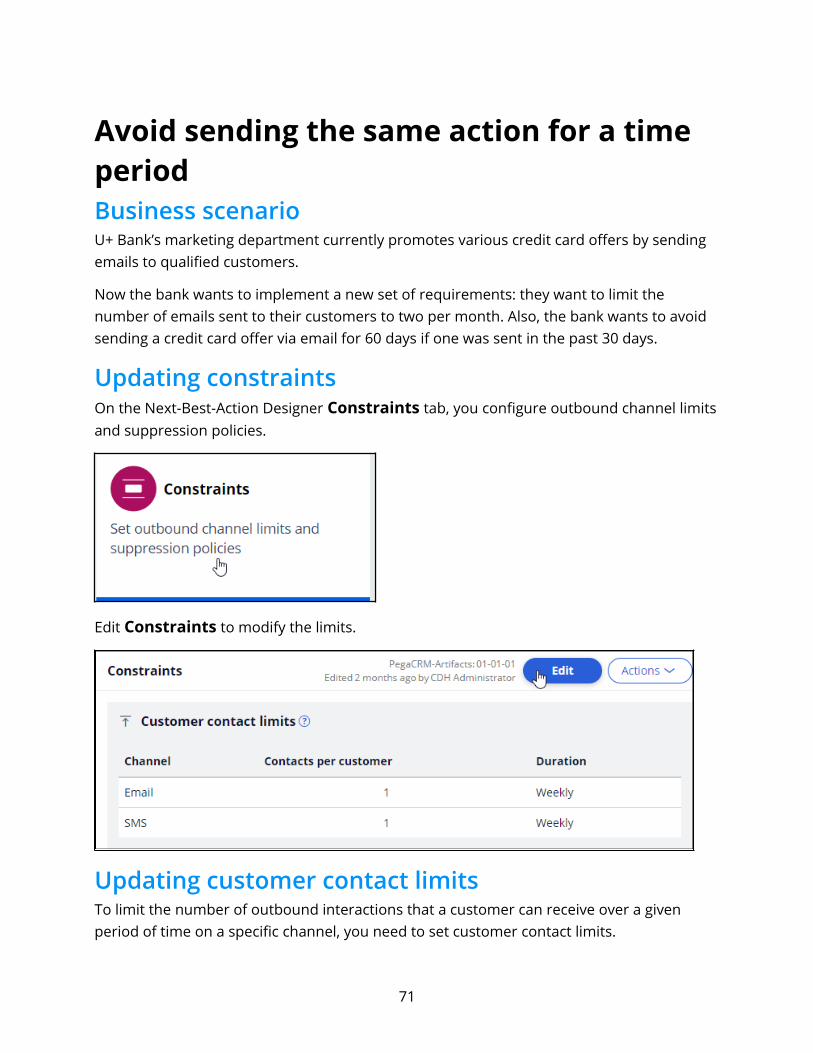
Avoid sending the same action for a time periodBusiness scenarioU+ Bank’s marketing department currently promotes various credit card offers by sending emails to qualified customers.
Now the bank wants to implement a new set of requirements: they want to limit the number of emails sent to their customers to two per month. Also, the bank wants to avoid sending a credit card offer via email for 60 days if one was sent in the past 30 days.
Updating constraintsOn the Next-Best-Action Designer Constraints tab, you configure outbound channel limitsand suppression policies.
Edit Constraints to modify the limits.
Updating customer contact limitsTo limit the number of outbound interactions that a customer can receive over a given period of time on a specific channel, you need to set customer contact limits.
71

In this scenario, the bank wants their customers to receive no more than two emails per month. So, you need to update the existing customer contact policy for the email channel to two emails per month.
In the contact policy, you can update current limits or add new channel limits.
Note: You cannot repeat a channel in a contact policy.
72
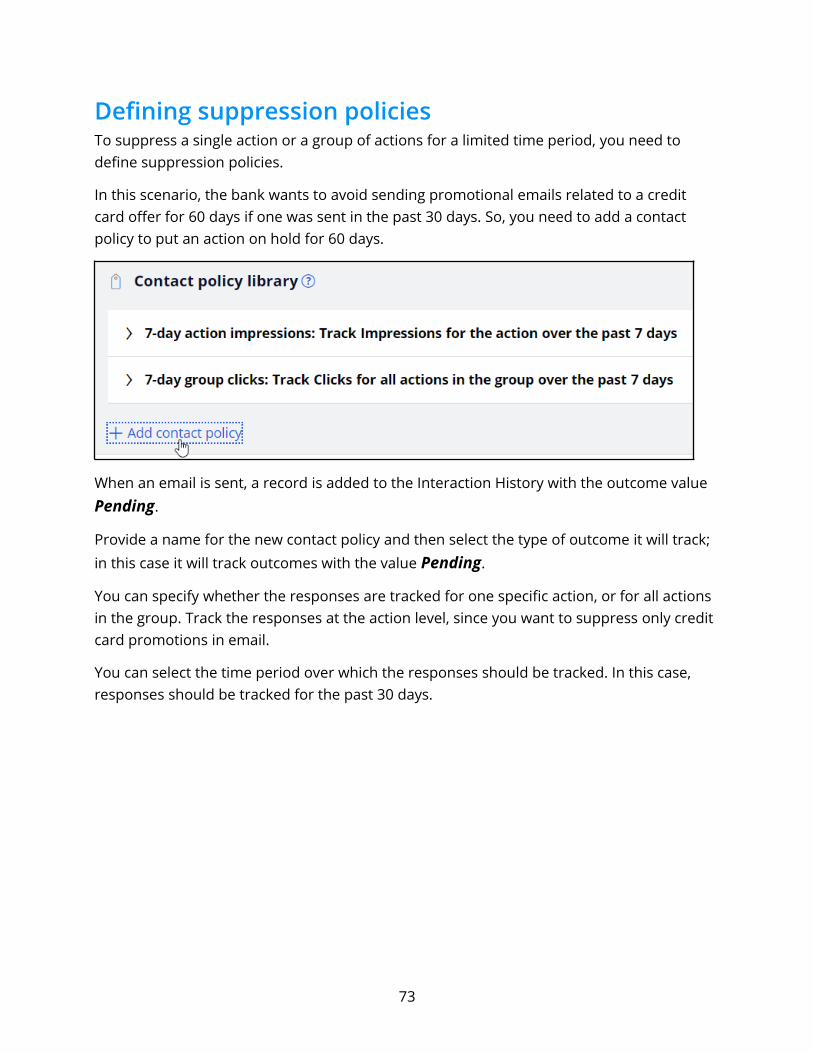
Defining suppression policiesTo suppress a single action or a group of actions for a limited time period, you need to define suppression policies.
In this scenario, the bank wants to avoid sending promotional emails related to a credit card offer for 60 days if one was sent in the past 30 days. So, you need to add a contact policy to put an action on hold for 60 days.
When an email is sent, a record is added to the Interaction History with the outcome value Pending.
Provide a name for the new contact policy and then select the type of outcome it will track; in this case it will track outcomes with the value Pending.
You can specify whether the responses are tracked for one specific action, or for all actions in the group. Track the responses at the action level, since you want to suppress only credit card promotions in email.
You can select the time period over which the responses should be tracked. In this case, responses should be tracked for the past 30 days.
73
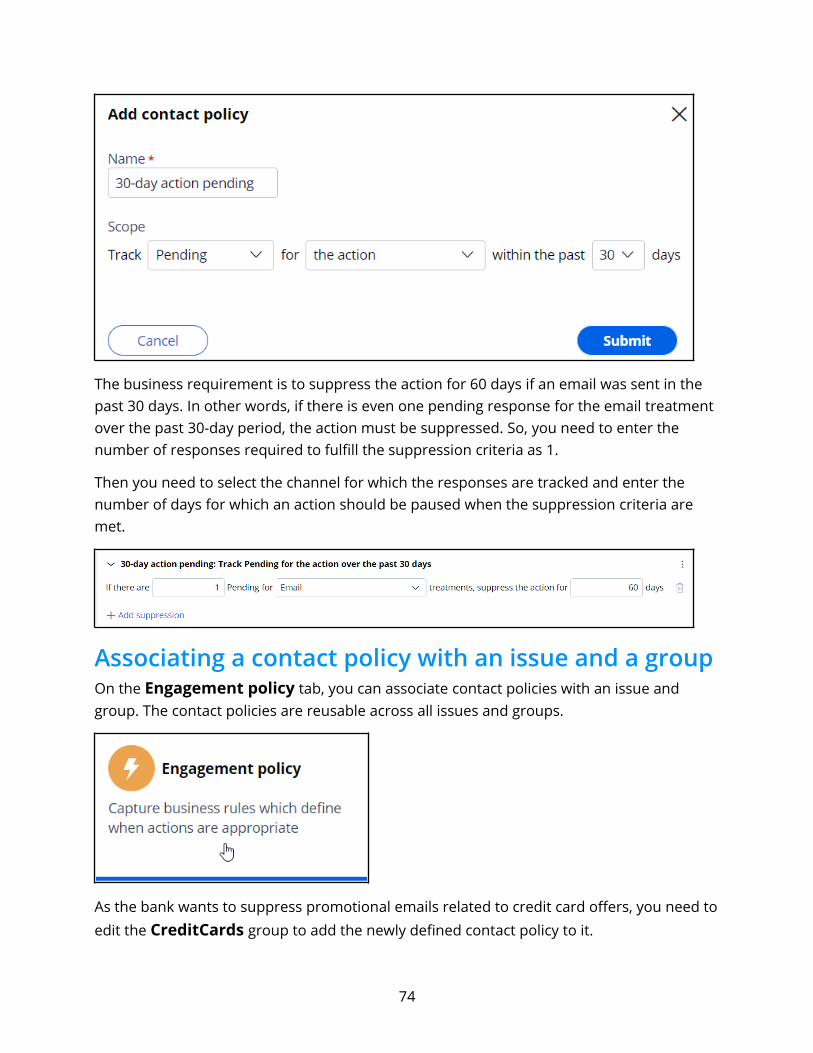
The business requirement is to suppress the action for 60 days if an email was sent in the past 30 days. In other words, if there is even one pending response for the email treatment over the past 30-day period, the action must be suppressed. So, you need to enter the number of responses required to fulfill the suppression criteria as 1.
Then you need to select the channel for which the responses are tracked and enter the number of days for which an action should be paused when the suppression criteria are met.
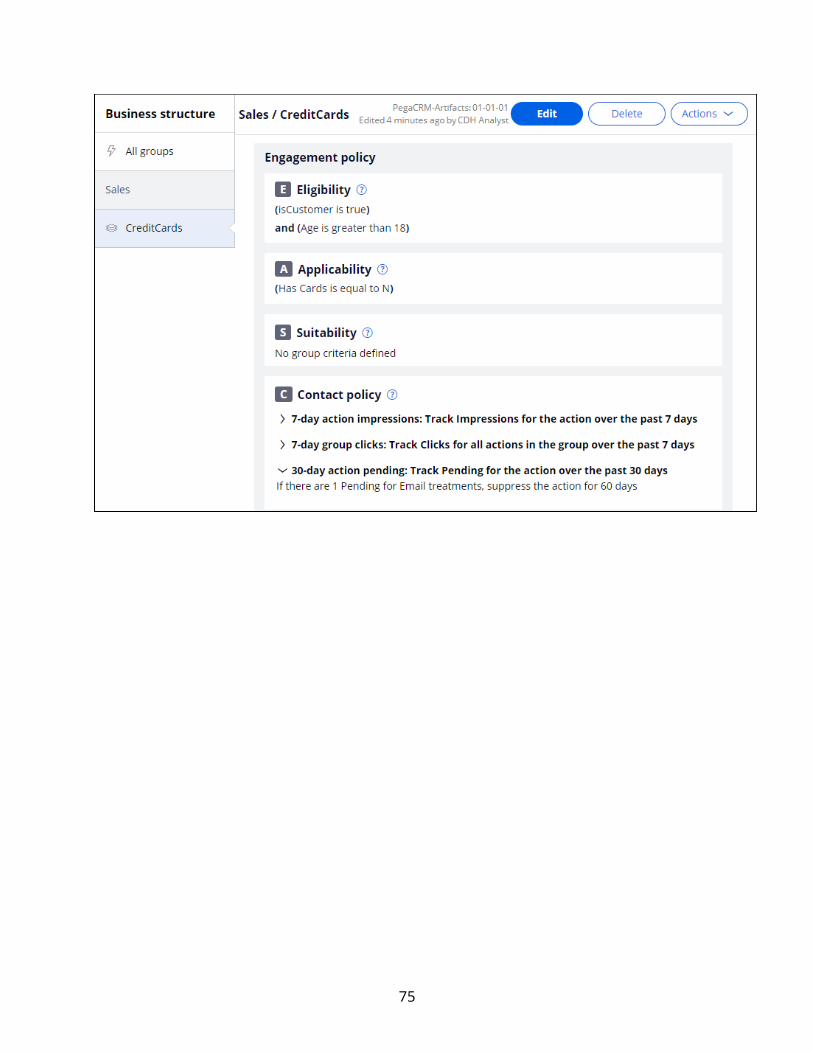
Associating a contact policy with an issue and a groupOn the Engagement policy tab, you can associate contact policies with an issue and group. The contact policies are reusable across all issues and groups.
As the bank wants to suppress promotional emails related to credit card offers, you need toedit the CreditCards group to add the newly defined contact policy to it.
74
75
Limiting action volume on outboundDescriptionIn outbound customer engagement, you need to cater to different kinds of operational limitations. These may include limits on the number of email communications that can be sent in a day, or the total number of communications that can be sent regarding a particular offer. Learn how to define volume constrains to limit the volume of actions in an outbound run.
Learning objectives Limit outbound action volumes using volume constraints
76
Volume constraintsWhat is volume constraint?In Pega Customer Decision Hub™ you can limit the volume of actions delivered to customers via always-on outbound.
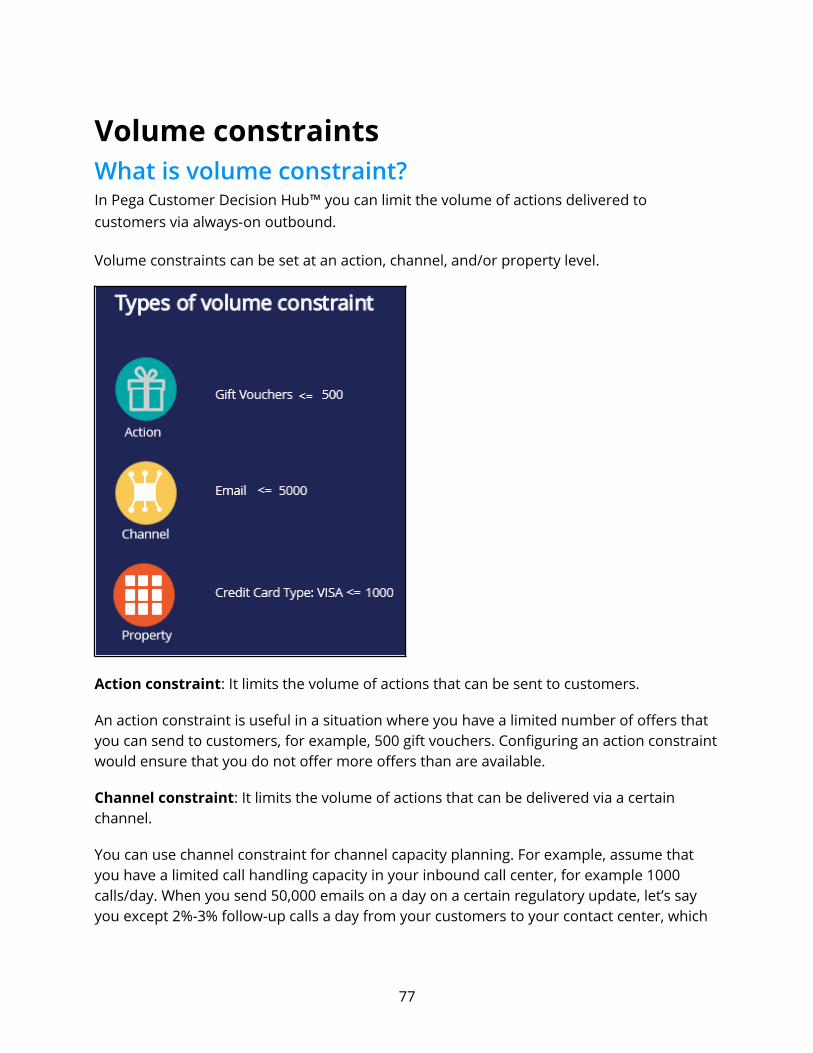
Volume constraints can be set at an action, channel, and/or property level.
Action constraint: It limits the volume of actions that can be sent to customers.
An action constraint is useful in a situation where you have a limited number of offers that you can send to customers, for example, 500 gift vouchers. Configuring an action constraintwould ensure that you do not offer more offers than are available.
Channel constraint: It limits the volume of actions that can be delivered via a certain channel.
You can use channel constraint for channel capacity planning. For example, assume that you have a limited call handling capacity in your inbound call center, for example 1000 calls/day. When you send 50,000 emails on a day on a certain regulatory update, let’s say you except 2%-3% follow-up calls a day from your customers to your contact center, which
77
is about 1000-1500 calls. So, you need to limit the outbound email volume to 35,000 emails a day to match the inbound call center capacity.
Property constraint: By default, actions are grouped under the issue / group business hierarchy. Using a property constraint, you can limit the volume of a set of actions across different issues and groups by grouping them using a property value. For example, you can group all credit card offers by setting a property, CreditCardType, to VISA. Then you can define a constraint to limit the action volume where CreditCardType is VISA.
Volume constraint modes
Within a volume constraint, the combination of constraints can be defined for one or more actions with one or more channel types.
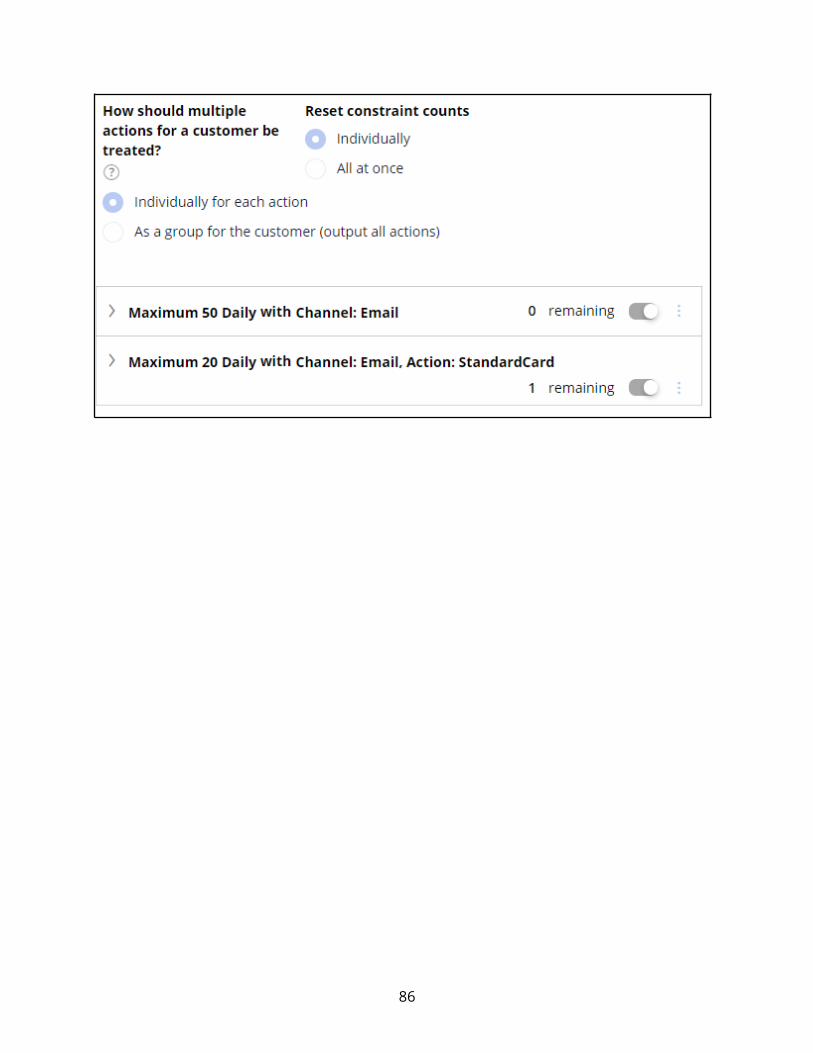
In situations where a customer is eligible for multiple actions, volume constraint can be applied in two different ways depending on the business requirement. That is, you may specify whether volume constraints should be applied to the actions as a group, or whethereach action should be evaluated separately.
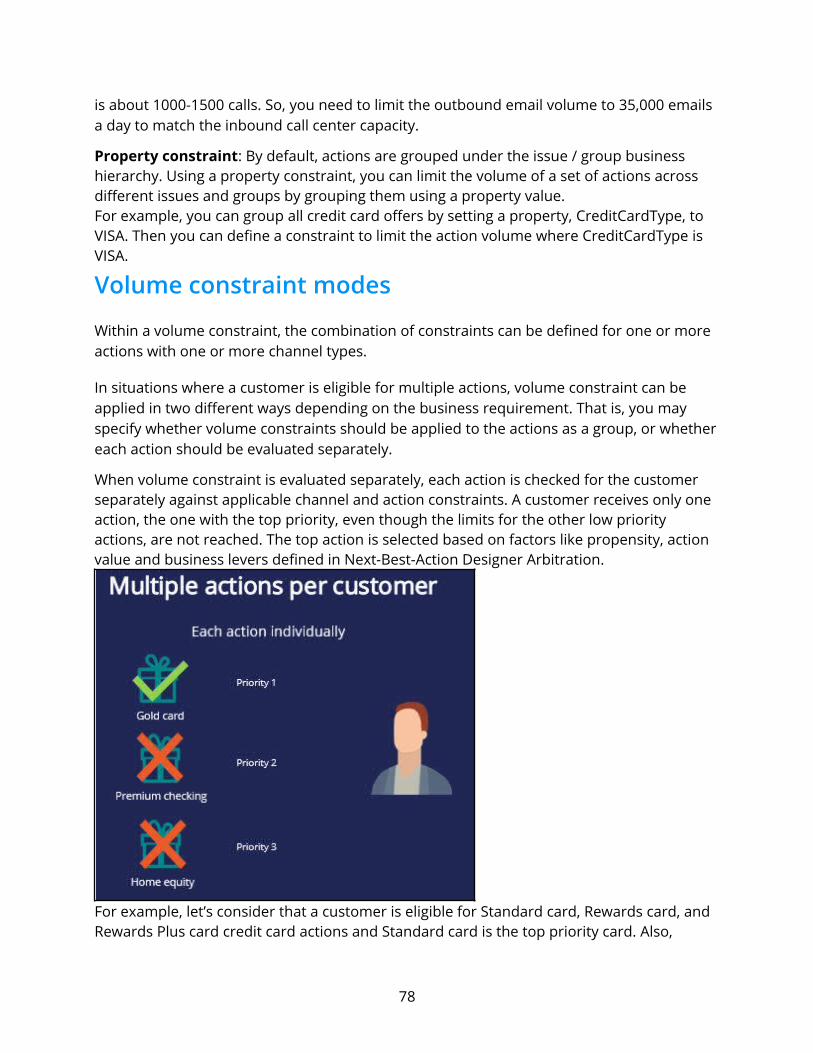
When volume constraint is evaluated separately, each action is checked for the customer separately against applicable channel and action constraints. A customer receives only one action, the one with the top priority, even though the limits for the other low priority actions, are not reached. The top action is selected based on factors like propensity, action value and business levers defined in Next-Best-Action Designer Arbitration.
For example, let’s consider that a customer is eligible for Standard card, Rewards card, and Rewards Plus card credit card actions and Standard card is the top priority card. Also,
78
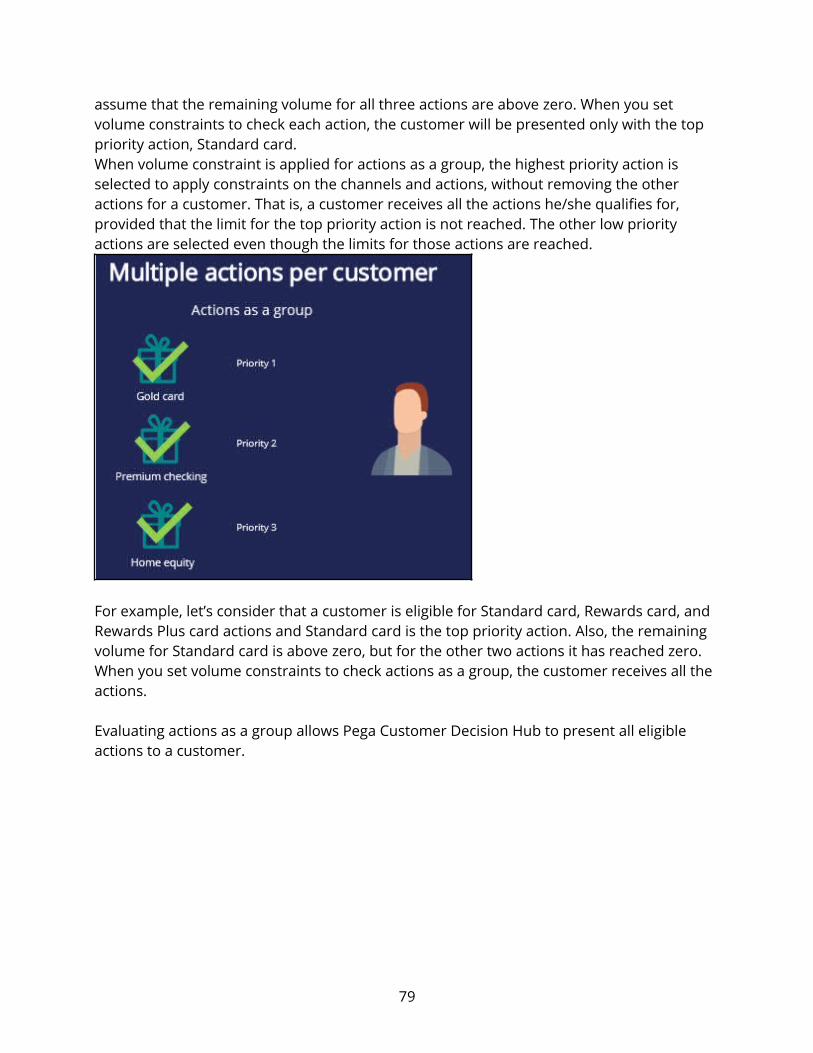
assume that the remaining volume for all three actions are above zero. When you set volume constraints to check each action, the customer will be presented only with the top priority action, Standard card. When volume constraint is applied for actions as a group, the highest priority action is selected to apply constraints on the channels and actions, without removing the other actions for a customer. That is, a customer receives all the actions he/she qualifies for, provided that the limit for the top priority action is not reached. The other low priority actions are selected even though the limits for those actions are reached.
For example, let’s consider that a customer is eligible for Standard card, Rewards card, and Rewards Plus card actions and Standard card is the top priority action. Also, the remaining volume for Standard card is above zero, but for the other two actions it has reached zero. When you set volume constraints to check actions as a group, the customer receives all the actions.
Evaluating actions as a group allows Pega Customer Decision Hub to present all eligible actions to a customer.
79
Configuring a volume constraintBusiness scenario
U+ bank has been running always-on outbound and now they would like to apply some limitations on the outbound volume. They have the following three different kinds of operational constraints to implement.
The IT department has enforced a limit of 1000 emails per week to avoid being classified as spammers. Hence, the marketing team wants to adhere to the limits.
The bank would like to restrict the number of Standard card offer emails to only 100 per week due to a business requirement.
The bank would also like to limit offer emails related to credit cards of type “Master” to only 400 per week due to a logistical issue with their fulfillment vendor.
Creating a volume constraint
A constraint is an optional configuration element of always-on outbound. When configured,it will limit the volume of actions that will ultimately be initiated.
To limit action volume on the email channel, you need to configure a volume constraint for the always-on outbound.
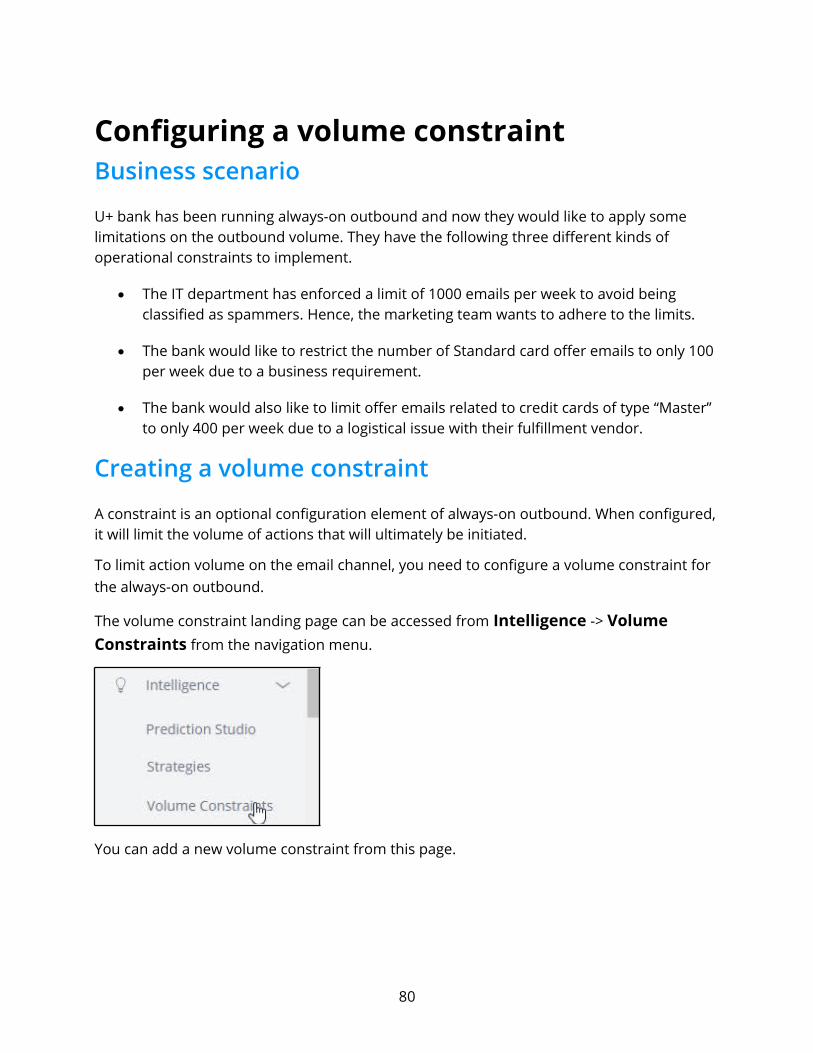
The volume constraint landing page can be accessed from Intelligence -> Volume Constraints from the navigation menu.
You can add a new volume constraint from this page.
80
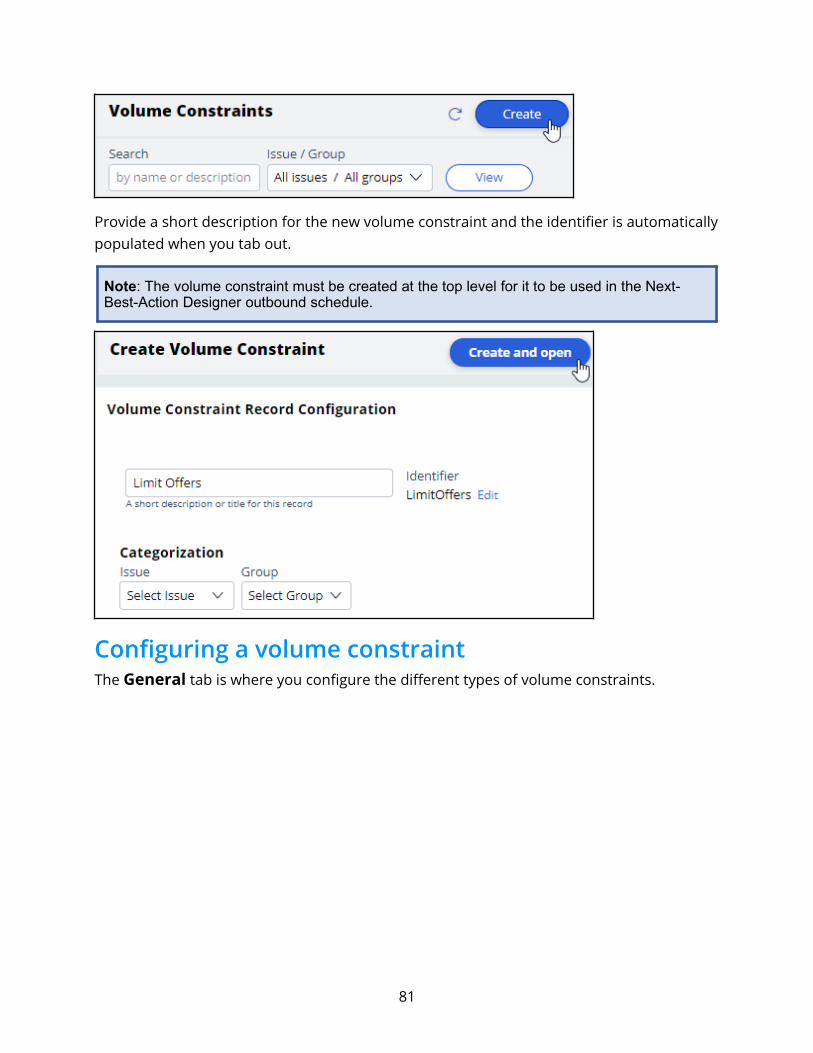
Provide a short description for the new volume constraint and the identifier is automaticallypopulated when you tab out.
Note: The volume constraint must be created at the top level for it to be used in the Next-Best-Action Designer outbound schedule.
Configuring a volume constraint The General tab is where you configure the different types of volume constraints.
81
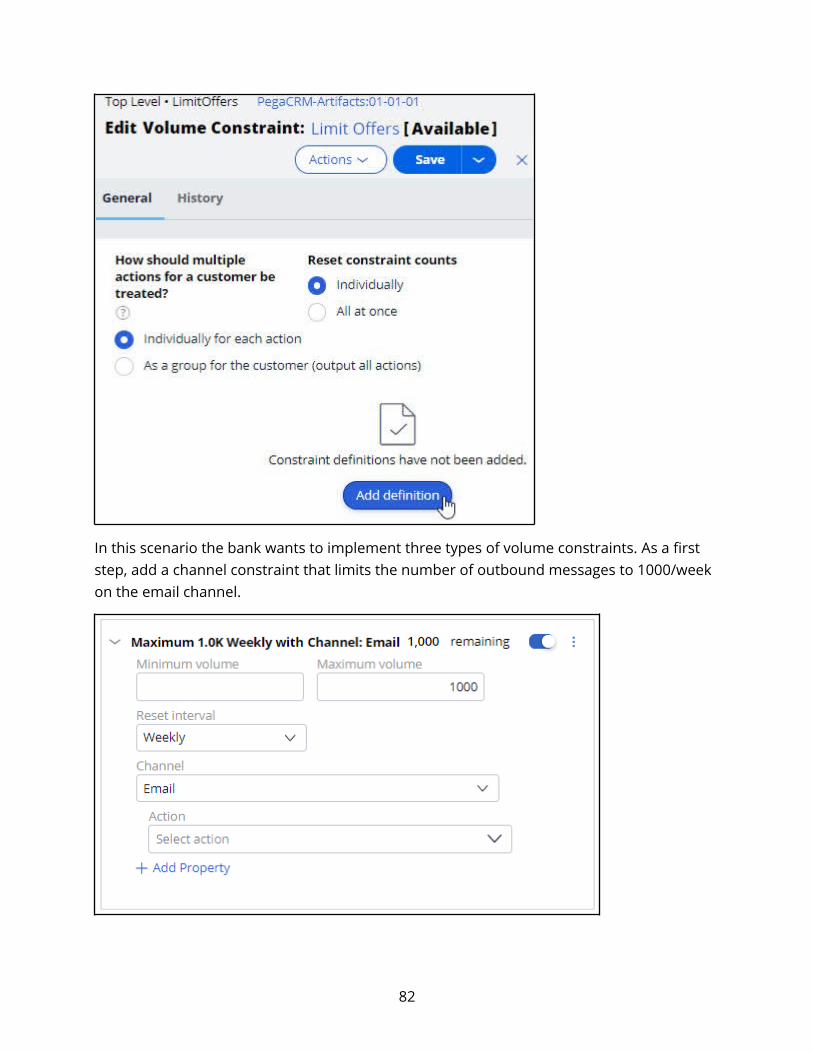
In this scenario the bank wants to implement three types of volume constraints. As a first step, add a channel constraint that limits the number of outbound messages to 1000/week on the email channel.
82
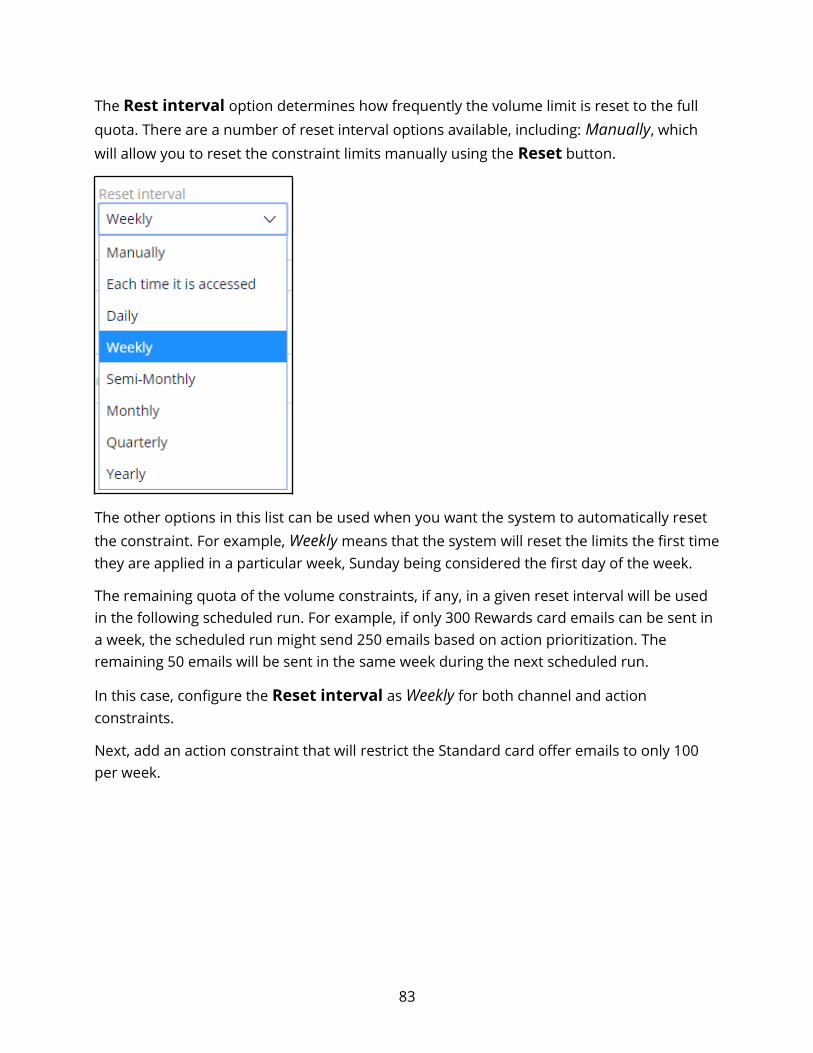
The Rest interval option determines how frequently the volume limit is reset to the full quota. There are a number of reset interval options available, including: Manually, which will allow you to reset the constraint limits manually using the Reset button.
The other options in this list can be used when you want the system to automatically reset the constraint. For example, Weekly means that the system will reset the limits the first timethey are applied in a particular week, Sunday being considered the first day of the week.
The remaining quota of the volume constraints, if any, in a given reset interval will be used in the following scheduled run. For example, if only 300 Rewards card emails can be sent in a week, the scheduled run might send 250 emails based on action prioritization. The remaining 50 emails will be sent in the same week during the next scheduled run.
In this case, configure the Reset interval as Weekly for both channel and action constraints.
Next, add an action constraint that will restrict the Standard card offer emails to only 100 per week.
83
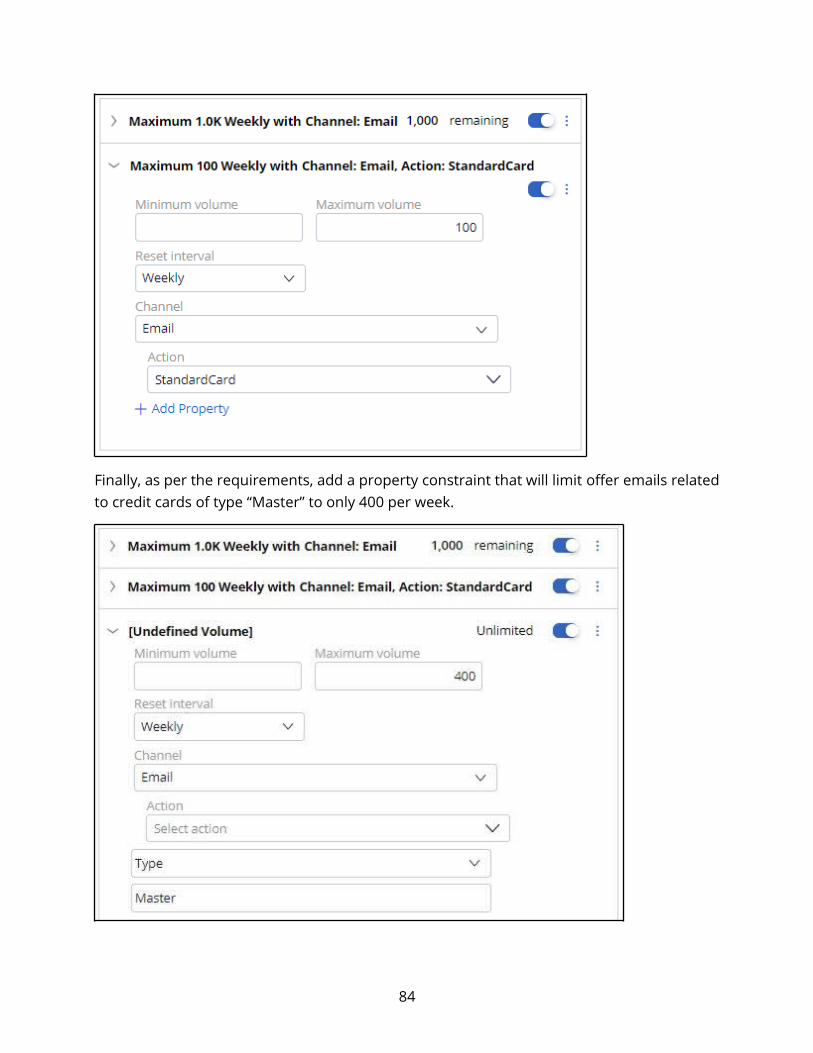
Finally, as per the requirements, add a property constraint that will limit offer emails relatedto credit cards of type “Master” to only 400 per week.
84
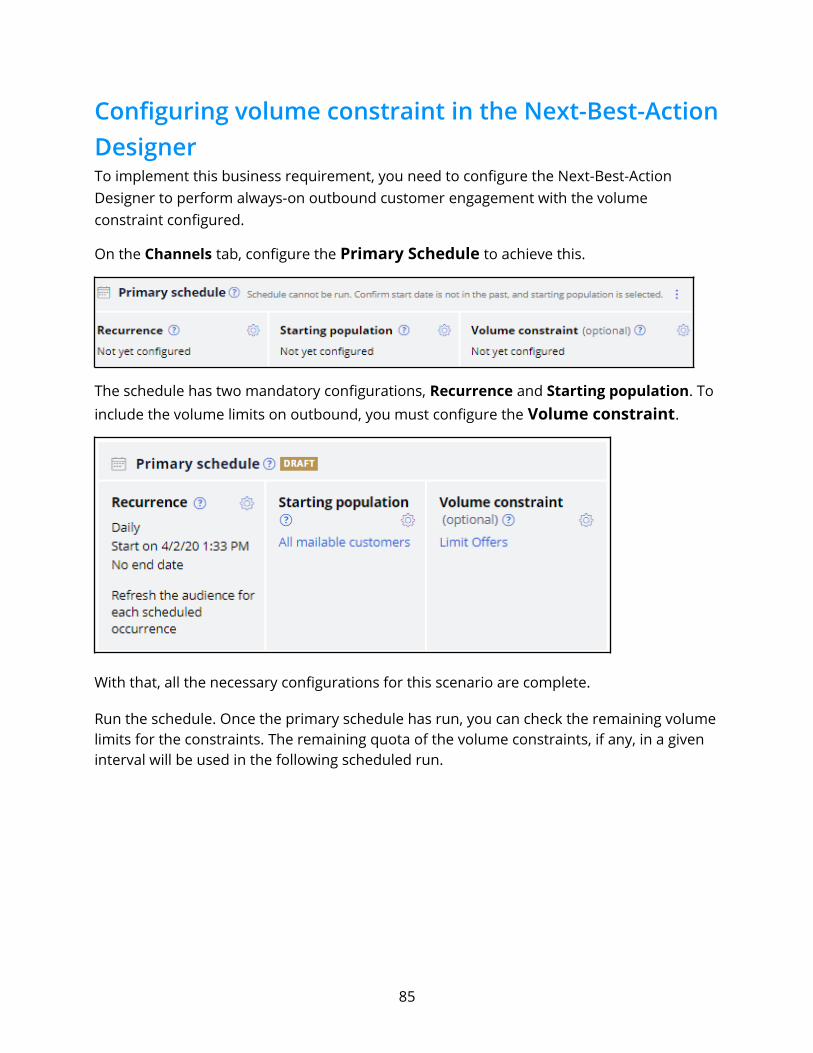
Configuring volume constraint in the Next-Best-ActionDesignerTo implement this business requirement, you need to configure the Next-Best-Action Designer to perform always-on outbound customer engagement with the volume constraint configured.
On the Channels tab, configure the Primary Schedule to achieve this.
The schedule has two mandatory configurations, Recurrence and Starting population. To include the volume limits on outbound, you must configure the Volume constraint.
With that, all the necessary configurations for this scenario are complete.
Run the schedule. Once the primary schedule has run, you can check the remaining volumelimits for the constraints. The remaining quota of the volume constraints, if any, in a given interval will be used in the following scheduled run.
85
86
Sharing action details with third-party distributorsDescriptionSending outbound communications via email and SMS has its challenges, including various operational, security and legal requirements. Sometimes, it’s easier to let an external email service provider handle message delivery for you. Learn how to share action details with an external service provider using files and database templates.
Learning objectives Explain outbound file and database templates
Write action details to files or database tables to send to third-party email service vendors
87
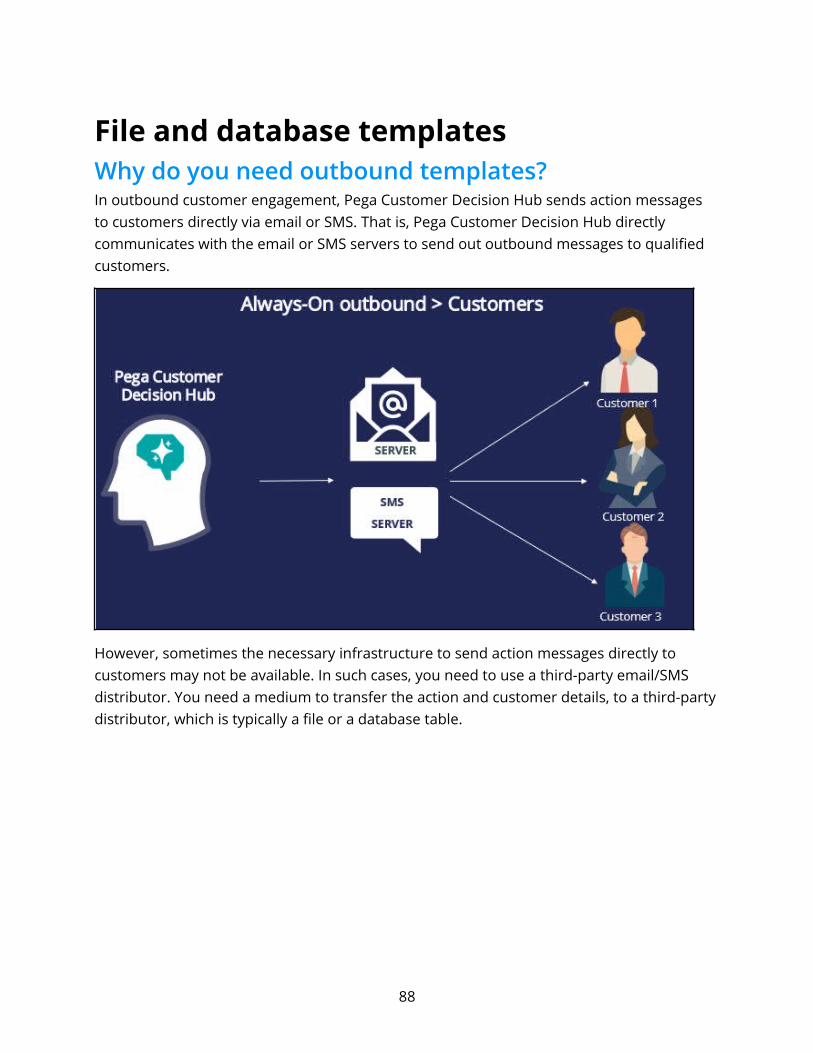
File and database templatesWhy do you need outbound templates?In outbound customer engagement, Pega Customer Decision Hub sends action messages to customers directly via email or SMS. That is, Pega Customer Decision Hub directly communicates with the email or SMS servers to send out outbound messages to qualified customers.
However, sometimes the necessary infrastructure to send action messages directly to customers may not be available. In such cases, you need to use a third-party email/SMS distributor. You need a medium to transfer the action and customer details, to a third-partydistributor, which is typically a file or a database table.
88
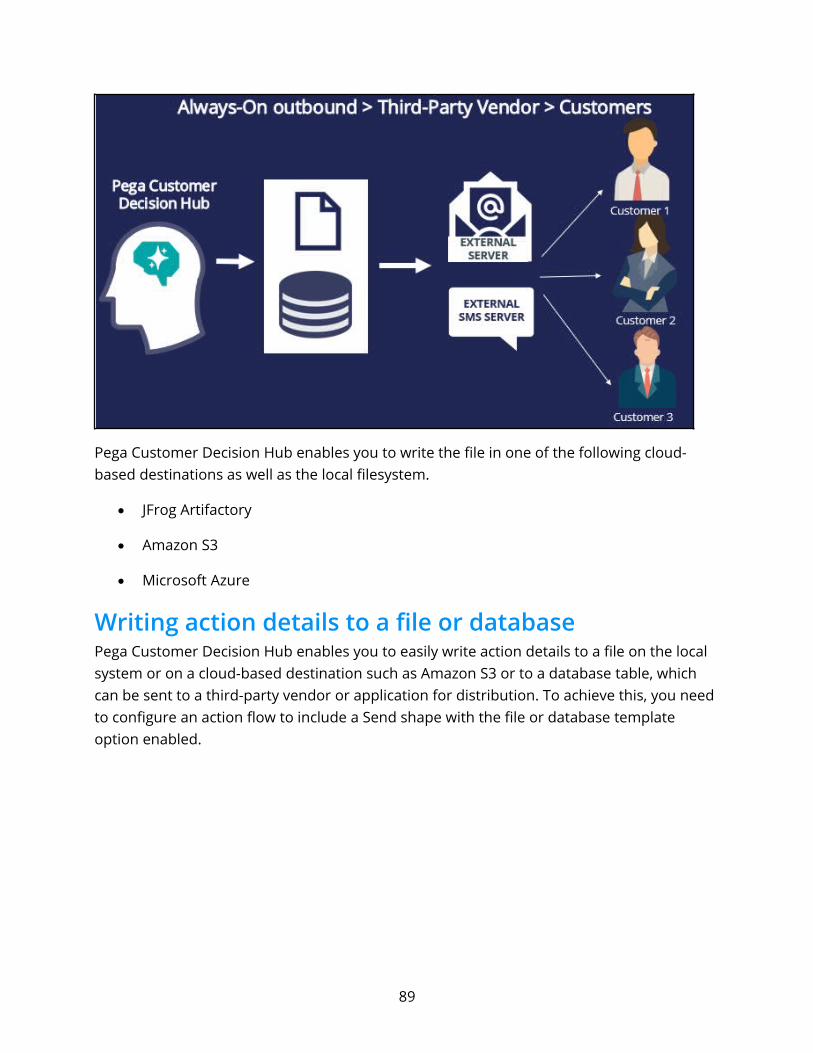
Pega Customer Decision Hub enables you to write the file in one of the following cloud-based destinations as well as the local filesystem.
JFrog Artifactory
Amazon S3
Microsoft Azure
Writing action details to a file or databasePega Customer Decision Hub enables you to easily write action details to a file on the local system or on a cloud-based destination such as Amazon S3 or to a database table, which can be sent to a third-party vendor or application for distribution. To achieve this, you need to configure an action flow to include a Send shape with the file or database template option enabled.
89
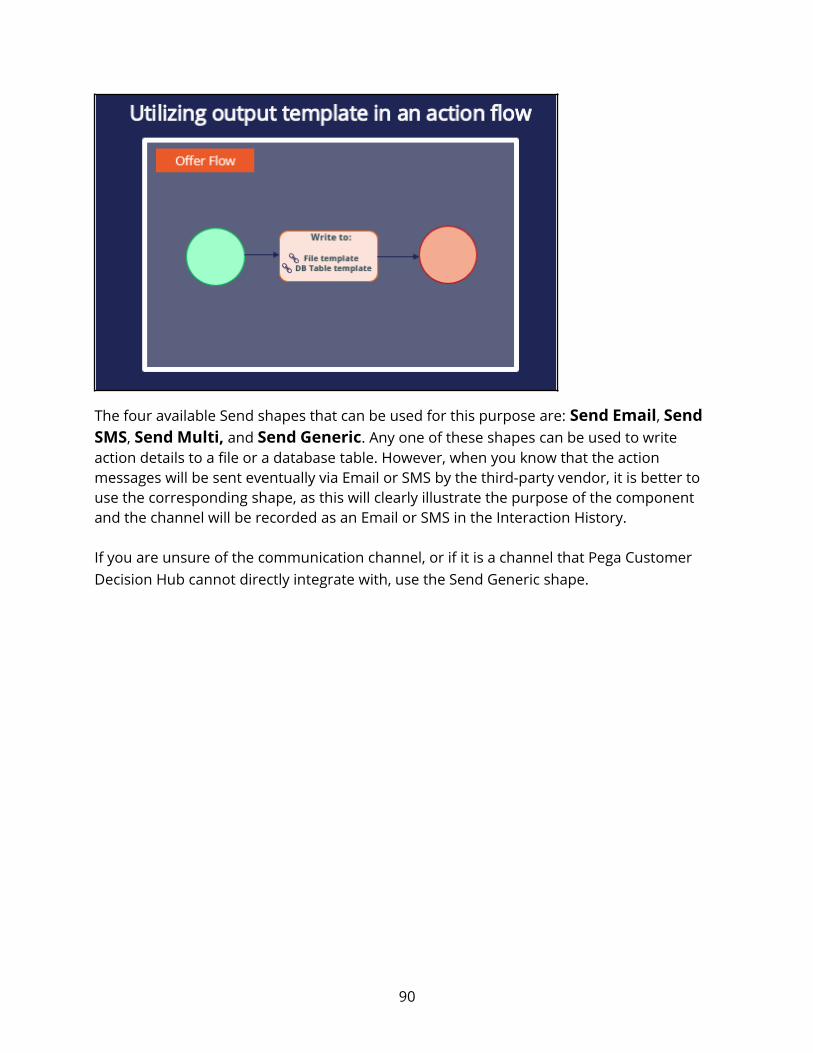
The four available Send shapes that can be used for this purpose are: Send Email, Send SMS, Send Multi, and Send Generic. Any one of these shapes can be used to write action details to a file or a database table. However, when you know that the action messages will be sent eventually via Email or SMS by the third-party vendor, it is better to use the corresponding shape, as this will clearly illustrate the purpose of the component and the channel will be recorded as an Email or SMS in the Interaction History.
If you are unsure of the communication channel, or if it is a channel that Pega Customer Decision Hub cannot directly integrate with, use the Send Generic shape.
90
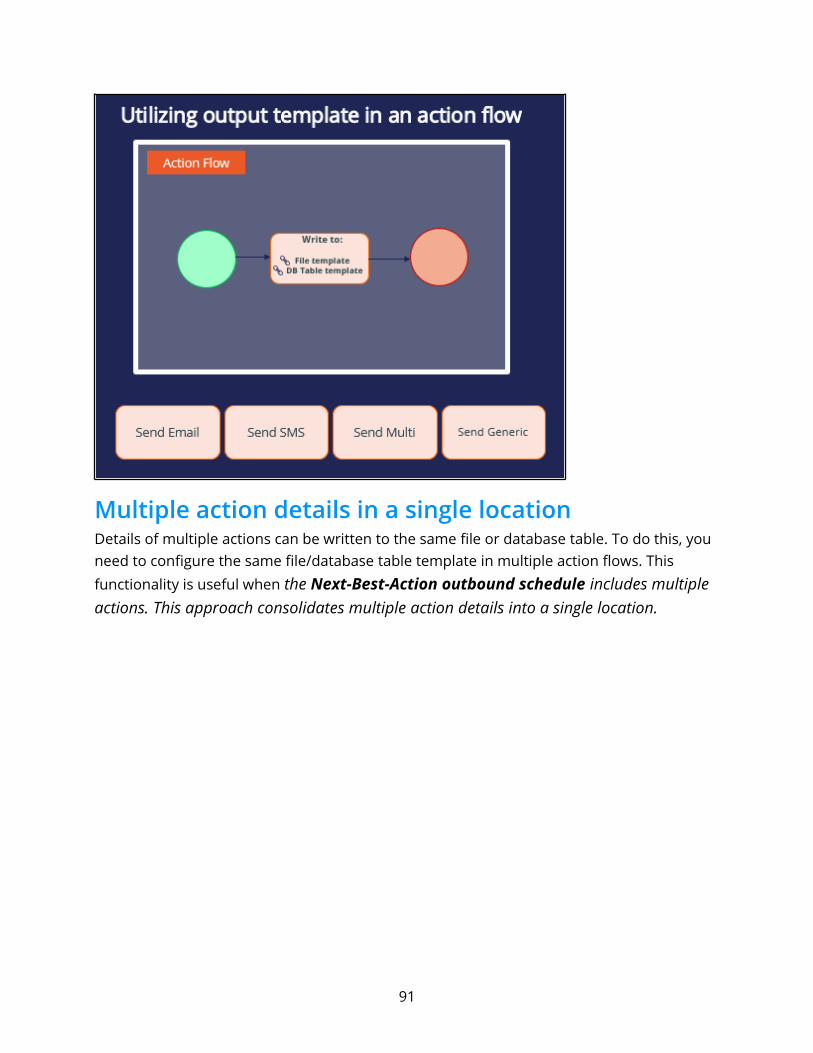
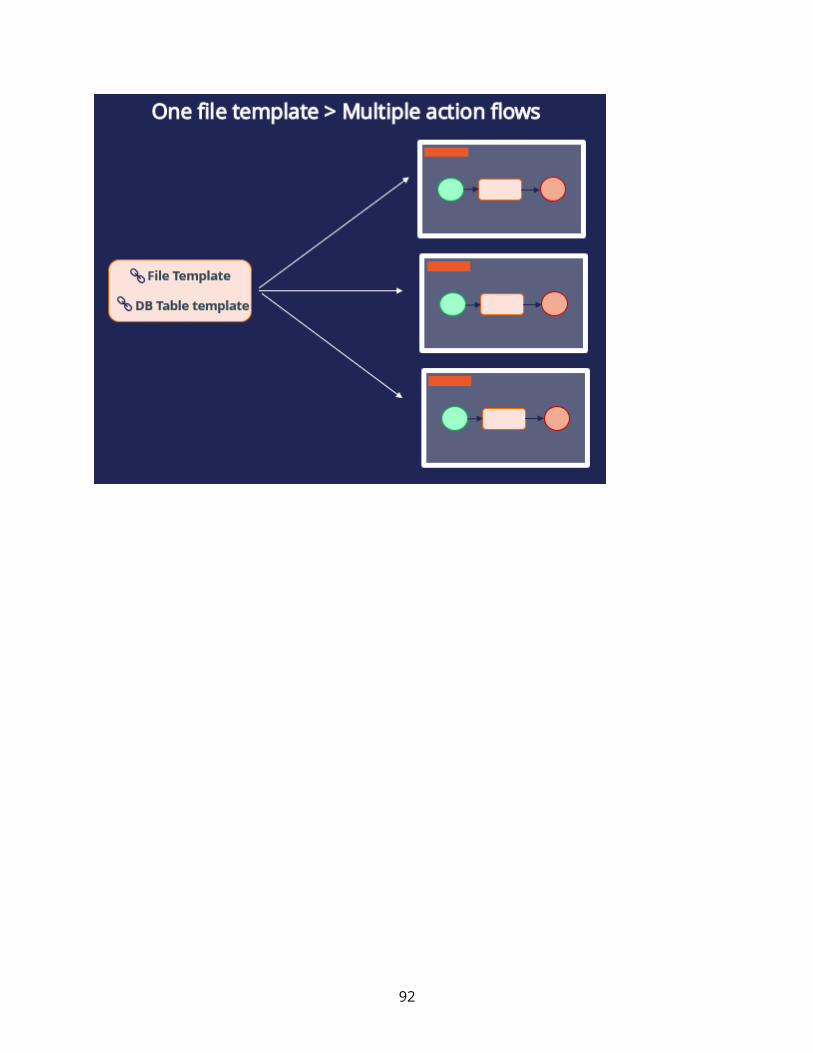
Multiple action details in a single locationDetails of multiple actions can be written to the same file or database table. To do this, you need to configure the same file/database table template in multiple action flows. This functionality is useful when the Next-Best-Action outbound schedule includes multiple actions. This approach consolidates multiple action details into a single location.
91
92
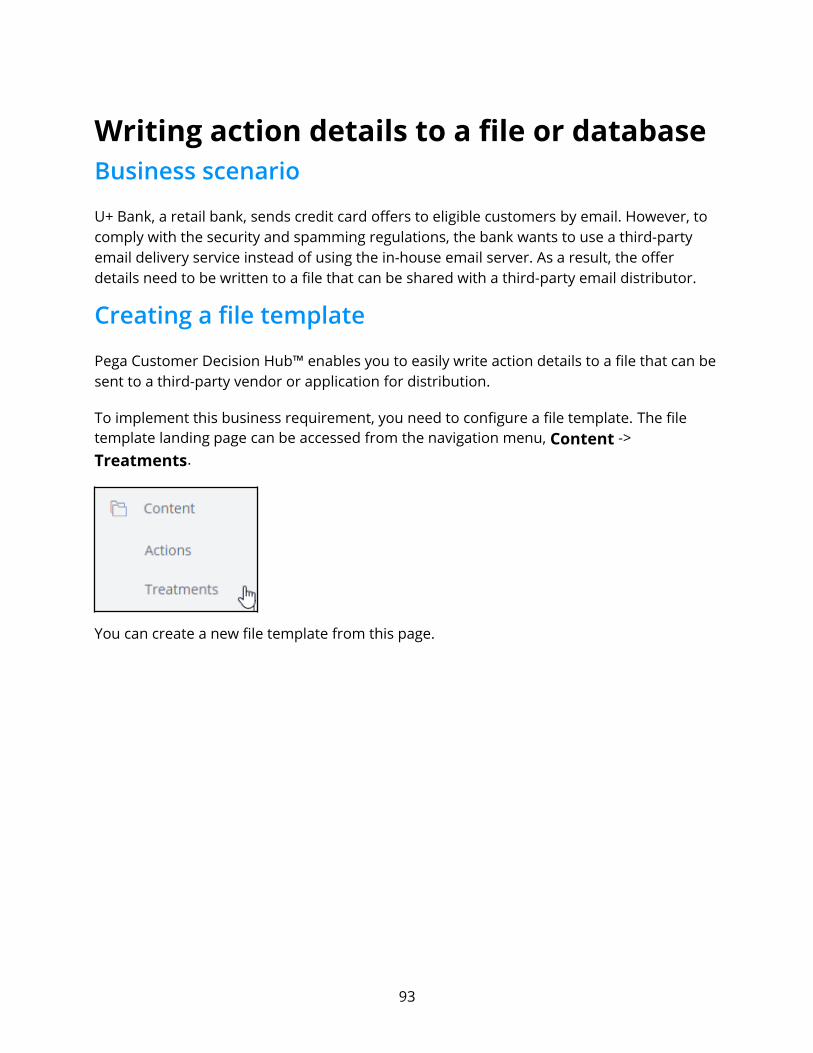
Writing action details to a file or databaseBusiness scenario
U+ Bank, a retail bank, sends credit card offers to eligible customers by email. However, to comply with the security and spamming regulations, the bank wants to use a third-party email delivery service instead of using the in-house email server. As a result, the offer details need to be written to a file that can be shared with a third-party email distributor.
Creating a file template
Pega Customer Decision Hub™ enables you to easily write action details to a file that can besent to a third-party vendor or application for distribution.
To implement this business requirement, you need to configure a file template. The file template landing page can be accessed from the navigation menu, Content -> Treatments.
You can create a new file template from this page.
93
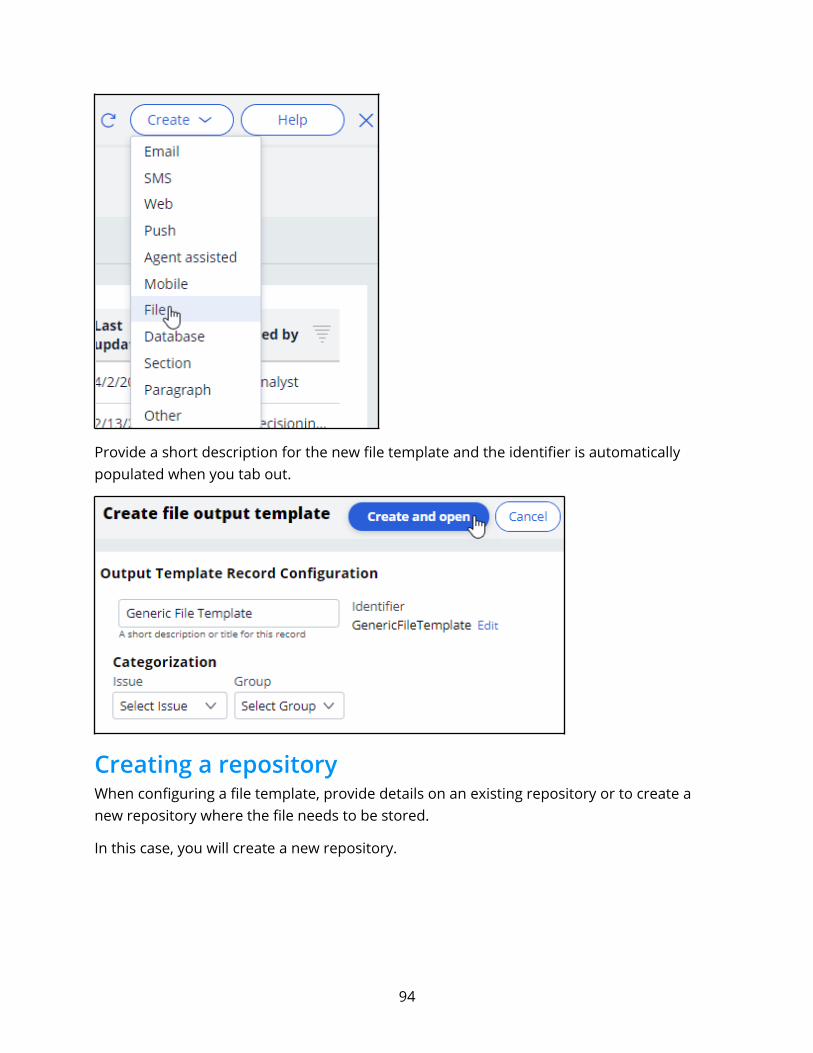
Provide a short description for the new file template and the identifier is automatically populated when you tab out.
Creating a repositoryWhen configuring a file template, provide details on an existing repository or to create a new repository where the file needs to be stored.
In this case, you will create a new repository.
94
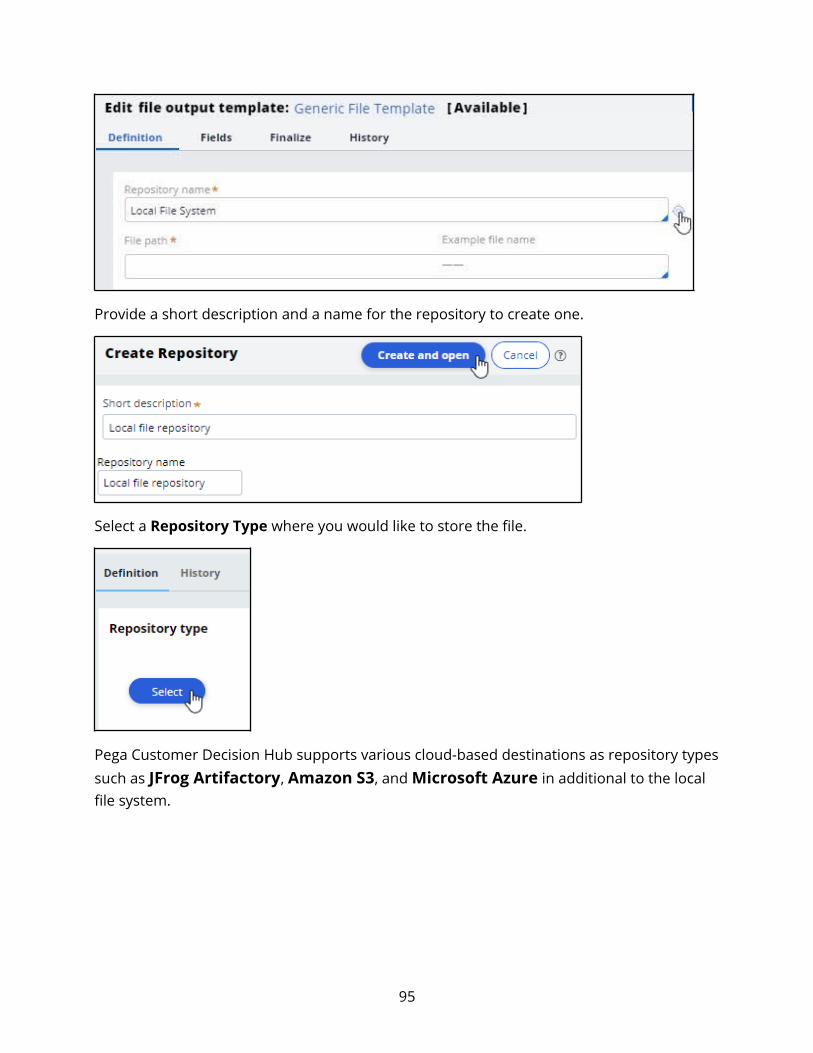
Provide a short description and a name for the repository to create one.
Select a Repository Type where you would like to store the file.
Pega Customer Decision Hub supports various cloud-based destinations as repository typessuch as JFrog Artifactory, Amazon S3, and Microsoft Azure in additional to the local file system.
95
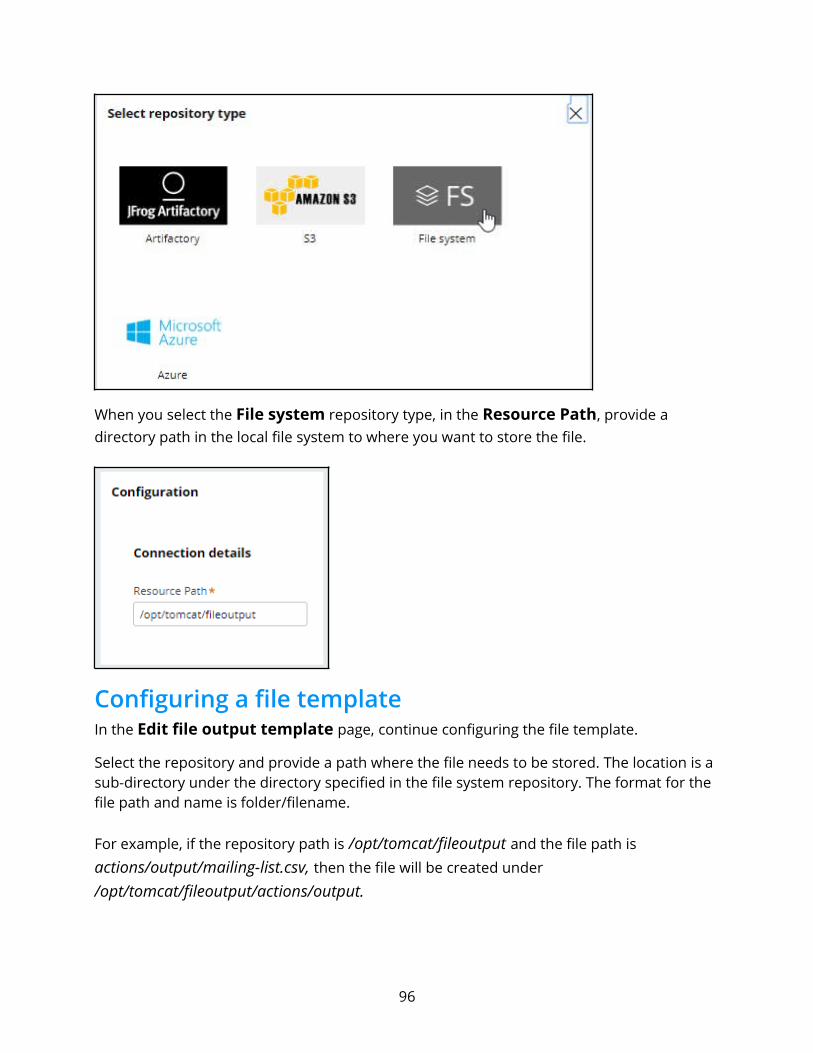
When you select the File system repository type, in the Resource Path, provide a directory path in the local file system to where you want to store the file.
Configuring a file templateIn the Edit file output template page, continue configuring the file template.
Select the repository and provide a path where the file needs to be stored. The location is a sub-directory under the directory specified in the file system repository. The format for the file path and name is folder/filename.
For example, if the repository path is /opt/tomcat/fileoutput and the file path is actions/output/mailing-list.csv, then the file will be created under /opt/tomcat/fileoutput/actions/output.
96

Output template finalizationFinalization is the technical process of writing data from an internal staging area to the final file. Finalized data is ready to be consumed by a different system. Finalization can be triggered manually or automatically by the system based on a schedule. Select the Finalizetemplate at the end of each outbound run option to trigger the finalization after each run.
By finalizing a template at the end of each run, you ensure that all data in the file is the result of a single run. That is, the final output includes all data related to the run that triggered the finalization. If you want the data from multiple outbound runs to be written tothe same file, leave this option unselected. When you leave this option unselected, you haveto configure a separate finalization schedule in the Finalize tab or finalize the file manuallyin the Treatments > File landing page.
If you chose to finalize at the end of each run, select Include run ID in the file name to include the run ID for easier identification of the files generated in each run.
In the Fields tab, you can configure the information elements that you want to output.
That is, you can configure the customer and action details that you want to share with the third-party email distributor. In the Name field you enter a name for the field. In
97
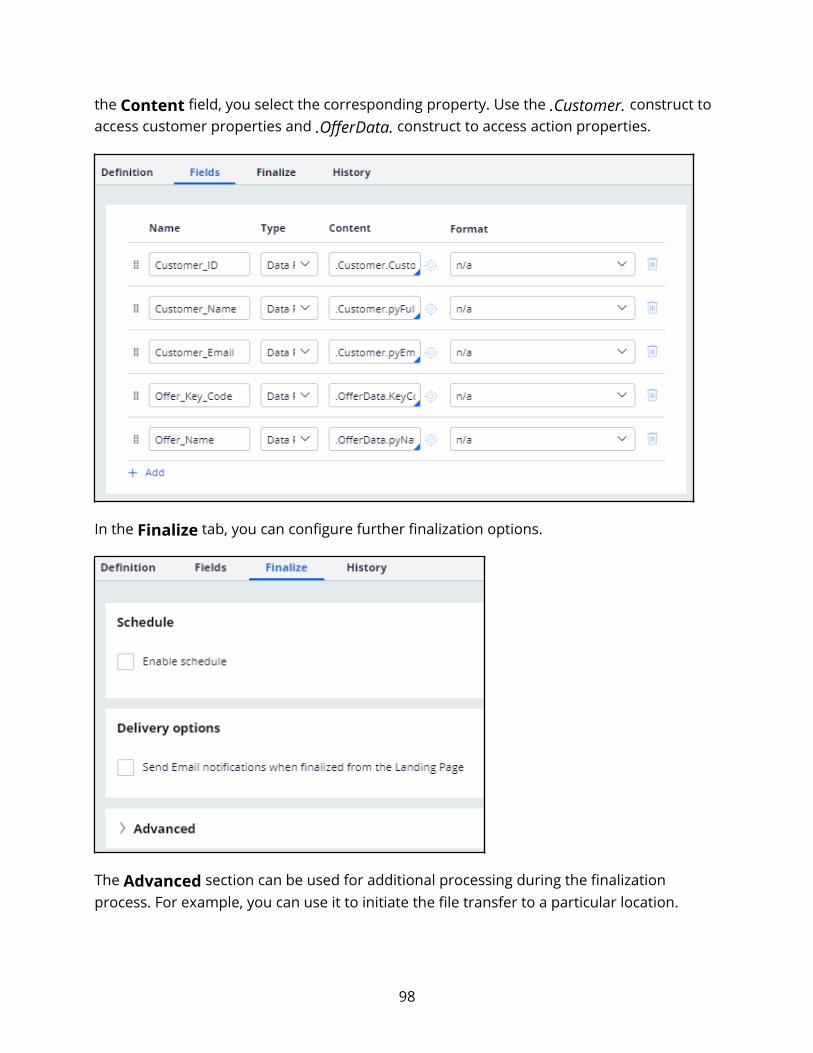
the Content field, you select the corresponding property. Use the .Customer. construct to access customer properties and .OfferData. construct to access action properties.
In the Finalize tab, you can configure further finalization options.
The Advanced section can be used for additional processing during the finalization process. For example, you can use it to initiate the file transfer to a particular location.
98
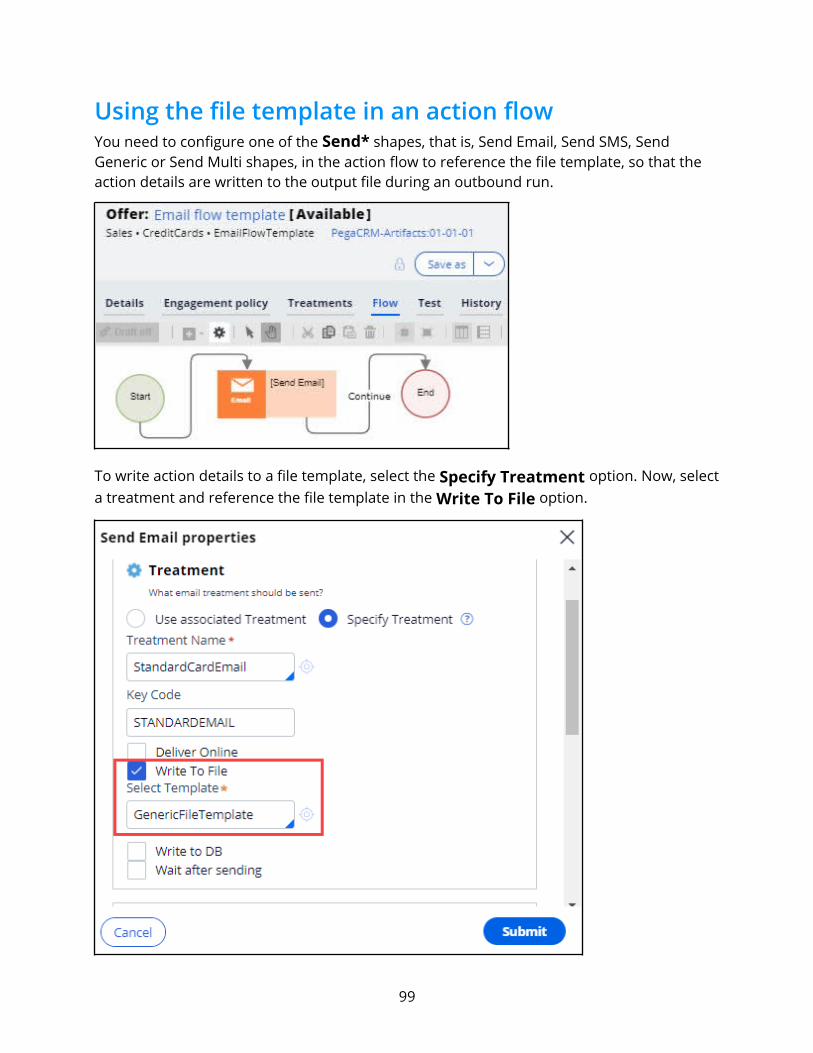
Using the file template in an action flowYou need to configure one of the Send* shapes, that is, Send Email, Send SMS, Send Generic or Send Multi shapes, in the action flow to reference the file template, so that the action details are written to the output file during an outbound run.
To write action details to a file template, select the Specify Treatment option. Now, selecta treatment and reference the file template in the Write To File option.
99
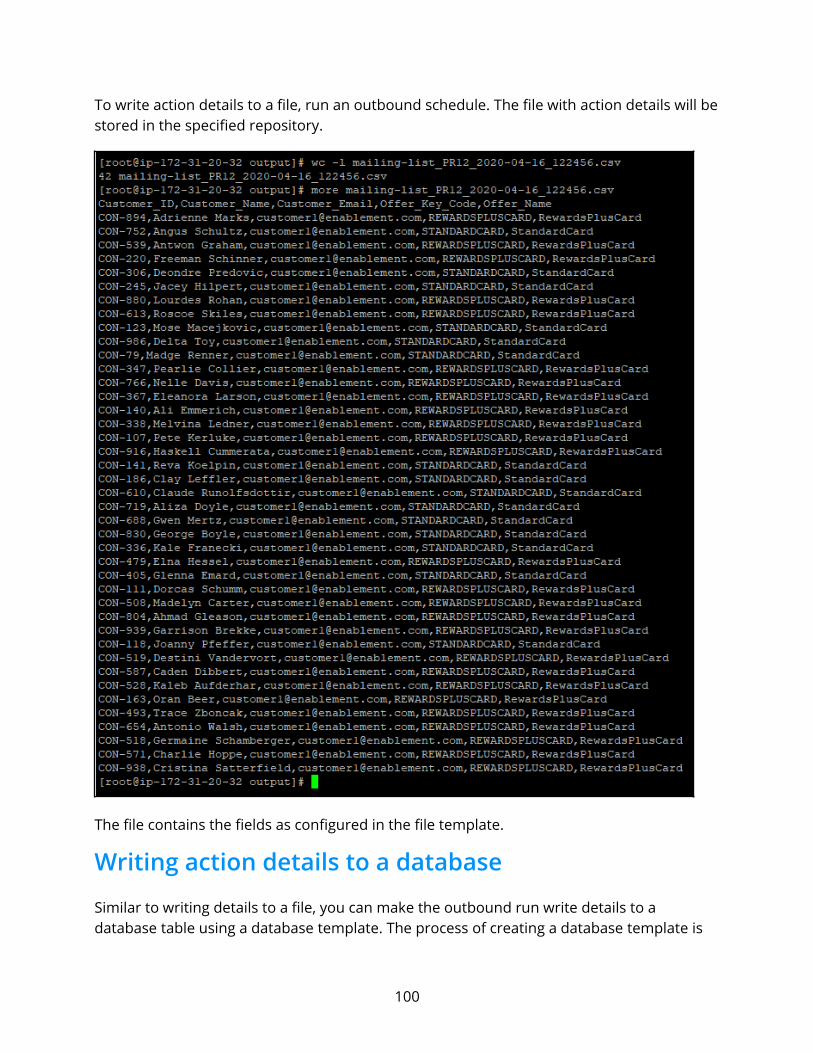
To write action details to a file, run an outbound schedule. The file with action details will bestored in the specified repository.
The file contains the fields as configured in the file template.
Writing action details to a database
Similar to writing details to a file, you can make the outbound run write details to a database table using a database template. The process of creating a database template is
100
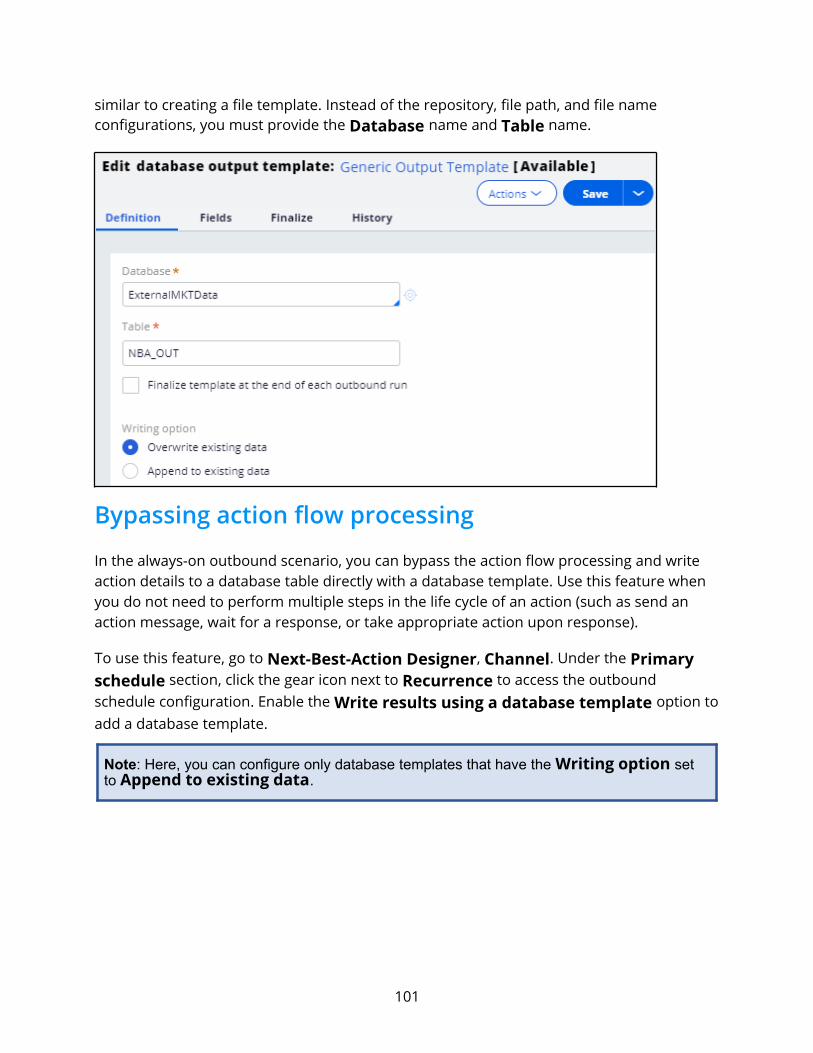
similar to creating a file template. Instead of the repository, file path, and file name configurations, you must provide the Database name and Table name.
Bypassing action flow processing
In the always-on outbound scenario, you can bypass the action flow processing and write action details to a database table directly with a database template. Use this feature when you do not need to perform multiple steps in the life cycle of an action (such as send an action message, wait for a response, or take appropriate action upon response).
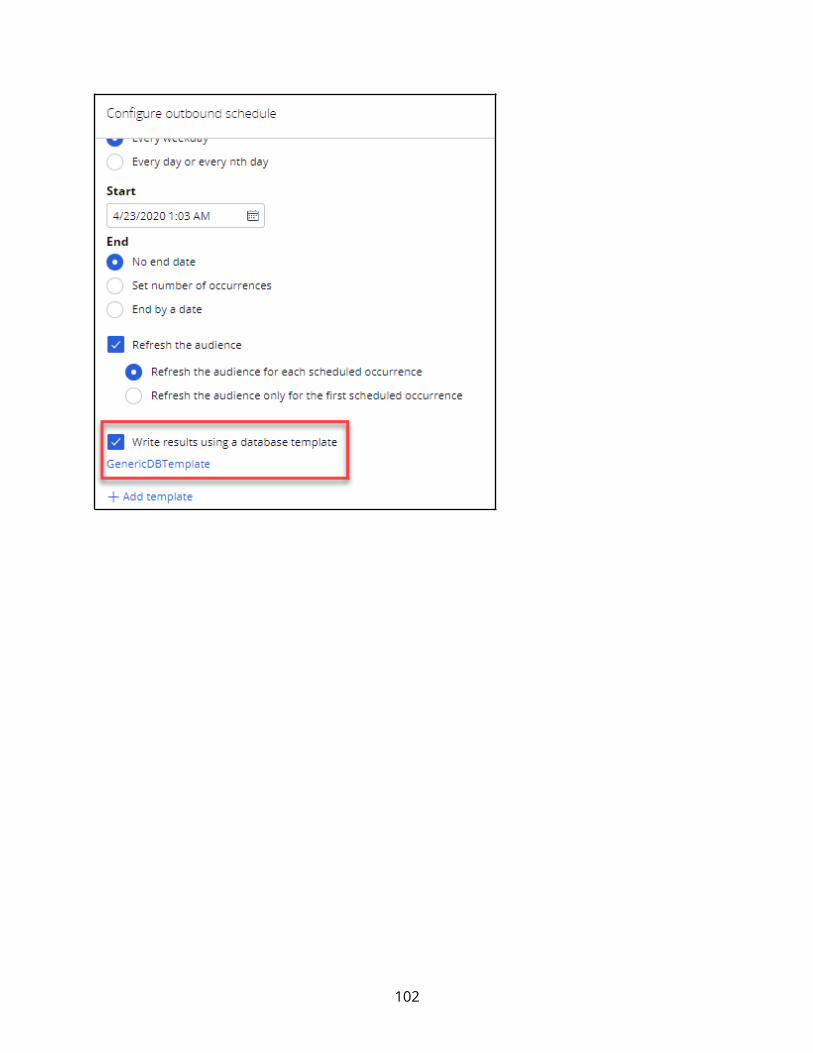
To use this feature, go to Next-Best-Action Designer, Channel. Under the Primary schedule section, click the gear icon next to Recurrence to access the outbound schedule configuration. Enable the Write results using a database template option toadd a database template.
Note: Here, you can configure only database templates that have the Writing option set to Append to existing data.
101
102