Embed Size (px)
Citation preview
ALTIRIS®
Asset Management Solution™ 6.5Product Guide
© 2001-2007 Altiris, Inc. All rights reserved.
Document Date: June 14, 2007
Information in this document: (i) is provided for informational purposes only with respect to products of Altiris or its subsidiaries (“Products”), (ii) represents Altiris' views as of the date of publication of this document, (iii) is subject to change without notice (for the latest documentation, visit our Web site at www.altiris.com/Support), and (iv) should not be construed as any commitment by Altiris. Except as provided in Altiris' license agreement governing its Products, ALTIRIS ASSUMES NO LIABILITY WHATSOEVER AND DISCLAIMS ANY EXPRESS OR IMPLIED WARRANTIES RELATING TO THE USE OF ANY PRODUCTS, INCLUDING WITHOUT LIMITATION, WARRANTIES OF FITNESS FOR A PARTICULAR PURPOSE, MERCHANTABILITY, OR INFRINGEMENT OF ANY THIRD-PARTY INTELLECTUAL PROPERTY RIGHTS. Altiris assumes no responsibility for any errors or omissions contained in this document, and Altiris specifically disclaims any and all liabilities and/or obligations for any claims, suits or damages arising in connection with the use of, reliance upon, or dissemination of this document, and/or the information contained herein.
Altiris may have patents or pending patent applications, trademarks, copyrights, or other intellectual property rights that relate to the Products referenced herein. The furnishing of this document and other materials and information does not provide any license, express or implied, by estoppel or otherwise, to any foregoing intellectual property rights.
No part of this document may be reproduced, stored in a retrieval system, or transmitted in any form or by any means without the express written consent of Altiris, Inc.
Customers are solely responsible for assessing the suitability of the Products for use in particular applications or environments. Products are not intended for use in medical, life saving, life sustaining, critical control or safety systems, or in nuclear facility applications.
*All other names or marks may be claimed as trademarks of their respective companies.
Asset Management Solution 6.5 2
Contents
Chapter 1: Introducing Altiris® Asset Management Solution™ . . . . . . . . . . . . . . . . . . . . 6Managing Assets Overview . . . . . . . . . . . . . . . . . . . . . . . . . . . . . . . . . . . . . . . . . . . . . . . . . . . . 6Managing Contracts Overview . . . . . . . . . . . . . . . . . . . . . . . . . . . . . . . . . . . . . . . . . . . . . . . . . . 7Terminology. . . . . . . . . . . . . . . . . . . . . . . . . . . . . . . . . . . . . . . . . . . . . . . . . . . . . . . . . . . . . . . 8Understanding Asset Management . . . . . . . . . . . . . . . . . . . . . . . . . . . . . . . . . . . . . . . . . . . . . . . 9
Resources and Resource Types . . . . . . . . . . . . . . . . . . . . . . . . . . . . . . . . . . . . . . . . . . . . . . 9Asset Management Usage Overview . . . . . . . . . . . . . . . . . . . . . . . . . . . . . . . . . . . . . . . . . . . . . 11
Asset Management Configuration Tasks . . . . . . . . . . . . . . . . . . . . . . . . . . . . . . . . . . . . . . . 11Asset Management Usage Tasks. . . . . . . . . . . . . . . . . . . . . . . . . . . . . . . . . . . . . . . . . . . . . 12
Total Cost Tracking . . . . . . . . . . . . . . . . . . . . . . . . . . . . . . . . . . . . . . . . . . . . . . . . . . . . . . . . . 12
Chapter 2: Asset Management Installation. . . . . . . . . . . . . . . . . . . . . . . . . . . . . . . . . . . 14Asset Management Requirements. . . . . . . . . . . . . . . . . . . . . . . . . . . . . . . . . . . . . . . . . . . . . . . 14Installing Asset Management Solution. . . . . . . . . . . . . . . . . . . . . . . . . . . . . . . . . . . . . . . . . . . . 15Upgrading . . . . . . . . . . . . . . . . . . . . . . . . . . . . . . . . . . . . . . . . . . . . . . . . . . . . . . . . . . . . . . . 15Asset Management Licensing . . . . . . . . . . . . . . . . . . . . . . . . . . . . . . . . . . . . . . . . . . . . . . . . . . 15
Chapter 3: Getting Started . . . . . . . . . . . . . . . . . . . . . . . . . . . . . . . . . . . . . . . . . . . . . . . 16Setting Up Organizational Type Resources . . . . . . . . . . . . . . . . . . . . . . . . . . . . . . . . . . . . . . . . . 17Importing Resource Data. . . . . . . . . . . . . . . . . . . . . . . . . . . . . . . . . . . . . . . . . . . . . . . . . . . . . 19Running an Inventory . . . . . . . . . . . . . . . . . . . . . . . . . . . . . . . . . . . . . . . . . . . . . . . . . . . . . . . 22Setting Up Financial Type Resources . . . . . . . . . . . . . . . . . . . . . . . . . . . . . . . . . . . . . . . . . . . . . 22
Defining Accounting Periods. . . . . . . . . . . . . . . . . . . . . . . . . . . . . . . . . . . . . . . . . . . . . . . . 22Creating Accounting Codes . . . . . . . . . . . . . . . . . . . . . . . . . . . . . . . . . . . . . . . . . . . . . . . . 23Creating a Depreciation Schedule . . . . . . . . . . . . . . . . . . . . . . . . . . . . . . . . . . . . . . . . . . . . 24
Deciding What To Set Up Next . . . . . . . . . . . . . . . . . . . . . . . . . . . . . . . . . . . . . . . . . . . . . . . . . 26Setting Up Asset Resources . . . . . . . . . . . . . . . . . . . . . . . . . . . . . . . . . . . . . . . . . . . . . . . . . . . 26Setting Up Contract Resources . . . . . . . . . . . . . . . . . . . . . . . . . . . . . . . . . . . . . . . . . . . . . . . . . 28
Adding a Win32 License . . . . . . . . . . . . . . . . . . . . . . . . . . . . . . . . . . . . . . . . . . . . . . . . . . 29Upgrading Software Licenses . . . . . . . . . . . . . . . . . . . . . . . . . . . . . . . . . . . . . . . . . . . . . . . 30Setting Up a Master License Agreement . . . . . . . . . . . . . . . . . . . . . . . . . . . . . . . . . . . . . . . 30Enable Contract Expiration Notification Policy. . . . . . . . . . . . . . . . . . . . . . . . . . . . . . . . . . . . 31Setting Up a Lease Schedule . . . . . . . . . . . . . . . . . . . . . . . . . . . . . . . . . . . . . . . . . . . . . . . 32
Working with Receiving Type Resources . . . . . . . . . . . . . . . . . . . . . . . . . . . . . . . . . . . . . . . . . . 32Creating a Catalog, Catalog Items, and a Stock Room . . . . . . . . . . . . . . . . . . . . . . . . . . . . . 32Creating a Purchase Request . . . . . . . . . . . . . . . . . . . . . . . . . . . . . . . . . . . . . . . . . . . . . . . 35Creating a Purchase Order. . . . . . . . . . . . . . . . . . . . . . . . . . . . . . . . . . . . . . . . . . . . . . . . . 36Creating an Invoice . . . . . . . . . . . . . . . . . . . . . . . . . . . . . . . . . . . . . . . . . . . . . . . . . . . . . 36Receiving Items . . . . . . . . . . . . . . . . . . . . . . . . . . . . . . . . . . . . . . . . . . . . . . . . . . . . . . . . 37
Configuration . . . . . . . . . . . . . . . . . . . . . . . . . . . . . . . . . . . . . . . . . . . . . . . . . . . . . . . . . . . . . 38
Chapter 4: Resource Types . . . . . . . . . . . . . . . . . . . . . . . . . . . . . . . . . . . . . . . . . . . . . . . 39Predefined and User-Defined Resource Types. . . . . . . . . . . . . . . . . . . . . . . . . . . . . . . . . . . . . . . 39Base Resource Types . . . . . . . . . . . . . . . . . . . . . . . . . . . . . . . . . . . . . . . . . . . . . . . . . . . . . . . 39Data Classes . . . . . . . . . . . . . . . . . . . . . . . . . . . . . . . . . . . . . . . . . . . . . . . . . . . . . . . . . . . . . 40
Asset Data Classes . . . . . . . . . . . . . . . . . . . . . . . . . . . . . . . . . . . . . . . . . . . . . . . . . . . . . . 40Contract Data Classes . . . . . . . . . . . . . . . . . . . . . . . . . . . . . . . . . . . . . . . . . . . . . . . . . . . . 41Financial Data Classes. . . . . . . . . . . . . . . . . . . . . . . . . . . . . . . . . . . . . . . . . . . . . . . . . . . . 41
Asset Management Solution 6.5 3
Resource Association Types . . . . . . . . . . . . . . . . . . . . . . . . . . . . . . . . . . . . . . . . . . . . . . . . . . . 47Resource Type Relationships . . . . . . . . . . . . . . . . . . . . . . . . . . . . . . . . . . . . . . . . . . . . . . . 48Creating a Resource Association Type . . . . . . . . . . . . . . . . . . . . . . . . . . . . . . . . . . . . . . . . . 49
Working with Resource Types. . . . . . . . . . . . . . . . . . . . . . . . . . . . . . . . . . . . . . . . . . . . . . . . . . 49Editing a Resource Type . . . . . . . . . . . . . . . . . . . . . . . . . . . . . . . . . . . . . . . . . . . . . . . . . . 50Creating a Resource Type . . . . . . . . . . . . . . . . . . . . . . . . . . . . . . . . . . . . . . . . . . . . . . . . . 50Exporting and Importing Resource Type Definitions . . . . . . . . . . . . . . . . . . . . . . . . . . . . . . . 51
Resource Type Interface Items. . . . . . . . . . . . . . . . . . . . . . . . . . . . . . . . . . . . . . . . . . . . . . . . . 51Edit Resource Type Page . . . . . . . . . . . . . . . . . . . . . . . . . . . . . . . . . . . . . . . . . . . . . . . . . . 52List Resources Page . . . . . . . . . . . . . . . . . . . . . . . . . . . . . . . . . . . . . . . . . . . . . . . . . . . . . 53Resource Association Type Page. . . . . . . . . . . . . . . . . . . . . . . . . . . . . . . . . . . . . . . . . . . . . 53Resource Data Class Page . . . . . . . . . . . . . . . . . . . . . . . . . . . . . . . . . . . . . . . . . . . . . . . . . 54Resource Data Class Summary Page. . . . . . . . . . . . . . . . . . . . . . . . . . . . . . . . . . . . . . . . . . 55
Chapter 5: Resources . . . . . . . . . . . . . . . . . . . . . . . . . . . . . . . . . . . . . . . . . . . . . . . . . . . 56Resource Categories . . . . . . . . . . . . . . . . . . . . . . . . . . . . . . . . . . . . . . . . . . . . . . . . . . . . . . . . 56Asset Types Category . . . . . . . . . . . . . . . . . . . . . . . . . . . . . . . . . . . . . . . . . . . . . . . . . . . . . . . 56
Asset Types Category Fields . . . . . . . . . . . . . . . . . . . . . . . . . . . . . . . . . . . . . . . . . . . . . . . 57Asset Life Cycle . . . . . . . . . . . . . . . . . . . . . . . . . . . . . . . . . . . . . . . . . . . . . . . . . . . . . . . . 64Retiring vs. Disposing of an Asset. . . . . . . . . . . . . . . . . . . . . . . . . . . . . . . . . . . . . . . . . . . . 64Computer Resource Type . . . . . . . . . . . . . . . . . . . . . . . . . . . . . . . . . . . . . . . . . . . . . . . . . 65
Contract Types Category . . . . . . . . . . . . . . . . . . . . . . . . . . . . . . . . . . . . . . . . . . . . . . . . . . . . . 65Lease Schedule Resource Type. . . . . . . . . . . . . . . . . . . . . . . . . . . . . . . . . . . . . . . . . . . . . . 67Mac License Resource Type . . . . . . . . . . . . . . . . . . . . . . . . . . . . . . . . . . . . . . . . . . . . . . . . 67Master Lease Resource Type . . . . . . . . . . . . . . . . . . . . . . . . . . . . . . . . . . . . . . . . . . . . . . . 68Master License Agreement Resource Type . . . . . . . . . . . . . . . . . . . . . . . . . . . . . . . . . . . . . . 68OS License Resource Type . . . . . . . . . . . . . . . . . . . . . . . . . . . . . . . . . . . . . . . . . . . . . . . . . 68Software License Resource Type . . . . . . . . . . . . . . . . . . . . . . . . . . . . . . . . . . . . . . . . . . . . 69Software Purchase Resource Type . . . . . . . . . . . . . . . . . . . . . . . . . . . . . . . . . . . . . . . . . . . 70UNIX License Resource Type . . . . . . . . . . . . . . . . . . . . . . . . . . . . . . . . . . . . . . . . . . . . . . . 70Virtual License Agreement Resource Type . . . . . . . . . . . . . . . . . . . . . . . . . . . . . . . . . . . . . . 70Win32 License Resource Type . . . . . . . . . . . . . . . . . . . . . . . . . . . . . . . . . . . . . . . . . . . . . . 70Contract Types Category Common Fields. . . . . . . . . . . . . . . . . . . . . . . . . . . . . . . . . . . . . . . 71
Financial Types Category . . . . . . . . . . . . . . . . . . . . . . . . . . . . . . . . . . . . . . . . . . . . . . . . . . . . . 79Configuring Accounting Periods . . . . . . . . . . . . . . . . . . . . . . . . . . . . . . . . . . . . . . . . . . . . . 79Working with Costs and Depreciation . . . . . . . . . . . . . . . . . . . . . . . . . . . . . . . . . . . . . . . . . 79
Organizational Types Category . . . . . . . . . . . . . . . . . . . . . . . . . . . . . . . . . . . . . . . . . . . . . . . . . 80Hierarchal Resource Types. . . . . . . . . . . . . . . . . . . . . . . . . . . . . . . . . . . . . . . . . . . . . . . . . 82
Other Types Category . . . . . . . . . . . . . . . . . . . . . . . . . . . . . . . . . . . . . . . . . . . . . . . . . . . . . . . 83Receiving Types Category . . . . . . . . . . . . . . . . . . . . . . . . . . . . . . . . . . . . . . . . . . . . . . . . . . . . 83
Legacy Receiving Types. . . . . . . . . . . . . . . . . . . . . . . . . . . . . . . . . . . . . . . . . . . . . . . . . . . 86Bundle Resource Type. . . . . . . . . . . . . . . . . . . . . . . . . . . . . . . . . . . . . . . . . . . . . . . . . . . . 87Receive Items Page . . . . . . . . . . . . . . . . . . . . . . . . . . . . . . . . . . . . . . . . . . . . . . . . . . . . . 87
Working with Resources . . . . . . . . . . . . . . . . . . . . . . . . . . . . . . . . . . . . . . . . . . . . . . . . . . . . . 89Adding a Resource . . . . . . . . . . . . . . . . . . . . . . . . . . . . . . . . . . . . . . . . . . . . . . . . . . . . . . 89Bulk Editing . . . . . . . . . . . . . . . . . . . . . . . . . . . . . . . . . . . . . . . . . . . . . . . . . . . . . . . . . . . 89Viewing a Resource Change History . . . . . . . . . . . . . . . . . . . . . . . . . . . . . . . . . . . . . . . . . . 90Using Item Tasks to Quickly Enter Resource Data. . . . . . . . . . . . . . . . . . . . . . . . . . . . . . . . . 90Merging Resources . . . . . . . . . . . . . . . . . . . . . . . . . . . . . . . . . . . . . . . . . . . . . . . . . . . . . . 90
Asset Management Solution 6.5 4
Reports . . . . . . . . . . . . . . . . . . . . . . . . . . . . . . . . . . . . . . . . . . . . . . . . . . . . . . . . . . . . . . . . . 92Accounting/Depreciation Reports . . . . . . . . . . . . . . . . . . . . . . . . . . . . . . . . . . . . . . . . . . . . 92
Web Service. . . . . . . . . . . . . . . . . . . . . . . . . . . . . . . . . . . . . . . . . . . . . . . . . . . . . . . . . . . . . . 92Resource Association Diagram . . . . . . . . . . . . . . . . . . . . . . . . . . . . . . . . . . . . . . . . . . . . . . . . . 92Resource Interface Items . . . . . . . . . . . . . . . . . . . . . . . . . . . . . . . . . . . . . . . . . . . . . . . . . . . . 93
Resource List Page . . . . . . . . . . . . . . . . . . . . . . . . . . . . . . . . . . . . . . . . . . . . . . . . . . . . . . 93Resource Display Page . . . . . . . . . . . . . . . . . . . . . . . . . . . . . . . . . . . . . . . . . . . . . . . . . . . 96Resource Selector. . . . . . . . . . . . . . . . . . . . . . . . . . . . . . . . . . . . . . . . . . . . . . . . . . . . . . . 97
Chapter 6: Asset Management Configuration and Scenarios . . . . . . . . . . . . . . . . . . . . . 98Evaluate the Cost of Depreciable Items. . . . . . . . . . . . . . . . . . . . . . . . . . . . . . . . . . . . . . . . . . . 98Allow Parallel Execution of Master License Summary Queries . . . . . . . . . . . . . . . . . . . . . . . . . . . . 98Using Software License Data Normalization . . . . . . . . . . . . . . . . . . . . . . . . . . . . . . . . . . . . . . . . 99Evaluating Software Licenses . . . . . . . . . . . . . . . . . . . . . . . . . . . . . . . . . . . . . . . . . . . . . . . . . 100Update Software Purchases . . . . . . . . . . . . . . . . . . . . . . . . . . . . . . . . . . . . . . . . . . . . . . . . . . 100Sharing Software Licenses. . . . . . . . . . . . . . . . . . . . . . . . . . . . . . . . . . . . . . . . . . . . . . . . . . . 100Working with Currencies . . . . . . . . . . . . . . . . . . . . . . . . . . . . . . . . . . . . . . . . . . . . . . . . . . . . 101
Specify a Base Currency . . . . . . . . . . . . . . . . . . . . . . . . . . . . . . . . . . . . . . . . . . . . . . . . . 101Converting Currencies. . . . . . . . . . . . . . . . . . . . . . . . . . . . . . . . . . . . . . . . . . . . . . . . . . . 102
Renaming Retired and Disposed Computers Scenario . . . . . . . . . . . . . . . . . . . . . . . . . . . . . . . . 102Retrieving Information from a Retired Server Scenario . . . . . . . . . . . . . . . . . . . . . . . . . . . . . . . 103Importing Receiving Type Resources with Connector Solution . . . . . . . . . . . . . . . . . . . . . . . . . . 103
Create Receiving Data Sources. . . . . . . . . . . . . . . . . . . . . . . . . . . . . . . . . . . . . . . . . . . . . 104Create Receiving Import Rules . . . . . . . . . . . . . . . . . . . . . . . . . . . . . . . . . . . . . . . . . . . . . 106Create a Task to run Receiving Import rules in order . . . . . . . . . . . . . . . . . . . . . . . . . . . . . 108
Chapter 7: Asset Management Security . . . . . . . . . . . . . . . . . . . . . . . . . . . . . . . . . . . . 110Role-based Security . . . . . . . . . . . . . . . . . . . . . . . . . . . . . . . . . . . . . . . . . . . . . . . . . . . . . . . 110
Predefined Security Roles . . . . . . . . . . . . . . . . . . . . . . . . . . . . . . . . . . . . . . . . . . . . . . . . 110Viewing and Configuring Role-based Security. . . . . . . . . . . . . . . . . . . . . . . . . . . . . . . . . . . 113Role Creation Considerations . . . . . . . . . . . . . . . . . . . . . . . . . . . . . . . . . . . . . . . . . . . . . . 113
Scope-based Security . . . . . . . . . . . . . . . . . . . . . . . . . . . . . . . . . . . . . . . . . . . . . . . . . . . . . . 114Setting Permissions for Resource Types and Data Classes . . . . . . . . . . . . . . . . . . . . . . . . . . 114
Security Scenarios . . . . . . . . . . . . . . . . . . . . . . . . . . . . . . . . . . . . . . . . . . . . . . . . . . . . . . . . 115Creating a Security Group Scenario . . . . . . . . . . . . . . . . . . . . . . . . . . . . . . . . . . . . . . . . . 115Restricting a Security Group Scenario . . . . . . . . . . . . . . . . . . . . . . . . . . . . . . . . . . . . . . . . 115Setting Security on a Data Class Scenario . . . . . . . . . . . . . . . . . . . . . . . . . . . . . . . . . . . . . 116Setting Security on an Item Task Scenario . . . . . . . . . . . . . . . . . . . . . . . . . . . . . . . . . . . . 117Creating a User with Cost Center and Related Assets Permissions . . . . . . . . . . . . . . . . . . . . 117Creating a Role with Restricted Report Permissions . . . . . . . . . . . . . . . . . . . . . . . . . . . . . . 118Collections Permissions Security Issue . . . . . . . . . . . . . . . . . . . . . . . . . . . . . . . . . . . . . . . 119
Index. . . . . . . . . . . . . . . . . . . . . . . . . . . . . . . . . . . . . . . . . . . . . . . . . . . . . . . . . . . . . . . 120
Asset Management Solution 6.5 5
Chapter 1Introducing Altiris® Asset Management Solution™
Altiris® Asset Management Solution™ helps organizations maximize existing IT investments by eliminating unnecessary software and hardware costs, managing contracts and entitlements, and aligning service resources with IT Infrastructure Library (ITIL) standards. These solutions also support the Sarbanes-Oxley Act, COBIT, and HIPAA.
Use Asset Management Solution to:
Manage assets, invoices, purchase orders, contracts, and the associations between them in a single data repository using a single interface.
Track assets and contracts from the initial intent to purchase, to ensuring regular maintenance, to retirement.
Track costs and depreciation.
NoteFor additional ease of management, Altiris® Barcode Solution™ helps you physically track and inventory assets that have already been added to your system with Altiris® Asset Control Solution™. To make data transfer easy, Altiris® Connector Solution™ lets you transfer data between the Notification Database, third-party applications, and numerous data sources, such as Microsoft SQL Server, Microsoft Excel, and Oracle. Altiris® Inventory Solution® can be used to identify your computer and software resources, which you can then manage with Asset Management Solution.
For information on these products, see http://www.altiris.com/Products.aspx.
Managing Assets OverviewAsset Management Solution helps you manage assets, invoices, purchase orders, and projects. If you are using other Altiris solutions, such as Inventory Solution, you can also integrate your asset data with computer inventory and contract data.
Asset Management Solution 6.5 6
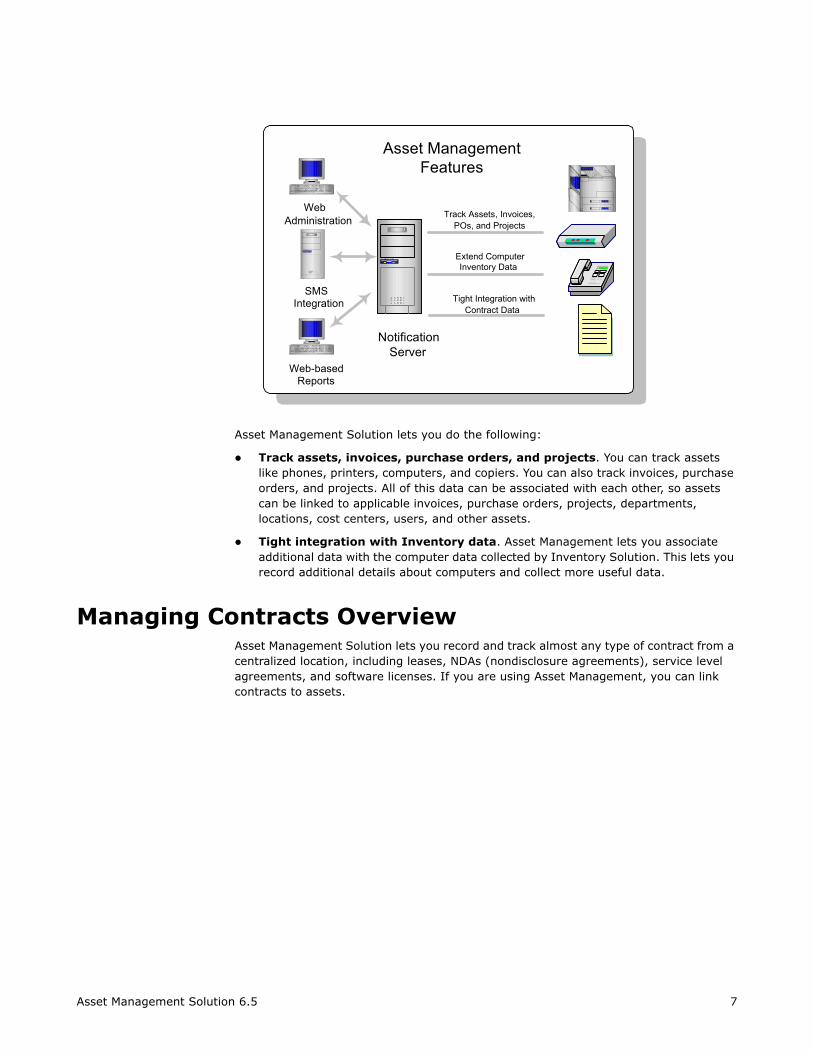
Asset Management Solution lets you do the following:
Track assets, invoices, purchase orders, and projects. You can track assets like phones, printers, computers, and copiers. You can also track invoices, purchase orders, and projects. All of this data can be associated with each other, so assets can be linked to applicable invoices, purchase orders, projects, departments, locations, cost centers, users, and other assets.
Tight integration with Inventory data. Asset Management lets you associate additional data with the computer data collected by Inventory Solution. This lets you record additional details about computers and collect more useful data.
Managing Contracts OverviewAsset Management Solution lets you record and track almost any type of contract from a centralized location, including leases, NDAs (nondisclosure agreements), service level agreements, and software licenses. If you are using Asset Management, you can link contracts to assets.
NotificationServer
Asset Management Features
SMSIntegration
WebAdministration
Web-basedReports
Track Assets, Invoices,POs, and Projects
Extend ComputerInventory Data
Tight Integration withContract Data
Asset Management Solution 6.5 7
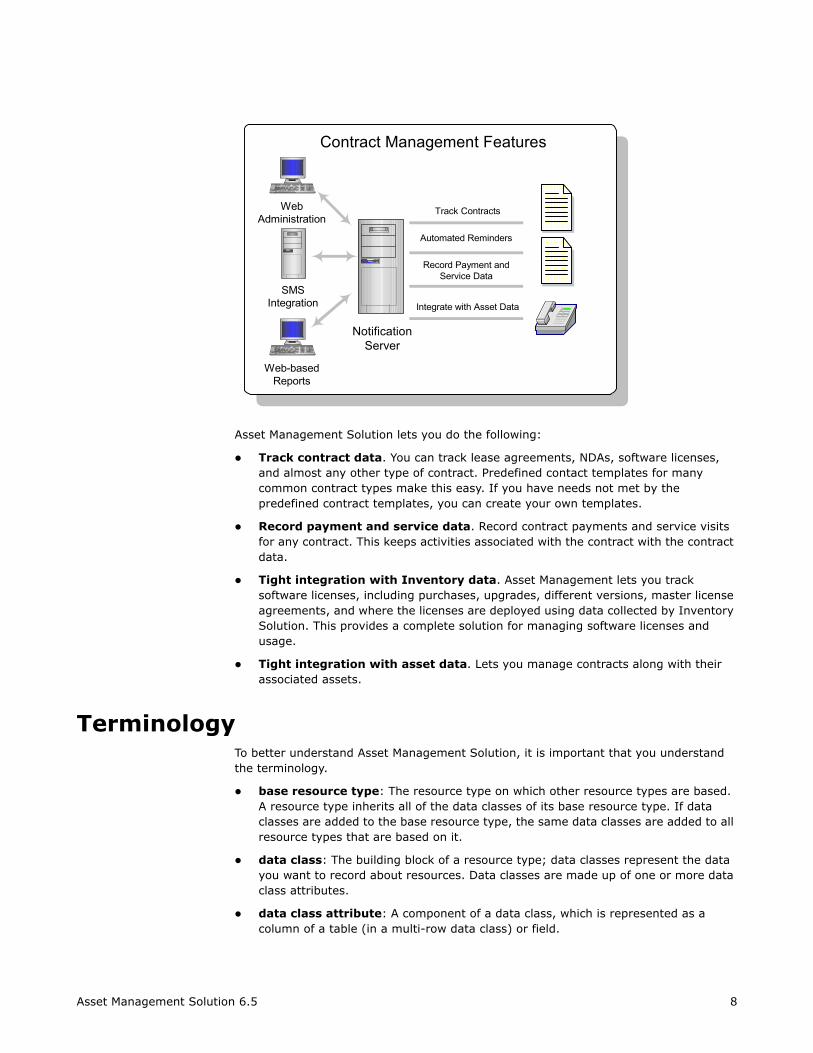
Asset Management Solution lets you do the following:
Track contract data. You can track lease agreements, NDAs, software licenses, and almost any other type of contract. Predefined contact templates for many common contract types make this easy. If you have needs not met by the predefined contract templates, you can create your own templates.
Record payment and service data. Record contract payments and service visits for any contract. This keeps activities associated with the contract with the contract data.
Tight integration with Inventory data. Asset Management lets you track software licenses, including purchases, upgrades, different versions, master license agreements, and where the licenses are deployed using data collected by Inventory Solution. This provides a complete solution for managing software licenses and usage.
Tight integration with asset data. Lets you manage contracts along with their associated assets.
TerminologyTo better understand Asset Management Solution, it is important that you understand the terminology.
base resource type: The resource type on which other resource types are based. A resource type inherits all of the data classes of its base resource type. If data classes are added to the base resource type, the same data classes are added to all resource types that are based on it.
data class: The building block of a resource type; data classes represent the data you want to record about resources. Data classes are made up of one or more data class attributes.
data class attribute: A component of a data class, which is represented as a column of a table (in a multi-row data class) or field.
NotificationServer
Contract Management Features
SMSIntegration
WebAdministration
Web-basedReports
Automated Reminders
Record Payment andService Data
Track Contracts
Integrate with Asset Data
Asset Management Solution 6.5 8
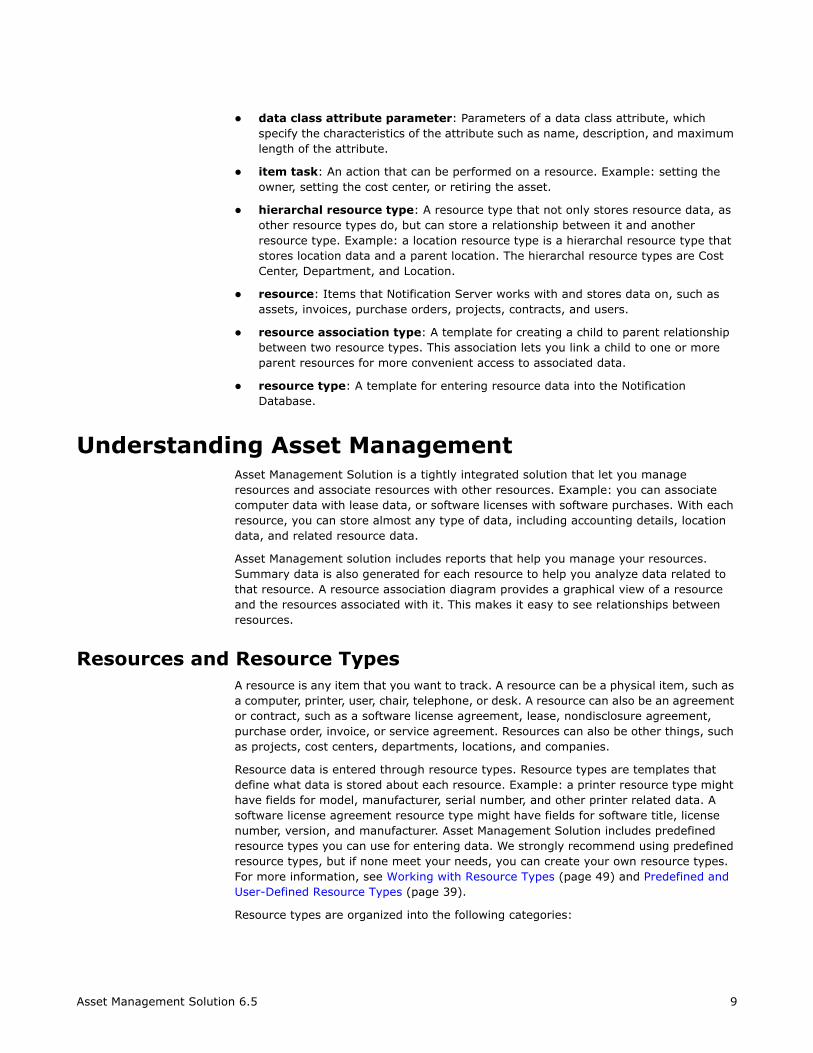
item task: An action that can be performed on a resource. Example: setting the owner, setting the cost center, or retiring the asset.
hierarchal resource type: A resource type that not only stores resource data, as other resource types do, but can store a relationship between it and another resource type. Example: a location resource type is a hierarchal resource type that stores location data and a parent location. The hierarchal resource types are Cost Center, Department, and Location.
resource: Items that Notification Server works with and stores data on, such as assets, invoices, purchase orders, projects, contracts, and users.
resource association type: A template for creating a child to parent relationship between two resource types. This association lets you link a child to one or more parent resources for more convenient access to associated data.
resource type: A template for entering resource data into the Notification Database.
Understanding Asset ManagementAsset Management Solution is a tightly integrated solution that let you manage resources and associate resources with other resources. Example: you can associate computer data with lease data, or software licenses with software purchases. With each resource, you can store almost any type of data, including accounting details, location data, and related resource data.
Asset Management solution includes reports that help you manage your resources. Summary data is also generated for each resource to help you analyze data related to that resource. A resource association diagram provides a graphical view of a resource and the resources associated with it. This makes it easy to see relationships between resources.
Resources and Resource TypesA resource is any item that you want to track. A resource can be a physical item, such as a computer, printer, user, chair, telephone, or desk. A resource can also be an agreement or contract, such as a software license agreement, lease, nondisclosure agreement, purchase order, invoice, or service agreement. Resources can also be other things, such as projects, cost centers, departments, locations, and companies.
Resource data is entered through resource types. Resource types are templates that define what data is stored about each resource. Example: a printer resource type might have fields for model, manufacturer, serial number, and other printer related data. A software license agreement resource type might have fields for software title, license number, version, and manufacturer. Asset Management Solution includes predefined resource types you can use for entering data. We strongly recommend using predefined resource types, but if none meet your needs, you can create your own resource types. For more information, see Working with Resource Types (page 49) and Predefined and User-Defined Resource Types (page 39).
Resource types are organized into the following categories:
Asset Management Solution 6.5 9
Contract Types: Contract data, such as the location of contract documents, payment data, service data, and any contract details. Contract asset types can be associated with other resources, such as computers, printers, and monitors.
Financial Types: Used for accounting and cost tracking documents.
Organizational Types: Used to track locations, departments, cost centers, companies, and users.
Other Resources: Resources that do not belong in any of the other predefined categories, such as projects.
Receiving Types: Used for tracking purchase orders, invoices, and catalog items
Datacenter Types: These resource types, used for tracking IT management resources, are installed by Altiris® CMDB Solution™.
Service Types: These resource types—Services and System—are a way of helping you track your critical infrastructure. They show the roles that machines play. Example: If you have an Exchange Server, that machine is providing an e-mail service. Service types are installed by Altiris CMDB Solution.
The predefined resource types also include extensive reporting data through a Summary tab associated with each resource and predefined reports. The summary data summarizes the equivalent of several reports of data into one convenient location. For more information, see Summary Tab (page 96).
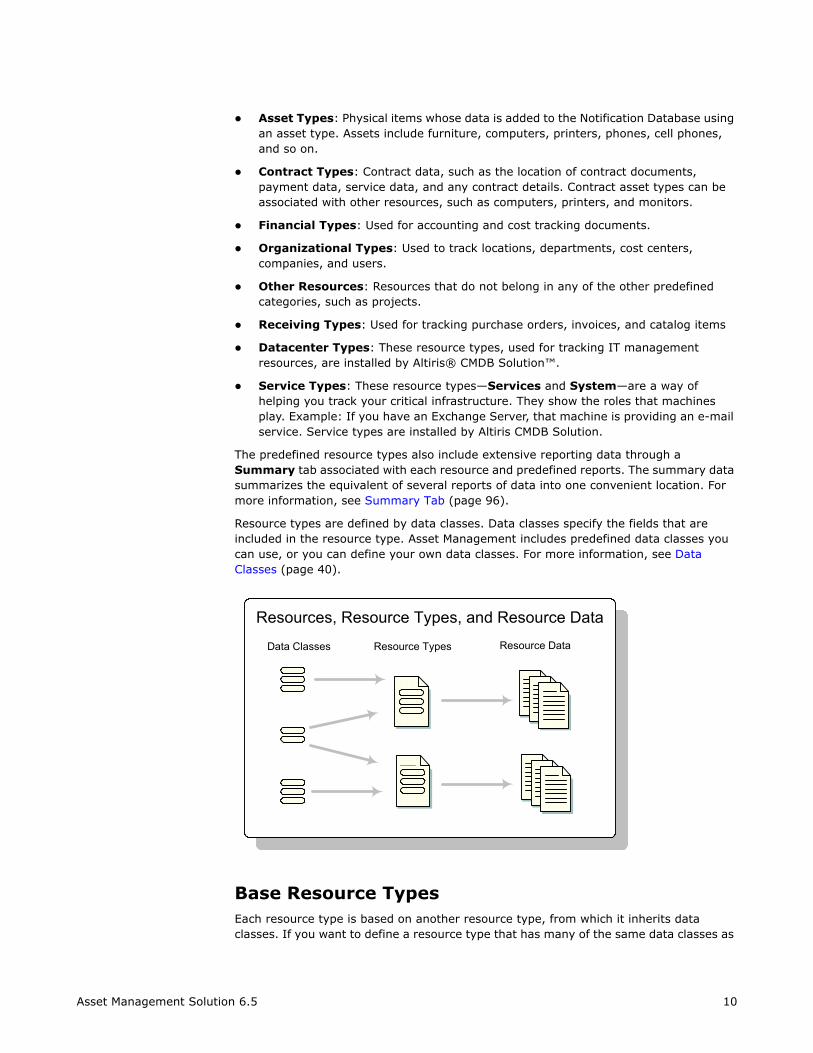
Resource types are defined by data classes. Data classes specify the fields that are included in the resource type. Asset Management includes predefined data classes you can use, or you can define your own data classes. For more information, see Data Classes (page 40).
Base Resource TypesEach resource type is based on another resource type, from which it inherits data classes. If you want to define a resource type that has many of the same data classes as
Resources, Resource Types, and Resource Data
Data Classes Resource Types Resource Data
Asset Management Solution 6.5 10
Example: You might have a computer resource that includes data classes with attributes such as Name, Manufacturer, Model, Location, and User and you want to add a scanner resource type that includes the same data classes as the computer resource type. Use the computer resource as a base type. The computer resource data classes are inherited by the new resource. If the data classes of the base resource type change, all of the resource types that are based on that resource type will also automatically change.
Example: If all of your asset resource types are based on the Asset resource type, and you find that you need to add a field for a special company tracking number to all assets, you can add a data class with the necessary definitions to the Asset resource type (or edit an existing data class) and all of the other asset resource types will automatically have the field added to them.
Asset Management Usage OverviewAsset Management Solution lets you manage assets in your environment, set cost data, and manage services and licenses associated with the assets.
Many tasks can be performed with Asset Management Solution. These tasks are organized into the following categories:
Asset Management Configuration Tasks (page 11)
Asset Management Usage Tasks (page 12)
Asset Management Configuration TasksConfiguration tasks are performed by an administrator using the Altiris Console Configuration tab. Many of these tasks need to be performed only during the initial setup of your resource management system; they are not ongoing tasks. The following are some of the more common Asset Management related configuration tasks:
1. Organize your resources.
Resources are organized using resource types. You can use predefined resource types or create your own resource types. Whenever possible, use predefined resource types because they leverage other resource types, provide summary data on the resources entered with them, include associated reports, and include functionality not available in custom resource types.
If none of the predefined resource types meet your needs, you can create a new resource type. Before creating the resource type, you will probably need to create data classes. For more information, see Creating and Configuring a Data Class (page 44) and Creating a Resource Type (page 50).
2. Add data to the Notification Database.
As you set up a resource management system, there is certain data that makes sense to enter before other data, such as organizational data, since most other resources rely on the availability of this data. Also, as you initially setup your system, some of the data you will want to add is available from other sources, in which case, you will want to import the data. For more information on entering initial data, see Getting Started (page 16).
3. Configure security.
Asset Management Solution 6.5 11
Asset Management Usage TasksManagement tasks are performed by managers or workers through the Resources tab of the Altiris Console. The following are some of the most common management tasks:
1. Add and edit resources.
Data that is not collected automatically or imported can be manually entered. For more information, see Adding a Resource (page 89).
Managers and workers do the majority of the work adding and editing resources. These users can perform the following tasks:
Edit resource data.
Add accounting data for an asset or contract. Example: cost and accounting data include accounting code, purchase order, warranty period, expense type, purchase or lease designation, RMA number, and so forth.
Add and assign locations, departments, and cost centers.
Assign users to departments.
Change the status of a single resource or change multiple resources simultaneously.
Assign a resource (like a computer) to an owner, a cost center, and a location.
Set asset ownership for users.
Modify existing software licenses.
Add master license agreements.
Create virtual license agreements.
Add lease schedules.
Add master leases.
Add service level agreements.
2. Dispose of single or groups of assets.
You can dispose of assets and record data such as disposal date, cash from disposal, and disposal reason.
3. Run reports.
Total Cost TrackingThis solution lets you track costs for assets and contracts. Depreciation can be charged to both resource types and transferred from one department or user to another, and the costs with transfer with them.
In a typical organization, seventy-five percent of an asset’s costs are services and indirect costs, with only twenty-five percent coming from the initial purchase. A range of
Asset Management Solution 6.5 12
Total cost tracking may involve any or all of the following:
Initial purchase costs.
Cost items. Example: A replacement mouse for a computer. A Cost item is used to track costs associated with a resource. Depreciable cost items cannot be assigned to cost centers and departments.
Depreciation. Depreciation can be configured, calculated, and transferred for assets and contracts.
Contract Costs. Any contractual costs related to an asset are included in the asset’s total costs. Example: A software license being used by a computer.
Partial ownership. If the computer is owned by a more than one user, costs will be split accordingly. By default, two owners will each own fifty percent of an asset, but you can change the ownership percentages.
Maintenance, servicing, and technical support.
Asset Management Solution 6.5 13
Chapter 2Asset Management Installation
The following are the installation related topics:
Asset Management Requirements (page 14)
Installing Asset Management Solution (page 15)
Upgrading (page 15)
Asset Management Licensing (page 15)
Asset Management RequirementsServer Requirements
The following must be installed before installing Asset Management Solution on the Notification Server computer:
Notification Server 6.0 SP3 KB27859 (or later). For information on installation, see Altiris Notification Server 6.0 SP3 Help
Altiris Console 6.5
Altiris® CMDB Solution™ 6.5
Additional Solutions for Enhanced Functionality
The following are solutions that work tightly with Asset Management. They are not required, but they greatly enhance the functionality of Asset Management Solution. They can be installed before or after Asset Management is installed.
Altiris® Inventory Solution™ 6.1 (or later). If you want to add computer inventory data to your resource management system, you will need Altiris® Inventory Solution for Windows™, Altiris® Inventory Solution for Mac™, and Altiris® Inventory Solution for UNIX™ as applicable to your environment.
Inventory Solution is also required to take full advantage of the software licensing features.
NoteAsset Management Solution will index the discovered software data from Inventory Solution if Inventory Solution is installed before installing Asset Management Solution. The indexing will speed-up the generation of software lists.
Altiris® Application Metering Solution™ 6.0 (or later). If this solution is used, you can collect additional computer asset and software licensing data.
Altiris® Connector Solution™ 6.5. Connector Solution lets you transfer data between numerous external data sources and the Notification Database. Any number of resources and items can be imported or exported.
When using Internet Explorer 7, you must set Tools > Internet Options > Security to medium, add the Altiris Console to Trusted Sites, and set Automatic
Asset Management Solution 6.5 14
Installing Asset Management SolutionBefore installing Asset Management Solution, be sure you have met the requirements for the solution (see Asset Management Requirements on page 14).
To install Asset Management solution
1. In the Altiris Console, click the Configuration tab.
2. In the left pane, select Upgrade/Install Additional Software.
3. In the right pane, select Available Solutions > Solutions > Altiris Asset Management.
4. Follow the installation wizard instructions.
UpgradingNoteYou must have Altiris® Asset Control and Contract Management Solution 6.1 or later installed before you can upgrade to 6.5.
To upgrade to Asset Management Solution 6.5
1. Make sure you have Asset Control and Contract Management Solution™ version 6.1 or later installed.
2. Install CMDB Solution 6.5 and the CMDB Solution 6.5 Language and Report Packs.
3. Install Asset Management Solution.
Asset Management LicensingAsset Management Solution includes a seven-day trial license. You can register and obtain 30-day evaluation licenses through our Web site at www.altiris.com or purchase full product licenses. For more information on registering your solution, see the Altiris Getting Started Guide.
Asset Management licenses are counted based on the number of concurrent users.
To check license usage
1. In the Altiris Console, select the Configuration tab.
2. In the left pane, select Configuration > Solutions Settings > Assets and Inventory > Asset Management Solution > License Usage.
These pages list the number of licenses available and the number currently in use.
Asset Management Solution 6.5 15

Chapter 3Getting Started
The Getting Started tasks guide you through the basic setup, configuration, and use of Asset Management Solution. Each task has a procedure and, in many cases, exercises to illustrate the steps of the procedure. The following will get you started with Asset Management Solution by working through practical exercises and common scenarios. After working through the scenarios, you should have a good working knowledge of the key features of the solution that you can apply to your own situation.
Before working through the exercises, you should have a basic understanding of Asset Management, see Introducing Altiris® Asset Management Solution™ (page 6).
Getting Started tasks
NoteThese tasks are to be performed sequentially. Some tasks cannot be completed without performing previous tasks.
Setting Up Organizational Type Resources (page 17)
Importing Resource Data (page 19)
Running an Inventory (page 22)
Setting Up Financial Type Resources (page 22)
Setting Up Asset Resources (page 26)
Setting Up Contract Resources (page 28)
Working with Receiving Type Resources (page 32)
Prerequisites for Getting Started tasks
Notification Server 6.0 SP3 with KB 27859 or later
Asset Management Solution 6.5 or later.
Altiris® Inventory Solution™ 6.1 or later
Altiris® Connector Solution™ 6.1 or later
Altiris® CMDB Solution™ 6.5
Exercise Scenario
Your organization has chosen to implement Altiris® Asset Management Suite™ and you are assigned the task of administrator. You will define your company’s structure within the Altiris Console and manage contracts and assets. In line with Altiris recommendations, you will first set up organizational resources with hierarchal relationships, including cost centers, departments, locations, users, and a company. After you add organizational resources, you set up financial resources. With the organizational and financial data in place, you can decide what to set up next (assets or contracts), according to your needs.
The security role required to complete each task is denoted at the beginning of each exercise. Example: Asset Administrator Task.
Asset Management Solution 6.5 16
Getting Started
Setting Up Organizational Type ResourcesAsset Administrator Task
As you start using Asset Management Solution to create your asset management system, certain resource data should be added before other data. Example: enter location data first because many other resources require the specification of a location. We recommend adding organization type (resource types under Resources > Organizational Types on the Resources tab of the Altiris Console) data first, so other resources can reference them. Organizational resource types (in no particular order) are:
Company
Cost Center
Department
Location
Users
NoteTo understand the advantages of using predefined organization resource types over user-defined resource types, see Predefined and User-Defined Resource Types (page 39).
Because of the relationships among resources, when you enter resource data, it is often necessary to enter some data for a first resource, then enter data for a related resource, and then go back and enter the remaining data for the first resource.
Example: the Manager field of a department resource. If you have not already created a user resource, you cannot specify a manager. You must first create a user to specify a manager. Also, if you are entering user data, and have not created a department, you cannot specify a department for a user.
In some situations, a resource cannot create associations with other resources, such as when you are creating a company resource. For information on resource type associations, see Resource Type Relationships (page 48).
ExerciseThe company you create for this exercise (Test Company) has a head office in a capital city responsible for sales and a regional office responsible for production. You will manually create two cost centers, two locations, and two departments. You will create a user for each department and create associations between the various resources.
NoteBefore you enter data, consider your organization’s needs and the relationships resources have with each other (see Resource Type Relationships on page 48). It is important to plan and set up organizational resources correctly at the beginning (see Organizational Types Category on page 80).
To create two cost centers with a hierarchal relationship
1. In the Altiris Console, click the Resources tab.
2. In the left pane, select Resources > Organizational Types > Cost Center.
Asset Management Solution 6.5 17
Getting Started
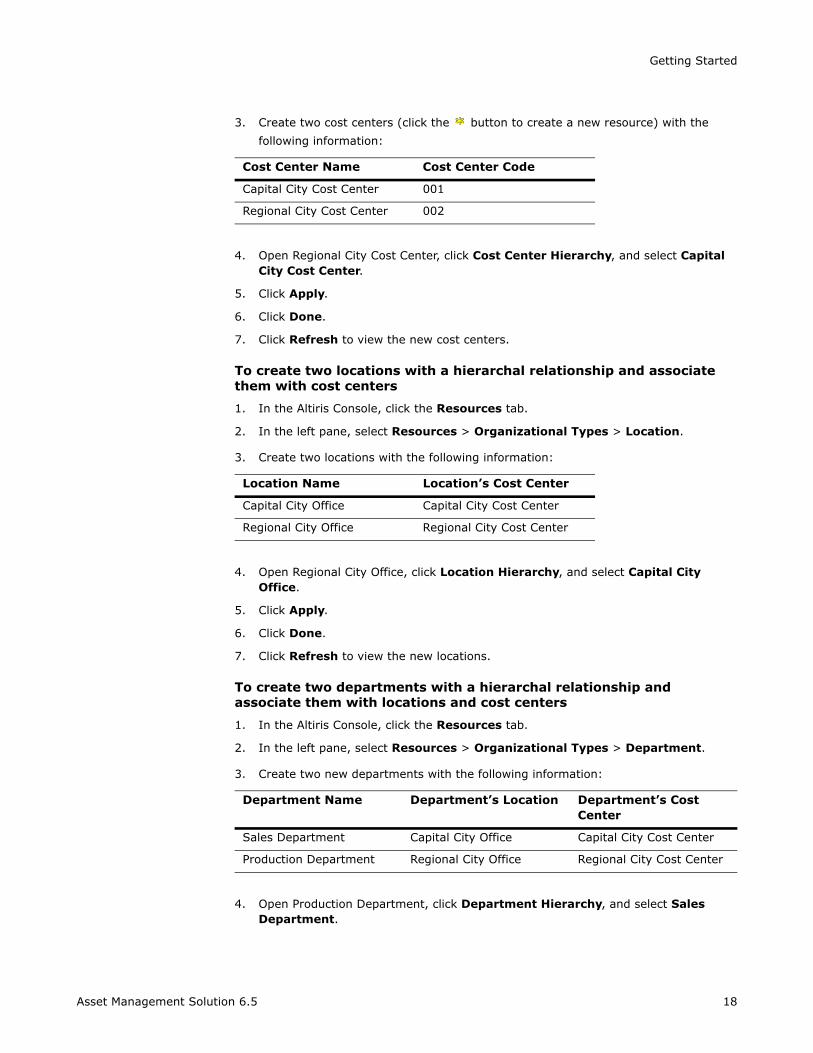
3. Create two cost centers (click the button to create a new resource) with the
following information:
4. Open Regional City Cost Center, click Cost Center Hierarchy, and select Capital City Cost Center.
5. Click Apply.
6. Click Done.
7. Click Refresh to view the new cost centers.
To create two locations with a hierarchal relationship and associate them with cost centers
1. In the Altiris Console, click the Resources tab.
2. In the left pane, select Resources > Organizational Types > Location.
3. Create two locations with the following information:
4. Open Regional City Office, click Location Hierarchy, and select Capital City Office.
5. Click Apply.
6. Click Done.
7. Click Refresh to view the new locations.
To create two departments with a hierarchal relationship and associate them with locations and cost centers
1. In the Altiris Console, click the Resources tab.
2. In the left pane, select Resources > Organizational Types > Department.
3. Create two new departments with the following information:
4. Open Production Department, click Department Hierarchy, and select Sales Department.
Cost Center Name Cost Center Code
Capital City Cost Center 001
Regional City Cost Center 002
Location Name Location’s Cost Center
Capital City Office Capital City Cost Center
Regional City Office Regional City Cost Center
Department Name Department’s Location Department’s Cost Center
Sales Department Capital City Office Capital City Cost Center
Production Department Regional City Office Regional City Cost Center
Asset Management Solution 6.5 18
Getting Started
5. Click Apply.
6. Click Done.
7. Click Refresh to view the new departments.
To create a company named Test Company
1. In the Altiris Console, click the Resources tab.
2. In the left pane, select Resources > Organizational Types > Company.
3. In the right pane, click the button to create a new company resource.
4. In the Company Name field, enter “Test Company”.
5. Click Done.
To create two users and associate them with departments and Test Company
1. In the Altiris Console, click the Resources tab.
2. In the left pane, select Resources > Organizational Types > User.
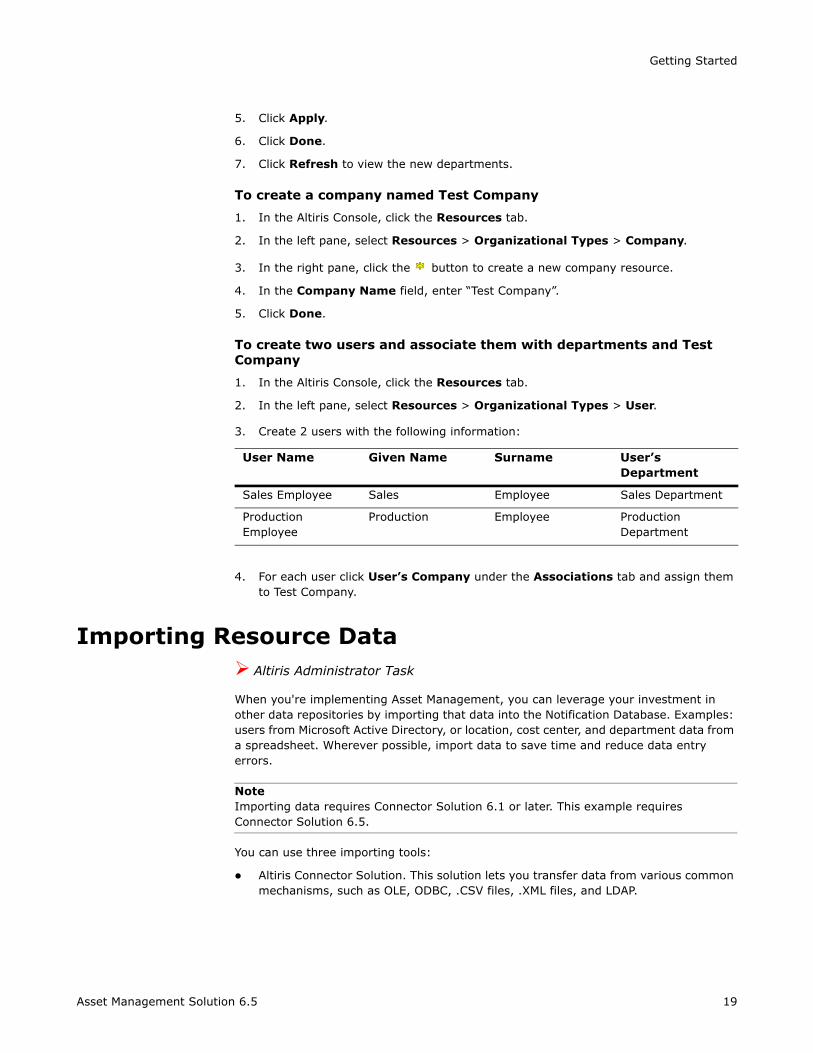
3. Create 2 users with the following information:
4. For each user click User’s Company under the Associations tab and assign them to Test Company.
Importing Resource DataAltiris Administrator Task
When you're implementing Asset Management, you can leverage your investment in other data repositories by importing that data into the Notification Database. Examples: users from Microsoft Active Directory, or location, cost center, and department data from a spreadsheet. Wherever possible, import data to save time and reduce data entry errors.
NoteImporting data requires Connector Solution 6.1 or later. This example requires Connector Solution 6.5.
You can use three importing tools:
Altiris Connector Solution. This solution lets you transfer data from various common mechanisms, such as OLE, ODBC, .CSV files, .XML files, and LDAP.
User Name Given Name Surname User’s Department
Sales Employee Sales Employee Sales Department
Production Employee
Production Employee Production Department
Asset Management Solution 6.5 19

Getting Started
Connector Packs. These work in conjunction with Altiris Connector Solution to import data from enterprise management applications, such as HP Openview and Remedy Action Request System.
Altiris data import components. These components of Notification Server let you import data from sources such as Microsoft Active Directory.
Setting up data to import involves three steps:
Creating a data source
Creating a data source definition
Creating a data transfer rule
ExerciseIn this exercise we will use a .CSV file as a data source. In your working scenario, if the data is not already available in another format like a .CSV file, we recommend that you create this type of data source. With organizational resources, having all of the data in front of you on a spreadsheet can assist you in the crucial stage of planning your organizational resource structure. Import cost center data with the aid of Connector Solution.
To create a .CSV file with Microsoft Excel and enter organizational resource data
1. In Excel, create a spreadsheet and enter data to re-create the following table.
2. Save the file as a .CSV file, and name it Sample Import File.
3. Close the file.
To create a data source definition
1. In the Altiris Console, click the Configuration tab.
2. In the left pane, select Configuration > Solutions Settings > Connectors.
3. Right-click Data Sources and select New > CSV File Data Source.
4. In the Name field, enter “Test Cost Center Import Data”.
5. Keep Comma (,) in the Delimiter Character field.
Column A B C D E
Row 1 Cost Center Code
Name Description Location Cost Center Hierarchy
2 1 Imported Cost Center 1
For testing purposes
Capital City Office
3 2 Imported Cost Center 2
For testing purposes
Capital City Office
Imported Cost Center 1
4 3 Imported Cost Center 3
For testing purposes
Capital City Office
Imported Cost Center 2
Asset Management Solution 6.5 20
Getting Started
6. Select the Allow Imports checkbox.
7. In the Import File field, browse to and select the Sample Import File CSV file.
8. Click Test Data Source.
9. For a preview, click the Display import data link.
10. Close the Data Source View Data Page window.
11. Click Apply.
To create a data transfer rule to perform the data transfer procedure
1. In the Altiris Console, click the Configuration tab.
2. In the left pane, select Configuration > Solutions Settings > Connectors.
3. Right-click Import/Export Rules and select New > Resources Import/Export Rule.
4. In the Name field, enter “Test Import Data Import Rule”.
5. In the Data Source field, select Test Cost Center Import Data.
6. In the Replication Direction field, select Import.
7. In the Resource Type field, select Cost Center.
8. Expand Column Mappings.
9. In Resource Lookup Key, select Resource Name.
10. Under Association Mappings in the Lookup Key column in the Cost Center Hierarchy row, select Resource Name.
11. In the Key Column Mappings column in the Cost Center Hierarchy row, select Cost Center Hierarchy.
12. In the NS Key column in the Cost Center’s Location row, select Resource Name.
13. In the Key Column Mappings column in the Cost Center’s Location row, select Location.
14. Leave Reverse Association Mappings with the default settings.
15. Click Apply.
16. Click Run Now.
17. Click the Resources tab.
18. Select Resources > Organizational Types > Cost Center and view the resources you just imported.
For further information on importing data, see the Altiris Connector Solution documentation and the Altiris Web site.
NoteWhen you create an external data source, the resource type’s data classes identify what information is required in the data source. Example: you wish to create a .CSV file to import monitor data from. In the Altiris Console, select the Configuration tab and select Configuration > Resource Settings > Data Classes > Asset Data Classes. Click on each data class. Any field with the Required checkbox selected must be set up as a column in your .CSV file.
Asset Management Solution 6.5 21
Getting Started
NoteAfter importing data with Altiris Connector Solution, you must run the Altiris CMDB Solution Clean Ownership Task.
Running an InventoryAsset Administrator Task
This task can be run only if the Altiris Agent is installed on the managed computers you wish to inventory.
For further information, see the Inventory Solution documentation and the Altiris Web site.
ExerciseAfter entering organizational type data, we recommend carrying out an inventory of your computers if you have not done so already (requires Inventory Solution). Inventory Solution gathers comprehensive software and hardware data from computers. Inventory data is integrated with Asset Management data.
To run a full inventory
1. In the Altiris Console, click the Tasks tab.
2. In the left pane, select Tasks > Assets and Inventory > Inventory > Windows > Inventory Tasks.
3. Click Recreate Full Inventory.
4. Select the Enable box.
5. In the Applies to Collections field, the default collection is set to All 32-bit Windows Computers.
6. Use the default settings in the Run fields.
7. Click Apply.
Setting Up Financial Type ResourcesAsset Administrator Task
Once the organizational type resources are set up, we recommend entering financial type data.
ExerciseDefine a book accounting period, create accounting codes, and a depreciation schedule. Create assets to associate with the financial data, then use reports to view the data.
Defining Accounting PeriodsThere are three types of accounting periods: Book, Tax, and Custom. They all perform the same function, which is to simply define accounting periods, while the names provide reference points for common accounting uses.
Asset Management Solution 6.5 22
Getting Started
To create an accounting period
1. In the Altiris Console, click the Configuration tab.
2. In the left pane, select Configuration > Solutions Settings > Assets and Inventory > Asset Management Solution > Accounting Periods.
3. In the right pane, set the Book reporting year to start on day 1 of month 7.
4. Set the reporting period to Quarterly.
5. Click OK.
Creating Accounting Codes
To create an accounting code
1. In the Altiris Console, click the Resources tab.
2. In the left pane, select Resource Management > Resources > Financial Types > Accounting Code.
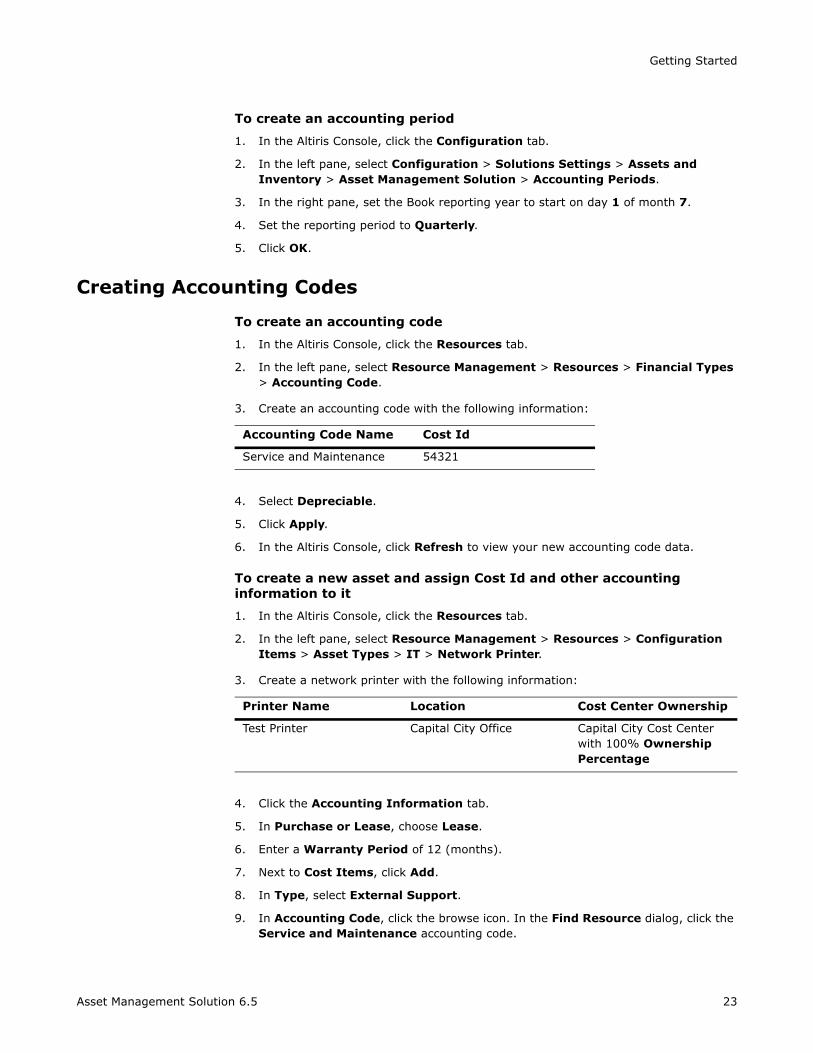
3. Create an accounting code with the following information:
4. Select Depreciable.
5. Click Apply.
6. In the Altiris Console, click Refresh to view your new accounting code data.
To create a new asset and assign Cost Id and other accounting information to it
1. In the Altiris Console, click the Resources tab.
2. In the left pane, select Resource Management > Resources > Configuration Items > Asset Types > IT > Network Printer.
3. Create a network printer with the following information:
4. Click the Accounting Information tab.
5. In Purchase or Lease, choose Lease.
6. Enter a Warranty Period of 12 (months).
7. Next to Cost Items, click Add.
8. In Type, select External Support.
9. In Accounting Code, click the browse icon. In the Find Resource dialog, click the Service and Maintenance accounting code.
Accounting Code Name Cost Id
Service and Maintenance 54321
Printer Name Location Cost Center Ownership
Test Printer Capital City Office Capital City Cost Center with 100% Ownership Percentage
Asset Management Solution 6.5 23
Getting Started
10. Click OK.
11. In Date and Amount, enter valid data.
12. In Status, select Incurred from the drop-down list.
13. In Description, enter a description.
14. Click the Associations tab and add a user or department Owner for this asset.
15. Click Done.
To view the printer in the cost center and location
1. In the left pane, select Resources > Organizational Types > Cost Center > Capital City Cost Center.
2. View the printer in the Assets tab.
3. In the left pane, select Resources > Organizational Types > Location > Capital City Office.
4. View the printer in the Assets tab.
See Also
Configuring Accounting Periods (page 79)
Working with Costs and Depreciation (page 79)
Creating a Depreciation ScheduleAsset Control supports the straight-line depreciation of assets and certain contracts.
ExerciseCreate a depreciation schedule and assign it to a monitor.
To create a depreciation schedule
1. In the Altiris Console, click the Resources tab.
2. In the left pane, select Resource Management > Resources > Financial Types > Depreciation Schedule.
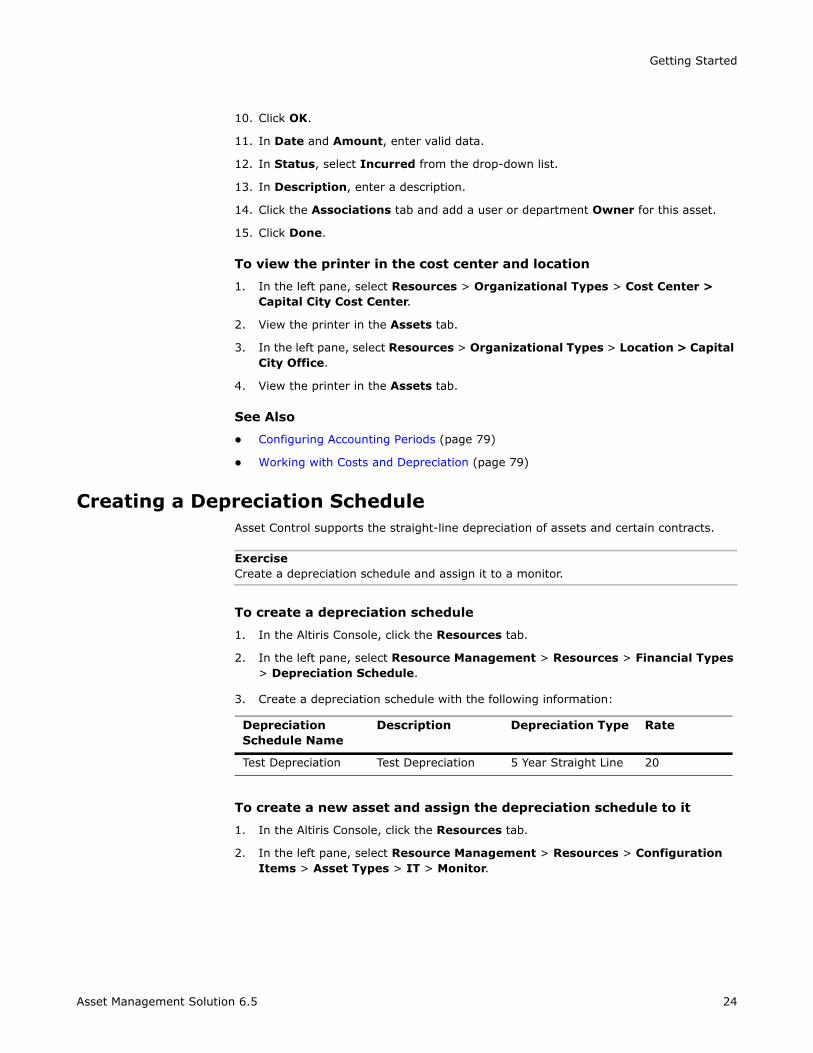
3. Create a depreciation schedule with the following information:
To create a new asset and assign the depreciation schedule to it
1. In the Altiris Console, click the Resources tab.
2. In the left pane, select Resource Management > Resources > Configuration Items > Asset Types > IT > Monitor.
Depreciation Schedule Name
Description Depreciation Type Rate
Test Depreciation Test Depreciation 5 Year Straight Line 20
Asset Management Solution 6.5 24
Getting Started
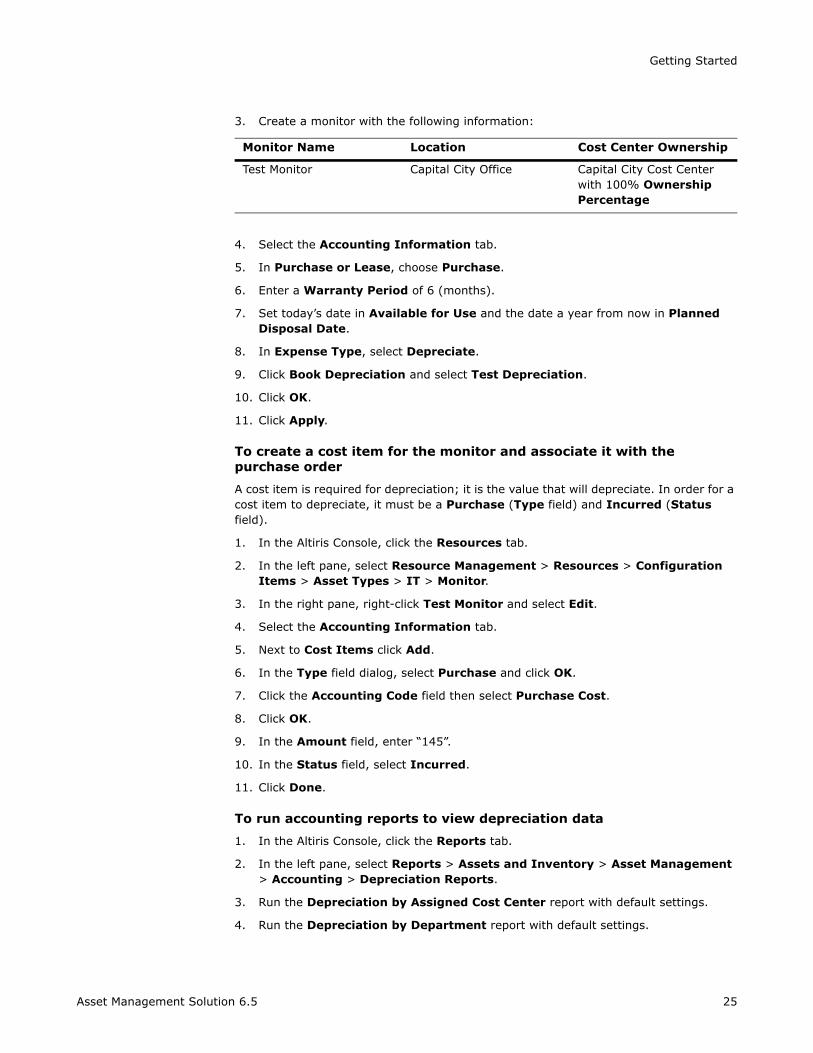
3. Create a monitor with the following information:
4. Select the Accounting Information tab.
5. In Purchase or Lease, choose Purchase.
6. Enter a Warranty Period of 6 (months).
7. Set today’s date in Available for Use and the date a year from now in Planned Disposal Date.
8. In Expense Type, select Depreciate.
9. Click Book Depreciation and select Test Depreciation.
10. Click OK.
11. Click Apply.
To create a cost item for the monitor and associate it with the purchase order
A cost item is required for depreciation; it is the value that will depreciate. In order for a cost item to depreciate, it must be a Purchase (Type field) and Incurred (Status field).
1. In the Altiris Console, click the Resources tab.
2. In the left pane, select Resource Management > Resources > Configuration Items > Asset Types > IT > Monitor.
3. In the right pane, right-click Test Monitor and select Edit.
4. Select the Accounting Information tab.
5. Next to Cost Items click Add.
6. In the Type field dialog, select Purchase and click OK.
7. Click the Accounting Code field then select Purchase Cost.
8. Click OK.
9. In the Amount field, enter “145”.
10. In the Status field, select Incurred.
11. Click Done.
To run accounting reports to view depreciation data
1. In the Altiris Console, click the Reports tab.
2. In the left pane, select Reports > Assets and Inventory > Asset Management > Accounting > Depreciation Reports.
3. Run the Depreciation by Assigned Cost Center report with default settings.
4. Run the Depreciation by Department report with default settings.
Monitor Name Location Cost Center Ownership
Test Monitor Capital City Office Capital City Cost Center with 100% Ownership Percentage
Asset Management Solution 6.5 25
Getting Started
Test Monitor should appear in the results of both reports.
See Also
Financial Types Category (page 79)
Total Cost Tracking (page 12)
Deciding What To Set Up NextAfter entering organizational types data, collecting inventory data, and setting up financial types data, you must decide which data is most important to manage first, according to your organization’s needs. It is not necessary to enter data for all resources before using Asset Management Solution; in fact, we recommend that you add data to your system in phases. If the most important resources you want to manage are computers, enter this data first (see Setting Up Asset Resources on page 26). If you have an urgent need to manage software licenses and leases, enter these first (see Setting Up Contract Resources on page 28).
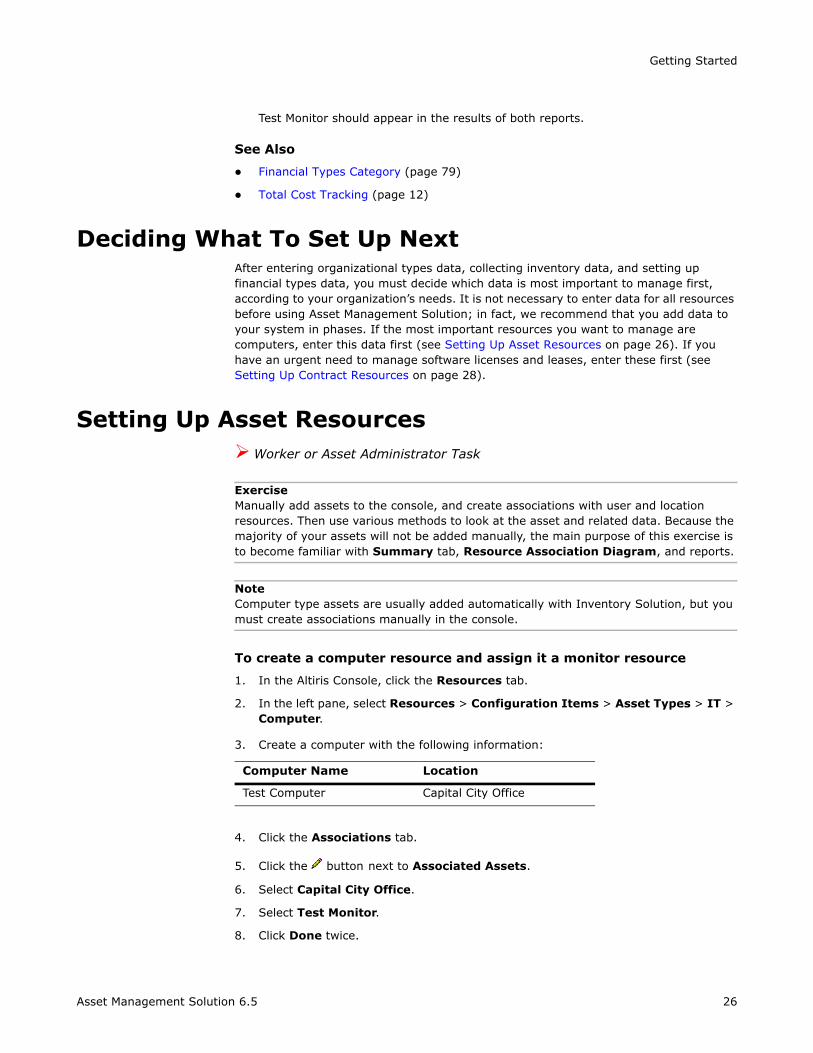
Setting Up Asset ResourcesWorker or Asset Administrator Task
ExerciseManually add assets to the console, and create associations with user and location resources. Then use various methods to look at the asset and related data. Because the majority of your assets will not be added manually, the main purpose of this exercise is to become familiar with Summary tab, Resource Association Diagram, and reports.
NoteComputer type assets are usually added automatically with Inventory Solution, but you must create associations manually in the console.
To create a computer resource and assign it a monitor resource
1. In the Altiris Console, click the Resources tab.
2. In the left pane, select Resources > Configuration Items > Asset Types > IT > Computer.
3. Create a computer with the following information:
4. Click the Associations tab.
5. Click the button next to Associated Assets.
6. Select Capital City Office.
7. Select Test Monitor.
8. Click Done twice.
Computer Name Location
Test Computer Capital City Office
Asset Management Solution 6.5 26
Getting Started
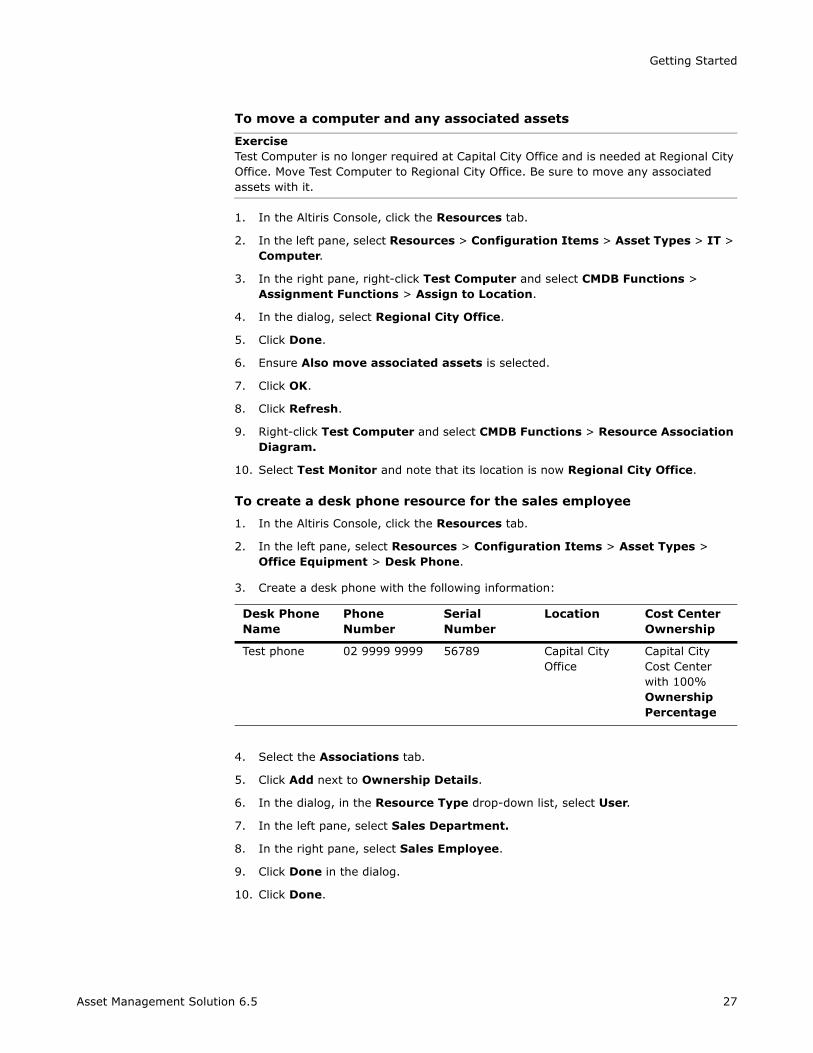
To move a computer and any associated assets
ExerciseTest Computer is no longer required at Capital City Office and is needed at Regional City Office. Move Test Computer to Regional City Office. Be sure to move any associated assets with it.
1. In the Altiris Console, click the Resources tab.
2. In the left pane, select Resources > Configuration Items > Asset Types > IT > Computer.
3. In the right pane, right-click Test Computer and select CMDB Functions > Assignment Functions > Assign to Location.
4. In the dialog, select Regional City Office.
5. Click Done.
6. Ensure Also move associated assets is selected.
7. Click OK.
8. Click Refresh.
9. Right-click Test Computer and select CMDB Functions > Resource Association Diagram.
10. Select Test Monitor and note that its location is now Regional City Office.
To create a desk phone resource for the sales employee
1. In the Altiris Console, click the Resources tab.
2. In the left pane, select Resources > Configuration Items > Asset Types > Office Equipment > Desk Phone.
3. Create a desk phone with the following information:
4. Select the Associations tab.
5. Click Add next to Ownership Details.
6. In the dialog, in the Resource Type drop-down list, select User.
7. In the left pane, select Sales Department.
8. In the right pane, select Sales Employee.
9. Click Done in the dialog.
10. Click Done.
Desk Phone Name
Phone Number
Serial Number
Location Cost Center Ownership
Test phone 02 9999 9999 56789 Capital City Office
Capital City Cost Center with 100% Ownership Percentage
Asset Management Solution 6.5 27
Getting Started
ExerciseCreate another desk phone using what you have learned and assign it to Production Employee, Regional City Office, and Regional City Cost Center.
The following three procedures will show you how to view resource association data with the Resource Association Diagram, Summary tab, and reports.
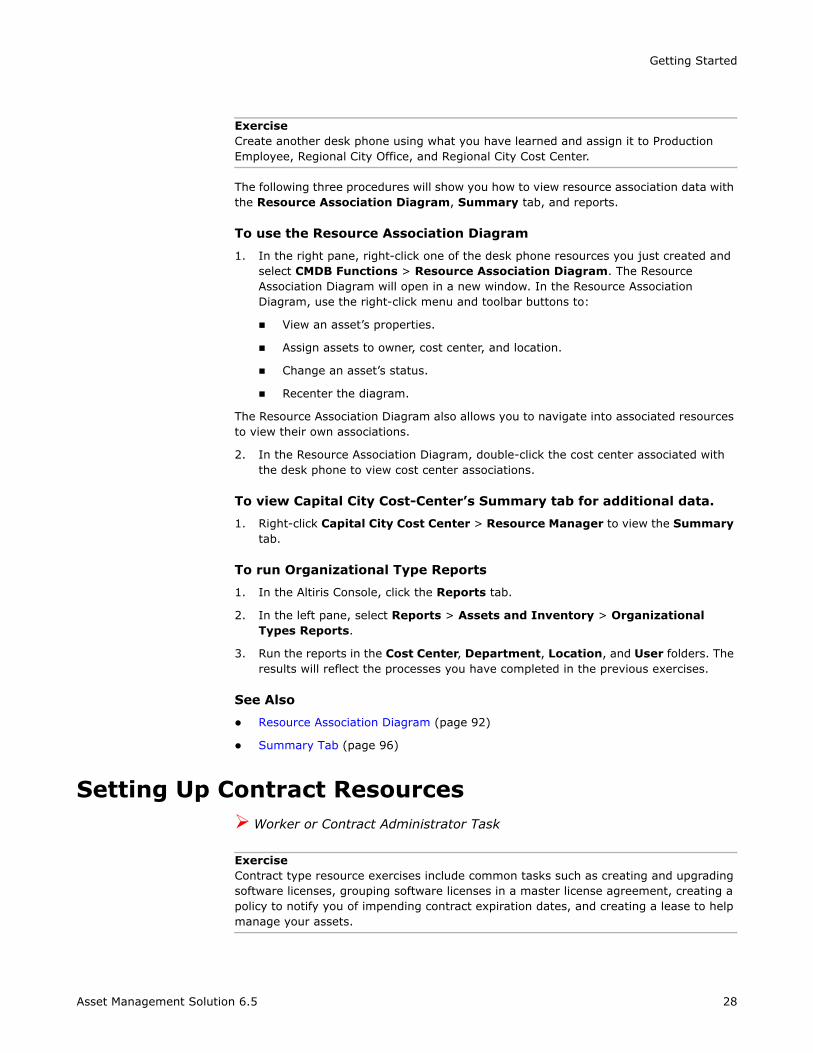
To use the Resource Association Diagram
1. In the right pane, right-click one of the desk phone resources you just created and select CMDB Functions > Resource Association Diagram. The Resource Association Diagram will open in a new window. In the Resource Association Diagram, use the right-click menu and toolbar buttons to:
View an asset’s properties.
Assign assets to owner, cost center, and location.
Change an asset’s status.
Recenter the diagram.
The Resource Association Diagram also allows you to navigate into associated resources to view their own associations.
2. In the Resource Association Diagram, double-click the cost center associated with the desk phone to view cost center associations.
To view Capital City Cost-Center’s Summary tab for additional data.
1. Right-click Capital City Cost Center > Resource Manager to view the Summary tab.
To run Organizational Type Reports
1. In the Altiris Console, click the Reports tab.
2. In the left pane, select Reports > Assets and Inventory > Organizational Types Reports.
3. Run the reports in the Cost Center, Department, Location, and User folders. The results will reflect the processes you have completed in the previous exercises.
See Also
Resource Association Diagram (page 92)
Summary Tab (page 96)
Setting Up Contract ResourcesWorker or Contract Administrator Task
ExerciseContract type resource exercises include common tasks such as creating and upgrading software licenses, grouping software licenses in a master license agreement, creating a policy to notify you of impending contract expiration dates, and creating a lease to help manage your assets.
Asset Management Solution 6.5 28
Getting Started
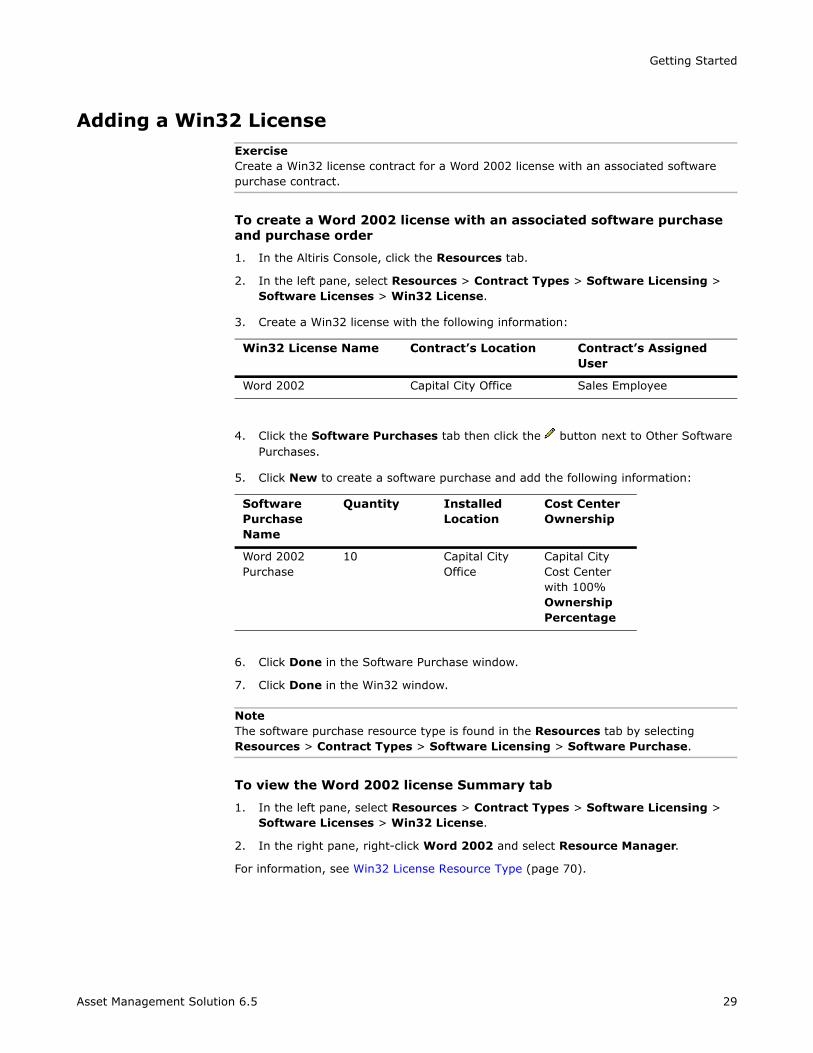
Adding a Win32 LicenseExerciseCreate a Win32 license contract for a Word 2002 license with an associated software purchase contract.
To create a Word 2002 license with an associated software purchase and purchase order
1. In the Altiris Console, click the Resources tab.
2. In the left pane, select Resources > Contract Types > Software Licensing > Software Licenses > Win32 License.
3. Create a Win32 license with the following information:
4. Click the Software Purchases tab then click the button next to Other Software Purchases.
5. Click New to create a software purchase and add the following information:
6. Click Done in the Software Purchase window.
7. Click Done in the Win32 window.
NoteThe software purchase resource type is found in the Resources tab by selecting Resources > Contract Types > Software Licensing > Software Purchase.
To view the Word 2002 license Summary tab
1. In the left pane, select Resources > Contract Types > Software Licensing > Software Licenses > Win32 License.
2. In the right pane, right-click Word 2002 and select Resource Manager.
For information, see Win32 License Resource Type (page 70).
Win32 License Name Contract’s Location Contract’s Assigned User
Word 2002 Capital City Office Sales Employee
Software Purchase Name
Quantity Installed Location
Cost Center Ownership
Word 2002 Purchase
10 Capital City Office
Capital City Cost Center with 100% Ownership Percentage
Asset Management Solution 6.5 29
Getting Started
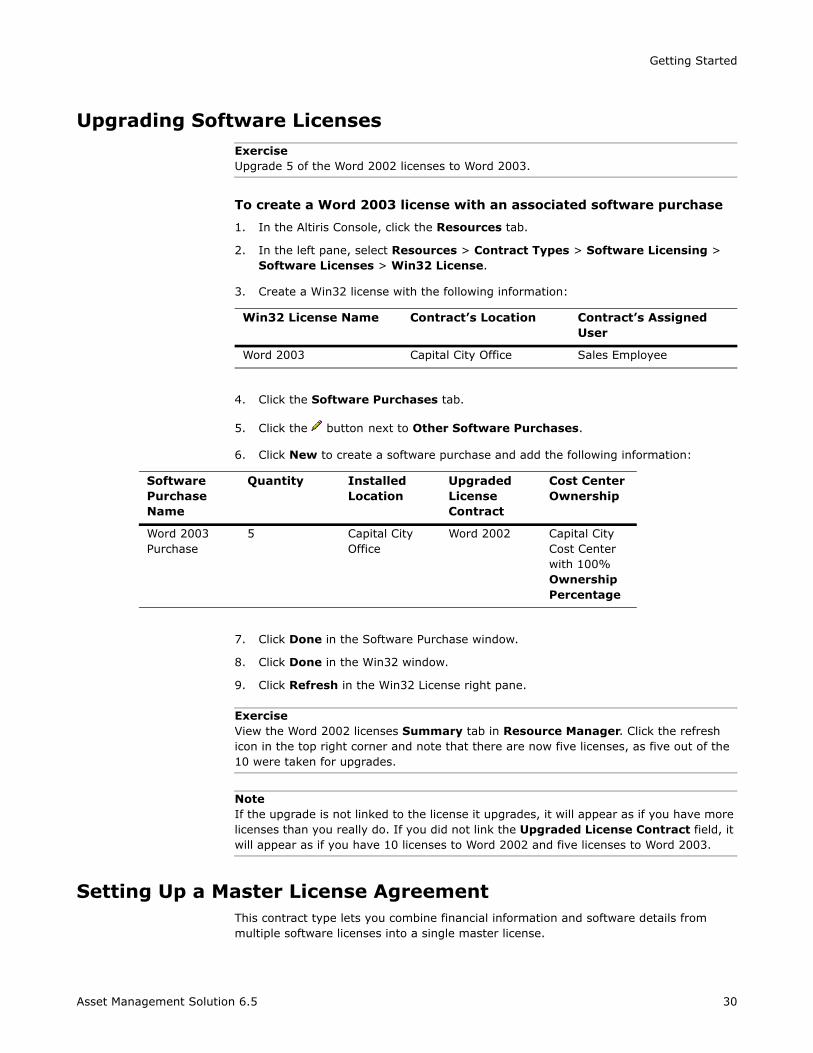
Upgrading Software LicensesExerciseUpgrade 5 of the Word 2002 licenses to Word 2003.
To create a Word 2003 license with an associated software purchase
1. In the Altiris Console, click the Resources tab.
2. In the left pane, select Resources > Contract Types > Software Licensing > Software Licenses > Win32 License.
3. Create a Win32 license with the following information:
4. Click the Software Purchases tab.
5. Click the button next to Other Software Purchases.
6. Click New to create a software purchase and add the following information:
7. Click Done in the Software Purchase window.
8. Click Done in the Win32 window.
9. Click Refresh in the Win32 License right pane.
ExerciseView the Word 2002 licenses Summary tab in Resource Manager. Click the refresh icon in the top right corner and note that there are now five licenses, as five out of the 10 were taken for upgrades.
NoteIf the upgrade is not linked to the license it upgrades, it will appear as if you have more licenses than you really do. If you did not link the Upgraded License Contract field, it will appear as if you have 10 licenses to Word 2002 and five licenses to Word 2003.
Setting Up a Master License AgreementThis contract type lets you combine financial information and software details from multiple software licenses into a single master license.
Win32 License Name Contract’s Location Contract’s Assigned User
Word 2003 Capital City Office Sales Employee
Software Purchase Name
Quantity Installed Location
Upgraded License Contract
Cost Center Ownership
Word 2003 Purchase
5 Capital City Office
Word 2002 Capital City Cost Center with 100% Ownership Percentage
Asset Management Solution 6.5 30
Getting Started
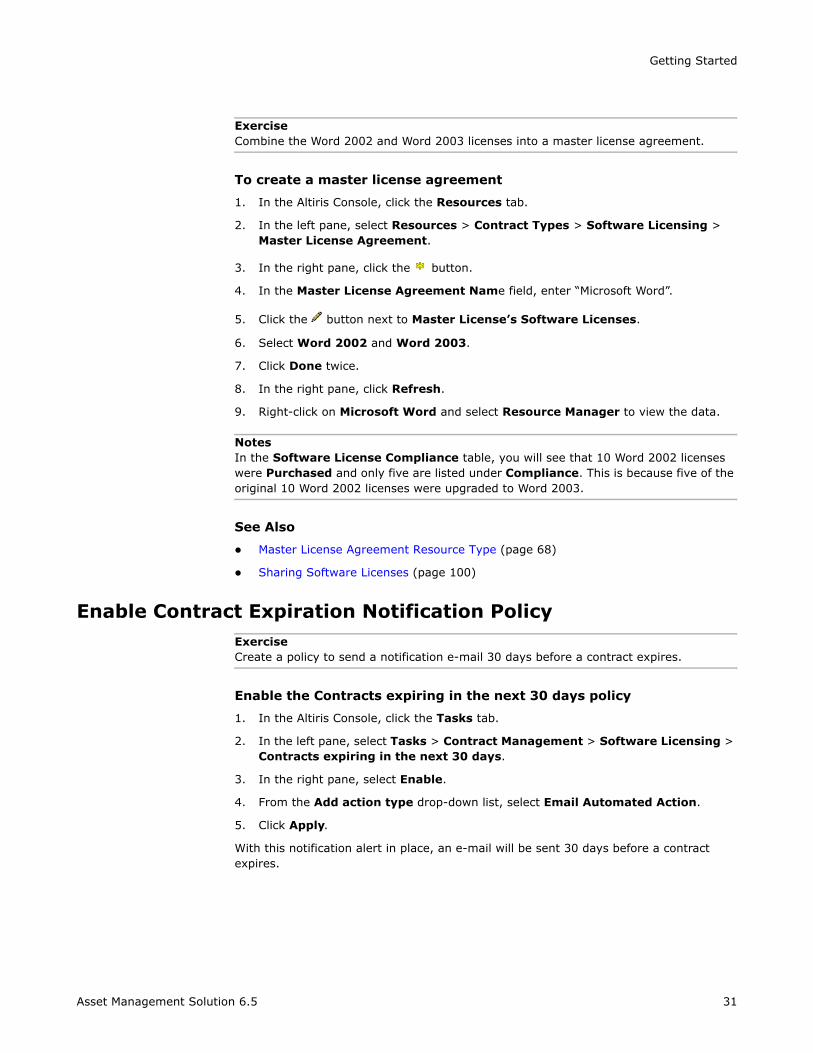
ExerciseCombine the Word 2002 and Word 2003 licenses into a master license agreement.
To create a master license agreement
1. In the Altiris Console, click the Resources tab.
2. In the left pane, select Resources > Contract Types > Software Licensing > Master License Agreement.
3. In the right pane, click the button.
4. In the Master License Agreement Name field, enter “Microsoft Word”.
5. Click the button next to Master License’s Software Licenses.
6. Select Word 2002 and Word 2003.
7. Click Done twice.
8. In the right pane, click Refresh.
9. Right-click on Microsoft Word and select Resource Manager to view the data.
NotesIn the Software License Compliance table, you will see that 10 Word 2002 licenses were Purchased and only five are listed under Compliance. This is because five of the original 10 Word 2002 licenses were upgraded to Word 2003.
See Also
Master License Agreement Resource Type (page 68)
Sharing Software Licenses (page 100)
Enable Contract Expiration Notification PolicyExerciseCreate a policy to send a notification e-mail 30 days before a contract expires.
Enable the Contracts expiring in the next 30 days policy
1. In the Altiris Console, click the Tasks tab.
2. In the left pane, select Tasks > Contract Management > Software Licensing > Contracts expiring in the next 30 days.
3. In the right pane, select Enable.
4. From the Add action type drop-down list, select Email Automated Action.
5. Click Apply.
With this notification alert in place, an e-mail will be sent 30 days before a contract expires.
Asset Management Solution 6.5 31
Getting Started
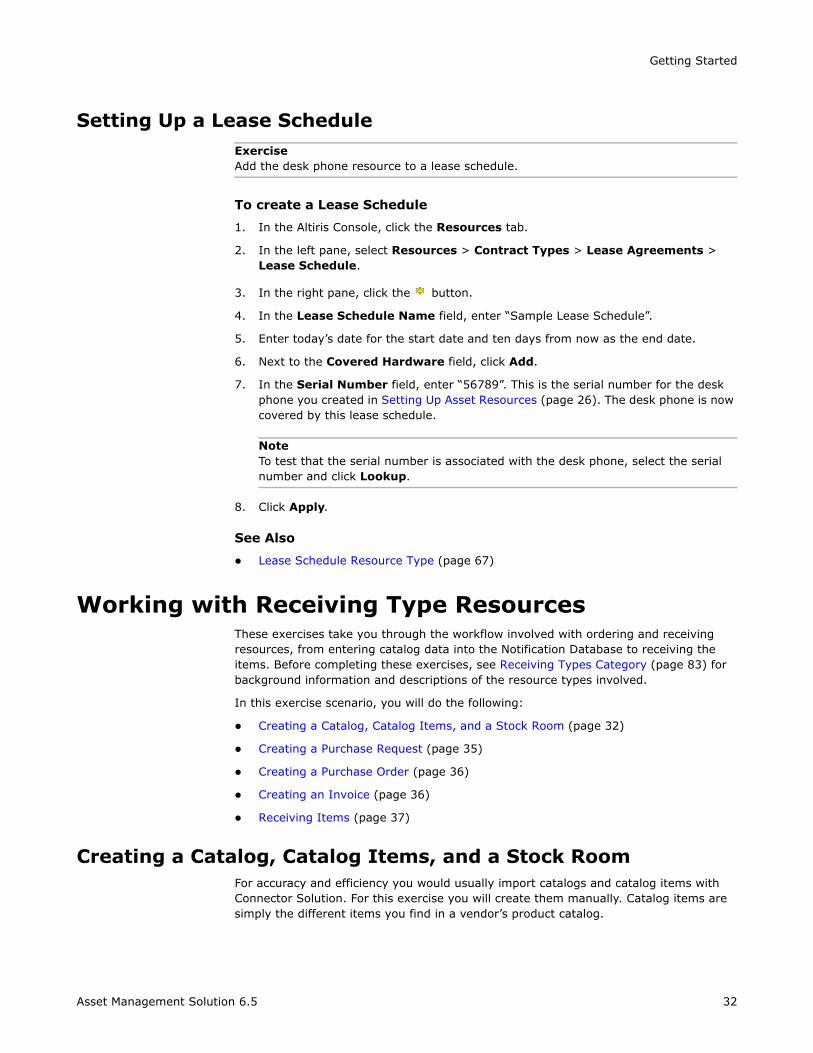
Setting Up a Lease ScheduleExerciseAdd the desk phone resource to a lease schedule.
To create a Lease Schedule
1. In the Altiris Console, click the Resources tab.
2. In the left pane, select Resources > Contract Types > Lease Agreements > Lease Schedule.
3. In the right pane, click the button.
4. In the Lease Schedule Name field, enter “Sample Lease Schedule”.
5. Enter today’s date for the start date and ten days from now as the end date.
6. Next to the Covered Hardware field, click Add.
7. In the Serial Number field, enter “56789”. This is the serial number for the desk phone you created in Setting Up Asset Resources (page 26). The desk phone is now covered by this lease schedule.
NoteTo test that the serial number is associated with the desk phone, select the serial number and click Lookup.
8. Click Apply.
See Also
Lease Schedule Resource Type (page 67)
Working with Receiving Type ResourcesThese exercises take you through the workflow involved with ordering and receiving resources, from entering catalog data into the Notification Database to receiving the items. Before completing these exercises, see Receiving Types Category (page 83) for background information and descriptions of the resource types involved.
In this exercise scenario, you will do the following:
Creating a Catalog, Catalog Items, and a Stock Room (page 32)
Creating a Purchase Request (page 35)
Creating a Purchase Order (page 36)
Creating an Invoice (page 36)
Receiving Items (page 37)
Creating a Catalog, Catalog Items, and a Stock RoomFor accuracy and efficiency you would usually import catalogs and catalog items with Connector Solution. For this exercise you will create them manually. Catalog items are simply the different items you find in a vendor’s product catalog.
Asset Management Solution 6.5 32
Getting Started
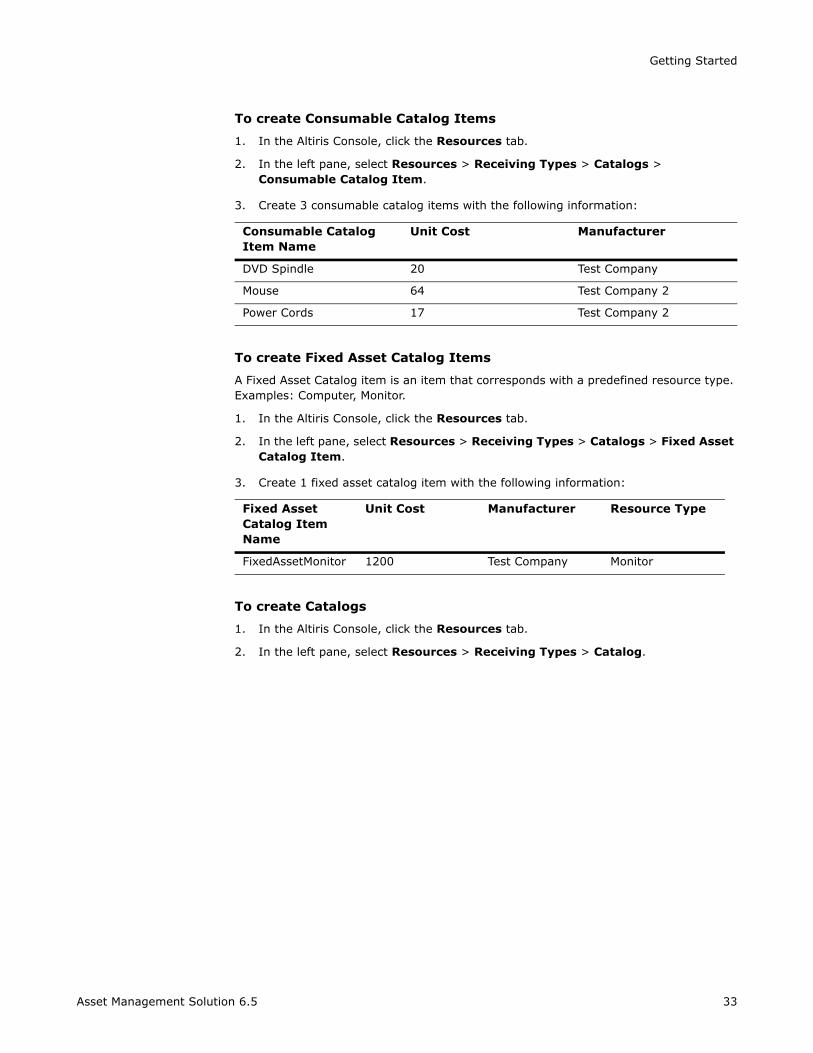
To create Consumable Catalog Items
1. In the Altiris Console, click the Resources tab.
2. In the left pane, select Resources > Receiving Types > Catalogs > Consumable Catalog Item.
3. Create 3 consumable catalog items with the following information:
To create Fixed Asset Catalog Items
A Fixed Asset Catalog item is an item that corresponds with a predefined resource type. Examples: Computer, Monitor.
1. In the Altiris Console, click the Resources tab.
2. In the left pane, select Resources > Receiving Types > Catalogs > Fixed Asset Catalog Item.
3. Create 1 fixed asset catalog item with the following information:
To create Catalogs
1. In the Altiris Console, click the Resources tab.
2. In the left pane, select Resources > Receiving Types > Catalog.
Consumable Catalog Item Name
Unit Cost Manufacturer
DVD Spindle 20 Test Company
Mouse 64 Test Company 2
Power Cords 17 Test Company 2
Fixed Asset Catalog Item Name
Unit Cost Manufacturer Resource Type
FixedAssetMonitor 1200 Test Company Monitor
Asset Management Solution 6.5 33
Getting Started
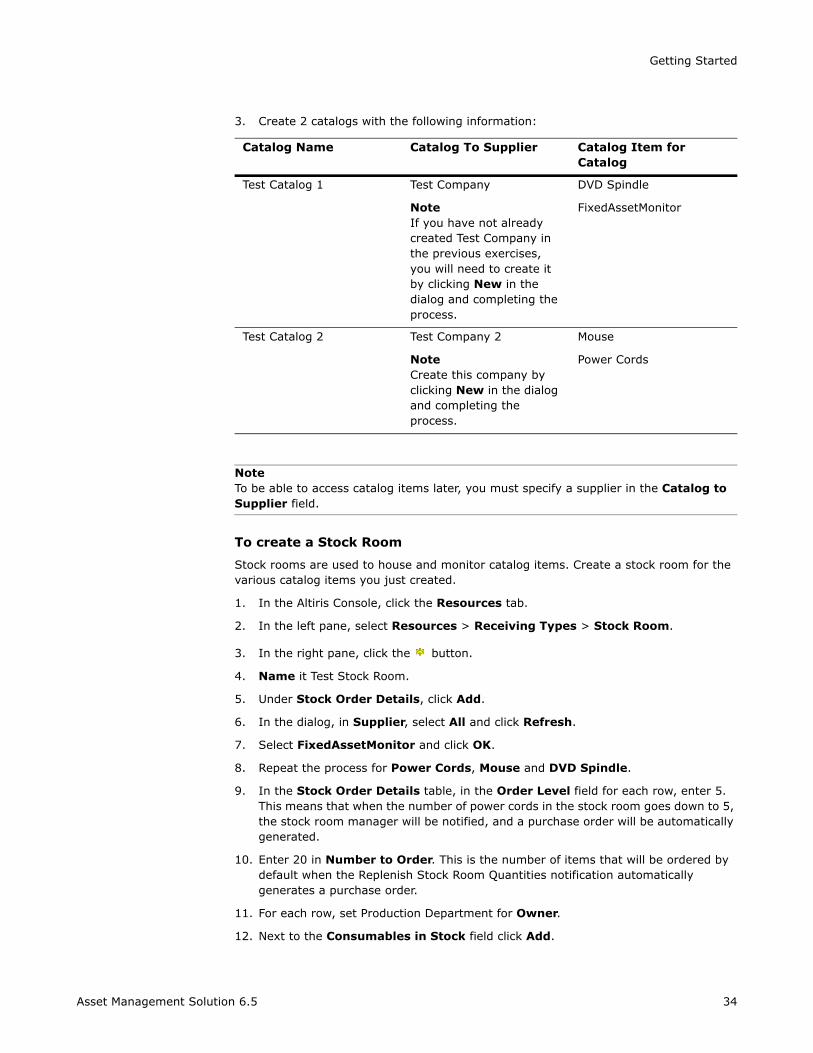
3. Create 2 catalogs with the following information:
NoteTo be able to access catalog items later, you must specify a supplier in the Catalog to Supplier field.
To create a Stock Room
Stock rooms are used to house and monitor catalog items. Create a stock room for the various catalog items you just created.
1. In the Altiris Console, click the Resources tab.
2. In the left pane, select Resources > Receiving Types > Stock Room.
3. In the right pane, click the button.
4. Name it Test Stock Room.
5. Under Stock Order Details, click Add.
6. In the dialog, in Supplier, select All and click Refresh.
7. Select FixedAssetMonitor and click OK.
8. Repeat the process for Power Cords, Mouse and DVD Spindle.
9. In the Stock Order Details table, in the Order Level field for each row, enter 5. This means that when the number of power cords in the stock room goes down to 5, the stock room manager will be notified, and a purchase order will be automatically generated.
10. Enter 20 in Number to Order. This is the number of items that will be ordered by default when the Replenish Stock Room Quantities notification automatically generates a purchase order.
11. For each row, set Production Department for Owner.
12. Next to the Consumables in Stock field click Add.
Catalog Name Catalog To Supplier Catalog Item for Catalog
Test Catalog 1 Test Company
NoteIf you have not already created Test Company in the previous exercises, you will need to create it by clicking New in the dialog and completing the process.
DVD Spindle
FixedAssetMonitor
Test Catalog 2 Test Company 2
NoteCreate this company by clicking New in the dialog and completing the process.
Mouse
Power Cords
Asset Management Solution 6.5 34
Getting Started
13. In the dialog, select Power Cords.
14. Click OK.
15. Select Owner, and in the dialog, select Production Department.
16. Click OK.
17. In the Number in Stock field, enter 10.
If the number in this field drops to 5 or lower, a purchase order will be created.
18. Select Stock Room Manager.
NoteFor e-mail notification to work, the user’s Email field needs to be populated and the Configuration > Server Settings > Notification Server Settings > Email Configuration page configured. If not, the notification is lost. See Altiris Notification Server Help.
19. In the dialog, select Production Employee (if you do not have this user, click New to create).
20. Select Stock Room’s Location.
21. In the dialog select Regional City Office (if you do not have this location, see Setting Up Organizational Type Resources on page 17 for instructions).
22. Click Done.
Creating a Purchase RequestAt this point of the receiving process you must create a purchase request for the catalog items you want to buy.
To create a Purchase Request
1. In the Altiris Console, click the Resources tab.
2. In the left pane, select Resources > Receiving Types > Purchase Request.
3. In the right pane, click the button.
The purchase request will automatically be assigned a number that can be edited if required.
4. In Approval Status, select Approved.
5. Next to the Line Items table click Add.
6. Ensure Catalog Item is selected.
7. In Supplier, select All and click Refresh.
8. Under Catalog Items, select DVD Spindle and click OK.
9. Repeat the process for FixedAssetMonitor, Mouse, and Power Cords.
10. Set the Owner for each line item to Production Department.
Asset Management Solution 6.5 35
Getting Started
NoteIn a real scenario when adding a number of items from the same catalog, you may want to first create a bundle resource containing multiple catalog items to simply add the bundle to a purchase request, rather than adding each individual item. See Bundle Resource Type (page 87).
11. Select Requestor, and select in the dialog Production Employee. If you have not already created this user in the previous exercises, you will need to create it by clicking New in the dialog and completing the process.
12. Click Done.
13. Select Check Stock Room and select Test Stock Room in the dialog.
NoteSee Stock Room (page 86) for information on stock allocation requests and the Check Stock Room field.
14. Click Done.
15. In the Quantity field in the Line Items table, set quantities for each item you are ordering.
16. Click Done.
Creating a Purchase OrderGenerate a purchase order from the purchase requests you just created.
To create a Purchase Order from a Purchase Request
1. In the Altiris Console, click the Resources tab.
2. In the left pane, select Resources > Receiving Types > Purchase Request.
3. In the right pane, right-click the purchase request you just created and select Generate Purchase Order.
At this point, two separate purchase orders will be generated (one for each catalog) containing the line items you add to the purchase request.
Creating an InvoiceGenerate invoices from the purchase orders you just created.
To create an Invoice from a Purchase Order
1. In the Altiris Console, click the Resources tab.
2. In the left pane, select Resources > Receiving Types > Purchase Order.
3. In the right pane, double-click one of the new purchase orders.
4. In the Edit Purchase Order dialog, click Generate under Generate Invoice.
At this point, an invoice will be generated containing the line items included in the purchase order.
5. Repeat the steps for the second purchase order.
Asset Management Solution 6.5 36
Getting Started
6. To view the invoices you have created, select Resources > Receiving Types > Invoice.
Receiving ItemsReceive the items in the invoices you just created into your database. See Receive Items Page (page 87) for detailed information.
To receive Consumable Catalog Items
1. In the Altiris Console, click the Resources tab.
2. In the left pane, select Resources > Receiving Types > Invoice.
3. In the right-pane, right-click the invoice containing Mouse and select Receive Items.
4. In the dialog, select Update an existing resource/Add the Consumable to a Stockroom.
5. In the Received Item Line Items table, select Mouse.
6. Select Test Stock Room under the Existing Resource field.
7. In Owner, select Production Department (if you do not have this location, see Setting Up Organizational Type Resources on page 17).
8. In Display Name, enter a name for the item.
NoteFor all consumable catalog items, you must choose a department or cost center in Owner. These items cannot be owned by users.
9. Select Receive selected.
10. Click Receive.
At this point Mouse will be added to Test Stock Room and a receiving slip (Resources > Receiving Types > Receiving Slip) will be created for the item.
To receive Fixed Asset Catalog Items
1. In the Altiris Console, click the Resources tab.
2. In the left pane, select Resources > Receiving Types > Invoice.
3. In the right-pane, right-click the invoice containing FixedAssetMonitor and select Receive Items.
4. In the dialog, select Create a new resource.
5. Enter Display Name values for two of the monitors.
6. Select the two FixedAssetMonitor rows.
7. Select Receive selected.
8. Click Receive.
At this point two new monitor resources will be added to the database and a receiving slip will be created for the item.
Asset Management Solution 6.5 37
Getting Started
ConfigurationAsset Management provides many options for automatically cleaning-up old data, entering data, and other options. Now that you understand the basics of these solutions, we recommend that you see Asset Management Configuration and Scenarios (page 98) to learn more about configuration options.
Asset Management Solution 6.5 38
Chapter 4Resource Types
Resource types are templates for entering resource data into the Notification Database.
Resource types consist of the following components:
Base resource types. This is the foundation on which a resource type is built. A resource type inherits the data classes of the base resource type. All resource types, except Asset and Contract, are based on another resource type. See Base Resource Types (page 39).
Data classes. These are the building blocks of a resource type. Each data class defines attributes that are used for storing data by a resource type. See Data Classes (page 40).
Resource association types. These create associations between resources and allow related data to be linked together. See Resource Association Types (page 47).
Resource creation and editing tasks are performed by a person with administrator rights.
Predefined and User-Defined Resource TypesWe advise using predefined resource types whenever possible. They contain relevant associations, fields, and reports for a particular type of resource. You can also add custom fields to predefined resource types. Most importantly, predefined resource types include features and reports not available in user-defined resource types. Example: Hierarchy (see Hierarchal Resource Types on page 82).
Commonly used resource types have been predefined, but they might be known by a name than you are unaccustomed to. Example: In your organization you have a “Mail Stop”. There is no predefined Mail Stop resource type; however, the predefined Location resource type is the Mail Stop equivalent and provides the needed functionality. You can change the name of any resource type through Altiris CMDB Solution using the Display As rule.
Base Resource TypesA base resource type is the resource type on which another resource type is based. A resource type inherits all of the data types of the base resource type. Any resource type can serve as a base resource type. If it changes, the resource type that uses it as a base resource will also change.
Specifying a base resource type is an effective way to create and manage resource types.
Example: Create a general invoice type that includes the attributes used in all invoices. Then you can customize specific invoices for the companies with which you work regularly that require unique attributes specific to that company. Simply add additional data classes for the unique attributes.
Asset Management Solution 6.5 39
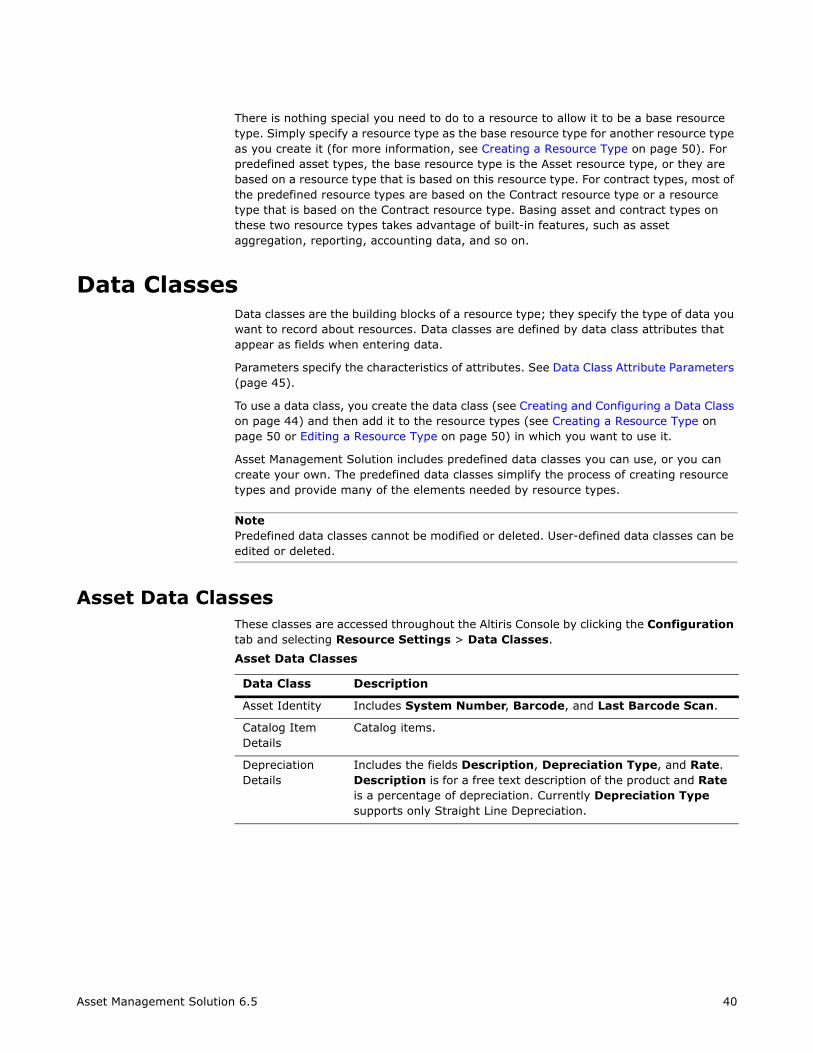
Data ClassesData classes are the building blocks of a resource type; they specify the type of data you want to record about resources. Data classes are defined by data class attributes that appear as fields when entering data.
Parameters specify the characteristics of attributes. See Data Class Attribute Parameters (page 45).
To use a data class, you create the data class (see Creating and Configuring a Data Class on page 44) and then add it to the resource types (see Creating a Resource Type on page 50 or Editing a Resource Type on page 50) in which you want to use it.
Asset Management Solution includes predefined data classes you can use, or you can create your own. The predefined data classes simplify the process of creating resource types and provide many of the elements needed by resource types.
NotePredefined data classes cannot be modified or deleted. User-defined data classes can be edited or deleted.
Asset Data ClassesThese classes are accessed throughout the Altiris Console by clicking the Configuration tab and selecting Resource Settings > Data Classes.
Asset Data Classes
Data Class Description
Asset Identity Includes System Number, Barcode, and Last Barcode Scan.
Catalog Item Details
Catalog items.
Depreciation Details
Includes the fields Description, Depreciation Type, and Rate. Description is for a free text description of the product and Rate is a percentage of depreciation. Currently Depreciation Type supports only Straight Line Depreciation.
Asset Management Solution 6.5 40
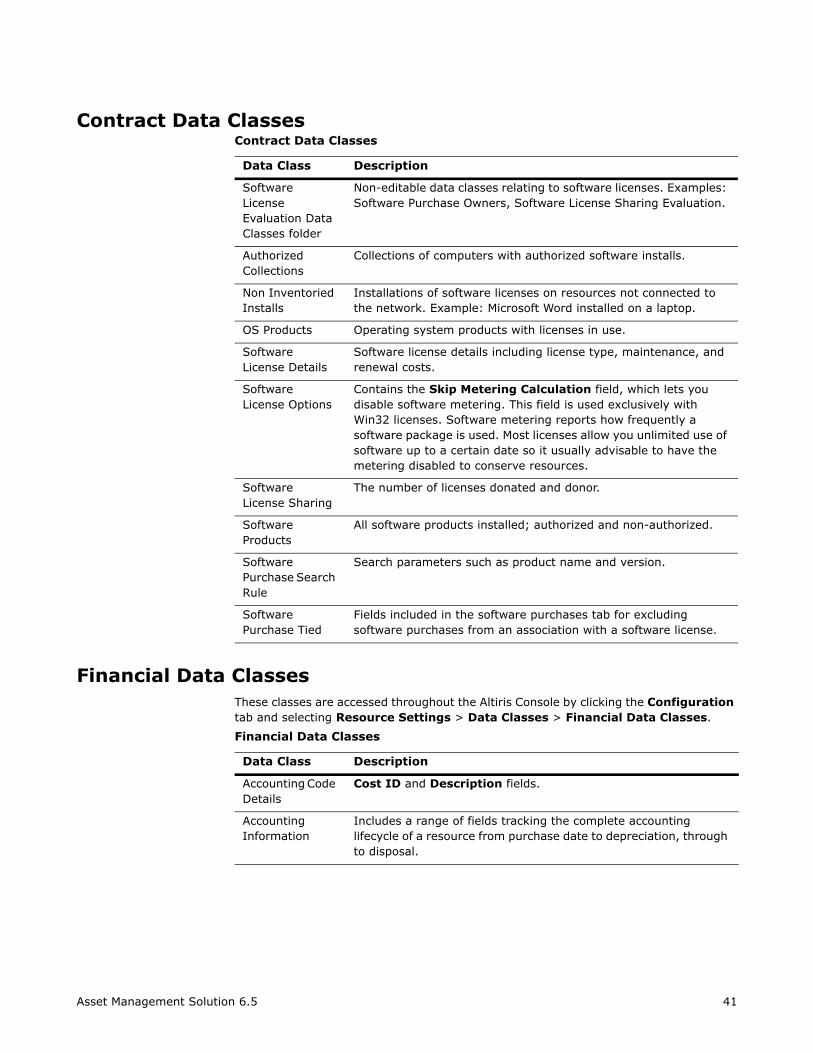
Financial Data ClassesThese classes are accessed throughout the Altiris Console by clicking the Configuration tab and selecting Resource Settings > Data Classes > Financial Data Classes.
Contract Data Classes
Data Class Description
Software License Evaluation Data Classes folder
Non-editable data classes relating to software licenses. Examples: Software Purchase Owners, Software License Sharing Evaluation.
Authorized Collections
Collections of computers with authorized software installs.
Non Inventoried Installs
Installations of software licenses on resources not connected to the network. Example: Microsoft Word installed on a laptop.
OS Products Operating system products with licenses in use.
Software License Details
Software license details including license type, maintenance, and renewal costs.
Software License Options
Contains the Skip Metering Calculation field, which lets you disable software metering. This field is used exclusively with Win32 licenses. Software metering reports how frequently a software package is used. Most licenses allow you unlimited use of software up to a certain date so it usually advisable to have the metering disabled to conserve resources.
Software License Sharing
The number of licenses donated and donor.
Software Products
All software products installed; authorized and non-authorized.
Software Purchase Search Rule
Search parameters such as product name and version.
Software Purchase Tied
Fields included in the software purchases tab for excluding software purchases from an association with a software license.
Financial Data Classes
Data Class Description
Accounting Code Details
Cost ID and Description fields.
Accounting Information
Includes a range of fields tracking the complete accounting lifecycle of a resource from purchase date to depreciation, through to disposal.
Asset Management Solution 6.5 41
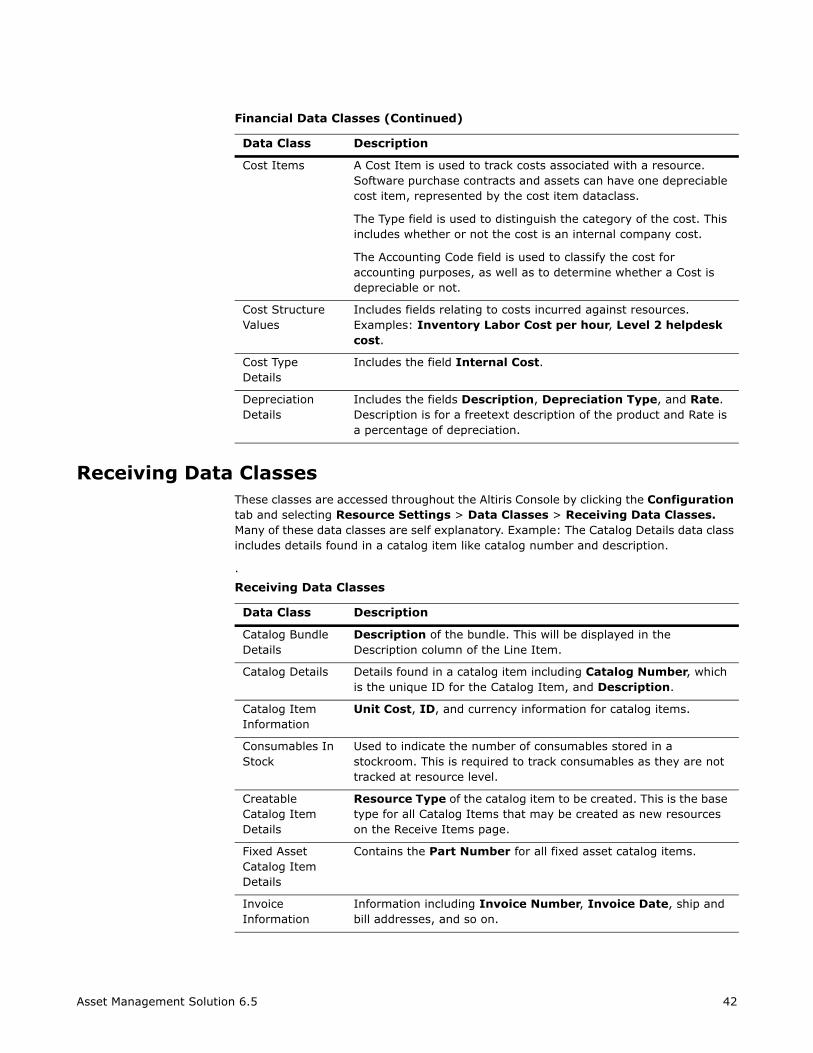
Receiving Data ClassesThese classes are accessed throughout the Altiris Console by clicking the Configuration tab and selecting Resource Settings > Data Classes > Receiving Data Classes. Many of these data classes are self explanatory. Example: The Catalog Details data class includes details found in a catalog item like catalog number and description.
.
Cost Items A Cost Item is used to track costs associated with a resource. Software purchase contracts and assets can have one depreciable cost item, represented by the cost item dataclass.
The Type field is used to distinguish the category of the cost. This includes whether or not the cost is an internal company cost.
The Accounting Code field is used to classify the cost for accounting purposes, as well as to determine whether a Cost is depreciable or not.
Cost Structure Values
Includes fields relating to costs incurred against resources. Examples: Inventory Labor Cost per hour, Level 2 helpdesk cost.
Cost Type Details
Includes the field Internal Cost.
Depreciation Details
Includes the fields Description, Depreciation Type, and Rate. Description is for a freetext description of the product and Rate is a percentage of depreciation.
Receiving Data Classes
Data Class Description
Catalog Bundle Details
Description of the bundle. This will be displayed in the Description column of the Line Item.
Catalog Details Details found in a catalog item including Catalog Number, which is the unique ID for the Catalog Item, and Description.
Catalog Item Information
Unit Cost, ID, and currency information for catalog items.
Consumables In Stock
Used to indicate the number of consumables stored in a stockroom. This is required to track consumables as they are not tracked at resource level.
Creatable Catalog Item Details
Resource Type of the catalog item to be created. This is the base type for all Catalog Items that may be created as new resources on the Receive Items page.
Fixed Asset Catalog Item Details
Contains the Part Number for all fixed asset catalog items.
Invoice Information
Information including Invoice Number, Invoice Date, ship and bill addresses, and so on.
Financial Data Classes (Continued)
Data Class Description
Asset Management Solution 6.5 42
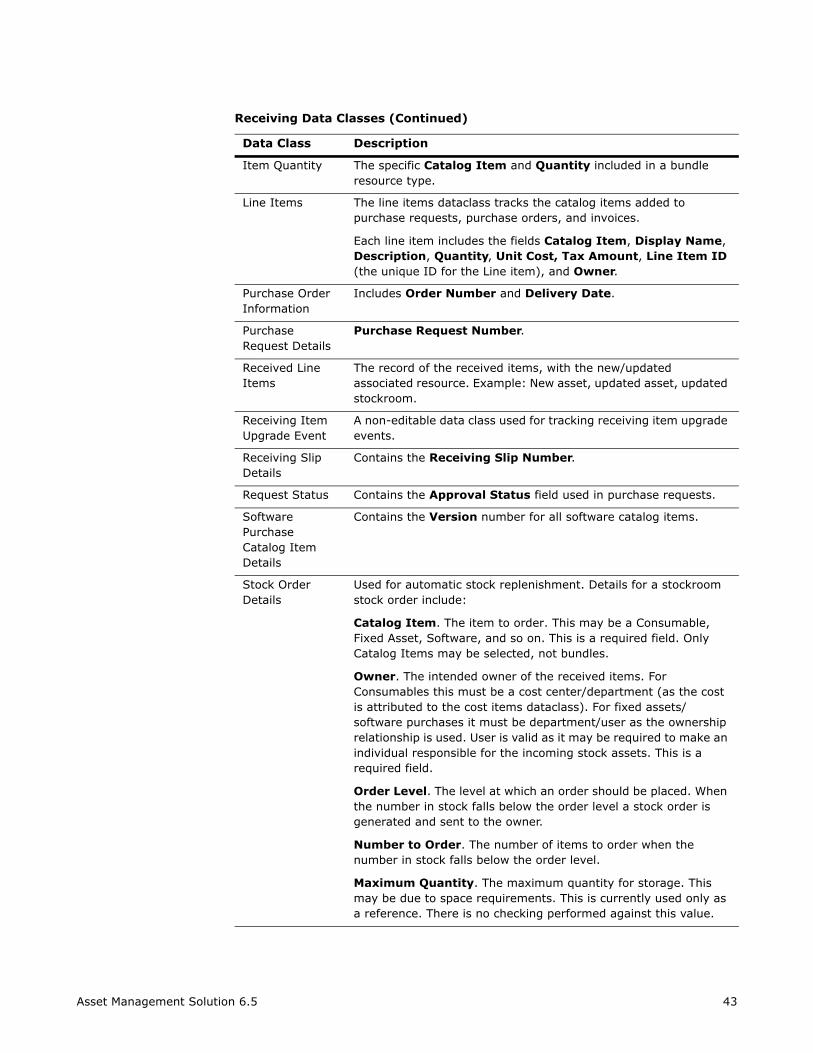
Item Quantity The specific Catalog Item and Quantity included in a bundle resource type.
Line Items The line items dataclass tracks the catalog items added to purchase requests, purchase orders, and invoices.
Each line item includes the fields Catalog Item, Display Name, Description, Quantity, Unit Cost, Tax Amount, Line Item ID (the unique ID for the Line item), and Owner.
Purchase Order Information
Includes Order Number and Delivery Date.
Purchase Request Details
Purchase Request Number.
Received Line Items
The record of the received items, with the new/updated associated resource. Example: New asset, updated asset, updated stockroom.
Receiving Item Upgrade Event
A non-editable data class used for tracking receiving item upgrade events.
Receiving Slip Details
Contains the Receiving Slip Number.
Request Status Contains the Approval Status field used in purchase requests.
Software Purchase Catalog Item Details
Contains the Version number for all software catalog items.
Stock Order Details
Used for automatic stock replenishment. Details for a stockroom stock order include:
Catalog Item. The item to order. This may be a Consumable, Fixed Asset, Software, and so on. This is a required field. Only Catalog Items may be selected, not bundles.
Owner. The intended owner of the received items. For Consumables this must be a cost center/department (as the cost is attributed to the cost items dataclass). For fixed assets/software purchases it must be department/user as the ownership relationship is used. User is valid as it may be required to make an individual responsible for the incoming stock assets. This is a required field.
Order Level. The level at which an order should be placed. When the number in stock falls below the order level a stock order is generated and sent to the owner.
Number to Order. The number of items to order when the number in stock falls below the order level.
Maximum Quantity. The maximum quantity for storage. This may be due to space requirements. This is currently used only as a reference. There is no checking performed against this value.
Receiving Data Classes (Continued)
Data Class Description
Asset Management Solution 6.5 43
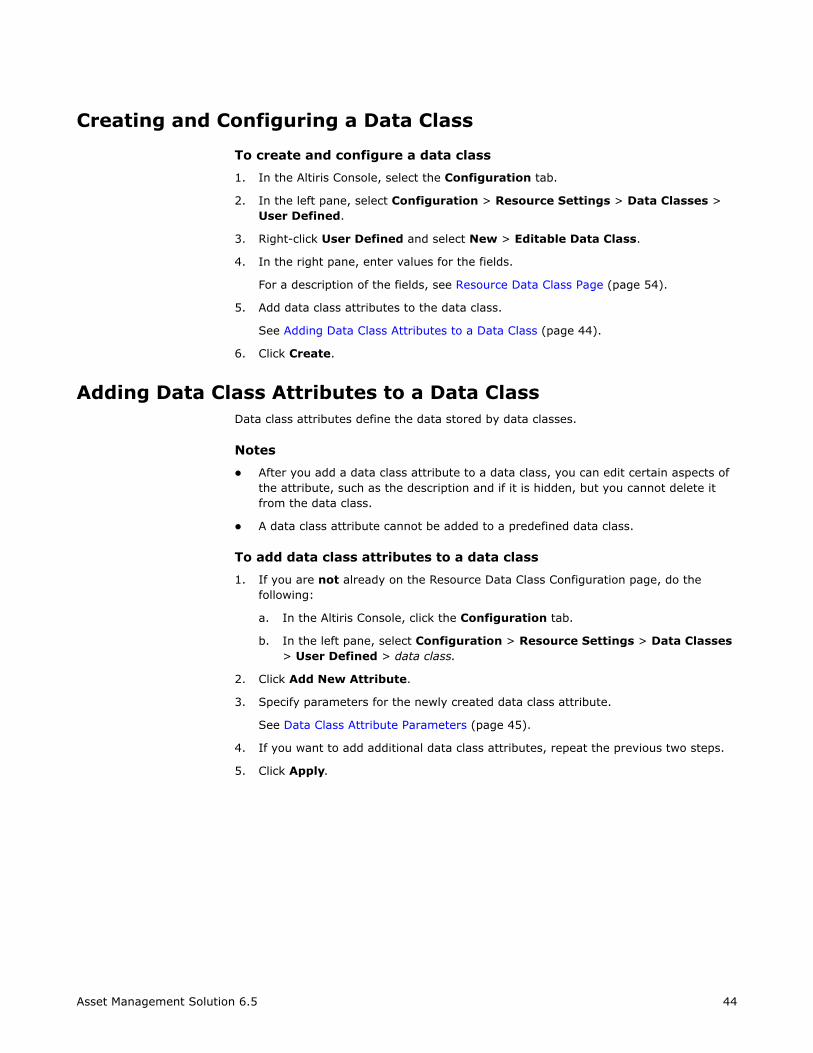
To create and configure a data class
1. In the Altiris Console, select the Configuration tab.
2. In the left pane, select Configuration > Resource Settings > Data Classes > User Defined.
3. Right-click User Defined and select New > Editable Data Class.
4. In the right pane, enter values for the fields.
For a description of the fields, see Resource Data Class Page (page 54).
5. Add data class attributes to the data class.
See Adding Data Class Attributes to a Data Class (page 44).
6. Click Create.
Adding Data Class Attributes to a Data ClassData class attributes define the data stored by data classes.
Notes
After you add a data class attribute to a data class, you can edit certain aspects of the attribute, such as the description and if it is hidden, but you cannot delete it from the data class.
A data class attribute cannot be added to a predefined data class.
To add data class attributes to a data class
1. If you are not already on the Resource Data Class Configuration page, do the following:
a. In the Altiris Console, click the Configuration tab.
b. In the left pane, select Configuration > Resource Settings > Data Classes > User Defined > data class.
2. Click Add New Attribute.
3. Specify parameters for the newly created data class attribute.
See Data Class Attribute Parameters (page 45).
4. If you want to add additional data class attributes, repeat the previous two steps.
5. Click Apply.
Asset Management Solution 6.5 44
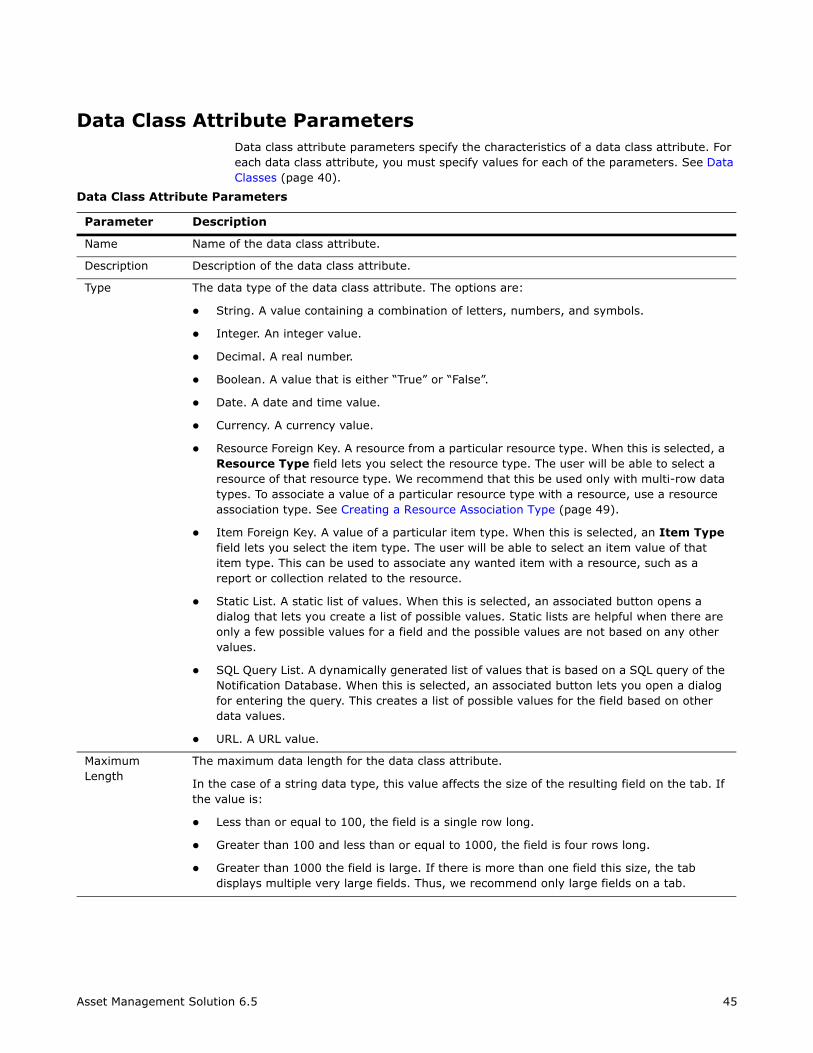
Data class attribute parameters specify the characteristics of a data class attribute. For each data class attribute, you must specify values for each of the parameters. See Data Classes (page 40).
Data Class Attribute Parameters
Parameter Description
Name Name of the data class attribute.
Description Description of the data class attribute.
Type The data type of the data class attribute. The options are:
String. A value containing a combination of letters, numbers, and symbols.
Integer. An integer value.
Decimal. A real number.
Boolean. A value that is either “True” or “False”.
Date. A date and time value.
Currency. A currency value.
Resource Foreign Key. A resource from a particular resource type. When this is selected, a Resource Type field lets you select the resource type. The user will be able to select a resource of that resource type. We recommend that this be used only with multi-row data types. To associate a value of a particular resource type with a resource, use a resource association type. See Creating a Resource Association Type (page 49).
Item Foreign Key. A value of a particular item type. When this is selected, an Item Type field lets you select the item type. The user will be able to select an item value of that item type. This can be used to associate any wanted item with a resource, such as a report or collection related to the resource.
Static List. A static list of values. When this is selected, an associated button opens a dialog that lets you create a list of possible values. Static lists are helpful when there are only a few possible values for a field and the possible values are not based on any other values.
SQL Query List. A dynamically generated list of values that is based on a SQL query of the Notification Database. When this is selected, an associated button lets you open a dialog for entering the query. This creates a list of possible values for the field based on other data values.
URL. A URL value.
Maximum Length
The maximum data length for the data class attribute.
In the case of a string data type, this value affects the size of the resulting field on the tab. If the value is:
Less than or equal to 100, the field is a single row long.
Greater than 100 and less than or equal to 1000, the field is four rows long.
Greater than 1000 the field is large. If there is more than one field this size, the tab displays multiple very large fields. Thus, we recommend only large fields on a tab.
Asset Management Solution 6.5 45
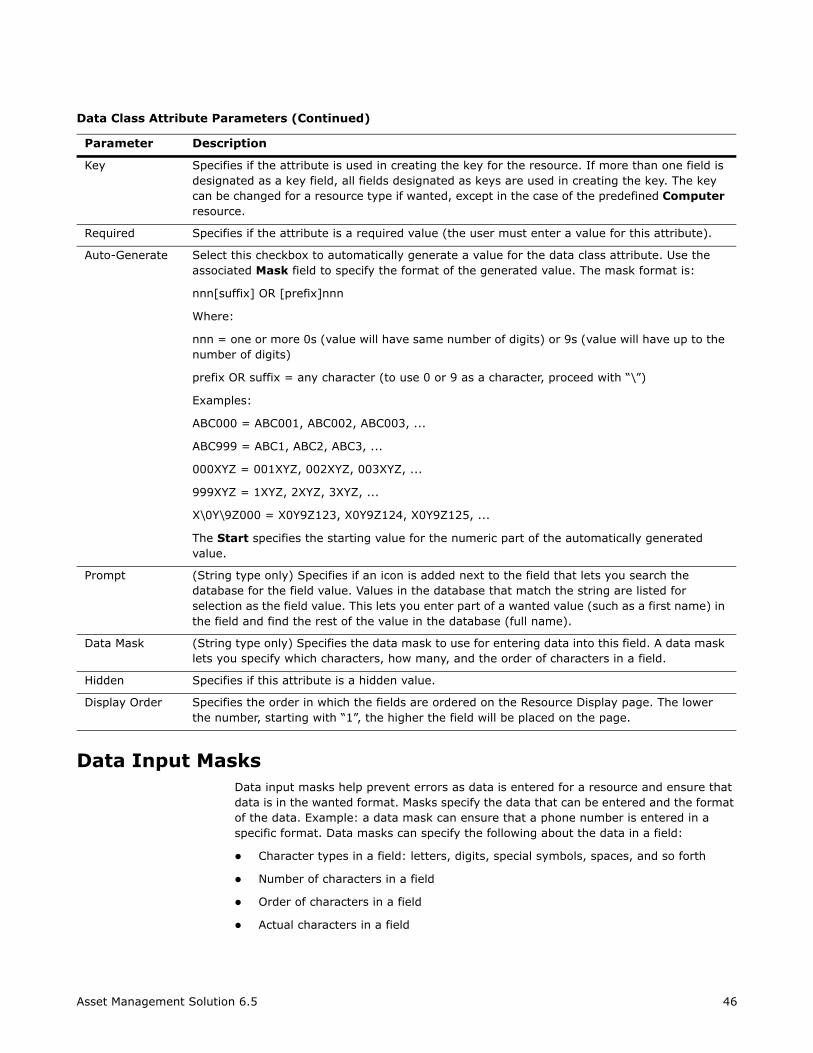
Data Input Masks Data input masks help prevent errors as data is entered for a resource and ensure that data is in the wanted format. Masks specify the data that can be entered and the format of the data. Example: a data mask can ensure that a phone number is entered in a specific format. Data masks can specify the following about the data in a field:
Character types in a field: letters, digits, special symbols, spaces, and so forth
Number of characters in a field
Order of characters in a field
Actual characters in a field
Key Specifies if the attribute is used in creating the key for the resource. If more than one field is designated as a key field, all fields designated as keys are used in creating the key. The key can be changed for a resource type if wanted, except in the case of the predefined Computer resource.
Required Specifies if the attribute is a required value (the user must enter a value for this attribute).
Auto-Generate Select this checkbox to automatically generate a value for the data class attribute. Use the associated Mask field to specify the format of the generated value. The mask format is:
nnn[suffix] OR [prefix]nnn
Where:
nnn = one or more 0s (value will have same number of digits) or 9s (value will have up to the number of digits)
prefix OR suffix = any character (to use 0 or 9 as a character, proceed with “\”)
Examples:
ABC000 = ABC001, ABC002, ABC003, ...
ABC999 = ABC1, ABC2, ABC3, ...
000XYZ = 001XYZ, 002XYZ, 003XYZ, ...
999XYZ = 1XYZ, 2XYZ, 3XYZ, ...
X\0Y\9Z000 = X0Y9Z123, X0Y9Z124, X0Y9Z125, ...
The Start specifies the starting value for the numeric part of the automatically generated value.
Prompt (String type only) Specifies if an icon is added next to the field that lets you search the database for the field value. Values in the database that match the string are listed for selection as the field value. This lets you enter part of a wanted value (such as a first name) in the field and find the rest of the value in the database (full name).
Data Mask (String type only) Specifies the data mask to use for entering data into this field. A data mask lets you specify which characters, how many, and the order of characters in a field.
Hidden Specifies if this attribute is a hidden value.
Display Order Specifies the order in which the fields are ordered on the Resource Display page. The lower the number, starting with “1”, the higher the field will be placed on the page.
Data Class Attribute Parameters (Continued)
Parameter Description
Asset Management Solution 6.5 46
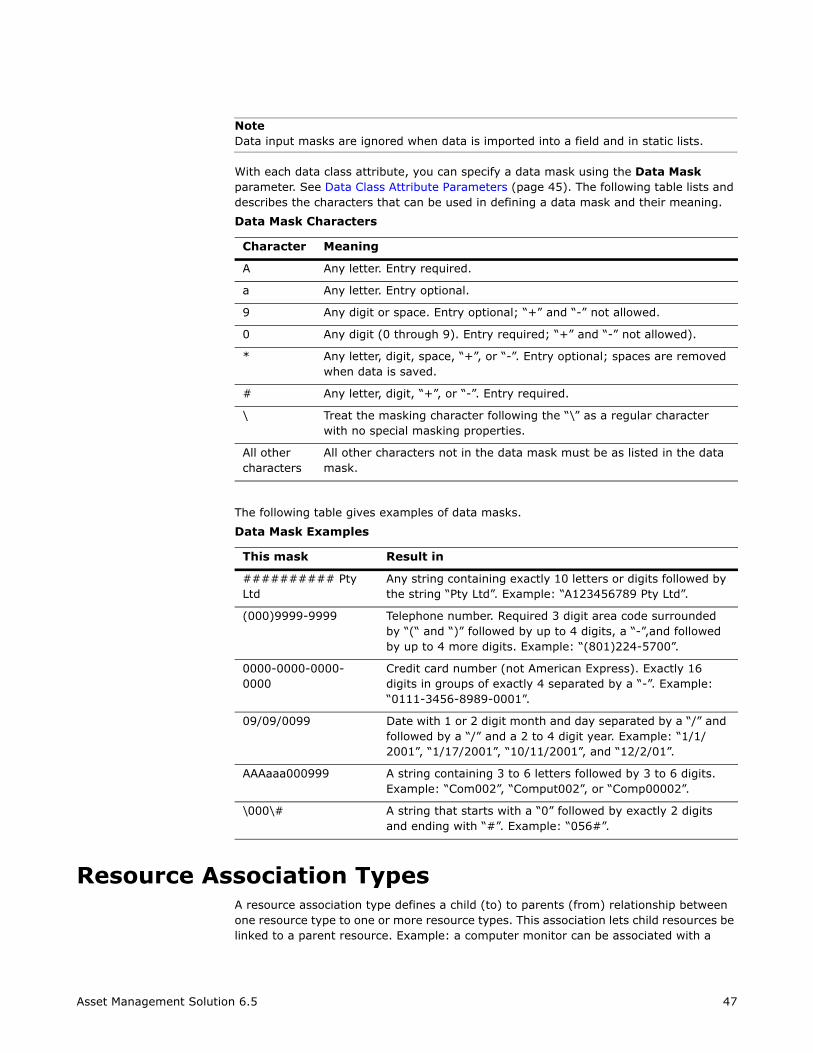
With each data class attribute, you can specify a data mask using the Data Mask parameter. See Data Class Attribute Parameters (page 45). The following table lists and describes the characters that can be used in defining a data mask and their meaning.
The following table gives examples of data masks.
Resource Association TypesA resource association type defines a child (to) to parents (from) relationship between one resource type to one or more resource types. This association lets child resources be linked to a parent resource. Example: a computer monitor can be associated with a
Data Mask Characters
Character Meaning
A Any letter. Entry required.
a Any letter. Entry optional.
9 Any digit or space. Entry optional; “+” and “-” not allowed.
0 Any digit (0 through 9). Entry required; “+” and “-” not allowed).
* Any letter, digit, space, “+”, or “-”. Entry optional; spaces are removed when data is saved.
# Any letter, digit, “+”, or “-”. Entry required.
\ Treat the masking character following the “\” as a regular character with no special masking properties.
All other characters
All other characters not in the data mask must be as listed in the data mask.
Data Mask Examples
This mask Result in
########## Pty Ltd
Any string containing exactly 10 letters or digits followed by the string “Pty Ltd”. Example: “A123456789 Pty Ltd”.
(000)9999-9999 Telephone number. Required 3 digit area code surrounded by “(“ and “)” followed by up to 4 digits, a “-”,and followed by up to 4 more digits. Example: “(801)224-5700”.
0000-0000-0000-0000
Credit card number (not American Express). Exactly 16 digits in groups of exactly 4 separated by a “-”. Example: “0111-3456-8989-0001”.
09/09/0099 Date with 1 or 2 digit month and day separated by a “/” and followed by a “/” and a 2 to 4 digit year. Example: “1/1/2001”, “1/17/2001”, “10/11/2001”, and “12/2/01”.
AAAaaa000999 A string containing 3 to 6 letters followed by 3 to 6 digits. Example: “Com002”, “Comput002”, or “Comp00002”.
\000\# A string that starts with a “0” followed by exactly 2 digits and ending with “#”. Example: “056#”.
Asset Management Solution 6.5 47
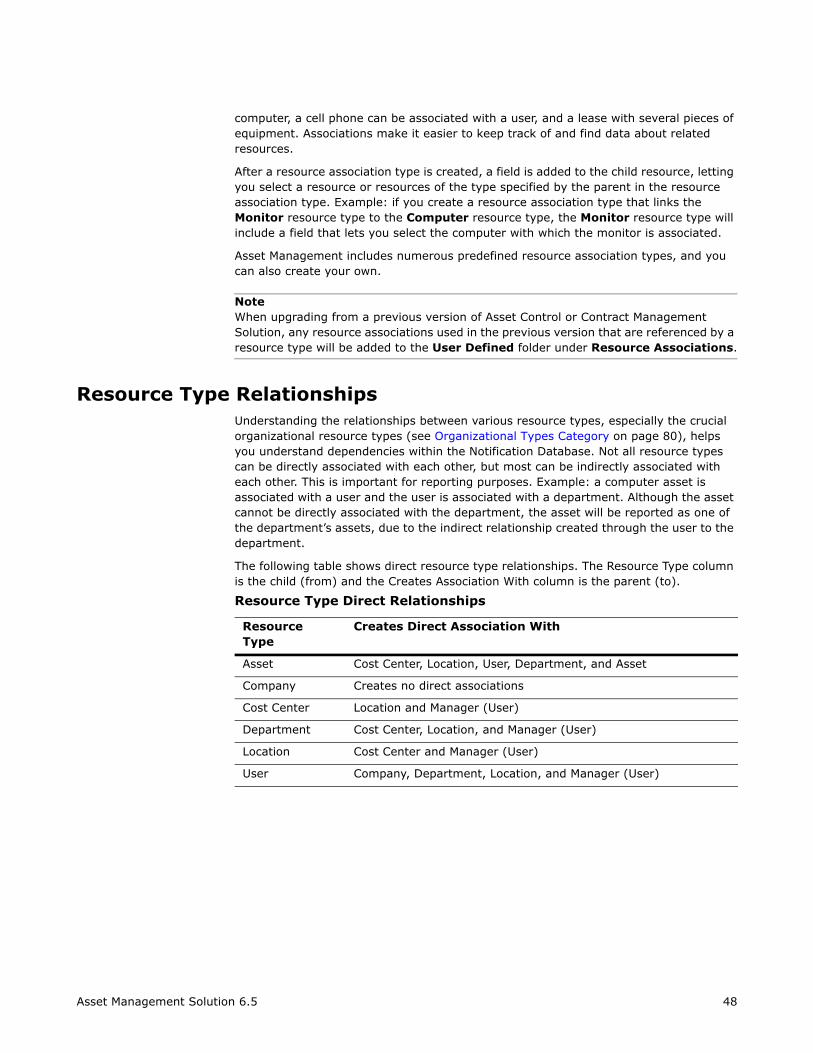
After a resource association type is created, a field is added to the child resource, letting you select a resource or resources of the type specified by the parent in the resource association type. Example: if you create a resource association type that links the Monitor resource type to the Computer resource type, the Monitor resource type will include a field that lets you select the computer with which the monitor is associated.
Asset Management includes numerous predefined resource association types, and you can also create your own.
NoteWhen upgrading from a previous version of Asset Control or Contract Management Solution, any resource associations used in the previous version that are referenced by a resource type will be added to the User Defined folder under Resource Associations.
Resource Type RelationshipsUnderstanding the relationships between various resource types, especially the crucial organizational resource types (see Organizational Types Category on page 80), helps you understand dependencies within the Notification Database. Not all resource types can be directly associated with each other, but most can be indirectly associated with each other. This is important for reporting purposes. Example: a computer asset is associated with a user and the user is associated with a department. Although the asset cannot be directly associated with the department, the asset will be reported as one of the department’s assets, due to the indirect relationship created through the user to the department.
The following table shows direct resource type relationships. The Resource Type column is the child (from) and the Creates Association With column is the parent (to).
Resource Type Direct Relationships
Resource Type
Creates Direct Association With
Asset Cost Center, Location, User, Department, and Asset
Company Creates no direct associations
Cost Center Location and Manager (User)
Department Cost Center, Location, and Manager (User)
Location Cost Center and Manager (User)
User Company, Department, Location, and Manager (User)
Asset Management Solution 6.5 48
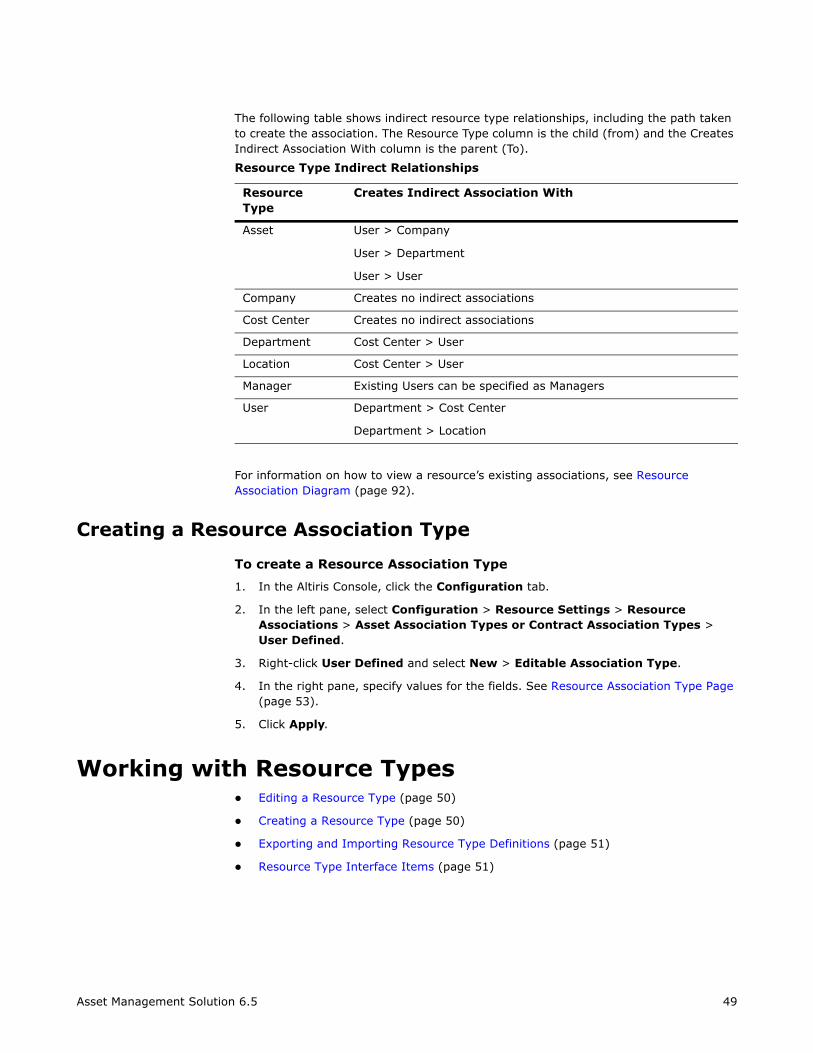
For information on how to view a resource’s existing associations, see Resource Association Diagram (page 92).
Creating a Resource Association Type
To create a Resource Association Type
1. In the Altiris Console, click the Configuration tab.
2. In the left pane, select Configuration > Resource Settings > Resource Associations > Asset Association Types or Contract Association Types > User Defined.
3. Right-click User Defined and select New > Editable Association Type.
4. In the right pane, specify values for the fields. See Resource Association Type Page (page 53).
5. Click Apply.
Working with Resource TypesEditing a Resource Type (page 50)
Creating a Resource Type (page 50)
Exporting and Importing Resource Type Definitions (page 51)
Resource Type Interface Items (page 51)
Resource Type Indirect Relationships
Resource Type
Creates Indirect Association With
Asset User > Company
User > Department
User > User
Company Creates no indirect associations
Cost Center Creates no indirect associations
Department Cost Center > User
Location Cost Center > User
Manager Existing Users can be specified as Managers
User Department > Cost Center
Department > Location
Asset Management Solution 6.5 49
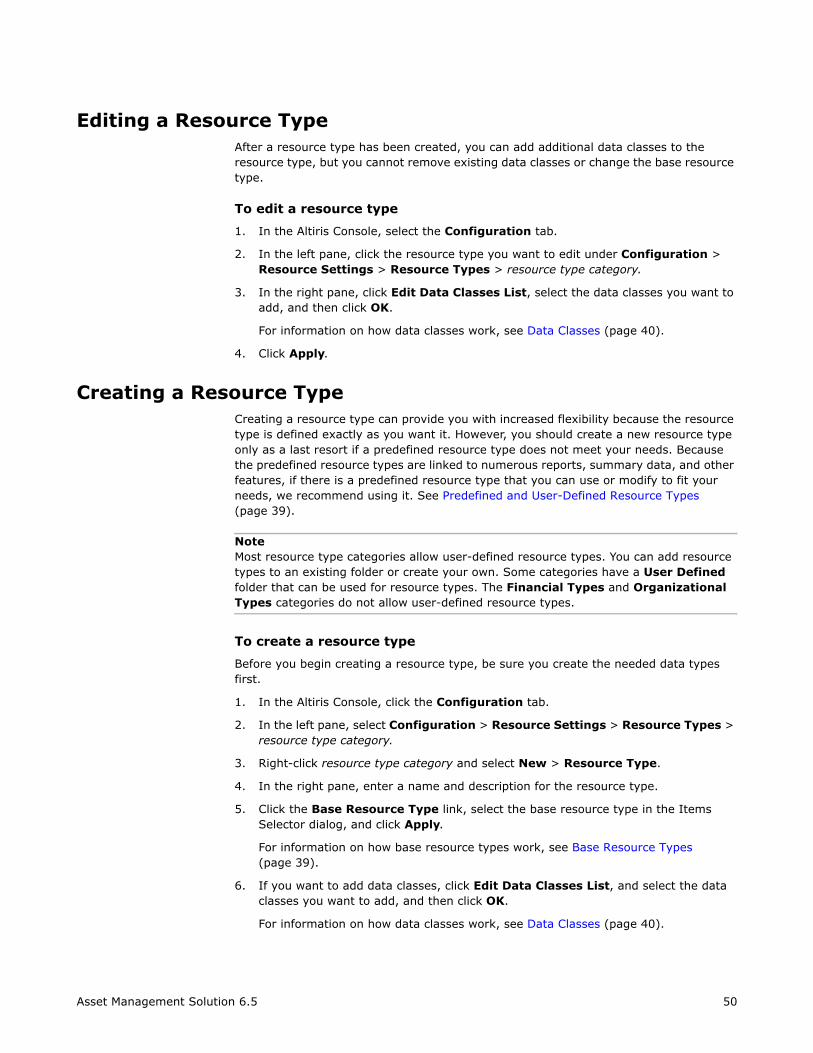
After a resource type has been created, you can add additional data classes to the resource type, but you cannot remove existing data classes or change the base resource type.
To edit a resource type
1. In the Altiris Console, select the Configuration tab.
2. In the left pane, click the resource type you want to edit under Configuration > Resource Settings > Resource Types > resource type category.
3. In the right pane, click Edit Data Classes List, select the data classes you want to add, and then click OK.
For information on how data classes work, see Data Classes (page 40).
4. Click Apply.
Creating a Resource TypeCreating a resource type can provide you with increased flexibility because the resource type is defined exactly as you want it. However, you should create a new resource type only as a last resort if a predefined resource type does not meet your needs. Because the predefined resource types are linked to numerous reports, summary data, and other features, if there is a predefined resource type that you can use or modify to fit your needs, we recommend using it. See Predefined and User-Defined Resource Types (page 39).
NoteMost resource type categories allow user-defined resource types. You can add resource types to an existing folder or create your own. Some categories have a User Defined folder that can be used for resource types. The Financial Types and Organizational Types categories do not allow user-defined resource types.
To create a resource type
Before you begin creating a resource type, be sure you create the needed data types first.
1. In the Altiris Console, click the Configuration tab.
2. In the left pane, select Configuration > Resource Settings > Resource Types > resource type category.
3. Right-click resource type category and select New > Resource Type.
4. In the right pane, enter a name and description for the resource type.
5. Click the Base Resource Type link, select the base resource type in the Items Selector dialog, and click Apply.
For information on how base resource types work, see Base Resource Types (page 39).
6. If you want to add data classes, click Edit Data Classes List, and select the data classes you want to add, and then click OK.
For information on how data classes work, see Data Classes (page 40).
Asset Management Solution 6.5 50
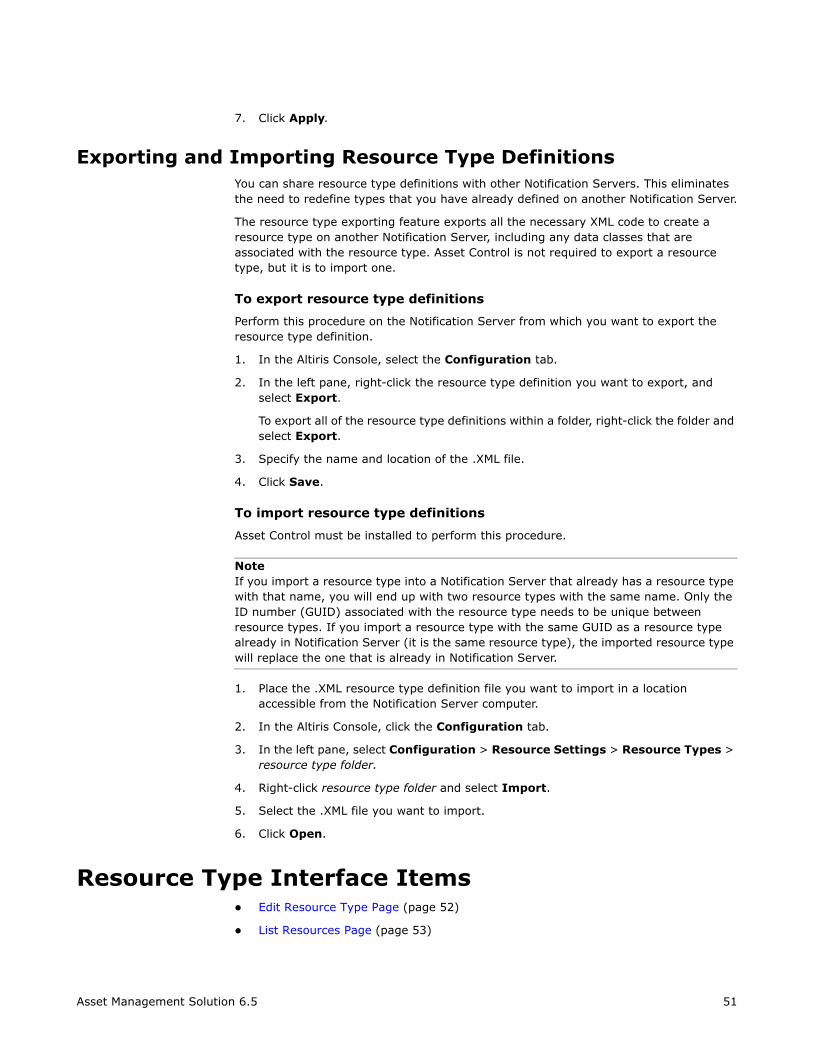
Exporting and Importing Resource Type DefinitionsYou can share resource type definitions with other Notification Servers. This eliminates the need to redefine types that you have already defined on another Notification Server.
The resource type exporting feature exports all the necessary XML code to create a resource type on another Notification Server, including any data classes that are associated with the resource type. Asset Control is not required to export a resource type, but it is to import one.
To export resource type definitions
Perform this procedure on the Notification Server from which you want to export the resource type definition.
1. In the Altiris Console, select the Configuration tab.
2. In the left pane, right-click the resource type definition you want to export, and select Export.
To export all of the resource type definitions within a folder, right-click the folder and select Export.
3. Specify the name and location of the .XML file.
4. Click Save.
To import resource type definitions
Asset Control must be installed to perform this procedure.
NoteIf you import a resource type into a Notification Server that already has a resource type with that name, you will end up with two resource types with the same name. Only the ID number (GUID) associated with the resource type needs to be unique between resource types. If you import a resource type with the same GUID as a resource type already in Notification Server (it is the same resource type), the imported resource type will replace the one that is already in Notification Server.
1. Place the .XML resource type definition file you want to import in a location accessible from the Notification Server computer.
2. In the Altiris Console, click the Configuration tab.
3. In the left pane, select Configuration > Resource Settings > Resource Types > resource type folder.
4. Right-click resource type folder and select Import.
5. Select the .XML file you want to import.
6. Click Open.
Resource Type Interface ItemsEdit Resource Type Page (page 52)
List Resources Page (page 53)
Asset Management Solution 6.5 51
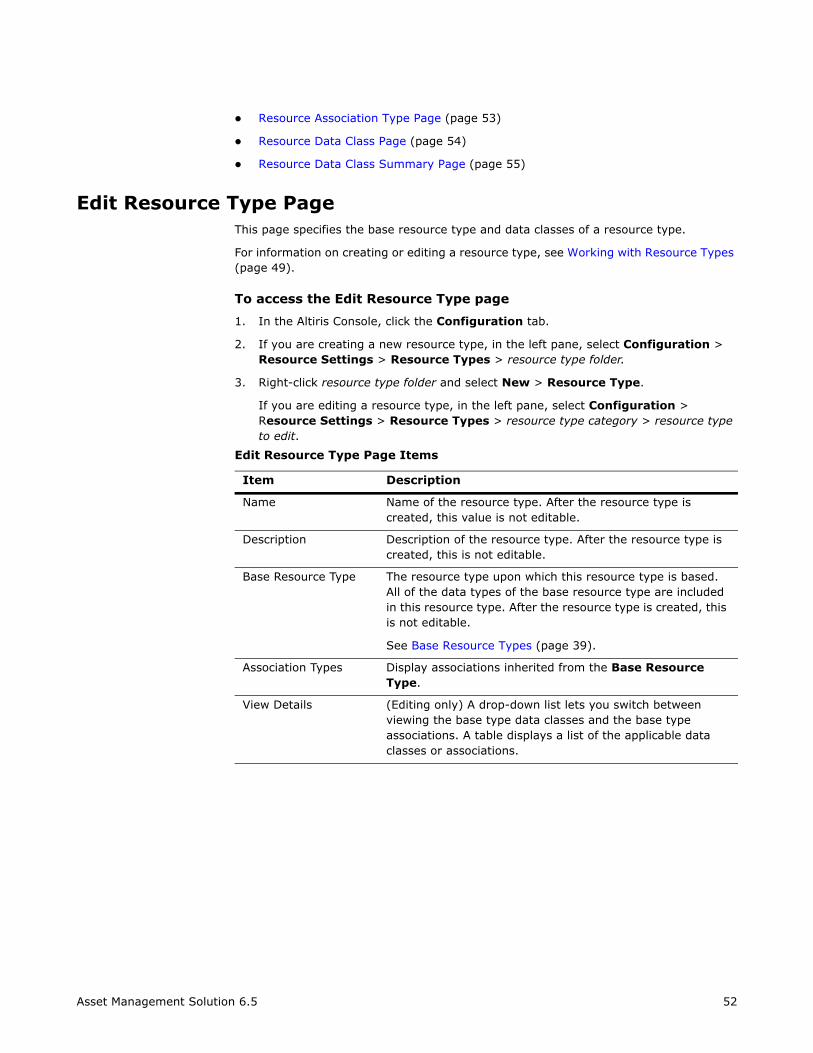
Resource Data Class Page (page 54)
Resource Data Class Summary Page (page 55)
Edit Resource Type PageThis page specifies the base resource type and data classes of a resource type.
For information on creating or editing a resource type, see Working with Resource Types (page 49).
To access the Edit Resource Type page
1. In the Altiris Console, click the Configuration tab.
2. If you are creating a new resource type, in the left pane, select Configuration > Resource Settings > Resource Types > resource type folder.
3. Right-click resource type folder and select New > Resource Type.
If you are editing a resource type, in the left pane, select Configuration > Resource Settings > Resource Types > resource type category > resource type to edit.
Edit Resource Type Page Items
Item Description
Name Name of the resource type. After the resource type is created, this value is not editable.
Description Description of the resource type. After the resource type is created, this is not editable.
Base Resource Type The resource type upon which this resource type is based. All of the data types of the base resource type are included in this resource type. After the resource type is created, this is not editable.
See Base Resource Types (page 39).
Association Types Display associations inherited from the Base Resource Type.
View Details (Editing only) A drop-down list lets you switch between viewing the base type data classes and the base type associations. A table displays a list of the applicable data classes or associations.
Asset Management Solution 6.5 52
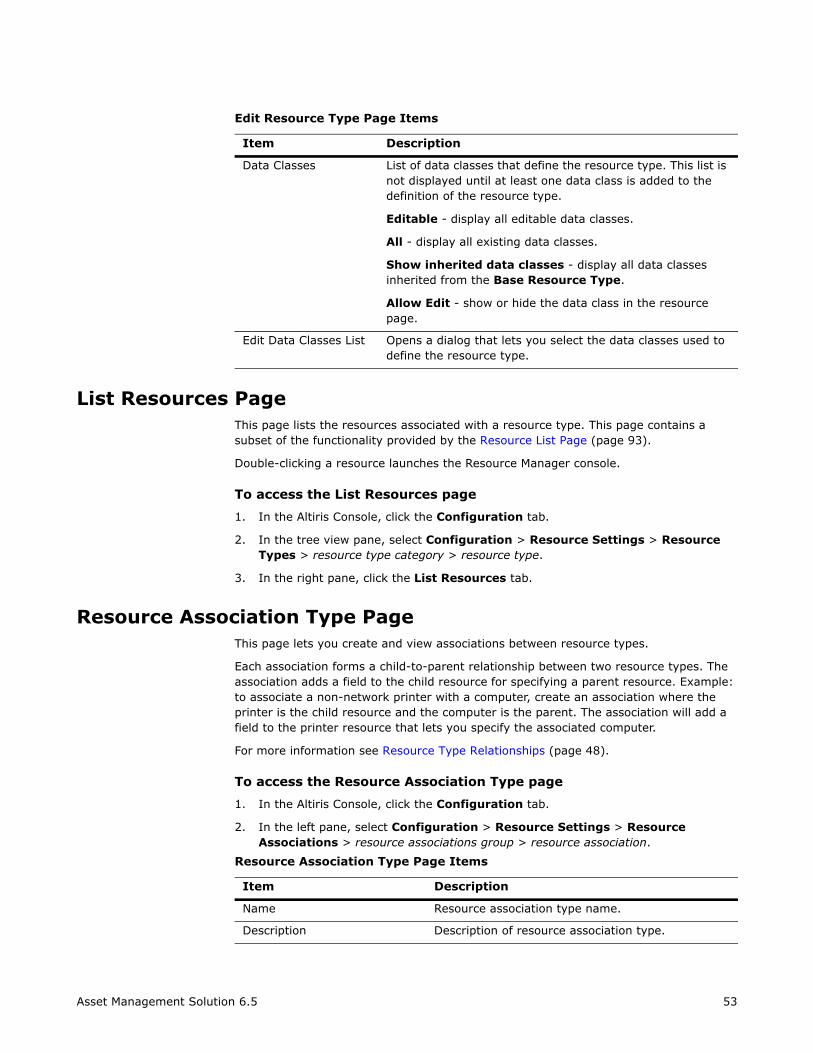
List Resources PageThis page lists the resources associated with a resource type. This page contains a subset of the functionality provided by the Resource List Page (page 93).
Double-clicking a resource launches the Resource Manager console.
To access the List Resources page
1. In the Altiris Console, click the Configuration tab.
2. In the tree view pane, select Configuration > Resource Settings > Resource Types > resource type category > resource type.
3. In the right pane, click the List Resources tab.
Resource Association Type PageThis page lets you create and view associations between resource types.
Each association forms a child-to-parent relationship between two resource types. The association adds a field to the child resource for specifying a parent resource. Example: to associate a non-network printer with a computer, create an association where the printer is the child resource and the computer is the parent. The association will add a field to the printer resource that lets you specify the associated computer.
For more information see Resource Type Relationships (page 48).
To access the Resource Association Type page
1. In the Altiris Console, click the Configuration tab.
2. In the left pane, select Configuration > Resource Settings > Resource Associations > resource associations group > resource association.
Data Classes List of data classes that define the resource type. This list is not displayed until at least one data class is added to the definition of the resource type.
Editable - display all editable data classes.
All - display all existing data classes.
Show inherited data classes - display all data classes inherited from the Base Resource Type.
Allow Edit - show or hide the data class in the resource page.
Edit Data Classes List Opens a dialog that lets you select the data classes used to define the resource type.
Resource Association Type Page Items
Item Description
Name Resource association type name.
Description Description of resource association type.
Edit Resource Type Page Items
Item Description
Asset Management Solution 6.5 53

Resource Data Class PageThis page defines the attributes of a data class. For information see Adding Data Class Attributes to a Data Class (page 44).
NoteThis page is applicable only to data classes that can be edited. For data classes that cannot be edited, see Resource Data Class Summary Page (page 55).
To access the Resource Data Class page
1. In the Altiris Console, click the Configuration tab.
Tab Name The Resource Display page tab on which the field for selecting the parent resource is added.
From Type The child resource type in the association.
To Type The parent resource type in the association.
Allow Association to Itself Allow the asset to be associated with itself.
Minimum Cardinality Specifies the minimum number of relationships that must be established between the child and parents.
Maximum Cardinality Specifies the maximum number of relationships that can be established between the child and parents. If you do not want to limit the number of relationships, select the Unlimited checkbox.
Enable Editing From Specifies the mechanism style used to select an associated resource. The options are:
Contract Assigned User Picker
Generic Picker
Hierarchy Picker (for hierarchal parent resource types)
Hierarchy Picker Showing Children (for hierarchal parent resource types)
List
Resource Picker for Asset
Software Purchase Association Control
Selecting the checkbox with the same name as the resource association type allows a reverse resource association to be created between two resources. Example: selecting the User checkbox for the Owners resource association lets you create an association from a user (parent) to an asset (child). Unless you select this box you can create associations only from a child resource to a parent resource.
Resource Association Type Page Items
Item Description
Asset Management Solution 6.5 54
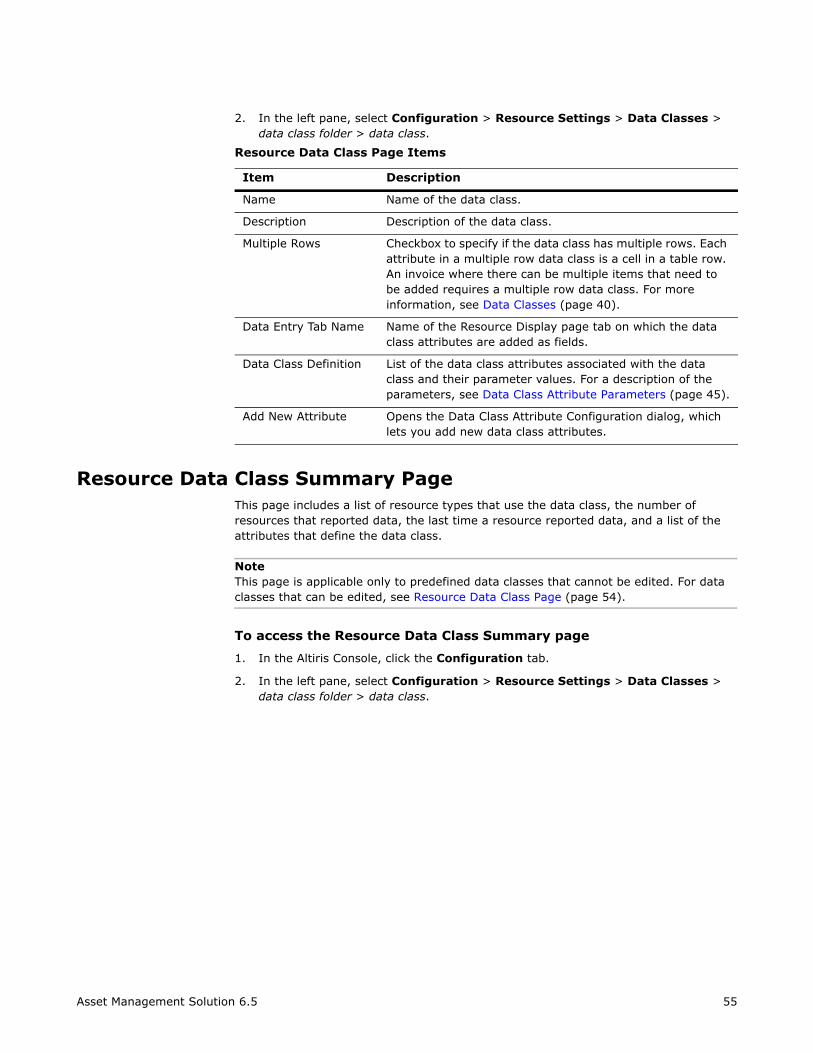
data class folder > data class.
Resource Data Class Summary PageThis page includes a list of resource types that use the data class, the number of resources that reported data, the last time a resource reported data, and a list of the attributes that define the data class.
NoteThis page is applicable only to predefined data classes that cannot be edited. For data classes that can be edited, see Resource Data Class Page (page 54).
To access the Resource Data Class Summary page
1. In the Altiris Console, click the Configuration tab.
2. In the left pane, select Configuration > Resource Settings > Data Classes > data class folder > data class.
Resource Data Class Page Items
Item Description
Name Name of the data class.
Description Description of the data class.
Multiple Rows Checkbox to specify if the data class has multiple rows. Each attribute in a multiple row data class is a cell in a table row. An invoice where there can be multiple items that need to be added requires a multiple row data class. For more information, see Data Classes (page 40).
Data Entry Tab Name Name of the Resource Display page tab on which the data class attributes are added as fields.
Data Class Definition List of the data class attributes associated with the data class and their parameter values. For a description of the parameters, see Data Class Attribute Parameters (page 45).
Add New Attribute Opens the Data Class Attribute Configuration dialog, which lets you add new data class attributes.
Asset Management Solution 6.5 55
Chapter 5Resources
Resources are items that can be managed by the Notification Server, such as computers, phones, contracts, users, and projects. Resources are based on templates called resource types. Predefined resource types are provided for commonly used resources and you can also create your own. Whenever possible, use the predefined resource types. For information on the benefits of predefined resources, see Predefined and User-Defined Resource Types (page 39).
NoteWith all resources, you can manually enter data or import it from an external source. To manually enter data, see Adding a Resource (page 89). To import data, you will need Altiris Connector Solution or an Altiris connector for a specific application. See Importing Resource Data (page 19).
Resource CategoriesResource types are grouped into categories for convenience. Resource types within a category have similar characteristics, a common purpose, or other similarities. The following are the main resource categories:
Asset Types Category (page 56)
Contract Types Category (page 65)
Financial Types Category (page 79)
Organizational Types Category (page 80)
Other Types Category (page 83)
Receiving Types Category (page 83)
Asset Types CategoryAssets represent physical items, whose data is added to the Notification Database using a resource type. Asset Control tracks and manages any asset. Each asset can be associated with a user, department, cost center, and location.
Asset Management Solution 6.5 56
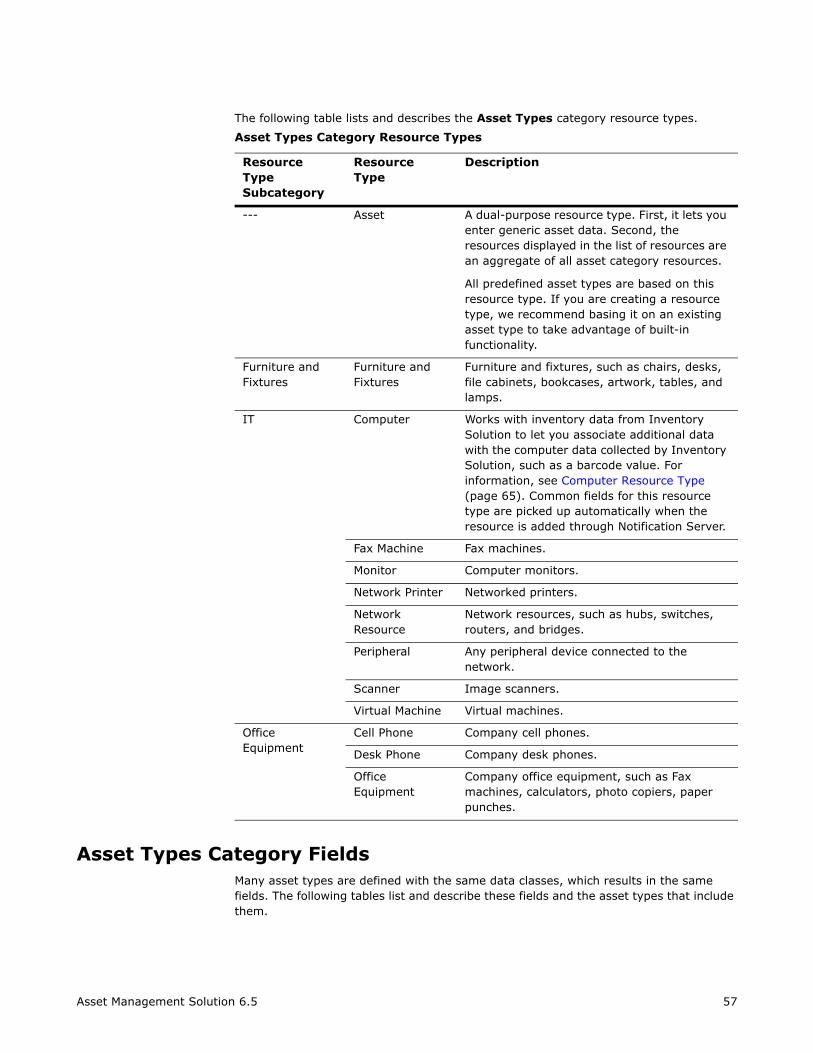
Asset Types Category FieldsMany asset types are defined with the same data classes, which results in the same fields. The following tables list and describe these fields and the asset types that include them.
Asset Types Category Resource Types
Resource Type Subcategory
Resource Type
Description
--- Asset A dual-purpose resource type. First, it lets you enter generic asset data. Second, the resources displayed in the list of resources are an aggregate of all asset category resources.
All predefined asset types are based on this resource type. If you are creating a resource type, we recommend basing it on an existing asset type to take advantage of built-in functionality.
Furniture and Fixtures
Furniture and Fixtures
Furniture and fixtures, such as chairs, desks, file cabinets, bookcases, artwork, tables, and lamps.
IT Computer Works with inventory data from Inventory Solution to let you associate additional data with the computer data collected by Inventory Solution, such as a barcode value. For information, see Computer Resource Type (page 65). Common fields for this resource type are picked up automatically when the resource is added through Notification Server.
Fax Machine Fax machines.
Monitor Computer monitors.
Network Printer Networked printers.
Network Resource
Network resources, such as hubs, switches, routers, and bridges.
Peripheral Any peripheral device connected to the network.
Scanner Image scanners.
Virtual Machine Virtual machines.
Office Equipment
Cell Phone Company cell phones.
Desk Phone Company desk phones.
Office Equipment
Company office equipment, such as Fax machines, calculators, photo copiers, paper punches.
Asset Management Solution 6.5 57
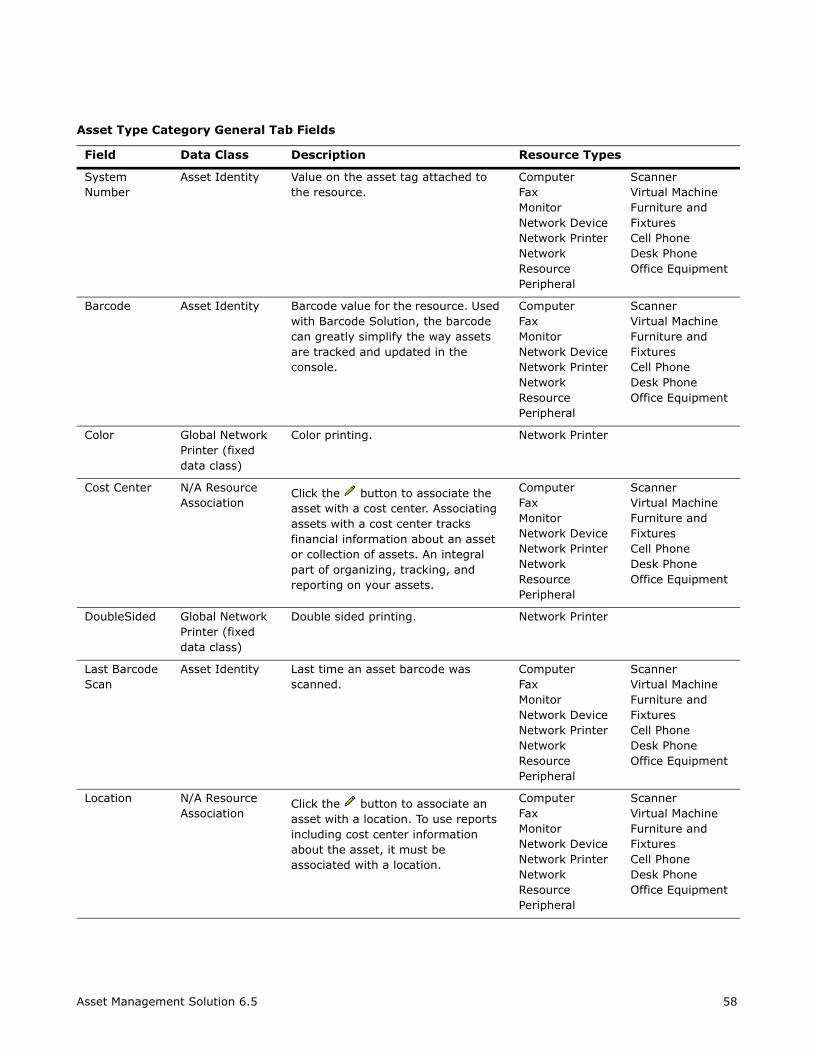
Field Data Class Description Resource Types
System Number
Asset Identity Value on the asset tag attached to the resource.
ComputerFaxMonitorNetwork DeviceNetwork PrinterNetwork ResourcePeripheral
ScannerVirtual MachineFurniture and FixturesCell PhoneDesk PhoneOffice Equipment
Barcode Asset Identity Barcode value for the resource. Used with Barcode Solution, the barcode can greatly simplify the way assets are tracked and updated in the console.
ComputerFaxMonitorNetwork DeviceNetwork PrinterNetwork ResourcePeripheral
ScannerVirtual MachineFurniture and FixturesCell PhoneDesk PhoneOffice Equipment
Color Global Network Printer (fixed data class)
Color printing. Network Printer
Cost Center N/A Resource Association
Click the button to associate the asset with a cost center. Associating assets with a cost center tracks financial information about an asset or collection of assets. An integral part of organizing, tracking, and reporting on your assets.
ComputerFaxMonitorNetwork DeviceNetwork PrinterNetwork ResourcePeripheral
ScannerVirtual MachineFurniture and FixturesCell PhoneDesk PhoneOffice Equipment
DoubleSided Global Network Printer (fixed data class)
Double sided printing. Network Printer
Last Barcode Scan
Asset Identity Last time an asset barcode was scanned.
ComputerFaxMonitorNetwork DeviceNetwork PrinterNetwork ResourcePeripheral
ScannerVirtual MachineFurniture and FixturesCell PhoneDesk PhoneOffice Equipment
Location N/A Resource Association
Click the button to associate an asset with a location. To use reports including cost center information about the asset, it must be associated with a location.
ComputerFaxMonitorNetwork DeviceNetwork PrinterNetwork ResourcePeripheral
ScannerVirtual MachineFurniture and FixturesCell PhoneDesk PhoneOffice Equipment
Asset Management Solution 6.5 58
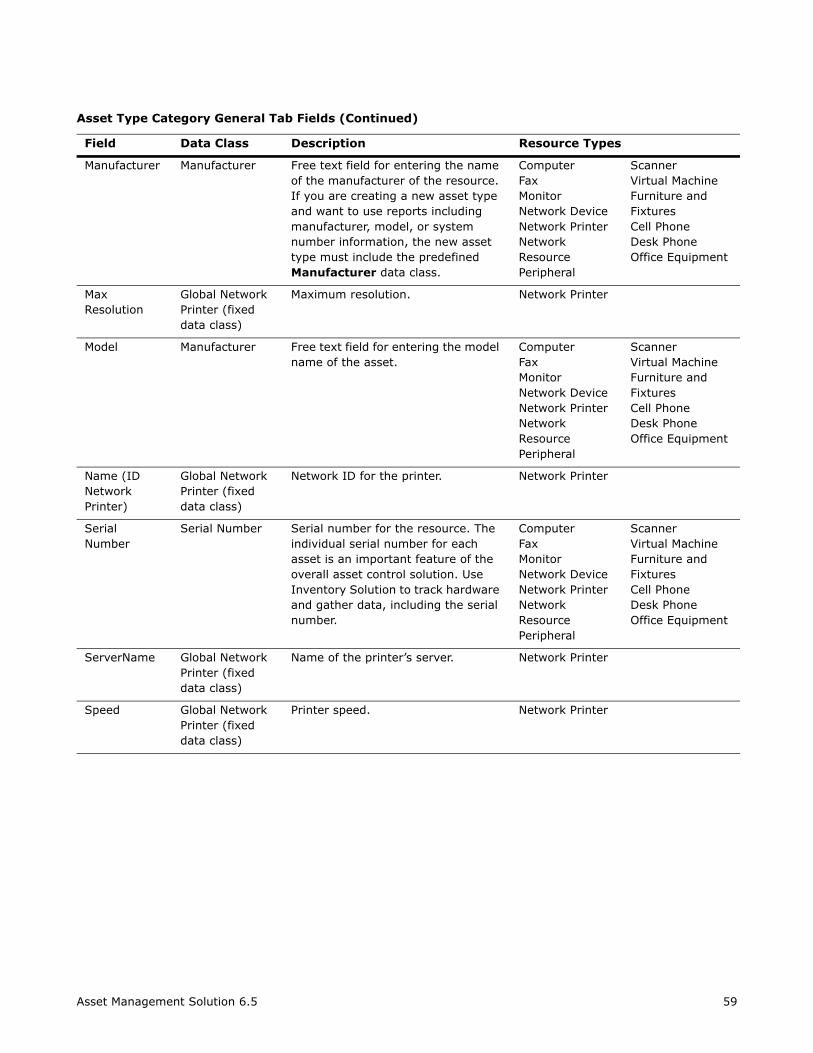
Manufacturer Manufacturer Free text field for entering the name of the manufacturer of the resource. If you are creating a new asset type and want to use reports including manufacturer, model, or system number information, the new asset type must include the predefined Manufacturer data class.
ComputerFaxMonitorNetwork DeviceNetwork PrinterNetwork ResourcePeripheral
ScannerVirtual MachineFurniture and FixturesCell PhoneDesk PhoneOffice Equipment
Max Resolution
Global Network Printer (fixed data class)
Maximum resolution. Network Printer
Model Manufacturer Free text field for entering the model name of the asset.
ComputerFaxMonitorNetwork DeviceNetwork PrinterNetwork ResourcePeripheral
ScannerVirtual MachineFurniture and FixturesCell PhoneDesk PhoneOffice Equipment
Name (ID Network Printer)
Global Network Printer (fixed data class)
Network ID for the printer. Network Printer
Serial Number
Serial Number Serial number for the resource. The individual serial number for each asset is an important feature of the overall asset control solution. Use Inventory Solution to track hardware and gather data, including the serial number.
ComputerFaxMonitorNetwork DeviceNetwork PrinterNetwork ResourcePeripheral
ScannerVirtual MachineFurniture and FixturesCell PhoneDesk PhoneOffice Equipment
ServerName Global Network Printer (fixed data class)
Name of the printer’s server. Network Printer
Speed Global Network Printer (fixed data class)
Printer speed. Network Printer
Asset Type Category General Tab Fields (Continued)
Field Data Class Description Resource Types
Asset Management Solution 6.5 59

Asset Types Category Accounting Information Tab Fields
Field Data Class Description Resource Types
Asset’s Status N/A Resource Association
Lets you define an asset’s status. Important for tracking the lifecycle of your assets and used in several reports.
ComputerFaxMonitorNetwork DeviceNetwork PrinterNetwork ResourcePeripheral
ScannerVirtual MachineFurniture and FixturesCell PhoneDesk PhoneOffice Equipment
Available for Use
Accounting Information
The date entered in this field will by default be the date of the purchase order for the item.
This field appears only if the resource is a Purchase.
ComputerFaxMonitorNetwork DeviceNetwork PrinterNetwork ResourcePeripheral
ScannerVirtual MachineFurniture and FixturesCell PhoneDesk PhoneOffice Equipment
Book Depreciation
Custom Depreciation
Tax Depreciation
Accounting Information
Book, Custom, and Tax depreciation all have the same functionality and are designed to be linked to depreciation schedules, but for different purposes. Example: The government specified depreciation timeframe on a monitor may be 5 years and thus a depreciation schedule will be linked to Tax Depreciation. Your organization may have a policy of replacing monitors every 3 years, and thus a depreciation schedule will be linked to Book Depreciation. Custom Depreciation is used for other special purpose depreciation schedules.
Used in depreciation reports under Reports > Assets and Inventory > Asset Management > Accounting.
ComputerFaxMonitorNetwork DeviceNetwork PrinterNetwork ResourcePeripheral
ScannerVirtual MachineFurniture and FixturesCell PhoneDesk PhoneOffice Equipment
Business Use Ratio
Accounting Information
Percentage for the extent the resource is used for business purposes. This will automatically be entered as 100% when the resource is entered through a Purchase and by default this field will appear blank. Enter a number in this field only if you wish to lower the percentage.
This field appears only if Expense Type is set to Depreciate.
Used in depreciation reports.
ComputerFaxMonitorNetwork DeviceNetwork PrinterNetwork ResourcePeripheral
ScannerVirtual MachineFurniture and FixturesCell PhoneDesk PhoneOffice Equipment
Asset Management Solution 6.5 60

Cash from Disposal
Accounting Information
Cash recouped from sale of asset. This is a static field and does not automatically update the original purchase order.
This field appears only if Asset’s Status is set to Disposed. You cannot enter a disposal cost by creating a negative value cost item.
ComputerFaxMonitorNetwork DeviceNetwork PrinterNetwork ResourcePeripheral
ScannerVirtual MachineFurniture and FixturesCell PhoneDesk PhoneOffice Equipment
Cost Items Cost Items Cost items represent the depreciable cost of the resource. You can have only one depreciable cost item per asset.
Type: The type of cost.
Accounting Code: Links to predefined Accounting Codes.
Date: Date of acquisition.
Amount: Cost amount.
Status: Incurred or Projected. Status must be set to incurred for depreciation.
Description: Freetext description.
Purchase Order: Links to a Purchase Order.
ComputerFaxMonitorNetwork DeviceNetwork PrinterNetwork ResourcePeripheral
ScannerVirtual MachineFurniture and FixturesCell PhoneDesk PhoneOffice Equipment
Date Discovered Missing
Accounting Information
Date asset was discovered missing.
This field appears only if Asset’s Status is set to Missing.
ComputerFaxMonitorNetwork DeviceNetwork PrinterNetwork ResourcePeripheral
ScannerVirtual MachineFurniture and FixturesCell PhoneDesk PhoneOffice Equipment
Date of Reservation
Accounting Information
Date the item has been reserved for.
This field appears only if Asset’s Status is set to In Stock.
ComputerFaxMonitorNetwork DeviceNetwork PrinterNetwork ResourcePeripheral
ScannerVirtual MachineFurniture and FixturesCell PhoneDesk PhoneOffice Equipment
Disposal Date Accounting Information
The date the asset was disposed. Used in disposal reports (Reports > Assets and Inventory> Asset Management > Disposal).
This field appears only if Asset’s Status is set to Disposed.
ComputerFaxMonitorNetwork DeviceNetwork PrinterNetwork ResourcePeripheral
ScannerVirtual MachineFurniture and FixturesCell PhoneDesk PhoneOffice Equipment
Asset Types Category Accounting Information Tab Fields (Continued)
Field Data Class Description Resource Types
Asset Management Solution 6.5 61
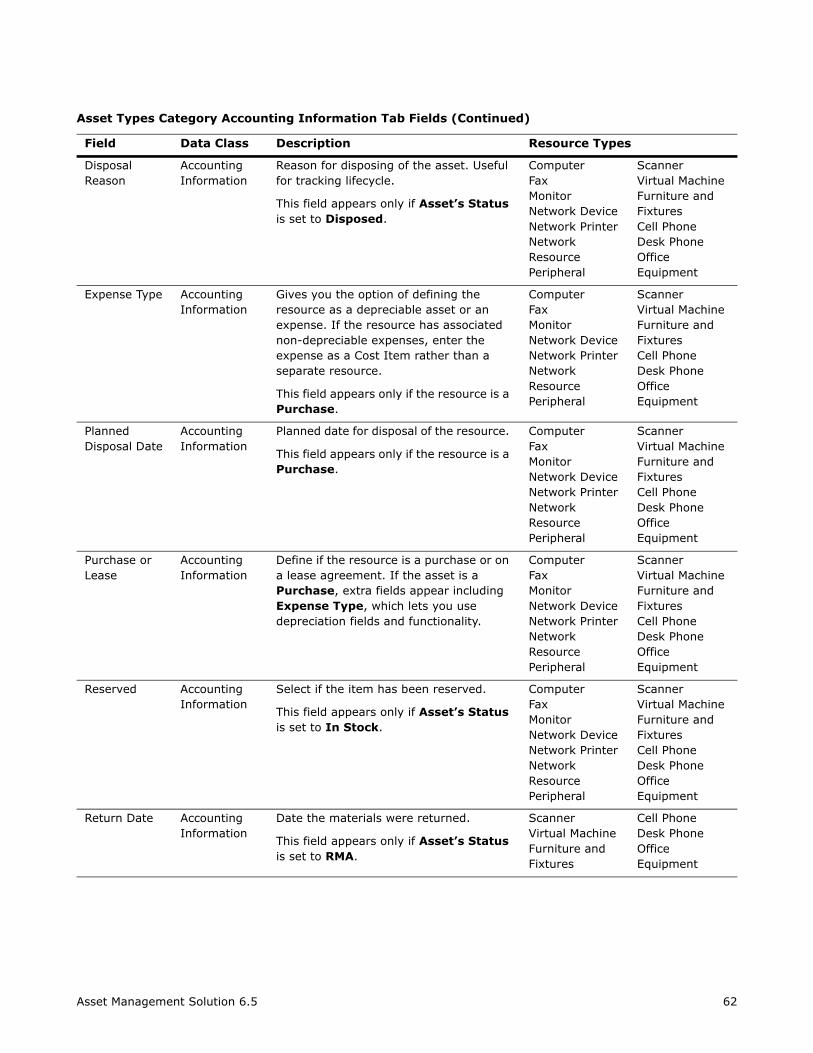
Disposal Reason
Accounting Information
Reason for disposing of the asset. Useful for tracking lifecycle.
This field appears only if Asset’s Status is set to Disposed.
ComputerFaxMonitorNetwork DeviceNetwork PrinterNetwork ResourcePeripheral
ScannerVirtual MachineFurniture and FixturesCell PhoneDesk PhoneOffice Equipment
Expense Type Accounting Information
Gives you the option of defining the resource as a depreciable asset or an expense. If the resource has associated non-depreciable expenses, enter the expense as a Cost Item rather than a separate resource.
This field appears only if the resource is a Purchase.
ComputerFaxMonitorNetwork DeviceNetwork PrinterNetwork ResourcePeripheral
ScannerVirtual MachineFurniture and FixturesCell PhoneDesk PhoneOffice Equipment
Planned Disposal Date
Accounting Information
Planned date for disposal of the resource.
This field appears only if the resource is a Purchase.
ComputerFaxMonitorNetwork DeviceNetwork PrinterNetwork ResourcePeripheral
ScannerVirtual MachineFurniture and FixturesCell PhoneDesk PhoneOffice Equipment
Purchase or Lease
Accounting Information
Define if the resource is a purchase or on a lease agreement. If the asset is a Purchase, extra fields appear including Expense Type, which lets you use depreciation fields and functionality.
ComputerFaxMonitorNetwork DeviceNetwork PrinterNetwork ResourcePeripheral
ScannerVirtual MachineFurniture and FixturesCell PhoneDesk PhoneOffice Equipment
Reserved Accounting Information
Select if the item has been reserved.
This field appears only if Asset’s Status is set to In Stock.
ComputerFaxMonitorNetwork DeviceNetwork PrinterNetwork ResourcePeripheral
ScannerVirtual MachineFurniture and FixturesCell PhoneDesk PhoneOffice Equipment
Return Date Accounting Information
Date the materials were returned.
This field appears only if Asset’s Status is set to RMA.
ScannerVirtual MachineFurniture and Fixtures
Cell PhoneDesk PhoneOffice Equipment
Asset Types Category Accounting Information Tab Fields (Continued)
Field Data Class Description Resource Types
Asset Management Solution 6.5 62
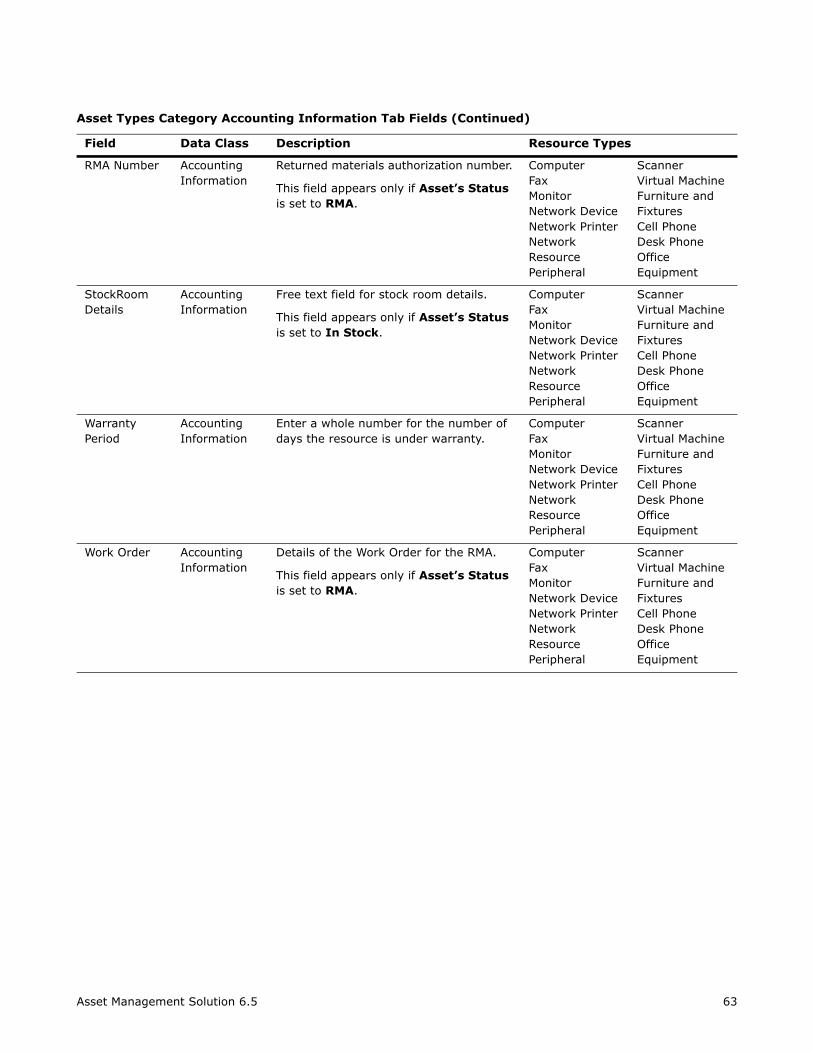
RMA Number Accounting Information
Returned materials authorization number.
This field appears only if Asset’s Status is set to RMA.
ComputerFaxMonitorNetwork DeviceNetwork PrinterNetwork ResourcePeripheral
ScannerVirtual MachineFurniture and FixturesCell PhoneDesk PhoneOffice Equipment
StockRoom Details
Accounting Information
Free text field for stock room details.
This field appears only if Asset’s Status is set to In Stock.
ComputerFaxMonitorNetwork DeviceNetwork PrinterNetwork ResourcePeripheral
ScannerVirtual MachineFurniture and FixturesCell PhoneDesk PhoneOffice Equipment
Warranty Period
Accounting Information
Enter a whole number for the number of days the resource is under warranty.
ComputerFaxMonitorNetwork DeviceNetwork PrinterNetwork ResourcePeripheral
ScannerVirtual MachineFurniture and FixturesCell PhoneDesk PhoneOffice Equipment
Work Order Accounting Information
Details of the Work Order for the RMA.
This field appears only if Asset’s Status is set to RMA.
ComputerFaxMonitorNetwork DeviceNetwork PrinterNetwork ResourcePeripheral
ScannerVirtual MachineFurniture and FixturesCell PhoneDesk PhoneOffice Equipment
Asset Types Category Accounting Information Tab Fields (Continued)
Field Data Class Description Resource Types
Asset Management Solution 6.5 63
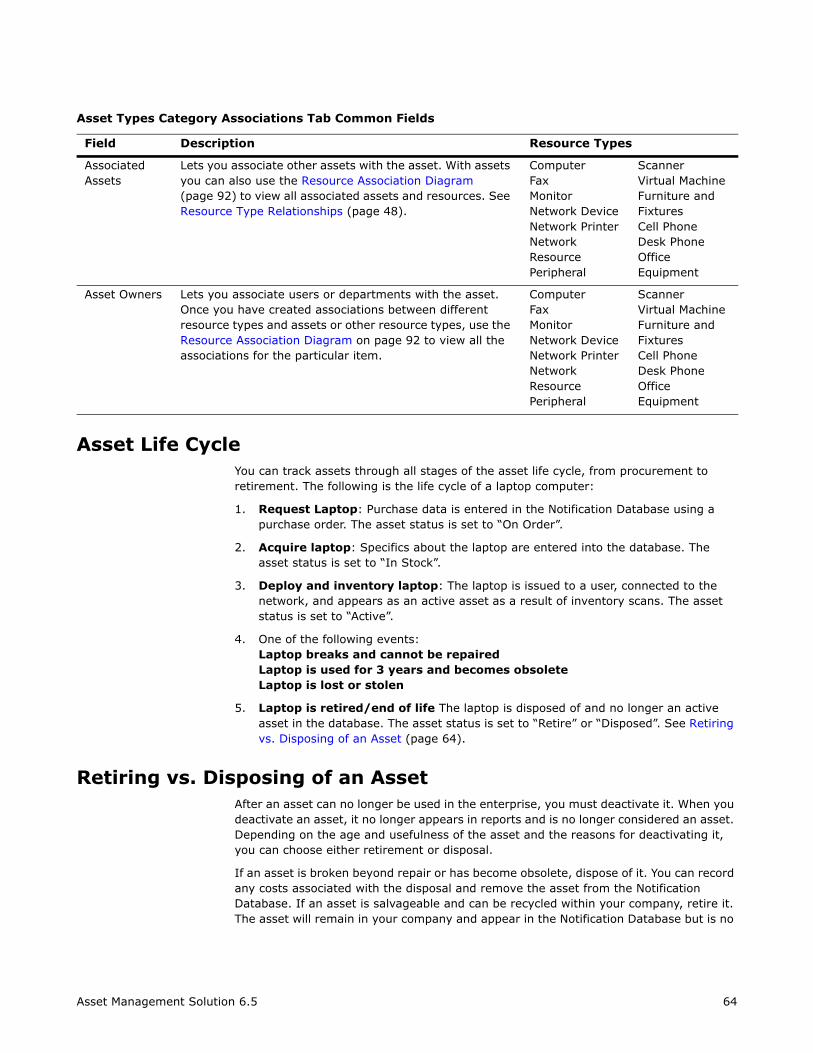
Asset Life CycleYou can track assets through all stages of the asset life cycle, from procurement to retirement. The following is the life cycle of a laptop computer:
1. Request Laptop: Purchase data is entered in the Notification Database using a purchase order. The asset status is set to “On Order”.
2. Acquire laptop: Specifics about the laptop are entered into the database. The asset status is set to “In Stock”.
3. Deploy and inventory laptop: The laptop is issued to a user, connected to the network, and appears as an active asset as a result of inventory scans. The asset status is set to “Active”.
4. One of the following events:Laptop breaks and cannot be repairedLaptop is used for 3 years and becomes obsoleteLaptop is lost or stolen
5. Laptop is retired/end of life The laptop is disposed of and no longer an active asset in the database. The asset status is set to “Retire” or “Disposed”. See Retiring vs. Disposing of an Asset (page 64).
Retiring vs. Disposing of an AssetAfter an asset can no longer be used in the enterprise, you must deactivate it. When you deactivate an asset, it no longer appears in reports and is no longer considered an asset. Depending on the age and usefulness of the asset and the reasons for deactivating it, you can choose either retirement or disposal.
If an asset is broken beyond repair or has become obsolete, dispose of it. You can record any costs associated with the disposal and remove the asset from the Notification Database. If an asset is salvageable and can be recycled within your company, retire it. The asset will remain in your company and appear in the Notification Database but is no
Asset Types Category Associations Tab Common Fields
Field Description Resource Types
Associated Assets
Lets you associate other assets with the asset. With assets you can also use the Resource Association Diagram (page 92) to view all associated assets and resources. See Resource Type Relationships (page 48).
ComputerFaxMonitorNetwork DeviceNetwork PrinterNetwork ResourcePeripheral
ScannerVirtual MachineFurniture and FixturesCell PhoneDesk PhoneOffice Equipment
Asset Owners Lets you associate users or departments with the asset. Once you have created associations between different resource types and assets or other resource types, use the Resource Association Diagram on page 92 to view all the associations for the particular item.
ComputerFaxMonitorNetwork DeviceNetwork PrinterNetwork ResourcePeripheral
ScannerVirtual MachineFurniture and FixturesCell PhoneDesk PhoneOffice Equipment
Asset Management Solution 6.5 64
NoteWhen an asset is disposed, depreciation is calculated up to but not including the disposal date.
Computer Resource TypeThe Computer resource type provides a large amount of built-in functionality for managing computer resources. This resource type also integrates tightly with data provided by Altiris Inventory Solution.
A benefit of the Computer resource type is that you can enter data associated with a computer that is not collected by Inventory Solution, such as a location or cost center. This resource type also lets you override data about a computer that is collected by Inventory Solution.
To make working with computer resources easier, there are several features that help you maintain your data. See the following:
Renaming Retired and Disposed Computers Scenario (page 102)
NotesTo track computer assets without Inventory Solution or to work with computers that are not included in data provided by Inventory Solution, do not use this asset type; instead, create a new asset type for the computer data.
When adding computer data to the Notification Database, the combination of Name and Domain for a computer must be unique.
Contract Types CategoryYou can track almost any type of contract data, including the location of contract documents, payment data, service data, and contract details. A contract, which is a type of resource, can be associated with other resources, including those added using Asset Management, such as a computer, printer, and monitor.
Asset Management Solution 6.5 65
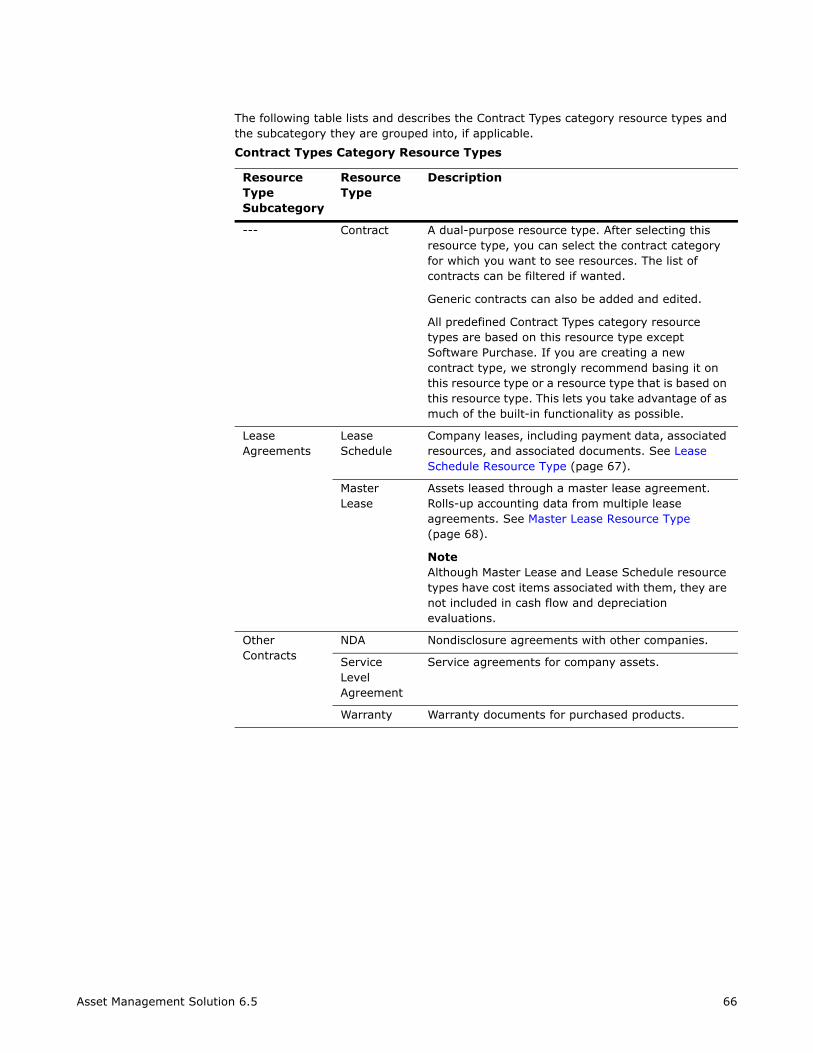
Contract Types Category Resource Types
Resource Type Subcategory
Resource Type
Description
--- Contract A dual-purpose resource type. After selecting this resource type, you can select the contract category for which you want to see resources. The list of contracts can be filtered if wanted.
Generic contracts can also be added and edited.
All predefined Contract Types category resource types are based on this resource type except Software Purchase. If you are creating a new contract type, we strongly recommend basing it on this resource type or a resource type that is based on this resource type. This lets you take advantage of as much of the built-in functionality as possible.
Lease Agreements
Lease Schedule
Company leases, including payment data, associated resources, and associated documents. See Lease Schedule Resource Type (page 67).
Master Lease
Assets leased through a master lease agreement. Rolls-up accounting data from multiple lease agreements. See Master Lease Resource Type (page 68).
NoteAlthough Master Lease and Lease Schedule resource types have cost items associated with them, they are not included in cash flow and depreciation evaluations.
Other Contracts
NDA Nondisclosure agreements with other companies.
Service Level Agreement
Service agreements for company assets.
Warranty Warranty documents for purchased products.
Asset Management Solution 6.5 66
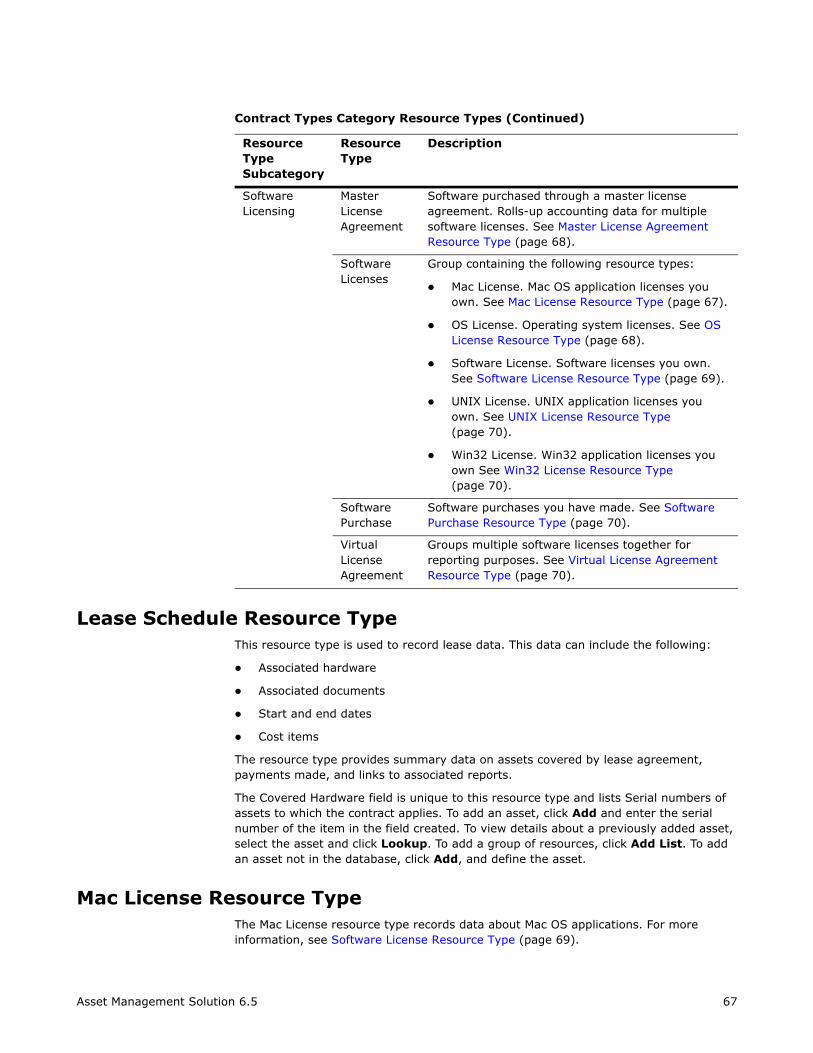
Lease Schedule Resource TypeThis resource type is used to record lease data. This data can include the following:
Associated hardware
Associated documents
Start and end dates
Cost items
The resource type provides summary data on assets covered by lease agreement, payments made, and links to associated reports.
The Covered Hardware field is unique to this resource type and lists Serial numbers of assets to which the contract applies. To add an asset, click Add and enter the serial number of the item in the field created. To view details about a previously added asset, select the asset and click Lookup. To add a group of resources, click Add List. To add an asset not in the database, click Add, and define the asset.
Mac License Resource TypeThe Mac License resource type records data about Mac OS applications. For more information, see Software License Resource Type (page 69).
Software Licensing
Master License Agreement
Software purchased through a master license agreement. Rolls-up accounting data for multiple software licenses. See Master License Agreement Resource Type (page 68).
Software Licenses
Group containing the following resource types:
Mac License. Mac OS application licenses you own. See Mac License Resource Type (page 67).
OS License. Operating system licenses. See OS License Resource Type (page 68).
Software License. Software licenses you own. See Software License Resource Type (page 69).
UNIX License. UNIX application licenses you own. See UNIX License Resource Type (page 70).
Win32 License. Win32 application licenses you own See Win32 License Resource Type (page 70).
Software Purchase
Software purchases you have made. See Software Purchase Resource Type (page 70).
Virtual License Agreement
Groups multiple software licenses together for reporting purposes. See Virtual License Agreement Resource Type (page 70).
Contract Types Category Resource Types (Continued)
Resource Type Subcategory
Resource Type
Description
Asset Management Solution 6.5 67
Master Lease Resource TypeUse this contract type to roll up accounting information from multiple lease schedules into a master lease.
Example: your organization leases several printers and computers from the same vendor (Company A). Create a master lease called Company A and link all lease schedules associated with the leased assets. Now you can view summary details for all leased equipment from Company A including payments, schedules, and serial numbers for covered hardware.
Each lease can be associated with only a single master lease. The following data can be recorded:
Associated leases
Associated documents
Start and end dates
Cost item
Master License Agreement Resource TypeThis contract type lets you combine financial information and software details from multiple software licenses into a single master license.
A master license agreement is a contract that applies to multiple products purchased under a single agreement.
Example: you purchase several Microsoft server products under a single agreement. The details of the agreement are entered using the Master License Agreement resource type. The purchase details are still entered using a Software Purchase resource type, with each product broken up into a separate resource, except the cost data is entered into the Master License Agreement and not the Software Purchase resource type.
NoteEach software license can be associated with only a single master license agreement.
OS License Resource TypeThe OS license resource type records data about particular versions of operating systems.
The version can be a major, minor, or some grouping. For operating systems supported by the different versions of Altiris Inventory Solution, license counts and other inventory data is automatically linked to the OS License resource type.
Currently supported operating systems:
Linux (Red Hat)
Mac OS
Asset Management Solution 6.5 68
Palm
Pocket PC
RIM devices
UNIX (Sun Solaris)
The summary data provides software usage data for the associated software products and links to related reports.
Software License Resource TypeThe Software license resource type records data about a particular version of an application to which you own licenses. Software license costs and details can also be linked to software purchases.
The version can be major, minor, or some grouping. As additional licenses are purchased and recorded using the Software Purchase resource type, you can associate that purchase with the appropriate application. The following data can be recorded:
Computers authorized to use the licenses
Associated software purchases
Maintenance and support costs
Payment data (This is available only after you upgrade from a previous version, not in a fresh install of version 6.5.)
Associated documents
The summary data provides software usage data for the associated software products and links to related reports.
The Software License resource type is the base resource type on which all of the other software license resource types are based. With these license types, you can take advantage of Altiris Inventory Solution to help you discover and track licenses.
NoteA software license can be tied to the Add/Remove program list. Picking the software from this list is simpler, since the list is smaller than the list generated by a software audit. Add/Remove also represents actual software programs, rather than all executable files. Where more granularity or flexibility is needed, or if an application does not show in the Add/Remove programs list, use the software audit data (SW_Audit table).
To record data about a license type that is not predefined, we recommend you create a new resource type based on the Software License resource type.
To add an application, the steps are the same for adding any resource (see Adding a Resource on page 89).
NoteThis resource type provides a count of the licenses used in the Summary tab or the Resource List page. To get data for these counts, you must be running Altiris Inventory Solution.
Asset Management Solution 6.5 69

A Software Purchase can be for one or more copies of the same product, but there can be only a single license for the purchase, Examples: Five copies of Microsoft Office 2000 or ten copies of Microsoft 2003 Server.
Each software purchase can be linked to a software license from the Software License resource. You can also specify the license upgraded by the purchase, if the purchase is an upgrade to licenses you already own.
UNIX License Resource TypeThis resource type records data about UNIX applications. This resource type is based on the Software License resource with the addition of the Software License Search Rules table on the Software Installs tab. For more details about this resource type, see Software License Resource Type (page 69).
NoteThe easiest way to add UNIX computer data is with Altiris Inventory Solution for UNIX.
Virtual License Agreement Resource TypeThe resource type groups multiple software licenses together for reporting purposes. These agreements let you look at any desired grouping of software licenses, such as by team, location, division, building, floor, and so on, and gather summary data on the group. Think of virtual license agreements as different views of collections of your software licenses.
NoteInformation contained in virtual license agreements does not roll up into advanced financial reporting. To utilize financial reporting with multiple licenses, use a master license agreement. Thus, you use a master license agreement to gather financial information about a group of licenses, and a virtual license agreement to group licenses but not require financial data. Another important difference is that each software license can belong to more than one virtual license agreement but to only one master license agreement.
Win32 License Resource TypeThis resource type records data about Win32 applications to which you own licenses. This resource type is based on the Software License resource with the addition of the Software License Search Rules table on the Software Installs tab and the Skip Metering Calculation checkbox on the General tab. The Skip Metering Calculation checkbox skips the calculation of application usage from the summary data. For more details about this resource type, see Software License Resource Type (page 69).
NoteWhen using Altiris Connector Solution to import Win 32 licenses and Software Purchases from the same data source, you can automatically create resource associations between the two. To do this you must first create a Win 32 License Association rule, and then edit the rule’s Association Mappings and Software Purchase Tied fields.
Asset Management Solution 6.5 70
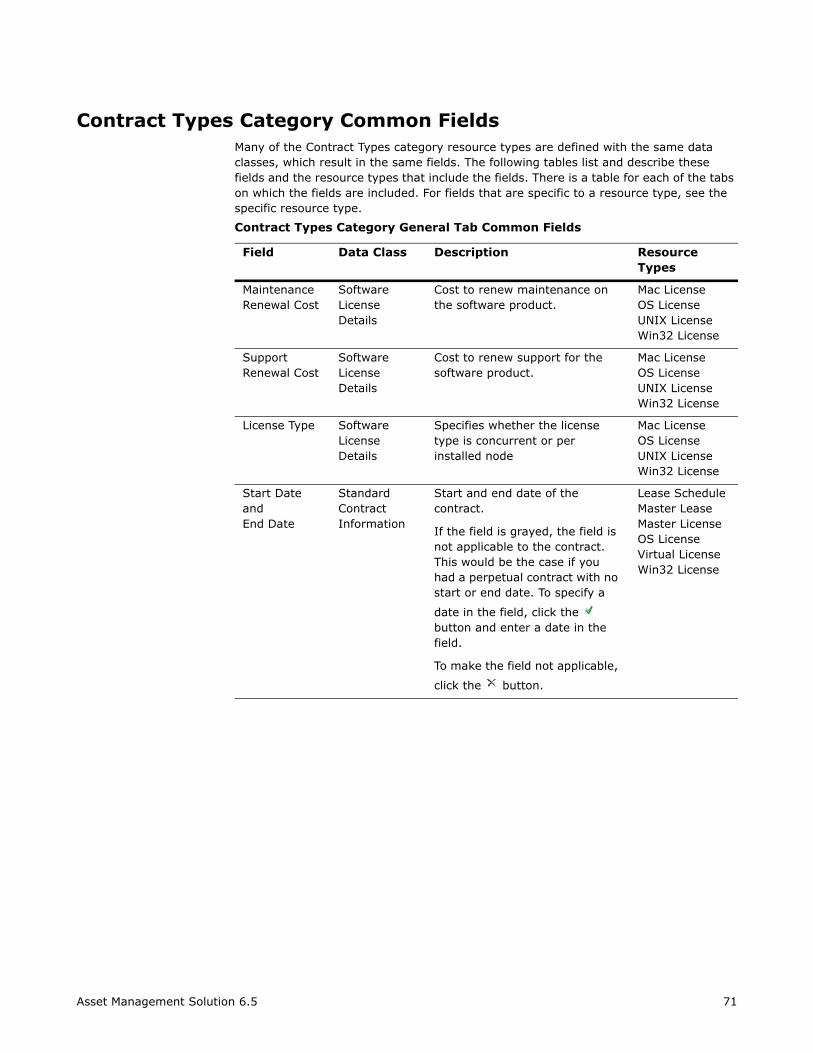
Many of the Contract Types category resource types are defined with the same data classes, which result in the same fields. The following tables list and describe these fields and the resource types that include the fields. There is a table for each of the tabs on which the fields are included. For fields that are specific to a resource type, see the specific resource type.
Contract Types Category General Tab Common Fields
Field Data Class Description Resource Types
Maintenance Renewal Cost
Software License Details
Cost to renew maintenance on the software product.
Mac LicenseOS LicenseUNIX LicenseWin32 License
Support Renewal Cost
Software License Details
Cost to renew support for the software product.
Mac LicenseOS LicenseUNIX LicenseWin32 License
License Type Software License Details
Specifies whether the license type is concurrent or per installed node
Mac LicenseOS LicenseUNIX LicenseWin32 License
Start DateandEnd Date
Standard Contract Information
Start and end date of the contract.
If the field is grayed, the field is not applicable to the contract. This would be the case if you had a perpetual contract with no start or end date. To specify a
date in the field, click the button and enter a date in the field.
To make the field not applicable,
click the button.
Lease ScheduleMaster LeaseMaster LicenseOS LicenseVirtual LicenseWin32 License
Asset Management Solution 6.5 71
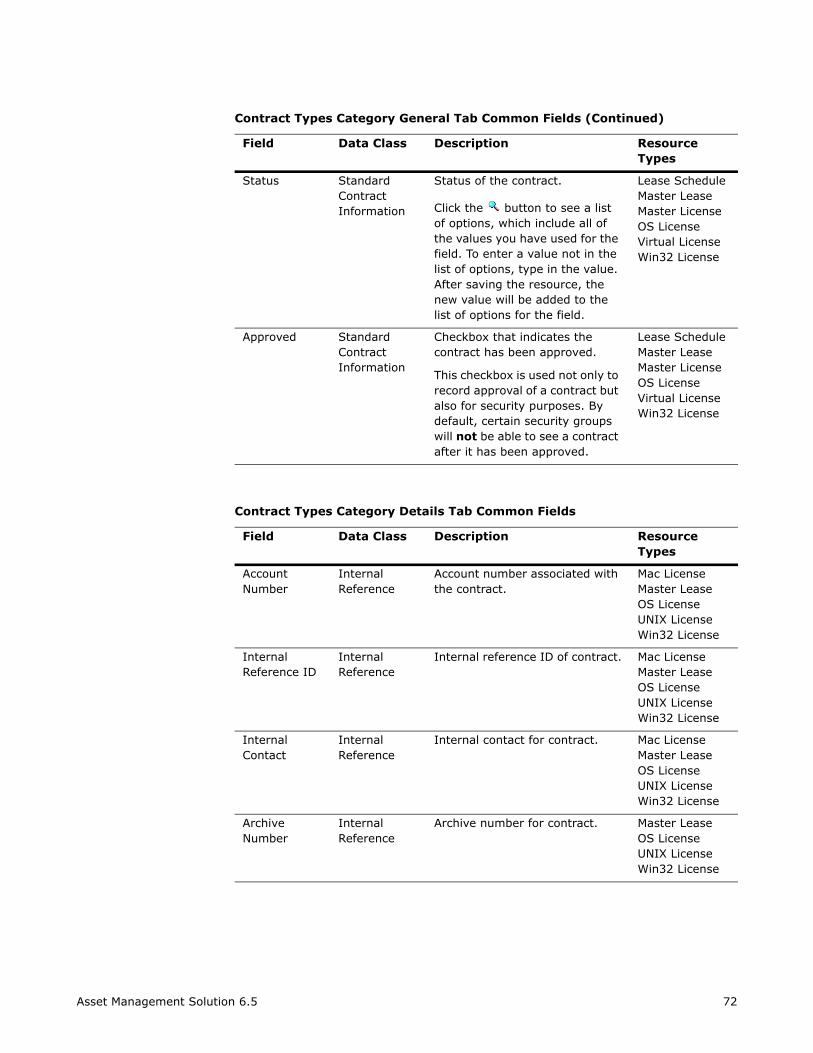
Status Standard Contract Information
Status of the contract.
Click the button to see a list of options, which include all of the values you have used for the field. To enter a value not in the list of options, type in the value. After saving the resource, the new value will be added to the list of options for the field.
Lease ScheduleMaster LeaseMaster LicenseOS LicenseVirtual LicenseWin32 License
Approved Standard Contract Information
Checkbox that indicates the contract has been approved.
This checkbox is used not only to record approval of a contract but also for security purposes. By default, certain security groups will not be able to see a contract after it has been approved.
Lease ScheduleMaster LeaseMaster LicenseOS LicenseVirtual LicenseWin32 License
Contract Types Category Details Tab Common Fields
Field Data Class Description Resource Types
Account Number
Internal Reference
Account number associated with the contract.
Mac LicenseMaster LeaseOS LicenseUNIX LicenseWin32 License
Internal Reference ID
Internal Reference
Internal reference ID of contract. Mac LicenseMaster LeaseOS LicenseUNIX LicenseWin32 License
Internal Contact
Internal Reference
Internal contact for contract. Mac LicenseMaster LeaseOS LicenseUNIX LicenseWin32 License
Archive Number
Internal Reference
Archive number for contract. Master LeaseOS LicenseUNIX LicenseWin32 License
Contract Types Category General Tab Common Fields (Continued)
Field Data Class Description Resource Types
Asset Management Solution 6.5 72
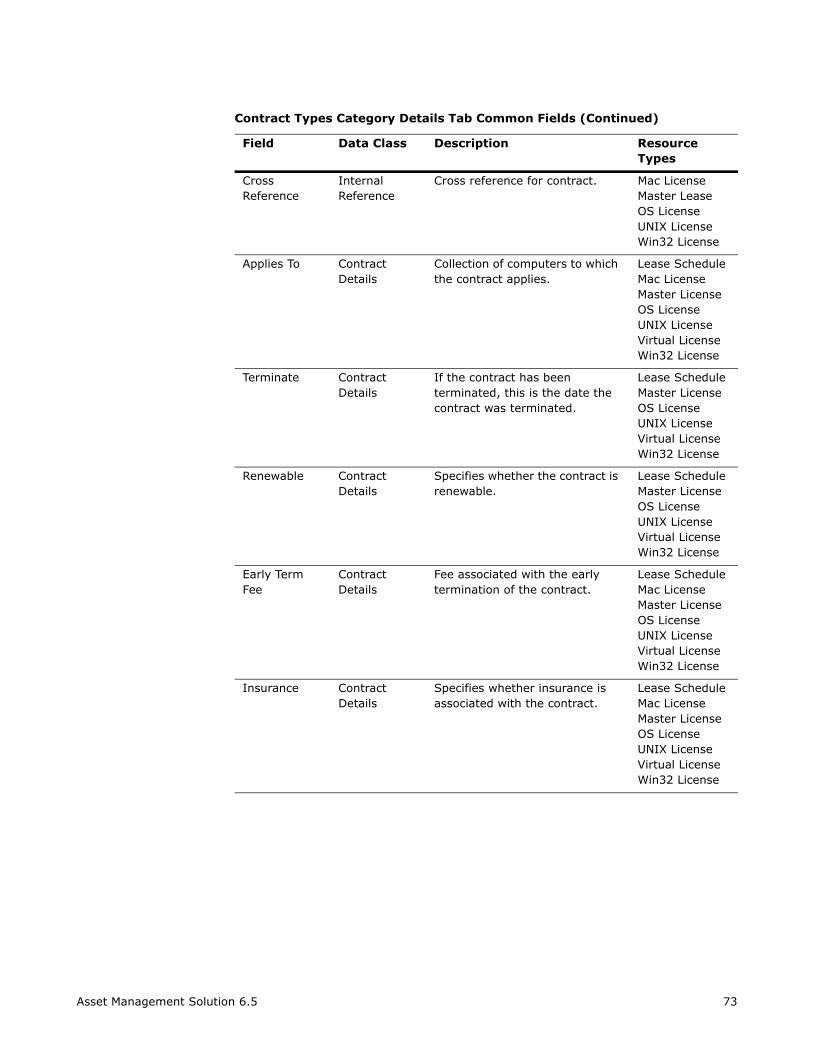
Cross Reference
Internal Reference
Cross reference for contract. Mac LicenseMaster LeaseOS LicenseUNIX LicenseWin32 License
Applies To Contract Details
Collection of computers to which the contract applies.
Lease ScheduleMac LicenseMaster LicenseOS LicenseUNIX LicenseVirtual LicenseWin32 License
Terminate Contract Details
If the contract has been terminated, this is the date the contract was terminated.
Lease ScheduleMaster LicenseOS LicenseUNIX LicenseVirtual LicenseWin32 License
Renewable Contract Details
Specifies whether the contract is renewable.
Lease ScheduleMaster LicenseOS LicenseUNIX LicenseVirtual LicenseWin32 License
Early Term Fee
Contract Details
Fee associated with the early termination of the contract.
Lease ScheduleMac LicenseMaster LicenseOS LicenseUNIX LicenseVirtual LicenseWin32 License
Insurance Contract Details
Specifies whether insurance is associated with the contract.
Lease ScheduleMac LicenseMaster LicenseOS LicenseUNIX LicenseVirtual LicenseWin32 License
Contract Types Category Details Tab Common Fields (Continued)
Field Data Class Description Resource Types
Asset Management Solution 6.5 73
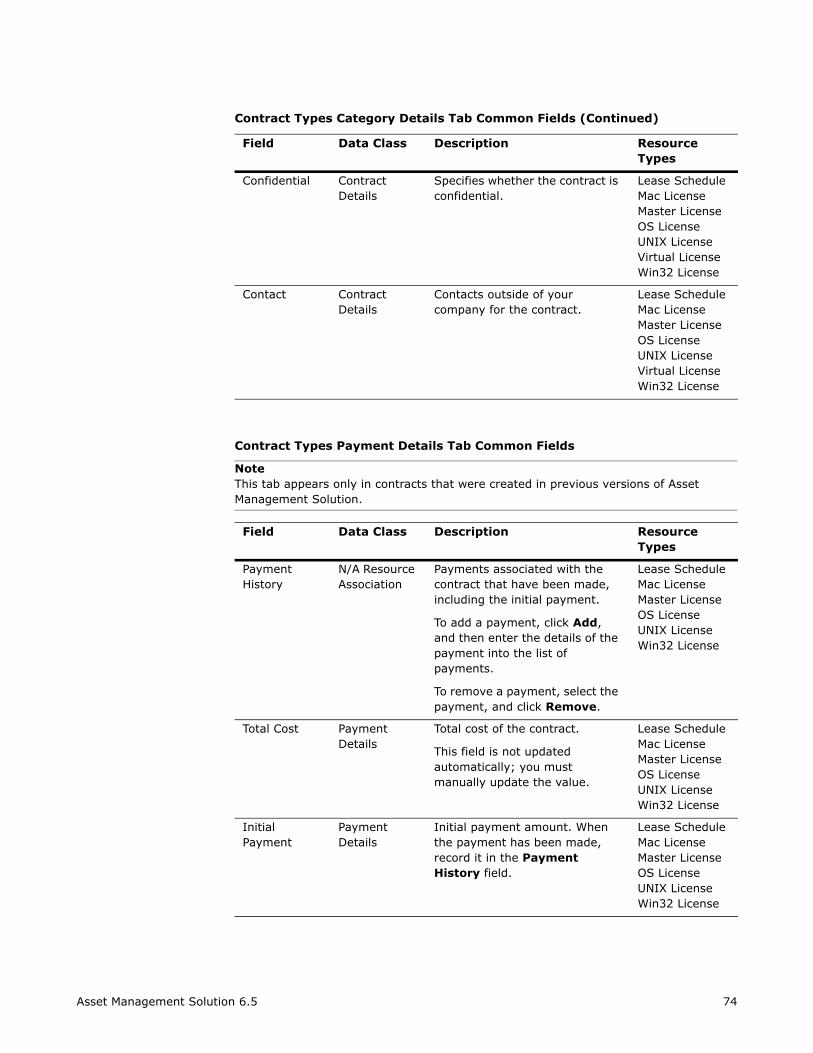
Confidential Contract Details
Specifies whether the contract is confidential.
Lease ScheduleMac LicenseMaster LicenseOS LicenseUNIX LicenseVirtual LicenseWin32 License
Contact Contract Details
Contacts outside of your company for the contract.
Lease ScheduleMac LicenseMaster LicenseOS LicenseUNIX LicenseVirtual LicenseWin32 License
Contract Types Payment Details Tab Common Fields
NoteThis tab appears only in contracts that were created in previous versions of Asset Management Solution.
Field Data Class Description Resource Types
Payment History
N/A Resource Association
Payments associated with the contract that have been made, including the initial payment.
To add a payment, click Add, and then enter the details of the payment into the list of payments.
To remove a payment, select the payment, and click Remove.
Lease ScheduleMac LicenseMaster LicenseOS LicenseUNIX LicenseWin32 License
Total Cost Payment Details
Total cost of the contract.
This field is not updated automatically; you must manually update the value.
Lease ScheduleMac LicenseMaster LicenseOS LicenseUNIX LicenseWin32 License
Initial Payment
Payment Details
Initial payment amount. When the payment has been made, record it in the Payment History field.
Lease ScheduleMac LicenseMaster LicenseOS LicenseUNIX LicenseWin32 License
Contract Types Category Details Tab Common Fields (Continued)
Field Data Class Description Resource Types
Asset Management Solution 6.5 74
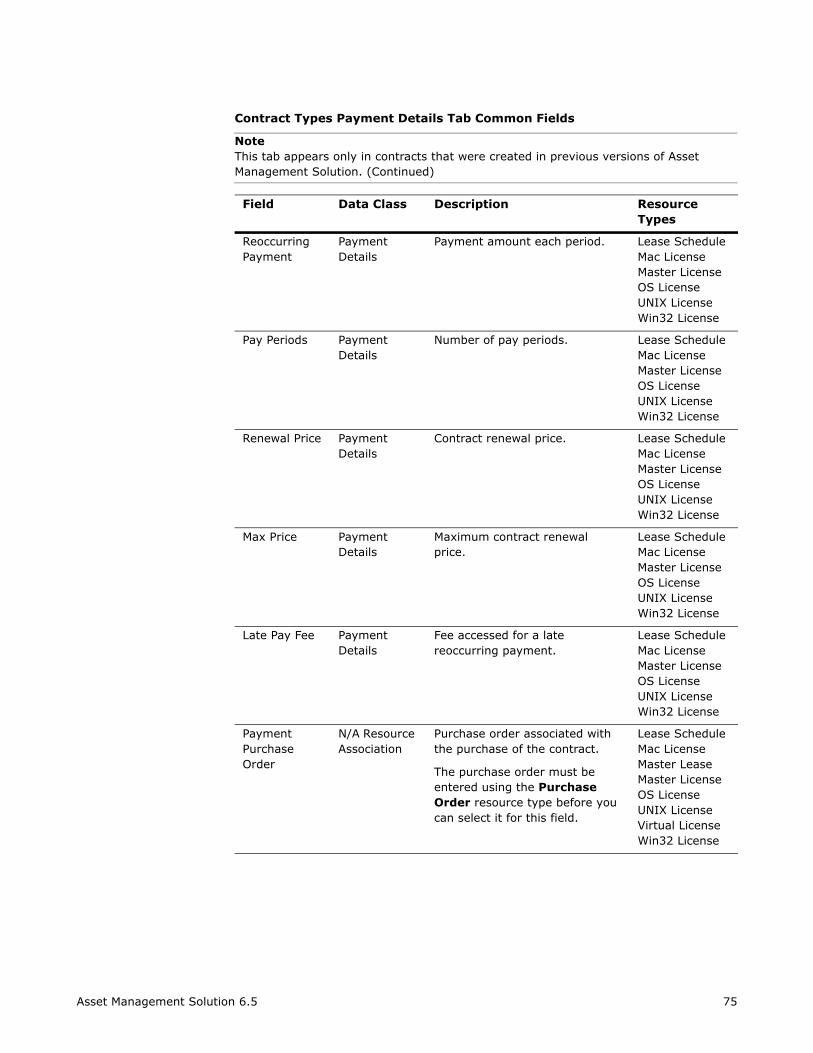
Reoccurring Payment
Payment Details
Payment amount each period. Lease ScheduleMac LicenseMaster LicenseOS LicenseUNIX LicenseWin32 License
Pay Periods Payment Details
Number of pay periods. Lease ScheduleMac LicenseMaster LicenseOS LicenseUNIX LicenseWin32 License
Renewal Price Payment Details
Contract renewal price. Lease ScheduleMac LicenseMaster LicenseOS LicenseUNIX LicenseWin32 License
Max Price Payment Details
Maximum contract renewal price.
Lease ScheduleMac LicenseMaster LicenseOS LicenseUNIX LicenseWin32 License
Late Pay Fee Payment Details
Fee accessed for a late reoccurring payment.
Lease ScheduleMac LicenseMaster LicenseOS LicenseUNIX LicenseWin32 License
Payment Purchase Order
N/A Resource Association
Purchase order associated with the purchase of the contract.
The purchase order must be entered using the Purchase Order resource type before you can select it for this field.
Lease ScheduleMac LicenseMaster LeaseMaster LicenseOS LicenseUNIX LicenseVirtual LicenseWin32 License
Contract Types Payment Details Tab Common Fields
NoteThis tab appears only in contracts that were created in previous versions of Asset Management Solution. (Continued)
Field Data Class Description Resource Types
Asset Management Solution 6.5 75
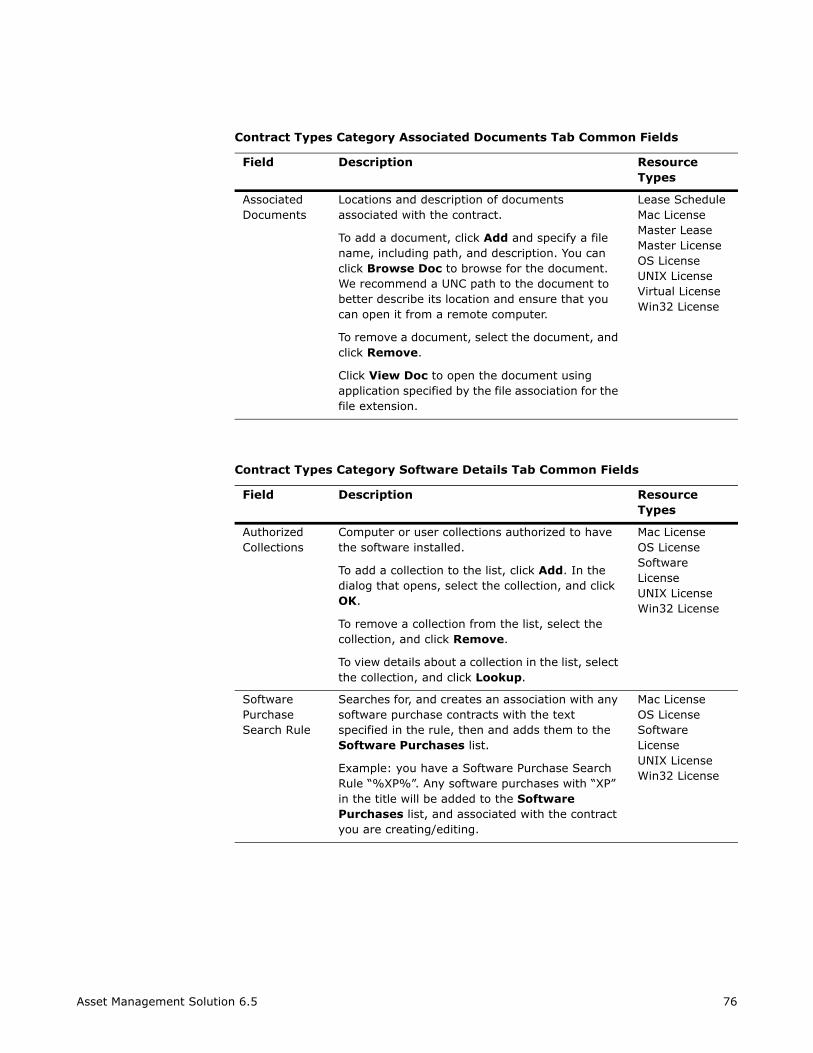
Contract Types Category Associated Documents Tab Common Fields
Field Description Resource Types
Associated Documents
Locations and description of documents associated with the contract.
To add a document, click Add and specify a file name, including path, and description. You can click Browse Doc to browse for the document. We recommend a UNC path to the document to better describe its location and ensure that you can open it from a remote computer.
To remove a document, select the document, and click Remove.
Click View Doc to open the document using application specified by the file association for the file extension.
Lease ScheduleMac LicenseMaster LeaseMaster LicenseOS LicenseUNIX LicenseVirtual LicenseWin32 License
Contract Types Category Software Details Tab Common Fields
Field Description Resource Types
Authorized Collections
Computer or user collections authorized to have the software installed.
To add a collection to the list, click Add. In the dialog that opens, select the collection, and click OK.
To remove a collection from the list, select the collection, and click Remove.
To view details about a collection in the list, select the collection, and click Lookup.
Mac LicenseOS LicenseSoftware LicenseUNIX LicenseWin32 License
Software Purchase Search Rule
Searches for, and creates an association with any software purchase contracts with the text specified in the rule, then and adds them to the Software Purchases list.
Example: you have a Software Purchase Search Rule “%XP%”. Any software purchases with “XP” in the title will be added to the Software Purchases list, and associated with the contract you are creating/editing.
Mac LicenseOS LicenseSoftware LicenseUNIX LicenseWin32 License
Asset Management Solution 6.5 76
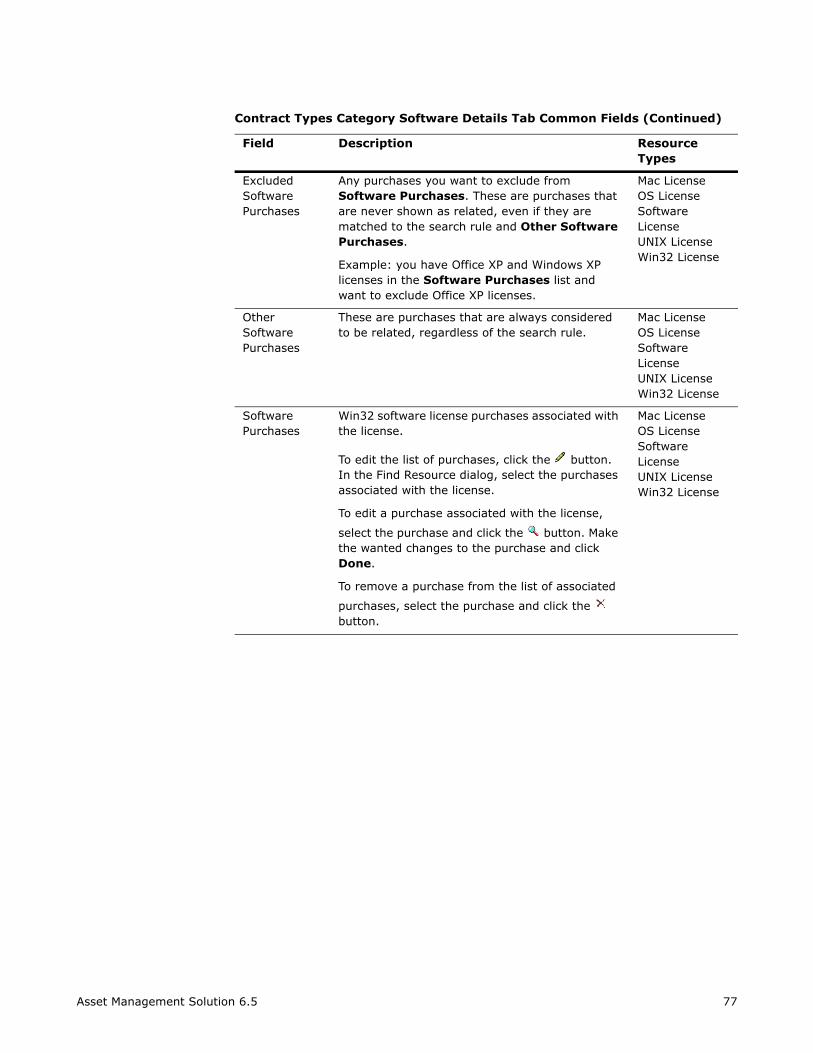
Excluded Software Purchases
Any purchases you want to exclude from Software Purchases. These are purchases that are never shown as related, even if they are matched to the search rule and Other Software Purchases.
Example: you have Office XP and Windows XP licenses in the Software Purchases list and want to exclude Office XP licenses.
Mac LicenseOS LicenseSoftware LicenseUNIX LicenseWin32 License
Other Software Purchases
These are purchases that are always considered to be related, regardless of the search rule.
Mac LicenseOS LicenseSoftware LicenseUNIX LicenseWin32 License
Software Purchases
Win32 software license purchases associated with the license.
To edit the list of purchases, click the button. In the Find Resource dialog, select the purchases associated with the license.
To edit a purchase associated with the license,
select the purchase and click the button. Make the wanted changes to the purchase and click Done.
To remove a purchase from the list of associated
purchases, select the purchase and click the button.
Mac LicenseOS LicenseSoftware LicenseUNIX LicenseWin32 License
Contract Types Category Software Details Tab Common Fields (Continued)
Field Description Resource Types
Asset Management Solution 6.5 77
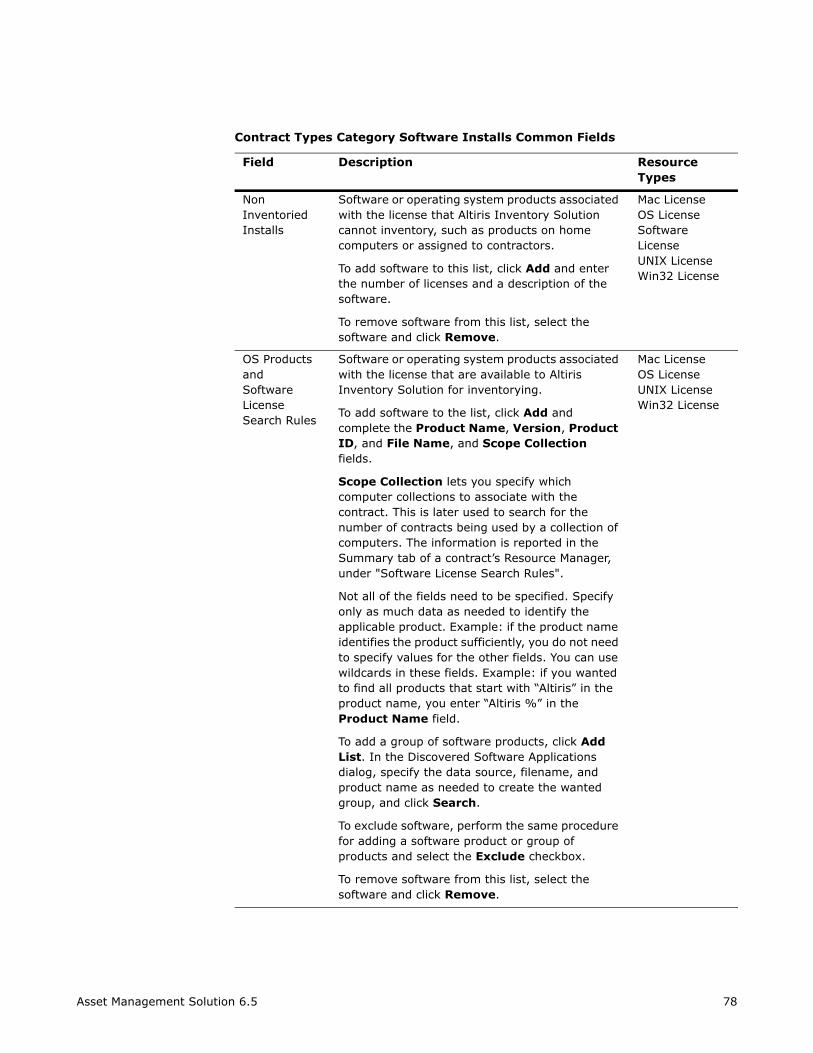
Contract Types Category Software Installs Common Fields
Field Description Resource Types
Non Inventoried Installs
Software or operating system products associated with the license that Altiris Inventory Solution cannot inventory, such as products on home computers or assigned to contractors.
To add software to this list, click Add and enter the number of licenses and a description of the software.
To remove software from this list, select the software and click Remove.
Mac LicenseOS LicenseSoftware LicenseUNIX LicenseWin32 License
OS Products andSoftware License Search Rules
Software or operating system products associated with the license that are available to Altiris Inventory Solution for inventorying.
To add software to the list, click Add and complete the Product Name, Version, Product ID, and File Name, and Scope Collection fields.
Scope Collection lets you specify which computer collections to associate with the contract. This is later used to search for the number of contracts being used by a collection of computers. The information is reported in the Summary tab of a contract’s Resource Manager, under "Software License Search Rules".
Not all of the fields need to be specified. Specify only as much data as needed to identify the applicable product. Example: if the product name identifies the product sufficiently, you do not need to specify values for the other fields. You can use wildcards in these fields. Example: if you wanted to find all products that start with “Altiris” in the product name, you enter “Altiris %” in the Product Name field.
To add a group of software products, click Add List. In the Discovered Software Applications dialog, specify the data source, filename, and product name as needed to create the wanted group, and click Search.
To exclude software, perform the same procedure for adding a software product or group of products and select the Exclude checkbox.
To remove software from this list, select the software and click Remove.
Mac LicenseOS LicenseUNIX LicenseWin32 License
Asset Management Solution 6.5 78
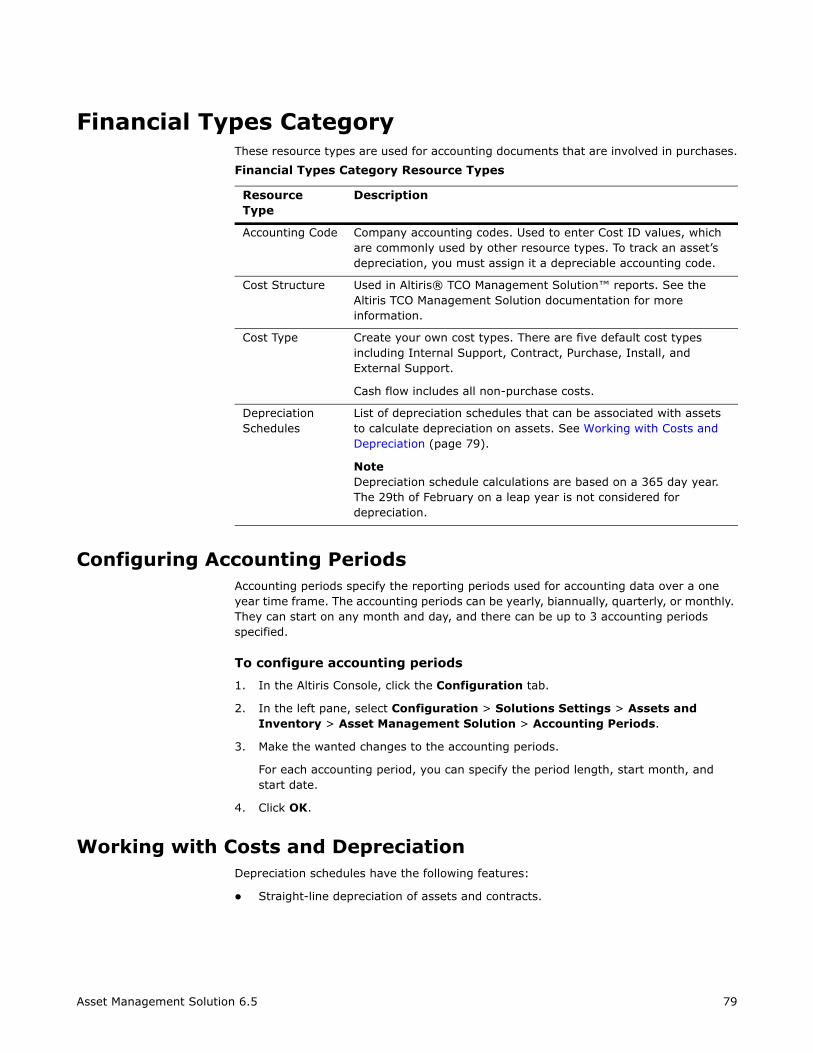
These resource types are used for accounting documents that are involved in purchases.
Configuring Accounting PeriodsAccounting periods specify the reporting periods used for accounting data over a one year time frame. The accounting periods can be yearly, biannually, quarterly, or monthly. They can start on any month and day, and there can be up to 3 accounting periods specified.
To configure accounting periods
1. In the Altiris Console, click the Configuration tab.
2. In the left pane, select Configuration > Solutions Settings > Assets and Inventory > Asset Management Solution > Accounting Periods.
3. Make the wanted changes to the accounting periods.
For each accounting period, you can specify the period length, start month, and start date.
4. Click OK.
Working with Costs and DepreciationDepreciation schedules have the following features:
Straight-line depreciation of assets and contracts.
Financial Types Category Resource Types
Resource Type
Description
Accounting Code Company accounting codes. Used to enter Cost ID values, which are commonly used by other resource types. To track an asset’s depreciation, you must assign it a depreciable accounting code.
Cost Structure Used in Altiris® TCO Management Solution™ reports. See the Altiris TCO Management Solution documentation for more information.
Cost Type Create your own cost types. There are five default cost types including Internal Support, Contract, Purchase, Install, and External Support.
Cash flow includes all non-purchase costs.
Depreciation Schedules
List of depreciation schedules that can be associated with assets to calculate depreciation on assets. See Working with Costs and Depreciation (page 79).
NoteDepreciation schedule calculations are based on a 365 day year. The 29th of February on a leap year is not considered for depreciation.
Asset Management Solution 6.5 79
Each purchased asset can be associated with a tax, book, and custom depreciation schedule.
One-hundred percent depreciation means that the asset is depreciated totally over one year. You cannot depreciate something in less than a year.
A depreciation rate cannot be set to more than 100%. If it is, the depreciation will not be calculated.
Before associating depreciation schedules with assets, you must do the following:
1. Ensure that the predefined Accounting Information resource type is included in the definition of the asset type used to enter the asset data. If you are using a predefined asset type or one that you have created that is based on the Asset resource type, the Accounting Information resource type is already included.
2. Configure accounting period data. See Configuring Accounting Periods (page 79).
3. Create a cost item to represent the depreciable cost of the resource.
4. Create depreciation schedules.
After you complete the previous steps, you can specify the depreciation schedules for the assets.
For an example of creating a depreciation schedule, see Creating a Depreciation Schedule (page 24).
Notes
You can have only one depreciable cost item per resource.
If you have a cost item with no accounting code, it is regarded as an expense by default.
For depreciation to be calculated, a cost item’s status must be set to Incurred. If the status is Projected, the cost will not be calculated.
If you have not set a status for a cost item (Incurred or Projected), the status will default to Incurred.
Depreciable cost items cannot be assigned to cost centers and departments.
When an asset is acquired by another company, the depreciable value of the computer’s cost item should be reconfigured to represent the value at the time of acquisition, not purchase. Example: Company A purchased a computer for $4000. Two years later Company B buys Company A. the value of the computer is now $1000 after two years of depreciation. Therefore the cost item for the computer should be set to $1000.
When an asset is disposed, a user can allocate a “Cash on Disposal” value. This value will be assigned against the current owner of the asset. Example: User, Department, or Cost Center.
Organizational Types CategoryThe Organizational Types category is used to enter organizational and user data. Organizational type resources are the essential building blocks upon which all of your
Asset Management Solution 6.5 80

The following table lists and describes the Organizational Types category resource types.
Organizational Types Category Resource Types
Resource Type
Description
Company Contains company details, internal and external.
For internal companies, it acts as a level of organization above the department level. In some situations, a single company consists of multiple smaller companies. This resource type lets you record data about these companies. If you have structured your resource management system as a single company, this resource type might not be needed for internal company data.
Cost Center Used to enter cost center code values, which are used for accounting related data.
Summary data includes a list of all resources and costs associated with the particular cost center.
With each cost center, you can associate a location. However, if your organization is structured such that a single cost center spans multiple locations, you would not use this field. You would, however, be able to specify a cost center for each location.
This is a hierarchal resource type. See Hierarchal Resource Types (page 82).
Department Contains department data. Each department also lets you specify a manager for the department from the User resource type, location, and cost center.
Summary data includes a list of all resources and costs associated with the particular department.
This is a hierarchal resource type.
Asset Management Solution 6.5 81
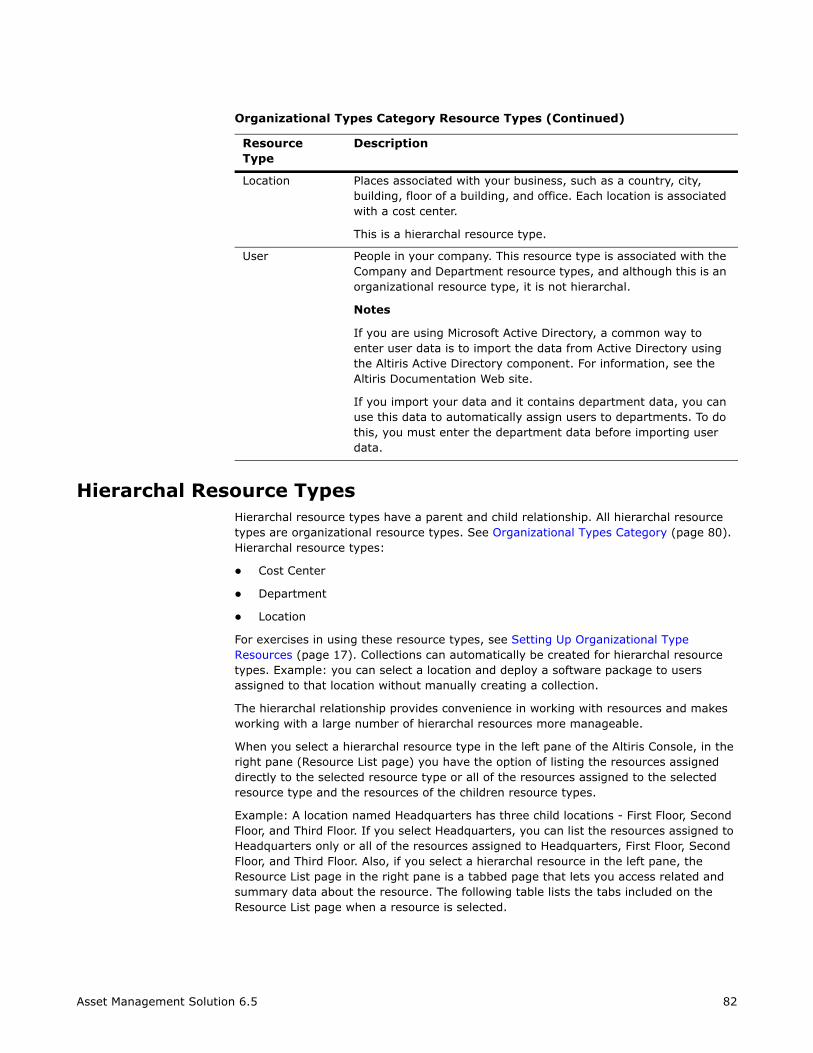
Hierarchal Resource TypesHierarchal resource types have a parent and child relationship. All hierarchal resource types are organizational resource types. See Organizational Types Category (page 80). Hierarchal resource types:
Cost Center
Department
Location
For exercises in using these resource types, see Setting Up Organizational Type Resources (page 17). Collections can automatically be created for hierarchal resource types. Example: you can select a location and deploy a software package to users assigned to that location without manually creating a collection.
The hierarchal relationship provides convenience in working with resources and makes working with a large number of hierarchal resources more manageable.
When you select a hierarchal resource type in the left pane of the Altiris Console, in the right pane (Resource List page) you have the option of listing the resources assigned directly to the selected resource type or all of the resources assigned to the selected resource type and the resources of the children resource types.
Example: A location named Headquarters has three child locations - First Floor, Second Floor, and Third Floor. If you select Headquarters, you can list the resources assigned to Headquarters only or all of the resources assigned to Headquarters, First Floor, Second Floor, and Third Floor. Also, if you select a hierarchal resource in the left pane, the Resource List page in the right pane is a tabbed page that lets you access related and summary data about the resource. The following table lists the tabs included on the Resource List page when a resource is selected.
Location Places associated with your business, such as a country, city, building, floor of a building, and office. Each location is associated with a cost center.
This is a hierarchal resource type.
User People in your company. This resource type is associated with the Company and Department resource types, and although this is an organizational resource type, it is not hierarchal.
Notes
If you are using Microsoft Active Directory, a common way to enter user data is to import the data from Active Directory using the Altiris Active Directory component. For information, see the Altiris Documentation Web site.
If you import your data and it contains department data, you can use this data to automatically assign users to departments. To do this, you must enter the department data before importing user data.
Organizational Types Category Resource Types (Continued)
Resource Type
Description
Asset Management Solution 6.5 82
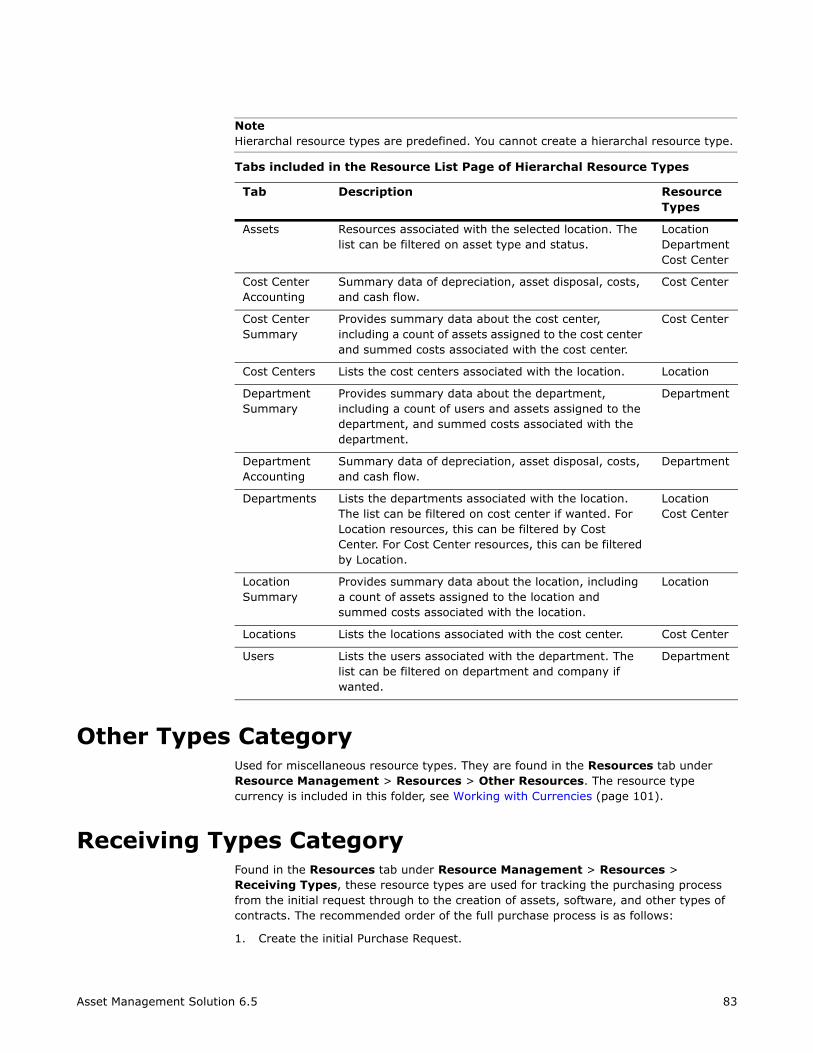
Other Types CategoryUsed for miscellaneous resource types. They are found in the Resources tab under Resource Management > Resources > Other Resources. The resource type currency is included in this folder, see Working with Currencies (page 101).
Receiving Types CategoryFound in the Resources tab under Resource Management > Resources > Receiving Types, these resource types are used for tracking the purchasing process from the initial request through to the creation of assets, software, and other types of contracts. The recommended order of the full purchase process is as follows:
1. Create the initial Purchase Request.
Tabs included in the Resource List Page of Hierarchal Resource Types
Tab Description Resource Types
Assets Resources associated with the selected location. The list can be filtered on asset type and status.
LocationDepartmentCost Center
Cost Center Accounting
Summary data of depreciation, asset disposal, costs, and cash flow.
Cost Center
Cost Center Summary
Provides summary data about the cost center, including a count of assets assigned to the cost center and summed costs associated with the cost center.
Cost Center
Cost Centers Lists the cost centers associated with the location. Location
Department Summary
Provides summary data about the department, including a count of users and assets assigned to the department, and summed costs associated with the department.
Department
Department Accounting
Summary data of depreciation, asset disposal, costs, and cash flow.
Department
Departments Lists the departments associated with the location. The list can be filtered on cost center if wanted. For Location resources, this can be filtered by Cost Center. For Cost Center resources, this can be filtered by Location.
LocationCost Center
Location Summary
Provides summary data about the location, including a count of assets assigned to the location and summed costs associated with the location.
Location
Locations Lists the locations associated with the cost center. Cost Center
Users Lists the users associated with the department. The list can be filtered on department and company if wanted.
Department
Asset Management Solution 6.5 83
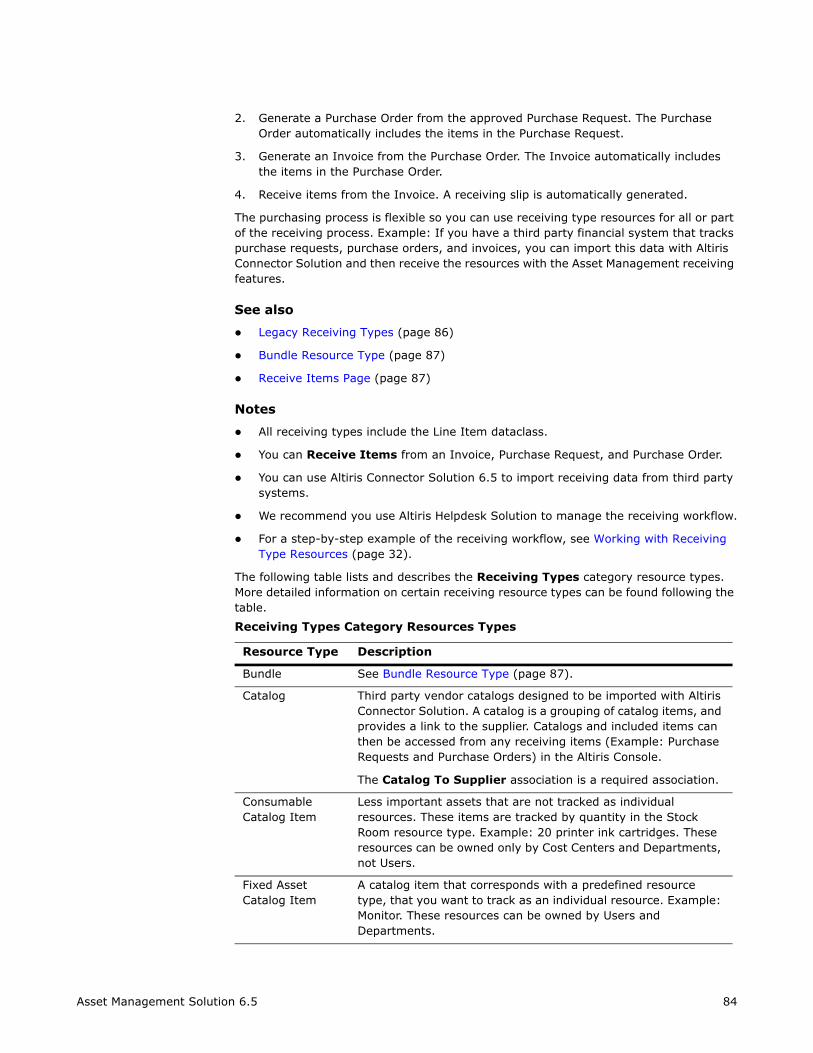
Order automatically includes the items in the Purchase Request.
3. Generate an Invoice from the Purchase Order. The Invoice automatically includes the items in the Purchase Order.
4. Receive items from the Invoice. A receiving slip is automatically generated.
The purchasing process is flexible so you can use receiving type resources for all or part of the receiving process. Example: If you have a third party financial system that tracks purchase requests, purchase orders, and invoices, you can import this data with Altiris Connector Solution and then receive the resources with the Asset Management receiving features.
See also
Legacy Receiving Types (page 86)
Bundle Resource Type (page 87)
Receive Items Page (page 87)
Notes
All receiving types include the Line Item dataclass.
You can Receive Items from an Invoice, Purchase Request, and Purchase Order.
You can use Altiris Connector Solution 6.5 to import receiving data from third party systems.
We recommend you use Altiris Helpdesk Solution to manage the receiving workflow.
For a step-by-step example of the receiving workflow, see Working with Receiving Type Resources (page 32).
The following table lists and describes the Receiving Types category resource types. More detailed information on certain receiving resource types can be found following the table.
Receiving Types Category Resources Types
Resource Type Description
Bundle See Bundle Resource Type (page 87).
Catalog Third party vendor catalogs designed to be imported with Altiris Connector Solution. A catalog is a grouping of catalog items, and provides a link to the supplier. Catalogs and included items can then be accessed from any receiving items (Example: Purchase Requests and Purchase Orders) in the Altiris Console.
The Catalog To Supplier association is a required association.
Consumable Catalog Item
Less important assets that are not tracked as individual resources. These items are tracked by quantity in the Stock Room resource type. Example: 20 printer ink cartridges. These resources can be owned only by Cost Centers and Departments, not Users.
Fixed Asset Catalog Item
A catalog item that corresponds with a predefined resource type, that you want to track as an individual resource. Example: Monitor. These resources can be owned by Users and Departments.
Asset Management Solution 6.5 84

Invoice Invoices from a vendor. Click Receive Items from the context menu to receive catalog items in an invoice.
NoteTo track other costs such as freight, you can define a data class with the required number fields and attach it to the Invoice Resource Type. To do this, open an invoice and click Add next to the Line Items table. In the dialog, click Create, and enter relevant data for the freight costs.
Purchase Order Purchase orders for ordered goods. These are linked to a company resource through the catalog containing the catalog items in the purchase order. Click Generate to generate an invoice fro ma purchase order. If you are manually creating purchase orders or invoices, we recommend you create one per supplier (this will occur automatically if you click Generate).
Purchase Request
Used to create initial purchase requests. Purchase requests contain Line Items. Line items are populated by catalog items.
From this resource type you can request items from Catalogs and Bundles, or individual line items. You can also generate new catalog items from the catalog picker, but must have the required security permissions.
The Line Items table automatically calculates the total cost of each line, and the whole of the purchase request. Click Generate to generate a purchase order (before doing this a purchase request must be Approved).
Receiving Slip This resource type is generated by using the Receive Items action on a receiving type (Example: Invoice or purchase order) and contains a record of the items received from that action.
Receiving Types Category Resources Types (Continued)
Resource Type Description
Asset Management Solution 6.5 85
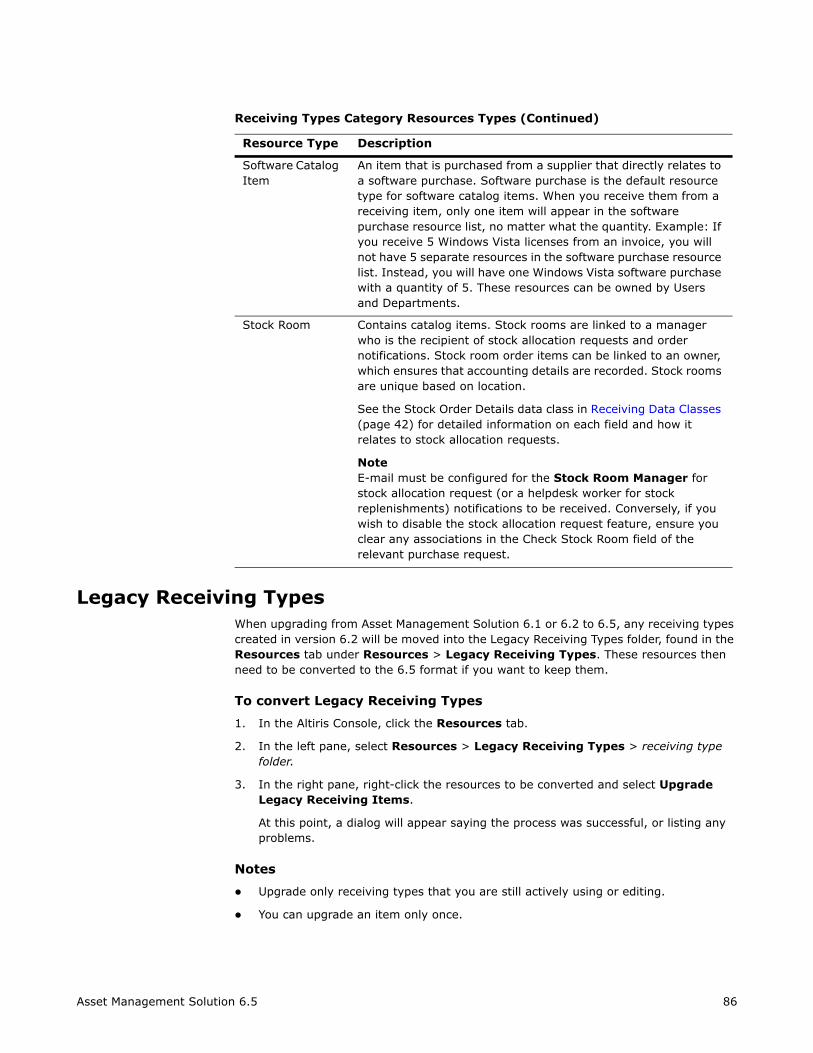
Legacy Receiving TypesWhen upgrading from Asset Management Solution 6.1 or 6.2 to 6.5, any receiving types created in version 6.2 will be moved into the Legacy Receiving Types folder, found in the Resources tab under Resources > Legacy Receiving Types. These resources then need to be converted to the 6.5 format if you want to keep them.
To convert Legacy Receiving Types
1. In the Altiris Console, click the Resources tab.
2. In the left pane, select Resources > Legacy Receiving Types > receiving type folder.
3. In the right pane, right-click the resources to be converted and select Upgrade Legacy Receiving Items.
At this point, a dialog will appear saying the process was successful, or listing any problems.
Notes
Upgrade only receiving types that you are still actively using or editing.
You can upgrade an item only once.
Software Catalog Item
An item that is purchased from a supplier that directly relates to a software purchase. Software purchase is the default resource type for software catalog items. When you receive them from a receiving item, only one item will appear in the software purchase resource list, no matter what the quantity. Example: If you receive 5 Windows Vista licenses from an invoice, you will not have 5 separate resources in the software purchase resource list. Instead, you will have one Windows Vista software purchase with a quantity of 5. These resources can be owned by Users and Departments.
Stock Room Contains catalog items. Stock rooms are linked to a manager who is the recipient of stock allocation requests and order notifications. Stock room order items can be linked to an owner, which ensures that accounting details are recorded. Stock rooms are unique based on location.
See the Stock Order Details data class in Receiving Data Classes (page 42) for detailed information on each field and how it relates to stock allocation requests.
NoteE-mail must be configured for the Stock Room Manager for stock allocation request (or a helpdesk worker for stock replenishments) notifications to be received. Conversely, if you wish to disable the stock allocation request feature, ensure you clear any associations in the Check Stock Room field of the relevant purchase request.
Receiving Types Category Resources Types (Continued)
Resource Type Description
Asset Management Solution 6.5 86
Not all fields from the legacy receiving types are copied into the converted resources. We recommend you check each converted resource to ensure all relevant data is kept. Altiris Connector Solution can be used to transfer data from legacy receiving type resources to their converted equivalents.
Bundle Resource TypeThis resource type is used for custom bundles of items from any catalog. Create a bundle resource with all of these items to create resource associations between items that need to be ordered together. Use the Catalog item bundle picker to view, create, and edit bundles. Example: You can create a bundle that includes all the computer equipment (based on catalog items) needed by a new employee. Each catalog item can belong to more than one bundle. The picker has two views:
Item view shows items in the top pane and their associated bundles in the bottom pane. You can filter results by resource types, supplier, and so on, in item view.
Bundle view shows bundles in the top pane and their associated items in the bottom pane.
Receive Items PageThis page appears when you receive items from a purchase request, purchase order, invoice, or user defined resource types inherited from any of the three. It is used to receive catalog items, add items as costs to existing resources, or update consumable catalog items in a stockroom. A receiving slip is automatically created as a record when
Asset Management Solution 6.5 87
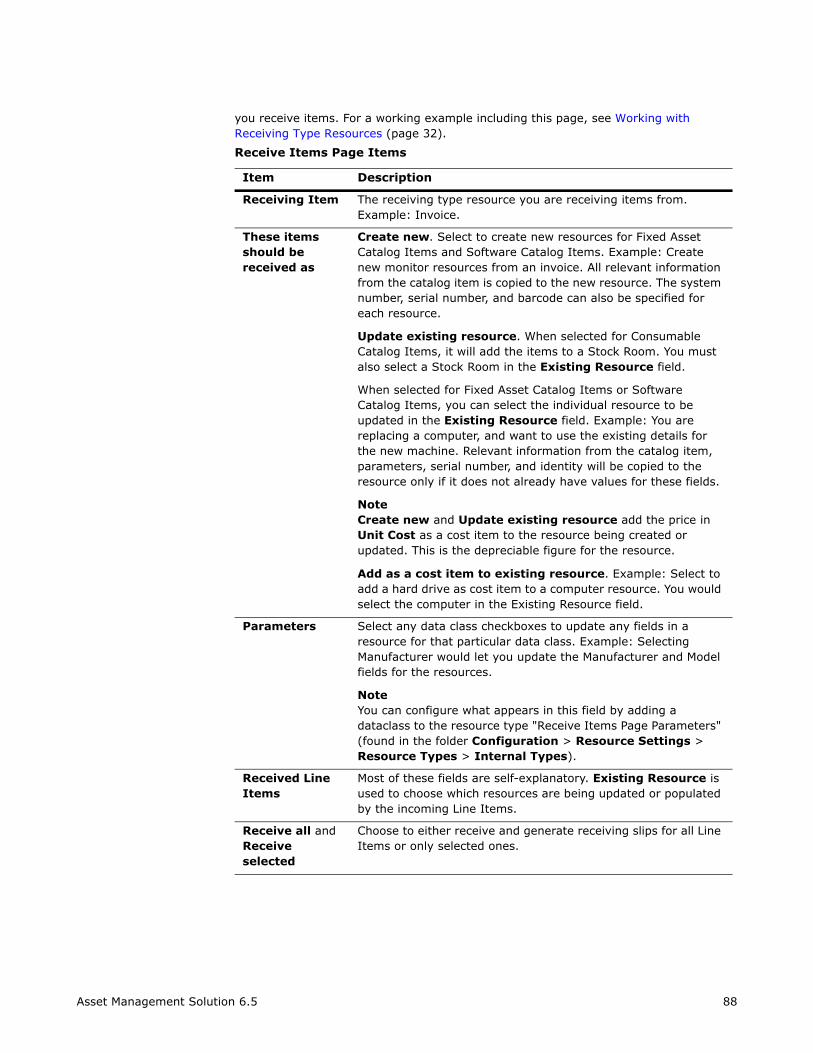
Receive Items Page Items
Item Description
Receiving Item The receiving type resource you are receiving items from. Example: Invoice.
These items should be received as
Create new. Select to create new resources for Fixed Asset Catalog Items and Software Catalog Items. Example: Create new monitor resources from an invoice. All relevant information from the catalog item is copied to the new resource. The system number, serial number, and barcode can also be specified for each resource.
Update existing resource. When selected for Consumable Catalog Items, it will add the items to a Stock Room. You must also select a Stock Room in the Existing Resource field.
When selected for Fixed Asset Catalog Items or Software Catalog Items, you can select the individual resource to be updated in the Existing Resource field. Example: You are replacing a computer, and want to use the existing details for the new machine. Relevant information from the catalog item, parameters, serial number, and identity will be copied to the resource only if it does not already have values for these fields.
Note Create new and Update existing resource add the price in Unit Cost as a cost item to the resource being created or updated. This is the depreciable figure for the resource.
Add as a cost item to existing resource. Example: Select to add a hard drive as cost item to a computer resource. You would select the computer in the Existing Resource field.
Parameters Select any data class checkboxes to update any fields in a resource for that particular data class. Example: Selecting Manufacturer would let you update the Manufacturer and Model fields for the resources.
NoteYou can configure what appears in this field by adding a dataclass to the resource type "Receive Items Page Parameters" (found in the folder Configuration > Resource Settings > Resource Types > Internal Types).
Received Line Items
Most of these fields are self-explanatory. Existing Resource is used to choose which resources are being updated or populated by the incoming Line Items.
Receive all and Receive selected
Choose to either receive and generate receiving slips for all Line Items or only selected ones.
Asset Management Solution 6.5 88
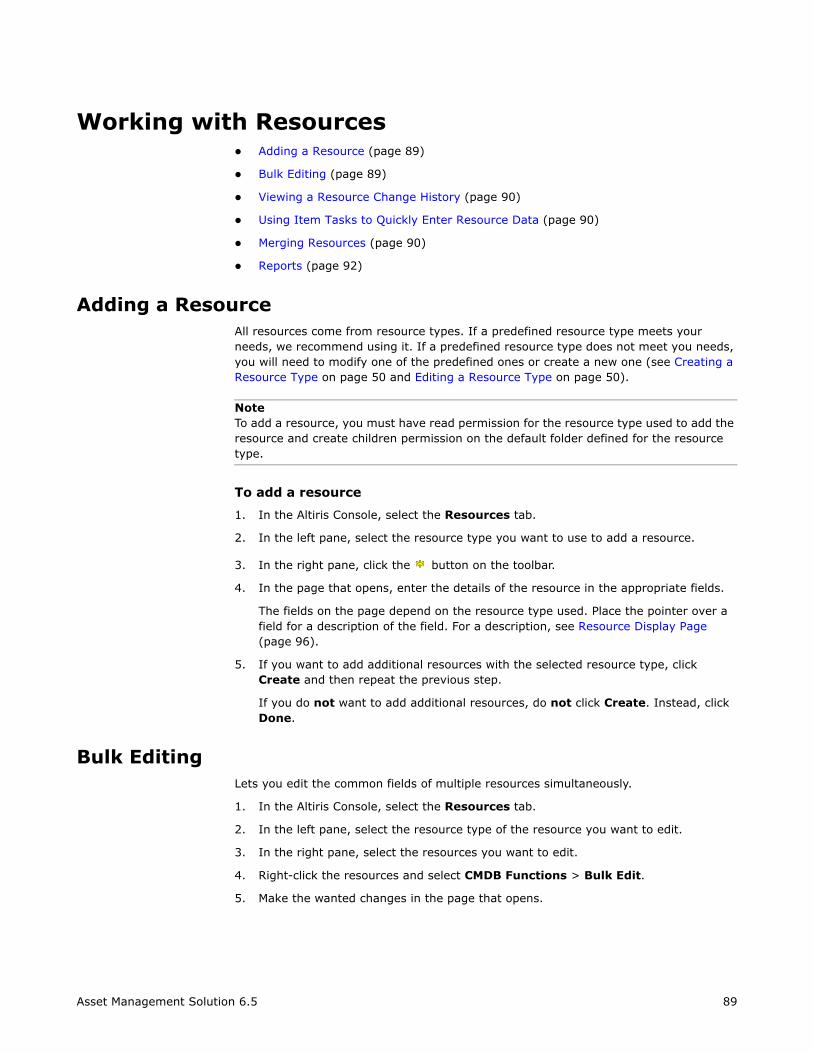
Adding a Resource (page 89)
Bulk Editing (page 89)
Viewing a Resource Change History (page 90)
Using Item Tasks to Quickly Enter Resource Data (page 90)
Merging Resources (page 90)
Reports (page 92)
Adding a ResourceAll resources come from resource types. If a predefined resource type meets your needs, we recommend using it. If a predefined resource type does not meet you needs, you will need to modify one of the predefined ones or create a new one (see Creating a Resource Type on page 50 and Editing a Resource Type on page 50).
NoteTo add a resource, you must have read permission for the resource type used to add the resource and create children permission on the default folder defined for the resource type.
To add a resource
1. In the Altiris Console, select the Resources tab.
2. In the left pane, select the resource type you want to use to add a resource.
3. In the right pane, click the button on the toolbar.
4. In the page that opens, enter the details of the resource in the appropriate fields.
The fields on the page depend on the resource type used. Place the pointer over a field for a description of the field. For a description, see Resource Display Page (page 96).
5. If you want to add additional resources with the selected resource type, click Create and then repeat the previous step.
If you do not want to add additional resources, do not click Create. Instead, click Done.
Bulk EditingLets you edit the common fields of multiple resources simultaneously.
1. In the Altiris Console, select the Resources tab.
2. In the left pane, select the resource type of the resource you want to edit.
3. In the right pane, select the resources you want to edit.
4. Right-click the resources and select CMDB Functions > Bulk Edit.
5. Make the wanted changes in the page that opens.
Asset Management Solution 6.5 89
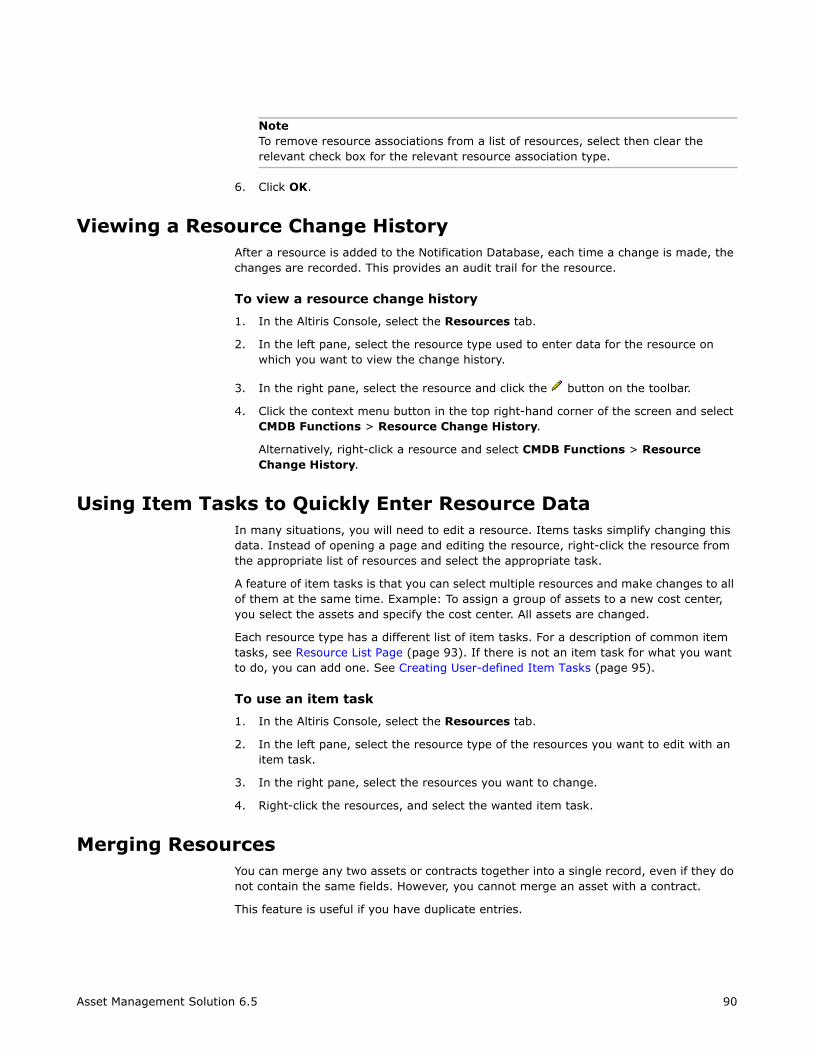
6. Click OK.
Viewing a Resource Change HistoryAfter a resource is added to the Notification Database, each time a change is made, the changes are recorded. This provides an audit trail for the resource.
To view a resource change history
1. In the Altiris Console, select the Resources tab.
2. In the left pane, select the resource type used to enter data for the resource on which you want to view the change history.
3. In the right pane, select the resource and click the button on the toolbar.
4. Click the context menu button in the top right-hand corner of the screen and select CMDB Functions > Resource Change History.
Alternatively, right-click a resource and select CMDB Functions > Resource Change History.
Using Item Tasks to Quickly Enter Resource DataIn many situations, you will need to edit a resource. Items tasks simplify changing this data. Instead of opening a page and editing the resource, right-click the resource from the appropriate list of resources and select the appropriate task.
A feature of item tasks is that you can select multiple resources and make changes to all of them at the same time. Example: To assign a group of assets to a new cost center, you select the assets and specify the cost center. All assets are changed.
Each resource type has a different list of item tasks. For a description of common item tasks, see Resource List Page (page 93). If there is not an item task for what you want to do, you can add one. See Creating User-defined Item Tasks (page 95).
To use an item task
1. In the Altiris Console, select the Resources tab.
2. In the left pane, select the resource type of the resources you want to edit with an item task.
3. In the right pane, select the resources you want to change.
4. Right-click the resources, and select the wanted item task.
Merging ResourcesYou can merge any two assets or contracts together into a single record, even if they do not contain the same fields. However, you cannot merge an asset with a contract.
This feature is useful if you have duplicate entries.
Asset Management Solution 6.5 90
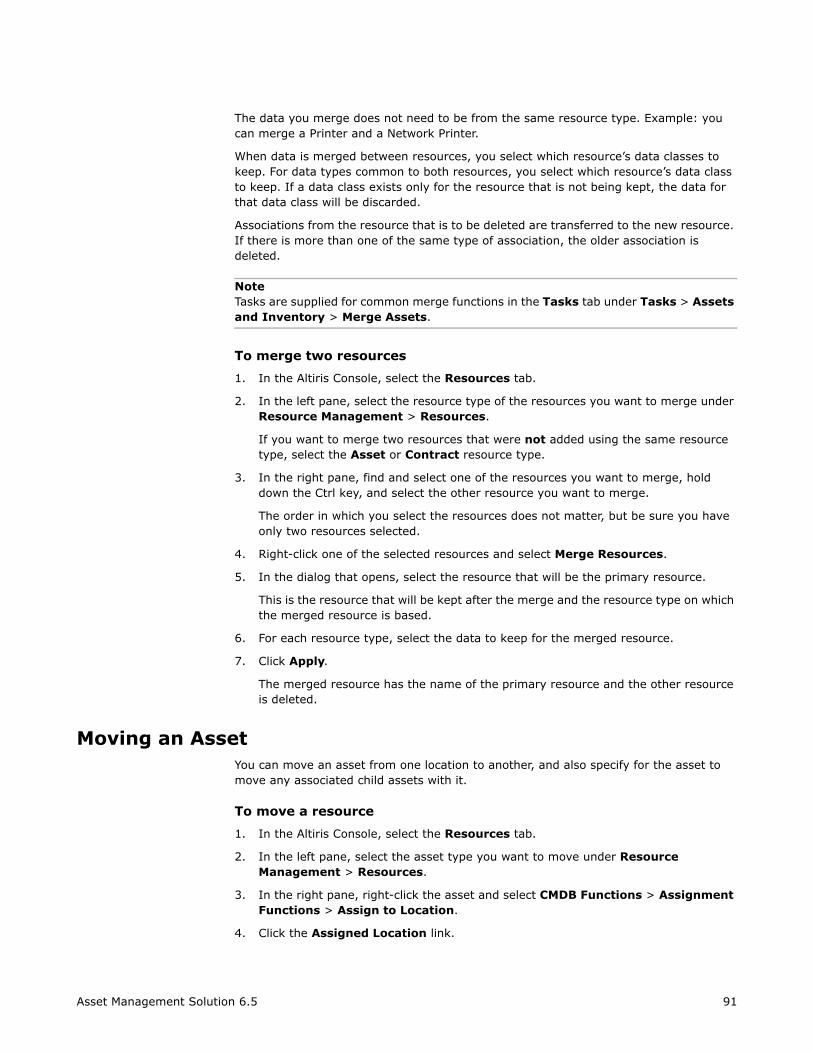
When data is merged between resources, you select which resource’s data classes to keep. For data types common to both resources, you select which resource’s data class to keep. If a data class exists only for the resource that is not being kept, the data for that data class will be discarded.
Associations from the resource that is to be deleted are transferred to the new resource. If there is more than one of the same type of association, the older association is deleted.
NoteTasks are supplied for common merge functions in the Tasks tab under Tasks > Assets and Inventory > Merge Assets.
To merge two resources
1. In the Altiris Console, select the Resources tab.
2. In the left pane, select the resource type of the resources you want to merge under Resource Management > Resources.
If you want to merge two resources that were not added using the same resource type, select the Asset or Contract resource type.
3. In the right pane, find and select one of the resources you want to merge, hold down the Ctrl key, and select the other resource you want to merge.
The order in which you select the resources does not matter, but be sure you have only two resources selected.
4. Right-click one of the selected resources and select Merge Resources.
5. In the dialog that opens, select the resource that will be the primary resource.
This is the resource that will be kept after the merge and the resource type on which the merged resource is based.
6. For each resource type, select the data to keep for the merged resource.
7. Click Apply.
The merged resource has the name of the primary resource and the other resource is deleted.
Moving an AssetYou can move an asset from one location to another, and also specify for the asset to move any associated child assets with it.
To move a resource
1. In the Altiris Console, select the Resources tab.
2. In the left pane, select the asset type you want to move under Resource Management > Resources.
3. In the right pane, right-click the asset and select CMDB Functions > Assignment Functions > Assign to Location.
4. Click the Assigned Location link.
Asset Management Solution 6.5 91
6. Click Apply.
7. If you wish to also move child associated child assets, ensure Also move associated assets is selected.
8. Click OK.
ReportsTo access Asset Management reports, in the Altiris console, click the Reports tab and select Reports > Assets and Inventory. The reports are divided into five folders with subfolders.
Accounting/Depreciation Reports Accounting reports used for depreciation and total cost tracking have certain terminology and features such as:
Accumulated Depreciation is the accumulated depreciation up to the selected accounting period. Example: Final quarter.
Rolled up costs include all of the costs associated with a department, user, or cost center hierarchy. Example: All costs associated with all assets and cost centers under the reported cost center.
Cost Model report values are assessed against data generated on a schedule by the Evaluate the Cost of Depreciable Items (page 98) policy.
For information on reporting, see Altiris Notification Server 6.0 SP3 Help.
Notes
Depreciation reports contain descriptions of their functionality in the Altiris Console.
The information in depreciation reports is accurate up to the last time the Depreciable Items Cost Evaluation task was run. See Evaluate the Cost of Depreciable Items (page 98).
Depreciation is calculated only up to the current date. It will not calculate future depreciation. Example: If it is mid-January and you have the accounting period set to Q1, depreciation is calculated only to the current day, not until the end of the quarter.
Web ServiceDocumentation for the Asset Management web service will be included in a future release of the Altiris Software Development Kit.
Resource Association DiagramThe Resource Association Diagram displays a graphic, showing a resource and all associated resources. Use the Resource Association Diagram to view relationships between assets, users, locations, departments, and cost centers.
Asset Management Solution 6.5 92
The Resource Association Diagram has two filters. The Association Type Filter lets you choose which type of association types you want to see displayed in the Resource Association Diagram, and the Resource Type Filter lets you choose which resource types you want to see.
To open the Resource Association Diagram for a resource
1. In the Altiris Console, select the Resources tab.
2. In the left pane, select the resource type of the resource you want to view.
3. In the right pane, right-click the resource you want to view and select CMDB Functions > Resource Association Diagram. The RAD will open in a new window. In the RAD, use the right-click menu to:
View an asset’s properties.
Reassign assets.
Change an asset’s status.
Recenter the diagram.
Resource Interface ItemsResource List Page (page 93)
Resource Display Page (page 96)
Resource List PageThis page lists resources associated with a resource type. From this page, you can access the Resource Display page, which lets you specify details for a new or existing resource.
Each Resource List page uses a Notification Server report to specify the data displayed on the page. You can change the report used by the page to a different report, including a custom report. Example: the List Resource page for the Computer resource type displays all computers. Change this to display only computers running a specific operating system.
You can right-click on a resource listed on this page to perform item tasks. The following table lists and describes the most common item tasks. You can also access the item tasks from the Resource Display page. To add item tasks, see Creating User-defined Item Tasks (page 95).
Common Item Tasks for a Resource on the Resource List Page
Item Task Description
Edit Edit the resource.
Resource Manager
Opens the Resource Manager, which displays details about the resource.
Delete Deletes a resource from the Notification Database.
Approve Approves a contract.
Asset Management Solution 6.5 93
To access the Resource List page
1. In the Altiris Console, select the Resources tab.
2. In the left pane, select Resource Management > Resources > resource category > resource type.
To modify what appears on a Resource List page
1. In the Altiris Console, click the Resources tab.
2. In the left pane, select Resource Management > Resources > resource type category > resource type.
3. In the right pane, click the (Pick Reports) button in the top right corner.
4. In the Items Selector dialog, select the reports you want to be able to use and click OK.
5. If you have selected more than one report as an option to be used by the page, in the right pane, click the Show field and select the report you want to use.
This report will now be the default report used to display data for the resource type. A default view for each resource type can be set by each user.
Move Moves a resource.
Export Exports the resource data as an .XML file.
Properties Opens a page that displays data about the resource, including general, security, and audit data.
Asset Functions > action
To perform the selected action for a resource without opening the Resource Display page. Available actions depend on the resource type. Includes Add Cost Item, Dispose of Asset(s), and Retire Asset(s).
One common action is Bulk Edit. See Bulk Editing (page 89).
Document Functions > Email Document
Opens a dialog for e-mailing resource data as a document.
Document Functions > Export to Document
Opens a dialog for exporting resource data as a document.
Bulk Change When multiple resources are selected, choose this option to make changes to all selected resources.
Clone Creates a copy of the resource. Clone a resource and make changes to the clone to enter data for similar resources.
Data Entry To edit the details of the resource.
Common Item Tasks for a Resource on the Resource List Page (Continued)
Item Task Description
Asset Management Solution 6.5 94
User-defined item tasks let you quickly access any page accessible through a URL and pass parameters to the page based on data from selected resources. Example: you right-click a user and select a user-defined item task that passes the name of the user as a parameter in the URL to a phone list Web site.
Each user-defined item task is defined for a specific resource type and all of the resource types based on that resource type. If you define an item task for the Monitor resource type, the item task will be available only when you right-click on a Monitor resource. If you create an item task for a Software License resource type, the item task will be available for Software License and all of the other resource types that are based on it (Example: OS License, Mac License, UNIX License, Win32 License).
NoteWhen an item task is used to access a page, the GUID and name of the resource are passed to the page in the URL.
To create a user-defined item task
1. In the Altiris Console, click the Configuration tab.
2. In the left pane, select Server Settings > Notification Server Settings > Item Tasks > User Defined.
3. Right-click User Defined and select New > Editable Item Action.
4. In the right pane, enter values into the fields.
Name. The name entered will be the text of the item task in the right-click menu.
Base URL. URL of the page accessed by the item action (excluding parameters).
Resource Type. Resource type to which the item action applies.
URL Parameters. One or more parameters can be passed in the URL. To add a parameter:
a. Click Add Parameter.
b. In the URL Parameter Name field, enter the name of the parameter. This value is added in the URL.
c. In the Data Class column, click the link and select the data class that contains the attribute that you want to pass in the parameter.
d. In the Data Class Column field, select the attribute you want passed in the parameter.
5. Click OK.
Asset Management Solution 6.5 95
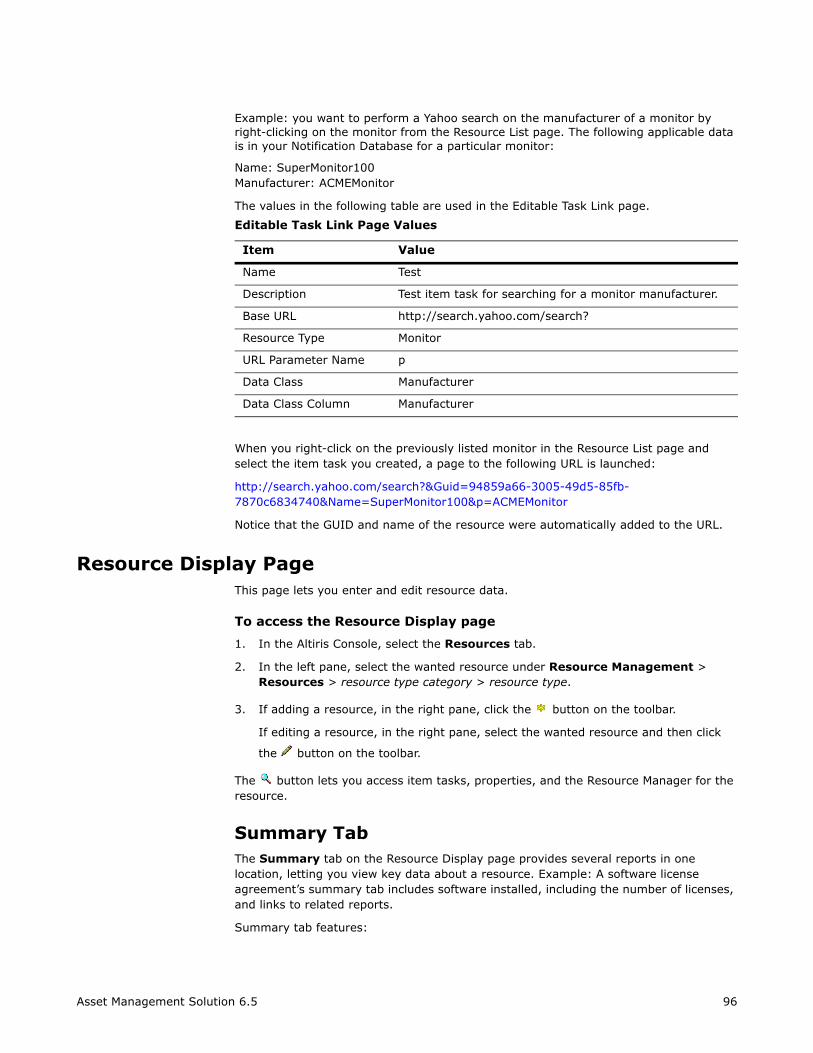
Name: SuperMonitor100Manufacturer: ACMEMonitor
The values in the following table are used in the Editable Task Link page.
When you right-click on the previously listed monitor in the Resource List page and select the item task you created, a page to the following URL is launched:
http://search.yahoo.com/search?&Guid=94859a66-3005-49d5-85fb-7870c6834740&Name=SuperMonitor100&p=ACMEMonitor
Notice that the GUID and name of the resource were automatically added to the URL.
Resource Display PageThis page lets you enter and edit resource data.
To access the Resource Display page
1. In the Altiris Console, select the Resources tab.
2. In the left pane, select the wanted resource under Resource Management > Resources > resource type category > resource type.
3. If adding a resource, in the right pane, click the button on the toolbar.
If editing a resource, in the right pane, select the wanted resource and then click
the button on the toolbar.
The button lets you access item tasks, properties, and the Resource Manager for the resource.
Summary TabThe Summary tab on the Resource Display page provides several reports in one location, letting you view key data about a resource. Example: A software license agreement’s summary tab includes software installed, including the number of licenses, and links to related reports.
Summary tab features:
Editable Task Link Page Values
Item Value
Name Test
Description Test item task for searching for a monitor manufacturer.
Base URL http://search.yahoo.com/search?
Resource Type Monitor
URL Parameter Name p
Data Class Manufacturer
Data Class Column Manufacturer
Asset Management Solution 6.5 96
Available when editing a resource but not available when creating a resource.
A link that lets you print the contents of the page.
Lets you manage and edit resources. Examples: when viewing the Summary tab of a cost center, you will see the name of the cost center and any child cost centers. Click the cost center name to open the Edit Cost Center window.
You cannot alter it by adding new reports and so forth but you can control what information appears.
To access the Summary tab
1. In the Altiris Console, click the Resources tab.
2. In the left pane, select the wanted resource under Resource Management > Resources > resource type category > resource type.
3. In the right pane, right-click the resource and select Resource Manager.
4. Select the Summary tab.
NoteFor Computer type resources, the tab is titled Summaries.
Configuring Asset Summary tab display
You can specify which information appears in the summary screen for different types of users by setting security permissions on summary screen items.
1. In the Altiris Console, click the Configuration tab.
2. In the left pane, select Configuration > Resource Settings > Resource Summary Items > Asset Summary Items.
3. Right-click the item you want to set permissions for (Example: Report Links) and select Properties.
4. Select the Security tab.
5. Make any wanted changes to the permissions.
6. Click Apply.
Resource SelectorThe resource selector dialog appears when creating associations between resources.
The dialog has two views. To change the view, select one of the icons at the top right of the dialog. The first view is the list view, which appears like the Altiris Console with a list of available resources. The second view is the search view that is designed for searching for a large list of resources. As you type in the search field, any resources with names that match the text you type appear in the list below. Example: if you type “mi”, all resources with names beginning with “mi” will appear.
Asset Management Solution 6.5 97
Chapter 6Asset Management Configuration and Scenarios
Asset Management Solution provides several options that let automatically clean up data and more. The options are:
Allow Parallel Execution of Master License Summary Queries (page 98)
Using Software License Data Normalization (page 99)
Sharing Software Licenses (page 100)
These options are accessed through the Configuration tab of the Altiris Console and are performed by a user with administrator rights.
Evaluate the Cost of Depreciable Items You can evaluate the cost of all depreciable resources at a scheduled time. Altiris recommends that the schedule is set outside of business hours to avoid unnecessary workload for the Database server.
To evaluate depreciable resources
1. In the Altiris Console, click the Configuration tab.
2. In the left pane, select Configuration > Solutions Settings > Assets and Inventory > Asset Management Solution > Cost Management > Depreciable Items Cost Evaluation.
3. In the right pane, set a schedule and click Apply, or manually execute by clicking Run Now.
Notes
Manual execution of this operation may take a considerable length of time on systems with large numbers of assets and contracts.
This task also executes the Altiris CMDB Solution Clean Ownership task.
The information in depreciation reports is accurate up to the last time this task was run.
Although Master Lease and Lease Schedule resource types have cost items associated with them, they are not included in cash flow and depreciation evaluations.
Allow Parallel Execution of Master License Summary Queries
The Contract Global Settings page lets you change the execution of Master License Summaries so that individual licensing queries are processed in parallel rather than sequentially. This may provide improved performance in situations where the SQL server has more than one physical processor allocated to it.
Asset Management Solution 6.5 98
Asset Management Configuration and Scenarios
To allow parallel execution of Master License Summary queries
1. In the Altiris Console, click the Configuration tab.
2. In the left pane, select Configuration > Solutions Settings > Assets and Inventory > Asset Management Solution > Contract Global Settings.
3. Select the checkbox under Allow parallel execution of Master License Summary queries.
4. Under Software License Options, you can set the number of days before Application Metering or Inventory information is considered to be outdated.
5. Click OK.
Using Software License Data NormalizationPreviously, Application Metering Solution data was stored in one table of the Notification Database. The table included all application data for each usage instance for every computer reporting inventory or application metering details. Searching this table was inefficient because every record had to be checked for specific data. Often, this table contains millions of entries and searching can take an exceptionally long time.
Now, there is a new system for indexing and storing application metering data that divides the data into two tables. By splitting the data (one for general application data and one for usage data), the process of locating specific details is much more efficient.
If you are using Application Metering along with Asset Management, the software license data normalization feature lets you convert your metering data tables into the new format. The data conversion process can be resource intensive when there are large amounts of data. We recommend carrying out the conversion at off-peak times. After the table has been converted, there is no reason to run the conversion again. By default, the conversion automatically occurs the first night Asset Management is installed.
If you disable the conversion, data in the old format cannot be used with the Asset Management software licensing features.
To change the run options for software license data normalization
1. In the Altiris Console, click the Configuration tab.
2. In the left pane, select Configuration > Solutions Settings > Assets and Inventory > Asset Management Solution > Software License > Software License Data Normalization.
3. In the right pane, make the wanted changes.
To disable the scheduled running of the conversion, clear the Enable checkbox.
To change the default schedule for running the conversion, select a schedule in the schedule selection field.
NoteThere is no benefit to running this feature more than once, so schedule it to run only once.
To run the conversion immediately (not recommended since it can run for hours), clear the Enable checkbox and click Run Now.
4. Click OK.
Asset Management Solution 6.5 99
Asset Management Configuration and Scenarios
Evaluating Software LicensesThe Software License Evaluation page lets you allow the evaluation of all software licenses on a schedule and specify the number of days after which software licensing calculations are considered to be out of date.
To set a Software License schedule
1. In the Altiris Console, click the Configuration tab.
2. In the left pane, select Configuration > Solutions Settings > Assets and Inventory > Asset Management Solution > Software License > Software License Evaluation.
3. In the right pane, select Enable Schedule.
4. Choose a schedule from the drop-down list.
5. Enter a number of days in the Automatic Expiration field.
6. Click Apply.
Update Software PurchasesThe Update Software Purchases page lets you schedule automatic updates to the resource association "Software Purchases” based on the Software Purchase Search Rule defined in the "Software License" resource item.
To set a Software License schedule
1. In the Altiris Console, click the Configuration tab.
2. In the left pane, select Configuration > Solutions Settings > Assets and Inventory > Asset Management Solution > Update Software Purchases.
3. In the right pane, select Enable Schedule.
4. Choose a schedule from the drop-down list.
5. Enter a number of days in the Automatic Expiration field.
6. Click Apply.
Sharing Software LicensesTo maximize use all of your existing software licenses, they can be shared between different versions of the same software package. Example: You have an unused license for Office 2003 and are running out of licenses for Office XP. You can use the spare Office 2003 license for Office XP.
Things to know about sharing software licenses:
You can borrow a license for an older version of a software product from a newer version, or vice versa.
You can share software licenses only with the same software product.
In the Software Installs tab, the license you select through the License Donator field is the donor that will be supplying the license to be borrowed.
Asset Management Solution 6.5 100
Asset Management Configuration and Scenarios
The summary tab in a software license’s resource manager shows borrowed and donated license details.
To share a software license
1. Open an existing software license.
2. Click the Software Installs tab.
3. Select Add next to the Software License Sharing table.
4. Select the appropriate license you want to borrow.
5. Click OK.
Working with CurrenciesWhen using currency features to convert different currencies, you must first create a currency resource, and then specify a base currency. You can create a currency either as a resource, or through the Base Currency configuration page (see Specify a Base Currency on page 101).
To create a Currency
1. In the Altiris Console, click the Resources tab.
2. In the left pane, select Resources > Other Resources > Currency.
3. Click the button.
4. Name the currency. Example: USD.
5. Set a Rate and Currency Code.
6. Click Done.
NoteCurrency conversion features are designed for working with asset types and receiving types. There are some fields containing financial data that are for information only and are not calculated in the overall cost model. Example: Maintenance Renewal Cost and Support Renewal Cost in a Win32 License. If you want one of these costs to be charged to an asset you must add it as a separate cost item.
Specify a Base CurrencyYou must set a base currency when you are using multiple currencies in your database. All cost items will default to this base currency. For information on converting cost item currencies, see Converting Currencies (page 102).
1. In the Altiris Console, click the Configuration tab.
2. In the left pane, select Configuration > Solutions Settings > Assets and Inventory > Asset Management Solution > Base Currency.
NoteCurrency resources are found in the Resources tab under Resources > Other Resources. You must have already created a currency to specify a base currency.
3. Click Add New.
Asset Management Solution 6.5 101
Asset Management Configuration and Scenarios
4. Specify a name, rate, and currency code for your base currency.
Notes
The rate for a Base Currency should be 1. Once you have specified a base currency you cannot change the currency, but can alter the rate.
For cost items with multiple value fields (Example: Cost and tax), only one currency can be used per line.
Converting CurrenciesWhen adding cost items to resources, you have the option of specifying a currency. By default, a cost item’s value will be set as the currency specified in the Base Currency page (see Specify a Base Currency on page 101), although it is not necessary to specify a base currency if you are working with only a single currency. To convert to a different currency, you must first create it then choose that currency when creating the cost item.
To convert to a currency other than the Base Currency
1. In the Altiris Console, click the Resources tab.
2. In the left pane, select Resources > Resource Folder > Resource Type.
3. In the right pane, double-click the resource you are adding a cost item to.
4. In the Edit/Create Resource dialog, click the Accounting Information tab.
5. Enter the cost item information in the Cost items table.
6. Select the cost item and click Currency.
7. Choose the new currency you wish to convert to.
Renaming Retired and Disposed Computers Scenario
There are situations where a computer is retired or disposed of and you want the replacement computer to have the same name. However, two computers with the same name can cause errors. To avoid this, rename the retired or disposed of computer in the Notification Database before adding the replacement computer to the network.
To rename a retired or disposed computer in the Notification Database
1. In the Altiris Console, select the Resources tab.
2. In the left pane, select the resource type of the resource you want to rename.
3. In the right pane, find the resource you want to rename in the list of resources and select it.
4. Click the button on the toolbar.
5. Enter a new name for the computer in the Edit Computer Name field of the dialog that opens.
If the name of the computer is not editable, the status of the computer is not set to Retired or Disposed. To change the status of the computer, select the Accounting Information tab, change the status in the Asset Status field to Retired or Disposed, and click Apply. The computer name is now editable.
Asset Management Solution 6.5 102
Asset Management Configuration and Scenarios
6. Click Done.
Retrieving Information from a Retired Server Scenario
In this scenario, you have retired a server and renamed it (see Renaming Retired and Disposed Computers Scenario on page 102). You have a new server replacing the functionality of the old server, and the problem is, the retired server has information you want to transfer to the new server. To resolve this problem and also free up the old server for a new purpose, simply merge the old server into the new server.
To merge two servers
1. In the Altiris Console, select the Resources tab.
2. In the left pane, select Resources > Configuration Items > Asset Types > IT > Computer.
3. In the right pane, hold down the Ctrl key, and select both servers.
4. Right-click one of the servers and select Merge Resources.
5. In the dialog that opens, select the server that will be the Primary Resource.
This is the server that will be kept after the merge and the resource type on which the merged resource is based.
NoteThe secondary server will be deleted in this process.
6. For each resource type, select the data to keep for the merged resource.
7. Click Apply.
Importing Receiving Type Resources with Connector Solution
This scenario involves Altiris Connector Solution 6.5 and Altiris Asset Management Solution 6.5. Using Connector Solution. In this scenario the aim is to import a purchase request into the database. Before you can import a purchase request, you must first have several other resources in place. In these exercises you will create four data sources and import rules for receiving type resources. The final stage will involve creating a task to run all of the import rules in the correct order which is:
Catalog. Catalogs must be present to import catalog items.
Catalog items. Catalog items must be present to order items in a purchase request.
Purchase request header. To save entering the same information multiple times for each line item in a purchase request, import common data first.
Purchase request lines. The line items you want to order in a purchase request.
Before importing any catalogs (the first import in this scenario) you must create company type resources for each catalog supplier, and stockroom type resources for the receiving items. If the company types are not created, you will not be able to import catalogs as company to supplier is a required association.
Asset Management Solution 6.5 103
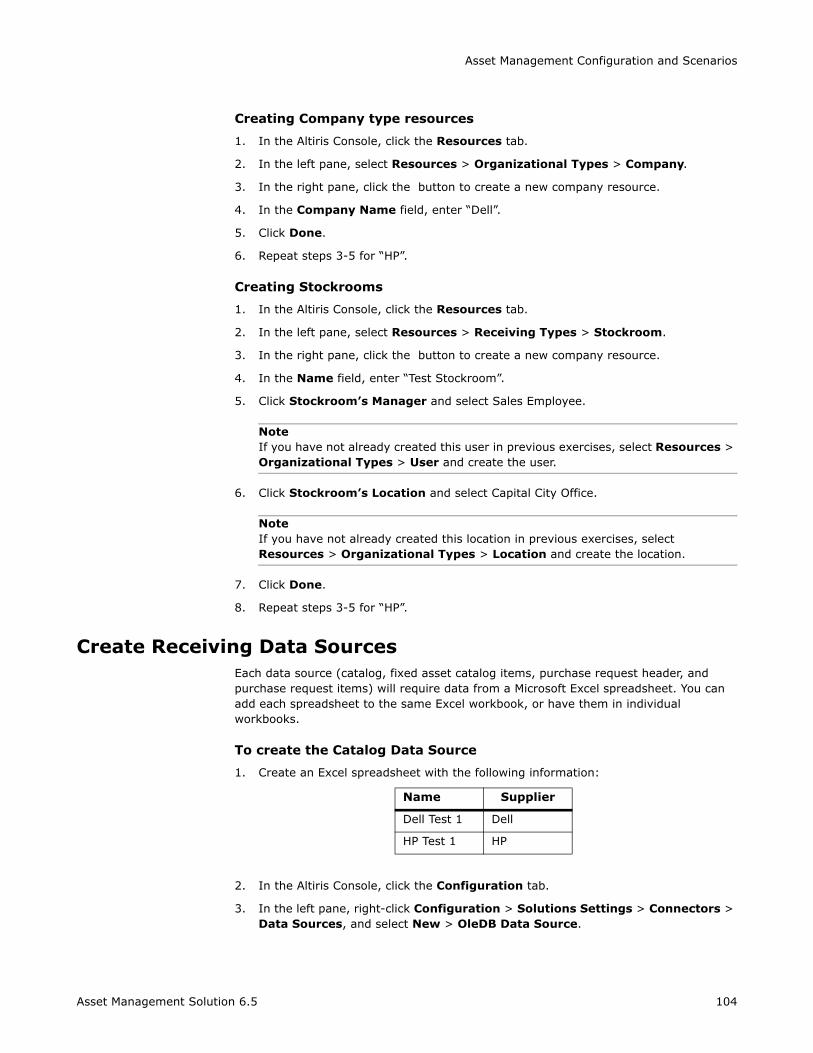
Asset Management Configuration and Scenarios
Creating Company type resources
1. In the Altiris Console, click the Resources tab.
2. In the left pane, select Resources > Organizational Types > Company.
3. In the right pane, click the button to create a new company resource.
4. In the Company Name field, enter “Dell”.
5. Click Done.
6. Repeat steps 3-5 for “HP”.
Creating Stockrooms
1. In the Altiris Console, click the Resources tab.
2. In the left pane, select Resources > Receiving Types > Stockroom.
3. In the right pane, click the button to create a new company resource.
4. In the Name field, enter “Test Stockroom”.
5. Click Stockroom’s Manager and select Sales Employee.
NoteIf you have not already created this user in previous exercises, select Resources > Organizational Types > User and create the user.
6. Click Stockroom’s Location and select Capital City Office.
NoteIf you have not already created this location in previous exercises, select Resources > Organizational Types > Location and create the location.
7. Click Done.
8. Repeat steps 3-5 for “HP”.
Create Receiving Data SourcesEach data source (catalog, fixed asset catalog items, purchase request header, and purchase request items) will require data from a Microsoft Excel spreadsheet. You can add each spreadsheet to the same Excel workbook, or have them in individual workbooks.
To create the Catalog Data Source
1. Create an Excel spreadsheet with the following information:
2. In the Altiris Console, click the Configuration tab.
3. In the left pane, right-click Configuration > Solutions Settings > Connectors > Data Sources, and select New > OleDB Data Source.
Name Supplier
Dell Test 1 Dell
HP Test 1 HP
Asset Management Solution 6.5 104
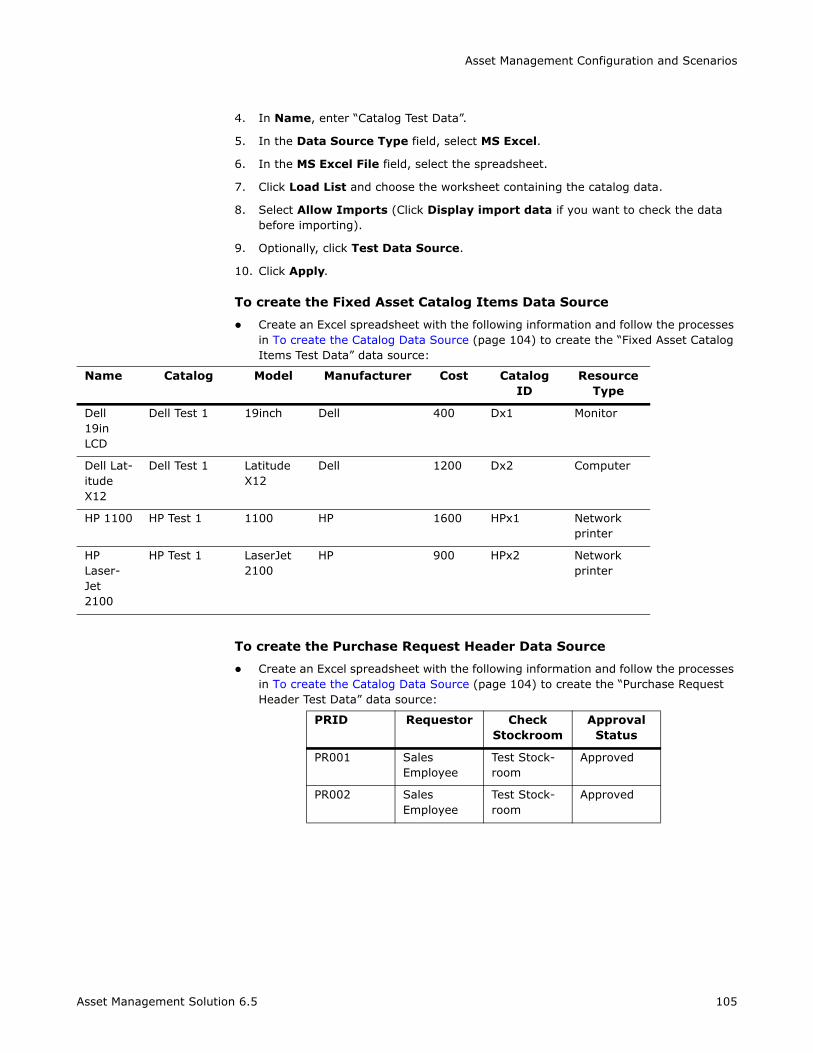
Asset Management Configuration and Scenarios
4. In Name, enter “Catalog Test Data”.
5. In the Data Source Type field, select MS Excel.
6. In the MS Excel File field, select the spreadsheet.
7. Click Load List and choose the worksheet containing the catalog data.
8. Select Allow Imports (Click Display import data if you want to check the data before importing).
9. Optionally, click Test Data Source.
10. Click Apply.
To create the Fixed Asset Catalog Items Data Source
Create an Excel spreadsheet with the following information and follow the processes in To create the Catalog Data Source (page 104) to create the “Fixed Asset Catalog Items Test Data” data source:
To create the Purchase Request Header Data Source
Create an Excel spreadsheet with the following information and follow the processes in To create the Catalog Data Source (page 104) to create the “Purchase Request Header Test Data” data source:
Name Catalog Model Manufacturer Cost Catalog ID
Resource Type
Dell 19in LCD
Dell Test 1 19inch Dell 400 Dx1 Monitor
Dell Lat-itude X12
Dell Test 1 Latitude X12
Dell 1200 Dx2 Computer
HP 1100 HP Test 1 1100 HP 1600 HPx1 Network printer
HP Laser-Jet 2100
HP Test 1 LaserJet 2100
HP 900 HPx2 Network printer
PRID Requestor Check Stockroom
Approval Status
PR001 Sales Employee
Test Stock-room
Approved
PR002 Sales Employee
Test Stock-room
Approved
Asset Management Solution 6.5 105
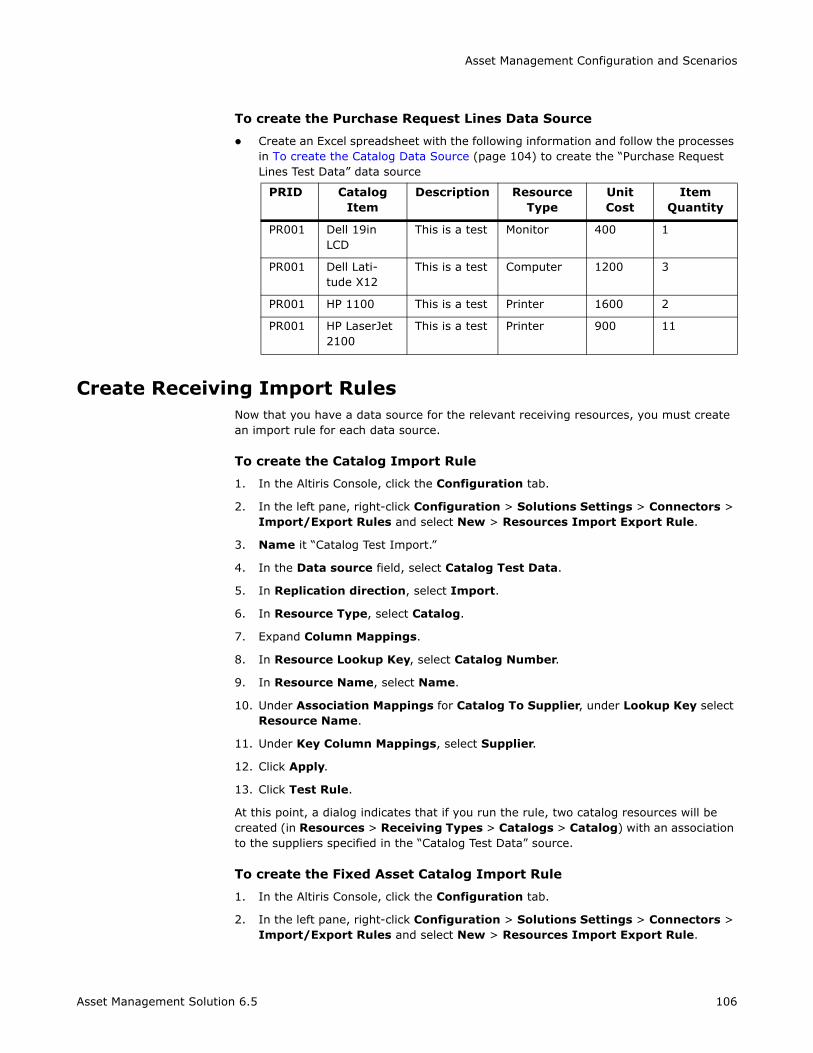
Asset Management Configuration and Scenarios
To create the Purchase Request Lines Data Source
Create an Excel spreadsheet with the following information and follow the processes in To create the Catalog Data Source (page 104) to create the “Purchase Request Lines Test Data” data source
Create Receiving Import RulesNow that you have a data source for the relevant receiving resources, you must create an import rule for each data source.
To create the Catalog Import Rule
1. In the Altiris Console, click the Configuration tab.
2. In the left pane, right-click Configuration > Solutions Settings > Connectors > Import/Export Rules and select New > Resources Import Export Rule.
3. Name it “Catalog Test Import.”
4. In the Data source field, select Catalog Test Data.
5. In Replication direction, select Import.
6. In Resource Type, select Catalog.
7. Expand Column Mappings.
8. In Resource Lookup Key, select Catalog Number.
9. In Resource Name, select Name.
10. Under Association Mappings for Catalog To Supplier, under Lookup Key select Resource Name.
11. Under Key Column Mappings, select Supplier.
12. Click Apply.
13. Click Test Rule.
At this point, a dialog indicates that if you run the rule, two catalog resources will be created (in Resources > Receiving Types > Catalogs > Catalog) with an association to the suppliers specified in the “Catalog Test Data” source.
To create the Fixed Asset Catalog Import Rule
1. In the Altiris Console, click the Configuration tab.
2. In the left pane, right-click Configuration > Solutions Settings > Connectors > Import/Export Rules and select New > Resources Import Export Rule.
PRID Catalog Item
Description Resource Type
Unit Cost
Item Quantity
PR001 Dell 19in LCD
This is a test Monitor 400 1
PR001 Dell Lati-tude X12
This is a test Computer 1200 3
PR001 HP 1100 This is a test Printer 1600 2
PR001 HP LaserJet 2100
This is a test Printer 900 11
Asset Management Solution 6.5 106
Asset Management Configuration and Scenarios
3. Name it “Fixed Asset Catalog Items Test Import.”
4. In the Data source field, select Fixed Asset Catalog Items Test Data.
5. In Replication direction, select Import.
6. In Resource Type, select Fixed Asset Catalog Item.
7. Expand Column Mappings.
8. In Resource Lookup Key, select Resource Name.
9. In Resource Name, select Name.
10. In the Catalog Item Information Row, for Unit Cost, select Cost.
NoteConnector Solution automatically maps data source columns with identical names to data class fields. All others must be mapped manually.
11. Under Association Mappings for Catalog for Catalog Item, under Lookup Key select Resource Name.
12. Under Key Column Mappings, select Catalog.
13. Click Apply.
14. Click Test Rule.
The dialog indicates that the four fixed asset catalog resources will be created when the rule is run.
To create the Purchase Request Header Import Rule
1. In the Altiris Console, click the Configuration tab.
2. In the left pane, right-click Configuration > Solutions Settings > Connectors > Import/Export Rules and select New > Resources Import Export Rule.
3. Name it “Purchase Request Header Test Import.”
4. In the Data source field, select Purchase Request Header Test Data.
5. In Replication direction, select Import.
6. In Resource Type, select Purchase Request.
7. Expand Column Mappings.
8. In Resource Lookup Key, select Purchase Request Number.
9. In Resource Name, select PRID.
10. Under Association Mappings for Requestor, under Lookup Key select Resource Name.
11. Under Association Mappings for Check Stockroom, under Lookup Key select Check Stockroom.
12. Click Apply.
13. Click Test Rule.
Creating the Purchase Request Lines Import Rule
1. In the Altiris Console, click the Configuration tab.
Asset Management Solution 6.5 107
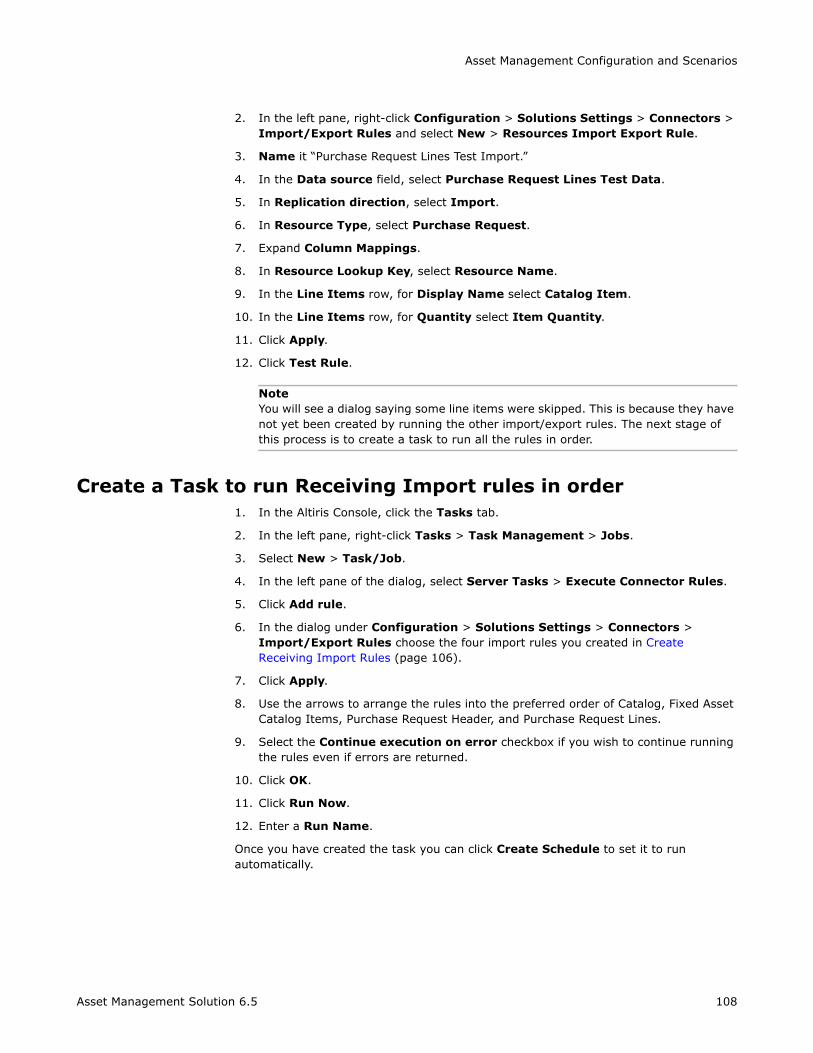
Asset Management Configuration and Scenarios
2. In the left pane, right-click Configuration > Solutions Settings > Connectors > Import/Export Rules and select New > Resources Import Export Rule.
3. Name it “Purchase Request Lines Test Import.”
4. In the Data source field, select Purchase Request Lines Test Data.
5. In Replication direction, select Import.
6. In Resource Type, select Purchase Request.
7. Expand Column Mappings.
8. In Resource Lookup Key, select Resource Name.
9. In the Line Items row, for Display Name select Catalog Item.
10. In the Line Items row, for Quantity select Item Quantity.
11. Click Apply.
12. Click Test Rule.
NoteYou will see a dialog saying some line items were skipped. This is because they have not yet been created by running the other import/export rules. The next stage of this process is to create a task to run all the rules in order.
Create a Task to run Receiving Import rules in order1. In the Altiris Console, click the Tasks tab.
2. In the left pane, right-click Tasks > Task Management > Jobs.
3. Select New > Task/Job.
4. In the left pane of the dialog, select Server Tasks > Execute Connector Rules.
5. Click Add rule.
6. In the dialog under Configuration > Solutions Settings > Connectors > Import/Export Rules choose the four import rules you created in Create Receiving Import Rules (page 106).
7. Click Apply.
8. Use the arrows to arrange the rules into the preferred order of Catalog, Fixed Asset Catalog Items, Purchase Request Header, and Purchase Request Lines.
9. Select the Continue execution on error checkbox if you wish to continue running the rules even if errors are returned.
10. Click OK.
11. Click Run Now.
12. Enter a Run Name.
Once you have created the task you can click Create Schedule to set it to run automatically.
Asset Management Solution 6.5 108
Asset Management Configuration and Scenarios
Asset Management Solution 6.5 109
Chapter 7Asset Management Security
Properly configuring security is an important part of Asset Management. In most environments, you will have multiple users that need to have various degrees of access to Asset Management Solution features. These users might be data input workers, managers, or administrators. Each type of user has different access needs. Setting-up security properly will ensure that your data is secure while permitting users to have the access they need. Example: You might have a data entry person that is allowed only to add new entries to the Notification Database for resources. The user cannot see existing data, perform editing functions, or create reports. Another user might be a supervisor, who is given rights to verify and update resource entries. Another user might be a manager, who needs to have access to reports. Another user, the administrator, has rights to do everything.
Asset Management Solution supports the two methods of security provided by Notification Server:
Role-based Security (page 110)
Scope-based Security (page 114)
For examples on how to setup security, see Security Scenarios (page 115).
Role-based SecurityIn Notification Server security, a role is a set of Notification Server privileges for a group or individual. An individual is a Windows domain or local computer user. A group is a domain, local computer, or Notification Server defined group of users. After you configure a role, you can add a user or group to that role.
Role-based security lets you set privileges for accessing Altiris Console tabs; the creation of reports, collections, and policies; the changing of security settings; the changing of incidents; and more.
We recommend that you add those that need access to Asset Management to roles and then set the privileges for these roles accordingly. To assist you, there are several predefined roles available.
Predefined Security RolesSeveral security roles are added to Notification Server by Asset Management Solution. These roles simplify the process of granting the appropriate rights to users. If the rights and permissions provided by these roles are adequate for your needs, all you need to do is assign the appropriate users to each role.
Asset Management Solution 6.5 110
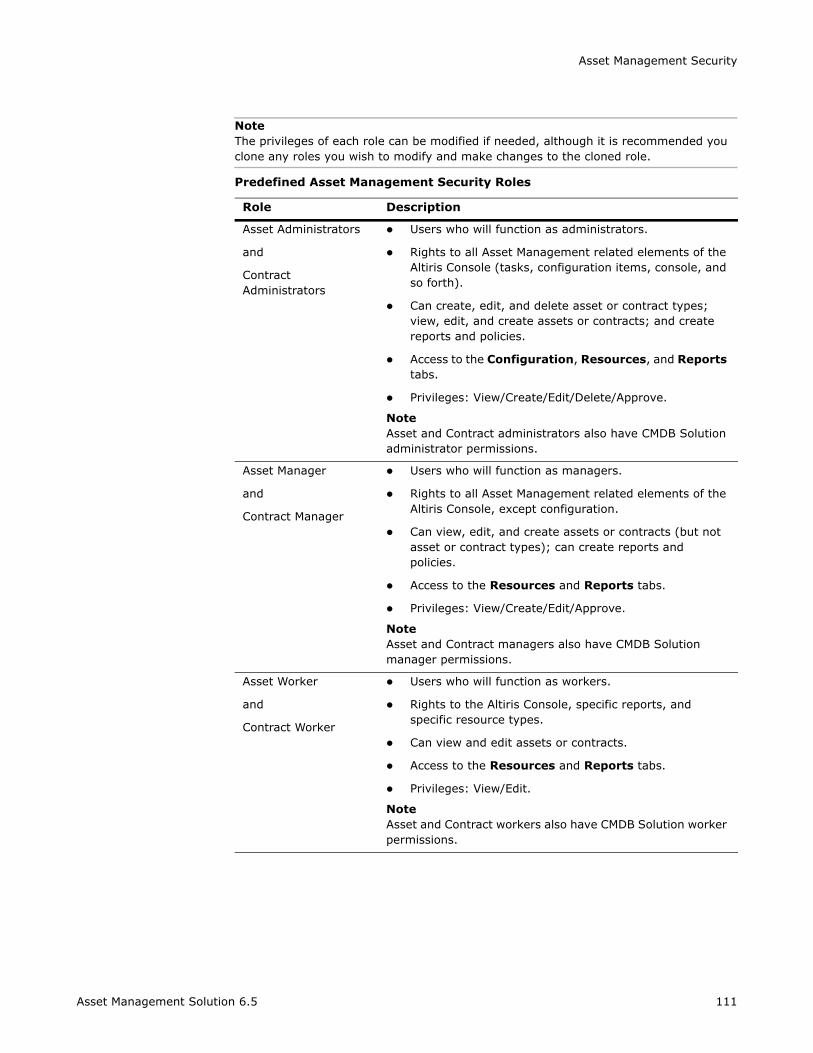
Asset Management Security
NoteThe privileges of each role can be modified if needed, although it is recommended you clone any roles you wish to modify and make changes to the cloned role.
Predefined Asset Management Security Roles
Role Description
Asset Administrators
and
Contract Administrators
Users who will function as administrators.
Rights to all Asset Management related elements of the Altiris Console (tasks, configuration items, console, and so forth).
Can create, edit, and delete asset or contract types; view, edit, and create assets or contracts; and create reports and policies.
Access to the Configuration, Resources, and Reports tabs.
Privileges: View/Create/Edit/Delete/Approve.
NoteAsset and Contract administrators also have CMDB Solution administrator permissions.
Asset Manager
and
Contract Manager
Users who will function as managers.
Rights to all Asset Management related elements of the Altiris Console, except configuration.
Can view, edit, and create assets or contracts (but not asset or contract types); can create reports and policies.
Access to the Resources and Reports tabs.
Privileges: View/Create/Edit/Approve.
NoteAsset and Contract managers also have CMDB Solution manager permissions.
Asset Worker
and
Contract Worker
Users who will function as workers.
Rights to the Altiris Console, specific reports, and specific resource types.
Can view and edit assets or contracts.
Access to the Resources and Reports tabs.
Privileges: View/Edit.
NoteAsset and Contract workers also have CMDB Solution worker permissions.
Asset Management Solution 6.5 111
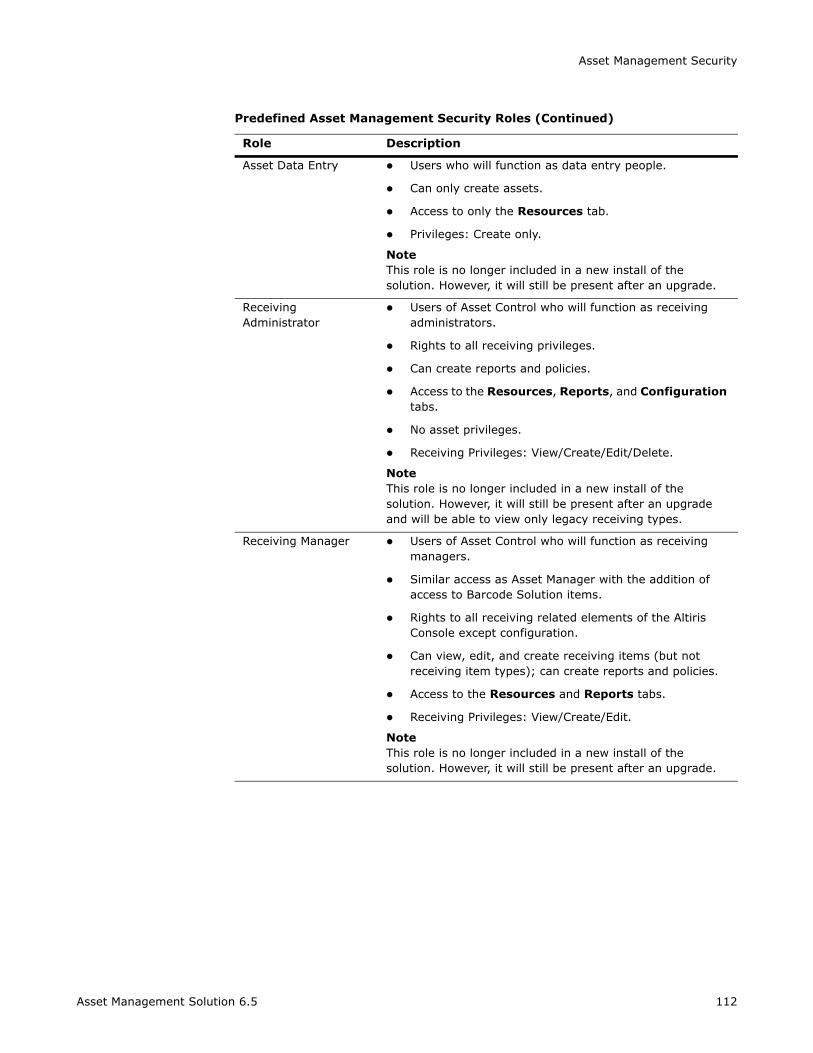
Asset Management Security
Asset Data Entry Users who will function as data entry people.
Can only create assets.
Access to only the Resources tab.
Privileges: Create only.
NoteThis role is no longer included in a new install of the solution. However, it will still be present after an upgrade.
Receiving Administrator
Users of Asset Control who will function as receiving administrators.
Rights to all receiving privileges.
Can create reports and policies.
Access to the Resources, Reports, and Configuration tabs.
No asset privileges.
Receiving Privileges: View/Create/Edit/Delete.
NoteThis role is no longer included in a new install of the solution. However, it will still be present after an upgrade and will be able to view only legacy receiving types.
Receiving Manager Users of Asset Control who will function as receiving managers.
Similar access as Asset Manager with the addition of access to Barcode Solution items.
Rights to all receiving related elements of the Altiris Console except configuration.
Can view, edit, and create receiving items (but not receiving item types); can create reports and policies.
Access to the Resources and Reports tabs.
Receiving Privileges: View/Create/Edit.
NoteThis role is no longer included in a new install of the solution. However, it will still be present after an upgrade.
Predefined Asset Management Security Roles (Continued)
Role Description
Asset Management Solution 6.5 112
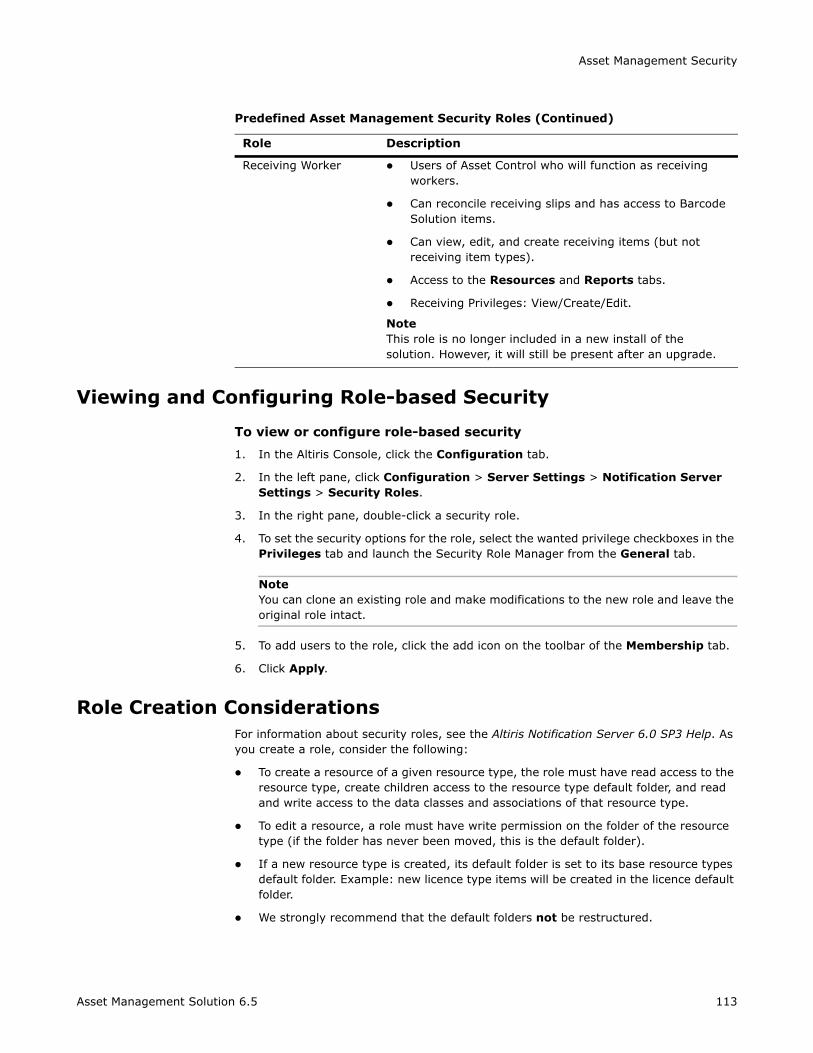
Asset Management Security
Viewing and Configuring Role-based Security
To view or configure role-based security
1. In the Altiris Console, click the Configuration tab.
2. In the left pane, click Configuration > Server Settings > Notification Server Settings > Security Roles.
3. In the right pane, double-click a security role.
4. To set the security options for the role, select the wanted privilege checkboxes in the Privileges tab and launch the Security Role Manager from the General tab.
NoteYou can clone an existing role and make modifications to the new role and leave the original role intact.
5. To add users to the role, click the add icon on the toolbar of the Membership tab.
6. Click Apply.
Role Creation ConsiderationsFor information about security roles, see the Altiris Notification Server 6.0 SP3 Help. As you create a role, consider the following:
To create a resource of a given resource type, the role must have read access to the resource type, create children access to the resource type default folder, and read and write access to the data classes and associations of that resource type.
To edit a resource, a role must have write permission on the folder of the resource type (if the folder has never been moved, this is the default folder).
If a new resource type is created, its default folder is set to its base resource types default folder. Example: new licence type items will be created in the licence default folder.
We strongly recommend that the default folders not be restructured.
Receiving Worker Users of Asset Control who will function as receiving workers.
Can reconcile receiving slips and has access to Barcode Solution items.
Can view, edit, and create receiving items (but not receiving item types).
Access to the Resources and Reports tabs.
Receiving Privileges: View/Create/Edit.
NoteThis role is no longer included in a new install of the solution. However, it will still be present after an upgrade.
Predefined Asset Management Security Roles (Continued)
Role Description
Asset Management Solution 6.5 113
Asset Management Security
Scope-based SecurityWith scope-based security, you set permissions on items in the Altiris Console. You can set permissions on resource types, data classes, resource association types, item tasks, reports, folders, collections, and other items. Permissions let you control exactly what data is accessible by a user or group.
You might want to limit who can view or manage certain resource types for security reasons. You can limit what resource types are viewable and manageable from the Resources tab. You can set security for an individual resource type or a complete folder. Example: You can limit who can see the lease agreements resource types, or you can limit who can change the permissions for the Computer resource type.
NoteWhen setting security for resource types, you are not determining who can add or edit resources, but who can view and manage the resource type itself.
You can also limit who can view or edit the data about a resource. Example: You might not need to limit which asset workers can view the list of computers, but you might want to limit who can view the accounting data for computers. Further, you might want to allow only certain people to view the accounting data for computers, while other people are allowed to both view and edit the accounting data for computers.
Setting Permissions for Resource Types and Data Classes
To set permissions for a resource type or data class
1. In the Altiris Console, click the Configuration tab.
2. In the left pane, right-click the resource type or data class item on which you want to set security, and select Properties.
3. Click the Security tab.
By default, an item inherits permissions from the parent object in the tree.
4. To change the inherited permissions, clear the Inherit the permission from parent object that apply to child objects checkbox.
5. Click Apply.
After clicking Apply, you can have the permissions that were inherited copied to this entity or removed.
6. To copy the inherited rights for editing, click Copy; to remove all inherited rights for all roles, click Remove.
You can define which permissions each user or role has. You set these permissions by adding or editing a permission.
7. To add a new permission, do the following:
a. Click Add.
b. Select a role (to add a user or group, click Advanced).
c. Click Select.
d. Select the permissions you want this user, group, or role to have.
e. Click Select.
Asset Management Solution 6.5 114
Asset Management Security
8. To edit a new permission, do the following:
a. Select the user, group, or role and click Edit.
b. Select the permissions you want this user, group, or role to have.
c. Click Select.
9. Click Apply.
Security ScenariosSetting security properly is an important part of protecting your data while using Asset Management Solution. Notification Server provides many options for setting security. To better understand the use of security in Asset Management Solution, the following scenarios are provided:
Creating a Security Group Scenario (page 115)
Restricting a Security Group Scenario (page 115)
Setting Security on a Data Class Scenario (page 116)
Setting Security on an Item Task Scenario (page 117)
Creating a User with Cost Center and Related Assets Permissions (page 117)
Creating a Role with Restricted Report Permissions (page 118)
Creating a Security Group ScenarioIn this scenario, you will create a special Asset Workers Group from the predefined Asset Workers Group and add users and groups to it.
To create a special asset workers group scenario
1. In the Altiris Console, click the Configuration tab.
2. In the left pane, select Configuration > Server Settings > Notification Server Settings > Security Roles.
3. In the right pane, right-click Asset Worker in the Roles field.
4. Select Clone.
5. In the Role dialog, enter a name and description.
6. Click the Membership tab.
7. Click Add new member.
8. Use the find feature to find the users or groups you want to add to this group.
9. Select the users or groups you want to add from the find results list.
10. Click OK.
11. Click Apply.
Restricting a Security Group ScenarioIn this scenario, you will restrict a group from accessing the Office Equipment resource type.
Asset Management Solution 6.5 115
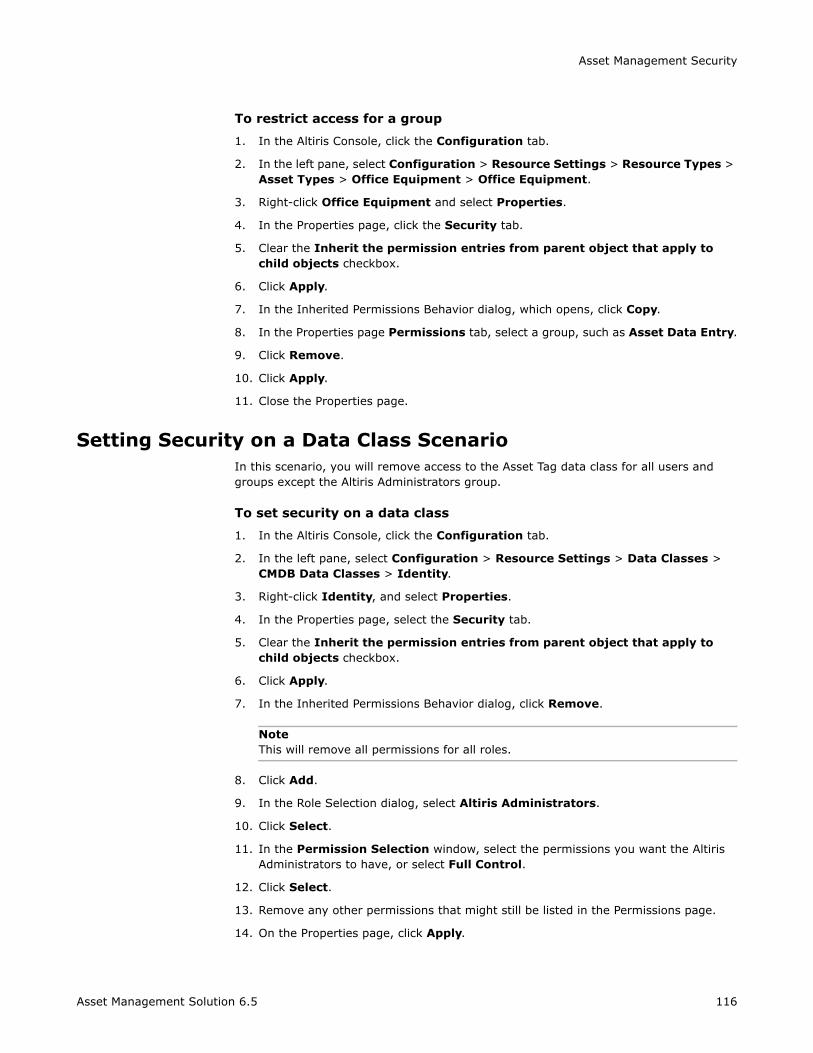
Asset Management Security
To restrict access for a group
1. In the Altiris Console, click the Configuration tab.
2. In the left pane, select Configuration > Resource Settings > Resource Types > Asset Types > Office Equipment > Office Equipment.
3. Right-click Office Equipment and select Properties.
4. In the Properties page, click the Security tab.
5. Clear the Inherit the permission entries from parent object that apply to child objects checkbox.
6. Click Apply.
7. In the Inherited Permissions Behavior dialog, which opens, click Copy.
8. In the Properties page Permissions tab, select a group, such as Asset Data Entry.
9. Click Remove.
10. Click Apply.
11. Close the Properties page.
Setting Security on a Data Class ScenarioIn this scenario, you will remove access to the Asset Tag data class for all users and groups except the Altiris Administrators group.
To set security on a data class
1. In the Altiris Console, click the Configuration tab.
2. In the left pane, select Configuration > Resource Settings > Data Classes > CMDB Data Classes > Identity.
3. Right-click Identity, and select Properties.
4. In the Properties page, select the Security tab.
5. Clear the Inherit the permission entries from parent object that apply to child objects checkbox.
6. Click Apply.
7. In the Inherited Permissions Behavior dialog, click Remove.
NoteThis will remove all permissions for all roles.
8. Click Add.
9. In the Role Selection dialog, select Altiris Administrators.
10. Click Select.
11. In the Permission Selection window, select the permissions you want the Altiris Administrators to have, or select Full Control.
12. Click Select.
13. Remove any other permissions that might still be listed in the Permissions page.
14. On the Properties page, click Apply.
Asset Management Solution 6.5 116

Asset Management Security
15. Close the Properties page.
Setting Security on an Item Task ScenarioItem tasks are used to enter data for a resource. Because you might not want all users to have access to all of the functions that item tasks let you perform, you can set security on the item tasks. In this example, you will deny all roles access to the Assign to Cost Center item task.
To set security on an item task
1. In the Altiris Console, click the Configuration tab.
2. From the left pane, right-click Configuration > Server Settings > Notification Server Settings > Item Tasks > CMDB Functions > Assignment Functions > Assign to Cost Center and select Properties.
3. In the Properties dialog, select the Security tab.
4. Clear the Inherit the permission entries from parent... checkbox.
5. Click Apply.
6. In the dialog that opens, click Remove.
NoteThis will remove all permissions except for those set by the Creator-Owner. Do Not Remove the Creator-Owner from this list. Doing so will lock yourself out of this feature.
7. Click Apply.
8. Close the Properties page.
Creating a User with Cost Center and Related Assets Permissions
Create a user who has access only to the Sales cost center and its assets.
Completing this operation involves three processes:
To Create the Cost Center Asset Coordinator Role and add the User (page 117)
To Give the Role Report permissions (page 118)
To Add the User to the Cost Center (page 118)
NoteIf you do not have a cost center named Sales and a user, create them first. See Adding a Resource (page 89).
To Create the Cost Center Asset Coordinator Role and add the User
1. In the Altiris Console, click the Configuration tab.
2. In the left pane, right-click Configuration > Server Settings > Notification Server Settings > Security Roles and select New > Security Role.
3. Name the new role Cost Center Asset Coordinator.
4. Click the refresh icon and select Cost Center Asset Coordinator.
Asset Management Solution 6.5 117
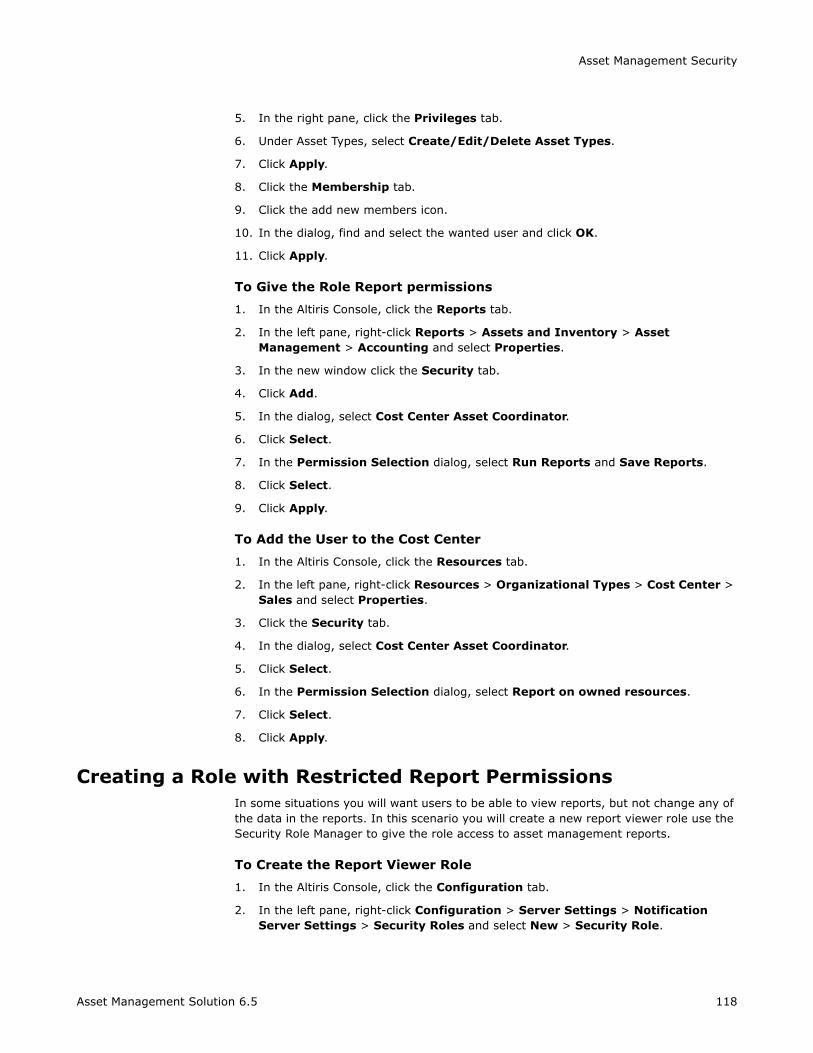
Asset Management Security
5. In the right pane, click the Privileges tab.
6. Under Asset Types, select Create/Edit/Delete Asset Types.
7. Click Apply.
8. Click the Membership tab.
9. Click the add new members icon.
10. In the dialog, find and select the wanted user and click OK.
11. Click Apply.
To Give the Role Report permissions
1. In the Altiris Console, click the Reports tab.
2. In the left pane, right-click Reports > Assets and Inventory > Asset Management > Accounting and select Properties.
3. In the new window click the Security tab.
4. Click Add.
5. In the dialog, select Cost Center Asset Coordinator.
6. Click Select.
7. In the Permission Selection dialog, select Run Reports and Save Reports.
8. Click Select.
9. Click Apply.
To Add the User to the Cost Center
1. In the Altiris Console, click the Resources tab.
2. In the left pane, right-click Resources > Organizational Types > Cost Center > Sales and select Properties.
3. Click the Security tab.
4. In the dialog, select Cost Center Asset Coordinator.
5. Click Select.
6. In the Permission Selection dialog, select Report on owned resources.
7. Click Select.
8. Click Apply.
Creating a Role with Restricted Report PermissionsIn some situations you will want users to be able to view reports, but not change any of the data in the reports. In this scenario you will create a new report viewer role use the Security Role Manager to give the role access to asset management reports.
To Create the Report Viewer Role
1. In the Altiris Console, click the Configuration tab.
2. In the left pane, right-click Configuration > Server Settings > Notification Server Settings > Security Roles and select New > Security Role.
Asset Management Solution 6.5 118
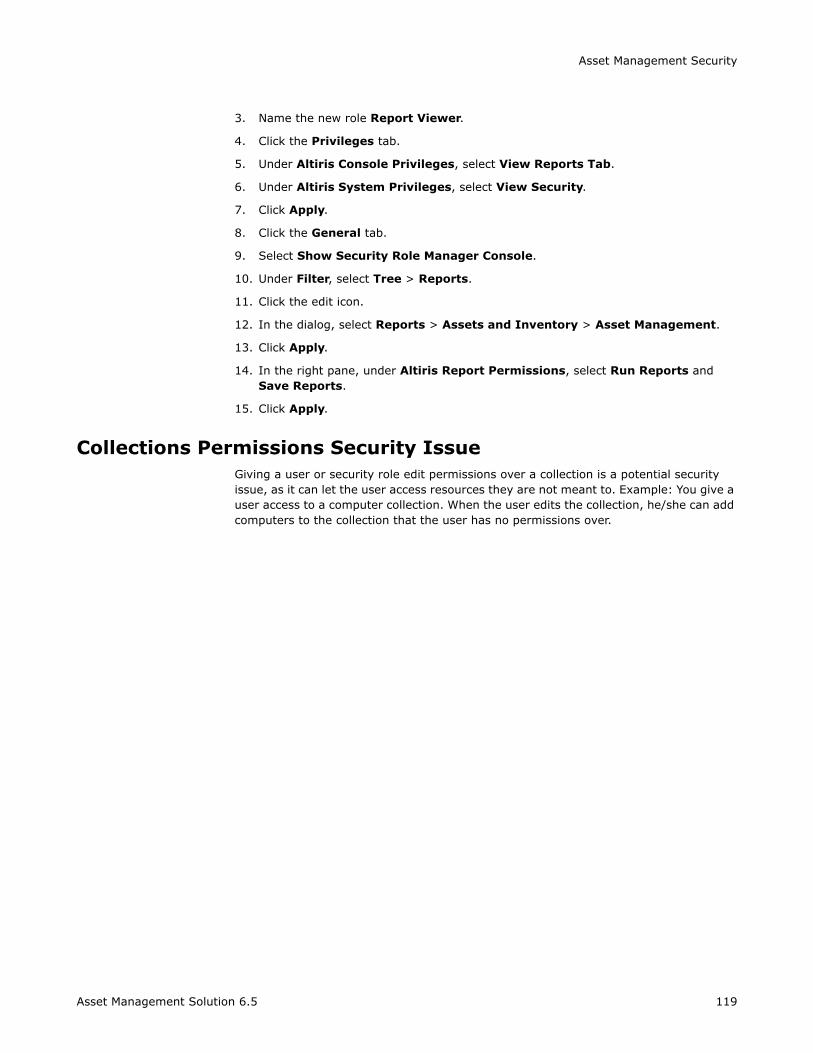
Asset Management Security
3. Name the new role Report Viewer.
4. Click the Privileges tab.
5. Under Altiris Console Privileges, select View Reports Tab.
6. Under Altiris System Privileges, select View Security.
7. Click Apply.
8. Click the General tab.
9. Select Show Security Role Manager Console.
10. Under Filter, select Tree > Reports.
11. Click the edit icon.
12. In the dialog, select Reports > Assets and Inventory > Asset Management.
13. Click Apply.
14. In the right pane, under Altiris Report Permissions, select Run Reports and Save Reports.
15. Click Apply.
Collections Permissions Security IssueGiving a user or security role edit permissions over a collection is a potential security issue, as it can let the user access resources they are not meant to. Example: You give a user access to a computer collection. When the user edits the collection, he/she can add computers to the collection that the user has no permissions over.
Asset Management Solution 6.5 119
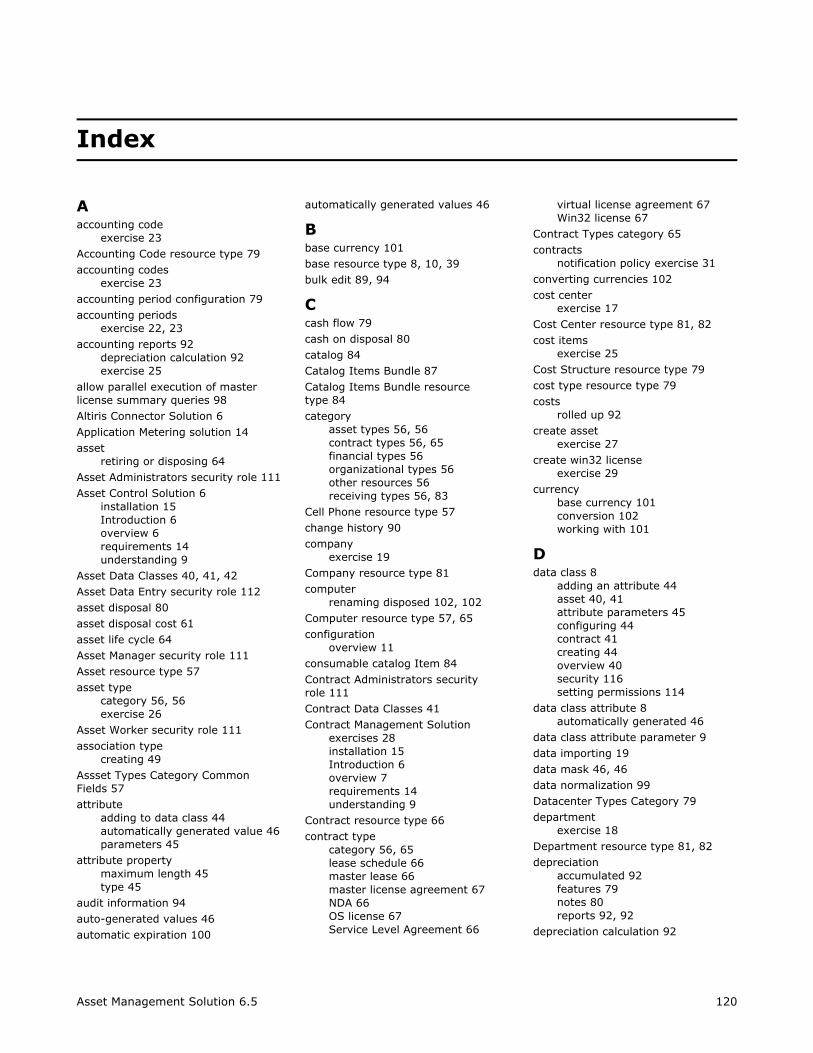
Index
Aaccounting code
exercise 23Accounting Code resource type 79accounting codes
exercise 23accounting period configuration 79accounting periods
exercise 22, 23accounting reports 92
depreciation calculation 92exercise 25
allow parallel execution of master license summary queries 98Altiris Connector Solution 6
Application Metering solution 14asset
retiring or disposing 64Asset Administrators security role 111Asset Control Solution 6
installation 15Introduction 6overview 6requirements 14understanding 9
Asset Data Classes 40, 41, 42Asset Data Entry security role 112asset disposal 80asset disposal cost 61asset life cycle 64Asset Manager security role 111Asset resource type 57asset type
category 56, 56exercise 26
Asset Worker security role 111association type
creating 49Assset Types Category Common Fields 57attribute
adding to data class 44automatically generated value 46parameters 45
attribute propertymaximum length 45type 45
audit information 94auto-generated values 46automatic expiration 100
automatically generated values 46
Bbase currency 101base resource type 8, 10, 39bulk edit 89, 94
Ccash flow 79cash on disposal 80catalog 84Catalog Items Bundle 87Catalog Items Bundle resource type 84category
asset types 56, 56contract types 56, 65financial types 56organizational types 56other resources 56receiving types 56, 83
Cell Phone resource type 57change history 90company
exercise 19Company resource type 81computer
renaming disposed 102, 102Computer resource type 57, 65configuration
overview 11consumable catalog Item 84Contract Administrators security role 111Contract Data Classes 41Contract Management Solution
exercises 28installation 15Introduction 6overview 7requirements 14understanding 9
Contract resource type 66contract type
category 56, 65lease schedule 66master lease 66master license agreement 67NDA 66OS license 67Service Level Agreement 66
virtual license agreement 67Win32 license 67
Contract Types category 65contracts
notification policy exercise 31converting currencies 102cost center
exercise 17Cost Center resource type 81, 82cost items
exercise 25Cost Structure resource type 79cost type resource type 79costs
rolled up 92create asset
exercise 27create win32 license
exercise 29currency
base currency 101conversion 102working with 101
Ddata class 8
adding an attribute 44asset 40, 41attribute parameters 45configuring 44contract 41creating 44overview 40security 116setting permissions 114
data class attribute 8automatically generated 46
data class attribute parameter 9data importing 19data mask 46, 46data normalization 99Datacenter Types Category 79department
exercise 18Department resource type 81, 82depreciation
accumulated 92features 79notes 80reports 92, 92
depreciation calculation 92
Asset Management Solution 6.5 120
exercise 24Depreciation Schedules resource type 79Desk Phone resource type 57display order 46disposal cost 61disposed computer renaming 102disposing of assets 64, 80
Eedit
bulk 94Edit Resource Type page 52evaluate the cost of depreciable items 98evaluating software licenses 100exercise
move resources 27exercises
assign depreciation schedule to asset 24
assigning cost id to an asset 23cost center summary tab 24create accounting codes 23create accounting periods 23create computer resource 26create cost item 25create depreciation schedule 24create desk phone 27create lease schedule 32create master license
agreement 31create purchase order 30create software purchase 30create win32 license 29creating a company 19creating accounting codes 23creating cost centers 17creating departments 18creating financial type
resources 22creating locations 18creating organizational type
resources 17creating users 19importing resources 19location summary tab 24upgrading software licenses 30view summary tab 28, 29
existing resourcereceiving page item 88
exporting resource types 51
FFax Machine resource type 57field display order 46financial type
category 56financial type resources
setting-up 22Financial Types category 79fixed asset catalog item 84Furniture and Fixtures resource type 57
Ggroup security 115
Hhidden attribute 46hidden field 46hierarchal relationships
exercise 17hierarchal resource type 9, 82
Iimporting resource types 51importing resources
exercise 19, 19
input mask 46installation 14, 15Inventory Solution 14Invoice resource type 85IT Infrastructure Library standards 6item foreign key 45item task 9
adding 95security 117using 90
item taskstable of 93
ITIL standards 6
Kkey attribute 46key field 46
Llease schedule 66
exercise 32Lease Schedule resource type 67legacy receiving types 86licensing 15life cycle of an asset 64line items 85Linux 68location
exercise 18Location resource type 82, 82
MMac License resource type 67
Mac OS 68Manufacturer attribute policy 59mask 46master lease 66Master Lease resource type 68master license agreement 67
exercise 30Master License Agreement resource type 68merging resources 90Microsoft Windows 69Monitor resource type 57move associated assets 91move resources 27moving an asset 91
NNDA contract type 66Network Printer resource type 57Network Resource resource type 57normalizing data 99Notification Server 14
OOffice Equipment resource type 57organizational type
category 56Organizational Types
exercise 17Organizational Types category 80OS license 67OS license resource type 68other resources
category 56Other Types category 83overview of usage 11, 11
PPalm 69parameters for attribute 45payment information 8Peripheral resource type 57Pocket PC 69Predefined Resource Types and User Defined Resource Types 39, 39Purchase Order resource type 85purchase request 85
Rreceive items 84receive items page 87Receiving Administrator security role 112Receiving Manager security role 112
Asset Management Solution 6.5 121
category 56, 83Receiving Worker security role 113Red Hat Linux 68registration 15renaming disposed computers 102renaming retired computers 102reports 92
accounting/depreciation 92depreciation by assigned cost
center 25depreciation by department 25
require field 46required attribute 46requirements 14resource 9
adding 89categories 56change history 90importing 19merging 90overview 9, 56
resource associationcreating 49exercise 17
resource association diagram 92exercise 28
resource association type 9creating 49overview 47
Resource Association Type page 53Resource Data Class page 54Resource Data Class Summary page 55Resource Display page 96resource foreign key 45Resource List page 53, 93resource reports 92resource selector 97resource type 9
Accounting Code 79advised usage 39Assets 57base 10Catalog Items Bundle 84Cell Phone 57Computer 65, 81Contract 66Cost Center 81, 82Cost Structure 79cost type 79creating 50Department 81, 82Depreciation Schedule 79Desk Phone 57editing 50exporting 51
Furniture and Fixtures 57hierarchal 82importing 51Invoice 85Lease Schedule 66, 67Location 82, 82Mac License 67Master Lease 66, 68Master License Agreement 67, 68Monitor 57NDA 66Network Printer 57Network Resources 57Office Equipment 57OS License 68overview 9, 39Purchase Order 85Receiving Slip 85Scanner 57Service Level Agreement 66setting permissions 114Software License 69Software Purchase 67, 70UNIZ License 70User 82Virtual License Agreement 67, 70Warranty 66Win32 License 67
resource type interface items 51Resource Type Relationships 48retired computer renaming 102retiring assets 64RIM devices 69role creation considerations 113role-based security 110rolled up costs 92
SScanner resource type 57scope collection 78scope-based security 114security 94
configuring role-based 113considerations 113creating a group scenario 115group creation scenario 115group restriction scenario 115predefined roles 110role-based 110scenarios 115scope-based 114setting for data class 114setting for resource type 114setting on data class scenario 116setting on item task scenario 117
service information 8Service Level Agreement contract type 66setup 14
assessing priorities 26exercises 16
sharing software licenses 100software catalog item 86software data normalization 99Software License 67Software License resource type 69software license sharing 100Software Licenses category 67software purchase
exercise 29Software Purchase resource type 67, 70static list 45stock allocation 86stock allocation requests 86stock room 86summary data 96summary information 10Summary tab 10, 96summary tab
exercise 28Sun Solaris 69
Tterminology 8
UUNIX 69UNIX License 67UNIX License resource type 70update software purchases 100upgrade
receiving type resources 86upgrading 15upgrading software licenses
exercise 30usage overview 11, 11user
exercise 19User resource type 82
Vvirtual license agreement 67Virtual License Agreement resource type 70Virtual Machine resource type 57
WWarranty Resource Type 66Win32 license 67
exercise 29working with currencies 101
Asset Management Solution 6.5 122