Embed Size (px)
Citation preview

THE
ALLIANCE INTERNATIONAL INC.
MOBILE MIXER OWNER / OPERATORS MANUAL
With Kartech Remote
2012 - 2013
Reimer Alliance International Inc. www.reimermix.com
Ph: 403-335-9500 Toll Free 1-855-335-9500

Table of Contents
Owner / Operator Manual 2012 – 2013 with Kartech Remote
Warranty 2 Specifications 4 Introduction 5 Principals of Operation 6 How Concrete is Accurately Batched 6
Calibration 7 Loading the Mixer 8 Controls 9 Control Panel 10 Cement Delivery System 11 Cement Motor Controls 12
Diagram 13 Lean Valve Adjustment 14 Water Pump 15
Diagram 16 Setting up to Pour 17 Pouring 18 Wash Down-Prepare for Transport 19 Optional Color Feeder 20 Using the Color Feeder with Parker Flo-Control 21 Optional Hawkridge Fibre Feeder 22
Safety 23 Operational Safety 23 Maintenance Safety 23 Maintenance 24 Preventative Maintenance 24 Inspection and Maintenance Schedule 24 Wear Plates/Service/Adjustment 25-26 Main Hydraulic Oil Tank 27 Oil Specifications 28 Air Supply Oiler 28 Trouble Shooting 29 Calibration Procedure 30-32 Apex I – Operating Instructions 33-34 Water Calibration 35 Admixture Screen 36-37 Manual Admix System 38
Kartech Radio Control Sec 2 (1-15) Mastermix Electronic Display Sec 3 (1 - 4) SunSource -Display Mix Control Sec 4 (1-17) Serial Number / Symbols Sec 5 (1-7)

WARRANTY
1. NEW EQUIPMENT WARRANTY
Subject to the limitations and exclusions set out below, Reimer Alliance
International Inc. warrants that if any component or part of a mixer manufactured by Reimer proves to be defective in material or workmanship within (6) six months from the original delivery date, Reimer will either repair or replace the defective part of the mixer.
2. LIMITATIONS AND EXCLUSIONS
This warranty by Reimer Alliance International Inc. does not extend to or include:
1 Trucks- see the warranty information included with the truck manufacturer's information pack.
ii Damage resulting from accident, misuse, abuse, neglect or from other than normal and ordinary use of the mixer.
iii Damage resulting from failure to operate or maintain the mixer as specified
in the operator's manual.
3. IMPROVEMENTS OR CHANGES- Reimer Alliance International
Inc. reserves the right to make improvements or changes in design and specifications at any time without incurring any obligation to owners of mixers previously sold.
REIMER ALLIANCE INTERNATIONAL INC. IS NOT RESPONSIBLE
FOR ANY INCIDENTAL OR CONSEQUENTIAL DAMAGES.

Capacity
Production rate Variable up to 75 yds3 per hour maximum
Dual Controls Manual and wireless
Water Tank 450 US gallon polyethylene
Vibrators Pneumatic
Fenders Light weight and durable
Electronic digital counter Calibration and delivery measurement
Powered Chutes, auger and swing
Auger 9 or 12"
Mixer only weight 8350 lbs { 3795 kgs )
Hawk 6 Ad Mix System Manual AdMix System Color feeder
Larger water tank
Fibre feeder
Cement level sensor and alarm
Cement bin windows
Auto tire inflation system
Booster Axle
Lift axle extension
Stainless Steel fenders Hydraulic vibrators or electric vibrators
Printer

Introduction
Congratulations, you have chosen the world's finest and most reliable mobile mixer. You are now part of the world-wide Reimer Alliance International family, operating successfully in 36 countries. Your Reimer Mobile Mixer, manufactured by Reimer Alliance International Inc., will meet or exceed your concrete requirements. Reimer Alliance International represents over 30 years of experience in mobile, volumetric, continuous hatching; both as a concrete supplier and as a mixer manufacturer.
Years of experience have helped us develop and engineer a mobile mixer that will give many years of dependable and profitable service.
This manual provides operating and maintenance procedures that are critical to the profitable and successful operation of your Reimer Mobile Mixer. Operation and maintenance of your new mixer in accordance with this manual will assure you of long and trouble free service.
The serial number of your mobile mixer is located on the front support web of the main aggregate bin (driver’s side). Please refer to this serial number when contacting Reimer Alliance International Inc. or its representatives, who are committed to providing prompt and efficient service.

Principle of Operation
The Reimer Mobile Mixer is uniquely designed to allow for the supply of freshly mixed concrete, regardless of delivery times, the elimination of wasted product, and flexibility of delivery that is not available with conventional transit mix operations. All the components of concrete; stone, sand, cement and water are transported to the site in separate compartments on one truck mounted unit. Dry ingredients are accurately proportioned and delivered to the mixing auger as they are being discharged. A controlled flow of water is added and the concrete is then blended as it is being discharged from a special mixing auger at the rear of the unit.
The mixing action is continuous until the bins are empty or indefinitely if the bins are being re- filled as the unit is producing concrete. On the other hand, the mixing action (and delivery of concrete through the chute) may be stopped and then started again by the operator to facilitate the loading of wheelbarrows or any application where small amounts of product are required. The discharge rate is infinitely variable from maximum, 60+ yards per hour down to zero.
How Concrete is Accurately Batched
With The Reimer Mobile Mixer
Ingredient proportioning is based on the known dry weight of each ingredient and the requirements for each as specified in the mix design. The calibration procedure translates these weights into volume settings.
Cement is fed into the mix at a constant rate that is proportional to the movement of the conveyor belt. The control gates allow the operator to change the proportional flow of both sand and coarse aggregate in relation to the movement of the conveyor belt and therefore, to the flow of cement. Because the cement and aggregate feeders are mechanically synchronized, the proportions of each of the dry ingredients are constant, once the proportioning controls are set and locked.
An electronic counter allows the operator to determine the accumulated amount of cement discharged and, based on the calibration, the amount of concrete produced.

Calibration
The calibration procedure will provide the operator with a chart indicating the control gate settings for the each type of concrete mix as well as the digital counter readout required to determine the volume of concrete poured.
A basic overview of the calibration procedure is as follows:
As previously explained, the cement discharge is proportional to the movement of the conveyor belt and to the digital counter. The first step in the procedure, then, is to determine the rate of cement discharge in pounds or kg per count. Once this is determined, the mix design is used to calculate the number of counts required to produce one cubic yard or meter of concrete.
EXAMPLE: You have determined, by weighing the cement discharged in a known number of counts that the cement is delivered at a rate of .45 pounds per count. The mix design indicates that 450 pounds of cement is required per cubic yard of concrete. This means that the digital counter must read 1000 (450 divided by .45) for sufficient cement to be discharged to produce one cubic yard. Now determine the control gate settings, which will allow the proper volume of aggregate to pass through, producing one cubic yard of concrete when the digital counter reads 100.
Because the cement discharge is always proportional to the movement of the conveyor, the design of the mix will remain constant, even if the discharge rate is changed, until the operator changes the control gate settings.
Proper calibration and setup of the Reimer Mobile Mixer, is essential to it's successful operation (See Pages 26 to 29). Ensure that the operator has a good understanding of the concept of volumetric, continuous hatching as explained in this manual.
Operation
The key to a successful and profitable business as a mobile concrete producer, is the proper operation of your Reimer Mobile Mixer. The operator must be chosen with care, as he is responsible for the proper set up of the proportioning controls and the general delivery of a quality concrete product.

Aggregate
Loading the Mixer
Cement, sand and course aggregate are carried in separate, divided bins. Materials loaded into the aggregate bins must be free of any foreign matter that may affect the quality of the concrete being produced or cause a partial or complete blockage in the control gates.
CAUTION: When loading aggregates, it is important that one aggregate not be allowed to spill over into the other's bin, especially when that bin is empty. This will adversely affect the quality of that part of the load.
Cement Powder
Water
Water may be loaded through the top of the tank or bottom loaded at the cam lock fitting.

Controls
Locate and become familiar with the operating controls of the Reimer Mobile Mixer.
• Master electrical switch -located on truck dash • 'In cab’ mixer control box -Provides for operation of all on/off and directional
control functions of the Reimer Mobile Mixer from the operator’s seat. • 'T' handle control box - Provides for operation of all on/off and directional
control functions from discharge area. • Belt and mix auger speed controls • Mix auger- Mix and Reverse • Aggregate control gate adjustment hand wheels, dials and pointers • Digital counters and reset button • Water pump activation switch • Conveyor function switch, labeled Belt/Auto/Water • Water proportioning valve • Water system blow-down valve- if installed for cold weather applications • Master air supply valve • EMERGENCY STOP BUTTON
• Power swing Lock/Free- allows for the auger trough to be pivoted manually. • Cement Motor Control
o Cement drive Motor On I Off } o o
Full I Lean Cement lean adjustment
} see Page 10 }

Control Panel
RE~ER REIMERALLIANCE :: lnlernat iona l l nc.
• ~Lu.r -- .-'."'
REia ER REIMERALLIANCE : Inter national Inc.

Cement Delivery System
Cement sprocketing shown above, can be interchanged by the operator to increase cement delivery.
15 x 17 Factory Setting 17 x 15 Will deliver approximately 20°/o
more cement
Roll up cement drop tube as shown during wash out.
Remove drop tube and check weekly for cement build up in this area.

Cement Motor Controls
Cement Motor On/Off Valve
Cement Discharge can be stopped by placing this valve in the open position.
Cement Motor ON Valve Closed
Cement
Lean Adjustment
With the cement feed valve in the lean position, cement discharge will be reduced by approx. 50%. Further reduction can be achieved by loosening the stop nut on the lean adjustment valve and turning the screw clockwise with an allen wrench.
C M FED
WARNING: Lean adjustment should not be turned more than 1 turns (counter clockwise) from the full IN position as seal damage will result.

SIDE VIEW
CEMENT MOTOR
CONTROLS
TOP VIEW ., c ..-
FULL
0 0
0 ., m m3:--mm cz
+t
.m )> z
LEAN
OFF
50%+
3) 50%-

LEAN VALVE ADJUSTMENT
Loosen the stop nut on both 3.1and 3.2
Use an Allen wrench to turn the spool adjustment in (clockwise) on both 3.1and 3.2 until you feel the
adjustment bottom out
From this position Fully In turn both 3.1and 3.2 Out (counterclockwise) 1Yz to 2 turns. You will feel
friction on the adjustment at this point. Do not continue to turn past this point or the seal may come
out. Both adjustments should be set to a similar position
The valve is now set to approximately SO/SO
If you require Less than SO% Turn adjustment 3.11n (clockwise) until you achieve the desired%
If you require Greater than SO% Turn adjustment 3.21n (clockwise) until you achieve the desired%
Note: Whenever making adjustments to one side the opposite side should always remain in the full Out
Position (1Yz to 2 turns)
Failure to do this may result in excessive heat generation and will eventually cause the valve to lock up
the hydraulic circuit. Readjusting the valve will solve the problem
Any adjustments made to this valve will NOT affect your calibration data when in the Full position

Water Pump

i . .
.· -· -
I= . a 2 3 4 5 5.2 6 7 8 9
10 12.1 12.2
--·-···--·--·····--------··-; j
i
· Bo.aHaJI CMcTeMa

Setting Up To Pour
Upon arrival at the pour site, confirm the specifications of the concrete to be poured. SET
CEMENT FEED VALVE AS REQUIRED. CONFIRM CEMENT MOTOR VALVE IS
CLOSED. (See Page 10 if lean mix is required). Using this information and with reference to the calibration chart, SET AND LOCK THE CONTROL GATES. Using the following sequence, set up the mixer in preparation for pouring. 1.Set operating controls: Master electrical switch- On
Water Tank Valve- Open
Water return valve- Open Emergency stop - Off To use Wireless set to ON Digital Counter - Reset
Conveyor function switch - Auto Position
Water pump switch- On
Add Mix Pumps -As Required Belt speed control- Set- (start at one tum less than fully open), maximum 4 turns= Fully Open
Auger speed control, 5 turns = Fully Open
Auger mix/reverse lever - Mix
Mix water control - Set (operator must become familiar
with initial settings required for proper slump, using small
trial batches) Cement delivery tube - Extend
2. Lower mix auger: The transport lock will automatically disengage when the boom is lowered. An angle of no less than 25° should be used on the mixing auger.
CAUTION: DO NOT ALLOW the angle of the mix auger to become to low, as this will limit the ability of the auger to mix thoroughly.
If required, lower the transition chute and add extensions as needed
3. Set power swing selector to desired function.
4. Apply any release agent at this time., if desired.
17

Pouring
As with any machine, the operator of the Reimer Mobile Mixer must understand and become confident in the operating procedures through training and experience. The following details the steps to be taken deliver a quality product to the customer.
1. Activate high idle function: using the 'RPM' switch. Engine should be turning at no
less than 1600 RPM.
2. Activate conveyor belt switch.
3. Activate mix auger switch:
4. Immediately adjust mix water feed valve: to obtain the desired concrete slump.
5. Vibrate bins: to ensure initial flow of sand and cement to conveyor belt.
6. Make frequent visual checks: of aggregate flows as well as the flow of concrete to ensure that the customer is receiving a concrete product that is true to the desired specifications.

Wash Down And Preparation For Transport
When the pour is complete or the mixer is empty, it is important that the mix auger be properly washed out to prevent an excessive concrete buildup which could interfere with the operation of the mixer on subsequent loads. The operator should take this opportunity to inspect the wear plates and make a general visual check of the mix auger and other components which may require maintenance or repair.
The following steps act as a guideline for washing out the mix auger and
preparing the mobile mixer for road transport:
+ Using a scraper, remove any excess material from the discharge end of the conveyor belt. + Roll up cement drop tube. + Run the mix auger until it is empty. + Adjust the mix auger speed control, to reduce auger speed as required. + Wash out swivel ring and area directly around discharge end of conveyor belt. + With mix auger still elevated, ensure that back plate and sides of the auger trough are free of
buildup. If desired, a rapid flow of water can be added to the mix auger by placing the conveyor function switch into the water position.
+ Switch mix auger control to 'OFF'.
+ Open the mix auger cover and lower the auger as far as possible.
+ Wash until the mix auger and trough are free of any cement or aggregate build up. + Elevate mix auger to transport position. The retaining lock will automatically engage.
CAUTION: Check for proper alignment as the auger is being raised.
+ Water pump- OFF
+ Master switch in cab - OFF

Description: Optional Color Feeder
The Reimer Color feeder is designed to supply a controlled flow of powdered color to the concrete mix.
Features: • 1.7 ft 3 large capacity • Large capacity extension available • Pneumatic vibrator to insure even flow
Calibrating the Color Feeder Using The Brand Flo-Control
Unloading
Valve Shown OFF
Set the conveyor belt speed and note the position of the belt speed flow control (e.g. number of turns open). Adjust the color feeder flow control to obtain the required discharge rate of colored powder. Record the settings of both the belt speed control and the color feed control for future reference.
Unloading the Color Feeder Hopper
Opening the unloading valve, allows the operator to unload the color feeder without the conveyor belt moving. The conveyor belt switch must be ON to supply oil flow to the color feeder.

Using the Color Feeder with Parker Flo-Control
ON
POSITION Color Feeder Valve Selector
OFF
POSITiON
On
, Unloading Off Valve
A. Color feeder selector valve: ON
B. Start with the fine adjustment at the position and the coarse adjustment at the :3 position. C. Rotate the COARSE adjustment counter clockwise to increase the discharge rate. D. The FINE adjustment is then used for more precise control. Clockwise rotation will
increase and counter clockwise rotation will decrease the discharge rate.
2. Calibrating The Color Feeder
A. Determine the number of lbs I yd3 or kg I m3 of color required. B. Cement motor: OFF (see page10).
C. Color Feeder selector valve: ON.
D. Select a position for Coarse adjustment. E. Zero the conveyor meter computer. F. Run the conveyor to collect a color sample. G. Weigh the color sample and compare with the meter reading. H. Make adjustments as per Section 1, D and record the dial settings when the correct
discharge rate is achieved for future reference.
3. Unloading Excess Color
A. Cement motor: OFF (See Page 10).
B. Color feeder selector valve: ON. C. Unloading valve: ON
D. Select a setting on the COARSE adjustment to unload the color feeder. E. Belt flo-control: OPEN ........Belt switch: ON.

Optional Hawkridge Fibre Feeder
Description: The Hawkridge Fibre Feeder is designed to supply a controlled flow of concrete reinforcement fibres, of various types, for mixing using volumetric batching concrete mixers.
Features:
• Works with a variety of fibre types. • No special packaging required. • Easy to install and operate. • Hydraulically driven. Other drive options are available. • A hydraulic control valve sets discharge rate.
When calibrating the fibre feeder, adjust the flo control to obtain the required discharge rate of fibre.
The fibre feeder discharge rate does not change proportionally with changes in the belt speed. Record the belt speed setting when calibrating the fibre feeder and use that belt speed whenever the fibre feeder is used.

Safety
Careful operation of your Reimer Mobile Mixer is your best insurance against an accident. Read and understand this operator's manual before operating.
Operational Safety
CAUTION: • Keep hands, feet and loose clothing away from rotating shafts, gears, chains, belts
and other moving parts. • When operating and moving about job sites, realize that the driver/operator holds the final responsibility for the safe operation of the mobile mixer. Be constantly aware of the location of open excavations, other workers, pilings, or anything else that that could be a hazard.
• When operating the power swing, chute, or boom functions, be aware of the location of workers.
• While everything has been done to ensure their reliability, do not trust hydraulic cylinders, hoses or fittings.
Maintenance Safety
23

Maintenance
Regular maintenance and inspection will help ensure trouble free operation, eliminate unnecessary down time, and extend the life of your Reimer Mobile Mixer. Keeping your mixer clean and free from cement build up helps to maintain a good image to your customers. The operator should perform a daily pre-operation check, inspecting the truck and mixer for any mechanical defects.
Preventative Maintenance
The following inspection and maintenance schedule acts as a guideline only. It should be noted that extreme weather conditions, a g g r e s s i v e aggregates, the nature of the concrete being produced (ie. low slump, high density) and other factors will affect the frequency of service required.
Inspection and Maintenance Schedule
COMPONENT ACTION FREQUENCY
Bottom auger bearing Grease Every 50 meters poured
Bottom auger seal Grease Every 50 meters poured
Conveyor shaft bearings Inspect and grease Every 250 meters poured
Cement hopper bearings Grease Every 250 meters poured
Hydraulic oil Check level Daily or after repairs to hoses
and/or other components.
Conveyor chain Apply oil As required
Cement feed chain Oil and check for tension As required
Air supply oiler for vibrator lubrication Inspect and fill As required
(See page 22) Check and adjust flow
AdMix filter screens Inspect and clean As Required
Hydraulic oil Drain and replace Every 2 years
Inspect for cement build Cement feed auger and delivery boot up Weekly
Auger swivel ring Inspect and lubricate Weekly
Water suction screen Inspect and clean Weekly or on condition
Mixer tie down bolts Check for security and Weekly
condition
Conveyor belt Check for damage & wear Monthly
Hydraulic pump drive shaft Inspect and grease Monthly
Mixer tie down bracket Check and re-torque frame Monthly
attachment bolts.
Hydraulic return line filter element REPLACE Yearly
Hydraulic suction screen (in tank) REPLACE Yearly

Wear Plates
The mix auger is equipped with replaceable wear plates, designed to protect the auger from premature wear. The wear plates must be inspected frequently and replaced when they wear down to the auger flighting.
CAUTION: Never allow the plates to wear into the mounting holes drilled into the flighting. The complete auger, or portion of it will have to be replaced if this occurs.
Inspect the wear plates during washout and monitor their condition. Also, be aware of the nature of up coming pours. This will help prevent a wear plate failure part way through a large, remote pour.
Remove the old wear plates by cutting the nuts off with a chisel or cutting torch, being careful not to damage the auger flighting. When using a torch, be careful not to scortch the rubber portions of the auger trough.
CAUTION: When attaching the new wear plates, it is important that they are against a firm, even surface st the bolting area. Excessive pressure on an uneven surface may cause breakage.
Service
The Reimer Mobile Mixer has been designed and tested to allow for a minimum number of adjustments and service items. The following sections describe adjustments and service that may be required.
Adjustments
1. Conveyor chain:- The take-ups on the front shaft of the conveyor must be adjusted to provide for proper tension on the conveyor chain. Proper adjustment is attained when the chain rollers are held about 1/8 "above the ends (front or back) of the chain return support bars. Be sure to check both sides of the conveyor chain, ensuring that the front shaft remains square to the main frame of the mixer.
2. Mix auger lift cylinder: -The lift cylinder is provided with an adjustable clevis to allow the proper engagement of the transport position locking hook. If the lock does not fully engage, lower the mix auger and support it with blocking to allow for the removal of the cylinder pin (clevis end). Loosen the tightening bolt to tum the clevis. Replace the pin and test for proper lock engagement. Repeat this procedure as necessary.

Adjustments cont'd
CAUTION:
Over adjustment puts undue stress on the swivel ring and support pins. When turning the clevis, do not hold the cylinder rod with a pipe wrench or other such tool. Seal damage will result. If necesssary, extend the cylinder rod until it bottoms out. This will prevent it from turning easily. It may also be necessary to slightly spread the clevis with a chisel to loosen the threads.
3. Control gate position pointers: -The pointers are set at the factory to indicate 0
or12 on the dial when the control gates are in the lowest position (resting on the conveyor belt). If a service function requires that the pointer setting relative to the gate position be changed, return it to the original factory setting. It is a good practice to check this setting during regular maintenance.
4. Cement feed drive chain: -Adjustment is provided by slotted holes under the cement drive motor mounting bracket.
5. Cement cross auger drive chain -Adjustment: -under the cement bin on the cross auger drive motor.
6. Mix auger: swing, boom and chute speed: -Adjustment for these directional functions is provided by flow controls under the main control panel.
26

27
Main Hydraulic Oil Tank
6 bolts for access to return oil filter---
Access to Suction Screen
Oil
Level ----· Indicator
Monitor the filter restriction guage when the mixer is running and the oil warm. Operation in the RED zone should be avoided as this indicates the return oil filter is contaminated. This filter can be changed by removing the 6 bolts on the top of the housing.
Replacement filter element part numbers:
Pall HC2544FMP9H 2004 model mixers
Western E4051B3C05 mixers before 2004

28
Oil Specifications
Cleanliness
In systems that use Eaton medium duty piston pumps, the fluid must be maintained at ISO Cleanliness Code 18/13 or better per SAE 11165. This code allows a maximum of2,500 particles per milliliter greater than 5 J.lm and a maximum of 80 particles per milliliter greater than 15 J.lm. When components with different cleanliness requirements are used in the same system, the cleanest standard should be applied.
Hydraulic System
Your Re1. mer Mob1.le M1. xer has been filled with Petro Canada
HYDREX*
to g1. ve you best all season performance, plus longer lasting protection against wear.
HYDREX* is recommended for use in equipment manufactured by: Eaton (Vickers),
Cincinnati Machine, Denison, Racine, Sauer-Danfoss, and others.
Minimum Requirements for Replacement Oil
In hydraulic systems that use Eaton's Medium Duty piston pumps and motors, the optimum viscosity range is 10- 39 eSt [ 60-180 SUS], at normal operating temperatures. Viscosity should never fall below 6 eSt [ 45 SUS ]. At the lowest expected start-up temperature, the viscosity, with a non-charge system, should not exceed 432 eSt [2,000 SUS ]
Air Supply Oiler
Keep the lubricator reservoir filled with appropriate oil (SAE 10 WT non-gumming type oil).
The oil feed rate can be varied, using the adjusting screw on the top of the lubricator.
The vibrator exhaust air should show an indication of oil when feed rate is adequate.

29
Trouble Shooting
Problem Cause Solution
No mixer functions operate
Master switch not active
Electrical failure
Locate and ensure that the cab master switch is turned on.
Locate and check main circuit breaker located in the main breaker box of truck. If a short circuit is indicated, find the short and repair.
No water pressure Water pump not running
Water tank is empty
Water pump has lost it's pnme
Water Suction Screen Plugged (Page 11)
Check water pump activation switch on rear panel.
Fill
Ensure that no pressurized air is being allowed into water system through the blow-down valve or a faulty diaphragm in the automatic water valve.
Remove and clean or replace
Digital meter not counting
Proximity sensor has come out of adjustment
Sensor Damaged
Light on top of sensor will flash when bolt head passes by if properly adjusted. Adjust to within 1/16" of sprocket.
Replace
No numbers on counter display
Digital counter has failed
Replace
Water leaking from pump
Mechanical seal has failed Replace seal, ensuring that seal components are properly installed. DO NOT RUN DRY!
Inconsistent slump
Moisture content of aggregates not consistent
Restriction in water supply line
Air in water causing pump cavitation.
Over adjustment of slump control valve.
Engine speed too low
Load materials of consistent moisture content. When this is not possible, the operator must compensate for moisture variations by making minor adjustments to the slump control valve or to the belt speed.
Remove Y-strainer plug and screen. Check for contamination and clean if necessary.
Check blow down air valve if so equipped. Valve must be fully closed.
Check automatic water valve diaphragm. Replace if defective. When setting the slump, do not "chase" it by over adjusting the control valve. It takes several seconds for the slump to respond to changes made to the valve setting.
Do not operate at less than 1600 R.P.M. Mix is too stony Sand has bridged or become
restricted Operate vibrators to cause sand to flo
Check control gate opening for restrict
w properly.
ion.

30
Reimer Mobile Mixer
Calibration procedure
The calibration of the mixer is the process which determines the control gate
settings and the meter count required to produce concrete of a certain
specification. A predetermined "mix design" is used as the guide for the
calibration procedure.
STEP 1 -Determine the 'cement output per count'. Each count is registered and displayed in the window of your meter.
Procedure:
1. Empty material from the sand and stone bins. 2. The cement bin should be at least 1/3 full. 3. Discharge an adequate amount of cement to ensure that the cement metering system is full. 4. Determine the empty weight of the container being used to collect the cement sample. 5. Zero the meter and place the container under the auger swivel ring. 6. Run the belt until the sample container is full, ensuring that all material being discharged
is collected. 7. Weigh the sample.
CAUTION: Remember to subtract the empty weight of the container.
1. Divide the sample weight by the number of counts shown on the meter to determine the cement output per count.
Cement Formula:
Sample Weight divided by meter count __ = cement output per count
Step 2 - Determine the number of counts required to deliver the specified weight of cement powder per yd 3 of concrete as needed in your mix design.
Count Formula:
Mix design requirements: lbs. of cement per yd 3 divided by cement output per
count (from step 1) = counts required per yd 3

31
Turn Cement Motor OFF. (See page 10)
Step 3- Determine the weight of stone that must be released per count.
Using your mix design, establish the required weight of stone to produce 1 yd 3 of concrete.
Divide the weight of stone per yard needed by the number of counts per yd 3 required
(from Step 2 ).
Stone Formula:
Mix design requirement lbs. of stone per yd 3 divided by counts per yd 3
(from step 2 ). = weight of stone per count
Procedure:
1. Fill stone bin at least 1/4 full . 2. Determine the empty weight of the container being used to collect the material sample. 3. Adjust control gate to the setting taken from the 'Sample Data Chart' found at the end
of the calibration section. 4. Run the belt until material is being discharged off the end of the conveyor. 5. Zero the counter and place the sample container under the discharge ring. 6. Run the belt until the sample container is full, ensuring that all material being discharged
is collected. 7. Read the meter and record the value. 8. Weigh the sample and divide by the meter reading to calculate the weight of stone per
count that has been discharged.
CAUTION: Remember to subtract the empty weight of the sample container.
1. Adjust the control gate andre-sample until the weight of stone per count is equal to the amount established in the stone formula above.
Record stone control gate setting

32
Step 4 - Determine the weight of sand that must be released per count.
Sand Formula:
Mix design requirement lbs.of sand per yd 3 divided by counts per yd 3
(from step 2 ). = weight of sand per count
Empty the stone bin and fill the sand bin Y4 full, repeating step 3, replacing stone with sand in all references.
Record sand control gate setting
SUMMARY:
Mix# (Operators Reference)
Strength required
Counts per yd 3
Stone gate setting
Sand gate setting
The mixer must be calibrated for each mix design used and the data should be
recorded on a chart for use by the operator.
Sample Data Chart- SAMPLE ONLY!
Cement Output per count .478 lbs. or .218 Kgs
Strength Counts Required Per Gate Setting Yd 3
M3 Stone Sand 3000 psi (20mpa) 872 1147 11.2 10
3500 psi (25mpa) 1008 1326 9.5 8
4000 psi (27.5mpa) 1150 1513 8.5 7
4500 psi (30mpa) 1238 1628 8.2 6.7
All calibration data should also be recorded elsewhere for a backup.
After calibrating, using weight it is recommended that the yield of each mix be verified by hatching concrete into a yield box (container of known volume) and comparing the result with that displayed by the meter. Small adjustments in the gate settings may be necessary to produce the desired yield.

33
APEX I
The APEX I is a processor and display designed to provide the mobile mixer operator
with information related to the Mixing and Discharge of concrete. During the Mixer
Calibration Procedure pertinent mix data information is entered into the Apex I to
provide for real-time calculations related to concrete volume, cement weight, aggregate
weight, and admixture flow rates. CemenUwater ratio, water flow rate and water totalizer are also available using the optional water meter.
Operating and data input
1. START- UP screen : displays time and counts/pulses
SCRN- to toggle between START-UP and ACTIVE-MIX screen
PRGM - to display the Program Screen ADMIX- to view admixture flow rates
RESET- to Zero: counts/pulses and ACTIVE-MIX screen volume. Values will be stored in the LAST 5 MIX screen.
2. ACTIVE - MIX SCREEN
MIX:(number@ name)
ST:(stone gate setting) SA:(sand gate setting)
CNT: (total counts/pulses between resets)
MPA/PSI:(strength)
C/W:(cement/water ratio)
H20:(water flow rate)
H20T:(total amount of water used between resets) RPM:(conveyor speed) VOLUME COUNT:(yards or meters)
3.PROGRAM SCREEN
OK- return to the ACTIVE- MIX screen SELECT- to choose one of the options
UP- scroll cursor up to the desired selection
DOWN- scroll cursor down to the desired selection

34
a. MIX SELECT SCREEN
UP and DOWN- select mix 1-15
SELECT- to return to the active mix screen
b. MIX ENTRY screen
MIX - select mix that is desired for data entry
SELECT -scroll data entry line through screen
UP - increase input value DOWN - decrease input value
EXIT - note when data entry line is under EXIT : Use Door symbol
(down key) to exit program
c. SET UP PARAMETERS screen
OK- to return to the ACTIVE-MIX screen
SELECT -allows programming of category selected
UP -to move the cursor up to the desired category DOWN - to move the cursor down to the desired category
C.1 SET CONTRAST
scroll between Set Contrast and Set Bright
- to decrease value + to increase value Use the door symbol to exit this screen
C.2 SET TIME
Set Time is used to scroll between minutes and hours
UP and DOWN increase and decrease values Use the door symbol to exit this screen
C.3 H20 PULSE/ L(liters) or G(gallons)
Select- moves the cursor underneath the number indicating the
pulse counts required to dispense 1 liter or 1 gallon
Up - increases the pulse count value Down - decreases the pulse count value

35
Water Calibration:
Active - Mix screen :
a) Press Reset to zero all totals
b) Dispense water into a container of known volume liters or gallons
c) Note the volume of water displayed at H20T and compare this with
the actual total
If the displayed volume is low the number of pulse counts required per liter or gallon
must be decreased.
If the displayed volume is high the number of pulse counts required per liter or gallon
must be increased.
It may be necessary to take several samples of water volume and make the
appropriate adjustments to the H20 PULSE count in order to achieve the level of
accuracy you require. However, once calibrated properly no further changes should be
needed.
C.4 METRIC/IMPERIAL
Select- used to change between metric and imperial
1. LAST 5 MIX screen -view a log of the last 5 resets.
Each time you press the RESET button it will log the concrete volume and strength of the current job. Note: if the RESET button is depressed with (zero) 0 counts, (zero) 0 volume will be logged.

36
ADMIXTURE SCREEN
Setting Flow rates for admixture
Enter the desired amount of admixture required per meter or yard in the appropriate line from the MIX ENTRY screen. The Apex I will calculate the number of counts per
minute and compute the desired flow rate- UMinute or Gal/minute to be displayed in
the ADMIX screen.
From the START-UP screen or ACTIVE MIX screen with the convey or belt running press the ADMIX button. The ADMIX screen will indicate the appropriate flow rate needed for the rate at which concrete is being produced. Use the admix flow-control and flow meter for either the HI flow or Lo Flow admix pumps to make the appropriate flow rate adjustment.
This process can be done while mixing. You may easily move between the ACTIVE MIX screen and the ADMIX screen to check the display which indicates the necessary flow rate.
CAUTION:
The computer does NOT control the admix. It only displays the amount of admixture that is required using the information that has been entered when setting up the MIX ENTRY screen. The operator must MANUALLY make adjustments to the ADMIX FLOW CONTROL.

37
CAUTION:
When mixing concrete, using a different cement powder or aggregates differing in size from those which were used when calibrating, errors in yield will result. The operator should be prepared to re-calibrate in these situations and make the necessary changes in the gate settings to maintain the accuracy of the Reimer Mobile Mixer.
Using a wheelbarrow to collect material samples for calibration.

Manual Admix System
ADMIX MUST BE ADJUSTED WHEN MAKING CHANGES TO
CONVEYOR OR SPEED.
38

MEGA RADIO REMOTE CONTROL SYSTEM
-PRELIMINARY-
INSTALLATION AND OPERATION MANUAL
REIMER
3A1931AJ.doc January 8, 2011
BJ

MEGA REMOTE
1
INDEX
DESCRIPTION .................................................................... 3
OPERATION ....................................................................... 3
TRANSMITTER AND RECEIVER SYNCHRONIZATION ........... 4
INDICATOR LEDs ............................................................... 5
INSTALLATION................................................................... 6
BEFORE APPLYING POWER! ............................................... 7
USING THE OPTIONAL PALM™ INTERFACE ......................... 8
DIAGNOSTIC .................................................................................. 8
HISTOGRAM ................................................................................... 9
FILE TRANSFER ............................................................................ 10
WIRING ........................................................................... 11
COLOR .............................................................................. 11
DESCRIPTION .................................................................. 11
RED .................................................................................. 11
POWER A.......................................................................... 11
BLACK .............................................................................. 11
GROUND B ....................................................................... 11
WHITE ............................................................................. 11
CAN HIGH C ..................................................................... 11
GREEN .............................................................................. 11
CAN LOW D ...................................................................... 11
ROUTINE MAINTENANCE .................................................. 13
MAINTENANCE PRECAUTIONS ......................................... 13
TROUBLESHOOTING ......................................................... 13
TROUBLESHOOTING CHART ............................................. 15
ERROR CODES .................................................................. 16
ERROR CODE .................................................................... 16

MEGA REMOTE
2
PROBLRM CAUSE .............................................................. 16
TRANSMITTER PICTORIAL ............................................... 18
RECEIVER PICTORIAL ...................................................... 19
SPECIFICATIONS ............................................................. 20
INSTRUCTION TO THE USER ............................................ 21

MEGA REMOTE
3
DESCRIPTION The MEGA REMOTE is a state
of the art microprocessor
based Radio Frequency (RF)
control system. It will provide
the operator the ability to
wirelessly operate equipment.
The operator is required to
follow all OSHA www.osha.gov
safety standards when
operating the equipment.
The remote control system
consists of the handheld radio
transmitter and receiver
module. Additional optional
equipment such as wiring
harnesses and Palm™
interface tools may be
available.
The transmitter is equipped
with pushbutton switches for
the various functions . The
transmitter runs on 2
rechargeable batteries.
The system’s radio receiver
has CAN for J1939 output to
accommodate the functions
available on the transmitter.
It also includes a port for RS-
232 communication to allow
software .
OPERATION
Power must be applied to the
receiver module for the
system to work.
Pressing the POWER button
will turn on the transmitter.
Pressing and holding the
POWER button until the LEDs
flash and stop will turn off the
transmitter. If the POWER or
ESTOP button is pressed or
the transmitter has been out
of range for more than 2

MEGA REMOTE
4
seconds, any outputs will be
turned off as a safety feature.
Use the buttons on the
keypad to operate the desired
functions.
To save battery life, the
transmitter will turn off when
it is idle (no functions are
used) for period greater than
15 minutes. The user must
press the POWER button at
this point to restore
transmitter operation.
The transmitter will NOT go
to sleep as long as the
receiver has power applied
to it.
TRANSMITTER AND RECEIVER SYNCHRONIZATION Each radio remote system is
designed to operate with a
unique radio ID code and RF
channel sequence. Each
receiver is programmed to
respond only to the
transmitter with the correct
ID code/RF channel sequence
for which it is set. This feature
allows multiple systems to
work in close proximity to one
another without interference.
In the event that a
transmitter becomes damaged
and a new one is needed, the
receiver can be
reprogrammed to respond to
the new transmitter. To teach
the ID code to the receiver,
use the following procedure.
*Please note that if this
procedure is interrupted

MEGA REMOTE
5
before it has completed, the
system may have
intermittent operation:
1. Turn the transmitter and
receiver off
2. Press and hold the
POWER button on the
transmitter for more
than 10 seconds. LEDs
should blink at this point
3. Apply power to the
receiver. Green LED
stays on when teaching
is in progress and it will
double-blink when
teaching is complete
4. Teach complete
INDICATOR LEDs The transmitter has two
indicators, the red BATTERY
indicator and the green
TRANSMIT indicator. The
green TRANSMIT indicator will
blink 1x/second when
transmitting and double-blink
2x/second when active but
not transmitting.
The red BATTERY indicator
starts blinking once every
second when the battery
voltage is low. Replace the
batteries at this point for
continued operation.
The receiver module can
identify problems with the
system in the form of an error
code. Check the red indicator
on the receiver to diagnose
system problems. Then, refer
to the ERROR CODE CHART in

MEGA REMOTE
6
this manual for explanation of
the error codes. The green
LED indicator will blink on the
receiver during normal
communication.
INSTALLATION Refer to the WIRING CHART
in this manual for hookup of
the harness.
To install the receiver module,
use the two mounting holes
provided on the enclosure to
attach it in a vertical manner
with the connectors facing
down. Please take extra
caution not to damage
internal components while
installing. For high vibration
applications, use shock
absorbing mounts. It is
advised to mount the unit as
high as possible, keeping
clear of metal obstructions
around the antenna which
might affect RF performance.
The main power to the
receiver should be connected
through a switched, fused line
capable of 20 amps. For best
results, connect the power
(+) to the receiver via an
auxiliary terminal of the
ignition switch, PTO switch, or
ignition relay. Be sure that the
ground (-) is connected
securely to the chassis or
battery with a star washer
which digs into the base metal
to insure good contact.
All connections must be
properly insulated to protect
against shorts.
Seal all connections with a
non-conductive silicone
grease to prevent corrosion.

MEGA REMOTE
7
BEFORE APPLYING POWER! Check power and ground
for proper polarity.
Check the wiring harness
for possible shorts before
connecting to output
devices (i.e. valves and
relays) by checking each
mating pin terminal.
Verify that the transmitter
batteries are fresh.
Read the rest of this
manual.

MEGA REMOTE
8
USING THE OPTIONAL PALM™ INTERFACE The Patented Palm Pilot™
interface, US patent No.
6,907,302, software is a very
useful tool for troubleshooting
the control system.
To use this tool, connect the
Palm™ serial cable to the
serial connector on the
receiver control harness or
adaptor, and apply power to
the system.
Main Page
Use the Palm’s stylus pen and
tap the icon REIMER to launch
the application.
DIAGNOSTIC
Tap the Diagnostic button to
see the diagnostic screens,
which shows the present state
of remote communications,
and system I/O.

MEGA REMOTE
9
RF Communications Page
When the round circle next to
a label is dark, the
corresponding ON/OFF input
or output is sensed to be
active or ON.
Outputs Page
HISTOGRAM
Tap the Histogram icon to see
a set of screens that show
which error codes are active
and how many times the
specific error code has been
active.

MEGA REMOTE
10
Histogram Page
This feature can be used to
troubleshoot machine wiring
and other problems. Tapping
the Reset button resets the
error code counts. The
password to reset error codes
is ████.
FILE TRANSFER
Tap the File Transfer
button to send new program
files from the Palm to the
receiver. New programs are
uploaded to the Palm via the
Palm™ desktop as a *.pdb file
using HotSync™.
File Transfer Page
This is only used for software
updates to the receiver. Tap
the ‘i’ icon for more
information on this procedure.

MEGA REMOTE
11
WIRING
COLOR DESCRIPTION RED POWER A BLACK GROUND B WHITE CAN HIGH C GREEN CAN LOW D

MEGA REMOTE
12
CAN MESSAGING J1939 message:
CAN BURD RATE: 250K PGN: 65440 DATA BYTES SIZE: 8 DATA [0] LSB of Input DATA [1] MSB of Input. DATA [2]-DATA[7] RESERVED We use the first two bytes for 16 switch input. Here is the mask for switches. #define ESTOP_MASK 0x0001 #define AUGER_MASK 0x0002 #define RPM_MASK 0x0004 #define BELT_MASK 0x0008 #define FRONT_MASK 0x0010 #define VIB_MASK 0x0020 #define REAR_MASK 0x0040 #define SPARE1_MASK 0x0080 #define SPARE2_MASK 0x0100 #define SPARE3_MASK 0x0200 #define BOOM_UP_MASK 0x0400 #define BOOM_DN_MASK 0x0800 #define CHUTE_UP_MASK 0x1000 #define CHUTE_DN_MASK 0x2000 #define SWING_LEFT_MASK 0x4000 #define SWING_RIGHT_MASK 0x8000

MEGA REMOTE
13
ROUTINE MAINTENANCE Clean transmitter regularly
with a damp cloth and mild
detergent.
Inspect electrical wiring for
wear points or other damage.
Repair as required.
Inspect all connections for
looseness or corrosion.
Tighten and/or "seal" as
necessary.
MAINTENANCE PRECAUTIONS When performing any
inspection or maintenance
work on the remote system,
always exercise care to
prevent injury to yourself and
others or damage to the
equipment. The following are
general precautions, which
should be closely followed in
carrying out any maintenance
work.
Do not have hydraulic power
available to the valves when
performing electrical tests.
Never operate or test any
function if any person is in an
area where they could be hurt
by being hit or squeezed by
the hydraulic equipment.
Turn power off before
connecting or disconnecting
valve coils or other electrical
loads.
TROUBLESHOOTING This next section provides
basic operator level
troubleshooting for the MEGA
REMOTE system. If, after
following these instructions,
the system still does not
function, contact your KAR-

MEGA REMOTE
14
TECH representative for
further instructions or
servicing.

MEGA REMOTE
15
TROUBLESHOOTING CHART
PROBLEM SOLUTION
1. No functions work 1. Check that transmitter power is on 2. Check that receiver power is on 3. Check system wiring for power into the system 4. Check LED status display for system status 5. Check for proper grounding of system's electrical circuit 6. Check system's hydraulic system
2. Certain functions do not
work
1. Check the wiring connection from the system to the valve coil for the output function that does not work 2. Check LED status display for possible fault or error indication 3. Check system's hydraulic system 4. Check system's electrical system
3. Functions operate
intermittently
1. Loose connector at the valve coil 2. Check LED status display for system status 3. Check receiver antenna for any damage and proper connection 4. Check system's hydraulic system

Reimer Alliance International Inc.
2/1/2011
MasterMix Electronic Display

2
Master Mix Electronic Display The Master Mix is a processor and display designed to provide the mobile mixer operator with
information related to the Mixing and Discharge of concrete. During the Mixer Calibration Procedure
pertinent mix data information is entered into the Apex I to provide for real-time calculations related
to concrete volume, cement weight, aggregate weight, and admixture flow rates. Cement/water
ratio, water flow rate and water totalizer are also available using the optional water meter.
Operating and data input
1. START- UP screen : displays time and counts/pulses
SCRN- to toggle between START-UP and ACTIVE-MIX screen
PRGM- to display the Program Screen
ADMIX- to view admixture flow rates
Reset – to Zero: counts/pulses and ACTIVE-MIX screen volume. Values will be
stored in the LAST 5 MIX screen.
2. ACTIVE - MIX screen
MIX: (number @ name)
ST: (stone gate setting)
SA: (sand gate setting)
CNT: (total counts/pulses between resets)
MPA/PSI: (strength)
C/W: (cement/water ratio)
H2O: (water flow rate)
H2OT: (total amount of water used between resets)
RPM: (conveyor speed)
VOLUME COUNT: (yards or meters)
3. PROGRAM screen
OK – return to the ACTIVE – MIX screen
SELECT- to choose one of the options
UP- scroll cursor up to the desired selection
DOWN- scroll cursor down to the desired selection
a) MIX Select screen
UP and DOWN- select mix 1-15
SELECT- to return to the active mix screen
b) MIX ENTRY screen
MIX – select mix that is desired for data entry
SELECT- scroll data entry line through screen
UP – increase input value
DOWN – decrease input value
EXIT- note when data entry line is under EXIT : Use
Door symbol (down key) to exit program
Note: Select will only scroll from top to bottom and
repeat
c) SET UP PARAMETERS screen
OK- to return to the ACTIVE-MIX screen
SELECT – allows programming of category selected
UP- to move the cursor up to the desired category
DOWN- to move the cursor down to the desired category

3
i. SET CONTRAST
scroll between Set Contrast and Set Bright
- to decrease value
+ to increase value
Use the door symbol to exit this screen
ii. SET TIME
scroll between minutes and hours
UP and DOWN increase and decrease values
Use the door symbol to exit this screen
iii. H2O PULSE/ L (liters) or G (gallons)
a) Select- moves the cursor underneath the number
indicating the pulse counts required to dispense 1 liter or 1
gallon
b) Up- increases the pulse count value
c) Down- decreases the pulse count value
Water Calibration: Active-Mix screen:
a) Press Reset to zero all totals
b) Dispense water into a container of known volume
liters or gallons
c) Note the volume of water displayed at H2OT and compare this
with the actual total
If the displayed volume is low the number of pulse counts required per liter or gallon must be
decreased.
If the displayed volume is high the number of pulse counts required per liter or gallon must
be increased.
It may be necessary to take several samples of water volume and make the appropriate
adjustments to the H2O PULSE count in order to achieve the level of accuracy you require.
Once calibrated properly no further changes should be needed.
iv. METRIC/IMPERIAL
Select- used to change between metric and imperial
Note: Auger PSI and BELT PSI are for future use
4. LAST 5 MIX screen – view a log of the last 5 resets.
Each time you press the RESET button it will log the concrete
volume and strength of the current job. Note: if the RESET button
is depressed with (zero) 0 counts, (zero) 0 volume will be logged.
5. ADMIXTURE Screen - Setting Flow rates for admixture
Enter the desired amount of admixture required per meter or yard in the
appropriate line from the MIX ENTRY screen. The Apex I will calculate the
number of counts per minute and compute the desired flow rate – L/Minute or
Gal/minute to be displayed in the ADMIX screen.

4
From the START-UP screen or ACTIVE MIX screen with the conveyor belt
running press the ADMIX button. The ADMIX screen will indicate the
appropriate flow rate needed for the rate at which concrete is being produced.
Use the admix flow-control and flow meter for either the HI flow or Lo Flow
admix pumps to make the appropriate flow rate adjustment. This process can
be done while mixing. You may easily move between the ACTIVE-MIX screen
and the ADMIX screen to check the display which indicates the necessary flow
rate.
CAUTION: The computer does NOT control the admix. It only displays the
amount of admixture that is required using the information that has been
entered when setting up the MIX ENTRY screen. The operator must manually
make adjustments to the admix flow control.
Note: If the conveyor speed is changed you must make the necessary adjustment to
the admix flow-control in order to dispense the correct amount of admixture. The
display in the ADMIX screen is to be used for reference only when making these
adjustments

USER GUIDE
Reimer
Cement mixer
Display mix control

Reimer SA-3258 User Guide
2
Table of Contents
I. Revisions………………………………………………………………………….2
II. Software Specification….…...………………………………………………...…2
III. Description of Operation………………………………………………………...3
IV. DP200 ………………………………………………………………………..…...4
V. DP200 I/O……………………………………………………………………….10
VI. Service Tool Screens……………………………………………………….…..11
I. Revisions
II. Software Specification
Module NODE
#
HWD
Version
Baud
Rate
Program Number
10106883 11 10106196v110 250k SA3258DP200xxx
LEVEL DESCRIPTION – ECO NUMBER DATE BY 0 CREATED 2/25/08 JH 1 Added printer 10/15/08 JH 2 Added Remote Print button 11/25/08 JH 3 Added company name to printer and ticket number 1/26/09 AE 4 Changes per Rev 110 addendum 4/7/09 AE 5 Updated to match current code rev 5/8/09 AE 6 Updated to match current code rev 5/22/09 AE 7 Updated to match current code rev 5/27/09 AE 8 Updated to match current code rev 6/9/09 AP
103-116 Shown on obsolete SA-3258-PRR revision record 5/11/11 AP 117 Added water ratio in Gal/Yd3 or Liter/m3. Switched rev
record to User Guide 5/11/11 AP
118 Improved accuracy in the Liter/m3 calculations 5/18/11 AP 119 Corrected Cement, Stone and Sand kg values on Mix Setup
screen 7/8/11 AP

Reimer SA-3258 User Guide
3
III. Description of Operation:
This machine is a truck mounted cement mixing unit. The electronic display system is used for monitoring purposes and setup calculations only. It also is used to save specific data after a run is complete. There is also voltage monitoring that is done, so if the system voltage drops below 10VDC two red LED’s will flash indicating to the operator that their battery voltage is too low. If the voltage gets too low, the display may not operate properly, and the counts from the pulse pickups will lose accuracy.
Main Screen 1:
Shows in large font the amount of counts that the conveyor has rotated. This is primarily used in calibrating the machine. The operator will have to print after they are done with the mix. The operator will not have the ability to print previous runs after they have been reset. Main Screen 2:
This screen shows operating data; which mix is selected, the strength that is being produced, the SA and ST gate positions, the amount of water that has been mixed with the concrete(H20T), current water flow meter reading(H20) the RPM and Count of the cement conveyor, and in large letters the overall cubic yards or meters of concrete that have been distributed. It also shows the C/W (cement to water ratio) overall since the last reset. Program Screen:
The operator will use this screen to navigate to the following; Mix Select screen to select which mix he would like to run. Mix Entry screen, used to setup the parameters for 10 preset mixes. This is where the operator will enter values that they want used for all calculations to include; Truck number, Strength, Pulses per yard (or meter), Cement weight per yard (or meter), Stone weight per yard (or meter), Sand weight per yard (or meter), ST gate position, SA gate position, Low Flow gallons (or liters) per yard (or meter), and Hi Flow gallons (or liters) per yard (or meter). Setup Parameters, where the operator has the ability to set the contrast and backlight of the display, set the time, set the amount of pulses per gallon or liter of water, and to select between metric and imperial units of measure. This screen also shows the pressure at the belt and auger motors. Last 5 Mix, when the operator is done with a load, they press the reset button to clear the counts. The values are calculated and will show the yards that were distributed and the strength of the mix for that and the 4 previous runs. This screen is also where the operator will need to go in order to reset the run values.
Admix Screen:
The operator will look at this screen for a reference as to how much of the Hi and Low flow fluid they should be adding to attain the correct mix they selected for the speed in which they are pumping.
Calibration:
There is no calibration required for the display once the program is loaded.

Reimer SA-3258 User Guide
4
IV. DP200 SPLASH SCREEN
MAIN SCREEN
SCRN – Switch to Run Screen, PGRM - Switch to Program Screen ADMIX - Switch to Add Mix Screen

Reimer SA-3258 User Guide
RUN SCREEN
SCRN – Switch to Main Screen, PGRM - Switch to Program Screen
ADMIX - Switch to Add Mix Screen
PROGRAM SCREEN
OK – Switch to Run Screen, SELECT – Switch to highlighted screen, UP – Highlight previous, DOWN – Highlight next
5

Reimer SA-3258 User Guide
MIX SELECT SCREEN
SELECT – Select current mix, Up – Show previous mix,
DOWN – Show next mix
MIX ENTRY SCREEN
MIX – Select mix number, SELECT – highlight value to adjust
Up – Adjust value up, DOWN – Adjust value down

Reimer SA-3258 User Guide
SETUP PARAMETERS SCREEN
OK – Switch to Run Screen, SELECT – Switch to highlighted screen
Up – Highlight previous, DOWN – Highlight next
LAST 5 MIX SCREEN
OK – Switch to Run Screen

Reimer SA-3258 User Guide
ADMIX SCREEN
OK – Switch to Run Screen
SET CONTRAST

Reimer SA-3258 User Guide
SET TIME AND DATE

Reimer SA-3258 User Guide
10
V. DP200 I/O
ft SAUER 1:lf' DANFOSS Housing Dimensions
" ~ I
vU U UU\ n s.ommlf.S41nl
DP 1fJ) Series Nlodel Code
A Modfllfom• I OP200 I Gt•phiQI Oi$pl.,_ P67 obo.o~ .,_nt-1
~ " • • iii
lltoi#I'M Clod/L 0 w l'tmpttCI!t.Urf' FuttetloMJty
C I 00 I No RI'C•ncl Llf ' 01 "R1C •ncl lll=
D FlosbMtmotYIApp/kotlon«-.y 02 2M9wilhoutAppliccion Key
Ol 2M9wilh Jlpplicotionl(cy
1 Apf:lfcodott Ulf
1:: 1:; use"'" J)p •
l:i l:~ev~
DP2IJII SerlesAVDilaiJ/e Models [1)200.()0. 00.0 1.00.00
CP200 -00-01.0 l-00 .00 DPl00-01·01..02..00..00
£1'200.01·01.0)..00.00
CP200 -04-01.02.00 .00 0PlOO..()t..01..().).(1()..(1()
DP200Serles Related Products Port Numbers Otuts<hMatlngConnKt« BagAsMmbty
OP2XXMou.-hgHarGva• R•plk•~ntN Kit PWS+1 GUICE Sln~•lkttllc.n:s.
DP'lOOPanel SNI Rep1actmtnl Gask.-
10 10702 1 10107380 10106883
10 107381
10107022 10107382
10100944
1010735:1 10101000
10 107355
DP200 Series Graphical Terminal
n smmt t<ll
W fml(l .Vh )
a-
a-11:Smn{0.91Ul )
l4mm!UJ.If(
Moontlng Panel Cutout Dimensions
~ IOC::::::~J
~ • ! i . ~ I ~
~ , : • i ~ • f
~'il ~
·,n ~ ~
~. _'lfo: lw.l~m~ .. ,.o.a ll.l" "W·o.otll
11 S .t~m~(O.J:IIUI111(...,_40lll
DPliJO Seiesftoduct Ptraneun DPlOOSori.s
Proo:-r NWI 7o:x(l ~lbit/OOJot-lt - 04K8on..:: llip. sn.M8on b011d ·- .... , _.,Sup pit 9-0lYdcfOSWit-IS
Con...:tor O.wd'!Oil.f.-12 ,. I.COwih ~l lo lcr.ds AlosolutiOII 160 K :MO piuk
Vkiw•bleA,.. eomm K ssmm (!. IS K 2 16)
IPAiotlllg IP67 Op.-.. on C<G COO: -XI 'C -t10"C(-4'F -tl se'F)
l•Rip•r.tuftl C<GCOI: -«<"C -t8s'C(-40'F .,,.., Wir• gc. l•Rip•r.tur• -<O't -t6s'C 1-«l"F + 110"fl ........ lSOg(O.Sib)
Vlb r.tlonJ5.h otk ,.,,., lMC.tso IW/fm llSkV
Digital Output {O.SA) 1
Use care when wiring mating connector. Diagram shows clevlcQ pins.
DP100Seies
' ~
, NC DIWAIN INC
~ ~ 10 a:ioRioiN
" amNTN
" DOUT(osA)
Comprehensive technical information: CP2XX SeriesGr.phical TerminalsTechnicallnformaion, 11023625 Sauer·Oanfoss product literature is online at wwwsauer·danfoss.com
11025041 • Rev A· Apr 2007 e CoPYright 2007, Sauer·Danfoss. All rightsreseiVed. Contents subject to ctunge.
&.1~o~r~~f'tl .-.,. r

Reimer SA-3258 User Guide
11
VI. Service Tool
Main Screen
Water Total Screen

Reimer SA-3258 User Guide
12
Set Defaults Screen
(If correct password is entered, all parameters go back to preset
settings)
Hi and Low flow presets screen

Reimer SA-3258 User Guide
13
SA and ST Gate settings preset screen
Pulses per yard and Strength presets screen

Reimer SA-3258 User Guide
14
Stone and Sand weight presets screen
Cement weight presets screen

Reimer SA-3258 User Guide
15
Last 5 saved values screen
Parameter Screen

Reimer SA-3258 User Guide
16
Company Name Screen
Ticket Number Screen

Reimer SA-3258 User Guide
17
AdMix Meter Options Screen
., . File View DesiQ-1 LOQ Parameter COI'IYOI.ri::ation Options Tools ~
,1 ;;111 ~~ I JI!l v w~f~JJ 4:- IJmiJ o .. • ........ a:~ ~==c====· 5iJ J5;1 J 'B 'W D - I ~ D~sticNavigatorl
~ v~ 2at~ _0,'~~· ·-.D~·~~~~- ~-~~ ~~MMN.>--------------------------------------------------------------EI -~ Reimer fSET NUMBERS PER THE FOLLOWING:
~ D~W~ents !:~:: ~:: ~~~ ::~:: $. ECU l~t 3a7.5lPMFLOWMETER !B e 0 ... SA325IDP20011 0
$~LQoJFtroeticw'ls €QI Di$~
EI~Pt:woYflete~"FtroCtions B~Displdo;
~ Hi and lowF~ ~SA~STG~e
10.11 - lowflo U16 r----o3
~ PPY~d oM'ld Stren.. 5) Stone m SoYKl wt 5) Cemenl: wt 5) S~vedV~Iues 5) Pororne<en
5) COI'JlPOI1Y N~ 5) Ticket
·~
r----1(_ st••l J .e ~ @} , • .fl ,:) ; t:) l5i i!"l 0 J {@] Inbox- Microsoft 0 .. I L1 PlUS+ I GUIDE
ISauer-D.M'/oss CG!SO ,.0 (CMri
II ~PlUS+ 1 SerVIce T ••• t.:) SA-3258

Switch Indicator Lights
ON
ALERT: Water Pump OFF, Conveyor Switch ON (Note 1)
ON
ON
SWITCH INDICATION
ON
ALERT: Water Pump OFF (Note 1)
Remote E-Stop ACTIVATED To Reset: PRESS E-Stop on Remote (Note 2)
ALERT: Closed Loop Error To Reset: Cycle MANUAL E-Stop (Note 3)
Activated
Activated
Activated
On
Activated
Activated
Activated
1
2
3
4
5
6
7
8
9
11
10

Model No.
RA 850 - 25
Manufacturing Code
350 3.50 Cu Meter Capacity750 7.50 Cu Meter Capacity850 8.50 Cu Meter Capacity950 9.50 Cu Meter Capacity1150 11.50 Cu Meter Capacity
25 26" Frame Extensions50 52" Frame Extensions
Model No.
1 2 3
1
2
3

Serial No.
H N 2 VA 118 L 10950
H Hydraulic Series V
N 9 x 96" AugerNS 9 x 86" AugerNL 9 x 116" AugerT 12 x 96" AugerTS 12 x 86" AugerTL 12 x 116" Auger
2 2' 450 Gal Water Tank3 3' 675 Gal Water TankO Custom Tank Size
VA 12 Volt Operating SystemVB 24 Volt Operating System
95118135 Conveyor length indicating the number of cross bars on the chain153170
Blank L-20 Standard ActuatorL L-30 Heavy Duty Actuator
Manufacturers Serial Number Code
Serial Numbers
1 2 3 4 5 6 7
1
2
3
4
5
6
7
25
1 10
2 9
3 8
4 7
5 6
23
1 10
2 9
3 8
4 7
5 6
24
22
21
20
15
16
19
17
18
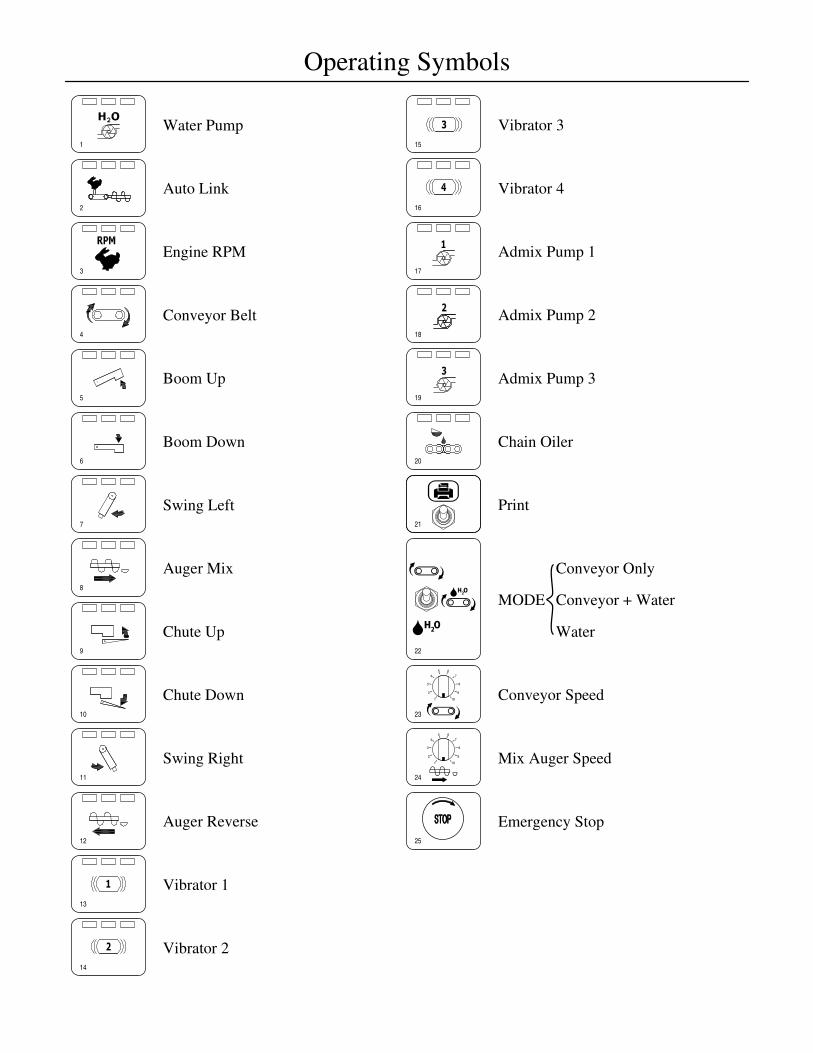
Conveyor Speed
Mix Auger Speed
Conveyor Only
Conveyor + Water
Water
Vibrator 3
Vibrator 4
Admix Pump 1
Admix Pump 2
Admix Pump 3
Chain Oiler
MODE
Emergency Stop
2
3
4
1
11
12
9
10
7
8
5
6
13
14
Water Pump
Auto Link
Engine RPM
Conveyor Belt
Boom Up
Boom Down
Swing Left
Auger Mix
Chute Up
Chute Down
Swing Right
Auger Reverse
Vibrator 1
Vibrator 2
Operating Symbols

Remote TX
POWER E-STOP
RPM
BE
LT
RE
AR
AU
GE
RF
RO
NT
VIB
SP
AR
E 1
SP
AR
E 3
SPARE 2
UP
BOOM
DN
UP
CHUTE
DN
SWING
LE
FT
RIG
HT
8 3 4
13 14 15
5
6
9
10
7 11

Switch Indicator Lights
ON
ALERT: Water Pump OFF, Conveyor Switch ON (Note 1)
ON
ON
SWITCH INDICATION
ON
ALERT: Water Pump OFF (Note 1)
Remote E-Stop ACTIVATED To Reset: PRESS E-Stop on Remote (Note 2)
ALERT: Closed Loop Error To Reset: Cycle MANUAL E-Stop (Note 3)
Activated
Activated
Activated
On
Activated
Activated
Activated
1
2
3
4
5
6
7
8
9
11
10

Switch Indicator Lights
ON
SWITCH INDICATION
Activated
Activated (Note 4)
Off (Note 4)
Standby
On
Off
Standby (Note 5)
Activated
Activated
Prime
On
Prime
Off
Standby (Note 5)
On
Prime
Off
Standby (Note 5)
On
Prime
15
16
17
18
12
13
14
20
19
Standby
On

Switch Status Indications Notes
Note 1:
FLASHING GREEN: Alerts the operator that the CONVEYOR switch has been activated while the WATER
PUMP is OFF. The CONVEYOR will NOT operate under this condition.
– Activate the WATER PUMP to resume normal operation.
Note 2:
AUTO LINK: The selection of AUTO LINK allows RPM, CONVEYOR, WATER, MIX AUGER, (and
ADMIX if selected ON) to start together when the CONVEYOR switch on the Keypad or the Remote TX
is activated. (RPM will engage 1 sec. in advance of the other functions.)
– MODE SWITCH (#22) must be in the CONVEYOR + WATER setting for AUTO LINK to be operational.
Note 3:
Once the E-Stop on the Remote TX has been deactivated it will be necessary to RESET the desired functions
for operation of the mixer.
Note 4:
CLOSED LOOP ERROR: Indicates the incoming conveyor pulse counts are out of range to maintain a
CLOSED LOOP condition. The Mixer will revert to OPEN LOOP mode and CONTINUE to operate.
– Probable cause for this indication:
A. Hydraulic Oil temperature LOW which can result in a slower CONVEYOR SPEED than has been
selected on the CONVEYOR SPEED (#23) adjustment.
o Reset CONVEYOR SPEED (#23) to a LOWER value.
o Next Cycle the MANUAL E-STOP (#25) button to clear Status Indication. (Allow 6 sec for
error indication to be cleared.)
o Once the Oil temperature has increased to at least 100 F / 38 C the mixer may be operated at full
speed with no error indication.
B. Pulse pickup SENSOR out of adjustment or failed.
o Check adjustment (see page XX) or replace SENSOR.
o Clear Status Indication as described above.
Note 5:
When program V.1.0V4F is installed VIB 4 (#16) will operate as a VIBRATOR switch input.
When program V.1.0A3F is installed VIB 4 (#16) will operate as an ADMIX switch input.
Note 6:
STEADY RED: Admix OFF
FLASHING GREEN: Indicates Admix is in STANDBY mode and will operate as soon as the CONVEYOR
is activated.
SOLID GREEN: Indicates Admix ON and CONVEYOR is activated.
AMBER: Indicates Admix is in PRIME mode which allows operation without the CONVEYOR activated.
Note 7:
FLASHING GREEN: Indicates Chain Oiler is in STANDBY mode and will operate as soon as the
CONVEYOR is activated
SOLID GREEN: Indicates Chain Oiler ON and CONVEYOR is activated