Embed Size (px)
Citation preview


Trend Micro Incorporated reserves the right to make changes to this document and tothe product described herein without notice. Before installing and using the product,review the readme files, release notes, and/or the latest version of the applicabledocumentation, which are available from the Trend Micro website at:
http://docs.trendmicro.com/en-us/enterprise/officescan.aspx
Trend Micro, the Trend Micro t-ball logo, OfficeScan, Control Manager, DamageCleanup Services, eManager, InterScan, Network VirusWall, ScanMail, ServerProtect,and TrendLabs are trademarks or registered trademarks of Trend Micro Incorporated.All other product or company names may be trademarks or registered trademarks oftheir owners.
Copyright © 2014. Trend Micro Incorporated. All rights reserved.
Document Part No.: OSEM115885_130313
Release Date: April 2014
Protected by U.S. Patent No.: 5,951,698
This documentation introduces the main features of the product and/or providesinstallation instructions for a production environment. Read through the documentationbefore installing or using the product.
Detailed information about how to use specific features within the product may beavailable at the Trend Micro Online Help Center and/or the Trend Micro KnowledgeBase.
Trend Micro always seeks to improve its documentation. If you have questions,comments, or suggestions about this or any Trend Micro document, please contact us [email protected].
Evaluate this documentation on the following site:
http://www.trendmicro.com/download/documentation/rating.asp

i
Table of ContentsPreface
Preface ................................................................................................................. xi
OfficeScan Documentation ............................................................................ xii
Audience ............................................................................................................ xii
Document Conventions ................................................................................. xiii
Terminology ..................................................................................................... xiv
Part I: Introduction and Getting StartedChapter 1: Introducing OfficeScan
About OfficeScan ........................................................................................... 1-2
New in this Release ........................................................................................ 1-2
Key Features and Benefits ............................................................................. 1-8
The OfficeScan Server ................................................................................. 1-10
The OfficeScan Agent ................................................................................. 1-12
Integration with Trend Micro Products and Services ............................. 1-12
Chapter 2: Getting Started with OfficeScanThe Web Console ........................................................................................... 2-2
The Dashboard ............................................................................................... 2-5
The Server Migration Tool ......................................................................... 2-28
Active Directory Integration ....................................................................... 2-31
The OfficeScan Agent Tree ........................................................................ 2-34
OfficeScan Domains .................................................................................... 2-47
OfficeScan™ 11.0 Administrator’s Guide
ii
Chapter 3: Getting Started with Data ProtectionData Protection Installation .......................................................................... 3-2
Data Protection License ................................................................................ 3-4
Deployment of Data Protection to OfficeScan Agents ........................... 3-6
Forensic Folder and DLP Database ............................................................ 3-8
Uninstalling Data Protection ...................................................................... 3-14
Part II: Protecting OfficeScan AgentsChapter 4: Using Trend Micro Smart Protection
About Trend Micro Smart Protection ......................................................... 4-2
Smart Protection Services .............................................................................. 4-3
Smart Protection Sources .............................................................................. 4-5
Smart Protection Pattern Files ...................................................................... 4-7
Setting Up Smart Protection Services ....................................................... 4-12
Using Smart Protection Services ................................................................ 4-31
Chapter 5: Installing the OfficeScan AgentOfficeScan Agent Fresh Installations .......................................................... 5-2
Installation Considerations ............................................................................ 5-2
Deployment Considerations ....................................................................... 5-10
Migrating to the OfficeScan Agent ............................................................ 5-61
Post-installation ............................................................................................ 5-65
OfficeScan Agent Uninstallation ................................................................ 5-68
Chapter 6: Keeping Protection Up-to-DateOfficeScan Components and Programs ...................................................... 6-2
Update Overview .......................................................................................... 6-13
Table of Contents
iii
OfficeScan Server Updates ......................................................................... 6-15
Integrated Smart Protection Server Updates ........................................... 6-27
OfficeScan Agent Updates .......................................................................... 6-28
Update Agents ............................................................................................... 6-52
Component Update Summary .................................................................... 6-60
Chapter 7: Scanning for Security RisksAbout Security Risks ...................................................................................... 7-2
Scan Method Types ........................................................................................ 7-8
Scan Types ..................................................................................................... 7-14
Settings Common to All Scan Types ......................................................... 7-25
Scan Privileges and Other Settings ............................................................ 7-50
Global Scan Settings .................................................................................... 7-64
Security Risk Notifications .......................................................................... 7-73
Security Risk Logs ........................................................................................ 7-81
Security Risk Outbreaks .............................................................................. 7-94
Chapter 8: Using Behavior MonitoringBehavior Monitoring ...................................................................................... 8-2
Configuring Global Behavior Monitoring Settings ................................... 8-7
Behavior Monitoring Privileges .................................................................. 8-10
Behavior Monitoring Notifications for OfficeScan Agent Users ......... 8-11
Behavior Monitoring Logs .......................................................................... 8-12
Chapter 9: Using Device ControlDevice Control ................................................................................................ 9-2
Permissions for Storage Devices .................................................................. 9-4
Permissions for Non-storage Devices ....................................................... 9-10
Modifying Device Control Notifications .................................................. 9-16

OfficeScan™ 11.0 Administrator’s Guide
iv
Device Control Logs .................................................................................... 9-17
Chapter 10: Using Data Loss PreventionAbout Data Loss Prevention ...................................................................... 10-2
Data Loss Prevention Policies .................................................................... 10-3
Data Identifier Types ................................................................................... 10-5
Data Loss Prevention Templates ............................................................. 10-18
DLP Channels ............................................................................................. 10-23
Data Loss Prevention Actions ................................................................. 10-34
Data Loss Prevention Exceptions ........................................................... 10-36
Data Loss Prevention Policy Configuration .......................................... 10-41
Data Loss Prevention Notifications ........................................................ 10-46
Data Loss Prevention Logs ...................................................................... 10-50
Chapter 11: Protecting Computers from Web-based ThreatsAbout Web Threats ...................................................................................... 11-2
Command & Control Contact Alert Services .......................................... 11-2
Web Reputation ............................................................................................ 11-4
Web Reputation Policies ............................................................................. 11-5
Suspicious Connection Service ................................................................. 11-11
Web Threat Notifications for Agent Users ............................................ 11-15
Configuring C&C Callback Notifications for Administrators ............ 11-16
C&C Contact Alert Notifications for Agent Users ............................... 11-19
Web Threat Logs ........................................................................................ 11-21
Chapter 12: Using the OfficeScan FirewallAbout the OfficeScan Firewall ................................................................... 12-2
Enabling or Disabling the OfficeScan Firewall ....................................... 12-6

Table of Contents
v
Firewall Policies and Profiles ...................................................................... 12-8
Firewall Privileges ....................................................................................... 12-22
Global Firewall Settings ............................................................................. 12-24
Firewall Violation Notifications for OfficeScan Agent Users ............. 12-26
Firewall Logs ............................................................................................... 12-28
Firewall Violation Outbreaks .................................................................... 12-29
Testing the OfficeScan Firewall ............................................................... 12-31
Part III: Managing the OfficeScan Server andAgents
Chapter 13: Managing the OfficeScan ServerRole-based Administration ......................................................................... 13-2
Trend Micro Control Manager ................................................................. 13-21
Reference Servers ....................................................................................... 13-27
Administrator Notification Settings ........................................................ 13-29
System Event Logs ..................................................................................... 13-31
Log Management ........................................................................................ 13-32
Licenses ........................................................................................................ 13-36
OfficeScan Database Backup ................................................................... 13-38
SQL Server Migration Tool ...................................................................... 13-40
OfficeScan Web Server/Agent Connection Settings ............................ 13-45
Web Console Password ............................................................................. 13-46
Authentication of Server-initiated Communications ............................ 13-46
Web Console Settings ................................................................................ 13-51
Quarantine Manager .................................................................................. 13-51
Server Tuner ................................................................................................ 13-52
OfficeScan™ 11.0 Administrator’s Guide
vi
Smart Feedback .......................................................................................... 13-55
Chapter 14: Managing the OfficeScan AgentEndpoint Location ....................................................................................... 14-2
OfficeScan Agent Program Management ................................................. 14-6
Agent-Server Connection .......................................................................... 14-24
OfficeScan Agent Proxy Settings ............................................................. 14-46
Viewing OfficeScan Agent Information ................................................. 14-50
Importing and Exporting Agent Settings ............................................... 14-51
Security Compliance .................................................................................. 14-52
Trend Micro Virtual Desktop Support ................................................... 14-69
Global Agent Settings ................................................................................ 14-83
Configuring Agent Privileges and Other Settings ................................. 14-84
Part IV: Providing Additional ProtectionChapter 15: Using Plug-in Manager
About Plug-in Manager ............................................................................... 15-2
Plug-in Manager Installation ....................................................................... 15-3
Native OfficeScan Feature Management .................................................. 15-4
Managing Plug-in Programs ........................................................................ 15-4
Uninstalling Plug-in Manager ................................................................... 15-11
Troubleshooting Plug-in Manager ........................................................... 15-11
Chapter 16: Troubleshooting ResourcesSupport Intelligence System ........................................................................ 16-2
Case Diagnostic Tool ................................................................................... 16-2
Trend Micro Performance Tuning Tool ................................................... 16-2

Table of Contents
vii
OfficeScan Server Logs ............................................................................... 16-2
OfficeScan Agent Logs .............................................................................. 16-14
Chapter 17: Technical SupportTroubleshooting Resources ........................................................................ 17-2
Contacting Trend Micro .............................................................................. 17-3
Sending Suspicious Content to Trend Micro ........................................... 17-5
Other Resources ........................................................................................... 17-6
AppendicesAppendix A: IPv6 Support in OfficeScan
IPv6 Support for OfficeScan Server and Agents ...................................... A-2
Configuring IPv6 Addresses ........................................................................ A-5
Screens That Display IP Addresses ............................................................ A-6
Appendix B: Windows Server Core 2008/2012 SupportWindows Server Core 2008/2012 Support ................................................ B-2
Installation Methods for Windows Server Core ....................................... B-2
OfficeScan Agent Features on Windows Server Core ............................. B-6
Windows Server Core Commands .............................................................. B-7
Appendix C: Windows 8/8.1 and Windows Server 2012Support
About Windows 8/8.1 and Windows Server 2012 ................................... C-2
Internet Explorer 10/11 ............................................................................... C-4
Appendix D: OfficeScan RollbackRolling Back the OfficeScan Server and OfficeScan Agents ................. D-2
OfficeScan™ 11.0 Administrator’s Guide
viii
Appendix E: GlossaryActiveUpdate .................................................................................................. E-2
Compressed File ............................................................................................. E-2
Cookie .............................................................................................................. E-2
Denial of Service Attack ............................................................................... E-2
DHCP .............................................................................................................. E-2
DNS ................................................................................................................. E-3
Domain Name ................................................................................................ E-3
Dynamic IP Address ..................................................................................... E-3
ESMTP ............................................................................................................ E-4
End User License Agreement ...................................................................... E-4
False Positive .................................................................................................. E-4
FTP .................................................................................................................. E-4
GeneriClean .................................................................................................... E-4
Hot Fix ............................................................................................................ E-5
HTTP ............................................................................................................... E-5
HTTPS ............................................................................................................ E-5
ICMP ............................................................................................................... E-6
IntelliScan ........................................................................................................ E-6
IntelliTrap ....................................................................................................... E-6
IP ...................................................................................................................... E-7
Java File ........................................................................................................... E-7
LDAP .............................................................................................................. E-7
Listening Port ................................................................................................. E-8
MCP Agent ..................................................................................................... E-8
Mixed Threat Attack ..................................................................................... E-8
NAT ................................................................................................................. E-8
Table of Contents
ix
NetBIOS ......................................................................................................... E-9
One-way Communication ............................................................................ E-9
Patch ................................................................................................................ E-9
Phish Attack .................................................................................................... E-9
Ping ................................................................................................................ E-10
POP3 ............................................................................................................. E-10
Proxy Server ................................................................................................. E-10
RPC ................................................................................................................ E-11
Security Patch ............................................................................................... E-11
Service Pack .................................................................................................. E-11
SMTP ............................................................................................................. E-11
SNMP ............................................................................................................ E-11
SNMP Trap .................................................................................................. E-12
SOCKS 4 ....................................................................................................... E-12
SSL ................................................................................................................. E-12
SSL Certificate .............................................................................................. E-12
TCP ................................................................................................................ E-12
Telnet ............................................................................................................. E-13
Trojan Port ................................................................................................... E-13
Trusted Port ................................................................................................. E-14
Two-way Communication .......................................................................... E-15
UDP ............................................................................................................... E-16
Uncleanable Files ......................................................................................... E-16
IndexIndex .............................................................................................................. IN-1


xi
Preface
PrefaceWelcome to the Trend Micro™ OfficeScan™ Administrator’s Guide. This documentdiscusses getting started information, agent installation procedures, and OfficeScanserver and agent management.
Topics include:
• OfficeScan Documentation on page xii
• Audience on page xii
• Document Conventions on page xiii
• Terminology on page xiv

OfficeScan™ 11.0 Administrator’s Guide
xii
OfficeScan DocumentationOfficeScan documentation includes the following:
TABLE 1. OfficeScan Documentation
DOCUMENTATION DESCRIPTION
Installation andUpgrade Guide
A PDF document that discusses requirements and procedures forinstalling the OfficeScan server, and upgrading the server andagents
Administrator’sGuide
A PDF document that discusses getting started information,OfficeScan agent installation procedures, and OfficeScan server andagent management
Help HTML files compiled in WebHelp or CHM format that provide "howto's", usage advice, and field-specific information. The Help isaccessible from the OfficeScan server and agent consoles, and fromthe OfficeScan Master Setup.
Readme file Contains a list of known issues and basic installation steps. It mayalso contain late-breaking product information not found in the Helpor printed documentation
Knowledge Base An online database of problem-solving and troubleshootinginformation. It provides the latest information about known productissues. To access the Knowledge Base, go to the following website:
http://esupport.trendmicro.com
Download the latest version of the PDF documents and readme at:
http://docs.trendmicro.com/en-us/enterprise/officescan.aspx
AudienceOfficeScan documentation is intended for the following users:
• OfficeScan Administrators: Responsible for OfficeScan management, includingthe OfficeScan server and OfficeScan agent installation and management. These

Preface
xiii
users are expected to have advanced networking and server managementknowledge.
• End users: Users who have the OfficeScan agent installed on their computers. Theendpoint skill level of these individuals ranges from beginner to power user.
Document ConventionsTo help you locate and interpret information easily, the OfficeScan documentation usesthe following conventions:
TABLE 2. Document Conventions
CONVENTION DESCRIPTION
ALL CAPITALS Acronyms, abbreviations, and names of certain commandsand keys on the keyboard
Bold Menus and menu commands, command buttons, tabs,options, and tasks
Italics References to other documentation or new technologycomponents
Agents > AgentManagement
A "breadcrumb" found at the start of procedures that helpsusers navigate to the relevant web console screen. Multiplebreadcrumbs means that there are several ways to get to thesame screen.
<Text> Indicates that the text inside the angle brackets should bereplaced by actual data. For example, C:\Program Files\<file_name> can be C:\Program Files\sample.jpg.
Note Provides configuration notes or recommendations
Tip Provides best practice information and Trend Microrecommendations

OfficeScan™ 11.0 Administrator’s Guide
xiv
CONVENTION DESCRIPTION
WARNING! Provides warnings about activities that may harm computerson your network
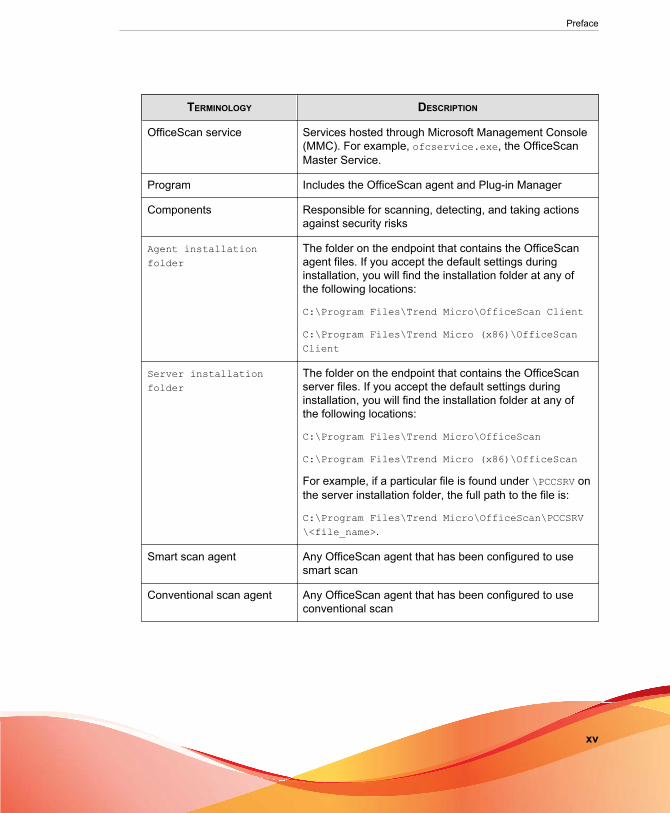
TerminologyThe following table provides the official terminology used throughout the OfficeScandocumentation:
TABLE 3. OfficeScan Terminology
TERMINOLOGY DESCRIPTION
OfficeScan agent The OfficeScan agent program
Agent endpoint The endpoint where the OfficeScan agent is installed
Agent user (or user) The person managing the OfficeScan agent on the agentendpoint
Server The OfficeScan server program
Server computer The endpoint where the OfficeScan server is installed
Administrator (or OfficeScanadministrator)
The person managing the OfficeScan server
Console The user interface for configuring and managingOfficeScan server and agent settings
The console for the OfficeScan server program is called"web console", while the console for the OfficeScan agentprogram is called "agent console".
Security risk The collective term for virus/malware, spyware/grayware,and web threats
License service Includes Antivirus, Damage Cleanup Services, and WebReputation and Anti-spyware—all of which are activatedduring OfficeScan server installation
Preface
xv
TERMINOLOGY DESCRIPTION
OfficeScan service Services hosted through Microsoft Management Console(MMC). For example, ofcservice.exe, the OfficeScanMaster Service.
Program Includes the OfficeScan agent and Plug-in Manager
Components Responsible for scanning, detecting, and taking actionsagainst security risks
Agent installationfolder
The folder on the endpoint that contains the OfficeScanagent files. If you accept the default settings duringinstallation, you will find the installation folder at any ofthe following locations:
C:\Program Files\Trend Micro\OfficeScan Client
C:\Program Files\Trend Micro (x86)\OfficeScanClient
Server installationfolder
The folder on the endpoint that contains the OfficeScanserver files. If you accept the default settings duringinstallation, you will find the installation folder at any ofthe following locations:
C:\Program Files\Trend Micro\OfficeScan
C:\Program Files\Trend Micro (x86)\OfficeScan
For example, if a particular file is found under \PCCSRV onthe server installation folder, the full path to the file is:
C:\Program Files\Trend Micro\OfficeScan\PCCSRV\<file_name>.
Smart scan agent Any OfficeScan agent that has been configured to usesmart scan
Conventional scan agent Any OfficeScan agent that has been configured to useconventional scan

OfficeScan™ 11.0 Administrator’s Guide
xvi
TERMINOLOGY DESCRIPTION
Dual-stack Entities that have both IPv4 and IPv6 addresses.
For example:
• Endpoints with both IPv4 and IPv6 addresses
• OfficeScan agents installed on dual-stack endpoints
• Update Agents that distribute updates to agents
• A dual-stack proxy server, such as DeleGate, canconvert between IPv4 and IPv6 addresses
Pure IPv4 An entity that only has an IPv4 address
Pure IPv6 An entity that only has an IPv6 address
Plug-in solutions Native OfficeScan features and plug-in programsdelivered through Plug-in Manager

Part IIntroduction and Getting
Started


1-1
Chapter 1
Introducing OfficeScanThis chapter introduces Trend Micro™ OfficeScan™ and provides an overview of itsfeatures and capabilities.
Topics include:
• About OfficeScan on page 1-2
• New in this Release on page 1-2
• Key Features and Benefits on page 1-8
• The OfficeScan Server on page 1-10
• The OfficeScan Agent on page 1-12
• Integration with Trend Micro Products and Services on page 1-12

OfficeScan™ 11.0 Administrator’s Guide
1-2
About OfficeScanTrend Micro™ OfficeScan™ protects enterprise networks from malware, networkviruses, web-based threats, spyware, and mixed threat attacks. An integrated solution,OfficeScan consists of the OfficeScan agent program that resides at the endpoint and aserver program that manages all agents. The OfficeScan agent guards the endpoint andreports its security status to the server. The server, through the web-based managementconsole, makes it easy to set coordinated security policies and deploy updates to everyagent.
OfficeScan is powered by the Trend Micro Smart Protection Network™, a nextgeneration cloud-client infrastructure that delivers security that is smarter thanconventional approaches. Unique in-the-cloud technology and a lighter-weight agentreduce reliance on conventional pattern downloads and eliminate the delays commonlyassociated with desktop updates. Businesses benefit from increased network bandwidth,reduced processing power, and associated cost savings. Users get immediate access tothe latest protection wherever they connect—within the company network, from home,or on the go.
New in this ReleaseTrend Micro OfficeScan includes the following new features and enhancements.
New in OfficeScan 11.0
This version of OfficeScan includes the following new features and enhancements:
TABLE 1-1. Server Enhancements
FEATURE DESCRIPTION
SQL DatabaseMigration Tool
Administrators can choose to migrate the existing CodeBase®server database to a SQL server database.
For details, see SQL Server Migration Tool on page 13-40.
Introducing OfficeScan
1-3
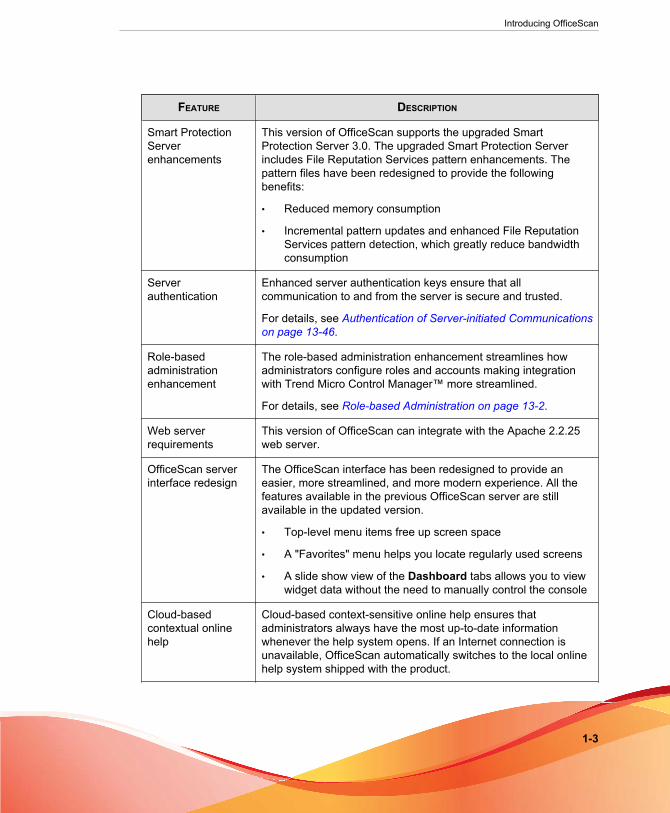
FEATURE DESCRIPTION
Smart ProtectionServerenhancements
This version of OfficeScan supports the upgraded SmartProtection Server 3.0. The upgraded Smart Protection Serverincludes File Reputation Services pattern enhancements. Thepattern files have been redesigned to provide the followingbenefits:
• Reduced memory consumption
• Incremental pattern updates and enhanced File ReputationServices pattern detection, which greatly reduce bandwidthconsumption
Serverauthentication
Enhanced server authentication keys ensure that allcommunication to and from the server is secure and trusted.
For details, see Authentication of Server-initiated Communicationson page 13-46.
Role-basedadministrationenhancement
The role-based administration enhancement streamlines howadministrators configure roles and accounts making integrationwith Trend Micro Control Manager™ more streamlined.
For details, see Role-based Administration on page 13-2.
Web serverrequirements
This version of OfficeScan can integrate with the Apache 2.2.25web server.
OfficeScan serverinterface redesign
The OfficeScan interface has been redesigned to provide aneasier, more streamlined, and more modern experience. All thefeatures available in the previous OfficeScan server are stillavailable in the updated version.
• Top-level menu items free up screen space
• A "Favorites" menu helps you locate regularly used screens
• A slide show view of the Dashboard tabs allows you to viewwidget data without the need to manually control the console
Cloud-basedcontextual onlinehelp
Cloud-based context-sensitive online help ensures thatadministrators always have the most up-to-date informationwhenever the help system opens. If an Internet connection isunavailable, OfficeScan automatically switches to the local onlinehelp system shipped with the product.
OfficeScan™ 11.0 Administrator’s Guide
1-4
FEATURE DESCRIPTION
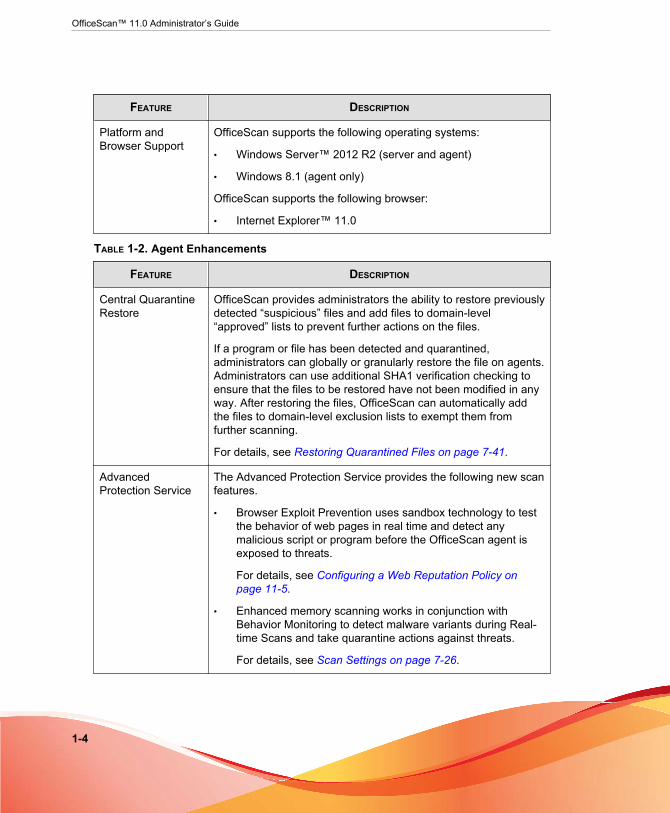
Platform andBrowser Support
OfficeScan supports the following operating systems:
• Windows Server™ 2012 R2 (server and agent)
• Windows 8.1 (agent only)
OfficeScan supports the following browser:
• Internet Explorer™ 11.0
TABLE 1-2. Agent Enhancements
FEATURE DESCRIPTION
Central QuarantineRestore
OfficeScan provides administrators the ability to restore previouslydetected “suspicious” files and add files to domain-level“approved” lists to prevent further actions on the files.
If a program or file has been detected and quarantined,administrators can globally or granularly restore the file on agents.Administrators can use additional SHA1 verification checking toensure that the files to be restored have not been modified in anyway. After restoring the files, OfficeScan can automatically addthe files to domain-level exclusion lists to exempt them fromfurther scanning.
For details, see Restoring Quarantined Files on page 7-41.
AdvancedProtection Service
The Advanced Protection Service provides the following new scanfeatures.
• Browser Exploit Prevention uses sandbox technology to testthe behavior of web pages in real time and detect anymalicious script or program before the OfficeScan agent isexposed to threats.
For details, see Configuring a Web Reputation Policy onpage 11-5.
• Enhanced memory scanning works in conjunction withBehavior Monitoring to detect malware variants during Real-time Scans and take quarantine actions against threats.
For details, see Scan Settings on page 7-26.
Introducing OfficeScan
1-5
FEATURE DESCRIPTION
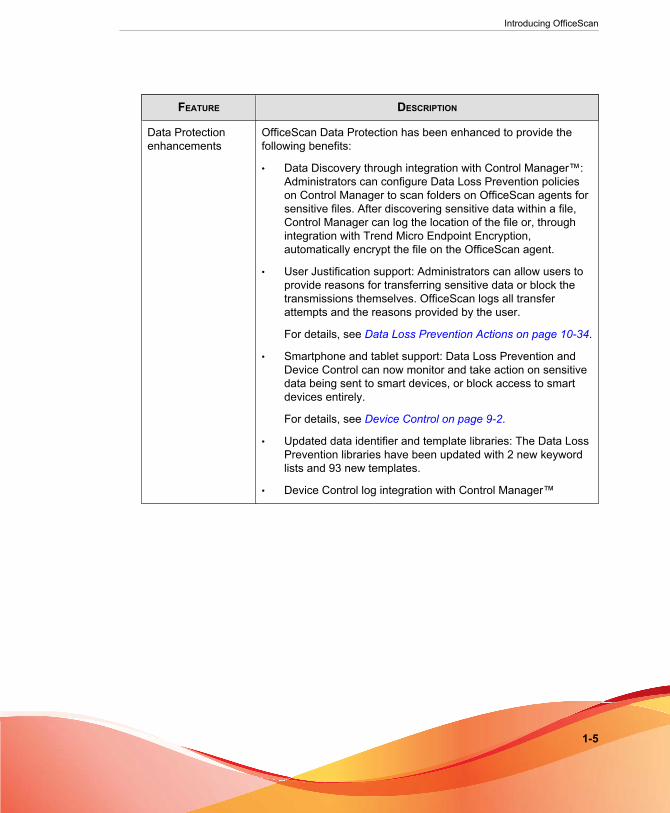
Data Protectionenhancements
OfficeScan Data Protection has been enhanced to provide thefollowing benefits:
• Data Discovery through integration with Control Manager™:Administrators can configure Data Loss Prevention policieson Control Manager to scan folders on OfficeScan agents forsensitive files. After discovering sensitive data within a file,Control Manager can log the location of the file or, throughintegration with Trend Micro Endpoint Encryption,automatically encrypt the file on the OfficeScan agent.
• User Justification support: Administrators can allow users toprovide reasons for transferring sensitive data or block thetransmissions themselves. OfficeScan logs all transferattempts and the reasons provided by the user.
For details, see Data Loss Prevention Actions on page 10-34.
• Smartphone and tablet support: Data Loss Prevention andDevice Control can now monitor and take action on sensitivedata being sent to smart devices, or block access to smartdevices entirely.
For details, see Device Control on page 9-2.
• Updated data identifier and template libraries: The Data LossPrevention libraries have been updated with 2 new keywordlists and 93 new templates.
• Device Control log integration with Control Manager™
OfficeScan™ 11.0 Administrator’s Guide
1-6
FEATURE DESCRIPTION
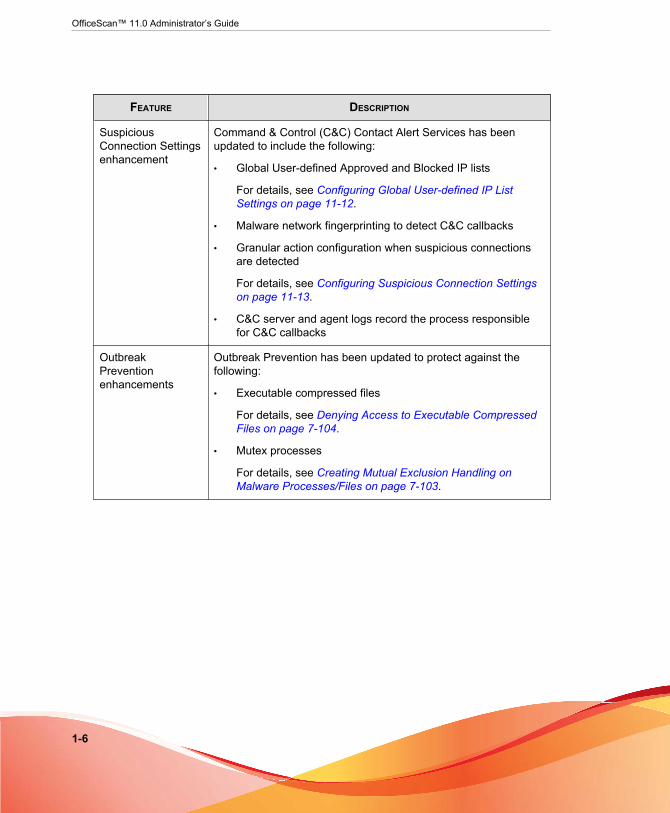
SuspiciousConnection Settingsenhancement
Command & Control (C&C) Contact Alert Services has beenupdated to include the following:
• Global User-defined Approved and Blocked IP lists
For details, see Configuring Global User-defined IP ListSettings on page 11-12.
• Malware network fingerprinting to detect C&C callbacks
• Granular action configuration when suspicious connectionsare detected
For details, see Configuring Suspicious Connection Settingson page 11-13.
• C&C server and agent logs record the process responsiblefor C&C callbacks
OutbreakPreventionenhancements
Outbreak Prevention has been updated to protect against thefollowing:
• Executable compressed files
For details, see Denying Access to Executable CompressedFiles on page 7-104.
• Mutex processes
For details, see Creating Mutual Exclusion Handling onMalware Processes/Files on page 7-103.

Introducing OfficeScan
1-7
FEATURE DESCRIPTION
Self-protectionfeatureenhancements
The self-protection features available in this release provide bothlight-weight and high level security solutions to protect both yourserver and OfficeScan agent programs.
• Light-weight solution: Designed for server platforms to protectOfficeScan agent process and registry keys by default,without affecting the performance of the server
• High-level security solution: Enhances the Agent Self-protection feature available in previous releases by providing:
• IPC command authentication
• Pattern file protection and verification
• Pattern file update protection
• Behavior Monitoring process protection
For details, see OfficeScan Agent Self-protection on page 14-12.
Scan performanceand detectionenhancements
• Real-Time Scan maintains a persistent scan cache whichreloads each time the OfficeScan agent starts. TheOfficeScan agent tracks any changes to files or folders thatoccurred since the OfficeScan agent unloaded and removesthese files from the cache.
• This version of OfficeScan includes global Approved lists forWindows system files, digitally signed files from reputablesources, and Trend Micro-tested files. After verifying that afile is known to be safe, OfficeScan does not perform anyaction on the file.
• Damage Cleanup Services enhancements provide improveddetection capabilities for rootkit threats and a reducednumber of false positives through updated GeneriCleanscanning.
• Compressed file settings are separated between Real-timeand On-demand Scans to help improve performance.
For details, see Configure Scan Settings for LargeCompressed Files on page 7-67.
• Dual-layer logs provide a more detailed view for detectionsthat administrators want to examine further.

OfficeScan™ 11.0 Administrator’s Guide
1-8
FEATURE DESCRIPTION
OfficeScan agentinterface redesign
The OfficeScan agent interface has been redesigned to providean easier, more streamlined, and more modern experience. Allthe features available in the previous OfficeScan client programare still available in the updated version.
The updated interface also allows administrators to "unlock"administrative functions directly from the OfficeScan agentconsole in order to quickly troubleshoot issues without openingthe web console.
Key Features and BenefitsOfficeScan provides the following features and benefits:
• Plug-in Manager and Plug-in Solutions
Plug-in Manager facilitates the installation, deployment, and management of plug-in solutions.
Administrators can install two kinds of plug-in solutions:
• Plug-in programs
• Native OfficeScan features
• Centralized Management
A web-based management console gives administrators transparent access to allagents and servers on the network. The web console coordinates automaticdeployment of security policies, pattern files, and software updates on every agentand server. And with Outbreak Prevention Services, it shuts down infectionvectors and rapidly deploys attack-specific security policies to prevent or containoutbreaks before pattern files are available. OfficeScan also performs real-timemonitoring, provides event notification, and delivers comprehensive reporting.Administrators can perform remote administration, set customized policies forindividual desktops or groups, and lock agent security settings.
• Security Risk Protection
Introducing OfficeScan
1-9
OfficeScan protects computers from security risks by scanning files and thenperforming a specific action for each security risk detected. An overwhelmingnumber of security risks detected over a short period of time signals an outbreak.To contain outbreaks, OfficeScan enforces outbreak prevention policies andisolates infected computers until they are completely risk-free.
OfficeScan uses smart scan to make the scanning process more efficient. Thistechnology works by off-loading a large number of signatures previously stored onthe local endpoint to Smart Protection Sources. Using this approach, the systemand network impact of the ever-increasing volume of signature updates to endpointsystems is significantly reduced.
For information about smart scan and how to deploy it to agents, see Scan MethodTypes on page 7-8.
• Damage Cleanup Services
Damage Cleanup Services™ cleans computers of file-based and network viruses,and virus and worm remnants (Trojans, registry entries, viral files) through a fully-automated process. To address the threats and nuisances posed by Trojans,Damage Cleanup Services does the following:
• Detects and removes live Trojans
• Kills processes that Trojans create
• Repairs system files that Trojans modify
• Deletes files and applications that Trojans drop
Because Damage Cleanup Services runs automatically in the background, it is notnecessary to configure it. Users are not even aware when it runs. However,OfficeScan may sometimes notify the user to restart their endpoint to complete theprocess of removing a Trojan.
• Web Reputation
Web reputation technology proactively protects agent computers within or outsidethe corporate network from malicious and potentially dangerous websites. Webreputation breaks the infection chain and prevents downloading of malicious code.
Verify the credibility of websites and pages by integrating OfficeScan with theSmart Protection Server or the Trend Micro Smart Protection Network.

OfficeScan™ 11.0 Administrator’s Guide
1-10
• OfficeScan Firewall
The OfficeScan firewall protects agents and servers on the network using statefulinspections and high performance network virus scans. Create rules to filterconnections by application, IP address, port number, or protocol, and then applythe rules to different groups of users.
• Data Loss Prevention
Data Loss Prevention safeguards an organization’s digital assets against accidentalor deliberate leakage. Data Loss Prevention allows administrators to:
• Identify the digital assets to protect
• Create policies that limit or prevent the transmission of digital assets throughcommon transmission channels, such as email messages and external devices
• Enforce compliance to established privacy standards
• Device Control
Device Control regulates access to external storage devices and network resourcesconnected to computers. Device Control helps prevent data loss and leakage and,combined with file scanning, helps guard against security risks.
• Behavior Monitoring
Behavior Monitoring constantly monitors agents for unusual modifications to theoperating system or on installed software.
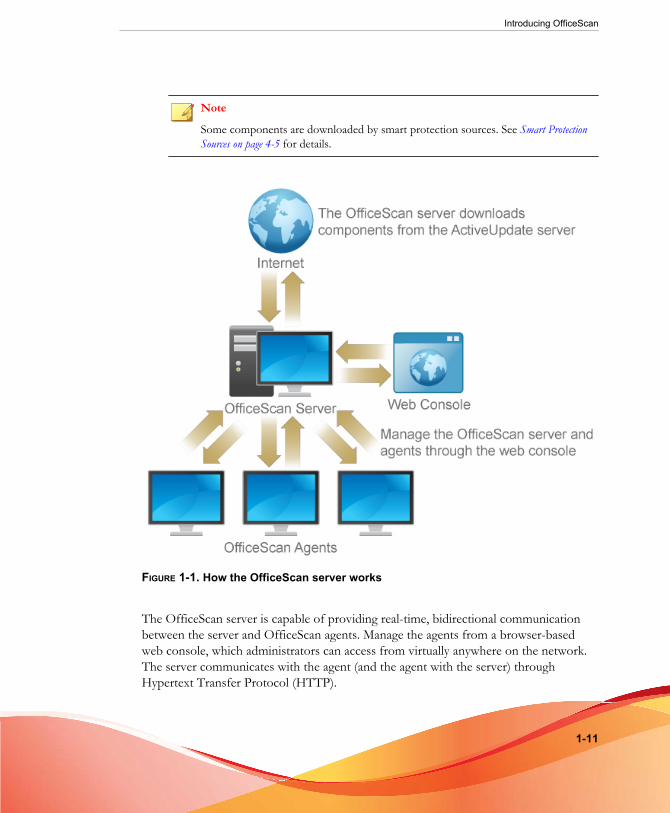
The OfficeScan ServerThe OfficeScan server is the central repository for all agent configurations, security risklogs, and updates.
The server performs two important functions:
• Installs, monitors, and manages OfficeScan agents
• Downloads most of the components needed by agents. The OfficeScan serverdownloads components from the Trend Micro ActiveUpdate server and thendistributes them to agents.
Introducing OfficeScan
1-11
Note
Some components are downloaded by smart protection sources. See Smart ProtectionSources on page 4-5 for details.
FIGURE 1-1. How the OfficeScan server works
The OfficeScan server is capable of providing real-time, bidirectional communicationbetween the server and OfficeScan agents. Manage the agents from a browser-basedweb console, which administrators can access from virtually anywhere on the network.The server communicates with the agent (and the agent with the server) throughHypertext Transfer Protocol (HTTP).
OfficeScan™ 11.0 Administrator’s Guide
1-12
The OfficeScan AgentProtect Windows computers from security risks by installing the OfficeScan agent oneach endpoint.
The OfficeScan agent reports to the parent server from which it was installed. Configureagents to report to another server by using the Agent Mover tool. The agent sendsevents and status information to the server in real time. Examples of events are virus/malware detection, agent startup, agent shutdown, start of a scan, and completion of anupdate.
Integration with Trend Micro Products andServices
OfficeScan integrates with the Trend Micro products and services listed in the followingtable. For seamless integration, ensure that the products run the required orrecommended versions.
TABLE 1-3. Products and Services that Integrate with OfficeScan
PRODUCT/SERVICE
DESCRIPTION VERSION
ActiveUpdateserver
Provides all the components that the OfficeScanagent needs to protect agents from securitythreats
Not applicable
SmartProtectionNetwork
Provides File Reputation Services and WebReputation Services to agents.
Smart Protection Network is hosted by TrendMicro.
Not applicable

Introducing OfficeScan
1-13
PRODUCT/SERVICE
DESCRIPTION VERSION
StandaloneSmartProtectionServer
Provides the same File Reputation Services andWeb Reputation Services offered by SmartProtection Network.
A standalone Smart Protection Server is intendedto localize the service to the corporate network tooptimize efficiency.
NoteAn integrated Smart Protection Server isinstalled with the OfficeScan server. It hasthe same functions as its standalonecounterpart but has limited capacity.
• 3.0
ControlManager
A software management solution that providesthe ability to control antivirus and content securityprograms from a central location—regardless ofthe platform or the physical location of theprogram.
• 6.0 SP1
(recommended)
• 6.0
• 5.5 SP1
DeepDiscoveryAdvisor
Deep Discovery provides network-widemonitoring powered by custom sandboxing andrelevant real-time intelligence to enable earlyattack detection, enable rapid containment, anddeliver custom security updates that immediatelyimprove protection against further attack.
3.0 and later


2-1
Chapter 2
Getting Started with OfficeScanThis chapter describes how to get started with Trend Micro™ OfficeScan™ and initialconfiguration settings.
Topics include:
• The Web Console on page 2-2
• The Dashboard on page 2-5
• Active Directory Integration on page 2-31
• The OfficeScan Agent Tree on page 2-34
• OfficeScan Domains on page 2-47

OfficeScan™ 11.0 Administrator’s Guide
2-2
The Web ConsoleThe web console is the central point for monitoring throughout the corporate network.The console comes with a set of default settings and values that you can configure basedon your security requirements and specifications. The web console uses standardInternet technologies, such as Java, CGI, HTML, and HTTPS.
NoteConfigure the timeout settings from the web console. See Web Console Settings on page 13-51.
Use the web console to do the following:
• Manage agents installed on networked computers
• Group agents into logical domains for simultaneous configuration andmanagement
• Set scan configurations and initiate manual scan on a single or multiple networkedcomputers
• Configure notifications about security risks on the network and view logs sent byagents
• Configure outbreak criteria and notifications
• Delegate web console administration tasks to other OfficeScan administrators byconfiguring roles and user accounts
• Ensure that agents comply with security guidelines
NoteThe web console does not support Windows 8, 8.1, or Windows Server 2012 in WindowsUI mode.
Requirements for Opening the Web ConsoleOpen the web console from any endpoint on the network that has the followingresources:
Getting Started with OfficeScan
2-3
• 300MHz Intel™ Pentium™ processor or equivalent
• 128MB of RAM
• At least 30MB of available disk space
• Monitor that supports 1024 x 768 resolution at 256 colors or higher
• Microsoft Internet Explorer™ 8.0 or later
Note
OfficeScan only supports HTTPS traffic for viewing the web console.
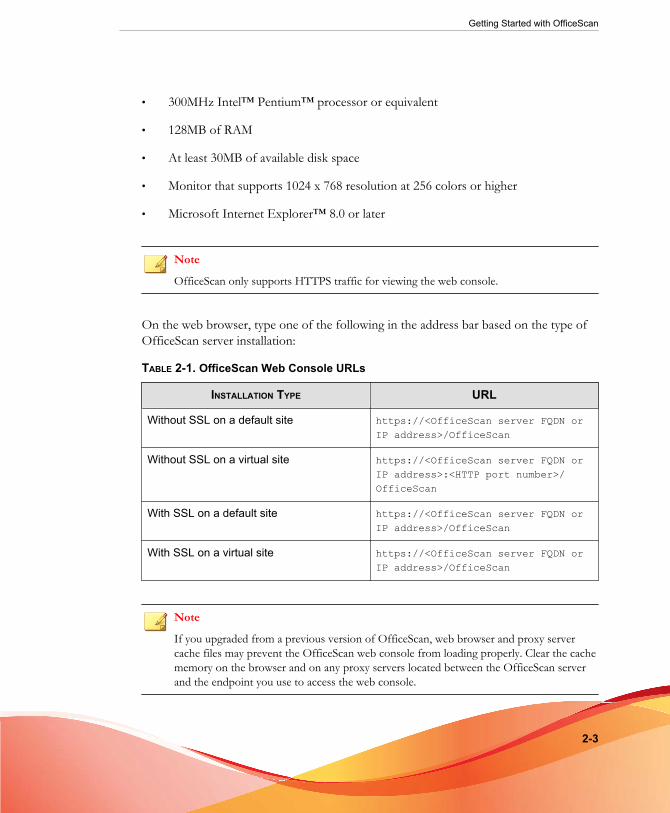
On the web browser, type one of the following in the address bar based on the type ofOfficeScan server installation:
TABLE 2-1. OfficeScan Web Console URLs
INSTALLATION TYPE URL
Without SSL on a default site https://<OfficeScan server FQDN orIP address>/OfficeScan
Without SSL on a virtual site https://<OfficeScan server FQDN orIP address>:<HTTP port number>/OfficeScan
With SSL on a default site https://<OfficeScan server FQDN orIP address>/OfficeScan
With SSL on a virtual site https://<OfficeScan server FQDN orIP address>/OfficeScan
Note
If you upgraded from a previous version of OfficeScan, web browser and proxy servercache files may prevent the OfficeScan web console from loading properly. Clear the cachememory on the browser and on any proxy servers located between the OfficeScan serverand the endpoint you use to access the web console.

OfficeScan™ 11.0 Administrator’s Guide
2-4
Logon Account
During OfficeScan server installation, Setup creates a root account and prompts you totype the password for this account. When opening the web console for the first time,type "root" as the user name and the root account password. If you forget the password,contact your support provider for help in resetting the password.
Define user roles and set up user accounts to allow other users to access the webconsole without using the root account. When users log on to the console, they can usethe user accounts you have set up for them. For more information, see Role-basedAdministration on page 13-2.
The Web Console Banner
The banner area of the web console provides the following options:
FIGURE 2-1. Web console banner area
• Support: Displays the Trend Micro support web page, where you can submitquestions and find answers to common questions about Trend Micro products
• More
• Threat Encyclopedia: Displays the Threat Encyclopedia website which isthe Trend Micro repository of malware-related information. Trend Microthreat experts regularly publish detections for malware, spam, maliciousURLs, and vulnerabilities. The Threat Encyclopedia also explains high-profileweb attacks and provides correlated information.
• Find a Reseller: Displays the Trend Micro Contact Us website withinformation about offices worldwide.
• About: Provides an overview of the product, instructions to checkcomponent version details, and a link to the Support Intelligence System. Fordetails, see Support Intelligence System on page 16-2.

Getting Started with OfficeScan
2-5
• <account name>: Click the account name (for example, root) to modify detailsfor the account, such as the password.
• Log off: Logs user off from the web console
The DashboardThe Dashboard appears when you open the OfficeScan web console or clickDashboard in the main menu.
Each web console user account has a completely independent dashboard. Any changesto a user account’s dashboard will not affect the dashboards of the other user accounts.
If a dashboard contains OfficeScan agent data, the data that displays depends on theagent domain permissions for the user account. For example, if you grant a user accountpermissions to manage domains A and B, the user account’s dashboard will only showdata from agents belonging to domains A and B.
For details about user accounts, see Role-based Administration on page 13-2.
The Dashboard screen contains the following:
• Product License Status section
• Widgets
• Tabs
Product License Status SectionThis section is found on top of the dashboard and shows the status of the OfficeScanlicenses.
FIGURE 2-2. Product License Status section
OfficeScan™ 11.0 Administrator’s Guide
2-6
Reminders about the license status display during the following instances:
• If you have a full version license:
• 60 days before a license expires
• During the product’s grace period. The duration of the grace period varies byregion. Please verify the grace period with your Trend Micro representative.
• When the license expires and grace period elapses. During this time, you willnot be able to obtain technical support or perform component updates. Thescan engines will still scan computers using out-of-date components. Theseout-of-date components may not be able to protect you completely from thelatest security risks.
• If you have a trial version license:
• 14 days before a license expires
• When the license expires. During this time, OfficeScan disables componentupdates, scanning, and all agent features.
If you have obtained an Activation Code, renew a license by going to Administration >Settings > Product License.
Product Information Bars
OfficeScan displays a variety of messages at the top of the Dashboard screen thatprovide additional information for administrators.
The information displayed includes:
• Latest service packs or patches available for OfficeScan
Note
Click More Information to download the patch from the Trend Micro DownloadCenter (http://downloadcenter.trendmicro.com).
• New widgets available
Getting Started with OfficeScan
2-7
• Authentication certificate notifications when the current certificate expires or abackup does not exist
• Maintenance agreement notifications when an agreement is close to the expiry date
• Assessment mode notifications
• Authenticity notifications
Note
If the license used for OfficeScan is not genuine, an informational message displays.If you do not obtain a genuine license, OfficeScan displays a warning and stopsperforming updates.
Tabs and WidgetsWidgets are the core components of the dashboard. Widgets provide specificinformation about various security-related events. Some widgets allow you to performcertain tasks, such as updating outdated components.
The information that widgets display comes from:
• OfficeScan server and agents
• Plug-in solutions and their agents
• Trend Micro Smart Protection Network
Note
Enable Smart Feedback to display data from Smart Protection Network. For details aboutSmart Feedback, see Smart Feedback on page 13-55.
Tabs provide a container for widgets. The Dashboard supports up to 30 tabs.
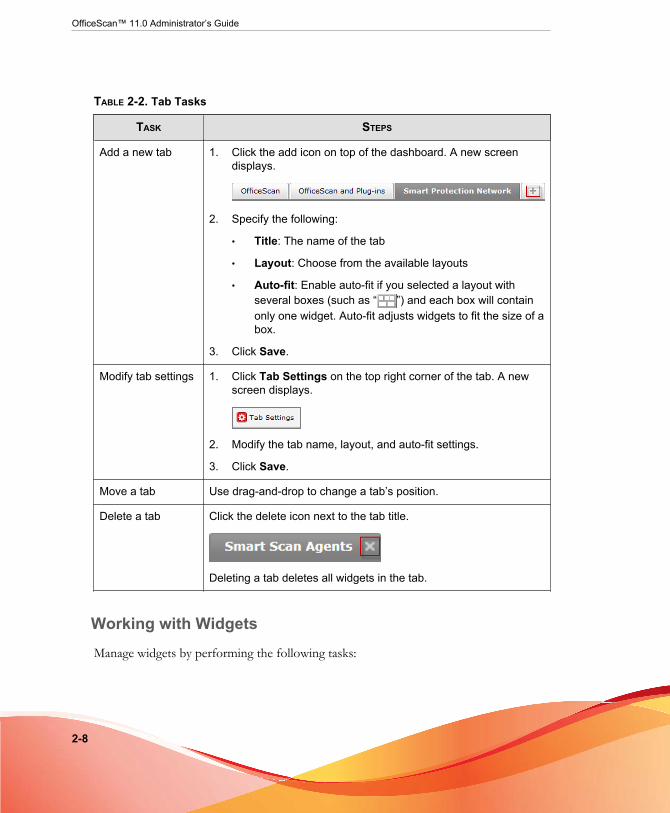
Working with Tabs
Manage tabs by performing the following tasks:
OfficeScan™ 11.0 Administrator’s Guide
2-8
TABLE 2-2. Tab Tasks
TASK STEPS
Add a new tab 1. Click the add icon on top of the dashboard. A new screendisplays.
2. Specify the following:
• Title: The name of the tab
• Layout: Choose from the available layouts
• Auto-fit: Enable auto-fit if you selected a layout withseveral boxes (such as “ ”) and each box will containonly one widget. Auto-fit adjusts widgets to fit the size of abox.
3. Click Save.
Modify tab settings 1. Click Tab Settings on the top right corner of the tab. A newscreen displays.
2. Modify the tab name, layout, and auto-fit settings.
3. Click Save.
Move a tab Use drag-and-drop to change a tab’s position.
Delete a tab Click the delete icon next to the tab title.
Deleting a tab deletes all widgets in the tab.
Working with Widgets
Manage widgets by performing the following tasks:

Getting Started with OfficeScan
2-9
TABLE 2-3. Widget Tasks
TASK STEPS
Play tab slide show Click Play Tab Slide Show to automatically switch betweentab views.
Add a new widget 1. Click a tab.
2. Click Add Widgets on the top right corner of the tab. Anew screen displays.
3. Select the widgets to add. For a list of available widgets,see Available Widgets on page 2-11.
• Click the display icons ( ) on the top rightsection of the screen to switch between the Detailedview and Summary view.
• To the left of the screen are widget categories. Selecta category to narrow down the selections.
• Use the search text box on top of the screen to searchfor a specific widget.
4. Click Add.
Move a widget Use drag-and-drop to move widgets to different locations withinthe tab.
Resize a widget Resize widgets on a multi-column tab by pointing the cursor tothe right edge of the widget and then moving the cursor to theleft or right.
Edit the widget title 1. Click the edit icon ( ). A new screen appears.
2. Type the new title.
NoteFor some widgets, such as OfficeScan and Plug-insMashup, widget-related items can be modified.
3. Click Save.
Refresh widget data Click the refresh icon ( ).

OfficeScan™ 11.0 Administrator’s Guide
2-10
TASK STEPS
Delete a widget Click the delete icon ( ).
Predefined Tabs and Widgets
The Dashboard comes with a set of predefined tabs and widgets. You can rename ordelete these tabs and widgets.
TABLE 2-4. Default Tabs in the Dashboard
TAB DESCRIPTION WIDGETS
OfficeScan This tab contains the same informationfound in the Dashboard screen inprevious OfficeScan versions. In thistab, you can view the overall securityrisk protection of the OfficeScannetwork. You can also take action onitems that require immediateintervention, such as outbreaks oroutdated components.
• Antivirus AgentConnectivity Widget onpage 2-13
• Security Risk DetectionsWidget on page 2-16
• Outbreaks Widget onpage 2-17
• Agent Updates Widgeton page 2-19
OfficeScanand Plug-ins
This tab shows which agents arerunning the OfficeScan agent and plug-in solutions. Use this tab to assess theoverall security status of agents.
OfficeScan and Plug-insMashup Widget on page2-19
SmartProtectionNetwork
This tab contains information fromTrend Micro Smart Protection Network,which provides File Reputation Servicesand Web Reputation Services toOfficeScan agents.
• Web Reputation TopThreat Sources Widgeton page 2-26
• Web Reputation TopThreatened UsersWidget on page 2-27
• File Reputation ThreatMap Widget on page2-28

Getting Started with OfficeScan
2-11
Available Widgets
The following widgets are available in this release:
TABLE 2-5. Available Widgets
WIDGET NAME AVAILABILITY
Antivirus AgentConnectivity
Available out-of-the-box
For details, see Antivirus Agent Connectivity Widget onpage 2-13.
Security Risk Detections Available out-of-the-box
For details, see Security Risk Detections Widget on page2-16.
Outbreaks Available out-of-the-box
For details, see Outbreaks Widget on page 2-17.
Agent Updates Available out-of-the-box
For details, see Agent Updates Widget on page 2-19.
OfficeScan and Plug-insMashup
Available out-of-the-box but only shows data fromOfficeScan agents
Data from the following plug-in solutions are availableafter activating each solution:
• Intrusion Defense Firewall
• Trend Micro Virtual Desktop Support
For details, see OfficeScan and Plug-ins Mashup Widgeton page 2-19.
Top Data Loss PreventionsIncidents
Available after activating OfficeScan Data Protection
For details, see Top Data Loss Preventions IncidentsWidget on page 2-21.
Data Loss PreventionIncidents Over Time
Available after activating OfficeScan Data Protection
For details, see Data Loss Prevention Incidents OverTime Widget on page 2-23.

OfficeScan™ 11.0 Administrator’s Guide
2-12
WIDGET NAME AVAILABILITY
Web Reputation Top ThreatSources
Available out-of-the-box
For details, see Web Reputation Top Threat SourcesWidget on page 2-26.
Web Reputation TopThreatened Users
Available out-of-the-box
For details, see Web Reputation Top Threatened UsersWidget on page 2-27.
File Reputation Threat Map Available out-of-the-box
For details, see File Reputation Threat Map Widget onpage 2-28.
C&C Callback Events Available out-of-the-box
For details, see C&C Callback Events Widget on page2-23.
IDF - Alert Status Available after activating Intrusion Defense Firewall. Seethe IDF documentation for details about these widgets.
IDF - Computer Status
IDF - Network EventsHistory
IDF - System EventsHistory

Getting Started with OfficeScan
2-13
Agent-Server Connectivity Widget
The Agent-Server Connectivity widget shows the connection status of all agents withthe OfficeScan server. Data displays in a table and pie chart. You can switch betweenthe table and pie chart by clicking the display icons ( ).
FIGURE 2-3. Agent-Server Connectivity widget displaying a table
Antivirus Agent Connectivity Widget
The Antivirus Agent Connectivity widget shows the connection status of antivirusagents with the OfficeScan server. Data displays in a table and pie chart. You can switchbetween the table and pie chart by clicking the display icons ( ).
FIGURE 2-4. Antivirus Agent Connectivity widget displaying a table

OfficeScan™ 11.0 Administrator’s Guide
2-14
Antivirus Agent Connectivity Widget Presented as a Table
The table breaks down agents by scan methods.
If the number of agents for a particular status is 1 or more, you can click the number toview the agents in the agent tree. You can initiate tasks on these agents or change theirsettings.
To display only agents using a particular scan method, click All and then select the scanmethod.
FIGURE 2-5. Connection status of conventional scan agents
FIGURE 2-6. Connection status of smart scan agents
If you selected Smart Scan:

Getting Started with OfficeScan
2-15
• The table breaks down online smart scan agents by connection status with SmartProtection Servers.
Note
Only online agents can report their connection status with Smart Protection Servers.
If agents are disconnected from a Smart Protection Server, restore the connection byperforming the steps in Solutions to Issues Indicated in OfficeScan Agent Icons on page 14-37.
• Each Smart Protection Server is a clickable URL that, when clicked, launches theserver’s console.
• If there are several Smart Protection Servers, click MORE. A new screen opens,showing all the Smart Protection Servers.
FIGURE 2-7. Smart Protection Servers list
In the screen, you can:
• View all the Smart Protection Servers to which agents connect and the number ofagents connected to each server. Clicking the number opens the agent tree whereyou can manage agent settings.
• Launch a server’s console by clicking the link for the server

OfficeScan™ 11.0 Administrator’s Guide
2-16
Antivirus Agent Connectivity Widget Presented as a Pie Chart
The pie chart only shows the number of agents for each status and does not break downagents by scan methods. Clicking a status separates it from, or re-connects it to, the restof the pie.
FIGURE 2-8. Antivirus Agent Connectivity widget displaying a pie chart
Security Risk Detections WidgetThe Security Risk Detections widget shows the number of security risks and infectedendpoints.
FIGURE 2-9. Security Risk Detections widget

Getting Started with OfficeScan
2-17
If the number of infected endpoints is 1 or more, you can click the number to view theinfected endpoints in the agent tree. You can initiate tasks on the OfficeScan agents onthese endpoints or change their settings.
Outbreaks Widget
The Outbreaks widget provides the status of any current security risk outbreaks and thelast outbreak alert.
FIGURE 2-10. Outbreaks widget
In this widget, you can:
• View outbreak details by clicking the date/time link of the alert.
• Reset the status of the outbreak alert information and immediately enforceoutbreak prevention measures when OfficeScan detects an outbreak. For details onenforcing outbreak prevention measures, see Outbreak Prevention Policies on page7-99.
OfficeScan™ 11.0 Administrator’s Guide
2-18
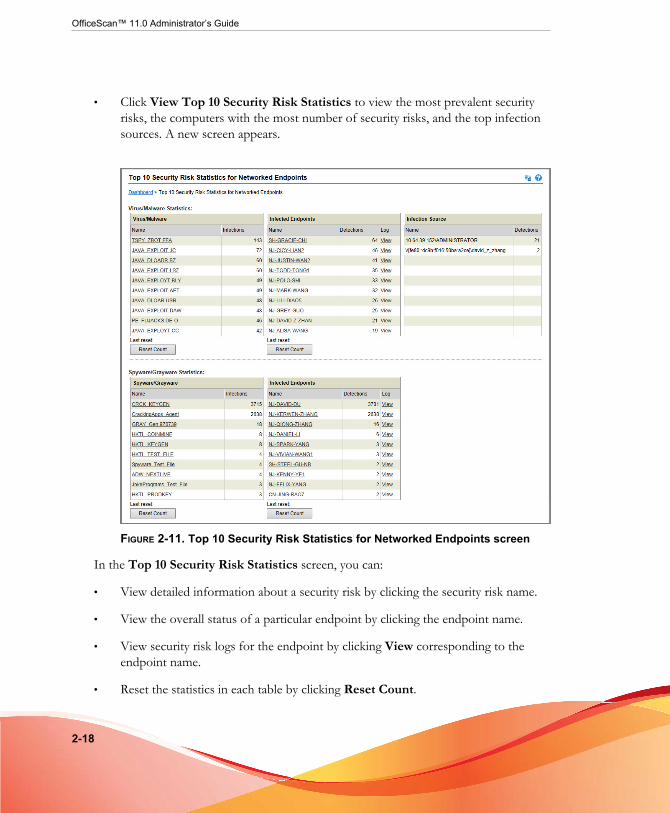
• Click View Top 10 Security Risk Statistics to view the most prevalent securityrisks, the computers with the most number of security risks, and the top infectionsources. A new screen appears.
FIGURE 2-11. Top 10 Security Risk Statistics for Networked Endpoints screen
In the Top 10 Security Risk Statistics screen, you can:
• View detailed information about a security risk by clicking the security risk name.
• View the overall status of a particular endpoint by clicking the endpoint name.
• View security risk logs for the endpoint by clicking View corresponding to theendpoint name.
• Reset the statistics in each table by clicking Reset Count.

Getting Started with OfficeScan
2-19
Agent Updates WidgetThe Agent Updates widget shows components and programs that protect networkedendpoints from security risks.
FIGURE 2-12. Agent Updates widget
In this widget, you can:
• View the current version for each component.
• View the number of agents with outdated components under the Outdatedcolumn. If there are agents that need to be updated, click the number link to startthe update.
• For each program, view the agents that have not been upgraded by clicking thenumber link corresponding to the program.
OfficeScan and Plug-ins Mashup WidgetThe OfficeScan and Plug-ins Mashup widget combines data from OfficeScan agentsand installed plug-in programs and then presents the data in the agent tree. This widget

OfficeScan™ 11.0 Administrator’s Guide
2-20
helps you quickly assess the protection coverage on agents and reduces the overheadrequired to manage the individual plug-in programs.
FIGURE 2-13. OfficeScan and Plug-ins Mashup widget
This widget shows data for the following plug-in programs:
• Intrusion Defense Firewall
• Trend Micro Virtual Desktop Support
These plug-in programs must be activated for the mashup widget to display data.Upgrade the plug-in programs if newer versions are available.
In this widget, you can:
• Choose the columns that display in the agent tree. Click the edit icon ( ) on thetop right corner of the widget and then select the columns in the screen thatdisplays.
TABLE 2-6. OfficeScan and Plug-ins Mashup Columns
COLUMN NAME DESCRIPTION
Computer Name The endpoint name
This column is always available and cannot be removed.

Getting Started with OfficeScan
2-21
COLUMN NAME DESCRIPTION
Domain Hierarchy The endpoint’s domain in the OfficeScan agent tree
Connection Status The OfficeScan agents connectivity with its parentOfficeScan server
Virus/Malware The number of viruses and malware detected by theOfficeScan agent
Spyware/Grayware The number of spyware and grayware detected by theOfficeScan agent
VDI Support Indicates whether the endpoint is a virtual machine
IDF Security Profile See the IDF documentation for details about thesecolumns and the data that they show.
IDF Firewall
IDF Status
IDF DPI
• Double-click data in the table. If you double-click OfficeScan data, the OfficeScanagent tree displays. If you double-click plug-in program data (except data in theVDI Support column), the plug-in program’s main screen displays.
• Use the search feature to find individual endpoints. You can type a full or partialhost name.
Top Data Loss Preventions Incidents Widget
This widget is available only if you activate OfficeScan Data Protection.

OfficeScan™ 11.0 Administrator’s Guide
2-22
This widget shows the number of digital asset transmissions, regardless of the action(block or pass).
FIGURE 2-14. Top Data Loss Preventions Incidents widget
To view data:
1. Select a time period for the detections. Choose from:
• Today: Detections in the last 24 hours, including the current hour
• 1 Week: Detections in the last 7 days, including the current day
• 2 Weeks: Detections in the last 14 days, including the current day
• 1 Month: Detections in the last 30 days, including the current day
2. After selecting the time period, choose from:
• User: Users that transmitted digital assets the most number of times
• Channel: Channels most often used to transmit digital assets
• Template: Digital asset templates that triggered the most detections
• Computer: Computers that transmitted digital assets the most number oftimes
Getting Started with OfficeScan
2-23
Note
This widget shows a maximum of 10 users, channels, templates, or computers.
Data Loss Prevention Incidents Over Time Widget
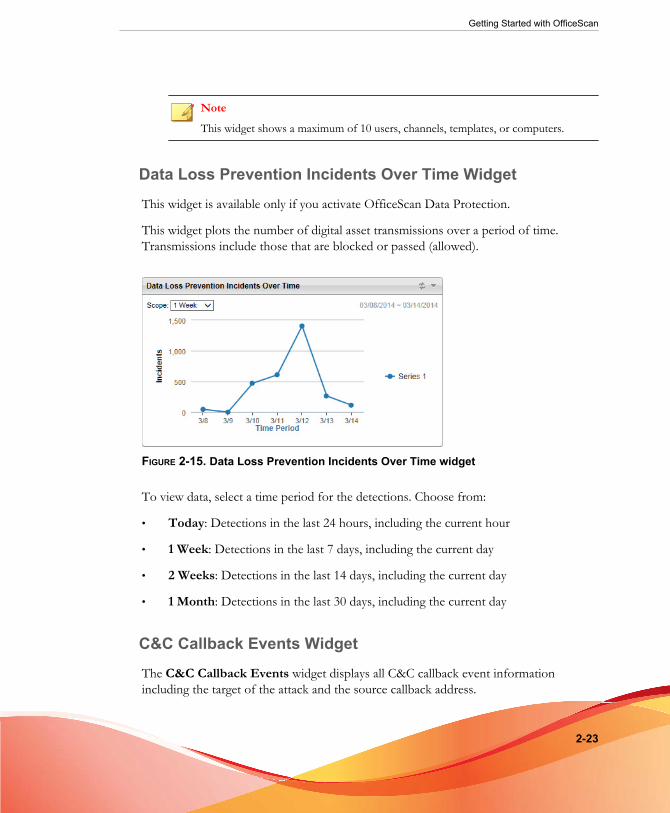
This widget is available only if you activate OfficeScan Data Protection.
This widget plots the number of digital asset transmissions over a period of time.Transmissions include those that are blocked or passed (allowed).
FIGURE 2-15. Data Loss Prevention Incidents Over Time widget
To view data, select a time period for the detections. Choose from:
• Today: Detections in the last 24 hours, including the current hour
• 1 Week: Detections in the last 7 days, including the current day
• 2 Weeks: Detections in the last 14 days, including the current day
• 1 Month: Detections in the last 30 days, including the current day
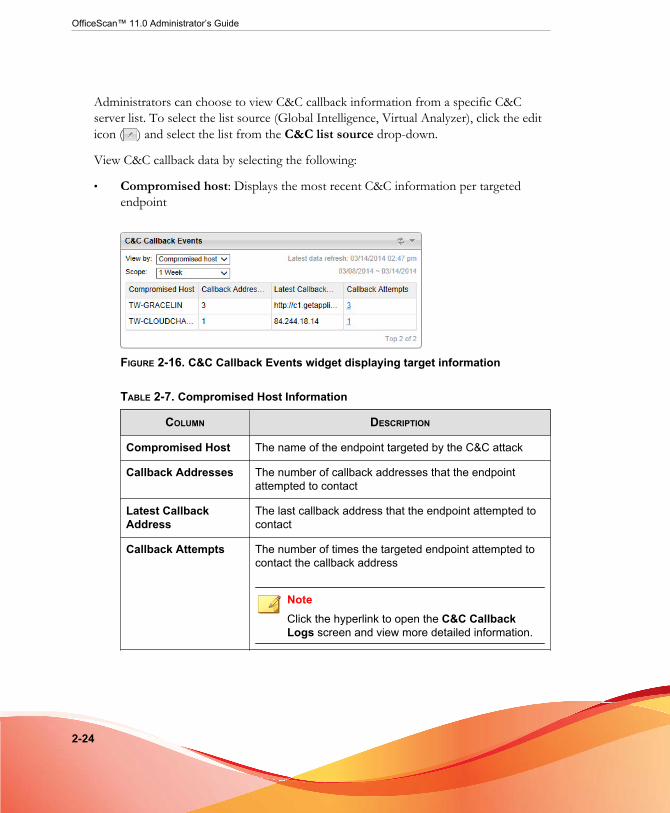
C&C Callback Events Widget
The C&C Callback Events widget displays all C&C callback event informationincluding the target of the attack and the source callback address.
OfficeScan™ 11.0 Administrator’s Guide
2-24
Administrators can choose to view C&C callback information from a specific C&Cserver list. To select the list source (Global Intelligence, Virtual Analyzer), click the editicon ( ) and select the list from the C&C list source drop-down.
View C&C callback data by selecting the following:
• Compromised host: Displays the most recent C&C information per targetedendpoint
FIGURE 2-16. C&C Callback Events widget displaying target information
TABLE 2-7. Compromised Host Information
COLUMN DESCRIPTION
Compromised Host The name of the endpoint targeted by the C&C attack
Callback Addresses The number of callback addresses that the endpointattempted to contact
Latest CallbackAddress
The last callback address that the endpoint attempted tocontact
Callback Attempts The number of times the targeted endpoint attempted tocontact the callback address
NoteClick the hyperlink to open the C&C CallbackLogs screen and view more detailed information.

Getting Started with OfficeScan
2-25
• Callback address: Displays the most recent C&C information per C&C callbackaddress
FIGURE 2-17. C&C Callback Events widget displaying callback addressinformation
TABLE 2-8. C&C Address Information
COLUMN DESCRIPTION
Callback Address The address of C&C callbacks originating from thenetwork
C&C Risk Level The risk level of the callback address determined byeither the Global Intelligence or Virtual Analyzer list
Compromised Hosts The number of endpoints that the callback addresstargeted
Latest CompromisedHost
The name of the endpoint that last attempted to contactthe C&C callback address
Callbacks Attempts The number of attempted callbacks made to the addressfrom the network
NoteClick the hyperlink to open the C&C CallbackLogs screen and view more detailed information.

OfficeScan™ 11.0 Administrator’s Guide
2-26
Web Reputation Top Threat Sources Widget
This widget displays the total number of security threat detections made by WebReputation Services. The information is displayed in a world map by geographiclocation. For help using this widget, click the Help button ( ) on top of the widget.
FIGURE 2-18. Web Reputation Top Threat Sources widget

Getting Started with OfficeScan
2-27
Web Reputation Top Threatened Users Widget
This widget displays the number of users affected by malicious URLs detected by WebReputation Services. The information is displayed in a world map by geographiclocation. For help using this widget, click the Help button ( ) on top of the widget.
FIGURE 2-19. Web Reputation Top Threatened Users widget

OfficeScan™ 11.0 Administrator’s Guide
2-28
File Reputation Threat Map Widget
This widget displays the total number of security threat detections made by FileReputation Services. The information is displayed in a world map by geographiclocation. For help using this widget, click the Help button ( ) on top of the widget.
FIGURE 2-20. File Reputation Threat Map widget
The Server Migration ToolOfficeScan provides the Server Migration Tool, which allows administrators to copyOfficeScan settings from previous OfficeScan versions to the current version. TheServer Migration Tool migrates the following settings:
• Domain structures • Additional service settings*
• Manual Scan settings* • Spyware/Grayware approved list*
• Scheduled Scan settings* • Global agent settings
• Real-time Scan settings* • Endpoint (Computer) location
• Scan Now settings* • Firewall policies and profiles
• Web Reputation settings* • Smart protection sources

Getting Started with OfficeScan
2-29
• Approved URL list* • Server update schedule
• Behavior Monitoring settings* • Agent (Client) update source andschedule
• Device Control settings* • Notifications
• Data Loss Prevention settings* • Proxy settings
• Privileges and other settings* • OfficeScan Agent (Client) Port andClient_LocalServer_Port in theofcscan.ini file
Note
• Settings with an asterisk (*) retain the configurations at both the root and domainlevel.
• The tool does not back up the OfficeScan agent listings of the OfficeScan server; onlythe domain structures.
• OfficeScan agent only migrates features available on the older version of theOfficeScan agent server. For features that are not available on the older server,OfficeScan agent applies the default settings.
Using the Server Migration Tool
NoteThis version of OfficeScan supports migrations from OfficeScan version 10.0 and later.
Older OfficeScan versions may not contain all the settings available in the latest version.OfficeScan automatically applies the default settings for any feature not migrated in theprevious OfficeScan server version.
Procedure
1. On the OfficeScan 11.0 server computer, navigate to <Server installation folder>\PCCSRV\Admin\Utility\ServerMigrationTool.
2. Copy the Server Migration Tool to the source OfficeScan server computer.

OfficeScan™ 11.0 Administrator’s Guide
2-30
Important
You must use the OfficeScan 11.0 Server Migration Tool on the source OfficeScanserver version to ensure that all data is properly formatted for the new target server.OfficeScan 11.0 is not compatible with older versions of the Server Migration Tool.
3. Double-click ServerMigrationTool.exe to start the Server Migration Tool.
The Server Migration Tool opens.
4. To export the settings from the source OfficeScan server:
a. Specify the destination folder using the Browse button.
Note
The default name of the export package is OsceMigrate.zip.
b. Click Export.
A confirmation message appears.
c. Copy the export package to the destination OfficeScan server.
5. To import the settings to the destination OfficeScan server:
a. Locate the export package using the Browse button.
b. Click Import.
A warning message appears.
c. Click Yes to proceed.
A confirmation message appears.
6. Verify that the server contains all the previous OfficeScan version settings.
7. Move the old OfficeScan agents to the new server.
For details about moving OfficeScan agents, see Moving OfficeScan Agents to AnotherDomain or OfficeScan Server on page 2-55 or Agent Mover on page 14-21.
Getting Started with OfficeScan
2-31
Active Directory IntegrationIntegrate OfficeScan with your Microsoft™ Active Directory™ structure to manageOfficeScan agents more efficiently, assign web console permissions using ActiveDirectory accounts, and determine which agents do not have security software installed.All users in the network domain can have secure access to the OfficeScan console. Youcan also configure limited access to specific users, even those in another domain. Theauthentication process and the encryption key provide validation of credentials for users.
Active Directory integration allows you to take full advantage of the following features:
• Role-based administration: Assign specific administrative responsibilities tousers by granting them access to the product console using their Active Directoryaccounts. For details, see Role-based Administration on page 13-2.
• Custom agent groups: Use Active Directory or IP addresses to manually groupagents and map them to domains in the OfficeScan agent tree. For details, seeAutomatic Agent Grouping on page 2-49.
• Outside server management: Ensure that computers in the network that are notmanaged by the OfficeScan server comply with your company’s security guidelines.For details, see Security Compliance for Unmanaged Endpoints on page 14-64.
Manually or periodically synchronize the Active Directory structure with the OfficeScanserver to ensure data consistency. For details, see Synchronizing Data with Active DirectoryDomains on page 2-33.
Integrating Active Directory with OfficeScan
Procedure
1. Go to Administration > Active Directory > Active Directory Integration.
2. Under Active Directory Domains, specify the Active Directory domain name.
3. Specify credentials that the OfficeScan server will use when synchronizing datawith the specified Active Directory domain. The credentials are required if theserver is not part of the domain. Otherwise, the credentials are optional. Be sure

OfficeScan™ 11.0 Administrator’s Guide
2-32
that these credentials do not expire or the server will not be able to synchronizedata.
a. Click Specify Domain Credentials.
b. In the popup window that opens, type the username and password. Theusername can be specified using any of the following formats:
• domain\username
• username@domain
c. Click Save.
4. Click the ( ) button to add more domains. If necessary, specify domaincredentials for any of the added domains.
5. Click the ( ) button to delete domains.
6. Specify encryption settings if you specified domain credentials. As a securitymeasure, OfficeScan encrypts the domain credentials you specified before savingthem to the database. When OfficeScan synchronizes data with any of the specifieddomains, it will use an encryption key to decrypt the domain credentials.
a. Go to the Encryption Settings for Domain Credentials section.
b. Type an encryption key that does not exceed 128 characters.
c. Specify a file to which to save the encryption key. You can choose a popularfile format, such as .txt. Type the file's full path and name, such as C:\AD_Encryption\EncryptionKey.txt.
WARNING!If the file is removed or the file path changes, OfficeScan will not be able tosynchronize data with all of the specified domains.
7. Click one of the following:
• Save: Save the settings only. Because synchronizing data may strain networkresources, you can choose to save the settings only and synchronize at a latertime, such as during non-critical business hours.
Getting Started with OfficeScan
2-33
• Save and Synchronize: Save the settings and synchronize data with theActive Directory domains.
8. Schedule periodic synchronizations. For details, see Synchronizing Data with ActiveDirectory Domains on page 2-33.
Synchronizing Data with Active Directory DomainsSynchronize data with Active Directory domains regularly to keep the OfficeScan agenttree structure up-to-date and to query unmanaged agents.
Manually Synchronizing Data with Active Directory Domains
Procedure
1. Go to Administration > Active Directory > Active Directory Integration.
2. Verify that the domain credentials and encryption settings have not changed.
3. Click Save and Synchronize.
Automatically Synchronizing Data with Active DirectoryDomains
Procedure
1. Go to Administration > Active Directory > Scheduled Synchronization.
2. Select Enable scheduled Active Directory synchronization.
3. Specify the synchronization schedule.
NoteFor daily, weekly, and monthly synchronizations, the period of time is the number ofhours during which OfficeScan synchronizes Active Directory with the OfficeScanserver.

OfficeScan™ 11.0 Administrator’s Guide
2-34
4. Click Save.
The OfficeScan Agent TreeThe OfficeScan agent tree displays all the agents grouped into domains that the servercurrently manages. Agents are grouped into domains so you can simultaneouslyconfigure, manage, and apply the same configuration to all domain members.
The agent tree displays in the main frame when you access certain functions from themain menu.
FIGURE 2-21. OfficeScan agent tree
Agent Tree Icons
The OfficeScan agent tree icons provide visual hints that indicate the type of endpointand the status of OfficeScan agents that OfficeScan manages.
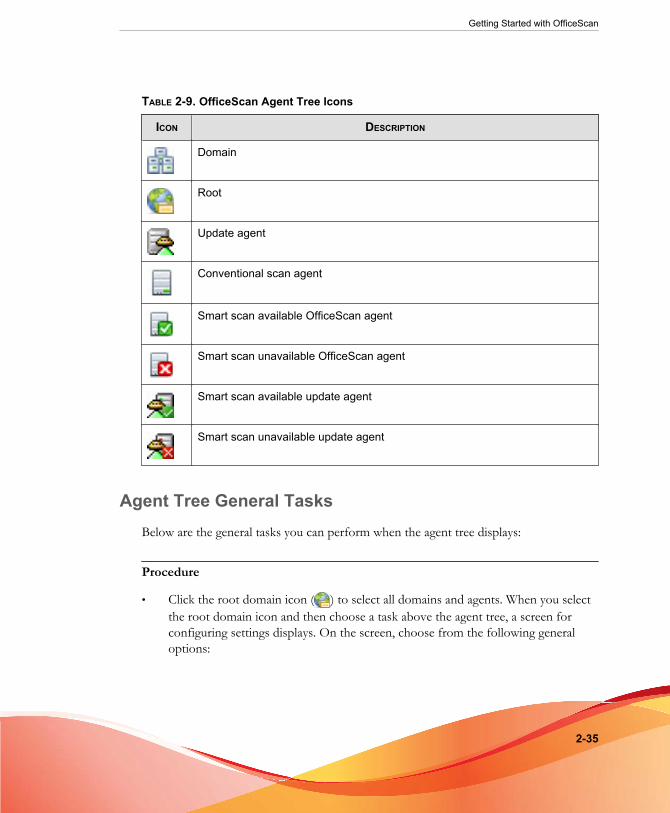
Getting Started with OfficeScan
2-35
TABLE 2-9. OfficeScan Agent Tree Icons
ICON DESCRIPTION
Domain
Root
Update agent
Conventional scan agent
Smart scan available OfficeScan agent
Smart scan unavailable OfficeScan agent
Smart scan available update agent
Smart scan unavailable update agent
Agent Tree General TasksBelow are the general tasks you can perform when the agent tree displays:
Procedure
• Click the root domain icon ( ) to select all domains and agents. When you selectthe root domain icon and then choose a task above the agent tree, a screen forconfiguring settings displays. On the screen, choose from the following generaloptions:

OfficeScan™ 11.0 Administrator’s Guide
2-36
• Apply to All Agents: Applies settings to all existing agents and to any newagent added to an existing/future domain. Future domains are domains notyet created at the time you configured the settings.
• Apply to Future Domains Only: Applies settings only to agents added tofuture domains. This option will not apply settings to new agents added to anexisting domain.
• To select multiple, adjacent domains or agents:
• From the right panel, select the first domain, press and hold the SHIFT key,and then click the last domain or agent in the range.
• To select a range of non-contiguous domains or agents, from the right panel, pressand hold the CTRL key and then click the domains or agents that you want toselect.
• Search for any agent to manage by specifying the agent name in the Search forendpoints text box.
A list of results appears in the agent tree. For more search options, click AdvancedSearch.
NoteIPv6 or IPv4 addresses cannot be specified when searching for specific agents. UseAdvanced Search to search by IPv4 or IPv6 address. For details, see Advanced SearchOptions on page 2-37.
• After selecting a domain, the agent tree table expands to show the agents belongingto the domain and all the columns containing relevant information for each agent.To view only a set of related columns, select an item in the agent tree view.
• View all: Shows all columns
• Update view: Shows all the components and programs
• Antivirus view: Shows antivirus components
• Anti-spyware view: Shows anti-spyware components
• Data protection view: Shows the status of the Data Protection module onagents

Getting Started with OfficeScan
2-37
• Firewall view: Shows firewall components
• Smart protection view: Shows the scan method used by agents (conventionalor smart scan) and smart protection components
• Update Agent view: Shows information for all Update Agents managed bythe OfficeScan server
• Rearrange columns by dragging the column titles to different positions in the agenttree. OfficeScan automatically saves the new column positions.
• Sort agents based on column information by clicking the column name.
• Refresh the agent tree by clicking the refresh icon ( ).
• View agent statistics below the agent tree, such as the total number of agents,number of smart scan agents, and number of conventional scan agents.
Advanced Search Options
Search for agents based on the following criteria:
Procedure
• Basic Criteria: Includes basic information about endpoints such as IP address,operating system, domain, MAC address, scan method, and web reputation status
• Searching by IPv4 segment requires a portion of an IP address starting withthe first octet. The search returns all endpoints with IP addresses containingthat entry. For example, typing 10.5 returns all computers in the IP addressrange 10.5.0.0 to 10.5.255.255.
• Searching by IPv6 address range requires a prefix and length.
• Searching by MAC address requires a MAC address range in hexadecimalnotation, for example, 000A1B123C12.
• Component Versions: Select the check box next to the component name, narrowdown the criteria by selecting Earlier than or Earlier than and including, andtype a version number. The current version number displays by default.

OfficeScan™ 11.0 Administrator’s Guide
2-38
• Status: Includes agent settings
• Click Search after specifying the search criteria. A list of endpoint names that meetthe criteria appears in the agent tree.
Agent Tree Specific Tasks
The agent tree displays when you access certain screens on the web console. Above theagent tree are menu items specific to the screen you have accessed. These menu itemsallow you to perform specific tasks, such as configuring agent settings or initiating agenttasks. To perform any of the tasks, first select the task target and then select a menuitem.
The following screens display the agent tree:
• Agent Management Screen on page 2-38
• Outbreak Prevention Screen on page 2-42
• Agent Selection Screen on page 2-43
• Rollback Screen on page 2-44
• Security Risk Logs Screen on page 2-45
The agent tree provides access to the following functions:
• Search for endpoints: Locate specific endpoints by typing search criteria in thetext box.
Administrators can also manually search the agent tree to locate endpoints or domains.Specific computer information displays in the table on the right.
Agent Management Screen
To view this screen, go to Agents > Agent Management.
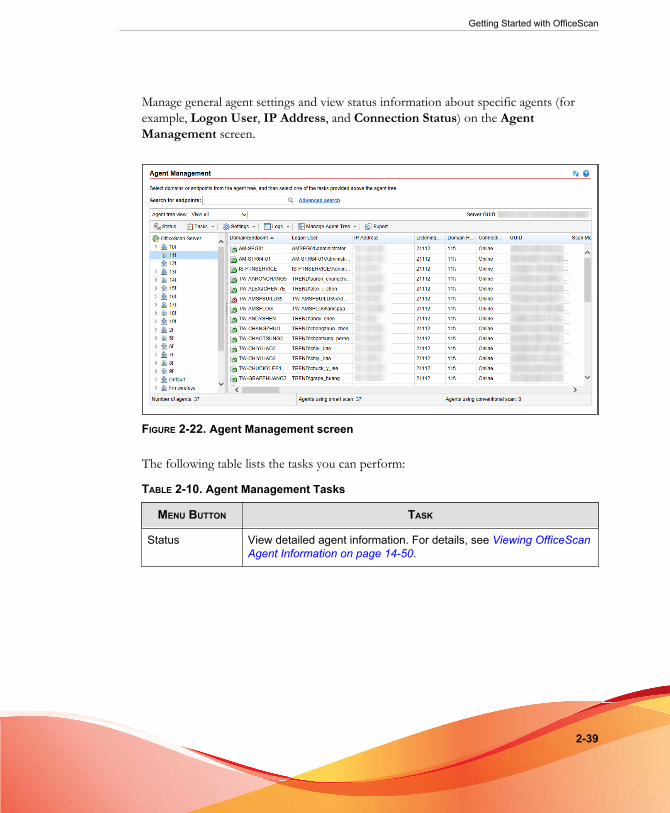
Getting Started with OfficeScan
2-39
Manage general agent settings and view status information about specific agents (forexample, Logon User, IP Address, and Connection Status) on the AgentManagement screen.
FIGURE 2-22. Agent Management screen
The following table lists the tasks you can perform:
TABLE 2-10. Agent Management Tasks
MENU BUTTON TASK
Status View detailed agent information. For details, see Viewing OfficeScanAgent Information on page 14-50.
OfficeScan™ 11.0 Administrator’s Guide
2-40
MENU BUTTON TASK
Tasks • Run Scan Now on agent computers. For details, see InitiatingScan Now on page 7-24.
• Uninstall the agent. For details, see Uninstalling the OfficeScanAgent from the Web Console on page 5-68.
• Restore suspicious file detections. For details see RestoringQuarantined Files on page 7-41.
• Restore spyware/grayware components. For details, seeRestoring Spyware/Grayware on page 7-49.

Getting Started with OfficeScan
2-41
MENU BUTTON TASK
Settings • Configure scan settings. For details, see the following topics:
• Scan Method Types on page 7-8
• Manual Scan on page 7-18
• Real-time Scan on page 7-15
• Scheduled Scan on page 7-20
• Scan Now on page 7-22
• Configure Web Reputation settings. For details, see WebReputation Policies on page 11-5.
• Configure Suspicious Connection Settings. For details, seeConfiguring Suspicious Connection Settings on page 11-13.
• Configure Behavior Monitoring settings. For details, seeBehavior Monitoring on page 8-2.
• Configure Device Control settings. For details, see DeviceControl on page 9-2.
• Configure Data Loss Prevention policies. For details, see DataLoss Prevention Policy Configuration on page 10-41.
• Assign agents as Update Agents. For details, see Update AgentConfiguration on page 6-52.
• Configure agent privileges and other settings. For details, seeConfiguring Agent Privileges and Other Settings on page 14-84.
• Enable or disable OfficeScan agent services. For details, seeOfficeScan Agent Services on page 14-6.
• Configure the spyware/grayware approved list. For details, seeSpyware/Grayware Approved List on page 7-47.
• Import and export agent settings. For details, see Importing andExporting Agent Settings on page 14-51.

OfficeScan™ 11.0 Administrator’s Guide
2-42
MENU BUTTON TASK
Logs View the following logs:
• Virus/Malware logs (for details, see Viewing Virus/Malware Logson page 7-82)
• Spyware/Grayware logs (for details, see Viewing Spyware/Grayware Logs on page 7-89)
• Firewall logs (for details, see Firewall Logs on page 12-28)
• Web Reputation logs (for details, see Web Threat Logs on page11-21)
• Suspicious Connection logs (for details, see Viewing SuspiciousConnection Logs on page 11-24)
• C&C Callback logs (for details, see Viewing C&C Callback Logson page 11-23.)
• Behavior Monitoring logs (for details, see Behavior MonitoringLogs on page 8-12)
• DLP logs (for details, see Data Loss Prevention Logs on page10-50)
• Device Control logs (for details, see Device Control Logs onpage 9-17)
Delete logs. For details, see Log Management on page 13-32.
Manage AgentTree
Manage the agent tree. For details, see Agent Grouping Tasks onpage 2-53.
Export Export a list of agents to a comma-separated value (.csv) file.
Outbreak Prevention Screen
To view this screen, go to Agents > Outbreak Prevention.

Getting Started with OfficeScan
2-43
Specify and activate outbreak prevention settings in the Outbreak Prevention screen.For details, see Configuring Security Risk Outbreak Prevention on page 7-98.
FIGURE 2-23. Outbreak Prevention screen
Agent Selection Screen
To view this screen, go to Updates > Agents > Manual Update. Select Manuallyselect agents and click Select.

OfficeScan™ 11.0 Administrator’s Guide
2-44
Initiate manual update in the Agent Selection screen. For details, see OfficeScan AgentManual Updates on page 6-42.
FIGURE 2-24. Agent Selection screen
Rollback Screen
To view this screen, go to Updates > Rollback. Click Synchronize with Server.
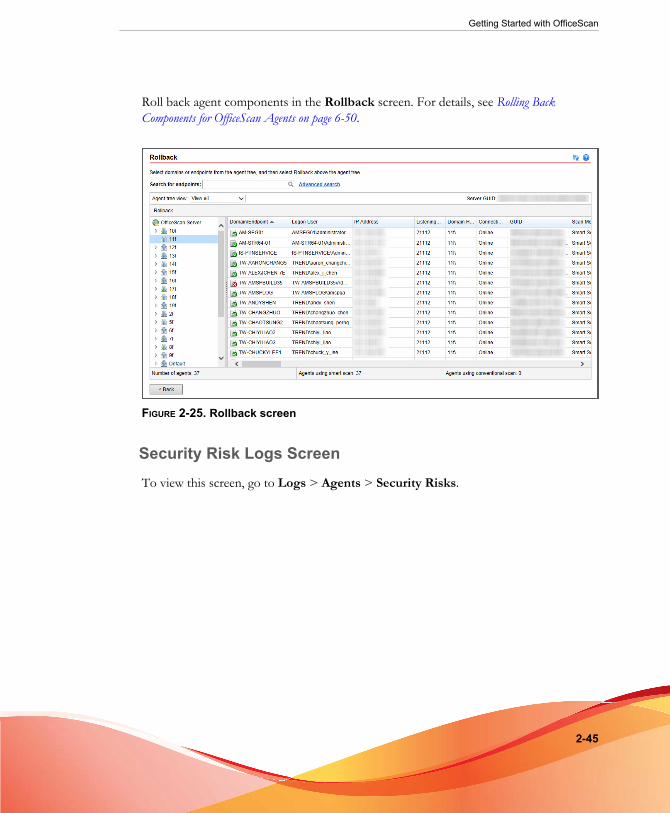
Getting Started with OfficeScan
2-45
Roll back agent components in the Rollback screen. For details, see Rolling BackComponents for OfficeScan Agents on page 6-50.
FIGURE 2-25. Rollback screen
Security Risk Logs Screen
To view this screen, go to Logs > Agents > Security Risks.
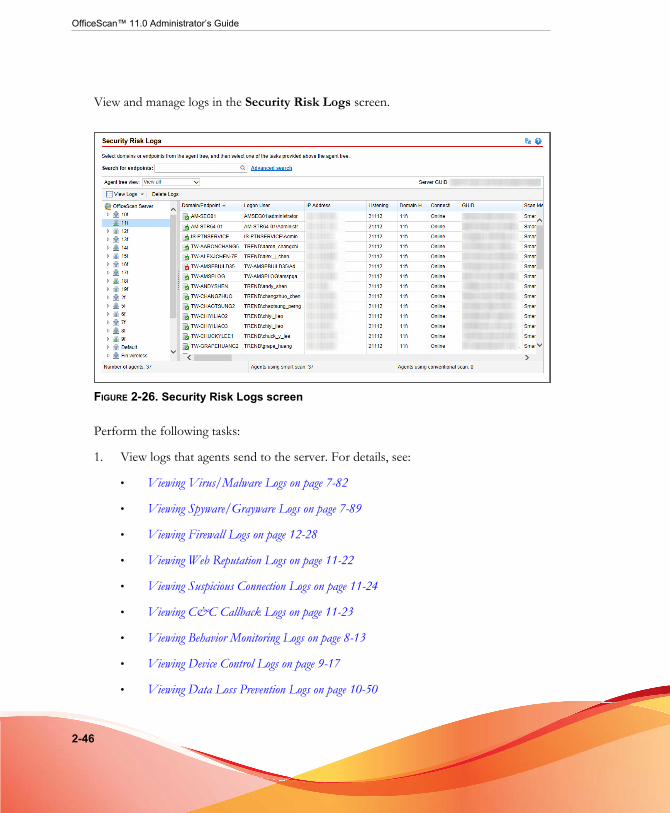
OfficeScan™ 11.0 Administrator’s Guide
2-46
View and manage logs in the Security Risk Logs screen.
FIGURE 2-26. Security Risk Logs screen
Perform the following tasks:
1. View logs that agents send to the server. For details, see:
• Viewing Virus/Malware Logs on page 7-82
• Viewing Spyware/Grayware Logs on page 7-89
• Viewing Firewall Logs on page 12-28
• Viewing Web Reputation Logs on page 11-22
• Viewing Suspicious Connection Logs on page 11-24
• Viewing C&C Callback Logs on page 11-23
• Viewing Behavior Monitoring Logs on page 8-13
• Viewing Device Control Logs on page 9-17
• Viewing Data Loss Prevention Logs on page 10-50

Getting Started with OfficeScan
2-47
2. Delete logs. For details, see Log Management on page 13-32.
OfficeScan DomainsA domain in OfficeScan is a group of agents that share the same configuration and runthe same tasks. By grouping agents into domains, you can configure, manage, and applythe same configuration to all domain members. For more information on agentgrouping, see Agent Grouping on page 2-47.
Agent Grouping
Use Agent Grouping to manually or automatically create and manage domains on theOfficeScan agent tree.
There are two ways to group agents into domains.
TABLE 2-11. Agent Grouping Methods
METHOD AGENT GROUPING DESCRIPTIONS
Manual • NetBIOSdomain
• ActiveDirectorydomain
• DNS domain
Manual agent grouping defines the domain to whicha newly installed agent should belong. When theagent appears in the agent tree, you can move it toanother domain or to another OfficeScan server.
Manual agent grouping also allows you to create,manage, and remove domains in the agent tree.
For details, see Manual Agent Grouping on page2-48.
Automatic Custom agentgroups
Automatic agent grouping uses rules to sort agents inthe agent tree. After you define the rules, you canaccess the agent tree to manually sort the agents orallow OfficeScan to automatically sort them whenspecific events occur or at scheduled intervals.
For details, see Automatic Agent Grouping on page2-49.
OfficeScan™ 11.0 Administrator’s Guide
2-48
Manual Agent Grouping
OfficeScan uses this setting only during fresh agent installations. The installationprogram checks the network domain to which a target endpoint belongs. If the domainname already exists in the agent tree, OfficeScan groups the agent on the target endpointunder that domain and will apply the settings configured for the domain. If the domainname does not exist, OfficeScan adds the domain to the agent tree, groups the agentunder that domain, and then applies the root settings to the domain and agent.
Configuring Manual Agent Grouping
Procedure
1. Go to Agents > Agent Grouping.
2. Specify the agent grouping method:
• NetBIOS domain
• Active Directory domain
• DNS domain
3. Click Save.
What to do next
Manage domains and the agents grouped under them by performing the following tasks:
• Add a domain
• Delete a domain or agent
• Rename a domain
• Move a single agent to another domain
For details, see Agent Grouping Tasks on page 2-53.
Getting Started with OfficeScan
2-49
Automatic Agent Grouping
Automatic agent grouping uses rules defined by IP addresses or Active Directorydomains. If a rule defines an IP address or an IP address range, the OfficeScan serverwill group agents with a matching IP address to a specific domain in the agent tree.Similarly, if a rule defines one or several Active Directory domains, the OfficeScanserver will group agents belonging to a particular Active Directory domain to a specificdomain in the agent tree.
Agents apply only one rule at a time. Prioritize rules so that if any agent satisfies morethan one rule, the rule with the highest priority applies.
Configuring Automatic Agent Grouping
Procedure
1. Go to Agents > Agent Grouping
2. Go to the Agent Grouping section and select Custom agent groups.
3. Go to the Automatic Agent Grouping section.
4. To start creating rules, click Add and then select either Active Directory or IPAddress.
• If you selected Active Directory, see the configuration instructions in DefiningAgent Grouping Rules by Active Directory Domains on page 2-50.
• If you selected IP Address, see the configuration instructions in DefiningAgent Grouping Rules by IP Addresses on page 2-51.
5. If you created more than one rule, prioritize the rules by performing these steps:
a. Select a rule.
b. Click an arrow under the Grouping Priority column to move the rule up ordown the list. The ID number of the rule changes to reflect the new position.
6. To use the rules during agent sorting:
a. Select the check boxes for the rules that you want to use.

OfficeScan™ 11.0 Administrator’s Guide
2-50
b. Enable the rules by switching the Status control to On.
Note
If you do not select the check box for a rule or if you disable a rule, the rule will notbe used when sorting agents in the agent tree. For example, if the rule dictates thatany agent should move to a new domain, the agent will not move and stays in itscurrent domain.
7. Specify a sorting schedule in the Scheduled Domain Creation section.
a. Select Enable scheduled domain creation.
b. Specify the schedule under Schedule-based Domain Creation.
8. Choose from the following options:
• Save and Create Domain Now: Choose this option if you specified newdomains in Defining Agent Grouping Rules by IP Addresses on page 2-51, step 7 orin Defining Agent Grouping Rules by Active Directory Domains on page 2-50, step 7.
• Save: Choose this option if you did not specify new domains or want tocreate the new domains only when agent sorting runs.
Note
Agent sorting will not start after completing this step.
Defining Agent Grouping Rules by Active Directory Domains
Ensure that you have configured Active Directory integration settings beforeperforming the steps in the procedure below. For details, see Active Directory Integration onpage 2-31.
Procedure
1. Go to Agents > Agent Grouping.
2. Go to the Agent Grouping section and select Custom agent groups.

Getting Started with OfficeScan
2-51
3. Go to the Automatic Agent Grouping section.
4. Click Add and then select Active Directory.
A new screen appears.
5. Select Enable grouping.
6. Specify a name for the rule.
7. Under Active Directory source, select the Active Directory domain(s) orsubdomains.
8. Under Agent tree, select an existing OfficeScan domain to which the ActiveDirectory domains map. If the desired OfficeScan domain does not exist, performthe following steps:
a. Mouseover on a particular OfficeScan domain and click the add domain icon( ).
b. Type the domain name in the text box provided.
c. Click the check mark next to the text box. The new domain is added and isautomatically selected.
9. (Optional) Select Duplicate Active Directory structure into OfficeScan agenttree. This option duplicates the hierarchy of the selected Active Directory domainsto the selected OfficeScan domain.
10. Click Save.
Defining Agent Grouping Rules by IP Addresses
Create custom agent groups using network IP addresses to sort agents in the OfficeScanagent tree. The feature can help administrators arrange the OfficeScan agent treestructure before the agent registers to the OfficeScan server.
Procedure
1. Go to Agents > Agent Grouping.

OfficeScan™ 11.0 Administrator’s Guide
2-52
2. Go to the Agent Grouping section and select Custom agent groups.
3. Go to the Automatic Agent Grouping section.
4. Click Add and then select IP Address.
A new screen appears.
5. Select Enable grouping.
6. Specify a name for the grouping.
7. Specify one of the following:
• A single IPv4 or IPv6 address
• An IPv4 address range
• An IPv6 prefix and length
Note
If a dual-stack agent’s IPv4 and IPv6 addresses belong to two separate agent groups,the agent will be grouped under the IPv6 group. If IPv6 is disabled on the agent’shost machine, the agent will move to the IPv4 group.
8. Select the OfficeScan domain to which the IP address or IP address ranges maps.If the domain does not exist, do the following:
a. Mouseover anywhere on the agent tree and click the add domain icon.
FIGURE 2-27. Add domain icon
b. Type the domain in the text box provided.
c. Click the check mark next to the text box. The new domain is added and isautomatically selected.
Getting Started with OfficeScan
2-53
9. Click Save.
Agent Grouping Tasks
You can perform the following tasks when grouping agents in domains:
• Add a domain. See Adding a Domain on page 2-53 for details.
• Delete a domain or agent. See Deleting a Domain or Agent on page 2-54 for details.
• Rename a domain. See Renaming a Domain on page 2-54 for details.
• Move a single agent to another domain or another OfficeScan server. See MovingOfficeScan Agents to Another Domain or OfficeScan Server on page 2-55 for details.
• Delete a domain or agent. See Deleting a Domain or Agent on page 2-54 for details.
Adding a Domain
Procedure
1. Navigate to Agents > Agent Management.
2. Click Manage Agent Tree > Add Domain.
3. Type a name for the domain you want to add.
4. Click Add.
The new domain appears in the agent tree.
5. (Optional) Create subdomains.
a. Select the parent domain.
b. Click Manage Agent Tree > Add domain.
c. Type the subdomain name.
OfficeScan™ 11.0 Administrator’s Guide
2-54
Deleting a Domain or Agent
Procedure
1. Navigate to Agents > Agent Management.
2. In the agent tree, select:
• One or several domains
• One, several, or all agents belonging to a domain
3. Click Manage Agent Tree > Remove Domain/Agent.
4. To delete an empty domain, click Remove Domain/Agent. If the domain hasagents and you click Remove Domain/Agent, the OfficeScan server will re-createthe domain and group all agents under that domain the next time agents connect tothe OfficeScan server. You can perform the following tasks before deleting thedomain:
a. Move agents to other domains. To move agents to other domains, drag anddrop agents to the destination domains.
b. Delete all agents.
5. To delete a single agent, click Remove Domain/Agent.
Note
Deleting the agent from the agent tree does not remove the OfficeScan agent fromthe agent endpoint. The OfficeScan agent can still perform server-independent tasks,such as updating components. However, the server is unaware of the existence of theagent and will therefore not deploy configurations or send notifications to the agent.
Renaming a Domain
Procedure
1. Navigate to Agents > Agent Management.

Getting Started with OfficeScan
2-55
2. Select a domain in the agent tree.
3. Click Manage Agent Tree > Rename Domain.
4. Type a new name for the domain.
5. Click Rename.
The new domain name appears in the agent tree.
Moving OfficeScan Agents to Another Domain or OfficeScanServer
Procedure
1. Navigate to Agents > Agent Management.
2. In the agent tree, select one, several, or all agents.
3. Click Manage Agent Tree > Move Agent.
4. To move agents to another domain:
• Select Move selected agent(s) to another domain.
• Select the domain.
• (Optional) Apply the settings of the new domain to the agents.
Tip
You can also drag and drop agents to another domain in the agent tree.
5. To move agents to another OfficeScan server:
• Select Move selected agent(s) to another OfficeScan Server.
• Type the server name or IPv4/IPv6 address and HTTP port number.
6. Click Move.


3-1
Chapter 3
Getting Started with Data ProtectionThis chapter discusses how to install and activate the Data Protection module.
Topics include:
• Data Protection Installation on page 3-2
• Data Protection License on page 3-4
• Deployment of Data Protection to OfficeScan Agents on page 3-6
• Forensic Folder and DLP Database on page 3-8
• Uninstalling Data Protection on page 3-14
OfficeScan™ 11.0 Administrator’s Guide
3-2
Data Protection InstallationThe Data Protection module includes the following features:
• Data Loss Prevention (DLP): Prevents unauthorized transmission of digitalassets
• Device Control: Regulates access to external devices
NoteOfficeScan out-of-the-box has a Device Control feature that regulates access to commonlyused devices such as USB storage devices. Device Control that is part of the DataProtection module expands the range of monitored devices. For a list of monitoreddevices, see Device Control on page 9-2.
Data Loss Prevention and Device Control are native OfficeScan features but arelicensed separately. After you install the OfficeScan server, these features are availablebut are not functional and cannot be deployed to agents. Installing Data Protectionmeans downloading a file from the ActiveUpdate server or a custom update source, ifone has been set up. When the file has been incorporated into the OfficeScan server,you can activate the Data Protection license to enable the full functionality of itsfeatures. Installation and activation are performed from Plug-in Manager.
Important
• You do not need to install the Data Protection module if the standalone Trend MicroData Loss Prevention software is already installed and running on endpoints.
• The Data Protection module can be installed on a pure IPv6 Plug-in Manager.However, only the Device Control feature can be deployed to pure IPv6 agents. TheData Loss Prevention feature does not work on pure IPv6 agents.
Installing Data Protection
Procedure
1. Open the OfficeScan web console and click Plug-ins in the main menu.

Getting Started with Data Protection
3-3
2. On the Plug-in Manager screen, go to the OfficeScan Data Protection sectionand click Download.
The size of the file to be downloaded displays beside the Download button.
Plug-in Manager stores the downloaded file to <Server installation folder>\PCCSRV\Download\Product.
Note
If Plug-in Manager is unable to download the file, it automatically re-downloads after24 hours. To manually trigger Plug-in Manager to download the file, restart theOfficeScan Plug-in Manager service from the Microsoft Management Console.
3. Monitor the download progress.
You can navigate away from the screen during the download.
If you encounter problems downloading the file, check the server update logs onthe OfficeScan web console. On the main menu, click Logs > Server Update.
After Plug-in Manager downloads the file, OfficeScan Data Protection displays in anew screen.
Note
If OfficeScan Data Protection does not display, see the reasons and solutions inTroubleshooting Plug-in Manager on page 15-11.
4. To install OfficeScan Data Protection immediately, click Install Now, or to installat a later time, perform the following:
a. Click Install Later.
b. Open the Plug-in Manager screen.
c. Go to the OfficeScan Data Protection section and click Install.
5. Read the license agreement and accept the terms by clicking Agree.
The installation starts.

OfficeScan™ 11.0 Administrator’s Guide
3-4
6. Monitor the installation progress. After the installation, the OfficeScan DataProtection version displays.
Data Protection LicenseView, activate, and renew the Data Protection license from Plug-in Manager.
Obtain an Activation Code from Trend Micro and then use it to activate the license.
Activating the Plug-in Program License
Procedure
1. Open the OfficeScan web console and click Plug-ins in the main menu.
2. On the Plug-in Manager screen, go to the plug-in program section and clickManage Program.
The Product License New Activation Code screen appears.
3. Type or copy-and-paste the Activation Code into the text fields.
4. Click Save.
The plug-in console appears.
Viewing and Renewing the License Information
Procedure
1. Open the OfficeScan web console and click Plug-ins in the main menu.
2. On the Plug-in Manager screen, go to the plug-in program section and clickManage Program.
3. Navigate the plug-in console to the View License Information hyperlink.

Getting Started with Data Protection
3-5
Not all plug-in programs display the View License Information hyperlink in thesame location. Refer to the plug-in program's user documentation for more details.
4. View the following license details in the screen that opens.
Option DescriptionStatus Displays either "Activated", "Not Activated" or "Expired"
Version Displays either "Full" or "Trial" version
NoteActivation of both the full and trial versions displays only as"Full".
Seats Displays how many endpoints the plug-in program can manage
Licenseexpires on
If the plug-in program has multiple licenses, the latest expirationdate displays.
For example, if the license expiration dates are 12/31/2011 and06/30/2011, 12/31/2011 displays.
ActivationCode
Displays the Activation Code
Reminders Depending on the current license version, the plug-in displaysreminders about the license expiration date either during thegrace period (full versions only), or when the license expires
NoteThe duration of the grace period varies by region. Verify the grace period of a plug-inprogram with a Trend Micro representative.
After a plug-in program license expires, the plug-in continues to function but updatesand support are no longer available.
5. Click View detailed license online to view information about the current licenseon the Trend Micro website.
6. To update the screen with the latest license information, click UpdateInformation.

OfficeScan™ 11.0 Administrator’s Guide
3-6
7. Click New Activation Code to open the Product License New ActivationCode screen.
For details, see Activating the Plug-in Program License on page 3-4.
Deployment of Data Protection to OfficeScanAgents
Deploy the Data Protection module to OfficeScan agents after activating its license.After the deployment, OfficeScan agents will start to use Data Loss Prevention andDevice Control.
Important
• By default, the module is disabled on Windows Server 2003, Windows Server 2008,and Windows Server 2012 to prevent impacting the performance of the host machine.If you want to enable the module, monitor the system’s performance constantly andtake the necessary action when you notice a drop in performance.
Note
You can enable or disable the module from the web console. For details, see OfficeScanAgent Services on page 14-6.
• If the Trend Micro Data Loss Prevention software already exists on the endpoint,OfficeScan will not replace it with the Data Protection module.
• Only Device Control can be deployed to pure IPv6 agents. Data Loss Preventiondoes not work on pure IPv6 agents.
• Online agents install the Data Protection module immediately. Offline and roamingagents install the module when they become online.
• Users must restart their computers to finish installing Data Loss Prevention drivers.Inform users about the restart ahead of time.
• Trend Micro recommends enabling debug logging to help you troubleshootdeployment issues. For details, see Enabling Debug Logging for the Data Protection Moduleon page 10-56.
Getting Started with Data Protection
3-7
Deploying the Data Protection Module to OfficeScanAgents
Procedure
1. Go to Agents > Agent Management.
2. In the agent tree, you can:
• Click the root domain icon ( ) to deploy the module to all existing andfuture agents.
• Select a specific domain to deploy the module to all existing and future agentsunder the domain.
• Select a specific agent to deploy the module only to that agent.
3. Deploy the module in two different ways:
• Click Settings > DLP Settings.
• Click Settings > Device Control Settings.
NoteIf you deploy from Settings > DLP Settings and the Data Protection modulewas deployed successfully, Data Loss Prevention drivers will be installed. If thedrivers are installed successfully, a message displays, informing users to restarttheir endpoints to finish installing the drivers.
If the message does not display, there might be problems installing the drivers.If you enabled debug logging, check the debug logs for details about driverinstallation problems.
4. A message displays, indicating the number of agents that have not installed themodule. Click Yes to start the deployment.
NoteIf you click No (or if the module was not deployed to one or several agents for somereason), the same message displays when you click Settings > DLP Settings orSettings > Device Control Settings again.
OfficeScan™ 11.0 Administrator’s Guide
3-8
OfficeScan agents start to download the module from the server.
5. Check if the module was deployed to agents.
a. In the agent tree, select a domain.
b. In the agent tree view, select Data protection view or View all.
c. Check the Data Protection Status column. The deployment status can beany of the following:
• Running: The module was deployed successfully and its features havebeen enabled.
• Requires restart: Data Loss Prevention drivers have not been installedbecause users have not restarted their computers. If the drivers are notinstalled, Data Loss Prevention will not be functional.
• Stopped: The service for the module has not been started or the targetendpoint has been shut down normally. To start the Data Protectionservice, go to Agents > Agent Management > Settings > AdditionalService Settings and enable Data Protection Services.
• Cannot install: There was a problem deploying the module to the agent.You will need to re-deploy the module from the agent tree.
• Cannot install (Data Loss Prevention already exists): The TrendMicro Data Loss Prevention software already exists on the endpoint.OfficeScan will not replace it with the Data Protection module.
• Not installed: The module has not been deployed to the agent. Thisstatus displays if you chose not to deploy the module to the agent or ifthe agent’s status is offline or roaming during deployment.
Forensic Folder and DLP DatabaseAfter a Data Loss Prevention incident occurs, OfficeScan logs the incident details in aspecialized forensic database. OfficeScan also creates an encrypted file containing a copyof the sensitive data which triggered the incident and generates a hash value for

Getting Started with Data Protection
3-9
verification purposes and to ensure the integrity of the sensitive data. OfficeScan createsthe encrypted forensic files on the agent machine and then uploads the files to aspecified location on the server.
Important
• The encrypted forensic files contain highly sensitive data and administrators shouldexercise caution when granting access to these files.
• OfficeScan integrates with Control Manager to provide Control Manager users withthe DLP Incident Reviewer or DLP Compliance Officer roles the ability to access thedata within the encrypted files. For details about the DLP roles and access to theforensic file data in Control Manager, see the Control Manager Administrator’s Guide 6.0Patch 2 or later.
Modifying the Forensic Folder and Database Settings
Administrators can change the location and deletion schedule of the forensic folder, andthe maximum size of files that agents upload by modifying OfficeScan’s INI files.
WARNING!
Changing the location of the forensic folder after logging Data Loss Prevention incidentscan cause a disconnect between the database data and the location of existing forensic files.Trend Micro recommends manually migrating any existing forensic files to the newforensic folder after modifying the forensic folder location.
The following table outlines the server settings available in the <Server installation folder>\PCCSRV\Private\ofcserver.ini file located on the OfficeScan server.
TABLE 3-1. Forensic Folder Server Settings in PCCSRV\Private\ofcserver.ini
OBJECTIVE INI SETTING VALUES
Enabling theuser-definedforensic folderlocation
[INI_IDLP_SECTION]
EnableUserDefinedUploadFolder
0: Disable (default)
1: Enable

OfficeScan™ 11.0 Administrator’s Guide
3-10
OBJECTIVE INI SETTING VALUES
Configuringthe user-definedforensic folderlocation
[INI_IDLP_SECTION]
UserDefinedUploadFolder
Note
• Administrators must enable theEnableUserDefinedUploadFoldersetting before Data Loss Preventionapplies this setting.
• The default location of the forensicfolder is:
<Server installation folder>\PCCSRV\Private\DLPForensicData
• The user-defined forensic folderlocation must be a physical drive(internal or external) on the servermachine. OfficeScan does not supportmapping a network drive location.
Default value:<Please replacethis value withcustomer definedfolder path. Forexample: C:\VolumeData\OfficeScanDlpForensicData>
User-defined value:Must be thephysical location ofa drive on theserver machine
Enabling thepurging offorensic datafiles
[INI_IDLP_SECTION]
ForensicDataPurgeEnable
0: Disable
1: Enable (default)
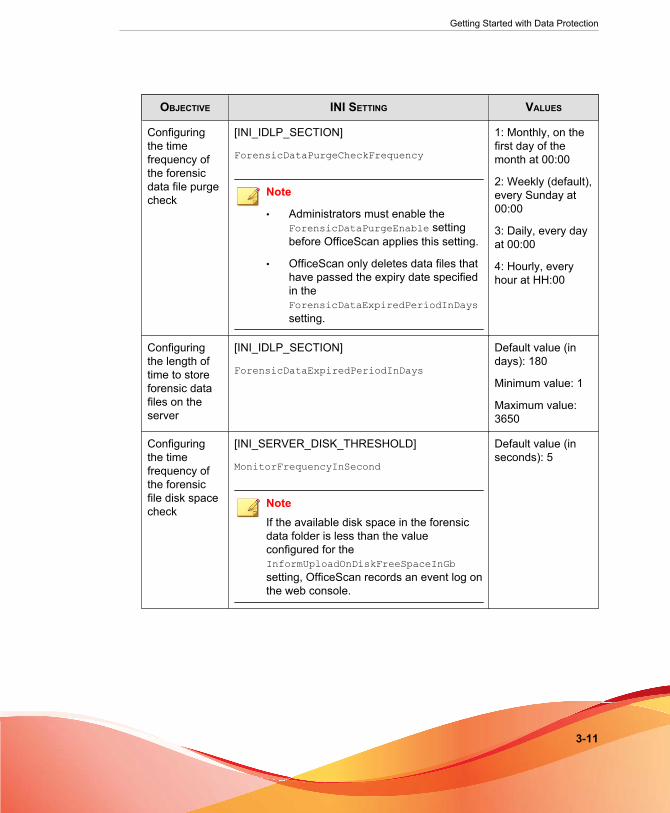
Getting Started with Data Protection
3-11
OBJECTIVE INI SETTING VALUES
Configuringthe timefrequency ofthe forensicdata file purgecheck
[INI_IDLP_SECTION]
ForensicDataPurgeCheckFrequency
Note
• Administrators must enable theForensicDataPurgeEnable settingbefore OfficeScan applies this setting.
• OfficeScan only deletes data files thathave passed the expiry date specifiedin theForensicDataExpiredPeriodInDayssetting.
1: Monthly, on thefirst day of themonth at 00:00
2: Weekly (default),every Sunday at00:00
3: Daily, every dayat 00:00
4: Hourly, everyhour at HH:00
Configuringthe length oftime to storeforensic datafiles on theserver
[INI_IDLP_SECTION]
ForensicDataExpiredPeriodInDays
Default value (indays): 180
Minimum value: 1
Maximum value:3650
Configuringthe timefrequency ofthe forensicfile disk spacecheck
[INI_SERVER_DISK_THRESHOLD]
MonitorFrequencyInSecond
NoteIf the available disk space in the forensicdata folder is less than the valueconfigured for theInformUploadOnDiskFreeSpaceInGbsetting, OfficeScan records an event log onthe web console.
Default value (inseconds): 5

OfficeScan™ 11.0 Administrator’s Guide
3-12
OBJECTIVE INI SETTING VALUES
Configuringthe uploadfrequency ofthe forensicfile disk spacecheck
[INI_SERVER_DISK_THRESHOLD]
IsapiCheckCountInRequest
NoteIf the available disk space in the forensicdata folder is less than the valueconfigured for theInformUploadOnDiskFreeSpaceInGbsetting, OfficeScan records an event log onthe web console.
Default value (innumber of files):200
Configuringthe minimumdisk spacevalue thattriggers alimited diskspacenotification
[INI_SERVER_DISK_THRESHOLD]
InformUploadOnDiskFreeSpaceInGb
NoteIf the available disk space in the forensicdata folder is less than the valueconfigured, OfficeScan records an eventlog on the web console.
Default value (inGB): 10
Configuringthe minimumspaceavailable touploadforensic datafiles fromagents
[INI_SERVER_DISK_THRESHOLD]
RejectUploadOnDiskFreeSpaceInGb
NoteIf the available disk space in the forensicdata folder is less than the valueconfigured, OfficeScan agents do notupload forensic data files to the server andOfficeScan records an event log on theweb console.
Default value (inGB): 1
The following table outlines the OfficeScan agent settings available in the <Serverinstallation folder>\PCCSRV\ofcscan.ini file located on the OfficeScan server.

Getting Started with Data Protection
3-13
TABLE 3-2. Forensic File Agent Settings in PCCSRV\ofcscan.ini
OBJECTIVE INI SETTING VALUES
Enabling theuploading offorensic datafiles to theserver
UploadForensicDataEnable 0: Disable
1: Enable (default)
Configuringthe maximumsize of filesthat theOfficeScanagent uploadsto the server
UploadForensicDataSizeLimitInMb
Note
The OfficeScan agent only sends files thatare less than this size to the server.
Default value (inMB): 10
Minimum value: 1
Maximum value:2048
Configuringthe length oftime to storeforensic datafiles on theOfficeScanagent
ForensicDataKeepDays
NoteThe OfficeScan agent deletes forensic datafiles that have passed the expiry datespecified every day at 11:00 am.
Default value (indays): 180
Minimum value: 1
Maximum value:3650
Configuringthe frequencyin which theOfficeScanagent checksfor serverconnectivity
ForensicDataDelayUploadFrequenceInMinutes
NoteOfficeScan agents that are unable toupload forensic files to the serverautomatically try to resend the files usingthe specified time interval.
Default value (inminutes): 5
Minimum value: 5
Maximum value: 60
Creating a Backup of Forensic DataDepending on the company’s security policy, the length of time necessary to store theforensic data information may vary greatly. In order to free disk space on the server,Trend Micro recommends performing a manual backup of the forensic folder data andforensic database.

OfficeScan™ 11.0 Administrator’s Guide
3-14
Procedure
1. Go to the forensic data folder location on the server.
• Default location: <Server installation folder>\PCCSRV\Private\DLPForensicData
• To locate the customized forensic folder location, see Configuring the user-definedforensic folder location on page 3-10.
2. Copy the folder to a new location.
3. To manually backup the forensic data database, navigate to <Server installationfolder>\PCCSRV\Private.
4. Copy the DLPForensicDataTracker.db file to a new location.
Uninstalling Data ProtectionIf you uninstall the Data Protection module from Plug-in Manager:
• All Data Loss Prevention configurations, settings, and logs are removed from theOfficeScan server.
• All Device Control configurations and settings provided by the Data Protectionmodule are removed from the server.
• The Data Protection module is removed from agents. Agent endpoints must berestarted to remove Data Protection completely.
• Data Loss Prevention policies will no longer be enforced on agents.
• Device Control will no longer monitor access to the following devices:
• Bluetooth adapters
• COM and LPT ports
• IEEE 1394 interface
• Imaging devices

Getting Started with Data Protection
3-15
• Infrared devices
• Modems
• PCMCIA card
• Print screen key
• Wireless NICs
Reinstall the Data Protection module anytime. After reinstallation, activate the licenseusing a valid Activation Code.
Uninstalling Data Protection from Plug-in Manager
Procedure
1. Open the OfficeScan web console and click Plug-ins in the main menu.
2. On the Plug-in Manager screen, go to the OfficeScan Data Protection sectionand click Uninstall.
3. Monitor the uninstallation progress. You can navigate away from the screen duringthe uninstallation.
4. Refresh the Plug-in Manager screen after the uninstallation. OfficeScan DataProtection is again available for installation.


Part IIProtecting OfficeScan Agents


4-1
Chapter 4
Using Trend Micro Smart ProtectionThis chapter discusses Trend Micro™ smart protection solutions and describes how toset up the environment required to use the solutions.
Topics include:
• About Trend Micro Smart Protection on page 4-2
• Smart Protection Services on page 4-3
• Smart Protection Sources on page 4-5
• Smart Protection Pattern Files on page 4-7
• Setting Up Smart Protection Services on page 4-12
• Using Smart Protection Services on page 4-31
OfficeScan™ 11.0 Administrator’s Guide
4-2
About Trend Micro Smart ProtectionTrend Micro™ smart protection is a next-generation cloud-agent content securityinfrastructure designed to protect customers from security risks and web threats. Itpowers both local and hosted solutions to protect users whether they are on thenetwork, at home, or on the go, using light-weight agents to access its unique in-the-cloud correlation of email, web and file reputation technologies, as well as threatdatabases. Customers’ protection is automatically updated and strengthened as moreproducts, services, and users access the network, creating a real-time neighborhoodwatch protection service for its users.
By incorporating in-the-cloud reputation, scanning, and correlation technologies, theTrend Micro smart protection solutions reduce reliance on conventional pattern filedownloads and eliminate the delays commonly associated with desktop updates.
The Need for a New SolutionIn the current approach to file-based threat handling, patterns (or definitions) requiredto protect endpoints are, for the most part, delivered on a scheduled basis. Patterns aredelivered in batches from Trend Micro to agents. When a new update is received, thevirus/malware prevention software on the agent reloads this batch of pattern definitionsfor new virus/malware risks into memory. If a new virus/malware risk emerges, thispattern once again needs to be updated partially or fully and reloaded on the agent toensure continued protection.
Over time, there has been a significant increase in the volume of unique emergingthreats. The increase in the volume of threats is projected to grow at a near-exponentialrate over the coming years. This amounts to a growth rate that far outnumbers thevolume of currently known security risks. Going forward, the volume of security risksrepresents a new type of security risk. The volume of security risks can impact serverand workstation performance, network bandwidth usage, and, in general, the overalltime it takes to deliver quality protection - or "time to protect".
A new approach to handling the volume of threats has been pioneered by Trend Microthat aims to make Trend Micro customers immune to the threat of virus/malwarevolume. The technology and architecture used in this pioneering effort leveragestechnology that off-loads the storage of virus/malware signatures and patterns to thecloud. By off-loading the storage of these virus/malware signatures to the cloud, Trend

Using Trend Micro Smart Protection
4-3
Micro is able to provide better protection to customers against the future volume ofemerging security risks.
Smart Protection ServicesSmart protection includes services that provide anti-malware signatures, webreputations, and threat databases that are stored in-the-cloud.
Smart protection services include:
• File Reputation Services: File Reputation Services off-loads a large number ofanti-malware signatures that were previously stored on agent computers to smartprotection sources. For details, see File Reputation Services on page 4-3.
• Web Reputation Services: Web Reputation Services allows local smart protectionsources to host URL reputation data that were previously hosted solely by TrendMicro. Both technologies ensure smaller bandwidth consumption when updatingpatterns or checking a URL’s validity. For details, see Web Reputation Services on page4-4.
• Smart Feedback: Trend Micro continues to harvest information anonymouslysent from Trend Micro products worldwide to proactively determine each newthreat. For details, see Smart Feedback on page 4-4.
File Reputation ServicesFile Reputation Services checks the reputation of each file against an extensive in-the-cloud database. Since the malware information is stored in the cloud, it is availableinstantly to all users. High performance content delivery networks and local cachingservers ensure minimum latency during the checking process. The cloud-agentarchitecture offers more immediate protection and eliminates the burden of patterndeployment besides significantly reducing the overall agent footprint.
Agents must be in smart scan mode to use File Reputation Services. These agents arereferred to as smart scan agents in this document. Agents that are not in smart scanmode do not use File Reputation Services and are called conventional scan agents.OfficeScan administrators can configure all or several agents to be in smart scan mode.

OfficeScan™ 11.0 Administrator’s Guide
4-4
OfficeScan must be in smart scan mode to use File Reputation Services.
Web Reputation Services
With one of the largest domain-reputation databases in the world, Trend Micro webreputation technology tracks the credibility of web domains by assigning a reputationscore based on factors such as a website's age, historical location changes andindications of suspicious activities discovered through malware behavior analysis. WebReputation Services then continues to scan sites and block users from accessing infectedones. Web Reputation features help ensure that the pages that users access are safe andfree from web threats, such as malware, spyware, and phishing scams that are designedto trick users into providing personal information. To increase accuracy and reduce falsepositives, Trend Micro Web reputation technology assigns reputation scores to specificpages or links within sites instead of classifying or blocking entire sites, since often, onlyportions of legitimate sites are hacked and reputations can change dynamically overtime.
OfficeScan agents subject to web reputation policies use Web Reputation Services.OfficeScan administrators can subject all or several agents to web reputation policies.
Smart Feedback
Trend Micro Smart Feedback provides continuous communication between TrendMicro products and its 24/7 threat research centers and technologies. Each new threatidentified through every single customer's routine reputation check automaticallyupdates all Trend Micro threat databases, blocking any subsequent customer encountersof a given threat.
By continuously processing the threat intelligence gathered through its extensive globalnetwork of customers and partners, Trend Micro delivers automatic, real-timeprotection against the latest threats and provides "better together" security, much like anautomated neighborhood watch that involves the community in the protection ofothers. Because the gathered threat information is based on the reputation of thecommunication source, not on the content of the specific communication, the privacyof a customer's personal or business information is always protected.
Samples of information sent to Trend Micro:

Using Trend Micro Smart Protection
4-5
• File checksums
• Websites accessed
• File information, including sizes and paths
• Names of executable files
You can terminate your participation to the program anytime from the web console.
Tip
You do not need to participate in Smart Feedback to protect your computers. Yourparticipation is optional and you may opt out at any time. Trend Micro recommends thatyou participate in Smart Feedback to help provide better overall protection for all TrendMicro customers.
For more information on the Smart Protection Network, visit:
http://www.smartprotectionnetwork.com
Smart Protection SourcesTrend Micro delivers File Reputation Services and Web Reputation Services toOfficeScan and smart protection sources.
Smart protection sources provide File Reputation Services by hosting the majority of thevirus/malware pattern definitions. OfficeScan agents host the remaining definitions. Theagent sends scan queries to smart protection sources if its own pattern definitionscannot determine the risk of the file. Smart protection sources determine the risk usingidentification information.
Smart protection sources provide Web Reputation Services by hosting web reputationdata previously available only through Trend Micro hosted servers. The agent sends webreputation queries to smart protection sources to check the reputation of websites that auser is attempting to access. The agent correlates a website’s reputation with the specificweb reputation policy enforced on the endpoint to determine whether access to the sitewill be allowed or blocked.

OfficeScan™ 11.0 Administrator’s Guide
4-6
The smart protection source to which the agent connects depends on the agent'slocation. Agents can connect to either Trend Micro Smart Protection Network or SmartProtection Server.
Trend Micro™ Smart Protection Network™
The Trend Micro™ Smart Protection Network™ is a next-generation cloud-clientcontent security infrastructure designed to protect customers from security risks andweb threats. It powers both on-premise and Trend Micro hosted solutions to protectusers whether they are on the network, at home, or on the go. Smart ProtectionNetwork uses lighter-weight agents to access its unique in-the-cloud correlation of email,web, and file reputation technologies, as well as threat databases. Customers’ protectionis automatically updated and strengthened as more products, services and users accessthe network, creating a real-time neighborhood watch protection service for its users.
For more information on the Smart Protection Network, visit:
http://www.smartprotectionnetwork.com
Smart Protection Server
Smart Protection Servers are for users who have access to their local corporate network.Local servers localize smart protection services to the corporate network to optimizeefficiency.
There are two types of Smart Protection Servers:
• Integrated Smart Protection Server: The OfficeScan Setup program includes anintegrated Smart Protection Server that installs on the same endpoint where theOfficeScan server is installed. After the installation, manage settings for this serverfrom the OfficeScan web console. The integrated server is intended for small-scaledeployments of OfficeScan, in which the number of agents does not exceed 3,000.For larger deployments, the standalone Smart Protection Server is required.
• Standalone Smart Protection Server: A standalone Smart Protection Serverinstalls on a VMware or Hyper-V server. The standalone server has a separatemanagement console and is not managed from the OfficeScan web console.
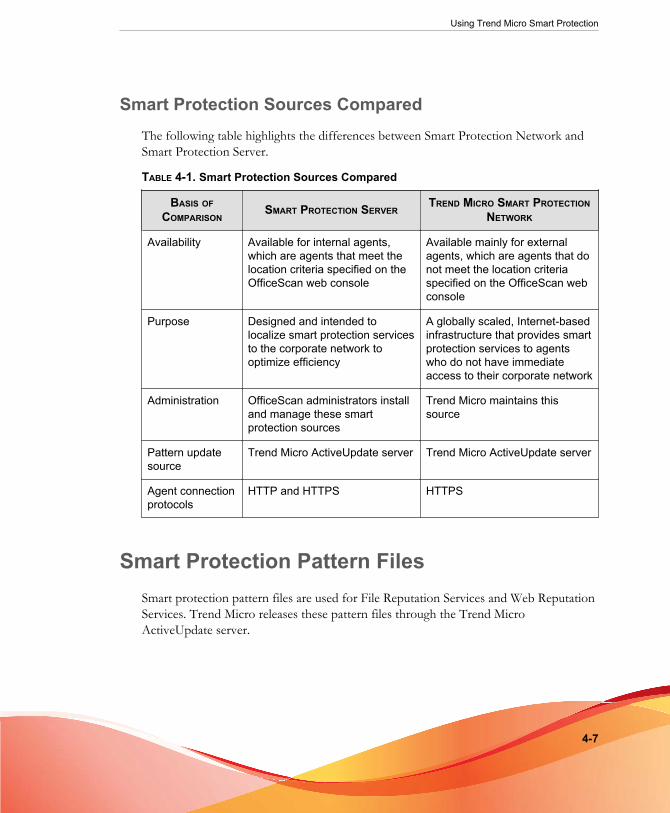
Using Trend Micro Smart Protection
4-7
Smart Protection Sources ComparedThe following table highlights the differences between Smart Protection Network andSmart Protection Server.
TABLE 4-1. Smart Protection Sources Compared
BASIS OFCOMPARISON
SMART PROTECTION SERVERTREND MICRO SMART PROTECTION
NETWORK
Availability Available for internal agents,which are agents that meet thelocation criteria specified on theOfficeScan web console
Available mainly for externalagents, which are agents that donot meet the location criteriaspecified on the OfficeScan webconsole
Purpose Designed and intended tolocalize smart protection servicesto the corporate network tooptimize efficiency
A globally scaled, Internet-basedinfrastructure that provides smartprotection services to agentswho do not have immediateaccess to their corporate network
Administration OfficeScan administrators installand manage these smartprotection sources
Trend Micro maintains thissource
Pattern updatesource
Trend Micro ActiveUpdate server Trend Micro ActiveUpdate server
Agent connectionprotocols
HTTP and HTTPS HTTPS
Smart Protection Pattern FilesSmart protection pattern files are used for File Reputation Services and Web ReputationServices. Trend Micro releases these pattern files through the Trend MicroActiveUpdate server.

OfficeScan™ 11.0 Administrator’s Guide
4-8
Smart Scan Agent Pattern
The Smart Scan Agent Pattern is updated daily and is downloaded by the OfficeScanagents’ update source (the OfficeScan server or a custom update source). The updatesource then deploys the pattern to smart scan agents.
Note
Smart scan agents are OfficeScan agents that administrators have configured to use FileReputation Services. Agents that do not use File Reputation Services are calledconventional scan agents.
Smart scan agents use the Smart Scan Agent Pattern when scanning for security risks. Ifthe pattern cannot determine the risk of the file, another pattern, called Smart ScanPattern, is leveraged.
Smart Scan Pattern
The Smart Scan Pattern is updated hourly and is downloaded by smart protectionsources. Smart scan agents do not download the Smart Scan Pattern. Agents verifypotential threats against the Smart Scan Pattern by sending scan queries to smartprotection sources.
Web Blocking List
The Web Blocking List is downloaded by smart protection sources. OfficeScan agentsthat are subject to web reputation policies do not download the Web Blocking List.
Note
Administrators can subject all or several agents to web reputation policies.
Agents subject to web reputation policies verify a website’s reputation against the WebBlocking List by sending web reputation queries to a smart protection source. The agentcorrelates the reputation data received from the smart protection source with the web

Using Trend Micro Smart Protection
4-9
reputation policy enforced on the endpoint. Depending on the policy, the agent willeither allow or block access to the site.
Smart Protection Pattern Update ProcessSmart protection pattern updates originate from the Trend Micro ActiveUpdate server.
FIGURE 4-1. Pattern update process

OfficeScan™ 11.0 Administrator’s Guide
4-10
Usage of Smart Protection PatternsThe OfficeScan agent uses the Smart Scan Agent Pattern to scan for security risks andonly queries the Smart Scan Pattern if the Smart Scan Agent Pattern cannot determinethe risk of a file. The agent queries the Web Blocking List when a user attempts toaccess a website. Advanced filtering technology enables the agent to "cache" the queryresults. This eliminates the need to send the same query more than once.
Agents that are currently in your intranet can connect to a Smart Protection Server toquery the Smart Scan Pattern or Web Blocking List. Network connection is required toconnect to the Smart Protection Server. If more than one Smart Protection Server hasbeen set up, administrators can determine the connection priority.
TipInstall several Smart Protection Servers to ensure the continuity of protection in the eventthat connection to a Smart Protection Server is unavailable.

Using Trend Micro Smart Protection
4-11
Agents that are currently not in your intranet can connect to Trend Micro SmartProtection Network for queries. Internet connection is required to connect to the SmartProtection Network.
FIGURE 4-2. Query process
Agents without access to the network or the Internet still benefit from protectionprovided by the Smart Scan Agent Pattern and the cache containing previous queryresults. The protection is reduced only when a new query is necessary and the agent,after repeated attempts, is still unable to reach any smart protection source. In this case,the agent flags the file for verification and temporarily allows access to the file. Whenconnection to a smart protection source is restored, all the files that have been flaggedare re-scanned. Then, the appropriate scan action is performed on files that have beenconfirmed as a threat.
The following table summarizes the extent of protection based on the agent’s location.

OfficeScan™ 11.0 Administrator’s Guide
4-12
TABLE 4-2. Protection Behaviors Based on Location
LOCATION PATTERN FILE AND QUERY BEHAVIOR
Access to the intranet • Pattern file: Agents download the Smart Scan AgentPattern file from the OfficeScan server or a customupdate source.
• File and web reputation queries: Agents connect tothe Smart Protection Server for queries.
Without access to theintranet but withconnection to SmartProtection Network
• Pattern file: Agents do not download the latest SmartScan Agent Pattern file unless connection to theOfficeScan server or a custom update source isavailable.
• File and web reputation queries: Agents connect toSmart Protection Network for queries.
Without access to theintranet and withoutconnection to SmartProtection Network
• Pattern file: Agents do not download the latest SmartScan Agent Pattern file unless connection to theOfficeScan server or a custom update source isavailable.
• File and web reputation queries: Agents do notreceive query results and must rely on the Smart ScanAgent Pattern and the cache containing previous queryresults.
Setting Up Smart Protection ServicesBefore agents can leverage File Reputation Services and Web Reputation Services,ensure that the smart protection environment has been properly set up. Check thefollowing:
• Smart Protection Server Installation on page 4-13
• Integrated Smart Protection Server Management on page 4-18
• Smart Protection Source List on page 4-24
• Agent Connection Proxy Settings on page 4-31

Using Trend Micro Smart Protection
4-13
• Trend Micro Network VirusWall Installations on page 4-31
Smart Protection Server Installation
You can install the integrated or standalone Smart Protection Server if the number ofagents is 1,000 or less. Install a standalone Smart Protection Server if there are morethan 1,000 agents.
Trend Micro recommends installing several Smart Protection Servers for failoverpurposes. Agents that are unable to connect to a particular server will try to connect tothe other servers you have set up.
Because the integrated server and the OfficeScan server run on the same endpoint, theendpoint’s performance may reduce significantly during peak traffic for the two servers.Consider using a standalone Smart Protection Server as the primary smart protectionsource for agents and the integrated server as a backup.
Standalone Smart Protection Server Installation
For instructions on installing and managing the standalone Smart Protection Server, seethe Smart Protection Server Installation and Upgrade Guide.
Integrated Smart Protection Server Installation
If you installed the integrated server during OfficeScan server installation:
• Enable the integrated server and configure settings for the server. For details, seeIntegrated Smart Protection Server Management on page 4-18.
• If the integrated server and OfficeScan agent exist on the same server computer,consider disabling the OfficeScan firewall. The OfficeScan firewall is intended foragent endpoint use and may affect performance when enabled on servers. Forinstructions on disabling the firewall, see Enabling or Disabling the OfficeScan Firewallon page 12-6.

OfficeScan™ 11.0 Administrator’s Guide
4-14
NoteConsider the effects of disabling the firewall and ensure that it adheres to yoursecurity plans.
TipInstall the integrated Smart Protection Server after completing the OfficeScan installationby using the Integrated Smart Protection Server Tool on page 4-14.
Integrated Smart Protection Server Tool
The Trend Micro OfficeScan Integrated Smart Protection Tool helps administrators toinstall or uninstall an Integrated Smart Protection Server after the OfficeScan serverinstallation is completed. The current OfficeScan version does not permit administratorsto install/remove an Integrated Smart Protection Server once the OfficeScan serverinstallation is complete. This tool enhances the flexibility of installation features fromprevious versions of OfficeScan.
Before installing the integrated Smart Protection Server, import the following to yourupgraded OfficeScan 11.0 server:
• Domain structures
• The following root and domain level settings:
• Scan configurations for all scan types (Manual, Real-time, Scheduled, ScanNow)
• Web Reputation settings
• Behavior Monitoring settings
• Device Control settings
• Data Loss Prevention settings
• Privileges and other settings
• Additional service settings
• Spyware/grayware approved list

Using Trend Micro Smart Protection
4-15
• Global agent settings
• Endpoint location
• Firewall policies and profiles
• Smart protection sources
• Server update schedule
• Agent update source and schedule
• Notifications
• Proxy settings
Procedure
1. Open a command prompt and go to the <Server installation folder>\PCCSRV\Admin\Utility\ISPSInstaller directory where ISPSInstaller.exe is located.
2. Run ISPSInstaller.exe using one of the following commands:
TABLE 4-3. Installer Options
COMMAND DESCRIPTION
ISPSInstaller.exe /i Installs the integrated Smart Protection Serverusing default port settings.
For details on the default port settings, see thetable below.

OfficeScan™ 11.0 Administrator’s Guide
4-16
COMMAND DESCRIPTION
ISPSInstaller.exe /i /f:[port number] /s:[portnumber] /w:[port number]
Installs the integrated Smart Protection Serverusing the ports specified, where:
• /f:[port number] represents the HTTP filereputation port
• /s:[port number] represents the HTTPSfile reputation port
• /w:[port number] represents the webreputation port
NoteAn unspecified port is automaticallyassigned the default value.
ISPSInstaller.exe /u Uninstalls the integrated Smart Protection Server
TABLE 4-4. Ports for the Integrated Smart Protection Server’s ReputationServices
WEB SERVER AND SETTINGS
PORTS FOR FILE REPUTATIONSERVICES
HTTP PORTFOR WEB
REPUTATIONSERVICESHTTP HTTPS (SSL)
Apache web server with SSLenabled
8082 4345 (notconfigurable)
5274 (notconfigurable)
Apache web server with SSLdisabled
8082 4345 (notconfigurable)
5274 (notconfigurable)
IIS default website with SSLenabled
80 443 (notconfigurable)
80 (notconfigurable)
IIS default website with SSLdisabled
80 443 (notconfigurable)
80 (notconfigurable)
IIS virtual website with SSLenabled
8080 4343(configurable)
8080(configurable)

Using Trend Micro Smart Protection
4-17
WEB SERVER AND SETTINGS
PORTS FOR FILE REPUTATIONSERVICES
HTTP PORTFOR WEB
REPUTATIONSERVICESHTTP HTTPS (SSL)
IIS virtual website with SSLdisabled
8080 4343(configurable)
8080(configurable)
3. After the installation completes, open the OfficeScan web console and verify thefollowing:
• Open the Microsoft Management Console (by typing services.msc inthe Start menu) and check that the Trend Micro Local Web ClassificationServer and Trend Micro Smart Scan Server are listed with a “Started” status.
• Open Windows Task Manager. In the Processes tab, check thatiCRCService.exe and LWCSService.exe are running,
• On the OfficeScan web console, check that the menu item Administration >Smart Protection > Integrated Server appears.
Smart Protection Server Best PracticesOptimize the performance of Smart Protection Servers by doing the following:
• Avoid performing Manual Scans and Scheduled Scans simultaneously. Stagger thescans in groups.
• Avoid configuring all agents from performing Scan Now simultaneously.
• Customize Smart Protection Servers for slower network connections, about512Kbps, by making changes to the ptngrowth.ini file.
Customizing ptngrowth.ini for the Standalone Server
Procedure
1. Open the ptngrowth.ini file in /var/tmcss/conf/.
2. Modify the ptngrowth.ini file using the recommended values below:
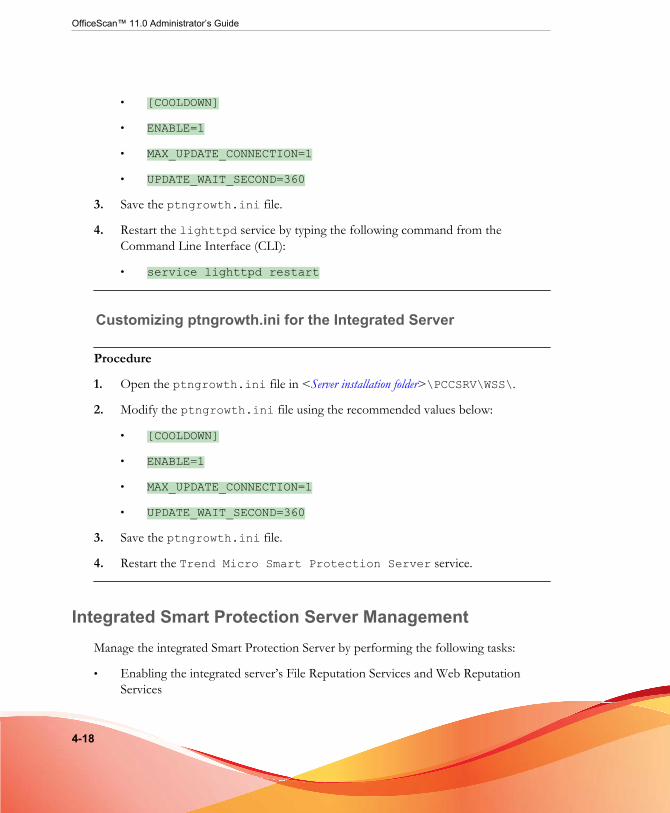
OfficeScan™ 11.0 Administrator’s Guide
4-18
• [COOLDOWN]
• ENABLE=1
• MAX_UPDATE_CONNECTION=1
• UPDATE_WAIT_SECOND=360
3. Save the ptngrowth.ini file.
4. Restart the lighttpd service by typing the following command from theCommand Line Interface (CLI):
• service lighttpd restart
Customizing ptngrowth.ini for the Integrated Server
Procedure
1. Open the ptngrowth.ini file in <Server installation folder>\PCCSRV\WSS\.
2. Modify the ptngrowth.ini file using the recommended values below:
• [COOLDOWN]
• ENABLE=1
• MAX_UPDATE_CONNECTION=1
• UPDATE_WAIT_SECOND=360
3. Save the ptngrowth.ini file.
4. Restart the Trend Micro Smart Protection Server service.
Integrated Smart Protection Server ManagementManage the integrated Smart Protection Server by performing the following tasks:
• Enabling the integrated server’s File Reputation Services and Web ReputationServices

Using Trend Micro Smart Protection
4-19
• Recording the integrated server’s addresses
• Updating the integrated server’s components
• Configuring the integrated server’s Approved/Blocked URL List
• Configuring the Virtual Analyzer C&C List settings
For details, see Configuring Integrated Smart Protection Server Settings on page 4-21.
Enabling the Integrated Server’s File Reputation Servicesand Web Reputation Services
For agents to send scan and web reputation queries to the integrated server, FileReputation Services and Web Reputation Services must be enabled. Enabling theseservices also allows the integrated server to update components from the ActiveUpdateserver.
These services are automatically enabled if you chose to install the integrated serverduring the OfficeScan server installation.
If you disable the services, be sure that you have installed standalone Smart ProtectionServers to which agents can send queries.
For details, see Configuring Integrated Smart Protection Server Settings on page 4-21.
Recording the Integrated Server’s Addresses
You will need the integrated server’s addresses when configuring the smart protectionsource list for internal agents. For details about the list, see Smart Protection Source List onpage 4-24.
When agents send scan queries to the integrated server, they identify the server by oneof two File Reputation Services addresses - HTTP or HTTPS address. Connectionthrough the HTTPS address allows for a more secure connection while HTTPconnection uses less bandwidth.
When agents send web reputation queries, they identify the integrated server by its WebReputation Services address.
OfficeScan™ 11.0 Administrator’s Guide
4-20
TipAgents managed by another OfficeScan server can also connect to this integrated server.On the other OfficeScan server’s web console, add the integrated server’s address to theSmart Protection Source list.
For details, see Configuring Integrated Smart Protection Server Settings on page 4-21.
Updating the Integrated Server’s ComponentsThe integrated server updates the following components:
• Smart Scan Pattern: OfficeScan agents verify potential threats against the SmartScan Pattern by sending scan queries to the integrated server.
• Web Blocking List: OfficeScan agents subject to web reputation policies verify awebsite’s reputation against the Web Blocking List by sending web reputationqueries to the integrated server.
You can manually update these components or configure an update schedule. Theintegrated server downloads the components from the ActiveUpdate server.
NoteA pure IPv6 integrated server cannot update directly from Trend Micro ActiveUpdateServer. A dual-stack proxy server that can convert IP addresses, such as DeleGate, isrequired to allow the integrated server to connect to the ActiveUpdate server.
For details, see Configuring Integrated Smart Protection Server Settings on page 4-21.
Integrated Server’s Approved/Blocked URL ListConfigurationAgents maintain their own approved/blocked URL list. Configure the list for agentswhen you set up web reputation policies (see Web Reputation Policies on page 11-5 fordetails). Any URL in the agent’s list will automatically be allowed or blocked.
The integrated server has its own approved/blocked URL list. If a URL is not in theagent’s list, the agent sends a web reputation query to the integrated server (if the

Using Trend Micro Smart Protection
4-21
integrated server has been assigned as a smart protection source). If the URL is found inthe integrated server’s approved/blocked URL list, the integrated server notifies theagent to allow or block the URL.
NoteThe blocked URL list has a higher priority than the Web Blocking List.
To add URLs to the integrated server’s approved/blocked list, import a list from astandalone Smart Protection Server. It is not possible to add URLs manually.
For details, see Configuring Integrated Smart Protection Server Settings on page 4-21.
Deep Discovery Advisor and Virtual Analyzer ConnectionSettingsConfigure the Virtual Analyzer C&C list settings to establish a connection between theintegrated Smart Protection Server and the Deep Discovery Advisor server. The DeepDiscovery Advisor's virtual analyzer creates the Virtual Analyzer C&C list which theSmart Protection Server stores for use by OfficeScan.
After establishing a successful connection to the Deep Discovery Advisor server, enablethe Virtual Analyzer C&C list to monitor C&C callbacks made to servers previouslyidentified by other agents on the network.
For details, see Configuring Integrated Smart Protection Server Settings on page 4-21.
Configuring Integrated Smart Protection Server Settings
Procedure
1. Go to Administration > Smart Protection > Integrated Server.
2. Select Enable File Reputation Services.
3. Select the protocol (HTTP or HTTPS) that agents will use when sending scanqueries to the integrated server.
4. Select Enable Web Reputation Services.

OfficeScan™ 11.0 Administrator’s Guide
4-22
5. Record the integrated server’s addresses found under the Server Address column.
6. To update the integrated server’s components:
• View the current versions of the Smart Scan Pattern and Web Blocking List.If an update is available, click Update Now. The update result displays ontop of the screen.
• To update the pattern automatically:
a. Select Enable scheduled updates.
b. Choose whether to update hourly or every 15 minutes.
c. Select an update source under File Reputation Services. The SmartScan Pattern will be updated from this source.
d. Select an update source under Web Reputation Services. The WebBlocking List will be updated from this source.
Note
• If you choose the ActiveUpdate server as the update source, ensure that theserver has Internet connection and, if you are using a proxy server, test ifInternet connection can be established using the proxy settings. See Proxy forOfficeScan Server Updates on page 6-19 for details.
• If you choose a custom update source, set up the appropriate environment andupdate resources for this update source. Also ensure that there is a functionalconnection between the server computer and this update source. If you needassistance setting up an update source, contact your support provider.
7. To configure the integrated server’s Approved/Blocked List:
a. Click Import to populate the list with URLs from a pre-formatted .csv file.You can obtain the .csv file from a standalone Smart Protection Server.
b. If you have an existing list, click Export to save the list to a .csv file.

Using Trend Micro Smart Protection
4-23
8. Note
• Contact the Deep Discovery Advisor administrator to obtain the server name orIP address, port number, and a valid API key.
• This version of OfficeScan only supports Deep Discovery Advisor 3.0 and later.
To configure the Deep Discovery Advisor server's Virtual Analyzer connection:
a. Type the server name or IP address of the Deep Discovery Advisor server.
Note
The server name supports FQDN formats and the IP address supports IPv4format. The server address only supports HTTPS protocol.
b. Type the API key.
c. Click Register to connect to the Deep Discovery Advisor server.
Note
Administrators can test the connection to the server before registering to theserver.
d. Select Enable Virtual Analyzer C&C list to allow OfficeScan to use thecustom C&C list analyzed by the local Deep Discovery Advisor server.
Note
The Enable Virtual Analyzer C&C list option is only available afterestablishing a successful connection to the Deep Discovery Advisor server.
Administrators can manually synchronize with the Deep Discovery Advisor at anytime by clicking the Sync Now button.
9. Click Save.
OfficeScan™ 11.0 Administrator’s Guide
4-24
Smart Protection Source ListAgents send queries to smart protection sources when scanning for security risks anddetermining a website’s reputation.
IPv6 Support for Smart Protection Sources
A pure IPv6 agent cannot send queries directly to pure IPv4 sources, such as:
• Smart Protection Server 2.0 (integrated or standalone)
NoteIPv6 support for Smart Protection Server starts in version 2.5.
• Trend Micro Smart Protection Network
Similarly, a pure IPv4 agent cannot send queries to pure IPv6 Smart Protection Servers.
A dual-stack proxy server that can convert IP addresses, such as DeleGate, is required toallow agents to connect to the sources.
Smart Protection Sources and Endpoint Location
The smart protection source to which the agent connects depends on the agentendpoint’s location.
For details on configuring location settings, see Endpoint Location on page 14-2.
TABLE 4-5. Smart Protection Sources by Location
LOCATION SMART PROTECTION SOURCES
External External agents send scan and web reputation queries to Trend MicroSmart Protection Network.
Using Trend Micro Smart Protection
4-25
LOCATION SMART PROTECTION SOURCES
Internal Internal agents send scan and web reputation queries to SmartProtection Servers or Trend Micro Smart Protection Network.
If you have installed Smart Protection Servers, configure the smartprotection source list on the OfficeScan web console. An internal agentpicks a server from the list if it needs to make a query. If the agent isunable to connect to the first server, it picks another server on the list.
TipAssign a standalone Smart Protection Server as the primaryscan source and the integrated server as a backup. This reducesthe traffic directed to the endpoint that hosts the OfficeScanserver and integrated server. The standalone server can alsoprocess more queries.
You can configure either the standard or custom list of smart protectionsources. The standard list is used by all internal agents. A custom listdefines an IP address range. If an internal agent’s IP address is withinthe range, the agent uses the custom list.
Configuring the Standard List of Smart Protection Sources
Procedure
1. Go to Administration > Smart Protection > Smart Protection Sources.
2. Click the Internal Agents tab.
3. Select Use the standard list (for all internal agents).
4. Click the standard list link.
A new screen opens.
5. Click Add.
A new screen opens.
6. Specify the Smart Protection Server’s host name or IPv4/IPv6 address. If youspecify an IPv6 address, enclose it in parentheses.

OfficeScan™ 11.0 Administrator’s Guide
4-26
Note
Specify the host name if there are IPv4 and IPv6 agents connecting to the SmartProtection Server.
7. Select File Reputation Services. Agents send scan queries using the HTTP orHTTPS protocol. HTTPS allows for a more secure connection while HTTP usesless bandwidth.
a. If you want agents to use HTTP, type the server’s listening port for HTTPrequests. If you want agents to use HTTPS, select SSL and type the server’slistening port for HTTPS requests.
b. Click Test Connection to check if connection to the server can beestablished.
Tip
The listening ports form part of the server address. To obtain the server address:
For the integrated server, open the OfficeScan web console and go toAdministration > Smart Protection > Integrated Server.
For the standalone server, open the standalone server's console and go to theSummary screen.
8. Select Web Reputation Services. Agents send web reputation queries using theHTTP protocol. HTTPS is not supported.
a. Type the server’s listening port for HTTP requests.
b. Click Test Connection to check if connection to the server can beestablished.
9. Click Save.
The screen closes.
10. Add more servers by repeating the previous steps.
11. On top of the screen, select Order or Random.
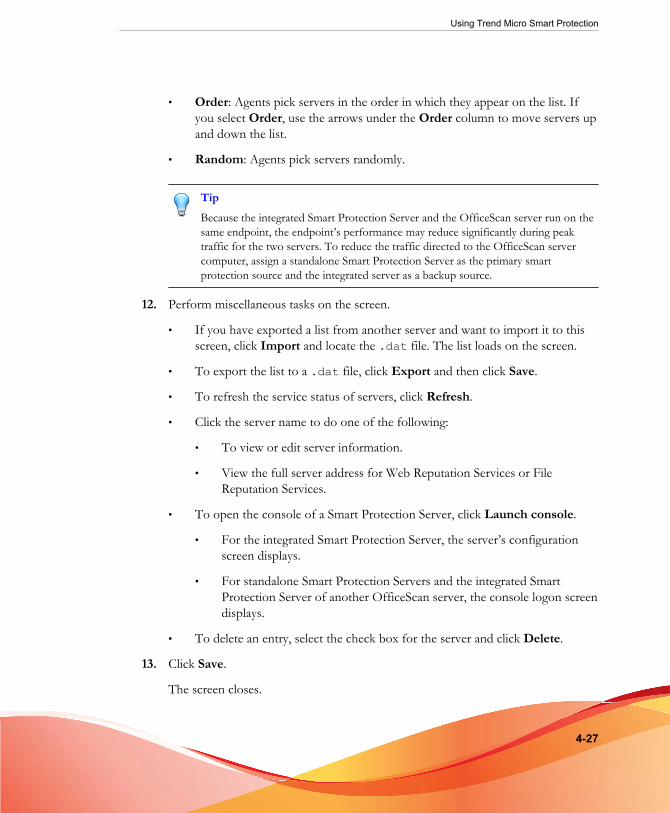
Using Trend Micro Smart Protection
4-27
• Order: Agents pick servers in the order in which they appear on the list. Ifyou select Order, use the arrows under the Order column to move servers upand down the list.
• Random: Agents pick servers randomly.
TipBecause the integrated Smart Protection Server and the OfficeScan server run on thesame endpoint, the endpoint’s performance may reduce significantly during peaktraffic for the two servers. To reduce the traffic directed to the OfficeScan servercomputer, assign a standalone Smart Protection Server as the primary smartprotection source and the integrated server as a backup source.
12. Perform miscellaneous tasks on the screen.
• If you have exported a list from another server and want to import it to thisscreen, click Import and locate the .dat file. The list loads on the screen.
• To export the list to a .dat file, click Export and then click Save.
• To refresh the service status of servers, click Refresh.
• Click the server name to do one of the following:
• To view or edit server information.
• View the full server address for Web Reputation Services or FileReputation Services.
• To open the console of a Smart Protection Server, click Launch console.
• For the integrated Smart Protection Server, the server’s configurationscreen displays.
• For standalone Smart Protection Servers and the integrated SmartProtection Server of another OfficeScan server, the console logon screendisplays.
• To delete an entry, select the check box for the server and click Delete.
13. Click Save.
The screen closes.
OfficeScan™ 11.0 Administrator’s Guide
4-28
14. Click Notify All Agents.
Configuring Custom Lists of Smart Protection Sources
Procedure
1. Go to Administration > Smart Protection > Smart Protection Sources.
2. Click the Internal Agents tab.
3. Select Use custom lists based on agent IP address.
4. (Optional) Select Use the standard list when all servers on the custom lists areunavailable.
5. Click Add.
A new screen opens.
6. In the IP Range section, specify an IPv4 or IPv6 address range, or both.
NoteAgents with an IPv4 address can connect to pure IPv4 or dual-stack Smart ProtectionServers. Agents with an IPv6 address can connect to pure IPv6 or dual-stack SmartProtection Servers. Agents with both IPv4 and IPv6 addresses can connect to anySmart Protection Server.
7. In the Proxy Setting section, specify proxy settings agents will use to connect tothe Smart Protection Servers.
a. Select Use a proxy server for agent and Smart Protection Servercommunication.
b. Specify the proxy server name or IPv4/IPv6 address, and port number.
c. If the proxy server requires authentication, type the user name and password.
8. In the Custom Smart Protection Server List, add the Smart Protection Servers.
a. Specify the Smart Protection Server’s host name or IPv4/IPv6 address. If youspecify an IPv6 address, enclose it in parentheses.
Using Trend Micro Smart Protection
4-29
NoteSpecify the host name if there are IPv4 and IPv6 agents connecting to theSmart Protection Server.
b. Select File Reputation Services. Agents send scan queries using the HTTPor HTTPS protocol. HTTPS allows for a more secure connection whileHTTP uses less bandwidth.
i. If you want agents to use HTTP, type the server’s listening port forHTTP requests. If you want agents to use HTTPS, select SSL and typethe server’s listening port for HTTPS requests.
ii. Click Test Connection to check if connection to the server can beestablished.
TipThe listening ports form part of the server address. To obtain the serveraddress:
For the integrated server, open the OfficeScan web console and go toAdministration > Smart Protection > Integrated Server.
For the standalone server, open the standalone server's console and go tothe Summary screen.
c. Select Web Reputation Services. Agents send web reputation queries usingthe HTTP protocol. HTTPS is not supported.
i. Type the server’s listening port for HTTP requests.
ii. Click Test Connection to check if connection to the server can beestablished.
d. Click Add to the List.
e. Add more servers by repeating the previous steps.
f. Select Order or Random.
• Order: Agents pick servers in the order in which they appear on the list.If you select Order, use the arrows under the Order column to moveservers up and down the list.

OfficeScan™ 11.0 Administrator’s Guide
4-30
• Random: Agents pick servers randomly.
Tip
Because the integrated Smart Protection Server and the OfficeScan server runon the same computer, the computer’s performance may reduce significantlyduring peak traffic for the two servers. To reduce the traffic directed to theOfficeScan server computer, assign a standalone Smart Protection Server as theprimary smart protection source and the integrated server as a backup source.
g. Perform miscellaneous tasks in the screen.
• To refresh the service status of servers, click Refresh.
• To open the console of a Smart Protection Server, click Launchconsole.
• For the integrated Smart Protection Server, the server’sconfiguration screen displays.
• For standalone Smart Protection Servers and the integrated SmartProtection Server of another OfficeScan server, the console logonscreen displays.
• To delete an entry, click Delete ( ).
9. Click Save.
The screen closes. The list you just added appears as an IP range link under the IPRange table.
10. Repeat step 4 to step 8 to add more custom lists.
11. Perform miscellaneous tasks in the screen.
• To modify a list, click the IP range link and then modify the settings in thescreen that opens.
• To export the list to a .dat file, click Export and then click Save.
• If you have exported a list from another server and want to import it to thisscreen, click Import and locate the .dat file. The list loads on the screen.
Using Trend Micro Smart Protection
4-31
12. Click Notify All Agents.
Agent Connection Proxy SettingsIf connection to the Smart Protection Network requires proxy authentication, specifyauthentication credentials. For details, see External Proxy for OfficeScan Agents on page14-47.
Configure internal proxy settings that agents will use when connecting to a SmartProtection Server. For details, see Internal Proxy for OfficeScan Agents on page 14-46.
Endpoint Location SettingsOfficeScan includes a location awareness feature that identifies the agent computer’slocation and determines whether the agent connects to the Smart Protection Network orSmart Protection Server. This ensures that agents remain protected regardless of theirlocation.
To configure location settings, see Endpoint Location on page 14-2.
Trend Micro Network VirusWall InstallationsIf you have Trend Micro™ Network VirusWall™ Enforcer installed:
• Install a hot fix (build 1047 for Network VirusWall Enforcer 2500 and build 1013for Network VirusWall Enforcer 1200).
• Update the OPSWAT engine to version 2.5.1017 to enable the product to detectthe agent’s scan method.
Using Smart Protection ServicesAfter the smart protection environment has been properly set up, agents are ready to useFile Reputation Services and Web Reputation Services. You can also begin to configureSmart Feedback settings.
OfficeScan™ 11.0 Administrator’s Guide
4-32
NoteFor instructions on setting up the smart protection environment, see Setting Up SmartProtection Services on page 4-12.
To benefit from protection provided by File Reputation Services, agents must use thescan method called smart scan. For details about smart scan and how to enable smartscan on agents, see Scan Method Types on page 7-8.
To allow OfficeScan agents to use Web Reputation Services, configure web reputationpolicies. For details, see Web Reputation Policies on page 11-5.
NoteSettings for scan methods and web reputation policies are granular. Depending on yourrequirements, you can configure settings that will apply to all agents or configure separatesettings for individual agents or agent groups.
For instructions on configuring Smart Feedback, see Smart Feedback on page 13-55.

5-1
Chapter 5
Installing the OfficeScan AgentThis chapter describes Trend Micro™ OfficeScan™ system requirements andOfficeScan agent installation procedures.
For details on upgrading OfficeScan agent, see the OfficeScan Installation and UpgradeGuide.
Topics include:
• OfficeScan Agent Fresh Installations on page 5-2
• Installation Considerations on page 5-2
• Deployment Considerations on page 5-10
• Migrating to the OfficeScan Agent on page 5-61
• Post-installation on page 5-65
• OfficeScan Agent Uninstallation on page 5-68

OfficeScan™ 11.0 Administrator’s Guide
5-2
OfficeScan Agent Fresh InstallationsThe OfficeScan agent can be installed on computers running Microsoft Windowsplatforms. OfficeScan is also compatible with various third-party products.
Visit the following website for a complete list of system requirements and compatiblethird-party products:
http://docs.trendmicro.com/en-us/enterprise/officescan.aspx
Installation ConsiderationsBefore installing agents, consider the following:
TABLE 5-1. Agent Installation Considerations
CONSIDERATION DESCRIPTION
Windowsfeature support
Some OfficeScan agent features are not available on certain Windowsplatforms.
IPv6 support The OfficeScan agent can be installed on dual-stack or pure IPv6agents. However:
• Some of the Windows operating systems to which the OfficeScanagent can be installed do not support IPv6 addressing.
• For some of the installation methods, there are specialrequirements to install the OfficeScan agent successfully.
OfficeScanagent IPaddresses
For agents with both IPv4 and IPv6 addresses, you can choose whichIP address will be used when the agent registers to the server.

Installing the OfficeScan Agent
5-3
CONSIDERATION DESCRIPTION
Exception lists Ensure that exception lists for the following features have beenconfigured properly:
• Behavior Monitoring: Add critical endpoint applications to theApproved Programs list to prevent the OfficeScan agent fromblocking these applications. For more information, see BehaviorMonitoring Exception List on page 8-5.
• Web Reputation: Add websites that you consider safe to theApproved URL List to prevent the OfficeScan agent from blockingaccess to the websites. For more information, see WebReputation Policies on page 11-5.
OfficeScan Agent Features
The OfficeScan agent features available on the endpoint depend on the endpoint’soperating system.
TABLE 5-2. OfficeScan Agent Features on Server Platforms
FEATURE
WINDOWS OPERATING SYSTEM
SERVER 2003 SERVER 2008/SERVER CORE 2008
SERVER 2012/SERVER CORE 2012
Manual Scan, Real-time Scan, andScheduled Scan
Yes Yes Yes
Component update(manual and scheduledupdate)
Yes Yes Yes
Update Agent Yes Yes Yes
Web reputation Yes but disabledby default duringserver installation
Yes but disabledby default duringserver installation
Yes but disabledby default duringserver installationand limited supportfor Windows UImode
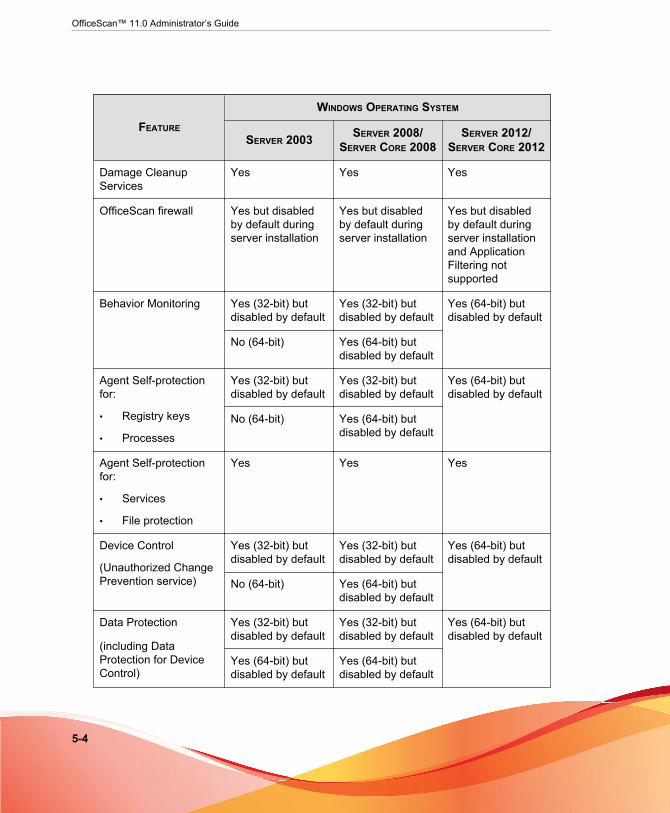
OfficeScan™ 11.0 Administrator’s Guide
5-4
FEATURE
WINDOWS OPERATING SYSTEM
SERVER 2003 SERVER 2008/SERVER CORE 2008
SERVER 2012/SERVER CORE 2012
Damage CleanupServices
Yes Yes Yes
OfficeScan firewall Yes but disabledby default duringserver installation
Yes but disabledby default duringserver installation
Yes but disabledby default duringserver installationand ApplicationFiltering notsupported
Behavior Monitoring Yes (32-bit) butdisabled by default
Yes (32-bit) butdisabled by default
Yes (64-bit) butdisabled by default
No (64-bit) Yes (64-bit) butdisabled by default
Agent Self-protectionfor:
• Registry keys
• Processes
Yes (32-bit) butdisabled by default
Yes (32-bit) butdisabled by default
Yes (64-bit) butdisabled by default
No (64-bit) Yes (64-bit) butdisabled by default
Agent Self-protectionfor:
• Services
• File protection
Yes Yes Yes
Device Control
(Unauthorized ChangePrevention service)
Yes (32-bit) butdisabled by default
Yes (32-bit) butdisabled by default
Yes (64-bit) butdisabled by default
No (64-bit) Yes (64-bit) butdisabled by default
Data Protection
(including DataProtection for DeviceControl)
Yes (32-bit) butdisabled by default
Yes (32-bit) butdisabled by default
Yes (64-bit) butdisabled by default
Yes (64-bit) butdisabled by default
Yes (64-bit) butdisabled by default

Installing the OfficeScan Agent
5-5
FEATURE
WINDOWS OPERATING SYSTEM
SERVER 2003 SERVER 2008/SERVER CORE 2008
SERVER 2012/SERVER CORE 2012
POP3 mail scan Yes Yes Yes
Agent Plug-in Manager Yes Yes Yes
Roaming mode Yes Yes (Server)
No (Server Core)
Yes
Smart Feedback Yes Yes Yes
TABLE 5-3. OfficeScan Agent Features on Desktop Platforms
FEATURE
WINDOWS OPERATING SYSTEM
XP VISTA WINDOWS 7 WINDOWS8/8.1
Manual Scan, Real-time Scan, andScheduled Scan
Yes Yes Yes Yes
Component update(manual andscheduled update)
Yes Yes Yes Yes
Update Agent Yes Yes Yes Yes
Web reputation Yes Yes Yes Yes but onlylimitedsupport forWindows UImode
Damage CleanupServices
Yes Yes Yes Yes
OfficeScan firewall Yes Yes Yes Yes butApplicationFiltering notsupported

OfficeScan™ 11.0 Administrator’s Guide
5-6
FEATURE
WINDOWS OPERATING SYSTEM
XP VISTA WINDOWS 7 WINDOWS8/8.1
Behavior Monitoring Yes (32-bit) Yes (32-bit) Yes (32-bit) Yes (32-bit)
No (64-bit) Yes (64-bit)
Vista 64-bitsupportrequires SP1or SP2
Yes (64-bit) Yes (64-bit)
Agent Self-protectionfor:
• Registry keys
• Processes
Yes (32-bit) Yes (32-bit) Yes (32-bit) Yes (32-bit)
No (64-bit) Yes (64-bit)
Vista 64-bitsupportrequires SP1or SP2
Yes (64-bit) Yes (64-bit)
Agent Self-protectionfor:
• Services
• File protection
Yes Yes Yes Yes
Device Control
(UnauthorizedChange Preventionservice)
Yes (32-bit) Yes (32-bit) Yes (32-bit) Yes (32-bit)
No (64-bit) Yes (64-bit)
Vista 64-bitsupportrequires SP1or SP2
Yes (64-bit) Yes (64-bit)
Data Protection
(including DataProtection for DeviceControl)
Yes (32-bit) Yes (32-bit) Yes (32-bit) Yes (32-bit) indesktop mode
Yes (64-bit) Yes (64-bit) Yes (64-bit) Yes (64-bit) indesktop mode
POP3 mail scan Yes Yes Yes Yes
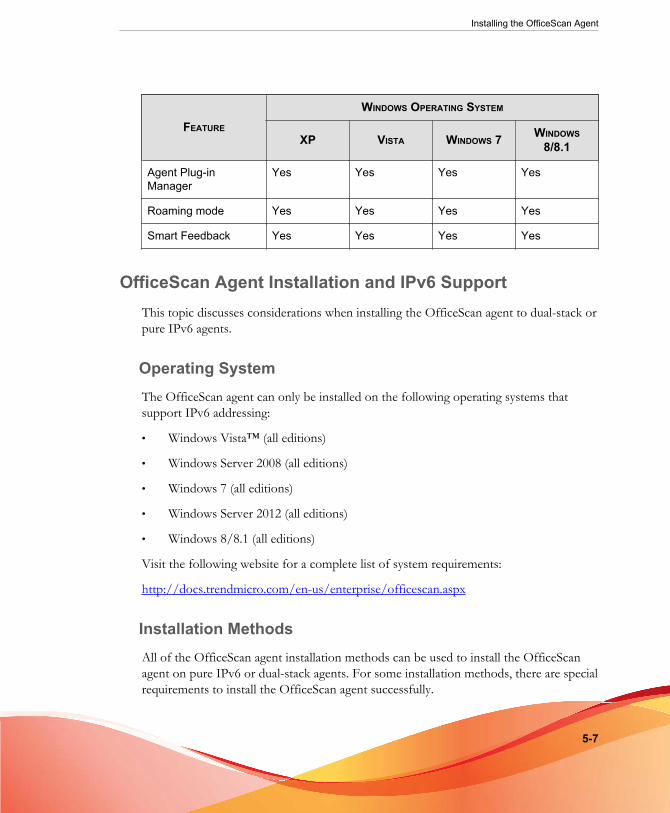
Installing the OfficeScan Agent
5-7
FEATURE
WINDOWS OPERATING SYSTEM
XP VISTA WINDOWS 7 WINDOWS8/8.1
Agent Plug-inManager
Yes Yes Yes Yes
Roaming mode Yes Yes Yes Yes
Smart Feedback Yes Yes Yes Yes
OfficeScan Agent Installation and IPv6 SupportThis topic discusses considerations when installing the OfficeScan agent to dual-stack orpure IPv6 agents.
Operating SystemThe OfficeScan agent can only be installed on the following operating systems thatsupport IPv6 addressing:
• Windows Vista™ (all editions)
• Windows Server 2008 (all editions)
• Windows 7 (all editions)
• Windows Server 2012 (all editions)
• Windows 8/8.1 (all editions)
Visit the following website for a complete list of system requirements:
http://docs.trendmicro.com/en-us/enterprise/officescan.aspx
Installation MethodsAll of the OfficeScan agent installation methods can be used to install the OfficeScanagent on pure IPv6 or dual-stack agents. For some installation methods, there are specialrequirements to install the OfficeScan agent successfully.
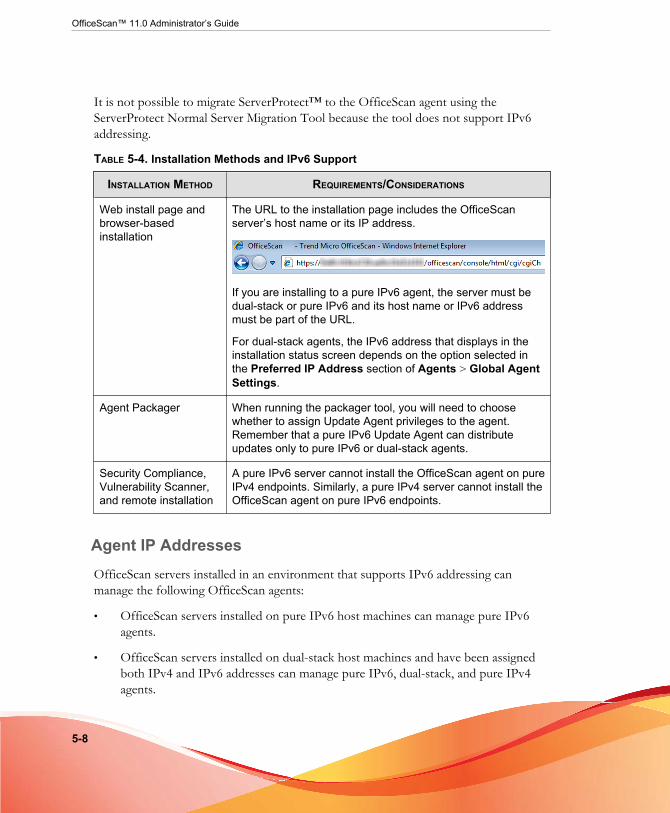
OfficeScan™ 11.0 Administrator’s Guide
5-8
It is not possible to migrate ServerProtect™ to the OfficeScan agent using theServerProtect Normal Server Migration Tool because the tool does not support IPv6addressing.
TABLE 5-4. Installation Methods and IPv6 Support
INSTALLATION METHOD REQUIREMENTS/CONSIDERATIONS
Web install page andbrowser-basedinstallation
The URL to the installation page includes the OfficeScanserver’s host name or its IP address.
If you are installing to a pure IPv6 agent, the server must bedual-stack or pure IPv6 and its host name or IPv6 addressmust be part of the URL.
For dual-stack agents, the IPv6 address that displays in theinstallation status screen depends on the option selected inthe Preferred IP Address section of Agents > Global AgentSettings.
Agent Packager When running the packager tool, you will need to choosewhether to assign Update Agent privileges to the agent.Remember that a pure IPv6 Update Agent can distributeupdates only to pure IPv6 or dual-stack agents.
Security Compliance,Vulnerability Scanner,and remote installation
A pure IPv6 server cannot install the OfficeScan agent on pureIPv4 endpoints. Similarly, a pure IPv4 server cannot install theOfficeScan agent on pure IPv6 endpoints.
Agent IP AddressesOfficeScan servers installed in an environment that supports IPv6 addressing canmanage the following OfficeScan agents:
• OfficeScan servers installed on pure IPv6 host machines can manage pure IPv6agents.
• OfficeScan servers installed on dual-stack host machines and have been assignedboth IPv4 and IPv6 addresses can manage pure IPv6, dual-stack, and pure IPv4agents.

Installing the OfficeScan Agent
5-9
After you install or upgrade agents, the agents register to the server using an IP address.
• Pure IPv6 agents register using their IPv6 address.
• Pure IPv4 agents register using their IPv4 address.
• Dual-stack agents register using either their IPv4 or IPv6 address. You can choosethe IP address that these agents will use.
Configuring the IP Address that Dual-stack Agents Use WhenRegistering to the Server
This setting is only available on dual-stack OfficeScan servers and is applied only bydual-stack agents.
Procedure
1. Go to Agents > Global Agent Settings.
2. Go to the Preferred IP Address section.
3. Choose from the following options:
• IPv4 only: Agents use their IPv4 address.
• IPv4 first, then IPv6: Agents use their IPv4 address first. If the agent cannotregister using its IPv4 address, it uses its IPv6 address. If registration isunsuccessful using both IP addresses, the agent retries using the IP addresspriority for this selection.
• IPv6 first, then IPv4: Agents use their IPv6 address first. If the agent cannotregister using its IPv6 address, it uses its IPv4 address. If registration isunsuccessful using both IP addresses, the agent retries using the IP addresspriority for this selection.
4. Click Save.

OfficeScan™ 11.0 Administrator’s Guide
5-10
Deployment ConsiderationsThis section provides a summary of the different OfficeScan agent installation methodsto perform a fresh installation of the OfficeScan agent. All installation methods requirelocal administrator rights on the target computers.
If you are installing agents and want to enable IPv6 support, read the guidelines inOfficeScan Agent Installation and IPv6 Support on page 5-7.
TABLE 5-5. Deployment Considerations for Installation
INSTALLATIONMETHOD/ OPERATING
SYSTEM SUPPORT
DEPLOYMENT CONSIDERATIONS
WANDEPLOY
MENT
CENTRALLY
MANAGED
REQUIRES USERINTERVE
NTION
REQUIRES ITRESOU
RCE
MASSDEPLOYM
ENT
BANDWIDTHCONSUMED
Web install page
Supported on alloperating systemsexcept WindowsServer Core 2008and Windows 8/8.1/Server 2012/ ServerCore 2012 inWindows UI mode
No No Yes No No High

Installing the OfficeScan Agent
5-11
INSTALLATIONMETHOD/ OPERATING
SYSTEM SUPPORT
DEPLOYMENT CONSIDERATIONS
WANDEPLOY
MENT
CENTRALLY
MANAGED
REQUIRES USERINTERVE
NTION
REQUIRES ITRESOU
RCE
MASSDEPLOYM
ENT
BANDWIDTHCONSUMED
Browser-basedinstallations
Supported on alloperating systems
NoteNotsupported onWindows 8,8.1, orWindowsServer 2012operating inWindows UImode.
No No Yes Yes No High, ifinstallationsstart at thesame time
UNC-basedinstallations
Supported on alloperating systems
No No Yes Yes No High, ifinstallationsstart at thesame time

OfficeScan™ 11.0 Administrator’s Guide
5-12
INSTALLATIONMETHOD/ OPERATING
SYSTEM SUPPORT
DEPLOYMENT CONSIDERATIONS
WANDEPLOY
MENT
CENTRALLY
MANAGED
REQUIRES USERINTERVE
NTION
REQUIRES ITRESOU
RCE
MASSDEPLOYM
ENT
BANDWIDTHCONSUMED
Remoteinstallations
Supported on alloperating systemsexcept:
• Windows VistaHome Basicand HomePremiumEditions
• Windows XPHome Edition
• Windows 7Home Basic/Home Premium
• Windows 8/8.1(basicversions)
No Yes No Yes No High
Login Script Setup
Supported on alloperating systems
No No Yes Yes No High, ifinstallationsstart at thesame time
Agent Packager
Supported on alloperating systems
No No Yes Yes No Low, ifscheduled

Installing the OfficeScan Agent
5-13
INSTALLATIONMETHOD/ OPERATING
SYSTEM SUPPORT
DEPLOYMENT CONSIDERATIONS
WANDEPLOY
MENT
CENTRALLY
MANAGED
REQUIRES USERINTERVE
NTION
REQUIRES ITRESOU
RCE
MASSDEPLOYM
ENT
BANDWIDTHCONSUMED
Agent Packager(MSI packagedeployed throughMicrosoft SMS)
Supported on alloperating systems
Yes Yes Yes/No Yes Yes Low, ifscheduled
Agent Packager(MSI packagedeployed throughActive Directory)
Supported on alloperating systems
Yes Yes Yes/No Yes Yes High, ifinstallationsstart at thesame time
Agent disk image
Supported on alloperating systems
No No No Yes No Low

OfficeScan™ 11.0 Administrator’s Guide
5-14
INSTALLATIONMETHOD/ OPERATING
SYSTEM SUPPORT
DEPLOYMENT CONSIDERATIONS
WANDEPLOY
MENT
CENTRALLY
MANAGED
REQUIRES USERINTERVE
NTION
REQUIRES ITRESOU
RCE
MASSDEPLOYM
ENT
BANDWIDTHCONSUMED
Trend MicroVulnerabilityScanner (TMVS)
Supported on alloperating systemsexcept:
• Windows VistaHome Basicand HomePremiumEditions
• Windows XPHome Edition
• Windows 8/8.1(basicversions)
No Yes No Yes No High

Installing the OfficeScan Agent
5-15
INSTALLATIONMETHOD/ OPERATING
SYSTEM SUPPORT
DEPLOYMENT CONSIDERATIONS
WANDEPLOY
MENT
CENTRALLY
MANAGED
REQUIRES USERINTERVE
NTION
REQUIRES ITRESOU
RCE
MASSDEPLOYM
ENT
BANDWIDTHCONSUMED
SecurityComplianceinstallations
Supported on alloperating systemsexcept:
• Windows VistaHome Basicand HomePremiumEditions
• Windows XPHome Edition
• Windows 7Home Basic/Home Premium
• Windows 8/8.1(basicversions)
No Yes No Yes No High
Web Install Page InstallationsUsers can install the OfficeScan agent program from the web install page if you installedthe OfficeScan server to endpoints running the following platforms:
• Windows Server 2003 with Internet Information Server (IIS) 6.0 or Apache 2.0.x
• Windows Server 2008 with Internet Information Server (IIS) 7.0
• Windows Server 2008 R2 with Internet Information Server (IIS) 7.5
• Windows Server 2012 with Internet Information Server (IIS) 8.0

OfficeScan™ 11.0 Administrator’s Guide
5-16
To install from the web install page, you need the following:
• Internet Explorer with the security level set to allow ActiveX™ controls. Therequired versions are as follows:
• 6.0 on Windows XP and Windows Server 2003
• 7.0 on Windows Vista and Windows Server 2008
• 8.0 on Windows 7
• 10.0 on Windows 8/8.1 and Windows Server 2012
• Administrator privileges on the endpoint
Send the following instructions to users to install the OfficeScan agent from the webinstall page. To send an installation notification through email, see Initiating a Browser-based Installation on page 5-18.
Installing from the Web Install Page
Procedure
1. Log on to the endpoint using a built-in administrator account.
Note
For Windows 7, 8, or 8.1 platforms, you have to enable the built-in administratoraccount first. Windows 7, 8, and 8.1 disable the built-in administrator account bydefault. For more information, refer to the Microsoft support site (http://technet.microsoft.com/en-us/library/dd744293%28WS.10%29.aspx).
2. If installing to endpoints running Windows XP, Vista, Server 2008, 7, 8, 8.1, orServer 2012, perform the following steps:
a. Launch Internet Explorer and add the OfficeScan server URL (such ashttps://<OfficeScan server name>:4343/officescan) to the listof trusted sites. In Windows XP Home, access the list by going to Tools >Internet Options > Security tab, selecting the Trusted Sites icon, andclicking Sites.

Installing the OfficeScan Agent
5-17
b. Modify the Internet Explorer security setting to enable Automaticprompting for ActiveX controls. On Windows XP, go to Tools > InternetOptions > Security tab, and click Custom level.
3. Open an Internet Explorer window and type the following:
https://<OfficeScan server name>:<port>/officescan
4. Click the installer link on the logon page to display the following installationoptions:
• Browser-Based Agent Installation (Internet Explorer only): Follow the on-screen instructions based on your operating system.
• MSI Agent Installation: Download the 32-bit or 64-bit package dependingon your operating system and follow the on-screen instructions.
Note
Allow ActiveX control installation if prompted.
5. After the installation completes, the OfficeScan agent icon appears in the Windowssystem tray.
Note
For a list of icons that display on the system tray, see OfficeScan Agent Icons on page14-25.
Browser-based Installation
Set up an email message that instructs users on the network to install the OfficeScanagent. Users click the OfficeScan agent installer link provided in the email to start theinstallation.
Before you install OfficeScan agents:
• Check the OfficeScan agent installation requirements.

OfficeScan™ 11.0 Administrator’s Guide
5-18
• Identify which computers on the network currently do not have protection againstsecurity risks. Perform the following tasks:
• Run the Trend Micro Vulnerability Scanner. This tool analyzes endpoints forinstalled antivirus software based on an IP address range you specify. Fordetails, see Vulnerability Scanner Usage on page 5-37.
• Run Security Compliance. For details, see Security Compliance for UnmanagedEndpoints on page 14-64.
Initiating a Browser-based Installation
Procedure
1. Go to Agents > Agent Installation > Browser-based.
2. Modify the subject line of the email message if necessary.
3. Click Create Email.
The default mail program opens.
4. Send the email to the intended recipients.
Performing a UNC-based InstallationAutoPcc.exe is a standalone program that installs the OfficeScan agent tounprotected computers and updates program files and components. Endpoints must bepart of the domain to be able to use AutoPcc using a Uniform Naming Convention(UNC) path.
Procedure
1. Go to Agents > Agent Installation > UNC-based.
• To install the OfficeScan agent to an unprotected endpoint usingAutoPcc.exe:
a. Connect to the server computer. Go to the UNC path:

Installing the OfficeScan Agent
5-19
\\<server computer name>\ofscan
b. Right-click AutoPcc.exe and select Run as administrator.
• For remote desktop installations using AutoPcc.exe:
a. Open a Remote Desktop Connection (Mstsc.exe) in console mode. Thisforces the AutoPcc.exe installation to run in session 0.
b. Go to the \\<server computer name>\ofscan directory andexecute AutoPcc.exe.
Installing Remotely from the OfficeScan Web ConsoleInstall the OfficeScan agent remotely to one or several computers connected to thenetwork. Ensure you have administrator rights to the target computers to performremote installation. Remote installation does not install the OfficeScan agent onendpoints already running the OfficeScan server.
Note
This installation method cannot be used on endpoints running Windows XP Home,Windows Vista Home Basic and Home Premium Editions, Windows 7 Home Basic andHome Premium Editions (32-bit and 64-bit versions), and Windows 8/8.1 (32-bit and 64-bit basic versions). A pure IPv6 server cannot install the OfficeScan agent on pure IPv4agents. Similarly, a pure IPv4 server cannot install the OfficeScan agent on pure IPv6agents.
Procedure
1. If running Windows Vista, Windows 7, Windows 8 (Pro, Enterprise), Windows 8.1,or Windows Server 2012, perform the following steps:
a. Enable a built-in administrator account and set the password for the account.
b. Disable simple file sharing on the endpoint.
c. Click Start > Programs > Administrative Tools > Windows Firewallwith Advanced Security.

OfficeScan™ 11.0 Administrator’s Guide
5-20
d. For Domain Profile, Private Profile, and Public Profile, set the firewall state to"Off".
e. Open Microsoft Management Console (click Start > Run and typeservices.msc) and start the Remote Registry and Remote ProcedureCall services. When installing the OfficeScan agent, use the built-inadministrator account and password.
2. In the web console, go to Agents > Agent Installation > Remote.
3. Select the target computers.
• The Domains and Endpoints list displays all the Windows domains on thenetwork. To display endpoints under a domain, double-click the domainname. Select any endpoint, and then click Add.
• If you have a specific endpoint name in mind, type the endpoint name in theSearch for endpoints field on top of the page and press ENTER.
OfficeScan prompts you for the target computer’s user name and password. Use anadministrator account user name and password to continue.
4. Type the user name and password, and then click Log in.
The target endpoint appears in the Selected Endpoints table.
5. Repeat steps 3 and 4 to add more computers.
6. Click Install when you are ready to install the OfficeScan agent to targetcomputers.
A confirmation box appears.
7. Click Yes to confirm that you want to install the OfficeScan agent to the targetcomputers.
A progress screen appears as the program files copy to each target endpoint.
When OfficeScan completes the installation to a target endpoint, the endpoint namedisappears in the Selected Endpoints list and appears in the Domains and Endpointslist with a red check mark.

Installing the OfficeScan Agent
5-21
When all target computers appear with red check marks in the Domains andEndpoints list, you have completed remote installation.
Note
If you install to multiple computers, OfficeScan records any unsuccessful installation in thelogs (for details, see Fresh Installation Logs on page 16-16), but it will not postpone the otherinstallations. You do not have to supervise the installation after you click Install. Check thelogs later to see the installation results.
Installing with Login Script Setup
Login Script Setup automates the installation of the OfficeScan agent to unprotectedcomputers when they log on to the network. Login Script Setup adds a program calledAutoPcc.exe to the server login script.
AutoPcc.exe installs the OfficeScan agent to unmanaged endpoints and updatesprogram files and components. Endpoints must be part of the domain to be able to useAutoPcc through the login script.
OfficeScan Agent Installation
AutoPcc.exe automatically installs the OfficeScan agent to an unprotected WindowsServer 2003 endpoint when the endpoint logs on to the server whose login scripts youmodified. However, AutoPcc.exe does not automatically install the OfficeScan agentto Windows Vista, 7, 8, 8.1, Server 2008, and Server 2012 computers. Users need toconnect to the server computer, go to \\<server computer name>\ofcscan,right-click AutoPcc.exe, and select Run as administrator.
For remote desktop installation using AutoPcc.exe:
• The endpoint must be run in Mstsc.exe /console mode. This forces theAutoPcc.exe installation to run in session 0.
• Map a drive to the "ofcscan" folder and execute AutoPcc.exe from that point.
OfficeScan™ 11.0 Administrator’s Guide
5-22
Program and Component Updates
AutoPcc.exe updates the program files and the antivirus, anti-spyware, and DamageCleanup Services components.
The Windows Server 2003, 2008, and 2012 Scripts
If you already have an existing login script, Login Script Setup appends a command thatexecutes AutoPcc.exe. Otherwise, OfficeScan creates a batch file calledofcscan.bat that contains the command to run AutoPcc.exe.
Login Script Setup appends the following at the end of the script:
\\<Server_name>\ofcscan\autopcc
Where:
• <Server_name> is the endpoint name or IP address of the OfficeScan serverendpoint.
• "ofcscan" is the OfficeScan shared folder name on the server.
• "autopcc" is the link to the autopcc executable file that installs the OfficeScanagent.
Login script location (through a net logon shared directory):
• Windows Server 2003: \\Windows 2003 server\system drive\windir\sysvol\domain\scripts\ofcscan.bat
• Windows Server 2008: \\Windows 2008 server\system drive\windir\sysvol\domain\scripts\ofcscan.bat
• Windows Server 2012: \\Windows 2012 server\system drive\windir\sysvol\domain\scripts\ofcscan.bat

Installing the OfficeScan Agent
5-23
Adding Autopcc.exe to the Login Script Using Login ScriptSetup
Procedure
1. On the endpoint you used to run the server installation, click Programs > TrendMicro OfficeScan Server <Server Name> > Login Script Setup from theWindows Start menu.
The Login Script Setup utility loads. The console displays a tree showing alldomains on the network.
2. Locate the server whose login script you want to modify, select it, and then clickSelect. Ensure that the server is a primary domain controller and that you haveadministrator access to the server.
Login Script Setup prompts you for a user name and password.
3. Type the user name and password. Click OK to continue.
The User Selection screen appears. The Users list shows the profiles of users thatlog on to the server. The Selected users list shows the user profiles whose loginscript you want to modify.
4. To modify the login script for a user profile, select the user profile from the Userslist, and then click Add.
5. To modify the login script of all users, click Add All.
6. To exclude a user profile that you previously selected, select the name from theSelected users list, and click Delete.
7. To reset your choices, click Delete All.
8. Click Apply when all target user profiles are in the Selected users list.
A message informs you that you have modified the server login scripts successfully.
9. Click OK.
Login Script Setup returns to its initial screen.
10. To modify the login scripts of other servers, repeat steps 2 to 4.

OfficeScan™ 11.0 Administrator’s Guide
5-24
11. To close Login Script Setup, click Exit.
Installing with Agent Packager
Agent Packager creates an installation package that you can send to users usingconventional media such as CD-ROM. Users run the package on the agent endpoint toinstall or upgrade the OfficeScan agent and update components.
Agent Packager is especially useful when deploying the OfficeScan agent or componentsto agents in low-bandwidth remote offices. OfficeScan agents installed using AgentPackager report to the server where the package was created.
Agent Packager requires the following:
• 350MB free disk space
• Windows Installer 2.0 (to run an MSI package)
Package Deployment Guidelines
1. Send the package to users and ask them to run the OfficeScan agent package ontheir computers by double-clicking the .exe or .msi file.
Note
Send the package only to users whose OfficeScan agent will report to the serverwhere the package was created.
2. If you have users who will install the .exe package on computers runningWindows Vista, Server 2008, 7, 8, 8.1, or Server 2012, instruct them to right-clickthe .exe file and select Run as administrator.
3. If you created an .msi file, deploy the package by performing the following tasks:
• Use Active Directory or Microsoft SMS. See Deploying an MSI Package UsingActive Directory on page 5-30 or Deploying an MSI Package Using Microsoft SMS onpage 5-32.

Installing the OfficeScan Agent
5-25
4. Launch the MSI package from a command prompt window to install theOfficeScan agent silently to a remote endpoint running Windows XP, Vista, Server2008, 7, 8, 8.1, or Server 2012.
Scan Method Guidelines for Agent Packages
Select the scan method for the package. See Scan Method Types on page 7-8 for details.
The components included in the package depend on the scan method you have selected.For details on the components available for each scan method, see OfficeScan AgentUpdates on page 6-28.
Before selecting the scan method, take note of the following guidelines to help youdeploy the package efficiently:
• If you will use the package to upgrade the agent to this OfficeScan version, checkthe domain level scan method on the web console. On the console, go to Agents> Agent Management, select the agent tree domain to which the agent belongs,and click Settings > Scan Settings > Scan Methods. The domain level scanmethod should be consistent with the scan method for the package.
• If you will use the package to perform a fresh installation of the OfficeScan agent,check the agent grouping setting. On the web console, go to Agents > AgentGrouping.
• If the agent grouping is by NetBIOS, Active Directory, or DNS domain, check thedomain to which the target endpoint belongs. If the domain exists, check the scanmethod configured for the domain. If the domain does not exist, check the rootlevel scan method (select the root domain icon ( ) in the agent tree and clickSettings > Scan Settings > Scan Methods). The domain or root level scanmethod should be consistent with the scan method for the package.

OfficeScan™ 11.0 Administrator’s Guide
5-26
• If the agent grouping is by custom agent groups, check the Grouping Priority andSource.
FIGURE 5-1. Automatic Agent Grouping preview pane
If the target endpoint belongs to a particular source, check the correspondingDestination. The destination is the domain name that appears in the agent tree.The agent will apply the scan method for that domain after the installation.
• If you will use the package to update components on the agent using thisOfficeScan version, check the scan method configured for the agent tree domain towhich the agent belongs. The domain level scan method should be consistent withthe scan method for the package.
Update Agent Considerations
Assign Update Agent privileges to the OfficeScan agent on the target endpoint. UpdateAgents help the OfficeScan server deploy components to agents. For details, see UpdateAgents on page 6-52.
If you assign Update Agent privileges to the OfficeScan agent:
1. Keep in mind that if the package will be deployed to a pure IPv6 agent, the UpdateAgent can distribute updates only to pure IPv6 or dual-stack agents.
2. Use the Scheduled Update Configuration Tool to enable and configure scheduledupdates for the agent. For details, see Update Methods for Update Agents on page 6-58.
Installing the OfficeScan Agent
5-27
3. The OfficeScan server that manages the Update Agent will not be able tosynchronize or deploy the following settings to the agent:
• Update Agent privilege
• Agent scheduled update
• Updates from Trend Micro ActiveUpdate server
• Updates from other update sources
Therefore, deploy the OfficeScan agent package only to computers that will not bemanaged by the OfficeScan server. Afterwards, configure the Update Agent to getits updates from an update source other than the OfficeScan server, such as acustom update source. If you want the OfficeScan server to synchronize settingswith the Update Agent, do not use Agent Packager and choose a differentOfficeScan agent installation method instead.
Creating an Installation Package Using Agent Packager
Procedure
1. On the OfficeScan server computer, browse to <Server installation folder>\PCCSRV\Admin\Utility\ClientPackager.
2. Double-click ClnPack.exe to run the tool.
The Agent Packager console opens.
3. Select the type of package you want to create.
TABLE 5-6. Agent Package Types
PACKAGE TYPE DESCRIPTION
Setup Select Setup to create the package as an executable file.The package installs the OfficeScan agent program withthe components currently available on the server. If thetarget endpoint has an earlier agent version installed,running the executable file upgrades the agent.

OfficeScan™ 11.0 Administrator’s Guide
5-28
PACKAGE TYPE DESCRIPTION
Update Select Update to create a package that contains thecomponents currently available on the server. The packagewill be created as an executable file. Use this package ifthere are issues updating components on any agentendpoint.
MSI Select MSI to create a package that conforms to theMicrosoft Installer Package format. The package alsoinstalls the OfficeScan agent program with the componentscurrently available on the server. If the target endpoint hasan earlier agent version installed, running the MSI fileupgrades the agent.
4. Select the operating system for which you want to create the package. Deploy thepackage only to endpoints that run the operating system type. Create anotherpackage to deploy to another operating system type.
5. Select the scan method that the agent package deploys.
For guidelines regarding how to select a scan method, see Scan Method Guidelines forAgent Packages on page 5-25.
6. Under Domain, select one of the following:
• Allow the agent to report its domain automatically: After installing theOfficeScan agent, the agent queries the OfficeScan server database andreports its domain settings to the server.
• Any domain in the list: Agent Packager synchronizes with the OfficeScanserver and lists the domains currently used in the agent tree.
7. Under Options, select from the following:
Option DescriptionSilent mode This option creates a package that installs on the agent
endpoint in the background, unnoticeable to the agent andwithout showing an installation status window. Enable thisoption if you plan to deploy the package remotely to the targetendpoint.
Installing the OfficeScan Agent
5-29
Option DescriptionForce overwritewith latestversion
This option overwrites component versions on the agent withthe versions currently available on the server. Enable thisoption to ensure that components on the server and agent aresynchronized.
DisablePrescan (freshinstallationsonly)
If the target endpoint does not have the OfficeScan agentinstalled, the package first scans the endpoint for security risksbefore installing the OfficeScan agent. If you are certain thatthe target endpoint is not infected with security risks, disableprescan.
If prescan is enabled, Setup scans for virus/malware in themost vulnerable areas of the endpoint, which include thefollowing:
• Boot area and boot directory (for boot viruses)
• Windows folder
• Program files folder
8. Under Update Agent Capabilities, select which features the Update Agent candeploy.
For more information about assigning Update Agent Capabilities, see Update AgentConsiderations on page 5-26.
9. Under Components, select the components and features to include in the package.
• For details about components, see OfficeScan Components and Programs on page6-2.
• The Data Protection module is only available if you install and activate DataProtection. For details about Data Protection, see Getting Started with DataProtection on page 3-1.
10. Next to Source file, ensure that the location of the ofcscan.ini file is correct.To modify the path, click ( ) to browse for the ofcscan.ini file.
By default, this file is in the <Server installation folder>\PCCSRV folderof the OfficeScan server.

OfficeScan™ 11.0 Administrator’s Guide
5-30
11. In Output file, click ( ), specify where you want to create the OfficeScan agentpackage, and type the package file name (for example, AgentSetup.exe).
12. Click Create.
After Agent Packager creates the package, the message “Package createdsuccessfully” appears. Locate the package in the directory that you specified in theprevious step.
13. Deploy the package.
Deploying an MSI Package Using Active Directory
Take advantage of Active Directory features to deploy the MSI package simultaneouslyto multiple agent endpoints. For instructions on creating an MSI file, see Installing withAgent Packager on page 5-24.
Procedure
1. Perform the following:
• For Windows Server 2003 and lower versions:
a. Open the Active Directory console.
b. Right-click the Organizational Unit (OU) where you want to deploy theMSI package and click Properties.
c. In the Group Policy tab, click New.
• For Windows Server 2008 and Windows Server 2008 R2:
a. Open the Group Policy Management Console. Click Start > ControlPanel > Administrative Tools > Group Policy Management.
b. In the console tree, expand Group Policy Objects in the forest anddomain containing the GPO that you want to edit.
c. Right-click the GPO that you want to edit, and then click Edit. Thisopens the Group Policy Object Editor.
Installing the OfficeScan Agent
5-31
• For Windows Server 2012:
a. Open the Group Policy Management Console. Click ServerManagement > Tools > Group Policy Management.
b. In the console tree, expand Group Policy Objects in the forest anddomain containing the GPO that you want to edit.
c. Right-click the GPO that you want to edit, and then click Edit. Thisopens the Group Policy Object Editor.
2. Choose between Computer Configuration and User Configuration, and openSoftware Settings below it.
TipTrend Micro recommends using Computer Configuration instead of UserConfiguration to ensure successful MSI package installation regardless of which userlogs on to the endpoint.
3. Below Software Settings, right-click Software installation, and then select Newand Package.
4. Locate and select the MSI package.
5. Select a deployment method and then click OK.
• Assigned: The MSI package is automatically deployed the next time a userlogs on to the endpoint (if you selected User Configuration) or when theendpoint restarts (if you selected Computer Configuration). This method doesnot require any user intervention.
• Published: To run the MSI package, inform users to go to Control Panel,open the Add/Remove Programs screen, and select the option to add/installprograms on the network. When the OfficeScan agent MSI package displays,users can proceed to install the OfficeScan agent.

OfficeScan™ 11.0 Administrator’s Guide
5-32
Deploying an MSI Package Using Microsoft SMS
Deploy the MSI package using Microsoft System Management Server (SMS) if you haveMicrosoft BackOffice SMS installed on the server. For instructions on creating an MSIfile, see Installing with Agent Packager on page 5-24.
The SMS server needs to obtain the MSI file from the OfficeScan server before it candeploy the package to target computers.
• Local: The SMS server and the OfficeScan server are on the same endpoint.
• Remote: The SMS server and the OfficeScan server are on different computers.
Known issues when installing with Microsoft SMS:
• "Unknown" appears in the Run Time column of the SMS console.
• If the installation was unsuccessful, the installation status may still show that theinstallation is complete on the SMS program monitor. For instructions on how tocheck if the installation was successful, see Post-installation on page 5-65.
The following instructions apply if you use Microsoft SMS 2.0 and 2003.
Obtaining the Package Locally
Procedure
1. Open the SMS Administrator console.
2. On the Tree tab, click Packages.
3. On the Action menu, click New > Package From Definition.
The Welcome screen of the Create Package From Definition Wizard appears.
4. Click Next.
The Package Definition screen appears.
5. Click Browse.
The Open screen appears.

Installing the OfficeScan Agent
5-33
6. Browse and select the MSI package file created by Agent Packager, and then clickOpen.
The MSI package name appears on the Package Definition screen. The packageshows "OfficeScan agent" and the program version.
7. Click Next.
The Source Files screen appears.
8. Click Always obtain files from a source directory, and then click Next.
The Source Directory screen appears, displaying the name of the package youwant to create and the source directory.
9. Click Local drive on site server.
10. Click Browse and select the source directory containing the MSI file.
11. Click Next.
The wizard creates the package. When it completes the process, the name of thepackage appears on the SMS Administrator console.
Obtaining the Package Remotely
Procedure
1. On the OfficeScan server, use Agent Packager to create a Setup package withan .exe extension (you cannot create an .msi package). See Installing with AgentPackager on page 5-24 for details.
2. On the endpoint where you want to store the source, create a shared folder.
3. Open the SMS Administrator console.
4. On the Tree tab, click Packages.
5. On the Action menu, click New > Package From Definition.
The Welcome screen of the Create Package From Definition Wizard appears.

OfficeScan™ 11.0 Administrator’s Guide
5-34
6. Click Next.
The Package Definition screen appears.
7. Click Browse.
The Open screen appears.
8. Browse for the MSI package file. The file is on the shared folder you created.
9. Click Next.
The Source Files screen appears.
10. Click Always obtain files from a source directory, and then click Next.
The Source Directory screen appears.
11. Click Network path (UNC name).
12. Click Browse and select the source directory containing the MSI file (the sharedfolder you created).
13. Click Next.
The wizard creates the package. When it completes the process, the name of thepackage appears on the SMS Administrator console.
Distributing the Package to Target Endpoints
Procedure
1. On the Tree tab, click Advertisements.
2. On the Action menu, click All Tasks > Distribute Software.
The Welcome screen of the Distribute Software Wizard appears.
3. Click Next.
The Package screen appears.

Installing the OfficeScan Agent
5-35
4. Click Distribute an existing package, and then click the name of the Setuppackage you created.
5. Click Next.
The Distribution Points screen appears.
6. Select a distribution point to which you want to copy the package, and then clickNext.
The Advertise a Program screen appears.
7. Click Yes to advertise the OfficeScan agent Setup package, and then click Next.
The Advertisement Target screen appears.
8. Click Browse to select the target computers.
The Browse Collection screen appears.
9. Click All Windows NT Systems.
10. Click OK.
The Advertisement Target screen appears again.
11. Click Next.
The Advertisement Name screen appears.
12. In the text boxes, type a name and your comments for the advertisement, and thenclick Next.
The Advertise to Subcollections screen appears.
13. Choose whether to advertise the package to subcollections. Choose to advertise theprogram only to members of the specified collection or to members ofsubcollections.
14. Click Next.
The Advertisement Schedule screen appears.
15. Specify when to advertise the OfficeScan agent Setup package by typing orselecting the date and time.

OfficeScan™ 11.0 Administrator’s Guide
5-36
NoteIf you want Microsoft SMS to stop advertising the package on a specific date, clickYes. This advertisement should expire, and then specify the date and time in theExpiration date and time list boxes.
16. Click Next.
The Assign Program screen appears.
17. Click Yes, assign the program, and then click Next.
Microsoft SMS creates the advertisement and displays it on the SMS Administratorconsole.
18. When Microsoft SMS distributes the advertised program (that is, the OfficeScanagent program) to target computers, a screen displays on each target endpoint.Instruct users to click Yes and follow the instructions provided by the wizard toinstall the OfficeScan agent to their computers.
Installations Using Agent Disk ImagesDisk imaging technology allows you to create an image of the OfficeScan agent usingdisk imaging software and make clones of it on other computers on the network.
Each OfficeScan agent installation needs a Globally Unique Identifier (GUID) so thatthe server can identify agents individually. Use the OfficeScan program calledImgSetup.exe to create a different GUID for each of the clones.
Creating a Disk Image of the OfficeScan Agent
Procedure
1. Install the OfficeScan agent on the endpoint.
2. Copy ImgSetup.exe from <Server installation folder>\PCCSRV\Admin\Utility\ImgSetup to this endpoint.
3. Run ImgSetup.exe on this endpoint.
Installing the OfficeScan Agent
5-37
This creates a RUN registry key under HKEY_LOCAL_MACHINE.
4. Create a disk image of the OfficeScan agent using the disk imaging software.
5. Restart the clone.
ImgSetup.exe automatically starts and creates one new GUID value. TheOfficeScan agent reports this new GUID to the server and the server creates a newrecord for the new OfficeScan agent.
WARNING!
To avoid having two computers with the same name in the OfficeScan database, manuallychange the endpoint name or domain name of the cloned OfficeScan agent.
Vulnerability Scanner Usage
Use Vulnerability Scanner to detect installed antivirus solutions, search for unprotectedcomputers on the network, and install OfficeScan agents to computers.
Considerations When Using Vulnerability Scanner
To help you decide whether to use Vulnerability Scanner, consider the following:
• Network Administration on page 5-38
• Network Topology and Architecture on page 5-38
• Software/Hardware Specifications on page 5-39
• Domain Structure on page 5-39
• Network Traffic on page 5-40
• Network Size on page 5-40

OfficeScan™ 11.0 Administrator’s Guide
5-38
Network Administration
TABLE 5-7. Network Administration
SETUP EFFECTIVENESS OF VULNERABILITY SCANNER
Administration with strict securitypolicy
Very effective. Vulnerability Scanner reports whetherall computers have antivirus software installed.
Administrative responsibilitydistributed across different sites
Moderately effective
Centralized administration Moderately effective
Outsource service Moderately effective
Users administer their owncomputers
Not effective. Because Vulnerability Scanner scansthe network for antivirus installations, it is not feasibleto have users scan their own computers.
Network Topology and Architecture
TABLE 5-8. Network Topology and Architecture
SETUP EFFECTIVENESS OF VULNERABILITY SCANNER
Single location Very effective. Vulnerability Scanner allows you toscan an entire IP segment and install the OfficeScanagent easily on the LAN.
Multiple locations with highspeed connection
Moderately effective
Multiple locations with low speedconnection
Not effective. You need to run Vulnerability Scanneron each location and OfficeScan agent installationmust be directed to a local OfficeScan server.
Remote and isolated computers Moderately effective

Installing the OfficeScan Agent
5-39
Software/Hardware Specifications
TABLE 5-9. Software/Hardware Specifications
SETUP EFFECTIVENESS OF VULNERABILITY SCANNER
Windows NT-based operatingsystems
Very effective. Vulnerability Scanner can easily installthe OfficeScan agent remotely to computers runningNT-based operating systems.
Mixed operating systems Moderately effective. Vulnerability Scanner can onlyinstall to computers running Windows NT-basedoperating systems.
Desktop management software Not effective. Vulnerability Scanner cannot be usedwith desktop management software. However, it canhelp track the progress of the OfficeScan agentinstallation.
Domain Structure
TABLE 5-10. Domain Structure
SETUP EFFECTIVENESS OF VULNERABILITY SCANNER
Microsoft Active Directory Very effective. Specify the domain administratoraccount in Vulnerability Scanner to allow remoteinstallation of the OfficeScan agent.
Workgroup Not effective. Vulnerability Scanner may havedifficulty installing to computers using differentadministrative accounts and passwords.
Novell™ Directory Service Not effective. Vulnerability Scanner requires aWindows Domain account to install the OfficeScanagent.
Peer-to-peer Not effective. Vulnerability Scanner may havedifficulty installing to computers using differentadministrative accounts and passwords.
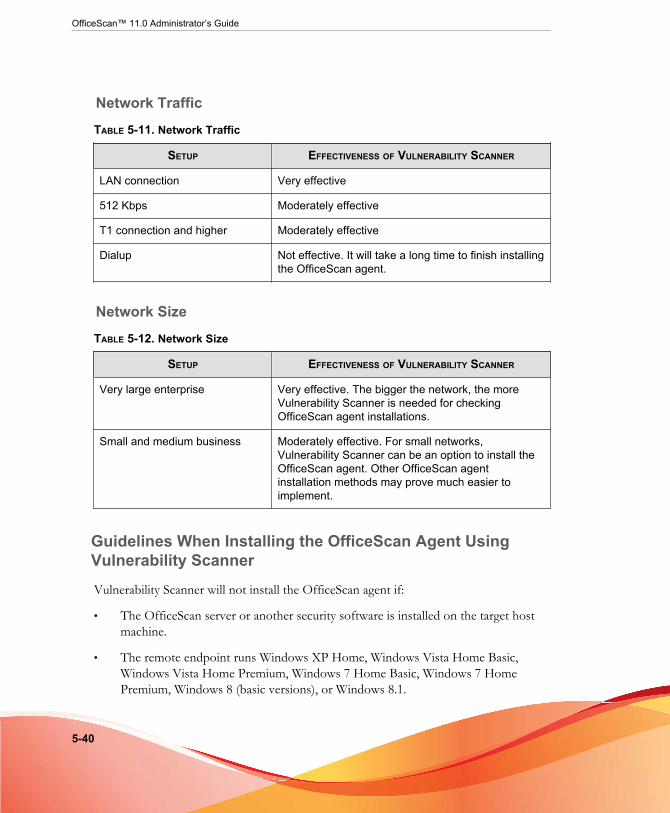
OfficeScan™ 11.0 Administrator’s Guide
5-40
Network Traffic
TABLE 5-11. Network Traffic
SETUP EFFECTIVENESS OF VULNERABILITY SCANNER
LAN connection Very effective
512 Kbps Moderately effective
T1 connection and higher Moderately effective
Dialup Not effective. It will take a long time to finish installingthe OfficeScan agent.
Network Size
TABLE 5-12. Network Size
SETUP EFFECTIVENESS OF VULNERABILITY SCANNER
Very large enterprise Very effective. The bigger the network, the moreVulnerability Scanner is needed for checkingOfficeScan agent installations.
Small and medium business Moderately effective. For small networks,Vulnerability Scanner can be an option to install theOfficeScan agent. Other OfficeScan agentinstallation methods may prove much easier toimplement.
Guidelines When Installing the OfficeScan Agent UsingVulnerability Scanner
Vulnerability Scanner will not install the OfficeScan agent if:
• The OfficeScan server or another security software is installed on the target hostmachine.
• The remote endpoint runs Windows XP Home, Windows Vista Home Basic,Windows Vista Home Premium, Windows 7 Home Basic, Windows 7 HomePremium, Windows 8 (basic versions), or Windows 8.1.
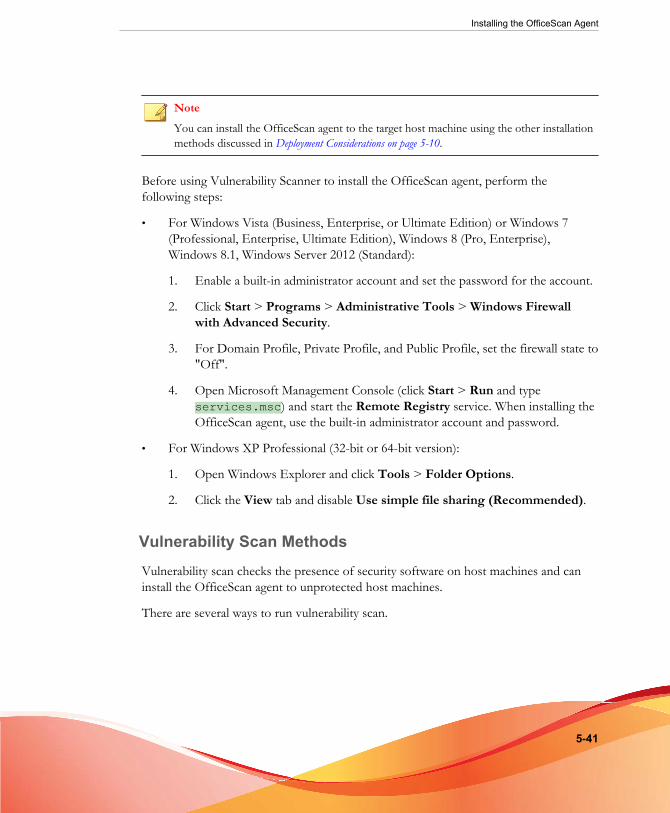
Installing the OfficeScan Agent
5-41
NoteYou can install the OfficeScan agent to the target host machine using the other installationmethods discussed in Deployment Considerations on page 5-10.
Before using Vulnerability Scanner to install the OfficeScan agent, perform thefollowing steps:
• For Windows Vista (Business, Enterprise, or Ultimate Edition) or Windows 7(Professional, Enterprise, Ultimate Edition), Windows 8 (Pro, Enterprise),Windows 8.1, Windows Server 2012 (Standard):
1. Enable a built-in administrator account and set the password for the account.
2. Click Start > Programs > Administrative Tools > Windows Firewallwith Advanced Security.
3. For Domain Profile, Private Profile, and Public Profile, set the firewall state to"Off".
4. Open Microsoft Management Console (click Start > Run and typeservices.msc) and start the Remote Registry service. When installing theOfficeScan agent, use the built-in administrator account and password.
• For Windows XP Professional (32-bit or 64-bit version):
1. Open Windows Explorer and click Tools > Folder Options.
2. Click the View tab and disable Use simple file sharing (Recommended).
Vulnerability Scan Methods
Vulnerability scan checks the presence of security software on host machines and caninstall the OfficeScan agent to unprotected host machines.
There are several ways to run vulnerability scan.

OfficeScan™ 11.0 Administrator’s Guide
5-42
TABLE 5-13. Vulnerability Scan Methods
METHOD DETAILS
Manual vulnerabilityscan
Administrators can run vulnerability scans on demand.
DHCP scan Administrators can run vulnerability scans on host machinesrequesting IP addresses from a DHCP server.
Vulnerability Scanner listens on port 67, which is the DHCPserver’s listening port for DHCP requests. If it detects a DHCPrequest from a host machine, vulnerability scan runs on themachine.
NoteVulnerability Scanner is unable to detect DHCP requests ifyou launched it on Windows Server 2008, Windows 7,Windows 8, 8.1, or Windows Server 2012.
Scheduledvulnerability scan
Vulnerability scans automatically run according to the scheduleconfigured by administrators.
After Vulnerability Scanner runs, it displays the status of the OfficeScan agent on thetarget host machines. The status can be any of the following:
• Normal: The OfficeScan agent is up and running and is working properly
• Abnormal: The OfficeScan agent services are not running or the agent does nothave real-time protection
• Not installed: The TMListen service is missing or the OfficeScan agent has notbeen installed
• Unreachable: Vulnerability Scanner was unable to establish connection with thehost machine and determine the status of the OfficeScan agent
Running a Manual Vulnerability Scan
Procedure
1. To run a vulnerability scan on the OfficeScan server computer, navigate to <Serverinstallation folder>\PCCSRV\Admin\Utility\TMVS and double-click TMVS.exe.
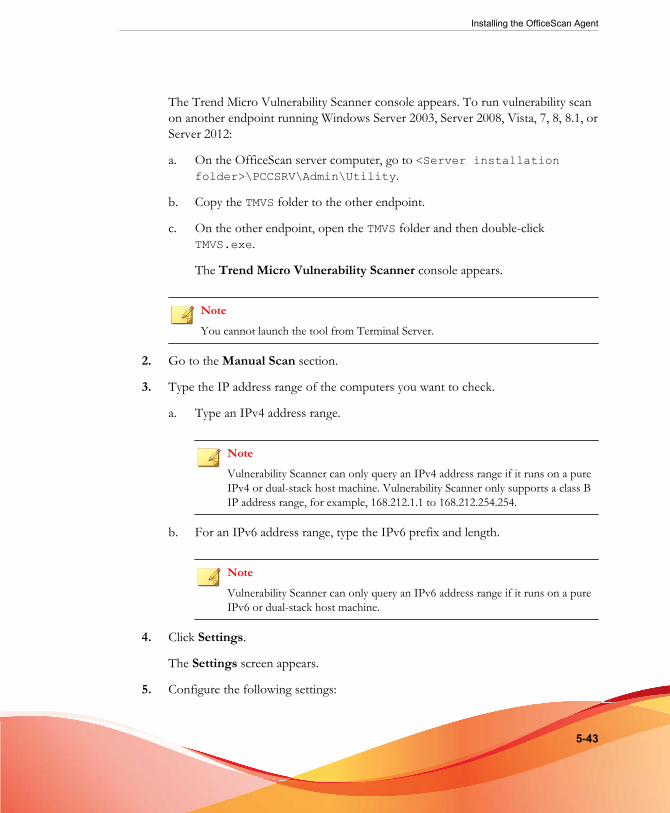
Installing the OfficeScan Agent
5-43
The Trend Micro Vulnerability Scanner console appears. To run vulnerability scanon another endpoint running Windows Server 2003, Server 2008, Vista, 7, 8, 8.1, orServer 2012:
a. On the OfficeScan server computer, go to <Server installationfolder>\PCCSRV\Admin\Utility.
b. Copy the TMVS folder to the other endpoint.
c. On the other endpoint, open the TMVS folder and then double-clickTMVS.exe.
The Trend Micro Vulnerability Scanner console appears.
NoteYou cannot launch the tool from Terminal Server.
2. Go to the Manual Scan section.
3. Type the IP address range of the computers you want to check.
a. Type an IPv4 address range.
NoteVulnerability Scanner can only query an IPv4 address range if it runs on a pureIPv4 or dual-stack host machine. Vulnerability Scanner only supports a class BIP address range, for example, 168.212.1.1 to 168.212.254.254.
b. For an IPv6 address range, type the IPv6 prefix and length.
NoteVulnerability Scanner can only query an IPv6 address range if it runs on a pureIPv6 or dual-stack host machine.
4. Click Settings.
The Settings screen appears.
5. Configure the following settings:

OfficeScan™ 11.0 Administrator’s Guide
5-44
a. Ping settings: Vulnerability Scan can "ping" the IP addresses specified in theprevious step to check if they are currently in use. If a target host machine isusing an IP address, Vulnerability Scanner can determine the host machine’soperating system. For details, see Ping Settings on page 5-56.
b. Method for retrieving computer descriptions: For host machines thatrespond to the "ping" command, Vulnerability Scanner can retrieve additionalinformation about the host machines. For details, see Method for RetrievingEndpoint Descriptions on page 5-53.
c. Product query: Vulnerability Scanner can check for the presence of securitysoftware on the target host machines. For details, see Product Query on page5-50.
d. OfficeScan server settings: Configure these settings if you wantVulnerability Scanner to automatically install OfficeScan agent to unprotectedhost machines. These settings identify the OfficeScan agent’s parent serverand the administrative credentials used to log on to the host machines. Fordetails, see OfficeScan Server Settings on page 5-58.
NoteCertain conditions may prevent the installation of the OfficeScan agent to thetarget host machines. For details, see Guidelines When Installing the OfficeScan AgentUsing Vulnerability Scanner on page 5-40.
e. Notifications: Vulnerability Scanner can send the vulnerability scan results toOfficeScan administrators. It can also display notifications on unprotectedhost machines. For details, see Notifications on page 5-54.
f. Save results: In addition to sending the vulnerability scan results toadministrators, Vulnerability Scan can also save the results to a .csv file. Fordetails, see Vulnerability Scan Results on page 5-56.
6. Click OK.
The Settings screen closes.
7. Click Start.
The vulnerability scan results appear in the Results table under the Manual Scantab.

Installing the OfficeScan Agent
5-45
Note
MAC address information does not display in the Results table if the endpoint runsWindows Server 2008 or Windows Server 2012.
8. To save the results to a comma-separated value (CSV) file, click Export, locate thefolder where you want to save the file, type the file name, and click Save.
Running a DHCP Scan
Procedure
1. Configure DHCP settings in the TMVS.ini file found under the following folder:<Server installation folder>\PCCSRV\Admin\Utility\TMVS.
TABLE 5-14. DHCP Settings in the TMVS.ini File
SETTING DESCRIPTION
DhcpThreadNum=x Specify the thread number for DHCP mode. The minimumis 3, the maximum is 100. The default value is 8.
DhcpDelayScan=x This is the delay time in seconds before checking therequesting endpoint for installed antivirus software.
The minimum is 0 (do not wait) and the maximum is 600.The default value is 30.
LogReport=x 0 disables logging, 1 enables logging.
Vulnerability Scanner sends the results of the scan to theOfficeScan server. Logs display in the System Event Logsscreen on the web console.
OsceServer=x This is the OfficeScan server's IP address or DNS name.
OsceServerPort=x This is the web server port on the OfficeScan server.
2. To run a vulnerability scan on the OfficeScan server computer, navigate to<Server installation folder>\PCCSRV\Admin\Utility\TMVS anddouble-click TMVS.exe. The Trend Micro Vulnerability Scanner consoleappears.

OfficeScan™ 11.0 Administrator’s Guide
5-46
a. On the OfficeScan server computer, go to <Server installationfolder>\PCCSRV\Admin\Utility.
b. Copy the TMVS folder to the other endpoint.
c. On the other endpoint, open the TMVS folder and then double-clickTMVS.exe.
The Trend Micro Vulnerability Scanner console appears.
Note
You cannot launch the tool from Terminal Server.
3. Under the Manual Scan section, click Settings.
The Settings screen appears.
4. Configure the following settings:
a. Product query: Vulnerability Scanner can check for the presence of securitysoftware on the target host machines. For details, see Product Query on page5-50.
b. OfficeScan server settings: Configure these settings if you wantVulnerability Scanner to automatically install the OfficeScan agent tounprotected host machines. These settings identify the OfficeScan agent’sparent server and the administrative credentials used to log on to the hostmachines. For details, see OfficeScan Server Settings on page 5-58.
Note
Certain conditions may prevent the installation of the OfficeScan agent to thetarget host machines. For details, see Guidelines When Installing the OfficeScan AgentUsing Vulnerability Scanner on page 5-40.
c. Notifications: Vulnerability Scanner can send the vulnerability scan results toOfficeScan administrators. It can also display notifications on unprotectedhost machines. For details, see Notifications on page 5-54.
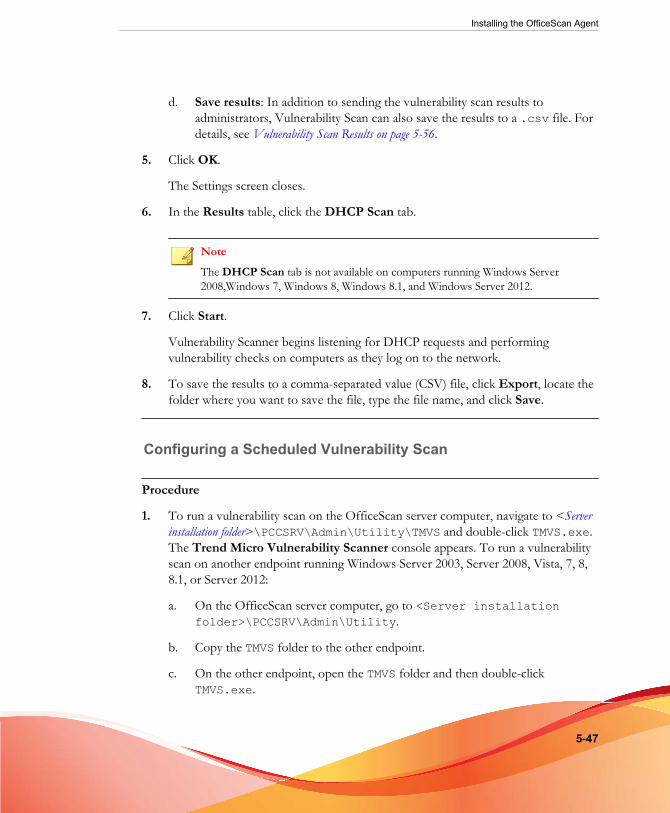
Installing the OfficeScan Agent
5-47
d. Save results: In addition to sending the vulnerability scan results toadministrators, Vulnerability Scan can also save the results to a .csv file. Fordetails, see Vulnerability Scan Results on page 5-56.
5. Click OK.
The Settings screen closes.
6. In the Results table, click the DHCP Scan tab.
NoteThe DHCP Scan tab is not available on computers running Windows Server2008,Windows 7, Windows 8, Windows 8.1, and Windows Server 2012.
7. Click Start.
Vulnerability Scanner begins listening for DHCP requests and performingvulnerability checks on computers as they log on to the network.
8. To save the results to a comma-separated value (CSV) file, click Export, locate thefolder where you want to save the file, type the file name, and click Save.
Configuring a Scheduled Vulnerability Scan
Procedure
1. To run a vulnerability scan on the OfficeScan server computer, navigate to <Serverinstallation folder>\PCCSRV\Admin\Utility\TMVS and double-click TMVS.exe.The Trend Micro Vulnerability Scanner console appears. To run a vulnerabilityscan on another endpoint running Windows Server 2003, Server 2008, Vista, 7, 8,8.1, or Server 2012:
a. On the OfficeScan server computer, go to <Server installationfolder>\PCCSRV\Admin\Utility.
b. Copy the TMVS folder to the other endpoint.
c. On the other endpoint, open the TMVS folder and then double-clickTMVS.exe.

OfficeScan™ 11.0 Administrator’s Guide
5-48
The Trend Micro Vulnerability Scanner console appears.
NoteYou cannot launch the tool from Terminal Server.
2. Go to the Scheduled Scan section.
3. Click Add/Edit.
The Scheduled Scan screen appears.
4. Configure the following settings:
a. Name: Type a name for the scheduled vulnerability scan.
b. IP address range: Type the IP address range of the computers you want tocheck.
i. Type an IPv4 address range.
NoteVulnerability Scanner can only query an IPv4 address range if it runs on apure IPv4 or dual-stack host machine that has an available IPv4 address.Vulnerability Scanner only supports a class B IP address range, forexample, 168.212.1.1 to 168.212.254.254.
ii. For an IPv6 address range, type the IPv6 prefix and length.
NoteVulnerability Scanner can only query an IPv6 address range if it runs on apure IPv6 or dual-stack host machine that has an available IPv6 address.
c. Schedule: Specify the start time using the 24-hour clock format and thenselect how often the scan will run. Choose from daily, weekly, or monthly.
d. Settings: Select which set of vulnerability scan settings to use.
• Select Use current settings if you have configured and want to usemanual vulnerability scan settings. For details about manual vulnerabilityscan settings, see Running a Manual Vulnerability Scan on page 5-42.
Installing the OfficeScan Agent
5-49
• If you did not specify manual vulnerability scan settings or if you want touse another set of settings, select Modify settings and then clickSettings. The Settings screen appears.
You can configure the following settings and then click OK:
• Ping settings: Vulnerability Scan can "ping" the IP addressesspecified in step 4b to check if they are currently in use. If a targethost machine is using an IP address, Vulnerability Scanner candetermine the host machine’s operating system. For details, see PingSettings on page 5-56.
• Method for retrieving computer descriptions: For hostmachines that respond to the "ping" command, VulnerabilityScanner can retrieve additional information about the hostmachines. For details, see Method for Retrieving Endpoint Descriptions onpage 5-53.
• Product query: Vulnerability Scanner can check for the presenceof security software on the target host machines. For details, seeProduct Query on page 5-50.
• OfficeScan server settings: Configure these settings if you wantVulnerability Scanner to automatically install the OfficeScan agentto unprotected host machines. These settings identify theOfficeScan agent’s parent server and the administrative credentialsused to log on to the host machines. For details, see OfficeScan ServerSettings on page 5-58.
Note
Certain conditions may prevent the installation of the OfficeScanagent to the target host machines. For details, see Guidelines WhenInstalling the OfficeScan Agent Using Vulnerability Scanner on page 5-40.
• Notifications: Vulnerability Scanner can send the vulnerabilityscan results to OfficeScan administrators. It can also displaynotifications on unprotected host machines. For details, seeNotifications on page 5-54.
OfficeScan™ 11.0 Administrator’s Guide
5-50
• Save results: In addition to sending the vulnerability scan results toadministrators, Vulnerability Scan can also save the results to a .csvfile. For details, see Vulnerability Scan Results on page 5-56.
5. Click OK.
The Scheduled Scan screen closes.The scheduled vulnerability scan you createdappears under the Scheduled Scan section. If you enabled notifications,Vulnerability Scanner sends you the scheduled vulnerability scan results.
6. To execute the scheduled vulnerability scan immediately, click Run Now.
The vulnerability scan results appear in the Results table under the ScheduledScan tab.
Note
MAC address information does not display in the Results table if the endpoint runsWindows Server 2008 or Windows Server 2012.
7. To save the results to a comma-separated value (CSV) file, click Export, locate thefolder where you want to save the file, type the file name, and click Save.
Vulnerability Scan Settings
Vulnerability scan settings are configured from Trend Micro Vulnerability Scanner(TMVS.exe) or from the TMVS.ini file.
Note
See Server Debug Logs Using LogServer.exe on page 16-3 for information on how to collectdebug logs for Vulnerability Scanner.
Product Query
Vulnerability Scanner can check for the presence of security software on agents. Thefollowing table discusses how Vulnerability Scanner checks security products:

Installing the OfficeScan Agent
5-51
TABLE 5-15. Security Products Checked by Vulnerability Scanner
PRODUCT DESCRIPTION
ServerProtect forWindows
Vulnerability Scanner uses RPC endpoint to check ifSPNTSVC.exe is running. It returns information includingoperating system, and Virus Scan Engine, Virus Pattern andproduct versions. Vulnerability Scanner cannot detect theServerProtect Information Server or the ServerProtectManagement Console.
ServerProtect for Linux If the target endpoint does not run Windows, VulnerabilityScanner checks if it has ServerProtect for Linux installed bytrying to connect to port 14942.
OfficeScan agent Vulnerability Scanner uses the OfficeScan agent port tocheck if the OfficeScan agent is installed. It also checks if theTmListen.exe process is running. It retrieves the portnumber automatically if executed from its default location.
If you launched Vulnerability Scanner on any endpoint otherthan the OfficeScan server, check and then use the otherendpoint's communication port.
PortalProtect™ Vulnerability Scanner loads the web page http://localhost:port/PortalProtect/index.html to check forproduct installation.
ScanMail™ for MicrosoftExchange™
Vulnerability Scanner loads the web page http://ipaddress:port/scanmail.html to check for ScanMailinstallation. By default, ScanMail uses port 16372. IfScanMail uses a different port number, specify the portnumber. Otherwise, Vulnerability Scanner cannot detectScanMail.
InterScan™ family Vulnerability Scanner loads each web page for differentproducts to check for product installation.
• InterScan Messaging Security Suite 5.x: http://localhost:port/eManager/cgi-bin/eManager.htm
• InterScan eManager 3.x: http://localhost:port/eManager/cgi-bin/eManager.htm
• InterScan VirusWall™ 3.x: http://localhost:port/InterScan/cgi-bin/interscan.dll

OfficeScan™ 11.0 Administrator’s Guide
5-52
PRODUCT DESCRIPTION
Trend Micro InternetSecurity™ (PC-cillin)
Vulnerability Scanner uses port 40116 to check if TrendMicro Internet Security is installed.
McAfee VirusScanePolicy Orchestrator
Vulnerability Scanner sends a special token to TCP port8081, the default port of ePolicy Orchestrator for providingconnection between the server and agent. The endpoint withthis antivirus product replies using a special token type.Vulnerability Scanner cannot detect the standalone McAfeeVirusScan.
Norton Antivirus™Corporate Edition
Vulnerability Scanner sends a special token to UDP port2967, the default port of Norton Antivirus Corporate EditionRTVScan. The endpoint with this antivirus product repliesusing a special token type. Since Norton Antivirus CorporateEdition communicates by UDP, the accuracy rate is notguaranteed. Furthermore, network traffic may influence UDPwaiting time.
Vulnerability Scanner detects products and computers using the following protocols:
• RPC: Detects ServerProtect for NT
• UDP: Detects Norton AntiVirus Corporate Edition clients
• TCP: Detects McAfee VirusScan ePolicy Orchestrator
• ICMP: Detects computers by sending ICMP packets
• HTTP: Detects OfficeScan agents
• DHCP: If it detects a DHCP request, Vulnerability Scanner checks if antivirussoftware has already been installed on the requesting endpoint.
Configuring Product Query Settings
Product query settings are a subset of vulnerability scan settings. For details aboutvulnerability scan settings, see Vulnerability Scan Methods on page 5-41.
Procedure
1. To specify product query settings from Vulnerability Scanner (TMVS.exe):

Installing the OfficeScan Agent
5-53
a. Launch TMVS.exe.
b. Click Settings.
The Settings screen appears.
c. Go to the Product query section.
d. Select the products to check.
e. Click Settings next to a product name and then specify the port number thatVulnerability Scanner will check.
f. Click OK.
The Settings screen closes.
2. To set the number of computers that Vulnerability Scanner simultaneously checksfor security software:
a. Go to <Server installation folder>\PCCSRV\Admin\Utility\TMVS and openTMVS.ini using a text editor such as Notepad.
b. To set the number of computers checked during manual vulnerability scans,change the value for ThreadNumManual. Specify a value between 8 and 64.
For example, type ThreadNumManual=60 if you want Vulnerability Scannerto check 60 computers at the same time.
c. To set the number of computers checked during scheduled vulnerabilityscans, change the value for ThreadNumSchedule. Specify a value between 8and 64.
For example, type ThreadNumSchedule=50 if you want VulnerabilityScanner to check 50 computers at the same time.
d. Save TMVS.ini.
Method for Retrieving Endpoint Descriptions
When Vulnerability Scanner is able to "ping" host machines, it can retrieve additionalinformation about the host machines. There are two methods for retrieving information:

OfficeScan™ 11.0 Administrator’s Guide
5-54
• Quick retrieval: Retrieves only the endpoint name
• Normal retrieval: Retrieves both domain and endpoint information
Configuring Retrieval Settings
Retrieval settings are a subset of vulnerability scan settings. For details aboutvulnerability scan settings, see Vulnerability Scan Methods on page 5-41.
Procedure
1. Launch TMVS.exe.
2. Click Settings.
The Settings screen appears.
3. Go to the Method for retrieving computer descriptions section.
4. Select Normal or Quick.
5. If you selected Normal, select Retrieve computer descriptions when available.
6. Click OK.
The Settings screen closes.
Notifications
Vulnerability Scanner can send the vulnerability scan results to OfficeScanadministrators. It can also display notifications on unprotected host machines.
Configuring Notification Settings
Notification settings are a subset of vulnerability scan settings. For details aboutvulnerability scan settings, see Vulnerability Scan Methods on page 5-41.
Procedure
1. Launch TMVS.exe.

Installing the OfficeScan Agent
5-55
2. Click Settings.
The Settings screen appears.
3. Go to the Notifications section.
4. To automatically send the Vulnerability Scan results to yourself or to otheradministrators in your organization:
a. Select Email results to the system administrator.
b. Click Configure to specify email settings.
c. In To, type the email address of the recipient.
d. In From, type the email address of the sender.
e. In SMTP server, type the SMTP server address.
For example, type smtp.company.com. The SMTP server information isrequired.
f. In Subject, type a new subject for the message or accept the default subject.
g. Click OK.
5. To inform users that their computers do not have security software installed:
a. Select Display a notification on unprotected computers.
b. Click Customize to configure the notification message.
c. In the Notification Message screen, type a new message or accept thedefault message.
d. Click OK.
6. Click OK.
The Settings screen closes.
OfficeScan™ 11.0 Administrator’s Guide
5-56
Vulnerability Scan Results
You can configure Vulnerability Scanner to save the vulnerability scan results to acomma-separated value (CSV) file.
Configuring Scan Results
Vulnerability scan results settings are a subset of vulnerability scan settings. For detailsabout vulnerability scan settings, see Vulnerability Scan Methods on page 5-41.
Procedure
1. Launch TMVS.exe.
2. Click Settings.
The Settings screen appears.
3. Go to the Save results section.
4. Select Automatically save the results to a CSV file.
5. To change the default folder for saving the CSV file:
a. Click Browse.
b. Select a target folder on the endpoint or on the network.
c. Click OK.
6. Click OK.
The Settings screen closes.
Ping Settings
Use "ping" settings to validate the existence of a target machine and determine itsoperating system. If these settings are disabled, Vulnerability Scanner scans all the IPaddresses in the specified IP address range – even those that are not used on any hostmachine – thereby making the scanning attempt longer than it should be.

Installing the OfficeScan Agent
5-57
Configuring Ping Settings
Ping settings are a subset of vulnerability scan settings. For details about vulnerabilityscan settings, see Vulnerability Scan Methods on page 5-41.
Procedure
1. To specify ping settings from Vulnerability Scanner (TMVS.exe):
a. Launch TMVS.exe.
b. Click Settings.
The Settings screen appears.
c. Go to the Ping settings section.
d. Select Allow Vulnerability Scanner to ping computers on your networkto check their status.
e. In the Packet size and Timeout fields, accept or modify the default values.
f. Select Detect the type of operating system using ICMP OSfingerprinting.
If you select this option, Vulnerability Scanner determines if a host machineruns Windows or another operating system. For host machines runningWindows, Vulnerability Scanner can identify the version of Windows.
g. Click OK.
The Settings screen closes.
2. To set the number of computers that Vulnerability Scanner simultaneously pings:
a. Go to <Server installation folder>\PCCSRV\Admin\Utility\TMVS and openTMVS.ini using a text editor such as Notepad.
b. Change the value for EchoNum. Specify a value between 1 and 64.
For example, type EchoNum=60 if you want Vulnerability Scanner to ping 60computers at the same time.
OfficeScan™ 11.0 Administrator’s Guide
5-58
c. Save TMVS.ini.
OfficeScan Server Settings
OfficeScan server settings are used when:
• Vulnerability Scanner installs the OfficeScan agent to unprotected target machines.Server settings allow Vulnerability Scanner to identify the OfficeScan agent’s parentserver and the administrative credentials to use when logging on to the targetmachines.
NoteCertain conditions may prevent the installation of the OfficeScan agent to the targethost machines. For details, see Guidelines When Installing the OfficeScan Agent UsingVulnerability Scanner on page 5-40.
• Vulnerability Scanner sends agent installation logs to the OfficeScan server.
Configuring OfficeScan Server Settings
OfficeScan server settings are a subset of vulnerability scan settings. For details aboutvulnerability scan settings, see Vulnerability Scan Methods on page 5-41.
Procedure
1. Launch TMVS.exe.
2. Click Settings.
The Settings screen appears.
3. Go to the OfficeScan server settings section.
4. Type the OfficeScan server name and port number.
5. Select Auto-install OfficeScan agent on unprotected computers.
6. To configure the administrative credentials:
a. Click Install to Account.

Installing the OfficeScan Agent
5-59
b. In the Account Information screen, type a user name and password.
c. Click OK.
7. Select Send logs to the OfficeScan server.
8. Click OK.
The Settings screen closes.
Installing with Security ComplianceInstall OfficeScan agents on computers within the network domains or install theOfficeScan agent to a target endpoint by using its IP address.
Before installing the OfficeScan agent, take note of the following:
Procedure
1. Record the logon credentials for each endpoint. OfficeScan will prompt you tospecify the logon credentials during installation.
2. The OfficeScan agent will not be installed on the endpoint if:
• The OfficeScan server is installed on the endpoint.
• The endpoint runs Windows XP Home, Windows Vista Home Basic,Windows Vista Home Premium, Windows 7™ Starter, Windows 7 HomeBasic, Windows 7 Home Premium, Windows 8 (basic versions), and Windows8.1. If you have computers running these platforms, choose anotherinstallation method. See Deployment Considerations on page 5-10 for details.
3. If the target endpoint runs Windows Vista (Business, Enterprise, or UltimateEdition) Windows 7 (Professional, Enterprise, or Ultimate Edition), Windows 8(Pro, Enterprise), Windows 8.1, or Windows Server 2012 (Standard), perform thefollowing steps on the endpoint:
a. Enable a built-in administrator account and set the password for the account.
b. Disable the Windows firewall.
OfficeScan™ 11.0 Administrator’s Guide
5-60
c. Click Start > Programs > Administrative Tools > Windows Firewallwith Advanced Security.
d. For Domain Profile, Private Profile, and Public Profile, set the firewall state to"Off".
e. Open Microsoft Management Console (click Start > Run and typeservices.msc) and start the Remote Registry service. When installing theOfficeScan agent, use the built-in administrator account and password.
4. If there are Trend Micro or third-party endpoint security programs installed on theendpoint, check if OfficeScan can automatically uninstall the software and replaceit with the OfficeScan agent. For a list of agent security software that OfficeScanautomatically uninstalls, open the following files in <Server installation folder>\PCCSRV\Admin. You can open these files using a text editor such as Notepad.
• tmuninst.ptn
• tmuninst_as.ptn
If the software on the target endpoint is not included in the list, manually uninstallit first. Depending on the uninstallation process of the software, the endpoint mayor may not need to restart after uninstallation.
Installing the OfficeScan Agent
Procedure
1. Go to Assessment > Unmanaged Endpoints.
2. Click Install on top of the agent tree.
• If an earlier OfficeScan agent version is already installed on the endpoint andyou click Install, the installation will be skipped and the agent will not beupgraded to this version. To upgrade the agent, a setting must be disabled.
a. Go to Agents > Agent Management.
b. Click the Settings > Privileges and Other Settings > Other Settingstab.
Installing the OfficeScan Agent
5-61
c. Disable the option OfficeScan agents can update components butnot upgrade the agent program or deploy hot fixes.
3. Specify the administrator logon account for each endpoint and click Log on.OfficeScan starts installing the agent on the target endpoint.
4. View the installation status.
Migrating to the OfficeScan AgentReplace agent security software installed on a target endpoint with the OfficeScan agent.
Migrating from Other Endpoint Security SoftwareWhen you install the OfficeScan agent, the installation program checks for any TrendMicro or third-party endpoint security software installed on the target endpoint. Theinstallation program can automatically uninstall the software and replace it with theOfficeScan agent.
For a list of endpoint security software that OfficeScan automatically uninstalls, openthe following files in <Server installation folder>\PCCSRV\Admin. Open these files using atext editor such as Notepad.
• tmuninst.ptn
• tmuninst_as.ptn
If the software on the target endpoint is not included in the list, manually uninstall itfirst. Depending on the uninstallation process of the software, the endpoint may or maynot need to restart after uninstallation.
OfficeScan Agent Migration Issues• If automatic agent migration is successful but a user encounters problems with the
OfficeScan agent right after installation, restart the endpoint.
• If the OfficeScan installation program proceeded to install the OfficeScan agentbut was unable to uninstall the other security software, there will be conflicts
OfficeScan™ 11.0 Administrator’s Guide
5-62
between the two software. Uninstall both software, and then install the OfficeScanagent using any of the installation methods discussed in Deployment Considerations onpage 5-10.
Migrating from ServerProtect Normal Servers
The ServerProtect™ Normal Server Migration Tool is a tool that helps migratecomputers running Trend Micro ServerProtect Normal Server to the OfficeScan agent.
The ServerProtect Normal Server Migration Tool shares the same hardware andsoftware specification as the OfficeScan server. Run the tool on computers runningWindows Server 2003 or Windows Server 2008.
When uninstallation of the ServerProtect Normal server is successful, the tool installsthe OfficeScan agent. It also migrates the scan exclusion list settings (for all scan types)to the OfficeScan agent.
While installing the OfficeScan agent, the migration tool agent installer may sometimestime out and notify you that the installation was unsuccessful. However, the OfficeScanagent may have been installed successfully. Verify the installation on the agent endpointfrom the OfficeScan web console.
Migration is unsuccessful under the following circumstances:
• The remote agent only has an IPv6 address. The migration tool does not supportIPv6 addressing.
• The remote agent cannot use the NetBIOS protocol.
• Ports 455, 337, and 339 are blocked.
• The remote agent cannot use the RPC protocol.
• The Remote Registry Service stops.
Note
The ServerProtect Normal Server Migration Tool does not uninstall the ControlManager™ agent for ServerProtect. For instructions on how to uninstall the agent, refer tothe ServerProtect and/or Control Manager documentation.

Installing the OfficeScan Agent
5-63
Using the ServerProtect Normal Server Migration Tool
Procedure
1. On the OfficeScan server computer, open <Server installation folder>\PCCSRV\Admin\Utility\SPNSXfr and copy the files SPNSXfr.exe and SPNSX.inito <Server installation folder>\PCCSRV\Admin.
2. Double-click SPNSXfr.exe to open the tool.
The Server Protect Normal Server Migration Tool console opens.
3. Select the OfficeScan server. The path of the OfficeScan server appears underOfficeScan server path. If it is incorrect, click Browse and select the PCCSRVfolder in the directory where you installed OfficeScan. To enable the tool toautomatically find the OfficeScan server again the next time you open the tool,select the Auto Find Server Path check box (selected by default).
4. Select the computers running ServerProtect Normal Server on which to performthe migration by clicking one of the following under Target endpoint:
• Windows Network tree: Displays a tree of domains on the network. Toselect computers using this method, click the domains on which to search foragent computers.
• Information Server name: Search by Information Server name. To selectcomputers by this method, type the name of an Information Server on thenetwork in the text box. To search for multiple Information Servers, insert asemicolon ";" between server names.
• Certain Normal Server name: Search by Normal Server name. To selectcomputers by this method, type the name of a Normal Server on the networkin the text box. To search for multiple Normal Servers, enter a semicolon ";"between server names.
• IP range search: Search by a range of IP addresses. To select computers bythis method, type a range of class B IP addresses under IP range.

OfficeScan™ 11.0 Administrator’s Guide
5-64
Note
If a DNS server on the network does not respond when searching for agents, thesearch stops responding. Wait for the search to time out.
5. Select Restart after installation to automatically restart the target computers aftermigration.
A restart is required for the migration to complete successfully. If you do not selectthis option, manually restart the computers after migration.
6. Click Search.
The search results appear under ServerProtect Normal Servers.
7. Click the computers on which to perform the migration.
a. To select all computers, click Select All.
b. To clear all computers, click Unselect All.
c. To export the list to a comma-separated value (CSV) file, click Export toCSV.
8. If logging on to the target computers requires a user name and password, do thefollowing:
a. Select the Use group account/password check box.
b. Click Set Logon Account.
The Enter Administration Information window appears.
c. Type the user name and password.
Note
Use the local/domain administrator account to log on to the target endpoint. Ifyou log on with insufficient privileges, such as "Guest" or "Normal user", youwill not be able to perform installation.
d. Click OK.

Installing the OfficeScan Agent
5-65
e. Click Ask again if logon is unsuccessful to be able to type the user nameand password again during the migration process if you are unable to log on.
9. Click Migrate.
10. If you did not select the Restart after installation option, restart the targetcomputers to complete the migration.
Post-installationAfter completing the installation, verify the following:
• OfficeScan Agent Shortcut on page 5-65
• Programs List on page 5-65
• OfficeScan Agent Services on page 5-66
• OfficeScan Agent Installation Logs on page 5-66
OfficeScan Agent Shortcut
The OfficeScan agent shortcuts appear on the Windows Start menu on the agentendpoint.
FIGURE 5-2. OfficeScan agent shortcut
Programs List
Security Agent is listed on the Add/Remove Programs list on the agent endpoint’sControl Panel.
OfficeScan™ 11.0 Administrator’s Guide
5-66
OfficeScan Agent ServicesThe following OfficeScan agent services display on Microsoft Management Console:
• OfficeScan NT Listener (TmListen.exe)
• OfficeScan NT RealTime Scan (NTRtScan.exe)
• OfficeScan NT Proxy Service (TmProxy.exe)
NoteThe OfficeScan NT Proxy Service does not exist on Windows 8/8.1 or WindowsServer 2012 platforms.
• OfficeScan NT Firewall (TmPfw.exe); if the firewall was enabled duringinstallation
• Trend Micro Unauthorized Change Prevention Service (TMBMSRV.exe)
• Trend Micro Common Client Solution Framework (TmCCSF.exe)
OfficeScan Agent Installation LogsThe OfficeScan agent installation log, OFCNT.LOG, exists on the following locations:
• %windir% for all installation methods except MSI package installation
• %temp% for the MSI package installation method
Recommended Post-installation TasksTrend Micro recommends performing the following post-installation tasks.
Installing the OfficeScan Agent
5-67
Component Updates
Update OfficeScan agent components to ensure that agents have the most up-to-dateprotection from security risks. You can run manual agent updates from the web consoleor instruct users to run "Update Now" from their computers.
Test Scan Using the EICAR Test Script
The European Institute for Computer Antivirus Research (EICAR) developed theEICAR test script as a safe way to confirm proper installation and configuration ofantivirus software. Visit the EICAR website for more information:
http://www.eicar.org
The EICAR test script is an inert text file with a .com extension. It is not a virus anddoes not contain any fragments of viral code, but most antivirus software react to it as ifit were a virus. Use it to simulate a virus incident and confirm that email notificationsand virus logs work properly.
WARNING!
Never use real viruses to test an antivirus product.
Performing a Test Scan
Procedure
1. Enable Real-time Scan on the agent.
2. Copy the following string and paste it into Notepad or any plain text editor: X5O!P%@AP[4\PZX54(P^)7CC)7}$EICAR-STANDARD-ANTIVIRUS-TEST-FILE!$H+H*
3. Save the file as EICAR.com to a temp directory. OfficeScan immediately detectsthe file.
4. To test other computers on the network, attach the EICAR.com file to an emailmessage and send it to one of the computers.

OfficeScan™ 11.0 Administrator’s Guide
5-68
Tip
Trend Micro recommends packaging the EICAR file using compression software(such as WinZip) and then performing another test scan.
OfficeScan Agent UninstallationThere are two ways to uninstall the OfficeScan agent from computers:
• Uninstalling the OfficeScan Agent from the Web Console on page 5-68
• Running the OfficeScan Agent Uninstallation Program on page 5-70
If the OfficeScan agent cannot be uninstalled using the above methods, manuallyuninstall the OfficeScan agent. For details, see Manually Uninstalling the OfficeScan Agent onpage 5-70.
Uninstalling the OfficeScan Agent from the Web ConsoleUninstall the OfficeScan agent program from the web console. Perform uninstallationonly if you encounter problems with the program and then reinstall it immediately tokeep the endpoint protected from security risks.
Procedure
1. Go to Agents > Agent Management.
2. In the agent tree, click the root domain icon ( ) to include all agents or selectspecific domains or agents.
3. Click Tasks > Agent Uninstallation.
4. On the Agent Uninstallation screen, click Initiate Uninstallation. The serversends a notification to the agents.
5. Check the notification status and check if there are agents that did not receive thenotification.
Installing the OfficeScan Agent
5-69
a. Click Select Unnotified Endpoints and then Initiate Uninstallation toimmediately resend the notification to un-notified agents.
b. Click Stop Uninstallation to prompt OfficeScan to stop notifying agentscurrently being notified. Agents already notified and already performinguninstallation ignore this command.
The OfficeScan Agent Uninstallation Program
Grant users the privilege to uninstall the OfficeScan agent program and then instructthem to run the agent uninstallation program from their computers.
Depending on your configuration, uninstallation may or may not require a password. Ifa password is required, ensure that you share the password only to users that will run theuninstallation program and then change the password immediately if it has beendivulged to other users.
Granting the OfficeScan Agent Uninstallation Privilege
Procedure
1. Go to Agents > Agent Management.
2. In the agent tree, click the root domain icon ( ) to include all agents or selectspecific domains or agents.
3. Click Settings > Privileges and Other Settings.
4. On the Privileges tab, go to the Uninstallation section.
5. To allow uninstallation without a password, select Allow users to uninstall theOfficeScan agent. If a password is required, select Require a password for usersto uninstall the OfficeScan agent, type the password, and then confirm it.
6. If you selected domain(s) or agent(s) in the agent tree, click Save. If you clicked theroot domain icon, choose from the following options:

OfficeScan™ 11.0 Administrator’s Guide
5-70
• Apply to All Agents: Applies settings to all existing agents and to any newagent added to an existing/future domain. Future domains are domains notyet created at the time you configured the settings.
• Apply to Future Domains Only: Applies settings only to agents added tofuture domains. This option will not apply settings to new agents added to anexisting domain.
Running the OfficeScan Agent Uninstallation Program
Procedure
1. On the Windows Start menu, click Programs > Trend Micro OfficeScan Agent> Uninstall OfficeScan Agent.
You can also perform the following steps:
a. Click Control Panel > Add or Remove Programs.
b. Locate Trend Micro OfficeScan Agent and click Change.
c. Follow the on-screen instructions.
2. If prompted, type the uninstallation password. OfficeScan notifies the user of theuninstallation progress and completion. The user does not need to restart the agentendpoint to complete the uninstallation.
Manually Uninstalling the OfficeScan Agent
Perform manual uninstallation only if you encounter problems uninstalling theOfficeScan agent from the web console or after running the uninstallation program.
Procedure
1. Log on to the agent endpoint using an account with Administrator privileges.

Installing the OfficeScan Agent
5-71
2. Right-click the OfficeScan agent icon on the system tray and select UnloadOfficeScan. If prompted for a password, specify the unload password then clickOK.
Note
• For Windows 8, 8.1, and Windows Server 2012, switch to desktop mode tounload the OfficeScan agent.
• Disable the password on computers where the OfficeScan agent will beunloaded. For details, see Configuring Agent Privileges and Other Settings on page14-84.
3. If the unload password was not specified, stop the following services fromMicrosoft Management Console:
• OfficeScan NT Listener
• OfficeScan NT Firewall
• OfficeScan NT RealTime Scan
• OfficeScan NT Proxy Service
NoteThe OfficeScan NT Proxy Service does not exist on Windows 8, 8.1, orWindows Server 2012 platforms.
• Trend Micro Unauthorized Change Prevention Service
• Trend Micro Common Client Solution Framework
4. Remove the OfficeScan agent shortcut from the Start menu.
• On Windows 8, 8.1, and Windows Server 2012:
a. Switch to desktop mode.
b. Move the mouse cursor to the bottom right corner of the screen andclick Start from the menu that appears.
The Home screen appears.

OfficeScan™ 11.0 Administrator’s Guide
5-72
c. Right-click Trend Micro OfficeScan.
d. Click Unpin from Start.
• On all other Windows platforms:
Click Start > Programs, right-click Trend Micro OfficeScan Agent, andclick Delete.
5. Open Registry Editor (regedit.exe).
WARNING!
The next steps require you to delete registry keys. Making incorrect changes to theregistry can cause serious system problems. Always make a backup copy beforemaking any registry changes. For more information, refer to the Registry Editor Help.
6. Delete the following registry keys:
• If there are no other Trend Micro products installed on the endpoint:
• HKEY_LOCAL_MACHINE\SOFTWARE\TrendMicro
For 64-bit computers:
HKEY_LOCAL_MACHINE\SOFTWARE\Wow6432node\Trend Micro
• If there are other Trend Micro products installed on the endpoint, delete thefollowing keys only:
• HKEY_LOCAL_MACHINE\SOFTWARE\TrendMicro\NSC
• HKEY_LOCAL_MACHINE\SOFTWARE\TrendMicro\OfcWatchDog
For 64-bit computers:
HKEY_LOCAL_MACHINE\SOFTWARE\Wow6432node\Trend Micro\OfcWatchDog
• HKEY_LOCAL_MACHINE\SOFTWARE\TrendMicro\PC-cillinNTCorp
For 64-bit computers:
Installing the OfficeScan Agent
5-73
HKEY_LOCAL_MACHINE\SOFTWARE\Wow6432node\Trend Micro\PC-cillinNTCorp
7. Delete the following registry keys/values:
• For 32-bit systems:
• HKEY_LOCAL_MACHINE\SOFTWARE\Microsoft\Windows\CurrentVersion\Uninstall\OfficeScanNT
• OfficeScanNT Monitor (REG_SZ) under HKEY_LOCAL_MACHINE\SOFTWARE\Microsoft\Windows\CurrentVersion\Run
• For 64-bit systems:
• HKEY_LOCAL_MACHINE\SOFTWARE\ Wow6432Node\Microsoft\Windows\CurrentVersion\Uninstall\OfficeScanNT
• OfficeScanNT Monitor (REG_SZ) under HKEY_LOCAL_MACHINE\SOFTWARE\ Wow6432Node\Microsoft\Windows\CurrentVersion\Run
8. Delete all instances of the following registry keys in the following locations:
• Locations:
• HKEY_LOCAL_MACHINE\SYSTEM\CurrentControlSet\Services
• HKEY_LOCAL_MACHINE\SYSTEM\ControlSet001\Services
• HKEY_LOCAL_MACHINE\SYSTEM\ControlSet002\Services
• HKEY_LOCAL_MACHINE\SYSTEM\ControlSet003\Services
• Keys:
• NTRtScan
• tmcfw
• tmcomm
• TmFilter
• TmListen

OfficeScan™ 11.0 Administrator’s Guide
5-74
• tmpfw
• TmPreFilter
• TmProxy
Note
TmProxy does not exist on Windows 8/8.1 or Windows Server 2012platforms.
• tmtdi
Note
tmtdi does not exist on Windows 8/8.1 or Windows Server 2012platforms.
• VSApiNt
• tmlwf (for Windows Vista/Server 2008/7/8/8.1/Server 2012computers)
• tmwfp (for Windows Vista/Server 2008/7/8/8.1/Server 2012computers)
• tmactmon
• TMBMServer
• TMebc
• tmevtmgr
• tmeevw (for Windows 8/8.1/Server 2012)
• tmusa (for Windows 8/8.1/Server 2012)
• tmnciesc
• tmeext (for Windows XP/2003)
9. Close Registry Editor.

Installing the OfficeScan Agent
5-75
10. Click Start > Settings > Control Panel and double-click System.
Note
For Windows 8/8.1 and Windows Server 2012 systems, skip this step.
11. Click the Hardware tab and then click Device Manager.
Note
For Windows 8/8.1 and Windows Server 2012 systems, skip this step.
12. Click View > Show hidden devices.
Note
For Windows 8/8.1 and Windows Server 2012 systems, skip this step.
13. Expand Non-Plug and Play Drivers and then uninstall the following devices (forWindows XP/Vista/7/Server 2003/Server 2008):
• tmcomm
• tmactmon
• tmevtmgr
• Trend Micro Filter
• Trend Micro PreFilter
• Trend Micro TDI Driver
• Trend Micro VSAPI NT
• Trend Micro Unauthorized Change Prevention Service
• Trend Micro WFP Callout Driver (For Windows Vista/Server 2008/7computers)
14. Manually delete Trend Micro drivers using a command line editor (Windows8/8.1/Server 2012 only) using the following commands:

OfficeScan™ 11.0 Administrator’s Guide
5-76
• sc delete tmcomm
• sc delete tmactmon
• sc delete tmevtmgr
• sc delete tmfilter
• sc delete tmprefilter
• sc delete tmwfp
• sc delete vsapint
• sc delete tmeevw
• sc delete tmusa
• sc delete tmebc
NoteRun the command line editor using administrator privileges (for example, right-clickcmd.exe and click Run as administrator) to ensure the commands executesuccessfully.
15. Uninstall the Common Firewall Driver.
a. Right-click My Network Places and click Properties.
b. Right-click Local Area Connection and click Properties.
c. On the General tab, select Trend Micro Common Firewall Driver andclick Uninstall.
NoteThe following steps only apply to Windows Vista/Server 2008/7/8/8.1/Server2012 operating systems. Agents using all other operating systems skip to step15.
d. Right-click Network and click Properties.
e. Click Manage network connections.

Installing the OfficeScan Agent
5-77
f. Right-click Local Area Connection and click Properties.
g. On the Networking tab, select Trend Micro NDIS 6.0 Filter Driver andclick Uninstall.
16. Restart the agent endpoint.
17. If there are no other Trend Micro products installed on the endpoint, delete theTrend Micro installation folder (typically, C:\Program Files\TrendMicro). For 64-bit computers, the installation folder can be found under C:\Program Files (x86)\Trend Micro.
18. If there are other Trend Micro products installed, delete the following folders:
• <Agent installation folder>
• The BM folder under the Trend Micro installation folder (typically, C:\Program Files\Trend Micro\BM for 32-bit systems and C:\ProgramFiles (x86)\Trend Micro\BM for 64-bit systems)


6-1
Chapter 6
Keeping Protection Up-to-DateThis chapter describes Trend Micro™ OfficeScan™ components and updateprocedures.
Topics include:
• OfficeScan Components and Programs on page 6-2
• Update Overview on page 6-13
• OfficeScan Server Updates on page 6-15
• Integrated Smart Protection Server Updates on page 6-27
• OfficeScan Agent Updates on page 6-28
• Update Agents on page 6-52
• Component Update Summary on page 6-60
OfficeScan™ 11.0 Administrator’s Guide
6-2
OfficeScan Components and ProgramsOfficeScan makes use of components and programs to keep agent computers protectedfrom the latest security risks. Keep these components and programs up-to-date byrunning manual or scheduled updates.
In addition to the components, OfficeScan agents also receive updated configurationfiles from the OfficeScan server. Agents need the configuration files to apply newsettings. Each time you modify OfficeScan settings through the web console, theconfiguration files change.
Components are grouped as follows:
• Antivirus Components on page 6-2
• Damage Cleanup Services Components on page 6-6
• Anti-spyware Components on page 6-6
• Firewall Components on page 6-7
• Web Reputation Component on page 6-8
• Behavior Monitoring Components on page 6-8
• Programs on page 6-10
• Suspicious Connections Components on page 6-12
• Browser Exploit Solution on page 6-12
Antivirus ComponentsAntivirus components consist of the following patterns, drivers, and engines:
• Virus Patterns on page 6-3
• Virus Scan Engine on page 6-4
• Virus Scan Driver on page 6-4
• IntelliTrap Pattern on page 6-5

Keeping Protection Up-to-Date
6-3
• IntelliTrap Exception Pattern on page 6-5
• Memory Inspection Pattern on page 6-5
Virus Patterns
The virus pattern available on the agent endpoint depends on the scan method the agentis using. For information about scan methods, see Scan Method Types on page 7-8.
TABLE 6-1. Virus Patterns
SCAN METHOD PATTERN IN USE
ConventionalScan
The Virus Pattern contains information that helps OfficeScan identifythe latest virus/malware and mixed threat attacks. Trend Micro createsand releases new versions of the Virus Pattern several times a week,and any time after the discovery of a particularly damaging virus/malware.
Trend Micro recommends scheduling automatic updates at least hourly,which is the default setting for all shipped products.
Smart Scan When in smart scan mode, OfficeScan agents use two lightweightpatterns that work together to provide the same protection provided byconventional anti-malware and anti-spyware patterns.
A smart protection source hosts the Smart Scan Pattern. This patternis updated hourly and contains majority of the pattern definitions. Smartscan agents do not download this pattern. Agents verify potentialthreats against the pattern by sending scan queries to the smartprotection source.
The agent update source (the OfficeScan server or a custom updatesource) hosts the Smart Scan Agent Pattern. This pattern is updateddaily and contains all the other pattern definitions not found on theSmart Scan Pattern. Agents download this pattern from the updatesource using the same methods for downloading other OfficeScancomponents.
For more information about Smart Scan Pattern and Smart Scan AgentPattern, see Smart Protection Pattern Files on page 4-7.
OfficeScan™ 11.0 Administrator’s Guide
6-4
Virus Scan Engine
At the heart of all Trend Micro products lies the scan engine, which was originallydeveloped in response to early file-based endpoint viruses. The scan engine today isexceptionally sophisticated and capable of detecting different types of Viruses andMalware on page 7-2. The scan engine also detects controlled viruses that are developedand used for research.
Rather than scanning every byte of every file, the engine and pattern file work togetherto identify the following:
• Tell-tale characteristics of the virus code
• The precise location within a file where the virus resides
OfficeScan removes viruses/malware upon detection and restores the integrity of thefile.
Updating the Scan Engine
By storing the most time-sensitive virus/malware information in the virus patterns,Trend Micro minimizes the number of scan engine updates while keeping protection up-to-date. Nevertheless, Trend Micro periodically makes new scan engine versionsavailable. Trend Micro releases new engines under the following circumstances:
• Incorporation of new scanning and detection technologies into the software
• Discovery of a new, potentially harmful virus/malware that the scan engine cannothandle
• Enhancement of the scanning performance
• Addition of file formats, scripting languages, encoding, and/or compressionformats
Virus Scan Driver
The Virus Scan Driver monitors user operations on files. Operations include opening orclosing a file, and executing an application. There are two versions for this driver. Theseare TmXPFlt.sys and TmPreFlt.sys. TmXPFlt.sys is used for real-time

Keeping Protection Up-to-Date
6-5
configuration of the Virus Scan Engine and TmPreFlt.sys for monitoring useroperations.
NoteThis component does not display on the console. To check its version, go to <Serverinstallation folder>\PCCSRV\Pccnt\Drv. Right-click the .sys file, select Properties, andgo to the Version tab.
IntelliTrap Pattern
The IntelliTrap pattern (for details, see IntelliTrap on page E-6 ). Pattern detects real-time compression files packed as executable files.
IntelliTrap Exception Pattern
The IntelliTrap Exception Pattern contains a list of "approved" compression files.
Memory Inspection Pattern
Real-Time Scan uses the Memory Inspection Pattern to evaluate executable compressedfiles identified by Behavior Monitoring. Real-Time Scan performs the following actionson executable compressed files:
1. Creates a mapping file in memory after verifying the process image path.
NoteThe Scan Exclusion list overrides the file scanning.
2. Sends the process ID to the Advanced Protection Service which then:
a. Uses the Virus Scan Engine to perform the memory scanning.
b. Filters the process through global Approved lists for Windows system files,digitally signed files from reputable sources, and Trend Micro-tested files.After verifying that a file is known to be safe, OfficeScan does not performany action on the file.
OfficeScan™ 11.0 Administrator’s Guide
6-6
3. After processing the memory scan, the Advanced Protection Service sends theresults to Real-Time Scan.
4. Real-Time Scan then quarantines any detected malware threat and terminates theprocess.
Damage Cleanup Services ComponentsDamage Cleanup Services components consist of the following engine and template.
• Virus Cleanup Engine on page 6-6
• Virus Cleanup Template on page 6-6
• Early Boot Clean Driver on page 6-6
Virus Cleanup Engine
The Virus Cleanup Engine scans for and removes Trojans and Trojan processes. Thisengine supports 32-bit and 64-bit platforms.
Virus Cleanup Template
The Virus Cleanup Template is used by the Virus Cleanup Engine to identify Trojanfiles and processes so the engine can eliminate them.
Early Boot Clean Driver
The Trend Micro Early Boot Clean Driver loads before the operating system driverswhich enables the detection and blocking of boot-type rootkits. After the OfficeScanagent loads, Trend Micro Early Boot Clean Driver calls Damage Cleanup Services toclean the rootkit.
Anti-spyware ComponentsAnti-spyware components consist of the following engine and patterns:
Keeping Protection Up-to-Date
6-7
• Spyware Pattern on page 6-7
• Spyware Scan Engine on page 6-7
• Spyware Active-monitoring Pattern on page 6-7
Spyware Pattern
The Spyware Pattern identifies spyware/grayware in files and programs, modules inmemory, Windows registry and URL shortcuts.
Spyware Scan Engine
The Spyware Scan Engine scans for and performs the appropriate scan action onspyware/grayware. This engine supports 32-bit and 64-bit platforms.
Spyware Active-monitoring Pattern
The Spyware Active-monitoring Pattern is used for real-time spyware/graywarescanning. Only conventional scan agents use this pattern.
Smart scan agents use the Smart Scan Agent Pattern for real-time spyware/graywarescanning. Agents send scan queries to a smart protection source if the risk of the scantarget cannot be determined during scanning.
Firewall ComponentsThe Firewall components consist of the following driver and pattern:
• Common Firewall Driver on page 6-7
• Common Firewall Pattern on page 6-8
Common Firewall Driver
The Common Firewall Driver is used with the Common Firewall Pattern to scan agentcomputers for network viruses. This driver supports 32-bit and 64-bit platforms.

OfficeScan™ 11.0 Administrator’s Guide
6-8
Common Firewall Pattern
Like the Virus Pattern, the Common Firewall Pattern helps OfficeScan identify virussignatures, unique patterns of bits and bytes that signal the presence of a network virus.
Web Reputation Component
The Web Reputation component is the URL Filtering Engine.
URL Filtering Engine
The URL Filtering Engine facilitates communication between OfficeScan and the TrendMicro URL Filtering Service. The URL Filtering Service is a system that rates URLs andprovides rating information to OfficeScan.
Behavior Monitoring Components
The Behavior Monitoring components consist of the following patterns, drivers, andservices:
• Behavior Monitoring Detection Pattern on page 6-8
• Behavior Monitoring Driver on page 6-9
• Behavior Monitoring Core Service on page 6-9
• Behavior Monitoring Configuration Pattern on page 6-9
• Digital Signature Pattern on page 6-9
• Policy Enforcement Pattern on page 6-9
Behavior Monitoring Detection Pattern
This pattern contains the rules for detecting suspicious threat behavior.

Keeping Protection Up-to-Date
6-9
Behavior Monitoring Driver
This kernel mode driver monitors system events and passes them to the BehaviorMonitoring Core Service for policy enforcement.
Behavior Monitoring Core Service
This user mode service has the following functions:
• Provides rootkit detection
• Regulates access to external devices
• Protects files, registry keys, and services
Behavior Monitoring Configuration Pattern
The Behavior Monitoring Driver uses this pattern to identify normal system events andexclude them from policy enforcement.
Digital Signature Pattern
This pattern contains a list of valid digital signatures that are used by the BehaviorMonitoring Core Service to determine whether a program responsible for a system eventis safe.
Policy Enforcement Pattern
The Behavior Monitoring Core Service checks system events against the policies in thispattern.
Memory Scan Trigger Pattern
Behavior Monitoring uses the Memory Scan Trigger Pattern to identify possible threatsafter detecting the following operations:
• File write action

OfficeScan™ 11.0 Administrator’s Guide
6-10
• Registry write action
• New process creation
After identifying one of these operations, Behavior Monitoring calls Real-time Scan'sMemory Inspection Pattern to check for security risks.
For details about the Real-time Scan operations, see Memory Inspection Pattern on page 6-5.
Programs
OfficeScan makes use of the following programs and product updates:
• OfficeScan Agent Program on page 6-10
• Hot Fixes, Patches, and Service Packs on page 6-10
OfficeScan Agent Program
The OfficeScan agent program provides the actual protection from security risks.
Hot Fixes, Patches, and Service Packs
After an official product release, Trend Micro often develops the following to addressissues, enhance product performance, or add new features:
• Hot Fix on page E-5
• Patch on page E-9
• Security Patch on page E-11
• Service Pack on page E-11
Your vendor or support provider may contact you when these items become available.Check the Trend Micro website for information on new hot fix, patch, and service packreleases:
http://www.trendmicro.com/download

Keeping Protection Up-to-Date
6-11
All releases include a readme file that contains installation, deployment, andconfiguration information. Read the readme file carefully before performing installation.
Hot Fix and Patch History
When the OfficeScan server deploys hot fix or patch files to OfficeScan agents, theOfficeScan agent program records information about the hot fix or patch in RegistryEditor. You can query this information for multiple agents using logistics software suchas Microsoft SMS, LANDesk™, or BigFix™.
Note
This feature does not record hot fixes and patches that are deployed only to the server.
This feature is available starting in OfficeScan 8.0 Service Pack 1 with patch 3.1.
• Agents upgraded from version 8.0 Service Pack 1 with patch 3.1 or later recordinstalled hot fixes and patches for version 8.0 and later.
• Agents upgraded from versions earlier than 8.0 Service Pack 1 with patch 3.1record installed hot fixes and patches for version 10.0 and later.
Information is stored in the following keys:
• HKEY_LOCAL_MACHINE\SOFTWARE\TrendMicro\PC-cillinNTCorp\CurrentVersion\HotfixHistory\<Product version>
• For computers running x64 type platforms:
HKEY_LOCAL_MACHINE\SOFTWARE\Wow6432Node\TrendMicro\ PC-cillinNTCorp\CurrentVersion\HotfixHistory\<Product version>
Check for the following keys:
• Key: HotFix_installed
Type: REG_SZ
Value: <Hot fix or patch name>
• Key: HotfixInstalledNum

OfficeScan™ 11.0 Administrator’s Guide
6-12
Type: DWORD
Value: <Hot fix or patch number>
Suspicious Connections Components
The Suspicious Connections components consist of the following list and pattern:
• Global C&C IP List on page 6-12
• Relevance Rule Pattern on page 6-12
Global C&C IP List
The Global C&C IP list works in conjunction with the Network Content InspectionEngine (NCIE) to detect network connections with known C&C servers. NCIE detectsC&C server contact through any network channel.
OfficeScan logs all connection information to servers in the Global C&C IP list forevaluation.
Relevance Rule Pattern
The Suspicious Connections service uses the Relevance Rule Pattern to detect uniquemalware family signatures located in the headers of network packets.
Browser Exploit Solution
The Browser Exploit Solution consists of the following patterns:
• Browser Exploit Prevention Pattern on page 6-13
• Script Analyzer Pattern on page 6-13
Keeping Protection Up-to-Date
6-13
Browser Exploit Prevention PatternThis pattern identifies the latest web browser exploits and prevents the exploits frombeing used to compromise the web browser.
Script Analyzer PatternThis pattern analyzes script in web pages and identifies malicious script.
Update OverviewAll component updates originate from the Trend Micro ActiveUpdate server. Whenupdates are available, the OfficeScan server and smart protection sources (SmartProtection Server or Smart Protection Network) download the updated components.There are no component download overlaps between the OfficeScan server and smartprotection sources because each one downloads a specific set of components.
NoteYou can configure both the OfficeScan server and Smart Protection Server to update froma source other than the Trend Micro ActiveUpdate server. To do this, you need to set up acustom update source. If you need assistance setting up this update source, contact yoursupport provider.
OfficeScan Server and OfficeScan Agent UpdateThe OfficeScan server downloads most of the components that agents need. The onlycomponent it does not download is the Smart Scan Pattern, which is downloaded bysmart protection sources.
If the OfficeScan server manages a large number of agents, updating may utilize asignificant amount of server computer resources, affecting the server’s stability andperformance. To address this issue, OfficeScan has an Update Agent feature that allowscertain agents to share the task of distributing updates to other agents.
The following table describes the different component update options for theOfficeScan server and agents, and recommendations on when to use them:

OfficeScan™ 11.0 Administrator’s Guide
6-14
TABLE 6-2. Server-Agent Update Options
UPDATE OPTION DESCRIPTION RECOMMENDATION
ActiveUpdateserver > Server >
Agent
The OfficeScan serverreceives updatedcomponents from the TrendMicro ActiveUpdate server(or other update source) andinitiates component updateon agents.
Use this method if there are no low-bandwidth sections between theOfficeScan server and agents.
ActiveUpdateserver > Server >Update Agents >
Agent
The OfficeScan serverreceives updatedcomponents from theActiveUpdate server (or otherupdate source) and initiatescomponent update onagents. Agents acting asUpdate Agents then notifyagents to updatecomponents.
If there are low-bandwidth sectionsbetween the OfficeScan server andagents, use this method to balancethe traffic load on the network.
ActiveUpdateserver > UpdateAgents > Agent
Update Agents receiveupdated components directlyfrom the ActiveUpdate server(or other update source) andnotifies agents to updatecomponents.
Use this method only if youexperience problems updatingUpdate Agents from the OfficeScanserver or from other Update Agents.
Under most circumstances, UpdateAgents receive updates faster fromthe OfficeScan server or from otherUpdate Agents than from anexternal update source.
ActiveUpdateserver > Agent
OfficeScan agents receiveupdated components directlyfrom the ActiveUpdate server(or other update source).
Use this method only if youexperience problems updatingagents from the OfficeScan serveror from Update Agents.
Under most circumstances, agentsreceive updates faster from theOfficeScan server or from UpdateAgents than from an externalupdate source.

Keeping Protection Up-to-Date
6-15
Smart Protection Source Update
A smart protection source (Smart Protection Server or Smart Protection Network)downloads the Smart Scan Pattern. Smart scan agents do not download this pattern.Agents verify potential threats against the pattern by sending scan queries to the smartprotection source.
Note
See Smart Protection Sources on page 4-5 for more information about smart protection sources.
The following table describes the update process for smart protection sources.
TABLE 6-3. Smart Protection Source Update Process
UPDATE PROCESS DESCRIPTION
ActiveUpdate server> Smart ProtectionNetwork
The Trend Micro Smart Protection Network receives updatesfrom the Trend Micro ActiveUpdate server. Smart scan agentsthat are not connected to the corporate network send queriesto the Trend Micro Smart Protection Network.
ActiveUpdate server> Smart ProtectionServer
A Smart Protection Server (integrated or standalone) receivesupdates from the Trend Micro ActiveUpdate server. Smartprotection agents that are connected to the corporate networksend queries to the Smart Protection Server.
Smart ProtectionNetwork > SmartProtection Server
A Smart Protection Server (integrated or standalone) receivesupdates from the Trend Micro Smart Protection Network. Smartprotection agents that are connected to the corporate networksend queries to the Smart Protection Server.
OfficeScan Server UpdatesThe OfficeScan server downloads the following components and deploys them toagents:

OfficeScan™ 11.0 Administrator’s Guide
6-16
TABLE 6-4. Components Downloaded by the OfficeScan Server
COMPONENT
DISTRIBUTION
CONVENTIONAL SCANAGENTS
SMART SCAN AGENTS
Antivirus
Smart Scan Agent Pattern No Yes
Virus Pattern Yes No
IntelliTrap Pattern Yes Yes
IntelliTrap Exception Pattern Yes Yes
Memory Inspection Pattern Yes Yes
Virus Scan Engine (32-bit) Yes Yes
Virus Scan Engine (64-bit) Yes Yes
Anti-spyware
Spyware Pattern Yes Yes
Spyware Active-monitoring Pattern Yes No
Spyware Scan Engine (32-bit) Yes Yes
Spyware Scan Engine (64-bit) Yes Yes
Damage Cleanup Services
Virus Cleanup Template Yes Yes
Virus Cleanup Engine (32-bit) Yes Yes
Virus Cleanup Engine (64-bit) Yes Yes
Early Boot Clean Driver (32-bit) Yes Yes
Early Boot Clean Driver (32-bit) Yes Yes
Firewall
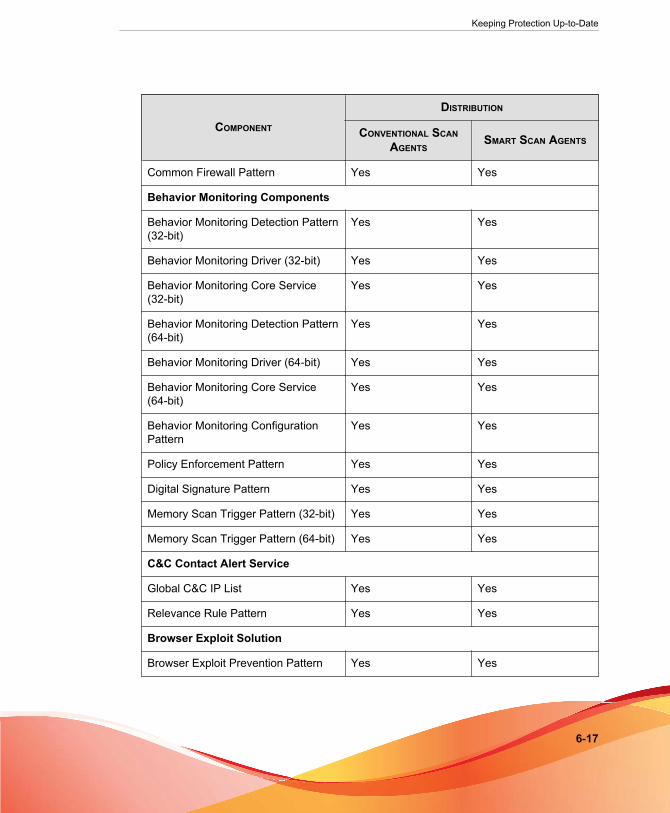
Keeping Protection Up-to-Date
6-17
COMPONENT
DISTRIBUTION
CONVENTIONAL SCANAGENTS
SMART SCAN AGENTS
Common Firewall Pattern Yes Yes
Behavior Monitoring Components
Behavior Monitoring Detection Pattern(32-bit)
Yes Yes
Behavior Monitoring Driver (32-bit) Yes Yes
Behavior Monitoring Core Service(32-bit)
Yes Yes
Behavior Monitoring Detection Pattern(64-bit)
Yes Yes
Behavior Monitoring Driver (64-bit) Yes Yes
Behavior Monitoring Core Service(64-bit)
Yes Yes
Behavior Monitoring ConfigurationPattern
Yes Yes
Policy Enforcement Pattern Yes Yes
Digital Signature Pattern Yes Yes
Memory Scan Trigger Pattern (32-bit) Yes Yes
Memory Scan Trigger Pattern (64-bit) Yes Yes
C&C Contact Alert Service
Global C&C IP List Yes Yes
Relevance Rule Pattern Yes Yes
Browser Exploit Solution
Browser Exploit Prevention Pattern Yes Yes

OfficeScan™ 11.0 Administrator’s Guide
6-18
COMPONENT
DISTRIBUTION
CONVENTIONAL SCANAGENTS
SMART SCAN AGENTS
Script Analyzer Pattern Yes Yes
Update reminders and tips:
• To allow the server to deploy the updated components to agents, enable automaticagent update. For details, see OfficeScan Agent Automatic Updates on page 6-37. Ifautomatic agent update is disabled, the server downloads the updates but does notdeploy them to the agents.
• A pure IPv6 OfficeScan server cannot distribute updates directly to pure IPv4agents. Similarly, a pure IPv4 OfficeScan server cannot distribute updates directlyto pure IPv6 agents. A dual-stack proxy server that can convert IP addresses, suchas DeleGate, is required to allow the OfficeScan server to distribute update to theagents.
• Trend Micro releases pattern files regularly to keep agent protection current. Sincepattern file updates are available regularly, OfficeScan uses a mechanism calledcomponent duplication that allows faster downloads of pattern files. SeeOfficeScan Server Component Duplication on page 6-20 for more information.
• If you use a proxy server to connect to the Internet, use the correct proxy settingsto download updates successfully.
• On the web console’s Dashboard, add the Agent Updates widget to view thecurrent versions of components and determine the number of agents with updatedand outdated components.
OfficeScan Server Update SourcesConfigure the OfficeScan server to download components from the Trend MicroActiveUpdate server or from another source. You may specify another source if theOfficeScan server is unable to reach the ActiveUpdate server directly. For a samplescenario, see Isolated OfficeScan Server Updates on page 6-24.
After the server downloads any available updates, it can automatically notify agents toupdate their components based on the settings you specified in Updates > Agents >
Keeping Protection Up-to-Date
6-19
Automatic Update. If the component update is critical, let the server notify the agentsat once by going to Updates > Agents > Manual Update.
NoteIf you do not specify a deployment schedule or event-triggered update settings in Updates> Agents > Automatic Update, the server will download the updates but will not notifyagents to update.
IPv6 Support for OfficeScan Server UpdatesA pure IPv6 OfficeScan server cannot update directly from pure IPv4 update sources,such as:
• Trend Micro ActiveUpdate Server
• Any pure IPv4 custom update source
Similarly, a pure IPv4 OfficeScan server cannot update directly from pure IPv6 customupdate sources.
A dual-stack proxy server that can convert IP addresses, such as DeleGate, is required toallow the server to connect to the update sources.
Proxy for OfficeScan Server UpdatesConfigure server programs hosted on the server computer to use proxy settings whendownloading updates from the Trend Micro ActiveUpdate server. Server programsinclude the OfficeScan server and the integrated Smart Protection Server.
Configuring Proxy Settings
Procedure
1. Go to Administration > Settings > Proxy.
2. Click the External Proxy tab.
3. Go to the OfficeScan Server Computer Updates section.
OfficeScan™ 11.0 Administrator’s Guide
6-20
4. Select Use a proxy server for pattern, engine, and license updates.
5. Specify the proxy protocol, server name or IPv4/IPv6 address, and port number.
6. If the proxy server requires authentication, type the user name and password.
7. Click Save.
Configuring the Server Update Source
Procedure
1. Go to Updates > Server > Update Source.
2. Select the location from where you want to download component updates.
If you choose ActiveUpdate server, ensure that the server has Internet connectionand, if you are using a proxy server, test if Internet connection can be establishedusing the proxy settings. For details, see Proxy for OfficeScan Server Updates on page6-19.
If you choose a custom update source, set up the appropriate environment andupdate resources for this update source. Also ensure that there is a functionalconnection between the server computer and this update source. If you needassistance setting up an update source, contact your support provider.
NoteThe OfficeScan server uses component duplication when downloading componentsfrom the update source. See OfficeScan Server Component Duplication on page 6-20 fordetails.
3. Click Save.
OfficeScan Server Component DuplicationWhen the latest version of a full pattern file is available for download from the TrendMicro ActiveUpdate server, 14 "incremental patterns" also become available.

Keeping Protection Up-to-Date
6-21
Incremental patterns are smaller versions of the full pattern file that account for thedifference between the latest and previous full pattern file versions. For example, if thelatest version is 175, incremental pattern v_173.175 contains signatures in version 175not found in version 173 (version 173 is the previous full pattern version since patternnumbers are released in increments of 2. Incremental pattern v_171.175 containssignatures in version 175 not found in version 171.
To reduce network traffic generated when downloading the latest pattern, OfficeScanperforms component duplication, a component update method where the OfficeScanserver or Update Agent downloads only incremental patterns. See Update AgentComponent Duplication on page 6-58 for information on how Update Agents performcomponent duplication.
Component duplication applies to the following components:
• Virus Pattern
• Smart Scan Agent Pattern
• Virus Cleanup Template
• IntelliTrap Exception Pattern
• Spyware Pattern
• Spyware Active-monitoring pattern
Component Duplication Scenario
To explain component duplication for the server, refer to the following scenario:
TABLE 6-5. Server Component Duplication Scenario
Full patternson theOfficeScanserver
Current version: 171
Other versions available:
169 167 165 161 159

OfficeScan™ 11.0 Administrator’s Guide
6-22
Latestversion ontheActiveUpdateserver
173.175 171.175 169.175 167.175 165.175 163.175
161.175 159.175 157.175 155.175 153.175 151.175
149.175 147.175
1. The OfficeScan server compares its current full pattern version with the latestversion on the ActiveUpdate server. If the difference between the two versions is14 or less, the server only downloads the incremental pattern that accounts for thedifference between the two versions.
Note
If the difference is more than 14, the server automatically downloads the full versionof the pattern file and 14 incremental patterns.
To illustrate based on the example:
• The difference between versions 171 and 175 is 2. In other words, the serverdoes not have versions 173 and 175.
• The server downloads incremental pattern 171.175. This incremental patternaccounts for the difference between versions 171 and 175.
2. The server merges the incremental pattern with its current full pattern to generatethe latest full pattern.
To illustrate based on the example:
• On the server, OfficeScan merges version 171 with incremental pattern171.175 to generate version 175.
• The server has 1 incremental pattern (171.175) and the latest full pattern(version 175).
3. The server generates incremental patterns based on the other full patterns availableon the server. If the server does not generate these incremental patterns, agentsthat missed downloading earlier incremental patterns automatically download thefull pattern file, which will consequently generate more network traffic.
To illustrate based on the example:

Keeping Protection Up-to-Date
6-23
• Because the server has pattern versions 169, 167, 165, 163, 161, 159, it cangenerate the following incremental patterns:
169.175, 167.175, 165.175, 163.175, 161.175, 159.175
• The server does not need to use version 171 because it already has theincremental pattern 171.175.
• The server now has 7 incremental patterns:
171.175, 169.175, 167.175, 165.175, 163.175, 161.175, 159.175
• The server keeps the last 7 full pattern versions (versions 175, 171, 169, 167,165, 163, 161). It removes any older version (version 159).
4. The server compares its current incremental patterns with the incremental patternsavailable on the ActiveUpdate server. The server downloads the incrementalpatterns it does not have.
To illustrate based on the example:
• The ActiveUpdate server has 14 incremental patterns:
173.175, 171.175, 169.175, 167.175, 165.175, 163.175, 161.175, 159.175,157.175, 155.175, 153.175, 151.175, 149.175, 147.175
• The OfficeScan server has 7 incremental patterns:
171.175, 169.175, 167.175, 165.175, 163.175, 161.175, 159.175
• The OfficeScan server downloads an additional 7 incremental patterns:
173.175, 157.175, 155.175, 153.175, 151.175, 149.175, 147.175
• The server now has all the incremental patterns available on the ActiveUpdateserver.
5. The latest full pattern and the 14 incremental patterns are made available to agents.

OfficeScan™ 11.0 Administrator’s Guide
6-24
Isolated OfficeScan Server Updates
If the OfficeScan server belongs to a network that is isolated completely from all outsidesources, you can keep the server’s components up-to-date by letting it update from aninternal source that contains the latest components.
This topic explains the tasks that you need to perform to update an isolated OfficeScanserver.
Updating an Isolated OfficeScan Server
This procedure is provided for your reference. If you are able to fulfill all the tasks inthis procedure, please ask your support provider for the detailed steps for each task.
Procedure
1. Identify the update source, such as Trend Micro Control Manager or a randomhost machine.The update source must have:
• A reliable Internet connection so that it can download the latest componentsfrom the Trend Micro ActiveUpdate server. Without Internet connection, theonly way for the update source to have the latest components is if you obtainthe components yourself from Trend Micro and then copy them into theupdate source.
• A functional connection with the OfficeScan server. Configure proxy settingsif there is a proxy server between the OfficeScan server and the updatesource. For details, see Proxy for OfficeScan Server Updates on page 6-19.
• Enough disk space for downloaded components
2. Point the OfficeScan server to the new update source. For details, see OfficeScanServer Update Sources on page 6-18.
3. Identify the components that the server deploys to agents. For a list of deployablecomponents, see OfficeScan Agent Updates on page 6-28.
Keeping Protection Up-to-Date
6-25
TipOne of the ways to determine if a component is being deployed to agents is by goingto the Update Summary screen on the web console (Updates > Summary). In thisscreen, the update rate for a component that is being deployed will always be largerthan 0%.
4. Determine how often to download the components. Pattern files are updatedfrequently (some on a daily basis) so it is a good practice to update them regularly.For engines and drivers, you can ask your support provider to notify you of criticalupdates.
5. On the update source:
a. Connect to the ActiveUpdate server. The server’s URL depends on yourOfficeScan version.
b. Download the following items:
• The server.ini file. This file contains information about the latestcomponents.
• The components you identified in step 3.
c. Save the downloaded items to a directory in the update source.
6. Run a manual update of the OfficeScan server. For details, see Manually Updating theOfficeScan Server on page 6-26.
7. Repeat step 5 to step 6 each time you need to update components.
OfficeScan Server Update MethodsUpdate OfficeScan server components manually or by configuring an update schedule.
To allow the server to deploy the updated components to agents, enable automatic agentupdate. For details, see OfficeScan Agent Automatic Updates on page 6-37. If automaticagent update is disabled, the server downloads the updates but does not deploy them tothe agents.
Update methods include:

OfficeScan™ 11.0 Administrator’s Guide
6-26
• Manual server update: When an update is critical, perform manual update so theserver can obtain the updates immediately. See Manually Updating the OfficeScan Serveron page 6-26 for details.
• Scheduled server update: The OfficeScan server connects to the update sourceduring the scheduled day and time to obtain the latest components. See SchedulingUpdates for the OfficeScan Server on page 6-26 for details.
Manually Updating the OfficeScan Server
Manually update the components on the OfficeScan server after installing or upgradingthe server and whenever there is an outbreak.
Procedure
1. Start a manual update by:
• Navigating to Updates > Server > Manual Update.
• Clicking Update Server Now on the web console’s main menu.
2. Select the components to update.
3. Click Update.
The server downloads the updated components.
Scheduling Updates for the OfficeScan Server
Configure the OfficeScan server to regularly check its update source and automaticallydownload any available updates. Because agents normally get updates from the server,using scheduled update is an easy and effective way of ensuring that protection againstsecurity risks is always current.
Procedure
1. Go to Updates > Server > Scheduled Update.
2. Select Enable scheduled update of the OfficeScan server.
Keeping Protection Up-to-Date
6-27
3. Select the components to update.
4. Specify the update schedule.
For daily, weekly, and monthly updates, the period of time is the number of hoursduring which OfficeScan will perform the update. OfficeScan updates at any giventime during this time period.
5. Click Save.
OfficeScan Server Update LogsCheck the server update logs to determine if there are problems updating certaincomponents. Logs include component updates for the OfficeScan server.
To keep the size of logs from occupying too much space on the hard disk, manuallydelete logs or configure a log deletion schedule. For more information about managinglogs, see Log Management on page 13-32.
Viewing the Update Logs
Procedure
1. Go to Logs > Server Update.
2. Check the Result column to see if there are components that were not updated.
3. To save logs to a comma-separated value (CSV) file, click Export to CSV. Openthe file or save it to a specific location.
Integrated Smart Protection Server UpdatesThe integrated Smart Protection Server downloads two components, namely the SmartScan Pattern and Web Blocking List. For details on these components and how toupdate them, see Integrated Smart Protection Server Management on page 4-18.

OfficeScan™ 11.0 Administrator’s Guide
6-28
OfficeScan Agent UpdatesTo ensure that agents stay protected from the latest security risks, update agentcomponents regularly.
Before updating agents, check if their update source (OfficeScan server or a customupdate source) has the latest components. For information on how to update theOfficeScan server, see OfficeScan Server Updates on page 6-15.
The following table lists all components that update sources deploy to agents and thecomponents in use when using a particular scan method.
TABLE 6-6. OfficeScan Components Deployed to Agents
COMPONENT
DISTRIBUTION
CONVENTIONAL SCANAGENTS
SMART SCAN AGENTS
Antivirus
Smart Scan Agent Pattern No Yes
Virus Pattern Yes No
IntelliTrap Pattern Yes Yes
IntelliTrap Exception Pattern Yes Yes
Virus Scan Engine (32-bit) Yes Yes
Virus Scan Engine (64-bit) Yes Yes
Memory Inspection Pattern Yes Yes
Anti-spyware
Spyware/Grayware Pattern Yes Yes
Spyware Active-monitoring Pattern Yes No
Spyware/Grayware Scan Engine (32-bit)
Yes Yes

Keeping Protection Up-to-Date
6-29
COMPONENT
DISTRIBUTION
CONVENTIONAL SCANAGENTS
SMART SCAN AGENTS
Spyware/Grayware Scan Engine (64-bit)
Yes Yes
Damage Cleanup Services
Damage Cleanup Template Yes Yes
Damage Cleanup Engine (32-bit) Yes Yes
Damage Cleanup Engine (64-bit) Yes Yes
Early Boot Clean Driver (32-bit) Yes Yes
Early Boot Clean Driver (64-bit) Yes Yes
Web Reputation Services
URL Filtering Engine Yes Yes
Firewall
Firewall Pattern Yes Yes
Firewall Driver (32-bit) Yes Yes
Firewall Driver (64-bit) Yes Yes
Behavior Monitoring Components
Behavior Monitoring Detection Pattern(32-bit)
Yes Yes
Behavior Monitoring Core Driver (32-bit)
Yes Yes
Behavior Monitoring Core Service(32-bit)
Yes Yes
Behavior Monitoring Detection Pattern(64-bit)
Yes Yes

OfficeScan™ 11.0 Administrator’s Guide
6-30
COMPONENT
DISTRIBUTION
CONVENTIONAL SCANAGENTS
SMART SCAN AGENTS
Behavior Monitoring Core Driver (64-bit)
Yes Yes
Behavior Monitoring Core Service(64-bit)
Yes Yes
Behavior Monitoring ConfigurationPattern
Yes Yes
Policy Enforcement Pattern Yes Yes
Digital Signature Pattern Yes Yes
Memory Scan Trigger Pattern (32-bit) Yes Yes
Memory Scan Trigger Pattern (64-bit) Yes Yes
Suspicious Connections
Global C&C IP List Yes Yes
Relevance Rule Pattern Yes Yes
Browser Exploits
Browser Exploit Prevention Pattern Yes Yes
Script Analyzer Pattern Yes Yes
OfficeScan Agent Update SourcesAgents can obtain updates from the standard update source (OfficeScan server) orspecific components from custom update sources such as the Trend MicroActiveUpdate server. For details, see Standard Update Source for OfficeScan Agents on page6-31 and Customized Update Sources for OfficeScan Agents on page 6-32.

Keeping Protection Up-to-Date
6-31
IPv6 Support for OfficeScan Agent Updates
A pure IPv6 agent cannot update directly from pure IPv4 update sources, such as:
• A pure IPv4 OfficeScan server
• A pure IPv4 Update Agent
• Any pure IPv4 custom update source
• Trend Micro ActiveUpdate Server
Similarly, a pure IPv4 agent cannot update directly from pure IPv6 update sources, suchas a pure IPv6 OfficeScan server or Update Agent.
A dual-stack proxy server that can convert IP addresses, such as DeleGate, is required toallow the agents to connect to the update sources.
Standard Update Source for OfficeScan Agents
The OfficeScan server is the standard update source for agents.
If the OfficeScan server is unreachable, agents will not have a backup source and willtherefore remain outdated. To update agents that cannot reach the OfficeScan server,Trend Micro recommends using Agent Packager. Use this tool to create a package withthe latest components available on the server and then run the package on agents.
NoteThe agent’s IP address (IPv4 or IPv6) determines if connection to the OfficeScan servercan be established. For details about IPv6 support for agent updates, see IPv6 Support forOfficeScan Agent Updates on page 6-31.
Configuring the Standard Update Source for OfficeScan Agents
Procedure
1. Go to Updates > Agents > Update Source.
2. Select Standard update source (update from OfficeScan server).

OfficeScan™ 11.0 Administrator’s Guide
6-32
3. Click Notify All Agents.
OfficeScan Agent Update Process
Note
This topic discusses the update process for OfficeScan agents. The update process forUpdate Agents is discussed in Standard Update Source for OfficeScan Agents on page 6-31.
If you configure OfficeScan agents to update directly from the OfficeScan server, theupdate process proceeds as follows:
1. The OfficeScan agent obtains updates from the OfficeScan server.
2. If unable to update from the OfficeScan server, the OfficeScan agent triesconnecting directly to the Trend Micro ActiveUpdate server if the optionOfficeScan agents download updates from the Trend Micro ActiveUpdateServer is enabled in Agents > Agent Management, click Settings > Privilegesand Other Settings > Other Settings (tab) > Update Settings.
Note
Only components can be updated from the ActiveUpdate server. Domain settings,programs and hot fixes can only be downloaded from the OfficeScan server orUpdate Agents. You can speed up the update process by configuring OfficeScanagents to only download pattern files from the ActiveUpdate server. For moreinformation, see ActiveUpdate Server as the OfficeScan Agent Update Source on page 6-36.
Customized Update Sources for OfficeScan Agents
Aside from the OfficeScan server, OfficeScan agents can update from custom updatesources. Custom update sources help reduce OfficeScan agent update traffic directed tothe OfficeScan server and allow OfficeScan agents that cannot connect to theOfficeScan server to get timely updates. Specify the custom update sources on theCustomized Update Source List, which can accommodate up to 1024 update sources.

Keeping Protection Up-to-Date
6-33
TipTrend Micro recommends assigning some OfficeScan agents as Update Agents and thenadding them to the list.
Configuring Customized Update Sources for OfficeScan Agents
Procedure
1. Go to Updates > Agents > Update Source.
2. Select Customized Update Source and click Add.
3. In the screen that displays, specify the agents’ IP addresses. You can type an IPv4range and/or an IPv6 prefix and length.
4. Specify the update source. You can select an Update Agent if one has beenassigned or type the URL of a specific source.
NoteEnsure that the OfficeScan agents can connect to the update source using their IPaddresses. For example, if you specified an IPv4 address range, the update sourcemust have an IPv4 address. If you specified an IPv6 prefix and length, the updatesource must have an IPv6 address. For details about IPv6 support for agent updates,see OfficeScan Agent Update Sources on page 6-30.
5. Click Save.
6. Perform miscellaneous tasks in the screen.
a. Select any of the following settings. For details on how these settings work,see OfficeScan Agent Update Process on page 6-32.
• Update Agents update components, domain settings, and agentprograms and hot fixes, only from the OfficeScan server
• OfficeScan agents update the following items from the OfficeScan serverif all customized sources are unavailable or not found:
• Components

OfficeScan™ 11.0 Administrator’s Guide
6-34
• Domain settings
• OfficeScan agent programs and hot fixes
b. If you specified at least one Update Agent as source, click Update AgentAnalytical Report to generate a report that highlights the update status ofagents. For details about the report, see Update Agent Analytical Report on page6-59.
c. Edit an update source by clicking the IP address range link. Modify thesettings in the screen that displays and click Save.
d. Remove an update source from the list by selecting the check box and clickingDelete.
e. To move an update source, click the up or down arrow. You can only moveone source at a time.
7. Click Notify All Agents.
OfficeScan Agent Update Process
Note
This topic discusses the update process for OfficeScan agents. The update process forUpdate Agents is discussed in Customized Update Sources for Update Agents on page 6-55.
After you have set up and saved the customized update source list, the update processproceeds as follows:
1. The OfficeScan agent updates from the first source on the list.
2. If unable to update from the first source, the OfficeScan agent updates from thesecond source, and so on.
3. If unable to update from all sources, the OfficeScan agent checks the followingsettings on the Update Source screen:

Keeping Protection Up-to-Date
6-35
TABLE 6-7. Additional Settings for Custom Update Sources
SETTING DESCRIPTION
Update Agents updatecomponents, domainsettings, and agentprograms and hot fixes,only from theOfficeScan server
If this setting is enabled, Update Agents update directlyfrom the OfficeScan server and disregard theCustomized Update Source List.
If disabled, Update Agents apply the customized updatesource settings configured for normal agents.
OfficeScan agents update the following items from the OfficeScan server if allcustomized sources are unavailable or not found:
Components If this setting is enabled, the agent updates componentsfrom the OfficeScan server.
If disabled, the agent then tries connecting directly to theTrend Micro ActiveUpdate server if any of the following istrue:
• In Agents > Agent Management, click Settings >Privileges and Other Settings > Other Settings(tab) > Update Settings, the option OfficeScanagents download updates from the Trend MicroActiveUpdate Server is enabled.
• The ActiveUpdate server is not included in theCustomized Update Source List.
NoteOnly components can be updated from theActiveUpdate server. Domain settings, programsand hot fixes can only be downloaded from theOfficeScan server or Update Agents. You canspeed up the update process by configuringagents to only download pattern files from theActiveUpdate server. For more information, seeActiveUpdate Server as the OfficeScan AgentUpdate Source on page 6-36.
Domain settings If this setting is enabled, the agent updates domain-levelsettings from the OfficeScan server.
OfficeScan™ 11.0 Administrator’s Guide
6-36
SETTING DESCRIPTION
OfficeScan agentprograms and hot fixes
If this setting enabled, the agent updates programs andhot fixes from the OfficeScan server.
4. If unable to update from all possible sources, the agent quits the update process.
ActiveUpdate Server as the OfficeScan Agent UpdateSource
When OfficeScan agents download updates directly from the Trend MicroActiveUpdate server, you can limit the download to only the pattern files to reduce thebandwidth consumed during updates and speed up the update process.
Scan engines and other components are not updated as frequently as pattern files, whichis another reason to limit the download to only the pattern files.
A pure IPv6 agent cannot update directly from the Trend Micro ActiveUpdate Server. Adual-stack proxy server that can convert IP addresses, such as DeleGate, is required toallow the OfficeScan agents to connect to the ActiveUpdate server.
Limiting Downloads from the ActiveUpdate Server
Procedure
1. Go to Agents > Global Agent Settings.
2. Go to the Updates section.
3. Select Download only the pattern files from the ActiveUpdate server whenperforming updates.
OfficeScan Agent Update Methods
OfficeScan agents that update components from the OfficeScan server or a customizedupdate source can use the following update methods:

Keeping Protection Up-to-Date
6-37
• Automatic updates: Agent update runs automatically when certain events occuror based on a schedule. For details, see OfficeScan Agent Automatic Updates on page6-37.
• Manual updates: When an update is critical, use manual update to immediatelynotify agents to perform component update. For details, see OfficeScan Agent ManualUpdates on page 6-42.
• Privilege-based updates: Users with update privileges have greater control overhow the OfficeScan agent on their computers gets updated. For details, seeConfiguring Update Privileges and Other Settings on page 6-44.
OfficeScan Agent Automatic UpdatesAutomatic update relieves you of the burden of notifying all agents to update andeliminates the risk of agent computers not having up-to-date components.
In addition to components, OfficeScan agents also receive updated configuration filesduring automatic update. Agents need the configuration files to apply new settings. Eachtime you modify OfficeScan settings through the web console, the configuration fileschange. To specify how often configuration files are applied to agents, see step 3Configuring OfficeScan Agent Automatic Updates on page 6-39.
NoteYou can configure agents to use proxy settings during automatic update. See Proxy forOfficeScan Agent Component Updates on page 6-47 for details.
There are two types of automatic updates:
• Event-triggered Updates on page 6-37
• Schedule-based Updates on page 6-39
Event-triggered Updates
The server can notify online agents to update components after it downloads the latestcomponents, and offline agents when they restart and then connect to the server.Optionally initiate Scan Now (manual scan) on OfficeScan agent computers after theupdate.

OfficeScan™ 11.0 Administrator’s Guide
6-38
TABLE 6-8. Event-triggered Update Options
OPTION DESCRIPTION
Initiate componentupdate on agentsimmediately after theOfficeScan serverdownloads a newcomponent
The server notifies agents to update as soon as it completesan update. Frequently updated agents only need to downloadincremental patterns, thus reducing the time it takes tocomplete the update (see OfficeScan Server ComponentDuplication on page 6-20 for details about incrementalpatterns). However, updating frequently may adversely affectthe server’s performance, especially if you have a largenumber of agents updating at the same time.
If you have agents on roaming mode and you want theseagents to update as well, select Include roaming and offlineagent(s). See OfficeScan Agent Roaming Privilege on page14-19 for details about roaming mode.
Let agents initiatecomponent update afterrestarting andconnecting to theOfficeScan server(roaming agentsexcluded)
Any agent that missed an update immediately downloadscomponents when it establishes connection with the server.The agent may miss an update if it is offline or if the endpointwhere it is installed is not up and running.
Perform Scan Now afterupdate (roaming agentsexcluded)
The server notifies agents to scan after an event-triggeredupdate. Consider enabling this option if a particular update is aresponse to a security risk that has already spread within thenetwork.
NoteIf the OfficeScan server is unable to successfully send an update notification to agents afterit downloads components, it automatically resends the notification after 15 minutes. Theserver continues to send update notifications up to a maximum of five times until the agentresponds. If the fifth attempt is unsuccessful, the server stops sending notifications. If youselect the option to update components when agents restart and then connect to the server,component update will still proceed.

Keeping Protection Up-to-Date
6-39
Schedule-based Updates
Running scheduled updates is a privilege. You need to first select OfficeScan agents thatwill have the privilege and these OfficeScan agents will then run updates based on theschedule.
Note
To use schedule-based update with Network Address Translation, see Configuring ScheduledOfficeScan Agent Updates with NAT on page 6-40.
Configuring OfficeScan Agent Automatic Updates
Procedure
1. Go to Updates > Agents > Automatic Update.
2. Select the events for an Event-triggered Update:
• Initiate component update on agents immediately after the OfficeScanserver downloads a new component
• Include roaming and offlines agent(s)
• Let agents initiate component update after restarting and connecting tothe OfficeScan server (roaming agents excluded)
• Perform Scan Now after update (roaming agents excluded)
For details about the available options, see Event-triggered Updates on page 6-37.
3. Configure the schedule for a Schedule-based Update.
• Minute(s) or Hour(s)
The option to Update agent configurations only once per day is availablewhen scheduling an hourly or minute-based update frequency. Theconfiguration file contains all OfficeScan agent settings configured using theweb console.

OfficeScan™ 11.0 Administrator’s Guide
6-40
TipTrend Micro often updates components; however, OfficeScan configurationsettings probably change less frequently. Updating the configuration files withthe components requires more bandwidth and increases the time OfficeScanneeds to complete the update. For this reason, Trend Micro recommendsupdating OfficeScan agent configurations only once per day.
• Daily or Weekly
Specify the time of the update and the time period the OfficeScan servernotifies agents to update components.
TipThis setting prevents all online agents from simultaneously connecting to theserver at the specified start time, significantly reducing the amount of trafficdirected to the server. For example, if the start time is 12pm and the timeperiod is 2 hours, OfficeScan randomly notifies all online agents to updatecomponents from 12pm until 2pm.
NoteAfter configuring the update schedule, enable the schedule on selected agents. Fordetails on enabling scheduled-based updates, see step 4 of Configuring Update Privilegesand Other Settings on page 6-44.
4. Click Save.
OfficeScan cannot notify offline agents immediately. Select Let agents initiatecomponent update after restarting and connecting to the OfficeScan server(roaming agents excluded) to update offline agents that become online after thetime period expires. Offline agents without this setting enabled update componentson the next schedule or during a manual update.
Configuring Scheduled OfficeScan Agent Updates with NAT
The following issues may arise if the local network uses NAT:
• OfficeScan agents appear offline on the web console.

Keeping Protection Up-to-Date
6-41
• The OfficeScan server is not able to successfully notify agents of updates andconfiguration changes.
Work around these issues by deploying updated components and configuration filesfrom the server to the OfficeScan agent with a scheduled update as described below.
Procedure
• Before installing the OfficeScan agent on agent computers:
a. Configure the agent update schedule in the Schedule-based Update sectionof Updates > Agents > Automatic Update.
b. Grant agents the privilege to enable scheduled update in Agents > AgentManagement, click Settings > Privileges and Other Settings > Privileges(tab) > Component Update Privileges.
• If OfficeScan agents already exist on agent computers:
a. Grant agents the privilege to perform "Update Now" in Agents > AgentManagement, click Settings > Privileges and Other Settings > Privileges(tab) > Component Update Privileges.
b. Instruct users to manually update components on the agent endpoint (byright-clicking the OfficeScan agent icon in the system tray and clicking"Update Now") to obtain the updated configuration settings.
When OfficeScan agents update, they will receive both the updated components and theconfiguration files.
Using the Domains Schedule Update Tool
The update schedule configured in automatic agent updates only applies to agents withscheduled update privileges. For other agents, you can set a separate update schedule.To do this, you will need to configure a schedule by agent tree domains. All agentsbelonging to the domain will apply the schedule.

OfficeScan™ 11.0 Administrator’s Guide
6-42
NoteIt is not possible to set an update schedule for a specific agent or a specific subdomain. Allsubdomains apply the schedule configured for their parent domain.
Procedure
1. Record the agent tree domain names and update schedules.
2. Go to <Server installation folder>\PCCSRV\Admin\Utility\DomainScheduledUpdate.
3. Copy the following files to <Server installation folder>\PCCSRV:
• DomainSetting.ini
• dsu_convert.exe
4. Open DomainSetting.ini using a text editor such as Notepad.
5. Specify the agent tree domain and then configure the update schedule for thedomain. Repeat this step to add more domains.
NoteDetailed configuration instructions are provided in the .ini file.
6. Save DomainSetting.ini.
7. Open a command prompt and change to the directory of the PCCSRV folder.
8. Type the following command and press Enter.
dsuconvert.exe DomainSetting.ini
9. On the web console, go to Agents > Global Agent Settings.
10. Click Save.
OfficeScan Agent Manual UpdatesUpdate OfficeScan agent components manually when OfficeScan agent components areseverely out-of-date and whenever there is an outbreak. OfficeScan agent components

Keeping Protection Up-to-Date
6-43
become severely out-of-date when the OfficeScan agent is unable to update componentsfrom the update source for an extended period of time.
In addition to components, OfficeScan agents also receive updated configuration filesautomatically during manual update. OfficeScan agents need the configuration files toapply new settings. Each time you modify OfficeScan settings through the web console,the configuration files change.
Note
In addition to initiating manual updates, you can grant users the privilege to run manualupdates (also called Update Now on OfficeScan agent endpoints). For details, seeConfiguring Update Privileges and Other Settings on page 6-44.
Updating OfficeScan Agents Manually
Procedure
1. Go to Updates > Agents > Manual Update.
2. The components currently available on the OfficeScan server and the date thesecomponents were last updated display on top of the screen. Ensure thecomponents are up-to-date before notifying agents to update.
Note
Manually update any outdated components on the server. See OfficeScan Agent ManualUpdates on page 6-42 for details.
3. To update only agents with outdated components:
a. Click Select agents with outdated components.
b. (Optional) Select Include roaming and offline agent(s):
• To update roaming agents with functional connection to the server.
• To update offline agents when they become online.
c. Click Initiate Update.

OfficeScan™ 11.0 Administrator’s Guide
6-44
Note
The server searches for agents whose component versions are earlier than theversions on the server and then notifies these agents to update. To check thenotification status, go to the Updates > Summary screen.
4. To update the agents of your choice:
a. Select Manually select agents.
b. Click Select.
c. In the agent tree, click the root domain icon ( ) to include all agents orselect specific domains or agents.
d. Click Initiate Component Update.
Note
The server starts notifying each agent to download updated components. Tocheck the notification status, go to the Updates > Summary screen.
Configuring Update Privileges and Other Settings
Configure update settings and grant agent users certain privileges, such as performing"Update Now" and enabling scheduled update.
Procedure
1. Go to Agents > Agent Management.
2. In the agent tree, click the root domain icon ( ) to include all agents or selectspecific domains or agents.
3. Click Settings > Privileges and Other Settings.
4. Click the Other Settings tab and configure the following options in the UpdateSettings section:

Keeping Protection Up-to-Date
6-45
Option DescriptionOfficeScanagentsdownloadupdates fromthe TrendMicroActiveUpdateServer
When initiating updates, OfficeScan agents first get updates fromthe update source specified on the Updates > Agents >Update Source screen. If the update is unsuccessful, the agentsattempt to update from the OfficeScan server. Selecting thisoption enables agents to attempt to update from the Trend MicroActiveUpdate server if the update from the OfficeScan server isunsuccessful.
NoteA pure IPv6 agent cannot update directly from the Trend MicroActiveUpdate Server. A dual-stack proxy server that can convertIP addresses, such as DeleGate, is required to allow the agents toconnect to the ActiveUpdate server.
Enableschedule-basedupdates onOfficeScanagents
Selecting this option configures all OfficeScan agents to enableschedule-based updates by default. Users with the Enable/Disable schedule-based updates privilege may override thissetting.
For details on configuring the update schedule, see ConfiguringOfficeScan Agent Automatic Updates on page 6-39.
OfficeScanagents canupdatecomponentsbut notupgrade theagentprogram ordeploy hotfixes
This option allows component updates to proceed but preventshot fix deployment and OfficeScan agent upgrade.
NoteDisabling this option may significantly affect server performanceas all agents simultaneously connect to the server to upgrade orinstall a hot fix.
5. Click the Privileges tab and configure the following options in the ComponentUpdates section:

OfficeScan™ 11.0 Administrator’s Guide
6-46
Option DescriptionPerform"UpdateNow"
Users with this privilege can update components on demand byright-clicking the OfficeScan agent icon on the system tray andselecting Update Now.
NoteOfficeScan agent users can use proxy settings during "UpdateNow". See Proxy Configuration Privileges for Agents on page 14-48 fordetails.
Enable/Disableschedule-basedupdates
Selecting this option allows OfficeScan agent users to enable anddisable scheduled updates using the OfficeScan agent right-clickmenu, which can override the Enable schedule-based updateson OfficeScan agents setting.
NoteAdministrators must first select the Enable schedule-basedupdates on OfficeScan agents setting on the Other Settingstab before the menu item appears on the OfficeScan agent menu.
6. If you selected domain(s) or agent(s) in the agent tree, click Save. If you clicked theroot domain icon, choose from the following options:
• Apply to All Agents: Applies settings to all existing agents and to any newagent added to an existing/future domain. Future domains are domains notyet created at the time you configured the settings.
• Apply to Future Domains Only: Applies settings only to agents added tofuture domains. This option will not apply settings to new agents added to anexisting domain.
Configuring Reserved Disk Space for OfficeScan AgentsUpdates
OfficeScan can allocate a certain amount of agent disk space for hot fixes, pattern files,scan engines, and program updates. OfficeScan reserves 60MB of disk space by default.

Keeping Protection Up-to-Date
6-47
Procedure
1. Go to Agents > Global Agent Settings.
2. Go to the Reserved Disk Space section.
3. Select Reserve __ MB of disk space for updates.
4. Select the amount of disk space.
5. Click Save.
Proxy for OfficeScan Agent Component UpdatesOfficeScan agents can use proxy settings during automatic update or if they have theprivilege to perform "Update Now".
TABLE 6-9. Proxy Settings Used During OfficeScan Agent Component Updates
UPDATE METHOD PROXY SETTINGS USED USAGE
Automaticupdate
• Automatic proxysettings. For details,see Automatic ProxySettings for theOfficeScan Agent onpage 14-49.
• Internal proxy settings.For details, seeInternal Proxy forOfficeScan Agents onpage 14-46.
1. OfficeScan agents will first useautomatic proxy settings to updatecomponents.
2. If automatic proxy settings are notenabled, internal proxy settings willbe used.
3. If both are disabled, agents will notuse any proxy settings.

OfficeScan™ 11.0 Administrator’s Guide
6-48
UPDATE METHOD PROXY SETTINGS USED USAGE
Update Now • Automatic proxysettings. For details,see Automatic ProxySettings for theOfficeScan Agent onpage 14-49.
• User-configured proxysettings. You can grantagent users theprivilege to configureproxy settings. Fordetails, see ProxyConfigurationPrivileges for Agentson page 14-48.
1. OfficeScan agents will first useautomatic proxy settings to updatecomponents.
2. If automatic proxy settings are notenabled, user-configured proxysettings will be used.
3. If both are disabled, or if automaticproxy settings are disabled andagent users do not have therequired privilege, agents will notuse any proxy when updatingcomponents.
Configuring OfficeScan Agent Update NotificationsOfficeScan notifies agent users when update-related events occur.
Procedure
1. Go to Agents > Global Agent Settings.
2. Go to the Alert Settings section.
3. Select the following options:
• Show the alert icon on the Windows taskbar if the virus pattern file isnot updated after __ day(s): An alert icon displays on the Windows task barto remind users to update a Virus Pattern that has not been updated withinthe specified number of days. To update the pattern, use any of the updatemethods discussed in OfficeScan Agent Update Methods on page 6-36.
All agents managed by the server will apply this setting.
• Display a notification message if the endpoint needs to restart to load akernel mode driver: After installing a hot fix or an upgrade package that
Keeping Protection Up-to-Date
6-49
contains a new version of a kernel mode driver, the driver’s previous versionmay still exist on the endpoint. The only way to unload the previous versionand load the new one is to restart the endpoint. After restarting the endpoint,the new version automatically installs and no further restart is necessary.
The notification message displays immediately after the agent endpoint installsthe hot fix or upgrade package.
4. Click Save.
Viewing OfficeScan Agent Update LogsCheck the agent update logs to determine if there are problems updating the VirusPattern on agents.
Note
In this product version, only logs for Virus Pattern updates can be queried from the webconsole.
To keep the size of logs from occupying too much space on the hard disk, manuallydelete logs or configure a log deletion schedule. For more information about managinglogs, see Log Management on page 13-32.
Procedure
1. Go to Logs > Agents > Agent Component Update.
2. To view the number of agent updates, click View under the Progress column. Inthe Component Update Progress screen that displays, view the number of agentsupdated for every 15-minute interval and the total number of agents updated.
3. To view agents that have updated the Virus Pattern, click View under the Detailscolumn.
4. To save logs to a comma-separated value (CSV) file, click Export to CSV. Openthe file or save it to a specific location.

OfficeScan™ 11.0 Administrator’s Guide
6-50
Enforcement of OfficeScan Agent Updates
Use Security Compliance to ensure that agents have the latest components. SecurityCompliance determines component inconsistencies between the OfficeScan server andagents. Inconsistencies typically occur when agents cannot connect to the server toupdate components. If the agent obtains an update from another source (such as theActiveUpdate server), it is possible for a component in the agent to be newer than theone in the server.
For more information, see Security Compliance for Managed Agents on page 14-53.
Rolling Back Components for OfficeScan Agents
Rollback refers to reverting to the previous version of the Virus Pattern, Smart ScanAgent Pattern, and Virus Scan Engine. If these components do not function properly,roll them back to their previous versions. OfficeScan retains the current and theprevious versions of the Virus Scan Engine, and the last five versions of the VirusPattern and Smart Scan Agent Pattern.
Note
Only the above-mentioned components can be rolled back.
OfficeScan uses different scan engines for agents running 32-bit and 64-bit platforms.You need to roll back these scan engines separately. The rollback procedure for all typesof scan engines is the same.
Procedure
1. Go to Updates > Rollback
2. Click Synchronize with Server under the appropriate section.
a. In the agent tree, click the root domain icon ( ) to include all agents orselect specific domains or agents.
b. Click Rollback.

Keeping Protection Up-to-Date
6-51
c. Click View Update Logs to check the result or Back to return to theRollback screen.
3. If an older version pattern file exists on the server, click Rollback Server andAgent Versions to roll back the pattern file for both the OfficeScan agent and theserver.
Running the Touch Tool for OfficeScan Agent Hot Fixes
The Touch Tool synchronizes the time stamp of one file with the time stamp of anotherfile or with the system time of the endpoint. If you unsuccessfully attempt to deploy ahot fix on the OfficeScan server, use the Touch Tool to change the time stamp of thehot fix. This causes OfficeScan to interpret the hot fix file as new, which makes theserver attempt to automatically deploy the hot fix again.
Procedure
1. On the OfficeScan server, go to <Server installation folder>\PCCSRV\Admin\Utility\Touch.
2. Copy TMTouch.exe to the folder that contains the file you want to change. Ifsynchronizing the file time stamp with the time stamp of another file, put both filesin the same location with the Touch tool.
3. Open a command prompt and go to the location of the Touch Tool.
4. Type the following:
TmTouch.exe <destination file name> <source file name>
Where:
• <destination file name> is the name of the hot fix file whose timestamp you want to change
• <source file name> is the name of the file whose time stamp you wantto replicate

OfficeScan™ 11.0 Administrator’s Guide
6-52
Note
If you do not specify a source file name, the tool sets the destination file time stampto the system time of the endpoint. Use the wild card character (*) for the destinationfile, but not for the source file name.
5. To check if the time stamp changed, type dir in the command prompt, or checkthe file’s properties from Windows Explorer.
Update AgentsTo distribute the task of deploying components, domain settings, or agent programs andhot fixes to OfficeScan agents, assign some OfficeScan agents to act as Update Agents,or update sources for other agents. This helps ensure that agents receive updates in atimely manner without directing a significant amount of network traffic to theOfficeScan server.
If the network is segmented by location and the network link between segmentsexperiences a heavy traffic load, assign at least one Update Agent on each location.
Note
OfficeScan agents assigned to update components from an Update Agent only receiveupdated components and settings from the Update Agent. All OfficeScan agents still reporttheir status back to the OfficeScan server.
Update Agent System Requirements
Visit the following website for a complete list of system requirements:
http://docs.trendmicro.com/en-us/enterprise/officescan.aspx
Update Agent Configuration
Update Agent configuration is a 2-step process:

Keeping Protection Up-to-Date
6-53
1. Assign the OfficeScan agent as an Update Agent for specific components.
2. Specify the agents that will update from this Update Agent.
Note
The number of concurrent agent connections that a single Update Agent can handledepends on the hardware specifications of the endpoint.
Assigning OfficeScan Agents as Update Agents
Procedure
1. Go to Agents > Agent Management.
2. In the agent tree, select the agents that will be designated as Update Agents.
Note
It is not possible to select the root domain icon as this will designate all agents asUpdate Agents. A pure IPv6 Update Agent cannot distribute updates directly to pureIPv4 agents. Similarly, a pure IPv4 Update Agent cannot distribute updates directly topure IPv6 agents. A dual-stack proxy server that can convert IP addresses, such asDeleGate, is required to allow the Update Agent to distribute updates to the agents.
3. Click Settings > Update Agent Settings.
4. Select the items that Update Agents can share.
• Component updates
• Domain settings
• OfficeScan agent programs and hot fixes
5. Click Save.

OfficeScan™ 11.0 Administrator’s Guide
6-54
Specifying the OfficeScan Agents that Update from anUpdate Agent
Procedure
1. Go to Updates > Agents > Update Source.
2. Under Customized Update Source List, click Add.
3. In the screen that displays, specify the agents’ IP addresses. You can type an IPv4range and/or an IPv6 prefix and length.
4. In the Update Agent field, select the Update Agent you wish to assign to theagents.
NoteEnsure that the agents can connect to the Update Agent using their IP addresses. Forexample, if you specified an IPv4 address range, the Update Agent must have an IPv4address. If you specified an IPv6 prefix and length, the Update Agent must have anIPv6 address.
5. Click Save.
Update Sources for Update AgentsUpdate Agents can obtain updates from various sources, such as the OfficeScan serveror a customized update source. Configure the update source from the web console’sUpdate Source screen.
IPv6 Support for Update Agents
A pure IPv6 Update Agent cannot update directly from pure IPv4 update sources, suchas:
• A pure IPv4 OfficeScan server
• Any pure IPv4 custom update source

Keeping Protection Up-to-Date
6-55
• Trend Micro ActiveUpdate server
Similarly, a pure IPv4 Update Agent cannot update directly from pure IPv6 updatesources, such as a pure IPv6 OfficeScan server.
A dual-stack proxy server that can convert IP addresses, such as DeleGate, is required toallow the Update Agent to connect to the update sources.
Standard Update Source for Update AgentsThe OfficeScan server is the standard update source for Update Agents. If youconfigure agents to update directly from the OfficeScan server, the update processproceeds as follows:
1. The Update Agent obtains updates from the OfficeScan server.
2. If unable to update from the OfficeScan server, the agent tries connecting directlyto the Trend Micro ActiveUpdate server if any of the following are true:
• In Agents > Agent Management, click Settings > Privileges and OtherSettings > Other Settings > Update Settings, the option OfficeScanagents download updates from the Trend Micro ActiveUpdate Server isenabled.
• The ActiveUpdate server is the first entry in the Customized Update SourceList.
TipPlace the ActiveUpdate server at the top of the list only if you experience problemsupdating from the OfficeScan server. When Update Agents update directly from theActiveUpdate server, significant bandwidth is consumed between the network andthe Internet.
3. If unable to update from all possible sources, the Update Agent quits the updateprocess.
Customized Update Sources for Update AgentsAside from the OfficeScan server, Update Agents can update from custom updatesources. Custom update sources help reduce agent update traffic directed to the

OfficeScan™ 11.0 Administrator’s Guide
6-56
OfficeScan server. Specify the custom update sources on the Customized Update SourceList, which can accommodate up to 1024 update sources. See Customized Update Sourcesfor OfficeScan Agents on page 6-32 for steps to configure the list.
Note
Ensure that the Update Agents update components, domain settings, and agentprograms and hot fixes, only from the OfficeScan server option is disabled on theUpdate Source for Agents screen (Updates > Agents > Update Source) in order forUpdate Agents to connect to the customized update sources.
After you have set up and saved the list, the update process proceeds as follows:
1. The Update Agent updates from the first entry on the list.
2. If unable to update from the first entry, the agent updates from the second entry,and so on.
3. If unable to update from all entries, the agent checks the following options underthe OfficeScan agents update the following items from the OfficeScan serverif all customized sources are unavailable or not found heading:
• Components: If enabled, the agent updates from the OfficeScan server.
If the option is disabled, the agent then tries connecting directly to the TrendMicro ActiveUpdate server if any of the following are true:
Note
You can only update components from the Active Update server. Domainsettings, programs and hot fixes can only be downloaded from the server orUpdate Agents.
• In Agents > Agent Management, click Settings > Privileges andOther Settings > Other Settings > Update Settings, the optionAgents download updates from the Trend Micro ActiveUpdateServer is enabled.
• The ActiveUpdate server is not included in the Customized UpdateSource List.

Keeping Protection Up-to-Date
6-57
• Domain settings: If enabled, the agent updates from the OfficeScan server.
• OfficeScan agent programs and hot fixes: If enabled, the agent updatesfrom the OfficeScan server.
4. If unable to update from all possible sources, the Update Agent quits the updateprocess.
The update process is different if the option Standard update source (update fromOfficeScan server) is enabled and the OfficeScan server notifies the agent to updatecomponents. The process is as follows:
1. The agent updates directly from the OfficeScan server and disregards the updatesource list.
2. If unable to update from the server, the agent tries connecting directly to the TrendMicro ActiveUpdate server if any of the following are true:
• In Agents > Agent Management, click Settings > Privileges and OtherSettings > Other Settings > Update Settings, the option OfficeScanagents download updates from the Trend Micro ActiveUpdate Server isenabled.
• The ActiveUpdate server is the first entry in the Customized Update SourceList.
TipPlace the ActiveUpdate server at the top of the list only if you experience problemsupdating from the OfficeScan server. When OfficeScan agents update directly fromthe ActiveUpdate server, significant bandwidth is consumed between the networkand the Internet.
3. If unable to update from all possible sources, the Update Agent quits the updateprocess.
Configuring the Update Source for the Update Agent
Procedure
1. Go to Updates > Agents > Update Source.

OfficeScan™ 11.0 Administrator’s Guide
6-58
2. Select whether to update from the standard update source for Update Agents(OfficeScan server) or customized update source for update agents.
3. Click Notify All Agents.
Update Agent Component Duplication
Like the OfficeScan server, Update Agents also use component duplication whendownloading components. See OfficeScan Server Component Duplication on page 6-20 fordetails on how the server performs component duplication.
The component duplication process for Update Agents is as follows:
1. The Update Agent compares its current full pattern version with the latest versionon the update source. If the difference between the two versions is 14 or less, theUpdate Agent downloads the incremental pattern that accounts for the differencebetween the two versions.
Note
If the difference is more than 14, the Update Agent automatically downloads the fullversion of the pattern file.
2. The Update Agent merges the incremental pattern it downloaded with its currentfull pattern to generate the latest full pattern.
3. The Update Agent downloads all the remaining incremental patterns on the updatesource.
4. The latest full pattern and all the incremental patterns are made available to agents.
Update Methods for Update AgentsUpdate Agents use the same update methods available to regular agents. For details, seeOfficeScan Agent Update Methods on page 6-36.
You can also use the Scheduled Update Configuration tool to enable and configurescheduled updates on an Update Agent that was installed using Agent Packager.
Keeping Protection Up-to-Date
6-59
NoteThis tool is not available if the Update Agent was installed using other installation methods.See Deployment Considerations on page 5-10 for more information.
Using the Scheduled Update Configuration Tool
Procedure
1. On the Update Agent endpoint, navigate to <Agent installation folder>.
2. Double-click SUCTool.exe to run the tool. The Schedule Update ConfigurationTool console opens.
3. Select Enable Scheduled Update.
4. Specify the update frequency and time.
5. Click Apply.
Update Agent Analytical ReportGenerate the Update Agent Analytical Report to analyze the update infrastructure anddetermine which agents download from the OfficeScan server, Update Agents, or fromActiveUpdate server. You can also use this report to check if the number of agentsrequesting updates from the update sources exceeds available resources, and redirectnetwork traffic to appropriate sources.
NoteThis report includes all Update Agents. If you have delegated the task of managing one orseveral domains to other administrators, they will also see Update Agents belonging to thedomains that they are not managing.
OfficeScan exports the Update Agent Analytical Report to a comma-separated value(.csv) file.
This report contains the following information:

OfficeScan™ 11.0 Administrator’s Guide
6-60
• OfficeScan agent endpoint
• IP address
• Agent tree path
• Update source
• If agents download the following from Update Agents:
• Components
• Domain settings
• OfficeScan agent programs and hot fixes
Important
The Update Agent Analytical Report only lists OfficeScan agents configured to receivepartial updates from an Update Agent. OfficeScan agents that configured to performcomplete updates from an Update Agent (including components, domain settings, andOfficeScan agent programs and hot fixes) do not appear in the report.
For details on generating the report, see Customized Update Sources for OfficeScan Agents onpage 6-32.
Component Update SummaryThe web console provides an Update Summary screen (go to Updates > Summary)that informs you of the overall component update status and lets you update outdatedcomponents. If you enable server scheduled update, the screen will also show the nextupdate schedule.
Refresh the screen periodically to view the latest component update status.
Note
To view component updates on the integrated Smart Protection Server, go toAdministration > Smart Protection > Integrated Server.

Keeping Protection Up-to-Date
6-61
Update Status for OfficeScan AgentsIf you initiated component update to agents, view the following information in thissection:
• Number of agents notified to update components.
• Number of agents not yet notified but already in the notification queue. To cancelthe notification to these agents, click Cancel Notification.
ComponentsIn the Update Status table, view the update status for each component that theOfficeScan server downloads and distributes.
For each component, view its current version and the last update date. Click the numberlink to view agents with out-of-date components. Manually update agents with out-of-date components.


7-1
Chapter 7
Scanning for Security RisksThis chapter describes how to protect computers from security risks using file-basedscanning.
Topics include:
• About Security Risks on page 7-2
• Scan Method Types on page 7-8
• Scan Types on page 7-14
• Settings Common to All Scan Types on page 7-25
• Scan Privileges and Other Settings on page 7-50
• Global Scan Settings on page 7-64
• Security Risk Notifications on page 7-73
• Security Risk Logs on page 7-81
• Security Risk Outbreaks on page 7-94
OfficeScan™ 11.0 Administrator’s Guide
7-2
About Security RisksSecurity risk is the collective term for viruses/malware and spyware/grayware.OfficeScan protects computers from security risks by scanning files and thenperforming a specific action for each security risk detected. An overwhelming numberof security risks detected over a short period of time signals an outbreak. OfficeScan canhelp contain outbreaks by enforcing outbreak prevention policies and isolating infectedcomputers until they are completely risk-free. Notifications and logs help you keep trackof security risks and alert you if you need to take immediate action.
Viruses and MalwareTens of thousands of virus/malware exist, with more being created each day. Althoughonce most common in DOS or Windows, endpoint viruses today can cause a greatamount of damage by exploiting vulnerabilities in corporate networks, email systems andwebsites.
TABLE 7-1. Virus/Malware Types
VIRUS /MALWARE TYPE
DESCRIPTION
Joke program Joke programs are virus-like programs that often manipulate theappearance of things on the endpoint's monitor.
Others “Others” include viruses/malware not categorized under any of theother virus/malware types.
Packer Packers are compressed and/or encrypted Windows or Linux™executable programs, often a Trojan horse program. Compressingexecutables makes packers more difficult for antivirus products todetect.
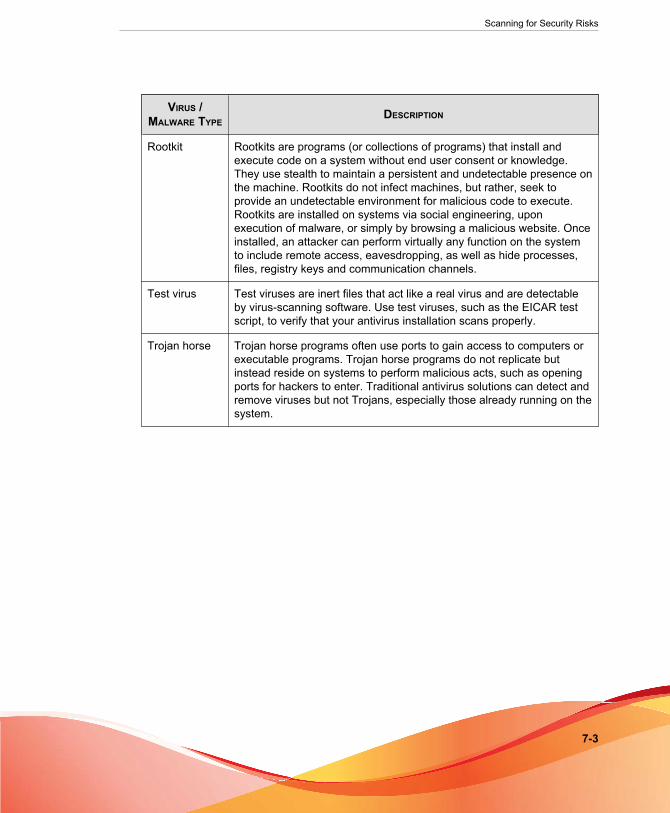
Scanning for Security Risks
7-3
VIRUS /MALWARE TYPE
DESCRIPTION
Rootkit Rootkits are programs (or collections of programs) that install andexecute code on a system without end user consent or knowledge.They use stealth to maintain a persistent and undetectable presence onthe machine. Rootkits do not infect machines, but rather, seek toprovide an undetectable environment for malicious code to execute.Rootkits are installed on systems via social engineering, uponexecution of malware, or simply by browsing a malicious website. Onceinstalled, an attacker can perform virtually any function on the systemto include remote access, eavesdropping, as well as hide processes,files, registry keys and communication channels.
Test virus Test viruses are inert files that act like a real virus and are detectableby virus-scanning software. Use test viruses, such as the EICAR testscript, to verify that your antivirus installation scans properly.
Trojan horse Trojan horse programs often use ports to gain access to computers orexecutable programs. Trojan horse programs do not replicate butinstead reside on systems to perform malicious acts, such as openingports for hackers to enter. Traditional antivirus solutions can detect andremove viruses but not Trojans, especially those already running on thesystem.
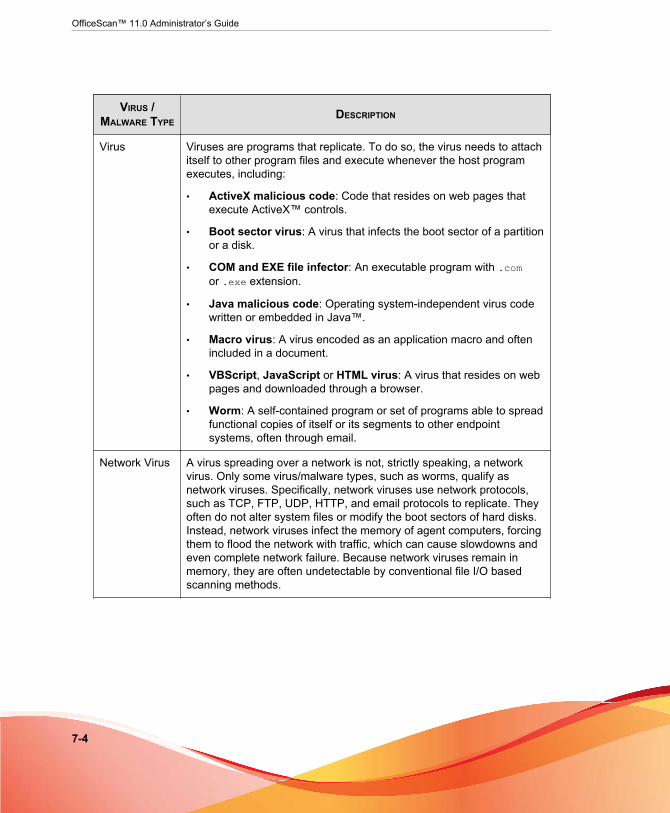
OfficeScan™ 11.0 Administrator’s Guide
7-4
VIRUS /MALWARE TYPE
DESCRIPTION
Virus Viruses are programs that replicate. To do so, the virus needs to attachitself to other program files and execute whenever the host programexecutes, including:
• ActiveX malicious code: Code that resides on web pages thatexecute ActiveX™ controls.
• Boot sector virus: A virus that infects the boot sector of a partitionor a disk.
• COM and EXE file infector: An executable program with .comor .exe extension.
• Java malicious code: Operating system-independent virus codewritten or embedded in Java™.
• Macro virus: A virus encoded as an application macro and oftenincluded in a document.
• VBScript, JavaScript or HTML virus: A virus that resides on webpages and downloaded through a browser.
• Worm: A self-contained program or set of programs able to spreadfunctional copies of itself or its segments to other endpointsystems, often through email.
Network Virus A virus spreading over a network is not, strictly speaking, a networkvirus. Only some virus/malware types, such as worms, qualify asnetwork viruses. Specifically, network viruses use network protocols,such as TCP, FTP, UDP, HTTP, and email protocols to replicate. Theyoften do not alter system files or modify the boot sectors of hard disks.Instead, network viruses infect the memory of agent computers, forcingthem to flood the network with traffic, which can cause slowdowns andeven complete network failure. Because network viruses remain inmemory, they are often undetectable by conventional file I/O basedscanning methods.

Scanning for Security Risks
7-5
VIRUS /MALWARE TYPE
DESCRIPTION
Probable virus/malware
Probable viruses/malware are suspicious files that have some of thecharacteristics of viruses/malware.
For details, see the Trend Micro Virus Encyclopedia:
http://www.trendmicro.com/vinfo/virusencyclo/
NoteClean cannot be performed on probable virus/malware, but thescan action is configurable.
Spyware and GraywareEndpoints are at risk from potential threats other than viruses/malware. Spyware/Grayware refers to applications or files not classified as viruses or Trojans, but can stillnegatively affect the performance of the endpoints on your network and introducesignificant security, confidentiality, and legal risks to your organization. Often spyware/grayware performs a variety of undesired and threatening actions such as irritating userswith pop-up windows, logging user keystrokes, and exposing endpoint vulnerabilities toattack.
If you find an application or file that OfficeScan cannot detect as grayware but you thinkis a type of grayware, send it to Trend Micro for analysis:
http://esupport.trendmicro.com/solution/en-us/1059565.aspx
TYPE DESCRIPTION
Spyware Gathers data, such as account user names and passwords, andtransmits them to third parties.
Adware Displays advertisements and gathers data, such as user web surfingpreferences, used for targeting advertisements at the user through aweb browser.

OfficeScan™ 11.0 Administrator’s Guide
7-6
TYPE DESCRIPTION
Dialer Changes endpoint Internet settings and can force the endpoint to dialpre-configured phone numbers through a modem. These are oftenpay-per-call or international numbers that can result in a significantexpense for your organization.
Joke program Causes abnormal endpoint behavior, such as closing and opening theCD-ROM tray and displaying numerous message boxes.
Hacking tool Helps hackers enter computers.
Remote accesstool
Helps hackers remotely access and control computers.
Passwordcrackingapplication
Helps hackers decipher account user names and passwords.
Others Other types of potentially malicious programs.
How Spyware/Grayware Gets into the Network
Spyware/Grayware often gets into a corporate network when users download legitimatesoftware that have grayware applications included in the installation package. Mostsoftware programs include an End User License Agreement (EULA), which the user hasto accept before downloading. Often the EULA does include information about theapplication and its intended use to collect personal data; however, users often overlookthis information or do not understand the legal jargon.
Potential Risks and Threats
The existence of spyware and other types of grayware on the network has the potentialto introduce the following:

Scanning for Security Risks
7-7
TABLE 7-2. Potential Risks and Threats
RISK OR THREAT DESCRIPTION
Reduced EndpointPerformance
To perform their tasks, spyware/grayware applications oftenrequire significant CPU and system memory resources.
Increased WebBrowser-relatedCrashes
Certain types of grayware, such as adware, often displayinformation in a browser frame or window. Depending on how thecode in these applications interacts with system processes,grayware can sometimes cause browsers to crash or freeze andmay even require the endpoint to restart.
Reduced UserEfficiency
By needing to close frequently occurring pop-up advertisementsand deal with the negative effects of joke programs, usersbecome unnecessarily distracted from their main tasks.
Degradation ofNetwork Bandwidth
Spyware/Grayware applications often regularly transmit the datathey collect to other applications running on or outside thenetwork.
Loss of Personaland CorporateInformation
Not all data spyware/grayware applications collect is as innocuousas a list of websites users visit. Spyware/Grayware can alsocollect user credentials, such as those used to access onlinebanking accounts and corporate networks.
Higher Risk of LegalLiability
If endpoint resources on the network are hijacked, hackers maybe able to utilize agent computers to launch attacks or installspyware/grayware on computers outside the network. Theparticipation of network resources in these types of activities couldleave an organization legally liable to damages incurred by otherparties.
Guarding Against Spyware/Grayware and Other Threats
There are many steps you can take to prevent the installation of spyware/grayware ontoyour endpoint. Trend Micro suggests the following:
• Configure all types of scans (Manual Scan, Real-time Scan, Scheduled Scan, andScan Now) to scan for and remove spyware/grayware files and applications. SeeScan Types on page 7-14 for more information.
• Educate your agent users to do the following:

OfficeScan™ 11.0 Administrator’s Guide
7-8
• Read the End User License Agreement (EULA) and included documentationof applications they download and install on their computers.
• Click No to any message asking for authorization to download and installsoftware unless agent users are certain both the creator of the software andthe website they view are trustworthy.
• Disregard unsolicited commercial email (spam), especially if the spam asksusers to click a button or hyperlink.
• Configure web browser settings that ensure a strict level of security. Trend Microrecommends requiring web browsers to prompt users before installing ActiveXcontrols.
• If using Microsoft Outlook, configure the security settings so that Outlook doesnot automatically download HTML items, such as pictures sent in spam messages.
• Do not allow the use of peer-to-peer file-sharing services. Spyware and othergrayware applications may be masked as other types of files your users may want todownload, such as MP3 music files.
• Periodically examine the installed software on your agent computers and look forapplications that may be spyware or other grayware.
• Keep your Windows operating systems updated with the latest patches fromMicrosoft. See the Microsoft website for details.
Scan Method TypesOfficeScan agents can use one of two scan methods when scanning for security risks.The scan methods are smart scan and conventional scan.
• Smart Scan
Agents that use smart scan are referred to as smart scan agents in this document.Smart scan agents benefit from local scans and in-the-cloud queries provided byFile Reputation Services.
• Conventional Scan

Scanning for Security Risks
7-9
Agents that do not use smart scan are called conventional scan agents. Aconventional scan agent stores all OfficeScan components on the agent endpointand scans all files locally.
Default Scan MethodIn this OfficeScan version, the default scan method for fresh installations is smart scan.This means that if you perform a fresh OfficeScan server installation and do not changethe scan method on the web console, all agents that the server manages use smart scan.
If you upgrade the OfficeScan server from an earlier version and automatic agentupgrade is enabled, all agents managed by the server still use the scan methodconfigured before the upgrade. For example, if you upgrade from OfficeScan 10, whichsupports smart scan and conventional scan, all upgraded agents that use smart scancontinue to use smart scan and all agents using conventional scan continue to useconventional scan.
Scan Methods ComparedThe following table provides a comparison between the two scan methods:
TABLE 7-3. Conventional Scan and Smart Scan Compared
BASIS OFCOMPARISON
CONVENTIONAL SCAN SMART SCAN
Availability Available in this OfficeScanversion and all earlierOfficeScan versions
Available starting in OfficeScan 10
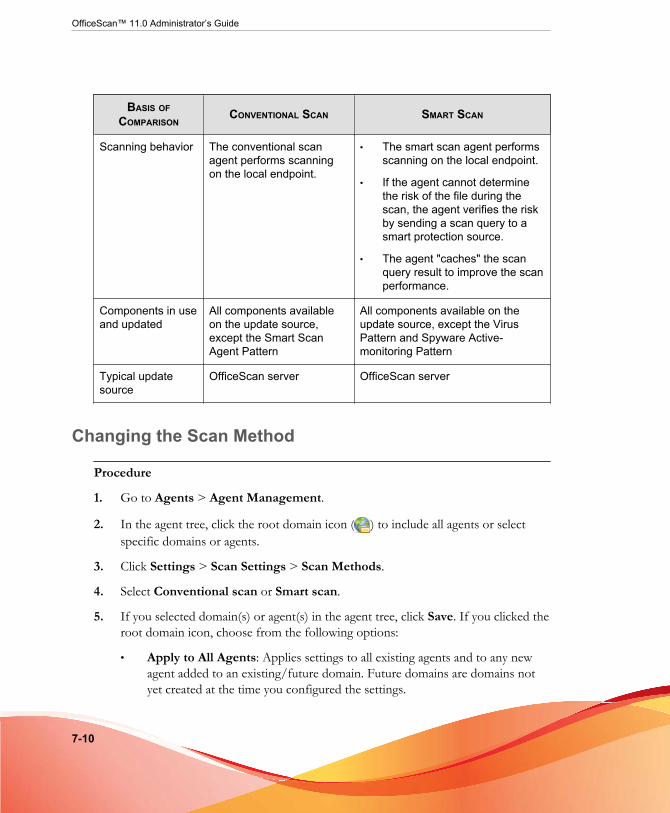
OfficeScan™ 11.0 Administrator’s Guide
7-10
BASIS OFCOMPARISON
CONVENTIONAL SCAN SMART SCAN
Scanning behavior The conventional scanagent performs scanningon the local endpoint.
• The smart scan agent performsscanning on the local endpoint.
• If the agent cannot determinethe risk of the file during thescan, the agent verifies the riskby sending a scan query to asmart protection source.
• The agent "caches" the scanquery result to improve the scanperformance.
Components in useand updated
All components availableon the update source,except the Smart ScanAgent Pattern
All components available on theupdate source, except the VirusPattern and Spyware Active-monitoring Pattern
Typical updatesource
OfficeScan server OfficeScan server
Changing the Scan Method
Procedure
1. Go to Agents > Agent Management.
2. In the agent tree, click the root domain icon ( ) to include all agents or selectspecific domains or agents.
3. Click Settings > Scan Settings > Scan Methods.
4. Select Conventional scan or Smart scan.
5. If you selected domain(s) or agent(s) in the agent tree, click Save. If you clicked theroot domain icon, choose from the following options:
• Apply to All Agents: Applies settings to all existing agents and to any newagent added to an existing/future domain. Future domains are domains notyet created at the time you configured the settings.

Scanning for Security Risks
7-11
• Apply to Future Domains Only: Applies settings only to agents added tofuture domains. This option will not apply settings to new agents added to anexisting domain.
Switching from Smart Scan to Conventional ScanWhen you switch agents to conventional scan, consider the following:
1. Number of agents to switch
Switching a relatively small number of agents at a time allows efficient use ofOfficeScan server and Smart Protection Server resources. These servers canperform other critical tasks while agents change their scan methods.
2. Timing
When switching back to conventional scan, agents will likely download the fullversion of the Virus Pattern and Spyware-active Monitoring Pattern from theOfficeScan server. These pattern files are only used by conventional scan agents.
Consider switching during off-peak hours to ensure the download process finisheswithin a short amount of time. Also consider switching when no agent is scheduledto update from the server. Also temporarily disable "Update Now" on agents andre-enable it after the agents have switched to smart scan.
3. Agent tree settings
Scan method is a granular setting that can be set on the root, domain, or individualagent level. When switching to conventional scan, you can:
• Create a new agent tree domain and assign conventional scan as its scanmethod. Any agent you move to this domain will use conventional scan.When you move the agent, enable the setting Apply settings of new domainto selected agents.
• Select a domain and configure it to use conventional scan. Smart scan agentsbelonging to the domain will switch to conventional scan.
• Select one or several smart scan agents from a domain and then switch themto conventional scan.

OfficeScan™ 11.0 Administrator’s Guide
7-12
NoteAny changes to the domain’s scan method overrides the scan method you haveconfigured for individual agents.
Switching from Conventional Scan to Smart ScanIf you are switching agents from conventional scan to smart scan, ensure that you haveset up Smart Protection Services. For details, see Setting Up Smart Protection Services on page4-12.
The following table provides other considerations when switching to smart scan:
TABLE 7-4. Considerations When Switching to Smart Scan
CONSIDERATION DETAILS
Product license To use smart scan, ensure that you have activated thelicenses for the following services and that the licenses are notexpired:
• Antivirus
• Web Reputation and Anti-spyware
OfficeScan server Ensure that agents can connect to the OfficeScan server. Onlyonline agents will be notified to switch to smart scan. Offlineagents get notified when they become online. Roaming agentsare notified when they become online or, if the agent hasscheduled update privileges, when scheduled update runs.
Also verify that the OfficeScan server has the latestcomponents because smart scan agents need to downloadthe Smart Scan Agent Pattern from the server. To updatecomponents, see OfficeScan Server Updates on page 6-15.
Number of agents toswitch
Switching a relatively small number of agents at a time allowsefficient use of OfficeScan server resources. The OfficeScanserver can perform other critical tasks while agents changetheir scan methods.

Scanning for Security Risks
7-13
CONSIDERATION DETAILS
Timing When switching to smart scan for the first time, agents need todownload the full version of the Smart Scan Agent Patternfrom the OfficeScan server. The Smart Scan Pattern is onlyused by smart scan agents.
Consider switching during off-peak hours to ensure thedownload process finishes within a short amount of time. Alsoconsider switching when no agent is scheduled to update fromthe server. Also temporarily disable "Update Now" on agentsand re-enable it after the agents have switched to smart scan.
Agent tree settings Scan method is a granular setting that can be set on the root,domain, or individual agent level. When switching to smartscan, you can:
• Create a new agent tree domain and assign smart scanas its scan method. Any agent you move to this domainwill use smart scan. When you move the agent, enablethe setting Apply settings of new domain to selectedagents.
• Select a domain and configure it to use smart scan.Conventional scan agents belonging to the domain willswitch to smart scan.
• Select one or several conventional scan agents from adomain and then switch them to smart scan.
NoteAny changes to the domain’s scan method overridesthe scan method you have configured for individualagents.

OfficeScan™ 11.0 Administrator’s Guide
7-14
CONSIDERATION DETAILS
IPv6 support Smart scan agents send scan queries to smart protectionsources.
A pure IPv6 smart scan agent cannot send queries directly topure IPv4 sources, such as:
• Smart Protection Server 2.0 (integrated or standalone)
NoteIPv6 support for Smart Protection Server starts inversion 2.5.
• Trend Micro Smart Protection Network
Similarly, a pure IPv4 smart scan agent cannot send queriesto pure IPv6 Smart Protection Servers.
A dual-stack proxy server that can convert IP addresses, suchas DeleGate, is required to allow smart scan agents toconnect to the sources.
Scan TypesOfficeScan provides the following scan types to protect OfficeScan agent computersfrom security risks:
TABLE 7-5. Scan Types
SCAN TYPE DESCRIPTION
Real-time Scan Automatically scans a file on the endpoint as it is received, opened,downloaded, copied, or modified
See Real-time Scan on page 7-15 for details.
Manual Scan A user-initiated scan that scans a file or a set of files requested bythe user
See Manual Scan on page 7-18 for details.
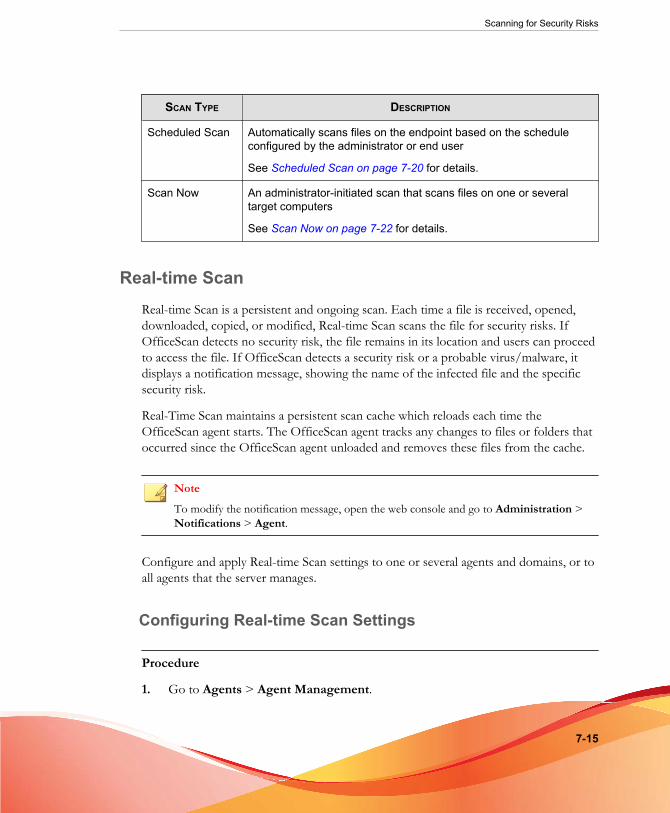
Scanning for Security Risks
7-15
SCAN TYPE DESCRIPTION
Scheduled Scan Automatically scans files on the endpoint based on the scheduleconfigured by the administrator or end user
See Scheduled Scan on page 7-20 for details.
Scan Now An administrator-initiated scan that scans files on one or severaltarget computers
See Scan Now on page 7-22 for details.
Real-time ScanReal-time Scan is a persistent and ongoing scan. Each time a file is received, opened,downloaded, copied, or modified, Real-time Scan scans the file for security risks. IfOfficeScan detects no security risk, the file remains in its location and users can proceedto access the file. If OfficeScan detects a security risk or a probable virus/malware, itdisplays a notification message, showing the name of the infected file and the specificsecurity risk.
Real-Time Scan maintains a persistent scan cache which reloads each time theOfficeScan agent starts. The OfficeScan agent tracks any changes to files or folders thatoccurred since the OfficeScan agent unloaded and removes these files from the cache.
Note
To modify the notification message, open the web console and go to Administration >Notifications > Agent.
Configure and apply Real-time Scan settings to one or several agents and domains, or toall agents that the server manages.
Configuring Real-time Scan Settings
Procedure
1. Go to Agents > Agent Management.

OfficeScan™ 11.0 Administrator’s Guide
7-16
2. In the agent tree, click the root domain icon ( ) to include all agents or selectspecific domains or agents.
3. Click Settings > Scan Settings > Real-time Scan Settings.
4. Select the following options:
• Enable virus/malware scan
• Enable spyware/grayware scan
NoteIf you disable virus/malware scanning, spyware/grayware scanning alsobecomes disabled. During a virus outbreak, Real-time Scan cannot be disabled(or will automatically be enabled if initially disabled) to prevent the virus frommodifying or deleting files and folders on agent computers.
5. Configure the following scan criteria:
• User Activity on Files on page 7-25
• Files to Scan on page 7-26
• Scan Settings on page 7-26
• Scan Exclusions on page 7-29
6. Click the Action tab and then configure the following:

Scanning for Security Risks
7-17
TABLE 7-6. Real-time Scan Actions
ACTION REFERENCE
Virus/Malware action Primary action (select one):
• Use ActiveAction on page 7-36
• Use the Same Action for all Virus/Malware Types onpage 7-37
• Use a Specific Action for Each Virus/Malware Typeon page 7-37
NoteFor details about the different actions, see Virus/Malware Scan Actions on page 7-34.
Additional virus/malware actions:
• Quarantine Directory on page 7-38
• Back Up Files Before Cleaning on page 7-39
• Damage Cleanup Services on page 7-40
• Display a Notification Message When Virus/Malwareis Detected on page 7-41
• Display a Notification Message When ProbableVirus/Malware is Detected on page 7-41
Spyware/Graywareaction
Primary action:
• Spyware/Grayware Scan Actions on page 7-46
Additional spyware/grayware action:
• Display a Notification Message When Spyware/Grayware is Detected on page 7-47
7. If you selected domain(s) or agent(s) in the agent tree, click Save. If you clicked theroot domain icon, choose from the following options:

OfficeScan™ 11.0 Administrator’s Guide
7-18
• Apply to All Agents: Applies settings to all existing agents and to any newagent added to an existing/future domain. Future domains are domains notyet created at the time you configured the settings.
• Apply to Future Domains Only: Applies settings only to agents added tofuture domains. This option will not apply settings to new agents added to anexisting domain.
Manual ScanManual Scan is an on-demand scan and starts immediately after a user runs the scan onthe OfficeScan agent console. The time it takes to complete scanning depends on thenumber of files to scan and the OfficeScan agent endpoint's hardware resources.
Configure and apply Manual Scan settings to one or several agents and domains, or to allagents that the server manages.
Configuring a Manual Scan
Procedure
1. Go to Agents > Agent Management.
2. In the agent tree, click the root domain icon ( ) to include all agents or selectspecific domains or agents.
3. Click Settings > Scan Settings > Manual Scan Settings.
4. On the Target tab, configure the following:
• Files to Scan on page 7-26
• Scan Settings on page 7-26
• CPU Usage on page 7-28
• Scan Exclusions on page 7-29
5. Click the Action tab and then configure the following:

Scanning for Security Risks
7-19
TABLE 7-7. Manual Scan Actions
ACTION REFERENCE
Virus/Malware action Primary action (select one):
• Use ActiveAction on page 7-36
• Use the Same Action for all Virus/Malware Types onpage 7-37
• Use a Specific Action for Each Virus/Malware Typeon page 7-37
NoteFor details about the different actions, see Virus/Malware Scan Actions on page 7-34.
Additional virus/malware actions:
• Quarantine Directory on page 7-38
• Back Up Files Before Cleaning on page 7-39
• Damage Cleanup Services on page 7-40
Spyware/Graywareaction
Primary action:
• Spyware/Grayware Scan Actions on page 7-46
6. If you selected domain(s) or agent(s) in the agent tree, click Save. If you clicked theroot domain icon, choose from the following options:
• Apply to All Agents: Applies settings to all existing agents and to any newagent added to an existing/future domain. Future domains are domains notyet created at the time you configured the settings.
• Apply to Future Domains Only: Applies settings only to agents added tofuture domains. This option will not apply settings to new agents added to anexisting domain.
OfficeScan™ 11.0 Administrator’s Guide
7-20
Scheduled ScanScheduled Scan runs automatically on the appointed date and time. Use Scheduled Scanto automate routine scans on the agent and improve scan management efficiency.
Configure and apply Scheduled Scan settings to one or several agents and domains, or toall agents that the server manages.
Configuring a Scheduled Scan
Procedure
1. Go to Agents > Agent Management.
2. In the agent tree, click the root domain icon ( ) to include all agents or selectspecific domains or agents.
3. Click Settings > Scan Settings > Scheduled Scan Settings.
4. Select the following options:
• Enable virus/malware scan
• Enable spyware/grayware scan
NoteIf you disable virus/malware scanning, spyware/grayware scanning also becomesdisabled.
5. Configure the following scan criteria:
• Schedule on page 7-29
• Files to Scan on page 7-26
• Scan Settings on page 7-26
• CPU Usage on page 7-28
• Scan Exclusions on page 7-29
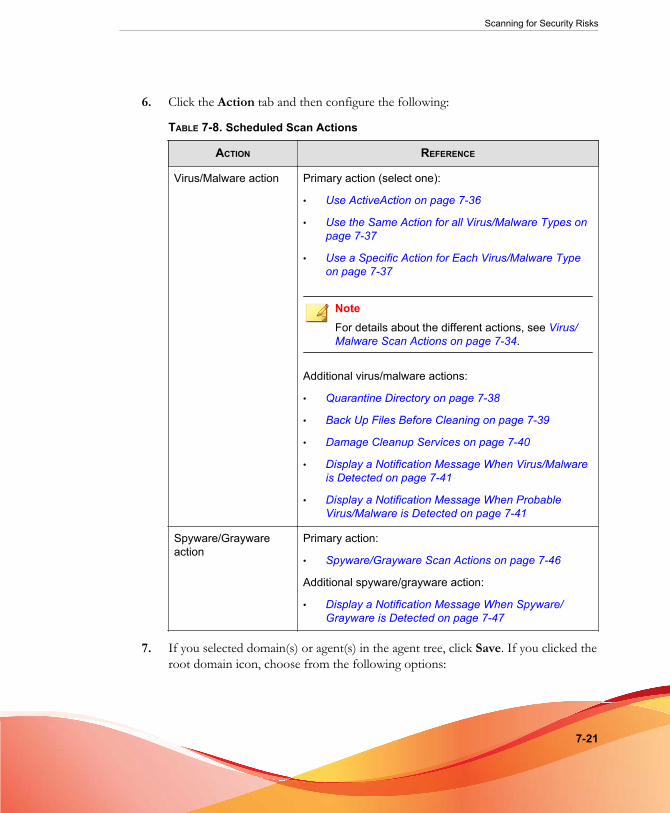
Scanning for Security Risks
7-21
6. Click the Action tab and then configure the following:
TABLE 7-8. Scheduled Scan Actions
ACTION REFERENCE
Virus/Malware action Primary action (select one):
• Use ActiveAction on page 7-36
• Use the Same Action for all Virus/Malware Types onpage 7-37
• Use a Specific Action for Each Virus/Malware Typeon page 7-37
NoteFor details about the different actions, see Virus/Malware Scan Actions on page 7-34.
Additional virus/malware actions:
• Quarantine Directory on page 7-38
• Back Up Files Before Cleaning on page 7-39
• Damage Cleanup Services on page 7-40
• Display a Notification Message When Virus/Malwareis Detected on page 7-41
• Display a Notification Message When ProbableVirus/Malware is Detected on page 7-41
Spyware/Graywareaction
Primary action:
• Spyware/Grayware Scan Actions on page 7-46
Additional spyware/grayware action:
• Display a Notification Message When Spyware/Grayware is Detected on page 7-47
7. If you selected domain(s) or agent(s) in the agent tree, click Save. If you clicked theroot domain icon, choose from the following options:
OfficeScan™ 11.0 Administrator’s Guide
7-22
• Apply to All Agents: Applies settings to all existing agents and to any newagent added to an existing/future domain. Future domains are domains notyet created at the time you configured the settings.
• Apply to Future Domains Only: Applies settings only to agents added tofuture domains. This option will not apply settings to new agents added to anexisting domain.
Scan NowScan Now is initiated remotely by OfficeScan administrators through the web consoleand can be targeted to one or several agent computers.
Configure and apply Scan Now settings to one or several agents and domains, or to allagents that the server manages.
Configuring Scan Now Settings
Procedure
1. Go to Agents > Agent Management.
2. In the agent tree, click the root domain icon ( ) to include all agents or selectspecific domains or agents.
3. Click Settings > Scan Settings > Scan Now Settings.
4. Select the following options:
• Enable virus/malware scan
• Enable spyware/grayware scan
NoteIf you disable virus/malware scanning, spyware/grayware scanning also becomesdisabled.
5. Configure the following scan criteria:

Scanning for Security Risks
7-23
• Files to Scan on page 7-26
• Scan Settings on page 7-26
• CPU Usage on page 7-28
• Scan Exclusions on page 7-29
6. Click the Action tab and then configure the following:
TABLE 7-9. Scan Now Actions
ACTION REFERENCE
Virus/Malware action Primary action (select one):
• Use ActiveAction on page 7-36
• Use the Same Action for all Virus/Malware Types onpage 7-37
• Use a Specific Action for Each Virus/Malware Typeon page 7-37
NoteFor details about the different actions, see Virus/Malware Scan Actions on page 7-34.
Additional virus/malware actions:
• Quarantine Directory on page 7-38
• Back Up Files Before Cleaning on page 7-39
• Damage Cleanup Services on page 7-40
Spyware/Graywareaction
Primary action:
• Spyware/Grayware Scan Actions on page 7-46
7. If you selected domain(s) or agent(s) in the agent tree, click Save. If you clicked theroot domain icon, choose from the following options:
• Apply to All Agents: Applies settings to all existing agents and to any newagent added to an existing/future domain. Future domains are domains notyet created at the time you configured the settings.

OfficeScan™ 11.0 Administrator’s Guide
7-24
• Apply to Future Domains Only: Applies settings only to agents added tofuture domains. This option will not apply settings to new agents added to anexisting domain.
Initiating Scan Now
Initiate Scan Now on computers that you suspect to be infected.
Procedure
1. Go to Agents > Agent Management.
2. In the agent tree, click the root domain icon ( ) to include all agents or selectspecific domains or agents.
3. Click Tasks > Scan Now.
4. To change the pre-configured Scan Now settings before initiating the scan, clickSettings.
The Scan Now Settings screen opens. See Scan Now on page 7-22 for details.
5. In the agent tree, select the agents that will perform scanning and then clickInitiate Scan Now.
Note
If you do not select any agent, OfficeScan automatically notifies all agents in theagent tree.
The server sends a notification to the agents.
6. Check the notification status and see if there are agents that did not receive thenotification.
7. Click Select Unnotified Endpoints and then Initiate Scan Now to immediatelyresend the notification to un-notified agents.
Example: Total number of agents: 50
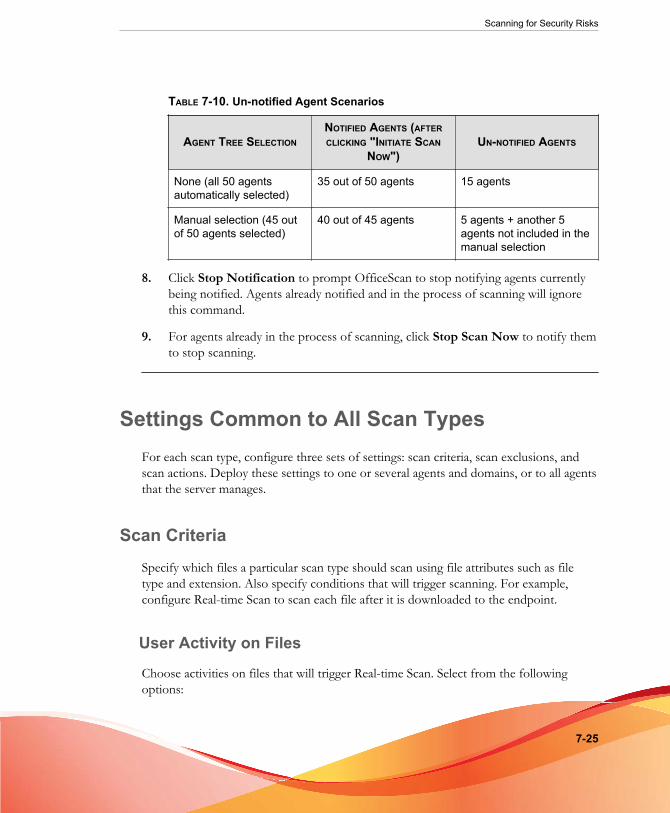
Scanning for Security Risks
7-25
TABLE 7-10. Un-notified Agent Scenarios
AGENT TREE SELECTIONNOTIFIED AGENTS (AFTERCLICKING "INITIATE SCAN
NOW")UN-NOTIFIED AGENTS
None (all 50 agentsautomatically selected)
35 out of 50 agents 15 agents
Manual selection (45 outof 50 agents selected)
40 out of 45 agents 5 agents + another 5agents not included in themanual selection
8. Click Stop Notification to prompt OfficeScan to stop notifying agents currentlybeing notified. Agents already notified and in the process of scanning will ignorethis command.
9. For agents already in the process of scanning, click Stop Scan Now to notify themto stop scanning.
Settings Common to All Scan TypesFor each scan type, configure three sets of settings: scan criteria, scan exclusions, andscan actions. Deploy these settings to one or several agents and domains, or to all agentsthat the server manages.
Scan Criteria
Specify which files a particular scan type should scan using file attributes such as filetype and extension. Also specify conditions that will trigger scanning. For example,configure Real-time Scan to scan each file after it is downloaded to the endpoint.
User Activity on Files
Choose activities on files that will trigger Real-time Scan. Select from the followingoptions:

OfficeScan™ 11.0 Administrator’s Guide
7-26
• Scan files being created/modified: Scans new files introduced into the endpoint(for example, after downloading a file) or files being modified
• Scan files being retrieved: Scans files as they are opened
• Scan files being created/modified and retrieved
For example, if the third option is selected, a new file downloaded to the endpoint willbe scanned and stays in its current location if no security risk is detected. The same filewill be scanned when a user opens the file and, if the user modified the file, before themodifications are saved.
Files to Scan
Select from the following options:
• All scannable files: Scan all files
• File types scanned by IntelliScan: Only scan files known to potentially harbormalicious code, including files disguised by a harmless extension name. SeeIntelliScan on page E-6 for details.
• Files with the following extensions: Only scan files whose extensions areincluded in the file extension list. Add new extensions or remove any of theexisting extensions.
Scan Settings
Select one or more of the following options:
• Scan floppy disk during system shutdown: Real-time Scan scans any floppy diskfor boot viruses before shutting down the endpoint. This prevents any virus/malware from executing when a user reboots the endpoint from the disk.
• Scan hidden folders: Allows OfficeScan to detect and then scan hidden folderson the endpoint during Manual Scan
• Scan network drive: Scans network drives or folders mapped to the OfficeScanagent endpoint during Manual Scan or Real-time Scan.

Scanning for Security Risks
7-27
• Scan the boot sector of the USB storage device after plugging in:Automatically scans only the boot sector of a USB storage device every time theuser plugs it in (Real-time Scan).
• Scan all files in removable storage devices after plugging in: Automaticallyscans all files on a USB storage device every time the user plugs it in (Real-timeScan).
• Quarantine malware variants detected in memory: Behavior Monitoring scansthe system memory for suspicious processes and Real-Time Scan maps the processand scans it for malware threats. If a malware threat exists, Real-Time scanquarantines the process and/or file.
NoteThis feature requires that administrators enable the Unauthorized Change PreventionService and the Advanced Protection Service.
• Scan compressed files: Allows OfficeScan to scan up to a specified number ofcompression layers and skip scanning any excess layers. OfficeScan also cleans ordeletes infected files within compressed files. For example, if the maximum is twolayers and a compressed file to be scanned has six layers, OfficeScan scans twolayers and skips the remaining four. If a compressed file contains security threats,OfficeScan cleans or deletes the file.
NoteOfficeScan treats Microsoft Office 2007 files in Office Open XML format ascompressed files. Office Open XML, the file format for Office 2007 applications,uses ZIP compression technologies. If you want files created using these applicationsto be scanned for viruses/malware, you need to enable scanning of compressed files.
• Scan OLE objects: When a file contains multiple Object Linking and Embedding(OLE) layers, OfficeScan scans the specified number of layers and ignores theremaining layers.
All OfficeScan agents managed by the server check this setting during ManualScan, Real-time Scan, Scheduled Scan, and Scan Now. Each layer is scanned forvirus/malware and spyware/grayware.
For example:

OfficeScan™ 11.0 Administrator’s Guide
7-28
The number of layers you specify is 2. Embedded within a file is a Microsoft Worddocument (first layer), within the Word document is a Microsoft Excel spreadsheet(second layer), and within the spreadsheet is an .exe file (third layer). OfficeScanwill scan the Word document and Excel spreadsheet, and skip the .exe file.
• Detect exploit code in OLE files: OLE Exploit Detection heuristicallyidentifies malware by checking Microsoft Office files for exploit code.
NoteThe specified number of layers is applicable to both Scan OLE objects andDetect exploit code options.
• Enable IntelliTrap: Detects and removes virus/malware on compressedexecutable files. This option is available only for Real-time Scan. See IntelliTrap onpage E-6 for details.
• Scan boot area: Scans the boot sector of the agent endpoint’s hard disk for virus/malware during Manual Scan, Scheduled Scan and Scan Now
CPU UsageOfficeScan can pause after scanning one file and before scanning the next file. Thissetting is used during Manual Scan, Scheduled Scan, and Scan Now.
Select from the following options:
• High: No pausing between scans
• Medium: Pause between file scans if CPU consumption is higher than 50%, anddo not pause if 50% or lower
• Low: Pause between file scans if CPU consumption is higher than 20%, and donot pause if 20% or lower
If you choose Medium or Low, when scanning is launched and CPU consumption iswithin the threshold (50% or 20%), OfficeScan will not pause between scans, resultingin faster scanning time. OfficeScan uses more CPU resource in the process but becauseCPU consumption is optimal, endpoint performance is not drastically affected. WhenCPU consumption begins to exceed the threshold, OfficeScan pauses to reduce CPUusage, and stops pausing when consumption is within the threshold again.

Scanning for Security Risks
7-29
If you choose High, OfficeScan does not check the actual CPU consumption and scansfiles without pausing.
Schedule
Configure how often (daily, weekly, or monthly) and what time Scheduled Scan will run.
For monthly Scheduled Scans, you can choose either a particular day of a month or aday of a week and the order of its occurrence.
• A particular day of a month: Select between the 1st and 31st day. If you selectedthe 29th, 30th, or 31st day and a month does not have this day, OfficeScan runsScheduled Scan on the last day of the month. Therefore:
• If you selected 29, Scheduled Scan runs on February 28 (except on a leapyear) and on the 29th day of all the other months.
• If you selected 30, Scheduled Scan runs on February 28 or 29, and on the 30thday of all the other months.
• If you selected 31, Scheduled Scan runs on February 28 or 29, April 30, June30, September 30, November 30, and on the 31st day of all the other months.
• A day of a week and the order of its occurrence: A day of a week occurs four orfive times a month. For example, there are typically four Mondays in a month.Specify a day of a week and the order in which it occurs during a month. Forexample, choose to run Scheduled Scan on the second Monday of each month. Ifyou choose the fifth occurrence of a day and it does not exist during a particularmonth, the scan runs on the fourth occurrence.
Scan ExclusionsConfigure scan exclusions to increase the scanning performance and skip scanning filescausing false alarms. When a particular scan type runs, OfficeScan checks the scanexclusion list to determine which files on the endpoint will be excluded from bothvirus/malware and spyware/grayware scanning.
When you enable scan exclusion, OfficeScan will not scan a file under the followingconditions:

OfficeScan™ 11.0 Administrator’s Guide
7-30
• The file is found under a specific directory (or any of its sub-directories).
• The file name matches any of the names in the exclusion list.
• The file extension matches any of the extensions in the exclusion list.
Tip
For a list of products that Trend Micro recommends excluding from Real-Time scans, goto:
http://esupport.trendmicro.com/solution/en-US/1059770.aspx
Wildcard Exceptions
Scan exclusion lists for files and directories support the use of wildcard characters. Usethe "?" character to replace one character and "*" to replace several characters.
Use wildcard characters cautiously. Using the wrong character might exclude incorrectfiles or directories. For example, addingC:\* to the Scan Exclusion List (Files) wouldexclude the entire C:\ drive.
TABLE 7-11. Scan Exclusions Using Wildcard Characters
VALUE EXCLUDED NOT EXCLUDED
c:\director*\fil\*.txt
c:\directory\fil\doc.txt
c:\directories\fil\files\document.txt
c:\directory\file\
c:\directories\files\
c:\directory\file\doc.txt
c:\directories\files\document.txt
c:\director?\file\*.txt
c:\directory\file\doc.txt
c:\directories\file\document.txt
c:\director?\file\?.txt
c:\directory\file\1.txt c:\directory\file\doc.txt
c:\directories\file\document.txt
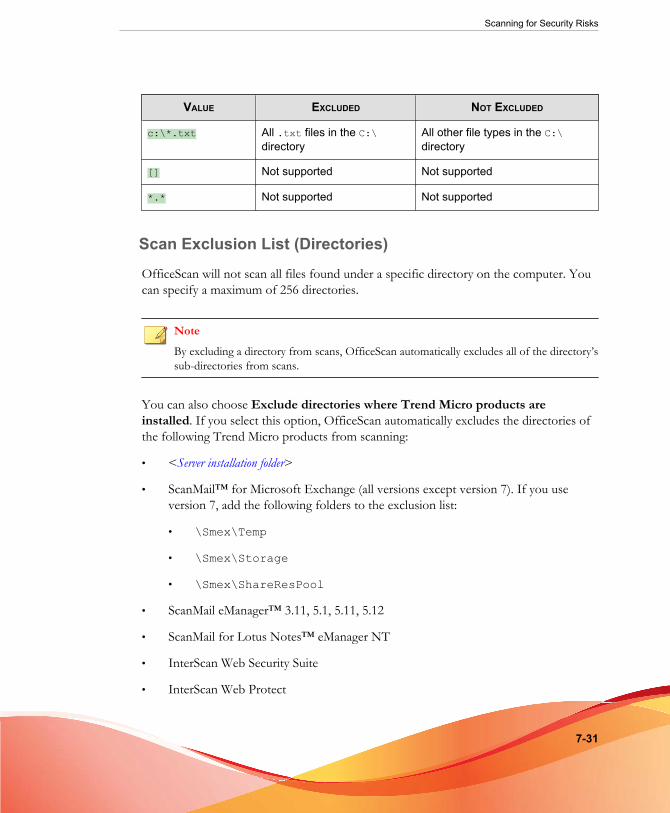
Scanning for Security Risks
7-31
VALUE EXCLUDED NOT EXCLUDED
c:\*.txt All .txt files in the C:\directory
All other file types in the C:\directory
[] Not supported Not supported
*.* Not supported Not supported
Scan Exclusion List (Directories)
OfficeScan will not scan all files found under a specific directory on the computer. Youcan specify a maximum of 256 directories.
Note
By excluding a directory from scans, OfficeScan automatically excludes all of the directory’ssub-directories from scans.
You can also choose Exclude directories where Trend Micro products areinstalled. If you select this option, OfficeScan automatically excludes the directories ofthe following Trend Micro products from scanning:
• <Server installation folder>
• ScanMail™ for Microsoft Exchange (all versions except version 7). If you useversion 7, add the following folders to the exclusion list:
• \Smex\Temp
• \Smex\Storage
• \Smex\ShareResPool
• ScanMail eManager™ 3.11, 5.1, 5.11, 5.12
• ScanMail for Lotus Notes™ eManager NT
• InterScan Web Security Suite
• InterScan Web Protect

OfficeScan™ 11.0 Administrator’s Guide
7-32
• InterScan FTP VirusWall
• InterScan Web VirusWall
• InterScan E-mail VirusWall
• InterScan VirusWall 3.53
• InterScan NSAPI Plug-in
• InterScan eManager 3.5x
If you have a Trend Micro product NOT included in the list, add the product directoriesto the scan exclusion list.
Also configure OfficeScan to exclude Microsoft Exchange 2000/2003 directories bygoing to the Scan Settings section of Agents > Global Agent Settings. If you useMicrosoft Exchange 2007 or later, manually add the directory to the scan exclusion list.Refer to the following site for scan exclusion details:
http://technet.microsoft.com/en-us/library/bb332342.aspx
When you configure the file list, choose from the following options:
• Retains current list (default): OfficeScan provides this option to prevent theaccidental overwriting of the agent’s existing exclusion list. In order to save anddeploy changes made to the exclusion list, select any of the other options.
• Overwrites: This option removes and replaces the entire exclusion list on theagent with the current list. After clicking Apply to All Agents, OfficeScan displaysa confirmation warning message.
• Adds paths to: This option adds the items in the current list to the agent’s existingexclusion list. If an item already exists in the agent’s exclusion list, the agent ignoresthe item.
• Removes paths from: This option removes the items in the current list from theagent's existing exclusion list, if found.

Scanning for Security Risks
7-33
Scan Exclusion List (Files)
OfficeScan will not scan a file if its file name matches any of the names included in thisexclusion list. If you want to exclude a file found under a specific location on theendpoint, include the file path, such as C:\Temp\sample.jpg.
You can specify a maximum of 256 files.
When you configure the file list, choose from the following options:
• Retains current list (default): OfficeScan provides this option to prevent theaccidental overwriting of the agent’s existing exclusion list. In order to save anddeploy changes made to the exclusion list, select any of the other options.
• Overwrites: This option removes and replaces the entire exclusion list on theagent with the current list. After clicking Apply to All Agents, OfficeScan displaysa confirmation warning message.
• Adds paths to: This option adds the items in the current list to the agent’s existingexclusion list. If an item already exists in the agent’s exclusion list, the agent ignoresthe item.
• Removes paths from: This option removes the items in the current list from theagent's existing exclusion list, if found.
Scan Exclusion List (File Extensions)
OfficeScan will not scan a file if its file extension matches any of the extensions includedin this exclusion list. You can specify a maximum of 256 file extensions. A period (.) isnot required before the extension.
For Real-time Scan, use an asterisk (*) as a wildcard character when specifyingextensions. For example, if you do not want to scan all files with extensions starting withD, such as DOC, DOT, or DAT, type D*.
For Manual Scan, Scheduled Scan, and Scan Now, use a question mark (?) or asterisk (*)as a wildcard character.

OfficeScan™ 11.0 Administrator’s Guide
7-34
Apply Scan Exclusion Settings to All Scan Types
OfficeScan allows you to configure scan exclusion settings for a particular scan type andthen apply the same settings to all the other scan types. For example:
On January 1, OfficeScan administrator Chris found out that there are a large number ofJPG files on agent computers and realized that these files do not pose any securitythreat. Chris added JPG in the file exclusion list for Manual Scan and then applied thissetting to all scan types. Real-time Scan, Scan Now, and Scheduled Scan are now set toskip scanning .jpg files.
A week later, Chris removed JPG from the exclusion list for Real-time Scan but did notapply scan exclusion settings to all scan types. JPG files will now be scanned but onlyduring Real-time Scan.
Scan Actions
Specify the action OfficeScan performs when a particular scan type detects a securityrisk. OfficeScan has a different set of scan actions for virus/malware and spyware/grayware.
Virus/Malware Scan Actions
The scan action OfficeScan performs depends on the virus/malware type and the scantype that detected the virus/malware. For example, when OfficeScan detects a Trojanhorse program (virus/malware type) during Manual Scan (scan type), it cleans (action)the infected file.
For information on the different virus/malware types, see Viruses and Malware on page7-2.
The following are the actions OfficeScan can perform against viruses/malware:
TABLE 7-12. Virus/Malware Scan Actions
ACTION DESCRIPTION
Delete OfficeScan deletes the infected file.
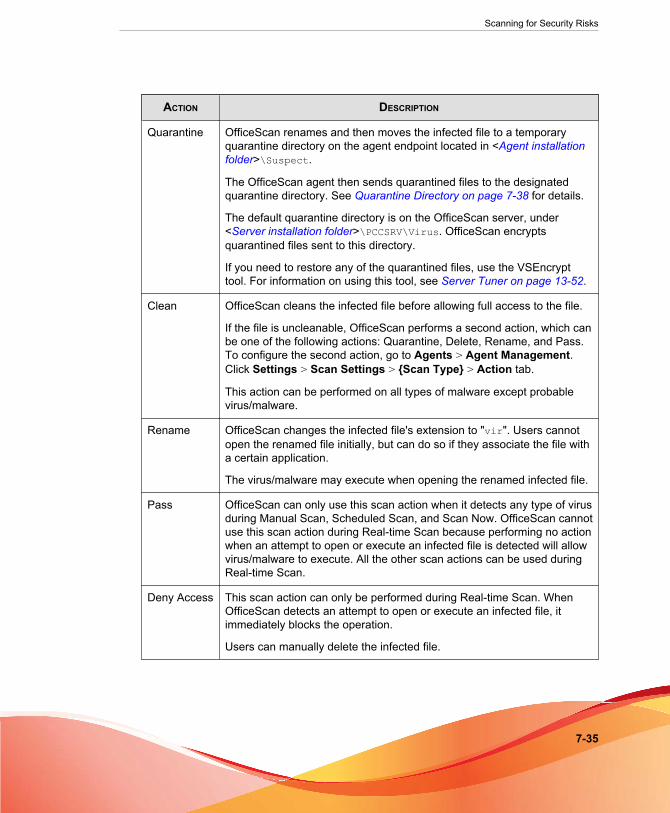
Scanning for Security Risks
7-35
ACTION DESCRIPTION
Quarantine OfficeScan renames and then moves the infected file to a temporaryquarantine directory on the agent endpoint located in <Agent installationfolder>\Suspect.
The OfficeScan agent then sends quarantined files to the designatedquarantine directory. See Quarantine Directory on page 7-38 for details.
The default quarantine directory is on the OfficeScan server, under<Server installation folder>\PCCSRV\Virus. OfficeScan encryptsquarantined files sent to this directory.
If you need to restore any of the quarantined files, use the VSEncrypttool. For information on using this tool, see Server Tuner on page 13-52.
Clean OfficeScan cleans the infected file before allowing full access to the file.
If the file is uncleanable, OfficeScan performs a second action, which canbe one of the following actions: Quarantine, Delete, Rename, and Pass.To configure the second action, go to Agents > Agent Management.Click Settings > Scan Settings > {Scan Type} > Action tab.
This action can be performed on all types of malware except probablevirus/malware.
Rename OfficeScan changes the infected file's extension to "vir". Users cannotopen the renamed file initially, but can do so if they associate the file witha certain application.
The virus/malware may execute when opening the renamed infected file.
Pass OfficeScan can only use this scan action when it detects any type of virusduring Manual Scan, Scheduled Scan, and Scan Now. OfficeScan cannotuse this scan action during Real-time Scan because performing no actionwhen an attempt to open or execute an infected file is detected will allowvirus/malware to execute. All the other scan actions can be used duringReal-time Scan.
Deny Access This scan action can only be performed during Real-time Scan. WhenOfficeScan detects an attempt to open or execute an infected file, itimmediately blocks the operation.
Users can manually delete the infected file.
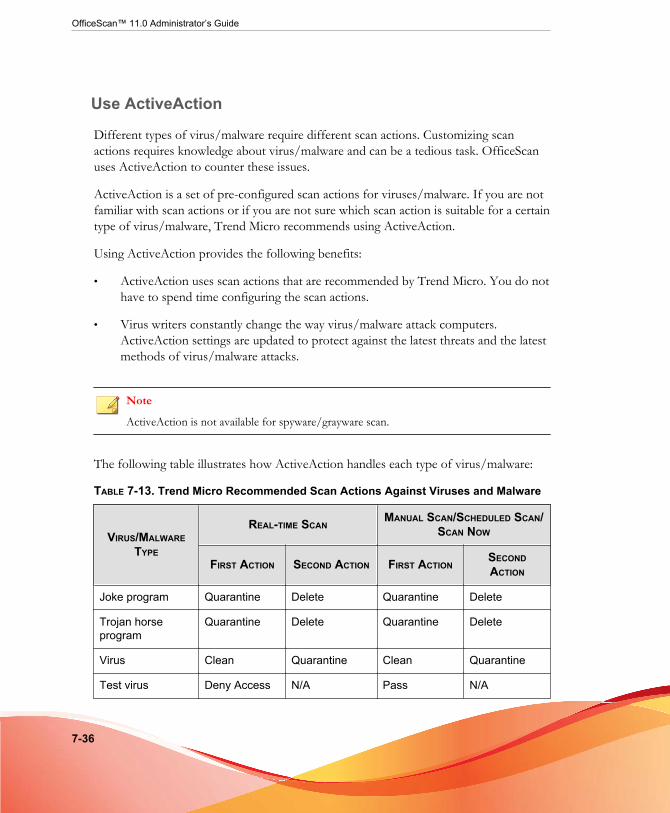
OfficeScan™ 11.0 Administrator’s Guide
7-36
Use ActiveAction
Different types of virus/malware require different scan actions. Customizing scanactions requires knowledge about virus/malware and can be a tedious task. OfficeScanuses ActiveAction to counter these issues.
ActiveAction is a set of pre-configured scan actions for viruses/malware. If you are notfamiliar with scan actions or if you are not sure which scan action is suitable for a certaintype of virus/malware, Trend Micro recommends using ActiveAction.
Using ActiveAction provides the following benefits:
• ActiveAction uses scan actions that are recommended by Trend Micro. You do nothave to spend time configuring the scan actions.
• Virus writers constantly change the way virus/malware attack computers.ActiveAction settings are updated to protect against the latest threats and the latestmethods of virus/malware attacks.
Note
ActiveAction is not available for spyware/grayware scan.
The following table illustrates how ActiveAction handles each type of virus/malware:
TABLE 7-13. Trend Micro Recommended Scan Actions Against Viruses and Malware
VIRUS/MALWARETYPE
REAL-TIME SCANMANUAL SCAN/SCHEDULED SCAN/
SCAN NOW
FIRST ACTION SECOND ACTION FIRST ACTIONSECONDACTION
Joke program Quarantine Delete Quarantine Delete
Trojan horseprogram
Quarantine Delete Quarantine Delete
Virus Clean Quarantine Clean Quarantine
Test virus Deny Access N/A Pass N/A

Scanning for Security Risks
7-37
VIRUS/MALWARETYPE
REAL-TIME SCANMANUAL SCAN/SCHEDULED SCAN/
SCAN NOW
FIRST ACTION SECOND ACTION FIRST ACTIONSECONDACTION
Packer Quarantine N/A Quarantine N/A
Others Clean Quarantine Clean Quarantine
Probable virus/malware
Deny Accessor user-configuredaction
N/A Pass or user-configuredaction
N/A
For probable virus/malware, the default action is "Deny Access" during Real-time Scanand "Pass" during Manual Scan, Scheduled Scan, and Scan Now. If these are not yourpreferred actions, you can change them to Quarantine, Delete, or Rename.
Use the Same Action for all Virus/Malware Types
Select this option if you want the same action performed on all types of virus/malware,except probable virus/malware. If you choose "Clean" as the first action, select a secondaction that OfficeScan performs if cleaning is unsuccessful. If the first action is not"Clean", no second action is configurable.
If you choose "Clean" as the first action, OfficeScan performs the second action when itdetects probable virus/malware.
Use a Specific Action for Each Virus/Malware Type
Manually select a scan action for each virus/malware type.
For all virus/malware types except probable virus/malware, all scan actions areavailable. If you choose "Clean" as the first action, select a second action thatOfficeScan performs if cleaning is unsuccessful. If the first action is not "Clean", nosecond action is configurable.
For probable virus/malware, all scan actions, except "Clean", are available.

OfficeScan™ 11.0 Administrator’s Guide
7-38
Quarantine Directory
If the action for an infected file is "Quarantine", the OfficeScan agent encrypts the fileand moves it to a temporary quarantine folder located in <Agent installation folder>\SUSPECT and then sends the file to the designated quarantine directory.
NoteYou can restore encrypted quarantined files in case you need to access them in the future.For details, see Restoring Encrypted Files on page 7-42.
Accept the default quarantine directory, which is located on the OfficeScan servercomputer. The directory is in URL format and contains the server’s host name or IPaddress.
• If the server is managing both IPv4 and IPv6 agents, use the host name so that allagents can send quarantined files to the server.
• If the server only has or is identified by its IPv4 address, only pure IPv4 and dual-stack agents can send quarantined files to the server.
• If the server only has or is identified by its IPv6 address, only pure IPv6 and dual-stack agents can send quarantined files to the server.
You can also specify an alternative quarantine directory by typing the location in URL,UNC path, or absolute file path format. Agents should be able to connect to thisalternative directory. For example, the alternative directory should have an IPv6 addressif it will receive quarantined files from dual-stack and pure IPv6 agents. Trend Microrecommends designating a dual-stack alternative directory, identifying the directory byits host name, and using UNC path when typing the directory.
Refer to the following table for guidance on when to use URL, UNC path, or absolutefile path:

Scanning for Security Risks
7-39
TABLE 7-14. Quarantine Directory
QUARANTINEDIRECTORY
ACCEPTEDFORMAT
EXAMPLE NOTES
A directory on theOfficeScanserver computer
URL http://<osceserver>
This is the default directory.
Configure settings for thisdirectory, such as the size of thequarantine folder. For details, seeQuarantine Manager on page13-51.
UNC path \\<osceserver>\ofcscan\Virus
A directory onanotherOfficeScanserver computer(if you have otherOfficeScanservers on thenetwork)
URL http://<osceserver2>
Ensure that agents can connectto this directory. If you specify anincorrect directory, the OfficeScanagent keeps the quarantined fileson the SUSPECT folder until acorrect quarantine directory isspecified. In the server's virus/malware logs, the scan result is"Unable to send the quarantinedfile to the designated quarantinefolder".
If you use UNC path, ensure thatthe quarantine directory folder isshared to the group "Everyone"and that you assign read andwrite permission to this group.
UNC path \\<osceserver2>\ofcscan\Virus
Another endpointon the network
UNC path \\<computer_name>\temp
A differentdirectory on theOfficeScan agent
Absolutepath
C:\temp
Back Up Files Before Cleaning
If OfficeScan is set to clean an infected file, it can first back up the file. This allows youto restore the file in case you need it in the future. OfficeScan encrypts the backup fileto prevent it from being opened, and then stores the file on the <Agent installation folder>\Backup folder.
To restore encrypted backup files, see Restoring Encrypted Files on page 7-42.
OfficeScan™ 11.0 Administrator’s Guide
7-40
Damage Cleanup ServicesDamage Cleanup Services cleans computers of file-based and network viruses, and virusand worm remnants (Trojans, registry entries, and viral files).
The agent triggers Damage Cleanup Services before or after virus/malware scanning,depending on the scan type.
• When Manual Scan, Scheduled Scan, or Scan Now runs, the OfficeScan agenttriggers Damage Cleanup Services first and then proceeds with virus/malwarescanning. During virus/malware scanning, the agent may trigger Damage CleanupServices again if cleanup is required.
• During Real-time Scan, the OfficeScan agent first performs virus/malwarescanning and then triggers Damage Cleanup Services if cleanup is required.
You can select the type of cleanup that Damage Cleanup Services runs:
• Standard cleanup: The OfficeScan agent performs any of the following actionsduring standard cleanup:
• Detects and removes live Trojans
• Kills processes that Trojans create
• Repairs system files that Trojans modify
• Deletes files and applications that Trojans drop
• Advanced cleanup: In addition to the standard cleanup actions, the OfficeScanagent stops activities by rogue security software (also known as FakeAV) andcertain rootkit variants. The OfficeScan agent also uses advanced cleanup rules toproactively detect and stop applications that exhibit FakeAV and rootkit behavior.
NoteWhile providing proactive protection, advanced cleanup also results in a high number offalse-positives.
Damage Cleanup Services does not run cleanup on probable virus/malware unless youselect the option Run cleanup when probable virus/malware is detected. You canonly select this option if the action on probable virus/malware is not Pass or Deny
Scanning for Security Risks
7-41
Access. For example, if the OfficeScan agent detects probable virus/malware duringReal-time Scan and the action is quarantine, the OfficeScan agent first quarantines theinfected file and then runs cleanup if necessary. The cleanup type (standard or advanced)depends on your selection.
Display a Notification Message When Virus/Malware isDetected
When OfficeScan detects virus/malware during Real-time Scan and Scheduled Scan, itcan display a notification message to inform the user about the detection.
To modify the notification message, select Virus/Malware from the Type drop-downin Administration > Notifications > Agent.
Display a Notification Message When Probable Virus/Malware is Detected
When OfficeScan detects probable virus/malware during Real-time Scan and ScheduledScan, it can display a notification message to inform the user about the detection.
To modify the notification message, select Virus/Malware from the Type drop-downin Administration > Notifications > Agent.
Restoring Quarantined FilesYou can restore files that OfficeScan quarantined if you believe that the detection wasinaccurate. The Central Quarantine Restore feature allows you to search for files in thequarantine directory and perform SHA1 verification checking to ensure that the files youwant to restore have not been modified in any way.
Procedure
1. Go to Agents > Agent Management.
2. In the agent tree, select a domain or select any agent.
3. Click Tasks > Central Quarantine Restore.
OfficeScan™ 11.0 Administrator’s Guide
7-42
The Central Quarantine Restore Criteria screen appears.
4. Type the name of the data you want to restore in the Infected file/object field.
5. Optionally specify the time period, security threat name, and file path of the data.
6. Click Search.
The Central Quarantine Restore screen appears displaying the results of thesearch.
7. Select Add restored file to the domain-level exclusion list to ensure that allOfficeScan agents in the domain(s) where the files are restored add the file to thescan exclusion list.
This ensures that OfficeScan does not detect the file as a threat during future scans.
8. Optionally type the SHA1 value of the file for verification purposes.
9. Select the files to restore from the list and click Restore.
TipTo view the individual OfficeScan agents that restore the file, click the link in theEndpoints column.
10. Click Close in the confirmation dialog.
To verify that OfficeScan successfully restored the quarantined file, see ViewingCentral Quarantine Restore Logs on page 7-88.
Restoring Encrypted FilesTo prevent infected from being opened, OfficeScan encrypts the file during thefollowing instances:
• Before quarantining a file
• When backing up a file before cleaning it
OfficeScan provides a tool that decrypts and then restores the file in case you need toretrieve information from it. OfficeScan can decrypt and restore the following files:

Scanning for Security Risks
7-43
TABLE 7-15. Files that OfficeScan can Decrypt and Restore
FILE DESCRIPTION
Quarantined files onthe agent endpoint
These files are found in the <Agent installation folder>\SUSPECT\Backup folder and are automatically purged after 7days. These files are also uploaded to the designatedquarantine directory on the OfficeScan server.
Quarantined files onthe designatedquarantine directory
By default, this directory is located on the OfficeScan servercomputer. For details, see Quarantine Directory on page 7-38.
Backed up encryptedfiles
These are the backup of infected files that OfficeScan was ableto clean. These files are found in the <Agent installationfolder>\Backup folder. To restore these files, users need tomove them to the <Agent installation folder>\SUSPECT\Backup folder.
OfficeScan only backs up and encrypts files before cleaning ifyou select Backup files before cleaning in Agents > AgentManagement > Settings > Scan Settings > {Scan Type} >Action tab.
WARNING!Restoring an infected file may spread the virus/malware to other files and computers.Before restoring the file, isolate the infected endpoint and move important files on thisendpoint to a backup location.
Decrypting and Restoring Files
Procedure
• If the file is on the OfficeScan agent endpoint:
a. Open a command prompt and go to <Agent installation folder>.
b. Run VSEncode.exe by double-clicking the file or by typing the following ata command prompt:
VSEncode.exe /u

OfficeScan™ 11.0 Administrator’s Guide
7-44
This parameter opens a screen with a list of files found under <Agentinstallation folder>\SUSPECT\Backup.
c. Select a file to restore and click Restore. The tool can only restore one file ata time.
d. In the screen that opens, specify the folder where to restore the file.
e. Click Ok. The file is restored to the specified folder.
Note
It might be possible for OfficeScan to scan the file again and treat it as infectedas soon as the file is restored. To prevent the file from being scanned, add it tothe scan exclusion list. See Scan Exclusions on page 7-29 for details.
f. Click Close when you have finished restoring files.
• If the file is on the OfficeScan server or a custom quarantine directory:
a. If the file is on the OfficeScan server computer, open a command promptand go to <Server installation folder>\PCCSRV\Admin\Utility\VSEncrypt.
If the file is on a custom quarantine directory, navigate to <Serverinstallation folder>\PCCSRV\Admin\Utility and copy theVSEncrypt folder to the endpoint where the custom quarantine directory islocated.
b. Create a text file and then type the full path of the files you want to encrypt ordecrypt.
For example, to restore files in C:\My Documents\Reports, type C:\My Documents\Reports\*.* in the text file.
Quarantined files on the OfficeScan server computer are found under<Server installation folder>\PCCSRV\Virus.
c. Save the text file with an INI or TXT extension. For example, save it asForEncryption.ini on the C: drive.
d. Open a command prompt and go to the directory where the VSEncryptfolder is located.
Scanning for Security Risks
7-45
e. Run VSEncode.exe by typing the following:
VSEncode.exe /d /i <location of the INI or TXT file>
Where:
<location of the INI or TXT file> is the path of the INI or TXTfile you created (for example, C:\ForEncryption.ini).
f. Use the other parameters to issue various commands.
TABLE 7-16. Restore Parameters
PARAMETER DESCRIPTION
None (no parameter) Encrypt files
/d Decrypt files
/debug Create a debug log and save it to the endpoint. Onthe OfficeScan agent endpoint, the debug logVSEncrypt.log is created in the <Agentinstallation folder>.
/o Overwrite an encrypted or decrypted file if it alreadyexists
/f <filename> Encrypt or decrypt a single file
/nr Do not restore the original file name
/v Display information about the tool
/u Launch the tool’s user interface
/r <Destination folder> The folder where a file will be restored
/s <Original file name> The file name of the original encrypted file
For example, type VSEncode [/d] [/debug] to decrypt files in theSuspect folder and create a debug log. When you decrypt or encrypt a file,OfficeScan creates the decrypted or encrypted file in the same folder. Beforedecrypting or encrypting a file, ensure that it is not locked.
OfficeScan™ 11.0 Administrator’s Guide
7-46
Spyware/Grayware Scan Actions
The scan action OfficeScan performs depends on the scan type that detected thespyware/grayware. While specific actions can be configured for each virus/malwaretype, only one action can be configured for all types of spyware/grayware (forinformation on the different types of spyware/grayware, see Spyware and Grayware on page7-5). For example, when OfficeScan detects any type of spyware/grayware duringManual Scan (scan type), it cleans (action) the affected system resources.
Note
The spyware/grayware scan actions are configurable through the web console only. TheOfficeScan agent console does not provide access to these settings.
The following are the actions OfficeScan can perform against spyware/grayware:
TABLE 7-17. Spyware/Grayware Scan Actions
ACTION DESCRIPTION
Clean OfficeScan terminates processes or delete registries, files, cookies, andshortcuts.
After cleaning spyware/grayware, OfficeScan agents back up spyware/grayware data, which you can restore if you consider the spyware/grayware safe to access. See Restoring Spyware/Grayware on page7-49 for details.
Pass OfficeScan performs no action on detected spyware/graywarecomponents but records the spyware/grayware detection in the logs. Thisaction can only be performed during Manual Scan, Scheduled Scan, andScan Now. During Real-time Scan, the action is "Deny Access".
OfficeScan will not perform any action if the detected spyware/grayware isincluded in the approved list. See Spyware/Grayware Approved List onpage 7-47 for details.
DenyAccess
OfficeScan denies access (copy, open) to the detected spyware/graywarecomponents. This action can only be performed during Real-time Scan.During Manual Scan, Scheduled Scan, and Scan Now, the action is"Pass".
Scanning for Security Risks
7-47
Display a Notification Message When Spyware/Grayware isDetectedWhen OfficeScan detects spyware/grayware during Real-time Scan and Scheduled Scan,it can display a notification message to inform the user about the detection.
To modify the notification message, select Spyware/Grayware from the Type drop-down in Administration > Notifications > Agent.
Spyware/Grayware Approved ListOfficeScan provides a list of "approved" spyware/grayware, which contains files orapplications that you do not want treated as spyware or grayware. When a particularspyware/grayware is detected during scanning, OfficeScan checks the approved list andperforms no action if it finds a match in the approved list.
Apply the approved list to one or several agents and domains, or to all agents that theserver manages. The approved list applies to all scan types, which means that the sameapproved list will be used during Manual Scan, Real-time Scan, Scheduled Scan, andScan Now.
Adding Already Detected Spyware/Grayware to theApproved List
Procedure
1. Go to one of the following:
• Agents > Agent Management
• Logs > Agents > Security Risks
2. In the agent tree, click the root domain icon ( ) to include all agents or selectspecific domains or agents.
3. Click Logs > Spyware/Grayware Logs or View Logs > Spyware/GraywareLogs.
4. Specify the log criteria and then click Display Logs.

OfficeScan™ 11.0 Administrator’s Guide
7-48
5. Select logs and click Add to Approved List.
6. Apply the approved spyware/grayware only to the selected agent computers or tocertain domain(s).
7. Click Save. The selected agents apply the setting and the OfficeScan server addsthe spyware/grayware to the approved list found in Agents > AgentManagement > Settings > Spyware/Grayware Approved List.
Note
OfficeScan can accommodate a maximum of 1024 spyware/grayware in the approved list.
Managing the Spyware/Grayware Approved List
Procedure
1. Go to Agents > Agent Management.
2. In the agent tree, click the root domain icon ( ) to include all agents or selectspecific domains or agents.
3. Click Settings > Spyware/Grayware Approved List.
4. On the Spyware/Grayware names table, select a spyware/grayware name. Toselect multiple names, hold the CTRL key while selecting.
• You can also type a keyword in the Search field and click Search. OfficeScanrefreshes the table with the names that match the keyword.
5. Click Add.
The names move to the Approved List table.
6. To remove names from the approved list, select the names and click Remove. Toselect multiple names, hold the CTRL key while selecting.
7. If you selected domain(s) or agent(s) in the agent tree, click Save. If you clicked theroot domain icon, choose from the following options:
Scanning for Security Risks
7-49
• Apply to All Agents: Applies settings to all existing agents and to any newagent added to an existing/future domain. Future domains are domains notyet created at the time you configured the settings.
• Apply to Future Domains Only: Applies settings only to agents added tofuture domains. This option will not apply settings to new agents added to anexisting domain.
Restoring Spyware/Grayware
After cleaning spyware/grayware, OfficeScan agents back up spyware/grayware data.Notify an online agent to restore backed up data if you consider the data harmless.Choose the spyware/grayware data to restore based on the backup time.
Note
OfficeScan agent users cannot initiate spyware/grayware restore and are not notified aboutwhich backup data the agent was able to restore.
Procedure
1. Go to Agents > Agent Management.
2. In the agent tree, open a domain and then select any agent.
Note
Only one agent at a time can perform spyware/grayware restore.
3. Click Tasks > Spyware/Grayware Restore.
4. To view the items to restore for each data segment, click View.
A new screen displays. Click Back to return to the previous screen.
5. Select the data segments that you want to restore.
6. Click Restore.

OfficeScan™ 11.0 Administrator’s Guide
7-50
OfficeScan notifies you of the restoration status. Check the spyware/graywarerestore logs for a full report. See Viewing Spyware/Grayware Restore Logs on page 7-92for details.
Scan Privileges and Other SettingsUsers with scan privileges have greater control over how files on their computers getscanned. Scan privileges allow users or the OfficeScan agent to perform the followingtasks:
• Users can configure Manual Scan, Scheduled Scan, and Real-time Scan settings. Fordetails, see Scan Type Privileges on page 7-50.
• Users can postpone, stop, or skip Scheduled Scan. For details, see Scheduled ScanPrivileges and Other Settings on page 7-52.
• Users enable scanning of POP3 email messages for virus/malware. For details, seeMail Scan Privileges and Other Settings on page 7-58.
• The OfficeScan agent can use cache settings to improve its scan performance. Fordetails, see Cache Settings for Scans on page 7-60.
Scan Type PrivilegesAllow users to configure their own Manual Scan, Real-time Scan and Scheduled Scansettings.
Granting Scan Type Privileges
Procedure
1. Go to Agents > Agent Management.
2. In the agent tree, click the root domain icon ( ) to include all agents or selectspecific domains or agents.

Scanning for Security Risks
7-51
3. Click Settings > Privileges and Other Settings.
4. On the Privileges tab, go to the Scan Privileges section.
5. Select the scan types that users are allowed to configure.
6. If you selected domain(s) or agent(s) in the agent tree, click Save. If you clicked theroot domain icon, choose from the following options:
• Apply to All Agents: Applies settings to all existing agents and to any newagent added to an existing/future domain. Future domains are domains notyet created at the time you configured the settings.
• Apply to Future Domains Only: Applies settings only to agents added tofuture domains. This option will not apply settings to new agents added to anexisting domain.
Configuring Scan Settings for the OfficeScan Agent
Procedure
1. Right-click the OfficeScan agent icon on the system tray and select OpenOfficeScan Agent Console.
2. Click Settings > {Scan Type}.
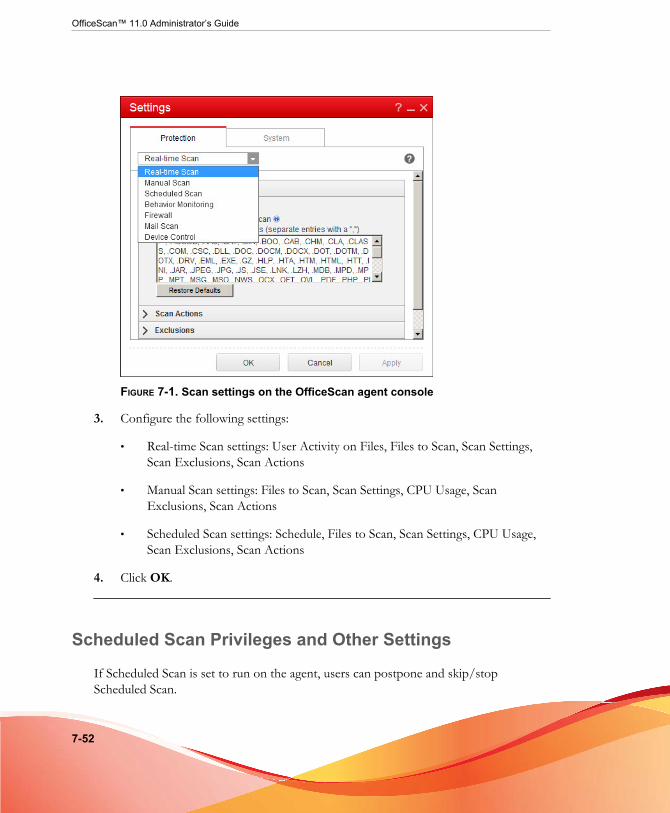
OfficeScan™ 11.0 Administrator’s Guide
7-52
FIGURE 7-1. Scan settings on the OfficeScan agent console
3. Configure the following settings:
• Real-time Scan settings: User Activity on Files, Files to Scan, Scan Settings,Scan Exclusions, Scan Actions
• Manual Scan settings: Files to Scan, Scan Settings, CPU Usage, ScanExclusions, Scan Actions
• Scheduled Scan settings: Schedule, Files to Scan, Scan Settings, CPU Usage,Scan Exclusions, Scan Actions
4. Click OK.
Scheduled Scan Privileges and Other Settings
If Scheduled Scan is set to run on the agent, users can postpone and skip/stopScheduled Scan.

Scanning for Security Risks
7-53
Postpone Scheduled Scan
Users with the "Postpone Scheduled Scan" privilege can perform the following actions:
• Postpone Scheduled Scan before it runs and then specify the postpone duration.Scheduled Scan can only be postponed once.
• If Scheduled Scan is in progress, users can stop scanning and restart it later. Usersthen specify the amount of time that should elapse before scanning restarts. Whenscanning restarts, all previously scanned files are scanned again. Scheduled Scan canbe stopped and then restarted only once.
Note
The minimum postpone duration/elapsed time users can specify is 15 minutes. Themaximum is 12 hours and 45 minutes, which you can reduce by going to Agents > GlobalAgent Settings. In the Scheduled Scan Settings section, modify the PostponeScheduled Scan for up to __ hours and __ minutes setting.
Skip and Stop Scheduled Scan
This privilege allows users to perform the following actions:
• Skip Scheduled Scan before it runs
• Stop Scheduled Scan when it is in progress
Note
Users cannot skip or stop a Scheduled Scan more than one time. Even after a systemrestart, Scheduled Scan resumes scanning based on the next scheduled time.
Scheduled Scan Privilege Notification
To allow users to take advantage of Scheduled Scan privileges, remind them about theprivileges you have granted them by configuring OfficeScan to display a notificationmessage before Scheduled Scan runs.

OfficeScan™ 11.0 Administrator’s Guide
7-54
Granting Scheduled Scan Privileges and Displaying thePrivilege Notification
Procedure
1. Go to Agents > Agent Management.
2. In the agent tree, click the root domain icon ( ) to include all agents or selectspecific domains or agents.
3. Click Settings > Privileges and Other Settings.
4. On the Privileges tab, go to the Scheduled Scan Privileges section.
5. Select the following options:
• Postpone Scheduled Scan
• Skip and stop Scheduled Scan
6. Click the Other Settings tab and go to the Scheduled Scan Settings section.
7. Select Display a notification before a scheduled scan occurs.
When you enable this option, a notification message displays on the agent endpointminutes before Scheduled Scan runs. Users are notified of the scan schedule (dateand time) and their Scheduled Scan privileges, such as postponing, skipping, orstopping Scheduled Scan.
Note
The number of minutes is configurable. To configure the number of minutes, go toAgents > Global Agent Settings. In the Scheduled Scan Settings section, modifythe Remind users of the Scheduled Scan __ minutes before it runs setting.
8. If you selected domain(s) or agent(s) in the agent tree, click Save. If you clicked theroot domain icon, choose from the following options:
• Apply to All Agents: Applies settings to all existing agents and to any newagent added to an existing/future domain. Future domains are domains notyet created at the time you configured the settings.
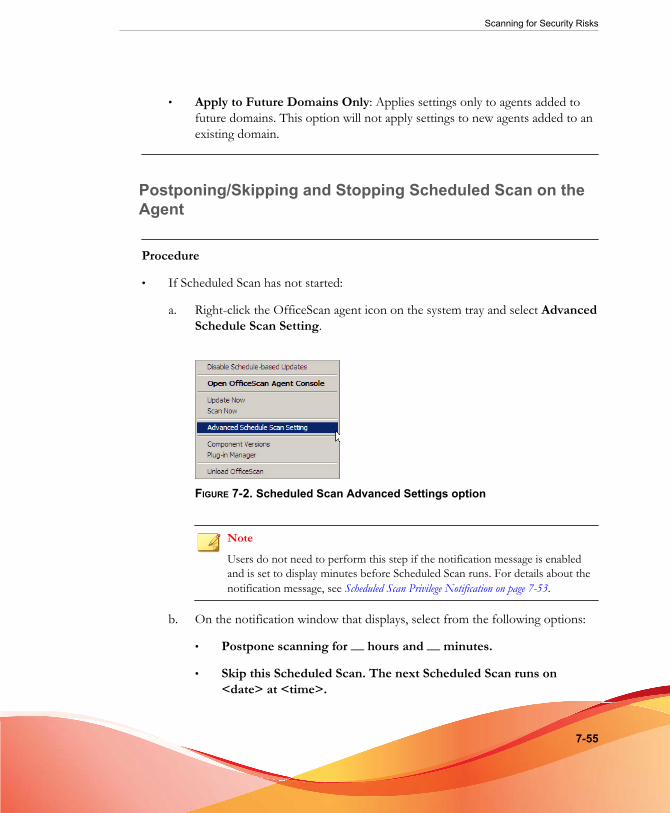
Scanning for Security Risks
7-55
• Apply to Future Domains Only: Applies settings only to agents added tofuture domains. This option will not apply settings to new agents added to anexisting domain.
Postponing/Skipping and Stopping Scheduled Scan on theAgent
Procedure
• If Scheduled Scan has not started:
a. Right-click the OfficeScan agent icon on the system tray and select AdvancedSchedule Scan Setting.
FIGURE 7-2. Scheduled Scan Advanced Settings option
Note
Users do not need to perform this step if the notification message is enabledand is set to display minutes before Scheduled Scan runs. For details about thenotification message, see Scheduled Scan Privilege Notification on page 7-53.
b. On the notification window that displays, select from the following options:
• Postpone scanning for __ hours and __ minutes.
• Skip this Scheduled Scan. The next Scheduled Scan runs on<date> at <time>.

OfficeScan™ 11.0 Administrator’s Guide
7-56
FIGURE 7-3. Scheduled Scan privileges on the OfficeScan agent endpoint
• If Scheduled Scan is in progress:
a. Right-click the OfficeScan agent icon on the system tray and selectScheduled Scan Advanced Settings.
b. On the notification window that displays, select from the following options:
• Stop scanning. Restart the scan after __ hours and __ minutes.
• Stop scanning. The next Scheduled Scan runs on <date> at<time>.

Scanning for Security Risks
7-57
FIGURE 7-4. Scheduled Scan privileges on the OfficeScan agent endpoint

OfficeScan™ 11.0 Administrator’s Guide
7-58
Mail Scan Privileges and Other SettingsWhen agents have the mail scan privileges, the Mail Scan option displays on theOfficeScan agent console. The Mail Scan option shows the POP3 mail scan.
FIGURE 7-5. Mail Scan settings on the OfficeScan agent console
The following table describes the POP3 mail scan program.
TABLE 7-18. Mail Scan Programs
DETAILS DESCRIPTION
Purpose Scans POP3 email messages for viruses/malware

Scanning for Security Risks
7-59
DETAILS DESCRIPTION
Prerequisites • Must be enabled by administrators from the web consolebefore users can use it
NoteTo enable POP3 Mail Scan, see Granting MailScan Privileges and Enabling POP3 Mail Scan onpage 7-59.
• Action against viruses/malware configurable from theOfficeScan agent console but not from the web console
Scan types supported Real-time Scan
Scanning is done as email messages are retrieved from thePOP3 mail server.
Scan results • Information about detected security risks available afterscanning is complete
• Scan results not logged on the OfficeScan agentconsole’s Logs screen
• Scan results not sent to the server
Other details Shares the OfficeScan NT Proxy Service (TMProxy.exe) withthe web reputation feature
Granting Mail Scan Privileges and Enabling POP3 Mail Scan
Procedure
1. Go to Agents > Agent Management.
2. In the agent tree, click the root domain icon ( ) to include all agents or selectspecific domains or agents.
3. Click Settings > Privileges and Other Settings.
4. On the Privileges tab, go to the Mail Scan section.
5. Select Display the Mail Scan settings on the agent console.

OfficeScan™ 11.0 Administrator’s Guide
7-60
6. Click the Other Settings tab and go to the POP3 Email Scan Settings section.
7. Select Scan POP3 email.
8. If you selected domain(s) or agent(s) in the agent tree, click Save. If you clicked theroot domain icon, choose from the following options:
• Apply to All Agents: Applies settings to all existing agents and to any newagent added to an existing/future domain. Future domains are domains notyet created at the time you configured the settings.
• Apply to Future Domains Only: Applies settings only to agents added tofuture domains. This option will not apply settings to new agents added to anexisting domain.
Cache Settings for ScansThe OfficeScan agent can build the digital signature and on-demand scan cache files toimprove its scan performance. When an on-demand scan runs, the OfficeScan agentfirst checks the digital signature cache file and then the on-demand scan cache file forfiles to exclude from the scan. Scanning time is reduced if a large number of files areexcluded from the scan.
Digital Signature Cache
The digital signature cache file is used during Manual Scan, Scheduled Scan, and ScanNow. Agents do not scan files whose signatures have been added to the digital signaturecache file.
The OfficeScan agent uses the same Digital Signature Pattern used for BehaviorMonitoring to build the digital signature cache file. The Digital Signature Patterncontains a list of files that Trend Micro considers trustworthy and therefore can beexcluded from scans.
Scanning for Security Risks
7-61
NoteBehavior Monitoring is automatically disabled on Windows server platforms (64-bitsupport for Windows XP, 2003, and Vista without SP1 is not available). If the digitalsignature cache is enabled, OfficeScan agents on these platforms download the DigitalSignature Pattern for use in the cache and do not download the other Behavior Monitoringcomponents.
Agents build the digital signature cache file according to a schedule, which isconfigurable from the web console. Agents do this to:
• Add the signatures of new files that were introduced to the system since the lastcache file was built
• Remove the signatures of files that have been modified or deleted from the system
During the cache building process, agents check the following folders for trustworthyfiles and then adds the signatures of these files to the digital signature cache file:
• %PROGRAMFILES%• %WINDIR%The cache building process does not affect the endpoint’s performance because agentsuse minimal system resources during the process. Agents are also able to resume a cachebuilding task that was interrupted for some reason (for example, when the host machineis powered off or when a wireless endpoint’s AC adapter is unplugged).
On-demand Scan CacheThe on-demand scan cache file is used during Manual Scan, Scheduled Scan, and ScanNow. OfficeScan agents do not scan files whose caches have been added to the on-demand scan cache file.
Each time scanning runs, the OfficeScan agent checks the properties of threat-free files.If a threat-free file has not been modified for a certain period of time (the time period isconfigurable), the OfficeScan agent adds the cache of the file to the on-demand scancache file. When the next scan occurs, the file will not be scanned if its cache has notexpired.
The cache for a threat-free file expires within a certain number of days (the time periodis also configurable). When scanning occurs on or after the cache expiration, the
OfficeScan™ 11.0 Administrator’s Guide
7-62
OfficeScan agent removes the expired cache and scans the file for threats. If the file isthreat-free and remains unmodified, the cache of the file is added back to the on-demand scan cache file. If the file is threat-free but was recently modified, the cache isnot added and the file will be scanned again on the next scan.
The cache for a threat-free file expires to prevent the exclusion of infected files fromscans, as illustrated in the following examples:
• It is possible that a severely outdated pattern file may have treated an infected,unmodified file as threat-free. If the cache does not expire, the infected file remainsin the system until it is modified and detected by Real-time Scan.
• If a cached file was modified and Real-time Scan is not functional during the filemodification, the cache needs to expire so that the modified file can be scanned forthreats.
The number of caches added to the on-demand scan cache file depends on the scan typeand its scan target. For example, the number of caches may be less if the OfficeScanagent only scanned 200 of the 1,000 files in the endpoint during Manual Scan.
If on-demand scans are run frequently, the on-demand scan cache file reduces thescanning time significantly. In a scan task where all caches are not expired, scanning thatusually takes 12 minutes can be reduced to 1 minute. Reducing the number of days a filemust remain unmodified and extending the cache expiration usually improve theperformance. Since files must remain unmodified for a relatively short period of time,more caches can be added to the cache file. The caches also expire longer, which meansthat more files are skipped from scans.
If on-demand scans are seldom run, you can disable the on-demand scan cache sincecaches would have expired when the next scan runs.
Configuring Cache Settings for Scans
Procedure
1. Go to Agents > Agent Management.
2. In the agent tree, click the root domain icon ( ) to include all agents or selectspecific domains or agents.

Scanning for Security Risks
7-63
3. Click Settings > Privileges and Other Settings.
4. Click the Other Settings tab and go to the Cache Settings for Scans section.
5. Configure settings for the digital signature cache.
a. Select Enable the digital signature cache.
b. In Build the cache every __ days, specify how often the agent builds thecache.
6. Configure settings for the on-demand scan cache.
a. Select Enable the on-demand scan cache.
b. In Add the cache for safe files that are unchanged for __ days, specify thenumber of days a file must remain unchanged before it is cached.
c. In The cache for each safe file expires within __ days, specify themaximum number of days a cache remains in the cache file.
Note
To prevent all caches added during a scan from expiring on the same day,caches expire randomly within the maximum number of days you specified. Forexample, if 500 caches were added to the cache today and the maximumnumber of days you specified is 10, a fraction of the caches will expire the nextday and the majority will expire on the succeeding days. On the 10th day, allcaches that remain will expire.
7. If you selected domain(s) or agent(s) in the agent tree, click Save. If you clicked theroot domain icon, choose from the following options:
• Apply to All Agents: Applies settings to all existing agents and to any newagent added to an existing/future domain. Future domains are domains notyet created at the time you configured the settings.
• Apply to Future Domains Only: Applies settings only to agents added tofuture domains. This option will not apply settings to new agents added to anexisting domain.

OfficeScan™ 11.0 Administrator’s Guide
7-64
Global Scan SettingsThere are a number of ways global scan settings get applied to agents.
• A particular scan setting can apply to all agents that the server manages or only toagents with certain scan privileges. For example, if you configure the postponeScheduled Scan duration, only agents with the privilege to postpone ScheduledScan will use the setting.
• A particular scan setting can apply to all or only to a particular scan type. Forexample, on endpoints with both the OfficeScan server and OfficeScan agentinstalled, you can exclude the OfficeScan server database from scanning. However,this setting applies only during Real-time Scan.
• A particular scan setting can apply when scanning for either virus/malware orspyware/grayware, or both. For example, assessment mode only applies duringspyware/grayware scanning.
Configuring Global Scan Settings
Procedure
1. Go to Agents > Global Agent Settings.
2. Configure the Global Scan Settings in each of the available sections.
• Scan Settings Section on page 7-64
• Scheduled Scan Settings Section on page 7-70
• Virus/Malware Log Bandwidth Settings Section on page 7-72
3. Click Save.
Scan Settings SectionThe Scan Settings section of the Global Agent Settings screen allows administratorsto configure the following:
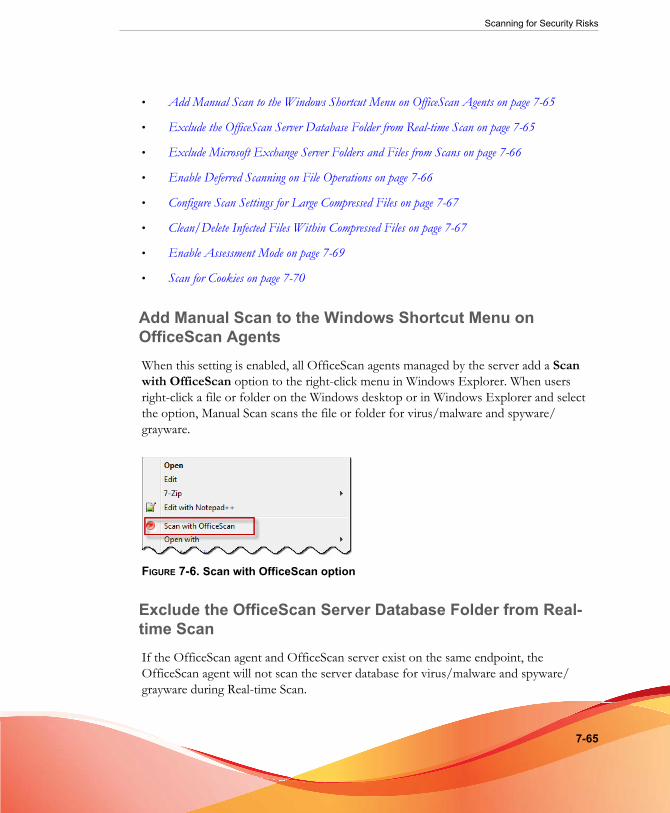
Scanning for Security Risks
7-65
• Add Manual Scan to the Windows Shortcut Menu on OfficeScan Agents on page 7-65
• Exclude the OfficeScan Server Database Folder from Real-time Scan on page 7-65
• Exclude Microsoft Exchange Server Folders and Files from Scans on page 7-66
• Enable Deferred Scanning on File Operations on page 7-66
• Configure Scan Settings for Large Compressed Files on page 7-67
• Clean/Delete Infected Files Within Compressed Files on page 7-67
• Enable Assessment Mode on page 7-69
• Scan for Cookies on page 7-70
Add Manual Scan to the Windows Shortcut Menu onOfficeScan AgentsWhen this setting is enabled, all OfficeScan agents managed by the server add a Scanwith OfficeScan option to the right-click menu in Windows Explorer. When usersright-click a file or folder on the Windows desktop or in Windows Explorer and selectthe option, Manual Scan scans the file or folder for virus/malware and spyware/grayware.
FIGURE 7-6. Scan with OfficeScan option
Exclude the OfficeScan Server Database Folder from Real-time ScanIf the OfficeScan agent and OfficeScan server exist on the same endpoint, theOfficeScan agent will not scan the server database for virus/malware and spyware/grayware during Real-time Scan.

OfficeScan™ 11.0 Administrator’s Guide
7-66
Tip
Enable this setting to prevent database corruption that may occur during scanning.
Exclude Microsoft Exchange Server Folders and Files fromScans
If the OfficeScan agent and a Microsoft Exchange 2000/2003 server exist on the sameendpoint, OfficeScan will not scan the following Microsoft Exchange folders and filesfor virus/malware and spyware/grayware during Manual Scan, Real-time Scan,Scheduled Scan and Scan Now:
• The following folders in \Exchsrvr\Mailroot\vsi 1: Queue, PickUp, andBadMail
• .\Exchsrvr\mdbdata, including these files: priv1.stm, priv1.edb,pub1.stm, and pub1.edb
• .\Exchsrvr\Storage Group
For Microsoft Exchange 2007 or later folders, you need to manually add the folders tothe scan exclusion list. For scan exclusion details, see the following website:
http://technet.microsoft.com/en-us/library/bb332342.aspx
See Scan Exclusions on page 7-29 for steps in configuring the scan exclusion list.
Enable Deferred Scanning on File Operations
Administrators can configure OfficeScan to defer the scanning of files. OfficeScanallows the user to copy files and then scans the files after the copy process completes.This deferred scanning improves the performance of the copy and scan processes.
Note
Deferred scanning requires that the Virus Scan Engine (VSAPI) be version 9.713 or later.For details on upgrading the server, see Manually Updating the OfficeScan Server on page 6-26.

Scanning for Security Risks
7-67
Configure Scan Settings for Large Compressed Files
All OfficeScan agents managed by the server check the following settings when scanningcompressed files for virus/malware and spyware/grayware. during Manual Scan, Real-time Scan, Scheduled Scan, and Scan Now:
• Configure scan settings for large compressed files: Select this option to enablecompressed file handling.
• Configure the following settings separately for Real-Time Scan and the other scantypes (Manual Scan, Scheduled Scan, Scan Now):
• Do not scan files (in a compressed file) if the size exceeds __ MB:OfficeScan does not scan any file that exceeds the limit.
• In a compressed file, scan only the first __ files: After decompressing acompressed file, OfficeScan scans the specified number of files and ignoresany remaining files.
Clean/Delete Infected Files Within Compressed Files
When all agents managed by the server detect virus/malware within compressed filesduring Manual Scan, Real-time Scan, Scheduled Scan and Scan Now, and the followingconditions are met, agents clean or delete the infected files.
• "Clean" or "Delete" is the action OfficeScan is set to perform. Check the actionOfficeScan performs on infected files by going to Agents > Agent Management> Settings > Scan Settings > {Scan Type} > Action tab.
• You enable this setting. Enabling this setting may increase endpoint resource usageduring scanning and scanning may take longer to complete. This is becauseOfficeScan needs to decompress the compressed file, clean/delete infected fileswithin the compressed file, and then re-compress the file.
• The compressed file format is supported. OfficeScan only supports certaincompressed file formats, including ZIP and Office Open XML, which uses ZIPcompression technologies. Office Open XML is the default format for MicrosoftOffice 2007 applications such as Excel, PowerPoint, and Word.

OfficeScan™ 11.0 Administrator’s Guide
7-68
NoteContact your support provider for a complete list of supported compressed fileformats.
For example, Real-time Scan is set to delete files infected with a virus. After Real-timeScan decompresses a compressed file named abc.zip and detects an infected file123.doc within the compressed file, OfficeScan deletes 123.doc and then re-compresses abc.zip, which is now safe to access.
The following table describes what happens if any of the conditions is not met.
TABLE 7-19. Compressed File Scenarios and Results
STATUS OF"CLEAN/DELETE
INFECTED FILESWITHIN
COMPRESSEDFILES"
ACTIONOFFICESCAN IS
SET TOPERFORM
COMPRESSED FILEFORMAT
RESULT
Enabled Clean orDelete
Not supported
Example: def.rarcontains aninfected file123.doc.
OfficeScan encrypts def.rar butdoes not clean, delete, or performany other action on 123.doc.
Disabled Clean orDelete
Supported/Notsupported
Example: abc.zipcontains aninfected file123.doc.
OfficeScan does not clean,delete, or perform any otheraction on both abc.zip and123.doc.

Scanning for Security Risks
7-69
STATUS OF"CLEAN/DELETE
INFECTED FILESWITHIN
COMPRESSEDFILES"
ACTIONOFFICESCAN IS
SET TOPERFORM
COMPRESSED FILEFORMAT
RESULT
Enabled/Disabled
Not Clean orDelete (inother words,any of thefollowing:Rename,Quarantine,Deny Accessor Pass)
Supported/Notsupported
Example: abc.zipcontains aninfected file123.doc.
OfficeScan performs theconfigured action (Rename,Quarantine, Deny Access orPass) on abc.zip, not 123.doc.
If the action is:
Rename: OfficeScan renamesabc.zip to abc.vir, but does notrename 123.doc.
Quarantine: OfficeScanquarantines abc.zip (123.docand all non-infected files arequarantined).
Pass: OfficeScan performs noaction on both abc.zip and123.doc but logs the virusdetection.
Deny Access: OfficeScan deniesaccess to abc.zip when it isopened (123.doc and all non-infected files cannot be opened).
Enable Assessment Mode
When in assessment mode, all agents managed by the server will log spyware/graywaredetected during Manual Scan, Scheduled Scan, Real-time Scan, and Scan Now but willnot clean spyware/grayware components. Cleaning terminates processes or deletesregistries, files, cookies, and shortcuts.
Trend Micro provides assessment mode to allow you to evaluate items that Trend Microdetects as spyware/grayware and then take appropriate action based on your evaluation.

OfficeScan™ 11.0 Administrator’s Guide
7-70
For example, detected spyware/grayware that you do not consider a security risk can beadded to the spyware/grayware approved list..
When in assessment mode, OfficeScan performs the following scan actions:
• Pass: During Manual Scan, Scheduled Scan and Scan Now
• Deny Access: During Real-time Scan
NoteAssessment mode overrides any user-configured scan action. For example, even if youchoose "Clean" as the scan action during Manual Scan, "Pass" remains as the scan actionwhen the agent is on assessment mode.
Scan for Cookies
Select this option if you consider cookies as potential security risks. When selected, allagents managed by the server will scan cookies for spyware/grayware during ManualScan, Scheduled Scan, Real-time Scan, and Scan Now.
Scheduled Scan Settings SectionOnly agents set to run Scheduled Scan will use the following settings. Scheduled Scancan scan for virus/malware and spyware/grayware.
The Scheduled Scan Settings section of the Global Scan Settings allows administratorsto configure the following:
• Remind Users of the Scheduled Scan __ Minutes Before it Runs on page 7-71
• Postpone Scheduled Scan for up to __ Hours and __ Minutes on page 7-71
• Automatically Stop Scheduled Scan When Scanning Lasts More Than __ Hours and __Minutes on page 7-71
• Skip Scheduled Scan When a Wireless Endpoint's Battery Life is Less Than __ % and its ACAdapter is Unplugged on page 7-71
• Resume a Missed Scheduled Scan on page 7-72

Scanning for Security Risks
7-71
Remind Users of the Scheduled Scan __ Minutes Before itRunsOfficeScan displays a notification message minutes before scanning runs to remind usersof the scan schedule (date and time) and any Scheduled Scan privilege you grant them.
The notification message can be enabled/disabled from Agents > Agent Management> Settings > Privileges and Other Settings > Other Settings (tab) > ScheduledScan Settings. If disabled, no reminder displays.
Postpone Scheduled Scan for up to __ Hours and __MinutesOnly users with the “Postpone Scheduled Scan” privilege can perform the followingactions:
• Postpone Scheduled Scan before it runs and then specify the postpone duration.
• If Scheduled Scan is in progress, users can stop scanning and restart it later. Usersthen specify the amount of time that should elapse before scanning restarts. Whenscanning restarts, all previously scanned files are scanned again.
The maximum postpone duration/elapsed time users can specify is 12 hours and45 minutes, which you can reduce by specifying the number of hour(s) and/orminute(s) in the fields provided.
Automatically Stop Scheduled Scan When Scanning LastsMore Than __ Hours and __ MinutesOfficeScan stops scanning when the specified amount of time is exceeded and scanningis not yet complete. OfficeScan immediately notifies users of any security risk detectedduring scanning.
Skip Scheduled Scan When a Wireless Endpoint's BatteryLife is Less Than __ % and its AC Adapter is UnpluggedOfficeScan immediately skips scanning when Scheduled Scan launches if it detects that awireless endpoint's battery life is running low and its AC adapter is not connected to any

OfficeScan™ 11.0 Administrator’s Guide
7-72
power source. If battery life is low but the AC adapter is connected to a power source,scanning proceeds.
Resume a Missed Scheduled Scan
When Scheduled Scan did not launch because OfficeScan is not running on the day andtime of Scheduled Scan, you can specify when OfficeScan will resume scanning:
• Same time next day: If OfficeScan is running at the exact same time next day,scanning is resumed.
• __ minutes after the endpoint starts: OfficeScan resumes scanning a number ofminutes after the user turns on the endpoint. The number of minutes is between 10and 120.
NoteUsers can postpone or skip a resumed Scheduled Scan if the administrator enabled thisprivilege. For details, see Scheduled Scan Privileges and Other Settings on page 7-52.
Virus/Malware Log Bandwidth Settings SectionThe Virus/Malware Log Bandwidth Settings section of the Global Scan Settings allowsadministrators to configure:
Enable OfficeScan Agents to Create a Single Virus/Malware Log Entry for Recurring Detections ofthe Same Virus/Malware Within an Hour on page 7-72
Enable OfficeScan Agents to Create a Single Virus/MalwareLog Entry for Recurring Detections of the Same Virus/Malware Within an Hour
OfficeScan consolidates virus log entries when detecting multiple infections from thesame virus/malware over a short period of time. OfficeScan may detect a single virus/malware multiple times, quickly filling the virus/malware log and consuming networkbandwidth when the OfficeScan agent sends log information to the server. Enabling thisfeature helps reduce both the number of virus/malware log entries made and the

Scanning for Security Risks
7-73
amount of network bandwidth OfficeScan agents consume when they report virus loginformation to the server.
Certified Safe Software Services Section
The Certified Safe Software Services section of the Global Scan Settings allowsadministrators to configure:
Enable the Certified Safe Software Service for Behavior Monitoring, Firewall, and Antivirus Scans onpage 7-73
Enable the Certified Safe Software Service for BehaviorMonitoring, Firewall, and Antivirus Scans
The Certified Safe Software Service queries Trend Micro datacenters to verify the safetyof a program detected by Malware Behavior Blocking, Event Monitoring, Firewall, orantivirus scans. Enable Certified Safe Software Service to reduce the likelihood of falsepositive detections.
Note
Ensure that OfficeScan agents have the correct proxy settings (for details, see OfficeScanAgent Proxy Settings on page 14-46) before enabling Certified Safe Software Service. Incorrectproxy settings, along with an intermittent Internet connection, can result in delays or failureto receive a response from Trend Micro datacenters, causing monitored programs toappear unresponsive.
In addition, pure IPv6 OfficeScan agents cannot query directly from Trend Microdatacenters. A dual-stack proxy server that can convert IP addresses, such as DeleGate, isrequired to allow the OfficeScan agents to connect to the Trend Micro datacenters.
Security Risk NotificationsOfficeScan comes with a set of default notification messages that inform you, otherOfficeScan administrators, and OfficeScan agent users of detected security risks.

OfficeScan™ 11.0 Administrator’s Guide
7-74
For details on notifications sent to administrators, see Security Risk Notifications forAdministrators on page 7-74.
For details on notifications sent to OfficeScan agent users, see Security Risk Notificationsfor OfficeScan Agent Users on page 7-78.
Security Risk Notifications for AdministratorsConfigure OfficeScan to send you and other OfficeScan administrators a notificationwhen it detects a security risk, or only when the action on the security risk isunsuccessful and therefore requires your intervention.
OfficeScan comes with a set of default notification messages that inform you and otherOfficeScan administrators of security risk detections. You can modify the notificationsand configure additional notification settings to suit your requirements.
TABLE 7-20. Types of Security Risk Notifications
TYPE REFERENCE
Virus/Malware Configuring Security Risk Notifications for Administrators onpage 7-75
Spyware/Grayware Configuring Security Risk Notifications for Administrators onpage 7-75
Digital AssetTransmissions
Configuring Data Loss Prevention Notification forAdministrators on page 10-47
C&C Callbacks Configuring C&C Callback Notifications for Administrators onpage 11-16
NoteOfficeScan can send notifications through email, SNMP trap, and Windows NT Eventlogs. Configure settings when OfficeScan sends notifications through these channels. Fordetails, see Administrator Notification Settings on page 13-29.

Scanning for Security Risks
7-75
Configuring Security Risk Notifications for Administrators
Procedure
1. Go to Administration > Notifications > Administrator.
2. In the Criteria tab:
a. Go to the Virus/Malware and Spyware/Grayware sections.
b. Specify whether to send notifications when OfficeScan detects virus/malwareand spyware/grayware, or only when the action on these security risks isunsuccessful.
3. In the Email tab:
a. Go to the Virus/Malware Detections and Spyware/Grayware Detectionssections.
b. Select Enable notification via email.
c. Select Send notifications to users with agent tree domain permissions.
You can use Role-based Administration to grant agent tree domainpermissions to users. If a detection occurs on any OfficeScan agent belongingto a specific domain, the email will be sent to the email addresses of the userswith domain permissions. See the following table for examples:
TABLE 7-21. Agent Tree Domains and Permissions
AGENT TREEDOMAIN
ROLES WITHDOMAIN
PERMISSIONS
USER ACCOUNTWITH THE ROLE
EMAIL ADDRESSFOR THE USER
ACCOUNT
Domain A Administrator(built-in)
root [email protected]
Role_01 admin_john [email protected]
admin_chris [email protected]

OfficeScan™ 11.0 Administrator’s Guide
7-76
AGENT TREEDOMAIN
ROLES WITHDOMAIN
PERMISSIONS
USER ACCOUNTWITH THE ROLE
EMAIL ADDRESSFOR THE USER
ACCOUNT
Domain B Administrator(built-in)
root [email protected]
Role_02 admin_jane [email protected]
If any OfficeScan agent belonging to Domain A detects a virus, the email willbe sent to [email protected], [email protected], and [email protected].
If any OfficeScan agent belonging to Domain B detects spyware, the emailwill be sent to [email protected] and [email protected].
Note
If you enable this option, all users with domain permissions must have acorresponding email address. The email notification will not be sent to userswithout an email address. Users and email addresses are configured fromAdministration > Account Management > User Accounts.
d. Select Send notifications to the following email address(es) and then typethe email addresses.
e. Accept or modify the default subject and message. You can use tokenvariables to represent data in the Subject and Message fields.
TABLE 7-22. Token Variables for Security Risk Notifications
VARIABLE DESCRIPTION
Virus/Malware detections
%v Virus/Malware name
%s Endpoint with virus/malware
%i IP address of the endpoint
%c MAC address of the endpoint
%m Domain of the endpoint

Scanning for Security Risks
7-77
VARIABLE DESCRIPTION
%p Location of virus/malware
%y Date and time of virus/malware detection
%e Virus Scan Engine version
%r Virus Pattern version
%a Action performed on the security risk
%n Name of the user logged on to the infected endpoint
Spyware/Grayware detections
%s Endpoint with spyware/grayware
%i IP address of the endpoint
%m Domain of the endpoint
%y Date and time of spyware/grayware detection
%n Name of the user logged on to the endpoint at the time ofdetection
%T Spyware/Grayware and scan result
4. In the SNMP Trap tab:
a. Go to the Virus/Malware Detections and Spyware/Grayware Detectionssections.
b. Select Enable notification via SNMP trap.
c. Accept or modify the default message. You can use token variables torepresent data in the Message field. See Table 7-22: Token Variables for SecurityRisk Notifications on page 7-76 for details.
5. In the NT Event Log tab:
a. Go to the Virus/Malware Detections and Spyware/Grayware Detectionssections.
b. Select Enable notification via NT Event Log.

OfficeScan™ 11.0 Administrator’s Guide
7-78
c. Accept or modify the default message. You can use token variables torepresent data in the Message field. See Table 7-22: Token Variables for SecurityRisk Notifications on page 7-76 for details.
6. Click Save.
Security Risk Notifications for OfficeScan Agent Users
OfficeScan can display notification messages on OfficeScan agent endpoint:
• Immediately after Real-time Scan and Scheduled Scan detect virus/malware andspyware/grayware. Enable the notification message and optionally modify itscontent.
• If restarting the agent endpoint is necessary to finish cleaning infected files. ForReal-time Scan, the message displays after a particular security risk has beenscanned. For Manual Scan, Scheduled Scan, and Scan Now, the message displaysonce and only after OfficeScan finishes scanning all the scan targets.
TABLE 7-23. Types of Security Risk Agent Notifications
TYPE REFERENCE
Virus/Malware Configuring Virus/Malware Notifications on page 7-80
Spyware/Grayware Configuring Spyware/Grayware Notifications on page 7-80
Firewall violations Modifying the Content of the Firewall Notification Message onpage 12-27
Web reputationviolations
Modifying the Web Threat Notifications on page 11-16
Device controlviolations
Modifying Device Control Notifications on page 9-16
Behavior monitoringpolicy violations
Modifying the Content of the Notification Message on page8-12
Digital assettransmissions
Configuring Data Loss Prevention Notification for Agents onpage 10-50

Scanning for Security Risks
7-79
TYPE REFERENCE
C&C callbacks Modifying the Web Threat Notifications on page 11-16
Notifying Users of Virus/Malware and Spyware/GraywareDetections
Procedure
1. Go to Agents > Agent Management.
2. In the agent tree, click the root domain icon ( ) to include all agents or selectspecific domains or agents.
3. Click Settings > Scan Settings > Real-time Scan Settings or Settings > ScanSettings > Scheduled Scan Settings.
4. Click the Action tab.
5. Select the following options:
• Display a notification message on the agent endpoint when virus/malware is detected
• Display a notification message on the agent endpoint when probablevirus/malware is detected
6. If you selected domain(s) or agent(s) in the agent tree, click Save. If you clicked theroot domain icon, choose from the following options:
• Apply to All Agents: Applies settings to all existing agents and to any newagent added to an existing/future domain. Future domains are domains notyet created at the time you configured the settings.
• Apply to Future Domains Only: Applies settings only to agents added tofuture domains. This option will not apply settings to new agents added to anexisting domain.

OfficeScan™ 11.0 Administrator’s Guide
7-80
Configuring Virus/Malware Notifications
Procedure
1. Go to Administration > Notifications > Agent.
2. From the Type drop-down, select Virus/Malware.
3. Configure detection settings.
a. Choose to display one notification for all virus/malware related events, orseparate notifications depending on the following severity levels:
• High: The OfficeScan agent was unable to handle critical malware
• Medium: The OfficeScan agent was unable to handle malware
• Low: The OfficeScan agent was able to resolve all threats
b. Accept or modify the default messages.
4. Click Save.
Configuring Spyware/Grayware Notifications
Procedure
1. Go to Administration > Notifications > Agent.
2. From the Type drop-down, select Spyware/Grayware.
3. Accept or modify the default message.
4. Click Save.

Scanning for Security Risks
7-81
Notifying Agents of a Restart to Finish Cleaning InfectedFiles
Procedure
1. Go to Agents > Agent Management.
2. In the agent tree, click the root domain icon ( ) to include all agents or selectspecific domains or agents.
3. Click Settings > Privileges and Other Settings.
4. Click the Other Settings tab and go to the Restart Notification section.
5. Select Display a notification message if the endpoint needs to restart tofinish cleaning infected files.
6. If you selected domain(s) or agent(s) in the agent tree, click Save. If you clicked theroot domain icon, choose from the following options:
• Apply to All Agents: Applies settings to all existing agents and to any newagent added to an existing/future domain. Future domains are domains notyet created at the time you configured the settings.
• Apply to Future Domains Only: Applies settings only to agents added tofuture domains. This option will not apply settings to new agents added to anexisting domain.
Security Risk LogsOfficeScan generates logs when it detects virus/malware or spyware/grayware, andwhen it restores spyware/grayware.
To keep the size of logs from occupying too much space on the hard disk, manuallydelete logs or configure a log deletion schedule. For more information about managinglogs, see Log Management on page 13-32.
OfficeScan™ 11.0 Administrator’s Guide
7-82
Viewing Virus/Malware LogsThe OfficeScan agent generates logs when it detects viruses and malware and sends thelogs to the server.
Procedure
1. Go to one of the following:
• Logs > Agents > Security Risks
• Agents > Agent Management
2. In the agent tree, click the root domain icon ( ) to include all agents or selectspecific domains or agents.
3. Click Logs > Virus/Malware Logs or View Logs > Virus/Malware Logs.
4. Specify the log criteria and then click Display Logs.
5. View logs. Logs contain the following information:
• Date and time of virus/malware detection
• Endpoint
• Security threat
• Infection source
• Infected file or object
• Scan type that detected the virus/malware
• Scan results
Note
For more information on scan results, see Virus/Malware Scan Results on page7-83.
• IP address

Scanning for Security Risks
7-83
• MAC address
• Log details (Click View to see the details.)
6. To save logs to a comma-separated value (CSV) file, click Export to CSV. Openthe file or save it to a specific location.
The CSV file contains the following information:
• All information in the logs
• User name logged on to the endpoint at the time of detection
Virus/Malware Scan Results
The following scan results display in the virus/malware logs:
TABLE 7-24. Scan Results
RESULT DESCRIPTION
Deleted • First action is “Delete” and the infected file was deleted.
• First action is “Clean” but cleaning was unsuccessful. Secondaction is “Delete” and the infected file was deleted.
Quarantined • First action is “Quarantine” and the infected file wasquarantined.
• First action is “Clean” but cleaning was unsuccessful. Secondaction is “Quarantine” and the infected file was quarantined.
Cleaned An infected file was cleaned.
Renamed • First action is “Rename” and the infected file was renamed.
• First action is “Clean” but cleaning was unsuccessful. Secondaction is “Rename” and the infected file was renamed.
Access denied • First action is “Deny Access” and access to the infected filewas denied when the user attempted to open the file.
• First action is “Clean” but cleaning was unsuccessful. Secondaction is “Deny Access” and access to the infected file wasdenied when the user attempted to open the file.

OfficeScan™ 11.0 Administrator’s Guide
7-84
RESULT DESCRIPTION
• Probable Virus/Malware was detected during Real-time Scan.
• Real-time Scan may deny access to files infected with a bootvirus even if the scan action is “Clean” (first action) and“Quarantine” (second action). This is because attempting toclean a boot virus may damage the Master Boot Record(MBR) of the infected endpoint. Run Manual Scan soOfficeScan can clean or quarantine the file.
Passed • First action is “Pass”. OfficeScan did not perform any actionon the infected file.
• First action is “Clean” but cleaning was unsuccessful. Secondaction is “Pass” so OfficeScan did not perform any action onthe infected file.
Passed a potentialsecurity risk
This scan result only displays when OfficeScan detects "probablevirus/malware" during Manual Scan, Scheduled Scan, and ScanNow. Refer to the following page on the Trend Micro online VirusEncyclopedia for information about probable virus/malware andhow to submit suspicious files to Trend Micro for analysis.
http://www.trendmicro.com/vinfo/virusencyclo/default5.asp?VName=POSSIBLE_VIRUS&VSect=Sn
Unable to clean orquarantine the file
“Clean” is the first action. “Quarantine” is the second action, andboth actions were unsuccessful.
Solution: See Unable to quarantine the file/Unable to rename thefile on page 7-84.
Unable to clean ordelete the file
“Clean” is the first action. “Delete” is the second action, and bothactions were unsuccessful.
Solution: See Unable to delete the file on page 7-85.
Unable to clean orrename the file
“Clean” is the first action. “Rename” is the second action, andboth actions were unsuccessful.
Solution: See Unable to quarantine the file/Unable to rename thefile on page 7-84.
Unable toquarantine the file/
Explanation 1
The infected file may be locked by another application, isexecuting, or is on a CD. OfficeScan will quarantine/rename the

Scanning for Security Risks
7-85
RESULT DESCRIPTION
Unable to renamethe file
file after the application releases the file or after it has beenexecuted.
Solution
For infected files on a CD, consider not using the CD as the virusmay infect other computers on the network.
Explanation 2
The infected file is in the Temporary Internet Files folder of theagent endpoint. Since the endpoint downloads files while you arebrowsing, the web browser may have locked the infected file.When the web browser releases the file, OfficeScan willquarantine/rename the file.
Solution: None
Unable to deletethe file
Explanation 1
The infected file may be contained in a compressed file and theClean/Delete infected files within compressed files setting inAgents > Global Agent Settings is disabled.
Solution
Enable the Clean/Delete infected files within compressed filesoption. When enabled, OfficeScan decompresses a compressedfile, cleans/deletes infected files within the compressed file, andthen re-compresses the file.
NoteEnabling this setting may increase endpoint resource usageduring scanning and scanning may take longer to complete.
Explanation 2
The infected file may be locked by another application, isexecuting, or is on a CD. OfficeScan will delete the file after theapplication releases the file or after it has been executed.
Solution

OfficeScan™ 11.0 Administrator’s Guide
7-86
RESULT DESCRIPTION
For infected files on a CD, consider not using the CD as the virusmay infect other computers on the network.
Explanation 3
The infected file is in the Temporary Internet Files folder of theOfficeScan agent endpoint. Since the endpoint downloads fileswhile you are browsing, the web browser may have locked theinfected file. When the web browser releases the file, OfficeScanwill delete the file.
Solution: None
Unable to send thequarantined file tothe designatedquarantine folder
Although OfficeScan successfully quarantined a file in the\Suspect folder of the OfficeScan agent endpoint, it cannot sendthe file to the designated quarantine directory.
Solution
Determine which scan type (Manual Scan, Real-time Scan,Scheduled Scan, or Scan Now) detected the virus/malware andthen check the quarantine directory specified in Agents > AgentManagement > Settings > {Scan Type} > Action tab.
If the quarantine directory is on the OfficeScan server computer oris on another OfficeScan server computer:
1. Check if the agent can connect to the server.
2. If you use URL as the quarantine directory format:
a. Ensure that the endpoint name you specify after http://is correct.
b. Check the size of the infected file. If it exceeds themaximum file size specified in Administration >Settings > Quarantine Manager, adjust the setting toaccommodate the file. You may also perform otheractions such as deleting the file.
c. Check the size of the quarantine directory folder anddetermine whether it has exceeded the folder capacityspecified in Administration > Settings > QuarantineManager. Adjust the folder capacity or manually deletefiles in the quarantine directory.

Scanning for Security Risks
7-87
RESULT DESCRIPTION
3. If you use UNC path, ensure that the quarantine directoryfolder is shared to the group “Everyone” and that you assignread and write permission to this group. Also check if thequarantine directory folder exists and if the UNC path iscorrect.
If the quarantine directory is on another endpoint on the network(You can only use UNC path for this scenario):
1. Check if the OfficeScan agent can connect to the endpoint.
2. Ensure that the quarantine directory folder is shared to thegroup “Everyone” and that you assign read and writepermission to this group.
3. Check if the quarantine directory folder exists.
4. Check if the UNC path is correct.
If the quarantine directory is on a different directory on theOfficeScan agent endpoint (you can only use absolute path forthis scenario), check if the quarantine directory folder exists.
Unable to cleanthe file
Explanation 1
The infected file may be contained in a compressed file and the“Clean/Delete” infected files within compressed files setting inAgents > Global Agent Settings is disabled.
Solution
Enable the Clean/Delete infected files within compressed filesoption. When enabled, OfficeScan decompresses a compressedfile, cleans/deletes infected files within the compressed file, andthen re-compresses the file.
NoteEnabling this setting may increase endpoint resource usageduring scanning and scanning may take longer to complete.
Explanation 2
The infected file is in the Temporary Internet Files folder ofthe OfficeScan agent endpoint. Since the endpoint downloadsfiles while you are browsing, the web browser may have locked

OfficeScan™ 11.0 Administrator’s Guide
7-88
RESULT DESCRIPTION
the infected file. When the web browser releases the file,OfficeScan will clean the file.
Solution: None
Explanation 3
The file may be uncleanable. For details and solutions, seeUncleanable Files on page E-16.
Action required OfficeScan is unable to complete the configured action on theinfected file without user intervention. Hover over the Actionrequired column to see the following details.
• “Action required - Contact Support for details on how toremove this threat with the Anti-Threat Tool Kit "Clean Boot"tool found in the OfficeScan ToolBox”
• “Action required - Contact Support for details on how toremove this threat with the Anti-Threat Tool Kit "Rescue Disk"tool found in the OfficeScan ToolBox”
• “Action required - Contact Support for details on how toremove this threat with the Anti-Threat Tool Kit "RootkitBuster" tool found in the OfficeScan ToolBox”
• “Action Required - OfficeScan detected a threat on aninfected agent. Restart the endpoint to finish cleaning thesecurity threat”
• “Action required – Perform a full system scan”
Viewing Central Quarantine Restore Logs
After cleaning malware, OfficeScan agents back up malware data. Notify an online agentto restore backed up data if you consider the data harmless. Information about whichmalware backup data was restored, the affected endpoint, and the restore result availablein the logs.
Procedure
1. Go to Logs > Agents > Central Quarantine Restore.

Scanning for Security Risks
7-89
2. Check the Successful, Unsuccessful, and Pending columns to see if OfficeScansuccessfully restored the quarantined data.
3. Click the count links in each column to view detailed information about eachaffected endpoint.
NoteFor Unsuccessful restorations, you can attempt to restore the file again on theCentral Quarantine Restore Details screen by clicking Restore All.
4. To save logs to a comma-separated value (CSV) file, click Export to CSV. Openthe file or save it to a specific location.
Viewing Spyware/Grayware LogsThe OfficeScan agent generates logs when it detects spyware and grayware and sendsthe logs to the server.
Procedure
1. Go to one of the following:
• Logs > Agents > Security Risks
• Agents > Agent Management
2. In the agent tree, click the root domain icon ( ) to include all agents or selectspecific domains or agents.
3. Click Logs > Spyware/Grayware Logs or View Logs > Spyware/GraywareLogs.
4. Specify the log criteria and then click Display Logs.
5. View logs. Logs contain the following information:
• Date and time of spyware/grayware detection
• Affected endpoint

OfficeScan™ 11.0 Administrator’s Guide
7-90
• Spyware/Grayware name
• Scan type that detected the spyware/grayware
• Details about the spyware/grayware scan results (if scan action was performedsuccessfully or not). See Spyware/Grayware Scan Results on page 7-90 for details.
• IP address
• MAC address
• Log details (Click View to see the details.)
6. Add spyware/grayware you consider harmless to the spyware/grayware approvedlist.
7. To save logs to a comma-separated value (CSV) file, click Export to CSV. Openthe file or save it to a specific location.
The CSV file contains the following information:
• All information in the logs
• User name logged on to the endpoint at the time of detection
Spyware/Grayware Scan Results
The following scan results display in the spyware/grayware logs:
TABLE 7-25. First Level Spyware/Grayware Scan Results
RESULT DESCRIPTION
Successful, NoAction Required
This is the first level result if the scan action was successful. Thesecond level result can be any of the following:
• Cleaned
• Access denied
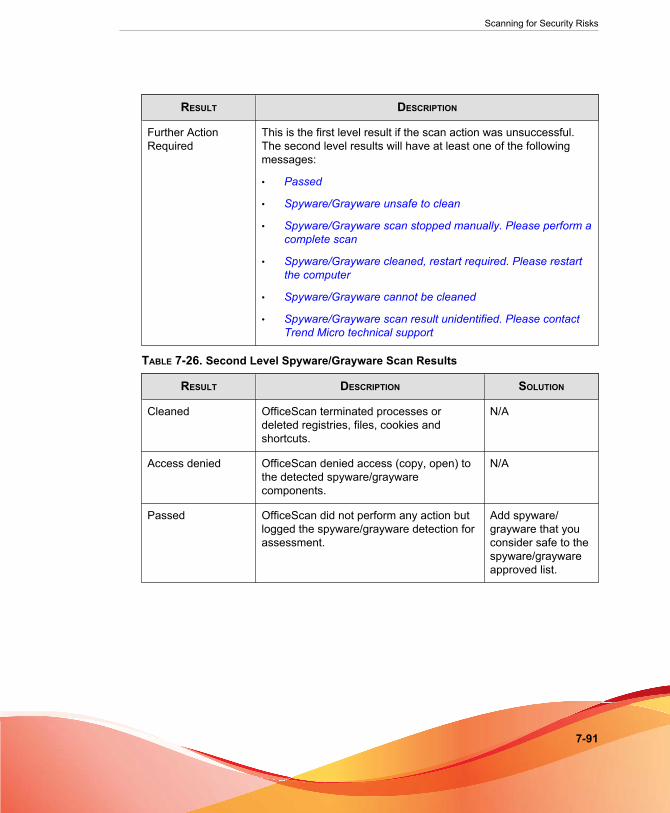
Scanning for Security Risks
7-91
RESULT DESCRIPTION
Further ActionRequired
This is the first level result if the scan action was unsuccessful.The second level results will have at least one of the followingmessages:
• Passed
• Spyware/Grayware unsafe to clean
• Spyware/Grayware scan stopped manually. Please perform acomplete scan
• Spyware/Grayware cleaned, restart required. Please restartthe computer
• Spyware/Grayware cannot be cleaned
• Spyware/Grayware scan result unidentified. Please contactTrend Micro technical support
TABLE 7-26. Second Level Spyware/Grayware Scan Results
RESULT DESCRIPTION SOLUTION
Cleaned OfficeScan terminated processes ordeleted registries, files, cookies andshortcuts.
N/A
Access denied OfficeScan denied access (copy, open) tothe detected spyware/graywarecomponents.
N/A
Passed OfficeScan did not perform any action butlogged the spyware/grayware detection forassessment.
Add spyware/grayware that youconsider safe to thespyware/graywareapproved list.

OfficeScan™ 11.0 Administrator’s Guide
7-92
RESULT DESCRIPTION SOLUTION
Spyware/Graywareunsafe to clean
: This message displays if the SpywareScan Engine attempts to clean any singlefolder and the following criteria are met:
• Items to clean exceed 250MB.
• The operating system uses the files inthe folder. The folder may also benecessary for normal systemoperation.
• The folder is a root directory (such asC: or F:)
Contact yoursupport provider forassistance.
Spyware/Graywarescan stoppedmanually. Pleaseperform a completescan
A user stopped scanning before it wascompleted.
Run a Manual Scanand wait for thescan to finish.
Spyware/Graywarecleaned, restartrequired. Pleaserestart the computer
OfficeScan cleaned spyware/graywarecomponents but the endpoint needs torestart to complete the task.
Restart the endpointimmediately.
Spyware/Graywarecannot be cleaned
Spyware/Grayware was detected on a CD-ROM or network drive. OfficeScan cannotclean spyware/grayware detected on theselocations.
Manually removethe infected file.
Spyware/Graywarescan resultunidentified. Pleasecontact Trend Microtechnical support
A new version of the Spyware Scan Engineprovides a new scan result that OfficeScanhas not been configured to handle.
Contact yoursupport provider forhelp in determiningthe new scan result.
Viewing Spyware/Grayware Restore LogsAfter cleaning spyware/grayware, OfficeScan agents back up spyware/grayware data.Notify an online agent to restore backed up data if you consider the data harmless.Information about which spyware/grayware backup data was restored, the affectedendpoint, and the restore result available in the logs.

Scanning for Security Risks
7-93
Procedure
1. Go to Logs > Agents > Spyware/Grayware Restore.
2. Check the Result column to see if OfficeScan successfully restored the spyware/grayware data.
3. To save logs to a comma-separated value (CSV) file, click Export to CSV. Openthe file or save it to a specific location.
Scan LogsWhen Manual Scan, Scheduled Scan, or Scan Now runs, the OfficeScan agent creates ascan log that contains information about the scan. You can view the scan log byaccessing the OfficeScan agent console. Agents do not send the scan log to the server.
Scan logs show the following information:
• Date and time OfficeScan started scanning
• Date and time OfficeScan stopped scanning
• Scan status
• Completed: The scan was completed without problems.
• Stopped: The user stopped the scan before it can be completed.
• Stopped Unexpectedly: The scan was interrupted by the user, system, or anunexpected event. For example, the OfficeScan Real-time Scan service mighthave terminated unexpectedly or the user performed a forced restart of theagent.
• Scan type
• Number of scanned objects
• Number of infected files
• Number of unsuccessful actions
• Number of successful actions

OfficeScan™ 11.0 Administrator’s Guide
7-94
• Smart Scan Agent Pattern version
• Virus Pattern version
• Spyware Pattern version
Security Risk OutbreaksA security risk outbreak occurs when detections of virus/malware, spyware/grayware,and shared folder sessions over a certain period of time exceed a certain threshold.There are several ways to respond to and contain outbreaks in the network, including:
• Enabling OfficeScan to monitor the network for suspicious activity
• Blocking critical agent endpoint ports and folders
• Sending outbreak alert messages to agents
• Cleaning up infected endpoints
Security Risk Outbreak Criteria and NotificationsConfigure OfficeScan to send you and other OfficeScan administrators a notificationwhen the following events occur:
TABLE 7-27. Types of Security Risk Outbreak Notifications
TYPE REFERENCE
• Virus/Malware
• Spyware/Grayware
• Shared foldersession
Configuring the Security Risk Outbreak Criteria andNotifications on page 7-95
Firewall violations Configuring the Firewall Violation Outbreak Criteria andNotifications on page 12-29
C&C callbacks Configuring the C&C Callback Outbreak Criteria andNotifications on page 11-20
Scanning for Security Risks
7-95
• Virus/Malware outbreak
• Spyware/Grayware outbreak
• Firewall Violations outbreak
• Shared folder session outbreak
Define an outbreak by the number of detections and the detection period. An outbreakis triggered when the number of detections within the detection period is exceeded.
OfficeScan comes with a set of default notification messages that inform you and otherOfficeScan administrators of an outbreak. You can modify the notifications andconfigure additional notification settings to suit your requirements.
NoteOfficeScan can send security risk outbreak notifications through email, SNMP trap, andWindows NT Event logs. For shared folder session outbreaks, OfficeScan sendsnotifications through email. Configure settings when OfficeScan sends notificationsthrough these channels. For details, see Administrator Notification Settings on page 13-29.
Configuring the Security Risk Outbreak Criteria andNotifications
Procedure
1. Go to Administration > Notifications > Outbreak.
2. In the Criteria tab:
a. Go to the Virus/Malware and Spyware/Grayware sections:
b. Specify the number of unique sources of detections.
c. Specify the number of detections and the detection period for each securityrisk.
TipTrend Micro recommends accepting the default values in this screen.

OfficeScan™ 11.0 Administrator’s Guide
7-96
OfficeScan sends a notification message when the number of detections isexceeded. For example, under the Virus/Malware section, if you specify 10unique sources, 100 detections, and a time period of 5 hours, OfficeScan sends thenotification when 10 different agents have reported a total of 101 security riskswithin a 5-hour period. If all instances are detected on only one agent within a 5-hour period, OfficeScan does not send the notification.
3. In the Criteria tab:
a. Go to the Shared Folder Sessions section.
b. Select Monitor shared folder sessions on your network.
c. In Shared folder sessions recorded, click the number link to view thecomputers with shared folders and the computers accessing the sharedfolders.
d. Specify the number of shared folder sessions and the detection period.
OfficeScan sends a notification message when the number of shared foldersessions is exceeded.
4. In the Email tab:
a. Go to the Virus/Malware Outbreaks, Spyware/Grayware Outbreaks,and Shared Folder Session Outbreaks sections.
b. Select Enable notification via email.
c. Specify the email recipients.
d. Accept or modify the default email subject and message. You can use tokenvariables to represent data in the Subject and Message fields.
TABLE 7-28. Token Variables for Security Risk Outbreak Notifications
VARIABLE DESCRIPTION
Virus/Malware outbreaks
%CV Total number of viruses/malware detected
%CC Total number of computers with virus/malware

Scanning for Security Risks
7-97
VARIABLE DESCRIPTION
Spyware/Grayware outbreaks
%CV Total number of spyware/grayware detected
%CC Total number of computers with spyware/grayware
Shared folder session outbreaks
%S Number of shared folder sessions
%T Time period when shared folder sessions accumulated
%M Time period, in minutes
e. Select additional virus/malware and spyware/grayware information to includein the email. You can include the agent/domain name, security risk name, dateand time of detection, path and infected file, and scan result.
f. Accept or modify the default notification messages.
5. In the SNMP Trap tab:
a. Go to the Virus/Malware Outbreaks and Spyware/Grayware Outbreakssections.
b. Select Enable notification via SNMP trap.
c. Accept or modify the default message. You can use token variables torepresent data in the Message field. See Table 7-28: Token Variables for SecurityRisk Outbreak Notifications on page 7-96 for details.
6. In the NT Event Log tab:
a. Go to the Virus/Malware Outbreaks and Spyware/Grayware Outbreakssections.
b. Select Enable notification via NT Event Log.
c. Accept or modify the default message. You can use token variables torepresent data in the Message field. See Table 7-28: Token Variables for SecurityRisk Outbreak Notifications on page 7-96 for details.

OfficeScan™ 11.0 Administrator’s Guide
7-98
7. Click Save.
Configuring Security Risk Outbreak PreventionWhen an outbreak occurs, enforce outbreak prevention measures to respond to andcontain the outbreak. Configure prevention settings carefully because incorrectconfiguration may cause unforeseen network issues.
Procedure
1. Go to Agents > Outbreak Prevention.
2. In the agent tree, click the root domain icon ( ) to include all agents or selectspecific domains or agents.
3. Click Start Outbreak Prevention.
4. Click any of the following outbreak prevention policies and then configure thesettings for the policy:
• Limiting/Denying Access to Shared Folders on page 7-99
• Blocking Vulnerable Ports on page 7-100
• Denying Write Access to Files and Folders on page 7-102
• Denying Access to Executable Compressed Files on page 7-104
• Creating Mutual Exclusion Handling on Malware Processes/Files on page 7-103
5. Select the policies you want to enforce.
6. Select the number of hours outbreak prevention will stay in effect. The default is48 hours. You can manually restore network settings before the outbreakprevention period expires.
WARNING!Do not allow outbreak prevention to remain in effect indefinitely. To block or denyaccess to certain files, folders, or ports indefinitely, modify endpoint and networksettings directly instead of using OfficeScan.

Scanning for Security Risks
7-99
7. Accept or modify the default agent notification message.
NoteTo configure OfficeScan to notify you during an outbreak, go to Administration >Notifications > Outbreak.
8. Click Start Outbreak Prevention.
The outbreak prevention measures you selected display in a new window.
9. Back in the Outbreak Prevention agent tree, check the Outbreak Preventioncolumn.
A check mark appears on computers applying outbreak prevention measures.
OfficeScan records the following events in the system event logs:
• Server events (initiating outbreak prevention and notifying agents to enableoutbreak prevention)
• OfficeScan agent event (enabling outbreak prevention)
Outbreak Prevention PoliciesWhen outbreaks occur, enforce any of the following policies:
• Limiting/Denying Access to Shared Folders on page 7-99
• Blocking Vulnerable Ports on page 7-100
• Denying Write Access to Files and Folders on page 7-102
• Denying Access to Executable Compressed Files on page 7-104
• Creating Mutual Exclusion Handling on Malware Processes/Files on page 7-103
Limiting/Denying Access to Shared FoldersDuring outbreaks, limit or deny access to shared folders on the network to preventsecurity risks from spreading through the shared folders.

OfficeScan™ 11.0 Administrator’s Guide
7-100
When this policy takes effect, users can still share folders but the policy will not apply tothe newly shared folders. Therefore, inform users not to share folders during anoutbreak or deploy the policy again to apply the policy to the newly shared folders.
Procedure
1. Go to Agents > Outbreak Prevention.
2. In the agent tree, click the root domain icon ( ) to include all agents or selectspecific domains or agents.
3. Click Start Outbreak Prevention.
4. Click Limit/Deny access to shared folders.
5. Select from the following options:
• Allow read access only: Limits access to shared folders
• Deny Full Access
Note
The read access only setting does not apply to shared folders already configuredto deny full access.
6. Click Save.
The Outbreak Prevention Settings screen displays again.
7. Click Start Outbreak Prevention.
The outbreak prevention measures you selected display in a new window.
Blocking Vulnerable Ports
During outbreaks, block vulnerable ports that viruses/malware might use to gain accessto OfficeScan agent computers.

Scanning for Security Risks
7-101
WARNING!
Configure Outbreak Prevention settings carefully. Blocking ports that are in use makesnetwork services that depend on them unavailable. For example, if you block the trustedport, OfficeScan cannot communicate with the agent for the duration of the outbreak.
Procedure
1. Go to Agents > Outbreak Prevention.
2. In the agent tree, click the root domain icon ( ) to include all agents or selectspecific domains or agents.
3. Click Start Outbreak Prevention.
4. Click Block Ports.
5. Select whether to Block trusted port.
6. Select the ports to block under the Blocked Ports column.
a. If there are no ports in the table, click Add. In the screen that opens, selectthe ports to block and click Save.
• All ports (including ICMP): Blocks all ports except the trusted port. Ifyou also want to block the trusted port, select the Block trusted portcheck box in the previous screen.
• Commonly used ports: Select at least one port number for OfficeScanto save the port blocking settings.
• Trojan ports: Blocks ports commonly used by Trojan horse programs.See Trojan Port on page E-13 for details.
• A port number or port range: Optionally specify the direction of thetraffic to block and some comments, such as the reason for blocking theports you specified.
• Ping protocol (Reject ICMP): Click if you only want to block ICMPpackets, such as ping requests.
b. To edit settings for the blocked port(s), click the port number.
OfficeScan™ 11.0 Administrator’s Guide
7-102
c. In the screen that opens, modify the settings and click Save.
d. To remove a port from the list, select the check box next to the port numberand click Delete.
7. Click Save.
The Outbreak Prevention Settings screen displays again.
8. Click Start Outbreak Prevention.
The outbreak prevention measures you selected display in a new window.
Denying Write Access to Files and Folders
Viruses/Malware can modify or delete files and folders on the host computers. Duringan outbreak, configure OfficeScan to prevent viruses/malware from modifying ordeleting files and folders on OfficeScan agent computers.
WARNING!OfficeScan does not support denying write access to mapped network drives.
Procedure
1. Go to Agents > Outbreak Prevention.
2. In the agent tree, click the root domain icon ( ) to include all agents or selectspecific domains or agents.
3. Click Start Outbreak Prevention.
4. Click Deny write access to files and folders.
5. Type the directory path. When you finish typing the directory path you want toprotect, click Add.
NoteType the absolute path, not the virtual path, for the directory.

Scanning for Security Risks
7-103
6. Specify the files to protect in the protected directories. Select all files or files basedon specific file extensions. For file extensions, to specify an extension that is not inthe list, type it in the text box, and then click Add.
7. To protect specific files, under Files to Protect, type the full file name and clickAdd.
8. Click Save.
The Outbreak Prevention Settings screen displays again.
9. Click Start Outbreak Prevention.
The outbreak prevention measures you selected display in a new window.
Creating Mutual Exclusion Handling on Malware Processes/Files
You can configure Outbreak Prevention to protect against security threats that utilizemutex processes by overriding the resources that the threat requires to infect and spreadthroughout the system. Outbreak Prevention creates mutual exclusions on files andprocesses related to known malware, preventing the malware from accessing theseresources.
Tip
Trend Micro recommends maintaining these exclusions until a solution to the malwarethreat can be implemented. Contact Support to obtain the correct mutex names to protectagainst during an outbreak.
Note
Mutual exclusion handling requires the Unauthorized Change Prevention Service and onlysupports 32-bit platforms.
Procedure
1. Go to Agents > Outbreak Prevention.

OfficeScan™ 11.0 Administrator’s Guide
7-104
2. In the agent tree, click the root domain icon ( ) to include all agents or selectspecific domains or agents.
3. Click Start Outbreak Prevention.
4. Click Create mutual exclusion (mutex) handling on malware processes/files.
5. Type the mutex name to protect against in the text field provided.
Add or remove mutex names from the list using the + and - buttons.
NoteOutbreak Prevention supports mutual exclusion handling on a maximum of sixmutex threats.
6. Click Save.
The Outbreak Prevention Settings screen displays again.
7. Click Start Outbreak Prevention.
The outbreak prevention measures you selected display in a new window.
Denying Access to Executable Compressed FilesDuring outbreaks, denying access to executable compressed files can prevent thepossible security risks that these files may contain from spreading across the network.You can choose to allow access to trusted files created by the supported executablepacker programs.
Procedure
1. Go to Agents > Outbreak Prevention.
2. In the agent tree, click the root domain icon ( ) to include all agents or selectspecific domains or agents.
3. Click Start Outbreak Prevention.
4. Click Deny access to executable compressed files.

Scanning for Security Risks
7-105
5. Select from the list of supported executable packer programs and click Add toallow access to executable packed files created by these packer programs.
Note
You can only approve the use of packed files created by the packer programs in theExecutable Packers list. Outbreak Prevention denies access to all other executablepacked file formats.
6. Click Save.
The Outbreak Prevention Settings screen displays again.
7. Click Start Outbreak Prevention.
The outbreak prevention measures you selected display in a new window.
Disabling Outbreak Prevention
When you are confident that an outbreak has been contained and that OfficeScanalready cleaned or quarantined all infected files, restore network settings to normal bydisabling Outbreak Prevention.
Procedure
1. Go to Agents > Outbreak Prevention.
2. In the agent tree, click the root domain icon ( ) to include all agents or selectspecific domains or agents.
3. Click Restore Settings.
4. To inform users that the outbreak is over, select Notify users after restoring theoriginal settings.
5. Accept or modify the default agent notification message.
6. Click Restore Settings.

OfficeScan™ 11.0 Administrator’s Guide
7-106
NoteIf you do not restore network settings manually, OfficeScan automatically restoresthese settings after the number of hours specified in Automatically restore networksettings to normal after __ hours on the Outbreak Prevention Settings screen.The default setting is 48 hours.
OfficeScan records the following events in the system event logs:
• Server events (initiating outbreak prevention and notifying OfficeScan agentsto enable outbreak prevention)
• OfficeScan agent event (enabling outbreak prevention)
7. After disabling outbreak prevention, scan networked computers for security risksto ensure that the outbreak has been contained.
8-1
Chapter 8
Using Behavior MonitoringThis chapter describes how to protect computers from security risks using the BehaviorMonitoring feature.
Topics include:
• Behavior Monitoring on page 8-2
• Configuring Global Behavior Monitoring Settings on page 8-7
• Behavior Monitoring Privileges on page 8-10
• Behavior Monitoring Notifications for OfficeScan Agent Users on page 8-11
• Behavior Monitoring Logs on page 8-12

OfficeScan™ 11.0 Administrator’s Guide
8-2
Behavior MonitoringBehavior Monitoring constantly monitors endpoints for unusual modifications to theoperating system or on installed software. Behavior Monitoring protects endpointsthrough Malware Behavior Blocking and Event Monitoring. Complementing thesetwo features are a user-configured exception list and the Certified Safe SoftwareService.
Important
• Behavior Monitoring does not support Windows XP or Windows 2003 64-bitplatforms.
• Behavior Monitoring does support Windows Vista 64-bit platforms with SP1 or later.
• By default, Behavior Monitoring is disabled on all versions of Windows Server 2003,Windows Server 2008, and Windows Server 2012. Before enabling BehaviorMonitoring on these server platforms, read the guidelines and best practices outlinedin OfficeScan Agent Services on page 14-6.
Malware Behavior BlockingMalware Behavior Blocking provides a necessary layer of additional threat protectionfrom programs that exhibit malicious behavior. It observes system events over a periodof time. As programs execute different combinations or sequences of actions, MalwareBehavior Blocking detects known malicious behavior and blocks the associatedprograms. Use this feature to ensure a higher level of protection against new, unknown,and emerging threats.
Malware Behavior Monitoring provides the following threat-level scanning options:
• Known threats: Blocks behaviors associated with known malware threats
• Known and potential threats: Blocks behavior associated with known threats andtakes action on behavior that is potentially malicious
When a program is blocked and notifications are enabled, OfficeScan displays anotification on the OfficeScan agent endpoint. For details about notifications, seeBehavior Monitoring Notifications for OfficeScan Agent Users on page 8-11.

Using Behavior Monitoring
8-3
Event MonitoringEvent Monitoring provides a more generic approach to protecting against unauthorizedsoftware and malware attacks. It monitors system areas for certain events, allowingadministrators to regulate programs that trigger such events. Use Event Monitoring ifyou have specific system protection requirements that are above and beyond what isprovided by Malware Behavior Blocking.
The following table provides a list of monitored system events.
TABLE 8-1. Monitored System Events
EVENTS DESCRIPTION
Duplicated SystemFile
Many malicious programs create copies of themselves or othermalicious programs using file names used by Windows systemfiles. This is typically done to override or replace system files,avoid detection, or discourage users from deleting the maliciousfiles.
Hosts FileModification
The Hosts file matches domain names with IP addresses. Manymalicious programs modify the Hosts file so that the web browseris redirected to infected, non-existent, or fake websites.
Suspicious Behavior Suspicious behavior can be a specific action or a series of actionsthat is rarely carried out by legitimate programs. Programsexhibiting suspicious behavior should be used with caution.
New InternetExplorer Plugin
Spyware/grayware programs often install unwanted InternetExplorer plugins, including toolbars and Browser Helper Objects.
Internet ExplorerSetting Modification
Many virus/malware change Internet Explorer settings, includingthe home page, trusted websites, proxy server settings, and menuextensions.
Security PolicyModification
Modifications in Windows Security Policy can allow unwantedapplications to run and change system settings.
Program LibraryInjection
Many malicious programs configure Windows so that allapplications automatically load a program library (DLL). Thisallows the malicious routines in the DLL to run every time anapplication starts.

OfficeScan™ 11.0 Administrator’s Guide
8-4
EVENTS DESCRIPTION
Shell Modification Many malicious programs modify Windows shell settings toassociate themselves to certain file types. This routine allowsmalicious programs to launch automatically if users open theassociated files in Windows Explorer. Changes to Windows shellsettings can also allow malicious programs to track the programsused and start alongside legitimate applications.
New Service Windows services are processes that have special functions andtypically run continuously in the background with fulladministrative access. Malicious programs sometimes installthemselves as services to stay hidden.
System FileModification
Certain Windows system files determine system behavior,including startup programs and screen saver settings. Manymalicious programs modify system files to launch automatically atstartup and control system behavior.
Firewall PolicyModification
The Windows Firewall policy determines the applications thathave access to the network, the ports that are open forcommunication, and the IP addresses that can communicate withthe computer. Many malicious programs modify the policy to allowthemselves to access to the network and the Internet.
System ProcessModification
Many malicious programs perform various actions on built-inWindows processes. These actions can include terminating ormodifying running processes.
New StartupProgram
Malicious applications usually add or modify autostart entries inthe Windows registry to automatically launch every time thecomputer starts.
When Event Monitoring detects a monitored system event, it performs the actionconfigured for the event.
The following table lists possible actions that administrators can take on monitoredsystem events.
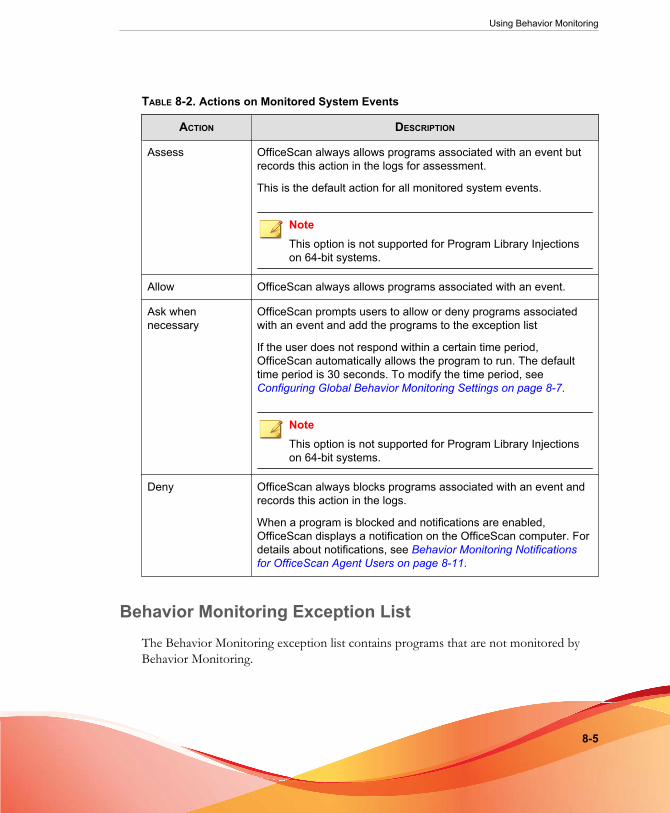
Using Behavior Monitoring
8-5
TABLE 8-2. Actions on Monitored System Events
ACTION DESCRIPTION
Assess OfficeScan always allows programs associated with an event butrecords this action in the logs for assessment.
This is the default action for all monitored system events.
NoteThis option is not supported for Program Library Injectionson 64-bit systems.
Allow OfficeScan always allows programs associated with an event.
Ask whennecessary
OfficeScan prompts users to allow or deny programs associatedwith an event and add the programs to the exception list
If the user does not respond within a certain time period,OfficeScan automatically allows the program to run. The defaulttime period is 30 seconds. To modify the time period, seeConfiguring Global Behavior Monitoring Settings on page 8-7.
NoteThis option is not supported for Program Library Injectionson 64-bit systems.
Deny OfficeScan always blocks programs associated with an event andrecords this action in the logs.
When a program is blocked and notifications are enabled,OfficeScan displays a notification on the OfficeScan computer. Fordetails about notifications, see Behavior Monitoring Notificationsfor OfficeScan Agent Users on page 8-11.
Behavior Monitoring Exception ListThe Behavior Monitoring exception list contains programs that are not monitored byBehavior Monitoring.
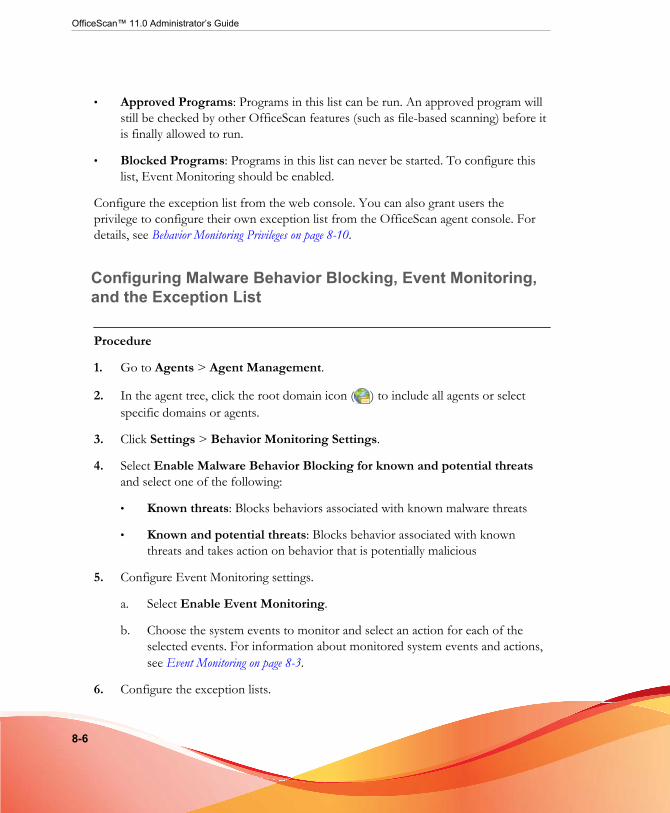
OfficeScan™ 11.0 Administrator’s Guide
8-6
• Approved Programs: Programs in this list can be run. An approved program willstill be checked by other OfficeScan features (such as file-based scanning) before itis finally allowed to run.
• Blocked Programs: Programs in this list can never be started. To configure thislist, Event Monitoring should be enabled.
Configure the exception list from the web console. You can also grant users theprivilege to configure their own exception list from the OfficeScan agent console. Fordetails, see Behavior Monitoring Privileges on page 8-10.
Configuring Malware Behavior Blocking, Event Monitoring,and the Exception List
Procedure
1. Go to Agents > Agent Management.
2. In the agent tree, click the root domain icon ( ) to include all agents or selectspecific domains or agents.
3. Click Settings > Behavior Monitoring Settings.
4. Select Enable Malware Behavior Blocking for known and potential threatsand select one of the following:
• Known threats: Blocks behaviors associated with known malware threats
• Known and potential threats: Blocks behavior associated with knownthreats and takes action on behavior that is potentially malicious
5. Configure Event Monitoring settings.
a. Select Enable Event Monitoring.
b. Choose the system events to monitor and select an action for each of theselected events. For information about monitored system events and actions,see Event Monitoring on page 8-3.
6. Configure the exception lists.

Using Behavior Monitoring
8-7
a. Under Type the full program path, type the full path of the program toapprove or block. Separate multiple entries with semicolons (;).
b. Click Add to Approved List or Add to Blocked List.
c. To remove a blocked or approved program from the list, click the trash binicon ( ) next to the program.
Note
OfficeScan accepts a maximum of 100 approved programs and 100 blockedprograms.
7. If you selected domain(s) or agent(s) in the agent tree, click Save. If you clicked theroot domain icon, choose from the following options:
• Apply to All Agents: Applies settings to all existing agents and to any newagent added to an existing/future domain. Future domains are domains notyet created at the time you configured the settings.
• Apply to Future Domains Only: Applies settings only to agents added tofuture domains. This option will not apply settings to new agents added to anexisting domain.
Configuring Global Behavior MonitoringSettings
OfficeScan applies global agent settings to all agents or only to agents with certainprivileges.
Procedure
1. Go to Agents > Global Agent Settings.
2. Go to the Behavior Monitoring Settings section.
3. Configure the following settings as required:

OfficeScan™ 11.0 Administrator’s Guide
8-8
OPTION DESCRIPTION
Automaticallyallow program ifuser does notrespond within __seconds
This setting only works if Event Monitoring is enabled and theaction for a monitored system event is "Ask when necessary".This action prompts a user to allow or deny programsassociated with the event. If the user does not respond withina certain time period, OfficeScan automatically allows theprogram to run. For details, see Event Monitoring on page8-3.
Prompt usersbefore executingnewlyencounteredprogramsdownloadedthrough HTTP oremailapplications(Server platformsexcluded)
Behavior Monitoring works in conjunction with WebReputation Services to verify the prevalence of filesdownloaded through HTTP channels or email applications.After detecting a "newly encountered" file, administrators canchoose to prompt users before executing the file. Trend Microclassifies a program as newly encountered based on thenumber of file detections or historical age of the file asdetermined by the Smart Protection Network.
Behavior Monitoring scans the following file types for eachchannel:
• HTTP: Scans .exe files.
• Email applications: Scans .exe, and compressed .exefiles in unencrypted .zip and .rar files.
Note
• Administrators must enable Web ReputationServices on the agent to allow OfficeScan to scanHTTP traffic before this prompt can display.
• For Windows 7/Vista/XP systems, this prompt onlysupports ports 80, 81, and 8080.
• OfficeScan matches the file names downloadedthrough email applications during the executionprocess. If the file name has been changed, theuser does not receive a prompt.
4. Go to the Certified Safe Software Service Settings section and enable theCertified Safe Software Service as required.

Using Behavior Monitoring
8-9
The Certified Safe Software Service queries Trend Micro datacenters to verify thesafety of a program detected by Malware Behavior Blocking, Event Monitoring,Firewall, or antivirus scans. Enable Certified Safe Software Service to reduce thelikelihood of false positive detections.
NoteEnsure that OfficeScan agents have the correct proxy settings (for details, seeOfficeScan Agent Proxy Settings on page 14-46) before enabling Certified Safe SoftwareService. Incorrect proxy settings, along with an intermittent Internet connection, canresult in delays or failure to receive a response from Trend Micro datacenters, causingmonitored programs to appear unresponsive.
In addition, pure IPv6 OfficeScan agents cannot query directly from Trend Microdatacenters. A dual-stack proxy server that can convert IP addresses, such asDeleGate, is required to allow the OfficeScan agents to connect to the Trend Microdatacenters.
5. Click Save.
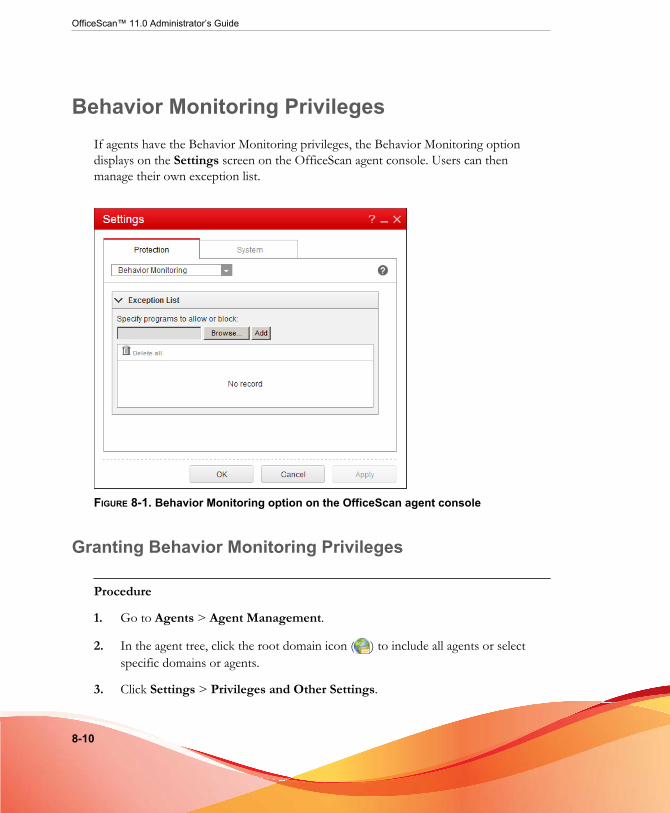
OfficeScan™ 11.0 Administrator’s Guide
8-10
Behavior Monitoring PrivilegesIf agents have the Behavior Monitoring privileges, the Behavior Monitoring optiondisplays on the Settings screen on the OfficeScan agent console. Users can thenmanage their own exception list.
FIGURE 8-1. Behavior Monitoring option on the OfficeScan agent console
Granting Behavior Monitoring Privileges
Procedure
1. Go to Agents > Agent Management.
2. In the agent tree, click the root domain icon ( ) to include all agents or selectspecific domains or agents.
3. Click Settings > Privileges and Other Settings.

Using Behavior Monitoring
8-11
4. On the Privileges tab, go to the Behavior Monitoring Privileges section.
5. Select Display the Behavior Monitoring settings on the OfficeScan agentconsole.
6. If you selected domain(s) or agent(s) in the agent tree, click Save. If you clicked theroot domain icon, choose from the following options:
• Apply to All Agents: Applies settings to all existing agents and to any newagent added to an existing/future domain. Future domains are domains notyet created at the time you configured the settings.
• Apply to Future Domains Only: Applies settings only to agents added tofuture domains. This option will not apply settings to new agents added to anexisting domain.
Behavior Monitoring Notifications forOfficeScan Agent Users
OfficeScan can display a notification message on the OfficeScan agent computerimmediately after Behavior Monitoring blocks a program. Enable the sending ofnotification messages and optionally modify the content of the message.
Enabling the Sending of Notification Messages
Procedure
1. Go to Agents > Agent Management.
2. In the agent tree, click the root domain icon ( ) to include all agents or selectspecific domains or agents.
3. Click Settings > Privileges and Other Settings.
4. Click the Other Settings tab and go to the Behavior Monitoring Settingssection.
OfficeScan™ 11.0 Administrator’s Guide
8-12
5. Select Display a notification when a program is blocked.
6. If you selected domain(s) or agent(s) in the agent tree, click Save. If you clicked theroot domain icon, choose from the following options:
• Apply to All Agents: Applies settings to all existing agents and to any newagent added to an existing/future domain. Future domains are domains notyet created at the time you configured the settings.
• Apply to Future Domains Only: Applies settings only to agents added tofuture domains. This option will not apply settings to new agents added to anexisting domain.
Modifying the Content of the Notification Message
Procedure
1. Go to Administration > Notifications > Agent.
2. From the Type drop-down, select Behavior Monitoring Policy Violations.
3. Modify the default message in the text box provided.
4. Click Save.
Behavior Monitoring LogsOfficeScan agents log unauthorized program access instances and send the logs to theserver. Any OfficeScan agent that runs continuously aggregates the logs and sends themat specified intervals, which is every 60 minutes by default.
To keep the size of logs from occupying too much space on the hard disk, manuallydelete logs or configure a log deletion schedule. For more information about managinglogs, see Log Management on page 13-32.

Using Behavior Monitoring
8-13
Viewing Behavior Monitoring Logs
Procedure
1. Go to Logs > Agents > Security Risks or Agents > Agent Management.
2. In the agent tree, click the root domain icon ( ) to include all agents or selectspecific domains or agents.
3. Click Logs > Behavior Monitoring Logs or View Logs > BehaviorMonitoring Logs.
4. Specify the log criteria and then click Display Logs.
5. View logs. Logs contain the following information:
• Date/Time unauthorized process was detected
• Endpoint where unauthorized process was detected
• Endpoint’s domain
• Violation, which is the event monitoring rule violated by the process
• Action performed when violation was detected
• Event, which is the type of object accessed by the program
• Risk level of the unauthorized program
• Program, which is the unauthorized program
• Operation, which is the action performed by the unauthorized program
• Target, which is the process that was accessed
6. To save logs to a comma-separated value (CSV) file, click Export to CSV. Openthe file or save it to a specific location.
OfficeScan™ 11.0 Administrator’s Guide
8-14
Configuring the Behavior Monitoring Log SendingSchedule
Procedure
1. Access <Server installation folder>\PCCSRV.
2. Open the ofcscan.ini file using a text editor such as Notepad.
3. Search for the string "SendBMLogPeriod" and then check the value next to it.
The default value is 3600 seconds and the string appears asSendBMLogPeriod=3600.
4. Specify the value in seconds.
For example, to change the log period to 2 hours, change the value to 7200.
5. Save the file.
6. Go to Agents > Global Agent Settings.
7. Click Save without changing any settings.
8. Restart the agent.

9-1
Chapter 9
Using Device ControlThis chapter describes how to protect computers from security risks using the DeviceControl feature.
Topics include:
• Device Control on page 9-2
• Permissions for Storage Devices on page 9-4
• Permissions for Non-storage Devices on page 9-10
• Modifying Device Control Notifications on page 9-16
• Device Control Logs on page 9-17

OfficeScan™ 11.0 Administrator’s Guide
9-2
Device ControlDevice Control regulates access to external storage devices and network resourcesconnected to computers. Device Control helps prevent data loss and leakage and,combined with file scanning, helps guard against security risks.
You can configure Device Control policies for internal and external agents. OfficeScanadministrators typically configure a stricter policy for external agents.
Policies are granular settings in the OfficeScan agent tree. You can enforce specificpolicies to agent groups or individual agents. You can also enforce a single policy to allagents.
After you deploy the policies, agents use the location criteria you have set in theComputer Location screen (see Endpoint Location on page 14-2) to determine theirlocation and the policy to apply. Agents switch policies each time the location changes.

Using Device Control
9-3
Important
• By default, Device Control is disabled on all versions of Windows Server 2003,Windows Server 2008, and Windows Server 2012. Before enabling Device Control onthese server platforms, read the guidelines and best practices outlined in OfficeScanAgent Services on page 14-6.
• The types of devices that OfficeScan can monitor depends on whether the DataProtection license is activated. Data Protection is a separately licensed module andmust be activated before you can use it. For details about the Data Protection license,see Data Protection License on page 3-4.
TABLE 9-1. Device Types
DATA PROTECTIONACTIVATED
DATA PROTECTION NOTACTIVATED
Mobile Devices
Mobile devices Monitored Not monitored
Storage Devices
CD/DVD Monitored Monitored
Floppy disks Monitored Monitored
Network drives Monitored Monitored
USB storage devices Monitored Monitored
Non-storage Devices
Bluetooth adapters Monitored Not monitored
COM and LPT ports Monitored Not monitored
IEEE 1394 interface Monitored Not monitored
Imaging devices Monitored Not monitored
Infrared devices Monitored Not monitored
Modems Monitored Not monitored
PCMCIA card Monitored Not monitored
Print screen key Monitored Not monitored
Wireless NICs Monitored Not monitored
• For a list of supported device models, see the Data Protection Lists document at:
http://docs.trendmicro.com/en-us/enterprise/officescan.aspx

OfficeScan™ 11.0 Administrator’s Guide
9-4
Permissions for Storage DevicesDevice Control permissions for storage devices are used when you:
• Allow access to USB storage devices, CD/DVD, floppy disks, and network drives.You can grant full access to these devices or limit the level of access.
• Configure the list of approved USB storage devices. Device Control allows you toblock access to all USB storage devices, except those that have been added to thelist of approved devices. You can grant full access to the approved devices or limitthe level of access.
The following table lists the permissions for storage devices.
TABLE 9-2. Device Control Permissions for Storage Devices
PERMISSIONS FILES ON THE DEVICE INCOMING FILES
Full access Permitted operations: Copy,Move, Open, Save, Delete,Execute
Permitted operations: Save,Move, Copy
This means that a file can besaved, moved, and copied to thedevice.
Modify Permitted operations: Copy,Move, Open, Save, Delete
Prohibited operations: Execute
Permitted operations: Save,Move, Copy
Read and execute Permitted operations: Copy,Open, Execute
Prohibited operations: Save,Move, Delete
Prohibited operations: Save,Move, Copy
Read Permitted operations: Copy,Open
Prohibited operations: Save,Move, Delete, Execute
Prohibited operations: Save,Move, Copy
Using Device Control
9-5
PERMISSIONS FILES ON THE DEVICE INCOMING FILES
List device contentonly
Prohibited operations: Alloperations
The device and the files itcontains are visible to the user(for example, from WindowsExplorer).
Prohibited operations: Save,Move, Copy
Block
(available afterinstalling DataProtection)
Prohibited operations: Alloperations
The device and the files itcontains are not visible to theuser (for example, fromWindows Explorer).
Prohibited operations: Save,Move, Copy
The file-based scanning function in OfficeScan complements and may override thedevice permissions. For example, if the permission allows a file to be opened butOfficeScan detects that the file is infected with malware, a specific scan action will beperformed on the file to eliminate the malware. If the scan action is Clean, the file opensafter it is cleaned. However, if the scan action is Delete, the file is deleted.
TipDevice Control for Data Protection supports all 64-bit platforms. For UnauthorizedChange Prevention monitoring on systems that OfficeScan does not support, set the devicepermission to Block to limit access to these devices.
Advanced Permissions for Storage DevicesAdvanced permissions apply when you grant limited permissions to most storagedevices. The permission can be any of the following:
• Modify
• Read and execute
• Read
• List device content only

OfficeScan™ 11.0 Administrator’s Guide
9-6
You can keep the permissions limited but grant advanced permissions to certainprograms on the storage devices and on the local endpoint.
To define programs, configure the following program lists.
TABLE 9-3. Program Lists
PROGRAM LIST DESCRIPTION VALID INPUTS
Programs withread and writeaccess to devices
This list contains local programs andprograms on storage devices that have readand write access to the devices.
An example of a local program is MicrosoftWord (winword.exe), which is usually foundin C:\Program Files\Microsoft Office\Office. If the permission for USB storagedevices is "List device content only" but "C:\Program Files\Microsoft Office\Office\winword.exe" is included in thislist:
• A user will have read and write accessto any file on the USB storage devicethat is accessed from Microsoft Word.
• A user can save, move, or copy aMicrosoft Word file to the USB storagedevice.
Program path andname
For details, seeSpecifying aProgram Path andName on page9-8.
Programs ondevices that areallowed to execute
This list contains programs on storagedevices that users or the system canexecute.
For example, if you want to allow users toinstall software from a CD, add theinstallation program path and name, suchas "E:\Installer\Setup.exe", to this list.
Program path andname or DigitalSignature Provider
For details, seeSpecifying aProgram Path andName on page 9-8or Specifying aDigital SignatureProvider on page9-7.
There are instances when you need to add a program to both lists. Consider the datalock feature in a USB storage device, which, if enabled, prompts users for a valid user

Using Device Control
9-7
name and password before the device can be unlocked. The data lock feature uses aprogram on the device called "Password.exe", which must be allowed to execute sothat users can unlock the device successfully. "Password.exe" must also have readand write access to the device so that users can change the user name or password.
Each program list on the user interface can contain up to 100 programs. If you want toadd more programs to a program list, you will need to add them to the ofcscan.inifile, which can accommodate up to 1,000 programs. For instructions on addingprograms to the ofcscan.ini file, see Adding Programs to the Device Control Lists Usingofcscan.ini on page 9-15.
WARNING!Programs added to the ofcscan.ini file will be deployed to the root domain and willoverwrite programs on individual domains and agents.
Specifying a Digital Signature Provider
Specify a Digital Signature Provider if you trust programs issued by the provider. Forexample, type Microsoft Corporation or Trend Micro, Inc. You can obtain the Digital

OfficeScan™ 11.0 Administrator’s Guide
9-8
Signature Provider by checking the properties of a program (for example, by right-clicking the program and selecting Properties).
FIGURE 9-1. Digital Signature Provider for the OfficeScan agent program(PccNTMon.exe)
Specifying a Program Path and Name
A program path and name should have a maximum of 259 characters and must onlycontain alphanumeric characters (A-Z, a-z, 0-9). It is not possible to specify only theprogram name.
You can use wildcards in place of drive letters and program names. Use a question mark(?) to represent single-character data, such as a drive letter. Use an asterisk (*) torepresent multi-character data, such as a program name.

Using Device Control
9-9
NoteWildcards cannot be used to represent folder names. The exact name of a folder must bespecified.
Wildcards are used correctly in the following examples:
TABLE 9-4. Correct Usage of Wildcards
EXAMPLE MATCHED DATA
?:\Password.exe The "Password.exe" file located directly under anydrive
C:\Program Files\Microsoft\*.exe
Any file in C:\Program Files that has a file extension
C:\Program Files\*.* Any file in C:\Program Files that has a file extension
C:\Program Files\a?c.exe Any .exe file in C:\Program Files that has 3 charactersstarting with the letter "a" and ending with the letter "c"
C:\* Any file located directly under the C:\ drive, with orwithout file extensions
Wildcards are used incorrectly in the following examples:
TABLE 9-5. Incorrect Usage of Wildcards
EXAMPLE REASON
??:\Buffalo\Password.exe ?? represents two characters and drive letters onlyhave a single alphabetic character.
*:\Buffalo\Password.exe * represents multi-character data and drive letters onlyhave a single alphabetic character.
C:\*\Password.exe Wildcards cannot be used to represent folder names.The exact name of a folder must be specified.
C:\?\Password.exe

OfficeScan™ 11.0 Administrator’s Guide
9-10
Permissions for Non-storage DevicesYou can allow or block access to non-storage devices. There are no granular oradvanced permissions for these devices.
Managing Access to External Devices (Data ProtectionActivated)
Procedure
1. Navigate to Agents > Agent Management.
2. In the agent tree, click the root domain icon ( ) to include all agents or selectspecific domains or agents.
3. Click Settings > Device Control Settings.
4. Click the External Agents tab to configure settings for external agents or theInternal Agents tab to configure settings for internal agents.
5. Select Enable Device Control.
6. Apply settings as follows:
• If you are on the External Agents tab, you can apply settings to internalagents by selecting Apply all settings to internal agents.
• If you are on the Internal Agents tab, you can apply settings to externalagents by selecting Apply all settings to external agents.
7. Choose to allow or block the AutoRun function (autorun.inf) on USB storagedevices.
8. Configure settings for storage devices.
a. Select a permission for each storage device. For details about permissions, seePermissions for Storage Devices on page 9-4.
b. If the permission for USB storage devices is Block, configure a list ofapproved devices. Users can access these devices and you can control the

Using Device Control
9-11
level of access using permissions. See Configuring an Approved List of USBDevices on page 9-12.
9. For each non-storage device, select Allow or Block.
10. If you selected domain(s) or agent(s) in the agent tree, click Save. If you clicked theroot domain icon, choose from the following options:
• Apply to All Agents: Applies settings to all existing agents and to any newagent added to an existing/future domain. Future domains are domains notyet created at the time you configured the settings.
• Apply to Future Domains Only: Applies settings only to agents added tofuture domains. This option will not apply settings to new agents added to anexisting domain.
Configuring Advanced Permissions
Although you can configure advanced permissions and notifications for a specificstorage device on the user interface, the permissions and notifications are actuallyapplied to all storage devices. This means that when you click Advanced permissionsand notifications for CD/DVD, you are actually defining permissions and notificationsfor all storage devices.
NoteFor details about advanced permissions and how to correctly define programs withadvanced permissions, see Advanced Permissions for Storage Devices on page 9-5.
Procedure
1. Click Advanced permissions and notifications.
A new screen opens.
2. Below Programs with read and write access to storage devices, type a programpath and file name and then click Add.
Digital Signature Provider is not accepted.
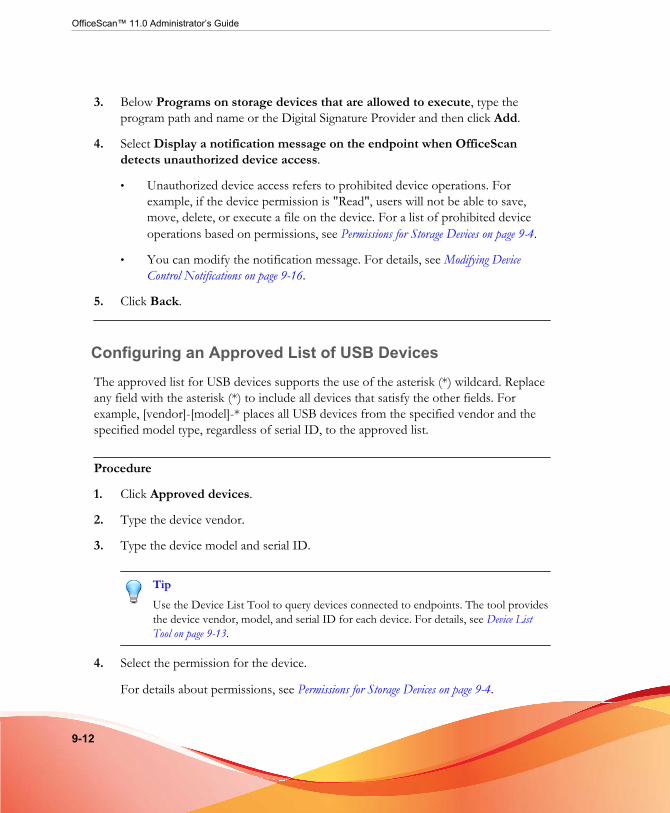
OfficeScan™ 11.0 Administrator’s Guide
9-12
3. Below Programs on storage devices that are allowed to execute, type theprogram path and name or the Digital Signature Provider and then click Add.
4. Select Display a notification message on the endpoint when OfficeScandetects unauthorized device access.
• Unauthorized device access refers to prohibited device operations. Forexample, if the device permission is "Read", users will not be able to save,move, delete, or execute a file on the device. For a list of prohibited deviceoperations based on permissions, see Permissions for Storage Devices on page 9-4.
• You can modify the notification message. For details, see Modifying DeviceControl Notifications on page 9-16.
5. Click Back.
Configuring an Approved List of USB DevicesThe approved list for USB devices supports the use of the asterisk (*) wildcard. Replaceany field with the asterisk (*) to include all devices that satisfy the other fields. Forexample, [vendor]-[model]-* places all USB devices from the specified vendor and thespecified model type, regardless of serial ID, to the approved list.
Procedure
1. Click Approved devices.
2. Type the device vendor.
3. Type the device model and serial ID.
TipUse the Device List Tool to query devices connected to endpoints. The tool providesthe device vendor, model, and serial ID for each device. For details, see Device ListTool on page 9-13.
4. Select the permission for the device.
For details about permissions, see Permissions for Storage Devices on page 9-4.
Using Device Control
9-13
5. To add more devices, click the plus (+) icon.
6. Click < Back.
Device List Tool
Run the Device List Tool locally on each endpoint to query external devices connectedto the endpoint. The tool scans an endpoint for external devices and then displaysdevice information in a browser window. You can then use the information whenconfiguring device settings for Data Loss Prevention and Device Control.
Running the Device List Tool
Procedure
1. On the OfficeScan server computer, go to \PCCSRV\Admin\Utility\ListDeviceInfo.
2. Copy listDeviceInfo.exe to the target endpoint.
3. On the endpoint, run the listDeviceInfo.exe.
4. View device information in the browser window that displays. Data LossPrevention and Device Control use the following information:
• Vendor (required)
• Model (optional)
• Serial ID (optional)
Managing Access to External Devices (Data ProtectionNot Activated)
Procedure
1. Go to Agents > Agent Management.

OfficeScan™ 11.0 Administrator’s Guide
9-14
2. In the agent tree, click the root domain icon ( ) to include all agents or selectspecific domains or agents.
3. Click Settings > Device Control Settings.
4. Click the External Agents tab to configure settings for external agents or theInternal Agents tab to configure settings for internal agents.
5. Select Enable Device Control.
6. Apply settings as follows:
• If you are on the External Agents tab, you can apply settings to internalagents by selecting Apply all settings to internal agents.
• If you are on the Internal Agents tab, you can apply settings to externalagents by selecting Apply all settings to external agents.
7. Choose to allow or block the AutoRun function (autorun.inf) on USB storagedevices.
8. Select a permission for each storage device. For details about permissions, seePermissions for Storage Devices on page 9-4.
9. Configure advanced permissions and notifications if the permission for a storagedevice is any of the following: Modify, Read and execute, Read, or List devicecontent only. See Configuring Advanced Permissions on page 9-11.
10. If you selected domain(s) or agent(s) in the agent tree, click Save. If you clicked theroot domain icon, choose from the following options:
• Apply to All Agents: Applies settings to all existing agents and to any newagent added to an existing/future domain. Future domains are domains notyet created at the time you configured the settings.
• Apply to Future Domains Only: Applies settings only to agents added tofuture domains. This option will not apply settings to new agents added to anexisting domain.

Using Device Control
9-15
Adding Programs to the Device Control Lists Usingofcscan.ini
NoteFor details about program lists and how to correctly define programs that can be added tothe lists, see Advanced Permissions for Storage Devices on page 9-5.
Procedure
1. On the OfficeScan server computer, go to <Server installation folder>\PCCSRV.
2. Open ofcscan.ini using a text editor.
3. To add programs with read and write access to storage devices:
a. Locate the following lines:
[DAC_APPROVED_LIST]
Count=x
b. Replace "x" with the number of programs in the program list.
c. Below "Count=x", add programs by typing the following:
Item<number>=<program path and name or Digital SignatureProvider>
For example:
[DAC_APPROVED_LIST]
Count=3
Item0=C:\Program Files\program.exe
Item1=?:\password.exe
Item2=Microsoft Corporation
4. To add programs on storage devices that are allowed to execute:
a. Locate the following lines:

OfficeScan™ 11.0 Administrator’s Guide
9-16
[DAC_EXECUTABLE_LIST]
Count=x
b. Replace "x" with the number of programs in the program list.
c. Below "Count=x", add programs by typing the following:
Item<number>=<program path and name or Digital SignatureProvider>
For example:
[DAC_EXECUTABLE_LIST]
Count=3
Item0=?:\Installer\Setup.exe
Item1=E:\*.exe
Item2=Trend Micro, Inc.
5. Save and close the ofcscan.ini file.
6. Open the OfficeScan web console and go to Agents > Global Agent Settings.
7. Click Save to deploy the program lists to all agents.
Modifying Device Control NotificationsNotification messages display on endpoints when Device Control violations occur.Administrators can modify the default notification message, if needed.
Procedure
1. Go to Administration > Notifications > Agent.
2. From the Type drop-down, select Device Control Violation.
3. Modify the default messages in the text box provided.

Using Device Control
9-17
4. Click Save.
Device Control LogsOfficeScan agents log unauthorized device access instances and send the logs to theserver. Any agent that runs continuously aggregates the logs and sends them after a 1-hour time period. Any agent that got restarted checks the last time the logs were sent tothe server. If the elapsed time exceeds 1 hour, the agent sends the logs immediately.
To keep the size of logs from occupying too much space on the hard disk, manuallydelete logs or configure a log deletion schedule. For more information about managinglogs, see Log Management on page 13-32.
Viewing Device Control Logs
NoteOnly attempts to access Storage Devices generate log data. OfficeScan agents block orallow access to Non-storage Devices as configured but do not log the action.
Procedure
1. Go to Logs > Agents > Security Risks or Agents > Agent Management.
2. In the agent tree, click the root domain icon ( ) to include all agents or selectspecific domains or agents.
3. Click Logs > Device Control Logs or View Logs > Device Control Logs.
4. Specify the log criteria and then click Display Logs.
5. View logs. Logs contain the following information:
• Date/Time unauthorized access was detected
• Endpoint where external device is connected or where network resource ismapped

OfficeScan™ 11.0 Administrator’s Guide
9-18
• Endpoint domain where external device is connected or where networkresource is mapped
• Device type or network resource accessed
• Target, which is the item on the device or network resource that was accessed
• Accessed by, which specifies where access was initiated
• Permissions set for the target
6. To save logs to a comma-separated value (CSV) file, click Export to CSV. Openthe file or save it to a specific location.

10-1
Chapter 10
Using Data Loss PreventionThis chapter discusses how to use the Data Loss Prevention feature.
Topics include:
• About Data Loss Prevention on page 10-2
• Data Loss Prevention Policies on page 10-3
• Data Identifier Types on page 10-5
• Data Loss Prevention Templates on page 10-18
• DLP Channels on page 10-23
• Data Loss Prevention Actions on page 10-34
• Data Loss Prevention Exceptions on page 10-36
• Data Loss Prevention Policy Configuration on page 10-41
• Data Loss Prevention Notifications on page 10-46
• Data Loss Prevention Logs on page 10-50

OfficeScan™ 11.0 Administrator’s Guide
10-2
About Data Loss PreventionTraditional security solutions are focused on preventing external security threats fromreaching the network. In today’s security environment, this is only half the story. Databreaches are now commonplace, exposing an organization’s confidential and sensitivedata – referred to as digital assets – to outside unauthorized parties. A data breach mayoccur as a result of internal employee mistakes or carelessness, data outsourcing, stolenor misplaced computing devices, or malicious attacks.
Data breaches can:
• Damage brand reputation
• Erode customer trust in the organization
• Result in unnecessary costs to cover for remediation and to pay fines for violatingcompliance regulations
• Lead to lost business opportunities and revenue when intellectual property is stolen
With the prevalence and damaging effects of data breaches, organizations now seedigital asset protection as a critical component of their security infrastructure.
Data Loss Prevention safeguards an organization’s sensitive data against accidental ordeliberate leakage. Data Loss Prevention allows you to:
• Identify the sensitive information that requires protection using data identifiers
• Create policies that limit or prevent the transmission of digital assets throughcommon transmission channels, such as email and external devices
• Enforce compliance to established privacy standards
Before you can monitor sensitive information for potential loss, you must be able toanswer the following questions:
• What data needs protection from unauthorized users?
• Where does the sensitive data reside?
• How is the sensitive data transmitted?
• What users are authorized to access or transmit the sensitive data?

Using Data Loss Prevention
10-3
• What action should be taken if a security violation occurs?
This important audit typically involves multiple departments and personnel familiar withthe sensitive information in your organization.
If you already defined your sensitive information and security policies, you can begin todefine data identifiers and company policies.
Data Loss Prevention PoliciesOfficeScan evaluates a file or data against a set of rules defined in DLP policies. Policiesdetermine files or data that requires protection from unauthorized transmission and theaction that OfficeScan performs after detecting a transmission.
Note
OfficeScan does not monitor data transmissions between the server and OfficeScan agents.
OfficeScan allows administrators to configure policies for internal and externalOfficeScan agents. Administrators typically configure a stricter policy for externalagents.
Administrators can enforce specific policies to agent groups or individual agents.
After deploying policies, agents use the location criteria set in the Endpoint Locationscreen (see Endpoint Location on page 14-2the OfficeScan Administrator’s Guide) todetermine the correct location settings and the policy to apply. Agents switch policieseach time the location changes.
Policy Configuration
Define DLP policies by configuring the following settings and deploying the settings toselected agents:
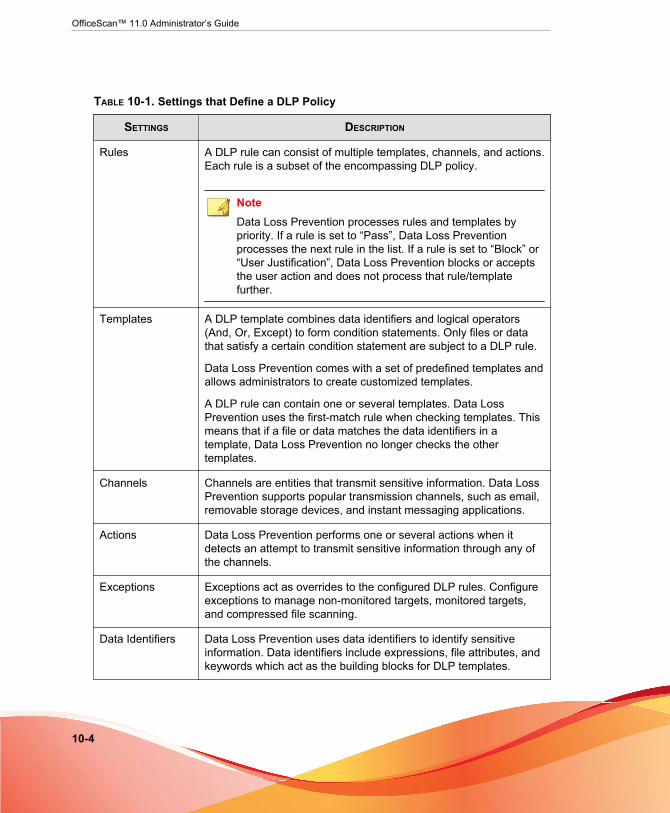
OfficeScan™ 11.0 Administrator’s Guide
10-4
TABLE 10-1. Settings that Define a DLP Policy
SETTINGS DESCRIPTION
Rules A DLP rule can consist of multiple templates, channels, and actions.Each rule is a subset of the encompassing DLP policy.
NoteData Loss Prevention processes rules and templates bypriority. If a rule is set to “Pass”, Data Loss Preventionprocesses the next rule in the list. If a rule is set to “Block” or“User Justification”, Data Loss Prevention blocks or acceptsthe user action and does not process that rule/templatefurther.
Templates A DLP template combines data identifiers and logical operators(And, Or, Except) to form condition statements. Only files or datathat satisfy a certain condition statement are subject to a DLP rule.
Data Loss Prevention comes with a set of predefined templates andallows administrators to create customized templates.
A DLP rule can contain one or several templates. Data LossPrevention uses the first-match rule when checking templates. Thismeans that if a file or data matches the data identifiers in atemplate, Data Loss Prevention no longer checks the othertemplates.
Channels Channels are entities that transmit sensitive information. Data LossPrevention supports popular transmission channels, such as email,removable storage devices, and instant messaging applications.
Actions Data Loss Prevention performs one or several actions when itdetects an attempt to transmit sensitive information through any ofthe channels.
Exceptions Exceptions act as overrides to the configured DLP rules. Configureexceptions to manage non-monitored targets, monitored targets,and compressed file scanning.
Data Identifiers Data Loss Prevention uses data identifiers to identify sensitiveinformation. Data identifiers include expressions, file attributes, andkeywords which act as the building blocks for DLP templates.

Using Data Loss Prevention
10-5
Data Identifier TypesDigital assets are files and data that an organization must protect against unauthorizedtransmission. You can define digital assets using the following data identifiers:
• Expressions: Data that has a certain structure. For details, see Expressions on page10-5.
• File attributes: File properties such as file type and file size. For details, see FileAttributes on page 10-10.
• Keyword lists: A list of special words or phrases. For details, see Keywords on page10-13.
Note
It is not possible to delete a data identifier that is being used in a DLP template. Delete thetemplate before deleting the data identifier.
Expressions
An expression is data that has a certain structure. For example, credit card numberstypically have 16 digits and appear in the format "nnnn-nnnn-nnnn-nnnn", making themsuitable for expression-based detections.
You can use predefined and customized expressions. For details, see PredefinedExpressions on page 10-5 and Customized Expressions on page 10-6.
Predefined Expressions
Data Loss Prevention comes with a set of predefined expressions. These expressionscannot be modified or deleted.
Data Loss Prevention verifies these expressions using pattern matching andmathematical equations. After Data Loss Prevention matches potentially sensitive datawith an expression, the data may also undergo additional verification checks.

OfficeScan™ 11.0 Administrator’s Guide
10-6
For a complete list of predefined expressions, see the Data Protection Lists document athttp://docs.trendmicro.com/en-us/enterprise/data-protection-reference-documents.aspx.
Viewing Settings for Predefined Expressions
Note
Predefined expressions cannot be modified or deleted.
Procedure
1. Go to Data Loss Prevention > Data Identifiers.
2. Click the Expression tab.
3. Click the expression name.
4. View settings in the screen that opens.
Customized Expressions
Create customized expressions if none of the predefined expressions meet yourrequirements.
Expressions are a powerful string-matching tool. Ensure that you are comfortable withexpression syntax before creating expressions. Poorly written expressions candramatically impact performance.
When creating expressions:
• Refer to the predefined expressions for guidance on how to define validexpressions. For example, if you are creating an expression that includes a date, youcan refer to the expressions prefixed with "Date".
• Note that Data Loss Prevention follows the expression formats defined in PerlCompatible Regular Expressions (PCRE). For more information on PCRE, visitthe following website:
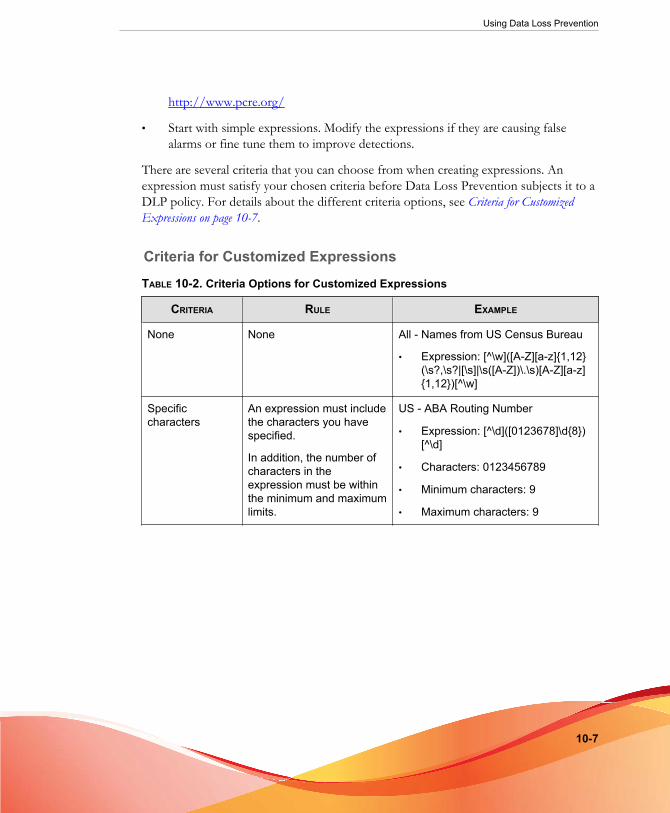
Using Data Loss Prevention
10-7
http://www.pcre.org/
• Start with simple expressions. Modify the expressions if they are causing falsealarms or fine tune them to improve detections.
There are several criteria that you can choose from when creating expressions. Anexpression must satisfy your chosen criteria before Data Loss Prevention subjects it to aDLP policy. For details about the different criteria options, see Criteria for CustomizedExpressions on page 10-7.
Criteria for Customized Expressions
TABLE 10-2. Criteria Options for Customized Expressions
CRITERIA RULE EXAMPLE
None None All - Names from US Census Bureau
• Expression: [^\w]([A-Z][a-z]{1,12}(\s?,\s?|[\s]|\s([A-Z])\.\s)[A-Z][a-z]{1,12})[^\w]
Specificcharacters
An expression must includethe characters you havespecified.
In addition, the number ofcharacters in theexpression must be withinthe minimum and maximumlimits.
US - ABA Routing Number
• Expression: [^\d]([0123678]\d{8})[^\d]
• Characters: 0123456789
• Minimum characters: 9
• Maximum characters: 9
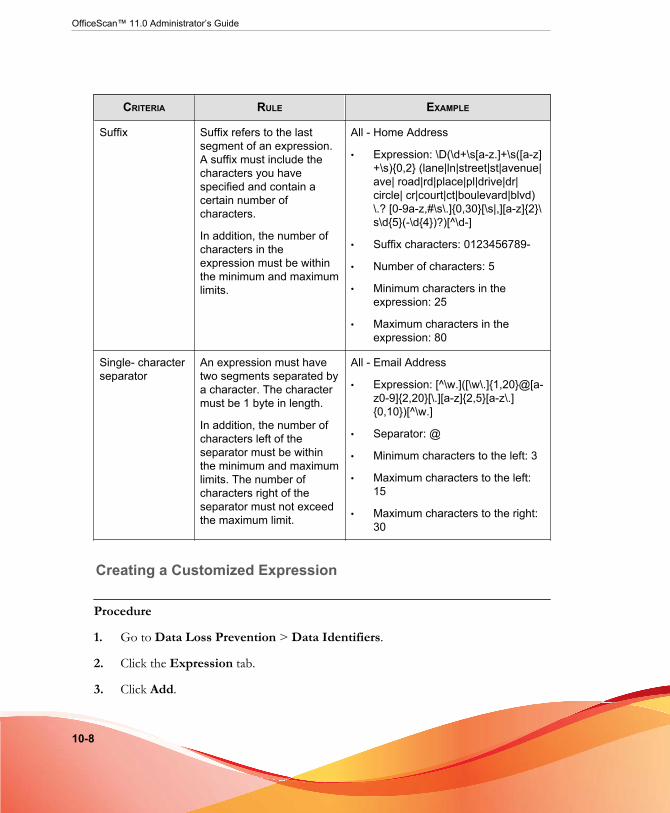
OfficeScan™ 11.0 Administrator’s Guide
10-8
CRITERIA RULE EXAMPLE
Suffix Suffix refers to the lastsegment of an expression.A suffix must include thecharacters you havespecified and contain acertain number ofcharacters.
In addition, the number ofcharacters in theexpression must be withinthe minimum and maximumlimits.
All - Home Address
• Expression: \D(\d+\s[a-z.]+\s([a-z]+\s){0,2} (lane|ln|street|st|avenue|ave| road|rd|place|pl|drive|dr|circle| cr|court|ct|boulevard|blvd)\.? [0-9a-z,#\s\.]{0,30}[\s|,][a-z]{2}\s\d{5}(-\d{4})?)[^\d-]
• Suffix characters: 0123456789-
• Number of characters: 5
• Minimum characters in theexpression: 25
• Maximum characters in theexpression: 80
Single- characterseparator
An expression must havetwo segments separated bya character. The charactermust be 1 byte in length.
In addition, the number ofcharacters left of theseparator must be withinthe minimum and maximumlimits. The number ofcharacters right of theseparator must not exceedthe maximum limit.
All - Email Address
• Expression: [^\w.]([\w\.]{1,20}@[a-z0-9]{2,20}[\.][a-z]{2,5}[a-z\.]{0,10})[^\w.]
• Separator: @
• Minimum characters to the left: 3
• Maximum characters to the left:15
• Maximum characters to the right:30
Creating a Customized Expression
Procedure
1. Go to Data Loss Prevention > Data Identifiers.
2. Click the Expression tab.
3. Click Add.

Using Data Loss Prevention
10-9
A new screen displays.
4. Type a name for the expression. The name must not exceed 100 bytes in lengthand cannot contain the following characters:
• > < * ^ | & ? \ /
5. Type a description that does not exceed 256 bytes in length.
6. Type the expression and specify whether it is case-sensitive.
7. Type the displayed data.
For example, if you are creating an expression for ID numbers, type a sample IDnumber. This data is used for reference purposes only and will not appearelsewhere in the product.
8. Choose one of the following criteria and configure additional settings for thechosen criteria (see Criteria for Customized Expressions on page 10-7):
• None
• Specific characters
• Suffix
• Single-character separator
9. Test the expression against an actual data.
For example, if the expression is for a national ID, type a valid ID number in theTest data text box, click Test, and then check the result.
10. Click Save if you are satisfied with the result.
NoteSave the settings only if the testing was successful. An expression that cannot detectany data wastes system resources and may impact performance.
11. A message appears, reminding you to deploy the settings to agents. Click Close.
12. Back in the DLP Data Identifiers screen, click Apply to All Agents.
OfficeScan™ 11.0 Administrator’s Guide
10-10
Importing Customized Expressions
Use this option if you have a properly-formatted .dat file containing the expressions.You can generate the file by exporting the expressions from either the server you arecurrently accessing or from another server.
Note
The .dat expression files generated by this Data Loss Prevention version are notcompatible with previous versions.
Procedure
1. Go to Data Loss Prevention > Data Identifiers.
2. Click the Expression tab.
3. Click Import and then locate the .dat file containing the expressions.
4. Click Open.
A message appears, informing you if the import was successful. If an expression tobe imported already exists, it will be skipped.
5. Click Apply to All Agents.
File Attributes
File attributes are specific properties of a file. You can use two file attributes whendefining data identifiers, namely, file type and file size. For example, a softwaredevelopment company may want to limit the sharing of the company’s software installerto the R&D department, whose members are responsible for the development andtesting of the software. In this case, the OfficeScan administrator can create a policy thatblocks the transmission of executable files that are 10 to 40MB in size to all departmentsexcept R&D.
By themselves, file attributes are poor identifiers of sensitive files. Continuing theexample in this topic, third-party software installers shared by other departments will
Using Data Loss Prevention
10-11
most likely be blocked. Trend Micro therefore recommends combining file attributeswith other DLP data identifiers for a more targeted detection of sensitive files.
For a complete list of supported file types see the Data Protection Lists document athttp://docs.trendmicro.com/en-us/enterprise/data-protection-reference-documents.aspx.
Creating a File Attribute List
Procedure
1. Go to Data Loss Prevention > Data Identifiers.
2. Click the File Attribute tab.
3. Click Add.
A new screen displays.
4. Type a name for the file attribute list. The name must not exceed 100 bytes inlength and cannot contain the following characters:
• > < * ^ | & ? \ /
5. Type a description that does not exceed 256 bytes in length.
6. Select your preferred true file types.
7. If a file type you want to include is not listed, select File extensions and then typethe file type’s extension. Data Loss Prevention checks files with the specifiedextension but does not check their true file types. Guidelines when specifying fileextensions:
• Each extension must start with an asterisk (*), followed by a period (.), andthen the extension. The asterisk is a wildcard, which represents a file’s actualname. For example, *.pol matches 12345.pol and test.pol.
• You can include wildcards in extensions. Use a question mark (?) to representa single character and an asterisk (*) to represent two or more characters. Seethe following examples:
- *.*m matches the following files: ABC.dem, ABC.prm, ABC.sdcm
OfficeScan™ 11.0 Administrator’s Guide
10-12
- *.m*r matches the following files: ABC.mgdr, ABC.mtp2r, ABC.mdmr
- *.fm? matches the following files: ABC.fme, ABC.fml, ABC.fmp
• Be careful when adding an asterisk at the end of an extension as this mightmatch parts of a file name and an unrelated extension. For example: *.do*matches abc.doctor_john.jpg and abc.donor12.pdf.
• Use semicolons (;) to separate file extensions. There is no need to add a spaceafter a semicolon.
8. Type the minimum and maximum file sizes in bytes. Both file sizes must be wholenumbers larger than zero.
9. Click Save.
10. A message appears, reminding you to deploy the settings to agents. Click Close.
11. Back in the DLP Data Identifiers screen, click Apply to All Agents.
Importing a File Attribute List
Use this option if you have a properly-formatted .dat file containing the file attributelists. You can generate the file by exporting the file attribute lists from either the serveryou are currently accessing or from another server.
Note
The .dat file attribute files generated by this Data Loss Prevention version are notcompatible with previous versions.
Procedure
1. Go to Data Loss Prevention > Data Identifiers.
2. Click the File Attribute tab.
3. Click Import and then locate the .dat file containing the file attribute lists.
4. Click Open.
Using Data Loss Prevention
10-13
A message appears, informing you if the import was successful. If a file attributelist to be imported already exists, it will be skipped.
5. Click Apply to All Agents.
KeywordsKeywords are special words or phrases. You can add related keywords to a keyword listto identify specific types of data. For example, "prognosis", "blood type", "vaccination",and "physician" are keywords that may appear in a medical certificate. If you want toprevent the transmission of medical certificate files, you can use these keywords in aDLP policy and then configure Data Loss Prevention to block files containing thesekeywords.
Commonly used words can be combined to form meaningful keywords. For example,"end", "read", "if", and "at" can be combined to form keywords found in source codes,such as "END-IF", "END-READ", and "AT END".
You can use predefined and customized keyword lists. For details, see Predefined KeywordLists on page 10-13 and Customized Keyword Lists on page 10-14.
Predefined Keyword ListsData Loss Prevention comes with a set of predefined keyword lists. These keyword listscannot be modified or deleted. Each list has its own built-in conditions that determine ifthe template should trigger a policy violation
For details about the predefined keyword lists in Data Loss Prevention, see the DataProtection Lists document at http://docs.trendmicro.com/en-us/enterprise/data-protection-reference-documents.aspx.
How Keyword Lists Work
Number of Keywords Condition
Each keyword list contains a condition that requires a certain number of keywords bepresent in a document before the list triggers a violation.

OfficeScan™ 11.0 Administrator’s Guide
10-14
The number of keywords condition contains the following values:
• All: All of the keywords in the list must be present in the document.
• Any: Any one of the keywords in the list must be present in the document.
• Specific number: There must be at least the specified number of keywords in thedocument. If there are more keywords in the document than the number specified,Data Loss Prevention triggers a violation.
Distance Condition
Some of the lists contain a “distance” condition to determine if a violation is present.“Distance” refers to the amount of characters between the first character of onekeyword and the first character of another keyword. Consider the following entry:
First Name:_John_ Last Name:_Smith_
The Forms - First Name, Last Name list has a “distance” condition of fifty (50) andthe commonly used form fields of “First Name” and “Last Name”. In the exampleabove, Data Loss Prevention triggers a violation as the number of characters betweenthe “F” in First Name and the “L” in Last Name is equal to eighteen (18).
For an example of an entry that does not trigger a violation, consider the following:
The first name of our new employee from Switzerland is John. His last name isSmith.
In this example, the number of characters between the “f” in “first name” and the “l” in“last name” is sixty-one (61). This exceeds the distance threshold and does not trigger aviolation.
Customized Keyword Lists
Create customized keyword lists if none of the predefined keyword lists meet yourrequirements.
There are several criteria that you can choose from when configuring a keyword list. Akeyword list must satisfy your chosen criteria before Data Loss Prevention subjects it toa policy. Choose one of the following criteria for each keyword list:

Using Data Loss Prevention
10-15
• Any keyword
• All keywords
• All keywords within <x> characters
• Combined score for keywords exceeds threshold
For details regarding the criteria rules, see Customized Keyword List Criteria on page 10-15.
Customized Keyword List Criteria
TABLE 10-3. Criteria for a Keyword List
CRITERIA RULE
Any keyword A file must contain at least one keyword in the keyword list.
All keywords A file must contain all the keywords in the keyword list.
All keywordswithin <x>characters
A file must contain all the keywords in the keyword list. In addition,each keyword pair must be within <x> characters of each other.
For example, your 3 keywords are WEB, DISK, and USB and thenumber of characters you specified is 20.
If Data Loss Prevention detects all keywords in the order DISK, WEB,and USB, the number of characters from the "D" (in DISK) to the "W"(in WEB) and from the "W" to the "U" (in USB) must be 20 characters orless.
The following data matches the criteria:DISK####WEB############USB
The following data does not match the criteria:DISK*******************WEB****USB(23 characters between "D" and"W")
When deciding on the number of characters, remember that a smallnumber, such as 10, usually results in a faster scanning time but onlycovers a relatively small area. This may reduce the likelihood ofdetecting sensitive data, especially in large files. As the numberincreases, the area covered also increases but scanning time might beslower.

OfficeScan™ 11.0 Administrator’s Guide
10-16
CRITERIA RULE
Combinedscore forkeywordsexceedsthreshold
A file must contain one or more keywords in the keyword list. If onlyone keyword was detected, its score must be higher than the threshold.If there are several keywords, their combined score must be higherthan the threshold.
Assign each keyword a score of 1 to 10. A highly confidential word orphrase, such as "salary increase" for the Human Resourcesdepartment, should have a relatively high score. Words or phrases that,by themselves, do not carry much weight can have lower scores.
Consider the scores that you assigned to the keywords whenconfiguring the threshold. For example, if you have five keywords andthree of those keywords are high priority, the threshold can be equal toor lower than the combined score of the three high priority keywords.This means that the detection of these three keywords is enough totreat the file as sensitive.
Creating a Keyword List
Procedure
1. Go to Data Loss Prevention > Data Identifiers.
2. Click the Keyword tab.
3. Click Add.
A new screen displays.
4. Type a name for the keyword list. The name must not exceed 100 bytes in lengthand cannot contain the following characters:
• > < * ^ | & ? \ /
5. Type a description that does not exceed 256 bytes in length.
6. Choose one of the following criteria and configure additional settings for thechosen criteria:
• Any keyword
• All keywords

Using Data Loss Prevention
10-17
• All keywords within <x> characters
• Combined score for keywords exceeds threshold
7. To manually add keywords to the list:
a. Type a keyword that is 3 to 40 bytes in length and specify whether it is case-sensitive.
b. Click Add.
8. To add keywords by using the "import" option:
NoteUse this option if you have a properly-formatted .csv file containing the keywords.You can generate the file by exporting the keywords from either the server you arecurrently accessing or from another server.
a. Click Import and then locate the .csv file containing the keywords.
b. Click Open.
A message appears, informing you if the import was successful. If a keywordto be imported already exists in the list, it will be skipped.
9. To delete keywords, select the keywords and click Delete.
10. To export keywords:
NoteUse the "export" feature to back up the keywords or to import them to anotherserver. All keywords in the keyword list will be exported. It is not possible to exportindividual keywords.
a. Click Export.
b. Save the resulting .csv file to your preferred location.
11. Click Save.
12. A message appears, reminding you to deploy the settings to agents. Click Close.

OfficeScan™ 11.0 Administrator’s Guide
10-18
13. Back in the DLP Data Identifiers screen, click Apply to All Agents.
Importing a Keyword List
Use this option if you have a properly-formatted .dat file containing the keyword lists.You can generate the file by exporting the keyword lists from either the server you arecurrently accessing or from another server.
NoteThe .dat keyword list files generated by this Data Loss Prevention version are notcompatible with previous versions.
Procedure
1. Go to Data Loss Prevention > Data Identifiers.
2. Click the Keyword tab.
3. Click Import and then locate the .dat file containing the keyword lists.
4. Click Open.
A message appears, informing you if the import was successful. If a keyword list tobe imported already exists, it will be skipped.
5. Click Apply to All Agents.
Data Loss Prevention TemplatesA DLP template combines DLP data identifiers and logical operators (And, Or, Except)to form condition statements. Only files or data that satisfy a certain conditionstatement will be subject to a DLP policy.
For example, a file must be a Microsoft Word file (file attribute) AND must containcertain legal terms (keywords) AND must contain ID numbers (expressions) for it to besubject to the "Employment Contracts" policy. This policy allows Human Resources

Using Data Loss Prevention
10-19
personnel to transmit the file through printing so that the printed copy can be signed byan employee. Transmission through all other possible channels, such as email, isblocked.
You can create your own templates if you have configured DLP data identifiers. Youcan also use predefined templates. For details, see Customized DLP Templates on page10-19 and Predefined DLP Templates on page 10-19.
Note
It is not possible to delete a template that is being used in a DLP policy. Remove thetemplate from the policy before deleting it.
Predefined DLP Templates
Data Loss Prevention comes with the following set of predefined templates that you canuse to comply with various regulatory standards. These templates cannot be modified ordeleted.
• GLBA: Gramm-Leach-Billey Act
• HIPAA: Health Insurance Portability and Accountability Act
• PCI-DSS: Payment Card Industry Data Security Standard
• SB-1386: US Senate Bill 1386
• US PII: United States Personally Identifiable Information
For a detailed list on the purposes of all predefined templates, and examples of databeing protected, see the Data Protection Lists document at http://docs.trendmicro.com/en-us/enterprise/data-protection-reference-documents.aspx.
Customized DLP Templates
Create your own templates if you have configured data identifiers. A template combinesdata identifiers and logical operators (And, Or, Except) to form condition statements.

OfficeScan™ 11.0 Administrator’s Guide
10-20
For more information and examples on how condition statements and logical operatorswork, see Condition Statements and Logical Operators on page 10-20.
Condition Statements and Logical Operators
Data Loss Prevention evaluates condition statements from left to right. Use logicaloperators carefully when configuring condition statements. Incorrect usage leads to anerroneous condition statement that will likely produce unexpected results.
See the examples in the following table.
TABLE 10-4. Sample Condition Statements
CONDITION STATEMENT INTERPRETATION AND EXAMPLE
[Data Identifier1] And [DataIdentifier 2] Except [DataIdentifier 3]
A file must satisfy [Data Identifier 1] and [Data Identifier 2]but not [Data Identifier 3].
For example:
A file must be [an Adobe PDF document] and must contain[an email address] but should not contain [all of thekeywords in the keyword list].
[Data Identifier 1] Or [DataIdentifier 2]
A file must satisfy [Data Identifier 1] or [Data Identifier 2].
For example:
A file must be [an Adobe PDF document] or [a MicrosoftWord document].
Except [Data Identifier 1] A file must not satisfy [Data Identifier 1].
For example:
A file must not be [a multimedia file].
As the last example in the table illustrates, the first data identifier in the conditionstatement can have the "Except" operator if a file must not satisfy all of the dataidentifiers in the statement. In most cases, however, the first data identifier does nothave an operator.

Using Data Loss Prevention
10-21
Creating a Template
Procedure
1. Go to Data Loss Prevention > DLP Templates.
2. Click Add.
A new screen displays.
3. Type a name for the template. The name must not exceed 100 bytes in length andcannot contain the following characters:
• > < * ^ | & ? \ /
4. Type a description that does not exceed 256 bytes in length.
5. Select data identifiers and then click the "add" icon.
When selecting definitions:
• Select multiple entries by pressing and holding the CTRL key and thenselecting the data identifiers.
• Use the search feature if you have a specific definition in mind. You can typethe full or partial name of the data identifier.
• Each template can contain a maximum of 40 data identifiers.
6. To create a new expression, click Expressions and then click Add newexpression. In the screen that appears, configure settings for the expression.
7. To create a new file attribute list, click File attributes and then click Add new fileattribute. In the screen that appears, configure settings for the file attribute list.
8. To create a new keyword list, click Keywords and then click Add new keyword.In the screen that appears, configure settings for the keyword list.
9. If you selected an expression, type the number of occurrences, which is thenumber of times an expression must occur before Data Loss Prevention subjects itto a policy.
10. Choose a logical operator for each definition.

OfficeScan™ 11.0 Administrator’s Guide
10-22
NoteUse logical operators carefully when configuring condition statements. Incorrectusage leads to an erroneous condition statement that will likely produce unexpectedresults. For examples of correct usage, see Condition Statements and Logical Operators onpage 10-20.
11. To remove a data identifier from the list of selected identifiers, click the trash binicon.
12. Below Preview, check the condition statement and make changes if this is not yourintended statement.
13. Click Save.
14. A message appears, reminding you to deploy the settings to agents. Click Close.
15. Back in the DLP Templates screen, click Apply to All Agents.
Importing TemplatesUse this option if you have a properly-formatted .dat file containing the templates.You can generate the file by exporting the templates from either the server you arecurrently accessing or from another server.
NoteTo import DLP templates from OfficeScan 10.6, import the associated data identifiers(previously named Definitions) first. Data Loss Prevention cannot import templates thatare missing their associated data identifiers.
Procedure
1. Go to Data Loss Prevention > DLP Templates.
2. Click Import and then locate the .dat file containing the templates.
3. Click Open.
A message appears, informing you if the import was successful. If a template to beimported already exists, it will be skipped.

Using Data Loss Prevention
10-23
4. Click Apply to All Agents.
DLP ChannelsUsers can transmit sensitive information through various channels. OfficeScan canmonitor the following channels:
• Network channels: Sensitive information is transmitted using network protocols,such as HTTP and FTP.
• System and application channels: Sensitive information is transmitted using alocal endpoint’s applications and peripherals.
Network Channels
OfficeScan can monitor data transmission through the following network channels:
• Email clients
• FTP
• HTTP and HTTPS
• IM Applications
• SMB protocol
• Webmail
To determine data transmissions to monitor, OfficeScan checks the transmission scope,which you need to configure. Depending on the scope that you selected, OfficeScan willmonitor all data transmissions or only transmissions outside the Local Area Network(LAN). For details about transmission scope, see Transmission Scope and Targets for NetworkChannels on page 10-27.
OfficeScan™ 11.0 Administrator’s Guide
10-24
Email Clients
OfficeScan monitors email transmitted through various email agents. OfficeScan checksthe email’s subject, body, and attachments for data identifiers. For a list of supportedemail agents, see the Data Protection Lists document at:
http://docs.trendmicro.com/en-us/enterprise/officescan.aspx
Monitoring occurs when a user attempts to send the email. If the email contains dataidentifiers, OfficeScan will either allow or block the email.
You can define monitored and non-monitored internal email domains.
• Monitored email domains: When OfficeScan detects email transmitted to amonitored domain, it checks the action for the policy. Depending on the action,the transmission is allowed or blocked.
Note
If you select email agents as a monitored channel, an email must match a policy for itto be monitored. In contrast, an email sent to monitored email domains isautomatically monitored, even if it does not match a policy.
• Non-monitored email domains: OfficeScan immediately allows the transmissionof emails sent to non-monitored domains.
Note
Data transmissions to non-monitored email domains and to monitored emaildomains where "Monitor" is the action are similar in that the transmission is allowed.The only difference is that for non-monitored email domains, OfficeScan does notlog the transmission, whereas for monitored email domains, the transmission isalways logged.
Specify domains using any of the following formats, separating multiple domains withcommas:
• X400 format, such as /O=Trend/OU=USA, /O=Trend/OU=China
• Email domains, such as example.com
Using Data Loss Prevention
10-25
For email messages sent through the SMTP protocol, OfficeScan checks if the targetSMTP server is on the following lists:
1. Monitored targets
2. Non-monitored targets
NoteFor details about monitored and non-monitored targets, see Defining Non-monitored andMonitored Targets on page 10-36.
3. Monitored email domains
4. Non-monitored email domains
This means that if an email is sent to an SMTP server on the monitored targets list, theemail is monitored. If the SMTP server is not on the monitored targets list, OfficeScanchecks the other lists.
For emails sent through other protocols, OfficeScan only checks the following lists:
1. Monitored email domains
2. Non-monitored email domains
FTPWhen OfficeScan detects that an FTP client is attempting to upload files to an FTPserver, it checks for the presence of data identifiers in the files. No file has beenuploaded at this point. Depending on the DLP policy, OfficeScan will allow or block theupload.
When you configure a policy that blocks file uploads, remember the following:
• When OfficeScan blocks an upload, some FTP clients will try to re-upload the files.In this case, OfficeScan terminates the FTP client to prevent the re-upload. Usersdo not receive a notification after the FTP client terminates. Inform them of thissituation when you roll out your DLP policies.
• If a file to be uploaded will overwrite a file on the FTP server, the file on the FTPserver may be deleted.

OfficeScan™ 11.0 Administrator’s Guide
10-26
For a list of supported FTP clients, see the Data Protection Lists document at:
http://docs.trendmicro.com/en-us/enterprise/officescan.aspx
HTTP and HTTPS
OfficeScan monitors data to be transmitted through HTTP and HTTPS. For HTTPS,OfficeScan checks the data before it is encrypted and transmitted.
For a list of supported web browsers and applications, see the Data Protection Listsdocument at:
http://docs.trendmicro.com/en-us/enterprise/officescan.aspx
IM Applications
OfficeScan monitors messages and files that users send through instant messaging (IM)applications. Messages and files that users receive are not monitored.
For a list of supported IM applications, see the Data Protection Lists document at:
http://docs.trendmicro.com/en-us/enterprise/officescan.aspx
When OfficeScan blocks a message or file sent through AOL Instant Messenger, MSN,Windows Messenger, or Windows Live Messenger, it also terminates the application. IfOfficeScan does not do this, the application will become unresponsive and users will beforced to terminate the application anyway. Users do not receive a notification after theapplication terminates. Inform them of this situation when you roll out your DLPpolicies.
SMB Protocol
OfficeScan monitors data transmissions through the Server Message Block (SMB)protocol, which facilitates shared file access. When another user attempts to copy orread a user’s shared file, OfficeScan checks if the file is or contains a data identifier andthen allows or blocks the operation.
Using Data Loss Prevention
10-27
Note
The Device Control action has a higher priority than the DLP action. For example, ifDevice Control does not allow files on mapped network drives to be moved, transmissionof sensitive data does not proceed even if DLP allows it. For details on Device Controlactions, see Permissions for Storage Devices on page 9-4.
For a list of applications that OfficeScan monitors for shared file access, see the DataProtection Lists document at:
http://docs.trendmicro.com/en-us/enterprise/officescan.aspx
Webmail
Web-based email services transmit data through HTTP. If OfficeScan detects outgoingdata from supported services, it checks the data for the presence of data identifiers.
For a list of supported web-based email services, see the Data Protection Lists documentat:
http://docs.trendmicro.com/en-us/enterprise/officescan.aspx
Transmission Scope and Targets for Network ChannelsTransmission scope and targets define data transmissions on network channels thatOfficeScan must monitor. For transmissions that should be monitored, OfficeScanchecks for the presence of data identifiers before allowing or blocking the transmission.For transmissions that should not be monitored, OfficeScan does not check for thepresence of data identifiers and immediately allows the transmission.
Transmission Scope: All Transmissions
OfficeScan monitors data transmitted outside the host computer.
Note
Trend Micro recommends choosing this scope for external agents.
OfficeScan™ 11.0 Administrator’s Guide
10-28
If you do not want to monitor data transmissions to certain targets outside the hostcomputer, define the following:
• Non-monitored targets: OfficeScan does not monitor data transmitted to thesetargets.
Note
Data transmissions to non-monitored targets and to monitored targets where"Monitor" is the action are similar in that the transmission is allowed. The onlydifference is that for non-monitored targets, OfficeScan does not log thetransmission, whereas for monitored targets, the transmission is always logged.
• Monitored targets: These are specific targets within the non-monitored targetsthat should be monitored. Monitored targets are:
• Optional if you defined non-monitored targets.
• Not configurable if you did not define non-monitored targets.
For example:
The following IP addresses are assigned to your company’s Legal Department:
• 10.201.168.1 to 10.201.168.25
You are creating a policy that monitors the transmission of Employment Certificates toall employees except the Legal Department’s full time staff. To do this, you would selectAll transmissions as the transmission scope and then:
Option 1:
1. Add 10.201.168.1-10.201.168.25 to the non-monitored targets.
2. Add the IP addresses of the Legal Department’s part-time staff to the monitoredtargets. Assume that there are 3 IP addresses, 10.201.168.21-10.201.168.23.
Option 2:
Add the IP addresses of the Legal Department’s full time staff to the non-monitoredtargets:
• 10.201.168.1-10.201.168.20

Using Data Loss Prevention
10-29
• 10.201.168.24-10.201.168.25
For guidelines on defining monitored and non-monitored targets, see Defining Non-monitored and Monitored Targets on page 10-36.
Transmission Scope: Only Transmissions Outside the LocalArea Network
OfficeScan monitors data transmitted to any target outside the Local Area Network(LAN).
Note
Trend Micro recommends choosing this scope for internal agents.
"Network" refers to the company or local network. This includes the current network(IP address of the endpoint and netmask) and the following standard private IPaddresses:
• Class A: 10.0.0.0 to 10.255.255.255
• Class B: 172.16.0.0 to 172.31.255.255
• Class C: 192.168.0.0 to 192.168.255.255
If you select this transmission scope, you can define the following:
• Non-monitored targets: Define targets outside the LAN that you consider safeand therefore should not be monitored.
Note
Data transmissions to non-monitored targets and to monitored targets where"Monitor" is the action are similar in that the transmission is allowed. The onlydifference is that for non-monitored targets, OfficeScan does not log thetransmission, whereas for monitored targets, the transmission is always logged.
• Monitored targets: Define targets within the LAN that you want to monitor.

OfficeScan™ 11.0 Administrator’s Guide
10-30
For guidelines on defining monitored and non-monitored targets, see Defining Non-monitored and Monitored Targets on page 10-36.
Resolving Conflicts
If settings for transmission scope, monitored targets, and non-monitored targetsconflict, OfficeScan recognizes the following priorities, in order of highest priority tolowest:
• Monitored targets
• Non-monitored targets
• Transmission scope
System and Application Channels
OfficeScan can monitor the following system and application channels:
• Cloud storage
• Data recorders (CD/DVD)
• Peer-to-peer applications
• PGP Encryption
• Printer
• Removable storage
• Synchronization software (ActiveSync)
• Windows clipboard
Cloud Storage
OfficeScan monitors files that users access using cloud storage sources. For a list ofsupported cloud storage sources, see the Data Protection Lists document at:
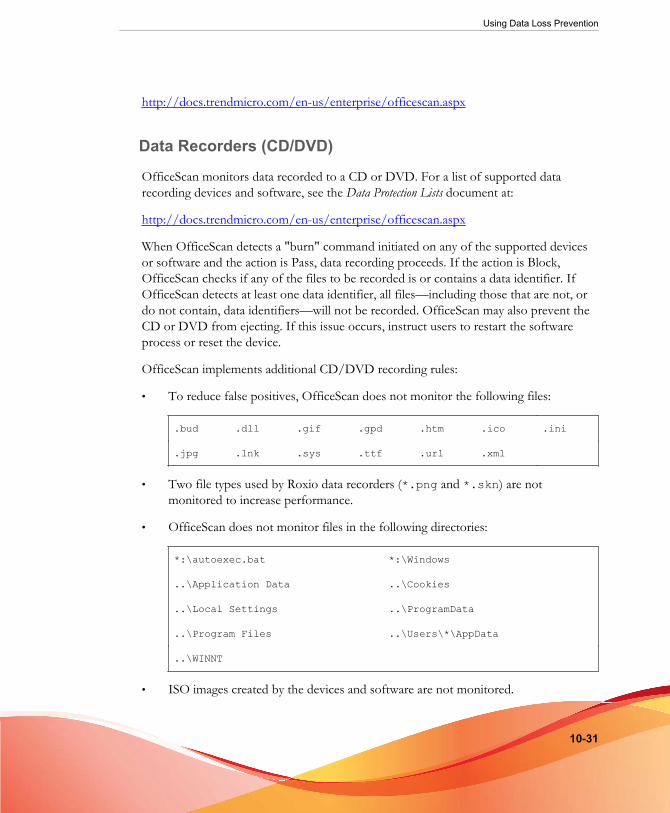
Using Data Loss Prevention
10-31
http://docs.trendmicro.com/en-us/enterprise/officescan.aspx
Data Recorders (CD/DVD)
OfficeScan monitors data recorded to a CD or DVD. For a list of supported datarecording devices and software, see the Data Protection Lists document at:
http://docs.trendmicro.com/en-us/enterprise/officescan.aspx
When OfficeScan detects a "burn" command initiated on any of the supported devicesor software and the action is Pass, data recording proceeds. If the action is Block,OfficeScan checks if any of the files to be recorded is or contains a data identifier. IfOfficeScan detects at least one data identifier, all files—including those that are not, ordo not contain, data identifiers—will not be recorded. OfficeScan may also prevent theCD or DVD from ejecting. If this issue occurs, instruct users to restart the softwareprocess or reset the device.
OfficeScan implements additional CD/DVD recording rules:
• To reduce false positives, OfficeScan does not monitor the following files:
.bud .dll .gif .gpd .htm .ico .ini
.jpg .lnk .sys .ttf .url .xml
• Two file types used by Roxio data recorders (*.png and *.skn) are notmonitored to increase performance.
• OfficeScan does not monitor files in the following directories:
*:\autoexec.bat *:\Windows
..\Application Data ..\Cookies
..\Local Settings ..\ProgramData
..\Program Files ..\Users\*\AppData
..\WINNT
• ISO images created by the devices and software are not monitored.

OfficeScan™ 11.0 Administrator’s Guide
10-32
Peer-to-Peer ApplicationsOfficeScan monitors files that users share through peer-to-peer applications.
For a list of supported peer-to-peer applications, see the Data Protection Lists documentat:
http://docs.trendmicro.com/en-us/enterprise/officescan.aspx
PGP EncryptionOfficeScan monitors data to be encrypted by PGP encryption software. OfficeScanchecks the data before encryption proceeds.
For a list of supported PGP encryption software, see the Data Protection Lists documentat:
http://docs.trendmicro.com/en-us/enterprise/officescan.aspx
PrinterOfficeScan monitors printer operations initiated from various applications.
OfficeScan does not block printer operations on new files that have not been savedbecause printing information has only been stored in the memory at this point.
For a list of supported applications that can initiate printer operations, see the DataProtection Lists document at:
http://docs.trendmicro.com/en-us/enterprise/officescan.aspx
Removable StorageOfficeScan monitors data transmissions to or within removable storage devices.Activities related to data transmission include:
• Creation of a file within the device
• Copying of a file from the host machine to the device
• Closing of a modified file within the device

Using Data Loss Prevention
10-33
• Modifying of file information (such as the file’s extension) within the device
When a file to be transmitted contains a data identifier, OfficeScan either blocks orallows the transmission.
Note
The Device Control action has a higher priority than the DLP action. For example, IfDevice Control does not allow copying of files to a removable storage device, transmissionof sensitive information does not proceed even if DLP allows it. For details on DeviceControl actions, see Permissions for Storage Devices on page 9-4.
For a list of supported removable storage devices and applications that facilitate datatransmission activities, see the Data Protection Lists document at:
http://docs.trendmicro.com/en-us/enterprise/officescan.aspx
The handling of file transmission to a removable storage device is a straightforwardprocess. For example, a user who creates a file from Microsoft Word may want to savethe file to an SD card (it does not matter which file type the user saves the file as). If thefile contains a data identifier that should not be transmitted, OfficeScan prevents the filefrom being saved.
For file transmission within the device, OfficeScan first backs up the file (if its size is75MB or less) to %WINDIR%\system32\dgagent\temp before processing it.OfficeScan removes the backup file if it allowed the file transmission. If OfficeScanblocked the transmission, it is possible that the file may have been deleted in theprocess. In this case, OfficeScan will copy the backup file to the folder containing theoriginal file.
OfficeScan allows you to define exceptions. OfficeScan always allows data transmissionsto or within these devices. Identify devices by their vendors and optionally provide thedevice models and serial IDs.
Tip
Use the Device List Tool to query devices connected to endpoints. The tool provides thedevice vendor, model, and serial ID for each device. For details, see Device List Tool on page9-13.

OfficeScan™ 11.0 Administrator’s Guide
10-34
Synchronization Software (ActiveSync)
OfficeScan monitors data transmitted to a mobile device through synchronizationsoftware.
For a list of supported synchronization software, see the Data Protection Lists documentat:
http://docs.trendmicro.com/en-us/enterprise/officescan.aspx
If the data has a source IP address of 127.0.0.1 and is sent through either port 990 or5678 (the ports used for synchronization), OfficeScan checks if the data is a dataidentifier before allowing or blocking its transmission.
When OfficeScan blocks a file transmitted on port 990, a file of the same namecontaining malformed characters may still be created at the destination folder on themobile device. This is because parts of the file have been copied to the device beforeOfficeScan blocked the transmission.
Windows Clipboard
OfficeScan monitors data to be transmitted to Windows clipboard before allowing orblocking the transmission.
OfficeScan can also monitor clipboard activities between the host machine andVMWare or Remote Desktop. Monitoring occurs on the entity with the OfficeScanagent. For example, the OfficeScan agent on a VMware virtual machine can preventclipboard data on the virtual machine from being transmitted to the host machine.Similarly, a host machine with the OfficeScan agent may not copy clipboard data to anendpoint accessed through Remote Desktop.
Data Loss Prevention ActionsWhen Data Loss Prevention detects the transmission of data identifiers, it checks theDLP policy for the detected data identifiers and performs the action configured for thepolicy.
The following table lists the Data Loss Prevention actions.
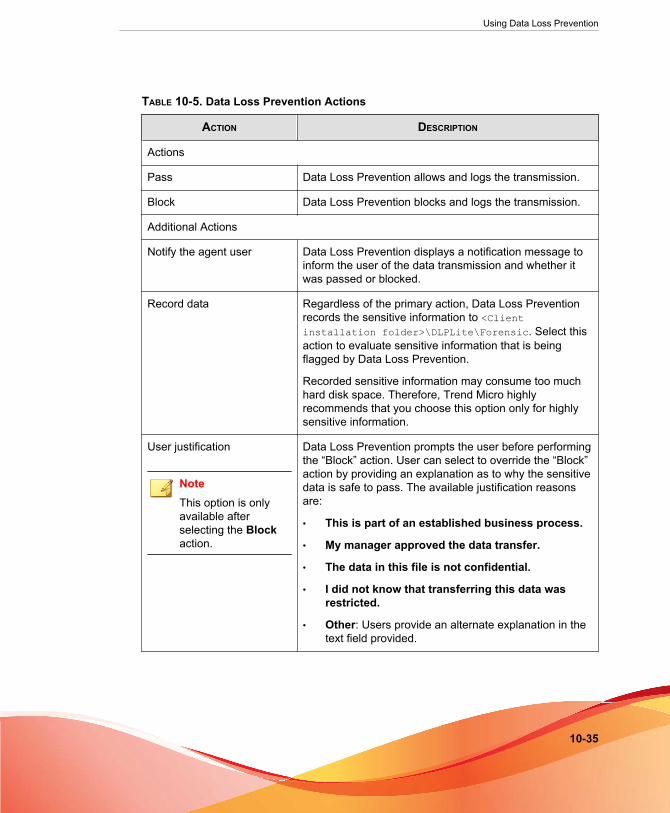
Using Data Loss Prevention
10-35
TABLE 10-5. Data Loss Prevention Actions
ACTION DESCRIPTION
Actions
Pass Data Loss Prevention allows and logs the transmission.
Block Data Loss Prevention blocks and logs the transmission.
Additional Actions
Notify the agent user Data Loss Prevention displays a notification message toinform the user of the data transmission and whether itwas passed or blocked.
Record data Regardless of the primary action, Data Loss Preventionrecords the sensitive information to <Clientinstallation folder>\DLPLite\Forensic. Select thisaction to evaluate sensitive information that is beingflagged by Data Loss Prevention.
Recorded sensitive information may consume too muchhard disk space. Therefore, Trend Micro highlyrecommends that you choose this option only for highlysensitive information.
User justification
NoteThis option is onlyavailable afterselecting the Blockaction.
Data Loss Prevention prompts the user before performingthe “Block” action. User can select to override the “Block”action by providing an explanation as to why the sensitivedata is safe to pass. The available justification reasonsare:
• This is part of an established business process.
• My manager approved the data transfer.
• The data in this file is not confidential.
• I did not know that transferring this data wasrestricted.
• Other: Users provide an alternate explanation in thetext field provided.

OfficeScan™ 11.0 Administrator’s Guide
10-36
Data Loss Prevention ExceptionsDLP exceptions apply to the entire policy, including all rules defined within the policy.Data Loss Prevention applies the exception settings to all transmissions before scanningfor digital assets. If a transmission matches one of the exception rules, Data LossPrevention immediately allows or scans the transmission depending on the exceptiontype.
Defining Non-monitored and Monitored TargetsDefine the non-monitored and monitored targets based on the transmission scopeconfigured on the Channel tab. For details on how to define non-monitored andmonitored targets for All transmissions, see Transmission Scope: All Transmissions on page10-27. For details on how to define non-monitored and monitored targets for Onlytransmissions outside the Local Area Network, see Transmission Scope: OnlyTransmissions Outside the Local Area Network on page 10-29.
Follow these guidelines when defining monitored and non-monitored targets:
1. Define each target by:
• IP address
• Host name
• FQDN
• Network address and subnet mask, such as 10.1.1.1/32
Note
For the subnet mask, Data Loss Prevention only supports a classless inter-domainrouting (CIDR) type port. That means that you can only type a number like 32instead of 255.255.255.0.
2. To target specific channels, include the default or company-defined port numbersfor those channels. For example, port 21 is typically for FTP traffic, port 80 forHTTP, and port 443 for HTTPS. Use a colon to separate the target from the portnumbers.
Using Data Loss Prevention
10-37
3. You can also include port ranges. To include all ports, ignore the port range.
Below are some examples of targets with port numbers and port ranges:
• 10.1.1.1:80
• host:5-20
• host.domain.com:20
• 10.1.1.1/32:20
4. Separate targets with commas.
Decompression RulesFiles contained in compressed files can be scanned for digital assets. To determine thefiles to scan, Data Loss Prevention subjects a compressed file to the following rules:
• Size of a decompressed file exceeds: __ MB (1-512MB)
• Compression layers exceed: __ (1-20)
• Number of files to scan exceeds: __ (1-2000)
Rule 1: Maximum Size of a Decompressed File
A compressed file – upon decompression – must meet the specified limit.
Example: You set the limit to 20MB.
Scenario 1: If the size of archive.zip upon decompression is 30MB, none of the filescontained in archive.zip will be scanned. The other two rules are no longer checked.
Scenario 2: If the size of my_archive.zip upon decompression is 10MB:
• If my_archive.zip does not contain compressed files, OfficeScan skips Rule 2and proceeds to Rule 3.
• If my_archive.zip contains compressed files, the size of all decompressed filesmust be within the limit. For example, if my_archive.zip contains AAA.rar,BBB.zip and EEE.zip, and EEE.zip contains 222.zip:

OfficeScan™ 11.0 Administrator’s Guide
10-38
my_archive.zip
= 10MB upon decompression
\AAA.rar = 25MB upon decompression
\BBB.zip = 3MB upon decompression
\EEE.zip = 1MB upon decompression
\222.zip
= 2MB upon decompression
my_archive.zip, BBB.zip, EEE.zip, and 222.zip will be checked againstRule 2 because the combined size of these files is within the 20MB limit. AAA.raris skipped.
Rule 2: Maximum Compression Layers
Files within the specified number of layers will be flagged for scanning.
For example:
my_archive.zip
\BBB.zip \CCC.xls
\DDD.txt
\EEE.zip \111.pdf
\222.zip \333.txt
If you set the limit to two layers:
• OfficeScan will ignore 333.txt because it is located on the third layer.
• OfficeScan will flag the following files for scanning and then check Rule 3:
• DDD.txt (located on the first layer)
• CCC.xls (located on the second layer)
• 111.pdf (located on the second layer)

Using Data Loss Prevention
10-39
Rule 3: Maximum Number of Files to ScanOfficeScan scans files up to the specified limit. OfficeScan scans files and folders innumeric and then alphabetic order.
Continuing from the example in Rule 2, OfficeScan has flagged the highlighted files forscanning:
my_archive.zip
\BBB.zip \CCC.xls
\DDD.txt
\EEE.zip \111.pdf
\222.zip \333.txt
In addition, my_archive.zip contains a folder named 7Folder, which was notchecked against Rule 2. This folder contains FFF.doc and GGG.ppt. This brings thetotal number of files to be scanned to 5, as highlighted below:
my_archive.zip
\7Folder \FFF.doc
\7Folder \GGG.ppt
\BBB.zip \CCC.xls
\DDD.txt
\EEE.zip \111.pdf
\222.zip \333.txt
If you set the limit to 4 files, the following files are scanned:
• FFF.doc
• GGG.ppt
• CCC.xls
• DDD.txt

OfficeScan™ 11.0 Administrator’s Guide
10-40
NoteFor files that contain embedded files, OfficeScan extracts the content of the embeddedfiles.
If the extracted content is text, the host file (such as 123.doc) and embedded files (suchas abc.txt and xyz.xls) are counted as one.
If the extracted content is not text, the host file (such as 123.doc) and embedded files(such as abc.exe) are counted separately.
Events that Trigger Decompression Rules
The following events trigger decompression rules:
TABLE 10-6. Events that Trigger Decompression Rules
A compressed file to be transmittedmatches a policy and the action on thecompressed file is Pass (transmit the file).
For example, to monitor .ZIP files thatusers are transmitting, you defined a fileattribute (.ZIP), added it to a template,used the template in a policy, and then setthe action to Pass.
NoteIf the action is Block, the entirecompressed file is not transmittedand therefore, there is no need toscan the files it contains.
A compressed file to be transmitted doesnot match a policy.
In this case, OfficeScan will still subject thecompressed file to the decompressionrules to determine which of the files itcontains should be scanned for digitalassets and whether to transmit the entirecompressed file.
Both events have the same result. When OfficeScan encounters a compressed file:
• If Rule 1 is not satisfied, OfficeScan allows the transmission of the entirecompressed file.
Using Data Loss Prevention
10-41
• If Rule 1 is satisfied, the other two rules are checked. OfficeScan allows thetransmission of the entire compressed file if:
• All scanned files do not match a policy.
• All scanned files match a policy and the action is Pass.
The transmission of the entire compressed file is blocked if at least onescanned file matches a policy and the action is Block.
Data Loss Prevention Policy ConfigurationYou can start to create Data Loss Prevention policies after you have configured dataidentifiers and organized them in templates.
In addition to data identifiers and templates, you need to configure channels and actionswhen creating a policy. For details about policies, see Data Loss Prevention Policies on page10-3.
Creating a Data Loss Prevention Policy
Procedure
1. Go to Agents > Agent Management.
2. In the agent tree, click the root domain icon ( ) to include all agents or selectspecific domains or agents.
3. Click Settings > DLP Settings.
4. Click the External Agents tab to configure a policy for external agents or theInternal Agents tab to configure a policy for internal agents.
NoteConfigure agent location settings if you have not done so. Agents use these locationsettings to determine the correct Data Loss Prevention policy to apply. For details,see Endpoint Location on page 14-2.

OfficeScan™ 11.0 Administrator’s Guide
10-42
5. Select Enable Data Loss Prevention.
6. Choose one of the following:
• If you are on the External Agents tab, you can apply all Data LossPrevention settings to internal agents by selecting Apply all settings tointernal agents.
• If you are on the Internal Agents tab, you can apply all Data LossPrevention settings to external agents by selecting Apply all settings toexternal agents.
7. On the Rules tab, click Add.
A policy can contain a maximum of 40 rules.
8. Configure the rule settings.
For details creating DLP rules, see Creating Data Loss Prevention Rules on page 10-43.
9. Click the Exceptions tab and configure any necessary exception settings.
For details on the available exception settings, see Data Loss Prevention Exceptions onpage 10-36.
10. If you selected domain(s) or agent(s) in the agent tree, click Save. If you clicked theroot domain icon, choose from the following options:
• Apply to All Agents: Applies settings to all existing agents and to any newagent added to an existing/future domain. Future domains are domains notyet created at the time you configured the settings.
• Apply to Future Domains Only: Applies settings only to agents added tofuture domains. This option will not apply settings to new agents added to anexisting domain.

Using Data Loss Prevention
10-43
Creating Data Loss Prevention Rules
Note
Data Loss Prevention processes rules and templates by priority. If a rule is set to “Pass”,Data Loss Prevention processes the next rule in the list. If a rule is set to “Block” or “UserJustification”, Data Loss Prevention blocks or accepts the user action and does not processthat rule/template further.
Procedure
1. Select Enable this rule.
2. Specify a name for the rule.
Configure the template settings:
3. Click the Template tab.
4. Select templates from the Available templates list and then click Add.
When selecting templates:
• Select multiple entries by clicking the template names which highlights thename.
• Use the search feature if you have a specific template in mind. You can typethe full or partial name of the template.
Note
Each rule can contain a maximum of 200 templates.
5. If your preferred template is not found in the Available templates list:
a. Click Add new template.
The Data Loss Prevention Templates screen displays.
For instructions on adding templates in the Data Prevention Templatesscreen, see Data Loss Prevention Templates on page 10-18.

OfficeScan™ 11.0 Administrator’s Guide
10-44
b. After creating the template, select it and then click Add.
NoteOfficeScan uses the first-match rule when checking templates. This means that if afile or data matches the definition on a template, OfficeScan will no longer check theother templates. Priority is based on the order of the templates in the list.
Configure the channel settings:
6. Click the Channel tab.
7. Select the channels for the rule.
For details about channels, see Network Channels on page 10-23 and System andApplication Channels on page 10-30.
8. If you selected any of the network channels, select the transmission scope:
• All transmissions
• Only transmissions outside the Local Area Network
See Transmission Scope and Targets for Network Channels on page 10-27 for details ontransmission scope, how targets work depending on the transmission scope, andhow to define targets correctly.
9. If you selected Email clients:
a. Click Exceptions.
b. Specify monitored and non-monitored internal email domains. For details onmonitored and non-monitored email domains, see Email Clients on page 10-24.
10. If you selected Removable storage:
a. Click Exceptions.
b. Add non-monitored removable storage devices, identifying them by theirvendors. The device model and serial ID are optional.
The approved list for USB devices supports the use of the asterisk (*)wildcard. Replace any field with the asterisk (*) to include all devices thatsatisfy the other fields.

Using Data Loss Prevention
10-45
For example, [vendor]-[model]-* places all USB devices from the specifiedvendor and the specified model type, regardless of serial ID, to the approvedlist.
c. To add more devices, click the plus (+) icon.
Tip
Use the Device List Tool to query devices connected to endpoints. The tool providesthe device vendor, model, and serial ID for each device. For details, see Device ListTool on page 9-13.
Configure the action settings:
11. Click the Action tab.
12. Select a primary action and any additional actions. For details about actions, seeData Loss Prevention Actions on page 10-34.
13. After configuring the Template, Channel, and Action settings, click Save.
Importing, Exporting, and Copying DLP Rules
Administrators can import previously defined rules (contained in a properlyformatted .dat file) or export the list of configured DLP rules. Copying a DLP ruleallows an administrator to modify the contents of a previously defined rule to save time.
The following table describes how each function works.
TABLE 10-7. Import, Export, and Copy Functions for DLP Rules
FUNCTION DESCRIPTION
Import Importing a rule list appends non-existing rules to the existing DLP rulelist. Data Loss Prevention skips rules that already exist in the target list.Data Loss Prevention maintains all pre-configured settings for eachrule, including the enabled or disabled status.

OfficeScan™ 11.0 Administrator’s Guide
10-46
FUNCTION DESCRIPTION
Export Exporting a rule list exports the entire list to a .dat file thatadministrators can then import and deploy to other domains or agents.Data Loss Prevention saves all rule settings based on the currentconfiguration.
Note
• Administrators must save or apply any new or modified rulesbefore exporting the list.
• Data Loss Prevention does not export any exceptionsconfigured for the policy, only the settings configured foreach rule.
Copy Copying a rule creates an exact replica of the current configurationsettings for the rule. Administrators must type a new name for the ruleand can make any configuration modifications necessary for the newrule.
Data Loss Prevention NotificationsOfficeScan comes with a set of default notification messages that inform OfficeScanadministrators and agent users of digital asset transmissions.
For details on notifications sent to administrators, see Data Loss Prevention Notifications forAdministrators on page 10-46.
For details on notifications sent to agent users, see Data Loss Prevention Notifications forAgent Users on page 10-50.
Data Loss Prevention Notifications for Administrators
Configure OfficeScan to send administrators a notification when it detects thetransmission of digital assets, or only when the transmission is blocked.

Using Data Loss Prevention
10-47
OfficeScan comes with a set of default notification messages that inform administratorsof digital asset transmissions. Modify the notifications and configure additionalnotification settings to suit company requirements.
Note
OfficeScan can send notifications through email, SNMP trap, and Windows NT Eventlogs. Configure settings when OfficeScan sends notifications through these channels. Fordetails, see Administrator Notification Settings on page 13-29.
Configuring Data Loss Prevention Notification forAdministrators
Procedure
1. Go to Administration > Notifications > Administrator.
2. On the Criteria tab:
a. Go to the Digital Asset Transmissions section.
b. Specify whether to send notifications when transmission of digital assets isdetected (the action can be blocked or passed) or only when the transmissionis blocked.
3. On the Email tab:
a. Go to the Digital Asset Transmissions section.
b. Select Enable notification via email.
c. Select Send notifications to users with agent tree domain permissions.
Use Role-based Administration to grant agent tree domain permissions tousers. If transmission occurs on any agent belonging to a specific domain, theemail are sent to the email addresses of the users with domain permissions.See the following table for examples:

OfficeScan™ 11.0 Administrator’s Guide
10-48
TABLE 10-8. Agent Tree Domains and Permissions
AGENT TREEDOMAIN
ROLES WITHDOMAIN
PERMISSIONS
USER ACCOUNTWITH THE ROLE
EMAIL ADDRESSFOR THE USER
ACCOUNT
Domain A Administrator(built-in)
root [email protected]
Role_01 admin_john [email protected]
admin_chris [email protected]
Domain B Administrator(built-in)
root [email protected]
Role_02 admin_jane [email protected]
If any OfficeScan agent belonging to Domain A detects a digital assettransmission, the email will be sent to [email protected], [email protected], [email protected].
If any OfficeScan agent belonging to Domain B detects the transmission, theemail is sent to [email protected] and [email protected].
NoteWhen enabling this option, all users with domain permissions must have acorresponding email address. The email notification will not be sent to userswithout an email address. Users and email addresses are configured fromAdministration > Account Management > User Accounts.
d. Select Send notifications to the following email address(es) and then typethe email addresses.
e. Accept or modify the default subject and message. Use token variables torepresent data in the Subject and Message fields.

Using Data Loss Prevention
10-49
TABLE 10-9. Token Variables for Data Loss Prevention Notifications
VARIABLE DESCRIPTION
%USER% The user logged on to the endpoint when transmissionwas detected
%COMPUTER% Endpoint where transmission was detected
%DOMAIN% Domain of the endpoint
%DATETIME% Date and time transmission was detected
%CHANNEL% The channel through which transmission was detected
%TEMPLATE% The digital asset template that triggered the detection
%RULE% The rule name that triggered the detection
4. On the SNMP Trap tab:
a. Go to the Digital Asset Transmissions section.
b. Select Enable notification via SNMP trap.
c. Accept or modify the default message. Use token variables to represent datain the Message field. See Table 10-9: Token Variables for Data Loss PreventionNotifications on page 10-49 for details.
5. On the NT Event Log tab:
a. Go to the Digital Asset Transmissions section.
b. Select Enable notification via NT Event Log.
c. Accept or modify the default message. You can use token variables torepresent data in the Message field. See Table 10-9: Token Variables for DataLoss Prevention Notifications on page 10-49 for details.
6. Click Save.

OfficeScan™ 11.0 Administrator’s Guide
10-50
Data Loss Prevention Notifications for Agent UsersOfficeScan can display notification messages on agent computers immediately after itallows or blocks the transmission of digital assets.
To notify users that digital asset transmission was blocked or allowed, select the optionNotify the agent user when creating a Data Loss Prevention policy. For instructionson creating a policy, see Data Loss Prevention Policy Configuration on page 10-41.
Configuring Data Loss Prevention Notification for Agents
Procedure
1. Go to Administration > Notifications > Agent.
2. In the Type drop-down, select Digital Asset Transmissions.
3. Accept or modify the default message.
4. Click Save.
Data Loss Prevention LogsAgents log digital asset transmissions (blocked and allowed transmissions) and send thelogs to the server immediately. If the agent is unable to send logs, it retries after 5minutes.
To keep the size of logs from occupying too much space on the hard disk, manuallydelete logs or configure a log deletion schedule. For more information about managinglogs, see Log Management on page 13-32.
Viewing Data Loss Prevention Logs
Procedure
1. Go to Agents > Agent Management or Logs > Agents > Security Risks.
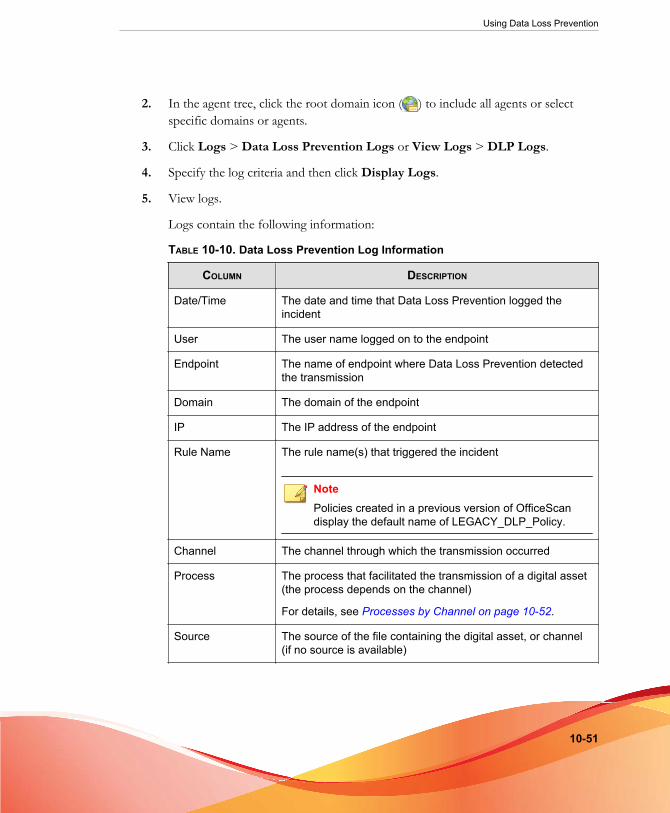
Using Data Loss Prevention
10-51
2. In the agent tree, click the root domain icon ( ) to include all agents or selectspecific domains or agents.
3. Click Logs > Data Loss Prevention Logs or View Logs > DLP Logs.
4. Specify the log criteria and then click Display Logs.
5. View logs.
Logs contain the following information:
TABLE 10-10. Data Loss Prevention Log Information
COLUMN DESCRIPTION
Date/Time The date and time that Data Loss Prevention logged theincident
User The user name logged on to the endpoint
Endpoint The name of endpoint where Data Loss Prevention detectedthe transmission
Domain The domain of the endpoint
IP The IP address of the endpoint
Rule Name The rule name(s) that triggered the incident
NotePolicies created in a previous version of OfficeScandisplay the default name of LEGACY_DLP_Policy.
Channel The channel through which the transmission occurred
Process The process that facilitated the transmission of a digital asset(the process depends on the channel)
For details, see Processes by Channel on page 10-52.
Source The source of the file containing the digital asset, or channel(if no source is available)

OfficeScan™ 11.0 Administrator’s Guide
10-52
COLUMN DESCRIPTION
Destination The intended destination of the file containing the digitalasset, or channel (if no source is available)
Action The action taken on the transmission
Details A link which includes additional details about the transmission
For details, see Data Loss Prevention Log Details on page10-54.
6. To save logs to a comma-separated value (CSV) file, click Export to CSV. Openthe file or save it to a specific location.
Processes by Channel
The following table lists the processes that display under the Process column in theData Loss Prevention logs.
TABLE 10-11. Processes by Channel
CHANNEL PROCESS
Synchronizationsoftware(ActiveSync)
Full path and process name of the synchronization software
Example:
C:\Windows\system32\WUDFHost.exe
Data recorder (CD/DVD)
Full path and process name of the data recorder
Example:
C:\Windows\Explorer.exe
Windows clipboard Not applicable
Email client - LotusNotes
Full path and process name of Lotus Notes
Example:
C:\Program Files\IBM\Lotus\Notes\nlnotes.exe
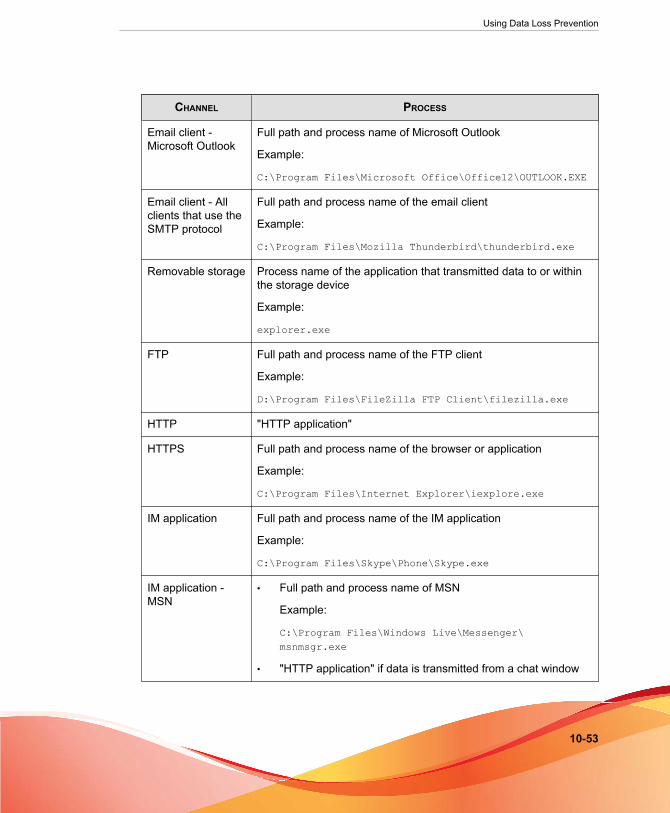
Using Data Loss Prevention
10-53
CHANNEL PROCESS
Email client -Microsoft Outlook
Full path and process name of Microsoft Outlook
Example:
C:\Program Files\Microsoft Office\Office12\OUTLOOK.EXE
Email client - Allclients that use theSMTP protocol
Full path and process name of the email client
Example:
C:\Program Files\Mozilla Thunderbird\thunderbird.exe
Removable storage Process name of the application that transmitted data to or withinthe storage device
Example:
explorer.exe
FTP Full path and process name of the FTP client
Example:
D:\Program Files\FileZilla FTP Client\filezilla.exe
HTTP "HTTP application"
HTTPS Full path and process name of the browser or application
Example:
C:\Program Files\Internet Explorer\iexplore.exe
IM application Full path and process name of the IM application
Example:
C:\Program Files\Skype\Phone\Skype.exe
IM application -MSN
• Full path and process name of MSN
Example:
C:\Program Files\Windows Live\Messenger\msnmsgr.exe
• "HTTP application" if data is transmitted from a chat window

OfficeScan™ 11.0 Administrator’s Guide
10-54
CHANNEL PROCESS
Peer-to-peerapplication
Full path and process name of the peer-to-peer application
Example:
D:\Program Files\BitTorrent\bittorrent.exe
PGP encryption Full path and process name of the PGP encryption software
Example:
C:\Program Files\PGP Corporation\PGP Desktop\PGPmnApp.exe
Printer Full path and process name of the application that initiated aprinter operation
Example:
C:\Program Files\Microsoft Office\Office12\ WINWORD.EXE
SMB protocol Full path and process name of the application from which sharedfile access (copying or creating a new file) was performed
Example:
C:\Windows\Explorer.exe
Webmail (HTTPmode)
"HTTP application"
Webmail (HTTPSmode)
Full path and process name of the browser or application
Example:
C:\Program Files\Mozilla Firefox\firefox.exe
Data Loss Prevention Log Details
The Data Loss Prevention Log Details screen shows additional details about thedigital asset transmission. The details of a transmission vary based on the channel andprocess through which OfficeScan detected the incident.
The following table lists the details that display.

Using Data Loss Prevention
10-55
TABLE 10-12. Data Loss Prevention Log Details
DETAIL DESCRIPTION
Date/Time The date and time that Data Loss Prevention logged the incident
Violation ID The unique ID of the incident
User The user name logged on to the endpoint
Endpoint The name of endpoint where Data Loss Prevention detected thetransmission
Domain The domain of the endpoint
IP The IP address of the endpoint
Channel The channel through which the transmission occurred
Process The process that facilitated the transmission of a digital asset (theprocess depends on the channel)
For details, see Processes by Channel on page 10-52.
Source The source of the file containing the digital asset, or channel (if nosource is available)
Email sender The email address where the transmission originated
Email subject The subject line of the email message containing the digital asset
Email recipient The destination email address(es) of the email message
URL The URL of a website or web page
FTP user The user name used to log on to the FTP server
File class The type of file in which Data Loss Prevention detected the digitalasset

OfficeScan™ 11.0 Administrator’s Guide
10-56
DETAIL DESCRIPTION
Rule/Template A list of the exact rule name(s) and template(s) that triggered thedetection
NoteEach rule can contain multiple templates that triggered theincident. Multiple template names are separated bycommas.
Action The action taken on the transmission
User justificationreason
The reason the user provided for continuing to transfer thesensitive data
Enabling Debug Logging for the Data Protection Module
Procedure
1. Obtain the logger.cfg file from your support provider.
2. Add the following data in HKEY_LOCAL_MACHINE\SOFTWARE\TrendMicro\PC-cillinNTCorp\DlpLite:
• Type: String
• Name: debugcfg
• Value: C:\Log\logger.cfg
3. Create a folder named “Log” in the C:\ directory.
4. Copy logger.cfg to the “Log” folder.
5. Deploy Data Loss Prevention and Device Control settings from the web consoleto start collecting logs.
Using Data Loss Prevention
10-57
NoteDisable debug logging for the Data Protection module by deleting debugcfg in theregistry key and restarting the endpoint.

11-1
Chapter 11
Protecting Computers from Web-based Threats
This chapter describes web-based threats and using OfficeScan to protect your networkand computers from web-based threats.
Topics include:
• About Web Threats on page 11-2
• Command & Control Contact Alert Services on page 11-2
• Web Reputation on page 11-4
• Web Reputation Policies on page 11-5
• Web Threat Notifications for Agent Users on page 11-15
• Configuring C&C Callback Notifications for Administrators on page 11-16
• C&C Callback Outbreaks on page 11-19
• Web Threat Logs on page 11-21

OfficeScan™ 11.0 Administrator’s Guide
11-2
About Web ThreatsWeb threats encompass a broad array of threats that originate from the Internet. Webthreats are sophisticated in their methods, using a combination of various files andtechniques rather than a single file or approach. For example, web threat creatorsconstantly change the version or variant used. Because the web threat is in a fixedlocation of a website rather than on an infected endpoint, the web threat creatorconstantly modifies its code to avoid detection.
In recent years, individuals once characterized as hackers, virus writers, spammers, andspyware makers are now known as cyber criminals. web threats help these individualspursue one of two goals. One goal is to steal information for subsequent sale. Theresulting impact is leakage of confidential information in the form of identity loss. Theinfected endpoint may also become a vector to deliver phish attacks or otherinformation capturing activities. Among other impacts, this threat has the potential toerode confidence in web commerce, corrupting the trust needed for Internettransactions. The second goal is to hijack a user’s CPU power to use it as an instrumentto conduct profitable activities. Activities include sending spam or conducting extortionin the form of distributed denial-of-service attacks or pay-per-click activities.
Command & Control Contact Alert ServicesTrend Micro Command & Control (C&C) Contact Alert Services provides enhanceddetection and alert capabilities to mitigate the damage caused by advanced persistentthreats and targeted attacks. C&C Contact Alert Services integrate with Web ReputationServices which determines the action taken on detected callback addresses based on theweb reputation security level.
The C&C IP list further enhances C&C callback detections using the Network ContentInspection Engine to identify C&C contacts through any network channel.
For details on configuring the Web Reputation Services security level, see Configuring aWeb Reputation Policy on page 11-5.
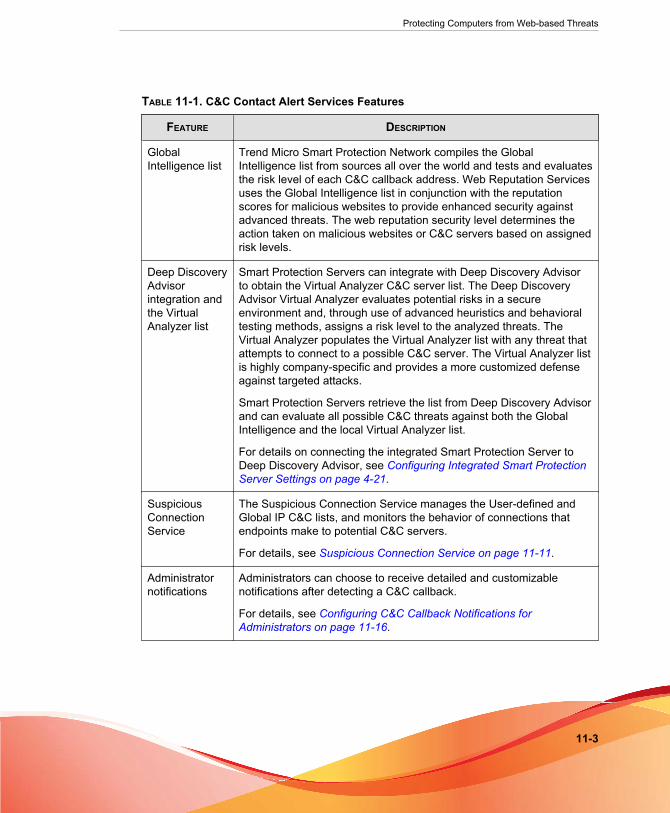
Protecting Computers from Web-based Threats
11-3
TABLE 11-1. C&C Contact Alert Services Features
FEATURE DESCRIPTION
GlobalIntelligence list
Trend Micro Smart Protection Network compiles the GlobalIntelligence list from sources all over the world and tests and evaluatesthe risk level of each C&C callback address. Web Reputation Servicesuses the Global Intelligence list in conjunction with the reputationscores for malicious websites to provide enhanced security againstadvanced threats. The web reputation security level determines theaction taken on malicious websites or C&C servers based on assignedrisk levels.
Deep DiscoveryAdvisorintegration andthe VirtualAnalyzer list
Smart Protection Servers can integrate with Deep Discovery Advisorto obtain the Virtual Analyzer C&C server list. The Deep DiscoveryAdvisor Virtual Analyzer evaluates potential risks in a secureenvironment and, through use of advanced heuristics and behavioraltesting methods, assigns a risk level to the analyzed threats. TheVirtual Analyzer populates the Virtual Analyzer list with any threat thatattempts to connect to a possible C&C server. The Virtual Analyzer listis highly company-specific and provides a more customized defenseagainst targeted attacks.
Smart Protection Servers retrieve the list from Deep Discovery Advisorand can evaluate all possible C&C threats against both the GlobalIntelligence and the local Virtual Analyzer list.
For details on connecting the integrated Smart Protection Server toDeep Discovery Advisor, see Configuring Integrated Smart ProtectionServer Settings on page 4-21.
SuspiciousConnectionService
The Suspicious Connection Service manages the User-defined andGlobal IP C&C lists, and monitors the behavior of connections thatendpoints make to potential C&C servers.
For details, see Suspicious Connection Service on page 11-11.
Administratornotifications
Administrators can choose to receive detailed and customizablenotifications after detecting a C&C callback.
For details, see Configuring C&C Callback Notifications forAdministrators on page 11-16.

OfficeScan™ 11.0 Administrator’s Guide
11-4
FEATURE DESCRIPTION
Endpointnotifications
Administrators can choose to send detailed and customizablenotifications to end users after detecting a C&C callback on anendpoint.
For details, see Enabling the Web Threat Notification Message onpage 11-15.
Outbreaknotifications
Administrators can customize outbreak notifications specific to C&Ccallback events and specify whether the outbreak occurs on a singleendpoint or across the entire network.
For details, see C&C Callback Outbreaks on page 11-19.
C&C callbacklogs
Logs provide detailed information regarding all C&C callback events.
For details, see Viewing C&C Callback Logs on page 11-23.
Web ReputationWeb reputation technology tracks the credibility of web domains by assigning areputation score based on factors such as a website's age, historical location changes andindications of suspicious activities discovered through malware behavior analysis. It willthen continue to scan sites and block users from accessing infected ones.
OfficeScan agents send queries to smart protection sources to determine the reputationof websites that users are attempting to access. A website’s reputation is correlated withthe specific web reputation policy enforced on the endpoint. Depending on the policy inuse, the OfficeScan agent will either block or allow access to the website.
Note
For details about smart protection sources, see Smart Protection Source List on page 4-24.
Add websites that you consider safe or dangerous to the approved or blocked list. Whenthe OfficeScan agent detects access to any of these websites, it automatically allows orblocks the access and no longer sends a query to smart protection sources.

Protecting Computers from Web-based Threats
11-5
Web Reputation PoliciesWeb reputation policies dictate whether OfficeScan will block or allow access to awebsite.
You can configure policies for internal and external agents. OfficeScan administratorstypically configure a stricter policy for external agents.
Policies are granular settings in the OfficeScan agent tree. You can enforce specificpolicies to agent groups or individual agents. You can also enforce a single policy to allagents.
After you deploy the policies, agents use the location criteria you have set in theEndpoint Location screen (see Endpoint Location on page 14-2) to determine theirlocation and the policy to apply. Agents switch policies each time the location changes.
Configuring a Web Reputation Policy
Before you begin
Specify proxy server authentication credentials if you have set up a proxy server tohandle HTTP communication in your organization and authentication is required beforeweb access is allowed.
For instructions on configuring the proxy settings, see External Proxy for OfficeScan Agentson page 14-47.
Procedure
1. Go to Agents > Agent Management.
2. Select the targets in the agent tree.
• To configure a policy for agents running Windows XP, Vista, 7, 8, or 8.1,select the root domain icon ( ), specific domains, or agents.

OfficeScan™ 11.0 Administrator’s Guide
11-6
NoteWhen you select the root domain or specific domains, the setting will onlyapply to agents running Windows XP, Vista, 7, 8, or 8.1. The setting will notapply to agents running Windows Server 2003, Windows Server 2008, orWindows Server 2012 even if they part of the domains.
• To configure a policy for agents running Windows Server 2003, WindowsServer 2008, or Windows Server 2012, select a specific agent.
3. Click Settings > Web Reputation Settings.
4. Click the External Agents tab to configure a policy for external agents or theInternal Agents tab to configure a policy for internal agents.
TipConfigure agent location settings if you have not done so. Agents will use thesesettings to determine their location and apply the correct web reputation policy. Fordetails, see Endpoint Location on page 14-2.
5. Select Enable Web reputation policy on the following operating systems. Theoperating systems listed in the screen depends on the targets you selected in step 1.
TipTrend Micro recommends disabling web reputation for internal agents if you alreadyuse a Trend Micro product with the web reputation capability, such as InterScan WebSecurity Virtual Appliance.
When a web reputation policy is enabled:
• External agents send web reputation queries to the Smart ProtectionNetwork.
• Internal agents send web reputation queries to:
• Smart Protection Servers if the Send queries to Smart ProtectionServers option is enabled. For details about this option, see step 7.
• Smart Protection Network if the Send queries to Smart ProtectionServers option is disabled.
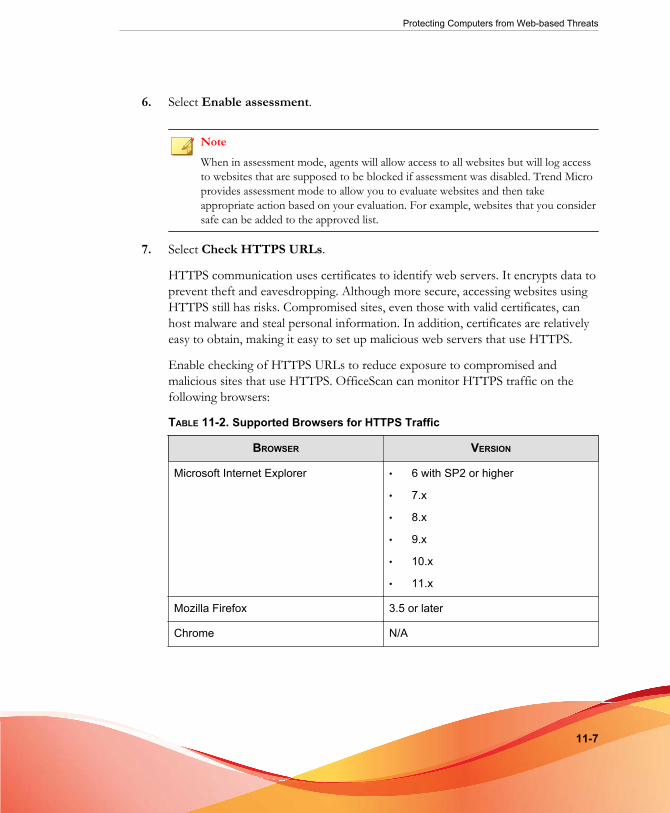
Protecting Computers from Web-based Threats
11-7
6. Select Enable assessment.
NoteWhen in assessment mode, agents will allow access to all websites but will log accessto websites that are supposed to be blocked if assessment was disabled. Trend Microprovides assessment mode to allow you to evaluate websites and then takeappropriate action based on your evaluation. For example, websites that you considersafe can be added to the approved list.
7. Select Check HTTPS URLs.
HTTPS communication uses certificates to identify web servers. It encrypts data toprevent theft and eavesdropping. Although more secure, accessing websites usingHTTPS still has risks. Compromised sites, even those with valid certificates, canhost malware and steal personal information. In addition, certificates are relativelyeasy to obtain, making it easy to set up malicious web servers that use HTTPS.
Enable checking of HTTPS URLs to reduce exposure to compromised andmalicious sites that use HTTPS. OfficeScan can monitor HTTPS traffic on thefollowing browsers:
TABLE 11-2. Supported Browsers for HTTPS Traffic
BROWSER VERSION
Microsoft Internet Explorer • 6 with SP2 or higher
• 7.x
• 8.x
• 9.x
• 10.x
• 11.x
Mozilla Firefox 3.5 or later
Chrome N/A

OfficeScan™ 11.0 Administrator’s Guide
11-8
Important
• HTTPS scanning only supports Windows 8, Windows 8.1, or Windows 2012platforms operating in desktop mode.
• After enabling HTTPS scanning for the first time on OfficeScan agents runningInternet Explorer 9, 10, or 11, users must enable the TmIEPlugInBHO Classadd-on in the browser pop-up window before HTTPS scanning is operational.
For more information on configuring Internet Explorer settings for webreputation, see the following Knowledge Base article:
• http://esupport.trendmicro.com/solution/en-us/1060643.aspx
8. Select Scan common HTTP ports only to restrict web reputation scanning totraffic through ports 80, 81, and 8080. By default, OfficeScan scans all trafficthrough all ports.
9. Select Send queries to Smart Protection Servers if you want internal agents tosend web reputation queries to Smart Protection Servers.
• If you enable this option:
• Agents refer to the smart protection source list to determine the SmartProtection Servers to which they send queries. For details about thesmart protection source list, see Smart Protection Source List on page 4-24.
• Be sure that Smart Protection Servers are available. If all SmartProtection Servers are unavailable, agents do not send queries to SmartProtection Network. The only remaining sources of web reputation datafor agents are the approved and blocked URL lists (configured in step10).
• If you want agents to connect to Smart Protection Servers through aproxy server, specify proxy settings in Administration > Settings >Proxy > Internal Proxy tab.
• Be sure to update Smart Protection Servers regularly so that protectionremains current.
• Agents will not block untested websites. Smart Protection Servers do notstore web reputation data for these websites.

Protecting Computers from Web-based Threats
11-9
• If you disable this option:
• Agents send web reputation queries to Smart Protection Network. Agentcomputers must have Internet connection to send queries successfully.
• If connection to Smart Protection Network requires proxy serverauthentication, specify authentication credentials in Administration >Settings > Proxy > External Proxy (tab) > OfficeScan ServerUpdates.
• Agents will block untested websites if you select Block pages that havenot been tested by Trend Micro in step 9.
10. Select from the available web reputation security levels: High, Medium, or Low
NoteThe security levels determine whether OfficeScan will allow or block access to aURL. For example, if you set the security level to Low, OfficeScan only blocks URLsthat are known to be web threats. As you set the security level higher, the web threatdetection rate improves but the possibility of false positives also increases.
11. If you disabled the Send queries to Smart Protection Servers option in step 7,you can select Block pages that have not been tested by Trend Micro.
NoteWhile Trend Micro actively tests web pages for safety, users may encounter untestedpages when visiting new or less popular websites. Blocking access to untested pagescan improve safety but can also prevent access to safe pages.
12. Select Block pages containing malicious script to identify web browser exploitsand malicious scripts, and prevent the use of these threats from compromising theweb browser.
OfficeScan utilizes both the Browser Exploit Prevention pattern and the ScriptAnalyzer pattern to identify and block web pages before exposing the system.

OfficeScan™ 11.0 Administrator’s Guide
11-10
TABLE 11-3. Supported Browsers for Browser Exploit Prevention
BROWSER VERSION
Microsoft Internet Explorer • 7.x
• 8.x
• 9.x
• 10.x
• 11.x
ImportantThe Browser Exploit Prevention feature requires that you enable the AdvancedProtection Service (go to Agents > Agent Management, click Settings >Additional Service Settings).
13. Configure the approved and blocked lists.
NoteThe approved list takes precedence over the blocked list. When a URL matches anentry in the approved list, agents always allows access to the URL, even if it is in theblocked list.
a. Select Enable approved/blocked list.
b. Type a URL.
You can add a wildcard character (*) anywhere on the URL.
For example:
• Typing www.trendmicro.com/* means that all pages in the TrendMicro website will be approved.
• Typing *.trendmicro.com/* means that all pages on any sub-domain of trendmicro.com will be approved.
You can type URLs containing IP addresses. If a URL contains an IPv6address, enclose the address in parentheses.

Protecting Computers from Web-based Threats
11-11
c. Click Add to Approved List or Add to Blocked List.
d. To export the list to a .dat file, click Export and then click Save.
e. If you have exported a list from another server and want to import it to thisscreen, click Import and locate the .dat file. The list loads on the screen.
ImportantWeb Reputation does not perform any scanning on addresses located in theApproved and Blocked lists.
14. To submit web reputation feedback, click the URL provided under ReassessURL. The Trend Micro Web Reputation Query system opens in a browserwindow.
15. Select whether to allow the OfficeScan agent to send web reputation logs to theserver. Allow agents to send logs if you want to analyze URLs being blocked byOfficeScan and take the appropriate action on URLs you think are safe to access.
16. If you selected domain(s) or agent(s) in the agent tree, click Save. If you clicked theroot domain icon, choose from the following options:
• Apply to All Agents: Applies settings to all existing agents and to any newagent added to an existing/future domain. Future domains are domains notyet created at the time you configured the settings.
• Apply to Future Domains Only: Applies settings only to agents added tofuture domains. This option will not apply settings to new agents added to anexisting domain.
Suspicious Connection ServiceThe Suspicious Connection Service manages the User-defined and Global IP C&C lists,and monitors the behavior of connections that endpoints make to potential C&Cservers.
• The User-defined Approved and Blocked IP lists allow further control overwhether endpoints can access specific IP addresses. Configure these lists when you

OfficeScan™ 11.0 Administrator’s Guide
11-12
want to allow access to an address blocked by the Global C&C IP list or blockaccess to an address that may pose a security risk.
For details, see Configuring Global User-defined IP List Settings on page 11-12.
• The Global C&C IP list works in conjunction with the Network ContentInspection Engine (NCIE) to detect network connections with Trend Microconfirmed C&C servers. NCIE detects C&C server contact through any networkchannel. The Suspicious Connection Service logs all connection information toservers in the Global C&C IP list for evaluation.
For details on enabling the Global C&C IP list, see Configuring Suspicious ConnectionSettings on page 11-13.
• After detecting malware on endpoints through Relevance Rule Pattern matching onnetwork packets, the Suspicious Connection Service can further investigate theconnection behavior to determine if a C&C callback occurred. After detecting aC&C callback, the Suspicious Connection Service can attempt to block and cleanthe source of the connection using GeneriClean technology.
For details on configuring the Suspicious Connection Service, see ConfiguringSuspicious Connection Settings on page 11-13.
For details about GeneriClean, see GeneriClean on page E-4.
Enable the Suspicious Connection Service on the Additional Service Settings screento protect agents against C&C server callbacks. For details, see Enabling or Disabling theAgent Services from the Web Console on page 14-8.
Configuring Global User-defined IP List Settings
Administrators can configure OfficeScan to allow, block, or log all connections betweenagents and user-defined C&C IP addresses.
Note
The User-defined IP Lists only support IPv4 addresses.
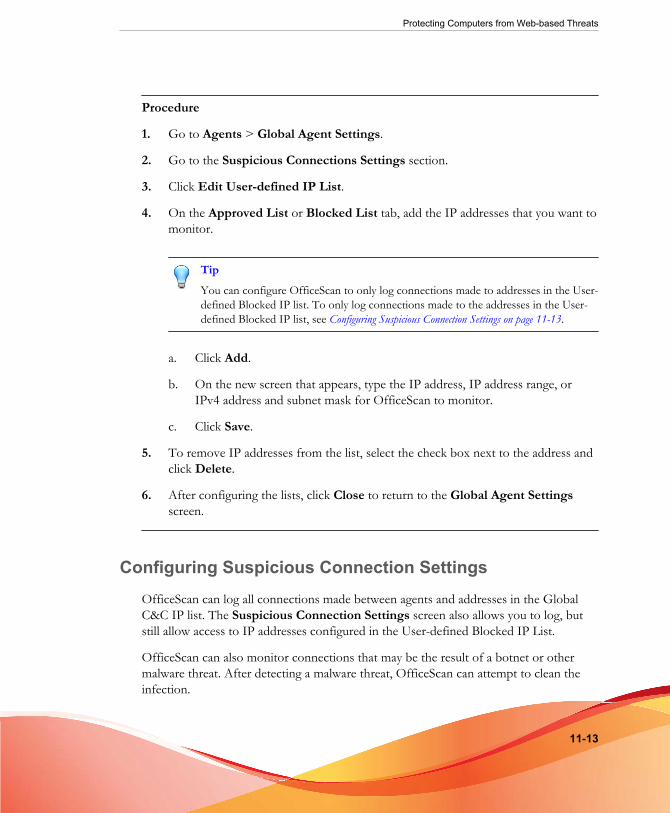
Protecting Computers from Web-based Threats
11-13
Procedure
1. Go to Agents > Global Agent Settings.
2. Go to the Suspicious Connections Settings section.
3. Click Edit User-defined IP List.
4. On the Approved List or Blocked List tab, add the IP addresses that you want tomonitor.
Tip
You can configure OfficeScan to only log connections made to addresses in the User-defined Blocked IP list. To only log connections made to the addresses in the User-defined Blocked IP list, see Configuring Suspicious Connection Settings on page 11-13.
a. Click Add.
b. On the new screen that appears, type the IP address, IP address range, orIPv4 address and subnet mask for OfficeScan to monitor.
c. Click Save.
5. To remove IP addresses from the list, select the check box next to the address andclick Delete.
6. After configuring the lists, click Close to return to the Global Agent Settingsscreen.
Configuring Suspicious Connection SettingsOfficeScan can log all connections made between agents and addresses in the GlobalC&C IP list. The Suspicious Connection Settings screen also allows you to log, butstill allow access to IP addresses configured in the User-defined Blocked IP List.
OfficeScan can also monitor connections that may be the result of a botnet or othermalware threat. After detecting a malware threat, OfficeScan can attempt to clean theinfection.

OfficeScan™ 11.0 Administrator’s Guide
11-14
Procedure
1. Go to Agents > Agent Management.
2. In the agent tree, click the root domain icon ( ) to include all agents or selectspecific domains or agents.
3. Click Settings > Suspicious Connection Settings.
The Suspicious Connection Settings screen appears.
4. Enable the Log network connections made to addresses in the Global C&CIP list setting to monitor connections made to Trend Micro confirmed C&Cservers. For details about the Global C&C IP list, see Suspicious Connection Service onpage 11-11.
• To allow agents to connect to addresses in the User-defined Blocked IP list,enable the Log and allow access to User-defined Blocked IP listaddresses setting.
Note
You must enable network connection logging before OfficeScan can allow access toaddresses in the User-defined Blocked IP list.
5. Enable the Log connections using malware network fingerprinting setting toperform pattern matching on packet headers. OfficeScan logs all connections madeby packets with headers that match known malware threats using the RelevanceRule pattern.
• To allow OfficeScan to attempt to clean connections made to C&C servers,enable the Clean suspicious connections when a C&C callback isdetected setting. OfficeScan uses GeneriClean to clean the malware threatand terminate the connection to the C&C server.
Note
You must enable Log connections using malware network fingerprinting beforeOfficeScan can attempt to clean the connections made to C&C servers detected bypacket structure matching.

Protecting Computers from Web-based Threats
11-15
6. If you selected domain(s) or agent(s) in the agent tree, click Save. If you clicked theroot domain icon, choose from the following options:
• Apply to All Agents: Applies settings to all existing agents and to any newagent added to an existing/future domain. Future domains are domains notyet created at the time you configured the settings.
• Apply to Future Domains Only: Applies settings only to agents added tofuture domains. This option will not apply settings to new agents added to anexisting domain.
Web Threat Notifications for Agent UsersOfficeScan can display a notification message on the OfficeScan agent endpointimmediately after it blocks a URL that violates a web reputation policy. You need toenable the notification message and optionally modify the content of the notificationmessage.
Enabling the Web Threat Notification Message
Procedure
1. Go to Agents > Agent Management.
2. In the agent tree, click the root domain icon ( ) to include all agents or selectspecific domains or agents.
3. Click Settings > Privileges and Other Settings.
4. Click the Other Settings tab.
5. In the Web Reputation Settings section, select Display a notification when aweb site is blocked.
6. In the C&C Callback Settings section, select Display a notification when aC&C callback is detected.
OfficeScan™ 11.0 Administrator’s Guide
11-16
7. If you selected domain(s) or agent(s) in the agent tree, click Save. If you clicked theroot domain icon, choose from the following options:
• Apply to All Agents: Applies settings to all existing agents and to any newagent added to an existing/future domain. Future domains are domains notyet created at the time you configured the settings.
• Apply to Future Domains Only: Applies settings only to agents added tofuture domains. This option will not apply settings to new agents added to anexisting domain.
Modifying the Web Threat Notifications
Procedure
1. Go to Administration > Notifications > Agent.
2. From the Type drop-down, select the type of web threat notification to modify:
• Web Reputation Violations
• C&C Callbacks
3. Modify the default message in the text box provided.
4. Click Save.
Configuring C&C Callback Notifications forAdministrators
OfficeScan comes with a set of default notification messages that inform you and otherOfficeScan administrators of C&C callback detections. You can modify the notificationsand configure additional notification settings to suit your requirements.

Protecting Computers from Web-based Threats
11-17
Procedure
1. Go to Administration > Notifications > Administrator.
2. On the Criteria tab:
a. Go to the C&C Callbacks section.
b. Specify whether to send notifications when OfficeScan detects a C&Ccallback (the action can be blocked or logged) or only when the risk level ofthe callback address is High.
3. On the Email tab:
a. Go to the C&C Callbacks section.
b. Select Enable notification via email.
c. Select Send notifications to users with agent tree domain permissions.
Use Role-based Administration to grant agent tree domain permissions tousers. If transmission occurs on any agent belonging to a specific domain, theemail are sent to the email addresses of the users with domain permissions.See the following table for examples:
TABLE 11-4. Agent Tree Domains and Permissions
AGENT TREEDOMAIN
ROLES WITHDOMAIN
PERMISSIONS
USER ACCOUNTWITH THE ROLE
EMAIL ADDRESSFOR THE USER
ACCOUNT
Domain A Administrator(built-in)
root [email protected]
Role_01 admin_john [email protected]
admin_chris [email protected]
Domain B Administrator(built-in)
root [email protected]
Role_02 admin_jane [email protected]
If any OfficeScan agent belonging to Domain A detects a C&C callback, theemail will be sent to [email protected], [email protected], and [email protected].

OfficeScan™ 11.0 Administrator’s Guide
11-18
If any OfficeScan agent belonging to Domain B detects the C&C callback, theemail is sent to [email protected] and [email protected].
NoteWhen enabling this option, all users with domain permissions must have acorresponding email address. The email notification will not be sent to userswithout an email address. Users and email addresses are configured fromAdministration > Account Management > User Accounts.
d. Select Send notifications to the following email address(es) and then typethe email addresses.
e. Accept or modify the default subject and message. Use token variables torepresent data in the Subject and Message fields.
TABLE 11-5. Token Variables for C&C Callback Notifications
VARIABLE DESCRIPTION
%CLIENTCOMPUTER%
Target endpoint that sent the callback
%IP% IP address of the targeted endpoint
%DOMAIN% Domain of the computer
%DATETIME% Date and time the transmission was detected
%CALLBACKADDRESS%
Callback address of the C&C server
%CNCRISKLEVEL%
Risk level of the C&C server
%CNCLISTSOURCE%
Indicates the C&C source list
%ACTION% Action taken
4. On the SNMP Trap tab:
a. Go to the C&C Callbacks section.
b. Select Enable notification via SNMP trap.
Protecting Computers from Web-based Threats
11-19
c. Accept or modify the default message. Use token variables to represent datain the Message field. See Table 11-5: Token Variables for C&C CallbackNotifications on page 11-18 for details.
5. On the NT Event Log tab:
a. Go to the C&C Callbacks section.
b. Select Enable notification via NT Event Log.
c. Accept or modify the default message. You can use token variables torepresent data in the Message field. See Table 11-5: Token Variables for C&CCallback Notifications on page 11-18 for details.
6. Click Save.
C&C Contact Alert Notifications for AgentUsers
OfficeScan can display a notification message on OfficeScan agent computersimmediately after blocking a C&C server URL. You need to enable the notificationmessage and optionally modify the content of the notification message
C&C Callback OutbreaksDefine a C&C callback outbreak by the number, source, and risk level of the callbacks.
OfficeScan comes with a default notification message that inform you and otherOfficeScan administrators of an outbreak. You can modify the notification message tosuit your requirements.
Note
OfficeScan can send C&C callback outbreak notifications through email. Configure emailsettings to allow OfficeScan to send emails successfully. For details, see AdministratorNotification Settings on page 13-29.

OfficeScan™ 11.0 Administrator’s Guide
11-20
Configuring the C&C Callback Outbreak Criteria andNotifications
Procedure
1. Go to Administration > Notifications > Outbreak.
2. On the Criteria tab, configure the following options:
Option DescriptionSame compromisedhost
Select to define an outbreak based on the callbackdetections per endpoint
C&C risk level Specify whether to trigger an outbreak on all C&Ccallbacks or only high risk sources
Action Select from Any action, Logged, or BlockedDetections Indicate the required number of detections that defines an
outbreak
Time Period Indicate the number of hours that the number ofdetections must occur within
Tip
Trend Micro recommends accepting the default values in this screen.
3. In the Email tab:
a. Go to the C&C Callbacks section.
b. Select Enable notification via email.
c. Specify the email recipients.
d. Accept or modify the default email subject and message. You can use tokenvariables to represent data in the Subject and Message fields.

Protecting Computers from Web-based Threats
11-21
TABLE 11-6. Token Variables for C&C Callbacks Outbreak Notifications
VARIABLE DESCRIPTION
%C Number of C&C callback logs
%T Time period when the C&C callback logs accumulated
e. Select from the available additional C&C callback information to include inthe email.
4. In the SNMP Trap tab:
a. Go to the C&C Callbacks section.
b. Select Enable notification via SNMP trap.
c. Accept or modify the default message. You can use token variables torepresent data in the Message field. See Table 11-6: Token Variables for C&CCallbacks Outbreak Notifications on page 11-21 for details.
5. In the NT Event Log tab:
a. Go to the C&C Callbacks section.
b. Select Enable notification via NT Event Log.
c. Accept or modify the default message. You can use token variables torepresent data in the Message field. See Table 11-6: Token Variables for C&CCallbacks Outbreak Notifications on page 11-21 for details.
6. Click Save.
Web Threat LogsConfigure both internal and external agents to send web reputation logs to the server.Do this if you want to analyze URLs that OfficeScan blocks and take appropriate actionon URLs you think are safe to access.

OfficeScan™ 11.0 Administrator’s Guide
11-22
To keep the size of logs from occupying too much space on the hard disk, manuallydelete logs or configure a log deletion schedule. For more information about managinglogs, see Log Management on page 13-32.
Viewing Web Reputation Logs
Procedure
1. Go to Logs > Agents > Security Risks or Agents > Agent Management.
2. In the agent tree, click the root domain icon ( ) to include all agents or selectspecific domains or agents.
3. Click View Logs > Web Reputation Logs or Logs > Web Reputation Logs.
4. Specify the log criteria and then click Display Logs.
5. View logs. Logs contain the following information:
ITEM DESCRIPTION
Date/Time The time the detection occurred
Endpoint The endpoint on which the detection occurred
Domain The domain of the endpoint on which the detectionoccurred
URL The URL blocked by Web Reputation Services
Risk Level The risk level of the URL
Description A description of the security threat
Process The process through which the contact was attempted(path\application_name)
6. If there are URLs that should not be blocked, click the Add to Approved Listbutton to add the website to the Approved URL list.

Protecting Computers from Web-based Threats
11-23
7. To save logs to a comma-separated value (CSV) file, click Export to All to CSV.Open the file or save it to a specific location.
Viewing C&C Callback Logs
Procedure
1. Go to Logs > Agents > Security Risks or Agents > Agent Management.
2. In the agent tree, click the root domain icon ( ) to include all agents or selectspecific domains or agents.
3. Click View Logs > C&C Callback Logs or Logs > C&C Callback Logs.
4. Specify the log criteria and then click Display Logs.
5. View logs. Logs contain the following information:
ITEM DESCRIPTION
Date/Time The time the detection occurred
User The user logged on at the time of the detection
Compromised Host The endpoint from which the callback originated
IP Address The IP address of the compromised host
Domain The domain of the endpoint on which the detectionoccurred
Callback Address The address to which the endpoint sent the callback
C&C List Source The C&C list source that identified the C&C server
C&C Risk Level The risk level of the C&C server
Protocol The Internet Protocol used for the transmission
Process The process that initiated the transmission (path\application_name)

OfficeScan™ 11.0 Administrator’s Guide
11-24
ITEM DESCRIPTION
Action The action taken on the callback
6. If Web Reputation blocked a URL that you do not want blocked, click the Add toWeb Reputation Approved List button to add the address to the WebReputation Approved List.
Note
OfficeScan can only add URLs to the Web Reputation Approved List. For detectionsmade by the Global C&C IP List or the Virtual Analyzer (IP) C&C List, manually addthese IP addresses to the User-defined Approved C&C IP List.
For details, see Configuring Global User-defined IP List Settings on page 11-12.
7. To save logs to a comma-separated value (CSV) file, click Export to All to CSV.Open the file or save it to a specific location.
Viewing Suspicious Connection Logs
Procedure
1. Go to Logs > Agents > Security Risks or Agents > Agent Management.
2. In the agent tree, click the root domain icon ( ) to include all agents or selectspecific domains or agents.
3. Click View Logs > Suspicious Connection Logs or Logs > SuspiciousConnection Logs.
4. Specify the log criteria and then click Display Logs.
5. View logs. Logs contain the following information:
ITEM DESCRIPTION
Date/Time The time the detection occurred
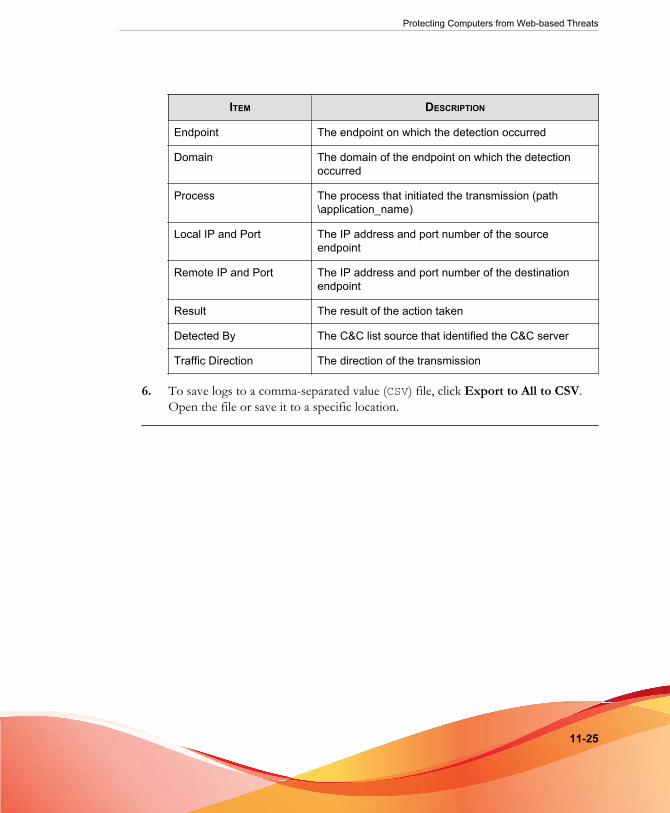
Protecting Computers from Web-based Threats
11-25
ITEM DESCRIPTION
Endpoint The endpoint on which the detection occurred
Domain The domain of the endpoint on which the detectionoccurred
Process The process that initiated the transmission (path\application_name)
Local IP and Port The IP address and port number of the sourceendpoint
Remote IP and Port The IP address and port number of the destinationendpoint
Result The result of the action taken
Detected By The C&C list source that identified the C&C server
Traffic Direction The direction of the transmission
6. To save logs to a comma-separated value (CSV) file, click Export to All to CSV.Open the file or save it to a specific location.

12-1
Chapter 12
Using the OfficeScan FirewallThis chapter describes the OfficeScan Firewall features and configurations.
Topics include:
• About the OfficeScan Firewall on page 12-2
• Enabling or Disabling the OfficeScan Firewall on page 12-6
• Firewall Policies and Profiles on page 12-8
• Firewall Privileges on page 12-22
• Global Firewall Settings on page 12-24
• Firewall Violation Notifications for OfficeScan Agent Users on page 12-26
• Firewall Logs on page 12-28
• Firewall Violation Outbreaks on page 12-29
• Testing the OfficeScan Firewall on page 12-31

OfficeScan™ 11.0 Administrator’s Guide
12-2
About the OfficeScan FirewallThe OfficeScan firewall protects agents and servers on the network using statefulinspection and high performance network virus scanning. Through the centralmanagement console, you can create rules to filter connections by application, IPaddress, port number, or protocol, and then apply the rules to different groups of users.
Note
You can enable, configure, and use the OfficeScan firewall on Windows XP endpoints thatalso have Windows Firewall enabled. However, manage policies carefully to avoid creatingconflicting firewall policies and producing unexpected results. See the Microsoftdocumentation for details on Windows Firewall.
The OfficeScan firewall includes the following key features and benefits:
• Traffic Filtering on page 12-2
• Application Filtering on page 12-3
• Certified Safe Software List on page 12-3
• Scanning for Network Viruses on page 12-3
• Customizable Profiles and Policies on page 12-4
• Stateful Inspection on page 12-4
• Intrusion Detection System on page 12-4
• Firewall Violation Outbreak Monitor on page 12-6
• OfficeScan Agent Firewall Privileges on page 12-6
Traffic FilteringThe OfficeScan firewall filters all incoming and outgoing traffic, providing the ability toblock certain types of traffic based on the following criteria:
• Direction (inbound/outbound)

Using the OfficeScan Firewall
12-3
• Protocol (TCP/UDP/ICMP/ICMPv6)
• Destination ports
• Source and destination endpoints
Application FilteringThe OfficeScan firewall filters incoming and outgoing traffic for specific applications,allowing these applications to access the network. However, network connections willdepend on the policies set by the administrator.
NoteOfficeScan does not support specific application exceptions on Windows 8, Windows 8.1,and Windows Server 2012 platforms. OfficeScan allows or denies all application traffic onendpoints with these platforms.
Certified Safe Software ListThe Certified Safe Software List provides a list of applications that can bypass firewallpolicy security levels. If the security level is set to Medium or High, OfficeScan will stillallow applications to run and access the network.
Enable querying of the global Certified Safe Software List that provides a morecomplete list. This is a list dynamically updated by Trend Micro.
NoteThis feature works with Behavior Monitoring. Ensure that you enable the UnauthorizedChange Prevention Service and Certified Safe Software Service, before enabling the globalCertified Safe Software List.
Scanning for Network VirusesThe OfficeScan firewall also examines each packet for network viruses. For details, seeViruses and Malware on page 7-2.
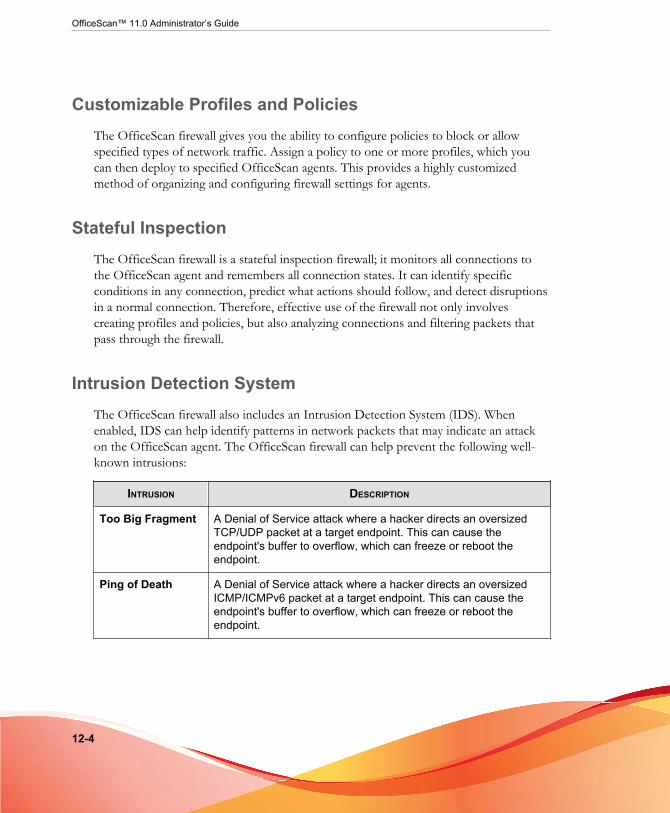
OfficeScan™ 11.0 Administrator’s Guide
12-4
Customizable Profiles and PoliciesThe OfficeScan firewall gives you the ability to configure policies to block or allowspecified types of network traffic. Assign a policy to one or more profiles, which youcan then deploy to specified OfficeScan agents. This provides a highly customizedmethod of organizing and configuring firewall settings for agents.
Stateful InspectionThe OfficeScan firewall is a stateful inspection firewall; it monitors all connections tothe OfficeScan agent and remembers all connection states. It can identify specificconditions in any connection, predict what actions should follow, and detect disruptionsin a normal connection. Therefore, effective use of the firewall not only involvescreating profiles and policies, but also analyzing connections and filtering packets thatpass through the firewall.
Intrusion Detection SystemThe OfficeScan firewall also includes an Intrusion Detection System (IDS). Whenenabled, IDS can help identify patterns in network packets that may indicate an attackon the OfficeScan agent. The OfficeScan firewall can help prevent the following well-known intrusions:
INTRUSION DESCRIPTION
Too Big Fragment A Denial of Service attack where a hacker directs an oversizedTCP/UDP packet at a target endpoint. This can cause theendpoint's buffer to overflow, which can freeze or reboot theendpoint.
Ping of Death A Denial of Service attack where a hacker directs an oversizedICMP/ICMPv6 packet at a target endpoint. This can cause theendpoint's buffer to overflow, which can freeze or reboot theendpoint.

Using the OfficeScan Firewall
12-5
INTRUSION DESCRIPTION
Conflicted ARP A type of attack where a hacker sends an Address ResolutionProtocol (ARP) request with the same source and destination IPaddress to a targeted endpoint. The target endpoint continuallysends an ARP response (its MAC address) to itself, causing it tofreeze or crash.
SYN Flood A Denial of Service attack where a program sends multiple TCPsynchronization (SYN) packets to the endpoint, causing theendpoint to continually send synchronization acknowledgment(SYN/ACK) responses. This can exhaust endpoint memory andeventually crash the endpoint.
OverlappingFragment
Similar to a Teardrop attack, this Denial of Service attack sendsoverlapping TCP fragments to the endpoint. This overwrites theheader information in the first TCP fragment and may passthrough a firewall. The firewall may then allow subsequentfragments with malicious code to pass through to the targetendpoint.
Teardrop Similar to an overlapping fragment attack, this Denial of Serviceattack deals with IP fragments. A confusing offset value in thesecond or later IP fragment can cause the receiving endpoint’soperating system to crash when attempting to reassemble thefragments.
Tiny FragmentAttack
A type of attack where a small TCP fragment size forces the firstTCP packet header information into the next fragment. This cancause routers that filter traffic to ignore the subsequent fragments,which may contain malicious data.
Fragmented IGMP A Denial of Service attack that sends fragmented IGMP packetsto a target endpoint, which cannot properly process the IGMPpackets. This can freeze or slow down the endpoint.
LAND Attack A type of attack that sends IP synchronization (SYN) packets withthe same source and destination address to the endpoint, causingthe endpoint to send the synchronization acknowledgment (SYN/ACK) response to itself. This can freeze or slow down theendpoint.

OfficeScan™ 11.0 Administrator’s Guide
12-6
Firewall Violation Outbreak MonitorThe OfficeScan firewall sends a customized notification message to specified recipientswhen firewall violations exceed certain thresholds, which may signal an attack.
OfficeScan Agent Firewall PrivilegesGrant OfficeScan agent users the privilege to view their firewall settings on theOfficeScan agent console. Also grant users the privilege to enable or disable the firewall,the Intrusion Detection System, and the firewall violation notification message.
Enabling or Disabling the OfficeScan FirewallDuring the OfficeScan server installation, you are prompted to enable or disable theOfficeScan firewall.
If you enabled the firewall during installation and noticed an impact on performance,especially on server platforms (Windows Server 2003, Windows Server 2008, andWindows Server 2012), consider disabling the firewall.
If you disabled the firewall during installation but now want to enable it to protect theagent from intrusions, first read the guidelines and instructions in OfficeScan Agent Serviceson page 14-6.
You can enable or disable the firewall on all or select OfficeScan agent endpoints.
Enabling or Disabling the OfficeScan Firewall on SelectedEndpoints
Use one of the following methods to enable or disable the firewall.

Using the OfficeScan Firewall
12-7
METHOD PROCEDURE
Create a new policyand apply it toOfficeScan agents
1. Create a new policy that enables/disables the firewall. Forsteps in creating a new policy, see Adding or Modifying aFirewall Policy on page 12-10.
2. Apply the policy to the OfficeScan agents.
Enable/Disable thefirewall driver andservice
1. Enable/Disable the firewall driver.
a. Open Windows Network Connection Properties.
b. Select or clear the Trend Micro Common FirewallDriver check box from the network card.
2. Enable/Disable the firewall service.
a. Open a command prompt and type services.msc.
b. Start or stop OfficeScan NT Firewall from MicrosoftManagement Console (MMC).
Enable/Disable thefirewall service fromthe web console
For the detailed steps, see OfficeScan Agent Services on page14-6.
Enabling or Disabling the OfficeScan Firewall on AllEndpoints
Procedure
1. Go to Administration > Settings > Product License.
2. Go to the Additional Services section.
3. In the Additional Services section, beside the Firewall for endpoints row, clickEnable or Disable.

OfficeScan™ 11.0 Administrator’s Guide
12-8
Firewall Policies and ProfilesThe OfficeScan firewall uses policies and profiles to organize and customize methodsfor protecting networked endpoints.
With Active Directory integration and role-based administration, each user role,depending on the permission, can create, configure, or delete policies and profiles forspecific domains.
Tip
Multiple firewall installations on the same endpoint may produce unexpected results.Consider uninstalling other software-based firewall applications on OfficeScan agentsbefore deploying and enabling the OfficeScan firewall.
The following steps are necessary to successfully use the OfficeScan firewall:
1. Create a policy. The policy allows you to select a security level that blocks or allowstraffic on networked endpoints and enables firewall features.
2. Add exceptions to the policy. Exceptions allow OfficeScan agents to deviate froma policy. With exceptions, you can specify agents, and allow or block certain typesof traffic, despite the security level setting in the policy. For example, block alltraffic for a set of agents in a policy, but create an exception that allows HTTPtraffic so agents can access a web server.
3. Create and assign profiles to OfficeScan agents. A firewall profile includes a set ofagent attributes and is associated with a policy. When any agent matches theattributes specified in the profile, the associated policy is triggered.
Firewall Policies
Firewall policies allow you to block or allow certain types of network traffic notspecified in a policy exception. A policy also defines which firewall features get enabledor disabled. Assign a policy to one or multiple firewall profiles.
OfficeScan comes with a set of default policies, which you can modify or delete.

Using the OfficeScan Firewall
12-9
With Active Directory integration and role-based administration, each user role,depending on the permission, can create, configure, or delete policies for specificdomains.
The following table lists the default firewall policies.
TABLE 12-1. Default Firewall Policies
POLICY NAMESECURITY
LEVELAGENT
SETTINGSEXCEPTIONS RECOMMENDED USE
All access Low Enablefirewall
None Use to allow agentsunrestricted access tothe network
CommunicationPorts for TrendMicro ControlManager
Low Enablefirewall
Allow all incomingand outgoingTCP/UDP trafficthrough ports 80and 10319
Use when agentshave an MCP agentinstallation
ScanMail forMicrosoftExchangeconsole
Low Enablefirewall
Allow all incomingand outgoing TCPtraffic through port16372
Use when agentsneed to access theScanMail console
InterScanMessagingSecurity Suite(IMSS) console
Low Enablefirewall
Allow all incomingand outgoing TCPtraffic through port80
Use when agentsneed to access theIMSS console
Also create new policies if you have requirements not covered by any of the defaultpolicies.
All default and user-created firewall policies display on the firewall policy list on the webconsole.
Configuring the Firewall Policy List
Procedure
1. Go to Agents > Firewall > Policies.

OfficeScan™ 11.0 Administrator’s Guide
12-10
2. To add a new policy, click Add.
If the new policy you want to create has similar settings with an existing policy,select the existing policy and click Copy. To edit an existing policy, click the policyname.
A policy configuration screen appears. See Adding or Modifying a Firewall Policy on page12-10 for more information.
3. To delete an existing policy, select the check box next to the policy and clickDelete.
4. To edit the firewall exception template, click Edit Exception Template.
See Editing the Firewall Exception Template on page 12-13 for more information.
The Exception Template Editor appears.
Adding or Modifying a Firewall Policy
Configure the following for each policy:
• Security level: A general setting that blocks or allows all inbound and/or alloutbound traffic on the OfficeScan agent endpoint
• Firewall features: Specify whether to enable or disable the OfficeScan firewall, theIntrusion Detection System (IDS), and the firewall violation notification message.See Intrusion Detection System on page 12-4 for more information on IDS.
• Certified Safe Software List: Specify whether to allow certified safe applicationsto connect to the network. See Certified Safe Software List on page 12-3 for moreinformation on Certified Safe Software List.
• Policy exception list: A list of configurable exceptions that block or allow varioustypes of network traffic

Using the OfficeScan Firewall
12-11
Adding a Firewall Policy
Procedure
1. Go to Agents > Firewall > Policies.
2. To add a new policy, click Add.
If a new policy you want to create has similar settings with an existing policy, selectthe existing policy and click Copy.
3. Type a name for the policy.
4. Select a security level.
The selected security level will not apply to traffic that meet the firewall policyexception criteria.
5. Select the firewall features to use for the policy.
• The firewall violation notification message displays when the firewall blocksan outgoing packet. To modify the message, see Modifying the Content of theFirewall Notification Message on page 12-27.
• Enabling all the firewall features grants the OfficeScan agent users theprivileges to enable/disable the features and modify firewall settings in theOfficeScan agent console.
WARNING!You cannot use the OfficeScan web console to override OfficeScan agentconsole settings that the user configures.
• If you do not enable the features, the firewall settings you configure from theOfficeScan web console display under Network card list on the OfficeScanagent console.
• The information under Settings on the OfficeScan agent console's Firewalltab always reflects the settings configured from the OfficeScan agent console,not from the server web console.
6. Enable the local or global Certified Safe Software List.

OfficeScan™ 11.0 Administrator’s Guide
12-12
Note
Ensure that the Unauthorized Change Prevention Service and Certified Safe SoftwareServices have been enabled before enabling this service.
7. Under Exception, select the firewall policy exceptions. The policy exceptionsincluded here are based on the firewall exception template. See Editing the FirewallException Template on page 12-13 for details.
• Modify an existing policy exception by clicking the policy exception name andchanging the settings in the page that opens.
Note
The modified policy exception will only apply to the policy to be created. If youwant the policy exception modification to be permanent, you will need to makethe same modification to the policy exception in the firewall exceptiontemplate.
• Click Add to create a new policy exception. Specify the settings in the pagethat opens.
Note
The policy exception will also apply only to the policy to be created. To applythis policy exception to other policies, you need to add it first to the list ofpolicy exceptions in the firewall exception template.
8. Click Save.
Modifying an Existing Firewall Policy
Procedure
1. Go to Agents > Firewall > Policies.
2. Click a policy.
3. Modify the following:

Using the OfficeScan Firewall
12-13
• Policy name
• Security level
• Firewall features to use for the policy
• Certified Safe Software Service List status
• Firewall policy exceptions to include in the policy
• Edit an existing policy exception (click the policy exception name andchange settings in the page that opens)
• Click Add to create a new policy exception. Specify the settings in thepage that opens.
4. Click Save to apply the modifications to the existing policy.
Editing the Firewall Exception Template
The firewall exception template contains policy exceptions that you can configure toallow or block different kinds of network traffic based on the OfficeScan agentendpoint's port number(s) and IP address(es). After creating a policy exception, edit thepolicies to which the policy exception applies.
Decide which type of policy exception you want to use. There are two types:
• Restrictive
Blocks only specified types of network traffic and applies to policies that allow allnetwork traffic. An example use of a restrictive policy exception is to blockOfficeScan agent ports vulnerable to attack, such as ports that Trojans often use.
• Permissive
Allows only specified types of network traffic and applies to policies that block allnetwork traffic. For example, you may want to permit OfficeScan agents to accessonly the OfficeScan server and a web server. To do this, allow traffic from thetrusted port (the port used to communicate with the OfficeScan server) and theport the OfficeScan agent uses for HTTP communication.

OfficeScan™ 11.0 Administrator’s Guide
12-14
OfficeScan agent listening port: Agents > Agent Management > Status. Theport number is under Basic Information.
Server listening port: Administration > Settings > Agent Connection. The portnumber is under Agent Connection Settings.
OfficeScan comes with a set of default firewall policy exceptions, which you canmodify or delete.
TABLE 12-2. Default Firewall Policy Exceptions
EXCEPTIONNAME
ACTION PROTOCOL PORT DIRECTION
DNS Allow TCP/UDP 53 Incoming and outgoing
NetBIOS Allow TCP/UDP 137, 138,139, 445
Incoming and outgoing
HTTPS Allow TCP 443 Incoming and outgoing
HTTP Allow TCP 80 Incoming and outgoing
Telnet Allow TCP 23 Incoming and outgoing
SMTP Allow TCP 25 Incoming and outgoing
FTP Allow TCP 21 Incoming and outgoing
POP3 Allow TCP 110 Incoming and outgoing
LDAP Allow TCP/UDP 389 Incoming and outgoing
NoteDefault exceptions apply to all agents. If you want a default exception to apply only tocertain agents, edit the exception and specify the IP addresses of the agents.
The LDAP exception is not available if you upgrade from a previous OfficeScan version.Manually add this exception if you do not see it on the exception list.

Using the OfficeScan Firewall
12-15
Adding a Firewall Policy Exception
Procedure
1. Go to Agents > Firewall > Policies.
2. Click Edit Exception Template.
3. Click Add.
4. Type a name for the policy exception.
5. Select the type of application. You can select all applications, or specify applicationpath or registry keys.
NoteVerify the name and full paths entered. Application exception does not supportwildcards.
6. Select the action OfficeScan will perform on network traffic (block or allow trafficthat meets the exception criteria) and the traffic direction (inbound or outboundnetwork traffic on the OfficeScan agent endpoint).
7. Select the type of network protocol: TCP, UDP, ICMP, or ICMPv6.
8. Specify ports on the OfficeScan agent endpoint on which to perform the action.
9. Select OfficeScan agent endpoint IP addresses to include in the exception. Forexample, if you chose to deny all network traffic (inbound and outbound) and typethe IP address for a single endpoint on the network, then any OfficeScan agentthat has this exception in its policy will not be able to send or receive data to orfrom that IP address.
• All IP addresses: Includes all IP addresses
• Single IP address: Type an IPv4 or IPv6 address, or a host name.
• Range (for IPv4 or IPv6): Type an IPv4 or IPv6 address range.
• Range (for IPv6): Type an IPv6 address prefix and length.
• Subnet mask: Type an IPv4 address and its subnet mask.

OfficeScan™ 11.0 Administrator’s Guide
12-16
10. Click Save.
Modifying a Firewall Policy Exception
Procedure
1. Go to Agents > Firewall > Policies.
2. Click Edit Exception Template.
3. Click a policy exception.
4. Modify the following:
• Policy exception name
• Application type, name, or path
• Action OfficeScan will perform on network traffic and the traffic direction
• Type of network protocol
• Port numbers for the policy exception
• OfficeScan agent endpoint IP addresses
5. Click Save.
Saving the Policy Exception List Settings
Procedure
1. Go to Agents > Firewall > Policies.
2. Click Edit Exception Template.
3. Click one of the following save options:
• Save Template Changes: Saves the exception template with the currentpolicy exceptions and settings. This option only applies the template topolicies created in the future, not existing policies.

Using the OfficeScan Firewall
12-17
• Save and Apply to Existing Policies: Saves the exception template with thecurrent policy exceptions and settings. This option applies the template toexisting and future policies.
Firewall Profiles
Firewall profiles provide flexibility by allowing you to choose the attributes that a singleagent or group of agents must have before applying a policy. Create user roles that cancreate, configure, or delete profiles for specific domains.
Users using the built-in administrator account or users with full managementpermissions can also enable the Overwrite agent security level/exception list optionto replace the OfficeScan agent profile settings with the server settings.
Profiles include the following:
• Associated policy: Each profile uses a single policy
• Agent attributes: OfficeScan agents with one or more of the following attributesapply the associated policy:
• IP address: Any OfficeScan agent that has a specific IP address, an IPaddress that falls within a range of IP addresses, or an IP address belonging toa specified subnet
• Domain: Any OfficeScan agent that belongs to a certain OfficeScan domain
• Endpoint: The OfficeScan agent with a specific endpoint name
• Platform: Any OfficeScan agent running a specific platform
• Logon name: OfficeScan agent endpoints to which specified users havelogged on
• NIC description: Any OfficeScan agent endpoint with a matching NICdescription
• Agent connection status: If the OfficeScan agent is online or offline
OfficeScan™ 11.0 Administrator’s Guide
12-18
Note
The OfficeScan agent is online if it can connect to the OfficeScan server or anyof the reference servers, and offline if it cannot connect to any server.
OfficeScan comes with a default profile named "All agents profile", which uses the "Allaccess" policy. You can modify or delete this default profile. You can also create newprofiles. All default and user-created firewall profiles, including the policy associated toeach profile and the current profile status, display on the firewall profile list on the webconsole. Manage the profile list and deploy all profiles to OfficeScan agents. OfficeScanagents store all the firewall profiles on the agent endpoint.
Configuring the Firewall Profile List
Procedure
1. Go to Agents > Firewall > Profiles.
2. For users using the built-in administrator account or users with full managementpermissions, optionally enable the Overwrite agent security level/exception listoption to replace the OfficeScan agent profile settings with the server settings.
3. To add a new profile, click Add. To edit an existing profile, select the profile name.
A profile configuration screen appears. See Adding and Editing a Firewall Profile onpage 12-20 more information.
4. To delete an existing policy, select the check box next to the policy and clickDelete.
5. To change the order of profiles in the list, select the check box next to the profileto move, and then click Move Up or Move Down.
OfficeScan applies firewall profiles to OfficeScan agents in the order in which theprofiles appear in the profile list. For example, if the agent matches the first profile,OfficeScan applies the actions configured for that profile to the agent. OfficeScanignores the other profiles configured for that agent.
Using the OfficeScan Firewall
12-19
Tip
The more exclusive a policy, the better it is at the top of the list. For example, move apolicy you create for a single agent to the top, followed by those for a range of agents,a network domain, and all agents.
6. To manage reference servers, click Edit Reference Server List. Reference serversare endpoints that act as substitutes for the OfficeScan server when it appliesfirewall profiles. A reference server can be any endpoint on the network (seeReference Servers on page 13-27 for more information). OfficeScan makes thefollowing assumptions when you enable reference servers:
• OfficeScan agents connected to reference servers are online, even if theagents cannot communicate with the OfficeScan server.
• Firewall profiles applied to online OfficeScan agents also apply to OfficeScanagents connected to reference servers.
Note
Only users using the built-in administrator account or those with full managementpermissions can see and configure the reference server list.
7. To save the current settings and assign the profiles to OfficeScan agents:
a. Select whether to Overwrite agent security level/exception list. Thisoption overwrites all user-configured firewall settings.
b. Click Assign Profile to Agents. OfficeScan assigns all profiles on the profilelist to all the OfficeScan agents.
8. To verify that you successfully assigned profiles to OfficeScan agents:
a. Go to Agents > Agent Management. In the agent tree view drop-downbox, select Firewall view.
b. Ensure that a green check mark exists under the Firewall column in the agenttree. If the policy associated with the profile enables the Intrusion DetectionSystem, a green check mark also exists under the IDS column.

OfficeScan™ 11.0 Administrator’s Guide
12-20
c. Verify that the agent applied the correct firewall policy. The policy appearsunder the Firewall Policy column in the agent tree.
Adding and Editing a Firewall Profile
OfficeScan agent endpoints may require different levels of protection. Firewall profilesallow you to specify the agent endpoints to which an associated policy applies.Generally, one profile is necessary for each policy in use.
Adding a Firewall Profile
Procedure
1. Go to Agents > Firewall > Profiles.
2. Click Add.
3. Click Enable this profile to allow OfficeScan to deploy the profile to OfficeScanagents.
4. Type a name to identify the profile and an optional description.
5. Select a policy for this profile.
6. Specify the agent endpoints to which OfficeScan applies the policy. Selectendpoints based on the following criteria:
• IP address
• Domain: Click the button to open and select domains from the agent tree.
Note
Only users with full domain permissions can select domains.
• Endpoint name: Click the button to open, and select OfficeScan agentendpoints from, the agent tree.
• Platform

Using the OfficeScan Firewall
12-21
• Logon name
• NIC description: Type a full or partial description, without wildcards.
TipTrend Micro recommends typing the NIC card manufacturer because NICdescriptions typically start with the manufacturer’s name. For example, if youtyped "Intel", all Intel-manufactured NICs will satisfy the criteria. If you typed aparticular NIC model, such as "Intel(R) Pro/100", only NIC descriptions thatstart with "Intel(R) Pro/100" will satisfy the criteria.
• Agent connection status
7. Click Save.
Modifying a Firewall Profile
Procedure
1. Go to Agents > Firewall > Profiles.
2. Click a profile.
3. Click Enable this profile to allow OfficeScan to deploy this profile to OfficeScanagents. Modify the following:
• Profile name and description
• Policy assigned to the profile
• OfficeScan agent endpoints, based on the following criteria:
• IP address
• Domain: Click the button to open the agent tree and select domainsfrom there.
• Endpoint name: Click the button to open the agent tree and select agentendpoints from there.
• Platform
OfficeScan™ 11.0 Administrator’s Guide
12-22
• Logon name
• NIC description: Type a full or partial description, without wildcards.
Tip
Trend Micro recommends typing the NIC card manufacturer becauseNIC descriptions typically start with the manufacturer’s name. Forexample, if you typed "Intel", all Intel-manufactured NICs will satisfy thecriteria. If you typed a particular NIC model, such as "Intel(R) Pro/100",only NIC descriptions that start with "Intel(R) Pro/100" will satisfy thecriteria.
• Agent connection status
4. Click Save.
Firewall PrivilegesAllow users to configure their own firewall settings. All user-configured settings cannotbe overridden by settings deployed from the OfficeScan server. For example, if the userdisables Intrusion Detection System (IDS) and you enable IDS on the OfficeScanserver, IDS remains disabled on the OfficeScan agent endpoint.
Enable the following settings to allow users to configure the firewall:
• Display the Firewall settings on the OfficeScan agent console
The Firewall option displays all firewall settings on the OfficeScan agent.
• Allow users to enable/disable the firewall, Intrusion Detection System, andthe firewall violation notification message
The OfficeScan firewall protects agents and servers on the network using statefulinspection, high performance network virus scanning, and elimination. If you grantusers the privilege to enable or disable the firewall and its features, warn them notto disable the firewall for an extended period of time to avoid exposing theendpoint to intrusions and hacker attacks.

Using the OfficeScan Firewall
12-23
If you do not grant users the privileges, the firewall settings you configure from theOfficeScan server web console display under Network card list on the OfficeScanagent console.
• Allow agents to send firewall logs to the OfficeScan server
Select this option to analyze traffic the OfficeScan firewall blocks and allows. Fordetails about firewall logs, see Firewall Logs on page 12-28.
If you select this option, configure the log sending schedule in Agents > GlobalAgent Settings. Go to the Firewall Settings section. The schedule only applies toagents with the firewall log sending privilege. For instructions, see Global FirewallSettings on page 12-24.
Granting Firewall Privileges
Procedure
1. Go to Agents > Agent Management.
2. In the agent tree, click the root domain icon ( ) to include all agents or selectspecific domains or agents.
3. Click Settings > Privileges and Other Settings.
4. On the Privileges tab, go to the Firewall Privileges section.
5. Select the following options:
• Display the Firewall tab on the OfficeScan agent console on page 12-22
• Allow users to enable/disable the firewall, Intrusion Detection System, and the firewallviolation notification message on page 12-22
• Allow OfficeScan agents to send firewall logs to the OfficeScan server on page 12-23
6. If you selected domain(s) or agent(s) in the agent tree, click Save. If you clicked theroot domain icon, choose from the following options:

OfficeScan™ 11.0 Administrator’s Guide
12-24
• Apply to All Agents: Applies settings to all existing agents and to any newagent added to an existing/future domain. Future domains are domains notyet created at the time you configured the settings.
• Apply to Future Domains Only: Applies settings only to agents added tofuture domains. This option will not apply settings to new agents added to anexisting domain.
Global Firewall SettingsThere are a number of ways global firewall settings get applied to OfficeScan agents.
• A particular firewall setting can apply to all agents that the server manages.
• A setting can apply only to OfficeScan agents with certain firewall privileges. Forexample, the firewall log sending schedule only applies to OfficeScan agents withthe privilege to send logs to the server.
Enable the following global settings as required:
• Send firewall logs to the server
You can grant certain OfficeScan agents the privilege to send firewall logs to theOfficeScan server. Configure the log sending schedule in this section. Only agentswith the privilege to send firewall logs will use the schedule.
See Firewall Privileges on page 12-22 for information on firewall privileges available toselected agents.
• Update the OfficeScan firewall driver only after a system reboot
Enable the OfficeScan agent to update the Common Firewall Driver only after theOfficeScan agent endpoint restarts. Enable this option to avoid potential agentendpoint disruptions (such as temporary disconnection from the network) whenthe Common Firewall Driver updates during agent upgrade.
NoteThis feature only supports agents upgraded from OfficeScan 8.0 SP1 and above.

Using the OfficeScan Firewall
12-25
• Send firewall log information to the OfficeScan server hourly to determinethe possibility of a firewall outbreak
When you enable this option, OfficeScan agents will send firewall log counts onceevery hour to the OfficeScan server. For details about firewall logs, see Firewall Logson page 12-28.
OfficeScan uses log counts and the firewall violation outbreak criteria to determinethe possibility of a firewall violation outbreak. OfficeScan sends email notificationsto OfficeScan administrators in the event of an outbreak.
• Go to the Certified Safe Software Service Settings section and enable theCertified Safe Software Service as required.
The Certified Safe Software Service queries Trend Micro datacenters to verify thesafety of a program detected by Malware Behavior Blocking, Event Monitoring,Firewall, or antivirus scans. Enable Certified Safe Software Service to reduce thelikelihood of false positive detections.
Note
Ensure that OfficeScan agents have the correct proxy settings (for details, seeOfficeScan Agent Proxy Settings on page 14-46) before enabling Certified Safe SoftwareService. Incorrect proxy settings, along with an intermittent Internet connection, canresult in delays or failure to receive a response from Trend Micro datacenters, causingmonitored programs to appear unresponsive.
In addition, pure IPv6 OfficeScan agents cannot query directly from Trend Microdatacenters. A dual-stack proxy server that can convert IP addresses, such asDeleGate, is required to allow the OfficeScan agents to connect to the Trend Microdatacenters.
Configuring Global Firewall Settings
Procedure
1. Go to Agents > Global Agent Settings.
2. Go to the following sections and configure the settings:
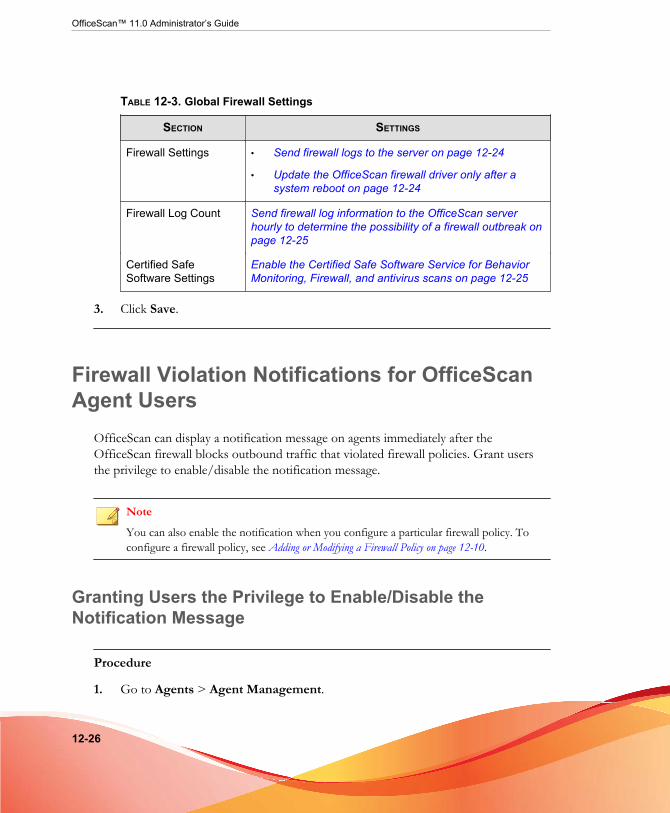
OfficeScan™ 11.0 Administrator’s Guide
12-26
TABLE 12-3. Global Firewall Settings
SECTION SETTINGS
Firewall Settings • Send firewall logs to the server on page 12-24
• Update the OfficeScan firewall driver only after asystem reboot on page 12-24
Firewall Log Count Send firewall log information to the OfficeScan serverhourly to determine the possibility of a firewall outbreak onpage 12-25
Certified SafeSoftware Settings
Enable the Certified Safe Software Service for BehaviorMonitoring, Firewall, and antivirus scans on page 12-25
3. Click Save.
Firewall Violation Notifications for OfficeScanAgent Users
OfficeScan can display a notification message on agents immediately after theOfficeScan firewall blocks outbound traffic that violated firewall policies. Grant usersthe privilege to enable/disable the notification message.
Note
You can also enable the notification when you configure a particular firewall policy. Toconfigure a firewall policy, see Adding or Modifying a Firewall Policy on page 12-10.
Granting Users the Privilege to Enable/Disable theNotification Message
Procedure
1. Go to Agents > Agent Management.
Using the OfficeScan Firewall
12-27
2. In the agent tree, click the root domain icon ( ) to include all agents or selectspecific domains or agents.
3. Click Settings > Privileges and Other Settings.
4. On the Privileges tab, go to the Firewall Privileges section.
5. Select Allow users to enable/disable the firewall, Intrusion DetectionSystem, and the firewall violation notification message.
6. If you selected domain(s) or agent(s) in the agent tree, click Save. If you clicked theroot domain icon, choose from the following options:
• Apply to All Agents: Applies settings to all existing agents and to any newagent added to an existing/future domain. Future domains are domains notyet created at the time you configured the settings.
• Apply to Future Domains Only: Applies settings only to agents added tofuture domains. This option will not apply settings to new agents added to anexisting domain.
Modifying the Content of the Firewall NotificationMessage
Procedure
1. Go to Administration > Notifications > Agent.
2. From the Type drop-down, select Firewall Violations.
3. Modify the default messages in the text box provided.
4. Click Save.

OfficeScan™ 11.0 Administrator’s Guide
12-28
Firewall LogsFirewall logs available on the server are sent by OfficeScan agents with the privilege tosend firewall logs. Grant specific agents this privilege to monitor and analyze traffic onthe endpoints that the OfficeScan firewall is blocking.
For information about firewall privileges, see Firewall Privileges on page 12-22.
To keep the size of logs from occupying too much space on the hard disk, manuallydelete logs or configure a log deletion schedule. For more information about managinglogs, see Log Management on page 13-32.
Viewing Firewall Logs
Procedure
1. Go to Logs > Agents > Security Risks or Agents > Agent Management.
2. In the agent tree, click the root domain icon ( ) to include all agents or selectspecific domains or agents.
3. Click Logs > Firewall Logs or View Logs > Firewall Logs.
4. To ensure that the most up-to-date logs are available to you, click Notify Agents.Allow some time for agents to send firewall logs before proceeding to the nextstep.
5. Specify the log criteria and then click Display Logs.
6. View logs. Logs contain the following information:
• Date and time of the firewall violation detection
• Endpoint where the firewall violation occurred
• Endpoint domain where the firewall violation occurred
• Remote host IP address
• Local host IP address

Using the OfficeScan Firewall
12-29
• Protocol
• Port number
• Direction: If inbound (Receive) or outbound (Send) traffic violated a firewallpolicy
• Process: The executable program or service running on the endpoint thatcaused the firewall violation
• Description: Specifies the actual security risk (such as a network virus or IDSattack) or the firewall policy violation
7. To save logs to a comma-separated value (CSV) file, click Export to CSV. Openthe file or save it to a specific location.
Firewall Violation OutbreaksDefine a firewall violation outbreak by the number of firewall violations and thedetection period.
OfficeScan comes with a default notification message that inform you and otherOfficeScan administrators of an outbreak. You can modify the notification message tosuit your requirements.
NoteOfficeScan can send firewall outbreak notifications through email. Configure email settingsto allow OfficeScan to send emails successfully. For details, see Administrator NotificationSettings on page 13-29.
Configuring the Firewall Violation Outbreak Criteria andNotifications
Procedure
1. Go to Administration > Notifications > Outbreak.

OfficeScan™ 11.0 Administrator’s Guide
12-30
2. In the Criteria tab:
a. Go to the Firewall Violations section.
b. Select Monitor firewall violations on OfficeScan agents.
c. Specify the number of IDS logs, firewall logs, and network virus logs.
d. Specify the detection period.
Tip
Trend Micro recommends accepting the default values in this screen.
OfficeScan sends a notification message when the number of logs is exceeded. Forexample, if you specify 100 IDS logs, 100 firewall logs, 100 network virus logs, anda time period of 3 hours, OfficeScan sends the notification when the serverreceives 301 logs within a 3-hour period.
3. In the Email tab:
a. Go to the Firewall Violation Outbreaks section.
b. Select Enable notification via email.
c. Specify the email recipients.
d. Accept or modify the default email subject and message. You can use tokenvariables to represent data in the Subject and Message fields.
TABLE 12-4. Token Variables for Firewall Violation Outbreak Notifications
VARIABLE DESCRIPTION
%A Log type exceeded
%C Number of firewall violation logs
%T Time period when firewall violation logs accumulated
4. Click Save.
Using the OfficeScan Firewall
12-31
Testing the OfficeScan FirewallTo ensure that the OfficeScan firewall works properly, perform a test on a singleOfficeScan agent or group of OfficeScan agents.
WARNING!Test OfficeScan agent program settings in a controlled environment only. Do not performtests on endpoints connected to the network or to the Internet. Doing so may exposeOfficeScan agent endpoints to viruses, hacker attacks, and other risks.
Procedure
1. Create and save a test policy. Configure the settings to block the types of trafficyou want to test. For example, to prevent the OfficeScan agent from accessing theInternet, do the following:
a. Set the security level to Low (allow all inbound/outbound traffic).
b. Select Enable firewall and Notify users when a firewall violation occurs.
c. Create an exception that blocks HTTP (or HTTPS) traffic.
2. Create and save a test profile, selecting the agents to which you will test firewallfeatures. Associate the test policy with the test profile.
3. Click Assign Profile to Agents.
4. Verify the deployment.
a. Click Agents > Agent Management.
b. Select the domain to which the agent belongs.
c. Select Firewall view from the agent tree view.
d. Check if there is a green check mark under the Firewall column of the agenttree. If you enabled the Intrusion Detection System for that agent, check thata green check mark also exists under the IDS column.
e. Verify that the agent applied the correct firewall policy. The policy appearsunder the Firewall Policy column in the agent tree.

OfficeScan™ 11.0 Administrator’s Guide
12-32
5. Test the firewall on the agent endpoint by attempting to send or receive the type oftraffic you configured in the policy.
6. To test a policy configured to prevent the agent from accessing the Internet, opena web browser on the agent endpoint. If you configured OfficeScan to display anotification message for firewall violations, the message displays on the agentendpoint when an outbound traffic violation occurs.
Part IIIManaging the OfficeScan
Server and Agents


13-1
Chapter 13
Managing the OfficeScan ServerThis chapter describes OfficeScan server management and configurations.
Topics include:
• Role-based Administration on page 13-2
• Reference Servers on page 13-27
• Administrator Notification Settings on page 13-29
• System Event Logs on page 13-31
• Log Management on page 13-32
• OfficeScan Database Backup on page 13-38
• SQL Server Migration Tool on page 13-40
• OfficeScan Web Server/Agent Connection Settings on page 13-45
• Web Console Password on page 13-46
• Server Tuner on page 13-52
• Smart Feedback on page 13-55
OfficeScan™ 11.0 Administrator’s Guide
13-2
Role-based AdministrationUse Role-based Administration to grant and control access to the OfficeScan webconsole. If there are several OfficeScan administrators in your organization, you can usethis feature to assign specific web console privileges to the administrators and presentthem with only the tools and permissions necessary to perform specific tasks. You canalso control access to the agent tree by assigning them one or several domains tomanage. In addition, you can grant non-administrators "view only" access to the webconsole.
Each user (administrator or non-administrator) is assigned a specific role. A role definesthe level of access to the web console. Users log on to the web console using customuser accounts or Active Directory accounts.
Role-based administration involves the following tasks:
1. Define user roles. For details, see User Roles on page 13-2.
2. Configure user accounts and assign a particular role to each user account. Fordetails, see User Accounts on page 13-12.
View web console activities for all users from the system event logs. The followingactivities are logged:
• Logging on to the console
• Password modification
• Logging off from the console
• Session timeout (user is automatically logged off)
User Roles
A user role determines the web console menu items accessible to a user. A role isassigned a permission for each menu item.
Assign permissions for the following:
• Menu Item Permissions on page 13-3
Managing the OfficeScan Server
13-3
• Menu Item Types on page 13-3
• Menu Items for Servers and Agents on page 13-3
• Menu Items for Managed Domains on page 13-6
Menu Item Permissions
Permissions determine the level of access to each menu item. The permission for amenu item can either be:
• Configure: Allows full access to a menu item. Users can configure all settings,perform all tasks, and view data in a menu item.
• View: Only allows users to view settings, tasks, and data in a menu item.
• No Access: Hides a menu item from view.
Menu Item Types
There are two configurable types of menu items for OfficeScan user roles.
TABLE 13-1. Menu Item Types
TYPE SCOPE
Menu Items forServers/Agents
• Server settings, tasks, and data
• Global agent settings, tasks, and data
For a complete list of available menu items, see Menu Items forServers and Agents on page 13-3.
Menu items formanaged domains
Granular agent settings, tasks, and data that are available outsidethe agent tree
For a complete list of available menu items, see Menu Items forManaged Domains on page 13-6.
Menu Items for Servers and Agents
The following tables list the menu items available for servers/agents.

OfficeScan™ 11.0 Administrator’s Guide
13-4
NoteMenu items display only after the activation of their respective plug-in program. Forexample, if the Data Loss Prevention module is not activated, none of the Data LossPrevention menu items appear in the list. Any additional plug-in programs display underthe Plug-ins menu item.
Only users assigned the “Administrator (Built-in)” role have access to the Plug-ins menuitem.
TABLE 13-2. Agents Menu Items
TOP-LEVEL MENU ITEM MENU ITEM
Agents • Agent Management
• Agent Grouping
• Global Agent Settings
• Endpoint Location
• Connection Verification
• Outbreak Prevention
TABLE 13-3. Logs Menu Items
TOP-LEVEL MENU ITEM MENU ITEM
Logs • Agents
• Security Risks
• Component Update
• Server Updates
• System Events
• Log Maintenance

Managing the OfficeScan Server
13-5
TABLE 13-4. Updates Menu Items
TOP-LEVELMENU ITEM
MENU ITEM SUBMENU ITEM
Updates Server • Scheduled Update
• Manual Update
• Update Source
Agents • Automatic Update
• Update Source
Rollback N/A
TABLE 13-5. Administration Menu Items
TOP-LEVELMENU ITEM
MENU ITEM SUBMENU ITEM
Administration Account Management • User Accounts
• User Roles
NoteOnly users using the built-in administrator accountcan access User Accountsand User Roles.
Smart Protection • Smart Protection Sources
• Integrated Server
• Smart Feedback
Active Directory • Active Directory Integration
• Scheduled Synchronization
Notifications • General Settings
• Outbreak
• Agent

OfficeScan™ 11.0 Administrator’s Guide
13-6
TOP-LEVELMENU ITEM
MENU ITEM SUBMENU ITEM
Settings • Proxy Settings
• Agent Connection Settings
• Inactive Agents
• Quarantine Manager
• Product License
• Control Manager Settings
• Web Console Settings
• Database Backup
Tools • Administrative Tools
• Agent Tools
Menu Items for Managed Domains
The following table lists the available menu items for managed domains.
TABLE 13-6. Dashboard Menu Item
MAIN MENU ITEM MENU ITEM
Dashboard
NoteAny user can access this page, regardless ofpermission.
N/A
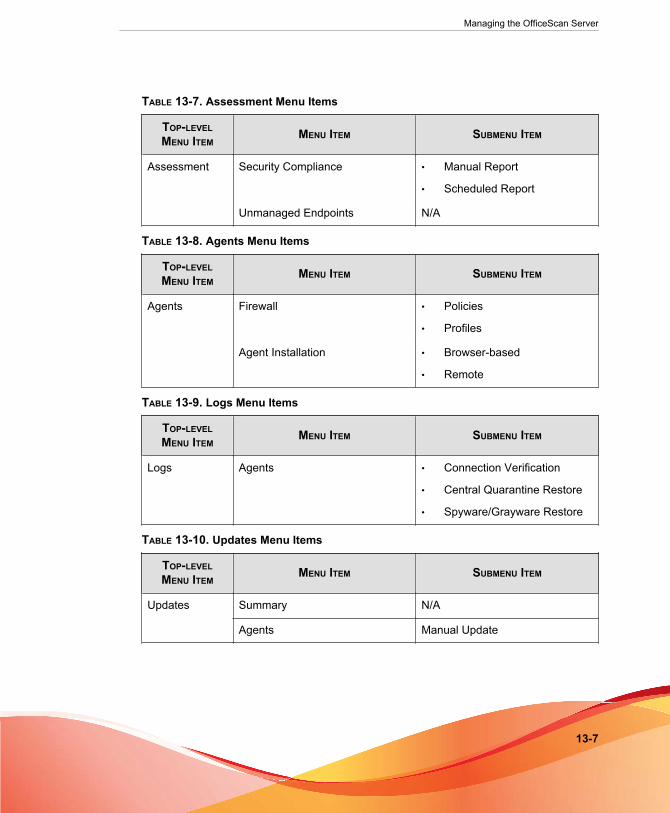
Managing the OfficeScan Server
13-7
TABLE 13-7. Assessment Menu Items
TOP-LEVELMENU ITEM
MENU ITEM SUBMENU ITEM
Assessment Security Compliance • Manual Report
• Scheduled Report
Unmanaged Endpoints N/A
TABLE 13-8. Agents Menu Items
TOP-LEVELMENU ITEM
MENU ITEM SUBMENU ITEM
Agents Firewall • Policies
• Profiles
Agent Installation • Browser-based
• Remote
TABLE 13-9. Logs Menu Items
TOP-LEVELMENU ITEM
MENU ITEM SUBMENU ITEM
Logs Agents • Connection Verification
• Central Quarantine Restore
• Spyware/Grayware Restore
TABLE 13-10. Updates Menu Items
TOP-LEVELMENU ITEM
MENU ITEM SUBMENU ITEM
Updates Summary N/A
Agents Manual Update

OfficeScan™ 11.0 Administrator’s Guide
13-8
TABLE 13-11. Administration Menu Items
TOP-LEVELMENU ITEM
MENU ITEM SUBMENU ITEM
Administration Notifications Administrator
Built-in User RolesOfficeScan comes with a set of built-in user roles that you cannot modify or delete. Thebuilt-in roles are as follows:
TABLE 13-12. Built-in User Roles
ROLE NAME DESCRIPTION
Administrator Delegate this role to other OfficeScan administrators or users withsufficient knowledge of OfficeScan.
Users with this role have "Configure" permission to all menuitems.
NoteOnly users assigned the “Administrator (Built-in)” role haveaccess to the Plug-ins menu item.
Guest User Delegate this role to users who want to view the web console forreference purposes.
• Users with this role have no access to the following menuitems:
• Plug-ins
• Administration > Account Management > User Roles
• Administration > Account Management > UserAccounts
• Users have "View" permission to all other menu items.

Managing the OfficeScan Server
13-9
ROLE NAME DESCRIPTION
Trend Power User
(upgrade only role)
This role is only available if you upgrade from OfficeScan 10.
This role inherits the permissions of the "Power User" role inOfficeScan 10. Users with this role have "Configure" permission toall agent tree domains but will have no access to the new featuresin this release.
Custom Roles
You can create custom roles if none of the built-in roles meet your requirement.
Only users with the built-in administrator role and those using the root account createdduring OfficeScan installation can create custom user roles and assign these roles to useraccounts.
Adding a Custom Role
Procedure
1. Go to Administration > Account Management > User Roles.
2. Click Add. If the role you want to create has similar settings with an existing role,select the existing role and click Copy.
A new screen appears.
3. Type a name for the role and optionally provide a description.
4. Click Menu Items for Servers/Agents and specify the permission for eachavailable menu item. For a list of available menu items, see Menu Items for Servers andAgents on page 13-3.
5. Click Menu items for Managed Domains and specify the permission for eachavailable menu item. For a list of available menu items, see Menu Items for ManagedDomains on page 13-6.
6. Click Save.

OfficeScan™ 11.0 Administrator’s Guide
13-10
The new role displays on the User Roles list.
Modifying a Custom Role
Procedure
1. Go to Administration > Account Management > User Roles.
2. Click the role name.
A new screen appears.
3. Modify any of the following:
• Description
• Role permissions
• Menu Items for Servers/Agents
• Menu items for Managed Domains
4. Click Save.
Deleting a Custom Role
Procedure
1. Go to Administration > Account Management > User Roles.
2. Select the check box next to the role.
3. Click Delete.
Note
A role cannot be deleted if it is assigned to at least one user account.

Managing the OfficeScan Server
13-11
Importing or Exporting Custom Roles
Procedure
1. Go to Administration > Account Management > User Roles.
2. To export custom roles to a .dat file:
a. Select the roles and click Export.
b. Save the.dat file. If you are managing another OfficeScan server, usethe .dat file to import custom roles to that server.
Note
Exporting roles can only be done between servers that have the same version.
3. To export custom roles to a .csv file:
a. Select the roles and click Export Role Settings.
b. Save the .csv file. Use this file to check the information and permissions forthe selected roles.
4. If you have saved custom roles from a different OfficeScan server and want toimport those roles into the current OfficeScan server, click Import and locatethe .dat file containing the custom roles.
• A role on the User Roles screen will be overwritten if you import a role withthe same name.
• Importing roles can only be done between servers that have the same version.
• A role imported from another OfficeScan server:
• Retains the permissions for menu items for servers/agents and menuitems for managed domains.
• Applies the default permissions for agent management menu items. Onthe other server, record the role’s permissions for agent managementmenu items and then re-apply them to the role that was imported.

OfficeScan™ 11.0 Administrator’s Guide
13-12
User Accounts
Set up user accounts and assign a particular role to each user. The user role determinesthe web console menu items a user can view or configure.
During OfficeScan server installation, Setup automatically creates a built-in accountcalled "root". Users who log on using the root account can access all menu items. Youcannot delete the root account but you can modify account details, such as the passwordand full name or the account description. If you forget the root account password,contact your support provider for help in resetting the password.
Add custom accounts or Active Directory accounts. All user accounts display on theUser Accounts list on the web console.
Assign user accounts permission to view or configure the granular agent settings, tasks,and data that are available in the agent tree. For a complete list of available agent treemenu items, see Agent Management Menu Items on page 13-12.
OfficeScan user accounts can be used to perform "single sign-on". Single sign-on allowsusers to access the OfficeScan web console from the Trend Micro Control Managerconsole. For details, see the procedure below.
Agent Management Menu Items
The following table lists the available agent management menu items.
Note
Menu items display only after the activation of their respective plug-in program. Forexample, if the Data Loss Prevention module is not activated, none of the Data LossPrevention menu items appear in the list.
TABLE 13-13. Agent Management Menu Items
MAIN MENU ITEM SUBMENUS
Status N/A

Managing the OfficeScan Server
13-13
MAIN MENU ITEM SUBMENUS
Tasks • Scan Now
• Agent Uninstallation
• Central Quarantine Restore
• Spyware/Grayware Restore
Settings • Scan Settings
• Scan Methods
• Manual Scan Settings
• Real-time Scan Settings
• Scheduled Scan Settings
• Scan Now Settings
• Web Reputation Settings
• Suspicious Connection Settings
• Behavior Monitoring Settings
• Device Control Settings
• DLP Settings
• Update Agent Settings
• Privileges and Other Settings
• Additional Service Settings
• Spyware/Grayware Approved List
• Export Settings
• Import Settings

OfficeScan™ 11.0 Administrator’s Guide
13-14
MAIN MENU ITEM SUBMENUS
Logs • Virus/Malware Logs
• Spyware/Grayware Logs
• Firewall Logs
• Web Reputation Logs
• Suspicious Connection Logs
• Behavior Monitoring Logs
• Device Control Logs
• Data Loss Prevention Logs
• Delete Logs
Manage Agent Tree • Add Domain
• Rename Domain
• Move Agent
• Remove Domain/Agent
Export None
Adding a Custom Account
Procedure
1. Go to Administration > Account Management > User Accounts.
2. Click Add.
The Step 1 User Information screen appears.
3. Select Enable this account.
4. Choose a previously configured role in the Select role drop-down.
For details on creating user roles, see Custom Roles on page 13-9.
5. Type the user name, description, and password and then confirm the password.
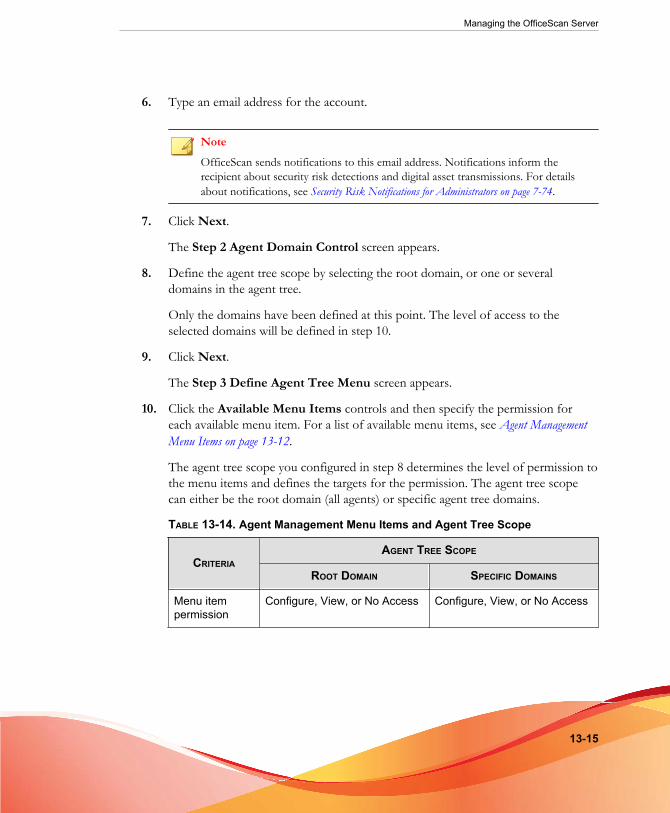
Managing the OfficeScan Server
13-15
6. Type an email address for the account.
NoteOfficeScan sends notifications to this email address. Notifications inform therecipient about security risk detections and digital asset transmissions. For detailsabout notifications, see Security Risk Notifications for Administrators on page 7-74.
7. Click Next.
The Step 2 Agent Domain Control screen appears.
8. Define the agent tree scope by selecting the root domain, or one or severaldomains in the agent tree.
Only the domains have been defined at this point. The level of access to theselected domains will be defined in step 10.
9. Click Next.
The Step 3 Define Agent Tree Menu screen appears.
10. Click the Available Menu Items controls and then specify the permission foreach available menu item. For a list of available menu items, see Agent ManagementMenu Items on page 13-12.
The agent tree scope you configured in step 8 determines the level of permission tothe menu items and defines the targets for the permission. The agent tree scopecan either be the root domain (all agents) or specific agent tree domains.
TABLE 13-14. Agent Management Menu Items and Agent Tree Scope
CRITERIAAGENT TREE SCOPE
ROOT DOMAIN SPECIFIC DOMAINS
Menu itempermission
Configure, View, or No Access Configure, View, or No Access

OfficeScan™ 11.0 Administrator’s Guide
13-16
CRITERIAAGENT TREE SCOPE
ROOT DOMAIN SPECIFIC DOMAINS
Target Root domain (all agents) orspecific domains
For example, you can grant arole "Configure" permission tothe "Tasks" menu item in theagent tree. If the target is theroot domain, the user caninitiate the tasks on all agents.If the targets are Domains Aand B, the tasks can only beinitiated on agents in DomainsA and B.
Only the selected domains
For example, you can grant arole "Configure" permission tothe "Settings" menu item in theagent tree. This means that theuser can deploy the settingsbut only to the agents in theselected domains.
The agent tree will only display if the permission to the AgentManagement menu item in "Menu Items for Servers/Agents" is"View".
• If you select the check box under Configure, the check box under View isautomatically selected.
• If you do not select any check box, the permission is "No Access".
• If you are configuring permissions for a specific domain, you can copy thepermissions to other domains by clicking Copy settings of the selecteddomain to other domains.
11. Click Finish.
12. Send the account details to the user.
Defining Permissions for Domains
When defining permissions for domains, OfficeScan automatically applies thepermissions for a parent domain to all the subdomains that it manages. A subdomaincannot have lesser permissions than its parent domain. For example, if the SystemAdministrator has permission to view and configure all agents that OfficeScan manages(the “OfficeScan Server” domain), the permissions for the subdomains must allow the
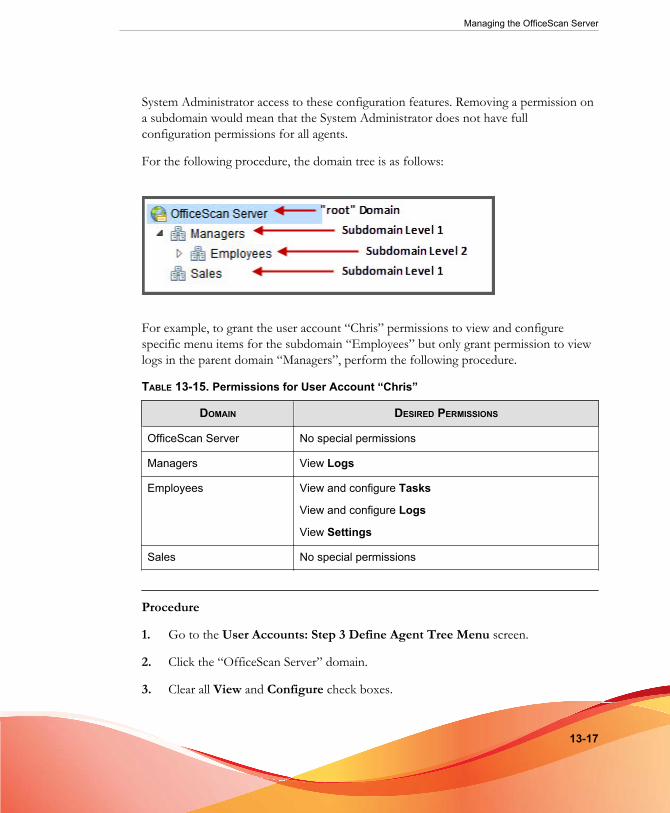
Managing the OfficeScan Server
13-17
System Administrator access to these configuration features. Removing a permission ona subdomain would mean that the System Administrator does not have fullconfiguration permissions for all agents.
For the following procedure, the domain tree is as follows:
For example, to grant the user account “Chris” permissions to view and configurespecific menu items for the subdomain “Employees” but only grant permission to viewlogs in the parent domain “Managers”, perform the following procedure.
TABLE 13-15. Permissions for User Account “Chris”
DOMAIN DESIRED PERMISSIONS
OfficeScan Server No special permissions
Managers View Logs
Employees View and configure Tasks
View and configure Logs
View Settings
Sales No special permissions
Procedure
1. Go to the User Accounts: Step 3 Define Agent Tree Menu screen.
2. Click the “OfficeScan Server” domain.
3. Clear all View and Configure check boxes.

OfficeScan™ 11.0 Administrator’s Guide
13-18
Note
The “OfficeScan Server” domain is only configurable if you selected all of itssubdomains on the User Accounts: Step 2 Agent Domain Control screen.
4. Click the “Sales” domain.
5. Clear all View and Configure check boxes.
Note
The “Sales” domain only displays if selected on the User Accounts: Step 2 AgentDomain Control screen.
6. Click the “Managers” domain.
7. Select to “View Logs” and clear all other View and Configure check boxes.
8. Click the “Employees” domain.
9. Select the following menu items for Chris:
• Tasks: View and configure
• Logs: View and configure
• Settings: View
Chris can now view and configure the selected menu items for the “Employees”domain and can only view Logs for the “Managers” domain.
If Chris has permission to view and configure the “Managers” domain, OfficeScanautomatically grants the same permissions to the “Employees” subdomain as well. Thisoccurs because the “Managers” domain manages all of its subdomains.
Modifying a Custom Account
Procedure
1. Go to Administration > Account Management > User Accounts.
Managing the OfficeScan Server
13-19
2. Click the user account.
3. Enable or disable the account using the check box provided.
4. Modify the following:
• Role
• Description
• Password
• Email address
5. Click Next.
6. Define the Agent Tree scope.
7. Click Next.
8. Click the Available Menu Items controls and then specify the permission foreach available menu item.
For a list of available menu items, see Agent Management Menu Items on page 13-12.
9. Click Finish.
10. Send the new account details to the user.
Adding Active Directory Accounts or Groups
Procedure
1. Go to Administration > Account Management > User Accounts.
2. Click Add.
The Step 1 User Information screen appears.
3. Select Enable this account.
4. Choose a previously configured role in the Select role drop-down.
OfficeScan™ 11.0 Administrator’s Guide
13-20
For details on creating user roles, see Custom Roles on page 13-9.
5. Select Active Directory user or group.
6. Search for an account (user name or group) by specifying the user name anddomain to which the account belongs.
NoteUse the character (*) to search for multiple accounts. If you do not specify thewildcard character, include the complete account name. OfficeScan will not return aresult for incomplete account names or if the default group "Domain Users" is used.
7. When OfficeScan finds a valid account, it displays the account name under Userand Groups. Click the forward icon (>) to move the account under SelectedUsers and Groups.
If you specify an Active Directory group, all members belonging to a group get thesame role. If a particular account belongs to at least two groups and the role forboth groups are different:
• The permissions for both roles are merged. If a user configures a particularsetting and there is a conflict between permissions for the setting, the higherpermission applies.
• All user roles display in the System Event logs. For example, "User John Doelogged on with the following roles: Administrator, Power User".
8. Click Next.
The Step 2 Agent Domain Control screen appears.
9. Define the Agent Tree scope.
10. Click Next.
The Step 3 Define Agent Tree Menu screen appears.
11. Click the Available Menu Items controls and then specify the permission foreach available menu item.
For a list of available menu items, see Agent Management Menu Items on page 13-12.
12. Click Finish.

Managing the OfficeScan Server
13-21
13. Inform the user to log on to the web console using his or her domain account andpassword.
Trend Micro Control ManagerTrend Micro Control Manager™ is a central management console that manages TrendMicro products and services at the gateway, mail server, file server, and corporatedesktop levels. The Control Manager web-based management console provides a singlemonitoring point for managed products and services throughout the network.
Control Manager allows system administrators to monitor and report on activities suchas infections, security violations, or virus entry points. System administrators candownload and deploy components throughout the network, helping ensure thatprotection is consistent and up-to-date. Control Manager allows both manual and pre-scheduled updates, and the configuration and administration of products as groups or asindividuals for added flexibility.
Control Manager Integration in this OfficeScan ReleaseThis OfficeScan release includes the following features and capabilities when managingOfficeScan servers from Control Manager:
• Create, manage, and deploy policies for OfficeScan Antivirus, Data LossPrevention, and Device Control, and assign privileges directly to OfficeScan agentsfrom the Control Manager console.
The following table lists the policy configurations available in Control Manager 6.0.
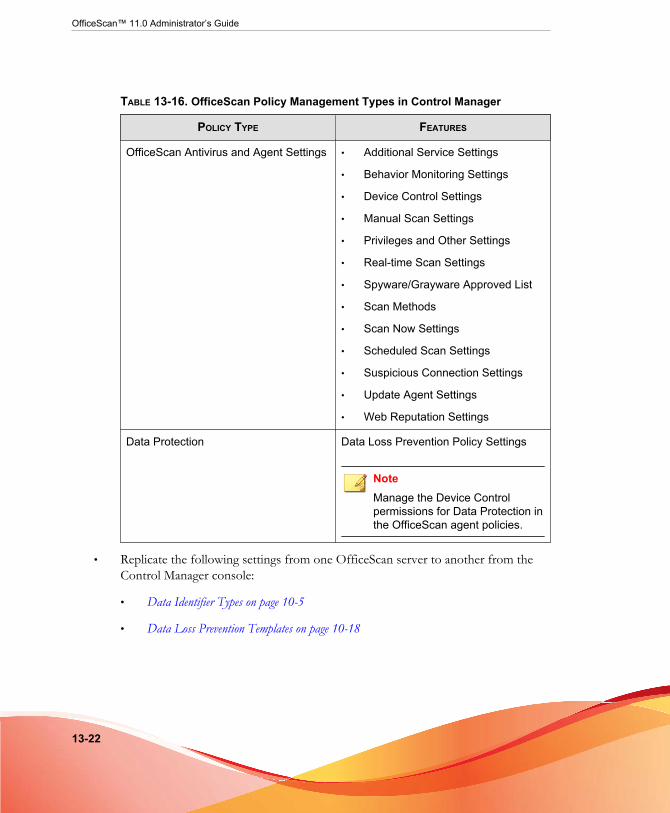
OfficeScan™ 11.0 Administrator’s Guide
13-22
TABLE 13-16. OfficeScan Policy Management Types in Control Manager
POLICY TYPE FEATURES
OfficeScan Antivirus and Agent Settings • Additional Service Settings
• Behavior Monitoring Settings
• Device Control Settings
• Manual Scan Settings
• Privileges and Other Settings
• Real-time Scan Settings
• Spyware/Grayware Approved List
• Scan Methods
• Scan Now Settings
• Scheduled Scan Settings
• Suspicious Connection Settings
• Update Agent Settings
• Web Reputation Settings
Data Protection Data Loss Prevention Policy Settings
NoteManage the Device Controlpermissions for Data Protection inthe OfficeScan agent policies.
• Replicate the following settings from one OfficeScan server to another from theControl Manager console:
• Data Identifier Types on page 10-5
• Data Loss Prevention Templates on page 10-18
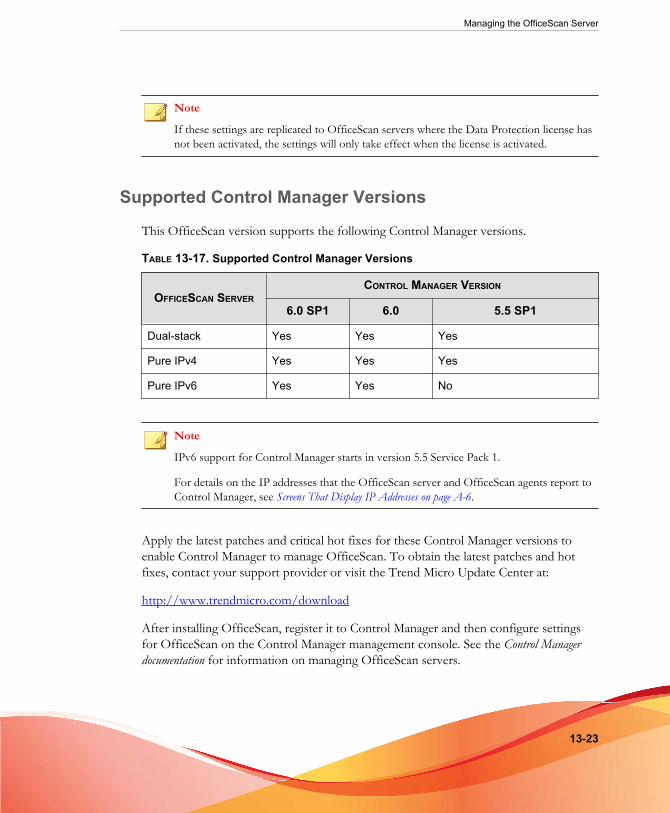
Managing the OfficeScan Server
13-23
Note
If these settings are replicated to OfficeScan servers where the Data Protection license hasnot been activated, the settings will only take effect when the license is activated.
Supported Control Manager Versions
This OfficeScan version supports the following Control Manager versions.
TABLE 13-17. Supported Control Manager Versions
OFFICESCAN SERVERCONTROL MANAGER VERSION
6.0 SP1 6.0 5.5 SP1
Dual-stack Yes Yes Yes
Pure IPv4 Yes Yes Yes
Pure IPv6 Yes Yes No
Note
IPv6 support for Control Manager starts in version 5.5 Service Pack 1.
For details on the IP addresses that the OfficeScan server and OfficeScan agents report toControl Manager, see Screens That Display IP Addresses on page A-6.
Apply the latest patches and critical hot fixes for these Control Manager versions toenable Control Manager to manage OfficeScan. To obtain the latest patches and hotfixes, contact your support provider or visit the Trend Micro Update Center at:
http://www.trendmicro.com/download
After installing OfficeScan, register it to Control Manager and then configure settingsfor OfficeScan on the Control Manager management console. See the Control Managerdocumentation for information on managing OfficeScan servers.
OfficeScan™ 11.0 Administrator’s Guide
13-24
Registering OfficeScan to Control Manager
Procedure
1. Go to Administration > Settings > Control Manager.
2. Specify the entity display name, which is the name of the OfficeScan server thatwill display in Control Manager.
By default, entity display name includes the server computer's host name and thisproduct’s name (for example, Server01_OSCE).
NoteIn Control Manager, OfficeScan servers and other products managed by ControlManager are referred to as "entities".
3. Specify the Control Manager server FQDN or IP address and the port number touse to connect to this server. Optionally connect with increased security usingHTTPS.
• For a dual-stack OfficeScan server, type the Control Manager FQDN or IPaddress (IPv4 or IPv6, if available).
• For a pure IPv4 OfficeScan server, type the Control Manager FQDN or IPv4address.
• For a pure IPv6 OfficeScan server, type the Control Manager FQDN or IPv6address.
NoteOnly Control Manager 5.5 SP1 and later versions support IPv6.
4. If the IIS web server of Control Manager requires authentication, type the username and password.
5. If you will use a proxy server to connect to the Control Manager server, specify thefollowing proxy settings:
• Proxy protocol

Managing the OfficeScan Server
13-25
• Server FQDN or IPv4/IPv6 address and port
• Proxy server authentication user ID and password
6. Decide whether to use one-way communication or two-way communication portforwarding, and then specify the IPv4/IPv6 address and port.
7. To check whether OfficeScan can connect to the Control Manager server based onthe settings you specified, click Test Connection.
Click Register if a connection was successfully established.
8. If the Control Manager server is version 6.0 SP1 or later, a message appearsprompting you to use the Control Manager server as the update source for theOfficeScan integrated Smart Protection Server. Click OK to use the ControlManager server as the integrated Smart Protection Server update source or Cancelto continue using the current update source (by default, the ActiveUpdate server).
9. If you change any of the settings on this screen after registration, click UpdateSettings after changing the settings to notify the Control Manager server of thechanges.
10. If you no longer want the Control Manager server to manage OfficeScan, clickUnregister.
Checking the OfficeScan Status on the Control ManagerManagement Console
Procedure
1. Open the Control Manager management console.
To open the Control Manager console, on any endpoint on the network, open aweb browser and type the following:
https://<Control Manager server name>/Webapp/login.aspx
Where <Control Manager server name> is the IP address or host name ofthe Control Manager server

OfficeScan™ 11.0 Administrator’s Guide
13-26
2. On the main menu, click Directories > Products.
3. Check if the OfficeScan server icon displays.
The Policy Export ToolThe Trend Micro OfficeScan Server Policy Export Tool helps administrators exportOfficeScan policy settings supported by Control Manager 6.0 or later. Administratorsalso require the Control Manager Import Tool in order to import policies. The PolicyExport Tool supports OfficeScan 10.6 Service Pack 1 and later.
• Real-time Scan settings • Behavior Monitoring settings
• Scheduled Scan settings • Device Control settings
• Manual Scan settings • Data Loss Prevention settings
• Scan Now settings • Privileges and Other Settings
• Update Agent settings • Additional Service settings
• Web reputation settings • Spyware/Grayware approved list
• Suspicious Connection settings
• Scan method
Using the Policy Export Tool
Procedure
1. On the OfficeScan server computer, navigate to <Server installation folder>\PCCSRV\Admin\Utility\PolicyExportTool.
2. Double-click PolicyExportTool.exe to start the Policy Export Tool.
A command line interface screen opens and the Policy Export Tool startsexporting settings. The tool creates two folders (PolicyClient and PolicyDLP)in the PolicyExportTool folder containing the exported settings.
3. Copy the two folders to the Control Manager installation folder.
Managing the OfficeScan Server
13-27
4. Execute the Policy Import Tool on the Control Manager server.
For details on the Policy Import Tool, see the Policy Import Tool Readme.
Note
The Policy Export Tool does not export customized data identifiers or customizedDLP templates. For administrators needing to export customized data identifiers andDLP templates, perform a manual export from the OfficeScan console and thenmanually import the file using the Control Manager console.
Reference ServersOne of the ways the OfficeScan agent determines which policy or profile to use is bychecking its connection status with the OfficeScan server. If an internal OfficeScanagent (or any agent within the corporate network) cannot connect to the server, theagent status becomes offline. The agent then applies a policy or profile intended forexternal agents. Reference servers address this issue.
Any OfficeScan agent that loses connection with the OfficeScan server will tryconnecting to reference servers. If the agent successfully establishes connection with areference server, it applies the policy or profile for internal agents.
Policies and profiles managed by reference servers include:
• Firewall profiles
• Web reputation policies
• Data Protection policies
• Device Control policies
Take note of the following:
• Assign computers with server capabilities, such as a web server, SQL server, orFTP server, as reference servers. You can specify a maximum of 32 referenceservers.

OfficeScan™ 11.0 Administrator’s Guide
13-28
• OfficeScan agents connect to the first reference server on the reference server list.If connection cannot be established, the agent tries connecting to the next serveron the list.
• OfficeScan agents use reference servers when determining the antivirus (BehaviorMonitoring, Device Control, firewall profiles, the web reputation policy) or DataProtection settings to use. Reference servers do not manage agents or deployupdates and agent settings. The OfficeScan server performs these tasks.
• The OfficeScan agent cannot send logs to reference servers or use them as updatesources
Managing the Reference Server List
Procedure
1. Go to Agents > Firewall > Profiles or Agents > Endpoint Location.
2. Depending on the displayed screen, do the following:
• If you are on the Firewall Profiles for Agents screen, click Edit ReferenceServer List.
• If you are on the Endpoint Location screen, click reference server list.
3. Select Enable the Reference Server list.
4. To add any endpoint to the list, click Add.
a. Specify the endpoint's IPv4/IPv6 address, name, or fully qualified domainname (FQDN), such as:
• computer.networkname
• 12.10.10.10
• mycomputer.domain.com
b. Type the port through which agents communicate with this endpoint. Specifyany open contact port (such as ports 20, 23 or 80) on the reference server.

Managing the OfficeScan Server
13-29
Note
To specify another port number for the same reference server, repeat steps 2aand 2b. The OfficeScan agent uses the first port number on the list and, ifconnection is unsuccessful, uses the next port number.
c. Click Save.
5. To edit the settings of any endpoint on the list, click the endpoint name. Modifythe endpoint name or port, and then click Save.
6. To remove any endpoint from the list, select the endpoint name and then clickDelete.
7. To enable the endpoints to act as reference servers, click Assign to Agents.
Administrator Notification SettingsConfigure administrator notification settings to allow OfficeScan to successfully sendnotifications through email, and SNMP Trap. OfficeScan can also send notificationsthrough Windows NT event log but no settings are configured for this notificationchannel.
OfficeScan can send notifications to you and other OfficeScan administrators when thefollowing are detected:
TABLE 13-18. Detections that Trigger Administrator Notifications
DETECTIONS
NOTIFICATION CHANNELS
EMAIL SNMP TRAPWINDOWS NTEVENT LOGS
Viruses and malware Yes Yes Yes
Spyware and grayware Yes Yes Yes
Digital asset transmissions Yes Yes Yes
C&C callbacks Yes Yes Yes

OfficeScan™ 11.0 Administrator’s Guide
13-30
DETECTIONS
NOTIFICATION CHANNELS
EMAIL SNMP TRAPWINDOWS NTEVENT LOGS
Virus and malwareoutbreaks
Yes Yes Yes
Spyware and graywareoutbreaks
Yes Yes Yes
Firewall violation outbreaks Yes No No
Shared folder sessionoutbreaks
Yes No No
Configuring General Notification Settings
Procedure
1. Go to Administration > Notifications > General Settings.
2. Configure email notification settings.
a. Specify either an IPv4/IPv6 address or endpoint name in the SMTP serverfield.
b. Specify a port number between 1 and 65535.
c. Specify a name or email address.
If you want to enable ESMTP in the next step, specify a valid email address.
d. Optionally enable ESMTP.
e. Specify the user name and password for the email address you specified in theFrom field.
f. Choose a method for authenticating the agent to the server:
• Login: Login is an older version of the mail user agent. The server andagent both use BASE64 to authenticate the user name and password.
Managing the OfficeScan Server
13-31
• Plain Text: Plain Text is the easiest to use but can also be unsafebecause the user name and password are sent as one string and BASE64encoded before being sent over the Internet.
• CRAM-MD5: CRAM-MD5 uses a combination of a challenge-responseauthentication mechanism and a cryptographic Message Digest 5algorithm to exchange and authenticate information.
3. Configure SNMP Trap notification settings.
a. Specify either an IPv4/IPv6 address or endpoint name in the Server IPaddress field.
b. Specify a community name that is difficult to guess.
4. Click Save.
System Event LogsOfficeScan records events related to the server program, such as shutdown and startup.Use these logs to verify that the OfficeScan server and services work properly.
To keep the size of logs from occupying too much space on the hard disk, manuallydelete logs or configure a log deletion schedule. For more information about managinglogs, see Log Management on page 13-32.
Viewing System Event Logs
Procedure
1. Go to Logs > System Events.
2. Under Event, check for logs that need further action. OfficeScan logs thefollowing events:

OfficeScan™ 11.0 Administrator’s Guide
13-32
TABLE 13-19. System Event Logs
LOG TYPE EVENTS
OfficeScan MasterService and DatabaseServer
• Master Service started
• Master Service stopped successfully
• Master Service stopped unsuccessfully
Outbreak Prevention • Outbreak Prevention enabled
• Outbreak Prevention disabled
• Number of shared folder sessions in the last<number of minutes>
Database backup • Database backup successful
• Database backup unsuccessful
Role-based web consoleaccess
• Logging on to the console
• Password modification
• Logging off from the console
• Session timeout (user automatically logged off)
Server authentication • The OfficeScan agent received invalid commandsfrom the server
• Authentication certificate invalid or expired
3. To save logs to a comma-separated value (CSV) file, click Export to CSV. Openthe file or save it to a specific location.
Log ManagementOfficeScan keeps comprehensive logs about security risk detections, events, andupdates. Use these logs to assess your organization's protection policies and to identifyOfficeScan agents at a higher risk of infection or attack. Also use these logs to checkagent-server connection and verify that component updates were successful.

Managing the OfficeScan Server
13-33
OfficeScan also uses a central time verification mechanism to ensure time consistencybetween OfficeScan server and agents. This prevents log inconsistencies caused by timezones, Daylight Saving Time, and time differences, which can cause confusion duringlog analysis.
NoteOfficeScan performs time verification for all logs except for Server Update and SystemEvent logs.
The OfficeScan server receives the following logs from OfficeScan agents:
• Viewing Virus/Malware Logs on page 7-82
• Viewing Spyware/Grayware Logs on page 7-89
• Viewing Suspicious Connection Logs on page 11-24
• Viewing Spyware/Grayware Restore Logs on page 7-92
• Viewing Firewall Logs on page 12-28
• Viewing Web Reputation Logs on page 11-22
• Viewing C&C Callback Logs on page 11-23
• Viewing Behavior Monitoring Logs on page 8-13
• Viewing Device Control Logs on page 9-17
• Viewing Data Loss Prevention Logs on page 10-50
• Viewing OfficeScan Agent Update Logs on page 6-49
• Viewing Connection Verification Logs on page 14-42
The OfficeScan server generates the following logs:
• OfficeScan Server Update Logs on page 6-27
• System Event Logs on page 13-31
The following logs are also available on the OfficeScan server and OfficeScan agents:

OfficeScan™ 11.0 Administrator’s Guide
13-34
• Windows Event Logs on page 16-22
• OfficeScan Server Logs on page 16-2
• OfficeScan Agent Logs on page 16-14
Log Maintenance
To keep the size of logs from occupying too much space on the hard disk, manuallydelete logs or configure a log deletion schedule from the web console.
Deleting Logs Based on a Schedule
Procedure
1. Go to Logs > Log Maintenance.
2. Select Enable scheduled deletion of logs.
3. Select the log types to delete. All OfficeScan-generated logs, except debug logs, canbe deleted based on a schedule. For debug logs, disable debug logging to stopcollecting logs.
Note
For virus/malware logs, you can delete logs generated from certain scan types andDamage Cleanup Services. For spyware/grayware logs, you can delete logs fromcertain scan types. For details about scan types, see Scan Types on page 7-14.
4. Select whether to delete logs for all the selected log types or only logs older than acertain number of days.
5. Specify the log deletion frequency and time.
6. Click Save.

Managing the OfficeScan Server
13-35
Manually Deleting Logs
Procedure
1. Go to Logs > Agents > Security Risks, or Agents > Agent Management.
2. In the agent tree, click the root domain icon ( ) to include all agents or selectspecific domains or agents.
3. Perform one of the following steps:
• If you are accessing the Security Risk Logs screen, click Delete Logs.
• If you are accessing the Agent Management screen, click Logs > DeleteLogs.
4. Select the log types to delete. Only the following logs can be deleted manually:
• Virus/Malware logs
• Spyware/Grayware logs
• Firewall logs
• Web Reputation logs
• Suspicious Connection logs
• C&C Callback logs
• Behavior Monitoring logs
• Device Control logs
• Data Loss Prevention logs
NoteFor virus/malware logs, you can delete logs generated from certain scan types andDamage Cleanup Services. For spyware/grayware logs, you can delete logs fromcertain scan types. For details about scan types, see Scan Types on page 7-14.
5. Select whether to delete logs for all the selected log types or only logs older than acertain number of days.

OfficeScan™ 11.0 Administrator’s Guide
13-36
6. Click Delete.
LicensesView, activate, and renew OfficeScan license services on the web console, and enable/disable the OfficeScan firewall. The OfficeScan firewall is part of the Antivirus service,which also includes support for outbreak prevention.
NoteSome native OfficeScan features, such as Data Protection and Virtual Desktop Support,have their own licenses. The licenses for these features are activated and managed fromPlug-in Manager. For details about licensing for these features, see Data Protection License onpage 3-4 and Virtual Desktop Support License on page 14-72.
A pure IPv6 OfficeScan server cannot connect to the Trend Micro Online RegistrationServer to activate/renew the license. A dual-stack proxy server that can convert IPaddresses, such as DeleGate, is required to allow the OfficeScan server to connect to theregistration server.
Viewing Product License Information
Procedure
1. Go to Administration > Settings > Product License.
2. View license status summary, which appears on top of the screen. Reminders aboutlicenses display during the following instances:
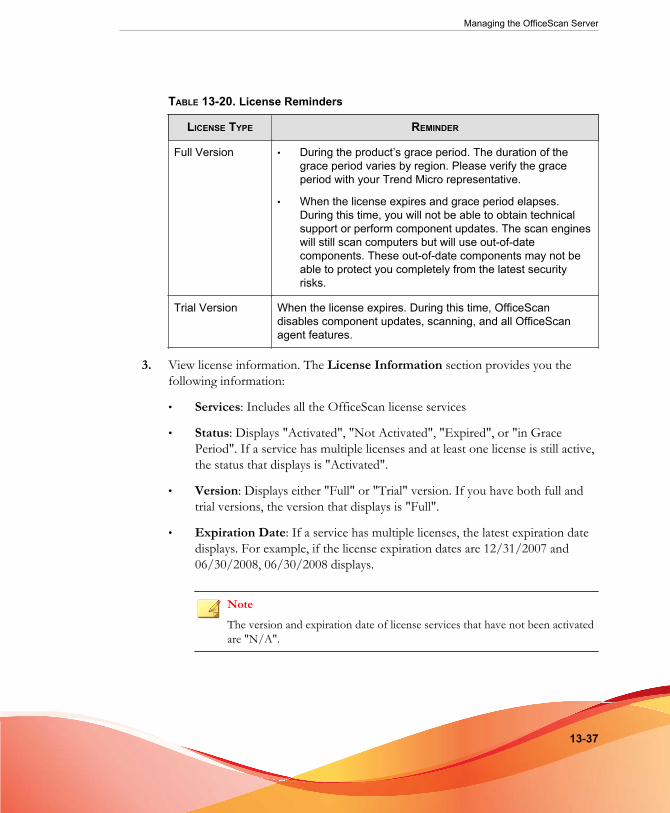
Managing the OfficeScan Server
13-37
TABLE 13-20. License Reminders
LICENSE TYPE REMINDER
Full Version • During the product’s grace period. The duration of thegrace period varies by region. Please verify the graceperiod with your Trend Micro representative.
• When the license expires and grace period elapses.During this time, you will not be able to obtain technicalsupport or perform component updates. The scan engineswill still scan computers but will use out-of-datecomponents. These out-of-date components may not beable to protect you completely from the latest securityrisks.
Trial Version When the license expires. During this time, OfficeScandisables component updates, scanning, and all OfficeScanagent features.
3. View license information. The License Information section provides you thefollowing information:
• Services: Includes all the OfficeScan license services
• Status: Displays "Activated", "Not Activated", "Expired", or "in GracePeriod". If a service has multiple licenses and at least one license is still active,the status that displays is "Activated".
• Version: Displays either "Full" or "Trial" version. If you have both full andtrial versions, the version that displays is "Full".
• Expiration Date: If a service has multiple licenses, the latest expiration datedisplays. For example, if the license expiration dates are 12/31/2007 and06/30/2008, 06/30/2008 displays.
NoteThe version and expiration date of license services that have not been activatedare "N/A".
OfficeScan™ 11.0 Administrator’s Guide
13-38
4. OfficeScan allows you to activate multiple licenses for a license service. Click theservice name to view all the licenses (both active and expired) for that service.
Activating or Renewing a License
Procedure
1. Go to Administration > Settings > Product License.
2. Click the name of the license service.
3. In the Product License Details screen that opens, click New Activation Code.
4. In the screen that opens, type the Activation Code and click Save.
NoteRegister a service before activating it. Contact your Trend Micro representative formore information about the Registration Key and Activation Code.
5. Back in the Product License Details screen, click Update Information torefresh the screen with the new license details and the status of the service. Thisscreen also provides a link to the Trend Micro website where you can view detailedinformation about your license.
OfficeScan Database BackupThe OfficeScan server database contains all OfficeScan settings, including scan settingsand privileges. If the server database becomes corrupted, you can restore it if you have abackup. Back up the database manually at any time or configure a backup schedule.
When backing up the database, OfficeScan automatically helps defragment the databaseand repairs any possible corruption to the index file.
Check the system event logs to determine the backup status. For more information, seeSystem Event Logs on page 13-31.

Managing the OfficeScan Server
13-39
Tip
Trend Micro recommends configuring a schedule for automatic backup. Back up thedatabase during non-peak hours when server traffic is low.
WARNING!
Do not perform the backup with any other tool or software. Configure database backupfrom the OfficeScan web console only.
Backing up the OfficeScan Database
Procedure
1. Go to Administration > Settings > Database Backup.
2. Type the location where you want to save the database. If the folder des not existyet, select Create the folder if not already present. Include the drive and fulldirectory path, such as C:\OfficeScan\DatabaseBackup.
By default, OfficeScan saves the backup in the following directory: <Serverinstallation folder>\DBBackup
Note
OfficeScan creates a subfolder under the backup path. The folder name indicates thetime of the backup and is in the following format: YYYYMMDD_HHMMSS.OfficeScan preserves the 7 most recent backup folders, automatically deleting olderfolder(s).
3. If the backup path is on a remote computer (using a UNC path), type anappropriate account name and the corresponding password. Ensure that theaccount has write privileges on the computer.
4. To configure a backup schedule:
a. Select Enable scheduled database backup.
b. Specify the backup frequency and time.

OfficeScan™ 11.0 Administrator’s Guide
13-40
c. To back up the database and save the changes you made, click Backup Now.To save only without backing up the database, click Save.
Restoring the Database Backup Files
Procedure
1. Stop the OfficeScan Master Service.
2. Overwrite the database files in <Server installation folder>\PCCSRV\HTTPDB withthe backup files.
3. Restart the OfficeScan Master Service.
SQL Server Migration ToolAdministrators can migrate the existing OfficeScan database from its native CodeBasestyle to a SQL Server database using the SQL Server Migration Tool. The SQL ServerMigration Tool supports the following database migrations:
• OfficeScan CodeBase database to new SQL Server Express database
• OfficeScan CodeBase database to preexisting SQL Server database
• OfficeScan SQL database (previously migrated) that was moved to anotherlocation
Using the SQL Server Migration Tool
The SQL Server Migration Tool migrates the existing CodeBase database to a SQLdatabase using SQL Server 2008 R2 SP2 Express.

Managing the OfficeScan Server
13-41
Tip
After migrating the OfficeScan database, you can move the newly migrated SQL databaseto a different SQL Server. Rerun the SQL Server Migration Tool and select Switch to anexisting OfficeScan SQL database to use the other SQL Server.
Important
Before running the SQL Server Migration Tool on Windows Server 2008 or later usingdomain user Windows authentication credentials:
• User Access Control needs to be turned off
• The OfficeScan Master Service cannot be running using the domain user account usedto log on to the SQL Server
Procedure
1. On the OfficeScan server computer, browse to <Server installation folder>\PCCSRV\Admin\Utility\SQL.
2. Double-click SQLTxfr.exe to run the tool.
The SQL Server Migration Tool console opens.
3. Choose the migration type:
Option DescriptionInstall a new SQLServer 2008 R2 SP2Express and migratethe OfficeScan database
Automatically installs SQL Server 2008 R2 SP2Express and migrates the existing OfficeScan databaseto a new SQL database
NoteOfficeScan automatically assigns port 1433 to theSQL Server.
Migrate the OfficeScandatabase to an existingSQL Server
Migrates the existing OfficeScan database to a newSQL database on an existing SQL Server

OfficeScan™ 11.0 Administrator’s Guide
13-42
Option DescriptionSwitch to an existingOfficeScan SQLdatabase
Changes the OfficeScan configuration settings topoint to an existing OfficeScan SQL database on anexisting SQL Server
4. Specify the Server name as follows:
• For new SQL installations: <host name or IP address of the SQL Server>\<instance name>
• For SQL Server migrations: <host name or IP address of the SQLServer>,<port_number>\<instance name>
• When switching to an existing OfficeScan SQL database: <host name or IPaddress of the SQL Server>,<port_number>\<instance name>
ImportantOfficeScan automatically creates an instance for the OfficeScan database when SQLServer installs. When migrating to an existing SQL Server or database, type thepreexisting instance name for the OfficeScan instance on the SQL Server.
5. Provide the authentication credentials for the SQL Server database.

Managing the OfficeScan Server
13-43
Important
When using the Windows Account to log on to the server:
• For a default domain administrator account:
• User name format: domain_name\administrator
• The account requires the following:
• Groups: “Administrators Group”
• User roles: “Log on as a service” and “Log on as a batch job”
• Database roles: “dbcreator”, “bulkadmin”, and “db_owner”
• For a domain user account:
• User name format: domain_name\user_name
• The account requires the following:
• Groups: “Administrators Group” and “Domain Admins”
• User roles: “Log on as a service” and “Log on as a batch job”
• Database roles: “dbcreator”, “bulkadmin”, and “db_owner”
6. For new SQL Server installations, type a new password and confirm.
Note
Passwords must meet the following minimum strength requirements:
a. Minimum length: 6 characters
b. Must contain at least 3 of the following:
• Uppercase letters: A - Z
• Lowercase letters: a - z
• Numbers: 0 - 9
• Special characters: !@#$^*?_~-();.+:
7. Specify the OfficeScan Database name on the SQL Server.

OfficeScan™ 11.0 Administrator’s Guide
13-44
When migrating the OfficeScan CodeBase database to a new SQL database,OfficeScan automatically creates the new database with the name provided.
8. Optionally, perform the following tasks:
• Click Test Connection to verify the authentication credentials for theexisting SQL Server or database.
• Click SQL Database Unavailable Alert… to configure the SQL databasenotification settings. For details, see Configuring the SQL Database UnavailableAlert on page 13-44.
9. Click Start to apply the configuration changes.
Configuring the SQL Database Unavailable AlertOfficeScan automatically sends this alert whenever the SQL database becomesunavailable.
WARNING!OfficeScan automatically stops all services when the database becomes unavailable.OfficeScan cannot log agent or event information, perform updates, or configure agentswhen the database is unavailable.
Procedure
1. On the OfficeScan server computer, browse to <Server installation folder>\PCCSRV\Admin\Utility\SQL.
2. Double-click SQLTxfr.exe to run the tool.
The SQL Server Migration Tool console opens.
3. Click SQL Database Unavailable Alert….
The SQL Server Unavailable Alert screen opens.
4. Type the email address(es) for the recipient(s) of the alert.
Separate multiple entries using semicolons (;).

Managing the OfficeScan Server
13-45
5. Modify the Subject and Message as necessary.
OfficeScan provides the following token variables:
TABLE 13-21. SQL Database Unavailable Alert Tokens
VARIABLE
DESCRIPTION
%x The name of the OfficeScan SQL Server instance
%s The name of the affected OfficeScan server
6. Click OK.
OfficeScan Web Server/Agent ConnectionSettings
During OfficeScan server installation, Setup automatically sets up a web server (IIS orApache web server) that enables networked computers to connect to the OfficeScanserver. Configure the web server to which networked endpoint agents will connect.
If you modify the web server settings externally (for example, from the IIS managementconsole), replicate the changes in OfficeScan. For example, if you change the IP addressof the server for networked computers manually or if you assign a dynamic IP addressto it, you need to reconfigure the server settings of OfficeScan.
WARNING!Changing the connection settings may result in the permanent loss of connection betweenthe server and agents and require the re-deployment of OfficeScan agents.
Configuring Connection Settings
Procedure
1. Go to Administration > Settings > Agent Connection.
OfficeScan™ 11.0 Administrator’s Guide
13-46
2. Type the domain name or IPv4/IPv6 address and port number of the web server.
NoteThe port number is the trusted port that the OfficeScan server uses to communicatewith OfficeScan agents.
3. Click Save.
Web Console PasswordThe screen for managing the web console password (or the password for the rootaccount created during OfficeScan server installation) will only be accessible if the servercomputer does not have the resources required to use role-based administration. Forexample, if the server computer runs Windows Server 2003 and Authorization ManagerRuntime is not installed, the screen is accessible. If resources are adequate, this screendoes not display and the password can be managed by modifying the root account in theUser Accounts screen.
If OfficeScan is not registered to Control Manager, contact your support provider forinstructions on how to gain access to the web console.
Authentication of Server-initiatedCommunications
OfficeScan uses public-key cryptography to authenticate communications that theOfficeScan server initiates on agents. With public-key cryptography, the server keeps aprivate key and deploys a public key to all agents. The agents use the public key to verifythat incoming communications are server-initiated and valid. The agents respond if theverification is successful.
NoteOfficeScan does not authenticate communications that agents initiate on the server.

Managing the OfficeScan Server
13-47
The public and private keys are associated with a Trend Micro certificate. Duringinstallation of the OfficeScan server, Setup stores the certificate on the host’s certificatestore. Use the Authentication Certificate Manager tool to manage Trend Microcertificates and keys.
When deciding on whether to use a single authentication key across all OfficeScanservers, take note of the following:
• Implementing a single certificate key is a common practice for standard levels ofsecurity. This approach balances the security level of your organization and reducesthe overhead associated with maintaining multiple keys.
• Implementing multiple certificate keys across OfficeScan servers provides amaximum level of security. This approach increases the maintenance requiredwhen certificate keys expire and need to be redistributed across the servers.
Important
Before reinstalling the OfficeScan server, ensure that you back up the existing certificate.After the new installation completes, import the backed up certificate to allowcommunication authentication between the OfficeScan server and OfficeScan agents tocontinue uninterrupted. If you create a new certificate during server installation, OfficeScanagents cannot authenticate server communication because they are still using the oldcertificate (which no longer exists).
For details on backing up, restoring, exporting, and importing certificates, see UsingAuthentication Certificate Manager on page 13-48.
Configuring Authentication of Server-initiatedCommunications
Procedure
1. On the OfficeScan server, go to <Server_installation_folder>\PCCSRVand open ofcscan.ini using a text editor.
2. Add or modify the text string SGNF in the [Global Settings] section.
To enable authentication: SGNF=1

OfficeScan™ 11.0 Administrator’s Guide
13-48
To disable authentication: SGNF=0
Note
OfficeScan enables authentication by default. Add the SGNF key to theofcscan.ini file only if you want to disable this feature.
3. On the web console, go to Agents > Global Agent Settings and click Save todeploy the setting to agents.
Using Authentication Certificate Manager
The OfficeScan server maintains expired certificates for agents with expired public keys.For example, agents that have not connected to the server for an extended period oftime have expired public keys. When agents reconnect, they associate the expired publickey with the expired certificate, allowing them to recognize server-initiatedcommunications. The server then deploys the latest public key to the agents.
When configuring certificates, note the following:
• For the certificate path, mapped drives and UNC paths are accepted.
• Choose a strong password and then record it for future reference.
Important
When using the Authentication Certificate Manager tool, note the following requirements:
• The user must have administrator privileges
• The tool can only manage certificates located on the local endpoint
Procedure
1. On the OfficeScan server, open a command prompt and change the directory to<Server installation folder>\PCCSRV\Admin\Utility\CertificateManager.
2. Issue any of the following commands:

Managing the OfficeScan Server
13-49
COMMAND EXAMPLE DESCRIPTION
CertificateManager.exe -c[Backup_Password]
CertificateManager.exe -cstrongpassword
Generates a new Trend Micro certificateand replaces the existing certificate
Do this if the existing certificate hasexpired or if it has been leaked tounauthorized parties.
CertificateManager.exe -b[Password][Certificatepath]
NoteThecertificate isin ZIPformat.
CertificateManager.exe -bstrongpasswordD:\Test\TrendMicro.zip
Backs up all Trend Micro certificatesissued by the current OfficeScan server
Do this to back up the certificate on theOfficeScan server.
Note
Backing up the OfficeScan servercertificates allows you to usethese certificates if you need toreinstall the OfficeScan server.
CertificateManager.exe -r[Password][Certificatepath]
NoteThecertificate isin ZIPformat.
CertificateManager.exe -rstrongpasswordD:\Test\TrendMicro.zip
Restores all Trend Micro certificates onthe server
Do this to restore the certificate on areinstalled OfficeScan server.

OfficeScan™ 11.0 Administrator’s Guide
13-50
COMMAND EXAMPLE DESCRIPTION
CertificateManager.exe -e[Certificatepath]
CertificateManager.exe -e<Agent_installation_folder>\OfcNTCer.dat
Exports the OfficeScan agent public keyassociated with the currently usedcertificate
Do this if the public key used by agentsbecomes corrupted. Copy the .dat fileto the agent’s root folder, overwriting theexisting file.
ImportantThe file path of the certificate onthe OfficeScan agent must be:
<Agent_installation_folder>\OfcNTCer.dat
CertificateManager.exe -i[Password][Certificatepath]
NoteThe defaultfile name ofthecertificate is:
OfcNTCer.pfx
CertificateManager.exe -istrongpasswordD:\Test\OfcNTCer.pfx
Imports a Trend Micro certificate to thecertificate store
CertificateManager.exe -l [CSVPath]
CertificateManager.exe -l D:\Test\MismatchedAgentList.csv
Lists agents (in CSV format) currentlyusing a mismatched certificate

Managing the OfficeScan Server
13-51
Web Console SettingsUse the Web Console Settings screen for the following:
• Configure the OfficeScan server to refresh the Summary dashboard periodically.By default, the server will refresh the dashboard every 30 seconds. The number ofseconds can be from 10 to 300.
• Specify the web console timeout settings. By default, a user is automatically loggedoff from the web console after 30 minutes of inactivity. The number of minutescan be from 10 to 60.
Configuring Web Console Settings
Procedure
1. Go to Administration > Settings > Web Console.
2. Select Enable auto refresh and then select the refresh interval.
3. Select Enable automatic log out from the web console and then select thetimeout interval.
4. Click Save.
Quarantine ManagerWhenever the OfficeScan agent detects a security risk and the scan action is quarantine,it encrypts the infected file and then moves it to the local quarantine folder located in<Agent installation folder>\SUSPECT.
After moving the file to the local quarantine directory, the OfficeScan agent sends it tothe designated quarantine directory. Specify the directory in Agents > AgentManagement > Settings > {Scan Type} Settings > Action tab. Files in thedesignated quarantine directory are encrypted to prevent them from infecting other files.See Quarantine Directory on page 7-38 for more information.

OfficeScan™ 11.0 Administrator’s Guide
13-52
If the designated quarantine directory is on the OfficeScan server computer, modify theserver’s quarantine directory settings from the web console. The server storesquarantined files in <Server installation folder>\PCCSRV\Virus.
NoteIf the OfficeScan agent is unable to send the encrypted file to the OfficeScan server for anyreason, such as a network connection problem, the encrypted file remains in theOfficeScan agent quarantine folder. The OfficeScan agent will attempt to resend the filewhen it connects to the OfficeScan server.
Configuring Quarantine Directory Settings
Procedure
1. Go to Administration > Settings > Quarantine Manager.
2. Accept or modify the default capacity of the quarantine folder and the maximumsize of an infected file that OfficeScan can store on the quarantine folder.
The default values display on the screen.
3. Click Save Quarantine Settings.
4. To remove all existing files in the quarantine folder, click Delete All QuarantinedFiles.
Server TunerUse Server Tuner to optimize the performance of the OfficeScan server usingparameters for the following server-related performance issues:
• Download
When the number of OfficeScan agents (including update agents) requestingupdates from the OfficeScan server exceeds the server's available resources, theserver moves the agent update request into a queue and processes the requests

Managing the OfficeScan Server
13-53
when resources become available. After the agent successfully updates componentsfrom the OfficeScan server, it notifies the server that the update is complete. Setthe maximum number of minutes the OfficeScan server waits to receive an updatenotification from the agent. Also set the maximum number of times the server triesto notify the agent to perform an update and to apply new configuration settings.The server keeps trying only if it does not receive agent notification.
• Buffer
When the OfficeScan server receives multiple requests from OfficeScan agents,such as a request to perform an update, the server handles as many requests as itcan and puts the remaining requests in a buffer. The server then handles therequests saved in the buffer one at a time when resources become available. Specifythe size of the buffer for events, such as agent requests for updates, and for agentlog reporting.
• Network Traffic
The amount of network traffic varies throughout the day. To control the flow ofnetwork traffic to the OfficeScan server and to other update sources, specify thenumber of OfficeScan agents that can simultaneously update at any given time ofthe day.
Server Tuner requires the following file: SvrTune.exe
Running Server Tuner
Procedure
1. On the OfficeScan server computer, go to <Server installation folder>\PCCSRV\Admin\Utility\SvrTune.
2. Double-click SvrTune.exe to start Server Tuner.
The Server Tuner console opens.
3. Under Download, modify the following settings:
• Timeout for client: Type the number of minutes for the OfficeScan server towait to receive an update response from agents. If the agent does not respond
OfficeScan™ 11.0 Administrator’s Guide
13-54
within this time, the OfficeScan server does not consider the agent to havecurrent components. When a notified agent times out, a slot for another agentawaiting notification becomes available.
• Timeout for update agent: Type the number of minutes for the OfficeScanserver to wait to receive an update response from an Update Agent. When anotified agent times out, a slot for another agent awaiting notificationbecomes available.
• Retry count: Type the maximum number of times the OfficeScan server triesto notify the agent to perform an update or to apply new configurationsettings.
• Retry interval: Type the number of minutes the OfficeScan server waitsbetween notification attempts.
4. Under Buffer, modify the following settings:
• Event Buffer: Type the maximum number of agent event reports to theserver (such as updating components) that OfficeScan holds in the buffer.The connection to the agent breaks while the agent request waits in thebuffer. OfficeScan establishes a connection to the agent when it processes theagent report and removes it from the buffer.
• Log Buffer: Type the maximum number of agent log information reports tothe server that OfficeScan holds in the buffer. The connection to the agentbreaks while the agent request waits in the buffer. OfficeScan establishes aconnection to the agent when it processes the agent report and removes itfrom the buffer.
NoteIf a large number of agents report to the server, increase the buffer size. Ahigher buffer size, however, means higher memory utilization on the server.
5. Under Network Traffic, modify the following settings:
• Normal hours: Click the radio buttons that represent the hours of the dayyou consider network traffic to be normal.
• Off-peak hours: Click the radio buttons that represent the hours of the dayyou consider network traffic to be at its lowest.
Managing the OfficeScan Server
13-55
• Peak hours: Click the radio buttons that represent the hours of the day youconsider network traffic to be at its peak.
• Maximum client connections: Type the maximum number of clients thatcan simultaneously update components from both "other update source" andfrom the OfficeScan server. Type a maximum number of clients for each ofthe time periods. When the maximum number of connections is reached,OfficeScan agents can update components only after a current agentconnection closes (due to either the completion of the update or the agentresponse reaching the timeout value you specified in the Timeout for clientor Timeout for Update Agent field).
6. Click OK. A prompt appears asking you to restart the OfficeScan Master Service.
NoteOnly the service restarts, not the computer.
7. Select from the following restart options:
• Click Yes to save the Server Tuner settings and restart the service. Thesettings take effect immediately after restart.
• Click No to save the Server Tuner settings but not restart the service. Restartthe OfficeScan Master Service or restart the OfficeScan server computer forsettings to take effect.
Smart FeedbackTrend Micro Smart Feedback shares anonymous threat information with the SmartProtection Network, allowing Trend Micro to rapidly identify and address new threats.You can disable Smart Feedback anytime through this console.

OfficeScan™ 11.0 Administrator’s Guide
13-56
Participating in the Smart Feedback Program
Procedure
1. Go to Administration > Smart Protection > Smart Feedback.
2. Click Enable Trend Micro Smart Feedback.
3. To help Trend Micro understand your organization, select the Industry type.
4. To send information about potential security threats in the files on your OfficeScanagents, select the Enable feedback of suspicious program files check box.
NoteFiles sent to Smart Feedback contain no user data and are submitted only for threatanalysis.
5. To configure the criteria for sending feedback, select the number of detections forthe specific amount of time that triggers the feedback.
6. Specify the maximum bandwidth OfficeScan can use when sending feedback tominimize network interruptions.
7. Click Save.

14-1
Chapter 14
Managing the OfficeScan AgentThis chapter describes OfficeScan agent management and configurations.
Topics include:
• Endpoint Location on page 14-2
• OfficeScan Agent Program Management on page 14-6
• Agent-Server Connection on page 14-24
• OfficeScan Agent Proxy Settings on page 14-46
• Viewing OfficeScan Agent Information on page 14-50
• Importing and Exporting Agent Settings on page 14-51
• Security Compliance on page 14-52
• Trend Micro Virtual Desktop Support on page 14-69
• Global Agent Settings on page 14-83
• Configuring Agent Privileges and Other Settings on page 14-84

OfficeScan™ 11.0 Administrator’s Guide
14-2
Endpoint LocationOfficeScan provides a location awareness feature that determines whether theOfficeScan agent’s location is internal or external. Location awareness is leveraged in thefollowing OfficeScan features and services:
TABLE 14-1. Features and Services that Leverage Location Awareness
FEATURE/SERVICE DESCRIPTION
Web ReputationServices
The OfficeScan agent’s location determines the web reputationpolicy that the OfficeScan agent will apply. Administrators typicallyenforce a stricter policy for external agents.
For details about web reputation policies, see Web ReputationPolicies on page 11-5.
File ReputationServices
For agents that use smart scan, the OfficeScan agent’s locationdetermine the smart protection source to which agents send scanqueries.
External OfficeScan agents send scan queries to Smart ProtectionNetwork while internal agents send the queries to the sourcesdefined in the smart protection source list.
For details about smart protection sources, see Smart ProtectionSources on page 4-5.
Data LossPrevention
The OfficeScan agent’s location determines the Data LossPrevention policy that the agent will apply. Administrators typicallyenforce a stricter policy for external agents.
For details about Data Loss Prevention policies, see Data LossPrevention Policies on page 10-3.
Device Control The OfficeScan agent’s location determines the Device Controlpolicy that the agent will apply. Administrators typically enforce astricter policy for external agents.
For details about Device Control policies, see Device Control onpage 9-2.

Managing the OfficeScan Agent
14-3
Location CriteriaSpecify whether location is based on the OfficeScan agent endpoint's gateway IP addressor the OfficeScan agent's connection status with the OfficeScan server or any referenceserver.
• Agent connection status: If the OfficeScan agent can connect to the OfficeScanserver or any of the assigned reference servers on the intranet, the endpoint'slocation is internal. Additionally, if any endpoint outside the corporate network canestablish connection with the OfficeScan server/reference server, its location isalso internal. If none of these conditions apply, the endpoint's location is external.
• Gateway IP and MAC address: If the OfficeScan agent endpoint's gateway IPaddress matches any of the gateway IP addresses you specified on the EndpointLocation screen, the endpoint's location is internal. Otherwise, the endpoint'slocation is external.
Configuring Location Settings
Procedure
1. Go to Agents > Endpoint Location.
2. Choose whether location is based on Agent connection status or Gateway IPand MAC address.
3. If you choose Agent connection status, decide if you want to use a referenceserver.
See Reference Servers on page 13-27 for details.
a. If you did not specify a reference server, the OfficeScan agent checks theconnection status with the OfficeScan server when the following eventsoccur:
• The OfficeScan agent switches from roaming to normal (online/offline)mode.
• The OfficeScan agent switches from one scan method to another. SeeScan Method Types on page 7-8 for details.

OfficeScan™ 11.0 Administrator’s Guide
14-4
• The OfficeScan agent detects IP address change in the endpoint.
• The OfficeScan agent restarts.
• Server initiates connection verification. See OfficeScan Agent Icons on page14-25 for details.
• Web reputation location criteria changes while applying global settings.
• Outbreak prevention policy is no longer enforced and pre-outbreaksettings are restored.
b. If you specified a reference server, the OfficeScan agent checks its connectionstatus with the OfficeScan server first, and then with the reference server ifconnection to the OfficeScan server is unsuccessful. The OfficeScan agentchecks the connection status every hour and when any of the above eventsoccur.
4. If you choose Gateway IP and MAC address:
a. Type the gateway IPv4/IPv6 address in the text box provided.
b. Type the MAC address.
c. Click Add.
If you do not type a MAC address, OfficeScan will include all the MACaddresses belonging to the specified IP address.
d. Repeat step a to step c until you have all the gateway IP addresses you want toadd.
e. Use the Gateway Settings Importer tool to import a list of gateway settings.
See Gateway Settings Importer on page 14-4 for details.
5. Click Save.
Gateway Settings ImporterOfficeScan checks the endpoint's location to determine the web reputation policy to useand the smart protection source to which to connect. One of the ways OfficeScan

Managing the OfficeScan Agent
14-5
identifies the location is by checking the endpoint's gateway IP address and MACaddress.
Configure the gateway settings on the Endpoint Location screen or use the GatewaySettings Importer tool to import a list of gateway settings to the Endpoint Locationscreen.
Using Gateway Settings Importer
Procedure
1. Prepare a text file (.txt) containing the list of gateway settings. On each line, typean IPv4 or IPv6 address and optionally type a MAC address.
Separate IP addresses and MAC addresses by a comma. The maximum number ofentries is 4096.
For example:
10.1.111.222,00:17:31:06:e6:e7
2001:0db7:85a3:0000:0000:8a2e:0370:7334
10.1.111.224,00:17:31:06:e6:e7
2. On the server computer, go to <Server installation folder>\PCCSRV\Admin\Utility\GatewaySettingsImporter and double-click GSImporter.exe.
NoteYou cannot run the Gateway Settings Importer tool from Terminal Services.
3. On the Gateway Settings Importer screen, browse to the file created in step 1and click Import.
4. Click OK.
The gateway settings display on the Endpoint Location screen and theOfficeScan server deploys the settings to OfficeScan agents.
5. To delete all entries, click Clear All.
OfficeScan™ 11.0 Administrator’s Guide
14-6
If you only need to delete a particular entry, remove it from the EndpointLocation screen.
6. To export the settings to a file, click Export All and then specify the file name andtype.
OfficeScan Agent Program ManagementThe following topics discuss ways to manage and protect the OfficeScan agent program:
• OfficeScan Agent Services on page 14-6
• OfficeScan Agent Service Restart on page 14-11
• OfficeScan Agent Self-protection on page 14-12
• OfficeScan Agent Security on page 14-16
• OfficeScan Agent Console Access Restriction on page 14-17
• OfficeScan Agent Unloading and Unlocking on page 14-18
• OfficeScan Agent Roaming Privilege on page 14-19
• Agent Mover on page 14-21
• Inactive OfficeScan Agents on page 14-24
OfficeScan Agent ServicesThe OfficeScan agent runs the services listed in the following table. You can view thestatus of these services from Microsoft Management Console.
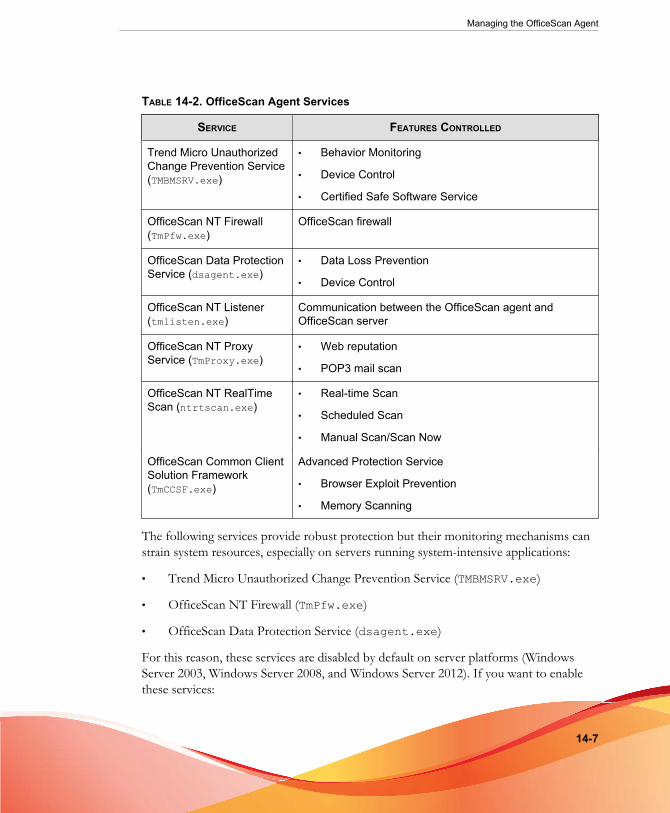
Managing the OfficeScan Agent
14-7
TABLE 14-2. OfficeScan Agent Services
SERVICE FEATURES CONTROLLED
Trend Micro UnauthorizedChange Prevention Service(TMBMSRV.exe)
• Behavior Monitoring
• Device Control
• Certified Safe Software Service
OfficeScan NT Firewall(TmPfw.exe)
OfficeScan firewall
OfficeScan Data ProtectionService (dsagent.exe)
• Data Loss Prevention
• Device Control
OfficeScan NT Listener(tmlisten.exe)
Communication between the OfficeScan agent andOfficeScan server
OfficeScan NT ProxyService (TmProxy.exe)
• Web reputation
• POP3 mail scan
OfficeScan NT RealTimeScan (ntrtscan.exe)
• Real-time Scan
• Scheduled Scan
• Manual Scan/Scan Now
OfficeScan Common ClientSolution Framework(TmCCSF.exe)
Advanced Protection Service
• Browser Exploit Prevention
• Memory Scanning
The following services provide robust protection but their monitoring mechanisms canstrain system resources, especially on servers running system-intensive applications:
• Trend Micro Unauthorized Change Prevention Service (TMBMSRV.exe)
• OfficeScan NT Firewall (TmPfw.exe)
• OfficeScan Data Protection Service (dsagent.exe)
For this reason, these services are disabled by default on server platforms (WindowsServer 2003, Windows Server 2008, and Windows Server 2012). If you want to enablethese services:

OfficeScan™ 11.0 Administrator’s Guide
14-8
• Monitor the system’s performance constantly and take the necessary action whenyou notice a drop in performance.
• For TMBMSRV.exe, you can enable the service if you exempt system-intensiveapplications from Behavior Monitoring policies. You can use a performance tuningtool to identify system intensive applications. For details, see Using the Trend MicroPerformance Tuning Tool on page 14-9.
For desktop platforms, disable the services only if you notice a significant drop inperformance.
Enabling or Disabling the Agent Services from the WebConsole
Procedure
1. Go to Agents > Agent Management.
2. For OfficeScan agents running Windows XP, Vista, 7, 8, or 8.1:
a. In the agent tree, click the root domain icon ( ) to include all agents orselect specific domains or agents.
NoteWhen you select the root domain or specific domains, the setting will onlyapply to agents running Windows XP, Vista, 7, 8, or 8.1. The setting will notapply to agents running any Windows Server platforms even if they are part ofthe domains.
b. Click Settings > Additional Service Settings.
c. Select or clear the check box under the following sections:
• Unauthorized Change Prevention Service
• Firewall Service
• Suspicious Connection Service
• Data Protection Service

Managing the OfficeScan Agent
14-9
• Advanced Protection Service
d. Click Save to apply settings to the domain(s). If you selected the root domainicon, choose from the following options:
• Apply to All Agents: Applies settings to all existing Windows XP/Vista/7/8/8.1 agents and to any new agents added to an existing/futuredomain. Future domains are domains not yet created at the time youconfigure the settings.
• Apply to Future Domains Only: Applies settings only to WindowsXP/Vista/7/8/8.1 agents added to future domains. This option will notapply settings to new agents added to an existing domain.
3. For OfficeScan agents running Windows Server 2003, Windows Server 2008, orWindows Server 2012:
a. Select a single agent in the agent tree.
b. Click Settings > Additional Service Settings.
c. Select or clear the check box under the following sections:
• Unauthorized Change Prevention Service
• Firewall Service
• Suspicious Connection Service
• Data Protection Service
• Advanced Protection Service
d. Click Save.
Using the Trend Micro Performance Tuning Tool
Procedure
1. Download Trend Micro Performance Tuning Tool from:
http://esupport.trendmicro.com/solution/en-us/1056425.aspx

OfficeScan™ 11.0 Administrator’s Guide
14-10
2. Unzip TMPerfTool.zip to extract TMPerfTool.exe.
3. Place TMPerfTool.exe in the <Agent installation folder> or in the same folder asTMBMCLI.dll.
4. Right-click TMPerfTool.exe and select Run as administrator.
5. Read and accept the end user agreement and then click OK.
6. Click Analyze.
FIGURE 14-1. System-intensive process highlighted
The tool starts to monitor CPU usage and event loading. A system-intensiveprocess is highlighted in red.
7. Select a system-intensive process and click the Add to the exception list (allow)button ( ).
8. Check if the system or application performance improves.
Managing the OfficeScan Agent
14-11
9. If the performance improves, select the process again and click the Remove fromthe exception list button ( ).
10. If the performance drops again, perform the following steps:
a. Note the name of the application.
b. Click Stop.
c. Click the Generate report button ( ) and then save the .xml file.
d. Review the applications that have been identified as conflicting and add themto the Behavior Monitoring exception list.
For details, see Behavior Monitoring Exception List on page 8-5.
OfficeScan Agent Service RestartOfficeScan restarts OfficeScan agent services that stopped responding unexpectedly andwere not stopped by a normal system process. For details about agent services, seeOfficeScan Agent Services on page 14-6.
Configure the necessary settings to enable OfficeScan agent services to restart.
Configuring Service Restart Settings
Procedure
1. Go to Agents > Global Agent Settings.
2. Go to the OfficeScan Service Restart section.
3. Select Automatically restart an OfficeScan agent service if the serviceterminates unexpectedly.
4. Configure the following:
• Restart the service after __ minutes: Specify the amount of time (innumber of minutes) that must elapse before OfficeScan restarts a service.

OfficeScan™ 11.0 Administrator’s Guide
14-12
• If the first attempt to restart the service fails, retry __ times: Specify themaximum retry attempts for restarting a service. Manually restart a service if itremains stopped after the maximum retry attempts.
• Reset the restart failure count after __ hours: If a service remains stoppedafter exhausting the maximum retry attempts, OfficeScan waits a certainnumber of hours to reset the failure count. If a service remains stopped afterthe number of hours elapses, OfficeScan restarts the service.
OfficeScan Agent Self-protectionOfficeScan agent self-protection provides ways for the OfficeScan agent to protect theprocesses and other resources required to function properly. OfficeScan agent self-protection helps thwart attempts by programs or actual users to disable anti-malwareprotection.
OfficeScan agent self-protection provides the following options:
• Protect OfficeScan Agent Services on page 14-13
• Protect Files in the OfficeScan Agent Installation Folder on page 14-14
• Protect OfficeScan Agent Registry Keys on page 14-15
• Protect OfficeScan Agent Processes on page 14-15
Configuring OfficeScan Agent Self-protection Settings
Procedure
1. Go to Agents > Agent Management.
2. In the agent tree, click the root domain icon ( ) to include all agents or selectspecific domains or agents.
3. Click Settings > Privileges and Other Settings.
4. Click the Other Settings tab and go to the OfficeScan Agent Self-protectionsection.

Managing the OfficeScan Agent
14-13
5. Enable the following options:
• Protect OfficeScan Agent Services on page 14-13
• Protect Files in the OfficeScan Agent Installation Folder on page 14-14
• Protect OfficeScan Agent Registry Keys on page 14-15
• Protect OfficeScan Agent Processes on page 14-15
6. If you selected domain(s) or agent(s) in the agent tree, click Save. If you clicked theroot domain icon, choose from the following options:
• Apply to All Agents: Applies settings to all existing agents and to any newagent added to an existing/future domain. Future domains are domains notyet created at the time you configured the settings.
• Apply to Future Domains Only: Applies settings only to agents added tofuture domains. This option will not apply settings to new agents added to anexisting domain.
Protect OfficeScan Agent Services
OfficeScan blocks all attempts to terminate the following OfficeScan agent services:
• OfficeScan NT Listener (TmListen.exe)
• OfficeScan NT RealTime Scan (NTRtScan.exe)
• OfficeScan NT Proxy Service (TmProxy.exe)
• OfficeScan NT Firewall (TmPfw.exe)
• OfficeScan Data Protection Service (dsagent.exe)
• Trend Micro Unauthorized Change Prevention Service (TMBMSRV.exe)
NoteIf this option is enabled, OfficeScan may prevent third-party products from installingsuccessfully on endpoints. If you encounter this issue, you can temporarily disable theoption and then re-enable it after the installation of the third-party product.

OfficeScan™ 11.0 Administrator’s Guide
14-14
• Trend Micro Common Client Solution Framework (TmCCSF.exe)
Protect Files in the OfficeScan Agent Installation Folder
To prevent other programs and even the user from modifying or deleting OfficeScanagent files, OfficeScan locks the following files in the root <Agent installation folder>:
• All digitally-signed files with .exe, .dll, and .sys extensions
• Some files without digital signatures, including:
• bspatch.exe
• bzip2.exe
• INETWH32.dll
• libcurl.dll
• libeay32.dll
• libMsgUtilExt.mt.dll
• msvcm80.dll
• MSVCP60.DLL
• msvcp80.dll
• msvcr80.dll
• OfceSCV.dll
• OFCESCVPack.exe
• patchbld.dll
• patchw32.dll
• patchw64.dll
• PiReg.exe
• ssleay32.dll

Managing the OfficeScan Agent
14-15
• Tmeng.dll
• TMNotify.dll
• zlibwapi.dll
Protect OfficeScan Agent Registry Keys
OfficeScan blocks all attempts to modify, delete, or add new entries under the followingregistry keys and subkeys:
• HKEY_LOCAL_MACHINE\SOFTWARE\TrendMicro\PC-cillinNTCorp\CurrentVersion
• HKEY_LOCAL_MACHINE\SOFTWARE\TrendMicro\NSC
• HKEY_LOCAL_MACHINE\SOFTWARE\TrendMicro\Osprey
• HKEY_LOCAL_MACHINE\SOFTWARE\TrendMicro\AMSP
Protect OfficeScan Agent Processes
OfficeScan blocks all attempts to terminate the following processes:
• TmListen.exe: Receives commands and notifications from the OfficeScan serverand facilitates communication from the OfficeScan agent to the server
• NTRtScan.exe: Performs Real-time, Scheduled, and Manual Scan on OfficeScanagents
• TmProxy.exe: Scans network traffic before passing it to the target application
• TmPfw.exe: Provides packet level firewall, network virus scanning, and intrusiondetection capabilities
• TMBMSRV.exe: Regulates access to external storage devices and preventsunauthorized changes to registry keys and processes
• DSAgent.exe: Monitors the transmission of sensitive data and controls access todevices

OfficeScan™ 11.0 Administrator’s Guide
14-16
• PccNTMon.exe: This process is responsible for starting the OfficeScan agentconsole
• TmCCSF.exe: Performs Browser Exploit Prevention and memory scanning
OfficeScan Agent Security
Control user access to the OfficeScan agent installation directory and registry settings byselecting from two security settings.
Controlling Access to the OfficeScan Agent InstallationDirectory and Registry Keys
Procedure
1. Go to Agents > Agent Management.
2. In the agent tree, click the root domain icon ( ) to include all agents or selectspecific domains or agents.
3. Click Settings > Privileges and Other Settings.
4. Click the Other Settings tab and go to the Agent Security Settings section.
5. Select from the following access permissions:
• High: The OfficeScan agent installation directory inherits the rights of theProgram Files folder and the OfficeScan agent’s registry entries inheritpermissions from the HKLM\Software key. For most Active Directoryconfigurations, this automatically limits “normal” users (those withoutadministrator privileges) to read-only access.
• Normal: This permission grants all users (the user group "Everyone") fullrights to the OfficeScan agent program directory and OfficeScan agentregistry entries.
6. If you selected domain(s) or agent(s) in the agent tree, click Save. If you clicked theroot domain icon, choose from the following options:
Managing the OfficeScan Agent
14-17
• Apply to All Agents: Applies settings to all existing agents and to any newagent added to an existing/future domain. Future domains are domains notyet created at the time you configured the settings.
• Apply to Future Domains Only: Applies settings only to agents added tofuture domains. This option will not apply settings to new agents added to anexisting domain.
OfficeScan Agent Console Access Restriction
This setting disables OfficeScan agent console access from the system tray or WindowsStart menu. The only way users can access the OfficeScan agent console is by double-clicking PccNTMon.exe from the <Agent installation folder>. After configuring thissetting, reload the OfficeScan agent for the setting to take effect.
This setting does not disable the OfficeScan agent. The OfficeScan agent runs in thebackground and continues to provide protection from security risks.
Restricting Access to the OfficeScan Agent Console
Procedure
1. Go to Agents > Agent Management.
2. In the agent tree, click the root domain icon ( ) to include all agents or selectspecific domains or agents.
3. Click Settings > Privileges and Other Settings.
4. Click the Other Settings tab and go to the OfficeScan Agent AccessRestriction section.
5. Select Do not allow users to access the OfficeScan agent console from thesystem tray or Windows Start menu.
6. If you selected domain(s) or agent(s) in the agent tree, click Save. If you clicked theroot domain icon, choose from the following options:

OfficeScan™ 11.0 Administrator’s Guide
14-18
• Apply to All Agents: Applies settings to all existing agents and to any newagent added to an existing/future domain. Future domains are domains notyet created at the time you configured the settings.
• Apply to Future Domains Only: Applies settings only to agents added tofuture domains. This option will not apply settings to new agents added to anexisting domain.
OfficeScan Agent Unloading and UnlockingThe OfficeScan agent unloading and unlocking privilege allows users to temporarily stopthe OfficeScan agent or gain access to advanced web console features with or without apassword.
Granting the Agent Unloading and Unlocking Privilege
Procedure
1. Go to Agents > Agent Management.
2. In the agent tree, click the root domain icon ( ) to include all agents or selectspecific domains or agents.
3. Click Settings > Privileges and Other Settings.
4. On the Privileges tab, go to the Unload and Unlock section.
5. To allow OfficeScan agent unloading without a password, select Does not requirea password.
• If a password is required, select Requires a password, type the password,and then confirm it.
6. If you selected domain(s) or agent(s) in the agent tree, click Save. If you clicked theroot domain icon, choose from the following options:
• Apply to All Agents: Applies settings to all existing agents and to any newagent added to an existing/future domain. Future domains are domains notyet created at the time you configured the settings.

Managing the OfficeScan Agent
14-19
• Apply to Future Domains Only: Applies settings only to agents added tofuture domains. This option will not apply settings to new agents added to anexisting domain.
OfficeScan Agent Roaming PrivilegeGrant certain users the OfficeScan agent roaming privilege if agent-server events areinterfering with the users’ tasks. For example, a user who frequently gives presentationscan enable roaming mode before starting a presentation to prevent the OfficeScanserver from deploying OfficeScan agent settings and initiating scans on the OfficeScanagent.
When OfficeScan agents are in roaming mode:
• OfficeScan agents do not send logs to the OfficeScan server, even if there is afunctional connection between the server and agents.
• The OfficeScan server does not initiate tasks and deploy OfficeScan agent settingsto the agents, even if there is functional connection between the server and agents.
• OfficeScan agents update components if they can connect to any of their updatesources. Sources include the OfficeScan server, Update Agents, or a custom updatesource.
The following events trigger an update on roaming agents:
• The user performs a manual update.
• Automatic agent update runs. You can disable automatic agent update onroaming agents. For details, see Disabling Automatic Agent Update on RoamingAgents on page 14-20.
• Scheduled update runs. Only agents with the required privileges can runscheduled updates. You can revoke this privilege anytime. For details, seeRevoking the Scheduled Update Privilege on Roaming OfficeScan Agents on page 14-21.
OfficeScan™ 11.0 Administrator’s Guide
14-20
Granting the Agent Roaming Privilege
Procedure
1. Go to Agents > Agent Management.
2. In the agent tree, click the root domain icon ( ) to include all agents or selectspecific domains or agents.
3. Click Settings > Privileges and Other Settings.
4. On the Privileges tab, go to the Roaming section.
5. Select Enable roaming mode.
6. If you selected domain(s) or agent(s) in the agent tree, click Save. If you clicked theroot domain icon, choose from the following options:
• Apply to All Agents: Applies settings to all existing agents and to any newagent added to an existing/future domain. Future domains are domains notyet created at the time you configured the settings.
• Apply to Future Domains Only: Applies settings only to agents added tofuture domains. This option will not apply settings to new agents added to anexisting domain.
Disabling Automatic Agent Update on Roaming Agents
Procedure
1. Go to Updates > Agents > Automatic Update.
2. Go to the Event-triggered Update section.
3. Disable Include roaming and offlines agent(s).

Managing the OfficeScan Agent
14-21
Note
This option is automatically disabled if you disable Initiate component update onagents immediately after the OfficeScan server downloads a new component.
Revoking the Scheduled Update Privilege on RoamingOfficeScan Agents
Procedure
1. Go to Agents > Agent Management.
2. In the agent tree, click the root domain icon ( ) or select specific domains oragents.
3. Click Settings > Privileges and Other Settings.
4. On the Privileges tab, go to the Component Update Privileges section.
5. Clear the Enable/Disable schedule-based updates option.
6. Click Save.
Agent MoverIf you have more than one OfficeScan server on the network, use the Agent Mover toolto transfer OfficeScan agents from one OfficeScan server to another. This is especiallyuseful after adding a new OfficeScan server to the network and you want to transferexisting OfficeScan agents to the new server.
Note
The two servers must be of the same language version. If you use Agent Mover to moveany OfficeScan agent running an earlier version to a server of the current version, theOfficeScan agent will be upgraded automatically.
Ensure that the account you use has administrator privileges before using this tool.

OfficeScan™ 11.0 Administrator’s Guide
14-22
Running Agent Mover
Procedure
1. On the OfficeScan server, go to <Server installation folder>\PCCSRV\Admin\Utility\IpXfer.
2. Copy IpXfer.exe to the OfficeScan agent endpoint. If the OfficeScan agentendpoint runs an x64 type platform, copy IpXfer_x64.exe instead.
3. On the OfficeScan agent endpoint, open a command prompt and then go to thefolder where you copied the executable file.
4. Run Agent Mover using the following syntax:
<executable file name> -s <server name> -p <serverlistening port> -c <agent listening port> -d <domain ordomain hierarchy> -e <Certificate location and file name>TABLE 14-3. Agent Mover Parameters
PARAMETER EXPLANATION
<executable filename>
IpXfer.exe or IpXfer_x64.exe
-s <server name> The name of the destination OfficeScan server (theserver to which the OfficeScan agent will transfer)
-p <serverlistening port>
The listening port (or trusted port) of the destinationOfficeScan server. To view the listening port on theOfficeScan web console, click Administration >Settings > Agent Connection in the main menu.
-c <agent listeningport>
The port number used by the OfficeScan agent endpointto communicate with the server
-d <domain ordomain hierarchy>
The agent tree domain or subdomain to which the agentwill be grouped. The domain hierarchy should indicate thesubdomain.
Managing the OfficeScan Agent
14-23
PARAMETER EXPLANATION
-e <Certificatelocation and filename>
Imports a new authentication certificate for the OfficeScanagent during the move process. If this parameter is notused, the OfficeScan agent automatically retrieves thecurrent authentication certificate from its new managingserver.
NoteThe default certificate location on the OfficeScanserver is:
<Server installation folder>\PCCSRV\Pccnt\Common\OfcNTCer.dat.
When using a certificate from a source other thanOfficeScan, ensure that the certificate is inDistinguished Encoding Rules (DER) format.
Examples:
ipXfer.exe -s Server01 -p 8080 -c 21112 -d Workgroup
ipXfer_x64.exe -s Server02 -p 8080 -c 21112 -d Workgroup\Group01
5. To confirm the OfficeScan agent now reports to the other server, do the following:
a. On the OfficeScan agent endpoint, right-click the OfficeScan agent programicon in the system tray.
b. Select Component Versions.
c. Check the OfficeScan server that the OfficeScan agent reports to in theServer name/port field.
Note
If the OfficeScan agent does not appear in the agent tree of the new OfficeScanserver managing it, restart the new server’s Master Service (ofservice.exe).
OfficeScan™ 11.0 Administrator’s Guide
14-24
Inactive OfficeScan AgentsWhen you use the OfficeScan agent uninstallation program to remove the OfficeScanagent program from endpoints, the program automatically notifies the server. When theserver receives this notification, it removes the OfficeScan agent icon in the agent tree toshow that the agent does not exist anymore.
However, if you use other methods to remove the OfficeScan agent, such asreformatting the endpoint hard drive or deleting the OfficeScan agent files manually,OfficeScan will not be aware of the removal and it will display the OfficeScan agent asinactive. If a user unloads or disables the OfficeScan agent for an extended period oftime, the server also displays the OfficeScan agent as inactive.
To have the agent tree display active agents only, configure OfficeScan to automaticallyremove inactive agents from the agent tree.
Automatically Removing Inactive Agents
Procedure
1. Go to Administration > Settings > Inactive Agents.
2. Select Enable automatic removal of inactive agents.
3. Select how many days should pass before OfficeScan considers the OfficeScanagent inactive.
4. Click Save.
Agent-Server ConnectionThe OfficeScan agent must maintain a continuous connection with its parent server sothat it can update components, receive notifications, and apply configuration changes ina timely manner. The following topics discuss how to check the OfficeScan agent’sconnection status and resolve connection issues:
• Agent IP Addresses on page 5-8

Managing the OfficeScan Agent
14-25
• OfficeScan Agent Icons on page 14-25
• Agent-Server Connection Verification on page 14-40
• Connection Verification Logs on page 14-41
• Unreachable Agents on page 14-42
OfficeScan Agent IconsThe OfficeScan agent icon in the system tray provide visual hints that indicate thecurrent status of the OfficeScan agent and prompt users to perform certain actions. Atany given time, the icon will show a combination of the following visual hints.

OfficeScan™ 11.0 Administrator’s Guide
14-26
TABLE 14-4. OfficeScan agent Status as Indicated in the OfficeScan agent Icon
AGENTSTATUS
DESCRIPTION VISUAL HINT
Agentconnectionwith theOfficeScanserver
Online agents areconnected to theOfficeScan server. Theserver can initiate tasksand deploy settings tothese agents
The icon contains a symbol resembling aheartbeat.
The background color is a shade of blue orred, depending on the status of the Real-time Scan Service.
Offline agents aredisconnected from theOfficeScan server. Theserver cannot managethese agents.
The icon contains a symbol resembling theloss of a heartbeat.
The background color is a shade of blue orred, depending on the status of the Real-time Scan Service.
It is possible for the agent to become offlineeven if it is connected to the network. Fordetails about this issue, see Solutions toIssues Indicated in OfficeScan Agent Iconson page 14-37.
Roaming agents may ormay not be able tocommunicate with theOfficeScan server.
The icon contains the desktop and signalsymbols.
The background color is a shade of blue orred, depending on the status of the Real-time Scan Service.
For details about roaming agents, seeOfficeScan Agent Roaming Privilege onpage 14-19.
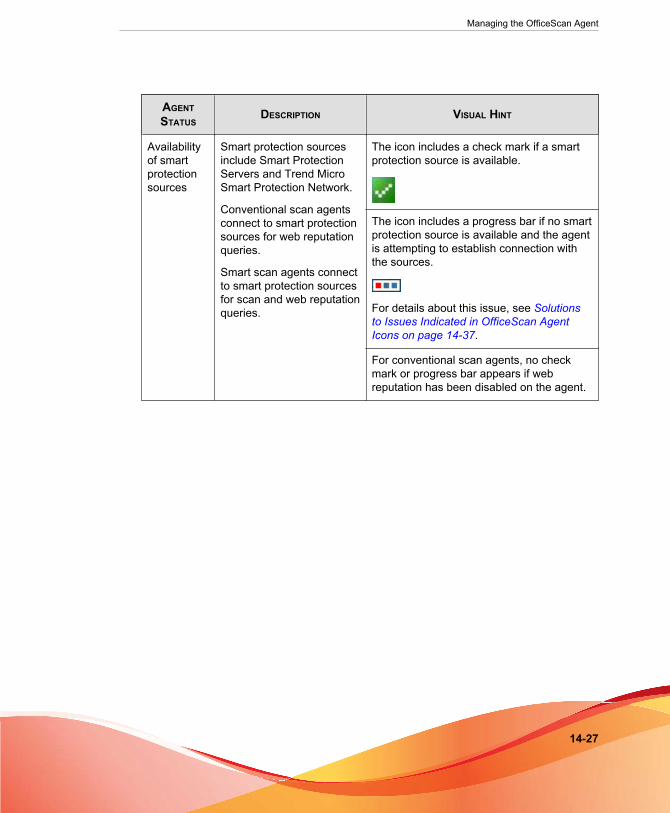
Managing the OfficeScan Agent
14-27
AGENTSTATUS
DESCRIPTION VISUAL HINT
Availabilityof smartprotectionsources
Smart protection sourcesinclude Smart ProtectionServers and Trend MicroSmart Protection Network.
Conventional scan agentsconnect to smart protectionsources for web reputationqueries.
Smart scan agents connectto smart protection sourcesfor scan and web reputationqueries.
The icon includes a check mark if a smartprotection source is available.
The icon includes a progress bar if no smartprotection source is available and the agentis attempting to establish connection withthe sources.
For details about this issue, see Solutionsto Issues Indicated in OfficeScan AgentIcons on page 14-37.
For conventional scan agents, no checkmark or progress bar appears if webreputation has been disabled on the agent.

OfficeScan™ 11.0 Administrator’s Guide
14-28
AGENTSTATUS
DESCRIPTION VISUAL HINT
Real-timeScanServicestatus
OfficeScan uses the Real-time Scan Service not onlyfor Real-time Scan, but alsofor Manual Scan andScheduled Scan.
The service must befunctional or the agentbecomes vulnerable tosecurity risks.
The entire icon is shaded blue if the Real-time Scan Service is functional. Twoshades of blue are used to indicate theagent’s scan method.
• For conventional scan:
• For smart scan:
The entire icon is shaded red if the Real-time Scan Service has been disabled or isnot functional.
Two shades of red are used to indicate theagent’s scan method.
• For conventional scan:
• For smart scan:
For details about this issue, see Solutionsto Issues Indicated in OfficeScan AgentIcons on page 14-37.
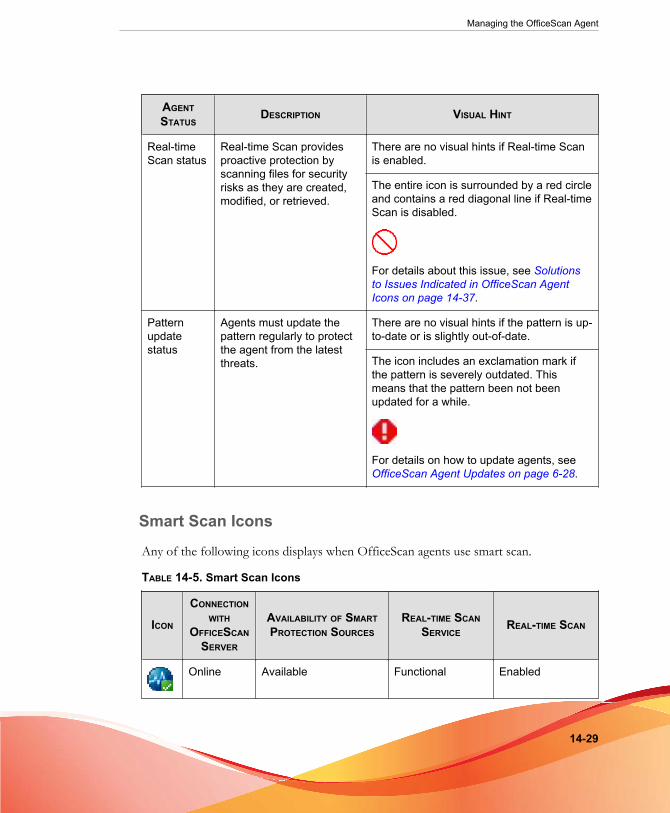
Managing the OfficeScan Agent
14-29
AGENTSTATUS
DESCRIPTION VISUAL HINT
Real-timeScan status
Real-time Scan providesproactive protection byscanning files for securityrisks as they are created,modified, or retrieved.
There are no visual hints if Real-time Scanis enabled.
The entire icon is surrounded by a red circleand contains a red diagonal line if Real-timeScan is disabled.
For details about this issue, see Solutionsto Issues Indicated in OfficeScan AgentIcons on page 14-37.
Patternupdatestatus
Agents must update thepattern regularly to protectthe agent from the latestthreats.
There are no visual hints if the pattern is up-to-date or is slightly out-of-date.
The icon includes an exclamation mark ifthe pattern is severely outdated. Thismeans that the pattern been not beenupdated for a while.
For details on how to update agents, seeOfficeScan Agent Updates on page 6-28.
Smart Scan Icons
Any of the following icons displays when OfficeScan agents use smart scan.
TABLE 14-5. Smart Scan Icons
ICON
CONNECTIONWITH
OFFICESCANSERVER
AVAILABILITY OF SMARTPROTECTION SOURCES
REAL-TIME SCANSERVICE
REAL-TIME SCAN
Online Available Functional Enabled
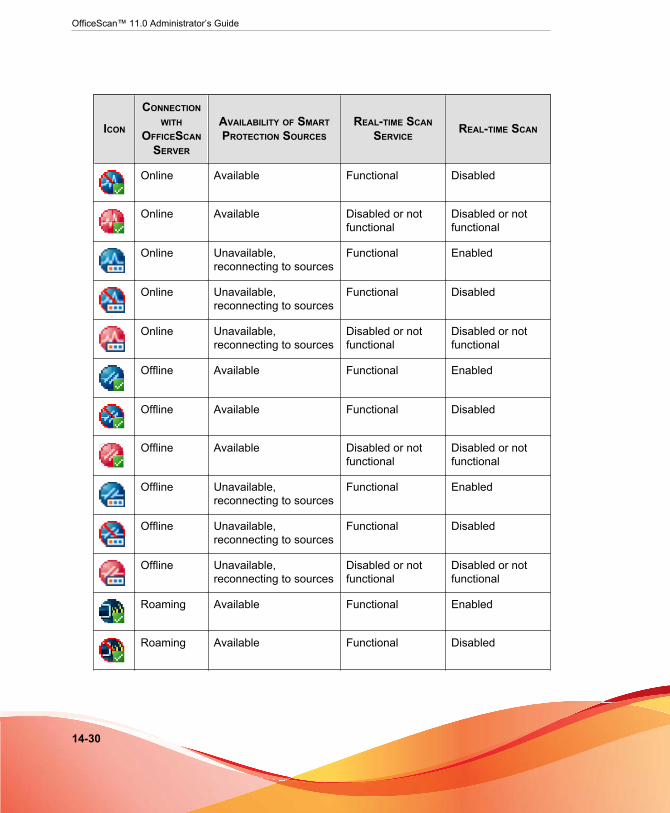
OfficeScan™ 11.0 Administrator’s Guide
14-30
ICON
CONNECTIONWITH
OFFICESCANSERVER
AVAILABILITY OF SMARTPROTECTION SOURCES
REAL-TIME SCANSERVICE
REAL-TIME SCAN
Online Available Functional Disabled
Online Available Disabled or notfunctional
Disabled or notfunctional
Online Unavailable,reconnecting to sources
Functional Enabled
Online Unavailable,reconnecting to sources
Functional Disabled
Online Unavailable,reconnecting to sources
Disabled or notfunctional
Disabled or notfunctional
Offline Available Functional Enabled
Offline Available Functional Disabled
Offline Available Disabled or notfunctional
Disabled or notfunctional
Offline Unavailable,reconnecting to sources
Functional Enabled
Offline Unavailable,reconnecting to sources
Functional Disabled
Offline Unavailable,reconnecting to sources
Disabled or notfunctional
Disabled or notfunctional
Roaming Available Functional Enabled
Roaming Available Functional Disabled

Managing the OfficeScan Agent
14-31
ICON
CONNECTIONWITH
OFFICESCANSERVER
AVAILABILITY OF SMARTPROTECTION SOURCES
REAL-TIME SCANSERVICE
REAL-TIME SCAN
Roaming Available Disabled or notfunctional
Disabled or notfunctional
Roaming Unavailable,reconnecting to sources
Functional Enabled
Roaming Unavailable,reconnecting to sources
Functional Disabled
Roaming Unavailable,reconnecting to sources
Disabled or notfunctional
Disabled or notfunctional
Conventional Scan Icons
Any of the following icons displays when OfficeScan agents use conventional scan.
TABLE 14-6. Conventional Scan Icons
ICON
CONNECTIONWITH
OFFICESCANSERVER
WEB REPUTATIONSERVICES
PROVIDED BYSMART
PROTECTIONSOURCES
REAL-TIMESCAN SERVICE
REAL-TIMESCAN
VIRUSPATTERN
Online Available Functional Enabled Up-to-date orslightlyoutdated
Online Unavailable,reconnecting tosources
Functional Enabled Up-to-date orslightlyoutdated
Online Available Functional Enabled Severelyoutdated

OfficeScan™ 11.0 Administrator’s Guide
14-32
ICON
CONNECTIONWITH
OFFICESCANSERVER
WEB REPUTATIONSERVICES
PROVIDED BYSMART
PROTECTIONSOURCES
REAL-TIMESCAN SERVICE
REAL-TIMESCAN
VIRUSPATTERN
Online Unavailable,reconnecting tosources
Functional Enabled Severelyoutdated
Online Available Functional Disabled Up-to-date orslightlyoutdated
Online Unavailable,reconnecting tosources
Functional Disabled Up-to-date orslightlyoutdated
Online Available Functional Disabled Severelyoutdated
Online Unavailable,reconnecting tosources
Functional Disabled Severelyoutdated
Online Available Disabled ornot functional
Disabled ornot functional
Up-to-date orslightlyoutdated
Online Unavailable,reconnecting tosources
Disabled ornot functional
Disabled ornot functional
Up-to-date orslightlyoutdated
Online Available Disabled ornot functional
Disabled ornot functional
Severelyoutdated
Online Unavailable,reconnecting tosources
Disabled ornot functional
Disabled ornot functional
Severelyoutdated
Offline Available Functional Enabled Up-to-date orslightlyoutdated
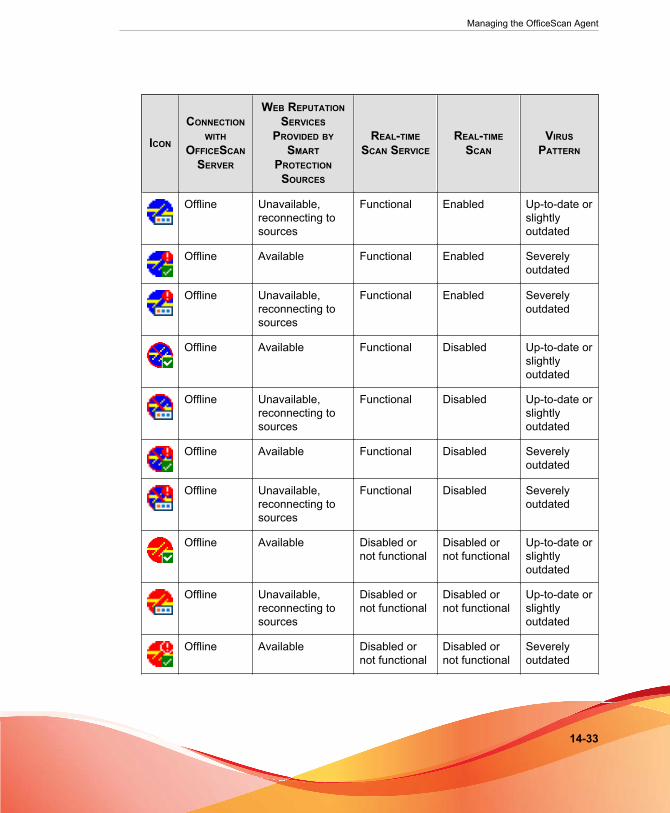
Managing the OfficeScan Agent
14-33
ICON
CONNECTIONWITH
OFFICESCANSERVER
WEB REPUTATIONSERVICES
PROVIDED BYSMART
PROTECTIONSOURCES
REAL-TIMESCAN SERVICE
REAL-TIMESCAN
VIRUSPATTERN
Offline Unavailable,reconnecting tosources
Functional Enabled Up-to-date orslightlyoutdated
Offline Available Functional Enabled Severelyoutdated
Offline Unavailable,reconnecting tosources
Functional Enabled Severelyoutdated
Offline Available Functional Disabled Up-to-date orslightlyoutdated
Offline Unavailable,reconnecting tosources
Functional Disabled Up-to-date orslightlyoutdated
Offline Available Functional Disabled Severelyoutdated
Offline Unavailable,reconnecting tosources
Functional Disabled Severelyoutdated
Offline Available Disabled ornot functional
Disabled ornot functional
Up-to-date orslightlyoutdated
Offline Unavailable,reconnecting tosources
Disabled ornot functional
Disabled ornot functional
Up-to-date orslightlyoutdated
Offline Available Disabled ornot functional
Disabled ornot functional
Severelyoutdated

OfficeScan™ 11.0 Administrator’s Guide
14-34
ICON
CONNECTIONWITH
OFFICESCANSERVER
WEB REPUTATIONSERVICES
PROVIDED BYSMART
PROTECTIONSOURCES
REAL-TIMESCAN SERVICE
REAL-TIMESCAN
VIRUSPATTERN
Offline Unavailable,reconnecting tosources
Disabled ornot functional
Disabled ornot functional
Severelyoutdated
Roaming Available Functional Enabled Up-to-date orslightlyoutdated
Roaming Unavailable,reconnecting tosources
Functional Enabled Up-to-date orslightlyoutdated
Roaming Available Functional Enabled Severelyoutdated
Roaming Unavailable,reconnecting tosources
Functional Enabled Severelyoutdated
Roaming Available Functional Disabled Up-to-date orslightlyoutdated
Roaming Unavailable,reconnecting tosources
Functional Disabled Up-to-date orslightlyoutdated
Roaming Available Functional Disabled Severelyoutdated
Roaming Unavailable,reconnecting tosources
Functional Disabled Severelyoutdated
Roaming Available Disabled ornot functional
Disabled ornot functional
Up-to-date orslightlyoutdated

Managing the OfficeScan Agent
14-35
ICON
CONNECTIONWITH
OFFICESCANSERVER
WEB REPUTATIONSERVICES
PROVIDED BYSMART
PROTECTIONSOURCES
REAL-TIMESCAN SERVICE
REAL-TIMESCAN
VIRUSPATTERN
Roaming Unavailable,reconnecting tosources
Disabled ornot functional
Disabled ornot functional
Up-to-date orslightlyoutdated
Roaming Available Disabled ornot functional
Disabled ornot functional
Severelyoutdated
Roaming Unavailable,reconnecting tosources
Disabled ornot functional
Disabled ornot functional
Severelyoutdated
Online Not applicable(Web reputationfeature disabledon agent)
Functional Enabled Up-to-date orslightlyoutdated
Online Not applicable(Web reputationfeature disabledon agent)
Functional Enabled Severelyoutdated
Online Not applicable(Web reputationfeature disabledon agent)
Functional Disabled Up-to-date orslightlyoutdated
Online Not applicable(Web reputationfeature disabledon agent)
Functional Disabled Severelyoutdated
Online Not applicable(Web reputationfeature disabledon agent)
Disabled ornot functional
Disabled ornot functional
Up-to-date orslightlyoutdated
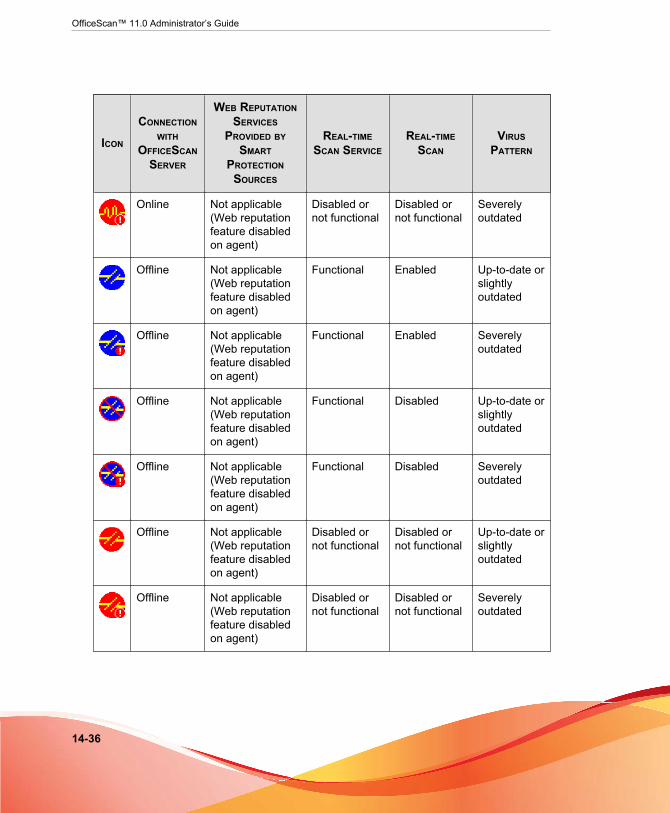
OfficeScan™ 11.0 Administrator’s Guide
14-36
ICON
CONNECTIONWITH
OFFICESCANSERVER
WEB REPUTATIONSERVICES
PROVIDED BYSMART
PROTECTIONSOURCES
REAL-TIMESCAN SERVICE
REAL-TIMESCAN
VIRUSPATTERN
Online Not applicable(Web reputationfeature disabledon agent)
Disabled ornot functional
Disabled ornot functional
Severelyoutdated
Offline Not applicable(Web reputationfeature disabledon agent)
Functional Enabled Up-to-date orslightlyoutdated
Offline Not applicable(Web reputationfeature disabledon agent)
Functional Enabled Severelyoutdated
Offline Not applicable(Web reputationfeature disabledon agent)
Functional Disabled Up-to-date orslightlyoutdated
Offline Not applicable(Web reputationfeature disabledon agent)
Functional Disabled Severelyoutdated
Offline Not applicable(Web reputationfeature disabledon agent)
Disabled ornot functional
Disabled ornot functional
Up-to-date orslightlyoutdated
Offline Not applicable(Web reputationfeature disabledon agent)
Disabled ornot functional
Disabled ornot functional
Severelyoutdated
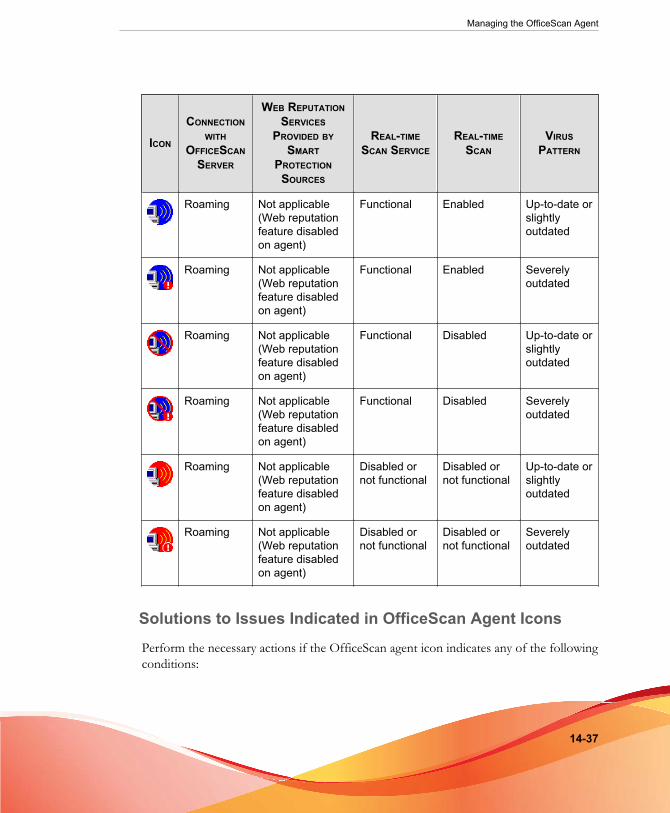
Managing the OfficeScan Agent
14-37
ICON
CONNECTIONWITH
OFFICESCANSERVER
WEB REPUTATIONSERVICES
PROVIDED BYSMART
PROTECTIONSOURCES
REAL-TIMESCAN SERVICE
REAL-TIMESCAN
VIRUSPATTERN
Roaming Not applicable(Web reputationfeature disabledon agent)
Functional Enabled Up-to-date orslightlyoutdated
Roaming Not applicable(Web reputationfeature disabledon agent)
Functional Enabled Severelyoutdated
Roaming Not applicable(Web reputationfeature disabledon agent)
Functional Disabled Up-to-date orslightlyoutdated
Roaming Not applicable(Web reputationfeature disabledon agent)
Functional Disabled Severelyoutdated
Roaming Not applicable(Web reputationfeature disabledon agent)
Disabled ornot functional
Disabled ornot functional
Up-to-date orslightlyoutdated
Roaming Not applicable(Web reputationfeature disabledon agent)
Disabled ornot functional
Disabled ornot functional
Severelyoutdated
Solutions to Issues Indicated in OfficeScan Agent Icons
Perform the necessary actions if the OfficeScan agent icon indicates any of the followingconditions:
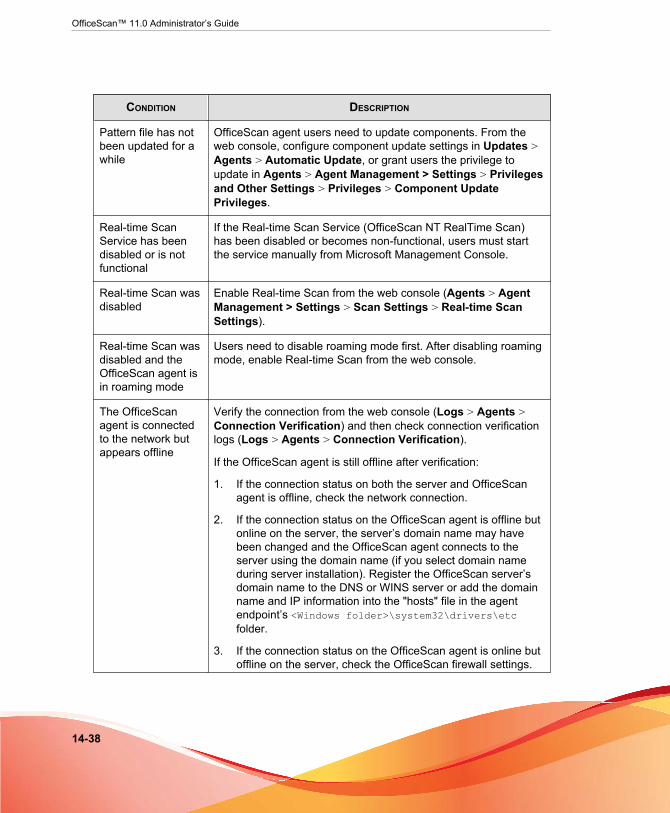
OfficeScan™ 11.0 Administrator’s Guide
14-38
CONDITION DESCRIPTION
Pattern file has notbeen updated for awhile
OfficeScan agent users need to update components. From theweb console, configure component update settings in Updates >Agents > Automatic Update, or grant users the privilege toupdate in Agents > Agent Management > Settings > Privilegesand Other Settings > Privileges > Component UpdatePrivileges.
Real-time ScanService has beendisabled or is notfunctional
If the Real-time Scan Service (OfficeScan NT RealTime Scan)has been disabled or becomes non-functional, users must startthe service manually from Microsoft Management Console.
Real-time Scan wasdisabled
Enable Real-time Scan from the web console (Agents > AgentManagement > Settings > Scan Settings > Real-time ScanSettings).
Real-time Scan wasdisabled and theOfficeScan agent isin roaming mode
Users need to disable roaming mode first. After disabling roamingmode, enable Real-time Scan from the web console.
The OfficeScanagent is connectedto the network butappears offline
Verify the connection from the web console (Logs > Agents >Connection Verification) and then check connection verificationlogs (Logs > Agents > Connection Verification).
If the OfficeScan agent is still offline after verification:
1. If the connection status on both the server and OfficeScanagent is offline, check the network connection.
2. If the connection status on the OfficeScan agent is offline butonline on the server, the server’s domain name may havebeen changed and the OfficeScan agent connects to theserver using the domain name (if you select domain nameduring server installation). Register the OfficeScan server’sdomain name to the DNS or WINS server or add the domainname and IP information into the "hosts" file in the agentendpoint’s <Windows folder>\system32\drivers\etcfolder.
3. If the connection status on the OfficeScan agent is online butoffline on the server, check the OfficeScan firewall settings.
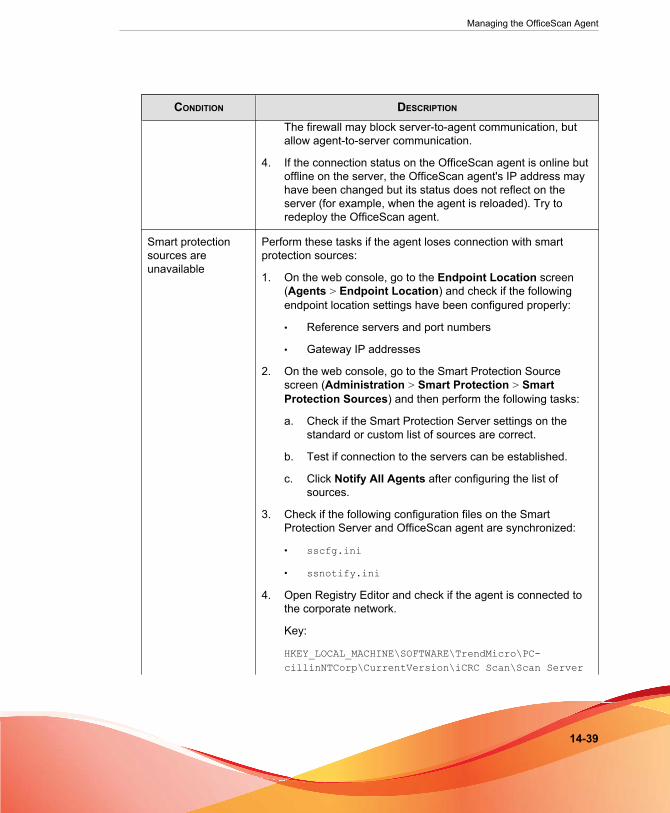
Managing the OfficeScan Agent
14-39
CONDITION DESCRIPTION
The firewall may block server-to-agent communication, butallow agent-to-server communication.
4. If the connection status on the OfficeScan agent is online butoffline on the server, the OfficeScan agent's IP address mayhave been changed but its status does not reflect on theserver (for example, when the agent is reloaded). Try toredeploy the OfficeScan agent.
Smart protectionsources areunavailable
Perform these tasks if the agent loses connection with smartprotection sources:
1. On the web console, go to the Endpoint Location screen(Agents > Endpoint Location) and check if the followingendpoint location settings have been configured properly:
• Reference servers and port numbers
• Gateway IP addresses
2. On the web console, go to the Smart Protection Sourcescreen (Administration > Smart Protection > SmartProtection Sources) and then perform the following tasks:
a. Check if the Smart Protection Server settings on thestandard or custom list of sources are correct.
b. Test if connection to the servers can be established.
c. Click Notify All Agents after configuring the list ofsources.
3. Check if the following configuration files on the SmartProtection Server and OfficeScan agent are synchronized:
• sscfg.ini
• ssnotify.ini
4. Open Registry Editor and check if the agent is connected tothe corporate network.
Key:
HKEY_LOCAL_MACHINE\SOFTWARE\TrendMicro\PC-cillinNTCorp\CurrentVersion\iCRC Scan\Scan Server
OfficeScan™ 11.0 Administrator’s Guide
14-40
CONDITION DESCRIPTION
• If LocationProfile=1, the OfficeScan agent isconnected to the network and should be able to connectto a Smart Protection Server.
• If LocationProfile=2, the OfficeScan agent is notconnected to the network and should connect to theSmart Protection Network. From Internet Explorer, checkif the OfficeScan agent endpoint can browse Internetweb pages.
5. Check internal and external proxy settings used to connect toSmart Protection Network and Smart Protection Servers. Fordetails, see Internal Proxy for OfficeScan Agents on page14-46 and External Proxy for OfficeScan Agents on page14-47.
6. For conventional scan agents, verify that the OfficeScan NTProxy Service (TmProxy.exe) is running. If this service stops,agents cannot connect to smart protection sources for webreputation.
Agent-Server Connection Verification
The agent connection status with the OfficeScan server displays on the OfficeScan webconsole’s agent tree.
FIGURE 14-2. Agent tree displaying agent connection status with OfficeScan server

Managing the OfficeScan Agent
14-41
Certain conditions may prevent the agent tree from displaying the correct agentconnection status. For example, if you accidentally unplug the network cable of theagent endpoint, the agent will not be able to notify the server that it is now offline. Thisagent will still appear as online in the agent tree.
Verify agent-server connection manually or let OfficeScan perform scheduledverification. You cannot select specific domains or agents and then verify theirconnection status. OfficeScan verifies the connection status of all its registered agents.
Verifying Agent-Server Connections
Procedure
1. Go to Logs > Agents > Connection Verification.
2. To verify agent-server connection manually, go to the Manual Verification taband click Verify Now.
3. To verify agent-server connection automatically, go to the Scheduled Verificationtab.
a. Select Enable scheduled verification.
b. Select the verification frequency and start time.
c. Click Save to save the verification schedule.
4. Check the agent tree to verify the status or view the connection verification logs.
Connection Verification LogsOfficeScan keeps connection verification logs to allow you to determine whether or notthe OfficeScan server can communicate with all of its registered agents. OfficeScancreates a log entry each time you verify agent-server connection from the web console.
To keep the size of logs from occupying too much space on the hard disk, manuallydelete logs or configure a log deletion schedule. For more information about managinglogs, see Log Management on page 13-32.

OfficeScan™ 11.0 Administrator’s Guide
14-42
Viewing Connection Verification Logs
Procedure
1. Go to Logs > Agents > Connection Verification.
2. View connection verification results by checking the Status column.
3. To save logs to a comma-separated value (CSV) file, click Export to CSV. Openthe file or save it to a specific location.
Unreachable AgentsOfficeScan agents on unreachable networks, such as those on network segments behinda NAT gateway, are almost always offline because the server cannot establish directconnection with the agents. As a result, the server cannot notify the agents to:
• Download the latest components.
• Apply agent settings configured from the web console. For example, when youchange the Scheduled Scan frequency from the web console, the server willimmediately notify agents to apply the new setting.
Unreachable agents therefore cannot perform these tasks in a timely manner. They onlyperform the tasks when they initiate connection with the server, which happens when:
• They register to the server after installation.
• They restart or reload. This event does not occur frequently and usually requiresuser intervention.
• Manual or scheduled update is triggered on the agent. This event also does notoccur frequently.
It is only during registration, restart, or reload that the server becomes "aware" of theagents’ connectivity and treats them as online. However, because the server is stillunable to establish connection with the agents, the server immediately changes the statusto offline.
OfficeScan provides the "heartbeat" and server polling features to resolve issuesregarding unreachable agents. With these features, the server stops notifying agents of

Managing the OfficeScan Agent
14-43
component updates and setting changes. Instead, the server takes a passive role, alwayswaiting for agents to send heartbeat or initiate polling. When the server detects any ofthese events, it treats the agents as online.
NoteAgent-initiated events not related to heartbeat and server polling, such as manual agentupdate and log sending, do not trigger the server to update the unreachable agents’ status.
Heartbeat
OfficeScan agents send heartbeat messages to notify the server that connection from theagent remains functional. Upon receiving a heartbeat message, the server treats the agentas online. In the agent tree, the agent’s status can either be:
• Online: For regular online agents
• Unreachable/Online: For online agents in the unreachable network
NoteOfficeScan agents do not update components or apply new settings when sendingheartbeat messages. Regular agents perform these tasks during routine updates (seeOfficeScan Agent Updates on page 6-28). Agents in the unreachable network perform thesetasks during server polling.
The heartbeat feature addresses the issue of OfficeScan agents in unreachable networksalways appearing as offline even when they can connect to the server.
A setting in the web console controls how often agents send heartbeat messages. If theserver did not receive a heartbeat, it does not immediately treat the agent as offline.Another setting controls how much time without a heartbeat must elapse beforechanging the agent’s status to:
• Offline: For regular offline OfficeScan agents
• Unreachable/Offline: For offline OfficeScan agents in the unreachable network
When choosing a heartbeat setting, balance between the need to display the latest agentstatus information and the need to manage system resources. The default setting is
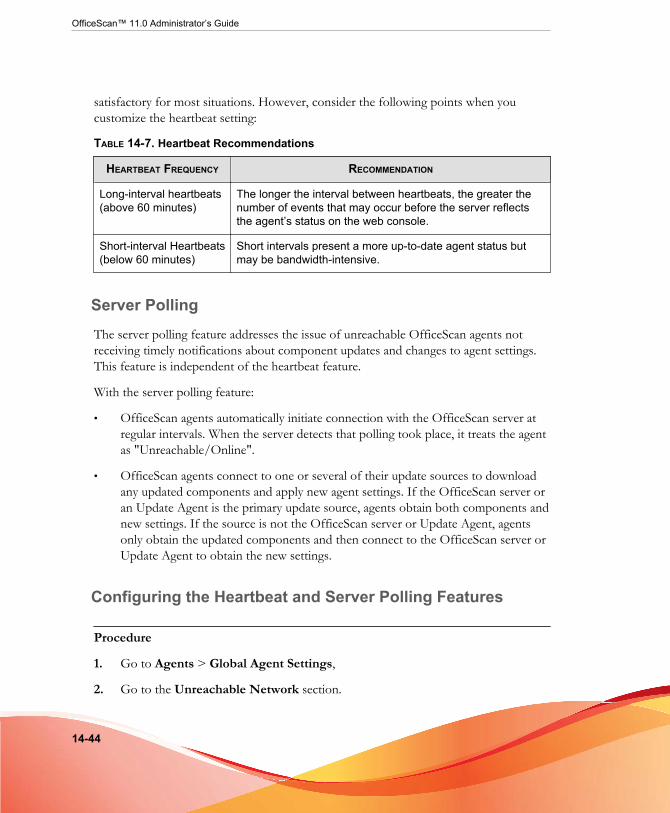
OfficeScan™ 11.0 Administrator’s Guide
14-44
satisfactory for most situations. However, consider the following points when youcustomize the heartbeat setting:
TABLE 14-7. Heartbeat Recommendations
HEARTBEAT FREQUENCY RECOMMENDATION
Long-interval heartbeats(above 60 minutes)
The longer the interval between heartbeats, the greater thenumber of events that may occur before the server reflectsthe agent’s status on the web console.
Short-interval Heartbeats(below 60 minutes)
Short intervals present a more up-to-date agent status butmay be bandwidth-intensive.
Server Polling
The server polling feature addresses the issue of unreachable OfficeScan agents notreceiving timely notifications about component updates and changes to agent settings.This feature is independent of the heartbeat feature.
With the server polling feature:
• OfficeScan agents automatically initiate connection with the OfficeScan server atregular intervals. When the server detects that polling took place, it treats the agentas "Unreachable/Online".
• OfficeScan agents connect to one or several of their update sources to downloadany updated components and apply new agent settings. If the OfficeScan server oran Update Agent is the primary update source, agents obtain both components andnew settings. If the source is not the OfficeScan server or Update Agent, agentsonly obtain the updated components and then connect to the OfficeScan server orUpdate Agent to obtain the new settings.
Configuring the Heartbeat and Server Polling Features
Procedure
1. Go to Agents > Global Agent Settings,
2. Go to the Unreachable Network section.

Managing the OfficeScan Agent
14-45
3. Configure server polling settings.
For details about server polling, see Server Polling on page 14-44.
a. If the OfficeScan server has both an IPv4 and IPv6 address, you can type anIPv4 address range and IPv6 prefix and length.
Type an IPv4 address range if the server is pure IPv4, or an IPv6 prefix andlength if the server is pure IPv6.
When any agent’s IP address matches an IP address in the range, the agentapplies the heartbeat and server polling settings and the server treats the agentas part of the unreachable network.
Note
Agents with an IPv4 address can connect to a pure IPv4 or dual-stackOfficeScan server.
Agents with an IPv6 address can connect to a pure IPv6 or dual-stackOfficeScan server.
Dual-stack agents can connect to dual-stack, pure IPv4, or pure IPv6OfficeScan server.
b. In Agents poll the server for updated components and settings every __minute(s), specify the server polling frequency. Type a value between 1 and129600 minutes.
Tip
Trend Micro recommends that the server polling frequency be at least threetimes the heartbeat sending frequency.
4. Configure heartbeat settings.
For details about the heartbeat feature, see Heartbeat on page 14-43.
a. Select Allow agents to send heartbeat to the server.
b. Select All agents or Only agents in the unreachable network.

OfficeScan™ 11.0 Administrator’s Guide
14-46
c. In Agents send heartbeat every __ minutes, specify how often agents sendheartbeat. Type a value between 1 and 129600 minutes.
d. In An agent is offline if there is no heartbeat after __ minutes, specifyhow much time without a heartbeat must elapse before the OfficeScan servertreats the agent as offline. Type a value between 1 and 129600 minutes.
5. Click Save.
OfficeScan Agent Proxy SettingsConfigure OfficeScan agents to use proxy settings when connecting to internal andexternal servers.
Internal Proxy for OfficeScan AgentsOfficeScan agents can use internal proxy settings to connect to the following servers onthe network:
• OfficeScan Server
The server computer hosts the OfficeScan server and the integrated SmartProtection Server. OfficeScan agents connect to the OfficeScan server to updatecomponents, obtain configuration settings, and send logs. OfficeScan agentsconnect to the integrated Smart Protection Server to send scan queries.
• Smart Protection Servers
Smart Protection Servers include all standalone Smart Protection Servers and theintegrated Smart Protection Server of other OfficeScan servers. OfficeScan agentsconnect to the servers to send scan and we reputation queries.
Configuring Internal Proxy Settings
Procedure
1. Go to Administration > Settings > Proxy.
Managing the OfficeScan Agent
14-47
2. Click the Internal Proxy tab.
3. Go to the Agent Connection with the OfficeScan Server section.
a. Select Use the following proxy settings when agents connect to theOfficeScan server.
b. Specify the proxy server name or IPv4/IPv6 address, and port number.
Note
Specify a dual-stack proxy server identified by its host name if you have IPv4and IPv6 agents. This is because internal proxy settings are global settings. Ifyou specify an IPv4 address, IPv6 agents cannot connect to the proxy server.The same is true for IPv4 agents.
c. If the proxy server requires authentication, type the user name and passwordand then confirm the password.
4. Go to the Agent Connection with Standalone Smart Protection Serverssection.
a. Select Use the following proxy settings when agents connect tostandalone Smart Protection Servers.
b. Specify the proxy server name or IPv4/IPv6 address, and port number.
c. If the proxy server requires authentication, type the user name and passwordand then confirm the password.
5. Click Save.
External Proxy for OfficeScan Agents
The OfficeScan server and OfficeScan agent can use external proxy settings whenconnecting to servers hosted by Trend Micro. This topic discusses external proxysettings for agents. For external proxy settings for the server, see Proxy for OfficeScanServer Updates on page 6-19.

OfficeScan™ 11.0 Administrator’s Guide
14-48
OfficeScan agents use the proxy settings configured in Internet Explorer or Chrome toconnect to the Trend Micro Smart Protection Network. If proxy server authentication isrequired, agents will use proxy server authentication credentials (user ID and password).
Configuring Proxy Server Authentication Credentials
Procedure
1. Go to Administration > Settings > Proxy.
2. Click the External Proxy tab.
3. Go to the OfficeScan Agent Connection with Trend Micro Servers section.
4. Type the user ID and password needed for proxy server authentication. Thefollowing proxy authentication protocols are supported:
• Basic access authentication
• Digest access authentication
• Integrated Windows Authentication
5. Click Save.
Proxy Configuration Privileges for Agents
You can grant agent users the privilege to configure proxy settings. OfficeScan agentsuse user-configured proxy settings only on the following instances:
• When OfficeScan agents perform "Update Now".
• When users disable, or the OfficeScan agent cannot detect, automatic proxysettings. See Automatic Proxy Settings for the OfficeScan Agent on page 14-49 for moreinformation.

Managing the OfficeScan Agent
14-49
WARNING!Incorrect user-configured proxy settings can cause update problems. Exercise cautionwhen allowing users to configure their own proxy settings.
Granting Proxy Configuration Privileges
Procedure
1. Go to Agents > Agent Management.
2. In the agent tree, click the root domain icon ( ) to include all agents or selectspecific domains or agents.
3. Click Settings > Privileges and Other Settings.
4. On the Privileges tab, go to the Proxy Settings Privilege section.
5. Select Allow the users to configure proxy settings.
6. If you selected domain(s) or agent(s) in the agent tree, click Save. If you clicked theroot domain icon, choose from the following options:
• Apply to All Agents: Applies settings to all existing agents and to any newagent added to an existing/future domain. Future domains are domains notyet created at the time you configured the settings.
• Apply to Future Domains Only: Applies settings only to agents added tofuture domains. This option will not apply settings to new agents added to anexisting domain.
Automatic Proxy Settings for the OfficeScan AgentManually configuring proxy settings may be a complicated task for many end users. Useautomatic proxy settings to ensure that correct proxy settings are applied withoutrequiring any user intervention.
When enabled, automatic proxy settings are the primary proxy settings when OfficeScanagents update components either through automatic update or Update Now. For

OfficeScan™ 11.0 Administrator’s Guide
14-50
information on automatic update and Update Now, see OfficeScan Agent Update Methods onpage 6-36.
If OfficeScan agents cannot connect using the automatic proxy settings, agent users withthe privilege to configure proxy settings can use user-configured proxy settings.Otherwise, connection using the automatic proxy settings will be unsuccessful.
Note
Proxy authentication is not supported.
Configuring Automatic Proxy Settings
Procedure
1. Go to Agents > Global Agent Settings,
2. Go to the Proxy Configuration section.
3. Select Automatically Detect Settings if you want OfficeScan to automaticallydetect the administrator-configured proxy settings by DHCP or DNS.
4. If you want OfficeScan to use the proxy auto-configuration (PAC) script set by thenetwork administrator to detect the appropriate proxy server:
a. Select Use Automatic Configuration Script.
b. Type the address for the PAC script.
5. Click Save.
Viewing OfficeScan Agent InformationThe View Status screen displays important information about OfficeScan agents,including privileges, agent software details and system events.
Managing the OfficeScan Agent
14-51
Procedure
1. Go to Agents > Agent Management.
2. In the agent tree, click the root domain icon ( ) to include all agents or selectspecific domains or agents.
3. Click Status.
4. View status information by expanding the agent endpoint's name. If you selectedmultiple agents, click Expand All to view status information for all the selectedagents.
5. (Optional) Use the Reset buttons to set the security risk count back to zero.
Importing and Exporting Agent SettingsOfficeScan allows you to export agent tree settings applied by a particular OfficeScanagent or domain to a file. You can then import the file to apply the settings to otheragents and domains or to another OfficeScan server of the same version.
All agent tree settings, except Update Agent settings, will be exported.
Exporting Agent Settings
Procedure
1. Go to Agents > Agent Management.
2. In the agent tree, click the root domain icon ( ) to include all agents or selectspecific domains or agents.
3. Click Settings > Export Settings.
4. Click any of the links to view the settings for the OfficeScan agent or domain youselected.
5. Click Export to save the settings.
OfficeScan™ 11.0 Administrator’s Guide
14-52
The settings are saved in a .dat file.
6. Click Save and then specify the location to which you want to save the .dat file.
7. Click Save.
Importing Agent Settings
Procedure
1. Go to Agents > Agent Management.
2. In the agent tree, click the root domain icon ( ) to include all agents or selectspecific domains or agents.
3. Click Settings > Import Settings.
4. Click Browse to locate the .dat file on the endpoint and click Import.
The Import Settings screen appears, showing a summary of the settings.
5. Click any of the links to view details about the scan settings or privileges to import.
6. Import the settings.
• If you clicked the root domain icon, select Apply to all domains and thenclick Apply to Target.
• If you selected domains, select Apply to all computers belonging to theselected domain(s), and then click Apply to Target.
• If you selected several agents, click Apply to Target.
Security ComplianceUse Security Compliance to determine flaws, deploy solutions, and maintain the securityinfrastructure. This feature helps reduce the time required to secure the networkenvironment and balance an organization’s needs for security and functionality.

Managing the OfficeScan Agent
14-53
Enforce security compliance for two types of endpoints:
• Managed: Endpoints with OfficeScan agents managed by the OfficeScan server.For details, see Security Compliance for Managed Agents on page 14-53.
• Unmanaged: Includes the following:
• OfficeScan agents not managed by the OfficeScan server
• Endpoints without OfficeScan agents installed
• Endpoints that the OfficeScan server cannot reach
• Endpoints whose security status cannot be verified
For details, see Security Compliance for Unmanaged Endpoints on page 14-64.
Security Compliance for Managed AgentsSecurity Compliance generates a Compliance Report to help you assess the securitystatus of OfficeScan agents managed by the OfficeScan server. Security Compliancegenerates the report on demand or according to a schedule.
The Manual Assessment screen displays the following tabs:
• Services: Use this tab to check if agent services are functional. For details, seeServices on page 14-54.
• Components: Use this tab to check if OfficeScan agents have up-to-datecomponents. For details, see Components on page 14-55.
• Scan Compliance: Use this tab to check if OfficeScan agents are running scansregularly. For details, see Scan Compliance on page 14-57.
• Settings: Use this tab to check if agent settings are consistent with the settings onthe server. For details, see Settings on page 14-59.
NoteThe Components tab can display OfficeScan agents running the current and earlierversions of the product. For the other tabs, only OfficeScan agents running version 10.5,10.6, or OfficeScan agents are shown.

OfficeScan™ 11.0 Administrator’s Guide
14-54
Notes on Compliance Report
• Security Compliance queries the OfficeScan agents’ connection status beforegenerating a Compliance Report. It includes online and offline agents in the report,but not roaming agents.
• For role-based user accounts:
• Each web console user account has a completely independent set ofCompliance Report settings. Any changes to a user account’s ComplianceReport settings will not affect the settings of the other user accounts.
• The scope of the report depends on the agent domain permissions for theuser account. For example, if you grant a user account permissions to managedomains A and B, the user account’s reports will only show data from agentsbelonging to domains A and B.
For details about user accounts, see Role-based Administration on page 13-2.
Services
Security Compliance checks whether the following OfficeScan agent services arefunctional:
• Antivirus
• Anti-spyware
• Firewall
• Web Reputation
• Behavior Monitoring/Device Control (also referred to as Trend MicroUnauthorized Change Prevention Service)
• Data Protection
• Suspicious Connection

Managing the OfficeScan Agent
14-55
A non-compliant agent is counted at least twice in the Compliance Report.
FIGURE 14-3. Compliance Report - Services tab
• In the Endpoints with Non-compliant Services category
• In the category for which the OfficeScan agent is non-compliant. For example, ifthe OfficeScan agent’s Antivirus service is not functional, the agent is counted inthe Antivirus category. If more than one service is not functional, the agent iscounted in each category for which it is non-compliant.
Restart non-functional services from the web console or from the OfficeScan agent. Ifthe services are functional after the restart, the agent will no longer appear as non-compliant during the next assessment.
ComponentsSecurity Compliance determines component version inconsistencies between theOfficeScan server and OfficeScan agents. Inconsistencies typically occur when agentscannot connect to the server to update components. If the agent obtains updates fromanother source (such as the Trend Micro ActiveUpdate server), it is possible for aagent’s component version to be newer than the version on the server.
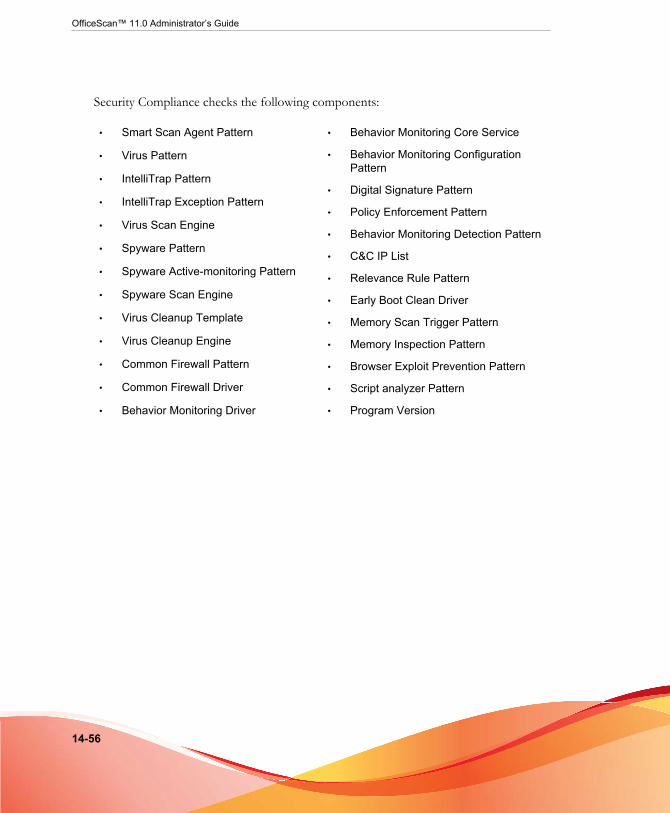
OfficeScan™ 11.0 Administrator’s Guide
14-56
Security Compliance checks the following components:
• Smart Scan Agent Pattern
• Virus Pattern
• IntelliTrap Pattern
• IntelliTrap Exception Pattern
• Virus Scan Engine
• Spyware Pattern
• Spyware Active-monitoring Pattern
• Spyware Scan Engine
• Virus Cleanup Template
• Virus Cleanup Engine
• Common Firewall Pattern
• Common Firewall Driver
• Behavior Monitoring Driver
• Behavior Monitoring Core Service
• Behavior Monitoring ConfigurationPattern
• Digital Signature Pattern
• Policy Enforcement Pattern
• Behavior Monitoring Detection Pattern
• C&C IP List
• Relevance Rule Pattern
• Early Boot Clean Driver
• Memory Scan Trigger Pattern
• Memory Inspection Pattern
• Browser Exploit Prevention Pattern
• Script analyzer Pattern
• Program Version

Managing the OfficeScan Agent
14-57
A non-compliant agent is counted at least twice in the Compliance Report.
FIGURE 14-4. Compliance Report - Components tab
• In the Computers with Inconsistent Component Versions category
• In the category for which the agent is non-compliant. For example, if the agent’sSmart Scan Agent Pattern version is not consistent with the version on the server,the agent is counted in the Smart Scan Agent Pattern category. If more than onecomponent version is inconsistent, the agent is counted in each category for whichit is non-compliant.
To resolve component version inconsistencies, update outdated components on theagents or server.
Scan Compliance
Security Compliance checks if Scan Now or Scheduled Scan are run regularly and ifthese scans are completed within a reasonable amount of time.
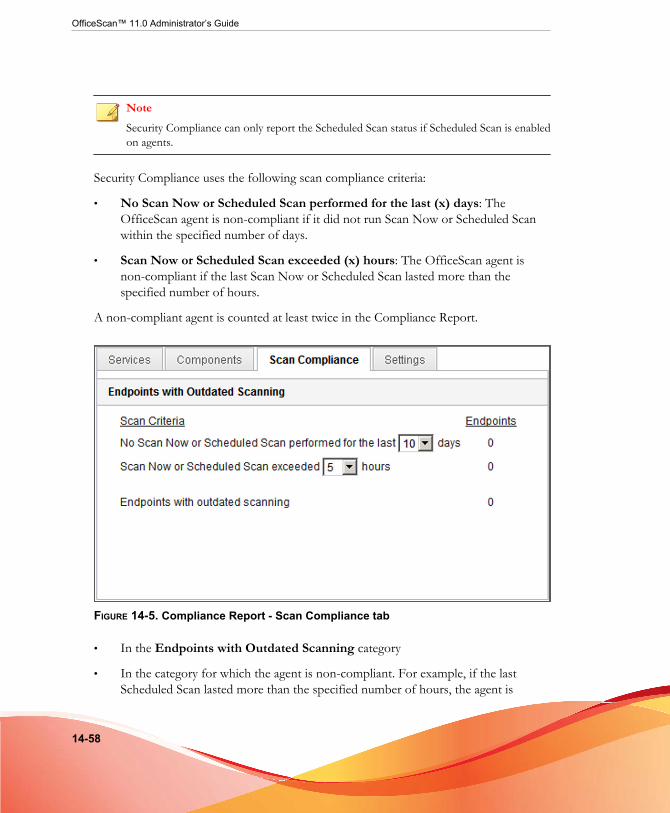
OfficeScan™ 11.0 Administrator’s Guide
14-58
NoteSecurity Compliance can only report the Scheduled Scan status if Scheduled Scan is enabledon agents.
Security Compliance uses the following scan compliance criteria:
• No Scan Now or Scheduled Scan performed for the last (x) days: TheOfficeScan agent is non-compliant if it did not run Scan Now or Scheduled Scanwithin the specified number of days.
• Scan Now or Scheduled Scan exceeded (x) hours: The OfficeScan agent isnon-compliant if the last Scan Now or Scheduled Scan lasted more than thespecified number of hours.
A non-compliant agent is counted at least twice in the Compliance Report.
FIGURE 14-5. Compliance Report - Scan Compliance tab
• In the Endpoints with Outdated Scanning category
• In the category for which the agent is non-compliant. For example, if the lastScheduled Scan lasted more than the specified number of hours, the agent is

Managing the OfficeScan Agent
14-59
counted in the Scan Now or Scheduled Scan exceeded <x> hours category. Ifthe agent satisfies more than one scan compliance criteria, it is counted in eachcategory for which it is non-compliant.
Run Scan Now or Scheduled Scan on agents that have not performed scan tasks or wereunable to complete scanning.
Settings
Security Compliance determines whether agents and their parent domains in the agenttree have the same settings. The settings may not be consistent if you move any agent toanother domain that is applying a different set of settings, or if any agent user withcertain privileges manually configured settings on the OfficeScan agent console.
OfficeScan verifies the following settings:
• Scan Method
• Manual Scan Settings
• Real-time Scan Settings
• Scheduled Scan Settings
• Scan Now Settings
• Privileges and Other Settings
• Additional Service Settings
• Web Reputation
• Behavior Monitoring
• Device Control
• Spyware/Grayware Approved List
• Data Loss Prevention Settings
• Suspicious Connection

OfficeScan™ 11.0 Administrator’s Guide
14-60
A non-compliant agent is counted at least twice in the Compliance Report.
FIGURE 14-6. Compliance Report - Settings tab
• In the Endpoints with Inconsistent Configuration Settings category
• In the category for which the agent is non-compliant. For example, if the scanmethod settings in the agent and its parent domain are not consistent, the agent iscounted in the Scan Method category. If more than one set of settings isinconsistent, the agent is counted in each category for which it is non-compliant.
To resolve the setting inconsistencies, apply domain settings to the agent.
On-demand Compliance Reports
Security Compliance can generate Compliance Reports on demand. Reports help youassess the security status of OfficeScan agents managed by the OfficeScan server.
For more information on Compliance Reports, see Security Compliance for Managed Agentson page 14-53.
Managing the OfficeScan Agent
14-61
Generating an On-demand Compliance Report
Procedure
1. Go to Assessment > Security Compliance > Manual Report.
2. Go to the Agent Tree Scope section.
3. Select the root domain or a domain and click Assess.
4. View Compliance Report for agent services.
For details about agent services, see Services on page 14-54.
a. Click the Services tab.
b. Under Endpoints with Non-compliant Services, check the number ofagents with non-compliant services.
c. Click a number link to display all affected agents in the agent tree.
d. Select agents from the query result.
e. Click Restart OfficeScan Agent to restart the service.
NoteAfter performing another assessment and the agent still appears as non-compliant, manually restart the service on the agent endpoint.
f. To save the list of agents to a file, click Export.
5. View Compliance Report for agent components.
For details about agent components, see Components on page 14-55.
a. Click the Components tab.
b. Under Endpoints with Inconsistent Component Versions, check thenumber of agents with component versions that are inconsistent with theversions on the server.
c. Click a number link to display all affected agents in the agent tree.

OfficeScan™ 11.0 Administrator’s Guide
14-62
NoteIf at least one agent has a more up-to-date component than the OfficeScanserver, manually update the OfficeScan server.
d. Select agents from the query result.
e. Click Update Now to force agents to download components.
Note
• To ensure that agents can upgrade the agent program, disable theOfficeScan agents can update components but not upgrade theagent program or deploy hot fixes option in Agents > AgentManagement > Settings > Privileges and Other Settings.
• Restart the endpoint instead of clicking Update Now to update theCommon Firewall Driver.
f. To save the list of agents to a file, click Export.
6. View Compliance Report for scans.
For details about scans, see Scan Compliance on page 14-57.
a. Click the Scan Compliance tab.
b. Under Endpoints with Outdated Scanning, configure the following:
• Number of days the agent has not performed Scan Now or ScheduledScan
• Number of hours Scan Now or Scheduled Scan is running
NoteIf the number of days or hours is exceeded, the agent is treated as non-compliant.
c. Click Assess next to the Agent Tree Scope.
d. Under Endpoints with Outdated Scanning, check the number of agentsthat satisfy the scan criteria.

Managing the OfficeScan Agent
14-63
e. Click a number link to display all affected agents in the agent tree.
f. Select agents from the query result.
g. Click Scan Now to initiate Scan Now on agents.
Note
To avoid repeating the scan, the Scan Now option will be disabled if ScanNow lasted more than the specified number of hours.
h. To save the list of agents to a file, click Export.
7. View Compliance Report for settings.
For details about settings, see Settings on page 14-59.
a. Click the Settings tab.
b. Under Computers with Inconsistent Configuration Settings, check thenumber of agents with settings inconsistent with the agent tree domainsettings.
c. Click a number link to display all affected agents in the agent tree.
d. Select agents from the query result.
e. Click Apply Domain Settings.
f. To save the list of agents to a file, click Export.
Scheduled Compliance Reports
Security Compliance can generate Compliance Reports according to a schedule. Reportshelp you assess the security status of OfficeScan agents managed by the OfficeScanserver.
For more information on Compliance Reports, see Security Compliance for Managed Agentson page 14-53.
OfficeScan™ 11.0 Administrator’s Guide
14-64
Configuring Settings for Scheduled Compliance Reports
Procedure
1. Go to Assessment > Security Compliance > Scheduled Report.
2. Select Enable scheduled reporting.
3. Specify a title for the report.
4. Select one or all of the following:
• Services on page 14-54
• Components on page 14-55
• Scan Compliance on page 14-57
• Settings on page 14-59
5. Specify the email address(es) that will receive notifications about scheduledCompliance Reports.
Note
Configure email notification settings to ensure that email notifications can be sentsuccessfully. For details, see Administrator Notification Settings on page 13-29.
6. Specify the schedule.
7. Click Save.
Security Compliance for Unmanaged Endpoints
Security Compliance can query unmanaged endpoints in the network to which theOfficeScan server belongs. Use Active Directory and IP addresses to query endpoints.
The security status of unmanaged endpoints can be any of the following:

Managing the OfficeScan Agent
14-65
TABLE 14-8. Security Status of Unmanaged Endpoints
STATUS DESCRIPTION
Managed by anotherOfficeScan server
The OfficeScan agents installed on the computers aremanaged by another OfficeScan server. OfficeScan agents areonline and run either this OfficeScan version or an earlierversion.
No OfficeScan agentinstalled
The OfficeScan agent is not installed on the endpoint.
Unreachable The OfficeScan server cannot connect to the endpoint anddetermine its security status.
Unresolved ActiveDirectory assessment
The endpoint belongs to an Active Directory domain but theOfficeScan server is unable to determine its security status.
NoteThe OfficeScan server database contains a list of agentsthat the server manages. The server queries ActiveDirectory for the computers' GUIDs and then comparesthem with GUIDs stored in the database. If a GUID is notin the database, the endpoint will fall under theUnresolved Active Directory Assessment category.
To run a security assessment, perform the following tasks:
1. Define the query scope. For details, see Defining the Active Directory/IP Address Scopeand Query on page 14-66.
2. Check unprotected computers from the query result. For details, see Viewing theQuery Results on page 14-68.
3. Install the OfficeScan agent. For details, see Installing with Security Compliance on page5-59.
4. Configure scheduled queries. For details, see Configuring the Scheduled QueryAssessment on page 14-69.

OfficeScan™ 11.0 Administrator’s Guide
14-66
Defining the Active Directory/IP Address Scope and Query
When querying for the first time, define the Active Directory/IP address scope, whichincludes Active Directory objects and IP addresses that the OfficeScan server will queryon demand or periodically. After defining the scope, start the query process.
Note
To define an Active Directory scope, OfficeScan must first be integrated with ActiveDirectory. For details about the integration, see Active Directory Integration on page 2-31.
Procedure
1. Go to Assessment > Unmanaged Endpoints.
2. On the Active Directory/IP Address Scope section, click Define. A new screenopens.
3. To define an Active Directory scope:
a. Go to the Active Directory Scope section.
b. Select Use on-demand assessment to perform real-time queries and getmore accurate results. Disabling this option causes OfficeScan to query thedatabase instead of each OfficeScan agent. Querying only the database can bequicker but is less accurate.
c. Select the objects to query. If querying for the first time, select an object withless than 1,000 accounts and then record how much time it took to completethe query. Use this data as your performance benchmark.
4. To define an IP address scope:
a. Go to the IP Address Scope section.
b. Select Enable IP Address Scope.
c. Specify an IP address range. Click the plus or minus button to add or deleteIP address ranges.
• For a pure IPv4 OfficeScan server, type an IPv4 address range.

Managing the OfficeScan Agent
14-67
• For a pure IPv6 OfficeScan server, type an IPv6 prefix and length.
• For a dual-stack OfficeScan server, type an IPv4 address range and/or IPv6prefix and length.
The IPv6 address range limit is 16 bits, which is similar to the limit for IPv4address ranges. The prefix length should therefore be between 112 and 128.
TABLE 14-9. Prefix Lengths and Number of IPv6 Addresses
LENGTH NUMBER OF IPV6 ADDRESSES
128 2
124 16
120 256
116 4,096
112 65,536
5. Under Advanced Setting, specify ports used by OfficeScan servers to communicatewith agents. Setup randomly generates the port number during OfficeScan serverinstallation.
To view the communication port used by the OfficeScan server, go to Agents >Agent Management and select a domain. The port displays next to the IP addresscolumn. Trend Micro recommends keeping a record of port numbers for yourreference.
a. Click Specify ports.
b. Type the port number and click Add. Repeat this step until you have all theport numbers you want to add.
c. Click Save.
6. To check the endpoint’s connectivity using a particular port number, selectDeclare an endpoint unreachable by checking port <x>. When connection isnot established, OfficeScan immediately treats the endpoint as unreachable. Thedefault port number is 135.

OfficeScan™ 11.0 Administrator’s Guide
14-68
Enabling this setting speeds up the query. When connection to endpoints cannotbe established, the OfficeScan server no longer needs to perform all the otherconnection verification tasks before treating endpoints as unreachable.
7. To save the scope and start the query, click Save and re-assess. To save thesettings only, click Save only. The Outside Server Management screen displays theresult of the query.
NoteThe query may take a long time to complete, especially if the query scope is broad.Do not perform another query until the Outside Server Management screen displaysthe result. Otherwise, the current query session terminates and the query processrestarts.
Viewing the Query ResultsThe query result appears under the Security Status section. An unmanaged endpointwill have one of the following statuses:
• Managed by another OfficeScan server
• No OfficeScan agent installed
• Unreachable
• Unresolved Active Directory assessment
Procedure
1. In the Security Status section, click a number link to display all affectedcomputers.
2. Use the search and advanced search functions to search and display only thecomputers that meet the search criteria.
If you use the advanced search function, specify the following items:
• IPv4 address range
• IPv6 prefix and length (prefix should be between 112 and 128)
Managing the OfficeScan Agent
14-69
• Endpoint name
• OfficeScan server name
• Active Directory tree
• Security status
OfficeScan will not return a result if the name is incomplete. Use the wildcardcharacter (*) if unsure of the complete name.
3. To save the list of computers to a file, click Export.
4. For OfficeScan agents managed by another OfficeScan server, use the AgentMover tool to have these OfficeScan agents managed by the current OfficeScanserver. For more information about this tool, see Agent Mover on page 14-21.
Configuring the Scheduled Query Assessment
Configure the OfficeScan server to periodically query the Active Directory and IPaddresses to ensure that security guidelines are implemented.
Procedure
1. Go to Assessment > Unmanaged Endpoints.
2. Click Settings on top of the agent tree.
3. Enable scheduled query.
4. Specify the schedule.
5. Click Save.
Trend Micro Virtual Desktop SupportOptimize virtual desktop protection by using Trend Micro Virtual Desktop Support.This feature regulates tasks on OfficeScan agents residing in a single virtual server.

OfficeScan™ 11.0 Administrator’s Guide
14-70
Running multiple desktops on a single server and performing on-demand scan orcomponent updates consume significant amount of system resources. Use this feature toprohibit agents from running scans or updating components at the same time.
For example, if a VMware vCenter server has three virtual desktops running OfficeScanagents, OfficeScan can initiate Scan Now and deploy updates simultaneously to all threeagents. Virtual Desktop Support recognizes that the agents are on the same physicalserver. Virtual Desktop Support allows a task to run on the first agent and postponesthe same task on the other two agents until the first agent finishes the task.
Virtual Desktop Support can be used on the following platforms:
• VMware vCenter™ (VMware View™)
• Citrix™ XenServer™ (Citrix XenDesktop™)
• Microsoft Hyper-V™ Server
For administrators using other virtualization applications, the OfficeScan server can alsoact as an emulated hypervisor to manage virtual agents.
For more details on these platforms, refer to the VMware View, Citrix XenDesktop, orMicrosoft Hyper-V websites.
Use the OfficeScan VDI Pre-Scan Template Generation Tool to optimize on-demandscan or remove GUIDs from base or golden images.
Virtual Desktop Support InstallationVirtual Desktop Support is a native OfficeScan feature but is licensed separately. Afteryou install the OfficeScan server, this feature is available but is not functional. Installingthis feature means downloading a file from the ActiveUpdate server (or a custom updatesource, if one has been set up). When the file has been incorporated into the OfficeScanserver, you can activate Virtual Desktop Support to enable its full functionality.Installation and activation are performed from Plug-in Manager.
NoteVirtual Desktop Support is not fully supported in pure IPv6 environments. For details, seePure IPv6 Server Limitations on page A-3.

Managing the OfficeScan Agent
14-71
Installing Virtual Desktop Support
Procedure
1. Open the OfficeScan web console and click Plug-ins in the main menu.
2. On the Plug-in Manager screen, go to the Trend Micro Virtual DesktopSupport section and click Download.
The size of the package displays beside the Download button.
Plug-in Manager stores the downloaded package to <Server installation folder>\PCCSRV\Download\Product.
NoteIf Plug-in Manager is unable to download the file, it automatically re-downloads after24 hours. To manually trigger Plug-in Manager to download the package, restart theOfficeScan Plug-in Manager service from the Microsoft Management Console.
3. Monitor the download progress. You can navigate away from the screen during thedownload.
If you encounter problems downloading the package, check the server update logson the OfficeScan product console. On the main menu, click Logs > ServerUpdate.
After Plug-in Manager downloads the file, Virtual Desktop Support displays in anew screen.
NoteIf Virtual Desktop Support does not display, see the reasons and solutions inTroubleshooting Plug-in Manager on page 15-11.
4. To install Virtual Desktop Support immediately, click Install Now. To install at alater time:
a. Click Install Later.
b. Open the Plug-in Manager screen.

OfficeScan™ 11.0 Administrator’s Guide
14-72
c. Go to the Trend Micro Virtual Desktop Support section and click Install.
5. Read the license agreement and accept the terms by clicking Agree.
The installation starts.
6. Monitor the installation progress. After the installation, the Virtual DesktopSupport version displays.
Virtual Desktop Support License
View, activate, and renew the Virtual Desktop Support license from Plug-in Manager.
Obtain the Activation Code from Trend Micro and then use it to enable the fullfunctionality of Virtual Desktop Support.
Activating or Renewing Virtual Desktop Support
Procedure
1. Open the OfficeScan web console and click Plug-ins in the main menu.
2. On the Plug-in Manager screen, go to the Trend Micro Virtual DesktopSupport section and click Manage Program.
3. Click View License Information.
4. On the Product License Details screen that opens, click New Activation Code.
5. On the screen that opens, type the Activation Code and click Save.
6. Back in the Product License Details screen, click Update Information to refreshthe screen with the new license details and the status of the feature. This screenalso provides a link to the Trend Micro website where you can view detailedinformation about your license.

Managing the OfficeScan Agent
14-73
Viewing License Information for Virtual Desktop Support
Procedure
1. Open the OfficeScan web console and click Plug-ins > [Trend Micro VirtualDesktop Support] Manage Program in the main menu.
2. Click View License Information.
3. View license details in the screen that opens.
The Virtual Desktop Support License Details section provides the followinginformation:
• Status: Displays either "Activated", "Not Activated" or "Expired".
• Version: Displays either "Full" or "Trial" version. If you have both full andtrial versions, the version that displays is "Full".
• Expiration Date: If Virtual Desktop Support has multiple licenses, the latestexpiration date displays. For example, if the license expiration dates are12/31/2010 and 06/30/2010, 12/31/2010 displays.
• Seats: Displays how many OfficeScan agents can use Virtual DesktopSupport
• Activation code: Displays the activation code
Reminders about licenses display during the following instances:
If you have a full version license:
• During the feature's grace period. The duration of the grace period varies byregion. Please verify the grace period with your Trend Micro representative.
• When the license expires and grace period elapses. During this time, you willnot be able to obtain technical support.
If you have a trial version license
• When the license expires. During this time, you will not be able to obtaintechnical support.

OfficeScan™ 11.0 Administrator’s Guide
14-74
4. Click View detailed license online to view information about your license on theTrend Micro website.
5. To update the screen with the latest license information, click UpdateInformation.
Virtual Server ConnectionsOptimize on-demand scan or component updates by adding VMware vCenter 4(VMware View 4), Citrix XenServer 5.5 (Citrix XenDesktop 4), or Microsoft Hyper-VServer. OfficeScan servers communicate with the specified virtual servers to determineOfficeScan agents that are on the same physical server.
For other VDI servers, OfficeScan server provides an emulated virtual hypervisor tomanage the virtual agents on other platforms. The OfficeScan hypervisor processesvirtual agent requests in the order that the server receives the requests. The OfficeScanserver processes one request at a time and places the other requests in a queue.
Adding Server Connections
Procedure
1. Open the OfficeScan web console and click Plug-ins > [Trend Micro VirtualDesktop Support] Manage Program in the main menu.
2. Select VMware vCenter Server, Citrix XenServer, Microsoft Hyper-V, orOther virtualization applications.
Note
When selecting Other virtualization applications, no further information isnecessary. The OfficeScan server responds to virtual agent requests in the order thatthe server receives the requests.
3. Enable the connection to the server.
4. Specify the following information:

Managing the OfficeScan Agent
14-75
• For VMware vCenter and Citrix XenServer servers:
• IP address
• Port
• Connection protocol (HTTP or HTTPS)
• Username
• Password
• For Microsoft Hyper-V servers:
• Host name or IP address
• Domain\username
Note
The logon account must be a domain account in the Administratorsgroup
• Password
5. Optionally enable proxy connection for VMware vCenter or Citrix XenServer.
a. Specify the proxy server name or IP address and port.
b. If the proxy server requires authentication, specify the user name andpassword.
6. Click Test connection to verify that the OfficeScan server can successfullyconnect to the server.
Note
For details on troubleshooting Microsoft Hyper-V connections, see TroubleshootingMicrosoft Hyper-V Connections on page 14-78.
7. Click Save.

OfficeScan™ 11.0 Administrator’s Guide
14-76
Adding Additional Server Connections
Procedure
1. Open the OfficeScan web console and click Plug-ins > [Trend Micro VirtualDesktop Support] Manage Program in the main menu.
2. Click Add new vCenter connection, Add new XenServer connection, or Addnew Hyper-V connection.
3. Repeat the steps to provide the proper server information.
4. Click Save.
Deleting a Connection Setting
Procedure
1. Open the OfficeScan web console and go to Plug-ins > [Trend Micro VirtualDesktop Support] Manage Program in the main menu.
2. Click Delete this connection.
3. Click OK to confirm the deletion of this setting.
4. Click Save.
Changing the VDI Scan Capacity
Administrators can increase the number of VDI endpoints that run concurrent scanningby modifying the vdi.ini file. Trend Micro recommends strictly monitoring the effectof changing the VDI capacity to ensure that system resources can handle any increasedscanning.
Managing the OfficeScan Agent
14-77
Procedure
1. On the OfficeScan server computer, go to <Server installation folder>PCCSRV\Private\vdi.ini.
2. Locate the [TaskController] settings.
The default TaskController settings are as follows:
• For OfficeScan 10.5 clients:
[TaskController]
Controller_00_MaxConcurrentGuests=1
Controller_01_MaxConcurrentGuests=3
Where:
• Controller_00_MaxConcurrentGuests=1 equals the maximumnumber of clients that can perform scans concurrently.
• Controller_01_MaxConcurrentGuests=3 equals the maximumnumber of clients that can perform updates concurrently.
• For OfficeScan 10.6 clients and OfficeScan 11.0 agents:
[TaskController]
Controller_02_MaxConcurrentGuests=1
Controller_03_MaxConcurrentGuests=3
Where:
• Controller_02_MaxConcurrentGuests=1 equals the maximumnumber of clients that can perform scans concurrently.
• Controller_03_MaxConcurrentGuests=3 equals the maximumnumber of clients that can perform updates concurrently.
3. Increase or decrease the count in each controller as necessary.
The minimum value for all settings is 1.

OfficeScan™ 11.0 Administrator’s Guide
14-78
The maximum value for all settings is 65536.
4. Save and close the vdi.ini file.
5. Restart the OfficeScan Master Service.
6. Monitor the CPU, memory, and disk usage resources of the VDI endpoints.Modify the controller settings further to increase/decrease the number ofconcurrent scans to best suit the VDI environment by repeating steps 1 to 5.
Troubleshooting Microsoft Hyper-V Connections
The Microsoft Hyper-V connection uses Windows Management Instrumentation(WMI) and DCOM for agent-server communication. Firewall policies may block thiscommunication, causing an unsuccessful connection to the Hyper-V server.
The Hyper-V server listening port defaults to port 135 and then chooses a randomlyconfigured port for further communication. If the firewall blocks WMI traffic or eitherof these two ports, communication with the server is unsuccessful. Administrators canmodify the firewall policy to allow successful communication with the Hyper-V server.
Verify that all connection settings, including IP address, domain\username, andpassword are correct before performing the following firewall modifications.
Allowing WMI Communication through the WindowsFirewall
Procedure
1. On the Hyper-V server, open the Windows Firewall Allowed Programs screen.
On Windows 2008 R2 systems, go to Control Panel > System and Security >Windows Firewall > Allow a program or feature through Windows Firewall.
2. Select Windows Management Instrumentation (WMI).

Managing the OfficeScan Agent
14-79
FIGURE 14-7. Windows Firewall Allowed Programs screen
3. Click Save.
4. Test the Hyper-V connection again.
Opening Port Communication through the Windows Firewallor a Third-party Firewall
Procedure
1. On the Hyper-V server, ensure that the firewall allows communication throughport 135 and test the Hyper-V connection again.
For details about opening ports, refer to your firewall documentation.
OfficeScan™ 11.0 Administrator’s Guide
14-80
2. If the connection to the Hyper-V server is unsuccessful, configure WMI to use afixed port.
For details on Setting Up a Fixed Port for WMI, refer to:
http://msdn.microsoft.com/en-us/library/windows/desktop/bb219447(v=vs.85).aspx
3. Open ports 135 and the newly created fixed port (24158) for communicationthrough the firewall.
4. Test the Hyper-V connection again.
VDI Pre-Scan Template Generation Tool
Use the OfficeScan VDI Pre-Scan Template Generation Tool to optimize on-demandscans or remove GUIDs from base or golden images. This tool scans the base or goldenimage and certifies the image. When scanning duplicates of this image, OfficeScan onlychecks parts that have changed. This ensures shorter scanning time.
Tip
Trend Micro recommends generating the pre-scan template after applying a Windowsupdate or installing a new application.
Creating a Pre-scan Template
Procedure
1. On the OfficeScan server computer, browse to <Server installation folder>\PCCSRV\Admin\Utility\TCacheGen.
2. Choose a version of the VDI Pre-Scan Template Generation Tool. The followingversions are available:
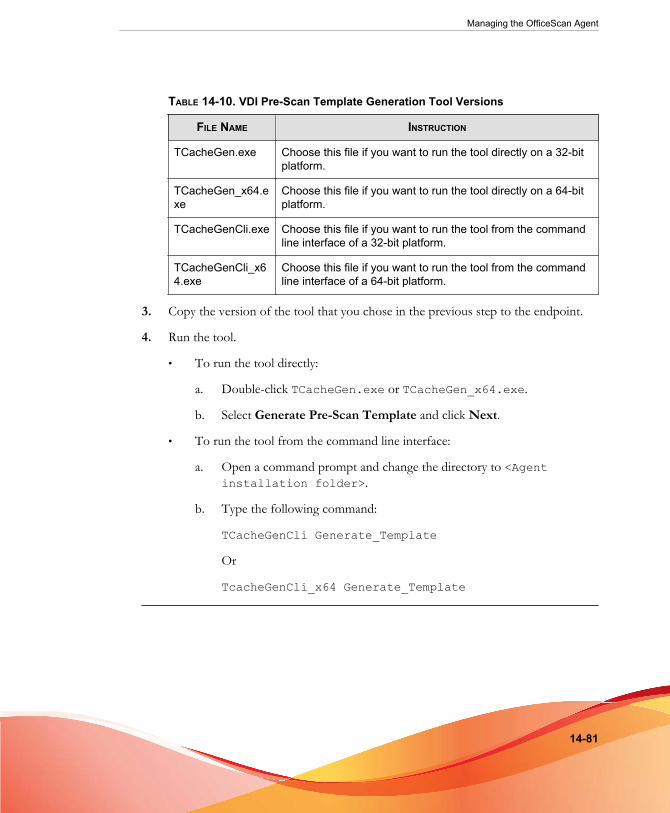
Managing the OfficeScan Agent
14-81
TABLE 14-10. VDI Pre-Scan Template Generation Tool Versions
FILE NAME INSTRUCTION
TCacheGen.exe Choose this file if you want to run the tool directly on a 32-bitplatform.
TCacheGen_x64.exe
Choose this file if you want to run the tool directly on a 64-bitplatform.
TCacheGenCli.exe Choose this file if you want to run the tool from the commandline interface of a 32-bit platform.
TCacheGenCli_x64.exe
Choose this file if you want to run the tool from the commandline interface of a 64-bit platform.
3. Copy the version of the tool that you chose in the previous step to the endpoint.
4. Run the tool.
• To run the tool directly:
a. Double-click TCacheGen.exe or TCacheGen_x64.exe.
b. Select Generate Pre-Scan Template and click Next.
• To run the tool from the command line interface:
a. Open a command prompt and change the directory to <Agentinstallation folder>.
b. Type the following command:
TCacheGenCli Generate_Template
Or
TcacheGenCli_x64 Generate_Template

OfficeScan™ 11.0 Administrator’s Guide
14-82
Note
The tool scans the image for security threats before generating the pre-scan template andremoving the GUID.
After generating the pre-scan template, the tool unloads the OfficeScan agent. Do notreload the OfficeScan agent. If the OfficeScan agent reloads, you will need to create thepre-scan template again.
Removing GUIDs from Templates
Procedure
1. On the OfficeScan server computer, browse to <Server installation folder>\PCCSRV\Admin\Utility\TCacheGen.
2. Choose a version of the VDI Pre-Scan Template Generation Tool. The followingversions are available:
TABLE 14-11. VDI Pre-Scan Template Generation Tool Versions
FILE NAME INSTRUCTION
TCacheGen.exe Choose this file if you want to run the tool directly on a 32-bitplatform.
TCacheGen_x64.exe
Choose this file if you want to run the tool directly on a 64-bitplatform.
TCacheGenCli.exe Choose this file if you want to run the tool from the commandline interface of a 32-bit platform.
TCacheGenCli_x64.exe
Choose this file if you want to run the tool from the commandline interface of a 64-bit platform.
3. Copy the version of the tool that you chose in the previous step to the endpoint.
4. Run the tool.
• To run the tool directly:
a. Double-click TCacheGen.exe or TCacheGen_x64.exe.

Managing the OfficeScan Agent
14-83
b. Select Remove GUID from Template and click Next.
• To run the tool from the command line interface:
a. Open a command prompt and change the directory to <Agentinstallation folder>.
b. Type the following command:
TCacheGenCli Remove GUID
Or
TcacheGenCli_x64 Remove GUID
Global Agent SettingsOfficeScan applies global agent settings to all agents or only to agents with certainprivileges.
Procedure
1. Go to Agents > Global Agent Settings.
2. Configure the following settings:
TABLE 14-12. Global Agent Settings
SETTING REFERENCE
Scan Settings Global Scan Settings on page 7-64
Scheduled Scan Settings Global Scan Settings on page 7-64
Virus/Malware LogBandwidth Settings
Global Scan Settings on page 7-64
Firewall Settings Global Firewall Settings on page 12-24
Behavior Monitoring Settings Behavior Monitoring on page 8-2
OfficeScan™ 11.0 Administrator’s Guide
14-84
SETTING REFERENCE
Certified Safe SoftwareService Settings
Enable the Certified Safe Software Service forBehavior Monitoring, Firewall, and Antivirus Scanson page 7-73
Suspicious ConnectionSettings
Configuring Global User-defined IP List Settings onpage 11-12
Updates ActiveUpdate Server as the OfficeScan AgentUpdate Source on page 6-36
Reserved Disk Space Configuring Reserved Disk Space for OfficeScanAgents Updates on page 6-46
Unreachable Network Unreachable Agents on page 14-42
Alert Settings Configuring OfficeScan Agent Update Notificationson page 6-48
OfficeScan Service Restart OfficeScan Agent Service Restart on page 14-11
Proxy Configuration Automatic Proxy Settings for the OfficeScan Agenton page 14-49
Preferred IP Address Agent IP Addresses on page 5-8
3. Click Save.
Configuring Agent Privileges and OtherSettings
Grant users the privileges to modify certain settings and perform high level tasks on theOfficeScan agent.
Note
Antivirus settings only appear after activating the OfficeScan Antivirus feature.

Managing the OfficeScan Agent
14-85
Tip
To enforce uniform settings and policies throughout the organization, grant limitedprivileges to users.
Procedure
1. Go to Agents > Agent Management.
2. In the agent tree, click the root domain icon ( ) to include all agents or selectspecific domains or agents.
3. Click Settings > Privileges and Other Settings.
4. On the Privileges tab, configure the following user privileges:
TABLE 14-13. Agent Privileges
AGENT PRIVILEGES REFERENCE
Roaming Privilege OfficeScan Agent Roaming Privilege on page14-19
Scan Privileges Scan Type Privileges on page 7-50
Scheduled Scan Privileges Scheduled Scan Privileges and Other Settingson page 7-52
Firewall Privileges Firewall Privileges on page 12-22
Behavior Monitoring Privileges Behavior Monitoring Privileges on page 8-10
Mail Scan Privileges Mail Scan Privileges and Other Settings onpage 7-58
Proxy Setting Privileges Proxy Configuration Privileges for Agents onpage 14-48
Component Update Privileges Configuring Update Privileges and OtherSettings on page 6-44
Unloading and Unlocking Granting the Agent Unloading and UnlockingPrivilege on page 14-18
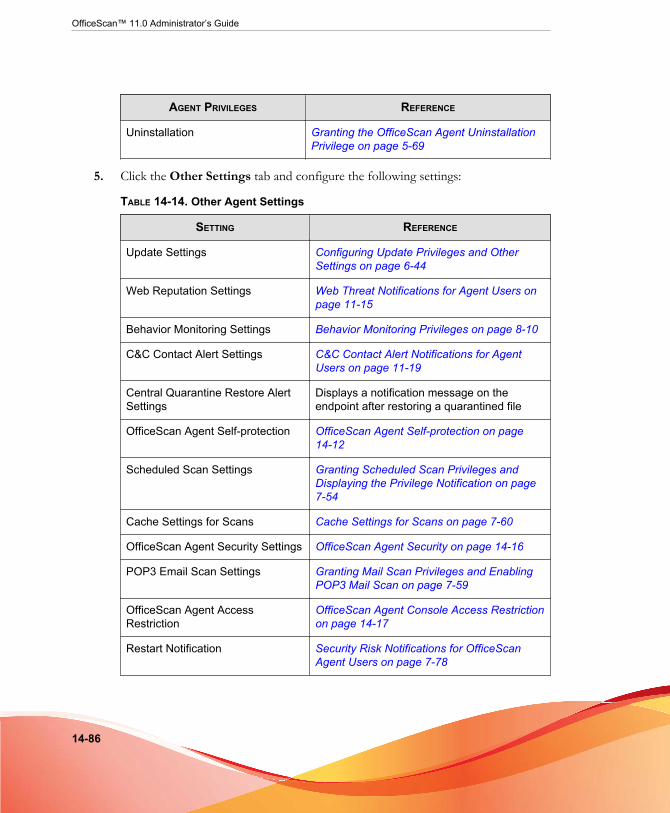
OfficeScan™ 11.0 Administrator’s Guide
14-86
AGENT PRIVILEGES REFERENCE
Uninstallation Granting the OfficeScan Agent UninstallationPrivilege on page 5-69
5. Click the Other Settings tab and configure the following settings:
TABLE 14-14. Other Agent Settings
SETTING REFERENCE
Update Settings Configuring Update Privileges and OtherSettings on page 6-44
Web Reputation Settings Web Threat Notifications for Agent Users onpage 11-15
Behavior Monitoring Settings Behavior Monitoring Privileges on page 8-10
C&C Contact Alert Settings C&C Contact Alert Notifications for AgentUsers on page 11-19
Central Quarantine Restore AlertSettings
Displays a notification message on theendpoint after restoring a quarantined file
OfficeScan Agent Self-protection OfficeScan Agent Self-protection on page14-12
Scheduled Scan Settings Granting Scheduled Scan Privileges andDisplaying the Privilege Notification on page7-54
Cache Settings for Scans Cache Settings for Scans on page 7-60
OfficeScan Agent Security Settings OfficeScan Agent Security on page 14-16
POP3 Email Scan Settings Granting Mail Scan Privileges and EnablingPOP3 Mail Scan on page 7-59
OfficeScan Agent AccessRestriction
OfficeScan Agent Console Access Restrictionon page 14-17
Restart Notification Security Risk Notifications for OfficeScanAgent Users on page 7-78

Managing the OfficeScan Agent
14-87
6. If you selected domain(s) or agent(s) in the agent tree, click Save. If you clicked theroot domain icon, choose from the following options:
• Apply to All Agents: Applies settings to all existing agents and to any newagent added to an existing/future domain. Future domains are domains notyet created at the time you configured the settings.
• Apply to Future Domains Only: Applies settings only to agents added tofuture domains. This option will not apply settings to new agents added to anexisting domain.


Part IVProviding Additional Protection

15-1
Chapter 15
Using Plug-in ManagerThis chapter discusses how to set up Plug-in Manager and provides an overview of plug-in solutions delivered through Plug-in Manager.
Topics include:
• About Plug-in Manager on page 15-2
• Plug-in Manager Installation on page 15-3
• Native OfficeScan Feature Management on page 15-4
• Managing Plug-in Programs on page 15-4
• Uninstalling Plug-in Manager on page 15-11
• Troubleshooting Plug-in Manager on page 15-11

OfficeScan™ 11.0 Administrator’s Guide
15-2
About Plug-in ManagerOfficeScan includes a framework called Plug-in Manager that integrates new solutionsinto the existing OfficeScan environment. To help ease the management of thesesolutions, Plug-in Manager provides at-a-glance data for the solutions in the form ofwidgets.
Note
None of the plug-in solutions currently support IPv6. The server can download thesesolutions but is not able to deploy the solutions to pure IPv6 OfficeScan agents or pureIPv6 hosts.
Plug-in Manager delivers two types of solutions:
• Native Product Features
Some native OfficeScan features are licensed separately and activated throughPlug-in Manager. In this release, two features fall under this category, namely,Trend Micro Virtual Desktop Support and OfficeScan Data Protection.
• Plug-in programs
Plug-in programs are not part of the OfficeScan program. The plug-in programshave separate licenses and management consoles. Access the management consolesfrom within the OfficeScan web console. Examples of plug-in programs areIntrusion Defense Firewall, Trend Micro Security (for Mac), and TrendMicro Mobile Security.
This document provides a general overview of plug-in program installation andmanagement and discusses plug-in program data available in widgets. Refer to specificplug-in program documentation for details on configuring and managing the program.
Plug-in Program Agents on EndpointsSome plug-in programs (such as Intrusion Defense Firewall) have agents that install onthe endpoint's Windows operating systems. OfficeScan agent Plug-in Manager runningunder the process name CNTAoSMgr.exe manages these agents.

Using Plug-in Manager
15-3
OfficeScan install CNTAoSMgr.exe with OfficeScan agent. The only additional systemrequirement for CNTAoSMgr.exe is Microsoft XML Parser (MSXML) version 3.0 orlater.
NoteOther plug-in program have agents that do not install on Windows operating systems arenot managed from the OfficeScan agent Plug-in Manager. The Trend Micro Security (forMac) agent and Mobile Device Agent for Trend Micro Mobile Security are examples ofthese agents.
WidgetsUse widgets to view at-a-glance data for deployed plug-in solutions. Widgets areavailable on the OfficeScan server’s Dashboard dashboard. A special widget, calledOfficeScan and Plug-ins Mashup, combines data from OfficeScan agents and plug-insolutions and then presents the data in the agent tree.
This Administrator’s Guide provides an overview of widgets and the solutions thatsupport widgets.
Plug-in Manager InstallationIn previous Plug-in Manager versions, the Plug-in Manager installation package isdownloaded from the Trend Micro ActiveUpdate server and then installed on theendpoint that hosts the OfficeScan server. In this version, the installation package isincluded in the OfficeScan server installation package.
Users who are new to OfficeScan have both the OfficeScan server and Plug-in Managerinstalled after completing the OfficeScan installation. Users who are upgrading to thisOfficeScan version and have used Plug-in Manager previously need to stop the Plug-inManager service before running the installation package.
Performing Post-installation TasksPerform the following after installing Plug-in Manager:

OfficeScan™ 11.0 Administrator’s Guide
15-4
Procedure
1. Open the OfficeScan web console and click Plug-ins in the main menu.
2. Manage plug-in solutions.
3. Access the Dashboard dashboard on the OfficeScan web console to managewidgets for the plug-in solutions.
Native OfficeScan Feature ManagementNative OfficeScan features install with OfficeScan and administrators activate eachfeature from Plug-in Manager. Manage some features, such as Trend Micro VirtualDesktop Support, from Plug-in Manager and others, such as OfficeScan DataProtection, from the OfficeScan web console.
Managing Plug-in ProgramsInstall and activate plug-in programs independently of OfficeScan. Each plug-inprovides a separate console for product management. The management consoles areaccessible from the OfficeScan web console.
Plug-in Program Installation
Plug-in programs display on the Plug-in Manager console. Use the console todownload, install, and manage the programs. Plug-in Manager downloads the installationpackage for the plug-in program from the Trend Micro ActiveUpdate server or from acustom update source, if one has been properly set up. An Internet connection isnecessary to download the package from the ActiveUpdate server.
When Plug-in Manager downloads an installation package or starts the installation, Plug-in Manager temporarily disables other plug-in program functions such as downloads,installations, and upgrades.

Using Plug-in Manager
15-5
Plug-in Manager does not support plug-in program installation or management fromTrend Micro Control Manager’s single sign-on function.
Installing Plug-in Programs
Procedure
1. Open the OfficeScan web console and click Plug-ins in the main menu.
2. On the Plug-in Manager screen, go to the plug-in program section and clickDownload.
The size of the plug-in program package displays beside the Download button.Plug-in Manager stores the downloaded package to <Server installationfolder>\PCCSRV\Download\Product.
Monitor the progress or navigate away from the screen during the download.
NoteIf OfficeScan encounters problems downloading or installing the package, check theserver update logs on the OfficeScan web console. On the main menu, click Logs >Server Update.
3. Click Install Now or Install Later.
• After clicking Install Now, the installation begins and an installation progressscreen appears.
• After clicking Install Later, the Plug-in Manager screen appears.
Install the plug-in program by clicking the Install button located in the plug-in program's section on the Plug-in Manager screen.
The Trend Micro End User License Agreement screen appears.
NoteNot all plug-in programs require this screen. If this screen does not appear, the plug-in program installation begins.

OfficeScan™ 11.0 Administrator’s Guide
15-6
4. Click Agree to install the plug-in program.
Monitor the progress or navigate away from the screen during the installation.
NoteIf OfficeScan encounters problems downloading or installing the package, check theserver update logs on the OfficeScan web console. On the main menu, click Logs >Server Update.
After the installation, the current plug-in program version displays on the Plug-inManager screen.
Activating the Plug-in Program License
Procedure
1. Open the OfficeScan web console and click Plug-ins in the main menu.
2. On the Plug-in Manager screen, go to the plug-in program section and clickManage Program.
The Product License New Activation Code screen appears.
3. Type or copy-and-paste the Activation Code into the text fields.
4. Click Save.
The plug-in console appears.
Viewing and Renewing the License Information
Procedure
1. Open the OfficeScan web console and click Plug-ins in the main menu.
2. On the Plug-in Manager screen, go to the plug-in program section and clickManage Program.

Using Plug-in Manager
15-7
3. Navigate the plug-in console to the View License Information hyperlink.
Not all plug-in programs display the View License Information hyperlink in thesame location. Refer to the plug-in program's user documentation for more details.
4. View the following license details in the screen that opens.
Option DescriptionStatus Displays either "Activated", "Not Activated" or "Expired"
Version Displays either "Full" or "Trial" version
NoteActivation of both the full and trial versions displays only as"Full".
Seats Displays how many endpoints the plug-in program can manage
Licenseexpires on
If the plug-in program has multiple licenses, the latest expirationdate displays.
For example, if the license expiration dates are 12/31/2011 and06/30/2011, 12/31/2011 displays.
ActivationCode
Displays the Activation Code
Reminders Depending on the current license version, the plug-in displaysreminders about the license expiration date either during thegrace period (full versions only), or when the license expires
Note
The duration of the grace period varies by region. Verify the grace period of a plug-inprogram with a Trend Micro representative.
After a plug-in program license expires, the plug-in continues to function but updatesand support are no longer available.
5. Click View detailed license online to view information about the current licenseon the Trend Micro website.

OfficeScan™ 11.0 Administrator’s Guide
15-8
6. To update the screen with the latest license information, click UpdateInformation.
7. Click New Activation Code to open the Product License New ActivationCode screen.
For details, see Activating the Plug-in Program License on page 3-4.
Plug-in Program Management
Configure settings and perform program-related tasks from the plug-in program’smanagement console, which is accessible from the OfficeScan web console. Tasksinclude activating the program and possibly deploying the plug-in program agent toendpoints. Consult the documentation for the specific plug-in program for details onconfiguring and managing the program.
Managing Plug-in Programs
Procedure
1. Open the OfficeScan web console and click Plug-ins in the main menu.
2. On the Plug-in Manager screen, go to the plug-in program section and clickManage Program.
FIGURE 15-1. Manage Program button
When managing the plug-in program for the first time, the plug-in program mayrequire activation. For details, see Activating the Plug-in Program License on page 3-4.
Using Plug-in Manager
15-9
Plug-in Program UpgradesA new version of an installed plug-in program displays on the Plug-in Manager console.Download the package and upgrade the plug-in program on the console. Plug-inManager downloads the package from the Trend Micro ActiveUpdate server or acustom update source, if one has been properly set up. An Internet connection isnecessary to download the package from the ActiveUpdate server.
When Plug-in Manager downloads an installation package or starts an upgrade, Plug-inManager temporarily disables other plug-in program functions such as downloads,installations, and upgrades.
Plug-in Manager does not support plug-in program upgrading from Trend MicroControl Manager’s single sign-on function.
Upgrading Plug-in Programs
Procedure
1. Open the OfficeScan web console and click Plug-ins in the main menu.
2. On the Plug-in Manager screen, go to the plug-in program section and clickDownload.
The size of the upgrade package displays beside the Download button.
Monitor the progress or navigate away from the screen during the download.
NoteIf OfficeScan encounters problems downloading or installing the package, check theserver update logs on the OfficeScan web console. On the main menu, click Logs >Server Update.
3. After Plug-in Manager downloads the package, a new screen displays.
4. Click Upgrade Now or Upgrade Later.
• After clicking Upgrade Now, the upgrade begins and an upgrade progressscreen appears.

OfficeScan™ 11.0 Administrator’s Guide
15-10
• After clicking Upgrade Later, the Plug-in Manager screen appears.
Upgrade the plug-in program by clicking the Upgrade button located in theplug-in program's section on the Plug-in Manager screen.
After the upgrade, the Plug-in Manager service may need to restart, causing the Plug-inManager screen to be temporarily unavailable. When the screen becomes available, thecurrent plug-in program version displays.
Plug-in Program Uninstallation
Uninstall a plug-in program in the following ways:
• Uninstall the plug-in program from the Plug-in Manager console.
• Uninstall the OfficeScan server, which uninstalls Plug-in Manager and all installedplug-in programs. For instructions on uninstalling the OfficeScan server, see theOfficeScan Installation and Upgrade Guide.
For plug-in programs with agents on the endpoint:
• Consult the documentation for the plug-in program to see if uninstalling the plug-in program also uninstalls the plug-in agent.
• For plug-in agents installed on the same endpoint as the OfficeScan agent,uninstalling the OfficeScan agent uninstalls the plug-in agents and the OfficeScanagent Plug-in Manager (CNTAoSMgr.exe).
Uninstalling Plug-in Programs from the Plug-in ManagerConsole
Procedure
1. Open the OfficeScan web console and click Plug-ins in the main menu.
2. On the Plug-in Manager screen, go to the plug-in program section and clickUninstall.

Using Plug-in Manager
15-11
3. Monitor the uninstallation progress or navigate away from the screen during theuninstallation.
4. Refresh the Plug-in Manager screen after the uninstallation.
The plug-in program is again available for installation.
Uninstalling Plug-in ManagerUninstall the OfficeScan server to uninstall Plug-in Manager and all installed plug-inprograms. For instructions on uninstalling the OfficeScan server, see the OfficeScanInstallation and Upgrade Guide.
Troubleshooting Plug-in ManagerCheck the OfficeScan server and OfficeScan agent debug logs for Plug-in Manager andplug-in program debug information.
Plug-in Program Does not Display on the Plug-in ManagerConsole
Any plug-in program available for download and installation may not display on thePlug-in Manager console for the following reasons:
Procedure
1. Plug-in Manager is still downloading the plug-in program, which may take sometime if the program package size is large. Check the screen from time to time to seeif the plug-in program displays.

OfficeScan™ 11.0 Administrator’s Guide
15-12
NoteIf Plug-in Manager is unable to download the plug-in program, it automatically re-downloads after 24 hours. To manually trigger Plug-in Manager to download theplug-in program, restart the OfficeScan Plug-in Manager service.
2. The server computer cannot connect to the Internet. If the server connects to theInternet through a proxy server, ensure that Internet connection can be establishedusing the proxy settings.
3. The OfficeScan update source is not the ActiveUpdate server. On the OfficeScanweb console, go to Updates > Server > Update Source and check the updatesource. If the update source is not the ActiveUpdate server, you have the followingoptions:
• Select the ActiveUpdate server as the update source.
• If you select Other Update Source, select the first entry in the Otherupdate source list as update source and verify that it can successfully connectto the ActiveUpdate server. Plug-in Manager only supports the first entry inthe list.
• If you select Intranet location containing a copy of the current file, ensurethe endpoint in the Intranet can also connect to the ActiveUpdate server.
Plug-in Agent Installation and Display Issues onEndpoints
Installation of the plug-in program’s agent on the endpoint may fail or the agent maynot display in the OfficeScan agent console for the following reasons:
Procedure
1. Plug-in Manager (CNTAosMgr.exe) on the endpoint is not running. In theOfficeScan agent endpoint, open Windows Task Manager and run theCNTAosMgr.exe process.
2. The installation package for the plug-in agent was not downloaded to theOfficeScan agent endpoint folder located in <Agent installation folder>

Using Plug-in Manager
15-13
\AU_Data\AU_Temp\{xxx}AU_Down\Product. Check Tmudump.txt locatedin \AU_Data\AU_Log\ for the download failure reasons.
NoteIf an agent successfully installs, agent information is available in <Agentinstallation folder>\AOSSvcInfo.xml.
3. The agent installation was unsuccessful or requires further action. You can checkthe installation status from the plug-in program’s management console andperform actions such as restarting the OfficeScan agent endpoint after installationor installing required operating system patches before installation.
The Apache Web Server Version is not SupportedPlug-in Manager handles some of the web requests using Internet Server ApplicationProgramming Interface (ISAPI). ISAPI is not compatible with Apache web serverversions 2.0.56 to 2.0.59 and versions 2.2.3 to 2.2.4.
If your Apache web server runs any of the incompatible versions, you can replace it withversion. 2.2.25, which is the version that OfficeScan and Plug-in Manager are using. Thisversion is also compatible with ISAPI.
Procedure
1. Upgrade the OfficeScan server to the current version.
2. Back up the following files on the Apache2 folder on <Server installationfolder>:
• httpd.conf
• httpd.conf.tmbackup
• httpd.default.conf
3. Uninstall the incompatible Apache web server version from the Add/RemovePrograms screen.
4. Install Apache web server 2.2.25.

OfficeScan™ 11.0 Administrator’s Guide
15-14
a. Launch apache.msi from <Server installation folder>\Admin\Utility\Apache.
b. In the Server Information screen, type the required information.
c. In the Destination Folder screen, change the destination folder by clickingChange and browsing to <Server installation folder>.
d. Complete the installation.
5. Copy the backup files back to the Apache2 folder.
6. Restart the Apache web server service.
Agents on the Endpoints Cannot be Launched if theAutomatic Configuration Script Setting on InternetExplorer Redirects to a Proxy Server
The OfficeScan agent Plug-in Manager (CNTAosMgr.exe) is unable to launch agentson endpoints because the agent launch command redirects to a proxy server. Thisproblem only occurs if the proxy setting redirects the user's HTTP traffic to 127.0.0.1.
To resolve this issue, use a well-defined proxy server policy. For example, do not rerouteHTTP traffic to 127.0.0.1.
If you need to use the proxy configuration that controls the 127.0.0.1 HTTP requests,perform the following tasks.
Procedure
1. Configure OfficeScan firewall settings on the OfficeScan web console.
NotePerform this step only if you enable the OfficeScan firewall on OfficeScan agents.
a. On the web console, go to Agents > Firewall > Policies and click EditException Template.
Using Plug-in Manager
15-15
b. On the Edit Exception Template screen, click Add.
c. Use the following information:
• Name: Your preferred name
• Action: Allow network traffic
• Direction: Inbound
• Protocol: TCP
• Port(s): Any port number between 5000 and 49151
d. IP address(es): Select Single IP address and specify your proxy server's IPaddress (recommended) or select All IP addresses.
e. Click Save.
f. Back on the Edit Exception Template screen, click Save and Apply toExisting Policies.
g. Go to Agents > Firewall > Profiles and click Assign Profile to Agents.
If there is no firewall profile, create one by clicking Add. Use the followingsettings:
• Name: Your preferred name
• Description: Your preferred description
• Policy: All Access Policy
After saving the new profile, click Assign Profile to Agents.
2. Modify the ofcscan.ini file.
a. Open the ofcscan.ini file in <Server installation folder> usinga text editor.
b. Search for [Global Setting] and add FWPortNum=21212 to the nextline. Change "21212" to the port number you specified in step c above.
For example:
[Global Setting]
OfficeScan™ 11.0 Administrator’s Guide
15-16
FWPortNum=5000
c. Save the file.
3. On the web console, go to Agents > Global Agent Settings and click Save.
An Error in the System, Update Module, or Plug-inManager Program occurred and the Error MessageProvides a Certain Error Code
Plug-in Manager displays any of the following error codes in an error message. If you areunable to troubleshoot a problem after referring to the solutions provided in the tablebelow, contact your support provider.
TABLE 15-1. Plug-in Manager Error Codes
ERRORCODE
MESSAGE, CAUSE, AND SOLUTION
001 An error in the Plug-in Manager program occurred.
The Plug-in Manager update module does not respond when querying theprogress of an update task. The module or command handler may not havebeen not initialized.
Restart the OfficeScan Plug-in Manager service and perform the task again.
002 A system error occurred.
The Plug-in Manager update module is unable to open the registry keySOFTWARE\TrendMicro\OfficeScan\service\AoS because it may have beendeleted.
Perform the following steps:
1. Open Registry Editor and go to HKEY_LOCAL_MACHINE\SOFTWARE\TrendMicro\OfficeScan\ service\AoS\OSCE_Addon_Service_CompList_Version. Reset the value to 1.0.1000.
2. Restart the OfficeScan Plug-in Manager service.
3. Download/Uninstall the plug-in program.

Using Plug-in Manager
15-17
ERRORCODE
MESSAGE, CAUSE, AND SOLUTION
028 An update error occurred.
Possible causes:
• Plug-in Manager update module was unable to download a plug-inprogram. Verify that the network connection is functional, and then tryagain.
• Plug-in Manager update module cannot install the plug-in program becausethe AU patch agent has returned an error. The AU patch agent is theprogram that launches installation of new plug-in programs. For the exactcause of the error, check the ActiveUpdate module debug log"TmuDump.txt" in \PCCSRV\Web\Service\AU_Data\AU_Log.
Perform the following steps:
1. Open Registry Editor and navigate to HKEY_LOCAL_MACHINE\SOFTWARE\TrendMicro\OfficeScan\ service\AoS\OSCE_Addon_Service_CompList_Version. Reset the value to 1.0.1000.
2. Delete the plug-in program registry key HKEY_LOCAL_MACHINE\SOFTWARE\TrendMicro\OfficeScan\ service\AoS\OSCE_ADDON_xxxx.
3. Restart the OfficeScan Plug-in Manager service.
4. Download and install the plug-in program.
170 A system error occurred.
Plug-in Manager update module cannot process an incoming operationbecause it is currently handling another operation.
Perform the task at a later time.
202 An error in the Plug-in Manager program occurred.
The Plug-in Manager program cannot handle the task being executed on theweb console.
Refresh the web console or upgrade Plug-in Manager if an upgrade to theprogram is available.

OfficeScan™ 11.0 Administrator’s Guide
15-18
ERRORCODE
MESSAGE, CAUSE, AND SOLUTION
203 An error in the Plug-in Manager program occurred.
The Plug-in Manager program encountered an interprocess communication(IPC) error when attempting to communicate with Plug-in Manager backendservices.
Restart the OfficeScan Plug-in Manager service and perform the task again.
Othererrorcodes
A system error occurred.
When downloading a new plug-in program, Plug-in Manager checks the plug-inprogram list from the ActiveUpdate server. Plug-in Manager was unable toobtain the list.
Perform the following steps:
1. Open Registry Editor and navigate to HKEY_LOCAL_MACHINE\SOFTWARE\TrendMicro\OfficeScan\ service\AoS\OSCE_Addon_Service_CompList_Version. Reset the value to 1.0.1000.
2. Restart the OfficeScan Plug-in Manager service.
3. Download and install the plug-in program.

16-1
Chapter 16
Troubleshooting ResourcesThis chapter provides a list of resources you can use to troubleshoot OfficeScan serverand OfficeScan agent issues.
Topics include:
• Support Intelligence System on page 16-2
• Case Diagnostic Tool on page 16-2
• OfficeScan Server Logs on page 16-2
• OfficeScan Agent Logs on page 16-14
OfficeScan™ 11.0 Administrator’s Guide
16-2
Support Intelligence SystemSupport Intelligence System is a page wherein you can easily send files to Trend Microfor analysis. This system determines the OfficeScan server GUID and sends thatinformation with the file you send. Providing the GUID ensures that Trend Micro canprovide feedback regarding the files sent for assessment.
Case Diagnostic ToolTrend Micro Case Diagnostic Tool (CDT) collects necessary debugging informationfrom a customer’s product whenever problems occur. It automatically turns theproduct's debug status on and off and collects necessary files according to problemcategories. Trend Micro uses this information to troubleshoot problems related to theproduct.
Run the tool on all platforms that OfficeScan supports. To obtain this tool and relevantdocumentation, contact your support provider.
Trend Micro Performance Tuning ToolTrend Micro provides a standalone performance tuning tool to identify applications thatcould potentially cause performance issues. The Trend Micro Performance Tuning Tool,available from the Trend Micro Knowledge Base, should be run on a standardworkstation image and/or a few target workstations during the pilot process to preemptperformance issues in the actual deployment of Behavior Monitoring and DeviceControl.
For details, visit http://esupport.trendmicro.com/solution/en-us/1056425.aspx.
OfficeScan Server LogsAside from logs available on the web console, you can use other types of logs (such asdebug logs) to troubleshoot product issues.
Troubleshooting Resources
16-3
WARNING!
Debug logs may affect server performance and consume a large amount of disk space.Enable debug logging only when necessary and promptly disable it if you no longer needdebug data. Remove the log file if you need to conserve disk space.
Server Debug Logs Using LogServer.exe
Use LogServer.exe to collect debug logs for the following:
• OfficeScan server basic logs
• Trend Micro Vulnerability Scanner
• Active Directory integration logs
• Agent grouping logs
• Security compliance logs
• Role-based administration
• Smart scan
Enabling Debug Logging
Procedure
1. Log on to the web console.
2. On the banner of the web console, click the first "O" in "OfficeScan".
3. Specify debug log settings.
4. Click Save.
5. Check the log file (ofcdebug.log) in the default location: <Server installationfolder>\PCCSRV\Log.

OfficeScan™ 11.0 Administrator’s Guide
16-4
Disabling Debug Logging
Procedure
1. Log on to the web console.
2. On the banner of the web console, click the first "O" in "OfficeScan".
3. Clear Enable debug log.
4. Click Save.
Enabling Debug Logging for Server Installation and Upgrade
Enable debug logging before performing the following tasks:
• Uninstall and then install the server again.
• Upgrade OfficeScan to a new version.
• Perform remote installation/upgrade (Debug logging is enabled on the endpointwhere you launched Setup and not on the remote endpoint.)
Procedure
1. Copy the LogServer folder located in <Server installation folder>\PCCSRV\Private to C:\.
2. Create a file named ofcdebug.ini with the following content:
[debug]
debuglevel=9
debuglog=c:\LogServer\ofcdebug.log
debugLevel_new=D
debugSplitSize=10485760
debugSplitPeriod=12

Troubleshooting Resources
16-5
debugRemoveAfterSplit=1
3. Save ofcdebug.ini to C:\LogServer.
4. Perform the appropriate task (that is, uninstall/reinstall the server, upgrade to anew server version, or perform remote installation/upgrade).
5. Check ofcdebug.log in C:\LogServer.
Installation Logs• Local Installation/Upgrade Logs
File name: OFCMAS.LOG
Location: %windir%
• Remote Installation/Upgrade Logs
• On the endpoint where you launched Setup:
File name: ofcmasr.log
Location: %windir%
• On the target endpoint:
File name: OFCMAS.LOG
Location: %windir%
Active Directory Logs• File name: ofcdebug.log
• File name: ofcserver.ini
Location: <Server installation folder>\PCCSRV\Private\
• File names:
• dbADScope.cdx

OfficeScan™ 11.0 Administrator’s Guide
16-6
• dbADScope.dbf
• dbADPredefinedScope.cdx
• dbADPredefinedScope.dbf
• dbCredential.cdx
• dbCredential.dbf
Location: <Server installation folder>\PCCSRV\HTTPDB\
Role-based Administration LogsTo get detailed role-based administration information, do one of the following:
• Run the Trend Micro Case Diagnostics Tool. For information, see Case DiagnosticTool on page 16-2.
• Gather the following logs:
• All files in the <Server installation folder>\PCCSRV\Private\AuthorStorefolder.
• OfficeScan Server Logs on page 16-2
OfficeScan Agent Grouping Logs• File name: ofcdebug.log
• File name: ofcserver.ini
Location: <Server installation folder>\PCCSRV\Private\
• File name: SortingRule.xml
Location: <Server installation folder>\PCCSRV\Private\SortingRuleStore\
• File names:
• dbADScope.cdx

Troubleshooting Resources
16-7
• dbADScope.dbf
Location: <Server installation folder>\HTTPDB\
Component Update Logs
File name: TmuDump.txt
Location: <Server installation folder>\PCCSRV\Web\Service\AU_Data\AU_Log
Getting Detailed Server Update Information
Procedure
1. Create a file named aucfg.ini with the following content:
[Debug]
level=-1
[Downloader]
ProxyCache=0
2. Save the file to <Server installation folder>\PCCSRV\Web\Service.
3. Restart the OfficeScan Master Service.
Stopping the Collection of Detailed Server UpdateInformation
Procedure
1. Delete aucfg.ini.
2. Restart the OfficeScan Master Service.

OfficeScan™ 11.0 Administrator’s Guide
16-8
Apache Server Logs
File names:
• install.log
• error.log
• access.log
Location: <Server installation folder>\PCCSRV\Apache2
Agent Packager Logs
Enabling Logging for Agent Packager Creation
Procedure
1. Modify ClnExtor.ini in <Server installation folder>\PCCSRV\Admin\Utility\ClientPackager as follows:
[Common]
DebugMode=1
2. Check ClnPack.log in C:\.
Disabling Logging for Agent Packager Creation
Procedure
1. Open ClnExtor.ini.
2. Change the "DebugMode" value from 1 to 0.
Troubleshooting Resources
16-9
Security Compliance Report LogsTo get detailed Security Compliance information, gather the following:
• File name: RBAUserProfile.ini
Location: <Server installation folder>\PCCSRV\Private\AuthorStore\
• All files in the <Server installation folder>\PCCSRV\Log\SecurityCompliance Report folder.
• OfficeScan Server Logs on page 16-2
Outside Server Management Logs• File name: ofcdebug.log
• File name: ofcserver.ini
Location: <Server installation folder>\PCCSRV\Private\
• All files in the <Server installation folder>\PCCSRV\Log\OutsideServer Management Report\ folder.
• File names:
• dbADScope.cdx
• dbADScope.dbf
• dbClientInfo.cdx
• dbclientInfo.dbf
Location: <Server installation folder>\HTTPDB\
Device Control Exception LogsTo get detailed Device Control Exception information, gather the following:
• File name: ofcscan.ini
OfficeScan™ 11.0 Administrator’s Guide
16-10
Location: <Server installation folder>\
• File name: dbClientExtra.dbf
Location: <Server installation folder>\HTTPDB\
• Device Control Exception List from the OfficeScan web console.
Web Reputation Logs
File name: diagnostic.log
Location: <Server installation folder>\PCCSRV\LWCS\
ServerProtect Normal Server Migration Tool Logs
To enable debug logging for ServerProtect Normal Server Migration Tool:
Procedure
1. Create a file named ofcdebug.ini file with the following content:
[Debug]
DebugLog=C:\ofcdebug.log
DebugLevel=9
2. Save the file to C:\.
3. Check ofcdebug.log in C:\.
Note
To disable debug logging, delete the ofcdebug.ini file.
Troubleshooting Resources
16-11
VSEncrypt Logs
OfficeScan automatically creates the debug log (VSEncrypt.log) in the user account'stemporary folder. For example, C:\Documents and Settings\<User name>\Local Settings\Temp.
Control Manager MCP Agent Logs
Debug Files on the <Server installation folder>\PCCSRV\CMAgent folder
• Agent.ini
• Product.ini
• The screenshot of the Control Manager Settings page
• ProductUI.zip
Enabling Debug Logging for the MCP Agent
Procedure
1. Modify product.ini in <Server installation folder>\PCCSRV\CmAgent as follows:
[Debug]
debugmode = 3
debuglevel= 3
debugtype = 0
debugsize = 10000
debuglog = C:\CMAgent_debug.log
2. Restart the OfficeScan Control Manager Agent service from MicrosoftManagement Console.

OfficeScan™ 11.0 Administrator’s Guide
16-12
3. Check CMAgent_debug.log in C:\.
Disabling Debug Logging for the MCP Agent
Procedure
1. Open product.ini and delete the following:
debugmode = 3
debuglevel= 3
debugtype = 0
debugsize = 10000
debuglog = C:\CMAgent_debug.log
2. Restart the OfficeScan Control Manager service.
Virus Scan Engine Logs
To enable debug logging for the Virus Scan Engine:
Procedure
1. Open Registry Editor (regedit.exe).
2. Go to HKEY_LOCAL_MACHINE\SYSTEM\CurrentControlSet\Services\TMFilter\Parameters.
3. Change the value of "DebugLogFlags" to "00003eff".
4. Perform the steps that led to the scanning issue you encountered.
5. Check TMFilter.log in %windir%.

Troubleshooting Resources
16-13
Note
Disable debug logging by restoring the value of "DebugLogFlags" to "00000000".
Virus/Malware Logs
File name:
• dbVirusLog.dbf
• dbVirusLog.cdx
Location: <Server installation folder>\PCCSRV\HTTPDB\
Spyware/Grayware Logs
File name:
• dbSpywareLog.dbf
• dbSpywareLog.cdx
Location: <Server installation folder>\PCCSRV\HTTPDB\
Outbreak Logs
LOG TYPE FILE
Current Firewall ViolationOutbreak Logs
File name: Cfw_Outbreak_Current.log
Location: <Server installation folder>\PCCSRV\Log\
Last Firewall ViolationOutbreak Logs
File name: Cfw_Outbreak_Last.log
Location: <Server installation folder>\PCCSRV\Log\
Current Virus /MalwareOutbreak Logs
File name: Outbreak_Current.log
Location: <Server installation folder>\PCCSRV\Log\

OfficeScan™ 11.0 Administrator’s Guide
16-14
LOG TYPE FILE
Last Virus /MalwareOutbreak Logs
File name: Outbreak_Last.log
Location: <Server installation folder>\PCCSRV\Log\
Current Spyware/GraywareOutbreak Logs
File name: Spyware_Outbreak_Current.log
Location: <Server installation folder>\PCCSRV\Log\
Last Spyware/GraywareOutbreak Logs
File name: Spyware_Outbreak_Last.log
Location: <Server installation folder>\PCCSRV\Log\
Virtual Desktop Support Logs• File name: vdi_list.ini
Location: <Server installation folder>\PCCSRV\TEMP\
• File name: vdi.ini
Location: <Server installation folder>\PCCSRV\Private\
• File name: ofcdebug.txt
Location: <Server installation folder>\PCCSRV\
To generate ofcdebug.txt, enable debug logging. For instructions on enabling debuglogging, see Enabling Debug Logging on page 16-3.
OfficeScan Agent LogsUse OfficeScan agent logs (such as debug logs) to troubleshoot OfficeScan agent issues.
WARNING!
Debug logs may affect agent performance and consume a large amount of disk space.Enable debug logging only when necessary and promptly disable it if you no longer needdebug data. Remove the log file if the file size becomes huge.
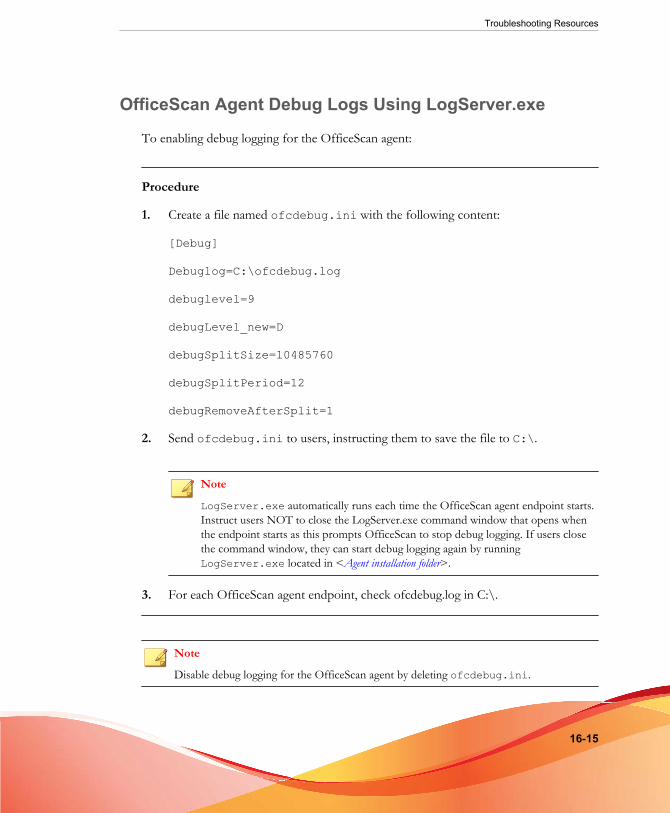
Troubleshooting Resources
16-15
OfficeScan Agent Debug Logs Using LogServer.exe
To enabling debug logging for the OfficeScan agent:
Procedure
1. Create a file named ofcdebug.ini with the following content:
[Debug]
Debuglog=C:\ofcdebug.log
debuglevel=9
debugLevel_new=D
debugSplitSize=10485760
debugSplitPeriod=12
debugRemoveAfterSplit=1
2. Send ofcdebug.ini to users, instructing them to save the file to C:\.
Note
LogServer.exe automatically runs each time the OfficeScan agent endpoint starts.Instruct users NOT to close the LogServer.exe command window that opens whenthe endpoint starts as this prompts OfficeScan to stop debug logging. If users closethe command window, they can start debug logging again by runningLogServer.exe located in <Agent installation folder>.
3. For each OfficeScan agent endpoint, check ofcdebug.log in C:\.
Note
Disable debug logging for the OfficeScan agent by deleting ofcdebug.ini.

OfficeScan™ 11.0 Administrator’s Guide
16-16
Fresh Installation LogsFile name: OFCNT.LOG
Locations:
• %windir% for all installation methods except MSI package
• %temp% for the MSI package installation method
Upgrade/Hot Fix LogsFile name: upgrade_yyyymmddhhmmss.log
Location: <Agent installation folder>\Temp
Damage Cleanup Services Logs
Enabling Debug Logging for Damage Cleanup Services
Procedure
1. Open TSC.ini in <Agent installation folder>.
2. Modify the following line as follows:
DebugInfoLevel=3
3. Check TSCDebug.log in <Agent installation folder>\debug.
Disabling Debug Logging for Damage Cleanup ServicesOpen TSC.ini and change the "DebugInfoLevel" value from 3 to 0.
Cleanup LogFile name: yyyymmdd.log

Troubleshooting Resources
16-17
Location: <Agent installation folder>\report\
Mail Scan LogsFile name: SmolDbg.txt
Location: <Agent installation folder>
OfficeScan Agent Connection LogsFile name: Conn_YYYYMMDD.log
Location: <Agent installation folder>\ConnLog
OfficeScan Agent Update LogsFile name: Tmudump.txt
Location: <Agent installation folder>\AU_Data\AU_Log
Getting Detailed OfficeScan Agent Update Information
Procedure
1. Create a file named aucfg.ini with the following content:
[Debug]
level=-1
[Downloader]
ProxyCache=0
2. Save the file to <Agent installation folder>.
3. Reload the OfficeScan agent.
OfficeScan™ 11.0 Administrator’s Guide
16-18
NoteStop collecting detailed agent update information by deleting the aucfg.ini file andreloading the OfficeScan agent.
Outbreak Prevention LogsFile name: OPPLogs.log
Location: <Agent installation folder>\OppLog
Outbreak Prevention Restore LogsFile names:
• TmOPP.ini
• TmOPPRestore.ini
Location: <Agent installation folder>\
OfficeScan Firewall Logs
Enabling Debug Logging for the Common Firewall Driver onWindows Vista/Server 2008/7/Server 2012/8/8.1 Computers
Procedure
1. Modify the following registry values:

Troubleshooting Resources
16-19
REGISTRY KEY VALUES
HKEY_LOCAL_MACHINE\System\CurrentControlSet\Services\tmwfp\Parameters
Type: DWORD value(REG_DWORD)
Name: DebugCtrl
Value: 0x00001111
HKEY_LOCAL_MACHINE\System\CurrentControlSet\Services\tmlwf\Parameters
Type: DWORD value(REG_DWORD)
Name: DebugCtrl
Value: 0x00001111
2. Restart the endpoint.
3. Check wfp_log.txt and lwf_log.txt in C:\.
Enabling Debug Logging for the Common Firewall Driver onWindows XP and Windows Server 2003 Computers
Procedure
1. Add the following data in HKEY_LOCAL_MACHINE\System\CurrentControlSet\Services\tmcfw\Parameters:
• Type: DWORD value (REG_DWORD)
• Name: DebugCtrl
• Value: 0x00001111
2. Restart the endpoint.
3. Check cfw_log.txt in C:\.

OfficeScan™ 11.0 Administrator’s Guide
16-20
Disabling Debug Logging for the Common Firewall Driver(all operating systems)
Procedure
1. Delete "DebugCtrl" in the registry key.
2. Restart the endpoint.
Enabling Debug Logging for the OfficeScan NT FirewallService
Procedure
1. Edit TmPfw.ini located in <Agent installation folder> as follows:
[ServiceSession]
Enable=1
2. Reload the agent.
3. Check ddmmyyyy_NSC_TmPfw.log in C:\temp.
Disabling Debug Logging for the OfficeScan NT FirewallService
Procedure
1. Open TmPfw.ini and change the "Enable" value from 1 to 0.
2. Reload the OfficeScan agent.

Troubleshooting Resources
16-21
Web Reputation and POP3 Mail Scan Logs
Enabling Debug Logging for the Web Reputation and POP3Mail Scan Features
Procedure
1. Edit TmProxy.ini located in <Agent installation folder> as follows:
[ServiceSession]
Enable=1
LogFolder=C:\temp
2. Reload the OfficeScan agent.
3. Check the ddmmyyyy_NSC_TmProxy.log in C:\temp.
Disabling Debug Logging for the Web Reputation and POP3Mail Scan Features
Procedure
1. Open TmProxy.ini and change the "Enable" value from 1 to 0.
2. Reload the OfficeScan agent.
Device Control Exception List Logs
File name: DAC_ELIST
Location: <Agent installation folder>\
OfficeScan™ 11.0 Administrator’s Guide
16-22
Data Protection Debug LogsTo enable Data Protection debug logs:
Procedure
1. Obtain the logger.cfg file from your support provider.
2. Add the following data in HKEY_LOCAL_MACHINE\SOFTWARE\TrendMicro\PC-cillinNTCorp\DlpLite:
• Type: String
• Name: debugcfg
• Value: C:\Log\logger.cfg
3. Create a folder named “Log” in the C:\ directory.
4. Copy logger.cfg to the Log folder.
5. Deploy Data Loss Prevention and Device Control settings from the web consoleto start collecting logs.
NoteDisable debug logging for the Data Protection module by deleting debugcfg in theregistry key and restarting the endpoint.
Windows Event LogsWindows Event Viewer records successful application events such as logging on orchanging account settings.
Procedure
1. Do one of the following:
• Click Start > Control Panel > Performance and Maintenance >Administrative Tools > Computer Management.

Troubleshooting Resources
16-23
• Open the MMC containing the Event Viewer snap-in.
2. Click Event Viewer.
Transport Driver Interface (TDI) LogsTo enable Transport Driver Interface (TDI) logs:
Procedure
1. Add the following data in HKEY_LOCAL_MACHINE\SYSTEM\CurrentControlSet\Service\tmtdi\Parameters:
PARAMETER VALUES
Key 1 Type: DWORD value (REG_DWORD)
Name: Debug
Value: 1111 (Hexadecimal)
Key 2 Type: String value (REG_SZ)
Name: LogFile
Value: C:\tmtdi.log
2. Restart the endpoint.
3. Check tmtdi.log in C:\.
NoteDisable debug logging for TDI by deleting Debug and LogFile in the registry key andrestarting the endpoint.


17-1
Chapter 17
Technical SupportThis chapter describes how to find solutions online, use the Support Portal, and contactTrend Micro.
Topics include:
• Troubleshooting Resources on page 17-2
• Contacting Trend Micro on page 17-3
• Sending Suspicious Content to Trend Micro on page 17-5
• Other Resources on page 17-6

OfficeScan™ 11.0 Administrator’s Guide
17-2
Troubleshooting ResourcesBefore contacting technical support, consider visiting the following Trend Micro onlineresources.
Trend Community
To get help, share experiences, ask questions, and discuss security concerns with otherusers, enthusiasts, and security experts, go to:
http://community.trendmicro.com/
Using the Support Portal
The Trend Micro Support Portal is a 24x7 online resource that contains the most up-to-date information about both common and unusual problems.
Procedure
1. Go to http://esupport.trendmicro.com.
2. Select a product or service from the appropriate drop-down list and specify anyother related information.
The Technical Support product page appears.
3. Use the Search Support box to search for available solutions.
4. If no solution is found, click Submit a Support Case from the left navigation andadd any relevant details, or submit a support case here:
http://esupport.trendmicro.com/srf/SRFMain.aspx
A Trend Micro support engineer investigates the case and responds in 24 hours orless.
Technical Support
17-3
Security Intelligence CommunityTrend Micro cyber security experts are an elite security intelligence team specializing inthreat detection and analysis, cloud and virtualization security, and data encryption.
Go to http://www.trendmicro.com/us/security-intelligence/index.html to learn about:
• Trend Micro blogs, Twitter, Facebook, YouTube, and other social media
• Threat reports, research papers, and spotlight articles
• Solutions, podcasts, and newsletters from global security insiders
• Free tools, apps, and widgets
Threat EncyclopediaMost malware today consists of "blended threats" - two or more technologies combinedto bypass computer security protocols. Trend Micro combats this complex malware withproducts that create a custom defense strategy. The Threat Encyclopedia provides acomprehensive list of names and symptoms for various blended threats, includingknown malware, spam, malicious URLs, and known vulnerabilities.
Go to http://about-threats.trendmicro.com/us/threatencyclopedia#malware to learnmore about:
• Malware and malicious mobile code currently active or "in the wild"
• Correlated threat information pages to form a complete web attack story
• Internet threat advisories about targeted attacks and security threats
• Web attack and online trend information
• Weekly malware reports
Contacting Trend MicroIn the United States, Trend Micro representatives are available by phone, fax, or email:

OfficeScan™ 11.0 Administrator’s Guide
17-4
Address Trend Micro, Inc. 10101 North De Anza Blvd., Cupertino, CA 95014
Phone Toll free: +1 (800) 228-5651 (sales)
Voice: +1 (408) 257-1500 (main)
Fax +1 (408) 257-2003
Website http://www.trendmicro.com
Email address [email protected]
• Worldwide support offices:
http://www.trendmicro.com/us/about-us/contact/index.html
• Trend Micro product documentation:
http://docs.trendmicro.com
Speeding Up the Support Call
To improve problem resolution, have the following information available:
• Steps to reproduce the problem
• Appliance or network information
• Computer brand, model, and any additional hardware connected to the endpoint
• Amount of memory and free hard disk space
• Operating system and service pack version
• Endpoint client version
• Serial number or activation code
• Detailed description of install environment
• Exact text of any error message received

Technical Support
17-5
Sending Suspicious Content to Trend MicroSeveral options are available for sending suspicious content to Trend Micro for furtheranalysis.
File Reputation Services
Gather system information and submit suspicious file content to Trend Micro:
http://esupport.trendmicro.com/solution/en-us/1059565.aspx
Record the case number for tracking purposes.
Email Reputation Services
Query the reputation of a specific IP address and nominate a message transfer agent forinclusion in the global approved list:
https://ers.trendmicro.com/
Refer to the following Knowledge Base entry to send message samples to Trend Micro:
http://esupport.trendmicro.com/solution/en-us/1055473.aspx
Web Reputation Services
Query the safety rating and content type of a URL suspected of being a phishing site, orother so-called "disease vector" (the intentional source of Internet threats such asspyware and malware):
http://global.sitesafety.trendmicro.com/
If the assigned rating is incorrect, send a re-classification request to Trend Micro.

OfficeScan™ 11.0 Administrator’s Guide
17-6
Other ResourcesIn addition to solutions and support, there are many other helpful resources availableonline to stay up to date, learn about innovations, and be aware of the latest securitytrends.
TrendEdgeFind information about unsupported, innovative techniques, tools, and best practicesfor Trend Micro products and services. The TrendEdge database contains numerousdocuments covering a wide range of topics for Trend Micro partners, employees, andother interested parties.
See the latest information added to TrendEdge at:
http://trendedge.trendmicro.com/
Download CenterFrom time to time, Trend Micro may release a patch for a reported known issue or anupgrade that applies to a specific product or service. To find out whether any patchesare available, go to:
http://www.trendmicro.com/download/
If a patch has not been applied (patches are dated), open the Readme file to determinewhether it is relevant to your environment. The Readme file also contains installationinstructions.
TrendLabsTrendLabs℠ is a global network of research, development, and action centers committedto 24x7 threat surveillance, attack prevention, and timely and seamless solutions delivery.Serving as the backbone of the Trend Micro service infrastructure, TrendLabs is staffedby a team of several hundred engineers and certified support personnel that provide awide range of product and technical support services.
Technical Support
17-7
TrendLabs monitors the worldwide threat landscape to deliver effective securitymeasures designed to detect, preempt, and eliminate attacks. The daily culmination ofthese efforts is shared with customers through frequent virus pattern file updates andscan engine refinements.
Learn more about TrendLabs at:
http://cloudsecurity.trendmicro.com/us/technology-innovation/experts/index.html#trendlabs


AppendicesAppendices


A-1
Appendix A
IPv6 Support in OfficeScanThis appendix is required reading for users who plan to deploy OfficeScan in anenvironment that supports IPv6 addressing. This appendix contains information on theextent of IPv6 support in OfficeScan.
Trend Micro assumes that the reader is familiar with IPv6 concepts and the tasksinvolved in setting up a network that supports IPv6 addressing.

OfficeScan™ 11.0 Administrator’s Guide
A-2
IPv6 Support for OfficeScan Server and AgentsIPv6 support for OfficeScan started in this version 10.6. Earlier OfficeScan versions donot support IPv6 addressing. IPv6 support is automatically enabled after installing orupgrading the OfficeScan server and OfficeScan agents that satisfy the IPv6requirements.
OfficeScan Server RequirementsThe IPv6 requirements for the OfficeScan server are as follows:
• The server must be installed on Windows Server 2008 or Windows Server 2012. Itcannot be installed on Windows Server 2003 because this operating system onlysupports IPv6 addressing partially.
• The server must use an IIS web server. Apache web server does not support IPv6addressing.
• If the server will manage IPv4 and IPv6 OfficeScan agents, it must have both IPv4and IPv6 addresses and must be identified by its host name. If a server is identifiedby its IPv4 address, IPv6 OfficeScan agents cannot connect to the server. Thesame issue occurs if pure IPv4 agents connect to a server identified by its IPv6address.
• If the server will manage only IPv6 agents, the minimum requirement is an IPv6address. The server can be identified by its host name or IPv6 address. When theserver is identified by its host name, it is preferable to use its Fully QualifiedDomain Name (FQDN). This is because in a pure IPv6 environment, a WINSserver cannot translate a host name to its corresponding IPv6 address.
NoteThe FQDN can only be specified when performing a local installation of the server.It is not supported on remote installations.
OfficeScan Agent RequirementsThe OfficeScan agent must be installed on:

IPv6 Support in OfficeScan
A-3
• Windows 7
• Windows Server 2008
• Windows Vista
• Windows 8
• Windows 8.1
• Windows Server 2012
It cannot be installed on Windows Server 2003 and Windows XP because theseoperating systems only support IPv6 addressing partially.
It is preferable for the OfficeScan agent to have both IPv4 and IPv6 addresses as someof the entities to which it connects only support IPv4 addressing.
Pure IPv6 Server Limitations
The following table lists the limitations when the OfficeScan server only has an IPv6address.
TABLE A-1. Pure IPv6 Server Limitations
ITEM LIMITATION
Agentmanagement
A pure IPv6 server cannot:
• Deploy OfficeScan agents to pure IPv4 endpoints.
• Manage pure IPv4 OfficeScan agents.
Updates andcentralizedmanagement
A pure IPv6 server cannot update from pure IPv4 update sources,such as:
• Trend Micro ActiveUpdate Server
• Any pure IPv4 custom update source
Productregistration,activation, andrenewal
A pure IPv6 server cannot connect to the Trend Micro OnlineRegistration Server to register the product, obtain the license, andactivate/renew the license.
OfficeScan™ 11.0 Administrator’s Guide
A-4
ITEM LIMITATION
Proxy connection A pure IPv6 server cannot connect through a pure IPv4 proxy server.
Plug-in solutions A pure IPv6 server will have Plug-in Manager but will not be able todeploy any of the plug-in solutions to:
• Pure IPv4 OfficeScan agents or pure IPv4 hosts (because of theabsence of a direct connection)
• Pure IPv6 OfficeScan agents or pure IPv6 hosts because noneof the plug-in solutions support IPv6.
Most of these limitations can be overcome by setting up a dual-stack proxy server thatcan convert between IPv4 and IPv6 addresses (such as DeleGate). Position the proxyserver between the OfficeScan server and the entities to which it connects or the entitiesthat it serves.
Pure IPv6 OfficeScan Agent LimitationsThe following table lists the limitations when the OfficeScan agent only has an IPv6address.
TABLE A-2. Pure IPv6 OfficeScan agent Limitations
ITEM LIMITATION
Parent OfficeScanserver
Pure IPv6 OfficeScan agents cannot be managed by a pureIPv4 OfficeScan server.
Updates A pure IPv6 OfficeScan agent cannot update from pure IPv4update sources, such as:
• Trend Micro ActiveUpdate Server
• A pure IPv4 OfficeScan server
• A pure IPv4 Update Agent
• Any pure IPv4 custom update source

IPv6 Support in OfficeScan
A-5
ITEM LIMITATION
Scan queries, webreputation queries, andSmart Feedback
A pure IPv6 OfficeScan agent cannot send queries to smartprotection sources, such as:
• Smart Protection Server 2.0 (integrated or standalone)
NoteIPv6 support for Smart Protection Server starts inversion 2.5.
• Trend Micro Smart Protection Network (also for SmartFeedback)
Software safety Pure IPv6 OfficeScan agents cannot connect to the TrendMicro-hosted Certified Safe Software Service.
Plug-in solutions Pure IPv6 OfficeScan agents cannot install plug-in solutionsbecause none of the plug-in solutions support IPv6.
Proxy connection A pure IPv6 OfficeScan agent cannot connect through a pureIPv4 proxy server.
Most of these limitations can be overcome by setting up a dual-stack proxy server thatcan convert between IPv4 and IPv6 addresses (such as DeleGate). Position the proxyserver between the OfficeScan agents and the entities to which they connect.
Configuring IPv6 AddressesThe web console allows you to configure an IPv6 address or an IPv6 address range. Thefollowing are some configuration guidelines.
• OfficeScan accepts standard IPv6 address presentations.
For example:
2001:0db7:85a3:0000:0000:8a2e:0370:7334
2001:db7:85a3:0:0:8a2e:370:7334
2001:db7:85a3::8a2e:370:7334

OfficeScan™ 11.0 Administrator’s Guide
A-6
::ffff:192.0.2.128
• OfficeScan also accepts link-local IPv6 addresses, such as:
fe80::210:5aff:feaa:20a2
WARNING!
Exercise caution when specifying a link-local IPv6 address because even thoughOfficeScan can accept the address, it might not work as expected under certaincircumstances. For example, OfficeScan agents cannot update from an update sourceif the source is on another network segment and is identified by its link-local IPv6address.
• When the IPv6 address is part of a URL, enclose the address in square brackets ([]).
• For IPv6 address ranges, a prefix and prefix length are usually required. Forconfigurations that require the server to query IP addresses, prefix lengthrestrictions apply to prevent performance issues that may occur when the serverqueries a significant number of IP addresses. For example, for the Outside ServerManagement feature, the prefix length can only be between 112 (65,536 IPaddresses) and 128 (2 IP addresses).
• Some settings that involve IPv6 addresses or address ranges will be deployed toOfficeScan agents but OfficeScan agents will ignore them. For example, if youconfigured the smart protection source list and included a Smart Protection Serveridentified by its IPv6 address, pure IPv4 OfficeScan agents will ignore the serverand connect to the other smart protection sources.
Screens That Display IP AddressesThis topic enumerates places in the web console where IP addresses are shown.
• Agent Tree
Whenever the agent tree displays, the IPv6 addresses of pure IPv6 OfficeScanagents display under the IP address column. For dual-stack OfficeScan agents,their IPv6 addresses display if they used their IPv6 address to register to the server.
IPv6 Support in OfficeScan
A-7
Note
The IP address that dual-stack OfficeScan agents use when registering to the servercan be controlled from Agents > Global Agent Settings > Preferred IP Address.
When you export agent tree settings to a file, the IPv6 addresses also display in theexported file.
• Agent Status
Detailed agent information is available when you go to Agents > AgentManagement > Status. In this screen, you will see the IPv6 addresses of pureIPv6 OfficeScan agents and dual-stack OfficeScan agents that used their IPv6addresses to register to the server.
• Logs
The IPv6 addresses of dual-stack and pure IPv6 OfficeScan agents display on thefollowing logs:
• Virus/Malware logs
• Spyware/Grayware logs
• Firewall logs
• Connection verification logs
• Control Manager Console
The following table lists which of the OfficeScan server and OfficeScan agents’ IPaddresses display on the Control Manager console.
TABLE A-3. OfficeScan Server and OfficeScan agent IP Addresses that Displayon the Control Manager Console
OFFICESCANCONTROL MANAGERVERSION
5.5 SP1 5.5 5.0
Dual-stack server IPv4 and IPv6 IPv4 IPv4
Pure IPv4 server IPv4 IPv4 IPv4

OfficeScan™ 11.0 Administrator’s Guide
A-8
OFFICESCANCONTROL MANAGERVERSION
5.5 SP1 5.5 5.0
Pure IPv6 server IPv6 Not supported Not supported
Dual-stackOfficeScan agent
The IP addressused when theOfficeScan agentregistered to theOfficeScan server
The IP addressused when theOfficeScan agentregistered to theOfficeScan server
The IP addressused when theOfficeScan agentregistered to theOfficeScan server
Pure IPv4OfficeScan agent
IPv4 IPv4 IPv4
Pure IPv6OfficeScan agent
IPv6 IPv6 IPv6
B-1
Appendix B
Windows Server Core 2008/2012Support
This appendix discusses OfficeScan support for Windows Server Core 2008/2012.

OfficeScan™ 11.0 Administrator’s Guide
B-2
Windows Server Core 2008/2012 SupportWindows Server Core 2008/2012 are "minimal" installations of Windows Server2008/2012. In a Server Core:
• Many of the Windows Server 2008/2012 options and features are removed.
• The server runs a much thinner core operating system.
• Tasks are performed mostly from the command line interface.
• The operating system runs fewer services and requires less resources duringstartup.
The OfficeScan agent supports Server Core. This section contains information on theextent of support for Server Core.
The OfficeScan server does not support Server Core.
Installation Methods for Windows Server CoreThe following installation methods are not or are partially supported:
• Web install page: This method is not supported because Server Core does not haveInternet Explorer.
• Trend Micro Vulnerability Scanner: The Vulnerability Scanner tool cannot be runlocally on the Server Core. Run the tool from the OfficeScan server or anotherendpoint.
The following installation methods are supported:
• Remote installation. For details, see Installing Remotely from the OfficeScan Web Consoleon page 5-19.
• Login Script Setup
• Agent Packager

Windows Server Core 2008/2012 Support
B-3
Installing the OfficeScan Agent Using Login Script Setup
Procedure
1. Open a command prompt.
2. Map the location of AutoPcc.exe file by typing the following command:
net use <mapped drive letter> \\<OfficeScan server hostname or IP address>\ofcscan
For example:
net use P: \\10.1.1.1\ofcscan
A message appears, informing you if the location of AutoPcc.exe was mappedsuccessfully.
3. Change to the location of AutoPcc.exe by typing the mapped drive letter and acolon. For example:
P:
4. Type the following to launch the installation:
AutoPcc.exe

OfficeScan™ 11.0 Administrator’s Guide
B-4
The following image shows the commands and results on the command prompt.
FIGURE B-1. Command prompt showing how to install the OfficeScan agentusing Login Script Setup
Installing the OfficeScan Agent Using the OfficeScanAgent Package
Procedure
1. Create the package.
For details, see Installing with Agent Packager on page 5-24.
2. Open a command prompt.
3. Map the location of the OfficeScan agent package by typing the followingcommand:
net use <mapped drive letter> \\<Location of the agentpackage>
For example:

Windows Server Core 2008/2012 Support
B-5
net use P: \\10.1.1.1\Package
A message appears, informing you if the location of the OfficeScan agent packagewas mapped successfully.
4. Change to the location of the OfficeScan agent package by typing the mappeddrive letter and a colon. For example:
P:
5. Copy the OfficeScan agent package to a local directory on the Server Coreendpoint by typing the following command:
copy <package file name> <directory on the Server Coreendpoint where you want to copy the package>
For example:
copy officescan.msi C:\Client Package
A message appears, informing you if the OfficeScan agent package was copiedsuccessfully.
6. Change to the local directory. For example:
C:
cd C:\Client Package
7. Type the package file name to launch the installation. For example:
officescan.msi
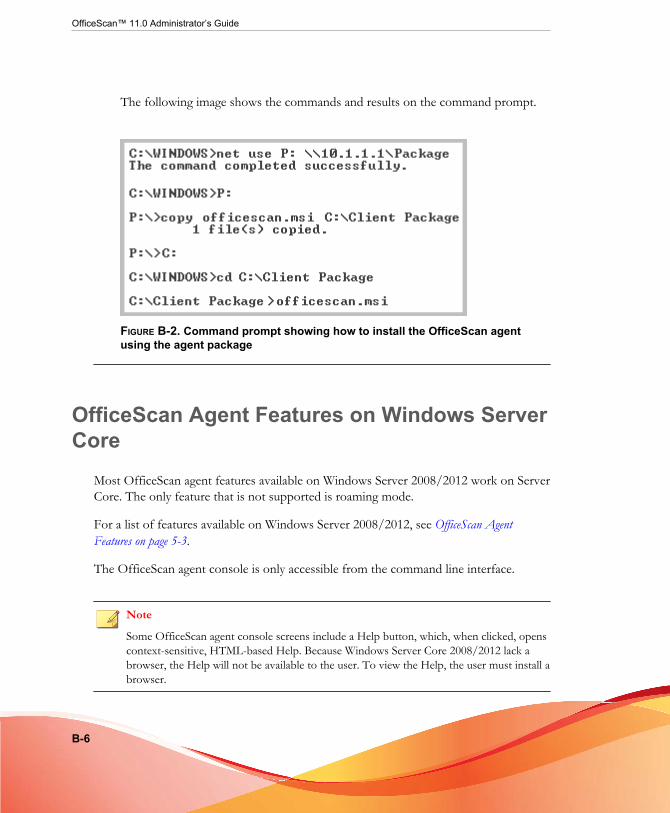
OfficeScan™ 11.0 Administrator’s Guide
B-6
The following image shows the commands and results on the command prompt.
FIGURE B-2. Command prompt showing how to install the OfficeScan agentusing the agent package
OfficeScan Agent Features on Windows ServerCore
Most OfficeScan agent features available on Windows Server 2008/2012 work on ServerCore. The only feature that is not supported is roaming mode.
For a list of features available on Windows Server 2008/2012, see OfficeScan AgentFeatures on page 5-3.
The OfficeScan agent console is only accessible from the command line interface.
Note
Some OfficeScan agent console screens include a Help button, which, when clicked, openscontext-sensitive, HTML-based Help. Because Windows Server Core 2008/2012 lack abrowser, the Help will not be available to the user. To view the Help, the user must install abrowser.
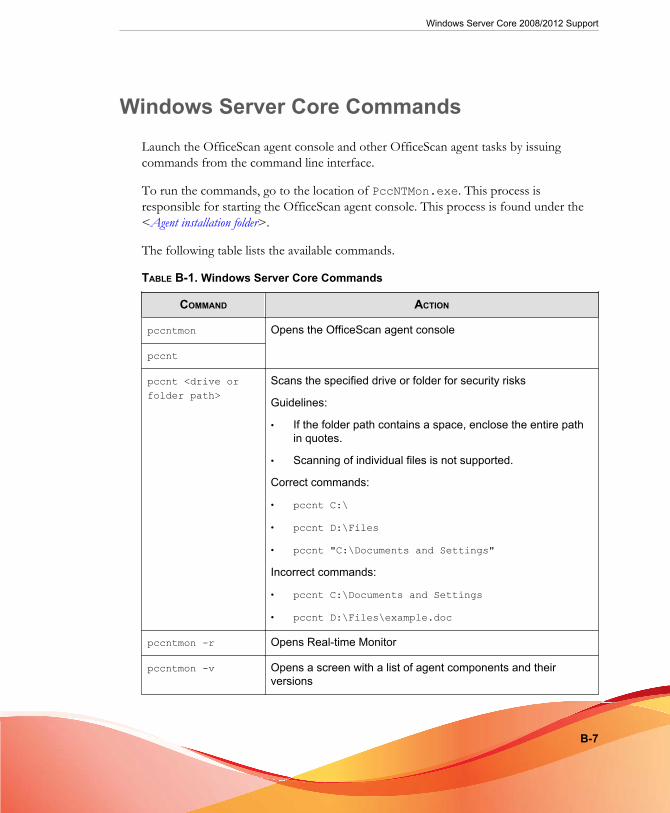
Windows Server Core 2008/2012 Support
B-7
Windows Server Core CommandsLaunch the OfficeScan agent console and other OfficeScan agent tasks by issuingcommands from the command line interface.
To run the commands, go to the location of PccNTMon.exe. This process isresponsible for starting the OfficeScan agent console. This process is found under the<Agent installation folder>.
The following table lists the available commands.
TABLE B-1. Windows Server Core Commands
COMMAND ACTION
pccntmon Opens the OfficeScan agent console
pccnt
pccnt <drive orfolder path>
Scans the specified drive or folder for security risks
Guidelines:
• If the folder path contains a space, enclose the entire pathin quotes.
• Scanning of individual files is not supported.
Correct commands:
• pccnt C:\
• pccnt D:\Files
• pccnt "C:\Documents and Settings"
Incorrect commands:
• pccnt C:\Documents and Settings
• pccnt D:\Files\example.doc
pccntmon -r Opens Real-time Monitor
pccntmon -v Opens a screen with a list of agent components and theirversions
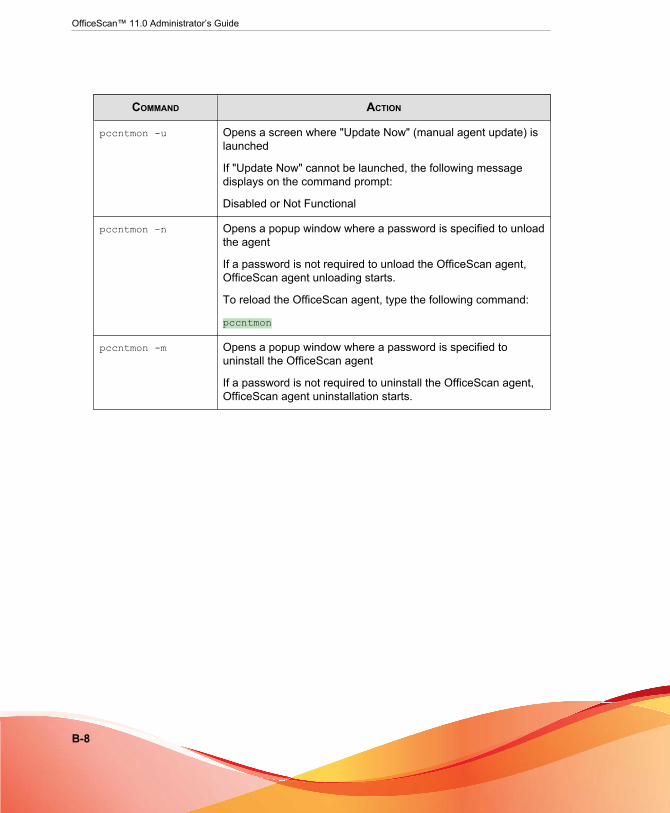
OfficeScan™ 11.0 Administrator’s Guide
B-8
COMMAND ACTION
pccntmon -u Opens a screen where "Update Now" (manual agent update) islaunched
If "Update Now" cannot be launched, the following messagedisplays on the command prompt:
Disabled or Not Functional
pccntmon -n Opens a popup window where a password is specified to unloadthe agent
If a password is not required to unload the OfficeScan agent,OfficeScan agent unloading starts.
To reload the OfficeScan agent, type the following command:
pccntmon
pccntmon -m Opens a popup window where a password is specified touninstall the OfficeScan agent
If a password is not required to uninstall the OfficeScan agent,OfficeScan agent uninstallation starts.

Windows Server Core 2008/2012 Support
B-9
COMMAND ACTION
pccntmon -c Shows the following information in the command line:
• Scan method
• Smart scan
• Conventional scan
• Pattern status
• Updated
• Outdated
• Real-time scan service
• Functional
• Disabled or Not Functional
• Agent connection status
• Online
• Roaming
• Offline
• Web Reputation Services
• Available
• Reconnecting
• File Reputation Services
• Available
• Reconnecting
pccntmon -h Shows all the available commands


C-1
Appendix C
Windows 8/8.1 and Windows Server2012 Support
This appendix discusses OfficeScan support for Windows 8/8.1 and Windows Server2012.

OfficeScan™ 11.0 Administrator’s Guide
C-2
About Windows 8/8.1 and Windows Server2012
Windows 8/8.1 and Windows Server 2012 provide users with two types of operatingmodes: desktop mode and Windows UI mode. The desktop mode is similar to theclassic Windows Start screen.
The Windows UI provides users with a new user interface experience similar to thatused on Windows phones. New features include a scrolling touch screen interface, tiles,and toast notifications.
TABLE C-1. Tiles and Toast Notifications
CONTROL DESCRIPTION
Tiles Tiles are similar to the desktop icons used in previousWindows releases. Users click or tap on a tile to launch theapplication associated with the tile.
Live tiles provide users application-specific information thatdynamically updates. Applications can post information to tileseven when the application is not running
Toast notifications Toast notifications are similar to a popup message. Thesenotifications provide time-sensitive information about eventsthat occur while an application is running. Toast notificationsappear in the foreground whether Windows is currently indesktop mode, displaying the lock screen, or running anotherapplication.
NoteDepending on the application, toast notifications maynot appear on all screens or in each mode.
OfficeScan in Windows UI Mode
The following table describes how OfficeScan supports the tiles and toast notificationsin Windows UI mode.

Windows 8/8.1 and Windows Server 2012 Support
C-3
TABLE C-2. OfficeScan Support for Tiles and Toast Notifications
CONTROL OFFICESCAN SUPPORT
Tiles OfficeScan provides users with a tile that links to theOfficeScan agent program. When users click the tile, Windowsswitches to desktop mode and the OfficeScan agent programdisplays.
NoteOfficeScan does not support live tiles.
Toast notifications OfficeScan provides the following toast notifications:
• Suspicious Program Detected
• Scheduled Scan
• Threat Resolved
• Computer Restart Required
• USB Storage Device Detected
• Outbreak Detected
NoteOfficeScan only displays toast notifications in WindowsUI mode.
Enabling Toast NotificationsUsers can choose to receive toast notifications by modifying PC Settings on theOfficeScan agent endpoint. OfficeScan requires that users enable toast notifications.
Procedure
1. Move the mouse pointer to the bottom right corner of the screen to display theCharms bar.
2. Click Settings > Change PC Settings.

OfficeScan™ 11.0 Administrator’s Guide
C-4
The PC settings screen appears.
3. Click Notifications.
4. Under the Notifications section, set the following settings to On:
• Show app notifications
• Show app notifications on the lock screen (optional)
• Play notification sounds (optional)
Internet Explorer 10/11Internet Explorer (IE) 10 is the default browser in Windows 8/8.1 and Windows Server2012. Internet Explorer 10 and later comes in two different versions: one for theWindows UI and one for the desktop mode.
Internet Explorer 10 and later for the Windows UI provide a plug-in free browsingexperience. Plug-in programs for web browsing previously followed no set standardsand consequently, the quality of the code employed by these plug-in programs isvariable. Plug-ins also require the use of more system resources and increase the risk ofmalware infection.
Microsoft has developed Internet Explorer 10 and later for the Windows UI to follownew standards-based technologies to replace the previously used plug-in solutions. Thefollowing table lists the technologies that Internet Explorer 10 and later use instead ofolder plug-in technology.
TABLE C-3. Comparison of Standards-based Technologies to Plug-in Programs
CAPABILITYWORLD WIDE WEB (W3C)
STANDARD TECHNOLOGYEXAMPLE PLUG-IN
EQUIVALENTS
Video and audio HTML5 video and audio • Flash
• Apple QuickTime
• Silverlight

Windows 8/8.1 and Windows Server 2012 Support
C-5
CAPABILITYWORLD WIDE WEB (W3C)
STANDARD TECHNOLOGYEXAMPLE PLUG-IN
EQUIVALENTS
Graphics • HTML5 canvas
• Scalable VectorGraphics (SVG)
• Cascading StyleSheets, Level 3 (CSS3)Transitions andAnimations
• CSS Transforms
• Flash
• Apple QuickTime
• Silverlight
• Java applets
Offline storage • Web storage
• File API
• IndexedDB
• Application cache API
• Flash
• Java applets
• Google Gears
Network communication,resource sharing, fileuploading
• HTML Web Messaging
• Cross-origin resourcesharing (CORS)
• Flash
• Java applets
Microsoft has also developed a plug-in compatible Internet Explorer 10 and laterversion solely for the desktop mode. If users in Windows UI mode encounter a websitethat requires the use of additional plug-in programs, a notification displays in InternetExplorer 10 and later prompting users to switch to desktop mode. Once in desktopmode, users can view websites requiring the use or installation of third-party plug-inprograms.
OfficeScan Feature Support in Internet Explorer 10/11The mode in which users operate Windows 8/8.1 or Windows Server 2012 affects theInternet Explorer 10 and later version used and hence the level of support that differentOfficeScan features provide. The following table lists the support level for differentOfficeScan features in desktop mode and Windows UI mode.
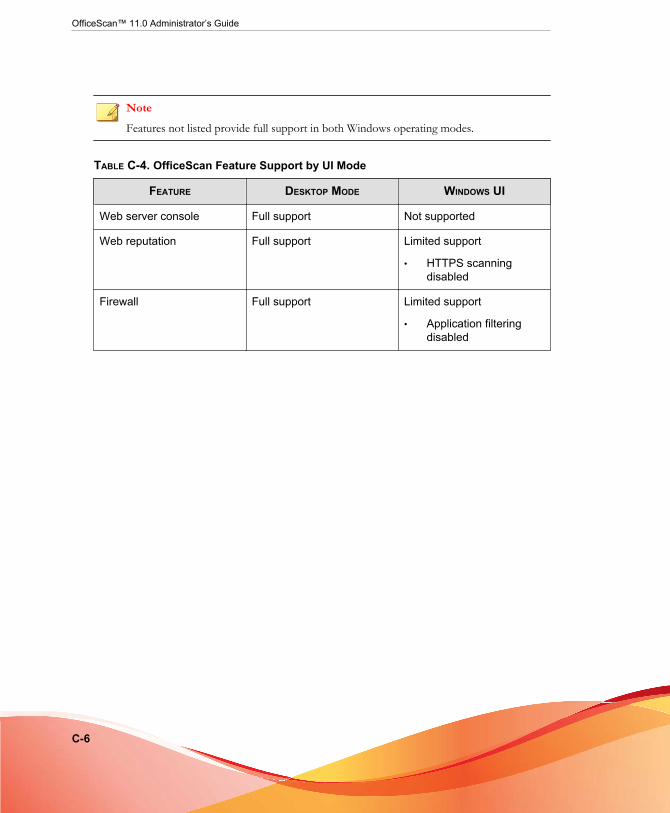
OfficeScan™ 11.0 Administrator’s Guide
C-6
NoteFeatures not listed provide full support in both Windows operating modes.
TABLE C-4. OfficeScan Feature Support by UI Mode
FEATURE DESKTOP MODE WINDOWS UI
Web server console Full support Not supported
Web reputation Full support Limited support
• HTTPS scanningdisabled
Firewall Full support Limited support
• Application filteringdisabled

D-1
Appendix D
OfficeScan RollbackThis appendix discusses OfficeScan server and agent rollback support.

OfficeScan™ 11.0 Administrator’s Guide
D-2
Rolling Back the OfficeScan Server andOfficeScan Agents
The OfficeScan rollback procedure involves rolling back OfficeScan agents and thenrolling back the OfficeScan server.
Important
• Administrators can only roll back the OfficeScan server and agents using thefollowing procedure if the administrator chose to back up the server during theinstallation process. If the server backup files are not available, refer to the previouslyinstalled OfficeScan version's Installation and Upgrade Guide for manual rollbackprocedures.
• This version of OfficeScan only supports rollbacks to the following OfficeScanversions:
• OfficeScan 10.6 (including all Service Pack versions)
• OfficeScan 10.5
• OfficeScan 10.0
Rolling Back the OfficeScan AgentsOfficeScan can only rollback OfficeScan agents to the same version of the server beingrestored. You cannot rollback OfficeScan agents to an older version than the server.
ImportantEnsure that you roll back OfficeScan agents before rolling back the OfficeScan server.
Procedure
1. Ensure that OfficeScan agents can upgrade the agent program.
a. On the OfficeScan 11.0 web console, go to Agents > Agent Management.
b. Select the OfficeScan agents to be rolled back.

OfficeScan Rollback
D-3
c. Click the Settings > Privileges and Other Settings > Other Settings tab.
d. Enable the OfficeScan agents can update components but not upgradethe agent program or deploy hot fixes option.
2. On the OfficeScan 11.0 web console, go to Updates > Agents > Update Source.
3. Select Customized Update Source.
4. On the Customized Update Source List, click Add.
A new screen opens.
5. Type the IP addresses of the OfficeScan agents to be rolled back.
6. Type the update source URL.
For example, type:
http://<IP address of the OfficeScan server>:<port>/OfficeScan/download/Rollback
7. Click Save.
8. Click Notify All Agents.
When the OfficeScan agent to be rolled back updates from the update source, theOfficeScan agent is uninstalled and the previous OfficeScan agent version isinstalled.
Tip
Administrators can speed up the rollback process by initiating a Manual Update onOfficeScan agents. For details, see Updating OfficeScan Agents Manually on page 6-43.
9. After the previous OfficeScan agent version is installed, inform the user to restartthe computer.
After the rollback process is complete, the OfficeScan agent continues to report tothe same OfficeScan server.

OfficeScan™ 11.0 Administrator’s Guide
D-4
Note
After rolling back the OfficeScan agent, all components, including the Virus Pattern,also roll back to the previous version. If administrators do not roll back theOfficeScan server, the rolled-back OfficeScan agent cannot update components.Administrators must change the update source of the rolled-back OfficeScan agent tothe standard update source to receive further component updates.
Rolling Back the OfficeScan Server
The rollback procedure for the OfficeScan server requires that administrators manuallystop Windows services, update the system registry, and replace OfficeScan server files inthe OfficeScan installation directory.
Important
Ensure that you roll back OfficeScan agents before rolling back the OfficeScan server.
Procedure
1. On the OfficeScan server computer, stop the following services:
• Intrusion Defense Firewall (if installed)
• Trend Micro Local Web Classification Server
• Trend Micro Smart Scan Server
• OfficeScan Active Directory Integration Service
• OfficeScan Control Manager Agent
• OfficeScan Plug-in Manager
• OfficeScan Master Service
• Apache 2 (if using the Apache web server)
• World Wide Web Publishing Service (if using the IIS web server)

OfficeScan Rollback
D-5
2. Copy and replace all files and directories from the <Server installation folder>\PCCSRV\Download\Rollback\ directory to the <Server installation folder>\PCCSRV\Download\ directory.
3. Click Start, type regedit, and press ENTER.
The Registry Editor screen appears.
4. In the left navigation pane, select the one of the following registry keys:
• For 32-bit systems: HKEY_LOCAL_MACHINE\SOFTWARE\TrendMicro\OfficeScan\service
• For 64-bit systems: HKEY_LOCAL_MACHINE\SOFTWARE\Wow6432Node\TrendMicro\Officescan\service
5. Go to File > Import....
6. Select the .reg file located in the <Server installation folder>\PCCSRV\Download\Rollback\ directory.
7. Click Yes to restore all of the previous OfficeScan version keys.
8. Open a command line editor (click Start and type cmd.exe) and type thefollowing commands to reset the Local Web Classification Server performancecounter:
cd <Server installation folder>\PCCSRV\LWCS
regsvr32.exe /u /s perfLWCSPerfMonMgr.dll
regsvr32.exe /s perfLWCSPerfMonMgr.dll
9. Restart the following services:
• Intrusion Defense Firewall (if installed)
• Trend Micro Local Web Classification Server
• Trend Micro Smart Scan Server
• OfficeScan Active Directory Integration Service
• OfficeScan Control Manager Agent

OfficeScan™ 11.0 Administrator’s Guide
D-6
• OfficeScan Plug-in Manager
• OfficeScan Master Service
• Apache 2 (if using the Apache web server)
• World Wide Web Publishing Service (if using the IIS web server)
10. Clean the Internet Explorer cache and remove ActiveX controls manually. Fordetails on removing ActiveX controls in Internet Explorer 9, see http://windows.microsoft.com/en-us/internet-explorer/manage-add-ons#ie=ie-9.
The OfficeScan server has been restored to the previously installed version.
TipAdministrators can confirm a successful rollback by checking the OfficeScan versionnumber on the About screen (Help > About).
11. After confirming that OfficeScan rolled back successfully, delete all files in the<Server_installation_folder>\PCCSRV\Download\Rollback\directory.

E-1
Appendix E
GlossaryThe terms contained in this glossary provide further information about commonlyreferenced endpoint terms, as well as Trend Micro products and technologies.

OfficeScan™ 11.0 Administrator’s Guide
E-2
ActiveUpdateActiveUpdate is a function common to many Trend Micro products. Connected to theTrend Micro update website, ActiveUpdate provides up-to-date downloads of patternfiles, scan engines, programs, and other Trend Micro component files through theInternet.
Compressed FileA single file containing one or more separate files plus information for extraction by asuitable program, such as WinZip.
CookieA mechanism for storing information about an Internet user, such as name, preferences,and interests, which is stored in the web browser for later use. The next time you accessa website for which your browser has a cookie, the browser sends the cookie to the webserver, which the web server can then use to present you with customized web pages.For example, you might enter a website that welcomes you by name.
Denial of Service AttackA Denial of Service (DoS) attack refers to an attack on the endpoint or network thatcauses a loss of "service", namely a network connection. Typically, DoS attacksnegatively affect network bandwidth or overload system resources such as theendpoint’s memory.
DHCPDynamic Host control Protocol (DHCP) is a protocol for assigning dynamic IPaddresses to devices in a network. With dynamic addressing, a device can have a

Glossary
E-3
different IP address every time it connects to the network. In some systems, the device’sIP address can even change while it is still connected. DHCP also supports a mix ofstatic and dynamic IP addresses.
DNSDomain Name system (DNS) is a general-purpose data query service chiefly used in theInternet for translating host names into IP addresses.
When a DNS agent requests host name and address data from a DNS server, theprocess is called resolution. Basic DNS configuration results in a server that performsdefault resolution. For example, a remote server queries another server for data in amachine in the current zone. Agent software in the remote server queries the resolver,which answers the request from its database files.
Domain NameThe full name of a system, consisting of its local host name and its domain name, forexample, tellsitall.com. A domain name should be sufficient to determine aunique Internet address for any host on the Internet. This process, called "nameresolution", uses the Domain Name System (DNS).
Dynamic IP AddressA Dynamic IP address is an IP address assigned by a DHCP server. The MAC addressof the endpoint will remain the same, however, the DHCP server may assign a new IPaddress to the endpoint depending on availability.

OfficeScan™ 11.0 Administrator’s Guide
E-4
ESMTPEnhanced Simple Mail Transport Protocol (ESMTP) includes security, authenticationand other devices to save bandwidth and protect servers.
End User License AgreementAn End User License Agreement or EULA is a legal contract between a softwarepublisher and the software user. It typically outlines restrictions on the side of the user,who can refuse to enter into the agreement by not clicking "I accept" during installation.Clicking "I do not accept" will, of course, end the installation of the software product.
Many users inadvertently agree to the installation of spyware and other types of graywareinto their computers when they click "I accept" on EULA prompts displayed during theinstallation of certain free software.
False PositiveA false positive occurs when a file is incorrectly detected by security software asinfected.
FTPFile Transfer Protocol (FTP) is a standard protocol used for transporting files from aserver to a client over the Internet. Refer to Network Working Group RFC 959 formore information.
GeneriCleanGeneriClean, also known as referential cleaning, is a new technology for cleaningviruses/malware even without the availability of virus cleanup components. Using a
Glossary
E-5
detected file as basis, GeneriClean determines if the detected file has a correspondingprocess/service in memory and a registry entry, and then removes them altogether.
Hot FixA hot fix is a workaround or solution to a single customer-reported issue. Hot fixes areissue-specific, and therefore not released to all customers. Windows hot fixes include aSetup program, while non-Windows hot fixes do not (typically you need to stop theprogram daemons, copy the file to overwrite its counterpart in your installation, andrestart the daemons).
By default, the OfficeScan agents can install hot fixes. If you do not want OfficeScanagents to install hot fixes, change agent update settings in the web console by going toAgents > Agent Management, click Settings > Privileges and Other Settings >Other Settings tab.
If you unsuccessfully attempt to deploy a hot fix on the OfficeScan server, use theTouch Tool to change the time stamp of the hot fix. This causes OfficeScan to interpretthe hot fix file as new, which makes the server attempt to automatically deploy the hotfix again. For details about this tool, see Running the Touch Tool for OfficeScan Agent HotFixes on page 6-51.
HTTPHypertext Transfer Protocol (HTTP) is a standard protocol used for transporting webpages (including graphics and multimedia content) from a server to a client over theInternet.
HTTPSHypertext Transfer Protocol using Secure Socket Layer (SSL). HTTPS is a variant ofHTTP used for handling secure transactions.

OfficeScan™ 11.0 Administrator’s Guide
E-6
ICMPOccasionally a gateway or destination host uses Internet Control Message Protocol(ICMP) to communicate with a source host, for example, to report an error in datagramprocessing. ICMP uses the basic support of IP as if it were a higher level protocol,however, ICMP is actually an integral part of IP, and implemented by every IP module.ICMP messages are sent in several situations: for example, when a datagram cannotreach its destination, when the gateway does not have the buffering capacity to forwarda datagram, and when the gateway can direct the host to send traffic on a shorter route.The Internet Protocol is not designed to be absolutely reliable. The purpose of thesecontrol messages is to provide feedback about problems in the communicationenvironment, not to make IP reliable.
IntelliScanIntelliScan is a method of identifying files to scan. For executable files (forexample, .exe), the true file type is determined based on the file content. For non-executable files (for example, .txt), the true file type is determined based on the fileheader.
Using IntelliScan provides the following benefits:
• Performance optimization: IntelliScan does not affect applications on the agentbecause it uses minimal system resources.
• Shorter scanning period: Because IntelliScan uses true file type identification, itonly scans files that are vulnerable to infection. The scan time is thereforesignificantly shorter than when you scan all files.
IntelliTrapVirus writers often attempt to circumvent virus filtering by using real-time compressionalgorithms. IntelliTrap helps reduce the risk of such viruses entering the network byblocking real-time compressed executable files and pairing them with other malwarecharacteristics. Because IntelliTrap identifies such files as security risks and may

Glossary
E-7
incorrectly block safe files, consider quarantining (not deleting or cleaning) files whenyou enable IntelliTrap. If users regularly exchange real-time compressed executable files,disable IntelliTrap.
IntelliTrap uses the following components:
• Virus Scan Engine
• IntelliTrap Pattern
• IntelliTrap Exception Pattern
IP"The internet protocol (IP) provides for transmitting blocks of data called datagramsfrom sources to destinations, where sources and destinations are hosts identified byfixed length addresses." (RFC 791)
Java FileJava is a general-purpose programming language developed by Sun Microsystems. AJava file contains Java code. Java supports programming for the Internet in the form ofplatform-independent Java "applets". An applet is a program written in Javaprogramming language that can be included in an HTML page. When you use a Java-technology enabled browser to view a page that contains an applet, the applet transfersits code to your endpoint and the browser’s Java Virtual Machine executes the applet.
LDAPLightweight Directory Access Protocol (LDAP) is an application protocol for queryingand modifying directory services running over TCP/IP.

OfficeScan™ 11.0 Administrator’s Guide
E-8
Listening PortA listening port is utilized for agent connection requests for data exchange.
MCP AgentTrend Micro Management Communication Protocol (MCP) is Trend Micro's nextgeneration agent for managed products. MCP replaces Trend Micro ManagementInfrastructure (TMI) as the way Control Manager communicates with OfficeScan. MCPhas several new features:
• Reduced network loading and package size
• NAT and firewall traversal support
• HTTPS support
• One-way and two-way communication support
• Single sign-on (SSO) support
• Cluster node support
Mixed Threat AttackMixed threat attacks take advantage of multiple entry points and vulnerabilities inenterprise networks, such as the “Nimda” or “Code Red” threats.
NATNetwork Address Translation (NAT) is a standard for translating secure IP addresses totemporary, external, registered IP address from the address pool. This allows trustednetworks with privately assigned IP addresses to have access to the Internet. This also

Glossary
E-9
means that you do not have to get a registered IP address for every machine in thenetwork.
NetBIOSNetwork Basic Input Output System (NetBIOS) is an application program interface(API) that adds functionality such as network capabilities to disk operating system(DOS) basic input/output system (BIOS).
One-way CommunicationNAT traversal has become an increasingly more significant issue in the current real-world network environment. To address this issue, MCP uses one-way communication.One-way communication has the MCP agent initiating the connection to, and polling ofcommands from, the server. Each request is a CGI-like command query or logtransmission. To reduce the network impact, the MCP agent keeps connection alive andopen as much as possible. A subsequent request uses an existing open connection. If theconnection breaks, all SSL connections to the same host benefit from session ID cachethat drastically reduces re-connection time.
PatchA patch is a group of hot fixes and security patches that solve multiple program issues.Trend Micro makes patches available on a regular basis. Windows patches include aSetup program, while non-Windows patches commonly have a setup script.
Phish AttackPhish, or phishing, is a rapidly growing form of fraud that seeks to fool web users intodivulging private information by mimicking a legitimate website.
In a typical scenario, unsuspecting users get an urgent sounding (and authentic looking)email telling them there is a problem with their account that they must immediately fix

OfficeScan™ 11.0 Administrator’s Guide
E-10
to avoid account termination. The email will include a URL to a website that looksexactly like the real thing. It is simple to copy a legitimate email and a legitimate websitebut then change the so-called backend, which receives the collected data.
The email tells the user to log on to the site and confirm some account information. Ahacker receives data a user provides, such as a logon name, password, credit cardnumber, or social security number.
Phish fraud is fast, cheap, and easy to perpetuate. It is also potentially quite lucrative forthose criminals who practice it. Phish is hard for even computer-savvy users to detect.And it is hard for law enforcement to track down. Worse, it is almost impossible toprosecute.
Please report to Trend Micro any website you suspect to be a phishing site.
PingPing is a utility that sends an ICMP echo request to an IP address and waits for aresponse. The Ping utility can determine if the endpoint with the specified IP address isonline or not.
POP3Post Office Protocol 3 (POP3) is a standard protocol for storing and transporting emailmessages from a server to a client email application.
Proxy ServerA proxy server is a World Wide Web server which accepts URLs with a special prefix,used to fetch documents from either a local cache or a remote server, then returns theURL to the requester.

Glossary
E-11
RPCRemote procedure call (RPC) is a network protocol that allows a program running onone host to cause code to be executed on another host.
Security PatchA security patch focuses on security issues suitable for deployment to all customers.Windows security patches include a Setup program, while non-Windows patchescommonly have a setup script.
Service PackA service pack is a consolidation of hot fixes, patches, and feature enhancementssignificant enough to be a product upgrade. Both Windows and non-Windows servicepacks include a Setup program and setup script.
SMTPSimple Mail Transport Protocol (SMTP) is a standard protocol used to transport emailmessages from server to server, and agent to server, over the Internet.
SNMPSimple Network Management Protocol (SNMP) is a protocol that supports monitoringof devices attached to a network for conditions that merit administrative attention.

OfficeScan™ 11.0 Administrator’s Guide
E-12
SNMP TrapA Small Network Management Protocol (SNMP) trap is a method of sendingnotifications to network administrators that use management consoles that support thisprotocol.
OfficeScan can store notification in Management Information Bases (MIBs). You canuse the MIBs browser to view SNMP trap notification.
SOCKS 4SOCKS 4 is a TCP protocol used by proxy servers to establish a connection betweenagents on the internal network or LAN and endpoints or servers outside the LAN. TheSOCKS 4 protocol makes connection requests, sets up proxy circuits and relays data atthe Application layer of the OSI model.
SSLSecure Socket Layer (SSL) is a protocol designed by Netscape for providing data securitylayered between application protocols (such as HTTP, Telnet, or FTP) and TCP/IP.This security protocol provides data encryption, server authentication, message integrity,and optional agent authentication for a TCP/IP connection.
SSL CertificateThis digital certificate establishes secure HTTPS communication.
TCPTransmission Control Protocol (TCP) is a connection-oriented, end-to-end reliableprotocol designed to fit into a layered hierarchy of protocols that support multi-network
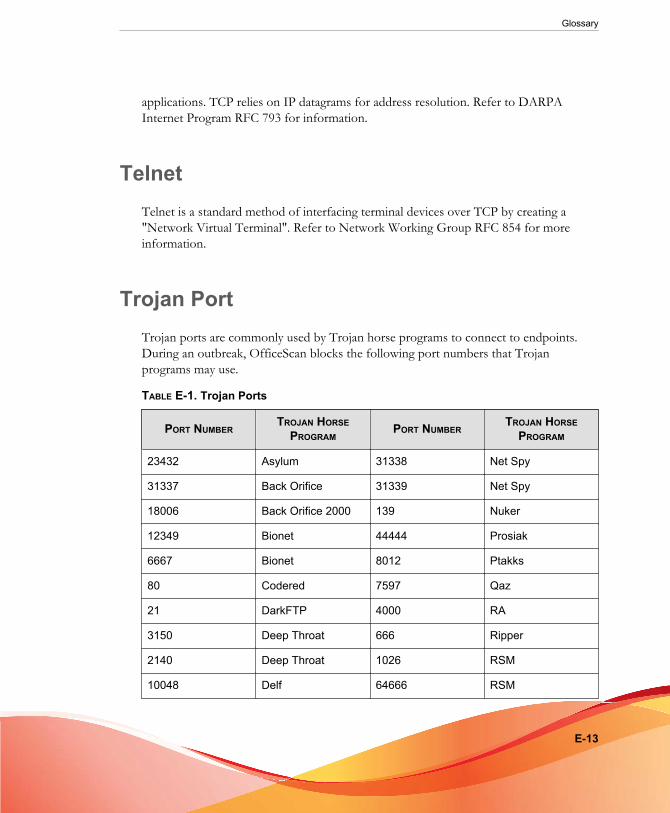
Glossary
E-13
applications. TCP relies on IP datagrams for address resolution. Refer to DARPAInternet Program RFC 793 for information.
TelnetTelnet is a standard method of interfacing terminal devices over TCP by creating a"Network Virtual Terminal". Refer to Network Working Group RFC 854 for moreinformation.
Trojan PortTrojan ports are commonly used by Trojan horse programs to connect to endpoints.During an outbreak, OfficeScan blocks the following port numbers that Trojanprograms may use.
TABLE E-1. Trojan Ports
PORT NUMBERTROJAN HORSE
PROGRAMPORT NUMBER
TROJAN HORSEPROGRAM
23432 Asylum 31338 Net Spy
31337 Back Orifice 31339 Net Spy
18006 Back Orifice 2000 139 Nuker
12349 Bionet 44444 Prosiak
6667 Bionet 8012 Ptakks
80 Codered 7597 Qaz
21 DarkFTP 4000 RA
3150 Deep Throat 666 Ripper
2140 Deep Throat 1026 RSM
10048 Delf 64666 RSM

OfficeScan™ 11.0 Administrator’s Guide
E-14
PORT NUMBERTROJAN HORSE
PROGRAMPORT NUMBER
TROJAN HORSEPROGRAM
23 EliteWrap 22222 Rux
6969 GateCrash 11000 Senna Spy
7626 Gdoor 113 Shiver
10100 Gift 1001 Silencer
21544 Girl Friend 3131 SubSari
7777 GodMsg 1243 Sub Seven
6267 GW Girl 6711 Sub Seven
25 Jesrto 6776 Sub Seven
25685 Moon Pie 27374 Sub Seven
68 Mspy 6400 Thing
1120 Net Bus 12345 Valvo line
7300 Net Spy 1234 Valvo line
Trusted PortThe server and the OfficeScan agent use trusted ports to communicate with each other.
If you block the trusted ports and then restore network settings to normal after anoutbreak, OfficeScan agents will not immediately resume communication with theserver. Agent-server communication will only be restored after the number of hours youhave specified in the Outbreak Prevention Settings screen elapses.
OfficeScan uses the HTTP port (by default, 8080) as the trusted port on the server.During installation, you may enter a different port number. To block this trusted portand the trusted port on the OfficeScan agent, select the Block trusted ports check boxon the Port Blocking screen.

Glossary
E-15
The master installer randomly generates the OfficeScan agent trusted port duringinstallation.
Determining the Trusted Ports
Procedure
1. Access <Server installation folder>\PCCSRV.
2. Open the ofcscan.ini file using a text editor such as Notepad.
3. For the server trusted port, search for the string "Master_DomainPort" and thencheck the value next to it.
For example, if the string appears as Master_DomainPort=80, this means thatthe trusted port on the server is port 80.
4. For the agent trusted port, search for the string "Client_LocalServer_Port" andthen check the value next to it.
For example, if the string appears as Client_LocalServer_Port=41375, thismeans that the trusted port on the agent is port 41375.
Two-way CommunicationTwo-way communication is an alternative to one-way communication. Based on one-way communication but with an extra HTTP-based channel that receives servernotifications, two-way communication can improve real time dispatching and processingof commands from the server by the MCP agent.
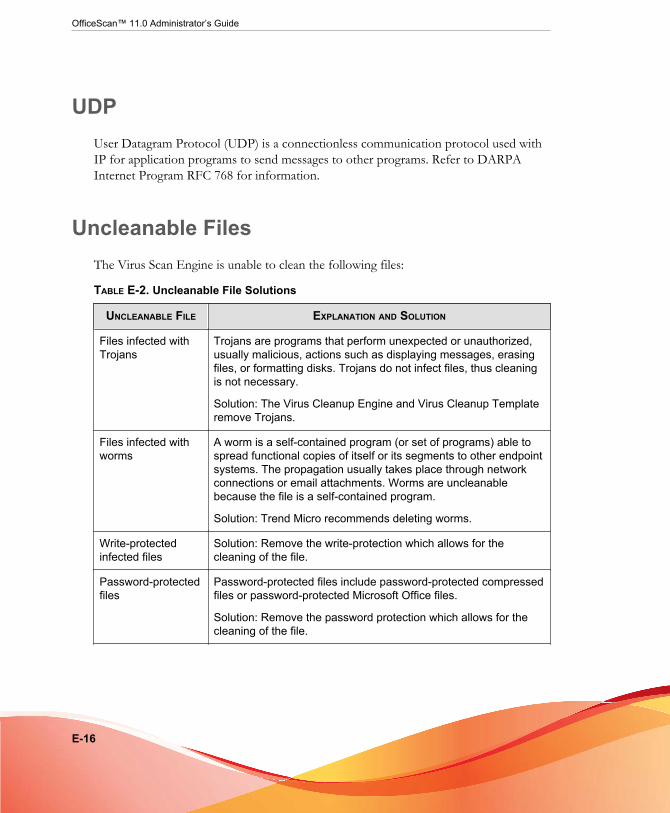
OfficeScan™ 11.0 Administrator’s Guide
E-16
UDPUser Datagram Protocol (UDP) is a connectionless communication protocol used withIP for application programs to send messages to other programs. Refer to DARPAInternet Program RFC 768 for information.
Uncleanable FilesThe Virus Scan Engine is unable to clean the following files:
TABLE E-2. Uncleanable File Solutions
UNCLEANABLE FILE EXPLANATION AND SOLUTION
Files infected withTrojans
Trojans are programs that perform unexpected or unauthorized,usually malicious, actions such as displaying messages, erasingfiles, or formatting disks. Trojans do not infect files, thus cleaningis not necessary.
Solution: The Virus Cleanup Engine and Virus Cleanup Templateremove Trojans.
Files infected withworms
A worm is a self-contained program (or set of programs) able tospread functional copies of itself or its segments to other endpointsystems. The propagation usually takes place through networkconnections or email attachments. Worms are uncleanablebecause the file is a self-contained program.
Solution: Trend Micro recommends deleting worms.
Write-protectedinfected files
Solution: Remove the write-protection which allows for thecleaning of the file.
Password-protectedfiles
Password-protected files include password-protected compressedfiles or password-protected Microsoft Office files.
Solution: Remove the password protection which allows for thecleaning of the file.

Glossary
E-17
UNCLEANABLE FILE EXPLANATION AND SOLUTION
Backup files Files with the RB0~RB9 extensions are backup copies of infectedfiles. The cleaning process creates a backup of the infected file incase the virus/malware damaged the file during the cleaningprocess.
Solution: If successfully cleaned, you do not need to keep thebackup copy of the infected file. If the endpoint functions normally,you can delete the backup file.
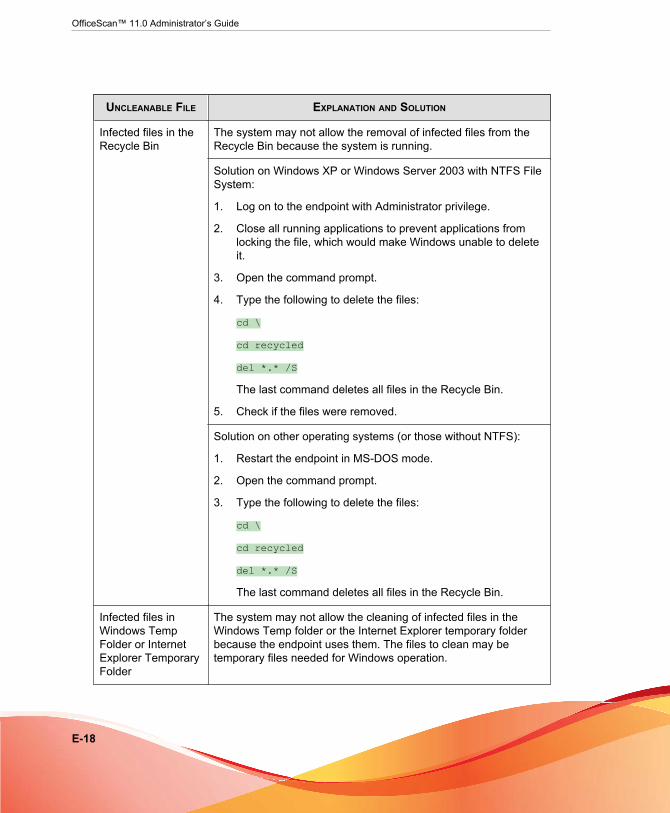
OfficeScan™ 11.0 Administrator’s Guide
E-18
UNCLEANABLE FILE EXPLANATION AND SOLUTION
Infected files in theRecycle Bin
The system may not allow the removal of infected files from theRecycle Bin because the system is running.
Solution on Windows XP or Windows Server 2003 with NTFS FileSystem:
1. Log on to the endpoint with Administrator privilege.
2. Close all running applications to prevent applications fromlocking the file, which would make Windows unable to deleteit.
3. Open the command prompt.
4. Type the following to delete the files:
cd \
cd recycled
del *.* /S
The last command deletes all files in the Recycle Bin.
5. Check if the files were removed.
Solution on other operating systems (or those without NTFS):
1. Restart the endpoint in MS-DOS mode.
2. Open the command prompt.
3. Type the following to delete the files:
cd \
cd recycled
del *.* /S
The last command deletes all files in the Recycle Bin.
Infected files inWindows TempFolder or InternetExplorer TemporaryFolder
The system may not allow the cleaning of infected files in theWindows Temp folder or the Internet Explorer temporary folderbecause the endpoint uses them. The files to clean may betemporary files needed for Windows operation.

Glossary
E-19
UNCLEANABLE FILE EXPLANATION AND SOLUTION
Solution on Windows XP or Windows Server 2003 with NTFS FileSystem:
1. Log on to the endpoint with Administrator privilege.
2. Close all running applications to prevent applications fromlocking the file, which would make Windows unable to deleteit.
3. If the infected file is in the Windows Temp folder:
a. Open the command prompt and go to the WindowsTemp folder (located at C:\Windows\Temp for WindowsXP or Windows Server 2003 endpoints by default).
b. Type the following to delete the files:
cd temp
attrib -h
del *.* /S
The last command deletes all files in the Windows Tempfolder.
4. If the infected file is in the Internet Explorer temporary folder:
a. Open a command prompt and go to the Internet ExplorerTemp folder (located in C:\Documents and Settings\<Your user name>\Local Settings\TemporaryInternet Files for Windows XP or Windows Server2003 endpoints by default).
b. Type the following to delete the files:
cd tempor~1
attrib -h
del *.* /S
The last command deletes all files in the InternetExplorer temporary folder.
c. Check if the files were removed.

OfficeScan™ 11.0 Administrator’s Guide
E-20
UNCLEANABLE FILE EXPLANATION AND SOLUTION
Solution on other operating systems (or those without NTFS):
1. Restart the endpoint in MS-DOS mode.
2. If the infected file is in the Windows Temp folder:
a. Open the command prompt and go to the WindowsTemp folder (located at C:\Windows\Temp for WindowsXP or Windows Server 2003 endpoints by default).
b. Type the following to delete the files:
cd temp
attrib -h
del *.* /S
The last command deletes all files in the Windows Tempfolder.
c. Restart the endpoint in normal mode.
3. If the infected file is in the Internet Explorer temporary folder:
a. Open a command prompt and go to the Internet ExplorerTemp folder (located in C:\Documents and Settings\<Your user name>\Local Settings\TemporaryInternet Files for Windows XP or Windows Server2003 endpoints by default).
b. Type the following to delete the files:
cd tempor~1
attrib -h
del *.* /S
The last command deletes all files in the InternetExplorer temporary folder.
c. Restart the endpoint in normal mode.

Glossary
E-21
UNCLEANABLE FILE EXPLANATION AND SOLUTION
Files compressedusing anunsupportedcompression format
Solution: Uncompress the files.
Locked files or filesthat are currentlyexecuting
Solution: Unlock the files or wait until the files have beenexecuted.
Corrupted files Solution: Delete the files.
Files Infected with TrojansTrojans are programs that perform unexpected or unauthorized, usually malicious,actions such as displaying messages, erasing files, or formatting disks. Trojans do notinfect files, thus cleaning is not necessary.
Solution: OfficeScan uses the Virus Cleanup Engine and Virus Cleanup Template toremove Trojans.
Files Infected with Worms
A worm is a self-contained program (or set of programs) able to spread functionalcopies of itself or its segments to other endpoint systems. The propagation usually takesplace through network connections or email attachments. Worms are uncleanablebecause the file is a self-contained program.
Solution: Trend Micro recommends deleting worms.
Write-protected Infected Files
Solution: Remove the write-protection to allow OfficeScan to clean the file.
OfficeScan™ 11.0 Administrator’s Guide
E-22
Password-protected Files
Includes password-protected compressed files or password-protected Microsoft Officefiles.
Solution: Remove the password protection for OfficeScan to clean these files.
Backup Files
Files with the RB0~RB9 extensions are backup copies of infected files. OfficeScancreates a backup of the infected file in case the virus/malware damaged the file duringthe cleaning process.
Solution: If OfficeScan successfully cleans the infected file, you do not need to keep thebackup copy. If the endpoint functions normally, you can delete the backup file.

IN-1
IndexAaction on monitored system events, 8-4actions
Data Loss Prevention, 10-34ActiveAction, 7-36Active Directory, 2-31–2-33, 2-47, 2-51, 5-13, 5-30
agent grouping, 2-47credentials, 2-32custom gentent groups, 2-31duplicate structure, 2-51integration, 2-31outside server management, 2-31role-based administration, 2-31scope and query, 14-66synchronization, 2-33
ActiveSync, 10-34ActiveX malicious code, 7-4Additional Service Settings, 14-6advanced permissions
configuring, 9-11storage devices, 9-5, 9-6
agent consoleaccess restriction, 14-17
agent disk image, 5-13, 5-36agent grouping, 2-47–2-51, 2-53–2-55
Active Directory, 2-47, 2-50adding a domain, 2-53automatic, 2-47, 2-49custom groups, 2-47deleting a domain or agent, 2-54DNS, 2-47IP addresses, 2-51manual, 2-47, 2-48methods, 2-47
moving agents, 2-55NetBIOS, 2-47renaming a domain, 2-54tasks, 2-53
agent installation, 5-2, 5-21Agent Packager, 5-24browser-based, 5-17from the web console, 5-19from the web install page, 5-15Login Script Setup, 5-21post-installation, 5-65system requirements, 5-2using agent disk image, 5-36using Security Compliance, 5-59using Vulnerability Scanner, 5-37
agent logsagent connection logs, 16-17agent update logs, 16-17Damage Cleanup Services logs, 16-16Data Protection debug logs, 10-56, 16-22debug logs, 16-15fresh installation logs, 16-16Mail Scan logs, 16-17OfficeScan firewall debug logs, 16-18Outbreak Prevention debug logs, 16-18TDI debug logs, 16-23upgrade/hot fix logs, 16-16web reputation debug logs, 16-21
agent mover, 14-21Agent Packager, 5-12, 5-24, 5-27, 5-28, 5-30, 5-32
deployment, 5-24settings, 5-27
agents, 2-47, 2-54, 2-55, 4-31, 5-2connection, 4-31
OfficeScan™ 11.0 Administrator’s Guide
IN-2
deleting, 2-54features, 5-3grouping, 2-47installation, 5-2locations, 4-31moving, 2-55proxy settings, 4-31
agent security level, 14-16agent self-protection, 14-12agent tree, 2-34–2-38, 2-42–2-45
about, 2-34advanced search, 2-36, 2-37filters, 2-36general tasks, 2-35specific tasks, 2-38, 2-42–2-45
agent management, 2-38manual component updates, 2-43outbreak prevention, 2-42rollback component updates, 2-44security risk logs, 2-45
views, 2-36agent uninstallation, 5-68agent update
automatic, 6-37customized source, 6-32event-triggered, 6-37from the ActiveUpdate server, 6-45manual, 6-42privileges, 6-44scheduled update, 6-39scheduled update with NAT, 6-40standard source, 6-31
agent upgradedisable, 6-45
application filtering, 12-3approved list, 7-47
approved programs list, 8-6assessment mode, 7-69automatic agent grouping, 2-47, 2-49AutoPcc.exe, 5-11, 5-12, 5-21, 5-22
BBehavior Monitoring, 8-12
action on system events, 8-4exception list, 8-5logs, 8-12
Behavior Monitoring Configuration Pattern,6-9Behavior Monitoring Core Service, 6-9Behavior Monitoring Detection Pattern, 6-8Behavior Monitoring Driver, 6-9blocked programs list, 8-6boot sector virus, 7-4
CC&C callbacks
global settingsuser-defined IP lists, 11-12
widgets, 2-23cache settings for scans, 7-60Case Diagnostic Tool, 16-2Certified Safe Software List, 12-3Certified Safe Software Service, 7-73, 8-9, 12-25COM file infector, 7-4Common Firewall Driver, 6-7, 6-8, 16-18, 16-19community, 17-2Compliance Report, 14-53component duplication, 6-20, 6-58components, 2-19, 5-67, 6-2
on the agent, 6-28on the OfficeScan server, 6-15on the Update Agent, 6-52update privileges and settings, 6-44

Index
IN-3
update summary, 6-60compressed files, 7-27, 7-67
decompression rules, 10-37condition statements, 10-20Conflicted ARP, 12-5connection verification, 14-40continuity of protection, 4-10Control Manager
integration with OfficeScan, 13-21MCP Agent logs, 16-11
conventional scan, 7-9–7-11switching to smart scan, 7-11
cookie scanning, 7-70CPU usage, 7-28criteria
customized expressions, 10-7, 10-8keywords, 10-15, 10-16
custom agent groups, 2-31, 2-47customized expressions, 10-6–10-8, 10-10
criteria, 10-7, 10-8importing, 10-10
customized keywords, 10-14criteria, 10-15, 10-16importing, 10-18
customized templates, 10-19creating, 10-21importing, 10-22
DDamage Cleanup Services, 1-9, 5-4, 5-5dashboard, 2-5
user accounts, 2-5dashboards
Summary, 2-5, 2-7, 2-10database backup, 13-38database scanning, 7-65data identifiers, 10-5
expressions, 10-5file attributes, 10-5keywords, 10-5
Data Loss Prevention, 10-2, 10-3, 10-5actions, 10-34channels, 10-23data identifiers, 10-5decompression rules, 10-37expressions, 10-5–10-8, 10-10file attributes, 10-10–10-12keywords, 10-13–10-16, 10-18network channels, 10-23–10-27, 10-29,10-30, 10-36policies, 10-41policy, 10-3system and application channels,10-30–10-32, 10-34templates, 10-18–10-22widgets, 2-21, 2-23
Data Protectiondeployment, 3-6installation, 3-2license, 3-4status, 3-8uninstallation, 3-14
debug logsagents, 16-14server, 16-2
decompression rules, 10-37device control, 9-2, 9-4–9-13
advanced permissions, 9-11configuring, 9-11
approved list, 9-12Digital Signature Provider, 9-7external devices, 9-10, 9-13managing access, 9-10, 9-13

OfficeScan™ 11.0 Administrator’s Guide
IN-4
non-storage devices, 9-10permissions, 9-4–9-6, 9-8, 9-10
program path and name, 9-8requirements, 9-2storage devices, 9-4–9-6USB devices, 9-12wildcards, 9-9
Device Control, 1-10logs, 9-17, 16-9notifications, 9-16
device control;device control list;devicecontrol list:adding programs, 9-15Device List Tool, 9-13DHCP settings, 5-45digital signature cache, 7-60Digital Signature Pattern, 6-9, 7-60Digital Signature Provider, 9-7
specifying, 9-7documentation, xiidomains, 2-47, 2-53, 2-54
adding, 2-53agent grouping, 2-47deleting, 2-54renaming, 2-54
DSP, 9-7
EEarly Boot Clean Driver, 6-6EICAR test script, 5-67, 7-3email domains, 10-24encrypted files, 7-42End User License Agreement (EULA), E-4Event Monitoring, 8-3exception list, 8-5
Behavior Monitoring, 8-5EXE file infector, 7-4export settings, 14-51
expressions, 10-5customized, 10-6, 10-10
criteria, 10-7, 10-8predefined, 10-5, 10-6
external device protection, 6-9external devices
managing access, 9-10, 9-13
FFakeAV, 7-40file attributes, 10-5, 10-10–10-12
creating, 10-11importing, 10-12wildcards, 10-11
file reputation, 4-3firewall, 5-4, 5-5, 12-2
benefits, 12-2default policy exceptions, 12-14disabling, 12-6outbreak monitor, 12-6policies, 12-8policy exceptions, 12-13privileges, 12-6, 12-22profiles, 12-4, 12-17tasks, 12-8testing, 12-31
firewall log count, 12-24Fragmented IGMP, 12-5FTP, 10-25
Ggateway IP address, 14-3gateway settings importer, 14-4
Hhot fixes, 6-10, 6-51HTML virus, 7-4

Index
IN-5
HTTP and HTTPS, 10-26
IIDS, 12-4IM applications, 10-26import settings, 14-51inactive agents, 14-24incremental pattern, 6-20installation, 5-2
agent, 5-2Data Protection, 3-2Plug-in Manager, 15-3plug-in program, 15-4Security Compliance, 5-59
integrated server, 4-6integrated Smart Protection Server, 4-18
ptngrowth.ini, 4-18update, 4-18, 4-20
components, 4-20Web Blocking List, 4-20
IntelliScan, 7-26IntelliTrap Exception Pattern, 6-5IntelliTrap Pattern, 6-5intranet, 4-12Intrusion Detection System, 12-4IPv6, 4-24
support, 4-24IPv6 support, A-2
displaying IPv6 addresses, A-6limitations, A-3, A-4
IpXfer.exe, 14-21
JJava malicious code, 7-4JavaScript virus, 7-4joke program, 7-2
Kkeywords, 10-5, 10-13
customized, 10-14–10-16, 10-18predefined, 10-13, 10-14
LLAND Attack, 12-5licenses, 13-36
Data Protection, 3-4status, 2-5
location awareness, 14-2locations, 4-31
awareness, 4-31logical operators, 10-20Login Script Setup, 5-11, 5-12, 5-21, 5-22logs, 13-32
about, 13-32agent update logs, 6-49Behavior Monitoring, 8-12central quarantine restore logs, 7-88connection verification logs, 14-41Device Control logs, 9-17firewall logs, 12-23, 12-24, 12-28scan logs, 7-93security risk logs, 7-81spyware/grayware logs, 7-89spyware/grayware restore logs, 7-92system event logs, 13-31virus/malware logs, 7-72, 7-82web reputation logs, 11-21
LogServer.exe, 16-3, 16-15
MMAC address, 14-3macro virus, 7-4mail scan, 7-58Malware Behavior Blocking, 8-2

OfficeScan™ 11.0 Administrator’s Guide
IN-6
manual agent grouping, 2-47, 2-48Manual Scan, 7-18
shortcut, 7-65Microsoft Exchange Server scanning, 7-66Microsoft SMS, 5-13, 5-32migration
from ServerProtect Normal Servers,5-62from third-party security software, 5-61
monitored email domains, 10-24monitored system events, 8-3monitored targets, 10-28, 10-29MSI package, 5-13, 5-30, 5-32
NNetBIOS, 2-47network channels, 10-23–10-27, 10-29, 10-30,10-36
email clients, 10-24FTP, 10-25HTTP and HTTPS, 10-26IM applications, 10-26monitored targets, 10-30, 10-36non-monitored targets, 10-30, 10-36SMB protocol, 10-26transmission scope, 10-30
all transmissions, 10-27conflicts, 10-30external transmissions, 10-29
transmission scope and targets, 10-27webmail, 10-27
network virus, 7-4, 12-3Network VirusWall Enforcer, 4-31new features, 1-2non-monitored email domains, 10-24non-monitored targets, 10-28, 10-29non-storage devices
permissions, 9-10notifications
agent update, 6-48C&C callback detections, 11-19Device Control, 9-16endpoint restart, 6-48firewall violations, 12-26for administrators, 10-46, 13-29for agent users, 7-78, 10-50outbreaks, 7-94, 11-19, 12-29outdated Virus Pattern, 6-48spyware/grayware detection, 7-47virus/malware detection, 7-41web threat detection, 11-15
OOfficeScan
about, 1-2agent, 1-12agent services, 14-11components, 2-19, 6-2component update, 5-67database backup, 13-38database scanning, 7-65documentation, xiikey features and benefits, 1-8licenses, 13-36logs, 13-32programs, 2-19terminology, xivweb console, 2-2web server, 13-45
OfficeScan agentconnection with OfficeScan server,14-25, 14-38connection with Smart ProtectionServer, 14-39

Index
IN-7
detailed agent information, 14-50files, 14-14import and export settings, 14-51inactive agents, 14-24installation methods, 5-10processes, 14-15registry keys, 14-15reserved disk space, 6-46uninstallation, 5-68
OfficeScan server, 1-10functions, 1-10
OfficeScan update, 6-13on-demand scan cache, 7-61online
community, 17-2outbreak criteria, 7-94, 11-19, 12-29outbreak prevention, 2-17
disabling, 7-105policies, 7-99
outbreak prevention policyblock ports, 7-100deny compressed file access, 7-104deny write access, 7-102executable compressed files, 7-104limit/deny access to shared folders, 7-99mutex handling, 7-103mutual exclusions, 7-103
outside server management, 2-31, 14-64logs, 16-9query results, 14-68scheduled query, 14-69
Overlapping Fragment, 12-5
Ppacker, 7-2password, 13-46patches, 6-10
pattern filessmart protection, 4-7Smart Scan Agent Pattern, 4-8Smart Scan Pattern, 4-8Web Blocking List, 4-8
PCRE, 10-6performance control, 7-28Performance Tuning Tool, 16-2Perle Compatible Regular Expressions, 10-6permissions
advanced, 9-11non-storage devices, 9-10program path and name, 9-8storage devices, 9-4
phishing, E-9Ping of Death, 12-4Plug-in Manager, 1-8, 5-5, 5-7, 15-2
installation, 15-3managing native product features, 15-4troubleshooting, 15-11uninstallation, 15-11
plug-in programinstallation, 15-4
policiesData Loss Prevention, 10-41firewall, 12-4, 12-8web reputation, 11-5
policy, 10-3Policy Enforcement Pattern, 6-9port blocking, 7-100predefined expressions, 10-5
viewing, 10-6predefined keywords
distance, 10-14number of keywords, 10-13
predefined tabs, 2-10

OfficeScan™ 11.0 Administrator’s Guide
IN-8
predefined templates, 10-19predefined widgets, 2-10pre-installation tasks, 5-16, 5-19, 5-59privileges
firewall privileges, 12-22, 12-24mail scan privileges, 7-58proxy configuration privileges, 14-48roaming privilege, 14-19scan privileges, 7-50Scheduled Scan privileges, 7-52unload privilege, 14-18
probable virus/malware, 7-5, 7-84programs, 2-19, 6-2proxy settings, 4-31
agents, 4-31automatic proxy settings, 14-49for external connection, 14-47for internal connection, 14-46for server component update, 6-19privileges, 14-48
ptngrowth.ini, 4-17, 4-18
Qquarantine directory, 7-38, 7-43quarantine manager, 13-51
RReal-time Scan, 7-15Real-time Scan service, 14-37reference server, 13-27remote installation, 5-12roaming agents, 5-5, 5-7role-based administration, 2-31, 13-2
user accounts, 13-12user roles, 13-2
rootkit, 7-3rootkit detection, 6-9
Sscan actions, 7-34
spyware/grayware, 7-46virus/malware, 7-67
scan cache, 7-60scan criteria
CPU usage, 7-28file compression, 7-27files to scan, 7-26schedule, 7-29user activity on files, 7-25
scan exclusions, 7-29, 7-30directories, 7-31file extensions, 7-33files, 7-33
scan method, 5-25default, 7-9
Scan Now, 7-22scan privileges, 7-50scan types, 5-3, 5-5, 7-14scheduled assessments, 14-63Scheduled Scan, 7-20
postpone, 7-71reminder, 7-71resume, 7-72skip and stop, 7-53, 7-71stop automatically, 7-71
Security Compliance, 14-52components, 14-55enforcing, 14-65enforcing update, 6-50installation, 5-59logs, 16-9outside server management, 2-31, 14-64scan, 14-57scheduled assessments, 14-63

Index
IN-9
services, 14-54settings, 14-59
security patches, 6-10security risks, 7-2, 7-5–7-7
phish attacks, E-9protection from, 1-9spyware/grayware, 7-5–7-7
server logsActive Directory logs, 16-5agent grouping logs, 16-6Agent Packager logs, 16-8Apache server logs, 16-8component update logs, 16-7Control Manager MCP Agent logs,16-11debug logs, 16-3Device Control logs, 16-9local installation/upgrade logs, 16-5outside server management logs, 16-9remote installation/upgrade logs, 16-5role-based administration logs, 16-6Security Compliance logs, 16-9ServerProtect Migration Tool debuglogs, 16-10Virtual Desktop Support logs, 16-14Virus Scan Engine debug logs, 16-12VSEncrypt debug logs, 16-11web reputation logs, 16-10
ServerProtect, 5-62Server Tuner, 13-52server update
component duplication, 6-20logs, 6-27manual update, 6-26proxy settings, 6-19scheduled update, 6-26
update methods, 6-25service restart, 14-11Smart Feedback, 4-3smart protectection, 4-12smart protection, 4-2–4-4, 4-6–4-9, 4-24
environment, 4-12File Reputation Services, 4-3pattern files, 4-7–4-9
Smart Scan Agent Pattern, 4-8Smart Scan Pattern, 4-8update process, 4-9Web Blocking List, 4-8
Smart Feedback, 4-3Smart Protection Network, 4-6Smart Protection Server, 4-6source, 4-7sources, 4-24
comparison, 4-7IPv6 support, 4-24locations, 4-24protocols, 4-7
volume of threats, 4-2Web Reputation Services, 4-3, 4-4
Smart Protection Network, 1-2, 4-6Smart Protection Server, 4-6, 4-13, 4-17, 4-18,4-20
best practices, 4-17installation, 4-13integrated, 4-6, 4-18, 4-20standalone, 4-6, 4-17update, 6-15, 6-27
smart scan, 6-3, 7-9–7-11switching from conventional scan, 7-11
Smart Scan Agent Pattern, 4-8, 6-3Smart Scan Pattern, 4-8, 6-3SMB protocol, 10-26

OfficeScan™ 11.0 Administrator’s Guide
IN-10
spyware/grayware, 7-5–7-7adware, 7-5dialers, 7-6guarding against, 7-7hacking tools, 7-6joke programs, 7-6password cracking applications, 7-6potential threats, 7-6remote access tools, 7-6restoring, 7-49spyware, 7-5
spyware/grayware scanactions, 7-46approved list, 7-47results, 7-90
Spyware Active-monitoring Pattern, 6-7Spyware Pattern, 6-7Spyware Scan Engine, 6-7SQL Server Migration Tool, 13-40, 13-44
alert notification, 13-44configuring, 13-41
standalone server, 4-6standalone Smart Protection Server, 4-17
ptngrowth.ini, 4-17storage devices
advanced permissions, 9-5, 9-6permissions, 9-4
summarydashboard, 2-5, 2-7, 2-10updates, 6-60
summary dashboardcomponents and programs, 2-19
Summary dashboard, 2-5, 2-7, 2-10predefined tabs, 2-10predefined widgets, 2-10product license status, 2-5
tabs, 2-7widgets, 2-7
supportknowledge base, 17-2resolve issues faster, 17-4TrendLabs, 17-6
Support Intelligence System, 2-4, 16-2SYN Flood, 12-5system and application channels, 10-23,10-30–10-32, 10-34
CD/DVD, 10-31cloud storage, 10-30peer-to-peer (P2P), 10-32PGP encryption, 10-32printer, 10-32removable storage, 10-32synchronization software, 10-34Windows clipboard, 10-34
system requirementsUpdate Agent, 6-52
Ttabs, 2-7Teardrop, 12-5templates, 10-18–10-22
condition statements, 10-20customized, 10-19, 10-21, 10-22logical operators, 10-20predefined, 10-19
test scan, 5-67test virus, 7-3third-party security software, 5-60Tiny Fragment Attack, 12-5TMPerftool, 16-2TMTouch.exe, 6-51Too Big Fragment, 12-4Top 10 Security Risk Statistics, 2-18

Index
IN-11
touch tool, 6-51TrendLabs, 17-6trial version, 13-36Trojan horse program, 1-9, 6-6, 7-3troubleshooting
Plug-in Manager, 15-11troubleshooting resources, 16-1
Uuninstallation, 5-68
Data Protection, 3-14from the web console, 5-68Plug-in Manager, 15-11using the uninstallation program, 5-69
unreachable agents, 14-42update
Smart Protection Server, 6-15, 6-27Update Agent, 5-3, 5-5, 5-26, 6-52
analytical report, 6-59assigning, 6-52component duplication, 6-58standard update source, 6-55system requirements, 6-52update methods, 6-58
update methodsagents, 6-36OfficeScan server, 6-25Update Agent, 6-58
Update Now, 6-46updates, 4-18, 4-20
agents, 6-28enforcing, 6-50integrated Smart Protection Server,4-18, 4-20OfficeScan server, 6-15Update Agent, 6-52
update source
agents, 6-30OfficeScan server, 6-18Update Agents, 6-54
URL Filtering Engine, 6-8USB devices
approved list, 9-12configuring, 9-12
user accounts, 2-5dashboard, 2-5
user roleadministrator, 13-8guest user, 13-8Trend Power User, 13-9
VVBScript virus, 7-4VDI, 14-69
logs, 16-14VDI Pre-scan Template Generation Tool,14-80Virtual Desktop Support, 14-69virus/malware, 7-2–7-5
ActiveX malicious code, 7-4boot sector virus, 7-4COM and EXE file infector, 7-4Java malicious code, 7-4joke program, 7-2macro virus, 7-4packer, 7-2probable virus/malware, 7-5rootkit, 7-3test virus, 7-3Trojan horse program, 7-3types, 7-2–7-5VBScript, JavaScript or HTML virus,7-4worm, 7-4

OfficeScan™ 11.0 Administrator’s Guide
IN-12
virus/malware scanglobal settings, 7-64results, 7-83
Virus Cleanup Engine, 6-6Virus Cleanup Template, 6-6Virus Encyclopedia, 7-5Virus Pattern, 6-3, 6-48, 6-50Virus Scan Driver, 6-4Virus Scan Engine, 6-4Vulnerability Scanner, 5-14, 5-37
DHCP settings, 5-45effectiveness, 5-37endpoint description retrieval, 5-54ping settings, 5-56product query, 5-50supported protocols, 5-52
WWeb Blocking List, 4-8, 4-20web console, 1-8, 2-2–2-4
about, 2-2banner, 2-4logon account, 2-4password, 2-4requirements, 2-2URL, 2-3
web install page, 5-10, 5-15webmail, 10-27web reputation, 1-9, 4-3, 4-4, 5-3, 5-5, 11-4
logs, 16-10policies, 11-5
web server information, 13-45web threats, 11-2widgets, 2-7, 2-11, 2-13, 2-16, 2-17, 2-19, 2-21, 2-23,2-26–2-28, 15-3
Agent-Server Connectivity, 2-13Agent Updates, 2-19
Antivirus Agent Connectivity, 2-13available, 2-11C&C Callback Events, 2-23Data Loss Prevention - DetectionsOver Time, 2-23Data Loss Prevention - TopDetections, 2-21File Reputation Threat Map, 2-28OfficeScan and Plug-ins Mashup, 2-19Outbreaks, 2-17Security Risk Detections, 2-16Web Reputation Top ThreatenedUsers, 2-27Web Reputation Top Threat Sources,2-26
wildcards, 10-11device control, 9-9file attributes, 10-11
Windows clipboard, 10-34Windows Server Core, B-2
available agent features, B-6commands, B-7supported installation methods, B-2
worm, 7-4