Embed Size (px)
Citation preview

Students List
Before the Lesson...1
Easy Login
When using shared tablets in multiple classes, students can login by selecting their grade, class, and name from the list rather than entering their User ID and password.Students can access their personal data instantly without spending time logging in.
Teachers log in from “Teacher login” on the bottom right by entering their password and selecting their name.
Teacher login
1 Teacher login is on the bottom right.
・Are they logged in or not?・Are they participating in the correct lesson?・Are they using another application?
1 Select “Add Subject” . 3 Enter the Subject name to add it to the Group.
You can also create Optional Subjects and proficiency-dependent teaching groups, etc. using a Group Code. ※See page 13 for details.
2 Select the Class (Group) to which to add the Subject.
2 Students select their grade, class, and name.
1
All-in-One Learning Support App that Builds Real-World Skills
LoiLoNote School for 2.7
① Log In
Regular Login
Launch LoiLoNote School and login using your School ID, User ID, and password. Your Classes and Subjects will be displayed.
② Create a SubjectIf the Subject you want to teach is not on the List of Subjects, first you need to add it.Tap “Add Subject” at the very bottom of the List of Subjects.You only need to add the Subject the first time you start teaching the lesson.After that, it is displayed on the List of Subjects, so simply select it from the list to join in.
③ Select a Subject, Create a NoteSelect your Class and Subject and tap “Create New Note” . Enter a Note name, e.g. unit or course name and tap “Use” .
④ Check Student ParticipationTap the small grey tab at the right-hand side of the screen to display the Teacher Tools. You can monitor students’ current activity using “Students List” .

2
Connect Cards and Present2
Connect Cards00:06:16
00:06:16
Tap to disconnect
00:06:16
00:06:1600:06:16
Drag the connecting line to a new Card to instantly switch the order of Cards.
Types of Card
Take photosand videos
DrawingCard
WebCard
Satellite map images
Photos and videos on camera roll
TextCard
Desktop
Enlarge desktop
Tap and edit
2 - ①① Create Cards
There are several dif ferent types of Card on LoiLoNote School’ s desktop: Text Card, Drawing Card, Web Card, Map Card, Camera Card, and Image Card. Tapping on a Card brings up the editing screen. You can add typewritten text, handwritten text, and audio to all types of Card.
④ PresentOnce you have connected all the Cards for your presentation, you can start presenting. Tap the first Card you want to display. Tap the screen again to hide the icon buttons. Swiping the screen displays the next Card, so you can move freely between Cards as you present. To use the autoplay function e.g. to play videos, tap the play button at the bottom left of the screen.
② Connect CardsConnect the Cards in the order you want to present them. Drag the yellow arrow at the top right corner of the first Card to the next Card to connect them with a line. The Cards will be displayed in the order you have connected them.
③ Change the Order of CardsDisconnect Cards by tapping the connecting line between them, rearrange the order and reconnect as above. Alternatively, drag the connecting line to another Card without disconnecting them first.
Editing mode
Swipe to movebetween Cards
Swipe to movebetween Cards
Presentation mode
Editing tools
Tap to go to next Card

Choose the type of pen you want to use from the pen tools on the left.
Writing Tools
Change the line thickness on the right.
Change the line color from the color palette at the bottom.
Edit Cards3The types of Card are: Text Card, Drawing Card, Web Card, Map Card, Camera Card (photos and videos) and Image Card. Available Editing Tools dif fer according to each type of Card, so try to select a type that suits your purpose when first creating the Card.
00:06:16
Drawing Tools
Pencil: draw normal lines Ruler: draw straight lines
Pen: draw thick and thin lines Highlighter: draw semi-transparent lines
Brush: draw thick and thin lines by varying the pen pressure
Add handwritten drawings and explanations to all types of Card.
Tap on the pencil in the top left to display the drawing tools. From here, you can set the thickness and color of lines.
To redo work, either use the eraser to trace over the parts you want to erase, or use the back arrow to undo changes.
Redo changes
Delete all lines
Once you have created a Card, tap on it to display the Editing Screen.
Editing mode
Editing tools
Text Tools
Enter text using the keyboard. Tap on the icons at the top to set the text alignment, size, and color.
Tap on the icons at the top to set the text alignment, size, and color.
Change the vertical text alignment to top, middle or bottom.
L Change the text size.
Color Change the text color.
Change the background color.
A
3

Edit videos that you have taken as Camera Cards or videos that are already saved to your tablet’ s camera roll.Add dubbing (voice/audio), background music, handwriting, and text.Carry out simple cut editing to delete unnecessary scenes from your video and keep only those that are necessary.
Cut EditingPress “in” at the start and “out” at the end of the scene you want to use to keep only the scenes that are necessary.
Copy VideoTo use multiple cuts from one video, select “Copy This Card Only” from the add icon at the top right to create a copy of the Card.By a process of further cut editing from the copy, you can take multiple cuts from the video.
Select “Copy One” to copy the current Card.
Select “Copy All” to copy a stack of connected Cards onto the desktop.
Replay audio Retake audio
Delete audio
Recording Tools
Add dubbing (voice/audio recording) to your Cards.Tap “Record” to start recording your voice. When you have finished recording, tap “Finish”. Tap “Use” to save the recorded data to the Card.
Video Editing Tools Video Card only
Background Music
Add free music to Cards as background music.
Copy
4

Map Tools
Combine aerial photographs which clearly show topography as well as two-dimensional planar maps according to your needs. Hold your finger down on the map to drop a pin. Make clear and easy-to-read personalized maps by dropping pins and adding text and handwriting.
Map Card only
Hybird SatelliteStandard
Place
Add Handwriting to “Hybrid” Maps
Add handwritten text to “Hybrid” mode to make a personalized atlas or mapbook.
Done When you find a page you want to cite, enlarge it so the part you want is clearly visible and tap “Done” .
The part you want to cite is added to the editing screen as a screenshot. As with other types of Cards, you can add typewritten text, handwriting, and drawings to the slide.
A new Card is created using the contents of your current screen.
Search Web
To start a web search, tap the magnifying glass icon on the editing screen and enter your search terms in the search homepage.
Web Search Tools
Web Cards can be used to conduct Internet searches as well as to take screenshots of the parts of search pages you want to cite.You can use the screenshots of search pages like newspaper or magazine cuttings to collect reference materials.
Web Card only
Select “Web Search Tool” from the editing tools of the cited Card to return to the cited webpage.
Map Display TypeSelect from “Standard” , “Hybrid” and, “Satellite” .
Drop Pins on MapsHold your finger down on the map to drop pins.Place and facility names are also displayed.
Display/Hide LabelsTap the speech bubble icon to the left of Map Display Types to display or hide pin labels.
5

Distribute Cards to the Whole Class4
00:06:16
The sent Card pops out of the “Send” icon.
“New” is displayed next to unviewed Cards on the list. The number of unviewed Cards is displayed in a red circle on the “Send” icon.
1. Send to all members
2. Send to individual membersTap “Send to Individual” to display the list of members. Select the member(s) to whom you want to send the Card and tap “Send to [no. of people]” .
Send toall members
Send to individualmembers
Student
00:06:16
00:06:16
Drag and drop the Card you want to send into the “Send” icon
① Bulk Distribution Using the “Send” IconSend materials from the teacher to all members of the class easily.To send materials to all members of the class, drag and drop the Card you want to send into the “Send” icon on the left-hand side of the desktop and select “Send to All”.
② Accessing Unviewed CardsStudents can access Cards that have been sent by the teacher at any time from the “Send” icon. By tapping on the “Send” icon, students can still receive Cards even if they missed them the first time (e.g. they were absent from class).
Student Student
Tap on a Card on the list on the left to display a preview. Tap “Use” in the top right to pop the Card out on the desktop.
6

5
“Submit” icon
Teacher
〇min〇sec
Submit
Tasks and Answers
① Set Students a TaskTeachers can create Submissions Boxes and use them to collect answers from students.Tap the “Submit” icon and tap “Create New Submissions Box” . Enter the content of the question or task you want to set and set the submission deadline.The task and submission deadline set by the teacher are displayed on students’ tablets.
Teacher
Enter a TaskTap the blue pencil icon in the top center and enter the content of the task.
Set Submission DeadlineTap the red timer icon on the right and set the submission deadline.The default setting is 15 minutes.
The task is displayed.
Deadline Countdown DisplayThe remaining time until the submission deadline is displayed in red on the left-hand side of the task.
After SubmissionAfter students have submitted their answer, the submission deadline countdown disappears and a green checkmark appears on the Submissions Box.
Student
② Student SubmissionsStudents enter their answers on a Card, drag and drop it into the “Submit” icon, and select the destination Submission Box.Stacks of connected Cards are sent together as one item. Teachers can provide a sample answer for comparison by submitting an answer in the same way.
Student
Select the Submissions Box to which to submit your answer from the list.
7

Hide answersDisplay answers
Share answers Sharing answers
Submitted
Submitted after submissions closed
! Not submitted
③ Submissions Box StatusSubmission status is displayed on the list of tasks.
Teacher④ Display List of AnswersA list of answers submitted by students is displayed on the teacher’ s tablet.
The answer displayed on the left of the screen with an orange border is the user’ s own answer.
The answer with a blue border is the teacher’ s sample answer (only displayed on students’ tablets).
⑤ Share Answers with StudentsSelect “Share Answers” to enable students to view the list of answers on their tablets.This feature is useful for sharing ideas and opinions in the classroom, as it enables students to view other students’ answers on their tablets.
Student
⑥ Reorder Submitted AnswersRearrange the order of submitted answers on the list of answers screen using the sort functions provided: “Submission order” , “Update order” , and “Student no. order” .Select “Anonymous” to hide student names.
⑦ Display/Hide AnswersToggle between display and hide student answers to temporarily hide answers like in a TV quiz game show.
8

Denis Jackson
Use Answer as a Card
Move
Send back Return work to student
Red Pen Tool
Display selected answers
Compare button
⑧ Select and Compare AnswersOn the list of answers screen, tap “Compare” and select multiple answers to display them in full-screen split-screen mode.
⑨ Compare AnswersTap “Edit” to rearrange the order of displayed answers or discard unwanted ones by tapping the “X” to narrow down the selection.
⑩ Evaluate Students’ AnswersUse the Red Pen Tool to write feedback and comments directly on students’ work.Tap on “Send Back” to return the annotated work directly to the student.
⑪ Get Students to PresentOn the list of answers screen, tap on a student’ s name and tap on “Get This Student to Present” to get that student to present their work to the class.That student’ s tablet screen is reflected in real-time on the whole class’s tablets, including the teacher’ s tablet. The presenting student can control the presentation (e.g. laser pointer, swiping between Cards).
To use an answer as a Card on your desktop, tap on the icon in the top right corner and tap “Use This” .The student’ s name is displayed underneath the Card.
The answer pops out as a Card from the “Send” Tunnel.9
6
7First of all, access the following address from your web browser (IE*, Google Chrome, Safari, etc.).
Cloud server versionhttps://n.loilo.tv/users/sign_in
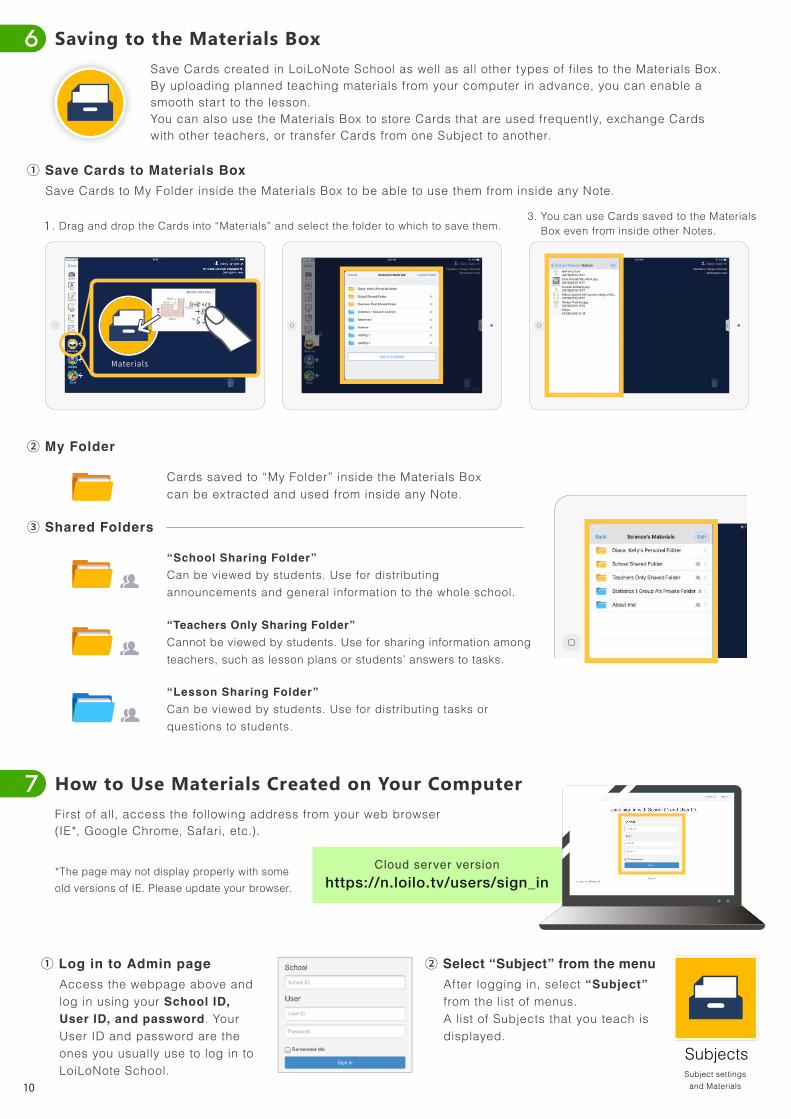
3. You can use Cards saved to the Materials Box even from inside other Notes.1. Drag and drop the Cards into “Materials” and select the folder to which to save them.
Materials
Saving to the Materials Box
Save Cards created in LoiLoNote School as well as all other types of files to the Materials Box.By uploading planned teaching materials from your computer in advance, you can enable a smooth start to the lesson.You can also use the Materials Box to store Cards that are used frequently, exchange Cards with other teachers, or transfer Cards from one Subject to another.
① Save Cards to Materials BoxSave Cards to My Folder inside the Materials Box to be able to use them from inside any Note.
② My Folder
③ Shared Folders
Cards saved to “My Folder” inside the Materials Box can be extracted and used from inside any Note.
“School Sharing Folder”Can be viewed by students. Use for distributing announcements and general information to the whole school.
“Teachers Only Sharing Folder”Cannot be viewed by students. Use for sharing information among teachers, such as lesson plans or students’ answers to tasks.
“Lesson Sharing Folder”Can be viewed by students. Use for distributing tasks or questions to students.
How to Use Materials Created on Your Computer
*The page may not display properly with some old versions of IE. Please update your browser.
① Log in to Admin pageAccess the webpage above and log in using your School ID, User ID, and password. Your User ID and password are the ones you usually use to log in to LoiLoNote School.
② Select “Subject” from the menuAfter logging in, select “Subject” from the list of menus.A list of Subjects that you teach is displayed.
SubjectsSubject settings
and Materials10

1. Open the “File” tab and select “Save As”.
Supported File Types
・PDF (worksheet, Office, etc.)
・Photographs
・Videos
・Music (MP3, aac, etc. from version 2.6)
・All other file types can be saved.
To create a new folder inside the Materials Box, tap on “Edit” and select “Create Folder” .
To copy an item, select the item you want to copy, then select the copy destination from the list.
To move an item, select the item you want to move, then select the moving destination from the list.
③ Select Subject from List of Subjects and Open Materials A list of Subjects that you have joined is displayed.Find the Subject to which to add the files and select “Materials Box” on the right.
④ Upload FilesOpen Materials inside the Subject and use the “Upload” button at the top to upload the files inside the folder.
⑤ Using Materials Created in Microsoft Office (PowerPoint, Word, etc.) as CardsPowerPoint, Excel, and Word files can be used as Cards if you convert them into PDFs in advance.
2.Select “PDF (*.pdf)” from file type and save.
Alternatively, open the “File” tab and select “Create PDF/XPS Document” from “Export” and save (Version: PowerPoint 2013).
⑥ Using Imported Materials as Cards
Tap “Materials” on your tablet, scroll through the list to find the materials you want, and export them as Cards.
⑦ How to Create, Move and Copy Folders
11

12
“Send” icon Send
00:06:16
9
[Student Tunnels]① Manage Inter-Student Communications ( “Tunnels” )Under initial settings, communication between students is blocked.To enable inter-student communications, tap “Unlock Tunnels” on the Teacher Tools tab. Locked
Teacher
Unlocked
② Create Group PresentationsStudents can share their research with the other members in their group by dragging and dropping the Cards into the “Send” Tunnel and selecting the group members’ names.Students can exchange Cards among the members of their group before finally combining the Cards into a single group presentation.
StudentStudent
③ Relock Student TunnelsTo prevent misuse or mischief by students, relock Tunnels at the end of the lesson.
Share screen
Starts screen sharing
8 Screen SharingReflect the contents of the teacher’ s tablet screen on student tablet screens in real-time.Use your tablet like a blackboard to show students important materials close up on their own tablets.
Teacher
Tap the pencil icon to add hand-writing to the Card.
Laser Pointer ToolUse it like a laser pointer when presenting to draw lines that fade over time.Drag your finger across the screen to draw a line or tap it to produce a circle.
Collaborative Learning

10
[ Check StudentParticipation ]
① Freeze Student ScreensFreeze student tablet screens from the Teacher Tools tab when you want to hold students’ attention e.g. during student presentations or teacher explanations.
Teacher Student
Teacher
[ Freeze Screens ]
Locked Unlocked
② Check Student ParticipationCheck the status of students to see whether they are participating in the lesson correctly.
[ Key ]White :
Yellow : Red :
PresentChoosing SubjectAbsent
Create Optional Subjects and proficiency-dependent teaching groups using Group Codes.Tap on “Add Subject” then “Create New Group” to create separate groups for Subjects that are not taught by Grade or Class.Students can enroll in the new group by entering the “Group Code” .
11
Teacher
Student
Class Management Tools
Create Optional Subjects
Teacher Student
1. From “Add Subject” , select “Create New Group” .
2. After creating the new group, create a new lesson for the group.
3. After the new lesson is created, the Group Code is displayed. Ask students to enter the code. You can display and check the code any time by tapping on “Students List”.
1. From the list, select “Enter Group Code” .
2. Enter the number that is displayed on the teacher’ s tablet to join the group.The lesson that you have joined is added to the list.
13

Exporting Cards
① Print or Use Cards in Another AppOn the editing screen, tap the icon in the top right corner and select “Export” .Tap “PDF File” to save the Card data as a PDF file. You can now use it as an email attachment and send it to your computer, etc.Tap “Save As Video File” to export the Card to your tablet’ s camera roll as a video file.You can also print it or use it in another app.
Q & A13
12
Q. How do I delete Cards that I am not using?A. When you start to move a Card, a trashcan icon
appears in the bottom-right corner of the desktop. Drag the Card you want to delete into it and click “OK” to delete it.
00:15
Start of videoEnd of video
Editing modeQ. How can I extract only the parts of a video I want to
use?A. On the editing screen, tap “in” at the point where you
want the video replay to begin and “out” at the point where you want it to end. As with other Cards, you can also enter text in the video and audio recording such as voiceover/narration and music. You can also export an edited video as a video file.
Move to either side to rearrange Cards
Select “Delete” from the icon in the top right corner of the screen to delete a Card.Q. How can I change the order of Cards while editing?
A. If you hold down on the thumbnail of a Card displayed at the bottom of the editing screen it is highlighted in red. While it is red you can rearrange the order of Cards. Select “Delete” from the icon in the top right corner of the screen to delete a Card.
A blue line appears when you connect stacks of Cards together
Q. Why do some Cards get a blue line when they are connected?
A. The blue line appears when you connect two “stacks” (groups) of Cards together. If you tap the “minus icon” at the beginning of a string of connected Cards, they are grouped together as a stack. If you connect multiple stacks of Cards together the connecting line turns blue. When creating a long presentation, you can create several separate stacks of Cards and join them together at the end to create a final presentation.
Export Print
PDF file
Save as Video File
14

[ External screen ]
Start display on external screen
Stop display
Connect to large external screen
Connect with wired connection or Apple TV Teacher operates presentation submitted by student
Apple TV
Q. How do I add folders to the Materials Box?A. From “Edit”, select “Create Folder”.
Folders created inside “School Sharing Folder”, “Teachers Only Folder”, and “My Folder” are indicated by a yellow icon. Folders created in all other locations are indicated by a blue icon.
See page 10 for more details about file types.
Q. How do I project my tablet screen onto an electronic blackboard or using a projector?
A. You can connect to a large external screen either with a wired connection or using Apple TV.
Q. How do I switch on/off the display on a large external screen?
A. On the Teacher Tools tab, tap “External Screen” to toggle between displaying and not displaying the tablet’ s screen on the external screen.
Q. How can teachers exchange Cards?A. Teachers can exchange Cards by putting them into the
“Teachers Only Sharing Folder” in the Materials Box.Students cannot view this folder.
[ Teachers Only Sharing Folder ]
Q. “I want to know more” or “I have a problem” ...A. While signed into LoiLoNote School, tap on your name in the top right corner and select “Support”.
The support portal webpage will open automatically, from where you can enquire freely about anything.You can also view a range of contents such as PDF user manuals, FAQ, videos, and Use Cases of lessons from all over the world.
15
TEL: (+81) 45-228-9446
Responses may be delayed to enquiries
received on weekends (Sat/Sun) and
Japanese national holidays.
Support telephone
Support email
Enquire by Line chat!
【How to add us:】Search for user ID
[@loilo] or use the QR
code on the right.
Support LINE@
You can view a range of contents such as PDF
user manuals, videos and Use Cases of lessons
from all over the world, and user FAQ.https://n.loilo.tv/en/teacher_support
Teacher support page now open!
Responses may be delayed to enquiries
received on weekends (Sat/Sun) and
Japanese national holidays.
4-43 Minaminakadori Basha-michi Otsu Bld. 403, Yokohama Naka-ku, Kanagawa. 231-0006 JAPAN
Feeling in the dark? Don’ t be shy, get in touch!
(+81)45-228-9446 [email protected] http://loilo.tv/us/
Simple yet effective learning support app bringing teacher’s ideas to life
Think independently, learn cooperatively