Embed Size (px)
Citation preview
ALE International proprietary and confidential. Copyright © 2016. All rights reserved.
Alcatel-Lucent 8001 DeskPhone User Manual
8AL90895USAB Ed2
Alcatel-Lucent 8001 DeskPhone ALE International proprietary and confidential. Copyright © 2016. All rights reserved. Page 2 of 49
INDEX
1. Getting Started ....................................................................................................................... 4 2. Set up the Phone .................................................................................................................... 4 3. Phone User Interface .............................................................................................................. 6
3.1 Hardware Component Instructions ................................................................................. 6 3.2 Phone Screen Display Features ........................................................................................ 8 3.3 Basic Network Settings ..................................................................................................... 9 3.4 SIP Account Settings ....................................................................................................... 10 3.5 Basic Features ................................................................................................................ 11
3.5.1 Making a Call ........................................................................................................... 11 3.5.2 Anonymous Call ....................................................................................................... 11 3.5.3 Redial ....................................................................................................................... 11 3.5.4 Call Log ..................................................................................................................... 12 3.5.5 Making Calls to Contacts ......................................................................................... 12 3.5.6 Multi-lines to Answer the Call ................................................................................. 12 3.5.7 Auto-Answer ............................................................................................................ 13 3.5.8 Ending a Call ............................................................................................................ 13 3.5.9 Using Hold and Recover (Switch Calling Line) ......................................................... 14 3.5.10 Transferring Calls ..................................................................................................... 14 3.5.11 Using Mute .............................................................................................................. 15 3.5.12 Do Not Disturb ......................................................................................................... 15 3.5.13 3-way Conference .................................................................................................... 15 3.5.14 Voice Mail ................................................................................................................ 16 3.5.15 Lock .......................................................................................................................... 16
3.6 Advanced Settings .......................................................................................................... 17 3.6.1 Using the phone book ............................................................................................. 17 3.6.2 Using Call Logs ......................................................................................................... 19 3.6.3 Peer-to-Peer ............................................................................................................ 19
3.7 Keypad Setting ............................................................................................................... 20 3.7.1 Language Setting ..................................................................................................... 20 3.7.2 Message ................................................................................................................... 20 3.7.3 Time & Date ............................................................................................................. 21 3.7.4 Ring Tone and Volume Setting ................................................................................ 21 3.7.5 Searching Phone Book ............................................................................................. 22 3.7.6 Features that cannot be set with the Keypad ......................................................... 22
4. WEB User Interface ............................................................................................................... 23 4.1 Network.......................................................................................................................... 24
4.1.1 LAN Port ................................................................................................................... 24 4.1.2 PC Port ..................................................................................................................... 26 4.1.3 Advanced VPN Setting ............................................................................................. 26
5. SIP Account ........................................................................................................................... 28 5.1 Basic ............................................................................................................................... 28 5.2 Call .................................................................................................................................. 29 5.3 Security........................................................................................................................... 30
6. Phone Setting........................................................................................................................ 31 6.1 Basic ............................................................................................................................... 31
6.1.1 Time Settings ........................................................................................................... 32 6.1.2 Call ........................................................................................................................... 33 6.1.3 VoIP Call Forward .................................................................................................... 34 6.1.4 QoS .......................................................................................................................... 35
6.2 Advanced ........................................................................................................................ 35 6.2.1 Basic ......................................................................................................................... 35
Alcatel-Lucent 8001 DeskPhone ALE International proprietary and confidential. Copyright © 2016. All rights reserved. Page 3 of 49
6.2.2 Advanced ................................................................................................................. 36 6.3 Line Keys ......................................................................................................................... 37 6.4 Function Keys ................................................................................................................. 38 6.5 Soft Key .......................................................................................................................... 38 6.6 Dial Plan ......................................................................................................................... 39 6.7 IP Strategy ...................................................................................................................... 40
7. Phone Book ........................................................................................................................... 40 7.1 Group ............................................................................................................................. 40 7.2 Contact ........................................................................................................................... 40 7.3 LDAP ............................................................................................................................... 41 7.4 Ban List ........................................................................................................................... 42
8. Phone Maintenance ............................................................................................................. 43 8.1 Basic ............................................................................................................................... 43
8.1.1 HTTP Upgrade .......................................................................................................... 43 8.1.2 FTP Upgrade ............................................................................................................ 44 8.1.3 TFTP Upgrade .......................................................................................................... 45 8.1.4 Default Setting ......................................................................................................... 45 8.1.5 Reboot ..................................................................................................................... 46
8.2 Advanced ........................................................................................................................ 46 8.2.1 Log ........................................................................................................................... 46 8.2.2 Auto Provision ......................................................................................................... 46
9. Password ............................................................................................................................... 48 10. WEB and Settings or Information ......................................................................................... 48
10.1 WEB User........................................................................................................................ 48 10.2 Note Tips ........................................................................................................................ 49
Alcatel-Lucent 8001 DeskPhone ALE International proprietary and confidential. Copyright © 2016. All rights reserved. Page 4 of 49
1. Getting Started
About
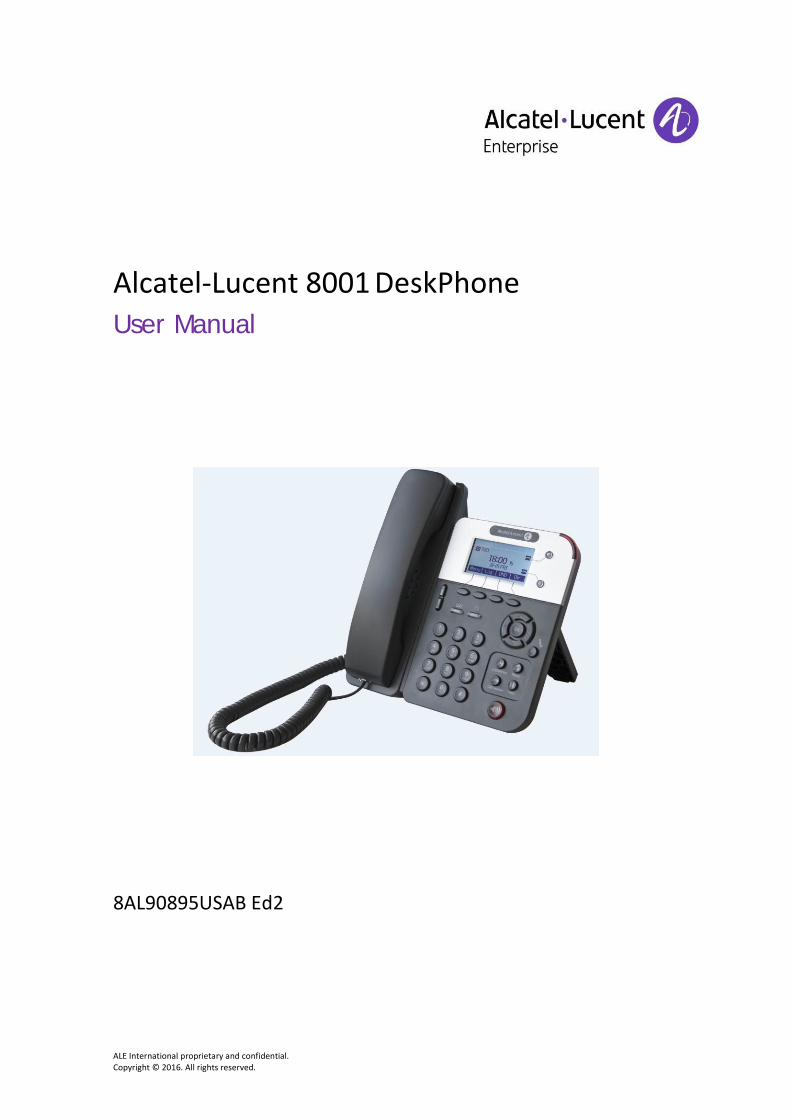
Alcatel-Lucent 8001 DeskPhone is a highly innovative VoIP SIP phone. It can perfectly satisfy all kinds of business communications. Alcatel-Lucent 8001 DeskPhone integrates a 132x64 pixels
graphic LCD, a large resolution display, elegant and intuitive user interface, which you can perfectly experience. Its rich features can effectively improve business communications.
Alcatel-Lucent 8001 DeskPhone meets the demands of small and medium enterprise, Home Office and large enterprises.
Feature Highlights
a) Multi-Language The LCD display supports Multi-Language.
b) HD Voice Special voice processing technology, high-fidelity voice quality, HD encoding, HD Handset, ensure clear, realistic and smooth communication.
c) Advanced Calling Capabilities Two lines with double color (GREEN & RED) LEDs, Synchronously control or manage 2 calls, Call queue, Switch between lines. Multi-parties conference, call transfer.
d) All kinds of Phone Book It supports XML Personal Phone Book\LDAP\Enterprise Phone Book etc. This feature satisfies customer's phone book requirements.
e) Support of HTTP\TFTP\FTP\Auto-Provision. f) Support of PoE and Power Adapter. g) 2-angles adjustable bracket, wall-mountable
An adaptor is required for compliance with standard TIA-570-C, section 8
2. Set up the Phone
a) Packing List: Check the packing list before installation, if you find anything missing, please contact your system administrator. 1*Alcatel-Lucent 8001 DeskPhone IP Phone 1*Handset 1* Handset Cord 1* Ethernet Cable
Alcatel-Lucent 8001 DeskPhone ALE International proprietary and confidential. Copyright © 2016. All rights reserved. Page 5 of 49
1* Phone Bracket 1* Safety sheet
b) Phone Installation: This section introduces how to install the phone with the components available in the pack: Attach the Bracket Connect the Handset and optional Headset Connect the Network and Power
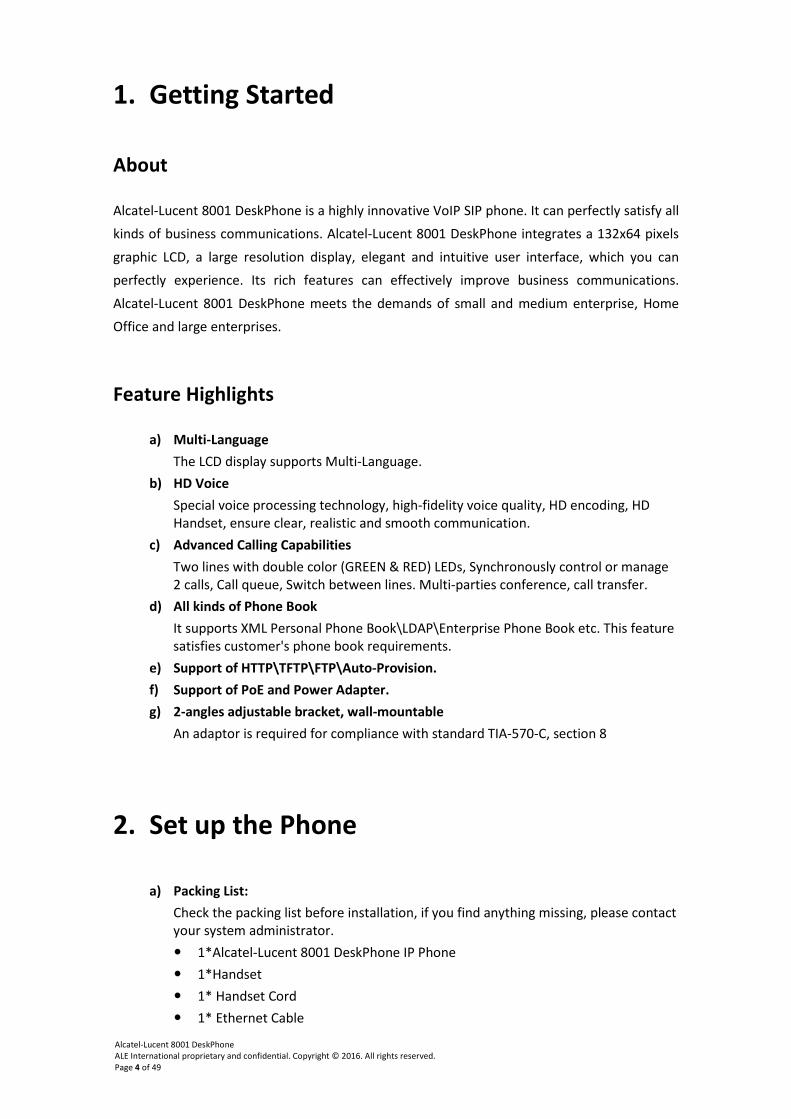
Attach the Bracket Please firstly let the part 1 of the bracket join the phone by following steps "a" to "b" as shown here-after, and then let the part 2 of the bracket join the lower holder or upper holder depending on the desired phone angle: respectively high or low.
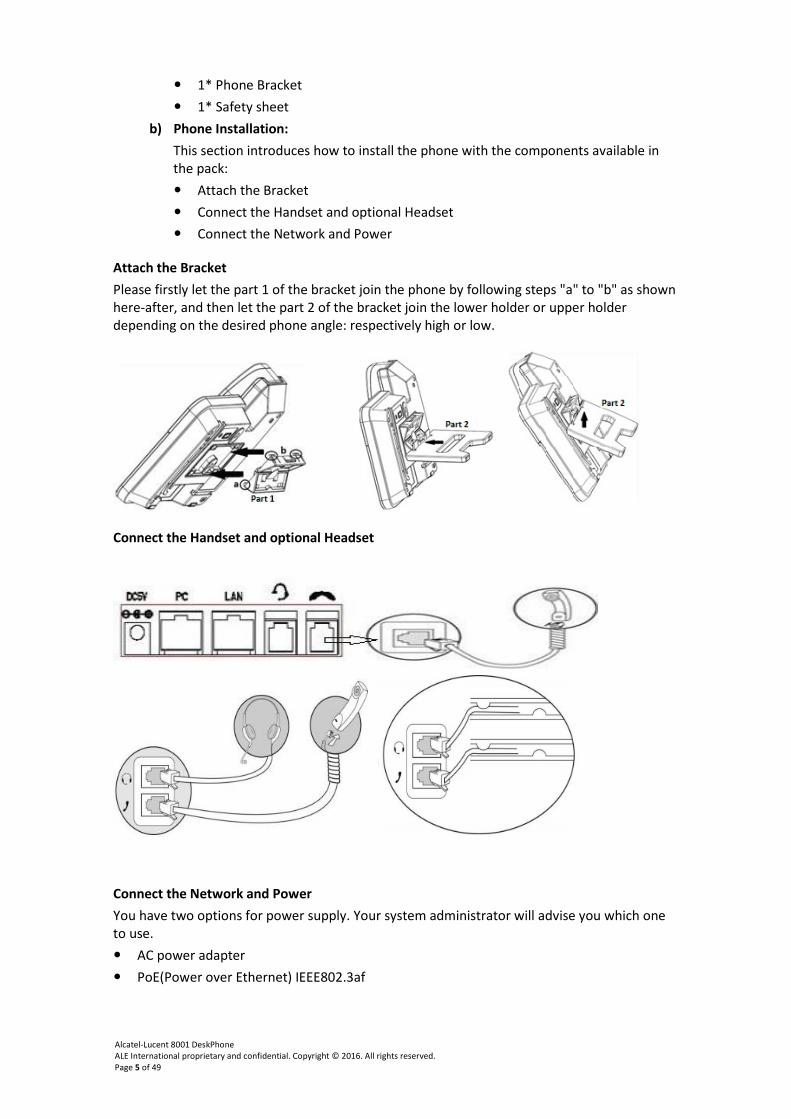
Connect the Handset and optional Headset
Connect the Network and Power You have two options for power supply. Your system administrator will advise you which one to use. AC power adapter PoE(Power over Ethernet) IEEE802.3af
Alcatel-Lucent 8001 DeskPhone ALE International proprietary and confidential. Copyright © 2016. All rights reserved. Page 6 of 49
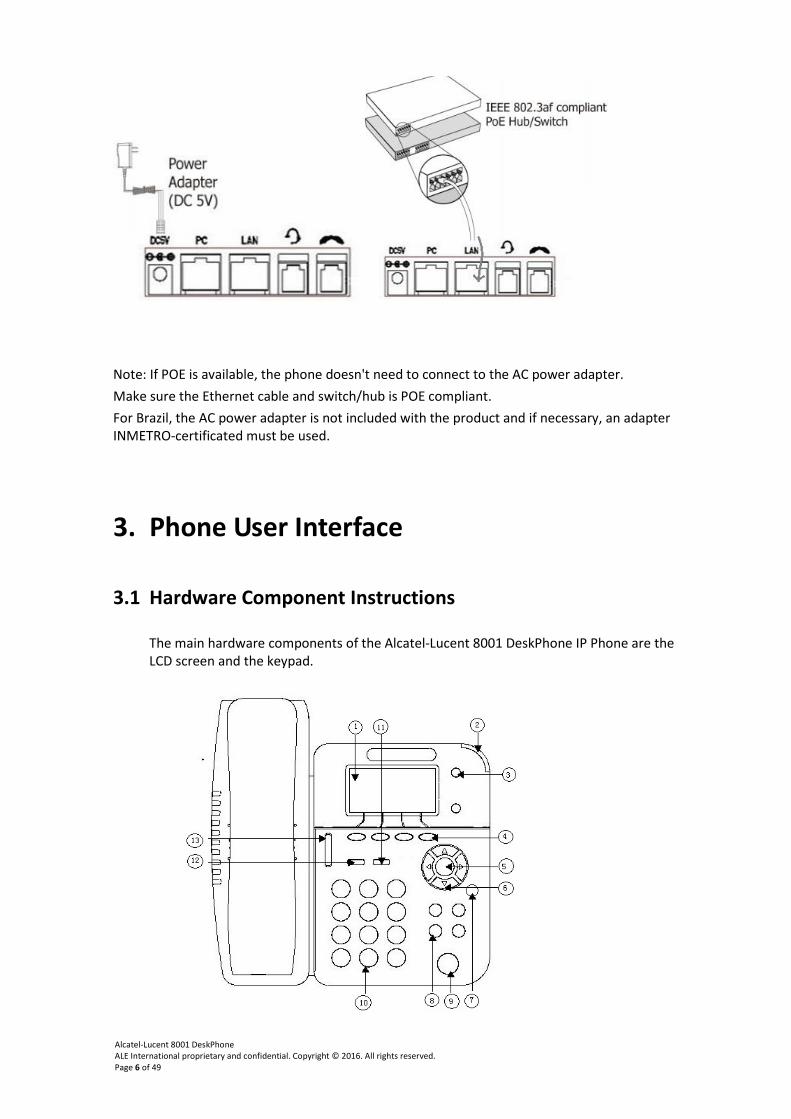
Note: If POE is available, the phone doesn't need to connect to the AC power adapter. Make sure the Ethernet cable and switch/hub is POE compliant. For Brazil, the AC power adapter is not included with the product and if necessary, an adapter INMETRO-certificated must be used.
3. Phone User Interface
3.1 Hardware Component Instructions
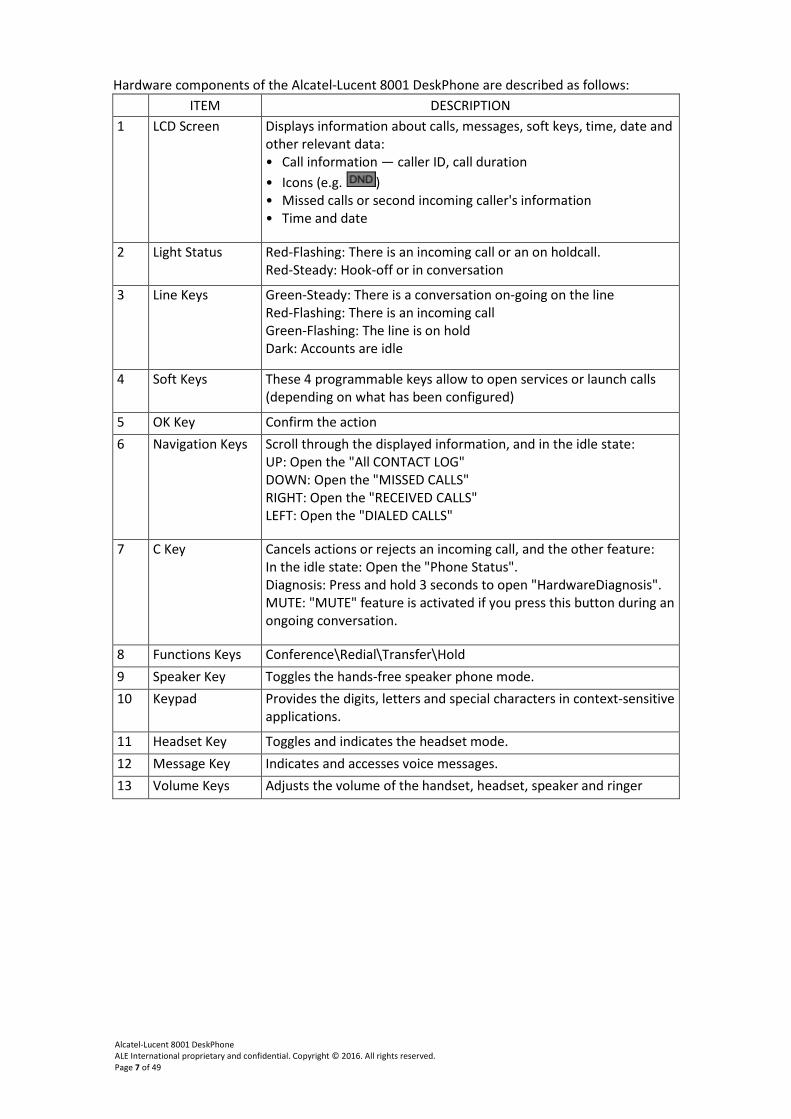
The main hardware components of the Alcatel-Lucent 8001 DeskPhone IP Phone are the LCD screen and the keypad.
Alcatel-Lucent 8001 DeskPhone ALE International proprietary and confidential. Copyright © 2016. All rights reserved. Page 7 of 49
Hardware components of the Alcatel-Lucent 8001 DeskPhone are described as follows: ITEM DESCRIPTION 1 LCD Screen Displays information about calls, messages, soft keys, time, date and
other relevant data: • Call information — caller ID, call duration • Icons (e.g. ) • Missed calls or second incoming caller's information • Time and date
2 Light Status Red-Flashing: There is an incoming call or an on holdcall. Red-Steady: Hook-off or in conversation
3 Line Keys Green-Steady: There is a conversation on-going on the line Red-Flashing: There is an incoming call Green-Flashing: The line is on hold Dark: Accounts are idle
4 Soft Keys These 4 programmable keys allow to open services or launch calls (depending on what has been configured)
5 OK Key Confirm the action 6 Navigation Keys Scroll through the displayed information, and in the idle state:
UP: Open the "All CONTACT LOG" DOWN: Open the "MISSED CALLS" RIGHT: Open the "RECEIVED CALLS" LEFT: Open the "DIALED CALLS"
7 C Key Cancels actions or rejects an incoming call, and the other feature: In the idle state: Open the "Phone Status". Diagnosis: Press and hold 3 seconds to open "HardwareDiagnosis". MUTE: "MUTE" feature is activated if you press this button during an ongoing conversation.
8 Functions Keys Conference\Redial\Transfer\Hold 9 Speaker Key Toggles the hands-free speaker phone mode. 10 Keypad Provides the digits, letters and special characters in context-sensitive
applications.
11 Headset Key Toggles and indicates the headset mode. 12 Message Key Indicates and accesses voice messages. 13 Volume Keys Adjusts the volume of the handset, headset, speaker and ringer
Alcatel-Lucent 8001 DeskPhone ALE International proprietary and confidential. Copyright © 2016. All rights reserved. Page 8 of 49
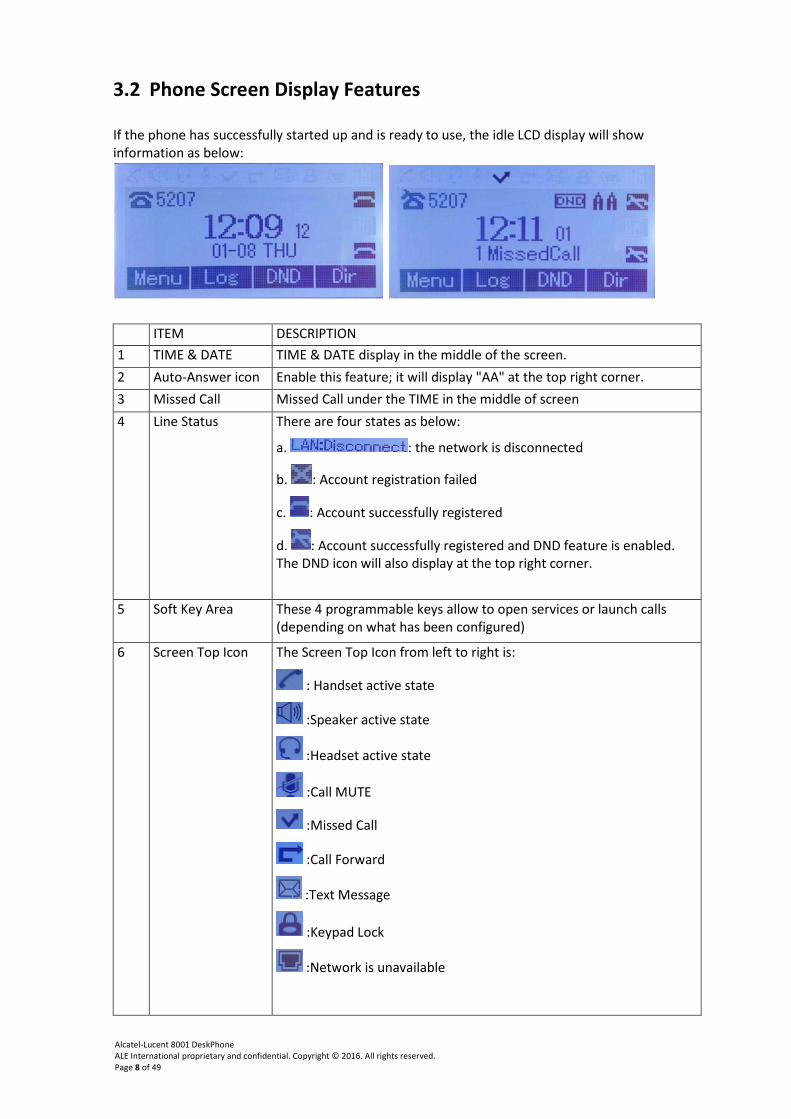
3.2 Phone Screen Display Features
If the phone has successfully started up and is ready to use, the idle LCD display will show information as below:
ITEM DESCRIPTION 1 TIME & DATE TIME & DATE display in the middle of the screen. 2 Auto-Answer icon Enable this feature; it will display "AA" at the top right corner. 3 Missed Call Missed Call under the TIME in the middle of screen 4 Line Status There are four states as below:
a. : the network is disconnected
b. : Account registration failed
c. : Account successfully registered
d. : Account successfully registered and DND feature is enabled. The DND icon will also display at the top right corner.
5 Soft Key Area These 4 programmable keys allow to open services or launch calls (depending on what has been configured)
6 Screen Top Icon The Screen Top Icon from left to right is:
: Handset active state
:Speaker active state
:Headset active state
:Call MUTE
:Missed Call
:Call Forward
:Text Message
:Keypad Lock
:Network is unavailable
Alcatel-Lucent 8001 DeskPhone ALE International proprietary and confidential. Copyright © 2016. All rights reserved. Page 9 of 49
3.3 Basic Network Settings
The phone supports three modes of Network Settings, including PPPoE\Static IP\DHCP.
DHCP Setting Feature Operating Steps DHCP Press OK or MENU > System Settings > Advanced Settings > Password (By
default Empty) > Network > LAN Port Press LAN Port to login in to the menu Select "DHCP" mode Press "Enter" key Set the DNS\WEB Port\Telnet Port Press "Save" key "Network is changed, press OK reboot" message appears
Static IP Setting Feature Operating Steps Static IP Press OK or MENU > System Settings > Advanced Settings > Password (By
default Empty) > Network > LAN Port Press LAN Port to login in to the menu Select "Static" mode Press "Enter" key Set the IP\Mask\GW\DNS\web port\telnet port Press "Save" key "Network is changed, press OK reboot" message appears
PPPoE Setting Feature Operating Steps PPPoE Press OK or MENU > System Settings > Advanced Settings > Password (by
default Empty) > Network > LAN Port Press LAN Port to login in to the menu Select "PPPoE" mode Press "Enter" key Set the User Name\Password\WEB Port\Telnet Port Press "Save" key "Network is changed, press OK reboot" message appears
Alcatel-Lucent 8001 DeskPhone ALE International proprietary and confidential. Copyright © 2016. All rights reserved. Page 10 of 49
3.4 SIP Account Settings
8001 DeskPhone makes calls based on SIP accounts. It can support one account or Two-accounts. Each account can be configured to a different SIP server.
If you want to... Then...
Create a SIP account -- 1) Select “System setting" > “Advanced setting";
-- 2) Enter the password required (By default: empty) ;
-- 3) Select “SIP" > “Account sip";
-- 4) Select one of the accounts you want to set, you can configure the following parameters
- Enable account*: Select Enable
- Number of lines: Default is 2
- Description: description of this account
- Display Name: The name displayed on the screen
- Authentication user: the Authenticated users are matched with the SIP server.(By default with the same account)
- Account*: the account matches with the SIP server (extension number)
- User password*: the user password matches with the SIP server
- SIP Server*: The primary SIP server, all calls through this server
- Out Bound Server: The outbound SIP server
- STUN Type: Enable/Disable STUN feature
- STUN: Input STUN URL
- Auto Answer: Enable/Disable this account auto answer feature
* Note: When you finish the setting, you can press Save to activate it, and then you can see the status icon in the LCD idle.
The parameters with the * mark here above must be set.
Disable SIP account -- 1) Select “System setting" > “Advanced setting";
-- 2) Enter the password required (By default empty) ;
-- 3) Select “SIP" > “Account sip";
-- 4) Select “Enable account" > “Disable";
-- 5) Select “Save" to save settings
Alcatel-Lucent 8001 DeskPhone ALE International proprietary and confidential. Copyright © 2016. All rights reserved. Page 11 of 49
3.5 Basic Features
3.5.1 Making a Call
Here are some easy ways to place a call on 8001 DeskPhone:
If you want to... Then...
Place a call using the handset
Pick up the handset -- 1) You can hear dial tone; -- 2) Enter a number; -- 3) Press
- or wait 5 s (default value), then the 8001 DeskPhone sends the number automatically.
Place a call using a speakerphone
Press Speaker button
Place a call using a headset
Put on your headset, by pressing Headset button so that the status light is Red
, and then do as using speakerphone
3.5.2 Anonymous Call
You can use anonymous call feature to block the identity and phone number from showing up to the called party when making a call. E. g. you want to call to consult some of the services, but you don't want to be harassed.
Enable Anonymous Call Press OK or MENU > Function Setting > Anonymous
-- Press Enter or OK button ,
- You can select which Account you want to use, enable/disable this feature and enable/disable rejecting anonymous calls
3.5.3 Redial
To redial the last placed call from your phone
Redial -- Press REDIAL button to dial the last number
- or press Navigation button-Left > "Dialed number", select a number, and press
Alcatel-Lucent 8001 DeskPhone ALE International proprietary and confidential. Copyright © 2016. All rights reserved. Page 12 of 49
3.5.4 Call Log
Dial from a call log -- 1) Press MENU or OK button > "Call history", you can select "All Calls", "Missed calls", "Received calls" and "Dialed numbers",
- or press Navigation button (in Standby interface) > select "All Calls"(up) "Missed calls"(down), "Received calls"(left) and "Dialed numbers" (right)
-- 2) Then press button.
NOTE: You can also press the "log" to login to this menu when in the idle state.
3.5.5 Making Calls to Contacts
You can also dial a contact from the Personal Phone Book.
Placing Calls to Contacts
-- 1) Press MENU or OK button > "Phone Book", you can select "Personal Phone Book", "Enterprise Phone Book", "LDAP" and "Black List",
- or press Navigation button (in Standby interface) > select the desired contact.
-- 2) Then press button.
NOTE: You can also press the "DIR" to login to this menu when in the idle state.
3.5.6 Multi-lines to Answer the Call
Multi-lines to Answer the Call
-- 1) Another Line button is Red and flashing, Light strip is Red and flashing;
-- 2) Press the flashing Line button to answer (at this time, the original call will be put on hold.)
Alcatel-Lucent 8001 DeskPhone ALE International proprietary and confidential. Copyright © 2016. All rights reserved. Page 13 of 49
3.5.7 Auto-Answer
You can set the phone and let it auto-answer incoming calls.
Auto-Answer the Coming Call
-- 1) Enable the Auto-Answer feature.
-- 2) In Auto-Answer mode you can select one of the following options in the MENU > Function Setting > Auto Answer > Device
Speaker
Handset
Headset
Note that if you use the Handset mode, you need to pick up the handset to get the call.
-- 3) Filter Groups
Auto-answer the incoming call from these special groups.
3.5.8 Ending a Call
To end a call, here are the options available in different contexts.
Hang up while using the Handset
-- Return the handset to its cradle,
- or press End
Hang up while using the Speakerphone
-- Press the Speaker button that is Red
- or press the Line button of the appropriate line,
- or press End
Hang up while using the Headset
-- Press the Headset button, (Do not keep the headset mode),
- or press End (keep the headset mode)
Hang up one call, but preserve another call on the other line
-- Press End,
- or refer to the above three methods
Alcatel-Lucent 8001 DeskPhone ALE International proprietary and confidential. Copyright © 2016. All rights reserved. Page 14 of 49
3.5.9 Using Hold and Recover (Switch Calling Line)
You can hold and resume calls. You can take a call in one line at anytime, and the other lines would be put on hold. As a result, you can switch between different calling lines on your phone.
If you want to... Then...
Put a call on hold -- Press the HOLD button,
- or press the soft key
Hold a line and switch to another line
Press another Line button for the appropriate line
Resume a call on current line
-- Press the Line button,
Resume a call on different line
Select the line you want to retrieve, then press the line button
NOTES
• Engaging the Hold feature typically generates music or a beeping tone.
• A held call is indicated by the Yellow-green and flashing Line button or a "Hold" on the LCD.
3.5.10 Transferring Calls
Transfer redirects a connected call. The target is the number to which you want to transfer the call.
Talk to the transfer recipient before transferring a call (consult transfer)
-- 1) Press TRANSFER button or press XFER;
-- 2) Enter number;
-- 3) press then transfer the call,
- or wait five seconds (default value) then transfer the call
Transfer to idle lines
or other numbers without talking to the transfer recipient (Blind transfer)
-- 1) Press TRANSFER button or XFER;
-- 2) Press
-- 3) Enter number;
-- 4) press , then transfer the call;
- or wait five seconds(default)then transfer the call
Notes: today's Alcatel-Lucent OXO system does not support blind transfer feature on 8001 DeskPhone
Blind transfer to the held line
-- 1) Press TRANSFER button or press XFER;
-- 2) Press the Line button of the held line
Alcatel-Lucent 8001 DeskPhone ALE International proprietary and confidential. Copyright © 2016. All rights reserved. Page 15 of 49
3.5.11 Using Mute
With Mute enabled, you can hear other parties on a call but they cannot hear you. You can use mute in conjunction with the handset, speakerphone, or a headset.
Toggle Mute on Press C button, a MUTE icon will appear on the top left of the screen
Toggle Mute off Press C button again, the MUTE icon disappears
3.5.12 Do Not Disturb
You can use the Do Not Disturb (DND) feature to block incoming calls on your phone with a busy tone (Can also be set to voice mail or other extension numbers, etc.).
Enable global DND -- 1) Press DND;
-- 2) All enabled line on the phone would change to status and the icon is .
Enable DND on a single line
Press MENU or OK button > "Function setting" > "DND" > (select line) "Enable"
Disable DND -- Global DND enabled, press to disable global DND;
-- Line DND enabled, press twice ,
- or press MENU or OK button > "Function setting" > "DND" > (select line) "Disable"
3.5.13 3-way Conference
You can enable a three-party conference, during the conversation, the three phone parties can communicate with every other party.
If you want to... Then...
Invite the transfer recipient into a conference
-- 1) When the transfer recipient answers the call, press CONFERENCE button or "CONF" on your phone;
-- 2) Then the held one, the transfer recipient and yourself will be into a conference, and the LCD will display
status.
Alcatel-Lucent 8001 DeskPhone ALE International proprietary and confidential. Copyright © 2016. All rights reserved. Page 16 of 49
Invite the third party into a conference in an active call
-- 1) Press "CONFERENCE” button or "CONF" in an active call;
-- 2) Enter the third party number;
-- 3) After connection with the third party, press "CONFERENCE” button or "CONF" again
Establish a conference with held line
-- 1) when one phone line is on-hold and the other line is busy, press "CONFERENCE” button,
- or Press "CONF" Soft key
-- 3) Press the held line's programmable button, the 3-way Conference is enabled.
3.5.14 Voice Mail
When the phone gets a voice mail from server, it will light up the voice mail button
Voice Mail --1) Press the Voice Mail button (When Voice Mails are available, icon is , when no message, icon is
-- 2) Enter the User Password
-- 3) The phone will login in to the voice mail server. You may need to follow the instructions to listen to your messages.
3.5.15 Lock
You can enable/disable lock function thru MMI, when lock feature is enabled, a lock icon will be shown in the main screen.
Lock -- 1) Menu -> System Settings -> Phone Settings
-- 2) Enter “Keypad Lock", click soft key “Shift" or left/right arrow key to choose the options: 1. "Lock All" means all the keys in phone set will be locked 2. "Lock & Auto Answer" means all the keys will be locked
while in auto answer mode it will be unlocked 3. "Lock Menu" means the “Menu" soft key will be locked 4. “Lock Function" means the function keys will be locked,
while the dialing pad will be in un-lock status 5. "Disable" means disable the “Lock “feature
-- 3) "Phone Lock Time Out" is used to set the interval how long the set will be locked again after you unlock the set
-- 4) The lock password is controlled by Alcatel-Lucent SIP server
Notes: Lock feature is a user oriented feature, if the phone set is locked, user can unlock the status thru MMI and the phone set always keeps in un-lock until you unlock it thru MMI. The password of lock can be configured thru solution, like OmniVista 8770.
Alcatel-Lucent 8001 DeskPhone ALE International proprietary and confidential. Copyright © 2016. All rights reserved. Page 17 of 49
3.6 Advanced Settings
3.6.1 Using the phone book
Enterprise Phone Book
Search a Contact from Enterprise Phone Book
-- 1) Press DIR in the idle status,
- or press "MENU" or "OK" button > “Phone book" > “Enterprise Phone Book",
-- 2) Select “Enterprise Phone Book", press "OK" button;
-- 3) Press "Find" and input the name who you want to search.
Call a Contact from Enterprise Phone Book
--1) Press "DIR" in the idle status,
- or press "MENU" or "OK" button > “Phone book">“Enterprise Phone Book",
-- 2) Select “Enterprise Phone Book", press "OK" button;
-- 3) Press "Find" and input the name who you want to search.
-- 4) When you find the right contact, you can launch the call.
Personal Phone Book
Add a Contact -- 1) Press Phone Book,
- or press "MENU" button > “Phone book" > “Personal phone book > View All",
-or press "OK" button > “Phone book" > “Personal phone book > View All";
-- 2) Select “Add contact", press "OK" button;
-- 3) Use the navigation keys to select content, press "OK" button to set and modify:
- Name: set the name of contact,
- Office Number: Set the contact Office Number
- Mobile Phone Number: Set the contact Mobile Phone Number
- Others Numbers: Set the contact Others Numbers
- SIP Account: Set the contact call SIP account
- Group: the contact will be placed into one of the user's groups
-- 4) Press "Save" soft key to complete
Alcatel-Lucent 8001 DeskPhone ALE International proprietary and confidential. Copyright © 2016. All rights reserved. Page 18 of 49
Add group -- 1) Press "DIR" soft key,
-or press "MENU" button > “Phone book" > “Personal phone book > View All",
- or press "OK" button > “Phone book" > “Personal phone book > View All";
-- 2) Select the “add group" then press OK button;
-- 3) Use the navigation keys to select content, press OK button to set and modify:
- Group name: name of the group
--4) Press "Save "soft key to complete
Modify group --1) Press "DIR" soft key,
- or press "MENU" button > “Phone book" > “Personal phone book > View All",
- or press "OK" button > “Phone book" > “Personal phone book > View All";
-- 2) Select the “Modify group" then press "OK" button ;
-- 3) Select the group you want to modify, press the "OK" button to set and modify, press "Save" to save the change
Delete group -- 1) Press "DIR" soft key,
- or press "MENU" button > “Phone book" > “Personal phone book > View All",
- or press "OK" button > “Phone book" > "Personal phone book > View All";
-- 2) Select the “Delete group" or OK button;
-- 3) Select the group you want to delete, press OK button
LDAP
Search a Contact from LDAP
-- 1) Press "DIR" in the idle status,
- or press "MENU" or OK "button" > "Phone book" > "LDAP",
-- 2) Select “LDAP", press "OK" button;
-- 3) Press "Find" and enter the name or number you want to find in the LDAP server.
Call a Contact from LDAP
-- 1) Press "DIR" in the idle status,
- or press "MENU" or "OK" button > “Phone book" > "LDAP",
-- 2) Select “LDAP", press "OK" button;
-- 3) Press "Find" and enter the name or number you want to find in the LDAP server.
-- 4) When you find the right contact, you can then launch the call
Alcatel-Lucent 8001 DeskPhone ALE International proprietary and confidential. Copyright © 2016. All rights reserved. Page 19 of 49
Black List
Add a Contact to the Black List
-- 1) Press "DIR" in the idle status,
- or press "MENU" or "OK" button > "Phone book" > "Black List",
-- 2) Select "Black List", press "OK" button;
-- 3) Press "Add" and enter the name \ office number \ mobile number \ other number \ SIP account you want to add into the Black List.
View a Contact in the Black List
-- 1) Press "DIR" in the idle status,
- or press "MENU" or "OK" button > "Phone book" > "Black List",
-- 2) Select "Black List", press "OK" button;
-- 3) Press "OPT" to view a contact in the list.
-- 4) If you want to move a contact or change it, you can follow the "OPT" to do so.
3.6.2 Using Call Logs
Your phone maintains records of your missed, placed, and received calls.
View call logs -- 1) Press "MENU" or "LOG" button > "All Call" > "Missed Calls", "Received Calls", or "Dialed numbers"
-- 2) Use the navigation keys to view the call record information.
Delete/Save Call Logs
-- 1) Login in to the Call Logs
-- 2) Use the navigation keys to view the call record or select DEL key.
-- 3) Use the navigation keys to view the call record or select Save key.
3.6.3 Peer-to-Peer
When all of the phone accounts (two accounts) are disabled on the 8001 DeskPhone, or when the 8001 DeskPhone has not registered successfully to a server, the 8001 DeskPhone is in 'peer to peer' state.
Peer-to-Peer Disable all of accounts or not register.
Make Call with Peer-to-Peer
-- 1) Press OK or MENU button > System Setting > Advanced Setting > SIP Account;
-- 2) Disable all of accounts or un-register;
-- 3) Turn back the phone to idle state, you can call another party using his IP address.
Alcatel-Lucent 8001 DeskPhone ALE International proprietary and confidential. Copyright © 2016. All rights reserved. Page 20 of 49
3.7 Keypad Setting
Alcatel-Lucent 8001 DeskPhone offers two ways to configure the keypad. One is setting through the local MENU, and the other is setting through the website management. Here is the description through the local MENU. NOTES: When you want to enter a “." e.g. for the IP address, please use the "*".
3.7.1 Language Setting
Alcatel-Lucent 8001 DeskPhone supports Multi-Language setting, here below an example.
Switch the Language -- 1) Press OK or MENU button> System Setting> Phone Setting> Language
-- 2) Here you can select Czech\ Danish\ Dutch\English\Estonian\ Finnish\French \German\Greek \Hungarian \Hebrew\ Icelandic\Italian \Latvian \Norwegian \ Korean\Lithuanian\ Polish\Portuguese\Portuguese-Brazil\ Russian\ Spanish\ Slovak\Slovenian \ Swedish \Turkish (in Great China version,8001DeskPhone also supports Chinese and traditional Chinese)
-- 3) After language selection, press Save.
3.7.2 Message
Alcatel-Lucent 8001 DeskPhone has a Messaging feature. It will display on the LCD when you receive a New Message.
Create a Message -- 1) Press OK or MENU button;
-- 2) Select "Messaging"
-- 3) Voice Message: Setting the Voice Message code in here.
Text Message: Write down the Text Message in here.
-- 4) Select Text Message> New Message.
-- 5) Input the receiver and write down the message body, and then press Send.
Message Inbox -- 1) Select Message Inbox.
-- 2) Select which message you want to check.
-- 3) You can press Enter to read or press Del to delete.
Alcatel-Lucent 8001 DeskPhone ALE International proprietary and confidential. Copyright © 2016. All rights reserved. Page 21 of 49
3.7.3 Time & Date
SNTP -- 1) Press OK or MENU button;
-- 2) Press OK or MENU button > System Setting> Phone Setting > Time & Date > Time and Date setting > SNTP
-- 3) SNTP
- Time Zone: Setting the time zone
- NTP Server 1: NTP server address1
- NTP Server 2: NTP server address2
- DayLight: Enable/Disable Day Light
SIP Server -- 1) Press OK or MENU button;
-- 2) Press OK or MENU button > System Setting > Phone Setting > Time & Date > Time and Date setting > SIP Server
-- 3) Press Save
Manual Setting
Press OK or MENU button;
-- 2) Press OK or MENU button > System Setting > Phone Setting > Time & Date > Time and Date setting > Manual Setting
-- 3) Manual Setting
- Manual Setting: Year\Month\Days\Hours\Minutes\Seconds
Time Display Format
-- 1) Press OK or MENU button;
-- 2) Press OK or MENU button > System Setting > Phone Setting > Time & Date > Time Display Format
--3) Time Mode: 24hour\12hour Date mode:
DDMMWWW\MMDDWWW\WWWDDMMM\DDMMMYY\YYYYMMDD\DDM MYYYY\MMDDYY\DDMMMYYYY\WWWDDMMM etc. (WWW mean day of week, Mon, Tue, Wed, ...)
3.7.4 Ring Tone and Volume Setting
Ring Type --1) Press OK or MENU button> System Setting > Phone Setting > Ring Type
-- 2) Select the ring type from 1 to 8 or custom ring, and then press Save.
Volume Setting -- 1) Press OK or MENU button;
-- 2) Press OK or MENU button > System Setting > Phone Setting > Volume Setting
-- 3) Volume Setting: Handset\Speaker\Headset\Ring volume
-- 4) Press Enter to adjust the volume and press Save NOTES: For the Custom Ring Type you need to upload it through website.
Alcatel-Lucent 8001 DeskPhone ALE International proprietary and confidential. Copyright © 2016. All rights reserved. Page 22 of 49
3.7.5 Searching Phone Book
Accurate Search -- 1) Press MENU or OK button > "Function Setting", you can select " Accurate Search "
-- 2) Then press Enable/Disable and Save.
-- 3) When you are back to idle state, you can use the digital keypad to search the contact.
T9 Search -- 1) Press MENU or OK button > "Function Setting", you can select " T9 search"
-- 2) Then press Enable/Disable and Save.
-- 3) When you are back to idle state, you can use the digital keypad to search the contact using T9 method.
NOTES: The Search Phone Book setting default is Accurate Search.
3.7.6 Features that cannot be set with the Keypad
Below features cannot be set with the keypad: 1) Dial Plan 2) Custom Ring Type 3) Update the Firmware or Backup the configuration file.
Alcatel-Lucent 8001 DeskPhone ALE International proprietary and confidential. Copyright © 2016. All rights reserved. Page 23 of 49
4. WEB User Interface
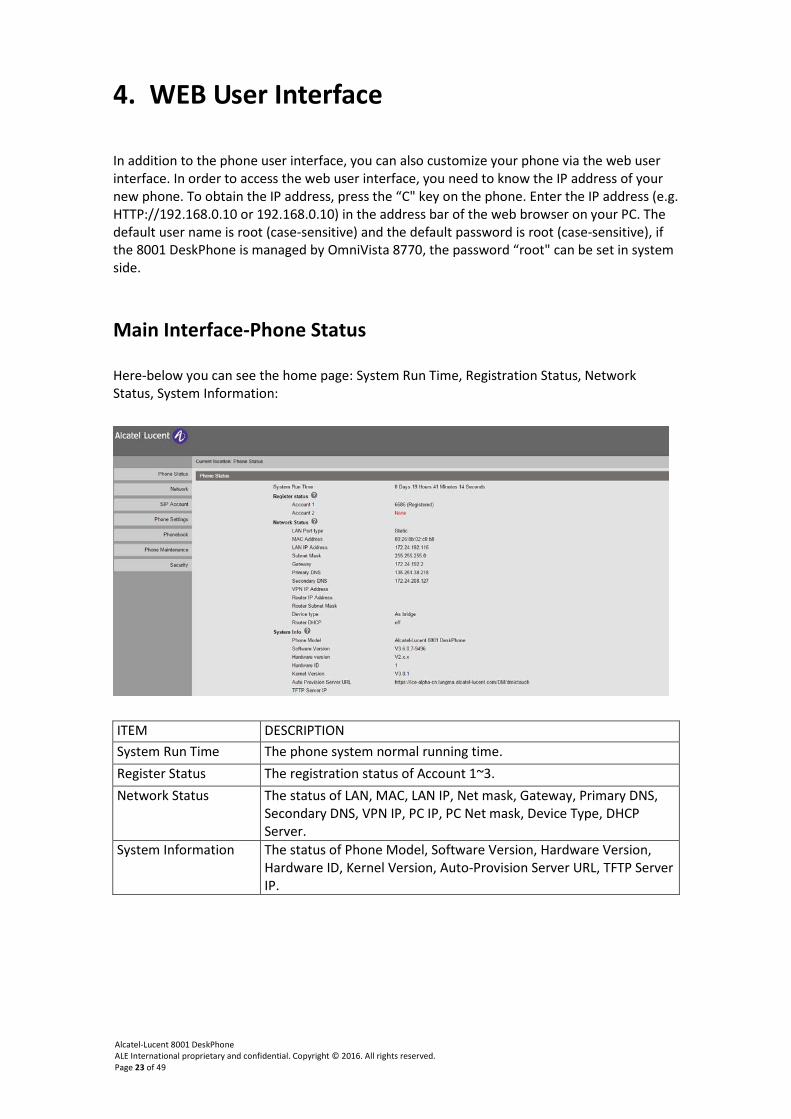
In addition to the phone user interface, you can also customize your phone via the web user interface. In order to access the web user interface, you need to know the IP address of your new phone. To obtain the IP address, press the “C" key on the phone. Enter the IP address (e.g. HTTP://192.168.0.10 or 192.168.0.10) in the address bar of the web browser on your PC. The default user name is root (case-sensitive) and the default password is root (case-sensitive), if the 8001 DeskPhone is managed by OmniVista 8770, the password “root" can be set in system side.
Main Interface-Phone Status
Here-below you can see the home page: System Run Time, Registration Status, Network Status, System Information:
ITEM DESCRIPTION System Run Time The phone system normal running time. Register Status The registration status of Account 1~3. Network Status The status of LAN, MAC, LAN IP, Net mask, Gateway, Primary DNS,
Secondary DNS, VPN IP, PC IP, PC Net mask, Device Type, DHCP Server.
System Information The status of Phone Model, Software Version, Hardware Version, Hardware ID, Kernel Version, Auto-Provision Server URL, TFTP Server IP.
Alcatel-Lucent 8001 DeskPhone ALE International proprietary and confidential. Copyright © 2016. All rights reserved. Page 24 of 49
4.1 Network
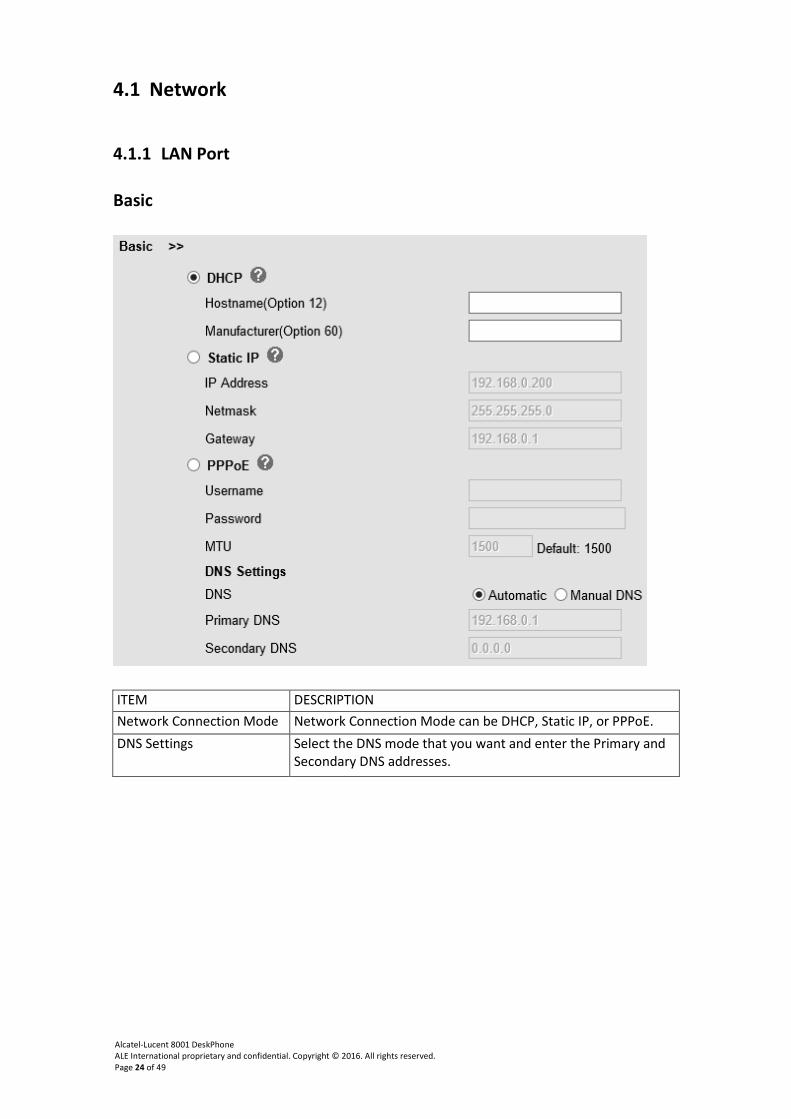
4.1.1 LAN Port
Basic
ITEM DESCRIPTION Network Connection Mode Network Connection Mode can be DHCP, Static IP, or PPPoE. DNS Settings Select the DNS mode that you want and enter the Primary and
Secondary DNS addresses.
Alcatel-Lucent 8001 DeskPhone ALE International proprietary and confidential. Copyright © 2016. All rights reserved. Page 25 of 49
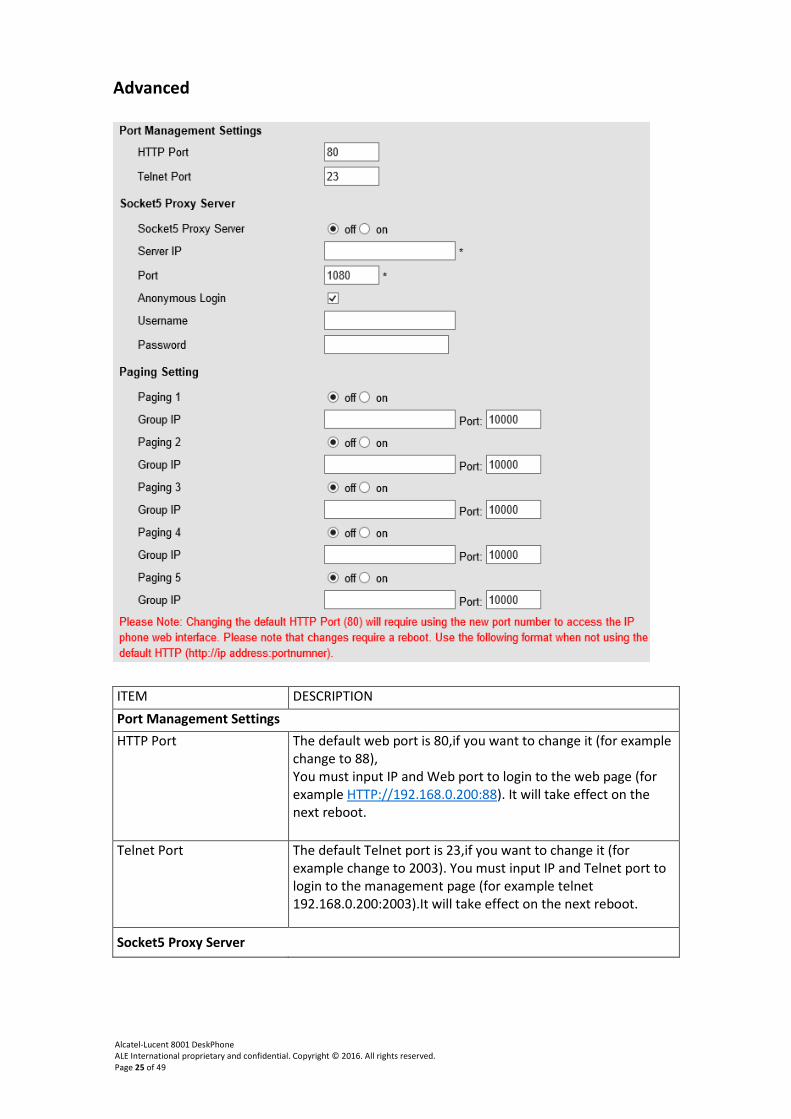
Advanced
ITEM DESCRIPTION Port Management Settings HTTP Port The default web port is 80,if you want to change it (for example
change to 88), You must input IP and Web port to login to the web page (for example HTTP://192.168.0.200:88). It will take effect on the next reboot.
Telnet Port The default Telnet port is 23,if you want to change it (for example change to 2003). You must input IP and Telnet port to login to the management page (for example telnet 192.168.0.200:2003).It will take effect on the next reboot.
Socket5 Proxy Server
Alcatel-Lucent 8001 DeskPhone ALE International proprietary and confidential. Copyright © 2016. All rights reserved. Page 26 of 49
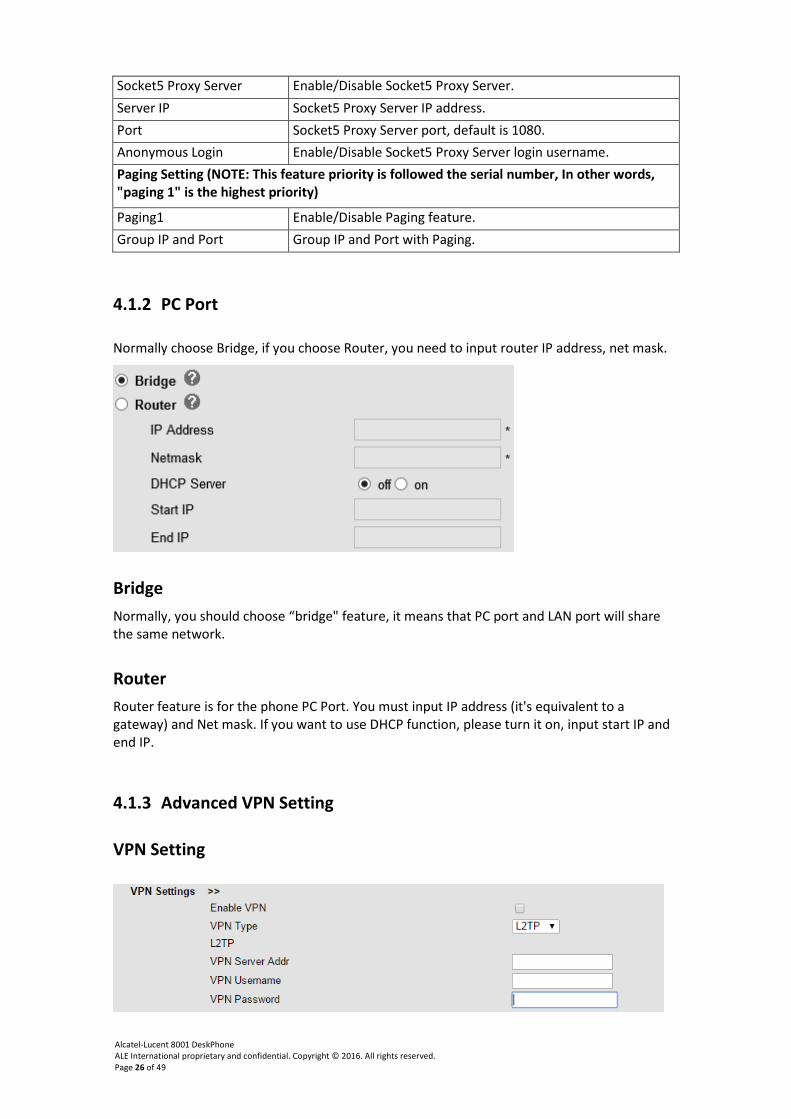
Socket5 Proxy Server Enable/Disable Socket5 Proxy Server. Server IP Socket5 Proxy Server IP address. Port Socket5 Proxy Server port, default is 1080. Anonymous Login Enable/Disable Socket5 Proxy Server login username. Paging Setting (NOTE: This feature priority is followed the serial number, In other words, "paging 1" is the highest priority)
Paging1 Enable/Disable Paging feature. Group IP and Port Group IP and Port with Paging.
4.1.2 PC Port
Normally choose Bridge, if you choose Router, you need to input router IP address, net mask.
Bridge Normally, you should choose “bridge" feature, it means that PC port and LAN port will share the same network.
Router Router feature is for the phone PC Port. You must input IP address (it's equivalent to a gateway) and Net mask. If you want to use DHCP function, please turn it on, input start IP and end IP.
4.1.3 Advanced VPN Setting
VPN Setting
Alcatel-Lucent 8001 DeskPhone ALE International proprietary and confidential. Copyright © 2016. All rights reserved. Page 27 of 49
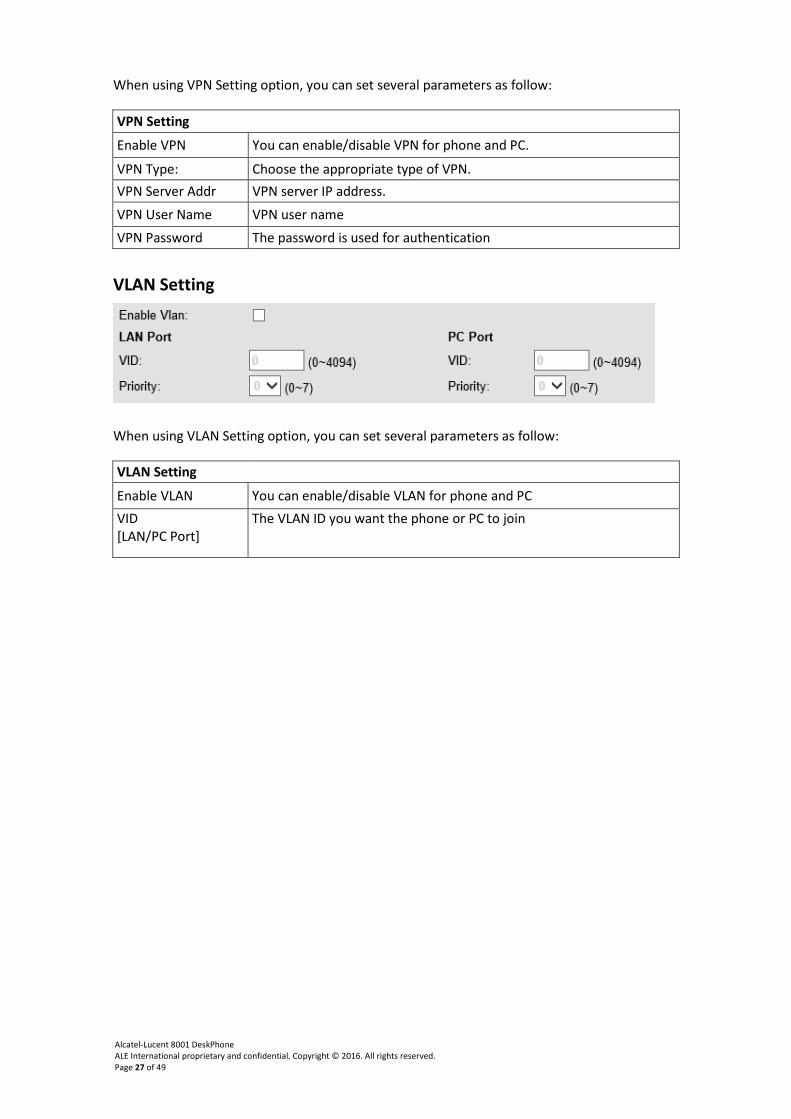
When using VPN Setting option, you can set several parameters as follow:
VPN Setting
Enable VPN You can enable/disable VPN for phone and PC.
VPN Type: Choose the appropriate type of VPN. VPN Server Addr VPN server IP address.
VPN User Name VPN user name VPN Password The password is used for authentication
VLAN Setting
When using VLAN Setting option, you can set several parameters as follow:
VLAN Setting
Enable VLAN You can enable/disable VLAN for phone and PC VID [LAN/PC Port]
The VLAN ID you want the phone or PC to join
Alcatel-Lucent 8001 DeskPhone ALE International proprietary and confidential. Copyright © 2016. All rights reserved. Page 28 of 49
5. SIP Account
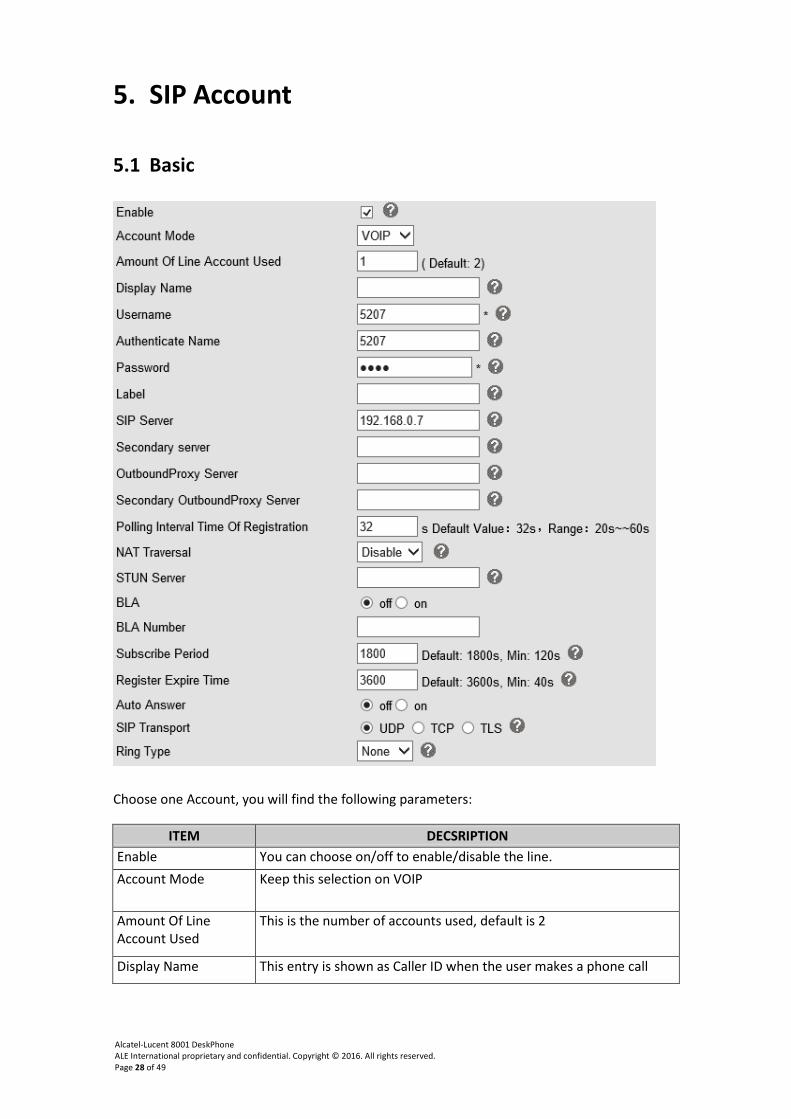
5.1 Basic
Choose one Account, you will find the following parameters:
ITEM DECSRIPTION Enable You can choose on/off to enable/disable the line. Account Mode Keep this selection on VOIP
Amount Of Line Account Used
This is the number of accounts used, default is 2
Display Name This entry is shown as Caller ID when the user makes a phone call
Alcatel-Lucent 8001 DeskPhone ALE International proprietary and confidential. Copyright © 2016. All rights reserved. Page 29 of 49
Username This is a username provided by SIP Server
Authenticate Name This is the ID for authentication
Password This is a password provided by SIP Server
Label Label for this account.
SIP Server Server for registration, provided by the administrator
Secondary server When the main server is not available, this device can register to this secondary server.
Outbound Proxy Server
Address of the outbound proxy server.
Secondary Outbound Proxy Server
When the main outbound server is not available, this device can use this secondary outbound proxy server.
Polling Interval Time Of Registration
Polling Interval Time Of Registration, default is 32 s.
NAT Traversal Defines whether the STUN server should be active or not
STUN Server Session Traversal Utilities for NAT (STUN) server address
BLA Bridge Line Appearance (BLA), also named Shared Line Appearance (SLA) With this BLA configuration, the 8001 DeskPhone set monitors a shared line status(this feature highly depends on SIP server status)
BLA Number BLA Number
Subscribe Period Subscription expiration time.
Register Expire Time Interval after which the IP phone automatically re-registers
SIP Transport There are three options; UDP/TCP/TLS
Ring Type Select the ringing type for this account.
5.2 Call
Alcatel-Lucent 8001 DeskPhone ALE International proprietary and confidential. Copyright © 2016. All rights reserved. Page 30 of 49
ITEM DECSRIPTION
Call
Do Not Disturb Enable/Disable Do Not Disturb
Anonymous Call Enable/Disable anonymous call.
Anonymous Call Rejection
Enable/Disable anonymous call rejection.
Use Session Timer Enable/Disable refresh session function. The device will send an Invite packet to refresh the session during a call if this option is enabled.
Session Timer The refresh session time interval.
Call Method This method includes SIP and TEL.
DNS-SRV Enable/Disable DNS-SRV.
Allow-events Enable/Disable Allow-events.
Registered NAT Enable/Disable Registered to NAT
UDP Keep-alive Message
The phone periodically sends a UDP packet to keep the port active and to avoid the server to shut down the port
UDP Keep-alive Interval
Default interval is 30 second.
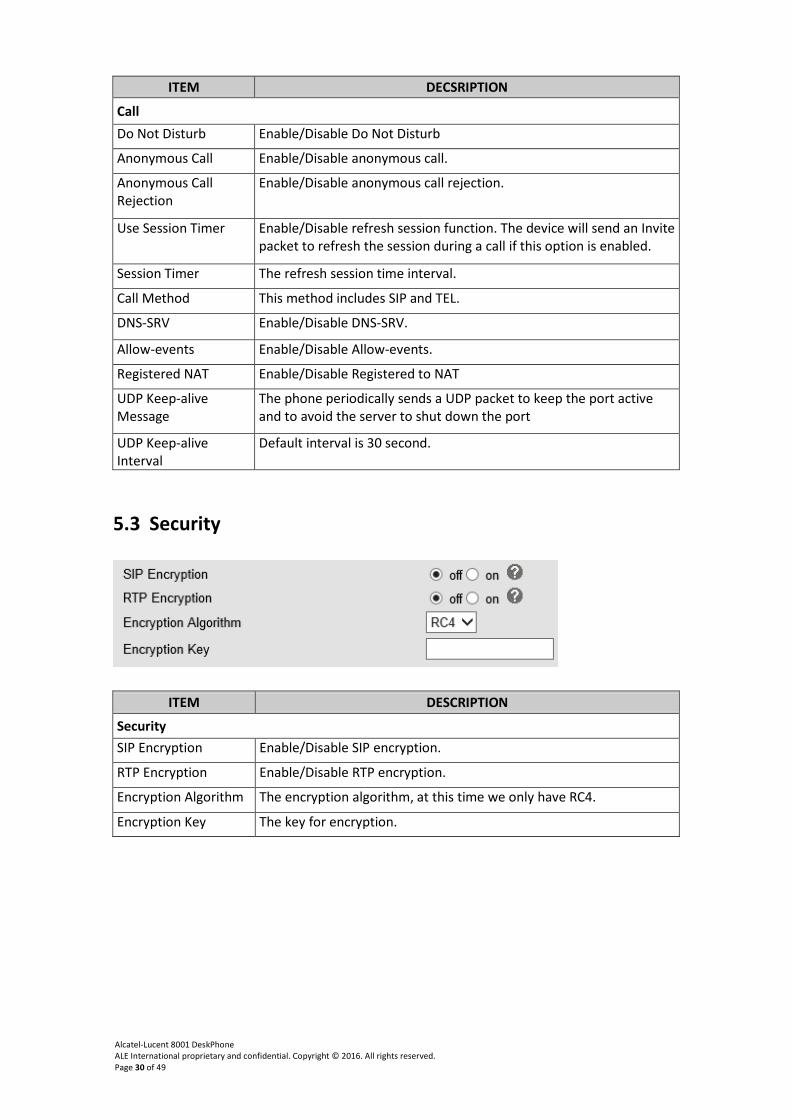
5.3 Security
ITEM DESCRIPTION
Security SIP Encryption Enable/Disable SIP encryption.
RTP Encryption Enable/Disable RTP encryption.
Encryption Algorithm The encryption algorithm, at this time we only have RC4.
Encryption Key The key for encryption.
Alcatel-Lucent 8001 DeskPhone ALE International proprietary and confidential. Copyright © 2016. All rights reserved. Page 31 of 49
6. Phone Setting
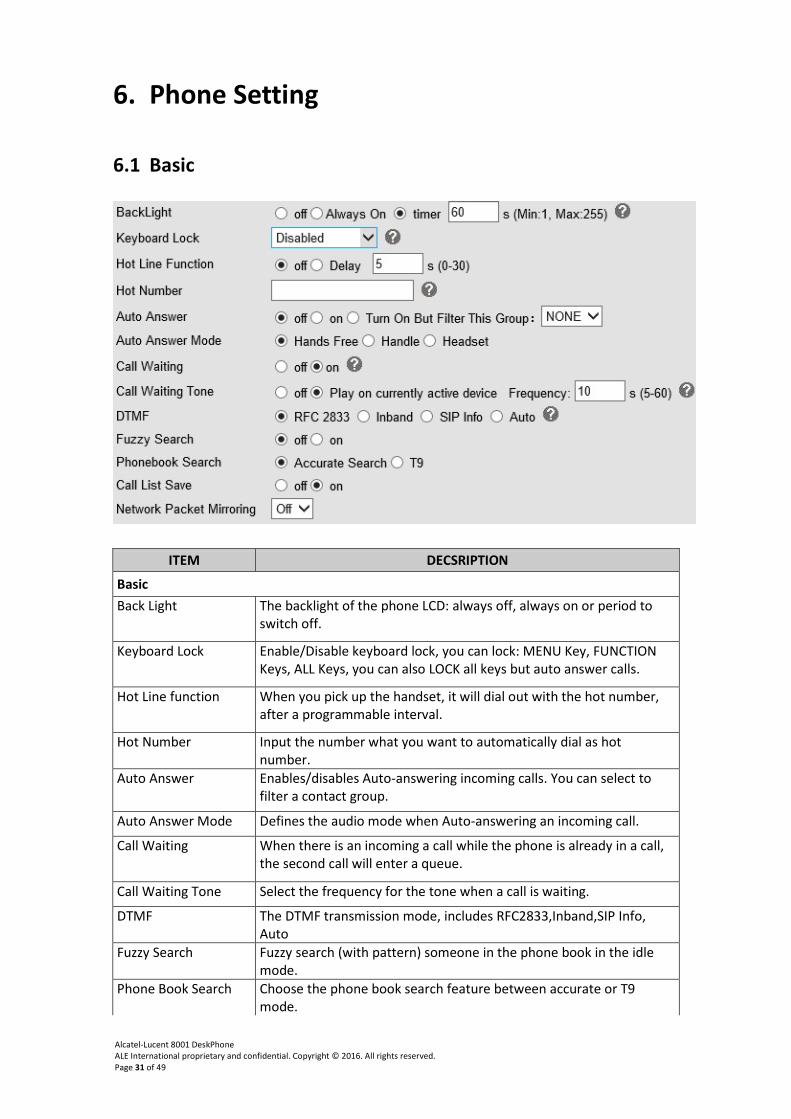
6.1 Basic
ITEM DECSRIPTION
Basic Back Light The backlight of the phone LCD: always off, always on or period to
switch off.
Keyboard Lock Enable/Disable keyboard lock, you can lock: MENU Key, FUNCTION Keys, ALL Keys, you can also LOCK all keys but auto answer calls.
Hot Line function When you pick up the handset, it will dial out with the hot number, after a programmable interval.
Hot Number Input the number what you want to automatically dial as hot number.
Auto Answer Enables/disables Auto-answering incoming calls. You can select to filter a contact group.
Auto Answer Mode Defines the audio mode when Auto-answering an incoming call.
Call Waiting When there is an incoming a call while the phone is already in a call, the second call will enter a queue.
Call Waiting Tone Select the frequency for the tone when a call is waiting.
DTMF The DTMF transmission mode, includes RFC2833,Inband,SIP Info, Auto
Fuzzy Search Fuzzy search (with pattern) someone in the phone book in the idle mode.
Phone Book Search Choose the phone book search feature between accurate or T9 mode.
Alcatel-Lucent 8001 DeskPhone ALE International proprietary and confidential. Copyright © 2016. All rights reserved. Page 32 of 49
Call List Save You can choose to save the call list into the phone or not.
Network Packet Mirroring
When you select on, then you can capture the phone's packets using a notebook connected to the PC port of the phone
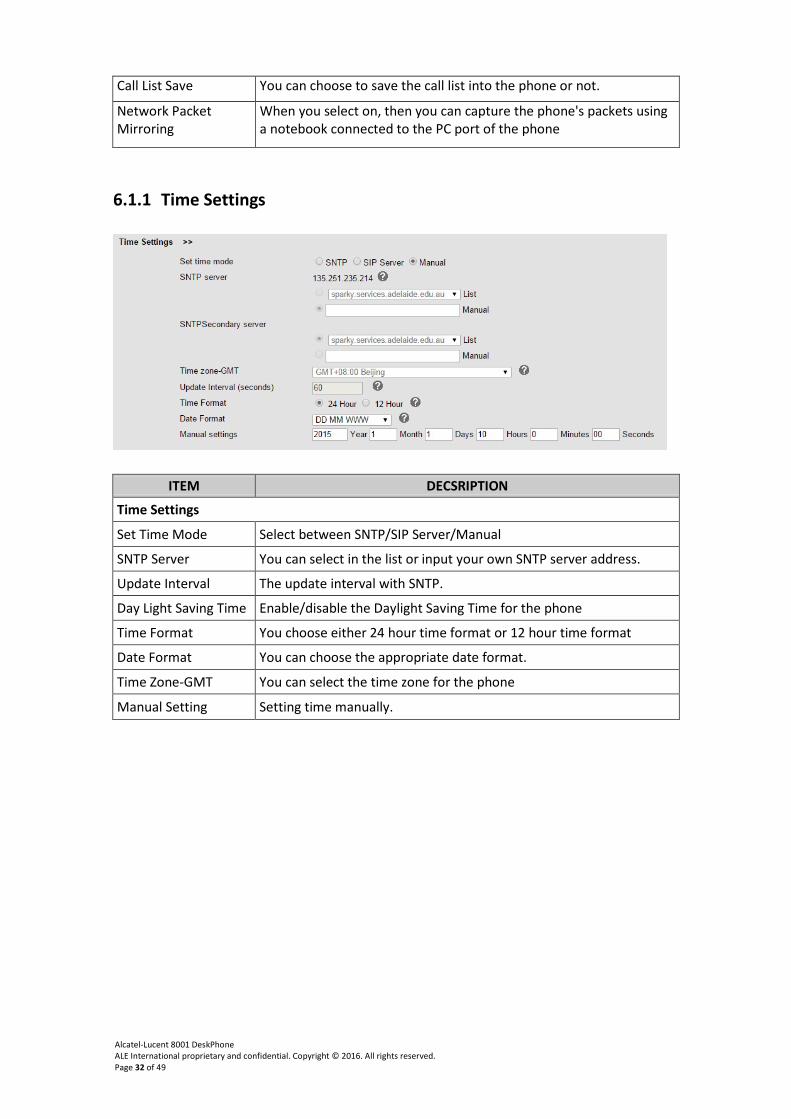
6.1.1 Time Settings
ITEM DECSRIPTION
Time Settings
Set Time Mode Select between SNTP/SIP Server/Manual
SNTP Server You can select in the list or input your own SNTP server address.
Update Interval The update interval with SNTP.
Day Light Saving Time Enable/disable the Daylight Saving Time for the phone
Time Format You choose either 24 hour time format or 12 hour time format
Date Format You can choose the appropriate date format.
Time Zone-GMT You can select the time zone for the phone
Manual Setting Setting time manually.
Alcatel-Lucent 8001 DeskPhone ALE International proprietary and confidential. Copyright © 2016. All rights reserved. Page 33 of 49
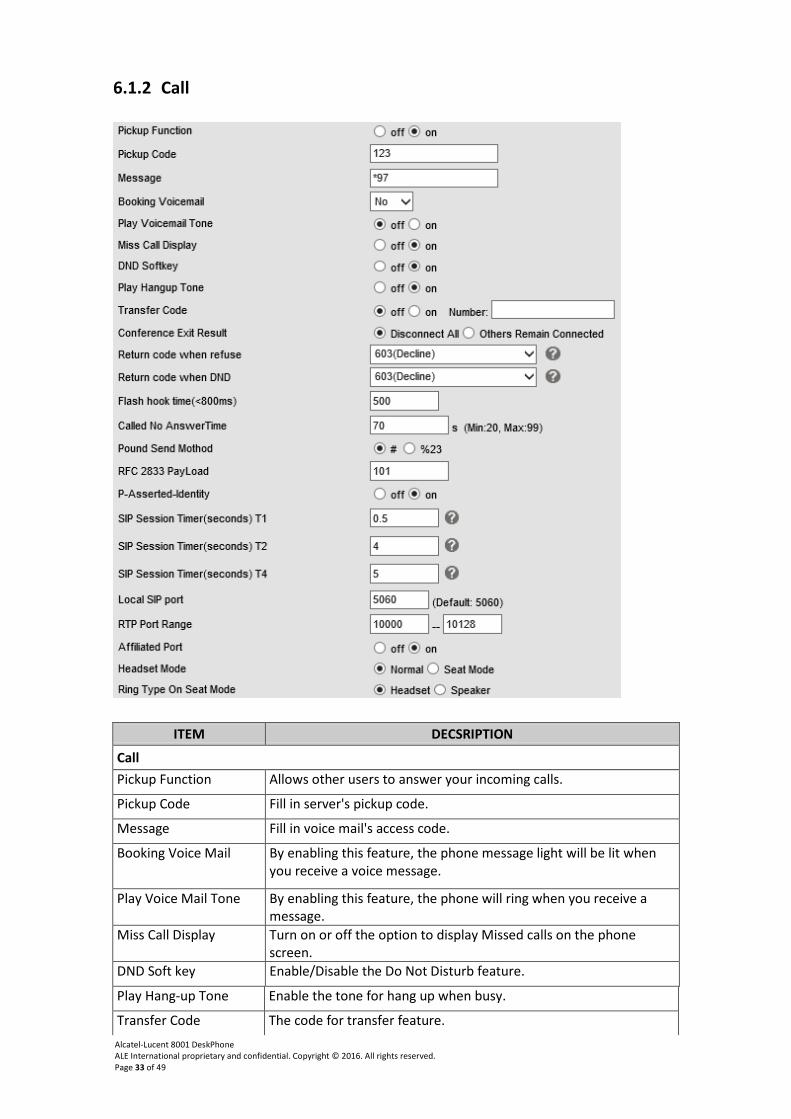
6.1.2 Call
ITEM DECSRIPTION
Call Pickup Function Allows other users to answer your incoming calls.
Pickup Code Fill in server's pickup code.
Message Fill in voice mail's access code.
Booking Voice Mail By enabling this feature, the phone message light will be lit when you receive a voice message.
Play Voice Mail Tone By enabling this feature, the phone will ring when you receive a message.
Miss Call Display Turn on or off the option to display Missed calls on the phone screen.
DND Soft key Enable/Disable the Do Not Disturb feature.
Play Hang-up Tone Enable the tone for hang up when busy.
Transfer Code The code for transfer feature.
Alcatel-Lucent 8001 DeskPhone ALE International proprietary and confidential. Copyright © 2016. All rights reserved. Page 34 of 49
Conference Exit Result Choose what should happen when the Conference originator hangs up: either keep the communication between the two other parties, or hang up the whole conference.
Return Code When Refuse
Select the code to feedback to the server when you reject the call.
Return Code When DND
Select the code to feedback to the server when you a call is rejected because of your DND function enabled.
Flash Hook Time (< 800 ms)
The time for the flash hook.
Called No Answer Time When you receive an incoming call while this feature is enabled, and if you don't answer the call, the caller will receive a time out after the here-defined "Called No Answer Time" has elapsed.
Pound Send Method Following RFC2396, the "#" will be interpreted as '#' or as %23 in the SIP request method, depending on what you define here.
RFC 2833 Play Load Default is 101, RTP Payload for DTMF Digits, Telephony Tones and Telephony Signals
P-Asserted-Identity Enable/Disable the P-Asserted-Identity feature.
SIP Session Timer T1 The SIP Session Timer T1 settings.
SIP Session Timer T2 The SIP Session Timer T2 settings.
SIP Session Timer T4 The SIP Session Timer T4 settings.
Local SIP Port The port range settings for SIP, default is 5060.
RTP Port Range The port range for RTP
Affiliated Port Enable/Disable the affiliated port feature.
Headset Mode Select headset mode as normal or seat.
Ring Type On Seat Mode
Select ring type mode with headset or speaker.
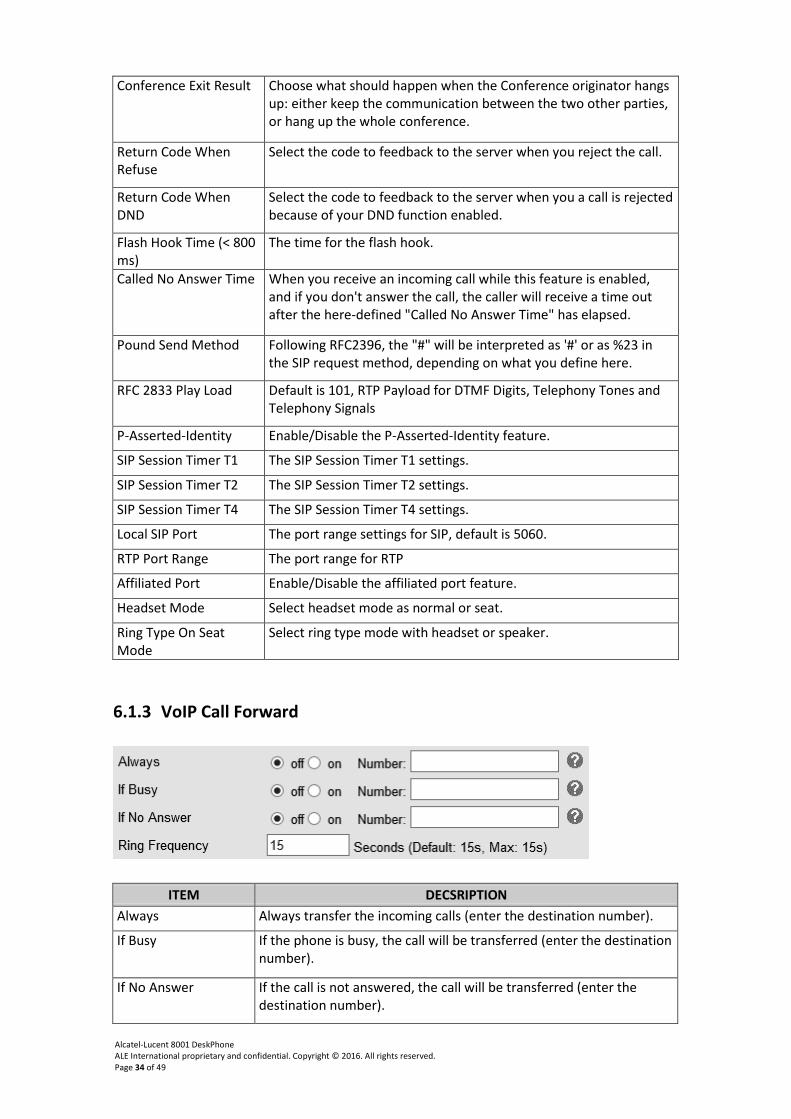
6.1.3 VoIP Call Forward
ITEM DECSRIPTION Always Always transfer the incoming calls (enter the destination number).
If Busy If the phone is busy, the call will be transferred (enter the destination number).
If No Answer If the call is not answered, the call will be transferred (enter the destination number).
Alcatel-Lucent 8001 DeskPhone ALE International proprietary and confidential. Copyright © 2016. All rights reserved. Page 35 of 49
Ring Frequency Here you define the time interval before an incoming call is forwarded (when forward “if no answer" is enabled)
6.1.4 QoS
ITEM DECSRIPTION
SIP QoS The range is 0~63,default is 26
Voice QoS The range is 0~63,default is 46
6.2 Advanced
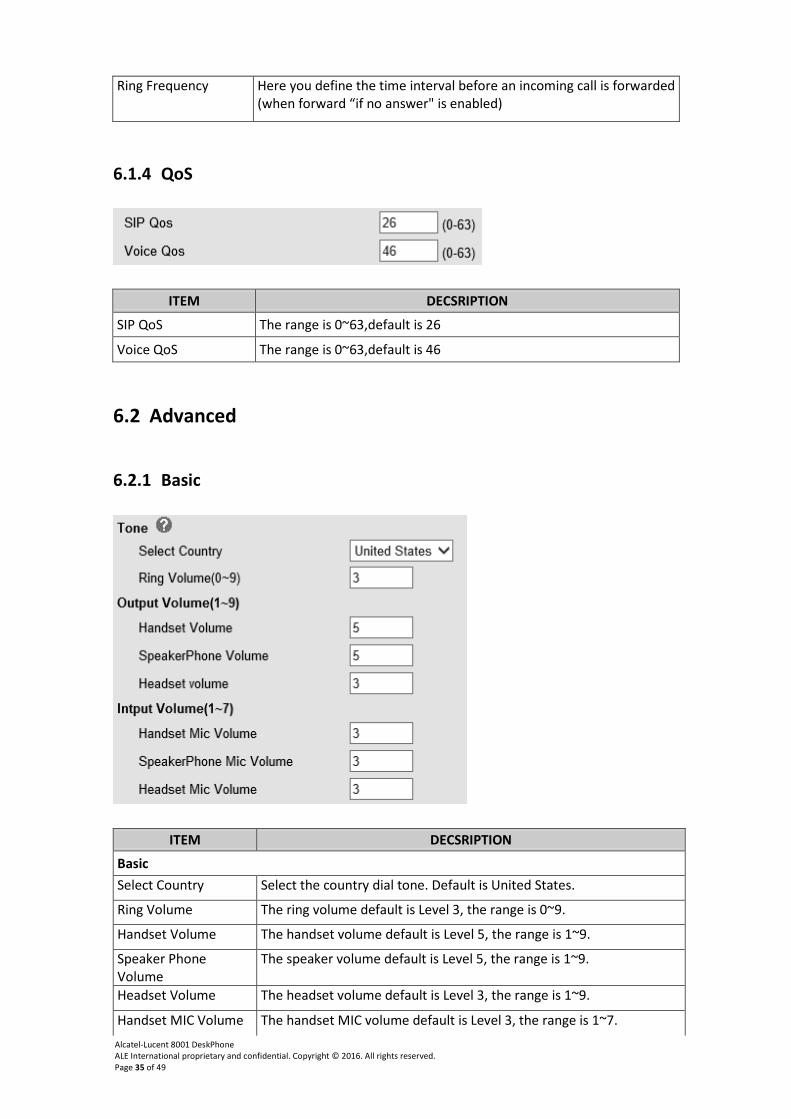
6.2.1 Basic
ITEM DECSRIPTION
Basic Select Country Select the country dial tone. Default is United States.
Ring Volume The ring volume default is Level 3, the range is 0~9.
Handset Volume The handset volume default is Level 5, the range is 1~9.
Speaker Phone Volume
The speaker volume default is Level 5, the range is 1~9.
Headset Volume The headset volume default is Level 3, the range is 1~9.
Handset MIC Volume The handset MIC volume default is Level 3, the range is 1~7.
Alcatel-Lucent 8001 DeskPhone ALE International proprietary and confidential. Copyright © 2016. All rights reserved. Page 36 of 49
Speaker Phone MIC Volume
The speaker MIC volume default is Level 3, the range is 1~7
Headset MIC Volume The headset MIC volume default is Level 3, the range is 1~7
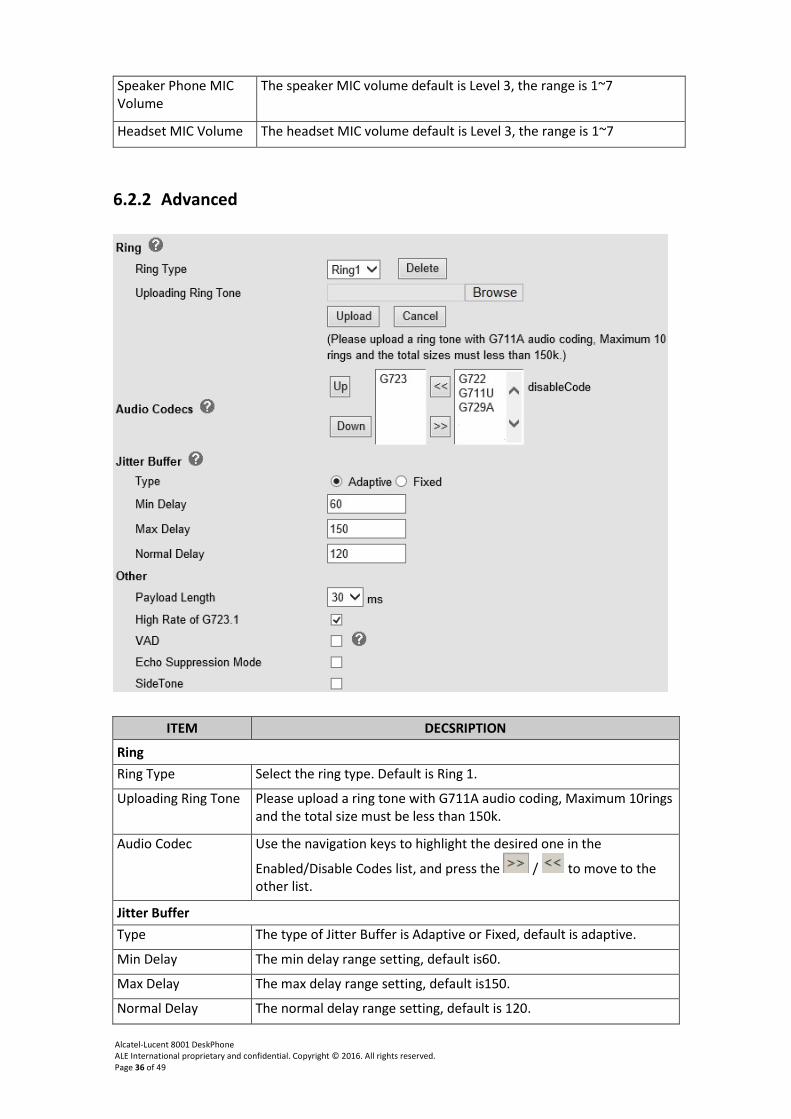
6.2.2 Advanced
ITEM DECSRIPTION
Ring Ring Type Select the ring type. Default is Ring 1.
Uploading Ring Tone Please upload a ring tone with G711A audio coding, Maximum 10rings and the total size must be less than 150k.
Audio Codec Use the navigation keys to highlight the desired one in the
Enabled/Disable Codes list, and press the / to move to the other list.
Jitter Buffer Type The type of Jitter Buffer is Adaptive or Fixed, default is adaptive.
Min Delay The min delay range setting, default is60.
Max Delay The max delay range setting, default is150.
Normal Delay The normal delay range setting, default is 120.
Alcatel-Lucent 8001 DeskPhone ALE International proprietary and confidential. Copyright © 2016. All rights reserved. Page 37 of 49
Other Payload Length The payload length setting, default is 30ms.
High Rate Of G723.1 Enable/Disable High Rate of G723.1 feature.
VAD Enable/Disable VAD feature.
Echo Suppression Mode
Enable/Disable Echo Suppression Mode feature.
Side Tone Enable/Disable Side Tone feature.
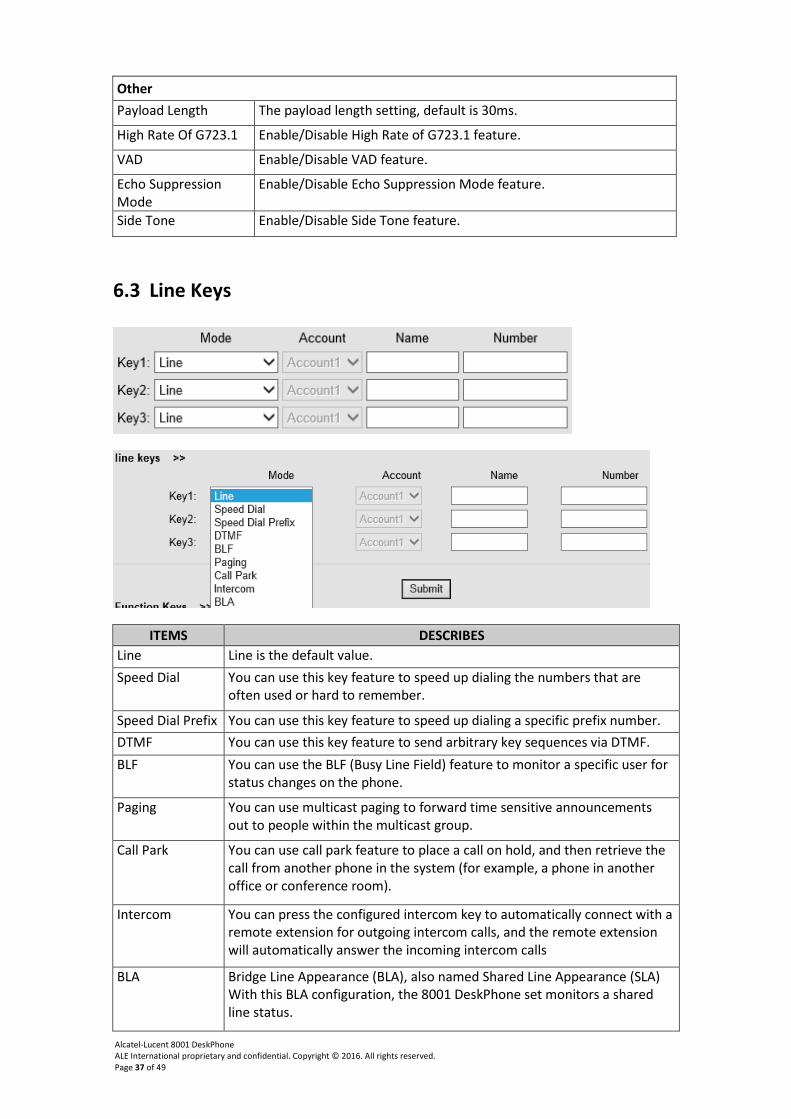
6.3 Line Keys
ITEMS DESCRIBES Line Line is the default value. Speed Dial You can use this key feature to speed up dialing the numbers that are
often used or hard to remember.
Speed Dial Prefix You can use this key feature to speed up dialing a specific prefix number. DTMF You can use this key feature to send arbitrary key sequences via DTMF. BLF You can use the BLF (Busy Line Field) feature to monitor a specific user for
status changes on the phone.
Paging You can use multicast paging to forward time sensitive announcements out to people within the multicast group.
Call Park You can use call park feature to place a call on hold, and then retrieve the call from another phone in the system (for example, a phone in another office or conference room).
Intercom You can press the configured intercom key to automatically connect with a remote extension for outgoing intercom calls, and the remote extension will automatically answer the incoming intercom calls
BLA Bridge Line Appearance (BLA), also named Shared Line Appearance (SLA) With this BLA configuration, the 8001 DeskPhone set monitors a shared line status.
Alcatel-Lucent 8001 DeskPhone ALE International proprietary and confidential. Copyright © 2016. All rights reserved. Page 38 of 49
NOTE: ONLY WHEN YOU CHOOSE "SPEED DIAL", THE RIGHT OF "NAME","NUMBER" WILL TAKE EFFECT.
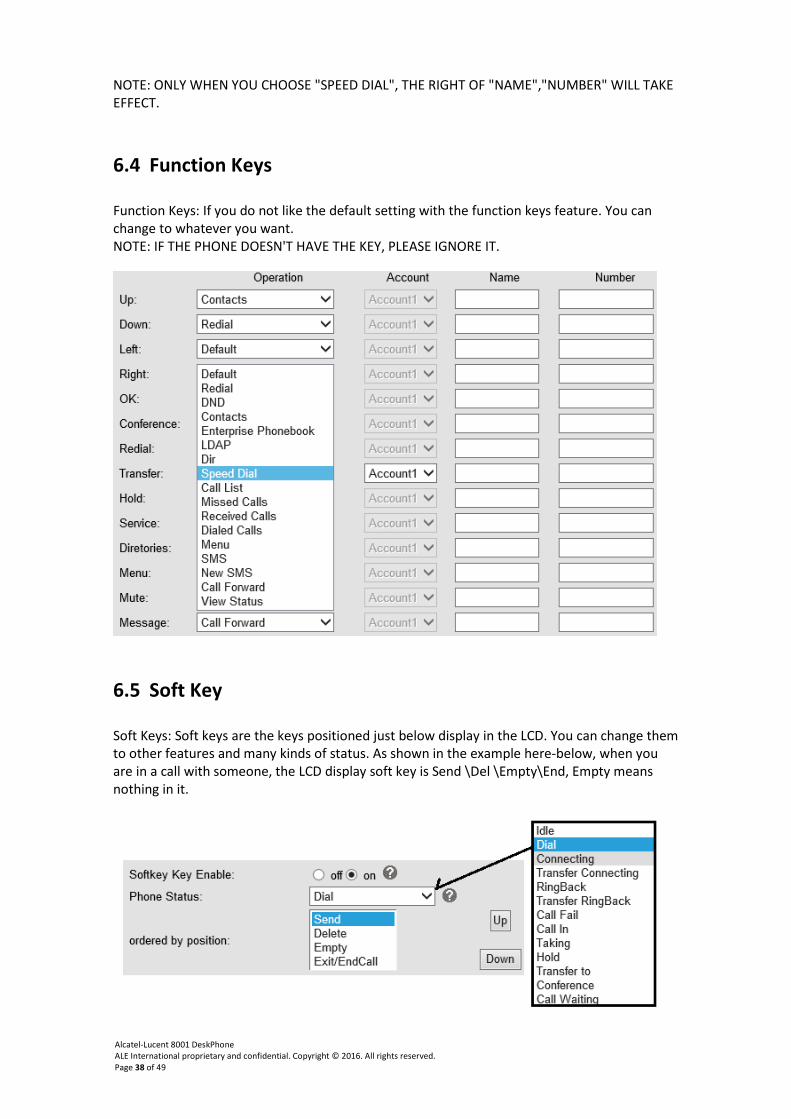
6.4 Function Keys
Function Keys: If you do not like the default setting with the function keys feature. You can change to whatever you want. NOTE: IF THE PHONE DOESN'T HAVE THE KEY, PLEASE IGNORE IT.
6.5 Soft Key
Soft Keys: Soft keys are the keys positioned just below display in the LCD. You can change them to other features and many kinds of status. As shown in the example here-below, when you are in a call with someone, the LCD display soft key is Send \Del \Empty\End, Empty means nothing in it.
Alcatel-Lucent 8001 DeskPhone ALE International proprietary and confidential. Copyright © 2016. All rights reserved. Page 39 of 49
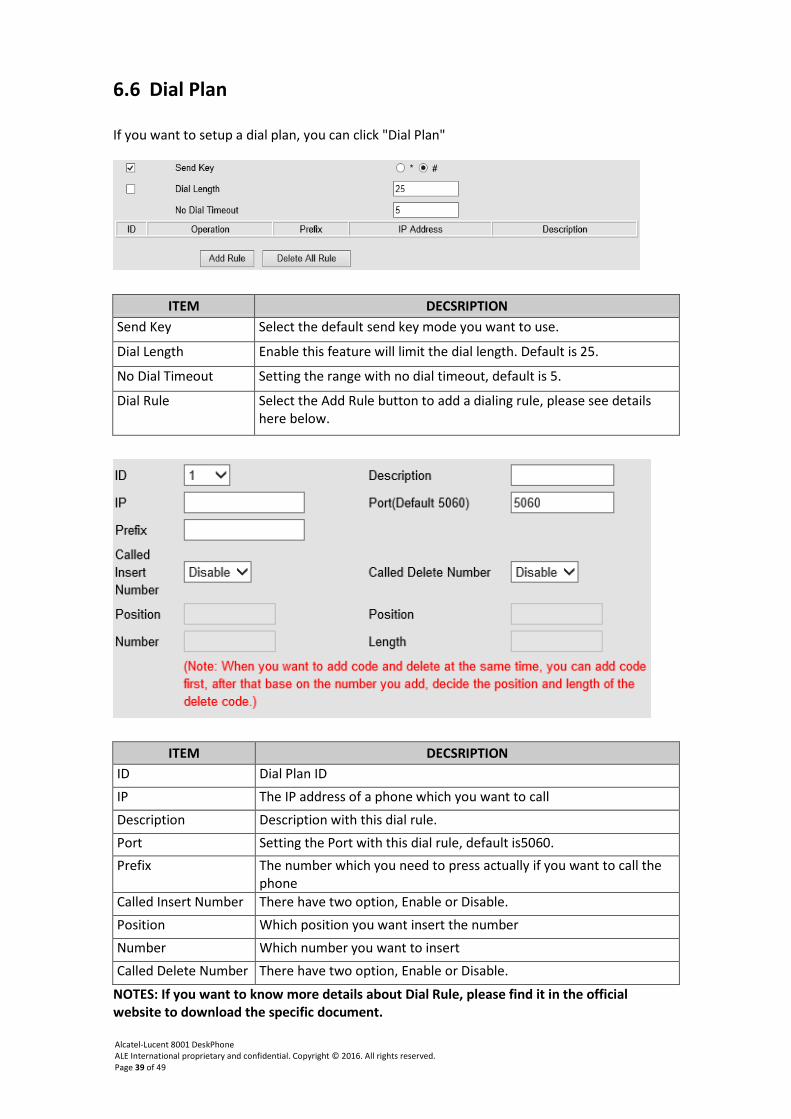
6.6 Dial Plan
If you want to setup a dial plan, you can click "Dial Plan"
ITEM DECSRIPTION Send Key Select the default send key mode you want to use.
Dial Length Enable this feature will limit the dial length. Default is 25.
No Dial Timeout Setting the range with no dial timeout, default is 5.
Dial Rule Select the Add Rule button to add a dialing rule, please see details here below.
ITEM DECSRIPTION ID Dial Plan ID IP The IP address of a phone which you want to call Description Description with this dial rule. Port Setting the Port with this dial rule, default is5060. Prefix The number which you need to press actually if you want to call the
phone Called Insert Number There have two option, Enable or Disable. Position Which position you want insert the number Number Which number you want to insert Called Delete Number There have two option, Enable or Disable.
NOTES: If you want to know more details about Dial Rule, please find it in the official website to download the specific document.
Alcatel-Lucent 8001 DeskPhone ALE International proprietary and confidential. Copyright © 2016. All rights reserved. Page 40 of 49
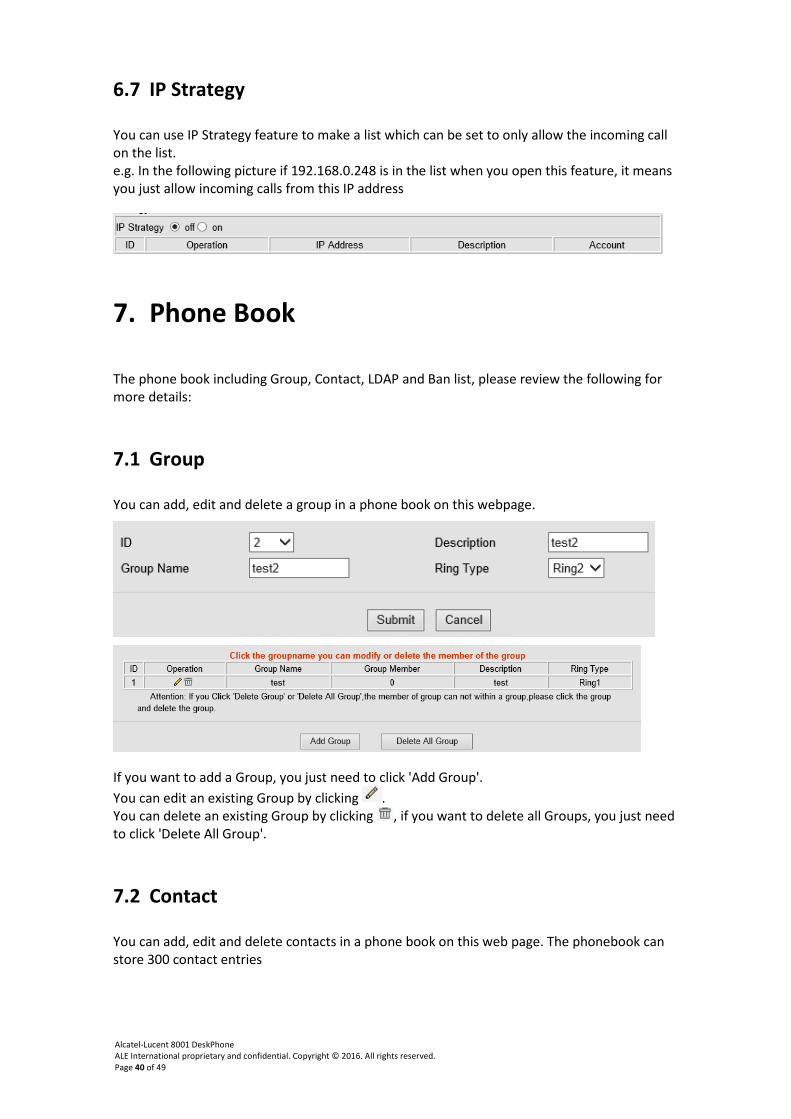
6.7 IP Strategy
You can use IP Strategy feature to make a list which can be set to only allow the incoming call on the list. e.g. In the following picture if 192.168.0.248 is in the list when you open this feature, it means you just allow incoming calls from this IP address
7. Phone Book
The phone book including Group, Contact, LDAP and Ban list, please review the following for more details:
7.1 Group
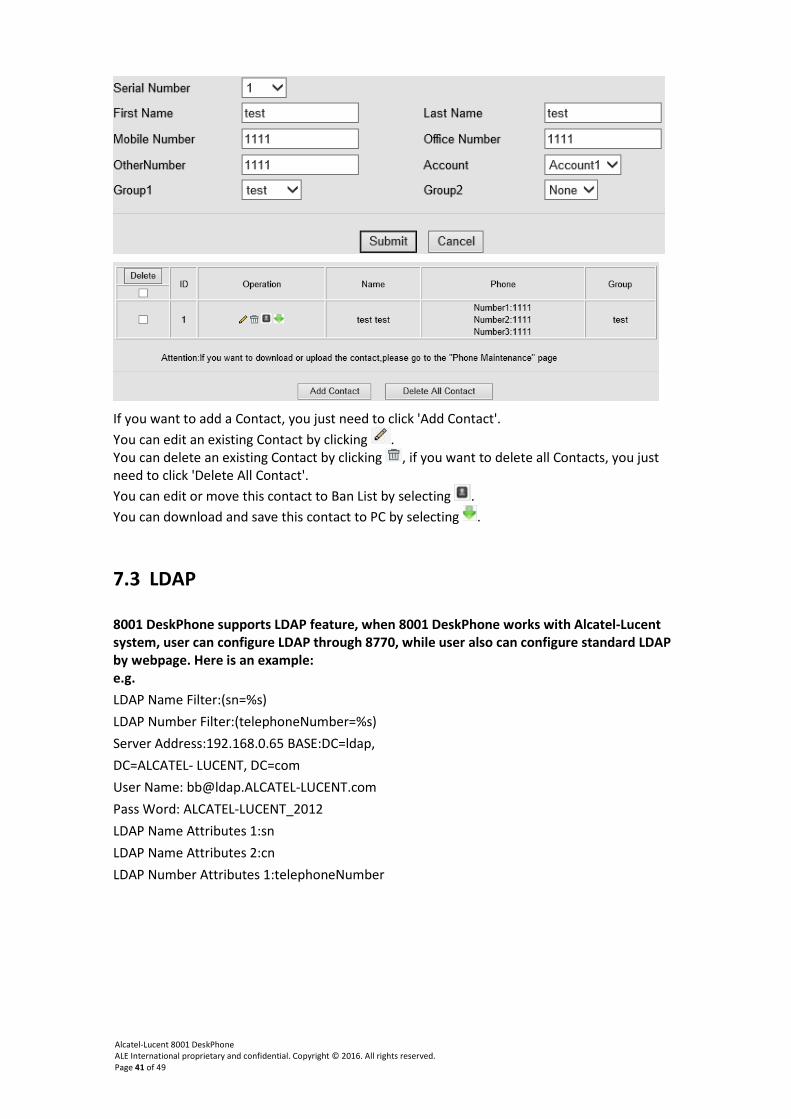
You can add, edit and delete a group in a phone book on this webpage.
If you want to add a Group, you just need to click 'Add Group'. You can edit an existing Group by clicking . You can delete an existing Group by clicking , if you want to delete all Groups, you just need to click 'Delete All Group'.
7.2 Contact
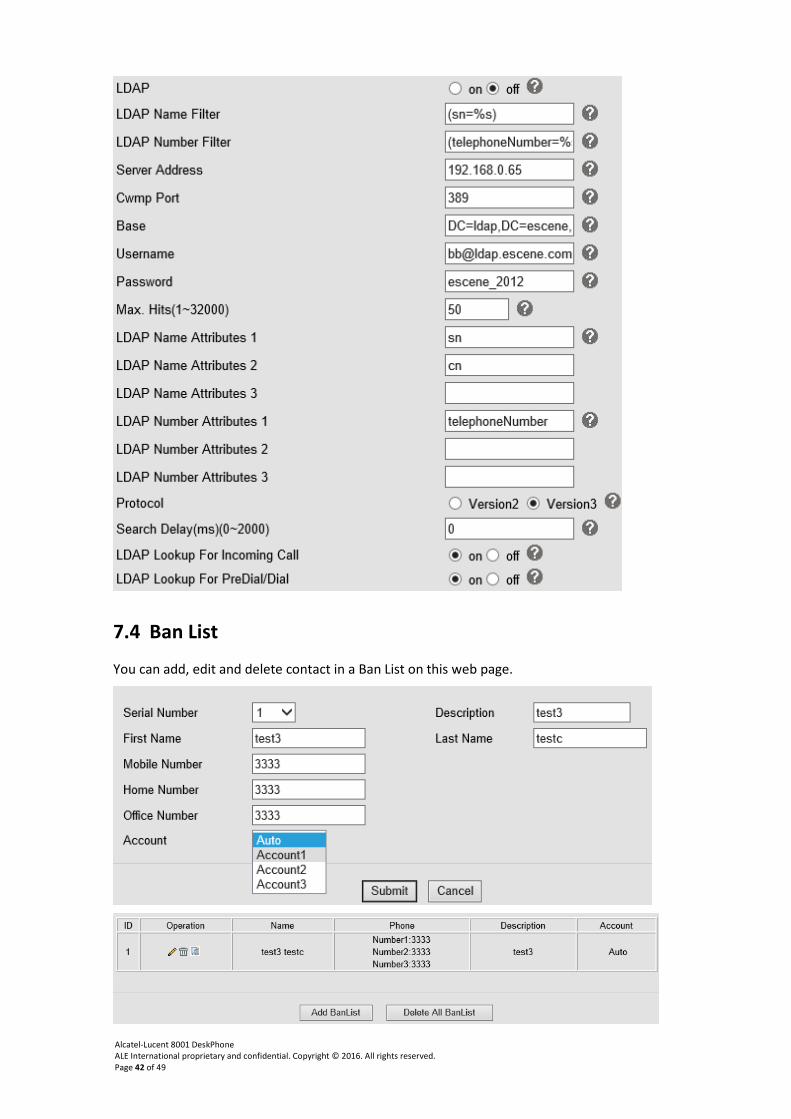
You can add, edit and delete contacts in a phone book on this web page. The phonebook can store 300 contact entries
Alcatel-Lucent 8001 DeskPhone ALE International proprietary and confidential. Copyright © 2016. All rights reserved. Page 41 of 49
If you want to add a Contact, you just need to click 'Add Contact'. You can edit an existing Contact by clicking . You can delete an existing Contact by clicking , if you want to delete all Contacts, you just need to click 'Delete All Contact'. You can edit or move this contact to Ban List by selecting . You can download and save this contact to PC by selecting .
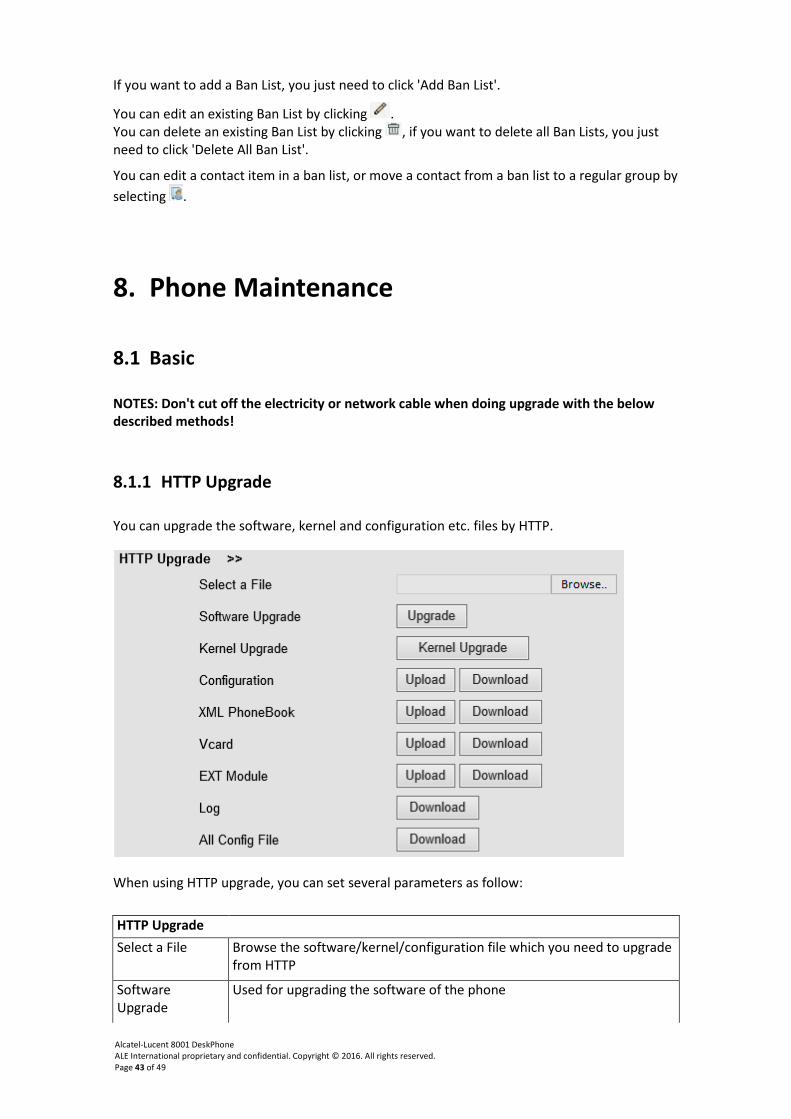
7.3 LDAP
8001 DeskPhone supports LDAP feature, when 8001 DeskPhone works with Alcatel-Lucent system, user can configure LDAP through 8770, while user also can configure standard LDAP by webpage. Here is an example: e.g. LDAP Name Filter:(sn=%s) LDAP Number Filter:(telephoneNumber=%s) Server Address:192.168.0.65 BASE:DC=ldap, DC=ALCATEL- LUCENT, DC=com User Name: [email protected] Pass Word: ALCATEL-LUCENT_2012 LDAP Name Attributes 1:sn LDAP Name Attributes 2:cn LDAP Number Attributes 1:telephoneNumber
Alcatel-Lucent 8001 DeskPhone ALE International proprietary and confidential. Copyright © 2016. All rights reserved. Page 42 of 49
7.4 Ban List
You can add, edit and delete contact in a Ban List on this web page.
Alcatel-Lucent 8001 DeskPhone ALE International proprietary and confidential. Copyright © 2016. All rights reserved. Page 43 of 49
If you want to add a Ban List, you just need to click 'Add Ban List'.
You can edit an existing Ban List by clicking . You can delete an existing Ban List by clicking , if you want to delete all Ban Lists, you just need to click 'Delete All Ban List'.
You can edit a contact item in a ban list, or move a contact from a ban list to a regular group by selecting .
8. Phone Maintenance
8.1 Basic
NOTES: Don't cut off the electricity or network cable when doing upgrade with the below described methods!
8.1.1 HTTP Upgrade
You can upgrade the software, kernel and configuration etc. files by HTTP.
When using HTTP upgrade, you can set several parameters as follow:
HTTP Upgrade Select a File Browse the software/kernel/configuration file which you need to upgrade
from HTTP
Software Upgrade
Used for upgrading the software of the phone
Alcatel-Lucent 8001 DeskPhone ALE International proprietary and confidential. Copyright © 2016. All rights reserved. Page 44 of 49
Kernel Upgrade Used for upgrading the kernel of the phone Configuration You can use upload/download to upload/download the configuration file
of the phone
XML Phone Book Used for uploading/downloading the XML phonebook of the phone Vcard Downloading all contacts in the Vcard mode, but upload only support one
by one transfer.
EXT Module 8001 DeskPhone doesn't support this feature
Log Used by the administrator for troubleshooting.
All Config File All Config File includes: Configuration, Extern, Log, XML Phone book, Enterprise Phone Book.
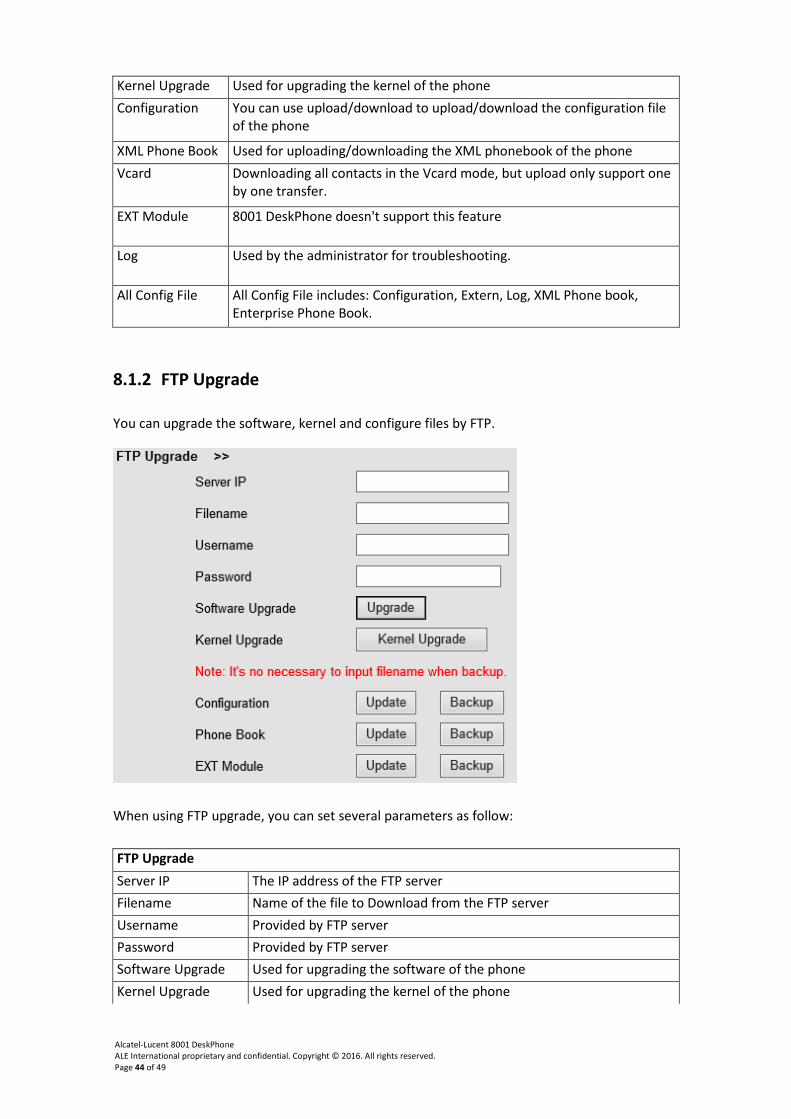
8.1.2 FTP Upgrade
You can upgrade the software, kernel and configure files by FTP.
When using FTP upgrade, you can set several parameters as follow:
FTP Upgrade Server IP The IP address of the FTP server Filename Name of the file to Download from the FTP server Username Provided by FTP server Password Provided by FTP server Software Upgrade Used for upgrading the software of the phone Kernel Upgrade Used for upgrading the kernel of the phone
Alcatel-Lucent 8001 DeskPhone ALE International proprietary and confidential. Copyright © 2016. All rights reserved. Page 45 of 49
Configuration Used for updating/backup of the configuration file of thephone
Phone Book Used for updating/backup of the phonebook of the phone
EXT Module This phone doesn't support this feature
NOTES: It's not necessary to input filename when doing backup Configuration, Phone Book.
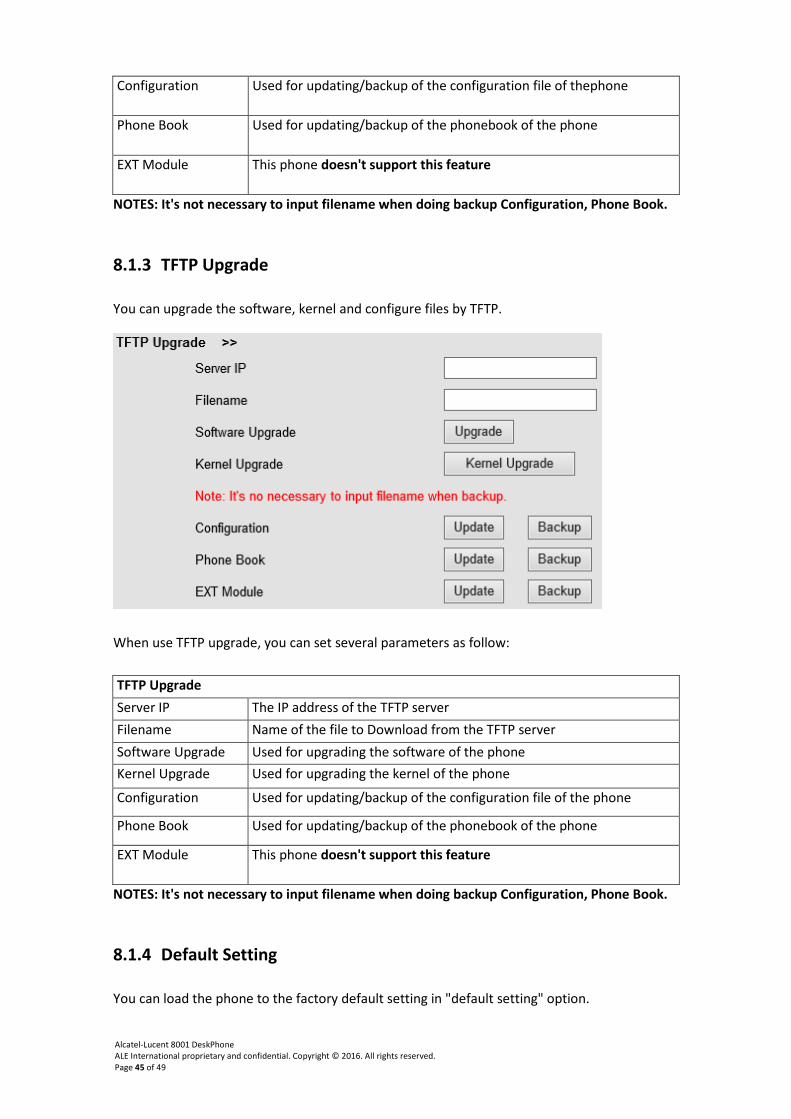
8.1.3 TFTP Upgrade
You can upgrade the software, kernel and configure files by TFTP.
When use TFTP upgrade, you can set several parameters as follow:
TFTP Upgrade Server IP The IP address of the TFTP server Filename Name of the file to Download from the TFTP server Software Upgrade Used for upgrading the software of the phone Kernel Upgrade Used for upgrading the kernel of the phone
Configuration Used for updating/backup of the configuration file of the phone
Phone Book Used for updating/backup of the phonebook of the phone
EXT Module This phone doesn't support this feature
NOTES: It's not necessary to input filename when doing backup Configuration, Phone Book.
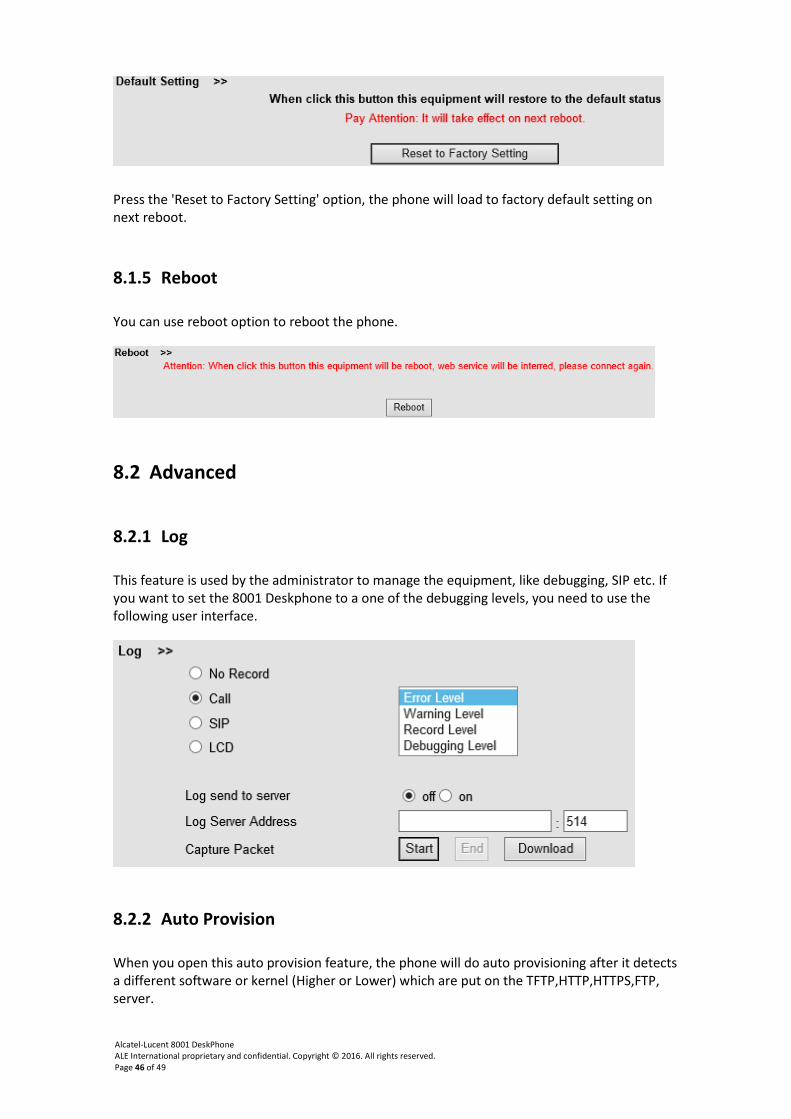
8.1.4 Default Setting
You can load the phone to the factory default setting in "default setting" option.
Alcatel-Lucent 8001 DeskPhone ALE International proprietary and confidential. Copyright © 2016. All rights reserved. Page 46 of 49
Press the 'Reset to Factory Setting' option, the phone will load to factory default setting on next reboot.
8.1.5 Reboot
You can use reboot option to reboot the phone.
8.2 Advanced
8.2.1 Log
This feature is used by the administrator to manage the equipment, like debugging, SIP etc. If you want to set the 8001 Deskphone to a one of the debugging levels, you need to use the following user interface.
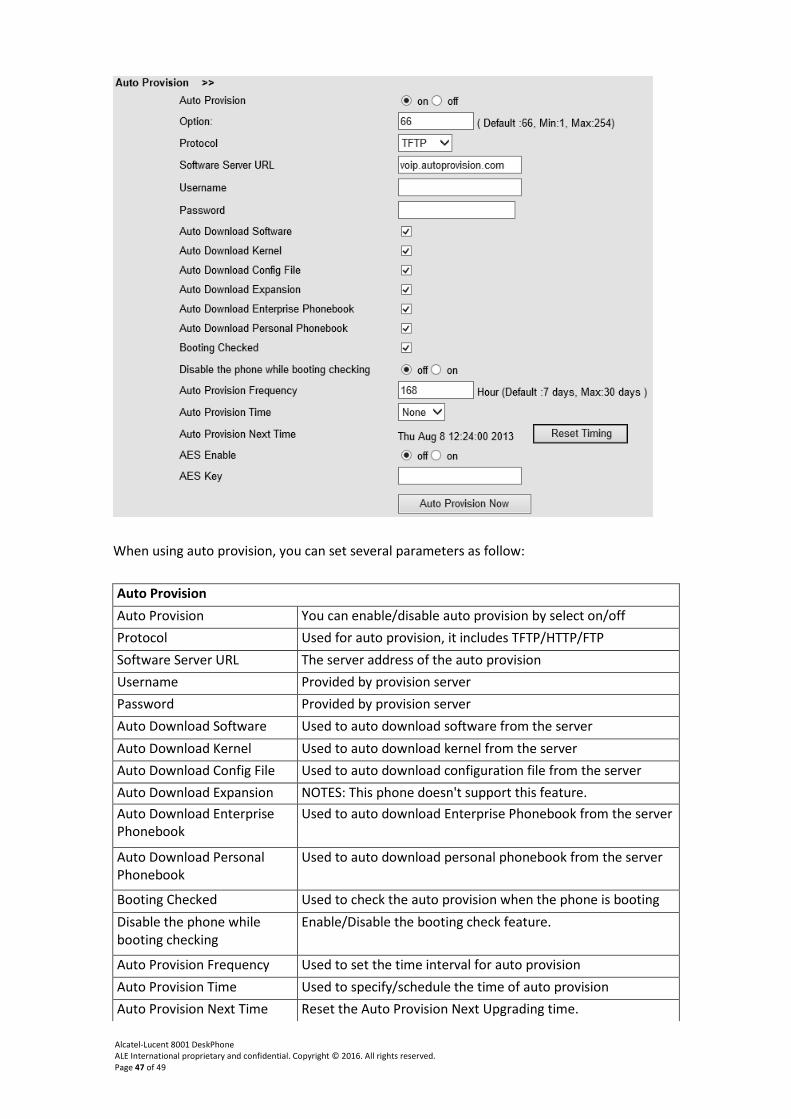
8.2.2 Auto Provision
When you open this auto provision feature, the phone will do auto provisioning after it detects a different software or kernel (Higher or Lower) which are put on the TFTP,HTTP,HTTPS,FTP, server.
Alcatel-Lucent 8001 DeskPhone ALE International proprietary and confidential. Copyright © 2016. All rights reserved. Page 47 of 49
When using auto provision, you can set several parameters as follow:
Auto Provision Auto Provision You can enable/disable auto provision by select on/off Protocol Used for auto provision, it includes TFTP/HTTP/FTP Software Server URL The server address of the auto provision Username Provided by provision server Password Provided by provision server Auto Download Software Used to auto download software from the server Auto Download Kernel Used to auto download kernel from the server Auto Download Config File Used to auto download configuration file from the server Auto Download Expansion NOTES: This phone doesn't support this feature. Auto Download Enterprise Phonebook
Used to auto download Enterprise Phonebook from the server
Auto Download Personal Phonebook
Used to auto download personal phonebook from the server
Booting Checked Used to check the auto provision when the phone is booting Disable the phone while booting checking
Enable/Disable the booting check feature.
Auto Provision Frequency Used to set the time interval for auto provision Auto Provision Time Used to specify/schedule the time of auto provision Auto Provision Next Time Reset the Auto Provision Next Upgrading time.
Alcatel-Lucent 8001 DeskPhone ALE International proprietary and confidential. Copyright © 2016. All rights reserved. Page 48 of 49
AES Enable You can enable/disable AES encryption for auto provision AES Key The key of the AES Auto Provision Now Used for doing auto provision immediately
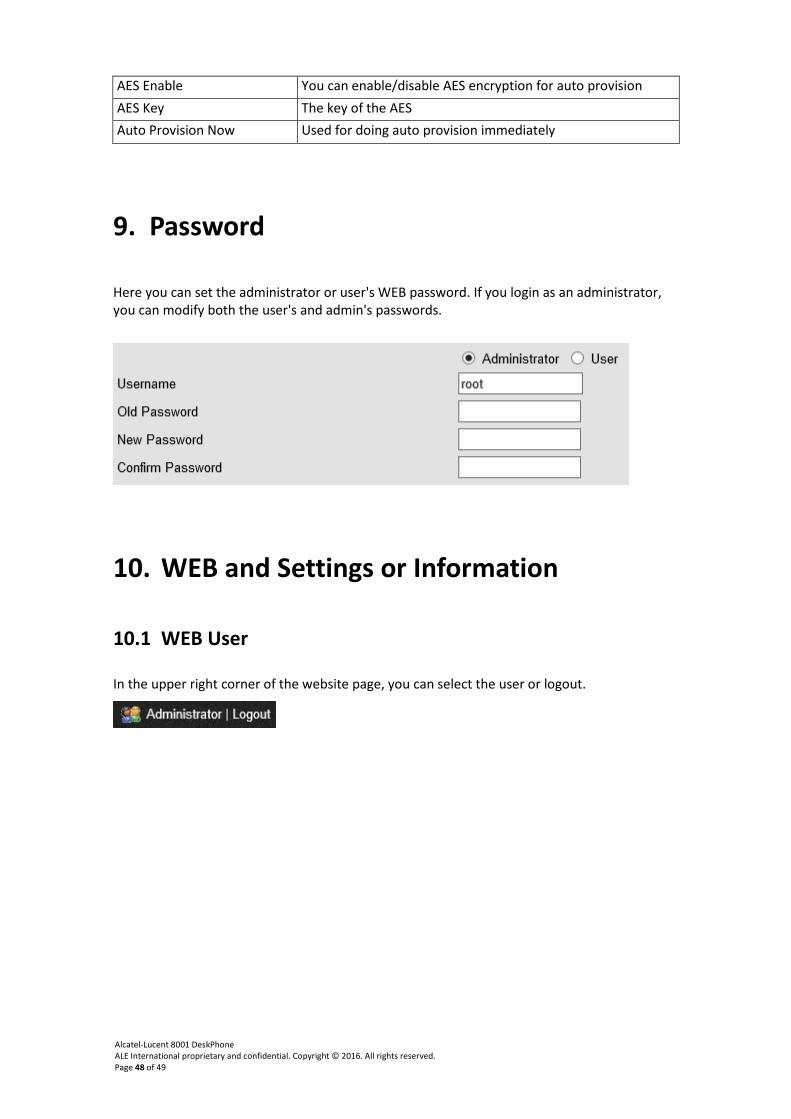
9. Password
Here you can set the administrator or user's WEB password. If you login as an administrator, you can modify both the user's and admin's passwords.
10. WEB and Settings or Information
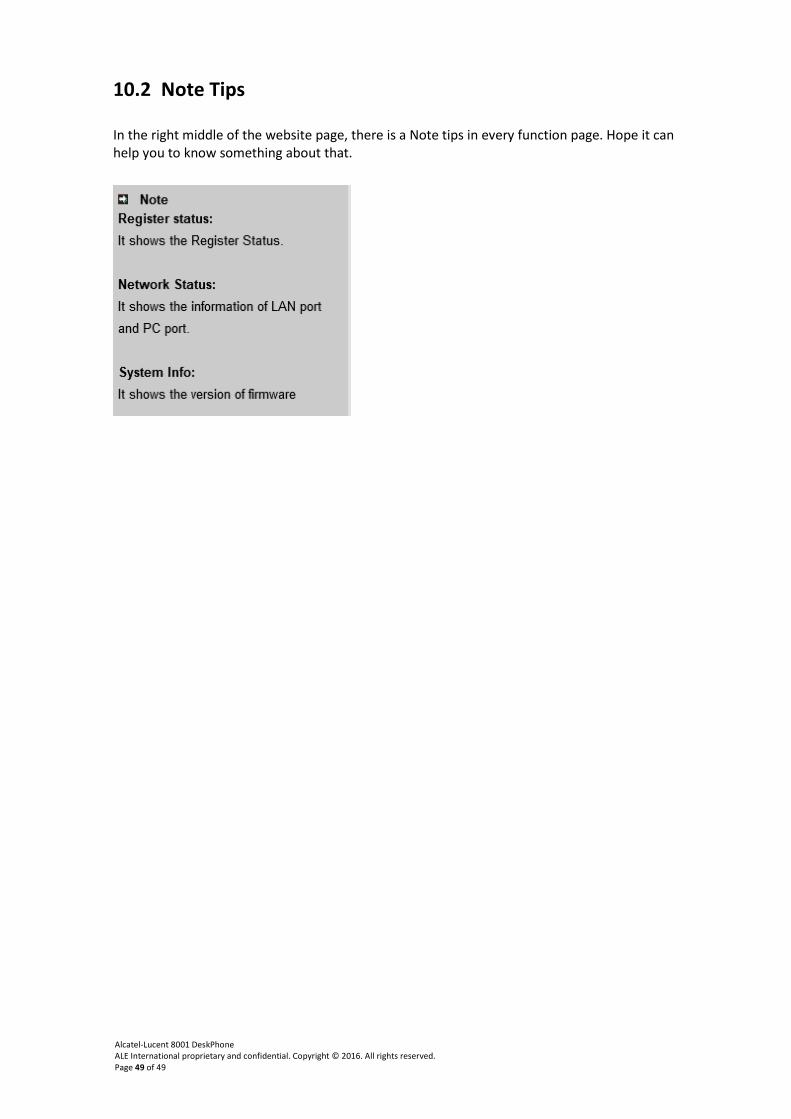
10.1 WEB User
In the upper right corner of the website page, you can select the user or logout.
Alcatel-Lucent 8001 DeskPhone ALE International proprietary and confidential. Copyright © 2016. All rights reserved. Page 49 of 49
10.2 Note Tips
In the right middle of the website page, there is a Note tips in every function page. Hope it can help you to know something about that.