Embed Size (px)
Citation preview
Akeeba Backup User's Guide
Nicholas K. Dionysopoulos
Akeeba Backup User's Guideby Nicholas K. Dionysopoulos
Published March 2010
Abstract
This book covers the use of the Akeeba Backup site backup component for Joomla!™ -powered web sites, as well asbasic reference for Kickstart. It does not cover the desktop aplications which have documentation of their own. Both thefree Akeeba Backup Core and the subscription-based Akeeba Backup Professional editions are completely covered.
Permission is granted to copy, distribute and/or modify this document under the terms of the GNU Free Documentation License, Version 1.3 or anylater version published by the Free Software Foundation; with no Invariant Sections, no Front-Cover Texts, and no Back-Cover Texts. A copy ofthe license is included in the appendix entitled "The GNU Free Documentation License".
iii
Table of ContentsI. User's Guide to Akeeba Backup for Joomla! ........................................................................................ 1
1. Introduction ........................................................................................................................... 21. Introducing Akeeba Backup .............................................................................................. 22. Indicative uses ................................................................................................................ 23. A typical backup/restoration workflow ................................................................................ 34. Server environment requirements ....................................................................................... 4
2. Installation, updates and upgrades .............................................................................................. 51. Installing Akeeba Backup ................................................................................................. 5
1.1. Getting the installation packages ............................................................................. 51.2. Installing the backup component and language files .................................................... 5
1.2.1. Manual installation ..................................................................................... 51.3. Installing the administrator panel icon module ........................................................... 6
2. Upgrading from Core to Professional ................................................................................. 63. Updating to the latest version ............................................................................................ 6
3. Using the Akeeba Backup component ........................................................................................ 71. Pages outside the Control Panel panes ................................................................................ 7
1.1. Common navigation elements ................................................................................. 71.2. The Control Panel ................................................................................................ 7
1.2.1. Editing the component's Parameters ............................................................. 112. Basic Operations ........................................................................................................... 13
2.1. Profiles Management ........................................................................................... 142.2. Configuration ..................................................................................................... 14
2.2.1. The main settings ..................................................................................... 152.2.2. Database dump engines ............................................................................. 202.2.3. File and directores scanner engines .............................................................. 222.2.4. Archiver engines ...................................................................................... 222.2.5. Data processing engines ............................................................................ 25
2.3. Backup now ....................................................................................................... 292.4. Administer Backup Files ...................................................................................... 32
2.4.1. Integrated restoration ................................................................................ 352.5. View Log .......................................................................................................... 37
3. Include data to the backup .............................................................................................. 383.1. Multiple Databases Definitions .............................................................................. 383.2. Off-site Directories Inclusion ................................................................................ 40
4. Exclude data from the backup ......................................................................................... 424.1. Files and Directories Exclusion ............................................................................. 424.2. Database Tables Exclusion ................................................................................... 444.3. Extension Filters ................................................................................................. 46
4.3.1. Components ............................................................................................ 474.3.2. Modules ................................................................................................. 474.3.3. Plug-ins .................................................................................................. 474.3.4. Languages ............................................................................................... 474.3.5. Templates ............................................................................................... 48
4.4. RegEx Files and Directories Exclusion ................................................................... 484.4.1. Regular Expressions recipies for files and directories ...................................... 50
4.5. RegEx Database Tables Exclusion ......................................................................... 504.5.1. Regular Expressions recipies for database tables ............................................. 52
5. Automating your backup ................................................................................................ 535.1. Front-end backup ................................................................................................ 53
5.1.1. A PHP alternative to wget ......................................................................... 545.1.2. Using the front-end backup in SiteGround CRON jobs .................................... 55
Akeeba Backup User's Guide
iv
5.2. Native CRON script ............................................................................................ 565.3. Alternative CRON script ...................................................................................... 575.4. Remote backups ................................................................................................. 58
6. Miscellaneous features ................................................................................................... 586.1. Light mode for cell phones, PDAs, MIDs, etc. ......................................................... 58
4. Restoring backups ................................................................................................................. 601. Overview of the restoration process .................................................................................. 602. Getting the files on your server ....................................................................................... 60
2.1. Uploading individual files .................................................................................... 602.2. Extracting on the server ....................................................................................... 61
3. Performing the restoration process .................................................................................... 653.1. Using the Akeeba Backup Installer (ABI) ................................................................ 653.2. Unorthodox: the emergency restoration procedure ..................................................... 74
4. Finalizing the restoration process ..................................................................................... 775. Step by step guides ............................................................................................................... 79
1. Backing up your site to a cloud storage service ................................................................... 791.1. Introduction ....................................................................................................... 791.2. Basic configuration ............................................................................................. 791.3. Using Amazon S3 ............................................................................................... 801.4. Using DropBox .................................................................................................. 821.5. Where to go from here? ....................................................................................... 83
II. Security information ...................................................................................................................... 846. Introduction .......................................................................................................................... 85
1. Foreword ..................................................................................................................... 852. Why you need to care about ownership and permissions? ..................................................... 85
7. How your web server works ................................................................................................... 861. Users and groups .......................................................................................................... 86
1.1. Users ................................................................................................................ 861.2. Groups .............................................................................................................. 861.3. How users and groups are understood by UNIX-derived systems ................................. 87
2. Ownership ................................................................................................................... 872.1. Process ownership .............................................................................................. 872.2. File ownership ................................................................................................... 88
3. Permissions .................................................................................................................. 893.1. The three types of permissions .............................................................................. 893.2. What permissions can control ............................................................................... 893.3. Permissions notation ............................................................................................ 90
3.3.1. The textual notation .................................................................................. 903.3.2. The octal notation .................................................................................... 90
8. Securing your Akeeba Backup installation ................................................................................. 921. Access rights ................................................................................................................ 922. Securing the temporary and output directories .................................................................... 923. Securing file transfers .................................................................................................... 93
III. Appendices ................................................................................................................................. 95A. The JPA archive format, v.1.1 ................................................................................................ 96B. GNU Free Documentation License .......................................................................................... 99
Part I. User's Guide toAkeeba Backup for Joomla!
2
Chapter 1. Introduction1. Introducing Akeeba BackupAkeeba Backup is a complete site backup solution for your Joomla!™ powered website. As the successor to therenowned JoomlaPack component, Akeeba Backup builds on its strong legacy to deliver an easy to use, yet powerful,solution to backing up, restoring and moving your site between servers of the same or different architecture.
Its mission is simple: backup your entire site - including all files and database contents - inside a standalone archive.You can then restore your entire site from the contents of this archive, without the need of installing Joomla!™ priorto the restoration. You can do so in a single click manner, without the tedious work required to set up and test externalutilities, without changing your server configuration and without having to dive into obscure configuration options.
If you want absolute power and flexibility, Akeeba Backup is right for you, too! It puts you in charge of fine-tuningyour backup, choosing which directories, files or database tables to exclude. It can even allow you to backup non-Joomla!™ content, as long as you specify which off-site directories and databases you want to add.
2. Indicative usesAkeeba Backup can be used for much more than just backup. Some indicative uses are:
• Security backups. Taking a snapshot of your site should your server fail, or a hacker exploit some security holeto deface or compromise your site.
• Template sites. Web professionals have used Akeeba Backup in order to create "template sites". This means thatyou can build a site on a local server, install every component you usually do on most clients' sites and back it up.You now have a canned site that can serve as a great template for future clients. Using the same method you can havea snapshot of all the sites you have built for your clients, without the need to have them installed on your local server.
• Build a site off-line, upload the finished site easily. Web professionals can build a complete site off-line on a localserver and when done take a snapshot with Akeeba Backup, then restore it on the production site.
• Testing upgrades locally, without risking breaking the on-line site. Joomla!™ updates have the potential ofbreaking things, especially in complex or badly written components and modules. Web masters use Akeeba Backupto get a site snapshot, restore it on a local test server, perform the upgrade there and test for any problems withoutthe live site being at risk.
• Debugging locally. Almost the same as above, web professionals have used Akeeba Backup to take a snapshot ofa client's Joomla!™ site in order to perform bug hunting. Using Akeeba Backup again, they can upload the fixedsite back on the live server.
• Relocating a site to a new host. Web masters who want to take their site to a new host have found Akeeba Backupto be their saviour. Just backup the original site and restore on the new host; presto, your site is relocated withvirtually no effort at all.
Akeeba Backup has the potential to save you hours of hard labor, according to our users. It is licensed under the GNUGeneral Public License version 3 or, at your option, any later version of the license. As a result, you are free to modifyit to your liking and install it on as many sites as you like without having to pay for a pricey "developer's license".
Akeeba Backup comes in two editions, Core and Professional. Akeeba Backup Core is provided free of charge andcontains all the features a typical webmaster would like to have in order to easily complete backup and restorationjobs. On top of that, we offer you unconditional free support, directly from members of our team, through our forum.Even if this is not enough for you, we even give away our full documentation without charging a single penny! No, we
Introduction
3
are not crazy and there are no strings attached. We simply believe that software - just like ideas - is born Free. It is ourduty to share it with you, for free. We just kindly ask you to donate some money to us if you find this software useful.
Akeeba Backup Professional is designed to take your experience to a whole new level. Featuring advanced options, likeembedded restoration, inclusion of external directories and databases, powerful filters based on regular expressions,incremental backup, easy exclusion of Joomla!™ extensions and support for putting your backups on compatible cloudstorage services (such as Amazon's S3), it is designed to give the professional user a strong efficiency leverage. AkeebaBackup Professional is the ideal choice for professional web developers. Thanks to its liberal GNU GPL v3 license,Akeeba Backup Professional can be installed on an unlimited number of clients' websites, royalty-free! Amazing, isn'tit?
3. A typical backup/restoration workflowAs stated, Akeeba Backup is designed to make your life easier. It does that by streamlining the workflow of backingup and restoring (or migrating) your site. From Akeeba Backup's perspective, restoring to the same host and location,copying your site in a subdirectory / subdomain of the same host or transfering your site to a completely new host isidentical. That's right, Akeeba Backup doesn't care if you are restoring, copying, cloning or migrating your site! Theprocess is always the same, so you only have to learn it once. The learning curve is very smooth, too!
The typical workflow involves using two utilities from the Akeeba Backup suite: the Akeeba Backup component itself,and Akeeba Kickstart. Here is the overview:
1. Install Akeeba Backup and configure it to taste. Hit on the Backup Now button and let your site back up. When itfinishes up, click on the Administer Backup Files button. Select the only backup entry from the list and click onDownload - or, better yet, use FTP to do that - saving the backup archive somewhere on your local PC.
2. Extract the kickstart- VERSION .zip file you downloaded from our File Release System. The only contained file iskickstart.php . Upload it to the server on which you want to restore your site to.
3. Upload the backup archive (do not extract it, just upload the whole archive!) to the server on which you wantto restore your site to (called hereforth the target server ). Your server's directory should now contain thekickstart.php and the backup archive.
4. Fire up your browser and visit the Kickstart URL on your target server, for example http://www.example.com/kickstart.php .
5. Change any option - if necessary - and hit the Start button. Sit back while Kickstart extracts the backup archivedirectly on the server! It's ultra-fast too (when compared to FTP uploading all those 4000+ files!).
6. A new window pops up, it's the Akeeba Backup Installer (ABI), the site restoration script which was embeddedinside your archive. Do not close the Kickstart window yet!
7. Follow the prompts of the Akeeba Backup Installer, filling in the details of the new server (most importantly, thenew database connection and FTP connection information).
8. When the Akeeba Backup Installer is done, it prompts you to delete the installation directory. Ignore this promptand simply close the ABI window.
9. Back to the Kickstart window, click the button titled "Finish". Kicstart removes the installation directory, restoresyour .htaccess file (if you had one in the first place), removes the backup archive and itself.
10.Believe it or not, you have a working site! Honestly!
If you are restoring to a different subdirectory on the same server as the original site, or to a whole different host, youmight need to edit your .htaccess file for your site to work properly. This is all described in the restoration section ofthis guide. If you need help backing up your site, take a look in the Backup Now section of this guide.
Introduction
4
4. Server environment requirementsIn order to work, Akeeba Backup requires the following server software environment:
• Joomla!™ 1.5.0 or later in the 1.5.x range. It is a native component; it doesn't require Legacy Mode but can workwith it if it's enabled.
• PHP 5.1.3 or greater, 5.2.1 or later highly recommended. Akeeba Backup will not work on PHP 4!
• MySQL 4.1 or later. MySQL 5.0 or greater recommended for optimal performance.
• Minimum 16Mb of PHP memory_limit (sufficient only for smaller web sites, without many plug-ins and modulesrunning). More is better. 32Mb to 64Mb recommended for optimal performance on large sites.
• The PHP function opendir must be available.
• Available free space or quota limit about 75%-80% of your site's size.
• The cURL PHP module must be installed for FTP and cloud backup to work
As far as the browser is concerned, you can use:
• Internet Explorer 7, or greater
• Firefox 2.0, or greater
• Safari 3, or greater
• Opera 9, or greater (Opera 10 highly recommended)
• Google Chrome 3 or greater
• Konqueror 3.5.9, or greater
Important
Google Chrome 4 introduced a feature where it permanently "remembers" redirections. Since redirectionsare a key component to the internal working of Joomla!™, using Google Chrome 4+ to administer yourJoomla!™ site can lead to unexpected results. Therefore we strongly recommend against using it for anysite administration tasks. Akeeba Backup includes workarounds for Chrome's behaviour, but we can'tguarantee that anything else in Joomla! (including installation) will work smoothy.
In any case, you must make sure that Javascript is enabled on your browser for the backup to work.
5
Chapter 2. Installation, updates andupgrades1. Installing Akeeba BackupInstalling Akeeba Backup is no different than installing any other Joomla!™ extension on your site. You can readthe complete instructions for installing Joomla!™ extensions on the official help page [http://help.joomla.org/con-tent/view/1476/235/]. Throughout this chapter we assume that you are familiar with these instructions and we willnot duplicate them.
1.1. Getting the installation packagesYou can download the latest installation packages by visiting our site at http://www.akeebabackup.com. Dependingon which edition you want to download, you have to visit a different download section of the site:
• Akeeba Backup Core. Visit the Download, Akeeba Backup Core for J! link in the top menu of our site. The releasesare listed with the most recent release appearing on top. Click on its name to see the download files. In the list offiles, please click the title ZIP file and download it to your local PC.
Alternatively, you can download Akeeba Backup Core directly from our JoomlaCode.org file repository [http://joomlacode.org/gf/project/jpack/frs].
• Akeeba Backup Professional. Visit the Download, Akeeba Backup Pro link in the top menu of our site. Makesure that you are either already logged in, or enter your username and password in the login box on the right handsidebar. Find the latest release and download the ZIP file.
• Language files. Language files are common for both editions. Just visit the Download, Language Files link in thetop menu of our site. Find your desired language and download the ZIP package.
In any case, do not extract the ZIP files yet!
1.2. Installing the backup component and language filesLog in to your site's administrator section. Click on the Extensions, Install/Uninstall link on the top menu. In thispage, locate the Browse button in the Upload Package File area. Locate the installation ZIP file you had previouslydownloaded and select it. Back to the page, click on the Upload File & Install button. After a short while, Joomla!™will tell you that the component has been installed.
Installing the language files is an identical procedure. Instead of chosing the component's installation package, justselect the ZIP file of your language.
1.2.1. Manual installation
Sometimes Joomla!™ is unable to properly extract ZIP archives due to technical limitations on your server. In thiscase, you can follow a manual installation procedure.
First, you have to extract the installation ZIP file in a subdirectory named akeeba on your local PC. Then, upload theentire subdirectory inside your site's temporary directory. At this point, there should be a subdirectory named akeebainside your site's temporary directory which contains all of the ZIP package's files.
If you are unsure where your site's temporary directory is located, you can look it up by going to the Global Configura-tion, click on the Server tab and take a look at the Path to Temp-folder setting. The default setting is the tmp directory
Installation, updates and upgrades
6
under your site's root. Rarely, especially on automated installations using Fantastico, this might have been assigned thesystem-wide /tmp directory. In this case, please consult your host for instructions on how to upload files inside thisdirectory, or about changing your Joomla!™ temporary directory back to the default location and making it writable.
Assuming that you are past this uploading step, click on the Extensions, Install/Uninstall link on the top menu. In thispage, locate the Install Directory edit box in the Install from Directory area. It is already filled in with the absolutepath to your temporary directory, for example /var/www/joomla/tmp. Please append /akeeba to it. As per ourexample, it should look something like /var/www/joomla/tmp/akeeba. Then, click on the Install button.
If you still can't install Akeeba Backup and you are receiving messages regarding unwritable directories, inability tomove files or other similar filesystem related error messages, please do not ask us for support. These errors stem fromyour site set up and can best be resolved by asking for help in the official Joomla!™ forums [http://forum.joomla.org].
1.3. Installing the administrator panel icon moduleAkeeba Backup comes with a handy administration module which displays the latest backup operation's status on youradministrator control panel page. In order to install it, download its installation ZIP file from our site and install it likeany other Joomla!™ extension. In fact, it's the same installation procedure you followed to install the component itself.
After you have installed it, please go to Extensions, Modules and click on the Administrator link above the list. On thefollowing list find the entry labeled Akeeba Backup Notification Module and click on it. On the following page makesure that Enabled is set to Yes and Position is set to "icon". Just save and you're ready!
2. Upgrading from Core to ProfessionalUpgrading from Akeeba Backup Core to Akeeba Backup Professional is by no means different than installing thecomponent. You do not have to uninstall the previous version; in fact, you are discouraged from doing so. Simplyfollow the installation instructions so as to install Akeeba Backup Professional over the existing Akeeba Backup Coreinstallation. That's all! All your settings are preserved.
3. Updating to the latest version
Checking for the latest version and upgradingYou can easily check for the latest published version of the Akeeba Backup component by visiting http://www.akeebabackup.com/latest. The page lists the version and release date of the latest Akeeba Backup release. Youcan check it against the data which appear on the right-hand pane of your Akeeba Backup Control Panel. If your releaseis out of date, simply click on the Download link to download the install package of the latest release to your PC.
Updating Akeeba Backup to the latest version is by no means different than installing the component. You do not haveto uninstall the previous version; in fact, you are discouraged from doing so. Simply follow the installation instructionsso as to install the latest Akeeba Backup version over the existing Akeeba Backup installation. That's all! All yoursettings are preserved.
Live updateThere is also an alternate update path, if your server supports it. It is called the "Live Update" feature and it is availablesince Akeeba Backup 3.0.b1. Whenever you visit the Akeeba Backup Control Panel, it will automatically check forthe existence of an updated version and it will notify you. Clicking on the notification allows you to perform a liveupdate without further interaction. Do note that if your server is protected by a firewall you'll have to enable port 80TCP traffic to www.akeebabackup.com and joomlacode.org for this feature to work properly.
7
Chapter 3. Using the Akeeba BackupcomponentIn this chapter you are going to find detailed reference of all the pages, options and features of the Akeeba Backupcomponents. To get things organized in a logical manner, we chose to present the individual pages in the same mannerthey appear on the component's Control Panel page, i.e. the first page which is presented to you when you launch thecomponent's back-end. Some of the pages are not available as Control Panel icons, but from different areas of thecomponent. These are discussed first.
1. Pages outside the Control Panel panes
1.1. Common navigation elementsAll pages have their title displayed above their contents. On the tool bar there is a Back icon. Clicking it will bringyou back to the Control Panel .
On pages where editing takes place (e.g. the Configuration page, the profiles editor, etc) instead of the Back icon thereis a Cancel icon which discards any changes made and returns you to the previous page. On those pages you will alsofind a Save icon which saves settings and returns you to the previous page, as well as an Apply icon which savessettings and returns you to the same editing page.
On the bottom of each page, just above the Joomla!™ footer, there is the license information. On the Control Panelpage there is also a donation link appearing on the right sidebar; if you feel that Akeeba Backup was useful for youdo not hesitate to donate any amount you deem appropriate.
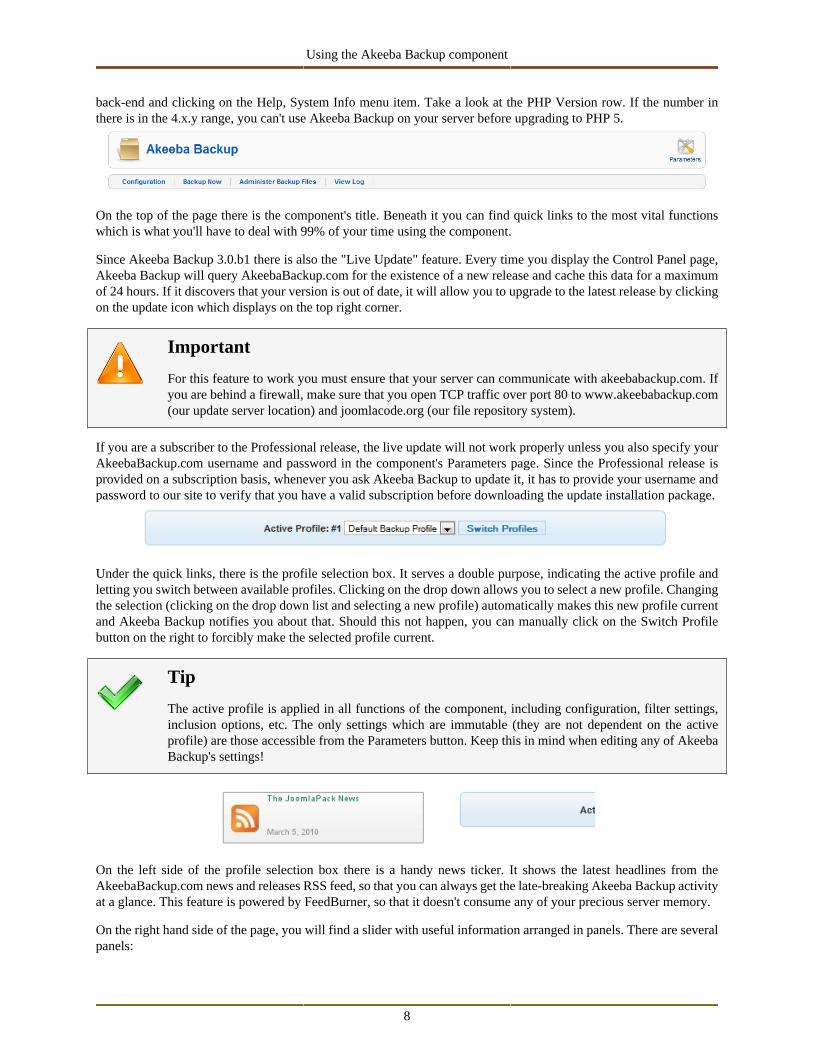
1.2. The Control PanelThe main page which loads when you click on Components > Akeeba Backup is called the Control Panel screen. Fromhere you can see if everything is in working order and access all of the component's functions and configuration options.
Important
If you get a big warning message when you visit this page, or if the interface doesn't work properly, youhave to follow the instructions in the next paragraph in the exact sequence provided!
If Akeeba Backup detects a problem with loading the necessary Javascript files, it will issue a big warning messagenotifying you that it couldn't load the necessary Javascript files. Sometimes, depending on your server settings, thismessage will not be shown but the interface will behave erraticaly and appear different thatn the screen shots providedin here. In this case, you have to follow these simple steps:
1. Use your favorite FTP client and give the media/com_akeeba directory and all of its contained subdirectoriesand files 0755 permissions (read/write/execute for the owner, read/execute for group and others).
2. If and only if you have completed the first step to no avail, click on the Parameters icon on the toolbar and changethe jQuery and jQuery UI sources to Google AJAX API Library.
If you see a blank page instead of the Control Panel, you may have a very old version of PHP installed on your server.Akeeba Backup requires PHP 5 in order to work. You can check your PHP version by going to your site's administrator
Using the Akeeba Backup component
8
back-end and clicking on the Help, System Info menu item. Take a look at the PHP Version row. If the number inthere is in the 4.x.y range, you can't use Akeeba Backup on your server before upgrading to PHP 5.
On the top of the page there is the component's title. Beneath it you can find quick links to the most vital functionswhich is what you'll have to deal with 99% of your time using the component.
Since Akeeba Backup 3.0.b1 there is also the "Live Update" feature. Every time you display the Control Panel page,Akeeba Backup will query AkeebaBackup.com for the existence of a new release and cache this data for a maximumof 24 hours. If it discovers that your version is out of date, it will allow you to upgrade to the latest release by clickingon the update icon which displays on the top right corner.
Important
For this feature to work you must ensure that your server can communicate with akeebabackup.com. Ifyou are behind a firewall, make sure that you open TCP traffic over port 80 to www.akeebabackup.com(our update server location) and joomlacode.org (our file repository system).
If you are a subscriber to the Professional release, the live update will not work properly unless you also specify yourAkeebaBackup.com username and password in the component's Parameters page. Since the Professional release isprovided on a subscription basis, whenever you ask Akeeba Backup to update it, it has to provide your username andpassword to our site to verify that you have a valid subscription before downloading the update installation package.
Under the quick links, there is the profile selection box. It serves a double purpose, indicating the active profile andletting you switch between available profiles. Clicking on the drop down allows you to select a new profile. Changingthe selection (clicking on the drop down list and selecting a new profile) automatically makes this new profile currentand Akeeba Backup notifies you about that. Should this not happen, you can manually click on the Switch Profilebutton on the right to forcibly make the selected profile current.
Tip
The active profile is applied in all functions of the component, including configuration, filter settings,inclusion options, etc. The only settings which are immutable (they are not dependent on the activeprofile) are those accessible from the Parameters button. Keep this in mind when editing any of AkeebaBackup's settings!
On the left side of the profile selection box there is a handy news ticker. It shows the latest headlines from theAkeebaBackup.com news and releases RSS feed, so that you can always get the late-breaking Akeeba Backup activityat a glance. This feature is powered by FeedBurner, so that it doesn't consume any of your precious server memory.
On the right hand side of the page, you will find a slider with useful information arranged in panels. There are severalpanels:
Using the Akeeba Backup component
9
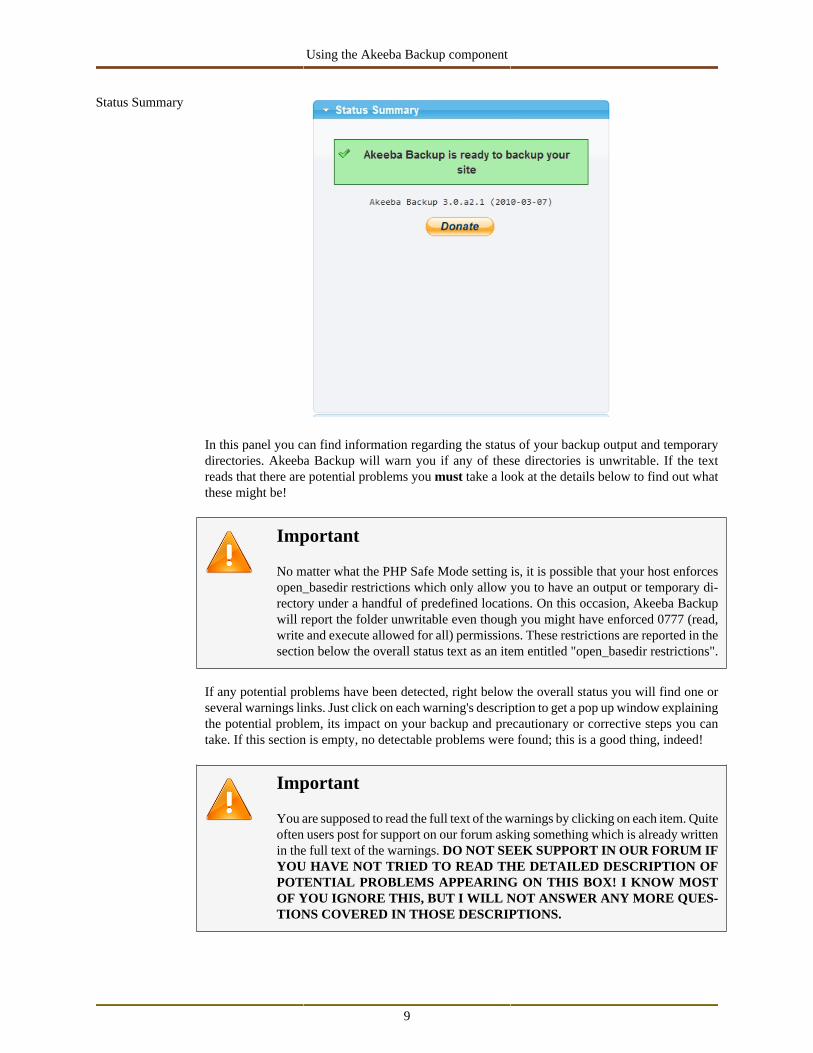
Status Summary
In this panel you can find information regarding the status of your backup output and temporarydirectories. Akeeba Backup will warn you if any of these directories is unwritable. If the textreads that there are potential problems you must take a look at the details below to find out whatthese might be!
Important
No matter what the PHP Safe Mode setting is, it is possible that your host enforcesopen_basedir restrictions which only allow you to have an output or temporary di-rectory under a handful of predefined locations. On this occasion, Akeeba Backupwill report the folder unwritable even though you might have enforced 0777 (read,write and execute allowed for all) permissions. These restrictions are reported in thesection below the overall status text as an item entitled "open_basedir restrictions".
If any potential problems have been detected, right below the overall status you will find one orseveral warnings links. Just click on each warning's description to get a pop up window explainingthe potential problem, its impact on your backup and precautionary or corrective steps you cantake. If this section is empty, no detectable problems were found; this is a good thing, indeed!
Important
You are supposed to read the full text of the warnings by clicking on each item. Quiteoften users post for support on our forum asking something which is already writtenin the full text of the warnings. DO NOT SEEK SUPPORT IN OUR FORUM IFYOU HAVE NOT TRIED TO READ THE DETAILED DESCRIPTION OFPOTENTIAL PROBLEMS APPEARING ON THIS BOX! I KNOW MOSTOF YOU IGNORE THIS, BUT I WILL NOT ANSWER ANY MORE QUES-TIONS COVERED IN THOSE DESCRIPTIONS.
Using the Akeeba Backup component
10
Below of all this information you can find a donation link. If you feel that Akeeba Backup hassaved your day - and you do not wish or can't afford subscribing to the Professional edition - youcan donate a small amount of money to help us keep the free version going!
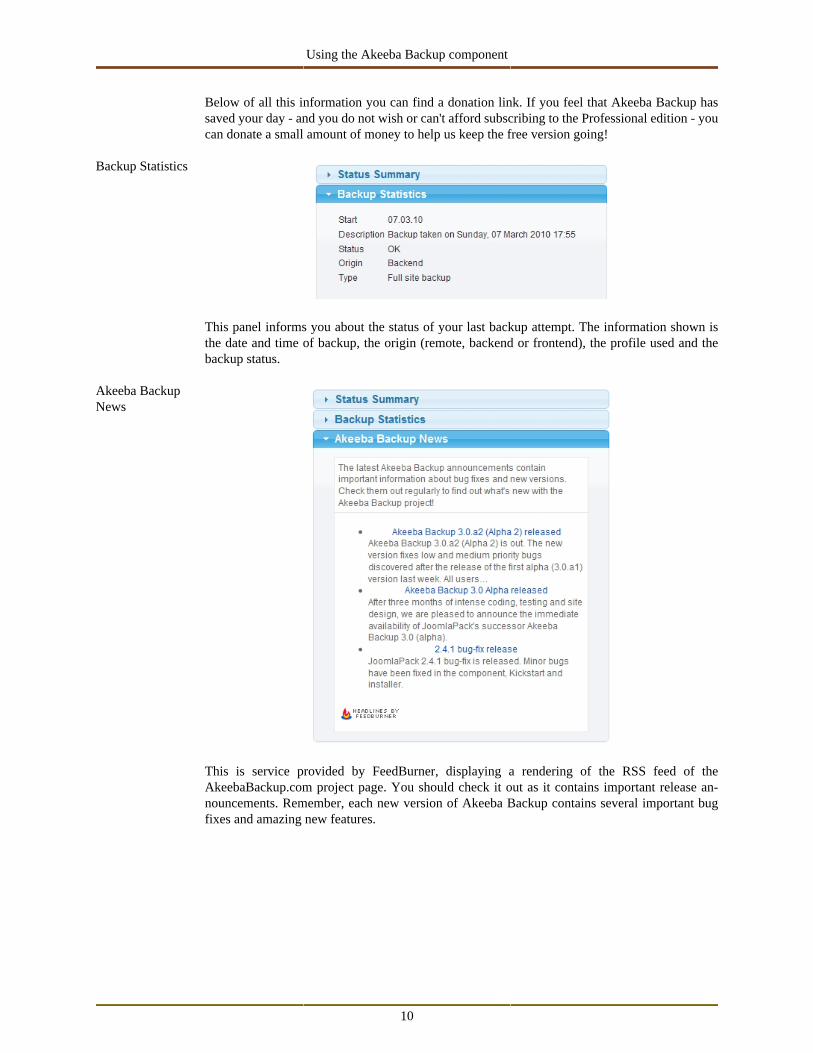
Backup Statistics
This panel informs you about the status of your last backup attempt. The information shown isthe date and time of backup, the origin (remote, backend or frontend), the profile used and thebackup status.
Akeeba BackupNews
This is service provided by FeedBurner, displaying a rendering of the RSS feed of theAkeebaBackup.com project page. You should check it out as it contains important release an-nouncements. Remember, each new version of Akeeba Backup contains several important bugfixes and amazing new features.

Using the Akeeba Backup component
11
Translation Cred-its
Each translation file contains information about the language and the translator. This informationis displayed in this panel.
The left navigation panel set allows access to the different functions of the component, by clicking on each icon.
1.2.1. Editing the component's Parameters
On the top of the Control Panel page you will see a toolbar icon named Parameters if and only if you are logged in as aSuper Administrator. Clicking this icon opens a popup inside the page where you can edit component-wide parameters.These parameters take effect regardless of the active profile.
Using the Akeeba Backup component
12
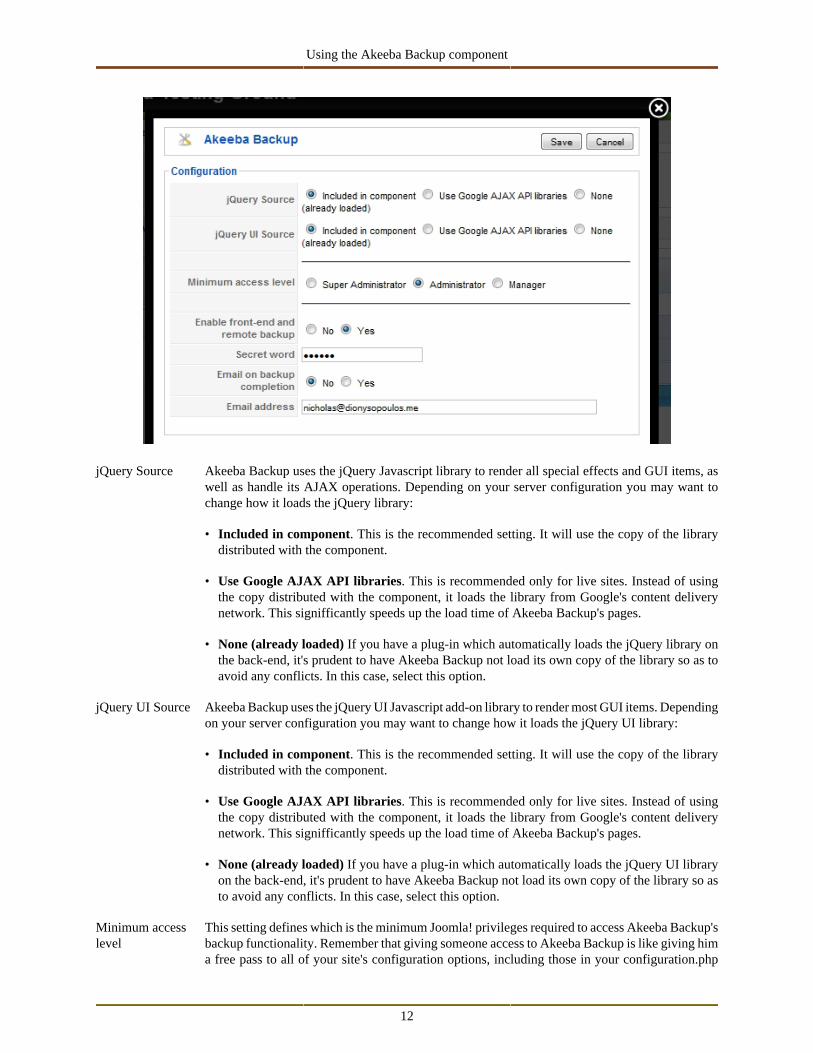
jQuery Source Akeeba Backup uses the jQuery Javascript library to render all special effects and GUI items, aswell as handle its AJAX operations. Depending on your server configuration you may want tochange how it loads the jQuery library:
• Included in component. This is the recommended setting. It will use the copy of the librarydistributed with the component.
• Use Google AJAX API libraries. This is recommended only for live sites. Instead of usingthe copy distributed with the component, it loads the library from Google's content deliverynetwork. This signifficantly speeds up the load time of Akeeba Backup's pages.
• None (already loaded) If you have a plug-in which automatically loads the jQuery library onthe back-end, it's prudent to have Akeeba Backup not load its own copy of the library so as toavoid any conflicts. In this case, select this option.
jQuery UI Source Akeeba Backup uses the jQuery UI Javascript add-on library to render most GUI items. Dependingon your server configuration you may want to change how it loads the jQuery UI library:
• Included in component. This is the recommended setting. It will use the copy of the librarydistributed with the component.
• Use Google AJAX API libraries. This is recommended only for live sites. Instead of usingthe copy distributed with the component, it loads the library from Google's content deliverynetwork. This signifficantly speeds up the load time of Akeeba Backup's pages.
• None (already loaded) If you have a plug-in which automatically loads the jQuery UI libraryon the back-end, it's prudent to have Akeeba Backup not load its own copy of the library so asto avoid any conflicts. In this case, select this option.
Minimum accesslevel
This setting defines which is the minimum Joomla! privileges required to access Akeeba Backup'sbackup functionality. Remember that giving someone access to Akeeba Backup is like giving hima free pass to all of your site's configuration options, including those in your configuration.php
Using the Akeeba Backup component
13
file, i.e. database and FTP conenction details. Never, ever give access to people who you don'tfully trust. That's why the default setting is Super Administrators, which allows only Super Ad-ministrators (by definition full access users) to access the component.
Important
Even if you have a third party ACL system, such as JUGA, this setting will work ontop of your system. If you have set this setting to Super Adminsitrators and try togive a Manager access to the component through the ACL system he won't be ableto use it. Even though your ACL system will let her through, Akeeba Backup's ownsetting will slam the door on her face. You have been warned!
Enable front-endand remote back-up
Akeeba Backup allows you to take backups from the front-end, or from a desktop applicationcalled Akeeba Remote Control. In order to be able to do so, you have to enable this option.
Secret word Whenever you need to take a front-end backup, you have to supply this secret word to let AkeebaBackup know that you really have access to its functions and you're not an imposter, or a hackerattempting to cause a massive denial of service attack by overloading your server with backupoperations. Please use only alphanumeric characters, i.e. lower and upper case a-z letters and thedigits 0-9. Do not use special characters, as they tend to cause problems when passed in the front-end backup URL without converting them to URL encoded format (which is beyond the scope ofthis manual - so just use a-z, A-Z and 0-9, OK?)
Email on backupcompletion
When enabled, Akeeba Backup will send an email regarding the backup status every time a front-end or remote backup is complete or failed.
Email address When the above option is enabled, the email will be sent to this email address. If you leave itblank, Akeeba Backup will send a copy of the email to all Super Administrators of the site.
AkeebaBackup.comUsername
If and only if you are using the Professional release you have to specify your username and pass-word for the live update feature to work properly. This is the same username and password youuse to login to our site and download the Professional release. This is required so that only userswith a valid Professional subscription can download update packages, just as you'd expect fromany commercial software.
Note
Users of Akeeba Backup Core do not need to supply this information. Akeeba Back-up Core is provided free of charge to everybody, therefore there is no need to vali-date the update against a username and a password.
AkeebaBackup.comPassword
See above.
2. Basic OperationsThe Basic Operations group contains the most common functions you will need on your daily Akeeba Backup usage.In fact, you will only use the other pages sparringly, mostly when you create a backup profile or want to update itafter doing signifficant changes to your site.
Using the Akeeba Backup component
14
2.1. Profiles Management
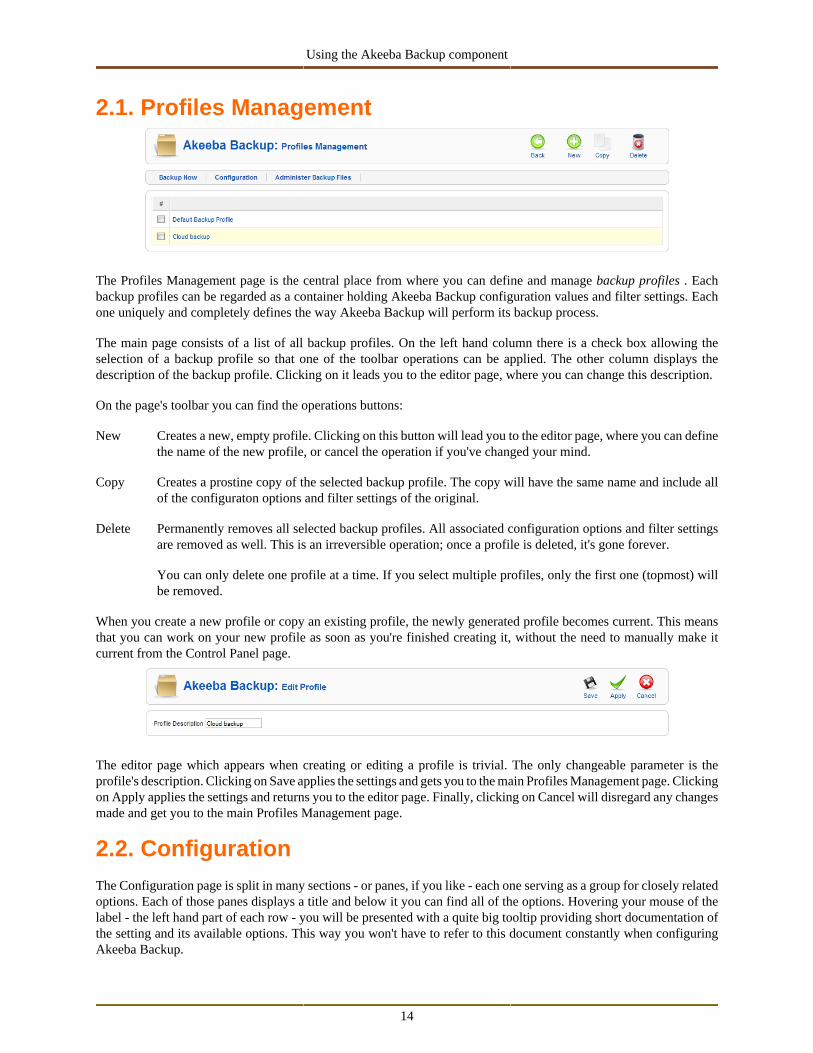
The Profiles Management page is the central place from where you can define and manage backup profiles . Eachbackup profiles can be regarded as a container holding Akeeba Backup configuration values and filter settings. Eachone uniquely and completely defines the way Akeeba Backup will perform its backup process.
The main page consists of a list of all backup profiles. On the left hand column there is a check box allowing theselection of a backup profile so that one of the toolbar operations can be applied. The other column displays thedescription of the backup profile. Clicking on it leads you to the editor page, where you can change this description.
On the page's toolbar you can find the operations buttons:
New Creates a new, empty profile. Clicking on this button will lead you to the editor page, where you can definethe name of the new profile, or cancel the operation if you've changed your mind.
Copy Creates a prostine copy of the selected backup profile. The copy will have the same name and include allof the configuraton options and filter settings of the original.
Delete Permanently removes all selected backup profiles. All associated configuration options and filter settingsare removed as well. This is an irreversible operation; once a profile is deleted, it's gone forever.
You can only delete one profile at a time. If you select multiple profiles, only the first one (topmost) willbe removed.
When you create a new profile or copy an existing profile, the newly generated profile becomes current. This meansthat you can work on your new profile as soon as you're finished creating it, without the need to manually make itcurrent from the Control Panel page.
The editor page which appears when creating or editing a profile is trivial. The only changeable parameter is theprofile's description. Clicking on Save applies the settings and gets you to the main Profiles Management page. Clickingon Apply applies the settings and returns you to the editor page. Finally, clicking on Cancel will disregard any changesmade and get you to the main Profiles Management page.
2.2. ConfigurationThe Configuration page is split in many sections - or panes, if you like - each one serving as a group for closely relatedoptions. Each of those panes displays a title and below it you can find all of the options. Hovering your mouse of thelabel - the left hand part of each row - you will be presented with a quite big tooltip providing short documentation ofthe setting and its available options. This way you won't have to refer to this document constantly when configuringAkeeba Backup.
Using the Akeeba Backup component
15
Some of the settings also feature a button. They can either do some action, like browsing for a folder and testingconnection parameters, or it may be labeled Configure.... This latter case is mostly interesting, as pressing the buttonwill toggle the display of a sub-pane which contains options pertaining to this specific option. This GUI pattern isprimarily used for "engines" type settings.
Another interface element worth mentioning are the sliders. Whenever you are supposed to enter a number, AkeebaBackup presents you with a dragable slider. You can drag the notch of the slider to the right, increasing its value, or tothe left in order to decrease its value. Since most sliders have a very wide range, making it impractical to make fine-grained selections, you can just click on the notch and use the left and right arrow keys on your keyboard to performthe fine tuning.
On the top of the page you can see the numeric ID and title of the active backup profile. This acts as a reminder, sothat you know which profile's settings you are editing.
The rest of this document is seperated into sub-sections. The first sub-section describes the settings of each of the mainconfiguration panes, whereas the resto of the sections discuss the settings made available to you through sub-panes.
2.2.1. The main settings
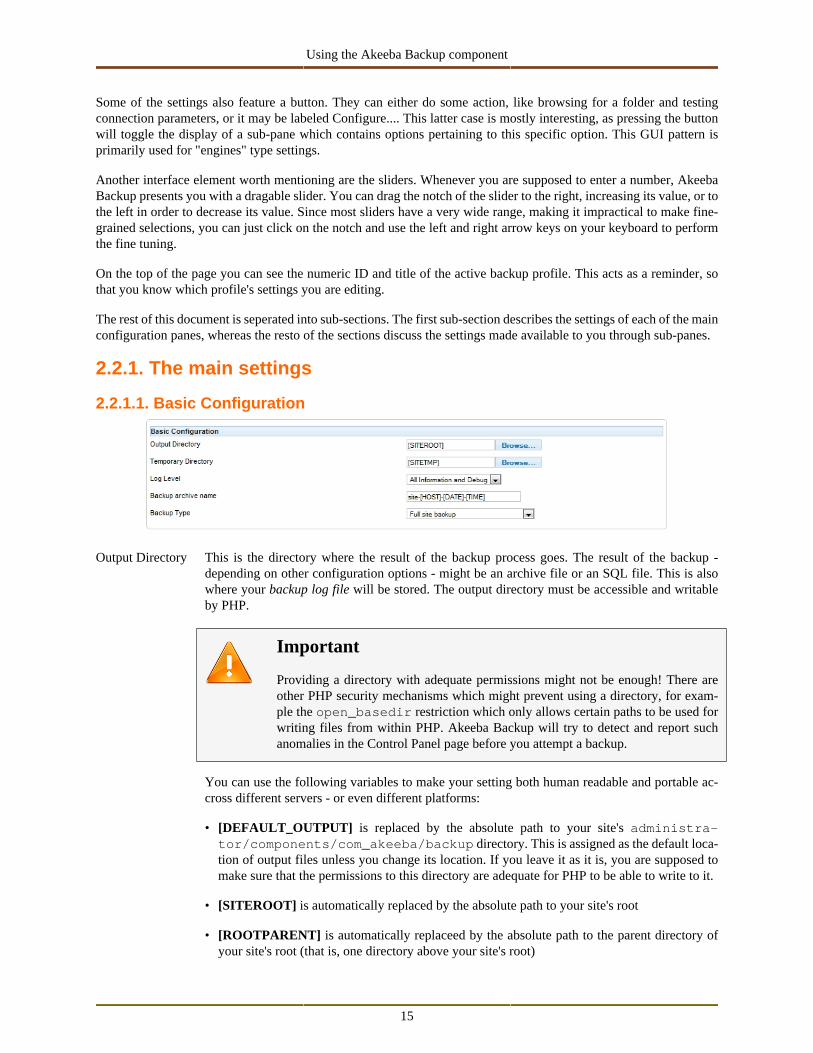
2.2.1.1. Basic Configuration
Output Directory This is the directory where the result of the backup process goes. The result of the backup -depending on other configuration options - might be an archive file or an SQL file. This is alsowhere your backup log file will be stored. The output directory must be accessible and writableby PHP.
Important
Providing a directory with adequate permissions might not be enough! There areother PHP security mechanisms which might prevent using a directory, for exam-ple the open_basedir restriction which only allows certain paths to be used forwriting files from within PHP. Akeeba Backup will try to detect and report suchanomalies in the Control Panel page before you attempt a backup.
You can use the following variables to make your setting both human readable and portable ac-cross different servers - or even different platforms:
• [DEFAULT_OUTPUT] is replaced by the absolute path to your site's administra-tor/components/com_akeeba/backup directory. This is assigned as the default loca-tion of output files unless you change its location. If you leave it as it is, you are supposed tomake sure that the permissions to this directory are adequate for PHP to be able to write to it.
• [SITEROOT] is automatically replaced by the absolute path to your site's root
• [ROOTPARENT] is automatically replaceed by the absolute path to the parent directory ofyour site's root (that is, one directory above your site's root)
Using the Akeeba Backup component
16
Is this over your head? No problem! Just click on the Browse... button and a pop-up directorynavigator will allow you to find the proper directory. Next to the folder's location there is thebutton labeled Use. Click on it to make the current directory the selected one and close the pop-up.To make it even easier for you, Akeeba Backup displays a small icon next to the Use button. If it's agreen check mark the directory is writable and you can use it. If it's a red X sign, the directory is notreadable and you either have to select a different directory, or change this directory's permissions.
Warning
NEVER, EVER, UNDER ANY CIRCUMSTANCES SHOULD YOU USEYOUR SITE'S ROOT AS YOUR OUTPUT OR TEMPORARY DIRECTO-RY! This will usually lead to corrupt backup or backup failure. The reason is thatthe output and temporary directories and all of their contents are automatically ex-cluded from the backup set. However, even if your backup succeeds due to a bug(remember, it's supposed to fail!), using your public, web accessible site root as youroutput or temporary directory is like a party invitation to hackers worldwide. If youcome to our forum with such a setup and a broken backup we can't help you.
Temporary Di-rectory
During the backup process, Akeeba Backup needs to store various pieces of temporary informationsuch as a copy of your database's dump - before putting it inside the archive - and a "memory" filewhich allows it to keep track of the backup process while it spans multiple discrete steps (pagecalls). The same notes as for the Output Directory setting are, of course, in place.
You can use the following variables to make your setting both human readable and portable ac-cross different servers - or even different platforms:
• [SITETMP] is replaced by the absolute path to your site's temp-folder, as configured in yoursite's Global Configuration.
Warning
If your site uses the system-wide /tmp directory, do not use it for your TemporaryDirectory setting! Most servers wipe out this directory's contents every minute,which will make the backup process fail, as Akeeba Backup's "memory" file willbe destroyed. If unsure, use the same directory as your backup output.
• [SITEROOT] is automatically replaced by the absolute path to your site's root
• [ROOTPARENT] is automatically replaceed by the absolute path to the parent directory ofyour site's root (that is, one directory above your site's root)
Log Level This option determines the verbosity of Akeeba Backup's log file:
• Errors only. Only fatal errors are reported. Use this on production boxes where you havealready confirmed there are no unreadable files or directories.
• Errors and warnings. The minimum recommended setting, reports fatal errors as well as warn-ings. Akeeba Backup communicates unreadable files and directories which it wasn't able tobackup through warnings. Read the warnings to make sure you don't end up with incompletebackups! Warnings are also reported in the Backup Now page GUI irrespective of the log ver-bosity setting as a convenience.
Using the Akeeba Backup component
17
• All information. As "Error and Warnings" but also includes some informative messages onAkeeba Backup's backup process.
• All Information and Debug. This is the recommended setting for reporting bugs. It is the mostverbose level, containing developer-friendly information on Akeeba Backup's operation. Thisis what we need to help you in case of a problem. This will also create a 2-5Mb log file on mostsites, so you should only use this until you have achieved consistently valid backup archivescreation.
• None. This log level is not recommended. You should only use this if you are paranoid andwant no log files written on the server. However, if you are truly concerned about security, youshould protect the backup output directory instead of using this log level!
Our servers usually run on Errors and Warnings or All Information levels. When we are testingnew releases or change our server setups, we switch to All Information and Debug until we aresure everything is flowing smoothly.
Backup archivename
Here you can define the naming template of backup files. There are a few available variables.Variables are special pieces of text which will be expanded to something else at backup time.They can be used to make the names of the files harder to guess for potential attackers, as wellas allow you to store multiple backup archives on the output directory at any given time. Theavailable variables and their expansion at backup time are:
[HOST] The configured host name of your site.
Note
This doesn't work in the native command-line CRON mode, i.e. usingbackup.php for producing automated backups. In such a case, it will bereplaced with an empty string (no text).
[DATE] The current server date, in the format YYYYMMDD (year as four digits, month astwo digits, day as two digits), for example 20080818 for August 18th 2008.
[TIME] The current server time, in the format HHMMSS (hour as two digits, minutes as twodigits and seconds as two digits), for example 221520 for 10:15:20 pm.
Backup Type It defines the kind of backup you'd like to take. The backup types for Akeeba Backup are:
• Full site backup which backs up the Joomla! database, any extra databases you might havedefined and all of the site's files. This produces a backup archive with an embedded installerso that you can restore your site with ease. This is the option 90% of the users want; it is theonly option which creates a full backup of your site, capable of producing a working site ifeverything is wiped out of your server.
• Main site database only (SQL file) which backs up only the Joomla! database. It results in asingle SQL file which can be used with any MySQL administration utility (e.g. phpMyAdmin)to restore only your database should disaster strike. This option is recommended for advancedusers only.
• Site files only which backs up nothing but the site's files. It is complementary to the previousoption.
Using the Akeeba Backup component
18
Warning
Having one "main site database" backup and one "sites files only" backup is notequal to having a full site backup! The full site backup also includes an installationscript which, just like Joomla!'s web installer, allows you to effortlessly recoveryour site even if everything is wiped out of your server. It acts as the glue betweenthe two pieces (files and database).
• All configured databases (archive file) which creates an archive file containing SQL fileswith dumps of your main site's database and all of the defined multiple databases. The databasedumps can be restored by any MySQL administration tool (for example phpMyAdmin). Thedifference to the second option is that it produces an uncompressed SQL file and doesn't includeany extra databases which you might have defined.
Note
Extra - or "multiple" - database definitions are only available in the Professionaledition of the component.
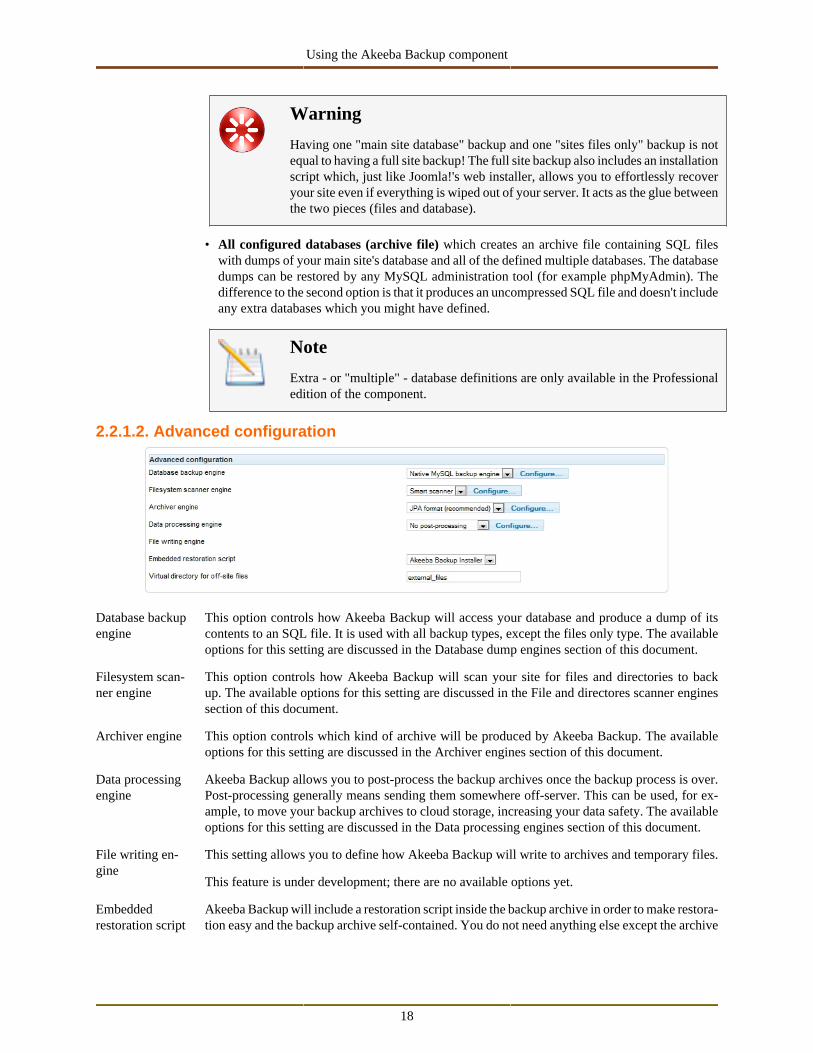
2.2.1.2. Advanced configuration
Database backupengine
This option controls how Akeeba Backup will access your database and produce a dump of itscontents to an SQL file. It is used with all backup types, except the files only type. The availableoptions for this setting are discussed in the Database dump engines section of this document.
Filesystem scan-ner engine
This option controls how Akeeba Backup will scan your site for files and directories to backup. The available options for this setting are discussed in the File and directores scanner enginessection of this document.
Archiver engine This option controls which kind of archive will be produced by Akeeba Backup. The availableoptions for this setting are discussed in the Archiver engines section of this document.
Data processingengine
Akeeba Backup allows you to post-process the backup archives once the backup process is over.Post-processing generally means sending them somewhere off-server. This can be used, for ex-ample, to move your backup archives to cloud storage, increasing your data safety. The availableoptions for this setting are discussed in the Data processing engines section of this document.
File writing en-gine
This setting allows you to define how Akeeba Backup will write to archives and temporary files.
This feature is under development; there are no available options yet.
Embeddedrestoration script
Akeeba Backup will include a restoration script inside the backup archive in order to make restora-tion easy and the backup archive self-contained. You do not need anything else except the archive
Using the Akeeba Backup component
19
in order to restore a site. Restoration scripts honour the settings in your configuration.php, mod-ifying only those necessary (for example, the database connection information), allowing you tocreate pristine copies ("clones") of your site to any host. You can find more information aboutrestoration scripts in the next Chapter.
Virtual directoryfor off-site files
Using the off-site directories inclusion of Akeeba Backup Professional, the component will beinstructed to look for files in arbitrary locations, even if they are outside the site's root (hence thename of that feature). All the directories included with this feature will be placed in the archiveas subdirectories of another folder, in order to avoid directory name clashes. We call this folderthe "virtual directory", because it doesn't physically exist on the server, it only exists inside thebackup archive.
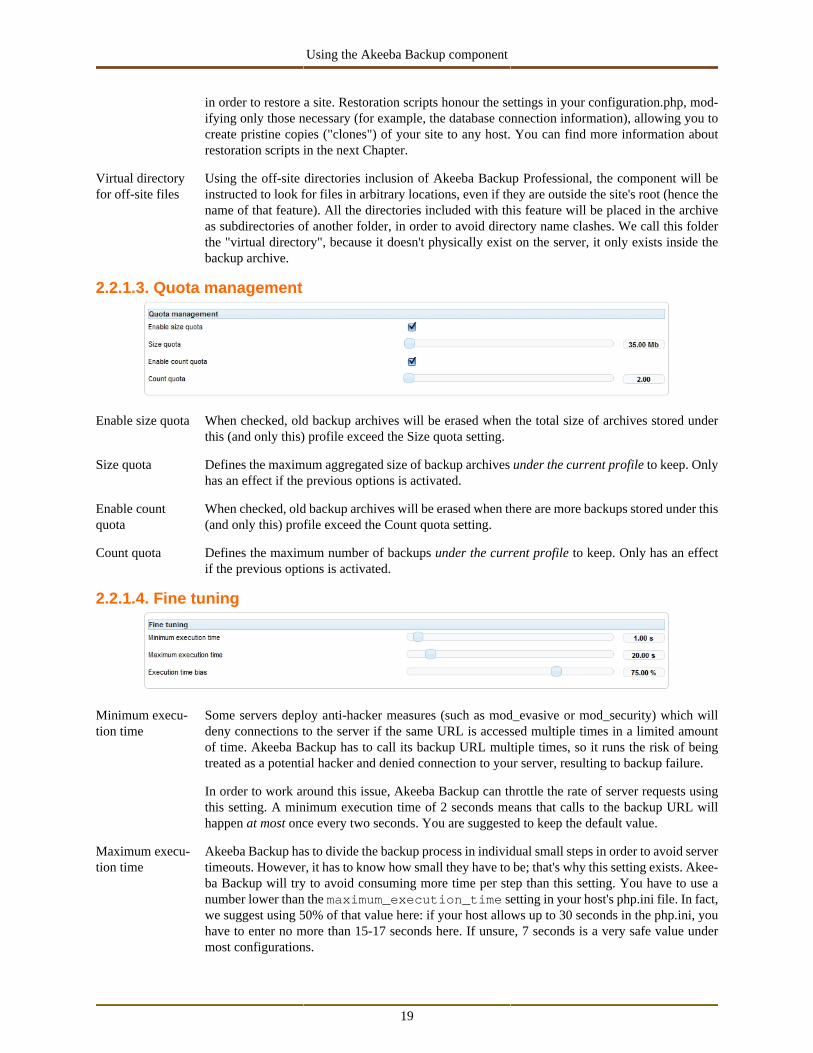
2.2.1.3. Quota management
Enable size quota When checked, old backup archives will be erased when the total size of archives stored underthis (and only this) profile exceed the Size quota setting.
Size quota Defines the maximum aggregated size of backup archives under the current profile to keep. Onlyhas an effect if the previous options is activated.
Enable countquota
When checked, old backup archives will be erased when there are more backups stored under this(and only this) profile exceed the Count quota setting.
Count quota Defines the maximum number of backups under the current profile to keep. Only has an effectif the previous options is activated.
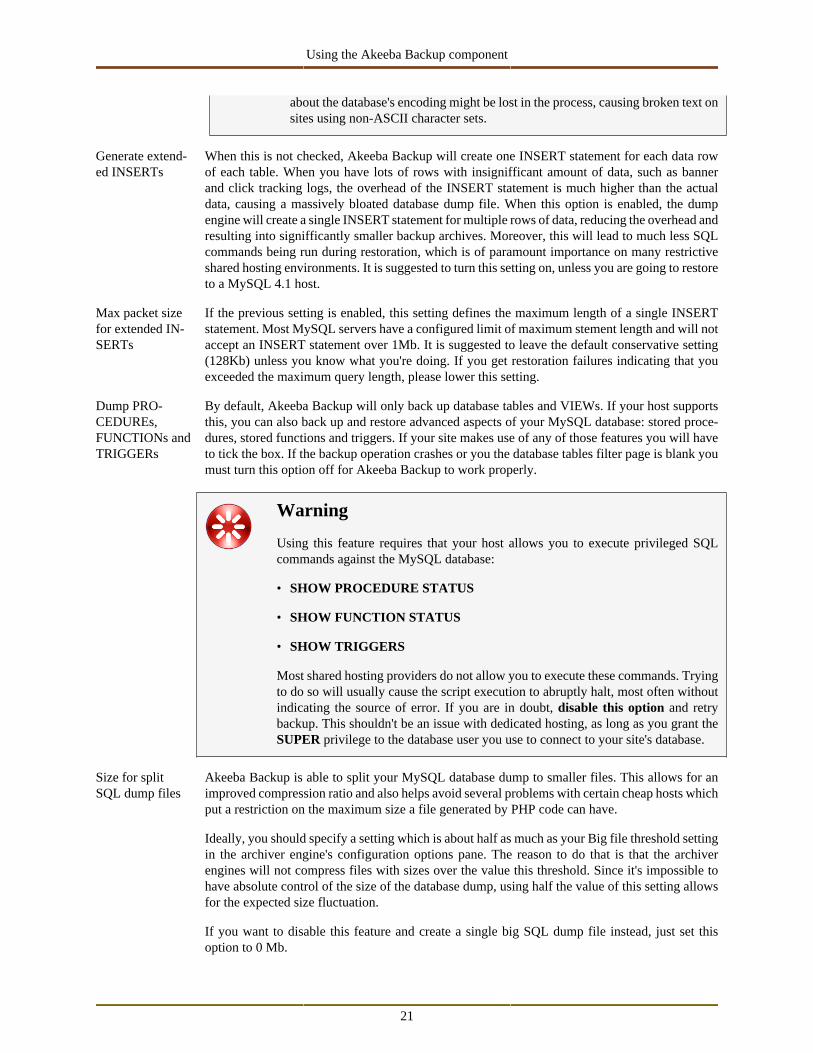
2.2.1.4. Fine tuning
Minimum execu-tion time
Some servers deploy anti-hacker measures (such as mod_evasive or mod_security) which willdeny connections to the server if the same URL is accessed multiple times in a limited amountof time. Akeeba Backup has to call its backup URL multiple times, so it runs the risk of beingtreated as a potential hacker and denied connection to your server, resulting to backup failure.
In order to work around this issue, Akeeba Backup can throttle the rate of server requests usingthis setting. A minimum execution time of 2 seconds means that calls to the backup URL willhappen at most once every two seconds. You are suggested to keep the default value.
Maximum execu-tion time
Akeeba Backup has to divide the backup process in individual small steps in order to avoid servertimeouts. However, it has to know how small they have to be; that's why this setting exists. Akee-ba Backup will try to avoid consuming more time per step than this setting. You have to use anumber lower than the maximum_execution_time setting in your host's php.ini file. In fact,we suggest using 50% of that value here: if your host allows up to 30 seconds in the php.ini, youhave to enter no more than 15-17 seconds here. If unsure, 7 seconds is a very safe value undermost configurations.

Using the Akeeba Backup component
20
Execution timebias
When Akeeba Backup calculates the available time left for performing operations within the cur-rent backup step a number of external settings may skew this result and lead to timeout errors. Thissetting defines how conservative the backup engine will be when performing those calculationsand is expressed as a percentage of the Maximum execution time parameter. The less this settingis, the more conservative Akeeba Backup gets. It is suggested not to use a value over 75%, unlessyou have a very fast server. If you experience timeouts, you may want to lower this setting to avalue around 50%.
2.2.2. Database dump engines
2.2.2.1. Native MySQL Backup Engine
This engine will take a backup of your MySQL database using nothing but PHP functions in order to accomplish that.This database dump engine supports all of the ground-breaking features available in MySQL 5, such as views, storedprocedures and functions, triggers, merge tables, temporary/memory tables, even federated tables.
Important
Restoring views, triggers, stored procedures and functions requires adequate privileges for the databaseuser during the restoration process. Most hosts do not assign this kind of privileges. If your restorationfails with a MySQL error when restoring such database entities you may have to ask your host to assignthose privileges to your database user.
MySQL Compat-ibility
his option controls the MySQL version compatibility when creating the database SQL dump file.In fact, it forces Akeeba Backup to request the appropriate CREATE TABLE commands fromyour database server. It is useful when migrating your site to another host with a different MySQLversion. The available options are:
• Default. This is the recommended option. The full feature set of your database server will beused when generating the CREATE command. Your target database server must run MySQLof a matching major version, i.e. MySQL 5 if the host you're backing up runs on MySQL 5.
• MySQL 4.1. Akeeba Backup will request from your database server to provide definitions(CREATE commands) in a MySQL 4.1 friendly format.
Important
This option will take effect in MySQL 4.1 or greater database hosts. If you use iton older MySQL version the backup might fail!
Warning
Do not use this option if your site is already running on MySQL 4.x or if bothyour site and the target host run on MySQL 5.x. Otherwise, crucial information
Using the Akeeba Backup component
21
about the database's encoding might be lost in the process, causing broken text onsites using non-ASCII character sets.
Generate extend-ed INSERTs
When this is not checked, Akeeba Backup will create one INSERT statement for each data rowof each table. When you have lots of rows with insignifficant amount of data, such as bannerand click tracking logs, the overhead of the INSERT statement is much higher than the actualdata, causing a massively bloated database dump file. When this option is enabled, the dumpengine will create a single INSERT statement for multiple rows of data, reducing the overhead andresulting into signifficantly smaller backup archives. Moreover, this will lead to much less SQLcommands being run during restoration, which is of paramount importance on many restrictiveshared hosting environments. It is suggested to turn this setting on, unless you are going to restoreto a MySQL 4.1 host.
Max packet sizefor extended IN-SERTs
If the previous setting is enabled, this setting defines the maximum length of a single INSERTstatement. Most MySQL servers have a configured limit of maximum stement length and will notaccept an INSERT statement over 1Mb. It is suggested to leave the default conservative setting(128Kb) unless you know what you're doing. If you get restoration failures indicating that youexceeded the maximum query length, please lower this setting.
Dump PRO-CEDUREs,FUNCTIONs andTRIGGERs
By default, Akeeba Backup will only back up database tables and VIEWs. If your host supportsthis, you can also back up and restore advanced aspects of your MySQL database: stored proce-dures, stored functions and triggers. If your site makes use of any of those features you will haveto tick the box. If the backup operation crashes or you the database tables filter page is blank youmust turn this option off for Akeeba Backup to work properly.
Warning
Using this feature requires that your host allows you to execute privileged SQLcommands against the MySQL database:
• SHOW PROCEDURE STATUS
• SHOW FUNCTION STATUS
• SHOW TRIGGERS
Most shared hosting providers do not allow you to execute these commands. Tryingto do so will usually cause the script execution to abruptly halt, most often withoutindicating the source of error. If you are in doubt, disable this option and retrybackup. This shouldn't be an issue with dedicated hosting, as long as you grant theSUPER privilege to the database user you use to connect to your site's database.
Size for splitSQL dump files
Akeeba Backup is able to split your MySQL database dump to smaller files. This allows for animproved compression ratio and also helps avoid several problems with certain cheap hosts whichput a restriction on the maximum size a file generated by PHP code can have.
Ideally, you should specify a setting which is about half as much as your Big file threshold settingin the archiver engine's configuration options pane. The reason to do that is that the archiverengines will not compress files with sizes over the value this threshold. Since it's impossible tohave absolute control of the size of the database dump, using half the value of this setting allowsfor the expected size fluctuation.
If you want to disable this feature and create a single big SQL dump file instead, just set thisoption to 0 Mb.
Using the Akeeba Backup component
22
Important
This setting has no effect on "Main site database only" backup profiles. This is be-cause the nature of this backup type does not allow splitting the database archivedump. If you want something equivallent, please use the "All configured databases"backup type instead, as it creates an archive file which contains your (split) databasedump and takes up MUCH less space on your web server.
2.2.3. File and directores scanner engines
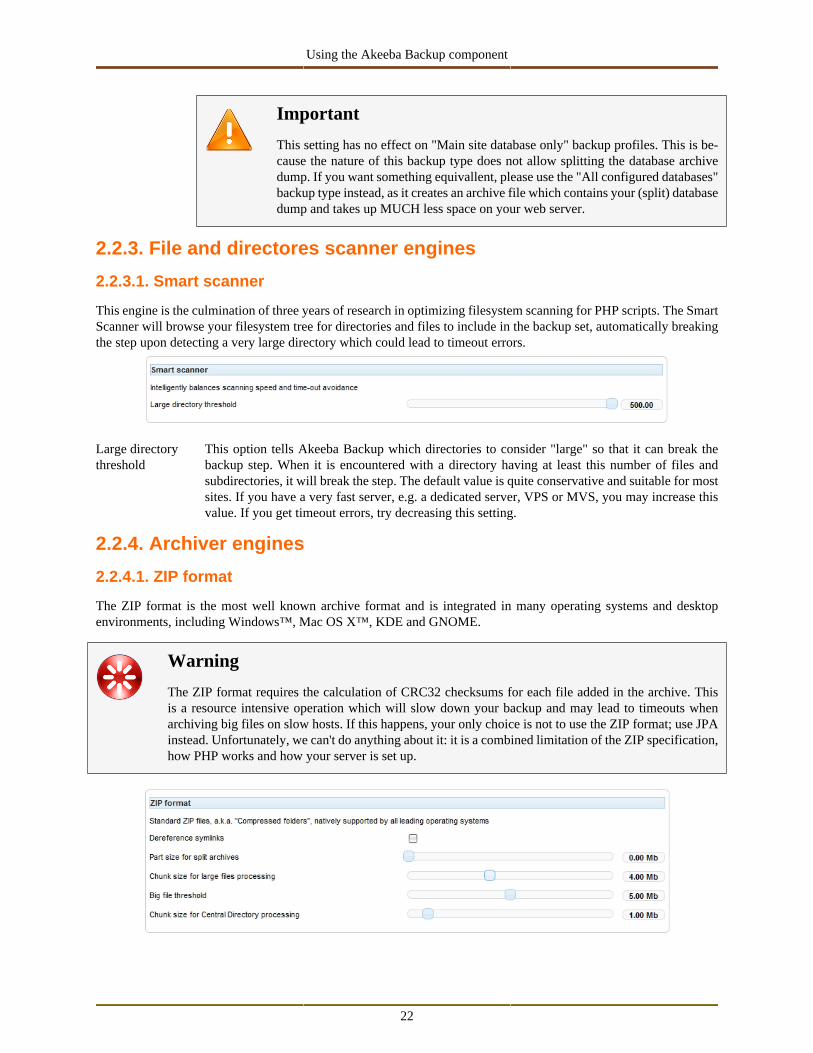
2.2.3.1. Smart scanner
This engine is the culmination of three years of research in optimizing filesystem scanning for PHP scripts. The SmartScanner will browse your filesystem tree for directories and files to include in the backup set, automatically breakingthe step upon detecting a very large directory which could lead to timeout errors.
Large directorythreshold
This option tells Akeeba Backup which directories to consider "large" so that it can break thebackup step. When it is encountered with a directory having at least this number of files andsubdirectories, it will break the step. The default value is quite conservative and suitable for mostsites. If you have a very fast server, e.g. a dedicated server, VPS or MVS, you may increase thisvalue. If you get timeout errors, try decreasing this setting.
2.2.4. Archiver engines
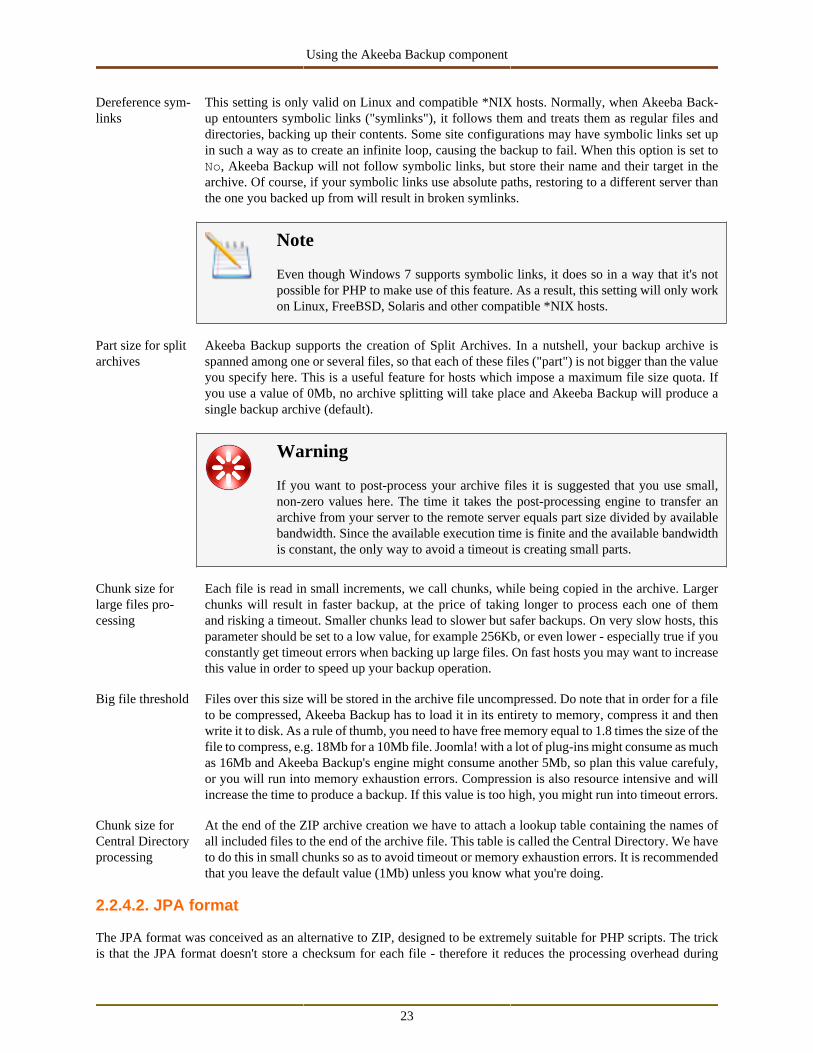
2.2.4.1. ZIP format
The ZIP format is the most well known archive format and is integrated in many operating systems and desktopenvironments, including Windows™, Mac OS X™, KDE and GNOME.
Warning
The ZIP format requires the calculation of CRC32 checksums for each file added in the archive. Thisis a resource intensive operation which will slow down your backup and may lead to timeouts whenarchiving big files on slow hosts. If this happens, your only choice is not to use the ZIP format; use JPAinstead. Unfortunately, we can't do anything about it: it is a combined limitation of the ZIP specification,how PHP works and how your server is set up.
Using the Akeeba Backup component
23
Dereference sym-links
This setting is only valid on Linux and compatible *NIX hosts. Normally, when Akeeba Back-up entounters symbolic links ("symlinks"), it follows them and treats them as regular files anddirectories, backing up their contents. Some site configurations may have symbolic links set upin such a way as to create an infinite loop, causing the backup to fail. When this option is set toNo, Akeeba Backup will not follow symbolic links, but store their name and their target in thearchive. Of course, if your symbolic links use absolute paths, restoring to a different server thanthe one you backed up from will result in broken symlinks.
Note
Even though Windows 7 supports symbolic links, it does so in a way that it's notpossible for PHP to make use of this feature. As a result, this setting will only workon Linux, FreeBSD, Solaris and other compatible *NIX hosts.
Part size for splitarchives
Akeeba Backup supports the creation of Split Archives. In a nutshell, your backup archive isspanned among one or several files, so that each of these files ("part") is not bigger than the valueyou specify here. This is a useful feature for hosts which impose a maximum file size quota. Ifyou use a value of 0Mb, no archive splitting will take place and Akeeba Backup will produce asingle backup archive (default).
Warning
If you want to post-process your archive files it is suggested that you use small,non-zero values here. The time it takes the post-processing engine to transfer anarchive from your server to the remote server equals part size divided by availablebandwidth. Since the available execution time is finite and the available bandwidthis constant, the only way to avoid a timeout is creating small parts.
Chunk size forlarge files pro-cessing
Each file is read in small increments, we call chunks, while being copied in the archive. Largerchunks will result in faster backup, at the price of taking longer to process each one of themand risking a timeout. Smaller chunks lead to slower but safer backups. On very slow hosts, thisparameter should be set to a low value, for example 256Kb, or even lower - especially true if youconstantly get timeout errors when backing up large files. On fast hosts you may want to increasethis value in order to speed up your backup operation.
Big file threshold Files over this size will be stored in the archive file uncompressed. Do note that in order for a fileto be compressed, Akeeba Backup has to load it in its entirety to memory, compress it and thenwrite it to disk. As a rule of thumb, you need to have free memory equal to 1.8 times the size of thefile to compress, e.g. 18Mb for a 10Mb file. Joomla! with a lot of plug-ins might consume as muchas 16Mb and Akeeba Backup's engine might consume another 5Mb, so plan this value carefuly,or you will run into memory exhaustion errors. Compression is also resource intensive and willincrease the time to produce a backup. If this value is too high, you might run into timeout errors.
Chunk size forCentral Directoryprocessing
At the end of the ZIP archive creation we have to attach a lookup table containing the names ofall included files to the end of the archive file. This table is called the Central Directory. We haveto do this in small chunks so as to avoid timeout or memory exhaustion errors. It is recommendedthat you leave the default value (1Mb) unless you know what you're doing.
2.2.4.2. JPA format
The JPA format was conceived as an alternative to ZIP, designed to be extremely suitable for PHP scripts. The trickis that the JPA format doesn't store a checksum for each file - therefore it reduces the processing overhead during
Using the Akeeba Backup component
24
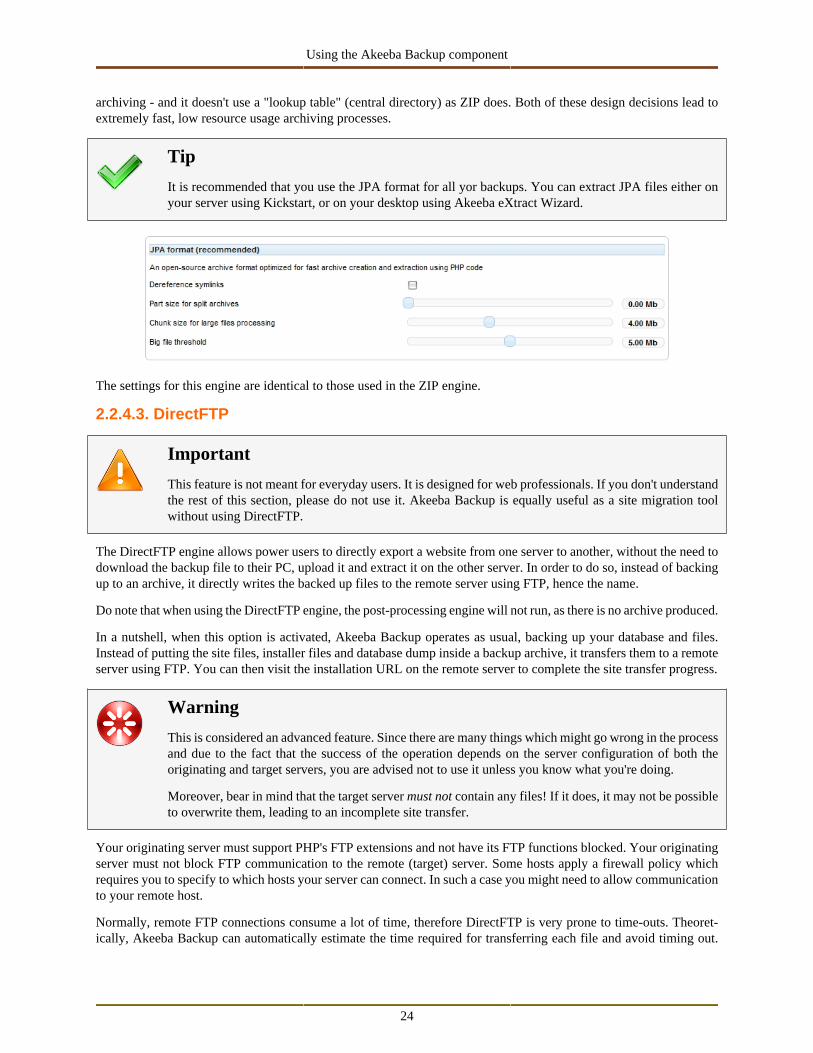
archiving - and it doesn't use a "lookup table" (central directory) as ZIP does. Both of these design decisions lead toextremely fast, low resource usage archiving processes.
Tip
It is recommended that you use the JPA format for all yor backups. You can extract JPA files either onyour server using Kickstart, or on your desktop using Akeeba eXtract Wizard.
The settings for this engine are identical to those used in the ZIP engine.
2.2.4.3. DirectFTP
Important
This feature is not meant for everyday users. It is designed for web professionals. If you don't understandthe rest of this section, please do not use it. Akeeba Backup is equally useful as a site migration toolwithout using DirectFTP.
The DirectFTP engine allows power users to directly export a website from one server to another, without the need todownload the backup file to their PC, upload it and extract it on the other server. In order to do so, instead of backingup to an archive, it directly writes the backed up files to the remote server using FTP, hence the name.
Do note that when using the DirectFTP engine, the post-processing engine will not run, as there is no archive produced.
In a nutshell, when this option is activated, Akeeba Backup operates as usual, backing up your database and files.Instead of putting the site files, installer files and database dump inside a backup archive, it transfers them to a remoteserver using FTP. You can then visit the installation URL on the remote server to complete the site transfer progress.
Warning
This is considered an advanced feature. Since there are many things which might go wrong in the processand due to the fact that the success of the operation depends on the server configuration of both theoriginating and target servers, you are advised not to use it unless you know what you're doing.
Moreover, bear in mind that the target server must not contain any files! If it does, it may not be possibleto overwrite them, leading to an incomplete site transfer.
Your originating server must support PHP's FTP extensions and not have its FTP functions blocked. Your originatingserver must not block FTP communication to the remote (target) server. Some hosts apply a firewall policy whichrequires you to specify to which hosts your server can connect. In such a case you might need to allow communicationto your remote host.
Normally, remote FTP connections consume a lot of time, therefore DirectFTP is very prone to time-outs. Theoret-ically, Akeeba Backup can automatically estimate the time required for transferring each file and avoid timing out.
Using the Akeeba Backup component
25
However, this is not always technically possible. In such a case you might want to lower the maximum execution timeallowance and bias in the Configuration. Do note that large files have to be transferred in a single step, as most PHPand FTP configuration combinations disallow resuming uploads (chunked uploads). This means that a very large file,or a very large database dump may cause the process to fail with a timeout error.
The available configuration options are:
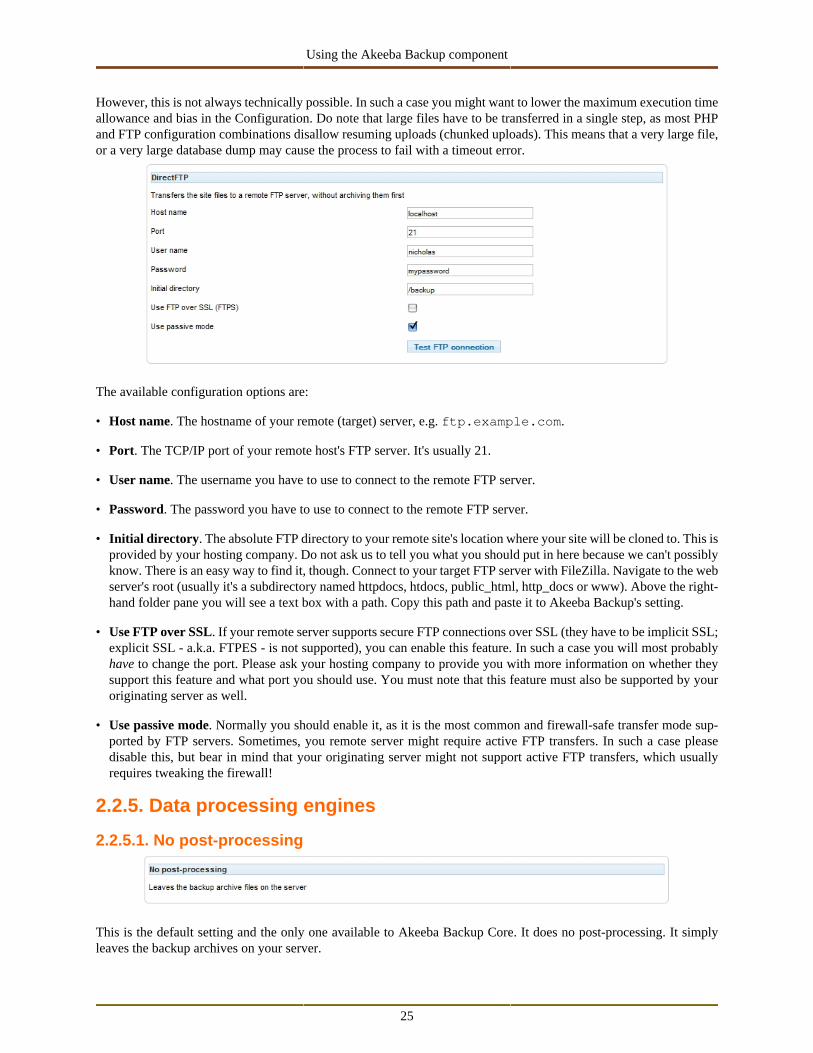
• Host name. The hostname of your remote (target) server, e.g. ftp.example.com.
• Port. The TCP/IP port of your remote host's FTP server. It's usually 21.
• User name. The username you have to use to connect to the remote FTP server.
• Password. The password you have to use to connect to the remote FTP server.
• Initial directory. The absolute FTP directory to your remote site's location where your site will be cloned to. This isprovided by your hosting company. Do not ask us to tell you what you should put in here because we can't possiblyknow. There is an easy way to find it, though. Connect to your target FTP server with FileZilla. Navigate to the webserver's root (usually it's a subdirectory named httpdocs, htdocs, public_html, http_docs or www). Above the right-hand folder pane you will see a text box with a path. Copy this path and paste it to Akeeba Backup's setting.
• Use FTP over SSL. If your remote server supports secure FTP connections over SSL (they have to be implicit SSL;explicit SSL - a.k.a. FTPES - is not supported), you can enable this feature. In such a case you will most probablyhave to change the port. Please ask your hosting company to provide you with more information on whether theysupport this feature and what port you should use. You must note that this feature must also be supported by youroriginating server as well.
• Use passive mode. Normally you should enable it, as it is the most common and firewall-safe transfer mode sup-ported by FTP servers. Sometimes, you remote server might require active FTP transfers. In such a case pleasedisable this, but bear in mind that your originating server might not support active FTP transfers, which usuallyrequires tweaking the firewall!
2.2.5. Data processing engines
2.2.5.1. No post-processing
This is the default setting and the only one available to Akeeba Backup Core. It does no post-processing. It simplyleaves the backup archives on your server.
Using the Akeeba Backup component
26
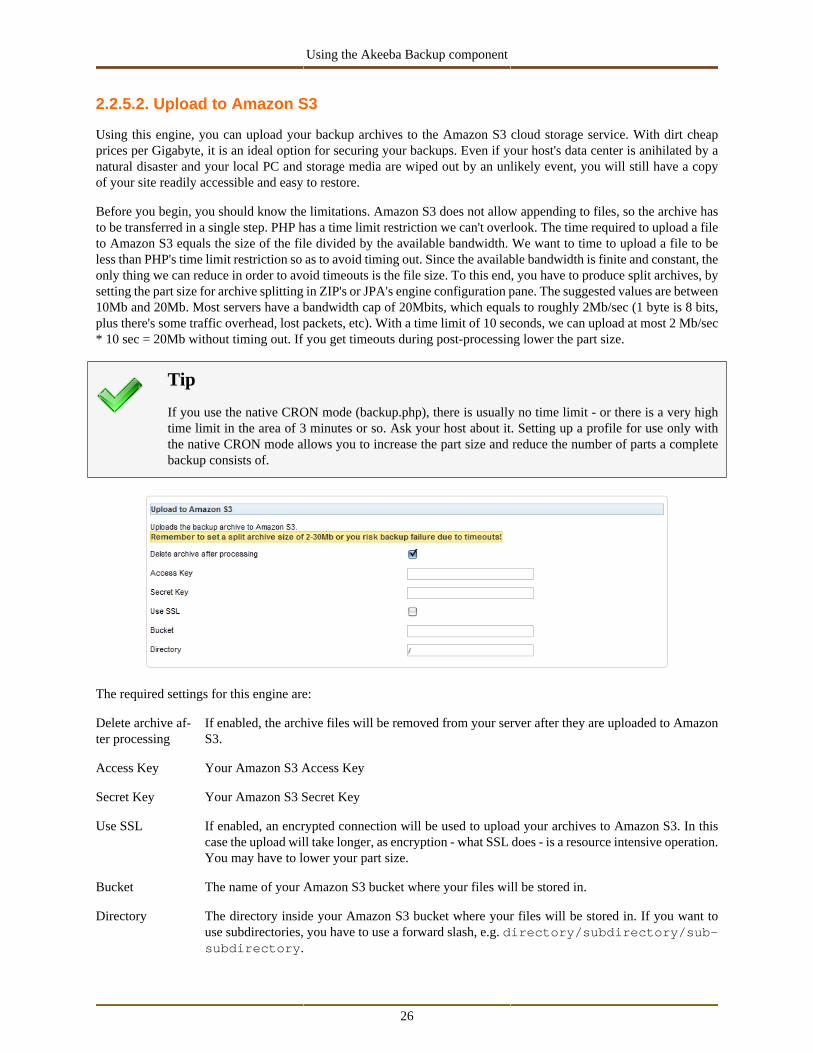
2.2.5.2. Upload to Amazon S3
Using this engine, you can upload your backup archives to the Amazon S3 cloud storage service. With dirt cheapprices per Gigabyte, it is an ideal option for securing your backups. Even if your host's data center is anihilated by anatural disaster and your local PC and storage media are wiped out by an unlikely event, you will still have a copyof your site readily accessible and easy to restore.
Before you begin, you should know the limitations. Amazon S3 does not allow appending to files, so the archive hasto be transferred in a single step. PHP has a time limit restriction we can't overlook. The time required to upload a fileto Amazon S3 equals the size of the file divided by the available bandwidth. We want to time to upload a file to beless than PHP's time limit restriction so as to avoid timing out. Since the available bandwidth is finite and constant, theonly thing we can reduce in order to avoid timeouts is the file size. To this end, you have to produce split archives, bysetting the part size for archive splitting in ZIP's or JPA's engine configuration pane. The suggested values are between10Mb and 20Mb. Most servers have a bandwidth cap of 20Mbits, which equals to roughly 2Mb/sec (1 byte is 8 bits,plus there's some traffic overhead, lost packets, etc). With a time limit of 10 seconds, we can upload at most 2 Mb/sec* 10 sec = 20Mb without timing out. If you get timeouts during post-processing lower the part size.
Tip
If you use the native CRON mode (backup.php), there is usually no time limit - or there is a very hightime limit in the area of 3 minutes or so. Ask your host about it. Setting up a profile for use only withthe native CRON mode allows you to increase the part size and reduce the number of parts a completebackup consists of.
The required settings for this engine are:
Delete archive af-ter processing
If enabled, the archive files will be removed from your server after they are uploaded to AmazonS3.
Access Key Your Amazon S3 Access Key
Secret Key Your Amazon S3 Secret Key
Use SSL If enabled, an encrypted connection will be used to upload your archives to Amazon S3. In thiscase the upload will take longer, as encryption - what SSL does - is a resource intensive operation.You may have to lower your part size.
Bucket The name of your Amazon S3 bucket where your files will be stored in.
Directory The directory inside your Amazon S3 bucket where your files will be stored in. If you want touse subdirectories, you have to use a forward slash, e.g. directory/subdirectory/sub-subdirectory.
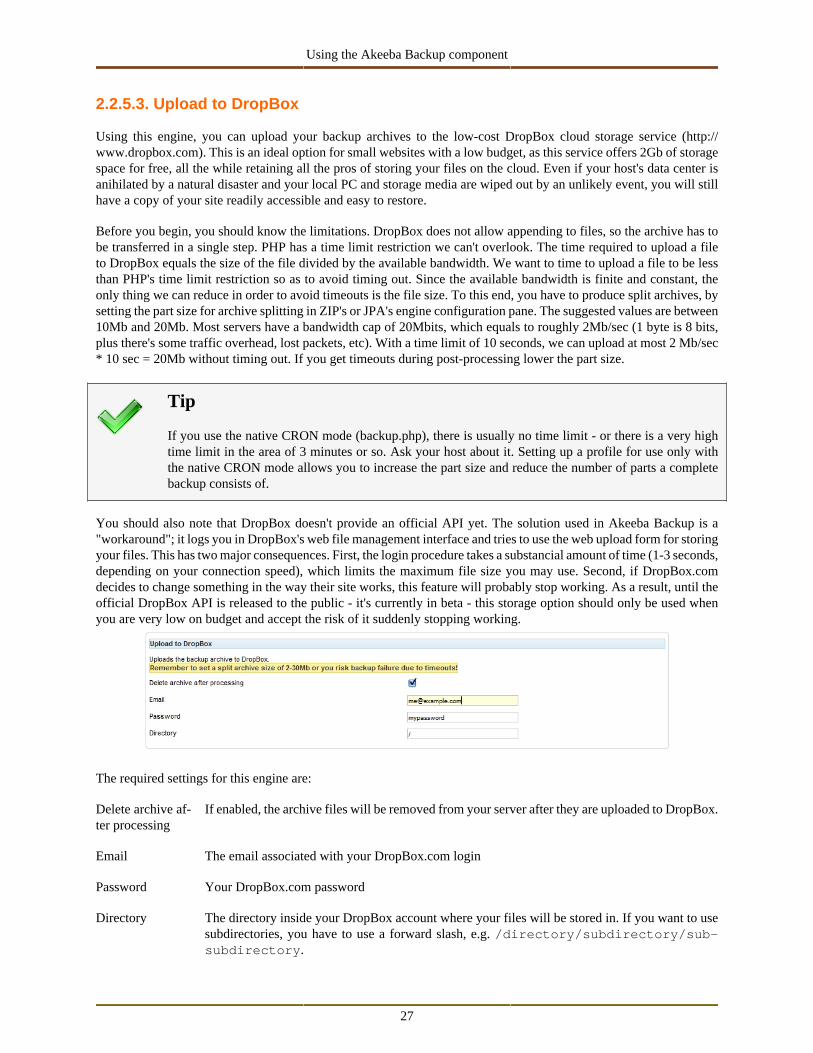
Using the Akeeba Backup component
27
2.2.5.3. Upload to DropBox
Using this engine, you can upload your backup archives to the low-cost DropBox cloud storage service (http://www.dropbox.com). This is an ideal option for small websites with a low budget, as this service offers 2Gb of storagespace for free, all the while retaining all the pros of storing your files on the cloud. Even if your host's data center isanihilated by a natural disaster and your local PC and storage media are wiped out by an unlikely event, you will stillhave a copy of your site readily accessible and easy to restore.
Before you begin, you should know the limitations. DropBox does not allow appending to files, so the archive has tobe transferred in a single step. PHP has a time limit restriction we can't overlook. The time required to upload a fileto DropBox equals the size of the file divided by the available bandwidth. We want to time to upload a file to be lessthan PHP's time limit restriction so as to avoid timing out. Since the available bandwidth is finite and constant, theonly thing we can reduce in order to avoid timeouts is the file size. To this end, you have to produce split archives, bysetting the part size for archive splitting in ZIP's or JPA's engine configuration pane. The suggested values are between10Mb and 20Mb. Most servers have a bandwidth cap of 20Mbits, which equals to roughly 2Mb/sec (1 byte is 8 bits,plus there's some traffic overhead, lost packets, etc). With a time limit of 10 seconds, we can upload at most 2 Mb/sec* 10 sec = 20Mb without timing out. If you get timeouts during post-processing lower the part size.
Tip
If you use the native CRON mode (backup.php), there is usually no time limit - or there is a very hightime limit in the area of 3 minutes or so. Ask your host about it. Setting up a profile for use only withthe native CRON mode allows you to increase the part size and reduce the number of parts a completebackup consists of.
You should also note that DropBox doesn't provide an official API yet. The solution used in Akeeba Backup is a"workaround"; it logs you in DropBox's web file management interface and tries to use the web upload form for storingyour files. This has two major consequences. First, the login procedure takes a substancial amount of time (1-3 seconds,depending on your connection speed), which limits the maximum file size you may use. Second, if DropBox.comdecides to change something in the way their site works, this feature will probably stop working. As a result, until theofficial DropBox API is released to the public - it's currently in beta - this storage option should only be used whenyou are very low on budget and accept the risk of it suddenly stopping working.
The required settings for this engine are:
Delete archive af-ter processing
If enabled, the archive files will be removed from your server after they are uploaded to DropBox.
Email The email associated with your DropBox.com login
Password Your DropBox.com password
Directory The directory inside your DropBox account where your files will be stored in. If you want to usesubdirectories, you have to use a forward slash, e.g. /directory/subdirectory/sub-subdirectory.
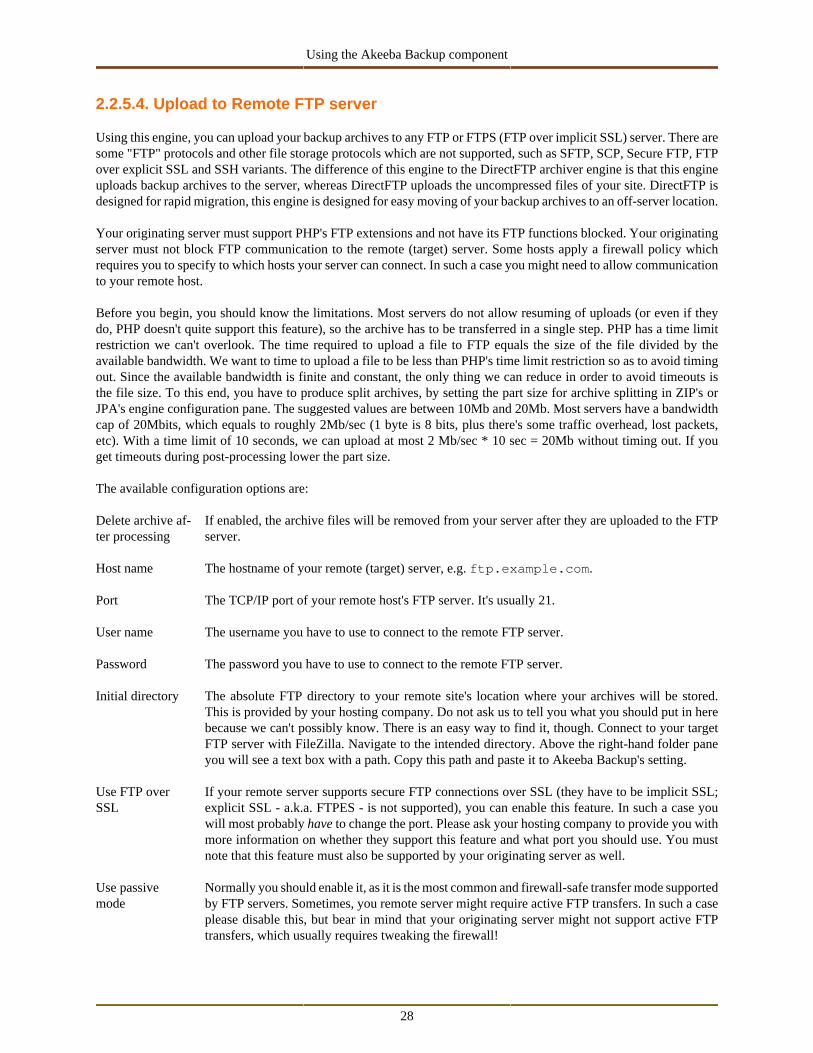
Using the Akeeba Backup component
28
2.2.5.4. Upload to Remote FTP server
Using this engine, you can upload your backup archives to any FTP or FTPS (FTP over implicit SSL) server. There aresome "FTP" protocols and other file storage protocols which are not supported, such as SFTP, SCP, Secure FTP, FTPover explicit SSL and SSH variants. The difference of this engine to the DirectFTP archiver engine is that this engineuploads backup archives to the server, whereas DirectFTP uploads the uncompressed files of your site. DirectFTP isdesigned for rapid migration, this engine is designed for easy moving of your backup archives to an off-server location.
Your originating server must support PHP's FTP extensions and not have its FTP functions blocked. Your originatingserver must not block FTP communication to the remote (target) server. Some hosts apply a firewall policy whichrequires you to specify to which hosts your server can connect. In such a case you might need to allow communicationto your remote host.
Before you begin, you should know the limitations. Most servers do not allow resuming of uploads (or even if theydo, PHP doesn't quite support this feature), so the archive has to be transferred in a single step. PHP has a time limitrestriction we can't overlook. The time required to upload a file to FTP equals the size of the file divided by theavailable bandwidth. We want to time to upload a file to be less than PHP's time limit restriction so as to avoid timingout. Since the available bandwidth is finite and constant, the only thing we can reduce in order to avoid timeouts isthe file size. To this end, you have to produce split archives, by setting the part size for archive splitting in ZIP's orJPA's engine configuration pane. The suggested values are between 10Mb and 20Mb. Most servers have a bandwidthcap of 20Mbits, which equals to roughly 2Mb/sec (1 byte is 8 bits, plus there's some traffic overhead, lost packets,etc). With a time limit of 10 seconds, we can upload at most 2 Mb/sec * 10 sec = 20Mb without timing out. If youget timeouts during post-processing lower the part size.
The available configuration options are:
Delete archive af-ter processing
If enabled, the archive files will be removed from your server after they are uploaded to the FTPserver.
Host name The hostname of your remote (target) server, e.g. ftp.example.com.
Port The TCP/IP port of your remote host's FTP server. It's usually 21.
User name The username you have to use to connect to the remote FTP server.
Password The password you have to use to connect to the remote FTP server.
Initial directory The absolute FTP directory to your remote site's location where your archives will be stored.This is provided by your hosting company. Do not ask us to tell you what you should put in herebecause we can't possibly know. There is an easy way to find it, though. Connect to your targetFTP server with FileZilla. Navigate to the intended directory. Above the right-hand folder paneyou will see a text box with a path. Copy this path and paste it to Akeeba Backup's setting.
Use FTP overSSL
If your remote server supports secure FTP connections over SSL (they have to be implicit SSL;explicit SSL - a.k.a. FTPES - is not supported), you can enable this feature. In such a case youwill most probably have to change the port. Please ask your hosting company to provide you withmore information on whether they support this feature and what port you should use. You mustnote that this feature must also be supported by your originating server as well.
Use passivemode
Normally you should enable it, as it is the most common and firewall-safe transfer mode supportedby FTP servers. Sometimes, you remote server might require active FTP transfers. In such a caseplease disable this, but bear in mind that your originating server might not support active FTPtransfers, which usually requires tweaking the firewall!
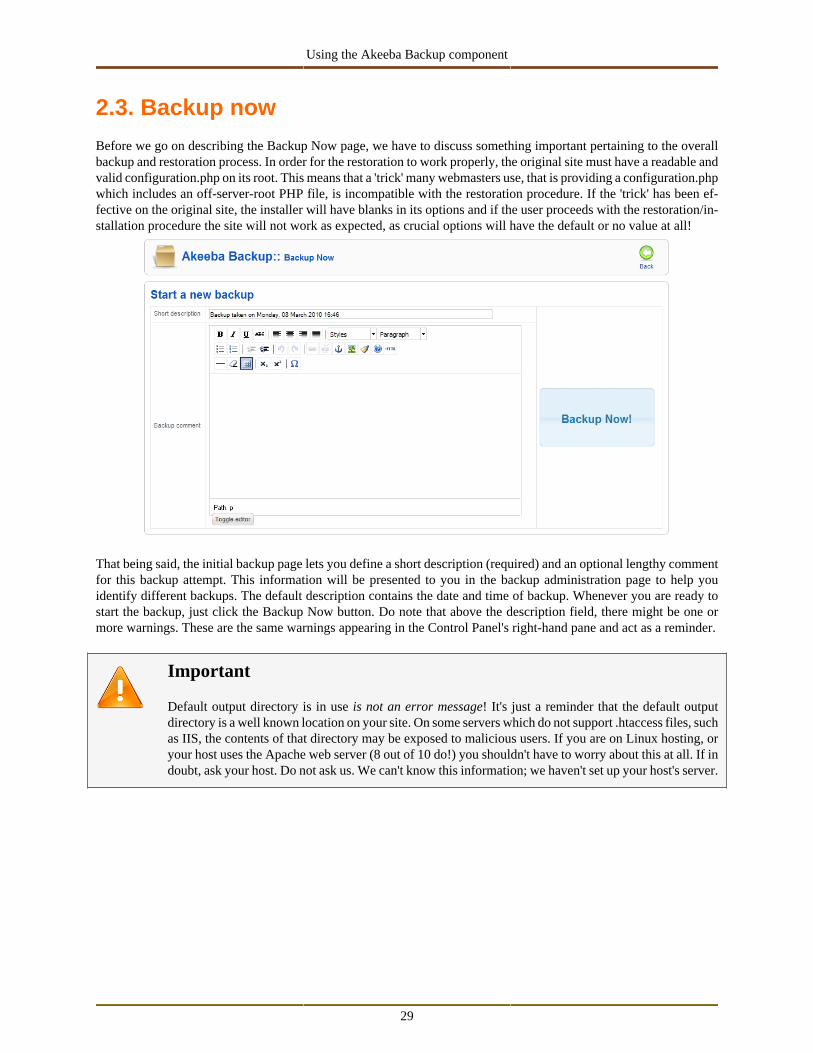
Using the Akeeba Backup component
29
2.3. Backup now
Before we go on describing the Backup Now page, we have to discuss something important pertaining to the overallbackup and restoration process. In order for the restoration to work properly, the original site must have a readable andvalid configuration.php on its root. This means that a 'trick' many webmasters use, that is providing a configuration.phpwhich includes an off-server-root PHP file, is incompatible with the restoration procedure. If the 'trick' has been ef-fective on the original site, the installer will have blanks in its options and if the user proceeds with the restoration/in-stallation procedure the site will not work as expected, as crucial options will have the default or no value at all!
That being said, the initial backup page lets you define a short description (required) and an optional lengthy commentfor this backup attempt. This information will be presented to you in the backup administration page to help youidentify different backups. The default description contains the date and time of backup. Whenever you are ready tostart the backup, just click the Backup Now button. Do note that above the description field, there might be one ormore warnings. These are the same warnings appearing in the Control Panel's right-hand pane and act as a reminder.
Important
Default output directory is in use is not an error message! It's just a reminder that the default outputdirectory is a well known location on your site. On some servers which do not support .htaccess files, suchas IIS, the contents of that directory may be exposed to malicious users. If you are on Linux hosting, oryour host uses the Apache web server (8 out of 10 do!) you shouldn't have to worry about this at all. If indoubt, ask your host. Do not ask us. We can't know this information; we haven't set up your host's server.
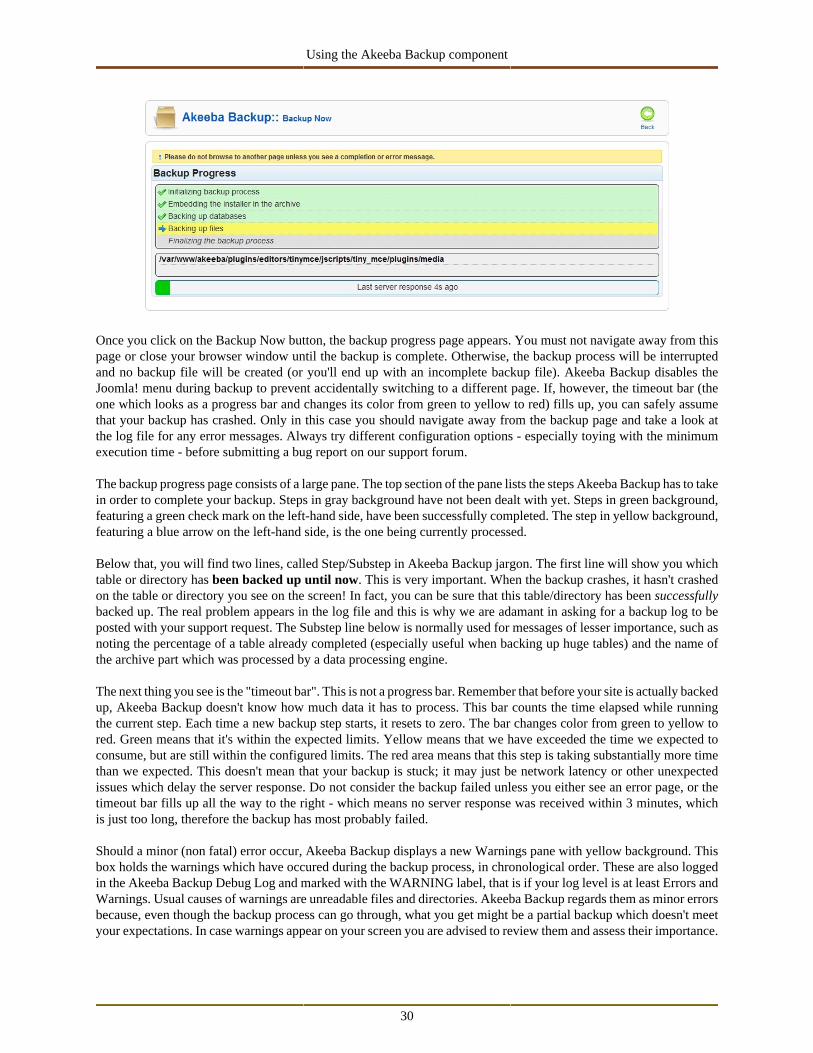
Using the Akeeba Backup component
30
Once you click on the Backup Now button, the backup progress page appears. You must not navigate away from thispage or close your browser window until the backup is complete. Otherwise, the backup process will be interruptedand no backup file will be created (or you'll end up with an incomplete backup file). Akeeba Backup disables theJoomla! menu during backup to prevent accidentally switching to a different page. If, however, the timeout bar (theone which looks as a progress bar and changes its color from green to yellow to red) fills up, you can safely assumethat your backup has crashed. Only in this case you should navigate away from the backup page and take a look atthe log file for any error messages. Always try different configuration options - especially toying with the minimumexecution time - before submitting a bug report on our support forum.
The backup progress page consists of a large pane. The top section of the pane lists the steps Akeeba Backup has to takein order to complete your backup. Steps in gray background have not been dealt with yet. Steps in green background,featuring a green check mark on the left-hand side, have been successfully completed. The step in yellow background,featuring a blue arrow on the left-hand side, is the one being currently processed.
Below that, you will find two lines, called Step/Substep in Akeeba Backup jargon. The first line will show you whichtable or directory has been backed up until now. This is very important. When the backup crashes, it hasn't crashedon the table or directory you see on the screen! In fact, you can be sure that this table/directory has been successfullybacked up. The real problem appears in the log file and this is why we are adamant in asking for a backup log to beposted with your support request. The Substep line below is normally used for messages of lesser importance, such asnoting the percentage of a table already completed (especially useful when backing up huge tables) and the name ofthe archive part which was processed by a data processing engine.
The next thing you see is the "timeout bar". This is not a progress bar. Remember that before your site is actually backedup, Akeeba Backup doesn't know how much data it has to process. This bar counts the time elapsed while runningthe current step. Each time a new backup step starts, it resets to zero. The bar changes color from green to yellow tored. Green means that it's within the expected limits. Yellow means that we have exceeded the time we expected toconsume, but are still within the configured limits. The red area means that this step is taking substantially more timethan we expected. This doesn't mean that your backup is stuck; it may just be network latency or other unexpectedissues which delay the server response. Do not consider the backup failed unless you either see an error page, or thetimeout bar fills up all the way to the right - which means no server response was received within 3 minutes, whichis just too long, therefore the backup has most probably failed.
Should a minor (non fatal) error occur, Akeeba Backup displays a new Warnings pane with yellow background. Thisbox holds the warnings which have occured during the backup process, in chronological order. These are also loggedin the Akeeba Backup Debug Log and marked with the WARNING label, that is if your log level is at least Errors andWarnings. Usual causes of warnings are unreadable files and directories. Akeeba Backup regards them as minor errorsbecause, even though the backup process can go through, what you get might be a partial backup which doesn't meetyour expectations. In case warnings appear on your screen you are advised to review them and assess their importance.
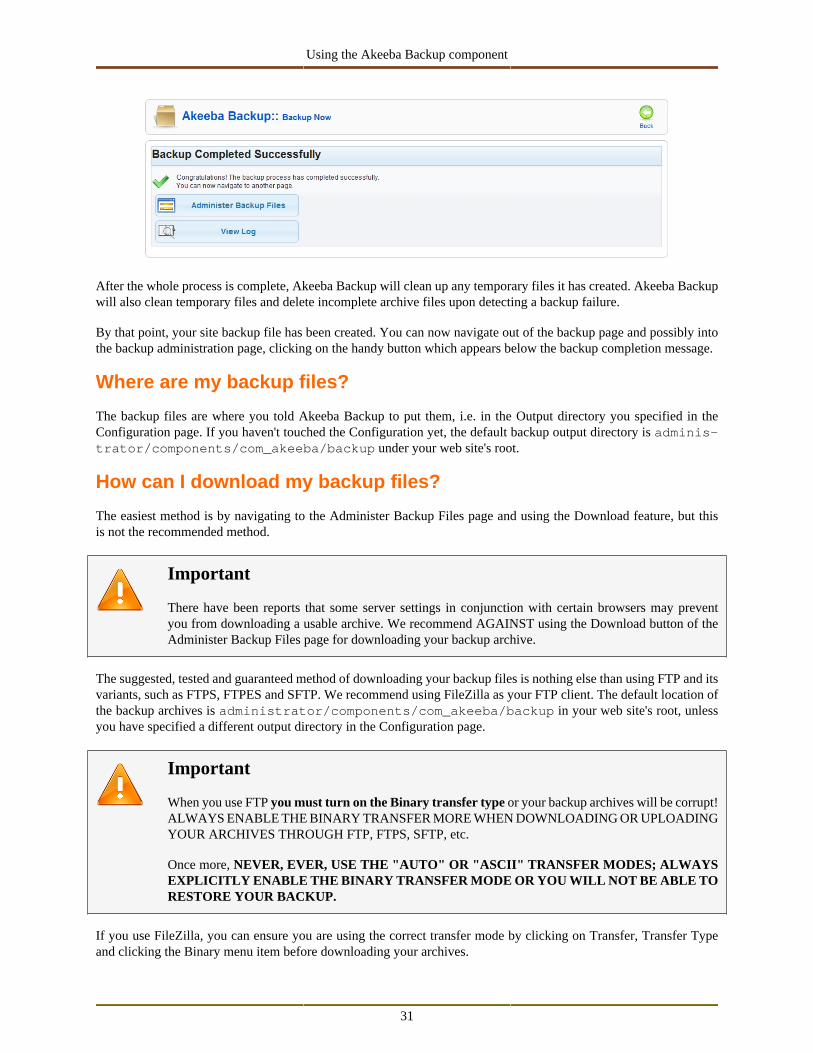
Using the Akeeba Backup component
31
After the whole process is complete, Akeeba Backup will clean up any temporary files it has created. Akeeba Backupwill also clean temporary files and delete incomplete archive files upon detecting a backup failure.
By that point, your site backup file has been created. You can now navigate out of the backup page and possibly intothe backup administration page, clicking on the handy button which appears below the backup completion message.
Where are my backup files?
The backup files are where you told Akeeba Backup to put them, i.e. in the Output directory you specified in theConfiguration page. If you haven't touched the Configuration yet, the default backup output directory is adminis-trator/components/com_akeeba/backup under your web site's root.
How can I download my backup files?
The easiest method is by navigating to the Administer Backup Files page and using the Download feature, but thisis not the recommended method.
Important
There have been reports that some server settings in conjunction with certain browsers may preventyou from downloading a usable archive. We recommend AGAINST using the Download button of theAdminister Backup Files page for downloading your backup archive.
The suggested, tested and guaranteed method of downloading your backup files is nothing else than using FTP and itsvariants, such as FTPS, FTPES and SFTP. We recommend using FileZilla as your FTP client. The default location ofthe backup archives is administrator/components/com_akeeba/backup in your web site's root, unlessyou have specified a different output directory in the Configuration page.
Important
When you use FTP you must turn on the Binary transfer type or your backup archives will be corrupt!ALWAYS ENABLE THE BINARY TRANSFER MORE WHEN DOWNLOADING OR UPLOADINGYOUR ARCHIVES THROUGH FTP, FTPS, SFTP, etc.
Once more, NEVER, EVER, USE THE "AUTO" OR "ASCII" TRANSFER MODES; ALWAYSEXPLICITLY ENABLE THE BINARY TRANSFER MODE OR YOU WILL NOT BE ABLE TORESTORE YOUR BACKUP.
If you use FileZilla, you can ensure you are using the correct transfer mode by clicking on Transfer, Transfer Typeand clicking the Binary menu item before downloading your archives.
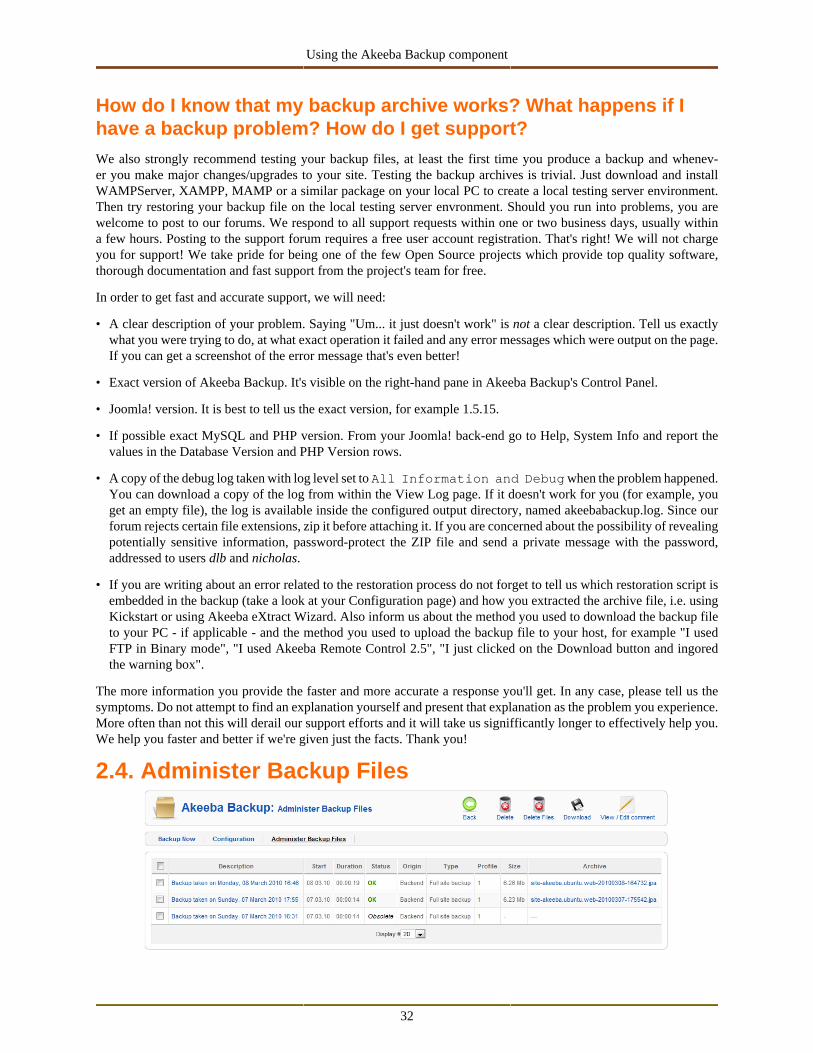
Using the Akeeba Backup component
32
How do I know that my backup archive works? What happens if Ihave a backup problem? How do I get support?We also strongly recommend testing your backup files, at least the first time you produce a backup and whenev-er you make major changes/upgrades to your site. Testing the backup archives is trivial. Just download and installWAMPServer, XAMPP, MAMP or a similar package on your local PC to create a local testing server environment.Then try restoring your backup file on the local testing server envronment. Should you run into problems, you arewelcome to post to our forums. We respond to all support requests within one or two business days, usually withina few hours. Posting to the support forum requires a free user account registration. That's right! We will not chargeyou for support! We take pride for being one of the few Open Source projects which provide top quality software,thorough documentation and fast support from the project's team for free.
In order to get fast and accurate support, we will need:
• A clear description of your problem. Saying "Um... it just doesn't work" is not a clear description. Tell us exactlywhat you were trying to do, at what exact operation it failed and any error messages which were output on the page.If you can get a screenshot of the error message that's even better!
• Exact version of Akeeba Backup. It's visible on the right-hand pane in Akeeba Backup's Control Panel.
• Joomla! version. It is best to tell us the exact version, for example 1.5.15.
• If possible exact MySQL and PHP version. From your Joomla! back-end go to Help, System Info and report thevalues in the Database Version and PHP Version rows.
• A copy of the debug log taken with log level set to All Information and Debug when the problem happened.You can download a copy of the log from within the View Log page. If it doesn't work for you (for example, youget an empty file), the log is available inside the configured output directory, named akeebabackup.log. Since ourforum rejects certain file extensions, zip it before attaching it. If you are concerned about the possibility of revealingpotentially sensitive information, password-protect the ZIP file and send a private message with the password,addressed to users dlb and nicholas.
• If you are writing about an error related to the restoration process do not forget to tell us which restoration script isembedded in the backup (take a look at your Configuration page) and how you extracted the archive file, i.e. usingKickstart or using Akeeba eXtract Wizard. Also inform us about the method you used to download the backup fileto your PC - if applicable - and the method you used to upload the backup file to your host, for example "I usedFTP in Binary mode", "I used Akeeba Remote Control 2.5", "I just clicked on the Download button and ingoredthe warning box".
The more information you provide the faster and more accurate a response you'll get. In any case, please tell us thesymptoms. Do not attempt to find an explanation yourself and present that explanation as the problem you experience.More often than not this will derail our support efforts and it will take us signifficantly longer to effectively help you.We help you faster and better if we're given just the facts. Thank you!
2.4. Administer Backup Files
Using the Akeeba Backup component
33
This page is the single place you can review all your Akeeba Backup backup history, as well as administer the backupfiles. The bulk of the page consists of a standard Joomla!™ list table. Each row represents a backup attempt anddisplays a whole lot of information:
The check boxcolumn
Clicking the check box on the leftmost cell of a row selects this backup for an operation to beapplied to it. Operations are activated by clicking on tool bar buttons. In case of an operationallowing a single row to be selected, the topmost selected row is considered as the sole selection.
Description Displays the description you have set when you started the backup. In case of frontend backups,this contains the default description which was assigned. If your backup has a comment attachedto it, an info icon will also appear. Hovering your mouse over the info icon will show you apreview of that comment.
Start The date when the backup started. The date is expressed in the user's preferred time zone, as it isset in the User Managment page of Joomla!™ itself.
Note
Backups taken without a logged in user, i.e. remote, front-end and native CRONbackups, express the time in the UTC time zone. We can't "fix" that; without a user,Joomla!™ can't reliably report the time zone.
Duration The duration of the backup in hours : minutes : seconds format. This information is not availablefor failed backups!
Status Indicates the status of the backup and can be one of:
OK A complete backup whose backup archive is available for download.
Obsolete A complete backup whose backup archive is either deleted, or was overwritten byanother backup attempt.
Note
If you move your backup output directory's location, all your previ-ous backups will appear as "Obsolete", even though you might havemoved these backup files as well. This is not a bug. Akeeba Backupinternally stores the absolute path to the backup files. When you movethe output directory its absolute path changes, so Akeeba Backup isunable to locate the old backup files.
Important
If your host uses MySQL 4.0 the status will always appear as Obsoleteand you will be unable to download the backup archive through yourbrowser, as the result of limitations of this ancient, obsolete and un-supported MySQL version. You can still use your favorite FTP clientto download the backup archives, though.
Pending A backup attempt which is still running. You should not see any such record, un-less a backup attempt started while you were loading this page. In this case, youshould not navigate to the Control Panel page! Doing so would invalidate the back-
Using the Akeeba Backup component
34
up and wreck havoc. You have been warned! Another reason to see such an entryis a backup attempt which failed with a PHP fatal error, or which was abruptly in-terrupted (by the user or a PHP error). In this case, you can safely delete the entryand get rid of the backup file as well.
Failed A backup attempt which failed with a catchable error condition.
Origin Indicates the origin of the backup and can be either frontend for backups originating from thefront-end - or remote interface - or backend for backups originating from the back-end (regularbackups).
Type Indicates the backup type and can be Full for full site backups (database and files), DB Only fordatabase only backups, Files only for files only backup or Multi DB for multiple databases backup(an archive containing SQL dumps of the main site's database and the defined multiple databases).
Profile Displays the numeric identifier of the backup profile used during the backup. It is possible thatsince then the profile may have been modified or even deleted!
Archive Displays the name of the backup file, if it is available. Clicking on the backup file name will letyou download it, directly from your browser. If it is a split archive the file name is not clickable butyou will be given as much download links as the parts of your backup are. For example, you mightsee links labelled "Part 01", "Part 02" through "Part 10" in a split archive consisting of ten files.
On the top of the page you can find a tool bar with operations buttons. The Delete button will remove the selectedbackup attempt entries along with their backup archives (if applicable), whereas the Delete Files button will onlyremove the files (if found on your server). The Restore button will run the integrated restoration feature for the selectedarchive file.
Important
Integrated restoration is only supported for Full Site and Files Only backup archives. Trying to use itwith any other type of backup files will ultimately result in an error.
The Download button will download the archive file of the currently selected backup row. It is possible that yourserver and/or browser don't work well with the download feature of Akeeba Backup. In this case you should downloadyour file through FTP, making sure that your FTP client is set up to use the BINARY transfer mode. In fact, we urgeyou to test restoring your backups. If your backup fails to extract, you can be sure that your browser is not compatiblewith Akeeba Backup's download feature and you'll have to resort to the FTP download method anyway.
Important
The only supported and guaranteed method of downloading your backup archives error-free is using FTP/SFTP in BINARY transfer mode. Anything else has the potential to CORRUPT your backup archives.
Tip
The Download button will only download the last part of a split archive. Please use the links in theArchive column in otder to download all of the parts of a split archive. Forgetting to download even asingle part will result in inability to extract the archive!
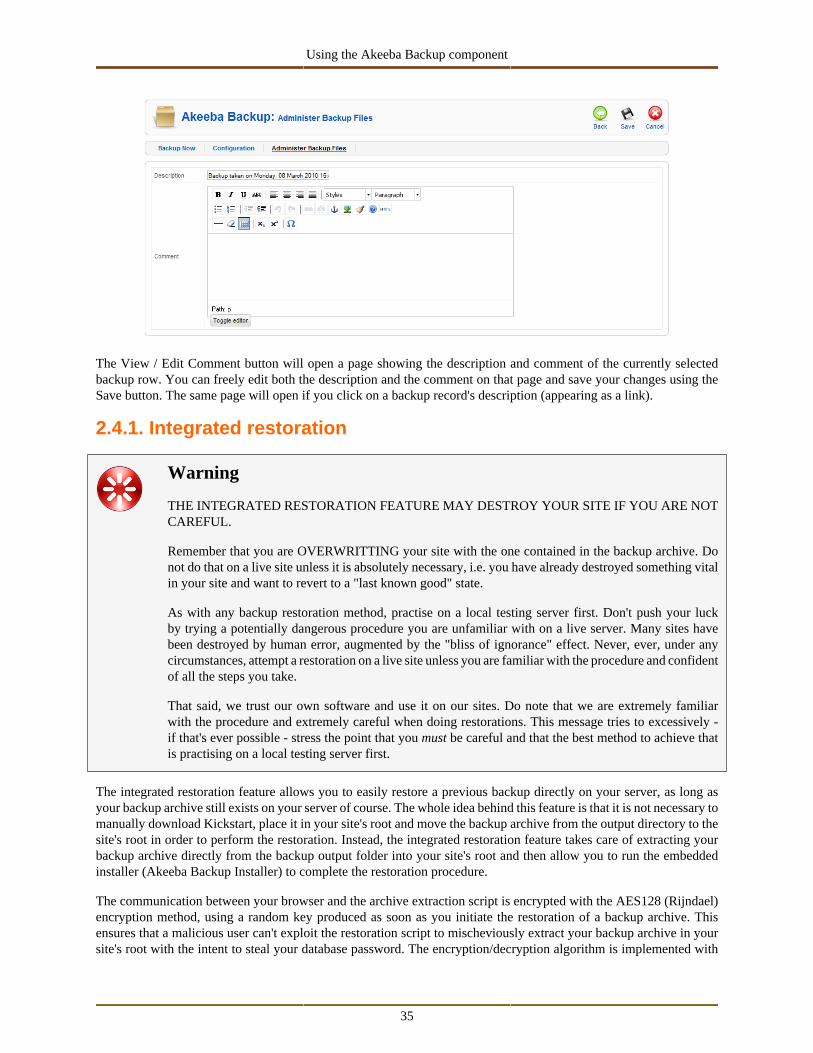
Using the Akeeba Backup component
35
The View / Edit Comment button will open a page showing the description and comment of the currently selectedbackup row. You can freely edit both the description and the comment on that page and save your changes using theSave button. The same page will open if you click on a backup record's description (appearing as a link).
2.4.1. Integrated restoration
Warning
THE INTEGRATED RESTORATION FEATURE MAY DESTROY YOUR SITE IF YOU ARE NOTCAREFUL.
Remember that you are OVERWRITTING your site with the one contained in the backup archive. Donot do that on a live site unless it is absolutely necessary, i.e. you have already destroyed something vitalin your site and want to revert to a "last known good" state.
As with any backup restoration method, practise on a local testing server first. Don't push your luckby trying a potentially dangerous procedure you are unfamiliar with on a live server. Many sites havebeen destroyed by human error, augmented by the "bliss of ignorance" effect. Never, ever, under anycircumstances, attempt a restoration on a live site unless you are familiar with the procedure and confidentof all the steps you take.
That said, we trust our own software and use it on our sites. Do note that we are extremely familiarwith the procedure and extremely careful when doing restorations. This message tries to excessively -if that's ever possible - stress the point that you must be careful and that the best method to achieve thatis practising on a local testing server first.
The integrated restoration feature allows you to easily restore a previous backup directly on your server, as long asyour backup archive still exists on your server of course. The whole idea behind this feature is that it is not necessary tomanually download Kickstart, place it in your site's root and move the backup archive from the output directory to thesite's root in order to perform the restoration. Instead, the integrated restoration feature takes care of extracting yourbackup archive directly from the backup output folder into your site's root and then allow you to run the embeddedinstaller (Akeeba Backup Installer) to complete the restoration procedure.
The communication between your browser and the archive extraction script is encrypted with the AES128 (Rijndael)encryption method, using a random key produced as soon as you initiate the restoration of a backup archive. Thisensures that a malicious user can't exploit the restoration script to mischeviously extract your backup archive in yoursite's root with the intent to steal your database password. The encryption/decryption algorithm is implemented with
Using the Akeeba Backup component
36
standard PHP and Javascript code, eliminating the need for third party cryptography libraries and ensuring that undernocircumstances unencrypted data will be exchanged between the browser and the server.
The whole process is fully automated, so there is not much to tell you about it. However, you must not that in orderfor the restoration procedure to work properly you must take care of the following:
1. This feature is directly calling the administrator/components/com_akeeba/restore.php script. Ifyou have a server-side protection, i.e. .htaccess rules, or permissions settings which prevent this file from beingcalled directly the process will fail.
2. Before the restoration begins, Akeeba Backup needs to create the administrator/compo-nents/com_akeeba/restoration.php file with all the archive extraction setup parameters. It is intelli-gent enough to use Joomla!'s FTP mode if it is enabled so as to overcome any permission problems, but you areultimately responsible for ensuring that the permission settings are adequate for Akeeba Backup to create this file.
If you have disabled Joomla!'s FTP layer, the permissions of the administrator/compo-nents/com_akeeba directory should be 0777 for the integrated restoration to work, or 0744 on hosts whichuse suPHP.
If you are using Joomla!'s FTP layer and it was active when you were installing Akeeba Backup, you'll need to givethis directory at least 0744 permissions, but you may have to manually remove restoration.php (but NOTrestore.php!!!) after the site restoration is over.
3. When the extraction of the backup archive finishes, you will be automatically forwarded to the Akeeba BackupInstaller page on a new tab or window. DO NOT CLOSE THE INTEGRATED RESTORATION PAGE'S TAB/WINDOW! After you have competed the Akeeba Backup Installer process you are supposed to return to the Inte-grated Restoration page and click on the Finalize button to:
• remove the installation directory from your site's root, and
• remove the administrator/components/com_akeeba/restoration.php setup file to minimizethe risk of a malicious user abusing this script.
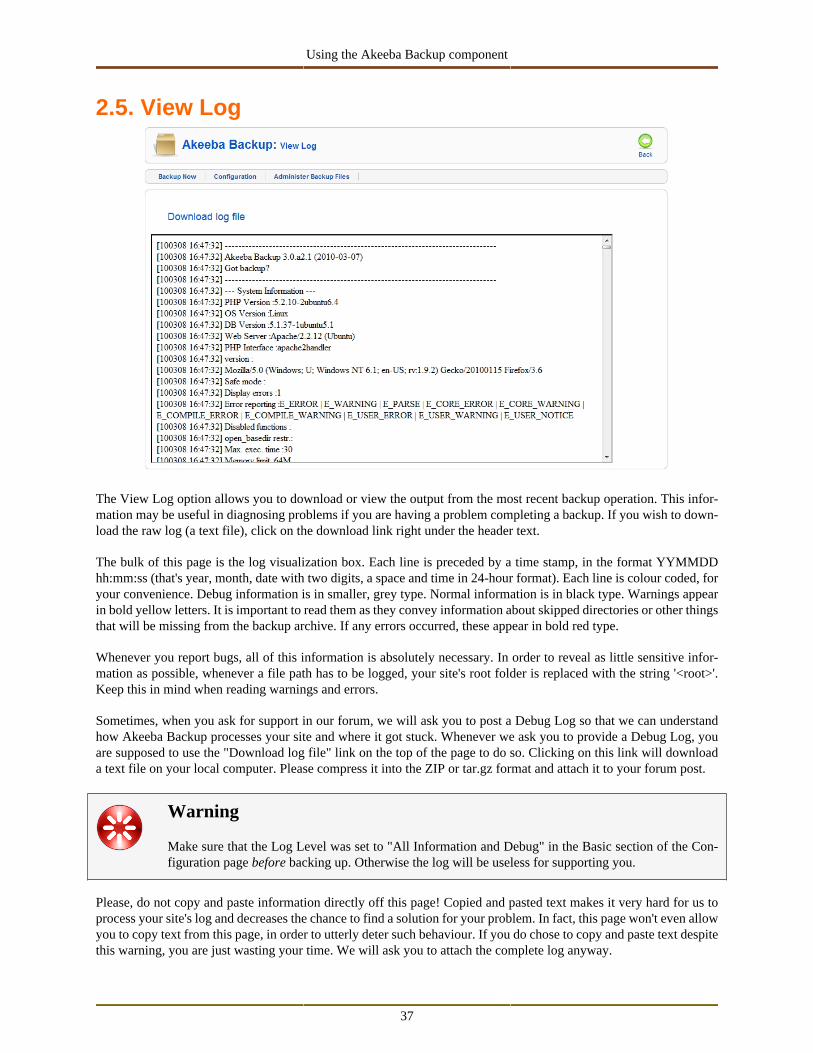
Using the Akeeba Backup component
37
2.5. View Log
The View Log option allows you to download or view the output from the most recent backup operation. This infor-mation may be useful in diagnosing problems if you are having a problem completing a backup. If you wish to down-load the raw log (a text file), click on the download link right under the header text.
The bulk of this page is the log visualization box. Each line is preceded by a time stamp, in the format YYMMDDhh:mm:ss (that's year, month, date with two digits, a space and time in 24-hour format). Each line is colour coded, foryour convenience. Debug information is in smaller, grey type. Normal information is in black type. Warnings appearin bold yellow letters. It is important to read them as they convey information about skipped directories or other thingsthat will be missing from the backup archive. If any errors occurred, these appear in bold red type.
Whenever you report bugs, all of this information is absolutely necessary. In order to reveal as little sensitive infor-mation as possible, whenever a file path has to be logged, your site's root folder is replaced with the string '<root>'.Keep this in mind when reading warnings and errors.
Sometimes, when you ask for support in our forum, we will ask you to post a Debug Log so that we can understandhow Akeeba Backup processes your site and where it got stuck. Whenever we ask you to provide a Debug Log, youare supposed to use the "Download log file" link on the top of the page to do so. Clicking on this link will downloada text file on your local computer. Please compress it into the ZIP or tar.gz format and attach it to your forum post.
Warning
Make sure that the Log Level was set to "All Information and Debug" in the Basic section of the Con-figuration page before backing up. Otherwise the log will be useless for supporting you.
Please, do not copy and paste information directly off this page! Copied and pasted text makes it very hard for us toprocess your site's log and decreases the chance to find a solution for your problem. In fact, this page won't even allowyou to copy text from this page, in order to utterly deter such behaviour. If you do chose to copy and paste text despitethis warning, you are just wasting your time. We will ask you to attach the complete log anyway.
Using the Akeeba Backup component
38
3. Include data to the backupBy default, Akeeba Backup automatically includes the whole database of your Joomla!™ installation as well as allthe files under your site's root in the backup set. Sometimes you want to include a different database - for example,one used by your non-Joomla!™ newsletter software - or files you have placed above your site's root for increasedsecurity. Akeeba Backup Professional can cope with that need by providing you with handy data inclusion filters.
3.1. Multiple Databases Definitions
Sometimes your site grows beyond Joomla!. A forum, a torrent tracker, a custom script... Some of them get to beinstalled in a database of their own, not as tables in the same database as the one Joomla! is using. If you really want totake a full site backup, you really need these databases backed up as well. The solution to this is the Multiple databasesdefinitions option of Akeeba Backup. You can define an unlimited number of additional MySQL databases which willget to be backed up (and restored!) along with your regular Joomla! database.
Warning
Do not use this feature to add your site's database. It is automatically added anyway. Doing so will causeerrors during the restoration of your site! You have been warned. Do not seek support for this kindof issues.
Warning
Do not confuse the term "database" with your Joomla!™ tables. It is possible that a single databasecontains tables for the current Joomla!™ site, tables from a standalone photo gallery script, tables fromanother Joomla!™ site on the same server (e.g. a subdomain), tables from a standalone PHPList instal-lation and so forth. As far as Akeeba Backup is concerned, all of those tables exist in the same database.Unless you tell it otherwise, it will backup ALL tables of the database.
A common misconception is that if you want to also backup a subdomain running on Joomla!™ andhaving its tables inside the same database as the main site, you should add its database a multiple databasedefinition. DO NOT DO THAT, IT WILL MAKE THE RESTORATION FAIL! After all, AkeebaBackup already backs up those tables. Why should you have to back them up a second time?
Warning
If you add an empty database (one which has no tables) will result in backup errors!
Note
The settings on this page are defined per profile . Make sure you have selected the desired profile inthe Control Panel page.
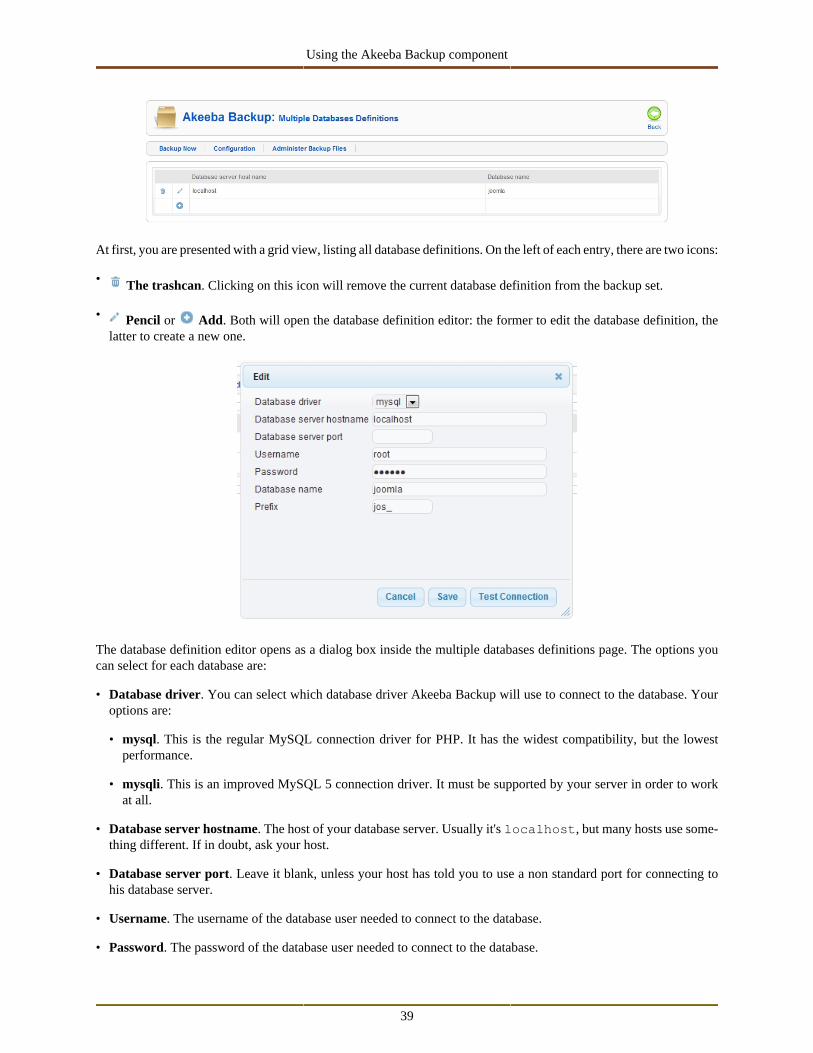
Using the Akeeba Backup component
39
At first, you are presented with a grid view, listing all database definitions. On the left of each entry, there are two icons:
• The trashcan. Clicking on this icon will remove the current database definition from the backup set.
• Pencil or Add. Both will open the database definition editor: the former to edit the database definition, thelatter to create a new one.
The database definition editor opens as a dialog box inside the multiple databases definitions page. The options youcan select for each database are:
• Database driver. You can select which database driver Akeeba Backup will use to connect to the database. Youroptions are:
• mysql. This is the regular MySQL connection driver for PHP. It has the widest compatibility, but the lowestperformance.
• mysqli. This is an improved MySQL 5 connection driver. It must be supported by your server in order to workat all.
• Database server hostname. The host of your database server. Usually it's localhost, but many hosts use some-thing different. If in doubt, ask your host.
• Database server port. Leave it blank, unless your host has told you to use a non standard port for connecting tohis database server.
• Username. The username of the database user needed to connect to the database.
• Password. The password of the database user needed to connect to the database.
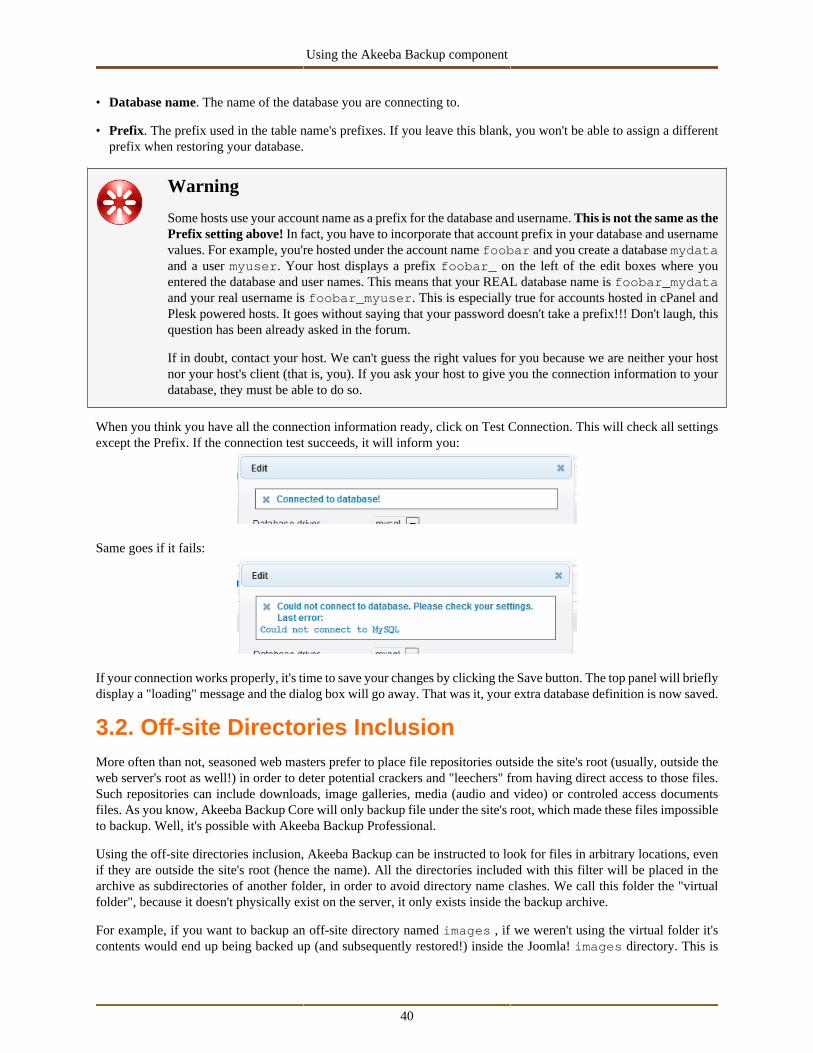
Using the Akeeba Backup component
40
• Database name. The name of the database you are connecting to.
• Prefix. The prefix used in the table name's prefixes. If you leave this blank, you won't be able to assign a differentprefix when restoring your database.
Warning
Some hosts use your account name as a prefix for the database and username. This is not the same as thePrefix setting above! In fact, you have to incorporate that account prefix in your database and usernamevalues. For example, you're hosted under the account name foobar and you create a database mydataand a user myuser. Your host displays a prefix foobar_ on the left of the edit boxes where youentered the database and user names. This means that your REAL database name is foobar_mydataand your real username is foobar_myuser. This is especially true for accounts hosted in cPanel andPlesk powered hosts. It goes without saying that your password doesn't take a prefix!!! Don't laugh, thisquestion has been already asked in the forum.
If in doubt, contact your host. We can't guess the right values for you because we are neither your hostnor your host's client (that is, you). If you ask your host to give you the connection information to yourdatabase, they must be able to do so.
When you think you have all the connection information ready, click on Test Connection. This will check all settingsexcept the Prefix. If the connection test succeeds, it will inform you:
Same goes if it fails:
If your connection works properly, it's time to save your changes by clicking the Save button. The top panel will brieflydisplay a "loading" message and the dialog box will go away. That was it, your extra database definition is now saved.
3.2. Off-site Directories InclusionMore often than not, seasoned web masters prefer to place file repositories outside the site's root (usually, outside theweb server's root as well!) in order to deter potential crackers and "leechers" from having direct access to those files.Such repositories can include downloads, image galleries, media (audio and video) or controled access documentsfiles. As you know, Akeeba Backup Core will only backup file under the site's root, which made these files impossibleto backup. Well, it's possible with Akeeba Backup Professional.
Using the off-site directories inclusion, Akeeba Backup can be instructed to look for files in arbitrary locations, evenif they are outside the site's root (hence the name). All the directories included with this filter will be placed in thearchive as subdirectories of another folder, in order to avoid directory name clashes. We call this folder the "virtualfolder", because it doesn't physically exist on the server, it only exists inside the backup archive.
For example, if you want to backup an off-site directory named images , if we weren't using the virtual folder it'scontents would end up being backed up (and subsequently restored!) inside the Joomla! images directory. This is
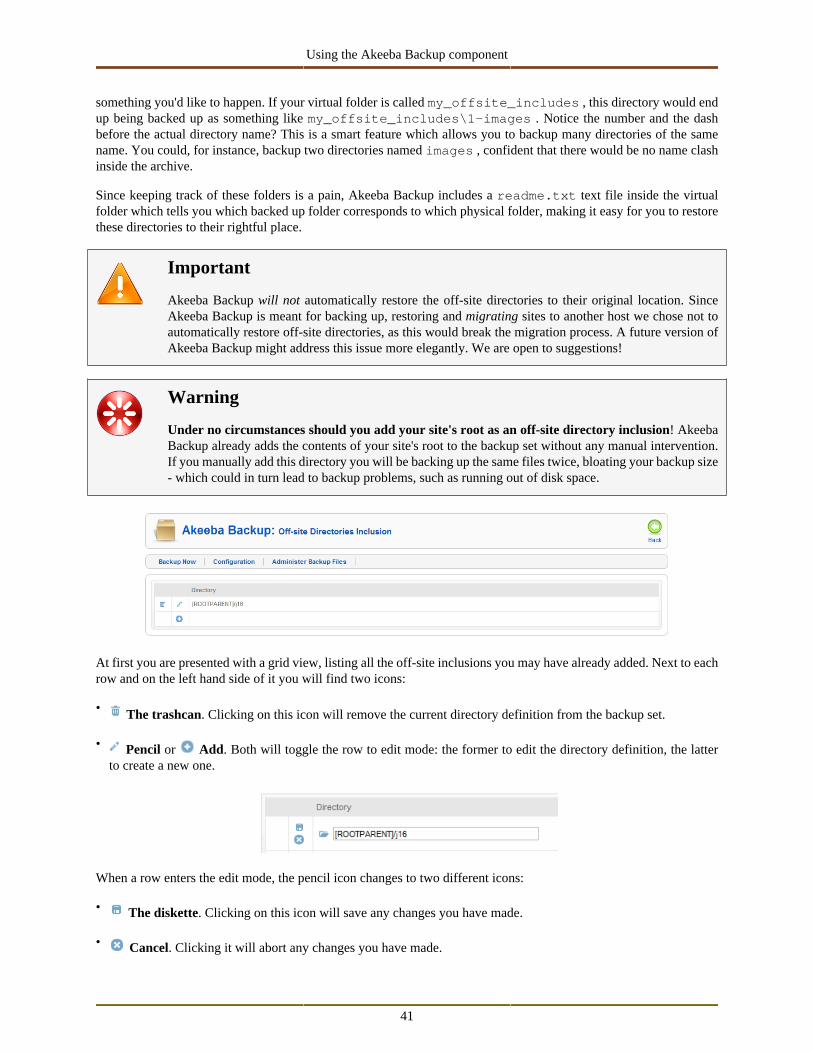
Using the Akeeba Backup component
41
something you'd like to happen. If your virtual folder is called my_offsite_includes , this directory would endup being backed up as something like my_offsite_includes\1-images . Notice the number and the dashbefore the actual directory name? This is a smart feature which allows you to backup many directories of the samename. You could, for instance, backup two directories named images , confident that there would be no name clashinside the archive.
Since keeping track of these folders is a pain, Akeeba Backup includes a readme.txt text file inside the virtualfolder which tells you which backed up folder corresponds to which physical folder, making it easy for you to restorethese directories to their rightful place.
Important
Akeeba Backup will not automatically restore the off-site directories to their original location. SinceAkeeba Backup is meant for backing up, restoring and migrating sites to another host we chose not toautomatically restore off-site directories, as this would break the migration process. A future version ofAkeeba Backup might address this issue more elegantly. We are open to suggestions!
Warning
Under no circumstances should you add your site's root as an off-site directory inclusion! AkeebaBackup already adds the contents of your site's root to the backup set without any manual intervention.If you manually add this directory you will be backing up the same files twice, bloating your backup size- which could in turn lead to backup problems, such as running out of disk space.
At first you are presented with a grid view, listing all the off-site inclusions you may have already added. Next to eachrow and on the left hand side of it you will find two icons:
• The trashcan. Clicking on this icon will remove the current directory definition from the backup set.
• Pencil or Add. Both will toggle the row to edit mode: the former to edit the directory definition, the latterto create a new one.
When a row enters the edit mode, the pencil icon changes to two different icons:
• The diskette. Clicking on this icon will save any changes you have made.
• Cancel. Clicking it will abort any changes you have made.
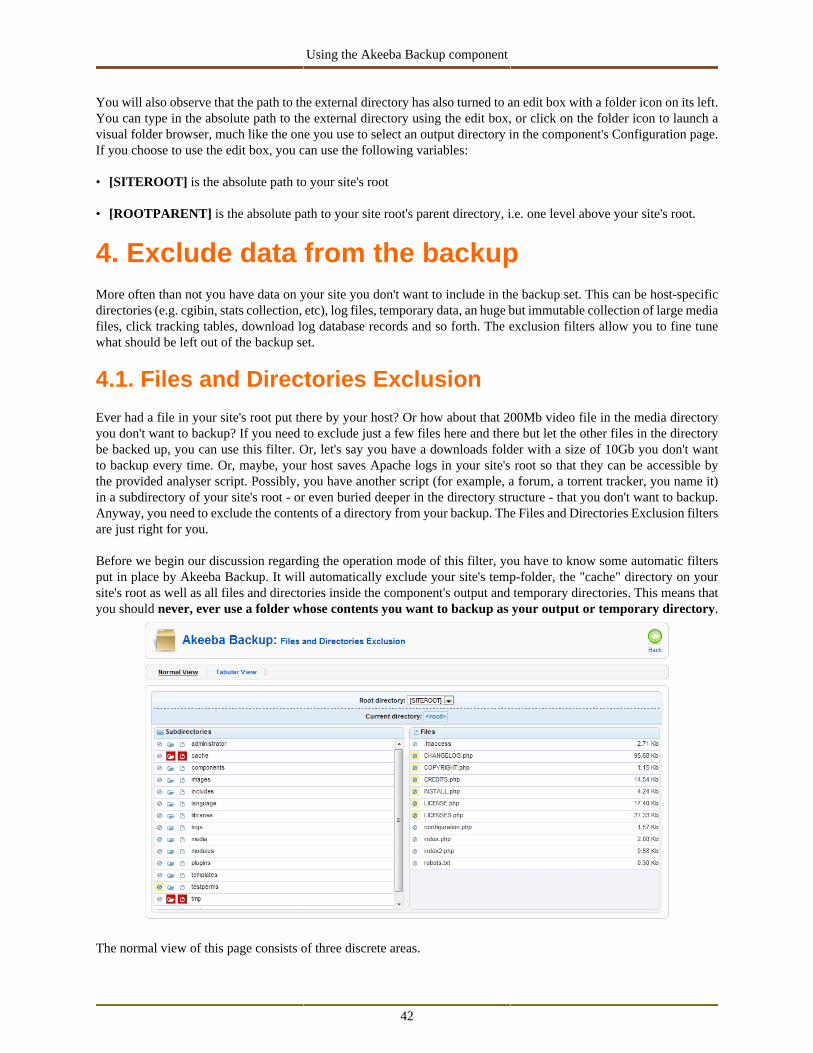
Using the Akeeba Backup component
42
You will also observe that the path to the external directory has also turned to an edit box with a folder icon on its left.You can type in the absolute path to the external directory using the edit box, or click on the folder icon to launch avisual folder browser, much like the one you use to select an output directory in the component's Configuration page.If you choose to use the edit box, you can use the following variables:
• [SITEROOT] is the absolute path to your site's root
• [ROOTPARENT] is the absolute path to your site root's parent directory, i.e. one level above your site's root.
4. Exclude data from the backupMore often than not you have data on your site you don't want to include in the backup set. This can be host-specificdirectories (e.g. cgibin, stats collection, etc), log files, temporary data, an huge but immutable collection of large mediafiles, click tracking tables, download log database records and so forth. The exclusion filters allow you to fine tunewhat should be left out of the backup set.
4.1. Files and Directories Exclusion
Ever had a file in your site's root put there by your host? Or how about that 200Mb video file in the media directoryyou don't want to backup? If you need to exclude just a few files here and there but let the other files in the directorybe backed up, you can use this filter. Or, let's say you have a downloads folder with a size of 10Gb you don't wantto backup every time. Or, maybe, your host saves Apache logs in your site's root so that they can be accessible bythe provided analyser script. Possibly, you have another script (for example, a forum, a torrent tracker, you name it)in a subdirectory of your site's root - or even buried deeper in the directory structure - that you don't want to backup.Anyway, you need to exclude the contents of a directory from your backup. The Files and Directories Exclusion filtersare just right for you.
Before we begin our discussion regarding the operation mode of this filter, you have to know some automatic filtersput in place by Akeeba Backup. It will automatically exclude your site's temp-folder, the "cache" directory on yoursite's root as well as all files and directories inside the component's output and temporary directories. This means thatyou should never, ever use a folder whose contents you want to backup as your output or temporary directory.
The normal view of this page consists of three discrete areas.
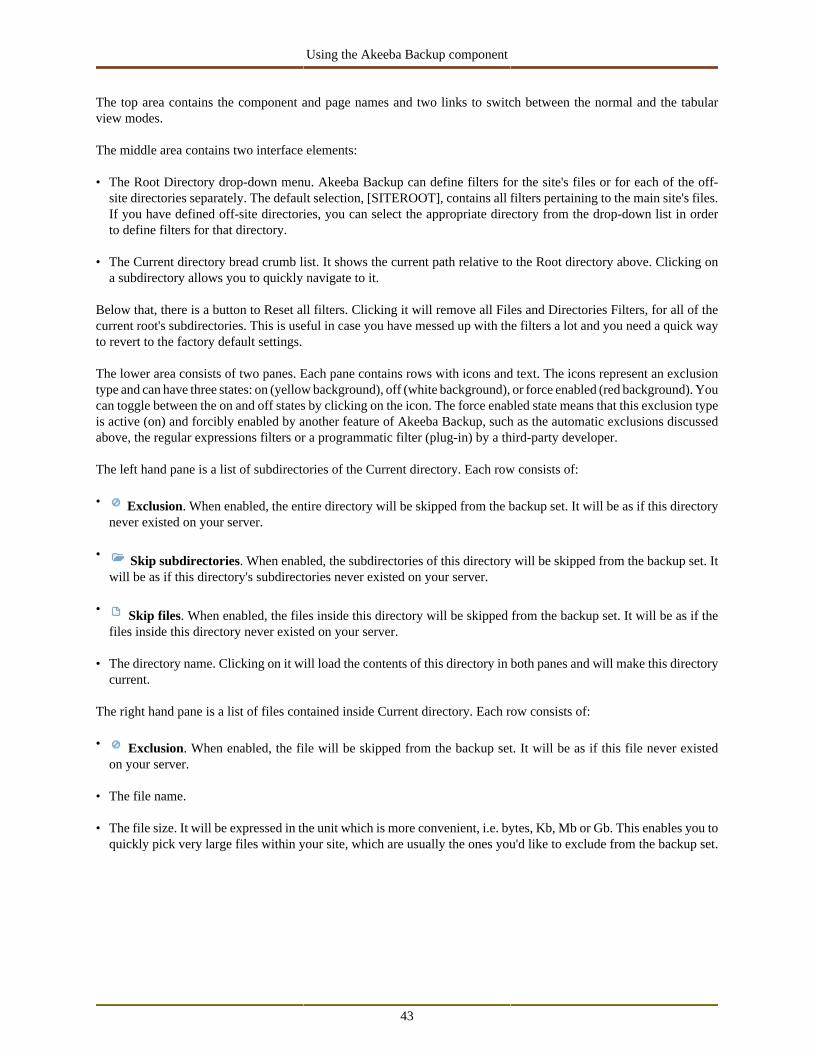
Using the Akeeba Backup component
43
The top area contains the component and page names and two links to switch between the normal and the tabularview modes.
The middle area contains two interface elements:
• The Root Directory drop-down menu. Akeeba Backup can define filters for the site's files or for each of the off-site directories separately. The default selection, [SITEROOT], contains all filters pertaining to the main site's files.If you have defined off-site directories, you can select the appropriate directory from the drop-down list in orderto define filters for that directory.
• The Current directory bread crumb list. It shows the current path relative to the Root directory above. Clicking ona subdirectory allows you to quickly navigate to it.
Below that, there is a button to Reset all filters. Clicking it will remove all Files and Directories Filters, for all of thecurrent root's subdirectories. This is useful in case you have messed up with the filters a lot and you need a quick wayto revert to the factory default settings.
The lower area consists of two panes. Each pane contains rows with icons and text. The icons represent an exclusiontype and can have three states: on (yellow background), off (white background), or force enabled (red background). Youcan toggle between the on and off states by clicking on the icon. The force enabled state means that this exclusion typeis active (on) and forcibly enabled by another feature of Akeeba Backup, such as the automatic exclusions discussedabove, the regular expressions filters or a programmatic filter (plug-in) by a third-party developer.
The left hand pane is a list of subdirectories of the Current directory. Each row consists of:
• Exclusion. When enabled, the entire directory will be skipped from the backup set. It will be as if this directorynever existed on your server.
• Skip subdirectories. When enabled, the subdirectories of this directory will be skipped from the backup set. Itwill be as if this directory's subdirectories never existed on your server.
• Skip files. When enabled, the files inside this directory will be skipped from the backup set. It will be as if thefiles inside this directory never existed on your server.
• The directory name. Clicking on it will load the contents of this directory in both panes and will make this directorycurrent.
The right hand pane is a list of files contained inside Current directory. Each row consists of:
• Exclusion. When enabled, the file will be skipped from the backup set. It will be as if this file never existedon your server.
• The file name.
• The file size. It will be expressed in the unit which is more convenient, i.e. bytes, Kb, Mb or Gb. This enables you toquickly pick very large files within your site, which are usually the ones you'd like to exclude from the backup set.
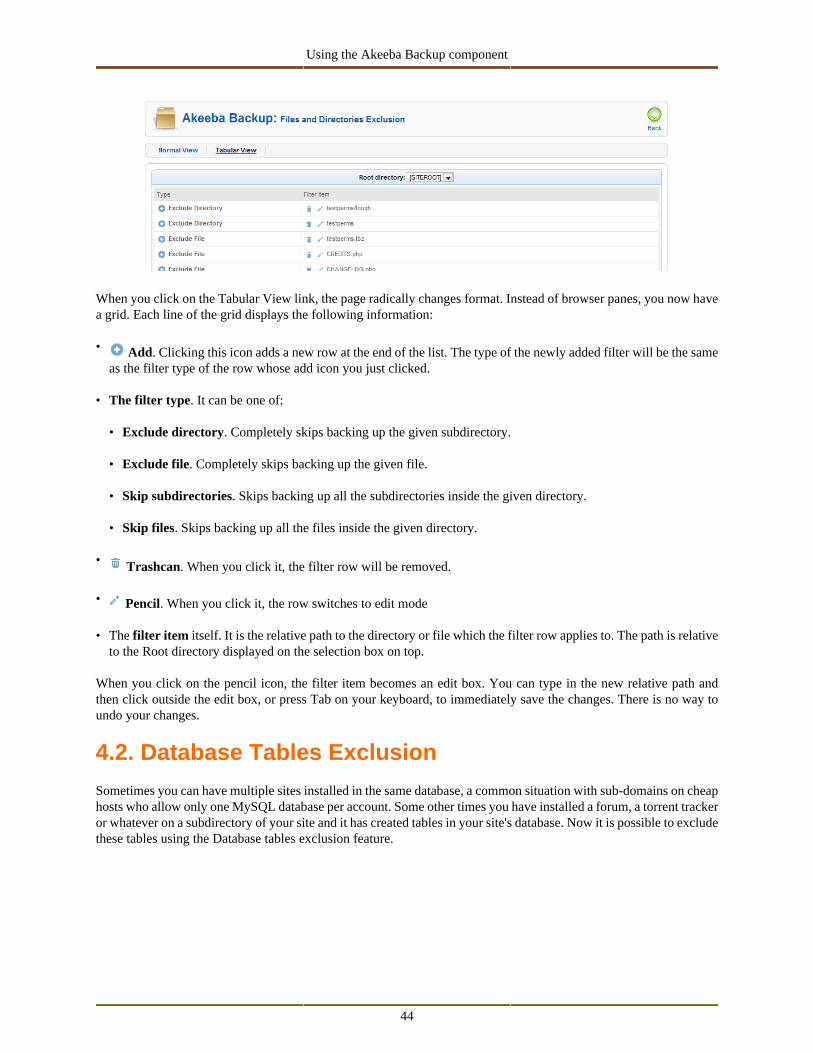
Using the Akeeba Backup component
44
When you click on the Tabular View link, the page radically changes format. Instead of browser panes, you now havea grid. Each line of the grid displays the following information:
• Add. Clicking this icon adds a new row at the end of the list. The type of the newly added filter will be the sameas the filter type of the row whose add icon you just clicked.
• The filter type. It can be one of:
• Exclude directory. Completely skips backing up the given subdirectory.
• Exclude file. Completely skips backing up the given file.
• Skip subdirectories. Skips backing up all the subdirectories inside the given directory.
• Skip files. Skips backing up all the files inside the given directory.
• Trashcan. When you click it, the filter row will be removed.
• Pencil. When you click it, the row switches to edit mode
• The filter item itself. It is the relative path to the directory or file which the filter row applies to. The path is relativeto the Root directory displayed on the selection box on top.
When you click on the pencil icon, the filter item becomes an edit box. You can type in the new relative path andthen click outside the edit box, or press Tab on your keyboard, to immediately save the changes. There is no way toundo your changes.
4.2. Database Tables Exclusion
Sometimes you can have multiple sites installed in the same database, a common situation with sub-domains on cheaphosts who allow only one MySQL database per account. Some other times you have installed a forum, a torrent trackeror whatever on a subdirectory of your site and it has created tables in your site's database. Now it is possible to excludethese tables using the Database tables exclusion feature.
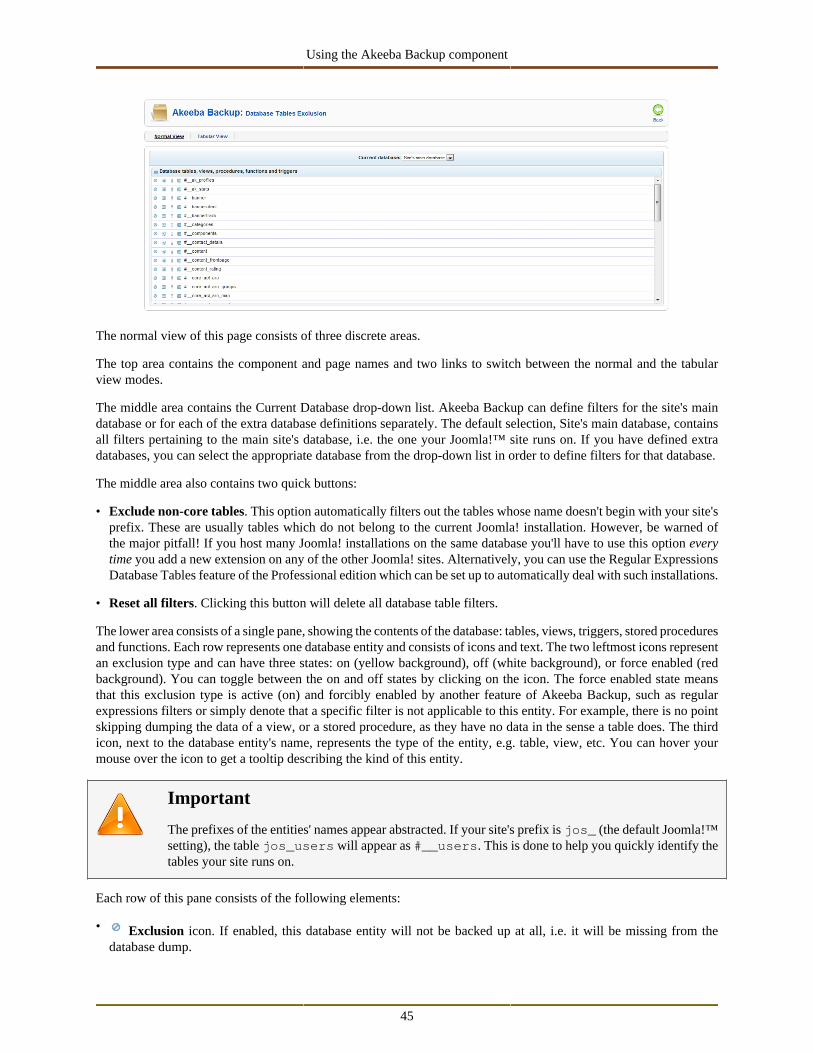
Using the Akeeba Backup component
45
The normal view of this page consists of three discrete areas.
The top area contains the component and page names and two links to switch between the normal and the tabularview modes.
The middle area contains the Current Database drop-down list. Akeeba Backup can define filters for the site's maindatabase or for each of the extra database definitions separately. The default selection, Site's main database, containsall filters pertaining to the main site's database, i.e. the one your Joomla!™ site runs on. If you have defined extradatabases, you can select the appropriate database from the drop-down list in order to define filters for that database.
The middle area also contains two quick buttons:
• Exclude non-core tables. This option automatically filters out the tables whose name doesn't begin with your site'sprefix. These are usually tables which do not belong to the current Joomla! installation. However, be warned ofthe major pitfall! If you host many Joomla! installations on the same database you'll have to use this option everytime you add a new extension on any of the other Joomla! sites. Alternatively, you can use the Regular ExpressionsDatabase Tables feature of the Professional edition which can be set up to automatically deal with such installations.
• Reset all filters. Clicking this button will delete all database table filters.
The lower area consists of a single pane, showing the contents of the database: tables, views, triggers, stored proceduresand functions. Each row represents one database entity and consists of icons and text. The two leftmost icons representan exclusion type and can have three states: on (yellow background), off (white background), or force enabled (redbackground). You can toggle between the on and off states by clicking on the icon. The force enabled state meansthat this exclusion type is active (on) and forcibly enabled by another feature of Akeeba Backup, such as regularexpressions filters or simply denote that a specific filter is not applicable to this entity. For example, there is no pointskipping dumping the data of a view, or a stored procedure, as they have no data in the sense a table does. The thirdicon, next to the database entity's name, represents the type of the entity, e.g. table, view, etc. You can hover yourmouse over the icon to get a tooltip describing the kind of this entity.
Important
The prefixes of the entities' names appear abstracted. If your site's prefix is jos_ (the default Joomla!™setting), the table jos_users will appear as #__users. This is done to help you quickly identify thetables your site runs on.
Each row of this pane consists of the following elements:
• Exclusion icon. If enabled, this database entity will not be backed up at all, i.e. it will be missing from thedatabase dump.
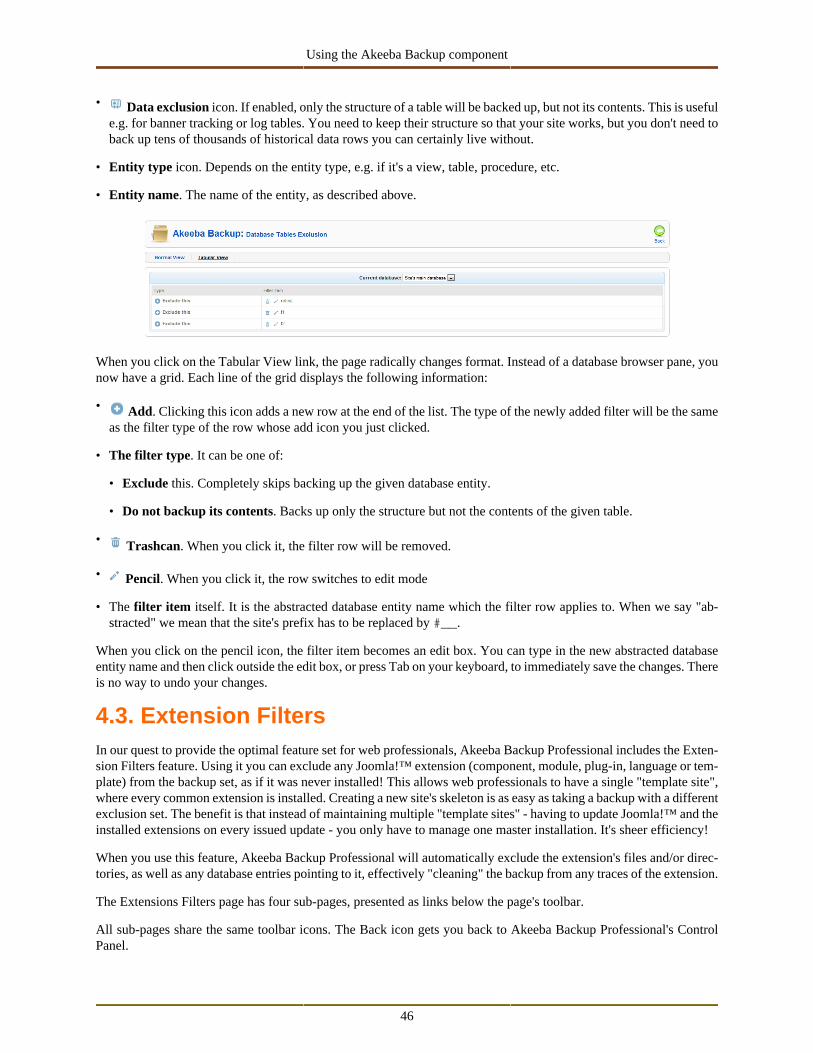
Using the Akeeba Backup component
46
• Data exclusion icon. If enabled, only the structure of a table will be backed up, but not its contents. This is usefule.g. for banner tracking or log tables. You need to keep their structure so that your site works, but you don't need toback up tens of thousands of historical data rows you can certainly live without.
• Entity type icon. Depends on the entity type, e.g. if it's a view, table, procedure, etc.
• Entity name. The name of the entity, as described above.
When you click on the Tabular View link, the page radically changes format. Instead of a database browser pane, younow have a grid. Each line of the grid displays the following information:
• Add. Clicking this icon adds a new row at the end of the list. The type of the newly added filter will be the sameas the filter type of the row whose add icon you just clicked.
• The filter type. It can be one of:
• Exclude this. Completely skips backing up the given database entity.
• Do not backup its contents. Backs up only the structure but not the contents of the given table.
• Trashcan. When you click it, the filter row will be removed.
• Pencil. When you click it, the row switches to edit mode
• The filter item itself. It is the abstracted database entity name which the filter row applies to. When we say "ab-stracted" we mean that the site's prefix has to be replaced by #__.
When you click on the pencil icon, the filter item becomes an edit box. You can type in the new abstracted databaseentity name and then click outside the edit box, or press Tab on your keyboard, to immediately save the changes. Thereis no way to undo your changes.
4.3. Extension FiltersIn our quest to provide the optimal feature set for web professionals, Akeeba Backup Professional includes the Exten-sion Filters feature. Using it you can exclude any Joomla!™ extension (component, module, plug-in, language or tem-plate) from the backup set, as if it was never installed! This allows web professionals to have a single "template site",where every common extension is installed. Creating a new site's skeleton is as easy as taking a backup with a differentexclusion set. The benefit is that instead of maintaining multiple "template sites" - having to update Joomla!™ and theinstalled extensions on every issued update - you only have to manage one master installation. It's sheer efficiency!
When you use this feature, Akeeba Backup Professional will automatically exclude the extension's files and/or direc-tories, as well as any database entries pointing to it, effectively "cleaning" the backup from any traces of the extension.
The Extensions Filters page has four sub-pages, presented as links below the page's toolbar.
All sub-pages share the same toolbar icons. The Back icon gets you back to Akeeba Backup Professional's ControlPanel.
Using the Akeeba Backup component
47
4.3.1. Components
The most evident use of the Extension Filters is to exclude components, the essential building blocks of any Joom-la!-powered web site.
The Components exclusion page presents a list with all installed non-core components. Each component lists its Stateand the Component name. When the State column contains a green check mark, it means that this module will beincluded in the backup. A white X in a red circle means that the component will be excluded from the backup set.Clicking on the status icon toggles its state.
Important
Akeeba Backup Professional is unable to automatically identify the database tables used by components.Joomla! enforces no naming standard for components' tables and there is also no standard way to auto-matically determine which tables are created by which component either. As a result, excluding compo-nents' database tables is your responsibility . Do not ask us to automate this process. The only methodto do so is to implement a workaround for certain components only. This is not an optimal solution as itwould mislead most users into believing that Akeeba Backup Professional can do this for every compo-nent they might have installed, which would simply be false.
4.3.2. Modules
From this page you can exclude any installed front-end or back-end non core module. The modules are displayed asa flat list spanning three columns.
The first column, labelled State , indicates the filtering status of this item. A green check mark, it means that thismodule will be included in the backup. A white X in a red circle means that the module will be excluded from thebackup set. Clicking on the status icon toggles its state.
The Module column contains the module's name.
The Area column indicates if this is a front-end (labelled as Public front-end ) or a back-end module (labelled asAdministrator back-end ). The front-end modules are always listed first.
4.3.3. Plug-ins
From this page you can exclude any installed front-end or back-end non core plug-ins. The plug-ins are displayed asa flat list spanning four columns.
The first column, labelled State , indicates the filtering status of this item. A green check mark, it means that this plug-in will be included in the backup. A white X in a red circle means that the plug-in will be excluded from the backupset. Clicking on the status icon toggles its state.
The Plug-in column contains the plug-in's name. The Type column displays the plug-in type, as reported by Joomla!.
The Area column indicates if this is a front-end (labelled as Public front-end ) or a back-end plug-in (labelled asAdministrator back-end ). The front-end plug-ins are always listed first.
4.3.4. Languages
From this page you can exclude any installed, non-default language. This means that each and every language markedas default for the back-end or the front-end will not be listed at all in this page! Languages are displayed in a listspanning three columns.
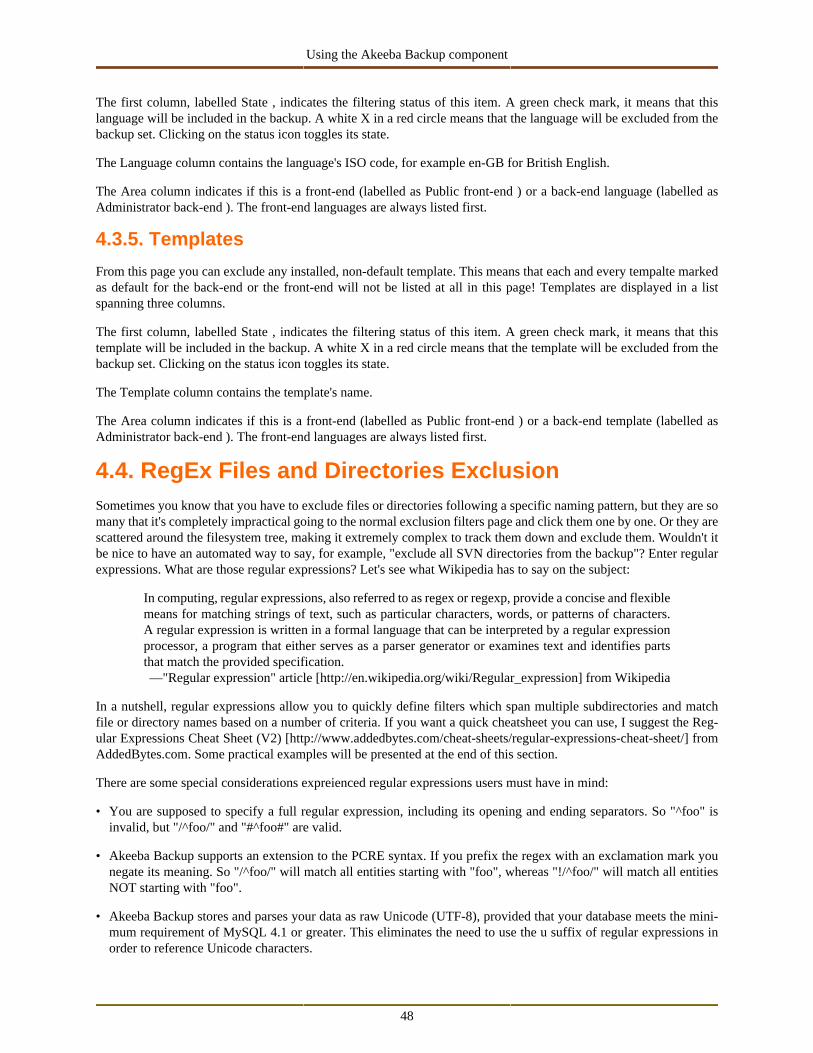
Using the Akeeba Backup component
48
The first column, labelled State , indicates the filtering status of this item. A green check mark, it means that thislanguage will be included in the backup. A white X in a red circle means that the language will be excluded from thebackup set. Clicking on the status icon toggles its state.
The Language column contains the language's ISO code, for example en-GB for British English.
The Area column indicates if this is a front-end (labelled as Public front-end ) or a back-end language (labelled asAdministrator back-end ). The front-end languages are always listed first.
4.3.5. Templates
From this page you can exclude any installed, non-default template. This means that each and every tempalte markedas default for the back-end or the front-end will not be listed at all in this page! Templates are displayed in a listspanning three columns.
The first column, labelled State , indicates the filtering status of this item. A green check mark, it means that thistemplate will be included in the backup. A white X in a red circle means that the template will be excluded from thebackup set. Clicking on the status icon toggles its state.
The Template column contains the template's name.
The Area column indicates if this is a front-end (labelled as Public front-end ) or a back-end template (labelled asAdministrator back-end ). The front-end languages are always listed first.
4.4. RegEx Files and Directories ExclusionSometimes you know that you have to exclude files or directories following a specific naming pattern, but they are somany that it's completely impractical going to the normal exclusion filters page and click them one by one. Or they arescattered around the filesystem tree, making it extremely complex to track them down and exclude them. Wouldn't itbe nice to have an automated way to say, for example, "exclude all SVN directories from the backup"? Enter regularexpressions. What are those regular expressions? Let's see what Wikipedia has to say on the subject:
In computing, regular expressions, also referred to as regex or regexp, provide a concise and flexiblemeans for matching strings of text, such as particular characters, words, or patterns of characters.A regular expression is written in a formal language that can be interpreted by a regular expressionprocessor, a program that either serves as a parser generator or examines text and identifies partsthat match the provided specification.—"Regular expression" article [http://en.wikipedia.org/wiki/Regular_expression] from Wikipedia
In a nutshell, regular expressions allow you to quickly define filters which span multiple subdirectories and matchfile or directory names based on a number of criteria. If you want a quick cheatsheet you can use, I suggest the Reg-ular Expressions Cheat Sheet (V2) [http://www.addedbytes.com/cheat-sheets/regular-expressions-cheat-sheet/] fromAddedBytes.com. Some practical examples will be presented at the end of this section.
There are some special considerations expreienced regular expressions users must have in mind:
• You are supposed to specify a full regular expression, including its opening and ending separators. So "^foo" isinvalid, but "/^foo/" and "#^foo#" are valid.
• Akeeba Backup supports an extension to the PCRE syntax. If you prefix the regex with an exclamation mark younegate its meaning. So "/^foo/" will match all entities starting with "foo", whereas "!/^foo/" will match all entitiesNOT starting with "foo".
• Akeeba Backup stores and parses your data as raw Unicode (UTF-8), provided that your database meets the mini-mum requirement of MySQL 4.1 or greater. This eliminates the need to use the u suffix of regular expressions inorder to reference Unicode characters.
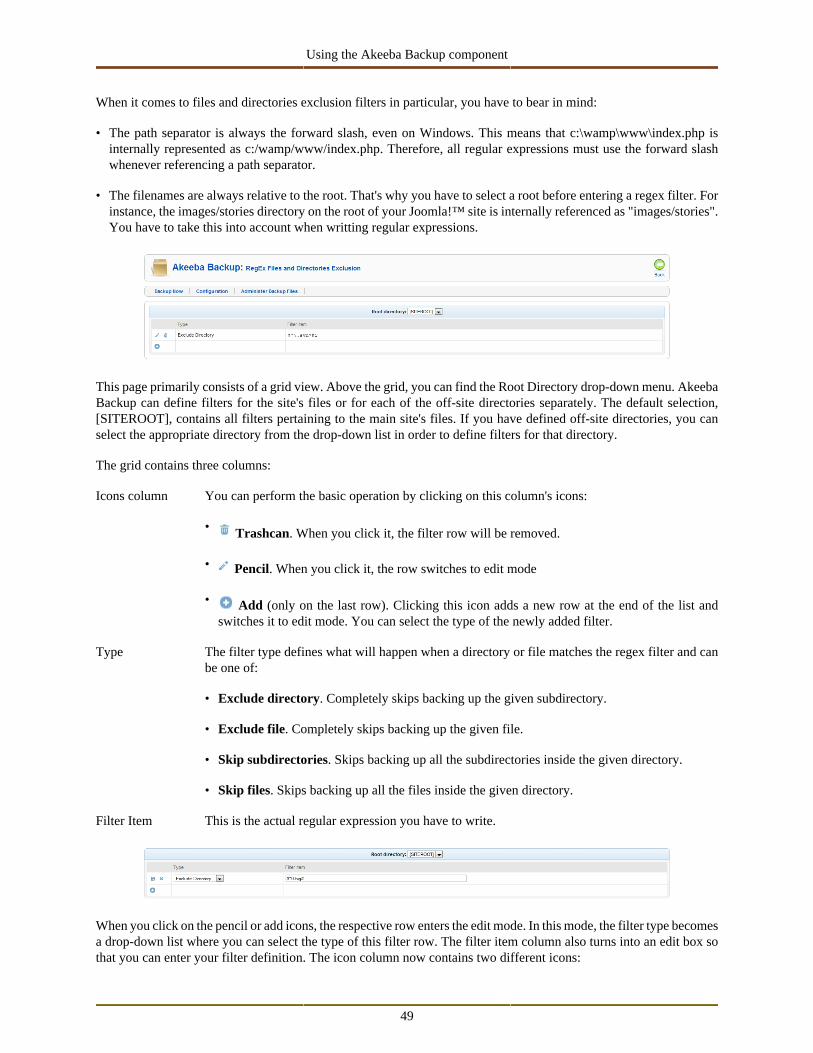
Using the Akeeba Backup component
49
When it comes to files and directories exclusion filters in particular, you have to bear in mind:
• The path separator is always the forward slash, even on Windows. This means that c:\wamp\www\index.php isinternally represented as c:/wamp/www/index.php. Therefore, all regular expressions must use the forward slashwhenever referencing a path separator.
• The filenames are always relative to the root. That's why you have to select a root before entering a regex filter. Forinstance, the images/stories directory on the root of your Joomla!™ site is internally referenced as "images/stories".You have to take this into account when writting regular expressions.
This page primarily consists of a grid view. Above the grid, you can find the Root Directory drop-down menu. AkeebaBackup can define filters for the site's files or for each of the off-site directories separately. The default selection,[SITEROOT], contains all filters pertaining to the main site's files. If you have defined off-site directories, you canselect the appropriate directory from the drop-down list in order to define filters for that directory.
The grid contains three columns:
Icons column You can perform the basic operation by clicking on this column's icons:
• Trashcan. When you click it, the filter row will be removed.
• Pencil. When you click it, the row switches to edit mode
• Add (only on the last row). Clicking this icon adds a new row at the end of the list andswitches it to edit mode. You can select the type of the newly added filter.
Type The filter type defines what will happen when a directory or file matches the regex filter and canbe one of:
• Exclude directory. Completely skips backing up the given subdirectory.
• Exclude file. Completely skips backing up the given file.
• Skip subdirectories. Skips backing up all the subdirectories inside the given directory.
• Skip files. Skips backing up all the files inside the given directory.
Filter Item This is the actual regular expression you have to write.
When you click on the pencil or add icons, the respective row enters the edit mode. In this mode, the filter type becomesa drop-down list where you can select the type of this filter row. The filter item column also turns into an edit box sothat you can enter your filter definition. The icon column now contains two different icons:
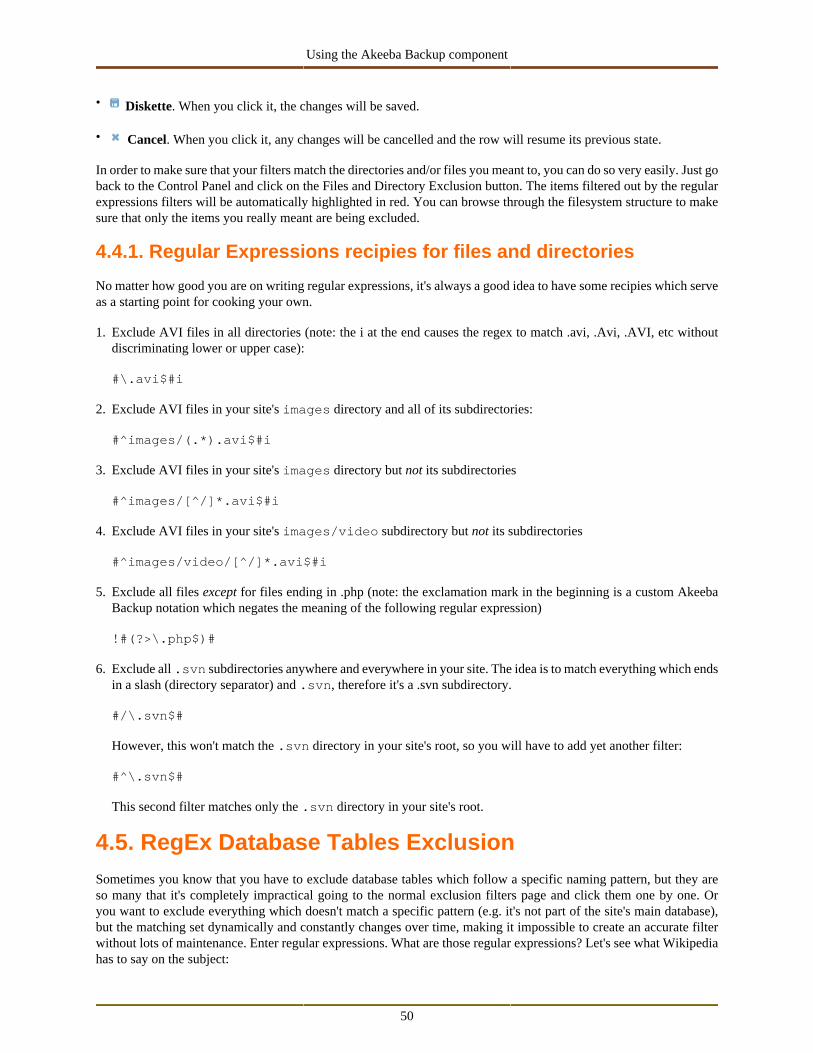
Using the Akeeba Backup component
50
• Diskette. When you click it, the changes will be saved.
• Cancel. When you click it, any changes will be cancelled and the row will resume its previous state.
In order to make sure that your filters match the directories and/or files you meant to, you can do so very easily. Just goback to the Control Panel and click on the Files and Directory Exclusion button. The items filtered out by the regularexpressions filters will be automatically highlighted in red. You can browse through the filesystem structure to makesure that only the items you really meant are being excluded.
4.4.1. Regular Expressions recipies for files and directories
No matter how good you are on writing regular expressions, it's always a good idea to have some recipies which serveas a starting point for cooking your own.
1. Exclude AVI files in all directories (note: the i at the end causes the regex to match .avi, .Avi, .AVI, etc withoutdiscriminating lower or upper case):
#\.avi$#i
2. Exclude AVI files in your site's images directory and all of its subdirectories:
#^images/(.*).avi$#i
3. Exclude AVI files in your site's images directory but not its subdirectories
#^images/[^/]*.avi$#i
4. Exclude AVI files in your site's images/video subdirectory but not its subdirectories
#^images/video/[^/]*.avi$#i
5. Exclude all files except for files ending in .php (note: the exclamation mark in the beginning is a custom AkeebaBackup notation which negates the meaning of the following regular expression)
!#(?>\.php$)#
6. Exclude all .svn subdirectories anywhere and everywhere in your site. The idea is to match everything which endsin a slash (directory separator) and .svn, therefore it's a .svn subdirectory.
#/\.svn$#
However, this won't match the .svn directory in your site's root, so you will have to add yet another filter:
#^\.svn$#
This second filter matches only the .svn directory in your site's root.
4.5. RegEx Database Tables ExclusionSometimes you know that you have to exclude database tables which follow a specific naming pattern, but they areso many that it's completely impractical going to the normal exclusion filters page and click them one by one. Oryou want to exclude everything which doesn't match a specific pattern (e.g. it's not part of the site's main database),but the matching set dynamically and constantly changes over time, making it impossible to create an accurate filterwithout lots of maintenance. Enter regular expressions. What are those regular expressions? Let's see what Wikipediahas to say on the subject:
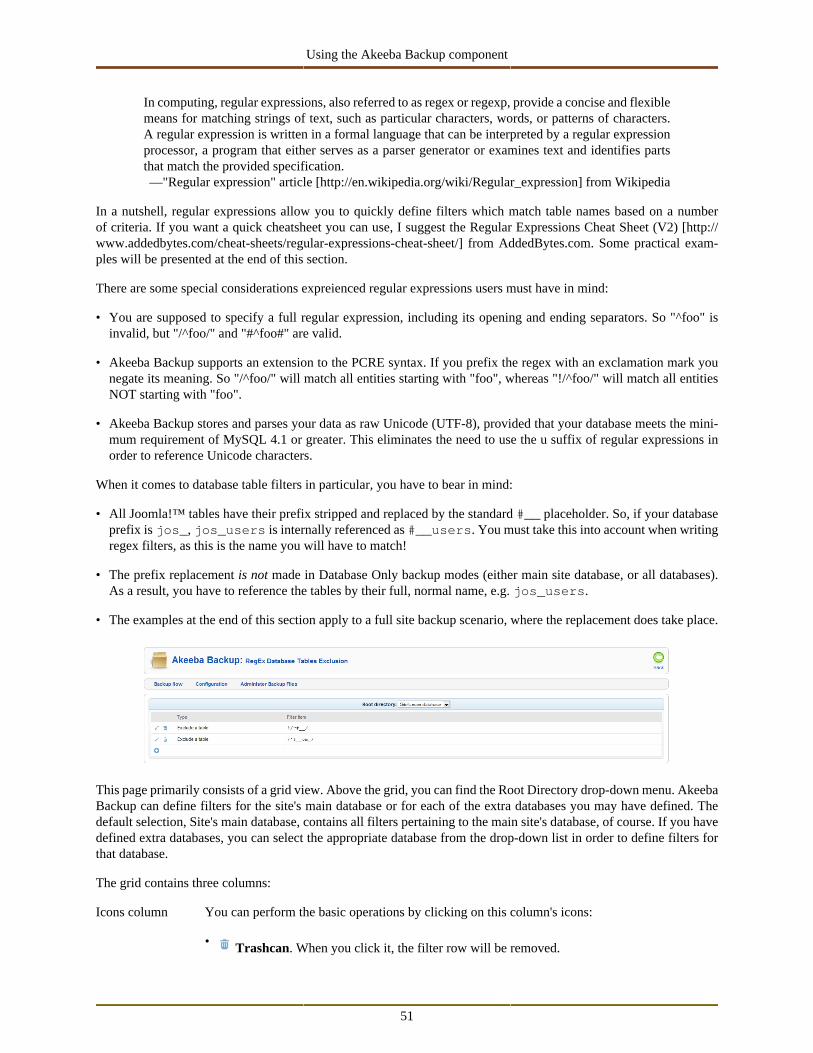
Using the Akeeba Backup component
51
In computing, regular expressions, also referred to as regex or regexp, provide a concise and flexiblemeans for matching strings of text, such as particular characters, words, or patterns of characters.A regular expression is written in a formal language that can be interpreted by a regular expressionprocessor, a program that either serves as a parser generator or examines text and identifies partsthat match the provided specification.—"Regular expression" article [http://en.wikipedia.org/wiki/Regular_expression] from Wikipedia
In a nutshell, regular expressions allow you to quickly define filters which match table names based on a numberof criteria. If you want a quick cheatsheet you can use, I suggest the Regular Expressions Cheat Sheet (V2) [http://www.addedbytes.com/cheat-sheets/regular-expressions-cheat-sheet/] from AddedBytes.com. Some practical exam-ples will be presented at the end of this section.
There are some special considerations expreienced regular expressions users must have in mind:
• You are supposed to specify a full regular expression, including its opening and ending separators. So "^foo" isinvalid, but "/^foo/" and "#^foo#" are valid.
• Akeeba Backup supports an extension to the PCRE syntax. If you prefix the regex with an exclamation mark younegate its meaning. So "/^foo/" will match all entities starting with "foo", whereas "!/^foo/" will match all entitiesNOT starting with "foo".
• Akeeba Backup stores and parses your data as raw Unicode (UTF-8), provided that your database meets the mini-mum requirement of MySQL 4.1 or greater. This eliminates the need to use the u suffix of regular expressions inorder to reference Unicode characters.
When it comes to database table filters in particular, you have to bear in mind:
• All Joomla!™ tables have their prefix stripped and replaced by the standard #__ placeholder. So, if your databaseprefix is jos_, jos_users is internally referenced as #__users. You must take this into account when writingregex filters, as this is the name you will have to match!
• The prefix replacement is not made in Database Only backup modes (either main site database, or all databases).As a result, you have to reference the tables by their full, normal name, e.g. jos_users.
• The examples at the end of this section apply to a full site backup scenario, where the replacement does take place.
This page primarily consists of a grid view. Above the grid, you can find the Root Directory drop-down menu. AkeebaBackup can define filters for the site's main database or for each of the extra databases you may have defined. Thedefault selection, Site's main database, contains all filters pertaining to the main site's database, of course. If you havedefined extra databases, you can select the appropriate database from the drop-down list in order to define filters forthat database.
The grid contains three columns:
Icons column You can perform the basic operations by clicking on this column's icons:
• Trashcan. When you click it, the filter row will be removed.
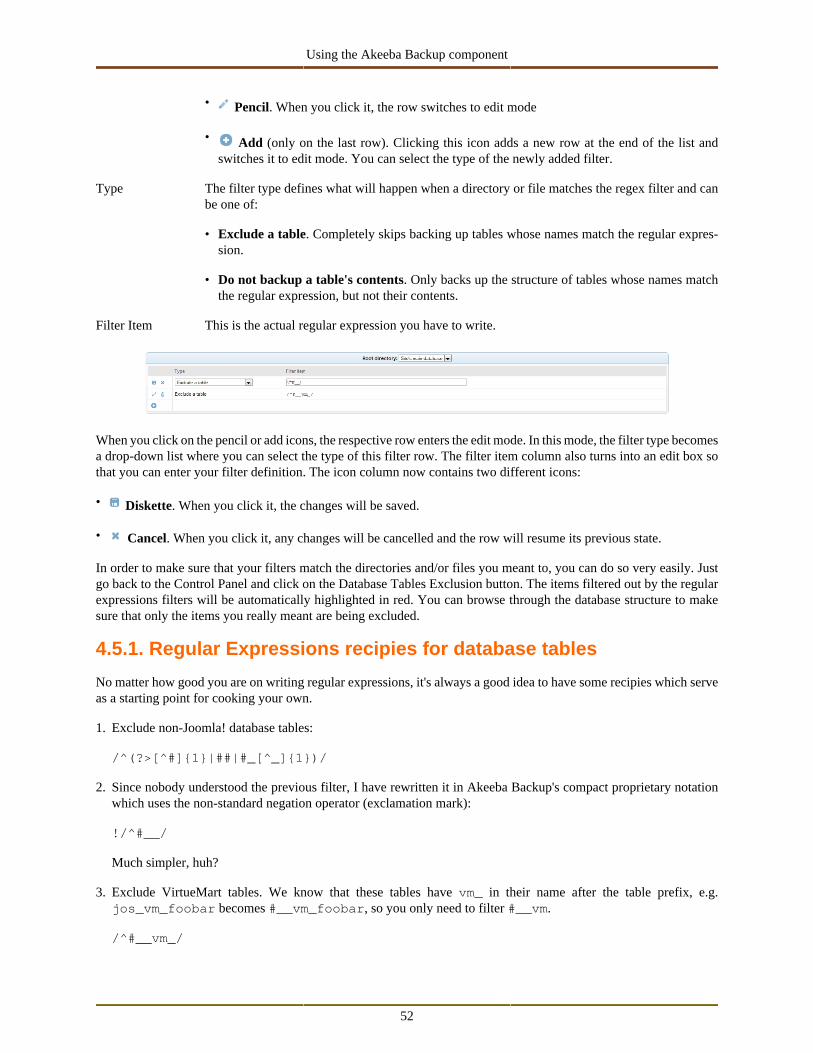
Using the Akeeba Backup component
52
• Pencil. When you click it, the row switches to edit mode
• Add (only on the last row). Clicking this icon adds a new row at the end of the list andswitches it to edit mode. You can select the type of the newly added filter.
Type The filter type defines what will happen when a directory or file matches the regex filter and canbe one of:
• Exclude a table. Completely skips backing up tables whose names match the regular expres-sion.
• Do not backup a table's contents. Only backs up the structure of tables whose names matchthe regular expression, but not their contents.
Filter Item This is the actual regular expression you have to write.
When you click on the pencil or add icons, the respective row enters the edit mode. In this mode, the filter type becomesa drop-down list where you can select the type of this filter row. The filter item column also turns into an edit box sothat you can enter your filter definition. The icon column now contains two different icons:
• Diskette. When you click it, the changes will be saved.
• Cancel. When you click it, any changes will be cancelled and the row will resume its previous state.
In order to make sure that your filters match the directories and/or files you meant to, you can do so very easily. Justgo back to the Control Panel and click on the Database Tables Exclusion button. The items filtered out by the regularexpressions filters will be automatically highlighted in red. You can browse through the database structure to makesure that only the items you really meant are being excluded.
4.5.1. Regular Expressions recipies for database tables
No matter how good you are on writing regular expressions, it's always a good idea to have some recipies which serveas a starting point for cooking your own.
1. Exclude non-Joomla! database tables:
/^(?>[^#]{1}|##|#_[^_]{1})/
2. Since nobody understood the previous filter, I have rewritten it in Akeeba Backup's compact proprietary notationwhich uses the non-standard negation operator (exclamation mark):
!/^#__/
Much simpler, huh?
3. Exclude VirtueMart tables. We know that these tables have vm_ in their name after the table prefix, e.g.jos_vm_foobar becomes #__vm_foobar, so you only need to filter #__vm.
/^#__vm_/
Using the Akeeba Backup component
53
5. Automating your backupEven though Akeeba Backup makes it very easy to take a backup of your Joomla!™ site, it still requires you to login to the site's backend, click on the Backup Now button and wait for the backup to finish. If you do this daily, it is adrag. Our job is to automate your life, making repeated and time consuming procedures a breeze. To this end we offernot just one, but three different backup automation possibilities for Akeeba Backup.
5.1. Front-end backupThe front-end backup feature is intended to provide the capability to perform an unattended, scheduled backup ofyour site.
The front-end backup URL performs a single backup step and sends a redirection (HTTP 302) header to force the clientto advance to the next page, which performs the next step and so forth. You will only see a message upon completion,should it be successful or not. There are a few limitations, though:
• It is not designed to be run from a normal web browser, but from an unattended cron script, utilizing wget orcron as a means of accessing the function.
• The script is not capable of showing progress messages.
• Normal web browsers tend to be "impatient". If a web page returns a bunch of redirection headers, the web browserthinks that the web server has had some sort of malfunction and stop loading the page. It will also show some kindof "destination unreachable" message. Remember, these browsers are meant to be used on web pages which aresupposed to show some content to a human. This behaviour is normal. Most browsers will quit after they encounterthe twentieth page redirect response, which is bound to happen. Do not come to the Free Support Forum complainingthat Firefox, Internet Explorer, Chrome, Safari, Opera or another browser doesn't work with the front-end backupfeature. It was NOT meant to work by design.
• Command line utilities, by default, will also give up loading a page after it has been redirected a number of times.For example, wget gives up after 20 redirects, curl does so after 50 redirects. Since Akeeba Backup redirects oncefor every step, it is advisable to configure your command line utility with a large number of redirects; about 10000should be more than enough for virtually all sites.
Most hosts offer a CPanel of some kind. There has to be a section for something like "CRON Jobs", "scheduled tasks"and the like. The help screen in there describes how to set up a scheduled job. One missing part for you would be thecommand to issue. Simply putting the URL in there is not going to work.
Warning
If your host only supports entering a URL in their "CRON" feature, this will most likely not work withAkeeba Backup. There is no workaround. It is a hard limitation imposed by your host. We would liketo help you, but we can't. As always, the only barrier to the different ways we can help you is serverconfiguration.
If you are on a UNIX-style OS host (usually, a Linux host) you most probably have access to a command line utilitycalled wget. It's almost trivial to use:
wget --max-redirect=10000 "http://www.yoursite.com/index2.php?option=com_akeeba&
view=backup&key=YourSecretKey&format=raw"
Of course, the line breaks are included for formatting clarity only. You should not have a line break in your commandline!
Using the Akeeba Backup component
54
Important
Do not miss the --max-redirect=1000 part of the wget command! If you fail to include it, the backupwill not work with wget complaining that the maximum number of redirections has been reached. Thisis normal behavior, it is not a bug.
Warning
Do not forget to surround the URL in double quotes. If you don't the backup will fail and it will be yourfault! The reason is that the ampersand is also used to separate multiple commands in a single commandline. If you don't use the double quotes at the start and end of the backup URL, your host will think thatyou tried to run multiple commands and load your site's homepage instead of the front-end backup URL.
If you're unsure, check with your host. Sometimes you have to get from them the full path to wget in order for CRONto work, thus turning the above command line to something like:
/usr/bin/wget --max-redirect=10000 "http://www.yoursite.com/index2.php?option=com_akeeba&
view=backup&key=YourSecretKey&format=raw"
Contact your host; they usually have a nifty help page for all this stuff. Read also the section on CRON jobs below.
Optionaly, you can also include an extra parameter to the above URL, &id=profile_id, where profile_id isthe numeric ID of the profile you want to use for the backup. If you don't specify this parameter, the default backupprofile (ID=1) will be used. In this sense, the aforementioned URL becomes:
/usr/bin/wget --max-redirect=10000 "http://www.yoursite.com/index2.php?option=com_akeeba&
view=backup&key=YourSecretKey&format=raw&profile=profile_id"
wget is multi-platform command line utility program which is not included with all operating systems. If yoursystem does not include the wget command, it can be downloaded at this address: http://wget.addictivecode.org/FrequentlyAskedQuestions#download. The wget homepage is here: http://www.gnu.org/software/wget/wget.html.Please note that the option --max-redirect is available on wget version 1.11 and above.
Important
Using a web browser (Internet Explorer, Firefox, ...) or wget version 1.10 and earlier will most probablyresult into an error message concerning the maximum redirections limit being exceeded. This is not abug. Most network software will stop dealing with a web site after it has redirected the request morethan 20 times. This is a safety feature to avoid consuming network resources on misconfigured web siteswhich have entered an infinite redirection loop. Akeeba Backup uses redirections creatively, to force thecontinuation of the backup process without the need for client-side scripting. It is possible, depending onsite size, Akeeba Backup configuration and server setup, that it will exceed the limit of 20 redirectionswhile performing a backup operation.
5.1.1. A PHP alternative to wget
As user DrChalta pointed out in a forum post, there is an alternative to wget, as long as your PHP installation hasthe cURL extension installed and enabled. For sterters, you need to save the following PHP script as backup.phpsomewhere your host's cron feature can find it. Please note that this is a command-line script and needn't be locatedin your site's root; it should be preferrably located above your site's root, in a non-web-accessible directory.
Using the Akeeba Backup component
55
The script below is a modification over DrChalta's original script, taking into account changes made in later versionsof our software. In order to configure it for your server, you only have to change the first three lines.
<?phpdefine('SITEURL', 'http://www.example.com'); // Base URL of your sitedefine('SECRETKEY', 'MySecretKey'); // Your secret keydefine('PROFILE',1); // The profile's ID
// ====================== DO NOT MODIFY BELOW THIS LINE ======================$curl_handle=curl_init();curl_setopt($curl_handle,CURLOPT_URL,SITEURL.'/index2.php?option=com_akeeba&view=backup&key='.SECRETKEY.'&format=raw&profile='.PROFILE.'&format=raw');curl_setopt($curl_handle,CURLOPT_FOLLOWLOCATION,TRUE);curl_setopt($curl_handle,CURLOPT_MAXREDIRS,10000); # Fix by Nicholascurl_setopt($curl_handle,CURLOPT_RETURNTRANSFER,1);$buffer = curl_exec($curl_handle);curl_close($curl_handle);if (empty($buffer)) echo "Sorry, the backup didn't work.";else echo $buffer;?>
Where www.yoursite.com and YourSecretKey should be set up as discussed in the previous section.
In order to call this script with a schedule, you need to put something like this to your crontab (or use your host'sCRON feature to set it up):
0 3 * * 6 /usr/local/bin/php /home/USER/backups/backup.php
Where /usr/local/bin/php is the absolute path to your PHP command-line executable and /home/US-ER/backups/backup.php is the absolute path to the script above.
If you set up your cron schedule with a visual tool (for example, a web interface), the command to execute part is "/usr/local/bin/php /home/USER/backups/backup.php".
Thank you DrChalta for this wonderful tip!
5.1.2. Using the front-end backup in SiteGround CRON jobs
As one of our users pointed out in the support forum, finding the correct command to issue for the CRON job is tricky.What he writes applies not only to his host, SiteGround, but many other commercial hosts as well. We'll simply quoteour user, bzcoder.
In the CPanel for SiteGround there is a cronjob option, you create a cronjob using that and use:
curl -b /tmp/cookies.txt -c /tmp/cookies.txt -L --max-redirs 1000 -v "<url>"
as your command.
Replace <url> with your backup URL. Make sure to use the initial url displayed on the backend NOT the final URLwhen you run the backup manually (been there, done that) - when you do that you end up with a url that doesn't workbecause of the extra parameter used in continuing the backup process.
Using the Akeeba Backup component
56
5.2. Native CRON scriptIf you have access to the command-line version of PHP, Akeeba Backup Professional includes an even better - andfaster - way of scheduling your backups. All Akeeba Backup Professional releases include the file administra-tor/components/com_akeeba/backup.php, which can be run from the command-line PHP interface (PHPCLI). In contrast with previous releases, it doesn't require the front-end backup in order to work; it is self-contained,native backup for your Joomla!™ site, even if your web server is down!
In order to schedule a backup, you will have to use the following command line to your host's CRON interface:
/usr/local/bin/php /home/USER/webroot/administrator/components/com_akeeba/backup.php
where /usr/local/bin/php is the path to your PHP CLI executable and /home/USER/webroot is the abso-lute path to your web site's root. You can get this information from your host.
The backup script accepts two optional parameters:
• -profile profile_id allows you to select which backup profile you would like to use for the scheduled backup.The profile_id is the numeric profile ID you can see in your Control Panel page.
• -description "Your description" allows you set a backup description different than the default. Do not forgetto enclose your description in double quotes, or this parameter will not work!
In order to give some examples, I will assume that your PHP CLI binary is located in /usr/local/bin/php - acommon setting among hosts - and that your web site's root is located at /home/johndoe/httpdocs.
1. Backup with the default profile (ID = 1) and default description:
usr/local/bin/php /home/johndoe/httpdocs/administrator/components/com_akeeba/backup.php
2. Backup with profile number 2 and default description:
usr/local/bin/php /home/johndoe/httpdocs/administrator/components/com_akeeba/backup.php -profile 2
3. Backup with the default profile (ID = 1) and a description reading "My automated backup":
usr/local/bin/php /home/johndoe/httpdocs/administrator/components/com_akeeba/backup.php -description "My automated backup"
4. Backup with profile number 2 and a description reading "My automated backup":
usr/local/bin/php /home/johndoe/httpdocs/administrator/components/com_akeeba/backup.php -profile 2 -description "My automated backup"
It goes without saying that the line breaks are for readability only. You should not include line breaks in your commandline.
Special considerations:
• Most hosts do not impose a time limit on scripts running from the command-line. If your host does and the limitis less than the required time to backup your site, the backup will fail. We are working on a workaround to allowoperation even within such time constraints.
• This script is not meant to run from a web interface. If your host only provides access to the CGI or FastCGI PHPbinaries, backup.php will not work with them. The solution to this issue is tied to the time constraint above. Theworkaround we're planning will solve both issues.
Using the Akeeba Backup component
57
• Some servers do not fully support this backup method. The usual symptoms will be a backup which starts butis intermittently or consistently aborted in mid-process without any further error messages and no indication ofsomething going wrong. In such a case, trying running the backup from the back-end of your site will work properly.If you witness similar symptoms please use the Alternative CRON Script, outlined in the next section.
5.3. Alternative CRON scriptOn some hosts it is impossible to use the native CRON script outlined in the previous section. On such hosts the CRONscript will get aborted if it is using too much CPU time, or if the system load exceeds a value predefined by yourhost company. In order to accomodate for these hosts, Akeeba Backup Professional includes an alternative CRONscript. The alternative CRON script performs the backup by using the front-end backup feature of Akeeba Backup.The alternative CRON script is located in administrator/components/com_akeeba/altbackup.php,and must be run from the command-line PHP interface (PHP CLI).
In order to schedule a backup, you will have to use the following command line to your host's CRON interface:
/usr/local/bin/php /home/USER/webroot/administrator/components/com_akeeba/altbackup.php
where /usr/local/bin/php is the path to your PHP CLI executable and /home/USER/webroot is the abso-lute path to your web site's root. You can get this information from your host.
The backup script accepts only one optional parameters:
• -profile profile_id allows you to select which backup profile you would like to use for the scheduled backup.The profile_id is the numeric profile ID you can see in your Control Panel page.
In order to give some examples, we will assume that your PHP CLI binary is located in /usr/local/bin/php -a common setting among hosts - and that your web site's root is located at /home/johndoe/httpdocs.
1. Backup with the default profile (ID = 1)
usr/local/bin/php /home/johndoe/httpdocs/administrator/components/com_akeeba/altbackup.php
2. Backup with profile number 2
usr/local/bin/php /home/johndoe/httpdocs/administrator/components/com_akeeba/altbackup.php -profile 2
It goes without saying that the line breaks are for readability only. You should not include line breaks in your commandline.
Special considerations:
• Most hosts do not impose a time limit on scripts running from the command-line. If your host does and the limit isless than the required time to backup your site, the backup will fail.
• This script is not meant to run from a web interface. If your host only provides access to the CGI or FastCGI PHPbinaries, backup.php will not work with them. The solution to this issue is tied to the time constraint above. Theworkaround we're planning will solve both issues.
• You must enable the front-end backup feature of your Akeeba Backup Professional instalaltion and assign a "secretkey" for it. This is possible by going to the Akeeba Backup Professional's Control Panel page and clicking on theParameters button on the top right corner of the toolbar. You will find the front-end backup options further downthe Parameters page.
• Before using the alternative CRON script for the first time, you must visit the Akeeba Backup's Control Panel pageat least once. Since the command-line version of PHP used to run the backup is oblivious to the domain name used
Using the Akeeba Backup component
58
by your site, we have to cache this information. Caching of this information occurs as soon as you visit the ControlPanel page. The host name is absolutely required in order for the script to be able to access your Akeeba Backupinstallation's front-end backup feature.
• Your host must support one of the three methods used by the helper script to access your front-end backup URL:
1. The PHP cURL module.
2. The fsockopen() method
3. The fopen() URL wrappers
If none of these methods is available, the backup will fail.
• Your host may have a firewall setup which doesn't allow the CRON script to access the front-end backup URL.In such a case, the backup will consistently fail without a new log file being produced and without a backup entrybeing written to the database. You will have to contact your host so that they can allow the script to access the front-end backup URL. Do note that despite the alternative CRON script and your site running on the same server, thefirewall restriction might still be in place. This is counter-intuitive, but we've seen this happening on man hosts.
If you are seeking assistance in our forums regarding a failed CRON job, please indicate if and which of these stepsyou have already tried. Not doing so will hinder our ability to help you in a timely manner.
5.4. Remote backupsIn addition to the automation directly on the server, we also provide a desktop application, called Akeeba RemoteControl, which allows you to backup your site from your desktop computer, without opening your browser, with asingle click. It will even download the backup file for you, using an FTP connection.
The software is provided free of charge from our website. In order to use it, you will have to follow the installationinstructions in its documentation pages. This section is not meant to be anything more than a simple reminder that thiswonderful software exists and it can save your time and - why not? - even your day.
6. Miscellaneous featuresSome features do not fall under any other category. We decided to reserve a place in our manual for these lesser-knownbut very useful features.
6.1. Light mode for cell phones, PDAs, MIDs, etc.In contrast to the classic front-end backup which is meant primarily for backup automation, the "Light Mode" is meantfor performing site backups from a browser, without even having to log in to the administrator backend. It goes furtherthan that, enabling you to backup your site from any web-capable device, including Pocket PC's, netbooks, or evenyour cell phone!
The "Light Mode" requires that your browser has at least rudimentary support for Javascript. Most recent web-capabledevices, including low end cellphones, fulfill this requirement. This feature has been tested on Pocket Internet Explorerrunning on a Mio P560 and a HTC Touch, as well as Sony Ericsson Nokia mobile phones. It also works on devicesrunning on Opera Mobile and Opera Mini.
The "light mode" performs user authentication using the front-end backup's secret word and allows you to select thebackup profile. It does not give you, however, the option to download your backup. If you want to do so, you'll eitherhave to log in to the administrator back-end of your site, or use other means - e.g. FTP client software.
In order to access the "Light Mode" you have to visit the URL:
Using the Akeeba Backup component
59
http://www.example.com/index.php?option=com_akeeba&view=light
Just replace www.example.com with the actual domain name and path to your site!
Important
The front-end backup feature option must be enabled from the Parameters button in the Control Panel.If it's not, you'll get an "Access Denied" message.
In the first page you get upon accessing this URL just select the backup profile from the drop down list and enter yoursecret word in the text box, then click on the Backup Now button. The backup process will proceed automatically,giving you a cut-down version of the backup progress information you would get from the backend backup mode.Akeeba Backup advances through the pages automatically, using Javascript.
60
Chapter 4. Restoring backups1. Overview of the restoration processThe restoration process consists of three individual steps:
1. Getting your files off the archive and into the server. This usally has two substeps:
a. Extracting the files from the archive
b. Uploading the files to your server
2. Running the actual restoration process
3. Removing the installation script from your server
As you may have observed, we did not talk at all about using or installing Joomla!™ in the restoration process. In fact,we strongly disencourage you from installing Joomla!™ prior to the restoration. The backup archive has everythingyou need: your database; your site's files (including the Joomla!™ CMS); and the PHP script to restore your databaseand re-configure your site - in case you moved to another server or subdomain. You can use the backup archives toperform bare metal restoration of your site. Even if the server which used to host you blows up and vanishes in a blacksmokey cloud, your entire site is safely stored in the backup archive.
The following sections will present the different alternatives to each of the previous three steps and coach you througha site's restoration.
2. Getting the files on your serverThere are two broad venues for getting the files off the backup and into the server. The first way is to extract the backupfile locally, then use your FTP client to upload them to the site. This is the safest way to do so, but it's also the slowest.Transferring 4,000 to 10,000 files - that's how many files there are in a mid-sized Joomla!™ site - by FTP is a mighty,lengthy, boring procedure. The FTP protocol was designed to transfer a few large files at a time. When confrontedwith thousands of files, the overhead of processing them is higher than the actual file data upload time.
This brings us to our second venue, extracting the archive files directly on the server. Using this method we upload thebackup archive itself to the server, then use a PHP script (called Kickstart; available free of charge from our website) toextract it directly on this server. The major benefit is time. The FTP protocol is extremely well-suited for bulky uploads.Your upload time of a single, big file is only determined by your available bandwidth. The drawback of this approachis that, depending on file and directory permissions, you may have to tweak the process to make it work smoothly.
As the developer of Akeeba Backup, I suggest investing the time to master the second way, unless you are on a verystrict deadline. Use the individual files upload as your fallback plan, if you can't get Kickstart to work on a specificserver. I'll be honest with you. I have not used the individual files upload ever since I created Kickstart. I have muchbetter things to do with my time than waiting two hours for a small site to upload when I can do it in less than 15 minutes.
2.1. Uploading individual filesThis is the easiest, but most time consuming, way to get your files on the server.
First, you'll have to extract the backup archive on your local PC. If you have a ZIP backup archive you can do sousing your favorite ZIP extraction software, such as 7-Zip. If you get extraction errors, such as CRC errors, or anindication that your archive may be corrupt, it doesn't necessarily mean that you have a bad archive. It might just bethat the host of the site you took the backup from didn't support all the necesary features for Akeeba Backup to create
Restoring backups
61
standards-compliant ZIP archives. In this case, we urge you to use Akeeba eXtract Wizard, available free of chargefrom the Download section of our website, and extract the ZIP archive using this software. If your backup archive isin the JPA format, the only way to extract it is the Akeeba eXtract Wizard.
Warning
If you get a message that your archive is corrupt, of an invalid format or that Akeeba eXtract Wizardcan't read data from the archive, you have a broken backup. The most common cause for broken backupfiles is the way you transfer them to your PC. If you want a trouble free restoration experience, alwaysuse FTP in BINARY transfer mode to transfer the backup archives from the server to your local PC. Asa precaution, selectively test extract some of your backup files to make sure that they have no problem.UNTESTED BACKUP ARCHIVES ARE AS GOOD AS HAVING NO BACKUP AT ALL. Beparanoid about testing your backup archives. It may as well be the difference between saving or losingyour site one day.
Once you have extracted the backup archive, you have a bunch of files inside a directory on your PC. Take a goodlook at them. Is there a file named .htaccess (note the dot in the beginning) inside this directory? If the answer isyes, please rename it to htaccess.bak before continuing.
Now use your favorite FTP client - I recommend FileZilla - to upload all those files to your server. Once you do, visitthe URL http://www.yoursite.com/installation/index.php, where www.yoursite.com is yourown site's domain, of course! Then proceed to Using the Akeeba Backup Installer section.
2.2. Extracting on the serverWe have created a nifty web-based backup extraction utility called Kickstart. It is able to extract your backup archivedirectly on your server, using normal PHP file writing functions or FTP mode. For more information, please refer tothe Kickstart documentation. This section is just a quick overview of that software.
Note
Make sure that you have already downloaded Kickstart on your local PC and unzipped it.
First things first. You will have to upload your backup archive on your server. To be more precise, upload the backuparchive to your site's root directory. On most servers it's a directory named www, public_html, httpdocs, ht-docs or http_docs. If in doubt, ask your host. Upload using your FTP client, but make sure that you are using theBINARY transfer mode. If you don't, you are wasting your time; the archive will become corrupt during transfer andyou'll have to re-upload. If the archive file is already on a subdirectory of the server, you just have to copy it to thesite's root directory. Consult the documentation of your FTP client for more information on doing so. Usually it's adrag and drop operation, but different FTP clients use different methods.
Then upload the files from the Kickstart.zip package. Do not upload the Kickstart.zip itself! You really need nothingbut kickstart.php itself. The rest of the files are just translations. You can skip them if you like.
In order to launch the Kickstart wizard, you simply have to visit http://www.example.com/mysitefolder/kickstart.php , replacing www.example.com with your server's host name and mysitefolder with what-ever folder you uploaded your files into. If you have uploaded to your server's root, you should omit both mysite-folder and its trailing slash.
For example, if you uploaded the files to a folder named joomla and your host name is www.mygreatsite.com,location to put in your browser's address bar is http://www.mygreatsite.com/joomla/kickstart.php. If you uploaded your files to the web server root and the host name is www.mybigsite.com then the location inthe address bar should be http://www.mybigsite.com/kickstart.php.
Restoring backups
62
The initial page of Kickstart consists of the basic configuration parameters it will use during the archive extractionprocess. On the top of the page there is a drop down list (combo box) containing all the JPA and ZIP archives it hasfound in the same directory as the script during the script's start up. You must choose the correct one. Conveniently,it pre-selects the first archive found, since most users will only have one archive present anyway.
The second configuration group, labelled " Operation Mode ", allows you to choose how Kickstart will process thetransition between the multiple steps required to fully extract the backup archive:
• AJAX (refreshless) uses AJAX mode. This is the fastest method but requires a compatible browser (Internet Ex-plorer 6+, Mozilla Firefox 1.5+, Konqueror 3.5.9+, Google Chrome, Safari or Opera 9+). Furthermore, it is possi-ble that on certain server configuration it will fail. Specifically, it will fail on servers which tamper with the scriptoutput, by forcing pop-up advertisements for example, or whose PHP verbosity is set too high.
• JavaScript Redirects is a fall-back method which should work on virtually any server setup. It is slower, becauseafter each step the whole page is reloaded and a small piece of JavaScript code makes sure that the browser advancesto the next step of the extraction process.
Warning
Kickstart requires JavaScript to be activated. Some software, such as firewalls, Internet security suitesand browser plug-ins, might deactivate JavaScript. If Kickstart appears to be absolutely unresponsive,please double check that JavaScript is enabled when accessing Kickstart.
You can also choose to Restore file permissions if you use a JPA archive. This option, naturally, only works if boththe server on which you backed up your site and the server on which you restore your site run on Linux. Do notethat there are some limitations to this feature. For example, you may have assigned a directory as unwritable by theowning user. Kickstart will have to assign it as user-writable in order for the extraction to work at all. Also, if you hadbeen mixing FTP uploads and PHP direct file writes on your site, restoring permissions might be a recipe for disaster.Finally, if your original site used the Joomla! FTP layer but your clone does not, or vice versa, trying to restore filepermissions might have adverse effects to the operation of the restored site.
As a rule of thumb, only use this feature if you are restoring to the same server as the one you backed up from and it'susing suPHP. In all other cases you may end up with "permissions hell" or even fail to restore your site.
Important
Remember that setting correct and secure permissions on files and folders is ultimately your responsibil-ity as a web master! Do not expect software to substitute your better judgement. Always check permis-sions after Kickstart and JPI are over restoring your site and make sure everything meets your securitystandards. You know your server environment and your site better than we do!
The next configuration group, labelled " Extraction Method ", allows you to specify how the extracted files are goingto be written to their final location.
• The " Write directly to files " option uses the quickest and most conservative approach of writing the files directlyfrom within the PHP code. However, it might impossible to use if there are insufficient permissions, PHP Safe Modeis activated or there are other server-specific restrictions. Kickstart will attempt to detect this kind of errors and warnyou just before the extraction process begins.
• The " Use FTP " option will attempt to use FTP access to write the extracted files to disk, using the FTP optionsyou can configure on the text box below.
Restoring backups
63
Important
FTP mode requires normal write access to the directory where kickstart.php resides in. This isbecause each file gets extracted as a temporary file in this folder first and is then "uploaded" usingFTP. This is a limitation of PHP not (widely) supporting appending file writes using FTP.
The configured FTP " initial directory " must point to the same directory as the one kickstart.php resides in.Kickstart will test for this and abort with an error message if it can't detect itself in the " initial directory ".
Some restrictions apply to the FTP mode. You can only use plain FTP servers, but not any of the FTP variants suchas SFTP, FTPS, etc. If you try to do something like that, Kickstart will not be able to connect to the FTP server.
The FTP host must be given as a domain or IP address, with a protocol prefix. Valid examples are "local-host", "ftp.example.com", "example.com", "192.168.0.1". However, using something like "ftp://localhost", "ftp://example.com/var/www", "ftp://user@pass:example.com/var/www" will not work. The FTP connection parameters(username and password) are to be typed in in the respective fields below the FTP host.
A note on what the initial directory is and how to set it up. It is the absolute FTP path where kickstart.php residesin and where your site's root will be located after the restoration is over. In order to find it, you can use FileZilla orany other FTP software. Just connect to your site, navigate to the directory where kickstart.php and your archive areand copy the FTP path. In FileZilla's default theme this is located above the right-hand directories pane (showingthe directories on your FTP server). It usually looks something like /public_html or /httpdocs or /www, but thisbasically depends on your host so my guess is as good as any. Just copy this whole string (including the leadingslash, if any!) and copy it to the initial directory field of Kickstart.
Next up, you have the "Stealth Mode" group. This optional feature allows you to safely restore your backup archiveon a live site without your users being able to inadvertently access the installer - and your secret database settings!- while you are at it. It does this by forwarding all requests not originating from your IP address to a dummy pageor an off-site URL.
Warning
This feature only works on Apache, Lighttpd and other servers which support .htaccess and mod_rewritedirectives. It will not work on IIS servers. If your site already has an .htaccess file on its root, it has to beoverwritten. If its permissions are not adequate, Kickstart will not warn you about this!
You can enable this feature by ticking the "Stealth mode (restrict access only to your IP while restoring)" check box.You can then enter the absolute URL of a dummy page or an external URL in the "Stealth Mode redirection URL" textbox. For example, you may enter something like "http://www.example.com/migration.html" to forward all visitors tothis URL while you are restoring your site. If you do not specify a URL, your web server will report a user-unfriendly403 Forbidden error message to your site's visitors.
If the URL is pointing to a page in the same domain as the one you are restoring in, you should be aware that it mustbe a static page (having a .html or .htm extension), but not a PHP page. Kickstart's Stealth Mode feature allows youto link to CSS, JavaScript and common media types (JPEG, JPG, GIF, PNG) files from that page. This allows you tocontruct a beautiful, up-to-the-point page notifying users that your site is temporarily off-line due to maintenance andwill be back shortly. This is what we use whenever we have to roll updates to AkeebaBackup.com itself.
The final settings group is the "Fine Tuning". Here you can define various parameters which influence the wayKickstart operates:
• Maximum archive chunk to process per step (Bytes). Kickstart splits the extraction process in smaller chunks,in order to avoid server timeouts. There are two conditions which define a chunk: the minimum amount of data
Restoring backups
64
extracted and the maximum number of files extracted. This option controls the former condition and is expressedin bytes. The default value, 1024768, means that Kickstart will try to extract at least 1Mb of data before concludingthe chunk.
Setting this to higher values will speed up the process, because it creates less chunks and, therefore, less time hasto be spent rendering the extraction process and wasted on network operations to and from the browser. On thedownside, on slower hosts it might cause a timeout.
• Maximum number of files to process at once. Kickstart splits the extraction process in smaller chunks, in orderto avoid server timeouts. There are two conditions which define a chunk: the minimum amount of data extractedand the maximum number of files extracted. This option controls the latter condition and is expressed in numberof files. The default values, 40, means that at most 40 files will be extracted, even if their total size is less thanMAXBATCHSIZE bytes.
Setting this to higher values will speed up the process, because it creates less chunks and, therefore, less time hasto be spent rendering the extraction process and wasted on network operations to and from the browser. On thedownside, on slower hosts it might cause a timeout.
• Minimum execution time per step (milliseconds). Kickstart 2.4 onwards uses the same anti-DoS solution com-patibility scheme as the Akeeba Backup component. This means that it tries to make each page load last at leastas many milliseconds as this setting. This allows Kickstart to avoid failing with 403 Forbidden error messages if itruns too fast on your server. The default value, 2000, means that Kickstart's page loads will last at least 2 seconds(2000 milliseconds divided by 1000 milliseconds per second equals 2 seconds). While this is a sane value for verysensitive hosts, it will slow Kickstart down considerably on faster hosts. In such a case, you may try lowering thisvalue to 1000, 500 or even lower. Setting it to 0 will result in Kickstart running at full speed. This is no exact science,so you may want to experiment with it a bit. According to my experience values around 600 yield a perfect balancebetween speed and avoiding 403 Forbidden error messages.
• Temporary directory. Kickstart needs a writable temporary directory for its normal operation. By default, it is setto be the same directory as the one Kickstart is located in. If for any reason this directory is not writable (for example,FTP mode is required to write to that directory) you can manually override the temporary directory location usingthis setting. For instance, if you want to set the temporary directory location to /tmp (a common writable temporarydirectory in Linux systems) change this setting to /tmp.
Another useful tip, especially if neither the Direct File Writes nor the FTP modes are working, is to create a directorynamed kicktemp inside your site's root directory with your favorite FTP client and set its permissions to 0777 (read,write and execute to user, group and "others"). Then, change this setting by appending kicktemp to it. For instance,on Windows hosts this setting might read something like C:\wamp\www\test; modify it to read C:\wamp\www\test\kicktemp. On Linux, Solaris, Mac OS X, FreeBSD and other UNIX variants hosts it will read somethinglike /home/myuser/httpdocs; modify it to read /home/myuser/httpdocs/kicktemp.
This trick only works if PHP Safe Mode is not enabled on your account. If the PHP Safe Mode is enabled, thereis no known way to use Kickstart, except than begging your host to change the owner of your site's root to be thesame as the user the web server runs under. Do keep in mind that this approach is not very secure and the ownershipshould be reverted after the restoration process is over.
• Pass-through chunk size while extracting large files (bytes) . When Kickstart is extracting files stored uncom-pressed in the archive (large files), it does so by reading a chunk of the uncompressed data to memory, then writingit to disk. It repeats this procedure until all file data has been processed.
The most time consuming part of this process is writing to the disk. Increasing the chunk's size results in fewer writeoperations and less time is consumed, at a risk of running out of memory. This setting is expressed in bytes and thedefault value, 1024768, represents 1Mb of information. You can usually set it to 6200000, or even higher dependingon your PHP configuration settings, without any side effects, greatly increasing Kickstart's performance, especiallyif you have a large number of big files in your backup archive.
Restoring backups
65
When you are done setting the options, please click the large, green " Start " button. The extraction process shouldnow start. There is some flickering between steps using the AJAX mode; this is due to the way the browsers handlepartial updates of the page source code.
Note
Some steps involving large files might take a while to finish. If you the page appears to be frozen giveit a couple of minutes before concluding that it is stuck.
During the extraction process, if Kickstart encounters a .htaccess file it will extract it as htaccess.bak in order to avoidpotential server configuration conflicts during the restoration process. This change will be reverted in the final stepof Kickstart. Just read on!
Now, as soon as the extraction process is over, you will be presented with Kickstart's final page. Clicking on the firstlink on this page will attempt to open a new window or tab in your browser, pointing to the Akeeba Backup Installerscreen. At this point, do not close the Kickstart tab or window ! Just switch to the new tab/window and go throughthe restoration process.
At this point, you should read the Using the Akeeba Backup Installer section
As soon as the restoration process is over and it tells you that you should remove the installation directory, close theABI tab/window and return to the Kickstart window. Clicking on the second link of the page will "fix" the name ofthe .htaccess file - if your original site had one - and remove kickstart.php and the backup archive. After that, youcan use the restored site.
3. Performing the restoration processThe actual restoration process is the easiest part of restoring or migrating a web site, as it is normally handled by asemi-automated script, the Akeeba Backup Installer (ABI for short). In extremely rare cases you may have to performthe restoration manually, for example if you have a partial backup or you encountered a grave bug in ABI and are ona strict deadline. The following sections will cover both methods.
3.1. Using the Akeeba Backup Installer (ABI)The Akeeba Backup Installer (ABI for short) is the latest generation of backup installer scripts we have developed.This one is not based on the original Joomla!™ installer, but written entirely from scratch. It's based on jQuery forits interface. It is more streamlined and more stable than the original installers in the JoomlaPack backup software.It is loaded with all the standard backup installer features, like multiple database restoration, automatic handling ofconfiguration.php and some even more exciting features, like the ability to restore database tables with foreignkeys and changing the password of a specific Super Administrator account, should you have multiple Super Admin-istrators on a single site.
Tip
You can have a "safe haven", a clean (no extensions) dedicated browser installation in order to performrestoration of your sites. Portable Firefox from PortableApps.com and Iron Portable work wonders forthis task!
All of the pages have a Next and a Previous button, taking you to the next or previous restoration step, respectively.All pages are divided in panes, denoted by clickable headers. Upon clicking each header, the relevant pane's contentscome into view. The first pane - opened by deafult - contains the most basic information for the current page, whereasthe other panes contain more advanced information and options.
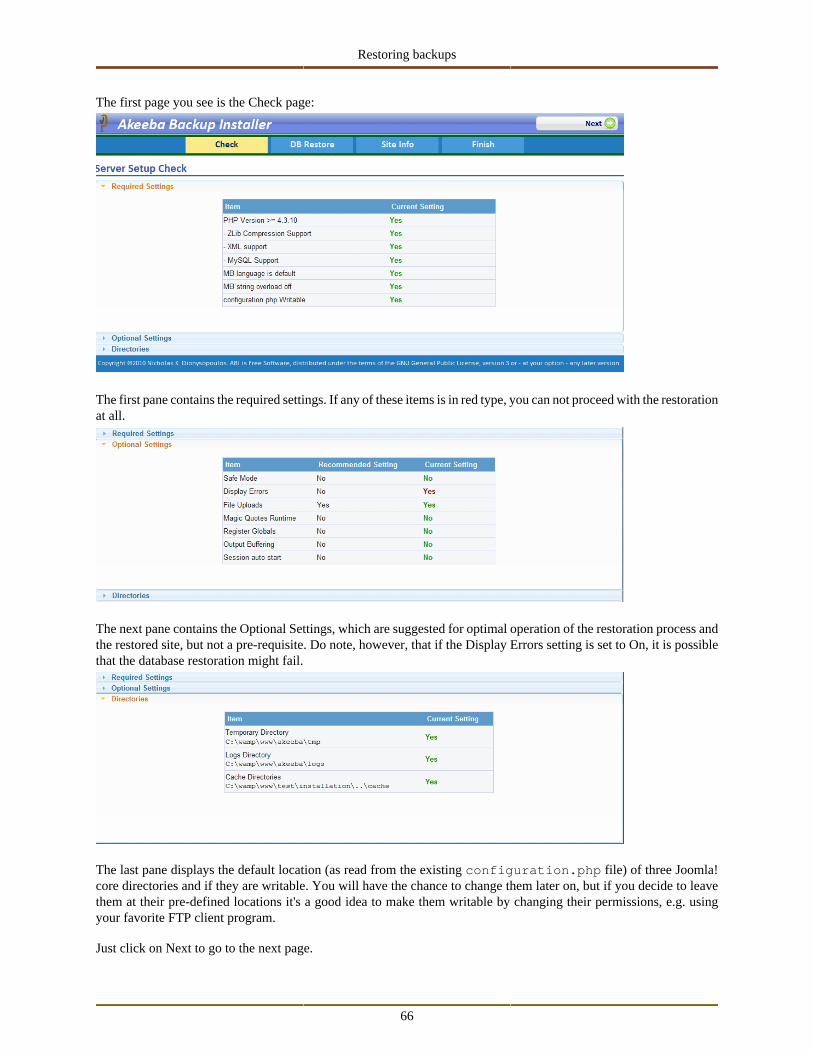
Restoring backups
66
The first page you see is the Check page:
The first pane contains the required settings. If any of these items is in red type, you can not proceed with the restorationat all.
The next pane contains the Optional Settings, which are suggested for optimal operation of the restoration process andthe restored site, but not a pre-requisite. Do note, however, that if the Display Errors setting is set to On, it is possiblethat the database restoration might fail.
The last pane displays the default location (as read from the existing configuration.php file) of three Joomla!core directories and if they are writable. You will have the chance to change them later on, but if you decide to leavethem at their pre-defined locations it's a good idea to make them writable by changing their permissions, e.g. usingyour favorite FTP client program.
Just click on Next to go to the next page.
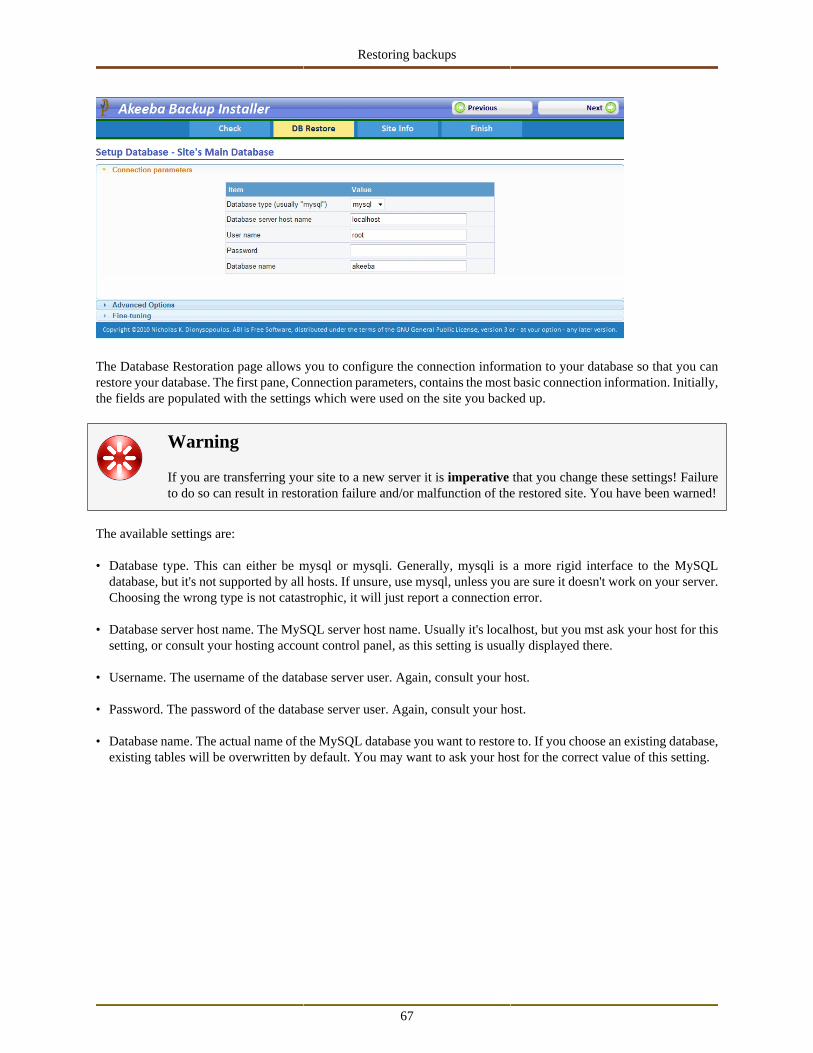
Restoring backups
67
The Database Restoration page allows you to configure the connection information to your database so that you canrestore your database. The first pane, Connection parameters, contains the most basic connection information. Initially,the fields are populated with the settings which were used on the site you backed up.
Warning
If you are transferring your site to a new server it is imperative that you change these settings! Failureto do so can result in restoration failure and/or malfunction of the restored site. You have been warned!
The available settings are:
• Database type. This can either be mysql or mysqli. Generally, mysqli is a more rigid interface to the MySQLdatabase, but it's not supported by all hosts. If unsure, use mysql, unless you are sure it doesn't work on your server.Choosing the wrong type is not catastrophic, it will just report a connection error.
• Database server host name. The MySQL server host name. Usually it's localhost, but you mst ask your host for thissetting, or consult your hosting account control panel, as this setting is usually displayed there.
• Username. The username of the database server user. Again, consult your host.
• Password. The password of the database server user. Again, consult your host.
• Database name. The actual name of the MySQL database you want to restore to. If you choose an existing database,existing tables will be overwritten by default. You may want to ask your host for the correct value of this setting.
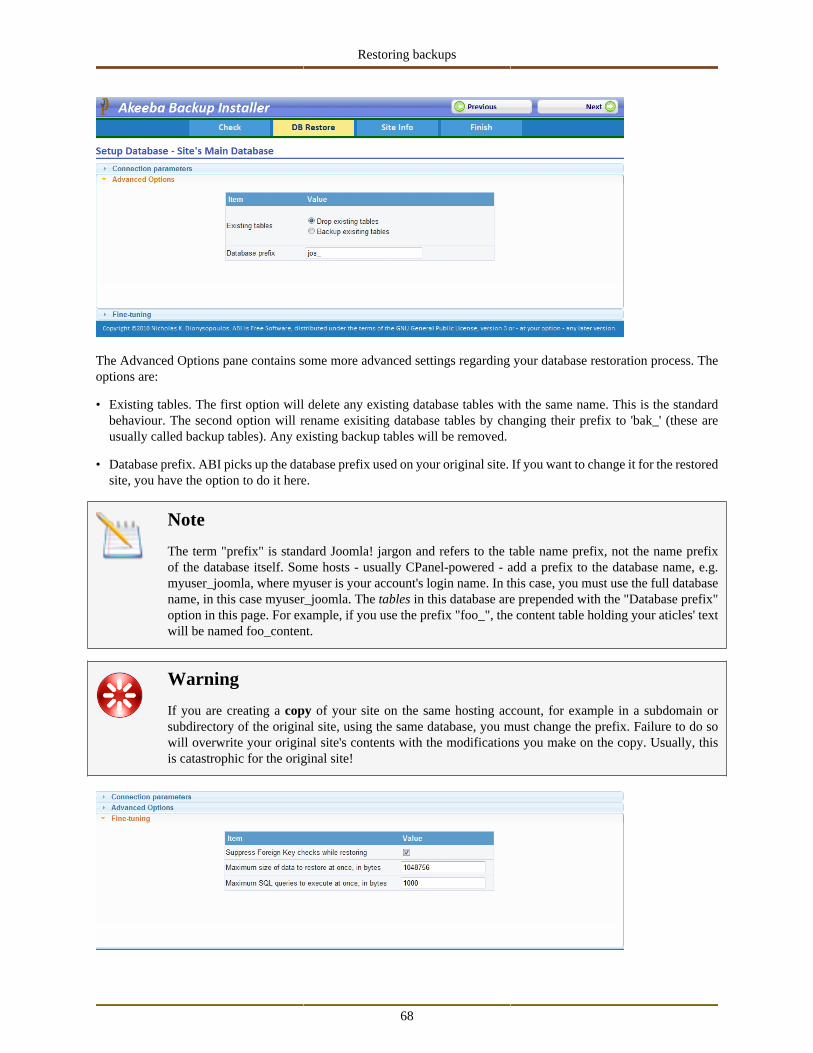
Restoring backups
68
The Advanced Options pane contains some more advanced settings regarding your database restoration process. Theoptions are:
• Existing tables. The first option will delete any existing database tables with the same name. This is the standardbehaviour. The second option will rename exisiting database tables by changing their prefix to 'bak_' (these areusually called backup tables). Any existing backup tables will be removed.
• Database prefix. ABI picks up the database prefix used on your original site. If you want to change it for the restoredsite, you have the option to do it here.
Note
The term "prefix" is standard Joomla! jargon and refers to the table name prefix, not the name prefixof the database itself. Some hosts - usually CPanel-powered - add a prefix to the database name, e.g.myuser_joomla, where myuser is your account's login name. In this case, you must use the full databasename, in this case myuser_joomla. The tables in this database are prepended with the "Database prefix"option in this page. For example, if you use the prefix "foo_", the content table holding your aticles' textwill be named foo_content.
Warning
If you are creating a copy of your site on the same hosting account, for example in a subdomain orsubdirectory of the original site, using the same database, you must change the prefix. Failure to do sowill overwrite your original site's contents with the modifications you make on the copy. Usually, thisis catastrophic for the original site!
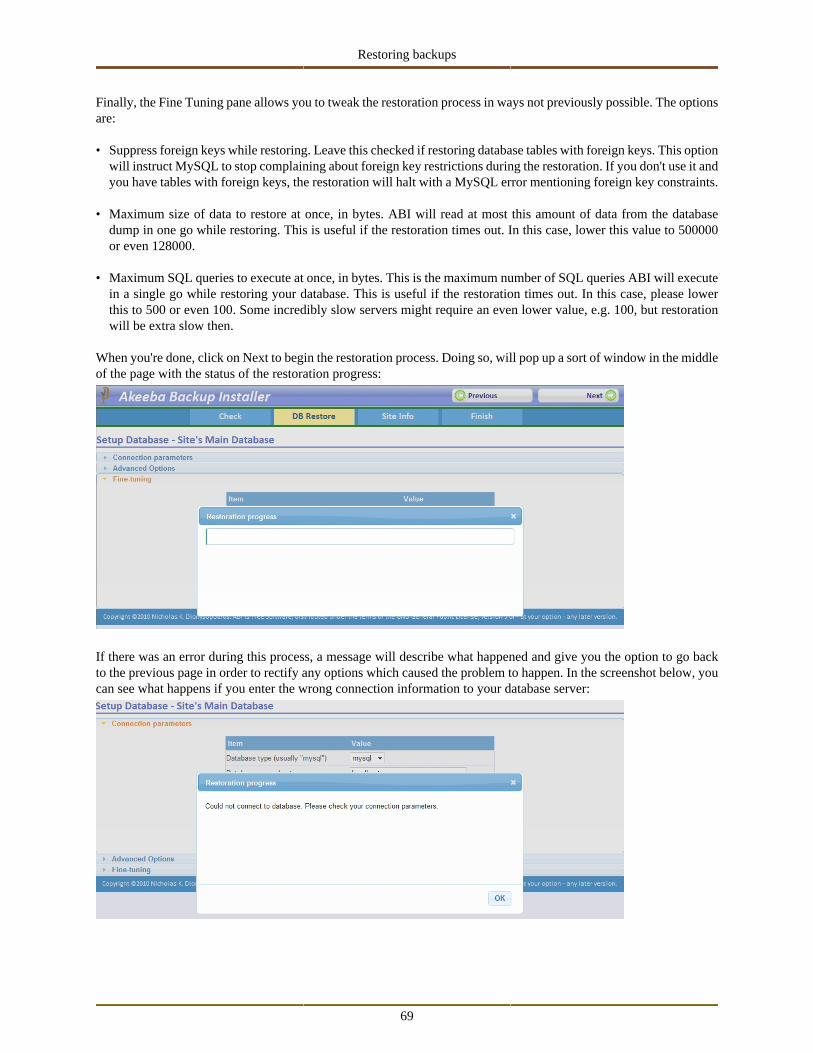
Restoring backups
69
Finally, the Fine Tuning pane allows you to tweak the restoration process in ways not previously possible. The optionsare:
• Suppress foreign keys while restoring. Leave this checked if restoring database tables with foreign keys. This optionwill instruct MySQL to stop complaining about foreign key restrictions during the restoration. If you don't use it andyou have tables with foreign keys, the restoration will halt with a MySQL error mentioning foreign key constraints.
• Maximum size of data to restore at once, in bytes. ABI will read at most this amount of data from the databasedump in one go while restoring. This is useful if the restoration times out. In this case, lower this value to 500000or even 128000.
• Maximum SQL queries to execute at once, in bytes. This is the maximum number of SQL queries ABI will executein a single go while restoring your database. This is useful if the restoration times out. In this case, please lowerthis to 500 or even 100. Some incredibly slow servers might require an even lower value, e.g. 100, but restorationwill be extra slow then.
When you're done, click on Next to begin the restoration process. Doing so, will pop up a sort of window in the middleof the page with the status of the restoration progress:
If there was an error during this process, a message will describe what happened and give you the option to go backto the previous page in order to rectify any options which caused the problem to happen. In the screenshot below, youcan see what happens if you enter the wrong connection information to your database server:
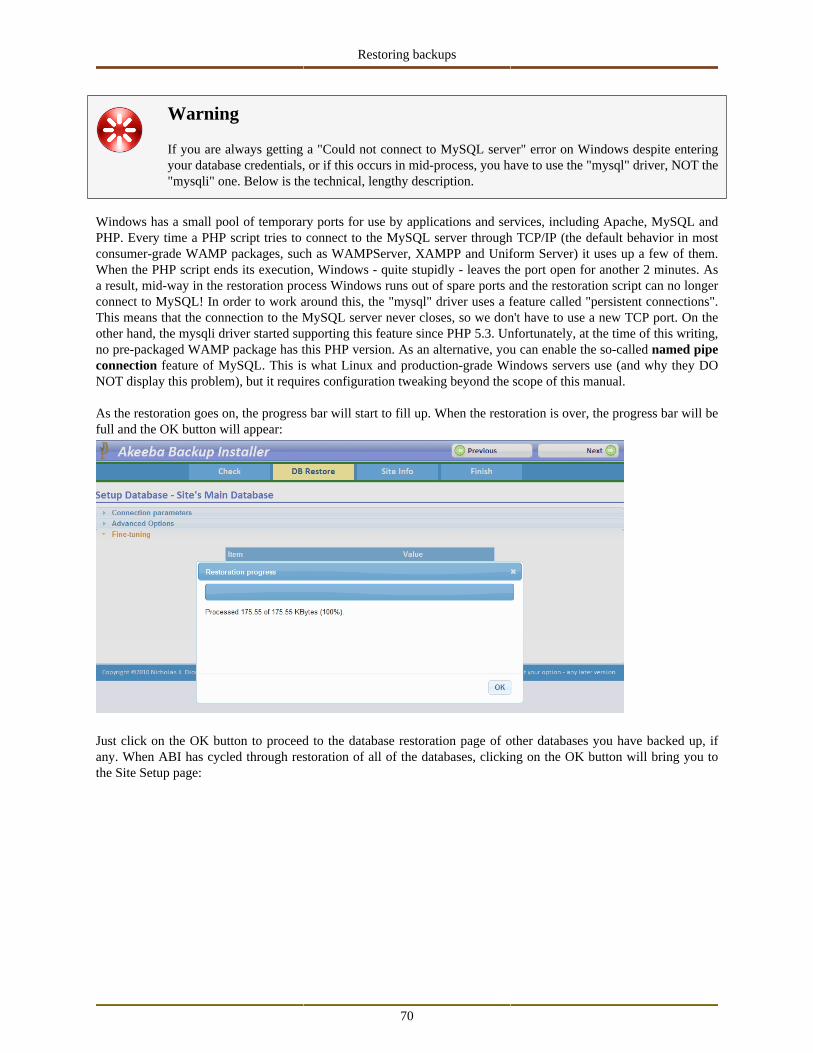
Restoring backups
70
Warning
If you are always getting a "Could not connect to MySQL server" error on Windows despite enteringyour database credentials, or if this occurs in mid-process, you have to use the "mysql" driver, NOT the"mysqli" one. Below is the technical, lengthy description.
Windows has a small pool of temporary ports for use by applications and services, including Apache, MySQL andPHP. Every time a PHP script tries to connect to the MySQL server through TCP/IP (the default behavior in mostconsumer-grade WAMP packages, such as WAMPServer, XAMPP and Uniform Server) it uses up a few of them.When the PHP script ends its execution, Windows - quite stupidly - leaves the port open for another 2 minutes. Asa result, mid-way in the restoration process Windows runs out of spare ports and the restoration script can no longerconnect to MySQL! In order to work around this, the "mysql" driver uses a feature called "persistent connections".This means that the connection to the MySQL server never closes, so we don't have to use a new TCP port. On theother hand, the mysqli driver started supporting this feature since PHP 5.3. Unfortunately, at the time of this writing,no pre-packaged WAMP package has this PHP version. As an alternative, you can enable the so-called named pipeconnection feature of MySQL. This is what Linux and production-grade Windows servers use (and why they DONOT display this problem), but it requires configuration tweaking beyond the scope of this manual.
As the restoration goes on, the progress bar will start to fill up. When the restoration is over, the progress bar will befull and the OK button will appear:
Just click on the OK button to proceed to the database restoration page of other databases you have backed up, ifany. When ABI has cycled through restoration of all of the databases, clicking on the OK button will bring you tothe Site Setup page:

Restoring backups
71
In the first pane, FTP Options, you are given the chance to set up your Joomla! site's FTP layer. The parameters youhave to setup are just like what Joomla! itself needs:
• Enable the FTP layer. Check this box to enable the FTP layer. If you leave it unchecked, providing the followingparameters will have no effect to your site's operation.
• Host name. The host name of the FTP server of your site. Usually it's something like ftp.example.com, but youmay want to ask your host.
• Port. The port where the FTP server listens to. Usually, this is port 21. If unsure either leave the default, or askyour host.
• Username. The username you use to login to the FTP server.
• Password. The password you use to login to the FTP server.
• Directory. The absolute FTP directory where your Joomla! installation is in. If you have provided all the informationabove, you may use the Auto find directory button to attempt to automatically determine this directory.
Note
This feature is not fail-safe. There is a high chance that ABI will not be able to automatically detectthe directory. In this case, you can use your favourite FTP client (we use FileZilla, which is free androcks) to browse to the root of your Joomla! installation and copy the absolute directory displayedthere to the Directory text box of ABI.
You can use the Test connection button to let ABI validate your settings.
The next pane is the Site Parameters pane:
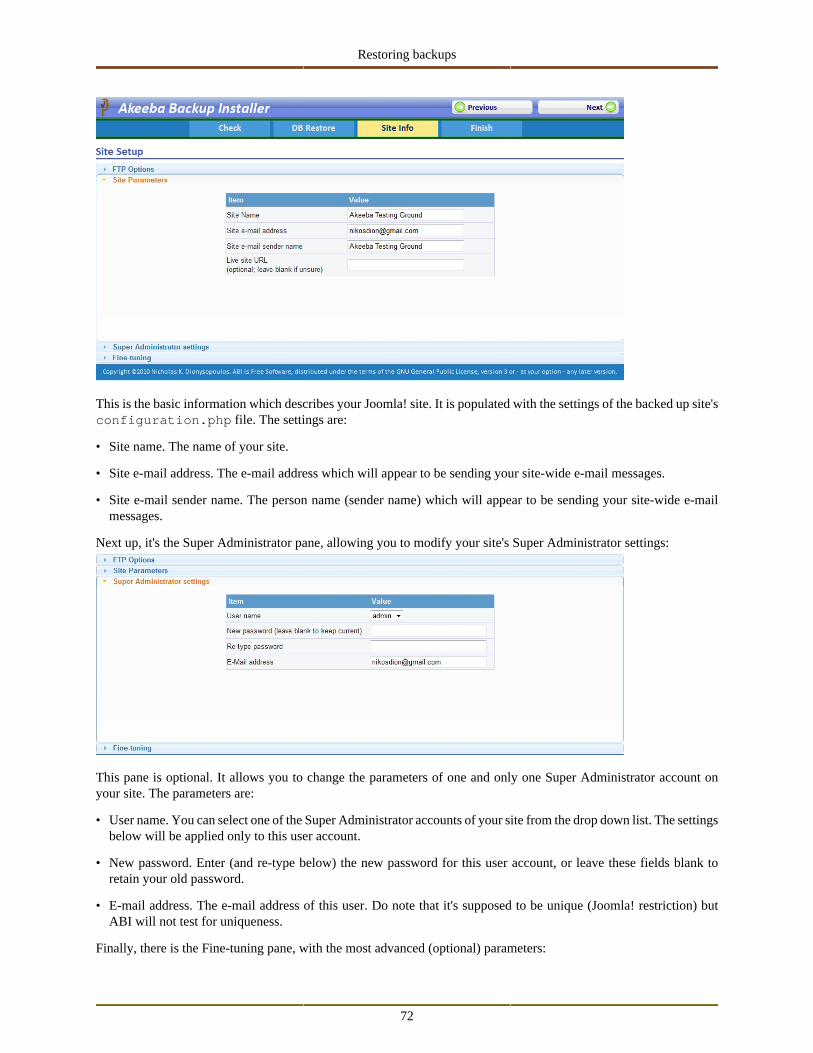
Restoring backups
72
This is the basic information which describes your Joomla! site. It is populated with the settings of the backed up site'sconfiguration.php file. The settings are:
• Site name. The name of your site.
• Site e-mail address. The e-mail address which will appear to be sending your site-wide e-mail messages.
• Site e-mail sender name. The person name (sender name) which will appear to be sending your site-wide e-mailmessages.
Next up, it's the Super Administrator pane, allowing you to modify your site's Super Administrator settings:
This pane is optional. It allows you to change the parameters of one and only one Super Administrator account onyour site. The parameters are:
• User name. You can select one of the Super Administrator accounts of your site from the drop down list. The settingsbelow will be applied only to this user account.
• New password. Enter (and re-type below) the new password for this user account, or leave these fields blank toretain your old password.
• E-mail address. The e-mail address of this user. Do note that it's supposed to be unique (Joomla! restriction) butABI will not test for uniqueness.
Finally, there is the Fine-tuning pane, with the most advanced (optional) parameters:
Restoring backups
73
Here you can fine-tune the absolute path to some of your site's system directories.
Important
ABI will test at the beginning of the restoration process if your old site's temporary and logs directoriesalready exist and are writable. In this case, it will keep them (useful if you have customized them and youare restoring to the same site you backed up from). If they don't, it'll calculate and provide the Joomla!default paths.
If you are restoring on the same server / user account as your original site, you must manually changethem, in order to avoid one site messing up with the other site. If you don't, nothing could happen, or allhell could break loose. Anyway, it's a good idea to inspect these settings nonetheless.
• Absolute path to site's root. This is automatically determined and you can't change it (Joomla! has no such feature).It is provided as reference only.
• Temporary Directory. The absolute path to the temporary directory. Normally, it's the tmp folder on your site's root.
• Logs Directory. The absolute path to the logs directory. Normally, it's the logs folder on your site's root.
When you're ready, click the Next button to have ABI write your configuration.php file and go to the final page.
If ABI could not write to the configuration.php file, it will present you with a dialog box informing you of this fact.
You can close the message by clicking on the "X" button on its top right corner. You can then copy the contents of thetext area and paste it into your configuration.php file - replacing any and all existing content - manually.
This is only required if your configuration.php file was not writable in the first place. Under most circumstances thiswon't happen.
Restoring backups
74
Warning
If you get this message and you do not copy the text box's contents to the configuration.php file, yoursite will not work. You have been warned! YOU MUST ABSOLUTELY AND WITHOUT QUESTIONCOPY THE TEXT BOX CONTENT INTO YOUR CONFIGURATION.PHP FILE.
After the restoration is over remember to remove the installation directory or, if you're using Kickstart, closethe ABI window and click the second "here" link in the Kickstart window. Or, you can click on the remove installa-tion directory link on this page to have ABI attempt to automatically remove the installation directory. If it'ssuccessful, it will present you with a dialog; as soon as you dismiss it you are redirected to your restored, operationalsite. That's all, folks!
Warning
If you are using Kickstart, do NOT click on the remove installation directory link. Doing so will interferewith the last of Kickstart and can result in a partially working site.
Important
Sometimes, after the restoration is over, you get a site front page which looks as if all images and CSSfiles are not loading. This is normal if your live site had a non-empty $live_site parameter in itsconfiguration.php file and you are restoring your backup to a different domain name or a differ-ent subdirectory of the original domain name, you have to manually edit configuration.php andchange the $live_site to reflect the new site's location.
For example, if the new site is located in http://www.example.com/mysite/, you have to editthe configuration.php file, locate the line starting with var $live_site and change it tobecome:
var $live_site = 'http://www.example.com/mysite';
3.2. Unorthodox: the emergency restoration procedure
Note
These instructions are meant to be first read before disaster strikes. Therefore, a fair amount of humourhas been used throughout. If you try to read it after disaster striked you will naturally find the humourousparts inappropriate, or even offensive. Rest assured that this is because you are under a huge amount ofstress. As soon as you'll have finished following the instructions herein, you will be able to re-read thisdocument with a light heart and enjoy the humorous puns as they were intended.
Inevitably, some people will end up with a backup file, a ruined site and a problem in the restoration procedure theycan't work out. Almost always, the recipe includes a pressing deadline which requires that the site is on-line... yesterday.If you are in a situation like the one we just described, breathe. Do not panic. We've got you covered, with this concisemanual site restoration guide. So, here it goes... it's manual Joomla! Site restoration In 7 steps or even less.
Step 1. Making sure it won't get worse.
Assuming such a situation, it's only human to be in panic and despair. Panic is a bad counsellor. It will give you wrongadvice. Despair will only make you careless. So, people, get it together! Make a backup of the only thing separating
Restoring backups
75
you from complete disaster: the backup file. Burn it on a CD. Write it on your USB key. Put it on a couple of locationson your file server. Just make sure you'll have an extra copy in case you screw up.
This exercise has been proven to lower the probability of anything going wrong. Furthermore, it's good for yourpsychology. It gives you a sense of security you didn't have five minutes ago.
Step 2. Extracting the archive.
Now, we have to extract the archive somewhere on your local hard drive.
If the archive is of the JPA type, you'll have to use the JoomlaPack UnJPA command line utility from the JPA utilities(jpa_utils) package.
If you have a ZIP package, there are a couple of gotchas. If you are working on a Linux machine, unzip will workjust fine. If you're on Windows and under certain configuration circumstances on the server you took the backup on,you might not be able to extract it with WinZIP, WinRAR, 7-Zip or other archiver software. So you'll have to useAkeeba eXtract Wizard available for free from our website. This is a GUI utility which allows direct extraction ofbackup archives on your Windows™ PC. It is possible to run it under other operating systems, such as Mac OS X™and Linux™, using DarWINE and WINE respectively. Please refer to the Akeeba eXtract Wizard documentation,available on-line on our site, for more information on using it.
Step 3. Editing your database backup.
Take a look at the directory where you extracted your backup archive. Inside it there is a directory named instal-lation. Inside this, there is a subdirectory named sql. Inside this there is a file, joomla.sql, containing yourdatabase data. COPY THIS TO ANOTHER LOCATION NOW! We'll have to edit it, so please, don't tamper with theoriginal, will you?
Open the copy of joomla.sql. Use a text editor (we recommend gedit and Kate on Linux™, Notepad++ on Win-dows™; do not use Wordpad or Word!). If you were ever familiar with SQL, you'll recognize that each line consistsof a single SQL command. But they have a problem: table names are mangled. You'll see that tables are in a formsimilar to #__banner instead of jos_banner. Ah, nice! We'll have to fix that.
Using your text editors Replace command, do the following changes:
• search for CREATE TABLE `#__ replace with CREATE TABLE `jos_
• search for DROP TABLE IF EXISTS `#__ replace with DROP TABLE IF EXISTS `jos_
• search for INSERT INTO `#__ replace with INSERT INTO `jos_
• search for CREATE VIEW `#__ replace with CREATE VIEW `jos_
• search for CREATE PROCEDURE `#__ replace with CREATE PROCEDURE `jos_
• search for CREATE FUNCTION `#__ replace with CREATE FUNCTION `jos_
• search for CREATE TRIGGER `#__ replace with CREATE TRIGGER `jos_
The idea is to replace all instances of #__ (note that there are two underscores after the hash sign) with jos_ in theMySQL command part (not the data part). Easy, wasn't it? NOW SAVE THAT FILE!
Step 4. Restoring the database.
In order to restore the database on the server you'll have to use some appropriate tool. For small to moderately sizeddatabase dumps (up to 2Mb), we find that phpMyAdmin [http://www.phpmyadmin.net] does the trick pretty well,plus it's installed on virtually all PHP enabled commercial hosts. For larger dumps, we found that bigdump.php from
Restoring backups
76
Alexey Ozerov [http://www.ozerov.de/bigdump.php] works wonders. Use either of those tools - or any other of yourliking - to restore your database.
If the restoration gets stuck with SQL errors on some CREATE TABLE command, it seems that you are restoring toa server with an older MySQL version than the one you took the backup from. In this case, if you have still access tothe original site, you can perform a new JoomlaPack backup with the database compatibility mode set to MySQL 4and start over. You did read the User Guide section on configuration options, right?
If you don't have access to the original site... Oh, this is gonna be such a long night. In a nutshell, you have twooptions: a) Edit all of the CREATE TABLE commands, eliminating everything between the last parenthesis and thesemi-colon of each command. b) Set up a MySQL 5 enabled local server (for example, XAMPP, WAMP, LAMPP,MAMP, depending on your operating system), restore the site in there, take a backup with the database compatibilitymode set to MySQL 4 and start over.
Step 5. Upload your site's files.
First of all, delete the installation subdirectory from the directory you extracted the backup archive to. We won't beneeding this any more. Then, using FTP - or any method you please - upload all of the files to the target server.
If you want to be thorough remember to set the directory and file permissions accordingly. If you just want to get thedamn thing on-line ASAP, just skip this permissions thing; it will remind you of itself as soon as you try to do somewebsite administration (like uploading a picture) after the site's back on-line.
Step 6. Edit configuration.php, if necessary.
If you were restoring to the same server location you took the backup on, nothing else is necessary. Your site shouldbe back on-line now. If not, you'll have to edit the configuration.php.
You have Joomla! 1.5.x. Good news! Joomla! 1.5.x doesn't require you to specify some of the hard-to-obtain param-eters. Your configuration.php consists of several lines. Each one is in the following form:
var $key = "value";
The key is the name of the configuration variable and value (inside double quotes!) is the value of the variable. Belowwe provide a list of the configuration variables which have to be modified to get up on-line.
dbtype is the database driver Joomla! will use. It can be either mysql or mysqli (notice the extra i in the end).If unsure, your best bet is mysql.
host is the database host name, usually localhost
user is the database user name, assigned from your host company
password is - obviously - the database password, assigned from your host company
db is the database's name, assigned from your host company
dbprefix is the database prefix; if you followed our instructions, it is jos_
live_site Normally this is an empty string. If, however, your Joomla! site's front page looks as if all images andCSS files are not loading, you have to modify it and enter your site's base URL. For example, if thenew site is located in http://www.example.com/mysite/, you have to locate the line startingwith var $live_site and change it to become:
var $live_site = "http://www.example.com/mysite";
That's all! You're good to go.
Restoring backups
77
Step 7. Enjoy success.
Your mission is accomplished. You are exhausted. Go drink whatever is your favourite drink and enjoy sweet success!
4. Finalizing the restoration processThis is a trivial part, either method you use to restore your site, so we'll just cover this in a couple of paragraphs.
If you are using Kickstart, as soon as ABI is done and presents its final page, simply close ABI's tab or window. Backto Kickstart's tab, click on the second "here" link. That's all there is to it. You now have a working site and you shouldnot read the rest of this section as it doesn't apply to you.
If you are not using Kickstart, or if Kickstart failed to perform the last step, you have to do two simple actions withyour facorite FTP client. The first is to remove the installation directory. The reason is very simple. As long asJoomla! detects the existence of this directory on your site, trying to access your site will redirect you to ABI's firstpage. Just remove it with the FTP client to enable access to your site.
If your site originally had a .htaccess file, it is renamed to htaccess.bak in a previous step, either automaticallyby Kickstart or manually. Rename this file to .htaccess (note the dot in front). You are now ready to access yoursite.
What happens if I get a blank page or an HTTP error500?
"Help! Accessing my site downloads PHP code or theindex.php file instead of displaying the front page!"This most probably means that your .htaccess file contains directives which your web server doesn't understand.We'll try to work around this issues.
The first thing you have to check if your server has mod_rewrite enabled. On most commercial hosts using theApache or Lighttpd web server software it is already enabled and shouldn't cause any problem. If in doubt, ask yourhost. On local servers, it's another story. For example, on WAMPserver it is not enabled by default, so you have toclick on its tray icon, go to Apache, Modules and make sure that mod_rewrite is ticked; if not, click on it to enableit. Other server packages require you to edit the httpd.conf or run other system commands. Please consult your serverpackage's documentation for more information on enabling mod_rewrite.
The other thing which might interfere is directives enabling PHP 5 on one host, but causing a conflict on another host,or on a local server. Usually they have a format like this:
AddHandler application/x-httpd-php5 .php
You most probably have to remove those lines beginning with AddHandler, especially if your problem is that you get abunch of code, or the web browser offers to download index.php, instead of your site's front page. You most certainlyhave to remove such lines if you are restoring on a local server.
You should also try commenting out lines which look suspicious to you, because any of those directives may causetrouble. If in doubt, get a fresh Joomla! package, extract the htaccess.txt file from it, rename it to .htaccessand upload it to your host.
Finally, you should note that some servers do not accept .htaccess. Putting such a file on your site's root will makethe server throw an HTTP Error 500: Internal Server Error as soon as you try to access your server. If this happens,you need to have a little chat with your host.
Restoring backups
78
As a side note, we might also add that some third party components, such as DOCman 1.4.x and VirtueMart 1.x, storeabsolute paths in their configuration files. If you restored to a different location / server than the one you originallyhad the site you backed up, trying to access your new web site's public front-end might result in blank pages or HTTPError 500. You will have to edit the configuration of those components and ensure that you have changed the pathsto reflect the correct paths on your new server / location.
My original site loads instead of the restored site
The front-page displays, but clicking on any link throwsa 404 error?!There are two possibilities here. The first is that you have redirections in your .htaccess file, for example direct-ing all traffic to the www prefixed site or to a specific domain, e.g. all traffic to www.example.com, even if it refer-enced example.com or example.net in the URL. Such problems are easy to spot because you have put this code in the.htaccess file and you should know about what it does. Just remove it or comment it out.
Another possibility is that you have to set or change the $live_site parameter in your site'sconfiguration.php. Normally, Joomla!™ is able to determine the absolute URL to your site's root withoutyour help. However, it looks like that some servers lie, most notably Microsoft™ IIS™, so we have to help our fa-vorite CMS with that. You had the chance to set this URL during the restoration, but it's never too late. Just edit theconfiguration.php file on your site's root with a plain text editor, e.g. Notepad++ or Kate, and find the linewhich starts with var $live_site. Change the rightmost part (the one between single quotes) to your site's URL,without a trailing slash. For example http://www.example.com - see? No trailing slash!
Finally, on some hosts it's required to change or enable the RewriteBase parameter in your .htaccess file. Mostoften than not it's enough to edit the file and find the line beginning with RewriteBase. If there is a hash in front,remove it. Change this line so that it reads:
RewriteBase /
or, if you restored in a subdirectory named myjoomla:
RewriteBase /myjoomla
Whenever I update something in the restored site, theoriginal site's content changes!The problem is that you didn't read the part of the manual regarding the restoration. As it is written in there, duringthe restoration you are presented with your database connection information. By default, ABI displays the parameterspertaining to your original (old, backed up) web site. However, you are restoring to a new server, or a subdomain inthe same server. How can it ever be possible that you use exactly the same database information? It can't, becauseJoomla!™ stores all of the site's content (except media files) in the database. As a result you'll have to restore the siteagain, this time after reading the part on using the Akeeba Backup Installer. I'm sorry, there is no easier workaroundto this problem.
79
Chapter 5. Step by step guidesEven though the previous chapters provide a good reference, they assume that you know what you're doing. Manytimes, especially when you are a novice user, just the number of options can be intimidating. We are perfectly aware ofthat, hence this section. It is designed to get you up to speed with performing complex operations or creating advancedsetups for your backup operation needs. It is not meant to be a thorough reference; if you have questions about how eachof the individual settings work, you should refer to the appropriate section of the other chapters in this User's Guide.
1. Backing up your site to a cloud storage ser-vice
1.1. IntroductionFor most of us, our websites are a key element to our business. Either being the business itself, or acting as the storefrontto the Internet, they provide a significant added value. The last thing any web site owner want is to see their site defaced,damaged or even lost. Dangers lurk everywhere. From a simple human error in site administration to malicious activityand from hardware failure to natural disasters, no web server is the bulletproof vault we’d like it to be.
While nobody expects a catastrophe to hit his site, a good deal of precaution is required. It’s pretty much the samerationale as in wearing a seatbelt while driving; you don’t expect to crash, but if you do you most certainly want toevade the incident unharmed. The web site equivalent to a safety belt is none other than backup.
Web site backup comes with its own set of limitations and pitfalls. If you trust your web host for backup you mightfind your expectations fall short. Most hosts take daily backups – if any at all –on a secondary hard disk on the sameserver or, even worse, on a secondary partition of the same hard disk. If the server goes down due to a hardware fault,so does your backup. A few enlightened hosts also take backups on remote storage, for example NAS arrays. Eventhey do so on rather sparse intervals, for example twice per week. This means that on a complete catastrophe you willmost assuredly lose a fair amount of data.
The solution is simple in concept. Take your own backups and store them on a cloud storage service, like Amazon S3or even DropBox. Taking your own backups means that you get to decide which data and how often has to be backedup, making sure that the crucial, regularly updated information routinely ends up in a backup archive. Using a cloudstorage device adds a strong data safety clause to your procedure, while keeping costs low. Cloud storage is designedto be redundant and reliable, boasting a negligible risk of data corruption or data loss. Combined with its incrediblylow cost (or even no cost for very low storage requirements!), it is reasonably attractive to businesses of all sizes: fromhobbyists and sole proprietorships up to large corporations and government agencies.
But how can you implement this seemingly utopist data protection scheme on your Joomla!™ site today, with thelowest possible cost? Enter Akeeba Backup Professional. The Professional edition sports significant features addedon top of those offered to our free of charge Akeeba Backup Core edition (formerly known as JoomlaPack). One ofthose features we are going to use to accomplish our objective: transferring backup archives to cloud storage.
This section describes how to set up your site to store its backup archives to either Amazon S3 or DropBox. Morecloud storage providers will be added in the future. The setup always follows the same principle, no matter whichcloud storage you want to use. Read along and you'll pick up the idea really fast.
1.2. Basic configurationThe most essential step is to download and install the Akeeba Backup Professional component to your site. In order todo that, you’ll have to subscribe to the Professional download service first. After that, simply follow the step-by-stepinstallation instructions. You can try to take your first, non-cloud backup to make sure that everything’s in working
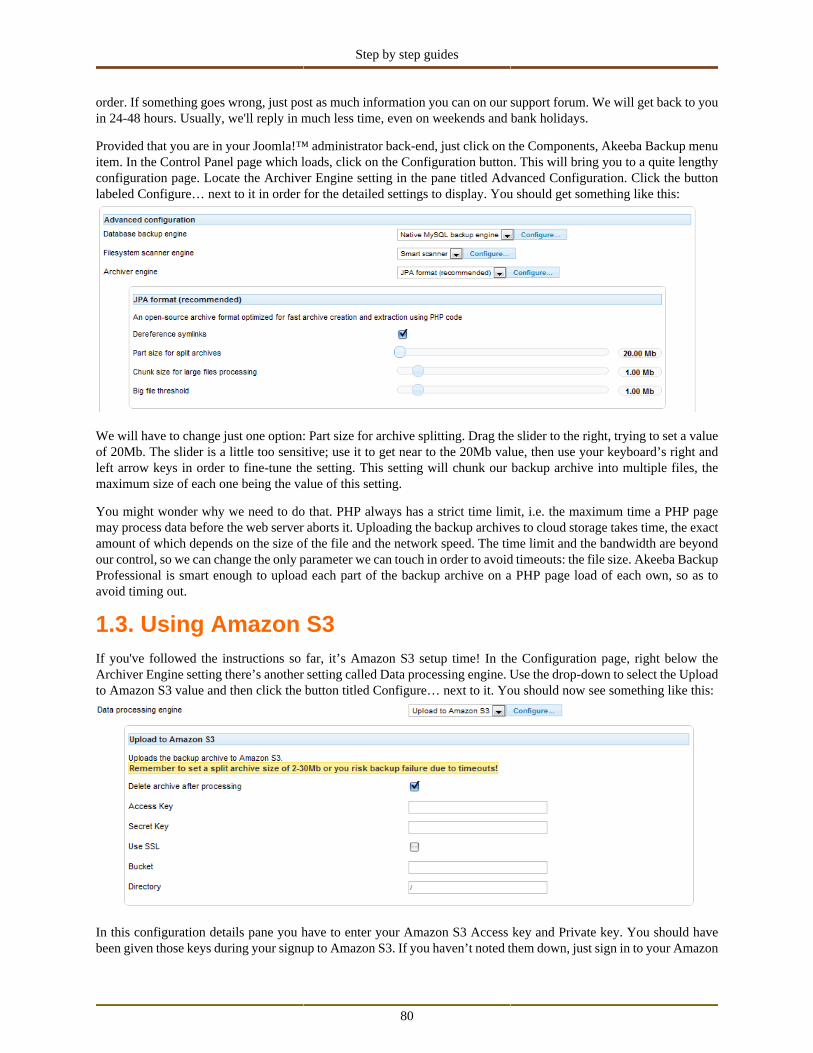
Step by step guides
80
order. If something goes wrong, just post as much information you can on our support forum. We will get back to youin 24-48 hours. Usually, we'll reply in much less time, even on weekends and bank holidays.
Provided that you are in your Joomla!™ administrator back-end, just click on the Components, Akeeba Backup menuitem. In the Control Panel page which loads, click on the Configuration button. This will bring you to a quite lengthyconfiguration page. Locate the Archiver Engine setting in the pane titled Advanced Configuration. Click the buttonlabeled Configure… next to it in order for the detailed settings to display. You should get something like this:
We will have to change just one option: Part size for archive splitting. Drag the slider to the right, trying to set a valueof 20Mb. The slider is a little too sensitive; use it to get near to the 20Mb value, then use your keyboard’s right andleft arrow keys in order to fine-tune the setting. This setting will chunk our backup archive into multiple files, themaximum size of each one being the value of this setting.
You might wonder why we need to do that. PHP always has a strict time limit, i.e. the maximum time a PHP pagemay process data before the web server aborts it. Uploading the backup archives to cloud storage takes time, the exactamount of which depends on the size of the file and the network speed. The time limit and the bandwidth are beyondour control, so we can change the only parameter we can touch in order to avoid timeouts: the file size. Akeeba BackupProfessional is smart enough to upload each part of the backup archive on a PHP page load of each own, so as toavoid timing out.
1.3. Using Amazon S3If you've followed the instructions so far, it’s Amazon S3 setup time! In the Configuration page, right below theArchiver Engine setting there’s another setting called Data processing engine. Use the drop-down to select the Uploadto Amazon S3 value and then click the button titled Configure… next to it. You should now see something like this:
In this configuration details pane you have to enter your Amazon S3 Access key and Private key. You should havebeen given those keys during your signup to Amazon S3. If you haven’t noted them down, just sign in to your Amazon
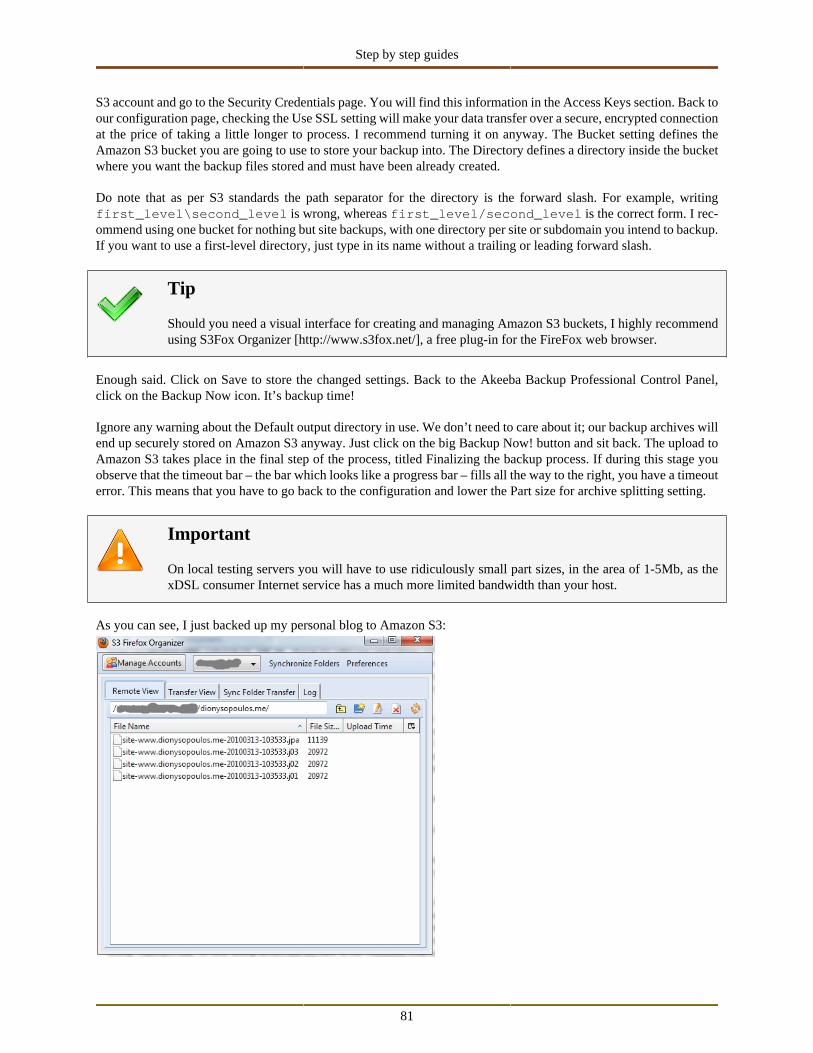
Step by step guides
81
S3 account and go to the Security Credentials page. You will find this information in the Access Keys section. Back toour configuration page, checking the Use SSL setting will make your data transfer over a secure, encrypted connectionat the price of taking a little longer to process. I recommend turning it on anyway. The Bucket setting defines theAmazon S3 bucket you are going to use to store your backup into. The Directory defines a directory inside the bucketwhere you want the backup files stored and must have been already created.
Do note that as per S3 standards the path separator for the directory is the forward slash. For example, writingfirst_level\second_level is wrong, whereas first_level/second_level is the correct form. I rec-ommend using one bucket for nothing but site backups, with one directory per site or subdomain you intend to backup.If you want to use a first-level directory, just type in its name without a trailing or leading forward slash.
Tip
Should you need a visual interface for creating and managing Amazon S3 buckets, I highly recommendusing S3Fox Organizer [http://www.s3fox.net/], a free plug-in for the FireFox web browser.
Enough said. Click on Save to store the changed settings. Back to the Akeeba Backup Professional Control Panel,click on the Backup Now icon. It’s backup time!
Ignore any warning about the Default output directory in use. We don’t need to care about it; our backup archives willend up securely stored on Amazon S3 anyway. Just click on the big Backup Now! button and sit back. The upload toAmazon S3 takes place in the final step of the process, titled Finalizing the backup process. If during this stage youobserve that the timeout bar – the bar which looks like a progress bar – fills all the way to the right, you have a timeouterror. This means that you have to go back to the configuration and lower the Part size for archive splitting setting.
Important
On local testing servers you will have to use ridiculously small part sizes, in the area of 1-5Mb, as thexDSL consumer Internet service has a much more limited bandwidth than your host.
As you can see, I just backed up my personal blog to Amazon S3:
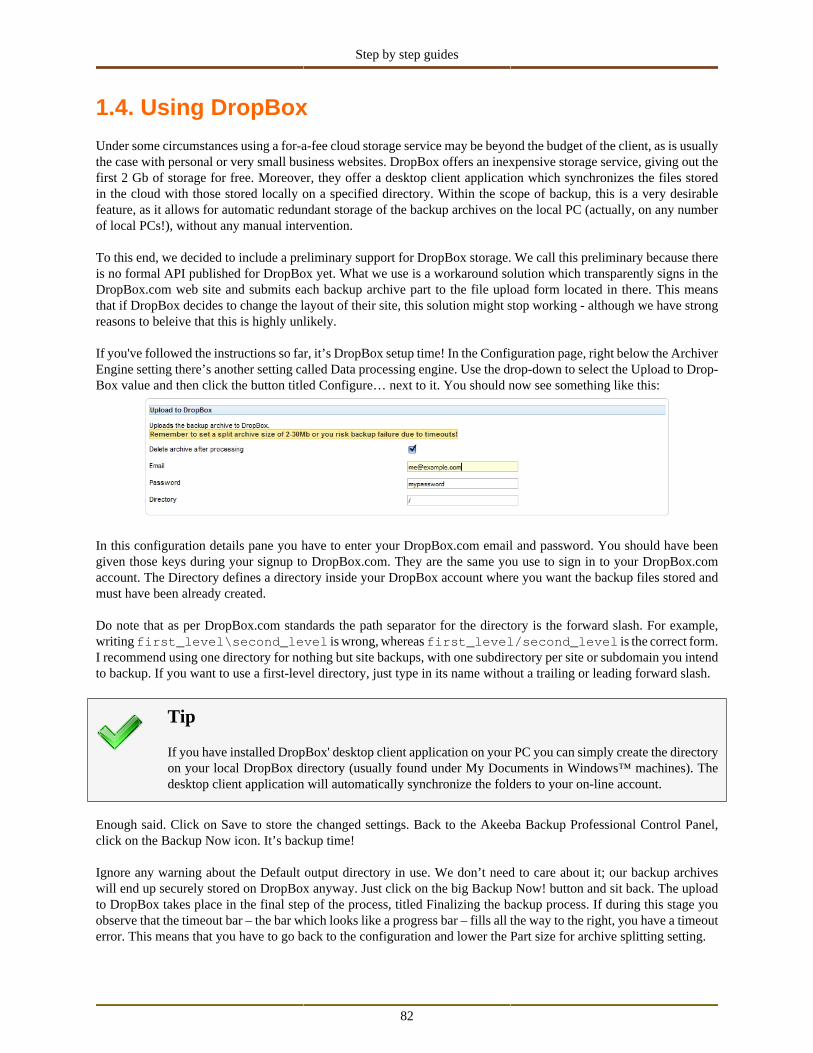
Step by step guides
82
1.4. Using DropBox
Under some circumstances using a for-a-fee cloud storage service may be beyond the budget of the client, as is usuallythe case with personal or very small business websites. DropBox offers an inexpensive storage service, giving out thefirst 2 Gb of storage for free. Moreover, they offer a desktop client application which synchronizes the files storedin the cloud with those stored locally on a specified directory. Within the scope of backup, this is a very desirablefeature, as it allows for automatic redundant storage of the backup archives on the local PC (actually, on any numberof local PCs!), without any manual intervention.
To this end, we decided to include a preliminary support for DropBox storage. We call this preliminary because thereis no formal API published for DropBox yet. What we use is a workaround solution which transparently signs in theDropBox.com web site and submits each backup archive part to the file upload form located in there. This meansthat if DropBox decides to change the layout of their site, this solution might stop working - although we have strongreasons to beleive that this is highly unlikely.
If you've followed the instructions so far, it’s DropBox setup time! In the Configuration page, right below the ArchiverEngine setting there’s another setting called Data processing engine. Use the drop-down to select the Upload to Drop-Box value and then click the button titled Configure… next to it. You should now see something like this:
In this configuration details pane you have to enter your DropBox.com email and password. You should have beengiven those keys during your signup to DropBox.com. They are the same you use to sign in to your DropBox.comaccount. The Directory defines a directory inside your DropBox account where you want the backup files stored andmust have been already created.
Do note that as per DropBox.com standards the path separator for the directory is the forward slash. For example,writing first_level\second_level is wrong, whereas first_level/second_level is the correct form.I recommend using one directory for nothing but site backups, with one subdirectory per site or subdomain you intendto backup. If you want to use a first-level directory, just type in its name without a trailing or leading forward slash.
Tip
If you have installed DropBox' desktop client application on your PC you can simply create the directoryon your local DropBox directory (usually found under My Documents in Windows™ machines). Thedesktop client application will automatically synchronize the folders to your on-line account.
Enough said. Click on Save to store the changed settings. Back to the Akeeba Backup Professional Control Panel,click on the Backup Now icon. It’s backup time!
Ignore any warning about the Default output directory in use. We don’t need to care about it; our backup archiveswill end up securely stored on DropBox anyway. Just click on the big Backup Now! button and sit back. The uploadto DropBox takes place in the final step of the process, titled Finalizing the backup process. If during this stage youobserve that the timeout bar – the bar which looks like a progress bar – fills all the way to the right, you have a timeouterror. This means that you have to go back to the configuration and lower the Part size for archive splitting setting.
Step by step guides
83
Important
On local testing servers you will have to use ridiculously small part sizes, in the area of 1-5Mb, as thexDSL consumer Internet service has a much more limited bandwidth than your host.
1.5. Where to go from here?Backing up your site to the cloud is the first step to backup autonomy and data safety. However, you still have to loginto your site’s back-end to take a cloud backup. This is suboptimal. What about when you are on the road for days,without reliable Internet connection? What about not wanting to go through this daily drill?
I am 100% behind you on this. I don’t like routine either. You know, programmers are lazy and get bored easily.
With Akeeba Backup Professional you have three (that’s not a typo, three) different options to automate your backup!Two of them are designed to utilize your host’s CRON scheduling, i.e. your host’s ability to run specific commandson his server, on a predefined schedule. This would mean that your backup is fully automated; you sleep at night, yoursite backs up itself. However, not all hosts support this method, especially the low end ones. For these cases, we havemade Akeeba Remote Control, a desktop application which makes backing up your site a single click procedure; orzero-click, if you use its built-in scheduling function.
You can read more about Akeeba Backup’s scheduling options in the Automating your backup section of this User’sGuide.
Overall, the Amazon S3 upload was our first, successful experiment in adding affordable, enterprise-grade qualities tofull a site backup solution. Even though that’s years ahead of the competition, we do not settle with it. Akeeba Backuphas always been in very active development. Our desire to push the envelope is a core ingredient of the philosophybehind the software. As a result, S3 - and DropBox - was just the beginning. Our roadmap includes support for severaloptions of taking the backup off your server. We will try to integrate practically all major storage facilities, as long asthey have a publicized integration API. If you have a specific need not covered by our base software, just contact us.We listen carefully to the community feedback and we make the impossible happen. All that for a very low subscriptionfee to the Professional downloads service.

Part II. Security information

85
Chapter 6. Introduction1. ForewordSince you have chosen Akeeba Backup for backing your site up, it is obvious that you are using Joomla!™ as yourweb-based Content Management System. By using Joomla!™ you have embarked to the joyful adventure of managinga PHP powered website. Usually, this last part is gone unnoticed. The fact that you are using a PHP application isoften taken for granted, but when it comes down to security and problem solving, this is the key concept of whichyou should have a strong grasp.
This part of the documentation deals with the basic concepts of PHP website management and their implications uponusing Akeeba Backup. In this part, we will see the intricacies of access permissions, web site users and the impactof various PHP settings on your site's operability and security. This is not meant to be a concise manual on websiteadministration. There are plenty of web and off-line resources with more in-depth information on the subject, but thisintroduction will quickly get you up to speed.
This document is no light reading; it is purposely sprinkled with a lot of tech-talk, albeit explained in layman's terms.Our objective was not to write a document which can be read and understood in a single reading. Some things youwill understand by the first time you'll have read it. Most of it you will only get it after reading it again. A few shadyareas will only become clear reading over again and referring to it every time you get stuck managing your site.
2. Why you need to care about ownership andpermissions?Most probably your server is running on Linux™, or another UNIX™-derivative operating system. You might haveread, or heard, how these operating systems are safer and more secure than others. This is just half the story. The realsecurity power of such operating systems stems from the way they manage files and directories, allowing or disablingaccess to them depending on who asks for it and what he's trying to do.
This management is pretty much like electricity in the Western world. It never gets in your way and you don't thinkabout it, but you must have some basic understanding of it so as not to run the risk of getting toasted by it. That'show it goes with ownership and permissions. You might not think about them a lot, but potentials crackers do. If youdon't manage permissions wisely, you might be creating a security hole on your server which can be exploited by amalicious cracker. Nobody wants his site cracked, right?
The following chapter will analyze how your web server works under the hood, so that you can grasp the third chapter,which analyzes all the ways you can secure your backup files so as not to fall prey on a cracker.
86
Chapter 7. How your web server works
1. Users and groupsThe concept of users is the fundamental block of ownership separation on multiuser operating systems. All Windows™versions based on the NT kernel are such; Windows™ NT, 2000, XP, Vista are all multiuser operating systems. OtherUNIX variants are also inherently multiuser, including Linux™ , BSD™ flavours, MacOSX™ , etc. Since most webservers capable of running Joomla!™ are based on Linux™ , we will talk about the Linux™ user system, which isin fact the same as the UNIX user system; after all, GNU/Linux is nothing but an open-source UNIX variant whichbecame very popular among geeks and recently among other people, too.
1.1. UsersAs we mentioned, the fundamental block of ownership separation is a user . Each user has an entry in the system'spassword database and consists of a user name and a numeric user ID . A user is not necessarily linked to a physicalperson; in fact, most utilities and services create and operate under a user of their own.
The numeric user ID is an unsigned integer, therefore it can take a value between 0 and 65534. The user name andthe numeric user ID are usually linked with an one to one relationship, meaning that if you know either one you canfind the other one. The exception to this is most ISPs. In this case, because there are more users than the availablenumber of user IDs, some numeric IDs will be reused, breaking the one to one relationship. However, on most - ifnot all - hosts, the one to one relationship exists.
Some user IDs are special. By convention, user IDs below 500 are reserved for system users. These are special userswhich are not assigned to some physical person. One of them, zero (0), has a very special meaning; it is assigned tothe super user , commonly called root . This user is the God of the system. He has unlimited powers. He can overrideall access restrictions and make any kind of modification. For this reason, no sane system administrator logs in underthat user. They will always log in under a normal user and only temporarily log in as root whenever they need tochange system-wide settings.
1.2. GroupsDefining permissions per user is tiresome on systems which have more than a few users. In order to combat this incon-venience, all UNIX systems have the notion of groups . A group is nothing but a collection of users. The relationshipto users is a many-to-many relationship, meaning that one user can belong to many groups and one group can containmany users. To keep things dead simple, groups have the same format as users. Each group has a group name and anumeric group ID . Again, not all groups are linked to a physical person; in fact there are a number of de facto groupnames used to control access to crucial system resources.
The numeric group ID is an unsigned integer, therefore it can take a value between 0 and 65534. The group name andgroup ID are linked with an one to one relationship, meaning that if you know either one you can find the other one.I am not aware of exceptions to this rule and I can't think a reason, either.
There are some special group ID's. By convention, zero (0), is assigned to the root's group. Its sole member should beroot, or other users with a user ID of 0. It empowers its members to do anything they please on the system, almost likethe user ID 0 does. Noticed the "almost" part? Belonging to the root group alone, without having a user ID of 0, doesnot give you infinite powers but it does grant you very broad access indeed!
Every user can belong to many different groups. To simplify things a little bit, every user has a so-called default group.This means that one of the groups he is a member of will be his effective group, unless otherwise specified, in alloperations.
How your web server works
87
1.3. How users and groups are understood by UNIX-de-rived systemsThis section is a bit ahead of the rest of this chapter, I know that. The information contained here, though, clarify a lotof what will follow, so it seemed only appropriate to include it here.
Every time the system has to store the owning user and group of a system item, it does so by storing the numeric userand group IDs, not the names! The names are only used as a convenience; you can't remember that John's user ID is637, but it's easy to remember that his user name is john. Likewise, remembering that group ID 22 controls access tothe CD-ROM drive is improbable, while remembering that the group named cdrom does that is self-understood.
Important
User IDs for a user with the same user name on different systems can be different. A user named exampleon system A and system B might have one user ID on system A and a completely different on system B.However, all UNIX-derived systems really know about are IDs, not names!
This is very (read: extremely) important when you transfer files from one system to another. All archive types whichstore owner information (for example GNU tar ) store nothing but the numeric ID's. Moving these to another systemand extracting them will screw up ownership and permissions. Just because you have the user ID 567 on Host A doesn'tmean that you won't end up with user ID 678 on Host B; extracting such an archive would make all your files ownedby someone else, effectively screwing up your site.
2. OwnershipThe term ownership implies that system items belong to someone. In the context of web site management the itemswe are interested in are files and processes . Everybody understands what files are, but the term processes is rarelyunderstood amongst webmasters. So, let's explain it.
2.1. Process ownershipEvery time you run a program, be it interactive or a system service, you create a process. A process is a piece ofcode being executed by the operating system. A process can spawn child processes which can spawn new threads .In layman's terms, a program can start other instances of itself or another program and they, in turn, can start smallpieces of executable code which can run in parallel with the main program.
Programs do not start spontaneously. Someone has either got to start them, or instruct the system to start them whensome criteria are met. This sentence is the acknowledgement of the simplicity behind a computer system; it can't thinkon its own, humans have to tell it what to do one way or the other. Based on how a program starts, it process willbe owned by some user.
In the first and simplest case, when you start a program, the ownership is almost self-understood. You are logged inas some user, so the process of the program you have executed is owned by your user. It's simple as that. This alsoimplies that the process has the same permissions as the owning user, that's why we say that the process runs underthis user; its access level is at most as much as the owning user, so the process is under the user.
The other case, instructing the system to start a process, is somewhat different. Usually, the utilities which are used tostart programs automatically are the system initialisation scripts, time-based execution programs (for example, cronand at ), etc. All of these programs are in most cases owned by root and are executed under root privileges. On top ofthat, most programs started this way are system services, running as long as the system is up and running. But do youremember what we said before? Root is the God of the system. Normally, these programs would get root's privileges,
How your web server works
88
posing a huge security hole. If there is a bug in the program and some malicious user exploits it, he could wreck havocon the system; root is above all restrictions.
In order to combat this possibility, UNIX systems employ a feature which allows processes to drop privileges and rununder a different user than the one which started them. In fact, they change their ownership! To prevent abuse of thisfeature, a process must run under root privileges to be able to switch to another user. This feature is extensively usedby system services, including MySQL and Apache.
In the context of web site management, Apache is of special interest. Apache is the de facto web server for Linuxsystems and is being used by over 50% of Internet sites, according to NetCraft's August 2008 survey. Chances are youare using it on your site, too. Apache, like most UNIX services (affectionately called daemons) uses the feature to dropprivileges. The user and group under which it runs are defined in its configuration files. These configuration files areusually out of the reach of regular users (like you!) on commercial hosts, for security reasons.
There is a special case which acts as the exception to the Apache rule. Many commercial hosts run suPHP-enabledApache installations. This is an extension to the normal PHP's mode of operation which allows each PHP page to runin a process owned by the file's owner (more on file ownership in the next sub-section). This means that each of thePHP files under your account on such a host run as the user which has been assigned to your account. And, if this stillisn't apparent to you, such hosts nullify the burden of ownership and permissions (more on permissions in the nextsection). To put it clearly: with suPHP the file owner, your own user and the Apache user are one and the same. If youare looking for a decent host, find one which is using suPHP. It's better for security and removes a lot of administrativeburden from you. A win-win situation.
2.2. File ownershipEverybody knows what a file is, right? Well, we all know intuitively what a file might be, but we seldom know whatexactly it is. A file is actually consisted of at least two parts. The first part is the file data, what we intuitively understandas the file contents. The second part is the file system entry, which makes the file data an identifiable entity. Thisis where the operating system stores all kinds of information, such as how the file is named, where it is located inthe file system hierarchy, when it was modified, etc. It also contains information about who owns the files and whatare the file's permissions. You might be surprised reading this, but only this latter, informative, part is required fora file. Really!
It seems absurd to have a file without file data, but it is anything but that. There are some special "files" (more correctly:file system entries) in the UNIX world. You have devices, whose "files" actually point to a serial input/output providedby this device, for example the serial port of your computer. There are directories, which obviously don't have anydata contained; they are used for organising files only. There are soft links, which are pointers to other files in the filesystem, used to have standardised names and locations on files which might be moved around or have varying names.There are also these wired beasts called "hard links", some peculiar file system entries which point to the file data ofanother file, making virtually impossible to know which is the "original" file and which is its clone. Their usefulness isonly apparent to the UNIX gurus, therefore out of the scope of this document. For the purpose of website managementwe are only concerned about regular files (hereby called "files"), directories and soft links (hereby called "links").
All files, directories and links are owned by a user and a group, be they files or links. In fact, they are owned by a userID and a group ID. Normally, the ownership is inherited by the creating process's ownership. When you create a filedirectly from an interactive editor application the editor's process is owned by your user ID and your default group ID,therefore the file will be owned by your user ID and your default group ID.
Links are a special case on their own. They are not files, they are pointer to files. The ownership (and permissions)of links is irrelevant. Whenever a process tries to access a link, the underlying operating system "follows" the link,until it finds a regular file. Therefore, the ownership that matters is that of the file linked to, not the link itself. Thisfeature of the operating system prevents unauthorised access to arbitrary files, normally accessible to specific usersonly, from users who just happen to know the path to those files.
What is especially interesting is the correlation between FTP, web server and file ownership. Whenever you accessFTP, you log in as some user. This user is linked to a system user (often the same user assigned to you by host), so
How your web server works
89
logging in FTP actually has the same effect as logging into the system as this user. Common sense implies that all fileoperations are performed under this user and all files created (read: uploaded) through FTP will be owned by this user.
Conversely, whenever you are using a web interface to perform file operations, you are using a web application - orany PHP script/application for that matter - running on the web server whose process is owned by a different user.Therefore, whenever you create files from a web application, they will be owned by the user the web server runs under.
The distinction of file ownership in these two cases is of paramount importance when you get stuck with files whichare accessible to FTP but inaccessible to the web server, or vice versa. This minute distinction is the cause of a lotof grief to many webmasters, so beware!
3. PermissionsSo far you have learned about users, groups and ownerships. But how do they all stick together? Why these arenecessary to have in the first place? The reason is simple: security. In multiuser operating systems you normallydon't like users snooping around other people's files, especially when those files contain sensitive information, suchas passwords. The most common method for overcoming this problem is to assign permissions on each system item,controlling who can do what. This simple concept works wonderfully; it's like putting doors on a building and givingpeople only the keys for the doors to areas they should have access to.
3.1. The three types of permissionsWe already learned that each system item is owned by a user ID and a group ID. Whenever a process tries to accessa system item, the operating system checks the permissions and decides if it will proceed with the operation or denyaccess. It seems reasonable to have control over what a process with the same owning user ID can do with it, what the aprocess with the same owning group ID can do with it and, finally, what the rest of the world can do with it. Indeed, thisis the rationale behind the three types of permissions we can define on UNIX systems. In order of precedence they are:
User permissions They are the access rights granted to the owning user of the item. Every process with the sameowning user ID as the item's owning user ID has these access rights. These access rights haveprecedence over all other permissions.
Group permis-sions
These are the access rights granted to the owning group of the item. Every process with the sameowning group ID as the item's owning group ID has these access rights. These access rights areapplied only if the owning user ID's of the process and the item do not match, but their owninggroup ID's match.
Other permis-sions
These are the access rights granted to the rest of the world. If the owning user ID's of the processand the item do not match and the same happens for the owning group ID's as well, these accessrights will be applied.
3.2. What permissions can controlWe will be focused on permissions on files and directories, the building blocks of a web site. Permissions can controlonly three different actions:
Read The ability to read a file, or get a directory listing.
Write The ability to write to a file, or the ability to create, rename and delete files and subdirectorieson a directory.
Execute (orBrowse, for di-rectories)
For files, it controls the ability to be directly executable from the command line. It is only mean-ingful for binary programs and executable scripts. For directories, it controls the ability to change
How your web server works
90
to that directory. Note that if this is disabled you can't usually obtain a directory listing and fileread operations might fail.
These three actions, combined with the three access request groups (owning user, owning group and the rest of theworld) give us a total of nine distinct operations which can be controlled. Each action is an on/off switch. If a permissionis set, it is turned on and the right to perform the action is granted. If the permission is not set, the switch is off andthe right to perform the action is not granted.
3.3. Permissions notationThe two most common notations for permissions is the textual notation and the octal notation. Each one has its ownvirtues.
3.3.1. The textual notation
The textual notation is traditionally used in UNIX long directory listing format and in most FTP clients listings as well.It consists of ten characters. The first one displays the file type. It can be one of dash (regular file), "d" (a directory) or"l" (a link). The following nine characters display the permissions, consisting of three groups of three letters each. Thegroups are in order of appearence: owning user, owning group and others. The permissions on each group are in orderof appearence: read (denoted with r), write (denoted with w) and execute/browse (denoted with x). If a permission isnot set, a dash appears instead of the letter.
For example, the string -rwxr-xr-x means that it is a regular file, the owning user has read/write/execute permis-sions, the owning group has read and execute permissions and so does the rest of the world. On the other hand, thestring dr-x------ indicates that we have a directory whose owning user has read and browse permissions andeverybody else (owning group and the rest of the world) have no right to access it.
3.3.2. The octal notation
This is the de facto standard geeks use to communicate permissions. The benefit of this approach is that you only needfour characters to fully define them and they're easier to read (to the trained eye, at least).
Permissions are in fact a bit field. Each permission is a bit which can be turned on or off. If you put bits together theyform bytes (by grouping eight bits together). Many bytes one next to the other form a computer-readable representationof a whole number (an integer). If you write this down in base 8, you've got the octal representation. If you didn'tunderstand this, it's OK. We'll explain it the easy way.
The octal notation consists of four numbers. In the context of web site management you can consider the first to bealways zero and sometimes ommited. The next three numbers describe each one the permissions. The second numberdescribes owning user permissions. The third number describes owning group's permissions. The fourth number de-scribes the permissions for the rest of the world. Each number is 0 to 7. The meaning of each number is simple:
0 No access
1 Execute/browse access only
2 Write access only
3 Write and execute/browse access
4 Read access only
5 Read and execute/browse access
6 Read and write access
How your web server works
91
7 Full access
It is almost apparent that "1" stands for execute only, "2" stands for write only and "4" stands for read only. Addingthese values together gives you the rest of the combinations. You can't add together the same value (1+1 is forbiddenas it is meaningless), so each of the composite values can be broken down to its components very easily. You don'teven have to memorise the whole table!
A permission of 0777 means that the owning user, owning group and the rest of the world can read, write and executethe file (full permissions for everyone). A 0764 permission means that the owning user has full access, the owninggroup has read and write access and the rest of the world have read only access.
92
Chapter 8. Securing your AkeebaBackup installation
1. Access rightsAs with every software which can access your site as a whole, Akeeba Backup needs to control who's got access to itsbackup functionality. Due to the lack of a thorough ACL mechanism in Joomla! 1.0 and 1.5, we have decided to makethe administrator (back end) of this component available by default to the Super Administrators only. This group ofpeople already has infinite access to the access, making them the ideal candidate for backup operators. You can changethis default behavior from the component's Parameters button in the Control Panel page.
The front-end backup feature is a different story. Since it has to be available to unattended scripts which can't usecookies and interactive user authentication, a different approach was taken. Instead of requiring the user to have loggedin with Joomla! it uses a simple "secret word" authentication model. Because this "secret word" is transmitted in cleartext we strongly advise against using it over anything else than a local network (for example, an automated tool runningon the same host as the web server). If you have to use it over the Internet we strongly advise using a secure protocolconnection (HTTPS) with a valid commercially acquired certificate.
If you want to enhance the security of your site, we strongly advise you to use a commercial-grade ACL system, suchas Dioscouri's JUGA or `CorePHP` Community ACL on top of Akeeba Backup's rundimentary access control andJoomla! 1.6's ACL system. Such ACL systems allow you to fine-tune the permission settings down to the user andcomponent view level, if so required. Using such an ACL scheme you can create, for example, a backup operator userwho has access to the Backup Now and configuration pages of Akeeba Backup, but not the Download function.
2. Securing the temporary and output directo-ries
About the temporary directory
By default - and unless you specify something different - the same temporary directory as Joomla!™ is used. This isnormally a directory named "tmp" on your site's root. The temporary files are short-lived, unless a fatal PHP error ora loss of connection abruptly halts JoomlaPack's operation. In this case, the temporary file will not be deleted beforea new backup is attempted, or you visit the Control Panel page.
Important
The only temporary files the component uses are database dumps and internal state information ("mem-ory") data. Unauthorised access to them can lead to leakage of sensitive information or could be used tofacilitate compromising your site's integrity.
To this end, it is sane to restrict the access to the temporary directory. If you can't use an off-site temporary directory,we srongly advice disabling direct web access to this directory. This can be done by creating an .htaccess file onthe directory with the following contents:
deny from all
Securing your Akee-ba Backup installation
93
Securing the backup output directoryBy default the component uses a non secure location to store its backup files, within your site's file system hierarchy,namely administrator/components/com_akeeba/backup. This location is well known and can be - the-oretically - accessed directly from a web browser. Since the backup output directory stores the results of your backupattempts, that is SQL files containing database backups and archive files containing all of your site, a malicious personwith access to this location could steal sensitive information or compromise your site's integrity.
The first line of defense, is to use mangled, hard to guess, names for the SQL backup. However, in the era of mul-ti-MBPS xDSL Internet connections and scripting, it wouldn't take an attacker that long to figure out the filename.Remember: security through obscurity is no security at all!
As a second line of defense, we include a secure .htaccess on the default backup output directory to disable directweb access. However, this is only possible on Apache-powered web servers which allow the use of .htaccess files.You should check with your host to ensure that this kind of protection is possible on your site.
However, this is not enough. Security experts argue that storing backups within the potentially vulnerable system itselfmight be a security risk. It is possible that a malicious person could gain access via other means. Think of a simplescenario. You have an Administrator with a weak password a hacker eventually guesses. Now the hacker can log in toyour site, but doesn't have access to the component. Despite that, you have installed a file administration component,such as eXtplorer, which allows administrators to browse the site's file system and download files. How long wouldit take before your site got compromised? Right. Not very long indeed!
The best approach is to use a directory which is outside your web server's root. By definition, this is not directlyexposed to the web and is usually unavailable to file administration utilities.
If you are really paranoid about securing your site's backup files - like we are for our own sites! - you can use AkeebaRemote Control. Remote Control is a desktop application for Microsoft Windows™ which allows backing up yoursite from your desktop, with options to automatically downloading the backup archive and remove the server's copy ofthis file. Alternatively, you can use our backup file post-processing options, for example uploading all backup archivesto Amazon S3 and removing your server copy.
3. Securing file transfersWhenever you download your backup files you can fall prey to a malicious user. Backup files are transferred unen-crypted (unless you access your site's administrator section through the HTTPS protocol). It is posible for a resourcefulhacker to launch a man-in-the-middle attack. In such a case, whatever you download from your site will be directedto the hacker's computer before reaching yours.
To avoid such insecure scenarios, we advise against using the Download button in the backup administration page. Wesuggest that you use Secure FTP (SFTP) instead. Avoid using the plain old FTP, because your password and data aretransmitted in clear text (unencrypted) over the Internet. Also avoid FTPS and FTPES (FTP over SSL) as they havesome security restrictions, like requiring your FTP server to have a commercially obtained SSL certificate in orderto be really effective. Sometimes, your host will allow secure access to a web based control panel which has a filedownload feature. You could use this, it's as safe as it gets.
There is also another reason why not to use the Download button in the backup administration page. Your host neitherdiscriminates the back end and front end pages of your Joomla! site, nor your IP from the rest of the world. As aresult, every time you use the Joomla!™ back end, the data transferred counts towards your monthly bandwidth quota.Backup archives are large, sometimes in the hundrends of megabytes. Transferring them through the Download featurewill incure a huge loss on your monthly bandwidth quota. Using Secure FTP or your host's control panel usually doesnot count through the bandwidth quota and should be used instead. It's better to ask your host, though; some include theFTP and SFTP traffic in your monthly bandwidth quota. Finally, the Download feature doesn't work with all possibleconfigurations and has objective problems with the handling of very large archives; this is a technical limitation which
Securing your Akee-ba Backup installation
94
can not be overcome in the PHP level the component operates. Most notably, many servers which use the FastCGImode do not work at all with the Download button. They will simply throw an HTTP 500 error page, or a "file notfound" message. We've tried all the tricks in the book and then some more, but there's really absolutely nothing wecan do about it. Sorry.
Important
The preferred and suggested method for downloading your backup files - for several reasons - is usingFTP in BINARY mode, preferably over an encrypted connection. Alternatively, you can use AkeebaRemote Control which uses this approach when downloading backup archives.

Part III. Appendices
96
Appendix A. The JPA archive format,v.1.1Design goalsThe JPA format strives to be a compressed archive format designed specifically for efficiency of creation by a PHPscript. It is similar in design to the PKZIP format, with a few notable differences:
• CRC32 is not used; calculation of file checksums is time consuming and can lead to errors when attempted on largefiles from a script running under PHP4, or a script running on PHP5 without the hash extension.
• Only allowed compression methods are store and deflate.
• There is no Central Directory (simplifies management of the file).
• File permissions (UNIX style) are stored within the file.
Even though JPA is designed for use by PHP scripts, creating a command-line utility, a programming library or evena GUI program in any other language is still possible. JPA is not supposed to have high compression rations, or besecure and error-tolerant as other archive formats. It merely an attempt to provide the best compromise for creatingarchives of very large directory trees using nothing but PHP code to do it.
This is an open format. You may use it in any commercial or non-commercial application royalty-free. Even thoughthe PHP implementation is GPL-licensed, we can provide it under commercial-friendly licenses, e.g. LGPL v3. Pleaseask us if you want to use it on your own software.
Structure of an archiveAn archive consists of exactly one Standard Header and one or more Entity Blocks . Each Entity Block consists ofexactly one Entity Description Block and at most one File Data Block . All values are stored in little-endian byte order,unless otherwise specified.
All textual data, e.g. file names and symlink targets, must be written as little-endian UTF-8, non null terminated strings,for the widest compatibility possible.
Standard HeaderThe function of the Standard Header is to allow identification of the archive format and supply the client with generalinformation regarding the archive at hand. It is a binary block appearing at the beginning of the archive file and therealone. It consists of the following data (in order of appearance):
Signature, 3 bytes The bytes 0x4A 0x50 0x41 (uppercase ASCII string “JPA”) used for identification purposes.
Header length, 2bytes
Unsigned short integer represented as two bytes, holding the size of the header in bytes. This isnow fixed to 19 bytes, but this variable is here to allow for forward compatibility. When extraheader fields are present, this value will be 19 + the length of all extra fields.
Major version, 1byte
Unsigned integer represented as single byte, holding the archive format major version, e.g. 0X01for version 1.1.
Minor version, 1byte
Unsigned integer represented as single byte, holding the archive format minor version, e.g. 0X01for version 1.1.
The JPA archive format, v.1.1
97
File count, 4bytes
Unsigned long integer represented as four bytes, holding the number of files present in the archive.
Uncompressedsize, 4 bytes
Unsigned long integer represented as four bytes, holding the total size of the archive's files whenuncompressed.
Compressed size,4 bytes
Unsigned long integer represented as four bytes, holding the total size of the archive's files in theirstored (compressed) form
Extra Header Field - Spanned Archive MarkerThis is an optional field, written after the Standard Header but before the first Entity Block, denoting that the currentarchive spans multiple files. Its structure is:
Signature, 4 bytes The bytes 0x4A, 0x50, 0x01, 0x01
Extra FieldLength, 2 bytes
The length of the extra field, without counting the signature length. It's value is fixed and equals 4.
Number of parts,2 bytes
The total number of parts this archive consists of.
When creating spanned archives, the first file (part) of the archive set has an extension of .j01, the next part has anextension of .j02 and so on. The last file of the archive set has the extension .jpa.
When creating spanned archives you must ensure that the Entity Description Block is within the limits of a single part,i.e. the contents of the Entity Description Block must not cross part boundaries. The File Data Block data can crossone or multiple part blocks.
Entity BlockAn Entity Block is merely the aggregation of an Entity Description Block and at most one File Data Block. An Entitycan be at present either a File or a Directory. If the entity is a File of zero length or if it is a Directory the File DataBlock is omitted. In any other case, the File Data Block must exist.
Entity Description BlockThe function of the Entity Description Block is to provide the client information about an Entity included in the archive.The client can then use this information in order to reconstruct a copy of the Entity on the client's filesystem. It is abinary block consisting of the following data (in order of appearance):
Signature, 3 bytes The bytes 0x4A, 0x50, 0x46 (uppercase ASCII string “JPF”) used for identification purposes.
Block length, 2bytes
Unsigned short integer, represented as 2 bytes, holding the total size of this Entity DescriptionBlock.
Length of entitypath, 2 bytes.
Unsigned short integer, represented as 2 bytes, holding the size of the entity path data below.
Entity path data,variable length.
Holds the complete (relative) path of the Entity as a UTF16 encoded string, without trailing null.The path separator must be a forward slash (“/”), even on systems which use a different pathseparator, e.g. Windows.
Entity type, 1byte.
• 0x00 for directories (instructs the client to recursively create the directory specified in Entitypath data).
• 0x01 for files (instructs the client to reconstruct the file specified in Entity path data)
The JPA archive format, v.1.1
98
• 0x02 for symbolic links (instructs the client to create a symbolic link whose target is stored,uncompressed, as the entity's File Data Block). When the type is 0x02 the Compression TypeMUST be 0x00 as well.
Compressiontype, 1 byte.
• 0x00 for no compression; the data contained in File Data Block should be written as-is to thefile. Also used for directories, symbolic links and zero-sized files.
• 0x01 for deflate (Gzip) compression; the data contained in File Data Block must be deflatedusing Gzip before written to the file.
• 0x02 for Bzip2 compression; the data contained in File Data Block must be uncompressedusing BZip2 before written to the file. This is generally discouraged, as both the archiving andunarchiving scripts must be ran in a PHP environment which supports the bzip2 library.
Compressed size,4 bytes
An unsigned long integer representing the size of the File Data Block in bytes. For directories,symlinks and zero-sized files it is zero (0x00000000).
Uncompressedsize, 4 bytes
An unsigned long integer representing the size of the resulting file in bytes. For directories, sym-links and zero-sized files it is zero (0x00000000).
Entity permis-sions, 4 bytes
UNIX-style permissions of the stored entity.
File Date BlockThe File Data Block is only present if the Entity is a file with a non-zero file size. It can consist of one and only oneof the following, depending on the Compression Type:
• Binary dump of file contents or textual representation of the symlink's target, for CT=0x00
• Gzip compression output, without the trailing Adler32 checksum, for CT=0x01
• Bzip2 compression output, for CT=0x02
Change LogRevision History
June 2009 NKD, JoomlaPack Develop-ers http://www.joomlapack.net
Updated to format version 1.1, fixed incorrect descriptions of header signatures
99
Appendix B. GNU Free DocumentationLicenseCopyright (C) 2000, 2001, 2002 Free Software Foundation, Inc. 51 Franklin St , Fifth Floor, Boston, MA 02110-1301USA . Everyone is permitted to copy and distribute verbatim copies of this license document, but changing it is notallowed.
0. PREAMBLEThe purpose of this License is to make a manual, textbook, or other functional and useful document "free" in the senseof freedom: to assure everyone the effective freedom to copy and redistribute it, with or without modifying it, eithercommercially or noncommercially. Secondarily, this License preserves for the author and publisher a way to get creditfor their work, while not being considered responsible for modifications made by others.
This License is a kind of "copyleft", which means that derivative works of the document must themselves be free in thesame sense. It complements the GNU General Public License, which is a copyleft license designed for free software.
We have designed this License in order to use it for manuals for free software, because free software needs freedocumentation: a free program should come with manuals providing the same freedoms that the software does. But thisLicense is not limited to software manuals; it can be used for any textual work, regardless of subject matter or whetherit is published as a printed book. We recommend this License principally for works whose purpose is instruction orreference.
1. APPLICABILITY AND DEFINITIONSThis License applies to any manual or other work, in any medium, that contains a notice placed by the copyright holdersaying it can be distributed under the terms of this License. Such a notice grants a world-wide, royalty-free license,unlimited in duration, to use that work under the conditions stated herein. The "Document", below, refers to any suchmanual or work. Any member of the public is a licensee, and is addressed as "you". You accept the license if you copy,modify or distribute the work in a way requiring permission under copyright law.
A "Modified Version" of the Document means any work containing the Document or a portion of it, either copiedverbatim, or with modifications and/or translated into another language.
A "Secondary Section" is a named appendix or a front-matter section of the Document that deals exclusively with therelationship of the publishers or authors of the Document to the Document's overall subject (or to related matters) andcontains nothing that could fall directly within that overall subject. (Thus, if the Document is in part a textbook ofmathematics, a Secondary Section may not explain any mathematics.) The relationship could be a matter of historicalconnection with the subject or with related matters, or of legal, commercial, philosophical, ethical or political positionregarding them.
The "Invariant Sections" are certain Secondary Sections whose titles are designated, as being those of Invariant Sec-tions, in the notice that says that the Document is released under this License. If a section does not fit the above def-inition of Secondary then it is not allowed to be designated as Invariant. The Document may contain zero InvariantSections. If the Document does not identify any Invariant Sections then there are none.
The "Cover Texts" are certain short passages of text that are listed, as Front-Cover Texts or Back-Cover Texts, in thenotice that says that the Document is released under this License. A Front-Cover Text may be at most 5 words, anda Back-Cover Text may be at most 25 words.
A "Transparent" copy of the Document means a machine-readable copy, represented in a format whose specificationis available to the general public, that is suitable for revising the document straightforwardly with generic text editors
GNU Free Documentation License
100
or (for images composed of pixels) generic paint programs or (for drawings) some widely available drawing editor,and that is suitable for input to text formatters or for automatic translation to a variety of formats suitable for inputto text formatters. A copy made in an otherwise Transparent file format whose markup, or absence of markup, hasbeen arranged to thwart or discourage subsequent modification by readers is not Transparent. An image format is notTransparent if used for any substantial amount of text. A copy that is not "Transparent" is called "Opaque".
Examples of suitable formats for Transparent copies include plain ASCII without markup, Texinfo input format, La-TeX input format, SGML or XML using a publicly available DTD, and standard-conforming simple HTML, PostScriptor PDF designed for human modification. Examples of transparent image formats include PNG, XCF and JPG. Opaqueformats include proprietary formats that can be read and edited only by proprietary word processors, SGML or XMLfor which the DTD and/or processing tools are not generally available, and the machine-generated HTML, PostScriptor PDF produced by some word processors for output purposes only.
The "Title Page" means, for a printed book, the title page itself, plus such following pages as are needed to hold,legibly, the material this License requires to appear in the title page. For works in formats which do not have anytitle page as such, "Title Page" means the text near the most prominent appearance of the work's title, preceding thebeginning of the body of the text.
A section "Entitled XYZ" means a named subunit of the Document whose title either is precisely XYZ or containsXYZ in parentheses following text that translates XYZ in another language. (Here XYZ stands for a specific sectionname mentioned below, such as "Acknowledgements", "Dedications", "Endorsements", or "History".) To "Preservethe Title" of such a section when you modify the Document means that it remains a section "Entitled XYZ" accordingto this definition.
The Document may include Warranty Disclaimers next to the notice which states that this License applies to theDocument. These Warranty Disclaimers are considered to be included by reference in this License, but only as regardsdisclaiming warranties: any other implication that these Warranty Disclaimers may have is void and has no effect onthe meaning of this License.
2. VERBATIM COPYINGYou may copy and distribute the Document in any medium, either commercially or noncommercially, provided thatthis License, the copyright notices, and the license notice saying this License applies to the Document are reproducedin all copies, and that you add no other conditions whatsoever to those of this License. You may not use technicalmeasures to obstruct or control the reading or further copying of the copies you make or distribute. However, youmay accept compensation in exchange for copies. If you distribute a large enough number of copies you must alsofollow the conditions in section 3.
You may also lend copies, under the same conditions stated above, and you may publicly display copies.
3. COPYING IN QUANTITYIf you publish printed copies (or copies in media that commonly have printed covers) of the Document, numberingmore than 100, and the Document's license notice requires Cover Texts, you must enclose the copies in covers thatcarry, clearly and legibly, all these Cover Texts: Front-Cover Texts on the front cover, and Back-Cover Texts on theback cover. Both covers must also clearly and legibly identify you as the publisher of these copies. The front covermust present the full title with all words of the title equally prominent and visible. You may add other material on thecovers in addition. Copying with changes limited to the covers, as long as they preserve the title of the Document andsatisfy these conditions, can be treated as verbatim copying in other respects.
If the required texts for either cover are too voluminous to fit legibly, you should put the first ones listed (as many asfit reasonably) on the actual cover, and continue the rest onto adjacent pages.
If you publish or distribute Opaque copies of the Document numbering more than 100, you must either include a ma-chine-readable Transparent copy along with each Opaque copy, or state in or with each Opaque copy a computer-net-
GNU Free Documentation License
101
work location from which the general network-using public has access to download using public-standard networkprotocols a complete Transparent copy of the Document, free of added material. If you use the latter option, you musttake reasonably prudent steps, when you begin distribution of Opaque copies in quantity, to ensure that this Transpar-ent copy will remain thus accessible at the stated location until at least one year after the last time you distribute anOpaque copy (directly or through your agents or retailers) of that edition to the public.
It is requested, but not required, that you contact the authors of the Document well before redistributing any largenumber of copies, to give them a chance to provide you with an updated version of the Document.
4. MODIFICATIONSYou may copy and distribute a Modified Version of the Document under the conditions of sections 2 and 3 above,provided that you release the Modified Version under precisely this License, with the Modified Version filling the roleof the Document, thus licensing distribution and modification of the Modified Version to whoever possesses a copyof it. In addition, you must do these things in the Modified Version:
A. Use in the Title Page (and on the covers, if any) a title distinct from that of the Document, and from those of previousversions (which should, if there were any, be listed in the History section of the Document). You may use the sametitle as a previous version if the original publisher of that version gives permission.
B. List on the Title Page, as authors, one or more persons or entities responsible for authorship of the modificationsin the Modified Version, together with at least five of the principal authors of the Document (all of its principalauthors, if it has fewer than five), unless they release you from this requirement.
C. State on the Title page the name of the publisher of the Modified Version, as the publisher.
D. Preserve all the copyright notices of the Document.
E. Add an appropriate copyright notice for your modifications adjacent to the other copyright notices.
F. Include, immediately after the copyright notices, a license notice giving the public permission to use the ModifiedVersion under the terms of this License, in the form shown in the Addendum below.
G. Preserve in that license notice the full lists of Invariant Sections and required Cover Texts given in the Document'slicense notice.
H. Include an unaltered copy of this License.
I. Preserve the section Entitled "History", Preserve its Title, and add to it an item stating at least the title, year, newauthors, and publisher of the Modified Version as given on the Title Page. If there is no section Entitled "History"in the Document, create one stating the title, year, authors, and publisher of the Document as given on its Title Page,then add an item describing the Modified Version as stated in the previous sentence.
J. Preserve the network location, if any, given in the Document for public access to a Transparent copy of the Docu-ment, and likewise the network locations given in the Document for previous versions it was based on. These maybe placed in the "History" section. You may omit a network location for a work that was published at least fouryears before the Document itself, or if the original publisher of the version it refers to gives permission.
K. For any section Entitled "Acknowledgements" or "Dedications", Preserve the Title of the section, and preserve inthe section all the substance and tone of each of the contributor acknowledgements and/or dedications given therein.
L. Preserve all the Invariant Sections of the Document, unaltered in their text and in their titles. Section numbers orthe equivalent are not considered part of the section titles.
M.Delete any section Entitled "Endorsements". Such a section may not be included in the Modified Version.
N. Do not retitle any existing section to be Entitled "Endorsements" or to conflict in title with any Invariant Section.
GNU Free Documentation License
102
O. Preserve any Warranty Disclaimers.
If the Modified Version includes new front-matter sections or appendices that qualify as Secondary Sections andcontain no material copied from the Document, you may at your option designate some or all of these sections asinvariant. To do this, add their titles to the list of Invariant Sections in the Modified Version's license notice. Thesetitles must be distinct from any other section titles.
You may add a section Entitled "Endorsements", provided it contains nothing but endorsements of your ModifiedVersion by various parties--for example, statements of peer review or that the text has been approved by an organizationas the authoritative definition of a standard.
You may add a passage of up to five words as a Front-Cover Text, and a passage of up to 25 words as a Back-CoverText, to the end of the list of Cover Texts in the Modified Version. Only one passage of Front-Cover Text and oneof Back-Cover Text may be added by (or through arrangements made by) any one entity. If the Document alreadyincludes a cover text for the same cover, previously added by you or by arrangement made by the same entity youare acting on behalf of, you may not add another; but you may replace the old one, on explicit permission from theprevious publisher that added the old one.
The author(s) and publisher(s) of the Document do not by this License give permission to use their names for publicityfor or to assert or imply endorsement of any Modified Version.
5. COMBINING DOCUMENTSYou may combine the Document with other documents released under this License, under the terms defined in section4 above for modified versions, provided that you include in the combination all of the Invariant Sections of all of theoriginal documents, unmodified, and list them all as Invariant Sections of your combined work in its license notice,and that you preserve all their Warranty Disclaimers.
The combined work need only contain one copy of this License, and multiple identical Invariant Sections may bereplaced with a single copy. If there are multiple Invariant Sections with the same name but different contents, makethe title of each such section unique by adding at the end of it, in parentheses, the name of the original author orpublisher of that section if known, or else a unique number. Make the same adjustment to the section titles in the listof Invariant Sections in the license notice of the combined work.
In the combination, you must combine any sections Entitled "History" in the various original documents, forming onesection Entitled "History"; likewise combine any sections Entitled "Acknowledgements", and any sections Entitled"Dedications". You must delete all sections Entitled "Endorsements".
6. COLLECTIONS OF DOCUMENTSYou may make a collection consisting of the Document and other documents released under this License, and replacethe individual copies of this License in the various documents with a single copy that is included in the collection,provided that you follow the rules of this License for verbatim copying of each of the documents in all other respects.
You may extract a single document from such a collection, and distribute it individually under this License, providedyou insert a copy of this License into the extracted document, and follow this License in all other respects regardingverbatim copying of that document.
7. AGGREGATION WITH INDEPENDENTWORKSA compilation of the Document or its derivatives with other separate and independent documents or works, in or ona volume of a storage or distribution medium, is called an "aggregate" if the copyright resulting from the compilation
GNU Free Documentation License
103
is not used to limit the legal rights of the compilation's users beyond what the individual works permit. When theDocument is included in an aggregate, this License does not apply to the other works in the aggregate which are notthemselves derivative works of the Document.
If the Cover Text requirement of section 3 is applicable to these copies of the Document, then if the Document is lessthan one half of the entire aggregate, the Document's Cover Texts may be placed on covers that bracket the Documentwithin the aggregate, or the electronic equivalent of covers if the Document is in electronic form. Otherwise they mustappear on printed covers that bracket the whole aggregate.
8. TRANSLATIONTranslation is considered a kind of modification, so you may distribute translations of the Document under the termsof section 4. Replacing Invariant Sections with translations requires special permission from their copyright holders,but you may include translations of some or all Invariant Sections in addition to the original versions of these InvariantSections. You may include a translation of this License, and all the license notices in the Document, and any WarrantyDisclaimers, provided that you also include the original English version of this License and the original versions ofthose notices and disclaimers. In case of a disagreement between the translation and the original version of this Licenseor a notice or disclaimer, the original version will prevail.
If a section in the Document is Entitled "Acknowledgements", "Dedications", or "History", the requirement (section4) to Preserve its Title (section 1) will typically require changing the actual title.
9. TERMINATIONYou may not copy, modify, sublicense, or distribute the Document except as expressly provided for under this License.Any other attempt to copy, modify, sublicense or distribute the Document is void, and will automatically terminateyour rights under this License. However, parties who have received copies, or rights, from you under this License willnot have their licenses terminated so long as such parties remain in full compliance.
10. FUTURE REVISIONS OF THIS LICENSEThe Free Software Foundation may publish new, revised versions of the GNU Free Documentation License from timeto time. Such new versions will be similar in spirit to the present version, but may differ in detail to address newproblems or concerns. See http://www.gnu.org/copyleft/ [http://www.gnu.org/copyleft/] .
Each version of the License is given a distinguishing version number. If the Document specifies that a particularnumbered version of this License "or any later version" applies to it, you have the option of following the terms andconditions either of that specified version or of any later version that has been published (not as a draft) by the FreeSoftware Foundation. If the Document does not specify a version number of this License, you may choose any versionever published (not as a draft) by the Free Software Foundation.
ADDENDUM: How to use this License for yourdocumentsTo use this License in a document you have written, include a copy of the License in the document and put the followingcopyright and license notices just after the title page:
Copyright (C) YEAR YOUR NAME.
Permission is granted to copy, distribute and/or modify this document under the terms of the GNUFree Documentation License, Version 1.2 or any later version published by the Free Software Foun-

GNU Free Documentation License
104
dation; with no Invariant Sections, no Front-Cover Texts, and no Back-Cover Texts. A copy of thelicense is included in the section entitled "GNU Free Documentation License".
If you have Invariant Sections, Front-Cover Texts and Back-Cover Texts, replace the "with...Texts." line with this:
with the Invariant Sections being LIST THEIR TITLES, with the Front-Cover Texts being LIST,and with the Back-Cover Texts being LIST.
If you have Invariant Sections without Cover Texts, or some other combination of the three, merge those two alterna-tives to suit the situation.
If your document contains nontrivial examples of program code, we recommend releasing these examples in parallelunder your choice of free software license, such as the GNU General Public License, to permit their use in free software.