Embed Size (px)
Citation preview

AK-EM 800Enterprise Manager
User Guide
2 User Guide USCO.PI.R1.G5.02 © Danfoss 2014-12 AK-EM 800
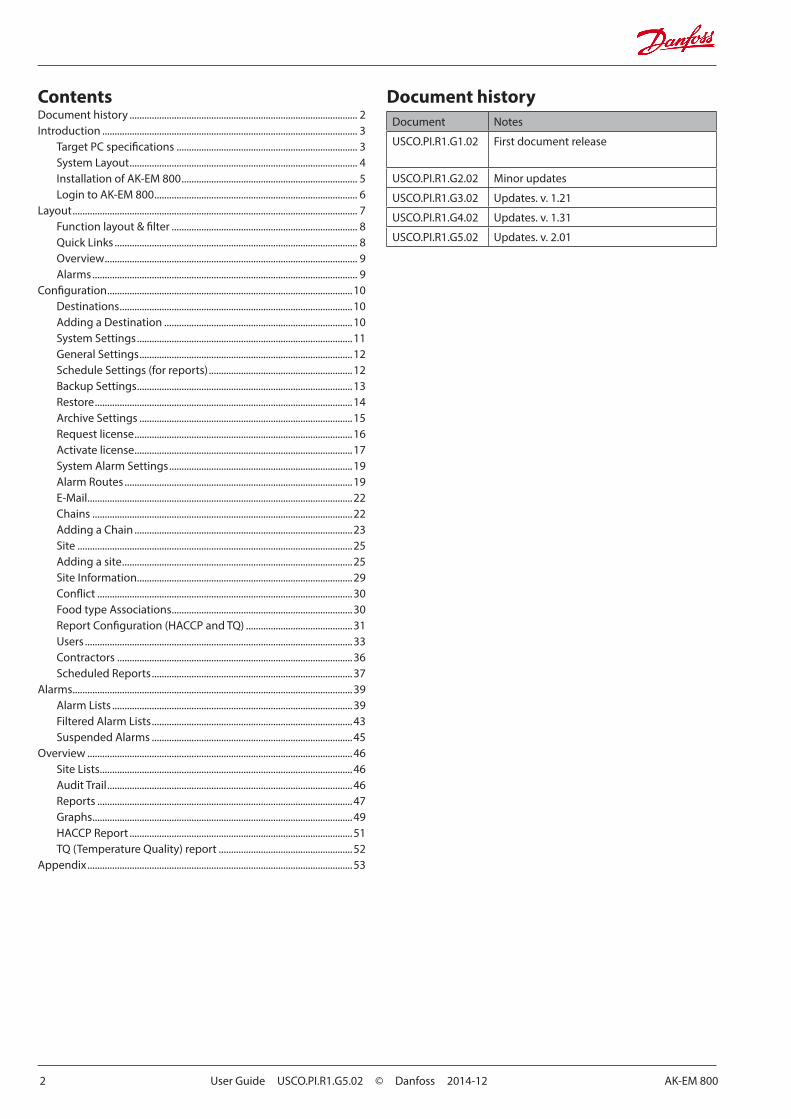
Document historyContentsDocument history ............................................................................................ 2Introduction ....................................................................................................... 3
Target PC specifications ......................................................................... 3System Layout ............................................................................................ 4Installation of AK-EM 800 ....................................................................... 5Login to AK-EM 800 .................................................................................. 6
Layout ................................................................................................................... 7Function layout & filter ........................................................................... 8Quick Links .................................................................................................. 8Overview ...................................................................................................... 9Alarms ........................................................................................................... 9
Configuration ...................................................................................................10Destinations ..............................................................................................10Adding a Destination ............................................................................10System Settings .......................................................................................11General Settings ......................................................................................12Schedule Settings (for reports) ..........................................................12Backup Settings .......................................................................................13Restore ........................................................................................................14Archive Settings ......................................................................................15Request license ........................................................................................16Activate license ........................................................................................17System Alarm Settings ..........................................................................19Alarm Routes ............................................................................................19E-Mail ...........................................................................................................22Chains .........................................................................................................22Adding a Chain ........................................................................................23Site ...............................................................................................................25Adding a site .............................................................................................25Site Information.......................................................................................29Conflict .......................................................................................................30Food type Associations .........................................................................30Report Configuration (HACCP and TQ) ...........................................31Users ............................................................................................................33Contractors ...............................................................................................36Scheduled Reports .................................................................................37
Alarms .................................................................................................................39Alarm Lists .................................................................................................39Filtered Alarm Lists .................................................................................43Suspended Alarms .................................................................................45
Overview ...........................................................................................................46Site Lists ......................................................................................................46Audit Trail ...................................................................................................46Reports .......................................................................................................47Graphs .........................................................................................................49HACCP Report ..........................................................................................51TQ (Temperature Quality) report ......................................................52
Appendix ...........................................................................................................53
Document Notes
USCO.PI.R1.G1.02 First document release
USCO.PI.R1.G2.02 Minor updates
USCO.PI.R1.G3.02 Updates. v. 1.21
USCO.PI.R1.G4.02 Updates. v. 1.31
USCO.PI.R1.G5.02 Updates. v. 2.01

AK-EM 800 User Guide USCO.PI.R1.G5.02 © Danfoss 2014-12 3
The AK-EM 800 is an Enterprise Management solution from Danfoss for the food retail industry. The AK-EM 800 is a multi-user, multi-site server PC application which provides alarm manage-ment and automatic data collection, together with reporting features.This document is designed to guide you through the installation of your AK-EM 800. This guide will also cover the installation of the included AKM agent, which is required to support legacy Danfoss control devices (described later in this guide).
Introduction
Target PC specifications
The minimum computer specification is detailed below. AK-EM 800 can run on a real and also on a virtual server. Database and application can be installed on different machines, but both machines must be in the same local area.
AK-EM 800 32 Bit AK-EM 800 64 Bit
Number of sites Up to 100 Up to 1000 (See Site Table)
Operating System
Windows 7 32 bit Windows 7 64 bit or Windows Server 2008 R2 64 bit
AKM Version N/A N/A
Web Browser Firefox and IE 9 Firefox and IE 9
CPU Intel Core i5 Intel Core i5
RAM 3GB 4GB
HDD 250GB Free Space 1TB Free Space
Installation Administrative rights during installation Administrative rights during installation
Network Requirements
Correct port settings in fire wall and routersDefault port for communication is 8080Default port for alarm is 3001
Correct port settings in fire wall and routersDefault port for communication is 8080Default port for alarm is 3001
Screen Resolution
1024x768 1024x768
Virtual Sever AK-EM 800 AKM Agent
Number of sites Up to 1000 (see site table) N/A
Operating System
Windows Server 2008 R2 64 bitVM Host System is server grade hardware
Windows 7 (32/64 bit) or Windows XP SP2
AKM Version N/A AKM Version 7.41 or Higher
Web Browser Firefox and IE 9 Firefox and IE 9
CPU VM CPU/Core allocation match Intel Core i5 Pentium 4, 2.4 GHz
RAM 4GB 1 or 2 GB
HDD 1TB Free spaceVHD (Virtual Hard Disk) attached to VM
10 GB free space
Installation Administrative rights during installation Administrative rights during installation
Network Requirements
Correct port settings in fire wall and routersDefault port for communication is 8080Default port for alarm is 3001
Correct port settings in fire wall and routersDefault port for communication is 8080Default port for alarm is 3001
Screen Resolution
1024x768 1024x768

4 User Guide USCO.PI.R1.G5.02 © Danfoss 2014-12 AK-EM 800
System LayoutDirect connection (AKM agent not required)The AK-EM 800 provides a direct communications connection path to AK-System Manager 800 series of front end controllers. AKM agent installation not required when using the AK-SM 800 series.In addition, the Danfoss AK-SC 255/AK-SC 355 (see minimum software specs in table opposite) are also supported via direct connect path.Legacy support (AKM agent required)For applications that use AK-SM 720, AK-SM 350, AKA Gateways, and the Danfoss m2 (known as legacy systems), it is still possible to connect to the AK-EM 800, via the use of the AKM-Agent. The use of the AKM agent allows for alarms and history logs from these systems to be synchronized between the existing AKM PC installation and the AK-EM 800.
Under this application the AK-EM 800 is connected and communi-cates to an installed AKM agent, which must be installed on designated AKM PC. There can be more than one AKM PC installation that communicates to the AK-EM 800. Each AKM PC will require installation of the AKM agent.
Direct connection AK-SC 255 /AK-SC 355 / AK-SM 800 Series Type version
AK-SC 355 3.091 and newer
AK-SC 255 2.201 and newer
AK-SM 800 series 8.011 and newer
The following picture describes the System Layout.
Danfoss Legacy Products
Log DataAlarms
AKM with AKM Agent
AK-EM 800
System Manager AK-SM System Controller AK-SC 255/355
History DataAlarmsLink to System Manager Web Interface
Direct connect Direct connect
AK-EM 800 User Guide USCO.PI.R1.G5.02 © Danfoss 2014-12 5
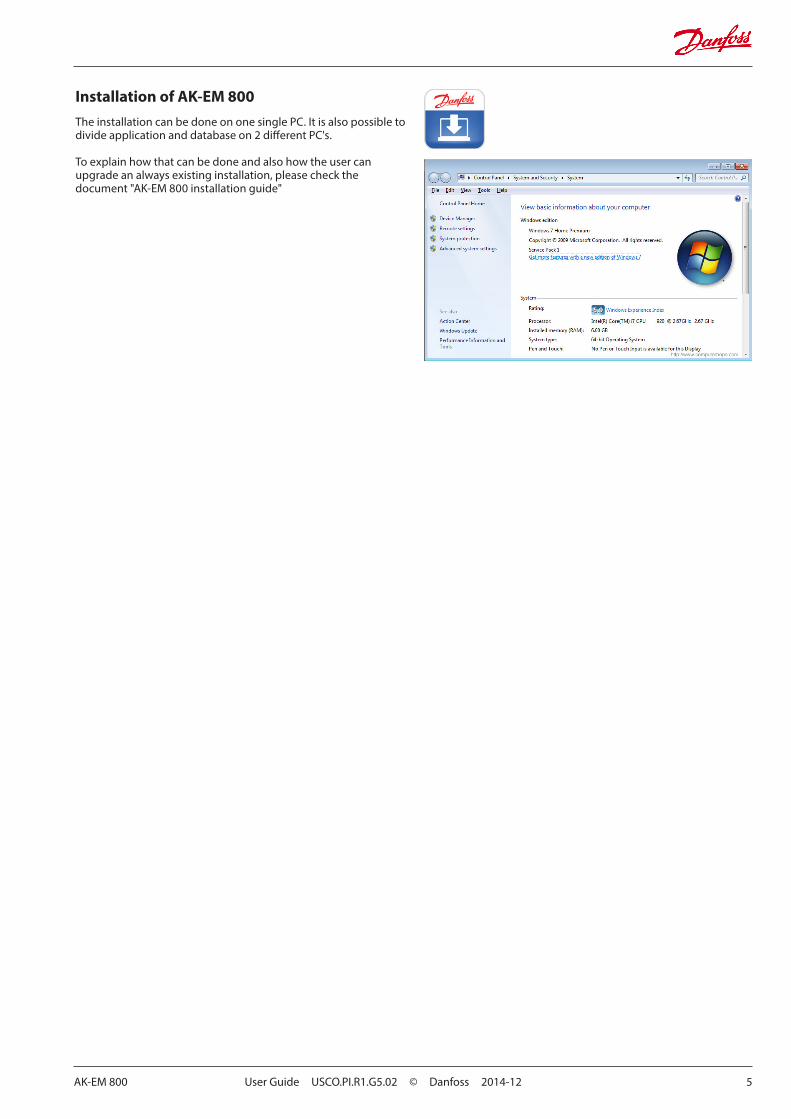
Installation of AK-EM 800The installation can be done on one single PC. It is also possible to divide application and database on 2 different PC's.
To explain how that can be done and also how the user can upgrade an always existing installation, please check the document "AK-EM 800 installation guide"

6 User Guide USCO.PI.R1.G5.02 © Danfoss 2014-12 AK-EM 800
Login to AK-EM 800
The AK-EM 800 installation creates a Desktop icon. Use the icon or type in your browser
http://ipadress:8080/AKEM_800
Ipadress is from the actual AK-EM 800 system
Default Log on name: adminDefault Password: danfoss
At the first login the user will then be prompted to change the password.
New password must be 7 to 15 characters. (numbers and letters)Spaces are allowed.
If AK-EM 800 is not licensed, a license is required (see chapter require license) and AK-EM800 will start in following window.It is not possible to use AK-EM 800, before the license is activated.

AK-EM 800 User Guide USCO.PI.R1.G5.02 © Danfoss 2014-12 7
LayoutOn the top there is a drop down menu, where there are one or more functions to choose between.
When a function is selected it will be opened just below the menu.
On the top right corner there are three quick links buttons.

8 User Guide USCO.PI.R1.G5.02 © Danfoss 2014-12 AK-EM 800
Function layout & filter
Each function is separated into 1 or more pages.
Select Configuration -> Users -> Users
A filter might is available if relevant
By Clicking the manage button on the right side, it will be possible edit the details for the current page.
Quick Links
There are three quick links in the top right corner of the screen.
If the Home button is pressed – it would lead to the function defined as the home page for that user.
If the Help button is pressed – it would open a new menu with two options.
If the Help option is chosen the User Guide for the AK-EM 800 will be opened in a separate browser tab
If the ”My Settings” option is chosen it will lead you to the User settings page for the user who is logged on.

AK-EM 800 User Guide USCO.PI.R1.G5.02 © Danfoss 2014-12 9
Overview
The Overview menu is where you work with History data.
Site List – A list of all created sites and possibility to collect logs
Audit Trail – A list of significant events in the EM 800 system
Reports – For viewing collected logs and making reports
Graphs - Create graphs and save them as a report
Alarms
The Alarms menu is where you can manage received alarms.
Alarm Lists – For managing received alarmsSuspended Sites / Assets – For suspending alarms from a site or assets

10 User Guide USCO.PI.R1.G5.02 © Danfoss 2014-12 AK-EM 800
Destinations
This is where the destinations are added. These destinations can be used for various functions like Report forwarding, Alarm forwarding etc.
At the moment it is possible to add Text message destinations and E-mail destinations, but only E-mail forwarding is supported in 1.0
Select Configuration -> Destinations -> Email
Press "Manage"
For adding a new entry select the "Add" button
Adding a Destination
1. All the fields in this column are required fields and must be filled out.
2. The selections in this field can be made according to preferences
3. When all required settings have been made the entry must be saved
ConfigurationThe Configuration menu is where you setup the AK-EM 800
GeneralDestinations – For adding E-mail and Text message receiversSystem Settings – For Email server settings, General settings,
Folder setting for scheduled report saving, Backup settings, Archive settings, requesting and activation of the license
AlarmSystem Alarm – For changing priority settings for system alarmsAlarm Routes – For making changes in the alarm forwarding rules
SiteSite – For adding / changing sitesChain – For adding / changing chain details
UsersUsers – For adding / changing user detailsContractors – For adding / changing contractors details

AK-EM 800 User Guide USCO.PI.R1.G5.02 © Danfoss 2014-12 11
System Settings
This is where settings related to the AK-EM 800 must be entered.
In system settings the user can add/change settings for Email, general details, schedules, backup, archive and licensing.
Select Configuration -> System Settings
1. Select which type of server is used
2. Add server details (e.g. Gmail, GMX,..)
3. If the server only allows authorized users this tickmark must be selected and details added
4. To test the entered details a Test mail can be sent to verify if entered settings are correct
It is possible to use the following type of Email servers:
1. SSL Encrypted SMTP Server2. TLS Encrypted SMTP Server3. Unauthorized SMTP Server4. Microsoft Exchange 2010 Server.
a. If the Exchange server is chosen the fields above will be different but intuitive.b. Exchange server only supports http not https

12 User Guide USCO.PI.R1.G5.02 © Danfoss 2014-12 AK-EM 800
General Settings
This is where settings related to alarms are entered.
Select Configuration -> System Settings -> General Settings
Schedule Settings (for reports)
Select Configuration -> System Settings -> Schedule Settings
In the schedule report section the user will be able to send a report as an attachment to an Email. But he will also be able to save a report on a scheduled basis in a free selectable folder. This can be a local folder on the AK-EM 800 server, but also a network drive.
Auto acknowledge inactive alarms:If an alarm should be acknowledged automatically when it is inactive. The alarm will acknowledge the alarm in the front end as well (except AKM sites).
Alarm repeat count duration When this setting is enabled with a time value, the AK-EM 800 system will monitor every alarm and add a counter detail, which shows how many times this alarm has occurred within the time set here since the last alarm has been received. Example: If the value here is set to 1 hour and an alarm is received at 7:00 Then AK-EM 800 will see how many times that alarm has been received from 6:00 to 7:00. (see picture Alarm repeat count). Even if the time now is 9:00 it will still calculate from 6:00 to 7:00, because the last time it received this alarm was at 7:00.
Allowable logdata gap (in minutes)Will ignore data gaps in logs > XX minutes. Max. time is 1440 minutes.
Dependent on the front end and the usage of the controller data gaps are possible. If this is the case and the user is not interested to get a system alarm for any data gap, this value should be adjusted.
License notification period (in days)When the license will expire, the user will get on every logon a notification (min 14 days, max 60 days before expiring)
Synchronize SC/SM time zone offsetAK-EM 800 is able to synchronize the time zone offset of AK- SC 255/AK-SC 355 and the SM800 series based on server timeSynchronize SC/SM clockAK-EM 800 is able to synchronize the clock of AK-SC 255/AK-SC 355 and the AK-SM 800 series based on server time
"Alarm repeat count"

AK-EM 800 User Guide USCO.PI.R1.G5.02 © Danfoss 2014-12 13
Backup Settings
Select Configuration -> System Settings -> Backup Settings
This feature allows the Superadmin to create a manual or scheduled backup of the system.The Superadmin has all rights at any time, and can not be deleted (default:admin/danfoss). There are several functions reserved for Superadmin only like report schedule settings, backup, archiving and licensing and alarm clear in one go without acknowledge.
This backup is always a complete database dump and not an incremental one.The user can create a schedule on a daily, weekly or monthly basis (Attention! AK-EM 800 will NOT delete any old backup file).To create such a backup, the Superadmin must select time, folder name the format and if the user likes to compress the backup file.If everything is selected, he must save his selection or he can make a backup on demand only (press backup now) In that case he will get a message and his selection is not saved

14 User Guide USCO.PI.R1.G5.02 © Danfoss 2014-12 AK-EM 800
Restore
To restore a backup to AK-EM 800 you can use the SQL order (if known) or a tool, which comes together with AK-EM 800.
The tool is available in the subfolder named “RestoreTool” in the AK-EM_800 folder.The folder contains an executable JAR file and two batch files.Please start the batch “RestoreTool” and follow the instructions.
It’s important to stop the Tomcat service (see installation guide)
Select the backup file (press select path) and afterwards press the Restore button. Dependent on size of the file it will take several minutes.If finished, restart the Tomcat service.

AK-EM 800 User Guide USCO.PI.R1.G5.02 © Danfoss 2014-12 15
Archive Settings
Select Configuration -> System Settings -> Archive Settings
This feature allows the Superadmin to archive (zip) the database. This action will move all data in a different database. They are still visible, but it will take more time to present the data in a report.It is only possible to archive data which are 14day old or older. If the user selects e.g. yesterday, he will get an error message. It is not possible to schedule the archive.
To create an archive, the Superadmin must select a data in the past (min. 14 days old) and press the archive now button.

16 User Guide USCO.PI.R1.G5.02 © Danfoss 2014-12 AK-EM 800
Request licenseSelect Configuration -> System Settings -> Request license
AK-EM 800 Version 2.0.1 introduces a new licensing model. A valid license must be purchased from Danfoss in order to operate your AK-EM 800. The license model offers the ability to only pay for functionality or number of sites you require. Please contact your Danfoss sales representative for full descriptions of the different license options.
In order to create a unique license (based on your PC/Server hardware credentials) and paid level of functionality, a custom file is required to be generated within your EM800 and mailed to the Danfoss license office. Once Danofss receives this information, a unique license will be generated by Danfoss and sent back for activation within your AK-EM800. Upon activation of the license, functionality and site capacity will be unlocked for the duration defined at the time of license creation. The following section describes the overall workflow.
Workflow:1. Download and install AK-EM800 software from Danfoss.com
(http://food-retail.danfoss.com/knowledge-center/software/ak-em-800/)
2. Fill in all fields (all of them are mandatory) 3. Press the save button(will be confirmed by a popup window
“User information saved successfully” 4. Press the “Generate UIF” button. (UIF = user information file).
Depended on your browser the user is forced to save the file in a directory of his choice.
The file contains unique information based on the install server or PC hardware and user details previously entered.{"Host Id":"invalid","Contact name":"User","No. of sites":"500","Purchase order":"KB00001","Email":"[email protected]","Customer number":"3150141092","Customer name":"Danfoss NAM","Primary contact": "3150141092", "OS_Platform":"2","License period in years":"5"}
When the UIF file is created, forward it to [email protected].
Danfoss will process the UIF file and will respond with a license file, which has been generated based on the specific hardware and license purchase previously entered. The license file has the extension .lic (e.g. 3_ disksn=S13TJ90S104587.lic) (e.g. 3_disksn=S13TJ90S104587.lic)
The following section will describe how to deploy the .lic file send by Danfoss.

AK-EM 800 User Guide USCO.PI.R1.G5.02 © Danfoss 2014-12 17
Activate license
The Superadmin starts AK-EM 800 1st time (default credentials admin/danfoss) or restarts his updated AK-EM 800. If no license is ordered, he can see only following screen. (“License is not available or expired”
For license entry or updates the user should select Configuration -> System Settings -> Activate license
To activate the received license, open the file with a text editor (e.g. Notepad) and copy the complete content in the clipboard (mark all then copy) and paste it in the “Paste license box on AK-EM 800.

18 User Guide USCO.PI.R1.G5.02 © Danfoss 2014-12 AK-EM 800
Press now the “Register” button and the Superadmin should get following message:
Now the Superadmin can see the license details and the Expire date.

AK-EM 800 User Guide USCO.PI.R1.G5.02 © Danfoss 2014-12 19
System Alarm Settings
In addition to alarms from the Danfoss front end controllers, the AK-EM 800 can generate System alarms and warning messages that can be sent by the AK-EM 800 System. And on this page it is possible to choose the severity of them.
Select Configuration -> Alarms -> System Alarm
Press "Manage"
The priority can be chosen from Log Only to CriticalAnd an appropriate Action code can also be chosen from 1-15
The Priority can be used in the current alarm screen as a sorting criteria.The Action code can be used for alarm forwarding. (see chapter alarm routes)
Or the particular alarm type can be disabled.
Alarm Routes
This is where you setup alarm forwarding rules by E-mail to previously created Destinations.
There is a list of all ready created rules which can be used to copy from or completely new rules can be created.
Select Configuration -> Alarms -> Alarm Routes
For adding a Routing rule, click on ”Manage” and select the ”Add” option.

20 User Guide USCO.PI.R1.G5.02 © Danfoss 2014-12 AK-EM 800
Alarm routes (continued)
First the sites that this rule should be used for must be selected.
1. Define a name for the rule2. Choose the sites3. Assign by clicking on the green ”Right” arrow.
Then a schedule for when this rule should be affective must be defined
1. Press the edit button or double click on a specific day and make the necessary selection for the schedule. The time values can be from 00:00 to 23:59
2. When done save the values to the time table by pressing OK
You can also select all days

AK-EM 800 User Guide USCO.PI.R1.G5.02 © Danfoss 2014-12 21
Third step in creating a forwarding rule is to select the recipients of the alarm
1. Choose the correct receiver among available destinations
2. Add it by clicking on the green ”Right” arrow.
Finally select the Action codes for which this rule should be affective for and save the routing rule.

22 User Guide USCO.PI.R1.G5.02 © Danfoss 2014-12 AK-EM 800
If all settings are made correctly an e-mail will be sent with the following alarm details.
Chains
Select Configuration -> Site -> Chain
Supporting multiple customers (Chains) is possible with the AK-EM 800. The following section describes how to configure store chains.
For adding a new Chain, click on ”Manage” and select the ”Add” option.
This is where the Chains are managed. Once a Chain has been created they can be associated with sites and reports can be made based on the Chain information
A new chain can be added or existing ones can be modified by clicking the manage button.

AK-EM 800 User Guide USCO.PI.R1.G5.02 © Danfoss 2014-12 23
Adding a Chain
First the contact details must be added
Then the sites must be associated for the chain if they are available and not associated.The association can also be done later when a site is created.
1. Select which sites to add to this chain
2. Add them by clicking on the green ”Right” arrow.

24 User Guide USCO.PI.R1.G5.02 © Danfoss 2014-12 AK-EM 800
Once the site have been added, the Food types used at this site must be created if HACCP and TQ reports are required.
The Food types are later used when configuring HACCP parameters.
1. For adding a new food type, click on ”Manage” and select the ”Add” option.
2. Add the necessary details for the entry and save it by pressing ”Done”. Recommendation: Add the limit also to the Food type name. That makes the limits visible on all settings
3. When all food types have been added the entries must be saved by pressing ”Done”.
4. Save the Chain entry by clicking the Save button.

AK-EM 800 User Guide USCO.PI.R1.G5.02 © Danfoss 2014-12 25
Site
Select Configuration -> Site -> Site
This is where the existing sites are listed, and new ones can be added by clicking the manage button.
For adding a new Site, click on ”Manage” and select the ”Add” option.
Adding a site
Enter the name and the other details for the new Site entry
Enter the name and the other details for the new Site entry.Comments and PDF’s can be added to a site. Max. 5 PDF’s with max. 10MByte per PDF are possible. Comments are not limited.
Choosing a chain, timezone and site name are mandatory.

26 User Guide USCO.PI.R1.G5.02 © Danfoss 2014-12 AK-EM 800
Adding an AK-SM 800 series or an AK-SC 355 site
1. Select AK-SM 8xx or AK-SC 355 as System Type2. Type the connection details (IP address and Alarm Port) for the
unit, and verify that there is a successful connection.3. Define how often the site connection should be scanned4. This action is dependend on the contract between monitoring
center and enduser. A typical value is once per day.5. Select how often history log data should be fetched from the
site6. Type in user name and password of the unit. This is needed for
write actions to the unit.
Adding a new AKM Site
1. Select AKM as System Type2. Type the connection details for the AKM Agent, and verify that
there is a successful connection to the AKM database.3. Define how often the site connection should be scanned4. Choose what type of data is collected from this site. If only log
an extra entry for alarm will be available.5. Select how often the log data should be fetched from the site6. Once there is a successful connection, retrieve all the networks
in AKM to choose the one for this site.

AK-EM 800 User Guide USCO.PI.R1.G5.02 © Danfoss 2014-12 27
7. When the networks have been scanned, they will be on the left side. And must be selected. Once the selection is done, the selection must be saved. Remember to add both master and slaves.
The contractor details can be added and the entry can be saved.
When saved, AK-EM 800 will retrieve asset and log details for the site.

28 User Guide USCO.PI.R1.G5.02 © Danfoss 2014-12 AK-EM 800
Once a site has been added and asset details and log definitions has been retrieved some extra functions will be available
Information page – Gives details about the assets and logs configured on the site
Conflicts– Gives information about any conflicts with this site
A conflict is detected, if there is any difference between the AK-SM 800 database and the unit on site is detected. E.g. new or deleted history logs,...
Associate food types– Gives the possibility to add assets to defined food types
Report configurationPossibility to create the conditions for- HACCP reports- TQ reports
Graphs– Easy way to view graphs for the selected site

AK-EM 800 User Guide USCO.PI.R1.G5.02 © Danfoss 2014-12 29
Site Information
On the Site information page it is possible to see the details that has been uploaded to the AK-EM 800 system, and the status e.g. a new log has been added to the system.
The user is able to enable only logs he likes to retrieve from a site.By default, nothing is selected, but all logs are collected.
In addition the user can change the collect rate (e.g. from site a 1 minute log is selected, but if a 10 minute log is good enough, the user can change the rate from here.)1. Select the logs for the new sample rate (or select all) 2. Choose "Collect rate" in the "Action" drop down box.3. Set the new sample rate in the "Collect rate" drop down box4. Press the "Save & Apply" button
It is also possible to recollect data in case of data gaps. 1. Select the logs to recollect (or select all) 2. Choose "Start time" in the "Action" drop down box.3. Set data and time4. Press the "Save & Apply" button
If the user like to do both in one go, he should choose "Both" in the "Action" drop down box.

30 User Guide USCO.PI.R1.G5.02 © Danfoss 2014-12 AK-EM 800
Conflict
The Conflicts page is only presented if there is a conflict between the known details and the newly updated details, e.g. if log definition has been changed or a new asset is added etc.
Select the assets or parameters and press the Accept button to accept the changes
If a log has been deleted in the front end, the previously collected data for these assets will not be deleted.Likewise if new parameters have been added in a log, they will also be collected, even though the user doesn’t accept the changes first.
Food type Associations
If a site has been assigned to a chain and Food type data is available it is possible to make HACCP reports for that site.
1. Select the food type
2. Choose the controller that must be assigned to the chosen food type
3. Assign by clicking on the green ”Right” arrow.

AK-EM 800 User Guide USCO.PI.R1.G5.02 © Danfoss 2014-12 31
Report Configuration (HACCP and TQ)Once the food types have been correctly assigned, it is time to select the parameters that must be added to the report.
1. Choose the Tag type: Temperature, Defrost and Main Switch signal
For HACCP or Temp quality sensor use e.g. "u12 S3 air", "u36 S6
Temp"
For Defrost signal use:a. CTRL.STATE if the controller value delivers (parameter EKC State
or Ctrl.State) 1,4,14 or 15 for defrost if not available use
b. REG.CONDITION (parameter Reg.Cond)if value delivers 4 or 5 if not available use
c. Defrost State e.g. "u60 Def. relay or Defrost state". Value should be 1
For main switch signal use:CTRL.STATE if the controller value delivers (parameter EKC State or Ctrl.State) 10,4,14 or 15 for defrostif not available useMAINSWITCH(2) (parameter r12 Mainswitch) controller delivers value 0 (0=off,1=On)if not available useMAINSWITCH(3) (parameter r12 Mainswitch) controller delivers
value -1 or 0 (0=off,1=On,-1=manual)
2. Select the parameterNote: These parameter must be logged
3. Add them to the ”Selected” list and save
Example: HACCP configuration

32 User Guide USCO.PI.R1.G5.02 © Danfoss 2014-12 AK-EM 800
Example: TQ configuration
Graphs- see custom graphing

AK-EM 800 User Guide USCO.PI.R1.G5.02 © Danfoss 2014-12 33
Users
Select Configuration -> Users -> Users
The users function is divided into 3 pages
All users – List of existing users with managing functions
User group– List of defined user groups with managing functions
My Settings– Settings for the user that is logged in
All Users page
There are by default 4 users created
Super Administrator– This user has all rights at any time, and can not be deleted (admin/danfoss)
Administrator – This user has all rights by default but can be altered (administrator/danfoss)
User – This user has all rights except write access to the ”Configuration” menu (user/danfoss)
Guest– This user can view everything but not change anything (guest/danfoss)
For adding a user, click on ”Manage” and select the ”Add” option.

34 User Guide USCO.PI.R1.G5.02 © Danfoss 2014-12 AK-EM 800
Adding a user
All the fields in this column must be filled in.
A good idea would be to have a default for the fields that the user can change afterwards,
Log on name can’t be changed later and User Group association can’t be changed by the user himself.
To disable the auto log off function, set the "Log off intervall" to zero.
Site association to a user
1. Select which site to associate to selected user
2. Assign them by clicking on the ”Right” arrow.
3. When all the settings have been made the new user can be
created by pressing the Save button in the top right corner
* Please find a time zone table at the end of the document
*

AK-EM 800 User Guide USCO.PI.R1.G5.02 © Danfoss 2014-12 35
User Groups page
This is where user groups can be added or existing User groups can be changed.
There are 4 User groups by default with different restrictions.
Super admin, Administrators, Users and Guests.
1. For adding a User group, click on ”Manage” and select the ”Add” option.
Adding a new user group
When creating a new ”User group” the admin must decide what pages the new User group must have read and write access to.
There are three tabs, where each of them represents a menu group. In every menu group the admin can choose the read or write access for each page.
1. The name for the new menu group must be entered here
2. If required the new group can be based on of the already existing user groups.
3. Assign rights
Read access will let the user view information for the respective page
Write access will let the user change information for the respective page

36 User Guide USCO.PI.R1.G5.02 © Danfoss 2014-12 AK-EM 800
Contractors
Select Configuration -> Users -> Contractors
A contractor is the person that has the technical knowledge regarding the installation, and will be the one to contact if something has to be changed on the installation.
For adding a Contractor, click on ”Manage” and select the ”Add” option.
When the Contractor informations has been added, the entry must be saved.When creating a site entry in the system, the contractors can be assigned for that site.
Choose which type of contractor it is

AK-EM 800 User Guide USCO.PI.R1.G5.02 © Danfoss 2014-12 37
Scheduled Reports
Select Configuration -> Schedules -> Reports
A scheduled report is today a HACCP or TQ report you like to forward on a frequently basis to one or more Email addresses.
To add a reports click on “Manage” and select “Add”. As usual Manage opens also the menu to edit or delete an existing schedule.
To schedule a HACCP report, the store must been setup before with food types, association of food types and the HACCP configuration (see corresponding chapter).Insert also the report type (today only HACCP and Temperature Quality are available), the format of the file name and the chain. Afterwards, you have to the select one or more sites (from available to selected sites) and the Email destinations. The destinations are defined before under menu configuration – destination.
The user can select, if the report should run for a period only (from to) or if the report should have no end date.Select also the time when the report will be send out.

38 User Guide USCO.PI.R1.G5.02 © Danfoss 2014-12 AK-EM 800
There is also a possibility to store the HACCP PDF on a network drive. The location can be defined in the system settings.(Configuration – System settings – Schedule settings)
As usual, a logo for the report can be selected.
After finishing all details, the report must be saved. A message box will appear and allows the user to give the schedule a name and also if the report will be shared with other users or not.
Afterwards the report is listed in the overview
The user can see the name of the report, when it was created and also when it was last time executed.
The result should be a report with a PDF attachment. The PDF contains HACCP data (see example below)

AK-EM 800 User Guide USCO.PI.R1.G5.02 © Danfoss 2014-12 39
AlarmsThe graphic below describes the work flow of an alarm and how it's handled in AK-EM 800.Active: An alarm situation is present on siteInactive: An alarm situation is not present on siteAcknowledged: A User has accepted this alarmCleared: A stage the alarm is when Ack’ed and Inactive
ActiveActiveAcknowledged
InactiveAcknowledgedInactive Cleared
Current
History
Alarm Lists
Select Alarm -> Alarm Lists
The Alarm Lists function contains 2 pages by default, Current Alarms and Historical Alarms, where the alarms which are not acknowledged will be listed in the Current alarms list.
If the alarm has been acknowledged by a user it will be shown with a tick mark in the ”Ack” column and the colour for that alarm will change according to the settings for the logged in user.
When cancelled and acknowledged it will be moved to Historical alarms.
An alarm can be acknowledged and cleared by selecting it and choosing one of the available options.
Reorganizing of columns is possible by drag&drop of the headlines

40 User Guide USCO.PI.R1.G5.02 © Danfoss 2014-12 AK-EM 800
By selecting the ”Show Pane” option it is possible to see more details for one selected alarms
1. Tick mark the Show Pane option
2. Select an alarm to see more details for that alarm
To see more details for an alarm, the user can double click an entry.Then three new pages will be presented.
The Overview page has a few more details than the list e.g. when the alarm was cancelled and a calculation of the duration
Press button “Legend” to get details about what history log is available for this particular alarm and select the log(s).

AK-EM 800 User Guide USCO.PI.R1.G5.02 © Danfoss 2014-12 41
Press Ok to get the log(s) presented. The graph will show, what’s available in the database. In parallem EM800 logs into the frontend and collects the newest data. This will take a few seconds, before updated data are presented.
If the resolution of the graph is not good enough, or the user needs to see data from previous time he should press the button “Standard graph”. The user is now able to change the timeframe or export the graph to PDF/XML.
42 User Guide USCO.PI.R1.G5.02 © Danfoss 2014-12 AK-EM 800
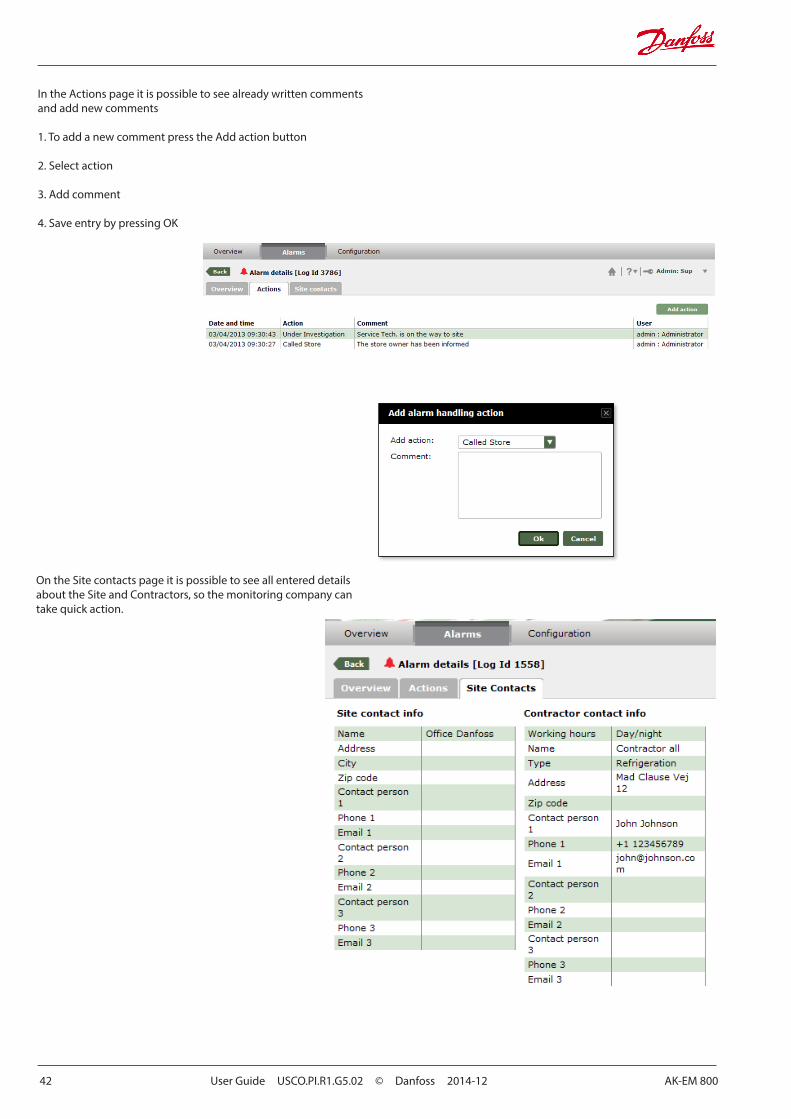
In the Actions page it is possible to see already written comments and add new comments
1. To add a new comment press the Add action button
2. Select action
3. Add comment
4. Save entry by pressing OK
On the Site contacts page it is possible to see all entered details about the Site and Contractors, so the monitoring company can take quick action.

AK-EM 800 User Guide USCO.PI.R1.G5.02 © Danfoss 2014-12 43
Filtered Alarm Lists
It is also possible to make filtered alarm lists
To make a filtered list, press the filter option
It is possible to open an existing filter settings, or create a new filter.When choosing the different filter settings they can be edited or left as they are.
If a filter already has been made and saved, it can be chosen in the list.
To filter on a specific chain levelWhich type of alarms you want to see
It is also possible to filter on a specific column e.g. Site name.
To enable the filtered view press Apply
If required the filter can be saved and opened later.

44 User Guide USCO.PI.R1.G5.02 © Danfoss 2014-12 AK-EM 800
A quicker way to make a filter is also possible.If an alarm is already selected and then the ”Filter” button is pressed, there will be some pre-selected values in the filter already.
When the filter has been applied a new page with the filtered alarms will be present where the filter settings can be seen as well.

AK-EM 800 User Guide USCO.PI.R1.G5.02 © Danfoss 2014-12 45
Suspended Alarms
Select Alarm -> Suspended sites / Assets
From the AK-EM 800 system, it is possible to suspend the alarms received from a Chain, site or an asset.
To add a new suspension rule click on Manage and press ”Add”
1. Select the duration for the suspension
2. Select which site or asset should be suspended
3. Add a comment and Save
When a suspension has been added it will be shown in the list.
It is also possible to see more details about that particular suspension, e.g. the amount of time left before the suspension is cancelled.
The entry in the list will automatically be deleted from the list when the suspension is over.
To stop suspension before time, select the correct suspension line and press the End button.

46 User Guide USCO.PI.R1.G5.02 © Danfoss 2014-12 AK-EM 800
Site Lists
Select Overview -> General ->Site Lists
The Site list is a list of complete entries in the AK-EM 800 system and can be filtered according to need as well.
From this list it is possible to do a manual collection of logs.
To start a manual collection of logs, press manage, choose a site and press the ”Collect logs” button.
Audit Trail
Select Overview -> General ->Audit Trail
The Audit trail is where all actions made in the AK-EM 800 system is saved.The data in here will never be deleted and can’t be deleted manually either.
Overview

AK-EM 800 User Guide USCO.PI.R1.G5.02 © Danfoss 2014-12 47
Reports
Select Overview -> General ->Reports
It is possible to present historical data in different ways in the AK-EM 800. This is done in the Graphs & Report function. It is possible to save favourite reports which can be opened for quick access to specific data.
To add a new report type or view data choose the ”Add” option.
Alarm Report
Enables the user to make an Alarm Count pr. Site pr. Asset report for the alarm report. To do this select “Alarm report” in the Report type.
1. Select the chain to make the report for
2. Select the duration for the alarms to be included in the report
3. Select the sites to be included in the report and either save this as a favourite or view to create the report.

48 User Guide USCO.PI.R1.G5.02 © Danfoss 2014-12 AK-EM 800
The Alarm Report will be opened in a new window, with a list sorted after the amount of alarms received pr. asset from the selected sites within the selected chain.
By double clicking again on one of the alarms, more details can be seen.
By double clicking on one of the lines it is possible to see further details for that particular asset

AK-EM 800 User Guide USCO.PI.R1.G5.02 © Danfoss 2014-12 49
Graphs
"Select Overview -> Graphs"
To present collected log data as a curve select ”Custom Graphing” as Report type
1. Select the chain to make the report for
2. Select from when the curve should be drawn
3. Select the parameters to be included in the report and either save this as a favourite or view to create the report.
A curve will be drawn where the Y-axis is scaled according to the max. and min. values for the selected parameters
It is possible to select or deselect the parameters to be drawn. If Min. and Max. values are changed the graph will automatically be scaled.Dependent on values a dual axis graph will be presented automatically.
More detail can be seen if the mouse is hovered over the curve
50 User Guide USCO.PI.R1.G5.02 © Danfoss 2014-12 AK-EM 800
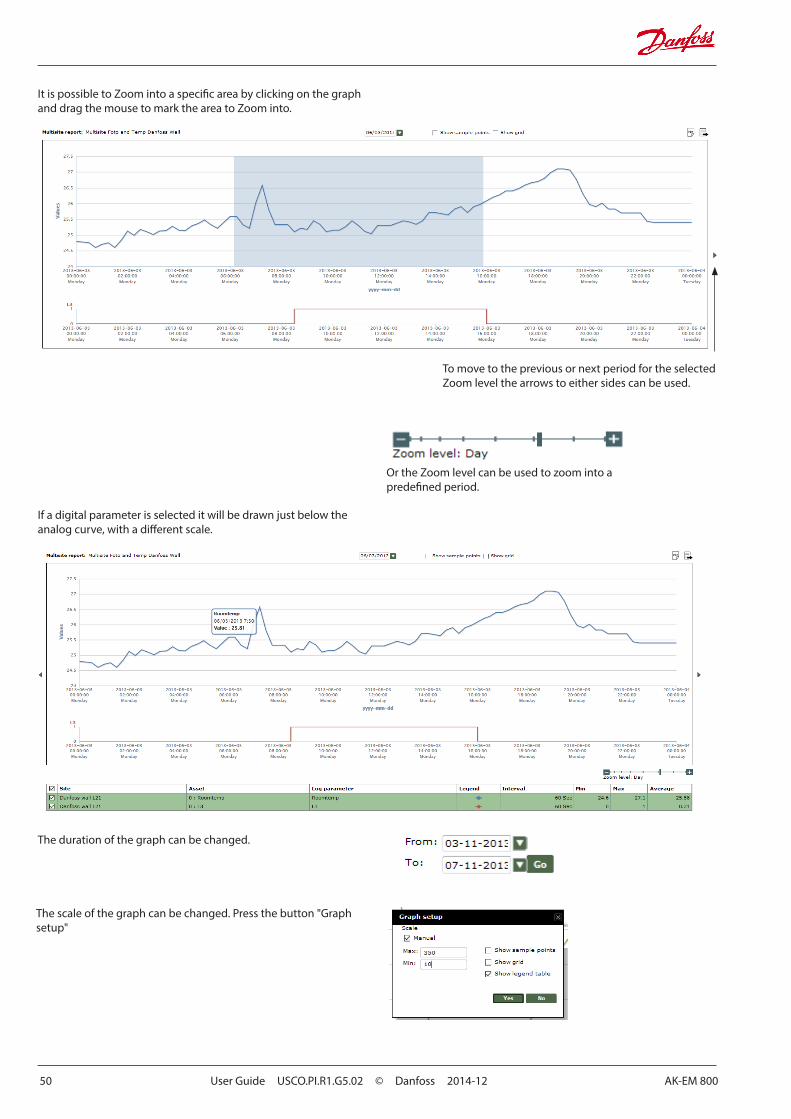
It is possible to Zoom into a specific area by clicking on the graph and drag the mouse to mark the area to Zoom into.
Or the Zoom level can be used to zoom into a predefined period.
To move to the previous or next period for the selected Zoom level the arrows to either sides can be used.
If a digital parameter is selected it will be drawn just below the analog curve, with a different scale.
The duration of the graph can be changed.
The scale of the graph can be changed. Press the button "Graph setup"

AK-EM 800 User Guide USCO.PI.R1.G5.02 © Danfoss 2014-12 51
The HACCP Report can only be made if the Food type association and HACCP Configuration has already been done.
1. Select the site to make the report for
2. Select the day to make the HACCP report for and either save this as a favourite or view to create the report.
HACCP Report
The HACCP Report will be opened in a new window, with a list of all the configured parameters.
1. To see more details press the Show Pane option
2. When a parameter is chosen the curves for it will be present just below.

52 User Guide USCO.PI.R1.G5.02 © Danfoss 2014-12 AK-EM 800
TQ (Temperature Quality) report
The TQ Report can only be made if the Report configuration (see site configuration) has already been done. In difference to the HACCP report, the TQ report will take the set point and not the food type as reference to present the colors.
1. Select the site to make the report for 2. Select the day to make the TQ report for and either save this as a
favorite or view to create the report
The TQ Report will be opened in a new window (or dependent on your browser setting in a new tab), with a list of all the configured parameters. 1. To see more details press the Show Pane option 2. When a parameter is chosen the curves for it will be present just
below.

AK-EM 800 User Guide USCO.PI.R1.G5.02 © Danfoss 2014-12 53
Time zone handling at AK-EM 800 Option selected by the user
UTC User Local Time (will be detected via Browser)
Site Local Time
Database handling UTC UTC UTC
Site List UTC User Local Site Local
Audit Trail UTC User Local EM800 Local
Graph and Reports Template creation date UTC User Local EM800 Local
Graph/HACCP view Site Local Site Local Site Local
Alarm List
Alarms from sites UTC User Local Site Local
AK-EM 800 System alarms that do not belong to any site UTC User Local EM800 Local
Suspended Site/Assets Site Local Site Local Site Local
Destinations -- -- --
System Settings -- -- --
Alarm Routes/ Email routing Site Local Site Local Site Local
System Alarms -- -- --
Users -- -- --
Contractors -- -- --
Site -- -- --
Chain -- -- --
Export to XML UTC UTC UTC
Export to PDF The timestamp appearing on Export will be same as the time stamp user is viewing on AK-EM 800.
Time zone settings
Appendix

54 User Guide USCO.PI.R1.G5.02 © Danfoss 2014-12 AK-EM 800
AD
AP-
KOO
L®
Danfoss can accept no responsibility for possible errors in catalogues, brochures and other printed material. Danfoss reserves the right to alter its products without notice. This also applies to products already on order provided that such alternations can be made without subsequential changes being necessary in specifications already agreed.All trademarks in this material are property of the respecitve companies. Danfoss and Danfoss logotype are trademarks of Danfoss A/S. All rights reserved.