Embed Size (px)
Citation preview

Operating Instructions
AirPrint Guide
For safe and correct use, be sure to read Safety Information before usingthe machine.


TABLE OF CONTENTSHow to Read the Manuals................................................................................................................................. 2
Symbols Used in Manuals............................................................................................................................. 2
Disclaimer........................................................................................................................................................2
1. How to Use AirPrint
Before Using AirPrint...........................................................................................................................................3
About AirPrint..................................................................................................................................................3
Requirements for using AirPrint......................................................................................................................3
Confirming Settings........................................................................................................................................ 4
Notes and Limitations.....................................................................................................................................5
Using AirPrint From OS X or macOS.................................................................................................................8
Connecting the Machine to OS X or macOS.............................................................................................. 8
Printing Documents Using OS X or macOS..................................................................................................9
Scanning Documents Using OS X or macOS............................................................................................13
Sending Faxes Using OS X or macOS...................................................................................................... 15
Using AirPrint From iOS................................................................................................................................... 19
Printing Documents Using iOS.................................................................................................................... 19
2. Trademarks
Trademarks....................................................................................................................................................... 21
1

How to Read the Manuals
Symbols Used in Manuals
This manual uses the following symbols:
Indicates supplementary explanations of the product's functions and instructions on resolving user errors.
[ ]Indicates the names of keys or buttons on the product or display.
Disclaimer
To the maximum extent permitted by applicable laws, in no event will the manufacturer be liable for anydamages whatsoever arising out of failures of this machine, losses of the registered data, or the use ornon-use of this product and operation manuals provided with it.
Make sure that you always copy or have backups of the data registered in this machine. Documents ordata might be erased due to your operational errors or malfunctions of the machine.
In no event will the manufacturer be responsible for any documents created by you using this machine orany results from the data executed by you.
2

1. How to Use AirPrintThis section describes how to use devices from OS X, macOS or iOS using AirPrint.
Before Using AirPrint
About AirPrint
AirPrint is a function that allows you to use AirPrint-compatible printers or multi-function printers that areon the same network to print, scan, and fax from iOS, OS X, or mac OS. You can use the print functionon iOS, and you can use the print, scan, and fax functions on OS X, or mac OS. You can use the print,scan, and fax functions via wired LAN, wireless LAN, or a USB connection on the same network, withoutinstalling any printer drivers or software.
• Available functions may differ depending on connected device or connection method.
• For details about available functions, see our website.
Requirements for using AirPrint
OS X and macOS requirements
The following conditions are necessary to print with OS X or macOS:
• OS X 10.7 (Lion) or later
• AirPrint compatible printer or multi-function printer
The following conditions are necessary to scan with OS X or macOS:
• OS X 10.10.3 (Yosemite) or later
• AirPrint compatible multi-function printer
The following conditions are necessary to send fax with OS X or macOS:
• OS X 10.10.3 (Yosemite) or later
• AirPrint compatible multi-function printer
iOS requirements
The latest version of iOS must be installed to print with iOS.
• iPad (All models)
• iPhone (3GS or later)
• iPod touch (3rd generation or later)
3

Output device requirements
To use AirPrint, select [Active] for the following settings. These settings are set to [Active] by default.
• AirPrint
• Bonjour
• IPP
A device certificate must be installed because AirPrint uses SSL encrypted communications. Adevice certificate is already installed by default.
To confirm the AirPrint settings and device certificate, see page 4 "Confirming Settings".
Confirming Settings
Confirm the settings required for AirPrint by using a web browser on a computer on the network.
We use Web Image Monitor installed on the printer or multi-function printer. To log in Web ImageMonitor, see the web manual for your machine.
Confirming AirPrint settings
1. Log in to Web Image Monitor as a network administrator.
2. Click [Configuration] in "Device Management".
3. Click [AirPrint] in "Network".
4. Confirm that [AirPrint] is set to [Active].
If [Active] is not set, set to [Active].
5. Click [OK].
6. Click [IPv4] in "Network".
7. Confirm that [IPP] is set to [Active].
If [Active] is not set, set to [Active].
8. Click [OK].
9. Click [Bonjour] in "Network".
10. Confirm that [IPv4] or [IPv6] in "Bonjour" is set to [Active].
If [Active] is not set, set to [Active].
11. Click [OK].
Confirming IPP-SSL environment settings
1. Log in to Web Image Monitor as a network administrator.
2. Click [Configuration] in "Device Management".
3. Click [Device Certificate] in "Security".
Confirm the following conditions for [Certificate 1]:
1. How to Use AirPrint
4

• [Certificate Status] must be [Installed].
• The certificate must have a valid expiration date in [Validity Period].
If an error message appears, see the web manual for your machine.
4. Click [OK].
5. Click [SSL/TLS] in "Security".
6. Configure the following settings:
• Set [Active] for the version of the internet protocol you are using for [SSL/TLS].
• Set [Active] for [TLS1.2] in [SSL/TLS Version].
7. Click [OK].
Notes and Limitations
About basic function
• You need to set the security settings for TLS1.2 to use AirPrint.
• A device certificate (self-signed certificate) is installed automatically when AirPrint is set to[Active] but a device certificate for SSL/TLS is not installed.
• Your machine may be unable to communicate with the following utilities after the devicecertificate for SSL/TLS is installed:
• Ridoc GlobalScan
• Third-party products
If this happens, you can recover communications by using one of the three ways describedbelow.
• Install the certificate issued by the certificate authority to both the machine and the utility.
• If a certificate (self-signed certificate) is already installed on the device, install it to theutility as a reliable certificate.
• After setting AirPrint to [Inactive], delete the device certificate for SSL/TLS (You cannotuse AirPrint when AirPrint is set to [Inactive]).
• The default for "Permit SSL / TLS Communication" is [Ciphertext / Cleartext]. You need tospecify HTTPS to use encrypted communications because access using HTTP is not redirectedto HTTPS when [Ciphertext / Cleartext] is set. For instance, you must enter a URL starting withhttps to access Web Image Monitor.
• When [Ciphertext / Cleartext] is set in "Permit SSL / TLS Communication", your machine maycommunicate in clear-text with device management software even if a certificate for SSL/TLSis installed. If you want to use encrypted communications, return the setting to [CiphertextPriority] or [Ciphertext Only].
• If you cannot use AirPrint, contact your service representative.
Before Using AirPrint
5

About the print function
• To print with AirPrint, configure the settings to not use the user authentication function or setprint job authentication to [Simple (All)]. For details, see the web manual for your machine.
• When printing with AirPrint, your machine cannot accept multiple jobs simultaneously. Waitfor the preceding job to finish before printing the next one.
• If you cancel a job while it is printing, the main text may continue printing if that job has acover sheet.
• You may not be able to use the printing functions depending on the application.
• When printing odd pages, the last page may be counted as black and white depending onthe application and the operation system.
About the scanner function
• You can use the scanner function with AirPrint even if [Use a Destination List that is not DSM] in[General Settings] tab in [Scanner Features] is set to [Not Available].
• When scanning with AirPrint, the following settings are applied. The settings in the [SendSettings] tab in [Scanner Features] are not applied.
• Compression (Black & White): On
• Compression Method (Black & White): MMR
• Compression (Gray Scale / Full Color): On
• You cannot use the scanner function if the user authentication management function is used torestrict the use of functions.
About the fax function
• The name set in [First Name] in [Program Fax Information] on the [Initial Settings] tab in [FaxFeatures] is printed as the name of the sender. For details about the settings, see the webmanual for your machine. If you want to use a name other than that set in [First Name],contact your service representative.
• If unavailable letters are used in the address, the letters are ignored when sending a fax.
• The line type for fax transmission is set to external line (default). If you want to use anextension line for fax transmissions, contact your service representative.
• You can check transmission results in the Record.
• You cannot check the contents of documents sent with the fax function of AirPrint from themachine.
• If you are using OS X 10.8, a cover sheet will not be sent even if it is configured.
• You cannot use the fax function in the following conditions:
• When the use of functions is restricted by the user authentication management function
• When the fax function is restricted by an external charge unit
1. How to Use AirPrint
6

• When [Restrict Adding of User Destinations (Fax)] in [Extended Security] in "Security" isset to [On] on Web Image Monitor
• When the optional fax unit is not installed
• If the country code is set to Korea and a sender's name is not registered on the machine
• When the fax is being used on the machine
• When the hard disk on the machine has insufficient storage
Before Using AirPrint
7
Using AirPrint From OS X or macOSThis section describes how to use the print, fax, and scan functions of printers and multi-function printersfrom OS X and macOS. OS X 10.11 is used for example in this manual.
Connecting the Machine to OS X or macOS
Use the following procedure to connect the machine to OS X or macOS using AirPrint.
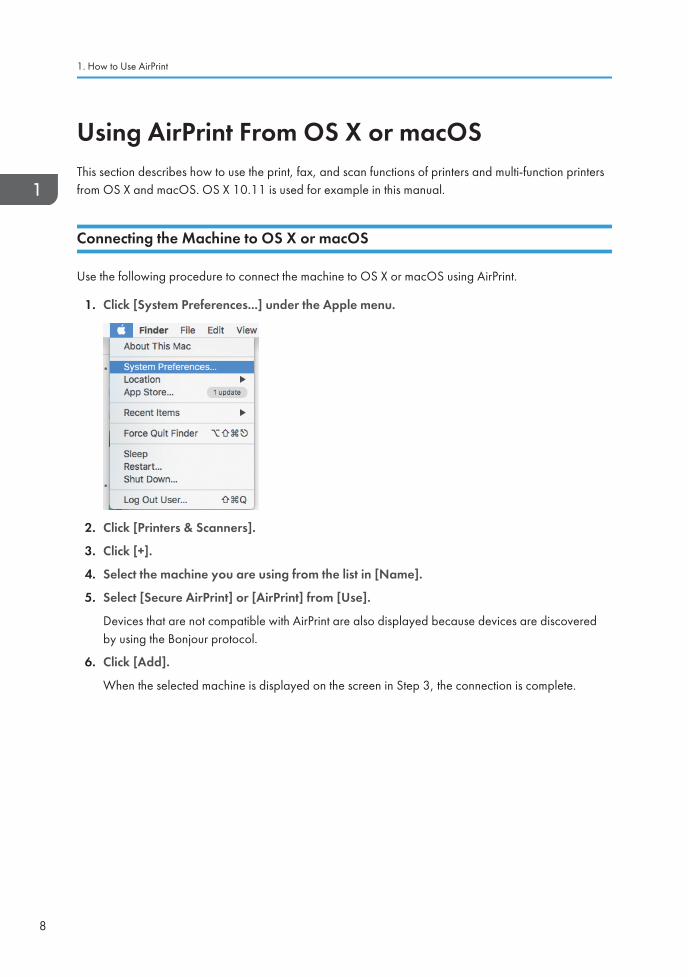
1. Click [System Preferences...] under the Apple menu.
2. Click [Printers & Scanners].
3. Click [+].
4. Select the machine you are using from the list in [Name].
5. Select [Secure AirPrint] or [AirPrint] from [Use].
Devices that are not compatible with AirPrint are also displayed because devices are discoveredby using the Bonjour protocol.
6. Click [Add].
When the selected machine is displayed on the screen in Step 3, the connection is complete.
1. How to Use AirPrint
8

Printing Documents Using OS X or macOS
1. Click [Print...] in the [File] menu of the application.
2. Select the machine to use for printing from [Printer].
3. Change the print settings as necessary, and then click [Print].
You can change the print settings by clicking [Show Details]. For details, see page 9 "Changingprint settings when using OS X or macOS".
Changing print settings when using OS X or macOS
You can change the print settings from OS X and macOS. Setting items may differ depending on theapplication you are using, the specifications of the connected machine, and the configuration of options.
1234
5
6
7 8
910
11
DVL901
1. Printer
Select the machine to use for printing.
Using AirPrint From OS X or macOS
9

2. Presets
You can save the displayed settings or recall stored settings.
3. Copies
Specify the quantity to print.
4. Pages
Specify the range of pages to print.
5. Paper Size
Specify the size of the paper. You can also specify custom sizes here.
6. Orientation
Select the orientation of the paper.
7. PDF
Displays the workflow menu for PDF.
8. Hide Details
Hides the print settings.
9. Black & White
Select this item to print in black and white.
10. Two-Sided
You can print on both sides of the paper when this item is checked.
11. Print option menu
Displays the menu according to the specifications of the connected machine and the configuration of options.For details, see page 10 "Print option menu".
Print option menu
Setting items may differ depending on specifications of the connected device or optional configurations.
[Media & Quality]
Select the paper tray and the paper type you want to use.
12
DVL902
1. Feed from
Select the paper tray.
2. Media Type
Select the type of paper.
1. How to Use AirPrint
10

[Layout]
Configure settings for two-sided printing or to combine multiple pages on one sheet.
1
2
DVL903
3
456
1. Pages per Sheet
Specify the number of pages to combine on one side of the paper.
2. Layout Direction
Specify how to arrange the pages.
3. Border
Specify the width and number of the borders between combined pages.
4. Two-Sided
Specify the print format for two sided printing.
5. Reverse page orientation
Reverse the orientation of the output paper.
6. Flip horizontally
Print by flipping the entire image on the page left to right.
[Paper Handling]
Specify the order of the pages to be printed, or print only the odd or even pages.
12
DVL904
34
1. Collate pages
When printing two or more sets, print them by sorting them in sets. (Sort printing)
2. Pages to Print
Specify to print all pages or only the odd or even pages.
3. Page Order
Specify the order of the pages to print.
Using AirPrint From OS X or macOS
11
4. Scale to fit paper size
Select this item to reduce or enlarge printouts to fit the paper. If you select this item, you can select thepaper size in [Destination Paper Size].
Reduce or enlarge printouts to fit the selected paper size.
When printing on paper larger than the print data without enlarging it, select [Scale down only].
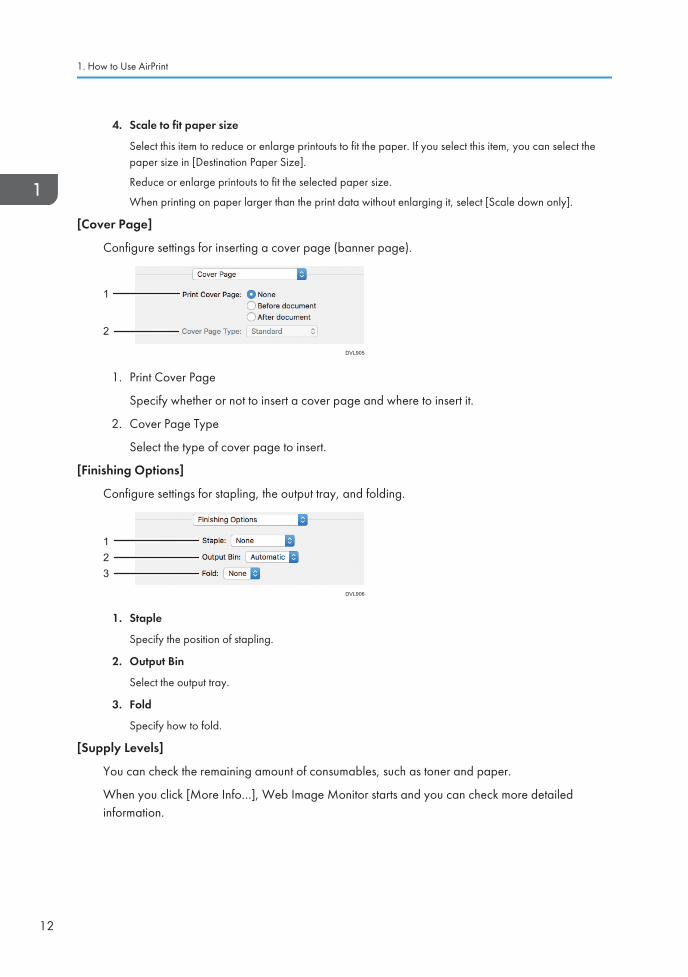
[Cover Page]
Configure settings for inserting a cover page (banner page).
1
2
DVL905
1. Print Cover Page
Specify whether or not to insert a cover page and where to insert it.
2. Cover Page Type
Select the type of cover page to insert.
[Finishing Options]
Configure settings for stapling, the output tray, and folding.
2
DVL906
3
1
1. Staple
Specify the position of stapling.
2. Output Bin
Select the output tray.
3. Fold
Specify how to fold.
[Supply Levels]
You can check the remaining amount of consumables, such as toner and paper.
When you click [More Info…], Web Image Monitor starts and you can check more detailedinformation.
1. How to Use AirPrint
12

Scanning Documents Using OS X or macOS
1. Place originals in the Auto Document Feeder (ADF) or on the exposure glass.
For details about placing originals, see the web manual for your machine.
2. Click [System Preferences...] under the Apple menu.
3. Click [Printers & Scanners].
4. Select the device to use for scanning from the list of [Printers].
5. Click [Scan].
6. Click [Open Scanner...]
7. Change the scan settings as necessary and click [Scan].
Select [Use Document Feeder] when using the ADF.
You can change the scan settings by clicking [Show Details]. For Details, see page 13"Changing scan settings".
When the scanned original is displayed on the [Scan] screen, scanning is complete.
Changing scan settings
You can change the scan settings from OS X and macOS. Setting items may differ depending on theapplication you are using, the specifications of the connected machine, and the configuration of options.
Using AirPrint From OS X or macOS
13

1234567891011
DVL908
12
1314
1. Scan Mode
Select whether to scan from the ADF or the exposure glass.
2. Kind
Select the type of original.
3. Resolution
Specify the resolution for scanning the original.
4. Use Custom Size
You can specify the scanning range as a value when this item is selected.
5. Size
Select the size of the original to scan.
6. Orientation
Select the orientation of scanned data.
7. Scan To
Specify the place to save scanned data.
8. Name
Specify the name for scanned data.
9. Format
Specify the file format for scanned data.
10. Image Correction
Specify the correction method for scanned data.
11. Enable edge detection
Use the function of the operating system to detect the outline of images and to specify the trimming range.
12. Scan
Execute scanning.
1. How to Use AirPrint
14

13. Overview
Display the scanned image of the original.
14. Hide Details
Hides the scan settings.
Sending Faxes Using OS X or macOS
1. Click [Print...] under the [File] menu of the application.
2. Select the device to use for sending fax from [Printer].
The machines that can be used to send faxes have "- Fax" at the end of their names.
3. Enter a fax number in [Address].
4. Change the fax transmission settings as necessary and click [Fax].
For details about fax transmission settings, see page 15 "Changing fax transmission settings".
Changing fax transmission settings
You can change the fax transmission settings from OS X and macOS. Setting items may differ dependingon the application you are using, the specifications of the connected machine, and the configuration ofoptions.
Using AirPrint From OS X or macOS
15

1234
5
6
8 9 DVL909
7
1. Printer
Select the machine to use for sending fax.
2. Presets
You can save the displayed settings or recall stored settings.
3. Copies
Specify the quantity to send fax.
4. Pages
Specify the range of pages of faxes to send.
5. Paper size
Specify the size of the paper.
6. Orientation
Select the orientation of the fax.
7. Fax transmission option menu
Displays the menus according to the specifications of the connected machine and the configuration of options.For details, see page 16 "Fax transmission option menu".
8. PDF
Displays the workflow menu for PDF.
9. Hide Details
Hides the fax transmission settings.
Fax transmission option menu
Setting items may differ depending on specifications of the connected device or optional configurations.
1. How to Use AirPrint
16

[Fax Information]
Enter information necessary for sending faxes.
2
DVL910
3
1
1. To
Enter the fax number of the destination.
2. Dialing Prefix
Enter the phone number necessary to call an external line from the phone being used.
3. Use cover page
Select this item when sending a cover page as the first page of the fax. Enter the contents of the coverpage in [Subject] and [Message].
[Preview]
This setting is not active even if it is configured.
[Layout]
Configure settings to combine multiple pages on one sheet.
2
DVL911
3
45
1
1. Pages per Sheet
Specify the number of pages to combine in one side of the paper.
2. Layout Direction
Specify how to arrange the pages.
3. Border
Specify the width and number of the borders between combined pages.
Using AirPrint From OS X or macOS
17

4. Reverse page orientation
Reverse the orientation of the fax to be sent.
5. Flip horizontally
Print by flipping the entire image on the page left to right.
[Paper Handling]
Specify the order of the pages to be sent, or send only the odd or even pages.
2
DVL912
3
1
1. Pages to Print
Specify to send all pages or only the odd or even pages.
2. Page Order
Specify the order of the pages to be sent.
3. Scale to fit paper size
Select this item to reduce or enlarge the size of faxes. If you select this item, you can select the paper sizein [Destination Paper Size].
Reduce or enlarge the size of faxes when sending to fit the selected paper size.
When sending on paper larger than the fax data without enlarging, check [Scale down only].
[Scheduler]
Configure a schedule for sending faxes.
2
DVL913
1
1. Print Document
Select [Now] to send the fax immediately.
Select [At] and specify the time to send the fax.
Select [On hold] to store the fax job in the print queue. You can send the fax later.
2. Priority
Select the priority level for sending the fax.
1. How to Use AirPrint
18

Using AirPrint From iOSThis section describes how to use the print function of printers and multi-function printers from iOS.
Printing Documents Using iOS
1. Tap the share icon ( ) on the application displaying data to print.
2. Tap [Print].
If [Print] is not displayed, flick the bottom area to the left.
3. Tap [Select Printer].
4. Tap the name of the device to use.
5. Tap [Option].
6. Change the print settings as necessary and tap [Print].
You can change the print settings by tapping [Options]. For details, see page 19 "Changing printsettings when using iOS".
Changing print settings when using iOS
You can change print settings from iOS. Setting items may differ depending on specifications of theconnected device or optional configurations.
Using AirPrint From iOS
19

1
DVL907
2
3
4
5
6
7
8
9
1. Printer
Select the device to use for printing.
2. Quantity
Specify the quantity to print.
3. Options
Show or hide the print settings.
4. Range
Specify the pages to print.
5. Double-sided
Configure setting for duplex printing.
6. Black & White
Select whether to print in black and white or color.
7. Staple
Configure setting for stapling.
8. Punch
Configure setting for punching.
9. Paper
Select the size of the paper.
1. How to Use AirPrint
20

2. TrademarksThis section describes about trademarks.
TrademarksApple, Bonjour, Macintosh, OS X, macOS and Safari are trademarks of Apple Inc., registered in theU.S. and other countries.
AirPrint and AirPrint logo are trademarks of Apple Inc.
21

MEMO
22

MEMO
23

MEMO
24 EN GB EN US EN AU M0BQ-7664


EN GB EN US EN AU M0BQ-7664 © 2018

![Operating Instructions General Settings Guidesupport.ricoh.com/bb_v1oi/pub_e/oi/0001027/... · To change the Copier/Document Server Features, Press [Copier / Document Server Features]](https://img.pdfslide.us/doc/110x75/5f0cdf907e708231d4378e13/operating-instructions-general-settings-to-change-the-copierdocument-server-features.jpg)