Embed Size (px)
Citation preview
2017AIR FORCE
JUNIOR RESERVE OFFICER TRAINING CORPS LEADERSHIP SCHOOL CADET
MANUAL(cadet LEADERSHIP course)
AFJROTCLSM9T000

1
Welcome toAir Force JROTC Cadet Leadership Course
(JROTC Summer Leadership School)
Your training will be one of the most rewarding and challenging experiences of your life. This challenge is a good thing. Cadet Leadership Course (CLC) will prepare you for things you will face in the future. If we are doing our job right, we will test you both mentally and physically and if you do your job right, you will be amazed at all you can accomplish through determination and teamwork.
You are bound to get frustrated and discouraged at times. That is natural; however, as with life, if you wish to succeed, never give up. Many JROTC cadets have successfully graduated CLC and it is certain that every one of them found it to be challenging. Through this experience, you will gain tremendous pride and confidence in the personal victories you achieve in CLC. While this may be hard to believe now, have the courage and dedication to make it through and you will see this for yourself.
We look forward to your successful completion of training and joining the ranks of cadets who have proudly graduated CLC.
TRANSITIONAL INFORMATION
/////////////////////WARNING//////////////////// IF YOU OR ONE OF THE OTHER TRAINEES FEEL ILL BEFORE OR DURING STRENUOUS EVENTS,TELL ONE OF THE INSTRUCTORS; do not worry about any unfounded fears or repercussions.
SAMPLES OF BEHAVIOR
1. Understand the importance of the information contained in this chapter.
2. Employ the theory of teamwork and show that each trainee can follow the simple verbal and written instructions contained in this chapter.
3. Be aware of safety and security procedures at all times.
OBJECTIVE: Trainees using this manual and the information contained in the briefing will be able to follow instructions without error.
INTRODUCTION
During CLC, you will be subjected to many requirements for various reasons. You will be presented with an enormous amount of information at different times as required. The first chapter of this manual is devoted to emphasizing the importance of much of the information you will be required to know and use during CLC.
INSTRUCTOR INTRODUCTION
The Flight Commanders and Flight Sergeants act as your immediate supervisors. They are very interested in your welfare and are responsible for your flights’ well being and success. They have the authority to issue orders and exercise supervisory control. Seek assistance from them for help with any problems you encounter, whether personal or with your training. If they cannot help you, they will refer you to someone that can.
2
METHODS OF HANDLING PROBLEMS AND COMPLAINTS
We must know your problem before we can solve it. Despite whether it is a personal problem at home or a problem with the dining hall, laundry facility, dormitory, or a training problem, we must know about it before we can fix it.
1. Use Chain of Command. The Chain of Command is the primary problem solving channel you will use while you are in CLC. Your Flight Commander or Flight Sergeant should be your first point of contact to help solve a problem. Secondly, see the First Sergeant and/or the Squadron Commander. Problems and complaints are often best solved at the lowest possible level. Give your Chain of Command an opportunity to solve your problem first.
2. If the chain of command does not solve your problem and you are still dissatisfied, ask to see the Commandant of CLC through the Open Door Policy. The only way we can help you is if you talk to someone in the school.
SAFEGUARDING VALUABLES
Check your lock to insure it works. Experience shows that if you do not lock up your valuables, they may be stolen. Do not leave wallets, money, watches, rings, or other valuables (stamps, checks, credit cards, etc.) lying around. Keep your security drawer locked unless getting something out, putting something in, or just working in it. If you miss any valuables report it to an instructor immediately. Secure all valuables while participating in such activities as physical conditioning, confidence course, or any other activity where adequate facilities are not available.
MONEY LIST
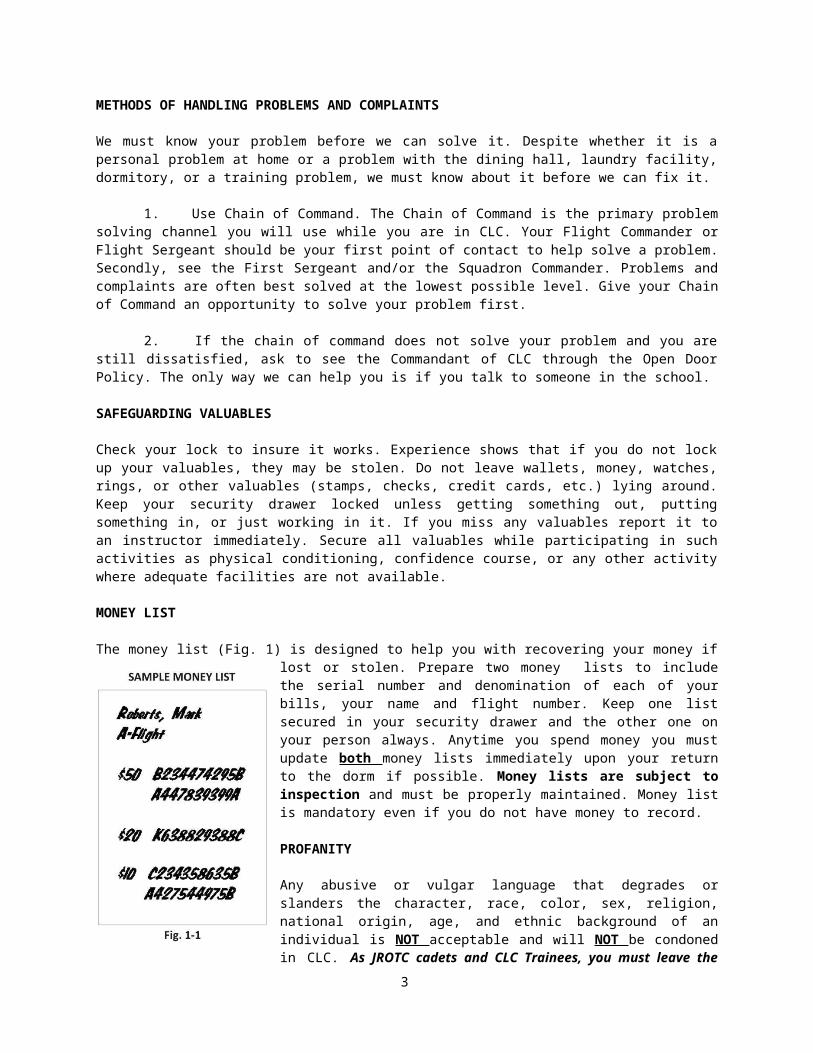
The money list (Fig. 1) is designed to help you with recovering your money if lost or stolen. Prepare two money lists to include the serial number and denomination of each of your bills, your name and flight number. Keep one list secured in your security drawer and the other one on your person always. Anytime you spend money you must update both money lists immediately upon your return to the dorm if possible. Money lists are subject to inspection and must be properly maintained. Money list is mandatory even if you do not have money to record.
PROFANITY
Any abusive or vulgar language that degrades or slanders the character, race, color, sex, religion, national origin, age, and ethnic background of an individual is NOT acceptable and will NOT be condoned in CLC. As JROTC cadets and CLC Trainees, you must leave the “civilian” thoughts and vocabularies behind; develop a sense of professionalism and concern for the feelings and well-being of your comrades.
PERSONAL HYGIENE
Figure 1 Group living makes it necessary that you practice certain rules of personal cleanliness and hygiene. Report any unhealthy or unsanitary conditions to the
instructors. On a daily basis, bathe, change your underclothing and socks, brush your teeth, and if male, shave if necessary. Wash your hands any time you use the restroom (latrine); clean and file your fingernails and toenails when needed. Use deodorant and if necessary, foot powder. Cleanliness and personal appearance are important factors at all times.
3
GROUND SAFETY
Ground safety is designed to prevent accidents and reduce loss of training time. Do not participate in horseplay, anywhere, any time. Remember, if you damage the dormitory or any of its contents you will pay for the damage. Use hand rails and always stay on the right side of the stairwells. Don't run up or down stairs. Report ALL accidents, no matter how minor, to an instructor immediately.
If you should injure yourself (e.g., falling in a stairwell) and think you might have an injury to your head, neck, or back, stay where you are. DO NOT MOVE. Stay in the position you have fallen if possible. If able, send someone for help. If not, call for help. If you see someone who might be injured take the following precautions:
1) DO NOT move them; make them lie still.
2) Get help, either by going for help yourself or sending someone else.
Report all safety hazards (broken steps, faulty wiring, etc.) to an instructor. You must ALWAYS wear some type of footwear (boots, low quarters, gym shoes, shower shoes). Shower shoes will be worn in the shower to help prevent fungus infection. If it becomes necessary to evacuate the dorm, you MUST NOT evacuate in shower shoes.
Stay out of fan rooms, boiler rooms, and electrical circuit breaker/fuse boxes, and other similar areas.
Neither mix cleaning agents nor use them for other than their specific purpose.
DO NOT handle stray animals, i.e., bats, cats, dogs, raccoons, etc. They carry diseases.
DORMITORY EMERGENCIES
Actual Fire
ALERT All personnel by shouting, “FIRE, FIRE, FIRE,” then activate the fire alarm located near the exits. If undressed, trainees wrap up in a blanket and put on any shoes, EXCEPT shower shoes. If working in your security drawer and it is an actual fire, do not lock your drawer. Simply evacuate the dormitory as quickly as possible. Trainees will exit in an orderly manner, using closest exit. DO NOT run or talk while evacuating the dormitory. Go to your pre-designate area, assemble in flight formation, and wait for further instructions.
Physically check to ensure that all rooms, latrines, utility room, and bays are evacuated. If practical, have JROTC instructors man fire extinguishers and attempt to extinguish the fire. DO NOT USE THE FIRE EXTINGUISHER ON ELECTRICAL FIRES. If unable to extinguish the fire, secure the doors and instructor(s) manning the fire extinguisher evacuate the dormitory and go to the pre-designated area. AFJROTC Instructors will be the last to leave the building ensuring ALL cadets have safely evacuated.
CAUTION
CAUTION
CAUTION
4
Fire Drill
You will be notified by authorized personnel that there is going to be a fire drill. Do not activate the fire alarm. Evacuate all personnel by shouting, “FIRE DRILL, FIRE DRILL, FIRE DRILL!” Ensure all personnel evacuate the dormitory and assemble at their pre-designated location. Flight leaders will take roll to ensure all their trainees are accounted for.
MILITARY TIME
Military time is based on a 24-hour clock. Midnight is 2400 (twenty-four hundred). One minute after midnight is 0001. One o'clock in the morning is 0100 (zero one hundred). Afternoon hours are 1400 (fourteen hundred), 1500 (fifteen hundred) and so forth. In a time statement such as 1518 (fifteen eighteen) it is 18 minutes after 3:00 in the afternoon. An easy way to compute afternoon and evening time is to add 12. For example, if it is 6:15 in the evening, you would add 12 and have the military time of 1815 (eighteen fifteen).
AFJROTC CADET CREED
I am an Air Force Junior ROTC Cadet.I am connected and faithful to every Corps of Cadets who served their community and nation with patriotism. I earn respect when I uphold the Core Values of Integrity First, Service Before Self, and Excellence in All We Do. I will always conduct myself to bring credit to my family, school, Corps of Cadets, community, and to myself.My character defines me. I will not lie, cheat, or steal. I am accountable for my actions and deeds.I will hold others accountable for their actions as well.I will honor those I serve with, those who have gone before me, and those who will come after me. I am a Patriot, a Leader, and a Wingman devoted to those I follow, serve and lead.I am an Air Force Junior ROTC Cadet.
CORE VALUES
Integrity First Service Before SelfExcellence in all we do
REPORTING STATEMENT
Reporting statements will be used when directed to respond or when initiating a conversation while in CLC. Reporting statements are given at the start of the conversation. One statement is required per conversation. The reporting statements you will use in CLC are: “Sir/Ma’am, Cadet reports as ordered,” if you told to report and “Sir/Ma’am, Cadet reports,” if you are reporting on your own.
DINING FACILITY PROCEDURES
Entry Procedures. Your flight enters the dining facility by “elements.” Be sure to remove your hat immediately upon entering and place it in your right cargo pocket.
DO NOT talk to anyone except dining facility personnel, student leaders, or instructors until seated.
When you are not moving forward, stand at parade rest with your training manual in your right hand and read. When moving forward, come to the position of attention and mark forward. Once you stop, return to parade rest and resume reading your manual.
5
Once you reach the serving line place your tray on the steel runners, keep both hands on the tray, and sidestep through the line quickly. Keep your head and eyes straight forward as you side step down the serving line. Be polite and courteous when speaking to dining facility personnel.
Do no execute any facing movements while carrying items.
Do not take more than two (2) glasses.
Always carry the tray with both hands.
Once you enter the dining area look for an empty seat and go directly to the table in an orderly manner.
After arriving at the table. Set your tray down when you get to the table and stand behind your chair at the position of attention. Remain at attention until there is someone behind each chair or there is no one behind you.
Once all trainees arrive at the table and are at attention, the last trainee to arrive states, “Trainees be seated.”
Before being seated. Remove your canteen and place it neatly under your chair along with your cadet manual.
Once seated. Allow those wanting to pray a few moments to do so before starting to eat. Now you may leave the table to fill your glasses. Carry no more than one glass in each hand at all times. DO NOT DRINK UNTIL YOU RETURN TO YOUR SEAT.
Use proper etiquette (manners) whenever you eat, i.e., do not talk with your mouth full, do not chew with your mouth open, etc.
You must drink at least two full glasses of non-caffeinated beverages with each meal. You may talk in a low tonewith others at your table. You may return to the serving line for seconds if sufficient time is available.
NEVER LEAVE THE TABLE WITH FOOD IN YOUR MOUTH.
When finished eating. Two trainees carry two trays each away from the table, their own and one other. Take the trays to the clipper then leave the dining hall. Trainees who do not take trays to the clipper must clean the table before leaving the dining hall. Assemble outside as instructed. DO NOT TAKE ANY FOOD OUT OF THE DINING HALL!
If at any time a glass or plate breaks, do not attempt to pick it up.
AFJROTC LS FORM 341, EXCELLENCE/DISCREPENCY REPORT
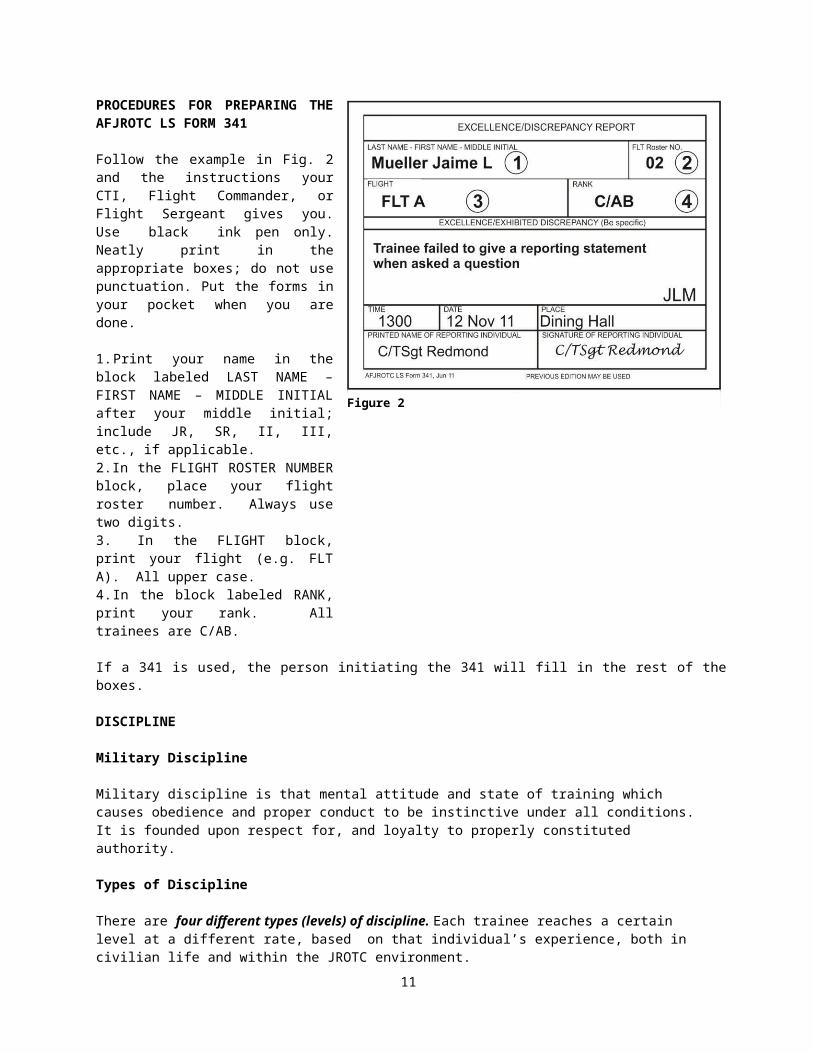
The AFJROTC LS FORM 341 is used to record excellence or discrepancies and to reinforce standards of training in areas such as dorm guard, general performance of duty, military bearing/personal appearance, and respect for authority. Any AFJROTC Instructor, Cadet Training Instructor, Cadet Fight Commander, Cadet Flight Sergeant, or cadet staff supervisory personnel may initiate an AFJROTC LS FORM 341 for either excellence or a discrepancy. You can receive an excellent 341. It is possible.
If a discrepancy is noted, your Flight Commander or Flight Sergeant will counsel you on the discrepancy. When told by your Flight Commander or Flight Sergeant, initial the excellence/discrepancy block in the bottom right corner to show that you are aware of the discrepancy. Always carry at least two properly annotated AFJROTC LS FORM 341s on your person.
Figure 2
6
PROCEDURES FOR PREPARING THE AFJROTC LS FORM 341
Follow the example in Fig. 2 and the instructions your CTI, Flight Commander, or Flight Sergeant gives you. Use black ink pen only. Neatly print in the appropriate boxes; do not use punctuation. Put the forms in your pocket when you are done.
1. Print your name in the block labeled LAST NAME – FIRST NAME – MIDDLE INITIAL after your middle initial; include JR, SR, II, III, etc., if applicable.2. In the FLIGHT ROSTER NUMBER block, place your flight roster number. Always use two digits.3. In the FLIGHT block, print your flight (e.g. FLT A). All upper case.4. In the block labeled RANK, print your rank. All trainees are C/AB.
If a 341 is used, the person initiating the 341 will fill in the rest of the boxes.
DISCIPLINE
Military Discipline
Military discipline is that mental attitude and state of training which causes obedience and proper conduct to be instinctive under all conditions. It is founded upon respect for, and loyalty to properly constituted authority.
Types of Discipline
There are four different types (levels) of discipline. Each trainee reaches a certain level at a different rate, based on that individual’s experience, both in civilian life and within the JROTC environment.
(1) Imposed Discipline--enforced obedience to orders and regulations. An example is when your CTI gives you a direct order; there is no choice; you must obey.
(2) Group Discipline is when the goals of the group come before your personal goals. One example is when an individual chooses to work with flight members to help make sure everyone passes their dorm appraisal instead of working alone for their own success.
(3) Task Discipline happens when the challenging nature of a task encourages an individual to complete the task even if the only challenge is to finish. An example would be completing your assigned duties exactly as required by directives or standards.
(4) Self-discipline (sometimes the hardest to achieve) is the willing and instinctive habit of obedience to accepted rules, or inward sense of responsibility that causes a person to do what they should without being told or watched. Simply, self-discipline is "doing what we should at all times." Such tasks as folding your clothes a certain way, hanging your clothes in a certain order, or placing your shoes in a certain place are methods of training necessary to help you attain self-discipline.
7
TEAMWORK GROUP DYNAMICS
Teamwork can be defined as "a joint action by a group of people, in which group unity and efficiency are placed above individual interests."
Group dynamics is much the same as teamwork but on a larger scale. It involves many individuals working together to achieve a common goal in which QUALITY is the desired outcome.
Understanding the importance of teamwork, group dynamics, and the close coordination necessary to get the mission accomplished requires recognizing group over individual achievement. For instance:
(1) An individual’s performance may exceed standards, but that person’s individual effort is tarnished if it demonstrates a lack of concern for the performance of others, or of the team as a whole (teamwork).
(2) If an element leader’s personal performance is error free in an evaluated area and that of his/her element is poor overall, self-centeredness may have replaced concern and responsibility for group performance (teamwork).
(3) An example of group dynamics may be when the entire flight, along with the other flights, workstogether to achieve a quality performance for their squadron at a parade.
The greatest quality you can reinforce is individual effort that fosters teamwork and supports the collective achievement of the team. Be Part of the Solution, Not the Problem.
RESPECT FOR AUTHORITY
By enrolling in Air Force JROTC and participating in CLC, you agreed to obey the laws (regulations) of Air Force JROTC and lawful orders given you by those appointed to positions of authority above you. This includes avoiding making derogatory remarks about superiors or policies with which you may personally disagree. Be loyal; if you cannot say anything kind about a person, say nothing at all . If you have a genuine complaint, use your chain of command. Respect for authority and discipline go hand in hand, but the first one to be acquired must be discipline. Self-discipline involves full voluntary acceptance of authority. Acceptance of authority is not following directions because you like someone--it is accepting that they are in charge and respecting their position of authority. You respect authority when you realize that some things, both pleasant and unpleasant, must be done and that there must be people to see that they are done.
PERSONAL INTEGRITY
The term "ethics" suggests to some people a very personal, individual standard of philosophy; however, the basic principles of integrity and conduct are guided by a sense of right and wrong. Your "sense of right and wrong" must be such that your behavior and motives are above suspicion. Air Force JROTC believes that integrity is important.
Air Force JROTC could not function without integrity because we have to be able to trust each other to do our jobs. Integrity is a firm adherence to a code of especially moral or artistic values. In other words, integrity is honesty. It is doing what you know to be right.
It is not something learned overnight. Most of you have already incorporated integrity into your set values. Your parents and school teachers have been helping you understand the difference between right and wrong as long as you can remember. Still, Air Force JROTC holds a higher standard of honesty than society demands, so we must begin to build upon the foundation already established. Integrity starts with you and it is an integral part of being in Air Force JROTC. Integrity is the cornerstone to the operation of Air Force JROTC, along with self-discipline. Integrity starts with you and it starts right now. Personal integrity involves the following attributes:
8
1) A firm adherence to a code of morals.
2) A total commitment to the highest personal and professional standards, establishing a set of values and adhering to those values and, not tolerating rude behavior.
The following are examples of integrity:
1) Telling the truth -- not lying, not cheating, stealing, or tolerating anyone who does.
2) Furthermore, integrity involves those special attributes of trust, financial responsibility, and professional courtesy.
Your integrity must never be questioned. Your peers, supervisors, and instructors must be able to trust you in ALL situations.
Communication is an important part of any environment, but especially in environments such as CLC and your home unit. It is extremely important that you practice the ideals of integrity in all of your interpersonal relationships.
Stick to the facts when talking about your personal daily experiences in CLC, both as an individual and as a flight member. Do not exaggerate when calling home. Don’t blame others for problems you create. Starting or passing rumors creates an emotional strain on other members of your flight; they are probably as confused and bewildered as you. Always put yourself in their shoes and see how you would feel if others were talking about you. If you should hear a rumor asks your CTI to either confirm it or tell you the correct information.
CUSTOMS AND COURTESIES
Customs and courtesies are time-honored traditions practiced by all members of JROTC. Some of these traditions have the force of law and some are acts of politeness.
Professionalism
No matter what the situation, always present yourself in a professional military manner. Giving respect to others and being respected go hand-in-hand. Remember, “First impressions are lasting impressions.”
Proper Courtesies
The following scenarios explain the proper procedures to follow while leaving the best possible impression on those you work with, and those in positions of authority.
1) Whenever you speak to an officer, CLC cadet staff member, or Senior Instructor, stand at the position of attention until they give you further instructions.
2) Answer questions by first stating “Sir/Ma’am,” then give the appropriate answer. The exception to this rule is when giving a direct reply containing a one word answer, in this case simply state “Yes Sir/Ma’am.” While in CLC, you must give the following reporting statement before speaking, asking, or answering questions: “Sir/Ma’am, trainee (last name) reports as ordered.”
3) Always walk on the left side and in step with those senior in rank.
4) Carry items in your left hand or on your left shoulder, leaving your right hand free for saluting.
9
If outside in a group with no one in charge, the first person to see the officer must call the group to attention, theneveryone salutes.
If outside in a group with someone in charge, the person in charge calls the group to attention and salutes for the entire group.
If performing outside details, the person in charge salutes for the group while other trainees continue working.
If marching in a group of four or less, everyone must salute while continuing to march.
If marching in a group of five or more, the person in charge salutes for the group while continuing to march.
Salute officers riding in appropriately marked staff vehicles. Some government vehicles are marked with the passengers’ insignia of rank (Colonel and above) on the bumper plate attached to the right side of the front bumper.
PEDESTRIAN TRAFFIC
You must always march at the position of attention unless you are with a visitor or told otherwise. When walking or marching during CLC, you will either be alone, in a group, or in a formation. A group will consist of two to eight trainees. A formation will consist of nine or more trainees. During hours of darkness, you will carry an operating flashlight and never walk alone. A trainee or any other person in charge must also have a flashlight.
Alone. If a troopwalk or sidewalk is available, use it. If troopwalks and sidewalks are not available, walk on the left side of the street/road, facing the oncoming traffic.
Groups and Formations. When two or more of you are marching together, they must march as a unit two abreast, at attention, properly sized, and in step with each other. One person will be in charge; this trainee or student leader will give appropriate marching commands, halt the group/formation at all intersections, check for traffic and assume responsibility for the entire group/formation. If troopwalks or sidewalks are available, use them. When in a group of four or less, ALL trainees will salute officers and staff cars (five or more trainees, the individual in charge will salute).
The individual in charge must march no more than four paces from the unit on the side of the unit nearest the traffic. The individual in charge MUST halt the unit before crossing any intersection. Ensure traffic is clear, enter the intersection and march the unit across the street. Once the unit has crossed, halt them on the opposite side of the intersection, and only then will the individual in charge leave the intersection.
Use road guards when marching unit contains Nine or More Trainees, including the individual in charge. Two road guards march six paces in front of the formation, and two march six paces behind the formation.
Road Guards. Road guards protect the members of a formation while crossing streets or intersections. They must also warn the individual in charge when hazardous situations exist in the following manner:
1) They raise their hands and march at Mark Time BEFORE entering a hazardous area.2) They must not enter a roadway or intersection until the individual in charge directs them to do
so.
Road guards are dispatched by the command "Road Guards, Out." Road Guards double-time to their post in the intersection. Road guards post in each lane of traffic that approaches the intersection through which the unit is passing. When posted, road guards assume a position of parade rest, raise their right arm diagonally with palm facing away from their body and extend and join their fingers. When the formation is halfway through the intersection, the rear road guards automatically relieve the front road guards and return to the front of the unit.
10
Remaining road guards remain in place until they receive the command “Road Guards In.” Road guards do not salute while performing duties.
The individual in charge of a unit with nine or more trainees MUST HALT THE UNIT before crossing intersection. After making sure traffic is clear, the individual in charge enters the intersection and gives the command, “Road Guards Out.” Once the unit is through the intersection, the individual in charge MUST HALT THE UNIT then give the command, “Road Guards In.”
HEAT HAZARDS
The sun can be extremely hot and uncomfortable during CLC. Often trainees arriving at CLC have problems coping with the heat. Listed are some tips to prevent heat problems or water intoxication.
Tips To Stay Healthy In the Heat
D o Hydrate at meals as directed Drink at least ½ to ¾ quarts of water per hour when working in hot conditions, but never more than 1½
quarts per hour or 12 quarts per day. Each canteen is 1 quart Get as much rest as possible Avoid overexposure to the sun during hot summer months Keep your head covered when exposed to the sun Wear sunscreen Take medications as prescribed by a medical provider
Do Not Overexpose yourself to the sun Over-exercise in hot weather Drink iced beverages (including ice water) immediately following exercise
Take Extra Precautions If You: Come from a colder climate Have an illness or have recently been ill Have recently had a fever Have ever had a heat illness Are out-of-shape Are taking any medications, prescription or non-prescription products
Warning Signs and SymptomsIndications of possible heat illness or water intoxication
Early Signs/Symptoms Dizziness Headache Dry mouth Nausea Unsteady walk Weakness Muscle cramps
11
Later Signs/Symptoms Hot body, high temperature Confusion, unresponsiveness, coma Vomiting Involuntary bowel movement Convulsions Weak or rapid pulse
Note: If you have these signs/symptoms, especially if more than one of them is present, inform instructor staff IMMEDIATLY!
TRAINEE RULES of CONDUCTYou are prohibited from:
Purchasing, possessing or consuming any alcoholic beverage Purchasing, possessing or using any tobacco products Purchasing, possessing or using any over-the-counter medication/supplements not prescribed or cleared
by a medical doctor Purchasing, possessing or inhaling aerosol products. These products are strictly prohibited and you are
not allowed to purchase them while attending CLC Purchasing or possessing any obscene or pornographic material Taking any food items into the dormitory Operating any motor vehicle Being alone in a confined space or motor vehicle with a member of the opposite gender or riding in
privately owned vehicles (POVs) of CLC personnel Entering an opposite gender dormitory room, at any time, without an CLC staff member being present. If
the CLC staff member the dormitory room, opposite gender trainees return to their own dormitory room Entering any “OFF-LIMITS” area Traveling alone during the hours of darkness Hitchhiking or waiting alongside any street or road for the purpose of obtaining transportation in a POV Using any patio area other than the one you are presently assigned to Engaging in public displays of affection (PDA), for example, kissing, holding hands, hugging, etc. Participating in any game of chance played with or without any type of gambling device Making sexual advances toward or seeking or accepting sexual advances or favors from anyone, including
any CLC staff member or other trainees Using threats, pressure or promise of return favors or favorable treatment for the purpose of gaining
sexual favors from anyone, including CLC staff members or other trainees Collecting or soliciting money from other trainees Wearing civilian clothing Utilizing a cellular phone without the expressed permission and direct oversight of CLC leadership
ASSAULTS
During the hours of darkness you are required to travel in groups of two or more. Avoid poorly lighted areas and be watchful. If you are a victim of an assault or witness to an assault, report it to the instructor staff immediately.
Public Display of Affection (PDA). The guiding principle in this area is common sense. The primary reason for not displaying affection in public is military bearing. PDA in uniform is unprofessional and inappropriate.
12
HYGIENE CLEANLINESS
The most effective way to prevent communicable diseases is through the practice of good personal hygiene habits; therefore, Do Not limit the use of sinks, showers, urinals, toilets or water fountains in the name of dormitory excellence. Personal hygiene is vitally important to your success.
Wash your hands with soap and water for 20 seconds at least five times a day (hand wipes and hand sanitizers are not a substitute for soap and water)
Wash your hands with soap and water prior to each meal and after you use the latrine Shower at least once per day Brush your teeth at least twice a day and floss your teeth at least once a day If you cough or sneeze, cover your mouth and nose with a tissue. If a tissue is not available use your sleeve. Always use hand sanitizer immediately afterward - avoid
coughing or sneezing directly into your hands Clean, cut and file your fingernails when necessary Avoid putting your hands in your mouth or touching around your face Change your undergarments (e.g., T-Shirt, underwear and socks) every day
Male trainees must shave your mustache and beard daily (twice if necessary). Your face and neck area will have a clean-shaven appearance at all times, unless you have a waiver. You may experience Pseudofolliculitis Barbae (PFB). This condition, commonly referred to as razor bumps, is an inflammatory reaction caused by stiff, strongly curved facial hair that grows close to the skin, and then re-enters the skin after a few days of growth. Another cause of PFB is shaving too closely or pressing the razor too hard against the skin. Immediately report problems or changes in your skin condition to CLS staff.
WINGMAN SYSTEM
The wingman system establishes policy for pairing of CLC trainees into teams to teach teamwork, develop a sense of responsibility and accountability for fellow Cadets. The system improves safety during CLC, and reduces the likelihood and opportunity for sexual harassment, misconduct, and suicidal gestures or attempts.
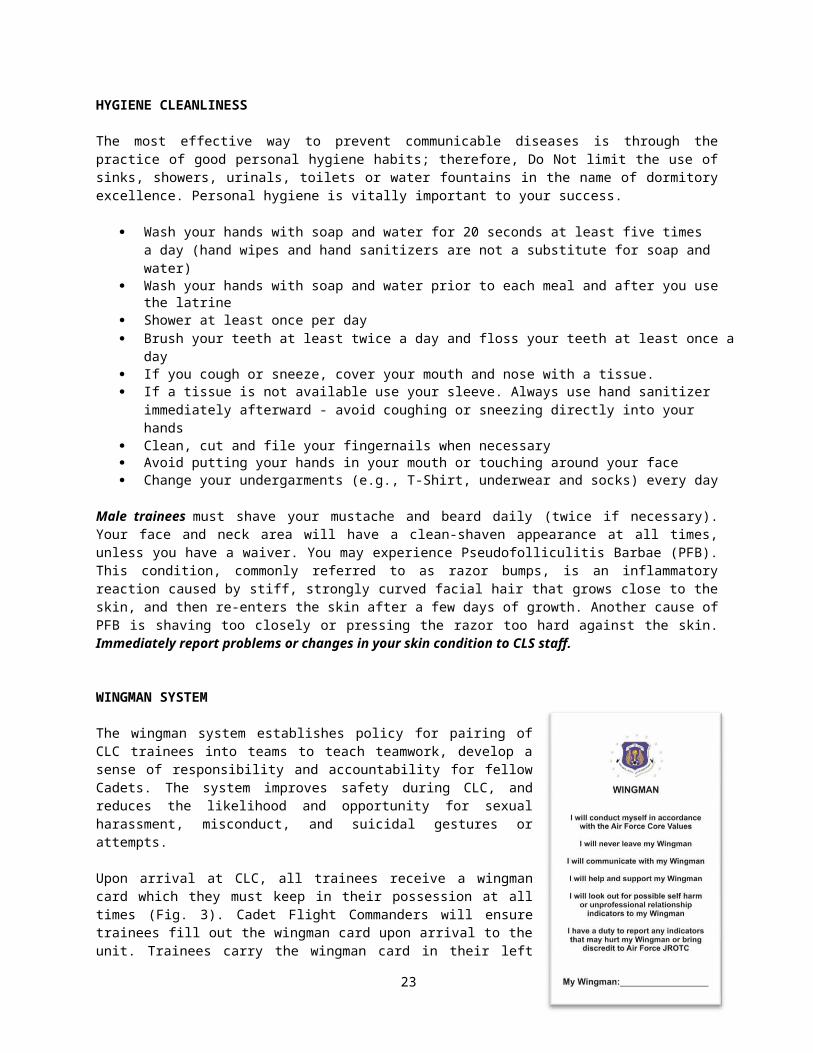
Upon arrival at CLC, all trainees receive a wingman card which they must keep in their possession at all times (Fig. 3). Cadet Flight Commanders will ensure trainees fill out the wingman card upon arrival to the unit. Trainees carry the wingman card in their left cargo pants pocket throughout the duration of training and make updates to their wingman cards when a primary wingman is changed. Inform CLC supervisory personnel if the wingman card is lost or destroyed.
Wingman System
Trainees are introduced to the wingman system in CLC and formed into two types of teams:
Primary Wingman TeamFigure 3
Primary wingmen (same gender) are assigned by bed number upon arrival at the assigned room. In cases where there are an odd number of trainees in a flight, a wingman team may consist of three personnel to ensure all trainees are part of a team. This pairing or team constitutes their primary wingman.
13
Ad-hoc Wingman TeamAd-hoc teams (same gender) are formed anytime the use of a primary wingman team for an event, appointment or activity is not practical. CLC staff in concert with student leaders are encouraged to create ad-hoc wingmen teams to facilitate multiple trainees going to appointments/activities at the same location and to efficiently allow trainees to attend appointments when primary wingmen have simultaneous appointments/activities in different locations.
Anytime a trainee leaves the dormitory, they will be part of a primary or ad-hoc wingman team. A trainee is NEVER alone without a wingman of the same gender. Trainees will ensure a wingman is always in view unless otherwise exempted below.
EXCEPTIONS: during appointments with medical provider and while using restroom facilities. Personnel notified of a separated wingman must inform CLC leadership. Anytime a trainee is separated from their primary/ad-hoc wingman they have a duty to report the incident to CLC supervisory personnel.
While in transit, trainees will either be in flight formation or transit in groups of at least two trainees of the same gender. When possible, trainees should be paired with their primary wingman.
Trainees will always know the location of their primary wingman. Cadet Flight Commanders and Flight Sergeants are responsible for ensuring all trainees have a primary wingman and assigning ad-hoc wingman.
In the rare event a trainee has no wingman; they must contact CLC staff in order to correct the situation.
Injured trainees who are not participating in regular flight activities with his/her flight are not to be alone at any time and may not be alone. This includes when a trainee must stay in the dormitory.
The wingman policy does not cover all training situations, however the intent is for each trainee to have a wingman and never be alone. Student leaders and trainees are expected to exercise sound judgment and common sense to ensure compliance with the wingman policy.
There are many rules to follow here in CLC, they are put in place to keep you safe while in the training environment. Pay close attention to directions given to you by your student leaders. Help your flight achieve great things by doing your part and following the rules and standards outlined within this study guide. If you encounter any problems while in CLC notify your Cadet Flight Commander or Flight Sergeant immediately.
14
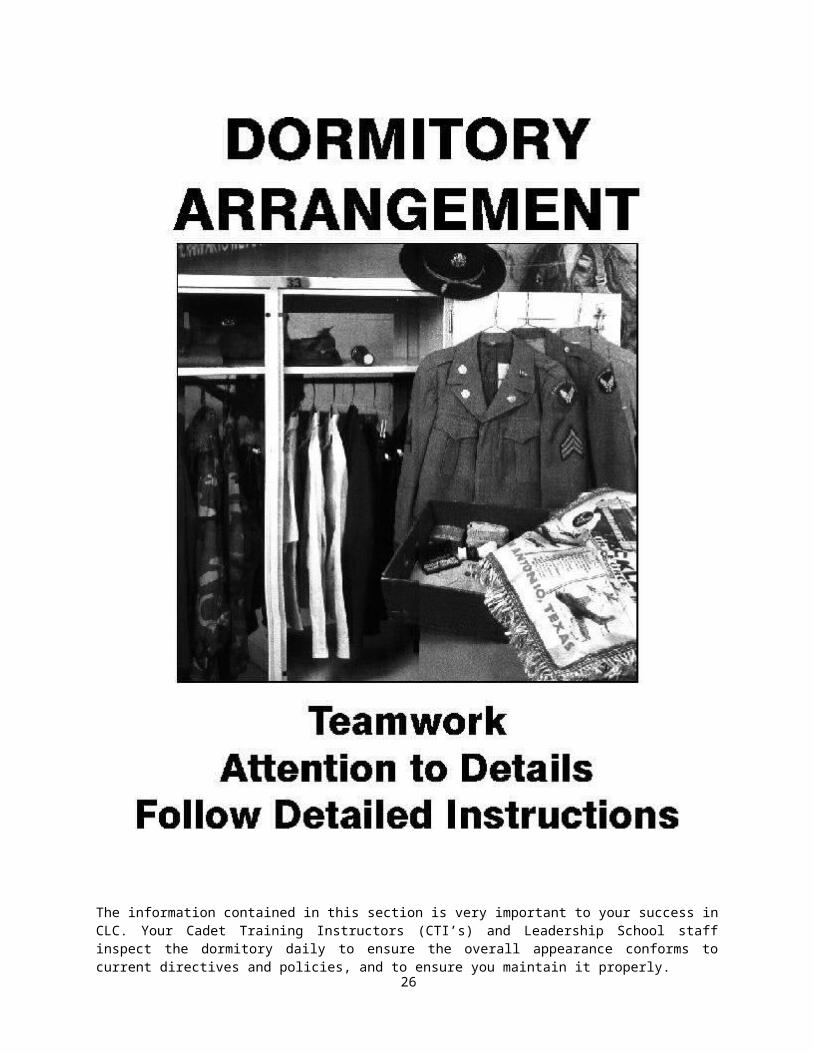
The information contained in this section is very important to your success in CLC. Your Cadet Training Instructors (CTI’s) and Leadership School staff inspect the dormitory daily to ensure the overall appearance conforms to current directives and policies, and to ensure you maintain it properly.
15
Due to the limited amount of space it is necessary to require that each item be displayed in a specified manner and area. Your success in CLC depends largely on your conforming to Air Force JROTC standards by displaying your ability to follow detailed instructions. This will be measured throughout your training with emphasis placed on dormitory arrangement.
To avoid confusion, clothing items are referred to in a gender neutral manner unless referring to specifically male or female items. Male specific items are followed with (Male). Female items are followed with (Female).
SAMPLES OF BEHAVIOR
1. Be able to prepare and maintain dorm living areas with no more than the allowable demerits.
2. Employ teamwork in properly maintaining dorm living areas.
3. Be able to follow instructions and pay attention to detail while maintaining living areas within acceptable standards.
4. Apply material in this manual and understand that responsibility for the use of this material lies with the individual trainee.
OBJECTIVE: Given this cadet manual, maintain your dorm area with NO more than the allowable demerits in each of the following areas:
- Wall Locker- Clothing Drawer- Security Drawer- Shoes- Beds- End of Bed Display- Personal Floor Area
Personal Area. Your personal area consists of your wall locker, clothing and security drawers. Your personal living area consists of your bed, shoe and end-of-bed displays, and floor area. It is YOUR responsibility to maintain your area according to AFJROTC Regional Leadership School standards.
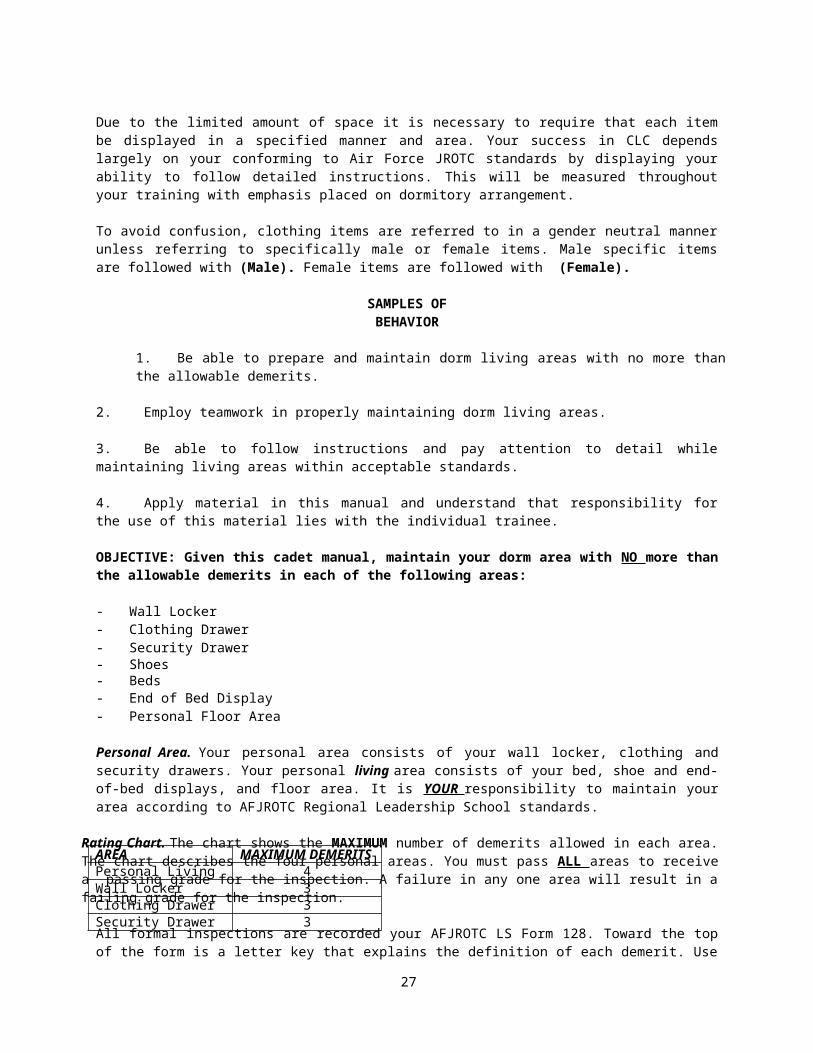
Rating Chart. The chart shows the MAXIMUM number of demerits allowed in each area. The chart describes the four personal areas. You must pass ALL areas to receive a passing grade for the inspection. A failure in any one area will result in a failing grade for the inspection.
All formal inspections are recorded your AFJROTC LS Form 128. Toward the top of the form is a letter key that explains the definition of each demerit. Use this form to correct your demerits and learn from your mistakes. DO NOT write on the AFJROTC LS Form 128.
AREA MAXIMUM DEMERITSPersonal Living Area 4Wall Locker 3Clothing Drawer 3Security Drawer 3
Figure 4
Figure 5
Figure 6
16
MARKING
It is mandatory that you mark personal items such as under clothing, towels, shoes, headgear, and any uniform items without nametapes. Marks should be approximately one and one-half inches long and one-half inch high.
Using a white or black marking pen (whichever shows up best on the item being marked), mark all your personal items with the first letter of your last name and the last four digits of your Social Security Account Number (SSAN) or the last four digits of your student ID number (example: B0224). Ensure the mark is always clear and legible. Remark any item if the mark fades or becomes illegible.
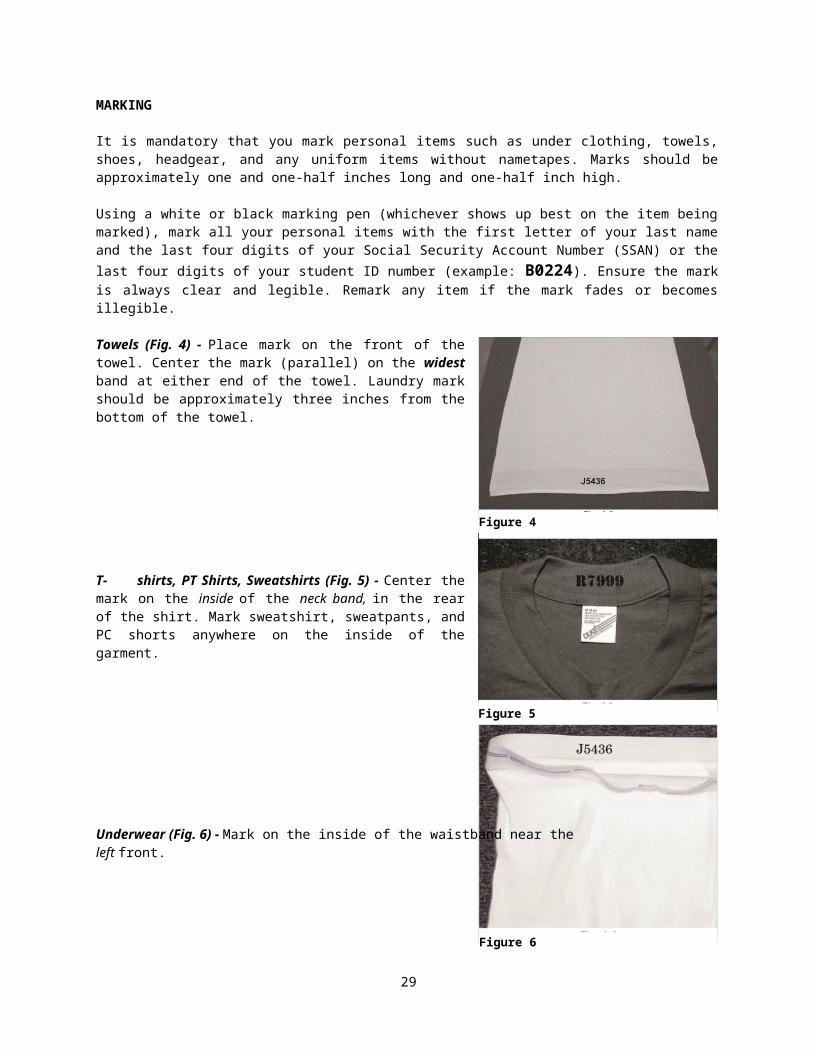
Towels (Fig. 4) - Place mark on the front of the towel. Center the mark (parallel) on the widest band at either end of the towel. Laundry mark should be approximately three inches from the bottom of the towel.
T-shirts, PT Shirts, Sweatshirts (Fig. 5) - Center the mark on the inside of the neck band, in the rear of the shirt. Mark sweatshirt, sweatpants, and PC shorts anywhere on the inside of the garment.
Underwear (Fig. 6) - Mark on the inside of the waistband near theleft front.
Figure 7
Figure 8
Figure 9
17
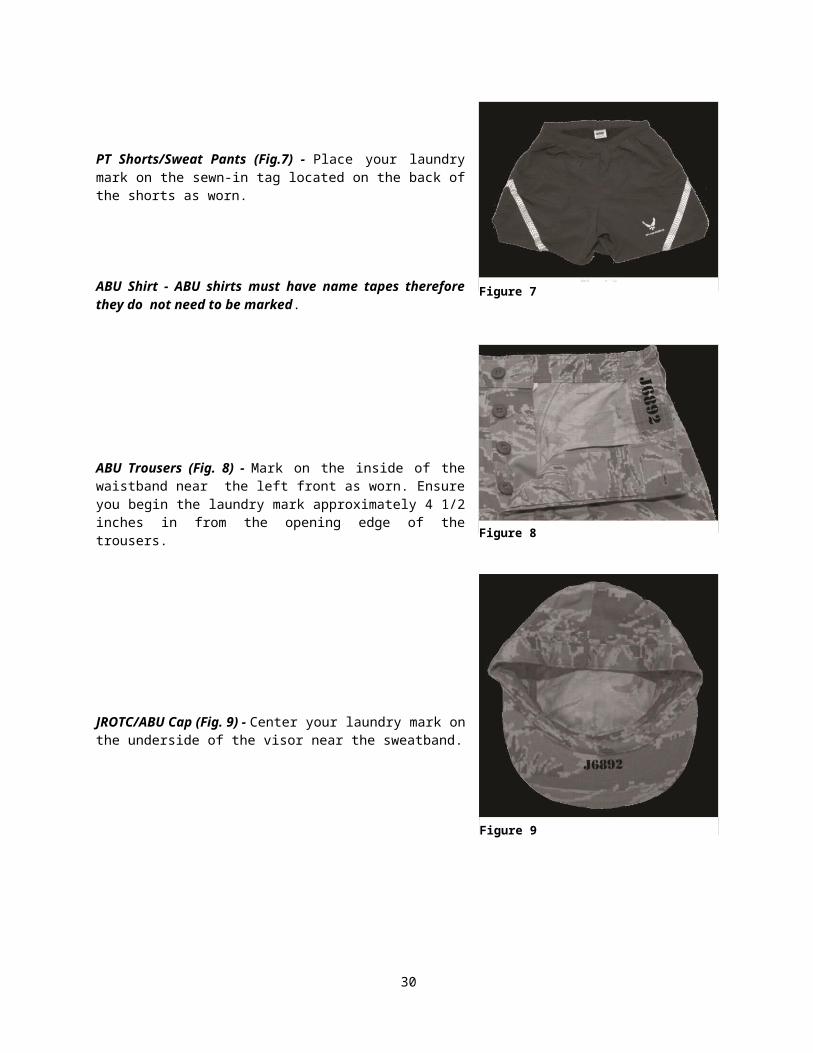
PT Shorts/Sweat Pants (Fig.7) - Place your laundry mark on the sewn-in tag located on the back of the shorts as worn.
ABU Shirt - ABU shirts must have name tapes therefore they do not need to be marked.
ABU Trousers (Fig. 8) - Mark on the inside of the waistband near the left front as worn. Ensure you begin the laundry mark approximately 4 1/2 inches in from the opening edge of the trousers.
JROTC/ABU Cap (Fig. 9) - Center your laundry mark on the underside of the visor near the sweatband.
Figure 11
Figure 10
18
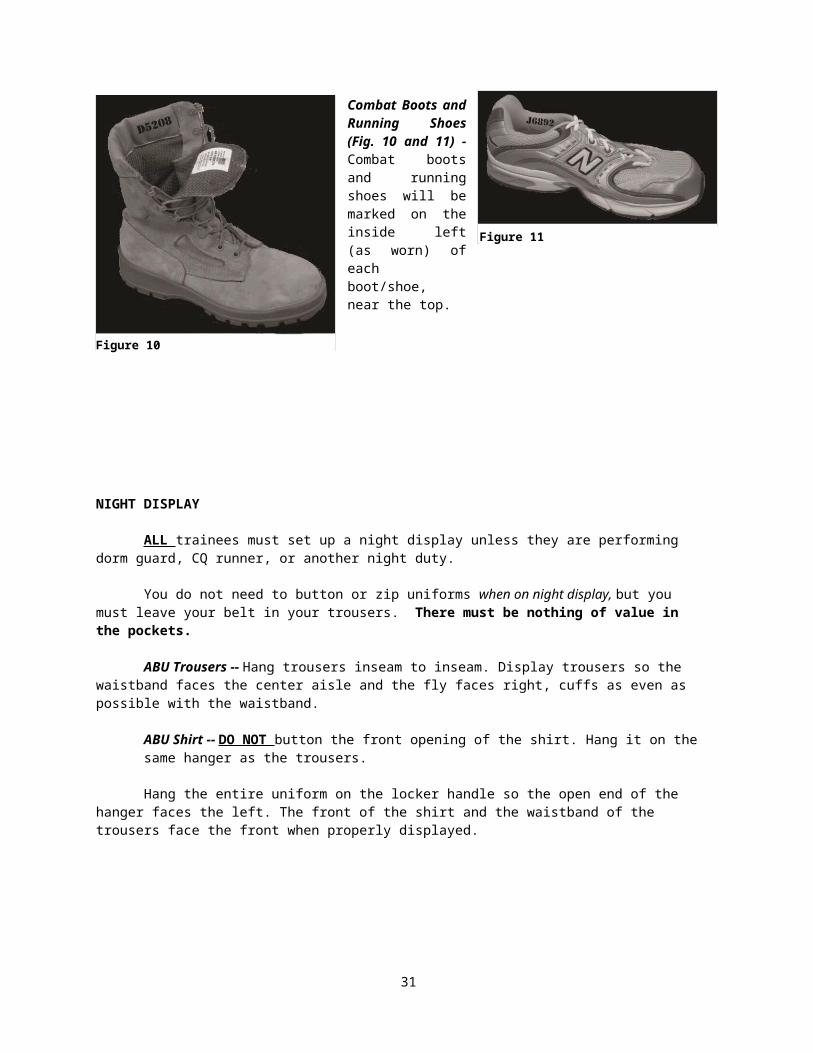
Combat Boots and Running Shoes (Fig. 10 and 11) - Combat boots and running shoes will be marked on the inside left (as worn) of each boot/shoe, near the top.
NIGHT DISPLAY
ALL trainees must set up a night display unless they are performing dorm guard, CQ runner, or another night duty.
You do not need to button or zip uniforms when on night display, but you must leave your belt in your trousers. There must be nothing of value in the pockets.
ABU Trousers -- Hang trousers inseam to inseam. Display trousers so the waistband faces the center aisle and the fly faces right, cuffs as even as possible with the waistband.
ABU Shirt -- DO NOT button the front opening of the shirt. Hang it on the same hanger as the trousers.
Hang the entire uniform on the locker handle so the open end of the hanger faces the left. The front of the shirt and the waistband of the trousers face the front when properly displayed.
Figure 12
19
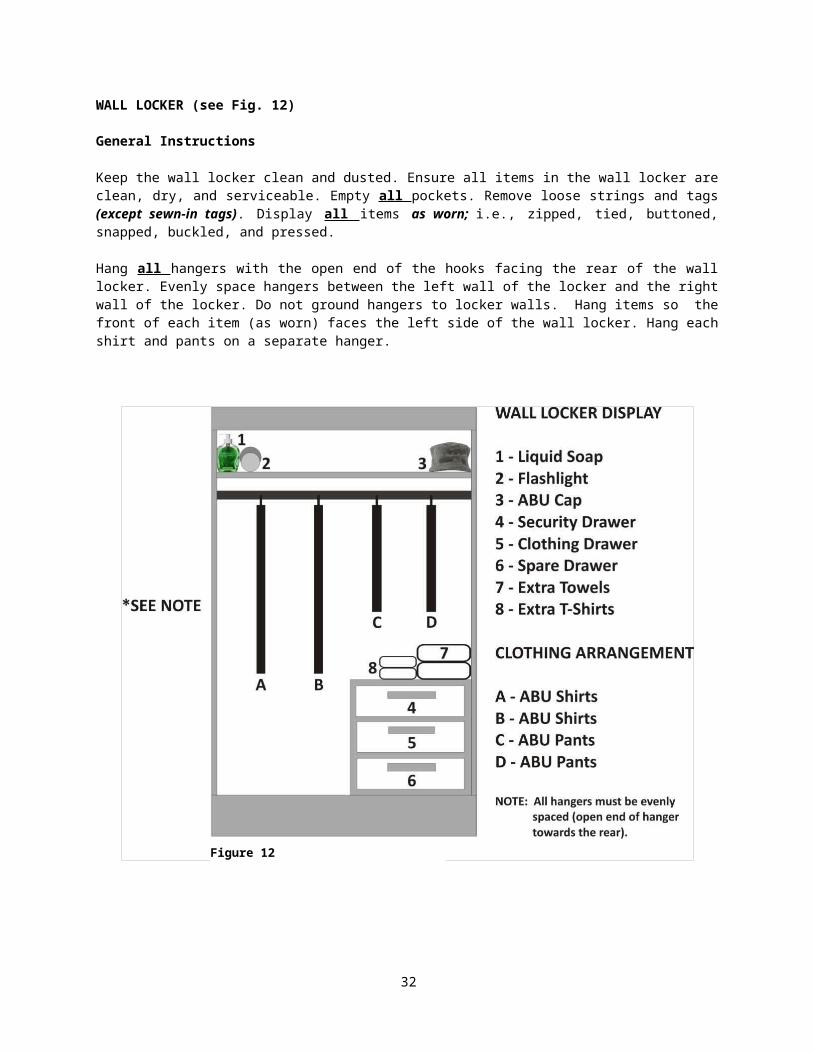
WALL LOCKER (see Fig. 12)
General Instructions
Keep the wall locker clean and dusted. Ensure all items in the wall locker are clean, dry, and serviceable. Empty all pockets. Remove loose strings and tags (except sewn-in tags). Display all items as worn; i.e., zipped, tied, buttoned, snapped, buckled, and pressed.
Hang all hangers with the open end of the hooks facing the rear of the wall locker. Evenly space hangers between the left wall of the locker and the right wall of the locker. Do not ground hangers to locker walls. Hang items so the front of each item (as worn) faces the left side of the wall locker. Hang each shirt and pants on a separate hanger.

20
SHELF DISPLAY
Top Shelf, Left Side
Liquid Soap -- Display the container upright flush with the front edge of the shelf and ground the side of the container to the left side of the wall locker. The front labeling should be facing the front of the wall locker and the dispenser nozzle should be turned toward the left facing the left side of the wall locker. If the container is too tall to stand upright, lay it on its side, top toward the rear.
Note: Soap bar is not authorized for use during CLC.
Flashlight -- Place the flashlight on the shelf with the bulb/wand end toward the rear, grounded to the soap. The butt end of the flashlight will be flush with the front edge of the shelf.Top Shelf, Right SideJROTC/ABU Patrol Cap -- If you have two clean caps, place one inside the other. Place the bill of the cap flush
with the front edge of shelf. Ground the cap to the right side of the wall locker.
Cadet Manual -- Place in spare drawer.
Bottom Left Floor
Physical Training (PT) Clothes
Neatly fold PT shorts, T-shirts and optional PT Sweats
Stack items with the largest on the bottom (Sweats on the bottom of PT shirt and shorts) (in any order). Socks must be able to fit on the left side of the PT clothes
Ground the bottom item to both the rear wall and the center partition
Roll white socks in the same manner as the socks in the clothing drawer.
Place socks to the left of the PT clothes with the smile to the front
Ground the first sock to the rear and left side of the wall locker and each remaining pair of socks should be grounded to the previous sock
All socks will fit in one row. (If you have too many socks to fit, place them stacked starting from the rear of the wall locker)
HANGING ARRANGEMENT
Left to Right
Airman Battle Uniform (ABU), Shirts Hang each shirt on a separate hanger with the front of the shirt facing the left side of the wall locker and
the left sleeve facing the wall locker door Button all buttons except the top one

Figure 13
21
Airman Battle Uniform (ABU), Trousers Hang each pair of trousers on a separate hanger. Place the legs of the trousers inseam to inseam and
drape them neatly over the hanger bar with the cuffs and waistband even Hang each pair of trousers with the fly facing the wall locker door, the waistband facing to the left and the
cuffs facing the right. The waist and cuffs must be as even as possible. DO NOT tie the blousing. Display all ABU trousers next to each other and to the right of the ABU shirts
Note: Remove hangers for uniforms in use or being cleaned and re-space the remaining hangers. Never place worn uniforms back in the lockers. If uniform is still going to be worn that day, place it outside your locker in the night display configuration. Items no not have to be removed from pockets.
CLOTHING DRAWER
General Instructions
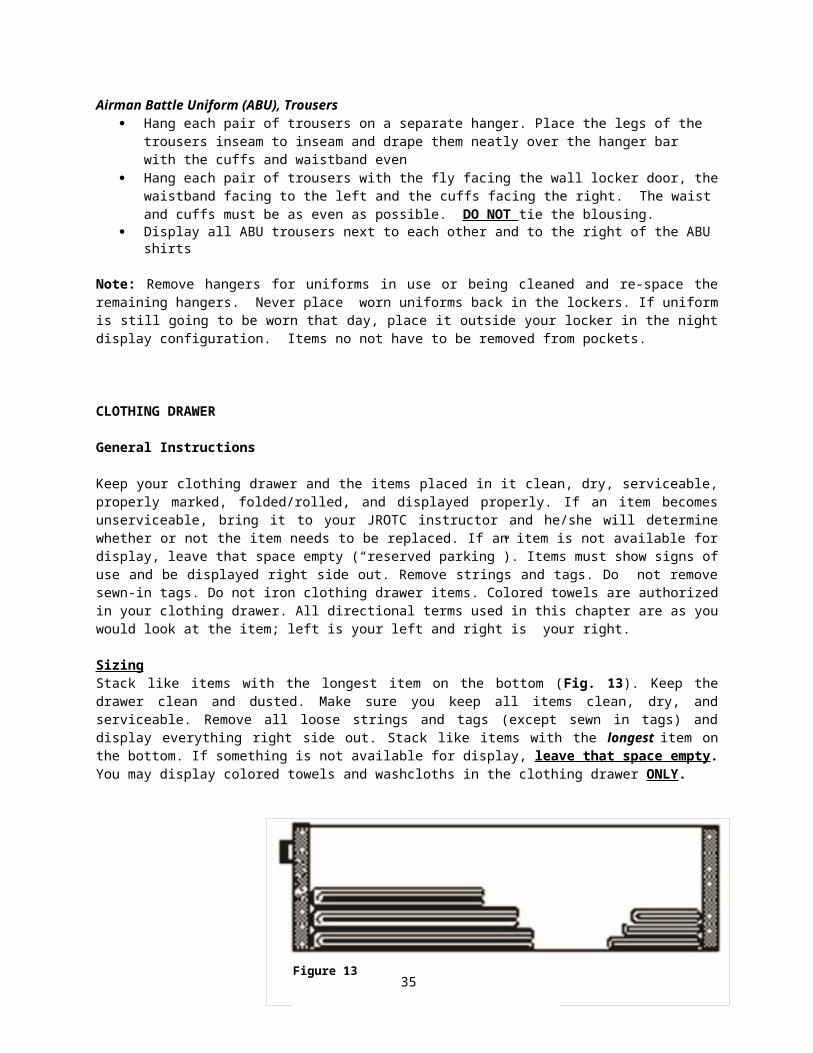
Keep your clothing drawer and the items placed in it clean, dry, serviceable, properly marked, folded/rolled, and displayed properly. If an item becomes unserviceable, bring it to your JROTC instructor and he/she will determine whether or not the item needs to be replaced. If an item is not available for display, leave that space empty (“reserved parking”). Items must show signs of use and be displayed right side out. Remove strings and tags. Do not remove sewn-in tags. Do not iron clothing drawer items. Colored towels are authorized in your clothing drawer. All directional terms used in this chapter are as you would look at the item; left is your left and right is your right.
SizingStack like items with the longest item on the bottom (Fig. 13). Keep the drawer clean and dusted. Make sure you keep all items clean, dry, and serviceable. Remove all loose strings and tags (except sewn in tags) and display everything right side out. Stack like items with the longest item on the bottom. If something is not available for display, leave that space empty. You may display colored towels and washcloths in the clothing drawer ONLY.
Figure 14 Figure 15
Figure 16 Figure 17 Figure 18
22
Folding
Folding and Rolling Instructions
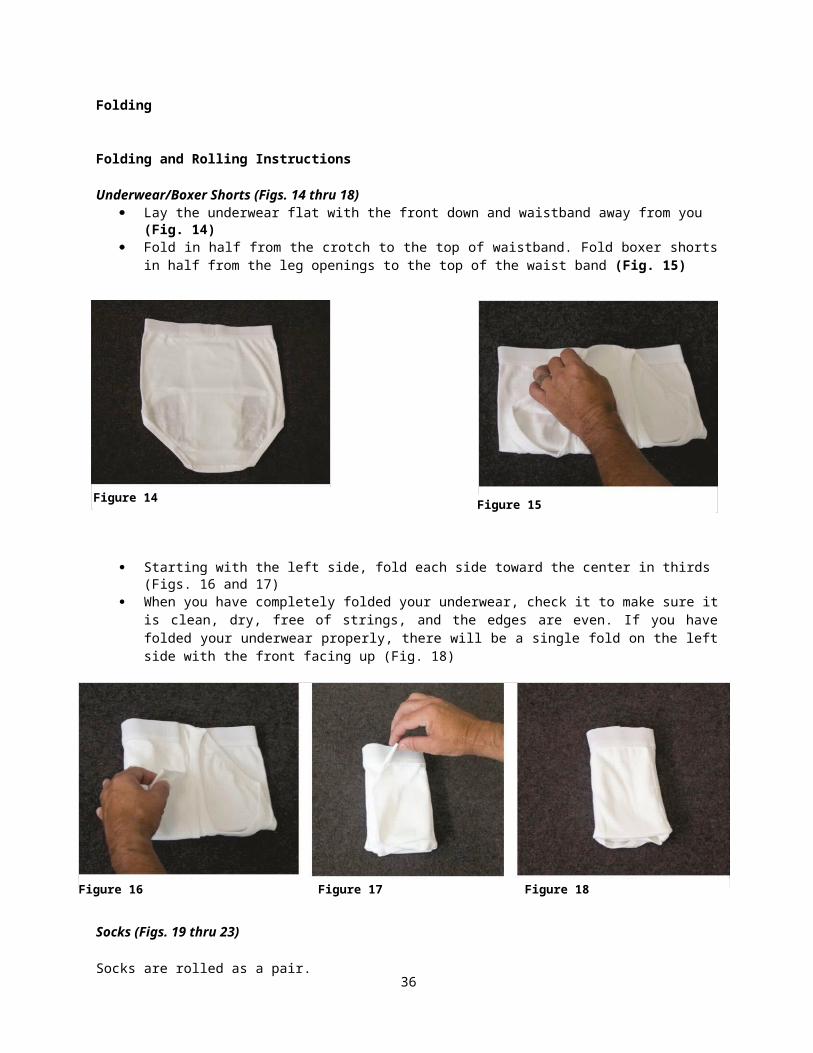
Underwear/Boxer Shorts (Figs. 14 thru 18) Lay the underwear flat with the front down and waistband away from you (Fig. 14) Fold in half from the crotch to the top of waistband. Fold boxer shorts in half from the leg openings to the
top of the waist band (Fig. 15)
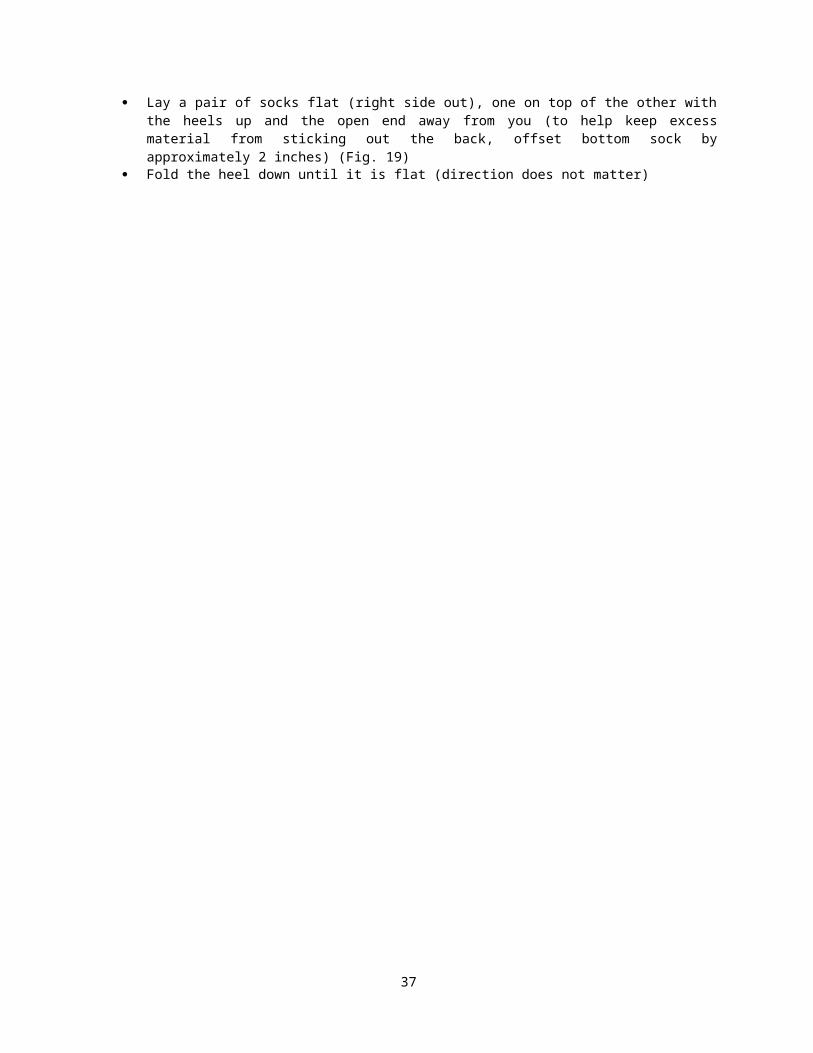
Starting with the left side, fold each side toward the center in thirds (Figs. 16 and 17) When you have completely folded your underwear, check it to make sure it is clean, dry, free of strings,
and the edges are even. If you have folded your underwear properly, there will be a single fold on the left side with the front facing up (Fig. 18)
Socks (Figs. 19 thru 23)
Socks are rolled as a pair. Lay a pair of socks flat (right side out), one on top of the other with the heels up and the open end away
from you (to help keep excess material from sticking out the back, offset bottom sock by approximately 2 inches) (Fig. 19)
Fold the heel down until it is flat (direction does not matter)
23
Roll the socks from the toe to the open ends (Figs. 20 and 21)
Figure 19 Figure 20 Figure 21
Fold the top sock open end back over the entire roll so that the open end of the sock conforms to the shape of the rolled sock (Fig. 22)
Check the opposite side of the roll to ensure closed side formed a curve that looks like a smile (Fig 23)
Figure 22 Figure 23
Towel (Figs. 24 thru 16)
Lay your towel flat with the laundry markdown and to your right (Fig. 24)
Figure 24
24
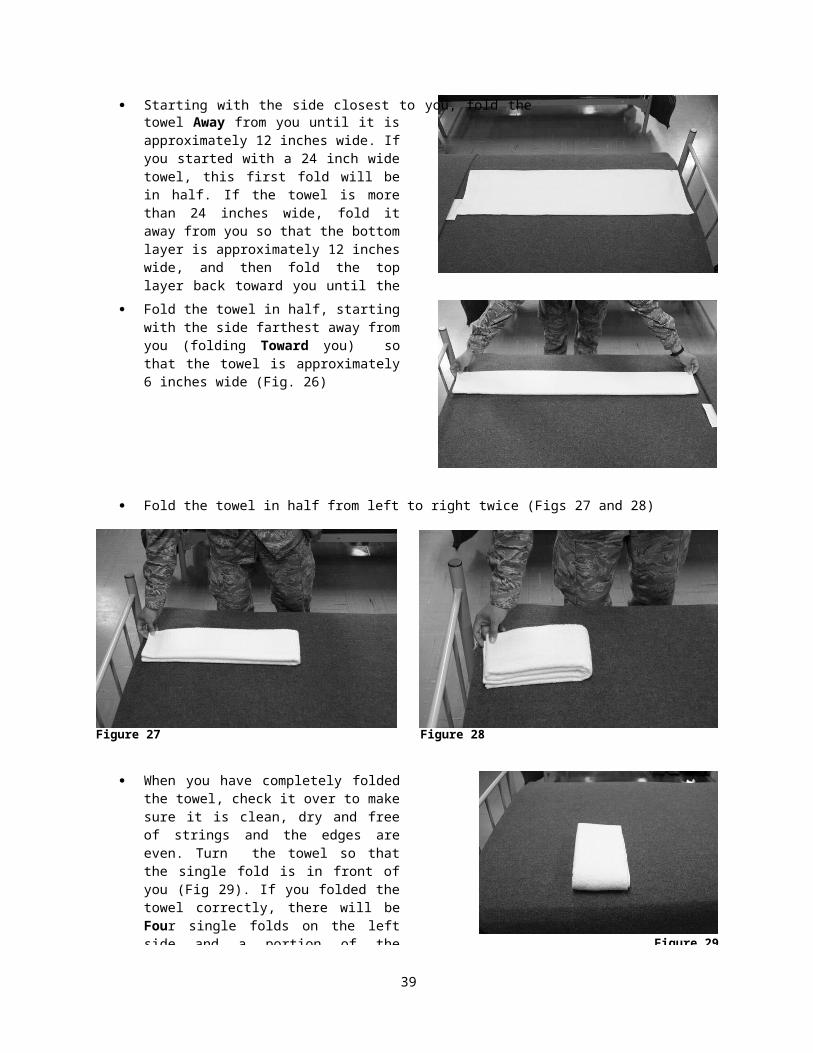
Starting with the side closest to you, fold thetowel Away from you until it is approximately 12 inches wide. If you started with a 24 inch wide towel, this first fold will be in half. If the towel is more than 24 inches wide, fold it away from you so that the bottom layer is approximately 12 inches wide, and then fold the top layer back toward you until the folded towel is approximately 12 inches wide (Fig. 25)
Figure 25
Fold the towel in half, starting with the side farthest away from you (folding Toward you) so that the towel is approximately 6 inches wide (Fig. 26)
Figure 26
Fold the towel in half from left to right twice (Figs 27 and 28)
Figure 27 Figure 28
When you have completely folded the towel, check it over to make sure it is clean, dry and free of strings and the edges are even. Turn the towel so that the single fold is in front of you (Fig 29). If you folded the towel correctly, there will be Four single folds on the left side and a portion of the laundry mark will be visible on the bottom right
Figure 29
25
Sand T-shirts (Figs 30 thru 35)
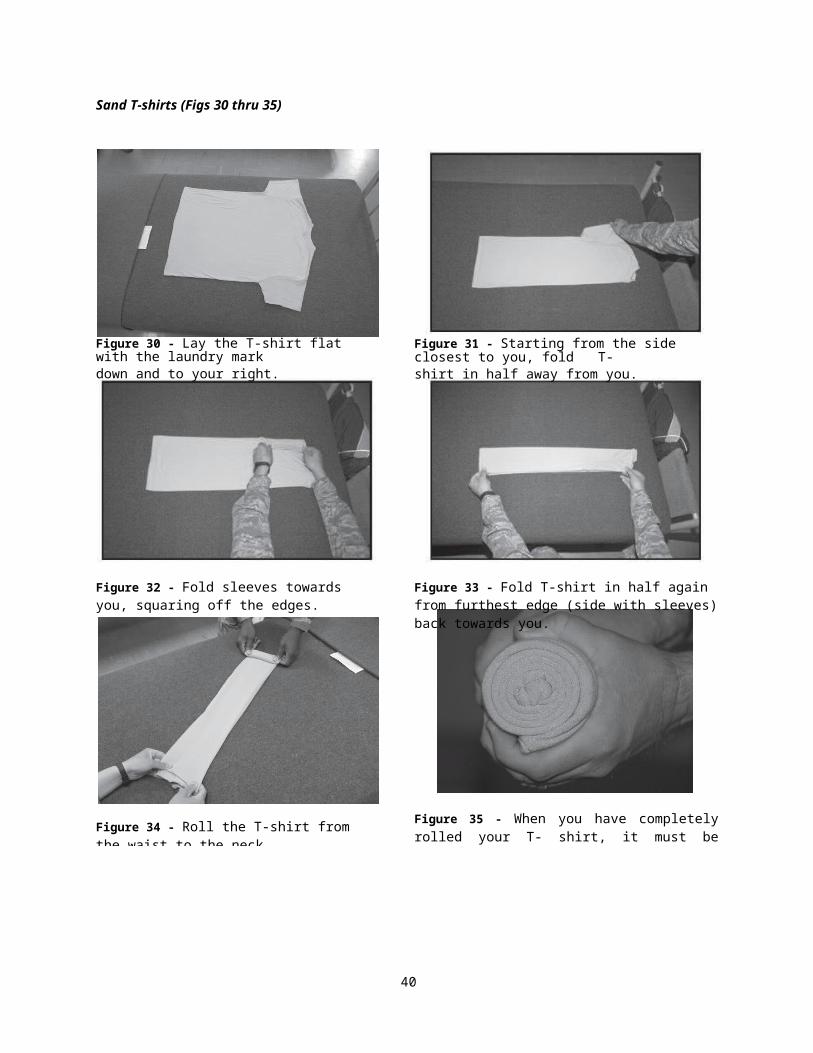
Figure 30 - Lay the T-shirt flat with the laundry markdown and to your right.
Figure 31 - Starting from the side closest to you, fold T-shirt in half away from you.
Figure 32 - Fold sleeves towards you, squaring off the edges.
Figure 33 - Fold T-shirt in half again from furthest edge (side with sleeves) back towards you.
Figure 34 - Roll the T-shirt from the waist to the neck.
Figure 35 - When you have completely rolled your T- shirt, it must be clean, dry, free of strings, and edges must be even.

26
PT Shirt – Fold the PT shirt as illustrated in figures 30 thru 33. Continue folding PT shirt using the same procedures as you would when folding the towel (figures 27 and 28), by folding it in half from left to right twice.
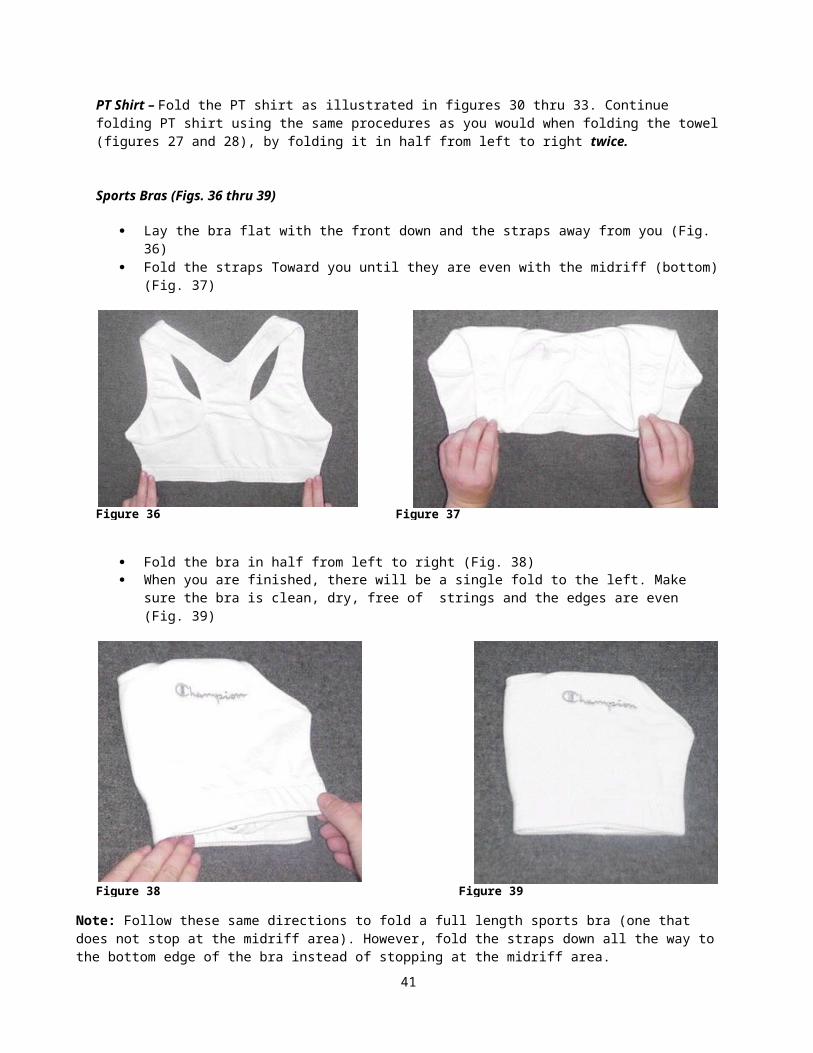
Sports Bras (Figs. 36 thru 39)
Lay the bra flat with the front down and the straps away from you (Fig. 36) Fold the straps Toward you until they are even with the midriff (bottom) (Fig. 37)
Figure 36 Figure 37
Fold the bra in half from left to right (Fig. 38) When you are finished, there will be a single fold to the left. Make sure the bra is clean, dry, free of
strings and the edges are even (Fig. 39)
Note: Follow these same directions to fold a full length sports bra (one that does not stop at the midriff area). However, fold the straps down all the way to the bottom edge of the bra instead of stopping at the midriff area.
Figure 38 Figure 39
27
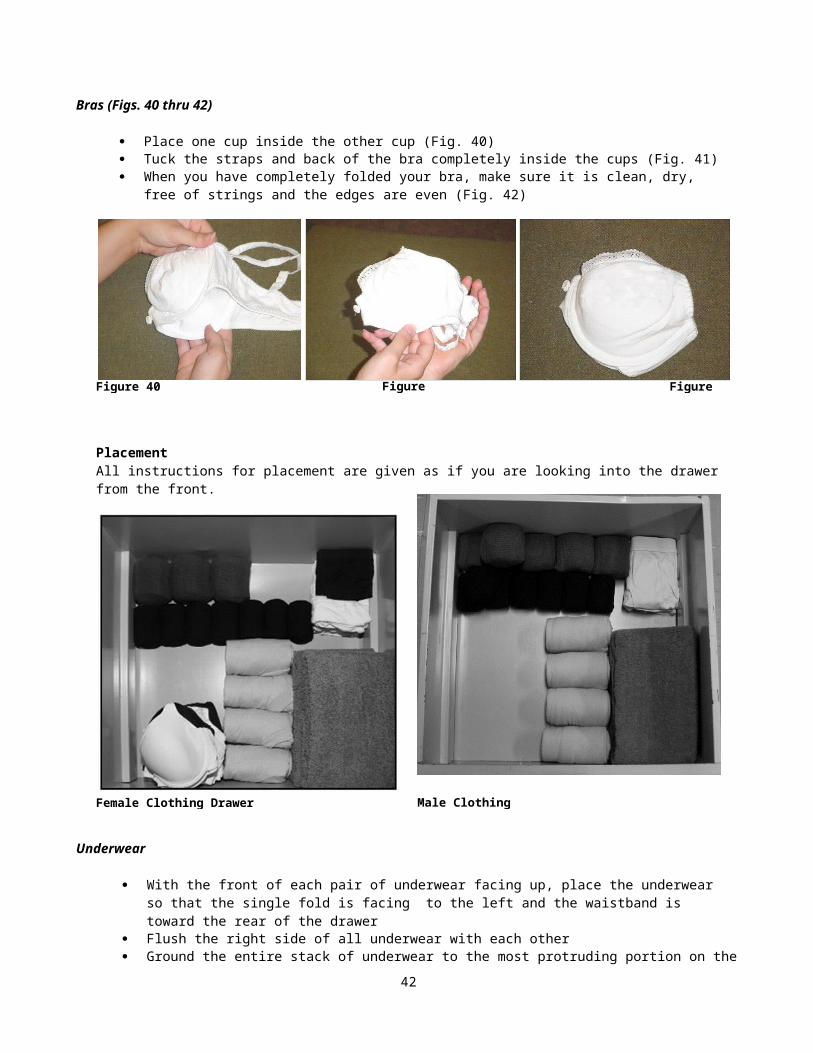
Bras (Figs. 40 thru 42)
Place one cup inside the other cup (Fig. 40) Tuck the straps and back of the bra completely inside the cups (Fig. 41) When you have completely folded your bra, make sure it is clean, dry, free of strings and the edges are
even (Fig. 42)
Figure 40 Figure 41 Figure 42
PlacementAll instructions for placement are given as if you are looking into the drawer from the front.
Underwear
With the front of each pair of underwear facing up, place the underwear so that the single fold is facing to the left and the waistband is toward the rear of the drawer
Flush the right side of all underwear with each other Ground the entire stack of underwear to the most protruding portion on the right side of the drawer
Female Clothing Drawer Male Clothing Drawer
28
Boot Socks
Ground your boot socks to the rear and left side of the drawer Place each roll so the open end is to the left and the “smile” is to the right (no frowns) Ground boot socks parallel to the rear of the drawer and to each other (“reserve parking” if item is not
there) Stack socks on top of each other when the line has reached the stack of underwear
Towels
Ensure the laundry mark of each towel is down and to the right. Place the towels so that the single fold edge is facing the front of the drawer
Ground the entire stack of towels to the front of the drawer and to the most protruding portion on the right side of the drawer
Note: Place Additional towels on top of the drawer set (fig. 12, item 7), laundry mark down and toward the rear. Single fold of the towels must be flush to the front of the drawer set and grounded to the right side of the locker.
Sand T-shirts
Ground sand T-shirts to the towels andthe front of the drawer
Display with the open edges facing the rear of the drawer and in the 6 o’clock position (shirt should be resting on the edges)
Place sand T-shirts one behind the other towards the rear of the drawer. If all T- shirts will not fit in one row, place the remaining T-shirts on top of existing row in the “V” formed by two T-shirts on the lower row, starting from the front of the drawer (Fig. 43)
Figure 43
Note: Place additional sand T-shirts on top of the drawer set (fig. 12, item 8) Ground the sand T-shirts to the towels, single fold flush to the front of the drawer set.
Sports Bra/Bras
If you are displaying sport bras, they will be stacked with the single fold to the left and underneath your regular bras. Stack bras on top of each other with the cups facing up
Ground the stack of bras to the sand T-shirts Ground the midriffs of all bras to the front of the drawer

29
SHOES
General Instructions
All of your footwear must be clean, dry, serviceable, properly marked and displayed. The inspection side of the bed is the right side of the bed as seen when standing in the center aisle, facing the wall. Shower shoe soles must be made completely of rubberized material and cannot be leather, sandal or sock type. When changing shoes during the day, place the shoes you just removed under the bed in proper order of display.
Lacing
Day DisplayExcept where noted, tightly lace your shoes. To tightly lace your shoes and boots, pull the laces as tightly as possible (all the way from the bottom to the top) and tuck the excess laces inside the shoe or boot.
Combat Boots (Fig. 44) Lace combat boots starting with the eyelets at the
bottom. Make a bar at the bottom by inserting the laces through the eyelets from the outside to the inside
After the bar is made, cross the laces and continue lacing this time from the inside to the outside of the eyelets until you reach the loops
Once you reach the loops, start at the bottom of each loop and lace in the same manner by crossing the laces until all the loops have been used
Tie a single knot at the end of the laces Tuck the excess laces inside the boot out of sight
Figure 44
Running Shoes (Fig. 45) Lace with a bar at the bottom and an “X” at the top Make a bar at the bottom by inserting the laces
through the bottom eyelets from the outside to the inside
Cross the laces and insert them from the inside to the outside. Continue lacing until you get to the top set of eyelets
Make an “X” by crossing the laces and inserting them from the outside to inside into the top eyelet
If running shoes have double eyelets at the top, use the inner eyelet, leaving the outer eyelet unused
Tie a single knot at the end of the laces If your running shoes have loops, lace them in the
same manner as the combat boots with loops. Tuck the excess laces inside the running shoes out of sight
Figure 45
30
Night Display (Fig. 47)Loosely lace your running shoes and combat boots at night. Tuck excess laces inside the shoe and boots.
Figure 46
Order of DisplayWhen viewed from the inspection side of the bed, set up the display from the center aisle end of the bed to the wall locker end. Use the following order of display:
Day (Fig. 46) Night (Fig. 47) Combat Boots Combat Boots Shower Shoes (Loosely Laced) Running Shower Shoes
Shoes Running Shoes (Loosely Laced)
Figure 47
Placement/Alignment Place the boots and shoes at the center aisle end of
the bed, on the inspection side Ground the heels and soles of each pair together.
If the heels and soles cannot be grounded together, ground the soles
Ground the right toe of the first pair of boots or shoes to the bedpost
Ground each successive pair of shoes at the soles only
Align each shoe so the toes are flush with an imaginary line drawn from the outer portion of one bedpost to the other (Fig. 48)
If you remove a pair of shoes from the display, slide the remaining shoes toward the bedpost to fill in the gap
Figure 48
Bunk beds – Display lower bunk shoes on the center aisle bed post and the upper bunk shoes on the wall side bed post. Upper bunk shoe alignment starts with combat boots grounded to the bed post followed by shower shoes, then running shoes.
31
SECURITY DRAWER
General Instructions
Keep the drawer clean and dusted. Keep all contents clean, dry, serviceable, and properly displayed. Store excessive amounts of personal items in your civilian luggage.
Male Drawer Female Drawer
Mandatory and Authorized Items and Pla cement
All instructions for placement are given as if you are looking into the drawer from the front.
Towel (Fig. 49)
Your towel must be white, brown, OD green and will be displayed wrinkle free
Display your towel with the laundry mark down so it is not visible. This will line the bottom of your drawer
Fit the towel to the inside of the drawer by folding the sides and excess material under
Use an imaginary line to divide the drawer approximately in half
Use the front half of the drawer for mandatory items and the back half for authorized personal items Figure 49
32
Back Half of the Drawer (Personal Area)
Neatly arrange important paperwork, money list (mandatory) and other authorized personal items. Some examples of authorized personal items are: shirt garters, body sponges, shaving cream, extra razors, comb, brush, extra blousing straps, religious undergarments, extra mesh bags, reflective belt, etc.
Wet items such as body sponge(s) must be stored in a partially opened resealable plastic bag (an exception to the “dry” general instruction)
Shaving cream or electric pre-shave is a mandatory item for males If you are not sure whether or not a personal item is authorized, ask CLC staff
Front Half of the Drawer (Mandatory Items)
Center
Evenly space the toothbrush case between the razor and the shampoo. Center the razor, toothbrush case and the shampoo between the left and right sides of the drawer.
Electric Razor
Note: shaving equipment is optional for females but must be displayed if used.
Remove the blade cover, if applicable Wrap the razor cord neatly around the razor. Do not use string or a rubber band to secure the cord. If
the cord is detachable, store it in the back half of the drawer Display the razor with the head (blade) down and toward the right side of the drawer, grounded to the
imaginary line Disposable/Non-Electric Razor Take the blade cover off the razor Display the razor with the blade down and to the right. Ground to the
imaginary line (in the same manner as the electric razor) Keep extra disposable razors in the personal area of your drawer, and leave the blade covers on If using a razor with disposable blades, leave the razors in the holder and place in the back half of the
drawer Store all other shaving equipment in the personal area of the drawer Toothbrush and Toothbrush Case Place your toothbrush in a toothbrush case with the head of the toothbrush toward the right and the
bristles facing the front of the drawer Place the toothbrush and case in front of the razor
o If you are not displaying a razor (female only), ground your toothbrush case to the imaginary lineo If the case is two pieces, place the bottom half inside the top halfo If the case is tubular or elongated, separate the two pieces, approximately 1/4-inch gap for air
flow Your toothbrush and case may be damp (an exception to the “dry” general instruction)
Shampoo
Display with the cap pointing toward the right side of the drawer Ground the length of the container to the front of the drawer and center it between the left and right
sides of the drawer
33
Right Side
Toothpaste
Display with the cap pointing toward the rear of the drawer Ground the bottom of the toothpaste to the front and right side of the drawer
Deodorant
Display with the cap pointing toward the rear of the drawer Ground the deodorant to the toothpaste and the front of the drawer
Left Side
Soap and Soap Container
Soap must show signs of use (an exception to the “dry” general instruction) Bar soap must be displayed in a container
o When storing soap in a one-piece container with a hinged lid, leave the container open with the hinges facing the left
o If you are storing your soap in a two-piece container without hinges, place the bottom inside the top
Ground the container, with soap, lengthwise to the left side and the front of drawer If you wish to use liquid soap, display it with the cap pointing toward the rear of the drawer. Ground the
bottom of the container to the front of the drawer and the length of the container to the left side of the drawer

34
BEDS
General Instructions (all measurements approximate)
The Inspection Side of the bed is the right side of the bed, as seen when standing in the center aisle facing the wall locker. Keep the bed rails clean and free of dust. Items placed on the bed must be clean, dry, and serviceable. Bed must be tight, neat and wrinkle free.
White Collar Bed (Fig. 50)
Mattress Cover
Must be clean and right side out. Put it on the mattress with the open end toward the wall locker; snap the snaps; tie the ties. Tuck any excess cover under the mattress. Keep mattress cover tight, neat and wrinkle free.
Bottom Sheet
Drape the bottom sheet evenly over the mattress so the edge of the sheet is flush with the foot end ofyour mattress.
Tuck any excess sheet smoothly under at the head end of your mattress. Make hospital corners using 45 degree angles. Use the following instructions.
o Grasp the side of the sheet about 12 inches from the head end of the mattress and lay it back onto the top of the bed then, smooth the side down.
o Tuck the part of the sheet hanging down at the head end of the bed under the mattress.o Grasp the portion of the sheet that you laid back and without changing the shape of the 45
degree angle, bring the sheet down and tuck it neatly under the mattress.
Top Sheet
Drape the top sheet evenly over the mattress so the edge of the sheet is six inches from the head end of the mattress, then tuck any excess sheet smoothly under at the foot of the bed.
Blanket
Drape the blanket evenly over the mattress lengthwise so the narrow edge of the blanket is six inches from the head end of the mattress (US insignia down).
At the head of the bed, fold back blanket and sheet together approximately six inches creating a white collar. Repeat the fold a second time.
Tuck excess blanket under the mattress at the foot end of the bed. Make hospital corners in the sheet and blanket at the same time. Keeping the blanket and sheet smooth
and neat, tuck the excess sides under the mattress.
Pillow
Place the pillow in a right side out pillowcase. Center the length of the pillow on the width of the mattress. Place the pillow between the two sheets, flush with the head end of the mattress.

Figure 50
35
Mattress
Center the mattress on the bed frame, and then ground it to the center aisle end of the frame.
AFJROTC LS FORM 341
Center a properly filled out, AFJROTC LS Form 341 under the single fold of the white collar, so the top half of the form is visible (printing up).
E Fold Hybrid Bed (Fig. 50a and Fign50b)
Bottom Sheet
Drape the bottom sheet evenly over the mattress so the edge of the sheet is flush with the foot end ofyour mattress.
Tuck any excess sheet smoothly under at the head end of your mattress. Make hospital corners using 45 degree angles. Use the following instructions.
o Grasp the side of the sheet about 12 inches from the head end of the mattress and lay it back onto the top of the bed then, smooth the side down.
o Tuck the part of the sheet hanging down at the head end of the bed under the mattress.o Grasp the portion of the sheet that you laid back and without changing the shape of the 45
degree angle, bring the sheet down and tuck it neatly under the mattress.
Top Sheet
Drape the top sheet evenly over the mattress so the edge of the sheet is flush with the head end of the mattress.
Tuck any excess sheet smoothly under at the foot end of your mattress. Make hospital corners using 45 degree angles. Use the following instructions.
o Grasp the side of the sheet about 12 inches from the foot end of the mattress and lay it back onto the top of the bed then, smooth the side down.
o Tuck the part of the sheet hanging down at the foot end of the bed under the mattress.o Grasp the portion of the sheet that you laid back and without changing the shape of the 45
degree angle, bring the sheet down and tuck it neatly under the mattress.
36
Figure 50a
Figure 50b
Blanket (Folding) Stand on the inspection side of the bed and drape the blanket evenly over the width of the mattress. If
the blanket has a US insignia on it, place it facing up. Put the narrow ends of the blanket to the right and left (Fig 50c)
First Fold − Fold the blanket in half from right to left (wall locker to center aisle) so the US insignia (if applicable) is on the inside (Fig 50d)
Second Fold− Fold the blanket in half from the inspection side to the non inspection side (Fig 50e) Third and Fourth Folds − Fold the blanket in thirds from left to right; center aisle to wall locker
(Figs 50f and 50g) When properly folded the blanket has an e-fold that is put facing the inspection side of the bed
(Fig 50a and 50h) Place a properly filled 341 on inspection side of bed inbetween the top single fold and the bottom open
fold of the blanket (fig 50b and 50i). Make sure only items 1 through 4 on the 341 are able to be seen (fig 2).
37
Figure 50c Figure 50d Figure 50e
Figure 50f Figure 50g Figure 50h
Figure 50i
38
END OF BED DISPLAY (Fig. 51)General Instructions -- All displayed items must be clean, dry, and serviceable where applicable.
Laundry Bag Placement
With the bag right side out and the zipper zipped (if applicable), close the top of the bag in the following manner
o Grasp one cord in your right hand and the other in your left
o Pull the cords in opposite directions to completely close the top of the bag
Display the bag approximately 3 inches from the right bedpost
o Bring the neck of the bag up between the mattress and the top horizontal bar
o Pull the bag over the top horizontal bar and toward you until the bag clears the floor, but is no higher than the bottom horizontal bar
o Tie the bag twice above the open end, by grabbing one cord in each hand. Take the cords behind the bag and cross both cords
o Pull tightly and wrap the cords around the opening of the bag again
o Tie the cords in a half-knot and let the excess hang straight down
Figure 51
Authorized and Mandatory Laundry Bag Items
Store all dirty clothes and towels inside your laundry bago Empty pockets of the items placed in the laundry bag
Plastic Bags
Place clean or dirty athletic supporters, if applicable, in a plastic bag. Plastic bags are also used to store your wet items, which is an exception to the dry rule
When items normally displayed in mesh bags become wet, display them in a mesh bag before placing it into a plastic bag
Secure each bag individually, filled or empty, with a string, rubber band or twist tie There will be at least two plastic bags but no more than four plastic bags in the laundry bag at a given
time
Mesh Bags
Mesh bags may be used for washing underwear and non marked items such as socks.

39
Towel
A white, brown, or OD green towel must be displayed on the end of your bed at all times. Your towel must show signs of use and may be damp, which is an exception to the clean and dry rule. However, it cannot be heavily stained, soiled or soaking wet
Fold the towel in half lengthwise Drape the towel evenly over the top horizontal bar of the bed so the laundry mark faces the left and the
single fold is grounded to the left bedpost Ensure the edges of the towel are even
Web Belt
Display your canteen on the end of your bed when you are not wearing it Clip the belt and hang it at the wall locker end of your bed over the right bedpost Your canteen may have water in it if the cap is on. If the canteen is empty, it must be displayed with the
cap off If the loop holding the cap is missing and/or broken, place the cap under the canteen inside the pouch
Personal Floor Area
Your personal floor area includes all areas under and around your bed and wall and locker. Keep the floor clean and free of scuff marks.
ALWAYS USE YOUR AFJROTC LEADERSHIP SCHOOL CADET MANUAL WHEN PREPARING YOUR AREAS
40
GRADUATION PARADEFORMAT
41
Format for Graduation Parade
Initial Formation of Parade
Flights will be positioned on the Ready Line in sequence from A to F (from right to left) in Column Formation and 6 paces apart. Color Guard will be in standby position with colors cased on the left flank of the reviewing stand (in parking lot). Commander of Troops and staff assumes a position abreast and to the left of the reviewing stand facing the line of flights.
Five minutes before parade starts, color guard uncases the colors, and marches on the field. As the colors approach the commander of the troops (C. T.), he/she will bring his/her staff to attention and will execute a Right Face and render the salute as the colors come abreast, the C.T. and staff. When the colors march six paces past the C.T., the C. T. will Order Arms and execute a Left Face. The colors will continue until they pass F-flight, and perform a 90-degree left turn, and proceed down the rear line until they get to their position, between the squadrons. They will execute a 90-degree turn, and halt on the FINAL LINE centered on C-flight and D-flight.
Commander of TroopsWhen the color guard clears the Squadron staff, the C. T. and staff will march to their designated spot. At the halfway point, the Wing Adjutant will break off and proceed to the final line at Adjutant's cadence. The Adjutant takes the position on the final line six paces to the right of the first flight, faces down line, and assumes Parade Rest.
Flight CommandersWhen the color guard enters the parade field, they will come to attention, execute an About Face, they will command FLIGHT, ATTENTION; PARADE REST.
PARADE BEGINS
Announcer performs introduction. At the completion of introduction, the C. T. starts parade with appropriate hand signals.
Wing AdjutantAfter receiving signal, comes to attention, and commands SOUND ADJUTANT'S CALL.
Flight CommandersOn the first note of Adjutant's Call, come to attention, execute an About Face, and call their flights to attention. Then, in order of right to left in each flight, command GUIDE ON LINE on the first note of march-on music. Next, command FORWARD, MARCH (march backward); (The Flight Commander halts the flight so the chest of the first person in the right file touches the right shoulder of the guide) FLIGHT, HALT; AT CLOSE INTERVAL, DRESS RIGHT, DRESS (The
42
Assistant Flight Commander will align the first three ranks, not including the Guide, and return to his/her position and assume close interval, dress right dress)
When the flight has been aligned, the Flight Commander calls Ready, FRONT and COVER. The Flight Commander then faces to the front and aligns on other Flight Commanders to the right.
Guidon BearerGuidon Bearers execute right face while the flight is dressed. This action enables bearers to position themselves on their own flight and to cover behind other Guidon Bearers to the right. They face to the front on the command Ready, FRONT.
Wing AdjutantAfter all elements come on the final line, the band (music) stops playing and the Wing Adjutant marches at adjutant’s cadence to a point between the Commander of Troops and the front line of Flight Commanders. The Wing Adjutant halts facing down line of the troops, executes left face, and commands in a loud and distinct voice G-u-i-d-e-s, POST.
Flight GuideOn the command Guides, POST, the guides move to their positions in the ranks by executing a left face and taking one pace forward.
Wing AdjutantAfter the Guides post, Wing Adjutant commands Present Arms (Flight Commanders supplements command) The Wing Adjutant then faces about, salutes, and reports Sir (Ma’am), the parade is formed.
Commander of TroopsReturns the salute and commands, TAKE YOUR POST.
Wing AdjutantMoves directly toward the C. T., executes a 45-degree pivot while marching to the left, then executes a 45-degree pivot while marching to the right, halts in position, and executes about face.
Commander of TroopsC.T. commands, ORDER, ARMS (Flight Commanders supplements command). C.T. then commands Wing Adjutant, RECEIVE THE REPORT.
Wing AdjutantReturns to original position, reversing the previous procedure, and commands REPORT.
Flight CommandersFrom Adjutant's left to right, report while saluting A (B) FLIGHT, ALL-PRESENT OR ACCOUNTED FOR SIR (MA’AM).
43
Wing AdjutantReturns Salute of each Flight Commander, execute about face, salutes and reports to the C.T.SIR, ALL PRESENT AND ACCOUNTED FOR.
Commander of TroopsReturns the salute and commands, PUBLISH THE ORDERS. Wing AdjutantFaces about and commands, ATTENTION TO ORDERS, DETAIL FOR TODAY, NONCOMMISSIONED OFFICER FOR TODAY C/ , BYORDER OF C/ . Then commands, OFFICERS, CENTER MARCH. The adjutant then returns to the appropriate position with the staff.
Officers and Guidon BearersOn the command, OFFICERS, move forward the required number of paces (Flight Commander 8 paces, Guidon Bearer 5 paces, Assistant Flight Commander 4 paces). On the command, CENTER, face the center and step off on the command MARCH. NOTE: On the command MARCH, the band (music) plays and the officers and Guidon Bearers march toward the center, maintaining relative positions.
First SergeantsThe first sergeant occupies the command position in the absence of the commander. On the commands OFFICERS and CENTER, the first sergeants stand fast. On the command MARCH, each moves by the most direct route around the flank of his or her respective mass nearest the Colors and halts abreast of the front rank. After officers and Guidon Bearers are positioned and the senior Flight Commander commands Forward, MARCH, each first sergeant moves by the most direct route to the command position in front of his or her mass.
On Reaching the CenterWhen officers and Guidon Bearers have reached the center, each individual halts and automatically faces the front at close interval. Then the right flank Flight Commanders says Sir (Ma’am), all in from the right followed by the left flank Flight Commander saying Sir (Ma’am), all in from the left.
Senior Flight CommanderCommands Forward, MARCH. The center officer or cadet in each rank is the base element, and the senior Flight Commander commands Officers, HALT. The officers halt and present arms in three counts. (Guidon Bearers halt and present arms in four counts.) NOTE: Guidon bearers should execute the first movement of present arms on the preparatory command Officers.
Commander of TroopsThe commander of troops returns the salute and commands ORDER, ARMS (Guidon Bearers return to carry guidon) and OFFICERS, POST, MARCH. On the command Post, officers, Guidon Bearers, and first sergeants face about.

44
On the command MARCH, they step off. (First sergeants return to their position within the mass, reversing the route they used to take command in the Flight Commanders absence.) The senior Flight Commander commands Officers, HALT when the leading rank is approximately four paces from the final line. Then the command Post, MARCH is given. On the command Post, officers and Guidon Bearers face outward toward their respective flights.
On the command MARCH, officers and Guidon Bearers move off in succession at four-pace distances (two half steps, two full steps). Flight Commanders and guidon bearers execute right (left) flank upon arriving at their respective flights and halt in their original positions in the formation. All face about at the Flight Commanders command Post. Guidon Bearers return to order guidon. At the conclusion of these movements, the band (music) stops playing. NOTE: During the execution of officers center, all Guidon Bearers remain at carry guidon except when saluting.
Commander of TroopsCommands PRESENT ARMS (Flight Commanders supplements command). C.T. then commands STAFF, CHANGE POST, MARCH (Salute automatically). Reports to reviewing officer SIR (MA’AM), I PRESENT THE COMMAND
Reviewing OfficerReturns the salute and then says, HAVE THE COLORS COME FORWARD.
Commander of TroopsCommands STAFF, ORDER, ARMS and then does about face and commands the flights ORDER, ARMS (Flight Commanders supplements command). The C.T. then commands COLORS, CENTER, MARCH (The song American Emblem is played after the command March is given). The C.T. marches forward, halts six paces from the front rank of the flag detail, faces about, and commands DETAIL, FORWARD, MARCH. C.T. will ensure individuals are in step with music. (Note: Color guard will stay in step with and maintain six pace distance from CT.) The Commander of Troops continues directly toward the reviewing officer. The dress is center in all ranks. After reaching a point five paces from the reviewing officer, the Commander of Troops halts the group on the command DETAIL, HALT. The music stops playing when the detachment halts. Once Color Guard is in place, Commander of Troops salutes, and reports SIR (MA’AM), THE COLORS ARE PRESENT
On the command CENTER (during C.T. commands of Colors, Center, March), the Commander of Troops’ staff moves. The wing staff officer executes right face and the wing adjutant executes left face.
On the command MARCH, they move forward three paces, halt, and execute about face. As the Colors pass, the senior officer gives present arms. After the Colors have passed, the senior officer gives order arms. Staff members then return to their original position under command of their senior officer.
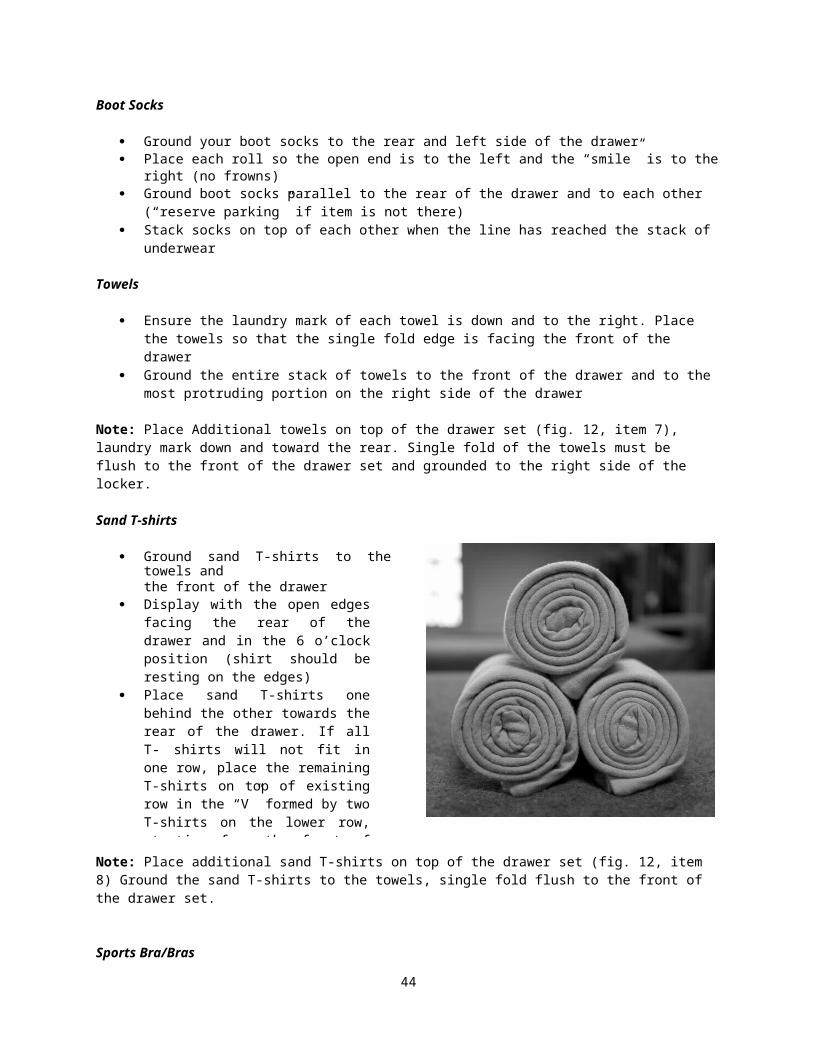
45
Reviewing OfficerReturns the salute and directs PRESENT THE COMMAND.
Commander of TroopsReturns to position and commands PRESENT ARMS. C.T. faces about and commands STAFF, PRESENT, ARMS. The National Anthem is now played. After the last note of music, C.T. commands STAFF, ORDER ARMS, and then does an about face and commands the flights ORDER ARMS.
Color GuardExecutes a right about and returns to its original position on the final line.
Commander of TroopsWhen the Colors are in position, faces about and salutes the reviewing officer, but gives no report.
Reviewing OfficerReturns the salute and commands MARCH THE COMMAND IN REVIEW. Commander of TroopsReturns in order and commands STAFF, CHANGE POST, MARCH and PASS AND REVIEW. Then commands COLUMN OF FLIGHT, RIGHT FLIGHT (on the command RIGHT FLIGHT, Flight Commanders do an about face), COLUMN RIGHT (Flight Commanders supplement with appropriate command – A Flight will command Column Right, all others will command Stand Fast), MARCH. The music begins on the command March.
Procedures for staff changing postOn the command Change Post, MARCH by the commander of troops, the staff officer moves forward three paces, halts, and executes an about face automatically without command. The commander of troops executes about face the same time as the staff faces about.
Procedures for changing direction of flights while marchingWhen the flights change direction, the Flight Commander faces the formation and marches backward until the turn is completed.The proper distance between units, the Colors, is 12 paces.
The Commander of Troops and staffs move into position in the column at the head of the flights after the second left turn.
The Commander of Troops commands Eyes, RIGHT when he/she arrives six paces from the reviewing stand. Commander of Troops and staff execute eyes right and the hand salute. They end the salute and face to the front when they have passed six paces beyond the reviewing stand by commanding Ready, FRONT. The reviewing officer returns their salutes. Other members of the reviewing party do not salute.
46
After executing ready front, the Commander of Troops turns out of the column and takes a post on the right side of the reviewing officer. The members of the staff accompany the commander of troops, maintaining relative positions. When the last flight has passed, the Commander of Troops faces the reviewing stand and salutes the reviewing officer.
Each Flight Commander turns his or her head to the right and commands Eyes, RIGHT. The command RIGHT is given when the Flight Commander is six paces from the reviewing stand. On the command RIGHT, the flight commander salutes and the officers in the front rank execute eyes right and salute simultaneously. No others salute. The commander keeps his or her head to the right until giving ready front. Troops, except those on the right flank, execute eyes right. The guidon bearer executes present guidon. On the command Ready, FRONT, given by the Flight Commander when the last rank of the flight is six paces beyond the reviewing stand, all officers end the salute. The guidon bearer executes carry guidon, and all troops turn their heads and eyes to the front. The reviewing officer returns the salute of the Commander of Troops and the salutes of Flight Commanders.
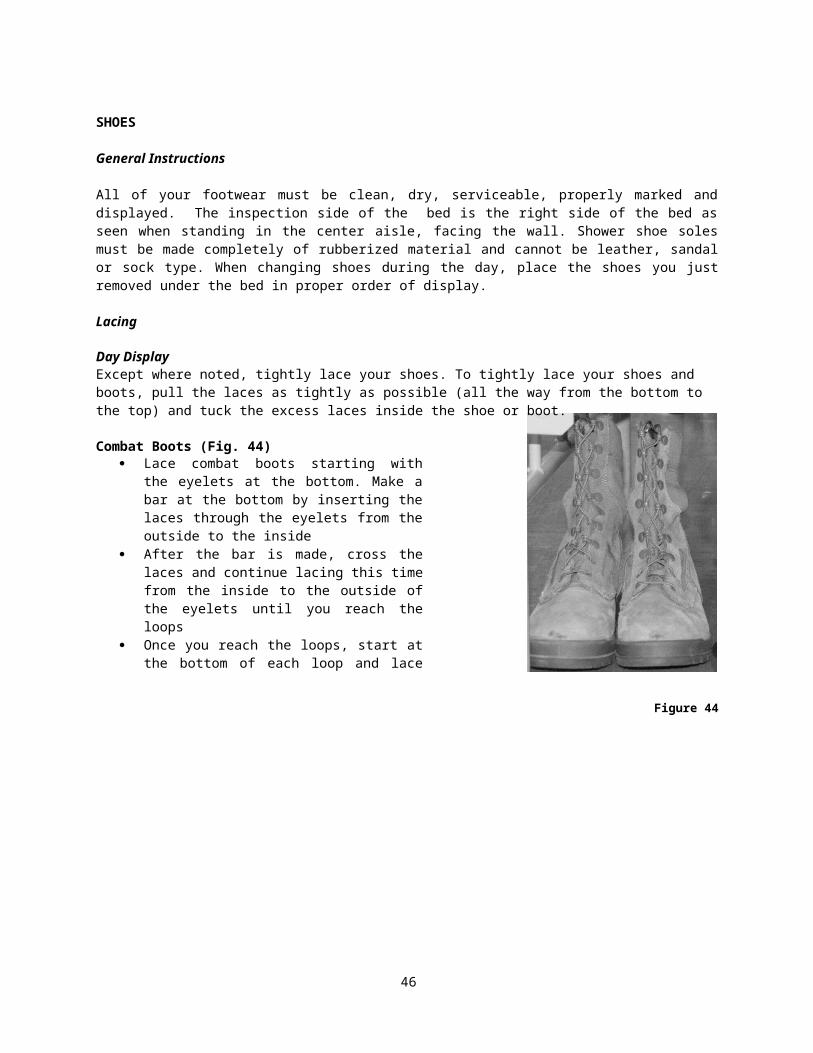
47
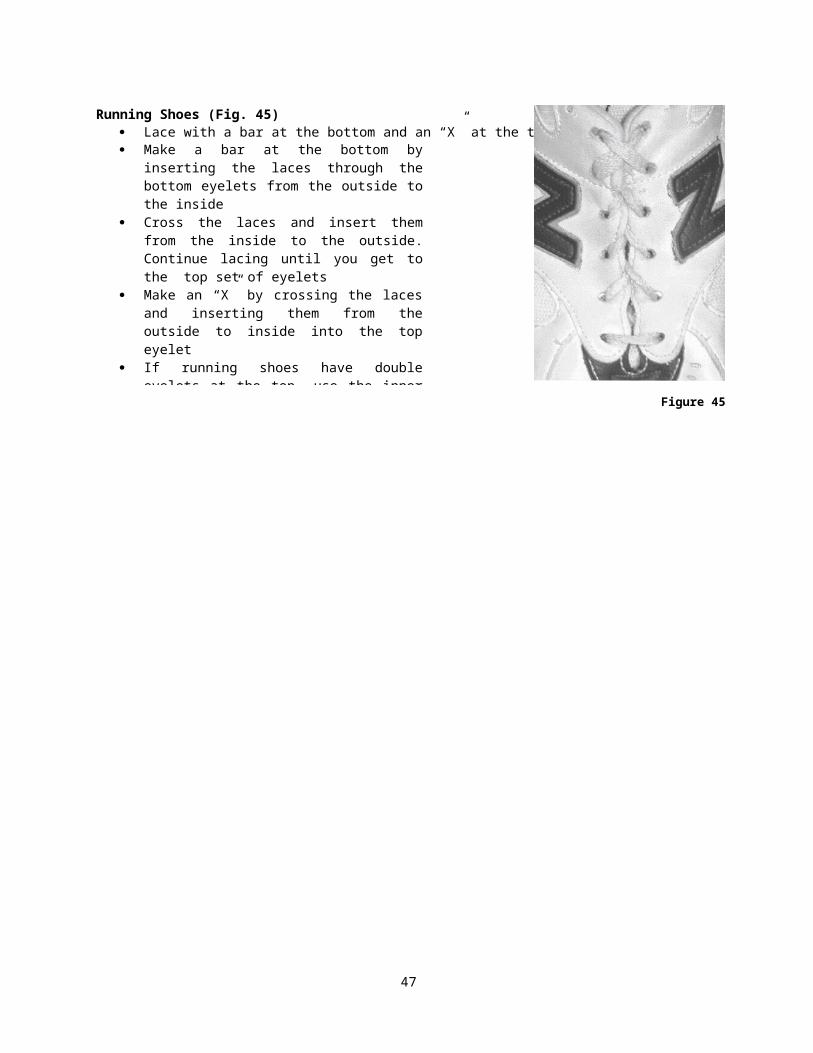
48
Drill Instruction Guide onhow to construct and present a drill lesson
The following procedures are effective means of teaching drill and were designed to assist instructors in presenting drill lessons. (Right Face will be used as an example and will be in italics)
Before the first formal drill instruction, set all ground rules that apply, i.e., drill waivers, conduct of the flight members, etc. Arrange the flight so all individuals can hear and observe the lesson.
1. INTRODUCTION (Any logical order)
a. AttentionGain the attention of your flight to insure that they are mentally prepared for the lesson. If this is the first time with this flight, it is a good idea to introduce yourself.
b. OverviewTell what you are going to teach - state the name of the position/movement, the objective and main points pertinent to the lesson being taught.
What I am going to teach you today is the military way of turning 90 degrees to the right from a halt. We call it a "right face."
c. MotivationGive a purpose for the position/movement telling them why it is used and why they must be attentive. (Stress Teamwork, pride, and mission accomplishment).
2. Body
a. 1st Whole Impression
(1) State commands
(a) After telling them what commands will be used for the movement, break them down into their separate parts, preparatory/execution, and then give the commands using proper characteristics of a command voice without execution of the movement.
The commands for this movement are . . . Right and Face. Right is the preparatory command . .. Face is the command of execution. Coming from me, it will sound like this . . .
(b) Next, stand at attention and using command voice give the command.
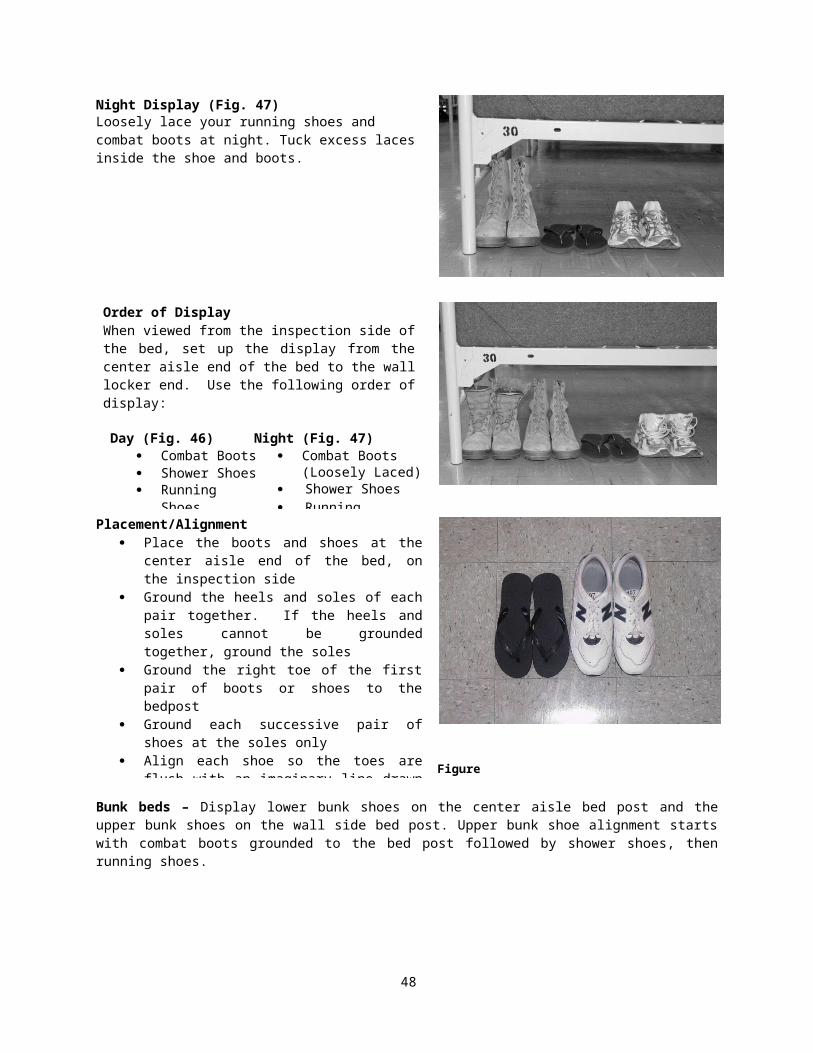
49
Right, HASE
(c) After giving the command, repeat the command.
Once again . . . Right, HASE
(2) State requirements
(a) Tell them what must the flight be doing to execute the movement, i.e., halted, attention, marching, etc. What formation can they execute the movement in? What interval and what cadence they execute the movement in?
The requirements for this movement are: you must be Halted at the position of Attention; this movement can be done in Any Formation or as a single individual; it is done at Close or Normal Interval; and in the Cadence of Quick Time.
(3) Tell flight which individual and/or element you will represent before performing each portion of the movement.
Behind me I have an imaginary flight. They are halted, at the position of Attention. They are in column formation, and at normal interval. I am going to represent each member of the entire flight at the same time with no exceptions.
(4) Direct the students' attention to the action areas. (In some movements you may demonstrate the majority with exceptions, to be explained later) Always use logical sequence. (Front to rear, base file first etc.)
Scan my entire body but pay particular attention to the lower half . . . mainly my feet.
(5) Demonstrate the movement properly using proper cadence, bearing, and command voice-- set the standard for performance. DO NOT TEACH THE MOVEMENT HERE.
(a) Position yourself so everyone can see and hear the presentation.
(b) Perform using a view that best emphasizes the action area. Movement in which the entire flight performs in the same manner requires two different views. Once you demonstrate the movement the first time, move yourself to give the flight a different view of the movement. Explain the action area and then demonstrate the movement a second time.
Again, I am going to represent each member of the entire flight at the same time. Scan my entire body but this time pay particular attention to the upper half, mainly my arms and hands.
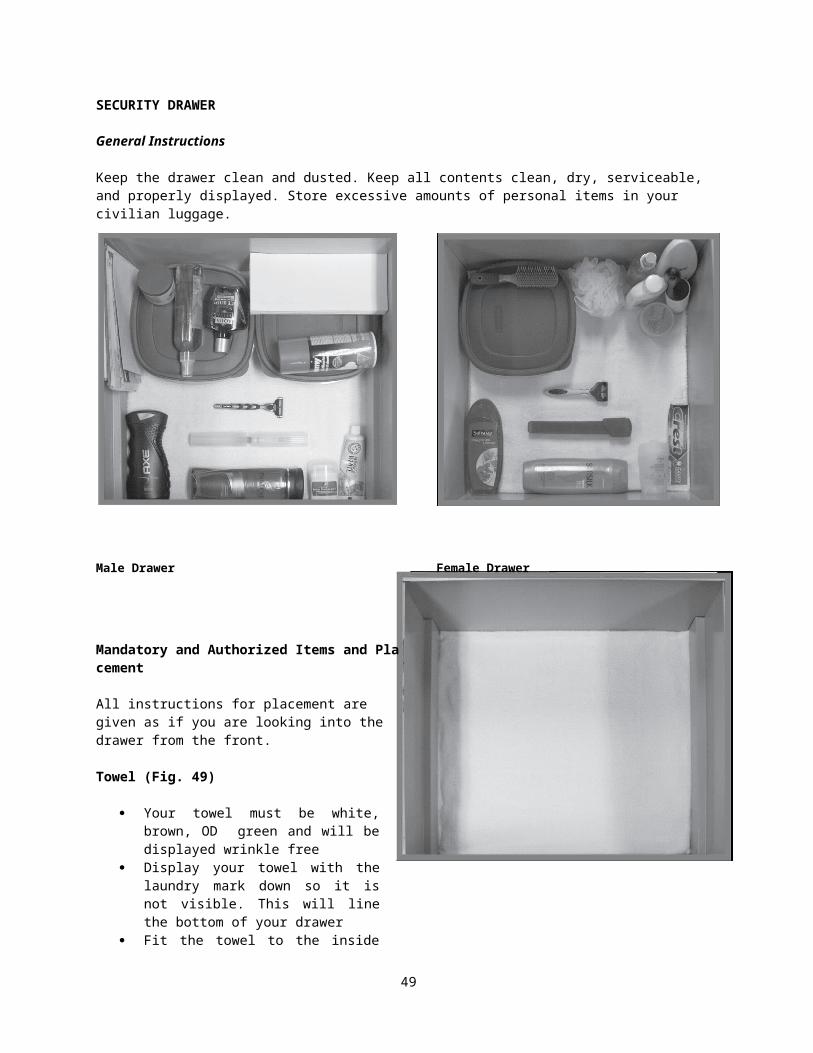
50
(c) When different procedures are required of different elements, only one view per element is required, i.e., Open ranks, Close/Extend while marching/halted. (Demonstrate only the first part of the movement during this step.)
b. Explain and Demonstrate
(1) Perform the movement slowly. Explain in detail every action you take, to include the preparatory command and command of execution, what foot the commands are given on, etc. DO NOT use command voice.
(2) If required, explain By-the Numbers procedures here.
(3) Ensure all information has been taught and all questions have been answered before proceeding.
Now I am going to break down this movement and show you exactly how it is done. Upon hearing the preparatory command of Right (do not use command voice) you will form a mental picture of what is about to take place.
When you hear the command of execution, FACE (do not use command voice), raise your right toe and left heel high enough to clear the ground (demonstrate).
Next you will turn 90 degrees to the right on the ball of the left foot and the heel of the right foot, assisted by slight pressure on the ball of the left foot. Keep the upper body at the position of attention (demonstrate).
After pivoting 90 degrees to the right, plant your right foot 22 ½ degrees off the center line of your body. Keep both legs straight but not stiff. Again, the upper body remains at the position of attention.
This completes count one of this two-count movement. To complete count two, bring your trailing foot (left) smartly forward the most direct route, so your heels come together and on line (demonstrate).
Feet should now be forming a 45-degree angle, which means the position of Attention has been resumed. This completes count two of the movement. Are there any questions?
When addressing questions, repeat the question to ensure that everyone hears it. Answer the question, then ask the person posing the question "Does this answer your question?" DO NOT TEACH during the question period.
c. 2nd Whole Impression
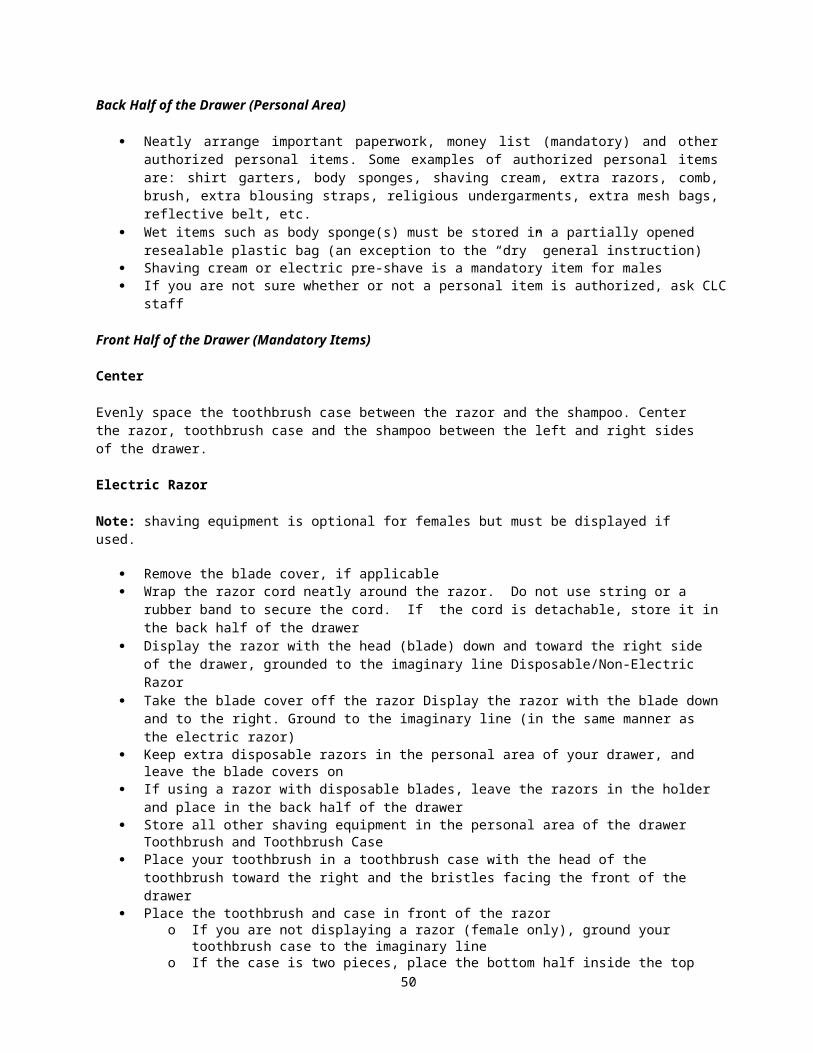
51
(1) Required for movements that use By-the-Numbers procedures or two part movements requiring demonstration of their remaining parts (i.e., Close ranks) during this step.
d. Application and Evaluation -- have the flight perform the movement just taught.
(1) Actively supervise the application.
(2) Correct substandard performance and/or improper procedures through positive feedback.
(3) Explain Dress, Cover, Interval, and Distance (DCID) as applicable.
3. CONCLUSION
a. Summary (Cover main points of the lesson)DO NOT TEACH
b. MotivationRemind them of the purpose for the position/movement telling them why it is used and why they must be attentive. (Stress Teamwork, pride, and mission accomplishment).
C. Closure (i.e., 10 min break, etc.)

52
DRILL TEACHING GUIDE
INTRODUCTIONA) INTRODUCE YOURSELF TO THE FLIGHTB) ENSURE YOUR FLIGHT IS MOTIVATED TO LEARNC) GIVE NAME OF MOVEMENT(S) YOU ARE TEACHING
WHOLE IMPRESSIONA) COMMANDS D) SHOW ACTION AREAB) SET THE STAGE E) DEMONSTRATEC) TELL WHO YOU REPRESENT
EXPLAIN AND DEMONSTRATEA) LOGICAL STEP BY STEP SEQUENCE (LEFT SIDE OF LP)B) EXPLAIN BY-THE-NUMBERS IF REQUIREDC) OBTAIN FEEDBACK (MAY QUESTION STUDENTS)
WHOLE IMPRESSIONREQUIRED FOR BY-THE-NUMBERS AND TWO PART MOVEMENTS
APPLICATION AND EVALUATIONCOACH PUPIL METHOD OF INSTRUCTION MAY BE USED
CONCLUSIONA) BRIEFLY REVIEW MAIN POINTS OF THE LESSONB) GIVE INSTRUCTIONS TO STUDENTS (I.E. 10 MIN BREAK
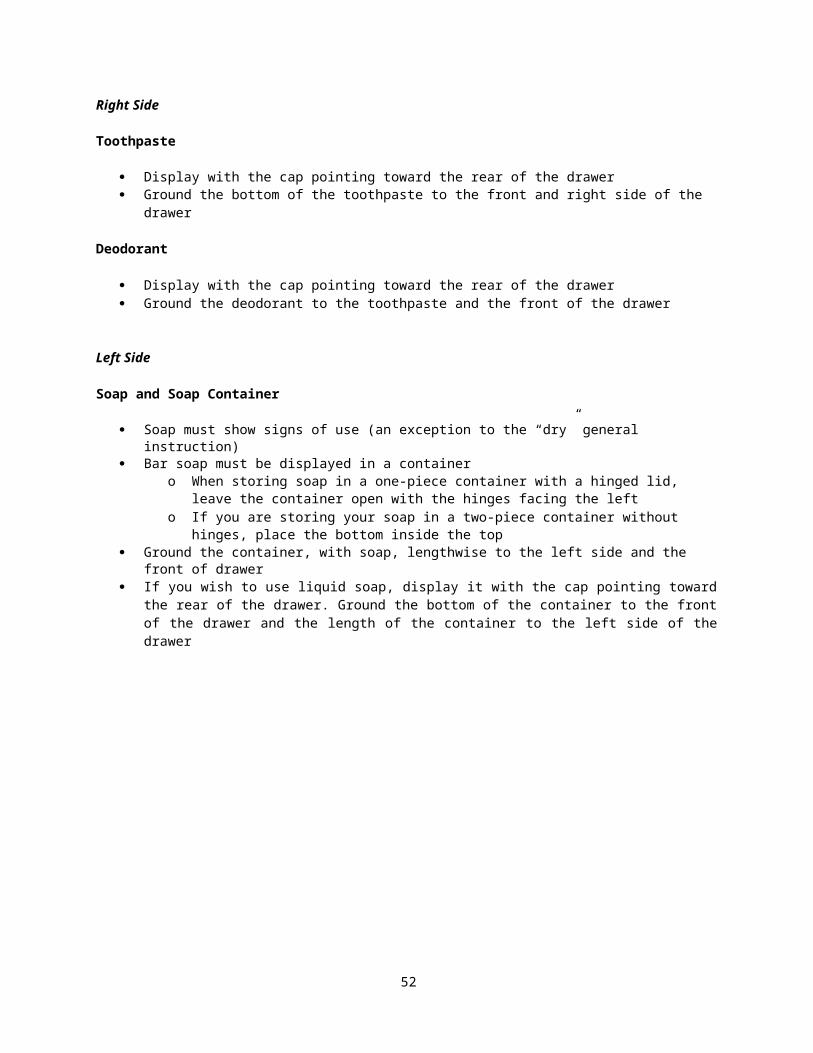
53
Drill Terminology
Adjutant. A ceremonial position occupied by the junior member of the command staff in reviews and parades and responsible to the troop or group commander. The adjutant's cadence is 140 steps per minute.
Alignment. Dress or cover
Base. The element on which a movement is planned, regulated, or aligned.
Cadence. The uniform step and rhythm in marching; that is, the number of steps marched per minute.
Center. The middle point of a formation. On an odd-numbered front, the center is the center person or element. On an even-numbered front, the center is the right center person or element.
Cover. Individuals aligning themselves directly behind the person to their immediate front while maintaining proper distance.
Depth. The total space from front to rear of any formation. An individual's depth is considered to be 12 inches.
Distance. The space from front to rear between units. The distance between individuals in formation is 40 inches as measured from their chests to the backs of individuals directly in front of them. Flight commanders, guides, and others whose positions in formation are 40 inches from a rank are themselves considered a rank.
Double Time. The rate of marching at 180 steps (30 inches in length) per minute.
Dress. Alignment of elements side by side or in line maintaining proper interval.
Element. The basic formation; that is, the smallest drill unit comprised of at least 3, but usually 8 to 12 individuals, one of whom is designated the element leader.
File. A single column of persons placed one behind the other
Final Line. The line on which the adjutant forms the front rank of troops for a parade or review.
Flank. The extreme right or left (troops right or left) side of a formation in line or in column.
Flight. At least two, but not more than four, elements.
Formation. An arrangement of units
Front. The space occupied by a unit, measured from flank to flank. The front of an individual is considered to be 22 inches
Guide. The airman designated to regulate the direction and rate of march.
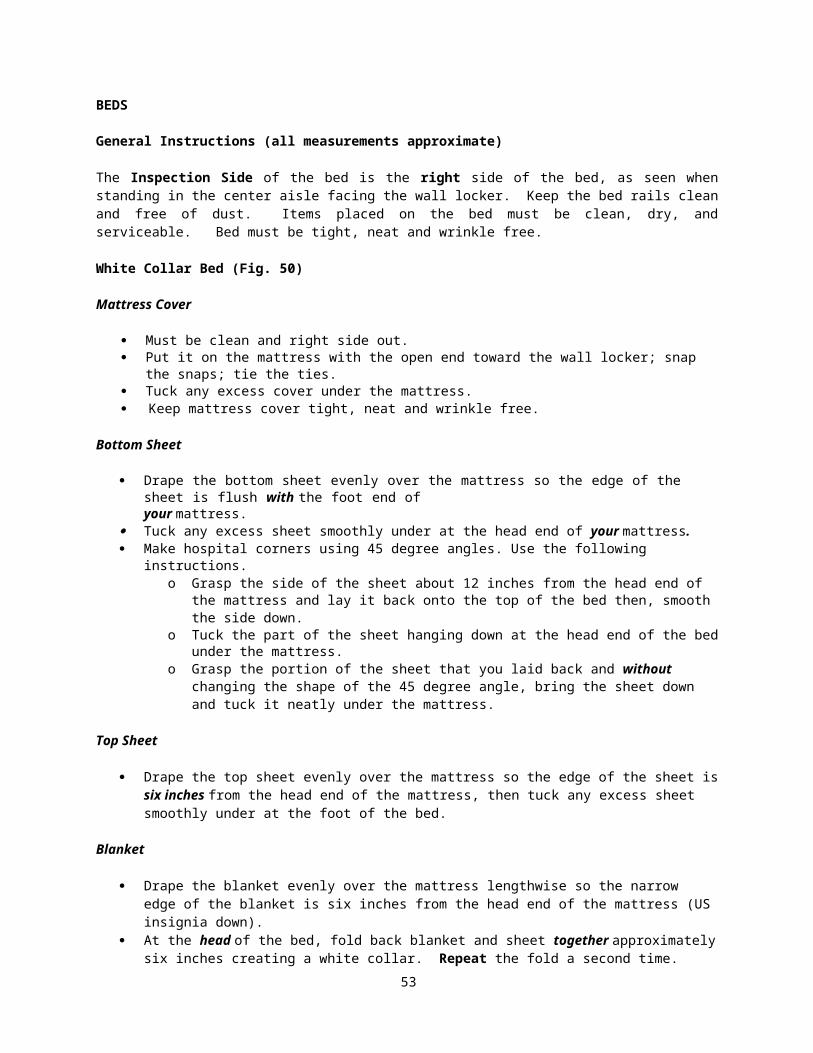
54
Head. The leading unit of a column.
In Column. The arrangement of units side by side with guide and element leaders to the head.
In Line. The arrangement of units one behind the other with the guide and element leader to the extreme right flank.
Interval. The space between individuals placed side by side. A normal interval is an arms length. A close interval is 4 inches.
Inverted Column. The arrangement of units side by side with guide and element leaders to the rear.
Inverted Line. The arrangement of units one behind the other with the guide and element leaders to the extreme left flank.
Line of March. A line followed by troops as they pass in review.
Mark Time. Marching in place at a rate of 100 to 120 steps per minute.
Mass Formation. The formation of a squadron or group in which the component units are in column, abreast of each other, and at close interval.
Pace. A step of 24 inches. This is the length of a full step in quick time.
Post. The correct place for an officer, noncommissioned officer (NCO), or airman to stand while in formation.
Quick Time. The rate of marching at 100 to 120 steps (12 or 24 inches in length) per minute.
Rank. A single line of persons placed side by side.
Ready Line. A forming line 20 paces to the rear of the final line where troops are formed for a parade or review at an established time prior to Adjutant's Call.
Reviewing Officer. The senior officer participating in a parade or review.
Slow Time. The rate of marching at 60 steps per minute (used in funeral ceremonies).
Step. The distance measured from heel to heel between the feet of an individual marching.
Unit. Any portion of a given formation.
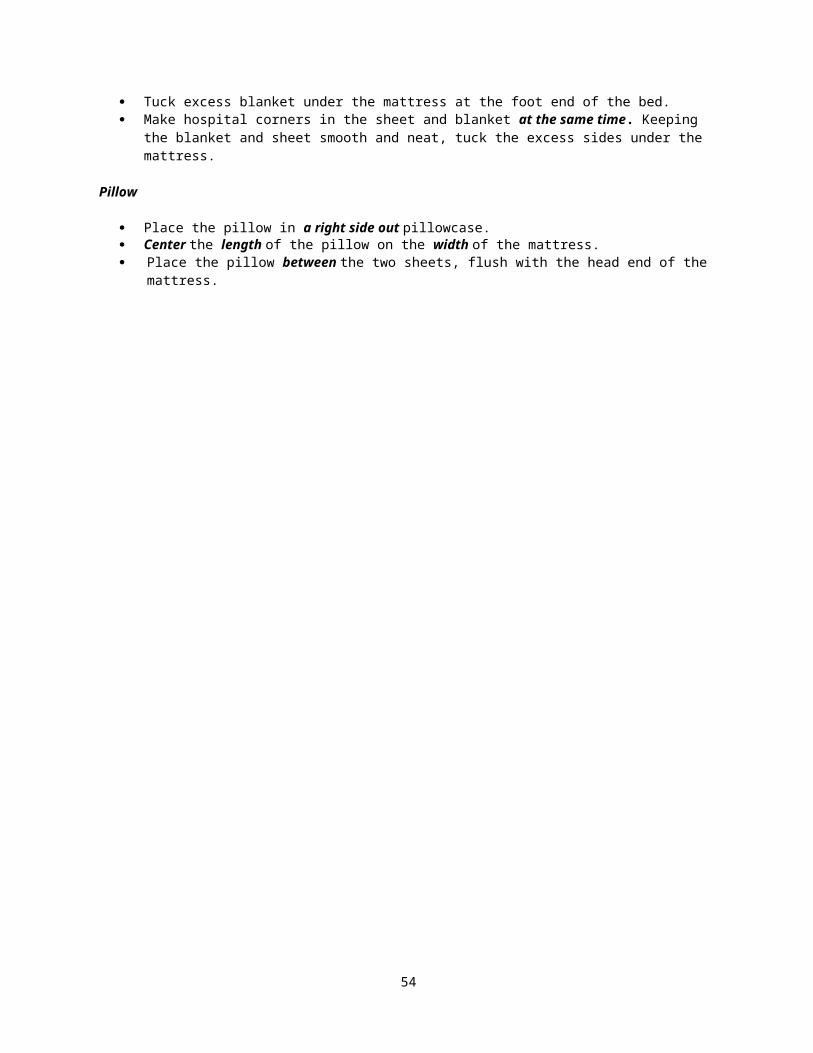
55
Phonetic AlphabetLetter Code Word Pronunciation
A Alfa AL fah
B Bravo BRAH voh
C Charlie CHAR lee
D Delta DEL tah
E Echo EKK oh
F Foxtrot FOKS trot
G Golf GolfH Hotel HO tell
I India IN dee ah
J Juliet JEW lee ett
K Kilo KEY loh
L Lima LEE mah
M Mike Mike
N November NOH vem berO Oscar OSS car
P Papa PAH pah
Q Quebec keh BECK
R Romeo ROW me oh
S Sierra see AIR ah
T Tango TANG go
U Uniform YOU nee form
V Victor VIK ter
W Whiskey WISS key
X X-ray EKS ray
Y Yankee YANG kee
Z Zulu ZOO loo
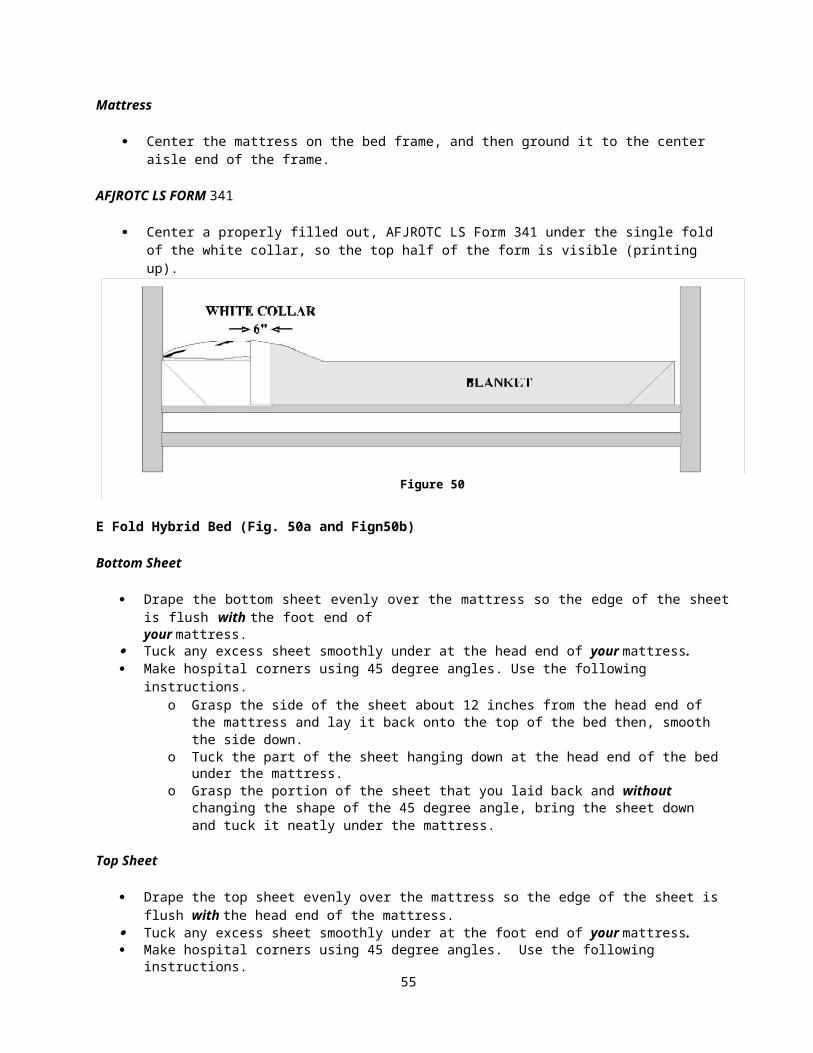
56
MEMORY WORK
AFJROTC Cadet CreedI am an Air Force Junior ROTC Cadet.I am connected and faithful to every Corps of Cadets who served their community and nation with patriotism. I earn respect when I uphold the Core Values of Integrity First, Service Before Self, and Excellence in All We Do. I will always conduct myself to bring credit to my family, school, Corps of Cadets, community, and to myself.My character defines me. I will not lie, cheat, or steal. I am accountable for my actions and deeds.I will hold others accountable for their actions as well.I will honor those I serve with, those who have gone before me, and those who will come after me. I am a Patriot, a Leader, and a Wingman devoted to those I follow, serve, and lead.I am an Air Force Junior ROTC Cadet.
The Air Force Song - by Robert Crawford Off we go into the wild blue yonder, Climbing high into the sun;Here they come zooming to meet our thunder,At 'em boys, Give 'er the gun! (Give 'er the gun now!) Down we dive, spouting our flame from under,Off with one helluva roar!We live in fame or go down in flame. Hey! Nothing can stop the U.S. Air Force!
Air Force Core ValuesIntegrity First Service Before SelfExcellence In All We Do!
Air Force MissionThe mission of the United States Air Force is to fly, fight and win … in air, space, and cyberspace.
Air Force MottoAIM HIGH...FLY-FIGHT-WIN!
CLC Chain of Command (fill in with the appropriate names)
CLC Commandant:
CLC Cadet Commander:
CLC Cadet Command Chief Master Sergeant:
CLC Cadet Squadron Commander:
CLC Cadet Squadron First Sergeant:
CLC Cadet Flight Commander:
CLC Cadet Flight Sergeant:
57
FORMATIONS (The terms “right” and “left” apply to right and left as the troops face.)
Group Formation
Flights will assemble in line formation in each squadron.
The interval between squadrons is 12 paces and the interval between flights is 6 paces.
Flight sergeants will call Fall, IN, square off and size the flight. Flight sergeants will then command Sound, OFF and take accountability. Following the completion of accountability the flight sergeant performs an about face, salutes, and reports the results to the flight commander. The flight commander returns the salute and instructs the flight sergeant to assume their position in the flight. Once the flight sergeant assumes their position, the flight commander will perform and about face.
When all the flights within a squadron have completed this phase, the squadron commander will ask for the report. Each flight commander will report the results of the accountability. When the report is completed the squadron commander will put their flight at parade rest, perform an About Face and assumes the position of Parade Rest.
At this time, the entire group formation is at the position of Parade Rest. Everyone is facing front to include the squadron staff.
The CLC cadet commander will order the squadron commanders to bring their squadrons to Attention.
Squadron commanders will come to the position of Attention. Perform an About Face, and bring their squadron to Attention. Flight commanders will supplement squadron commander’s commands.
Once the squadrons are at Attention, the squadron commanders will perform an About Face.
CLC Commander will then command, “Report.”
Beginning with A-Squadron, squadron commanders will state, “A-Squadron, all present and or accounted for, Sir/Ma’am.”
Dismissing the Group.
The CLC cadet commander commands DISMISS YOUR SQUADRONS.
The squadron commanders salute the CLC cadet commander, executes an about face and instructed the flight commanders to take charge of their flights.
If the group commander desires to release the squadrons to their commanders without directing that the squadrons be dismissed promptly, the command TAKE CHARGE OF YOUR SQUADRONS is given. The squadron commanders salute the group commander and take charge of their squadrons.
Accountability – The command for accountability is Sound, OFF. On the command of execution OFF, each member of the flight will sound off in a loud and clear voice his or her flight roster number. The individual issuing the command will use a current flight roster to track accountability. Missing trainees must be accounted for immediately.
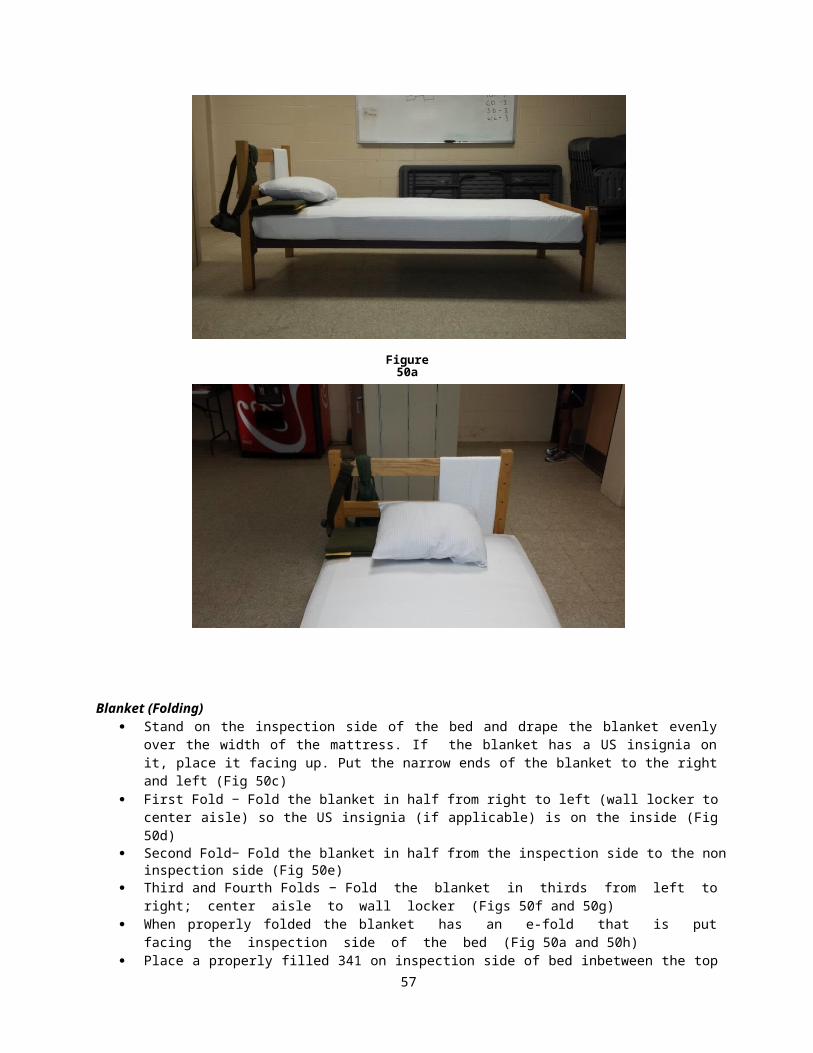
58
NOTES