Embed Size (px)
Citation preview

1

2
Agricultural Marketing (AGM)
USER GUIDE for Trader

3
Table of Contents Overview ....................................................................................................................................................... 4
Login to AGM ................................................................................................................................................ 4
Create Trades ................................................................................................................................................ 6
Generate New Trades (Sales & Stock) ...................................................................................................... 6
Trades History ............................................................................................................................................. 10
Generate Purchase Permit (Sales & Stock) ............................................................................................. 13
Print (Purchase) Permit: ...................................................................................................................... 18
Download (Purchase) Permit .............................................................................................................. 20
Cancel (Purchase) Permit .................................................................................................................... 23
Generate Sales Permit (Stock Trade) ...................................................................................................... 27
Print (Primary/Purchase) Permit: ........................................................................................................ 32
Download (Purchase) Permit .............................................................................................................. 34
Cancel (Purchase) Permit .................................................................................................................... 36
SOS (Emergency Permit-Sales & Stock) .................................................................................................. 40
Print (Emergency) Permit .................................................................................................................... 43
Download (Emergency) Permit ........................................................................................................... 45
Cancel Permit (Emergency permit) ..................................................................................................... 48
Edit trades ................................................................................................................................................... 52
Transfer Trade ......................................................................................................................................... 53
Convert Trade ......................................................................................................................................... 57
Retail Sale ................................................................................................................................................ 59
Log Off ......................................................................................................................................................... 62

4
Overview
Agricultural marketing is a unique platform designed to facilitate efficient &
effective service delivery. It will act as an information gateway to citizens&
provide up-to-date information about Commodity details, Trader and Trade
details & the required services of Agriculture Marketing Department.
Create a smart link / interface between Traders, Commission agents and other information providers.
Execute and maintain required Infrastructure facilities in Agriculture Marketing Committee and department check post for the economic development in Andhra Pradesh.
E-enable delivery of the entire Agriculture Marketing department services through appropriate automation of backend processes.
Login to AGM
Step 1:
Open browser in your desktop or laptop & enter the URL
http://36.255.252.154:8080/prweb/ to open AGM website.
Step 2:
Enter valid Marketing Committee user name (license number), password & click
on the ‘Log in' button.

5
.
If the authentication is successful, “Create Trades “ page is displayed.

6
Create Trades
Generate New Trades (Sales & Stock)
Step 1:
To generate new trades, click on the “GENERATE NEW TRADE” button displayed in
the Create Trades page.
Step 2:
Fill in the Supplier details displayed in the “Generate New Trade” pop up window.

7
Step 3:
Fill in the Trade details (Trade Type (Sale/Stock), Commodity, Quantity,
Commodity weight & Trade Value).
NOTE: Market fee is auto calculated and displayed.
8
Step 4:
Click on the check box to acknowledge the declaration.
Step 5:
Click on the “PAY MARKET FEES” button displayed on acknowledgement of the
declaration.
9
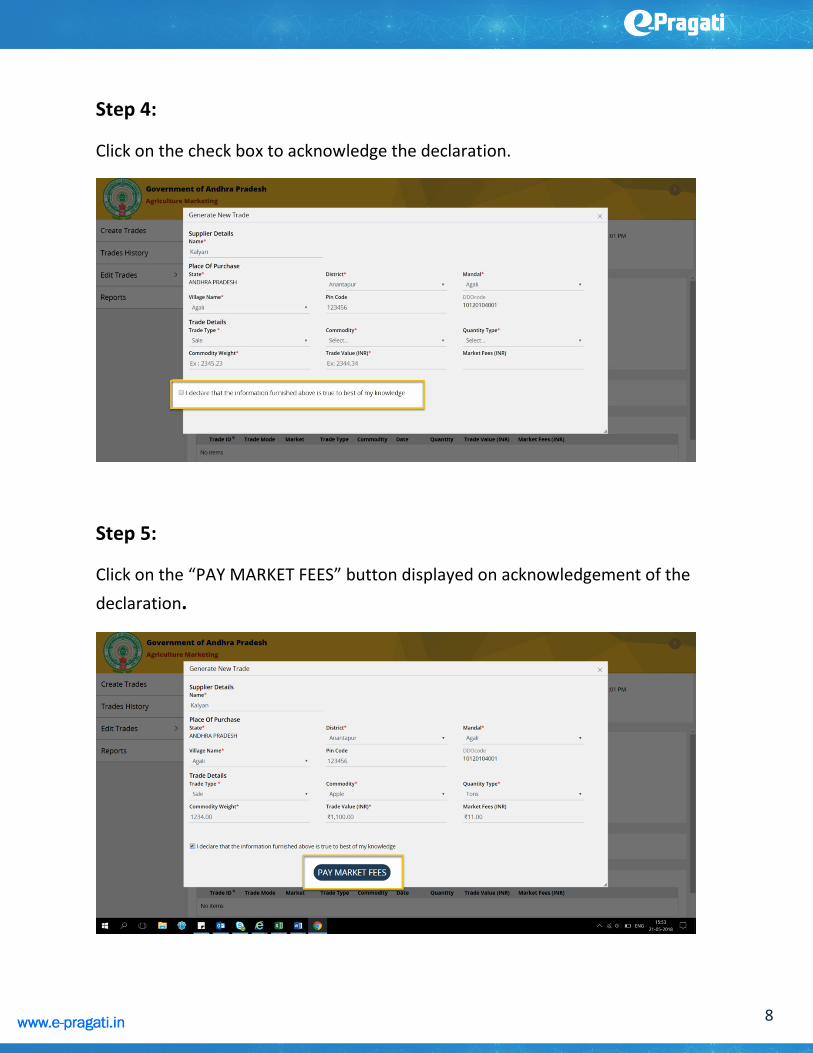
Payment gateway opens up in a new window.
Step 6:
Select the card type (master card, visa)
Enter the Marketing committee Account number
Enter the CVV number displayed on the back side of your card
Click on the Pay button
Once the payment is successful, the new window for payment gateway will close
& the ‘Create Trades’ page is displayed with the “Trade details” under Today's
trade section.

10
Trades History
Trade history page displays the list of trades performed until yesterday along with
the options to perform search, page navigation & filters on each column.

11
Step 1: Search Trades
Users can search by entering the Trade id or the Commodity.
Enter the ‘Trade id’ or ‘Commodity’ & click on ‘Search’ button.
Step 2: Search between Dates
Users can narrow down their search by filtering the trades by selecting the dates
from the calendar dropdowns.

12
Step 2: Page Navigation
Users can navigate across the list of pages displayed for previous trades.
Step 3: Filter
Users can filter the list of previous trades based on various criteria by using the
filter options displayed on column heading.

13
Generate Purchase Permit (Sales & Stock)
Step 1:
Click on the Purchase Permit button displayed for any of the sale trade displayed
under previous trades section
NOTE: “Sale” trade type has only one active option for “Purchase permit”,
whereas ‘Store’ type trade has both purchase & Sale permit options active.

14
“Consignee Details” pop up should be displayed.
Step 2:
Fill in the details of the consignee.

15
NOTE: You can generate the permit only if the Consignee State is “Andhra
Pradesh”.
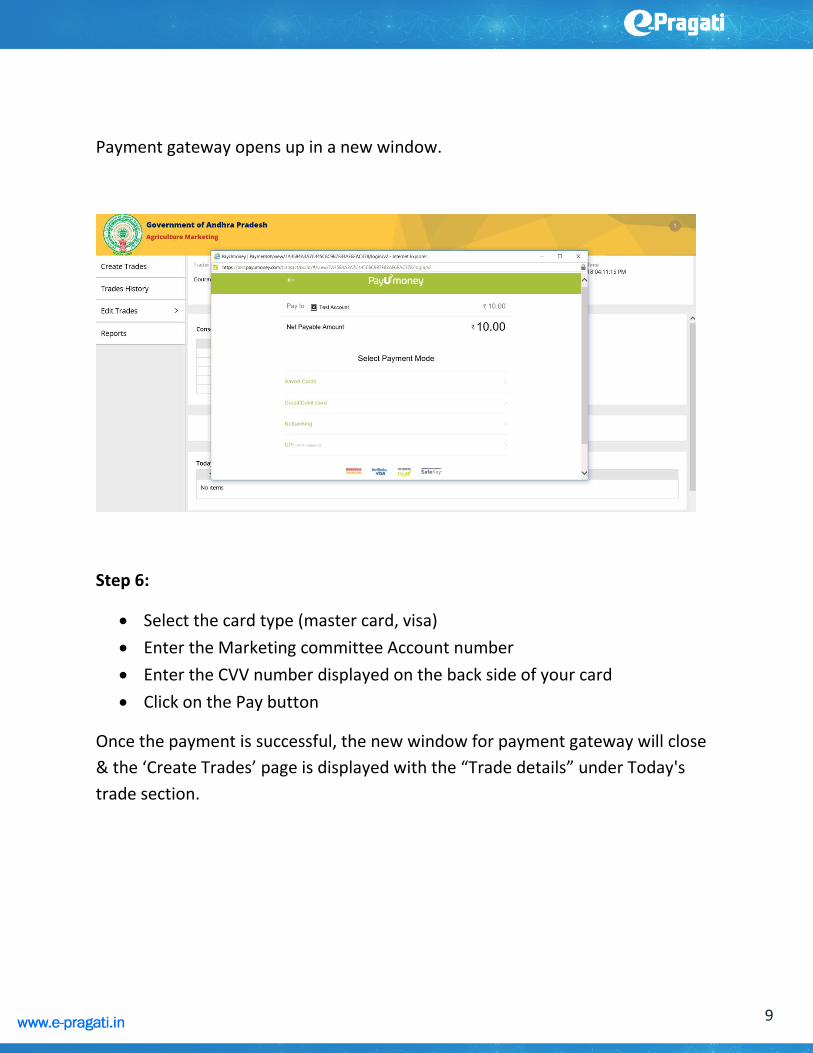
Step 3:
Click on “Add Item” under create permit below the consignee details to create
permit.
Step 4:
Enter the ‘Vehicle Number’ & ‘Quantity’ details in the fields displayed under
Create Permit section.
16
NOTE: ‘Trade Value’ and ‘Market Fees’ sections are grayed out initially & will be
auto calculated & the values will be displayed based on the Quantity you entered.
Step 5:
Click on Submit button displayed on the bottom right side.

17
The “Consignee details” pop up should close & the “Previous trades” page should
be displayed.
Step 6:

18
Click on the arrow displayed for the sale trade. Purchase permit details are
displayed below the selected sale trade permit.
Print (Purchase) Permit:
Step 1:
Click on the “Print Permit” hyperlink displayed for the permit id.

19
Step 2:
“Purchase permit” should open up in a new window, where we can take a print of
it.
Step 3:

20
Click on the top right corner of the browser to close the new window for “Print
Permit” & the previous trade s page should be displayed with the purchase permit
details.
Download (Purchase) Permit
Step 1:
Click on the ‘Download” hyperlink displayed for the Purchase permit.

21
Step 2:
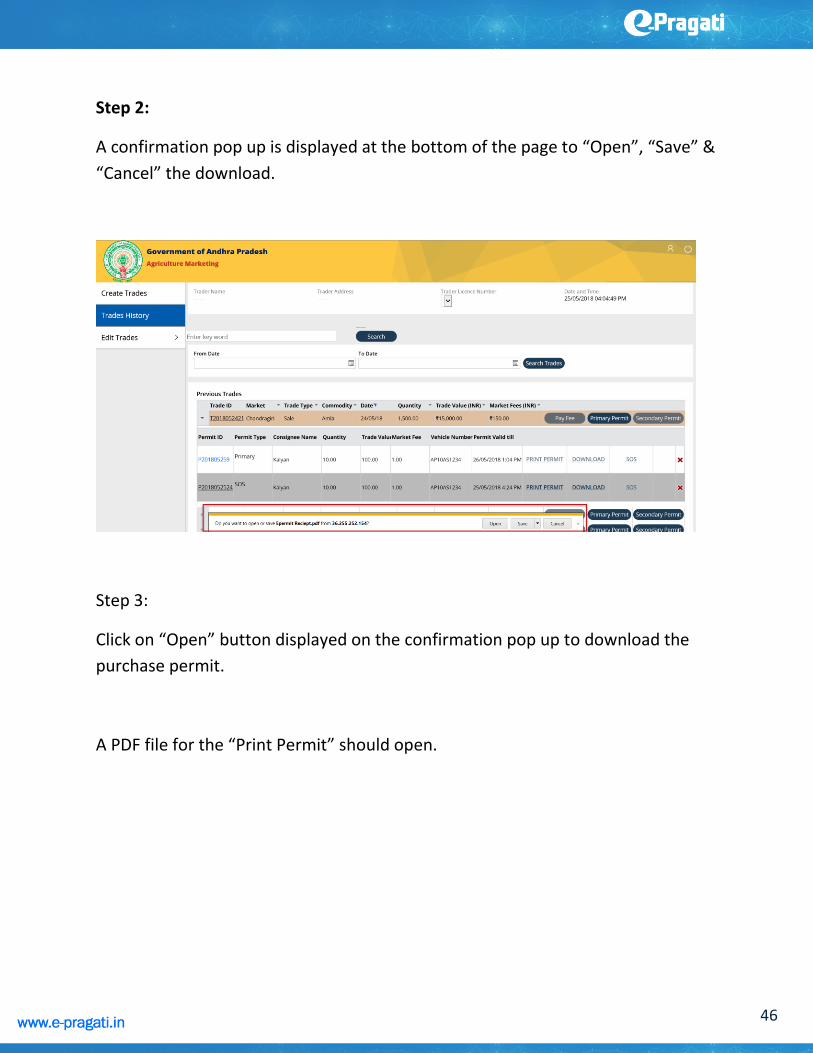
A confirmation pop up is displayed at the bottom of the page to “Open”, “Save” &
“Cancel” the download.
Step 3:

22
Click on “Open” button displayed on the confirmation pop up to download the
purchase permit.
A PDF file for the “Print Permit” should open.
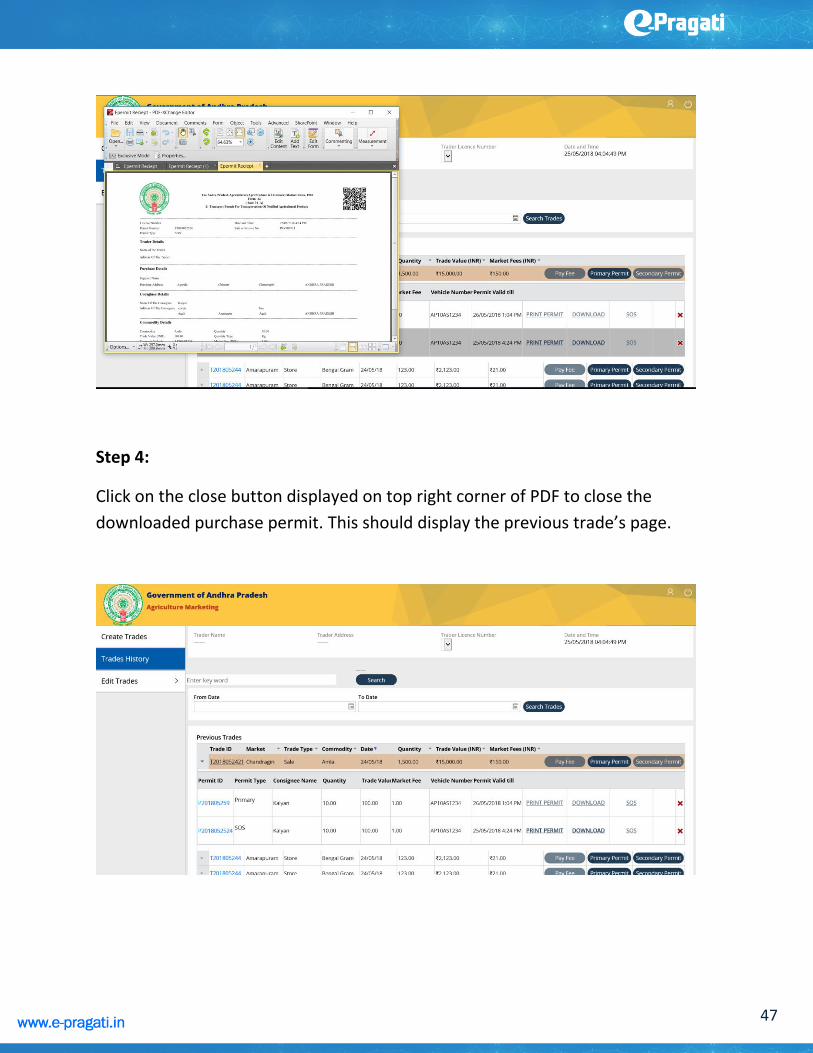
Step 4:
Click on the close button displayed on top right corner of PDF to close the
download purchase permit. This should display the previous trade’s page.

23
Cancel (Purchase) Permit
Step 1:
Click on the Red Cross mark displayed on the extreme right of the “Purchase
permit” for ‘Sale” trade type.

24
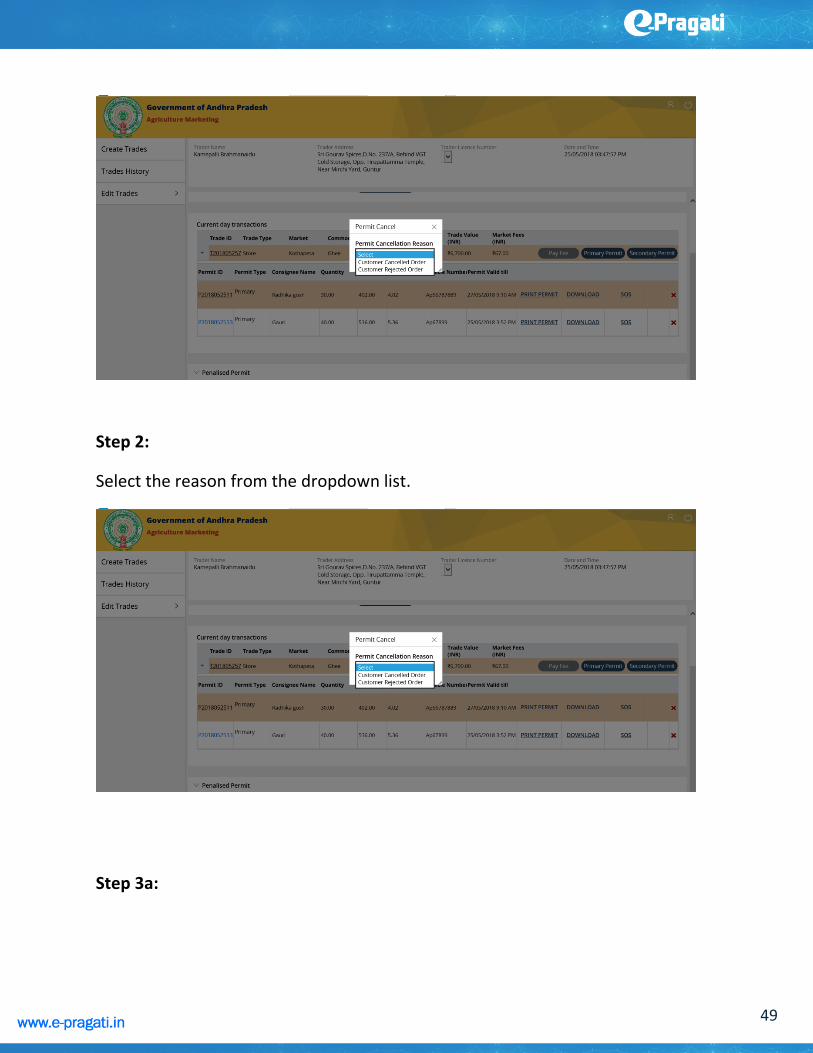
A ‘Permit Cancel’ pop up with a dropdown list of reasons will appear.
Step 2:
Select the reason from the dropdown list.

25
Step 3a:
For “Customer Cancelled Order”, Permit cancel pop up is displayed with the
Permit details along with the Permit Cancellation Reason, cancel & submit
buttons.
Step 3b:
For “Customer Rejected Order”, Permit cancel pop up is displayed with the Permit
details along with the Permit Cancellation Reason, Rejected quantity (if any),
Rejected Reason, cancel & submit buttons.

26
NOTE: Customer can Cancel/Reject the order only before the expiry of the permit.
Once the permit is expired, the customer can only reject the order.
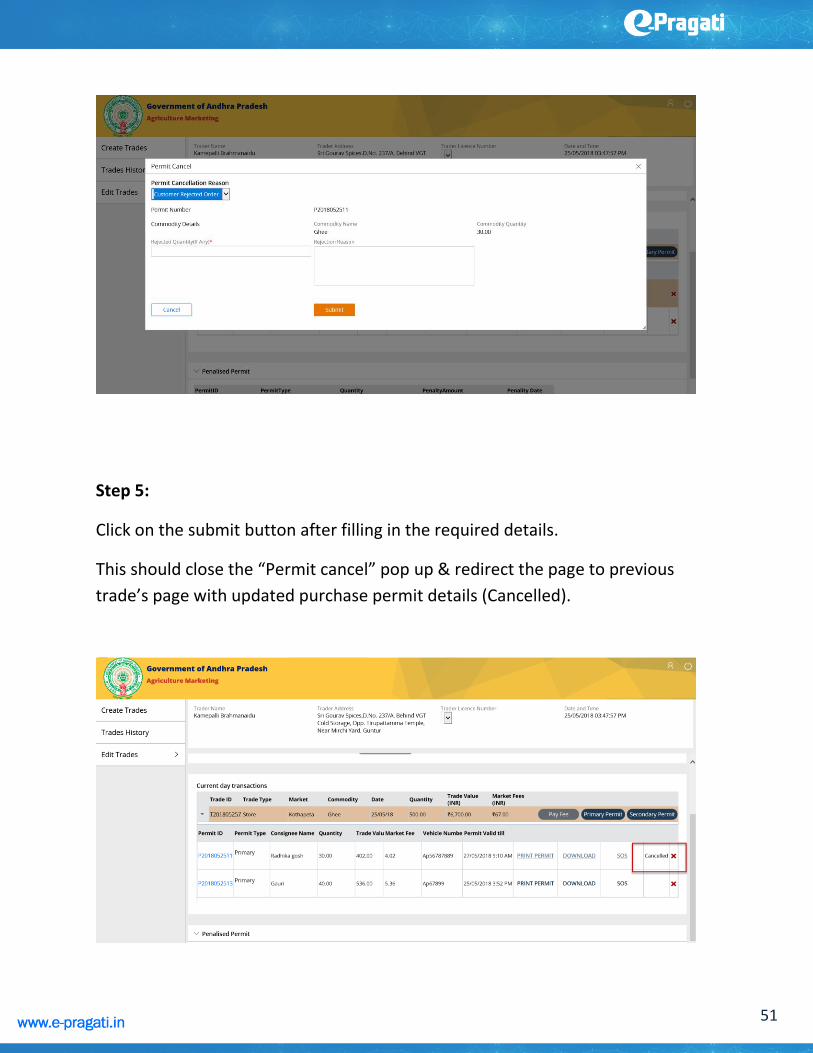
Step 4:
Click on the submit button after filling in the required details.
This should close the “Permit cancel” pop up & redirect the page to previous
trade’s page with updated purchase permit details (Cancelled).

27
Generate Sales Permit (Stock Trade)
Step 1:
Click on the Sales Permit button displayed for any of the STOCK trade displayed
under previous trades section.
NOTE: Sales permit can only be generated after the purchase permit has expired
& the consignee purchase permit state is “Andhra Pradesh”.

28
NOTE: “Sale” trade type has only one active option for “Purchase/Primary
permit”, whereas ‘Store’ type trade has purchase/Primary& Sale/Secondary
permit options active.
“Consignee Details” pop up is displayed with secondary trade details on the top.

29
NOTE: You can generate sales permit only if the consignee state is “Andhra
Pradesh”.
Step 2:
Click on the radio button displayed beside the secondary trade details and fill in
the details of the consignee.
Step 3:
Click on “Add Item” under create permit below the consignee details to create
permit.

30
Step 4:
Enter the ‘Vehicle Number’ & ‘Quantity’ details in the fields displayed under
Create Permit section.

31
NOTE: ‘Trade Value’ section is grayed out initially & will be auto calculated & the
value will be displayed based on the Quantity you entered.
Step 5:
Click on Submit button displayed on the bottom right side.
The “Consignee details” pop up should close & the “Previous trades” page should
be displayed.
Step 6:
Click on the arrow displayed for the STOCK trade. Purchase permit details are
displayed below the selected sale trade permit.

32
Print (Primary/Purchase) Permit:
Step 1:
Click on the “Print Permit” hyperlink displayed for the permit id.
Step 2:

33
“Purchase permit” should open up in a new window, where we can take a print of
it.
Step 3:
Click on the top right corner of the browser to close the new window for “Print
Permit” & the previous trade s page should be displayed with the purchase permit
details.

34
Download (Purchase) Permit
Step 1:
Click on the ‘Download” hyperlink displayed for the Purchase permit.
Step 2:
A confirmation pop up is displayed at the bottom of the page to “Open”, “Save” &
“Cancel” the download.

35
Step 3:
Click on “Open” button displayed on the confirmation pop up to download the
purchase permit.
A PDF file for the “Print Permit” should open.
Step 4:

36
Click on the close button displayed on top right corner of PDF to close the
download purchase permit. This should display the previous trade’s page.
Cancel (Purchase) Permit
A Permit can only be cancelled before it expires.
Traders can cancel/ reject permit only 3 times in a month.
Step 1:
Click on the Red Cross mark displayed on the extreme right of the “Purchase
permit” for ‘Sale” trade type.

37
A ‘Permit Cancel’ pop up with a dropdown list of reasons will appear.
Step 2:
Select the reason from the dropdown list.
Step 3a:

38
For “Customer Cancelled Order”, Permit cancel pop up is displayed with the
Permit details along with the Permit Cancellation Reason, cancel & submit
buttons.
Step 3b:
For “Customer Rejected Order”, Permit cancel pop up is displayed with the Permit
details along with the Permit Cancellation Reason, Rejected quantity (if any),
Rejected Reason, cancel & submit buttons.

39
Step 4:
Click on the submit button after filling in the required details.
This should close the “Permit cancel” pop up & redirect the page to previous
trade’s page with updated purchase permit details (Cancelled).

40
SOS (Emergency Permit-Sales & Stock)
Emergency Permit can be generated for both Purchase & Sale Permits & it is valid
for the next 24 hours only.
Step 1:
Click on the “SOS” hyperlink displayed for the purchase permit.
Emergency Permit pop up is displayed

41
Step 2a:
Select the “Emergency Permit reason” (Natural Disaster) from the drop down in
the pop up.
Step 2b:

42
For reasons like “Accident” or “Vehicle break down”, please fill in the vehicle
number & quantity under add items.
NOTE: The trade value and the market fees are auto calculated and displayed on
filling in the quantity fields
Step 3:
Click on Submit button displayed on the bottom right side of the page.
Emergency permit is generated and is displayed in the list of “Purchase Permit”
under the respective trade.

43
NOTE: You can take a print or download the emergency permit just like the
purchase permit.
Print (Emergency) Permit
Step 1:
Click on the “Print Permit” hyperlink displayed for the emergency permit id.

44
Step 2:
“Purchase permit” should open up in a new window, where we can take a print of
it.
Step 3:
Click on the top right corner of the browser to close the new window for “Print
Permit” & the previous trade s page should be displayed with the purchase permit
details.

45
Download (Emergency) Permit
Step 1:
Click on the ‘Download” hyperlink displayed for the Purchase permit.
46
Step 2:
A confirmation pop up is displayed at the bottom of the page to “Open”, “Save” &
“Cancel” the download.
Step 3:
Click on “Open” button displayed on the confirmation pop up to download the
purchase permit.
A PDF file for the “Print Permit” should open.
47
Step 4:
Click on the close button displayed on top right corner of PDF to close the
downloaded purchase permit. This should display the previous trade’s page.

48
Cancel Permit (Emergency permit)
Traders can cancel the permit only before it expires.
Traders can cancel/ reject permit only 3 times in a month.
Step 1:
Click on the Red Cross mark displayed on the extreme right of the “Purchase
permit” for ‘Sale” trade type.
A ‘Permit Cancel’ pop up with a dropdown list of reasons will appear.
49
Step 2:
Select the reason from the dropdown list.
Step 3a:

50
For “Customer Cancelled Order”, Permit cancel pop up is displayed with the
Permit details along with the Permit Cancellation Reason, cancel & submit
buttons.
Step 4b:
For “Customer Rejected Order", Permit cancel pop up is displayed with the Permit
details along with the Permit Cancellation Reason, Rejected quantity (if any),
Rejected Reason, cancel & submit buttons.
51
Step 5:
Click on the submit button after filling in the required details.
This should close the “Permit cancel” pop up & redirect the page to previous
trade’s page with updated purchase permit details (Cancelled).

52
Edit trades
Step 1:
Click on the Edit trades button displayed in the menu section.
Edit trades should display list of below items (Sub menu).
Transfer Trades
Convert Trades
Retail Sale

53
Transfer Trade
Transfer Trade displays list of all (sales & Stock) trades.
Stock Trades which do not have any Quantity are not displayed under Transfer
trade.
Transfer trade does not require to generate any permit.

54
Step 1:
Click on the Transfer trade button displayed under the Edit Menu.
Step 2:
Click on the arrow button displayed on the right side of each trade id.
Initially there are no Permits displayed.

55
Step 2:
Click on the transfer button displayed on the left for any of the trade.
Transfer trade details pop up should be displayed.
Step 3:
Fill in the trade details, Consignee details & click on submit button.

56
The pop up window for transfer trade details should close & the Transfer trade
page is displayed.
The Purchase permit for the transfer is created automatically & displayed under
the trade item.

57
NOTE: Sales permit can be generated for the trade item only after the Purchase
permit has expired.
Emergency permit can be generated only before the purchase permit for the
trade item expires.
Convert Trade
Traders an convert their existing Sale trades to Stock Trades.
Traders will not be able to convert their Purchase permit quantities into stock.
Ex: Trader has 10 quantities of a trade item & he has generated purchase permit
for 4 quantities, then he may only be able to convert the remaining quantities of
trade item into stock.
Step 1:

58
Click on “Convert Trade” displayed under Edit Trades in the menu.
Concert trade page should display list of consolidated trades & trades items.
Step 2:
Click on “Convert to stock” button displayed for the list of trade items
A confirmation pop up window is displayed

59
Step 3:
Click on “Yes” button displayed on the pop up confirmation.
The selected trade item is converted to stock & the page is redirected to the
Create Trades page.
Retail Sale
Step 1:
Click on Retail Sale displayed under the Edit trade in the menu section.

60
List of all trades are displayed.
Step 2:
Click on the Generate Retail Sale button displayed for any of the trade items
displayed.
Retail Sale info page is displayed with the list of addresses & the quantities for the
trade stock, consignee details.

61
Step 3:
Select the address of the stock which you want to retail, fill in the Consignee
details & Click submit.

62
Log Off
Click on the power icon displayed on top right side of the page.
Below list of options are displayed in the dropdown to choose from
Switch Role
Log off
Step 2:
Click on the “Log Off” button displayed in the list of options.

63
The user is successfully logged out of the application & the page is redirected to “One portal”.

64