Embed Size (px)
Citation preview

END USER INTERFACE
TIPS AND REFERENCE GUIDE
Last Updated: February 3, 2016
www.agiloft.com/documentation/eui-reference-guide.pdf
© Agiloft, Inc. 2016

1
CONTENTS
Introduction ............................................................................................................................................................ 2
End User Interface Overview .............................................................................................................................. 2
About This Guide ................................................................................................................................................ 2
Default Configuration ............................................................................................................................................. 3
main.php ............................................................................................................................................................. 3
home.htm ........................................................................................................................................................... 3
menu.htm ........................................................................................................................................................... 3
translation.properties ......................................................................................................................................... 4
style.css and others ............................................................................................................................................ 4
Tips & Tricks ............................................................................................................................................................ 4
Single Sign-on (SSO) ............................................................................................................................................ 4
Chat ..................................................................................................................................................................... 5
Dropdown Menus ............................................................................................................................................... 7
Pre-populating Records: ...................................................................................................................................10
Macros Reference .................................................................................................................................................14
Additional Tools ....................................................................................................................................................23
Visualization Parameters ($params) .................................................................................................................23
User related tools .............................................................................................................................................23
Response related tools .....................................................................................................................................26
Localization related tools .................................................................................................................................26
2
Introduction
End User Interface Overview
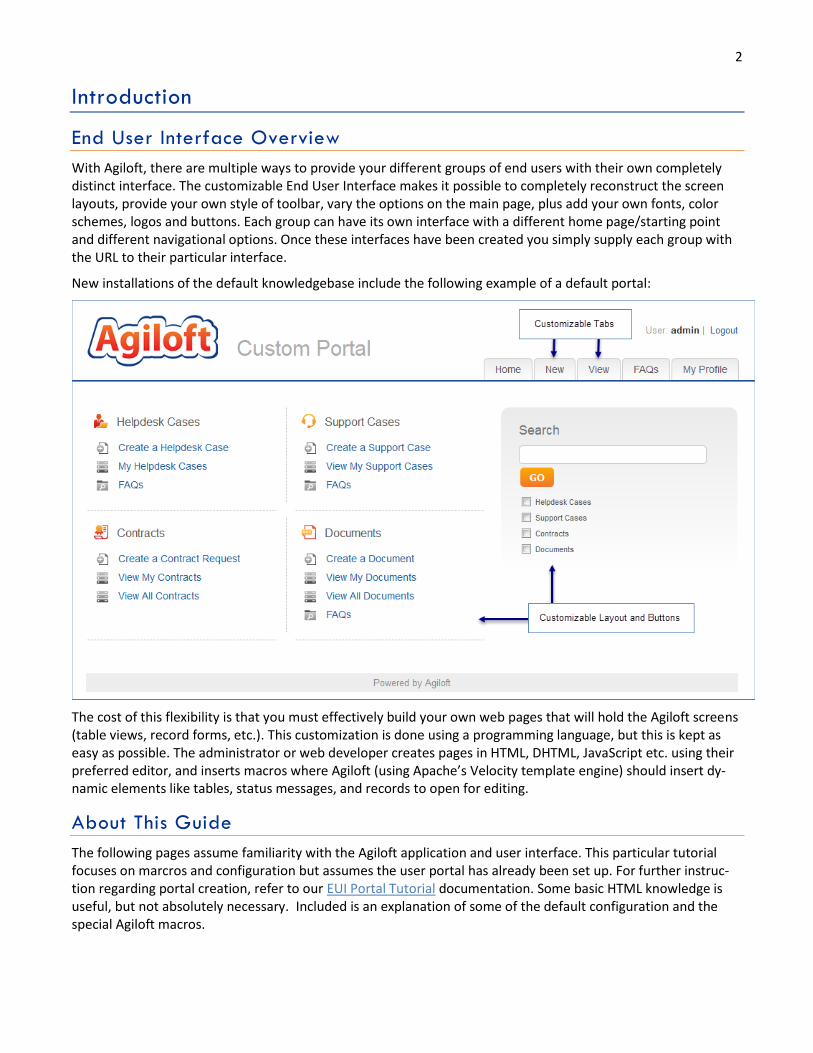
With Agiloft, there are multiple ways to provide your different groups of end users with their own completely distinct interface. The customizable End User Interface makes it possible to completely reconstruct the screen layouts, provide your own style of toolbar, vary the options on the main page, plus add your own fonts, color schemes, logos and buttons. Each group can have its own interface with a different home page/starting point and different navigational options. Once these interfaces have been created you simply supply each group with the URL to their particular interface.
New installations of the default knowledgebase include the following example of a default portal:
The cost of this flexibility is that you must effectively build your own web pages that will hold the Agiloft screens (table views, record forms, etc.). This customization is done using a programming language, but this is kept as easy as possible. The administrator or web developer creates pages in HTML, DHTML, JavaScript etc. using their preferred editor, and inserts macros where Agiloft (using Apache’s Velocity template engine) should insert dy-namic elements like tables, status messages, and records to open for editing.
About This Guide
The following pages assume familiarity with the Agiloft application and user interface. This particular tutorial focuses on marcros and configuration but assumes the user portal has already been set up. For further instruc-tion regarding portal creation, refer to our EUI Portal Tutorial documentation. Some basic HTML knowledge is useful, but not absolutely necessary. Included is an explanation of some of the default configuration and the special Agiloft macros.
3
Default Configuration
This section details some of the important components of the default EUI configuration. The pages that will be discussed are: main.php
home.htm
menu.htm
translation.properties and the $ewText.get() macro
meta.htm, style.css, and style-ie.css
main.php
The standard login pages provided by Agiloft are set to direct a user to main.php when logging into the custom portal.
The default configuration of main.php sets the browser title and acts as a wrapper to pull in additional templates home.htm, header.htm, and footer.htm.
The page title is determined using #if macros and the special Agiloft macros $ewUser.isInGroup() and $ew-Text.get(). This is a good page to look at how these macros behave as the rest of the page is rather simple.
Note: While a login page does have to specify which EUI2 page a user will be taken to, it does not have to be the main.php page. Different login pages for the same project could even direct users to different landing pages.
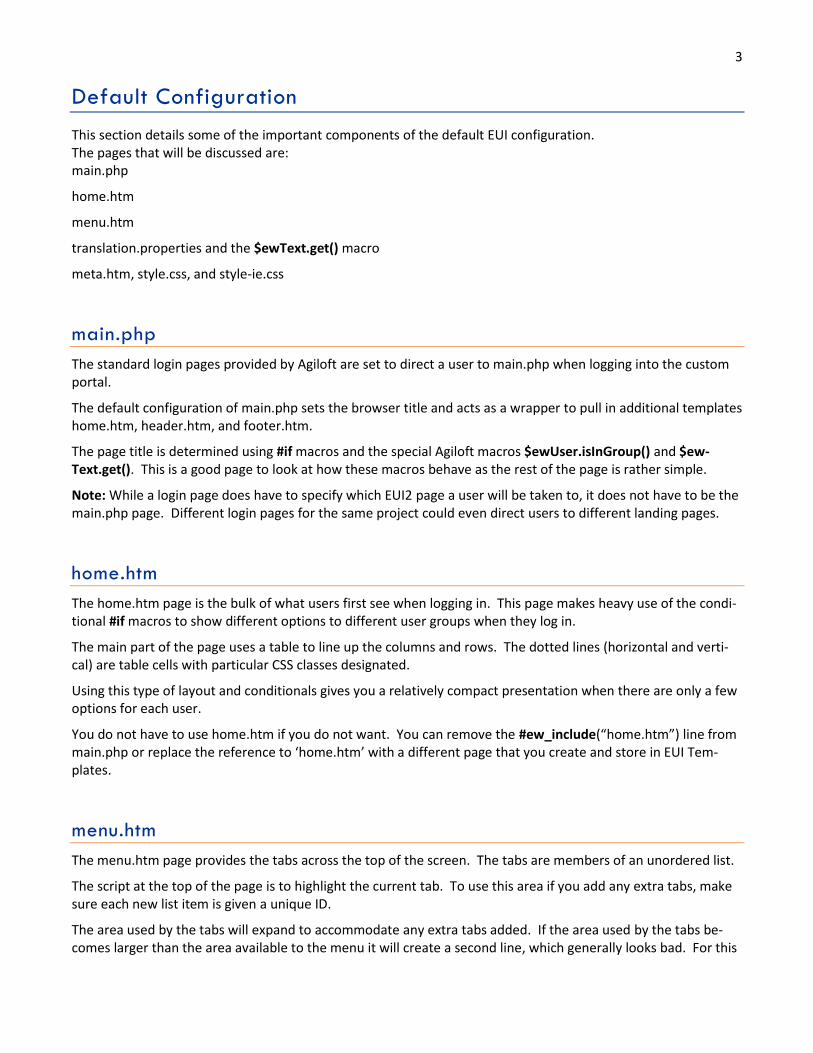
home.htm
The home.htm page is the bulk of what users first see when logging in. This page makes heavy use of the condi-tional #if macros to show different options to different user groups when they log in.
The main part of the page uses a table to line up the columns and rows. The dotted lines (horizontal and verti-cal) are table cells with particular CSS classes designated.
Using this type of layout and conditionals gives you a relatively compact presentation when there are only a few options for each user.
You do not have to use home.htm if you do not want. You can remove the #ew_include(“home.htm”) line from main.php or replace the reference to ‘home.htm’ with a different page that you create and store in EUI Tem-plates.
menu.htm
The menu.htm page provides the tabs across the top of the screen. The tabs are members of an unordered list.
The script at the top of the page is to highlight the current tab. To use this area if you add any extra tabs, make sure each new list item is given a unique ID.
The area used by the tabs will expand to accommodate any extra tabs added. If the area used by the tabs be-comes larger than the area available to the menu it will create a second line, which generally looks bad. For this
4 reason, it is advisable to use shorter tab names (or add line breaks into the tab names), to show each user a lim-ited number of tabs, or to create dropdown menus for the extra items.
To create dropdown menus, see the TIPS & TRICKS section.
translation.properties
Translation.properties is actually a family of pages. The default Agiloft setup includes the EUI Templates ‘trans-lation.properties’, ‘translation_ru.properties’, and ‘translation_zh.properties’. These records hold the text re-trieved by the $ewText.get() macro for English, Russian, and Chinese, respectively.
The Agiloft system associates a locale with each user session. This locale sets the language used by the wizards, tables, and fields. To support translations of HTML page text, the $ewText.get() macro was developed. This macro checks the session locale and uses that to determine which translation.properties file to use.
The locale is usually set from the user’s record or from the login page. You can allow users to switch the locale once logged in by using the #ew_locale() macro (and possibly the #ew_languages_all() macro) to display lan-guage options to the user.
The file called ‘translation.properties’ is the default file when a locale is not set. This is normally in English. Other files should be named translation_XX.properties where XX is a proper Java locale code. A list of supported Java locale codes can be found at: http://www.roseindia.net/tutorials/i18n/locales-list.shtml.
Each row of the translation.properties file consists of a key, followed by =, followed by the text to display. Exam-ple: home.hc.my.link=My Cases
The key is what the $ewText.get() macro looks for. In the example above, $ewText.Get(home.hc.my.link) would return “My Cases”. You may use any keys that you want.
Note: After altering any of the translation.properties files, the server cache must be cleared before the new text is made available. For hosted customers, please contact our support services if you need your server cache cleared. Purchased customers may clear their server cache through the Cache tab of the server admin console.
style.css and others
The default pages make use of a meta.htm page. This meta.htm page calls the standard scripts and CSS that are used rather than repeating them on each page. The actual CSS files are ‘style-ie.css’ (for Internet Explorer specific styles) and ‘style.css’. Style.css uses standard CSS and may be updated as you need. Keep in mind that by default the <divs> on the home.htm page have their location determined by the HTML table and do not use relative positioning. If you update the CSS files to assign positioning to the <divs>, then the HTML table on home.htm should be removed.
Tips & Tricks
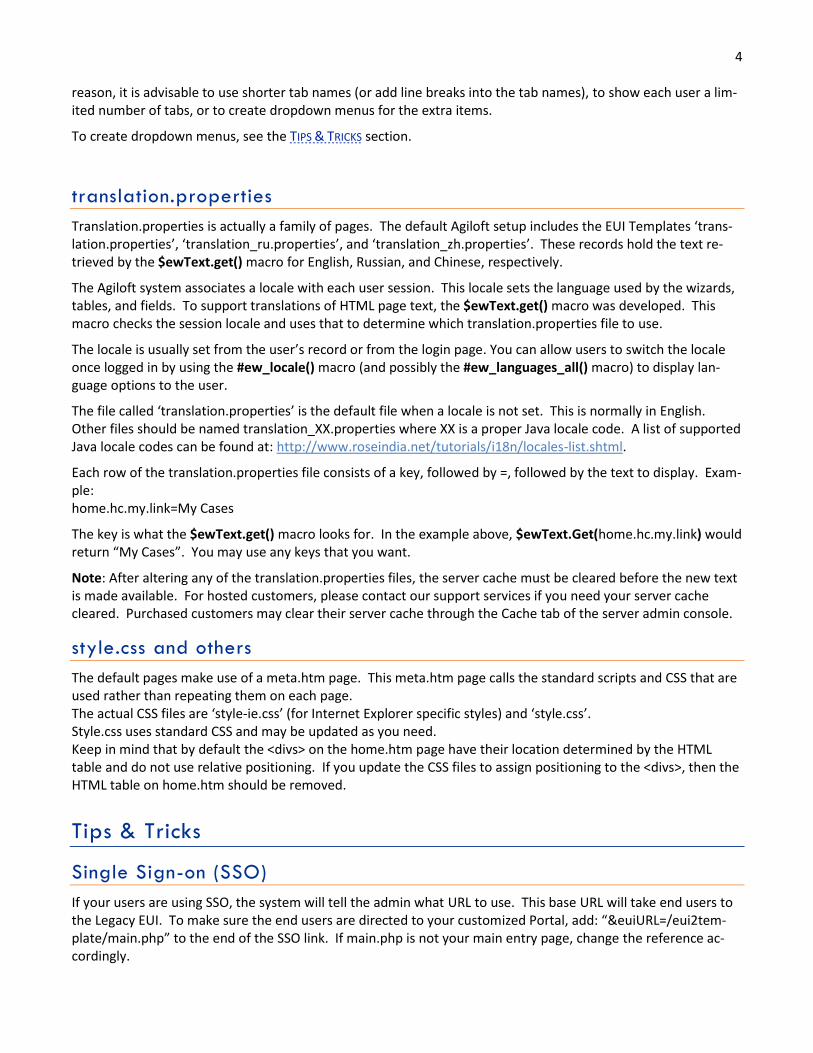
Single Sign-on (SSO)
If your users are using SSO, the system will tell the admin what URL to use. This base URL will take end users to the Legacy EUI. To make sure the end users are directed to your customized Portal, add: “&euiURL=/eui2tem-plate/main.php” to the end of the SSO link. If main.php is not your main entry page, change the reference ac-cordingly.

5 The completed link will look like: https://qa01.enterprisewizard.com/gui2/sso.jsp?auto-Login=true&project=Demo_02a&State=Main&euiURL=/eui2template/main.php
For Google SSO, the link would look like: https://qa01.enterprisewizard.com/gui2/sso?project=Demo_02a&State=Main&euiURL=/eui2tem-plate/main.php
Chat
Launch a chat session from the custom portal with the #ew_chat() macro. See the MACROS REFERENCE section for how this macro is used. The macro only creates the URL to launch the chat session; it must also be added to a button or menu item to show to the users.
There is no one right way to do this, it all depends on the specific needs of the client. You may want to make multiple types of chats available to different types of users based on the user’s group membership, or you may need just a simple chat button to show up for just one user group, such as those in the Customer group.
In the section below we will walk through an example setup to provide a Sales chat button to users in the Cus-tomer group. After building out the simpler example we will discuss leveraging that sample code to create a more complex setup.
Example Sales Chat Setup
In this example, we will simply add a tab to the EUI called Chat. This is done by editing the menu.htm record in the EUI Templates table. About halfway down in the body of that record you will find a stub of code that is com-mented out that would create a tab called “Chat” in the EUI. See the line below.
<!--<li id="chat"><a href='#ew_forward("chat.html")'>$ewText.get("menu.chat")</a></li>-->
If you were to remove the comment enclosure (<!-- and -->) to make it live, it would not work because there is not an EUI Template defined called “chat.htm”. Creating that EUI template would then make this line of code work. For now, however you can add a chat tab to the EUI by replacing it with the following code:
<script type="text/javascript">
// Popup window code
function newPopup(url) {
popupWindow = window.open( url,'popUpWin-dow','height=500,width=500,left=10,top=10,resizable=yes,scrollbars=yes,toolbar=no,menubar=no,loca-tion=no,directories=no,status=no')
}
</script>
#if ($ewUser.isInGroup("Customer"))
<li id="chat"><a href="JavaScript:new-Popup('#ew_chat("46326e7a79564f5a3271376f4257786b5945344e46413d3d")')">$ew-Text.get("menu.chat")</a></li>
#end
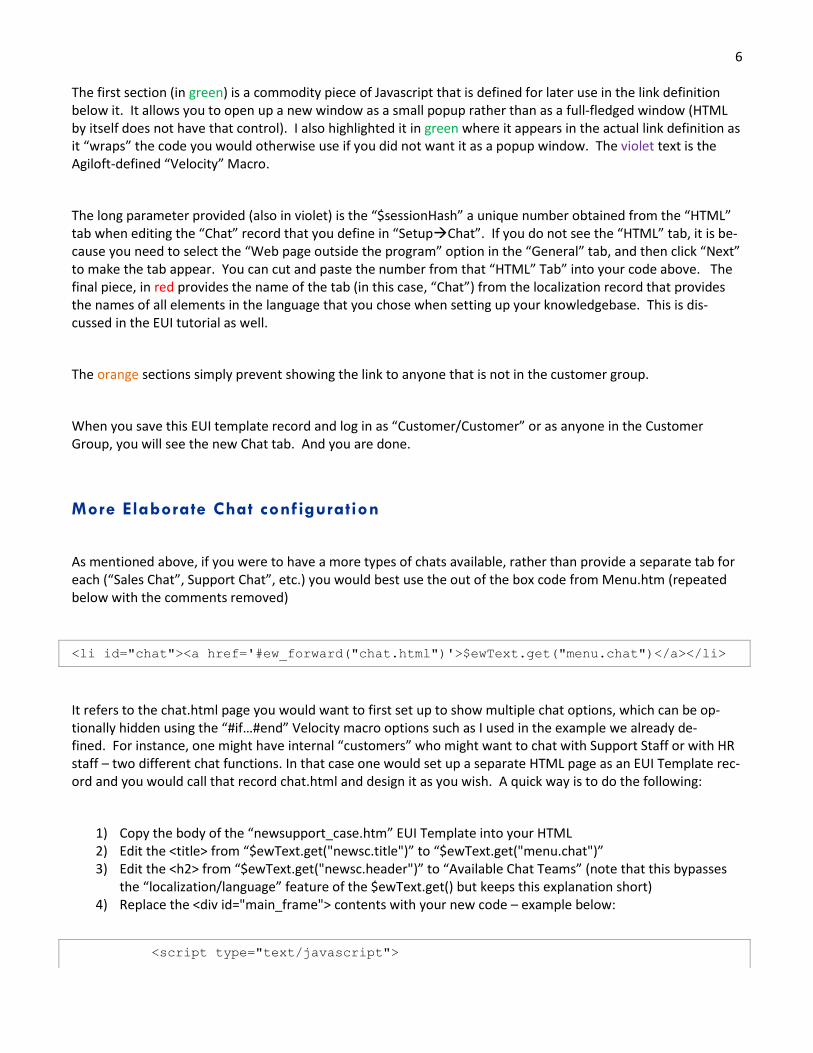
6 The first section (in green) is a commodity piece of Javascript that is defined for later use in the link definition below it. It allows you to open up a new window as a small popup rather than as a full-fledged window (HTML by itself does not have that control). I also highlighted it in green where it appears in the actual link definition as it “wraps” the code you would otherwise use if you did not want it as a popup window. The violet text is the Agiloft-defined “Velocity” Macro.
The long parameter provided (also in violet) is the “$sessionHash” a unique number obtained from the “HTML” tab when editing the “Chat” record that you define in “SetupChat”. If you do not see the “HTML” tab, it is be-cause you need to select the “Web page outside the program” option in the “General” tab, and then click “Next” to make the tab appear. You can cut and paste the number from that “HTML” Tab” into your code above. The final piece, in red provides the name of the tab (in this case, “Chat”) from the localization record that provides the names of all elements in the language that you chose when setting up your knowledgebase. This is dis-cussed in the EUI tutorial as well.
The orange sections simply prevent showing the link to anyone that is not in the customer group.
When you save this EUI template record and log in as “Customer/Customer” or as anyone in the Customer Group, you will see the new Chat tab. And you are done.
More Elaborate Chat configuration
As mentioned above, if you were to have a more types of chats available, rather than provide a separate tab for each (“Sales Chat”, Support Chat”, etc.) you would best use the out of the box code from Menu.htm (repeated below with the comments removed)
<li id="chat"><a href='#ew_forward("chat.html")'>$ewText.get("menu.chat")</a></li>
It refers to the chat.html page you would want to first set up to show multiple chat options, which can be op-tionally hidden using the “#if…#end” Velocity macro options such as I used in the example we already de-fined. For instance, one might have internal “customers” who might want to chat with Support Staff or with HR staff – two different chat functions. In that case one would set up a separate HTML page as an EUI Template rec-ord and you would call that record chat.html and design it as you wish. A quick way is to do the following:
1) Copy the body of the “newsupport_case.htm” EUI Template into your HTML 2) Edit the <title> from “$ewText.get("newsc.title")” to “$ewText.get("menu.chat")” 3) Edit the <h2> from “$ewText.get("newsc.header")” to “Available Chat Teams” (note that this bypasses
the “localization/language” feature of the $ewText.get() but keeps this explanation short) 4) Replace the <div id="main_frame"> contents with your new code – example below:
<script type="text/javascript">
7
// Popup window code
function newPopup(url) {
popupWindow =
window.open(url,'popUpWindow','height=500,width=500,left=10,top=10,resizable=yes,scr
ollbars=yes,toolbar=no,menubar=no,location=no,directories=no,status=no')
}
</script>
#if ($ewUser.isInGroup("Customer"))
<li id="Supportchat"><a
href="JavaScript:newPopup('#ew_chat("46326e7a79564f5a3271376f4257786b5945344e46413d3
d")')">Chat With Support</a></li>
<li id="Saleschat"><a
href="JavaScript:newPopup('#ew_chat("4e773175324f65514f64376674436a546c476e366f413d3
d")')">Chat With a Sales Rep</a></li>
#end
#if ($ewUser.isInGroup("Guest"))
<li id="Saleschat"><a
href="JavaScript:newPopup('#ew_chat("4e773175324f65514f64376674436a546c476e366f413d3
d")')">Chat With a Sales Rep</a></li>
#end
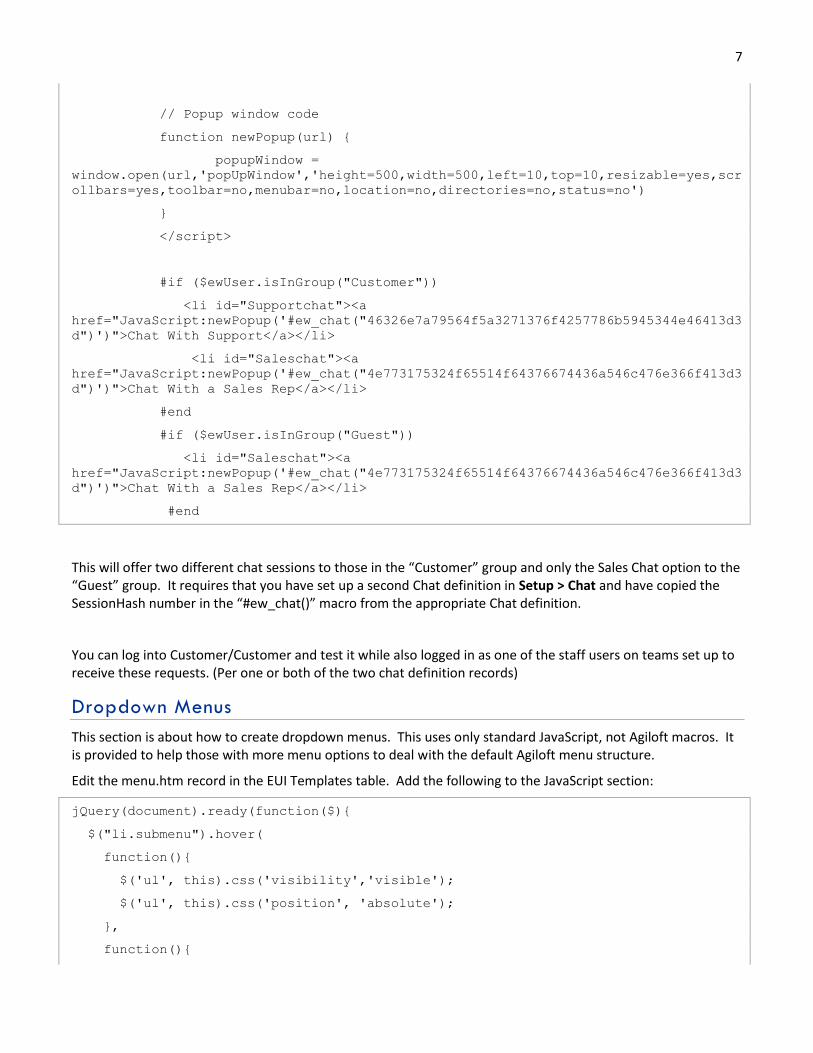
This will offer two different chat sessions to those in the “Customer” group and only the Sales Chat option to the “Guest” group. It requires that you have set up a second Chat definition in Setup > Chat and have copied the SessionHash number in the “#ew_chat()” macro from the appropriate Chat definition.
You can log into Customer/Customer and test it while also logged in as one of the staff users on teams set up to receive these requests. (Per one or both of the two chat definition records)
Dropdown Menus
This section is about how to create dropdown menus. This uses only standard JavaScript, not Agiloft macros. It is provided to help those with more menu options to deal with the default Agiloft menu structure.
Edit the menu.htm record in the EUI Templates table. Add the following to the JavaScript section:
jQuery(document).ready(function($){
$("li.submenu").hover(
function(){
$('ul', this).css('visibility','visible');
$('ul', this).css('position', 'absolute');
},
function(){

8 $('ul', this).css('visibility','hidden');
}
);
$("li.submenu ul li").hover(
function(){
$(this).css('background','#5F76A3');
$('a', this).css('color', 'white');
},
function(){
$(this).css('background','white');
$('a', this).css('color', '#07315b');
}
)
})
This code lets the submenus be revealed upon mouse-over. This code and the CSS below require that the menu items that have a dropdown menu be in a list item with an ID of “submenu”. The example below is one of the list items from a menu. Notice that it contains a separate list which is the dropdown items.
<li id="submit" class="submenu"><a href='#' style="cursor: default">New
Ticket</a>
<ul>
<li><a href='#ew_forward("submit_repair.html")'>New Equipment
Repair</a></li>
<li><a href='#ew_forward("submit_swi.html")'>New System Issue</a></li>
#if ($ewUser.isInGroup("Vendor") || $ewUser.isInGroup("admin"))
<li><a href='#ew_forward("submit_maintenance.html")'>New Maintenance
Request</a></li>
#end
</ul>
</li>
To set the appearance of the dropdown menus, edit the style.css file and add the following or something similar:
#menu li.submenu ul {
visibility: hidden;
list-style: none;
margin: 0;
padding: 0;
position: absolute;

9 border: 1px solid #5F76A3;
border-top: none;
z-index: 598;
margin-top: -19px !important;
margin-left: -19px !important;
}
#menu li.submenu:hover > ul {
visibility: visible;
}
#menu li.submenu:hover {
position: relative;
z-index: 599;
cursor: default;
}
#menu li.submenu ul li, #menu li.submenu ul li a {
padding: 0;
margin: 0;
background: none;
}
#menu li.submenu ul {
margin: 0;
padding: 3px;
background: white;
}
#menu li.submenu ul li {
padding: 5px 10px 5px 15px;
width: 150px;
}
#menu li.submenu ul li:hover {
background: #5F76A3;
}
#menu li.submenu ul li:hover a {
color: white;

10 }
#menu li.submenu ul li a {
color: #07315b;
font-weight: normal;
text-align: left;
}
Pre-populating Records:
This page is about how to pass parameters using the Agiloft macros in the End User Interface and how this can be used to make hotlinks that will pre-fill records. This section will be most useful to readers with a strong web development background and JavaScript experience.
The main way to use this feature would be to provide the user different links to create different types of tickets. For example, you could use a different link for critical tickets or for submitting to a different department. This could also be used with a question tree to track the user responses and to submit a ticket at the end based on those responses.
Passing Data between Pages
To add a query string created by #ew_forward to a URL, add a question mark [?] after the macro, followed by the parameter names and values.
Example1: bla-bla.location.href = "#ew_forward("mytemplate")?param1=bla-bla&...¶mN=bla-bla"; Example2: '#ew_forward("case")?summary=I\'m locked out&priority=Critical&assigned_team=Admin team' To pre-fill fields in the form created by #ew_create_record, add an ampersand [&] after the macro followed by the parameter names and values.
Example1: bla-bla.location.href = "#ew_create_record("mytemplate")¶m1=bla-bla&...&par-
amN=bla-bla";;
Example2: #ew_create_record("case", "/eui2template/main.php" "parent")&summary=I\'m locked
out&priority=Critical&assigned_team=Admin Team
Note: In both cases, the individual parameter values do not need quotes and may have spaces. Older browsers may not interpret the spaces correctly however. To include single or double quotes they must be preceded by a backslash \.
For field population use the name of the field, not the label. There appears to be no difference in the format of the values based on field data type - text, number, choice, and linked fields all tested the same.
Grabbing Passed Data
The next step is to take the query parameters we have just passed with #ew_forward and include them in the #ew_create_record on our new page. This is the tricky part and can be done with either JavaScript or standard Velocity macros.
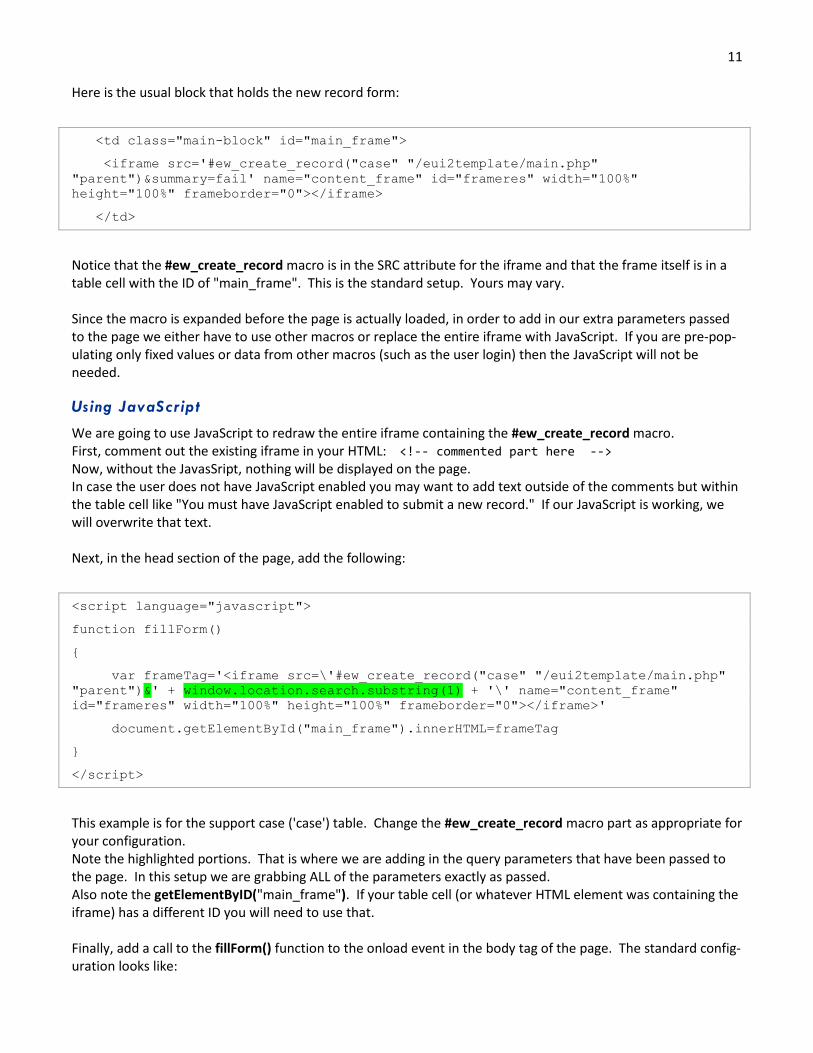
11 Here is the usual block that holds the new record form:
<td class="main-block" id="main_frame">
<iframe src='#ew_create_record("case" "/eui2template/main.php"
"parent")&summary=fail' name="content_frame" id="frameres" width="100%"
height="100%" frameborder="0"></iframe>
</td>
Notice that the #ew_create_record macro is in the SRC attribute for the iframe and that the frame itself is in a table cell with the ID of "main_frame". This is the standard setup. Yours may vary. Since the macro is expanded before the page is actually loaded, in order to add in our extra parameters passed to the page we either have to use other macros or replace the entire iframe with JavaScript. If you are pre-pop-ulating only fixed values or data from other macros (such as the user login) then the JavaScript will not be needed.
Using JavaScript
We are going to use JavaScript to redraw the entire iframe containing the #ew_create_record macro. First, comment out the existing iframe in your HTML: <!-- commented part here --> Now, without the JavasSript, nothing will be displayed on the page. In case the user does not have JavaScript enabled you may want to add text outside of the comments but within the table cell like "You must have JavaScript enabled to submit a new record." If our JavaScript is working, we will overwrite that text. Next, in the head section of the page, add the following:
<script language="javascript">
function fillForm()
{
var frameTag='<iframe src=\'#ew_create_record("case" "/eui2template/main.php"
"parent")&' + window.location.search.substring(1) + '\' name="content_frame"
id="frameres" width="100%" height="100%" frameborder="0"></iframe>'
document.getElementById("main_frame").innerHTML=frameTag
}
</script>
This example is for the support case ('case') table. Change the #ew_create_record macro part as appropriate for your configuration. Note the highlighted portions. That is where we are adding in the query parameters that have been passed to the page. In this setup we are grabbing ALL of the parameters exactly as passed. Also note the getElementByID("main_frame"). If your table cell (or whatever HTML element was containing the iframe) has a different ID you will need to use that. Finally, add a call to the fillForm() function to the onload event in the body tag of the page. The standard config-uration looks like:

12 <body onload="menuChange();" id="main_table_top">
Change it to <body onload="fillForm();menuChange();" id="main_table_top">. That should be all that is needed for the basic setup. You may now use #ew_forward URLs as described in the top part to pass parameters to auto-fill your forms. What if you don't want to grab all of the parameters? A second JavaScript function can be added to parse the query string and grab only the requested part:
function qs(search_for)
{
var query = window.location.search.substring(1);
var parms = query.split('&');
for (var i=0; i<parms.length; i++) {
var pos = parms[i].indexOf('=');
if (pos > 0 && search_for == parms[i].substring(0,pos)) {
return parms[i].substring(pos+1);;
}
}
return "";
}
Referencing this function, we could change our fillForm() function to say:
function fillForm()
{
var frameTag='<iframe src=\'#ew_create_record("case" "/eui2template/main.php"
"parent")&summary=' + qs("summary") + '&priority=' + qs("priority") + '\'
name="content_frame" id="frameres" width="100%" height="100%"
frameborder="0"></iframe>'
document.getElementById("main_frame").innerHTML=frameTag
}
Notice that now we need to call out each parameter we want specifically with a call to our new function. It will check to see if a parameter has been passed with the given name and return the value (or blank if the parameter is not found). This could be useful if the parameters are being passed with incorrect names (not the proper field name) or if you only want to use select parts of the query string.
13
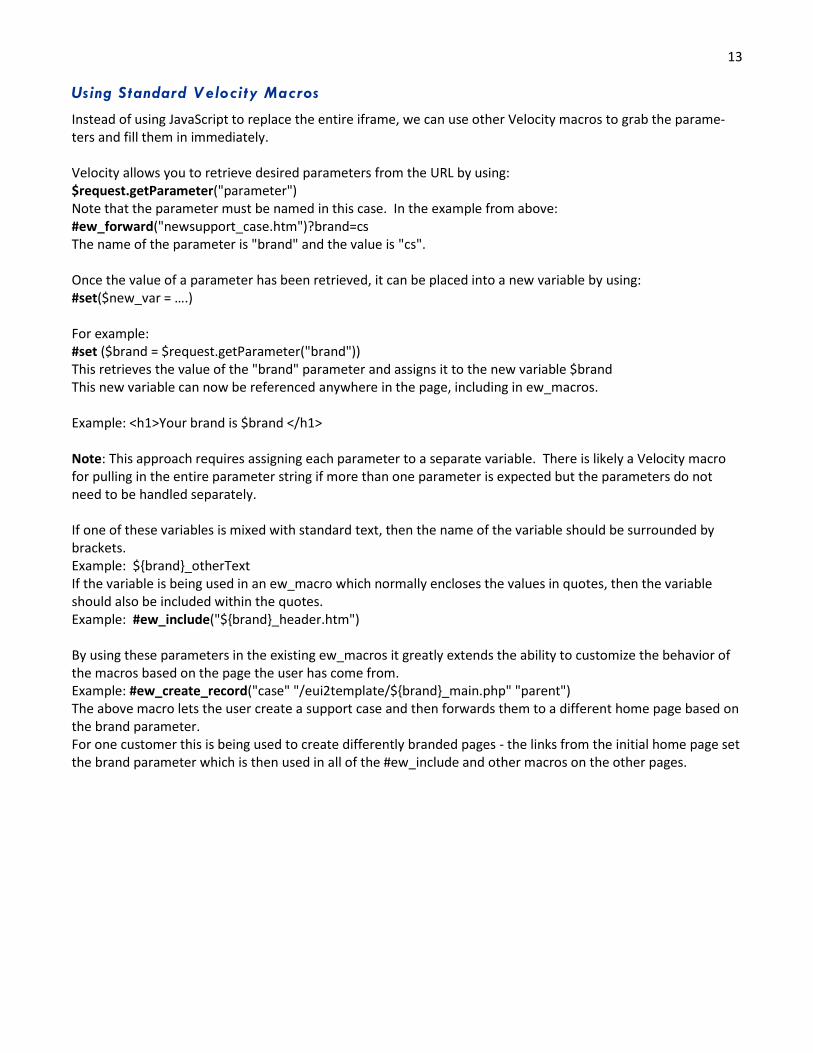
Using Standard Velocity Macros
Instead of using JavaScript to replace the entire iframe, we can use other Velocity macros to grab the parame-ters and fill them in immediately. Velocity allows you to retrieve desired parameters from the URL by using: $request.getParameter("parameter") Note that the parameter must be named in this case. In the example from above: #ew_forward("newsupport_case.htm")?brand=cs The name of the parameter is "brand" and the value is "cs". Once the value of a parameter has been retrieved, it can be placed into a new variable by using: #set($new_var = ….) For example: #set ($brand = $request.getParameter("brand")) This retrieves the value of the "brand" parameter and assigns it to the new variable $brand This new variable can now be referenced anywhere in the page, including in ew_macros. Example: <h1>Your brand is $brand </h1> Note: This approach requires assigning each parameter to a separate variable. There is likely a Velocity macro for pulling in the entire parameter string if more than one parameter is expected but the parameters do not need to be handled separately. If one of these variables is mixed with standard text, then the name of the variable should be surrounded by brackets. Example: ${brand}_otherText If the variable is being used in an ew_macro which normally encloses the values in quotes, then the variable should also be included within the quotes. Example: #ew_include("${brand}_header.htm") By using these parameters in the existing ew_macros it greatly extends the ability to customize the behavior of the macros based on the page the user has come from. Example: #ew_create_record("case" "/eui2template/${brand}_main.php" "parent") The above macro lets the user create a support case and then forwards them to a different home page based on the brand parameter. For one customer this is being used to create differently branded pages - the links from the initial home page set the brand parameter which is then used in all of the #ew_include and other macros on the other pages.
14
Macros Reference
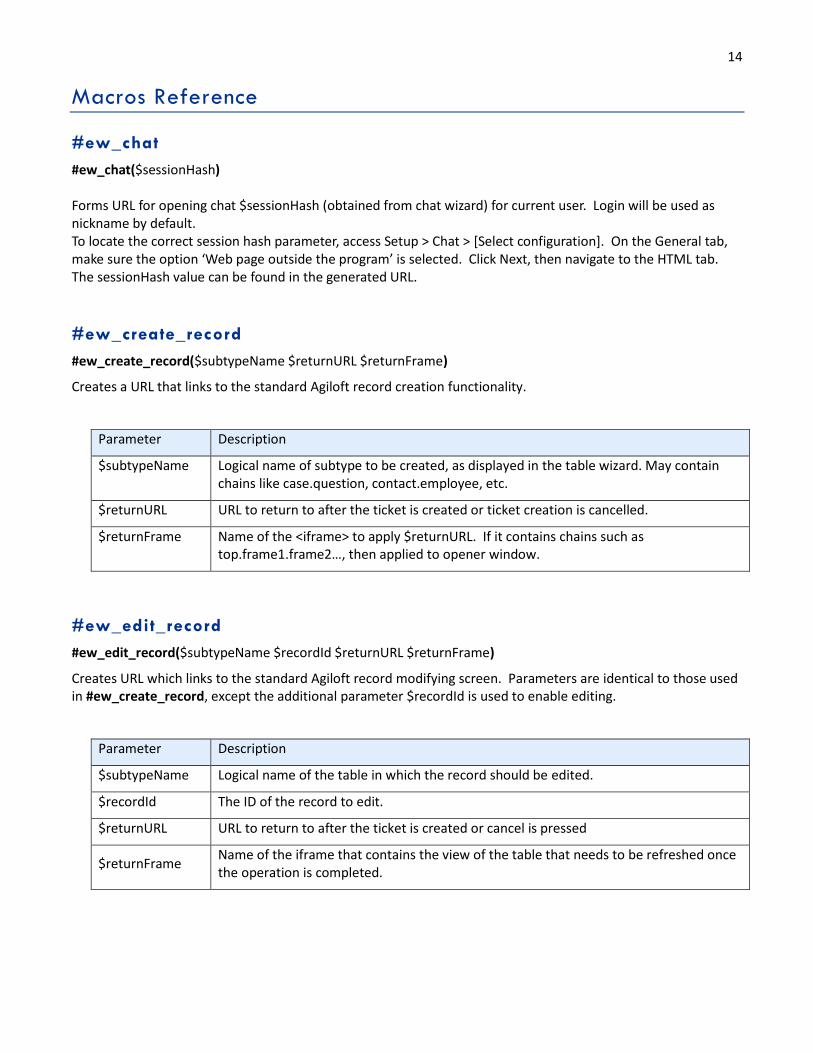
#ew_chat
#ew_chat($sessionHash) Forms URL for opening chat $sessionHash (obtained from chat wizard) for current user. Login will be used as nickname by default. To locate the correct session hash parameter, access Setup > Chat > [Select configuration]. On the General tab, make sure the option ‘Web page outside the program’ is selected. Click Next, then navigate to the HTML tab. The sessionHash value can be found in the generated URL.
#ew_create_record
#ew_create_record($subtypeName $returnURL $returnFrame)
Creates a URL that links to the standard Agiloft record creation functionality.
Parameter Description
$subtypeName Logical name of subtype to be created, as displayed in the table wizard. May contain chains like case.question, contact.employee, etc.
$returnURL URL to return to after the ticket is created or ticket creation is cancelled.
$returnFrame Name of the <iframe> to apply $returnURL. If it contains chains such as top.frame1.frame2…, then applied to opener window.
#ew_edit_record
#ew_edit_record($subtypeName $recordId $returnURL $returnFrame)
Creates URL which links to the standard Agiloft record modifying screen. Parameters are identical to those used in #ew_create_record, except the additional parameter $recordId is used to enable editing.
Parameter Description
$subtypeName Logical name of the table in which the record should be edited.
$recordId The ID of the record to edit.
$returnURL URL to return to after the ticket is created or cancel is pressed
$returnFrame Name of the iframe that contains the view of the table that needs to be refreshed once the operation is completed.
15
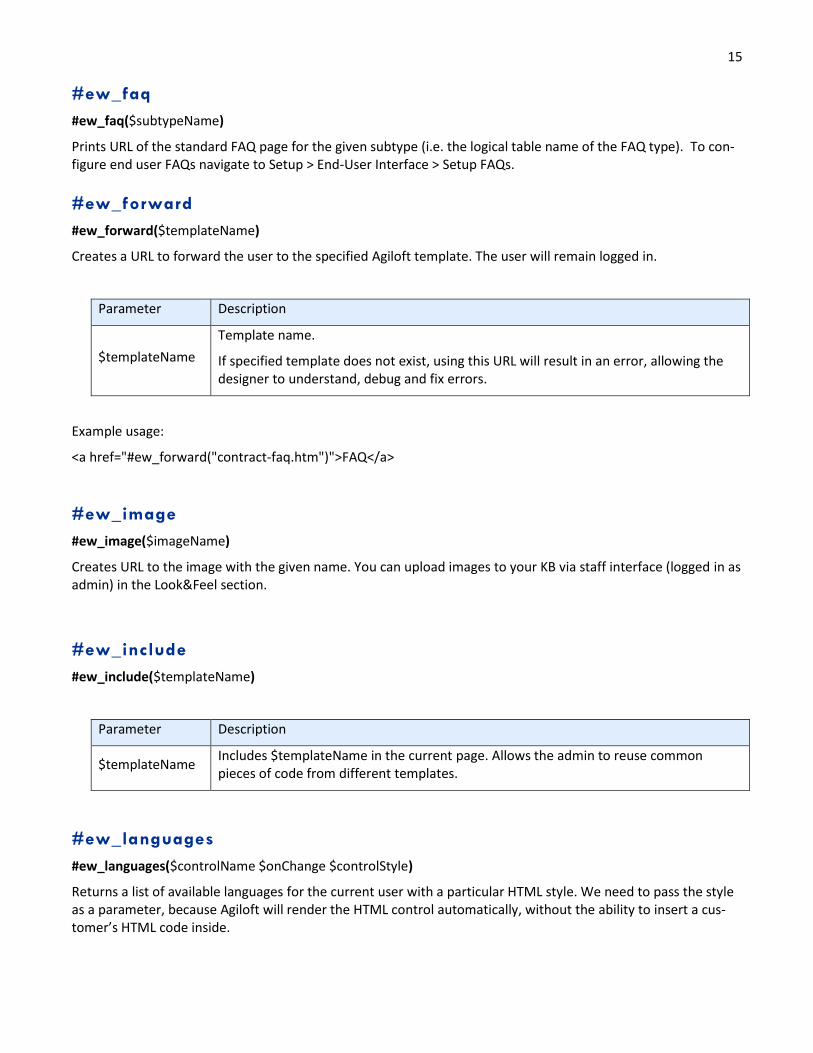
#ew_faq
#ew_faq($subtypeName)
Prints URL of the standard FAQ page for the given subtype (i.e. the logical table name of the FAQ type). To con-figure end user FAQs navigate to Setup > End-User Interface > Setup FAQs.
#ew_forward
#ew_forward($templateName)
Creates a URL to forward the user to the specified Agiloft template. The user will remain logged in.
Parameter Description
$templateName
Template name.
If specified template does not exist, using this URL will result in an error, allowing the designer to understand, debug and fix errors.
Example usage:
<a href="#ew_forward("contract-faq.htm")">FAQ</a>
#ew_image
#ew_image($imageName)
Creates URL to the image with the given name. You can upload images to your KB via staff interface (logged in as admin) in the Look&Feel section.
#ew_include
#ew_include($templateName)
Parameter Description
$templateName Includes $templateName in the current page. Allows the admin to reuse common pieces of code from different templates.
#ew_languages
#ew_languages($controlName $onChange $controlStyle)
Returns a list of available languages for the current user with a particular HTML style. We need to pass the style as a parameter, because Agiloft will render the HTML control automatically, without the ability to insert a cus-tomer’s HTML code inside.
16
Parameter Description
$controlName Required name of the HTML select list.
$onChange JavaScript code to be run when a language is selected.
$controlStyle CSS class name for the select list control.
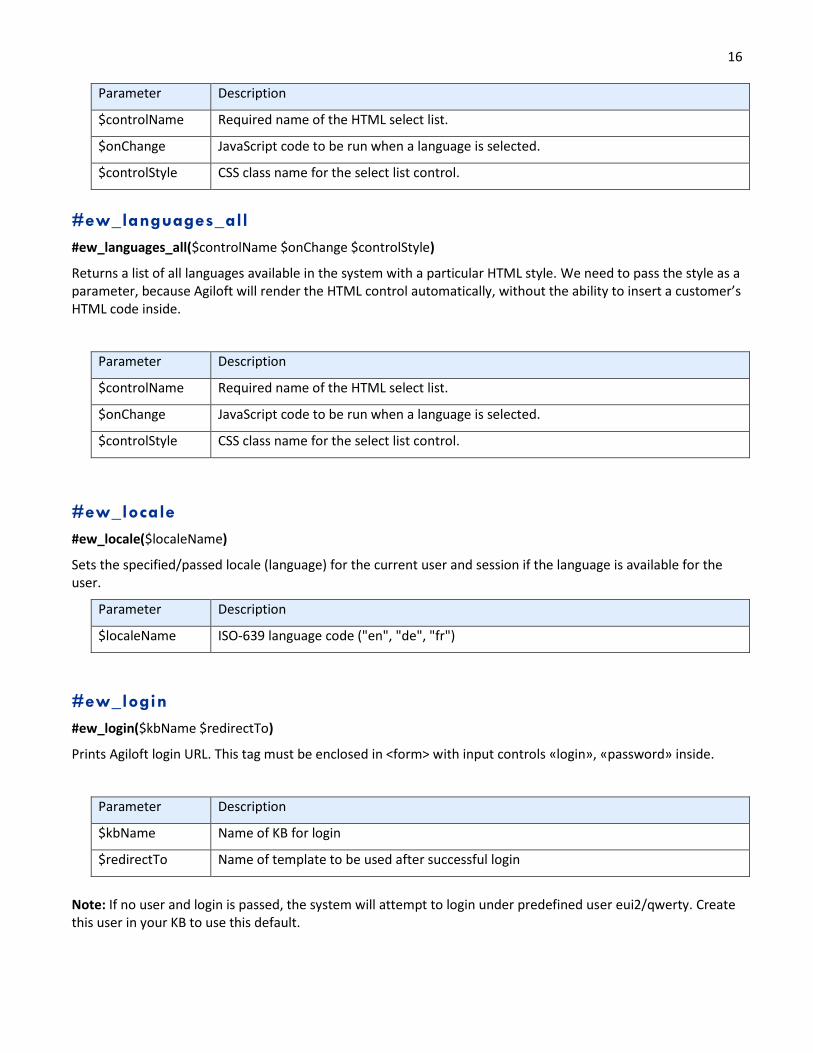
#ew_languages_all
#ew_languages_all($controlName $onChange $controlStyle)
Returns a list of all languages available in the system with a particular HTML style. We need to pass the style as a parameter, because Agiloft will render the HTML control automatically, without the ability to insert a customer’s HTML code inside.
Parameter Description
$controlName Required name of the HTML select list.
$onChange JavaScript code to be run when a language is selected.
$controlStyle CSS class name for the select list control.
#ew_locale
#ew_locale($localeName)
Sets the specified/passed locale (language) for the current user and session if the language is available for the user.
Parameter Description
$localeName ISO-639 language code ("en", "de", "fr")
#ew_login
#ew_login($kbName $redirectTo)
Prints Agiloft login URL. This tag must be enclosed in <form> with input controls «login», «password» inside.
Parameter Description
$kbName Name of KB for login
$redirectTo Name of template to be used after successful login
Note: If no user and login is passed, the system will attempt to login under predefined user eui2/qwerty. Create this user in your KB to use this default.

17
#ew_logout
#ew_logout($url)
Logs out of Agiloft and redirects the user to the specified URL.
Parameter Description
$url URL for redirect after logout
Example usage:
<a href="#ew_logout("http://www.example.com")">Click to logout</a>
#ew_menu_homepage
#ew_menu_homepage($menuName $onChange $target)
Parameter Description
$menuName Unique name for menu control. If empty value is passed, default “homeMenu” will be used.
$onChange JavaScript function to be called on menu item selection. This method will pass single parameter page ID. If empty, default is used.
$target Name of the frame where selected home page should be loaded when using default on-Change processor.
#ew_menu_languages
#ew_menu_languages($menuName $onChange $target $showCurrent)
Draws standard Agiloft drop-down menu with languages available to the user.
Parameter Description
$menuName Unique name for menu control. If empty value is passed, default “langMenu” will be used.
$onChange JavaScript function to be called on menu item select. This function will be passed with single parameter, selected locale value (see #ew_locale).
$target Name of target frame where to execute default onChange. Default value is ”self”.
$showCurrent …if to show currently selected language with meu icon. Default value is “true”.

18
#ew_new_search
#ew_new_search($subtypeName $frameName $allowSaving $returnURL $params)
Provides a piece of JavaScript to run the Saved Search wizard (mostly for use in onClick event handlers).
Parameter Description
$subtypeName Table for which the search will be created
$frameName The name of HTML iframe in which to display the results after the Wizard has finished.
$allowSaving "true" if the user will be allowed to save the created search, otherwise "false".
$returnURL URL to be applied to $frameName after wizard has finished. If "", then the standard ta-ble search will be used.
$params
Visualization Parameters formed as a request query, e.g. "showstatus=false&show-pages=false..." etc. They will be applied to the table view for $subtypeName.
Use this parameter if you leave $returnURL empty. Otherwise, add required parameters to $returnURL directly.
Note: #ew_create_search($subtypeName $frameName $allowSaving $returnURL) DEPRECATED
#ew_query
#ew_query($subtypeName $frameName $controlId $params)
Provides a piece of JavaScript (mostly for use in onClick/onChange event handlers) that runs a search for a table in an iframe.
Parameter Description
$subtypeName Table to display
$frameName The name of HTML iframe in which to display the results.
$controlId The ID of the HTML control which contains the query to use (for example, a form field).
$params String of request Parameters that will be passed to the table in $frameName (see the #ew_table macro, and the parameter list for details).
Note: #ew_execute_search($subtypeName $frameName $controlId) DEPRECATED
19
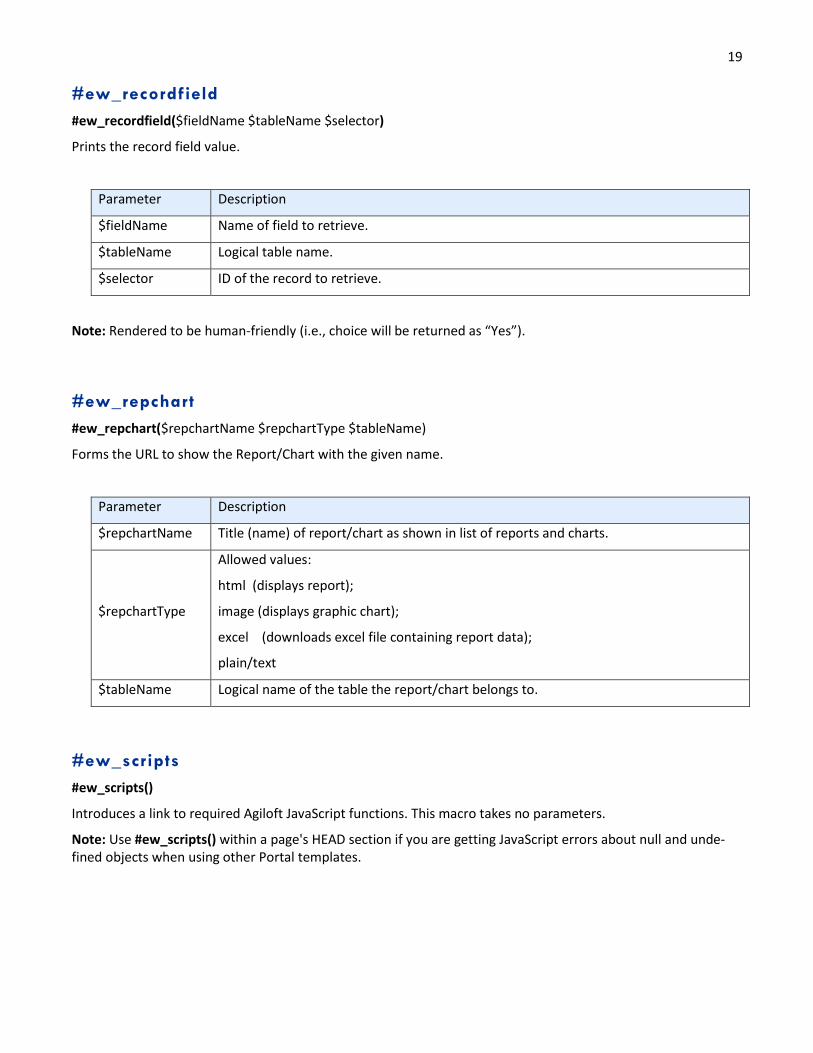
#ew_recordfield
#ew_recordfield($fieldName $tableName $selector)
Prints the record field value.
Parameter Description
$fieldName Name of field to retrieve.
$tableName Logical table name.
$selector ID of the record to retrieve.
Note: Rendered to be human-friendly (i.e., choice will be returned as “Yes”).
#ew_repchart
#ew_repchart($repchartName $repchartType $tableName)
Forms the URL to show the Report/Chart with the given name.
Parameter Description
$repchartName Title (name) of report/chart as shown in list of reports and charts.
$repchartType
Allowed values:
html (displays report);
image (displays graphic chart);
excel (downloads excel file containing report data);
plain/text
$tableName Logical name of the table the report/chart belongs to.
#ew_scripts
#ew_scripts()
Introduces a link to required Agiloft JavaScript functions. This macro takes no parameters.
Note: Use #ew_scripts() within a page's HEAD section if you are getting JavaScript errors about null and unde-fined objects when using other Portal templates.

20
#ew_searches_list
#ew_searches_list($subtypeName $frameName $controlName $controlStyle $params $selectedSearch)
Draws an HTML select list control with Saved Searches available, based on user access permissions.
Parameter Description
$subtypeName Name of the table for which to display the appropriate searches.
$frameName Name of the iframe that contains the view of the table that needs to be refreshed once a search is selected.
$controlName Required name of the HTML select list.
$controlStyle CSS class name to be applied to the select list.
$params String of the request Parameters that will be passed to the table in $frameName (see the #ew_table macro, and the following parameter list for details).
$selectedSearch Name of the search to be selected in list initially
Note: #ew_searches($subtypeName $frameName $controlName $controlStyle) DEPRECATED
#ew_session
#ew_session()
Prints Agiloft session ID to screen. This may be used to 'manually' construct a URL that contains the session in-formation.
<a href="/gui2/eui2template/testContacts.htm;#ew_session()">Contacts</a>
results in:
<a href="/gui2/eui2template/testContacts.htm;jsessionid=D7988DF0E8E173...
#ew_status
#ew_status()
Prints last operation status stored in the request (ActionStatuses)
Note: This is normally used with #ew_table to show the status message associated with the displayed table re-sults.
#ew_table
#ew_table($subtypeName $viewName $searchName $queryString $params $frameName $frameStyle)
Draws an HTML iframe and displays the specified Agiloft table.
21
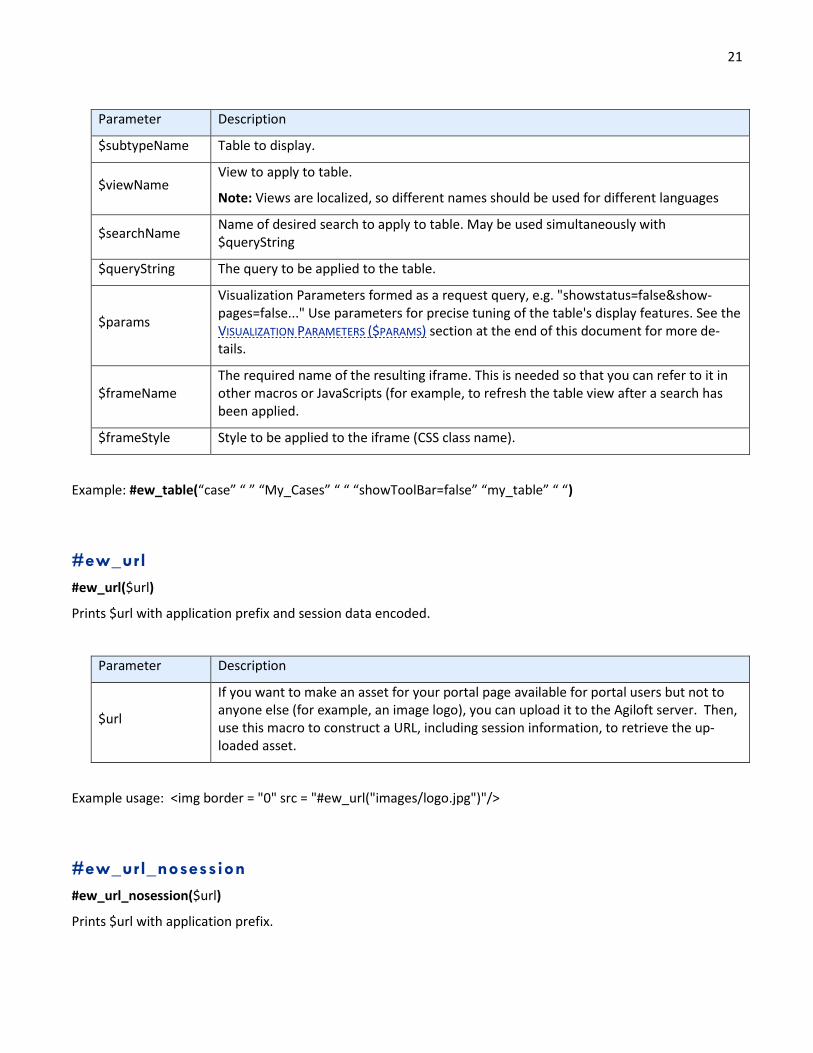
Parameter Description
$subtypeName Table to display.
$viewName View to apply to table.
Note: Views are localized, so different names should be used for different languages
$searchName Name of desired search to apply to table. May be used simultaneously with $queryString
$queryString The query to be applied to the table.
$params
Visualization Parameters formed as a request query, e.g. "showstatus=false&show-pages=false..." Use parameters for precise tuning of the table's display features. See the VISUALIZATION PARAMETERS ($PARAMS) section at the end of this document for more de-tails.
$frameName The required name of the resulting iframe. This is needed so that you can refer to it in other macros or JavaScripts (for example, to refresh the table view after a search has been applied.
$frameStyle Style to be applied to the iframe (CSS class name).
Example: #ew_table(“case” “ ” “My_Cases” “ “ “showToolBar=false” “my_table” “ “)
#ew_url
#ew_url($url)
Prints $url with application prefix and session data encoded.
Parameter Description
$url
If you want to make an asset for your portal page available for portal users but not to anyone else (for example, an image logo), you can upload it to the Agiloft server. Then, use this macro to construct a URL, including session information, to retrieve the up-loaded asset.
Example usage: <img border = "0" src = "#ew_url("images/logo.jpg")"/>
#ew_url_nosession
#ew_url_nosession($url)
Prints $url with application prefix.

22
#ew_user
#ew_user()
Prints current user login. This macro does not take parameters.
#ew_userfield
#ew_userfield($fieldName)
Prints current user's record field value.
Parameter Description
$fieldName A logical name of the field to return.
Example: #ew_userfield("_16_company_name0")
Note: It is rendered to be human-friendly (i.e., choice will be returned as ‘Yes’).
#ew_userid()
#ew_userid()
Prints current user ID.
#ew_view_record
#ew_view_record($subtypeName $recordId $returnURL $returnFrame)
Creates URL which links to the standard Agiloft record viewing screen. Parameters are identical to those used in #ew_create_record, with the additional parameter $recordId.
Parameter Description
$subtypeName Logical name of the table in which the record should be viewed.
$recordId The ID of the record to view.
$returnURL URL to return to after the ticket is created or cancel is pressed
$returnFrame Name of the iframe that contains the view of the table that needs to be refreshed once the operation is completed.

23
Additional Tools
Visualization Parameters ($params)
The following list of visualization parameters can be applied to these macros:
#ew_table; #ew_searches_list; #ew_query; and #ew_new_search
Parameter Values
(default in bold)
Description
showSearchCriteria true, false Whether used search criteria will be shown to user
workWithPopUp true, false Determines whether edit and new operations should be per-
formed within the current frame or the pop-up window
showToolBar true, false Show toolbar on top of table (Edit, Delete etc)
showNavigation true, false Show pages navigation above the table
showStatus true, false Show status of operations on above the table
Showfastsearch true, false Show search dialog for the table
User related tools
$ewUser
In a template, one can use $ewUser tool macros with several handy methods:
Macro Description
$ewUser.isInGroup($gr_name)
Returns true if current user belongs to any of pointed groups. False otherwise.
gr_name - names of groups separated by comma
Example: #if ($ewUser.isInGroup("Staff,admin")) This is text for per-mitted users only #else This is text for all other users #end
$ewUser.isInTeam($tm_name)
Returns true if current user belongs to any of specified teams. False otherwise.
tm_name - names of teams separated by comma
$ewUser.getCurrentUserLogin() Returns login name of the current user
$ewUser.getCurrentUserField($field)
Returns string with the field value from the current user contact.
field - name of the contact field
Example: Welcome $ewUser.getCurrentUserField("full_name")!

separate each phrase with a comma. Example:
24
$ewPermission.table
The $ewPermission.table macro describes permission actions for individual users or groups. To add more than one action type, $ewPermission.table (" create ", "delete_others" )
Action Description
Record Permissions
“create” Allow user to create a new record
"delete_own" Allow user to delete own records
“delete_others” Allow user to delete others’ records
"mass_delete" Allow user to delete multiple records
"dele_oth_if_pub_y" Delete others’ records if published field is yes
"massedit" Allow user to perform mass edit
"import_multiple" Allows import of multiple records from a file
"export_multiple" Allows export of multiple records to a file
"link_multiple_recs" Link multiple records using the Link menu
"print_recs" Print records using the printer icon
View and Edit Permissions
"view_own" Allow user to view own records
“view_others” Allow user to view others’ records
"view_own_if_pub_y" View own records if published field is yes.
"view_oth_if_pub_y" View others’ records if published field is yes.
“edit_own” Allow user to edit own records
"edit_others" Allow user to edit others’ records
Saved Search Permissions
"mod_own_s_searches" Allow user to modify/delete saved searches that they created
"mod_all_s_searches" Allow user to modify/delete all saved searches
"mod_own_s_views" Allow user to modify/delete saved views that they created
"mod_all_s_views" Allow user to modify/delete all saved views
"mod_own_s_reports" Allow user to modify/delete saved reports that they created
"mod_all_s_reports" Allow user to modify/delete all saved reports
"pub_s_reports" Allow user to publish saved reports
"v_own_with_ssearch" View own entries that satisfy the saved search
"v_oth_with_ssearch" View others’ entries that satisfy the saved search
"e_own_with_ssearch" Edit own entries that satisfy the saved search
25
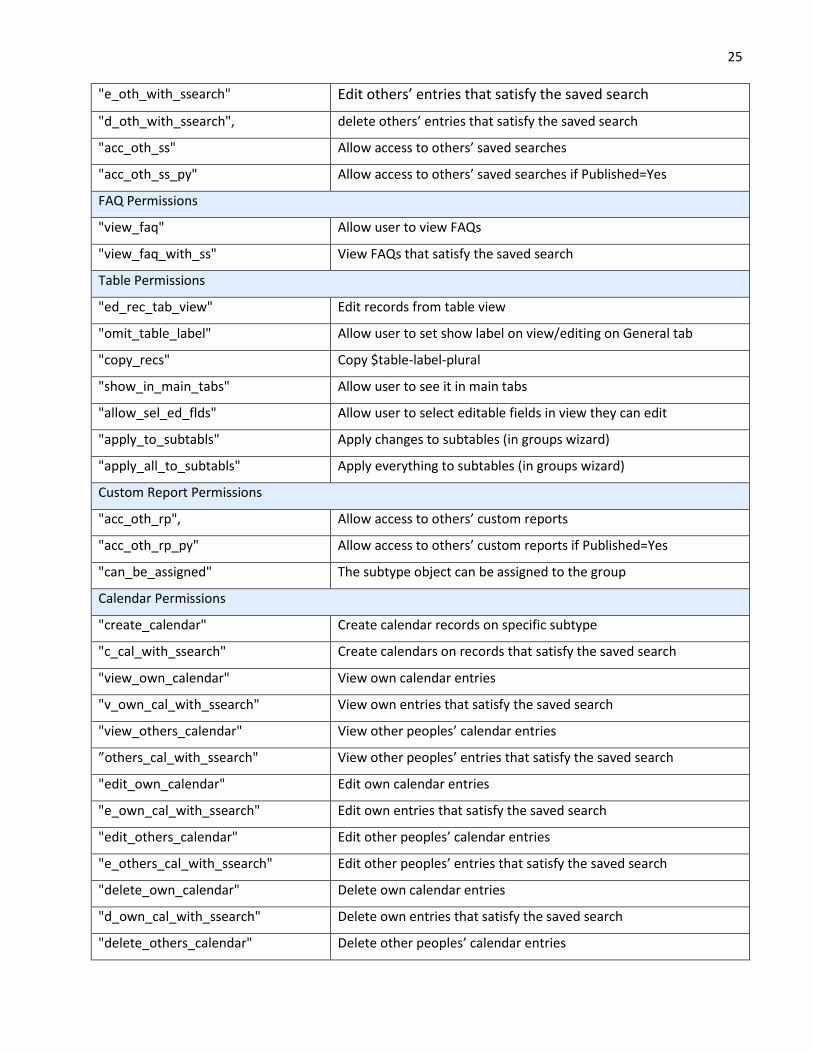
"e_oth_with_ssearch" Edit others’ entries that satisfy the saved search
"d_oth_with_ssearch", delete others’ entries that satisfy the saved search
"acc_oth_ss" Allow access to others’ saved searches
"acc_oth_ss_py" Allow access to others’ saved searches if Published=Yes
FAQ Permissions
"view_faq" Allow user to view FAQs
"view_faq_with_ss" View FAQs that satisfy the saved search
Table Permissions
"ed_rec_tab_view" Edit records from table view
"omit_table_label" Allow user to set show label on view/editing on General tab
"copy_recs" Copy $table-label-plural
"show_in_main_tabs" Allow user to see it in main tabs
"allow_sel_ed_flds" Allow user to select editable fields in view they can edit
"apply_to_subtabls" Apply changes to subtables (in groups wizard)
"apply_all_to_subtabls" Apply everything to subtables (in groups wizard)
Custom Report Permissions
"acc_oth_rp", Allow access to others’ custom reports
"acc_oth_rp_py" Allow access to others’ custom reports if Published=Yes
"can_be_assigned" The subtype object can be assigned to the group
Calendar Permissions
"create_calendar" Create calendar records on specific subtype
"c_cal_with_ssearch" Create calendars on records that satisfy the saved search
"view_own_calendar" View own calendar entries
"v_own_cal_with_ssearch" View own entries that satisfy the saved search
"view_others_calendar" View other peoples’ calendar entries
”others_cal_with_ssearch" View other peoples’ entries that satisfy the saved search
"edit_own_calendar" Edit own calendar entries
"e_own_cal_with_ssearch" Edit own entries that satisfy the saved search
"edit_others_calendar" Edit other peoples’ calendar entries
"e_others_cal_with_ssearch" Edit other peoples’ entries that satisfy the saved search
"delete_own_calendar" Delete own calendar entries
"d_own_cal_with_ssearch" Delete own entries that satisfy the saved search
"delete_others_calendar" Delete other peoples’ calendar entries
26
"d_others_cal_with_ssearch" Delete other peoples’ entries that satisfy the saved search
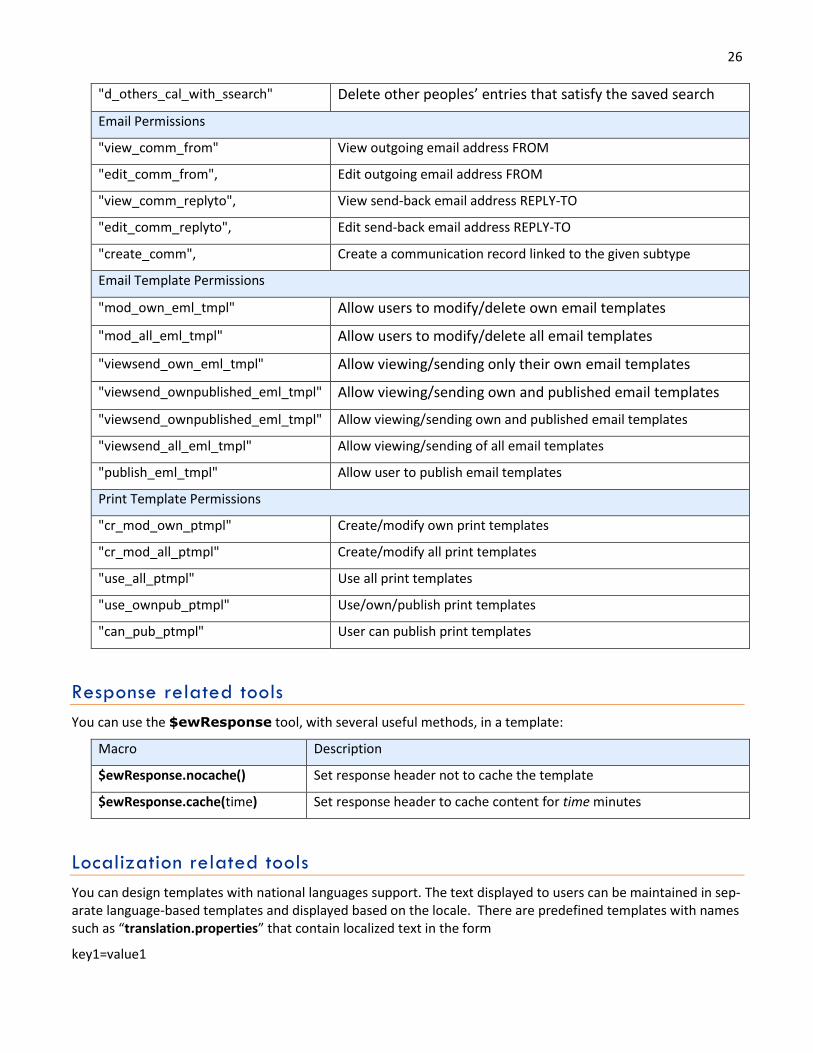
Email Permissions
"view_comm_from" View outgoing email address FROM
"edit_comm_from", Edit outgoing email address FROM
"view_comm_replyto", View send-back email address REPLY-TO
"edit_comm_replyto", Edit send-back email address REPLY-TO
"create_comm", Create a communication record linked to the given subtype
Email Template Permissions
"mod_own_eml_tmpl" Allow users to modify/delete own email templates
"mod_all_eml_tmpl" Allow users to modify/delete all email templates
"viewsend_own_eml_tmpl" Allow viewing/sending only their own email templates
"viewsend_ownpublished_eml_tmpl" Allow viewing/sending own and published email templates
"viewsend_ownpublished_eml_tmpl" Allow viewing/sending own and published email templates
"viewsend_all_eml_tmpl" Allow viewing/sending of all email templates
"publish_eml_tmpl" Allow user to publish email templates
Print Template Permissions
"cr_mod_own_ptmpl" Create/modify own print templates
"cr_mod_all_ptmpl" Create/modify all print templates
"use_all_ptmpl" Use all print templates
"use_ownpub_ptmpl" Use/own/publish print templates
"can_pub_ptmpl" User can publish print templates
Response related tools
You can use the $ewResponse tool, with several useful methods, in a template:
Macro Description
$ewResponse.nocache() Set response header not to cache the template
$ewResponse.cache(time) Set response header to cache content for time minutes
Localization related tools
You can design templates with national languages support. The text displayed to users can be maintained in sep-arate language-based templates and displayed based on the locale. There are predefined templates with names such as “translation.properties” that contain localized text in the form
key1=value1

27 key2=value2
…
If you want to translate your templates to, say, French, you must create a template named translation_fr.prop-erties and insert your translations there. If a key is not found in the localized properties template, then the text from the default translation.properties is used.
Macro Description
$ewText.get($key)
Reads the current session locale, then looks up the key line in the corresponding translation.properties file and prints the text value to the screen. Example: Welcome To $ewText.get("home.sc.title")!
$ewText.get(key) Returns localized message
$ewText.get(key, [value1, value2,...]) Returns localized message with values substituted
Note: Once you have logged in, the properties are cached by the application, so after changes are made in one of the *.properties file you must reset system cache via admin console to see the changes.