Embed Size (px)
Citation preview
Agile Product Lifecycle Management for Process Supply Chain Relationship Management User GuideRelease 6.0Part No. E12388-01
September 2009
Agile Product Lifecycle Management for Process
ii Supply Chain Relationship Management User Guide
opyrights and TrademarksAgile Product Lifecycle Management for Process, Release 6.0
E12388-01
Copyright © 1995, 2009, Oracle and/or its affiliates. All rights reserved.
This software and related documentation are provided under a license agreement containing restrictions on use and disclosure and are protected by intellectual property laws. Except as expressly permitted in your license agreement or allowed by law, you may not use, copy, reproduce, translate, broadcast, modify, license, transmit, distribute, exhibit, perform, publish, or display any part, in any form, or by any means. Reverse engineering, disassembly, or decompilation of this software, unless required by law for interoperability, is prohibited.
The information contained herein is subject to change without notice and is not warranted to be error-free. If you find any errors, please report them to us in writing.
If this software or related documentation is delivered to the U.S. Government or anyone licensing it on behalf of the U.S. Government, the following notice is applicable:
U.S. GOVERNMENT RIGHTS
Programs, software, databases, and related documentation and technical data delivered to U.S. Government customers are “commercial computer software” or “commercial technical data” pursuant to the applicable Federal Acquisition Regulation and agency-specific supplemental regulations. As such, the use, duplication, disclosure, modification, and adaptation shall be subject to the restrictions and license terms set forth in the applicable Government contract, and, to the extent applicable by the terms of the Government contract, the additional rights set forth in FAR 52.227-19, Commercial Computer Software License (December 2007). Oracle USA, Inc., 500 Oracle Parkway, Redwood City, CA 94065.
This software is developed for general use in a variety of information management applications. It is not developed or intended for use in any inherently dangerous applications, including applications which may create a risk of personal injury. If you use this software in dangerous applications, then you shall be responsible to take all appropriate fail-safe, backup, redundancy, and other measures to ensure the safe use of this software. Oracle Corporation and its affiliates disclaim any liability for any damages caused by use of this software in dangerous applications.
Oracle is a registered trademark of Oracle Corporation and/or its affiliates. Other names may be trademarks of their respective owners.
This software and documentation may provide access to or information on content, products, and services from third parties. Oracle Corporation and its affiliates are not responsible for and expressly disclaim all warranties of any kind with respect to third-party content, products, and services. Oracle Corporation and its affiliates will not be responsible for any loss, costs, or damages incurred due to your access to or use of third-party content, products, or services.
September 2009
iii
DOCUMENT CONTROL
Change RecordDate Author Version Change Reference
Sept-07 Agile/Oracle 1.0 Initial release, Part No. TPPR-0039-5.1A
Feb-08 Oracle 2.0 Second release, Part No. E11003-01
Sept-09 Oracle 3.0 Third release, Part No. E12388-01
Agile Product Lifecycle Management for Process
iv Supply Chain Relationship Management User Guide
Contents
v
CONTENTS
About This ManualAgile Product Lifecycle Management for Process Documentation . . . . . . . . . . . . . . . . . . . . . . . . . . . . . . . . . . . . . . . . . . . vii
TTY Access to Oracle Support Services . . . . . . . . . . . . . . . . . . . . . . . . . . . . . . . . . . . . . . . . . . . . . . . . . . . . . . . . . . . . . . viiAgile Training Aids . . . . . . . . . . . . . . . . . . . . . . . . . . . . . . . . . . . . . . . . . . . . . . . . . . . . . . . . . . . . . . . . . . . . . . . . . . . . . . viiAccessibility of Code Examples in Documentation . . . . . . . . . . . . . . . . . . . . . . . . . . . . . . . . . . . . . . . . . . . . . . . . . . . . viiAccessibility of Links to External Web Sites in Documentation . . . . . . . . . . . . . . . . . . . . . . . . . . . . . . . . . . . . . . . . . . vii
Audience . . . . . . . . . . . . . . . . . . . . . . . . . . . . . . . . . . . . . . . . . . . . . . . . . . . . . . . . . . . . . . . . . . . . . . . . . . . . . . . . . . . . . . . . . viiiVariability of Installations . . . . . . . . . . . . . . . . . . . . . . . . . . . . . . . . . . . . . . . . . . . . . . . . . . . . . . . . . . . . . . . . . . . . . . . . . . . viiiWhere to Find Information . . . . . . . . . . . . . . . . . . . . . . . . . . . . . . . . . . . . . . . . . . . . . . . . . . . . . . . . . . . . . . . . . . . . . . . . . . viiiDocument Conventions . . . . . . . . . . . . . . . . . . . . . . . . . . . . . . . . . . . . . . . . . . . . . . . . . . . . . . . . . . . . . . . . . . . . . . . . . . . . . . .ix
Chapter 1 Introduction to Supply Chain Relationship Management
Overview . . . . . . . . . . . . . . . . . . . . . . . . . . . . . . . . . . . . . . . . . . . . . . . . . . . . . . . . . . . . . . . . . . . . . . . . . . . . . . . . . . . . . . . . . . 1-1Touch Points with Other Applications . . . . . . . . . . . . . . . . . . . . . . . . . . . . . . . . . . . . . . . . . . . . . . . . . . . . . . . . . . . . . . . . . . 1-3
Global Specification Management . . . . . . . . . . . . . . . . . . . . . . . . . . . . . . . . . . . . . . . . . . . . . . . . . . . . . . . . . . . . . 1-3Manage Core Data . . . . . . . . . . . . . . . . . . . . . . . . . . . . . . . . . . . . . . . . . . . . . . . . . . . . . . . . . . . . . . . . . . . . . . . . . . 1-3Workflow Administration . . . . . . . . . . . . . . . . . . . . . . . . . . . . . . . . . . . . . . . . . . . . . . . . . . . . . . . . . . . . . . . . . . . . 1-3eQuestionnaire . . . . . . . . . . . . . . . . . . . . . . . . . . . . . . . . . . . . . . . . . . . . . . . . . . . . . . . . . . . . . . . . . . . . . . . . . . . . . 1-4Supplier Portal. . . . . . . . . . . . . . . . . . . . . . . . . . . . . . . . . . . . . . . . . . . . . . . . . . . . . . . . . . . . . . . . . . . . . . . . . . . . . . 1-4
Getting Started with Supply Chain Relationship Management . . . . . . . . . . . . . . . . . . . . . . . . . . . . . . . . . . . . . . . . . . . . . . 1-5Accessing Supply Chain Relationship Management . . . . . . . . . . . . . . . . . . . . . . . . . . . . . . . . . . . . . . . . . . . . . . . . . . . 1-5
Chapter 2 Company and Facility Profiles
Overview of Profiles . . . . . . . . . . . . . . . . . . . . . . . . . . . . . . . . . . . . . . . . . . . . . . . . . . . . . . . . . . . . . . . . . . . . . . . . . . . . . . . . . 2-1Searching for a Company or Facility Profile . . . . . . . . . . . . . . . . . . . . . . . . . . . . . . . . . . . . . . . . . . . . . . . . . . . . . . . . . . . . . 2-2Creating a Company Profile . . . . . . . . . . . . . . . . . . . . . . . . . . . . . . . . . . . . . . . . . . . . . . . . . . . . . . . . . . . . . . . . . . . . . . . . . . 2-3
Company Information Tab . . . . . . . . . . . . . . . . . . . . . . . . . . . . . . . . . . . . . . . . . . . . . . . . . . . . . . . . . . . . . . . . . . . . . . . 2-5Company Information Section . . . . . . . . . . . . . . . . . . . . . . . . . . . . . . . . . . . . . . . . . . . . . . . . . . . . . . . . . . . . . . . . 2-5Administrative Information Section . . . . . . . . . . . . . . . . . . . . . . . . . . . . . . . . . . . . . . . . . . . . . . . . . . . . . . . . . . . . 2-5Business Unit(s) Section. . . . . . . . . . . . . . . . . . . . . . . . . . . . . . . . . . . . . . . . . . . . . . . . . . . . . . . . . . . . . . . . . . . . . . 2-6Parent Relationships Section . . . . . . . . . . . . . . . . . . . . . . . . . . . . . . . . . . . . . . . . . . . . . . . . . . . . . . . . . . . . . . . . . . 2-6Child Relationships Section . . . . . . . . . . . . . . . . . . . . . . . . . . . . . . . . . . . . . . . . . . . . . . . . . . . . . . . . . . . . . . . . . . . 2-6Cross References Section . . . . . . . . . . . . . . . . . . . . . . . . . . . . . . . . . . . . . . . . . . . . . . . . . . . . . . . . . . . . . . . . . . . . . 2-7
Custom Tab . . . . . . . . . . . . . . . . . . . . . . . . . . . . . . . . . . . . . . . . . . . . . . . . . . . . . . . . . . . . . . . . . . . . . . . . . . . . . . . . . . . . 2-7Extended Attributes Section. . . . . . . . . . . . . . . . . . . . . . . . . . . . . . . . . . . . . . . . . . . . . . . . . . . . . . . . . . . . . . . . . . . 2-8Custom Sections Section . . . . . . . . . . . . . . . . . . . . . . . . . . . . . . . . . . . . . . . . . . . . . . . . . . . . . . . . . . . . . . . . . . . . . 2-8
Adding a Custom Section. . . . . . . . . . . . . . . . . . . . . . . . . . . . . . . . . . . . . . . . . . . . . . . . . . . . . . . . . . . . . . . . . . . 2-9Editing a Custom Section. . . . . . . . . . . . . . . . . . . . . . . . . . . . . . . . . . . . . . . . . . . . . . . . . . . . . . . . . . . . . . . . . . 2-10Deleting a Custom Section. . . . . . . . . . . . . . . . . . . . . . . . . . . . . . . . . . . . . . . . . . . . . . . . . . . . . . . . . . . . . . . . . 2-12
Supporting Documents Tab . . . . . . . . . . . . . . . . . . . . . . . . . . . . . . . . . . . . . . . . . . . . . . . . . . . . . . . . . . . . . . . . . . . . . 2-13Supplier Document Management Section . . . . . . . . . . . . . . . . . . . . . . . . . . . . . . . . . . . . . . . . . . . . . . . . . . . . . . 2-13Attachments Section . . . . . . . . . . . . . . . . . . . . . . . . . . . . . . . . . . . . . . . . . . . . . . . . . . . . . . . . . . . . . . . . . . . . . . . . 2-13
Adding an Attachment . . . . . . . . . . . . . . . . . . . . . . . . . . . . . . . . . . . . . . . . . . . . . . . . . . . . . . . . . . . . . . . . . . . . 2-13Supply Categories Tab . . . . . . . . . . . . . . . . . . . . . . . . . . . . . . . . . . . . . . . . . . . . . . . . . . . . . . . . . . . . . . . . . . . . . . . . . . 2-15DRL Catalog Tab. . . . . . . . . . . . . . . . . . . . . . . . . . . . . . . . . . . . . . . . . . . . . . . . . . . . . . . . . . . . . . . . . . . . . . . . . . . . . . . 2-15Facilities Tab . . . . . . . . . . . . . . . . . . . . . . . . . . . . . . . . . . . . . . . . . . . . . . . . . . . . . . . . . . . . . . . . . . . . . . . . . . . . . . . . . . 2-16Contacts Tab . . . . . . . . . . . . . . . . . . . . . . . . . . . . . . . . . . . . . . . . . . . . . . . . . . . . . . . . . . . . . . . . . . . . . . . . . . . . . . . . . . 2-17
Adding a Contact . . . . . . . . . . . . . . . . . . . . . . . . . . . . . . . . . . . . . . . . . . . . . . . . . . . . . . . . . . . . . . . . . . . . . . . . . . 2-17Saving the Company Profile . . . . . . . . . . . . . . . . . . . . . . . . . . . . . . . . . . . . . . . . . . . . . . . . . . . . . . . . . . . . . . . . . . . . . . . . . 2-19Creating a Facility Profile . . . . . . . . . . . . . . . . . . . . . . . . . . . . . . . . . . . . . . . . . . . . . . . . . . . . . . . . . . . . . . . . . . . . . . . . . . . 2-19
Facility Information Tab . . . . . . . . . . . . . . . . . . . . . . . . . . . . . . . . . . . . . . . . . . . . . . . . . . . . . . . . . . . . . . . . . . . . . . . . 2-21
Agile Product Lifecycle Management for Process
vi Supply Chain Relationship Management User Guide
Facility Information Section . . . . . . . . . . . . . . . . . . . . . . . . . . . . . . . . . . . . . . . . . . . . . . . . . . . . . . . . . . . . . . . . . 2-21Administrative Information Section . . . . . . . . . . . . . . . . . . . . . . . . . . . . . . . . . . . . . . . . . . . . . . . . . . . . . . . . . . . 2-22Business Unit(s) Section. . . . . . . . . . . . . . . . . . . . . . . . . . . . . . . . . . . . . . . . . . . . . . . . . . . . . . . . . . . . . . . . . . . . . 2-22Cross References Section . . . . . . . . . . . . . . . . . . . . . . . . . . . . . . . . . . . . . . . . . . . . . . . . . . . . . . . . . . . . . . . . . . . . 2-23
Custom Tab . . . . . . . . . . . . . . . . . . . . . . . . . . . . . . . . . . . . . . . . . . . . . . . . . . . . . . . . . . . . . . . . . . . . . . . . . . . . . . . . . . . 2-24Extended Attributes Section. . . . . . . . . . . . . . . . . . . . . . . . . . . . . . . . . . . . . . . . . . . . . . . . . . . . . . . . . . . . . . . . . . 2-24Custom Sections . . . . . . . . . . . . . . . . . . . . . . . . . . . . . . . . . . . . . . . . . . . . . . . . . . . . . . . . . . . . . . . . . . . . . . . . . . . 2-25
Supporting Documents Tab . . . . . . . . . . . . . . . . . . . . . . . . . . . . . . . . . . . . . . . . . . . . . . . . . . . . . . . . . . . . . . . . . . . . . 2-26Supplier Document Management Section . . . . . . . . . . . . . . . . . . . . . . . . . . . . . . . . . . . . . . . . . . . . . . . . . . . . . . 2-26Attachments Section . . . . . . . . . . . . . . . . . . . . . . . . . . . . . . . . . . . . . . . . . . . . . . . . . . . . . . . . . . . . . . . . . . . . . . . . 2-26
Sourcing Approval Tab. . . . . . . . . . . . . . . . . . . . . . . . . . . . . . . . . . . . . . . . . . . . . . . . . . . . . . . . . . . . . . . . . . . . . . . . . . 2-27Contacts Tab . . . . . . . . . . . . . . . . . . . . . . . . . . . . . . . . . . . . . . . . . . . . . . . . . . . . . . . . . . . . . . . . . . . . . . . . . . . . . . . . . . 2-27
Facility Contacts Section . . . . . . . . . . . . . . . . . . . . . . . . . . . . . . . . . . . . . . . . . . . . . . . . . . . . . . . . . . . . . . . . . . . . 2-28Company Contacts Section . . . . . . . . . . . . . . . . . . . . . . . . . . . . . . . . . . . . . . . . . . . . . . . . . . . . . . . . . . . . . . . . . . 2-28Adding a Contact . . . . . . . . . . . . . . . . . . . . . . . . . . . . . . . . . . . . . . . . . . . . . . . . . . . . . . . . . . . . . . . . . . . . . . . . . . 2-29
Audit Trail Tab . . . . . . . . . . . . . . . . . . . . . . . . . . . . . . . . . . . . . . . . . . . . . . . . . . . . . . . . . . . . . . . . . . . . . . . . . . . . . . . . 2-30Event History Section . . . . . . . . . . . . . . . . . . . . . . . . . . . . . . . . . . . . . . . . . . . . . . . . . . . . . . . . . . . . . . . . . . . . . . . 2-30
Saving the Facility Profile . . . . . . . . . . . . . . . . . . . . . . . . . . . . . . . . . . . . . . . . . . . . . . . . . . . . . . . . . . . . . . . . . . . . . . . . . . . 2-30Assigning a Facility to a Different Company . . . . . . . . . . . . . . . . . . . . . . . . . . . . . . . . . . . . . . . . . . . . . . . . . . . . . . . . . . . . 2-30
Chapter 3 Sourcing Approvals
Overview . . . . . . . . . . . . . . . . . . . . . . . . . . . . . . . . . . . . . . . . . . . . . . . . . . . . . . . . . . . . . . . . . . . . . . . . . . . . . . . . . . . . . . . . . . 3-1Types of Sourcing Approvals . . . . . . . . . . . . . . . . . . . . . . . . . . . . . . . . . . . . . . . . . . . . . . . . . . . . . . . . . . . . . . . . . . . . . . 3-2
Accessing Sourcing Approvals. . . . . . . . . . . . . . . . . . . . . . . . . . . . . . . . . . . . . . . . . . . . . . . . . . . . . . . . . . . . . . . . . . . . . . . . . 3-3Specification-related Sourcing Approvals Section . . . . . . . . . . . . . . . . . . . . . . . . . . . . . . . . . . . . . . . . . . . . . . . . . 3-4Alternate (Estimated) Specification-related Supply Capabilities Section . . . . . . . . . . . . . . . . . . . . . . . . . . . . . . 3-4Non-specification Related Sourcing Approvals Section . . . . . . . . . . . . . . . . . . . . . . . . . . . . . . . . . . . . . . . . . . . . 3-5
Creating a Specification-Related Sourcing Approval . . . . . . . . . . . . . . . . . . . . . . . . . . . . . . . . . . . . . . . . . . . . . . . . . . . . . . 3-6Custom Tab . . . . . . . . . . . . . . . . . . . . . . . . . . . . . . . . . . . . . . . . . . . . . . . . . . . . . . . . . . . . . . . . . . . . . . . . . . . . . . . . . . . 3-13Supporting Documents Tab . . . . . . . . . . . . . . . . . . . . . . . . . . . . . . . . . . . . . . . . . . . . . . . . . . . . . . . . . . . . . . . . . . . . . 3-13
Supplier Document Management Section . . . . . . . . . . . . . . . . . . . . . . . . . . . . . . . . . . . . . . . . . . . . . . . . . . . . . . 3-13Attachments Section . . . . . . . . . . . . . . . . . . . . . . . . . . . . . . . . . . . . . . . . . . . . . . . . . . . . . . . . . . . . . . . . . . . . . . . . 3-13
Signature Approval Tab . . . . . . . . . . . . . . . . . . . . . . . . . . . . . . . . . . . . . . . . . . . . . . . . . . . . . . . . . . . . . . . . . . . . . . . . . 3-14Current Status Section . . . . . . . . . . . . . . . . . . . . . . . . . . . . . . . . . . . . . . . . . . . . . . . . . . . . . . . . . . . . . . . . . . . . . . 3-14Event History Section . . . . . . . . . . . . . . . . . . . . . . . . . . . . . . . . . . . . . . . . . . . . . . . . . . . . . . . . . . . . . . . . . . . . . . . 3-15Signature Documents Section . . . . . . . . . . . . . . . . . . . . . . . . . . . . . . . . . . . . . . . . . . . . . . . . . . . . . . . . . . . . . . . . 3-15
Creating an Alternate (Estimated) Specification-Related Supply Capability . . . . . . . . . . . . . . . . . . . . . . . . . . . . . . . . . . 3-15Creating a Non-Specification Related Sourcing Approval . . . . . . . . . . . . . . . . . . . . . . . . . . . . . . . . . . . . . . . . . . . . . . . . . 3-17Workflows and Sourcing Approvals . . . . . . . . . . . . . . . . . . . . . . . . . . . . . . . . . . . . . . . . . . . . . . . . . . . . . . . . . . . . . . . . . . . 3-19
Managing Sourcing Approvals . . . . . . . . . . . . . . . . . . . . . . . . . . . . . . . . . . . . . . . . . . . . . . . . . . . . . . . . . . . . . . . . . . . 3-19Using Action Items . . . . . . . . . . . . . . . . . . . . . . . . . . . . . . . . . . . . . . . . . . . . . . . . . . . . . . . . . . . . . . . . . . . . . . . . . . . . . 3-19Working with a Signature Document . . . . . . . . . . . . . . . . . . . . . . . . . . . . . . . . . . . . . . . . . . . . . . . . . . . . . . . . . . . . . . 3-21Transitioning a Workflow . . . . . . . . . . . . . . . . . . . . . . . . . . . . . . . . . . . . . . . . . . . . . . . . . . . . . . . . . . . . . . . . . . . . . . . 3-22
Selecting Workflow Participants . . . . . . . . . . . . . . . . . . . . . . . . . . . . . . . . . . . . . . . . . . . . . . . . . . . . . . . . . . . . . . 3-23
Chapter 4 Supplier Document Management
Overview . . . . . . . . . . . . . . . . . . . . . . . . . . . . . . . . . . . . . . . . . . . . . . . . . . . . . . . . . . . . . . . . . . . . . . . . . . . . . . . . . . . . . . . . . . 4-1Publishing to Supplier Portal . . . . . . . . . . . . . . . . . . . . . . . . . . . . . . . . . . . . . . . . . . . . . . . . . . . . . . . . . . . . . . . . . . . . . . . . . 4-2Searching for Supplier Documents. . . . . . . . . . . . . . . . . . . . . . . . . . . . . . . . . . . . . . . . . . . . . . . . . . . . . . . . . . . . . . . . . . . . . 4-3Adding Supplier Documents. . . . . . . . . . . . . . . . . . . . . . . . . . . . . . . . . . . . . . . . . . . . . . . . . . . . . . . . . . . . . . . . . . . . . . . . . . 4-7Editing Supplier Documents. . . . . . . . . . . . . . . . . . . . . . . . . . . . . . . . . . . . . . . . . . . . . . . . . . . . . . . . . . . . . . . . . . . . . . . . . . 4-9Deleting Supplier Documents. . . . . . . . . . . . . . . . . . . . . . . . . . . . . . . . . . . . . . . . . . . . . . . . . . . . . . . . . . . . . . . . . . . . . . . . . 4-9
vii
ABOUT THIS MANUAL
Agile Product Lifecycle Management for Process DocumentationThe Agile Product Lifecycle Management (PLM) for Process documentation set includes Adobe® Acrobat™ PDF files. The Oracle Technology Network (OTN) Web site: http://www.oracle.com/technology/documentation/agile.html contains the latest versions of the Agile PLM for Process PDF files. You can view or download these manuals from the Web site, or you can ask your Agile administrator if there is an Agile PLM for Process Documentation folder available on your network from which you can access the Agile PLM for Process documentation (PDF) files.
Note To read the PDF files, you must use the free Adobe Reader™ version 7.0 or later. This program can be downloaded from the Adobe Web site: http://www.adobe.com/.
If you need additional assistance or information, please go to http://metalink.oracle.com or phone 1.800.233.1711 for assistance.
TTY Access to Oracle Support ServicesOracle provides dedicated Text Telephone (TTY) access to Oracle Support Services within the United States of America 24 hours a day, 7 days a week. For TTY support, call 800.446.2398. Outside the United States, call +1.407.458.2479.
Agile Training AidsGo to the Oracle University Web page http://www.oracle.com/education/chooser/selectcountry_new.html for more information on Agile Training offerings.
Accessibility of Code Examples in DocumentationScreen readers may not always correctly read the code examples in this document. The conventions for writing code require that closing braces should appear on an otherwise empty line; however, some screen readers may not always read a line of text that consists solely of a bracket or brace.
Accessibility of Links to External Web Sites in DocumentationThis documentation may contain links to Web sites of other companies or organizations that Oracle does not own or control. Oracle neither evaluates nor makes any representations regarding the accessibility of these Web sites.
Before calling Oracle Support about a problem with an Agile PLM for Process manual, please have the full part number, which is located on the title page.
Agile Product Lifecycle Management for Process
Supply Chain Relationship Management User Guide
AudienceThis guide is intended for end users who are responsible for creating and managing information in Agile Product Lifecycle Management for Process. Information about administering the system resides in the Agile Product Lifecycle Management for Process Administrator User Guide.
Variability of InstallationsDescriptions and illustrations of the Agile PLM for Process user interface included in this manual may not match your installation. The user interface of Agile PLM for Process applications and the features included can vary greatly depending on such variables as:
❑ Which applications your organization has purchased and installed
❑ Configuration settings that may turn features off or on
❑ Customization specific to your organization
❑ Security settings as they apply to the system and your user account
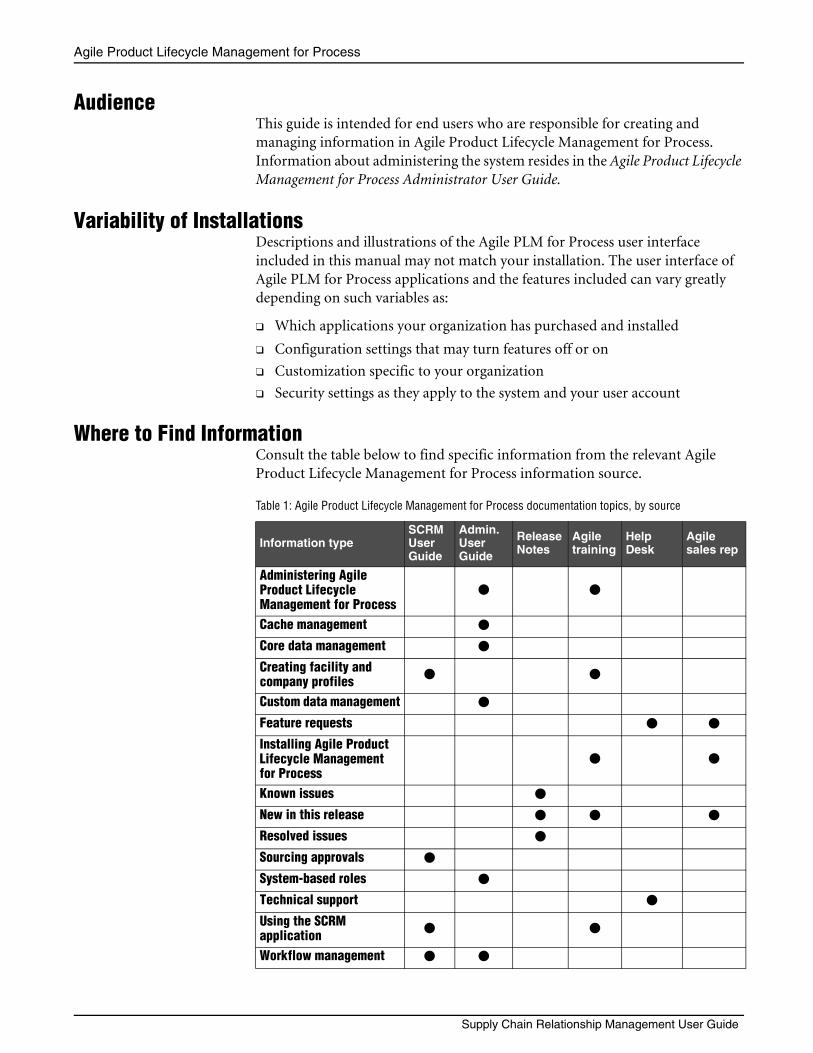
Where to Find InformationConsult the table below to find specific information from the relevant Agile Product Lifecycle Management for Process information source.
Table 1: Agile Product Lifecycle Management for Process documentation topics, by source
Information typeSCRM User Guide
Admin. User Guide
Release Notes
Agile training
Help Desk
Agile sales rep
Administering Agile Product Lifecycle Management for Process
● ●
Cache management ●
Core data management ●
Creating facility and company profiles ● ●
Custom data management ●
Feature requests ● ●
Installing Agile Product Lifecycle Management for Process
● ●
Known issues ●
New in this release ● ● ●
Resolved issues ●
Sourcing approvals ●
System-based roles ●
Technical support ●
Using the SCRM application ● ●
Workflow management ● ●
About This Manual
ix
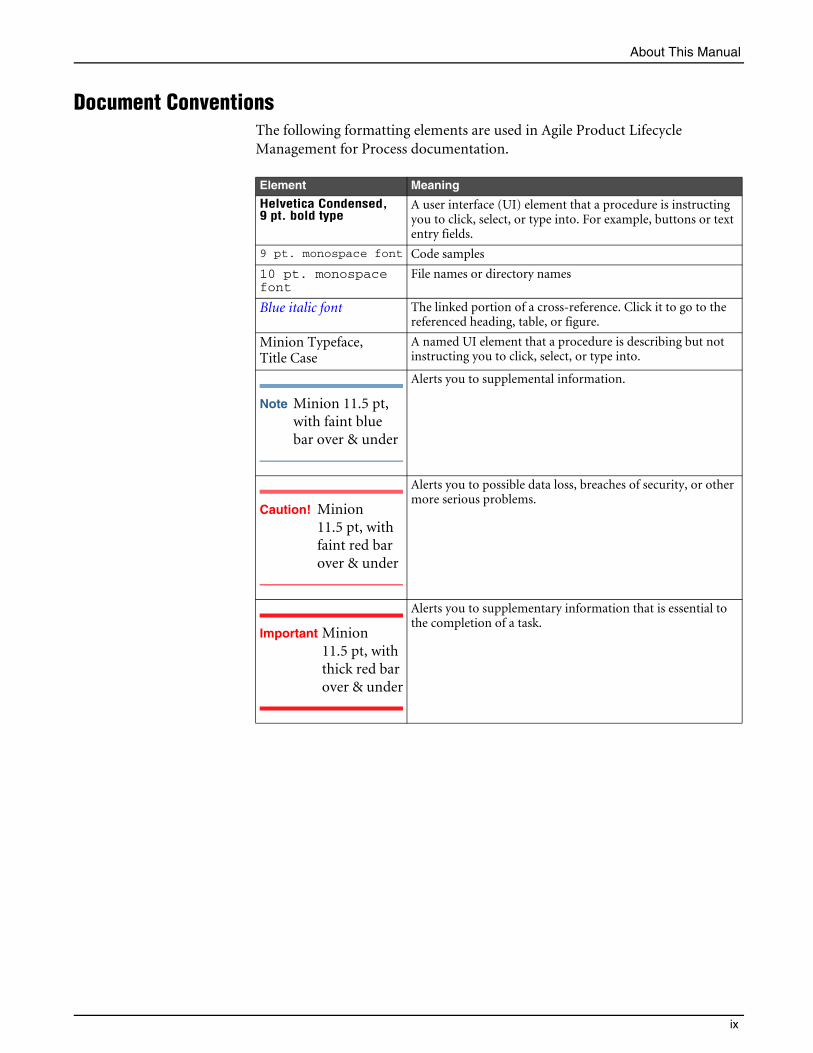
Document ConventionsThe following formatting elements are used in Agile Product Lifecycle Management for Process documentation.
Element Meaning
Helvetica Condensed, 9 pt. bold type
A user interface (UI) element that a procedure is instructing you to click, select, or type into. For example, buttons or text entry fields.
9 pt. monospace font Code samples
10 pt. monospace font
File names or directory names
Blue italic font The linked portion of a cross-reference. Click it to go to the referenced heading, table, or figure.
Minion Typeface, Title Case
A named UI element that a procedure is describing but not instructing you to click, select, or type into.
Note Minion 11.5 pt, with faint blue bar over & under
Alerts you to supplemental information.
Caution! Minion 11.5 pt, with faint red bar over & under
Alerts you to possible data loss, breaches of security, or other more serious problems.
Important Minion 11.5 pt, with thick red bar over & under
Alerts you to supplementary information that is essential to the completion of a task.
Agile Product Lifecycle Management for Process
Supply Chain Relationship Management User Guide
1-1
CHAPTER 1
Introduction to Supply ChainRelationship Management
This chapter introduces the Supply Chain Relationship Management application. The topics covered include:❑ Touch Points with Other Applications❑ Getting Started with Supply Chain Relationship Management
OverviewSupply Chain Relationship Management (SCRM) provides collaborative business process for managing supply chain relationships and sourcing approvals across product suppliers, distributors, and all other supply chain participants.
You can use Supply Chain Relationship Management to build a view of the relationships between participants in a supply chain. Agile PLM for Process can leverage the information you provide in other applications such as Global Specification Management (GSM) and Supplier Portal (SP).
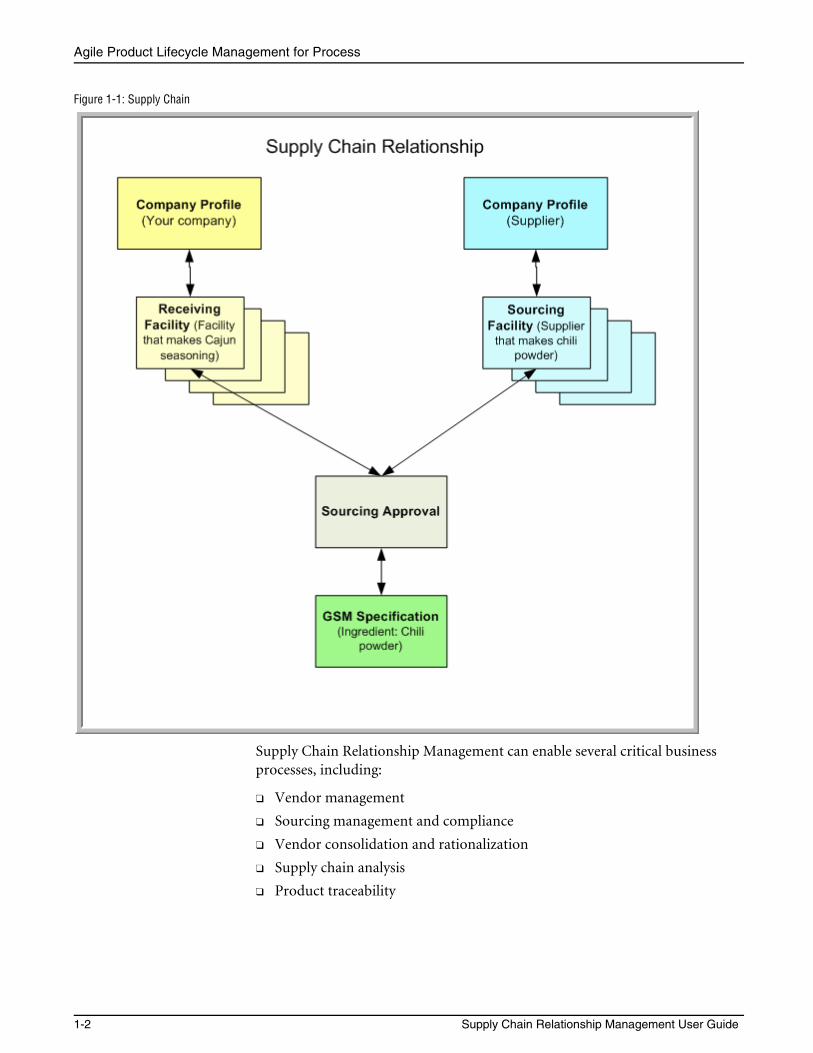
Figure 1-1 below shows the supply chain relationship of a company, a supplier, and an ingredient specification. In this example, a company owns a receiving facility that produces Cajun seasoning. The receiving facility obtains the chili powder required for the Cajun seasoning from a supplier sourcing facility. The sourcing approval tracks the approval relationship from the sourcing facility to the receiving facility.
Agile Product Lifecycle Management for Process
1-2 Supply Chain Relationship Management User Guide
Figure 1-1: Supply Chain
Supply Chain Relationship Management can enable several critical business processes, including:
❑ Vendor management
❑ Sourcing management and compliance
❑ Vendor consolidation and rationalization
❑ Supply chain analysis
❑ Product traceability
Chapter 1 Introduction to Supply Chain Relationship Management
1-3
Touch Points with Other ApplicationsThe SCRM application interfaces with several other applications.
Global Specification ManagementGlobal Specification Management (GSM) provides your company with a tool to create and modify your company’s products, including finished products and manufacturing processes to ingredient and packaging specifications. These specifications are syndicated to SCRM, where sourcing approvals are created. Refer to the Agile Product Lifecycle Management for Process Global Specification Management User Guide for more information.
Manage Core DataYour Agile PLM for Process administrator uses the Manage Core Data application (ADMN) to manage core data such as data lists and extended attributes. Core data that is specific to SCRM includes the following and is further explained in the Agile Product Lifecycle Management for Process Administrator User Guide:
• Business units
• Classes
• Company extended attributes
• Contact categories
• Document types
• Facility extended attributes
• Protocol IDs
• SDM statuses
• Sourcing types
Workflow AdministrationWorkflows drive sourcing approvals, an integral part of SCRM. As part of workflow management, an Agile PLM for Process administrator plans and creates workflows using the Workflow Administration (WFA) application. This process involves creating workflow statuses, workflow transitions, workflow functional areas, and workflow groups. The workflows are then saved to Agile PLM for Process and integrated across all applications. Refer to the Agile Product Lifecycle Management for Process Administrator User Guide for more information.
Agile Product Lifecycle Management for Process
1-4 Supply Chain Relationship Management User Guide
eQuestionnaireThe eQuestionnaire (eQ) application’s communication and coordination tools can be used to increase supply side collaboration between your company and its suppliers. Questionnaires containing specific data requests are created and sent electronically to suppliers. Once the requested data is returned, it can then be automatically integrated into GSM and other applications. The user has the ability to create new questionnaires for information-gathering purposes or send existing ones for validation. Refer to the Agile Product Lifecycle Management for Process eQuestionnaire User Guide for more information.
Supplier PortalSupplier Portal provides a central location for your company’s supply chain partners to access procurement and sourcing-related specifications, business processes and protocols in a flexible, secure and user-customizable environment. It gives internal resources and external supply chain partners (such as vendors, suppliers, brokers and distributors) the ability to obtain:
• Information regarding the specifications that are to be sourced
• Guidance surrounding expectations of deliverables
• Contact information of the various facilities and resources with which they may need to interact
Using Supplier Portal, you can set restrictions that control what information in Agile PLM for Process is visible to your suppliers. Refer to the Agile Product Lifecycle Management for Process Supplier Portal User Guide for more information.
Chapter 1 Introduction to Supply Chain Relationship Management
1-5
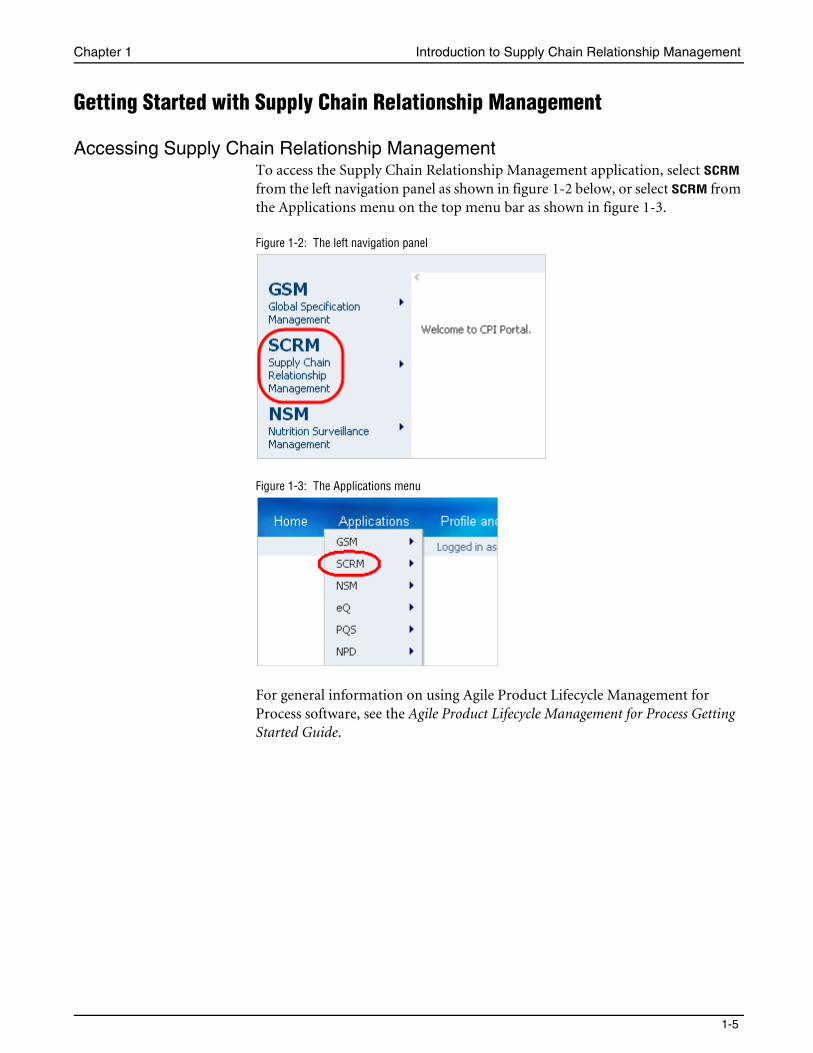
Getting Started with Supply Chain Relationship Management
Accessing Supply Chain Relationship ManagementTo access the Supply Chain Relationship Management application, select SCRM from the left navigation panel as shown in figure 1-2 below, or select SCRM from the Applications menu on the top menu bar as shown in figure 1-3.
Figure 1-2: The left navigation panel
Figure 1-3: The Applications menu
For general information on using Agile Product Lifecycle Management for Process software, see the Agile Product Lifecycle Management for Process Getting Started Guide.

Agile Product Lifecycle Management for Process
1-6 Supply Chain Relationship Management User Guide
2-1
CHAPTER 2
Company and Facility ProfilesThis chapter describes how to use Supply Chain Relationship Management to create and maintain company and facility profiles. The topics covered include:❑ Searching for a Company or Facility Profile❑ Creating a Company Profile❑ Saving the Company Profile❑ Creating a Facility Profile❑ Saving the Facility Profile❑ Assigning a Facility to a Different Company
Overview of ProfilesSupply Chain Relationship Management (SCRM) serves as a comprehensive platform for managing global supply and distribution relationships, and is a centralized repository for global provider information.
Information about each company is organized into two levels:
• Company profiles
• Facility profiles
Every relationship in the supply chain must have a company profile. You can arrange company relationships hierarchically, allowing you to model the sourcing relationships as far up the chain as necessary. After a company profile is created, you can create its facility profiles. Facility profiles may only be created from within a company profile. Each company may have multiple facility profiles.
Note You cannot delete a company profile or a facility profile in SCRM.
Agile Product Lifecycle Management for Process
2-2 Supply Chain Relationship Management User Guide
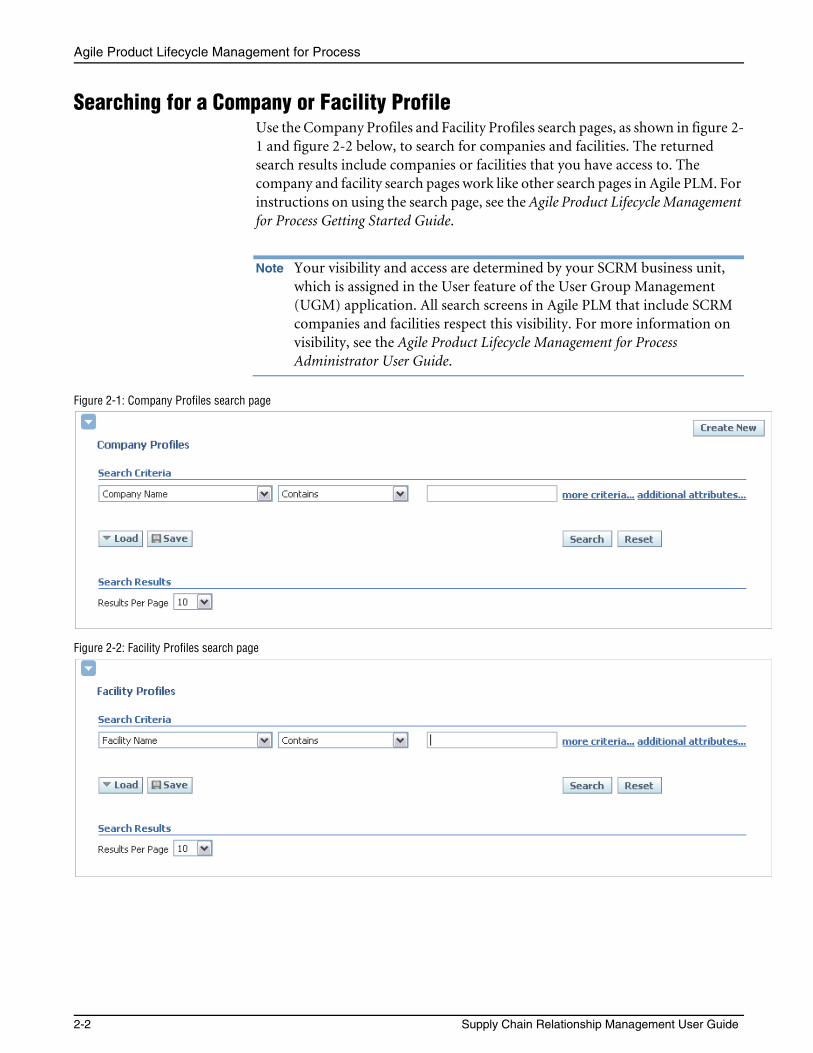
Searching for a Company or Facility ProfileUse the Company Profiles and Facility Profiles search pages, as shown in figure 2-1 and figure 2-2 below, to search for companies and facilities. The returned search results include companies or facilities that you have access to. The company and facility search pages work like other search pages in Agile PLM. For instructions on using the search page, see the Agile Product Lifecycle Management for Process Getting Started Guide.
Note Your visibility and access are determined by your SCRM business unit, which is assigned in the User feature of the User Group Management (UGM) application. All search screens in Agile PLM that include SCRM companies and facilities respect this visibility. For more information on visibility, see the Agile Product Lifecycle Management for Process Administrator User Guide.
Figure 2-1: Company Profiles search page
Figure 2-2: Facility Profiles search page
Chapter 2 Company and Facility Profiles
2-3
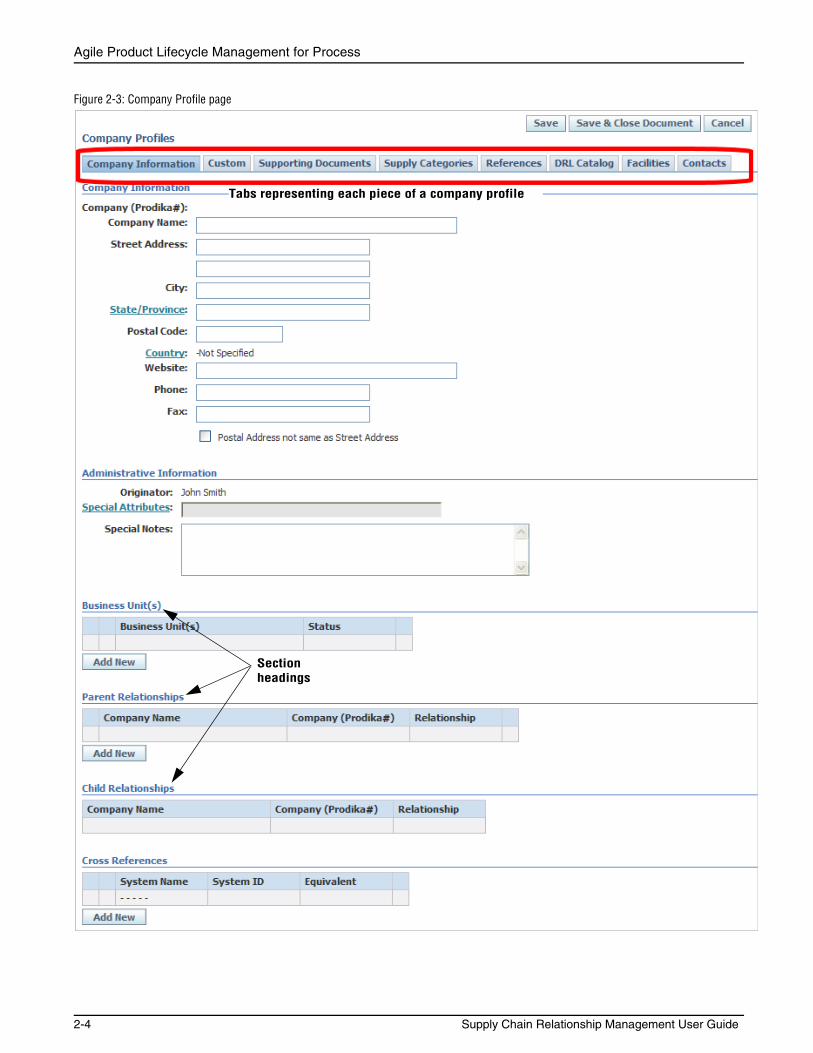
Creating a Company ProfileUse the Company Profiles page to create a company profile. This page includes the following tabs, as shown in figure 2-3 below:
• Company Information
• Custom
• Supporting Documents
• Supply Categories
• DRL Catalog
• Facilities
• Contacts
Agile Product Lifecycle Management for Process
2-4 Supply Chain Relationship Management User Guide
Figure 2-3: Company Profile page
Tabs representing each piece of a company profile
Section headings
Chapter 2 Company and Facility Profiles
2-5
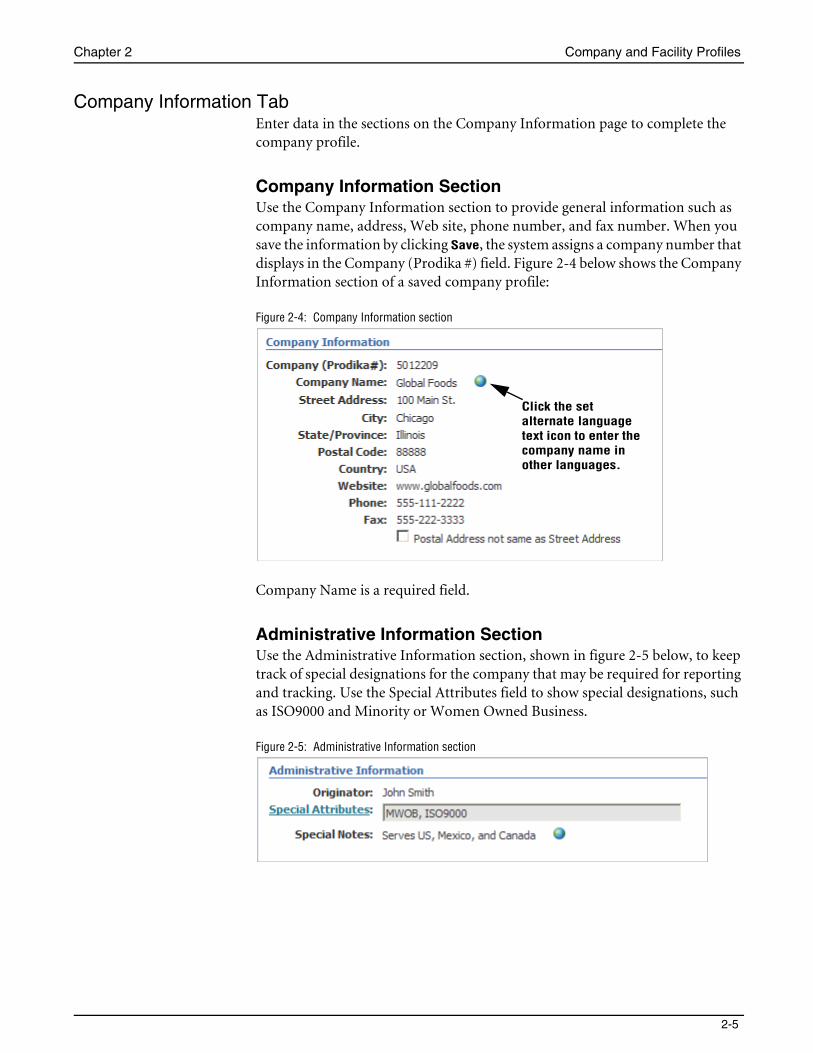
Company Information TabEnter data in the sections on the Company Information page to complete the company profile.
Company Information SectionUse the Company Information section to provide general information such as company name, address, Web site, phone number, and fax number. When you save the information by clicking Save, the system assigns a company number that displays in the Company (Prodika #) field. Figure 2-4 below shows the Company Information section of a saved company profile:
Figure 2-4: Company Information section
Company Name is a required field.
Administrative Information SectionUse the Administrative Information section, shown in figure 2-5 below, to keep track of special designations for the company that may be required for reporting and tracking. Use the Special Attributes field to show special designations, such as ISO9000 and Minority or Women Owned Business.
Figure 2-5: Administrative Information section
Click the set alternate language text icon to enter the company name in other languages.
Agile Product Lifecycle Management for Process
2-6 Supply Chain Relationship Management User Guide
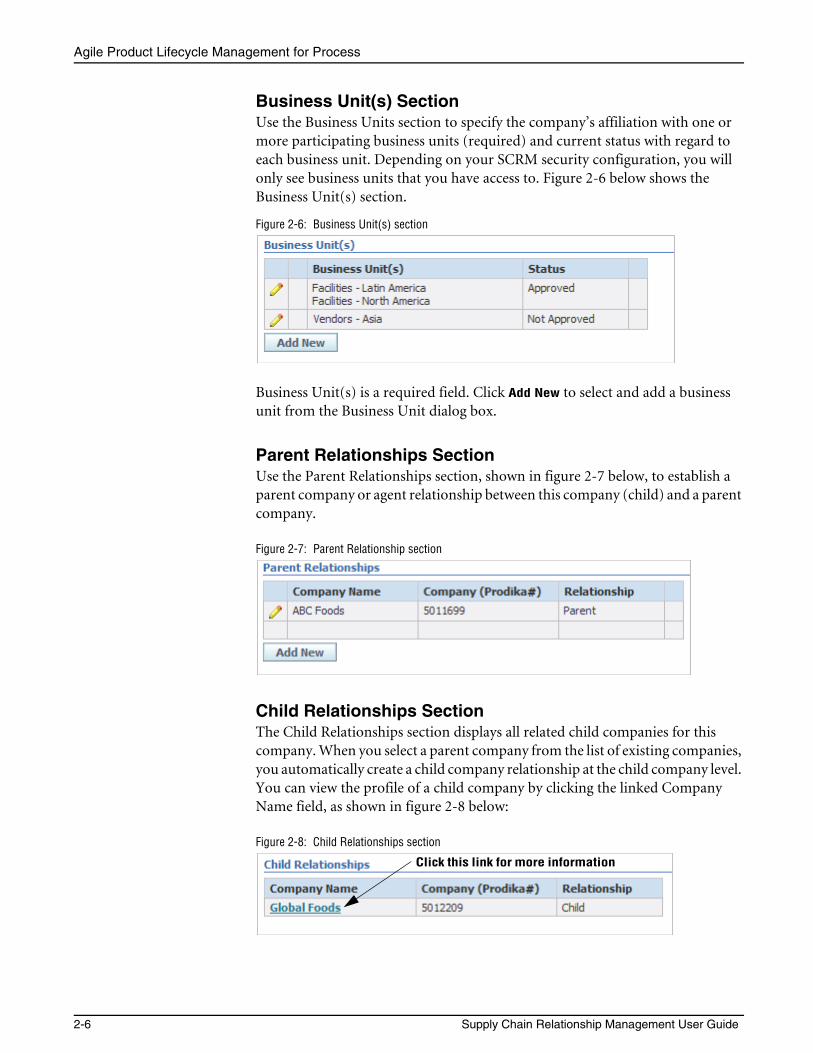
Business Unit(s) SectionUse the Business Units section to specify the company’s affiliation with one or more participating business units (required) and current status with regard to each business unit. Depending on your SCRM security configuration, you will only see business units that you have access to. Figure 2-6 below shows the Business Unit(s) section.
Figure 2-6: Business Unit(s) section
Business Unit(s) is a required field. Click Add New to select and add a business unit from the Business Unit dialog box.
Parent Relationships SectionUse the Parent Relationships section, shown in figure 2-7 below, to establish a parent company or agent relationship between this company (child) and a parent company.
Figure 2-7: Parent Relationship section
Child Relationships SectionThe Child Relationships section displays all related child companies for this company. When you select a parent company from the list of existing companies, you automatically create a child company relationship at the child company level. You can view the profile of a child company by clicking the linked Company Name field, as shown in figure 2-8 below:
Figure 2-8: Child Relationships section
Click this link for more information

Chapter 2 Company and Facility Profiles
2-7
Cross References SectionThe Cross References section includes the system name, system ID, and equivalent value assigned to this company in an external system. A company can have multiple entries. Refer to figure 2-9 below:
Figure 2-9: Cross References section
Custom TabUse the Custom tab to enter extended attributes or custom sections for a company. The Custom page, shown in figure 2-10 below, consists of two sections:
• Extended Attributes
• Custom Sections
Note The extended attribute fields and custom sections are created and maintained by your administrator.
Figure 2-10: Custom tab
Agile Product Lifecycle Management for Process
2-8 Supply Chain Relationship Management User Guide
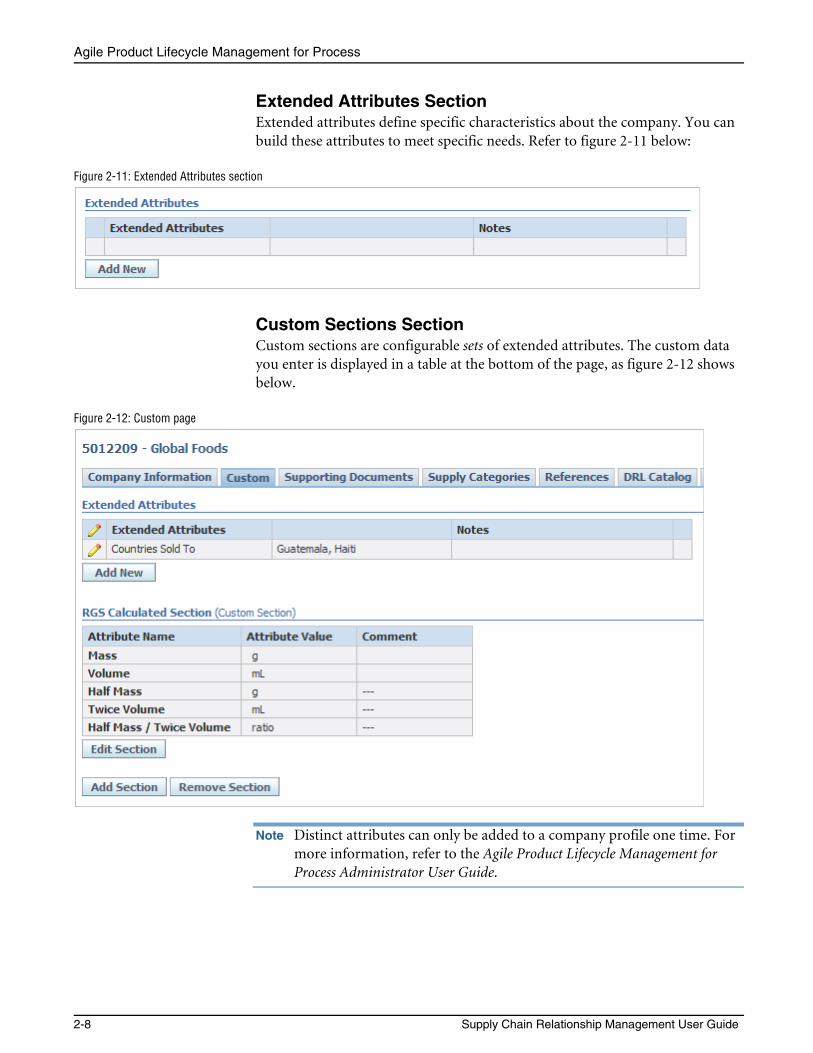
Extended Attributes SectionExtended attributes define specific characteristics about the company. You can build these attributes to meet specific needs. Refer to figure 2-11 below:
Figure 2-11: Extended Attributes section
Custom Sections SectionCustom sections are configurable sets of extended attributes. The custom data you enter is displayed in a table at the bottom of the page, as figure 2-12 shows below.
Figure 2-12: Custom page
Note Distinct attributes can only be added to a company profile one time. For more information, refer to the Agile Product Lifecycle Management for Process Administrator User Guide.
Chapter 2 Company and Facility Profiles
2-9
Important If you remove a custom section or extended attribute, the system deletes the data that you entered. Delete data with caution, because it cannot be retrieved.
Adding a Custom Section
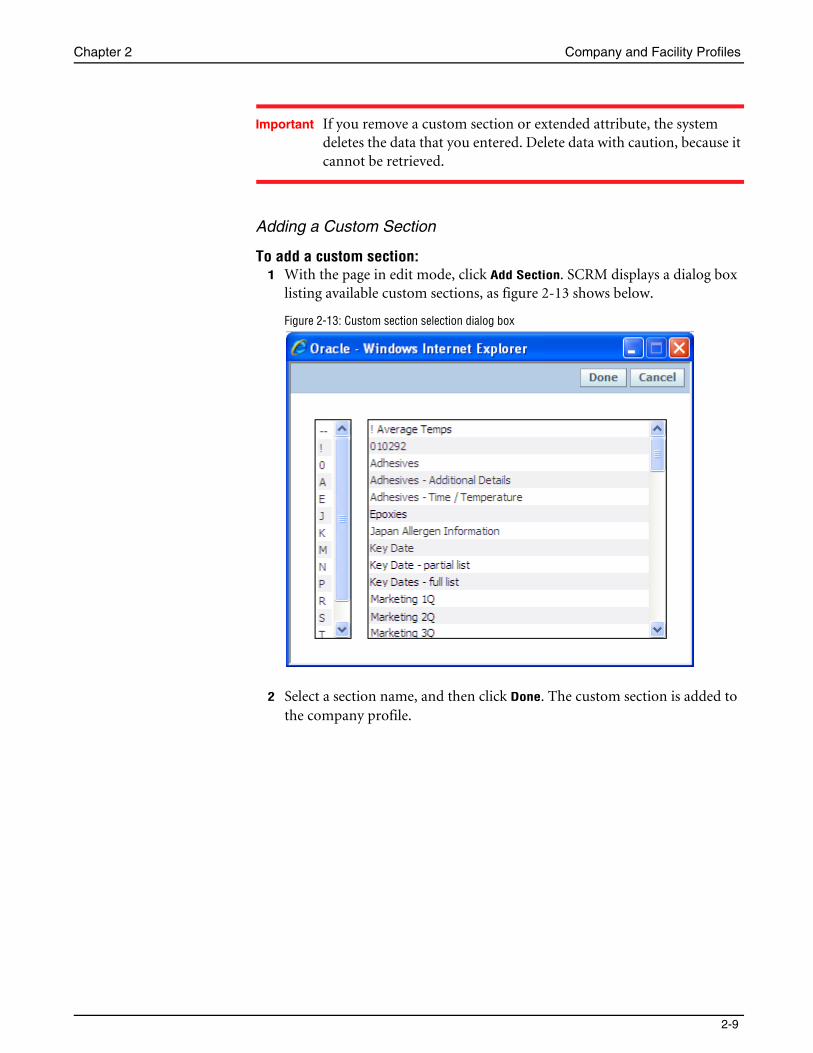
To add a custom section:1 With the page in edit mode, click Add Section. SCRM displays a dialog box
listing available custom sections, as figure 2-13 shows below.
Figure 2-13: Custom section selection dialog box
2 Select a section name, and then click Done. The custom section is added to the company profile.
Agile Product Lifecycle Management for Process
2-10 Supply Chain Relationship Management User Guide
Editing a Custom Section
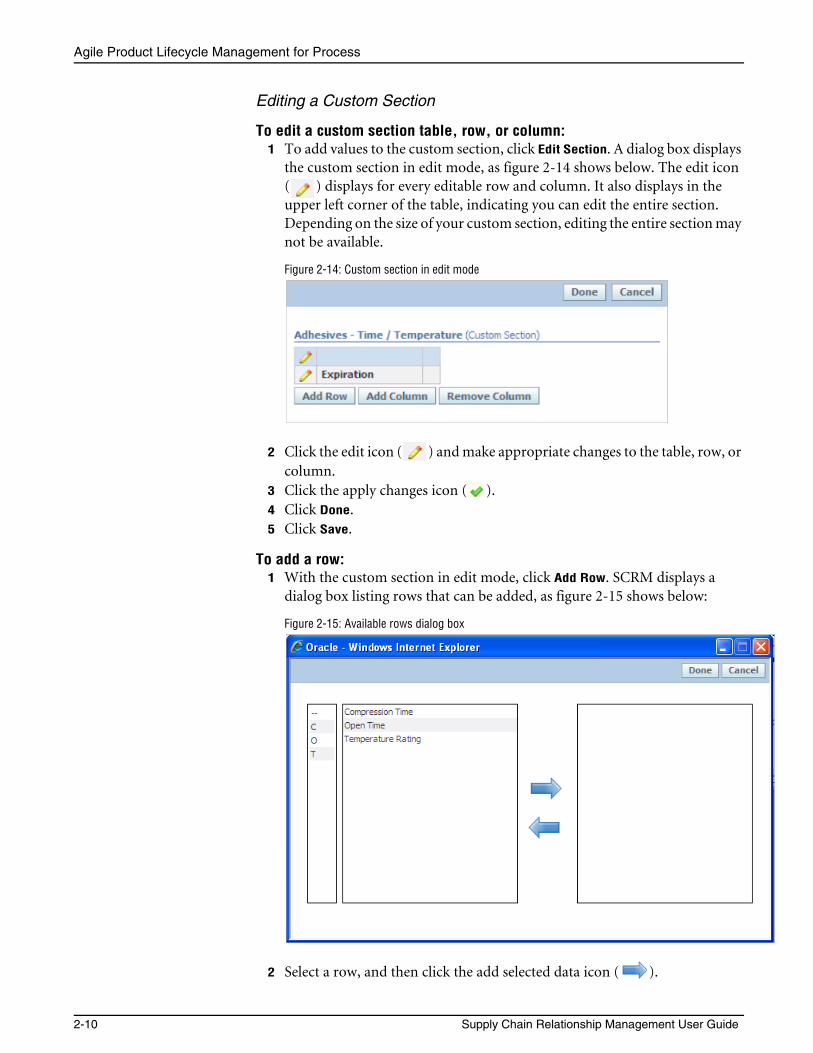
To edit a custom section table, row, or column:1 To add values to the custom section, click Edit Section. A dialog box displays
the custom section in edit mode, as figure 2-14 shows below. The edit icon ( ) displays for every editable row and column. It also displays in the upper left corner of the table, indicating you can edit the entire section. Depending on the size of your custom section, editing the entire section may not be available.
Figure 2-14: Custom section in edit mode
2 Click the edit icon ( ) and make appropriate changes to the table, row, or column.
3 Click the apply changes icon ( ). 4 Click Done. 5 Click Save.
To add a row:1 With the custom section in edit mode, click Add Row. SCRM displays a
dialog box listing rows that can be added, as figure 2-15 shows below:
Figure 2-15: Available rows dialog box
2 Select a row, and then click the add selected data icon ( ).
Chapter 2 Company and Facility Profiles
2-11
3 Repeat step 2 to add additional rows. 4 Click Done. SCRM closes the dialog box. The added rows display in the table. 5 Click Save.
To delete a row:1 With the custom section in edit mode, click the edit icon ( ) on the row
you want to delete. 2 Click the delete row icon ( ). The row is deleted from the table.3 Click Save.
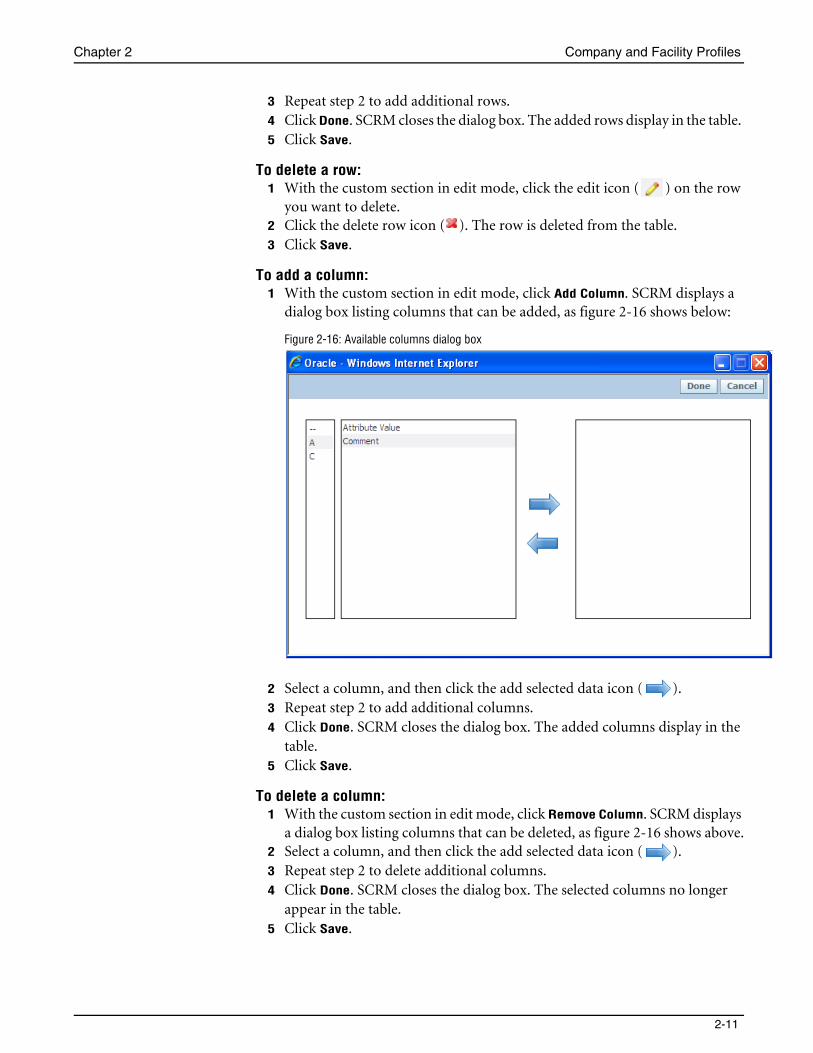
To add a column:1 With the custom section in edit mode, click Add Column. SCRM displays a
dialog box listing columns that can be added, as figure 2-16 shows below:
Figure 2-16: Available columns dialog box
2 Select a column, and then click the add selected data icon ( ). 3 Repeat step 2 to add additional columns.4 Click Done. SCRM closes the dialog box. The added columns display in the
table. 5 Click Save.
To delete a column:1 With the custom section in edit mode, click Remove Column. SCRM displays
a dialog box listing columns that can be deleted, as figure 2-16 shows above.2 Select a column, and then click the add selected data icon ( ). 3 Repeat step 2 to delete additional columns. 4 Click Done. SCRM closes the dialog box. The selected columns no longer
appear in the table. 5 Click Save.
Agile Product Lifecycle Management for Process
2-12 Supply Chain Relationship Management User Guide
Deleting a Custom Section
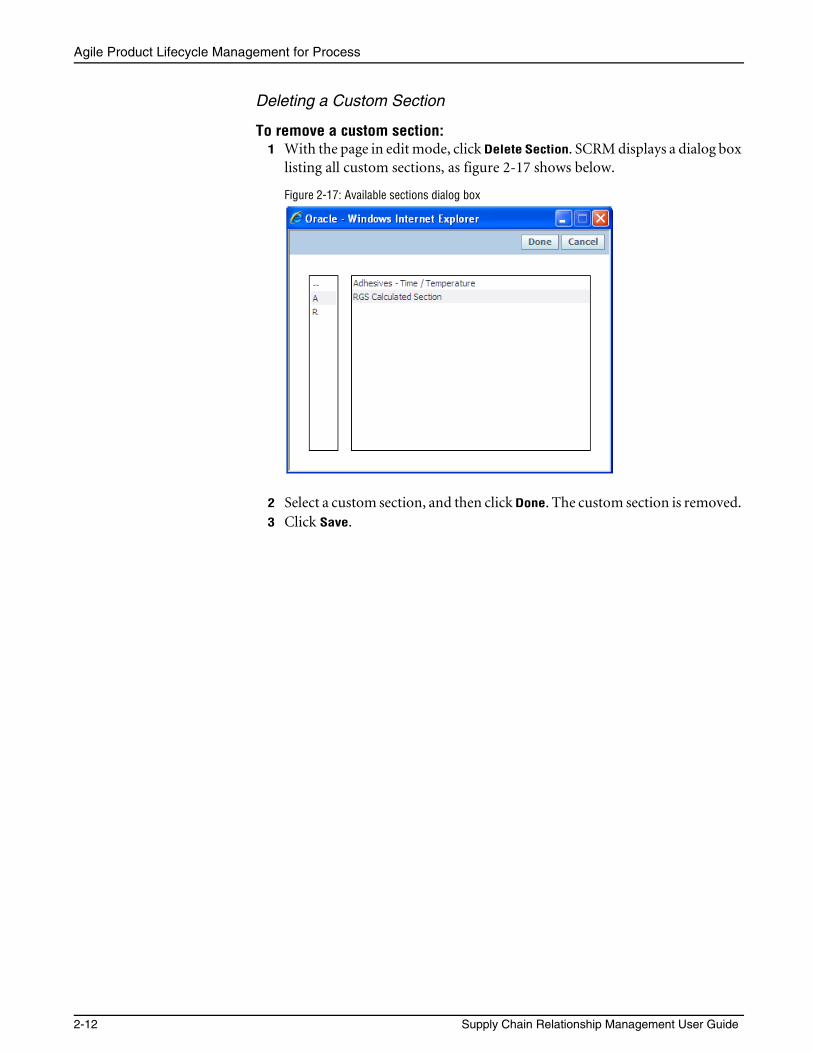
To remove a custom section:1 With the page in edit mode, click Delete Section. SCRM displays a dialog box
listing all custom sections, as figure 2-17 shows below.
Figure 2-17: Available sections dialog box
2 Select a custom section, and then click Done. The custom section is removed. 3 Click Save.
Chapter 2 Company and Facility Profiles
2-13
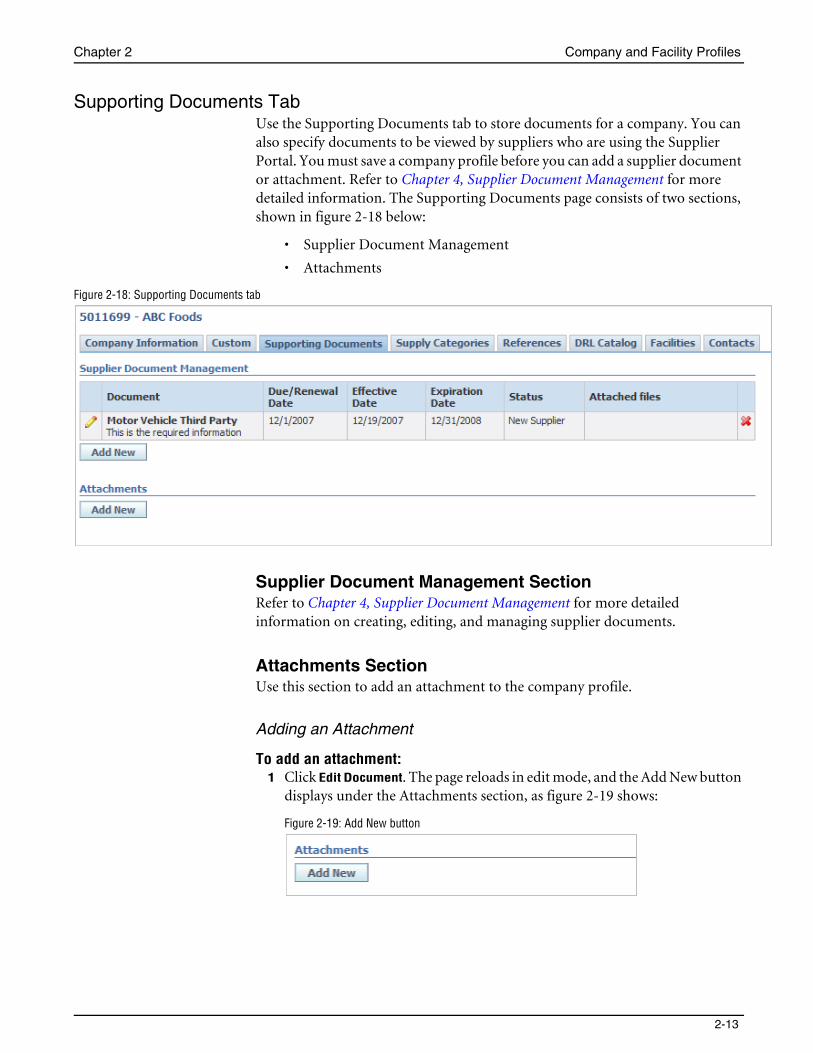
Supporting Documents TabUse the Supporting Documents tab to store documents for a company. You can also specify documents to be viewed by suppliers who are using the Supplier Portal. You must save a company profile before you can add a supplier document or attachment. Refer to Chapter 4, Supplier Document Management for more detailed information. The Supporting Documents page consists of two sections, shown in figure 2-18 below:
• Supplier Document Management
• Attachments
Figure 2-18: Supporting Documents tab
Supplier Document Management SectionRefer to Chapter 4, Supplier Document Management for more detailed information on creating, editing, and managing supplier documents.
Attachments SectionUse this section to add an attachment to the company profile.
Adding an Attachment
To add an attachment:1 Click Edit Document. The page reloads in edit mode, and the Add New button
displays under the Attachments section, as figure 2-19 shows:
Figure 2-19: Add New button
Agile Product Lifecycle Management for Process
2-14 Supply Chain Relationship Management User Guide
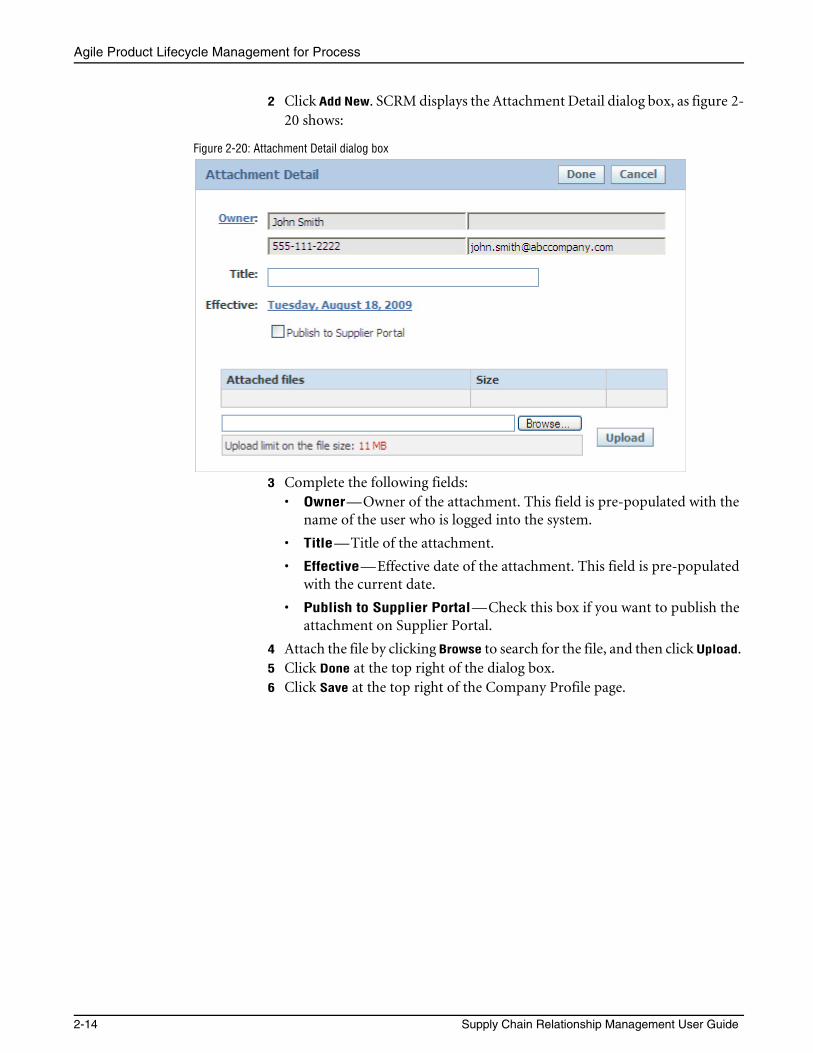
2 Click Add New. SCRM displays the Attachment Detail dialog box, as figure 2-20 shows:
Figure 2-20: Attachment Detail dialog box
3 Complete the following fields:• Owner—Owner of the attachment. This field is pre-populated with the
name of the user who is logged into the system.
• Title—Title of the attachment.
• Effective—Effective date of the attachment. This field is pre-populated with the current date.
• Publish to Supplier Portal—Check this box if you want to publish the attachment on Supplier Portal.
4 Attach the file by clicking Browse to search for the file, and then click Upload. 5 Click Done at the top right of the dialog box. 6 Click Save at the top right of the Company Profile page.
Chapter 2 Company and Facility Profiles
2-15
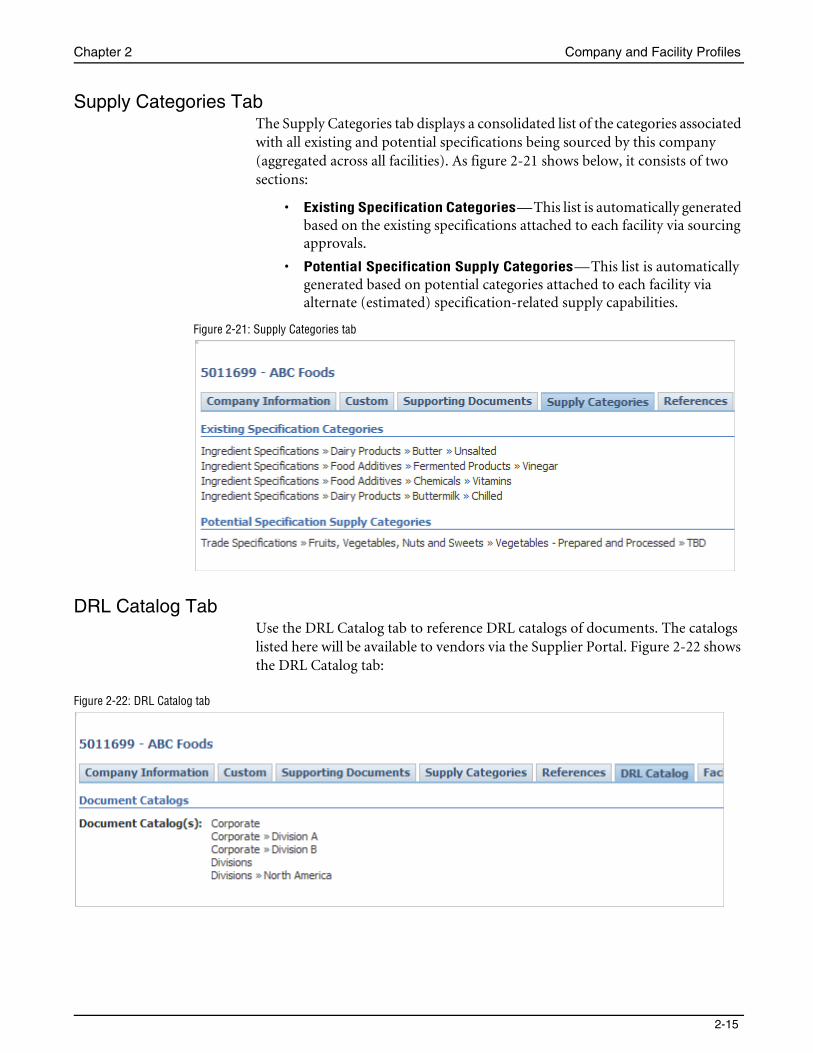
Supply Categories TabThe Supply Categories tab displays a consolidated list of the categories associated with all existing and potential specifications being sourced by this company (aggregated across all facilities). As figure 2-21 shows below, it consists of two sections:
• Existing Specification Categories—This list is automatically generated based on the existing specifications attached to each facility via sourcing approvals.
• Potential Specification Supply Categories—This list is automatically generated based on potential categories attached to each facility via alternate (estimated) specification-related supply capabilities.
Figure 2-21: Supply Categories tab
DRL Catalog TabUse the DRL Catalog tab to reference DRL catalogs of documents. The catalogs listed here will be available to vendors via the Supplier Portal. Figure 2-22 shows the DRL Catalog tab:
Figure 2-22: DRL Catalog tab

Agile Product Lifecycle Management for Process
2-16 Supply Chain Relationship Management User Guide
Facilities TabYou can add facilities owned by the company using the Facilities tab. When you add a facility for a company, the facility is tied to the company and considered a “child” of that company.
Note You must create a facility profile within an existing company profile. When you create a new company profile, you must save the profile before you can create the facility profile.
For detailed information on creating a facility profile, see Creating a Facility Profile on page 2-19.
The Facilities tab is shown in figure 2-23 below:
Figure 2-23: Facilities tab
Chapter 2 Company and Facility Profiles
2-17
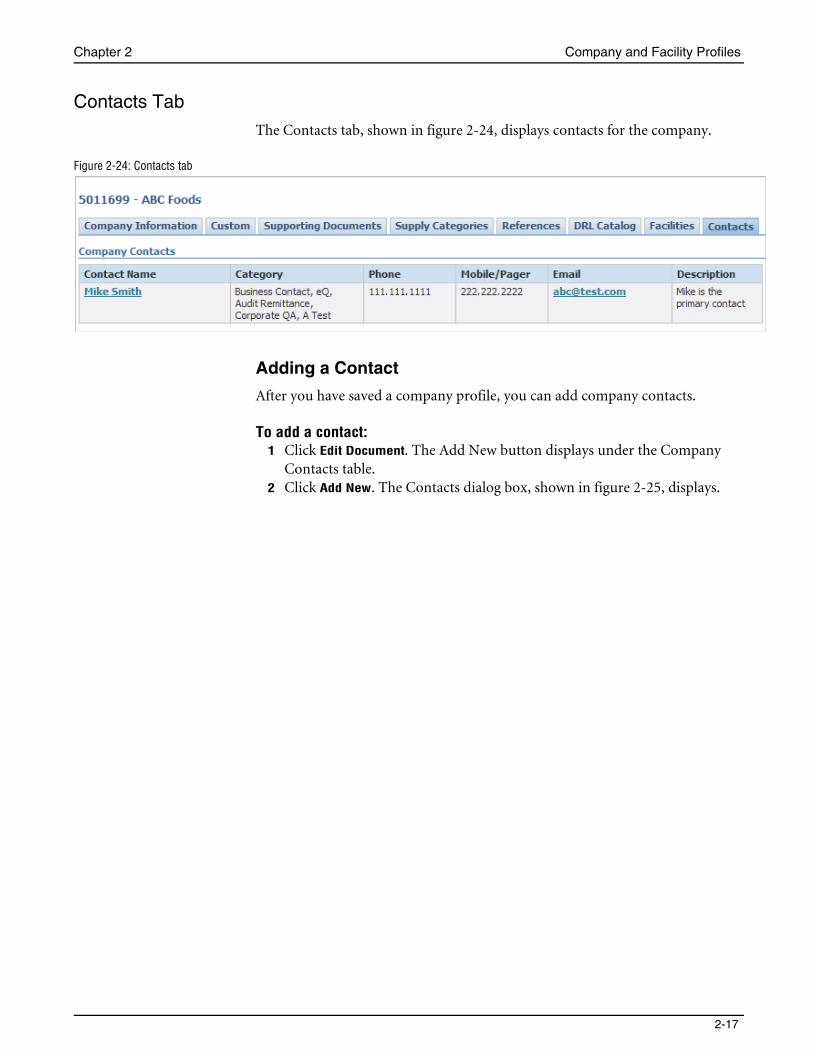
Contacts Tab
The Contacts tab, shown in figure 2-24, displays contacts for the company.
Figure 2-24: Contacts tab
Adding a Contact
After you have saved a company profile, you can add company contacts.
To add a contact:1 Click Edit Document. The Add New button displays under the Company
Contacts table. 2 Click Add New. The Contacts dialog box, shown in figure 2-25, displays.
Agile Product Lifecycle Management for Process
2-18 Supply Chain Relationship Management User Guide
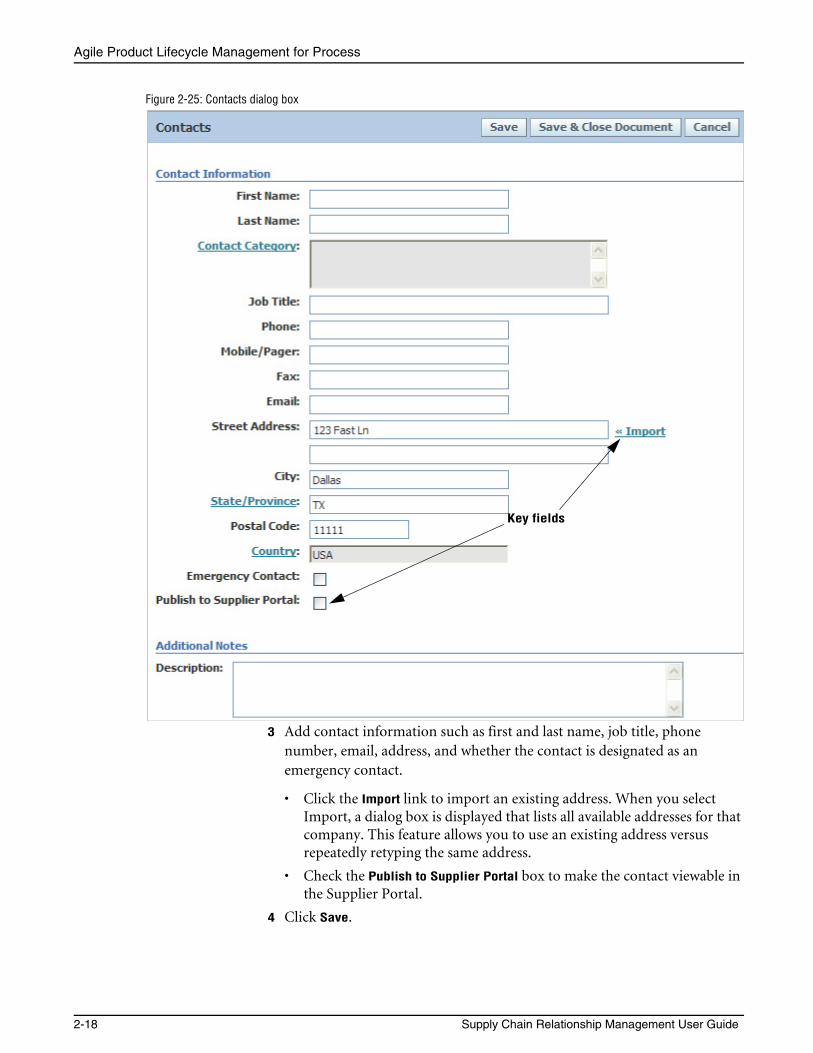
Figure 2-25: Contacts dialog box
3 Add contact information such as first and last name, job title, phone number, email, address, and whether the contact is designated as an emergency contact.
• Click the Import link to import an existing address. When you select Import, a dialog box is displayed that lists all available addresses for that company. This feature allows you to use an existing address versus repeatedly retyping the same address.
• Check the Publish to Supplier Portal box to make the contact viewable in the Supplier Portal.
4 Click Save.
Key fields
Chapter 2 Company and Facility Profiles
2-19
Saving the Company ProfileOnce you entered all data for the company profile, click Save & Close Document
at the top right of the page.
Creating a Facility ProfileA facility is a plant or manufacturing location. When you create a facility within a company profile, the facility becomes a “child” of the “parent” company. A company is a vendor, supplier, broker, distributor, or co-packer.
In addition to using the facilities feature to manage information about facilities, use it to create all sourcing approvals, which are tied to facilities. There are two types of sourcing approvals:
• Specification-related sourcing approvals
• Non-specification related sourcing approvals
Refer to Chapter 3, Sourcing Approvals for more information on sourcing approvals.
To create a facility profile, select the parent company using the search page. Select the Facilities tab and click Create Facility. The facility profile page consists of several tabs across the top of the page:
• Facility Information
• Custom
• Supporting Documents
• Sourcing Approval
• Contacts
• Audit Trail
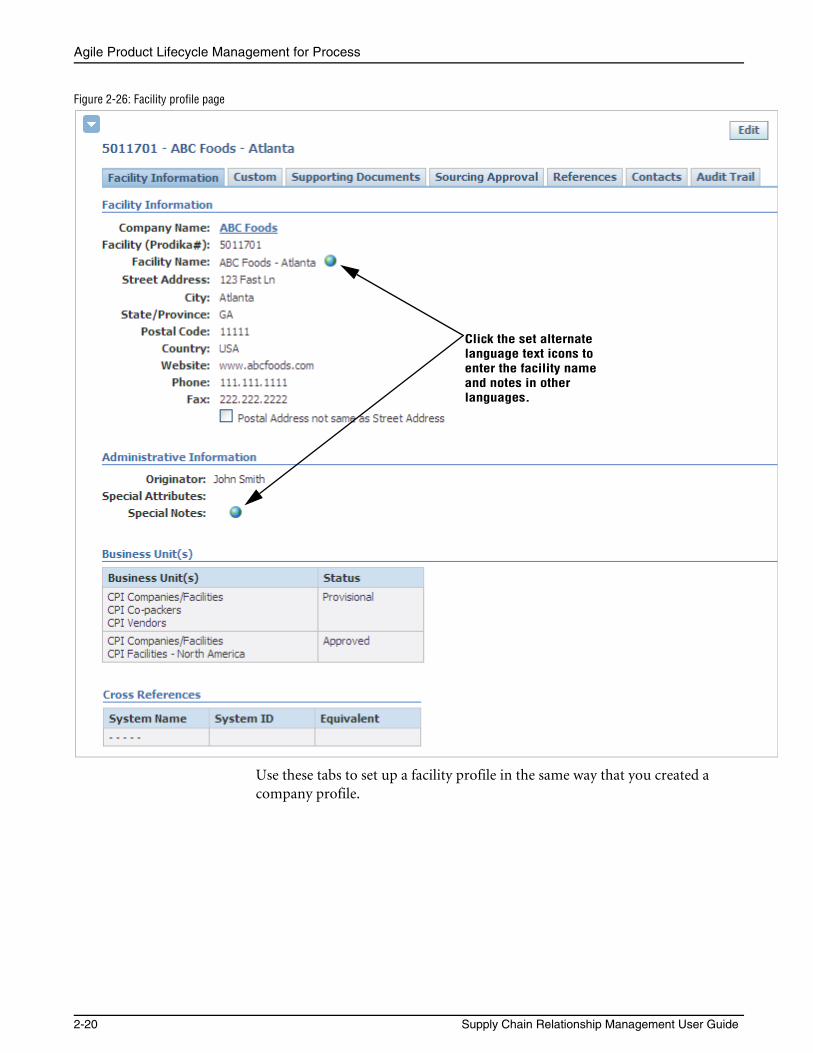
Figure 2-26 below shows the facility profile page.
Agile Product Lifecycle Management for Process
2-20 Supply Chain Relationship Management User Guide
Figure 2-26: Facility profile page
Use these tabs to set up a facility profile in the same way that you created a company profile.
Click the set alternate language text icons to enter the facility name and notes in other languages.
Chapter 2 Company and Facility Profiles
2-21
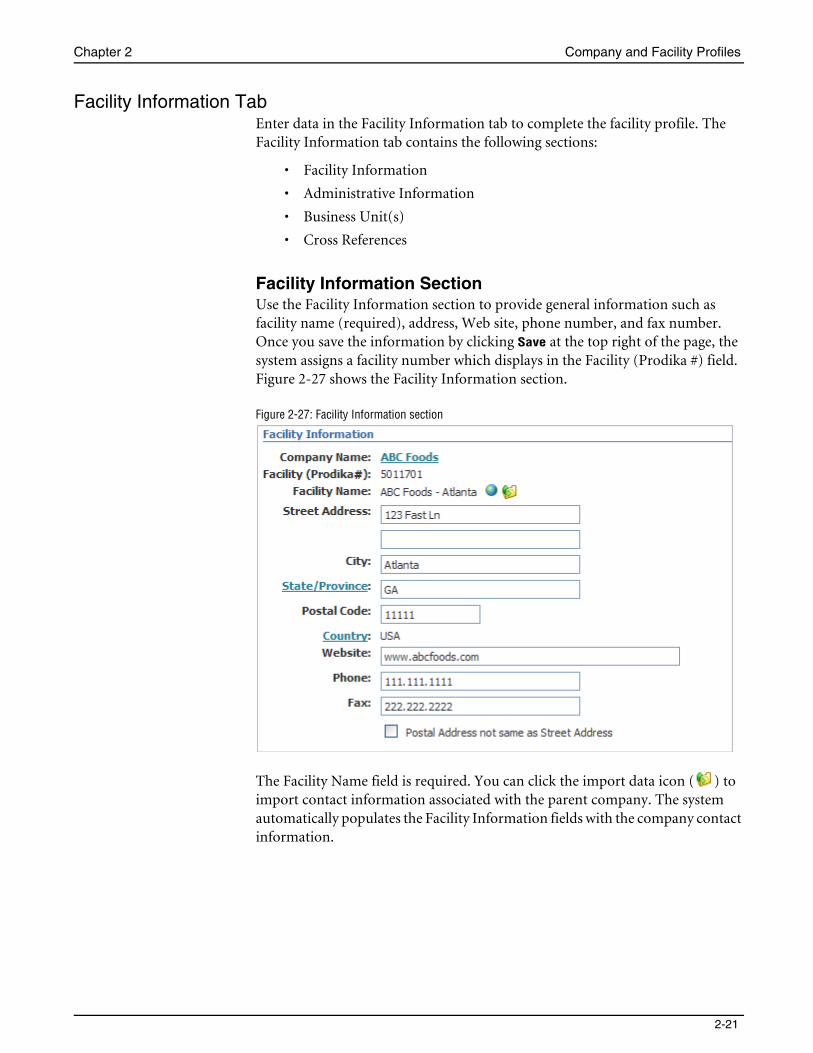
Facility Information TabEnter data in the Facility Information tab to complete the facility profile. The Facility Information tab contains the following sections:
• Facility Information
• Administrative Information
• Business Unit(s)
• Cross References
Facility Information SectionUse the Facility Information section to provide general information such as facility name (required), address, Web site, phone number, and fax number. Once you save the information by clicking Save at the top right of the page, the system assigns a facility number which displays in the Facility (Prodika #) field. Figure 2-27 shows the Facility Information section.
Figure 2-27: Facility Information section
The Facility Name field is required. You can click the import data icon ( ) to import contact information associated with the parent company. The system automatically populates the Facility Information fields with the company contact information.
Agile Product Lifecycle Management for Process
2-22 Supply Chain Relationship Management User Guide
Note The facility’s parent name automatically displays in the Company Name field. This field contains a link to the Company Profile page. You can reassign the facility to a new company using the Company Name field if you are assigned the [SCRM_FACILITY_RELOCATER] role. For more information, refer to Assigning a Facility to a Different Company on page 2-30.
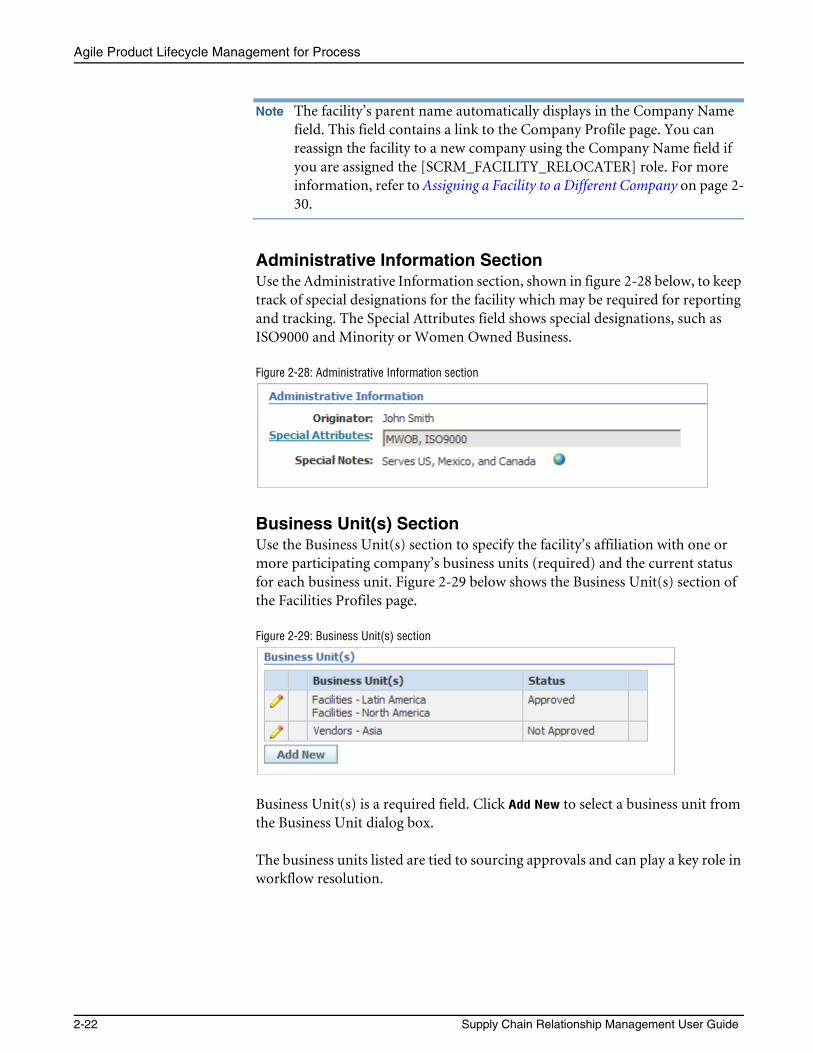
Administrative Information SectionUse the Administrative Information section, shown in figure 2-28 below, to keep track of special designations for the facility which may be required for reporting and tracking. The Special Attributes field shows special designations, such as ISO9000 and Minority or Women Owned Business.
Figure 2-28: Administrative Information section
Business Unit(s) SectionUse the Business Unit(s) section to specify the facility’s affiliation with one or more participating company’s business units (required) and the current status for each business unit. Figure 2-29 below shows the Business Unit(s) section of the Facilities Profiles page.
Figure 2-29: Business Unit(s) section
Business Unit(s) is a required field. Click Add New to select a business unit from the Business Unit dialog box.
The business units listed are tied to sourcing approvals and can play a key role in workflow resolution.
Chapter 2 Company and Facility Profiles
2-23
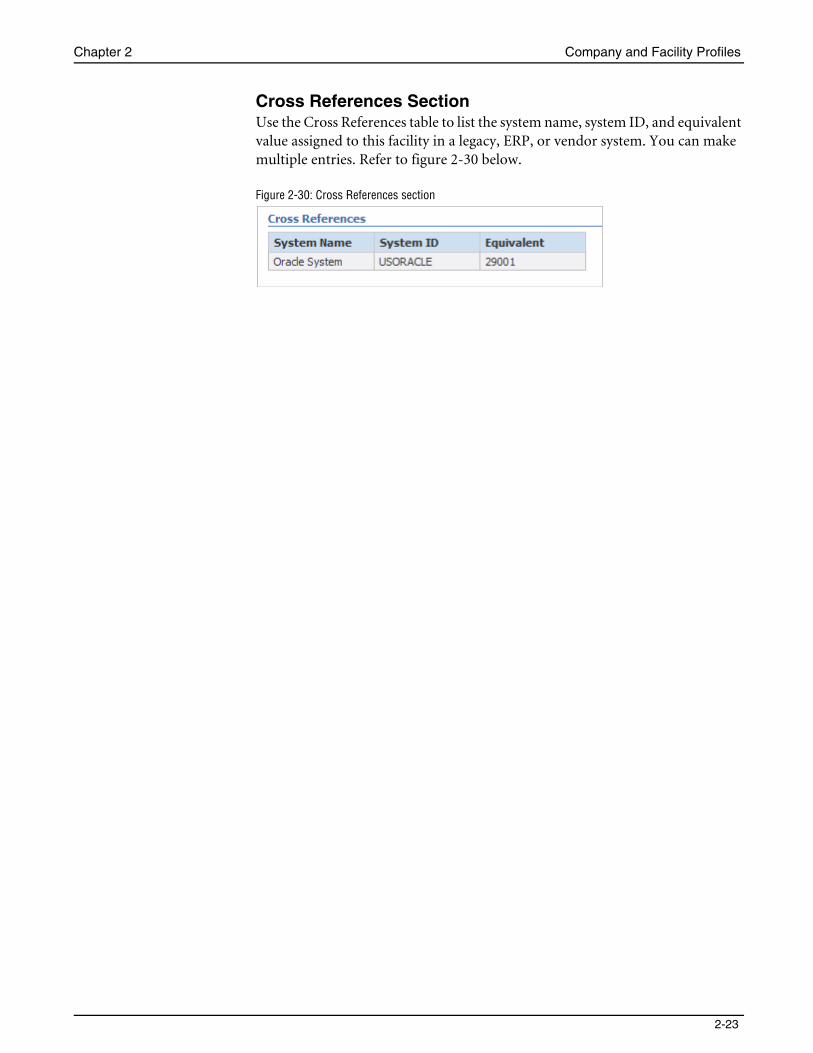
Cross References SectionUse the Cross References table to list the system name, system ID, and equivalent value assigned to this facility in a legacy, ERP, or vendor system. You can make multiple entries. Refer to figure 2-30 below.
Figure 2-30: Cross References section
Agile Product Lifecycle Management for Process
2-24 Supply Chain Relationship Management User Guide
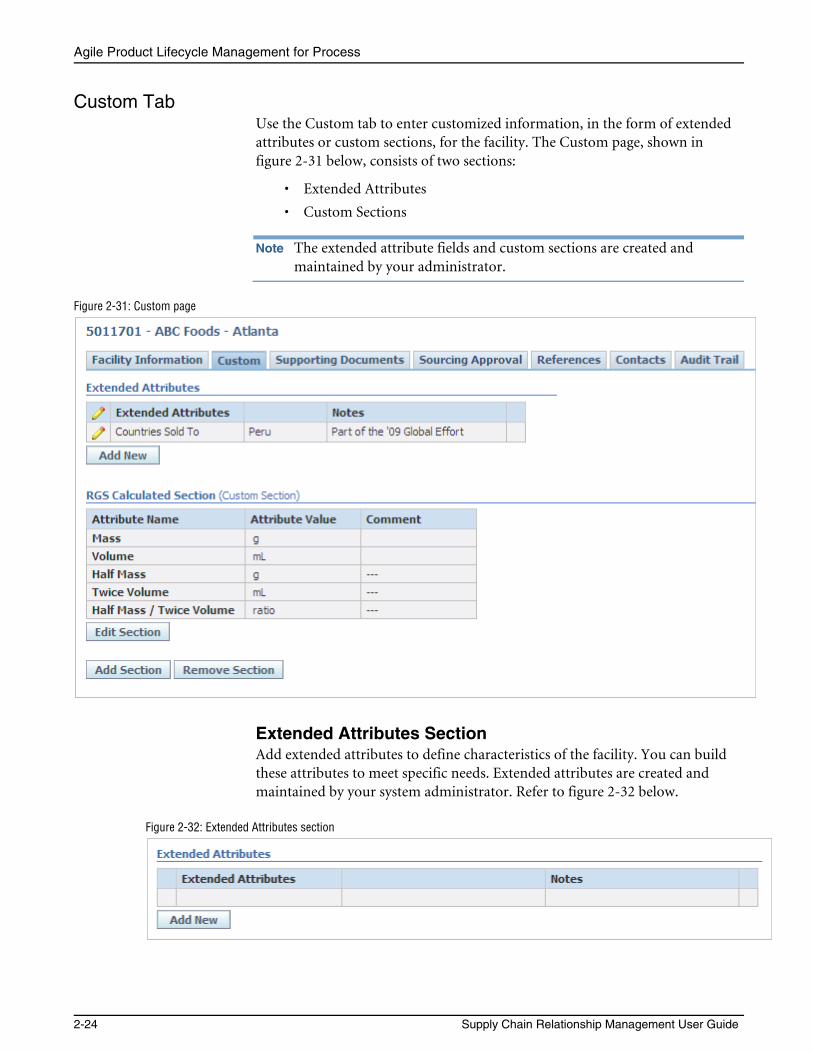
Custom TabUse the Custom tab to enter customized information, in the form of extended attributes or custom sections, for the facility. The Custom page, shown in figure 2-31 below, consists of two sections:
• Extended Attributes
• Custom Sections
Note The extended attribute fields and custom sections are created and maintained by your administrator.
Figure 2-31: Custom page
Extended Attributes SectionAdd extended attributes to define characteristics of the facility. You can build these attributes to meet specific needs. Extended attributes are created and maintained by your system administrator. Refer to figure 2-32 below.
Figure 2-32: Extended Attributes section
Chapter 2 Company and Facility Profiles
2-25
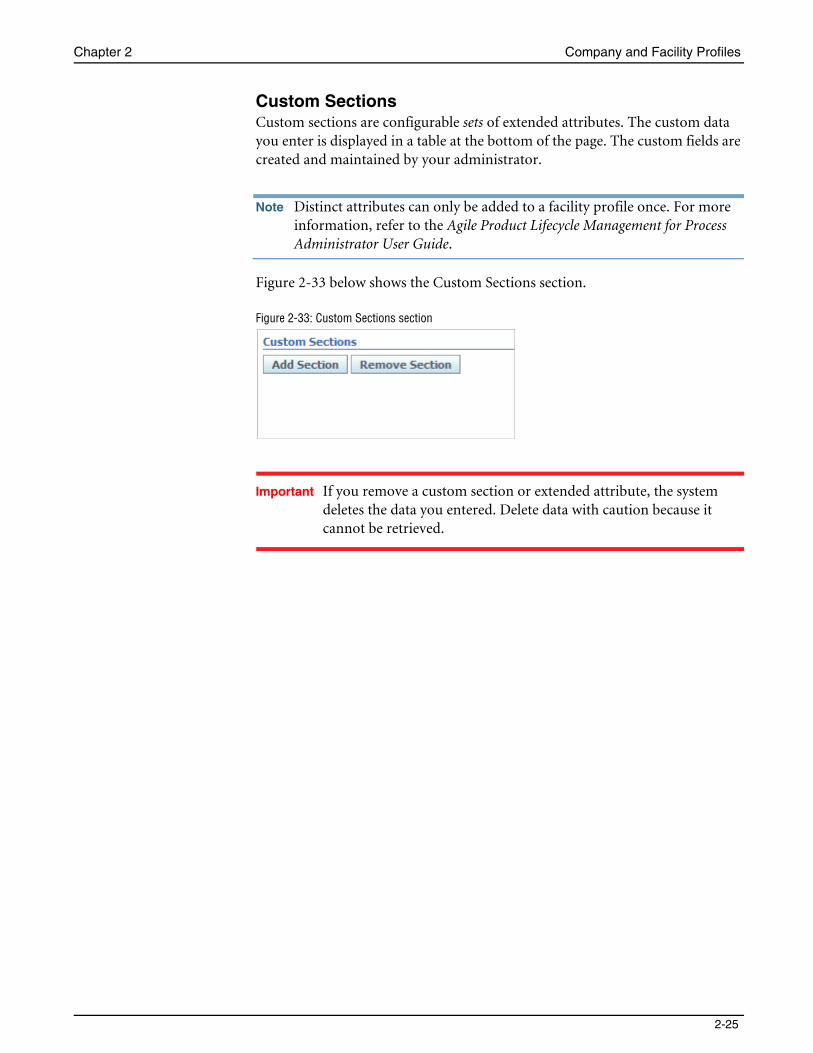
Custom SectionsCustom sections are configurable sets of extended attributes. The custom data you enter is displayed in a table at the bottom of the page. The custom fields are created and maintained by your administrator.
Note Distinct attributes can only be added to a facility profile once. For more information, refer to the Agile Product Lifecycle Management for Process Administrator User Guide.
Figure 2-33 below shows the Custom Sections section.
Figure 2-33: Custom Sections section
Important If you remove a custom section or extended attribute, the system deletes the data you entered. Delete data with caution because it cannot be retrieved.
Agile Product Lifecycle Management for Process
2-26 Supply Chain Relationship Management User Guide
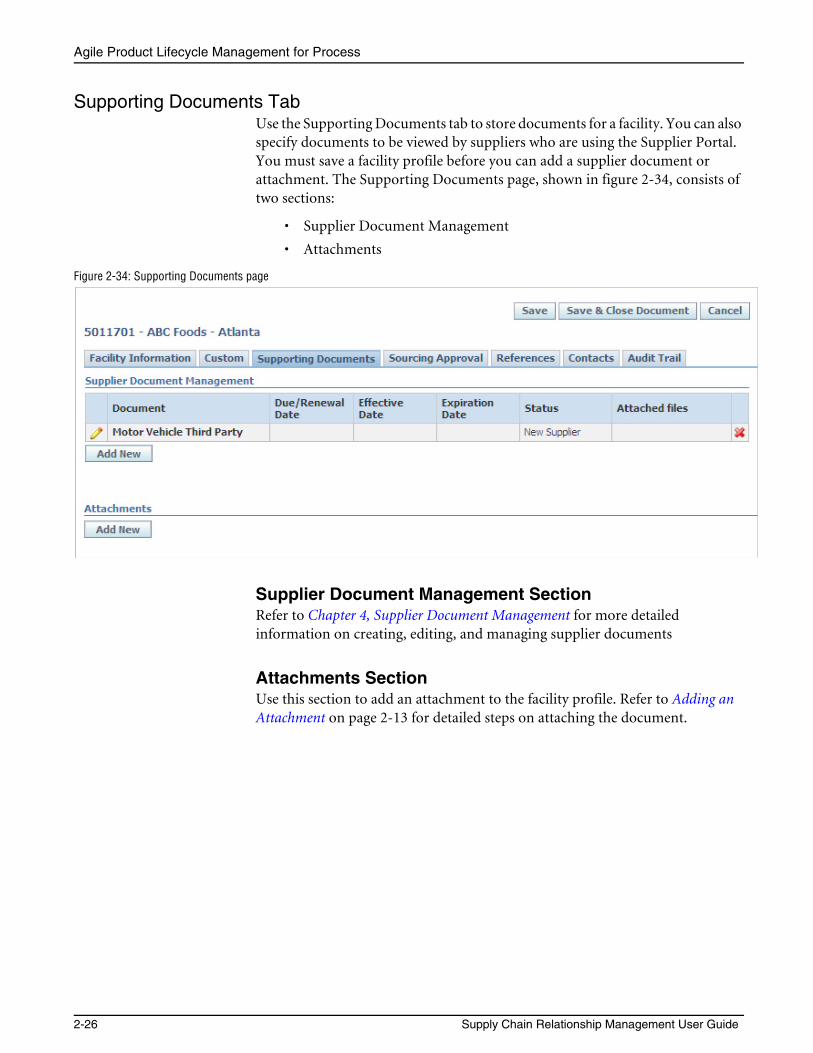
Supporting Documents TabUse the Supporting Documents tab to store documents for a facility. You can also specify documents to be viewed by suppliers who are using the Supplier Portal. You must save a facility profile before you can add a supplier document or attachment. The Supporting Documents page, shown in figure 2-34, consists of two sections:
• Supplier Document Management
• Attachments
Figure 2-34: Supporting Documents page
Supplier Document Management SectionRefer to Chapter 4, Supplier Document Management for more detailed information on creating, editing, and managing supplier documents
Attachments SectionUse this section to add an attachment to the facility profile. Refer to Adding an Attachment on page 2-13 for detailed steps on attaching the document.
Chapter 2 Company and Facility Profiles
2-27
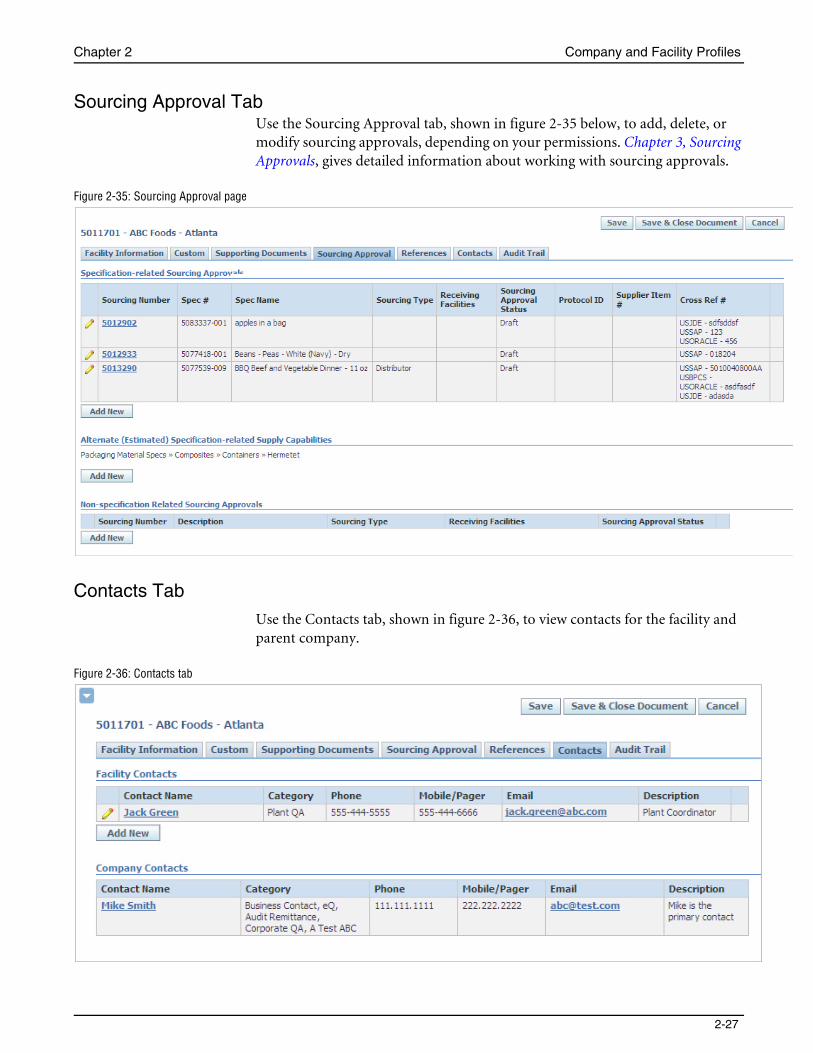
Sourcing Approval TabUse the Sourcing Approval tab, shown in figure 2-35 below, to add, delete, or modify sourcing approvals, depending on your permissions. Chapter 3, Sourcing Approvals, gives detailed information about working with sourcing approvals.
Figure 2-35: Sourcing Approval page
Contacts Tab
Use the Contacts tab, shown in figure 2-36, to view contacts for the facility and parent company.
Figure 2-36: Contacts tab
Agile Product Lifecycle Management for Process
2-28 Supply Chain Relationship Management User Guide
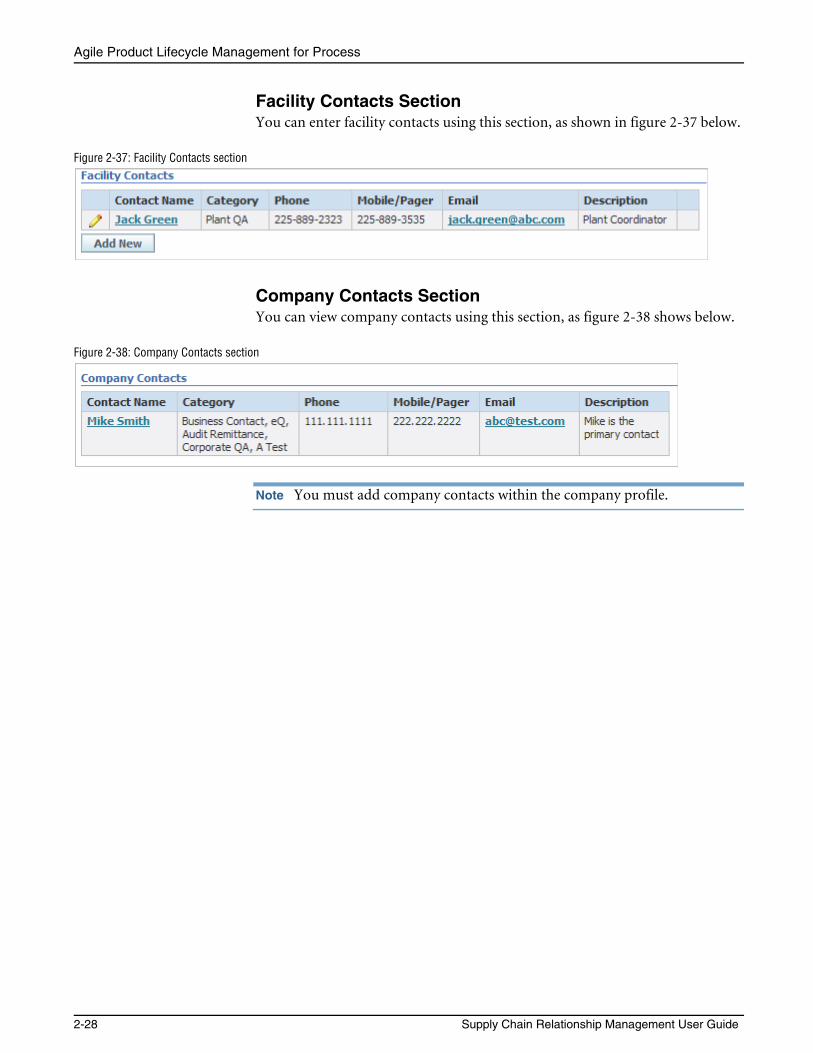
Facility Contacts SectionYou can enter facility contacts using this section, as shown in figure 2-37 below.
Figure 2-37: Facility Contacts section
Company Contacts SectionYou can view company contacts using this section, as figure 2-38 shows below.
Figure 2-38: Company Contacts section
Note You must add company contacts within the company profile.
Chapter 2 Company and Facility Profiles
2-29
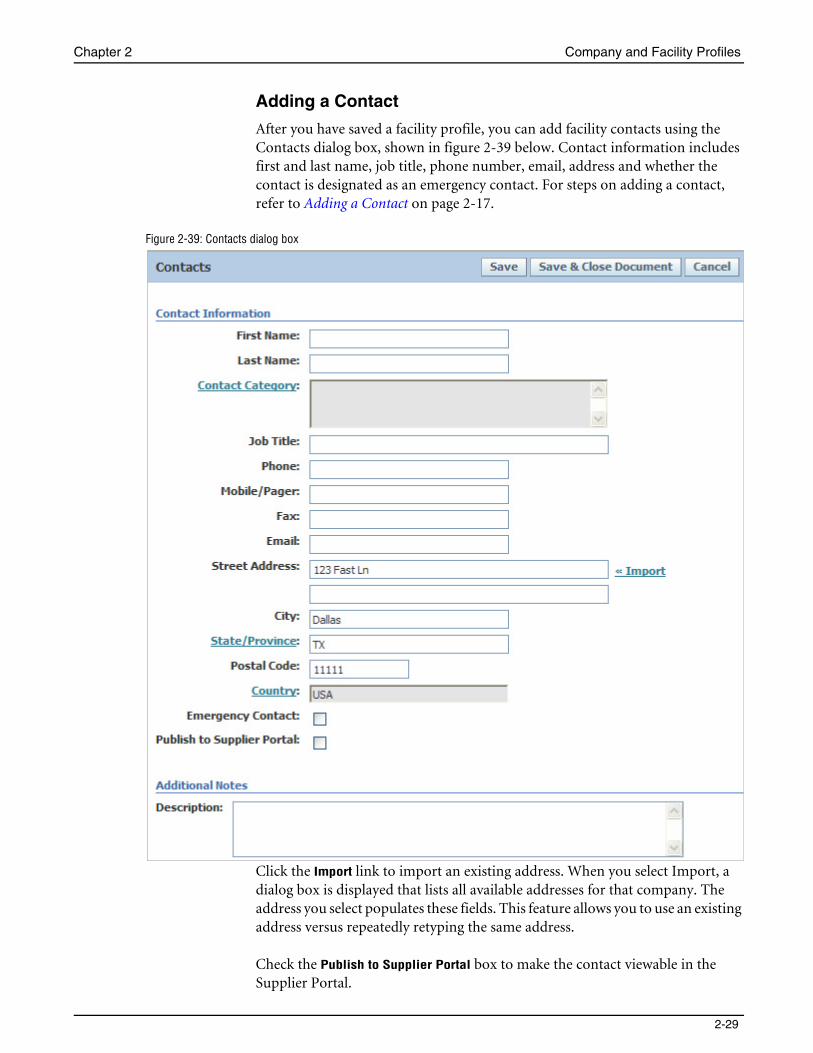
Adding a Contact
After you have saved a facility profile, you can add facility contacts using the Contacts dialog box, shown in figure 2-39 below. Contact information includes first and last name, job title, phone number, email, address and whether the contact is designated as an emergency contact. For steps on adding a contact, refer to Adding a Contact on page 2-17.
Figure 2-39: Contacts dialog box
Click the Import link to import an existing address. When you select Import, a dialog box is displayed that lists all available addresses for that company. The address you select populates these fields. This feature allows you to use an existing address versus repeatedly retyping the same address.
Check the Publish to Supplier Portal box to make the contact viewable in the Supplier Portal.
Agile Product Lifecycle Management for Process
2-30 Supply Chain Relationship Management User Guide
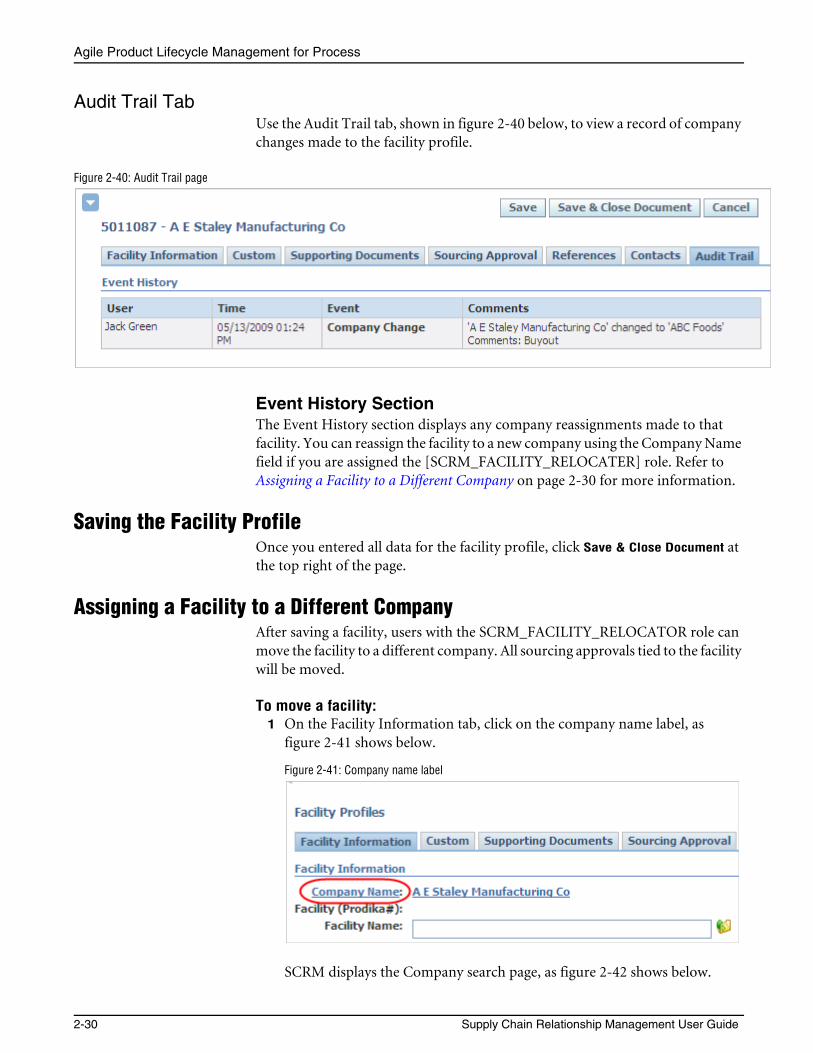
Audit Trail TabUse the Audit Trail tab, shown in figure 2-40 below, to view a record of company changes made to the facility profile.
Figure 2-40: Audit Trail page
Event History SectionThe Event History section displays any company reassignments made to that facility. You can reassign the facility to a new company using the Company Name field if you are assigned the [SCRM_FACILITY_RELOCATER] role. Refer to Assigning a Facility to a Different Company on page 2-30 for more information.
Saving the Facility ProfileOnce you entered all data for the facility profile, click Save & Close Document at the top right of the page.
Assigning a Facility to a Different CompanyAfter saving a facility, users with the SCRM_FACILITY_RELOCATOR role can move the facility to a different company. All sourcing approvals tied to the facility will be moved.
To move a facility:1 On the Facility Information tab, click on the company name label, as
figure 2-41 shows below.
Figure 2-41: Company name label
SCRM displays the Company search page, as figure 2-42 shows below.
Chapter 2 Company and Facility Profiles
2-31
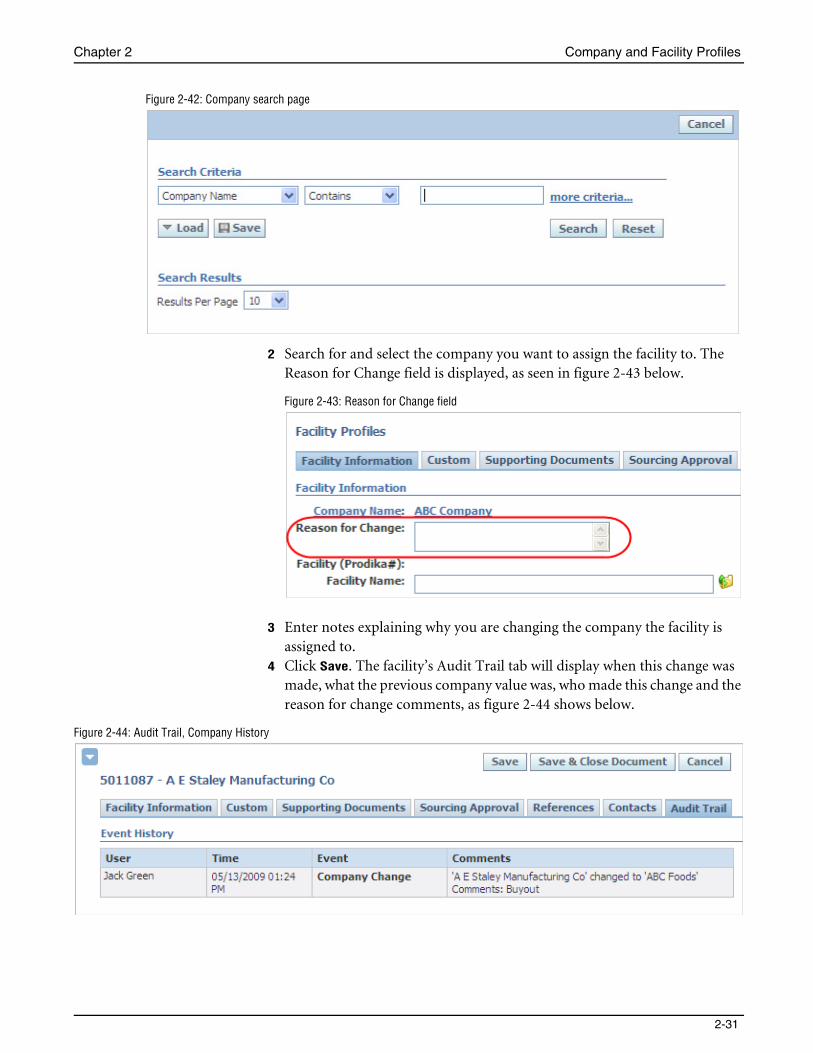
Figure 2-42: Company search page
2 Search for and select the company you want to assign the facility to. The Reason for Change field is displayed, as seen in figure 2-43 below.
Figure 2-43: Reason for Change field
3 Enter notes explaining why you are changing the company the facility is assigned to.
4 Click Save. The facility’s Audit Trail tab will display when this change was made, what the previous company value was, who made this change and the reason for change comments, as figure 2-44 shows below.
Figure 2-44: Audit Trail, Company History

Agile Product Lifecycle Management for Process
2-32 Supply Chain Relationship Management User Guide
3-1
CHAPTER 3
Sourcing ApprovalsThis chapter describes the types of sourcing approvals and discusses the steps involved in creating sourcing approvals. The topics covered include:❑ Accessing Sourcing Approvals❑ Creating a Specification-Related Sourcing Approval❑ Creating an Alternate (Estimated) Specification-Related Supply Capability❑ Creating a Non-Specification Related Sourcing Approval❑ Workflows and Sourcing Approvals
OverviewA sourcing approval is a document that defines what will be supplied, who will supply it, and to whom it will be supplied. It describes the approval status among all facilities throughout the extended supply chain.
Note You can only create a sourcing approval from a facility profile.
Agile Product Lifecycle Management for Process
3-2 Supply Chain Relationship Management User Guide
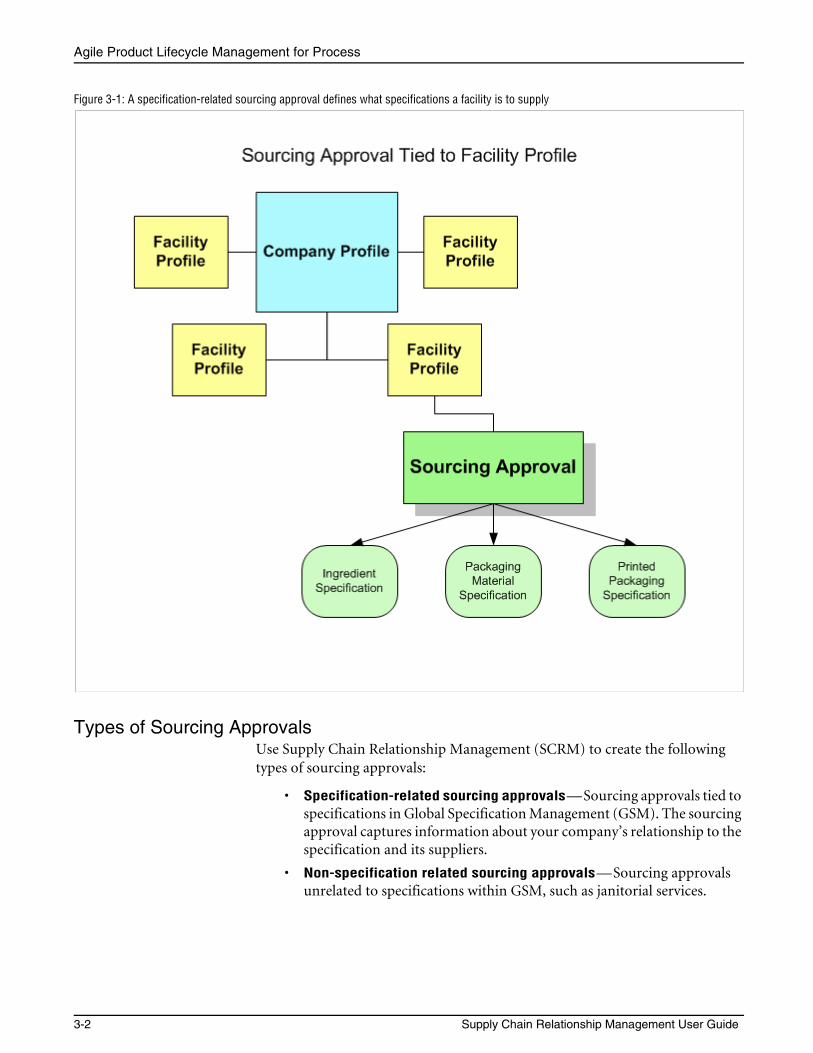
Figure 3-1: A specification-related sourcing approval defines what specifications a facility is to supply
Types of Sourcing ApprovalsUse Supply Chain Relationship Management (SCRM) to create the following types of sourcing approvals:
• Specification-related sourcing approvals—Sourcing approvals tied to specifications in Global Specification Management (GSM). The sourcing approval captures information about your company’s relationship to the specification and its suppliers.
• Non-specification related sourcing approvals—Sourcing approvals unrelated to specifications within GSM, such as janitorial services.
Chapter 3 Sourcing Approvals
3-3
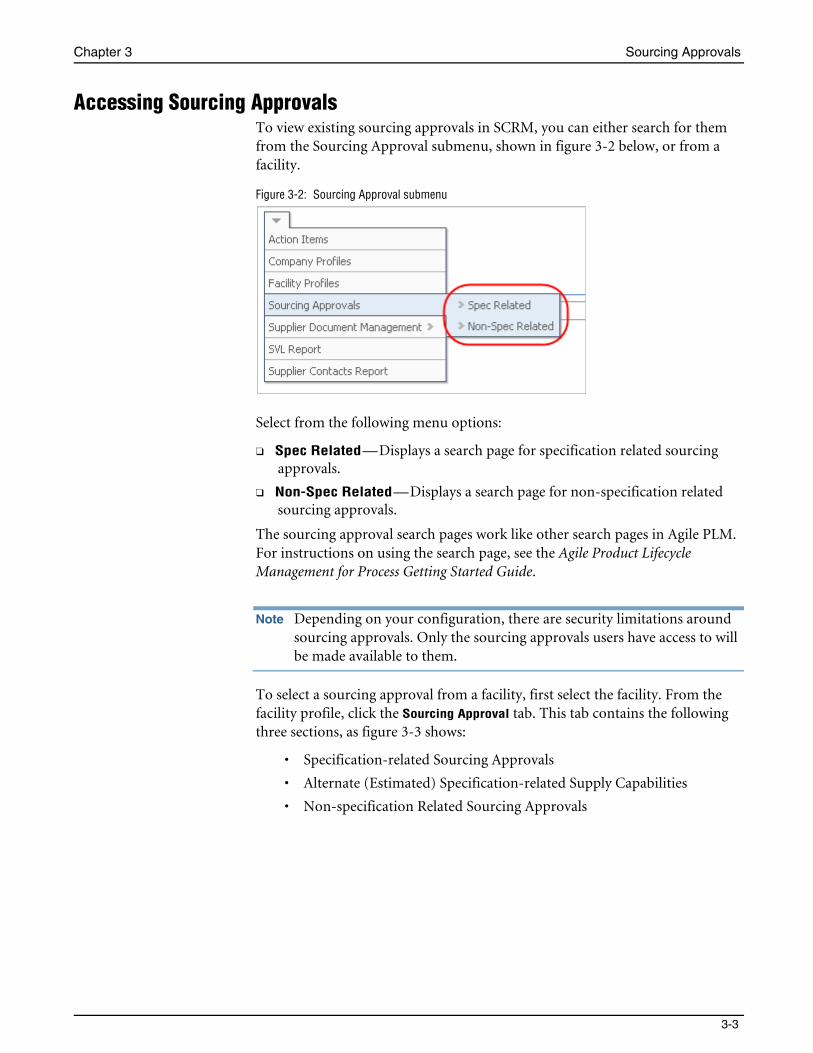
Accessing Sourcing ApprovalsTo view existing sourcing approvals in SCRM, you can either search for them from the Sourcing Approval submenu, shown in figure 3-2 below, or from a facility.
Figure 3-2: Sourcing Approval submenu
Select from the following menu options:
❑ Spec Related—Displays a search page for specification related sourcing approvals.
❑ Non-Spec Related—Displays a search page for non-specification related sourcing approvals.
The sourcing approval search pages work like other search pages in Agile PLM. For instructions on using the search page, see the Agile Product Lifecycle Management for Process Getting Started Guide.
Note Depending on your configuration, there are security limitations around sourcing approvals. Only the sourcing approvals users have access to will be made available to them.
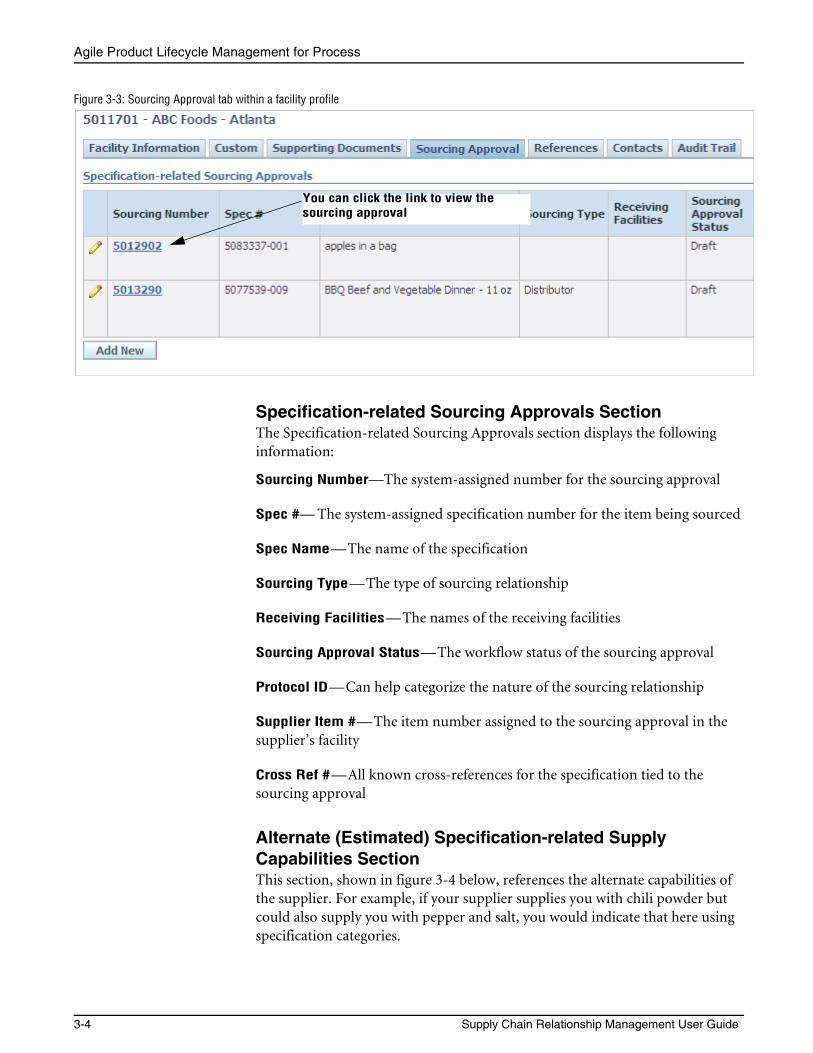
To select a sourcing approval from a facility, first select the facility. From the facility profile, click the Sourcing Approval tab. This tab contains the following three sections, as figure 3-3 shows:
• Specification-related Sourcing Approvals
• Alternate (Estimated) Specification-related Supply Capabilities
• Non-specification Related Sourcing Approvals
Agile Product Lifecycle Management for Process
3-4 Supply Chain Relationship Management User Guide
Figure 3-3: Sourcing Approval tab within a facility profile
Specification-related Sourcing Approvals SectionThe Specification-related Sourcing Approvals section displays the following information:
Sourcing Number—The system-assigned number for the sourcing approval
Spec #— The system-assigned specification number for the item being sourced
Spec Name—The name of the specification
Sourcing Type—The type of sourcing relationship
Receiving Facilities—The names of the receiving facilities
Sourcing Approval Status—The workflow status of the sourcing approval
Protocol ID—Can help categorize the nature of the sourcing relationship
Supplier Item #—The item number assigned to the sourcing approval in the supplier’s facility
Cross Ref #—All known cross-references for the specification tied to the sourcing approval
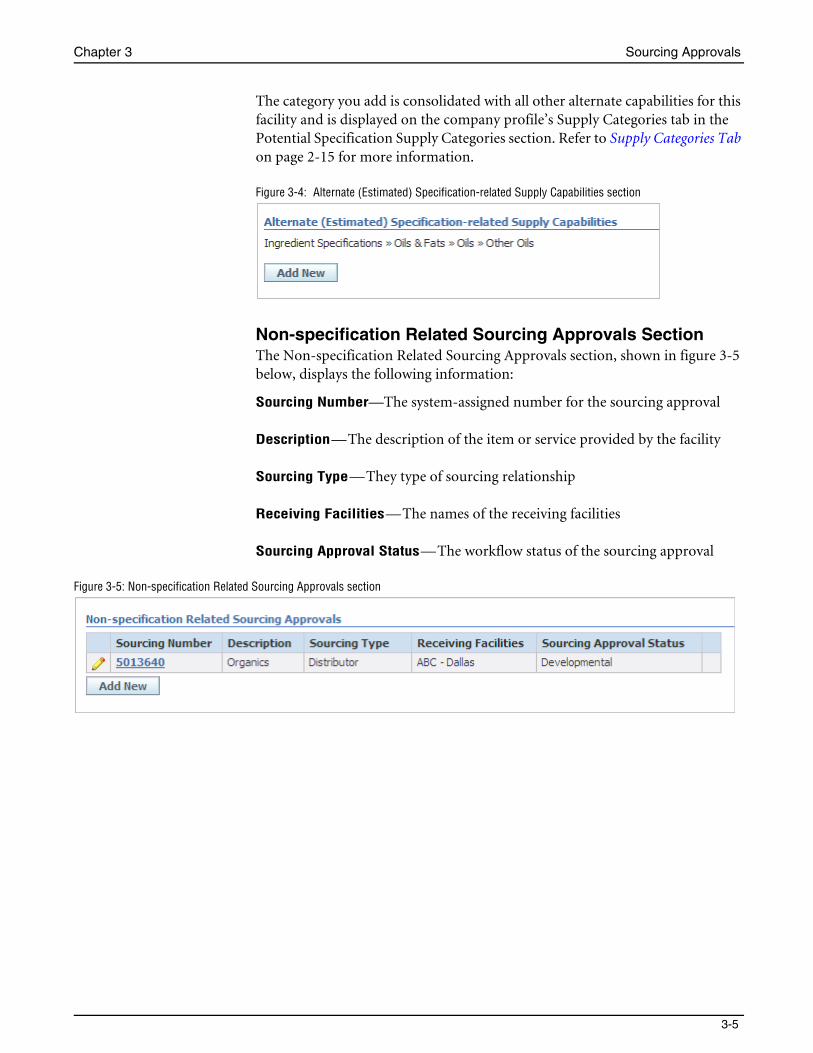
Alternate (Estimated) Specification-related Supply Capabilities SectionThis section, shown in figure 3-4 below, references the alternate capabilities of the supplier. For example, if your supplier supplies you with chili powder but could also supply you with pepper and salt, you would indicate that here using specification categories.
You can click the link to view the sourcing approval
Chapter 3 Sourcing Approvals
3-5
The category you add is consolidated with all other alternate capabilities for this facility and is displayed on the company profile’s Supply Categories tab in the Potential Specification Supply Categories section. Refer to Supply Categories Tab on page 2-15 for more information.
Figure 3-4: Alternate (Estimated) Specification-related Supply Capabilities section
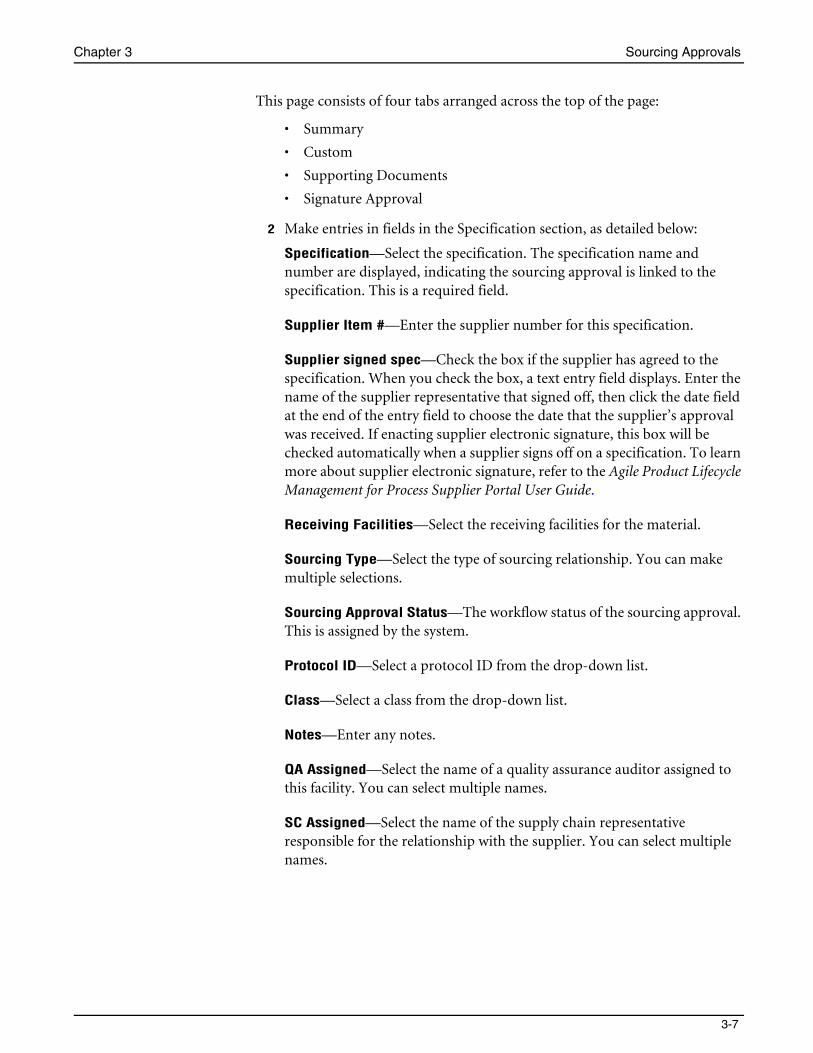
Non-specification Related Sourcing Approvals SectionThe Non-specification Related Sourcing Approvals section, shown in figure 3-5 below, displays the following information:
Sourcing Number—The system-assigned number for the sourcing approval
Description—The description of the item or service provided by the facility
Sourcing Type—They type of sourcing relationship
Receiving Facilities—The names of the receiving facilities
Sourcing Approval Status—The workflow status of the sourcing approval
Figure 3-5: Non-specification Related Sourcing Approvals section

Agile Product Lifecycle Management for Process
3-6 Supply Chain Relationship Management User Guide
Creating a Specification-Related Sourcing ApprovalTo add a specification-related sourcing approval:
1 Click Add New from the Sourcing Approval tab in a facility profile. Supply Chain Relationship Management displays the Specification-Related Sourcing Approval page, as shown in figure 3-6 below.
Figure 3-6: Specification-Related Sourcing Approval page
Chapter 3 Sourcing Approvals
3-7
This page consists of four tabs arranged across the top of the page:
• Summary
• Custom
• Supporting Documents
• Signature Approval
2 Make entries in fields in the Specification section, as detailed below:
Specification—Select the specification. The specification name and number are displayed, indicating the sourcing approval is linked to the specification. This is a required field.
Supplier Item #—Enter the supplier number for this specification.
Supplier signed spec—Check the box if the supplier has agreed to the specification. When you check the box, a text entry field displays. Enter the name of the supplier representative that signed off, then click the date field at the end of the entry field to choose the date that the supplier’s approval was received. If enacting supplier electronic signature, this box will be checked automatically when a supplier signs off on a specification. To learn more about supplier electronic signature, refer to the Agile Product Lifecycle Management for Process Supplier Portal User Guide.
Receiving Facilities—Select the receiving facilities for the material.
Sourcing Type—Select the type of sourcing relationship. You can make multiple selections.
Sourcing Approval Status—The workflow status of the sourcing approval. This is assigned by the system.
Protocol ID—Select a protocol ID from the drop-down list.
Class—Select a class from the drop-down list.
Notes—Enter any notes.
QA Assigned—Select the name of a quality assurance auditor assigned to this facility. You can select multiple names.
SC Assigned—Select the name of the supply chain representative responsible for the relationship with the supplier. You can select multiple names.
Agile Product Lifecycle Management for Process
3-8 Supply Chain Relationship Management User Guide
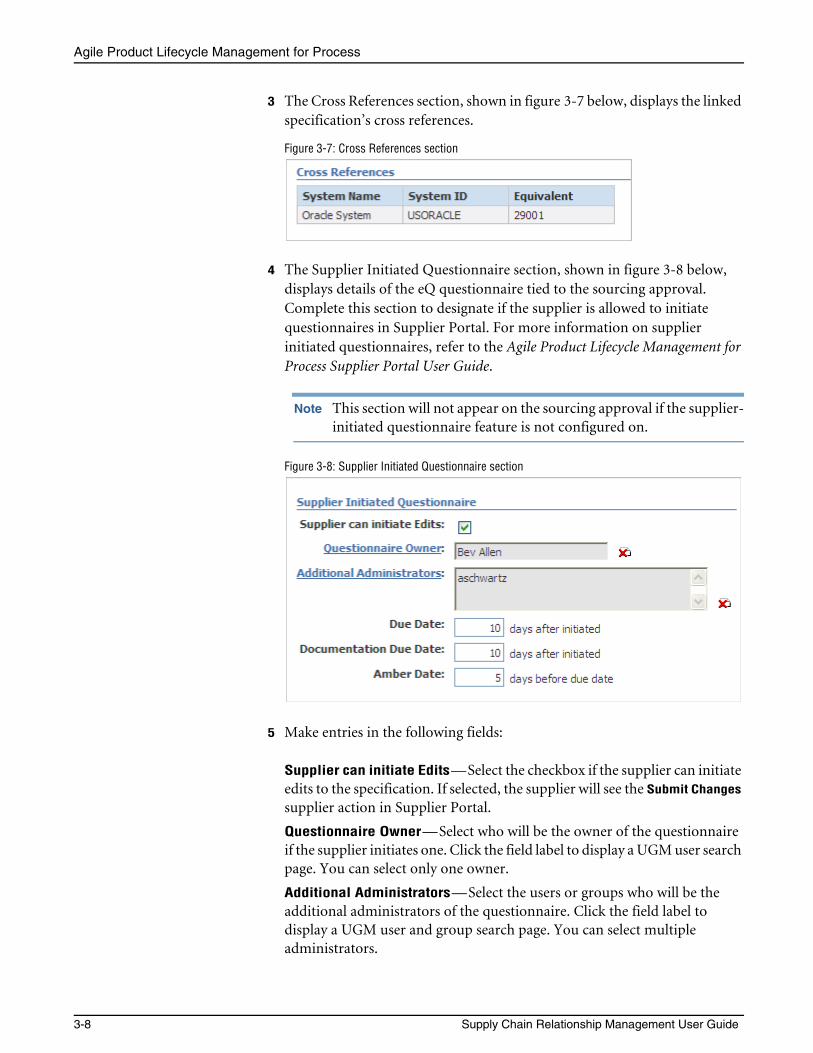
3 The Cross References section, shown in figure 3-7 below, displays the linked specification’s cross references.
Figure 3-7: Cross References section
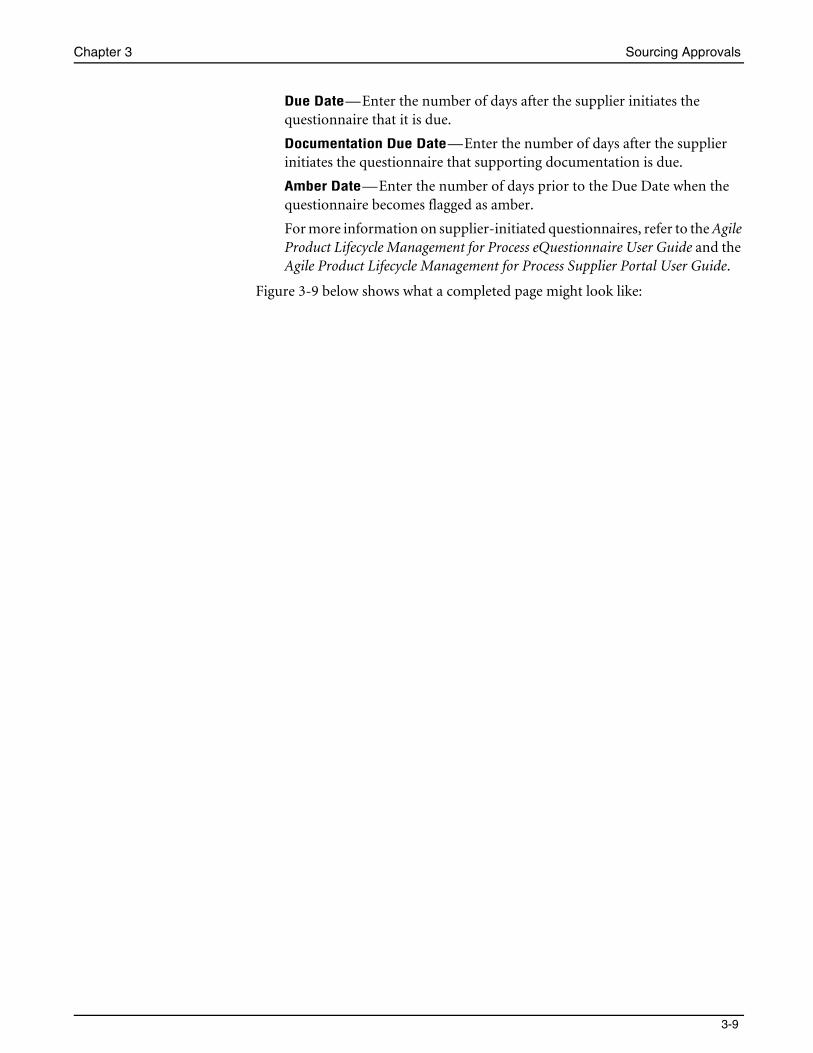
4 The Supplier Initiated Questionnaire section, shown in figure 3-8 below, displays details of the eQ questionnaire tied to the sourcing approval. Complete this section to designate if the supplier is allowed to initiate questionnaires in Supplier Portal. For more information on supplier initiated questionnaires, refer to the Agile Product Lifecycle Management for Process Supplier Portal User Guide.
Note This section will not appear on the sourcing approval if the supplier-initiated questionnaire feature is not configured on.
Figure 3-8: Supplier Initiated Questionnaire section
5 Make entries in the following fields:
Supplier can initiate Edits—Select the checkbox if the supplier can initiate edits to the specification. If selected, the supplier will see the Submit Changes
supplier action in Supplier Portal.
Questionnaire Owner—Select who will be the owner of the questionnaire if the supplier initiates one. Click the field label to display a UGM user search page. You can select only one owner.
Additional Administrators—Select the users or groups who will be the additional administrators of the questionnaire. Click the field label to display a UGM user and group search page. You can select multiple administrators.
Chapter 3 Sourcing Approvals
3-9
Due Date—Enter the number of days after the supplier initiates the questionnaire that it is due.
Documentation Due Date—Enter the number of days after the supplier initiates the questionnaire that supporting documentation is due.
Amber Date—Enter the number of days prior to the Due Date when the questionnaire becomes flagged as amber.
For more information on supplier-initiated questionnaires, refer to the Agile Product Lifecycle Management for Process eQuestionnaire User Guide and the Agile Product Lifecycle Management for Process Supplier Portal User Guide.
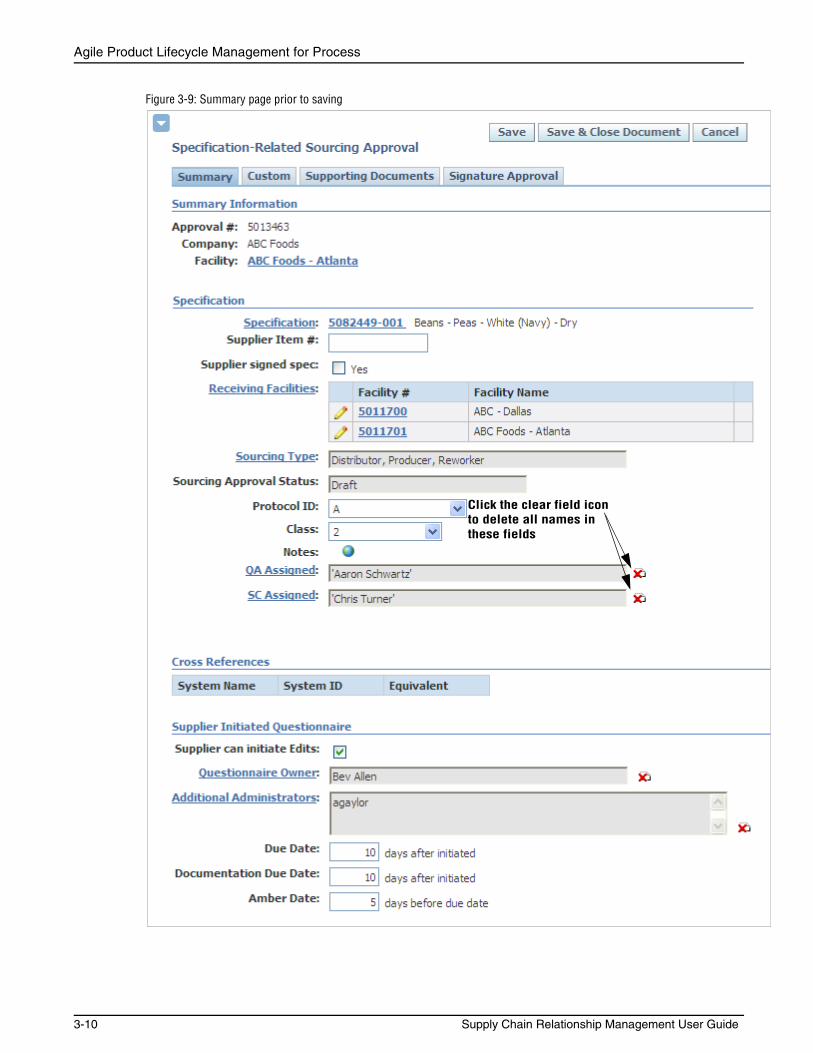
Figure 3-9 below shows what a completed page might look like:
Agile Product Lifecycle Management for Process
3-10 Supply Chain Relationship Management User Guide
Figure 3-9: Summary page prior to saving
Click the clear field icon to delete all names in these fields
Chapter 3 Sourcing Approvals
3-11
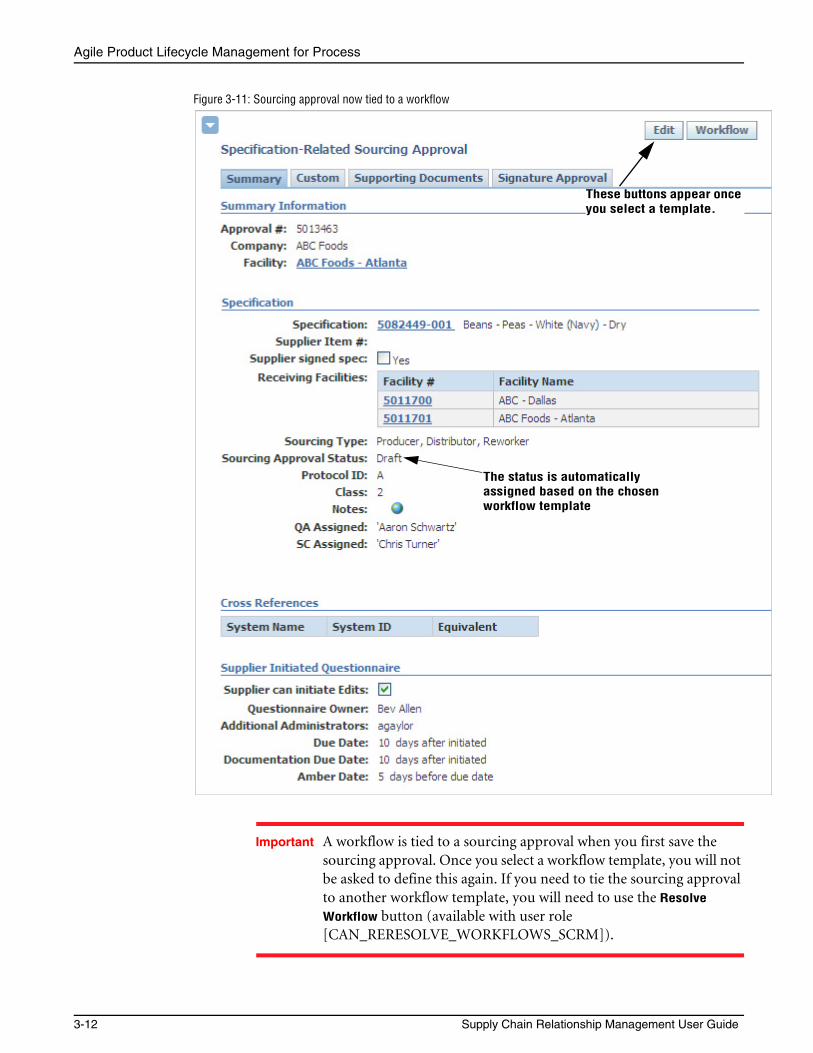
6 Click Save. You can use the other tabs to complete the sourcing approval. All sourcing approvals will be tied to a workflow. In some cases, when the sourcing approval resolves to multiple workflow templates, you will need to select the workflow template from the available options. For more detailed information on workflows, refer to Workflows and Sourcing Approvals on page 3-19.
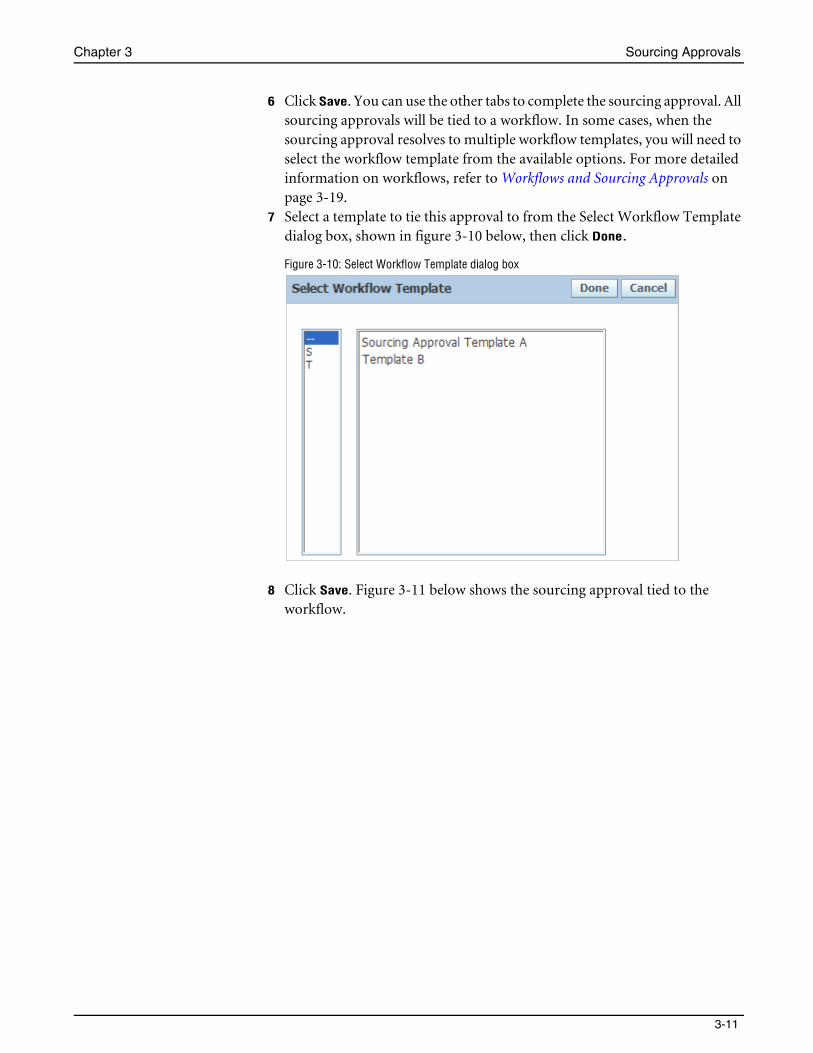
7 Select a template to tie this approval to from the Select Workflow Template dialog box, shown in figure 3-10 below, then click Done.
Figure 3-10: Select Workflow Template dialog box
8 Click Save. Figure 3-11 below shows the sourcing approval tied to the workflow.
Agile Product Lifecycle Management for Process
3-12 Supply Chain Relationship Management User Guide
Figure 3-11: Sourcing approval now tied to a workflow
Important A workflow is tied to a sourcing approval when you first save the sourcing approval. Once you select a workflow template, you will not be asked to define this again. If you need to tie the sourcing approval to another workflow template, you will need to use the Resolve
Workflow button (available with user role [CAN_RERESOLVE_WORKFLOWS_SCRM]).
These buttons appear once you select a template.
The status is automatically assigned based on the chosen workflow template
Chapter 3 Sourcing Approvals
3-13
The system assigns a sourcing approval status based on the workflow template you chose. Refer to Workflows and Sourcing Approvals on page 3-19 for more information on workflows.
Custom TabThe Custom tab allows you to enter customized information, in the form of extended attributes and custom sections. Refer to page 2-7, Custom Tab for more information on custom data.
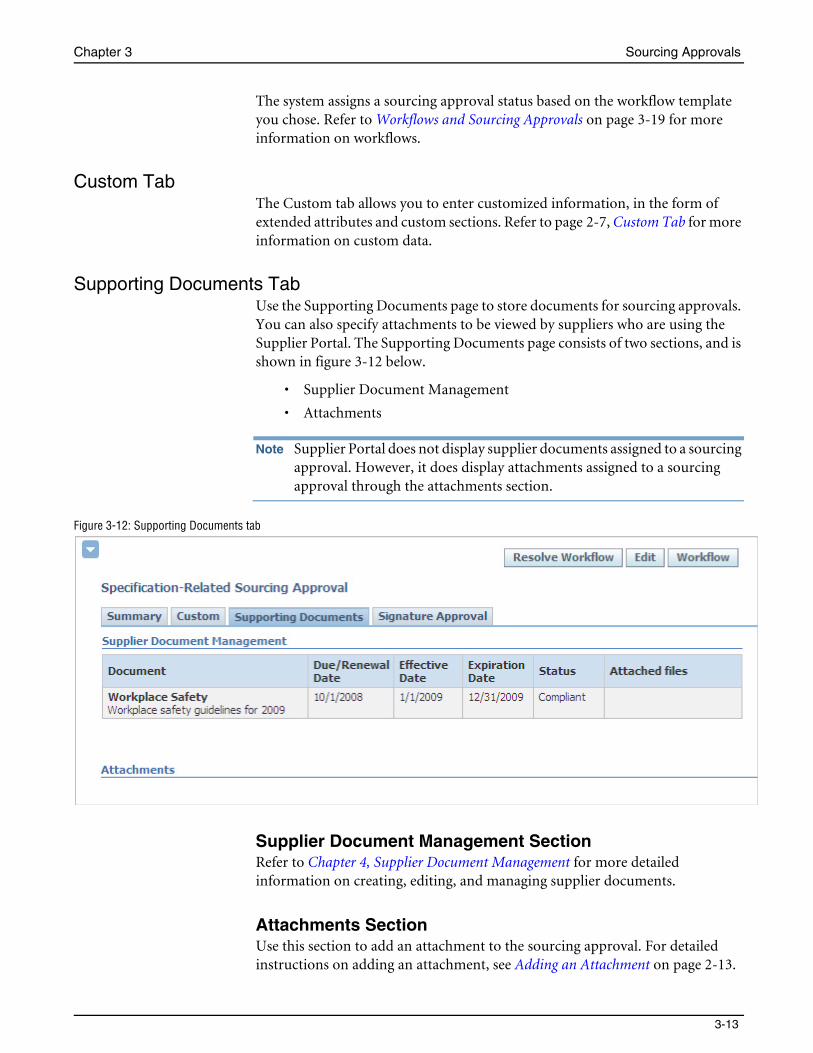
Supporting Documents TabUse the Supporting Documents page to store documents for sourcing approvals. You can also specify attachments to be viewed by suppliers who are using the Supplier Portal. The Supporting Documents page consists of two sections, and is shown in figure 3-12 below.
• Supplier Document Management
• Attachments
Note Supplier Portal does not display supplier documents assigned to a sourcing approval. However, it does display attachments assigned to a sourcing approval through the attachments section.
Figure 3-12: Supporting Documents tab
Supplier Document Management SectionRefer to Chapter 4, Supplier Document Management for more detailed information on creating, editing, and managing supplier documents.
Attachments SectionUse this section to add an attachment to the sourcing approval. For detailed instructions on adding an attachment, see Adding an Attachment on page 2-13.
Agile Product Lifecycle Management for Process
3-14 Supply Chain Relationship Management User Guide
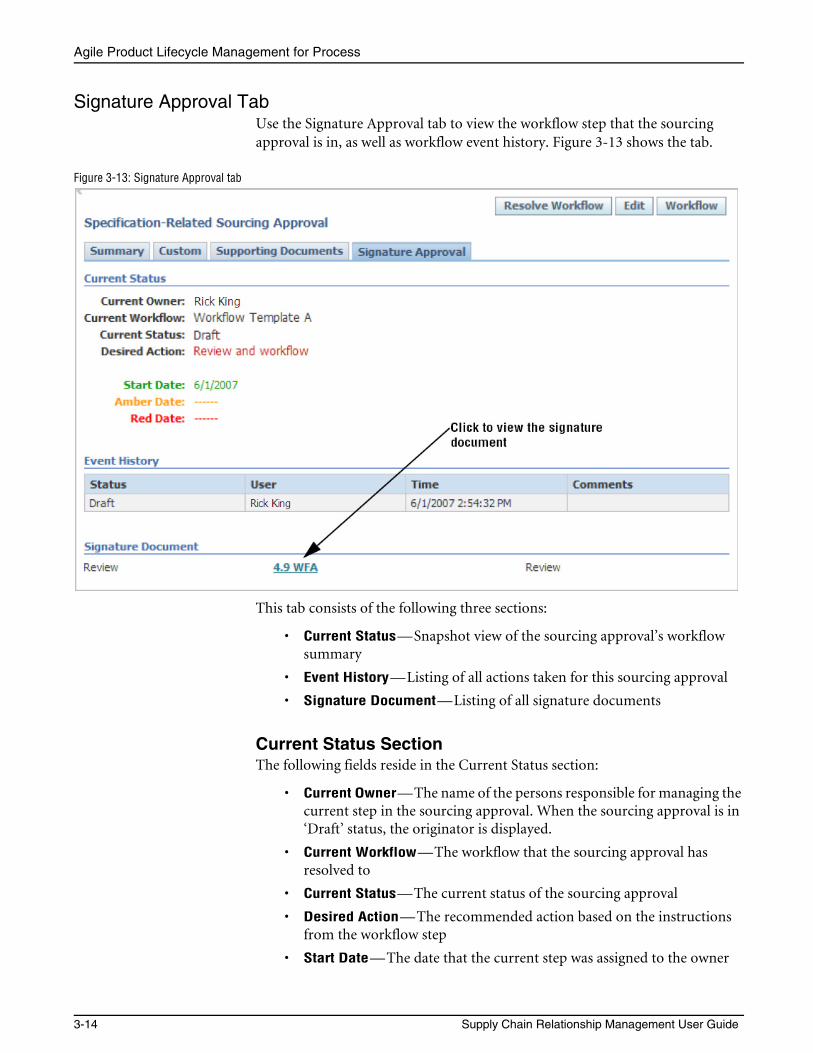
Signature Approval TabUse the Signature Approval tab to view the workflow step that the sourcing approval is in, as well as workflow event history. Figure 3-13 shows the tab.
Figure 3-13: Signature Approval tab
This tab consists of the following three sections:
• Current Status—Snapshot view of the sourcing approval’s workflow summary
• Event History—Listing of all actions taken for this sourcing approval
• Signature Document—Listing of all signature documents
Current Status SectionThe following fields reside in the Current Status section:
• Current Owner—The name of the persons responsible for managing the current step in the sourcing approval. When the sourcing approval is in ‘Draft’ status, the originator is displayed.
• Current Workflow—The workflow that the sourcing approval has resolved to
• Current Status—The current status of the sourcing approval
• Desired Action—The recommended action based on the instructions from the workflow step
• Start Date—The date that the current step was assigned to the owner
Chapter 3 Sourcing Approvals
3-15
• Amber Date—The date that a reminder will be issued to the owner indicating a deadline is approaching
• Red Date—The date that the current workflow task is due
Event History SectionThe Event History section displays the current and past steps within the sourcing approval process. Each step status is displayed along with the name of the user who transitioned the workflow, the date that the workflow was transitioned, and any related comments. The most recent transitions are displayed first.
Signature Documents SectionThe Signature Documents section lists all signature documents assigned to this sourcing approval. See Working with a Signature Document on page 3-21 for more information on signature documents.
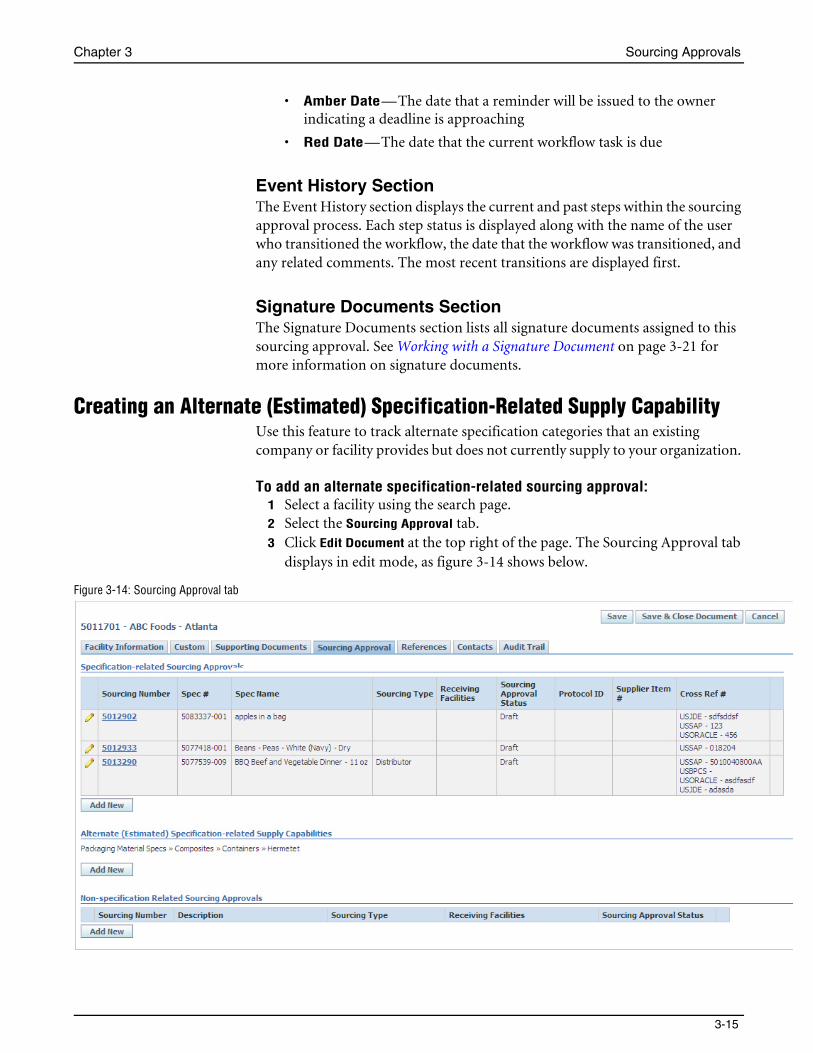
Creating an Alternate (Estimated) Specification-Related Supply CapabilityUse this feature to track alternate specification categories that an existing company or facility provides but does not currently supply to your organization.
To add an alternate specification-related sourcing approval:1 Select a facility using the search page. 2 Select the Sourcing Approval tab.3 Click Edit Document at the top right of the page. The Sourcing Approval tab
displays in edit mode, as figure 3-14 shows below.
Figure 3-14: Sourcing Approval tab
Agile Product Lifecycle Management for Process
3-16 Supply Chain Relationship Management User Guide
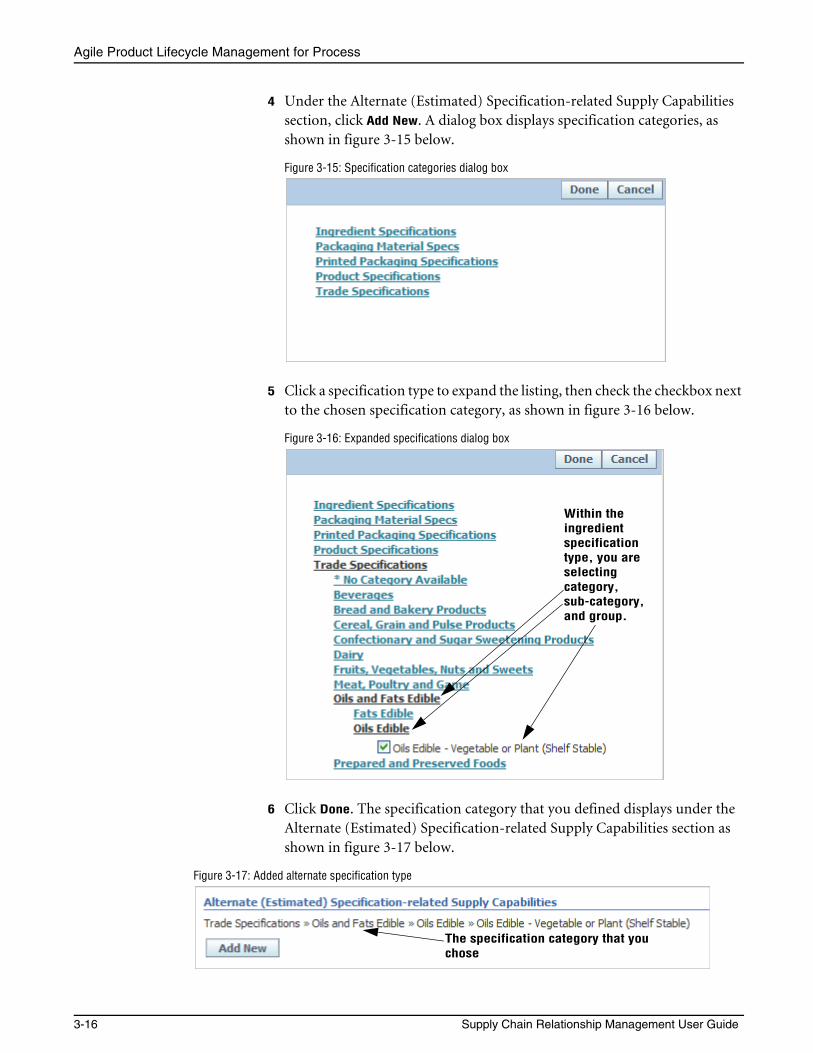
4 Under the Alternate (Estimated) Specification-related Supply Capabilities section, click Add New. A dialog box displays specification categories, as shown in figure 3-15 below.
Figure 3-15: Specification categories dialog box
5 Click a specification type to expand the listing, then check the checkbox next to the chosen specification category, as shown in figure 3-16 below.
Figure 3-16: Expanded specifications dialog box
6 Click Done. The specification category that you defined displays under the Alternate (Estimated) Specification-related Supply Capabilities section as shown in figure 3-17 below.
Figure 3-17: Added alternate specification type
Within the ingredient specification type, you are selecting category, sub-category, and group.
The specification category that you chose
Chapter 3 Sourcing Approvals
3-17
7 Click Save. The record is now tied to the sourcing approval. This information will be displayed in the Potential Specification Supply Categories section on the company profile’s Supply Categories tab. See Supply Categories Tab on page 2-15 for more information.
Note You can later search for the record using “alternate supply capability” as your search criteria.
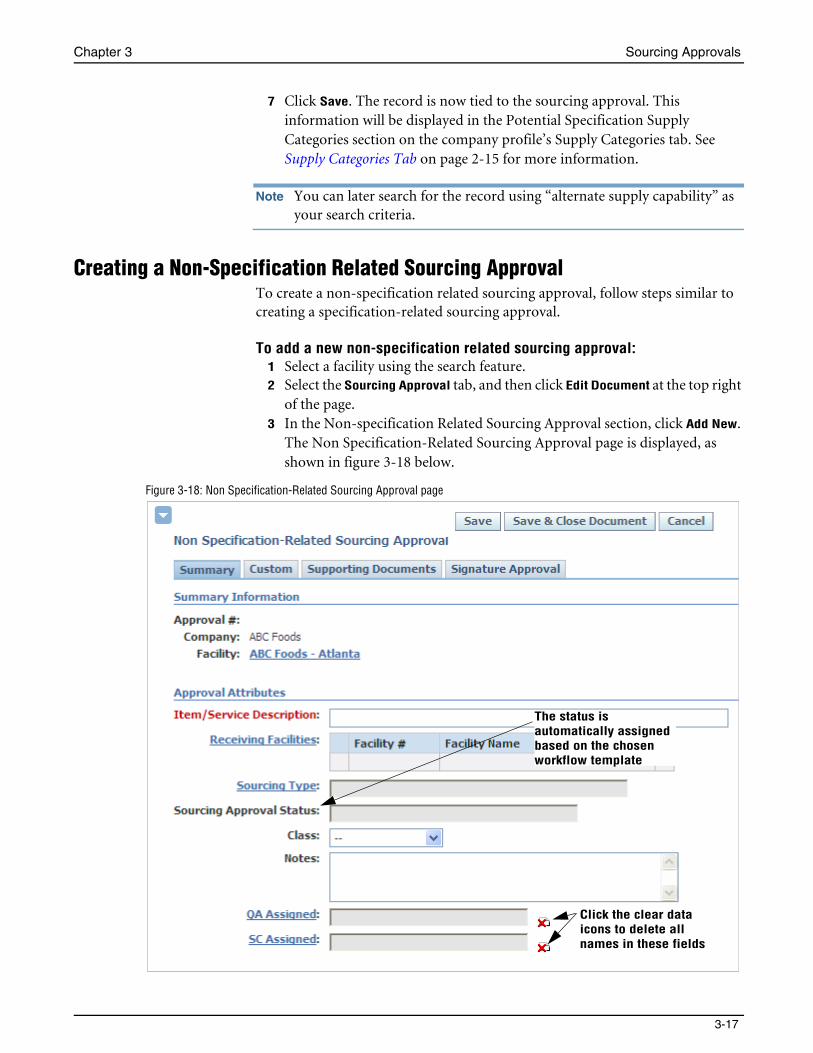
Creating a Non-Specification Related Sourcing ApprovalTo create a non-specification related sourcing approval, follow steps similar to creating a specification-related sourcing approval.
To add a new non-specification related sourcing approval:1 Select a facility using the search feature.2 Select the Sourcing Approval tab, and then click Edit Document at the top right
of the page. 3 In the Non-specification Related Sourcing Approval section, click Add New.
The Non Specification-Related Sourcing Approval page is displayed, as shown in figure 3-18 below.
Figure 3-18: Non Specification-Related Sourcing Approval page
The status is automatically assigned based on the chosen workflow template
Click the clear data icons to delete all names in these fields
Agile Product Lifecycle Management for Process
3-18 Supply Chain Relationship Management User Guide
4 In the Approval Attributes section, make entries in the following fields:
Item/Service Description—Enter a detailed description of the item or service. This is a required field.
Receiving Facilities—Select the receiving facilities for the material.
Sourcing Type—Select the type of sourcing relationship from the list in the pop-up dialog box. You can make multiple selections.
Sourcing Approval Status — Assigned by the system. The workflow status of the sourcing approval.
Class—Select a class from the drop-down list.
Notes—Enter any notes.
QA Assigned—Select the name of a quality assurance auditor assigned to this facility. You can select multiple names.
SC Assigned—Select the name of the supply chain representative responsible for the relationship with the supplier. You can select multiple names.
Note It is important to enter a detailed description in the Item/Service Description field. Doing so will make it easier to locate the record if you ever need to search for the sourcing approval by description.
Use the remaining sourcing approval tabs to add more information:
• Custom
• Supporting Documents
• Signature Approval
5 Click Save. See Transitioning a Workflow on page 3-22 for more information.
Chapter 3 Sourcing Approvals
3-19
Workflows and Sourcing ApprovalsYou can use SCRM to obtain supplier approval at the facility and specification level through workflow automation.
Workflows represent business practices and processes used by your company. You create workflows using the Workflow Administration (WFA) application. Refer to the Agile Product Lifecycle Management for Process Administrator User Guide for more information.
Managing Sourcing ApprovalsYou manage sourcing approvals using signature documents and workflows. Get to your sourcing approvals and signature documents by:
❑ Using your Action Items list
❑ Clicking a link that is emailed to you (for signature documents only)
Using Action Items
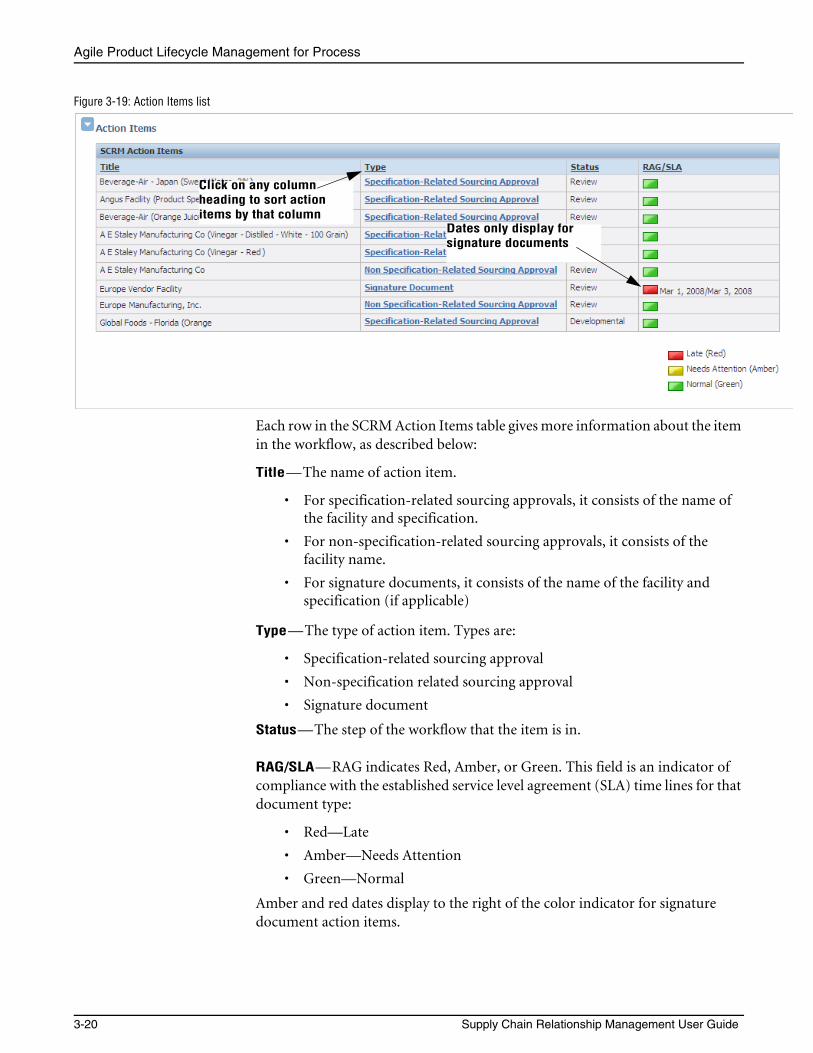
As a sourcing approval moves through the workflow process, action items generate for designated team members. Each owner of subsequent steps will receive the item (sourcing approval or signature document) in his or her Action Items list, as figure 3-19 shows below. Signature requestees will also be alerted via email.
The Action Items page displays when you select Action Items from the SCRM menu. Action items are workflow items assigned to you that require your attention—think of them as your “To Do” list. Action items indicate that review or a signature document is required before the document can progress to the next step.
As you take appropriate action for each item assigned to you, the item’s status updates, and the item progresses to the next step in the workflow. It remains in your Action Items list as long as you are the “owner” of the current step in the workflow.
Agile Product Lifecycle Management for Process
3-20 Supply Chain Relationship Management User Guide
Figure 3-19: Action Items list
Each row in the SCRM Action Items table gives more information about the item in the workflow, as described below:
Title—The name of action item.
• For specification-related sourcing approvals, it consists of the name of the facility and specification.
• For non-specification-related sourcing approvals, it consists of the facility name.
• For signature documents, it consists of the name of the facility and specification (if applicable)
Type—The type of action item. Types are:
• Specification-related sourcing approval
• Non-specification related sourcing approval
• Signature document
Status—The step of the workflow that the item is in.
RAG/SLA—RAG indicates Red, Amber, or Green. This field is an indicator of compliance with the established service level agreement (SLA) time lines for that document type:
• Red—Late
• Amber—Needs Attention
• Green—Normal
Amber and red dates display to the right of the color indicator for signature document action items.
Dates only display for signature documents
Click on any column heading to sort action items by that column
Chapter 3 Sourcing Approvals
3-21
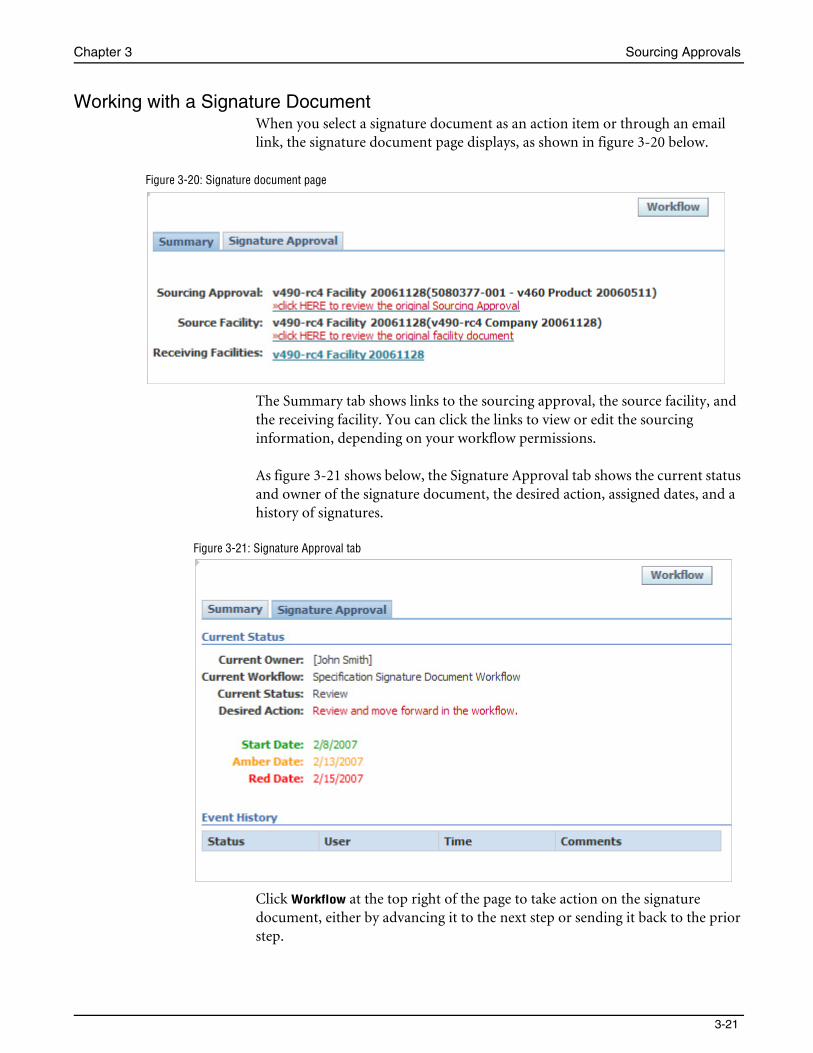
Working with a Signature DocumentWhen you select a signature document as an action item or through an email link, the signature document page displays, as shown in figure 3-20 below.
Figure 3-20: Signature document page
The Summary tab shows links to the sourcing approval, the source facility, and the receiving facility. You can click the links to view or edit the sourcing information, depending on your workflow permissions.
As figure 3-21 shows below, the Signature Approval tab shows the current status and owner of the signature document, the desired action, assigned dates, and a history of signatures.
Figure 3-21: Signature Approval tab
Click Workflow at the top right of the page to take action on the signature document, either by advancing it to the next step or sending it back to the prior step.
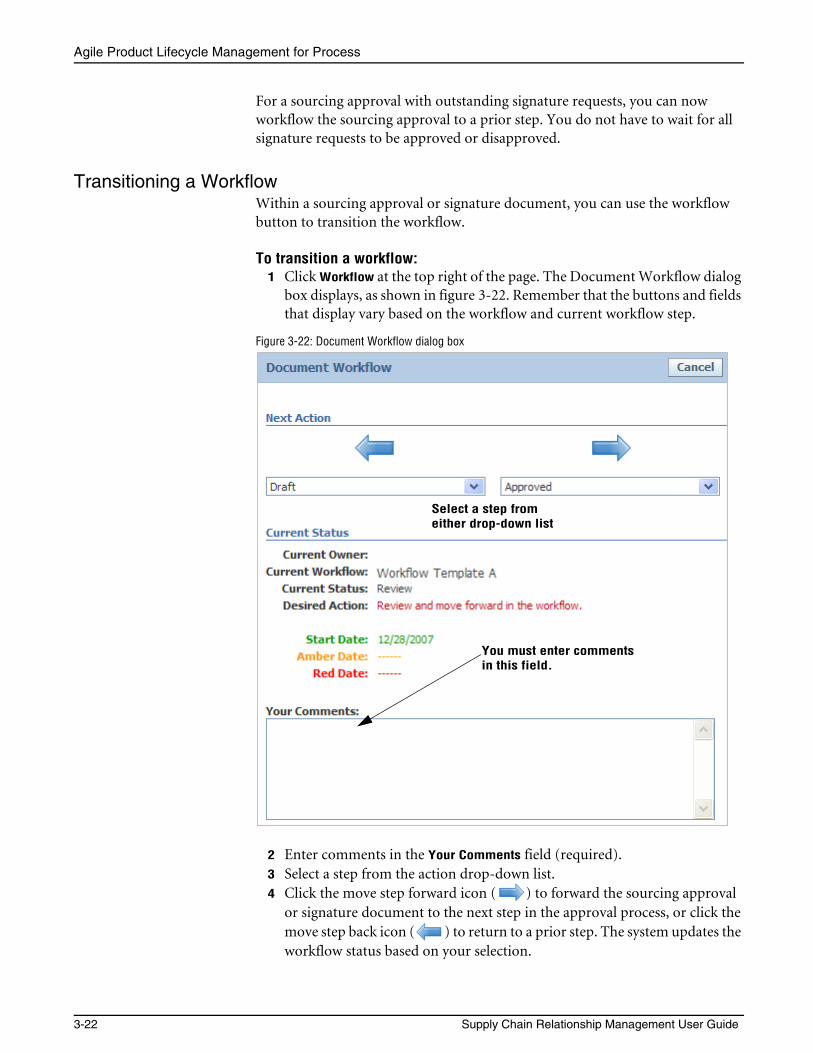
Agile Product Lifecycle Management for Process
3-22 Supply Chain Relationship Management User Guide
For a sourcing approval with outstanding signature requests, you can now workflow the sourcing approval to a prior step. You do not have to wait for all signature requests to be approved or disapproved.
Transitioning a WorkflowWithin a sourcing approval or signature document, you can use the workflow button to transition the workflow.
To transition a workflow:1 Click Workflow at the top right of the page. The Document Workflow dialog
box displays, as shown in figure 3-22. Remember that the buttons and fields that display vary based on the workflow and current workflow step.
Figure 3-22: Document Workflow dialog box
2 Enter comments in the Your Comments field (required). 3 Select a step from the action drop-down list. 4 Click the move step forward icon ( ) to forward the sourcing approval
or signature document to the next step in the approval process, or click the move step back icon ( ) to return to a prior step. The system updates the workflow status based on your selection.
Select a step from either drop-down list
You must enter comments in this field.
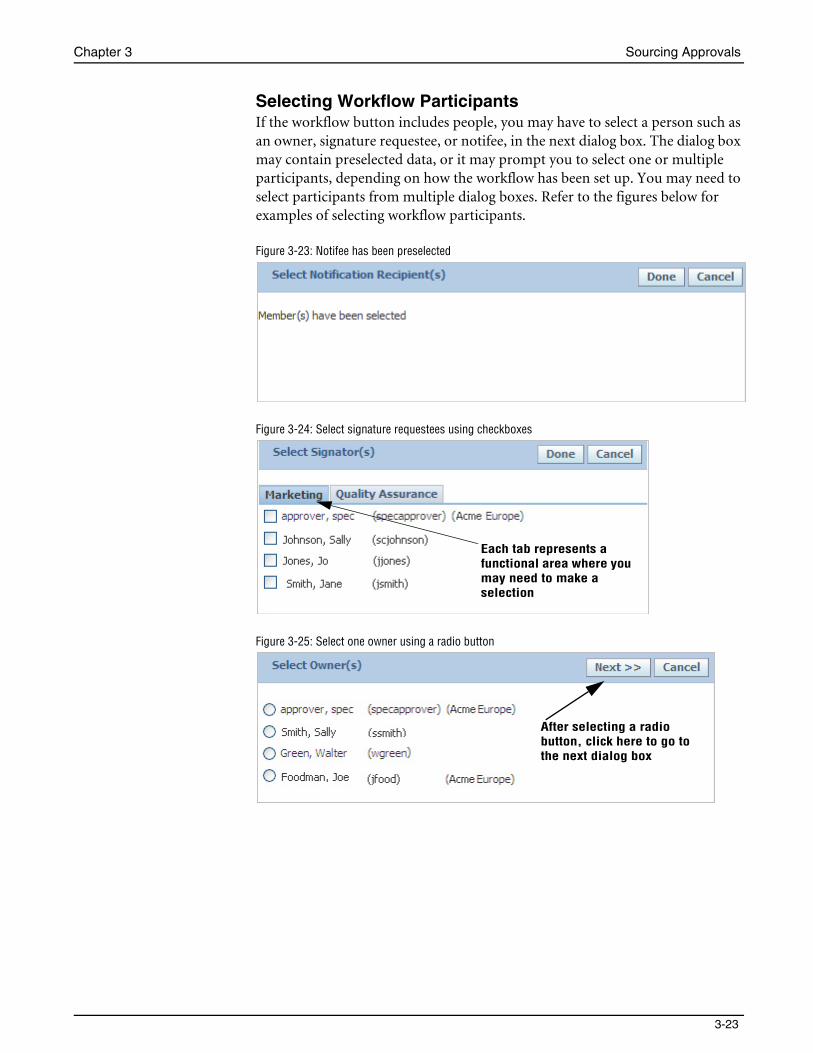
Chapter 3 Sourcing Approvals
3-23
Selecting Workflow ParticipantsIf the workflow button includes people, you may have to select a person such as an owner, signature requestee, or notifee, in the next dialog box. The dialog box may contain preselected data, or it may prompt you to select one or multiple participants, depending on how the workflow has been set up. You may need to select participants from multiple dialog boxes. Refer to the figures below for examples of selecting workflow participants.
Figure 3-23: Notifee has been preselected
Figure 3-24: Select signature requestees using checkboxes
Figure 3-25: Select one owner using a radio button
Each tab represents a functional area where you may need to make a selection
After selecting a radio button, click here to go to the next dialog box
Agile Product Lifecycle Management for Process
3-24 Supply Chain Relationship Management User Guide
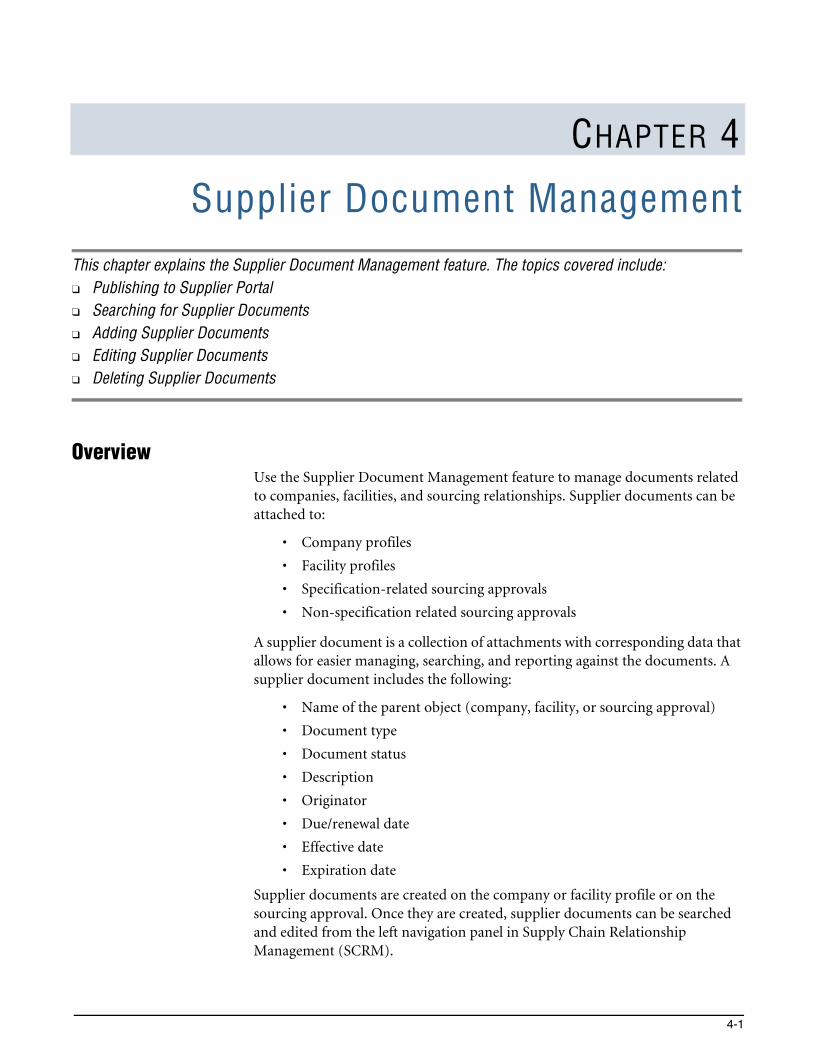
4-1
CHAPTER 4
Supplier Document ManagementThis chapter explains the Supplier Document Management feature. The topics covered include:❑ Publishing to Supplier Portal❑ Searching for Supplier Documents❑ Adding Supplier Documents❑ Editing Supplier Documents❑ Deleting Supplier Documents
OverviewUse the Supplier Document Management feature to manage documents related to companies, facilities, and sourcing relationships. Supplier documents can be attached to:
• Company profiles
• Facility profiles
• Specification-related sourcing approvals
• Non-specification related sourcing approvals
A supplier document is a collection of attachments with corresponding data that allows for easier managing, searching, and reporting against the documents. A supplier document includes the following:
• Name of the parent object (company, facility, or sourcing approval)
• Document type
• Document status
• Description
• Originator
• Due/renewal date
• Effective date
• Expiration date
Supplier documents are created on the company or facility profile or on the sourcing approval. Once they are created, supplier documents can be searched and edited from the left navigation panel in Supply Chain Relationship Management (SCRM).
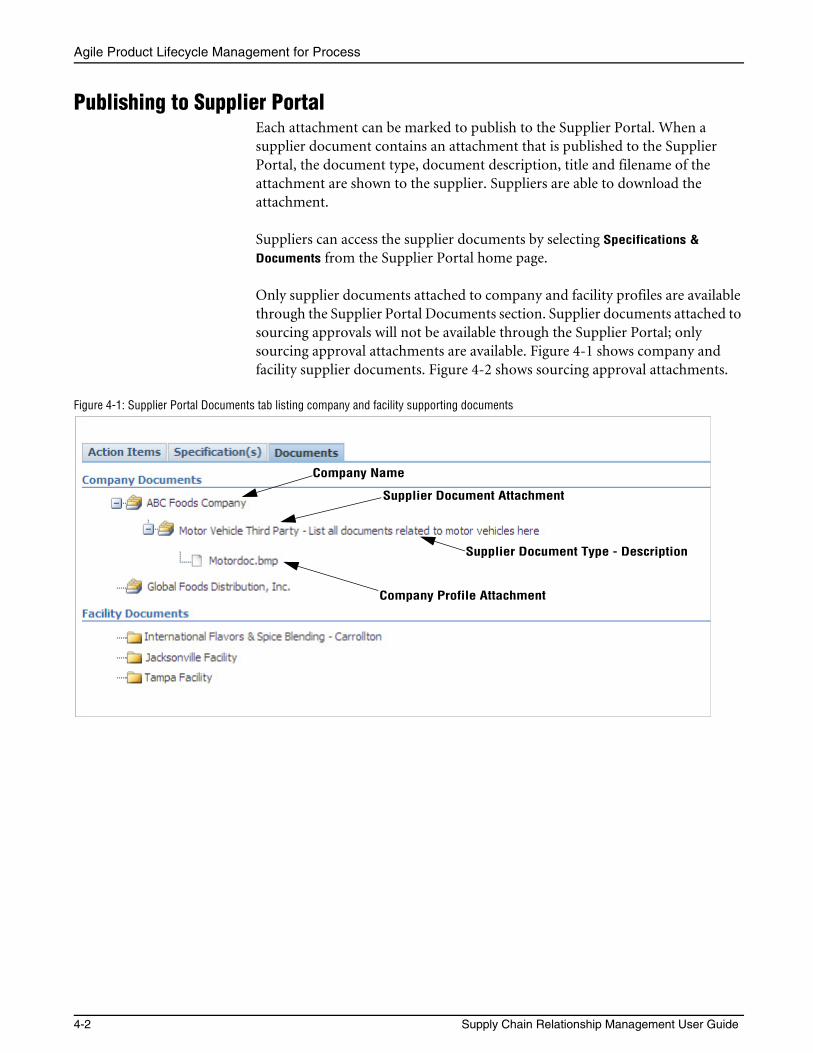
Agile Product Lifecycle Management for Process
4-2 Supply Chain Relationship Management User Guide
Publishing to Supplier PortalEach attachment can be marked to publish to the Supplier Portal. When a supplier document contains an attachment that is published to the Supplier Portal, the document type, document description, title and filename of the attachment are shown to the supplier. Suppliers are able to download the attachment.
Suppliers can access the supplier documents by selecting Specifications &
Documents from the Supplier Portal home page.
Only supplier documents attached to company and facility profiles are available through the Supplier Portal Documents section. Supplier documents attached to sourcing approvals will not be available through the Supplier Portal; only sourcing approval attachments are available. Figure 4-1 shows company and facility supplier documents. Figure 4-2 shows sourcing approval attachments.
Figure 4-1: Supplier Portal Documents tab listing company and facility supporting documents
Company Name
Supplier Document Attachment
Supplier Document Type - Description
Company Profile Attachment
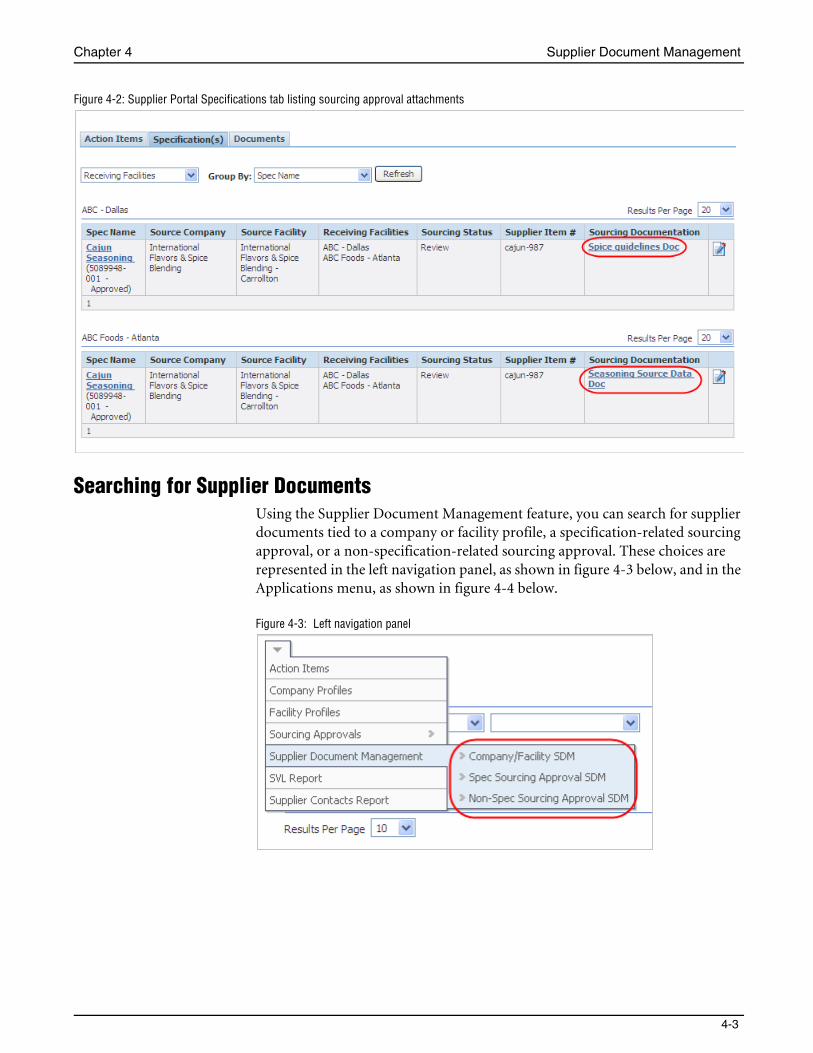
Chapter 4 Supplier Document Management
4-3
Figure 4-2: Supplier Portal Specifications tab listing sourcing approval attachments
Searching for Supplier DocumentsUsing the Supplier Document Management feature, you can search for supplier documents tied to a company or facility profile, a specification-related sourcing approval, or a non-specification-related sourcing approval. These choices are represented in the left navigation panel, as shown in figure 4-3 below, and in the Applications menu, as shown in figure 4-4 below.
Figure 4-3: Left navigation panel
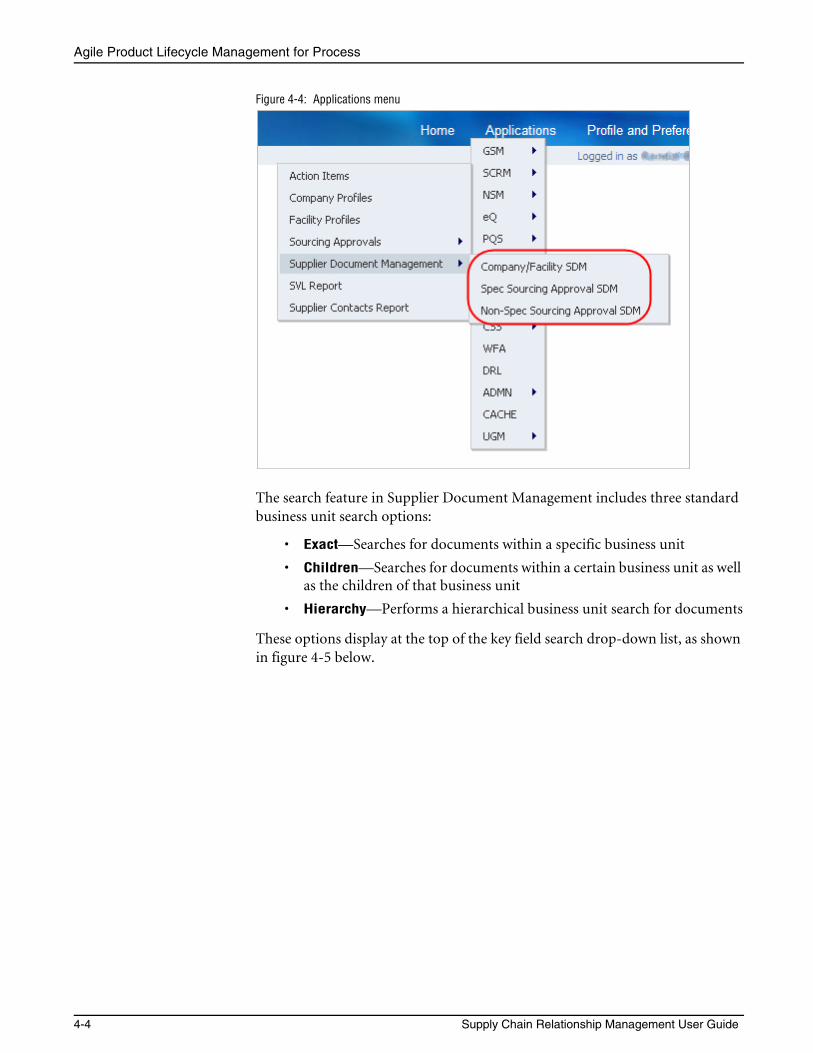
Agile Product Lifecycle Management for Process
4-4 Supply Chain Relationship Management User Guide
Figure 4-4: Applications menu
The search feature in Supplier Document Management includes three standard business unit search options:
• Exact—Searches for documents within a specific business unit
• Children—Searches for documents within a certain business unit as well as the children of that business unit
• Hierarchy—Performs a hierarchical business unit search for documents
These options display at the top of the key field search drop-down list, as shown in figure 4-5 below.
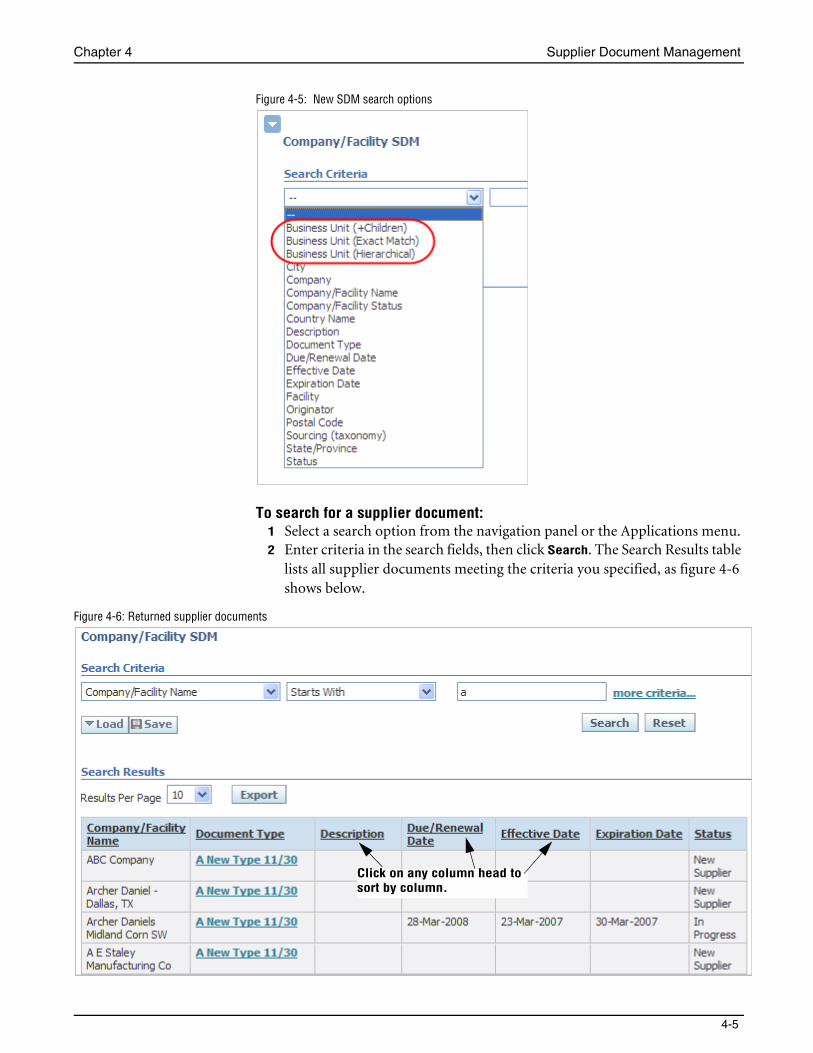
Chapter 4 Supplier Document Management
4-5
Figure 4-5: New SDM search options
To search for a supplier document:1 Select a search option from the navigation panel or the Applications menu. 2 Enter criteria in the search fields, then click Search. The Search Results table
lists all supplier documents meeting the criteria you specified, as figure 4-6 shows below.
Figure 4-6: Returned supplier documents
Click on any column head to sort by column.
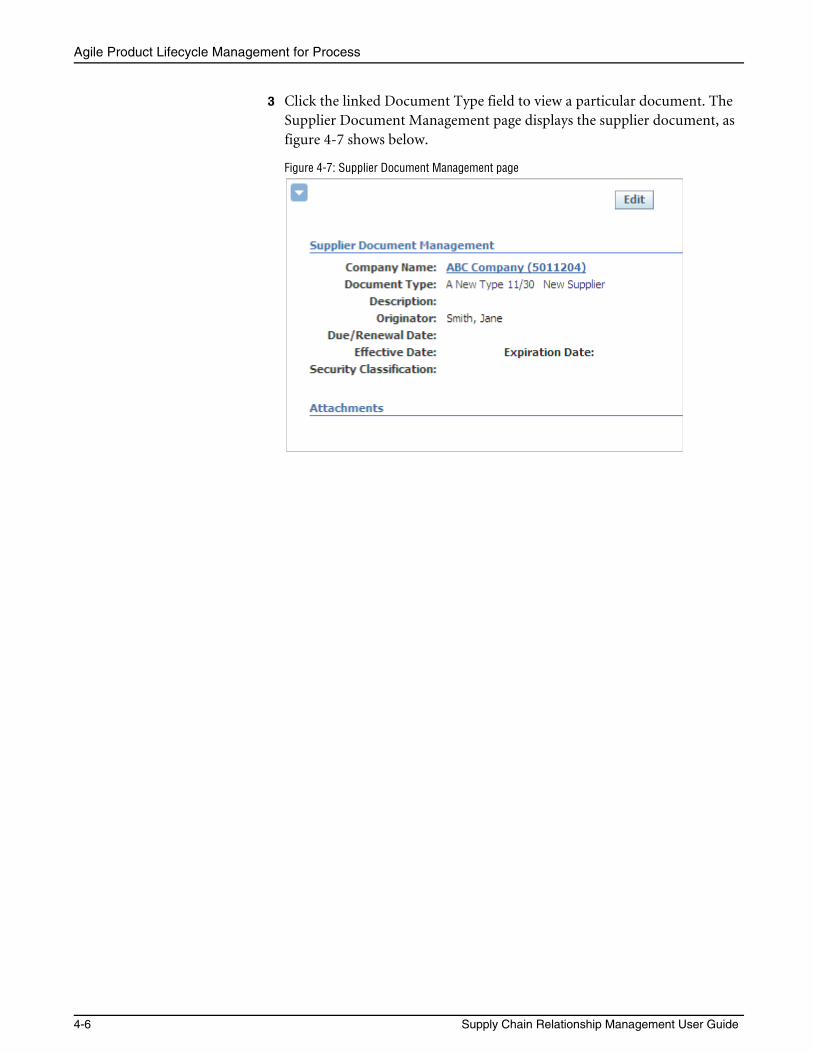
Agile Product Lifecycle Management for Process
4-6 Supply Chain Relationship Management User Guide
3 Click the linked Document Type field to view a particular document. The Supplier Document Management page displays the supplier document, as figure 4-7 shows below.
Figure 4-7: Supplier Document Management page
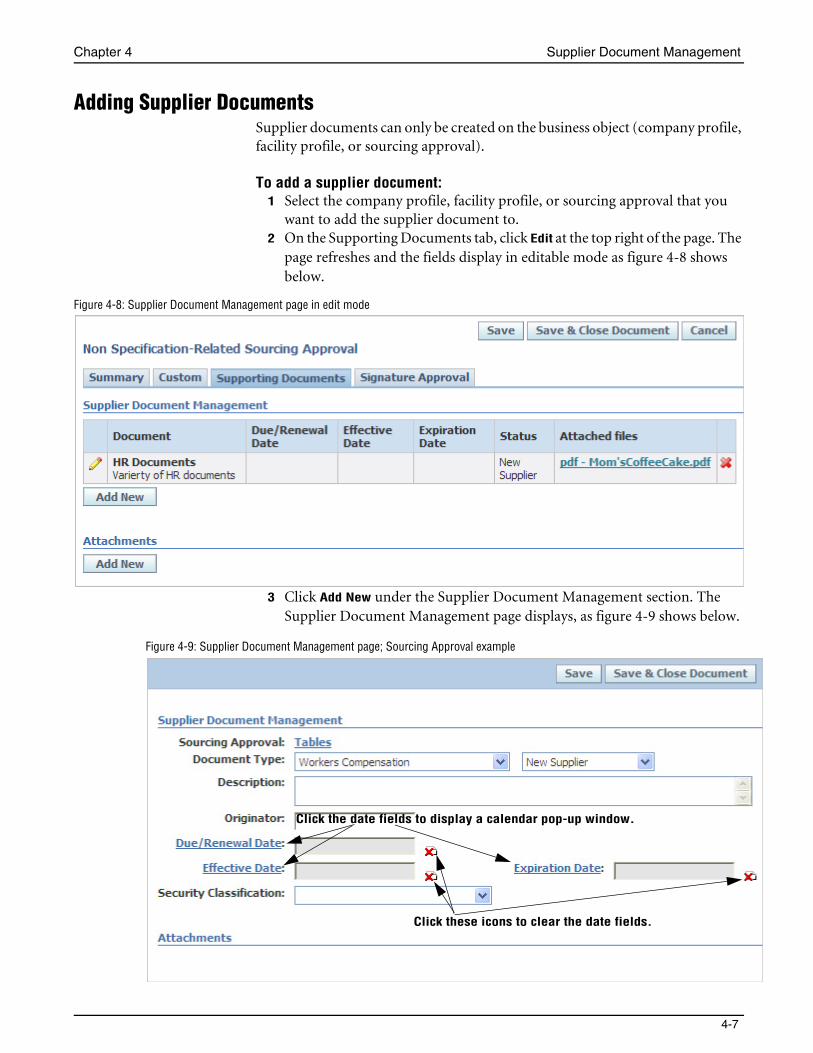
Chapter 4 Supplier Document Management
4-7
Adding Supplier DocumentsSupplier documents can only be created on the business object (company profile, facility profile, or sourcing approval).
To add a supplier document:1 Select the company profile, facility profile, or sourcing approval that you
want to add the supplier document to. 2 On the Supporting Documents tab, click Edit at the top right of the page. The
page refreshes and the fields display in editable mode as figure 4-8 shows below.
Figure 4-8: Supplier Document Management page in edit mode
3 Click Add New under the Supplier Document Management section. The Supplier Document Management page displays, as figure 4-9 shows below.
Figure 4-9: Supplier Document Management page; Sourcing Approval example
Click these icons to clear the date fields.
Click the date fields to display a calendar pop-up window.

Agile Product Lifecycle Management for Process
4-8 Supply Chain Relationship Management User Guide
4 Complete the following fields in the Supplier Document Management section:
(Object Name)—The name of the company, facility, specification-related sourcing approval, or non-specification related sourcing approval. This field is supplied by the system and cannot be changed.
Document Type—Type of supplier document.
Document Status (unlabeled)—Status of the document.
Description—Description of the document.
Originator—The name of the person who created the document. This field is supplied by the system and cannot be changed.
Due/Renewal Date—The due date or renewal date.
Effective Date—The date the supplier document takes effect.
Expiration Date—The date the supplier document expires.
Security Classification—The security classification assigned to the document. This field appears when object level security (OLS) is configured on. For more information on OLS, refer to the Agile Product Lifecycle Management for Process Administrator User Guide.
5 Click Save at the top right of the page. The Add New button displays at the bottom of the Attachments section.
6 Click Add New to add a new attachment to the supplier document. SCRM displays the Attachment Detail dialog box, as shown in figure 4-10 below.
Figure 4-10: Attachment Detail dialog box
7 Complete the following fields:• Owner—The owner of the attachment. This field is pre-populated with
the name of the user who is logged into the system.
• Title—The title of the attachment.
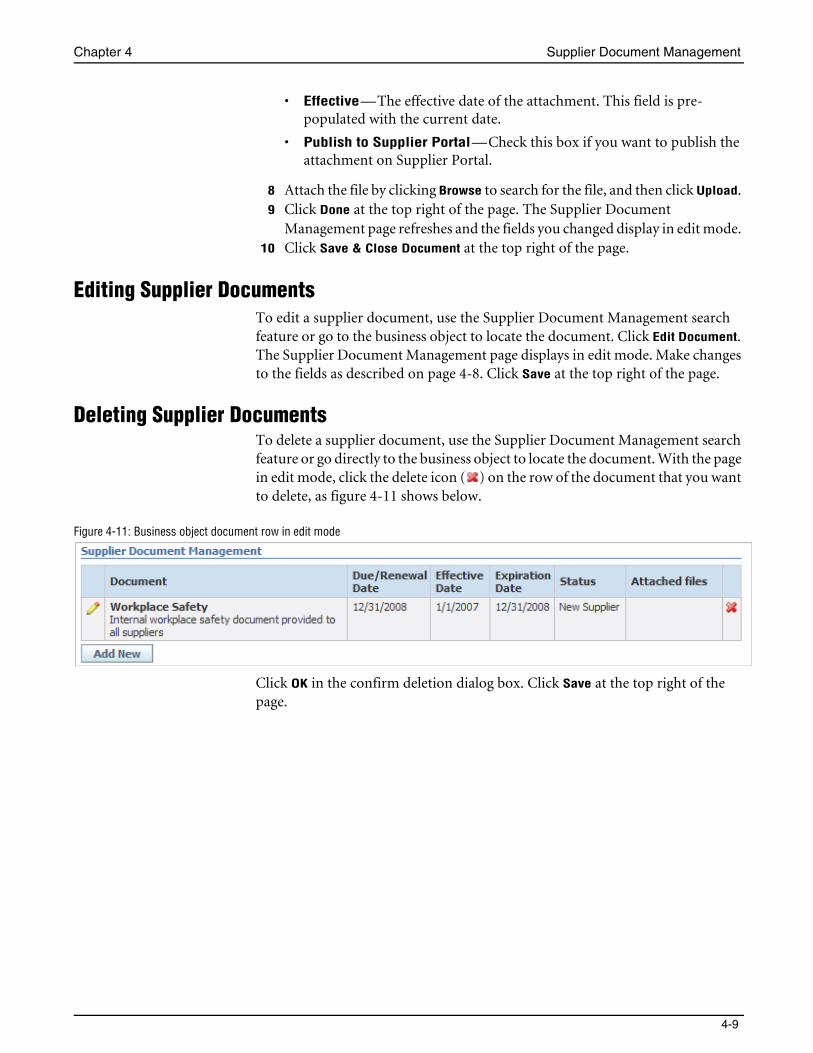
Chapter 4 Supplier Document Management
4-9
• Effective—The effective date of the attachment. This field is pre-populated with the current date.
• Publish to Supplier Portal—Check this box if you want to publish the attachment on Supplier Portal.
8 Attach the file by clicking Browse to search for the file, and then click Upload. 9 Click Done at the top right of the page. The Supplier Document
Management page refreshes and the fields you changed display in edit mode. 10 Click Save & Close Document at the top right of the page.
Editing Supplier DocumentsTo edit a supplier document, use the Supplier Document Management search feature or go to the business object to locate the document. Click Edit Document. The Supplier Document Management page displays in edit mode. Make changes to the fields as described on page 4-8. Click Save at the top right of the page.
Deleting Supplier DocumentsTo delete a supplier document, use the Supplier Document Management search feature or go directly to the business object to locate the document. With the page in edit mode, click the delete icon ( ) on the row of the document that you want to delete, as figure 4-11 shows below.
Figure 4-11: Business object document row in edit mode
Click OK in the confirm deletion dialog box. Click Save at the top right of the page.

Agile Product Lifecycle Management for Process
4-10 Supply Chain Relationship Management User Guide


![Agile Product Lifecycle Management Product Quality ... · [1]Agile Product Lifecycle Management Product Quality Management User Guide Release 9.3.6 E71165-01 February 2017](https://img.pdfslide.us/doc/110x75/5aea83007f8b9a585f8c766c/agile-product-lifecycle-management-product-quality-1agile-product-lifecycle.jpg)