Embed Size (px)
Citation preview

Agile e6.0.4
Installation Manual for Oracle 10g for Agile e6.0.4 on Unix
Part Number: INSORAUNIX-604B
Copyrights and Trademarks Copyright © 1992, 2007 Oracle and/or its affiliates. All rights reserved.
The Programs (which include both the software and documentation) contain proprietary information; they are provided under a license agreement containing restrictions on use and disclosure and are also protected by copyright, patent, and other intellectual and industrial property laws. Reverse engineering, disassembly, or decompilation of the Programs, except to the extent required to obtain interoperability with other independently created software or as specified by law, is prohibited.
The information contained in this document is subject to change without notice. If you find any problems in the documentation, please report them to us in writing. This document is not warranted to be error-free. Except as may be expressly permitted in your license agreement for these Programs, no part of these Programs may be reproduced or transmitted in any form or by any means, electronic or mechanical, for any purpose.
If the Programs are delivered to the United States Government or anyone licensing or using the Programs on behalf of the United States Government, the following notice is applicable:
U.S. GOVERNMENT RIGHTS Programs, software, databases, and related documentation and technical data delivered to U.S. Government customers are "commercial computer software" or "commercial technical data" pursuant to the applicable Federal Acquisition Regulation and agency-specific supplemental regulations. As such, use, duplication, disclosure, modification, and adaptation of the Programs, including documentation and technical data, shall be subject to the licensing restrictions set forth in the applicable Oracle license agreement, and, to the extent applicable, the additional rights set forth in FAR 52.227-19, Commercial Computer Software--Restricted Rights (June 1987). Oracle USA, Inc., 500 Oracle Parkway, Redwood City, CA 94065.
The Programs are not intended for use in any nuclear, aviation, mass transit, medical, or other inherently dangerous applications. It shall be the licensee's responsibility to take all appropriate fail-safe, backup, redundancy and other measures to ensure the safe use of such applications if the Programs are used for such purposes, and we disclaim liability for any damages caused by such use of the Programs.
The Programs may provide links to Web sites and access to content, products, and services from third parties. Oracle is not responsible for the availability of, or any content provided on, third-party Web sites. You bear all risks associated with the use of such content. If you choose to purchase any products or services from a third party, the relationship is directly between you and the third party. Oracle is not responsible for: (a) the quality of third-party products or services; or (b) fulfilling any of the terms of the agreement with the third party, including delivery of products or services and warranty obligations related to purchased products or services. Oracle is not responsible for any loss or damage of any sort that you may incur from dealing with any third party.
Oracle is a registered trademark of Oracle Corporation. Other names may be trademarks of their respective owners.
NOTICE OF RESTRICTED RIGHTS: The Software is a “commercial item,” as that term is defined at 48 C.F.R. 2.101 (OCT 1995), consisting of “commercial computer software” and “commercial computer software documentation” as such terms are used in 48 C.F.R. 12.212 (SEPT 1995) and when provided to the U. S. Government, is provided (a) for acquisition by or on behalf of civilian agencies, consistent with the policy set forth in 48 C.F.R. 12.212; or (b) for acquisition by or on behalf of units of the Department of Defense, consistent with the policies set forth in 48 C.F.R. 227.7202-1 (JUN 1995) and 227.7202-4 (JUN 1995).
August 10, 2007
ii
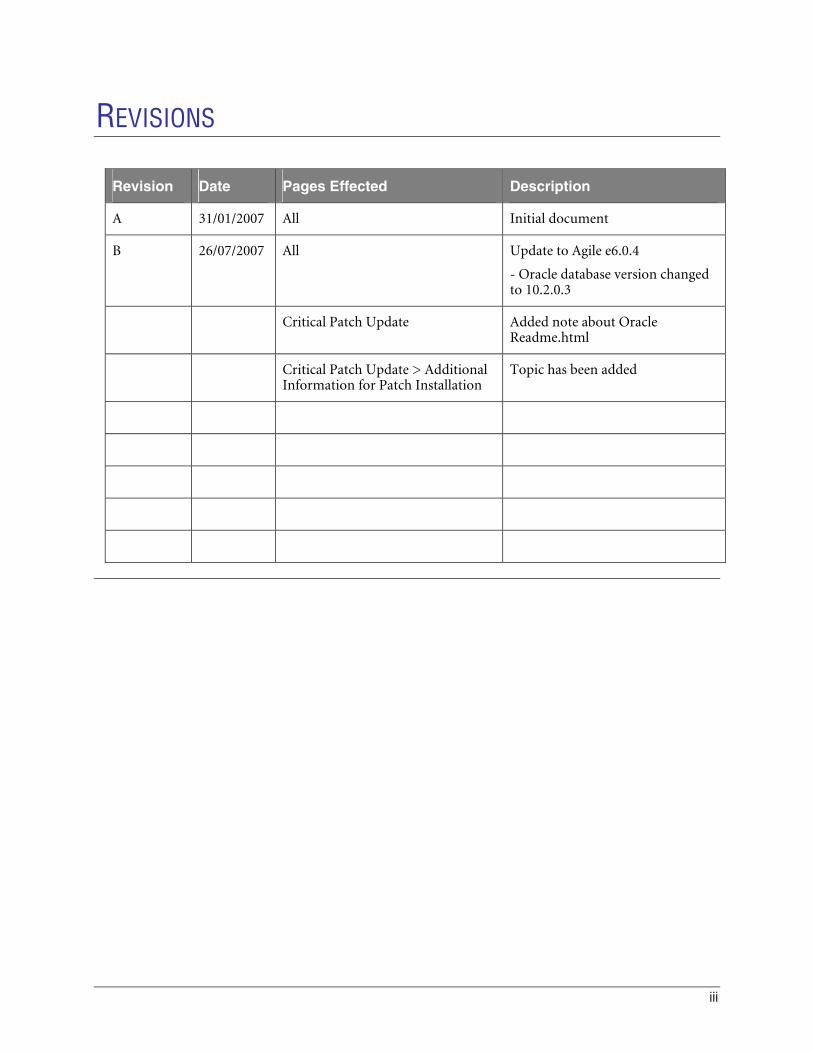
REVISIONS
Revision Date Pages Effected Description
A 31/01/2007 All Initial document
B 26/07/2007 All Update to Agile e6.0.4
- Oracle database version changed to 10.2.0.3
Critical Patch Update Added note about Oracle Readme.html
Critical Patch Update > Additional Information for Patch Installation
Topic has been added
iii

CONTENTS Chapter 1 Introduction 1
Chapter 2 Requirements 2
AIX 2 Hardware Requirements 2 Software Requirements 2 Configure Shell Limits 3
HP-UX 3 Hardware Requirements 3 Software Requirements 4 Kernel Parameters 4
Linux 6 Hardware Requirements 6 Software Requirements 6 Kernel Parameters 7 Set Shell Limits for the Oracle User 8
Solaris 9 Hardware Requirements 9 Software Requirements 10 Kernel Parameters 10
Solaris 9 11 Solaris 10 11
Chapter 3 Prepare the System 12
Set up an Oracle OS User 12 Set up the Shell Environment Variables for Oracle 10g 12 Free Disk Space in the /tmp Directory 13 Copy Database Start and Stop Scripts for the Oracle Server 14 Mount CDs to Your File System 14
AIX 14 HP-UX 15 Linux 15 Solaris 15
Chapter 4 Install Oracle 10g 16
Install the Oracle Server 16 Install the Oracle Client 21 Install the Oracle Patch 26 Create the Database 29
iv
Configure the Oracle Listener 36 About the Directory Structure 36
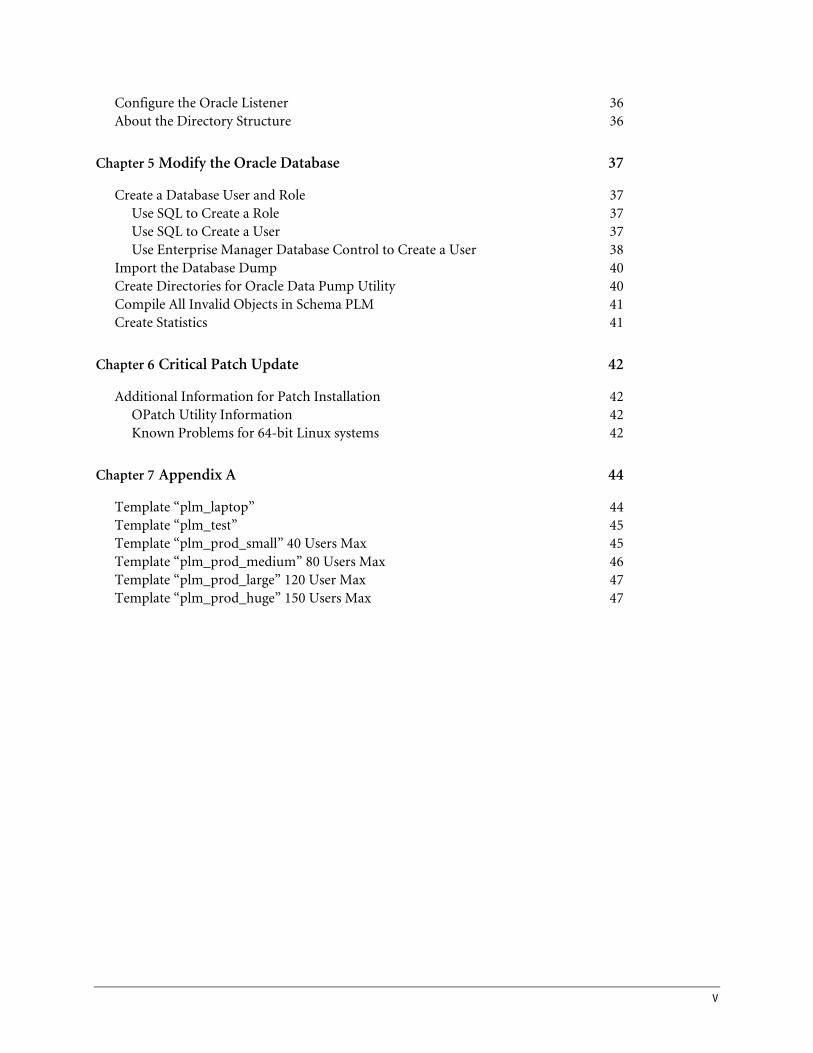
Chapter 5 Modify the Oracle Database 37
Create a Database User and Role 37 Use SQL to Create a Role 37 Use SQL to Create a User 37 Use Enterprise Manager Database Control to Create a User 38
Import the Database Dump 40 Create Directories for Oracle Data Pump Utility 40 Compile All Invalid Objects in Schema PLM 41 Create Statistics 41
Chapter 6 Critical Patch Update 42
Additional Information for Patch Installation 42 OPatch Utility Information 42 Known Problems for 64-bit Linux systems 42
Chapter 7 Appendix A 44
Template “plm_laptop” 44 Template “plm_test” 45 Template “plm_prod_small” 40 Users Max 45 Template “plm_prod_medium” 80 Users Max 46 Template “plm_prod_large” 120 User Max 47 Template “plm_prod_huge” 150 Users Max 47
v

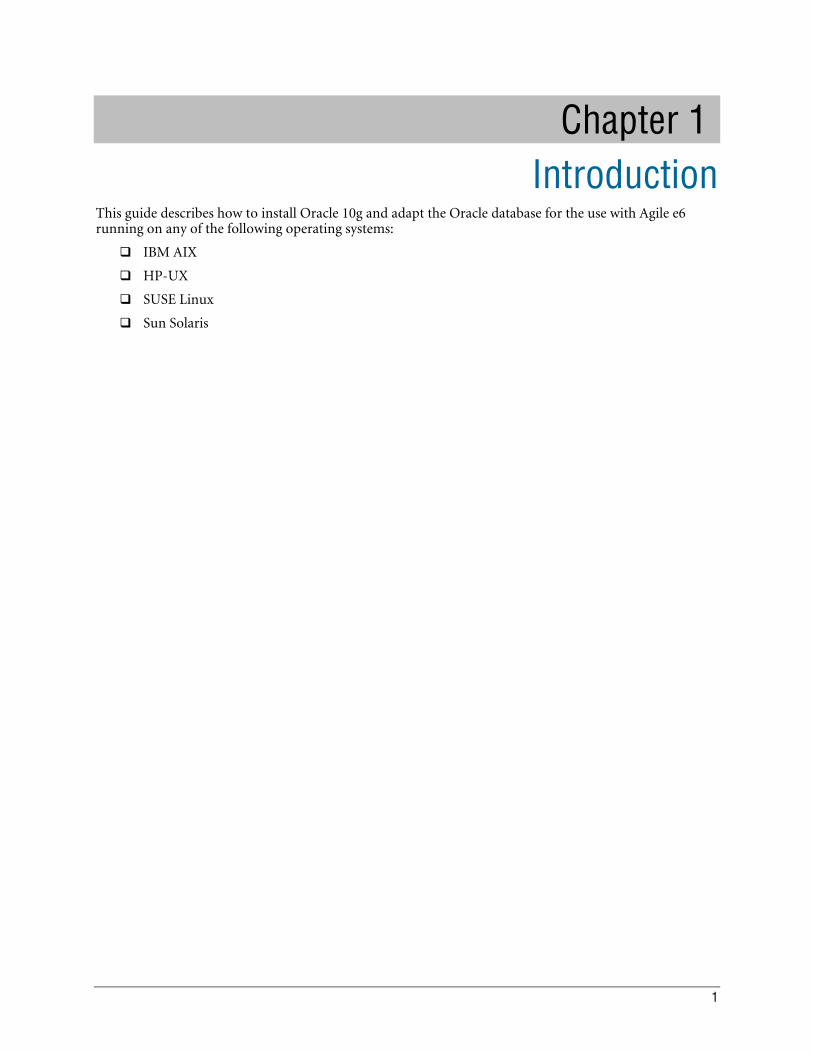
Chapter 1 Introduction
This guide describes how to install Oracle 10g and adapt the Oracle database for the use with Agile e6 running on any of the following operating systems:
IBM AIX
HP-UX
SUSE Linux
Sun Solaris
1
Agile e6
Chapter 2 Requirements
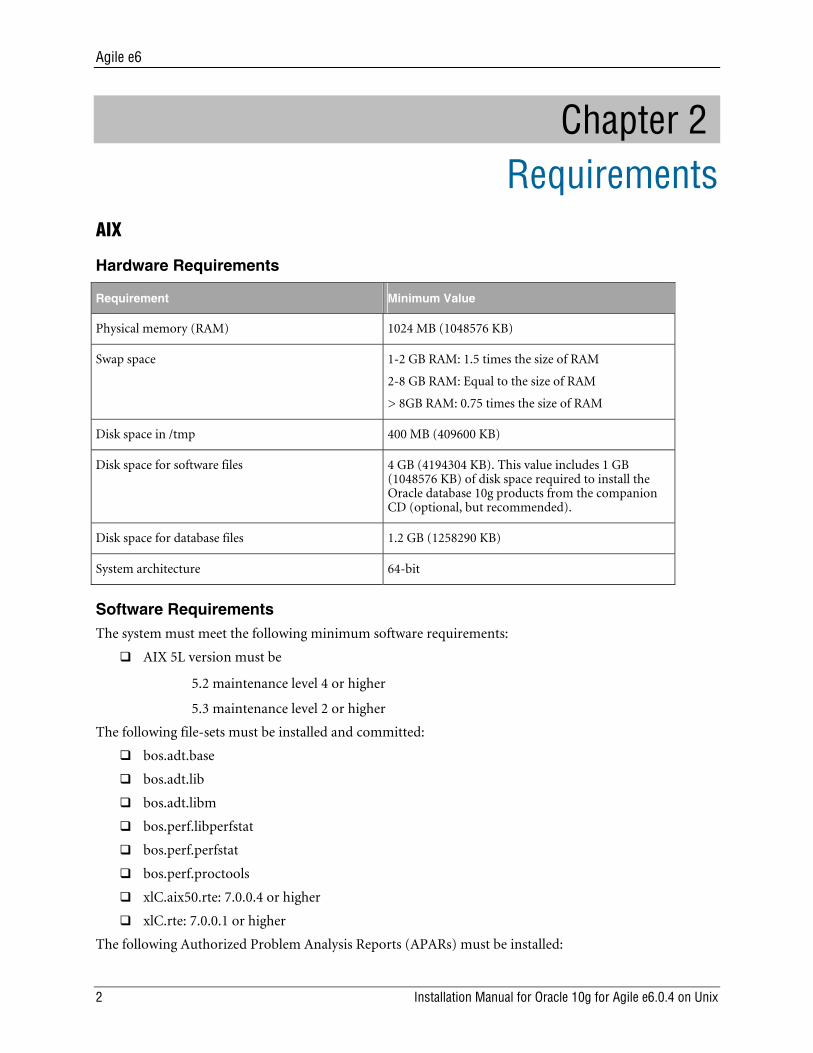
AIX
Hardware Requirements
Requirement Minimum Value
Physical memory (RAM) 1024 MB (1048576 KB)
Swap space 1-2 GB RAM: 1.5 times the size of RAM
2-8 GB RAM: Equal to the size of RAM
> 8GB RAM: 0.75 times the size of RAM
Disk space in /tmp 400 MB (409600 KB)
Disk space for software files 4 GB (4194304 KB). This value includes 1 GB (1048576 KB) of disk space required to install the Oracle database 10g products from the companion CD (optional, but recommended).
Disk space for database files 1.2 GB (1258290 KB)
System architecture 64-bit
Software Requirements The system must meet the following minimum software requirements:
AIX 5L version must be
5.2 maintenance level 4 or higher
5.3 maintenance level 2 or higher
The following file-sets must be installed and committed:
bos.adt.base
bos.adt.lib
bos.adt.libm
bos.perf.libperfstat
bos.perf.perfstat
bos.perf.proctools
xlC.aix50.rte: 7.0.0.4 or higher
xlC.rte: 7.0.0.1 or higher
The following Authorized Problem Analysis Reports (APARs) must be installed:
2 Installation Manual for Oracle 10g for Agile e6.0.4 on Unix
Chapter 2 Requirements
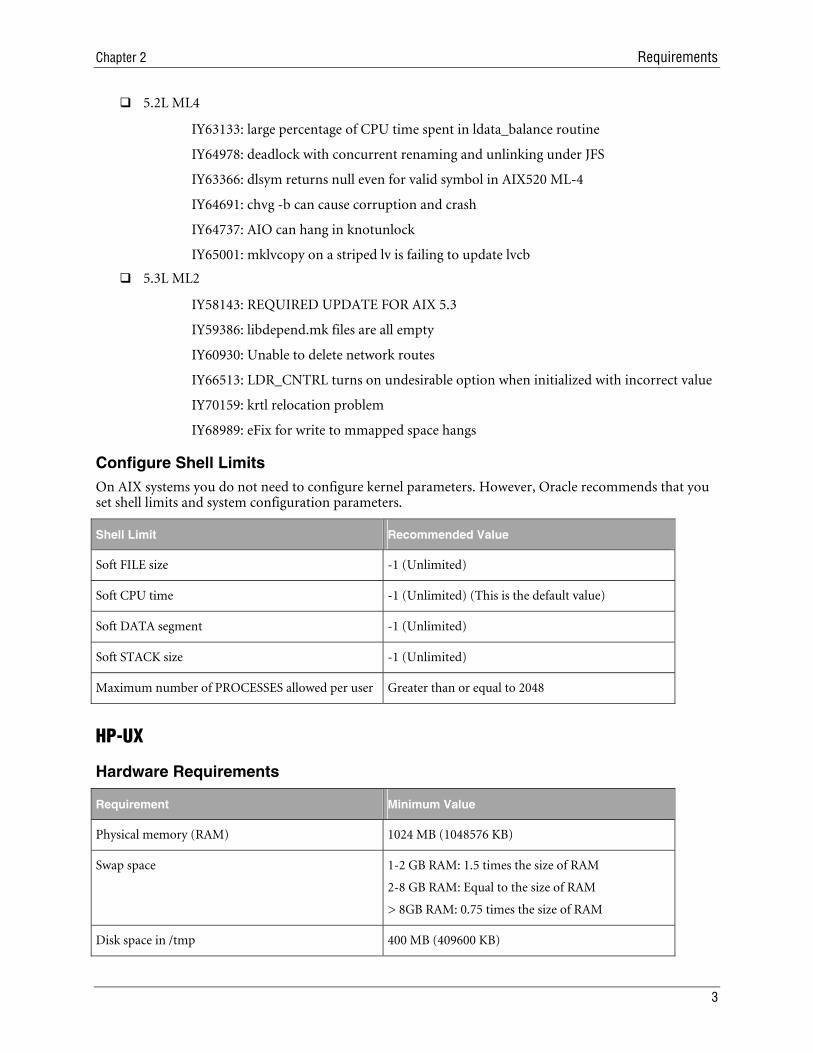
5.2L ML4
IY63133: large percentage of CPU time spent in ldata_balance routine
IY64978: deadlock with concurrent renaming and unlinking under JFS
IY63366: dlsym returns null even for valid symbol in AIX520 ML-4
IY64691: chvg -b can cause corruption and crash
IY64737: AIO can hang in knotunlock
IY65001: mklvcopy on a striped lv is failing to update lvcb
5.3L ML2
IY58143: REQUIRED UPDATE FOR AIX 5.3
IY59386: libdepend.mk files are all empty
IY60930: Unable to delete network routes
IY66513: LDR_CNTRL turns on undesirable option when initialized with incorrect value
IY70159: krtl relocation problem
IY68989: eFix for write to mmapped space hangs
Configure Shell Limits On AIX systems you do not need to configure kernel parameters. However, Oracle recommends that you set shell limits and system configuration parameters.
Shell Limit Recommended Value
Soft FILE size -1 (Unlimited)
Soft CPU time -1 (Unlimited) (This is the default value)
Soft DATA segment -1 (Unlimited)
Soft STACK size -1 (Unlimited)
Maximum number of PROCESSES allowed per user Greater than or equal to 2048
HP-UX
Hardware Requirements
Requirement Minimum Value
Physical memory (RAM) 1024 MB (1048576 KB)
Swap space 1-2 GB RAM: 1.5 times the size of RAM
2-8 GB RAM: Equal to the size of RAM
> 8GB RAM: 0.75 times the size of RAM
Disk space in /tmp 400 MB (409600 KB)
3

Agile e6
Disk space for software files 3.5 GB (3670016 KB). This value includes 1 GB (1048576 KB) of disk space required to install the Oracle database 10g products from the companion CD (optional, but recommended).
Disk space for database files 1.2 GB (1258290 KB)
System architecture 64-bit
Software Requirements The system must meet the following minimum software requirements:
HP-UX must be
HP-UX 11i (11.11) PA-RISC
HP-UX 11i Quality Pack (GOLDQPK11i), Dec 2004 or later must be installed.
If GOLDQPK is not installed then these two patch kits need to be installed: GOLDAPPS11i, December 2004 or later GOLDBASE11i, December 2004 or later
HP-UX 11v2 (11.23) PA-RISC
The following patches must be installed:
11.11
PHNE_31097: ONC/NFS general release/performance patch
PHSS_31221: HP aC++ -AA runtime libraries (aCC A.03.60)
PHSS_30970: ld(1) and linker tools cumulative patch
11.23
PHSS_31849: linker + fdp cumulative patch
PHSS_31852: aC++ Runtime (PA A.03.61)
You must install any additional recommended patches for Java SDK 1.4.2.
Refer to the following website for more information about additional patches that may be required by JDK 1.4.2: http://www.hp.com/products1/unix/java/patches/index.html
Kernel Parameters Verify that the following kernel parameters are set either to the formula or to values greater than, or equal to the recommended value shown:
Parameter Recommended Value
ksi_alloc_max (nproc*8)
executable_stack 0
max_thread_proc 1024
4 Installation Manual for Oracle 10g for Agile e6.0.4 on Unix
Chapter 2 Requirements
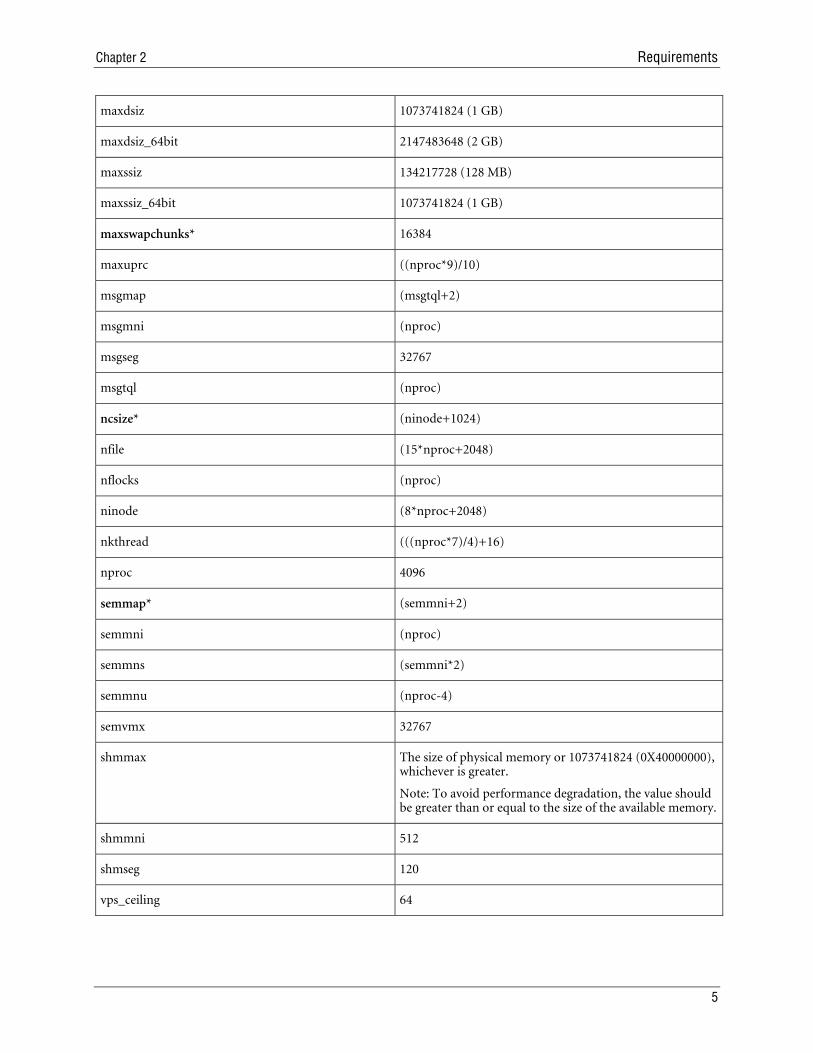
maxdsiz 1073741824 (1 GB)
maxdsiz_64bit 2147483648 (2 GB)
maxssiz 134217728 (128 MB)
maxssiz_64bit 1073741824 (1 GB)
maxswapchunks* 16384
maxuprc ((nproc*9)/10)
msgmap (msgtql+2)
msgmni (nproc)
msgseg 32767
msgtql (nproc)
ncsize* (ninode+1024)
nfile (15*nproc+2048)
nflocks (nproc)
ninode (8*nproc+2048)
nkthread (((nproc*7)/4)+16)
nproc 4096
semmap* (semmni+2)
semmni (nproc)
semmns (semmni*2)
semmnu (nproc-4)
semvmx 32767
shmmax The size of physical memory or 1073741824 (0X40000000), whichever is greater. Note: To avoid performance degradation, the value should be greater than or equal to the size of the available memory.
shmmni 512
shmseg 120
vps_ceiling 64
5
Agile e6
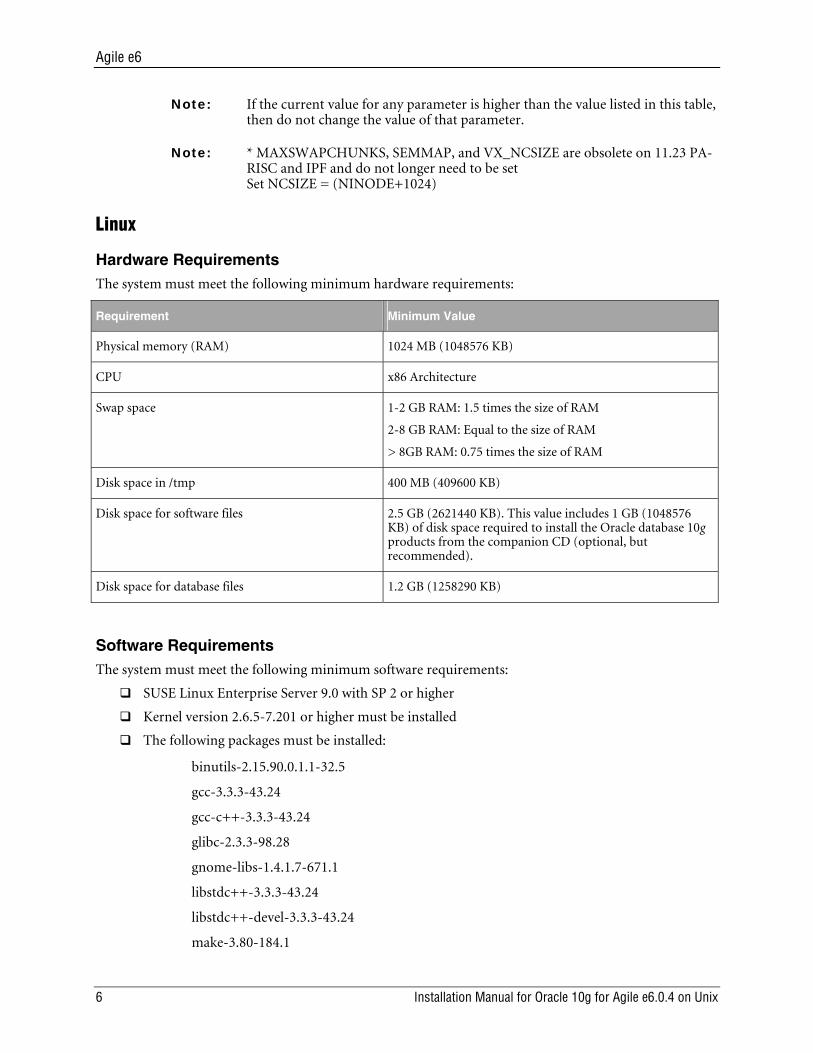
Note: If the current value for any parameter is higher than the value listed in this table, then do not change the value of that parameter.
Note: * MAXSWAPCHUNKS, SEMMAP, and VX_NCSIZE are obsolete on 11.23 PA-RISC and IPF and do not longer need to be set Set NCSIZE = (NINODE+1024)
Linux
Hardware Requirements The system must meet the following minimum hardware requirements:
Requirement Minimum Value
Physical memory (RAM) 1024 MB (1048576 KB)
CPU x86 Architecture
Swap space 1-2 GB RAM: 1.5 times the size of RAM
2-8 GB RAM: Equal to the size of RAM
> 8GB RAM: 0.75 times the size of RAM
Disk space in /tmp 400 MB (409600 KB)
Disk space for software files 2.5 GB (2621440 KB). This value includes 1 GB (1048576 KB) of disk space required to install the Oracle database 10g products from the companion CD (optional, but recommended).
Disk space for database files 1.2 GB (1258290 KB)
Software Requirements The system must meet the following minimum software requirements:
SUSE Linux Enterprise Server 9.0 with SP 2 or higher
Kernel version 2.6.5-7.201 or higher must be installed
The following packages must be installed:
binutils-2.15.90.0.1.1-32.5
gcc-3.3.3-43.24
gcc-c++-3.3.3-43.24
glibc-2.3.3-98.28
gnome-libs-1.4.1.7-671.1
libstdc++-3.3.3-43.24
libstdc++-devel-3.3.3-43.24
make-3.80-184.1
6 Installation Manual for Oracle 10g for Agile e6.0.4 on Unix
Chapter 2 Requirements
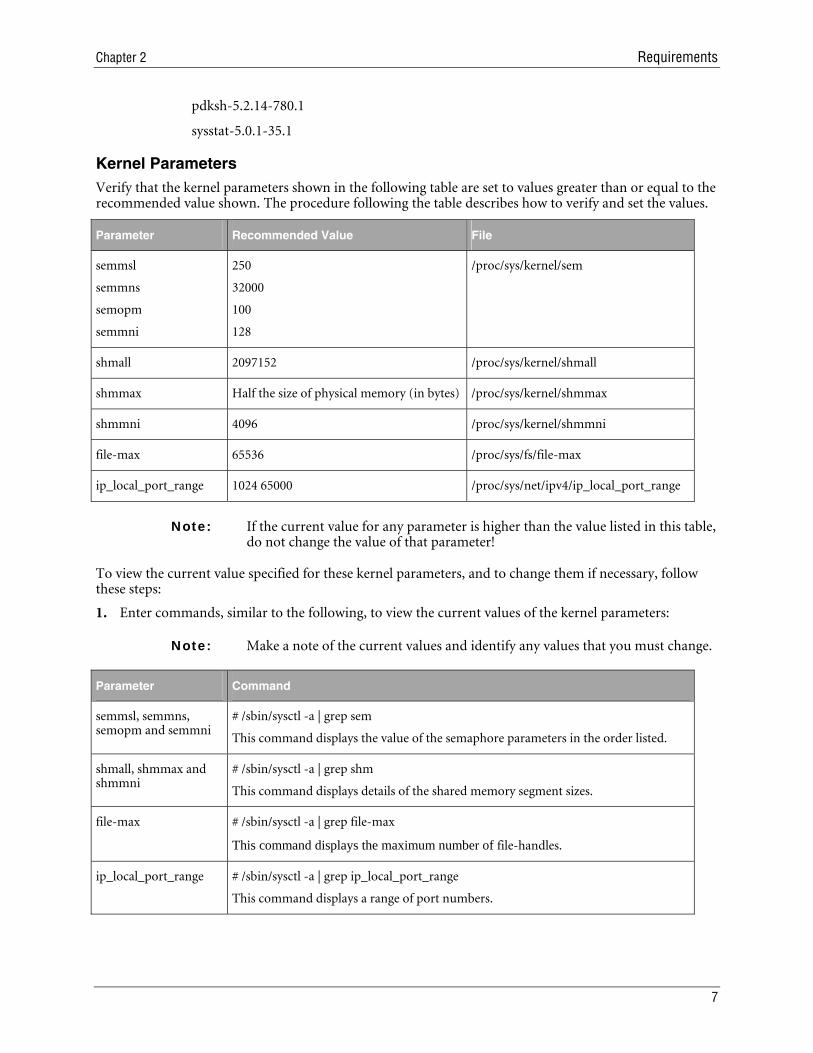
pdksh-5.2.14-780.1
sysstat-5.0.1-35.1
Kernel Parameters Verify that the kernel parameters shown in the following table are set to values greater than or equal to the recommended value shown. The procedure following the table describes how to verify and set the values.
Parameter Recommended Value File
semmsl
semmns
semopm
semmni
250
32000
100
128
/proc/sys/kernel/sem
shmall 2097152 /proc/sys/kernel/shmall
shmmax Half the size of physical memory (in bytes) /proc/sys/kernel/shmmax
shmmni 4096 /proc/sys/kernel/shmmni
file-max 65536 /proc/sys/fs/file-max
ip_local_port_range 1024 65000 /proc/sys/net/ipv4/ip_local_port_range
Note: If the current value for any parameter is higher than the value listed in this table, do not change the value of that parameter!
To view the current value specified for these kernel parameters, and to change them if necessary, follow these steps:
1. Enter commands, similar to the following, to view the current values of the kernel parameters:
Note: Make a note of the current values and identify any values that you must change.
Parameter Command
semmsl, semmns, semopm and semmni
# /sbin/sysctl -a | grep sem
This command displays the value of the semaphore parameters in the order listed.
shmall, shmmax and shmmni
# /sbin/sysctl -a | grep shm
This command displays details of the shared memory segment sizes.
file-max # /sbin/sysctl -a | grep file-max
This command displays the maximum number of file-handles.
ip_local_port_range # /sbin/sysctl -a | grep ip_local_port_range
This command displays a range of port numbers.
7

Agile e6
2. If the value of any kernel parameter is different to the recommended value, complete the following steps:
Using any text editor, create or edit the /etc/sysctl.conf file and add or edit lines similar to the following:
Note: Include lines only for the kernel parameter values that you want to change. For the semaphore parameters (kernel.sem), you must specify all four values. However, if any of the current values are larger than the recommended value specify the larger value.
kernel.shmall = 2097152 kernel.shmmax = 2147483648 kernel.shmmni = 4096 kernel.sem = 250 32000 100 128 fs.file-max = 65536 net.ipv4.ip_local_port_range = 1024 65000
By specifying the values in the /etc/sysctl.conf file, they persist when you reboot the system.
3. Enter the following command to change the current values of the kernel parameters:
/sbin/sysctl -p
4. Review the output from this command to verify that the values are correct. If the values are incorrect, edit the /etc/sysctl.conf file, then enter this command again.
5. Enter the following command to cause the system to read the /etc/sysctl.conf file when it reboots:
/sbin/chkconfig boot.sysctl on
Set Shell Limits for the Oracle User To improve the performance of the software on Linux systems, you must increase the following shell limits for the Oracle user:
Shell Limit Item in limits.conf Hard Limit
Maximum number of open file descriptors
nofile 65536
Maximum number of processes available to a single user
nproc 16384
To increase the shell limits:
1. Add the following lines to /etc/security/limits.conf file:
Oracle soft nproc 2047
Oracle hard nproc 16384
Oracle soft nofile 1024
Oracle hard nofile 65536
2. Add the following line to the /etc/pam.d/login file, if it does not already exist:
8 Installation Manual for Oracle 10g for Agile e6.0.4 on Unix
Chapter 2 Requirements
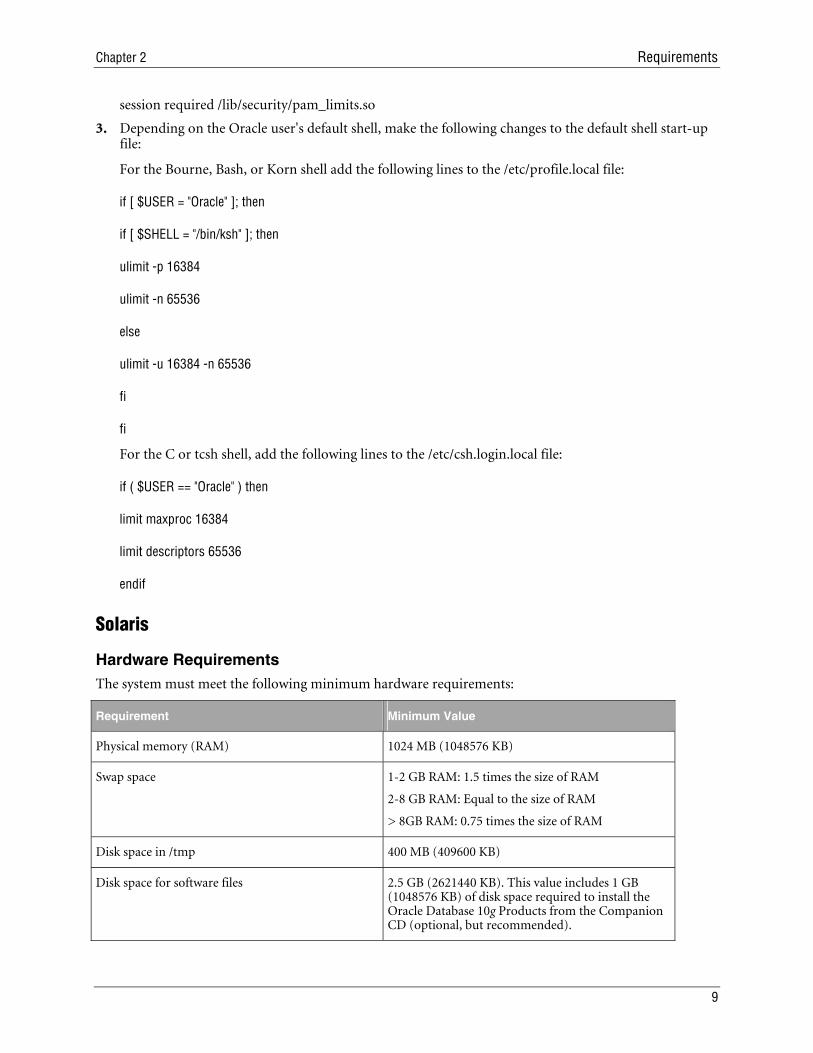
session required /lib/security/pam_limits.so
3. Depending on the Oracle user's default shell, make the following changes to the default shell start-up file:
For the Bourne, Bash, or Korn shell add the following lines to the /etc/profile.local file:
if [ $USER = "Oracle" ]; then
if [ $SHELL = "/bin/ksh" ]; then
ulimit -p 16384
ulimit -n 65536
else
ulimit -u 16384 -n 65536
fi
fi
For the C or tcsh shell, add the following lines to the /etc/csh.login.local file:
if ( $USER == "Oracle" ) then
limit maxproc 16384
limit descriptors 65536
endif
Solaris
Hardware Requirements The system must meet the following minimum hardware requirements:
Requirement Minimum Value
Physical memory (RAM) 1024 MB (1048576 KB)
Swap space 1-2 GB RAM: 1.5 times the size of RAM
2-8 GB RAM: Equal to the size of RAM
> 8GB RAM: 0.75 times the size of RAM
Disk space in /tmp 400 MB (409600 KB)
Disk space for software files 2.5 GB (2621440 KB). This value includes 1 GB (1048576 KB) of disk space required to install the Oracle Database 10g Products from the Companion CD (optional, but recommended).
9
Agile e6
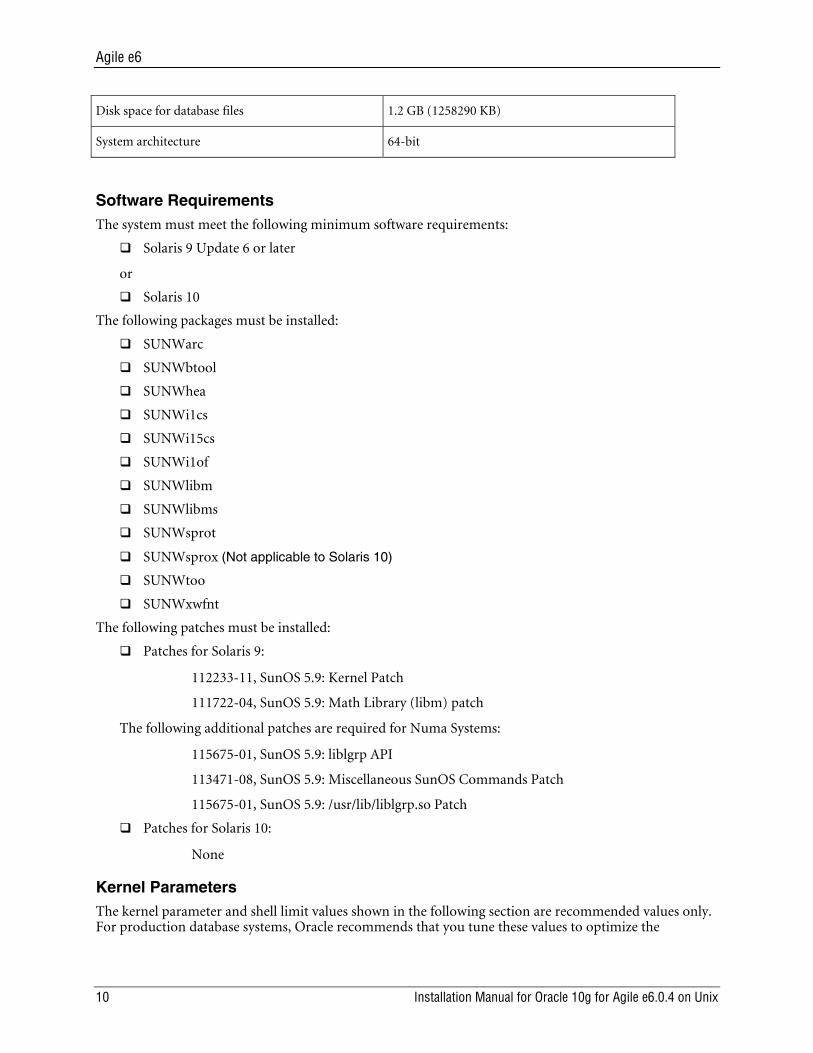
Disk space for database files 1.2 GB (1258290 KB)
System architecture 64-bit
Software Requirements The system must meet the following minimum software requirements:
Solaris 9 Update 6 or later
or
Solaris 10
The following packages must be installed:
SUNWarc
SUNWbtool
SUNWhea
SUNWi1cs
SUNWi15cs
SUNWi1of
SUNWlibm
SUNWlibms
SUNWsprot
SUNWsprox (Not applicable to Solaris 10)
SUNWtoo
SUNWxwfnt
The following patches must be installed:
Patches for Solaris 9:
112233-11, SunOS 5.9: Kernel Patch
111722-04, SunOS 5.9: Math Library (libm) patch
The following additional patches are required for Numa Systems:
115675-01, SunOS 5.9: liblgrp API
113471-08, SunOS 5.9: Miscellaneous SunOS Commands Patch
115675-01, SunOS 5.9: /usr/lib/liblgrp.so Patch
Patches for Solaris 10:
None
Kernel Parameters The kernel parameter and shell limit values shown in the following section are recommended values only. For production database systems, Oracle recommends that you tune these values to optimize the
10 Installation Manual for Oracle 10g for Agile e6.0.4 on Unix
Chapter 2 Requirements
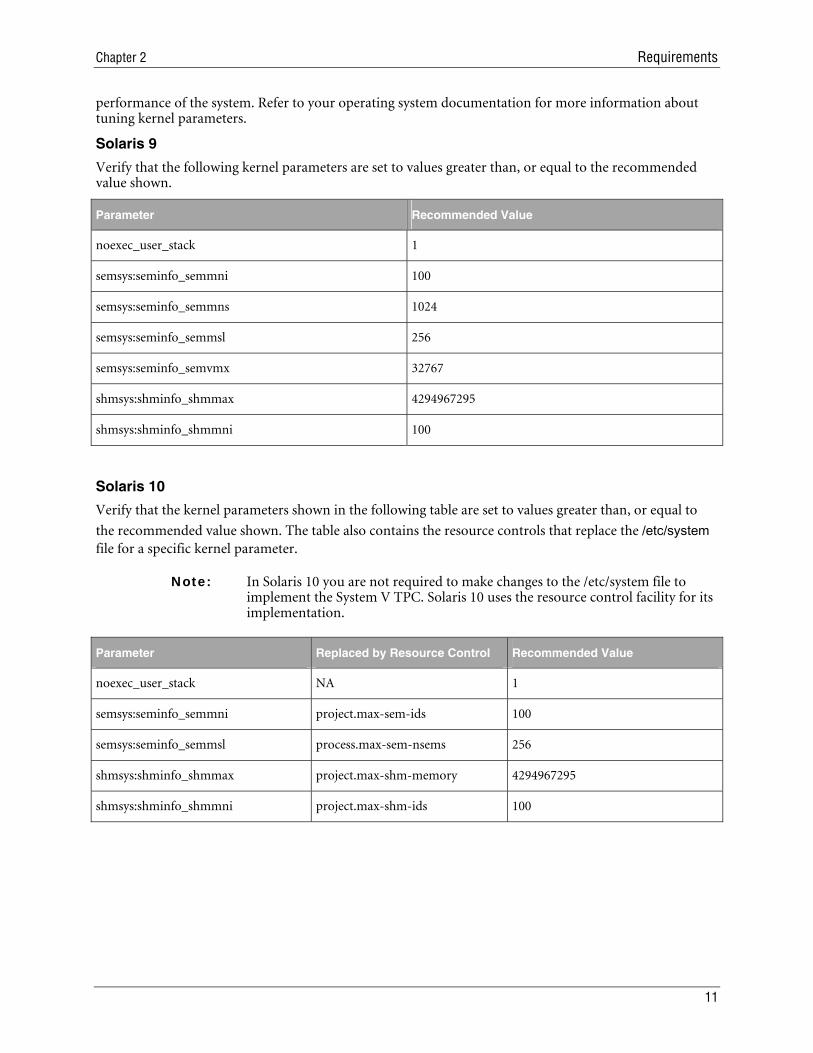
performance of the system. Refer to your operating system documentation for more information about tuning kernel parameters.
Solaris 9
Verify that the following kernel parameters are set to values greater than, or equal to the recommended value shown.
Parameter Recommended Value
noexec_user_stack 1
semsys:seminfo_semmni 100
semsys:seminfo_semmns 1024
semsys:seminfo_semmsl 256
semsys:seminfo_semvmx 32767
shmsys:shminfo_shmmax 4294967295
shmsys:shminfo_shmmni 100
Solaris 10
Verify that the kernel parameters shown in the following table are set to values greater than, or equal to
the recommended value shown. The table also contains the resource controls that replace the /etc/system file for a specific kernel parameter.
Note: In Solaris 10 you are not required to make changes to the /etc/system file to implement the System V TPC. Solaris 10 uses the resource control facility for its implementation.
Parameter Replaced by Resource Control Recommended Value
noexec_user_stack NA 1
semsys:seminfo_semmni project.max-sem-ids 100
semsys:seminfo_semmsl process.max-sem-nsems 256
shmsys:shminfo_shmmax project.max-shm-memory 4294967295
shmsys:shminfo_shmmni project.max-shm-ids 100
11
Agile e6
Chapter 3 Prepare the System
Set up an Oracle OS User To create an Oracle account, do the following:
1. Create the dba group for the machine on which Oracle is being installed:
groupadd –g 1001 dba
2. Create an Oracle user “Oracle” with the home directory ”/app/Oracle” (the directory must be created first) login shell ”/bin/csh” and member of the group "dba":
useradd –u 1001 –g dba –d /app/oracle –s /bin/csh oracle
3. Log into Oracle and create the directories /app/oracle/bin, /app/oracle/product, and /app/oracle/product/10.2.
4. Create the directory, links, and mount points for distribution of the data files:
/app/oracle/mnt1/oradata/plm60
/app/oracle/mnt2/oradata/plm60
/app/oracle/mnt3/oradata/plm60
Set up the Shell Environment Variables for Oracle 10g To set up the shell environment variables, do the following:
1. Copy scripts from the folder doc/oracleAddOn/unix/scripts to $HOME
Take a look at the script (vi) and if necessary, change the value for ORACLE_BASE or/and ORACLE_HOME and then source the script:
chmod 754 csh_ORA10.2
source $HOME/csh_ORA10.2
2. Set file creation permissions with the “umask” command:
login:
umask 022
3. Verify the environment. 4. Log off and log in as the Oracle user to ensure all environment settings are active. 5. Type env | sort at the Unix prompt to view all environment variables.
12 Installation Manual for Oracle 10g for Agile e6.0.4 on Unix
Chapter 3 Prepare the System
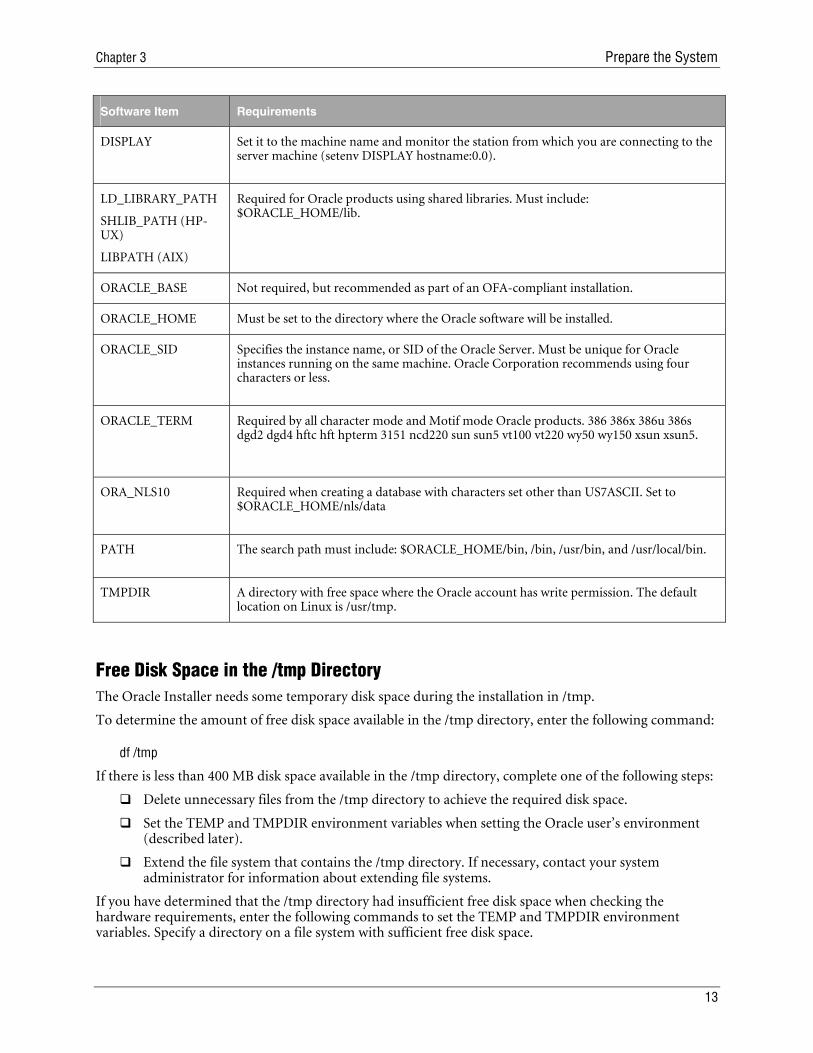
Software Item Requirements
DISPLAY Set it to the machine name and monitor the station from which you are connecting to the server machine (setenv DISPLAY hostname:0.0).
LD_LIBRARY_PATH
SHLIB_PATH (HP-UX)
LIBPATH (AIX)
Required for Oracle products using shared libraries. Must include: $ORACLE_HOME/lib.
ORACLE_BASE Not required, but recommended as part of an OFA-compliant installation.
ORACLE_HOME Must be set to the directory where the Oracle software will be installed.
ORACLE_SID Specifies the instance name, or SID of the Oracle Server. Must be unique for Oracle instances running on the same machine. Oracle Corporation recommends using four characters or less.
ORACLE_TERM Required by all character mode and Motif mode Oracle products. 386 386x 386u 386s dgd2 dgd4 hftc hft hpterm 3151 ncd220 sun sun5 vt100 vt220 wy50 wy150 xsun xsun5.
ORA_NLS10 Required when creating a database with characters set other than US7ASCII. Set to $ORACLE_HOME/nls/data
PATH The search path must include: $ORACLE_HOME/bin, /bin, /usr/bin, and /usr/local/bin.
TMPDIR A directory with free space where the Oracle account has write permission. The default location on Linux is /usr/tmp.
Free Disk Space in the /tmp Directory The Oracle Installer needs some temporary disk space during the installation in /tmp.
To determine the amount of free disk space available in the /tmp directory, enter the following command:
df /tmp
If there is less than 400 MB disk space available in the /tmp directory, complete one of the following steps:
Delete unnecessary files from the /tmp directory to achieve the required disk space.
Set the TEMP and TMPDIR environment variables when setting the Oracle user’s environment (described later).
Extend the file system that contains the /tmp directory. If necessary, contact your system administrator for information about extending file systems.
If you have determined that the /tmp directory had insufficient free disk space when checking the hardware requirements, enter the following commands to set the TEMP and TMPDIR environment variables. Specify a directory on a file system with sufficient free disk space.
13
Agile e6
Bourne, Bash, or Korn shell:
TEMP=/directory
TMPDIR=/directory
export TEMP TMPDIR
C shell:
setenv TEMP /directory
setenv TMPDIR /directory
Copy Database Start and Stop Scripts for the Oracle Server
Note: If you install only the Oracle Client you can skip this step.
If not yet done, copy the start and stop scripts from folder doc/OracleAddOn/unix/scripts/bin to the directory /app/Oracle/bin. The default environment file ~/csh_ORA10.2 includes the directory in the search path.
start_PLM60
stop_PLM60
stop_PLM60_immediate
stop_PLM60_transactional
stop_PLM60_abort
Mount CDs to Your File System
AIX 1. If necessary, enter a command similar to the following to dismount the currently mounted disc, then
remove it from the drive:
umount <mount point>
2. Insert the disc into the CD-ROM or DVD-ROM drive. 3. To mount the disc enter a command similar to the following:
/usr/sbin/mount -rv cdrfs <device name> <mount point>
4. To run the rootpre.sh script, enter one of the following commands:
CD-ROM installation: # /cdrom/rootpre.sh
DVD-ROM installation: # /cdrom/db/rootpre.sh
14 Installation Manual for Oracle 10g for Agile e6.0.4 on Unix
Chapter 3 Prepare the System
HP-UX 1. If necessary, enter a command similar to the following to dismount the currently mounted disc, then
remove it from the drive:
/usr/sbin/umount <mount point>
2. Insert the disc into the CD-ROM or DVD-ROM drive. 3. To mount the disc enter commands similar to the following:
su - root
/usr/sbin/mount -F cdfs -o rr <device name> <mount point>
Linux 1. If necessary, enter a command similar to the following to dismount the currently mounted disc, then
remove it from the drive:
eject /media/cdrom
Note: The pathname /media/cdrom can differ depending on the installed type of drive. E.g. /media/cdrecord if you have a CD writer installed, or /media/dvd if you have a DVD-ROM installed.
2. Insert the disc into the CD-ROM or DVD-ROM drive. 3. To verify that the disc mounted automatically, enter a command similar to the following:
ls /media/cdrom
4. If this command fails to display the contents of the disc, enter a command similar to the following:
mount -t iso9660 /dev/cdrom /media/cdrom
Solaris The operating system should automatically recognize the inserted CD and mount it to /cdrom or /CDROM. To release the CD use the command eject /cdrom.
If the automatic mount does not run, use the following commands with root privileges to mount the CD:
mount -r -F hsfs device_name /cdrom
mount -r -F /dev/... /cdrom
15
Agile e6
Chapter 4 Install Oracle 10g
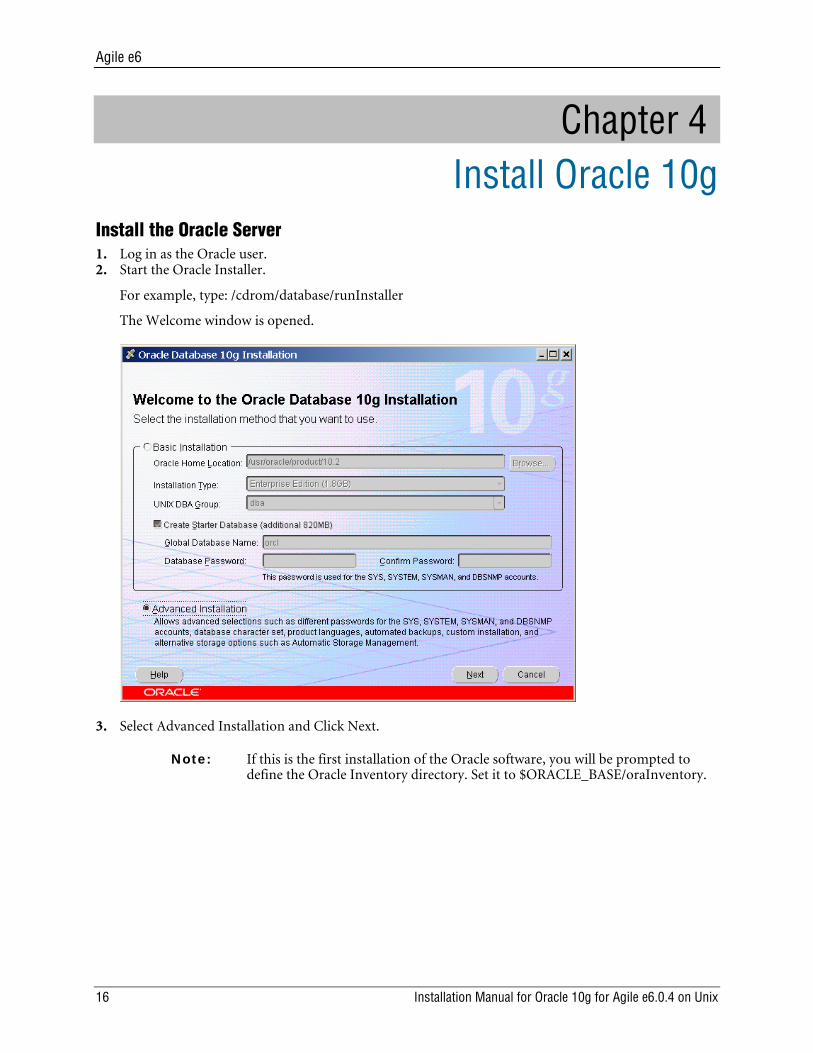
Install the Oracle Server 1. Log in as the Oracle user. 2. Start the Oracle Installer.
For example, type: /cdrom/database/runInstaller
The Welcome window is opened.
3. Select Advanced Installation and Click Next.
Note: If this is the first installation of the Oracle software, you will be prompted to define the Oracle Inventory directory. Set it to $ORACLE_BASE/oraInventory.
16 Installation Manual for Oracle 10g for Agile e6.0.4 on Unix
Chapter 4 Install Oracle 10g
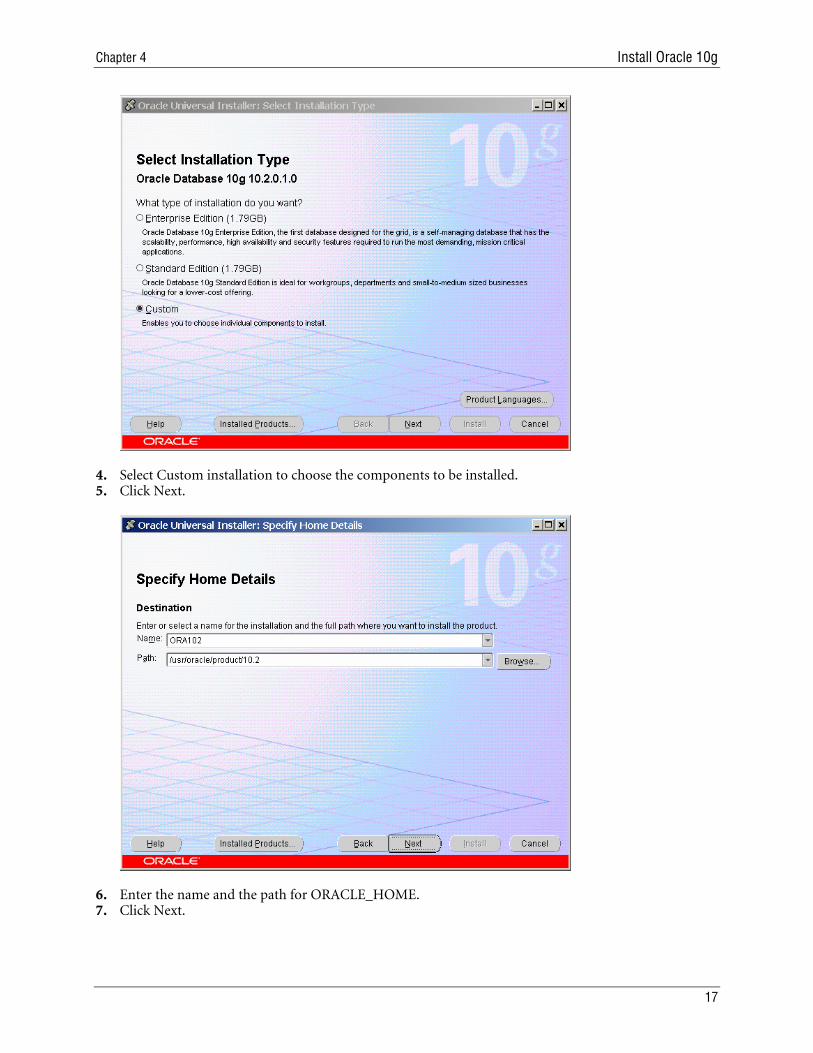
4. Select Custom installation to choose the components to be installed. 5. Click Next.
6. Enter the name and the path for ORACLE_HOME. 7. Click Next.
17

Agile e6
8. Select the components you want to install from the product list and click Next. 9. Oracle will check the OS requirements. Ignore the message ‘kernel parameter noexec_user_stack not
found’ and click Next.
If some other checks fail, stop the installation and check once again if all requirements are met (see Requirements chapter above).
18 Installation Manual for Oracle 10g for Agile e6.0.4 on Unix
Chapter 4 Install Oracle 10g
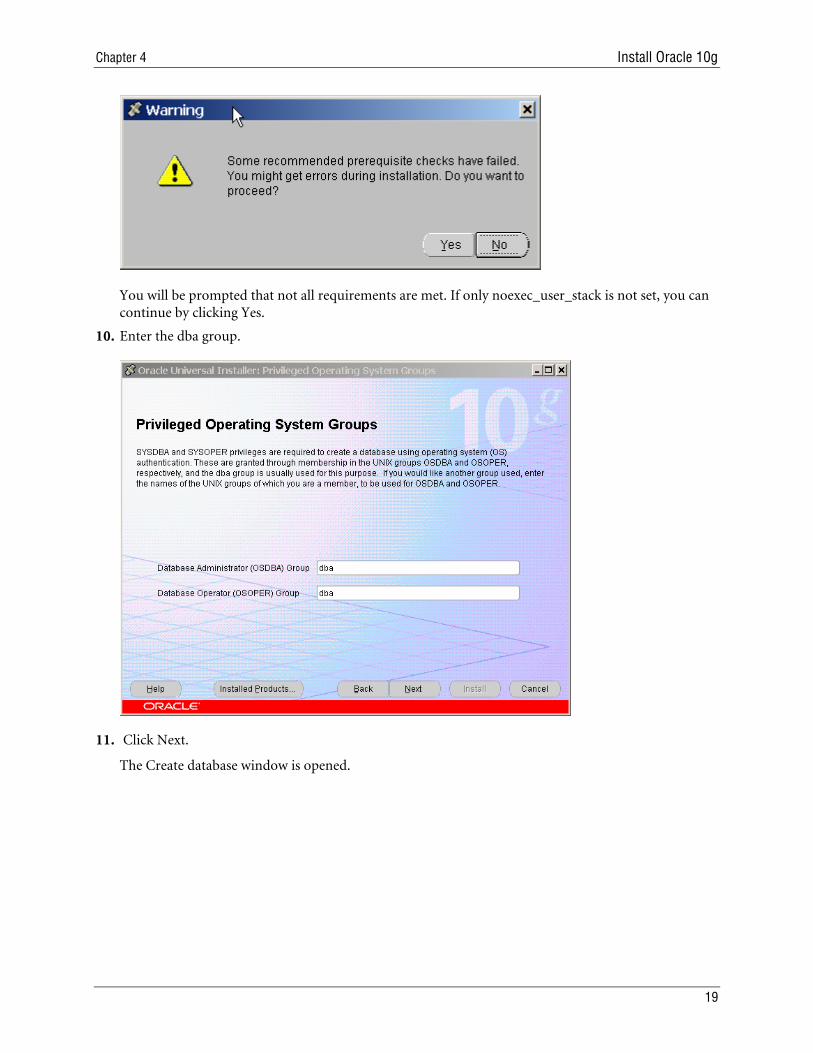
You will be prompted that not all requirements are met. If only noexec_user_stack is not set, you can continue by clicking Yes.
10. Enter the dba group.
11. Click Next.
The Create database window is opened.
19
Agile e6
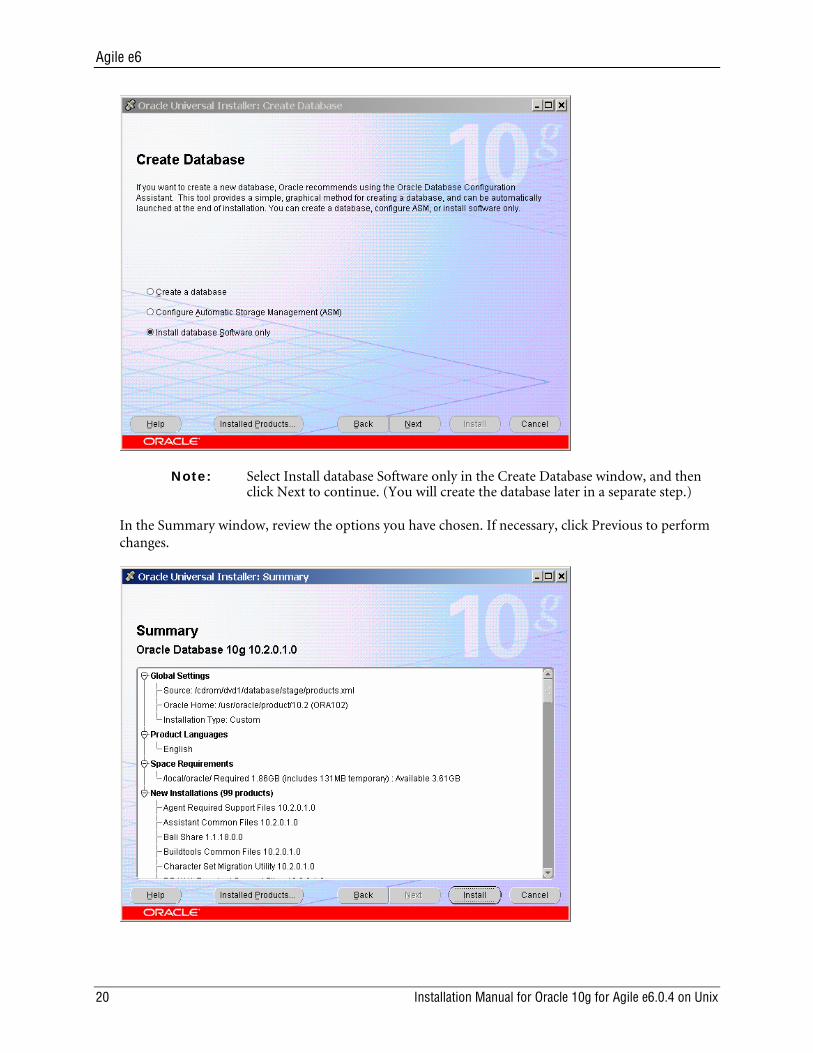
Note: Select Install database Software only in the Create Database window, and then click Next to continue. (You will create the database later in a separate step.)
In the Summary window, review the options you have chosen. If necessary, click Previous to perform changes.
20 Installation Manual for Oracle 10g for Agile e6.0.4 on Unix
Chapter 4 Install Oracle 10g
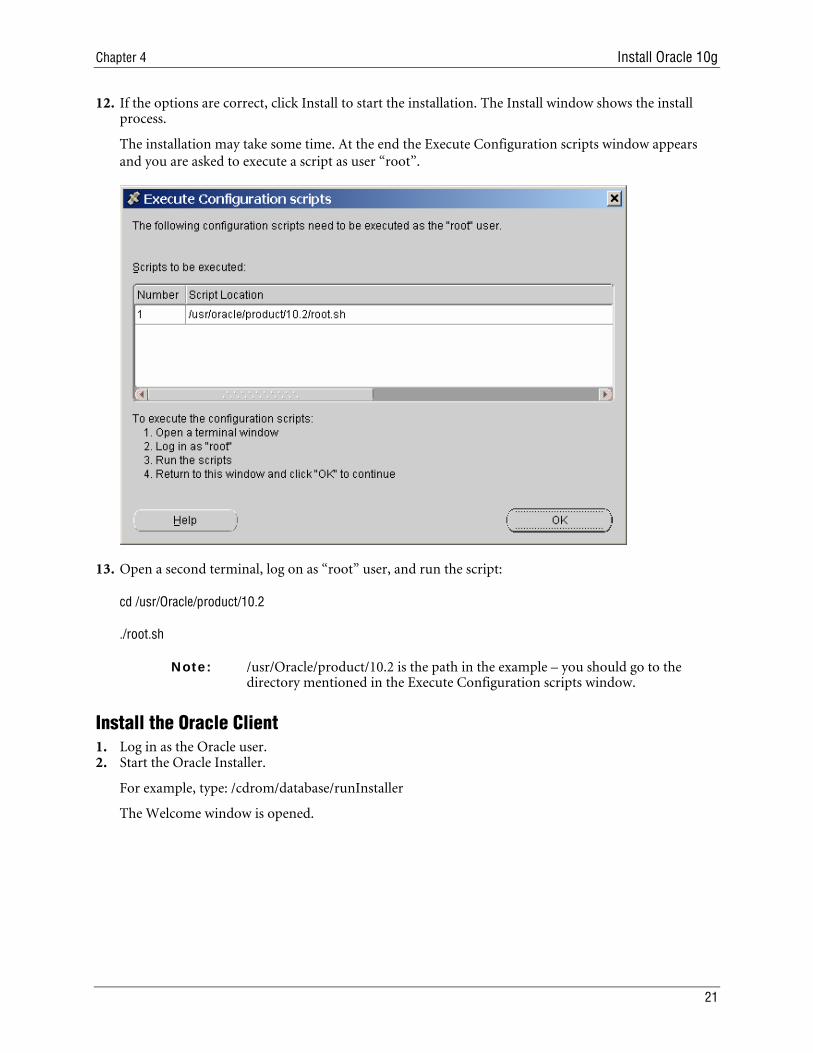
12. If the options are correct, click Install to start the installation. The Install window shows the install process.
The installation may take some time. At the end the Execute Configuration scripts window appears and you are asked to execute a script as user “root”.
13. Open a second terminal, log on as “root” user, and run the script:
cd /usr/Oracle/product/10.2
./root.sh
Note: /usr/Oracle/product/10.2 is the path in the example – you should go to the directory mentioned in the Execute Configuration scripts window.
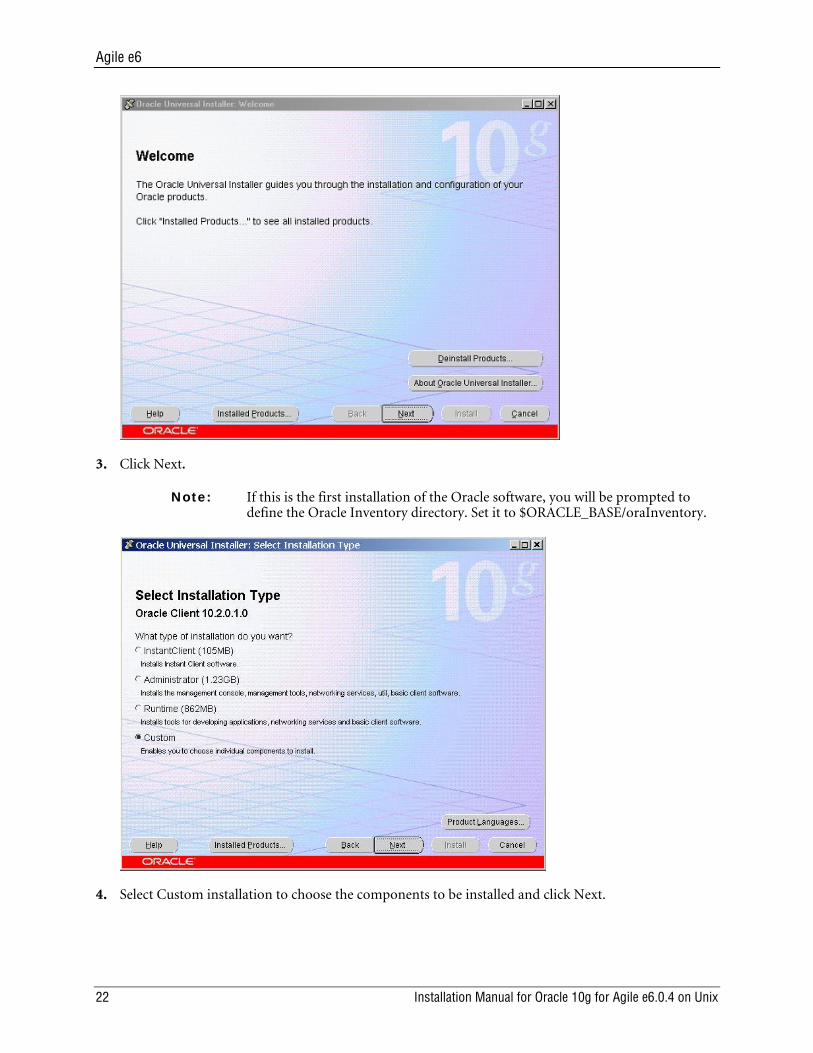
Install the Oracle Client 1. Log in as the Oracle user. 2. Start the Oracle Installer.
For example, type: /cdrom/database/runInstaller
The Welcome window is opened.
21
Agile e6
3. Click Next.
Note: If this is the first installation of the Oracle software, you will be prompted to define the Oracle Inventory directory. Set it to $ORACLE_BASE/oraInventory.
4. Select Custom installation to choose the components to be installed and click Next.
22 Installation Manual for Oracle 10g for Agile e6.0.4 on Unix
Chapter 4 Install Oracle 10g
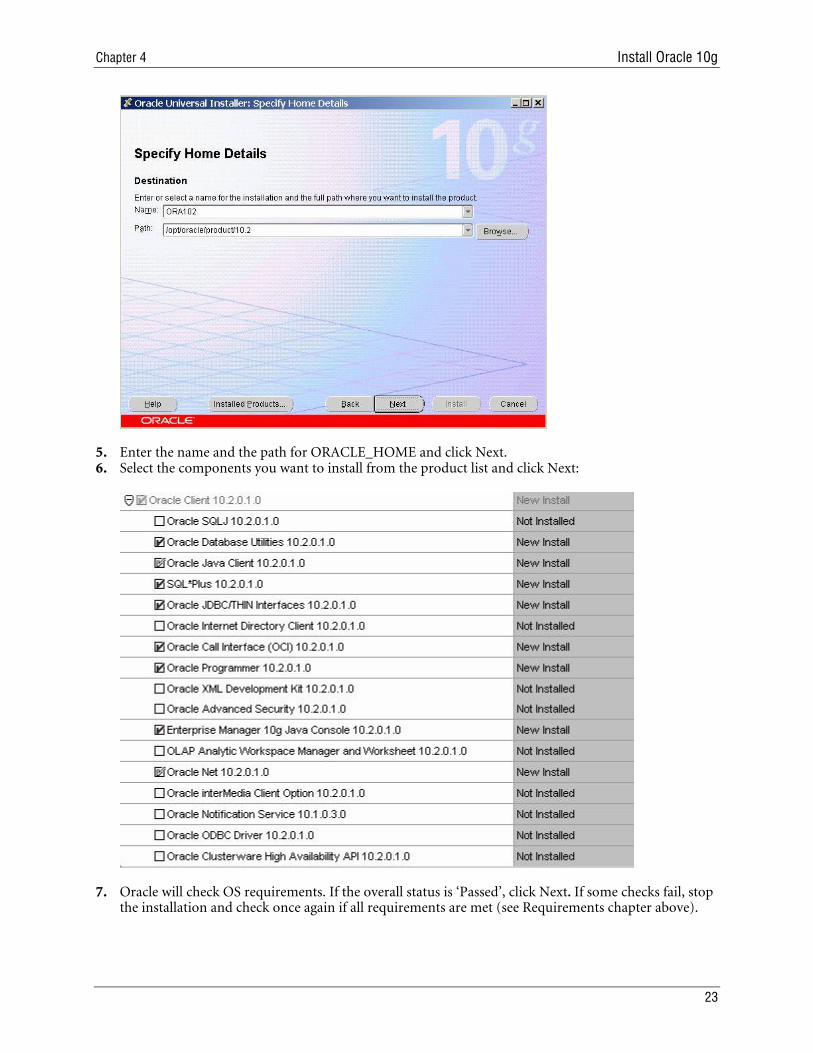
5. Enter the name and the path for ORACLE_HOME and click Next. 6. Select the components you want to install from the product list and click Next:
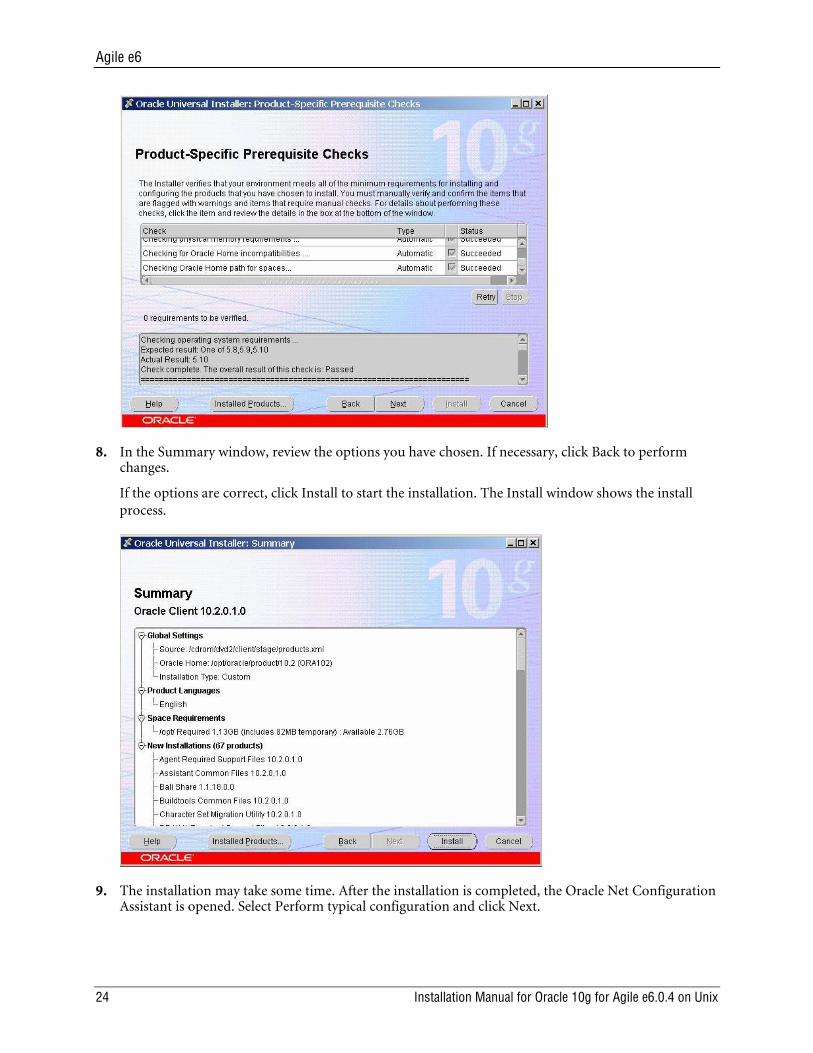
7. Oracle will check OS requirements. If the overall status is ‘Passed’, click Next. If some checks fail, stop the installation and check once again if all requirements are met (see Requirements chapter above).
23
Agile e6
8. In the Summary window, review the options you have chosen. If necessary, click Back to perform changes.
If the options are correct, click Install to start the installation. The Install window shows the install process.
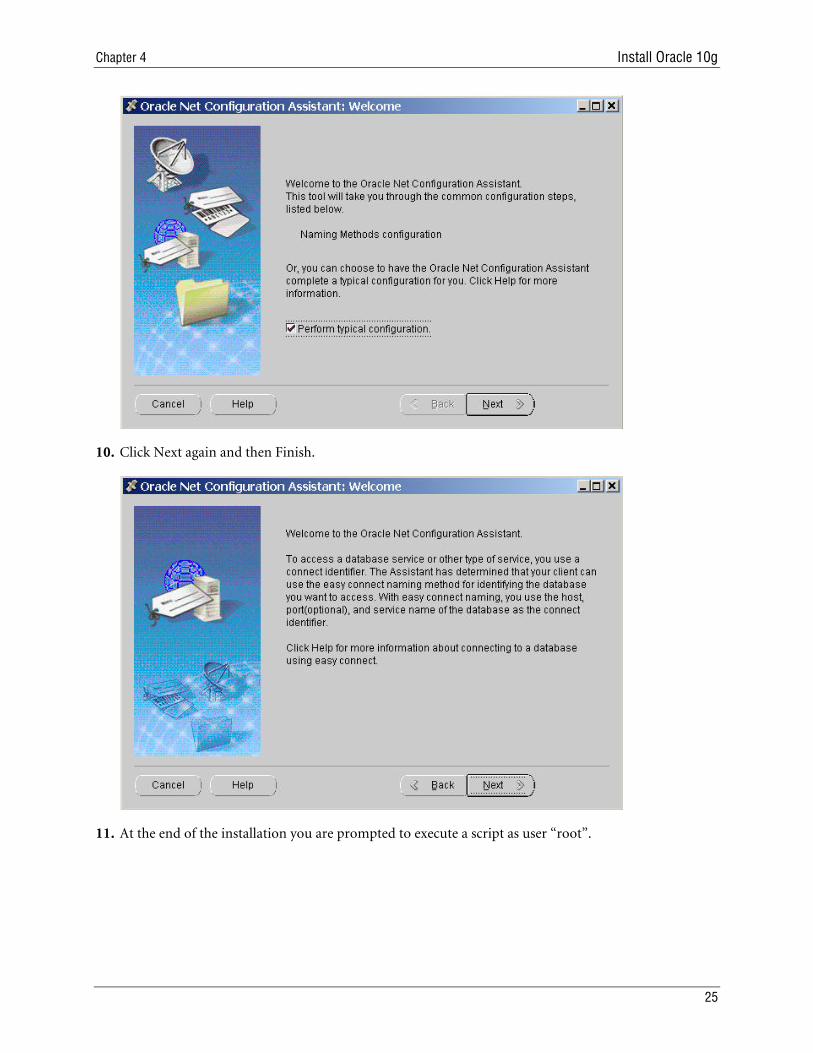
9. The installation may take some time. After the installation is completed, the Oracle Net Configuration Assistant is opened. Select Perform typical configuration and click Next.
24 Installation Manual for Oracle 10g for Agile e6.0.4 on Unix
Chapter 4 Install Oracle 10g
10. Click Next again and then Finish.
11. At the end of the installation you are prompted to execute a script as user “root”.
25
Agile e6
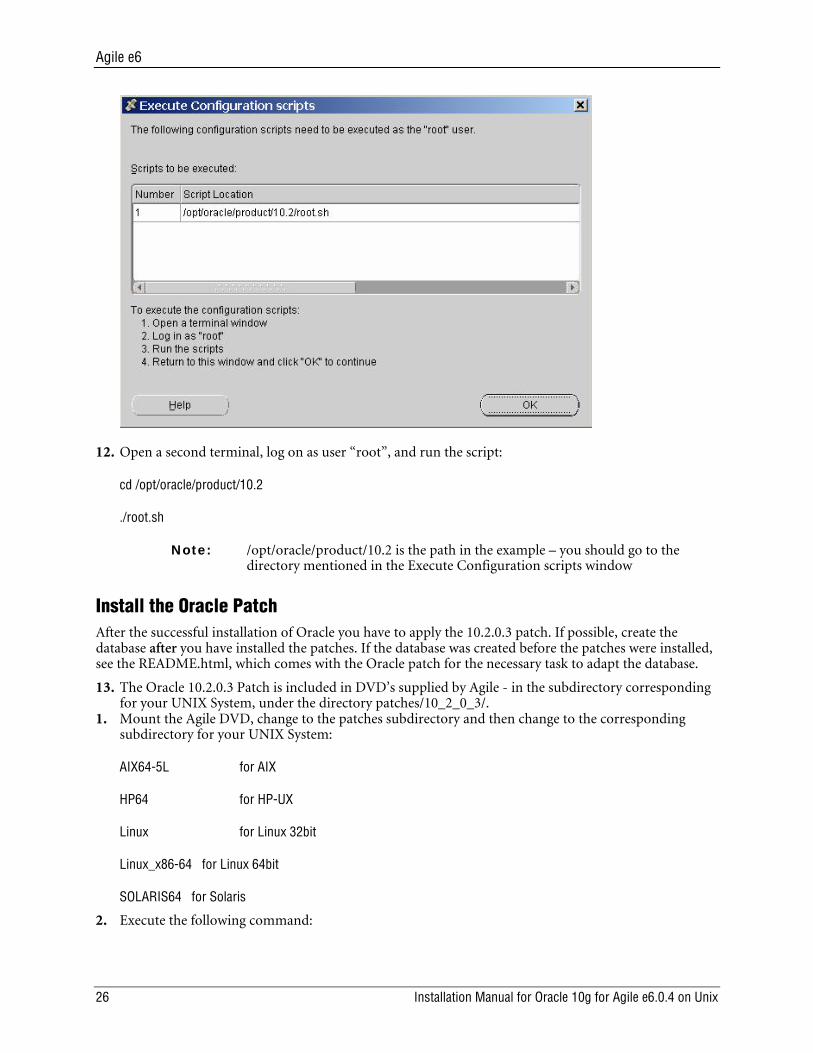
12. Open a second terminal, log on as user “root”, and run the script:
cd /opt/oracle/product/10.2
./root.sh
Note: /opt/oracle/product/10.2 is the path in the example – you should go to the directory mentioned in the Execute Configuration scripts window
Install the Oracle Patch After the successful installation of Oracle you have to apply the 10.2.0.3 patch. If possible, create the database after you have installed the patches. If the database was created before the patches were installed, see the README.html, which comes with the Oracle patch for the necessary task to adapt the database.
13. The Oracle 10.2.0.3 Patch is included in DVD’s supplied by Agile - in the subdirectory corresponding for your UNIX System, under the directory patches/10_2_0_3/.
1. Mount the Agile DVD, change to the patches subdirectory and then change to the corresponding subdirectory for your UNIX System:
AIX64-5L for AIX
HP64 for HP-UX
Linux for Linux 32bit
Linux_x86-64 for Linux 64bit
SOLARIS64 for Solaris
2. Execute the following command:
26 Installation Manual for Oracle 10g for Agile e6.0.4 on Unix
Chapter 4 Install Oracle 10g
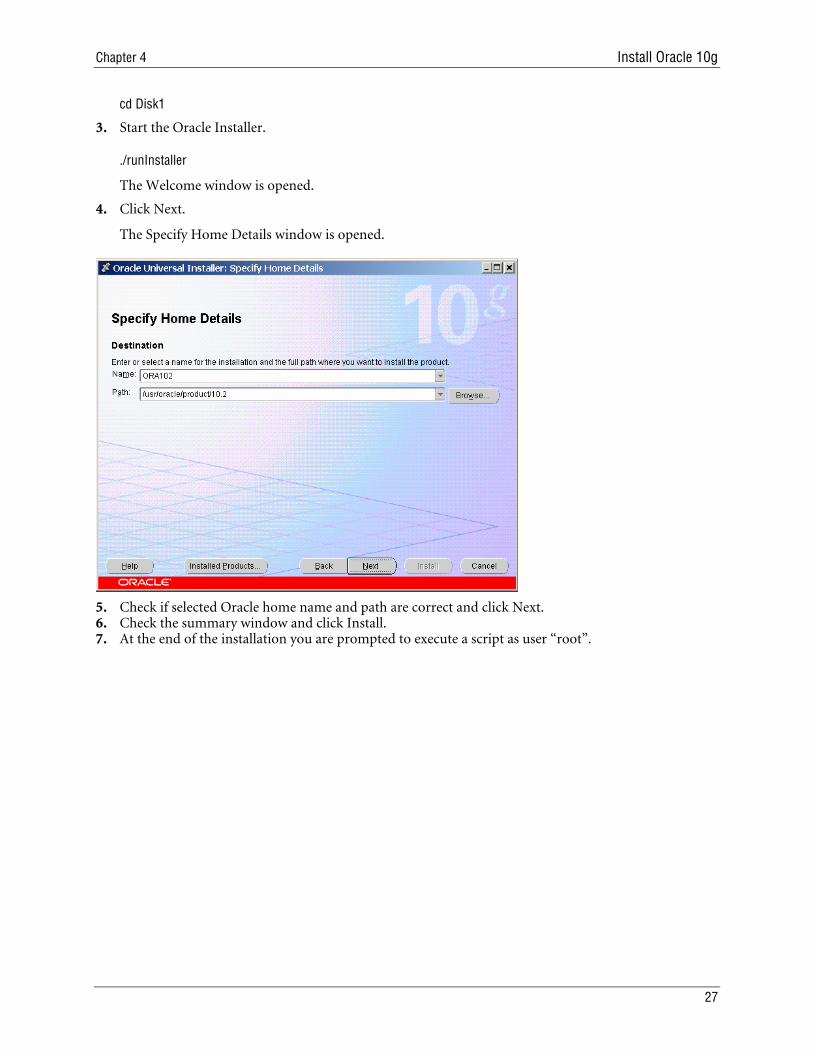
cd Disk1
3. Start the Oracle Installer.
./runInstaller
The Welcome window is opened.
4. Click Next.
The Specify Home Details window is opened.
5. Check if selected Oracle home name and path are correct and click Next. 6. Check the summary window and click Install. 7. At the end of the installation you are prompted to execute a script as user “root”.
27
Agile e6
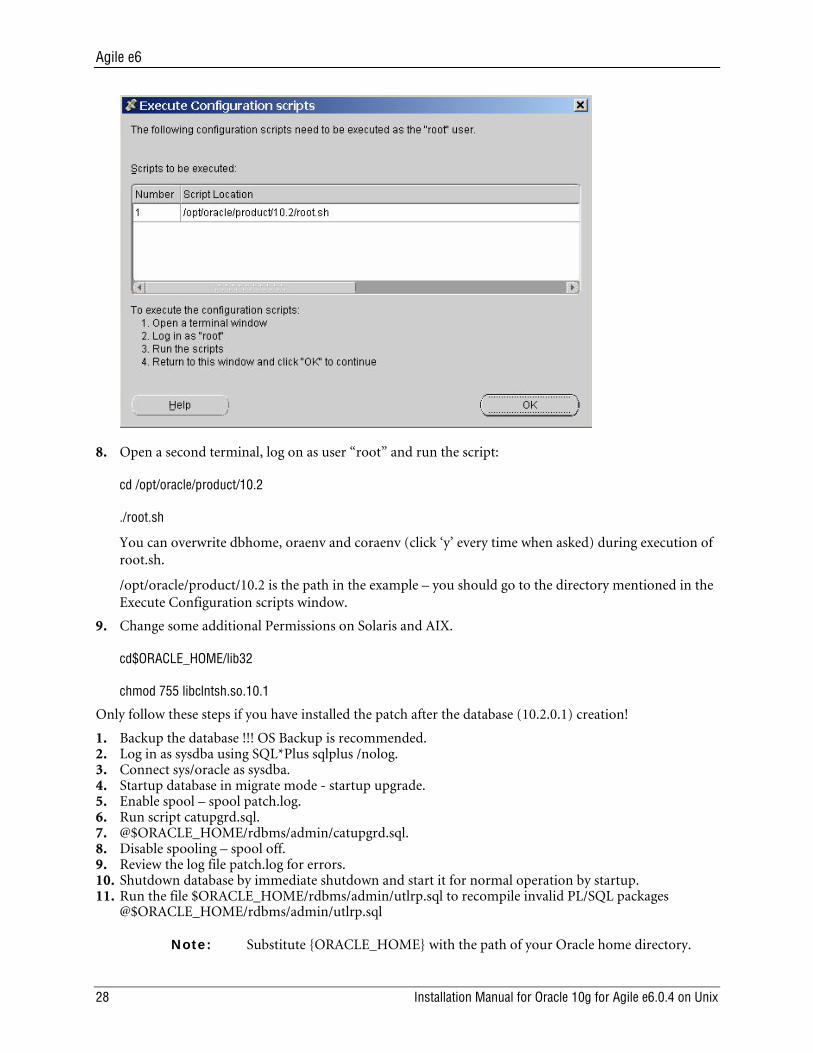
8. Open a second terminal, log on as user “root” and run the script:
cd /opt/oracle/product/10.2
./root.sh
You can overwrite dbhome, oraenv and coraenv (click ‘y’ every time when asked) during execution of root.sh.
/opt/oracle/product/10.2 is the path in the example – you should go to the directory mentioned in the Execute Configuration scripts window.
9. Change some additional Permissions on Solaris and AIX.
cd$ORACLE_HOME/lib32
chmod 755 libclntsh.so.10.1
Only follow these steps if you have installed the patch after the database (10.2.0.1) creation!
1. Backup the database !!! OS Backup is recommended. 2. Log in as sysdba using SQL*Plus sqlplus /nolog. 3. Connect sys/oracle as sysdba. 4. Startup database in migrate mode - startup upgrade. 5. Enable spool – spool patch.log. 6. Run script catupgrd.sql. 7. @$ORACLE_HOME/rdbms/admin/catupgrd.sql. 8. Disable spooling – spool off. 9. Review the log file patch.log for errors. 10. Shutdown database by immediate shutdown and start it for normal operation by startup. 11. Run the file $ORACLE_HOME/rdbms/admin/utlrp.sql to recompile invalid PL/SQL packages
@$ORACLE_HOME/rdbms/admin/utlrp.sql
Note: Substitute {ORACLE_HOME} with the path of your Oracle home directory.
28 Installation Manual for Oracle 10g for Agile e6.0.4 on Unix
Chapter 4 Install Oracle 10g
Create the Database Using the Database Configuration Assistant (DBCA) templates, which are provided in the folder doc/OracleAddOn/unix/templates, the database will be create. DBCA templates include database options, initialization parameters, and storage information for data files, tablespaces, control files, and redo logs.
Six different templates are predefined to meet different requirements according to the purpose and size of the Agile e6 database installation.
Template Name Description
plm_laptop Small sized database especially designed for laptop installations.
plm_test Database designed for test installations. Number of concurrent users < 40. No archiving.
plm_prod_small Database designed for productive use. Number of concurrent users < 40. Archiving.
plm_prod_medium
Database designed for productive use. Number of concurrent users: 40 – 80. Archiving.
plm_prod_large Database designed for productive use. Number of concurrent users: 80 – 120. Archiving.
plm_prod_huge Database designed for productive use. Number of concurrent users: 120 – 150. Archiving.
Additional information on significant database parameters and settings of each template can be found in the Appendix. Decide which template corresponds to your needs. It is also possible to adapt any of the values during the database creation process.
Copy the DBCA template file (e.g. plm_test.dbt) to {ORACLE_HOME}/assistants/dbca/templates. 1. Start the Oracle Database Configuration Assistant
$ORACLE_HOME/bin/dbca
An introduction window is opened.
2. To start the database configuration click Next.
29

Agile e6
3. Select Create a Database and click Next.
A list of different templates is provided. You should also see the template that you have chosen and copied in the step above.
4. Select the template you want to use and click Next. 5. Check if the global database name and SID (default: plm60) are correct and click Next.
The next window provides the possibility to centrally manage Oracle databases using Oracle Enterprise Manager Database Control.
6. Select this option and click Next.
30 Installation Manual for Oracle 10g for Agile e6.0.4 on Unix
Chapter 4 Install Oracle 10g
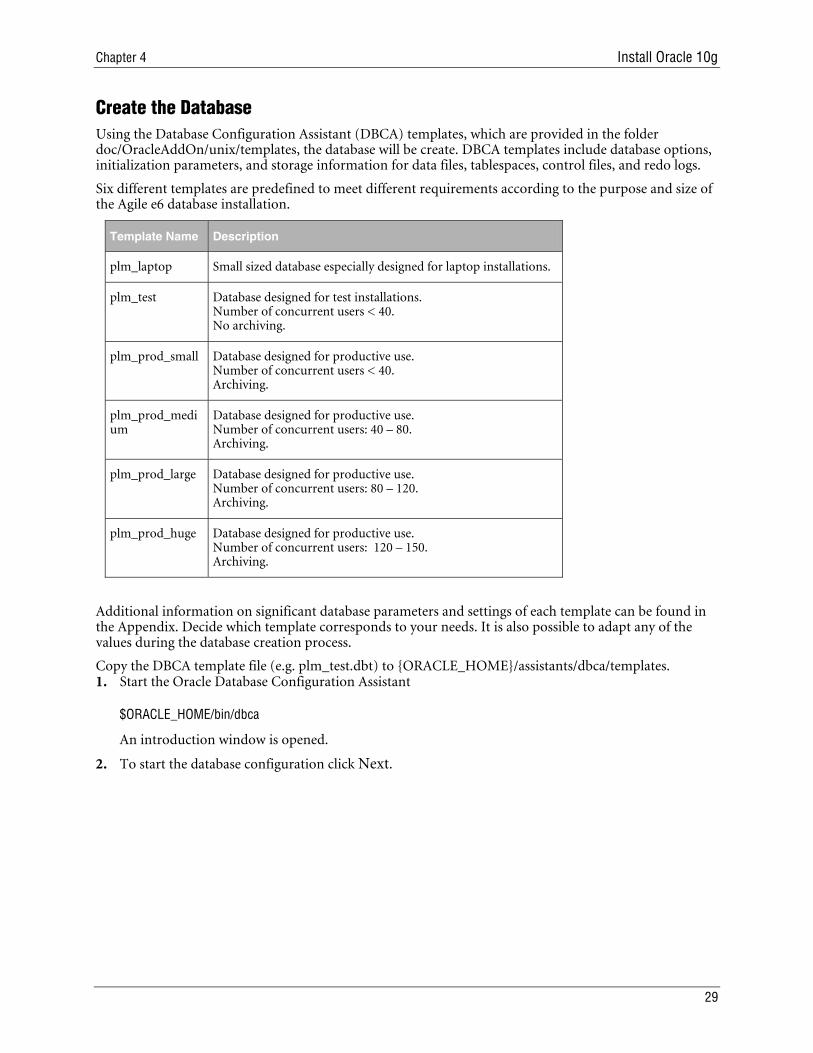
7. Enter passwords for SYS, SYSTEM, SYSMAN and DBSNMP. It is highly recommended to use different passwords for these accounts. Click Next.
The next window provides the possibility to register your database with directory service.
8. Select No, do not register the database and click Next. 9. Select File System for database storage and click Next.
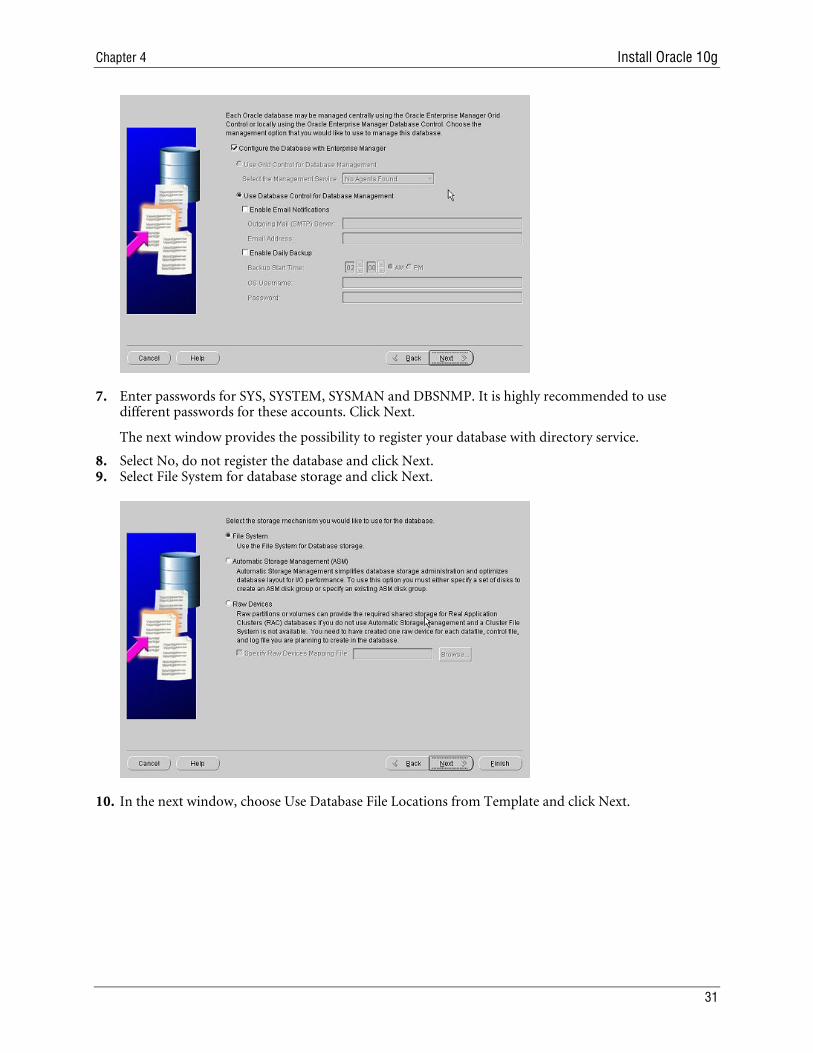
10. In the next window, choose Use Database File Locations from Template and click Next.
31
Agile e6
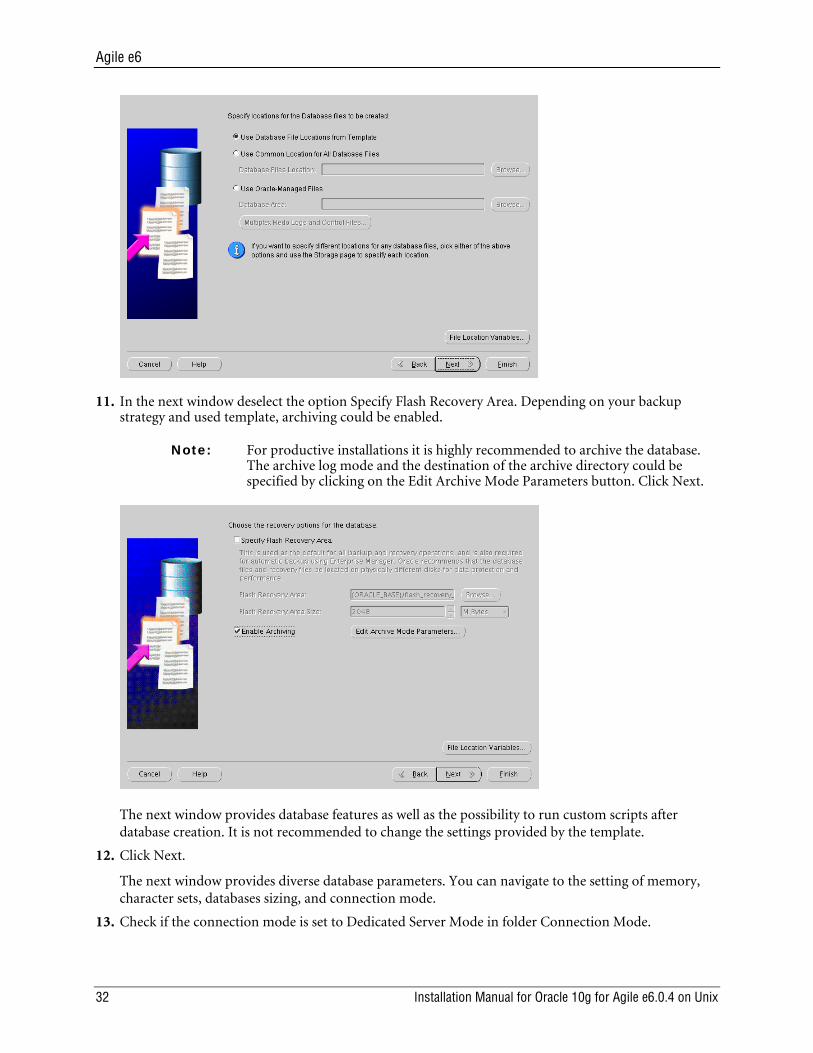
11. In the next window deselect the option Specify Flash Recovery Area. Depending on your backup strategy and used template, archiving could be enabled.
Note: For productive installations it is highly recommended to archive the database. The archive log mode and the destination of the archive directory could be specified by clicking on the Edit Archive Mode Parameters button. Click Next.
The next window provides database features as well as the possibility to run custom scripts after database creation. It is not recommended to change the settings provided by the template.
12. Click Next.
The next window provides diverse database parameters. You can navigate to the setting of memory, character sets, databases sizing, and connection mode.
13. Check if the connection mode is set to Dedicated Server Mode in folder Connection Mode.
32 Installation Manual for Oracle 10g for Agile e6.0.4 on Unix

Chapter 4 Install Oracle 10g
The values are recommended by Agile for the selected kind of database installation.
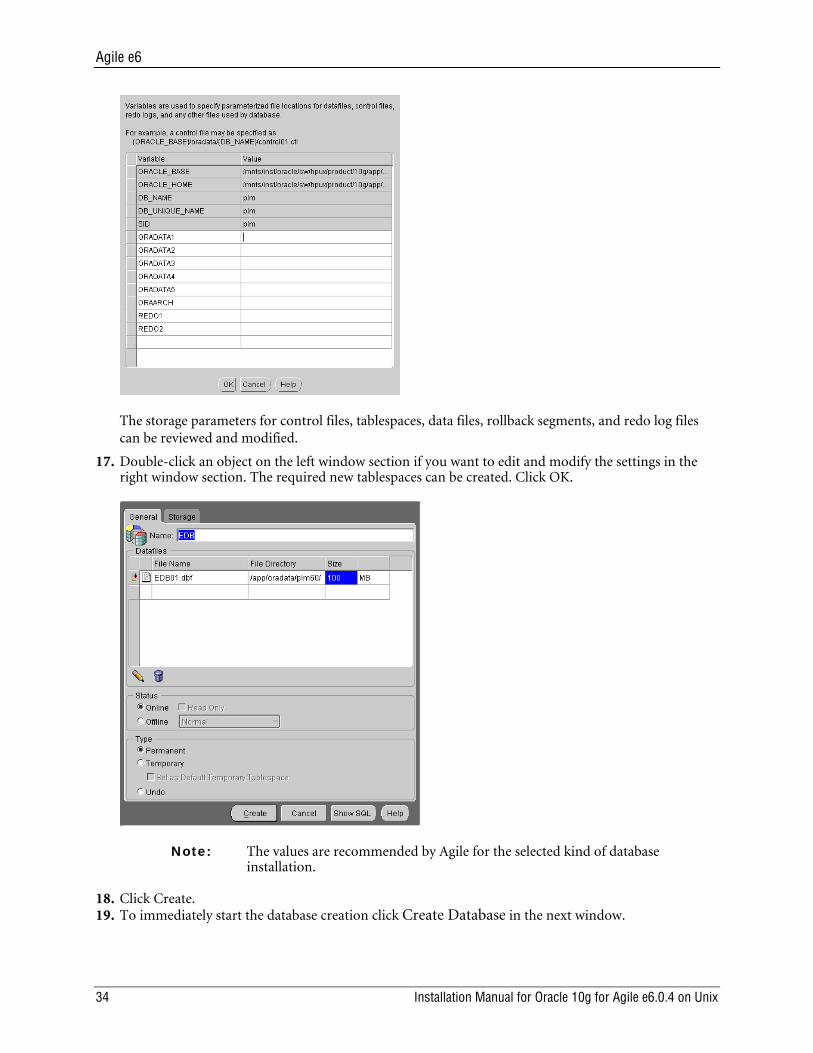
14. Click Next. 15. In the next window click File Location Variables. 16. Review and adapt the file location of your system. Enter variables mentioned in the table below, as
well as the values for them. See table for detailed information on predefined file destination variables.
Variable Description
ORADATA1 Data files of tablespaces EDB, EDB_LOB, EDB_TMPIDX
ORADATA2 Data files of tablespaces EDB_IDX, EDB_TMP
ORADATA3 Data files of temporary tablespace TEMP
ORADATA4 Data files of undo tablespace
ORADATA5 Data files of tablespaces SYSTEM, TOOLS, USERS
ORAARCH archive log files
REDO1 redo log files
REDO2 redo log files
33
Agile e6
The storage parameters for control files, tablespaces, data files, rollback segments, and redo log files can be reviewed and modified.
17. Double-click an object on the left window section if you want to edit and modify the settings in the right window section. The required new tablespaces can be created. Click OK.
Note: The values are recommended by Agile for the selected kind of database installation.
18. Click Create. 19. To immediately start the database creation click Create Database in the next window.
34 Installation Manual for Oracle 10g for Agile e6.0.4 on Unix
Chapter 4 Install Oracle 10g
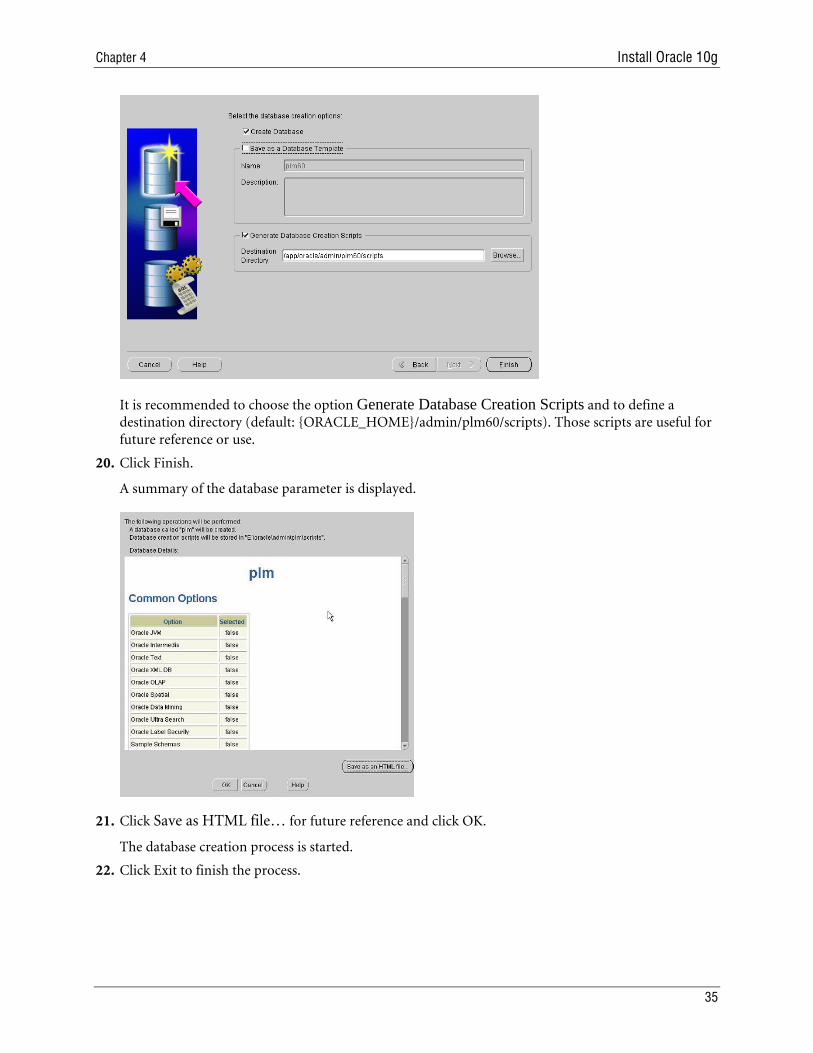
It is recommended to choose the option Generate Database Creation Scripts and to define a destination directory (default: {ORACLE_HOME}/admin/plm60/scripts). Those scripts are useful for future reference or use.
20. Click Finish.
A summary of the database parameter is displayed.
21. Click Save as HTML file… for future reference and click OK.
The database creation process is started.
22. Click Exit to finish the process.
35
Agile e6
Configure the Oracle Listener 1. Copy the listener configuration files from Agile e6 DVD, in the doc/oracleAddOn/unix directory, to
your installation.
cp listener.ora /app/oracle/product/10.2/network/admin
cp tnsnames.ora /app/oracle/product/10.2/network/admin
cp tnsnav.ora /app/oracle/product/10.2/network/admin
cp sqlnet.ora /app/oracle/product/10.2/network/admin
2. Adapt the configuration files (especially, tnsnames.ora and listener.ora to reflect the correct hostname and other information).
3. Start the listener and test the database connection.
lsnrctl start
tnsping plm60
sqlplus system@plm60
About the Directory Structure The Oracle Software is placed in the directory $ORACLE_HOME, which contains the network configuration, trace and log files.
$ORACLE_HOME -> /app/Oracle/product/10.2
$ORACLE_HOME/network/admin
$ORACLE_HOME/network/trace
$ORACLE_HOME/network/log
The directory $ORACLE_HOME/dbs contains the server parameter files.
$ORACLE_HOME/dbs/spfileplm60.ora
/app/Oracle/admin contains the create scripts, the log trace and init files of all databases /app/Oracle/admin/plm60.
bdump: alert_PLM60.log alert file, background process trace files
If an error occurs, always consult the alert file first. You can see every start and stop of the instance and every log switch. Errors are included in the file.
cdump: core dump files
create: database create scripts
pfile: instance parameter files
udump: user SQL traces
36 Installation Manual for Oracle 10g for Agile e6.0.4 on Unix
Chapter 5 Modify the Oracle Database
Chapter 5 Modify the Oracle Database
Create a Database User and Role You will need to create the Agile e6 database user and role and provide the necessary privileges and quotas. You can do this by using the commands in the following section, or using the Oracle Enterprise Manager Database Control as described in the section below.
Use SQL to Create a Role 1. Check if the plm role exists – open sqlplus session, connect as SYSTEM and execute. 2. Select role from dba_roles where role=’AGILE_E_ROLE’. 3. If the string ‘AGILE_E_ROLE’ is returned, the role already exists. Skip the role creation and continue
with the user creation. Otherwise, the role does not exist and has to be created by:
Create role AGILE_E_ROLE;
GRANT CONNECT TO AGILE_E_ROLE;
GRANT CREATE TABLE TO AGILE_E_ROLE;
GRANT CREATE VIEW TO AGILE_E_ROLE;
GRANT CREATE SYNONYM TO AGILE_E_ROLE;
GRANT CREATE DATABASE LINK TO AGILE_E_ROLE;
GRANT CREATE CLUSTER TO AGILE_E_ROLE;
GRANT CREATE SEQUENCE TO AGILE_E_ROLE;
GRANT ALTER SESSION TO AGILE_E_ROLE;
GRANT CREATE PROCEDURE TO AGILE_E_ROLE;
GRANT CREATE TRIGGER TO AGILE_E_ROLE;
GRANT ALL ON DIRECTORY ORA_DMP TO AGILE_E_ROLE;
Use SQL to Create a User 1. Create a database user (named, e.g. plm):
CREATE USER PLM
IDENTIFIED BY <PASSWORD>
DEFAULT TABLESPACE "EDB"
TEMPORARY TABLESPACE "TEMP"
37
Agile e6
PROFILE DEFAULT
QUOTA UNLIMITED ON "EDB"
QUOTA UNLIMITED ON "EDB_IDX"
QUOTA UNLIMITED ON "EDB_TMP"
QUOTA UNLIMITED ON "EDB_TMPIDX"
QUOTA UNLIMITED ON "EDB_LOB"
ACCOUNT UNLOCK;
GRANT "AGILE_E_ROLE" TO PLM;
ALTER USER PLM DEFAULT ROLE AGILE_E_ROLE;
A default script (cre_plm_usr.sql) with these commands can be found on the Agile e6 DVD in the directory doc/OracleAddOn/sql.
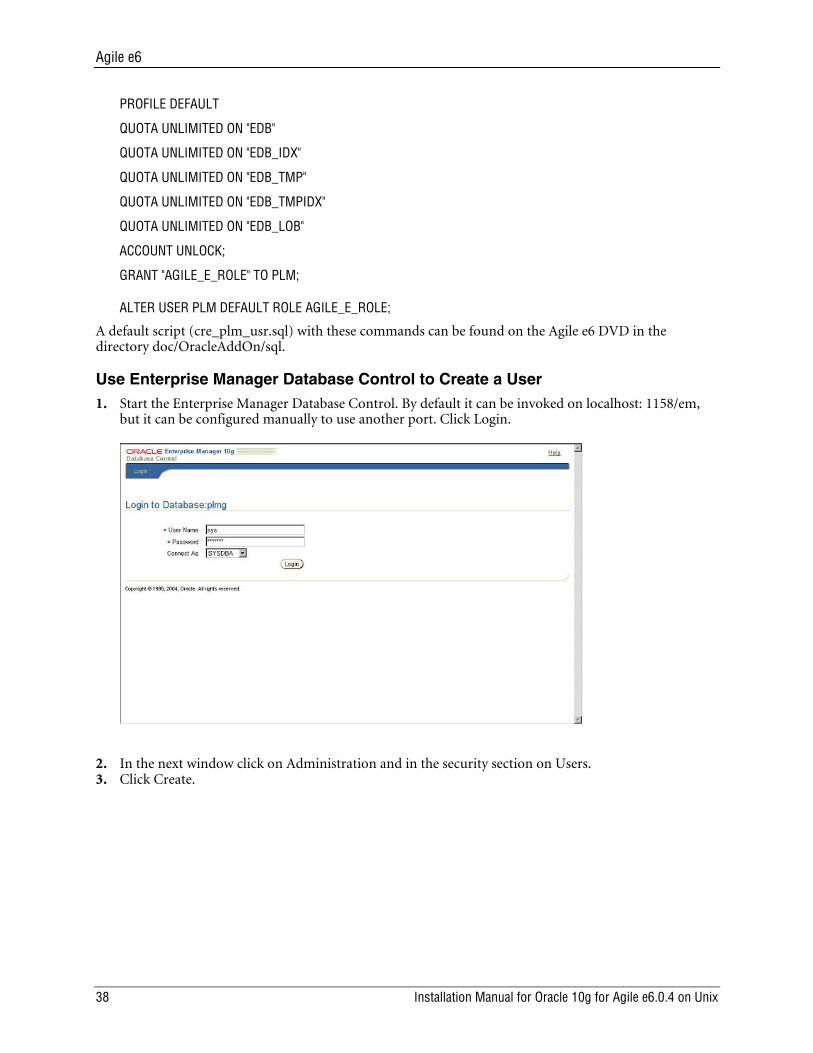
Use Enterprise Manager Database Control to Create a User 1. Start the Enterprise Manager Database Control. By default it can be invoked on localhost: 1158/em,
but it can be configured manually to use another port. Click Login.
2. In the next window click on Administration and in the security section on Users. 3. Click Create.
38 Installation Manual for Oracle 10g for Agile e6.0.4 on Unix
Chapter 5 Modify the Oracle Database
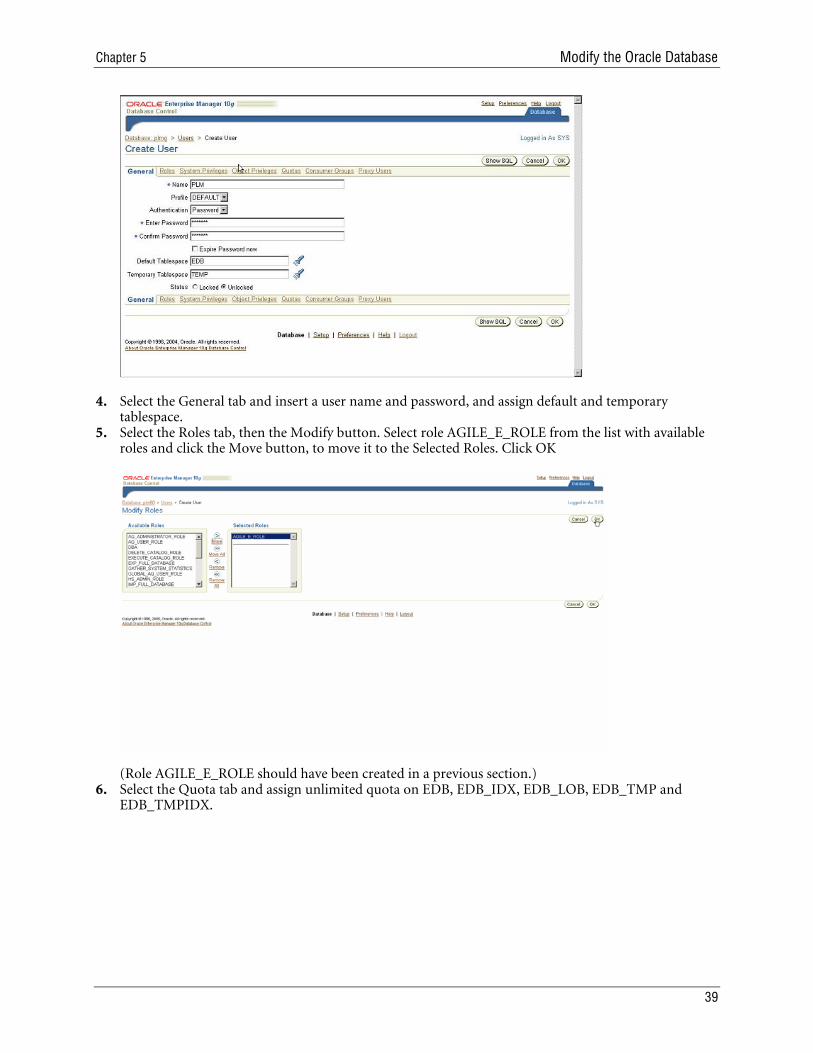
4. Select the General tab and insert a user name and password, and assign default and temporary tablespace.
5. Select the Roles tab, then the Modify button. Select role AGILE_E_ROLE from the list with available roles and click the Move button, to move it to the Selected Roles. Click OK
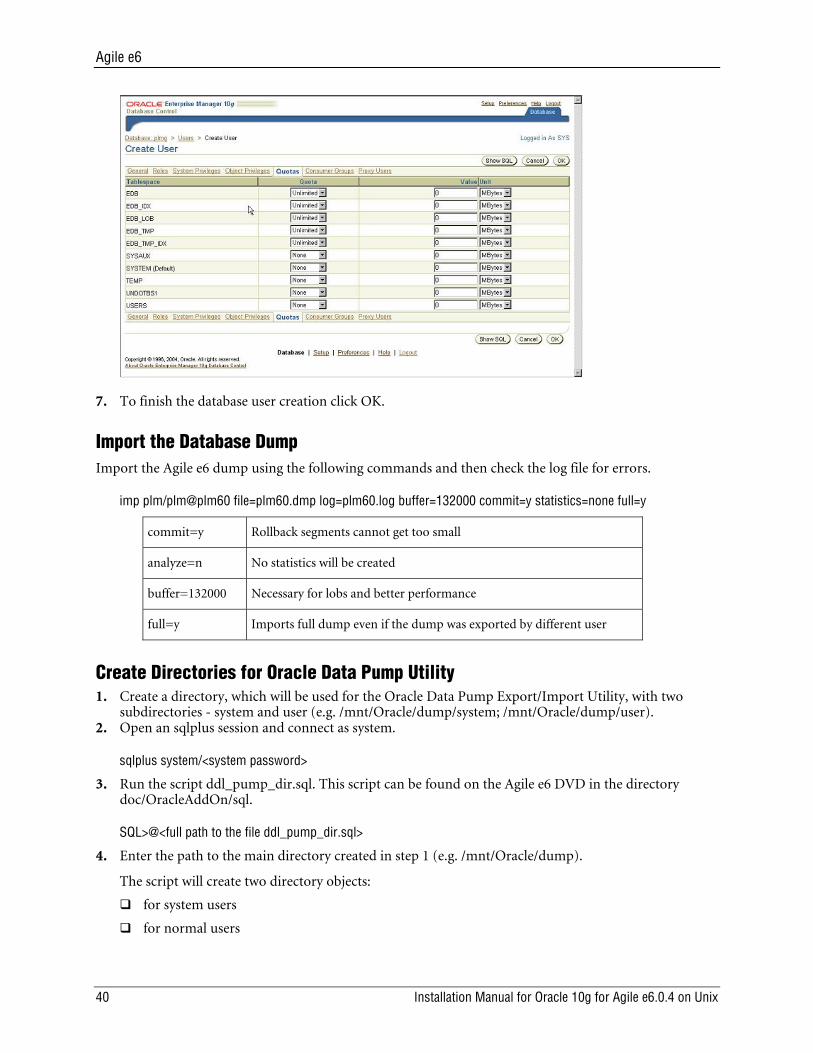
(Role AGILE_E_ROLE should have been created in a previous section.) 6. Select the Quota tab and assign unlimited quota on EDB, EDB_IDX, EDB_LOB, EDB_TMP and
EDB_TMPIDX.
39
Agile e6
7. To finish the database user creation click OK.
Import the Database Dump Import the Agile e6 dump using the following commands and then check the log file for errors.
imp plm/plm@plm60 file=plm60.dmp log=plm60.log buffer=132000 commit=y statistics=none full=y
commit=y Rollback segments cannot get too small
analyze=n No statistics will be created
buffer=132000 Necessary for lobs and better performance
full=y Imports full dump even if the dump was exported by different user
Create Directories for Oracle Data Pump Utility 1. Create a directory, which will be used for the Oracle Data Pump Export/Import Utility, with two
subdirectories - system and user (e.g. /mnt/Oracle/dump/system; /mnt/Oracle/dump/user). 2. Open an sqlplus session and connect as system.
sqlplus system/<system password>
3. Run the script ddl_pump_dir.sql. This script can be found on the Agile e6 DVD in the directory doc/OracleAddOn/sql.
SQL>@<full path to the file ddl_pump_dir.sql>
4. Enter the path to the main directory created in step 1 (e.g. /mnt/Oracle/dump).
The script will create two directory objects:
for system users
for normal users
40 Installation Manual for Oracle 10g for Agile e6.0.4 on Unix
Chapter 5 Modify the Oracle Database
And it assigns the rights for the second directory to user “PLM”.
Compile All Invalid Objects in Schema PLM After importing the Agile e6 dump, some objects might be invalid. This could be verified as follows:
1. Open an sqlplus session and connect as “system”.
sqlplus system/<system password>
SQL>select * from dba_objects where status <> ’VALID’ and owner=’PLM’;
If the returned message says ‘no rows selected’ then no invalid objects exist. Otherwise, you have to run the script compile_all.sql, which can be found on the Agile Oracle Add-On CD.
SQL>@<full path to the file compile_all.sql>
2. Verify again that there are no invalid objects by:
SQL>select * from dba_objects where status <> ’VALID’ and owner=’PLM’;
Create Statistics In Oracle 10g the default value for the OPTIMIZER_MODE initialization parameter is ALL_ROWS, which means that a cost-based approach will be used for all SQL statements. Agile highly recommends creating statistics in order to avoid performance loss. This should be done after the dump import and has to be repeated periodically.
1. Calculate statistics on all tables and indexes in db schema PLM:
SQL> EXECUTE DBMS_STATS.GATHER_SCHEMA_STATS('PLM',CASCADE =>true);
2. Calculate statistics on all tables and indexes in db schema PLM with 5% of the rows:
SQL> EXECUTE DBMS_STATS.GATHER_SCHEMA_STATS('PLM', estimate_percent => 5, CASCADE =>true);
3. Drop all statistics of PLM schema objects. Optimizer is now running in rule mode.
SQL> EXECUTE DBMS_STATS.DELETE_SCHEMA_STATS('PLM');
For all schema objects statistics must be available to support the cost based optimizer. If tables and indexes are modified or created, statistics must be established.
1. Calculate statistics on all tables without statistics and their indexes in db schema PLM with 5% of the rows:
SQL> EXECUTE DBMS_STATS.GATHER_SCHEMA_STATS(ownname => 'PLM',options => 'GATHER EMPTY', estimate_percent => 5, CASCADE =>true);
2. Calculate statistics on tables t_master_dat and their indexes in db schema PLM_ENTW with 10% of the rows:
SQL> EXECUTE DBMS_STATS.GATHER_TABLE_STATS(ownname=> 'PLM_ENTW', tabname=> 'T_MASTER_DAT', partname=> NULL , estimate_percent=> 10 ,cascade=> true);
Statistic information can be viewed e.g. in USER_TABLES and USER_INDEXES. These views provide information like average row length and number of rows.
41
Agile e6
Chapter 6 Critical Patch Update
A Critical Patch Update (CPU) is a collection of patches for multiple security vulnerabilities. It also includes non-security fixes that are required (because of interdependencies) by those security patches.
Critical patch update patches are cumulative, which means fixes from previous Oracle security alerts and critical patch updates are included. It is not required to have previous security patches applied before applying the CPUJul2007 patches. However, you must be on the stated patch set level for a given product home before applying the CPUJul2007 patches for that release.
Oracle strongly recommends that fixes are applied as soon as possible.
Note: Information for CPUJul2007 patch installation can be found in the Oracle readme file on the Agile Patch DVD.
Note: The Readme.html file for each OS can be found in patches/CPU_07_2007/<OS>/ 6079591/, where <OS> corresponds to the currently used operating system.
Additional Information for Patch Installation
OPatch Utility Information OPatch version 10.2.0.3.0 comes with 10gR2. You must use the OPatch utility release 10.2.0.3.2 or later.
Follow the instructions below before starting with CPUJul2007 installation.
- Rename the directory $ORACLE_HOME/OPatch
mv $ORACLE_HOME/OPatch $ORACLE_HOME/OPatch-backup
- Copy the directory OPatch from patches/OPatch on the Agile Patch DVD to $ORACLE_HOME
cd patches
cp –R OPatch $ORACLE_HOME
You can remove the backup of the OPatch directory after applying the CPU.
Known Problems for 64-bit Linux systems Execute the following commands in addition to the generic preinstallation instructions.
Failing to follow this step will result in the following errors while relinking the client sharedlib during the CPU patch installation:
…
cp: cannot stat `/DISCARD/': No such file or directory
…
42 Installation Manual for Oracle 10g for Agile e6.0.4 on Unix
Chapter 6 Critical Patch Update
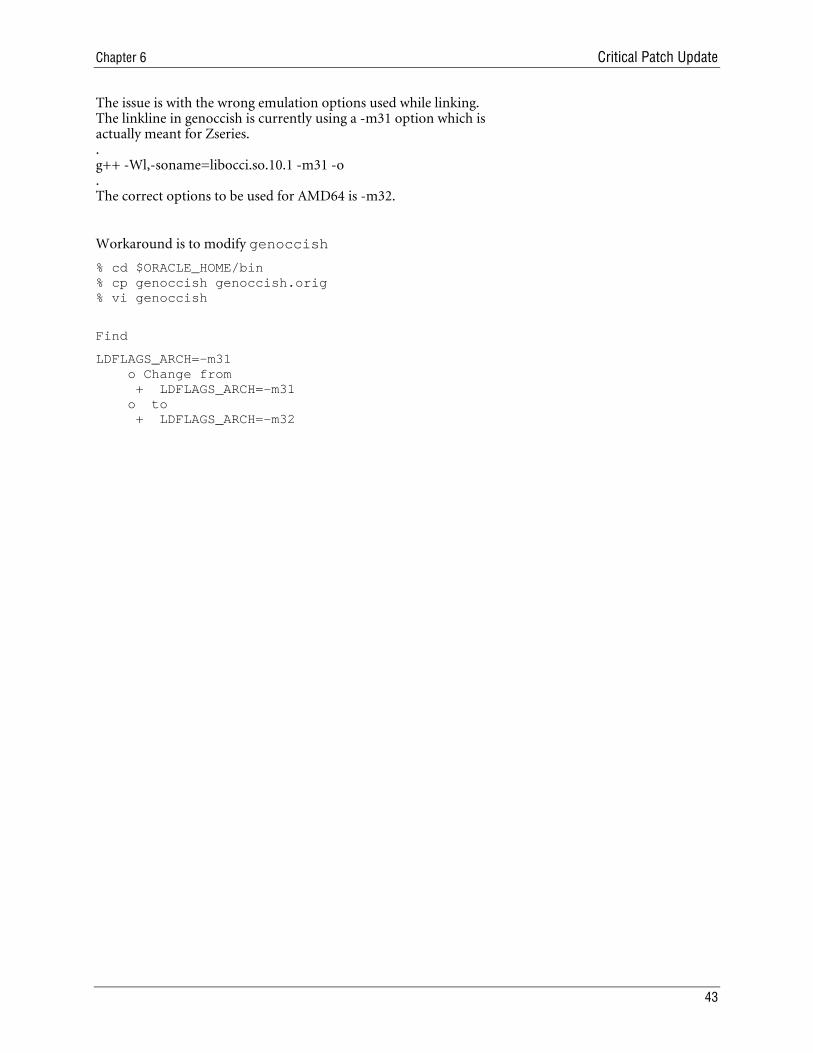
The issue is with the wrong emulation options used while linking. The linkline in genoccish is currently using a -m31 option which is actually meant for Zseries. . g++ -Wl,-soname=libocci.so.10.1 -m31 -o . The correct options to be used for AMD64 is -m32.
Workaround is to modify genoccish
% cd $ORACLE_HOME/bin % cp genoccish genoccish.orig % vi genoccish
Find
LDFLAGS_ARCH=-m31 o Change from + LDFLAGS_ARCH=-m31 o to + LDFLAGS_ARCH=-m32
43
Agile e6
Chapter 7 Appendix A
The most significant parameters of the predefined Database Configuration Assistant templates are referenced in the following.
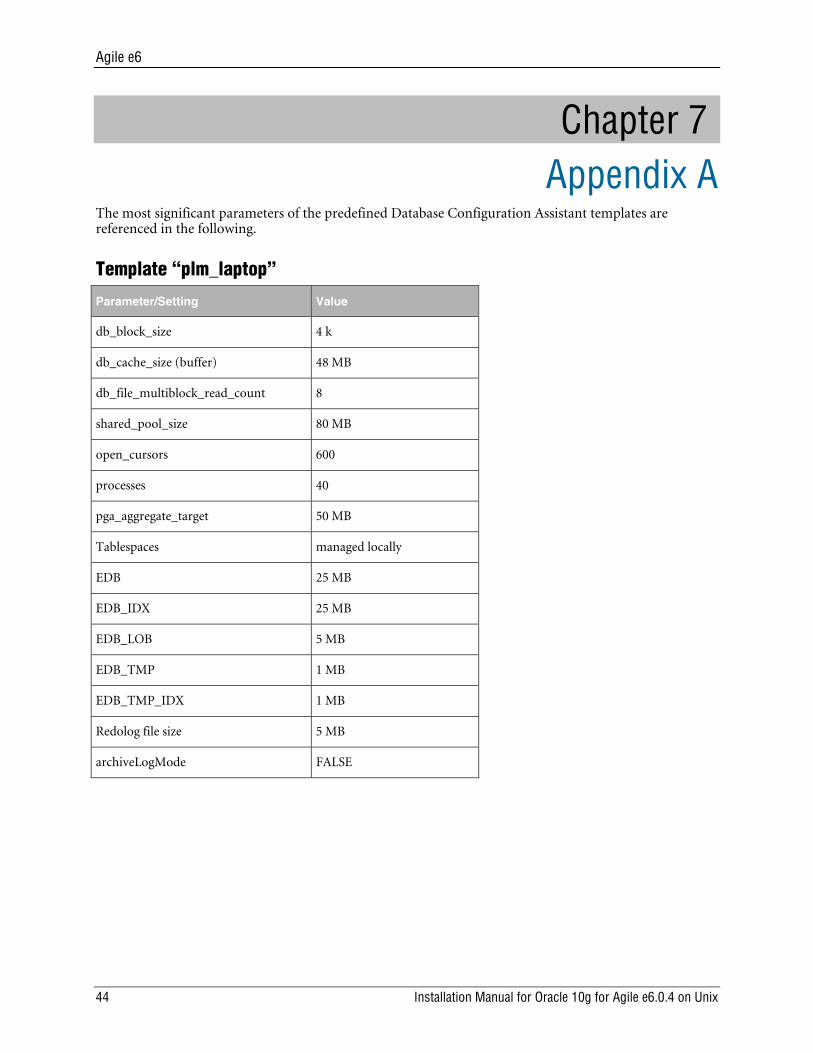
Template “plm_laptop”
Parameter/Setting Value
db_block_size 4 k
db_cache_size (buffer) 48 MB
db_file_multiblock_read_count 8
shared_pool_size 80 MB
open_cursors 600
processes 40
pga_aggregate_target 50 MB
Tablespaces managed locally
EDB 25 MB
EDB_IDX 25 MB
EDB_LOB 5 MB
EDB_TMP 1 MB
EDB_TMP_IDX 1 MB
Redolog file size 5 MB
archiveLogMode FALSE
44 Installation Manual for Oracle 10g for Agile e6.0.4 on Unix
Chapter 7 Appendix A
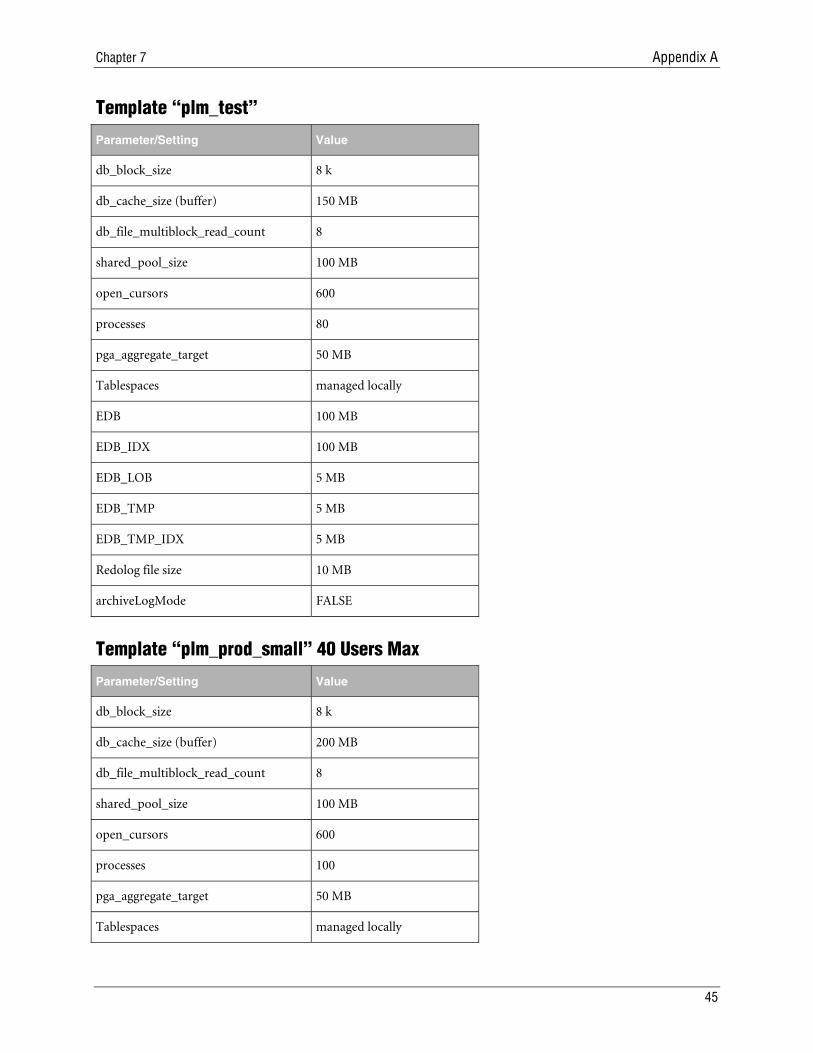
Template “plm_test”
Parameter/Setting Value
db_block_size 8 k
db_cache_size (buffer) 150 MB
db_file_multiblock_read_count 8
shared_pool_size 100 MB
open_cursors 600
processes 80
pga_aggregate_target 50 MB
Tablespaces managed locally
EDB 100 MB
EDB_IDX 100 MB
EDB_LOB 5 MB
EDB_TMP 5 MB
EDB_TMP_IDX 5 MB
Redolog file size 10 MB
archiveLogMode FALSE
Template “plm_prod_small” 40 Users Max
Parameter/Setting Value
db_block_size 8 k
db_cache_size (buffer) 200 MB
db_file_multiblock_read_count 8
shared_pool_size 100 MB
open_cursors 600
processes 100
pga_aggregate_target 50 MB
Tablespaces managed locally
45
Agile e6
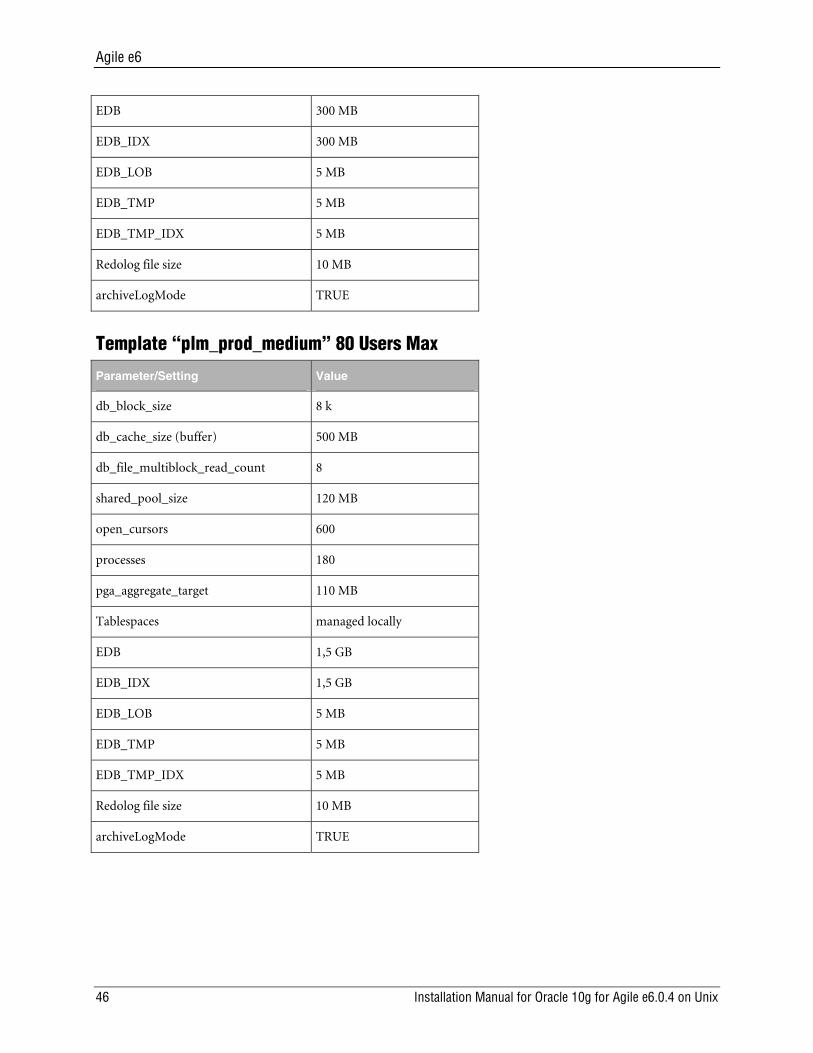
EDB 300 MB
EDB_IDX 300 MB
EDB_LOB 5 MB
EDB_TMP 5 MB
EDB_TMP_IDX 5 MB
Redolog file size 10 MB
archiveLogMode TRUE
Template “plm_prod_medium” 80 Users Max
Parameter/Setting Value
db_block_size 8 k
db_cache_size (buffer) 500 MB
db_file_multiblock_read_count 8
shared_pool_size 120 MB
open_cursors 600
processes 180
pga_aggregate_target 110 MB
Tablespaces managed locally
EDB 1,5 GB
EDB_IDX 1,5 GB
EDB_LOB 5 MB
EDB_TMP 5 MB
EDB_TMP_IDX 5 MB
Redolog file size 10 MB
archiveLogMode TRUE
46 Installation Manual for Oracle 10g for Agile e6.0.4 on Unix

Chapter 7 Appendix A
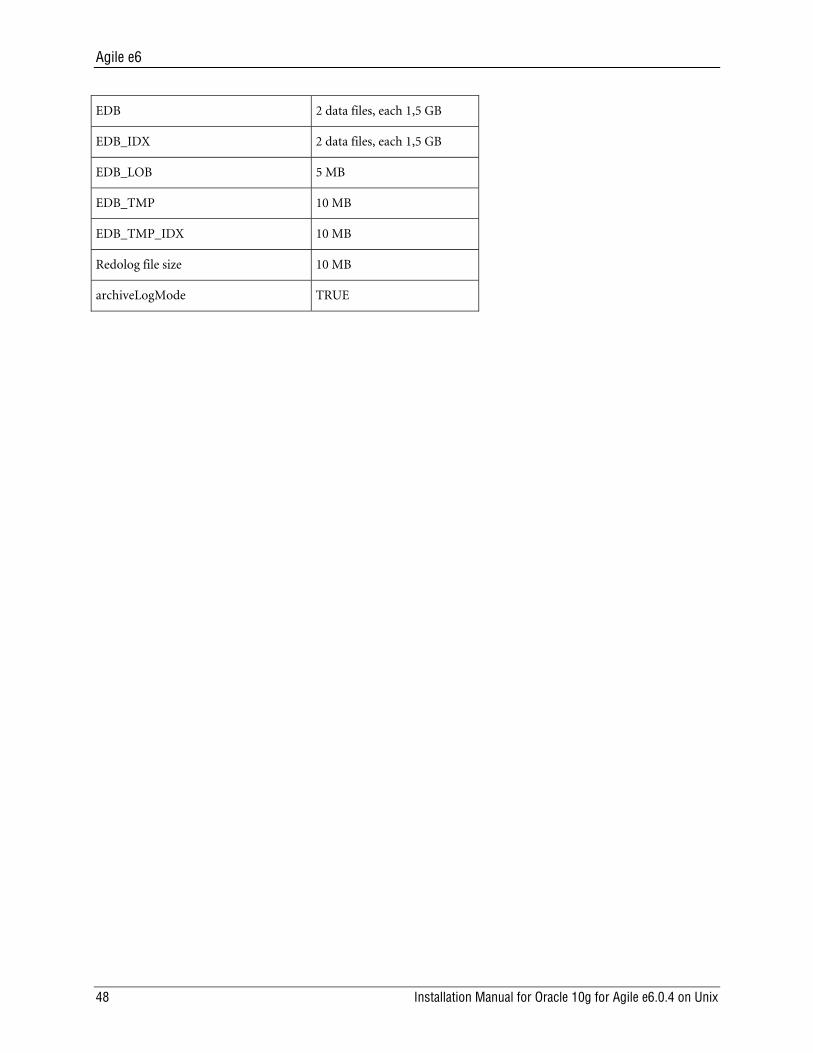
Template “plm_prod_large” 120 User Max
Parameter/Setting Value
db_block_size 8 k
db_cache_size (buffer) 1 GB
db_file_multiblock_read_count 8
shared_pool_size 160 MB
open_cursors 600
processes 260
pga_aggregate_target 160 MB
Tablespaces managed locally
EDB 2 data files, each 1,5 GB
EDB_IDX 2 data files, each 1,5 GB
EDB_LOB 5 MB
EDB_TMP 10 MB
EDB_TMP_IDX 10 MB
Redolog file size 10 MB
archiveLogMode TRUE
Template “plm_prod_huge” 150 Users Max
Parameter/Setting Value
db_block_size 8 k
db_cache_size (buffer) 1 GB
db_file_multiblock_read_count 8
shared_pool_size 200 MB
open_cursors 600
processes 320
pga_aggregate_target 200
Tablespaces managed locally
47
Agile e6
EDB 2 data files, each 1,5 GB
EDB_IDX 2 data files, each 1,5 GB
EDB_LOB 5 MB
EDB_TMP 10 MB
EDB_TMP_IDX 10 MB
Redolog file size 10 MB
archiveLogMode TRUE
48 Installation Manual for Oracle 10g for Agile e6.0.4 on Unix


![[1]Oracle® Application Integration Architecture Agile Product … · [1]Oracle® Application Integration Architecture Agile Product Lifecycle Management for Oracle EBS: Design to](https://img.pdfslide.us/doc/110x75/5f87f83b9297c13f6c3a62fd/1oracle-application-integration-architecture-agile-product-1oracle-application.jpg)