Embed Size (px)
Citation preview
Please retain the information on this manual for future reference.Colour, designs and decorations may varyfrom those shown in the photographs.Printed in China.
Customer Services:+44 (0)1702 208175
Item no. TDK26© 2016 Discovery Communications LLC. Discovery kids and the Discovery Kids logo are trademarks of Discovery Communications,LLC, used under license. All Rights Reserved. discoverykids.com www. trendsuk.co.uk
Distributed by Trends UK Ltd, Harwell Innovation Centre, Curie Avenue, Harwell Oxford, Didcot OX11 0QG. UKEmail: [email protected]
Requires 3 x 1.5V AAA batteries (not included).
The purpose of the crossed-out wheelie bin symbol is to remind us that most electrical product and batteries contain trace elements which could be harmful to our environment and therefore our health. We must all be
careful to dispose of them responsibly in a specifically designated way – either using a collection scheme or into the correctly labelled civic amenity (NOT into general waste) – this will help your local authority to arrange to recycle or dispose of them in the appropriate manner.
To be used under
the direct supervision of an adult.
WARNING!
THIS 41-PIECESET INCLUDES
SLIDES, TOOLS ANDACCESSORIES
FOR COLLECTINGAND CREATING
SPECIMENS
LEDILLUMINATION
Inspired by
AGES 8+
360 Super HD Microscope360 Super HD MicroscopeInstruction Manual
60X120X200X
MAGNIFICATION
2 3
Inspired by
1 x microscope
1 x smartphone adapter
2 x prepared slides
10 x blank slides
12 x slide covers
12 x blank labels
2 x collecting vials
1 x tweezers
1 x manual
Contents
1. The most important parts of your microscope are the lenses. Handle them with care. If the lenses are dirty or dusty you can clean them with a soft cotton cloth or a special lens-cleaning tissue. Do not wipe them with a finger or a facial tissue.
2. If you are not going to use your microscope for a week or more, remove the three batteries that power the illuminators.
3. Protect your microscope from dust and moisture by always storing it in its box.
Helpful Hints
1) Read the important battery information on page 7.
2) Unscrew the battery door on the base of the microscope.
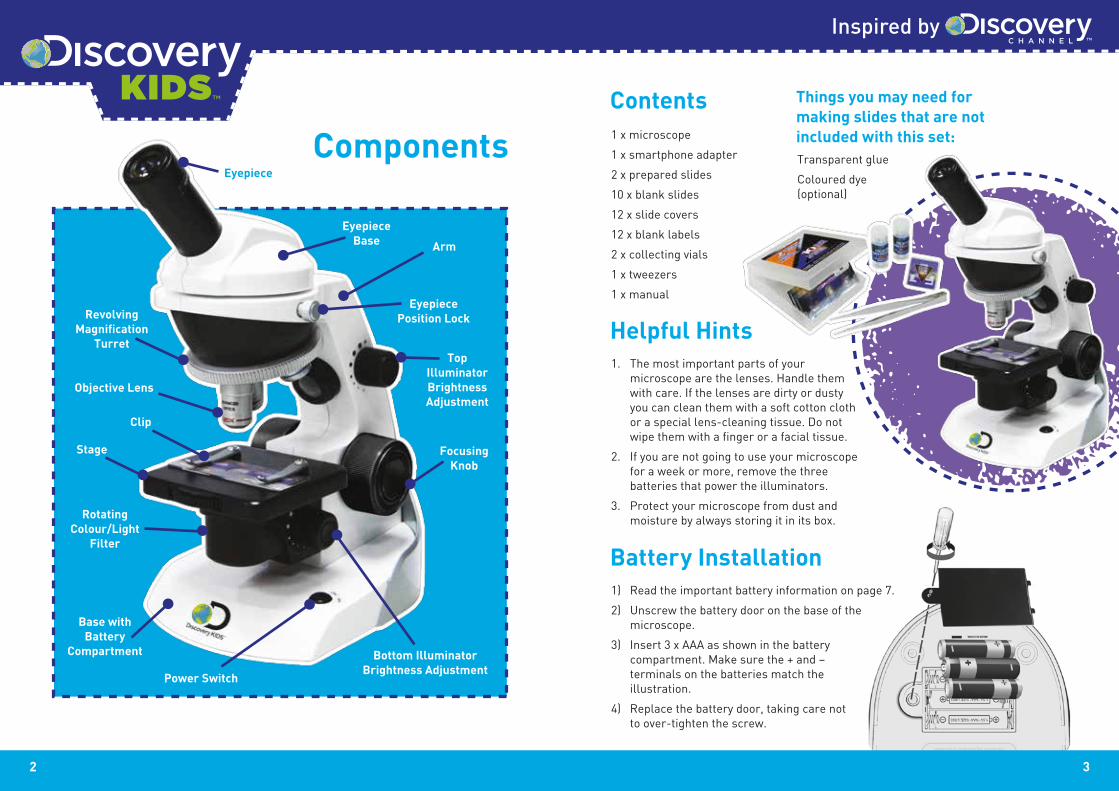
3) Insert 3 x AAA as shown in the battery compartment. Make sure the + and – terminals on the batteries match the illustration.
4) Replace the battery door, taking care not to over-tighten the screw.
Battery Installation
Transparent glue
Coloured dye (optional)
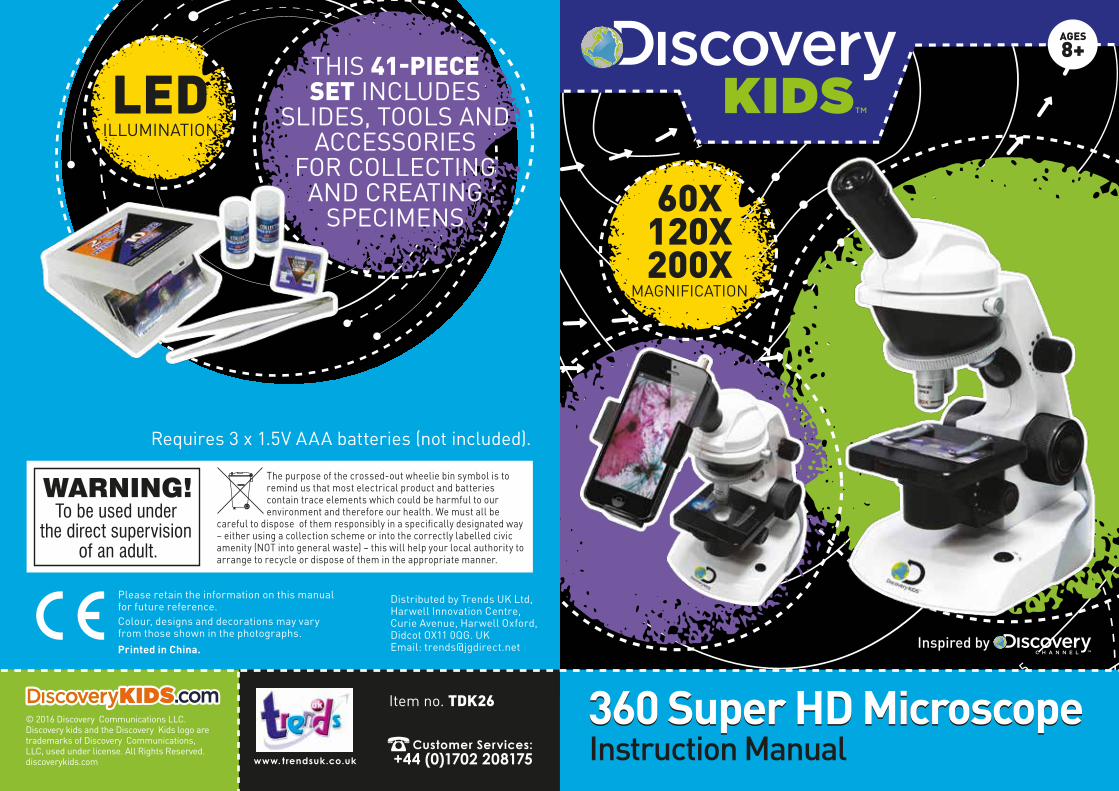
Things you may need for making slides that are not included with this set:Components
Eyepiece
EyepieceBase
EyepiecePosition Lock
TopIlluminatorBrightnessAdjustment
Bottom IlluminatorBrightness Adjustment
FocusingKnob
Power Switch
Base withBattery
Compartment
RotatingColour/Light
Filter
Stage
Clip
Objective Lens
RevolvingMagnification
Turret
Arm
4 5
Inspired by
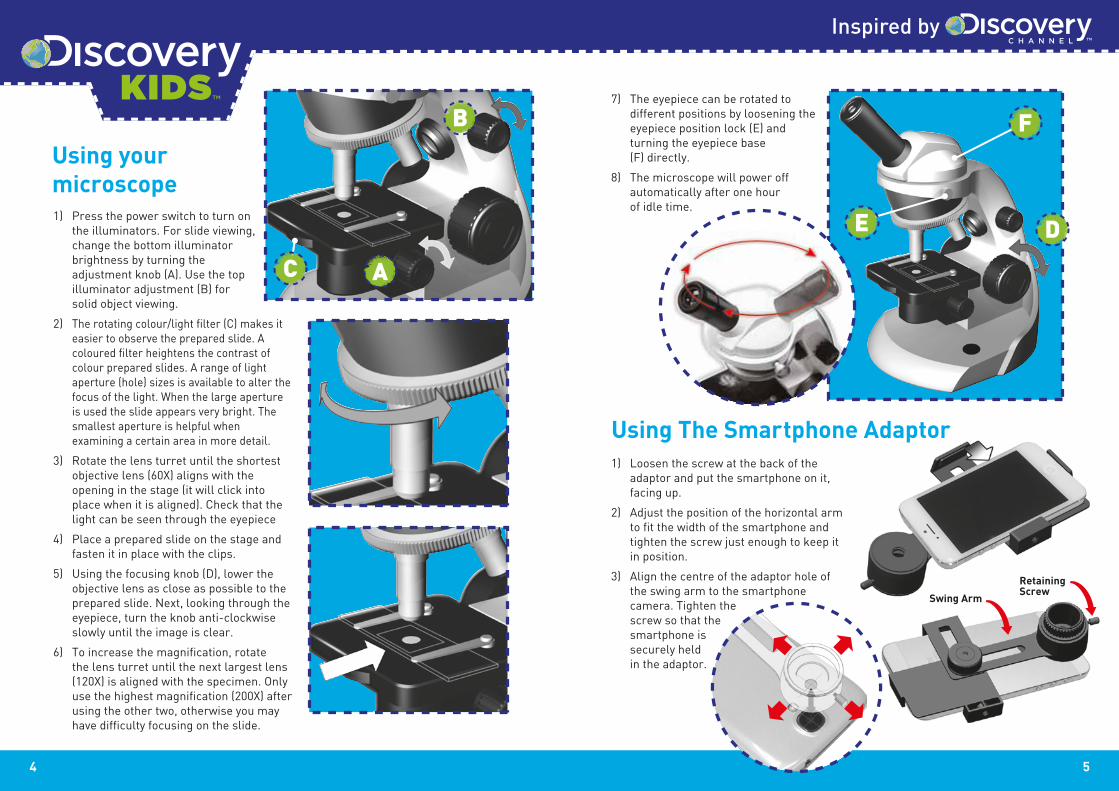
7) The eyepiece can be rotated to different positions by loosening the eyepiece position lock (E) and turning the eyepiece base (F) directly.
8) The microscope will power off automatically after one hour of idle time.
1) Loosen the screw at the back of the adaptor and put the smartphone on it, facing up.
2) Adjust the position of the horizontal arm to fit the width of the smartphone and tighten the screw just enough to keep it in position.
3) Align the centre of the adaptor hole of the swing arm to the smartphone camera. Tighten the screw so that the smartphone is securely held in the adaptor.
1) Press the power switch to turn on the illuminators. For slide viewing, change the bottom illuminator brightness by turning the adjustment knob (A). Use the top illuminator adjustment (B) for solid object viewing.
2) The rotating colour/light filter (C) makes it easier to observe the prepared slide. A coloured filter heightens the contrast of colour prepared slides. A range of light aperture (hole) sizes is available to alter the focus of the light. When the large aperture is used the slide appears very bright. The smallest aperture is helpful when examining a certain area in more detail.
3) Rotate the lens turret until the shortest objective lens (60X) aligns with the opening in the stage (it will click into place when it is aligned). Check that the light can be seen through the eyepiece
4) Place a prepared slide on the stage and fasten it in place with the clips.
5) Using the focusing knob (D), lower the objective lens as close as possible to the prepared slide. Next, looking through the eyepiece, turn the knob anti-clockwise slowly until the image is clear.
6) To increase the magnification, rotate the lens turret until the next largest lens (120X) is aligned with the specimen. Only use the highest magnification (200X) after using the other two, otherwise you may have difficulty focusing on the slide.
Using your microscope
B
AC
DE
F
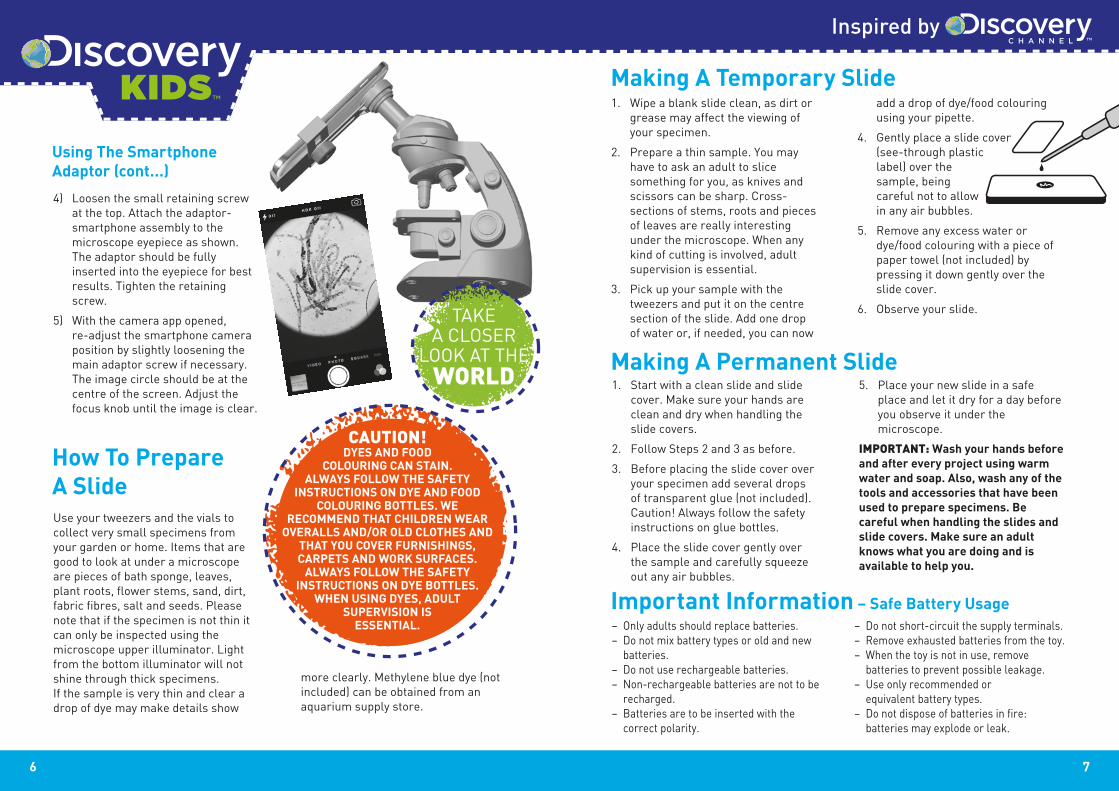
Using The Smartphone Adaptor
Swing Arm
RetainingScrew
Use your tweezers and the vials to collect very small specimens from your garden or home. Items that are good to look at under a microscope are pieces of bath sponge, leaves, plant roots, flower stems, sand, dirt, fabric fibres, salt and seeds. Please note that if the specimen is not thin it can only be inspected using the microscope upper illuminator. Light from the bottom illuminator will not shine through thick specimens. If the sample is very thin and clear a drop of dye may make details show
6 7
Inspired by
1. Wipe a blank slide clean, as dirt or grease may affect the viewing of your specimen.
2. Prepare a thin sample. You may have to ask an adult to slice something for you, as knives and scissors can be sharp. Cross-sections of stems, roots and pieces of leaves are really interesting under the microscope. When any kind of cutting is involved, adult supervision is essential.
3. Pick up your sample with the tweezers and put it on the centre section of the slide. Add one drop of water or, if needed, you can now
4) Loosen the small retaining screw at the top. Attach the adaptor-smartphone assembly to the microscope eyepiece as shown. The adaptor should be fully inserted into the eyepiece for best results. Tighten the retaining screw.
5) With the camera app opened, re-adjust the smartphone camera position by slightly loosening the main adaptor screw if necessary. The image circle should be at the centre of the screen. Adjust the focus knob until the image is clear.
Making A Temporary Slide
CAUTION! DYES AND FOOD
COLOURING CAN STAIN. ALWAYS FOLLOW THE SAFETY
INSTRUCTIONS ON DYE AND FOOD COLOURING BOTTLES. WE
RECOMMEND THAT CHILDREN WEAR OVERALLS AND/OR OLD CLOTHES AND
THAT YOU COVER FURNISHINGS, CARPETS AND WORK SURFACES.
ALWAYS FOLLOW THE SAFETY INSTRUCTIONS ON DYE BOTTLES.
WHEN USING DYES, ADULT SUPERVISION IS
ESSENTIAL.
more clearly. Methylene blue dye (not included) can be obtained from an aquarium supply store.
How To Prepare A Slide
Using The Smartphone Adaptor (cont...)
1. Start with a clean slide and slide cover. Make sure your hands are clean and dry when handling the slide covers.
2. Follow Steps 2 and 3 as before.
3. Before placing the slide cover over your specimen add several drops of transparent glue (not included). Caution! Always follow the safety instructions on glue bottles.
4. Place the slide cover gently over the sample and carefully squeeze out any air bubbles.
Making A Permanent Slide
– Only adults should replace batteries.– Do not mix battery types or old and new
batteries.– Do not use rechargeable batteries.– Non-rechargeable batteries are not to be
recharged.– Batteries are to be inserted with the
correct polarity.
Important Information – Safe Battery Usage
5. Place your new slide in a safe place and let it dry for a day before you observe it under the microscope.
IMPORTANT: Wash your hands before and after every project using warm water and soap. Also, wash any of the tools and accessories that have been used to prepare specimens. Be careful when handling the slides and slide covers. Make sure an adult knows what you are doing and is available to help you.
add a drop of dye/food colouring using your pipette.
4. Gently place a slide cover (see-through plastic label) over the sample, being careful not to allow in any air bubbles.
5. Remove any excess water or dye/food colouring with a piece of paper towel (not included) by pressing it down gently over the slide cover.
6. Observe your slide.
– Do not short-circuit the supply terminals.– Remove exhausted batteries from the toy.– When the toy is not in use, remove
batteries to prevent possible leakage.– Use only recommended or
equivalent battery types.– Do not dispose of batteries in fire:
batteries may explode or leak.
TAKEA CLOSER
LOOK AT THEWORLD