Embed Size (px)
Citation preview

Operation and Maintenance Manual
AERIAL WORK PLATFORMS
XLB-4319 Hydraulic Boom Lift
XLB-4319
B33-01-0080

BOOM PERSONNEL LIFT This equipment is designed and manufactured in compliance with the duties, re-sponsibilities, and standards set forth for manufacturers in the ANSI 92.2 standard in effect at the time of manufacture.
This equipment will meet or exceed applicable OSHA codes and ANSI A92.2 stan-dards when used in accordance with sections 7, 8, 9, 10 & 11 of ANSI A92.2 and all other manufacturer’s recommendations.
It is the responsibility of the user of this equipment to follow all applicable ANSI, OSHA, Federal, State, and local codes and regulations that govern the safe opera-tion of this equipment.

i
Table of Contents Preface................................................................................................................ v 1 Safety................................................................................................................1-1
1-1 Introduction.........................................................................................1-1 1-2 Before Operation ................................................................................1-2 1-3 During Operation ................................................................................1-3 1-4 Maintenance Safety.............................................................................1-5 General Maintenance......................................................................1-5 Battery Maintenance.......................................................................1-6 1-5 Damaged Equipment Policy ...............................................................1-6 Safety Statement .............................................................................1-6 Damage Policy................................................................................1-6 Damage Repair Notice....................................................................1-6 Reporting Safety Defects................................................................1-7
2 Introduction.....................................................................................................2-1 2-1 General Description ............................................................................2-1 2-2 Specifications......................................................................................2-4 Boom Lift Work Platform ..............................................................2-4 2-3 Warranty .............................................................................................2-5
3 Operation .........................................................................................................3-1 3-1 Operator Controls ...............................................................................3-1 Ground Control Station.......................................................................3-1 Basket Control Station....................................................................3-4 3-2 Normal Operating Procedure ..............................................................3-6 3-3 Emergency Lowering..........................................................................3-8 3-4 Manual Boom Rotation.......................................................................3-9 3-5 Battery Recharge (DC MODEL ONLY) ..........................................3-10 3-6 Boom Lift Transport .........................................................................3-11 Trailer Hitching ............................................................................3-11
4 Maintenance ....................................................................................................4-1 4-1 Scheduled Service Checks ..................................................................4-1 Daily/Weekly Service Checks ........................................................4-1 Monthly Service Checks.................................................................4-2 4-2 Wheel Nut Torque Requirements .......................................................4-3 4-3 Lubrication..........................................................................................4-4 4-4 Hydraulic System................................................................................4-5 Hydraulic System Inspection..........................................................4-5 Fluid Check and Replacement ........................................................4-5 Return Filter Replacement..............................................................4-6 Air Bleeding ...................................................................................4-6 Hydraulic Pressure Checks and Adjustments .................................4-7 Hydraulic Cylinder Replacement .................................................4-10 4-5 SLEW RING BEARING..................................................................4-17 Check Free Play............................................................................4-17 4-6 Limit Switch checks and adjustments...............................................4-18 Adjusting Boom Down Limit Switch ...........................................4-18 Adjusting Outrigger Position Switches ........................................4-19 4-7 Troubleshooting................................................................................4-20 Troubleshooting Aids ...................................................................4-22 4-8 Material Safety Data Sheets..............................................................4-31

ii
5 Replacement Decals........................................................................................ 5-1
6 Parts List ......................................................................................................... 6-1 6-1 Upper Boom Parts List....................................................................... 6-2 6-2 Lower Boom Parts List ...................................................................... 6-4 6-3 Jib Boom Parts List ............................................................................ 6-6 6-4 Compartment Covers Parts List ......................................................... 6-8 6-5 Reservoir Compartment Parts List, Gas model ................................ 6-10 6-6 Pump Compartment Parts List, DC Model ...................................... 6-12 6-7 Chassis and Rotation Unit Parts List................................................ 6-16 6-8 Hitch and Jack Assembly Parts List ................................................. 6-18 6-9 Axle and Wheel Assembly Parts List.............................................. 6-20 6-10 Rear Lights and Junction Box Parts List.......................................... 6-23 6-11 Outriggers Parts List ........................................................................ 6-25 6-12 Basket Parts List............................................................................... 6-27 6-13 Outrigger Hydraulic Controls Parts List .......................................... 6-29 6-14 Lower Controls Parts List ................................................................ 6-31 6-15 Upper Controls Parts List................................................................. 6-33 6-16 Engine Compartment Parts List, Gas Model.................................... 6-35 6-17 Boom Control Hydraulics Parts List, Basket ................................... 6-39 6-18 Boom Control Hydraulics Parts List, Ground, Gas Model .............. 6-41 6-19 Boom Control Hydraulics Parts List, Ground, DC Model ............... 6-43 6-20 Lower Boom Cylinder Hydraulics Parts List ................................... 6-45 6-21 Upper Boom Cylinder Hydraulics Parts List ................................... 6-46 6-22 Pushbutton Panel Parts List, Basket................................................. 6-47 6-23 Pushbutton Panel Parts List, Ground Controls................................. 6-49
7 ANSI Reprint .................................................................................................. 7-1

iii
List of Illustrations Figure 2-1. XLB-4319 Hydraulic Boom Lift.............................................................2-1 Figure 2-2. Basket and Ground Station Controls.......................................................2-2 Figure 2-3. Safe Operating Zone ...............................................................................2-3 Figure 3-1. Ground Control Station Access...............................................................3-1 Figure 3-2. Ground Control Station...........................................................................3-2 Figure 3-3. Engine Keyswitch ...................................................................................3-3 Figure 3-4. Basket Control Station ............................................................................3-4 Figure 3-5. Outrigger Controls ..................................................................................3-6 Figure 3-6. Manual Lowering Valve .........................................................................3-8 Figure 3-7. Basket Control Station ............................................................................3-8 Figure 3-8. Emergency Rotation................................................................................3-9 Figure 3-9. Battery Charger .....................................................................................3-10 Figure 3-10. Trailer Hitching.....................................................................................3-11 Figure 4-1. Wheel Bolt Tightening Sequence............................................................4-3 Figure 4-2. Lubricate Monthly...................................................................................4-4 Figure 4-3. Lubricate Semi-Annually ........................................................................4-4 Figure 4-4. Hydraulic Reservoir ................................................................................4-5 Figure 4-5. Main Bypass Valve and Pressure Test Port (Gas Engine Model) ...........4-7 Figure 4-6. Outriggers Bypass Valve ........................................................................4-8 Figure 4-7. Boom Control Bypass Valve, Basket Station..........................................4-9 Figure 4-8. Hydraulic Cylinder Removal ................................................................4-11 Figure 4-9. Jib Boom Components ..........................................................................4-14 Figure 4-10. Basket Swivel Cylinder.........................................................................4-16 Figure 4-11. Slew Ring Position Measurement .........................................................4-17 Figure 4-12. Boom Down Limit Switch ....................................................................4-18 Figure 4-13. Outrigger Position Switch.....................................................................4-19 Figure 4-14. Simplified Electrical Diagram, DC Model............................................4-22 Figure 4-15. Detailed Electrical Diagram, DC Model ...............................................4-23 Figure 4-16. Simplified Electrical Diagram, Gas Model ...........................................4-24 Figure 4-17. Detailed Electrical Diagram, Gas Model ..............................................4-25 Figure 4-18. Hydraulic Diagram, DC Model.............................................................4-26 Figure 4-19. Hydraulic Diagram, Gas Model ............................................................4-28 Figure 4-20. Level Sensor..........................................................................................4-30 Figure 5-1. Replacement Decals ................................................................................5-2 Figure 5-2. Decal Locations, Trailer and Boom ........................................................5-5 Figure 5-3. Decal Locations, Control Compartment Exterior....................................5-6 Figure 5-4. Lubricate Monthly Decal ........................................................................5-6 Figure 5-5. Lubricate Semi-Annually Decal..............................................................5-6 Figure 6-1. Upper Boom............................................................................................6-2 Figure 6-2. Lower Boom ...........................................................................................6-4 Figure 6-3. Jib Boom .................................................................................................6-6 Figure 6-4. Compartment Covers ..............................................................................6-8 Figure 6-5. Reservoir Compartment, Gas Model....................................................6-10 Figure 6-6. Pump Compartment, DC Model............................................................6-12 Figure 6-7. Chassis and Rotation Unit.....................................................................6-16 Figure 6-8. Hitch and Jack Assembly ......................................................................6-18 Figure 6-9. Axle and Wheel Assembly....................................................................6-20 Figure 6-10. Rear Lights and Junction Box...............................................................6-23

iv
Figure 6-11. Outriggers............................................................................................. 6-25 Figure 6-12. Basket ................................................................................................... 6-27 Figure 6-13. Outrigger Hydraulic Controls............................................................... 6-29 Figure 6-14. Lower Controls..................................................................................... 6-31 Figure 6-15. Upper Controls ..................................................................................... 6-33 Figure 6-16. Engine Compartment Parts List, Gas Model ........................................ 6-35 Figure 6-17. Boom Control Hydraulics, Basket........................................................ 6-39 Figure 6-18. Gas Model Boom Control Hydraulics, Ground.................................... 6-41 Figure 6-19. DC Model Boom Control Hydraulics, Ground .................................... 6-43 Figure 6-20. Lower Boom Cylinder Hydraulics ....................................................... 6-45 Figure 6-21. Upper Boom Cylinder Hydraulics........................................................ 6-46 Figure 6-22. Basket Pushbutton Panel, Gas Model................................................... 6-47 Figure 6-23. Pushbutton Panel, Ground Controls ..................................................... 6-49
List of Tables Table 1-1. Minimum Safe Approach Distances....................................................... 1-3 Table 2-1. Specifications ......................................................................................... 2-4 Table 4-1. Daily/Weekly Service Checks................................................................ 4-1 Table 4-2. Monthly Service Checks ........................................................................ 4-2 Table 4-3. Troubleshooting Chart.......................................................................... 4-20 Table 4-4. Level Sensor LEDs............................................................................... 4-30 Table 5-1. Replacement Decals ............................................................................... 5-1 Table 6-1. Upper Boom Parts List ........................................................................... 6-3 Table 6-2. Lower Boom Parts List........................................................................... 6-5 Table 6-3. Jib Boom Parts List ................................................................................ 6-7 Table 6-4. Compartment Covers Parts List.............................................................. 6-9 Table 6-5. Reservoir Compartment Parts List, Gas Model.................................... 6-11 Table 6-6. Pump Compartment Parts List, DC Model........................................... 6-13 Table 6-7. Chassis and Rotation Unit Parts List .................................................... 6-17 Table 6-8. Hitch and Jack Assembly Parts List ..................................................... 6-19 Table 6-9. Axle and Wheel Assembly Parts List ................................................... 6-21 Table 6-10. Rear Lights and Junction Box Parts List .............................................. 6-24 Table 6-11. Outriggers Parts List............................................................................. 6-26 Table 6-12. Basket Parts List ................................................................................... 6-28 Table 6-13. Outrigger Hydraulic Controls Parts List............................................... 6-30 Table 6-14. Lower Controls Parts List..................................................................... 6-32 Table 6-15. Upper Controls Parts List ..................................................................... 6-34 Table 6-16. Engine Compartment Parts List, Gas Model ........................................ 6-36 Table 6-17. Boom Control Hydraulics Parts List, Basket........................................ 6-40 Table 6-18. Gas Model Boom Control Hydraulics Parts List, Ground.................... 6-42 Table 6-19. DC Model Boom Control Hydraulics Parts List, Ground .................... 6-44 Table 6-20. Lower Boom Cylinder Hydraulics Parts List ....................................... 6-45 Table 6-21. Upper Boom Cylinder Hydraulics Parts List........................................ 6-46 Table 6-22. Basket Pushbutton Panel Parts List ...................................................... 6-48 Table 6-23. Pushbutton Panel Parts List, Ground Controls ..................................... 6-49 Table 7-1. Minimum Safe Approach Distance (M.S.A.D.) to energized (exposed or insulated) power lines and parts. .......................................... 7-11

v
PREFACE The purpose of this manual is to provide a thorough understanding of the XLB-4319 Hydraulic Boom Lift operation and controls. Read the safety and operating instructions in this manual and become familiar with the location and use of all controls.
Follow all warnings, cautions, and instructions in this manual and any attached to and supplied with the boom lift. All OSHA, ANSI, state, and local codes and regulations concerning this equipment should obtained, read, and thoroughly understood before attempting to operate this equipment.
To ensure proper and safe use of this equipment, only trained and qualified personnel should operate and maintain the boom lift.
SAFETY NOTES This manual contains DANGERS, WARNINGS, CAUTIONS, and NOTES that must be followed to prevent the possibility of improper service, personnel injury or death, and damage to equipment.
DANGER Dangers warn of equipment operation near electrical power lines that could lead to personal injury or death.
WARNING Warnings describe conditions or practices that could lead to personal injury or death.
CAUTION Cautions provide information important to prevent errors that could damage machine or components.
NOTE: Notes contain additional information important to a procedure.

vi

1-1
1 Safety
1-1 ip-
me-
sense in the operation of mechanical equipment is the best s
implemented at all
considered as legal advice and is intended to
For any questions concerning the safe use of this equipment, call 800-937-0540 before operating.
INTRODUCTION Familiarity and proper training are required for the safe operation of mechanical equment. Equipment operated improperly or by untrained personnel can be dangerous. Read the operating instructions in this manual and become familiar with the location and proper use of all controls. Inexperienced operators should receive instruction from soone familiar with the equipment before being allowed to operate the machine. The use ofintelligence and commonpractice in any safety policy. Be professional and always observe the safety procedureset forth in this manual.
All OSHA, ANSI, state, and local codes and regulations pertaining to this equipment should be obtained, read, and thoroughly understood before attempting to operate this equipment. Persons under the influence of drugs, alcohol, or prescription medication should not be on or near this equipment. Common sense should betimes during the use of this equipment. Do not operate this equipment in areas where the equipment or user may come in contact with a live power source.
The information contained herein is not to befor informational purposes only. This information is offered to alert Bil-Jax customersprocedures that may be of concern to them.
This information is not intended to be all inclusive and is to be followed in the use of Bil-Jax equipment only.

XLB-4319
1-2
1-2 BEFORE OPERATION Ensure the following general safety precautions are followed before operating the XLB-4319 Hydraulic Boom Lift.
• ALWAYS survey the usage area for potential hazards such as untamped earth fills, unlevel surfaces, overhead obstructions, and electrically charged conduc-tors or wires. Be aware of any potential hazards and always consider what could happen. Watch for moving vehicles in the operating area.
• ALWAYS read, understand, and follow the procedures in this manual before at-tempting to operate equipment.
• ALWAYS inspect the equipment for damaged or worn parts. Check for cracked welds, hydraulic leaks, damaged wiring, loose wire connectors, damaged out-riggers, low tire pressure, uneven tire wear, or tire damage. Also check for any improper operation. NEVER operate equipment if damaged in any way. Im-properly operating equipment must be repaired before using.
• ALWAYS wear proper clothing for the job. Wear protective equipment as re-quired by federal, state, or local regulations. The operator MUST wear a safety harness and lanyard.
• ALWAYS locate, read, and follow all directions and warnings displayed on the equipment.
• ALWAYS inspect the equipment for “DO NOT USE” tags. NEVER use equip-ment tagged in this way until all repairs are made and all “DO NOT USE” tags are removed by authorized maintenance personnel.
• ALWAYS make sure the basket and outrigger shoes are free of mud, grease, or other slippery material to reduce the possibility of slipping.
• NEVER allow improperly trained personnel to operate this equipment. Only trained and authorized personnel shall be allowed to operate this equipment.
• NEVER operate this equipment if you are under the influence of alcohol or drugs, or if you feel ill, dizzy, or unsteady in any way. Operators must be physi-cally fit, thoroughly trained, and not easily excitable.
• NEVER modify, alter, or change the equipment in any way that would affect its original design or operation in any way.
• NEVER operate this equipment in ways for which it is not intended.

1 — SAFETY
1-3
1-3 DURING OPERATION Ensure the following general safety precautions are followed during the operation of the XLB-4319 Hydraulic Boom Lift.
DANGER This machine is not insulated for use near electrical power lines and DOES NOT provide protection from contact with or close proximity to any electrically charged conductor. Operator must maintain safe clearances at all times (10 feet minimum) and always allow for platform movement such as wind induced sway. Always contact the power company before performing work near power lines. As-sume every line is hot. Remember, power lines can be blown by the wind.
Refer to Table 1-1 for minimum safe approach distances between machine and electrical power lines.
Table 1-1. Minimum Safe Approach Distances
Minimum Safe Approach Distance Voltage Range (Phase to Phase) (Feet) (Meters)
0 to 300V Avoid Contact Over 300V to 50KV 10 3.05 Over 50KV to 200KV 15 4.60 Over 200KV to 350KV 20 6.10 Over 350KV to 500KV 25 7.62 Over 500KV to 750KV 35 10.67 Over 750KV to 1000KV 45 13.72
• ALWAYS position lift far enough away from power sources to ensure that no part of the lift can accidentally reach into an unsafe area. This includes full ex-tension of the boom through 360 degrees rotation.
• ALWAYS operate only on a firm and level surface. NEVER use on surfaces that do not support the equipment with its rated load capacity and the resulting force exerted on the outriggers during boom extension and rotation.
• ALWAYS keep yourself and all personnel away from potential pinch or shear points.
• ALWAYS report any misuse of equipment to the proper authorities. Horseplay is prohibited.
• ALWAYS maintain good footing on the work platform. NEVER wear slippery soled shoes.
• ALWAYS make certain all personnel are clear and there are no obstructions be-fore repositioning basket.
• ALWAYS cordon off area around the outriggers to keep personnel and other equipment away from it while in use.
• ALWAYS stay clear of wires, cables, and other overhead obstructions.
• ALWAYS engage the boom travel locking pins before towing the trailer.

XLB-4319
1-4
• NEVER allow electrode contact with any part of the basket if welding is being performed from the platform.
• NEVER use without the outriggers fully extended and firmly based.
• NEVER override or by-pass manufacturer's safety devices.
• NEVER attach a safety harness to an adjacent structure, pole, or equipment while working from the boom platform.
• NEVER move unit with a person or materials on board.
• NEVER try to move the trailer with the boom extended.
• NEVER stand or sit on cage bars. Work only within the work cage and do not lean out over the cage to perform work.
• NEVER attempt to increase working height with boxes, ladders, or other means.
• NEVER operate this equipment when exposed to high winds, thunderstorms, ice, or any other weather conditions that would compromise operator safety.
• NEVER allow ropes, electric cords, hoses, etc. to become entangled in the equipment when the basket is being raised or lowered.
• NEVER exceed manufacturer's load limits or use the lift as a crane for lifting heavy materials. Make sure all tools and equipment are safely stowed.
• NEVER exceed load ratings by transferring loads to the basket at elevated heights.
• NEVER use cage to carry materials and never allow overhang of materials when raising or lowering the basket.
• NEVER push or pull with the boom or basket and NEVER use the boom to lift any part of the trailer.
• NEVER use the boom or basket to place a “dead man” load against any struc-ture, materials, or equipment.
• NEVER climb up or down boom.
• NEVER leave the keys in the boom lift while unattended or not in use.

1 — SAFETY
1-5
1-4 MAINTENANCE SAFETY Ensure the following safety precautions are observed whenever maintenance is per-formed on the XLB-4319 Hydraulic Boom Lift.
General Maintenance • ALWAYS perform maintenance procedures according to manufacturer's re-
quirements. NEVER short change maintenance procedures.
• ALWAYS check hydraulic system. Make sure all lines, connectors, and fittings are tight and in good condition.
• ALWAYS turn the key switch off before connecting or disconnecting wiring to or from valve solenoids or other load devices.
• ALWAYS disconnect power to the hydraulic pump drive motor before making electrical checks of the hydraulic valves.
• ALWAYS keep all mechanisms properly adjusted and lubricated according to maintenance schedule and manufacturer’s specifications.
• ALWAYS perform a function check of operating controls before each use and after repairs have been made.
• ALWAYS locate and protect against possible pinch points prior to performing maintenance and repairs.
• ALWAYS use factory-approved parts to repair or maintain this equipment. If this equipment is rebuilt, retesting is required in accordance with factory instructions.
• NEVER allow water or foreign particles into the DC electric motor housing. In-gestion of water or foreign particles may cause serious damage to the motor. If the motor gets wet, oven dry the motor to remove all moisture before operating; consult motor manufacturer for drying instructions.
• NEVER test or operate the hydraulic components when another person is near the equipment.
• NEVER add unauthorized fluids to the hydraulic system or battery. Check origi-nal manufacturer specifications.
• NEVER exceed the manufacturer's recommended relief valve settings.
• NEVER touch or allow metal tools to contact static discharge sensitive elec-tronic components. ALWAYS use static discharge prevention mats and ground-ing devices when handling electronic components.
• NEVER tamper with cylinder counter balance valves. Contact the Bil-Jax Ser-vice Department at 800-537-0540 if the cylinder counter balance valves need adjusting.
• NEVER attempt repairs you do not understand. Consult manufacturer if you have any questions regarding proper maintenance, specifications, or repair.

XLB-4319
1-6
Battery Maintenance Ensure the following general safety precautions are followed whenever performing bat-tery maintenance on the XLB-4319 Hydraulic Boom Lift.
• ALWAYS check battery acid level daily on the DC model boom lift. Check battery test indicator for proper state of charge on maintenance free batteries before using lift.
• ALWAYS wear safety glasses when working near battery.
• ALWAYS avoid contact with battery acid. Battery acid causes serious burns. Avoid contact with skin or eyes. If accidental contact occurs, flush with water and consult a physician immediately.
• ALWAYS disconnect ground cable first when removing battery.
• ALWAYS connect ground cable last when installing battery.
• ALWAYS charge batteries in open, well-ventilated areas.
• NEVER smoke when servicing battery.
• NEVER allow batteries to overcharge and boil.
• NEVER short across battery posts to check for current. NEVER break a live circuit at battery.
• NEVER jump start other vehicles using boom lift battery.
1-5 DAMAGED EQUIPMENT POLICY
Safety Statement At Bil-Jax, we are dedicated to the safety of all users of our products. Therefore, all Bil-Jax lifts are designed, manufactured and tested to comply with current applicable Federal OSHA and ANSI codes and regulations.
Damage Policy There may be occasions when a Bil-Jax lift is involved in an incident that results in struc-tural damage to the lift. This can seriously compromise the ability of the lift to perform in a safe manner. Therefore, whenever a Bil-Jax lift is damaged structurally or when there is the possibility of structural damage (this damage may be internal and is not always visi-ble to the naked eye), Bil-Jax requires that the lift be returned to our facility at 125 Tay-lor Parkway, Archbold, Ohio, for reconditioning. If you have any questions concerning what constitutes structural damage, please call the Bil-Jax Service Department at 800-537-0540.
Damage Repair Notice There may be occasions when a Bil-Jax lift is involved in an incident resulting in non-structural damage. When this occurs and repairs are made by the owner or area distribu-tor, please notify Bil-Jax of these non-maintenance repairs and request a repair form to be filled out and returned to Bil-Jax.

1 — SAFETY
1-7
Bil-Jax, Inc. 125 Taylor Parkway
Archbold, Ohio 43502
Reporting Safety Defects
If you believe that your vehicle has a defect which could cause a crash or could cause injury or death, you should immediately inform the National Highway Traffic Safety Administration (NHTSA) in addition to notifying Bil-Jax, Inc. If NHTSA receives similar complaints, it may open an investigation, and if it finds that a safety defect exists in a group of vehicles, it may order a recall and remedy campaign. However, NHTSA cannot become involved in any individual problems between you, your dealer, or Bil-Jax, Inc. To contact NHTSA you may either call the Auto Safety Hotline toll-free at 1-800-424-9393 (366-0123 in Washington, DC area) or write to:
NHTSA U.S. DEPARTMENT of TRANSPORTATION 400 7th Street SW, (NSA-11) Washington, DC 20590
You can also obtain other information about motor vehicle safety from the Hotline.

XLB-4319
1-8

2-1
2 Introduction
2-1
s
-
trol valves. Three hydraulic cylinders elevate the lower boom, upper boom, and jib
GENERAL DESCRIPTION The XLB-4319 Hydraulic Boom Lift (Figure 2-1) is designed to position personnel withtheir tools and equipment at overhead work locations. The work basket load capacity i450 lbs. During all boom operations, the unit is supported by four extended outriggers.
Two versions of the XLB-4319 boom lift are available – gasoline powered or batterypowered. On both versions the hydraulic power unit includes a reservoir, pump, and con
boom. A hydraulic motor and worm gear rotates the boom 360° around a vertical axis.
XLB-4319
OUTRIGGER
UPPERBOOM
JIBBOOMWORK
BASKET
LOWERBOOM
Figure 2-1. XLB-4319 Hydraulic Boom Lift

XLB-4319
2-2
The gasoline powered boom lift (gas model) uses a 4-cycle, 8-horsepower Honda engine. The engine drive shaft is directly coupled to the hydraulic pump. A 12 Volt DC storage battery powers the engine starter circuit. An auxiliary voltage regulator/rectifier provides up to 18 Amps charge current while the engine is running.
The battery powered boom lift (DC model) uses a 24 Volt, 39 Amp, one horsepower, DC motor to drive the hydraulic pump. The DC motor is powered by four 6 Volt DC, 245 Amp-hour, deep charge batteries connected in series. A 40 Amp, automatic, on-board battery charger is provided for recharging the batteries at the end of each work pe-riod.
The boom lift is equipped with basket and ground station control panels (Figure 2-2). The control panels include motion enable pushbuttons and proportional hydraulic valves for controlling the direction and speed of boom lift and rotation. The gas model basket station control panel includes an engine start pushbutton. Boom elevation and rotation controls are operational only when the outriggers are correctly extended and the moving boom sections are within a programmed safe operating zone.
GROUND STATION CONTROLS BASKET STATION CONTROLS
Figure 2-2. Basket and Ground Station Controls

2 — INTRODUCTION
2-3
Only one boom motion is permitted at a time, and only as long as the boom is within the safe operating zone (Figure 2-3). When a selected boom motion reaches a safe operating limit, the boom motion ceases and another boom motion must be selected within the safe operating zone.
FTC
XLB-4319 SPECIFICATIONS
CAPACITY .......................................... 450 LB.MAXIMUM PLATFORM HEIGHT ....... 37 FT.WORK HEIGHT .................................. 43 FT.POWER SOURCE .............................. 24V DC BATTERY OR GAS
45.9
42.6
39.4
36
32.8
24.5
26.3
23
19.7
16.4
13
9.8
6.5
3.2
0
B06-00-0430
9.8 6.5 3.2 0 3.2 6.5 9.8 13 16.4 19.7 23
Figure 2-3. Safe Operating Zone
Outrigger load sensing interlocks and interlock safety switches prevent all boom lifting operations until the four outriggers are properly extended, the trailer is level, and the full weight of the boom lift is loaded onto the outriggers. An interlock prevents the retracting of any outrigger while the upper or lower boom is raised two inches (50 mm) or more.
Boom elevation speeds are adjustable from zero to 5.3 inches per second (0 to 27 ft/min). A hydraulic hose failure at either retract-cylinder port will cause a counterbalance valve to stop the return oil flow. It is strongly recommended that no one adjust or tamper with these safety devices. If service is required, please notify Bil-Jax for instructions.
Emergency lowering of the basket is by manual valve plungers on the upper and lower boom lift cylinders or by manual operation of a hand pump in the basket. Firmly pushing in and holding a valve plunger manually retracts the boom lift cylinder. Smooth pumping of the hand pump while engaging a single hydraulic valve lever enables boom operation in case of a hydraulic power failure.
The XLB-4319 Hydraulic Boom Lift cylinders will not rust or corrode during storage since the cylinder rod is fully immersed in oil. It is important that the cylinder rods be kept clean and undamaged for the protection of the cylinder head packings.

XLB-4319
2-4
2-2 SPECIFICATIONS Boom Lift Work Platform Model Number: XLB-4319 Serial Number ________________ Manufactured by: Bil-Jax, Inc.
125 Taylor Parkway Archbold, Ohio 43502 800-537-0540
Table 2-1. Specifications Feature Data
Rated Platform Load 450 lbs (204 kg) total Maximum Work Height 43 ft (13.1 m) Extended Basket Height 37 ft (11.3 m) Maximum Outreach 19 ft (9.8 m) Elevation Rate, Nominal
5.3 in./sec (135 mm/sec) [26.7 ft/min (8.14 m/min)]
Horizontal Reach 19 ft (5.9 m) Boom Rotation 700° Rotation Speed 318° per minute, nominal Basket Dimensions 51 in. W x 30 in. D x 45 in. H
(129.5 cm x 76 cm x 114.3 cm) Power Source, Gas Model 8 Horsepower, 4-Cycle,
Gasoline Engine with Remote Start Control and Alternator Circuit
Storage Battery, Gas Model 12 Volt DC, 195 Amp Storage Battery, NAPA P/N 5022NF
Power Source, DC Model 24 Volt DC, 4 Deep Cycle, 245 Amp-hour Batteries
Battery Charger, DC Model 110/120 Volt, 40 Amp Hydraulic Pressure 2756 psi (19,000 kPa) Reservoir Capacity 2.75 Gallons (10.4 Liters) Hydraulic Capacity 7 Gallons (26.5 Liters) Hydraulic Oil Energol HLP-HD46 (BP Oil) Gross Vehicle Weight, DC Model 2860 lbs (1297 kg) Gross Vehicle Weight, Gas Model 3200 lbs (1452 kg) Tongue Weight, DC Model 100 lbs (45.4 kg) Tongue Weight, Gas Model 160 lbs (72.6 kg) Trailer Brakes Mechanical Surge

2 — INTRODUCTION
2-5
2-3 WARRANTY Bil-Jax warrants its boom lifts for one year from the date of delivery against all defects of material and workmanship, provided the unit is operated and maintained in compliance with Bil-Jax’s operating and maintenance instructions. Bil-Jax will, at its option, repair or replace any unit or component part which fails to function properly in normal use.
This warranty does not apply if the lift and/or its component parts have been altered, changed, or repaired without the consent of bil-jax or by anyone other than Bil-Jax or its factory trained personnel, nor if the lift and/or its components have been subjected to misuse, negligence, accident or any conditions deemed other than those considered as occurring during normal use.
Components not manufactured by Bil-Jax are covered by their respective manufacturer’s warranties. A list of those components and their warranties is available upon written re-quest to Bil-Jax.
Bil-Jax shall not in any event be liable for the cost of any special, indirect, or consequen-tial damages to anyone, product, or thing. This warranty is in lieu of all other warranties expressed or implied. We neither assume nor authorize any representative, or other per-son, to assume for us any other liability in connection with the sale, rental, or use of this product.

XLB-4319
2-6

3-1
3 Operation
3-1 multiple operator controls. Equip-
ment power and outrigger controls are located at ground level. Boom lift and rotation l and in the basket.
the latch decal. Open the control compartment cover. Unhook the support rod behind the
OPERATOR CONTROLS The XLB-4319 Hydraulic Boom Lift is equipped with
controls are located at ground leve
Ground Control Station The ground control station (Figure 3-1) operates the outriggers and lift booms. To access the boom controls, reach into the cover latch port and release the cover latch according to
front edge of the cover and place the rod end into the mating hole in the battery bracket.
LATCHDECAL
COVERLATCHPORT
CONTROLCOMPARTMENT
COVER
GROUNDCONTROLSTATION
Figure 3-1. Ground Control Station Access

XLB-4319
3-2
The ground control station (Figure 3-2) includes the following electrical and hydraulic controls.
OUTRIGGEROPERATOR
LEVERS
BOOM OPERATORLEVERS
OUTRIGGERSRUN
PUSHBUTTON
KEYSWITCH
BOOMRUN
PUSHBUTTON
EMERGENCYSTOP
PUSHBUTTON
OUTRIGGERINDICATORS
peration from the basket control station. Turn-ing the key switch to the right selects operation from the ground control station. The cen-
hydraulic operations. Removing the key protects
r from the upper and lower control stations. Pressing the EMERGENCY STOP pushbutton also
ine or DC motor to interrupt hydraulic power. Before you can
ight up when the boom lift outriggers are extended rom the trailer axle. All four indicators must be lit and
Figure 3-2. Ground Control Station
Key Switch Turning the key switch to the left selects o
ter (Off) position disables electrical andagainst unauthorized boom lift operation.
EMERGENCY STOP Pushbutton When pressed, the EMERGENCY STOP pushbutton disconnects electrical powe
shuts off the gasoline engrestore power, you must rotate the EMERGENCY STOP pushbutton clockwise.
Outrigger Indicators Four green OUTRIGGER indicators land the boom weight is removed fthe trailer must be level to enable operation of the lift booms.

3 — OPERATION
3-3
Outriggers Run Pushbutton
ed,
aulic valves to extend and retract the out-perator lever retracts the cylinder to raise the outrigger. r lever lowers the related outrigger. When released, the op-
s
and the boom rotation drive motor. Pulling a boom operator lever
rotation operator lever turns the boom clockwise. Pushing the operator lever turns the boom counterclockwise. How far the lever is pushed or pulled controls the
al
Engine Keyswitch (Gas MOn the gas model start and stop the gasoline engine from ust be in the ON position (as shown) to enable engine start-up from the work basket control station.
Holding the black outriggers run pushbutton in enables operation of the outrigger cylin-ders. The outrigger cylinders can only be operated when the lift boom cylinders are re-tracted.
Boom Run Pushbutton Holding the green boom run pushbutton in enables operation of the lift boom cylinders. The lift boom cylinders can only be operated when the outrigger cylinders are extendthe boom weight is removed from the trailer axle, and the trailer is level.
Outrigger Operator Levers Four outrigger operator levers position the hydrrigger cylinders. Lifting an oPushing down on an operatoerator levers return to the center (valve-off) position. Starting on your left, the outriggerare numbered 1 through 4. A decal located below the outrigger valve manifold indicates which operator lever controls which outrigger.
Boom Operator Levers Four boom operator levers position proportional hydraulic valves to extend and retract the boom lift cylindersextends the cylinder to raise the boom. Pushing a boom operator lever lowers the related boom. How far the lever is pushed or pulled controls the boom lift speed.
Pulling the boom
boom rotation speed.
When released, the boom operator levers return to the center (valve-off) position. A declocated in front of the valve manifold shows which boom motion is controlled by each operator lever.
odel only) boom lift, the engine keyswitch (Figure 3-3) is used to
the ground position. The keyswitch m
ENGINEKEYSWITCH
Figure 3-3. Engine Keyswitch

XLB-4319
3-4
Basket Control Station The basket control station (Figure 3-3) operates the hydraulic boom lift, boom rotation. and basket rotation motions. The basket control station includes the following electrical and hydraulic controls.
BOOMOPERATOR LEVERS
EMERGENCYSTOP PUSHBUTTON
HYDRAULICHAND PUMP
BOOM RUNPUSHBUTTON
ENGINE STARTPUSHBUTTON
(GAS MODEL ONLY)
115 VOLTOUTLET
AUDIBLEALARM
Y STOP pushbutton disconnects electrical power from
Boom Run Pushbutton Holding the green boom run pushbutton in enables operation of the boom lift and rota-tion functions. Boom lift and rotation can only be operated when the outrigger cylinders are extended, the boom weight is supported by all four outriggers, and the trailer is level.
Figure 3-4. Basket Control Station
EMERGENCY STOP Pushbutton When pressed, the EMERGENCthe upper and lower control stations. Pressing the EMERGENCY STOP pushbutton alsoshuts off the gasoline engine or DC motor to interrupt hydraulic power. Before you can restore power, you must rotate the EMERGENCY STOP pushbutton clockwise.

3 — OPERATION
3-5
Boom Operator Levers Five boom operator levers position proportional hydraulic valves to extend and retract three boom lift cylinders, the boom rotation drive motor, and the basket swivel cylinder. Pulling a boom operator lever extends the cylinder to raise the boom. Pushing a boom lift operator lever lowers the related boom. How far the lever is pushed or pulled controls the boom lift speed.
Pulling the boom rotation or basket rotation operator lever turns the boom or basket clockwise. Pushing the operator lever turns the boom or basket counterclockwise. How far the lever is pushed or pulled controls the rotation speed.
When released, the boom operator levers return to the center (valve-off) position. A decal located in front of the valve manifold shows which boom motion is controlled by each operator lever.
Hydraulic Hand Pump The basket control station is equipped with a hydraulic hand pump. In case lift boom op-erating power is lost, the hand pump is available to manually lower the lift boom. Hold-ing the related operator lever in position and smoothly operating the hand pump lowers the lift boom or swivels the work basket to another position.
Engine Start Pushbutton (Gas Model only) Pressing the engine start pushbutton restarts the gasoline engine while in the work bas-ket. The pushbutton should only be pressed until the engine starts. The engine should not be cranked longer than 15 seconds at a time. Over-cranking will burn up the starter mo-tor.
Audible Alarm An audible alarm is located in the basket station control panel. The audible alarm sounds whenever the key switch is on and the boom lift is out of level.
115 Volt Outlet The 115 Volt AC outlet is provided for running electrical power tools in the work basket. A connecting power cord must be plugged in to a suitable power source. The power plug is located on the inside of the trailer frame, near the tow end of the trailer. The outlet is rated for a 15-ampere load. Do not overload the accessory power circuit.

XLB-4319
3-6
3-2 NORMAL OPERATING PROCEDURE Perform the following procedures to operate the XLB-4319 Hydraulic Boom Lift.
1. Read and follow all safety precautions contained in Section 1 and all responsi-bilities outlined in the ANSI A92.2 reprint contained in Section 7 of this man-ual.
2. Position the lift at the work area. Make sure the lift is on a firm and level surface and that there are no potential hazards such as overhead obstructions or electri-cally charged conductors. Do not operate the lift if such hazards exist.
3. Check the tow trailer and boom lift for damaged or worn parts. Repair or re-place parts as necessary. Do not use a damaged boom lift.
4. Apply the trailer parking brake.
5. Lower the trailer tongue jack and unhitch the trailer from the tow vehicle. The trailer must be unhitched before the outriggers are lowered.
6. See Figure 3-4 and lower the boom lift outriggers as follows:
a. Start the engine or motor.
b. Turn the key switch to the ground control position.
c. Press and hold in the black outrigger run pushbutton.
OUTRIGGERSRUN
PUSHBUTTON
BUBBLELEVEL
INDICATOR
KEYSWITCH
OUTRIGGEROPERATOR
LEVERS
Figure 3-5. Outrigger Controls

3 — OPERATION
3-7
WARNING Always verify that the green outrigger LEDs light up when the outrigger feet be-come loaded. If an outrigger LED fails to light up or lights up before the outrigger foot becomes loaded, the limit switch or switch setting is faulty. Using the boom lift with a faulty limit switch or switch setting can cause severe injury, death, or damage to the equipment.
d. Push down on the rear outrigger levers (1 & 2) to lower the rear outriggers. Lower the rear outriggers only until the rear outrigger LEDs light up on the control panel.
e. Push down on the front outrigger levers (3 & 4) to lower the front outrig-gers. Raise the trailer wheels off the ground. Verify that the front outrigger LEDs light up on the control panel.
f. Watch the bubble level indicator and adjust the outriggers as needed to level the trailer.
NOTE: An LED level switch and four outrigger position switches prevent boom motions if the trailer is not level or if one or more outriggers is not sup-porting the vehicle load. The load of the boom lift vehicle must be placed on all four outriggers and the trailer must be level to enable motor-powered boom lift operations.
7. Remove the keeper pins and transport pins that secure the upper and lower booms. Stow the transport pins in the retainer clips provided.
8. Use the ground control station to operate the boom lift controls. Raise, lower, and rotate the boom to get familiar with the controls. Learn to smoothly start and stop all boom motions.
9. Lower the boom sections to position the basket for boarding. Turn the key switch to the basket control position.
10. Raise the safety bar and enter the basket. Put on the safety harness and attach the lanyard to the attachment position on the basket railing. Operate the boom lift carefully.
11. When boom lift operations are complete, retract the boom and outriggers for trailer towing according to the following procedure:
a. Using the basket control station, rotate the basket to the center position.
b. Fully retract the jib boom, the upper boom, and the lower boom.
c. Exit the basket and turn the key switch to the ground control position.
d. Retract the two rear outriggers until the trailer tires touch. Do not fully re-tract the rear outriggers.
e. Retract the front outriggers until fully raised.
f. Retract the rear outriggers until fully raised.
g. Prior to towing, install the transport pins and keeper pins to secure the up-per and lower booms. Refer to paragraph 3-6 for towing instructions.

XLB-4319
3-8
3-3 EMERGENCY LOWERING The XLB-4319 Boom Lift is equipped with two manual lowering valves and a hydraulic hand pump. These devices can be used to lower the basket in case of a power failure, a load shift, or other emergency situation.
The manual lowering valves are located on the upper and lower boom lift cylinders and are manually operated from the ground. The hydraulic hand pump is located in the work basket. Use the hand pump in case an assistant is not available on the ground.
To lower the work basket from the ground, push in the valve plunger (Figure 3-6) on the lower boom lift cylinder. Continue pushing the valve plunger to fully retract the lower boom. Push in and hold the valve plunger on the upper boom lift cylinder until the upper boom is retracted.
VALVEPLUNGER
Figure 3-6. Manual Lowering Valve
To manually lower the boom lift from the work basket, push the upper or lower boom operator lever (Figure 3-7) down and use the hand pump to lower the boom. Apply a steady up-and-down pumping action. The hydraulic cylinders are dual acting; boom motion will continue throughout pump handle operation.
HANDPUMP
BOOM OPERATORLEVERS
Figure 3-7. Basket Control Station

3 — OPERATION
3-9
3-4 MANUAL BOOM ROTATION The hydraulic boom lift is equipped with an emergency rotation handle (crank) that can be used to rotate the boom in case of a power failure or other emergency situation.
Use the following procedure to manually rotate the boom:
1. Remove the crank from its stowage rack and install the crank on the hex end of the worm gear drive screw (Figure 3-8).
2. Hold the boom rotation valve lever in the correct position for boom rotation and turn the crank to rotate the boom.
BOOM ROTATIONVALVE LEVER
BOOM ROTATIONCRANK
Figure 3-8. Emergency Rotation

XLB-4319
3-10
3-5 BATTERY RECHARGE (DC MODEL ONLY) The DC model boom lift batteries should be recharged after each 8-hour work shift or more often if needed. When the boom lift is not in use, the batteries should be recharged at least once per week.
The normal charge time is 10 to 12 hours. If the battery charge is extremely low, a full recharge may take up to 24 hours.
Recharge the DC model boom lift batteries as follows:
WARNING Recharge the batteries in a well ventilated area only. Do not charge batteries near fire, flame, or other ignition sources. Batteries being charged may emit highly ex-plosive hydrogen gas. Failure to properly ventilate the charge gases may result in serious injury or death.
1. Move the boom lift to a well ventilated area with direct access to a grounded 120 VAC electrical outlet. Make sure the recharge area is not near fire, flames or other ignition sources.
2. Plug a short, heavy-duty power cord into the battery charger receptacle on the electrical cord connected to the charger. The recommended power cord should be an 12 AWG multi-strand, grounded cord no longer than 50 feet (16 meters).
NOTE: Using an underrated or long power cord will reduce the output of the battery charger, resulting in longer charge time.
3. Plug the power cord into a grounded 120 VAC receptacle. Verify that the red ON-CHARGING indicator LED lights up on the battery charger.
4. To determine the charge rate at any time during the charge cycle, observe the DC ammeter (Figure 3-9). The ammeter needle moves to the right at the start of the charge cycle. As the battery charge rises, the needle moves farther left.
Figure 3-9. Battery Charger

3 — OPERATION
3-11
CAUTION Always remember to unplug the battery charger power cord before moving the boom lift. Failure to unplug the power cord will cause damage to the equipment.
5. Inspect the charge indicator LEDs near the end of the expected charge cycle. If all indicator LEDs are off, the battery is fully charged. (The DC ammeter needleshould point to the left.)
NOTE: The yellow 80% CHARGE indicator lights up when the battery voltage is charge. At full charge (3-1/2 hours after the 80% CHARGE hts up), the charger turns off.
use.
3-6 BOOM LIFT TRAThe boom lift trailer is a single axle trailer fitted with a two-inch ball hitch, surge brakes, brea lift tfore towi hitch, tow, and back the boom lift trailer:
TraileTrai give tow vehicle backing instructions.
the ball. Jack up the tongue as needed.
2. Align the ball and hitch (Figure 3-10). Fasten the breakaway safety cable to the tow vehicle.
nearing fullindicator lig
If the battery voltage does not reach the 80% CHARGE level in 14 hours, the charger turns off and the red CHECK BATTERY indicator LED lights up. This prevents extended charging of a faulty battery.
6. Unplug the power cord from the 120 VAC receptacle and the charger recepta-cle. Properly store the power cord for next
NSPORT
kaway safety cable, safety chains, brake lights, and side marker lights. Proper boomransport requires the correct hookup and inspection of these trailer components be-
ng. Use the following procedures to
r Hitching ler hitching requires a second person to
1. Back the tow vehicle to the trailer. Verify that the ball and hitch are in line and that the trailer hitch will clear
BREAKAWAYSAFETY CABLE
JACK INRAISED
POSITION
JACK INRAISED
POSITION
PIVOTLOCKING
PIN
PO EPLUG
W R SAFETYCHAINS
PARKINGBRAKE
BALL
ANDHITCH
Figure 3-10. Trailer Hitching

XLB-4319
3-12
3. l
4. the tow
5. Release the trailer parking brake.
Ho d ball hitch release lever open and lower the hitch onto the ball. Let go of the release lever to secure the ball.
Crank the jack down to check for secure coupling. If jacking will raisevehicle bumper two or three inches, the ball hitch coupling is secure.
6. Pull the pivot locking pin. Swivel the jack 90 degrees to the travel position andrelease the pivot locking pin.
CAUTION Always cross and attach the safety chains before towing. Failure to attach safety chains properly will allow tongue to drop in case of ball hitch failure, resulting in serious damage to the trailer and equipment.
7. Attach the trailer safety chains to the tow vehicle. Make sure the chains cross under the trailer tongue. If needed, cross the chains over then under the tow bar to prevent dragging.
8. Connect the trailer lights to the tow vehicle power plug.
9. Check the breakaway safety cable. If the safety cable does not have adequate slack, the brakes may drag.
10. Before towing the trailer, check the following and make all necessary adjust-ments, corrections, or repairs:
a. Check that the trailer jack and outriggers are in their travel positions.
b. Verify that the transport pins and pin keepers secure the upper and lower booms. If the booms are not secured, install the transport pins and pin keep-ers at this time.
c. Verify that the basket is centered and that all onboard equipment is secured.
d. Check that the key switch is in the OFF position. Remove the key.
e. Verify that trailer brake lights and marker lights work properly.
f. Check that the trailer tires are evenly inflated and not low on air.
WARNING Improper tightening of boom lift trailer wheel nuts can cause wheel lugs to shear, causing serious injury or damage to equipment. Check and maintain the proper wheel nut torque according to the maintenance instructions in this manual.
Periodically check the wheel nut torque according to the instructions in Section 4 of this manual. More frequent torque checks are required when a wheel is recently installed.
Prior to towing, while the trailer wheels are elevated for boom lift operation, check for loose wheels and for wheel lug wear indications. If a loose wheel mounting is indicated, remove and inspect the wheel lugs for damage. Do not tow the boom lift with worn or damaged wheel lugs.

4-1
4 Maintenance
4-1 ECKS
Perform the following -1.
/Weekly Service Chec
before use Weekly
SCHEDULED SERVICE CH
Daily/Weekly Service Checks daily/weekly service checks as listed in Table 4
Table 4-1. Daily ks
Service Check Daily
Check to see that all decals are present.
Check that controls and indicators at ground and basket control stations operate properly.
Raise booms and press emergency stop pushbutton. Verify that booms remain elevated and do not drift down.
Check that boom down limy
it switch and outrigger position . switches operate properl
Check/add hydraulic oil.
Check/add engine oil.
Check engine air filter element. Clean or replace dirty ordamaged air filter element.
Check trailer tires for proper inflation. When cold, tires should be inflated to 55 psi (3.8 bar).
Check trailer running lights for proper operation.
Check battery electrolyte level. If battery charge is low, add re
water to bring electrolyte just above plates. If batteries a
fully charged, raise electrolyte to full mark in each cell.
Check trailer hitch components for damage and proper operation. Refer to Trailer Hitching in paragraph 3-6.
Check electrical wiring for cuts, loose terminals, broken wires, chaffing, corrosion, or other damage. Repair all damage, remove corrosion, and seal exposed connections.
Lubricate grease fittings labeled LUBRICATE WEEKLY with NLGI Grade 2 multi-purpose grease.
Check trailer and boom lift for missing or loose hardware. Replace or tighten missing or loose hardware as needed.

XLB-4319
4-2
Monthly Service Checks Perform the following monthly service checks as listed in Table 4-2.
Table 4-2. Monthly Service Checks
Service Check
Every month
Every 6 months
Every 12 months
Check/add hydraulic oil per paragraph 4-4.
Clean battery terminals and battery charger operation.
Check operation of manual lowering valves and hand pump.
Check wheel nut torque per paragraph 4-2.
Lubricate compartment hinges and latches with light weight machine oil.
Lubricate grease fittings labeled LUBRICATE MONTHLY per paragraph 4-3.2.
Lubricate trailer tongue jack (2 places) with NLGI Grade 2 multi-purpose grease.
Lubricate grease fittings labeled LUBRICATE SEMI-ANNUALLY per paragraph 4-3. 3.
Change engine oil.
Check battery cables and wiring for loose connections and damaged wires.
Replace spark plug.
Replace hydraulic oil and oil filter.
Check boom pivot pin and sleeve bearings for wear. Replace worn or damaged pivot pins and sleeve bearings.
Check slew bearing for wear or damage per paragraph 4-5.
Inspect and adjust trailer brakes.
Load test boom lift operations with 450 pounds (204 kg).

4 — MAINTENANCE
4-3
4-2 WHEEL NUT TORQUE REQUIREMENTS It is very important to apply and maintain the correct wheel bolt torque on the boom lift trailer. The wheel bolts must be evenly tightened to the following specified torque incre-ments whenever a trailer wheel is removed and installed. Use the following tightening procedure:
1. Evenly tighten the wheel bolts to 25 lb-ft (34 N·m) in the tightening sequence shown in Figure 4-1.
1
2
34
Figure 4-1. Wheel Bolt Tightening Sequence
2. Evenly tighten the wheel bolts to 60 lb-ft (81,4 N·m) using the tightening se-quence shown.
3. Evenly tighten the wheel bolts to 100 lb-ft (135,6 N·m) using the tightening se-quence shown.

XLB-4319
4-4
4-3 LUBRICATION Lubrication makes operation of the XLB-4319 Boom Lift more efficient and extends the equipment life. Use the following procedures to lubricate the boom lift components.
1. Lubricate trailer jack post and all grease fittings labeled LUBRICATE WEEKLY with NLGI Grade 2 multi-purpose grease.
2. Lubricate all LUBRICATE MONTHLY grease fittings with NLGI Grade 2 multi-purpose grease. Wipe off dirt and grease residue. Add approximately ½ ounce (15 cc) of grease to each fitting. See Figure 4-2 for grease fitting loca-tions.
GREASEFITTINGS
GREASEFITTINGS
Figure 4-2. Lubricate Monthly
3. Lubricate the slew ring bearing grease fitting (Figure 4-3) with NLGI Grade 2 multi-purpose grease. Wipe off dirt and grease residue. Rotate the boom and add approximately ½ ounce (15 cc) of grease to each bearing quadrant.
GREASEFITTING
Figure 4-3. Lubricate Semi-Annually

4 — MAINTENANCE
4-5
4-4 HYDRAULIC SYSTEM Hydraulic system maintenance varies with equipment use and the environment in which the boom lift is used. Constant attention to keep the oil clean and the reservoir properly filled will help prevent possible damage to the system. Hydraulic diagrams are provided in this section for general reference.
WARNING Hydraulic system pressure settings are factory settings and should not need read-justment. The only time readjustment is needed is when a component in the hy-draulic control circuit is replaced. Only the adjustments covered in this manual are permitted. If you believe that any other hydraulic component needs adjust-ment, notify Bil-Jax for additional instruction. Hydraulic motions are quiet, quick, and can be dangerous to persons on or near the lift vehicle. Failure to heed this warning can result in serious injury or death.
Hydraulic System Inspection Check the hydraulic hose and fittings for leaks and damage daily. Tighten or replace as necessary to prevent hydraulic oil loss. Secure hoses and lines as needed to prevent rub-bing and chafing.
Fluid Check and Replacement The oil level should be checked with the engine or motor off, the boom down, and the trailer on a level surface. Pull the dipstick out of the reservoir (Figure 4-4) and wipe off any oil with a clean shop cloth, then reinsert the dipstick. Pull the dipstick to check the oil level. The oil level should be between the full and add oil marks on the dipstick.
HYDRAULICRESERVOIR
DIPSTICK
Figure 4-4. Hydraulic Reservoir

XLB-4319
4-6
Do not mix hydraulic oils. The reservoir is originally filled with Energol HLP-HD46, a high-grade, non-foaming hydraulic oil designed for temperatures as low as -20°F (-33°C). For temperatures reaching -40°F (-40°C), use Dextron Automatic Transmission Fluid Type A.
If either oil is not available, a good grade SAE 10W hydraulic oil may be used where the low temperature is above 32°F (0°C). SAE 5W hydraulic oil may be used where low temperatures reach 0°F (-18°C).
Once a year or whenever the oil becomes contaminated, drain the reservoir, clean the sump strainer, and replace the hydraulic oil and return filter.
Return Filter Replacement The hydraulic oil filter should be replaced yearly or whenever filter contamination has a noticeable effect on the beam lift functions. If return filter clogging is suspected, check the system hydraulic pressure.
With engine or motor running and no controls actuated, hydraulic system pressure should be near 0 (zero), or minimal. If the pressure exceeds 30 psig (2 bar) (200 kPa gage), the return filter should be replaced as follows:
1. Use cleaning cloths and alcohol solvent to clean away dirt on filter cover and housing (Figure 4-4). Be sure to place reusable components on new cleaning cloths. Do not allow filter parts to become contaminated.
2. Use a wrench to loosen filter cover.
3. Remove filter cover. Place reusable filter parts on new cleaning cloths.
4. Lift filter element and element holder above reservoir oil level. Drain residual oil back into filter housing.
5. Remove and discard used filter element.
6. Locate OUT marking on one end of new filter element.
7. With OUT end up, seat new filter element in center of filter holder.
8. Seat filter holder and element in filter housing.
9. Wipe o-ring and mating seal surface of cover with cleaning cloth. If o-ring is cut or gouged, replace o-ring.
10. Install and hand tighten filter cover. Do not over-tighten filter cover.
Air Bleeding Delayed response or sporadic boom lift motions may indicate air in the lift cylinders. Use the following procedure to bleed entrapped air from the hydraulic system.
1. Fill the reservoir with the proper hydraulic fluid. Replace, but do not tighten the reservoir fill cap.
2. Fully raise and lower the boom to return oil with entrapped air to the reservoir.
3. Allow several minutes for air to escape the reservoir oil.
4. Repeat steps 1 through 3 as needed. Add oil slowly and only when the boom is lowered to prevent adding more air to the system.

4 — MAINTENANCE
4-7
Hydraulic Pressure Checks and Adjustments Hydraulic pressures are set at the factory and should not be adjusted unless a hydraulic component has been replaced in the regulated circuit.
On the gas engine model a pressure test port (Figure 4-5) is located at the ground station boom control valves. A hydraulic pressure gage [0-6000 psig (0-400 bar) (41 000 kPa gage) minimum range] must be connected to the test port when adjusting hydraulic pres-sures. This is the only pressure test port on the boom lift.
On the DC model boom lift, the main bypass valve and pressure test port are mounted on the hydraulic manifold located between the hydraulic pump and reservoir. To prevent tampering, the main bypass valve cap is secured with locking wire and a seal. If a pres-sure adjustment is required, call Bil-Jax and request a replacement lock wire and seal.
The boom lift has four bypass valves that regulate hydraulic operating pressures. These include (1) the main bypass valve, (2) the outriggers bypass valve, (3) the basket station boom controls bypass valve, and (4) the ground station boom controls bypass valve.
Check/Adjust System and Outriggers Hydraulic Pressures The system hydraulic pressure (pump output pressure) is regulated by the main bypass valve. The system hydraulic pressure is used to power all hydraulic operations. The main bypass valve and pressure test port for the gas model boom lift are shown in (Figure 4-5).
MAINBYPASSVALVE
PRESSURETEST PORT
Figure 4-5. Main Bypass Valve and Pressure Test Port (Gas Engine Model)

XLB-4319
4-8
To adjust the system hydraulic pressure, we must first set the outriggers bypass pressure very high. This ensures that you are reading system pressure when fully retracting an outrigger cylinder. After adjusting the system pressure, we must readjust the outriggers bypass pressure to specification.
Adjust System Pressure
1. Connect a hydraulic pressure gage to the pressure test port.
2. Remove the cap from the outriggers bypass valve (Figure 4-6). Turn the adjust screw to the right exactly two turns. This adjustment will allow the main bypass valve to regulate the test pressure.
3. Reinstall and tighten the cap to prevent oil leakage. Do not over tighten the cap.
OUTRIGGERSBYPASS VALVE
Figure 4-6. Outriggers Bypass Valve
4. Start the gasoline engine or DC motor. Run the engine or motor for at least five minutes to warm the hydraulic oil to the normal operating temperature.
5. Pull up one outrigger control lever to fully retract the outrigger. While the out-rigger control lever is pulled up, read the pressure gage. If the pressure is rising, allow the pressure to reach its highest reading.
6. On the gas model boom lift, if the pressure gage reading is 3045 psig [210 bar (21 000 kPa)] nominal, no adjustment is required. If an adjustment is required, proceed with step 8.
7. On the DC model boom lift, if the pressure gage reading is 2750 psig [190 bar (19 000 kPa)] nominal, no adjustment is required. If an adjustment is required, proceed with step 8.
NOTE: Loosening the adjust lock nut will cause hydraulic oil to leak from the main bypass valve. It is recommended that you shut the engine off before making adjustments to the main bypass valve.
8. Press the emergency stop pushbutton to turn off the hydraulic pump.
9. Loosen the adjust lock nut for the main bypass valve.

4 — MAINTENANCE
4-9
10. Use hex wrench to turn the pressure adjust screw. Turn the adjust screw right for higher pressure or left for lower pressure. Turning the adjust screw 1/4 turn will adjust the pressure about 150 psig [10,4 bar (1 037 kPa gage)].
11. Tighten the adjust lock nut.
12. Reset the emergency stop pushbutton and restart the engine or motor.
13. Pull up one outrigger control lever and recheck the system pressure. If the pres-sure is still too high or too low, repeat the adjustment starting with step 6.
14. When the system pressure is properly adjusted, remove the cap from the outrig-gers bypass valve (Figure 4-6). Turn the adjust screw to the left two turns.
15. Reinstall and tighten the adjust screw cap. Do not over tighten the cap.
Check/Adjust Outriggers Pressure
1. Pull up one outrigger control lever and read the pressure at the gage. If the gage reading is 2750 psig [190 bar (19 000 kPa)] nominal, no adjustment is required.
2. If the outriggers pressure is too high or too low, remove the cap (Figure 4-6) and adjust the pressure. Turning the adjust screw to the right 1/4 turn will raise the pressure about 150 psig [10,4 bar (1 037 kPa gage)].
3. Reinstall and tighten the adjust screw cap. Do not over tighten the cap.
4. Repeat steps 1 through 3 as needed to properly adjust outrigger pressure.
5. If no other hydraulic pressures are to be checked, shut down the engine or motor and remove the pressure gage.
Check/Adjust Boom Hydraulic Pressure The hydraulic pressure for the basket station boom controls is regulated by a bypass valve (Figure 4-7) at the front of the basket station valve bank. The hydraulic pressure for the ground station boom controls is regulated by an identical valve at the back of the ground station boom controls. The regulated pressure is used to extend and retract all basket and boom positioning cylinders.
BYPASS VALVEADJUST SCREW
VALVECAP
Figure 4-7. Boom Control Bypass Valve, Basket Station

XLB-4319
4-10
Check and adjust the hydraulic bypass pressure for the basket or ground station boom controls as follows:
1. Connect a hydraulic pressure gage to the pressure test port.
2. Start the gasoline engine or DC motor. Run the engine or motor for at least five minutes to warm the hydraulic oil to the normal operating temperature.
3. Extend the outriggers to fully support and level the boom lift.
4. Turn the ground control station key switch to basket or ground position, accord-ing to which bypass pressure (basket or ground control) is to be adjusted.
NOTE: When adjusting the bypass pressure for the basket station boom controls, the basket station boom controls must be used. When adjusting the by-pass pressure for the ground station boom controls, the ground station boom controls must be used.
5. Push down the lower beam control lever at the basket or ground station and read the pressure gage. If the pressure gage reading is 2750 psig [190 bar (19 000 kPa)] nominal, no adjustment is required. If an adjustment is required, proceed with step 6.
6. Press the emergency stop pushbutton to turn off the hydraulic pump.
NOTE: Removing the adjust screw cap while the hydraulic pump is running will cause oil to leak from the bypass valve. It is recommended that you shut the engine off before removing the adjust screw cap.
7. Locate the bypass valve for the selected boom control valve bank. Remove the adjust screw cap.
8. Use screwdriver to turn the adjust screw. Turning the adjust screw 1/4 turn to the right will increase the pressure about 150 psig [10,4 bar (1 037 kPa gage)].
9. Reinstall and tighten the adjust screw cap. Do not over tighten the cap.
10. Reset the emergency stop pushbutton and restart the engine or motor.
11. Push the upper or lower beam control lever down at the basket or ground station controls and read the pressure gage. If the bypass pressure is still too high or too low, repeat the adjustment starting with step 6.
12. If no other hydraulic pressures are to be checked, shut down the engine or motor and remove the pressure gage.
Hydraulic Cylinder Replacement
WARNING Hydraulic cylinders are heavy and may have hydraulic oil on the surface. Hydrau-lic cylinders must be secured with lifting straps or tie-downs when removing, in-stalling, and handling. Failure to heed this warning can result in serious injury.

4 — MAINTENANCE
4-11
Boom Lift Cylinder Removal and Installation
WARNING Make sure the boom and boom cylinder are securely supported before removing the boom cylinder. Failure to do so may cause the boom or boom cylinder to fall. This may cause severe injury or damage to the boom lift.
1. If removing the lower boom lift cylinder, raise the lower boom to just above horizontal and stand a 36 inch (90 cm) long length of 4x4 hardwood shoring on the trailer tongue directly below the lower boom rest plate. Lower the boom onto the shoring. Manually check the stability of the shoring.
2. If removing the upper boom lift cylinder, raise the lower boom about two inches (50 mm) above the boom rest position.
3. Press in and hold the manual lowering valve at the boom lift cylinder that is to be replaced. Bleed off all hydraulic pressure to the cylinder.
4. Refer to Figure 4-8. At the piston rod end of the cylinder, unscrew and remove the keeper pins from both sides of the pivot pin. Thread the removed keeper pin hardware to the boom for use during cylinder installation.
5. Drive out the pivot pin with a hammer and a brass or hardwood drift. Do not al-low the free end of the cylinder to fall.
MANUALLOWERING
VALVE
PIVOTPIN
PINKEEPER HYDRAULIC
CYLINDER
VALVEBLOCK
PINKEEPER
UPPERBOOM
PIVOTPIN
Figure 4-8. Hydraulic Cylinder Removal

XLB-4319
4-12
6. If removing the lower boom lift cylinder, fully retract the cylinder. Use the pivot pin to turn the piston rod pivot boss 90°. Lower the cylinder through the relief slot in the stabilizer beam (not shown).
7. Turn off the key switch and remove the key.
8. Tag the hydraulic hoses that connect to the cylinder valve block. Each valve block port is stamped with an identity number.
9. Place absorbent drip cloths below the cylinder ports. Remove the hydraulic hoses from the lift cylinder. Elevate the hoses to help prevent fluid leakage. Pro-tect exposed hose fittings and cylinder ports with plugs and caps.
10. At the base of the cylinder, unscrew and remove the keeper pins from both sides of the boom pivot pin. Thread the removed keeper pin hardware to the boom for use during cylinder installation.
11. Drive out the pivot pin with a hammer and a brass or hardwood drift.
12. Lift and remove the cylinder using an overhead hoist and lifting straps.
13. After repairing the hydraulic cylinder, reinstall the cylinder in the reverse order of removal.
14. Power up the hydraulic system and check for leakage. Tighten the hydraulic fit-tings as needed.
15. Bleed entrapped air from the hydraulic cylinder according to instructions in paragraph 4-4.
NOTE: Do not tamper with the cylinder counterbalance or manual lowering valves. If the valves need adjustment, contact the Bil-Jax Service Department at 800-537-0540.
Outrigger Cylinder Removal and Installation 1. Lower the outrigger until the foot pad meets the floor and supports only the out-
rigger beam. Leave the weight of the boom lift on the trailer wheels.
2. At the piston rod end of the cylinder, unscrew and remove the keeper pins from both sides of the boom pivot pin. Thread the removed keeper pin screws and keeper pins to the outrigger beam for use during cylinder installation.
3. Place a block of wood shoring between the outrigger beam and cylinder.

4 — MAINTENANCE
4-13
4. Drive out the pivot pin with a hammer and a brass or hardwood drift. Do not al-low the free end of the cylinder to fall.
5. Fully retract the cylinder.
6. Turn off the key switch and remove the key.
7. Tag the hydraulic hoses that connect to the cylinder valve block. Each valve block port is stamped with an identity number.
8. Place absorbent drip cloths below the cylinder ports. Remove the hydraulic hoses from the lift cylinder. Plug the hose fittings to prevent fluid leakage. Pro-tect exposed cylinder ports with plugs and caps.
9. At the base of the cylinder, unscrew and remove the keeper pins from both sides of the pivot pin. Thread the removed keeper pin screws and keeper pins to the mating beam for use during cylinder installation.
10. Drive out the pivot pin with a hammer and a brass or hardwood drift.
11. Lift and remove the cylinder using an overhead hoist and lifting straps.
12. After repairing the hydraulic cylinder, reinstall the cylinder in the reverse order of removal.
13. Power up the hydraulic system and check for leakage. Tighten the hydraulic fit-tings as needed.
14. Bleed entrapped air from the hydraulic cylinder according to instructions in paragraph 4-4.
Jib Boom Cylinder Removal and Installation 1. Fully lower the outriggers and the upper and lower boom.
2. Extend the jib beam to raise the basket a few inches.
3. Place shoring under the jib beam. Lower the beam onto the shoring to support the weight of the basket.
4. Place shoring under both rear corners of the basket. Adjust the shoring to relieve any binding torque load on the upper jib beam pivot pins.
5. Remove the four keeper pins from the upper jib beam pivot pins (Figure 4-9). Secure the keeper pins to the mating beam for use during cylinder installation.

XLB-4319
4-14
JIB BEAMCYLINDER
BEAMPIVOT PIN
PIVOTPIN
KEEPERPINS
(2 PER SIDE)
UPPER JIBBEAM
KEEPERPINS
(2 PER SIDE)KEEPERPIN
PIVOT
Figure 4-9. Jib Boom Components
6. Try to rotate one of the upper jib beam pivot pins with a keeper pin. Adjust the rear basket shoring as needed to enable pivot pin movement.
PIN

4 — MAINTENANCE
4-15
7. Remove the upper jib beam pivot pin at the top end of the beam. If needed, drive out the pivot pin with a hammer and a brass or hardwood drift.
8. Before removing the bottom pivot pin, insert a long blade screwdriver through the top pivot pin bores.
9. Remove the pivot pin at the bottom end of the upper jib beam. If needed, drive out the pivot pin with a hammer and a brass or hardwood drift. Remove the up-per jib beam.
10. Fully retract the jib beam cylinder. Turn off the key switch and remove the key.
11. Tag the hydraulic hoses that connect to the left and right ports of the cylinder valve block.
12. Sketch the location of wire ties that secure the hydraulic hoses at the cylinder. The hoses must be properly secured to prevent pinching during jib boom opera-tion. Cut the wire ties from the jib boom cylinder hydraulic lines.
13. Place absorbent drip cloths below the cylinder ports. Remove the hydraulic hoses from the jib boom cylinder. Plug the hose fittings to prevent fluid leakage. Protect exposed cylinder ports with plugs and caps.
14. At the top of the cylinder, unscrew and remove the keeper pins from both sides of the boom pivot pin. Secure the keeper pins to the mating beam for use during cylinder installation.
15. Support the weight of the jib boom cylinder using an overhead hoist and lifting straps.
16. Drive out the pivot pin with a hammer and a brass or hardwood drift and re-move the jib boom cylinder.
17. After repairing the hydraulic cylinder, reinstall the cylinder in the reverse order of removal.
18. Power up the hydraulic system and check for leakage. Tighten the hydraulic fit-tings as needed.
19. Bleed entrapped air from the hydraulic cylinder according to instructions in paragraph 4-4.

XLB-4319
4-16
Basket Swivel Cylinder Removal and Installation 1. Fully lower the outriggers and raise the upper boom. Position the basket for easy
access to the hydraulic cylinder (Figure 4-10) mounted on the bottom of the work basket.
KEEPERPIN
HYDRAULICCYLINDER
Figure 4-10. Basket Swivel Cylinder
2. Place absorbent drip cloths below the cylinder ports. Remove the hydraulic hoses from the jib boom cylinder. Plug the hose fittings to prevent fluid leakage. Protect exposed cylinder ports with plugs and caps.
3. Remove the keeper pins from both ends of the cylinder. Remove the hydraulic cylinder.
4. Secure the keeper pins to the mating beam for use during cylinder installation.
5. After repairing the hydraulic cylinder, reinstall the cylinder in the reverse order of removal.
6. Power up the hydraulic system and check for leakage. Tighten the hydraulic fit-tings as needed.
7. Bleed entrapped air from the hydraulic cylinder according to instructions in paragraph 4-4.

4 — MAINTENANCE
4-17
4-5 SLEW RING BEARING
Check Free Play Check the free play of the slew ring bearing every six months. If the recommended main-tenance schedule is followed, there should be little or no wear of the slew ring bearing. Check the slew ring bearing free play according to the following procedure:
1. Fully retract (lower) the lift booms.
2. Go to the hydraulic reservoir side of the boom lift. Open the power cabinet.
3. Access the top surface of the slew ring gear near the front end (trailer tow end) of the gear. This area is below and behind the hydraulic pump reservoir.
4. Insert a 2-inch (50 mm) caliper or bore micrometer at the top front surface of the slew ring gear.
5. Measure the distance from the top of the slew ring gear to the horizontal plate above the gear (Figure 4-11). Record the measurement.
6. Place a 175 lb (80 kg) load in the boom lift basket.
7. Raise the lower boom until the front of the boom is about 11.5 ft (3,5 m) from the ground.
8. Slowly raise the upper boom and extend the jib boom until both are horizontal.
9. Repeat the measurement in step 5. Record the measurement.
10. If the difference between the measurements in step 5 and step 9 is greater than 0.25 inch (6,35 mm) the slew ring bearing should be replaced. Notify Bil-Jax for bearing replacement instructions or assistance.
MEASUREHERE
TOW EOF TRA
SLEWRING
NDILER
Figure 4-11. Slew Ring Position Measurement

XLB-4319
4-18
4-6 LIM
Adjusting Boom Down Limit Switch When thThe boom ggers. The boom down limit switch should trip when the lower boom is within 2 inches (50 mm) of seating on the trailer tongue. You may not be able to extend or retract the outriggers if the boom down limit switch is loose, damaged, or not adjusted properly.
Use the following procedure to readjust the boom down limit switch:
1. Lower the outriggers and raise the lower boom for free access to the limit switch, Figure 4-12.
2. Inspect the limit switch for loose mounting or visible damage. If the mounting hardware is loose, tighten the hardware. If the limit switch is damaged, replace the limit switch.
3. Measure the free height of the limit switch actuator roller. The top of the roller should be 0.75 inch (19 mm) above the limit switch mounting plate. Adjust the actuator position as needed.
4. Fully lower the upper and lower booms.
5. Press the outrigger run pushbutton to verify that the boom down limit switch isengaged. The hydraulic pump motor should run when the outrigger run pushbutton is pressed.
6. If the pump motor does not run, the limit switch or switch wiring is damaged. Repair or replace a damaged limit switch or wiring, as needed.
IT SWITCH CHECKS AND ADJUSTMENTS
e upper and lower booms are retracted, the boom down limit switch is actuated. down limit switch must be actuated to lower or raise the outri
-
Figure 4-12. Boom Down Limit Switch

4 — MAINTENANCE
4-19
Adjusting Outrigger Position Switches The outrigger position switches are set up to detect when the boom lift load is transferred from the trailer wheels to the outriggers. When the load is transferred to each outrigger, the related position switch is engaged and the related LED lights up on the control panel. All four position switch circuits must be engaged to enable lift boom operation. Use the following procedure to check and adjust the outrigger position switches.
1. Inspect the outrigger position switches for loose mounting or visible damage. If the mounting hardware is loose, tighten the hardware. If a position switch is damaged, replace the switch.
2. Lower the outriggers and raise the trailer wheels off the ground. Verify that all four outrigger LEDs light up.
3. If an LED is lit before the outrigger is lowered or if an LED fails to light when the outrigger is lowered, check the adjustment of the related outrigger position switch as follows:
a. Measure the distance between the actuator roller and the outrigger pivot, Figure 4-13. The roller should be 1/8 inch (3 mm) from the outrigger pivot. Adjust the actuator as needed.
b. If the actuator is correctly adjusted, but the LED fails to light up or go dim, check the switch, LED, and wiring. Repair or replace the faulty component. Refer to the detailed electrical diagram in Figure 4-15.
OUTRIGGERPOSITION SWITCH
OUTRIGGERPIVOT
POSITION SWITCHTRIP POINT
ACTUATORROLLER
Figure 4-13. Outrigger Position Switch

XLB-4319
4-20
4-7 TROUBLESHOOTING
Table 4-3. Troubleshooting Chart
Problem Cause Correction a. Emergency stop engaged (pushed in).
b. Battery charge is low.
c. Battery ground or in-series cable
loose. d. Main circuit breaker tripped or
switched off.
a. Rotate emergency stop buttons clock-wise to disengage.
b. Check charge level. Recharge battery if needed.
c. Check for and repair loose battery connections or ground fault.
d. Reset main circuit breaker inside ground control panel.
a. Main disconnect unplugged. b. Fuse F2 burned out. Fuse is mounted
on front inner wall of boom pivot weldment, in series with the positive battery cable.
c. Motor contactor failed. d. Pump motor failed.
a. Plug in main disconnect. b. Correct cause of short circuit and
replace fuse.
c. Replace motor contactor. d. Check pump motor operation; repair
or replace motor if faulty.
1. Engine or motor will not start.
DC model only
Gas model only a. Engine key switch in wrong position.
b. Fuel tank empty. c. Engine oil level low. d. Spark plug fouled or damaged. e. Fuse F2 burned out. Fuse is mounted
inside engine key switch housing. f. Starter relay or starter motor failed.
a. Turn key switch to run position. b. Refill fuel tank. c. Check/add engine oil. d. Check/replace spark plug. e. Correct cause of short circuit and
replace fuse. f. Replace failed starter relay or motor.
a. Basket/ground key switch in wrong position.
b. Hydraulic oil level low.
c. Boom down limit switch or switch wiring failed.
d. Hydraulic gear pump failed.
a. Turn key switch to ground position.
b. Check hydraulic oil level in reservoir. Add oil as needed.
c. Check boom down limit switch and wiring operation per paragraph 4-6.
d. Check pump; replace if hot to touch.
a. Boom enable valve SV1 faulty (stick-ing open) (see item 4, Figure 6-19).
a. Repair or replace faulty valve.
2. Pump motor runs, but out-riggers will not extend.
DC model only
Gas model only a. Outrigger enable valve solenoid SV2 failed (see item 6, Figure 6-18).
b. Boom enable valve SV1 faulty (stick-ing open) (see item 1, Figure 6-18).
a. Replace faulty wiring or solenoid.
b. Repair or replace faulty valve.

4 — MAINTENANCE
4-21
Table 4-3. Troubleshooting Chart, Continued
3. Pump motor runs, but upper and lower boom lift func-tions do not work.
a. Basket/ground key switch in wrong position.
b. Boom lift out of level. c. Outrigger not under load.
d. Hydraulic oil level low.
e. Boom enable valve solenoid SV1
failed (see item 1, Figure 6-18 or item 4, Figure 6-19).
f. Hydraulic output filter dirty.
g. Hydraulic gear pump failed.
a. Turn key switch to enable basket or ground controls.
b. Operate outriggers to level boom lift. c. Check that all outriggers support a
load; adjust outriggers as needed. d. Check hydraulic oil level per para-
graph 4-4. Add oil as needed. e. Replace faulty wiring or solenoid.
f. Check pump output pressure, no load. Replace filter if pump output pressure reaches 30 psig (206 kPa gage) with no hydraulic function selected.
g. Check pump; replace if hot to touch.
4. Pump motor runs, but the upper and lower booms will not retract.
a. Obstruction below basket or boom.
b. Basket/ground key switch in wrong position.
c. Boom lift shifted out of level.
d. Outrigger not under load.
e. Hydraulic oil level low.
f. Boom enable valve solenoid SV1 failed (see item 1, Figure 6-18 or item 4, Figure 6-19).
a. Raise and reposition the boom to avoid the obstruction.
b. Turn key switch to ground or basket run position.
c. If out of level alarm is sounding, manually lower boom.
d. Check that all outriggers support a load. If not, manually lower boom.
e. Manually lower boom. Check oil level in reservoir; add oil as needed.
f. Manually lower boom. Repair faulty wiring or replace failed solenoid.
5. Pump motor runs, but the boom rotate function does not work.
a. Basket/ground key switch in wrong position.
b. Boom lift out of level. c. Outrigger not under load.
d. Hydraulic oil level low.
e. Rotate obstruction or hard stop
reached. f. Slew ring bearing worn and binding.
a. Turn key switch to ground or basket position.
b. Operate outriggers to level boom lift. c. Check that all outriggers are support-
ing a load; adjust as needed. d. Check hydraulic oil level in reservoir.
Add oil as needed. e. Rotate boom in opposite direction.
f. Retract boom and retry rotation.
Replace slew ring bearing if worn.
6. One hydraulic boom or outrigger function fails to work.
a. Control valve failed; leaking.
b. Cylinder counterbalance valve failed; leaking.
c. Cylinder failed; leaking.
a. Repair or replace control valve if hot to touch.
b. Counterbalance valves are in cylinder manifold blocks. Repair or replace valve if hot to touch.
c. Touch cylinder wall near piston; re-pair or replace cylinder if hot touch.

XLB-4319
4-22
Troubleshooting Aids Electrical diagrams are provided in Figure 4-14 through Figure 4-17. Hydraulic diagrams are provided in Figure 4-18 and Figure 4-19. Level sensor LED indications are shown in Table 4-4.
MOTORCONTACTOR
PUMPMOTOR
CIRCUITBREAKER
OUTRIGGERSENABLE
SW3
BOOM DOWNLIMIT SWITCH
BASKETCONTROLS
AUDIBLEALARM
E-STOP
BOOMENABLE
PB7
OF
F
GR
OU
ND
BA
SK
ET
BASKET/OFF/GROUND
KEYSWITCHSW2
OUTRIGGERPOSITIONSWITCHES
BOOMENABLEVALVE
SV1
+–M
ALARMRELAY
RL2
OUTRIGGERDOWN LEDs
PB6
BOOMENABLE
LEVELSENSOR
E-STOP
PB2
F2
MCB
MAIN DISCONNECT
12 VDCBATTERY
FUSE
PB1 PB4
Figure 4-14. Simplified Electrical Diagram, DC Model

4 — MAINTENANCE
4-23
22 21 20 19 3 3 8 7 6 5 4 9 3 0 0 12 1 15 23
6 7 8 14 23 0
M
F2
PLATFORMCONTROL BOX
PUMP COMPARTMENT
BOOM DOWNLIMIT SWITCH
OUTRIGGERPOSITIONSWITCHES
PUMPMOTOR
BATTERIES
BATTERYCHARGER
AUDIBLEALARM
E-STOPP 6P 7
BOOM
KEYSWITCH
P 2BOOM
P 4OUT-
RIGGERS
P 1E-STOP
ALARMRELAY
R 2
MCBS 3W
B
B
BB
B
L
S 1V
MOTORCONTACTOR
S 5W
S 6W
S 4W
S 7W
BASKET
WS 2
GND
LEDS
C 1T
+ –
GROUND CONTROL BOX
Figure 4-15. Detailed Electrical Diagram, DC Model

XLB-4319
4-24
ENGINESTART
STARTERRELAY
CIRCUITBREAKER
AUDIBLEALARM
E-STOP
OFF
GROUND
BA
SK
ET
/OF
F/G
RO
UN
DK
EY
SW
ITC
HS
W1
OUTRIGGERPOSITIONSWITCHES
+
–
OUTRIGGERDOWN LEDs
LEVELSENSOR
STARTERMOTOR
M
ENGINEKEYSWITCH SW2
O
I
ST
E-STOPPB1
PB2
ALARMRELAY
RL2
SW3
BOOM DOWNLIMIT SWITCH
OUTRIGGERSENABLE
PB3
OUTRIGGERSENABLE VALVE
BOOMENABLEVALVE
SV1
CB
1
PB6
BOOM ENABLE
BOOMENABLE
BASKET
PB5
F2
SV2
BASKETCONTROLS
RUNLED
BASKETCONTROLS
12 VDCBATTERY
FUSE
IGNITION UNIT
SPARK PLUG
G
Figure 4-16. Simplified Electrical Diagram, Gas Model

4 — MAINTENANCE
4-25
TE
RM
INA
L B
LOC
K N
UM
BE
R
1211
BO
OM
DO
WN
LIM
IT S
WIT
CH
112
82
3
E-S
TOP
PB
1
728
16
RU
NLE
D
OU
TR
IGG
ER
SE
NA
BLE
VA
LVE
SV
2
OU
TR
IGG
ER
LE
Ds
BO
OM
EN
AB
LEV
ALV
ES
V1
AU
DIB
LEA
LAR
M
OU
TR
IGG
ER
LIM
IT S
WIT
CH
ES
7
PB
3O
UT
RIG
GE
RS
EN
AB
LE
LEV
EL
SE
NS
OR
RED
WHITE
BLACK
1011
1213
19 23
PB
2B
OO
ME
NA
BLE
22
20
2628
PB
6B
OO
ME
NA
BLE
EN
GIN
ES
TAR
T
21
6 1817
16
PB
5E
-STO
P
BA
SK
ET
CO
NT
RO
LS
TOE
NG
INE
IGN
ITIO
NC
OIL
ALA
RM
RE
LAY
RL2
15 A
CIR
CU
ITB
RE
AK
ER
4A
BASKET
OFF
GROUND
SW
1B
AS
KE
T/
OF
F/
GR
OU
ND
KE
YS
WIT
CH
TO E
NG
INE
KE
YS
WIT
CH
LP1
LP2
LP3
LP4
LP5
TO E
NG
INE
STA
RT
ER
SO
LEN
OID
12V
DC
BAT
TE
RY
1
FU
SE
F2
7
Figure 4-17. Detailed Electrical Diagram, Gas Model

XLB-4319
4-26
12
5
67
8
GROUND CONTROL VALVE BANK
TOBASKETCONTROLVALVEBANK
BOOM SLEWMOTOR
43
OUTRIGGER CONTROL VALVE BANK
X
FROMRETURNMANIFOLD
PRESSUREFILTER
2755 PSI
RE
TU
RN
FIL
TE
R
2755 PSI
2755 PSI
M
OUTRIGGERCYL. 1
OUTRIGGERCYL. 2
OUTRIGGERCYL. 3
OUTRIGGERCYL. 4
DIVERTERVALVE
TO UPPERBOOM LIFTCYLINDER
TO LOWERBOOM LIFTCYLINDER
TO JIBBOOM LIFTCYLINDER
=
EXT.CYL.
RET.CYL.
SUCTIONFILTER
Figure 4-18. Hydraulic Diagram, DC Model, Sheet 1 of 2

4 — MAINTENANCE
4-27
12
56 7
8
BASKET CONTROL VALVE BANK
FROMGROUND
CONTROLVALVEBANK
43
2755 PSI
2
1
6
5
EMERGENCYHAND PUMP
UPPERBOOM LIFTCYLINDER
LOWERBOOM LIFTCYLINDER
JIBBOOM LIFTCYLINDER
BASKETSLEW
CYLINDER
CHECKVALVE
Figure 4-18. Hydraulic Diagram, DC Model, Sheet 2 of 2

XLB-4319
4-28
12
5
67
8
GROUND CONTROL VALVE BANK
TOBASKETCONTROLVALVEBANK
BOOM SLEWMOTOR
43
OUTRIGGER CONTROL VALVE BANK
X
FROMRETURNMANIFOLD
PRESSUREFILTER
3045 PSI
RETURNFILTER
2755 PSI
2755 PSI
JACK CYL. 1 JACK CYL. 4
JACK CYL. 2 JACK CYL. 3
DIVERTERVALVE
SV1
TO UPPERBOOM LIFTCYLINDER
TO LOWERBOOM LIFTCYLINDER
TO JIBBOOM LIFTCYLINDER
ENGINE
DIVERTERVALVE
SV2
SUCTIONFILTER
Figure 4-19. Hydraulic Diagram, Gas Model, Sheet 1 of 2

4 — MAINTENANCE
4-29
BASKET CONTROL VALVE BANK
2
56 7
8
FROMGROUND
CONTROLVALVEBANK
43
2755 PSI
1
EMERGENCYHAND PUMP
UPPERBOOM LIFTCYLINDER
LOWERBOOM LIFTCYLINDER
JIBBOOM LIFTCYLINDER
BASKETSLEW
CYLINDER
CHECKVALVE
Figure 4-19. Hydraulic Diagram, Gas Model, Sheet 2 of 2

XLB-4319
4-30
YELLOW LEDOUT OF LEVEL(MOMENTARY)
RED LEDOUTPUT SIGNAL
(ON WHEN LEVEL)
GREEN LEDINPUT POWER
Figure 4-20. Level Sensor
Table 4-4. Level Sensor LEDs
Color Description Yellow Boom lift out of level. Signals alarm after 2 second delay. Green Boom lift power is on. Red Boom lift level. Goes out after time delay.

4 — MAINTENANCE
4-31
4-8 MATERIAL SAFETY DATA SHEETS
MATERIAL SAFETY DATA SHEET FOR LEAD ACID BATTERIES, WET, FILLED WITH ACID
SECTION I: GENERAL INFORMATION Manufacturer’s Name: Crown Battery Mfg. Company EMERGENCY NO: 800 487-2879 Street Address: 1445 Majestic Drive OR 800 OIL-TANK City, State, Zip Fremont, Ohio 43420 Phone Number: 419 334-7181 REVISION DATE: 5/18/2000
SECTION II: MATERIAL IDENTIFICATION AND INFORMATION
COMPONENTS PERCENT OSHA ACGIH OTHER LIMITS CAS NUMBER Hazardous Components PEL TLV 1% or greater Carcinogens 0.01% or greater
METALLIC LEAD METAL 25.5% 0.05 mg/m3 0.05 mg/m3 NONE 7439-92-1 LEAD SULFATES 18.2% 0.05 mg/m3 0.05 mg/m3 NONE 7439-92-1 LEAD OXIDES 18.0% 0.05 mg/m3 0.05 mg/m3 NONE 7439-92-1 POLYPROPYLENE CASE MTL 6.4% SEPARATORS 3.5% SULFURIC ACID(H2SO4) 5.2% 1.0 mg/m3 1.0 mg/m3 NONE 7664-93-9 WATER 19.2%
REGULATORY INFORMATION: Those ingredients listed above are not subject to the reporting requirements of 313 of Title III of the Superfund Amendments and Reauthorization Act. The items are covered in an exemption as a “Manufactured Article”. 372.30(b)
SECTION III: PHYSICAL / CHEMICAL CHARACTERISTICS
Boiling Point Approximately 203F Vapor Density: Greater Than 1 Vapor Pressure 14 @ 37% @ 80 F Melting Point: -36 F to -10.6 F Solubility in Water 100% Water Reactive: Yes, Produces Heat Specific Gravity 1.245 - 1.295 Battery Electrolyte Appearance & Odor Clear Liquid with Sharp Pungent Odor
SECTION IV: FIRE AND EXPLOSION HAZARD DATA:
Flash Point: Not Combustible Auto Ignition Temperature N/A Flammabiltiy Limits in Air % by Volume: N/A Extinguishing Media: Dry Chemical Carbon Dioxide, Water Fog, Water Special Fire Fighting Procedures: Sulfuric Acid Fumes, Sulfur Dioxide Gas or Carbon Monoxide may be released when acid decomposes. Wear NIOSH approved self contained breathing apparatus. Unusual Hazards: Water applied to sulfuric acid generates heat and causes acid to splatter. Wear full-cover acid resistant clothing. Sulfuric acid reacts violently with metals, nitrates, chlorates, carbides, fulminates, picrates and other organic materials. Reacts with most metals to yield explosive/flammable hydrogen gas. This reaction is intensified when sulfuric acid is dilluted with water to form battery electrolyte.

XLB-4319
4-32
MATERIAL SAFETY DATA SHEET FOR LEAD ACID BATTERIES, WET, FILLED WITH ACID (Continued)
********************************************************************************************SECTION V -- HEALTH HAZARD DATA
********************************************************************************************Primary Routes of Entry: Inhalation: YES Skin: YES Ingestion: YES Health Hazards: Acute EYES, SKIN, RESPIRATORY SYSTEM & DIGESTIVE SYSTEM Chronic: EYES, SKIN, RESPIRATORY SYSTEM & DIGESTIVE SYSTEM Signs and Symptoms of Exposure: IRRITATION OF EXPOSED AREA, BURNS AND RESPIRATORY PROBLEMS NO POSSIBILITY OF EXPOSURE OF LEAD WILL OCCUR UNLESS BATTERY IS DESTROYED. Medical Conditions Generally Aggravated By Exposure: EXPOSURE TO MIST MAY CAUSE LUNG DAMAGE & AGGRAVATE PULMONARY CONDITION. Emergency First Aid Procedures: SEEK MEDICAL ASSISTANCE FOR FURTHER TREATMENT, OBSERVATION AND SUPPORT IF NECESSARY. Eye Contact: WASH WITH COPIOUS QUANTITIES OF COOL WATER FOR AT LEAST 15 MINUTES Skin Contact: FLUSH AREA WITH LARGE AMOUNTS OF COOL WATER FOR AT LEAST 15 MINUTES Inhalation: REMOVE TO FRESH AIR, IF BREATHING IS DIFFICULT - GIVE OXYGEN Ingestion: GIVE MILK TO DRINK, DO NOT INDUCE VOMITTING. CALL PHYSICIAN ********************************************************************************************
SECTION VI -- REACTIVITY DATA
******************************************************************************************** Stability: STABLE Conditions to Avoid: N/A Incompatibility: AVOID COMBUSTIBLES, ORGANIC MATERIALS, AND STRONG REDUCING AGENTS Hazardous Decomposition Products: SULFUR TRIOXIDE, CARBON MONOXIDE, SULFURIC ACID FUMES, & SULFUR DIOXIDE Hazardous Polymerization: MAY OCCUR Conditions to Avoid: N/A ********************************************************************************************
SECTION VII -- SPILL OR LEAK PROCEDURES
********************************************************************************************Steps to be taken in case material is released or spilled: CONTAIN SPILL, USING NON-COMBUSTIBLE MATERIALS: VERMICULITE, DRY SAND & EARTH. NEUTRALIZE WITH LIME, SODA ASH, SODIUM BICARBONATE, ETC. Waste disposal method: CONSULT STATE ENVIRONMENTAL AGENCY. INDIVIDUAL STATE REGULATIONS VARY Precautions to be taken in Handling & Storage: SEPARATE FROM INCOMPATIBLE MATERIALS, KEEP AWAY FROM FIRE, SPARKS AND HEAT Other Precautions and/or Special Hazards: CONTACT WITH METALS MAY PRODUCE TOXIC SULFUR DIOXIDE FUMES & MAY ALSO RELEASE FLAMMABLE HYDROGEN GAS. THIS REACTION IS INTENSIFIED WHEN DILUTED. NFPA Rating: HEALTH: 3 FLAMMABILITY: 0 REACTIVITY: 2 SPECIAL: 0 HMIS Rating: HEALTH: 3 FLAMMABILITY: 0 REACTIVITY: 2 PERSONAL PROTECTION: X ********************************************************************************************
SECTION VIII -- CONTROL AND PROTECTIVE MEASURES
********************************************************************************************Respiratory Protection: ABOVE P.E.L.: NIOSH APPROVED, FITTED, FULL FACE RESPIRATOR Protective Gloves: ACID RESISTANT Eye Protection: FULL FACE PROTECTION Ventilation: LOCAL EXHAUST: VENTILATED AREA PREFERRED MECHANICAL: IF BELOW P.E.L. SPECIAL: MUST BE ACID & EXPLOSIVE RESISTANT OTHER: MUST BE ACID & EXPLOSIVE RESISTANT Other Protective Equipment: ACID RESISTANT CLOTHING AND BOOTS Hygienic Work Practices: N/A

XLB-4319
4-33
MATERIAL SAFETY DATA SHEET FOR AW–46 HYDRAULIC OIL
1-SITE SPECIFIC INFORMATION: AW-46 HYDRAULIC OIL 2-GENERAL INFORMATION TRADE NAME: AW-46 HYDRAULIC OIL EMERGENCY TELEPHONE NUMBERS: (517) 849-2144 CHEMICAL FAMILY: LUBRICATING OIL CAS NUMBER: MIXTURE: ISSUE DATE 12/15/96 HAZARDOUS INGREDIENTS: ---------------------------------------------------------------------------- CONTAINS NO INGREDIENTS NOW KNOWN TO BE HAZARDOUS AS DEFINED IN OSHA 29 CFR 1910.1000 AND OSHA 29 CFR 1910.1200. ---------------------------------------------------------------------------- HEALTH HAZARD DATA THRESHHOLD LIMIT VALUE: 5mg/m3 AS OIL MIST 8 hr, TWA PRIMARY ROUTES OF ENTRY: INHALATION, SKIN ABRASION AND INGESTION. CARCINOGENIC: NO SYMPTOMS IF INGESTED, CONTACTED WITH SKIN, OR VAPOR INHALED: NO ADVERSE EFFECTS EXPECTED. EYES: FLUSH WITH WATER FOR 15 MINUTES SKIN: WASH THOROUGHLY WITH WARM SOAPY WATER. INGESTION: DO NOT INDUCE VOMITTING-SEEK MEDICAL ATTENTION. MEDICAL CONDITIONS AGGRAVATED BY EXPOSURE: NONE KNOWN AIR EXPOSURE LIMITS: P.E.L. NOT ESTABLISHED T.L.V. 5mg/m3 OSHA 29 CFR 1910.1000 HEALTH: 1 FIRE: 1 SPECIFIC: X REACTIVITY: 0 ---------------------------------------------------------------------------- PHYSICAL DATA: BOILING POINT: 400+ DEG F. VAPOR PRESSURE (PSIA): N/A SPECIFIC GRAVITY (H20=1): 0.87 SOULUBILITY IN WATER: NEGLIGIBLE PH OF CONCENTRATE: N/A APPEARANCE AND ODOR: PALE YELLOW, PETROLEUM ODOR ---------------------------------------------------------------------------- FIRE AND EXPLOSION HAZARD DATA FLASH POINT(METHOD USED): 425 DEG F. FLAMMABLE LIMITS: NOT DETERMINED LEL: N/A UEL: N/A EXTINGUISHING MEDIA: SAND, DRY CHEMICAL, FOAM, CO2. TREAT AS CLASS B FIRE. UNUSUAL FIRE AND EXPLOSION HAZARDS: NONE ---------------------------------------------------------------------------- REACTIVIYY DATA STABILITY: STABLE CONDITIONS TO AVOID: AVOID EXTREMES OF HEAT. INCOMPATIBILITY (MATERIALS TO AVOID): STRONG OXIDIZING MATERIALS. HAZARDOUS DECOMPOSITION PRODUCTS: INCOMPLETE COMBUSTION MAY CAUSE CARBON OXIDES. HAZARDOUS POLYMERIZATION: WILL NOT OCCUR. ---------------------------------------------------------------------------- SPILL OR LEAK PROCEDURES: STEPS TO BE TAKEN IN CASE MATERIAL IS RELEASED OR SPILLED. DIKE AND ABSORB ON INERT MATERIAL. FOLLOW ALL LOCAL, STATE, AND FEDERAL REGULATIONS FOR DISPOSAL OF COLLECTED MATERIAL. ----------------------------------------------------------------------------

4 — MAINTENANCE
4-34
MATERIAL SAFETY DATA SHEET FOR AW–46 HYDRAULIC OIL (Continued)
SPECIAL PROTECTION INFORMATION RESPIRATORY PROTECTION (SPECIFIC TYPE) NONE REQUIRED VENTILATION: NORMAL LOCAL EXHAUST: NORMAL MECHANICAL EXHAUST (GENERAL) X PROTECTIVE GLOVES: OIL IMPERVIOUS GLOVES RECOMMENDED EYE PROTECTION: SAFETY GLASSES RECOMMENDED OTHER PROTECTIVE EQUIPMENT: NONE REQUIRED ---------------------------------------------------------------------------- SPECIAL INSTRUCTIONS SPECIAL LABELLING INSTRUCTIONS: NOT REQUIRED SPECIAL PACKAGING RECOMMENDATIONS: NONE HANDLING AND STORAGE RECOMMENDATIONS: DO NOT CUT OR WELD ON EMPTY CONTAINERS, AVOID EXTREMES OF COLD OR HEAT. STORE IN CLEAN DRY AREA. DISCLAIMER: THE INFORMATION CONTAINED HEREIN HAS BEEN COMPILED FROM SOURCES CONSIDERED TO BE DEPENDABLE AND IS ACCURATE TO THE BEST OF THE SELLERS KNOWLEDGE. THE SELLER MAKES NO WARRANTY WHATSOEVER, EXPRESSED, IMPLIED OR OF MERCHANTABILITY REGARDING THE ACCURACY OF SUCH DATA OR THE RESULTS TO BE OBTAINED FROM THE USE THEREOF.

5-1
5 Replacement Decals Refer to Table 5-1 and Figure 5-1 through Figure 5-5 for descriptions and locations of decals on ft.
able 5- placem
Qty
the XLB-4319 Hydraulic Boom Li
T 1. Re ent Decals
Decal No. Description of Decal B06-00-0033 CAUTION: THIS UNIT
ONLY BE TOWED WHEN…SHALL
2
B06-00-0034 E
1 DANGER: …DURING CHARGING, EXPLOSIVOXYHYDROGEN GAS…
B06-00-0036 LUBRICATE WEEKLY 22
B06-00-0037 LUBRICATE SEMI-ANNUALLY 1
B06-00-0043 MANUAL PUMP HANDLE 1
B06-00-0060 STOP…READ OPERATING… 1
B06-00-0062 THIS PLUG 115 VOLT 2
B06-00-0068 THE HYDRAULIC SYSTEM… (decal on hydraulic reservoir)
1
B06-00-0115 1500 WATT LOAD LIMIT 1
B06-00-0130 LUBRICATE MONTHLY 1
B06-00-0151 DANGER: 110 VOLT 1
B 2 06-00-0161B Bil-Jax – LARGE LABLE
B06-00-0167 Caution Tape, Black and Yellow
B06-00-0173 SAFETY HARNESS LANYARD ATTACHMENT POINT
1
B06-00-0189 WARNING: LEVEL MACHINEBEFORE USE
1
B06-00-0192 OPERATION AND SERVICEMANUAL INSIDE
1
B06-00-0225 WARNING: STAY CLEARWHILE RAISING …
5
B06-00-0261 CAUTION: ANSI DECAL 1
B06-00-0268 EMERGENCY R TATION HANDLE
1 O
Decal No. Description of Decal QtyB06-00-0334 DANGER: HIGH VOLTAG
OPERATION E 2
B06-00-0363B Bil-Jax – SMALL LABLE 2
B06-00-0380 MAXIMUM CAPACITY 450 LBS
1
B06-00-0393 Basket Station Valve Numbers 1
B06-00-0394 Basket Station Valve Motions 1
B06-00-0395 Ground Station Valve Numbers 1
B06-00-0396 Ground Station Valve Motions 1
B06-00-0397 LATCHED UNLATCHED 1
B06-00-0398 OUTRIGGER INSTRUCTIONS 1
B06-00-0399 ABBREVIATED OPERATINGINSTRUCTIONS
1
B06-00-0400 DANGER: BEFORE USING, LOWER ALL 4 OUTRIGGERS
5
B06-00-0401 DANGER: BOOM SAFETY INSTRUCTIONS
2
B06-00-0402 BOOM LIFT INSTRUCTIONS BASKET
1
B06-00-0403 PUSH TO LOWER 2
B06-00-0404 WARNING: STAND CLEAR OF OUTRIGGER…
4
B06-00-0405 WARNING: PINCH POINT… 10
B06-00-0406 XLB-4319 TRANSFER 2
B06-00-0409 EMERGENCY ROTATION GEAR
1
B06-00-0430 XLB–4319 SPECIFICATIONS 1

XLB-4319
5-2
B06-00-0363BB06-00-0406
XLB-4319
FTC B06-00-0409
EMERGENCYROTATION GEAR
B06-00-0409
LUBRICATEWEEKLY
COIA B06-00-0036
B06-00-0036
LUBRICATEMONTHLY
B06-00-0130RIF
B06-00-0130��� ������������������
CCTT B06-00-0380
B06-00-0380
LUBRICATESEMI-ANNUALLYCOIA B06-00-0037
B06-00-0037
MANUAL PUMP HANDLECOIA B06-00-0043
B06-00-0043
THIS PLUG 115 VOLTRIL B06-00-0062
B06-00-0062
B06-00-0405EMERGENCY ROTATION HANDLE
OFA B06-00-0268
B06-00-0268
COIA/RFT B06-00-0033
THIS UNIT SHALL ONLY BE TOWEDWHEN ALL BOOM SECTIONS ARE FULLYDOWN AND LOCKED WITH TRANSPORTSAFETY PINS.
CAUTION
B06-00-0033
SAFETYHARNESSLANYARD
ATTACHMENTPOINT
B06-00-0173UFC
B06-00-0173
This machine is NOT insulated. Do not use within 10 ft. of powerlines or other electrically charged sources. This machine DOESNOT provide protection for personnel from contact with or closeproximity to any live electrical power source and should be consid-ered energized by all personnel coming in contact with machine.
IT IS UNLAWFUL TO OPERATETHIS EQUIPMENT WITHIN 10FEET OF HIGH VOLTAGELINES OF 50,000 VOLTS ORLESS.
For safe clearance of lines in excess of 50,000 volts, see owners manual.
DANGER
FFL B06-00-0334
B06-00-0334
COFC B06-00-0192
OPERATION AND SERVICEMANUAL INSIDE
B06-00-0192
LFC B06-00-0189
WARNING• Level machine before use.
• Failure to level this machine couldresult in serious injury or death!
B06-00-0189
110 VOLT
DANGER
GFT/LFC B06-00-0151
B06-00-0151
This machine is designed and manufactured in compli-ance with the ANSI A92.2 standard in force on the date ofmanufacture. Dealers, owners, users, operators, lessors,and lessees are responsible for inspection, maintenance,training, and operation as required by A92.2 and the ownersmanual.
Alterations, modifications, or changes to this machinewithout the written authorization of Workforce Products,Inc. as well as any unauthorized adjustment of valves,disabling or by-passing of safety devices or the improperuse of this machine shall exempt Workforce Products, Inc.from any liability for any resulting injuries or damage.FFU
CAUTION
B06-00-0261
B06-00-0261
DANGER
• Risk of Electric Shock
DO NOT expose charger to rain, power wash detergents orspray - DO NOT use frayed or damaged electric cords whencharging.
• During charging, explosive oxyhydrogen gas is generated.DO NOT smoke or allow open fire, sparks, or embers nearbattery when charging.
• Connect input cord only to properly grounded three wireoutlet with specified voltage and frequency.
• Always wear safety goggles and face shield when workingon or near battery.
• Check battery acid level at the start of each day. If acid doesnot cover the plates, add only enough distilled or demineral-ized water to completely cover the plates.
• Keep terminals and terminal connections clean.
• Consult Operation and Maintenance Manual for additionalinformation on battery maintenance.
FAILURE TO COMPLY WITH THE FOLLOWING INSTRUCTIONSOR ANY OTHER IMPROPER USE OR MAINTENANCE OF THISEQUIPMENT WILL RESULT IN INJURY OR DEATH.
RIR/OFGB06-00-0034
B06-00-0034
STAY CLEARWHILE RAISINGOR LOWERING
WARNINGCCFO B06-00-0225
B06-00-0225
B06-00-0161B
WARNING
STAY CLEARFTC B06-00-0405
PINCH POINT
© Bil-Jax, Inc. 2004
Figure 5-1. Replacement Decals, Sheet 1 of 3

5 — REPLACEMENT DECALS
5-3
WARNING
B06-00-0404FTC
Stand clear of outrigger while itis being lowered. Contact withoutrigger foot pad will causeserious crushing injury.
FTC B06-00-0397
1. Read Operation Manual and alldecals prior to operating.
2. Follow the instructions on the lowercontrols for “Unhitching”, “SettingUp” and “Boom Operating”. Thiswill ensure proper boom set up andalso help you familiarize yourselfwith the operation of the lift.
3. Check again to be sure all outrig-gers are properly set and the lift islevel.
BOOM OPERATING INSTRUCTIONS FOR XLB-4319
B06-00-0402FTC
4. Always wear full body harness andattach lanyard to the providedattachment when operating fromthe basket.
5. Check the emergency stop buttonto make sure it is in the releasedposition.
6. Press and hold the green enablebutton with one hand while operat-ing the control levers with the otherhand. Each lever is clearly markedfor function and direction.
FTC B06-00-0403
PUSH TO LOWER
EMERGENCYLOWERING VALVE
FTC B06-00-0393
FTC B06-00-0399
ABBREVIATED OPERATING INSTRUCTIONSIMPROPER USE OF THIS EQUIPMENT WILL RESULT IN SERIOUS INJURY OR DEATH.THIS MACHINE MUST NOT BE OPERATED UNLESS YOU ARE COMPLETELY FAMILIARWITH THE INSTRUCTIONS CONTAINED IN THE OPERATING MANUAL
UNHITCHING
Machine must be unhitched from vehicle beforesetting up.1. Apply hand brake.2. Remove lighting plug and safety wire from
vehicle.3. Lower trailer tongue jack.4. Release trailer hitch from vehicle.
SETTING UP
1. Read Operation Manual and all decals prior tooperation.
2. Check to be sure all personnel are clear ofoutriggers.
3. Select ground controls with key switch.4. Make sure emergency stop buttons are re-
leased.5. Using outrigger levers, lower each outrigger to
within 6” from ground.6. Lower the two outriggers closest to the trailer
hitch until trailer tongue jack is clear of ground.7. Level machine using two remaining outriggers
while referring to bubble level.8. Check to be sure both wheels are clear of
ground.9. Check all outrigger lights show green and
buzzer has stopped.10. Check to be sure each outrigger foot is in firm
contact with the ground.11. Do not place boards, concrete blocks, or any
other object under the outrigger foot to obtaingreater height adjustment.
BOOM OPERATING
1. Remove transport stowing pins.2. Select ground controls with key switch.3. Press green “enable” button and operate levers
as required.4. Check all lift functions for proper operation.5. Return all boom arms to stowed position. Move
key switch to basket controls. Lift is now readyfor operation from the basket.
WARNINGSTOWING MACHINE
1. Fully lower each boom into transport position.2. Using outrigger levers, raise outriggers full start-
ing at the cage end.3. Install boom locking pins.
TOWING MACHINE
Do not tow machine unless:* The booms are full lowered* The boom locking pins are in place* All outriggers are fully retracted1. Secure trailer hitch to ball on towing vehicle.2. Attach safety wire.3. Attach lighting plugs. Check to make sure lighting
wire cannot be damaged in transit.4. Check to make sure lights are working properly.5. Fully raise trailer tongue jack and release hand
brake.6. The trailer weight must not exceed the vehicle
towing capacity.7. Do not exceed maximum towing speed.
EMERGENCY LOWERING PROCEDURE
From Basket (if fitted)In the event of power failure, the basket may belowered using the emergency hand pump. Theprocedure is as follows:1. Attach hand pump handle.2. Select function required with control lever(s).3. Pump hand pump.
From Ground1. Press red emergency lowering valve on base of
bottom boom lift cylinder. Stand clear of descend-ing structure.
2. Press red emergency lowering valve on top ofboom cylinder. Stand clear of descending struc-ture.
Emergency Rotation - Install emergency rotation handleon red hex-shaft on rotation gearbox. Turn handle torotate structure.
RIL B06-00-0060
STOPREAD OPERATING
INSTRUCTIONS BEFORE
OPERATING
MACHINE
B06-00-0115AIF/RFC
• Use only tools equipped with3 prong grounded plug.
• 1500 Watt maximum load.
• 15 Amp maximum circuit.
DANGERFAILURE TO COMPLY WITH THE FOLLOWING SAFETY INSTRUCTIONS OR ANY OTHER IMPROPER USE
OF THIS EQUIPMENT WILL RESULT IN SERIOUS INJURY OR DEATH.BEFORE USE
• Operator must read and understand owners manual and all decals on machine before operating. It is operatorsresponsibility to comply with all warnings and instructions.
• Survey the job site and identify all potential hazards.• Inspect lift for proper maintenance and any damaged or worn components. DO NOT operate until proper
maintenance has been performed and all damaged or worn parts have been replaced. See owners manual forproper maintenance procedures.
• NEVER TAKE CHANCES—DO NOT use this lift if you are under the influence of drugs or alcohol, or if you feeldizzy, ill, or unsteady in any way.
• OPERATE ON FIRM AND LEVEL SURFACE ONLY—if used on loose gravel or other soft surfaces, additional basesupport under each outrigger foot pad may be necessary.
• Properly deploy all 4 outriggers by lowering each outrigger until it is in firm contact with the ground.• Level machine before use—if buzzer sounds, lift is not level and the necessary outrigger adjustment should be
made to level machine before continuing.• All occupants must wear full body harness and lanyard.• Check safety devices daily before use—see owners manual for proper check procedures.• When working on public roads, warnings and barriers must be set up in accordance with all local, state, and federal
traffic codes.• Cordon off area around base to keep personnel and other equipment away from unit while in use.
DURING USE
• To avoid hand injuries, always keep hands inside basket area during boom movement.• DO NOT use without all four outriggers in firm contact with the ground and the lift level.• DO NOT release outriggers with boom extended or operator in basket.• DO NOT move or reposition trailer while operator occupies basket.• DO NOT use when exposed to high winds, rain, snow, or ice.
• DO NOT use where lift operator can come in contact with overhead obstructions such as electric wires, cables, ropes,overhangs, etc.
• DO NOT operate without full body harness and lanyard in use by all basket occupants.• DO NOT stand or sit on guard rails or top edge of basket.• DO NOT lean out over top edge of basket to perform work.• DO NOT use boxes, ladders, scaffolding, or any other
means to increase working height.• DO NOT climb up or down boom.• DO NOT exceed rated lift capacity.• DO NOT allow ropes, electric cords, hoses, etc. to become
entangled in the lift while platform is being raised or lowered.• DO NOT override, alter, or bypass safety devices.• DO NOT use boom rotation or basket rotation (if so equipped) for pushing or pulling.• DO NOT exceed platform capacity when transferring loads to the platform while elevated.• DO NOT use as a crane for lifting materials.• DO NOT leave keys in machine while unattended.• Plug charger in at the end of each day.• When using the lift with the 110V power cord plugged into the base of the unit, care must be taken to ensure that the
cord is not damaged or entangled during rotation.• DO NOT allow flames, sparks, or embers near batteries and DO NOT smoke near batteries. Batteries produce a
hydrogen, oxygen gas mixture which can explode.
OWNERS & OPERATORS ARE RESPONSIBLE FOR INSPECTION, MAINTENANCE, TRAINING,AND OPERATION AS REQUIRED BY THE OWNERS MANUAL .
IF YOU HAVE NOT BEEN PROVIDED WITH SAFETY LITERATURE,OR FOR ANY QUESTIONS CONCERNING THE SAFE USE OF THISEQUIPMENT, CALL 419/445-9675.FTC B06-00-0401
B06-00-0399
B06-00-0404
B06-00-0403
B06-00-0397
B06-00-0115
THE HYDRAULIC SYSTEM OFTHIS MACHINE IS DESIGNED TO USEENERGOL HLP-46 HYDRAULIC OIL
OII B06-00-0068
B06-00-0068
FTC B06-00-0395
B06-00-0395
B06-00-0393B06-00-0402
B06-00-0060
DANGERFTC B06-00-0400
BEFORE USING, LOWER ALL 4 OUTRIGGERS UNTILEACH OUTRIGGER IS IN FIRM CONTACT WITH THEGROUND, THEN LEVEL THE MACHINE.
B06-00-0400
B06-00-0401
Figure 5-1. Replacement Decals, Sheet 2 of 3

XLB-4319
5-4
FTC B06-00-0396
B06-00-0396
FTC B06-00-0394
B06-00-0394
FTC B06-00-0398
1) Ensure Emergency Stop buttons are released.2) Turn key to Ground Controls.3) Press and hold black button.4) Operate Outrigger Levers to level unit (refer to
Bubble Level).5) Lower outriggers 3 and 4 first to ensure tongue
jack is clear of ground.6) Check to be sure each outrigger foot is in firm
contact with ground.7) Check to be sure all outriggers are showing a
green light and buzzer has stopped.
B06-00-0398
FTC
XLB-4319 SPECIFICATIONS
CAPACITY .......................................... 450 LB.MAXIMUM PLATFORM HEIGHT ....... 37 FT.WORK HEIGHT .................................. 43 FT.POWER SOURCE .............................. 24V DC BATTERY OR GAS
45.9
42.6
39.4
36
32.8
24.5
26.3
23
19.7
16.4
13
9.8
6.5
3.2
0
B06-00-0430
9.8 6.5 3.2 0 3.2 6.5 9.8 13 16.4 19.7 23
B06-00-0430 Figure 5-1. Replacement Decals, Sheet 3 of 3

5 — REPLACEMENT DECALS
5-5
XLB
-4319
0130
0225
BO
TH
SID
ES
0225
0268
0403
0189
0401
0400
0225
BO
TH
SID
ES
0043
0402
0173
0115
0380 01
92
0060
0334
SE
E F
IGU
RE
5-3
FO
R C
OM
PAR
TM
EN
TC
OV
ER
DE
CA
LS04
04
0036
0151
0393
0404
(ALL
OU
TR
IGG
ER
S)
0036
(ALL
OU
TR
IGG
ER
S)
0405
(ALL
OU
TR
IGG
ER
S)
0363
BB
OT
HS
IDE
S
0400
(ALL
OU
TR
IGG
ER
S)
0036
0405
0036
0405
0062
0036
0036
0161
BB
OT
HS
IDE
S
0405
BO
TH
SID
ES
0406
BO
TH
SID
ES
0036
0036
0394
0
0403
404
0409
0033
0033
0062
0334
Figure 5-2. Decal Locations, Trailer and Boom

XLB-4319
5-6
0398
04010399
0397
0395
0261
0430
0395, 0396ON TOP OF
CONTROL BOX
0033
0334, 0034ON ENDPANEL
Figure 5-3. Decal Locations, Control Compartment Exterior
Figure 5-4. Lubricate Monthly Decal
0037
Figure 5-5. Lubricate Semi-Annually Decal

6-1
6 Parts List

XLB-4319
6-2
6-1 UPPER BOOM PARTS LIST Refer to Table 6-1 for the upper boom parts list.
17
19, 19A17
12
3 4 5 6
4 5 63
278
9
1011 2
3
4 56
1517
18, 18A
14 12
13
3
45
617
20
17
19, 19A
18, 18A17
2122
253
65
4
2623
2224
16, 16A, 16B,16C, 16D
Figure 6-1. Upper Boom

6 — PARTS LIST
6-3
Table 6-1. Upper Boom Parts List
Item No. Part No. Description Qty 1 B11-03-0043 Vertical Boom 1
2 B36-00-0059 Pivot Pin, 30mm dia. x 221mm 3
3 B36-00-0042 Locking Pin 10
4 Flat Washer 10
5 Lock Washer 10
6 Cap Screw 10
7 Cap Screw 2
8 Flat Washer 2
9 Hose Clamp 1
10 Flat Washer 2
11 Hex Nut 2
12 B31-00-0036 Wear Pad 1
13 Cap Screw 2
14 Trimlock, 1/4 in. x 30 in. 1
15 Trimlock, 1/4 in. x 7 in. 1
16 B02-03-0027 Hydraulic Cylinder, Upper Boom 1
16A B25-00-0084 Bushing, Cylinder Pivot 4
16B B02-13-0107 B02-13-0106
Seal Kit, End Cap With Groove Seal Kit, End Cap With Groove
1
16C B02-04-0082 B02-04-0064
Counter-Balance Valve, End Cap With GrooveCounter-Balance Valve, End Cap Without Groove
1
16D B02-14-0059 B02-14-0055
Emergency Lowering Valve, End Cap With Groove Emergency Lowering Valve, End Cap Without Groove
1
17 Grease Fitting 6
18 B11-03-0040 Upper Boom 1
18A B25-00-0084 Bushing, Upper Boom 4
19 B11-03-0042 Upper Boom Stabilizer 1
19A B25-00-0084 Bushing, Upper Boom Stabilizer 4
20 B36-00-0062 Pivot Pin, 30mm dia. x 179mm 1
21 Cap Screw 2
22 Flat Washer 4
23 B11-03-0045 Knuckle, Jib Boom 1
24 Self Locking Nut 2
25 B36-00-0058 Pivot Pin, 30mm dia. x 201mm 1
26 B36-00-0060 Pivot Pin, 30mm dia. x 216mm 1

XLB-4319
6-4
6-2 LOWER BOOM PARTS LIST Refer to Table 6-2 for the lower boom parts list.
181916
1514
13, 13A,13B, 13C
1217
2021
2223
2
26
4
25
1, 1A
2
2
3 4 5 6 7, 7A
9,9
82
9A, 9B,C, 9D
2 2
11
11 11
34 5 6
34 5 6
3
4 5
10
6
oweFigure 6-2. L r Boom

6 — PARTS LIST
6-5
Tabl ower Boom Parts List
Item No. Part No. Description Qty
e 6-2. L
1 B11-03-0039 Lower Boom 1
1A B25-00-0084 Bushing, Lower Boom 4
2 Grease Fitting 6
3 B36-00-0042 Locking Pin 8
4 Flat Washer 8
5 Lock Washer 8
6 Cap Screw 8
7 B11-03-0041 Lower Boom Stabilizer 1
7A B25-00-0084 Bushing, Lower Boom Stabilizer 4
8 B36-00-0062 Pivot Pin, 30mm dia. x 179mm 1
9 B02-03-0028 Hydraulic Cylinder, Lower Boom 1
9A B25-00-0084 Bushing, Cylinder Pivot 4
9B B02-13-0107 B02-13-0106
Seal Kit, End Cap With Groove Seal Kit, End Cap With Groove
1
9C B02-04-0082 B02-04-0064
Counter-Balance Valve, End Cap With Groove Counter-Balance Valve, End Cap Without Groove
1
9D B02-14-0059 B02-14-0055
Emergency Lowering Valve, End Cap With Groove Emergency Lowering Valve, End Cap Without Groove
1
10 Boom Support Bracket 1
11 B36-00-0059 Pivot Pin, 30mm dia. x 221mm 3
12 Self Locking Hex Nut 4
13 B01-03-0056 Limit Switch 1
13A B01-03-0003 Head, Limit Switch 1
13B B01-03-0054 Roller Arm 1
13C B01-03-0055 Plug Adapter 1
14 Wire Tie AR
15 B01-03-0064 Cable, Limit Switch 1
16 Socket Head Screw 4
17 Flat Washer 4
18 Flat Head Screw, M8 x 1.25 x 20mm 2
19 B31-00-0037 Boom Wear Pad 1
20 Socket Head Screw 1
21 Lock Washer 1
22 Flat Washer 1
23 Chain 1
24 B36-00-0040 Transport Pin 1
25 Clamp 1
26 Flat Head Screw 1

XLB-4319
6-6
6-3 JIB BOOM PARTS LIST Refer to Table 6-3 for the jib boom parts list.
34
56
15
86
5
15
43
9
77
7A
7A
7B
7B
56
5 6
43
23 4
2
8
1
8
8
10, 10A,10B, 10C
11 12 13
11
14
C8
C8
Figure 6-3. Jib Boom

6 — PARTS LIST
6-7
Table 6-3. Jib Boom Parts List
Item No. Part No. Description Qty 1 B11-03-0045 Jib Boom Knuckle 1
2 B36-00-0067 Pivot Pin, 25mm dia. x 208mm 2
3 B36-00-0042 Locking Pin 8
4 Flat Washer 8
5 Lock Washer 8
6 Cap Screw 8
7 B11-03-0044 Jib Boom 2
7A B25-00-0081 Bushing, Jib Boom, Full Boss 2
7B B25-00-0086 Bushing, Jib Boom, Short Boss 4
8 Grease Fitting 4
9 B11-03-0046 Cage Support 1
10 B02-03-0029 Hydraulic Cylinder, Jib Boom 1
10A B25-00-0081 Bushing, Cylinder Pivot 4
10B B02-13-0107 B02-13-0106
Seal Kit, End Cap With Groove Seal Kit, End Cap Without Groove
1
10C B02-04-0082 B02-04-0064
Counter-Balance Valve, End Cap With GrooveCounter-Balance Valve, End Cap Without Groove
2
11 B02-01-0168 Hydraulic Hose Assembly, 6mm, C8 2
12 B02-02-0210 Adapter, Straight, 1/4 BSP Male-1/4 BSP Male 2
13 B02-00-0044 1/4 Dowty Washer 2
14 Wire Tie AR
15 B36-00-0066 Pivot Pin, 25mm dia. x 201mm 2

XLB-4319
6-8
6-4 COMPARTMENT COVERS PARTS LIST Refer to Table 6-4 for the control and power compartment covers parts list.
4
5
4
3
21
26
3
7,7A
14
15
16
13
89
10
115
3
12
Figure 6-4. Compartment Covers

6 — PARTS LIST
6-9
Table 6-4. Compartment Covers Parts List
Item No. Part No. Description Qty 1 B42-01-1015 Hinge, Cover 2
2 Cap Screw 8
3 Flat Washer 10
4 Fender Washer 4
5 Hex Nut 6
6 Lock Washer 4
7 B18-00-0156 Cover, Control Compartment 1
7A B18-00-0155 Cover, Pump Compartment (not shown) 1
8 B04-07-0121 Latch, Cover 1
9 Washer, Internal Lock 2
10 Hex Nut 1
11 Trimlock, 1/4 in. x 30.5 in. 1
12 Hex Nut, Self Locking 1
13 B42-00-0020 Support Rod 1
14 Socket Head Screw, Flat Head 1
15 B04-07-0118 Clamp, Support Rod 1
16 Hex Nut, Self Locking 1
NOTE: Quantities shown are for one cover. There are two covers on the machine, control compartment and pump compartment. The pump compartment does not have an opening and does not require a trim lock, item 11.

XLB-4319
6-10
6-5 RESERVOIR COMPARTMENT PARTS LIST, GAS MODEL
Refer to Table 6-5 for the pump compartment parts list for the gas model boom lift.
C31
13
1214
6
89
10
11
9
12
12
13
1617
18
1920
2122
23
9
24
1, 1A
2
34
5
7
C37 C34 C26C23
C28
C14
15
TOHYDRAULIC
PUMP
159
Figure 6-5. Reservoir Compartment, Gas Model

6 — PARTS LIST
6-11
Table 6-5. Reservoir Compartment Parts List, Gas Model
Item No. Part No. Description Qty 1 Reservoir Assembly 1
1A Hydraulic Filter (not shown) 1
2 B02-01-0185 Hydraulic Hose Assembly, 13mm, C31 1
3 Cap Screw 2
4 Lock Washer 2
5 Flat Washer 2
6 Hydraulic Hose Assembly, Pump Supply 1
7 Hex Nut, Self Locking 2
8 B02-02-0205 Adapter, Straight, 1/4 BSP Male-3/8 BSP Male
5
9 B02-00-0043 3/8 Dowty Washer 8
10 Return Manifold Assembly 1
11 Socket Head Cap Screw 2
12 B02-00-0042 1/2 Dowty Washer 4
13 B02-02-0218 Adapter, Straight, 3/8 BSP Male-1/2 BSP Male
2
14 B02-02-0220 1/2 BSP Male Plug 2
15 B02-02-0206 Adapter, Straight, 3/8 BSP Male-3/8 BSP Male
2
16 B02-01-0183 Hydraulic Hose Assembly, 10 mm, C28 1
17 B02-01-0173 Hydraulic Hose Assembly, 6 mm, C14 1
18 B02-01-0156 Hydraulic Hose Assembly, 10 mm, C1 1
19 Hydraulic Hose Assembly, 6 mm, C37 1
20 Hydraulic Hose Assembly, 6 mm, C34 1
21 B02-01-0163 Hydraulic Hose Assembly, 6 mm, C26 1
22 B02-01-0182 Hydraulic Hose Assembly, 6 mm, C23 1
23 B02-02-0215 3/8 BSP Male Plug 1
24 Cap 1

XLB-4319
6-12
6-6 PUMP COMPARTMENT PARTS LIST, DC MODEL Refer to Table 6-6 for the pump compartment parts list for the DC model boom lift.
8
1112
31413
910
76
54
3
2
1
15
16
17
18
19
20
2324
22 21
42
40
2625
39
40
48
41, 41A,41B, 41C,
41D
43
444546
3940
27
28
40
29
29
40
29
30
35
30
31
36
3334
3637
38 C14C26
C23
C28
C1
C31
32
47
Figure 6-6. Pump Compartment, DC Model

6 — PARTS LIST
6-13
Table 6-6. Pump Compartment Parts List, DC Model
Item No. Part No. Description Qty 1 B01-04-0001 Battery, Dry Cell, 6 Volt DC 4
2 Cable, Battery, 2 Ga. x 8 in. 3
3 Terminal Boot 12
4 0090-0185 Hex Nut, Self Locking, 5/16 in.-18 2
5 0090-0420 Flat Washer, 5/16 in. 2
6 0090-0787 Fender Washer 2
7 B04-07-0081 Threaded Rod, 5/16 in. x 10 in. 2
8 Cable, Battery, 2 Ga. x 12 in. 1
9 Flat Washer 2
10 Socket Head Cap Screw 2
11 Flat Washer 6
12 Flange Nut 2
13 B01-10-0245 Fuse, 200 Amp, FS2 1
14 B01-10-0246 Insulator 1
15 Cable, Battery, 2 Ga. x 21 in. 1
16 Cable Connector, Plug and Receptacle 1
17 Cable, Battery, 2 Ga. x 12 in. 1
18 Cable, Battery, 2 Ga. x 14 in. 1
19 Machine Screw, Flat Head 2
20 Cable, Battery, 2 Ga. x 38 in. 1
21 Hex Nut, Self Locking 2
22 Cap Screw 2
23 Lock Washer 2
24 Flat Washer 2
25 Hex Nut 4
26 Fender Washer 2
27 Hydraulic Return Manifold 1
28 Socket Head Cap Screw 2
29 B02-00-0042 1/2 Dowty Washer 4
30 B02-02-0218 Adapter, Straight, 3/8 BSP Male-1/2 BSP Male
2
31 B02-02-0220 1/2 BSP Male Plug 2
32 B02-02-0206 Adapter, Straight, 3/8 BSP Male-3/8 BSP Male
2
33 B02-01-0183 Hydraulic Hose Assembly, 10 mm, C28 1
34 B02-01-0156 Hydraulic Hose Assembly, 10 mm, C1 1
35 B02-02-0215 3/8 BSP Male Plug 3

XLB-4319
6-14
6-6 PUMP COMPARTMENT PARTS LIST, DC MODEL Refer to Table 6-6 for the pump compartment parts list for the DC model boom lift.
8
1112
31413
910
76
54
3
2
1
15
16
17
18
19
20
2324
22 21
42
40
2625
39
40
48
41, 41A,41B, 41C,
41D
43
444546
3940
27
28
40
29
29
40
29
30
35
30
31
36
3334
3637
38 C14C26
C23
C28
C1
C31
32
47
Figure 6-6. Pump Compartment, DC Model

6 — PARTS LIST
6-15
Table 6-6. Pump Compartment Parts List, DC Model (continued)
Item No. Part No. Description Qty 36 B02-01-0173 Hydraulic Hose Assembly, 6 mm, C14 1
37 B02-01-0163 Hydraulic Hose Assembly, 6 mm, C26 1
38 B02-01-0182 Hydraulic Hose Assembly, 6 mm, C23 1
39 B02-02-0205 Adapter, Straight, 1/4 BSP Male-3/8 BSP Male
4
40 B02-00-0043 3/8 Dowty Washer 9
41 Pump and Reservoir Assembly 1
41A B02-15-0419 Pump Assembly Without Reservoir 1
41B Hydraulic Filter (not shown) 1
41C B02-15-0389 Motor, 24V 1
41D B02-15-0390 Brush Kit, 24V Motor 1
42 B02-02-0216 Fitting, Test Gauge 1
43 B02-00-0043 1/4 Dowty Washer 1
44 Hydraulic Hose Assembly, Pump Output 1
45 B02-02-0214 Fitting, Tee, 1/4 BSP Male 1
46 B02-02-0213 Adapter, Straight, 1/4 BSP Female Swivel-3/8 BSP Male
1
47 B02-01-0185 Hydraulic Hose Assembly, 13mm, C31 1
48 Start Contact, 24V 1

XLB-4319
6-16
6-7 CHASSIS AND ROTATION UNIT PARTS LIST Refer to Table 6-7 for the chassis and rotation unit parts list.
1
2
3, 3A, 3B, 3C
7
17
18
67
6
54
8
16
11
15
12
13
14
1110 9
Figure 6-7. Chassis and Rotation Unit

6 — PARTS LIST
6-17
Table 6-7. Chassis and Rotation Unit Parts List
Item No. Part No. Description Qty 1 Boom Support Bracket 1
2 Cap Screw 12
3 B02-06-0009 Slew Motor 1
3A B02-06-0010 Seal Kit, Slew Motor 1
3B B02-06-0011 Slew Motor End Seal 1
3C B25-00-0078 Taper Roller Bearing 2
4 Cap Screw 2
5 Lock Washer 2
6 B13-00-0007 Worm Gearbox With Slew Ring 1
7 Grease Fitting 4
8 B12-00-0140 Trailer Chassis 1
9 Socket Head Screw 16
10 Hex Nut 4
11 Flat Washer 8
12 B01-10-0016 Level Sensor 1
13 Machine Screw 3
14 Lock Washer 3
15 Level Sensor Cover 1
16 Machine Screw 4
17 B11-03-0047 Slew Restrictor 1
18 B46-00-0035 Handle, Manual Rotation 1

XLB-4319
6-18
6-8 HITCH AND JACK ASSEMBLY PARTS LIST Refer to Table 6-8 for the hitch and jack assembly parts list.
1, 1A
237
3635
403428
3034
31
30
29
32
39
28
33
38
20
19
2726
25
24
2322
2114
1213
15
1216
8
18
17 12
1311
9
10 87
65
4
3
5
Figure 6-8. Hitch and Jack Assembly

6 — PARTS LIST
6-19
Table 6-8. Hitch and Jack Assembly Parts List
Item No. Part No. Description Qty 1 B12-00-0122 Parking/Surge Brake Control Assembly 1
1A B12-00-0123 Hand Brake Only 1 2 Cap Screw 2 3 B01-10-0179 Lamp, Side Marker, Amber 2 4 0090-0344 Screw, Self Tapping, #10-24 x 1/2" 4 5 Hex Nut, Self Locking 2 6 Spacer 1 7 Bracket, Brake Cable 1 8 B12-00-0125 Brake Rod 1 9 Clamp 2
10 Socket Head Screw, Flat Head 2 11 B36-00-0040 Transport Pin 1 12 Flat Washer 2 13 Cap Screw 1 14 Chain 1 15 Keeper pin 1 16 Hex Nut 1 17 Hex Nut, Self Locking 2 18 0090-0188 Hex Nut, Self Locking, 3/8”-16 2 19 B23-02-0063 Swivel Plate 1 20 B12-00-0173 Breakaway Safety Cable 1 21 Cotter Key 1 22 Flat Washer 1 23 Spring 1 24 Swivel Pin 1 25 B23-02-0061 Jack Assembly 1 26 Hex Nut, Self Locking 1 27 Bushing 1 28 B03-00-0017 Safety Chain 2 29 0090-0959 Cap Screw, M12 x 1.75 x 100mm 1 30 Flat Washer 2 31 0090-1032 Cap Screw, M12 x 1.75 x 80mm 1 32 B01-01-0137 Wiring Harness 1 33 B12-00-0120 Ball Hitch 1 34 0090-0960 Hex Nut, Self Locking, M12 x 1.75 2 35 Hex Nut, Self Locking 2 36 0090-0042 Cap Screw, 3/8”-16 x 1” 2 37 B12-00-0172 Housing, Coupler With Bearings 1 38 B12-00-0171 Overrun Shaft 1 39 B12-00-0124 Damper, Gas Shock 1 40 B12-00-0135 Rubber Boot, Hitch 1

XLB-4319
6-20
6-9 AXLE AND WHEEL ASSEMBLY PARTS LIST
Refer to Table 6-9 for the axle and wheel assembly parts list.
12
3
47 5
6
11, 11A
12
1314
16
17
25
26
292728,28A
3132
30
19
20
2122
35
2324
34
33
36
37
38
8
8
8
10
39
9
15
18
Figure 6-9. Axle and Wheel Assembly

6 — PARTS LIST
6-21
Table 6-9. Axle and Wheel Assembly Parts List
Item No. Part No. Description Qty 1 Hex Nut, Self Locking 4 * B22-00-0026 Kit, Fender (includes items 2, 3, & 6-10) 2 2 B29-00-0154 Bracket, Fender 2 3 B18-00-0109 Fender, Top Mount 2 4 Flat Washer 4 5 Cap Screw 4 6 0090-0033 Cap Screw, 5/16”-18 x 1-3/4” 4 7 B07-06-5772 Fender Mount 4 8 0090-0420 Flat Washer, 5/16” 16 9 0090-0185 Nut, Lock, 5/16”-18 4
10 0090-0645 Cap Screw, 5/16”-18 x 1/2” 8 11 B08-02-0012 Tire 2
11A B08-02-0013 Rim Only 2 12 B10-00-0062 Bolt, Wheel Lug, Conical, M12 x 1.5 8 13 B10-00-0063 Dust Cap 2 14 B10-00-0061 Flange Nut, Spindle 2 15 B21-00-0025
B21-00-0025B Brake Drum with Bearings, Nut Mount Spindle Brake Drum with Bearings, Bolt Mount Spindle
2
16 B25-00-0077 B25-00-0077B
Wheel Bearing, Nut Mount Spindle Wheel Bearing, Bolt Mount Spindle
4
17 B10-00-0083 B10-00-0083B
Retaining Ring, Nut Mount Spindle Retaining Ring, Bolt Mount Spindle
2
18 B10-00-0077 Pull-off Spring 2 19 B10-00-0078 Expanding Clutch 2 20 B21-00-0024 Brake Shoe (pair) 2 21 B10-00-0079
B10-00-0079B Spindle, Nut Mount Spindle, Bolt Mount
2
22 B10-00-0080 Cable Eye 2 23 B12-00-0126 Brake Cable 2 24 B10-00-0081 Spring, Reverse Lever 2 25 B10-00-0076 Bearing Bolt 2 26 B10-00-0075 Spring, Shoe Retaining 2 27 B10-00-0074 Cotter Pin 2 28 B10-00-0072 Reverse Lever LH Side 1
28A B10-00-0073 Reverse Lever RH Side 1 29 B10-00-0065 Brake Adjuster Assembly 2 30 B10-00-0071 Plug, Plastic 4 31 B10-00-0070 Cover Plate 2 32 B10-00-0069
B10-00-0082 Lock Nut, Nut Mount Spindle Bolt, M20 x 60mm, Bolt Mount Spindle (not shown)
2
33 B10-00-0068 Cover, Spindle Lock Nut, Nut Mount Spindle Only 2 34 B10-00-0067 Backplate Cap 2 35 B10-00-0066 Brake Cable Shell 2 36 Hex Nut, Self Locking 4 37 Flat Washer 4 38 B10-00-0064 Axle Assembly 1 39* Order fender kit B22-00-0026 when replacing original side mounted fender.
Cap Screw 4

XLB-4319
6-22
6-10 REAR LIGHTS AND JUNCTION BOX PARTS LIST Refer to Table 6-10 for the rear lights and junction box parts list.
6
7
8
109
1
3
2
111
2
5
5
4
Figure 6-10. Rear Lights and Junction Box

6 — PARTS LIST
6-23
Table 6-10. Rear Lights and Junction Box Parts List
Item No. Part No. Description Qty 1 B01-10-0023 Tail Light Assembly, Right 1
2 B01-10-0024 Tail Light Assembly, Left 1
3 0090-0934 Screw, Self Tapping, 1/4"-20 x 3/4" 2
4 B29-00-0037 Bracket, License Plate 1
5 B01-10-0069 Lens, Replacement 2
6 B01-09-0023 Anchor Plate, Wire Tie 3
7 B01-09-0030 Wire Tie, 3/32” x 6 1/4" 3
8 B01-10-0014 Junction Box 1
9 B01-10-0049 Cover, Junction Box 1
10 B01-09-0029 Cord Grip 1
11 B01-09-0010 Cord Cap 1

XLB-4319
6-24
6-11 OUTRIGGERS PARTS LIST Refer to Table 6-11 for the outriggers parts list.
1
2
3, 3A,3B, 3C
25
6
4
19
2021 27
18
25
26
2223
7
8
910, 10A, 10B
24
17
2120
19 18
2
11, 11A
12
13
14
15
16
Figure 6-11. Outriggers

6 — PARTS LIST
6-25
Table 6-11. Outriggers Parts List
Item No. Part No. Description Qty 1 Dust Shield 1
2 Grease Fitting 2
3 B02-03-0026 Hydraulic Cylinder, Outrigger 1
3A B25-00-0084 Bushing, Cylinder Pivot 4
3B B02-13-0109 Seal Kit, Outrigger 1
3C B02-14-0060 Check Valve, Outrigger 2
4
B02-01-0174 B02-01-0175 B02-01-0176 B02-01-0177
Hydraulic Hose Assembly, 6 mm, C15 Hydraulic Hose Assembly, 6 mm, C16 Hydraulic Hose Assembly, 6 mm, C17 Hydraulic Hose Assembly, 6 mm, C18
2
5 B02-00-0044 1/4 Dowty Washer 2
6 B02-02-0203 Adapter, 90°, 1/4 BSP Male-1/4 BSP Male 2
7 B01-03-0059 Cable, Limit Switch 1
8 Socket Head Cap Screw 4
9 Flat Washer 4
10 B01-03-0051 Limit Switch, Body With 2 NC Contacts 1
10A B01-03-0003 Head, Limit Switch 1
10B B01-03-0057 Contact Only, 2 NC 1
11 B23-01-0099 Outrigger 1
11A B25-00-0084 Bushing, Outrigger 2
12 B23-02-0064 Outrigger Footpad 1
13 B23-02-0065 Hinge Pin, 16mm dia. x 102mm 1
14 Split Pin, 0.19 in. dia. x 1 in. 2
15 Trimlock 7 in.
16 Sleeve, Hinge Pin 1
17 B36-00-0057 Pivot Pin, 30mm dia. x 167mm 1
18 B36-00-0042 Locking Pin 4
19 Cap Screw 4
20 Lock Washer 4
21 Flat Washer 4
22 Flat Washer 4
23 Hex Nut, Self Locking 4
24 B36-00-0055 Pivot Pin, 30mm dia. x 211mm 1
25 Flat Washer 2
26 Split Pin, 0.25 in. dia. x 2 in. 2
27 B36-00-0058 Pivot Pin, 30mm dia. x 201mm 1
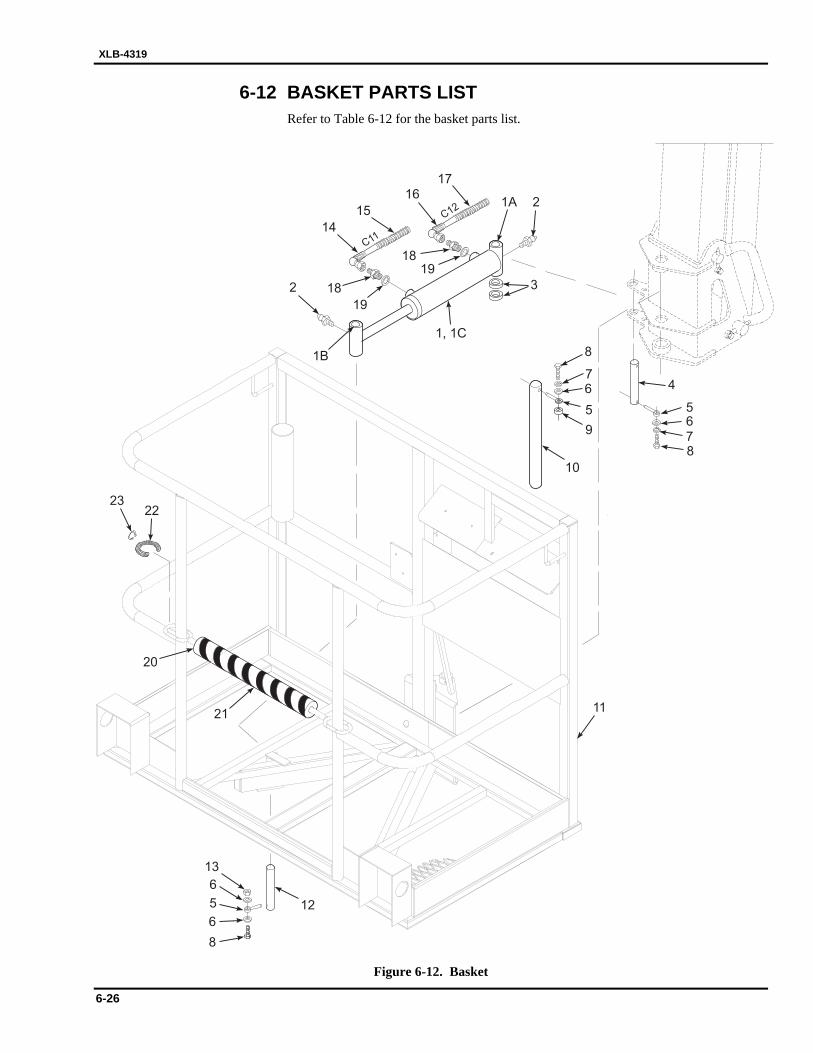
XLB-4319
6-26
6-12 BASKET PARTS LIST Refer to Table 6-12 for the basket parts list.
2
1B
1, 1C
1918
14C11
C121516
17
1819
7
8
6
5
9
10
21
20
2223
4
5678
3
1A 2
12
8
656
13
11
Figure 6-12. Basket

6 — PARTS LIST
6-27
Table 6-12. Basket Parts List
Item No. Part No. Description Qty 1 B02-03-0030 Hydraulic Cylinder, Cage 1
1A B25-00-0087 Bushing, Cage Cylinder, Cylinder End 2
1B B25-00-0085 Bushing, Cage Cylinder, Rod End 2
1C B02-13-0110 B02-13-0116
Seal Kit, Cage Cylinder End Cap With Groove Seal Kit, Cage Cylinder End Cap Without Groove
1
2 Grease Fitting 2
3 Spacer 2
4 B36-00-0065 Pivot Pin, 16mm dia. x 102mm 1
5 B36-00-0042 Locking Pin 3
6 Flat Washer 3
7 Lock Washer 3
8 Cap Screw 3
9 Spacer 1
10 B36-00-0061 Pivot Pin, 25mm dia. x 330mm 1
11 B17-00-0126 Basket Weldment 1
12 B36-00-0064 Pivot Pin, 16mm dia. x 108mm 1
13 Hex Nut 1
14 B02-01-0165 Hydraulic Hose Assembly, 6 mm, C11 1
15 Flexible Sleeve 1
16 B02-01-0171 Hydraulic Hose Assembly, 6 mm, C12 1
17 Flexible Sleeve 1
18 B02-02-0210 Adapter, Straight 1/4 BSP Male-1/4 BSP Male 2
19 B02-00-0044 1/4 Dowty Washer 2
20 B05-00-0001 Tube, Foam, 21 1/2" Long 1
21 B06-00-0167 Caution Tape, Black and Yellow 1 Roll
22 B00-00-0086 Casing, Wire, Slit, 5/16” Dia. x 8 1/2" Long 2
23 B01-09-0030 Wire Tie, 3/32” x 7” 6

XLB-4319
6-28
6-13 OUTRIGGER HYDRAULIC CONTROLS PARTS LIST Refer to Table 6-13 for the outrigger hydraulic controls parts list.
1
23
45
414
1414
75
6
6
7
23
8A
8C
8 8B
109
6
6
6
1112
C14 C15C16
C17
C38 C15C16
C17
C18
13
C18
Figure 6-13. Outrigger Hydraulic Controls

6 — PARTS LIST
6-29
Table 6-13. Outrigger Hydraulic Controls Parts List
Item No. Part No. Description Qty 1 B02-01-0173 Hydraulic Hose Assembly, 6 mm, C14 1
2 B02-01-0174 Hydraulic Hose Assembly, 6 mm, C15 2
3 B02-01-0175 Hydraulic Hose Assembly, 6 mm, C16 2
4 B02-01-0176 Hydraulic Hose Assembly, 6 mm, C17 2
5 B02-01-0177 Hydraulic Hose Assembly, 6 mm, C18 2
6 B02-02-0205 Adapter, Straight, 1/4 BSP Male-3/8 BSP Male 6
7 B02-00-0043 3/8 Dowty Washer 10
8 B02-04-0075 Valve Control 1
8A B02-14-0068 Lever Pivot Box With Gaiter 4
8B B02-14-0069 End Cap With Spring 4
8C B02-14-0053 Handle, Valve Control 4
9 Flat Washer 2
10 Self Locking Hex Nut 2
11 Flat Washer 2
12 Cap Screw 2
13 Hydraulic Hose Assembly, 6 mm, C38 (Gas Model Only)
1
14 B02-02-0204 Adapter, Straight With Orifice, 1/4 BSP Male-3/8 BSP Male
4

XLB-4319
6-30
6-14 LOWER CONTROLS PARTS LIST Refer to Table 6-14 for the lower controls parts list.
1*
2
3
4
5A
5C5B
5
6
7
8
9
10
711
12
16
15
1413
1417
21*20* 19*
18*
22*
Figure 6-14. Lower Controls

6 — PARTS LIST
6-31
Table 6-14. Lower Controls Parts List
Item No. Part No. Description Qty 1* Battery Charger 1
2 Cap Screw 2
3 Flat Washer 2
4 Standoff, Hex 2
5 B02-04-0074 Valve Control, Boom Lift 1
5A B02-14-0068 Lever Pivot Box With Gaiter 4
5B B02-14-0069 End Cap With Spring 4
5C B02-14-0053 Handle, Valve Control 4
6 Hex Nut, Self Locking 4
7 Flat Washer 8
8 Support Bracket, Control Box 1
9 Lower Control Box 1
10 Strain Relief 2
11 B04-07-0130 Screw, 1/4 Turn, Control Box 6
12 Strain Relief 9
13 Hex Nut, Self Locking 4
14 Flat Washer 8
15 Hex Nut, Self Locking 2
16 Flat Washer 2
17 Cap Screw 4
18* Cap Screw 4
19* Lock Washer 4
20* Cap Screw 2
21* Lock Washer 2
22* Support Bracket 1
* This item used on DC model boom lift only.

XLB-4319
6-32
6-15 UPPER CONTROLS PARTS LIST Refer to Table 6-15 for the upper controls parts list.
2
2B
2C
2A
1
3
3
19
4
6
20
7
14
15
2213
15
16
186
15
8
821
5
5
9
1011
12
17
Figure 6-15. Upper Controls

6 — PARTS LIST
6-33
Table 6-15. Upper Controls Parts List
Item No. Part No. Description Qty 1 B17-00-0129 Cover, Basket Hydraulics 1
2 B02-04-0076 Valve Control 1
2A B02-14-0068 Lever Pivot Box With Gaiter 5
2B B02-14-0069 End Cap With Spring 5
2C B02-14-0052 Handle, Valve Control 5
3 0090-0420 Flat Washer, 5/16” 4
4 0090-0185 Hex Nut, Self-locking, 5/16”-18 2
5 0090-0182 Hex Nut, Self-locking, 10-24 4
6 0090-0419 Flat Washer, 1/4” 4
7 0090-0183 Hex Nut, Self-locking, 1/4”-20 3
8 0090-0415 Flat Washer, #10 4
9 B01-10-0046 Junction Box, 110 Vac Outlet 1
10 0090-0232 Machine Screw, 10-24 x 3/8 2
11 B01-10-0034 Receptacle, 120 Vac, GFI 1
12 B01-10-0035 Cover, Junction Box 1
13 Manual Hydraulic Pump 1
14 B04-07-0120 Clamp 1
15 0090-0344 Screw, Self Tapping, #10-24 x 1/2 8
16 B40-00-0033 Chain 10 in.
17 B07-10-1200 Handle, Hydraulic Pump 1
18 0090-0456 Cap Screw, 1/4"-20 x 3” 3
19 0090-0037 Cap Screw, 5/16”-18 x 2 1/2" 2
20 Control Box, Upper 1
21 0090-0232 Machine Screw, #10-24 x 5/8” 4
22 B00-00-0014 Cap, Manual Tube 2

XLB-4319
6-34
6-16 ENGINE COMPARTMENT PARTS LIST, GAS MODEL
Refer to Table 6-16 for the gas model engine compartment parts list.
1
78
910
11
12
13
1415 16
23
65
4
17
18
19
1053
52
87
5150
494645
44 4847
33
30
25
2322
24
29
57
32
21
31
42
4041
55
5859
54
39
26
27
28
36
34
37
38
35
56
60
61
62
63
62
43
20
C33
Figure 6-16. Engine Compartment Parts List, Gas Model

6 — PARTS LIST
6-35
Table 6-16. Engine Compartment Parts List, Gas Model
Item No. Part No. Description Qty 1 Engine Cover 1
2 Lock Washer 4
3 Cap Screw 4
4 Lock Washer 4
5 Flat Washer 4
6 Cap Screw 4
7 Socket Head Cap Screw 6
8 Lock Washer 6
9 Flange Adapter 2
10 O-ring 2
11 Seal Ring 1
12 Adapter, M/M 1
13 Hydraulic Hose Assembly, Pump Supply 1
14 0090-0420 Flat Washer, 5/16” 4
15 0090-0208 Lock Washer, 5/16” 4
16 0090-0030 Machine Screw, 5/16”-18 x 1” 4
17 Seal Ring 1
18 Adapter, M/M 1
19 Hydraulic Hose Assembly, 6mm, C33 1
20 Spiral Wrap 1
21 0090-0714 Cap Screw, 1/4"-20 x 2 3/4" 4
22 0090-0787 Washer, Fender 4
23 B07-10-1026 Spacer, Isolation Mount Ring 4
24 B20-00-0006 Ring, Isolation Mount 4
25 B20-00-0007 Bushing, Isolation Mount 4
26 0090-0010 Cap Screw, 1/4"-20 x 1 1/2" 2
27 0090-0419 Flat Washer, 1/4" 2
28 0090-0183 Nut, Lock, 1/4"-20 2
29 B20-00-0013 Rectifier/Regulator, Voltage, 12 Volt, 18 Amp 1
30 Rectifier/Regulator Harness 1
31 B07-06-5198 Engine Mount Plate 1
32 0090-0875 Flat Washer, USS, 1/4" 4
33 0090-0183 Nut, Lock, 1/4"-20 4
34 0090-0472 Sheet Metal Screw, #10 x 1/2" 2
35 0090-0180 Nut, Lock, #6-32 4
36 B29-00-0095 Bracket, Solenoid 1
37 B01-10-0084 Solenoid, Choke, 12 Volt 1
38 0090-0708 Machine Screw, #6-32 x 3/8” 4

XLB-4319
6-36
6-16 ENGINE COMPARTMENT PARTS LIST, GAS MODEL
Refer to Table 6-16 for the gas model engine compartment parts list.
1
78
910
11
12
13
1415 16
23
65
4
17
18
19
1053
52
87
5150
494645
44 4847
33
30
25
2322
24
29
57
32
21
31
42
4041
55
5859
54
39
26
27
28
36
34
37
38
35
56
60
61
62
63
62
43
20
C33
Figure 6-16. Engine Compartment Parts List, Gas Model
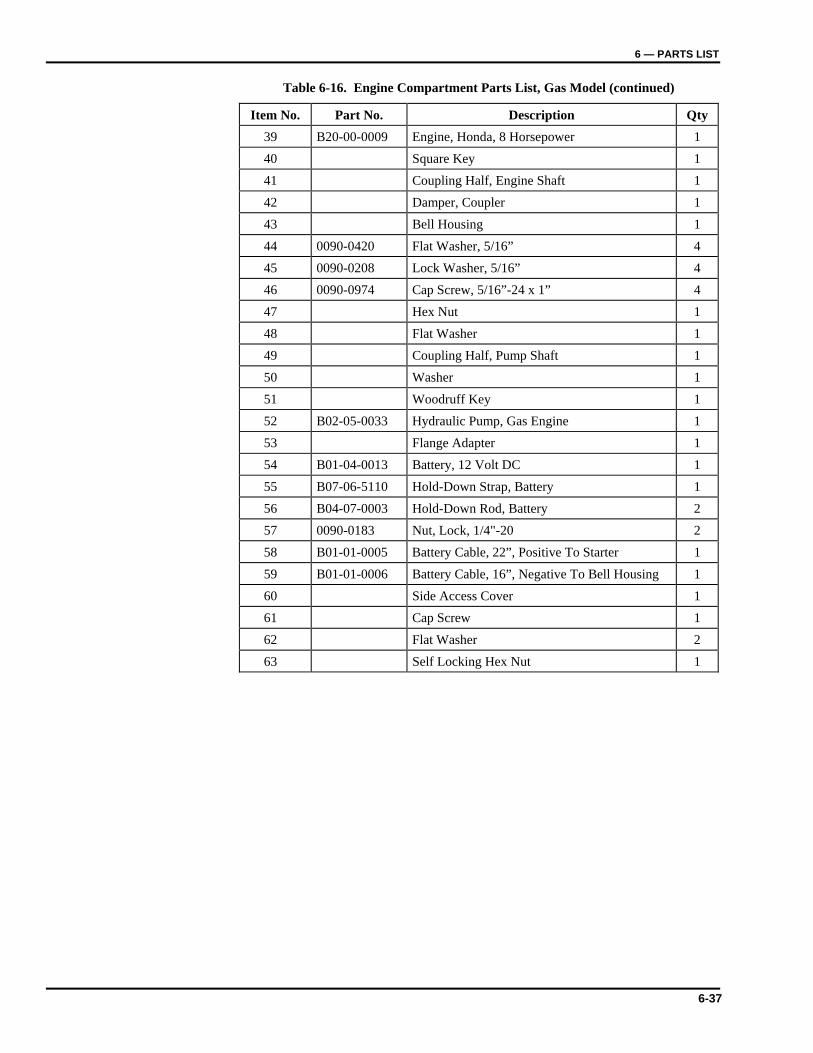
6 — PARTS LIST
6-37
Table 6-16. Engine Compartment Parts List, Gas Model (continued)
Item No. Part No. Description Qty 39 B20-00-0009 Engine, Honda, 8 Horsepower 1
40 Square Key 1
41 Coupling Half, Engine Shaft 1
42 Damper, Coupler 1
43 Bell Housing 1
44 0090-0420 Flat Washer, 5/16” 4
45 0090-0208 Lock Washer, 5/16” 4
46 0090-0974 Cap Screw, 5/16”-24 x 1” 4
47 Hex Nut 1
48 Flat Washer 1
49 Coupling Half, Pump Shaft 1
50 Washer 1
51 Woodruff Key 1
52 B02-05-0033 Hydraulic Pump, Gas Engine 1
53 Flange Adapter 1
54 B01-04-0013 Battery, 12 Volt DC 1
55 B07-06-5110 Hold-Down Strap, Battery 1
56 B04-07-0003 Hold-Down Rod, Battery 2
57 0090-0183 Nut, Lock, 1/4"-20 2
58 B01-01-0005 Battery Cable, 22”, Positive To Starter 1
59 B01-01-0006 Battery Cable, 16”, Negative To Bell Housing 1
60 Side Access Cover 1
61 Cap Screw 1
62 Flat Washer 2
63 Self Locking Hex Nut 1

XLB-4319
6-38
6-17 BOOM CONTROL HYDRAULICS PARTS LIST, BASKET
Refer to Table 6-17 for the boom control hydraulics parts list.
1A
1B
1C
1
2
13
5
6
7
8
11
109
2
3
4
12
2
2
13
14
15
17
16
213
3
23
2
18
8
19
6
20
21
22
27
25
24
C9
C10
C1
C3
C12
C27
C2
C4
C7
C27
C6
C8
C8 C
11
C7
C5
28
31
26
2
3
29
Figure 6-17. Boom Control Hydraulics, Basket

6 — PARTS LIST
6-39
Table 6-17. Boom Control Hydraulics Parts List, Basket
Item No. Part No. Description Qty 1 B02-04-0076 Valve Control, Basket 1
1A B02-14-0068 Lever Pivot Box With Gaiter 5
1B B02-14-0069 End Cap With Spring 5
1C B02-14-0052 Handle, Valve Control 5
2 B02-00-0043 3/8 Dowty Washer 15
3 B02-02-0206 Adapter, Straight, 3/8 BSP Male-3/8 BSP Male 3
4 B02-02-0209 Tee Adapter, 3/8 BSP Female Swivel-1/4 BSP Male-3/8 BSP Male
1
5 B02-01-0159 Hydraulic Hose Assembly, 6 mm, C4 1
6 B02-01-0160 Hydraulic Hose Assembly, 6 mm, C7 2
7 B02-01-0166 Hydraulic Hose Assembly, 6 mm, C5 1
8 B02-01-0168 Hydraulic Hose Assembly, 6 mm, C8 2
9 B02-01-0165 Hydraulic Hose Assembly, 6 mm, C11 1
10 B02-01-0164 Hydraulic Hose Assembly, 6 mm, C27 1
11 Spiral Wrap 1
12 Check Valve 1
13 B02-02-0205 Adapter, Straight, 1/4 BSP Male-3/8 BSP Male 11
14 B02-01-0157 Hydraulic Hose Assembly, 10 mm, C2 1
15 B02-01-0171 Hydraulic Hose Assembly, 6 mm, C12 1
16 Spiral Wrap 1
17 B02-01-0169 Hydraulic Hose Assembly, 6 mm, C9 1
18 B02-01-0164 Hydraulic Hose Assembly, 6 mm, C27 1
19 B02-01-0167 Hydraulic Hose Assembly, 6 mm, C6 1
20 B02-01-0158 Hydraulic Hose Assembly, 6 mm, C3 1
21 B02-01-0156 Hydraulic Hose Assembly, 10 mm, C1 1
22 B02-01-0170 Hydraulic Hose Assembly, 10 mm, C10 1
23 B02-02-0208 Tee Adapter, 3/8 BSP Female Swivel-3/8 BSP Male-3/8 BSP Male
1
24 B02-02-0044 1/4 Dowty Washer 1
25 B02-02-0210 Adapter, Straight, 1/4 BSP Male-1/4 BSP Male 1
26 Wire Tie AR
27 Pump, Emergency Down 1
28 B02-02-0207 Tee Adapter, 1/4 BSP Female Swivel-1/4 BSP Male-1/4 BSP Male
2
29 Cable Sleeve 1

XLB-4319
6-40
6-18 BOOM CONTROL HYDRAULICS PARTS LIST, GROUND, GAS MODEL
Refer to Table 6-18 for the gas model boom control hydraulics parts list.
5
1, 1A, 1B
23 4
3
2
6, 6A, 6B
33 22
3
23
32
2 329
16
3132
33
30
34
28
23
27
19
24
25
24
25
23
13
12A
12C
12B
122
14
15
1817
16
2
3
11
1098
7
2021
22
C38
C36
C37
C33
C35
C34
C29
C7
C7
C29
C2 C
28C
21
C22
C4
C3
C29
C29
C24
C25
C27
C27
C32
26
2719
23
Figure 6-18. Gas Model Boom Control Hydraulics, Ground

6 — PARTS LIST
6-41
Table 6-18. Gas Model Boom Control Hydraulics Parts List, Ground
Item No. Part No. Description Qty 1 B02-04-0086 2-Way Solenoid Valve, SV1, Boom Enable 1
1A B02-04-0072 Coil For Valve, SV1, 12V DC 1 1B B02-14-0070 Valve Replacement, SV1 1 2 B02-00-0043 3/8 Dowty Washer 19 3 B02-02-0205 Adapter, Straight, 1/4 BSP Male-3/8 BSP Male 18 4 Hydraulic Hose Assembly, 6 mm, C36 1 5 Hydraulic Hose Assembly, 6 mm, C38 1 6 B02-04-0086 2-Way Solenoid Valve, SV2, Outriggers Enable 1
6A B02-04-0072 Coil For Valve, SV2, 12V DC 1 6B B02-14-0070 Valve Replacement, SV2 1 7 Hydraulic Hose Assembly, 6 mm, C37 1 8 B02-01-0161 Hydraulic Hose Assembly, 6 mm, C24 1 9 B02-01-0162 Hydraulic Hose Assembly, 6 mm, C25 1
10 B02-01-0164 Hydraulic Hose Assembly, 6 mm, C27 2 11 Hydraulic Hose Assembly, 6 mm, C32 1 12 B02-04-0074 Valve Control, Ground Station Boom 1
12A B02-14-0068 Lever Pivot Box With Gaiter 4 12B B02-14-0069 End Cap With Spring 4 12C B02-14-0053 Handle, Control Valve 4 13 B02-02-0206 Adapter, Straight, 3/8 BSP Male-3/8 BSP Male 1 14 B02-01-0183 Hydraulic Hose Assembly, 10 mm, C28 1 15 B02-01-0157 Hydraulic Hose Assembly, 6 mm, C2 1 16 B02-02-0207 Tee Fitting, 1/4 BSP Female Swivel-1/4 BSP
Male-1/4 BSP Male 3
17 B02-01-0181 Hydraulic Hose Assembly, 6 mm, C22 1 18 B02-01-0180 Hydraulic Hose Assembly, 6 mm, C21 1 19 B02-01-0184 Hydraulic Hose Assembly, 6 mm, C29 2 20 B02-01-0159 Hydraulic Hose Assembly, 6 mm, C4 1 21 B02-01-0158 Hydraulic Hose Assembly, 6 mm, C3 1 22 Wire Tie AR 23 B02-02-0212 Tee Fitting, 1/4 BSP Male-1/4 BSP Female
Swivel-1/4 BSP Male 2
24 B02-02-0211 Adapter, Straight, 1/4 BSP Male-1/2 BSP Male 2 25 B02-00-0042 1/2 Dowty Washer 2 26 B02-06-0009 Gear Motor, Boom Rotation 1 27 B02-01-0160 Hydraulic Hose Assembly, 6 mm, C7 2 28 Hydraulic Hose Assembly, 6 mm, C34 1 29 Pressure Valve, Hydraulic 1 30 Hydraulic Hose Assembly, 6 mm, C33 1 31 Tee Fitting, M/M/F 1 32 Seal Ring 1 33 Pressure Tap 1 34 Hydraulic Hose Assembly, 6 mm, C35 1

XLB-4319
6-42
6-19 BOOM CONTROL HYDRAULICS PARTS LIST, GROUND, DC MODEL
Refer to Table 6-19 for the DC model boom control hydraulics parts list.
3
2
4, 4A, 4B
33 2
2125
17
2223
22
23
21
11 10
10A
10B10C
2
12
13
1615
14
2
3
8
7
9
6
5
18
19
20
C29
C13
C7
C20
C19
C7
C29
C2 C
28C
21
C22
C4
C3
C29
C29
C24
C25
C27
C27
24
1
23
25
Figure 6-19. DC Model Boom Control Hydraulics, Ground

6 — PARTS LIST
6-43
Table 6-19. DC Model Boom Control Hydraulics Parts List, Ground
Item No. Part No. Description Qty 1 B02-01-0179 Hydraulic Hose Assembly, 6 mm, C20 1
2 B02-00-0043 3/8 Dowty Washer 15
3 B02-02-0205 Adapter, Straight, 1/4 BSP Male-3/8 BSP Male 14
4 B02-04-0085 2-Way Solenoid Valve, SV1, Boom Enable 1
4A B02-14-0056 Coil For Valve, SV1, 24V DC 1
4B B02-14-0070 Valve Replacement, SV1 1
5 B02-01-0172 Hydraulic Hose Assembly, 6 mm, C13 1
6 B02-01-0161 Hydraulic Hose Assembly, 6 mm, C24 1
7 B02-01-0162 Hydraulic Hose Assembly, 6 mm, C25 1
8 B02-01-0164 Hydraulic Hose Assembly, 6 mm, C27 2
9 B02-01-0178 Hydraulic Hose Assembly, 6 mm, C19 1
10 B02-04-0074 Valve Control, Ground Station Boom 1
10A B02-14-0068 Lever Pivot Box With Gaiter 4
10B B02-14-0069 End Cap With Spring 4
10C B02-14-0053 Handle, Control Valve 4
11 B02-02-0206 Adapter, Straight, 3/8 BSP Male-3/8 BSP Male 1
12 B02-01-0183 Hydraulic Hose Assembly, 10 mm, C28 1
13 B02-01-0157 Hydraulic Hose Assembly, 6 mm, C2 1
14 B02-02-0207 Tee Fitting, 1/4 BSP Female Swivel-1/4 BSP Male-1/4 BSP Male
2
15 B02-01-0181 Hydraulic Hose Assembly, 6 mm, C22 1
16 B02-01-0180 Hydraulic Hose Assembly, 6 mm, C21 1
17 B02-01-0184 Hydraulic Hose Assembly, 6 mm, C29 2
18 B02-01-0159 Hydraulic Hose Assembly, 6 mm, C4 1
19 B02-01-0158 Hydraulic Hose Assembly, 6 mm, C3 1
20 Wire Tie AR
21 B02-02-0212 Tee Fitting, 1/4 BSP Male-1/4 BSP Female Swivel-1/4 BSP Male
2
22 B02-02-0211 Adapter, Straight, 1/4 BSP Male-1/2 BSP Male 2
23 B02-00-0042 1/2 Dowty Washer 2
24 B02-06-0009 Gear Motor, Boom Rotation 1
25 B02-01-0160 Hydraulic Hose Assembly, 6 mm, C7 2

XLB-4319
6-44
6-20 LOWER BOOM CYLINDER HYDRAULICS PARTS LIST
Refer to Table 6-20 for the lower boom cylinder hydraulics parts list.
5
1
23
C21
2
C22
C22 4
3
3
4
Figure 6-20. Lower Boom Cylinder Hydraulics
Table 6-20. Lower Boom Cylinder Hydraulics Parts List
Item No. Part No. Description Qty 1 B02-01-0180 Hydraulic Hose Assembly, 6mm, C21 1
2 B02-02-0210 Adapter, Straight, 1/4 BSP Male-1/4 BSP Male 2
3 B02-00-0044 1/4 Dowty Washer 3
4 B02-01-0181 Hydraulic Hose Assembly, 6mm, C22 2
5 B02-02-0203 Elbow, 90°, 1/4 BSP Male-1/4 BSP Male 1

6 — PARTS LIST
6-45
6-21 UPPER BOOM CYLINDER HYDRAULICS PARTS LIST
Refer to Table 6-21 for the upper boom cylinder parts list.
1 23
C5
76
54
8 21
C25
C26C24
C32
Figure 6-21. Upper Boom Cylinder Hydraulics
Table 6-21. Upper Boom Cylinder Hydraulics Parts List
Item No. Part No. Description Qty 1 B02-02-0203 Elbow, 90°, 1/4 BSP Male-1/4 BSP Male 2
2 B02-00-0044 1/4 Dowty Washer 5
3 B02-01-0166 Hydraulic Hose Assembly, 6mm, C5 1
4 B02-01-0158 Hydraulic Hose Assembly, 6mm, C3 1
5 B02-01-0161 Hydraulic Hose Assembly, 6mm, C24 1
6 B02-01-0163 Hydraulic Hose Assembly, 6mm, C26 1
7 B02-01-0162 Hydraulic Hose Assembly, 6mm, C25 1
8 B02-02-0210 Adapter, Straight, 1/4 BSP Male-1/4 BSP Male 3

XLB-4319
6-46
6-22 PUSHBUTTON PANEL PARTS LIST, BASKET Refer to Table 6-22 for the basket pushbutton panel parts list.
1
8
9
12
15, 16
17, 18
2
4
5
7
Figure 6-22. Basket Pushbutton Panel
3
10
11
13
14
6

6 — PARTS LIST
6-47
Table 6-22. Basket Pushbutton Panel Parts List
Part No. DescrItem No. iption Qty
1 B1B19-00-0043
l Enclosure, Upper Control Box, Gas Model
1 9-00-0042 Enclosure, Upper Control Box, DC Mode
2 B01-09-0023 Cord Grip 1
3 B01-02-0085 Pushbutton Switch, Boom Enable, Green 1
4 B01-02-0084 Pushbutton Switch, Emergency Stop, Red 1
5 B06-00-0441 Decal, Upper Controls 1
6 B01-10-0002 Audible Warning Device (Alarm) 1
7 B01-02-0098 Pushbutton Switch, Engine Start, SW2, Yellow(Gas Model Only)
1
8 B06-00-0442 Decal, Engine Start (Gas Model Only) 1
9 B01-09-0021 Nut, Electric Lock 1
10 B01-02-0086 NC Contact 1
11 B01-02-0087 NO Contact (Gas Model Only) 1
12 B01-02-0087 NO Contact, DC Model NO Contact, Gas Model
2 1
13 B01-09-0050 Butt Splice 1
14 B01-09-0032 Female Spade 2
15 B01-10-0031 B01-10-0030
3-Position Terminal Strip, DC Model 5-Position Terminal Strip, Gas Model
1 1
16 B01-10-0090 5-Position Marker Strip (Gas Model Only) 1
17 009 2 0-0813 Screw, Machine, 8-32 x 3/4"
18 0090-0181 Nut, Lock, 8-32 2

XLB-4319
6-48
6-23 HBUTTON PANEL PARTS LIST,
el parts list.
PUSGROUND CONTROLS Refer to Table 6-23 for the pushbutton pan
1234
1011
6789 5
4321
Figu
Table 6-2
Item No. Part
re 6-23. Pushbutton Panel, Ground Controls
3. Pushbutton Panel Parts List, Ground Controls
No. Description Qty 1 B01-02-0085 Pushbutton Switch, Boom Enable, PB2 1
2 B01-02-0089 Pushbutton Switch, Outriggers Enable, PB3 1
3 B01-02-0084 Pushbutton Switch, Emergency Stop, PB1 1
4 B01-02-0088 Key Switch, Basket/Off/Ground, SW1 1
4A B01-02-0101 5-Contact Mount Adapter
4B B01-02-0102 Double NO Contact (Gas model only)
5 Control Panel Closure 1
6 Alarm Relay, RL2 1
7 Motor Contactor (DC model only) 1
8 Circuit Breaker 1
9 Terminal Block Segment AR
10 B01-10- Green 5 0243 LED,
11 B04-07-0130 Screw, 1/4 Turn, Control Box 6
B01-02-0086 NC Contact
B0 - 1-02 0087 NO Contact

7-1
7 ANSI Reprint The the time of mIndustry
7. Res7.1 Gen
the
shalspec
.3 Vehtribuaerial dweig
stall man
7.5 Installalating t In the eve -
re the mobile unit
-
7.6
-
7.8.1 -
following sections are reprinted from the ANSI A92.2-2001 code in effect atanufacture. Permission to reprint has been granted by the Scaffold
Association.
ponsibilities of Dealers and Installers eral Responsibilities. Each dealer or installer as applicable shall comply with
requirements of this section. 7.2 Vehicle Specifications. Each dealer or installer, or both, who sells an aerial device
l inform the owner or user, or both, of the manufacturer’s minimum vehicle ifications.
7 icle Weight Distribution. The installer shall be responsible for the weight dis-tion of the completed mobile unit in accordance with the requirements of the
evice and the applicable regulations. Allowance shall be made for the ht of readily removable tools and material specified by the user.
7.4 Manuals. Upon delivery of the equipment to the owner or user, the dealer or in-er shall provide the manuals as required by Paragraph 6.4 of this standard anduals for auxiliary equipment added by the installer.
tions. The installer shall comply with Sections 5 and 6 of this standard re-o proper installation and shall follow the instructions of the manufacturer. nt the original manufacturer no longer exists, an equivalent entity may pro
aller of an aerial device shall, befovide these instructions. The instis placed in operation, perform stability tests in accordance with the requirements of4.5.1 and 4.5.2, the operational and visual tests in accordance with the requirements of 6.6.1 and 6.6.2, and the appropriate electrical tests required in 5.4.3 of this stan-dard. The installer shall, when installing an aerial device on a chassis which is a highway vehicle, comply with all requirements of the applicable Federal Motor Ve-hicle Safety Standards in effect at the time of installation. Certification as a manu-facturer (alteration, intermediate or final) of a motor vehicle under the Federal Mo-tor Vehicle Safety Standards is required. The travel height of the mobile unit shallbe posted in a location that is readily visible to the vehicle operator. For insulated aerial devices, the installer shall assure conformance to the Qualification test re-quirements of 5.3.2 by either obtaining certification of the test and performing a periodic test after installation, or by performing the Qualification test. Quality Assurance. The installer shall have a documented quality assurance pro-gram which will ensure compliance with this standard.
7.7 Welding. All welds made by the installer, whose failure could result in motion of the platform(s) shall meet the Structural Welding Code AWS D1.1-98 and AWS Dl.2-98. The installer shall establish applicable welding quality assurance procedures for all weldments.
7.8 Training. The dealer or installer shall offer training or training materials that aid owners and users in the operation, inspection, testing and maintenance of the aerial device. This training shall be offered initially and subsequently on request. Dealer or Installer as User. Whenever a dealer or installer directs personnel to operate an aerial device (inspecting, sales demonstrations, or any form of use), the dealer or installer shall assume the responsibilities of users as specified in Section 9of this standard. All personnel authorized to operate the aerial device shall have been trained.

XLB-4319
7-2
8. 8.1
8.2 8.2.1 or to initial use, all new or modified mobile units
entity(s),
8.2.2 upon the intervals at which inspections and
e ervals are dependent upon component
onent life. Two classifications are designated: onthly intervals.
Periodic Inspection and Test: One to twelve month intervals.
op
for malfunction. r observable deterioration or excessive
(4) visible damage or contami-
(6) ed to the aerial device for malfunction, signs of
and moisture accumulation. ther fasteners for loose, deformed or
her locking devices. Any suspected items shall be
8.2.4 Periodi obile unit shall be performed at th pending upon its activity, severity of service, and env w. (These inspections shall include th
(1) (2) ins,
aves for wear, cracks or
or excessive abrasion.
and generators for loose fasteners, leaks, un-g speed, and excessive heating.
external valve housing, leaks, and sticking spools.
(8) Visually inspect any vacuum prevention systems and verify function of ry “A” aerial devices.
Responsibilities of Owners General Responsibilities. Each owner shall comply with the requirements of this section. The following responsibilities pertain to the owner’s inspection, testing, maintenance, modification, training, and transfer of ownership. These activities shall be performed by qualified person(s). Inspection and Testing Classifications. Initial Inspection and Test. Prishall be inspected and tested to ensure compliance with the provisions of this stan-dard. Verification by the manufacturer, the installer or an equivalentmeets this requirement. Regular Inspection and Tests. The inspection procedure for mobile units is di-vided into two classifications based tests shall be performed. Intervals shall be set by the owner in accordance with thmanufacturer’s recommendations. Such intfunction and exposure to wear, deterioration and other agents which adversely af-fect comp
(1) Frequent Inspection and Test: Daily to m (2)8.2.3 Frequent Inspection and Test. Items determined by the owner in accordance with
the manufacturer’s recommendations for each specific aerial device shall be in-spected for defects. The following tests and inspections shall be performed by the
erator once daily, prior to first use: (1) Operating controls and associated mechanisms for conditions interfering
with proper operation. (2) Visual and audible safety devices (3) Hydraulic or pneumatic systems fo
leakage. Fiberglass and other insulating components for nation.
(5) Missing or illegible operational and instructional markings. Electrical systems of/or relatexcessive deterioration, dirt
(7) Visual inspection of bolts, pins, and omissing fasteners and otcarefully examined or tested and a determination made by a qualified per-son as to whether they constitute a safety hazard. All unsafe items shall be replaced or repaired before use. c Inspection or Test. An inspection of the m
e intervals defined in 8.2.2 deironment, or as specifically indicated belo
e requirements of 8.2.3): Structural members for deformation, cracks or corrosion Parts, such as pins, bearings, shafts, gears, rollers, locking devices, chachain sprockets, wire and synthetic ropes, and shedistortion.
(3) Hydraulic and pneumatic relief valve settings. (4) Hydraulic system for proper oil level.
(5) Hydraulic and pneumatic fittings, hoses, and tubing for evidence of leak-age, abnormal deformation
(6) Compressors, pumps, motors,usual noises or vibrations, loss of operatin
(7) Hydraulic and pneumatic valves for malfunction and visible cracks in the
such systems on Catego

7 — ANSI REPRINT
7-3
(9) Hydraulic and pneumatic cylinders and holding valves for malfunction and visible damage.
resence of foreign ma-
and other fasteners.
(14) rer. (15)
(16) If t he electrical insulating shall be thoroughly inspected for lack of cleanliness
sys pliance with the rating of the aerial device in licable methods and procedures as outlined in
ed for AC bare-hand work, the unit shall undergo a
(b)
(c) nt that crosses the insulating replacement of an insulating component(s), the
cordance with section 5.4.3;
(e) r replacement. Any sus-
constitute a safety hazard.
8.3 l be designated to the operator or other authorized per-
son ords of frequent inspections need not be mad shall be reported in writing to a pers -
five years or as required by applicable
.4 Mai by the Welding re-pair manual, shaloriginal ine the re-
8.4.1 wner shall train their maintenance personnel in in-
recommendations and Section 8 of this standard.
ration of the aerial device shall be made without the written approval of the manufacturer. If such modifications or changes are made, the capacity, operation, and maintenance instruction markings shall be changed accordingly. In no case shall the safety factors be reduced below those specified in this standard or below the manufacturers design safety factors, whichever are greater. Should the original manufacturer no longer exist, an equiva-
fication. ing or additions made to the mobile unit after
the final acceptance that affect weight distribution shall meet applicable regulations
(10) Hydraulic and pneumatic filters for cleanliness and the pterial in the system indicating other component deterioration.
(11) Electrical systems and components for deterioration or wear including those not readily visible on a frequent inspection.
(12) Performance test of all boom movements. (13) Condition and tightness of bolts
Welds, as specified by the manufactu Legible and proper identification, operational, and instructional markings.
he aerial device is rated as an insulated device, tcomponents and system(s) and other conditions that compromise insulation. Then these components and
tem(s) shall be tested for comaccordance with one of the appsection 5.4.3 of this standard:
(a) If the aerial device is us60 Hz test as shown in Table 2 at least every three years; If the aerial device is used for DC bare-hand work, the unit shall undergo a DC test as shown in Table 2 at least every three years; After repair or modification of any componesystem(s), or the repair or unit shall be dielectrically tested in ac
(d) An insulated replacement boom shall be tested to insure conformance to 5.3.3 by the supplier; Bare-hand work units shall be tested as shown in Table l after any majorepair to the insulated boom or any insulated boompected items shall be carefully examined or tested and a determination made by a qualified person as to whether they All unsafe items shall be replaced or repaired before use.
Inspection and Test Records. (l) Items to be inspected shal
making frequent inspections. Rece. However, where a safety hazard is found, iton responsible for the corrective action and that report and a record of the cor
rection shall be maintained for five years, or as required by applicable regulations. (2) Written, dated and signed reports and records shall be made of periodic inspec-tions and tests and retained for a period ofregulations.
8 ntenance. Maintenance and frequency of maintenance shall be determined owner in accordance with the manufacturer’s recommendations. s of components or welds, designated as critical in the manufacturersl be made in accordance with the manufacturers recommendations. Should the
manufacturer no longer exist an equivalent entity may determquired procedure. Maintenance Training. The ospection and maintenance of the aerial device in accordance with the manufac-turer’s
8.5 Modifications. No modifications or additions which affect the stability, mechani-cal, hydraulic, or electrical integrity or the safe ope
lent entity may approve required modi8.6 Weight Distribution. Changes in load

XLB-4319
7-4
by governmental agencies. In no case shall axle loads of the fully loaded vehicle exceed the Gross Axle Weight Ratings (GAWR) assigned by the manufacturer.
8.7 it
be promptly replaced.
the original aerial device parts or components or shall provide
8.10 Sf
8.11 M s) is stored on the mo-bile
8.12 Trainin rization of
shall have the same responsibilities as specified under Section 11 of this standard.
ing th tion, application and operation of aerial devices, including recogni-ti l operate an ae-rithe fo
(2)
(3) (4) Responsibilities associated with problems or malfunctions affecting the op-
s affecting stability. s and decals.
on. tions, such as Part 4, ANSI C2-1997, Na-
fety Code (applies to utility workers as defined in ANSI stries using aerial devices
nent to that industry.
( a qualified per-
ion of the aerial device. (8.12.3 Retrai l be retrained, when so directed by the user, based
on.12.4 Fa evice he/she
pose and function of all controls. o the aerial device.
9.1 Gesec
Note: Any change in weight distribution may adversely affect stability. Transfer of Ownership. When a change in ownership of an aerial device occurs, shall be the responsibility of the seller to provide the manufacturer's manual(s) forthat aerial device to the purchaser. It is the responsibility of the purchaser to notify the manufacturer of the unit model and serial number and the name and address ofthe new owner within 60 days.
8.8 Markings. The markings on the aerial device shall not be removed, defaced, or al-tered. All missing or illegible markings shall
8.9 Parts. When parts or components are replaced they shall be identical in specifica-tion and function toan equal or greater factor of safety.
afety Bulletins. Owners shall comply with safety related bulletins as received rom the manufacturer, dealer or installer.
anuals. The owner shall insure that the operating manual( unit.
g, Retraining, and FamiliaOperators. 8.12.1 Owner as a Renter or Lessor. When an owner functions as a renter or lessor he
8.12.2 General Training. Only personnel who have received general instructions regard-e inspec
on and avoidance of hazards associated with their operation, shalal device. Such items covered shall include, but not necessarily be limited to,
llowing issues and requirements: (1) The purpose and use of manuals.
That operating manuals are an integral part of the aerial device and must beproperly stored on the vehicle when not in use. A pre-start inspection.
eration of the aerial device. (5) Factor
(6) The purpose of placard (7) Workplace inspecti (8) Applicable safety rules and regula
tional Electrical SaC2). The above standard is an example; other induhave safety rules perti
(9) Authorization to operate. (10) Operator warnings and instructions.
11) Actual operation of the aerial device. Under the direction ofson, the trainee shall operate the aerial device for a sufficient period of time to demonstrate proficiency in the actual operat
12) Proper use of personal fall protection equipment ning. The operator shal
the user’s observation and evaluation of the operator. 8 miliarization. When an operator is directed to operate an aerial d
is not familiar with, the operator, prior to operating, shall be instructed regardingthe following items and issues :
(1) The location of the manuals. (2) The pur
(3) Safety devices and operating characteristics specific t
9. Responsibility of Users. neral Responsibilities. Each User shall comply with the requirements of this tion.

7 — ANSI REPRINT
7-5
9.2 Pe aer
.3 Train of Operators.
ing the in , including recogni-tion and avoidance of hazards associated with their operation, shall operate an ae-rial defollowing
(1 als. (2 of the aerial device and must be
icle when not in use. (3 (4) R
er (5) F
(6) The purpose of placards and decals. (( -
tiC es have safety rules pertinent to that industry.
(
tion of a qualified per-
ection equipment .3.2 Retra ned, when so directed by the user, based on
the us.3.3 Famil
not familiar with, the operator, prior to operating, shall be instructed regarding the following items and issues:
(1) The location of the manuals. (2) The purpose and function of all controls. (3) Safety devices and operating characteristics specific to the aerial device.
.4 Application. The employer and assigned operator shall insure that the aerial device is used only for intended applications as defined in the operating manual, and that recognized safety practices are observed.
.5 Mobile Operation. Before and during driving, the driver shall: (1) Avoid traveling on any surface that adversely affects vehicle stability. (2) Maintain a safe distance from obstacles and overhead lines. (3) Maintain communications between the driver and the operator. (4) Under all travel conditions, the driver shall limit travel speed in accordance
with conditions of the ground surface, congestion, and slope. .6 Alterations. Altering or disabling of safety devices, guards, or interlocks if so
equipped shall be prohibited. .7 Bare-Hand Work. For bare-hand work, a Category “A” aerial device shall be
used. .8 Lower Controls. The lower controls of aerial devices shall not be used for con-
tinuous operation with personnel in the platform.
rsonnel. Only trained and authorized personnel shall be permitted to operate theial device.
9 ing, Retraining, and Familiarization9.3.1 General Training. Only personnel who have received general instructions regard-
spection, application and operation of aerial devices
vice. Such items covered shall include, but not necessarily be limited to, the issues and requirements:
) The purpose and use of manu) That operating manuals are an integral part
properly stored on the veh) A pre-start inspection.
esponsibilities associated with problems or malfunctions affecting the op-ation of the aerial device. actors affecting stability.
7) Workplace inspection. 8) Applicable safety rules and regulations, such as Part 4, ANSI C2-1997, Na
onal Electrical Safety Code. (applies to utility workers as defined in ANSI 2). The above standard is an example; other industries using aerial devic
9) Authorization to operate. (10) Operator warnings and instructions.
(11) Actual operation of the aerial device. Under the direcson, the trainee shall operate the aerial device for a sufficient period of time to demonstrate proficiency in the actual operation of the aerial device.
(12) Proper use of personal fall prot9 ining. The operator shall be retrai
er’s observation and evaluation of the operator. 9 iarization. When an operator is directed to operate an aerial device he/she is
9
9
9
9
9
10. Responsibilities of Operators

XLB-4319
7-6
10.1 General Responsibilities. Each operator shall comply with the requirements of this ection. peration. During operation of th
s10.2 O e aerial device all platform occupants shall use
10.3 Wdevice in or on the work platform for achieving additional working height or reach.
v10.5 L g. Any loading which includes a horizontal load shall be avoided unless the
10.6 Oa s.
d ts prior to each day’s operation. The following tests and inspections shall
-
d other fasteners for loose, deformed or devices. Any suspected items shall be
s unsafe items shall be re use.
ards suc(
( ions.
(5) O (6) W (7) P
h use the operator shall: lectrical conductors.
r-d
(3)
10.9 M ng in mobile operation the operator shall deter-
mine ly designed for mobile operation. shall be permitted to operate the
aeri0.11 Training, Retraining, and Familiarization of Operators.
10.11
cognition and avoidance of hazards associated with their operation, shall op-
appropriate fall protection connected to the aerial device at the platform position. ork Platform. The operator shall not use railings, planks, ladders or any other
10.4 Brakes. The vehicle parking brake(s) shall be set at all times that the boom is ele-ated except when the aerial device is being used in accordance with 9.5. oadin
mobile unit is designed for that application. bservations. Observations during operation for any defects shall be conducted on
n ongoing basi10.6.1 Pre-start Inspection. Items determined by the owner in accordance with the
manufacturer’s recommendations for each specific aerial device shall be inspectefor defecbe performed by the operator once daily, prior to first use:
(1) Operating controls and associated mechanisms for conditions interfering with proper operation.
(2) Visual and audible safety devices for malfunction. (3) Hydraulic or pneumatic systems for observable deterioration or excessive
leakage. (4) Fiberglass and other insulating components for visible damage or contami
nation. (5) Missing or illegible operational and instructional markings. (6) Electrical systems of/or related to the aerial device for malfunction, signs of
excessive deterioration, dirt and moisture accumulation. (7) Visual inspection of bolts, pins, an
missing fasteners and other lockingcarefully examined or tested and a determination made by a qualified per-on as to whether they constitute a safety hazard. All
replaced or repaired befo10.7 Worksite. Before the aerial device is used the worksite shall be surveyed for haz-
h as: 1) Untamped earth fills. (2) Ditches. 3) Dropoffs and floor obstruct (4) Debris.
verhead obstructions and electrical conductors. eather conditions.
resence of unauthorized persons. 10.8 Precautions. Before and during eac (1) Check for overhead obstructions and e (2) Insure that the load on the platform and/or load lifting devices are in acco
ance with the manufacturer's rated capacity. Insure that outriggers and stabilizers are used if the manufacturer's instruc-tions require their use.
(4) Insure that guardrails are properly installed, and the gates are closed. (5) Use outrigger pads when necessary to provide firm footing.
obile Operation. Before engagi that the aerial device is specifical
10.10 Personnel. Only trained and authorized personnel al device.
1
.1 General Training. Only personnel who have received general instructions re-garding the inspection, application and operation of aerial devices, including re

7 — ANSI REPRINT
7-7
erate an aerial device. Such items covered shall include, but not necessarily be limited to, the following issues and requirements:
(1) The purpose and use of manuals. (2) That operating manuals are an integral part of the aerial device and must
be properly stored on the vehicle when not in use. (3) A pre-start inspection. (4) Responsibilities associated with problems or malfunctions affecting the
operation of the aerial device. (5) Factors affecting stability. (6) The purpose of placards and decals. (7) Workplace inspection.
(8) Applicable safety rules and regulations, such as Part 4, ANSI C2-1997, National Electrical Safety Code (applies to utility workers as defined in ANSI C2). The above standard is an example; other industries using ae-rial devices have safety rules pertinent to that industry.
(9) Authorization to operate. (10) Operator warnings and instructions. (11) Actual operation of the aerial device. Under the direction of a qualified
person, the trainee shall operate the aerial device for a sufficient period of time to demonstrate proficiency in the actual operation of the aerial de-vice.
(12) Proper use of personal fall protection equipment 10.11.2 Retraining. The operator shall be retrained, when so directed by the user, based
on the user’s observation and evaluation of the operator. 10.11.3 Familiarization. When an operator is directed to operate an aerial device he/she
is not familiar with, the operator, prior to operating, shall be instructed regard-ing the following items and issues:
(1) The location of the manuals. (2) The purpose and function of all controls. (3) Safety devices and operating characteristics specific to the aerial device. 11. Responsibilities of Renters, Lessors or Lessees 11.1 General Responsibilities. Each renter or lessor or lessee shall comply with the re-
quirements of the applicable section or sections below.

XLB-4319
7-8
11.1.1 Lessor or Lessee as Dealer or Installer. When a lessor or lessee uses the aerial esponsibilities as specified
11.1.2 Lessor or Lessee as Owner. When a lessor or lessee uses the aerial device as an shall have the same responsibilities as specified under Section 8 of this
11.1.3 Lessor or Lessee as User. When a lessor or lessee uses the aerial device as a user he shall have the same responsibilities as specified under Section 9 of this stan-
10 of
p specified in this standard which are not assigned to the renting entity or lessee as the user.
11.3 Obligations. Upon delivery each renter or lessor of an aerial device shall provide
erial Devices. These manuals shall be stored on the mobile unit.
11.4 Training. The renter or lessor shall offer training or training materials that aid the renting entity or lessee in the operation, inspection, testing and maintenance of the aerial device. This training shall be offered initially and subsequently on request.
11.4.1 General training. Only personnel who have received general instructions regard-ing the inspection, application and operation of aerial devices, including recogni-tion and avoidance of hazards associated with their operation, shall operate an ae-rial device. Such items covered shall include, but not necessarily be limited to, the following issues and requirements:
(1) The purpose and use of manuals. (2) That operating manuals are an integral part of the aerial device and must
be properly stored on the vehicle when not in use. (3) A pre-start inspection. (4) Responsibilities associated with problems or malfunctions affecting the
operation of the aerial device. (5) Factors affecting stability. (6) The purpose of placards and decals. (7) Workplace inspection. (8) Applicable safety rules and regulations, such as Part 4, ANSI C2-1997,
National Electrical Safety Code (applies to utility workers as defined in ANSI C2). The above standard is an example; other industries using aerial devices have safety rules pertinent to that industry.
(9) Authorization to operate. (10) Operator warnings and instructions. (11) Actual operation of the aerial device. Under the direction of a qualified
person, the trainee shall operate the aerial device for a sufficient period of time to demonstrate proficiency in the actual operation of the aerial device.
(12) Proper use of personal fall protection equipment 11.4.2 Familiarization. When an operator is directed to operate an aerial device he/she
is not familiar with, the operator, prior to operating, shall be instructed regarding the following items and issues:
(1) The location of the manuals. (2) The purpose and function of all controls. (3) Safety devices and operating characteristics specific to the aerial device. 11.5 Communications. In the event the manufacturer or installer provides the renter or
lessor manuals, bulletins, or other materials for the information of the user of an ae-rial device, the renter or lessor shall pass them on to the user without any undue de-lay.
device as a dealer or installer he shall have the same runder Section 7 of t is standard. h
owner hestandard.
dard. 11.1.4 Lessor or Lessee as Operator. When a lessor or lessee uses the aerial device as
an operator he shall have the same responsibilities as specified under Section this standard.
11.2 Ownership Duties. The renter or lessor shall carry out the duties of ownershi
the operators manual and the ANSI/SIA A92.2-xxxx Manual of Responsibilities for dealers, owners, users, operators, lessors and lessees of Vehicle Mounted Elevatingand Rotating A

7 — ANSI REPRINT
7-9

XLB-4319
7-10
M.S.A.D. = Minimum Safe Approach Distance (See Table 7-1).
D
ENOTES PROHIBITED ZONE
• Do not allow machine, personnel, or conductive materials inside prohibited zone.
• Maintain M.S.A.D. from all energized lines and parts as well as those shown.
• Assume all electrical parts and wires are energized unless known otherwise.
Diagrams shown are only for purposes of illustrating M.S.A.D. work positions, not all work positions.

7 — ANSI REPRINT
7-11
Table 7-1. Minimum Safe Approach Distance (M.S.A.D.) to energized (exposed or insulated) power lines and parts.
Minimum Safe Approach Distance Voltage Range (Phase to Phase) (Feet) (Meters)
0 to 300V Avoid Contact Over 300V to 50KV 10 3.05 Over 50KV to 200KV 15 4.60 Over 200KV to 350KV 20 6.10 Over 350KV to 500KV 25 7.62 Over 500KV to 750KV 35 10.67 Over 750KV to 1000KV 45 13.72

XLB-4319
7-12


125 Taylor Parkway Archbold, OH 43502 Phone (419) 445-8915 (800) 537-0540 Fax (419) 445-0367


![Cameron(Cobb(Cobb Resume[1] Author: Sara Rhodes Created Date: 20120705160416Z](https://img.pdfslide.us/doc/110x75/600bb5aa3624b139524f86df/-cameroncobb-cobb-resume1-author-sara-rhodes-created-date-20120705160416z-.jpg)