Embed Size (px)
Citation preview

1
MM-3
The Morse Machine™
Owner's Manual

2
INTRODUCTION
The Morse Machine is a full-featured, high performance keyer featuring 2-–255 WPM program-mable or 2–99 WPM variable speed selection and 8,000 memory characters that can be stored into20 memories (36,500 characters if 32 k RAM is used. See page 4). Seven programmable modes ofoperation are included: KEYER/MEMORY SEND, BEACON (to automatically repeat a Morse orRS-232 ASCII message at a programmed interval of one to 999 seconds), MEMORY LOAD,TRAINER (allows random code group practice at steadily increasing speeds), MORSE TERMINAL,CONTEST SIMULATOR and QSO SIMULATOR.
Whether you're an expert or a novice CW'er, The Morse Machine will help improve your code:
A proficiency trainer allows random code group practice with steadily increasing speedA random word generator generates four-letter words for a more realistic practice sessionA QSO simulator simulates QSOs like those you would hear on the airA DX Contest simulator hones your CW skills
For the serious CW contester, The Morse Machine includes automatic serial number insertionand incrementing in any memory message. You can use the front panel knob to adjust your send-ing speed or enter a precise speed with the keypad.
A computer serial port can be interfaced to The Morse Machine through its RS-232 compatibleI/O allowing any front panel function to be programmed from the computer. Loading memories is assimple as typing them on the computer keyboard. Further, your random code, contest or practicesessions can be displayed on your computer screen.
RF INTERFERENCE
The MM-3 has been certified under Subpart J of Part 15 of the FCC requirements. The unit gen-erates and uses radio frequency energy. If the MM-3 is not installed and used in accordance withthis manual, it may cause interference to radio and TV reception. It has been type-tested and com-plies with the limits of a Class 8 computing device in accordance with specifications in Subpart J ofPart 15 of the FCC requirements which provides reasonable protection against such interference inresidential installations. If the MM-3 causes interference to radio or TV reception (test by turningthe unit on and off and noting any change in reception), you are encouraged to correct the interfer-ence using one or more of the following measures:
Re-orient the TV or radio antennaRelocate the computer with respect to the MM-3Plug the computer into a different outlet than the MM-3
If necessary, you should consult with the dealer or an experienced radio/TV technician for addi-tional information. You may also find the FCC booklet, "How to Identify and Resolve Radio-TV In-terference Problems" a helpful resource.
Note: Use shielded cable for all connections to your keyer.

3
INSTALLATION
POWER
Apply 13 volts DC to the power input jack on the rear panel of the MM-3. You can easily accom-plish this by connecting the cord attached to the optional AC-1 or AC-4 wall adapters to the powersocket on the rear panel of the MM-3.
If you do not have one of the optional power supplies, you must supply 9–16 Volts DC to theMM-3 from any external power source Including batteries) capable of delivering at least 350 mA(see page 5, Low Power). Use the mating power connector supplied for connecting the MM-3 andthe power source. BE SURE TO OBSERVE PROPER POLARITY. The center pin is positive.
You can operate the-MM-3-in an automobile by using the optional DC-1 power cord.
PADDLE
Wire your external keyer paddle to the included ¼-inch stereo phono plug, using a cable con-taining two conductors plus a shield. Connect the shield to the paddle common, the tip to the dashcontact and the ring to the dot contact. If you have a paddle wired in reverse, see the [*][C][7][1][2]command described on page 4. For right-handed operators, the thumb activates the dot contactand the index and middle fingers operate the dash contact.
STRAIGHT KEY
You can use the MM-3 with a Straight Key instead of a keyer paddle. Use a two-conductor ster-eo plug with the key across the tip (dash) terminal and the sleeve (common) terminal. The MM-3must be programmed for Straight Key mode ([*][C][5]).
Reversing Paddle
[*][C][7][1][1] Paddle normal: dot = ring, dash = tip (default)[*][C][7][1][2] Paddle reversed: dot = tip, dash = ring
The [*][C][7][1][2] command is for those who have their keyer paddle wired the other way. Un-fortunately, there is no standard.
These commands do not affect straight key mode, which always works from the tip and ignoresthe ring of the connector.
HEADPHONES
The headphone jack will drive low, medium or high impedance headphones. A standard 1/8-inch(3.5 mm) two-conductor headphone plug is necessary.

4
TRANSMITTER
The Morse Machine will key virtually any modern amateur radio transmitter. There are two out-put jacks which are diode-protected against inadvertent hook-up to the wrong keying polarity. Theground side of the RCA-type phone jack (keyer output) should be connected to the transmitter'schassis ground on its key input jack. The center conductor of the MM-3 keyed output jack shouldbe connected to the "hot" terminal of the transmitter key input jack. Use a shielded coaxial cable forbest RF immunity. Use the plus (+) keyed output jack to key Cathode keyed and most transistorkeyed transmitters. Use the minus (–) keyed output jack to key grid-block keyed and some transis-tor keyed transmitters. If you connect your transmitter key input to the wrong MM-3 keyed output,either the transmitter will not key, or it will be keyed continuously. To correct the situation, simplyplug the output line into the other output jack. No damage should occur to either the transmitter orthe MM-3 if you momentarily connect to the wrong keyed output jack. Maximum current on theseconnections is 100 mA on the positive and -30 mA on the negative Keyed output.
MEMORY
The MM-3 comes with an 8 kbyte static RAM (6264) installed. The RAMs contents are pre-served with an on-board lithium battery while the power is off. You can expand the message memo-ry yourself by removing the 8 k RAM and installing a 32 k byte static RAM (type 43256 or 62256),which can be purchased at you local electronics supply store (AEA does not carry stock on theseitems). No jumpers need to be cut or changed. The 32 k RAM increases the maximum messagememory size from 8,400 to approximately 36,500 Morse characters. The 32 k RAM also increasesthe ASCII-to-Morse buffer size if you use the keyer as a Morse terminal.
LOW POWER
There are several ways to reduce the current consumed by the keyer. Normally the MM-3 re-quires 350 mA at 12 Volts. You can reduce this by 100 mA by disabling the speaker audio. Press[*][B][1] and [*][B][2] to disable the CW and keypad sidetone. By opening the case and removingjumper JP1 from behind the power connector the LEDs and the serial port drivers will be disabled,reducing the current by 20 mA. Also, try substituting CMOS parts for some of the integrated cir-cuits:
Replacing the 8031 with an 80C31 saves about 100 mAReplacing the 8155 with an 81C55 saves about 60 mA
SERIAL PORT
The Morse Machine contains a serial port for communications to and from a terminal or personalcomputer. On the rear panel are two RCA-type phono jacks labeled "SERIAL IN" and "SERIALOUT". You will need to construct an adapter so that your computer or terminal can be used with thekeyer.
Example:
The adapter in the illustration above connects the keyer to a terminal or a computer. If you aregoing to use the keyer as a controlling terminal for a modem or Packet TNC (Terminal Node Con-troller), reverse the SERIAL IN and OUT plugs. This eliminates the need for a Null-Modem cable.

5
QUICK REFERENCE
We recommend that you perform the following functions to quickly acquaint yourself with TheMorse Machine and to ensure the unit is operating properly.
Note: Do not connect the MM-3 to your transmitter at this time.
KEYER/MEMORY SEND MODE
1. Turn the power switch on. On the keypad, press [*][C][0] to reset the keyer options. TheKEYER mode light and MEMORY BANK A light should be on.
2. Press and release [*], then hold your finger on [1]. The monitor tone will increase in frequency.3. Press [*] twice and hold [1]. The monitor tone will decrease in frequency.4. Press the dot contact on your keyer paddle and adjust the SPEED knob to a comfortable send-
ing speed. Send a series of letters with the paddle to "get a feel" for the perfect code the MM-3produces.
5. Press [*][2][0][5] and send more Morse characters. Note that the length of the dots has short-ened by one-half.
6. Press [*][*][2][4][0] and send more Morse characters. Note that the length of the dashes has in-creased by four-thirds.
7. Press [*][C][0]. The monitor tone will return to 500 Hz and the dot and dash ratios will return toperfect 1:1 and 3:1 respectively.
8. Press [*][A][6] and note that the keyer speed is now 20 WPM; independent of the setting of theSPEED knob. Press [*][6][0][2] and note that the speed has slowed to 2 WPM.
9. Press the dot paddle and very quickly (before the dot has finished sending) press the dash pad-dle and then let up quickly. After the dot has finished and a proper intracharacter space is in-serted, a dash will automatically be sent. This is called Dash Memory.
10. Similar to step 9, press the dash paddle quickly and then press the dot paddle momentarily.After the dash has finished and a proper intracharacter space is automatically inserted, the key-er will send a dot automatically. This is called Dot Memory.
11. Press [*][B][3] and repeat step 10. Note that the Dot Memory is no longer present.12. Press [*][B][4] and repeat step 9. Note that the Dash Memory is no longer present.13. Press [*][A][3] and then [*][A][4]. Note that both Dot and Dash Memories are re-enabled.14. Enter [*][A][6] and a two-digit number corresponding to a sending speed you feel comfortable
with (if less than 10 WPM, use [0] as the first digit). Practice sending at that speed for about aminute. Because The Morse Machine has almost perfect dot and dash ratios and spacing,many operators feel the speed calibration is low. However, the MM-3 is calibrated using theFCC definition of "PARIS" as the standard word (see APPENDIX C). You might also note thatmany code practice tapes are actually faster than the advertised speed. Press [*][8][6] to returnthe sending speed to the control of the SPEED knob.
15. Press [*][B][5] and note that the tone stays on as long as you hold the dash paddle, but dots areformed normally while you hold the dot paddle. This is called the semi-automatic or "Bug"mode. Press [*][A][5] and the keyer will return to fully automatic or "iambic" operation.
16. Press [*][*][7]. The MM-3 will key continuously until you press any keypad button or touch eitherpaddle. This is the Transmitter Tune feature. The tune feature operates only in the KEYERmode.

6
MEMORY LOAD MODE
1. Press [*][4] to go to the MEMORY LOAD mode. All of the steps you went through in the KEYERmode could be repeated in MEMORY LOAD mode (except for the Transmitter Tune, which isn'tnecessary).
2. Press [1] and send a short message with the paddle, one word at time. Upon completion of themessage, press the [#] button to terminate message loading.
3. Press [*][3] to return to the KEYER mode and press [1]. Immediately, the message you re-corded will be sent. You may change the sending speed if you like and send the messageagain by pressing [1].
4. Press [1] and play back the message again. Between words in the message playback, pressthe dot paddle and hold momentarily. The message will halt without inserting an extra dot. Nowyou may send anything with the paddle. By pressing [0], the message will resume sending fromwhere you interrupted the message. This is a very useful feature for inserting a signal report,for example, in the middle of a message.
5. Press [*][4] to go to the MEMORY LOAD mode and then press [*][A][8][3]. Now send a mes-sage with the paddle, one word at a time. End the message by pressing [#].
6. Press [*][3] to return to the KEYER mode and press [3]. Immediately, the message will startplaying back with the same pauses that were present between words during the loading opera-tion. This is called the Real Time Space Loading Mode. The other (Auto-Word Space) loadingmode will insert a maximum of one word space between characters. Real Time spacing usesmore memory to store the extra spaces.
7. Press [*][4] to go to the MEMORY LOAD mode and press [*][B][8] (Auto-Word Space). Nowpress [4] and send "NR" with the paddle and press [*][0], which inserts the Serial Number Gen-erator at this point in the message. Now send "K" with the paddle and end the message bypressing [#] on the keypad.
8. Press [*][3] to return to the KEYER and press [4]. The keyer should play back: "NR 1 K". Press[4] again and the keyer should play back "NR 2 K". Now press [*][0] and then [4]. The keyershould now play back "NR 2 K" again (it repeated the same serial number). Now press[*][*][0][1][6][1][#] and then press [4] again. Now the message should read "NR 161 K".
9. Press [4] again and press the dot paddle between "162" and "K" to halt the message (right afterthe serial number).
10. Press [*][4] to go to the MEMORY LOAD mode and press [0] (EDIT). Now, with the paddle,send "DE K1XX K". Press [#] to end the message loading.
11. Press [*][3] to return to the KEYER mode and press [4]. The message should now read "NR162 DE K1XX K" You have just edited your old message.
BEACON MODE
1. Press [*][4] to go to the MEMORY LOAD mode and press [1][#]. (This erases the old messagestored in location 1.) Press [1] again and send a message into memory for about 15 seconds.End the message by pressing [#].
2. Press [*][8] to go to the BEACON mode. Press [*][7][3][0][#]. Now wait until the sweep second-hand on your watch comes to the top of a minute. At that precise time, press [1]. The messageshould play back for 15 seconds at the speed you loaded in. Note that the BEACON light isblinking on and off. There should be a 15-second pause and then the message will be auto-matically replayed. A half-second before the message is replayed, the TRANSMIT light willcome on and after the message ends it will go out.
3. Halt the sequence by pressing the [#] button on the keypad or by pressing, either paddle. In-crease the sending speed by turning the SPEED knob to the right. Now press [1] and note thatthe message is sent faster and therefore ends sooner, but the silence between messages islonger. If you time the start of each transmission you will see that the message still repeatsevery 30 seconds.

7
TRAINER MODE
1. Press [*][5] to go to the TRAINER mode. Press [*][6][0][5] and [*][*][6][2][0] for a starting speedof 5 WPM and an ending speed of 20 WPM. Press [*][7][0][5][0][#] for a practice duration of 5minutes.
2. Press [D] and the keyer should start sending code at a 15 WPM character speed with spacebetween characters such that the beginning word speed is only 5 WPM. The space betweencharacters will shorten gradually until the spacing is proper for 15 WPM. Then both the charac-ter speed and character spacing will increase in proper proportion until the ending speed of 20WPM is reached. The TRAINER will continue to send until you halt it by pressing the [#] button.
3. Press [*][C][3] and then [D]. The Trainer should repeat sending as in step 2 except that difficultcharacters will be included. Press [#] to stop.
4. Press [*][C][2] and [*][B][9]. Now press [D] and notice that the difficult characters have disap-peared, but that the Trainer is sending random word lengths and not continuous five-lettergroups. Press [#] to stop.
5. Press [*][C][1]. Pressing [D] will now start code practice in four-letter words. Press [#] to stop.6. Press [*][B][0]. Pressing [D] will now start slow code. The slow characters will gradually speed
up to 20 WPM.7. See Appendix A for the different character sets.
ASCII/MORSE CONVERTER MODE
1. Connect a computer's serial port to the keyer. Use the DB-25 (or appropriate connector for yourcomputer) to phono adapter as shown in the Hook-Up Instructions (page 5).
2. Set up your computer's terminal communications program for 1200 baud / eight bits / no parity.3. Press [*][9] to go to the ASCII/MORSE CONVERTER mode.4. On the computer keyboard, type A B C +. The keyer should sound only the letters "ABC".5. On the MM-3 keypad, press [*][8][C][3].6. On the computer keyboard, type A B C + again. This time the keyer should sound the letters
"ABC" followed by AR. Using the paddle, send some Morse characters and notice that the com-puter prints them out on the screen.
7. Set up the terminal program for 300 baud / eight bits / no parity. On the keyer keypad, press[*][C][9][3] and repeat step six to verify that communication still takes place between the keyerand the computer. See chapter 10 for more info.
This concludes the quick reference guide of your Morse Machine. If all these features operateproperly, your MM-3 is in good operational condition. If not, please re-read the instructions and ifnecessary, start over from the beginning. If you are still having problems, see Appendix H regard-ing technical support. For detailed operating instructions, see the appropriate chapter.

8
CONTROL FUNCTIONS
1 2 3 4 5 6 7
1. KEYER MODE INDICATORLight indicates if KEYER mode is activated.
2. MEMORY LOAD MODE INDICATORLight indicates if MEMORY LOAD mode is activated.
3. TRAINER MODE INDICATORLight indicates if TRAINER mode is activated.
4. BEACON INDICATORLight indicates if BEACON mode is activated.
5. POWER ON/OFF AND VOLUME CONTROLTurns power on/off and adjusts volume.
6. SPEED CONTROLAdjusts Morse speed.
7. KEYPADEnables the various functions of the unit.
Refer to APPENDIX G for information on the various commands for each mode.

9
KEYER/MEMORY SEND OPERATION
Speed Set
[*][A][6] Keypad controls speed[*][B][6] SPEED knob controls speed[*][6][n][n] Set sending speed of keypad control (n = number 0 through 9)[*][C][8][6][n][n][n] Set sending speed of keypad control[*][C][8][1][n][n] Set counter-clockwise (lower) SPEED knob limit[*][C][8][2][n][n] Set clockwise (upper) SPEED knob limit
When you first turn on or reset your MM-3, it is in the KEYER mode. The SPEED knob controlsthe sending speed and the sidetone is set at a tone of 500 Hz. To change the speed, rotate theSPEED knob.
For exact speeds in words per minute (WPM), press [*][A][6] to transfer speed control to the key-pad. To change the speed, press [*][6] and enter the new speed as two digits, for example 1 and 5.If the new speed is less than 10 WPM, the first digit must be zero. The range of speed is from 2–99WPM.
Example: To enter 40 WPM, press [*][6][4][0].To enter 7 WPM, press [*][6][0][7].
Meteor-scatter users may want code faster than 99 WPM. The [*][C][8][6] command is similar tothe [*][6] command, except that three digits of speed are permitted, for a range of 2–255 WPM.
To return control of the keyer speed to the SPEED knob, press [B][6].
The SPEED knob normally has a range of 5 to 45 WPM, with 5 WPM in the completely counter-clockwise position and 45 WPM in the completely clockwise position. To change the SPEED knobrange, use the [*][C][8][1] and [*][C][8][2] commands.
Example: To set the SPEED knob range to 7–50 WPM, press [*][C][8][1][0][7] and[*][C][8][2][5][0].
SIDE TONE CHANGE
[*][1] Tone pitch higher[*][*][1] Tone pitch lower[*][A][1] CW sidetone on[*][B][1] CW sidetone off[*][A][2] Keypad tone on[*][B][2] Keypad tone off
To raise the sidetone pitch, press [*] and hold the [1] key until the desired tone is reached. Thetone may be lowered by pressing [*] twice and holding the [1] key, that is [*][*][1]. The keypad tonewill be slightly lower than the CW monitor tone.
AUTOMATIC AND SEMI-AUTOMATIC OPERATION
[*][A][5] Automatic (Iambic) mode[*][B][5] Semi-automatic (Bug) mode[*][C][5] Straight key mode[*][C][7][1][3] Dot/Dash squeeze generates alternating dots and dashes (default)[*][C][7][1][4] Dot/Dash squeeze generates all dots or all dashes
Once the MM-3 is turned on, it is set to Automatic Keyer operation.
10
You may operate the keyer in the Semi-automatic mode by pressing [*][B][5]. The keyer now be-haves as a "bug". For character recognition in the MEMORY LOAD, MORSE TERMINAL and SIM-ULATOR modes, the keyer recognizes only dashes from the dash paddle, no matter how quicklyyou tap the paddle. Be sure to use both the dot and dash paddles in the Semi-automatic mode. Toreturn to full Automatic mode, press [*][A][5]. When loading memories or using the QSO Simulator,you must use the dot paddle to form dots and the dash paddle to form dashes.
For Straight Key mode, press [*][C][5]. Now dots and dashes are formed only on the dash pad-dle, and the dot paddle has no effect. You may connect a straight key in place of the keyer paddle.In the Straight Key mode, you may load message memories in the MEMORY LOAD mode, sendASCII over the serial port in the MORSE TERMINAL mode, and converse in the QSO SIMULATORmodes.
The [*][C][7][1][4] command is for those unaccustomed to the iambic feature of modern keyers.If both the dot and dash paddles are closed, the keyer generates a string of all dots or all dashes,depending on which contact was closed first. Dot and dash memories are disabled.
DOT-DASH RATIO
[*][2][n][n] Set dot ratio[*][*][2][n][n] Set dash ratio
"Perfect" Morse code is sent with the time for a dot equal to the time for a space between dots(a dot/space ratio of 1.0) and the time for a dash equal to three space times (a dash/space ratio of3.0).
The dot/space ratio is adjustable from 0.5 to 1.5 in 0.1 increments, and is set to 1.0 when theMM-3 is turned on. To adjust the dot/space ratio, press [*][2] and enter the dot ratio in tenths.
Example: To set a dot ratio of 0.7, press [*][2][0][7].To set a dot ratio of 1.3, press [*][2][1][3].
If the dot/space ratio is more than 1.5 or less than 0.5, the keyer will ignore the command.
The dash/space ratio is set to 3.0 when the MM-3 is turned on and is adjustable from 2.0 to 4.0in 0.1 increments. To change the dash ratio, enter [*][*][2] and the new dash ratio.
Example: To set a dash ratio of 3.5, press [*][*][2][3][5].
If the dash/space ratio is more than 4.0 or less than 2.0. the keyer will ignore the command.
The code speed is automatically adjusted for other than "perfect" dot and dash ratios and isbased on the standard word "PARIS".
DOT AND DASH MEMORY
[*][A][3] Dot memory on[*][B][3] Dot memory off[*][A][4] Dash memory on[*][B][4] Dash memory off
The selectable Dot and Dash Memories are active (on) when the MM-3 is powered up. The DotMemory allows insertion of a dot during a string of dashes. For example the letter "Q" could be sentas follows:

11
Dot contact made after dash hasstarted but before space time hasexpired, will give proper dot.Dot contact does not have to be properduration.
Less than onespace time, otherwiseanother dashwill occur.
The Dash Memory works the same way, allowing the insertion of a dash in a string of dots.
TRANSMITTER TUNING
To allow transmitter tuning, the keyer output transistors are activated by pressing [*][*][7]. Youcan turn off the tuning by pressing any keypad button or touching either key paddle. The tune fea-ture works only in the KEYER mode.
CURTIS KEYING
[*][C][7][3][8] Curtis type A keying[*][C][7][3][9] Curtis type B keying
The default is [*][C][7][3][9] (Curtis B). In type B keying, when both paddles are squeezed andreleased during an element, the iambic feature adds the opposite element afterwards. In type Akeying, the element ends and is not followed by another.
TOGGLE TRANSMIT
[*][*][8]
The transmitter keying outputs are normally enabled in the KEYER mode. To disable the out-puts, press [*][*][8] to toggle transmitting off. See also Chapter 11, TRANSMIT CONTROL.
CLEARING ENTRIES
[#]
If you make a mistake programming and the command was not finished, you can clear it bypressing [#]. If you completed the command, repeat with the correct programming.
UNACCEPTABLE ENTRIES
The keyer ignores unacceptable entries and sounds an error tone. For example, if a speedchange is entered [*][6][0][1], the result will be no speed change.
TRANSMIT DELAY
[*][C][8][0][n][n]
There is normally a 20 msec. delay between the activation of the PTT output and the activationof the CW keying outputs. The delay gives linear amplifiers time to switch to transmit before theoutput is keyed. nn is in units of 10 msec. The delay can therefore range from 0 to 990 msec (.99

12
seconds). The default setting is [*][C][8][0][0][2] (20 msec.). If the PTT output is not used, youshould set the command to [*][C][8][0][0][0] (no delay).
AUTOMATIC CHARACTER SPACING
[*][C][7][1][7] Enable auto character spacing after 1 dot interval[*][C][7][1][8] Enable auto character spacing after 2 dot intervals[*][C][7][1][9] Disable auto character spacing from paddle
The space between Morse characters is defined to be 3 dot intervals long. If auto characterspacing is enabled, there is a dead time after the completion of the last code element until thescheduled beginning of the next character. During this dead time, the keyer paddle is "dead", andno dots or dashes can begin until exactly 3 silent dot-intervals have passed. This ensures a fullcharacter-space between characters. Dot and dash memories are active during the dead time.
In the [*][C][7][1][7] command, the dead time starts after 1 silent dot interval and has a durationof 2 dot intervals, for tighter control of character spacing. In the [*][C][7][1][8] command, the deadtime starts after 2 silent dot intervals and lasts for 1 dot interval, for looser control of characterspacing.
The default is [*][C][7][1][9] (no auto character spacing).

13
KEYER MEMORY PROGRAMMING
[*][4]
MEMORY LOCATIONS
The Morse Machine has 20 separate memory locations (0 through 9 in Memory Banks A and B)that may be loaded with any length message up to approximately 8,400 characters (36,500 charac-ters if a 32 k RAM is used), assuming a standard word of "PARIS". If you load longer characterssuch as "5" repeatedly, you cannot load as many. One memory location can store 8,400 charactersor they may be allocated as desired. For instance, one location can store 400 characters, another6,000 and another 2,000, etc. You can expand the memory by substituting a static 32 k CMOSRAM device for the 8 k RAM that comes with the keyer, as described on page 4.
[A] Select Memory Bank A[B] Select Memory Bank B
Select one of the two banks of 10 message memories by pressing [A] or [B]. Note that at alltimes either the BANK A light or the BANK B light is lit to show which memory bank the keyer is us-ing. Any time you wish to select a message from a particular bank, you may press [A] or [B] beforethe memory number.
Example: Press [A][1] to select message 1 In Bank A.Press [B][7] to select message 7 In Bank B.
You may press A to make sure you are in Bank A, even if the keyer is already using Bank A.
AUTO WORD SPACING
[*][A][8] Real-time spacing[*][B][8] Auto-word spacing
Two memory-loading options are available: Real-Time spacing and Auto-Word spacing. In bothload modes, memory loading does not begin until the first character is loaded (that is, there will beno pause when starting the Memory Send in the KEYER/MEMORY SEND mode).
In Auto-Word spacing, a pause in loading that lasts longer than two dot times records a charac-ter space. If the pause is longer than five dot times, the keyer records a word space. In this modeyou may make long pauses between words while storing at most one word space. The Morse Ma-chine is set to Auto-Word spacing at turn-on or reset.
REAL TIME SPACING
[*][A][8]
To select Real-Time spacing, press [*][A][8]. In Real Time spacing, the keyer records all pausesin sending as you send them. To re-select Auto-Word spacing, press [*][B][8]. Real Time spacinguses more memory to store extra spaces.
MESSAGE ENTRY
To enter a message into the memory, press the number of the desired storage location, key inthe message with the paddle and end the message with the [#] key. If you are loading more than 10messages, specify which memory bank by pressing either [A] or [B] before the message number.
Example: To store a message In memory A5, press [5] or [A][5].Now enter the message with the keyer paddle.After you finish sending the message, press [#].

14
At the beginning and at the end of message entry, the MEMORY LOAD light will go out momen-tarily while the keyer changes the message buffer partition.
For instructions on automatic message entry from a computer, see SERIAL PORT OPERA-TION, Keyer Commands from the Computer.
SERIAL NUMBER USE
[*][0] Insert serial number
You can insert an automatically incremented serial number (1 to 9,999) anywhere in any of the20 messages. You can insert the serial number as many times within a message as you wish (theserial number automatically increases by one only after a message is completed).
To insert the Automatic Serial Number Generator during the loading of a message, stop send-ing, press [*][0], and resume sending.
[*][*][0][n][n][n][n][#] Serial number set
On turn-on, the serial number is set to 1. A different starting serial number may be set by press-ing [*][*][0][n][n][n][n][#]. Do not change the number during message loading.
Example: To start at serial number 1, press [*][*][0][1][#].To start at serial number 57, press [*][*][0][5][7][#].To start at serial number 4234, press [*][*][0][4][2][3][4][#].
SPEED-UP PART OF A MESSAGE
[*][*][3] Insert speed change
When played back, a message starts out at the selected keyer code speed. You can speed upparts of the message by 41 % by inserting [*][*][3] before the part you want sent faster. Subsequentuse of [*][*][3] in the message will alternate between fast and normal code speed. Contest opera-tors may wish to use this feature to speed up parts of messages such as CQs and signal reports.
Example: On keypad, press [1]On paddle send "NR"On keypad, press [*][0] and [*][*][3]On paddle send "EPA"On keypad, press [#]
Message 1 now contains "NR nn EPA" as a contest exchange, with "NR nn" at normal speedand "EPA" at 41 % faster speed.
Example: On keypad, press [1] and [*][*][3]On paddle, send "CQ TEST DE"On keypad, press [*][*][3]On paddle, send "N7ML"On keypad press [#]
Message 1 now contains "CQ TEST DE N7ML" with "CQ TEST DE" at fast speed and "N7ML"at normal speed.
Fast speed is always 41 % faster than normal speed, even if the SPEED knob is adjusted or ifthe code speed is changed from the keypad.

15
INSERT ONE MESSAGE INTO ANOTHER
[*][*][9][n] (n = message number 0 through 9)
The contents of one message may be inserted into another message. The two messages mustbe in the same message memory bank (A or B).
Example: Message 8 contains "DE N7ML"On keypad, press [1]On paddle, send "CQ TEST"On keypad, press [*][*][9][8]On paddle, send "K"On keypad, press [#]
Now message 1 will play back "CQ TEST DE N7ML K". This feature works only one level deep;that is, the inserted message must not itself contain [*][*][9][n].
MEMORY FULL
The memory is almost full when the sidetone pitch suddenly becomes lower and the MEMLOAD light starts blinking. When this happens, the keyer has room for only about 20 more charac-ters. When the sidetone shuts off, the memory can no longer accept characters, and there is roomonly for the [#] at the end of the message. If you need to load further to complete the current mes-sage, you must erase or shorten one of the other messages (use the Edit command to reduce aprevious message and then continue the current message).
ERASING
If the on-board lithium back-up battery is good, turning The Morse Machine VOLUME knob tothe OFF position will not erase the memory. With the standard RAM chip installed, the lithium bat-tery should last three to five years.
If an individual message is to be erased, go to MEMORY LOAD mode and simply press themessage number [n] and [#]. The entire message in that location will be erased.
Example: To erase messages 3 and 7 in the current memory bank, press [3][#] and[7][#] or [7][#] and [3][#].
If you wish to enter very long messages, you should erase unused or undesired messages. Thesidetone pitch will suddenly drop in pitch to signal that the memory is almost full.
EDITING
[D] Edit [#]
If in the KEYER mode you halt a message before it is completed, you can terminate or changethe remainder at that point. Switch to the MEMORY LOAD mode by pressing [*][4]. To change theremainder of the message, press [D], enter the new part of the message normally, and finish with[#]. If you want to erase the remainder of the message, press [D][#].
SEMI-AUTOMATIC (BUG) MEMORY LOAD
[*][B][5]
You may enter a message in the Semi-automatic (Bug) mode ([*][B][5]). In the KEYER mode,the message will be sent with the selected dot and dash ratio. Some paddles require a 1 µF capaci-tor across the dash contacts to prevent loading multiple dashes due to contact bounce.

16
STRAIGHT KEY MEMORY LOAD
[*][C][5]
You may also enter a message in the Straight Key mode ([*][C][5]). In the KEYER mode, Themessage will be sent with the selected dot and dash ratio. Some straight keys require a 1 µF ca-pacitor across the contacts to prevent multiple dot loading due to contact bounce.
TOGGLE TRANSMIT
[*][*][8]
The transmitter keying outputs are normally disabled in MEMORY LOAD mode. To enable theoutputs, press [*][*][8] to toggle transmitting on.
BATTERY LIFE
The internal lithium battery should last three to five years with the standard CMOS RAM in-stalled. Expanding the memory with to 32 k may reduce the battery life somewhat.

17
MEMORY SEND OPERATION
[*][3]
The messages stored in any of the 20 memory locations may be sent at any speed between 2and 255 WPM, regardless of their loading speed.
SENDING A MESSAGE
Number of message
To start a message, press the number of the desired message. If the light for Bank A is lit andthe message is in Bank B, be sure to press [B] before the number.
Example: To send message 6 in the current bank, press [6].To send Bank A's message 3, press [A][3].
REMOTE SENDING
Memory locations 1 through 4 may be remotely activated. The Remote Memory jack J5 containsthe four message lines plus a common. For fast access to messages 1–4 in a contest, you canmount four push-buttons on your keyer paddle and wire them to J5 as shown below.
INTERRUPTING AND RESTATING A MESSAGE
[#] or key paddle
You may interrupt a message by either pressing the [#] button or tapping either of the key pad-dles. The Morse Machine then enters normal keyer operation. You may either restart the messageby pressing the message number or resume the message from the point of interruption by pressing[D].
SENDING THE NEXT MESSAGE
[D]
Once a message is finished, pressing [D] will start the next message in the series 0 to 9. Press-ing [D] after message 0 ends will start message 1. Pressing [D] after message A9 ends will startmessage B0 without changing the current memory bank from A to B. Pressing [D] after messageB9 ends will sound the error tone.

18
EDITING
See MEMORY SEND PROGRAMMING, Editing.
SERIAL NUMBER CHANGE OR REPEAT
You may enter one serial number in a message as many times as you wish. Serial numbers au-tomatically increase by one only after a message has been completed.
[C] Repeat last serial number
It is common in contests for a station to ask for a repeat of the serial number only. Pressing [C]causes the keyer to send only the serial number last sent without automatically incrementing it.
[*][*][0][n][n][n][n][#] Serial number set
In the KEYER mode, you may enter a new serial number. For example: To reset the serial num-ber to 285, press [*][*][0][2][8][5][#]. Note that leading zeros are not necessary.
[*][0] Retain last serial number
If you sent a message with a serial number and the contact was not completed, press [*][0] be-fore making your next contact and the previously sent serial number will be used again for the newcontact.
MESSAGE 1 REPEAT
[*][7][n][n][n][#]
Contest operators may wish to have one of the message memories, such as a CQ message, re-peat at regular intervals automatically. Message 1 in the current memory bank (A or B) can be setup to do this. The range of the Message 1 Repeat Interval is from zero seconds to 999 seconds inone second increments. The time entry must be terminated with the [#] key. An interval of zero sec-onds disables the repeat feature so that Message 1 is sent only once every time you press 1. Atturn-on or reset, the feature is disabled (interval = 0).
Example: To make Message 1 repeat after pausing for 15 seconds,press [*][7][1][5][#] and then press [1].
Example: To return Message 1 to normal, non-repeating operation,press [*][7][0][#].
The BEACON light flashes on and off while the repeat feature is cycling. If you press the [#],[0]...[9], [C] or [D] buttons or tap either of the key paddles while the repeat feature is cycling, Mes-sage 1 will not repeat until you press 1 again.
Note: The keyer must be in the KEYER mode ([*][3]) or Contest Simulator mode ([*][*][4]) for the[*][7] command to have this effect. The [*][7] command has other functions in other keyer operatingmodes.
There is a difference in the repeat operation between the KEYER and BEACON modes. InKEYER only Message 1 repeats. Pressing any other message number key causes Message 1 tostop repeating and the new message to be sent only once. In BEACON, the last memory numberpressed is the one that repeats. The TRANSMIT light and transmitter send-receive output are acti-vated a half-second before the message repeats.

19
LITERAL OR CUT SERIAL NUMBERS
[*][A][7] Serial number as is[*][B][7] Serial number 9 = N, 0 = T[*][C][7][2][1] 0 in a serial number is sent as a numeral 0 (default)[*][C][7][2][2][2] 0 in a serial number is sent as letter T[*][C][7][2][3] 0 in a serial number is sent as letter 0[*][C][7][2][4] 1 in a serial number is sent as numeral 1 (default)[*][C][7][2][5] 1 in a serial number is sent as letter A[*][C][7][2][6] 9 in a serial number is sent as numeral 9 (default)[*][C][7][2][7] 9 in a serial number is sent as letter N
To save sending time in a contest, some operators prefer to shorten Morse 9 to N and Morse 0to T. Pressing [*][B][7] causes the keyer to send the serial number this way automatically. Press[*][A][7] to return to literal serial numbers.
These are for customizing the serial number. Many contesters are particular about this. Notethat the commands [*][A][7] and [*][B][7] can be implemented with other commands.
[*][A][7] does the same thing as [*][C][7][2][1] and [*][C][7][2][6][*][B][7] does the same thing as [*][C][7][2][2] and [*][C][7][2][7]
LEADING 0's IN SERIAL NUMBERS
[*][C][7][0][1] Serial number contains no leading zeros (default)[*][C][7][0][2] Serial number minimum 2 digits, 0 fill[*][C][7][0][3] Serial number minimum 3 digits, 0 fill[*][C][7][0][4] Serial number always 4 digits, 0 fill
This is for those operators who like leading zeros on low serial numbers. Example: For leadingzeros on serial numbers below 100. select [*][C][7][0][3]; this will send 001–099, 100–999 and1000–9999.
FARNSWORTH CODE FROM MESSAGE BUFFERS
[*][C][7][3][1] Message buffers send Farnsworth code[*][C][7][3][2] Message buffers send slow code[*][6][n][n] Set sending speed if keypad control[*][C][6][n][n] Farnsworth character speed[*][A][0] Farnsworth code[*][B][0] Slow code
(See TRAINER OPERATION, Fast (Farnsworth) or Slow code mode.)
Press [*][C][7][3][1] to send code practice from the message buffers using the Farnsworth meth-od. The overall code speed is set by [*][6][n][n], and the character speed is set by [*][C][6][n][n].The keyer must be set to Farnsworth code ([*][A][0], not [*][B][0]) and keypad control of speed([*][A][6] not [*][B][6]). Hand-sent code on the paddle will be at the Farnsworth speed([*][C][6][n][n]), not the keypad set speed ([*][6][n][n]).
Note that the keyer must not be in TRAINER mode when setting the overall code speed([*][6][n][n]).
The default is [*][C][7][3][2] (no Farnsworth from message buffers).

20
Example: Issue these commands to set up a message at 5 WPM with a Farnsworth characterspeed of 18 WPM:
1. [*][4] MEMORY LOAD mode2. [*][B][8] Auto-Word spacing3. [1] text [#] Load Message 1 text4. [*][3] KEYER mode5. [*][A][0] Farnsworth code6. [*][C][6][1][8] Farnsworth speed = 18 WPM7. [*][6][0][5] Code speed = 5 WPM8. [*][A][6] Keypad control of speed9. [*][C][7][3][1] Message buffers send Farnsworth10. [1] Start message 1

21
BEACON OPERATION
[*][8]
In certain areas of communications such as moonbounce, tropospheric and meteor scatter, it isdesirable to transmit a message during a fixed time interval and then receive for another fixed timeinterval. The Morse Machine does this by sending any of the 20 memory messages at repeating in-tervals.
BEACON INTERVAL
[*][7][n][n][n][#]
The Beacon Interval is the time from the start of one beacon message to the start of the nextone. The range of the Beacon Interval is from one second to 999 seconds in one-second incre-ments. The time entry must be terminated with the [#] key.
Example: Message 1 Is to be sent for 15 seconds, followed by 45 seconds of receive time.Press [*][4] to go to MEMORY LOAD mode, press [1], and send the text to load mes-sage 1, ending with [#]. Now press [*][8] to go to BEACON mode. Set the Beacon In-terval to 60 seconds by pressing [*][7][6][0][#]. Now press [1] and adjust the sendingspeed until the message lasts for 15 seconds.
Note: The keyer must be in BEACON mode for the [*][7] command to have this effect. [*][7] hasother functions in other keyer operating modes.
INITIATING BEACON MODE
Message number digit
To start the beacon, press the digit that stores the desired message. The BEACON light willblink on and off while the beacon is cycling.
INTERRUPTING BEACON MODE
[#] or keyer paddle
As in the KEYER mode, you may interrupt the Beacon by pressing the [#] button or touching ei-ther of the keyer paddles.
RESTARTING OR RESUMING BEACON MODE
Message number or [D]
As in the KEYER mode, you may restart the Beacon by pressing the number of the desiredmessage. You may also resume the Beacon message by pressing [D].
TRANSMITTER SEND-RECEIVE OUTPUT
An accessory PTT output is available on The Morse Machine to operate a transmitter send-re-ceive switch for a half-second before the Beacon starts sending until the Beacon message is com-pleted. This output follows the XMIT light on the front panel. The first time the Beacon is sent, theaccessory output is not operated. This allows a test of the message speed before operating thetransmitter. You can disable this output by using the Toggle Transmit command ([*][*][8]).

22
TOGGLE TRANSMIT
[*][*][8]
The transmitter keying outputs are normally enabled in the BEACON mode. To disable the out-puts, press [*][*][8] to toggle transmitting off.

23
TRAINER OPERATION
[*][5]
The TRAINER mode sends randomly selected Morse characters for a programmable duration.You may select increasing, decreasing or constant speeds. The random character sequences areprogrammed using a pseudo-random generator. Several modes of operation are possible.
[*][6][n][n] Trainer starting speed[*][*][6][n][n] Trainer finishing speed[*][C][6][n][n] Farnsworth character speed
On turn-on, the Trainer is in the Farnsworth mode, the starting speed is 5 WPM, and the finish-ing speed is 15 WPM. The Farnsworth speed is 15 WPM, and the practice duration is 10 minutes.
FAST (FARNSWORTH) OR SLOW CODE MODE
[*][A][0] Farnsworth code[*][8][0] Slow code[*][C][6][n][n] Farnsworth character speed
Many people find learning code takes far less time if the characters are sent at speeds greaterthan 12 to 15 WPM, but with the spaces between characters much longer than normal for thesespeeds. This is called the Fast Code or Farnsworth Method. In this mode, the characters are sentat the Farnsworth speed, but the space between letters is adjusted to make the code speed equalto the starting speed. The extra space is gradually shortened until the code is sent at the Farns-worth speed. From then on, the code is sent with no extra space, gradually increasing speed untilthe finishing speed is reached.
Slow Code sends code with the proper intracharacter spacing during the speed increase. Un-less you can copy at speeds greater than 12 WPM, we strongly recommend use of the Fast Codemethod.
At turn-on, the Fast Code mode is selected. To select Slow Code, press [*][B][0}. Re-select FastCode by pressing [*][A][0].
TRAINER STARTING SPEED
[*][6][n][n]
In the Farnsworth mode, the practice session begins with a word speed equal to the startingspeed. If the Farnsworth speed is higher than the starting speed, the character speed is the Farns-worth speed. On turn-on, the word speed starts out at 5 WPM with a character speed of 15 WPM.To change the starting speed, press [*][6] and enter the two-digit speed desired.
Example: For 7 WPM starting speed, press [*][6][0][7].
TRAINER FINISHING SPEED
[*][*][6][n][n]
In the Farnsworth mode, the practice session ends with a word speed equal to the finishingspeed. If the Farnsworth speed is higher than the finishing speed, the character speed is the Farns-worth speed. On turn-on, the word speed ends up at 15 WPM with a character speed of 15 WPM.To change the finishing speed, press [*][*][6] and enter the two-digit speed desired.
Example: For 20 WPM finishing speed, press [*][*][6][2][0].

24
The finishing speed may be higher than, lower than or equal to the starting speed.
TRAINER FARNSWORTH SPEED
[*][C][6][n][n]
Some instructors prefer a character speed of 18 WPM for slower word speeds. To change theFarnsworth speed, press [*][C][6] and enter the two-digit speed desired.
Example: For 18 WPM Farnsworth speed, press [*][C][6][1][8].
Thus, in our example of 7–20 WPM with 18 WPM Farnsworth, the code starts out at a wordspeed of 7 WPM and a character speed of 18 WPM. The word speed increases to 18 WPM whilemaintaining a character speed of 18 WPM. At this point the word speed and character speed staythe same as the speed increases to 20 WPM and then continues at 20 WPM.
TRAINER SPEED CHANGE INTERVAL
[*][7][n][n][n][#] (n = number 0 through 9)
On turn-on, the Trainer practice session is set for 10 minutes. The duration is entered in tenthsof minutes, with a range of 0.1 minute to 99.9 minutes.
Example: 15 min. 0 sec. Press [*][7][1][5][0][#].
At the end of the speed change interval, the Trainer will continue to send at the finishing speed.
Note: The keyer must be in TRAINER mode for the [*][7] command to have this effect. The [*][7]command has other functions in other keyer operating modes.
INITIATING TRAINER MODE
[0]...[9], [D]
After you have selected the various Trainer options, start the Trainer by pressing any of the key-pad digits or the [D] button. Each digit will send its own unique character sequence. Your copy maybe compared with the published Answer Booklet ($20.00 from AEA), or with the serial output onyour computer screen if one is connected (see SERIAL PORT OPERATION). If you find that youare memorizing the character sets, press the [D] button for a random start.
TERMINATING TRAINER MODE
[#]
To stop the Trainer, press the [#] button or one of the keyer paddles.
FIVE-CHARACTER OR RANDOM CODE SPACING
[*][A][9] Five-character groups[*][B][9] Random length groups
On turn-on, the Trainer is set to transmit five-character code groups. If you desire, select ran-dom spacing by pressing [*][B][9].

25
CHARACTER SET
[*][C][1] Four-letter groups[*][C][7][3][5] Letters A-Z[*][C][7][3][6] Numbers 0-9[*][C][7][3]]7] Letters and numbers[*][C][2] Easy character set[*][C][3] Medium difficulty character set[*][C][4] Complete character set
On turn-on, the Trainer is set to send the Easy Character Set, which includes only those Morsecharacters that you need to know to pass a US amateur radio code test. The code tests of othercountries may require only letters and numbers ([*][C][7][3][7]). The advanced code student mayselect additional characters from the Medium Difficulty or Complete character sets. The MediumDifficulty set includes the Easy set plus all other punctuation and prosigns that might be encoun-tered. The Complete set includes the Medium Difficulty set plus foreign Morse characters. Tables ofcharacter sets are listed in APPENDIX A.
The Morse Machine includes a four-letter word generator that you can use for code practice bypressing [*][C][1]. A pseudo-random generator is used to generate more than 5,200 four-letterwords. Most of these are nonsense words, but all are pronounceable. The character set consists ofall letters except Q, X, Y and Z. Start the Trainer by pressing any of the keypad digits or the [0] but-ton. Each digit will send its own unique word sequence. Your copy may be compared with the pub-lished Answer Booklet, or with the serial output on your computer screen if one is connected (seeSERIAL PORT OPERATION). If you find that you are memorizing the words, press the [0] buttonfor a random start.
TOGGLE TRANSMIT
[*][*][8]
The transmitter keying outputs are normally disabled in the TRAINER mode. To enable the out-puts, press [*][*][8] to toggle transmitting on SERIAL PORT OPERATION.

26
SERIAL PORT OPERATION
The Morse Machine's serial port can be connected directly to an RS-232 interface through theadapter described under Hook-Up Instructions on page 5. Although the keyer's SERIAL OUT portsources only +5 Volts and Ground, it uses the same circuit as a home computer serial port adapterand will work with many RS-232 computers as it is. The SERIAL IN port consists of a series resis-tor to the base of a transistor, so it will handle a range of voltage levels. No inverters are necessaryon the serial port.
The keyer's serial port has many practical uses. It can be used to echo Trainer code practicetext to the screen so you can check your copy. Everything you hear and send on the QSO Simula-tor also goes to the serial output and shows up on your computer screen. The Contest Simulatorprints log entries or QSO text on the serial output. You can use the computer to type in the contentsof message memories and then load them into the keyer via the SERIAL IN jack. In fact, you canuse the computer to issue commands to the keyer to change modes, load memories, set up theTrainer, etc. Any command that you can enter via the keypad you can also enter via the computer.
CONNECTING TO A TERMINAL OR COMPUTER
[*][C][9][n]
Connect your DB-25 to a phono adapter as in the diagram under Hook-up Instructions. Set upyour computer terminal program1 (see next page) for 1200 baud / eight bits / no parity. The MorseMachine accepts serial input data of eight bits / no parity, or seven-bit data with any parity. The par-ity bit is stripped off internally before the data is used. The serial output data is always eight bits /no parity.
[*][C][9][n] Set serial ASCII baud rate
On turn-on, the keyer is set up for 1200 baud serial operation. If you wish to use a different seri-al baud rate, press [*][C][9][n], where [n] is a digit from the following list:
1 = 1200 baud 6 = 600 baud2 = 2400 baud 7 = 7200 baud3 = 300 baud 8 = 1800 baud4 = 4800 baud 9 = 9600 baud5 = 150 baud (0 = 1200 baud)
Example: For 2400 baud operation, press [*][C][9][2].
CONNECTING TO A MODEM OR PACKET TNC (TERMINAL NODE CONTROLLER)
Connect the adapter as in the diagram under Hook-Up Instructions (page 5) except reverse theRCA-type phono plugs on the SERIAL IN and SERIAL OUT jacks. This will eliminate the need for aNull-Modem adapter cable.
1 A terminal program is referred to by many names: modem software, dumb terminal software and communi-cations software to name a few. All of these programs are similar in nature, in that they allow you to commu-nicate with a modem attached to your computer. The modem then communicates with your computer using aspecial language called ASCII (American Standard Code for Information Interchange). We have designedthe MM-3 to communicate In ASCII, therefore the same software used for your modem is compatible with theMM-3. For the IBM-PC environment, programs include Pro-Comm, Cross Talk and 0 Modem. For the Apple,ASCII Express Pro, Modem Manager and Hayes SMARTCOMM are suitable. AEA's COM-PakRatt is de-signed for the Commodore 64 or 128. The Red-Ryder program is suitable for the Macintosh.

27
MORSE-TO-ASCII DATA TO THE COMPUTER
In all modes except MEMORY LOAD, the Morse code from the paddle is translated to ASCIIand sent to the SERIAL OUT line.
KEYER COMMANDS FROM THE COMPUTER
In all operating modes except ASCII/MORSE CONVERTER, the ASCII that the computer sendsto the keyer is interpreted as a command stream that controls the keyer the same way the keypaddoes. You can use this feature to change keyer operating modes, load message buffers, set vari-ous parameters and options, etc. For example, consider this ASCII data stream from a computer:
[*][4][A][1]CQ TEST DE N6IA[#],,,[2]NR [*][0] SCV K[#][*][3][*][*][0][1][#][*][B][6]
Puts keyer in MEMORY LOAD modeSelects message memory 1 In Bank AText for message 1End of message 1Delay (example)Selects message memory 2 (Bank A)Message 2 text, with serial numberEnd of message 2Puts keyer In KEYER/MEMORY SEND modeSet serial number to 1Use the SPEED knob
The commands may be placed on separate lines, since Carriage Returns and Linefeeds haveno effect as command keys, and are not translated to Morse as message text. Their only effect isdelay. Similarly, commas have no effect as command keys, and may be used for delay betweenmessage loads to give the buffers time to realign their boundaries.
28
ASCII / MORSE
[*][9]
In most of the keyer operating modes, sending Morse code on the paddle produces ASCII out-put to a computer, and ASCII input characters from a computer are treated as commands to thekeyer. In the ASCII/MORSE CONVERTER mode, Morse code sent on a paddle, bug or StraightKey is still converted to ASCII on the SERIAL OUT line as before, but ASCII on the SERIAL IN lineis converted to audible Morse code. This mode turns the keyer into an inexpensive terminal thatcan be used as a data entry device for a computer, or a master terminal for a radio communica-tions data controller or telephone modem.
MORSE SPEED
[*][6][n][n]
The Morse paddle speed is controlled by either the SPEED knob or the keypad, depending onwhether [*][A][6] or [*][B][6] was pressed. The speed of the incoming ASCII-to-Morse is also con-trolled by either the SPEED knob or the keypad, depending on whether [*][C][7][1][5] or[*][C][7][1][6] was pressed. This way you may send and receive at different speeds if you wish.
USING THE KEYER AS AN I/O DEVICE
When keying in data to be sent to a computer, you can send a carriage return/linefeed code bysending · · – – on the paddle.
USING THE KEYER AS A MORSE TERMINAL
[*][9]
To converse with a TNC or modem, press [*][9] to set up the converter BEFORE turning on theTNC. Set [*][6][n][n] to a comfortable receiving speed.
Some TNCs use auto-baud routines to initialize their serial ports. AEA units such as the PK-232and PK-88 operate in this manner. With the keyer character set at any level below Complete (use[*][C][1], [*][C][2] or [*][C][3]), send several – – – – characters (CH, or four dashes). The keyertranslates each of these characters to an asterisk (*) for the auto-baud routine. Then send the· – · – character, which is the carriage return. You should then hear the TNC's sign-on message.The first command to give the TNC is "ECHO OFF".
DO NOT use the ·· – – character (CRLF) to end a line; always use the · – · – <CR> character.The extra linefeed confuses the TNC.
Example: To use the AEA PK-88 to connect to N7BTI on packet radio, send
– · – · – · – – ··· – ··· – ·· · – · –
C <SP> N 7 B T I <CR>
SERIAL CHARACTER SETS
You can filter out difficult ASCII-to-Morse characters from the serial port so that the keyer doesnot sound them out on the speaker. Use the Character Set commands (see APPENDIX B, SerialPort Character Sets). Carriage returns and Iinefeeds from the computer are never translated toaudible Morse.

29
SENDING CONTROL CHARACTERS
To send ASCII Control characters, send – · – · – <CT> followed by the Morse letter A–Z. For ex-ample, to send an ASCII CTRL-C, send:
– · – · – – · – · CT C
CORRECTING ERRORS
Send the Morse error character (eight dots) to correct any sending errors you make. The MM-3will produce enough ASCII backspace characters to erase to the beginning of the last word yousent.
CHARACTER BUFFERS
In the CONVERTER mode, the keyer sets aside 256 bytes as an ASCII transmit buffer, andwhatever else is unused by the message memories as an ASCII receive buffer. Thus it is possibleto have almost 8 k characters of ASCII-to-Morse receive buffer. This is fortunate, as the Morse out-put is much slower than the ASCII input, and there will be quite an accumulation of data after awhile.
CANCEL BUFFER CHARACTERS
A CRTL-X, or hex $18 character, sent from a terminal to the serial data input of the keyer, can-cels any unsent Morse characters in the buffer. This character may be sent while the keyer is inASCII CONVERTER mode, in either command or data mode.
FLOW CONTROL
The keyer uses software flow control (XON/XOFF) in both the send and receive directions tocontrol the serial ASCII data.
COMMAND MODE
CTRL-C
In the ASCII/MORSE CONVERTER mode, the keyer normally treats incoming ASCII as text tobe translated into audible Morse code. However, typing a CTRL-C from the computer keyboard willplace the keyer into the same "command mode" as in all the other keyer operating modes (seeSERIAL PORT OPERATION, Keyer Commands from the Computer, page 27). To return the ASCIIstream to "data mode" type [*][C][7][0][9]. This command does not clear the ASCII buffers; the [*][9]command does clear the buffers as it re-initializes ASCII/Morse Converter mode.
TRANSMIT CONTROL
[*][*][8] Toggle the enable for PTT and output keying[*][C][7][0][5] Enable PTT and keying for current mode[*][C][7][0][6] Disable PTT and keying for current mode[*][C][7][0][7] Turn on PTT[*][C][7][0][8] Turn off PTTCTRL-D (In CONVERTER data mode) Turn off PTT
Push-to-Talk and output keying are normally enabled in the ASCII CONVERTER mode. Tochange to the opposite enable state, use the [*][*][8] command. If the enable state is not known,use the [*][C][7][0][5] or [*][C][7][0][6] commands.

30
The user may turn on PTT from the serial port before starting to transmit Morse characters. The[*][C][7][0][7] command turns on PTT, which is then turned off automatically after 20 seconds of noactivity. This type of PTT assertion stays activated between Morse characters.
If the last character the terminal sends to the keyer is a CTRL-D, the keyer sends Morse until itgets to the CTRL-D, when it turns off the PTT that the [*][C][7][0][7] command activated. After proc-essing the CTRL-D, the keyer is still in data mode.
Instead of CTRL-D, the terminal may sendCTRL-C [*][C][7][0][8]
to turn off PTT at the end of a string of data. PTT stays on until all data characters before theCTRL-C are transmitted.
MORSE SPEED FROM SERIAL DATA
[*][C][7][1][5] Keypad controls speed of data from serial[*][C][7][1][6] SPEED knob controls speed of data from serial
The ASCII/MORSE CONVERTER mode converts serial data to audible Morse characters. Ei-ther the keypad or the SPEED knob can control the speed of the Morse characters.
SPACE CHARACTERS
[*][C][7][3][3] Literal space characters from serial[*][C][7][3][4] Limited space characters from serial
A group of space characters sent on the serial port to the keyer normally results in only oneMorse space being transmitted. To remove this limit, use the [*][C][7][3][3] command. The keyer willthen send the same number of Morse spaces as the number of ASCII spaces it receives from theserial port. To reinstate the limit, press [*][C][7][3][4].
EPROM VERSION
[*][C][7][0][0]
The terminal can find out the MM-3's firmware version number by sending the [*][C][7][0][0] com-mand. The keyer responds with two ASCII numerals on the serial port. The Fall 1990 release num-ber is 12.

31
QSO SIMULATOR
[*][*][5]
The QSO Simulator is a Morse code training mode that lets you take part in everyday amateurradio conversations without actually being on the air. You need no antenna, no linear amplifier, nopostage for QSL cards. You can learn CW operating skills at your own comfort level.
The QSO Simulator creates computer generated CW signals that call CQ, talk to each other, ortalk to you. The keyer simulates the CW portion of an unspecified amateur band, at no particulartime of day, season, or location. Good radio propagation across the United States is assumed. Allcall letters of the stations you hear are random United States call signs.
The typical conversation, or "ragchew", involves exchanging call letters, signal reports, stationlocations, operator names, transmitter types, antennas, and weather. If you miss a piece of infor-mation, you can ask for it to be repeated. If you make a mistake, the other station may ask you torepeat the information. You may even ask the other station to slow down (QRS) or speed up (QRQ)and he/she will.
The Morse Machine QSO Simulator is an excellent training aid for prospective hams, new oper-ators and hams improving their CW speed. It enables you to send and receive before getting onthe air. You can keep track of your progress by connecting the keyer's serial port to a computer andwatching the text come out on the screen.
Important: End all your transmissions with either K, <KN> or <AR>. The QSO Simulator willanswer after you send one of these and wait.
SETTING A CODE SPEED LIMIT
[*][D][6][n][n]
At turn-on, the highest code speed the simulator will produce is 24 WPM. Press [*][D][6][n][n] toestablish the highest speed you can copy comfortably. The lowest speed is about two-thirds of thespeed limit.
Example: To set a range of 12–18 WPM for the simulator, press [*][D][6][1][8].
STARTING THE QSO SIMULATOR
[*][*][5]
Press [*][*][5] to start the simulator. If you now call CQ (see Operating below), a simulated "sta-tion" may answer you. If you do nothing, within about 60 seconds you will hear a computer gener-ated "station" calling CQ. If you do not answer, another "station" may answer and a conversation(QSO) between the two will start.
CHANGING SIMULATOR "CHANNELS"
[C] Change channel[D] Start simulated CO
Press [C] to abandon the current conversation. This has the same effect as pressing [*][*][5]again to re-start the simulator. Press [D] to abandon the current conversation and bring up a simu-lated station calling CQ. This lets you answer another station's CQ if you do not want to call CQyourself.

32
OPERATING
In amateur radio conversations (QSOs) on CW (Continuous Wave, or Morse code), the idea is tobe as friendly and as clear as possible in the shortest amount of time. Hams use abbreviations asoften as they can; as a result, a decoded QSO looks quite different from a written conversation.See APPENDICES D and E for some common CW abbreviations. Here is an example of a CWragchew, or friendly conversation, and a translation into clear text:
CQ CQ CQ CQ CQ DE KB2NYA KB2NYAKB2NYA K
KB2NYA DE KB2BOF KB2BOF AR
KB2BOF DE KB2NYA GE TNX FER CALL --UR RST 57N 57N -- QTH ISOSSINING NY ? OSSINING NY ES NAME ISCURLY CURLY -- SO HW CPY? AR KB2BOFDE KB2NYA K
KB2NYA DE KB2BOF R GE CURLY -- UR RSTIS 56N 56N HR IN BROOKLYN NY BROOK-LYN NY -- NAME HR MOE MOE -- SO BK TOU CURLY AR KB2NYA DE KB2BOF K
KB2BOF DE KB2NYA R FB MOE -- RIG HR ISHEATH DX60B RUNNING 6T WTS -- ANT ISDIPOLE -- RCVR IS SX 101 -- WX HR ISSUNNY ES TMP ABT 5T DEGR -- SO HW NWMOE? AR KB2BOF DE KB2NYA K
KB2BOF DE KB2NYA OK MOE FB -- WL QRMGETTING BAD HR SO BETTER QRT FER NW-- 73 ES CUL MOE <SK> KB2BOF DE KB2NYA
KB2NYA DE KB2BOF R OK CURLY -- TNX FBQSO ES HPE CUAGN -- 73 CURLY KB2NYADE KB2BOF
I'd like to talk to anyone who is around. My callsign is KB2NYA Go ahead.
Calling KB2NYA. This is KB2BOF.
KB2BOF, this is KB2NYA. Good evening,thanks for the call. Your signal report is 579. Mylocation is Ossining, New York, I repeat, Ossin-ing, New York, and my name is Curly. So Howare you receiving me? (End of message)KB2BOF, this is KB2NYA. Go ahead.
KB2NYA, this is KB2BOF. Okay. received. Goodevening, Curly. Your signal report is 569 here inBrooklyn, New York. The name here is Moe. Soback to you, Curly. (End of message) KB2NYA,this is KB3BOF. Go ahead.
KB2BOF, this is KB2NYA. Okay, received. Fine,Mow. The transmitter here is a Heath DX-60Brunning 60 watts. Theantenna is a dipole. The receiver is the SX-101.The weather here is sunny and the temperatureis about 50 degrees. So how are you receivingme now, Moe? (End of message) KB2BOF, thisis KB3NAY. Go ahead.
KB2BOF, this is KB2NYA. Okay, Moe, fine. Well,the interference is getting bad here so I'd betterget off the air for now. Best regards and see youlater, Moe. (End of contact) KB2BOF, this isKB2NYA. Go ahead.
KB2NYA, this is KB2BOF. Okay, Curly. Thanksfor the fine conversation and I hope to see youagain. Best regards, Curly. (End of contact)KB2NYA, this is KB2BOF
Let's take this conversation apart.
A CQ (literally from "seek you") is a general call made by an operator who wants to have a con-tact with anybody who hears him/her. The most effective CQs are short CQs. The best is called the"five by three": five CQs followed by DE (from) and three transmissions of the call sign, and then K.If this does not bring a response, it is repeated until someone answers. DE is sent only once. At theend, K is sent, which is a general "go ahead" to anybody.
When you answer a CQ, or call another station, send the other operator's call sign first, then DE,and then your call sign. This sequence is required and cannot be reversed. The DE is optional, butit's almost indispensable as a separator between call signs. End with <AR> (end of message).

33
The double dash, which sounds like the letters <BT> sent as one character, is used to separatethoughts or sentences, much as the period is used in written text. You may hear stations in real lifesending periods, but the standard practice is to use the double dash. It's shorter than the period,and you can send it repeatedly as you pause for words.
Signal reports on CW follow the RST format, which consists of three numbers: 1–5 for Readabil-ity, 1–9 for Strength, and 1–9 for Tone. A detailed break-down of each number's meaning can befound in several ARRL publications. The best report, 599, means that the station is perfectly read-able, has an extremely strong signal, and has a perfect tone. The number "9" is frequently short-ened to an "N" - reports of 5NN are commonplace.
Names and locations are frequently sent twice. Actual radio conditions are worse than what thekeyer simulates, so if you repeat important information the other operator has a better chance ofcopying everything.
At the end of a transmission, send <AR>, his/her call sign DE your call sign, K. You could send<KN> instead of K, which would mean you don't want anybody to break in on your QSO, but manyoperators really wouldn't mind the unlikely event of a third party breaking in. If you use <KN>, re-member to send it as one character, not the two separate characters K and N.
Some hams use "BK TO U" ("back to you") as a transitional phrase which implies the transmis-sion will be ending shortly, so get ready to send. Critics of "BK TO U" prefer to use "SO HW?" or"HW NW?", meaning how are you copying (receiving) my signal, fully expecting a response like"UR SIGS FB".
When you send numbers, you can save some time by abbreviating 0's as T's. Exception: In callsigns such as KAØXXX you must send the full 0.
On the last transmission from each side of a QSO, goodbyes are said and then the sign <SK> issent instead of <AR>. This is the End of Contact signal, meaning the conversation is over.
So far ham conversations must seem a bit mechanical. In real life, some QSOs consist of ex-changing names, locations, ham gear, weather, and nothing else, but many QSOs have more sub-stance. For the first few exchanges, that stiff format is useful, but then comes the opportunity fortransmissions to reflect the operator's personality, interests, feelings, and opinions. Pleasant ragch-ews come from the exchange of ideas. You might expand upon something the other operator hassaid, or ask questions to follow up on what he/she has said.
Listen to some QSOs for a while before transmitting. Notice the format of the conversations be-tween stations. When you feel ready, answer a CQ. The simulator decides you are finished sendinga transmission after you send either a K (go ahead), a <KN> (go only), or <AR> (end of transmis-sion), and then pause for a certain length of time. If you pause too long after a K in the middle ofyour transmission, the other station might interrupt you. If you are getting interrupted too often,slow down your sending speed. Remember to send K, <KN> or <AR> at the end, because the oth-er operator is waiting for it.
Now that you have become used to the ragchew format, change to a clear channel and try call-ing CQ yourself. If you don't get an answer, keep trying. Enjoy your QSO.
STOPPING THE SIMULATOR
[#]
To stop the simulator temporarily, press the [#] key. The Morse code stops while the keyer idlesin QSO Simulator mode. Pressing [#] again makes the simulator resume. To use the MM-3 as anordinary keyer, press [*][3].

34
TOGGLE TRANSMIT
[*][*][8]
The transmitter keying outputs are normally disabled in the QSO SIMULATOR mode. To enablethe outputs, press [*][*][8] to toggle transmitting on.
35
DX Contest Simulator
The Contest Simulator is a Morse code training mode that brings you the excitement of the DXchase without actually being on the air. You can place yourself anywhere in the world, at any timeof the day you wish, and experience shortwave amateur radio operating conditions as they wouldoccur at that time and place. You need no antenna, no linear amplifier, no postage for QSL cards.You can improve your CW operating skills at your own comfort level.
Before starting the Contest Simulator, you go through a simple procedure of setting the keyer'sinternal clock for the simulated time of day at which you wish to start the contest. Once you are op-erating, you can change bands when you wish. If the simulator decides that the selected band isnormally open for the current time of day, you will hear computer generated CW signals. The sig-nals are working each other or calling CQ. Some are even talking with stations in your skip zone,which you cannot hear.
After you complete each contact, the simulator can print a log entry on the Serial Out port (seepage 45, Serial Port Output). If you are using the keyer without a terminal or computer, you can geta Morse report of your score at any time with a keypad command.
The radio propagation programmed for each band represents what you would expect to hear ona good propagation day with an omni-directional antenna. The propagation follows the internal timeof day that you set before the contest. For example, the 15- and 10-meter bands are wide openduring local daylight hours and closed at night. 160 and 80 meters are open at night and closedduring daytime hours. The simulated stations you hear (with proper prefixes) are at distances youwould expect to hear under normal condition for the time of day and frequency band selected.
All call letters of the stations you hear are totally random (subject to the country's callsign as-signment rules). The prefixes are weighted according to the population density, with the guaranteethat for each of the 300 + countries, there is at least on station represented.
A typical two-way contest exchange involves call letters, signal reports and CQWW zones. Ifyou miss a piece of information, you can ask for it to be repeated. If you make a mistake, the otherstation may ask you to repeat the information. You may even ask the other station to slow down(QRS) or speed up (QRQ).
CONTEST SIMULATOR COMMANDS
[*][D][1][a][n][n] Latitude[*][D][2][b][n][n][n] Longitude[*][D][3][n][n] Hour (UTC)
These commands set the time and place for the contest. Each of these commands also setsyour contest score to zero.
To enter your contest location, you need to know your latitude and longitude to the nearestwhole degree. Set your latitude and longitude with the [*][D][1] and [*][D][2] commands. On theright edge of the keypad the keys from top to bottom are A, B, C and D. These keys have addition-al functions of North, East, West and South respectively, for setting the latitude and longitude.
The range of "nn" for latitude is 00 to 90. Longitude "nnn" ranges from 000 to 180. The defaultcoordinates are for Washington, DC: 39 North by 77 West.
Example: To set coordinates of 48 degrees North by 122 degrees West (Seattle, WA), thecommands are [*][D][1][A][4][8] and [*][D][2][C][1][2][2].To set coordinates of 1 degree South by 37 degrees East (Nairobi, Kenya), thecommands are [*][D][1][D][1] and [*][D][2][B][0][3][7].

36
Notes: 0 degrees latitude is either [*][D][1][A][0][0] or [*][D][1][D][0][0].0 degrees longitude is either [*][D][2][B][0][0][0] or [*][D][2][C][0][0][0]180 degrees longitude is either [*][D][2][B][1][8][0] or [*][D][2][C][1][8][0]
Set the starting time of the contest with the [*][D][3] command. "nn" is the hour in UTC, 00–23.As the contest progresses, the internal time of day advances in real time, causing simulated radioconditions to change. The time of day advances as long as the keyer is on, no matter what the key-er's operating mode. The time is saved when the keyer is off, and resumes where it left off whenthe keyer is turned on again. The default time of day is [*][D][3][0][0] (0000 UTC).
Start the Contest Simulator
[*][*][4]
Press [*][*][4] to start the contest. Listen to some QSOs for a while before transmitting. Noticethe patterns in the contest exchanges you hear. The contest exchange is RST and CQWW zone,usually run together (e.g., 59903). Some of the numbers are abbreviated in the interest of faster ex-changes:
T = 0A = 1N = 9
There are two ways to go in a contest. In the Hunt and Pounce strategy you wait for station tocall CQ and you answer them. In the Call CQ Forever technique you stake out a frequency (simula-tor "channel") and call CQ for hours, letting the stations come to you. Newcomers should listen to aCQer for a while and then call it.
You might not copy the complete callsign of a station that answers your CQ. This is not a prob-lem; just send the station's suffix if you heard it, then the exchange (RST zone). Most of the timethe station will come back to you. You must, however, acknowledge callers by sending at least partof their callsign, or they will not come back to you.
You don't need to send a complete CQ at the end of each contact. Try sending just "R TUTEST" or just "R TU" at the end of several contacts. You may or may not get an answer dependingon which station is waiting to call you, so keep trying. If the "R TU" gets no answer, send a full CQthat includes your callsign.
As soon as the simulator knows your callsign, it can use the callsign and your geographical co-ordinates to determine your country. Your callsign must agree with those normally found at your lat-itude and longitude. If it doesn't, you will get no points for your QSOs until your callsign agrees withyour location. If you are setting yourself up outside your native country, assume a local callsign,such as ZA2RPS for Albania.
The main idea behind the simulator's callsign detector is that every callsign has a number in itsomewhere. If you make a mistake in sending your call and the number is faulty, the callsign willnot be recognized and no QSO will result. You can reduce sending errors by sending CQs, ex-changes and your callsign from message memories. See the "Keyer Memory Programming" sec-tion.
The contest simulator decides you are finished sending a transmission after you pause for a cer-tain length of time (shorter than in the QSO simulator). If you pause too long between words, theother station might interrupt you. If you are getting interrupted too often, slow down your sendingspeed.
When you have completed a QSO successfully, the simulator awards you your QSO points andprints a log entry on the serial port, including your new score. If you have just worked a new coun-try or zone on your present band, the log entry shows the new country or zone number for thatband.

37
CHANGE SIMULATOR BAND
[*][D][4][n] Change band
Change bands with the [*][D][4] command. "n" is a number from 0 to 5 which selects one of theshortwave amateur bands:
0 = 1.8 MHz 3 = 14 MHz1 = 3.5 MHz 4 = 21 MHz2 = 7 MHz 5 = 28 MHz
Changing bands does not reset your contest score. The default value is [*][D][4][3] (14 MHz).
CODE SPEED LIMIT
[*][D][6][n][n]
At turn-on, the highest code speed the simulator will produce is 24 WPM. Press [*][D][6][n][n] toestablish the highest speed you can copy comfortably. The lowest speed is about two-thirds of theupper speed limit.
Example: To set a range of 24-36 WPM for the simulator, press [*][D][6][3][6].The slower simulated stations generally send more lengthy exchanges.Faster stations are more efficient in their transmission content.
CHANGE SIMULATOR CHANNELS
[C] Change channels[D] Change channels
The [C] and [D] keys change "'frequency" within a "band". The current channel activity is aban-doned. Most of the time the simulator switches to a channel that has other activity in progress;sometimes the new channel has no activity. Press [C] or [D] and listen for a few seconds; if youhear nothing then it is probably safe to send your own CQ.
REPORT CONTEST SCORE IN MORSE
[*][D][7]
During the contest, the simulator prints a contest log on the keyer's serial port. If you are not us-ing a terminal or computer to read the serial port, you can still get a report of your contest score bypressing [*][D][7]. This command changes channels, sends the score in Morse numerals, and thenchanges channels again. The [*][D][7] command works only in Contest Simulator mode.
Your score remains unchanged when you change bands, suspend the simulation or turn thekeyer's power off. The score is reset to zero if you change your latitude, longitude or time of daywith the [*][D][1], [*][D][2] or [*][D][3] commands. To purposely reset the score to zero (e.g. whenchanging operators), use the [*][D][3] command to enter a new time of day or the same time of day.
SERIAL PORT OUTPUT
[*][C][7][4][2] Print contest QSO, not log[*][C][7][4][3] Print contest log, not QSO (default)
In the QSO Simulator mode ([*][*][5]), the serial port output shows the text of all QSOs, bothuser-generated and machine-simulated. The Contest Simulator ([*][*][4]) normally uses the serialport to print a log of all successful contacts completed by the user.

38
The commands control the use of the serial output in Contest Simulator mode. [*][C][7][4][2]yields serial output of the text, similar to the serial activity in the QSO Simulator, but not the log en-tries of the contacts. [*][C][7][4][3] yields the contest log, containing callsigns, time and score, butwithout a transcript of the actual text exchanged.
SUSPEND/CONTINUE THE SIMULATION
[#]
Press [#] to stop the simulator tones. The time of day continues to advance while the tones aresuspended. Press [#] again to make the simulator continue where it left off. Pressing [*][*][4] alsocontinues the simulation.
To freeze the simulation, including the time of day, turn off the keyer. If the internal battery isworking, the simulation will continue when the keyer is turned on again. Your contest score will re-main unchanged.
To use the MM-3 as a keyer again, press [*][3].
VOCABULARY
Here is a list of some of the words the simulator responds to:
AGN QRZCALL RPTCODE RSTDE TESTQRQ ZONEQRS ?
SCORING
Here are the rules of the contest:
Exchange RST and CQ zone. Example: 59903 or 5NNT3.Work as many countries and CO zones on as many bands as possible.
QSOs between stations in the same country are worth 0 points. QSOs between stations in dif-ferent countries on the same continent are worth 1 point, except for North America where theycount 2 QSO points. QSOs between different continents are worth 3 QSO points.
The score is computed as follows:
Score = QSO points × (Countries + Zones).
Countries and zones may be worked once on each band for multiplier credit. New countries orzones worked on a band are shown in the log entry on your terminal.

39
Contest Simulator Countries List
A22 Botswana FGO/FS St. Martin Is.A35 Tonga FH8 MayotteA41 Oman FK8 New CaledoniaA51 Bhutan FM MartiniqueA61 United Arab Emirates FO French PolynesiaA71 Qatar FO0X Clipperton Is.A92 Bahrain FP5 St. Pierre & MiquelonAP2 Pakistan FR7 ReunionBV2 Taiwan FR7/G Glorioso Is.BY China FR7/J Juan de Nova/EuropaC21 Nauru FR7/T Tromelin Is,C31 Andorra FT8W Crozet Is.C53 Gambia FT8X Kerguelen Is.C6A Bahamas FT8Z Amsterdam/S1, PaulC9M Mozambique FW0 Wallis & Futuna Is.CE Chile FY French GuianaCE0A Easter Is. G EnglandCE0X San Felix Is. GD Isle of ManCE0Z Juan Fernandez Is. GI Northern IrelandCN8 Morocco GJ JerseyCO, CM Cuba GM ScotlandCP Bolivia GM/S* Shetland Is.CT Portugal GU GuernseyCT3 Madeira Is. GW WalesCU Azores Is. H44 Solomon Is.CX Uruguay HA, HG HungaryCY9 S1, Paul Is. HB9 SwitzerlandCYO Sable Is. HB0 LichtensteinD2A Angola HC EcuadorD44 Cape Verde Is. HC8 Galapagos Is.D68 Comoros HH2 HaitiDF, DJ-L, Y2-8 Germany HI Dominican RepublicDU Philippines HK ColombiaEA Spain HK0 Malpelo Is.EA6 Balearic Is. HK0 San Andres/ProvidenciaEA8 Canary Is. HL KoreaEA9 Ceuta & Melilla HP PanamaEI Ireland HR HondurasEL Liberia HS1 ThailandEP2 Iran HV Vatican CityES Estonia HZ1 Saudi ArabiaET3 Ethiopia I ItalyF France IS0 SardiniaFG Guadeloupe IT9 SicilyJ28 Djibouti OZ DenmarkJ37 Grenada P29 Papua New GuineaJ5 Guinea-Bissau PA NetherlandsJ6L St. Lucia PJ2-3 Netherlands AntillesJ73 Dominica PJ5 St Eust./Saba/St Maar.J88 St. Vincent PY, PR-W BrazilJA,JE-S Japan PY0/F* Fernando de NoronhaJD1 Minami Tori Shima PY0/P* St. Peter & PaulJD1 Ogasawara Is. PY0/T* Trinidade/Martim Vaz.JT1 Mongolia PZ1 SurinamJW Svalbard Is. S23 BangladeshJX Jan Mayen Is. S79 SeychellesJY Jordan S92 Sao Tome & Principe

40
KG4 Guantanamo Bay SM SwedenKH1, AH1 Baker & Howland Is. SP PolandKH2, AH2 Guam ST2 SudanKH3, AH3 Johnston Is. SU EgyptKH4, AH4 Midway Is. SV GreeceKH5 Palmyra & Jarvis Is. SV5 Dodecanese Is.KH6, AH6 Hawaii SV9 CreteKH7 Kure Is. T2 TuvaluKH8, AH8 American Samoa T30 West KiribatiKH9, AH9 Wake Is T31 Central KiribatiKH0, AH0 Mariana Is. T32 East KiribatiKL7, AL7 Alaska T5 SomaliaKP1 Navassa Is. T77 San MarinoKP2, NP2 Virgin Is. TA TurkeyKP4, NP4 Puerto Rico TF3 IcelandKP5, NP5 Desecheo Is. TG GuatemalaLA Norway TI Costa RicaLU Argentina TI9 Cocos Is.LX Luxembourg TJ1 CameroonLY Lithuania TK5 CorsicaLZ Bulgaria TLB Central African Rep.OA Peru TN8 CongoOD5 Lebanon TR8 GabonOE Austria TT8 ChadOH Finland TU2 Ivory CoastOH0 Aland Is. TY1 BeninOJ0 Market Reef TZ MaliOK Czechoslovakia UA 1,3,4,6 Eur. Russian SFSRON Belgium UA2 KaliningradOX3 Greenland UA9,0 Asiatic Russian SFSROY Faroe Is. UB5 UkraineUC2 Byelorussia XF4 Revilla Gigedo Is.UD6 Azerbaijan XT2 Burkina FasoUF6 Georgia XU1 KampucheaUG6 Armenia XV, 3W VietnamUH8 Turkmen XW8 LaosUI8 Uzbek XX9 MacaoUJ8 Tadzhik XZ2 MyanmarUL7 Kazakh YA1 AfghanistanUM8 Kirghiz YB, YC IndonesiaUN1 Karelia YI1 IraqUO5 Moldavia YJ8 VanuatuV2A Antigua & Barbuda YK1 SyriaV31 Belize YL LatviaV44 St. Kitts & Nevis YN NicaraguaV51 Namibia YO RomaniaV73 Marshall Is. YS EI SalvadorV85 Brunei YU, YT, 4N YugoslaviaVE, VO, VY Canada YV VenezuelaVK Australia YV0A Aves Is.VK9L Lord Howe Is. Z2 ZimbabweVK9N Norfolk Is. ZA2 AlbaniaVK9X Christmas Is. ZB2 GibraltarVK9Y Cocos (Keeling) Is. ZD7 St. Helena Is.VK9Z Willis Is. ZD8 Ascension Is.VK0/H* Heard Is. ZD9 Tristan de CunhaVK0/M* Macquarie Is. ZF2 Cayman Is.VP2E Anguilla ZK1 Southern Cook Is.VP2M Montserrat ZK1M Northern Cook Is.

41
VP2V British Virgin Is. ZK2 Niue Is.VP5 Turks & Caicos Is. ZK3 TokelausVP8 Falkland Is. ZL New ZealandVP8/G* South Georgia Is. ZL7 Chatham Is.VP8/0* South Orkney Is. ZL8 Kermadec Is.VP8/S* South Sandwich Is. ZL9 Auckland & Campbell Is.VP8/SH* South Shetland Is. ZP ParaguayVP9 Bermuda ZS South AfricaVQ9 Chagos Is. ZS9 Walvis BayVR6 Pitcairn Is. 1S1 Spratly Is.VS6 Hong Kong 3A2 MonacoVU2 India 3B6,7 Agalega/St. BrandonVU7 Andaman & Nicobar Is. 3B8 MauritiusVU7 Laccadive Is 3B9 Rodriguez Is.W, K, N United States 3C1 Equatorial GuineaXE Mexico 3D2 Fiji3D6 Swaziland 6Y5 Jamaica3V8 Tunisia 7P8 Lesotho3X Guinea 7Q7 Malawi3Y Bouvet Is. 7X Algeria4J1 Malyj Vysotskij Is. 8P6 Barbados4S7 Sri Lanka 8Q7 Maldives4W1, 7O Yemen 8R1 Guyana4X Israel 9G1 Ghana5A Libya 9H Malta5B5, ZC4 Cyprus 9J2 Zambia5H3 Tanzania 9K2 Kuwait5N Nigeria 9L1 Sierra Leone5R8 Madagascar 9M2 West Malaysia5T5 Mauritania 9M6,8 East Malaysia5U7 Niger 9N1 Nepal5V7 Togo 9Q5 Zaire5W1 Western Samoa 9U5 Burundi5X5 Uganda 9V1 Singapore5Z4 Kenya 9X5 Rwanda6W Senegal 9Y4 Trinidad & Tobago
* Artificial suffix added so you can tell which country you're working.

42
RESET AND RESTART
[*][C][0] Reset keyer (Erase all memories)[*][D][0] Restart keyer
If you get the keyer into an unknown state, or the commands have made the keyer unusable,press [*][C][0] to reset the keyer's options to their default values. This will erase any messages youhave stored in memory.
Pressing [*][D][0] to restart the keyer is a less drastic measure. It starts the keyer from a knownstate without changing any of the options you have set. You may use [*][D][0] to stop beacons, endcode training sessions, etc.
INTERESTING USES FOR THE MORSE MACHINE
Connect the serial port to a computer. The Morse Machine will echo the Trainer code practicetext to the screen so you can check your copy. Everything you hear and send on the QSO and OXSimulators also can go to the serial output and show up on your computer screen.
Connect the serial port to a computer, set up the ASCII/MORSE CONVERTER mode, and up-load a text file from the computer to the keyer. This gives you a code practice session with plainEnglish text at a constant speed. When the file is finished, compare your copy with the actual textin the computer.
With The Morse Machine, packet radio is now accessible to the blind without expensive ASCII-to-voice synthesizers. Just set up the keyer as a terminal connected to a packet TNC. The keyer al-so is useful as a highly portable terminal to operate packet radio in the field.
Connect an AEA CP-1 or CP-100 Computer Patch to your receiver's audio. Connect the digitaloutput from the CP-1 to The Morse Machine's dash input. Press [*][C][5] to set Straight Key mode.Connect the keyer's serial port to a computer. You now have a Morse reader.
Slow down the Morse code you hear on the air by connecting the keyer's serial port to an AEAPK-232 data controller. Set up the PK-232 in Morse operation, find a fast Morse signal, use the PK-232 to convert the Morse to ASCII, and use the MM-3 to convert the ASCII back to Morse code, on-ly slower.
Generate on-the-air code practice by connecting the keyer to a transmitter, setting the keyer tothe ASCII/MORSE CONVERTER mode and uploading a text file from a computer. Or set the keyerto Trainer mode, then press [*][*][8] to activate the Transmit output. Put four-letter words on the air,and remember to identify every 10 minutes.

43
APPENDIX A - Trainer ([*][5]) Character Sets
Easy Character Set ([*][C][2]):
A · – P · – – · 4 ···· –B – ··· Q – · – · – 5 ·····C – · – · R · – · 6 – ····D – ·· S ··· 7 – – ···E · T – 8 – – – ··F ·· – · U ·· – 9 – – – – ·G – – · V ··· – . Period · – · – · –H ···· W . – – , Comma – – ·· – –I ·· X – .. – ? Question Mark ·· – – ··J · – – – Y – · – – / Fraction bar – ·· – ·K – · – Z – – ·· + End of Message (AR) · – · – ·L · – ·· 0 – – – – – End of Work (SK) ··· – · –M – – 1 · – – – – = Double Dash (BT) – ··· –N – · 2 ·· – – –O – – – 3 ··· – –
Medium Difficulty Character Set ([*][C][3]) - Easy plus the following:
! Understood (SN) ··· – · ' Apostrophe · – – – – ·& Wait (AS) · – ··· - Hyphen – ···· –> Attention (KA) – · – · – ; Semicolon – · – · – ·( Left parenthesis (KN) – · – – · ) Right parenthesis – · – – · –* Quote · – ·· – · : Colon – – – ···
Complete Character Set ([*][C][4]) - Medium Difficulty plus the following:
_ Underline ·· – – · –$ Dollar Sign ··· – ·· –[ AE (Ä) · – · –\ OE (Ö) – – – ·] á, à · – – · –^ UE (Ü) ·· – –@ é ·· – ··c – · – ··e (Separation signal) · – ·· –h CH – – – –ñ – – · – –z – – ·· –

44
APPENDIX B - Serial Port Character Sets
ASCII Serial Data In to Morse Output:
Char. Set ASCII Char. Also Known As Morse
[*][C][1] A – Z0 – 9.,?/
PeriodCommaQuestion MarkFraction Bar
· – · – · –– – ·· – –·· – – ··– ·· – ·
[*][C][2] Above, plus:-:;
HyphenColonSemicolon
– ···· –– – – ···– · – · – ·
[*][C][3] Above, plus:!*&'()+<=>
Understood (SN)QuoteWait (AS)ApostropheLeft paren. (KN)Right paren.End of msg. (AR)End of work (SK)Double dash (BT)Attention (KA)
··· – ·· – ·· – ·· – ···· – – – – ·– · – – ·– · – – · –· – · – ···· – · –– ··· –– · – · –
[*][C][4] Above, plus:$@[\]^_cehnz
Dollar signSwedish EGerman AE (ä)German OE (ö)Swedish A (å)German UE (ü)UnderlineFrench C (ç)French E (é, è)German CHSpanish N (ñ)Foreign Z
··· – ·· –·· – ··· – · –– – – ·· – – · –·· – –·· – – · –– · – ··· – ·· –– – – –– – · – –– – ·· –
For [*][C][1], [*][C][2] and [*][C][3] upper and lower-case ASCII letters are translated the same.For [*][C][4], only upper-case ASCII letters are translated to the English alphabet; the lower-caseletters c, e, h, n and z are reserved for foreign code characters. The other lower-case letters arenot translated.
The characters * and # are not translated from ASCII to Morse. They are used only to emulatekeypad commands from the computer. Carriage Return and Linefeed are never translated from AS-CII to Morse.
Morse Paddle Input to ASCII Serial Data Out:
The resulting ASCII codes are the same as above, except some characters in [*][C][1], [*][C][2]and [*][C][3]:

45
·· – – becomes ASCII Carriage Return, Linefeed· – · – becomes ASCII Carriage Return– – – – becomes ASCII *
Use ·· – – (CRLF) to end a line when talking to a computer or terminal. Use · – · – (CR) to end aline when talking to a modem or packet TNC.
In [*][C][4], these characters become ASCII ^, [ and h respectively.
To send Control characters on the SERIAL OUT line, send – · – · – (CT) followed by the letterA–Z. For example, to send a CTRL-C to force a TNC's command mode, send:
– · – · – – · – · CT C
APPENDIX C - Code Speed
The International Morse Code speed is defined by the word "PARIS". It has 10 dots, fourdashes, nine intracharacter spaces, four intracharacter spaces and one word space for a totalequivalent of 50 code elements (dot or space time). To adjust code speed for various dot/spaceand dash/space ratios, the number of code elements in the word "PARIS" is used as a reference sothat with any allowable dot/space and dash/space ratios, the code speed is correct for the refer-ence word "PARIS".
A rule of thumb says that to calculate code speed in words per minute, divide the total numberof characters sent in one minute by five. That can be quite misleading! This method does not accu-rately take into account the variable length of individual characters.
Quite often, when the speed of the MM-3 is compared against tape recordings of certainspeeds, the MM-3 appears to be sending too slowly. but many tapes on the market are actuallysent faster than the labeled speed!

46
APPENDIX D - CW ABBREVIATIONS
ABT about OP operatorADR address OT old timerAGN again PSE pleaseANT antenna PWR powerBCNU be seeing you R received, rogerBK back, break RCVE receiveBN been, between RCVR receiverCONDX conditions RIG equipmentCPY copy RPT repeat, reportCQ general call to any station RST signal reportCUAGN see you again RTTY radio teletypeCUD could SA sayCUL see you later SSB single sidebandCUZ because SIG signalCW continuous wave SKED scheduleDE from SRI sorryDEGR degrees STN stationDX distance, rare station SUM someES and TEMP temperatureFB fine business TFC trafficFER for TKS thanksFONE phone, voice TMW tomorrowFREQ frequency TNX thanksGA good afternoon, go ahead TT thatGE good evening TU thank youGESS guess TVI television interferenceGG going U youGL good luck UR yourGM good morning VY veryGN good night WL well, willGND ground WT wattGUD good WAT whatHI high, laughter WATSA what do you sayHPE hope WID withHR here WK week, weakHVE have WRK work, have OSO withHW how WX weatherK go ahead XCVR transceiverKNW know XMTR transmitterMSG message XYL wifeMTRS meters YL young ladyNR number YR yearNW now 73 best regardsOM old man 88 love and kisses

47
APPENDIX E - INFORMAL MEANINGS OF Q SIGNALS
QRL busyQRM interference from other stationsQRN atmospheric interference staticQRO high power. increase powerQRP low power. decrease powerQRQ send fasterQRS send slowerQRT stop sending. get off the airQRU I have no traffic for you. all talked outQRV readyQRX call again later, waitQRZ who is calling me?QSS fading signalQSK CW break-inQSL acknowledge receipt. send confirmation cardQSO contact. conversationQST calling all radio amateursQSY change frequencyQTH location

48
APPENDIX F - ABBREVIATED COMMANDS
Mode/Command Keypad Range At Turn-on
KEYER:
Go to KEYER Mode [*][3] KEYER
Keypad Speed ControlSPEED Knob Control
[*][A][6][*][B][6] SPEED Knob
Keypad Code Speed
SPEED Knob Speed limits
[*][6][n][n][*][C][8][6][n][n][n][*][C][8][1][n][n][*][C][8][2][n][n]
2–99 WPM2–255 WPM2–99 WPM (lower)2–99 WPM (upper)
20 WPM20 WPM5 WPM45 WPM
Tone IncreaseTone Increase
[*][1][*][*][1]
122–2500 Hz122–2500 Hz
500 Hz500 Hz
CW Sidetone OnCW Sidetone Off
[*][A][1][*][B][1]
On
Keypad Tone OnKeypad Tone Off
[*][A][2][*][B][2]
On
Dot/Space RatioDash/Space Ratio
[*][2][n][n][*][*][2][n][n]
0.5–1.5 in 0.1 increments2.0–4.0 in 0.1 increments
1.03.0
Dot Memory OnDot Memory OffDash Memory OnDash Memory Off
[*][A][3][*][B][3][*][A][4][*][B][4]
On
On
Automatic (Iambic)Semiautomatic (Bug)Straight Key
[*][A][5][*][B][5][*][C][5]
On
Tune OnTune Off
[*][*][7]Any Off
Retain Serial NumberSet Serial NumberRepeat Serial Number
[*][0][*][*][0][n][n][n][n][#][C]
1
Serial Number As IsCut Serial Numbers
[*][A][7][*][B][7]
Sends actual numbers9 = N, 0 = T
On
Send MessageSend Bank A MessageSend Bank B MessageSend Next Higher Msg.
[n][A][n][B][n][D]
Message 0–9, current bankMessage 0–9Message 0–9(A9 wraps to B0)
Message 1 Repeat Time [*][7][n][n][n][#] 0 to 999 seconds in 1 sec.increments
0 second
Toggle Transmit [*][*][8] Transmit On
Farnsworth MessagesSlow Code MessagesFarns. Character Speed
[*][C][7][3][1][*][C][7][3][2][*][C][6][n][n]
Slow Code

49
Mode/Command Keypad Range At Turn-on
MEMORY LOAD:
Go to MEMORY Load [*][4]
Select Bank ASelect Bank B
[A][B]
LoadErase
[n] msg [#][n][#]
Insert Serial NumberInsert Speed ChangeInsert Other Message
[*][0][*][*][3][*][*][9][n]
Toggle Normal / +41 %n must be in same bank
Normal
Real-Time SpacingAuto-Word Spacing
[*][A][8][*][B][8] On
TRAINER:
Go to TRAINER Mode [*][5]
Start SpeedFinish SpeedFarnsworth SpeedSpeed Change Interval
[*][6][n][n][*][*][6][n][n][*][C][6][n][n][*][7][n][n][n][#]
2–99 WPM2–99 WPM2–99 WPM00.1–99.9 minutes in 0.1 minutesincrements
5 WPM15 WPM15 WPM10 min.
Fast Code MethodSlow Code Method
[*][A][0][*][B][0]
On
Five-Character GroupsRandom Length Groups
[*][A][9][*][B][9]
On
Four-Letter WordsEasy Character SetEasy Set Medium DifficultyComplete Set
[*][C][1][*][C][2][*][C][3][*][C][4]
Start TrainerStart Random TrainerStop Trainer
[n][D][#]
0–9
BEACON:
Go to BEACON Mode [*][8]
Beacon Cycle Time [*][7][n][n][n][#] 1 to 99 secondsin 1 second increments
60 seconds
Beacon Start [n] Message 0–9
QSO SIMULATOR:
Go to QSO Simulator [*][*][5]
Simulator Speed Limit [*][D][6][n][n] 2–99 WPM 24 WPM
Change Channel [C]
Start Simulated CQ [D]
Stop Simulator [#]
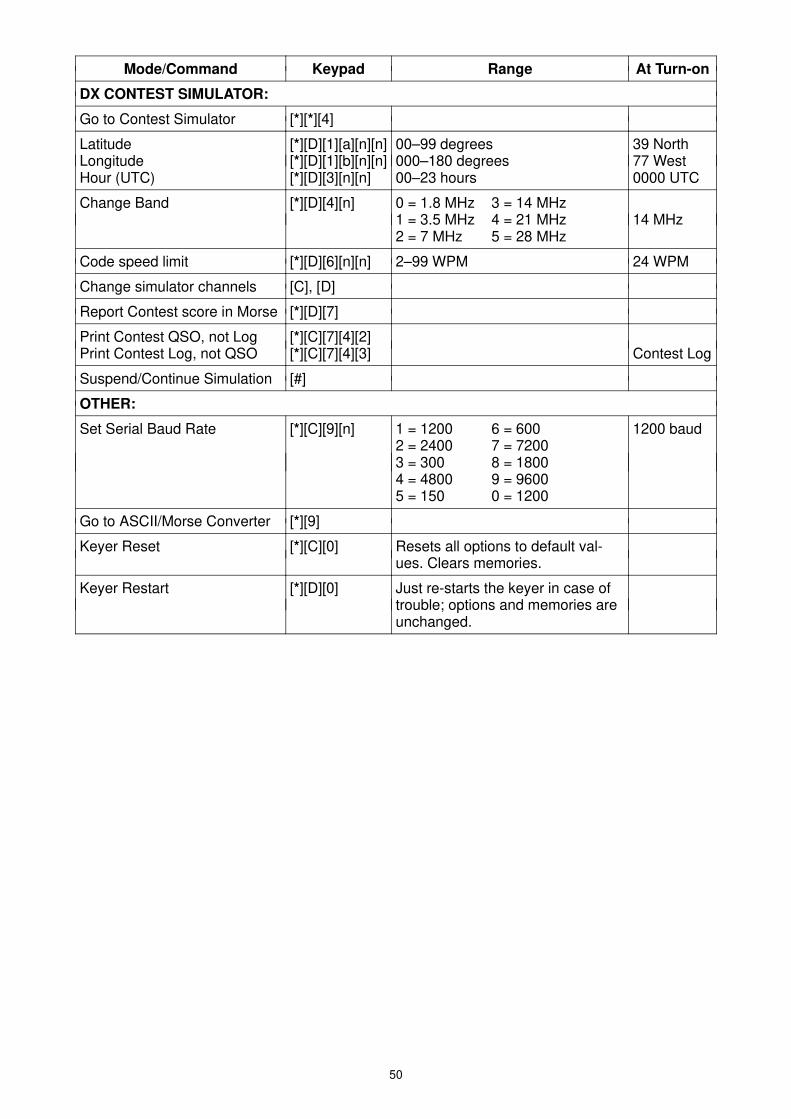
50
Mode/Command Keypad Range At Turn-on
DX CONTEST SIMULATOR:
Go to Contest Simulator [*][*][4]
LatitudeLongitudeHour (UTC)
[*][D][1][a][n][n][*][D][1][b][n][n][*][D][3][n][n]
00–99 degrees000–180 degrees00–23 hours
39 North77 West0000 UTC
Change Band [*][D][4][n] 0 = 1.8 MHz 3 = 14 MHz1 = 3.5 MHz 4 = 21 MHz2 = 7 MHz 5 = 28 MHz
14 MHz
Code speed limit [*][D][6][n][n] 2–99 WPM 24 WPM
Change simulator channels [C], [D]
Report Contest score in Morse [*][D][7]
Print Contest QSO, not LogPrint Contest Log, not QSO
[*][C][7][4][2][*][C][7][4][3] Contest Log
Suspend/Continue Simulation [#]
OTHER:
Set Serial Baud Rate [*][C][9][n] 1 = 1200 6 = 6002 = 2400 7 = 72003 = 300 8 = 18004 = 4800 9 = 96005 = 150 0 = 1200
1200 baud
Go to ASCII/Morse Converter [*][9]
Keyer Reset [*][C][0] Resets all options to default val-ues. Clears memories.
Keyer Restart [*][D][0] Just re-starts the keyer in case oftrouble; options and memories areunchanged.

51
APPENDIX G - Commands in numerical order
K = KEYER/MEMORY SEND mode M = MEMORY LOAD modeT = TRAINER mode B = BEACON modeQ = QSO SIMULATOR mode D = OX Contest Simulator
[*][1] Tone pitch increase [*][*][1] Tone pitch decrease[*][2] Set dot ratio [*][*][2] Set dash ratio[*][3] Keyer send mode (= K) [*][*][3] Insert speed change (M)[*][4] Memory load mode (= M) [*][*][4] Contest Simulator Mode (= D)[*][5] Trainer mode (= T) [*][*][5] QSO simulator mode (= a)[*][6] Start speed (T) [*][*][6] End speed (T)
Keypad speed (K/M)[*][7] Message 1 repeat interval (K,D) [*][*][7] Tune (key down) (K)
Beacon interval (B)Speed change interval (T)
[*][8] Beacon send mode (= B) [*][*][8] Toggle transmit[*][9] ASCII/Morse converter mode [*][*][9] Insert message number (M)[*][0] Retain last serial number (K) [*][*][0} Serial number set
Insert serial number (M)
[*][A][1] CW sidetone on [*][B][1] CW sidetone off[*][A][2] Keypad tone on [*][B][2] Keypad tone off[*][A][3] Dot memory on [*][B][3] Dot memory off[*][A][4] Dash memory on [*][B][4] Dash memory off[*][A][5] Iambic mode [*][B][5] Bug mode[*][A][6] Use keypad speed [*][B][6] Use analog speed[*][A][7] Serial number as is [*][B][7] Serial number N = 9, T = 0[*][A][8] Real time spacing [*][B][8] Auto-word spacing[*][A][9] Five-character groups [*][B][9] Random length groups[*][A][0] Farnsworth code [*][B][0] Slow code
[*][C][1] 4-letter groups [*][D][1] Latitude (D)[*][C][2] Easy character set [*][D][2} Longitude (D)[*][C][3] Medium difficulty character set [*][D][3] Time of Day (D)[*][C][4] Complete character set [*][D][4] Band (D)[*][C][5] Straight key mode[*][C][6] Farnsworth character speed [*][D][6] Simulator speed limit (D/Q)[*][C][7] (See special commands next page) [*][D][7] Score[*][C][8] " "[*][C][9] Set ASCII baud rate[*][C][0] Reset [*][D][0] Restart
[0]...[9] Send message (KID)Load message (M)Beacon start (B)Start code practice session (T)
[A] Select memory bank A[B] Select memory bank B[C] Repeat last serial number (K/B)
Change simulator channel (Q/D)[D] Resume message / Select next higher message (K)
Edit message (M)Random code practice (T)Change simulator channel (D)

52
Special Commands
[*][C][7][0][0] Sends the EPROM version number in Morse[*][C][7][0][1] Serial number contains no leading zeroes[*][C][7][0][2] Serial number minimum 2 digits, 0 fill[*][C][7][0][3] Serial number minimum 3 digits, 0 fill[*][C][7][0][4] Serial number always 4 digits, 0 fill[*][C][7][0][5] Enable PTT and keying for current mode[*][C][7][0][6] Disable PTT and keying for current mode[*][C][7][0][7] Turn on PTT[*][C][7][0][8] Turn off PTT[*][C][7][0][9] Go to data mode
[*][C][7][1][0] Sends the EPROM version number in ASCll[*][C][7][1][1] Paddle normal; dot = ring, dash = tip[*][C][7][1][2] Paddle reversed; dot = tip, dash = ring[*][C][7][1][3] Dot/dash squeeze generates alternating dots and dashes[*][C][7][1][4] Dot/dash squeeze generates all dots or all dashes[*][C][7][1][5] Keypad controls speed of data from serial[*][C][7][1][6] SPEED knob controls speed of data from serial[*][C][7][1][7] Enable auto character spacing after 1 dot interval[*][C][7][1][8] Enable auto character spacing after 2 dot intervals[*][C][7][1][9] Disable auto character spacing from paddle
[*][C][7][2][1] 0 in a serial number is sent as numeral 0[*][C][7][2][2] 0 in a serial number is sent as letter T[*][C][7][2][3] 0 in a serial number is sent as letter O[*][C][7][2][4] 1 in a serial number is sent as numeral 1[*][C][7][2][5] 1 in a serial number is sent as letter A[*][C][7][2][6] 9 in a serial number is sent as numeral 9[*][C][7][2][7] 9 in a serial number is sent as letter N
[*][C][7][3][0] Read spare parallel port inputs[*][C][7][3][1] Message buffers send Farnsworth code[*][C][7][3][2] Message buffers send slow code[*][C][7][3][3] Literal space characters from serial[*][C][7][3][4] Limited space characters from serial[*][C][7][3][5] Trainer letters A-Z[*][C][7][3][6] Trainer numbers 0-9[*][C][7][3][7] Trainer letters and numbers[*][C][7][3][8] Curtis type A keying[*][C][7][3][9] Curtis type 8 keying[*][C]8[0][n][n] Transmit delay time[*][C]8[1][n][n] Set the counter -clockwise limit of the SPEED knob[*][C]8[2][n][n] Set the clockwise limit of the SPEED knob[*][C]8[6][n][n] Set the code speed

53
APPENDIX I - Component Placement Diagram

54
APPENDIX J - Schematic Diagram

55