Embed Size (px)
Citation preview
www.peterhayesflyfishing.com THE AUSTRALIAN FLY FISHING SCHOOL
© Copyright Peter Hayes. May not be reproduced without permission of the author. 1
Advanced Tune Up Notes Course Breakdown
1. Trouble Shooting the Cast
2. General Improvements
3. New Casting Concepts
1. Trouble Shooting the Cast:
Discussion: 5 minute group discussion to identify issues. Guessing needs? Trailing loops, lack of shoot, piled leaders, fat loops,
Explain causes and teach trails.
Removing wind knot trick.
Lack of power or drive
Poor Roll Casting skills
Lack of accuracy- hand eye coordination
Sore arm / shoulders / elbow / wrist from poor bio mechanics
Cannot figure eight etc.
2. General Improvements:
False Casting:
Loop Shape, form and plane: Use rope Line Speed/Tempo Try blindfolded.
Trajectory
Casting Plane: Tilted out / in / offside.
Work on picking leaves with various casting planes and trajectories. Variety of loop heights. Hover fly.
Pick Up Lay Down Cast: three shoots to the end exercise
3. Newer Casting Concepts:
Spiral pickup, Back flip cast and cut back cast, toilet bend pick up, constant tension casting.
Learning and practice exercises:
False casting – Blindfolded also
Picking leaves – trajectory and plane
Reverse drift
Practice throwing trails
Circles, eights and straights.
Skish
Course Notes: Full Set of all notes
Body Language - for better casting
The Red Ferrari
Gear – assembly and equipment
Get a Grip On It
Casting Plane and Stance
Rod Loading Principals
Stopping the Rod – squeezing superglue stop
Roll Casting – my favourite cast
False Casting – should be minimised
Trouble Shooting the Cast
Knot Difficult Knots - Surgeon, Clinch & Penny
Loop Shape and Form – Fat Albert & Elle
Single Hauling – extra line speed for free
Retrieving Line in the Air
Advanced Roll Casting Techniques
Double Hauling Pulling -gives greater power and distance Swoop - for tighter loops Aerial Mends Water Mends Creative Casting
www.peterhayesflyfishing.com THE AUSTRALIAN FLY FISHING SCHOOL
© Copyright Peter Hayes. May not be reproduced without permission of the author. 2
BODY LANGUAGE - for better casting In subsequent articles I would like to tell you about a variety of fishing situations you will undoubtedly find yourself in and some of the casts that you would do well to master to make the best of them. I will draw on 30 years experience fishing in streams, lakes and saltwater. For the last dozen years this fishing has been done in the capacity of a professional guide as well as a competitive fisherman at world championship level. I believe what I have to convey to you can, and will, make a great difference to your catch rates and more importantly to your enjoyment of the sport. Before we can get into the details of specific situations and related casts we must first chat generally about what I call the ‘Body Language’ of good casting. You must understand what I am talking about and be comfortably in achieving it. We can then move forward on a much faster learning curve and deal with a variety of casting techniques. Good body language is obvious when you see it. Watching bad casting can be likened to listening and watching me play a violin. Some of the obvious differences are spelt out below and next time you go out for a practice cast I want you to consider where you fit in to ‘casting body language’. Soft Hands Are perhaps the most important asset to achieving powerful yet graceful technique. Grip the corks in a squirrel grip and you will never feel the delicate signals coming from the flexing of the rod tip. You will never be able to stop the rod abruptly and smoothly. Learning reverse drift (covered later) will be near impossible. You will end up with a sore neck and perhaps a tennis elbow and worse to come is the dreaded tailing loop that is so often the result of a tight grip.
Caress the corks, let the rod talk to you. Let the grip pivot in your palm, it’s just like using a drumstick. A loose grip enables you to squeeze off the cast to a sudden stop. This is a sensational feeling when you first feel it. Weight transfer Don’t become the cement man. It is really import in all sports that I can think of to understand weight transfer. Rock back and forward a little as you cast. Believe it or not in good casting both the back and forward casts should be initiated with body movement. This is really important for little people or long casting Bent knees Are an important aspect of weight transfer. If you are stiff in the legs I will bet you are stiff everywhere else. Bend the knees a little, soften up. Loose as a goose. Could you ski or play golf effectively with straight legs? The final delivery of a long cast is a little like the hip and leg movement of a golf shot. Or skimming a stone on a river. Light on your feet A student once told me he was taught to box in a gym. The instructor said he was not allowed to put his heels on the ground at any time. When I am casting well, in the groove if you like, I am mostly slightly on my toes. Imagine standing on a soft sand-flat in Northern Australia. Your feet should hardly leave an impression in the sand as you walk. Be light on your feet. I can’t understand how anyone could possibly enjoy casting with flat, heavy, feet. Bent elbow At our casting schools I so often see fly casters casting with their arm too straight. I call it a wooden arm. Wooden arm casters can never make good casters. For a start it is not possible to move the rod tip in a straight line, it will scribe an arc that results in a fat loop. It is not possible to achieve a sudden but smooth stop and they never get the feel of the wonderful throwing action that results from the straightening of a bent elbow. Think about throwing a ball. It is the straightening of the bent elbow that gives the
www.peterhayesflyfishing.com THE AUSTRALIAN FLY FISHING SCHOOL
© Copyright Peter Hayes. May not be reproduced without permission of the author. 3
fling. If you threw with a wooden arm you would have to call it bowling. Wooden arm casters end up with dodgy shoulders too. Relaxed wrist Forget the story about tying the rod but to your forearm, don’t bend your wrist etc. This is all rubbish. Think again of throwing a ball. Bandage a wooden ruler to the back of your forearm and wrist and then try to throw a ball. It’s ridiculous. The more relaxed your wrist can be, and within reason, the more you can use it the better. The only important thing here, and it is of paramount importance, is that you move the rod first then use your wrist at the latest possible time. Many beginners simply start the casting stroke with their wrist. This is one of the biggest faults in most anglers casting. The correct sequence of movement for throwing or casting is body, arm, wrist. Not wrist, wrist, arm, or wrist, arm, arm. Go and try throwing a ball with a wrist first movement. I call this a 2 year old girl throw. Smoooth Mel Kreiger said think oily, I say think sexy, really sexy. Good casting is like ballet. It should not be aggressive, nor tiring or painful. Loops should flow smoothly out of the rod tip with power, speed and grace. You should feel at one with the rod, not fighting against it. Good casting is actually effortless and anyone watching should really want to do it. Try this for me. Do some false casting with 30 feet of line out. Get the loop reasonably tight and moving with nice tempo then shut your eyes. Yes, shut them and continue to cast. What is the feeling in your hand. Loosen up – everywhere. Feel your breathing. It should feel sweet. What is happening is a beautiful thing.
www.peterhayesflyfishing.com THE AUSTRALIAN FLY FISHING SCHOOL
© Copyright Peter Hayes. May not be reproduced without permission of the author. 4
The Red Ferrari – a must read I need to tell you a story. A very important story that I feel compelled to tell you. You must read it carefully, and you must understand it. If you do then you will make a great fly caster.
Hank was a 28 year old yuppie New York stockbroker. He wanted desperately to learn to fly cast.
His desire was fuelled each lunch-time by watching his mates cast on the top floor of their multi story office block. They were exceptional casters and every day they competed with each other to throw the perfect cast.
It was summer; the days were sunny, warm and still. The fluorescent orange fly lines they used speared their way into the distance with perfectly symmetrical, narrow loops. The faster the lines went through the air, and the narrower the loops, the further they flew.
Hank the yank became obsessed with the almost sensual nature of the perfect cast. He determined he would outdo his work mates and really teach them a thing or two about the perfect cast.
Rather than take lessons from his mates, fishing guides or even Peter Hayes, Hank decided to search the web. From Amazon.com he bought every book ever written on the subject of fly casting. He enthusiastically set out to read every word of each of the 427 books.
Nine months and many late nights later Hank decided that the perfect cast is not achieved by using a Sage rod, nor a Loomis or a Scott rod but by using his Red Ferrari.
On a sunny Sunday afternoon his fly casting work mates were invited to a drag racing strip where hank excitedly skited that he would show them the perfect fly cast.
They were perplexed and confused as Hank extended the Ferraris aerial. Onto the end of the aerial he tied the back end of the Fluro orange fly line. Hank walked the entire 30 metres of line back behind the car and laid it on the ground in a dead straight line.
He asked his mates to gather around the end of the quarter mile long drag strip to watch the perfect loop fly off into the distance.
After warming up the car Hank jumped in, he put on his seatbelt and his racing helmet. Starting slowly he accelerated the automatic Ferrari smoothly. Imagine what happened.
At 20 km/hr the aerial had a slight backward bend caused by towing the weight of the line. The line was dragged forward flapping against the ground every now and then.
At 100 km/hr the aerial had a fair bend in it and the line no longer dragged on the ground. Hank reached top speed.
At 300 km/hr the aerial had a fantastic backward bend and the line trailed pin straight behind the vehicle (unlike some of your back casts). Naturally the tip of the aerial was moving in a dead straight line toward the end of the drag strip.
Hanks mates cheered as he approached the end of the quarter mile long straight. They recognised that this was the best forward cast they had ever seen.
Hank needed one further ingredient to produce the perfect cast. A solid brick wall had been built at the end of the drag strip. His mates watched with anticipation has he slammed the Ferrari which was still accelerating, head on into the wall at 300km/hr. (this is what I call a superglue stop)
Imagine the cast they witnessed. The aerial had been bent backwards, the line was travelling fast and it was in a dead straight line. The top of the aerial whipped forward as it stopped dead in its tracks when the Ferrari hit the wall. The back of the line was held tight and stationary by the aerial and the rest of the line flew over the top of the car in a perfectly tight and symmetrical loop. The cheer went up, it was the perfect cast.
Now imagine the Ferrari going over the top of a big round hill and crashing into a truck as he went down the other side. This would be a terrible cast.
Imagine the Ferrari going round a big corner and crashing into a wall. That would be a terrible cast.
www.peterhayesflyfishing.com THE AUSTRALIAN FLY FISHING SCHOOL
© Copyright Peter Hayes. May not be reproduced without permission of the author. 5
In both cases the power would be dissipated through a circular path.
Imagine if you replaced the brick wall with a huge sponge rubber block that successfully decelerated Hank to a stop over 20 or so metres. That would be a terrible cast as the loop would not form properly.
You need a sudden, abrupt, stop.
Worse still would be if you removed the wall altogether and the Ferrari ran out of petrol at the end of the mile. If it spluttered to a long slow stop the line would not even travel over the top of the Ferrari.
Another bad cast would result if Hank had driven just 1 meter and stepped on the brakes. This is obviously not a long enough casting stroke.
I hope you understand this silly story and next time you practice your casting think of a miniature Ferrari stuck on your rod tip.
Think of yourself as a Ferrari driver rather than a granny driving a Volkswagen over a hill.
Use a bright coloured fly line, drive your rod tip in straight lines, stop it abruptly and watch the perfect cast with a grin. Fly casting is fun.
GEAR - assembly & equipment Rod Assembly
Push ferrules together with medium firmness 90 degrees out of alignment. Rotate to line up as you push the final little bit home. Reverse procedure to disassemble. Be sure to always carry your rod backwards between fishing spots. Many rods are broken by being poked into trees, bushes rocks etc.
Tight Ferrules
Hold rod horizontally behind knees with one hand each side of ferrule. Move both knees outward pressing against your wrists. The logic behind this method is that your leg muscles are about 10 times stronger than your arm muscles. An additional benefit is that you will apply the force in a straight line along the axis of the rod. Lessening the chance of breakage.
Reel and Line
On disassembly never fully wind the leader back onto the spool. If you do there is a chance that the end will be very difficult to find, it may form a half hitch when you pull it out and cause problems later or you may accidentally pull it out the wrong area of the reel frame. Make sure you always leave 30 – 40 cm of tippet out of the reel to avoid these issues.
Line
When threading your rod resist using the tippet to thread through the runners. Instead double over the fly line about 60 cm from the end then use this doubled over piece to thread the rod. In this form it is easier to see and work with. It is also less likely to skid down the rings if you accidentally let it go.
Threading the Rod
When straightening coiled line (removing memory) try to wrap the line around an object 10 metres away. Pulling on both ends then straightens 20 metres. Another way is to drop a coil of line to the ground and pulling with both hands against your foot you will straighten 3 – 4 metres each pull. This is much faster and better than straightening the line with your hands pulling 0.5-1 meter at a time.
If your leader/line join ever gets stuck in the rod tip as you try to pull it out please consider this better and safer method. Reach the rod tip over an obstacle it could be a rock, a branch of a tree or a clump of grass. Walking away from the object while holding the rod butt and the fly will pull line from the reel. This is a straight pull on the rod tip – not an angled pull that one day will result in a breakage.
If you ever pull line out your rod by hand be sure to be holding the silver tip top runner in the other hand. It is impossible to break the rod this way.
Leaders
Always straighten leaders before fishing. Never tolerate a telephone cord leader. Straighten by pulling several times through a tight hand. There
www.peterhayesflyfishing.com THE AUSTRALIAN FLY FISHING SCHOOL
© Copyright Peter Hayes. May not be reproduced without permission of the author. 6
is an opportunity here to feel for any wind knots, abrasions and week spots. A combination of heat caused by friction and stretching straightens the leader.
Hooking the Fly on the Rod
Try to avoid using the fly keeper next to the corks. Instead use this method. Leave a couple of metres of fly line out of the rod tip. Grab the fly and reaching up the rod as far as you can place it in one of the runners well up the rod. Draw the leader back around the base of the reel and wind up any slack. This always leaves plenty of line out of the rod tip for when you next want to start casting.
Getting the fly out of the ring can be done in two simple ways. With your line hand undo the leader from around the reel. Keep hold of it with one finger and pulling a slight bend into the rod tip let the loop ping off your finger tip. In most cases the fly will flick off the rod ring onto the water in front of you. If it sticks on the rod ring, and occasionally it will, you can tap the rod lightly, but sharply, just in front of the corks. This sudden jar gives the fly whiplash as it jumps off the ring into the water.
GETTING A GRIP To me, the way that you grip the rod is the single most important thing in good fly casting. Get this part right and everything else will fall into place more easily.
If you use an incorrect grip your casting ability can be very restricted.
Geometry of the Grip
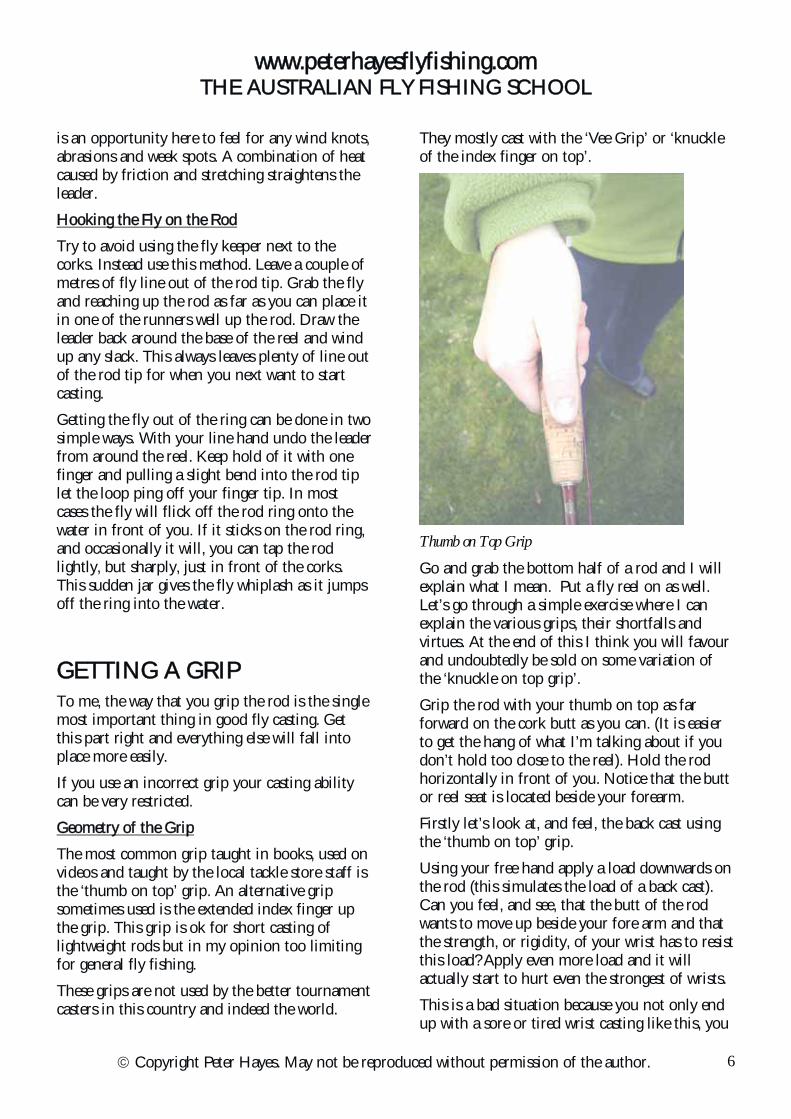
The most common grip taught in books, used on videos and taught by the local tackle store staff is the ‘thumb on top’ grip. An alternative grip sometimes used is the extended index finger up the grip. This grip is ok for short casting of lightweight rods but in my opinion too limiting for general fly fishing.
These grips are not used by the better tournament casters in this country and indeed the world.
They mostly cast with the ‘Vee Grip’ or ‘knuckle of the index finger on top’.
Thumb on Top Grip
Go and grab the bottom half of a rod and I will explain what I mean. Put a fly reel on as well. Let’s go through a simple exercise where I can explain the various grips, their shortfalls and virtues. At the end of this I think you will favour and undoubtedly be sold on some variation of the ‘knuckle on top grip’.
Grip the rod with your thumb on top as far forward on the cork butt as you can. (It is easier to get the hang of what I’m talking about if you don’t hold too close to the reel). Hold the rod horizontally in front of you. Notice that the butt or reel seat is located beside your forearm.
Firstly let’s look at, and feel, the back cast using the ‘thumb on top’ grip.
Using your free hand apply a load downwards on the rod (this simulates the load of a back cast). Can you feel, and see, that the butt of the rod wants to move up beside your fore arm and that the strength, or rigidity, of your wrist has to resist this load? Apply even more load and it will actually start to hurt even the strongest of wrists.
This is a bad situation because you not only end up with a sore or tired wrist casting like this, you
www.peterhayesflyfishing.com THE AUSTRALIAN FLY FISHING SCHOOL
© Copyright Peter Hayes. May not be reproduced without permission of the author. 7
also loose control of the casting stroke at the completion of the back cast. Because your wrist is straining to resist the back cast load, when this load finally comes off your wrist at the end of the backstroke you naturally, and unthinkingly, swing the rod back further. This ‘windscreen wiper’ action always results in a poor back cast. This is something that we must avoid at all costs.
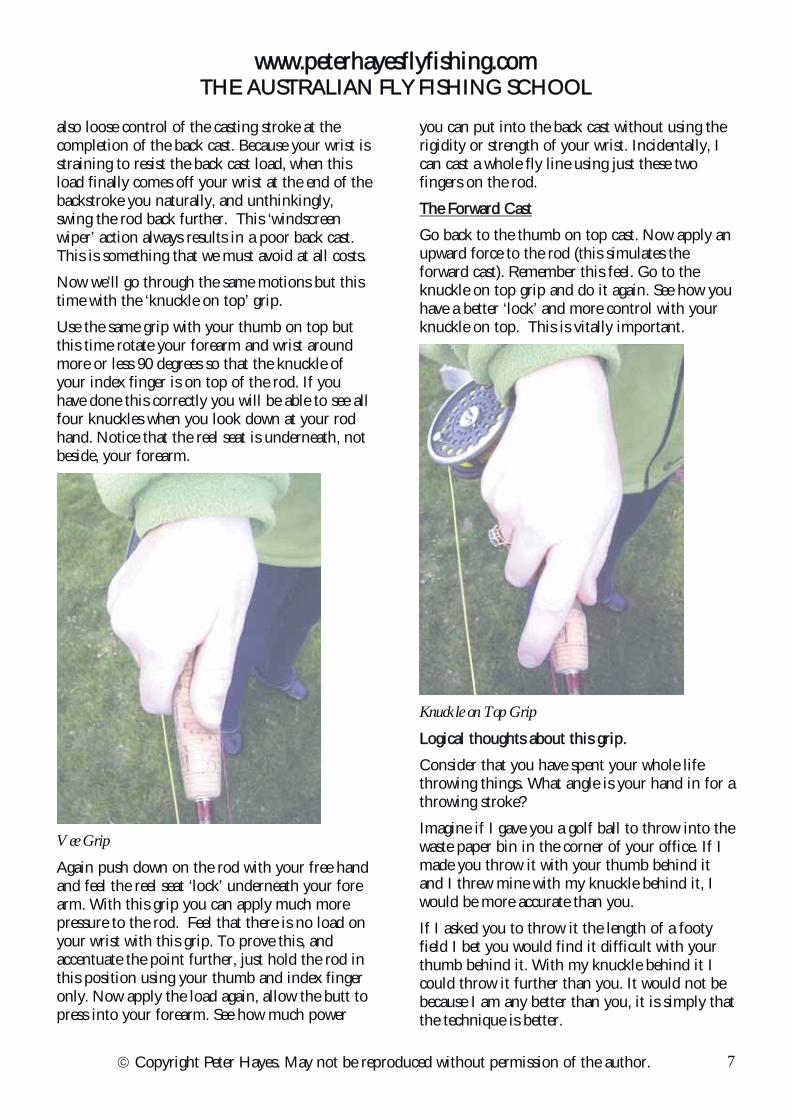
Now we’ll go through the same motions but this time with the ‘knuckle on top’ grip.
Use the same grip with your thumb on top but this time rotate your forearm and wrist around more or less 90 degrees so that the knuckle of your index finger is on top of the rod. If you have done this correctly you will be able to see all four knuckles when you look down at your rod hand. Notice that the reel seat is underneath, not beside, your forearm.
Vee Grip
Again push down on the rod with your free hand and feel the reel seat ‘lock’ underneath your fore arm. With this grip you can apply much more pressure to the rod. Feel that there is no load on your wrist with this grip. To prove this, and accentuate the point further, just hold the rod in this position using your thumb and index finger only. Now apply the load again, allow the butt to press into your forearm. See how much power
you can put into the back cast without using the rigidity or strength of your wrist. Incidentally, I can cast a whole fly line using just these two fingers on the rod.
The Forward Cast
Go back to the thumb on top cast. Now apply an upward force to the rod (this simulates the forward cast). Remember this feel. Go to the knuckle on top grip and do it again. See how you have a better ‘lock’ and more control with your knuckle on top. This is vitally important.
Knuckle on Top Grip
Logical thoughts about this grip.
Consider that you have spent your whole life throwing things. What angle is your hand in for a throwing stroke?
Imagine if I gave you a golf ball to throw into the waste paper bin in the corner of your office. If I made you throw it with your thumb behind it and I threw mine with my knuckle behind it, I would be more accurate than you.
If I asked you to throw it the length of a footy field I bet you would find it difficult with your thumb behind it. With my knuckle behind it I could throw it further than you. It would not be because I am any better than you, it is simply that the technique is better.
www.peterhayesflyfishing.com THE AUSTRALIAN FLY FISHING SCHOOL
© Copyright Peter Hayes. May not be reproduced without permission of the author. 8
Casting a fly line is no more difficult than throwing stones. The hand, arm and wrist movements are identical. Knuckle behind and a short stroke for a short cast or a long stroke for a long cast.
Strength of the Grip
One of the easiest ways to really improve an intermediate caster is to get them to relax their grip.
The strength you use to hold the rod is very important to me. Believe it or not the correct strength is much less than you would expect. Again like throwing you do not squeeze the ball before you throw it. Have you ever heard golf instructors say ‘don’t strangle the corks’ – this is the same. Hold the corks like they are an over ripe banana. Don’t squish the banana between your fingers.
If the corks are squeezed too tightly it is not possible to move the rod in a smooth enough manner. Nor is it possible to stop it crisply enough. Shock waves will appear in the line, you will promote the possibility of a tennis elbow, end up with tight shoulder and neck muscles and worse still – never, ever, be a great fly caster. Advanced techniques like reverse drift will be impossible to learn and you will never get the fabulous feeling of the rod loading and unloading.
Good fly casting must at times be powerful and always be smooth and graceful. This sport must be more like ballet than boxing.
A relaxed grip will enable you to squeeze to a stop. When I asked the great Joan Wulff about hand tension she said two things;
1. Hold the corks like a wet sponge and don’t squeeze any water out on the loading move.
2. Squeeze to a stop on the power snap. Peter ‘I tell the students that you cannot squeeze a squeeze’.
Feedback
What do you think this term might mean? Think about it for a moment before you read on. Good
casters get plenty of feedback from the line weight and the rod flex to their casting hand.
You can only get this feed back if you use a soft hand or a light grip and you are receptive to the feelings coming from your rod tip. This feedback or feel, comes from the line weight pulling against the rod tip as you move it back and forward. You should be able to feel the rod load and unload. It should feel silky smooth, almost sexy.
Casting with a tight grip and tense arm muscles is an awful experience to me. Don’t do it. Seek out the sensuous feel of fly casting.
In Summary
Make sure you can see some of your knuckles when you look at your rod hand.
Ensure the rod butt is locked under your forearm for loading move of the back cast. There should be no wrist rotation during this move. Your index finger knuckle provides the push for the forward cast.
Use a relaxed grip with a soft hand and remember that you cannot squeeze a squeeze.
CASTING PLANE & STANCE Casting Plane
Most beginner and intermediate casters do all of their casting with the rod tilted at an angle away from their body. I call this a tilted out plane. I guess they’re scared of being punctured by the fly and whipped by the line. They incorrectly believe this angle will always keep the fly and line away from them.
If you adopt this casting plane, and attitude, you will never cast with any consistent accuracy. You will sometimes promote wind knots. The fly and line will often collide into the rod. It will be very difficult to do any of the ‘Off Side’ or tilted in casts and perform any of the aerial mends necessary for river and stream fishing.
Of equal importance, you will be dangerous to have as a boat partner and your fishing mates will avoid you like the plague. Let me explain my
www.peterhayesflyfishing.com THE AUSTRALIAN FLY FISHING SCHOOL
© Copyright Peter Hayes. May not be reproduced without permission of the author. 9
ideas on this very important aspect of fly casting. Descriptions are all for right hand casters.
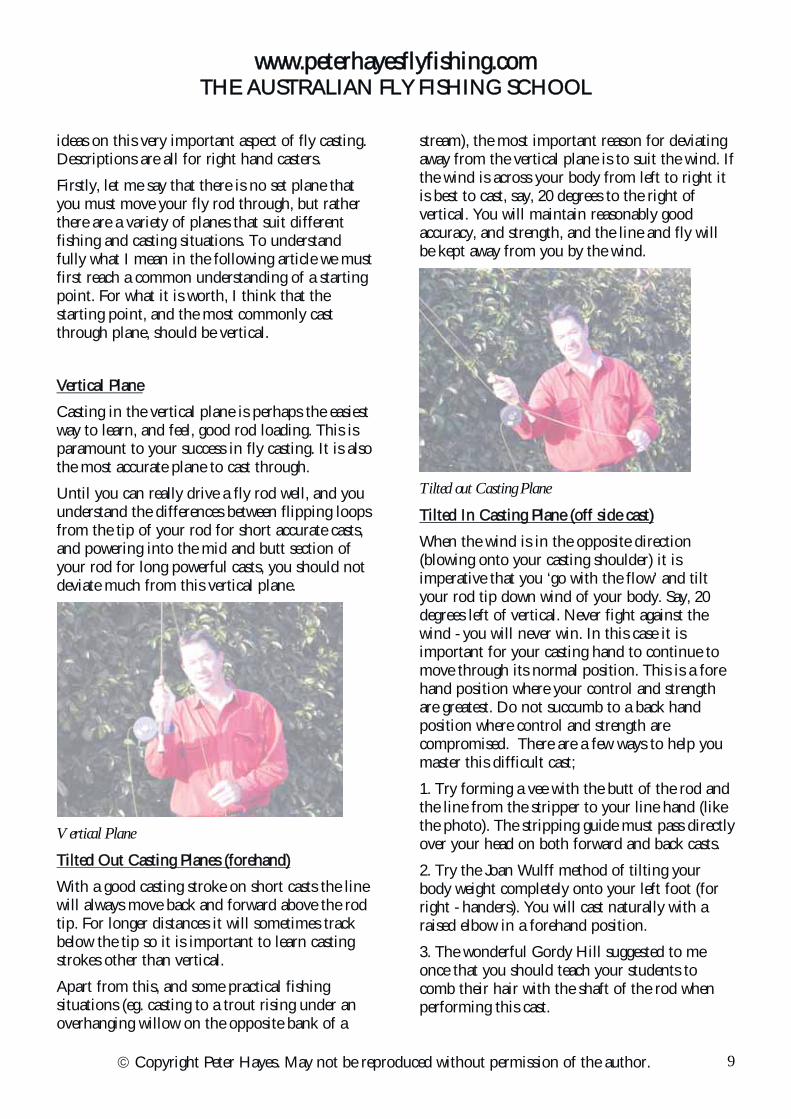
Firstly, let me say that there is no set plane that you must move your fly rod through, but rather there are a variety of planes that suit different fishing and casting situations. To understand fully what I mean in the following article we must first reach a common understanding of a starting point. For what it is worth, I think that the starting point, and the most commonly cast through plane, should be vertical.
Vertical Plane
Casting in the vertical plane is perhaps the easiest way to learn, and feel, good rod loading. This is paramount to your success in fly casting. It is also the most accurate plane to cast through.
Until you can really drive a fly rod well, and you understand the differences between flipping loops from the tip of your rod for short accurate casts, and powering into the mid and butt section of your rod for long powerful casts, you should not deviate much from this vertical plane.
Vertical Plane
Tilted Out Casting Planes (forehand)
With a good casting stroke on short casts the line will always move back and forward above the rod tip. For longer distances it will sometimes track below the tip so it is important to learn casting strokes other than vertical.
Apart from this, and some practical fishing situations (eg. casting to a trout rising under an overhanging willow on the opposite bank of a
stream), the most important reason for deviating away from the vertical plane is to suit the wind. If the wind is across your body from left to right it is best to cast, say, 20 degrees to the right of vertical. You will maintain reasonably good accuracy, and strength, and the line and fly will be kept away from you by the wind.
Tilted out Casting Plane
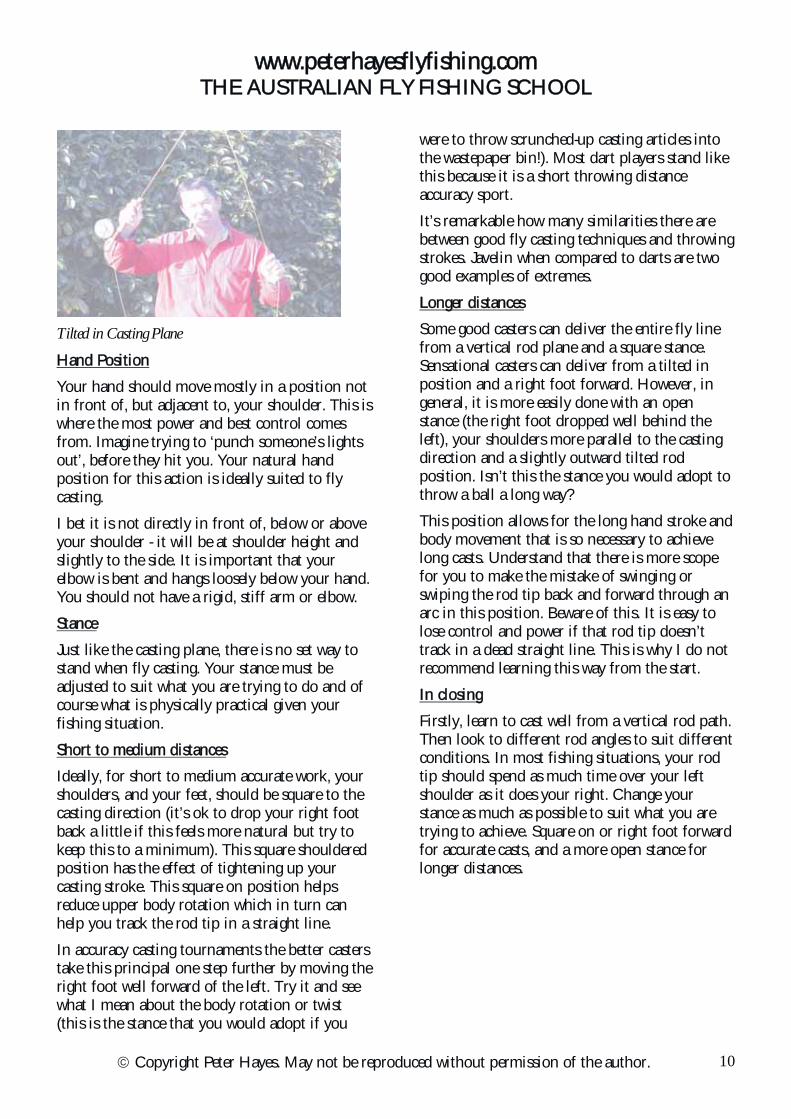
Tilted In Casting Plane (off side cast)
When the wind is in the opposite direction (blowing onto your casting shoulder) it is imperative that you ‘go with the flow’ and tilt your rod tip down wind of your body. Say, 20 degrees left of vertical. Never fight against the wind - you will never win. In this case it is important for your casting hand to continue to move through its normal position. This is a fore hand position where your control and strength are greatest. Do not succumb to a back hand position where control and strength are compromised. There are a few ways to help you master this difficult cast;
1. Try forming a vee with the butt of the rod and the line from the stripper to your line hand (like the photo). The stripping guide must pass directly over your head on both forward and back casts.
2. Try the Joan Wulff method of tilting your body weight completely onto your left foot (for right - handers). You will cast naturally with a raised elbow in a forehand position.
3. The wonderful Gordy Hill suggested to me once that you should teach your students to comb their hair with the shaft of the rod when performing this cast.
www.peterhayesflyfishing.com THE AUSTRALIAN FLY FISHING SCHOOL
© Copyright Peter Hayes. May not be reproduced without permission of the author. 10
Tilted in Casting Plane
Hand Position
Your hand should move mostly in a position not in front of, but adjacent to, your shoulder. This is where the most power and best control comes from. Imagine trying to ‘punch someone’s lights out’, before they hit you. Your natural hand position for this action is ideally suited to fly casting.
I bet it is not directly in front of, below or above your shoulder - it will be at shoulder height and slightly to the side. It is important that your elbow is bent and hangs loosely below your hand. You should not have a rigid, stiff arm or elbow.
Stance
Just like the casting plane, there is no set way to stand when fly casting. Your stance must be adjusted to suit what you are trying to do and of course what is physically practical given your fishing situation.
Short to medium distances
Ideally, for short to medium accurate work, your shoulders, and your feet, should be square to the casting direction (it’s ok to drop your right foot back a little if this feels more natural but try to keep this to a minimum). This square shouldered position has the effect of tightening up your casting stroke. This square on position helps reduce upper body rotation which in turn can help you track the rod tip in a straight line.
In accuracy casting tournaments the better casters take this principal one step further by moving the right foot well forward of the left. Try it and see what I mean about the body rotation or twist (this is the stance that you would adopt if you
were to throw scrunched-up casting articles into the wastepaper bin!). Most dart players stand like this because it is a short throwing distance accuracy sport.
It’s remarkable how many similarities there are between good fly casting techniques and throwing strokes. Javelin when compared to darts are two good examples of extremes.
Longer distances
Some good casters can deliver the entire fly line from a vertical rod plane and a square stance. Sensational casters can deliver from a tilted in position and a right foot forward. However, in general, it is more easily done with an open stance (the right foot dropped well behind the left), your shoulders more parallel to the casting direction and a slightly outward tilted rod position. Isn’t this the stance you would adopt to throw a ball a long way?
This position allows for the long hand stroke and body movement that is so necessary to achieve long casts. Understand that there is more scope for you to make the mistake of swinging or swiping the rod tip back and forward through an arc in this position. Beware of this. It is easy to lose control and power if that rod tip doesn’t track in a dead straight line. This is why I do not recommend learning this way from the start.
In closing
Firstly, learn to cast well from a vertical rod path. Then look to different rod angles to suit different conditions. In most fishing situations, your rod tip should spend as much time over your left shoulder as it does your right. Change your stance as much as possible to suit what you are trying to achieve. Square on or right foot forward for accurate casts, and a more open stance for longer distances.
www.peterhayesflyfishing.com THE AUSTRALIAN FLY FISHING SCHOOL
© Copyright Peter Hayes. May not be reproduced without permission of the author. 11
ROD LOADING – principals Loading the rod is of vital importance to good fly casting. Good casters simply load, or bend, the rod more than poor casters. Whilst in this bent state they are also able to keep the rod tip moving in a straight line. This loading effect causes the catapulting that propels the line forward and makes the whole thing look effortless and smooth. Without the bending the rod works like a windscreen wiper simply swiping backwards and forwards. Much effort is expended by the caster for little gain. You won’t want to persevere with fly fishing if you cast like this.
For good rod loading you need to consider the following points so take a rod out on the water and go through the following exercises. Try to avoid practicing on the grass on the – it doesn’t have the same effect and it will take ten times longer to learn the feelings.
Pre bend
Fly rods, because of their nature (long fine whippy things) don’t like being bent suddenly or instantly. They work better as catapults if the bend is put in gradually. Think back to using a sling shot as a kid. You pulled the rubber bands back slowly and as far as you could before you let fly. You didn’t pull back at a hundred miles an hour.
A fly rod is no different the prebend needs to be applied in a gradual manner until it peaks.
To understand this principal start with just 10 feet of fly line on the water and your rod tip level with, or in the water. In this static position the rod is not bent, the water is floating the line. Now lift the rod slowly until two feet of line is hanging from the rod tip. Stop here and think for a while. The rod tip starts to bend ever so slightly because the weight of this two feet of line is no longer supported by the water but by the rod.
Continue the lift and stop when four feet of line is hanging from the rod tip. Think again. The weight has increased even more, so the bending effect must have also increased.
Continue the lift and stop at six feet. Use your brain again. The weight of line hanging from the rod tip is even greater. Continue to the full ten feet. Now the entire fly line is supported by the rod, none of it is floated by the water. All of it is in the air. This is now the maximum bend that we can apply to the rod by the line weight alone. This is what I call ‘prebend’.
Rate of Prebend and the ‘Waterfall’ Effect
Applying this maximum prebend at a constant rate is extremely critical. If the prebend move occurs too quickly it is ineffective and the line noise as it leaves the water scares the fish. Try it now by casting say, 30 feet, then quickly rip into the back cast as fast as you can. Hear how the line tears or rips as it leaves the water. This absolutely scares the fins off fish. Avoid it at all costs. Similarly it is ineffective if it occurs too slowly or in a stop start manner.
You really need to ‘peel’ the line off the water at a constant rate. I can’t stress this point enough. Think of the water as honey. We need to remove all the line from the honey before we put the power snap in.
The waterfall effect ensures that the pre-bending occurs at a constantly accelerating and smooth rate. Cast a little further out, say 30 – 40 feet. Now watch the point where the fly line first touches or joins the water after leaving your rod tip. Watch this ‘joining point’ as you start moving the rod into the back cast. See how it travels out away from you towards the end of the line or leader. Try it a few times and watch the joining point travel away from you carefully.
When you get the lift off speed right you will see a little triangular waterfall, perhaps an inch or so high. Keep this waterfall running the entire length of your fly line at a rate that you can see with your eyes. When the waterfall reaches the leader (not before), snap into the back cast. Make sure you do this with a squeeze of the hand as well as a little wrist movement. Once the rod is properly pre-bent, or stretched tight, it doesn’t matter how hard you apply the power (better more than less).
I guess the trick is knowing how hard to pull for the given length of line and wind conditions –
www.peterhayesflyfishing.com THE AUSTRALIAN FLY FISHING SCHOOL
© Copyright Peter Hayes. May not be reproduced without permission of the author. 12
only practice and perhaps tuition will tell you this.
If you lift off the water too quickly you will not see the waterfall. If you lift too slowly the waterfall will not form and an additional problem is that the line will sag in toward you. The ideal situation is that the line is absolutely – get it right and see the difference to your cast.
Right Angle Load Application
Everything bends best, or most, if the load is applied at a right angle to the lever. This is a fact of life we cannot change. This applies to fly rods too. Never apply power to a fly rod until the waterfall reaches the leader, the fly line is out of the honey and the line is hanging at a right angle to the rod. At this instant the rod is fully pre-bent, the line is all out of the honey and it is at 90 degrees to the rod. At this point it is beneficial to have an appropriate grip as discussed previously.
Try something else for me. Pull your line back in to 5 feet and repeat the cast, adhering to the rules above. See how the line is at a right angle when the waterfall reaches the end? Do it again at 15 feet, again at 25 feet, again at 35 feet and so on. Cunning isn’t it? These rules apply no matter what length of line you cast. Remember to do it at a constant velocity and this will result in the line being taught, or straight. Do it too slowly or hesitate at the end and the line will sag creating too much slack to back cast.
Back cast and Forward Cast
Snap or squeeze into the back cast when the waterfall reaches the leader, wait for the line to straighten behind you and push forward with your knuckle. Track the rod tip in a straight line and push smoothly without trying to belt the cover off it. It’s a bit like golf. Within reason, the less you try on the forward cast the better it works – it’s all in the loading of the back cast. The forward cast should be a reversal of the back cast – a smooth acceleration to a sudden stop.
STOPPING THE ROD – the squeezing superglue stop The more fly casting courses I teach the more I believe in the importance in teaching people how to stop the rod on the back cast. This seems somewhat more important than the stop on the forward cast but it is not.
This may sound a little simplistic but if I can teach you to stop the rod properly (more crisply but without a shock) your casting will improve markedly and it will help you cast out of sight with sensational power and accuracy that you never imagined possible.
This is the only sport in the world that I can think of where we need to understand how to throw something backward – not forward. This is unnatural to us. The important part of throwing backwards occurs very late in the hand and arm movement. It is a small, and late, finger squeezing, wrist snap. It is the stop of the rod tip that I want to focus on most.
I want you to think about how you stop the rod now. You probably stop it in a jerky manner, there is a chance that you come to a slow stop or don’t really stop it at all and if you suffer from a trailing loop (where the fly tangles with the line on the final delivery cast) I bet you either drift slowly forward immediately after the stop (casting instructors the world over call this CREEP) or, worse, you violently whip the rod forward a little and stop forward of the rearmost tip position. This is the single worst problem faced by most fly casters.
The Squeezing Superglue Stop. (SSS)
Initially I want you to learn what I call a ‘superglue stop’. Imagine the whole rod blank is smeared with superglue. Whilst you move it backwards into the back cast it moves through the air without getting stuck. However, the instant you stop it on the back cast it gets immediately glued into the most rearmost position. It is absolutely stationary. The tip does not shake, or vibrate, back and forward. The tip does not whip forward, it is PERFECTLY still.
www.peterhayesflyfishing.com THE AUSTRALIAN FLY FISHING SCHOOL
© Copyright Peter Hayes. May not be reproduced without permission of the author. 13
I want you to turn sideways and cast a little lower in the sky, say 45 degrees (this is so you don’t get a sore neck watching vertically up). Watch your rod tip stop on the back cast. You should be able to see the tip runner. You should be able to see, and count, 4 or 5 snake guides before you throw the forward cast. If you cannot physically see these runners you haven’t stopped the rod still enough.
Go and try it. I bet you agree that it is difficult. I can’t stress to you how important it is to learn this superglue stop properly.
Another thought on this subject and excuse me for digressing. Can you remember seeing movies of the Roman days. Remember the huge ancient catapults they wheel up to the castle. They usually throw huge rocks or boiling, flaming, cauldrons of oil. Can you recall how the catapulting arm always comes to a superglue stop against a thumping big cross bar? This concept is not new.
As a general rule it seems the shorter the line you cast the more you vibrate the tip and the longer the line you cast the more you whip it forward a little when you stop.
Now here is one of the greatest secrets in fly casting. You must learn to move the rod through the air on both front and back casts with a very soft and relaxed hand. When you decide to speed up and stop (or apply the power snap) it is critically important that you learn to squeeze to a stop. Just momentarily squeeze to a stop. Perhaps ‘pop’ to a stop. Think of the corks being covered with bubble wrap. Never squeeze and air out during the forward or back stroke but pop a bubble at the end of each stroke. Go try it.
Caress the corks – don’t squeeze them or it will be impossible. You don’t squeeze a tennis ball before you throw it so don’t squeeze the corks. Hold the corks like an overripe banana. The easiest way to turn an average caster into a great caster is to get them to relax their grip and stop the rod abruptly but smoothly. The more suddenly we can stop the rod the faster the loop rockets off the rod tip.
Think of holding a really over ripe Banana, a Banana that is so squishy you would not dream of eating it. Don’t squish it until the ends of each stroke and then only for a fraction of a second.
Understand that wether you like it or not this is more like ballet than boxing
Reverse Drift.
Once you have mastered the squeezing superglue stop the next step is to learn reverse drift. This will add more power and control to your cast than any other technique can.
The power increases because it gives us a longer forward throwing stroke combined with a better rod loading angle. The control comes because the reverse drift adds a ‘shock absorber’ or cushioning to the back cast loop turnover. This cushioning effect is very important when throwing heavy flies (Tongariro and Saltwater fly fishing)
Once the rod has stopped absolutely still I want you to learn to drift the rod tip backwards a little. The amount of reverse drift can, and should, vary between just 15 cm for a 10 meter cast to 2 or 3 metres for a 25 meter cast.
You will find it much easier said than done. Some of the keys are:
Throw a tight and fast back cast. If you have a soft grip the back cast will pull the rod tip back for you. If your back cast has a large loop and it is slow you will never feel the sensational pull of the line.
After the superglue stop you can relax your wrist and fingers to reverse the rod tip.
After the superglue stop you can raise your elbow a few inches.
After the superglue stop move your hand backwards.
I think that good casters use a combination of all of the above to achieve good reverse drift.
To get the hang of it stand side on and cast a little lower with the rod tilted out so it is easy to see.
Cast using just the rod hand with the line locked under one finger.
Watch for the superglue stop then drift back while the loop is unrolling prior to making the forward cast. Note that the drift is not a second throw but a relaxing action.
www.peterhayesflyfishing.com THE AUSTRALIAN FLY FISHING SCHOOL
© Copyright Peter Hayes. May not be reproduced without permission of the author. 14
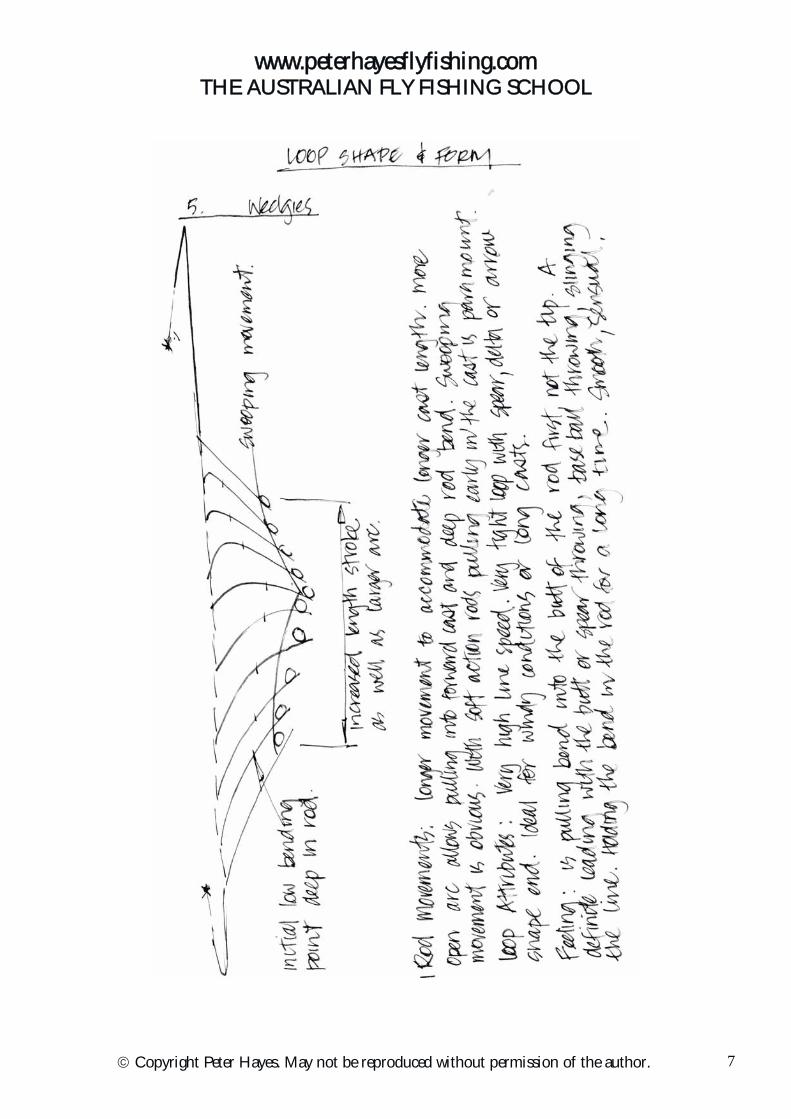
The point is this. For additional power we want to extend the forward throwing length and get a more laid back rod angle. Movement through this longer length and lower angle allows the bend to travel deeper into the butt of the rod thereby giving greater catapulting characteristics from a stronger part of the rod.
THERE IS NO SUBSTITUTE FOR LENGTH OF STROKE.
Aborigines worked this out 20 000 years ago, it is not a new concept. I could explain to you how a Woomera works but that is another story.
The ‘Whip Forward’ & ‘Creep Forward’ Stop
Under no circumstances should you whip the rod forward after it reaches the most rearward position. This is one of the greatest causes of the dreaded trailing loop. Apart from this stop screwing up the shape of the back cast loop you are simply robbing yourself of forward throwing length. An obvious analogy of this is that Javelin thrower does not stand and throw the javelin like a dart player does he?
Almost as bad as the whip it forward caster is the caster who drifts lazily forward while he is waiting for his back cast to unroll. Then puts the punch into the forward cast – this is the second most common cause of the trailing loop. It is called CREEP. Don’t be a CREEP.
Think of a cricketer throwing the ball from the boundary with a chance of a run out. He would take his hand right back as far as he could to give a long throwing length. He would be standing side on in an open shoulder stance and more than likely would extend his throwing length by skipping or running a step or two toward the stumps before he throws.
This is why javelin throwers run before they throw. They want to build up the throwing length. They don’t stand stationary with their toes on the line and throw from there. This would be a sissy throw.
The cricket player does not stand statue like on the boundary with his right foot forward then move his hand as far back as he can get it then drift it forward to in front of his face and throw
from there. In this case he has robbed himself of forward throwing length.
Try it. It is stupid, and sissy! You throw will lack the power to go very far at all and this is one of the main causes of the trailing loop.
Turbo charge your cast
In terms of adding power to a cast the priorities are as follows:
a) Learn a sudden and abrupt superglue stop.
b) Reverse drift from this position.
c) Swoop for the forward cast.
d) Add a single haul.
e) Add the double haul.
ROLL CASTING – my favourite cast I can’t emphasize the importance of good roll and half roll casting skills enough. There are many times during a fishing day that you should use these casts. Sometimes it is the most efficient way to fish (half rolling when flogging wet flies), sometimes it is the best way to swim the flies (roll casting when loch style fishing) and sometimes it is the only cast you can use (casting under willows with obstructions behind).
As an example of its effectiveness I remember years ago when I caught 57 fish in a day in a small mountain creek. I could not have caught half of them if I wasn’t proficient at both back and fore hand roll casting.
In addition to the fishing virtues of this cast Roll casting has the ability to teach you so much about casting in general.
Roll Casting
Is best practiced on the water but if you understand the concepts and principals of my method it works just fine on grass. In most cases my method of roll casting is quite different to what you see shown in fly fishing books and on videos.
www.peterhayesflyfishing.com THE AUSTRALIAN FLY FISHING SCHOOL
© Copyright Peter Hayes. May not be reproduced without permission of the author. 15
This comes about mainly from my tournament casting background where accuracy and speed are important. Commonly taught roll casting throws high, big, slow, open loops that do not shoot line and are extremely in accurate. It makes me shiver just writing that sentence.
If you learn to roll cast well, I must say there aren’t many around that can, you will find that it is the most accurate cast you can do. It is the fastest cast you can do, you can get the fly into tighter spots, you can shoot a lot of line, it can be a tight loop cast that travels close to the water and you will catch fish that others consider impossible. You will also enjoy fly fishing much more.
The Back Cast or Draw Back
Drawback would be a better term than back cast. It is vitally important when learning to roll cast that you do not use any rod power going back. Simply draw the line slowly back.
For short casting (up to 15 metres) I track the rod tip in a triangular path. The draw back is horizontal and as close to the water as possible. This is the base of the triangle. When the tip is as far back behind you as possible move it up in a vertical line. This is the short side of the triangle (imagine you are moving it up a star picket stuck in the ground). Once you reach the top of the picket, about shoulder height, stop. This stop is important. You must always start a roll cast from a stopped rod position.
Forward Cast
Now the tricky, and most important, part begins. Firstly, move the rod tip forward in a dead straight imaginary line between the top of the star picket and the target.
Imagine a piece of fencing wire has been strained between the two. The other way to conceptualize this rod tip path is to imagine building the triangle with 4 x 2 timber. From the target, back to the post, up the post then back to the target. The rod tip MUST not move away from this timber frame.
Delayed Gratification
Secondly, and also of paramount importance is the manner in which the rod tip is moved forward. It is important that most of the cast is executed with your wrist in a cocked back position. This means the butt of the rod should be away from your forearm (almost 90 degrees) for 2/3 or more of the delivery cast. Only at the last moment should you snap your wrist forward and produce a power snap. Resist at all costs turning your wrist over during the forward cast. Imagine there is a wedge of wood between your fore arm and the rod but – keep your wrist cocked until the last moment. The longer you can hold off the power snap the better in roll casting. I call this delayed gratification. I can type the effect using just 2 keys on my keyboard. A good cast will result by \\\\\\/ and a bad cast will result with \/. Simple
Loading the Rod on the Forward Cast
The speed of the forward cast is also important – it helps load the rod. It is best to ‘Drift’ into the power snap of the wrist. It is the length of this ‘drift’ prior to the application of power that allows us to load the rod. Remember back to previous lessons where I explained that the only thing that can bend the rod is the weight of the fly line pulling at a right angle to the rod? Well this applies to roll casting as well.
Try this simple exercise: Walking back away from the water, with 15 metres of line out draw the rod back to the base of the star picket. Now up to shoulder height and stop. With the rod in this position I want you to exaggerate the length of the ‘drift’ by walking forward three paces. Keep the rod tip back while you walk forward. Now drift the rod slowly forward keeping your wrist cocked back. Stop when the rod tip is adjacent to your body, your wrist should still be in a cocked position.
Look at the relationship between the line and the rod. See how about 4 metres of line is hanging at a right angle to the rod? Now snap your wrist over as you complete the forward cast. Feel the rod bend and the weight of the line? Understanding this loading principal forms the basis of good roll casting technique. Repeat this
www.peterhayesflyfishing.com THE AUSTRALIAN FLY FISHING SCHOOL
© Copyright Peter Hayes. May not be reproduced without permission of the author. 16
example again but this time walk forward 5 paces, then six etc. See how the cast improves each time as you get more and more line behind the rod tip.
The trick now is to learn to get as much of this effect as you can while your feet are in one spot – there aren’t many fishing situations where you can walk forward four steps before casting. Think about this though. Wading in streams you can often let the fly line trail downstream in the current before you make the forward cast – this is exactly the same effect. Likewise in some lake and stream situations you can deliberately make a 1/3 or ½ back cast and let the line lay on the water or the ground momentarily before you get into the forward cast. It is possible to roll cast a whole fly line in this manner. Casting in this manner still impresses me after 25 years of casting.
Loop Size is Everything
The forward loop size is directly related to the height of the rod tip at the start of the forward cast and the trajectory. A knee high starting point in a straight line to the target rolls a very tight and low loop where as a shoulder height start and horizontal trajectory rolls a tight but higher loop. Adjust the height to suit the fishing situation. Don’t cast tight loops unless you need to. In loch style fishing from a boat with 5-meter leaders of 2 kg you would be silly to throw tight loops. Instead, aim high, open loops into the air. Let the wind help you. But when that monster brown sips gently 2 metres inside the edge of a willow just 40 centimetres above the water make sure you wipe the smile of his face with a knee high shooting loop. When you finally wipe the smile from your face think about letting him go so that you can try again some other time.
FALSE CASTING – minimise it All the good fly fishermen I know try to avoid false casting. This is for many reasons. False casting is a great way to scare fish, get tangles, hook your boat partner or the bushes behind, put wind knots in the leader, get tired muscles, and waste time in the air. The good casters are great at long line shooting from a single back cast. They
are also great at getting the fly to the fish quickly. Hundreds of times in each guiding season I see perfect and accurate presentations made to a rise form 5 or 6 false casts after the event. The fish is 10 metres away by then!
Having said this all the good anglers have the ability to false cast powerful yet smooth, loops that are in control and appropriately sized. There are many times when it is good to false cast and it is one of those activities that I am sure is good for the spirit. If you enjoy it you should do it, after all we are suppose to be having fun. Let’s get good at it and use it with caution when fishing.
The following exercises, done regularly should really fast track your false casting technique. All casting to be done with the rod in a tilted out manner. A sideways stance with excellent views of both forward and back cast is absolutely essential.
Exercise 1 – Rod Loading
Objective: Learn to increase the bend in the rod as line length and hence weight increases. Learn to increase stroke length and rod arc to achieve different bending positions. False casting using different length lines.
Short Cast – 6 metres
Small arc and short stroke. Sudden and abrupt stop. Little power. Cast tight loops. Produce cast at a 45 degree tilted out plane in a side on stance. We want it easy to, and we must, watch or study the forward and back cast loops.
Feeling is to flip or flick little loops off the end of your rod tip.
Medium Cast - 13 metres
Larger arc, medium length stroke. More force required over a longer length. Feel like you are trying to break the rod 4 or 5 feet below the tip. Start stroke slow and smoothly accelerate to a thumping stop. Focus a little on pulling the butt into the forward cast, not pushing.
Long Cast – 18 metres
Really big arc, very long stroke length. Obviously pull the bend into the butt of the rod. Learn abrupt stops. Thwuumping big stops. Obvious body weight transfer. Definitely late wrist snaps.
www.peterhayesflyfishing.com THE AUSTRALIAN FLY FISHING SCHOOL
© Copyright Peter Hayes. May not be reproduced without permission of the author. 17
Exercise 2 – Loop Control
Objective: Learn to produce narrow, medium and wide loops as required. Primarily I want you to learn the three fundamental requirements for a good back cast loop.
Loop shape, position and speed are all as important as each other. I call a good back cast loop an Elle Macpherson. It is good looking, it is tight and tidy, long and slender and goes back quickly into the right place. Elle comes from well or thoroughly loaded rods moving through the correct plane. Short power snaps combined with an abrupt stop tighten and speed Elle up.
The opposite of an Elle loop is a ‘Fat Albert’. As you can imagine Fat Albert is a big round loop that often sags down close to the ground. He travels slowly and is very wind affected.
Loop Size
Learn that loop size or width is dictated by how low you ‘dip the tip below the straight line forward movement at the end of the stroke’. Loops can also be opened up by doming the rod tip. Try to avoid this method of opening loops.
Practice
False casting with just 6 metres of line. Produce narrow loops. Produce medium meter high loops. Dome the rod tip a little to produce really wide loops.
Primarily focus on tight loops with sudden rod stops in a controlled plane.
Trajectory
Learn to tilt the trajectory at different angles according to the length you cast.
A short cast requires a high back cast and low forward cast. A long cast requires a low or horizontal back cast and a high or horizontal forward cast. Both back casts and forward casts should be on a perfectly straight line no matter what the angle.
Practice picking leaves
With 8 metres of line cast with good tempo and tight loops.
Stand in front of a bush or brick wall. Aim at some leaves or bricks at varying heights – get good at this. Aim at some leaves higher up etc. You should also aim your back cast to varying points on a tree. On command you should be able to throw an Elle Macpherson directly at the second branch up or at the bark hanging off the trunk etc.
Learn that an abrupt stop makes the loop travel faster and a slow lazy stop slows it down. The abrupt stop combined with a tight loop hovers the fly on the forward turnover giving the sighting or judgement ability.
Tempo
Adjust tempo for short medium and long casts.
Learn that the tempo has to be faster with a short line and it slows as the line length increases. We can of course speed it up at will to cut through the wind etc. We also need to speed up the tempo when side casting. This is because the line is low or close to the ground and it will easily drop and catch the bank if it travels too slowly.
Practice
With 10 metres of line out show me slow motion casting in a controlled manner. Speed up to a medium fast tempo then speed up to as fast as you can manage without ‘whipping’ the line.
Exercise 3 – Tailing Loops
A tailing loop is a condition usually, but not exclusively, associated with the forward cast. On the forward cast the leader and fly travels forward below the main loop and catches on the line as it passes. It often causes wind knots and tangles.
The only possible cause of a tailing loop is that the rod tip path dips below the straight line on the forward cast. This can come about from several causes.
If you back cast plane is high as well as your forward cast.
The tip will move in a concave manner. In my opinion this is a rare cause.
If sudden acceleration is applied to the rod at the start or part way through the delivery stroke the tip will cave in and move forward in a concave
www.peterhayesflyfishing.com THE AUSTRALIAN FLY FISHING SCHOOL
© Copyright Peter Hayes. May not be reproduced without permission of the author. 18
manner. We call this ‘shocking’ the rod. This is a common cause particularly when you are going for distance and trying that little bit to hard.
If the rod angle is too close to vertical and too far forward at the start of the forward cast. (Too short an arc and stroke length for the given cast).
This occurs with creep forward or whip forward stops. The problem is twofold. The forward throwing length is not long enough to produce the power required and the rod at this angle is too weak to resist the tip dipping. This is a common cause.
A much less often cause is a violent and early haul when going for that big distance cast.
Bruce Richards knows more about the technical aspects of the casting stroke than any man on the planet. Bruce tells me that in his opinion the most common cause of trailing loops is people
start their forward cast too slowly. This is in effect a variation of creep.
Practice
With 10 metres of line out cast with good tempo and tidy Elle loops.
Learn to cause a tail by shocking the rod with sudden acceleration at the start of the forward cast
By creeping or whipping forward and shocking the rod
By simply too short a stroke and arc for the given line length.
The remedy for a tailing loop is to smoothly accelerate into the casting stroke. Lengthen your stroke length and perhaps open up the arc a little. All this time looking for straight line tip movement.
TROUBLESHOOTING THE CAST Some of the most common problems we encounter.
The Line won’t shoot out properly
More than likely the problem started when you threw a poor back cast. Have you turned into a windscreen wiper? Make sure you throw the line upwards behind you and with enough power. Go back to the basic wet fly cast and ‘watch the waterfall’ before you put the power in. Get the fly line to “fire” back behind you. Don’t come forward too soon. Turn and watch the line unfurl if you doubt your timing. Push smoothly and ‘along the gutter’ on the forward cast. Only let the line slip through your fingers at the completion of the rod stroke A very common problem is letting the line slip too early in the forward cast. We can liken this to a slipping clutch in a car – you don’t go anywhere.
The fly catches on the line or the leader on the forward cast. This is called a tailing loop. There are only two possible causes of tailing loops.
The most common reason a tailing loop is formed is because the rod tip moves in a concave path rather than a straight line or a very slight dome. A second reason is that your forward cast and back cast angles are less than 180 degrees
Nine times out of ten a tailing loop is caused by a drifting or springing forward of the rod after you stop the back cast, then punching the forward cast. The springing forward simply robs you of some distance or travel on the forward cast and the punch only serves to make the rod tip buckle because it cannot cope with the sudden application of power in mid stroke.
The remedy is this. Stand slightly side on and throw a back cast – watch the rod tip as it stops. It must come to a dead stop or it is allowed to drift slightly further back but never forward. Don’t be too impatient, wait at this back most position until you are ready to come forward. Finally push the rod forward smoothly using a long steady stroke.
Another cause of this common problem is too short a back cast for the length of line you are casting. Make sure you lengthen the stroke as you lengthen the line.
www.peterhayesflyfishing.com THE AUSTRALIAN FLY FISHING SCHOOL
© Copyright Peter Hayes. May not be reproduced without permission of the author.
2
The line and particularly the leader lands in a heap on the water
s more than likely you started the back cast from too far back. You have reverted to a windscreen wiper. Condense the arc to suit the distance you are throwing. Get the rod tip to do the work. If this is not the cause you are possibly throwing on the wrong plane. Aim the back cast higher and the forward cast lower. The problem is never your rod, line or leader. It is the way you stroke the rod.
KNOT DIFFICULT KNOTS - surgeon, clinch and penny
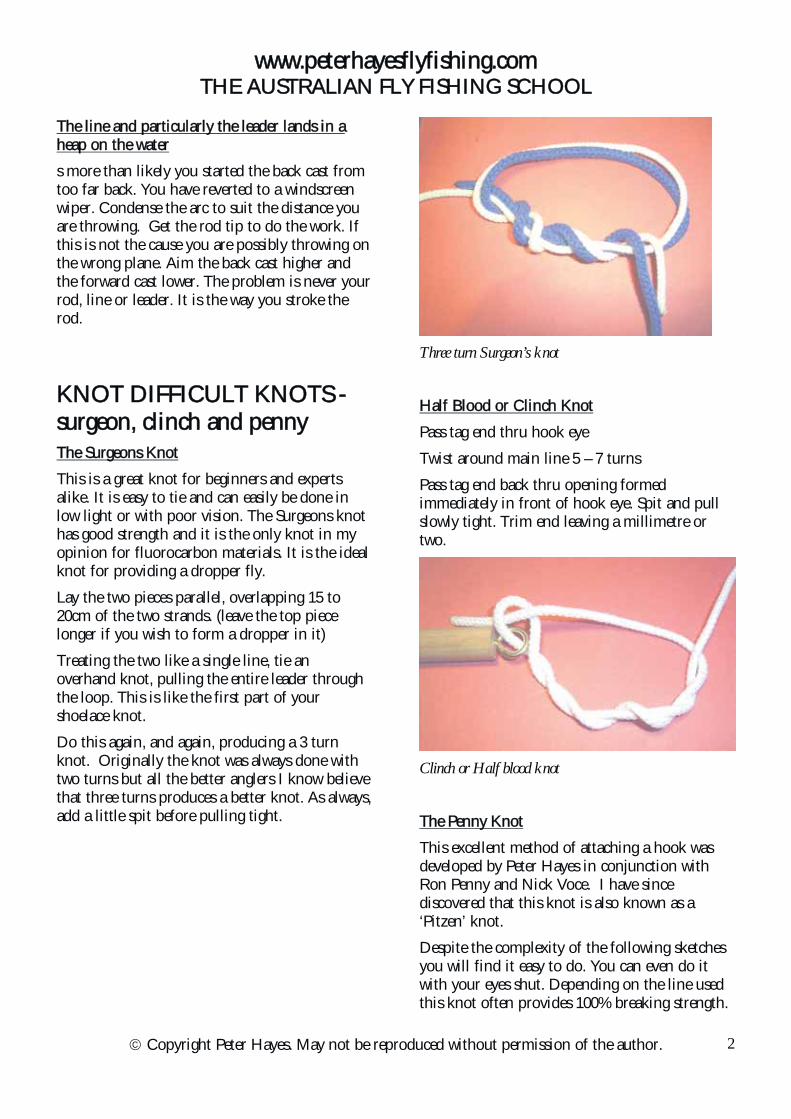
The Surgeons Knot This is a great knot for beginners and experts alike. It is easy to tie and can easily be done in low light or with poor vision. The Surgeons knot has good strength and it is the only knot in my opinion for fluorocarbon materials. It is the ideal knot for providing a dropper fly.
Lay the two pieces parallel, overlapping 15 to 20cm of the two strands. (leave the top piece longer if you wish to form a dropper in it)
Treating the two like a single line, tie an overhand knot, pulling the entire leader through the loop. This is like the first part of your shoelace knot.
Do this again, and again, producing a 3 turn knot. Originally the knot was always done with two turns but all the better anglers I know believe that three turns produces a better knot. As always, add a little spit before pulling tight.
Three turn Surgeon’s knot
Half Blood or Clinch Knot
Pass tag end thru hook eye
Twist around main line 5 – 7 turns
Pass tag end back thru opening formed immediately in front of hook eye. Spit and pull slowly tight. Trim end leaving a millimetre or two.
Clinch or Half blood knot
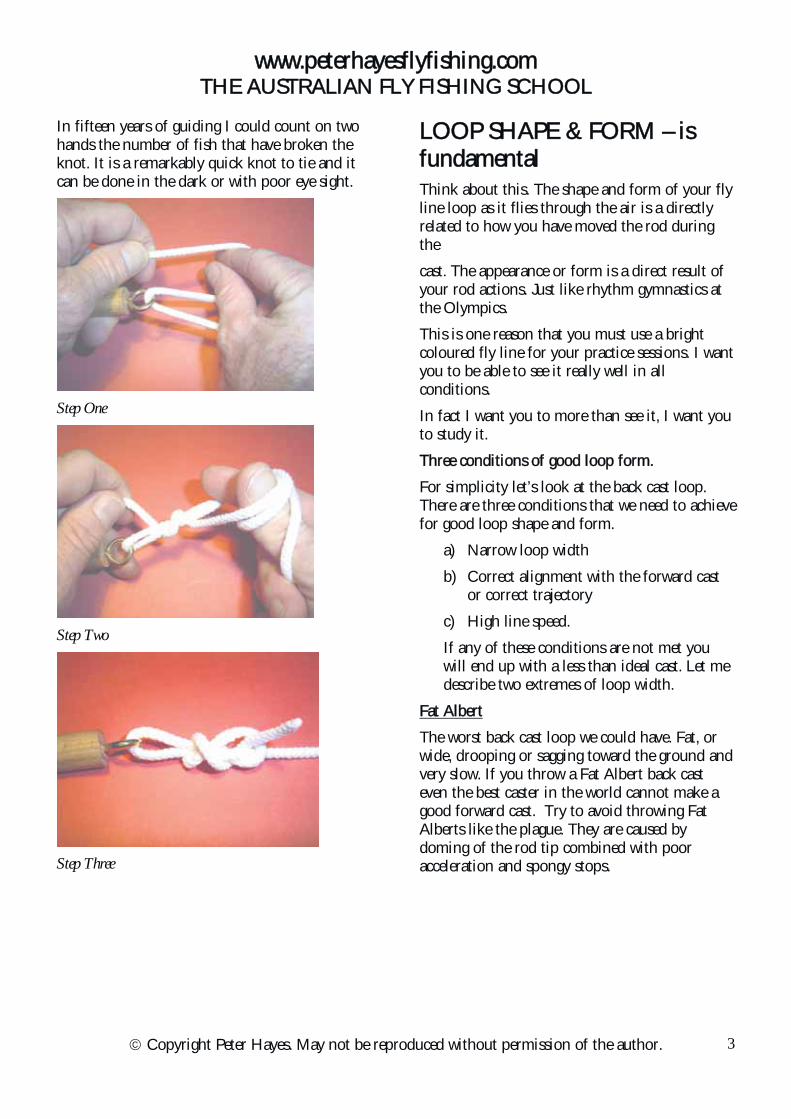
The Penny Knot
This excellent method of attaching a hook was developed by Peter Hayes in conjunction with Ron Penny and Nick Voce. I have since discovered that this knot is also known as a ‘Pitzen’ knot.
Despite the complexity of the following sketches you will find it easy to do. You can even do it with your eyes shut. Depending on the line used this knot often provides 100% breaking strength.
www.peterhayesflyfishing.com THE AUSTRALIAN FLY FISHING SCHOOL
© Copyright Peter Hayes. May not be reproduced without permission of the author.
3
In fifteen years of guiding I could count on two hands the number of fish that have broken the knot. It is a remarkably quick knot to tie and it can be done in the dark or with poor eye sight.
Step One
Step Two
Step Three
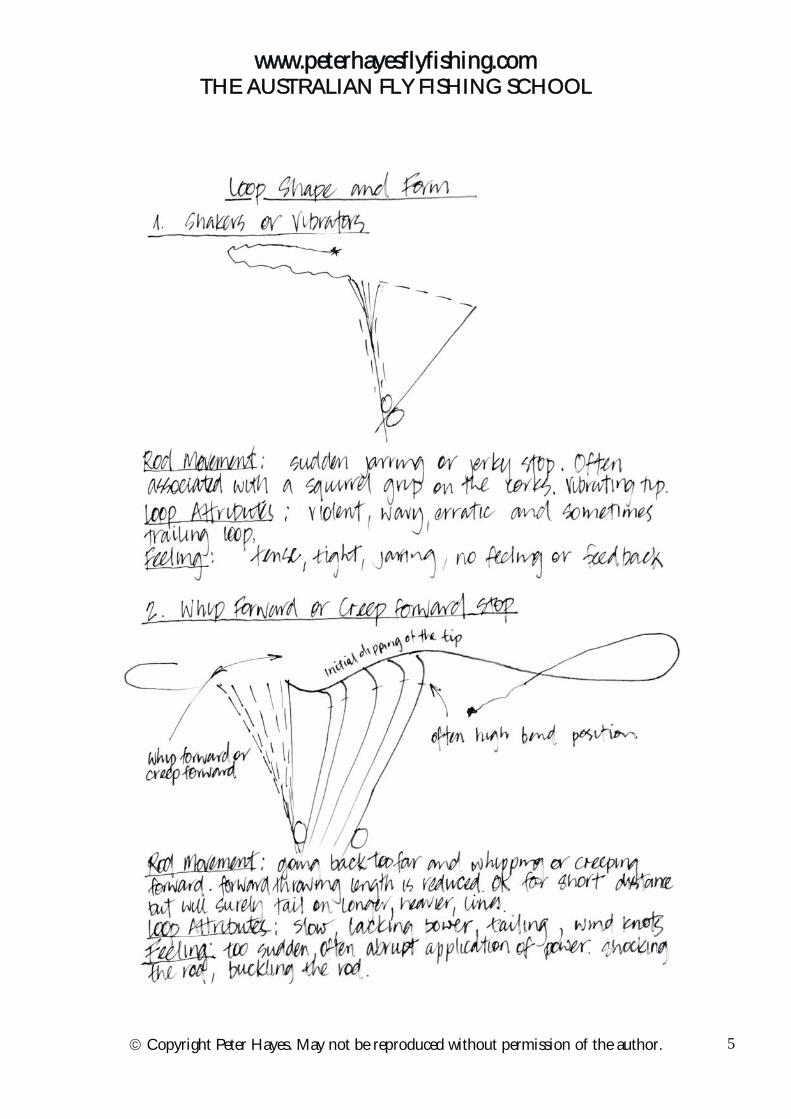
LOOP SHAPE & FORM – is fundamental Think about this. The shape and form of your fly line loop as it flies through the air is a directly related to how you have moved the rod during the
cast. The appearance or form is a direct result of your rod actions. Just like rhythm gymnastics at the Olympics.
This is one reason that you must use a bright coloured fly line for your practice sessions. I want you to be able to see it really well in all conditions.
In fact I want you to more than see it, I want you to study it.
Three conditions of good loop form.
For simplicity let’s look at the back cast loop. There are three conditions that we need to achieve for good loop shape and form.
a) Narrow loop width
b) Correct alignment with the forward cast or correct trajectory
c) High line speed.
If any of these conditions are not met you will end up with a less than ideal cast. Let me describe two extremes of loop width.
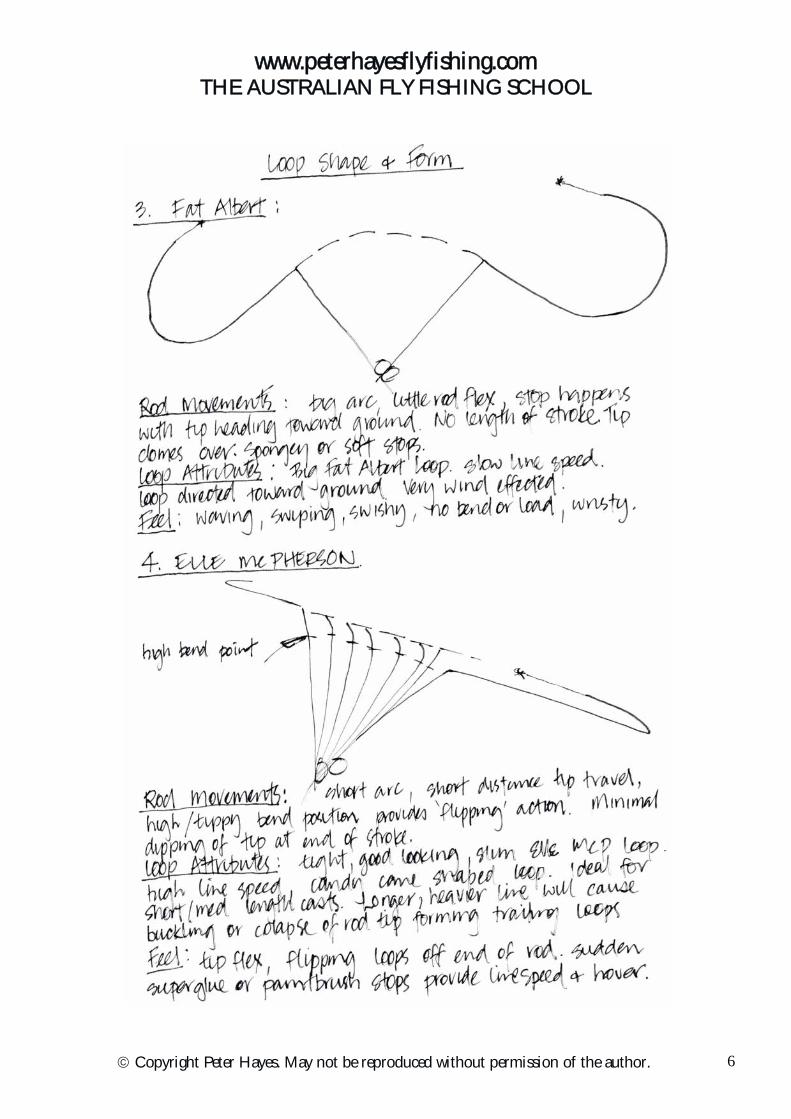
Fat Albert
The worst back cast loop we could have. Fat, or wide, drooping or sagging toward the ground and very slow. If you throw a Fat Albert back cast even the best caster in the world cannot make a good forward cast. Try to avoid throwing Fat Alberts like the plague. They are caused by doming of the rod tip combined with poor acceleration and spongy stops.
www.peterhayesflyfishing.com THE AUSTRALIAN FLY FISHING SCHOOL
© Copyright Peter Hayes. May not be reproduced without permission of the author.
4
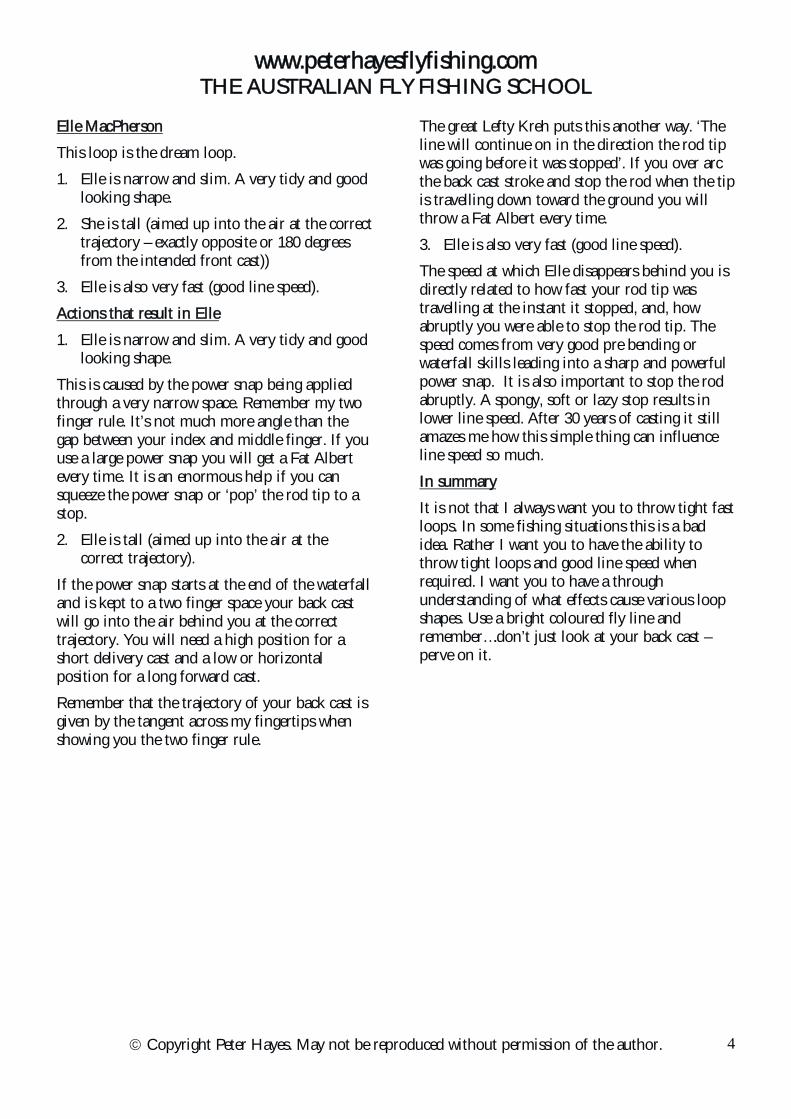
Elle MacPherson
This loop is the dream loop.
1. Elle is narrow and slim. A very tidy and good looking shape.
2. She is tall (aimed up into the air at the correct trajectory – exactly opposite or 180 degrees from the intended front cast))
3. Elle is also very fast (good line speed).
Actions that result in Elle
1. Elle is narrow and slim. A very tidy and good looking shape.
This is caused by the power snap being applied through a very narrow space. Remember my two finger rule. It’s not much more angle than the gap between your index and middle finger. If you use a large power snap you will get a Fat Albert every time. It is an enormous help if you can squeeze the power snap or ‘pop’ the rod tip to a stop.
2. Elle is tall (aimed up into the air at the correct trajectory).
If the power snap starts at the end of the waterfall and is kept to a two finger space your back cast will go into the air behind you at the correct trajectory. You will need a high position for a short delivery cast and a low or horizontal position for a long forward cast.
Remember that the trajectory of your back cast is given by the tangent across my fingertips when showing you the two finger rule.
The great Lefty Kreh puts this another way. ‘The line will continue on in the direction the rod tip was going before it was stopped’. If you over arc the back cast stroke and stop the rod when the tip is travelling down toward the ground you will throw a Fat Albert every time.
3. Elle is also very fast (good line speed).
The speed at which Elle disappears behind you is directly related to how fast your rod tip was travelling at the instant it stopped, and, how abruptly you were able to stop the rod tip. The speed comes from very good pre bending or waterfall skills leading into a sharp and powerful power snap. It is also important to stop the rod abruptly. A spongy, soft or lazy stop results in lower line speed. After 30 years of casting it still amazes me how this simple thing can influence line speed so much.
In summary
It is not that I always want you to throw tight fast loops. In some fishing situations this is a bad idea. Rather I want you to have the ability to throw tight loops and good line speed when required. I want you to have a through understanding of what effects cause various loop shapes. Use a bright coloured fly line and remember….don’t just look at your back cast – perve on it.
www.peterhayesflyfishing.com THE AUSTRALIAN FLY FISHING SCHOOL
© Copyright Peter Hayes. May not be reproduced without permission of the author.
5
www.peterhayesflyfishing.com THE AUSTRALIAN FLY FISHING SCHOOL
© Copyright Peter Hayes. May not be reproduced without permission of the author. 6
www.peterhayesflyfishing.com THE AUSTRALIAN FLY FISHING SCHOOL
© Copyright Peter Hayes. May not be reproduced without permission of the author. 7
THE AUSTRALIAN FLY CASTING SCHOOL www.peterhayesflyfishing.com
© Copyright Peter Hayes. May not be reproduced without permission of the author. 8
SINGLE HAULING Hauling is simply the pulling down of the line by the line hand during the casting stroke. Hauling results in greater line speed, smoother casting with less rod hand effort and longer distances.
Most people are familiar with the double haul. A pull down on both the back cast and forward cast. In many cases this is mandatory for saltwater fishing. Not so for freshwater fishing. A haul can also assist in smoothing up the casting stroke. By using a haul you can reduce the force you need to apply with the rod hand. This is important for women and young fly casters that lack strength. I single haul any line length over 12 metres. I nearly always single haul the hardest stroke of the cast. For example when the wind is from behind I haul the back cast. In a head wind I haul the front cast.
Hauling results in three things that are beneficial to a good cast. Let me explain.
Length of line movement:
If you can pull down say 1 meter with your line hand during the cast then this length gets added to the rod tip movement in terms of the total distance the fly has moved before you let it go. The longer this line movement the easier it is to cast. 1 meter doesn’t sound much but if you consider the rod tip may only move 4 metres your extra hand movement ads 25% to the fly tow distance.
Additional speed:
The speed your line hand moves down is added to the rod tip speed. If you stroke the rod tip forward at say, 50 km/hr and you also move your hand down at 50 km/hr the total speed that the fly moves forward at is 100km/hr. Obviously better.
Additional rod bend:
Pulling the line down with your hand helps to increase rod bend. You would see the same effect if you cast single handed and some one pulled the fly one meter at the end of your cast. Another analogy is this.
Consider that the line is free running through the snake guides. There is nothing stopping it being
pulled from either the tip of the rod or the stripping guide. If you lift the rod up until the line hangs at a right angle and you have some one pull quickly down on the leader, by say, one meter. Then the rod will flex down accordingly. This effect is exactly the same if you pull one meter of line down from the stripping guide end. More rod flex means more catapulting effect, hence more line speed. Now that you are providing more bending pressure to the rod it is imperative that your grip is sound and that your forearm, not your wrist, resists this additional load. Remember the locking grip we discussed in previous notes?
Understand that it doesn’t matter which end of the line is pulled to produce greater bending.
The Single Haul
A single haul is a simple pull down during one half of the stroke. Most commonly the back cast. There is a feeding up of the line on the forward cast. This is the only haul I believe is necessary for freshwater fishing where rods are generally light and flexible, flies are not overly large or heavy and casting distances are relatively short.
There are three critical aspects to the haul.
1. Timing - when to pull down
Remember from the rod loading notes I said that the only time you should put any power into a fly rod was when the line is at a right angle to the rod, or when the waterfall reaches the leader? Well this applies to the haul as well. There is no point pulling down on the line unless you are at this right angle point with the rod. This is when the haul will have the greatest effect.
Everyone that I have taught casting to, bar none, has pulled down on the line prematurely.
2. Length of Haul
Some casting instructors advocate it is only necessary to haul 15 cm in a quick jerky manner. I don’t know about that. I spend my life getting people to smooth their casting up. I will call you a jerk if I ever see you jerking a haul.
Hauls should be smooth and their length should vary according to the length of line cast. I agree
THE AUSTRALIAN FLY CASTING SCHOOL www.peterhayesflyfishing.com
© Copyright Peter Hayes. May not be reproduced without permission of the author. 9
short lines only require short hauls but long casts require long hauling lengths. In tournament distance casting long arms are at a definite advantage.
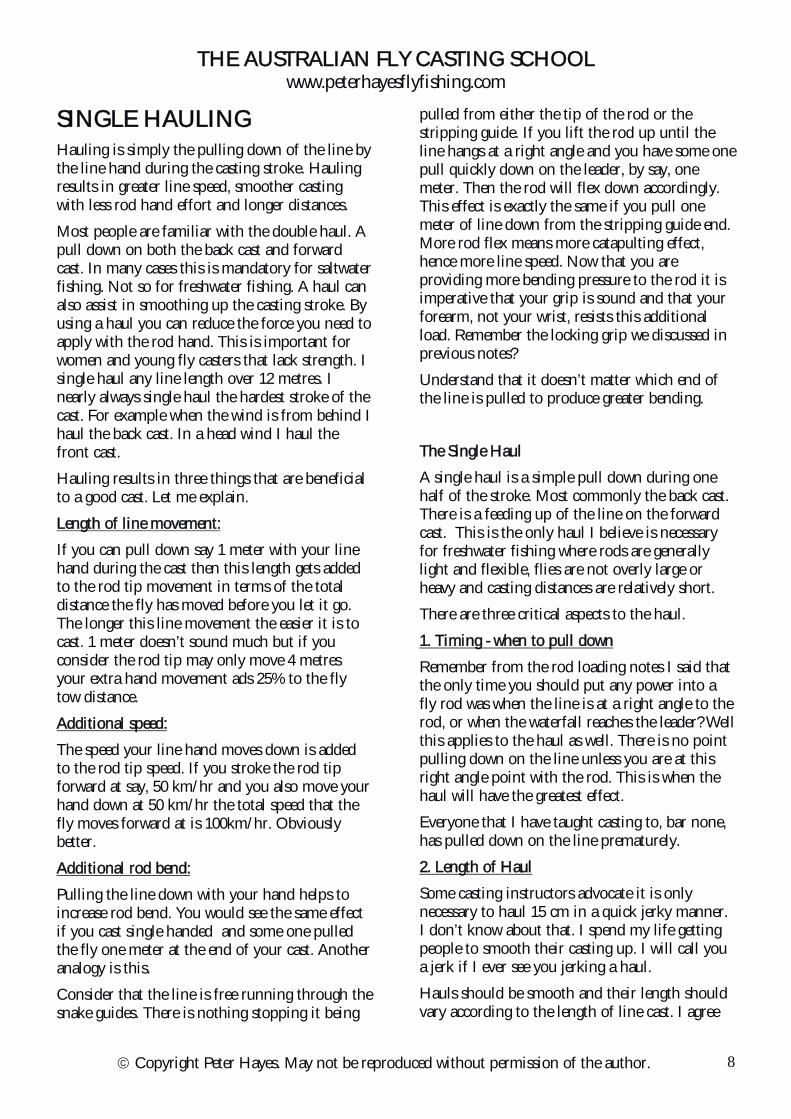
Start of haul-thumbs together.
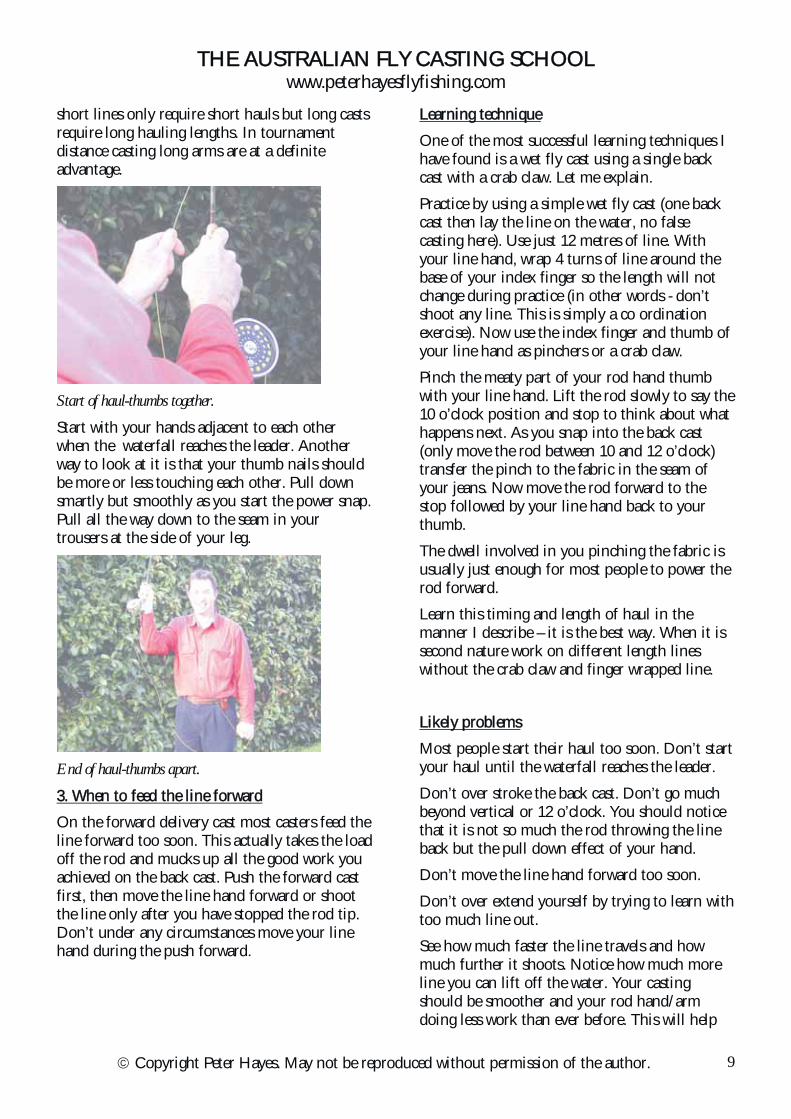
Start with your hands adjacent to each other when the waterfall reaches the leader. Another way to look at it is that your thumb nails should be more or less touching each other. Pull down smartly but smoothly as you start the power snap. Pull all the way down to the seam in your trousers at the side of your leg.
End of haul-thumbs apart.
3. When to feed the line forward
On the forward delivery cast most casters feed the line forward too soon. This actually takes the load off the rod and mucks up all the good work you achieved on the back cast. Push the forward cast first, then move the line hand forward or shoot the line only after you have stopped the rod tip. Don’t under any circumstances move your line hand during the push forward.
Learning technique
One of the most successful learning techniques I have found is a wet fly cast using a single back cast with a crab claw. Let me explain.
Practice by using a simple wet fly cast (one back cast then lay the line on the water, no false casting here). Use just 12 metres of line. With your line hand, wrap 4 turns of line around the base of your index finger so the length will not change during practice (in other words - don’t shoot any line. This is simply a co ordination exercise). Now use the index finger and thumb of your line hand as pinchers or a crab claw.
Pinch the meaty part of your rod hand thumb with your line hand. Lift the rod slowly to say the 10 o’clock position and stop to think about what happens next. As you snap into the back cast (only move the rod between 10 and 12 o’clock) transfer the pinch to the fabric in the seam of your jeans. Now move the rod forward to the stop followed by your line hand back to your thumb.
The dwell involved in you pinching the fabric is usually just enough for most people to power the rod forward.
Learn this timing and length of haul in the manner I describe – it is the best way. When it is second nature work on different length lines without the crab claw and finger wrapped line.
Likely problems
Most people start their haul too soon. Don’t start your haul until the waterfall reaches the leader.
Don’t over stroke the back cast. Don’t go much beyond vertical or 12 o’clock. You should notice that it is not so much the rod throwing the line back but the pull down effect of your hand.
Don’t move the line hand forward too soon.
Don’t over extend yourself by trying to learn with too much line out.
See how much faster the line travels and how much further it shoots. Notice how much more line you can lift off the water. Your casting should be smoother and your rod hand/arm doing less work than ever before. This will help
THE AUSTRALIAN FLY CASTING SCHOOL www.peterhayesflyfishing.com
© Copyright Peter Hayes. May not be reproduced without permission of the author. 10
enormously in the control aspects of the rod movement.
RETRIEVING LINE - in the Air This is a simple casting technique that I use frequently in my day to day fishing. Surprisingly this is a technique little known outside of tournament casting circles. It will take you a little while to get the hang of the co ordination imprint (it is a little like patting your head and rubbing your tummy for many) but once mastered you will use it often as a method of shortening line. Start with 10 metres of line on the water in front of you. With your line hand place the fly line in the groove of your first knuckle of your rod hand index finger. Keep the line in this groove for the whole process. Do not let it out for the entire shortening process. As you start into your back cast pull down on the line at the same time. Have your index finger slightly open during this movement. If you are gripping the line tightly you will risk a friction burn to your finger. At the end of the back cast your line hand should have pulled in about a meter or so of line. Your hand should be by your side. Now clamp the line with your index finger and throw the forward cast. While you are making the forward cast with your rod hand I want you to release the line from your line hand and move it up to meet your index finger at the end of the forward cast. Grab the line again and repeat the pull down procedure. A little tricky isn’t it. This ‘hands together, hands apart, hands together co ordination is common in fly casting. Practice it well and it will become a great tool for you in the future. Issues to watch out for Avoid over casting the back cast during this process. Because there is so much going on in your brain this is likely.
Avoid pulling the line out of your rod finger during the casts. If you have trouble with the coordination perhaps practice very slowly at first. Just one back cast then lay the line back on the water. Repeat it again slowly. If the line gets stuck behind the reel seat at the end of the back cast you are using your wrist too early in the stroke or you have the rod tilted out too much. This is a really common fault. Watch the problem occur then correct it.
DOUBLE HAUL - half the work for double the line speed. I once talked to Tom White, the great American casting instructor, about the double haul. Tom likened it to woodcutting. Tom said ‘Peetuur- why use a bow saw when you can get a chain saw’. I think it is a good analogy. The two major things that determine how far your fly line flies through the air are loop shape and line speed. Loop shape and size is dictated by where you bend the rod and how far the rod tip dips away from its flight path at the end of the stroke. We will discuss this as a separate issue later. Line speed is dictated by three factors. Firstly how fast the tip is going at the end of the forward cast. Secondly by how abruptly it is stopped. The third and very important factor is how fast your hauling hand moves the line. Let’s deal with the third one here. In really basic terms if you throw the rod tip forward at 20 k/hr at the same time as your hauling hand comes down at 20 k/hr the speed of the fly line is 40 k/hr. The total of the two speeds. Once the loop is formed the fly turnover speed actually doubles to 80 k/hr and if you don’t
THE AUSTRALIAN FLY CASTING SCHOOL www.peterhayesflyfishing.com
© Copyright Peter Hayes. May not be reproduced without permission of the author. 11
understand this it doesn’t really matter. Just trust me. I’m a fishing guide. The greatest benefit of double hauling is that additional speed is introduced into the cast by the line hand and the rod hand energy is split between the two hands. You do not need to overpower or force the rod to achieve greater speed. You will therefore have better rod tip control resulting in better loops. In fact the rod movement is far less important and with less force comes greater control. Greater control results in better loop form, and position, which are fundamental necessities. All of this is very important in young casters or lady casters who don’t have the strength that some guys have.
Timing Timing is critical in any hauling movement. I have watched many double hauling casters and to the untrained eye they look pretty flash. However, as they say in golf, ‘a lot of show for not much go’. The main problem that I see is that most casters haul prematurely and often in a jerky manner. Let’s consider the timing. Just think of the back cast first. Start with the rod tip at water level, line hand and rod hand together. Slowly peel or waterfall the line off the water as you lift into the back cast. Just as you are about to introduce the power snap to the movement stop for a second in that position. If your hands are not touching at this moment you have started the haul too early. The point I make is that the line hand should rip down as the rod tip snaps back. Not a second before. Hauling is not very effective if your line hand moves away from the rod hand during the lift up or loading movement. It must be saved for the power snap period of the cast. Another way to get the timing correct is to keep your hands together as the waterfall runs out toward the leader. As soon as it gets to the leader - haul. I want you to feel that the object of the haul is to tear or rip the leader only out of the water. This will ensure a late haul and I cannot stress the importance of this enough.
Let me try to explain the problem with an early haul. If the rod tip leaves the water and it initially travels back towards your body at 20 k/hr at the same time your hand moves down at 20 km/hr then the total line speed is still only 20 km/hr. On the other hand if we leave it until the rod tip is above you and travelling back and upwards, away from your body at the same time as your hand pulls forward and down then the line speed becomes 40 km/hr. I hope this makes sense. I cannot think of a simpler explanation. The forward cast is the same but in the reverse order. We need to stroke the rod forward and haul as late as possible to get the speed up effect.
Length of Haul Length of haul is not as important as the timing or the speed of the haul. However, the haul length should increase as the line length increases. A short sharp haul of 6 inches or so is fine for short to medium casts less than 45 feet. Longer powerful casts require long smooth hauls in addition to long smooth rod strokes. An additional benefit of hauling is that we are moving a greater amount of line through the air (or moving the fly a greater distance) before we let it go. There is no substitute for this ‘length of stroke’. Think about this. If I make a long delivery cast with just the rod hand I am guessing the distance the rod tip travels from the rearward position to fully forward is about 20 feet. In this case the fly moves forward 20 feet before it is let go. If I introduce a haul to this movement I can haul about 5 feet, now the fly moves 25 feet or an additional 25 %. This extra 25% of movement is a great help. If you don’t believe the advantage try casting without the haul again and reduce the rod tip travel by 25% to 15 feet. You will see that it is very difficult to cast out of sight with only a 15-foot tip travel.
THE AUSTRALIAN FLY CASTING SCHOOL www.peterhayesflyfishing.com
© Copyright Peter Hayes. May not be reproduced without permission of the author. 12
Learning Exercises There are a variety of ways to learn the timing of double hauling. This is just one of many that seem to work for most casters. Many seem to think that this is like rubbing your tummy with one hand while patting your head with the other and jumping up and down at the same time. Start on the lawn with the wind at your back. Have no more than 20 feet of line out the rod. Cast with the rod horizontal to the ground and your elbow in close to your body. Cast in this sideways position across the wind such that the wind blows on the side of the forward cast and back cast loop. I want equal wind pressure in each direction if you know what I mean. Holding the line hand next to the rod hand flip little loops backward and forward watching them roll out and extend onto the grass before committing to the forward cast and so on. Do it slowly with narrow loops. Move the rod through a very short arc and stroke to achieve this. Learning hauling is pointless unless you can throw narrow tight loops. It is also important that you can maintain this loop control at various distances. You see, once you haul down with your line hand it is very important to move the line hand back up to touch the rod hand again. In this position it is ready for the next haul down. A narrow fast Elle Macpherson loop will actually pull your line hand back up. A big Fat Albert loop will never do this and slack will build between the stripping guide and the line hand. This is awful and you will bugger up the next cast with this slack. Once you can throw Elle’s onto the ground in both directions you are ready for the hauling movement. If you are throwing Fat Alberts do not continue.
Timing Reference Look for a reference point directly down wind or midway between the forward and back casts. Once the rod tip gets to this mid point it is time to complete the rod power snap (keep the power
snap really tidy, much less force, and movement is required when you introduce a haul). The haul must not occur until this mid point. Get the feeling that the rod tip is travelling away from your body at the same time as the line hand is pulled toward you.
Trampoline Tummy At the rod tip midpoint your hands should be touching each other. At the same time as the rod tip snaps to complete the cast I want you to pull the line hand smartly into your stomach (I almost want you to wind yourself). This is perhaps no more than a foot or so and it is parallel to the rod. Imagine your stomach has a trampoline in it. Your hand must bounce immediately back to meet the rod hand position. At this point let the line extend onto the ground again. Repeat the process in the opposite direction again. Hands touching and moving together to the midpoint reference. Line hand into the trampoline guts and back again as you finish the rod stroke. Let the line land on the ground. Do this SLOWLY for 5 or 10 minutes. It is painful but do it slowly and for that long. It is important to develop what I call a coordination imprint. Some people develop this more slowly than others. Don’t be dismayed if this takes a little time. I have never met anyone that cannot develop this coordination. It is only slow, methodical practice. It is certainly a help if the rod is low to the ground and operated in a small arc where you can easily see the forward and back cast extend. Once you think you have the idea cemented into your head increase the tempo and false cast without letting the line land on the ground each time. The next step is to slip a little line into the cast and as you lengthen line three things must happen. One is that the rod stroke must increase to cope with the longer and heavier line. Additionally the rod angle must be raised to keep the line from hitting the ground and the length of haul should increase accordingly. When trying
THE AUSTRALIAN FLY CASTING SCHOOL www.peterhayesflyfishing.com
© Copyright Peter Hayes. May not be reproduced without permission of the author. 13
to cast out of sight the haul length should be from hands touching to hands fully apart (for most this is between 5 and 6 feet). Memory Triggers: 1. Haul at the right time, later the better 2. Throw Elle Macpherson loops (slender, tight and tidy) 3. Trampoline guts Increase haul length and rod stroke as line length increases
SWOOP - for tighter loops It surprises me a little that when I ask my casting course students whether they know what ‘swoop’ is in fly casting. They look back with blank faces. Good swooping results in tighter loops, greater line speed and added distance I can assure you that unless you fully understand swoop you will never be a seriously good caster. Swoop is of paramount importance in both long casting and roll casting. Roll casting can, and will, become your favorite cast if you understand and practice swoop. Let me try to explain. In fly casting when you are striving for greater distance there are two main considerations when throwing the forward cast. The first is that the rod tip travels as far as it can possibly go from the furthermost rear position to the furthermost forward position. The longer you can stroke the rod tip the better. Think of throwing a stone or a ball. A long hand stroke will produce a more powerful throw and hence a greater distance. A cricketer doesn’t throw a ball from the boundary to the stumps with the hand and arm stroke of a dart player does he? The long tip travel allows us time to build a deep and more powerful bend in the rod as we move it forward against the weight of the line. It’s this bend that produces the catapulting effect we love. The deeper in the rod we produce the bend the more powerful the cast and the more likely the cast will have that characteristic flying wedge shape.
The second, and also very important consideration is that the rod tip must travel this long distance in a straight line. Inexperienced casters will often ‘dome’ the tip over on the forward cast, or worse still, swipe around the side as well. The straighter line the tip moves in, the better integrity the loop shape will have. Enter - ‘Swoop’. Think about this for a moment. What path should your hand take to produce a long straight line tip movement? You probably realize it should not take a convex path - that would produce the domed rod tip movement. Most people when asked say that your hand should move in a perfectly straight line. A little like the Ferrari story. This is not correct either. Believe it or not, your hand needs to move in a dipping, then raising path. A little like a kid would draw a bird. Get this right and it will produce the most remarkable cast you have ever made. A simple way for you to see what I mean is for you to try this exercise. Take the top half of your fly rod and standing 1.5 metres away from your lounge room wall scrape the tip up the wall until it meets the corner of the ceiling. This is the cornice. Now, if you have had a half decent builder the cornice should travel forward and back in the long straight line I am talking about. Do you agree? Now move the rod tip as far back along the cornice as you can go. Move it forward as far as you can go. That is a straight line isn’t it? Do it again this time watching your hand and elbow position as you do it. Interesting? Have a think about it then try it with a full rod and 15 metres of line. If you have any trouble almost doubling the line speed and adding 5 - 8 metres to your distance you need to revisit out tuition program and get out to practice more regularly. It is worth persevering with. When you get a good handle on swoop it will make such a difference to your flycasting enjoyment.
THE AUSTRALIAN FLY CASTING SCHOOL www.peterhayesflyfishing.com
© Copyright Peter Hayes. May not be reproduced without permission of the author. 14
PULLING - for greater power and distance Most fly fishermen push their casts. Pulling casts gives far greater power and distance.
To keep it simple let’s consider just your forward delivery cast.
All the good casters I know are pullers not pushers. In general the Americans are pullers. The English are pushers. All good saltwater casters are pullers.
You cannot push a cane rod but you can make an exceptional cast with a pull. Have you any idea what I am talking about? Try to think about it and make an assessment on your casting style before you read on.
I find it difficult to explain but perhaps the most simplistic description would be to use throwing sports as examples. Shot put is pushing but Javelin is pulling. I guess what I am trying to say is that any throwing stroke which starts by leading with the elbow is a pull.
Give darts a thought. Is it a pulling or pushing sport? I wont tell you the answer, discover it for yourself.
Try this. Take your fly rod outside and tie the leader to a door handle or something at similar height. Move 6 or 7 paces forward and stand as if you were throwing the forward cast away from the door. The door handle position becomes your back cast. Be sure to be standing side on so you can easily see the door handle.
Lift the rod tip to a vertical position above your head with very little force on the line. Now push forward 20 to 30 cm with your hand. Feel the flex in the rod. It is in the tip. It is weak. If you accelerate into the stroke violently from this position a trailing loop is certain.
Now strip in the line as you reach back with your hand and lay the rod back to point at the door handle. Lift the tip up from this position say 18 inches and tension the line a little with the same force as the previous example. Now with the rod at the same angle pull forward 20 – 30 cm. Feel the difference. This is a stronger force for the same movement. Good casters pull the bend into
the rod much earlier in the stroke than pushers. Pullers very rarely get trailing loops. Pushers are notorious for getting trailing loops. Pullers cast vee or wedge shaped loops.
AERIAL MENDING – a must for moving water Aerial mending is the term used for throwing irregular shapes into the delivery loop while it is in the air. This will result in an amount of controlled slack landing on the water.
There are frequent occasions during fishing, particularly river fishing where the fly line should not land in a straight line.
The obvious time is when a dry fly or nymph is cast across the stream. An unnatural drift will occur due to the vagaries of the current acting against the line at various points between you and the fly. Dry fly’s will skate and wet fly will resist sinking and move faster than the current speed.
There are several aerial manoeuvres we can make that result in slack line or line positioned upstream or up current of the fly.
Reach Cast
A Reach cast is used to position fly line up current of the fly thereby allowing a longer drag free drift. It is mostly used when casting across current.
Casting in a vertical plane the initial deliver stroke is made with the rod tip toward the target. After a high 11 o’clock stop position the loop will form and the fly will continue toward the target. Immediately after the stop the rod tip is moved in an upstream direction smoothly to an extreme left or right position. This diagonally sideways motion occurs while the line is unrolling in the air toward the target. The objective is to have the fly alight on the water at the same time as the rod tip reaches the water as far up current as you can reach. In this cast the line will be straight between the rod tip and fly.
Commonly, when people practice this cast they never fully reach upstream. I often stand 12 feet to the side of the caster and ask them to cast
THE AUSTRALIAN FLY CASTING SCHOOL www.peterhayesflyfishing.com
© Copyright Peter Hayes. May not be reproduced without permission of the author. 15
toward the target then touch my outstretched hand with their rod tip. Understand that this sideways movement of the rod tip will naturally shorten the delivery length of the fly so you may need to shoot some line into the delivery. This should be done smoothly while the rod tip is moving sideways to meet the water.
Aerial Mend Cast
An Aerial Mend cast is used to throw a curve or loop of line up current. The time it takes for the current to push this upstream loop to the equivalent downstream position determines the amount of drag free drift time. Another time it is frequently used is to produce some slack before throwing a water mend. Commonly used when casting across currents. Also used to throw around mid stream rocks, bank side logs and weed beds.
Again make the initial forward delivery push toward the target. Stop the rod suddenly at the 10 or 11 o’clock position. Move the rod tip out to the side in a diagonally down manner then back to the centre position at the water in front of you. I guess the rod tip movement is in a sideways vee to either the left or the right. Like this <or this>.
The object is to have the fly and line alight on the water at the same time as the rod tip ends up at the water in front of you.
The wider out you move the rod the more slack you will throw up stream.
There is also a timing issue here. If you want the slack loop to land out near the fly you need to do the sideways vee, or <, immediately the rod stops at the 11 o’clock position. If you require the loop to be positioned close to the angler then allow a second or two after the stop before you make the vee movement.
With a little practice it is possible to position this upstream slack very accurately.
Slack Line or Wiggle Cast
Used mostly for downstream or down wind presentations but equally important for saltwater berley trail fishing where you need the fly to sink while drifting away from you.
The initial deliver stroke is made toward the target as in the other casts. This sends the fly on the way to the correct spot. From the 10 or 11 o’clock stop position the rod tip is moved up to 6 or 8 times in a shaking left – right – left manner. The width of these cycles dictates the width of the slack on the water. The number of cycles dictates how many left right waves land on the water. The sideways shakes are done while the line is falling toward the water. Your grip should be light and it is definitely a wrist shake rather than a forearm swipe.
Puddle Cast
This is another slack line cast that has its place on running water. This cast requires a low back cast and high forward cast. Aim the forward cast much higher than normal, say 30 degrees above horizontal. Good line speed and a tight loop also help in the recoil process after the line straightens on the forward delivery cast. A heavier fly like a bead head nymph also helps but is not necessary.
When the line fully extends in the high trajectory with fast line speed and narrow loop it is natural for it to kick back or recoil. Due to its high position there is plenty of slack by the time the line lands on the water. To assist the recoil process you can also pull back with the rod tip or your line hand at the moment of straightening.
Positive Curve Cast
This is another method of producing a curve to the left or right. A curve to the right is very difficult for the right hander to master but let me explain the left curve. Cast in a horizontal manner with good line speed and tempo. On the delivery toward the target don’t just stop the rod but stop it with a definite and sudden whack. It is necessary for the tip to stop so suddenly that it recoils or counter flexes. This abrupt recoiling action results in the end of the line kicking or tucking around in the plane the cast was made. The wrist stop and recoil is the key to this cast. Imagine your hand whacks into a trampoline and immediately recoils. The closer you work with your hand to your body the easier it is to produce this thumping hard stop.
Key Learning Points
THE AUSTRALIAN FLY CASTING SCHOOL www.peterhayesflyfishing.com
© Copyright Peter Hayes. May not be reproduced without permission of the author. 16
Don’t throw high back casts when doing these casts. Stop the rod high on the delivery cast. It’s only a split second but an 11 o’clock position will give you plenty of time to make the sideways movements. Always move the rod tip in smooth movements. There is no place for abrupt jerky forceful movements here. Remember, the fly goes in the direction of the initial stroke before the stop. The back of the line will go in the direction the rod tip moves it after the stop.
ON WATER MENDING – for longer drag free drifts Aerial mends are ideally suited to short to medium length casts and result in drag free drifts of relatively short lengths. This suits small to medium sized rivers and dry fly and light weight nymphs. Commonly used in summer time.
On water mending is more frequently required for longer drifts with heavy nymphs. Success nymphing rivers like the Goulburn or the Tongariro River in winter depend mostly on your ability to get the fly to depth in a drag free manner over the lies. Large yarn indicators are generally used to detect the takes.
Whilst working with Ron Burgin I was able to learn his mending technique that is as impressive a solution to mending that I have ever seen. I call it power mending because of the distance and accuracy it is possible to throw slack using this method.
Power Mending Upstream to the right.
Easier done than written but lets have a go at explaining it. For instruction purposes lets consider the stream is moving in a direction from our right to our left. We make a cast upstream and well above the imagined lie of the fish. It is important to understand that with all on water mending the mends or line movement must be done well above the lie of the trout. If you mess with the line too much when it is above the fish and you risk putting them down.
When the flies land we wait a second or two for the nymphs and leader to sink, allow the indicator to ‘bog’ onto the water. Now raise the rod high above your head, As high as you can reach with an extended arm, cock your wrist well and have your hand above your right eye. Your hand should be fully rotated clockwise, a palm out position. Without this rotation it is not possible to get enough power in the sudden wrist movement.
This is a lot like a saluting position. Salute to the indicator with a well cocked wrist. This is also a high elbow position.
Using mostly your wrist and very little arm, whack the rod tip aggressively in a diagonally low to high movement. This need only be a relatively short, perhaps 2 meter, movement. Stop the rod sharply. The object is to use the speed and direction of the rod tip movement to throw a loop of line back along itself toward the indicator. Understand that we are repositioning the line not extending it so don’t shoot further line.
As a result of this wrist snap the line is thrown outward and upward toward the indicator. Now ease the rod back closer to vertical and lift the line to ensure the loop travels the full length of the line on the water. It is in the subtleties of this easing back motion that give the ability to position the slack line accurately. You need to play with this concept a little to see what I mean.
Power mending is easily practiced on the lawn. Simply place a brick on your nail knot and walk out say 20 metres of slack line. Salute to the brick and go to it.
Try using a hose to place various shaped mends on the lawn as a template. Pretty soon you will be amazed at how accurately and how far you can throw a mend.
Upstream to the left.
This is a fore hand mend as opposed to the back hand mend. It is used for a right hander when the river is moving from left to right. It is slightly more difficult as the natural tendency is to move the rod tip diagonally from high to low. Again,
THE AUSTRALIAN FLY CASTING SCHOOL www.peterhayesflyfishing.com
© Copyright Peter Hayes. May not be reproduced without permission of the author. 17
your hand should be above your forehead. The rod tilted out slightly and your wrist well cocked. The movements and the checking are all the same as previously described but focus on the rod tip going from low to high.
Dab Mending This describes the little mends that throw more line, as opposed to repositioning existing line, toward the indicator.
This technique is generally for extending drifts after the indicator passes your body. A dab mend is used when slack line is only being thrown out a short distance.
Hold the rod tip close to the water in front of your body pointing toward the indicator. You require a high elbow and low wrist. Your back of hand should be facing up. Again, a quick, sharp snap of the wrist should result in the rod tip moving from low to high in a diagonal ‘out and away’ manner. The object being to throw line along itself and slightly to one side.
CREATIVE CASTING – for tight quarter fishing In fly fishing we are often presented with fish catching opportunities that that require casts other than the normal overhead forward- back-forward cast.
For me the greatest satisfaction in fly fishing comes when I make that seemingly impossible cast that results in the capture of a fish that most other anglers find untouchable. These fish are fortunately often the biggest in the pool and I get a buzz from this too.
The following collection of what I call creative casts, will I hope, bring many trout undone for you. Try to practice them as often as you can and maybe next time you wont have to walk past that ‘difficult to get at’ fish.
Roll Cast Revisited
I’ve covered Roll Casts extensively in previous notes but it is such an important, and useful cast, here are a few reminders.
Start the forward cast with the rod tip as far behind you as possible. The more length we can move the rod tip through on the forward cast the more power we can deliver. This is particularly important to achieve distance.
At the fully back position raise the rod tip to a height to suit the forward cast you need. A higher start point produces a high loop. A low start point produces a low loop, ideal to throw under overhanging vegetation. Try a variation of heights. You will be amazed at how low a loop you can throw. Having said that, the further you need to cast the higher you need the rod tip to be.
At the extreme backward position and before the forward cast is made the rod tip must be stationary. Do not get this bit wrong or you risk cracking off your fly and producing that characteristic whipping sound. Move the rod tip slowly and steadily forward before you put the final whammy or punch into the cast.
During the forward cast the rod tip must move in a straight line. Imagine the rod tip slides down a fencing wire strained tightly between the top of the rod in the backward position and the target. To achieve anything near a straight line tip movement you must ‘swoop with your arm and wrist’. More about this later.
The novice will find it difficult to achieve this straight line tip travel. A natural doming, or windscreen wiper movement is difficult to avoid and this will produce a larger and less powerful loop which generally ends in a heap, well short of the desired target.
Another way to look at it is the rod tip should never get any higher than its start point during the forward motion. Keep it running downhill toward the target.
An important point to note. During the forward movement of your hand, arm and rod, watch the loop of fly line hanging below, then behind, the rod tip. The greater this loop of line, or another
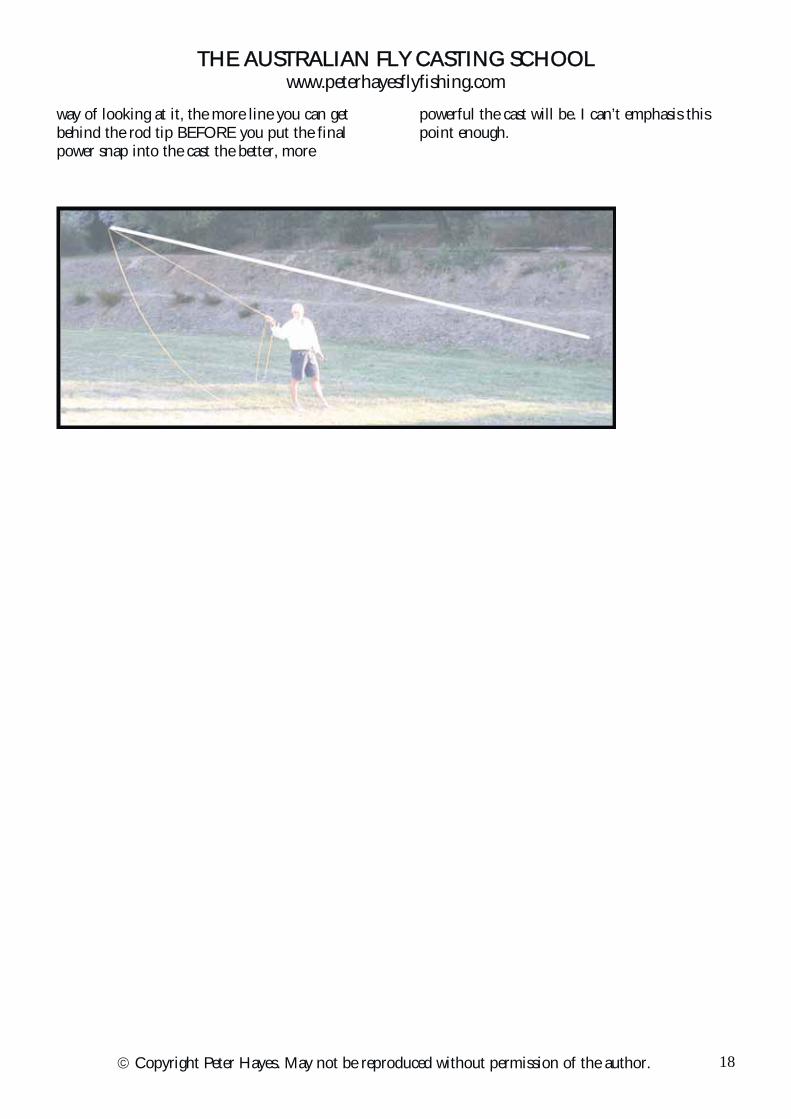
THE AUSTRALIAN FLY CASTING SCHOOL www.peterhayesflyfishing.com
© Copyright Peter Hayes. May not be reproduced without permission of the author. 18
way of looking at it, the more line you can get behind the rod tip BEFORE you put the final power snap into the cast the better, more
powerful the cast will be. I can’t emphasis this point enough.
www.peterhayesflyfishing.com THE AUSTRALIAN FLY FISHING SCHOOL
© Copyright Peter Hayes. May not be reproduced without permission of the author.
19
ADVANCED ROLL CASTING There are several variations on the standard roll cast that I would like to discuss with you.
Half Roll Cast
A standard half roll cast is very under utilised by most fishermen. It is commonly used in wet fly flogging and loch style fishing where you wish to fish the fly to your feet whilst leaving enough line out to quickly load the rod. It is also a great pick off method in upstream dry fly fishing where the water is rushing the fly back toward you.
Toward the end of the retrieve leave 6 or 7 metres of line on the water. Draw the rod tip slowly back until it is as far back as possible. Stop or hesitate for a second in this position before you power into the forward cast.
Start the rod tip slowly building acceleration to a sudden and abrupt wrist snap. In doing this ensure the rod tip travels in a straight line path. Avoid doming. A slightly upwards direction is better than a downward one for this cast.
Watch the loop unfurl out the front and when it is almost straightened pull into the back cast. If you wait too long the line will sag down and touch the water. If you aim the cast down instead of up this will also happen. Don’t pull into the back cast too soon as this could crack your fly off.
Deliver the forward cast in the usual manner.
Extended Roll Cast
If you understand the following concept it is possible for you, with a minimum of practice, to roll cast ¾ of your fly line. With any roll casting the objective should be to get as much line behind the rod as possible (this provides the weight that loads the rod on the forward cast) whilst maintaining the minimum line/water anchor in front of the rod. Without the water tension (or anchor) provided by the line in front of the rod it is more or less impossible to make a roll cast.
Too little line behind the rod and we have not got enough weight to bend the rod on the forward cast. If there is too much line anchored on the water in front too much of the cast energy is used to lift and release the line from water tension.
Try this simple exercise to see the benefits of the above points. First let’s get 15 metres of line out on the water in front of you. Draw the rod aback and make a normal forward roll cast. Feel the power and look for the line speed. Try it again and again.
Now this time draw the rod back and before making the forward cast take 4 or 5 steps back up the bank drawing the line further out of the water. Walk backwards until just one meter of fly line is left in the water. Walk forward to the waters edge all the while keeping he rod tip back and your wrist cocked. When you reach the water move the rod into the normal delivery cast. Can you feel the extra power? Can you see the increased line speed? Do it again this time with a little more line. And again this time with more line. You are now at the point that I discussed in the first paragraph. You have a very small forward anchor with plenty of line behind the rod. Ideal isn’t it.
The challenge now is to achieve these conditions without walking back and forward.
Learning to throw this loop of line back behind you is easier said than done. Here are some key points to it. Firstly it is important to break most of the water tension out front. Do this by water falling the line to the nail knot, Then, with a stiff upper body rotate your whole torso to throw the back cast. Don’t use too much power or you will lose the forward anchor and throw the line completely behind you. With a little practice it becomes second nature to throw a half power back cast when you want to. It helps when practicing this cast to throw a tennis ball on the ground behind you as an aiming point for the loop. As you get more accomplished at the cast start the forward cast before your rear loop lands on the ground.
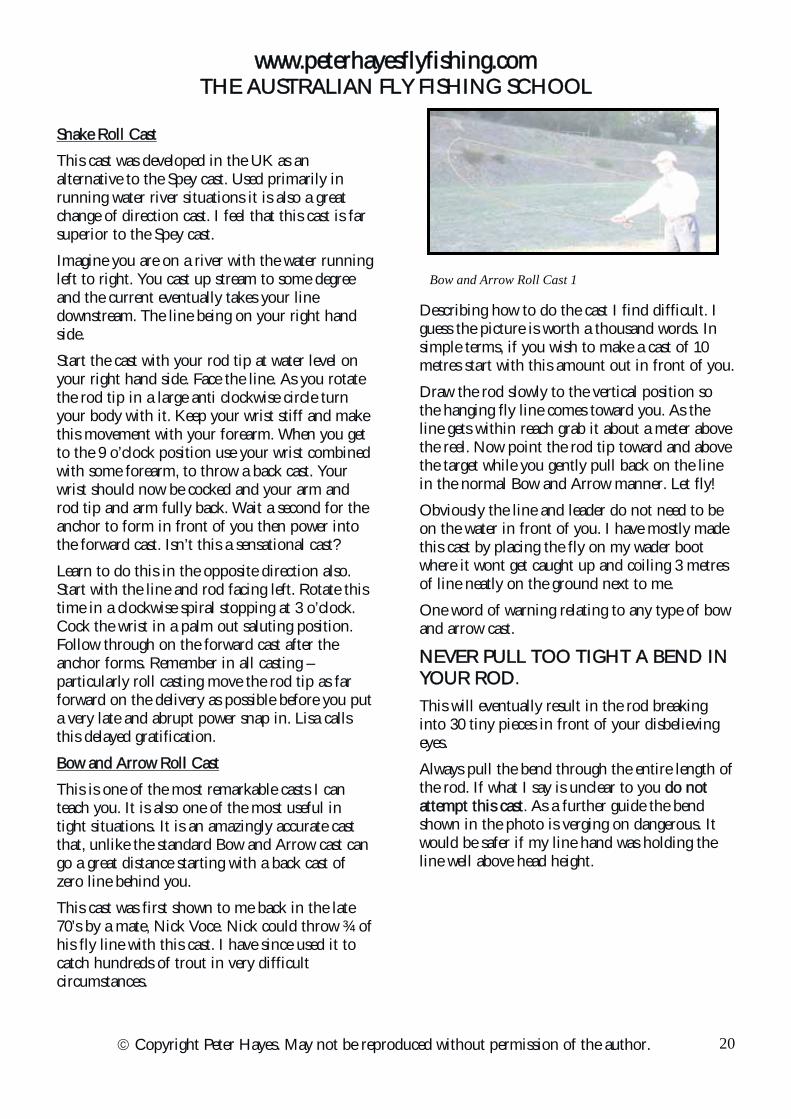
www.peterhayesflyfishing.com THE AUSTRALIAN FLY FISHING SCHOOL
© Copyright Peter Hayes. May not be reproduced without permission of the author.
20
Snake Roll Cast
This cast was developed in the UK as an alternative to the Spey cast. Used primarily in running water river situations it is also a great change of direction cast. I feel that this cast is far superior to the Spey cast.
Imagine you are on a river with the water running left to right. You cast up stream to some degree and the current eventually takes your line downstream. The line being on your right hand side.
Start the cast with your rod tip at water level on your right hand side. Face the line. As you rotate the rod tip in a large anti clockwise circle turn your body with it. Keep your wrist stiff and make this movement with your forearm. When you get to the 9 o’clock position use your wrist combined with some forearm, to throw a back cast. Your wrist should now be cocked and your arm and rod tip and arm fully back. Wait a second for the anchor to form in front of you then power into the forward cast. Isn’t this a sensational cast?
Learn to do this in the opposite direction also. Start with the line and rod facing left. Rotate this time in a clockwise spiral stopping at 3 o’clock. Cock the wrist in a palm out saluting position. Follow through on the forward cast after the anchor forms. Remember in all casting – particularly roll casting move the rod tip as far forward on the delivery as possible before you put a very late and abrupt power snap in. Lisa calls this delayed gratification.
Bow and Arrow Roll Cast
This is one of the most remarkable casts I can teach you. It is also one of the most useful in tight situations. It is an amazingly accurate cast that, unlike the standard Bow and Arrow cast can go a great distance starting with a back cast of zero line behind you.
This cast was first shown to me back in the late 70’s by a mate, Nick Voce. Nick could throw ¾ of his fly line with this cast. I have since used it to catch hundreds of trout in very difficult circumstances.
Describing how to do the cast I find difficult. I guess the picture is worth a thousand words. In simple terms, if you wish to make a cast of 10 metres start with this amount out in front of you.
Draw the rod slowly to the vertical position so the hanging fly line comes toward you. As the line gets within reach grab it about a meter above the reel. Now point the rod tip toward and above the target while you gently pull back on the line in the normal Bow and Arrow manner. Let fly!
Obviously the line and leader do not need to be on the water in front of you. I have mostly made this cast by placing the fly on my wader boot where it wont get caught up and coiling 3 metres of line neatly on the ground next to me.
One word of warning relating to any type of bow and arrow cast.
NEVER PULL TOO TIGHT A BEND IN YOUR ROD.
This will eventually result in the rod breaking into 30 tiny pieces in front of your disbelieving eyes.
Always pull the bend through the entire length of the rod. If what I say is unclear to you do not attempt this cast. As a further guide the bend shown in the photo is verging on dangerous. It would be safer if my line hand was holding the line well above head height.
Bow and Arrow Roll Cast 1


![[self tune]](https://img.pdfslide.us/doc/110x75/58ef40721a28ab163a8b46b3/self-tune.jpg)