Embed Size (px)
Citation preview
Advanced Training Manual: Approvals | Page 1 of 16
Advanced Training Manual: Approvals
Last Updated: March 2012
Advanced Training Manual: Approvals | Page 2 of 16
Table of Contents • Introduction• Training Objective• Approvals Settings
– Approval Options – Configure Client-Level Approval Settings – Configure User-Level Approval Settings – Reset (Remove/Undo) Approval Settings
• Approval Requests (submitter perspective) – Submit for Approval – Pending Approval – Approvals Page
• Approval Processing (approver perspective) – Pending Approval – Approvals Page – Decline or Approve – Sample Approval Notices – Delegate Approval
IntroductionWelcome to the Approvals Training Manual for CampaignBreeze. Using an Admin level account, you can setup and configure a variety of approval requirements for your users.
Training ObjectiveBy the end of this training manual, users will be able to configure approval requirements, understand what users see when they submit for approval, and review and approve/decline campaigns.

Advanced Training Manual: Approvals | Page 3 of 16
Approval Settings
This section of the training manual will cover the process for configuring approval settings for your users.
There are different levels of Admin accounts within the system, and also different levels of access available to modify Settings. Contact your administrator if your privileges need to be changed in order to access these features.
Approval Options
There are several settings that can be configured to setup an approval structure that meets your needs. Access these settings under the Approvals text link, and click the setting name to make changes.
Campaign Approval By default, campaign approvals are turned off unless your company has specific requirements to have the feature enabled. This setting must be changed to On to enable approvals.
Approval WorkflowThere are three workflow options available: Any, All, In Order.
• Any – any of the approvers identified can approve or decline. As soon as one approver approves or declines, the approval request is approved or declined.
• All – all approvers identified are required to approve. As soon as one approver declines, the approval request is declined. Approvers can be setup as individuals (for instance John, Jane and Sue all must approve), or as groups (for instance Legal and Marketing all must approve). When using groups, as soon as one approver from a group approves or declines, that reflects the group’s decision.
• In Order – groups must be used for this approval workflow (even if the group only includes one user). Each group of approvers is notified in order. One approver from the group must approve before the next group is notified. If an approver from one group declines, the approval request is declined.
Approval DelegationIf an approver will be away from the office for an extended period of time, they can temporarily delegate their approvals to another user (see Page 16). If approvals need to be permanently changed to a new user, that needs to be configured under Approval Workflow.
Email Notifications for Submitted, Approved and Declined Approval RequestsIf desired, you can modify the email subject and body for the email notifications that are sent when an approval request is submitted, approved and declined (see Page 15).

Advanced Training Manual: Approvals | Page 4 of 16
Configure Client-Level Approval Settings (minimum requirements: Client Admin role and access to Settings)
As a Client Admin with access to Settings, you can configure approval requirements for all users in your client. As a Group Admin with access to Settings and multiple clients, you can configure approval requirements for all users in each client individually or across the entire group.
For Client Admins
1. Click the Admin text link in the upper right.
2. Click the Settings tab. At the top of the page, you will see “Administration - [your client name]”, which indicates you are modifying settings on behalf of all users in that client. If you only want to modify settings for an individual user, see Page 5.
3. Click the Approvals text link.
4. Click each setting you wish to modify for the client, make any necessary changes, and click the Update button.
For Group Admins
1. Click the Admin text link in the upper right.
2. Click the Clients tab.
3. Click the name of the client you wish to modify.
4. Click the Settings tab. At the top of the window, you will see “Viewing Client: [specific client name]”, which indicates you are modifying settings on behalf of all users in that client. If you only want to modify settings for an individual user, see Page 5.
5. Click the Approvals text link.
6. Click each setting you wish to modify for the client, make any necessary changes, and click the Update button.

Advanced Training Manual: Approvals | Page 5 of 16
Configure User-Level Approval Settings (minimum requirements: Client Admin role and access to Settings)
If you do not want to apply approval settings to all users within a client, you can control them at an individual user level as well.
For Client and Group Admins
1. Click the Admin text link in the upper right.
2. Click the Users tab.
3. Locate the user you want to modify using the Search box, click the down arrow icon ( ) next to their name, and select Settings.
4. At the top of the window, you will see “Viewing User: [specific user]”, which indicates you are modifying settings on behalf of that individual user. If you want to modify settings for an entire client or group, see Page 4.
5. Click the Approvals text link.
6. Click each setting you wish to modify for the user, make any necessary changes, and click the Update button.
Reset (Remove/Undo) Approval Settings (minimum requirements: Client Admin role and access to Settings)
If you want to remove the approval requirements for all users within a client or group or for an individual user, you can reset the setting.
1. Click the Admin text link in the upper right.
2. Click the Groups / Clients / Users (depending on which level you want to modify) tab.
3. Locate the group / client / user you want to modify using the Search box, click the down arrow icon ( ) next to their name, and select Settings.
4. Click the Approvals text link.
5. At the far right of the “Workflow” setting, click the down arrow icon ( ) and select Reset.

Advanced Training Manual: Approvals | Page 6 of 16
Approval Requests (submitter perspective)
Submit for Approval
After the approval settings have been configured, users who have approval requirements on their accounts will see the following options on the Preview and Send step.
• Note to Approver – optionally include a note to be sent in the notification email to the approver(s)
• Notify Only – upon approval, the submitter will receive an email letting him/her know the campaign has been approved and can be scheduled or sent from his/her approval status page
• Schedule Campaign – upon approval, the campaign will be automatically scheduled based upon the choices selected by the submitter
• Send Campaign – upon approval, the campaign will be sent immediately

Advanced Training Manual: Approvals | Page 7 of 16
Pending Approval
After the user has submitted the campaign for approval, he/she can review its status via the Home page.
The submitter will also receive email notifications regarding status changes (see Page 15).
The Pending Approvals tab includes campaigns that particular user has created and that are pending approval or are awaiting to be sent or scheduled.
The Pending Approvals text link under the To Do section provides access to view the approval status page for any campaigns that you have submitted for approval, or campaigns that require your approval (if applicable). The number shown within the ( ) symbol represents only those campaigns that are currently awaiting approval.
You can access the details for all of your approval requests at any time by clicking on the Pending Approvals text link, which will take you to your Approvals page (see Page 8). You can also click on a campaign title in the Pending Approvals tab to access its specific approval status page.
Advanced Training Manual: Approvals | Page 8 of 16
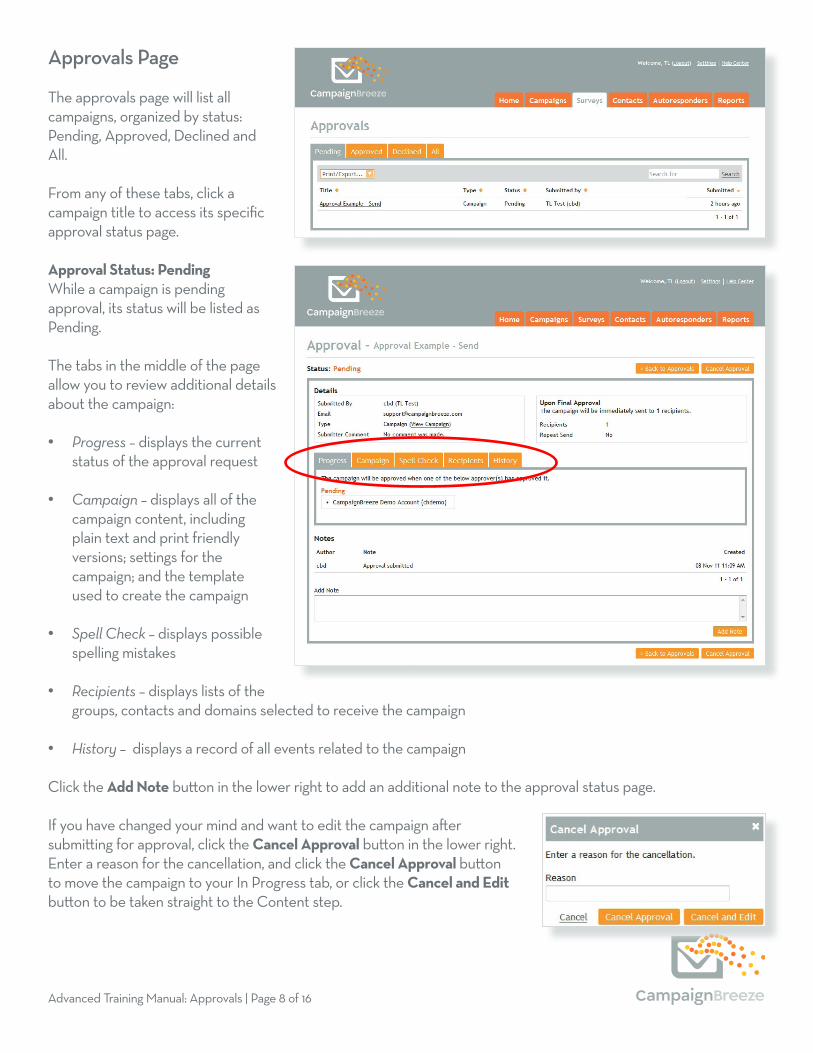
Approvals Page
The approvals page will list all campaigns, organized by status: Pending, Approved, Declined and All.
From any of these tabs, click a campaign title to access its specific approval status page.
Approval Status: Pending While a campaign is pending approval, its status will be listed as Pending.
The tabs in the middle of the page allow you to review additional details about the campaign:
• Progress – displays the current status of the approval request
• Campaign – displays all of the campaign content, including plain text and print friendly versions; settings for the campaign; and the template used to create the campaign
• Spell Check – displays possible spelling mistakes
• Recipients – displays lists of the groups, contacts and domains selected to receive the campaign
• History – displays a record of all events related to the campaign
Click the Add Note button in the lower right to add an additional note to the approval status page.
If you have changed your mind and want to edit the campaign after submitting for approval, click the Cancel Approval button in the lower right. Enter a reason for the cancellation, and click the Cancel Approval button to move the campaign to your In Progress tab, or click the Cancel and Edit button to be taken straight to the Content step.

Advanced Training Manual: Approvals | Page 9 of 16
Approval Status: Approved After a campaign has been approved, the action specified by the submitter will be taken:
Submit for Approval (Notify Only)
If he/she had selected “Submit for Approval (Notify Only)”, the campaign will be placed in his/her Pending Approvals tab to be sent or scheduled:
Click on the campaign title to access the details.
Scroll to the bottom of the page, and schedule or send the campaign.
To cancel the approval request, click Cancel Approval in the lower left to move the campaign back to your In Progress tab.
Submit for Approval and Schedule
If he/she had selected “Submit for Approval and Schedule”, the campaign will be scheduled.
If the requested schedule time has already passed, the campaign will be scheduled to be sent on the next hour.
Submit for Approval and Send
If he/she had selected “Submit for Approval and Send”, the campaign will be sent immediately.

Advanced Training Manual: Approvals | Page 10 of 16
Approval Status: Declined When an approval request has been declined, the campaign will be moved back to the submitter’s In Progress tab.
Advanced Training Manual: Approvals | Page 11 of 16
Approval Processing (approver perspective)
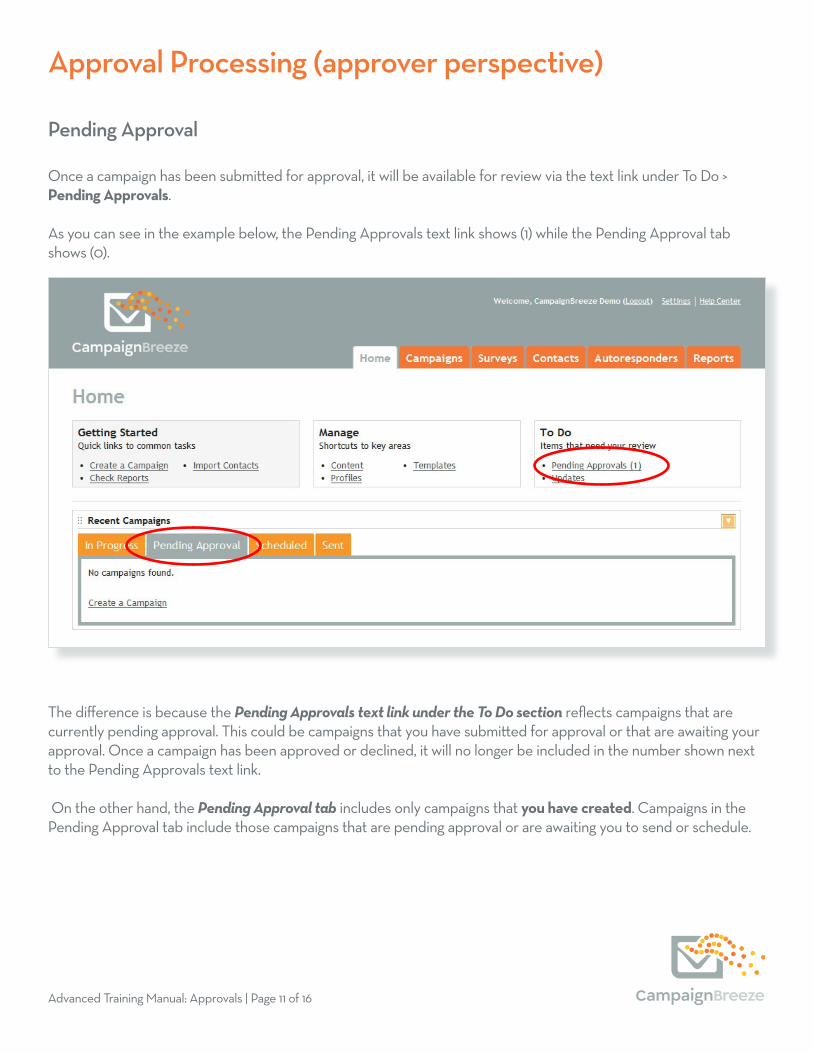
Pending Approval
Once a campaign has been submitted for approval, it will be available for review via the text link under To Do > Pending Approvals.
As you can see in the example below, the Pending Approvals text link shows (1) while the Pending Approval tab shows (0).
The difference is because the Pending Approvals text link under the To Do section reflects campaigns that are currently pending approval. This could be campaigns that you have submitted for approval or that are awaiting your approval. Once a campaign has been approved or declined, it will no longer be included in the number shown next to the Pending Approvals text link.
On the other hand, the Pending Approval tab includes only campaigns that you have created. Campaigns in the Pending Approval tab include those campaigns that are pending approval or are awaiting you to send or schedule.

Advanced Training Manual: Approvals | Page 12 of 16
Approvals Page
Click the Pending Approvals text link to access the Approvals Page. You are always able to access the Approvals page, even if there are (0) pending approvals.
The approvals page will list all campaigns, organized by status: Pending, Approved, Declined and All.
From any of these tabs, click a campaign title to access its specific approval status page.

Advanced Training Manual: Approvals | Page 13 of 16
Approval Status PageUntil a campaign has been approved or declined, its status will display as Pending.
The Approval Status Page provides all of the information you will need to review the campaign.
The Details box in the upper left includes key information about the request:
• Submitted By • Email Address• Link to View Campaign• Submitter Comments (if any)
The Upon Final Approval box in the upper right includes the details the user selected when submitting for approval (e.g. notify only, schedule or send immediately), as well as the total number of recipients included in the campaign and details for any repeat sends requested by the user.
The tabs in the middle of the page allow you to review additional details about the campaign:
• Progress – displays the current status of the approval request
• Campaign – displays all of the campaign content, including plain text and print friendly versions; settings for the campaign; and the template used to create the campaign
• Spell Check – displays possible spelling mistakes
• Recipients – displays lists of the groups, contacts and domains selected to receive the campaign
• History – displays a record of all events related to the campaign
Click the Add Note button in the lower right to add an additional note to the approval status page.
Advanced Training Manual: Approvals | Page 14 of 16
Decline or Approve
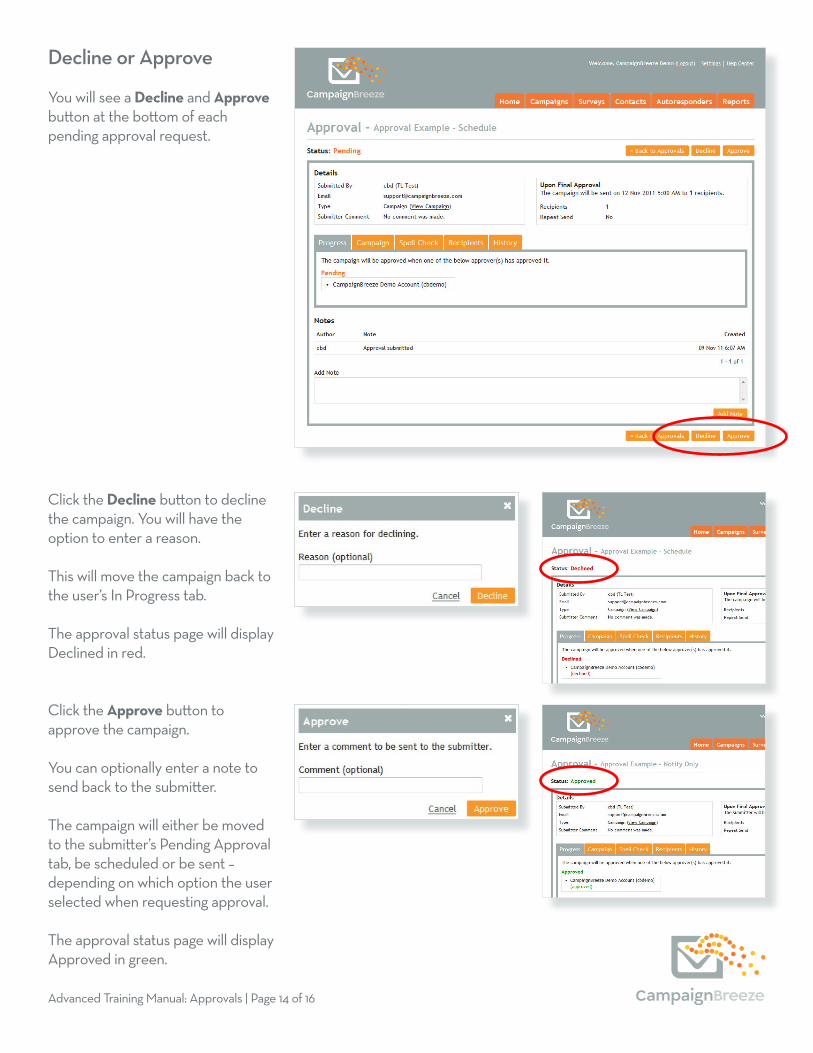
You will see a Decline and Approve button at the bottom of each pending approval request.
Click the Decline button to decline the campaign. You will have the option to enter a reason.
This will move the campaign back to the user’s In Progress tab.
The approval status page will display Declined in red.
Click the Approve button to approve the campaign.
You can optionally enter a note to send back to the submitter.
The campaign will either be moved to the submitter’s Pending Approval tab, be scheduled or be sent – depending on which option the user selected when requesting approval.
The approval status page will display Approved in green.

Advanced Training Manual: Approvals | Page 15 of 16
Sample Approval Notices
Sent to Approver
Sent to Submitter

Advanced Training Manual: Approvals | Page 16 of 16
Delegate Approval
If you are going to be out of the office for an extended period of time, you can delegate your approval responsibilities to another user. They will receive the notices that you normally would, and will have the access you normally would to approve campaigns.
Note if you need to permanently adjust your approval settings to route to a different user, contact your administrator or support.
To delegate your approvals:
1. Click Settings in the upper right of your account.
2. Click the Approvals text link.
3. Click the Delegate To setting.
4. Click the Delegate to user radio button.
5. Start typing the name of the person you want to delegate to (a minimum of 3 characters is required before options will appear), or click the drop down arrow to select from a list.
6. Click the Update button.
To stop delegating your approvals:
1. Click Settings in the upper right of your account.
2. Click the Approvals text link.
3. Click the Delegate To setting.
4. Click the Do not Delegate radio button.
5. Click the Update button.