Embed Size (px)
Citation preview
Advanced Tips for Bet ter Translat ionAutodesk Revit 2010 IES
IES Worldwide Support Series
A. Chan and M. Farrell
What is a “gbXML”?
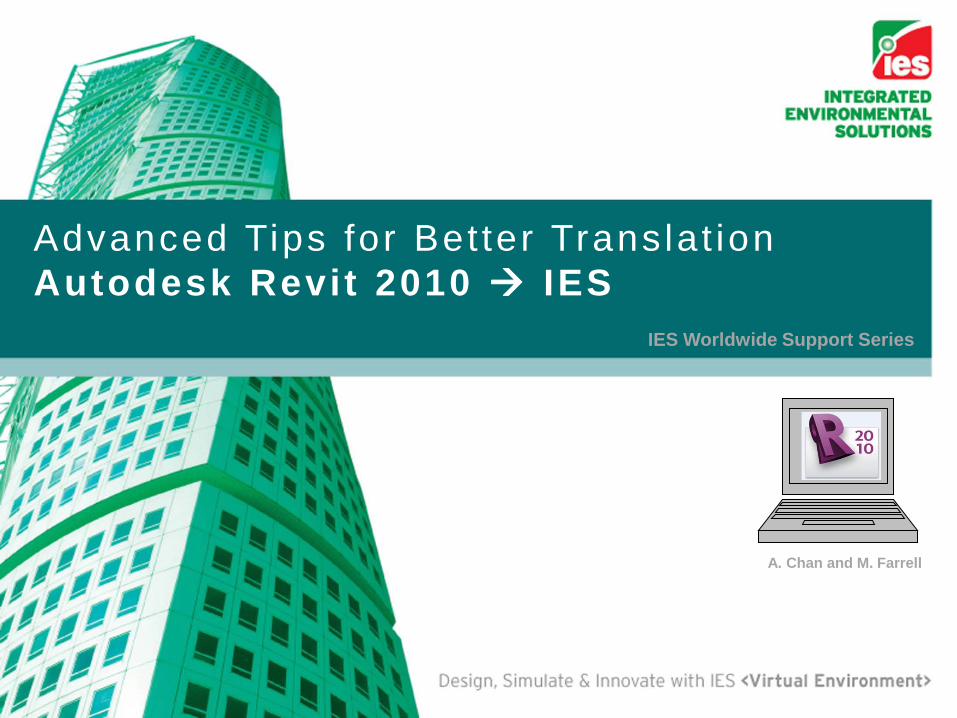
When you click on ‘Set Model Properties’, even though you are doing it within Revit using the IES toolbar, in the background, you are actually exporting a gbXML file, and the 3D model you are seeing is a gbXML model. This shows what will be exporting for analysis, so it’s important to look at this model to see what’s translating correctly and what’s not…
“gbXML” refers to Green Building XML (extensible markup language) schema was developed to facilitate the transfer information from building information models to integrate with building performance analysis. XML is a web-based, standards-compliant specification that can be used to store and transport virtually any kind of data. It is based on a relatively simple text-based syntax similar to HTML, on top of that, IES added many improvements to the original gbXML format to enhance the translation. One drawback with gbXML is that it is intended specifically for storing all model data, and so is not a comprehensive list of data that is exporting out. Also, gbXML data that is edited or changed outside of the model , such as in the Virtual Environment, cannot be re-imported to the original BIM model. Even though this technically means that gbXML is not truly an interoperable method of information exchange, yet it is still a useful data format for obtaining building simulation. geometry
All bounding elements from the model will translate as 2D surfaces which represents their geometry that enclose the 3D spaces (rooms). Anything you see in “Blue” means it is translating as “Rooms”, and anything you see in “Green” means it is translating as “Shading Surface”, and I will explain the difference between a ‘Room’ vs ‘Shading Surface’ in a little bit.
In order to take advantage of this advanced workflow between the platforms, the Revit model must be properly prepared for analysis. Like any type of analysis, the usefulness and accuracy of the results depend greatly on the quality of the inputs. This is also where you want to distinguish your Revit model that is used for documentation vs a Revit model that is used for design/energy performance analysis.
REVIT TO IES TRANSLATION ASSISTANCE
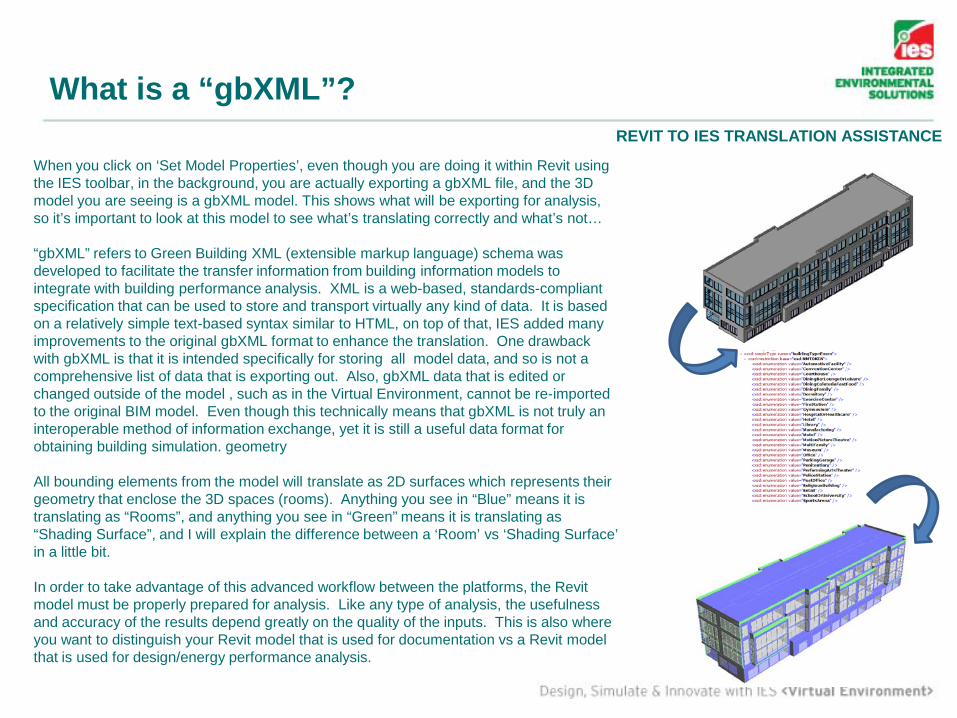
gbXML export hierarchy diagramThis diagram shows a summary of the data gbXML is exporting.
First, location, it is very important because it defines geographically where your building is. That defines the what kind of climate and how it effects your building. Location and climate dictate the performance of your building both in terms of design and energy. You set this through the IES toolbar.
Next is Building type. Defining the proper building types will pull different building parameters into the analysis; such as occupancy density, what the heating and cooling setpoints are, occupancy or equipment schedules. For example, for an Office occupancy density which is 150 sq.ft/person verses Retail’s occupancy density which is 300 sq.ft/person. These are set through the IES toolbar, and are all based on ASHRAE and standard profile data.
Rooms are the most fundamental and critical element for design/building performance analysis. They are elements that determine the accuracy of your analysis from your model. These must be places in every interior space, even if it is not occupiable or accessible.
Shading Surfaces are necessary to use as shading devices, overhangs of roofs, balconies or even surrounding buildings as part of the analysis
The difference between ‘Rooms’ and ‘Shading Surfaces’ is that Rooms are objects that will be part of the model, and will be used for energy analysis, and shading surfaces are objects that will shade the rooms, but are otherwise not part of the energy analysis. Classifying rooms and shading properly is extremely important to the accuracy of your analysis.
Surfaces, which are elements that are used to defined the rooms. These surfaces include walls, floors, ceilings and roof. These surfaces “bound” the room volume in Revit. Lastly, there are openings, which include doors, windows, and skylights. These are housed on “surfaces”.
REVIT TO IES TRANSLATION ASSISTANCE
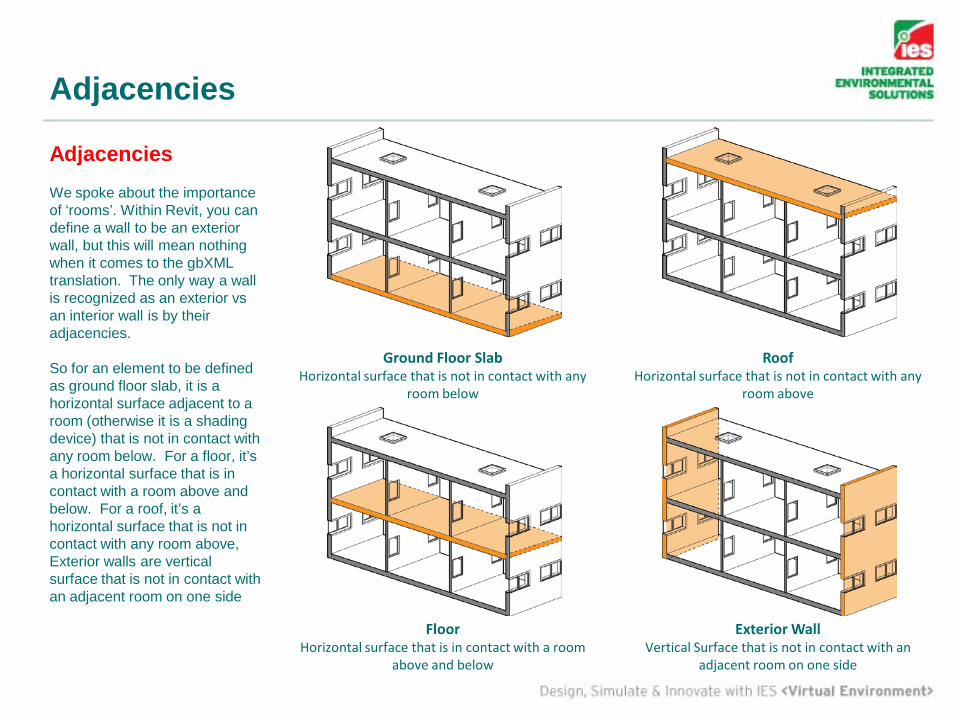
Adjacencies
Ground Floor SlabHorizontal surface that is not in contact with any
room below
RoofHorizontal surface that is not in contact with any
room above
FloorHorizontal surface that is in contact with a room
above and below
Exterior WallVertical Surface that is not in contact with an
adjacent room on one side
AdjacenciesWe spoke about the importance of ‘rooms’. Within Revit, you can define a wall to be an exterior wall, but this will mean nothing when it comes to the gbXML translation. The only way a wall is recognized as an exterior vsan interior wall is by their adjacencies.
So for an element to be defined as ground floor slab, it is a horizontal surface adjacent to a room (otherwise it is a shading device) that is not in contact with any room below. For a floor, it’s a horizontal surface that is in contact with a room above and below. For a roof, it’s a horizontal surface that is not in contact with any room above, Exterior walls are vertical surface that is not in contact with an adjacent room on one side
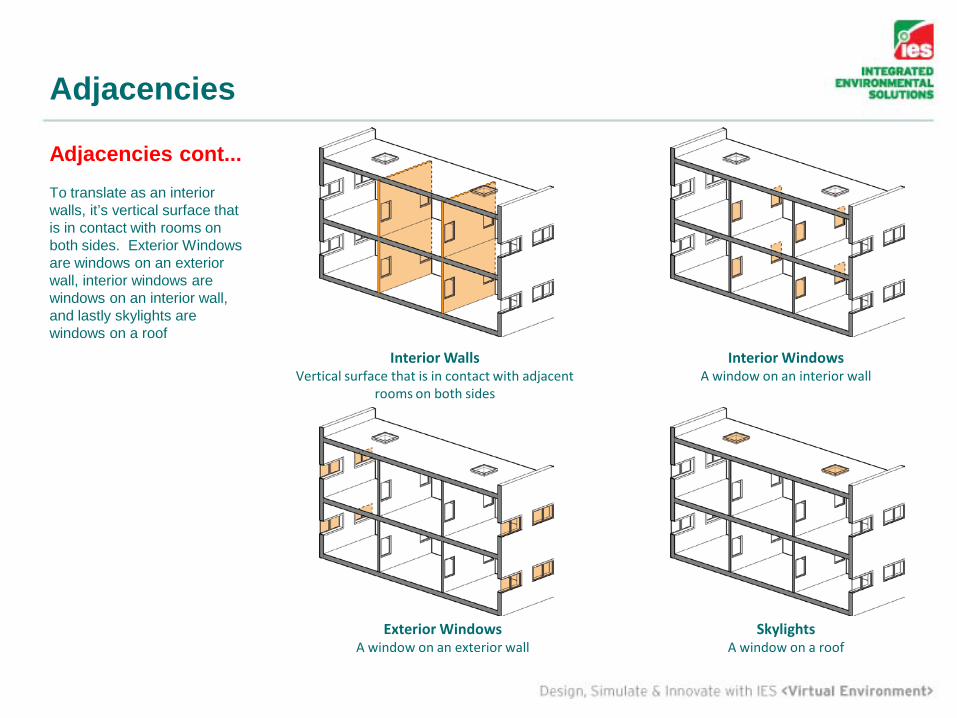
Adjacencies
Interior WallsVertical surface that is in contact with adjacent
rooms on both sides
Interior WindowsA window on an interior wall
Exterior WindowsA window on an exterior wall
SkylightsA window on a roof
Adjacencies cont...To translate as an interior walls, it’s vertical surface that is in contact with rooms on both sides. Exterior Windows are windows on an exterior wall, interior windows are windows on an interior wall, and lastly skylights are windows on a roof
Typical Workflow
1. If it’s a central model, detach from central. Clean up views, elements that are not related to energy analysis (casework, railings, etc) , and purge unused. This will help reduce the size of the file.
2. Try to keep the model as lean as possible in Revit, as it will be worth it when trying to run analysis, and will impact runtime greatly. Only keep elements essential to the gbXML. Many firms have separate Revit construction document models and Revit analysis models, though in the future hopefully that will change. Simplicity of your model is key, like using a singular wall from ground to roof, instead of stacked or layered, complex walls. Use actual window families instead of a curtain wall embedded in opaque walls. Use simple, generic families if possible. Always use the appropriate family type for any custom components you make.
3. Make sure all the room are placed in each and every space, and rooms are set to its proper upper limits (tied to the level above, etc.). Area and volume computations must be turned on. Basically, review and address all issues in the IES Revit 2010 White Paper. Those basic settings must be addressed or the exported geometry will be inaccurate.
4. Export the lowest level of complexity possible. This means, when translating into VE, use the most simple type of export possible for the analysis. This can be the difference between 50 and 500 shading surfaces, and minutes verses hours for an analysis. Do 1” mullions really matter on a curtain wall to the overall energy performance of the building?
5. Clean up/non-room bounding all the unnecessary jogs and surfaces, for example, you can make shaft walls that are located on the exterior side of walls to be non-room bounding rather than placing a separate room into them. If an interior space has many ½ walls or jogs (that protrudes into but does not divide two spaces), these walls can often be made non-room bounding, and leave a simple room perimeter to bound the space. Think about where you really need to take account of the walls for your type of analysis.
REVIT TO IES TRANSLATION ASSISTANCE
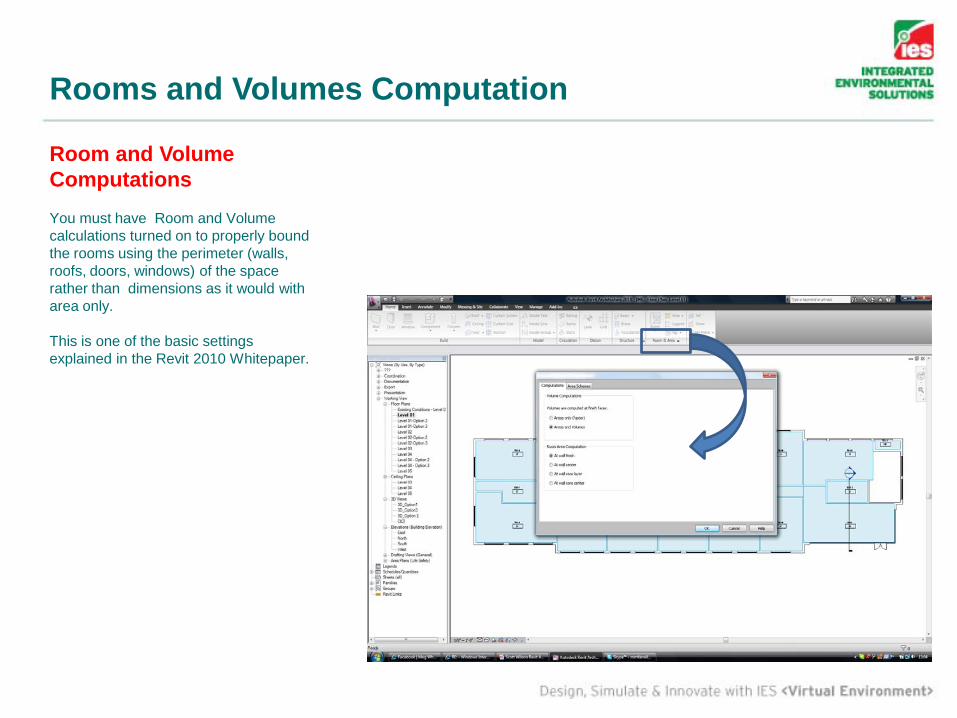
Rooms and Volumes Computation
Room and Volume ComputationsYou must have Room and Volume calculations turned on to properly bound the rooms using the perimeter (walls, roofs, doors, windows) of the space rather than dimensions as it would with area only.
This is one of the basic settings explained in the Revit 2010 Whitepaper.
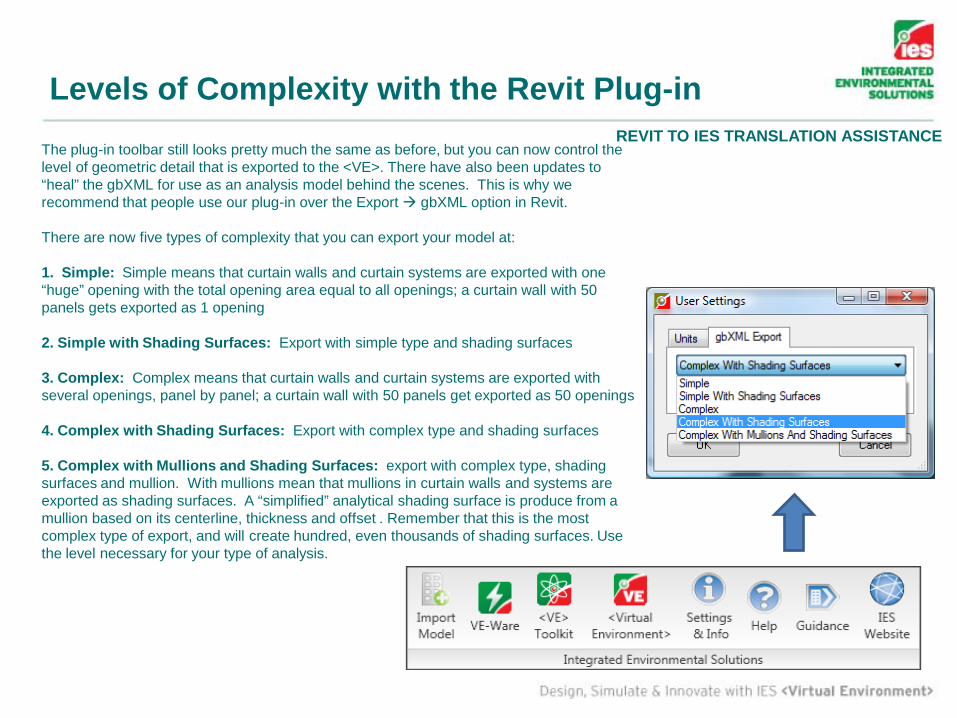
Levels of Complexity with the Revit Plug-inREVIT TO IES TRANSLATION ASSISTANCE
The plug-in toolbar still looks pretty much the same as before, but you can now control the level of geometric detail that is exported to the <VE>. There have also been updates to “heal” the gbXML for use as an analysis model behind the scenes. This is why we recommend that people use our plug-in over the Export gbXML option in Revit.
There are now five types of complexity that you can export your model at:
1. Simple: Simple means that curtain walls and curtain systems are exported with one “huge” opening with the total opening area equal to all openings; a curtain wall with 50 panels gets exported as 1 opening
2. Simple with Shading Surfaces: Export with simple type and shading surfaces
3. Complex: Complex means that curtain walls and curtain systems are exported with several openings, panel by panel; a curtain wall with 50 panels get exported as 50 openings
4. Complex with Shading Surfaces: Export with complex type and shading surfaces
5. Complex with Mullions and Shading Surfaces: export with complex type, shading surfaces and mullion. With mullions mean that mullions in curtain walls and systems are exported as shading surfaces. A “simplified” analytical shading surface is produce from a mullion based on its centerline, thickness and offset . Remember that this is the most complex type of export, and will create hundred, even thousands of shading surfaces. Use the level necessary for your type of analysis.
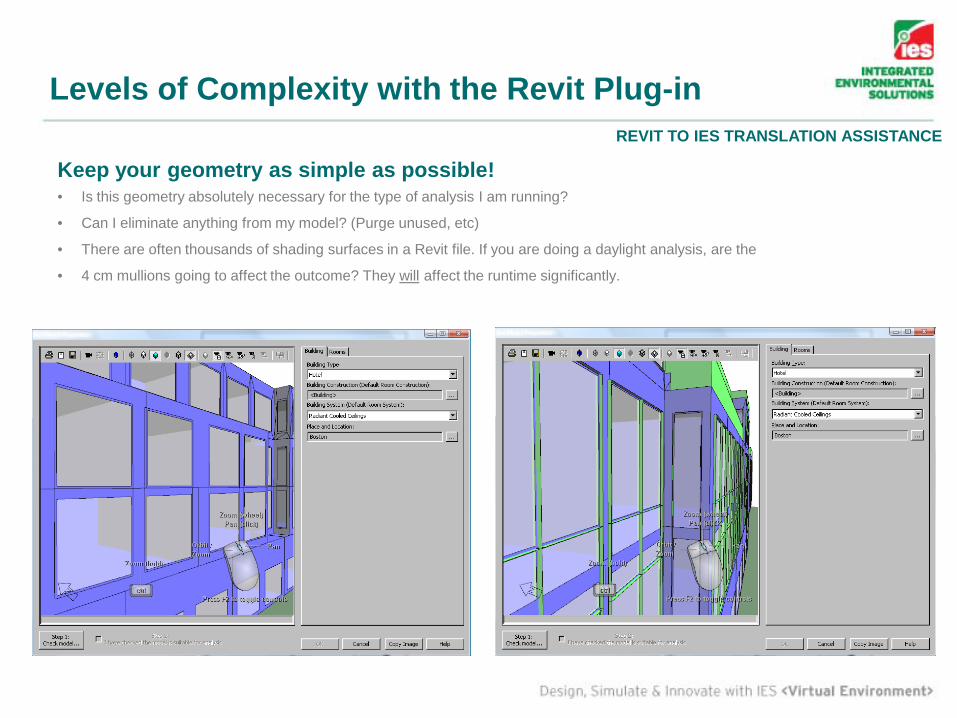
Levels of Complexity with the Revit Plug-in
Keep your geometry as simple as possible!• Is this geometry absolutely necessary for the type of analysis I am running?
• Can I eliminate anything from my model? (Purge unused, etc)
• There are often thousands of shading surfaces in a Revit file. If you are doing a daylight analysis, are the
• 4 cm mullions going to affect the outcome? They will affect the runtime significantly.
REVIT TO IES TRANSLATION ASSISTANCE
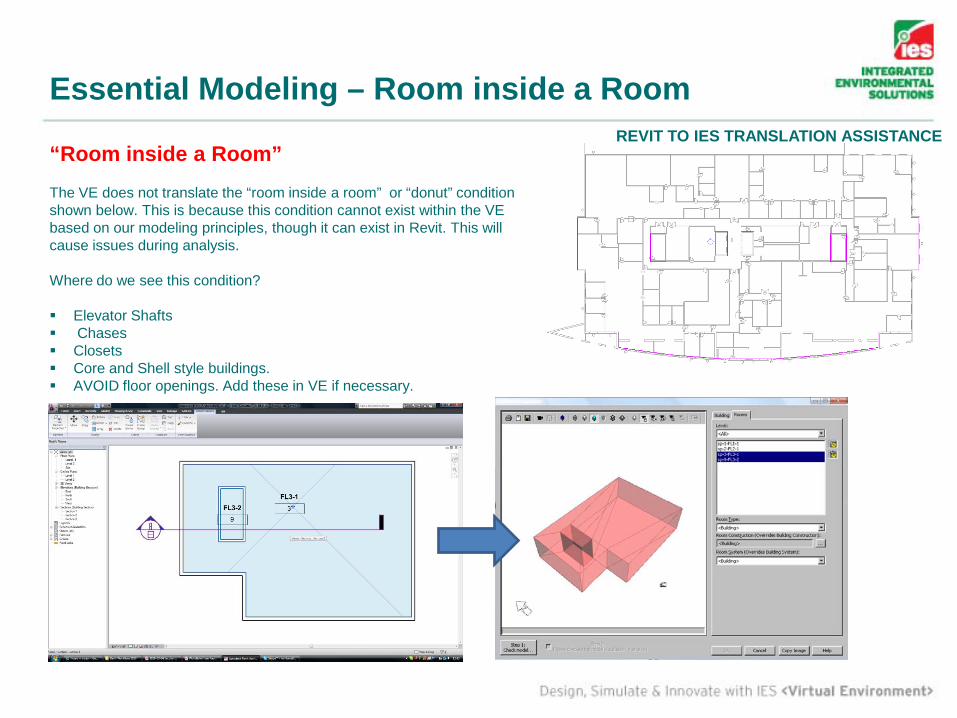
Essential Modeling – Room inside a Room
“Room inside a Room”The VE does not translate the “room inside a room” or “donut” condition shown below. This is because this condition cannot exist within the VE based on our modeling principles, though it can exist in Revit. This will cause issues during analysis.
Where do we see this condition?
Elevator Shafts Chases Closets Core and Shell style buildings. AVOID floor openings. Add these in VE if necessary.
REVIT TO IES TRANSLATION ASSISTANCE
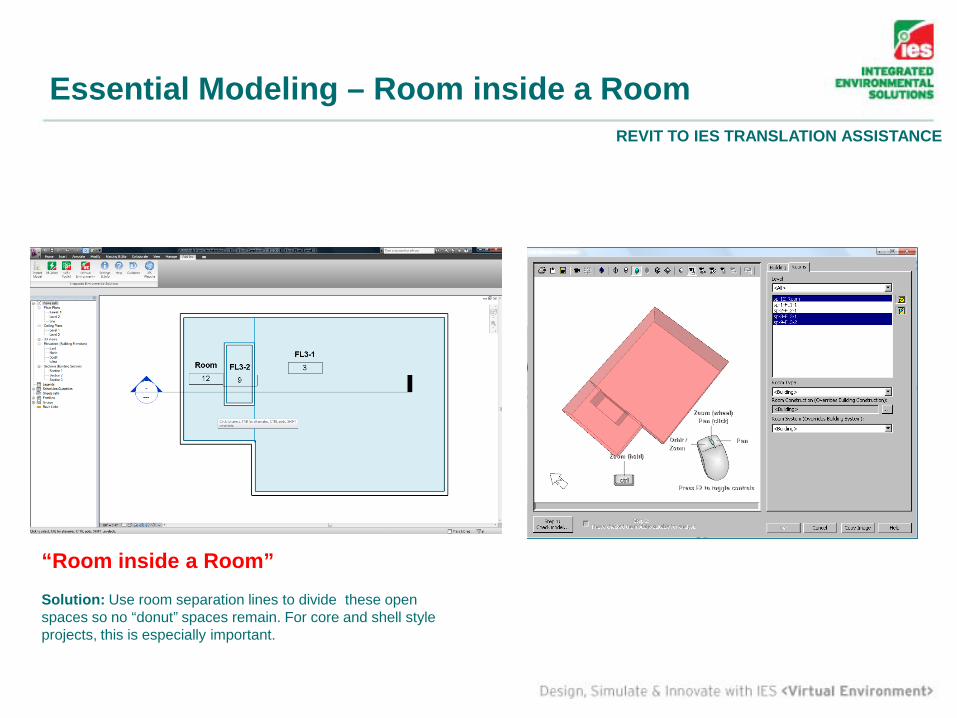
Essential Modeling – Room inside a Room
“Room inside a Room”Solution: Use room separation lines to divide these open spaces so no “donut” spaces remain. For core and shell style projects, this is especially important.
REVIT TO IES TRANSLATION ASSISTANCE
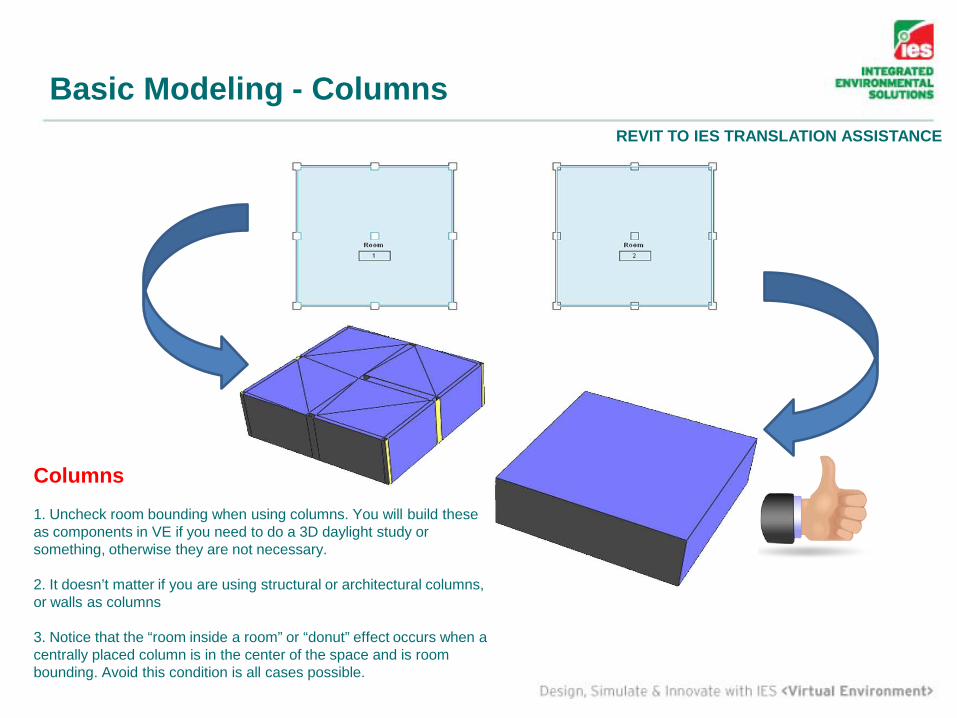
Basic Modeling - ColumnsREVIT TO IES TRANSLATION ASSISTANCE
Columns 1. Uncheck room bounding when using columns. You will build these as components in VE if you need to do a 3D daylight study or something, otherwise they are not necessary.
2. It doesn’t matter if you are using structural or architectural columns, or walls as columns
3. Notice that the “room inside a room” or “donut” effect occurs when a centrally placed column is in the center of the space and is room bounding. Avoid this condition is all cases possible.
Essential Modeling – Curtain WallREVIT TO IES TRANSLATION ASSISTANCECurtain Walls
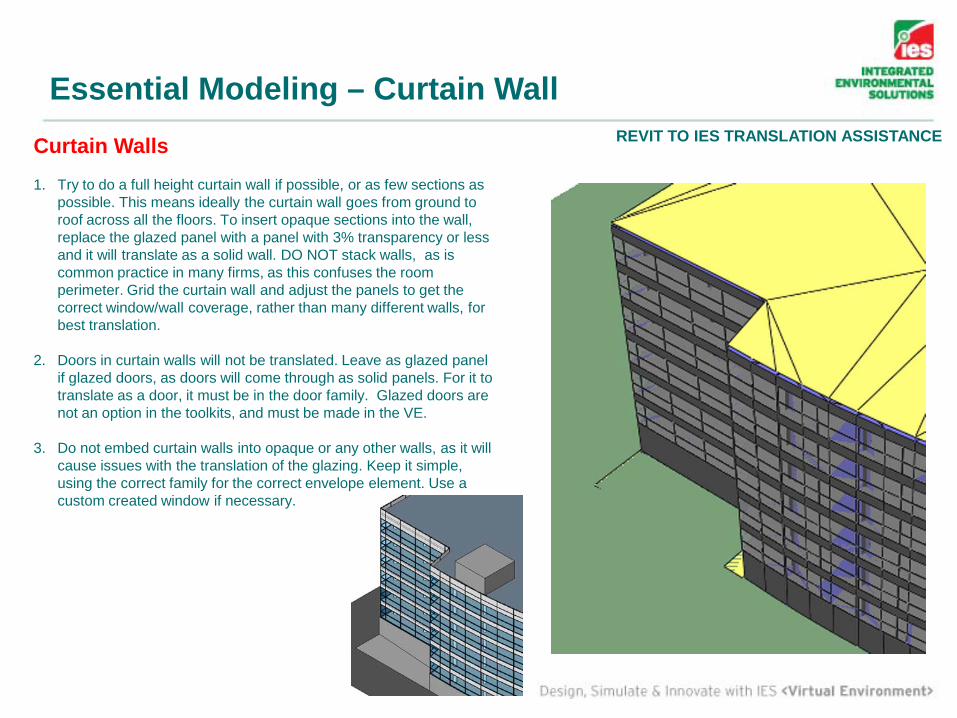
1. Try to do a full height curtain wall if possible, or as few sections as possible. This means ideally the curtain wall goes from ground to roof across all the floors. To insert opaque sections into the wall, replace the glazed panel with a panel with 3% transparency or less and it will translate as a solid wall. DO NOT stack walls, as is common practice in many firms, as this confuses the room perimeter. Grid the curtain wall and adjust the panels to get the correct window/wall coverage, rather than many different walls, for best translation.
2. Doors in curtain walls will not be translated. Leave as glazed panel if glazed doors, as doors will come through as solid panels. For it to translate as a door, it must be in the door family. Glazed doors are not an option in the toolkits, and must be made in the VE.
3. Do not embed curtain walls into opaque or any other walls, as it will cause issues with the translation of the glazing. Keep it simple, using the correct family for the correct envelope element. Use a custom created window if necessary.
Linked RVT Files
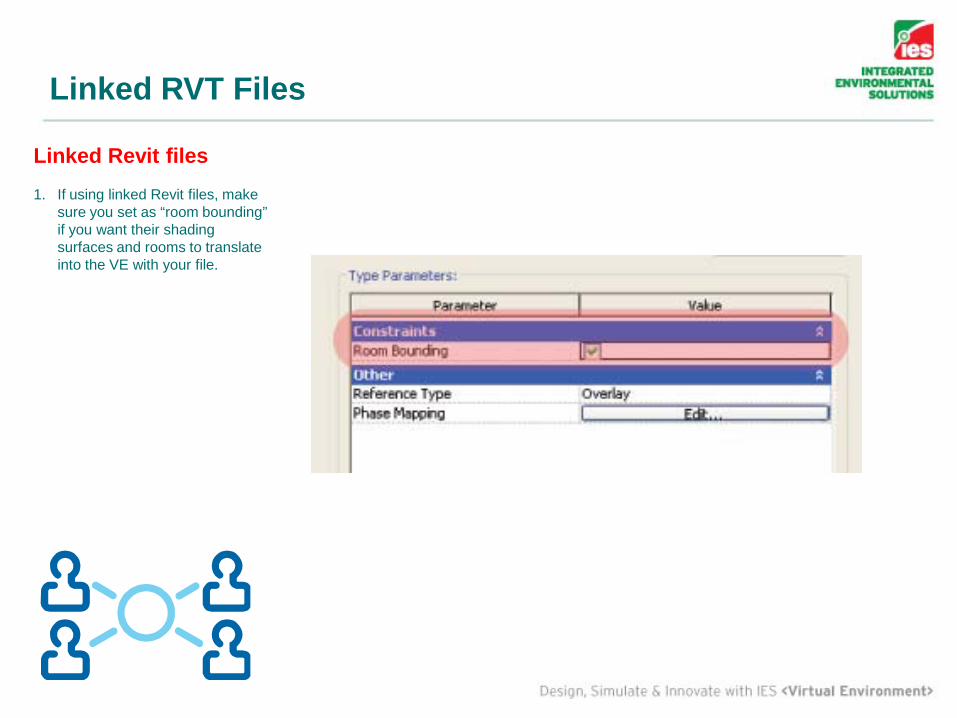
Linked Revit files1. If using linked Revit files, make
sure you set as “room bounding” if you want their shading surfaces and rooms to translate into the VE with your file.
Basic Modeling - Walls
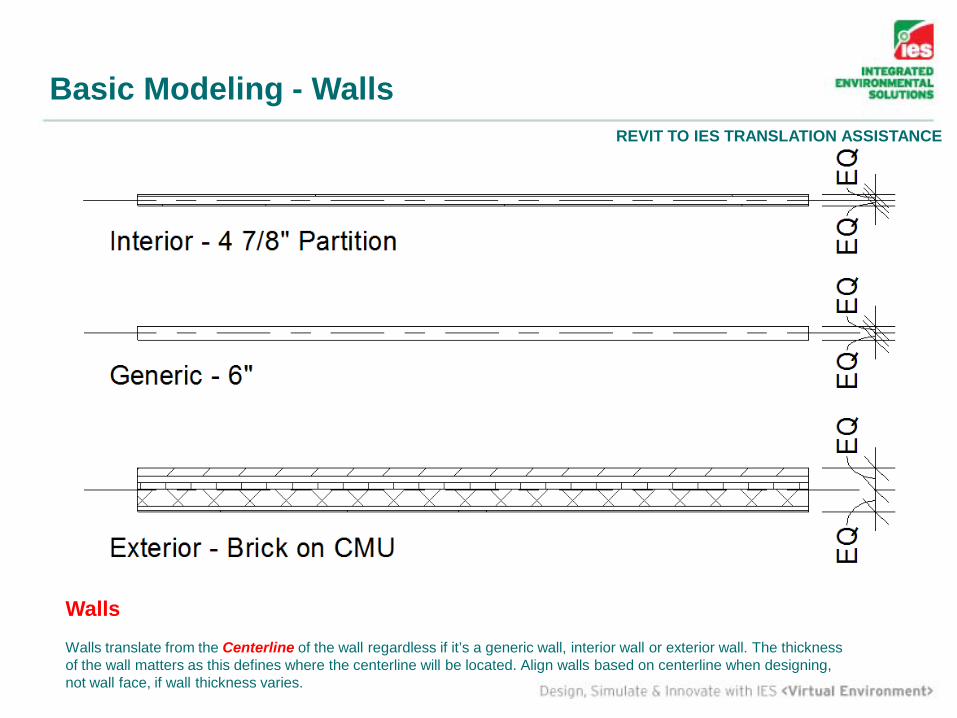
WallsWalls translate from the Centerline of the wall regardless if it’s a generic wall, interior wall or exterior wall. The thickness of the wall matters as this defines where the centerline will be located. Align walls based on centerline when designing, not wall face, if wall thickness varies.
REVIT TO IES TRANSLATION ASSISTANCE
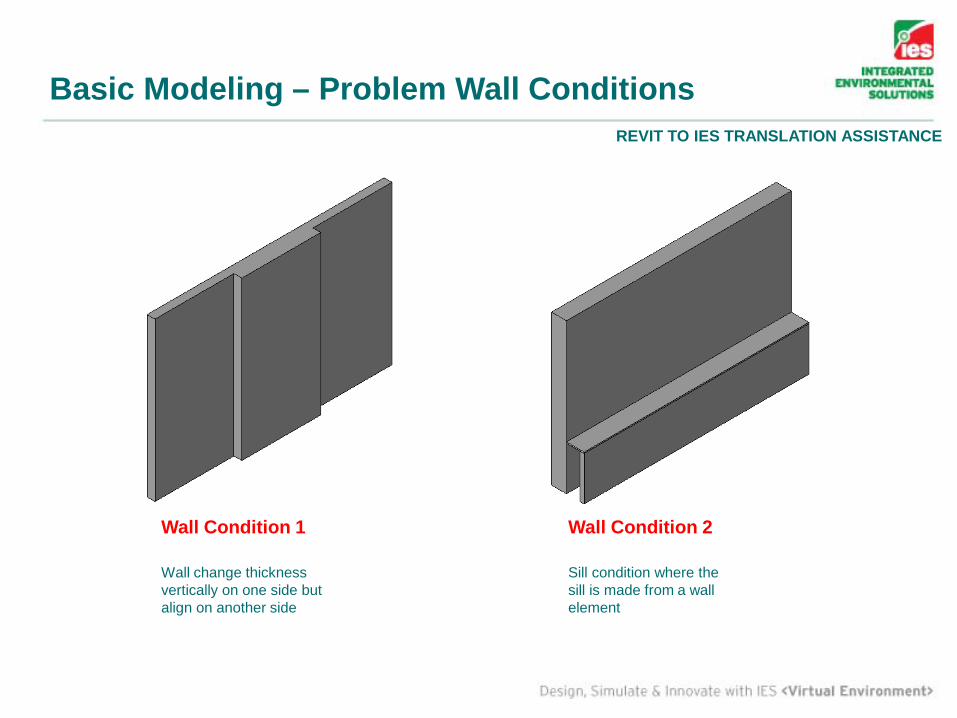
Basic Modeling – Problem Wall Conditions
Wall Condition 1
Wall change thickness vertically on one side but align on another side
Wall Condition 2
Sill condition where the sill is made from a wall element
REVIT TO IES TRANSLATION ASSISTANCE
REVIT TO IES TRANSLATION ASSISTANCE
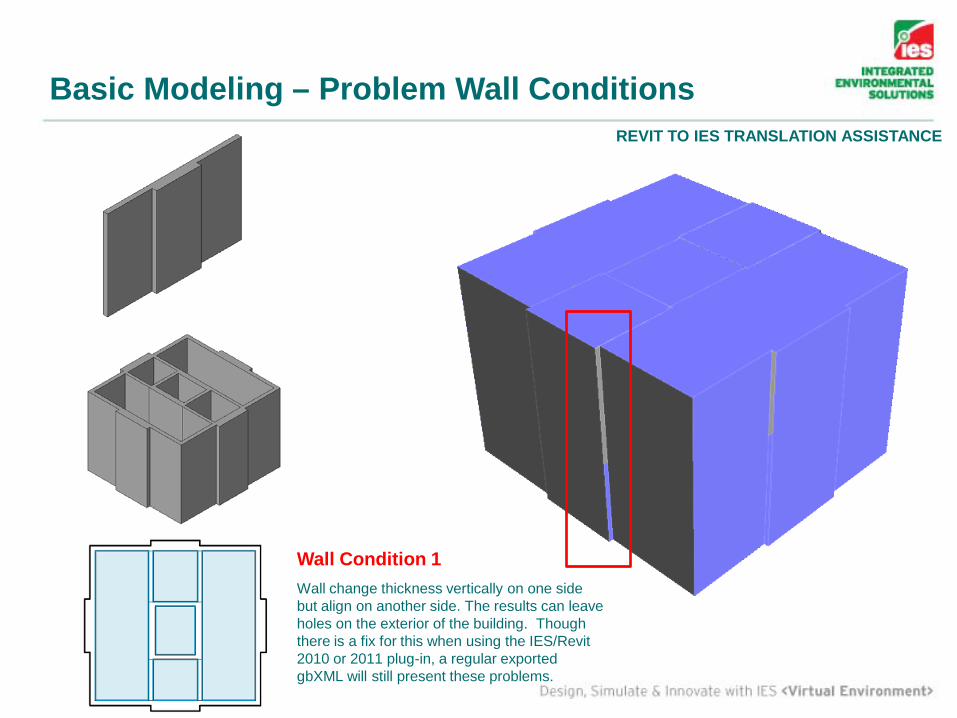
Basic Modeling – Problem Wall Conditions
Wall Condition 1Wall change thickness vertically on one side but align on another side. The results can leave holes on the exterior of the building. Though there is a fix for this when using the IES/Revit 2010 or 2011 plug-in, a regular exported gbXML will still present these problems.
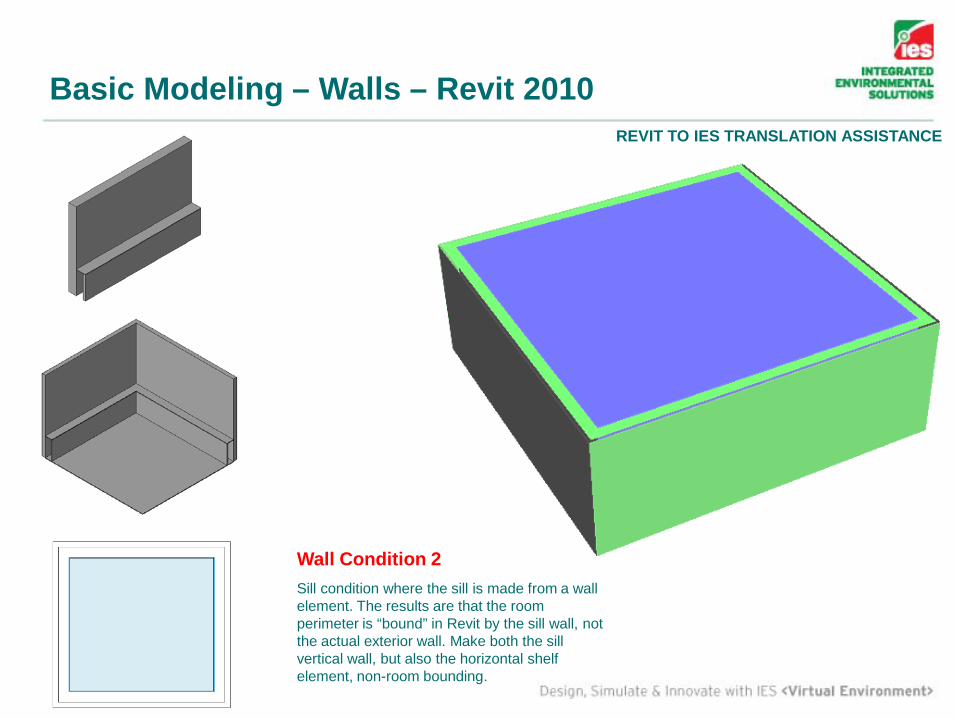
Basic Modeling – Walls – Revit 2010REVIT TO IES TRANSLATION ASSISTANCE
Wall Condition 2Sill condition where the sill is made from a wall element. The results are that the room perimeter is “bound” in Revit by the sill wall, not the actual exterior wall. Make both the sill vertical wall, but also the horizontal shelf element, non-room bounding.
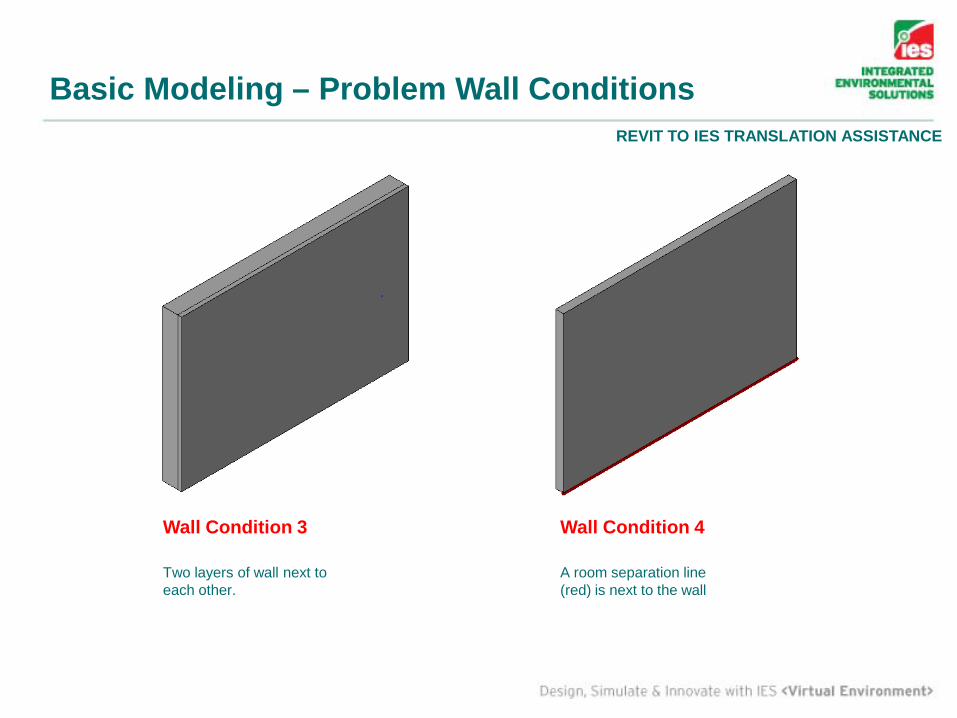
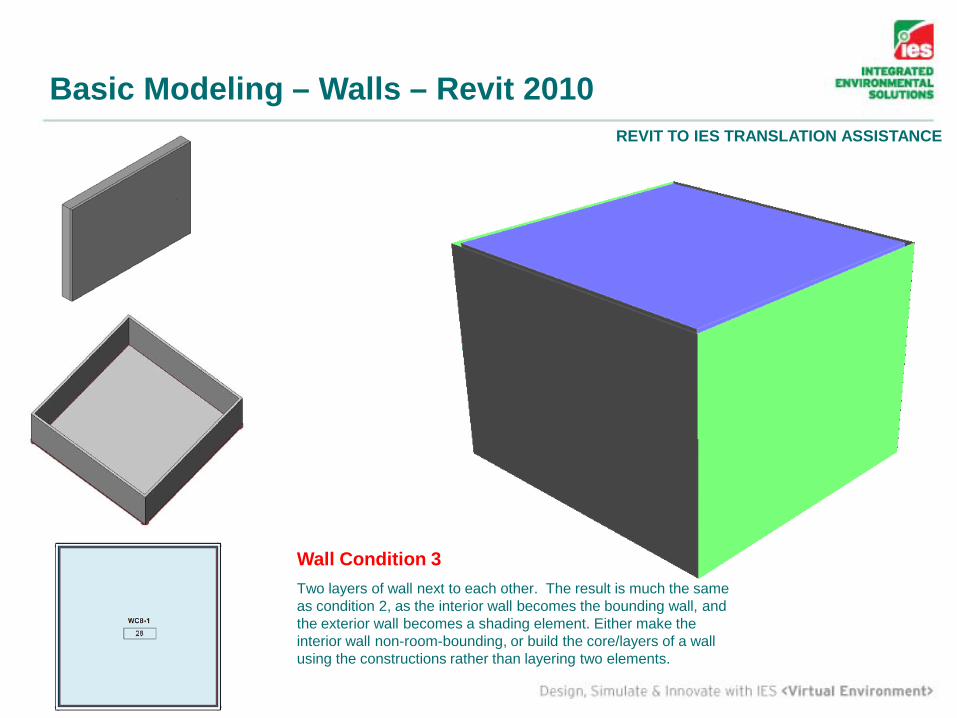
Wall Condition 3
Two layers of wall next to each other.
Wall Condition 4
A room separation line (red) is next to the wall
REVIT TO IES TRANSLATION ASSISTANCE
Basic Modeling – Problem Wall Conditions
Basic Modeling – Walls – Revit 2010REVIT TO IES TRANSLATION ASSISTANCE
Wall Condition 3Two layers of wall next to each other. The result is much the same as condition 2, as the interior wall becomes the bounding wall, and the exterior wall becomes a shading element. Either make the interior wall non-room-bounding, or build the core/layers of a wall using the constructions rather than layering two elements.

Basic Modeling – Walls – Revit 2010REVIT TO IES TRANSLATION ASSISTANCE
Wall Condition 4A room separation line (red) is next to the wall. This does almost the same thing, except it makes a HOLE on the perimeter, with a shading element over it. ONLY use room separation lines to separate two spaces with a hole between them (meaning divided space without a wall or barrier). Never use around the perimeter of a room to get it to bound quickly. If it is not bounding correctly, there is an issue with the Revit model that must be addressed.

Basic Modeling – Floors – Revit 2010
Floor Condition 3A layer of floor on top of another floor
Translation to <VE> with Revit 2010The lower slab will translate as a shading surface, and the finish floor would become the “bounding “ perimeter of the room as Revit fills the volume of the space with a room. This is similar to the wall next to wall condition, and is often done at firms to apply different floor finishes to different rooms.
SolutionThe same solution applies, and you make the finished floor surface non-room bounding. Ideally, you have a singular floor slab for each floor. The other issue you will see with this is disappearing rooms after you place them in Revit. Rooms can get caught between the floors, and placed over each other many times until you realize what is happening. Avoid layered walls, floors, and generally any layered elements that bound rooms/are in the gbXML hierarchy in the beginning of the document,.
REVIT TO IES TRANSLATION ASSISTANCE

Basic Modeling – Floors – Revit 2010
Floor Condition 4A slope d floor or ramp
Translation to <VE> with Revit 2010The ramp will “bound “ the room, and create a sloped foundation to the room, when in reality it is most likely a raised panel system or filled in material. The edges will translate as holes where the slope intersects the wall.
REVIT TO IES TRANSLATION ASSISTANCE
SolutionMake the ramp or sloped floor non-room bounding. If you have things like lightshelves in rooms, those are also room bounding and affect the way the room volume fills the space. Also make non-room bounding.
Shading Devices
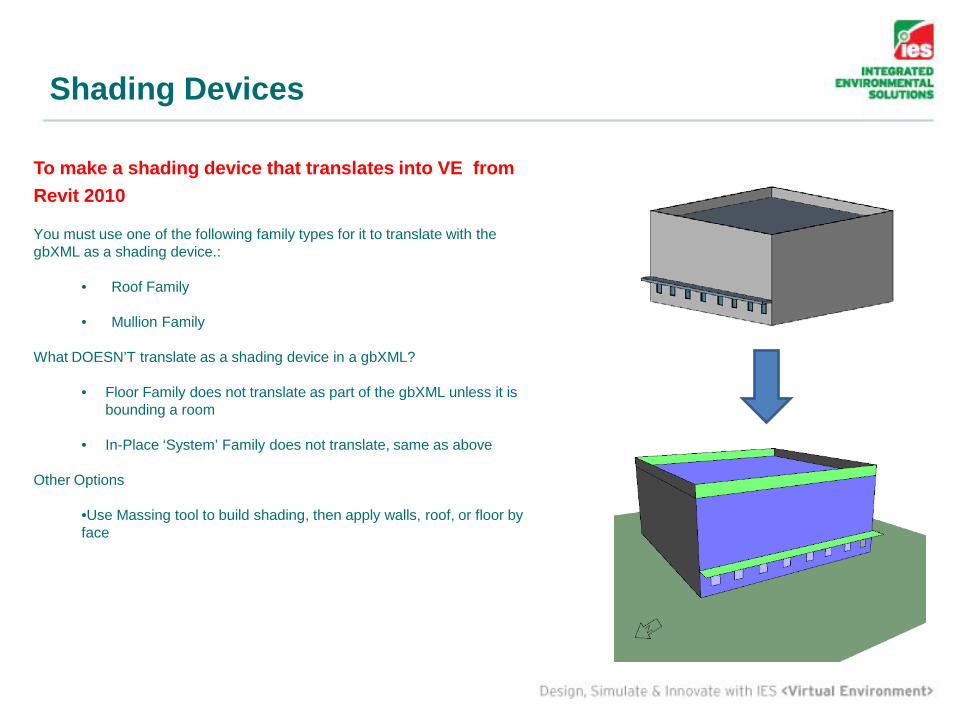
To make a shading device that translates into VE from Revit 2010
You must use one of the following family types for it to translate with the gbXML as a shading device.:
• Roof Family
• Mullion Family
What DOESN’T translate as a shading device in a gbXML?
• Floor Family does not translate as part of the gbXML unless it is bounding a room
• In-Place ‘System’ Family does not translate, same as above
Other Options
•Use Massing tool to build shading, then apply walls, roof, or floor by face
Basic Modeling - Openings
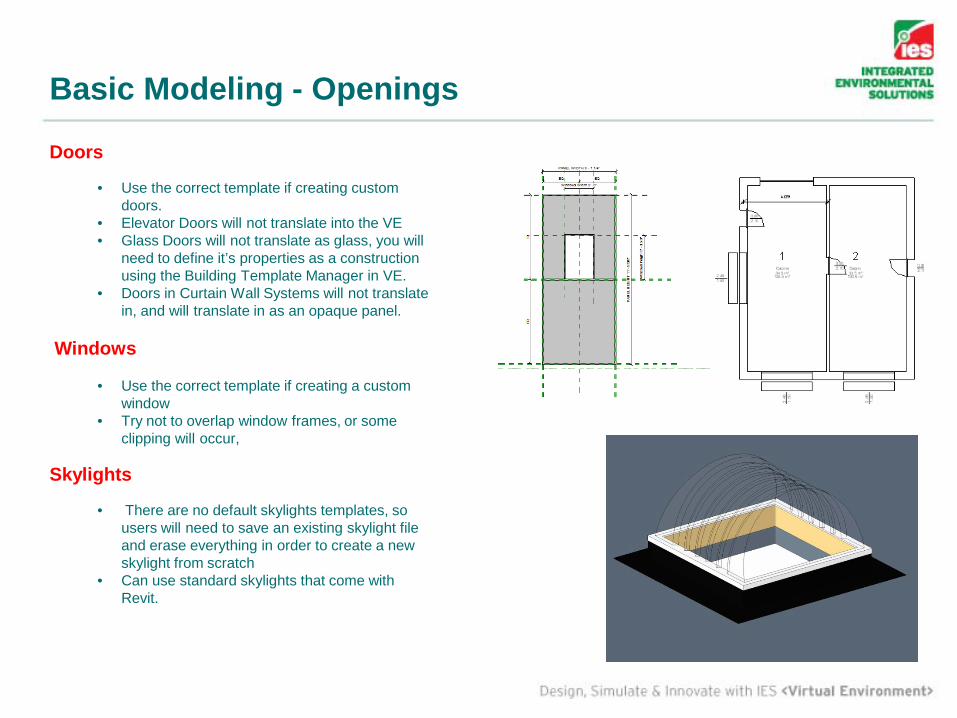
Doors
• Use the correct template if creating custom doors.
• Elevator Doors will not translate into the VE• Glass Doors will not translate as glass, you will
need to define it’s properties as a construction using the Building Template Manager in VE.
• Doors in Curtain Wall Systems will not translate in, and will translate in as an opaque panel.
Windows
• Use the correct template if creating a custom window
• Try not to overlap window frames, or some clipping will occur,
Skylights
• There are no default skylights templates, so users will need to save an existing skylight file and erase everything in order to create a new skylight from scratch
• Can use standard skylights that come with Revit.
Basic Modeling - Families
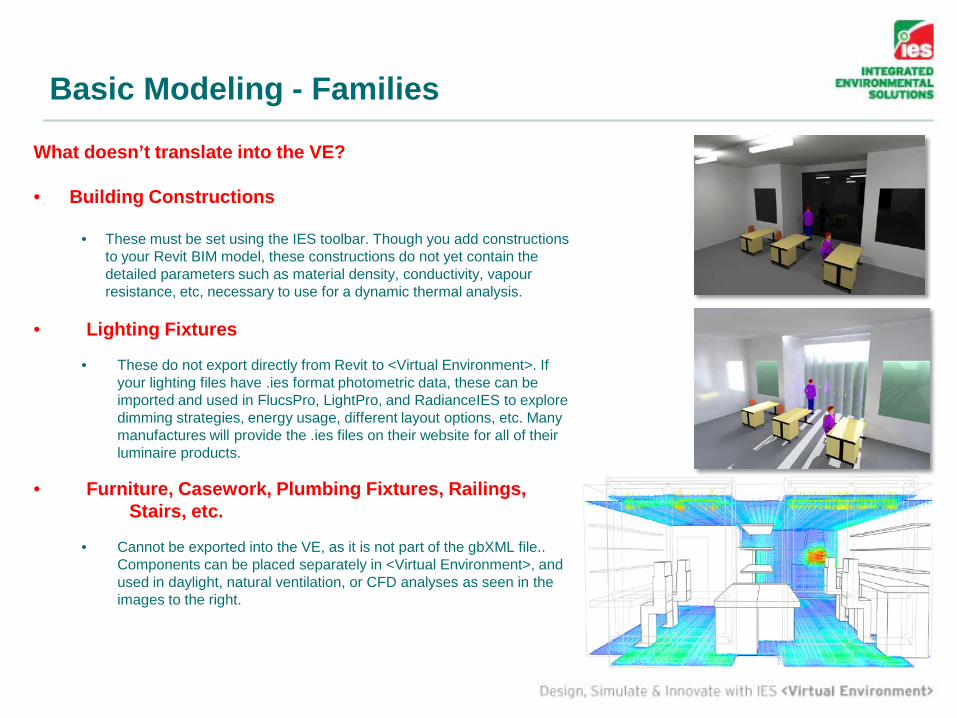
What doesn’t translate into the VE?
• Building Constructions
• These must be set using the IES toolbar. Though you add constructions to your Revit BIM model, these constructions do not yet contain the detailed parameters such as material density, conductivity, vapour resistance, etc, necessary to use for a dynamic thermal analysis.
• Lighting Fixtures
• These do not export directly from Revit to <Virtual Environment>. If your lighting files have .ies format photometric data, these can be imported and used in FlucsPro, LightPro, and RadianceIES to explore dimming strategies, energy usage, different layout options, etc. Many manufactures will provide the .ies files on their website for all of their luminaire products.
• Furniture, Casework, Plumbing Fixtures, Railings, Stairs, etc.
• Cannot be exported into the VE, as it is not part of the gbXML file.. Components can be placed separately in <Virtual Environment>, and used in daylight, natural ventilation, or CFD analyses as seen in the images to the right.
Please attend the “Revit to IES Workflow” training for more information. Translation into the VE, or any other analysis software through the gbXML language, is not perfect, and will usually require some editing to your Revit model. By using the correct modelling settings, in combination with IES’s gbXML “healing” tools, you can successfully translate models into the VE.
This document is not meant to be a supplement to training and support, and does not cover all issues that can occur during translation.
Please contact [email protected] for prompt assistance.
Upload large models for support at http://upload.iesve.com/
IES Worldwide Support Series