Embed Size (px)
Citation preview
Advanced Router Pod
Planning and Installation Guide
For Cisco Networking Academy® CCNA 3.x/CCNP 3.x Curriculums
Document Version: 2005-06-03
Copyright © 2005, Network Development Group, Inc. www.netdevgroup.com NETLAB Academy Edition and NETLAB+ are registered trademarks of Network Development Group, Inc. Cisco, IOS, Cisco IOS, Networking Academy, CCNA, CCNP, and PIX are registered trademarks of Cisco Systems, Inc.

NETLABAE Advanced Router Pod www.netdevgroup.com
1 Introduction................................................................................................................. 3
1.1 Lab Orientation ................................................................................................... 4 1.2 Deviations ........................................................................................................... 4
2 Lab Device Requirements........................................................................................... 4 3 Adtran Atlas 550 Setup............................................................................................... 6
3.1 Atlas Slot Configuration ..................................................................................... 6 3.2 Serial & PVC Setup ............................................................................................ 7 3.3 FXS Setup ........................................................................................................... 7 3.4 BRI Setup............................................................................................................ 7 3.5 PRI Setup ............................................................................................................ 7
4 Control Device Requirements..................................................................................... 8 4.1 Control Switch Overview ................................................................................... 8 4.2 Access Server...................................................................................................... 9 4.3 Switched Outlets ................................................................................................. 9
5 Pre-requisites............................................................................................................. 10 5.1 Setup Control Devices ...................................................................................... 10 5.2 Upload IOS Images........................................................................................... 10 5.3 Disable User Logins (optional)......................................................................... 10
6 Adding the Pod ......................................................................................................... 11 6.1 Start the New Pod Wizard................................................................................. 11 6.2 Add an Advanced Router Pod........................................................................... 11 6.3 Select Control Switch and Ports ....................................................................... 11 6.4 Select Access Server(s) and Ports..................................................................... 12 6.5 Select Switched Outlets .................................................................................... 13 6.6 Select Router Types .......................................................................................... 14 6.7 Select Software Images and Recovery Options ................................................ 15 6.8 Select a Pod ID.................................................................................................. 16 6.9 Select a Pod Name ............................................................................................ 16
7 Cable the Pod ............................................................................................................ 18 8 Testing the Pod ......................................................................................................... 18 9 Finishing Up.............................................................................................................. 20
9.1 Bring the Pod(s) Back Online ........................................................................... 20 9.2 Enable Advanced Router Pod and CCNA 3.x/CCNP 3.x Exercises ................ 22 9.3 Schedule a Lab Reservation for Your New Pod. .............................................. 24
6/3/2005 Page 2 of 26

NETLABAE Advanced Router Pod www.netdevgroup.com
PART 1 – PLANNING
Introduction 1 NETLAB Academy Edition® features four pods for use with the CCNA 3.x and CCNP 3.x curriculums, Basic Router Pod, Basic Switch Pod, Advanced Router Pod and Advanced Switch Pod. This guide documents the NETLABAE
Advanced Router Pod, used with CCNA 3.x and CCNP 3.x labs that require Frame Relay, ISDN, or Dial.
The Advanced Router Pod contains 3 routers. You can have up to eight of these pods on one NETLABAE system. The NETLABAE Advanced Router Pod features direct access to the console of routers R1, R2, and R3. An Adtran Atlas 550 (sold separately) emulates service provider functions such as frame relay, ISDN, and PSTN.
6/3/2005 Page 3 of 26

NETLABAE Advanced Router Pod www.netdevgroup.com
1.1
1.2
2
Lab Orientation This document assumes that you are familiar with the CCNA 3.x/CCNP 3.x curriculums and labs.
Deviations Users often contact our technical support team for lab-related problems. Users are typically not aware that there are many NETLABAE servers and may be easily confused by local deviations from the standard curriculum and labs. If your NETLABAE pods will be made accessible outside your local Academy, please be conservative in your deviations and substitutions. Even if your user community is local or relatively small, we recommend that you (1) document the specifics of your pods and (2) use the NETLABAE News and Announcements feature to point users to your documentation.
Lab Device Requirements This section describes the requirements for each lab device. Lab devices (sold separately) are part of the topology and users can interact with them either directly through the console or indirectly via Telnet and other protocols.
The Advanced Router Pod includes three routers, R1, R2 and R3. The following table depicts the interface requirements for each router:
Router Ethernet Serial BRI PRI AUX / External Modem
R1 1 2 1 1
R2 1 1 Optional 1 (Recommended) Optional
R3 1 2 1 1
The Ethernet interface must be a built-in interface, which is capable of activation from the ROM monitor mode. All NETLABAE supported routers have at least one Ethernet interface that meets this requirement. The serial interfaces may be built-in, or provided by modular interface cards such as the WIC-2AS or WIC-2T. Serial connections between routers require the appropriate serial cables. You can use DTE and DCE cables back-to-back, or special cables that provide both DTE and DCE in one cable (available from SIGMAnet).
6/3/2005 Page 4 of 26
NETLABAE Advanced Router Pod www.netdevgroup.com
Be sure to match your router and Adtran Atlas BRI and PRI interface types according to you local requirements (i.e. BRI vs. S/T, T1/PRI vs. E1/PRA). R1 and R3 communicate with the PSTN using external modems (sold separately). NETLAB Academy Edition® has an interface name translation feature that allows configuration files to be loaded without errors on different router platforms. As a configuration is being loaded, NETLABAE will substitute the correct interface names if necessary. To do this, NETLABAE maintains a fixed table of interface names that should present on each router model. This may influence the selection of modular interface cards and slot placement within the router. The NETLABAE hardware support web pages depict the expected interface names for each router model. NETLABAE has been designed to support a broad range of hardware to allow great flexibility with equipment selection Keep in mind that the hardware you select must meet both these requirements:
1. Supported by NETLABAE. 2. Meet the specifications for the lab exercises of the curriculums your Academy
wishes to implement. Please Note: Due to the dynamic nature of curriculum requirements, NDG makes no guarantee that every NETLABAE supported device will meet all curriculum or lab requirements. We strongly recommend that a knowledgeable person carefully study the curriculum and labs taught by your Academy before deploying a NETLABAE lab bundle (pod) or specific Cisco equipment model. NDG makes no guarantee that every NETLABAE supported device will meet all curriculum or lab requirements. To aid in this study we recommend using the following resources:
Review the information provided on the NETLABAE website for information on NETLABAE supported equipment and IOS images. Not all NETLABAE supported equipment is an ideal choice for some of the Cisco Networking Academy curriculum modules or labs.
http://www.netdevgroup.com/ae/labdevices.htm
Consult your Cisco Networking Academy Program contact.
Consult your Cisco sales representative.
6/3/2005 Page 5 of 26
NETLABAE Advanced Router Pod www.netdevgroup.com
Adtran Atlas 550 Setup 3
3.1
The Advanced Router Pod utilizes an Adtran Atlas 550 to emulate functions normally obtained from a network service provider. The Atlas 550 is statically configured and always powered on. Lab users do not interact with the Atlas management console. This section describes how to cable and configure the Atlas 550 for compatibility with NETLABAE labs.
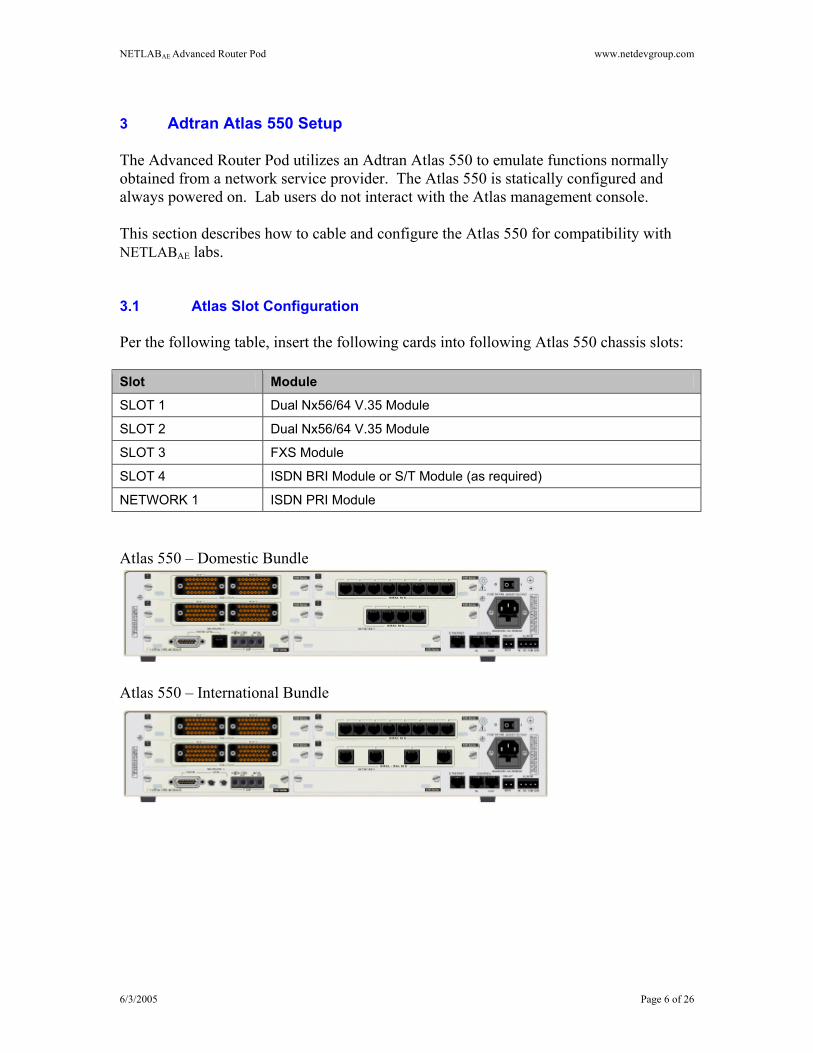
Atlas Slot Configuration Per the following table, insert the following cards into following Atlas 550 chassis slots: Slot Module SLOT 1 Dual Nx56/64 V.35 Module
SLOT 2 Dual Nx56/64 V.35 Module
SLOT 3 FXS Module
SLOT 4 ISDN BRI Module or S/T Module (as required)
NETWORK 1 ISDN PRI Module Atlas 550 – Domestic Bundle
Atlas 550 – International Bundle
6/3/2005 Page 6 of 26
NETLABAE Advanced Router Pod www.netdevgroup.com
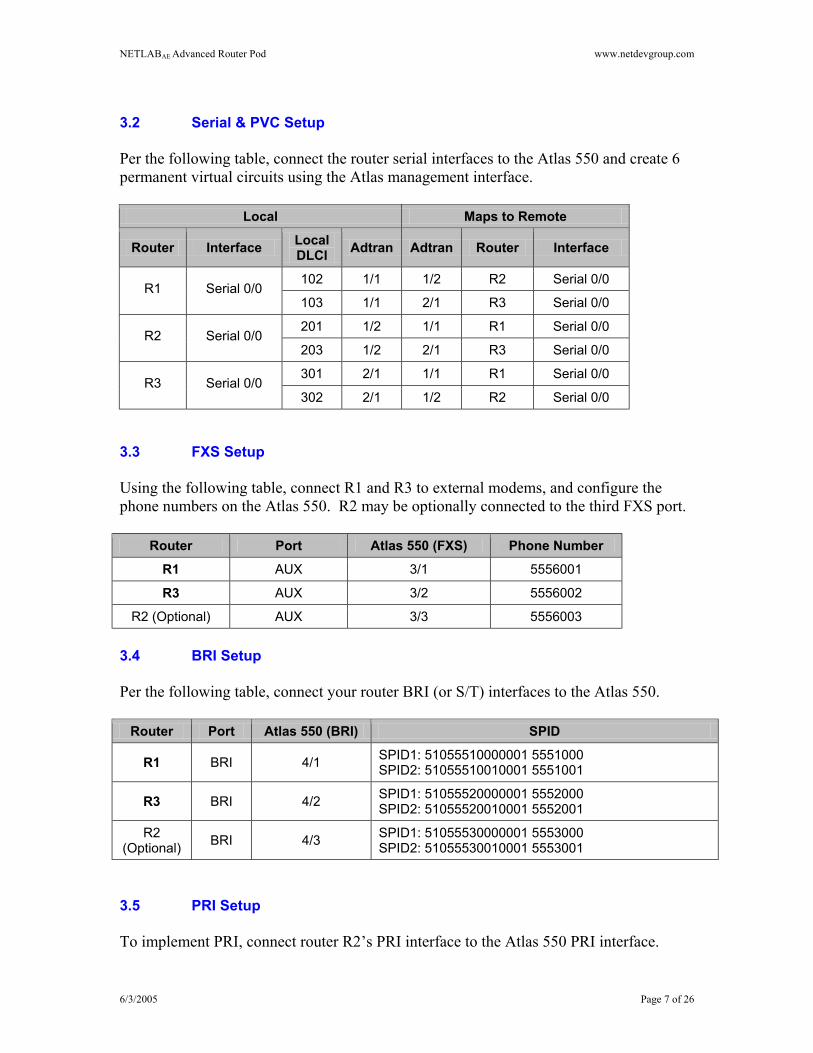
3.2 Serial & PVC Setup Per the following table, connect the router serial interfaces to the Atlas 550 and create 6 permanent virtual circuits using the Atlas management interface.
Local Maps to Remote
Router Interface Local DLCI Adtran Adtran Router Interface
102 1/1 1/2 R2 Serial 0/0 R1 Serial 0/0
103 1/1 2/1 R3 Serial 0/0
201 1/2 1/1 R1 Serial 0/0 R2 Serial 0/0
203 1/2 2/1 R3 Serial 0/0
301 2/1 1/1 R1 Serial 0/0 R3 Serial 0/0
302 2/1 1/2 R2 Serial 0/0 3.3 FXS Setup Using the following table, connect R1 and R3 to external modems, and configure the phone numbers on the Atlas 550. R2 may be optionally connected to the third FXS port.
Router Port Atlas 550 (FXS) Phone Number R1 AUX 3/1 5556001
R3 AUX 3/2 5556002
R2 (Optional) AUX 3/3 5556003 3.4 BRI Setup Per the following table, connect your router BRI (or S/T) interfaces to the Atlas 550.
Router Port Atlas 550 (BRI) SPID
R1 BRI 4/1 SPID1: 51055510000001 5551000 SPID2: 51055510010001 5551001
R3 BRI 4/2 SPID1: 51055520000001 5552000 SPID2: 51055520010001 5552001
R2 (Optional) BRI 4/3 SPID1: 51055530000001 5553000
SPID2: 51055530010001 5553001 3.5 PRI Setup To implement PRI, connect router R2’s PRI interface to the Atlas 550 PRI interface.
6/3/2005 Page 7 of 26
NETLABAE Advanced Router Pod www.netdevgroup.com
Control Device Requirements 4
NETLABAE control devices provide internal connectivity, console access, and managed power. Control devices are dynamically managed by NETLABAE and are not accessible or configurable by end users. ⇒ Management of control devices is covered in the NETLAB+ Administrator Guide. The Advanced Router Pod requires the following control device resources: Control Device Resource Quantity Required
Control Switch 3 Consecutive ports
Access Server 3 lines
Switched Outlet Devices 3 outlets 4.1
he
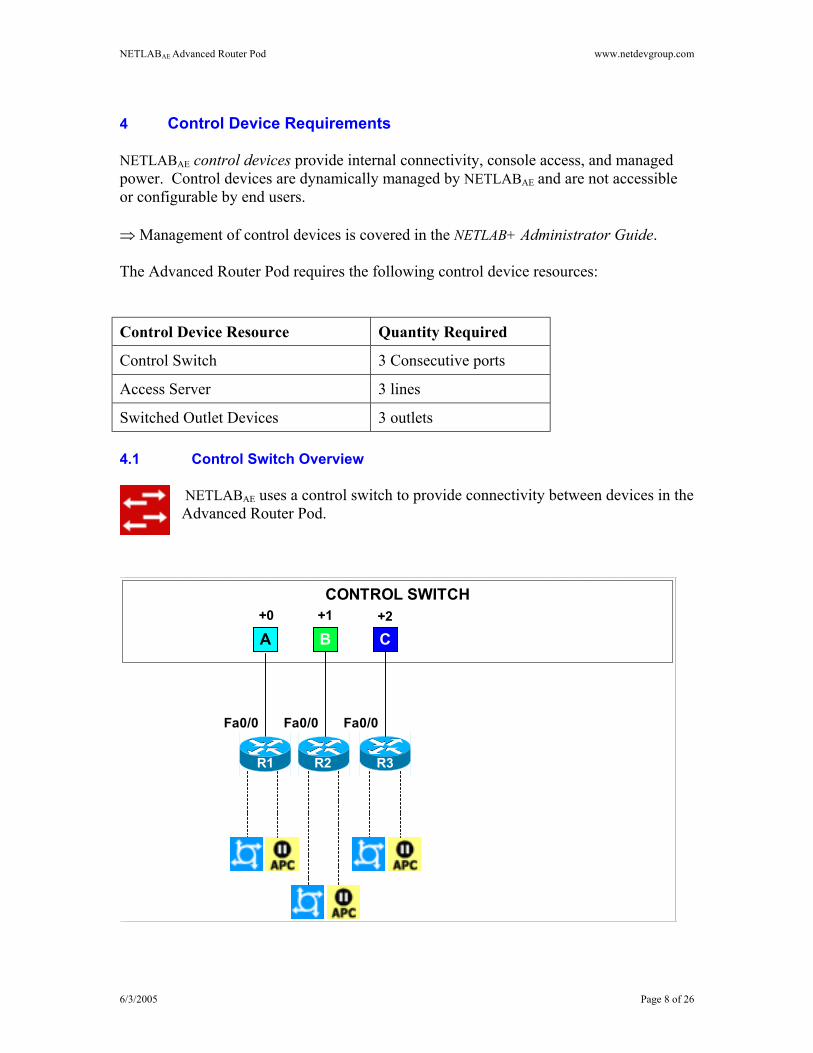
Control Switch Overview
NETLABAE uses a control switch to provide connectivity between devices in tAdvanced Router Pod.
A B C
CONTROL SWITCH+0 +1 +2
R1 R2 R3
Fa0/0 Fa0/0 Fa0/0
6/3/2005 Page 8 of 26
NETLABAE Advanced Router Pod www.netdevgroup.com
The Advanced Router Pod requires 3 consecutive ports on a control switch. Ports are labeled +0 to +2 in the diagram and are relative to the base port of your choice. As with all pods, you choose a base port for the Advanced Router Pod. To determine the actual port numbers, simply add the base port number chosen for this pod to the depicted relative port numbers. For example, if the base port is 5, the actual port numbers will be 5 to 7. Using SNMP, NETLABAE will automatically assign and program VLANs on ports +0 to +2. These VLANs are depicted as letters A, B, and C. Each NETLABAE pod has a unique VLAN pool and the actual VLAN numbers will be unique for each NETLABAE pod. This is to avoid conflict between pods. 4.2 Access Server
Access servers provide console connections to lab routers, lab switches, and lab firewall devices so that users can access these devices from NETLABAE. The Advanced Router Pod requires three access server ports. These ports provide
console access to R1, R2 and R3. 4.3 Switched Outlets
Switched outlets provide managed electrical power, allowing NETLABAE and users to turn lab equipment on and off. The Advanced Router Pod requires a switched outlet for R1, R2 and R3.
6/3/2005 Page 9 of 26
NETLABAE Advanced Router Pod www.netdevgroup.com
PART 2 - IMPLEMENTATION
Pre-requisites 5
5.1
5.2
5.3
This section covers tasks that should be executed prior to adding an Advanced Router Pod.
Setup Control Devices
Using the guidelines in section 4, decide which control switch ports, access server ports, and switched outlets you will use for your Advanced Router Pod. Add control devices if necessary. Control device configuration is documented in the NETLAB+ Administrator Guide.
Upload IOS Images
Upload the IOS images for R1, R2 and R3. NETLABAE will recover these images on the appliance if they are erased from flash.
Disable User Logins (optional) You must take all equipment pods offline to add pods or configure control devices. You may wish to disable user logins during this time.
6/3/2005 Page 10 of 26
NETLABAE Advanced Router Pod www.netdevgroup.com
Adding the Pod 6
6.1
This section walks you through the process of adding an Advanced Router Pod using the NETLABAE New Pod Wizard.
Start the New Pod Wizard
Login to the administrator account. Select Equipment Pods.
Select Take All OFFLINE if any of the pods are online. Caution: this will cancel any reservations in progress. Select Add a Pod. The New Pod Wizard will now help you add an equipment pod to your system. 6.2
6.3
Add an Advanced Router Pod When prompted, select Advanced Router Pod.
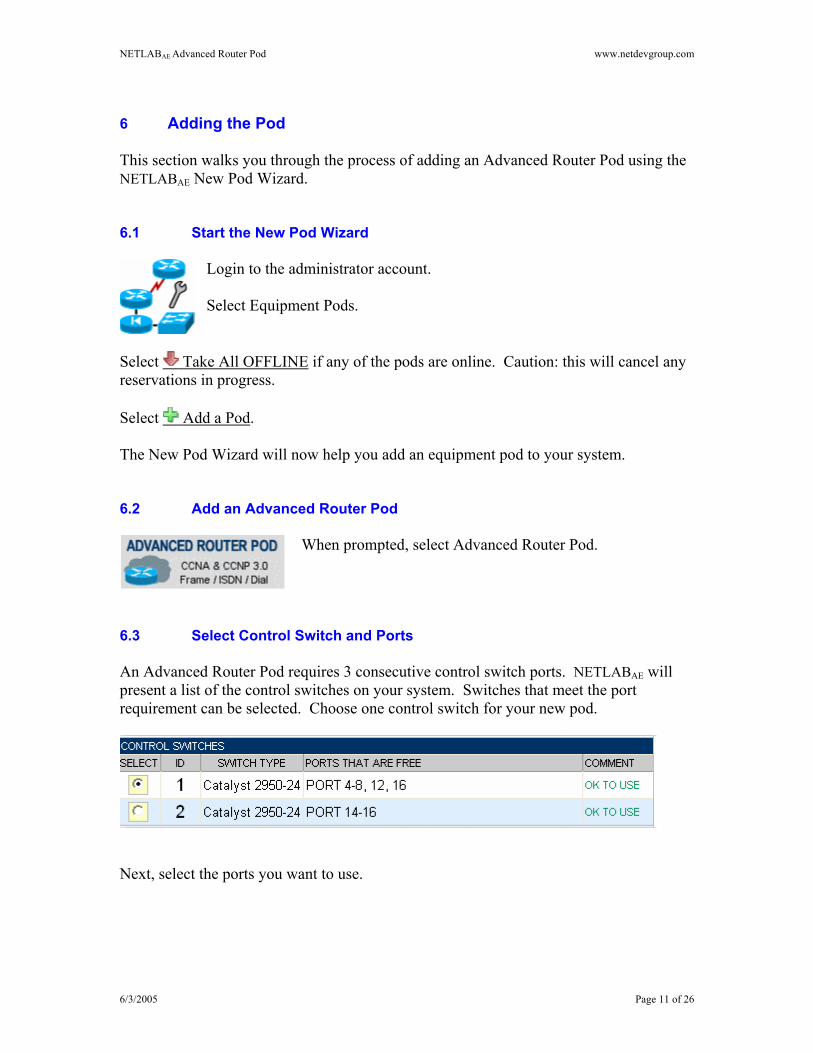
Select Control Switch and Ports An Advanced Router Pod requires 3 consecutive control switch ports. NETLABAE will present a list of the control switches on your system. Switches that meet the port requirement can be selected. Choose one control switch for your new pod.
Next, select the ports you want to use.
6/3/2005 Page 11 of 26
NETLABAE Advanced Router Pod www.netdevgroup.com
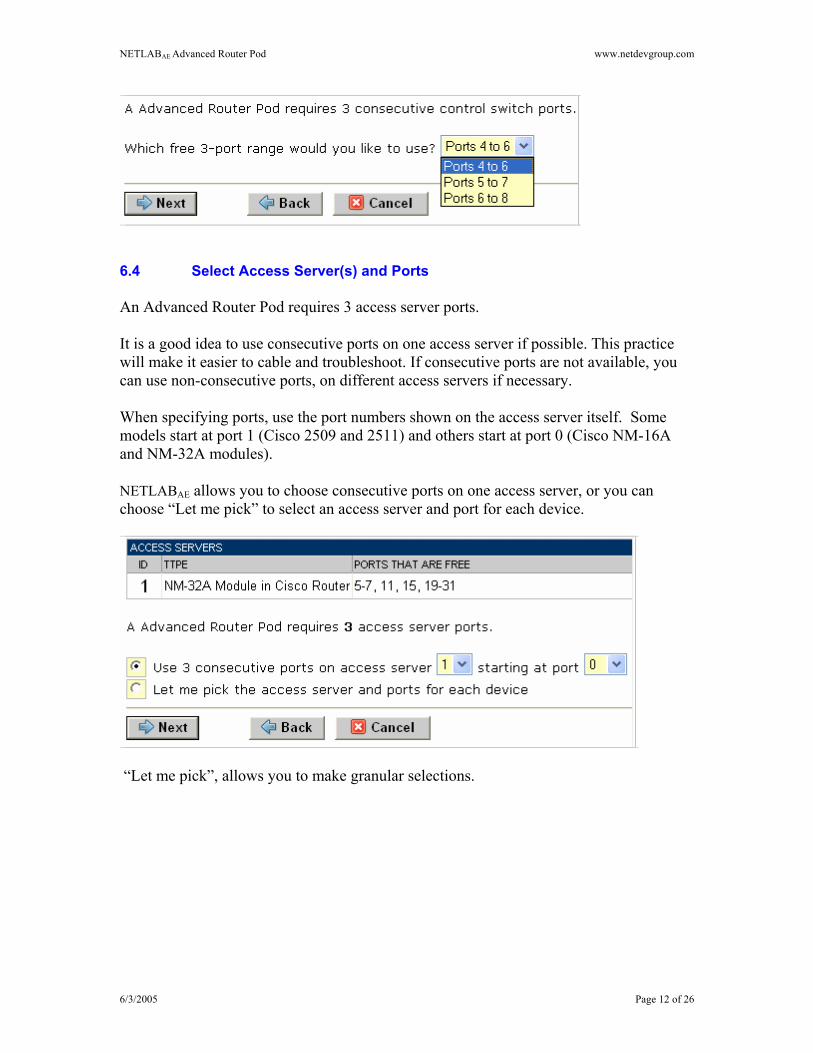
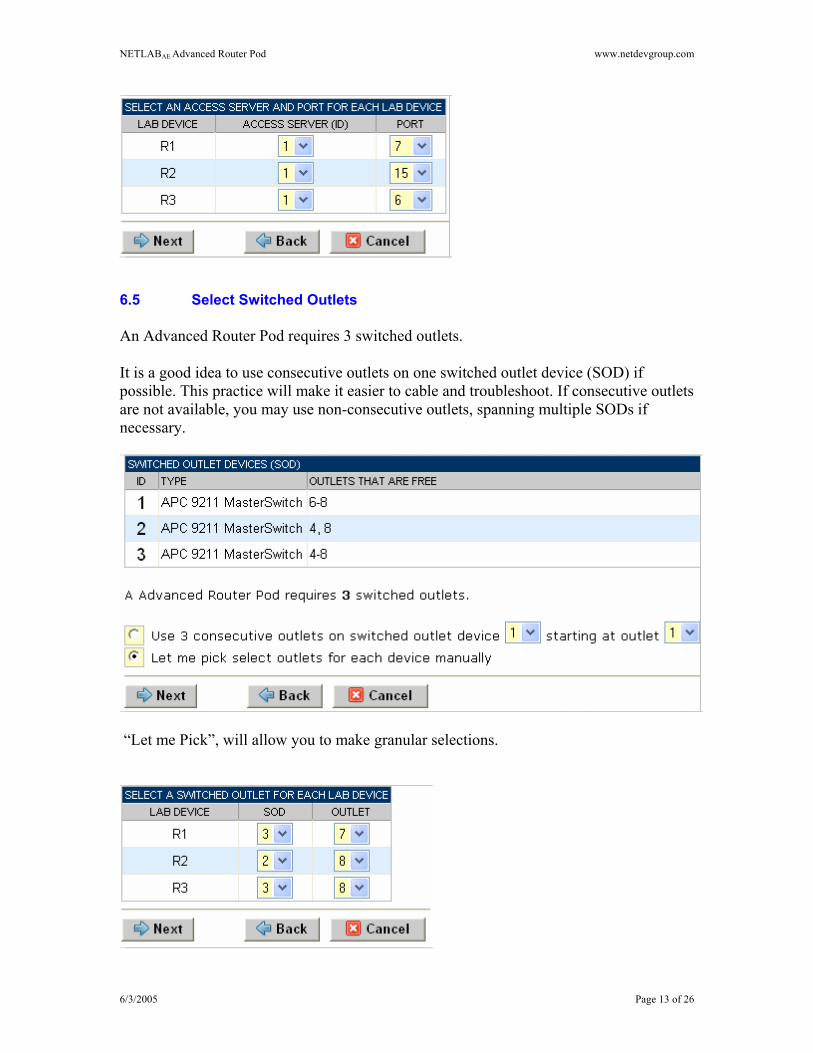
6.4 Select Access Server(s) and Ports An Advanced Router Pod requires 3 access server ports. It is a good idea to use consecutive ports on one access server if possible. This practice will make it easier to cable and troubleshoot. If consecutive ports are not available, you can use non-consecutive ports, on different access servers if necessary. When specifying ports, use the port numbers shown on the access server itself. Some models start at port 1 (Cisco 2509 and 2511) and others start at port 0 (Cisco NM-16A and NM-32A modules). NETLABAE allows you to choose consecutive ports on one access server, or you can choose “Let me pick” to select an access server and port for each device.
“Let me pick”, allows you to make granular selections.
6/3/2005 Page 12 of 26
NETLABAE Advanced Router Pod www.netdevgroup.com
6.5 Select Switched Outlets An Advanced Router Pod requires 3 switched outlets. It is a good idea to use consecutive outlets on one switched outlet device (SOD) if possible. This practice will make it easier to cable and troubleshoot. If consecutive outlets are not available, you may use non-consecutive outlets, spanning multiple SODs if necessary.
“Let me Pick”, will allow you to make granular selections.
6/3/2005 Page 13 of 26
NETLABAE Advanced Router Pod www.netdevgroup.com
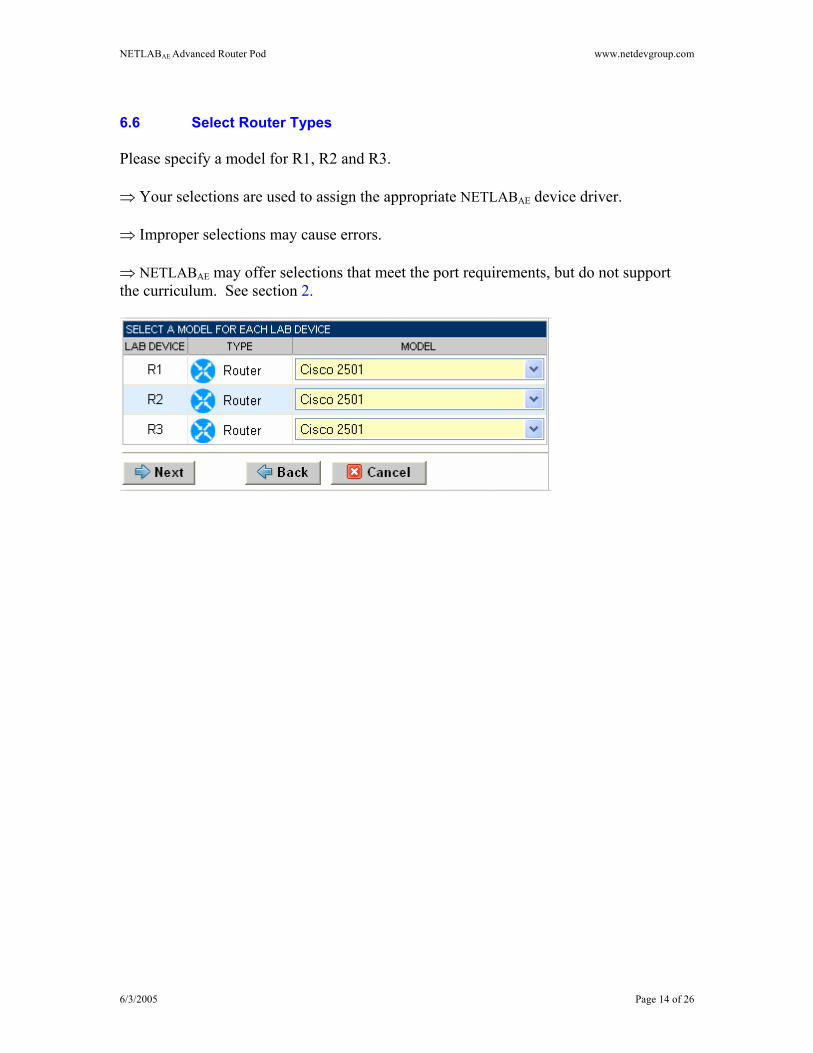
6.6 Select Router Types Please specify a model for R1, R2 and R3. ⇒ Your selections are used to assign the appropriate NETLABAE device driver. ⇒ Improper selections may cause errors. ⇒ NETLABAE may offer selections that meet the port requirements, but do not support the curriculum. See section 2.
6/3/2005 Page 14 of 26
NETLABAE Advanced Router Pod www.netdevgroup.com
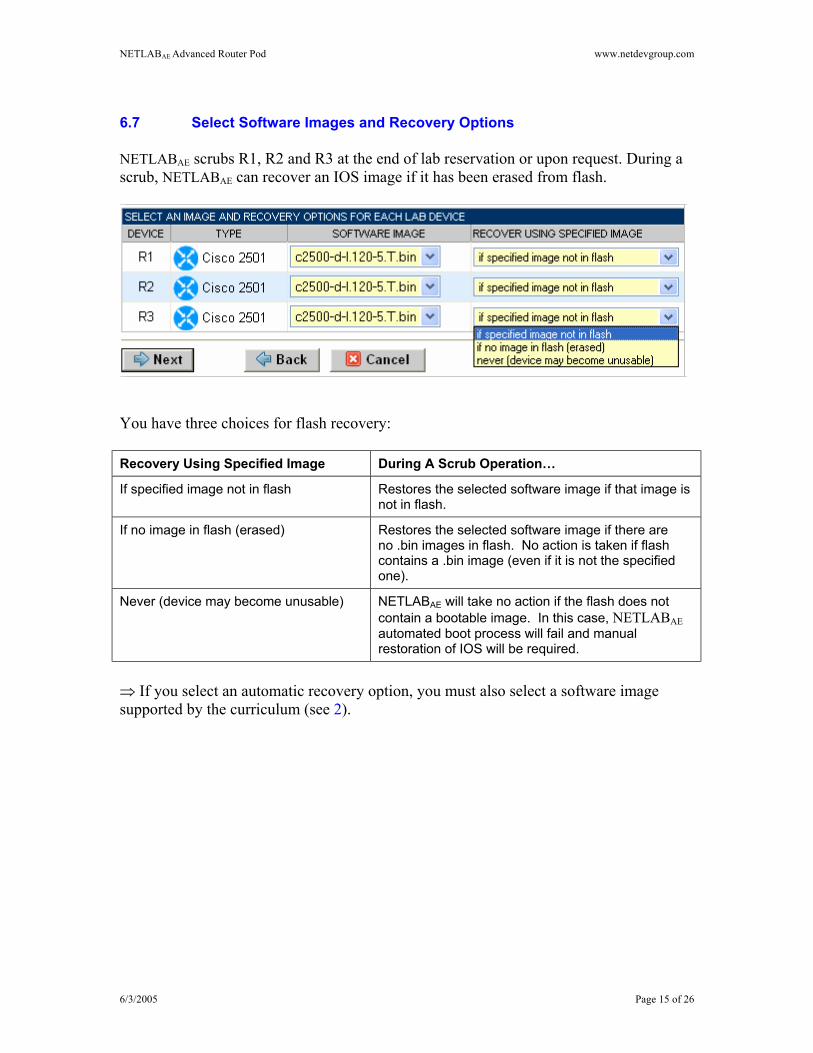
6.7 Select Software Images and Recovery Options NETLABAE scrubs R1, R2 and R3 at the end of lab reservation or upon request. During a scrub, NETLABAE can recover an IOS image if it has been erased from flash.
You have three choices for flash recovery: Recovery Using Specified Image During A Scrub Operation…
If specified image not in flash Restores the selected software image if that image is not in flash.
If no image in flash (erased) Restores the selected software image if there are no .bin images in flash. No action is taken if flash contains a .bin image (even if it is not the specified one).
Never (device may become unusable) NETLABAE will take no action if the flash does not contain a bootable image. In this case, NETLABAE automated boot process will fail and manual restoration of IOS will be required.
⇒ If you select an automatic recovery option, you must also select a software image supported by the curriculum (see 2).
6/3/2005 Page 15 of 26

NETLABAE Advanced Router Pod www.netdevgroup.com
6.8 Select a Pod ID Each pod is assigned a unique numeric ID.
6.9 Select a Pod Name Each pod can have a unique name. This name will appear in the scheduler, along with the pod type.
6.10 Verify Your Settings At this point NETLABAE has added the pod to its database. However, the pod has not been brought online yet. You will want to cable up the pod and run a pod test before bringing the pod online. These tasks are discussed in the remaining sections.
After you click OK, the new pod will appear in the list of equipment pods.
6/3/2005 Page 16 of 26
NETLABAE Advanced Router Pod www.netdevgroup.com
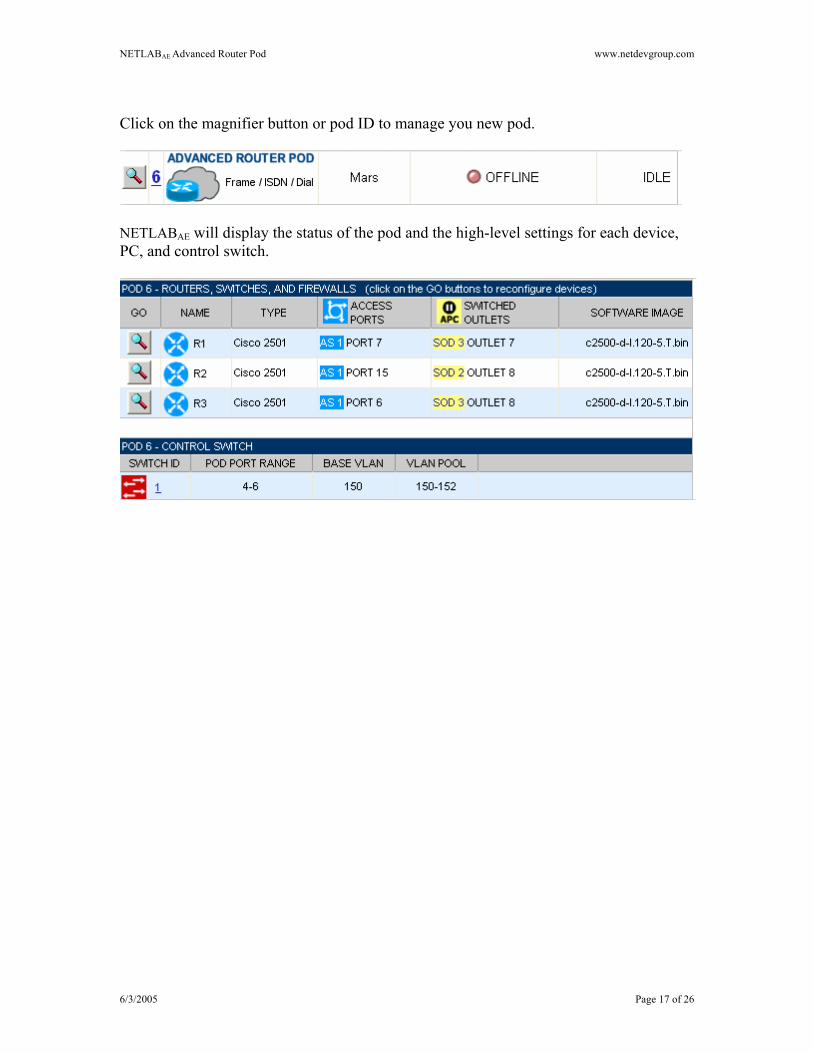
Click on the magnifier button or pod ID to manage you new pod.
NETLABAE will display the status of the pod and the high-level settings for each device, PC, and control switch.
6/3/2005 Page 17 of 26
NETLABAE Advanced Router Pod www.netdevgroup.com
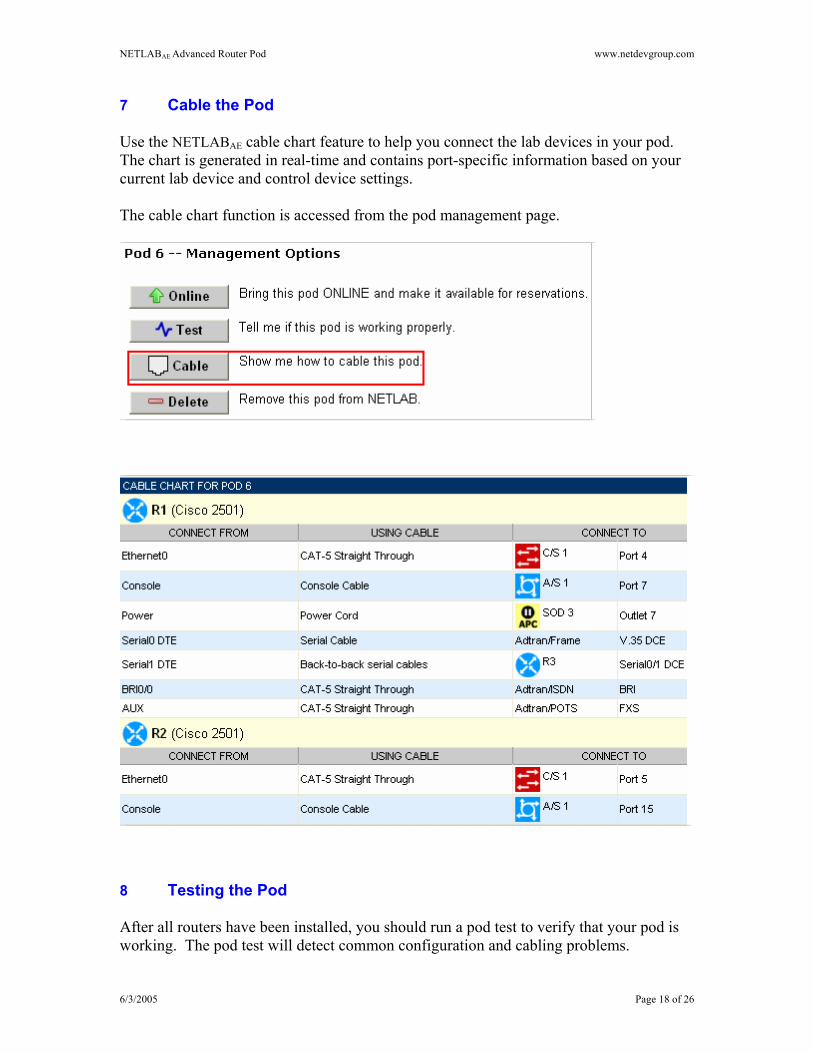
Cable the Pod 7 Use the NETLABAE cable chart feature to help you connect the lab devices in your pod. The chart is generated in real-time and contains port-specific information based on your current lab device and control device settings. The cable chart function is accessed from the pod management page.
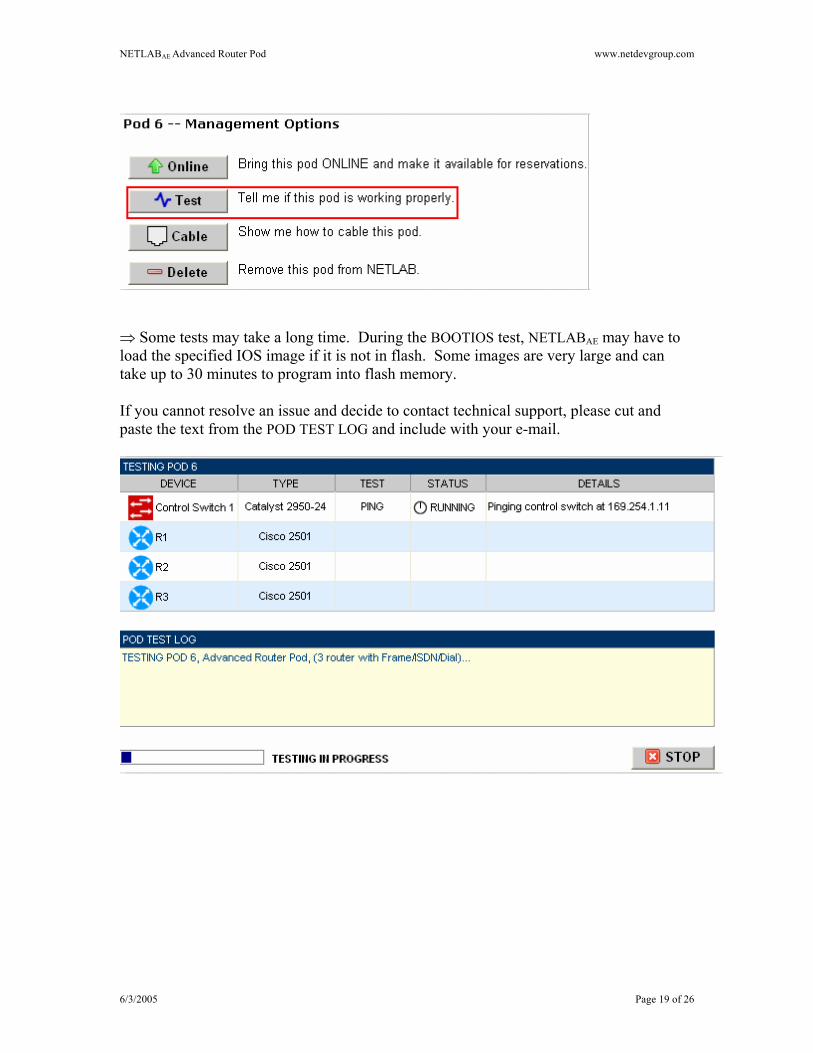
Testing the Pod 8 After all routers have been installed, you should run a pod test to verify that your pod is working. The pod test will detect common configuration and cabling problems.
6/3/2005 Page 18 of 26
NETLABAE Advanced Router Pod www.netdevgroup.com
⇒ Some tests may take a long time. During the BOOTIOS test, NETLABAE may have to load the specified IOS image if it is not in flash. Some images are very large and can take up to 30 minutes to program into flash memory. If you cannot resolve an issue and decide to contact technical support, please cut and paste the text from the POD TEST LOG and include with your e-mail.
6/3/2005 Page 19 of 26
NETLABAE Advanced Router Pod www.netdevgroup.com
Finishing Up 9
9.1
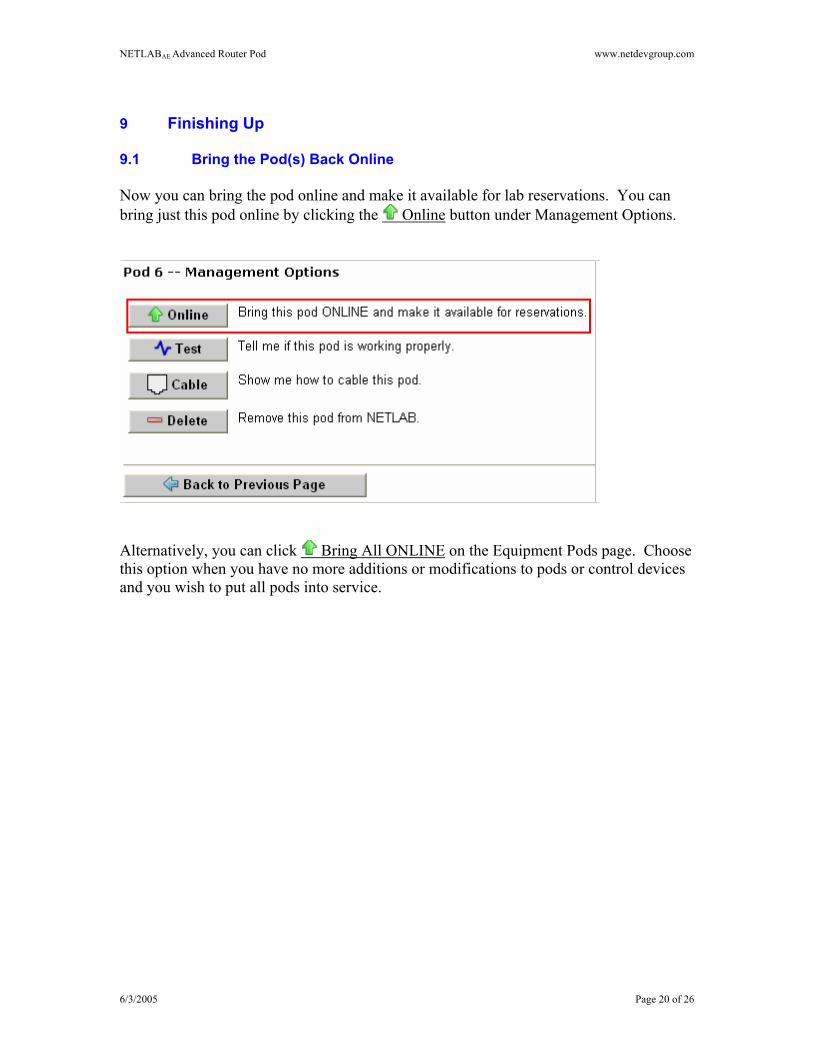
Bring the Pod(s) Back Online Now you can bring the pod online and make it available for lab reservations. You can bring just this pod online by clicking the Online button under Management Options.
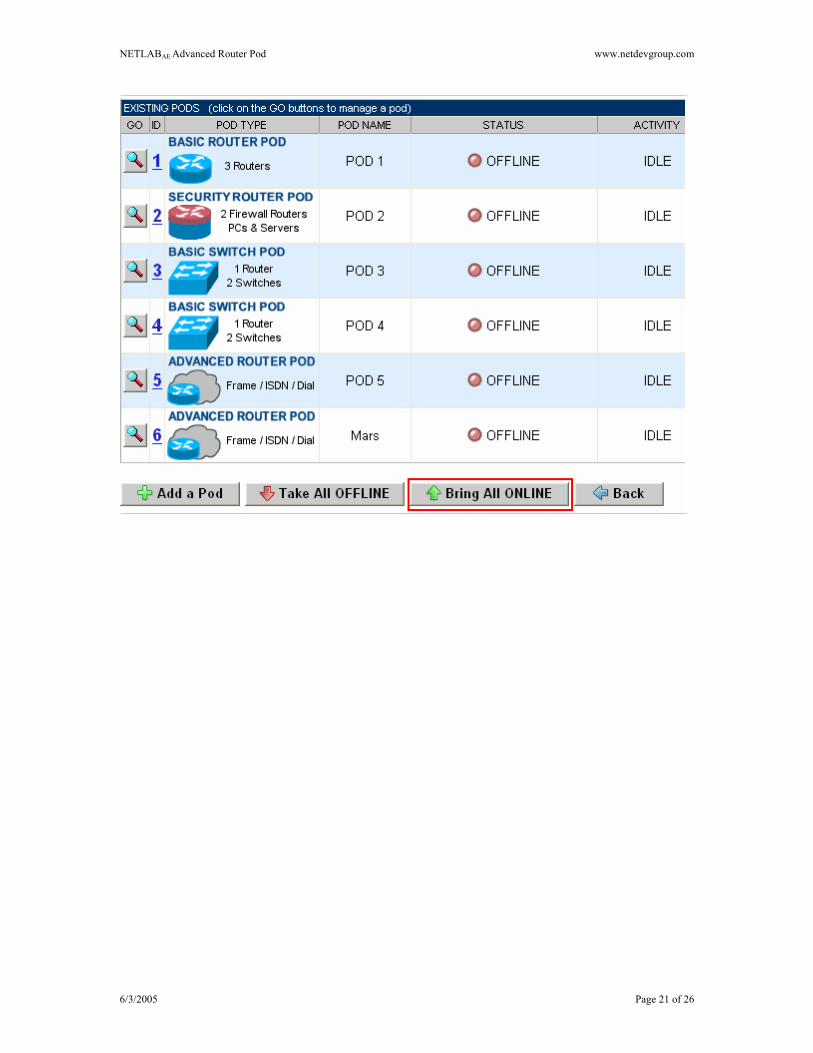
Alternatively, you can click Bring All ONLINE on the Equipment Pods page. Choose this option when you have no more additions or modifications to pods or control devices and you wish to put all pods into service.
6/3/2005 Page 20 of 26
NETLABAE Advanced Router Pod www.netdevgroup.com
6/3/2005 Page 21 of 26
NETLABAE Advanced Router Pod www.netdevgroup.com
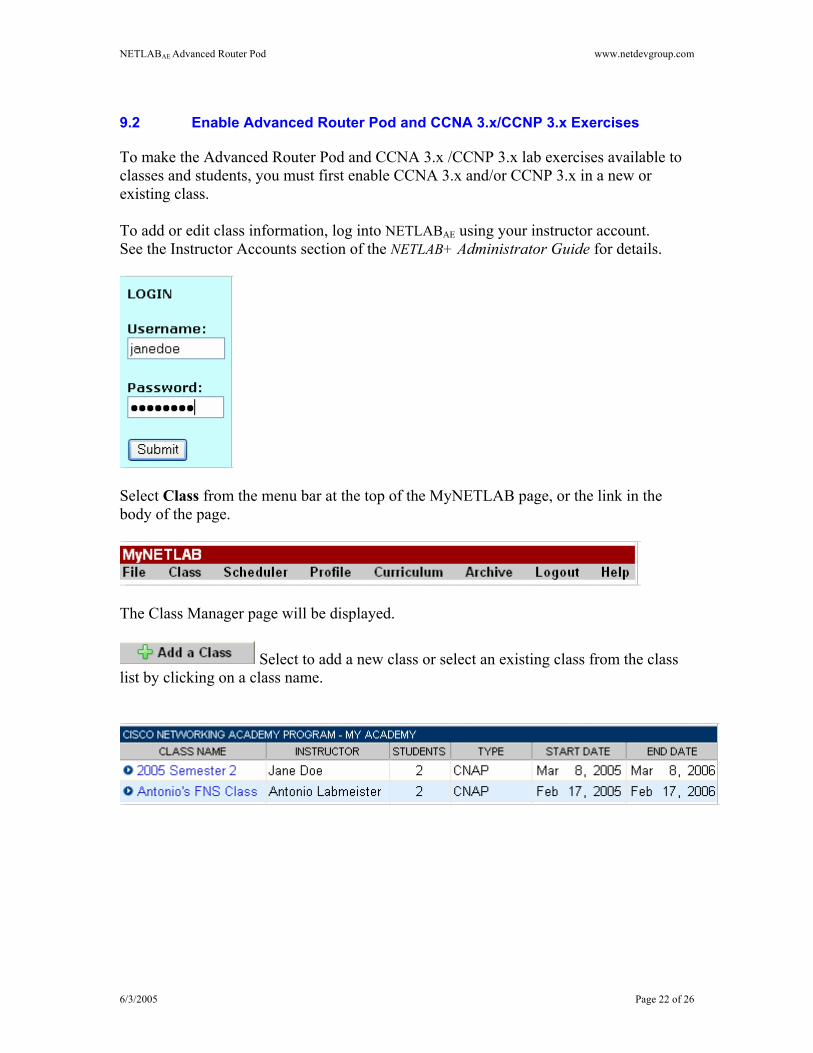
9.2 Enable Advanced Router Pod and CCNA 3.x/CCNP 3.x Exercises To make the Advanced Router Pod and CCNA 3.x /CCNP 3.x lab exercises available to classes and students, you must first enable CCNA 3.x and/or CCNP 3.x in a new or existing class. To add or edit class information, log into NETLABAE using your instructor account. See the Instructor Accounts section of the NETLAB+ Administrator Guide for details.
Select Class from the menu bar at the top of the MyNETLAB page, or the link in the body of the page.
The Class Manager page will be displayed.
Select to add a new class or select an existing class from the class list by clicking on a class name.
6/3/2005 Page 22 of 26
NETLABAE Advanced Router Pod www.netdevgroup.com
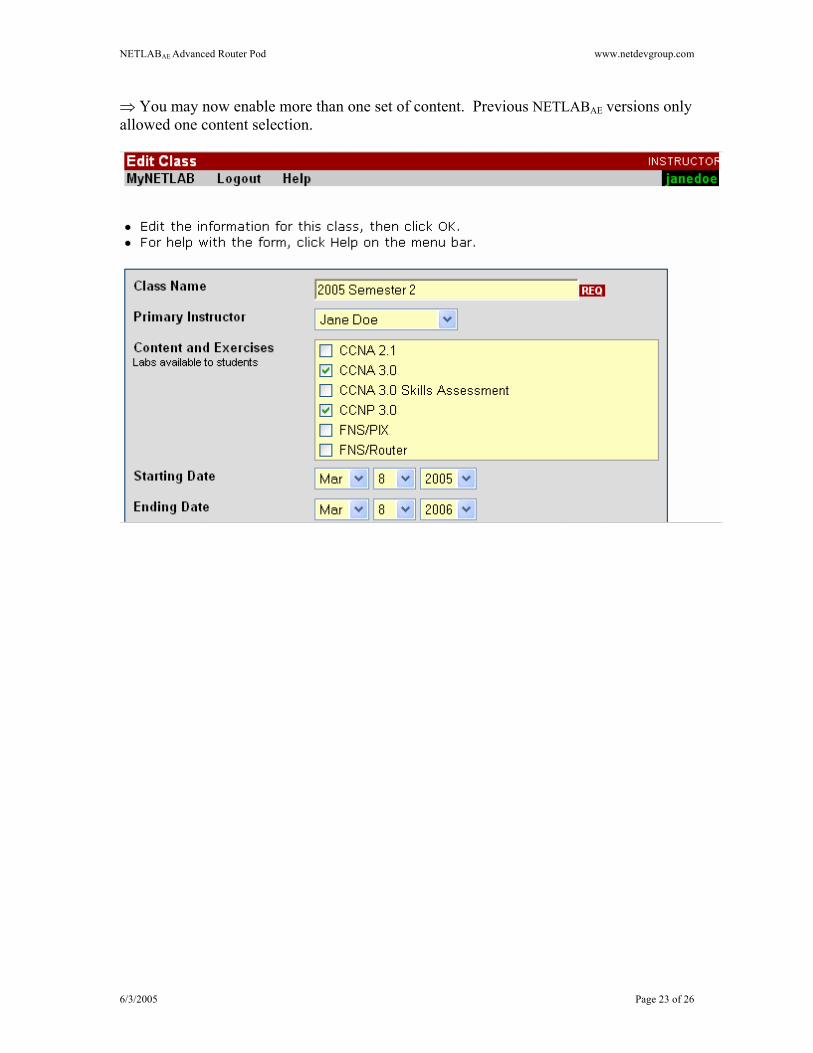
⇒ You may now enable more than one set of content. Previous NETLABAE versions only allowed one content selection.
6/3/2005 Page 23 of 26

NETLABAE Advanced Router Pod www.netdevgroup.com
9.3 Schedule a Lab Reservation for Your New Pod. To schedule a lab reservation, select Scheduler from the menu bar or the link on the body of the MyNETLAB page.
The Scheduler Options screen will be displayed. Detailed descriptions of the scheduler options are available by selecting Help on the menu bar. In this example, we will reserve an equipment pod for your own use.
Select OK to proceed to the reservation calendar. Please Note: The selection of pods depicted may be different from the pods available at your site.
6/3/2005 Page 24 of 26
NETLABAE Advanced Router Pod www.netdevgroup.com
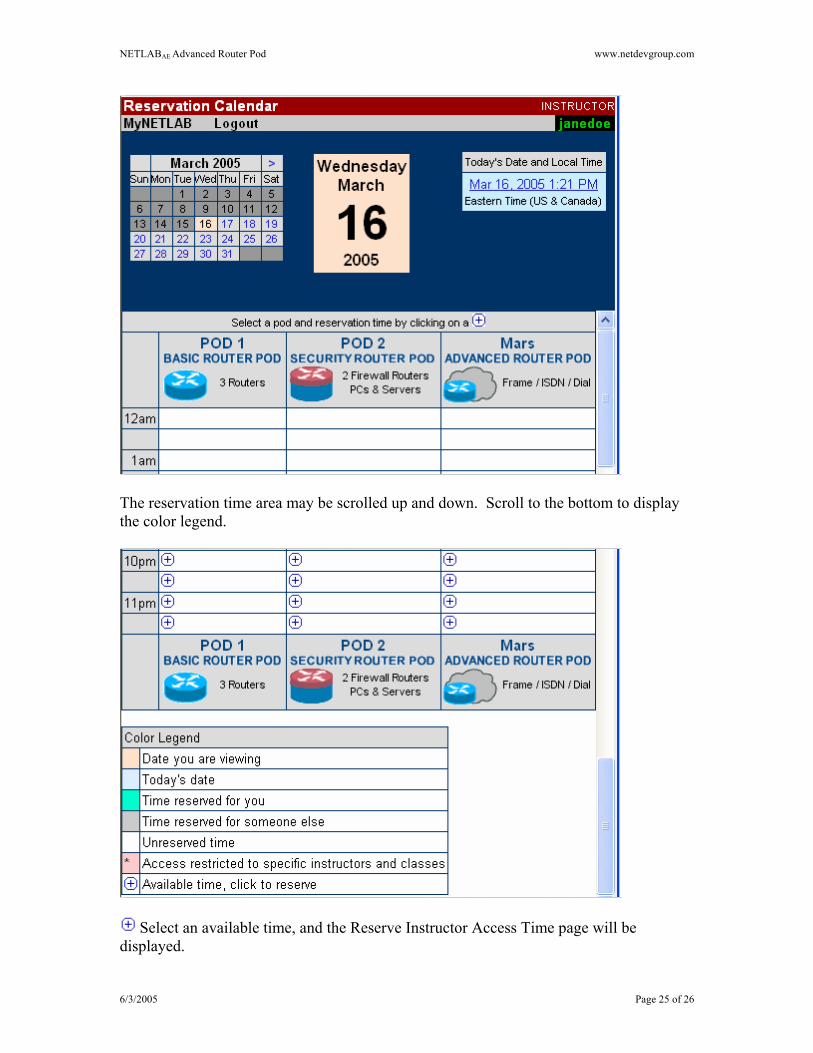
The reservation time area may be scrolled up and down. Scroll to the bottom to display the color legend.
Select an available time, and the Reserve Instructor Access Time page will be displayed.
6/3/2005 Page 25 of 26
NETLABAE Advanced Router Pod www.netdevgroup.com
6/3/2005 Page 26 of 26
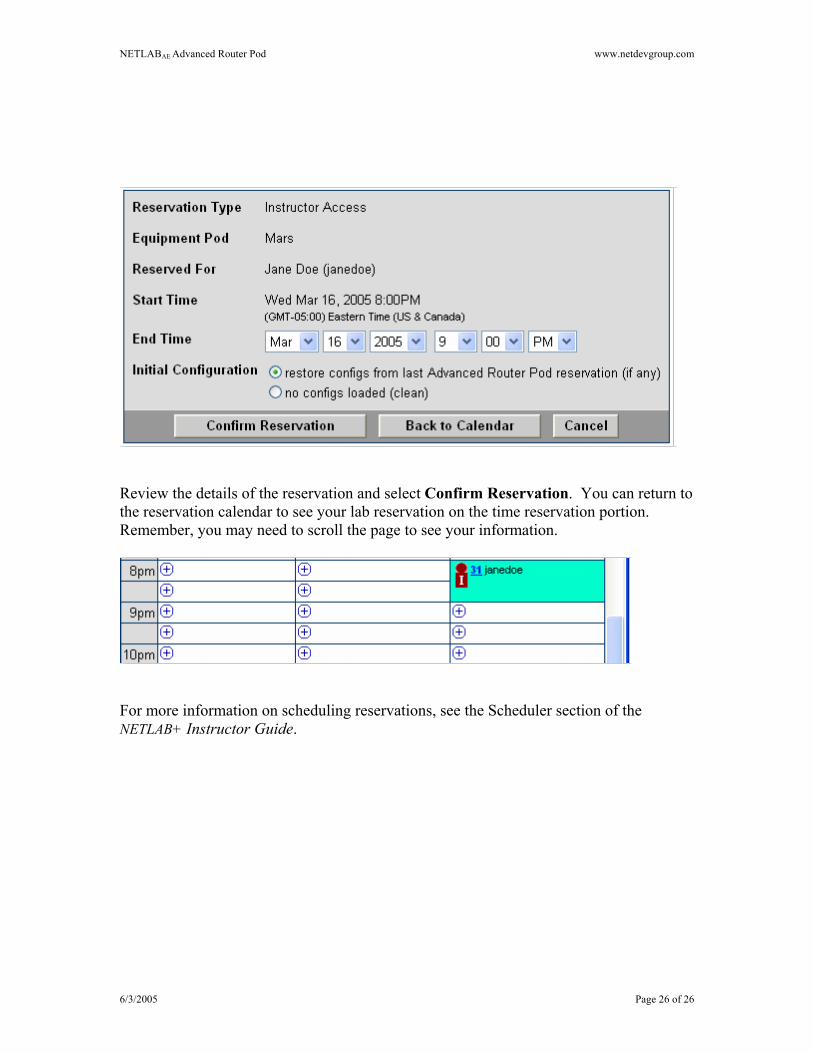
Review the details of the reservation and select Confirm Reservation. You can return to the reservation calendar to see your lab reservation on the time reservation portion. Remember, you may need to scroll the page to see your information.
For more information on scheduling reservations, see the Scheduler section of the NETLAB+ Instructor Guide.