Embed Size (px)
Citation preview
Advanced Hybrid System
Operating InstructionsMODEL NO. KX-TA624
Please read this manual before connectingthe Advanced Hybrid System.
PSQX1709ZA-01.QX 99.10.15 1:29 PM Page 1

2
System ComponentsThank you for purchasing a Panasonic Telephone System.
NOTICE:• A Proprietary Telephone is abbreviated as PT.• A Single Line Telephone is abbreviated as SLT.• This Operating Instructions does not show the complete model number that indicates the country
where your models should be used. The model number of your unit is found on the label affixed tothe unit.
MODEL NO. – – – – – – – –
(label)
Service Unit
Telephone
Optional Equipment
DescriptionModel No.
KX-TA624 Advanced Hybrid System
KX-T7020KX-T7130KX-T7050
Proprietary Telephone (12 COs)Proprietary Telephone with LCD (12 COs)Proprietary Telephone (12 COs)
KX-T7040
KX-TA62460KX-TA62474KX-TA62477KX-TA62491
KX-T30865
DSS Console (32 DSSs and 16 Feature buttons)
Doorphone/Door Opener CardExpansion Card (up to 8 extension lines for a single line telephone)Expansion Card (up to 3 exchange lines and 8 extension lines)OGM and FAX Detection Card
Doorphone
PSQX1709ZA-01.QX 99.10.15 9:54 AM Page 2

3
Important Information
Satisfactory performance cannot be guaranteed for each combination of host and subsidiaryequipment.
‘Prevention of access by user.’ This equipment is intended to be accessible only by authorisedpersonnel. It must be installed in a locked room or similar environment, so that user access isprevented. Failure to prevent such user access will invalidate any approval given to this equipment.
PSQX1709ZA-01.QX 99.10.15 9:54 AM Page 3

4
Precautions
When using the KX-T7000 series, keep the following conditions in mind: •This apparatus is designed to be installed and operated under controlled conditions of ambienttemperature and a relative humidity not greater than 60%.
•Avoid installing the apparatus in damp or humid environments, such as in bathrooms or nearswimming pools.
•999 or 112 can be dialled on the apparatus after accessing the exchange line for the purpose ofmaking outgoing calls to the BT emergency service.
•During dialling, the apparatus may tinkle the bells of other telephones using the same line. This isnot a fault and we advise you not to call the Fault Repair Service.
•If the apparatus does not operate properly, disconnect the unit from the telephone line cord andthen connect again.
•If there is any trouble, unplug the extension line and connect a known working phone. If theknown working phone operates properly, have the defective phone repaired by your maintainer orPanasonic dealer. If the known working phone does not operate properly, check the AdvancedHybrid System and the Internal extension wiring.
•Keep the unit away from heating appliances and electrical noise generating devices such asfluorescent lamps and motors.
•The unit should be kept free of dust, moisture and vibration, and should not be exposed to directsunlight.
•Do not use benzine, thinner, or the like, or any abrasive powder to clean the cabinet. Wipe it witha soft cloth.
•Do not use any handset other than a Panasonic handset.• This apparatus is capable of being used in conjunction with hearing aids fitted with
inductive coil pick-ups. The handset should be held as for normal conversation. Foroperation the hearing aid should be set to its “T” position or as directed in theoperating instructions for the hearing aid.
• These apparatuses are designed to aid the visually handicapped to locate dial keysand buttons.
• Never attempt to insert wires, pins, etc. into the vents or other holes of this unit.
APPROVED for connection totelecommunication systemsspecified in the instructions foruse subject to the conditions setout in them.
This unit complies with the EU Directives.
73 / 23 / EEC89 / 336 / EEC92 / 31 / EEC93 / 68 / EEC
“Electrical equipment for use within certain voltage limits.”“Electromagnetic compatibility” (basic standard)“Electromagnetic compatibility” (amendment)“Marking”
The CE mark on this unit certifies compliance with the above mentioned Directives.
Warning:This is a Class A Product. In a domestic environment this product may cause radio interference in whichcase the user may be required to take adequate measures.
610186
PSQX1709ZA-01.QX 99.10.15 4:18 PM Page 4
5
Precautions
WARNING
THIS UNIT MAY ONLY BE INSTALLED AND SERVED BY QUALIFIEDSERVICE PERSONNEL.
WHEN A FAILURE OCCURS WHICH RESULTS IN THE INTERNAL PARTSBECOMING ACCESSIBLE, DISCONNECT THE POWER SUPPLY CORDIMMEDIATELY AND RETURN THIS UNIT TO YOUR DEALER.
DISCONNECT THE TELECOM CONNECTION BEFORE DISCONNECTINGTHE POWER CONNECTION PRIOR TO RELOCATING THE EQUIPMENT.THEN RECONNECT THE POWER FIRST.
THIS UNIT IS EQUIPPED WITH AN EARTHING CONTACT PLUG. FORSAFETY REASONS, THIS PLUG MUST ONLY BE CONNECTED TO ANEARTHING CONTACT SOCKET WHICH HAS BEEN INSTALLEDACCORDING TO REGULATIONS.
THE POWER SUPPLY CORD IS USED AS THE MAIN DISCONNECT DEVICE,ENSURE THAT THE SOCKET-OUTLET IS LOCATED/INSTALLED NEAR THEEQUIPMENT AND IS EASILY ACCESSIBLE.
TO PREVENT THE RISK OF FIRE OR ELECTRIC SHOCK, DO NOT EXPOSETHIS PRODUCT TO RAIN OR MOISTURE.
SERIAL NO. DATE OF PURCHASE (found on the bottom of the unit)
NAME OF DEALER
DEALER’S ADDRESS
For your future reference
PSQX1709ZA-01.QX 99.10.15 9:54 AM Page 5

6
Introduction
Structure of the ManualThis manual consists of the following sections.
Section 1. Operations
Describes the features and their operation. It also provides information about the programmingrequired, conditions and connection references for each feature.
Section 2. Appendix
Provides the Tone/Ring Tone List, LED Indication, Feature Number List and the TelephoneTroubleshooting.
Index
Description of the Symbols Mainly Used in this Manual
!! Additional information and conditions.
☞ The feature or program references.
PSQX1709ZA-01.QX 99.10.15 9:54 AM Page 6
7
ContentsB
asic Op
eration
sA
dvan
ced O
peratio
ns
Op
erator / M
anag
erO
peratio
ns
Ap
pen
dix
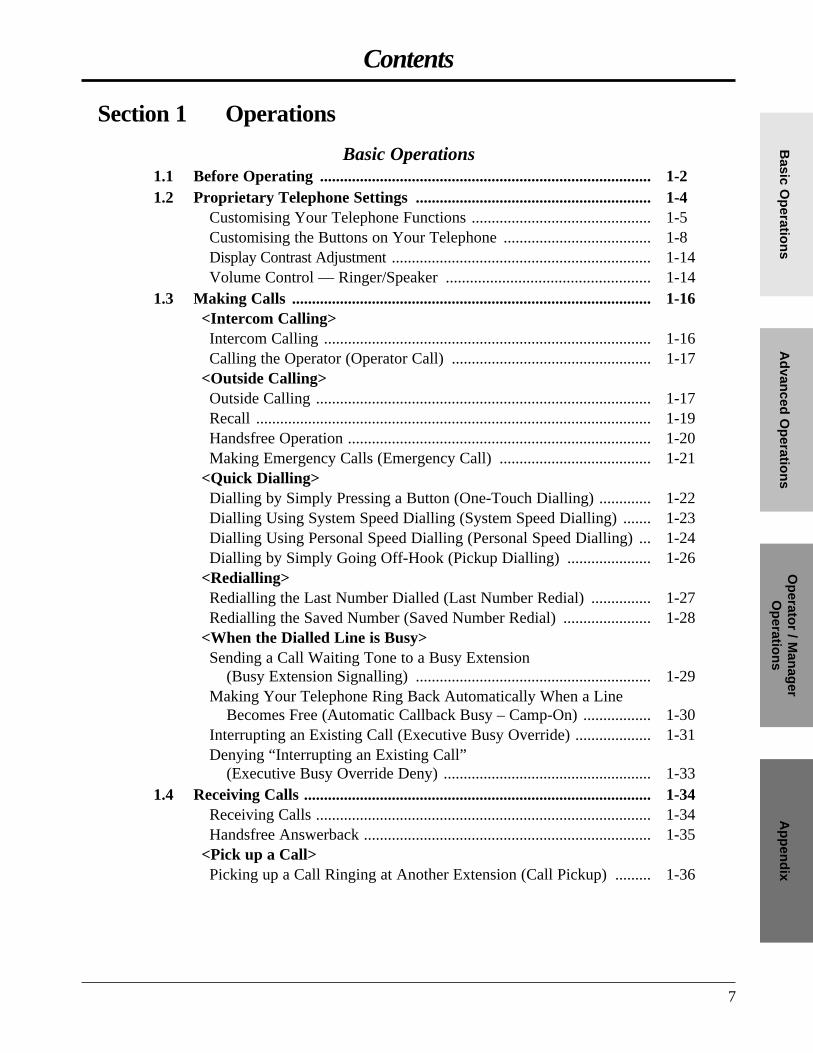
Section 1 Operations
Basic Operations1.1 Before Operating ................................................................................... 1-21.2 Proprietary Telephone Settings ........................................................... 1-4
Customising Your Telephone Functions ............................................. 1-5Customising the Buttons on Your Telephone ..................................... 1-8Display Contrast Adjustment ................................................................. 1-14Volume Control — Ringer/Speaker ................................................... 1-14
1.3 Making Calls .......................................................................................... 1-16<Intercom Calling>Intercom Calling .................................................................................. 1-16Calling the Operator (Operator Call) .................................................. 1-17
<Outside Calling>Outside Calling .................................................................................... 1-17Recall ................................................................................................... 1-19Handsfree Operation ............................................................................ 1-20Making Emergency Calls (Emergency Call) ...................................... 1-21
<Quick Dialling>Dialling by Simply Pressing a Button (One-Touch Dialling) ............. 1-22Dialling Using System Speed Dialling (System Speed Dialling) ....... 1-23Dialling Using Personal Speed Dialling (Personal Speed Dialling) ... 1-24Dialling by Simply Going Off-Hook (Pickup Dialling) ..................... 1-26
<Redialling>Redialling the Last Number Dialled (Last Number Redial) ............... 1-27Redialling the Saved Number (Saved Number Redial) ...................... 1-28
<When the Dialled Line is Busy>Sending a Call Waiting Tone to a Busy Extension
(Busy Extension Signalling) ........................................................... 1-29Making Your Telephone Ring Back Automatically When a Line
Becomes Free (Automatic Callback Busy – Camp-On) ................. 1-30Interrupting an Existing Call (Executive Busy Override) ................... 1-31Denying “Interrupting an Existing Call”
(Executive Busy Override Deny) .................................................... 1-331.4 Receiving Calls ....................................................................................... 1-34
Receiving Calls .................................................................................... 1-34Handsfree Answerback ........................................................................ 1-35
<Pick up a Call>Picking up a Call Ringing at Another Extension (Call Pickup) ......... 1-36
PSQX1709ZA-01.QX 99.10.15 9:54 AM Page 7
8
Contents
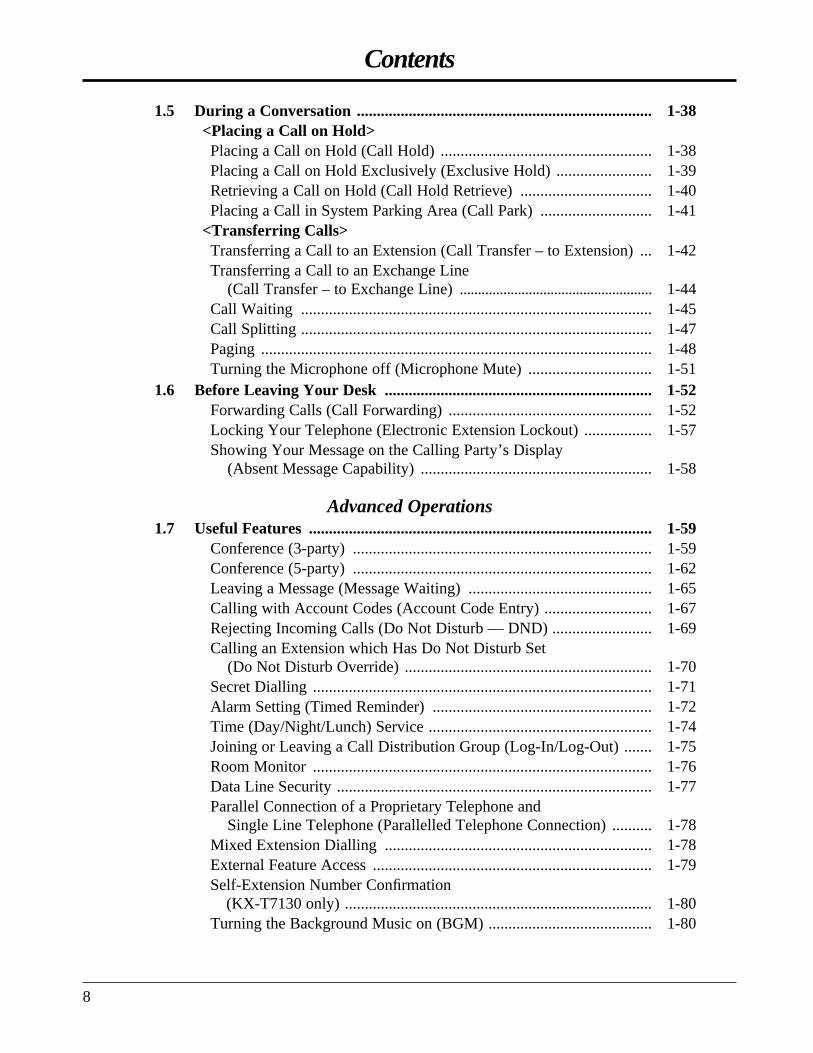
1.5 During a Conversation .......................................................................... 1-38<Placing a Call on Hold>Placing a Call on Hold (Call Hold) ..................................................... 1-38Placing a Call on Hold Exclusively (Exclusive Hold) ........................ 1-39Retrieving a Call on Hold (Call Hold Retrieve) ................................. 1-40Placing a Call in System Parking Area (Call Park) ............................ 1-41
<Transferring Calls>Transferring a Call to an Extension (Call Transfer – to Extension) ... 1-42Transferring a Call to an Exchange Line
(Call Transfer – to Exchange Line) ..................................................... 1-44Call Waiting ........................................................................................ 1-45Call Splitting ........................................................................................ 1-47Paging .................................................................................................. 1-48Turning the Microphone off (Microphone Mute) ............................... 1-51
1.6 Before Leaving Your Desk ................................................................... 1-52Forwarding Calls (Call Forwarding) ................................................... 1-52Locking Your Telephone (Electronic Extension Lockout) ................. 1-57Showing Your Message on the Calling Party’s Display
(Absent Message Capability) .......................................................... 1-58
Advanced Operations1.7 Useful Features ...................................................................................... 1-59
Conference (3-party) ........................................................................... 1-59Conference (5-party) ........................................................................... 1-62Leaving a Message (Message Waiting) .............................................. 1-65Calling with Account Codes (Account Code Entry) ........................... 1-67Rejecting Incoming Calls (Do Not Disturb — DND) ......................... 1-69Calling an Extension which Has Do Not Disturb Set
(Do Not Disturb Override) .............................................................. 1-70Secret Dialling ..................................................................................... 1-71Alarm Setting (Timed Reminder) ....................................................... 1-72Time (Day/Night/Lunch) Service ........................................................ 1-74Joining or Leaving a Call Distribution Group (Log-In/Log-Out) ....... 1-75Room Monitor ..................................................................................... 1-76Data Line Security ............................................................................... 1-77Parallel Connection of a Proprietary Telephone and
Single Line Telephone (Parallelled Telephone Connection) .......... 1-78Mixed Extension Dialling ................................................................... 1-78External Feature Access ...................................................................... 1-79Self-Extension Number Confirmation
(KX-T7130 only) ............................................................................. 1-80Turning the Background Music on (BGM) ......................................... 1-80
PSQX1709ZA-01.QX 99.10.15 9:54 AM Page 8
9
ContentsB
asic Op
eration
sA
dvan
ced O
peratio
ns
Op
erator / M
anag
erO
peratio
ns
Ap
pen
dix
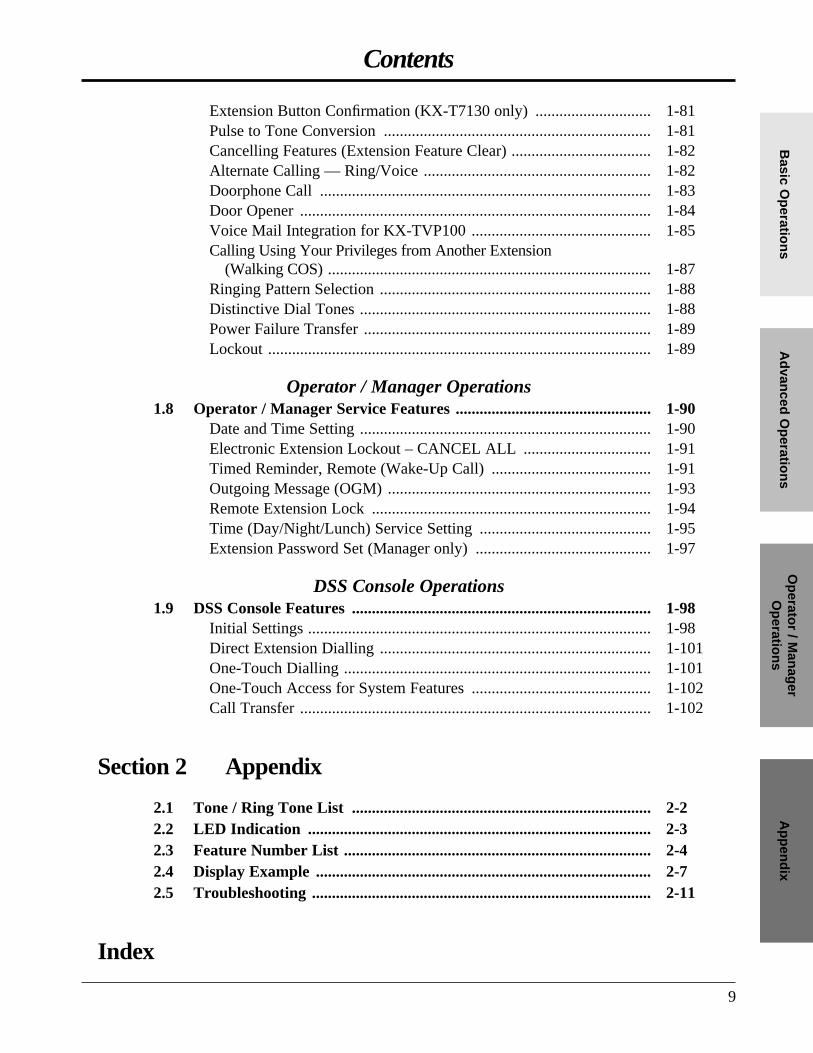
Extension Button Confirmation (KX-T7130 only) ............................. 1-81Pulse to Tone Conversion ................................................................... 1-81Cancelling Features (Extension Feature Clear) ................................... 1-82Alternate Calling — Ring/Voice ......................................................... 1-82Doorphone Call ................................................................................... 1-83Door Opener ........................................................................................ 1-84Voice Mail Integration for KX-TVP100 ............................................. 1-85Calling Using Your Privileges from Another Extension
(Walking COS) ................................................................................. 1-87Ringing Pattern Selection .................................................................... 1-88Distinctive Dial Tones ......................................................................... 1-88Power Failure Transfer ........................................................................ 1-89Lockout ................................................................................................ 1-89
Operator / Manager Operations1.8 Operator / Manager Service Features ................................................. 1-90
Date and Time Setting ......................................................................... 1-90Electronic Extension Lockout – CANCEL ALL ................................ 1-91Timed Reminder, Remote (Wake-Up Call) ........................................ 1-91Outgoing Message (OGM) .................................................................. 1-93Remote Extension Lock ...................................................................... 1-94Time (Day/Night/Lunch) Service Setting ........................................... 1-95Extension Password Set (Manager only) ............................................ 1-97
DSS Console Operations1.9 DSS Console Features ........................................................................... 1-98
Initial Settings ...................................................................................... 1-98Direct Extension Dialling .................................................................... 1-101One-Touch Dialling ............................................................................. 1-101One-Touch Access for System Features ............................................. 1-102Call Transfer ........................................................................................ 1-102
Section 2 Appendix
2.1 Tone / Ring Tone List ........................................................................... 2-22.2 LED Indication ...................................................................................... 2-32.3 Feature Number List ............................................................................. 2-42.4 Display Example .................................................................................... 2-72.5 Troubleshooting ..................................................................................... 2-11
Index
PSQX1709ZA-01.QX 99.10.15 9:54 AM Page 9

10
PSQX1709ZA-01.QX 99.10.15 9:54 AM Page 10
Basic O
peratio
ns
Ad
vanced
Op
eration
sO
perato
r / Man
ager
/ DS
S C
on
sole O
peratio
ns
Section 1
Operations
PSQX1709ZA-02.QX 99.10.15 9:55 AM Page 1
• For proprietary telephone operations, all button illustrations are based on the KX-T7130model.
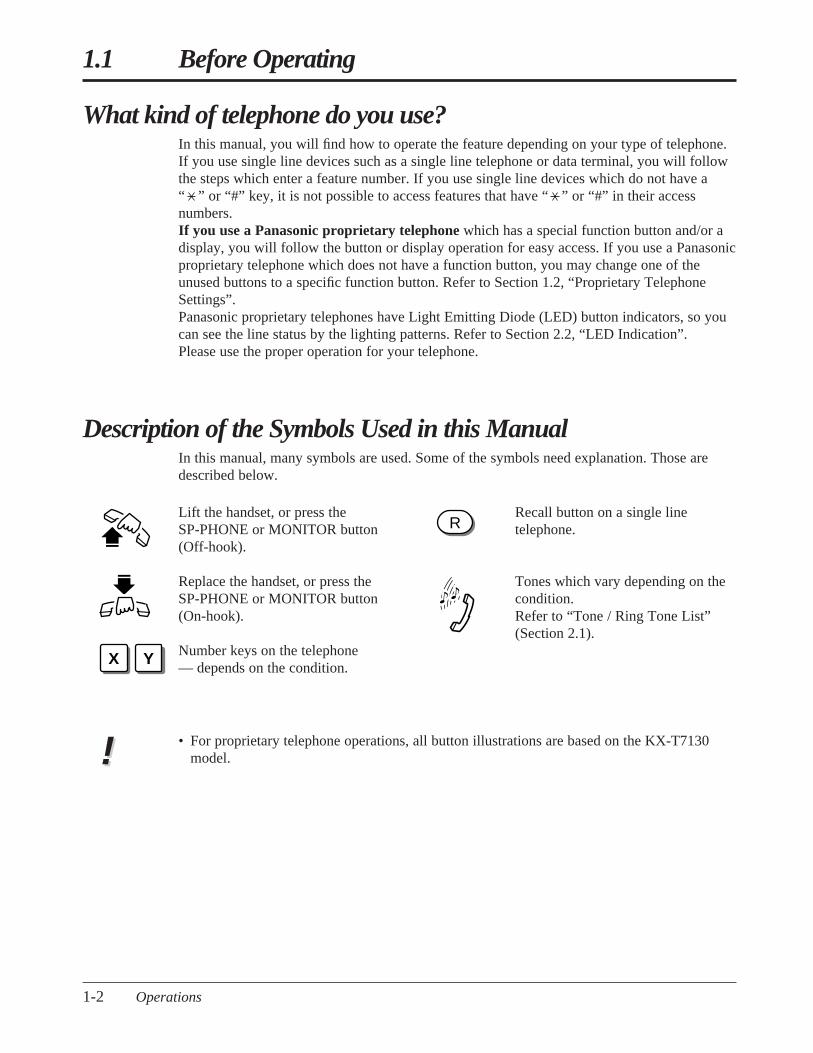
Lift the handset, or press theSP-PHONE or MONITOR button(Off-hook).
Replace the handset, or press theSP-PHONE or MONITOR button(On-hook).
Number keys on the telephone — depends on the condition.
Recall button on a single linetelephone.
Tones which vary depending on thecondition.Refer to “Tone / Ring Tone List” (Section 2.1).
1-2 Operations
1.1 Before Operating
What kind of telephone do you use?In this manual, you will find how to operate the feature depending on your type of telephone. If you use single line devices such as a single line telephone or data terminal, you will followthe steps which enter a feature number. If you use single line devices which do not have a “ ” or “#” key, it is not possible to access features that have “ ” or “#” in their accessnumbers.If you use a Panasonic proprietary telephone which has a special function button and/or adisplay, you will follow the button or display operation for easy access. If you use a Panasonicproprietary telephone which does not have a function button, you may change one of theunused buttons to a specific function button. Refer to Section 1.2, “Proprietary TelephoneSettings”.Panasonic proprietary telephones have Light Emitting Diode (LED) button indicators, so youcan see the line status by the lighting patterns. Refer to Section 2.2, “LED Indication”.Please use the proper operation for your telephone.
Description of the Symbols Used in this ManualIn this manual, many symbols are used. Some of the symbols need explanation. Those aredescribed below.
X Y
R
!!
PSQX1709ZA-02.QX 99.10.15 9:55 AM Page 2
To terminate one party and talk to the other
PT
Confirmation tone (optional)Press the line key or INTERCOM to which you wish to remain connected.
COor
INTERCOM
Interrupting an Existing Call (Executive Busy Override)
Executive Busy Override — ExtensionAllows you to connect to an existing intercom (extension) call.System Programming is required to use this feature.
Any Telephone
Dial 3.
3
Confirmation tone (optional)
If you make an intercom call and while hearing a busy tone
A three-party conference is now established.
To leave the conference
Any Telephone
The other two parties continue their conversation.
Hang up or press SP-PHONE.
• This feature does not work when “Data Line Security” or “Executive Busy Override Deny”is set at either or both of the other parties.
• When a 2-party call is changed to a 3-party call or vice versa, a confirmation tone is sent toall parties. The tone can be disabled.
• 1.3 Making Calls, ‘Denying “Interrupting an Existing Call”(Executive Busy OverrideDeny)’
• 1.7 Useful Features, “Conference (3-party)”• 1.7 Useful Features, “Data Line Security”• See the Installation Manual, Section 3, “Executive Busy Override”.
!!
☞
• If all three parties are extensions, this operation is not possible.
Operations 1-3
1.1 Before OperatingB
asic Op
eration
s
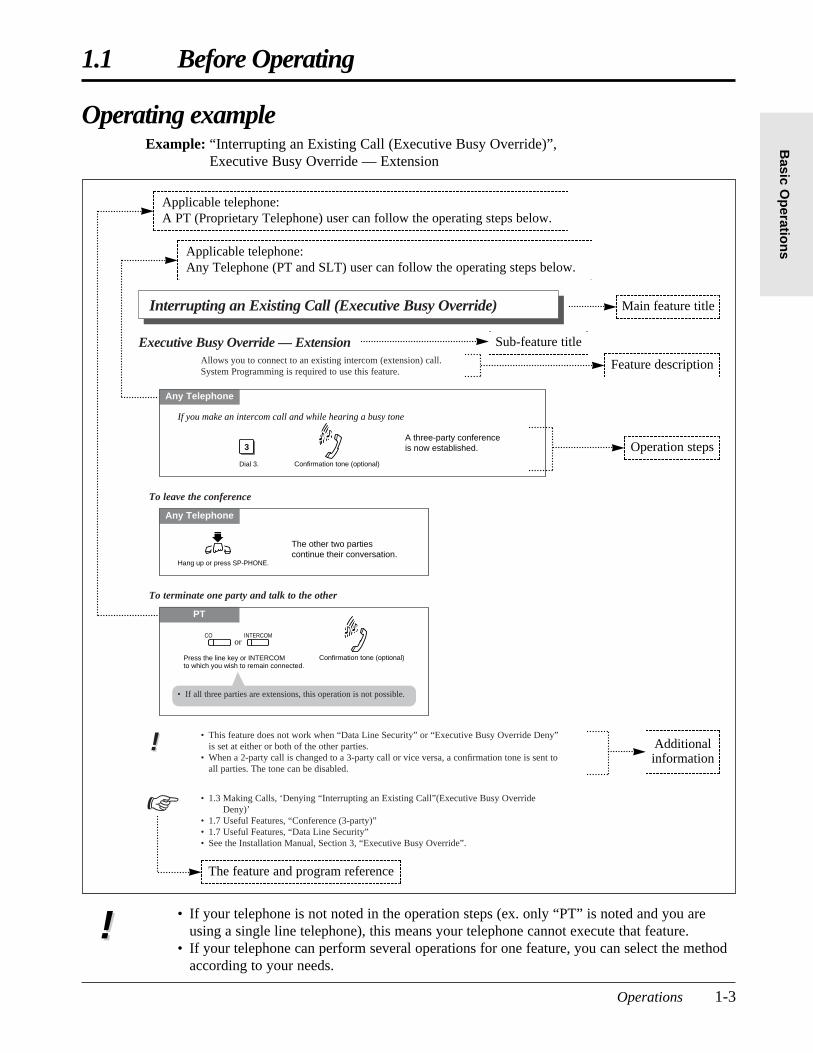
Operating exampleExample: “Interrupting an Existing Call (Executive Busy Override)”,
Executive Busy Override — Extension
Sub-feature title
Operation steps
Feature description
Main feature title
The feature and program reference
Applicable telephone:A PT (Proprietary Telephone) user can follow the operating steps below.
Applicable telephone:Any Telephone (PT and SLT) user can follow the operating steps below.
• If your telephone is not noted in the operation steps (ex. only “PT” is noted and you areusing a single line telephone), this means your telephone cannot execute that feature.
• If your telephone can perform several operations for one feature, you can select the methodaccording to your needs.
!!
Additionalinformation
PSQX1709ZA-02.QX 99.10.15 9:55 AM Page 3
1-4 Operations
1.2 Proprietary Telephone Settings
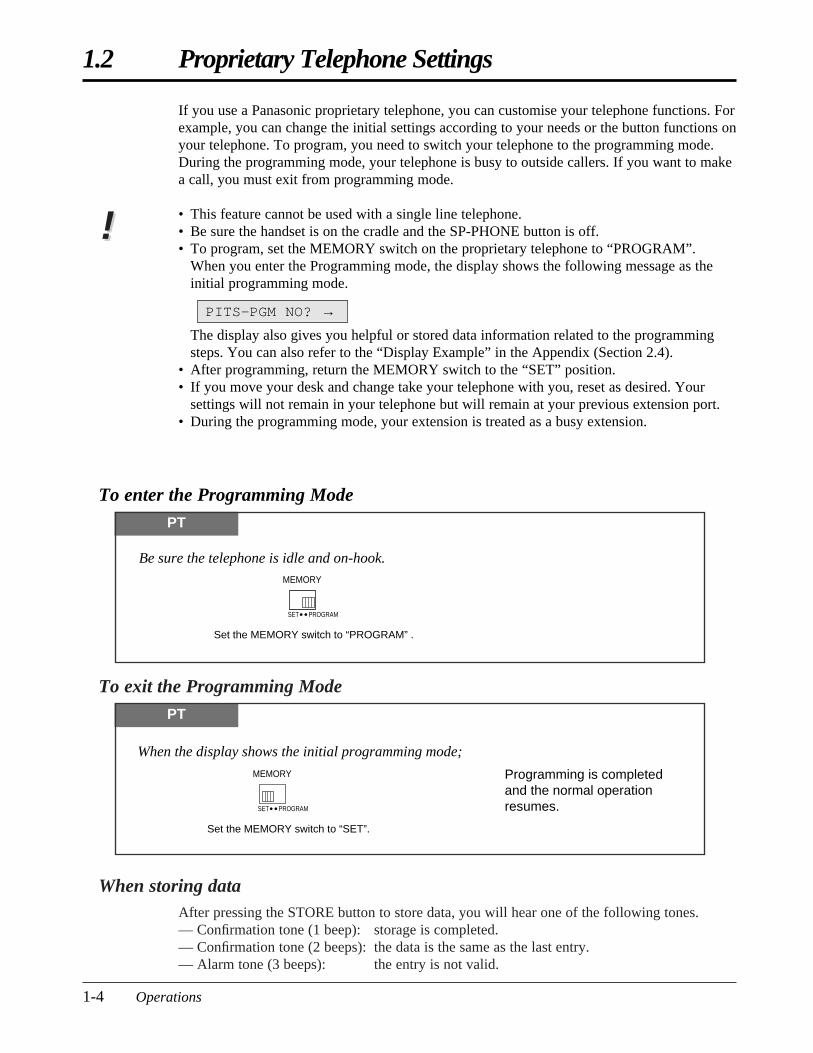
If you use a Panasonic proprietary telephone, you can customise your telephone functions. Forexample, you can change the initial settings according to your needs or the button functions onyour telephone. To program, you need to switch your telephone to the programming mode.During the programming mode, your telephone is busy to outside callers. If you want to makea call, you must exit from programming mode.
• This feature cannot be used with a single line telephone.• Be sure the handset is on the cradle and the SP-PHONE button is off.• To program, set the MEMORY switch on the proprietary telephone to “PROGRAM”.
When you enter the Programming mode, the display shows the following message as theinitial programming mode.
The display also gives you helpful or stored data information related to the programmingsteps. You can also refer to the “Display Example” in the Appendix (Section 2.4).
• After programming, return the MEMORY switch to the “SET” position.• If you move your desk and change take your telephone with you, reset as desired. Your
settings will not remain in your telephone but will remain at your previous extension port.• During the programming mode, your extension is treated as a busy extension.
PITS-PGM NO? →
!!
To exit the Programming Mode
When storing dataAfter pressing the STORE button to store data, you will hear one of the following tones.— Confirmation tone (1 beep): storage is completed.— Confirmation tone (2 beeps): the data is the same as the last entry.— Alarm tone (3 beeps): the entry is not valid.
PT
SET PROGRAM
MEMORY
Set the MEMORY switch to “PROGRAM” .
Be sure the telephone is idle and on-hook.
PT
SET PROGRAM
MEMORY
When the display shows the initial programming mode;
Programming is completed and the normal operation resumes.
Set the MEMORY switch to “SET”.
To enter the Programming Mode
PSQX1709ZA-02.QX 99.10.15 9:55 AM Page 4
Operations 1-5
1.2 Proprietary Telephone SettingsB
asic Op
eration
s
You can change the initial settings of your telephone. Check the available items in the list andchange the settings, if required.
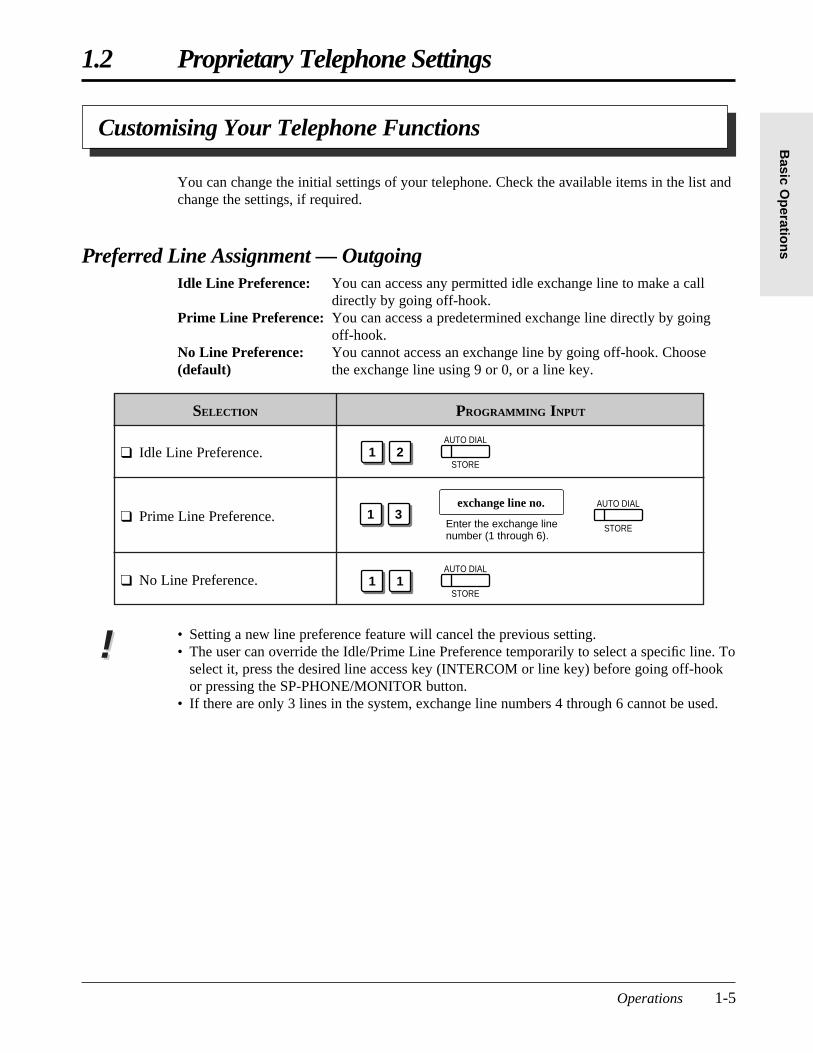
Preferred Line Assignment — OutgoingIdle Line Preference: You can access any permitted idle exchange line to make a call
directly by going off-hook.Prime Line Preference: You can access a predetermined exchange line directly by going
off-hook.No Line Preference: You cannot access an exchange line by going off-hook. Choose(default) the exchange line using 9 or 0, or a line key.
• Setting a new line preference feature will cancel the previous setting.• The user can override the Idle/Prime Line Preference temporarily to select a specific line. To
select it, press the desired line access key (INTERCOM or line key) before going off-hookor pressing the SP-PHONE/MONITOR button.
• If there are only 3 lines in the system, exchange line numbers 4 through 6 cannot be used.
SELECTION PROGRAMMING INPUT
1 2AUTO DIAL
STORE
❑ No Line Preference.
❑ Idle Line Preference.
❑ Prime Line Preference.
Customising Your Telephone Functions
1 3Enter the exchange line number (1 through 6).
exchange line no. AUTO DIAL
STORE
1 1AUTO DIAL
STORE
!!
PSQX1709ZA-02.QX 99.10.15 9:55 AM Page 5
1-6 Operations
1.2 Proprietary Telephone Settings
PROGRAMMING INPUT
3Enter the exchange line numbers you want to ring (1 through 6).
exchange line no. AUTO DIAL
STORE
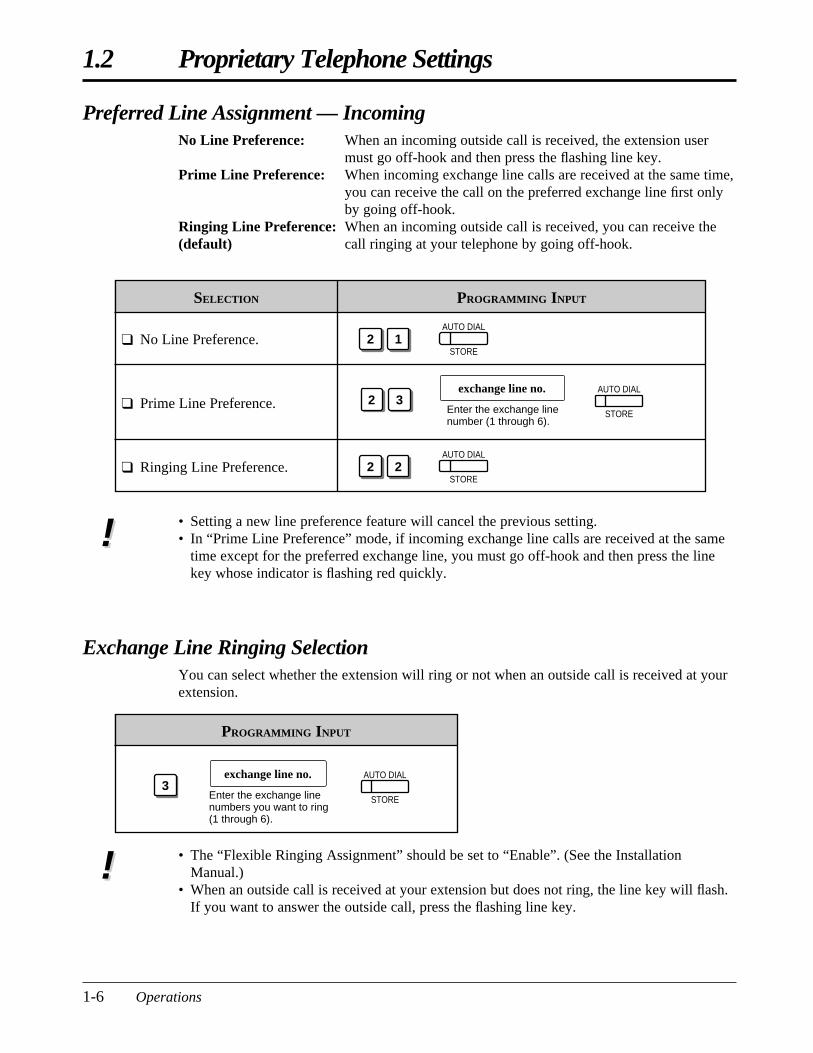
Exchange Line Ringing SelectionYou can select whether the extension will ring or not when an outside call is received at yourextension.
• The “Flexible Ringing Assignment” should be set to “Enable”. (See the InstallationManual.)
• When an outside call is received at your extension but does not ring, the line key will flash.If you want to answer the outside call, press the flashing line key.
!!
❑ Ringing Line Preference.
Preferred Line Assignment — IncomingNo Line Preference: When an incoming outside call is received, the extension user
must go off-hook and then press the flashing line key.Prime Line Preference: When incoming exchange line calls are received at the same time,
you can receive the call on the preferred exchange line first onlyby going off-hook.
Ringing Line Preference: When an incoming outside call is received, you can receive the (default) call ringing at your telephone by going off-hook.
SELECTION PROGRAMMING INPUT
❑ No Line Preference.
❑ Prime Line Preference.
• Setting a new line preference feature will cancel the previous setting.• In “Prime Line Preference” mode, if incoming exchange line calls are received at the same
time except for the preferred exchange line, you must go off-hook and then press the linekey whose indicator is flashing red quickly.
2 1AUTO DIAL
STORE
2 3Enter the exchange line number (1 through 6).
exchange line no. AUTO DIAL
STORE
2 2AUTO DIAL
STORE
!!
PSQX1709ZA-02.QX 99.10.15 9:55 AM Page 6
Operations 1-7
1.2 Proprietary Telephone SettingsB
asic Op
eration
s
OPERATION
• 1.5 During a Conversation, “Call Waiting”• 2.1 Tone / Ring Tone List
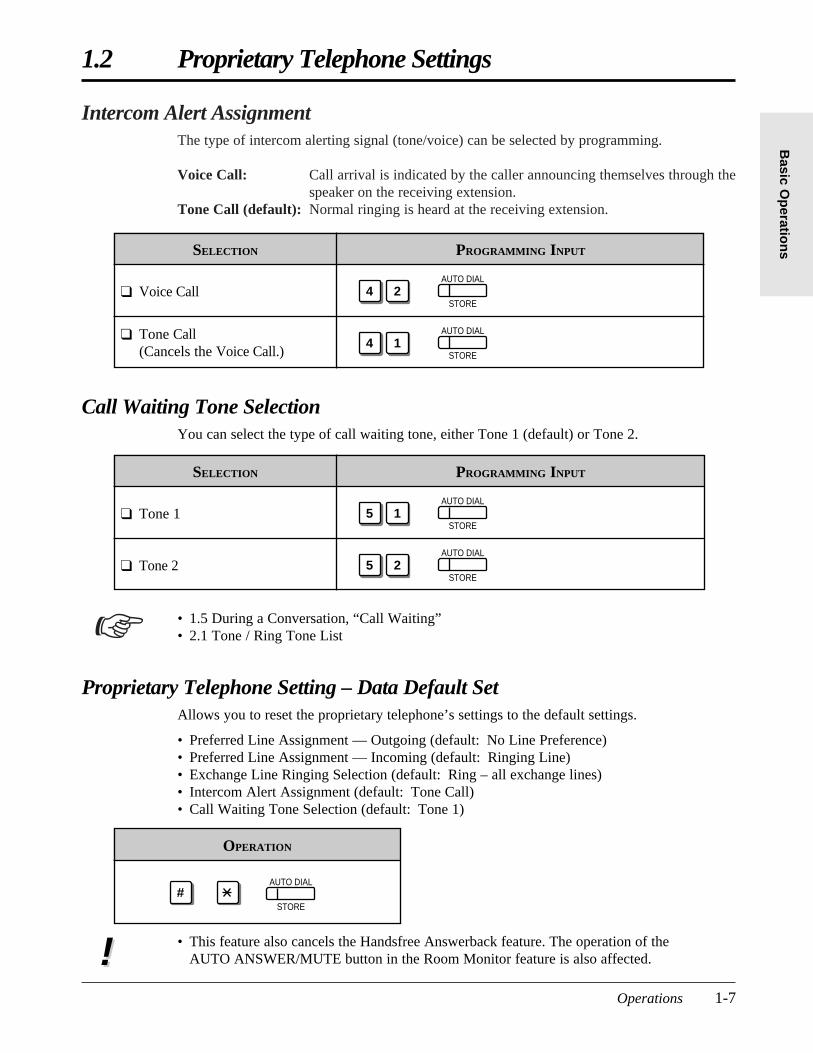
Proprietary Telephone Setting – Data Default SetAllows you to reset the proprietary telephone’s settings to the default settings.
• Preferred Line Assignment — Outgoing (default: No Line Preference)• Preferred Line Assignment — Incoming (default: Ringing Line)• Exchange Line Ringing Selection (default: Ring – all exchange lines)• Intercom Alert Assignment (default: Tone Call)• Call Waiting Tone Selection (default: Tone 1)
Call Waiting Tone SelectionYou can select the type of call waiting tone, either Tone 1 (default) or Tone 2.
SELECTION PROGRAMMING INPUT
❑ Tone 1
❑ Tone 2
AUTO DIAL
STORE#
5 1AUTO DIAL
STORE
5 2AUTO DIAL
STORE
☞
Intercom Alert AssignmentThe type of intercom alerting signal (tone/voice) can be selected by programming.
Voice Call: Call arrival is indicated by the caller announcing themselves through thespeaker on the receiving extension.
Tone Call (default): Normal ringing is heard at the receiving extension.
SELECTION PROGRAMMING INPUT
4 2AUTO DIAL
STORE
4 1AUTO DIAL
STORE
❑ Tone Call(Cancels the Voice Call.)
❑ Voice Call
• This feature also cancels the Handsfree Answerback feature. The operation of theAUTO ANSWER/MUTE button in the Room Monitor feature is also affected.!!
PSQX1709ZA-02.QX 99.10.15 9:55 AM Page 7
1-8 Operations
1.2 Proprietary Telephone Settings
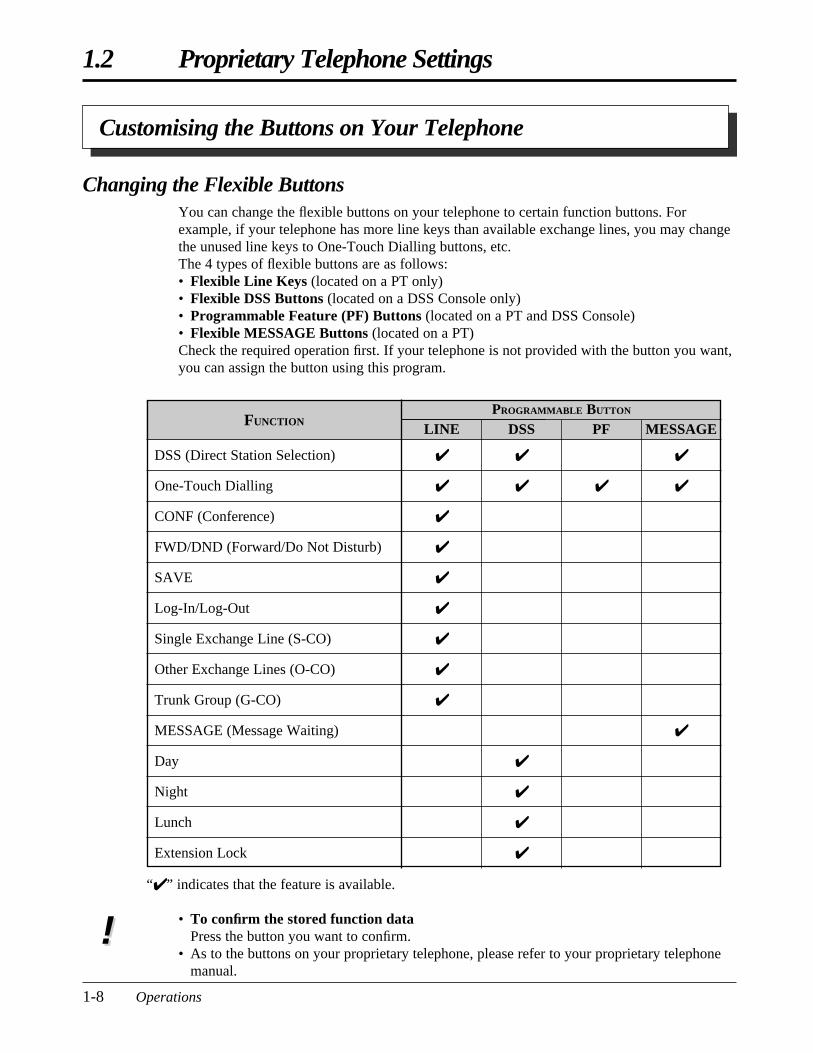
“✔” indicates that the feature is available.
• To confirm the stored function dataPress the button you want to confirm.
• As to the buttons on your proprietary telephone, please refer to your proprietary telephonemanual.
!!
PROGRAMMABLE BUTTON
LINE DSS PFFUNCTION
MESSAGE
✔
✔
✔
✔
✔
✔
✔
✔
✔
✔
✔
✔
✔
✔
✔
✔
✔
✔
✔
DSS (Direct Station Selection)
One-Touch Dialling
CONF (Conference)
FWD/DND (Forward/Do Not Disturb)
SAVE
Log-In/Log-Out
Single Exchange Line (S-CO)
Other Exchange Lines (O-CO)
Trunk Group (G-CO)
MESSAGE (Message Waiting)
Day
Night
Lunch
Extension Lock
Changing the Flexible ButtonsYou can change the flexible buttons on your telephone to certain function buttons. Forexample, if your telephone has more line keys than available exchange lines, you may changethe unused line keys to One-Touch Dialling buttons, etc.The 4 types of flexible buttons are as follows:• Flexible Line Keys (located on a PT only)• Flexible DSS Buttons (located on a DSS Console only)• Programmable Feature (PF) Buttons (located on a PT and DSS Console)• Flexible MESSAGE Buttons (located on a PT)Check the required operation first. If your telephone is not provided with the button you want,you can assign the button using this program.
Customising the Buttons on Your Telephone
PSQX1709ZA-02.QX 99.10.15 9:55 AM Page 8
Operations 1-9
1.2 Proprietary Telephone SettingsB
asic Op
eration
s
Line Access KeysOne of the following 3 types of line keys must be used to select an exchange line whenmaking a call.• Trunk Group (G-CO) key• Other Exchange Lines (O-CO) key• Single Exchange Line (S-CO) key
• A flexible line key can be assigned as a Line Access Key (G-CO, O-CO or S-CO) inProprietary Telephone Settings. Once a flexible line key is assigned as a Line Access Key, itprovides the line status using lighting patterns and colour indication. Please refer to “2.2LED Indication”.
• You can set the G-CO and S-CO keys on one telephone. Incoming and outgoing calls on theline are shown on the key in the following priority. S-CO > G-CO
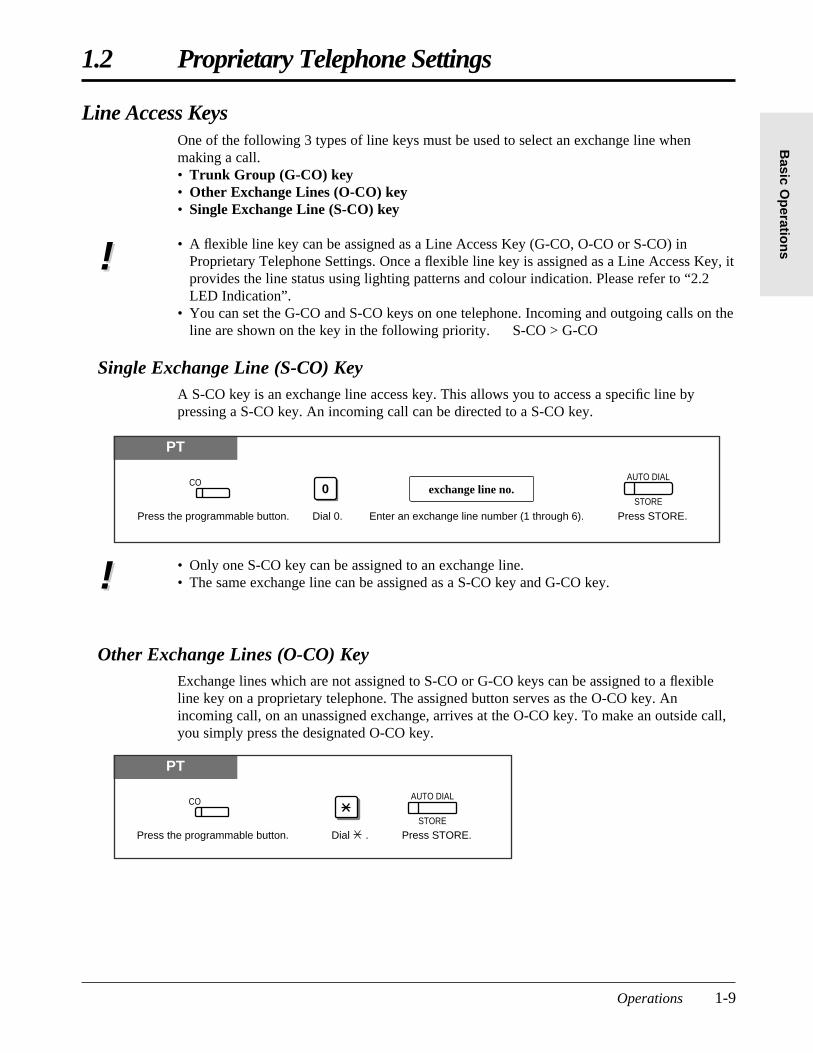
Single Exchange Line (S-CO) KeyA S-CO key is an exchange line access key. This allows you to access a specific line bypressing a S-CO key. An incoming call can be directed to a S-CO key.
!!
!!
PT
Press the programmable button. Dial 0. Enter an exchange line number (1 through 6).
0
Press STORE.
COexchange line no.
AUTO DIAL
STORE
• Only one S-CO key can be assigned to an exchange line.• The same exchange line can be assigned as a S-CO key and G-CO key.
PT
Other Exchange Lines (O-CO) KeyExchange lines which are not assigned to S-CO or G-CO keys can be assigned to a flexibleline key on a proprietary telephone. The assigned button serves as the O-CO key. Anincoming call, on an unassigned exchange, arrives at the O-CO key. To make an outside call,you simply press the designated O-CO key.
Press the programmable button. Press STORE.
AUTO DIAL
STORE
CO
Dial .
PSQX1709ZA-02.QX 99.10.15 9:55 AM Page 9
1-10 Operations
1.2 Proprietary Telephone Settings
PT
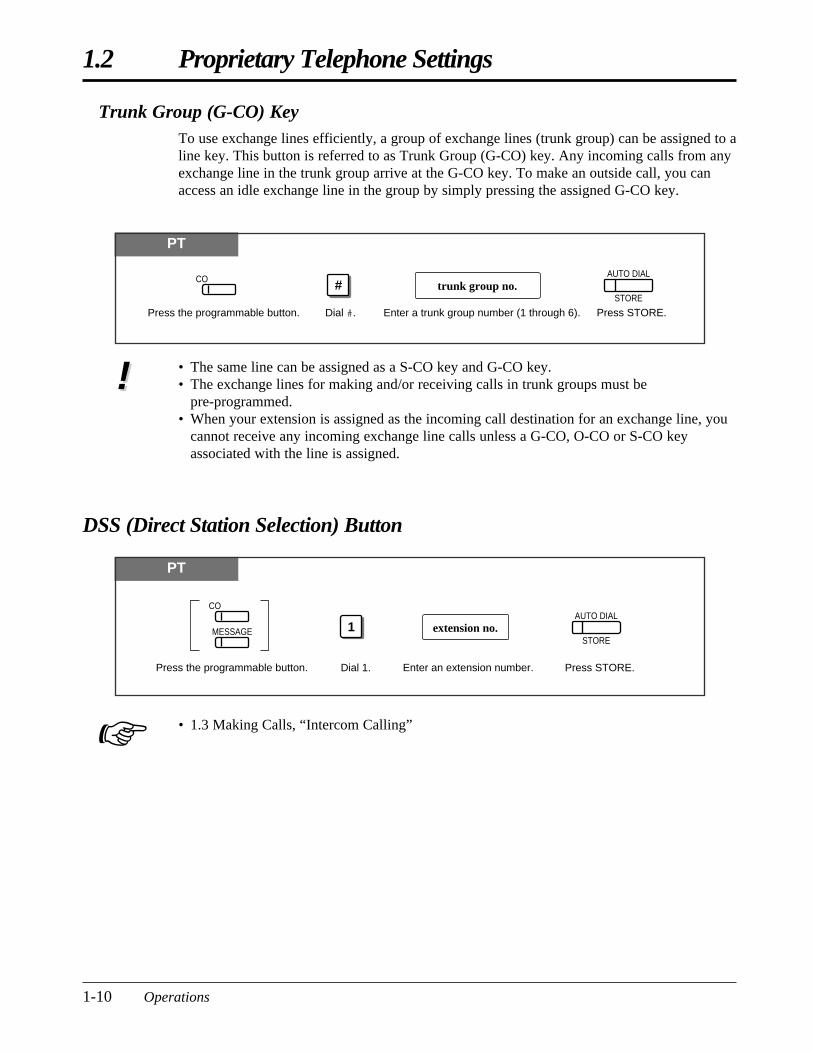
DSS (Direct Station Selection) Button
Press the programmable button. Press STORE.Dial 1.
1AUTO DIAL
STOREextension no.
Enter an extension number.
CO
MESSAGE
Trunk Group (G-CO) KeyTo use exchange lines efficiently, a group of exchange lines (trunk group) can be assigned to aline key. This button is referred to as Trunk Group (G-CO) key. Any incoming calls from anyexchange line in the trunk group arrive at the G-CO key. To make an outside call, you canaccess an idle exchange line in the group by simply pressing the assigned G-CO key.
• The same line can be assigned as a S-CO key and G-CO key.• The exchange lines for making and/or receiving calls in trunk groups must be
pre-programmed.• When your extension is assigned as the incoming call destination for an exchange line, you
cannot receive any incoming exchange line calls unless a G-CO, O-CO or S-CO keyassociated with the line is assigned.
PT
Press the programmable button. Dial #. Enter a trunk group number (1 through 6). Press STORE.
AUTO DIAL
STORE
COtrunk group no.#
!!
• 1.3 Making Calls, “Intercom Calling”☞
PSQX1709ZA-02.QX 99.10.15 9:55 AM Page 10

Operations 1-11
1.2 Proprietary Telephone SettingsB
asic Op
eration
s
• To store the telephone number of an external party, a line access code (9, 0 or 81 through86) must be stored as the first digit.
• You can use 0 through 9, , #, PAUSE and INTERCOM (Secret) as follows.PAUSE: inserts a pause.INTERCOM: conceals all or part of a stored number.
• The number of Personal Speed Dialling numbers corresponds to the number of PF buttonsassigned as One-Touch Dialling. (PF buttons are on a proprietary telephone.) You cannotassign both the One-Touch Dialling and Personal Speed Dialling features. For example, ifyou assign One-Touch Dialling to the PF 1 button and then Personal Speed Dialling 0, thePersonal Speed Dialling 0 feature will overwrite the One-Touch assignment.
• 1.7 Useful Features, “Secret Dialling”
One-Touch Dialling Button
PT
Press the programmable button and dial 2 or press the PF button.
Press STORE.
AUTO DIAL
STOREtelephone no.
Enter the telephone number(max. 24 digits).
2
CO
MESSAGE
PF
)( +
!!
PT
CONF (Conference) Button
Press the programmable button. Dial 3.
3
Press STORE.
AUTO DIAL
STORE
CO
• 1.7 Useful Features, “Conference (3-party)”• 1.7 Useful Features, “Conference, Unattended”• 1.7 Useful Features, “Conference (5-party)”
☞
☞
PSQX1709ZA-02.QX 99.10.15 9:55 AM Page 11
1-12 Operations
1.2 Proprietary Telephone Settings
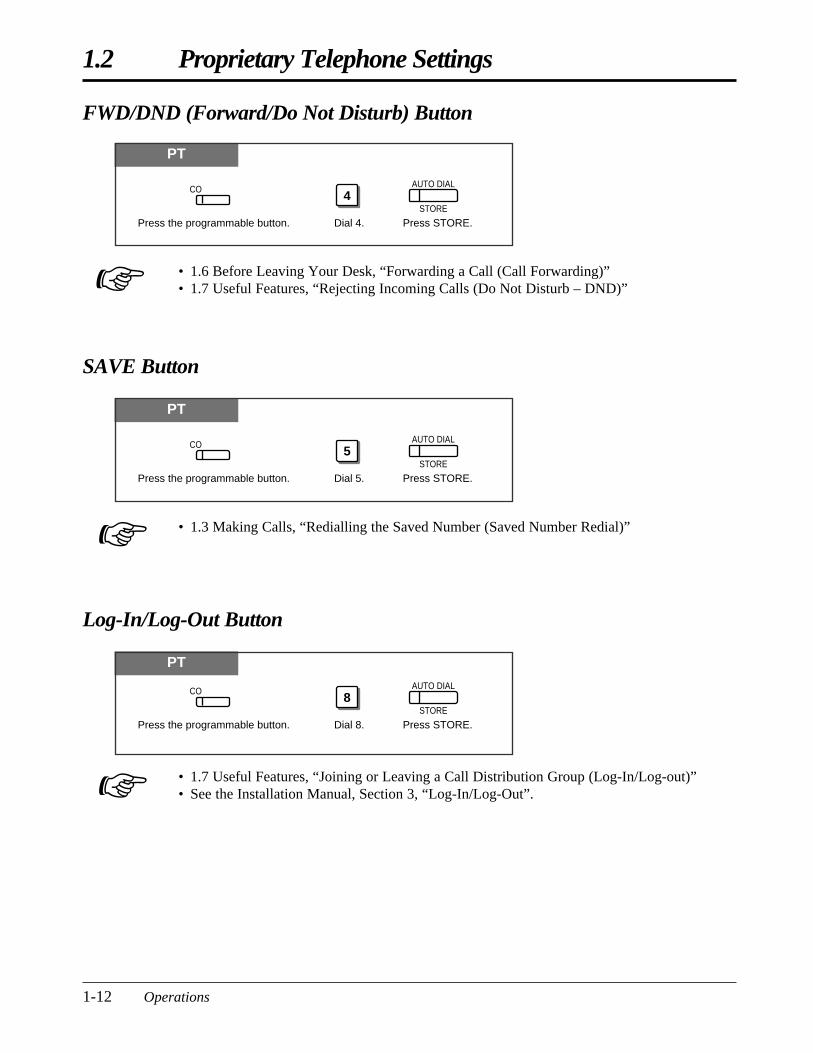
• 1.7 Useful Features, “Joining or Leaving a Call Distribution Group (Log-In/Log-out)”• See the Installation Manual, Section 3, “Log-In/Log-Out”.☞
PT
Log-In/Log-Out Button
Press the programmable button. Dial 8.
8
Press STORE.
AUTO DIAL
STORE
CO
PT
SAVE Button
Press the programmable button. Dial 5.
5
Press STORE.
AUTO DIAL
STORE
CO
• 1.3 Making Calls, “Redialling the Saved Number (Saved Number Redial)”☞
FWD/DND (Forward/Do Not Disturb) Button
PT
Press the programmable button. Dial 4.
4
Press STORE.
AUTO DIAL
STORE
CO
• 1.6 Before Leaving Your Desk, “Forwarding a Call (Call Forwarding)”• 1.7 Useful Features, “Rejecting Incoming Calls (Do Not Disturb – DND)”☞
PSQX1709ZA-02.QX 99.10.15 9:55 AM Page 12
Operations 1-13
1.2 Proprietary Telephone SettingsB
asic Op
eration
s
PT
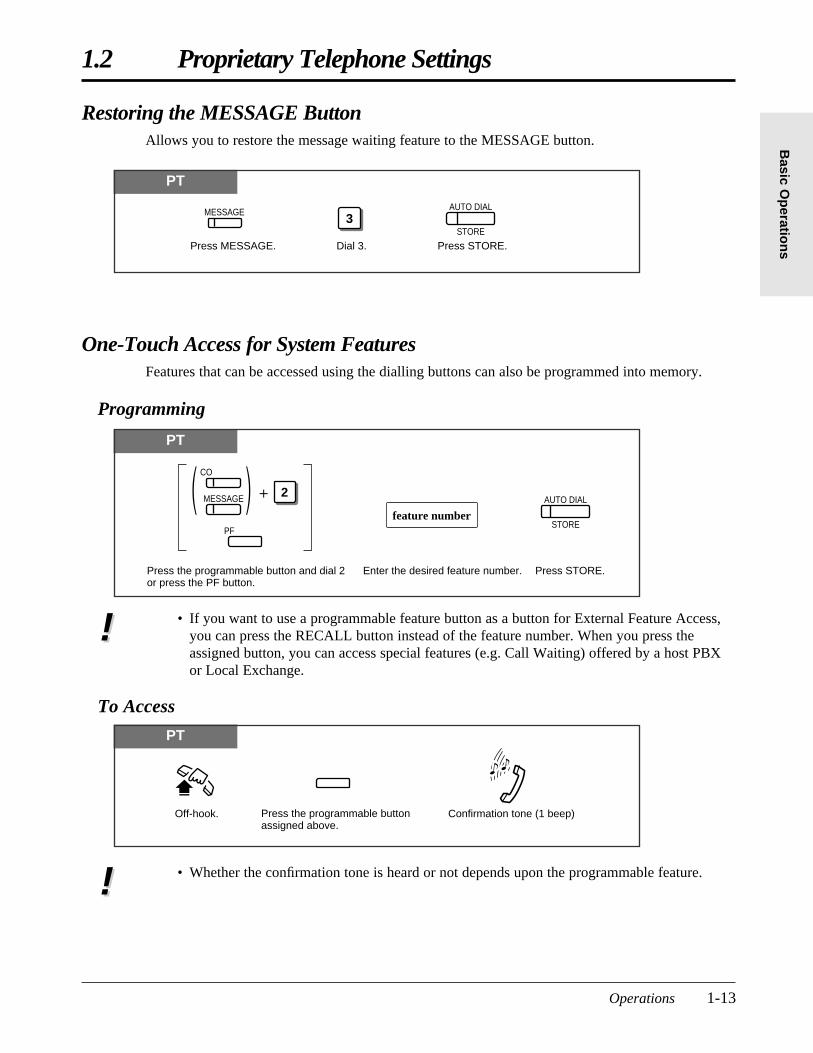
Restoring the MESSAGE ButtonAllows you to restore the message waiting feature to the MESSAGE button.
Press MESSAGE. Dial 3.
3
Press STORE.
AUTO DIAL
STORE
MESSAGE
One-Touch Access for System FeaturesFeatures that can be accessed using the dialling buttons can also be programmed into memory.
Programming
PT
PT
AUTO DIAL
STORE
Enter the desired feature number. Press STORE.
feature number
Press the programmable button and dial 2 or press the PF button.
2
CO
MESSAGE
PF
)( +
Off-hook. Confirmation tone (1 beep)Press the programmable button assigned above.
To Access
• If you want to use a programmable feature button as a button for External Feature Access,you can press the RECALL button instead of the feature number. When you press theassigned button, you can access special features (e.g. Call Waiting) offered by a host PBXor Local Exchange.
!!
• Whether the confirmation tone is heard or not depends upon the programmable feature.!!
PSQX1709ZA-02.QX 99.10.15 9:55 AM Page 13
1-14 Operations
1.2 Proprietary Telephone Settings
PT
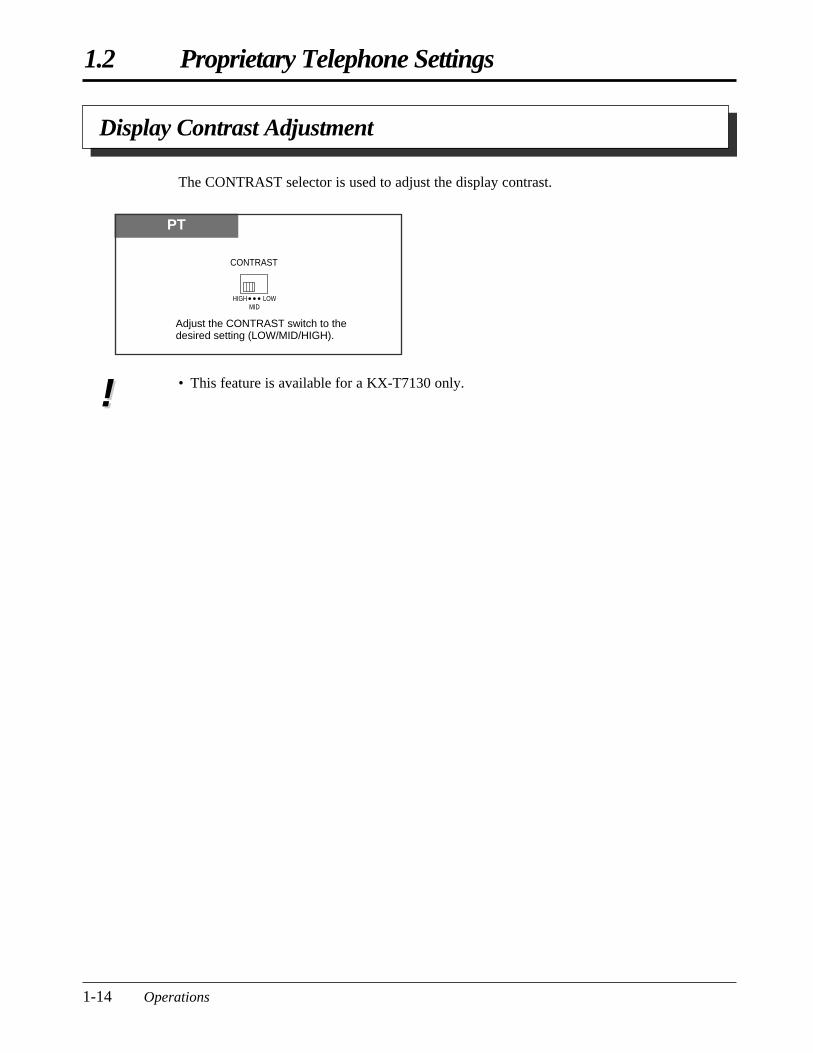
The CONTRAST selector is used to adjust the display contrast.
Display Contrast Adjustment
PT
HIGH LOWMID
CONTRAST
Adjust the CONTRAST switch to the desired setting (LOW/MID/HIGH).
• This feature is available for a KX-T7130 only.!!
PSQX1709ZA-02.QX 99.10.15 9:55 AM Page 14
Operations 1-15
1.2 Proprietary Telephone SettingsB
asic Op
eration
s
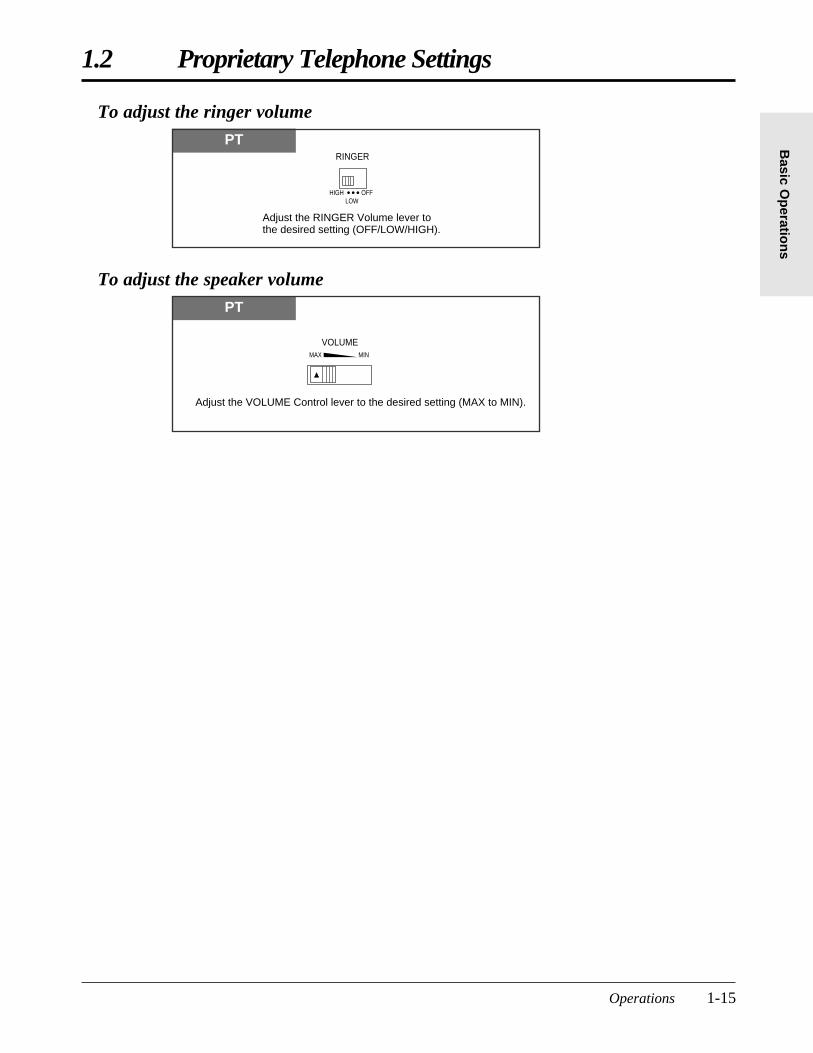
To adjust the ringer volume
To adjust the speaker volume
PT
HIGH OFF LOW
RINGER
Adjust the RINGER Volume lever to the desired setting (OFF/LOW/HIGH).
PT
VOLUME
Adjust the VOLUME Control lever to the desired setting (MAX to MIN).
MAX MIN
PSQX1709ZA-02.QX 99.10.15 9:55 AM Page 15

1-16 Operations
1.3 Making Calls
Intercom Calling
• After dialling an extension number, you will hear one of the following tones.Ringback tone: Indicates the destination extension is being called.Confirmation tone: Indicates you can perform voice calling (e.g. Paging).Busy tone: Indicates the destination extension is busy.Do Not Disturb (DND) tone: Indicates the destination extension has set the “Do Not
Disturb (DND)” feature.• An extension number and a name, if programmed, are shown on a display PT during an
intercom call.• You can assign a DSS button on a flexible button in Proprietary Telephone Settings. The
stored number can be displayed in the following way.1. Set the MEMORY switch to “PROGRAM”.2. Press the desired button while on-hook.
The number will be displayed. After checking the number return the MEMORY switch tothe “SET” position.
• You can press a flexible button assigned as a DSS button directly to make an intercom callwithout going off-hook. It can be done by System Programming.
• 1.2 Proprietary Telephone Settings, “Customising the Buttons on Your Telephone”, DSS (Direct Station Selection) Button
• 2.1 Tone/Ring Tone List• See the Installation Manual, Section 3, “Intercom Calling”.
PT
PT
PT
Allows you to make a call to another extension.
Using the handset
Any Telephone
extension no.
Lift the handset. Talk. Hang up.Enter the extension number.
PT
Lift the handset or press SP-PHONE/MONITOR.
Talk. Hang up or press SP-PHONE/MONITOR.
Press the flexible button assigned as a DSS button.
PT
extension no.
Press SP-PHONE or INTERCOM.
Talk.Enter the extension number. Press SP-PHONE.
SP-PHONESP-PHONEor
INTERCOM
Using the Speakerphone
Using a DSS (Direct Station Selection) button
!!
☞
PSQX1709ZA-03.QX 99.10.15 9:56 AM Page 16
Operations 1-17
1.3 Making CallsB
asic Op
eration
s
Outside Calling
Allows you to make a call to an external party using one of the following line access methods.1.) Making Outside Calls Using Automatic Line Access2.) Making Outside Calls Using Individual Line Access3.) Making Outside Calls Using Trunk Group Access
• An exchange line which is not assigned to a line key cannot be dialled.• Helpful hints for the Handsfree (speakerphone) operation are noted in the “Handsfree
Operation” feature.
• 1.2 Proprietary Telephone Settings, “Customising the Buttons on Your Telephone”, Single Exchange Line (S-CO) Key, Trunk Group (G-CO) Key
• 1.6 Before Leaving Your Desk, “Locking Your Telephone (Electronic Extension Lockout)”• 1.7 Useful Features, “Calling with Account Codes (Account Code Entry)”• 1.7 Useful Features, “Calling Using Your Privileges from Another Extension (Walking COS)”• 1.8 Operator / Manager Service Features, “Remote Extension Lock”• See the Installation Manual, Section 3, “Outside Calling”.• See the Installation Manual, Section 3, “Call Barring Override by Account Codes”.• See the Installation Manual, Section 3, “Call Barring — Extension Lock Boundary Class”.• See the Installation Manual, Section 3, “Call Barring”.
PTPT
Calling the Operator (Operator Call)
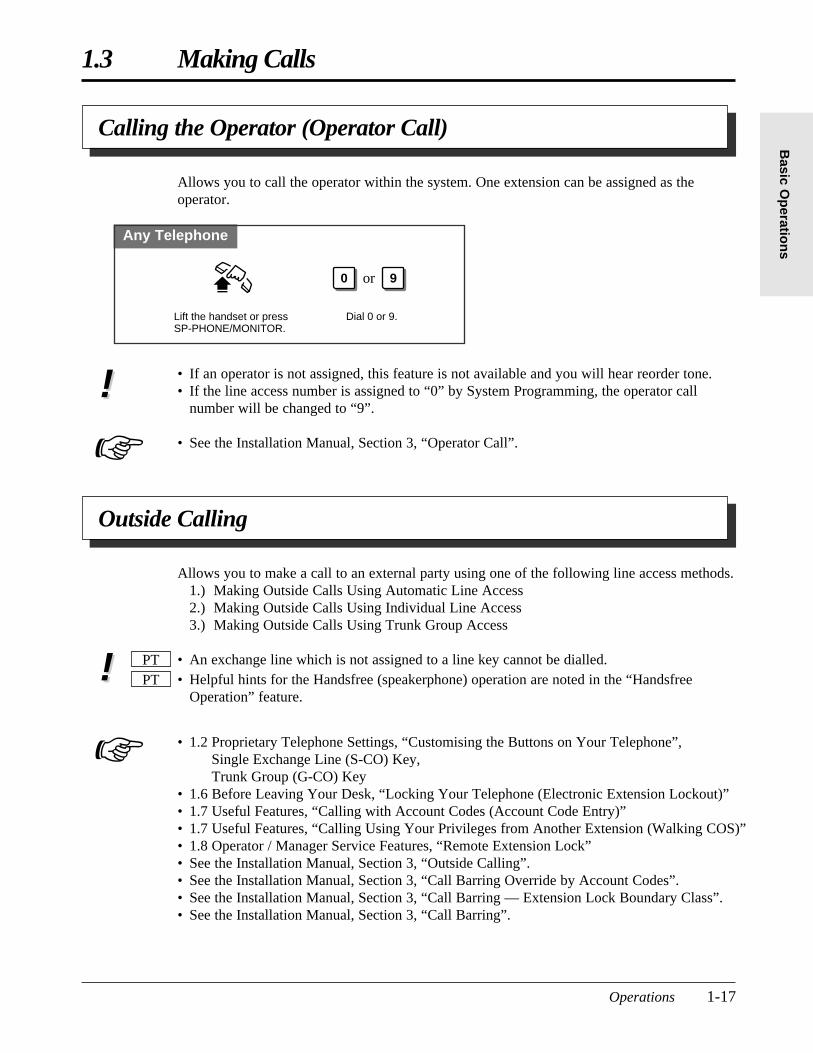
• If an operator is not assigned, this feature is not available and you will hear reorder tone.• If the line access number is assigned to “0” by System Programming, the operator call
number will be changed to “9”.
• See the Installation Manual, Section 3, “Operator Call”.
Allows you to call the operator within the system. One extension can be assigned as theoperator.
Any Telephone
Dial 0 or 9.Lift the handset or press SP-PHONE/MONITOR.
0 9or
!!
!!
☞
☞
PSQX1709ZA-03.QX 99.10.15 9:56 AM Page 17
1-18 Operations
1.3 Making Calls
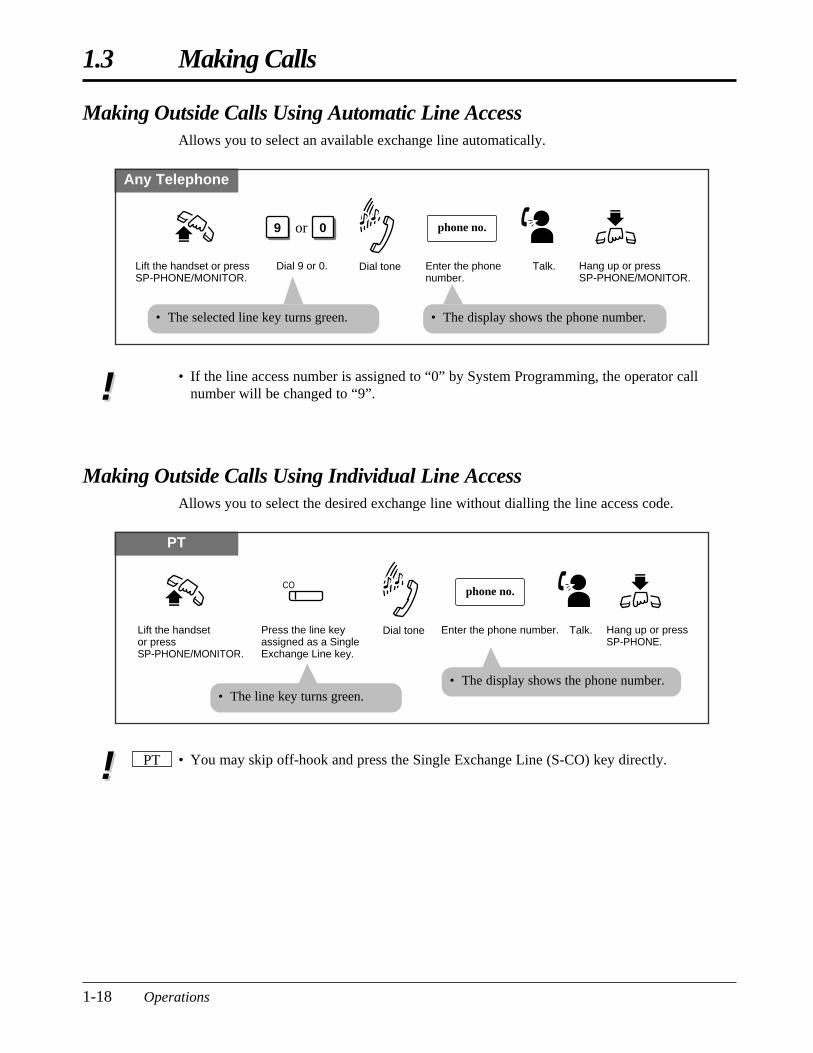
Making Outside Calls Using Automatic Line AccessAllows you to select an available exchange line automatically.
Any Telephone
Dial 9 or 0. Enter the phone number.
9 0 phone no.
Lift the handset or press SP-PHONE/MONITOR.
Hang up or press SP-PHONE/MONITOR.
Dial tone Talk.
or
• The selected line key turns green. • The display shows the phone number.
• You may skip off-hook and press the Single Exchange Line (S-CO) key directly.PT
Making Outside Calls Using Individual Line AccessAllows you to select the desired exchange line without dialling the line access code.
PT
Press the line key assigned as a Single Exchange Line key.
Enter the phone number.
phone no.
Lift the handset or press SP-PHONE/MONITOR.
Hang up or press SP-PHONE.
Dial tone Talk.
CO
• The line key turns green.• The display shows the phone number.
!!
• If the line access number is assigned to “0” by System Programming, the operator callnumber will be changed to “9”.!!
PSQX1709ZA-03.QX 99.10.15 9:56 AM Page 18
Operations 1-19
1.3 Making CallsB
asic Op
eration
s
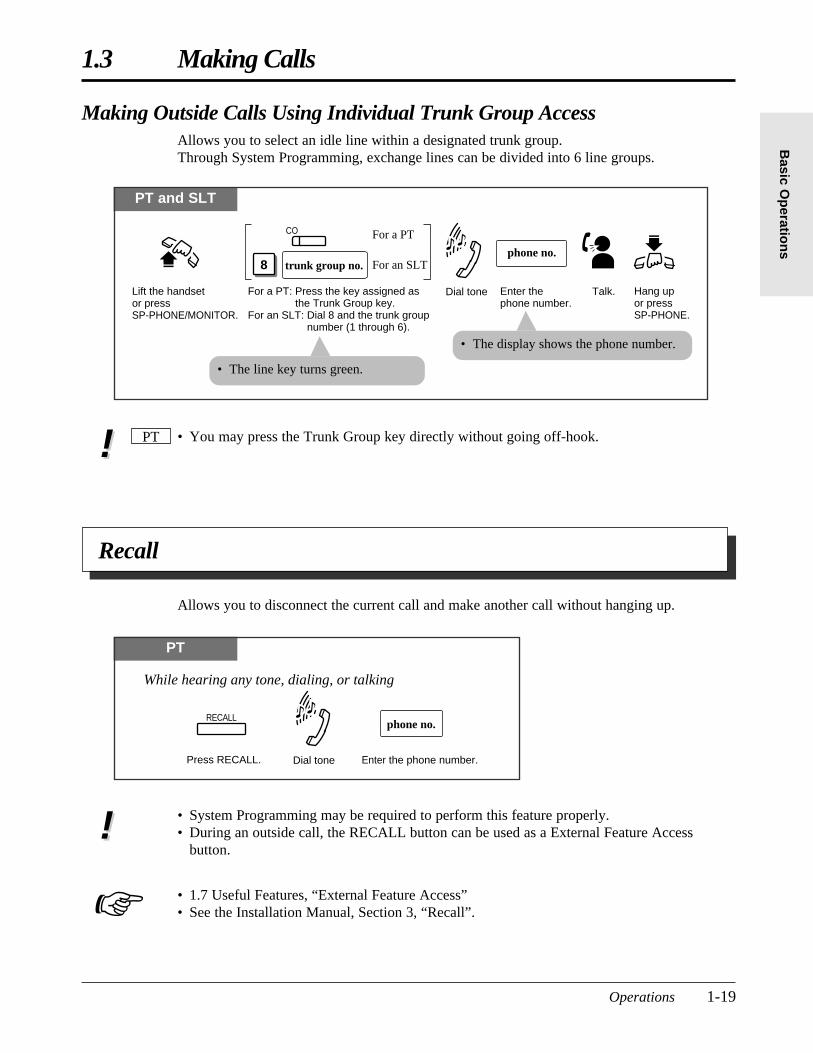
PT and SLT
For a PT: Press the key assigned as the Trunk Group key.For an SLT: Dial 8 and the trunk group
number (1 through 6).
Enter the phone number.
phone no.
Lift the handset or press SP-PHONE/MONITOR.
Hang up or press SP-PHONE.
Dial tone Talk.
For an SLT
For a PT
8 trunk group no.
CO
• The line key turns green.
• The display shows the phone number.
• You may press the Trunk Group key directly without going off-hook.PT
Making Outside Calls Using Individual Trunk Group AccessAllows you to select an idle line within a designated trunk group.Through System Programming, exchange lines can be divided into 6 line groups.
!!
• System Programming may be required to perform this feature properly.• During an outside call, the RECALL button can be used as a External Feature Access
button.
• 1.7 Useful Features, “External Feature Access”• See the Installation Manual, Section 3, “Recall”.
Allows you to disconnect the current call and make another call without hanging up.
PT
Press RECALL. Enter the phone number.
RECALLphone no.
While hearing any tone, dialing, or talking
Dial tone
Recall
!!
☞
PSQX1709ZA-03.QX 99.10.15 9:56 AM Page 19
1-20 Operations
1.3 Making Calls
• Helpful hints for the Handsfree operation:— Use this unit in a quiet room for best performance.— If you and the other party talk at the same time, parts of your conversation will be lost.
To avoid this, talk alternately.• The handsfree mode is cancelled if you do not start dialling within 10 seconds.• The KX-T7050 has MONITOR button instead of a SP-PHONE button. It can be used for
handsfree dialling, etc., but it cannot be used for a handsfree conversation.• You can enable the handsfree mode by pressing a line key or INTERCOM button.
• See the Installation Manual, Section 3, “Handsfree Operation”.
PT
PTPT
PT
PT
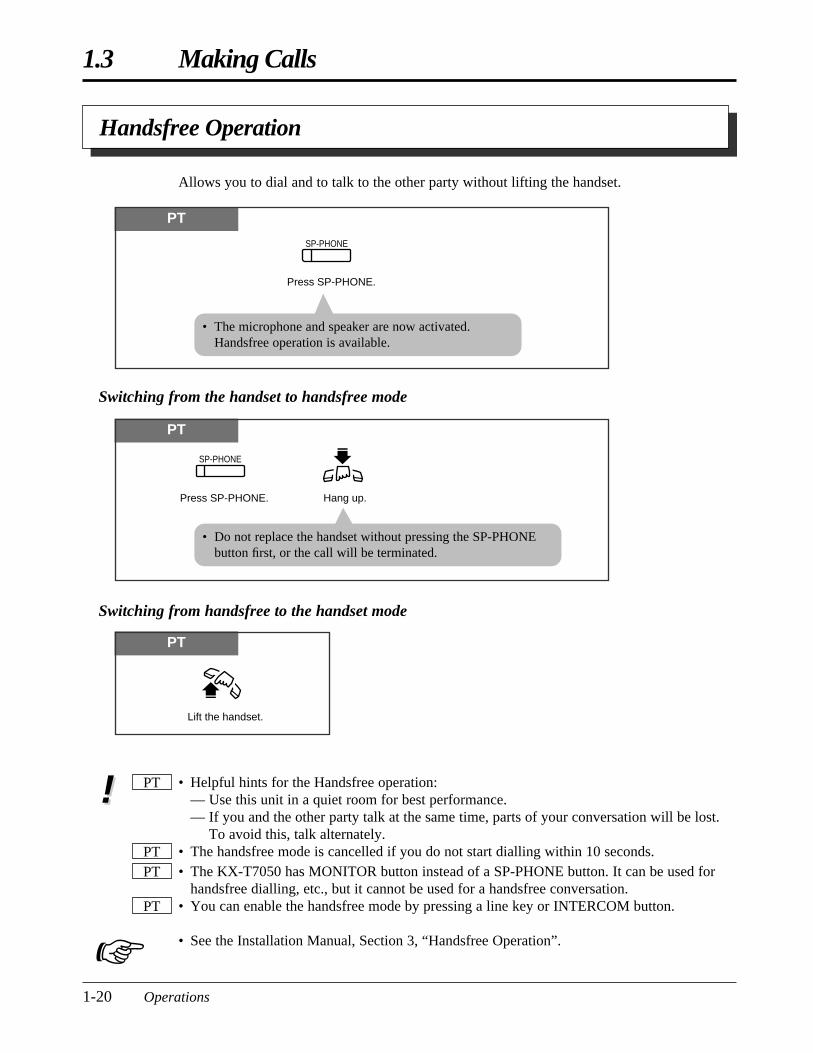
Lift the handset.
Switching from handsfree to the handset mode
!!
Allows you to dial and to talk to the other party without lifting the handset.
Handsfree Operation
PT
Press SP-PHONE.
SP-PHONE
• The microphone and speaker are now activated.Handsfree operation is available.
PT
Press SP-PHONE.
SP-PHONE
Hang up.
• Do not replace the handset without pressing the SP-PHONEbutton first, or the call will be terminated.
Switching from the handset to handsfree mode
☞
PSQX1709ZA-03.QX 99.10.15 9:56 AM Page 20
Operations 1-21
1.3 Making CallsB
asic Op
eration
s
• An emergency call is allowed even in the following cases,— Account Code – Verify–All mode— Any call barring COS number— Electronic Extension Lockout
• If your system is connected to a host PBX, you must dial the host PBX line access codeafter the line access code.
• See the Installation Manual, Section 3, “Emergency Call”.
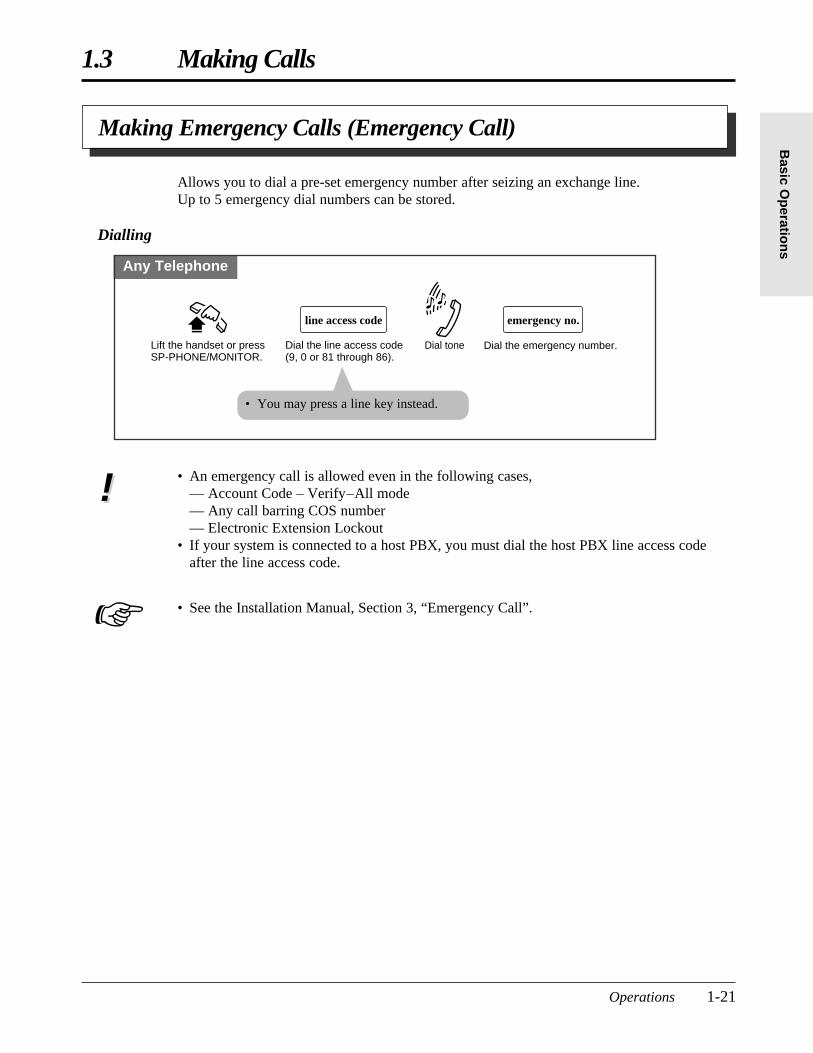
Allows you to dial a pre-set emergency number after seizing an exchange line.Up to 5 emergency dial numbers can be stored.
Dialling
Any Telephone
Lift the handset or press SP-PHONE/MONITOR.
Dial the line access code (9, 0 or 81 through 86).
line access code emergency no.
Dial the emergency number.Dial tone
• You may press a line key instead.
Making Emergency Calls (Emergency Call)
!!
☞
PSQX1709ZA-03.QX 99.10.15 9:56 AM Page 21
1-22 Operations
1.3 Making Calls
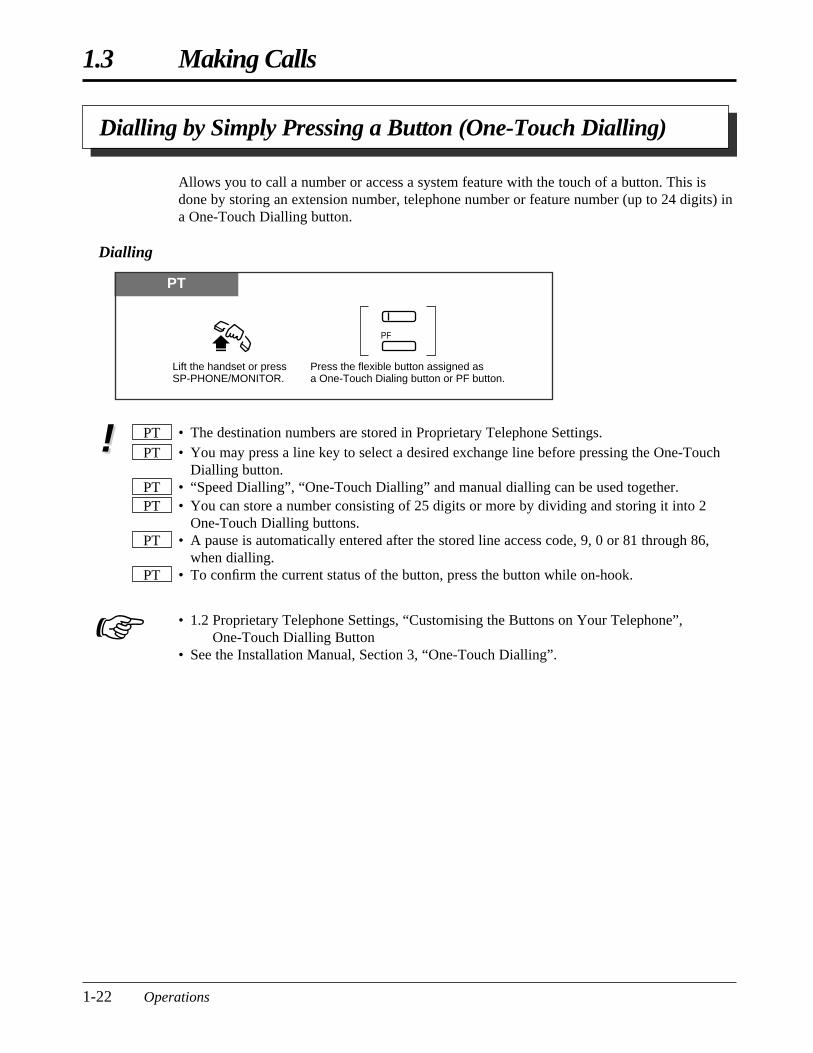
• The destination numbers are stored in Proprietary Telephone Settings.• You may press a line key to select a desired exchange line before pressing the One-Touch
Dialling button.• “Speed Dialling”, “One-Touch Dialling” and manual dialling can be used together.• You can store a number consisting of 25 digits or more by dividing and storing it into 2
One-Touch Dialling buttons.• A pause is automatically entered after the stored line access code, 9, 0 or 81 through 86,
when dialling.• To confirm the current status of the button, press the button while on-hook.
• 1.2 Proprietary Telephone Settings, “Customising the Buttons on Your Telephone”, One-Touch Dialling Button
• See the Installation Manual, Section 3, “One-Touch Dialling”.
PT
PT
PTPT
PTPT!!
Dialling by Simply Pressing a Button (One-Touch Dialling)
Allows you to call a number or access a system feature with the touch of a button. This isdone by storing an extension number, telephone number or feature number (up to 24 digits) ina One-Touch Dialling button.
Dialling
PT
Lift the handset or press SP-PHONE/MONITOR.
Press the flexible button assigned as a One-Touch Dialing button or PF button.
PF
☞
PSQX1709ZA-03.QX 99.10.15 9:56 AM Page 22

Operations 1-23
1.3 Making CallsB
asic Op
eration
s
Dialling Using System Speed Dialling (System Speed Dialling)
Allows you to make a call using pre-programmed speed dial numbers. This system supports100 speed dial numbers which are available to all extension users.
PT and SLT
Lift the handset or press SP-PHONE/MONITOR.
system speed dial no.
Enter a system speed dial number (00 through 99).
AUTO DIAL
STORE
For an SLT
For a PT
For a PT: Press AUTO DIAL/STORE.For an SLT: Dial .
• You will not hear a tone.• The AUTO DIAL/STORE indicator lights.
• The AUTO DIAL/STORE indicatorlight turns off.
• System Speed Dial numbers must be stored by System Programming.• “Speed Dialling”, “One-Touch Dialling” and manual dialling can be used together.• You may press a line key or dial a line access code to select a desired exchange line before
pressing the AUTO DIAL/STORE button or dialling .• It is possible to cancel call barring with this feature (Call Barring Override for System
Speed Dialling). In this case, System Programming is necessary.• A System Speed Dial number can be divided when stored.
<Example>If the number is divided and stored in System Speed Dial numbers 01 and 02,
Press: [AUTO DIAL/STORE] [0] [1] [AUTO DIAL/STORE] [0] [2].• The dialled number appears on the display.• A rotary telephone cannot use this feature.
• See the Installation Manual, Section 3, “Call Barring for System Speed Dialling”.• See the Installation Manual, Section 3, “System Speed Dialling”.
SLTPT
PT
!!
☞
PSQX1709ZA-03.QX 99.10.15 9:56 AM Page 23

1-24 Operations
1.3 Making Calls
• An account code must be stored by pressing “ ” and entering the account code after theline access code.
• You can store an extension number, telephone number, or feature number of up to 24 digits.Valid digits are “0 through 9”.
• A pause can be stored by pressing the key. However, in the account code verify-all,verify-toll (call barring) and forced modes, “ ” is not regarded as a pause.
• To store the telephone number of an external party, a line access code (9, 0 or 81 through86) must be stored as the first digit.
• The number of Personal Speed Dialling numbers corresponds to the number of PF buttonsassigned as One-Touch Dialling. (PF buttons are on a proprietary telephone.) You cannotassign both the One-Touch Dialling and Personal Speed Dialling features. For example, ifyou assign One-Touch Dialling to the PF 1 button and then Personal Speed Dialling 0, thePersonal Speed Dialling 0 feature will overwrite the One-Touch assignment.
• A rotary telephone cannot use this feature.
• 1.2 Proprietary Telephone Settings, “Customising the Button on Your Telephone”, One-Touch Dialling Button
• See the Installation Manual, Section 3, “Personal Speed Dialling”.
SLT
PT
!!
☞
Allows you to store up to 10 speed dial numbers at your extension. These numbers areavailable for your extension only.
Storing a phone number
Any Telephone
Confirmation tone
Lift the handset or press SP-PHONE/MONITOR.
2 #
Dial 2 . Enter the personal speed dial number (0 through 9).
personal speed dial no.
Enter the desired number.
desired no.
Dial #. Hang up or press SP-PHONE/MONITOR.
Any Telephone
Lift the handset or press SP-PHONE/MONITOR.
#
Dial #. Enter the personal speed dial number (0 through 9).
personal speed dial no.
• You may dial “1 ” instead of “#”.
Dialling
Dialling Using Personal Speed Dialling (Personal Speed Dialling)
PSQX1709ZA-03.QX 99.10.15 9:56 AM Page 24

Operations 1-25
1.3 Making CallsB
asic Op
eration
s
PT
Lift the handset or press SP-PHONE/MONITOR.
3 #
Dial 3 . Enter the personal speed dial number (0 through 9).
personal speed dial no.
Dial #.
Checking the stored personal speed dialling numbers
PSQX1709ZA-03.QX 99.10.15 9:56 AM Page 25
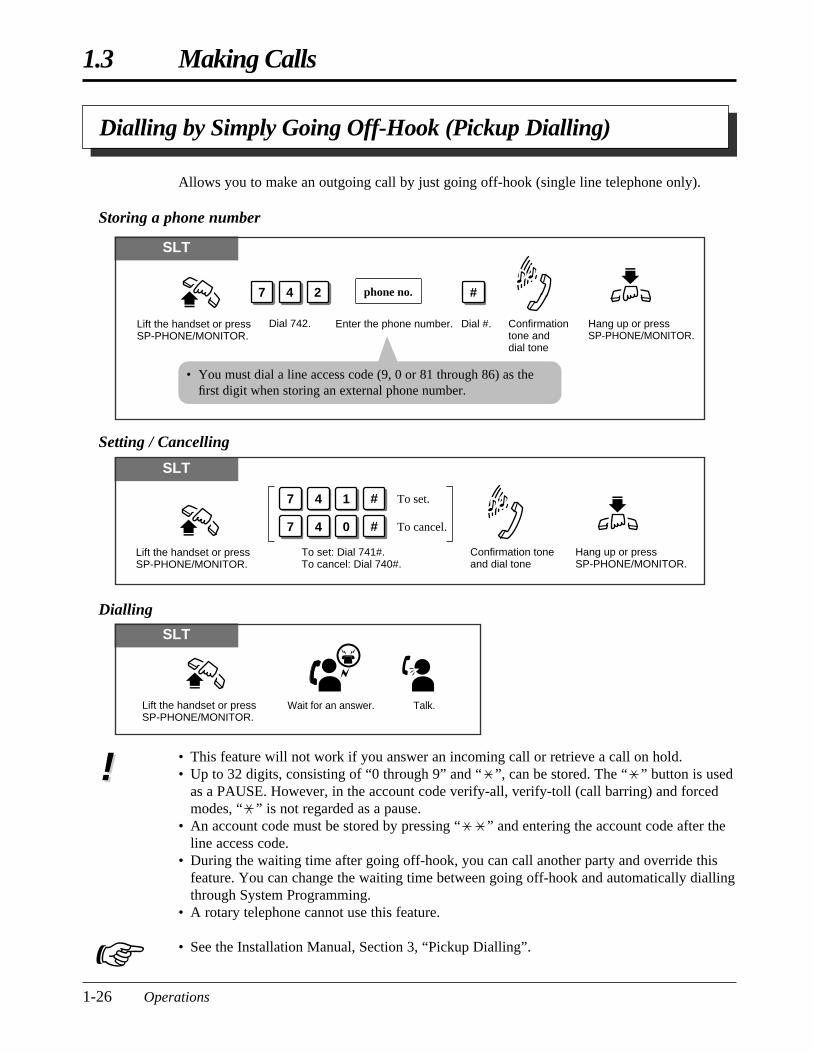
• This feature will not work if you answer an incoming call or retrieve a call on hold.• Up to 32 digits, consisting of “0 through 9” and “ ”, can be stored. The “ ” button is used
as a PAUSE. However, in the account code verify-all, verify-toll (call barring) and forcedmodes, “ ” is not regarded as a pause.
• An account code must be stored by pressing “ ” and entering the account code after theline access code.
• During the waiting time after going off-hook, you can call another party and override thisfeature. You can change the waiting time between going off-hook and automatically diallingthrough System Programming.
• A rotary telephone cannot use this feature.
• See the Installation Manual, Section 3, “Pickup Dialling”.
!!
1-26 Operations
1.3 Making Calls
Dialling by Simply Going Off-Hook (Pickup Dialling)
Allows you to make an outgoing call by just going off-hook (single line telephone only).
Storing a phone number
SLT
Confirmation tone and dial tone
Lift the handset or press SP-PHONE/MONITOR.
7 4 2 #
Dial 742. Enter the phone number.
phone no.
Dial #. Hang up or press SP-PHONE/MONITOR.
• You must dial a line access code (9, 0 or 81 through 86) as thefirst digit when storing an external phone number.
SLT
Confirmation tone and dial tone
Lift the handset or press SP-PHONE/MONITOR.
Hang up or press SP-PHONE/MONITOR.
To set: Dial 741#.To cancel: Dial 740#.
7 4 1 To set.
7 4 0
#
# To cancel.
Setting / Cancelling
SLT
Lift the handset or press SP-PHONE/MONITOR.
Wait for an answer. Talk.
Dialling
☞
PSQX1709ZA-03.QX 99.10.15 9:56 AM Page 26
Operations 1-27
1.3 Making CallsB
asic Op
eration
s
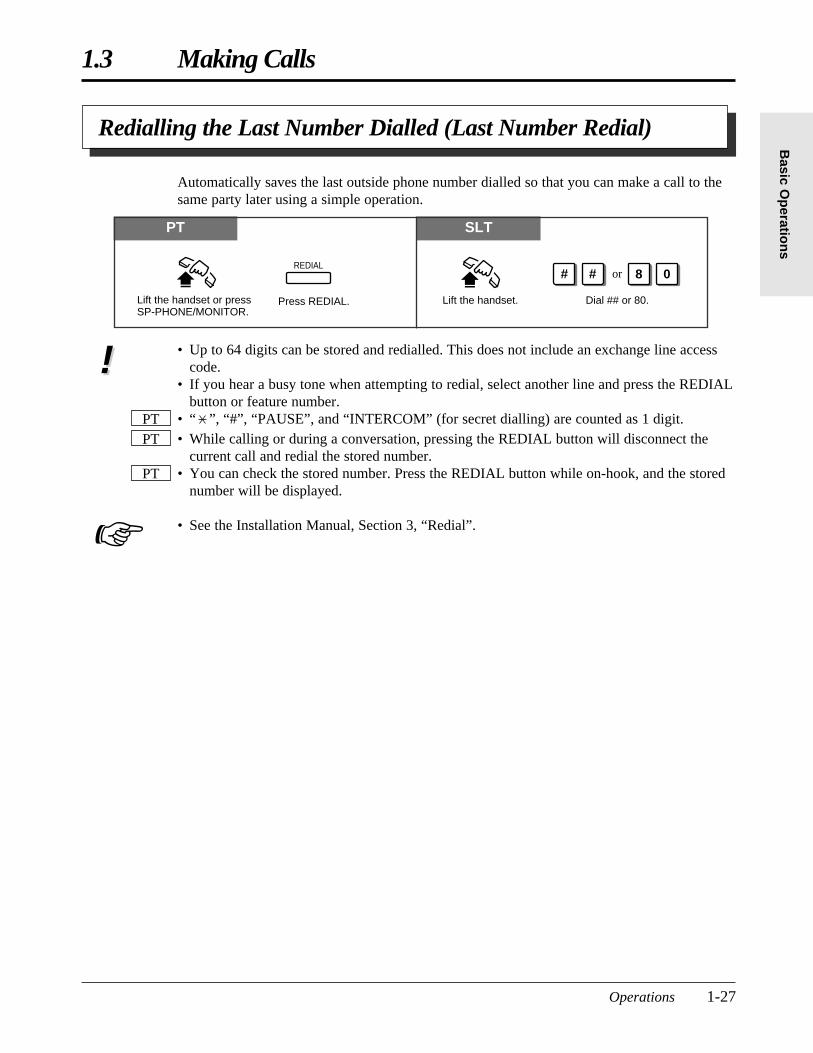
Automatically saves the last outside phone number dialled so that you can make a call to thesame party later using a simple operation.
PT SLT
Lift the handset. Dial ## or 80.
8 0or
Press REDIAL.
REDIAL
Lift the handset or press SP-PHONE/MONITOR.
##
Redialling the Last Number Dialled (Last Number Redial)
• Up to 64 digits can be stored and redialled. This does not include an exchange line accesscode.
• If you hear a busy tone when attempting to redial, select another line and press the REDIALbutton or feature number.
• “ ”, “#”, “PAUSE”, and “INTERCOM” (for secret dialling) are counted as 1 digit.• While calling or during a conversation, pressing the REDIAL button will disconnect the
current call and redial the stored number.• You can check the stored number. Press the REDIAL button while on-hook, and the stored
number will be displayed.
• See the Installation Manual, Section 3, “Redial”.
PT
PTPT
!!
☞
PSQX1709ZA-03.QX 99.10.15 9:56 AM Page 27
1-28 Operations
1.3 Making Calls
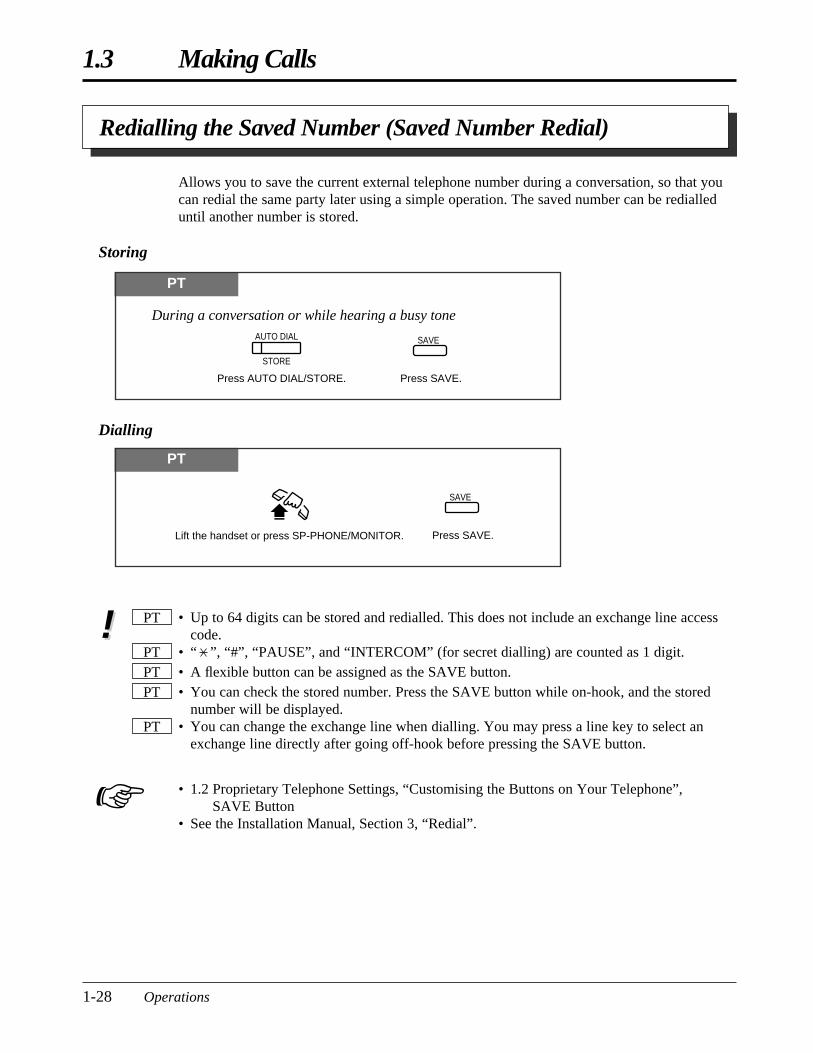
Redialling the Saved Number (Saved Number Redial)
Allows you to save the current external telephone number during a conversation, so that youcan redial the same party later using a simple operation. The saved number can be redialleduntil another number is stored.
Storing
PT
Press SAVE.Press AUTO DIAL/STORE.
During a conversation or while hearing a busy toneAUTO DIAL
STORE
SAVE
• Up to 64 digits can be stored and redialled. This does not include an exchange line accesscode.
• “ ”, “#”, “PAUSE”, and “INTERCOM” (for secret dialling) are counted as 1 digit.• A flexible button can be assigned as the SAVE button.• You can check the stored number. Press the SAVE button while on-hook, and the stored
number will be displayed.• You can change the exchange line when dialling. You may press a line key to select an
exchange line directly after going off-hook before pressing the SAVE button.
• 1.2 Proprietary Telephone Settings, “Customising the Buttons on Your Telephone”, SAVE Button
• See the Installation Manual, Section 3, “Redial”.
PT
PTPTPT
PT!!
☞
PT
Lift the handset or press SP-PHONE/MONITOR. Press SAVE.
SAVE
Dialling
PSQX1709ZA-03.QX 99.10.15 9:56 AM Page 28
Operations 1-29
1.3 Making CallsB
asic Op
eration
s
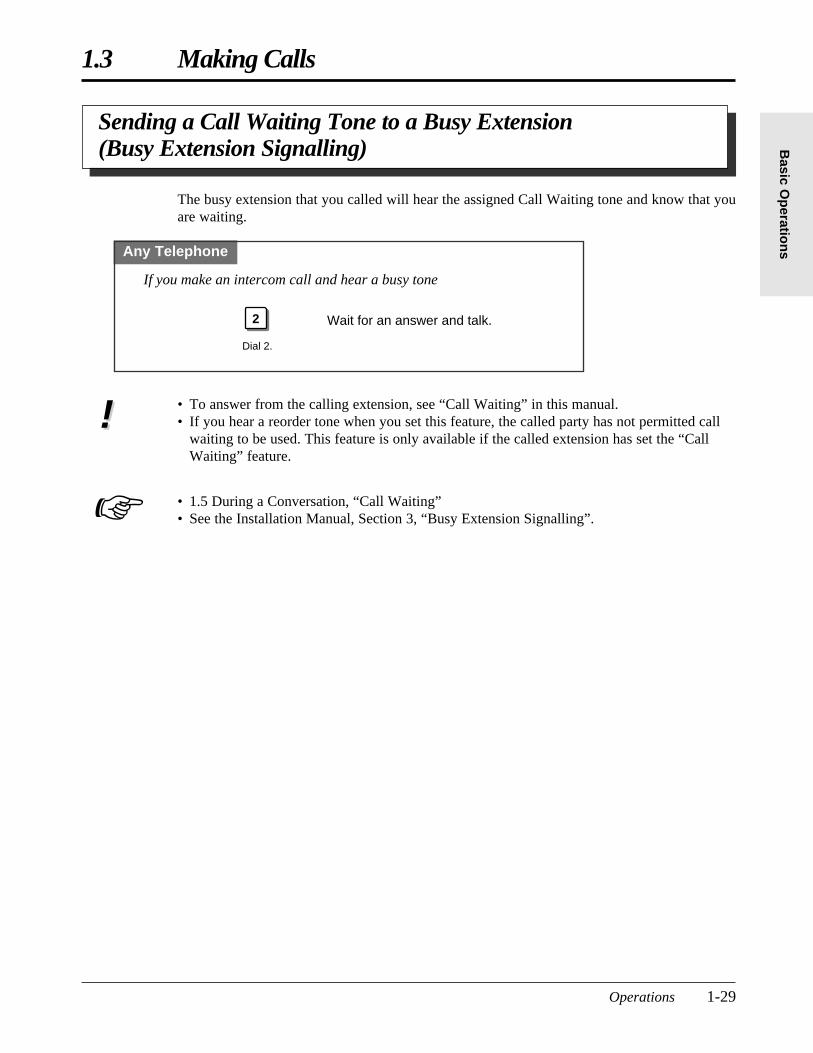
Sending a Call Waiting Tone to a Busy Extension (Busy Extension Signalling)
The busy extension that you called will hear the assigned Call Waiting tone and know that youare waiting.
Any Telephone
Dial 2.
2
If you make an intercom call and hear a busy tone
Wait for an answer and talk.
• To answer from the calling extension, see “Call Waiting” in this manual.• If you hear a reorder tone when you set this feature, the called party has not permitted call
waiting to be used. This feature is only available if the called extension has set the “CallWaiting” feature.
• 1.5 During a Conversation, “Call Waiting”• See the Installation Manual, Section 3, “Busy Extension Signalling”.
!!
☞
PSQX1709ZA-03.QX 99.10.15 9:56 AM Page 29
1-30 Operations
1.3 Making Calls
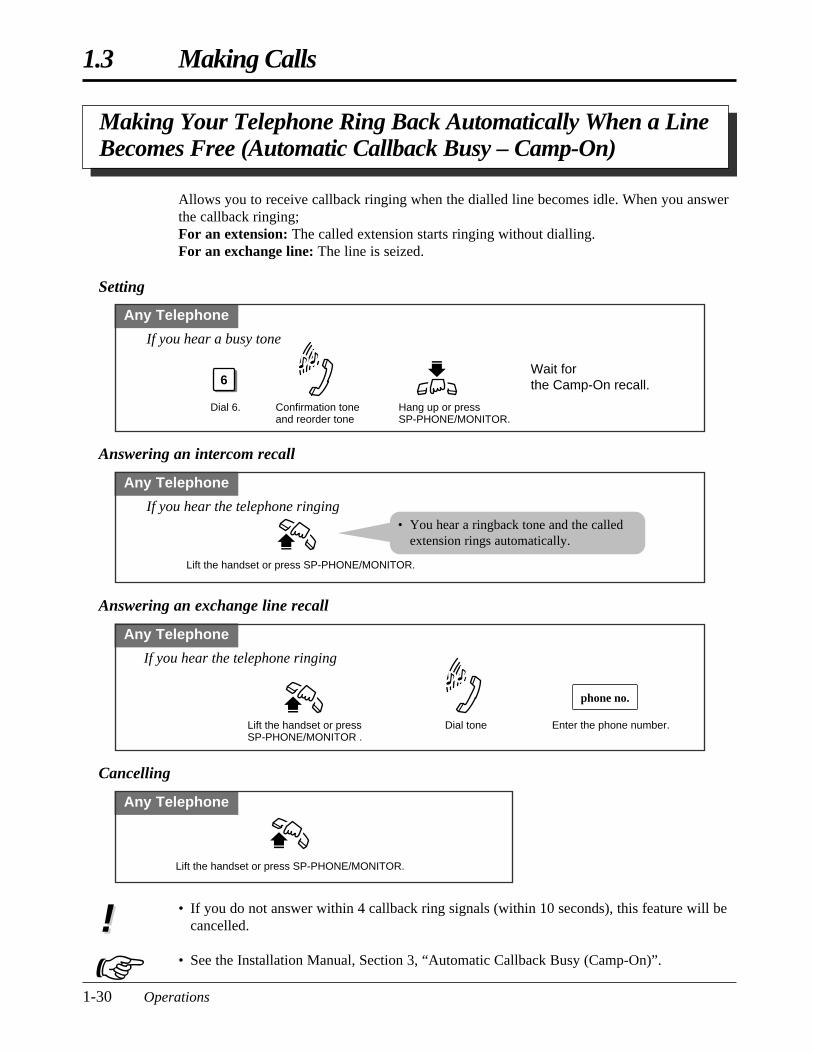
Cancelling
Any Telephone
Lift the handset or press SP-PHONE/MONITOR.
• If you do not answer within 4 callback ring signals (within 10 seconds), this feature will becancelled.
• See the Installation Manual, Section 3, “Automatic Callback Busy (Camp-On)”.
!!
Making Your Telephone Ring Back Automatically When a LineBecomes Free (Automatic Callback Busy – Camp-On)
Allows you to receive callback ringing when the dialled line becomes idle. When you answerthe callback ringing;For an extension: The called extension starts ringing without dialling.For an exchange line: The line is seized.
Setting
Answering an intercom recall
Any Telephone
Dial 6. Hang up or press SP-PHONE/MONITOR.
6
Confirmation tone and reorder tone
If you hear a busy tone
Wait for the Camp-On recall.
Any Telephone
If you hear the telephone ringing
Lift the handset or press SP-PHONE/MONITOR.
• You hear a ringback tone and the calledextension rings automatically.
Answering an exchange line recall
Any Telephone
Enter the phone number.Dial tone
If you hear the telephone ringing
Lift the handset or press SP-PHONE/MONITOR .
phone no.
☞
PSQX1709ZA-03.QX 99.10.15 9:56 AM Page 30
Operations 1-31
1.3 Making CallsB
asic Op
eration
s
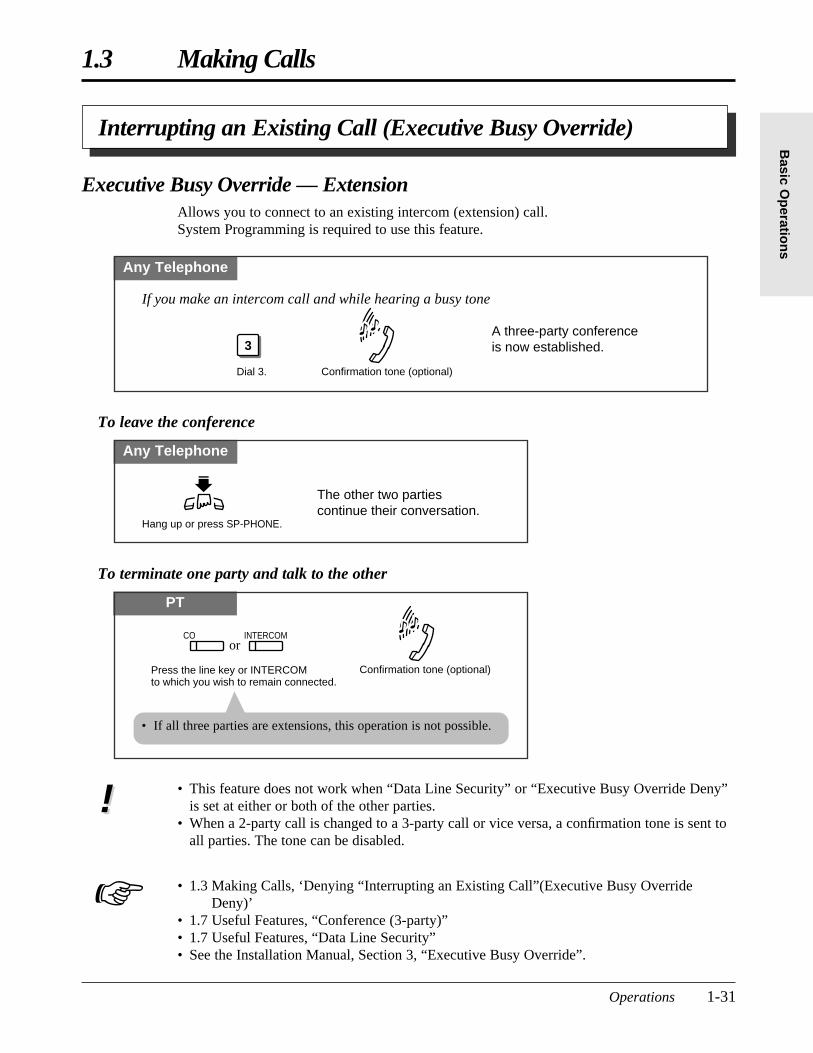
To terminate one party and talk to the other
PT
Confirmation tone (optional)Press the line key or INTERCOM to which you wish to remain connected.
COor
INTERCOM
Interrupting an Existing Call (Executive Busy Override)
Executive Busy Override — ExtensionAllows you to connect to an existing intercom (extension) call.System Programming is required to use this feature.
Any Telephone
Dial 3.
3
Confirmation tone (optional)
If you make an intercom call and while hearing a busy tone
A three-party conference is now established.
To leave the conference
Any Telephone
The other two parties continue their conversation.
Hang up or press SP-PHONE.
• This feature does not work when “Data Line Security” or “Executive Busy Override Deny”is set at either or both of the other parties.
• When a 2-party call is changed to a 3-party call or vice versa, a confirmation tone is sent toall parties. The tone can be disabled.
• 1.3 Making Calls, ‘Denying “Interrupting an Existing Call”(Executive Busy OverrideDeny)’
• 1.7 Useful Features, “Conference (3-party)”• 1.7 Useful Features, “Data Line Security”• See the Installation Manual, Section 3, “Executive Busy Override”.
!!
☞
• If all three parties are extensions, this operation is not possible.
PSQX1709ZA-03.QX 99.10.15 9:56 AM Page 31
1-32 Operations
1.3 Making Calls
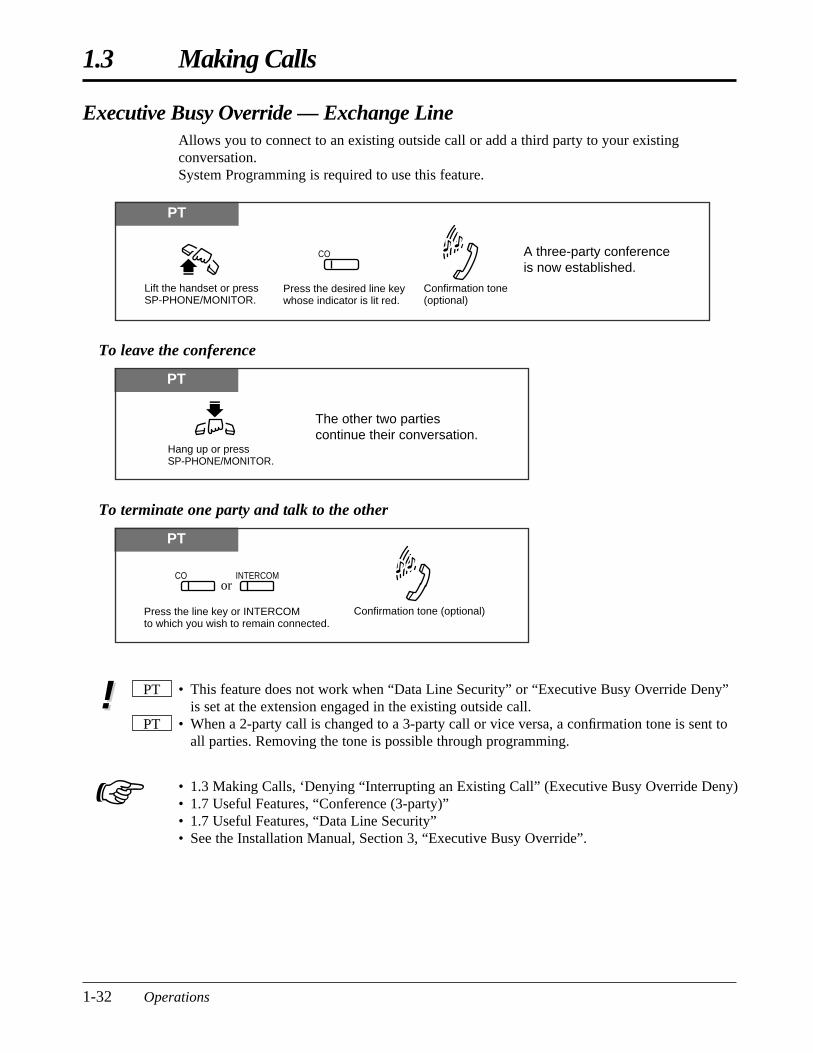
• This feature does not work when “Data Line Security” or “Executive Busy Override Deny”is set at the extension engaged in the existing outside call.
• When a 2-party call is changed to a 3-party call or vice versa, a confirmation tone is sent toall parties. Removing the tone is possible through programming.
• 1.3 Making Calls, ‘Denying “Interrupting an Existing Call” (Executive Busy Override Deny)• 1.7 Useful Features, “Conference (3-party)”• 1.7 Useful Features, “Data Line Security”• See the Installation Manual, Section 3, “Executive Busy Override”.
PT
PT
☞
!!
Executive Busy Override — Exchange LineAllows you to connect to an existing outside call or add a third party to your existingconversation.System Programming is required to use this feature.
PT
Confirmation tone (optional)
Press the desired line key whose indicator is lit red.
CO
Lift the handset or press SP-PHONE/MONITOR.
A three-party conference is now established.
PT
Hang up or press SP-PHONE/MONITOR.
The other two parties continue their conversation.
To leave the conference
PT
Confirmation tone (optional)Press the line key or INTERCOM to which you wish to remain connected.
COor
INTERCOM
To terminate one party and talk to the other
PSQX1709ZA-03.QX 99.10.15 9:56 AM Page 32
Operations 1-33
1.3 Making CallsB
asic Op
eration
s
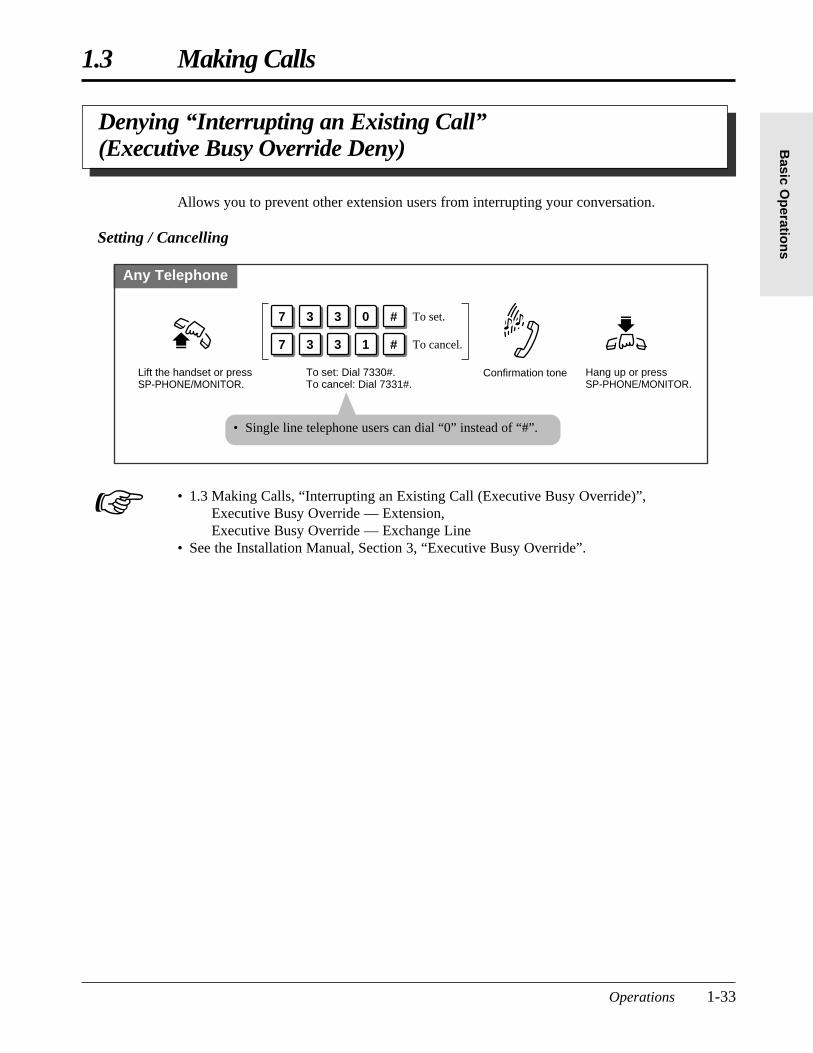
Denying “Interrupting an Existing Call” (Executive Busy Override Deny)
• 1.3 Making Calls, “Interrupting an Existing Call (Executive Busy Override)”, Executive Busy Override — Extension,Executive Busy Override — Exchange Line
• See the Installation Manual, Section 3, “Executive Busy Override”.
Allows you to prevent other extension users from interrupting your conversation.
Setting / Cancelling
Any Telephone
To set: Dial 7330#.To cancel: Dial 7331#.
7 3 3 # To set.
7 3 3
0
1 # To cancel.
Lift the handset or press SP-PHONE/MONITOR.
Hang up or press SP-PHONE/MONITOR.
Confirmation tone
☞
• Single line telephone users can dial “0” instead of “#”.
PSQX1709ZA-03.QX 99.10.15 9:56 AM Page 33
1.4 Receiving Calls
1-34 Operations
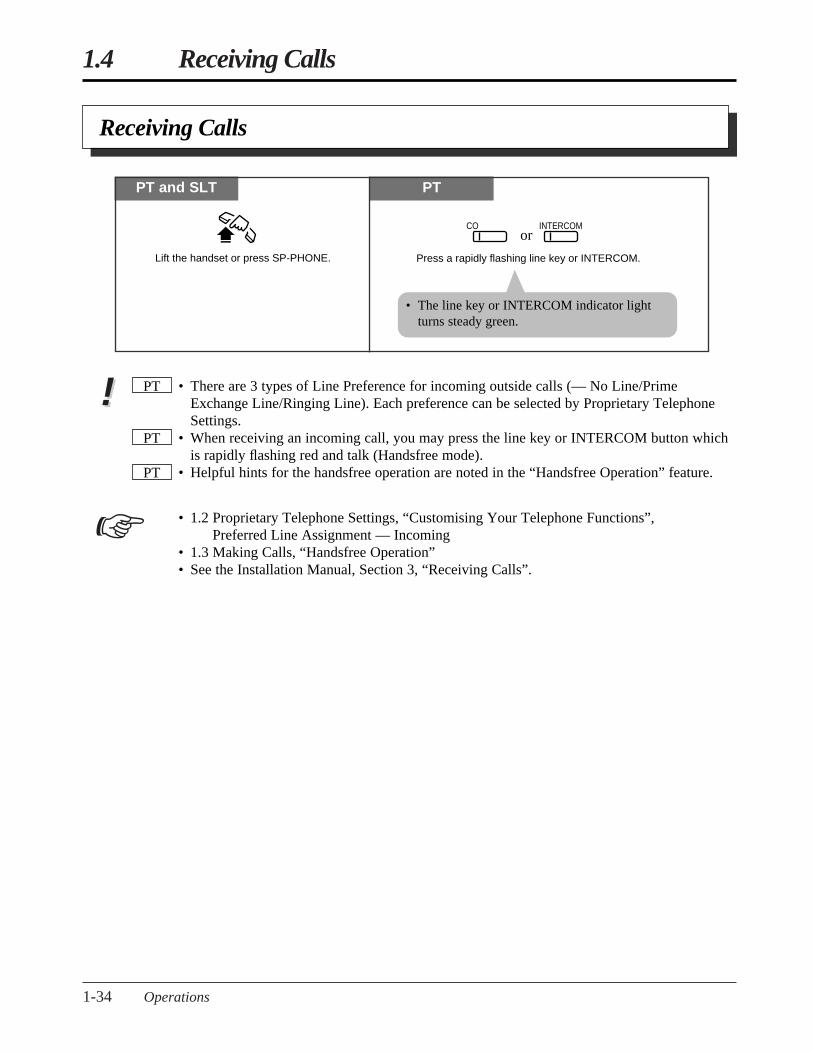
Receiving Calls
• The line key or INTERCOM indicator lightturns steady green.
• There are 3 types of Line Preference for incoming outside calls (— No Line/PrimeExchange Line/Ringing Line). Each preference can be selected by Proprietary TelephoneSettings.
• When receiving an incoming call, you may press the line key or INTERCOM button whichis rapidly flashing red and talk (Handsfree mode).
• Helpful hints for the handsfree operation are noted in the “Handsfree Operation” feature.
• 1.2 Proprietary Telephone Settings, “Customising Your Telephone Functions”, Preferred Line Assignment — Incoming
• 1.3 Making Calls, “Handsfree Operation”• See the Installation Manual, Section 3, “Receiving Calls”.
PT
PT
PT
PT and SLT PT
Lift the handset or press SP-PHONE. Press a rapidly flashing line key or INTERCOM.
COor
INTERCOM
!!
☞
PSQX1709ZA-04.QX 99.10.15 9:57 AM Page 34
1.4 Receiving Calls
Operations 1-35
Basic O
peratio
ns
• This feature does not work for incoming outside calls or doorphone calls.• When an outside call is transferred to your extension, this feature is overridden and a ring
tone is heard.
• 1.2 Proprietary Telephone Settings, “Customising Your Telephone Functions”,Intercom Alert Assignment
• 1.7 Useful Features, “Room Monitor”• See the Installation Manual, Section 3, “Handsfree Answerback”.
PTPT
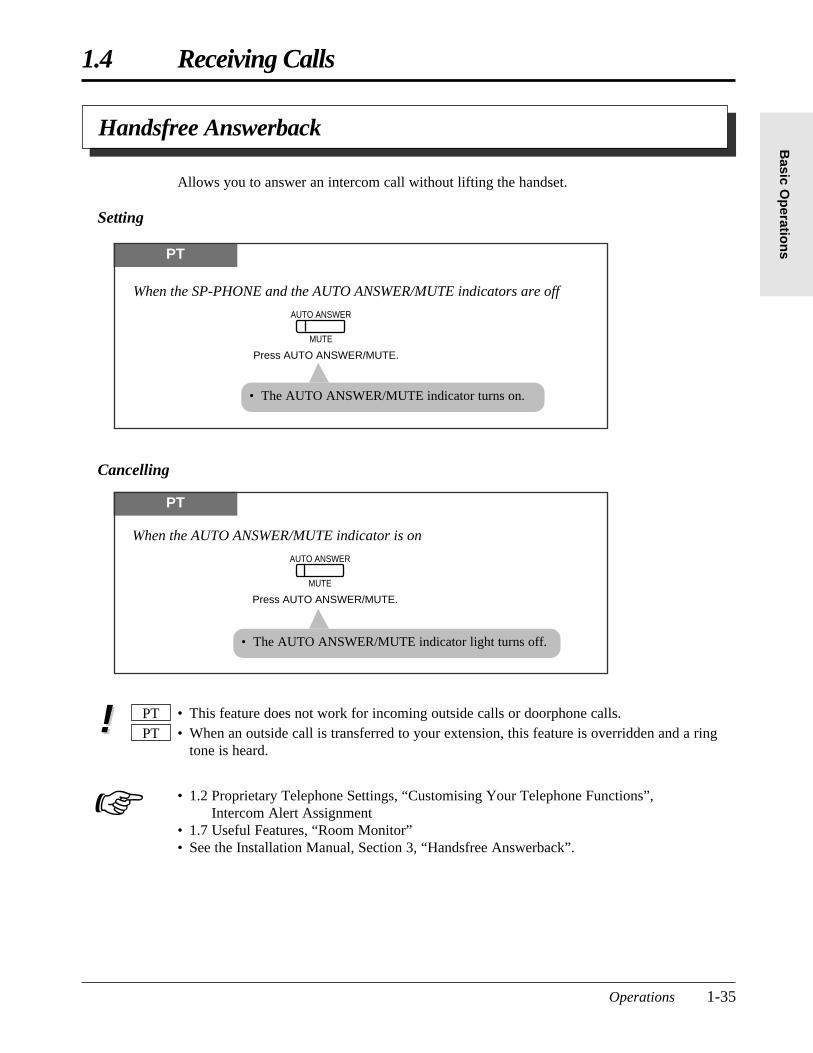
PT
Press AUTO ANSWER/MUTE.
When the AUTO ANSWER/MUTE indicator is on
AUTO ANSWER
MUTE
• The AUTO ANSWER/MUTE indicator light turns off.
Cancelling
!!
☞
Handsfree Answerback
Allows you to answer an intercom call without lifting the handset.
Setting
PT
Press AUTO ANSWER/MUTE.
When the SP-PHONE and the AUTO ANSWER/MUTE indicators are off
AUTO ANSWER
MUTE
• The AUTO ANSWER/MUTE indicator turns on.
PSQX1709ZA-04.QX 99.10.15 9:57 AM Page 35
1.4 Receiving Calls
1-36 Operations
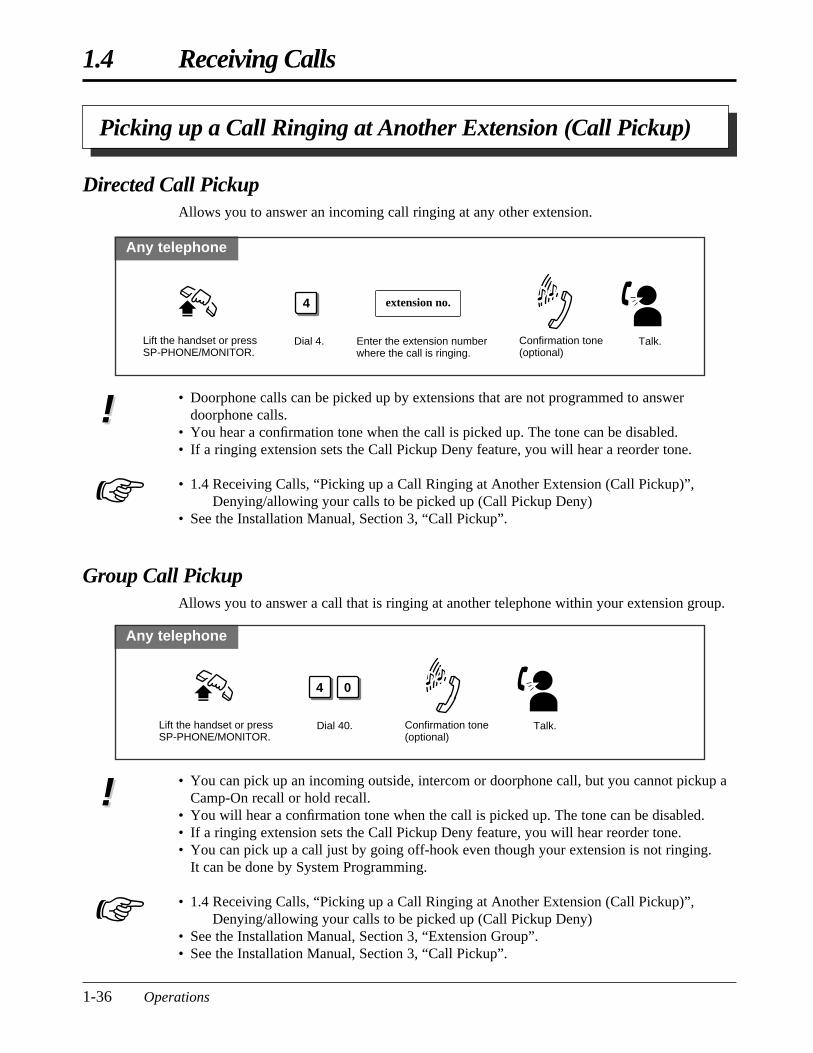
Picking up a Call Ringing at Another Extension (Call Pickup)
• Doorphone calls can be picked up by extensions that are not programmed to answerdoorphone calls.
• You hear a confirmation tone when the call is picked up. The tone can be disabled.• If a ringing extension sets the Call Pickup Deny feature, you will hear a reorder tone.
• 1.4 Receiving Calls, “Picking up a Call Ringing at Another Extension (Call Pickup)”,Denying/allowing your calls to be picked up (Call Pickup Deny)
• See the Installation Manual, Section 3, “Call Pickup”.
Directed Call PickupAllows you to answer an incoming call ringing at any other extension.
Any telephone
Enter the extension number where the call is ringing.
Dial 4.
extension no.4
Lift the handset or press SP-PHONE/MONITOR.
Confirmation tone (optional)
Talk.
!!
☞
Group Call PickupAllows you to answer a call that is ringing at another telephone within your extension group.
Any telephone
Dial 40.
4 0
Lift the handset or press SP-PHONE/MONITOR.
Confirmation tone (optional)
Talk.
• You can pick up an incoming outside, intercom or doorphone call, but you cannot pickup aCamp-On recall or hold recall.
• You will hear a confirmation tone when the call is picked up. The tone can be disabled.• If a ringing extension sets the Call Pickup Deny feature, you will hear reorder tone.• You can pick up a call just by going off-hook even though your extension is not ringing.
It can be done by System Programming.
• 1.4 Receiving Calls, “Picking up a Call Ringing at Another Extension (Call Pickup)”,Denying/allowing your calls to be picked up (Call Pickup Deny)
• See the Installation Manual, Section 3, “Extension Group”.• See the Installation Manual, Section 3, “Call Pickup”.
!!
☞
PSQX1709ZA-04.QX 99.10.15 9:57 AM Page 36
1.4 Receiving Calls
Operations 1-37
Basic O
peratio
ns
• 1.4 Receiving Calls, “Picking up a Call Ringing at Another Extension (Call Pickup)”, Directed Call Pickup
• 1.4 Receiving Calls, “Picking up a Call Ringing at Another Extension (Call Pickup)”, Group Call Pickup
• See the Installation Manual, Section 3, “Call Pickup”.
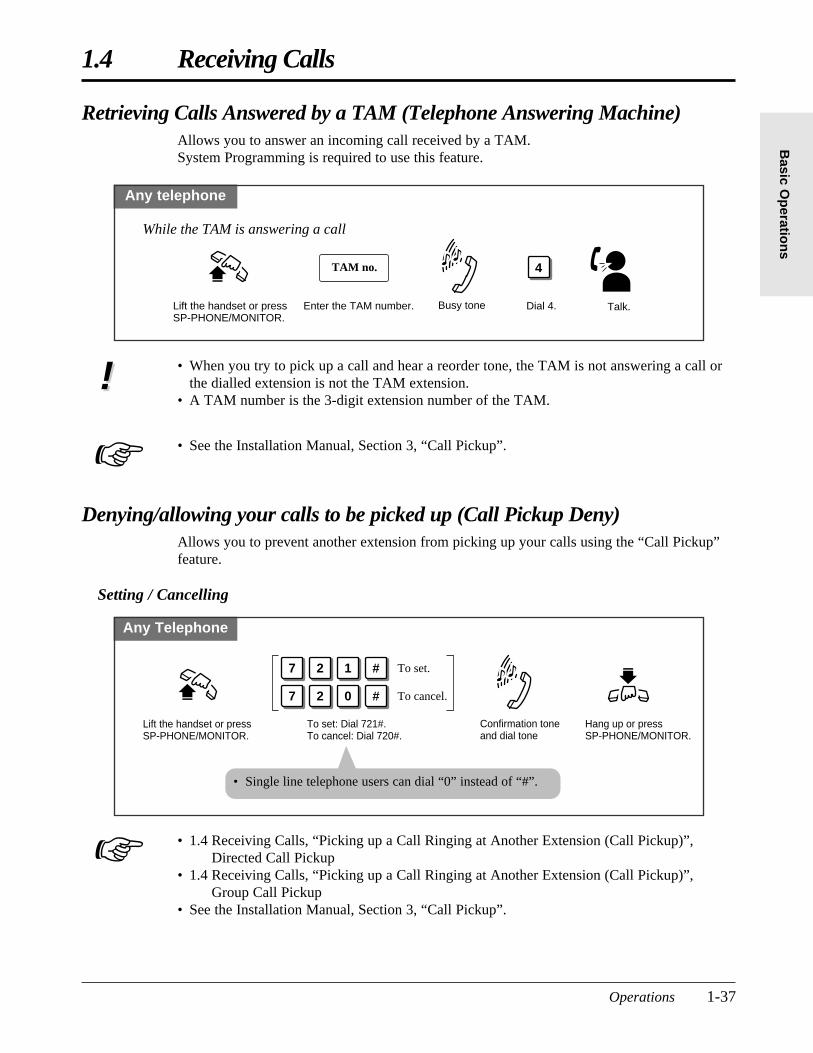
Denying/allowing your calls to be picked up (Call Pickup Deny)Allows you to prevent another extension from picking up your calls using the “Call Pickup”feature.
Setting / Cancelling
Any Telephone
To set: Dial 721#.To cancel: Dial 720#.
7 2 1 # To set.
7 2 0 # To cancel.
Lift the handset or press SP-PHONE/MONITOR.
Hang up or press SP-PHONE/MONITOR.
Confirmation tone and dial tone
☞
☞
Retrieving Calls Answered by a TAM (Telephone Answering Machine)Allows you to answer an incoming call received by a TAM.System Programming is required to use this feature.
Any telephone
Enter the TAM number. Dial 4.
TAM no. 4
Lift the handset or press SP-PHONE/MONITOR.
Busy tone Talk.
While the TAM is answering a call
• When you try to pick up a call and hear a reorder tone, the TAM is not answering a call orthe dialled extension is not the TAM extension.
• A TAM number is the 3-digit extension number of the TAM.
• See the Installation Manual, Section 3, “Call Pickup”.
!!
• Single line telephone users can dial “0” instead of “#”.
PSQX1709ZA-04.QX 99.10.15 9:57 AM Page 37
1.5 During a Conversation
1-38 Operations
Placing a Call on Hold (Call Hold)
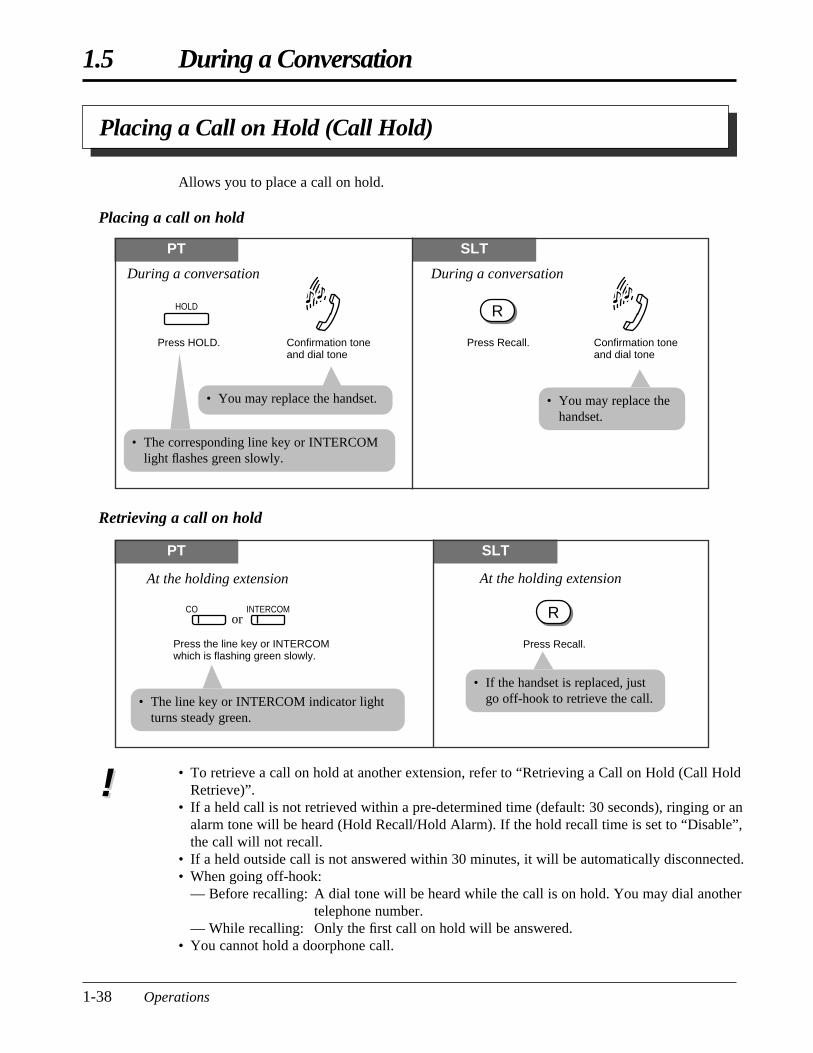
Allows you to place a call on hold.
Placing a call on hold
PT SLT
Press Recall. Confirmation tone and dial tone
During a conversation
Press HOLD. Confirmation tone and dial tone
HOLD
During a conversation
R
• The corresponding line key or INTERCOMlight flashes green slowly.
• You may replace thehandset.
• If the handset is replaced, justgo off-hook to retrieve the call.
• You may replace the handset.
PT SLT
Press the line key or INTERCOM which is flashing green slowly.
COor
INTERCOM
At the holding extensionAt the holding extension
Press Recall.
R
• The line key or INTERCOM indicator lightturns steady green.
Retrieving a call on hold
• To retrieve a call on hold at another extension, refer to “Retrieving a Call on Hold (Call HoldRetrieve)”.
• If a held call is not retrieved within a pre-determined time (default: 30 seconds), ringing or analarm tone will be heard (Hold Recall/Hold Alarm). If the hold recall time is set to “Disable”,the call will not recall.
• If a held outside call is not answered within 30 minutes, it will be automatically disconnected.• When going off-hook:
— Before recalling: A dial tone will be heard while the call is on hold. You may dial anothertelephone number.
— While recalling: Only the first call on hold will be answered.• You cannot hold a doorphone call.
!!
PSQX1709ZA-04.QX 99.10.15 9:57 AM Page 38
1.5 During a Conversation
Operations 1-39
Basic O
peratio
ns
• During a 5-party conference, you cannot use this feature.• With outside calls, you can put multiple calls on hold. However, with intercom calls, you
can put only one call on hold. One way around this is to use the Call Park feature. See twopages ahead.
• If a call is placed on hold for more than the programmed time, ringing or an alarm tone willbe heard (Hold Alarm/Hold Recall) and the LCD will flash the following display.Example:— When holding extension 211, Mr. Brown: “211: Brown” will flash.— When holding exchange line, CO 1: “Call on CO 1” will flash.
• If “Hold-2” or “Hold-3” is assigned by System Programming, you must dial “50” afterpressing the Recall button.
• Only an outside or intercom call can be placed on hold at any one time. If you want to holdboth calls, use the Call Park feature.
• 1.5 During a Conversation, “Retrieving a Call on Hold (Call Hold Retrieve)”• 1.5 During a Conversation, “Placing a Call in System Parking Area (Call Park)”• 1.7 Useful Features, “Conference (5-party)”• See the Installation Manual, Section 3, “Hold”.
SLT
SLT
PT
PTPT
☞
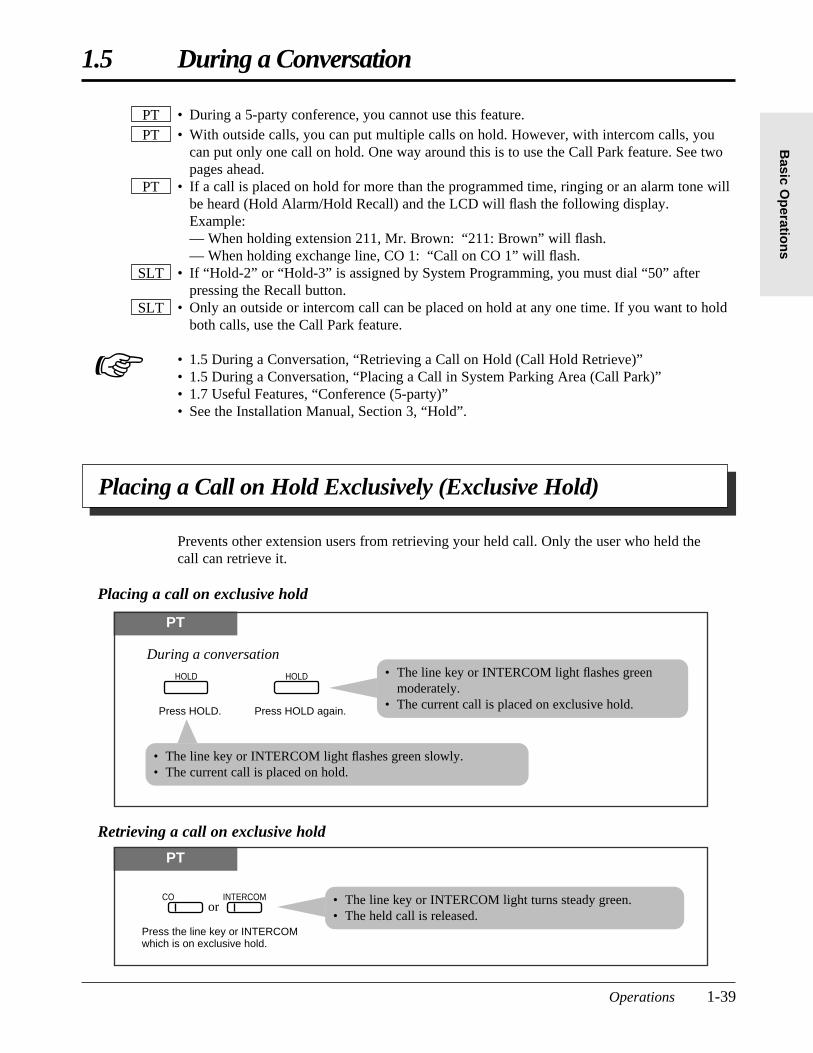
Prevents other extension users from retrieving your held call. Only the user who held thecall can retrieve it.
Placing a call on exclusive hold
PT
Press HOLD.
HOLD
Press HOLD again.
HOLD
During a conversation
• The line key or INTERCOM light flashes green slowly.• The current call is placed on hold.
• The line key or INTERCOM light flashes greenmoderately.
• The current call is placed on exclusive hold.
Placing a Call on Hold Exclusively (Exclusive Hold)
PT
Press the line key or INTERCOMwhich is on exclusive hold.
COor
INTERCOM
Retrieving a call on exclusive hold
• The line key or INTERCOM light turns steady green.• The held call is released.
PSQX1709ZA-04.QX 99.10.15 9:57 AM Page 39
1.5 During a Conversation
1-40 Operations
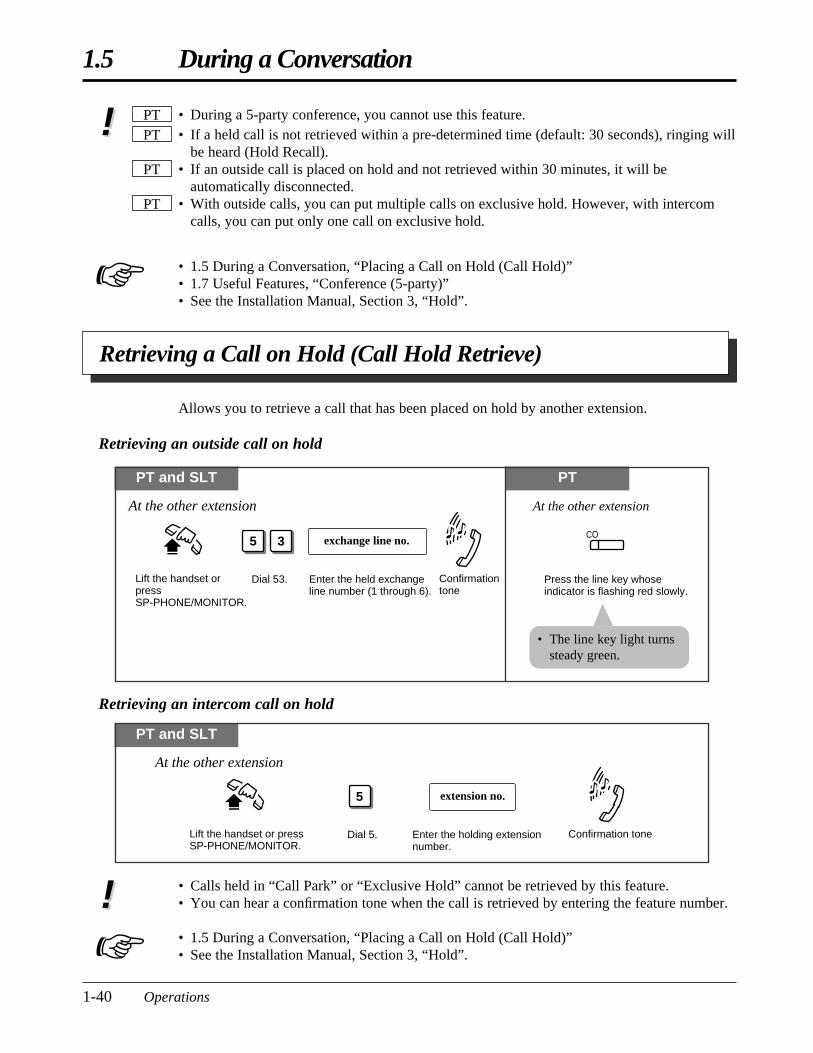
Retrieving a Call on Hold (Call Hold Retrieve)
• Calls held in “Call Park” or “Exclusive Hold” cannot be retrieved by this feature.• You can hear a confirmation tone when the call is retrieved by entering the feature number.
• 1.5 During a Conversation, “Placing a Call on Hold (Call Hold)”• See the Installation Manual, Section 3, “Hold”.
Allows you to retrieve a call that has been placed on hold by another extension.
Retrieving an outside call on hold
PT and SLT PT
Enter the held exchange line number (1 through 6).
CO
Dial 53.
exchange line no.5 3
Lift the handset or press SP-PHONE/MONITOR.
Press the line key whose indicator is flashing red slowly.
Confirmation tone
At the other extension At the other extension
• The line key light turnssteady green.
Retrieving an intercom call on hold
PT and SLT
Enter the holding extension number.
Dial 5.
extension no.5
Lift the handset or press SP-PHONE/MONITOR.
Confirmation tone
At the other extension
!!☞
• During a 5-party conference, you cannot use this feature.• If a held call is not retrieved within a pre-determined time (default: 30 seconds), ringing will
be heard (Hold Recall).• If an outside call is placed on hold and not retrieved within 30 minutes, it will be
automatically disconnected.• With outside calls, you can put multiple calls on exclusive hold. However, with intercom
calls, you can put only one call on exclusive hold.
• 1.5 During a Conversation, “Placing a Call on Hold (Call Hold)”• 1.7 Useful Features, “Conference (5-party)”• See the Installation Manual, Section 3, “Hold”.
PT
PT
PTPT!!
☞
PSQX1709ZA-04.QX 99.10.15 9:57 AM Page 40
1.5 During a Conversation
Operations 1-41
Basic O
peratio
ns
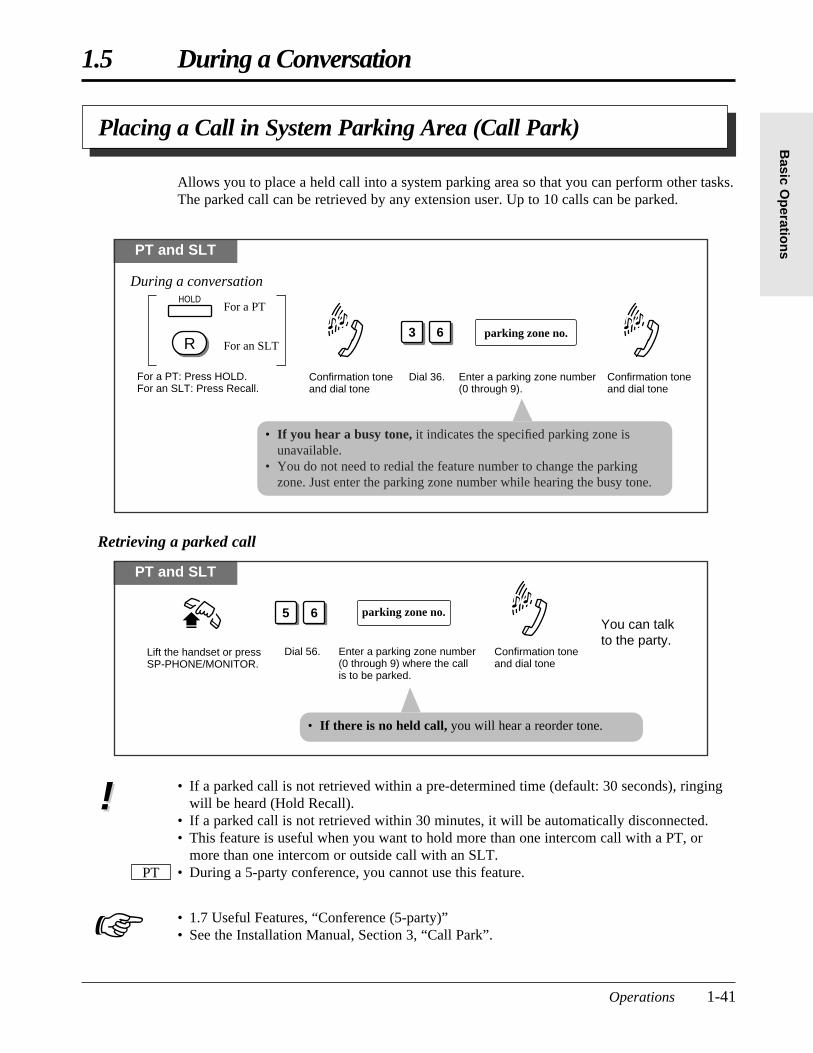
Placing a Call in System Parking Area (Call Park)
Allows you to place a held call into a system parking area so that you can perform other tasks.The parked call can be retrieved by any extension user. Up to 10 calls can be parked.
PT and SLT
For a PT: Press HOLD.For an SLT: Press Recall.
Dial 36.
63
Confirmation tone and dial tone
Confirmation tone and dial tone
Enter a parking zone number (0 through 9).
parking zone no.
During a conversationHOLD
For an SLT
For a PT
R
• If you hear a busy tone, it indicates the specified parking zone isunavailable.
• You do not need to redial the feature number to change the parkingzone. Just enter the parking zone number while hearing the busy tone.
PT and SLT
Confirmation tone and dial tone
Dial 56. Enter a parking zone number (0 through 9) where the call is to be parked.
5 6 parking zone no.
Lift the handset or press SP-PHONE/MONITOR.
You can talk to the party.
• If there is no held call, you will hear a reorder tone.
Retrieving a parked call
• If a parked call is not retrieved within a pre-determined time (default: 30 seconds), ringingwill be heard (Hold Recall).
• If a parked call is not retrieved within 30 minutes, it will be automatically disconnected.• This feature is useful when you want to hold more than one intercom call with a PT, or
more than one intercom or outside call with an SLT.• During a 5-party conference, you cannot use this feature.
• 1.7 Useful Features, “Conference (5-party)”• See the Installation Manual, Section 3, “Call Park”.
PT
!!
☞
PSQX1709ZA-04.QX 99.10.15 9:57 AM Page 41
1.5 During a Conversation
1-42 Operations
Transferring a Call to an Extension (Call Transfer – to Extension)
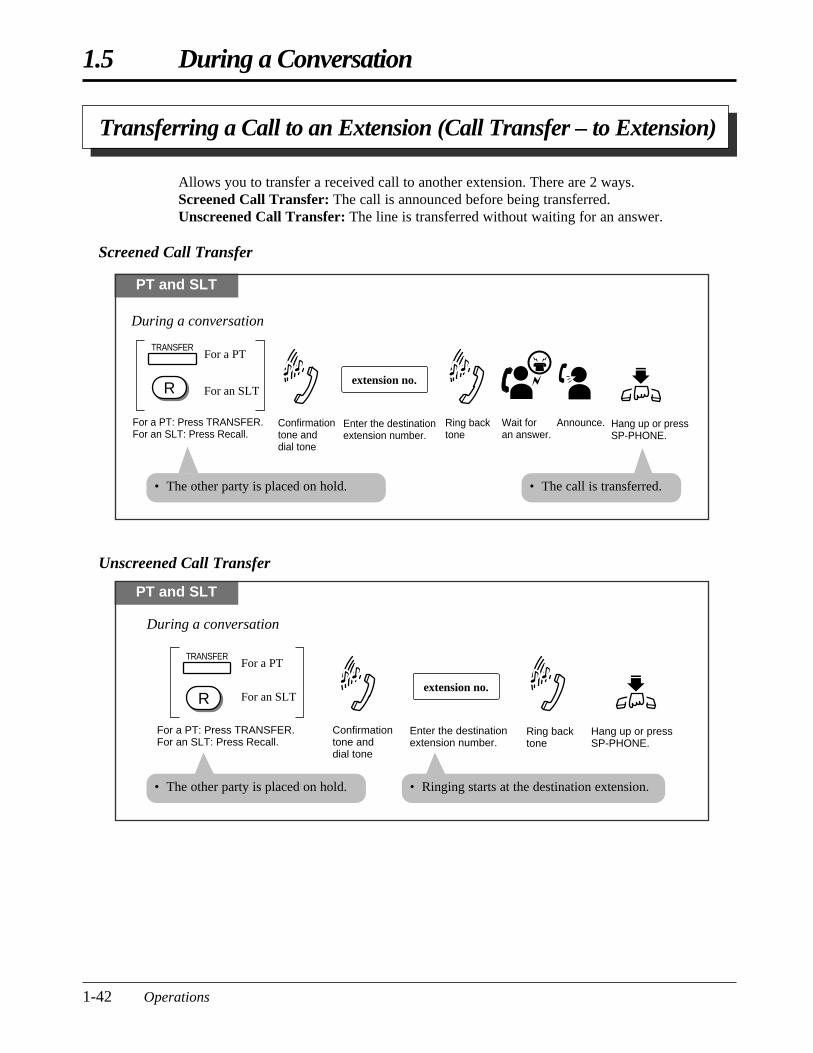
Allows you to transfer a received call to another extension. There are 2 ways.Screened Call Transfer: The call is announced before being transferred.Unscreened Call Transfer: The line is transferred without waiting for an answer.
Screened Call Transfer
PT and SLT
For a PT: Press TRANSFER.For an SLT: Press Recall.
Enter the destination extension number.
For an SLT
For a PTTRANSFER
extension no.
During a conversation
Hang up or press SP-PHONE.
Confirmation tone and dial tone
Announce.Wait for an answer.
Ring backtone
R
• The call is transferred.• The other party is placed on hold.
PT and SLT
For a PT: Press TRANSFER.For an SLT: Press Recall.
Enter the destination extension number.
For an SLT
For a PTTRANSFER
extension no.
During a conversation
Hang up or press SP-PHONE.
Confirmation tone and dial tone
Ring backtone
R
• Ringing starts at the destination extension.• The other party is placed on hold.
Unscreened Call Transfer
PSQX1709ZA-04.QX 99.10.15 9:57 AM Page 42
1.5 During a Conversation
Operations 1-43
Basic O
peratio
ns
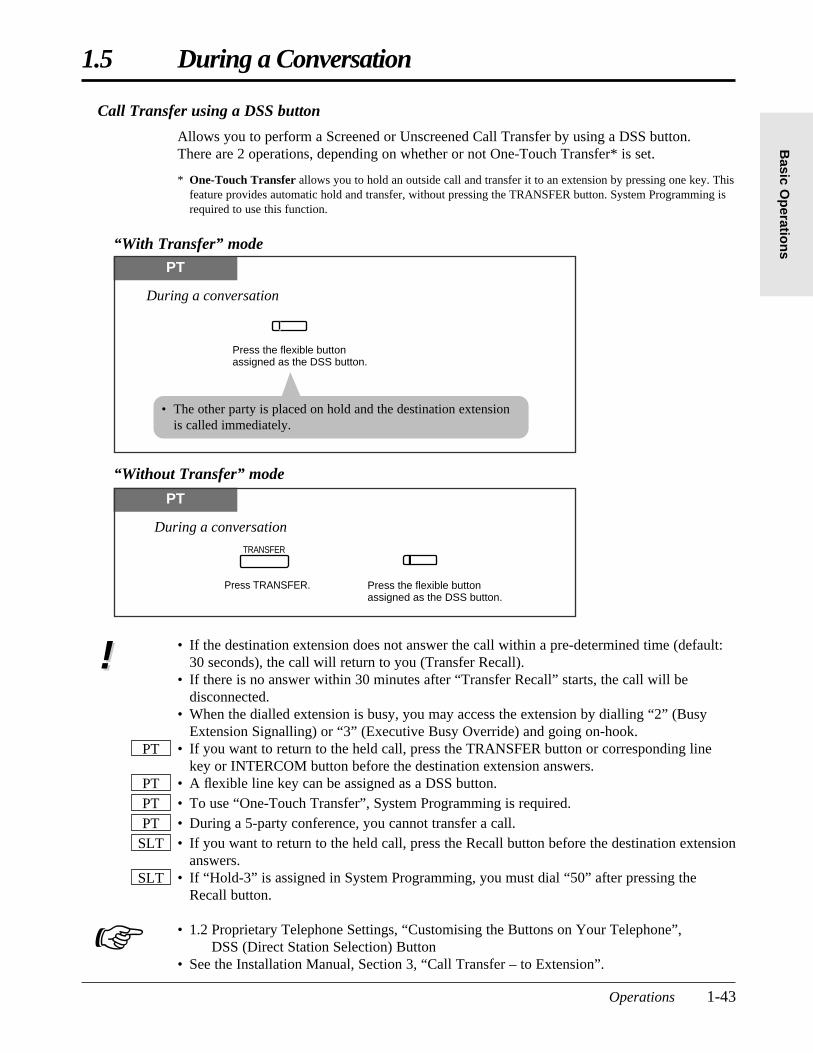
Call Transfer using a DSS button
Allows you to perform a Screened or Unscreened Call Transfer by using a DSS button.There are 2 operations, depending on whether or not One-Touch Transfer* is set.
* One-Touch Transfer allows you to hold an outside call and transfer it to an extension by pressing one key. Thisfeature provides automatic hold and transfer, without pressing the TRANSFER button. System Programming isrequired to use this function.
“With Transfer” mode
PT
Press the flexible button assigned as the DSS button.
During a conversation
• The other party is placed on hold and the destination extensionis called immediately.
PT
Press the flexible button assigned as the DSS button.
During a conversation
Press TRANSFER.
TRANSFER
“Without Transfer” mode
• If the destination extension does not answer the call within a pre-determined time (default:30 seconds), the call will return to you (Transfer Recall).
• If there is no answer within 30 minutes after “Transfer Recall” starts, the call will bedisconnected.
• When the dialled extension is busy, you may access the extension by dialling “2” (BusyExtension Signalling) or “3” (Executive Busy Override) and going on-hook.
• If you want to return to the held call, press the TRANSFER button or corresponding linekey or INTERCOM button before the destination extension answers.
• A flexible line key can be assigned as a DSS button.• To use “One-Touch Transfer”, System Programming is required.• During a 5-party conference, you cannot transfer a call.• If you want to return to the held call, press the Recall button before the destination extension
answers.• If “Hold-3” is assigned in System Programming, you must dial “50” after pressing the
Recall button.
• 1.2 Proprietary Telephone Settings, “Customising the Buttons on Your Telephone”, DSS (Direct Station Selection) Button
• See the Installation Manual, Section 3, “Call Transfer – to Extension”.
SLT
SLTPTPTPT
PT
!!
☞
PSQX1709ZA-04.QX 99.10.15 9:57 AM Page 43
1.5 During a Conversation
1-44 Operations
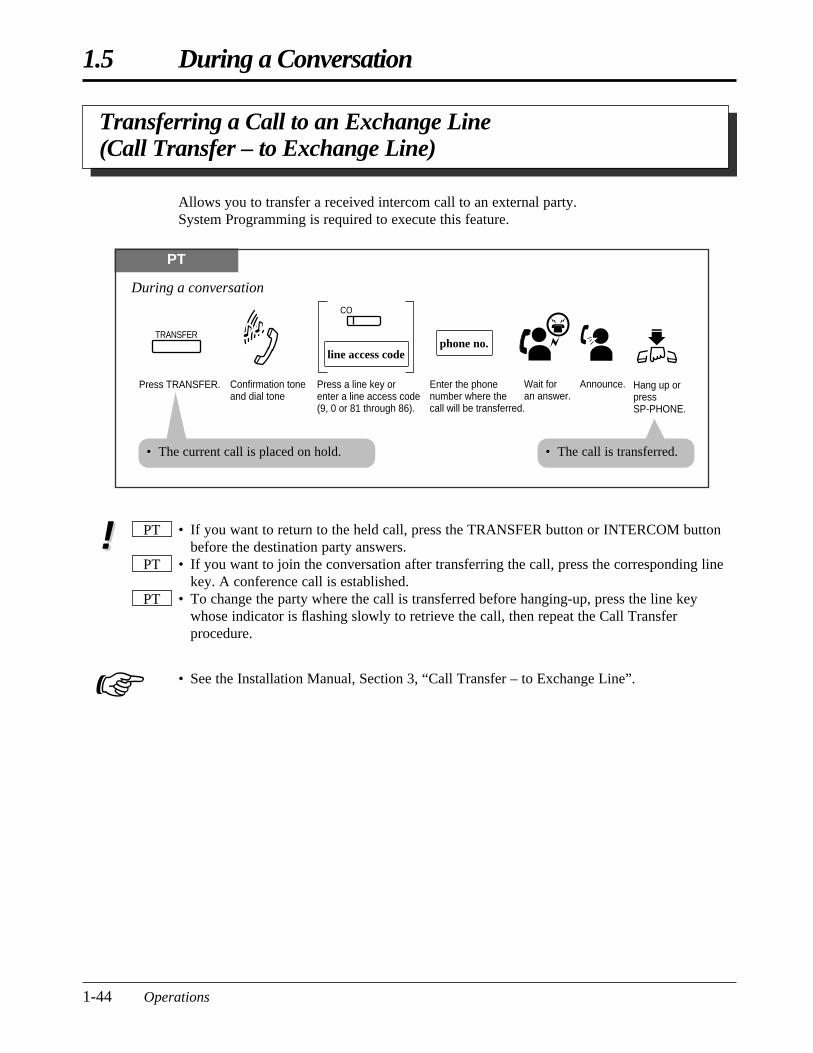
Transferring a Call to an Exchange Line (Call Transfer – to Exchange Line)
Allows you to transfer a received intercom call to an external party.System Programming is required to execute this feature.
PT
Press TRANSFER. Enter the phone number where the call will be transferred.
TRANSFERphone no.
During a conversation
Hang up or press SP-PHONE.
Confirmation tone and dial tone
Announce.Wait for an answer.
line access code
CO
Press a line key or enter a line access code (9, 0 or 81 through 86).
• The current call is placed on hold. • The call is transferred.
• If you want to return to the held call, press the TRANSFER button or INTERCOM buttonbefore the destination party answers.
• If you want to join the conversation after transferring the call, press the corresponding linekey. A conference call is established.
• To change the party where the call is transferred before hanging-up, press the line keywhose indicator is flashing slowly to retrieve the call, then repeat the Call Transferprocedure.
• See the Installation Manual, Section 3, “Call Transfer – to Exchange Line”.
PT
PT
PT!!
☞
PSQX1709ZA-04.QX 99.10.15 9:57 AM Page 44

1.5 During a Conversation
Operations 1-45
Basic O
peratio
ns
PT SLT
Call Waiting
Talk to the new caller.
While hearing a Call Waiting tone
Press the flashing line key or INTERCOM.
COor
INTERCOM
Talk to the new caller.
While hearing a Call Waiting tone
Lift the handset.Hang up.
• The current call is disconnected.• The current call is disconnected.
During a conversation, a Call Waiting tone informs you that there is a call waiting.You can answer the second call by disconnecting the first call or placing it on hold.
To talk to the new caller by terminating the current call
Any Telephone
Lift the handset or press SP-PHONE/MONITOR.
Hang up or press SP-PHONE/MONITOR.
Confirmation tone and dial tone
To set: Dial 7321#.To cancel: Dial 7320#.
7 3 2 1
7 3 2 0
To set.
To cancel.
#
#
Setting / Cancelling for intercom calls
Any Telephone
Lift the handset or press SP-PHONE/MONITOR.
Hang up or press SP-PHONE/MONITOR.
Confirmation tone and dial tone
To set: Dial 7311#.To cancel: Dial 7310#.
7 3 1 1
7 3 1 0
To set.
To cancel.
#
#
Setting / Cancelling for outside calls
• Single line telephone users can dial “0” instead of “#”.
• Single line telephone users can dial “0” instead of “#”.
PSQX1709ZA-04.QX 99.10.15 9:57 AM Page 45
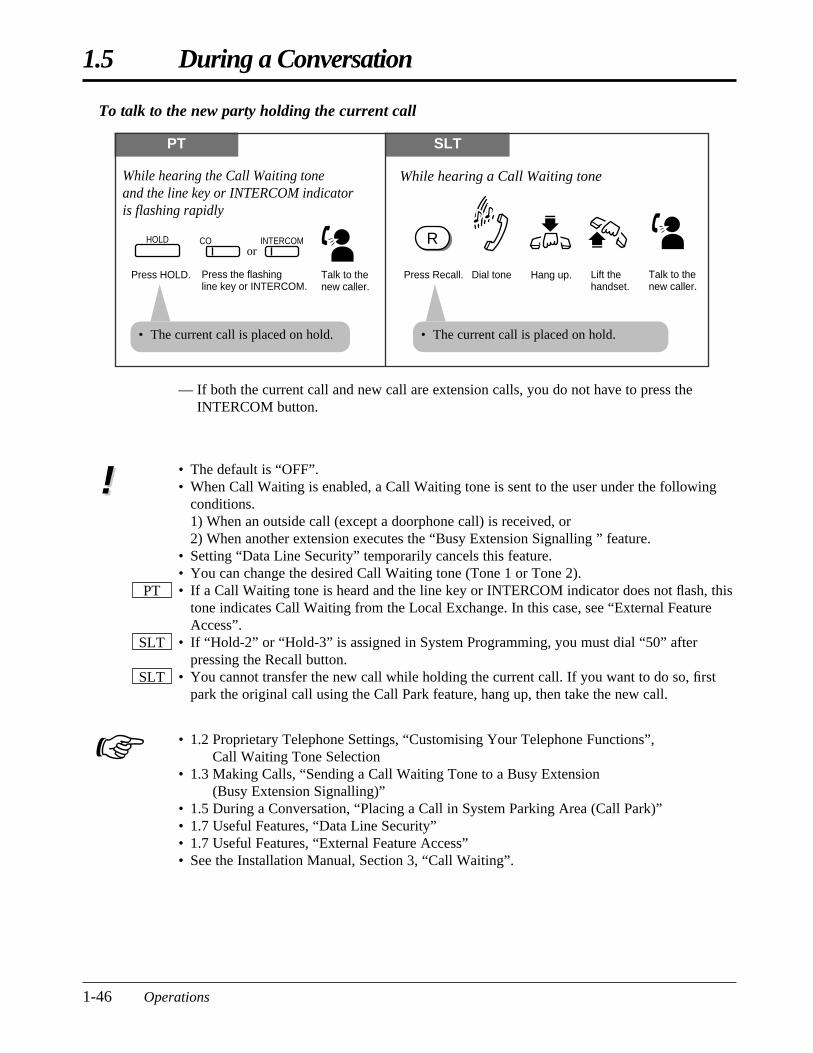
1.5 During a Conversation
1-46 Operations
• The default is “OFF”.• When Call Waiting is enabled, a Call Waiting tone is sent to the user under the following
conditions.1) When an outside call (except a doorphone call) is received, or2) When another extension executes the “Busy Extension Signalling ” feature.
• Setting “Data Line Security” temporarily cancels this feature.• You can change the desired Call Waiting tone (Tone 1 or Tone 2).• If a Call Waiting tone is heard and the line key or INTERCOM indicator does not flash, this
tone indicates Call Waiting from the Local Exchange. In this case, see “External FeatureAccess”.
• If “Hold-2” or “Hold-3” is assigned in System Programming, you must dial “50” afterpressing the Recall button.
• You cannot transfer the new call while holding the current call. If you want to do so, firstpark the original call using the Call Park feature, hang up, then take the new call.
• 1.2 Proprietary Telephone Settings, “Customising Your Telephone Functions”, Call Waiting Tone Selection
• 1.3 Making Calls, “Sending a Call Waiting Tone to a Busy Extension (Busy Extension Signalling)”
• 1.5 During a Conversation, “Placing a Call in System Parking Area (Call Park)”• 1.7 Useful Features, “Data Line Security”• 1.7 Useful Features, “External Feature Access”• See the Installation Manual, Section 3, “Call Waiting”.
SLT
SLT
PT
!!
☞
PT SLT
• The current call is placed on hold.• The current call is placed on hold.
Talk to the new caller.
While hearing a Call Waiting tone
Talk to the new caller.
Press the flashing line key or INTERCOM.
COor
INTERCOM
Lift the handset.
Hang up.Press Recall. Dial tone
HOLD
Press HOLD.
While hearing the Call Waiting tone and the line key or INTERCOM indicator is flashing rapidly
R
To talk to the new party holding the current call
— If both the current call and new call are extension calls, you do not have to press theINTERCOM button.
PSQX1709ZA-04.QX 99.10.15 9:57 AM Page 46
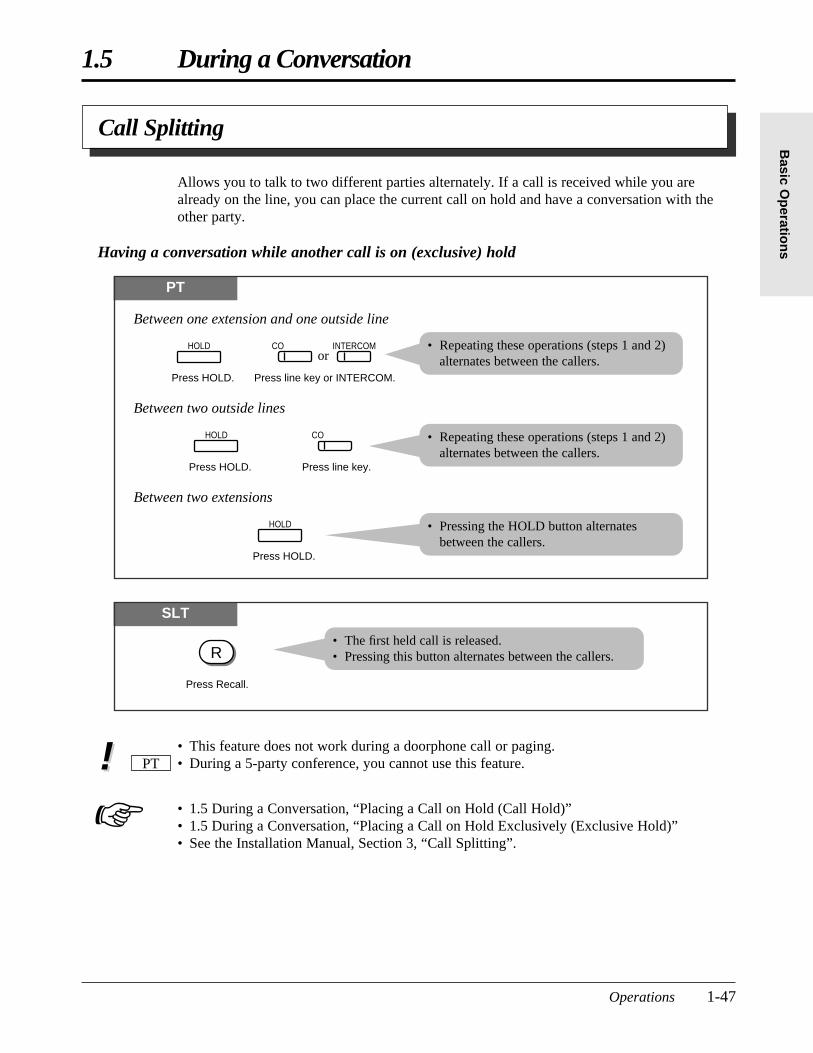
1.5 During a Conversation
Operations 1-47
Basic O
peratio
ns
Call Splitting
• This feature does not work during a doorphone call or paging.• During a 5-party conference, you cannot use this feature.
• 1.5 During a Conversation, “Placing a Call on Hold (Call Hold)”• 1.5 During a Conversation, “Placing a Call on Hold Exclusively (Exclusive Hold)”• See the Installation Manual, Section 3, “Call Splitting”.
PT
Allows you to talk to two different parties alternately. If a call is received while you arealready on the line, you can place the current call on hold and have a conversation with theother party.
Having a conversation while another call is on (exclusive) hold
SLT
Press Recall.
R• The first held call is released.• Pressing this button alternates between the callers.
PT
Press line key or INTERCOM.
COor
INTERCOM
Press HOLD.
HOLD
Between one extension and one outside line
Press line key.
CO
Press HOLD.
HOLD
Between two outside lines
Press HOLD.
HOLD
Between two extensions
• Repeating these operations (steps 1 and 2)alternates between the callers.
• Repeating these operations (steps 1 and 2)alternates between the callers.
• Pressing the HOLD button alternatesbetween the callers.
!!☞
PSQX1709ZA-04.QX 99.10.15 9:57 AM Page 47
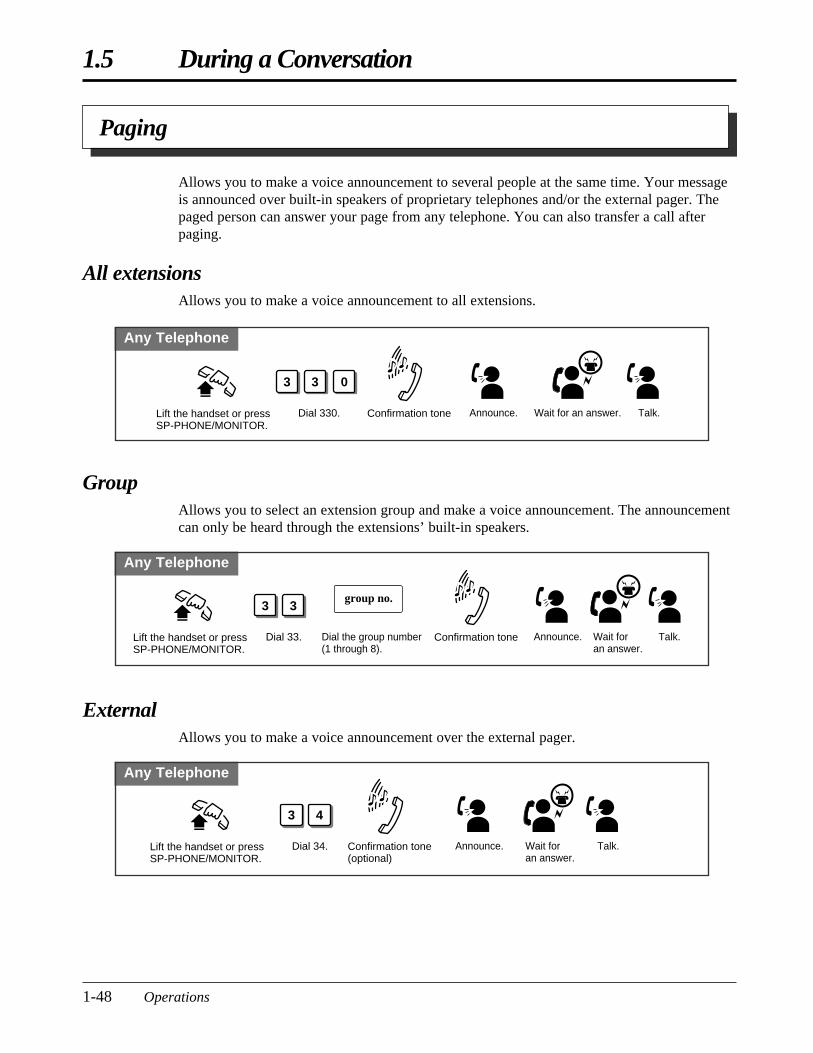
1.5 During a Conversation
1-48 Operations
Paging
Allows you to make a voice announcement to several people at the same time. Your messageis announced over built-in speakers of proprietary telephones and/or the external pager. Thepaged person can answer your page from any telephone. You can also transfer a call afterpaging.
All extensionsAllows you to make a voice announcement to all extensions.
GroupAllows you to select an extension group and make a voice announcement. The announcementcan only be heard through the extensions’ built-in speakers.
Any Telephone
Confirmation toneLift the handset or press SP-PHONE/MONITOR.
Announce. Wait for an answer.
3 3 0
Dial 330. Talk.
Any Telephone
Confirmation toneLift the handset or press SP-PHONE/MONITOR.
Announce. Wait for an answer.
3 3
Dial 33. Talk.Dial the group number (1 through 8).
group no.
ExternalAllows you to make a voice announcement over the external pager.
Any Telephone
Confirmation tone (optional)
Lift the handset or press SP-PHONE/MONITOR.
Announce. Wait for an answer.
3 4
Dial 34. Talk.
PSQX1709ZA-04.QX 99.10.15 9:57 AM Page 48
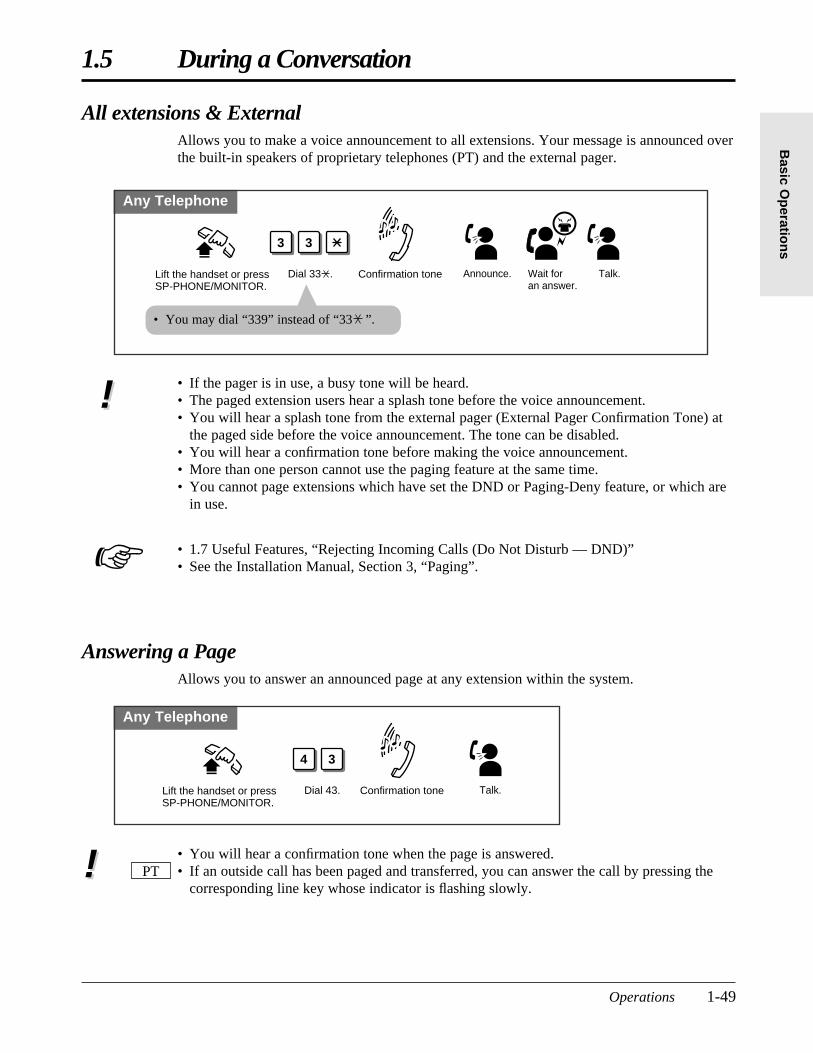
1.5 During a Conversation
Operations 1-49
Basic O
peratio
ns
All extensions & ExternalAllows you to make a voice announcement to all extensions. Your message is announced overthe built-in speakers of proprietary telephones (PT) and the external pager.
Any Telephone
Confirmation toneLift the handset or press SP-PHONE/MONITOR.
Announce. Wait for an answer.
3 3
Dial 33 . Talk.
• You may dial “339” instead of “33 ”.
• You will hear a confirmation tone when the page is answered.• If an outside call has been paged and transferred, you can answer the call by pressing the
corresponding line key whose indicator is flashing slowly.PT
Answering a PageAllows you to answer an announced page at any extension within the system.
Any Telephone
Confirmation toneLift the handset or press SP-PHONE/MONITOR.
Talk.
4 3
Dial 43.
!!
• If the pager is in use, a busy tone will be heard.• The paged extension users hear a splash tone before the voice announcement.• You will hear a splash tone from the external pager (External Pager Confirmation Tone) at
the paged side before the voice announcement. The tone can be disabled.• You will hear a confirmation tone before making the voice announcement.• More than one person cannot use the paging feature at the same time.• You cannot page extensions which have set the DND or Paging-Deny feature, or which are
in use.
• 1.7 Useful Features, “Rejecting Incoming Calls (Do Not Disturb — DND)”• See the Installation Manual, Section 3, “Paging”.
!!
☞
PSQX1709ZA-04.QX 99.10.15 9:57 AM Page 49
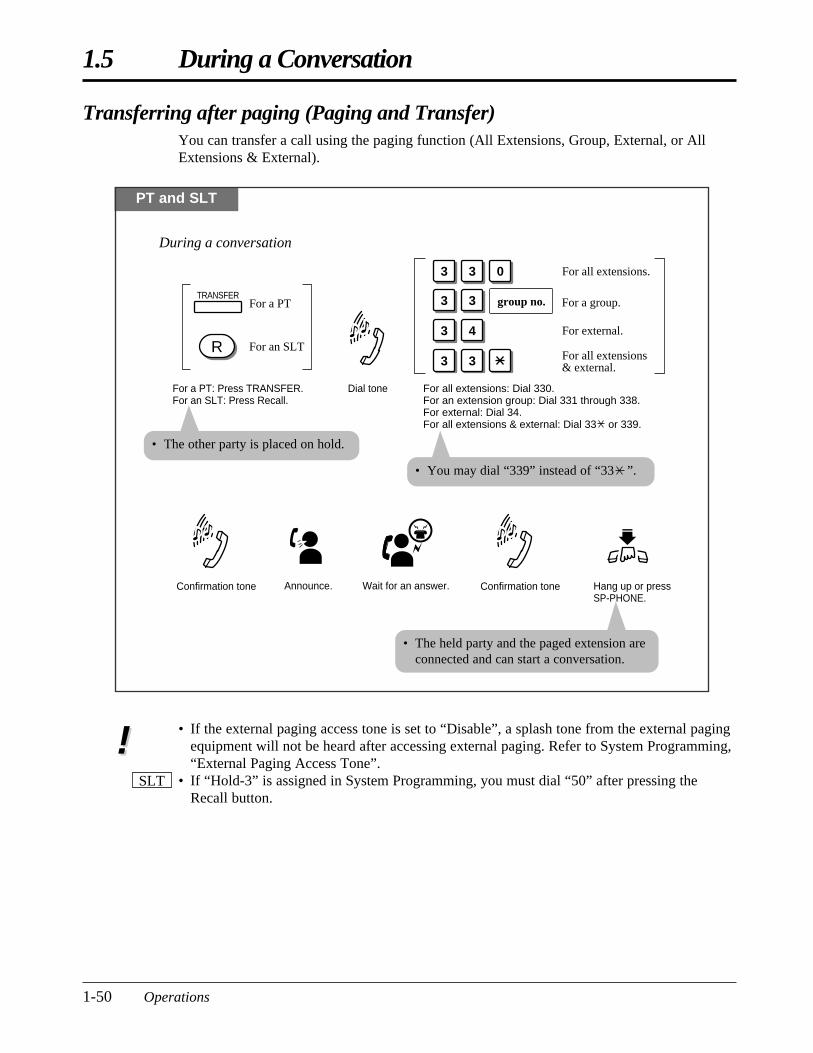
1.5 During a Conversation
1-50 Operations
Transferring after paging (Paging and Transfer)You can transfer a call using the paging function (All Extensions, Group, External, or AllExtensions & External).
PT and SLT
Dial tone
Confirmation toneConfirmation tone Wait for an answer.Announce.
During a conversation
Hang up or press SP-PHONE.
For a PT: Press TRANSFER.For an SLT: Press Recall.
For an SLT
For a PTTRANSFER
group no.
3 3 0
3 3
For all extensions.
For a group.
3 4 For external.
3 3 For all extensions & external.
For all extensions: Dial 330.For an extension group: Dial 331 through 338.For external: Dial 34.For all extensions & external: Dial 33 or 339.
R
• The other party is placed on hold.
• The held party and the paged extension areconnected and can start a conversation.
• You may dial “339” instead of “33 ”.
• If the external paging access tone is set to “Disable”, a splash tone from the external pagingequipment will not be heard after accessing external paging. Refer to System Programming,“External Paging Access Tone”.
• If “Hold-3” is assigned in System Programming, you must dial “50” after pressing theRecall button.
SLT
!!
PSQX1709ZA-04.QX 99.10.15 9:57 AM Page 50
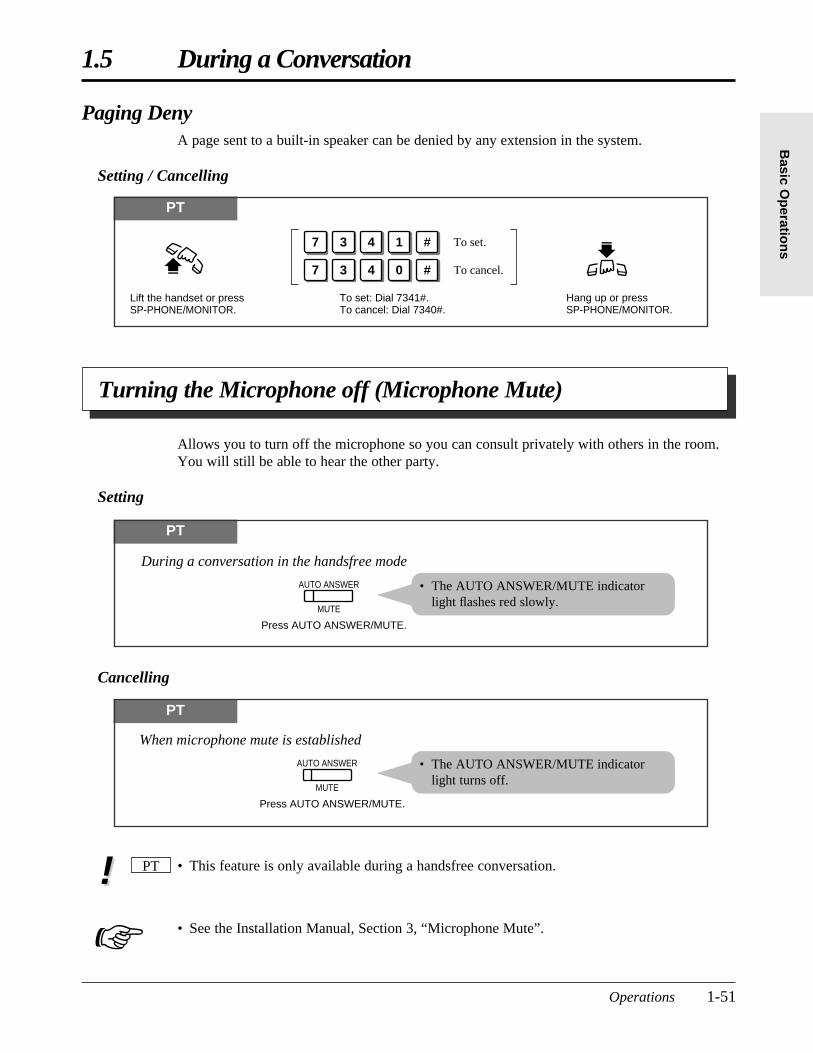
1.5 During a Conversation
Operations 1-51
Basic O
peratio
ns
Turning the Microphone off (Microphone Mute)
• This feature is only available during a handsfree conversation.
• See the Installation Manual, Section 3, “Microphone Mute”.
PT
Allows you to turn off the microphone so you can consult privately with others in the room.You will still be able to hear the other party.
Setting
PT
Press AUTO ANSWER/MUTE.
During a conversation in the handsfree mode
AUTO ANSWER
MUTE
PT
Press AUTO ANSWER/MUTE.
When microphone mute is established
AUTO ANSWER
MUTE
Cancelling
!!
Paging DenyA page sent to a built-in speaker can be denied by any extension in the system.
Setting / Cancelling
PT
To set: Dial 7341#.To cancel: Dial 7340#.
7 3 4 # To set.
7 3 4
1
0 # To cancel.
Lift the handset or press SP-PHONE/MONITOR.
Hang up or press SP-PHONE/MONITOR.
• The AUTO ANSWER/MUTE indicatorlight flashes red slowly.
• The AUTO ANSWER/MUTE indicatorlight turns off.
☞
PSQX1709ZA-04.QX 99.10.15 9:57 AM Page 51
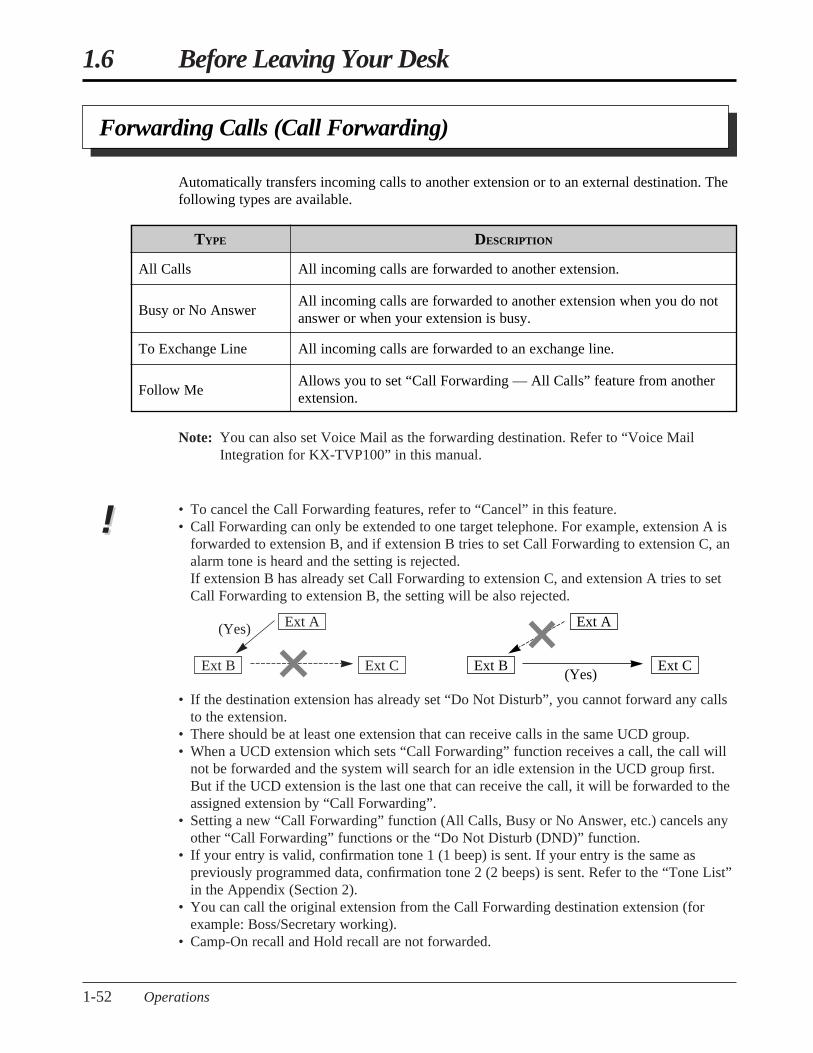
1.6 Before Leaving Your Desk
1-52 Operations
Forwarding Calls (Call Forwarding)
Automatically transfers incoming calls to another extension or to an external destination. Thefollowing types are available.
Note: You can also set Voice Mail as the forwarding destination. Refer to “Voice MailIntegration for KX-TVP100” in this manual.
• To cancel the Call Forwarding features, refer to “Cancel” in this feature.• Call Forwarding can only be extended to one target telephone. For example, extension A is
forwarded to extension B, and if extension B tries to set Call Forwarding to extension C, analarm tone is heard and the setting is rejected.If extension B has already set Call Forwarding to extension C, and extension A tries to setCall Forwarding to extension B, the setting will be also rejected.
• If the destination extension has already set “Do Not Disturb”, you cannot forward any callsto the extension.
• There should be at least one extension that can receive calls in the same UCD group.• When a UCD extension which sets “Call Forwarding” function receives a call, the call will
not be forwarded and the system will search for an idle extension in the UCD group first.But if the UCD extension is the last one that can receive the call, it will be forwarded to theassigned extension by “Call Forwarding”.
• Setting a new “Call Forwarding” function (All Calls, Busy or No Answer, etc.) cancels anyother “Call Forwarding” functions or the “Do Not Disturb (DND)” function.
• If your entry is valid, confirmation tone 1 (1 beep) is sent. If your entry is the same aspreviously programmed data, confirmation tone 2 (2 beeps) is sent. Refer to the “Tone List”in the Appendix (Section 2).
• You can call the original extension from the Call Forwarding destination extension (forexample: Boss/Secretary working).
• Camp-On recall and Hold recall are not forwarded.
Ext A
Ext B Ext C
(Yes) Ext A
Ext B Ext C(Yes)
!!
TYPE DESCRIPTION
All Calls
Busy or No Answer
Follow Me
To Exchange Line
All incoming calls are forwarded to another extension.
All incoming calls are forwarded to another extension when you do notanswer or when your extension is busy.
Allows you to set “Call Forwarding — All Calls” feature from anotherextension.
All incoming calls are forwarded to an exchange line.
PSQX1709ZA-05.QX 99.10.15 9:58 AM Page 52
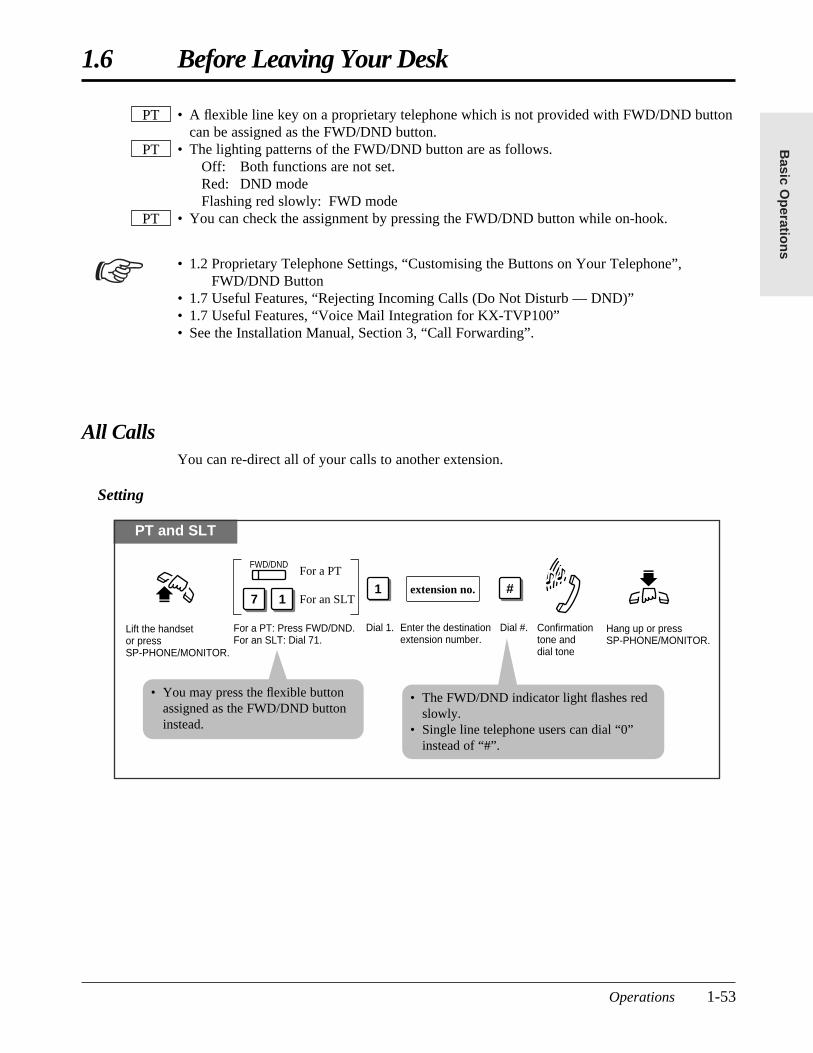
1.6 Before Leaving Your Desk
Operations 1-53
Basic O
peratio
ns
PT and SLT
• A flexible line key on a proprietary telephone which is not provided with FWD/DND buttoncan be assigned as the FWD/DND button.
• The lighting patterns of the FWD/DND button are as follows.Off: Both functions are not set.Red: DND modeFlashing red slowly: FWD mode
• You can check the assignment by pressing the FWD/DND button while on-hook.
• 1.2 Proprietary Telephone Settings, “Customising the Buttons on Your Telephone”,FWD/DND Button
• 1.7 Useful Features, “Rejecting Incoming Calls (Do Not Disturb — DND)”• 1.7 Useful Features, “Voice Mail Integration for KX-TVP100”• See the Installation Manual, Section 3, “Call Forwarding”.
PT
PT
PT
Lift the handset or press SP-PHONE/MONITOR.
For a PT: Press FWD/DND.For an SLT: Dial 71.
Hang up or press SP-PHONE/MONITOR.
Confirmation tone and dial tone
Dial 1. Enter the destination extension number.
Dial #.
1For an SLT
For a PT
17
FWD/DND
extension no. #
• You may press the flexible buttonassigned as the FWD/DND buttoninstead.
☞
• The FWD/DND indicator light flashes redslowly.
• Single line telephone users can dial “0”instead of “#”.
All CallsYou can re-direct all of your calls to another extension.
Setting
PSQX1709ZA-05.QX 99.10.15 9:58 AM Page 53
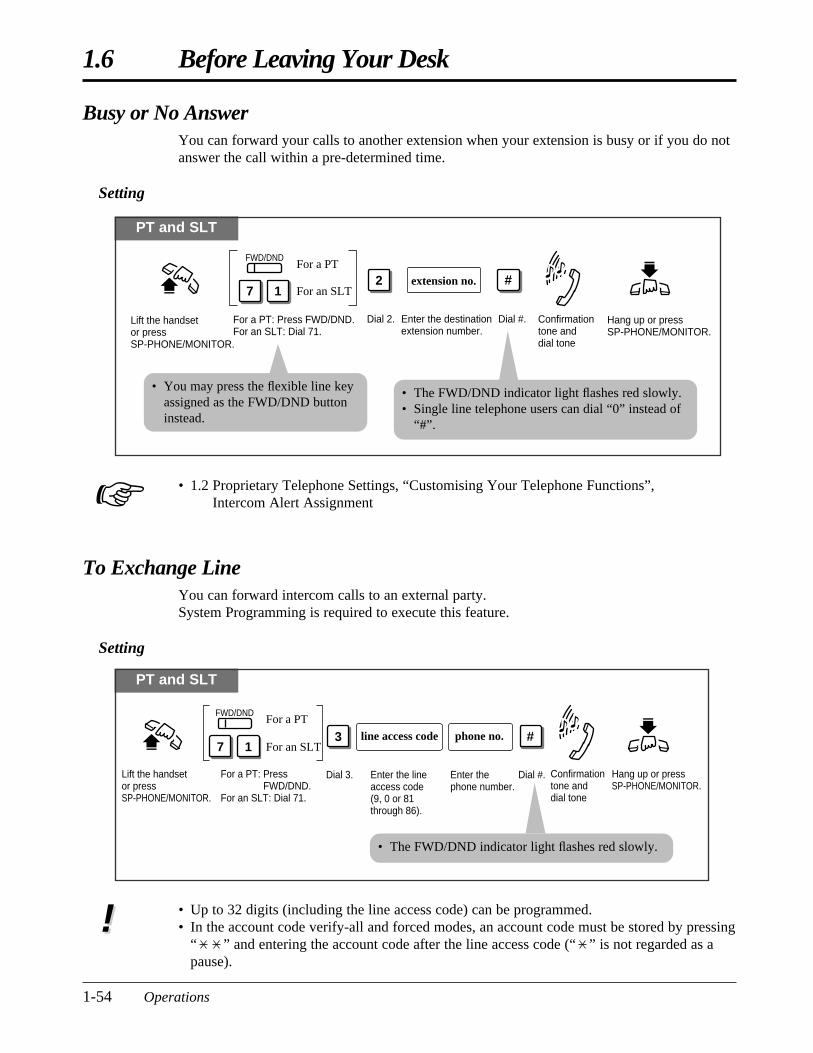
1.6 Before Leaving Your Desk
1-54 Operations
• Up to 32 digits (including the line access code) can be programmed.• In the account code verify-all and forced modes, an account code must be stored by pressing
“ ” and entering the account code after the line access code (“ ” is not regarded as apause).
!!
PT and SLT
Busy or No AnswerYou can forward your calls to another extension when your extension is busy or if you do notanswer the call within a pre-determined time.
Setting
• 1.2 Proprietary Telephone Settings, “Customising Your Telephone Functions”, Intercom Alert Assignment
Lift the handset or press SP-PHONE/MONITOR.
For a PT: Press FWD/DND.For an SLT: Dial 71.
Hang up or press SP-PHONE/MONITOR.
Confirmation tone and dial tone
Dial 2. Enter the destination extension number.
Dial #.
2For an SLT
For a PT
17
FWD/DND
extension no. #
• You may press the flexible line keyassigned as the FWD/DND buttoninstead.
• The FWD/DND indicator light flashes red slowly.• Single line telephone users can dial “0” instead of
“#”.
PT and SLT
• The FWD/DND indicator light flashes red slowly.
To Exchange LineYou can forward intercom calls to an external party.System Programming is required to execute this feature.
Setting
For a PT: Press FWD/DND.For an SLT: Dial 71.
Enter the line access code(9, 0 or 81 through 86).
Enter the phone number.
Dial #.
7 1 For an SLT
For a PT
Dial 3.
line access code phone no.3
Lift the handset or press SP-PHONE/MONITOR.
Hang up or press SP-PHONE/MONITOR.
Confirmation tone and dial tone
FWD/DND
#
☞
PSQX1709ZA-05.QX 99.10.15 9:58 AM Page 54

1.6 Before Leaving Your Desk
Operations 1-55
Basic O
peratio
ns
Follow MeYou can set the “Call Forwarding” feature from the destination extension. This is useful if youforget to set “Call Forwarding — All Calls” before you leave your desk.
Setting
• This feature can be cancelled at your extension or the destination extension.
PT and SLT
For a PT: Press FWD/DND.For an SLT: Dial 71.
Enter your extension number.
Dial #.
7 1 For an SLT
For a PTFWD/DND
Dial 5.
extension no.5
Lift the handset or press the SP-PHONE/MONITOR button.
Hang up or press the SP-PHONE/MONITOR button.
Confirmation tone and dial tone
At the destination extension
#
!!
• You may press the flexible line keyassigned as the FWD/DND buttoninstead.
• The FWD/DND indicator light flashes redslowly.
• Single line telephone users can dial “0”instead of “#”.
PSQX1709ZA-05.QX 99.10.15 9:58 AM Page 55
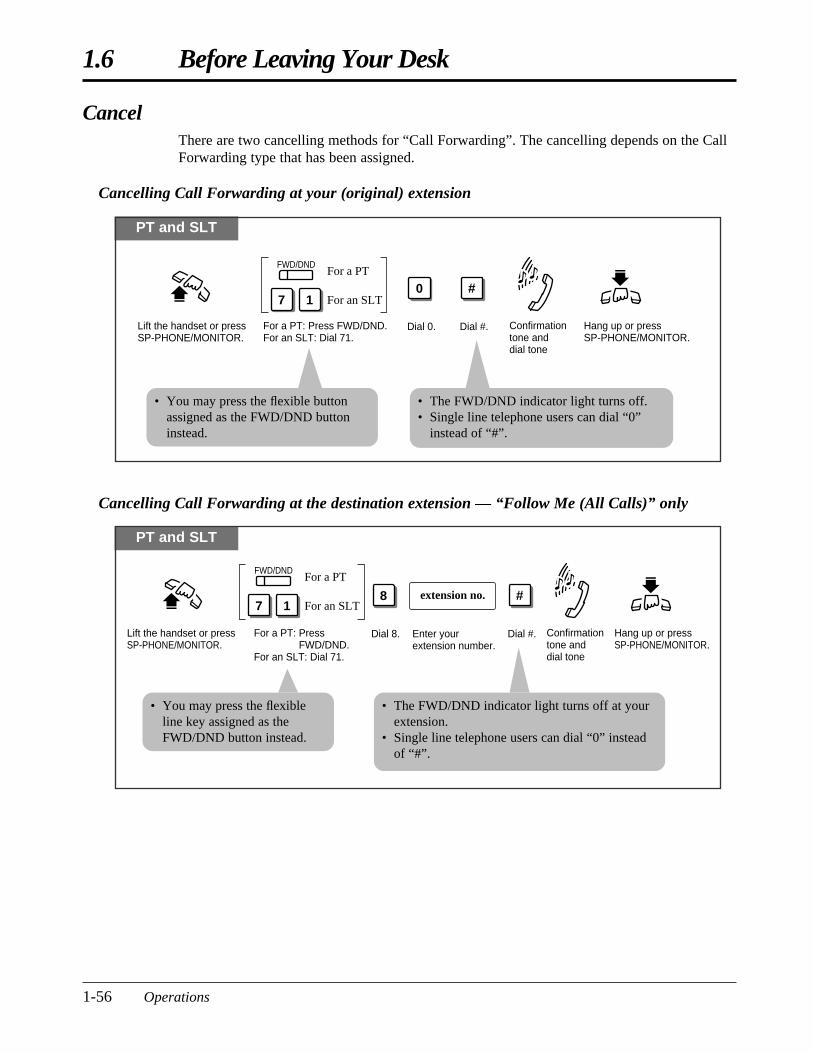
1.6 Before Leaving Your Desk
1-56 Operations
Cancelling Call Forwarding at the destination extension — “Follow Me (All Calls)” only
• You may press the flexibleline key assigned as theFWD/DND button instead.
PT and SLT
For a PT: Press FWD/DND.For an SLT: Dial 71.
Enter your extension number.
Dial #.
7 1 For an SLT
For a PTFWD/DND
Dial 8.
extension no.8
Lift the handset or press SP-PHONE/MONITOR.
Hang up or press SP-PHONE/MONITOR.
Confirmation tone and dial tone
#
• The FWD/DND indicator light turns off at yourextension.
• Single line telephone users can dial “0” insteadof “#”.
CancelThere are two cancelling methods for “Call Forwarding”. The cancelling depends on the CallForwarding type that has been assigned.
Cancelling Call Forwarding at your (original) extension
PT and SLT
For a PT: Press FWD/DND.For an SLT: Dial 71.
Dial #.
7 1 For an SLT
For a PTFWD/DND
Dial 0.
0
Lift the handset or press SP-PHONE/MONITOR.
Hang up or press SP-PHONE/MONITOR.
Confirmation tone and dial tone
#
• The FWD/DND indicator light turns off.• Single line telephone users can dial “0”
instead of “#”.
• You may press the flexible buttonassigned as the FWD/DND buttoninstead.
PSQX1709ZA-05.QX 99.10.15 9:58 AM Page 56
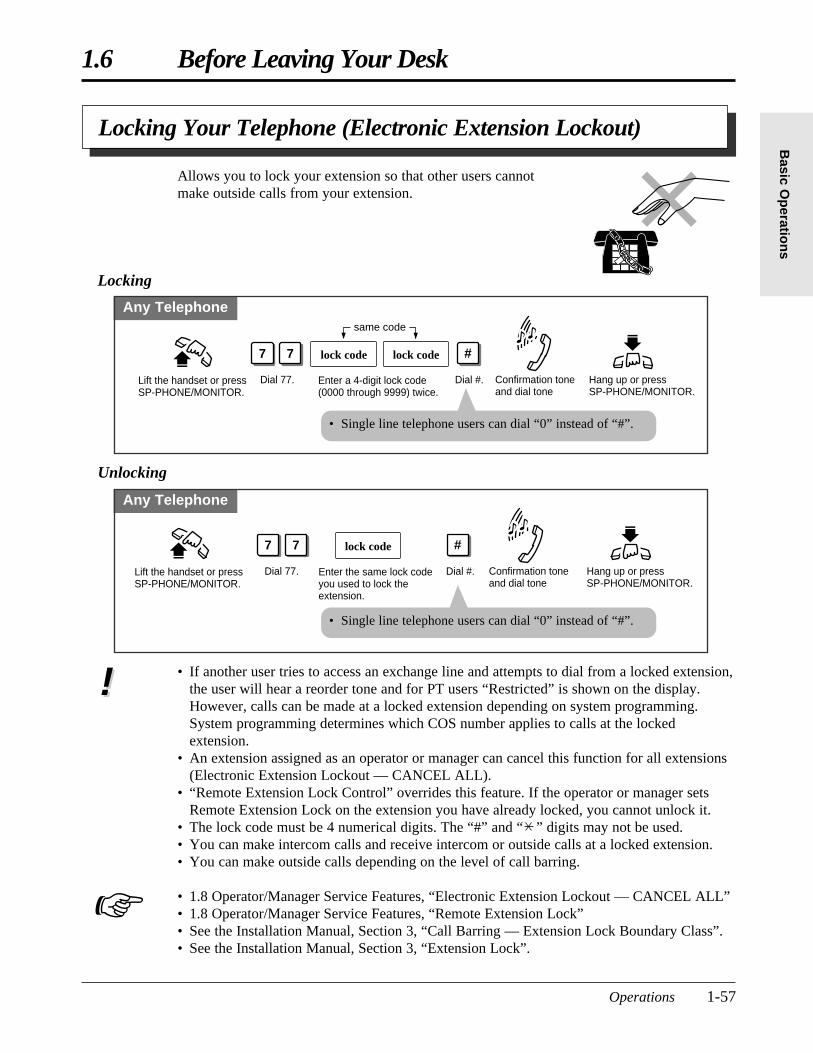
1.6 Before Leaving Your Desk
Operations 1-57
Basic O
peratio
ns
Locking Your Telephone (Electronic Extension Lockout)
• If another user tries to access an exchange line and attempts to dial from a locked extension,the user will hear a reorder tone and for PT users “Restricted” is shown on the display.However, calls can be made at a locked extension depending on system programming.System programming determines which COS number applies to calls at the lockedextension.
• An extension assigned as an operator or manager can cancel this function for all extensions(Electronic Extension Lockout — CANCEL ALL).
• “Remote Extension Lock Control” overrides this feature. If the operator or manager setsRemote Extension Lock on the extension you have already locked, you cannot unlock it.
• The lock code must be 4 numerical digits. The “#” and “ ” digits may not be used.• You can make intercom calls and receive intercom or outside calls at a locked extension.• You can make outside calls depending on the level of call barring.
• 1.8 Operator/Manager Service Features, “Electronic Extension Lockout — CANCEL ALL”• 1.8 Operator/Manager Service Features, “Remote Extension Lock”• See the Installation Manual, Section 3, “Call Barring — Extension Lock Boundary Class”.• See the Installation Manual, Section 3, “Extension Lock”.
Any Telephone
Lift the handset or press SP-PHONE/MONITOR.
Dial 77. Hang up or press SP-PHONE/MONITOR.
Enter a 4-digit lock code (0000 through 9999) twice.
Dial #.
7 7 lock code lock code
same code
Confirmation tone and dial tone
#
Any Telephone
Lift the handset or press SP-PHONE/MONITOR.
Dial 77. Hang up or press SP-PHONE/MONITOR.
Enter the same lock code you used to lock the extension.
Dial #.
7 7 lock code
Confirmation tone and dial tone
#
Allows you to lock your extension so that other users cannotmake outside calls from your extension.
Locking
Unlocking
!!
☞
• Single line telephone users can dial “0” instead of “#”.
• Single line telephone users can dial “0” instead of “#”.
PSQX1709ZA-05.QX 99.10.15 9:58 AM Page 57
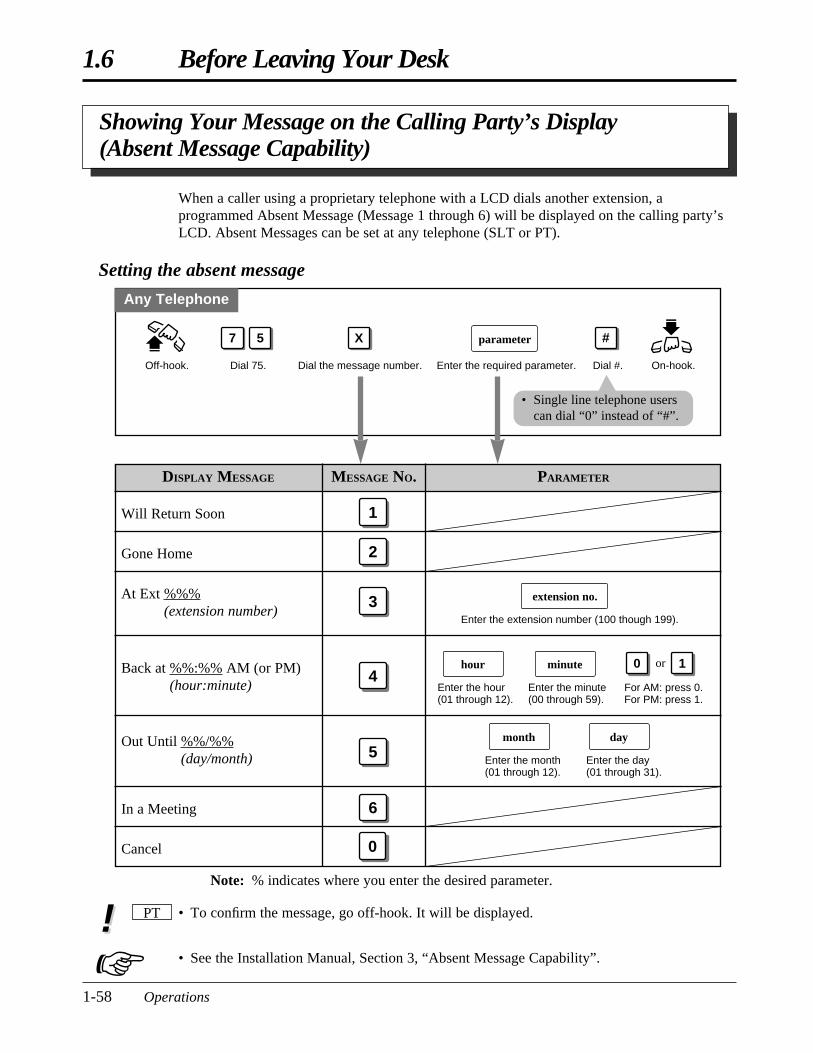
1.6 Before Leaving Your Desk
1-58 Operations
Off-hook. Dial 75. Dial the message number. On-hook.Enter the required parameter. Dial #.
parameter7 5 X #
When a caller using a proprietary telephone with a LCD dials another extension, aprogrammed Absent Message (Message 1 through 6) will be displayed on the calling party’sLCD. Absent Messages can be set at any telephone (SLT or PT).
Setting the absent message
DISPLAY MESSAGE PARAMETER
1Will Return Soon
MESSAGE NO.
2Gone Home
3At Ext %%%(extension number)
4Back at %%:%% AM (or PM)(hour:minute)
5Out Until %%/%%
(day/month)
6
0
In a Meeting
Cancel
Note: % indicates where you enter the desired parameter.
Any Telephone
extension no.
Enter the extension number (100 though 199).
For AM: press 0. For PM: press 1.
10 orhour
Enter the hour (01 through 12).
minute
Enter the minute (00 through 59).
month
Enter the month (01 through 12).
day
Enter the day (01 through 31).
Showing Your Message on the Calling Party’s Display (Absent Message Capability)
• To confirm the message, go off-hook. It will be displayed.
• See the Installation Manual, Section 3, “Absent Message Capability”.
PT!!☞
• Single line telephone userscan dial “0” instead of “#”.
PSQX1709ZA-05.QX 99.10.15 9:58 AM Page 58
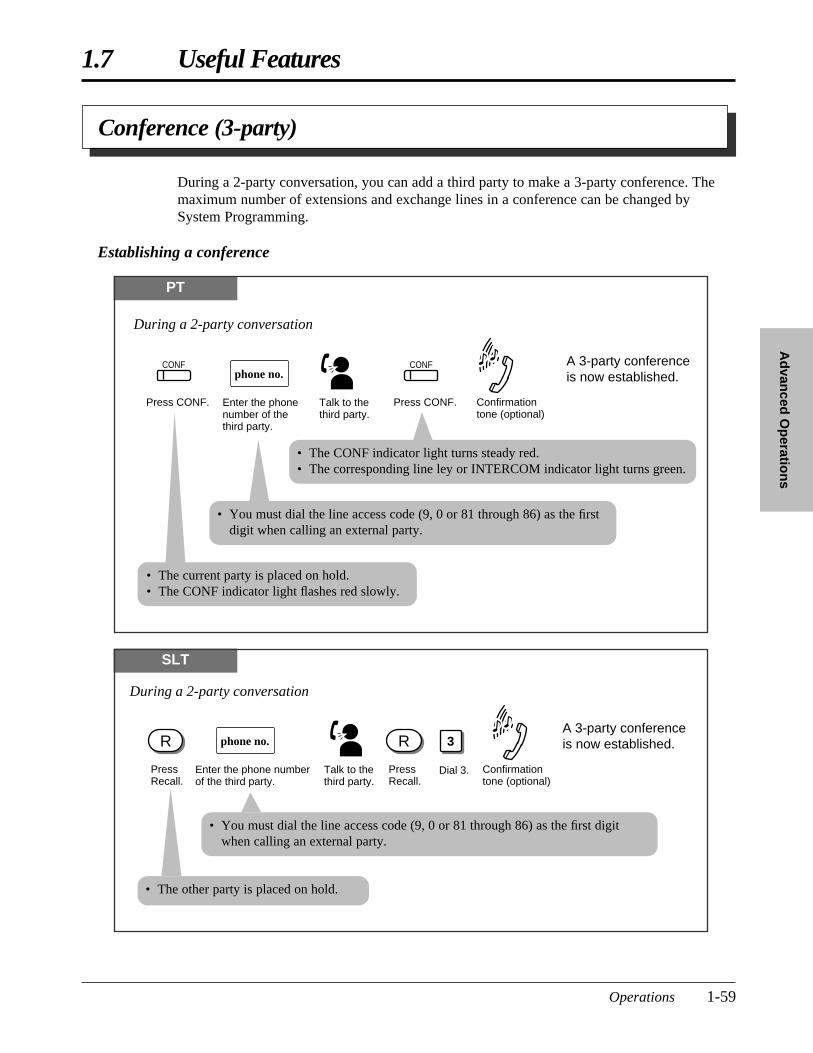
1.7 Useful Features
Operations 1-59
Ad
vanced
Op
eration
s
Conference (3-party)
During a 2-party conversation, you can add a third party to make a 3-party conference. Themaximum number of extensions and exchange lines in a conference can be changed bySystem Programming.
Establishing a conference
SLT
Enter the phone number of the third party.
Talk to the third party.
During a 2-party conversation
PressRecall.
Dial 3.PressRecall.
3A 3-party conference is now established.phone no.
Confirmation tone (optional)
R R
• You must dial the line access code (9, 0 or 81 through 86) as the first digitwhen calling an external party.
• The other party is placed on hold.
PT
Enter the phone number of the third party.
Talk to the third party.
During a 2-party conversation
A 3-party conference is now established.phone no.
Confirmation tone (optional)
Press CONF.
CONF
Press CONF.
CONF
• You must dial the line access code (9, 0 or 81 through 86) as the firstdigit when calling an external party.
• The CONF indicator light turns steady red.• The corresponding line ley or INTERCOM indicator light turns green.
• The current party is placed on hold.• The CONF indicator light flashes red slowly.
PSQX1709ZA-05.QX 99.10.15 9:58 AM Page 59
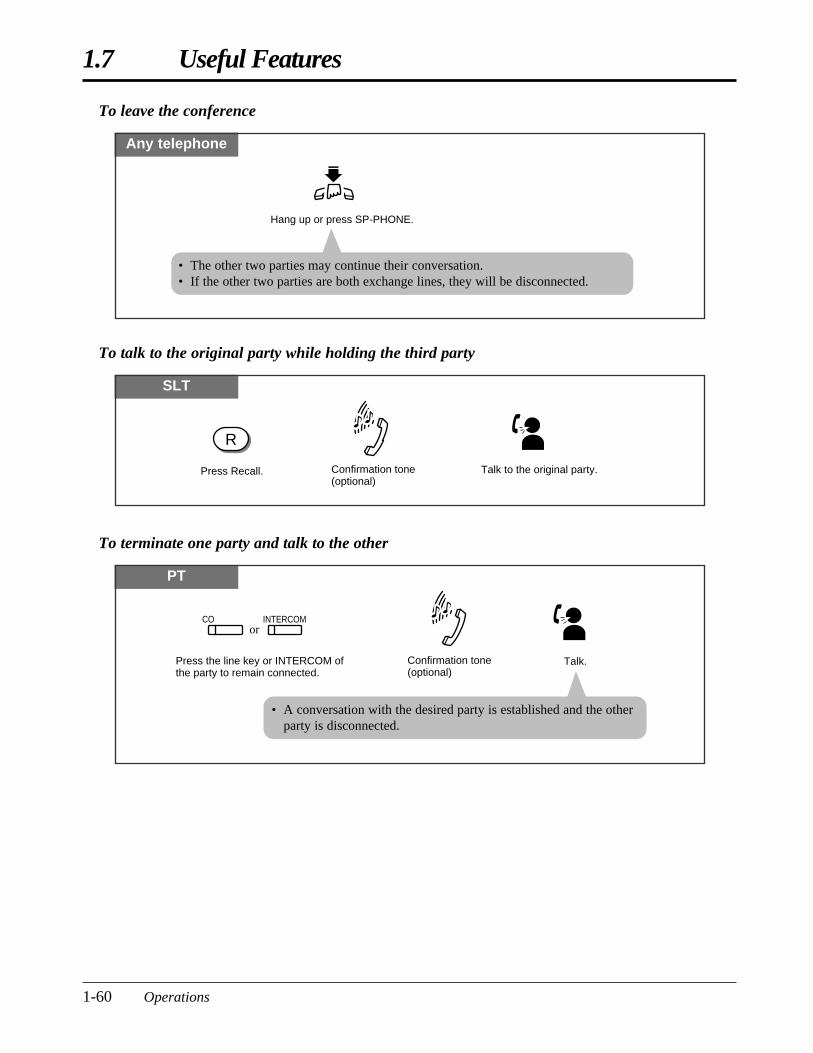
1.7 Useful Features
1-60 Operations
To leave the conference
Any telephone
Hang up or press SP-PHONE.
• A conversation with the desired party is established and the otherparty is disconnected.
To talk to the original party while holding the third party
To terminate one party and talk to the other
SLT
Talk to the original party.Confirmation tone (optional)
Press Recall.
R
PT
Talk.Press the line key or INTERCOM of the party to remain connected.
COor
INTERCOM
Confirmation tone (optional)
• The other two parties may continue their conversation.• If the other two parties are both exchange lines, they will be disconnected.
PSQX1709ZA-05.QX 99.10.15 9:58 AM Page 60
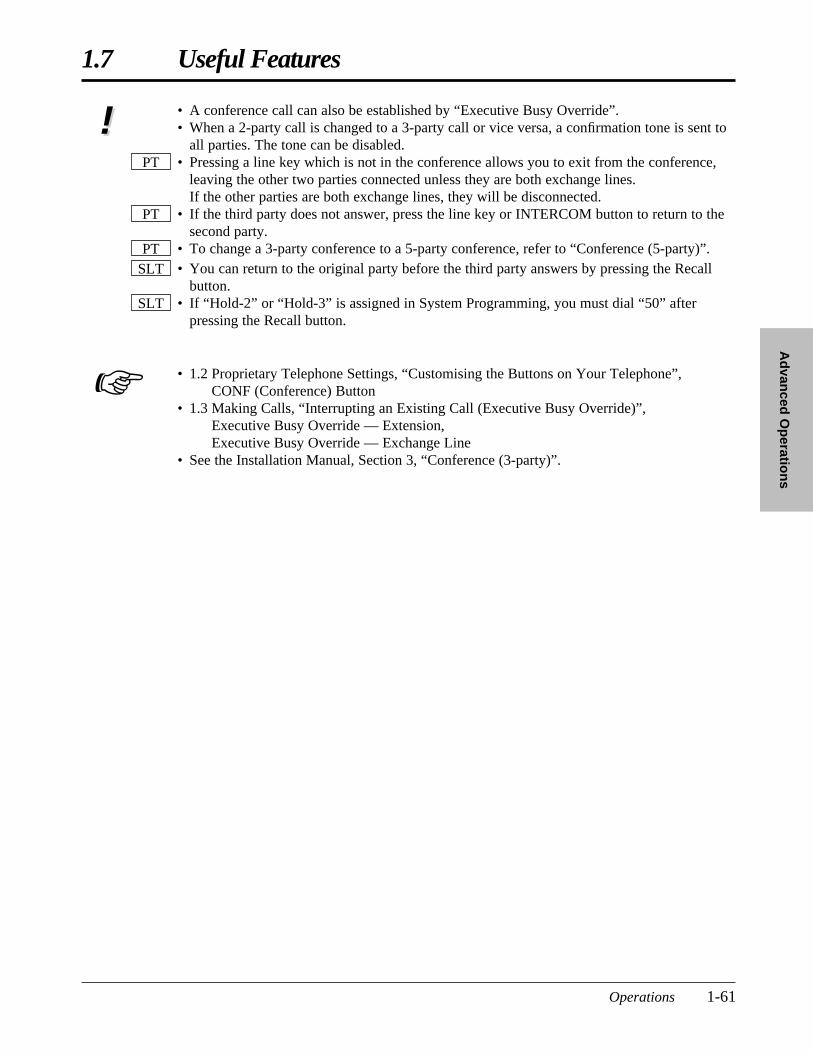
1.7 Useful Features
Operations 1-61
Ad
vanced
Op
eration
s
• 1.2 Proprietary Telephone Settings, “Customising the Buttons on Your Telephone”, CONF (Conference) Button
• 1.3 Making Calls, “Interrupting an Existing Call (Executive Busy Override)”, Executive Busy Override — Extension,Executive Busy Override — Exchange Line
• See the Installation Manual, Section 3, “Conference (3-party)”.
☞
!! • A conference call can also be established by “Executive Busy Override”.• When a 2-party call is changed to a 3-party call or vice versa, a confirmation tone is sent to
all parties. The tone can be disabled.• Pressing a line key which is not in the conference allows you to exit from the conference,
leaving the other two parties connected unless they are both exchange lines.If the other parties are both exchange lines, they will be disconnected.
• If the third party does not answer, press the line key or INTERCOM button to return to thesecond party.
• To change a 3-party conference to a 5-party conference, refer to “Conference (5-party)”.• You can return to the original party before the third party answers by pressing the Recall
button.• If “Hold-2” or “Hold-3” is assigned in System Programming, you must dial “50” after
pressing the Recall button.SLT
SLTPT
PT
PT
PSQX1709ZA-05.QX 99.10.15 9:58 AM Page 61
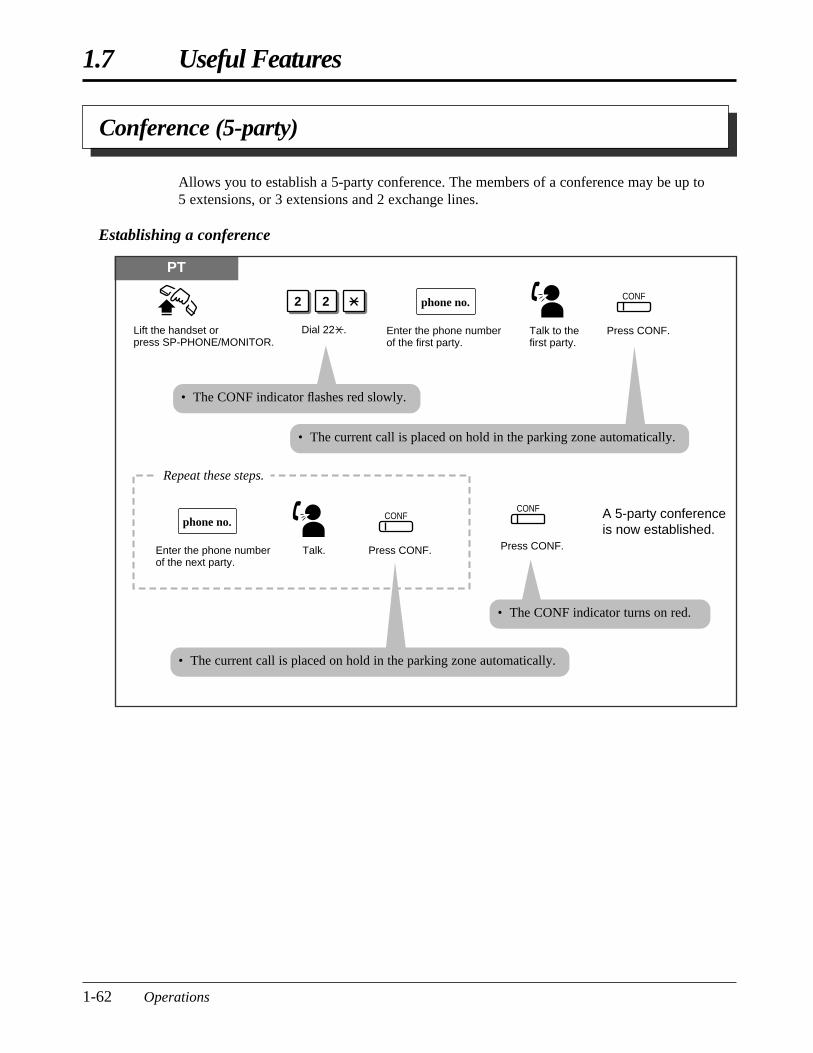
1.7 Useful Features
1-62 Operations
Conference (5-party)
Allows you to establish a 5-party conference. The members of a conference may be up to5 extensions, or 3 extensions and 2 exchange lines.
Establishing a conference
PT
Enter the phone number of the first party.
Talk to the first party.
A 5-party conference is now established.
phone no.
Press CONF.
CONF
Press CONF.
2 2
Dial 22 .Lift the handset orpress SP-PHONE/MONITOR.
Repeat these steps.
Enter the phone number of the next party.
Talk.
phone no.
Press CONF.
CONF
CONF
• The current call is placed on hold in the parking zone automatically.
• The CONF indicator flashes red slowly.
• The current call is placed on hold in the parking zone automatically.
• The CONF indicator turns on red.
PSQX1709ZA-05.QX 99.10.15 9:58 AM Page 62
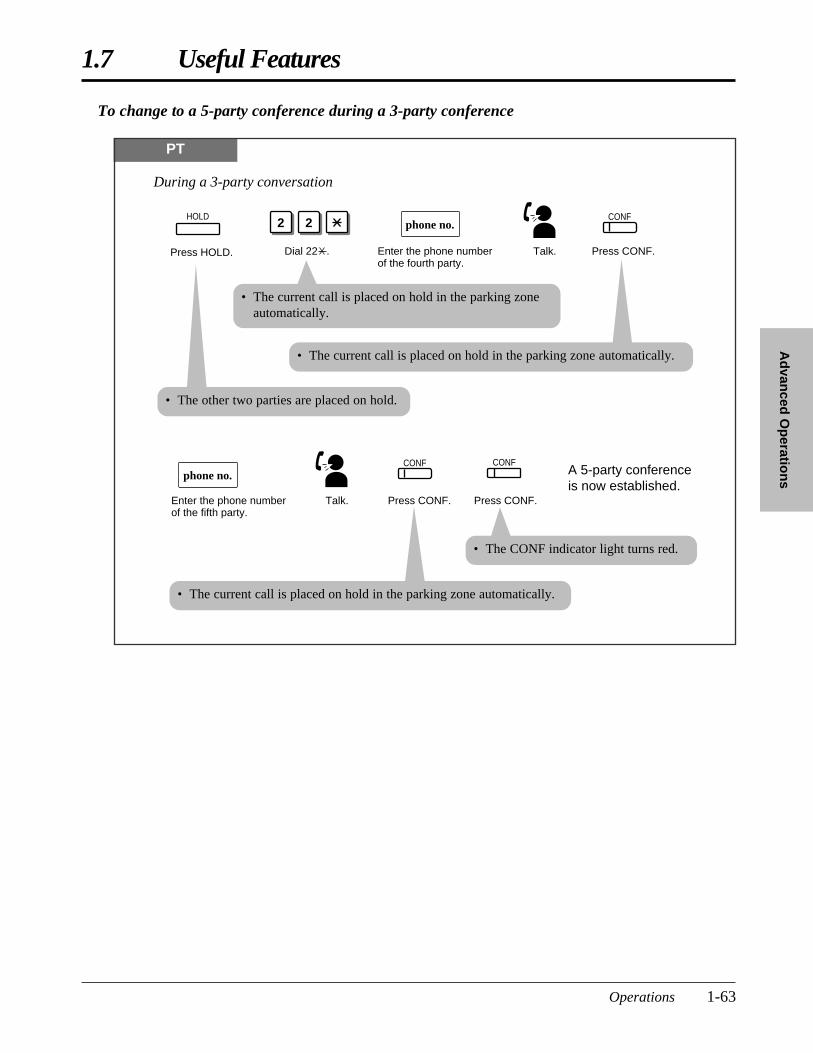
1.7 Useful Features
Operations 1-63
Ad
vanced
Op
eration
s
PT
During a 3-party conversation
Press CONF.
CONF
Press HOLD.
HOLD2 2
Dial 22 . Enter the phone number of the fourth party.
Talk.
phone no.
Enter the phone number of the fifth party.
Talk.
phone no.
Press CONF.
Press CONF.
A 5-party conference is now established.
CONF
CONF
• The other two parties are placed on hold.
• The CONF indicator light turns red.
To change to a 5-party conference during a 3-party conference
• The current call is placed on hold in the parking zoneautomatically.
• The current call is placed on hold in the parking zone automatically.
• The current call is placed on hold in the parking zone automatically.
PSQX1709ZA-05.QX 99.10.15 9:58 AM Page 63
1.7 Useful Features
1-64 Operations
• System programming is required to execute this feature.• Up to 2 exchange lines can join a conference.• When a 5-party conference is changed to a 4-party conference, a confirmation tone is sent to
all parties. The tone can be disabled.• A 3-party conference between 3 extensions cannot be changed to a 5-party conference. (The
HOLD button cannot be used.)• When a 5-party conference is established, a confirmation tone is sent to all parties. The tone
can be disabled.• More than one 5-party conference cannot be established at the same time.• The Unattended Conference and Executive Busy Override features are not available during a
5-party conference.• During a 5-party conference, the Call Park feature cannot be used by another extension.• If parked calls are not retrieved within 5 minutes during a 5-party conference, ringing or an
alarm tone will be heard (Call Park Recall).• When the extension who started the 5-party conference goes on-hook, the 5-party
conference is terminated.• When an incoming call is received, a Call Waiting tone is heard. You can answer the call
after leaving the conference by going off-hook.• This feature cannot be used with a single line telephone.
• 1.3 Making Calls, “Interrupting an Existing Call (Executive Busy Override)”• 1.5 During a Conversation, “Call Waiting”• 1.7 Useful Features, “Conference (3-party)”• 1.7 Useful Features, “Conference, Unattended”• See the Installation Manual, Section 3, “Conference (5-party)”.
SLT
PT
PT
PTPT
PTPT
PT
PT
PTPTPT
☞
!!
PSQX1709ZA-05.QX 99.10.15 9:58 AM Page 64
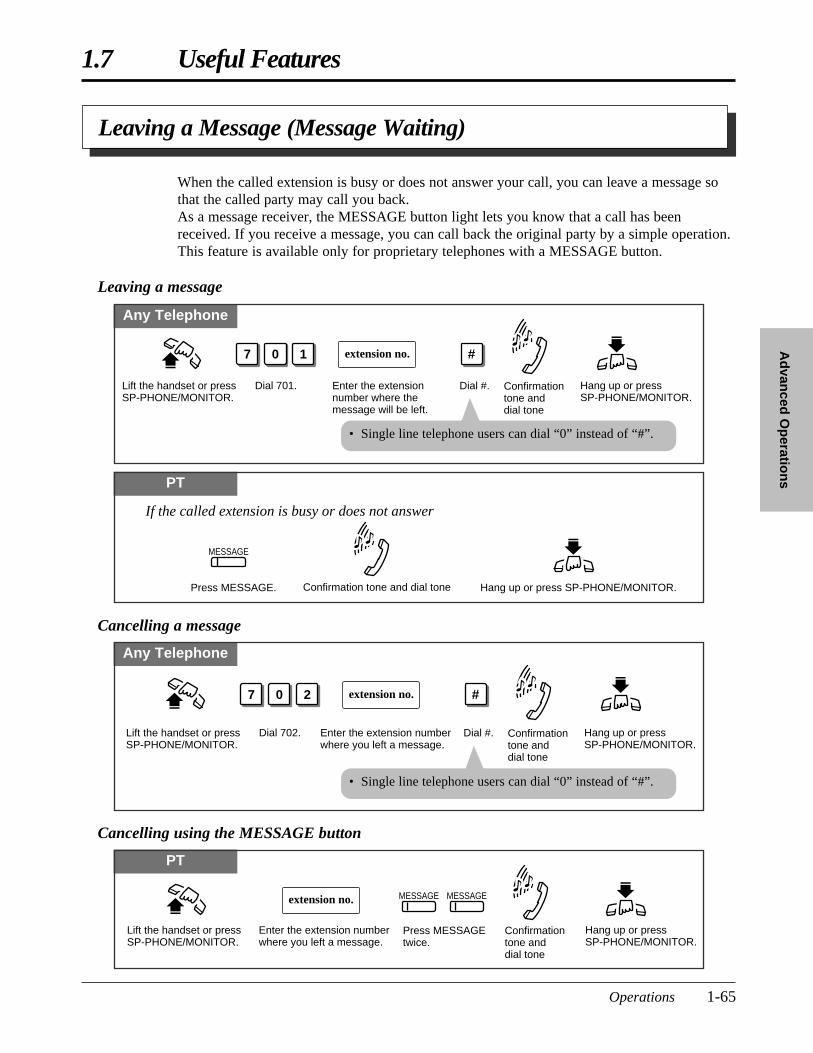
1.7 Useful Features
Operations 1-65
Ad
vanced
Op
eration
s
Leaving a Message (Message Waiting)
When the called extension is busy or does not answer your call, you can leave a message sothat the called party may call you back.As a message receiver, the MESSAGE button light lets you know that a call has beenreceived. If you receive a message, you can call back the original party by a simple operation.This feature is available only for proprietary telephones with a MESSAGE button.
Leaving a message
Any Telephone
Dial 701. Enter the extension number where the message will be left.
Dial #.
7 0 1 extension no.
Lift the handset or press SP-PHONE/MONITOR.
Hang up or press SP-PHONE/MONITOR.
Confirmation tone and dial tone
#
Any Telephone
Dial 702. Enter the extension number where you left a message.
Dial #.
7 0 2 extension no.
Lift the handset or press SP-PHONE/MONITOR.
Hang up or press SP-PHONE/MONITOR.
Confirmation tone and dial tone
#
PT
Press MESSAGE twice.
MESSAGE MESSAGE
Enter the extension number where you left a message.
extension no.
Lift the handset or press SP-PHONE/MONITOR.
Hang up or press SP-PHONE/MONITOR.
Confirmation tone and dial tone
Cancelling a message
Cancelling using the MESSAGE button
PT
Press MESSAGE. Hang up or press SP-PHONE/MONITOR.
MESSAGE
Confirmation tone and dial tone
If the called extension is busy or does not answer
• Single line telephone users can dial “0” instead of “#”.
• Single line telephone users can dial “0” instead of “#”.
PSQX1709ZA-05.QX 99.10.15 9:58 AM Page 65
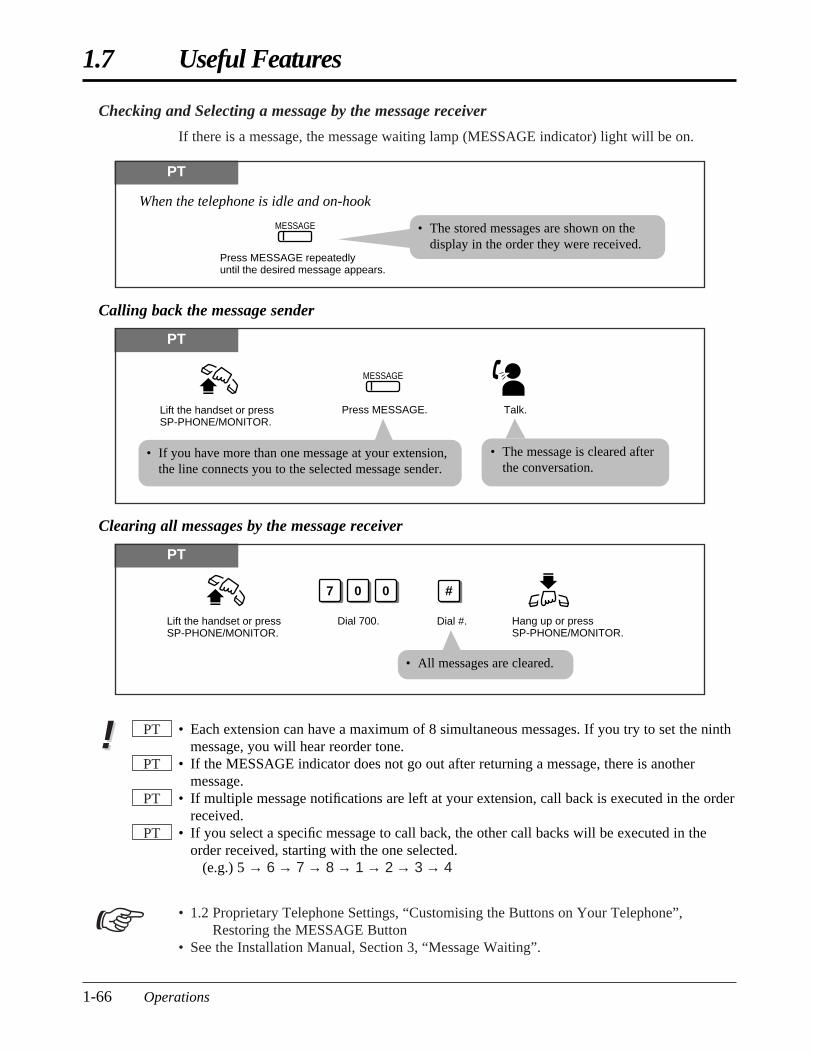
1.7 Useful Features
1-66 Operations
• If you have more than one message at your extension,the line connects you to the selected message sender.
• The message is cleared afterthe conversation.
Calling back the message sender
Clearing all messages by the message receiver
PT
Press MESSAGE.
MESSAGE
Lift the handset or press SP-PHONE/MONITOR.
Talk.
• All messages are cleared.
PT
Dial 700. Dial #.
7 0 0
Lift the handset or press SP-PHONE/MONITOR.
Hang up or press SP-PHONE/MONITOR.
#
• Each extension can have a maximum of 8 simultaneous messages. If you try to set the ninthmessage, you will hear reorder tone.
• If the MESSAGE indicator does not go out after returning a message, there is anothermessage.
• If multiple message notifications are left at your extension, call back is executed in the orderreceived.
• If you select a specific message to call back, the other call backs will be executed in theorder received, starting with the one selected.
(e.g.) 5 → 6 → 7 → 8 → 1 → 2 → 3 → 4
• 1.2 Proprietary Telephone Settings, “Customising the Buttons on Your Telephone”,Restoring the MESSAGE Button
• See the Installation Manual, Section 3, “Message Waiting”.
PT
PT
PT
PT!!
☞
Checking and Selecting a message by the message receiver
If there is a message, the message waiting lamp (MESSAGE indicator) light will be on.
PT
Press MESSAGE repeatedly until the desired message appears.
MESSAGE
When the telephone is idle and on-hook
• The stored messages are shown on thedisplay in the order they were received.
PSQX1709ZA-05.QX 99.10.15 9:58 AM Page 66
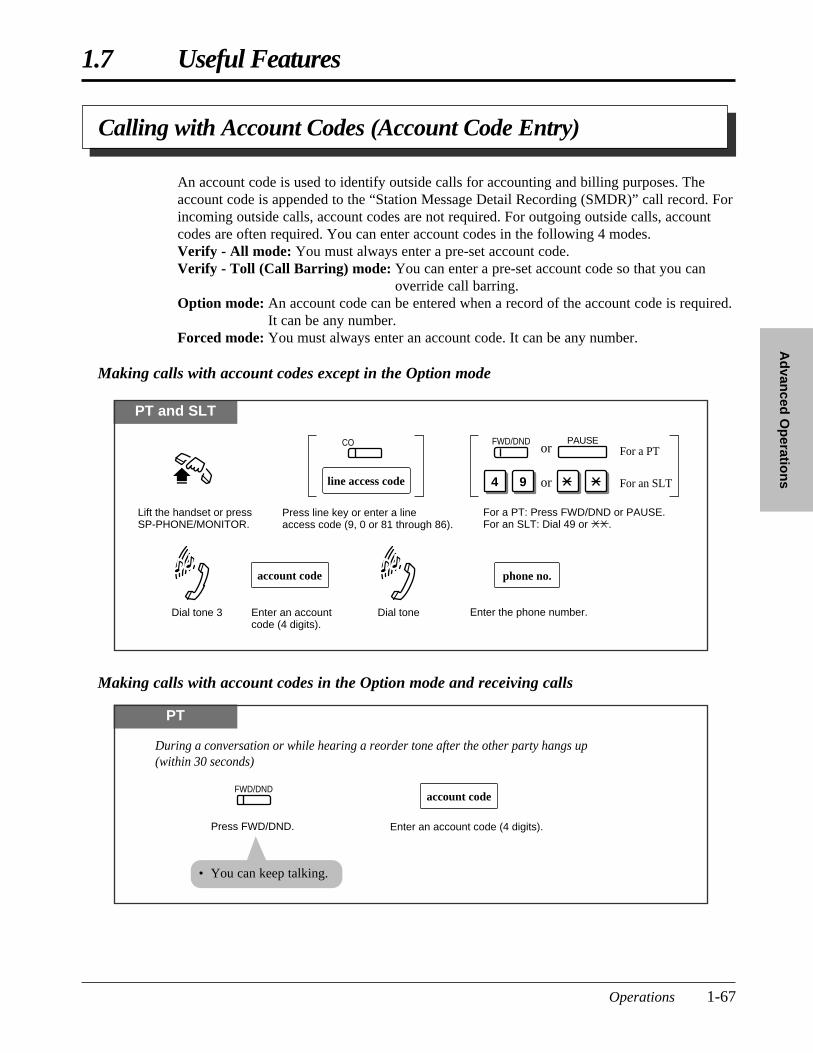
1.7 Useful Features
Operations 1-67
Ad
vanced
Op
eration
s
PT
account code
Enter an account code (4 digits).Press FWD/DND.
During a conversation or while hearing a reorder tone after the other party hangs up (within 30 seconds)
FWD/DND
• You can keep talking.
Making calls with account codes in the Option mode and receiving calls
Calling with Account Codes (Account Code Entry)
An account code is used to identify outside calls for accounting and billing purposes. Theaccount code is appended to the “Station Message Detail Recording (SMDR)” call record. Forincoming outside calls, account codes are not required. For outgoing outside calls, accountcodes are often required. You can enter account codes in the following 4 modes.Verify - All mode: You must always enter a pre-set account code.Verify - Toll (Call Barring) mode: You can enter a pre-set account code so that you can
override call barring.Option mode: An account code can be entered when a record of the account code is required.
It can be any number.Forced mode: You must always enter an account code. It can be any number.
Making calls with account codes except in the Option mode
PT and SLT
account code
Enter an account code (4 digits).
Dial tone
For a PT: Press FWD/DND or PAUSE.For an SLT: Dial 49 or .
Lift the handset or press SP-PHONE/MONITOR.
Press line key or enter a line access code (9, 0 or 81 through 86).
Enter the phone number.
phone no.
line access code
CO
For an SLT
For a PT
4 9 or
orPAUSEFWD/DND
Dial tone 3
PSQX1709ZA-05.QX 99.10.15 9:58 AM Page 67

1.7 Useful Features
1-68 Operations
• In the Verify-All mode, you must always enter a pre-set account code when making anoutside call. In the Verify-Toll (Call Barring) mode, you can enter a pre-set account codeonly when you need to override call barring.
• You do not need to make an account code entry when receiving incoming calls.• You can clear and re-enter a number by pressing “ ” or the FWD/DND button while
entering an account code.• An account code can be stored into Auto Dialling (“One-Touch Dialling”, “Pickup
Dialling”, “System/Personal Speed Dialling”, “Call Forwarding — to Exchange Line”). Tostore an account code, “ ” must be entered before the account code.
Example (Pickup Dialling):— [Off-hook] [742] [Line Access Code] [ ] [Account Code] [Phone Number] [#]
[On-hook]• If the account code entered does not match the pre-set account code in the verify-all mode,
when making an outside call, reorder tone is heard.• An account code has 4 digits (0 through 9). RECALL, PAUSE, etc. cannot be used.
• See the Installation Manual, Section 3, “Station Message Detail Recording (SMDR)”.• See the Installation Manual, Section 3, “Account Code Entry”.• See the Installation Manual, Section 3, “Call Barring Override by Account Codes”.
PT
!!
☞
PSQX1709ZA-05.QX 99.10.15 9:58 AM Page 68
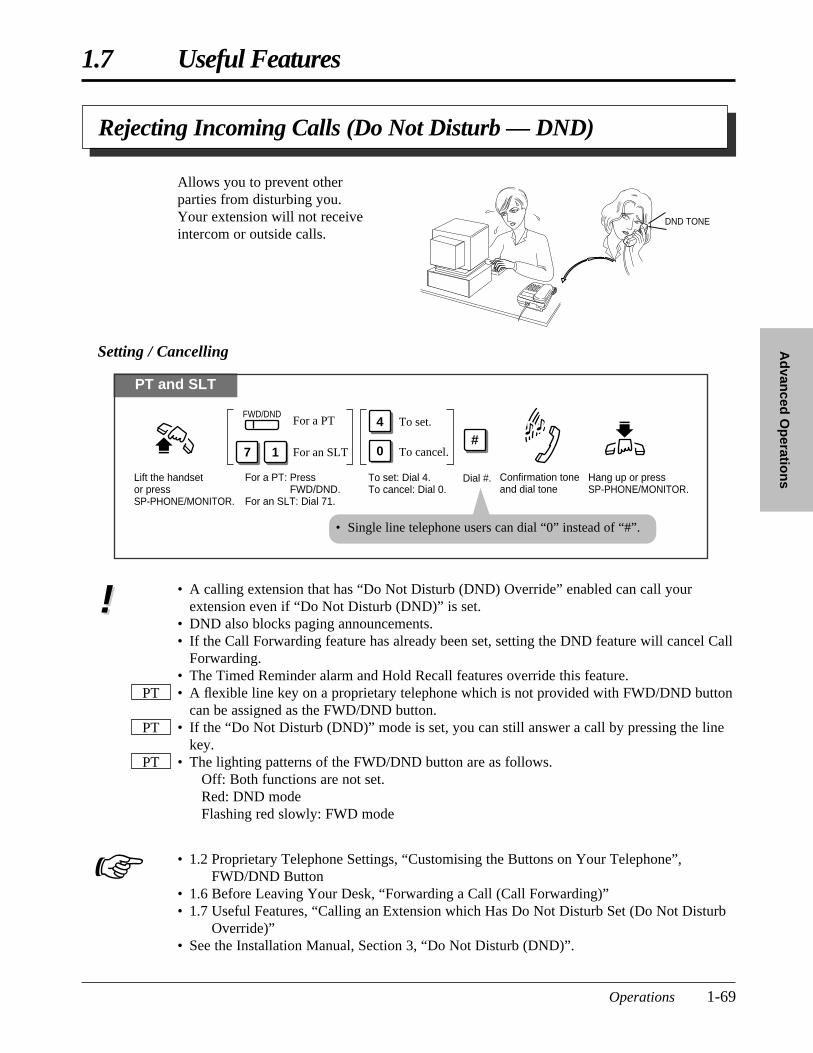
1.7 Useful Features
Operations 1-69
Ad
vanced
Op
eration
s
• A calling extension that has “Do Not Disturb (DND) Override” enabled can call yourextension even if “Do Not Disturb (DND)” is set.
• DND also blocks paging announcements.• If the Call Forwarding feature has already been set, setting the DND feature will cancel Call
Forwarding.• The Timed Reminder alarm and Hold Recall features override this feature.• A flexible line key on a proprietary telephone which is not provided with FWD/DND button
can be assigned as the FWD/DND button.• If the “Do Not Disturb (DND)” mode is set, you can still answer a call by pressing the line
key.• The lighting patterns of the FWD/DND button are as follows.
Off: Both functions are not set.Red: DND modeFlashing red slowly: FWD mode
• 1.2 Proprietary Telephone Settings, “Customising the Buttons on Your Telephone”,FWD/DND Button
• 1.6 Before Leaving Your Desk, “Forwarding a Call (Call Forwarding)”• 1.7 Useful Features, “Calling an Extension which Has Do Not Disturb Set (Do Not Disturb
Override)”• See the Installation Manual, Section 3, “Do Not Disturb (DND)”.
PT
PT
PT
!!
☞
Rejecting Incoming Calls (Do Not Disturb — DND)
Allows you to prevent otherparties from disturbing you.Your extension will not receiveintercom or outside calls.
PT and SLT
For a PT: Press FWD/DND.For an SLT: Dial 71.
Dial #.
7 1 For an SLT
For a PTFWD/DND
Lift the handset or press SP-PHONE/MONITOR.
Hang up or press SP-PHONE/MONITOR.
Confirmation tone and dial tone
To set: Dial 4.To cancel: Dial 0.
4
0
To set.
To cancel.#
• Single line telephone users can dial “0” instead of “#”.
DND TONE
Setting / Cancelling
PSQX1709ZA-05.QX 99.10.15 9:58 AM Page 69
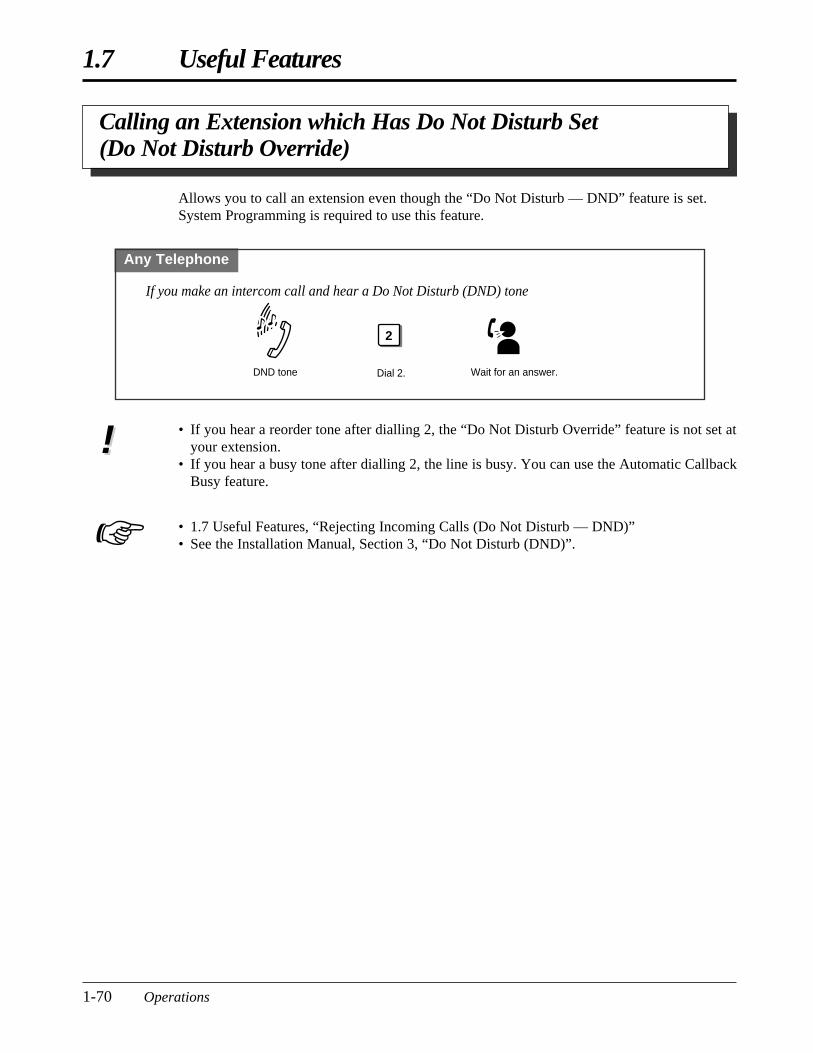
1.7 Useful Features
1-70 Operations
Any Telephone
• If you hear a reorder tone after dialling 2, the “Do Not Disturb Override” feature is not set atyour extension.
• If you hear a busy tone after dialling 2, the line is busy. You can use the Automatic CallbackBusy feature.
• 1.7 Useful Features, “Rejecting Incoming Calls (Do Not Disturb — DND)”• See the Installation Manual, Section 3, “Do Not Disturb (DND)”.
Allows you to call an extension even though the “Do Not Disturb — DND” feature is set.System Programming is required to use this feature.
Dial 2.
2
Wait for an answer.DND tone
If you make an intercom call and hear a Do Not Disturb (DND) tone
Calling an Extension which Has Do Not Disturb Set (Do Not Disturb Override)
!!
☞
PSQX1709ZA-05.QX 99.10.15 9:58 AM Page 70

1.7 Useful Features
Operations 1-71
Ad
vanced
Op
eration
s• A secret code, “[” or “]” (pressing the INTERCOM button), is counted as 1 digit.• You can conceal one or more parts of a telephone number.
• If the phone number “901344-853[506]” has been stored, the display will show thefollowing when the call is made.
• You can program whether to print out the concealed number(s) on the call logging throughSystem Programming.
• Do not press the INTERCOM button before a line access number (9, 0 or 81 through 86).
• 1.2 Proprietary Telephone Settings, “Customising the Buttons on Your Telephone”, One-Touch Dialling Button
• 1.3 Making Calls, “Dialling by Simply Pressing a Button (One-Touch Dialling)”• 1.3 Making Calls, “Dialling using System Speed Dialling (System Speed Dialling)”• See the Installation Manual, Section 3, “Secret Dialling”.
PT
PT
01344-853...
PTPTPT!!
☞
Secret Dialling
Allows you to conceal all or part(s) of a “System Speed Dialling number” or “One-TouchDialling number” assigned to a flexible line key, both which normally appear on the display.
PT
Press INTERCOM before and after the part you wish to conceal.
INTERCOM
When storing the phone number
<PT Display Example>
— “506” is not shown on the display when you dial.901344-853[506]
PSQX1709ZA-05.QX 99.10.15 9:58 AM Page 71
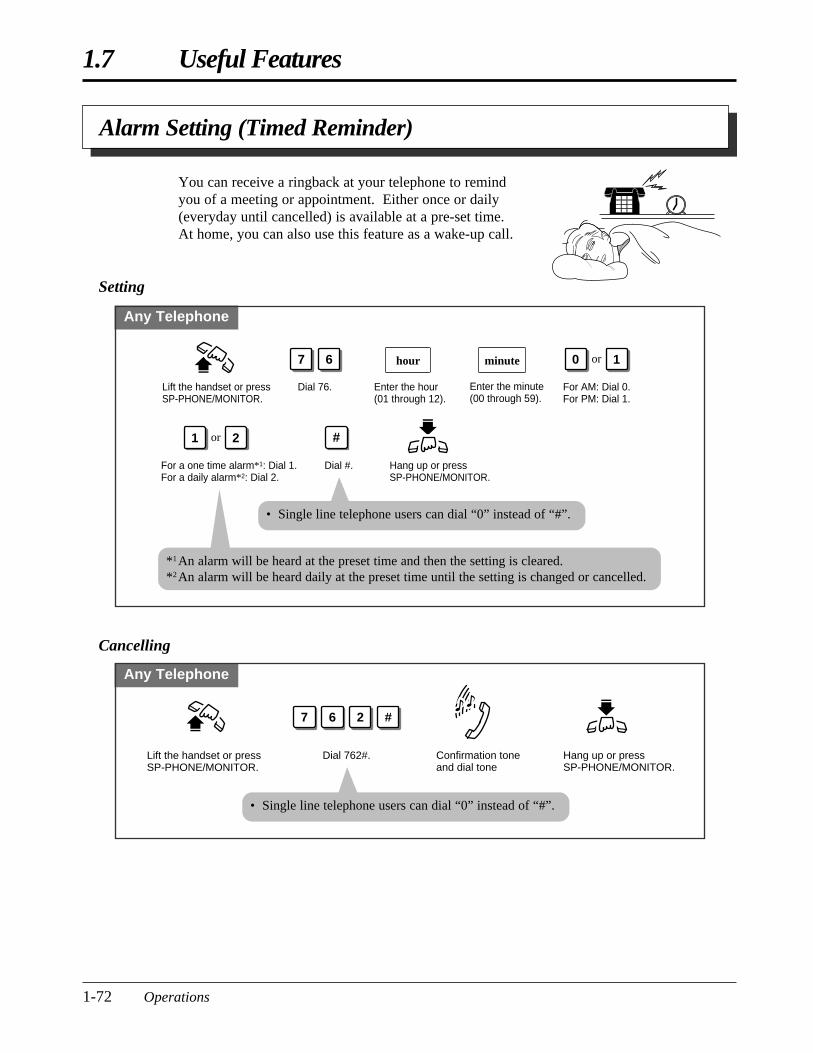
1.7 Useful Features
1-72 Operations
Cancelling
Any Telephone
Dial 762#.
7 6 2 #
Lift the handset or press SP-PHONE/MONITOR.
Hang up or press SP-PHONE/MONITOR.
Confirmation tone and dial tone
• Single line telephone users can dial “0” instead of “#”.
Alarm Setting (Timed Reminder)
You can receive a ringback at your telephone to remindyou of a meeting or appointment. Either once or daily(everyday until cancelled) is available at a pre-set time. At home, you can also use this feature as a wake-up call.
Setting
Any Telephone
Lift the handset or press SP-PHONE/MONITOR.
Dial 76.
Hang up or press SP-PHONE/MONITOR.
Enter the hour (01 through 12).
Dial #.
#
hour minute
For AM: Dial 0. For PM: Dial 1.
7 6 0 1or
For a one time alarm*1: Dial 1. For a daily alarm*2: Dial 2.
1 2or
Enter the minute (00 through 59).
*1An alarm will be heard at the preset time and then the setting is cleared.*2An alarm will be heard daily at the preset time until the setting is changed or cancelled.
• Single line telephone users can dial “0” instead of “#”.
PSQX1709ZA-05.QX 99.10.15 9:58 AM Page 72
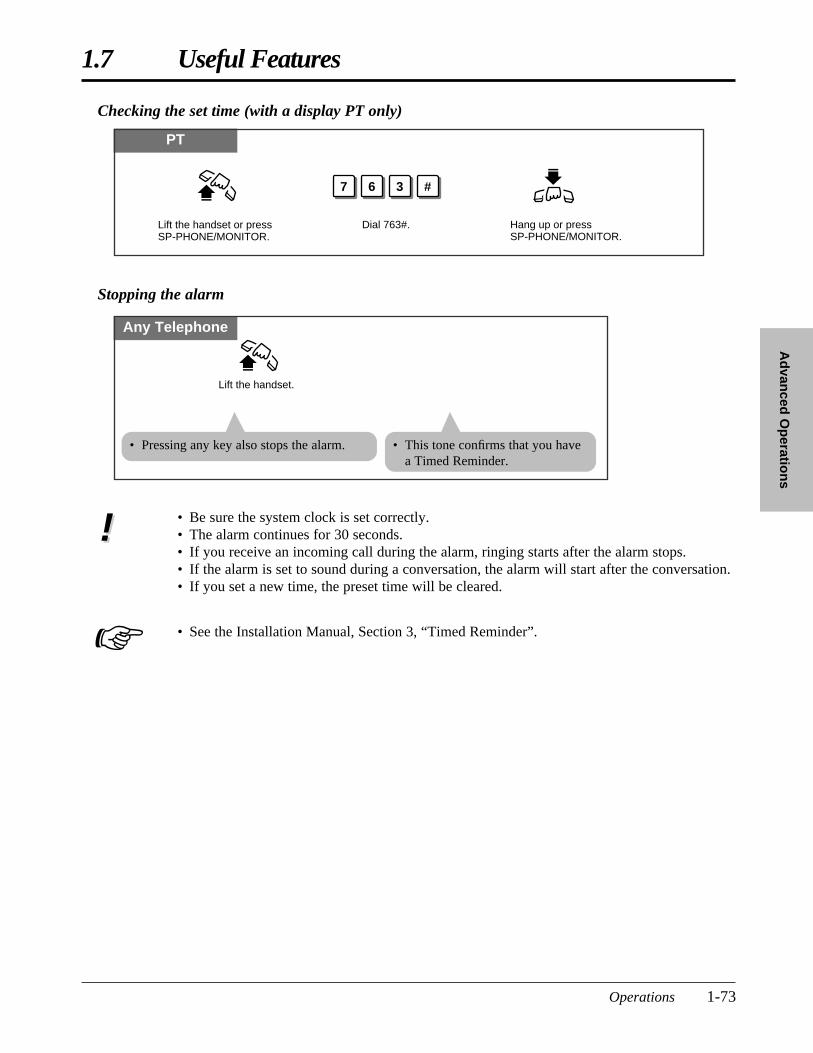
1.7 Useful Features
Operations 1-73
Ad
vanced
Op
eration
s
• Be sure the system clock is set correctly.• The alarm continues for 30 seconds.• If you receive an incoming call during the alarm, ringing starts after the alarm stops.• If the alarm is set to sound during a conversation, the alarm will start after the conversation.• If you set a new time, the preset time will be cleared.
• See the Installation Manual, Section 3, “Timed Reminder”.
Stopping the alarm
Any Telephone
Lift the handset.
• Pressing any key also stops the alarm.
!!
PT
Dial 763#.
7 6 3 #
Lift the handset or press SP-PHONE/MONITOR.
Hang up or press SP-PHONE/MONITOR.
Checking the set time (with a display PT only)
☞
• This tone confirms that you havea Timed Reminder.
PSQX1709ZA-05.QX 99.10.15 9:58 AM Page 73
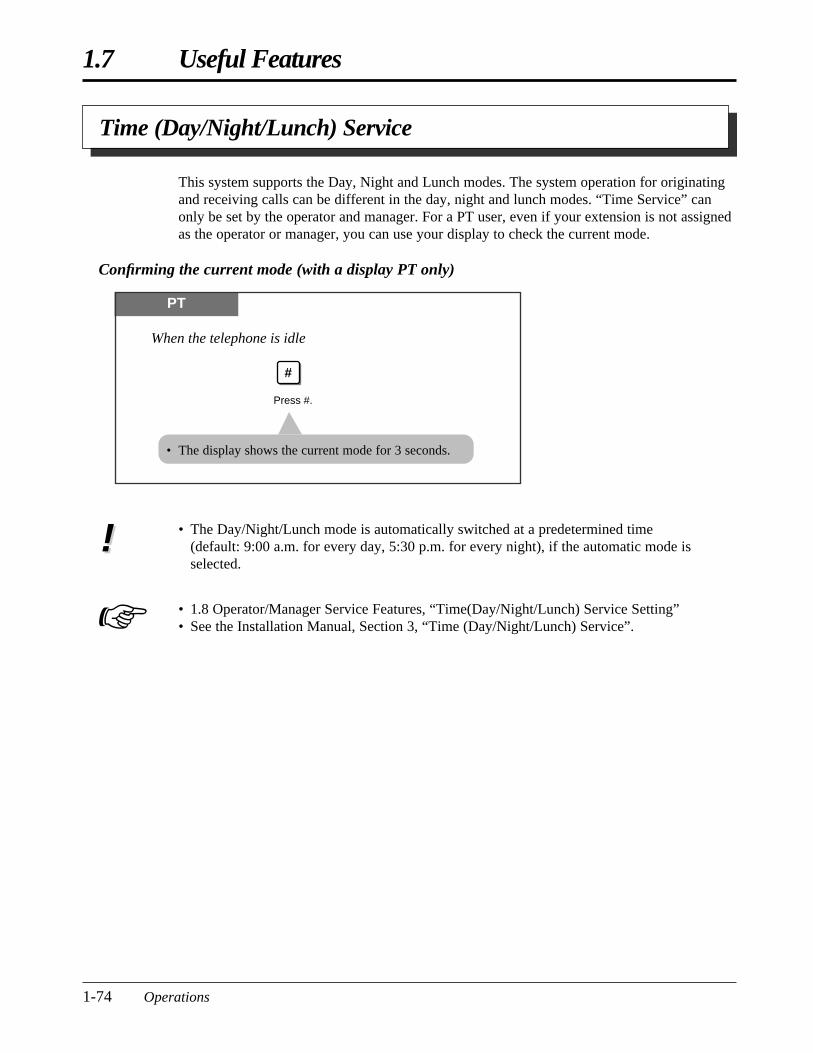
1.7 Useful Features
1-74 Operations
• The Day/Night/Lunch mode is automatically switched at a predetermined time(default: 9:00 a.m. for every day, 5:30 p.m. for every night), if the automatic mode isselected.
• 1.8 Operator/Manager Service Features, “Time(Day/Night/Lunch) Service Setting”• See the Installation Manual, Section 3, “Time (Day/Night/Lunch) Service”.
This system supports the Day, Night and Lunch modes. The system operation for originatingand receiving calls can be different in the day, night and lunch modes. “Time Service” canonly be set by the operator and manager. For a PT user, even if your extension is not assignedas the operator or manager, you can use your display to check the current mode.
Confirming the current mode (with a display PT only)
PT
Press #.
When the telephone is idle
#
• The display shows the current mode for 3 seconds.
!!
☞
Time (Day/Night/Lunch) Service
PSQX1709ZA-05.QX 99.10.15 9:58 AM Page 74

1.7 Useful Features
Operations 1-75
Ad
vanced
Op
eration
s
Joining or Leaving a Call Distribution Group (Log-In/Log-Out)
Allows you to assign the Log-In mode or Log-Out modewithin a hunting, DISA ring or UCD group. When inLog-Out mode, you can leave the group temporarily,preventing group calls from ringing at your extension.The lighting patterns of the Log-In/Log-Out button on aproprietary telephone and status are as follows.
Off: Log-In modeRed: Log-Out mode
Log-In / Log-Out (Using the Log-In/Log-Out button)
PT
Lift the handset or press SP-PHONE/MONITOR.
Hang up or press SP-PHONE/MONITOR.
Press the flexible button assigned as the Log-In/Log-Out button.
Confirmation tone and dial tone
• The indicator light turns off in Log-In mode or turns steady red in Log-Out mode.
Log-In / Log-Out (Using the feature number)
Any Telephone
For Log-In mode: Dial 7360#.For Log-Out mode: Dial 7361#.
7 3 6 # To Log-In.
7 3 6
0
1 # To Log-Out.
Lift the handset or press SP-PHONE/MONITOR.
Hang up or press SP-PHONE/MONITOR.
Confirmation tone and dial tone
• The default is “Log-In” mode.• There should be at least one extension in the group that is logged-in.• The last member of an extension group cannot log out.• The Log-In/Log-Out button can be assigned to a flexible line key.
• 1.2 Proprietary Telephone Settings, “Customising the Buttons on Your Telephone”, Log-In/Log-Out Button
• See the Installation Manual, Section 3, “Extension Hunting”.• See the Installation Manual, Section 3, “Direct Inward System Access (DISA)”.• See the Installation Manual, Section 3, “Uniform Call Distribution (UCD)”.• See the Installation Manual, Section 3, “Log-In/Log-Out”.
PT
!!
☞
• Single line telephone users can dial “0” instead of “#”.
Log-In
Log-Out
UCD GroupHunting Group
DISA Ring Group
PSQX1709ZA-06.QX 99.10.15 9:59 AM Page 75
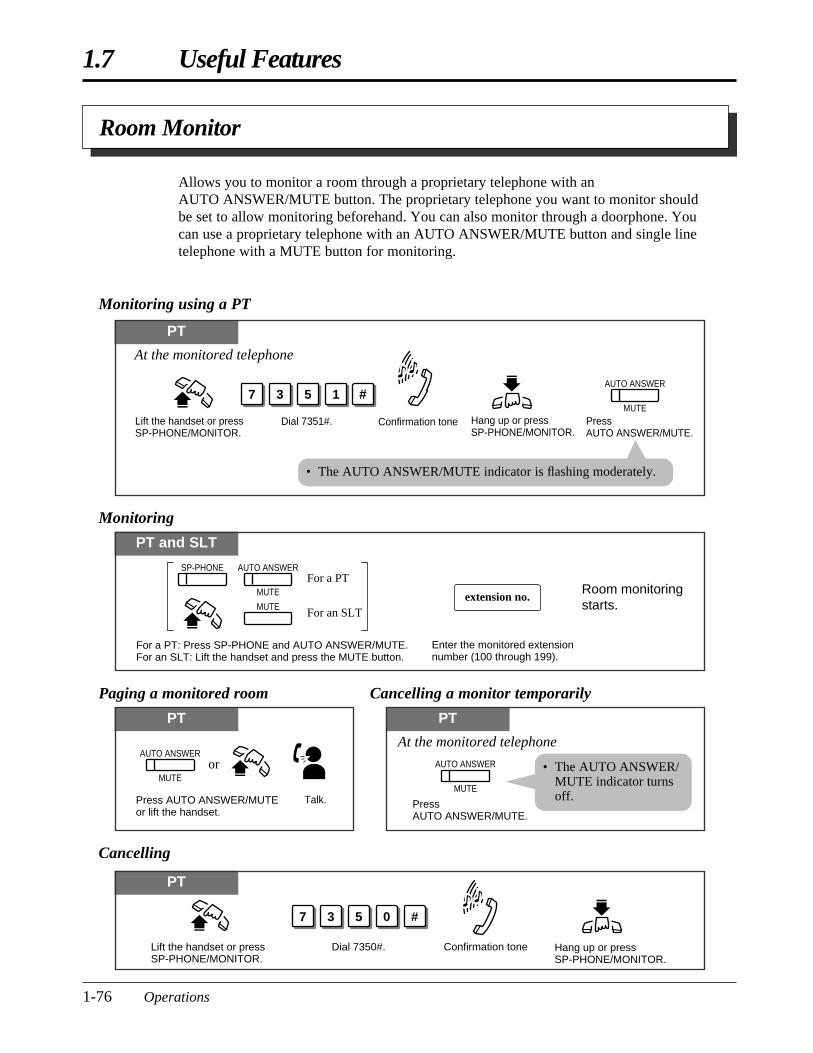
Cancelling a monitor temporarily
1.7 Useful Features
1-76 Operations
Cancelling
PT
Dial 7350#.
7 3 5 0 #
Lift the handset or press SP-PHONE/MONITOR.
Hang up or press SP-PHONE/MONITOR.
Confirmation tone
Room Monitor
Allows you to monitor a room through a proprietary telephone with anAUTO ANSWER/MUTE button. The proprietary telephone you want to monitor shouldbe set to allow monitoring beforehand. You can also monitor through a doorphone. Youcan use a proprietary telephone with an AUTO ANSWER/MUTE button and single linetelephone with a MUTE button for monitoring.
Monitoring using a PT
PT
Lift the handset or press SP-PHONE/MONITOR.
Press AUTO ANSWER/MUTE.
Dial 7351#.
AUTO ANSWER
MUTE
Confirmation tone Hang up or press SP-PHONE/MONITOR.
At the monitored telephone
5 137 #
• The AUTO ANSWER/MUTE indicator is flashing moderately.
PT and SLT
For a PT: Press SP-PHONE and AUTO ANSWER/MUTE.For an SLT: Lift the handset and press the MUTE button.
Enter the monitored extension number (100 through 199).
extension no.Room monitoring starts.
AUTO ANSWER
MUTE
SP-PHONEFor a PT
MUTE For an SLT
PT
Press AUTO ANSWER/MUTE or lift the handset.
AUTO ANSWER
MUTEor
Talk.
Monitoring
Paging a monitored room
PT
Press AUTO ANSWER/MUTE.
AUTO ANSWER
MUTE
At the monitored telephone
• The AUTO ANSWER/MUTE indicator turnsoff.
PSQX1709ZA-06.QX 99.10.15 9:59 AM Page 76
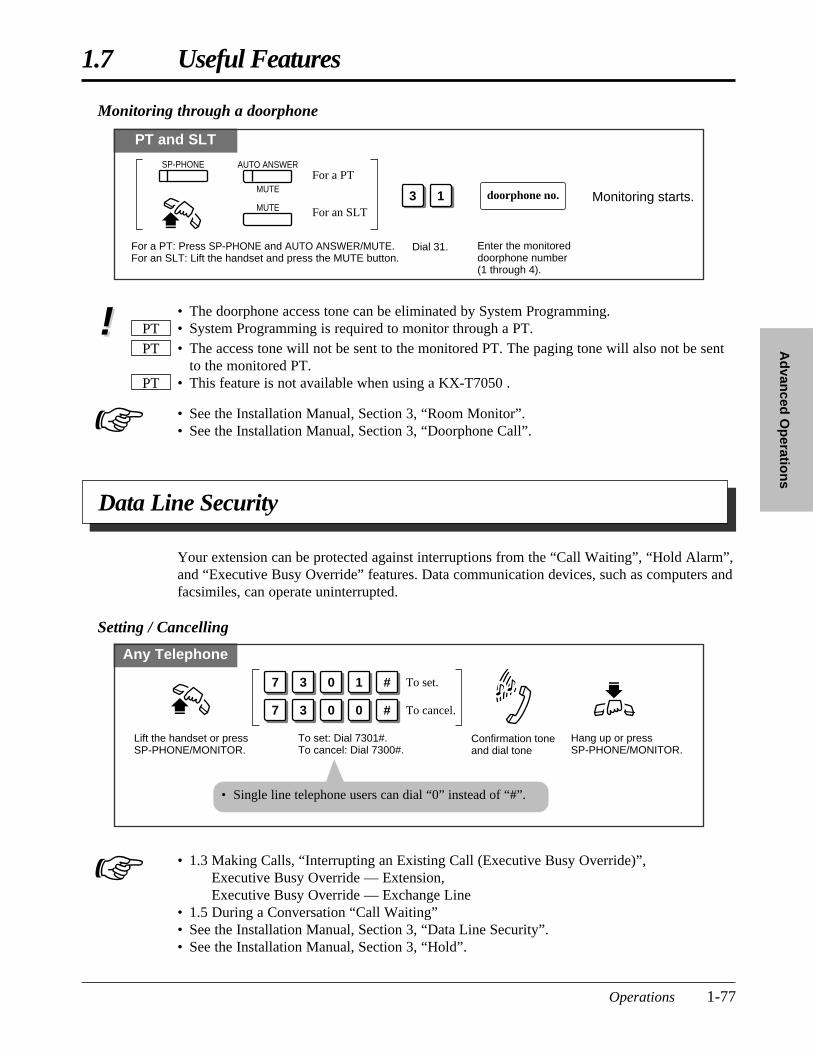
1.7 Useful Features
Operations 1-77
Ad
vanced
Op
eration
s
• The doorphone access tone can be eliminated by System Programming.• System Programming is required to monitor through a PT.• The access tone will not be sent to the monitored PT. The paging tone will also not be sent
to the monitored PT.• This feature is not available when using a KX-T7050 .
• See the Installation Manual, Section 3, “Room Monitor”.• See the Installation Manual, Section 3, “Doorphone Call”.
PT
PTPT
Monitoring through a doorphone
PT and SLT
For a PT: Press SP-PHONE and AUTO ANSWER/MUTE.For an SLT: Lift the handset and press the MUTE button.
Enter the monitored doorphone number (1 through 4).
doorphone no. Monitoring starts.3 1
Dial 31.
SP-PHONE AUTO ANSWER
MUTEFor a PT
MUTE For an SLT
!!
Data Line Security
• 1.3 Making Calls, “Interrupting an Existing Call (Executive Busy Override)”, Executive Busy Override — Extension,Executive Busy Override — Exchange Line
• 1.5 During a Conversation “Call Waiting”• See the Installation Manual, Section 3, “Data Line Security”.• See the Installation Manual, Section 3, “Hold”.
Your extension can be protected against interruptions from the “Call Waiting”, “Hold Alarm”,and “Executive Busy Override” features. Data communication devices, such as computers andfacsimiles, can operate uninterrupted.
Setting / Cancelling
Any Telephone
To set: Dial 7301#.To cancel: Dial 7300#.
7 3 0 1 # To set.
7 3 0 0 # To cancel.
Lift the handset or press SP-PHONE/MONITOR.
Hang up or press SP-PHONE/MONITOR.
Confirmation tone and dial tone
☞
☞
• Single line telephone users can dial “0” instead of “#”.
PSQX1709ZA-06.QX 99.10.15 9:59 AM Page 77
1.7 Useful Features
1-78 Operations
Parallel Connection of a Proprietary Telephone and Single LineTelephone (Parallelled Telephone Connection)
Any extension connected to extension ports 01 through 16 can be connected in parallel with aproprietary telephone and a single line telephone. In the event of a power failure, CO1 andCO4 can be accessed using the single line telephones that are connected in parallel with theproprietary telephones to extension ports 01 and 09 respectively. If the extension receives acall, ringing will be heard from the proprietary telephone and the single line telephone. Youcan answer the call by using either the proprietary telephone or the single line telephone. Ananswering machine, facsimile, MODEM (personal computer), etc., can be connected insteadof a single line telephone.System Programming is required to enable this feature.
• A proprietary telephone LCD will show you the status of the single line telephone.• The following features will not work with a single line telephone connected in parallel with
a proprietary telephone.Call SplittingExternal Feature AccessAccount code inputConferenceDoor opener while talking to the doorphonePickup dialling
• A single line telephone connected in parallel with a proprietary telephone cannot make a callin the following cases.— The proprietary telephone is set to the BGM mode.— The proprietary telephone is receiving a page through the built-in speaker.— The proprietary telephone is set to the PROGRAM mode.
• A single line telephone connected in parallel with a proprietary telephone will not ring in thefollowing cases.— The proprietary telephone is set to Handsfree Answerback.— The proprietary telephone is set to “Voice Call” in the Intercom Alert Assignment.
• See the Installation Manual, Section 3, “Parallelled Telephone Connection”.
SLT
SLT
SLTPT!!
Mixed Extension Dialling
Any telephone, either a KX-T7130/KX-T7020/KX-T7050, single line rotary phone (10 pps,20 pps) or single line touch tone telephone, may be used as an extension for the system.
☞
PSQX1709ZA-06.QX 99.10.15 9:59 AM Page 78
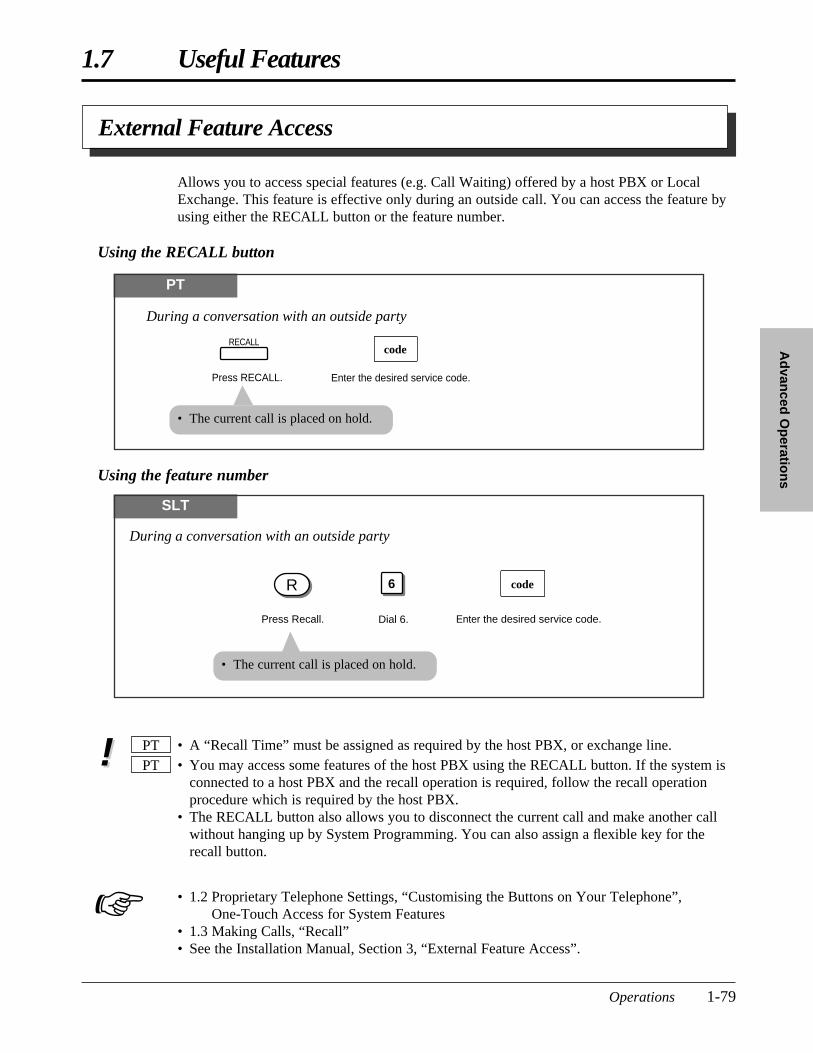
1.7 Useful Features
Operations 1-79
Ad
vanced
Op
eration
s
External Feature Access
• A “Recall Time” must be assigned as required by the host PBX, or exchange line.• You may access some features of the host PBX using the RECALL button. If the system is
connected to a host PBX and the recall operation is required, follow the recall operationprocedure which is required by the host PBX.
• The RECALL button also allows you to disconnect the current call and make another callwithout hanging up by System Programming. You can also assign a flexible key for therecall button.
• 1.2 Proprietary Telephone Settings, “Customising the Buttons on Your Telephone”, One-Touch Access for System Features
• 1.3 Making Calls, “Recall”• See the Installation Manual, Section 3, “External Feature Access”.
PTPT
Allows you to access special features (e.g. Call Waiting) offered by a host PBX or LocalExchange. This feature is effective only during an outside call. You can access the feature byusing either the RECALL button or the feature number.
Using the RECALL button
PT
Press RECALL. Enter the desired service code.
RECALLcode
During a conversation with an outside party
• The current call is placed on hold.
SLT
Enter the desired service code.
code
During a conversation with an outside party
Dial 6.
6
Press Recall.
R
• The current call is placed on hold.
Using the feature number
!!
☞
PSQX1709ZA-06.QX 99.10.15 9:59 AM Page 79
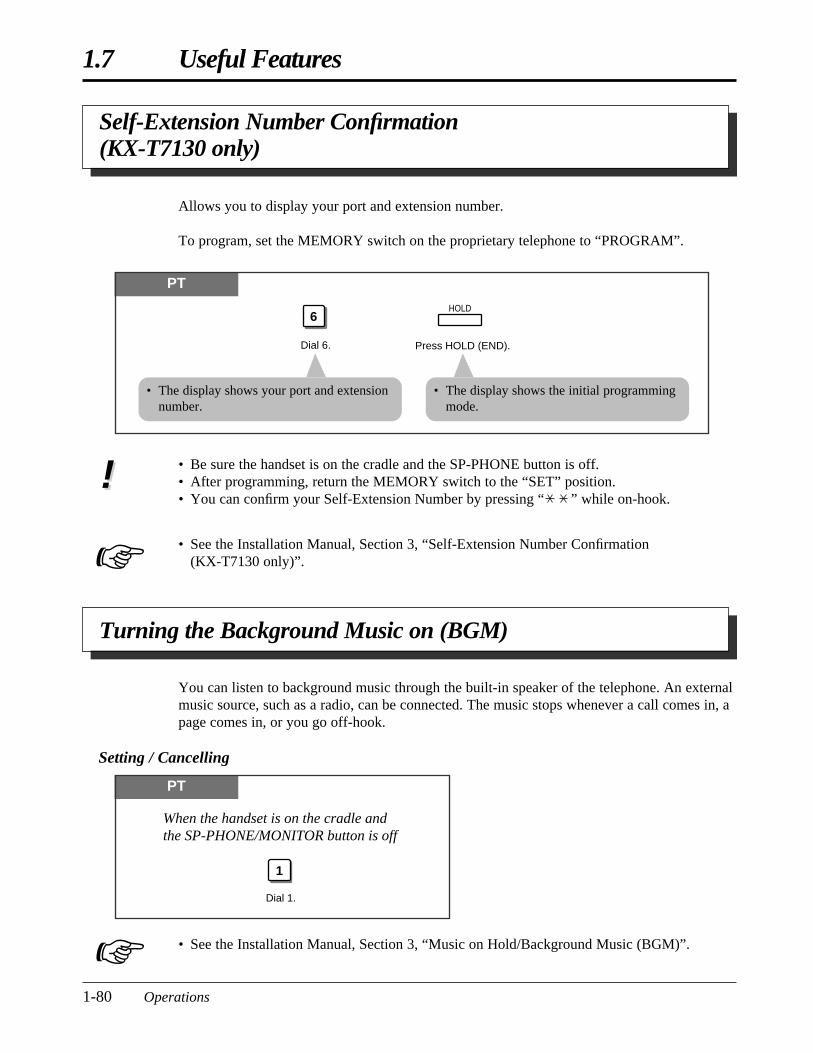
• See the Installation Manual, Section 3, “Music on Hold/Background Music (BGM)”.
1.7 Useful Features
1-80 Operations
Self-Extension Number Confirmation(KX-T7130 only)
• Be sure the handset is on the cradle and the SP-PHONE button is off.• After programming, return the MEMORY switch to the “SET” position.• You can confirm your Self-Extension Number by pressing “ ” while on-hook.
• See the Installation Manual, Section 3, “Self-Extension Number Confirmation (KX-T7130 only)”.
Allows you to display your port and extension number.
To program, set the MEMORY switch on the proprietary telephone to “PROGRAM”.
!!
PT
Dial 6.
6
Press HOLD (END).
HOLD
• The display shows the initial programmingmode.
• The display shows your port and extensionnumber.
Turning the Background Music on (BGM)
You can listen to background music through the built-in speaker of the telephone. An externalmusic source, such as a radio, can be connected. The music stops whenever a call comes in, apage comes in, or you go off-hook.
Setting / Cancelling
PT
Dial 1.
1
When the handset is on the cradle and the SP-PHONE/MONITOR button is off
☞
☞
PSQX1709ZA-06.QX 99.10.15 9:59 AM Page 80
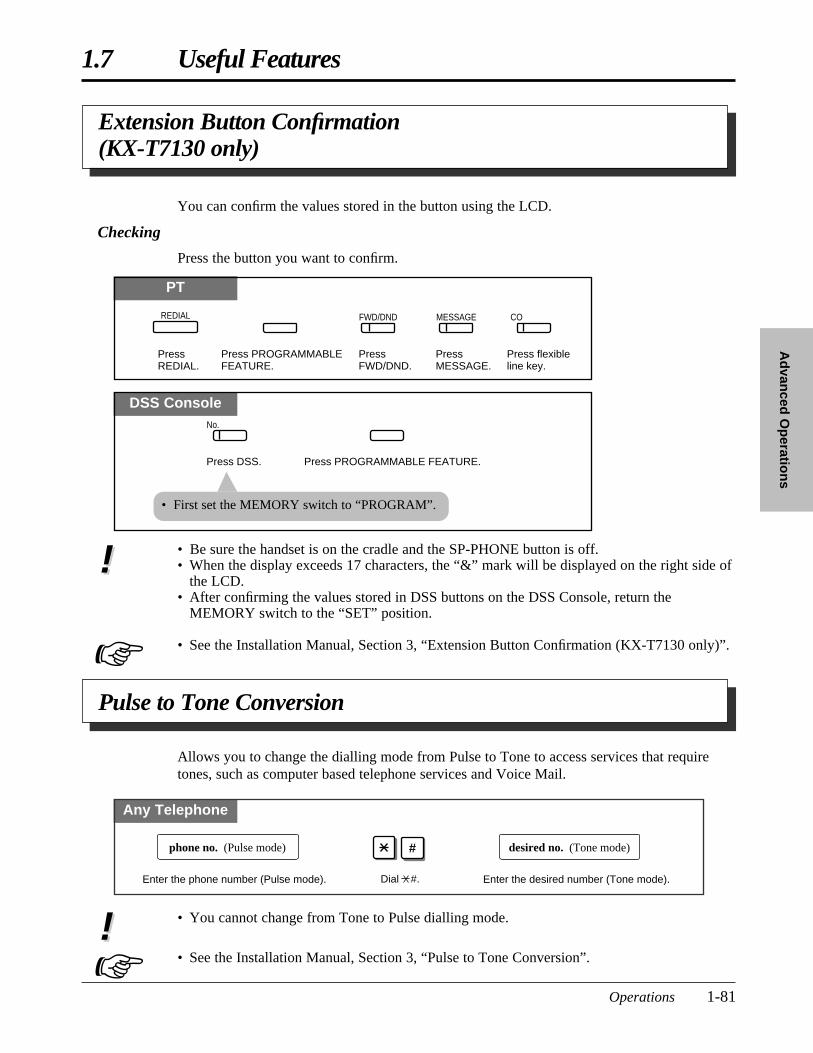
1.7 Useful Features
Operations 1-81
Ad
vanced
Op
eration
s
Extension Button Confirmation(KX-T7130 only)
You can confirm the values stored in the button using the LCD.
Checking
Press the button you want to confirm.
PT
DSS Console
• Be sure the handset is on the cradle and the SP-PHONE button is off.• When the display exceeds 17 characters, the “&” mark will be displayed on the right side of
the LCD.• After confirming the values stored in DSS buttons on the DSS Console, return the
MEMORY switch to the “SET” position.
• See the Installation Manual, Section 3, “Extension Button Confirmation (KX-T7130 only)”.
Press PROGRAMMABLEFEATURE.
Press FWD/DND.
Press REDIAL.
Press flexible line key.
COREDIAL FWD/DND
Press MESSAGE.
MESSAGE
Press PROGRAMMABLE FEATURE.Press DSS.
No.
!!
Pulse to Tone Conversion
!! • You cannot change from Tone to Pulse dialling mode.
• See the Installation Manual, Section 3, “Pulse to Tone Conversion”.
Allows you to change the dialling mode from Pulse to Tone to access services that requiretones, such as computer based telephone services and Voice Mail.
Any Telephone
#
Dial #.Enter the phone number (Pulse mode).
phone no. (Pulse mode) desired no. (Tone mode)
Enter the desired number (Tone mode).
☞
☞
• First set the MEMORY switch to “PROGRAM”.
PSQX1709ZA-06.QX 99.10.15 9:59 AM Page 81
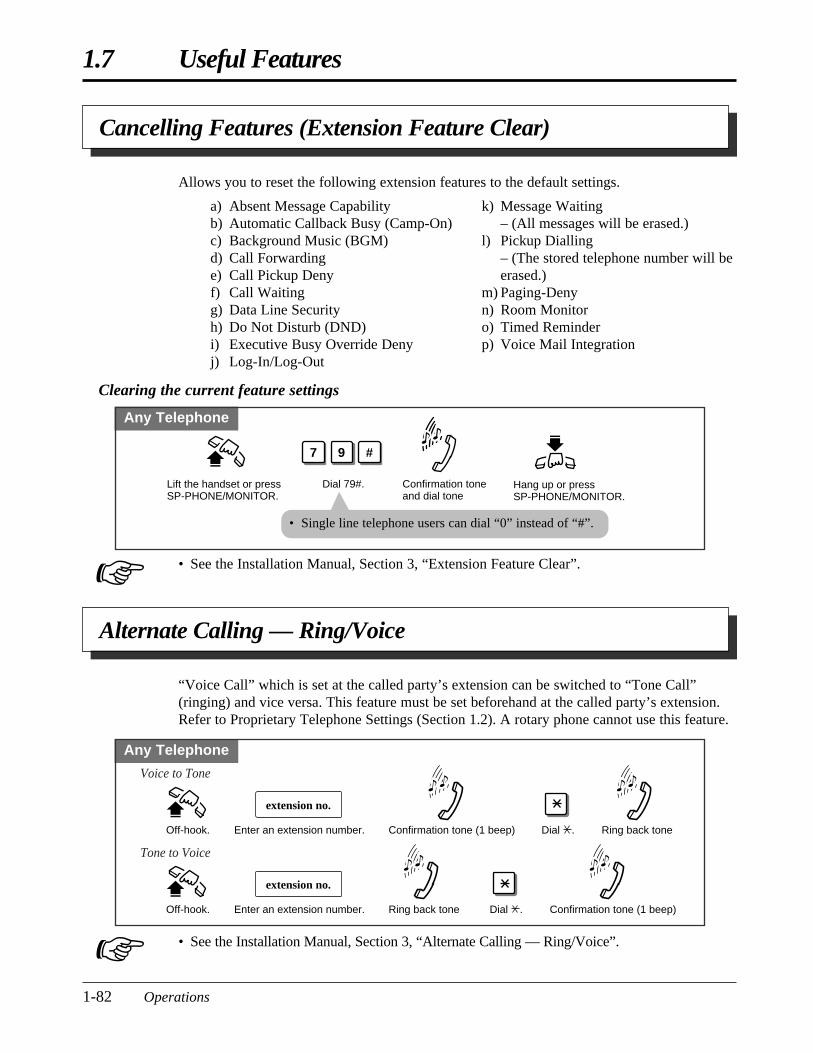
1.7 Useful Features
1-82 Operations
Cancelling Features (Extension Feature Clear)
Allows you to reset the following extension features to the default settings.
a) Absent Message Capabilityb) Automatic Callback Busy (Camp-On)c) Background Music (BGM)d) Call Forwardinge) Call Pickup Denyf) Call Waitingg) Data Line Securityh) Do Not Disturb (DND)i) Executive Busy Override Denyj) Log-In/Log-Out
k) Message Waiting – (All messages will be erased.)
l) Pickup Dialling – (The stored telephone number will beerased.)
m) Paging-Denyn) Room Monitoro) Timed Reminderp) Voice Mail Integration
Clearing the current feature settings
Any Telephone
Dial 79#.
7 9 #
Lift the handset or press SP-PHONE/MONITOR.
Hang up or press SP-PHONE/MONITOR.
Confirmation tone and dial tone
Alternate Calling — Ring/Voice
“Voice Call” which is set at the called party’s extension can be switched to “Tone Call”(ringing) and vice versa. This feature must be set beforehand at the called party’s extension.Refer to Proprietary Telephone Settings (Section 1.2). A rotary phone cannot use this feature.
Any Telephone
Off-hook. Enter an extension number. Ring back toneConfirmation tone (1 beep) Dial .
extension no.
Voice to Tone
Off-hook. Enter an extension number. Dial .
extension no.
Tone to Voice
Ring back tone Confirmation tone (1 beep)
• See the Installation Manual, Section 3, “Extension Feature Clear”.☞
• See the Installation Manual, Section 3, “Alternate Calling — Ring/Voice”.☞
• Single line telephone users can dial “0” instead of “#”.
PSQX1709ZA-06.QX 99.10.15 9:59 AM Page 82
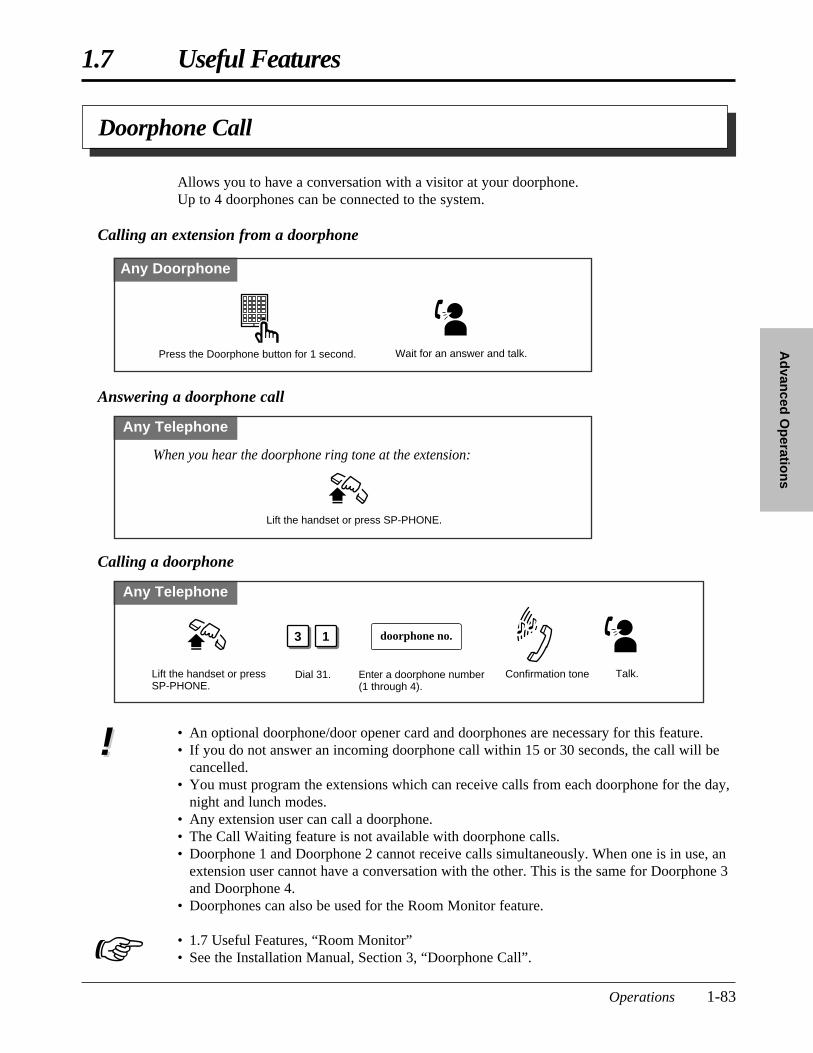
• An optional doorphone/door opener card and doorphones are necessary for this feature.• If you do not answer an incoming doorphone call within 15 or 30 seconds, the call will be
cancelled.• You must program the extensions which can receive calls from each doorphone for the day,
night and lunch modes.• Any extension user can call a doorphone.• The Call Waiting feature is not available with doorphone calls.• Doorphone 1 and Doorphone 2 cannot receive calls simultaneously. When one is in use, an
extension user cannot have a conversation with the other. This is the same for Doorphone 3and Doorphone 4.
• Doorphones can also be used for the Room Monitor feature.
• 1.7 Useful Features, “Room Monitor”• See the Installation Manual, Section 3, “Doorphone Call”.
1.7 Useful Features
Operations 1-83
Ad
vanced
Op
eration
s
☞
Doorphone Call
Allows you to have a conversation with a visitor at your doorphone.Up to 4 doorphones can be connected to the system.
Calling an extension from a doorphone
Any Doorphone
Wait for an answer and talk.Press the Doorphone button for 1 second.
Any Telephone
Lift the handset or press SP-PHONE.
When you hear the doorphone ring tone at the extension:
Answering a doorphone call
Calling a doorphone
Any Telephone
Enter a doorphone number (1 through 4).
Dial 31.
doorphone no.3 1
Lift the handset or press SP-PHONE.
Confirmation tone Talk.
!!
PSQX1709ZA-06.QX 99.10.15 9:59 AM Page 83
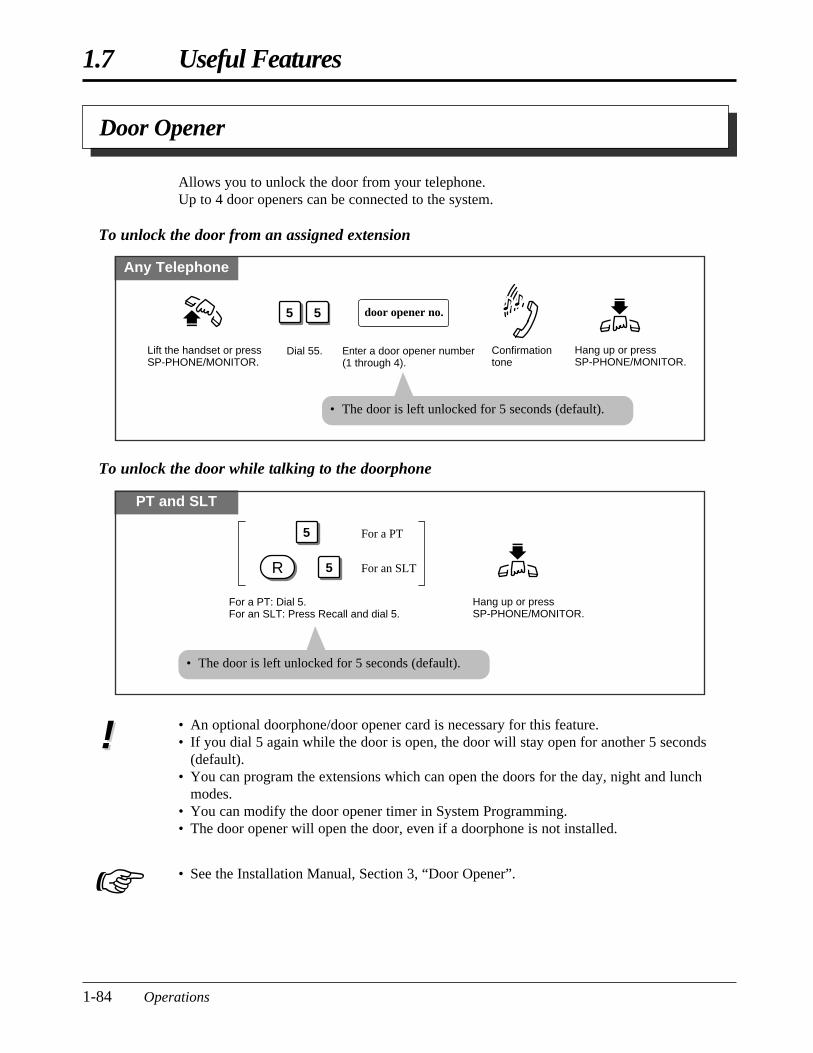
1.7 Useful Features
1-84 Operations
Allows you to unlock the door from your telephone.Up to 4 door openers can be connected to the system.
To unlock the door from an assigned extension
Any Telephone
Enter a door opener number (1 through 4).
Dial 55.
door opener no.5 5
Lift the handset or press SP-PHONE/MONITOR.
Confirmation tone
Hang up or press SP-PHONE/MONITOR.
• The door is left unlocked for 5 seconds (default).
PT and SLT
For a PT: Dial 5.For an SLT: Press Recall and dial 5.
Hang up or press SP-PHONE/MONITOR.
5 For a PT
For an SLT5R
To unlock the door while talking to the doorphone
• The door is left unlocked for 5 seconds (default).
Door Opener
• An optional doorphone/door opener card is necessary for this feature.• If you dial 5 again while the door is open, the door will stay open for another 5 seconds
(default).• You can program the extensions which can open the doors for the day, night and lunch
modes.• You can modify the door opener timer in System Programming.• The door opener will open the door, even if a doorphone is not installed.
• See the Installation Manual, Section 3, “Door Opener”.
!!
☞
PSQX1709ZA-06.QX 99.10.15 9:59 AM Page 84
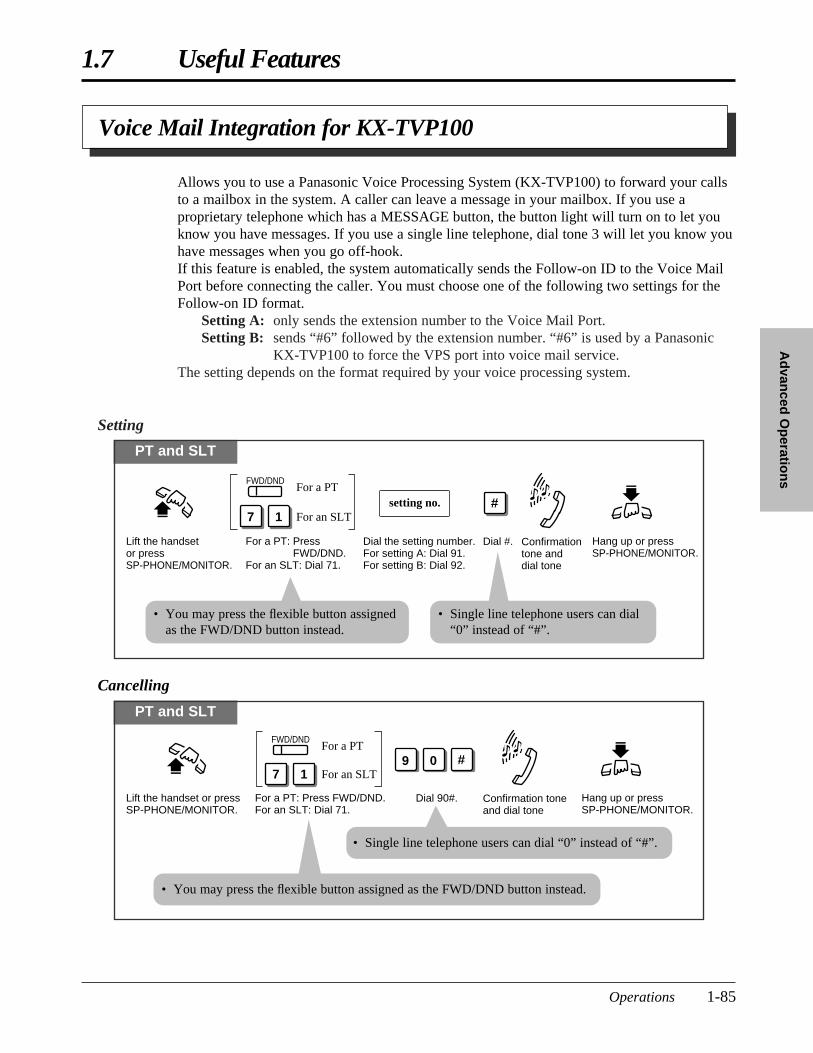
1.7 Useful Features
Operations 1-85
Ad
vanced
Op
eration
s
Voice Mail Integration for KX-TVP100
Allows you to use a Panasonic Voice Processing System (KX-TVP100) to forward your callsto a mailbox in the system. A caller can leave a message in your mailbox. If you use aproprietary telephone which has a MESSAGE button, the button light will turn on to let youknow you have messages. If you use a single line telephone, dial tone 3 will let you know youhave messages when you go off-hook.If this feature is enabled, the system automatically sends the Follow-on ID to the Voice MailPort before connecting the caller. You must choose one of the following two settings for theFollow-on ID format.
Setting A: only sends the extension number to the Voice Mail Port.Setting B: sends “#6” followed by the extension number. “#6” is used by a Panasonic
KX-TVP100 to force the VPS port into voice mail service.The setting depends on the format required by your voice processing system.
Setting
PT and SLT
For a PT: Press FWD/DND.For an SLT: Dial 71.
Dial the setting number.For setting A: Dial 91.For setting B: Dial 92.
setting no.
Lift the handset or press SP-PHONE/MONITOR.
Hang up or press SP-PHONE/MONITOR.
Confirmation tone and dial tone
7 1 For an SLT
For a PTFWD/DND
Dial #.
#
• You may press the flexible button assignedas the FWD/DND button instead.
• Single line telephone users can dial“0” instead of “#”.
Cancelling
PT and SLT
For a PT: Press FWD/DND.For an SLT: Dial 71.
Lift the handset or press SP-PHONE/MONITOR.
Hang up or press SP-PHONE/MONITOR.
Confirmation tone and dial tone
7 1 For an SLT
For a PTFWD/DND
Dial 90#.
9 0 #
• You may press the flexible button assigned as the FWD/DND button instead.
• Single line telephone users can dial “0” instead of “#”.
PSQX1709ZA-06.QX 99.10.15 9:59 AM Page 85
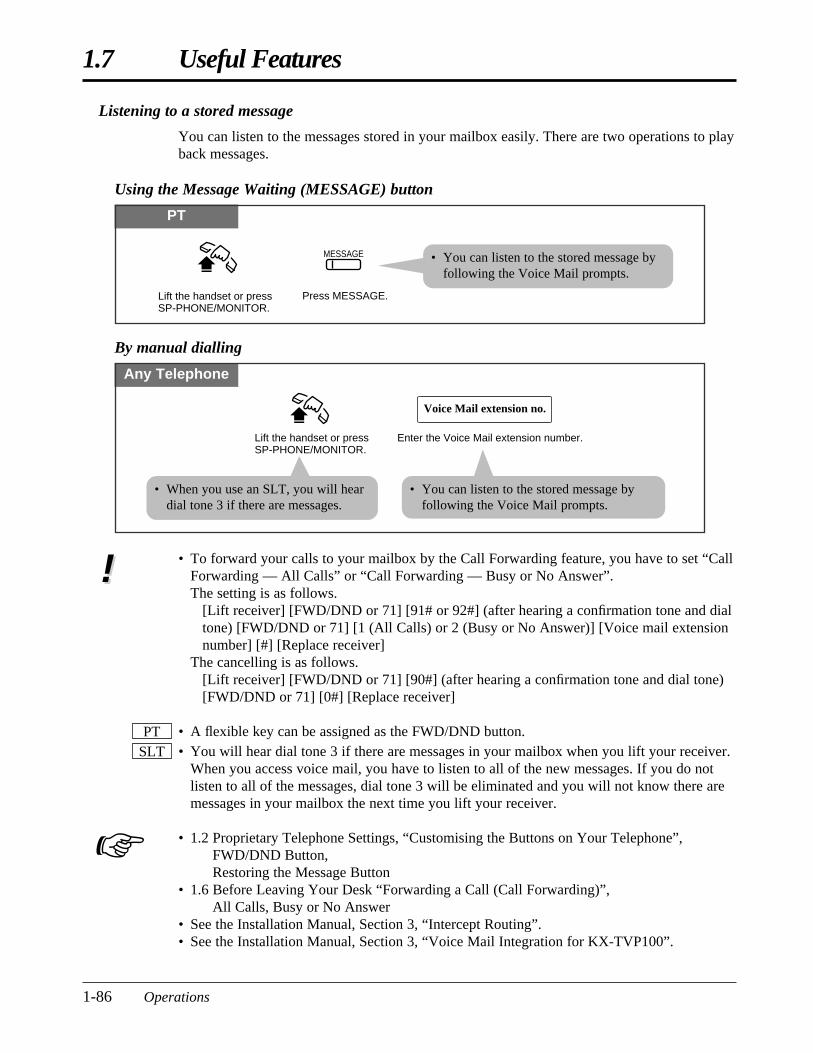
1.7 Useful Features
1-86 Operations
By manual dialling
Any Telephone
Enter the Voice Mail extension number.
Voice Mail extension no.
Lift the handset or press SP-PHONE/MONITOR.
• You can listen to the stored message byfollowing the Voice Mail prompts.
• To forward your calls to your mailbox by the Call Forwarding feature, you have to set “CallForwarding — All Calls” or “Call Forwarding — Busy or No Answer”.The setting is as follows.
[Lift receiver] [FWD/DND or 71] [91# or 92#] (after hearing a confirmation tone and dialtone) [FWD/DND or 71] [1 (All Calls) or 2 (Busy or No Answer)] [Voice mail extensionnumber] [#] [Replace receiver]
The cancelling is as follows.[Lift receiver] [FWD/DND or 71] [90#] (after hearing a confirmation tone and dial tone)[FWD/DND or 71] [0#] [Replace receiver]
• A flexible key can be assigned as the FWD/DND button.• You will hear dial tone 3 if there are messages in your mailbox when you lift your receiver.
When you access voice mail, you have to listen to all of the new messages. If you do notlisten to all of the messages, dial tone 3 will be eliminated and you will not know there aremessages in your mailbox the next time you lift your receiver.
• 1.2 Proprietary Telephone Settings, “Customising the Buttons on Your Telephone”, FWD/DND Button, Restoring the Message Button
• 1.6 Before Leaving Your Desk “Forwarding a Call (Call Forwarding)”, All Calls, Busy or No Answer
• See the Installation Manual, Section 3, “Intercept Routing”.• See the Installation Manual, Section 3, “Voice Mail Integration for KX-TVP100”.
SLTPT
!!
☞
• When you use an SLT, you will heardial tone 3 if there are messages.
Listening to a stored message
You can listen to the messages stored in your mailbox easily. There are two operations to playback messages.
Using the Message Waiting (MESSAGE) button
PT
Press MESSAGE.
MESSAGE
Lift the handset or press SP-PHONE/MONITOR.
• You can listen to the stored message byfollowing the Voice Mail prompts.
PSQX1709ZA-06.QX 99.10.15 9:59 AM Page 86
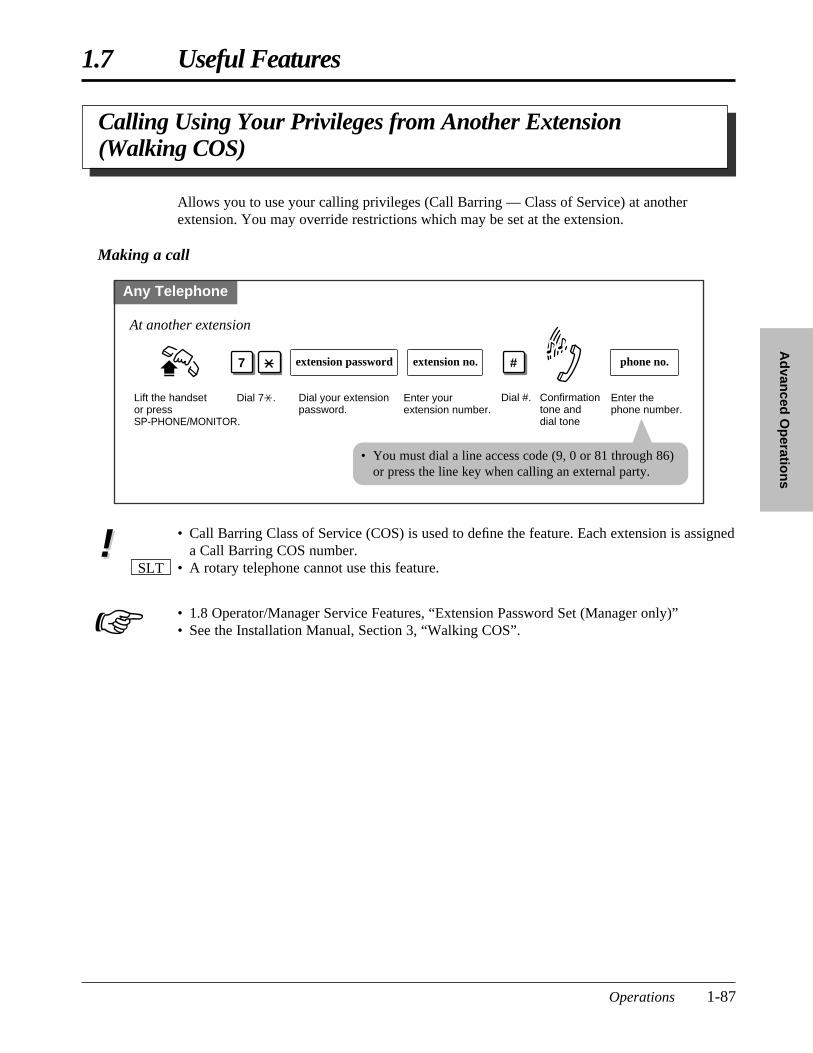
1.7 Useful Features
Operations 1-87
Ad
vanced
Op
eration
s
Calling Using Your Privileges from Another Extension (Walking COS)
• Call Barring Class of Service (COS) is used to define the feature. Each extension is assigneda Call Barring COS number.
• A rotary telephone cannot use this feature.
• 1.8 Operator/Manager Service Features, “Extension Password Set (Manager only)”• See the Installation Manual, Section 3, “Walking COS”.
SLT
Allows you to use your calling privileges (Call Barring — Class of Service) at anotherextension. You may override restrictions which may be set at the extension.
Making a call
Any Telephone
Dial your extension password.
extension password extension no.
Enter the phone number.
phone no.
Lift the handset or press SP-PHONE/MONITOR.
Confirmation tone and dial tone
At another extension
Dial 7*.
7
Enter your extension number.
Dial #.
#
• You must dial a line access code (9, 0 or 81 through 86)or press the line key when calling an external party.
!!
☞
PSQX1709ZA-06.QX 99.10.15 9:59 AM Page 87
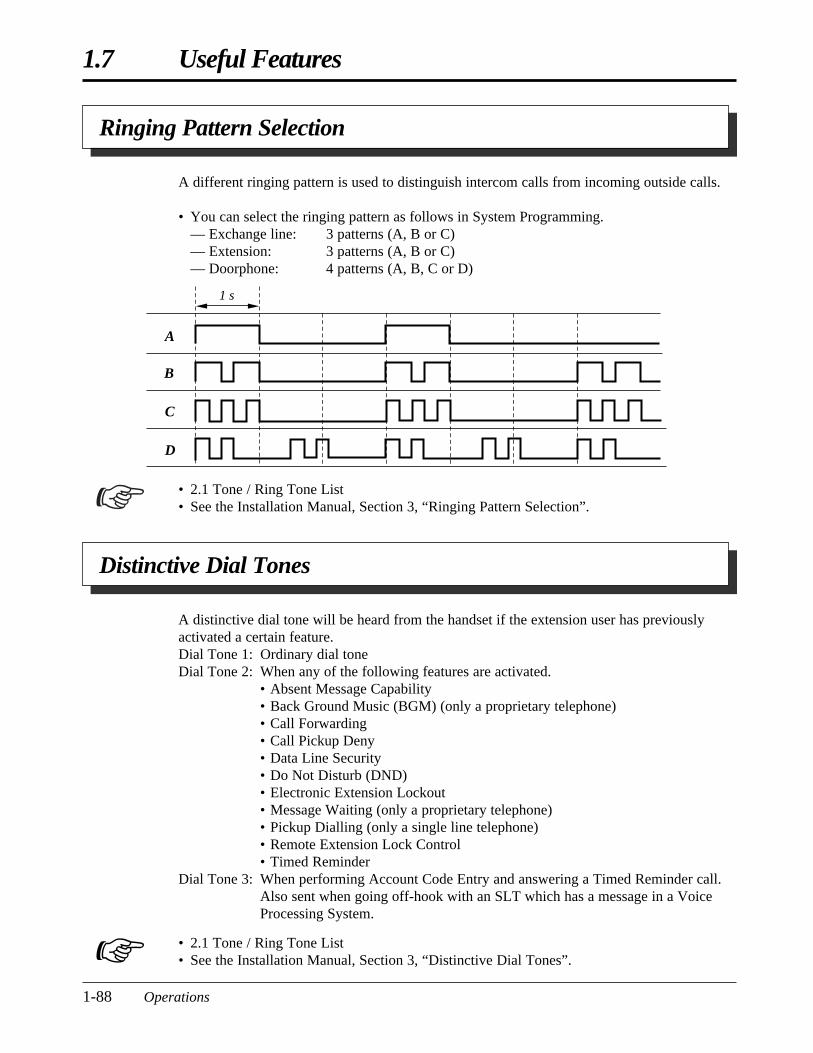
1.7 Useful Features
1-88 Operations
• 2.1 Tone / Ring Tone List• See the Installation Manual, Section 3, “Ringing Pattern Selection”.
A different ringing pattern is used to distinguish intercom calls from incoming outside calls.
• You can select the ringing pattern as follows in System Programming.— Exchange line: 3 patterns (A, B or C)— Extension: 3 patterns (A, B or C)— Doorphone: 4 patterns (A, B, C or D)
Ringing Pattern Selection
1 s
A
B
C
D
☞
Distinctive Dial Tones
A distinctive dial tone will be heard from the handset if the extension user has previouslyactivated a certain feature.Dial Tone 1: Ordinary dial toneDial Tone 2: When any of the following features are activated.
• Absent Message Capability• Back Ground Music (BGM) (only a proprietary telephone)• Call Forwarding• Call Pickup Deny• Data Line Security• Do Not Disturb (DND)• Electronic Extension Lockout• Message Waiting (only a proprietary telephone)• Pickup Dialling (only a single line telephone)• Remote Extension Lock Control• Timed Reminder
Dial Tone 3: When performing Account Code Entry and answering a Timed Reminder call.Also sent when going off-hook with an SLT which has a message in a VoiceProcessing System.
• 2.1 Tone / Ring Tone List• See the Installation Manual, Section 3, “Distinctive Dial Tones”.☞
PSQX1709ZA-06.QX 99.10.15 9:59 AM Page 88
1.7 Useful Features
Operations 1-89
Ad
vanced
Op
eration
s
Power Failure Transfer
Lockout
If one party in a conversation goes on-hook, both parties will be disconnected from the speechpath automatically. Reorder tone is sent to the off-hook party before they are disconnected. Nooperation is necessary.
During a power failure, each of the following exchange lines will be connected to an assignedextension.
Exchange line 1: extension port 01Exchange line 4: extension port 09
• During a power failure, all features cannot be used except for incoming and outgoingoutside calls from extension ports 01 and 09.
• If extension ports 01 and 09 are connected to proprietary telephones, disconnect the unitsand connect single line telephones.
• See the Installation Manual, Section 3, “Power Failure Transfer”.
!!
☞
PSQX1709ZA-06.QX 99.10.15 9:59 AM Page 89

1.8 Operator / Manager Service Features
1-90 Operations
Date and Time Setting
The system supports one operator and one manager. Any extension can be appointed as theoperator and extension port 01 is appointed as the manager. System Programming is requiredto assign the operator. They can perform the following features.
1) Date and Time Setting2) Electronic Extension Lockout — CANCEL ALL3) Timed Reminder, Remote (Wake-Up Call)4) Outgoing Message (OGM)5) Remote Extension Lock6) Time (Day/Night/Lunch) Service Setting7) Extension Password Set (Manager only)
When the current time setting is wrong, you can adjust it by the following procedure.
Setting
PT
Dial 0. Enter the year (last 2 digits).
Enter the month (01 through 12).
year
Enter the hour (01 through 12).
hour
month
Enter the day (01 through 31).
Press AUTO DIAL/STORE.
Enter the day of the week.0: For Sun 1: For Mon2: For Tue 3: For Wed4: For Thu 5: For Fri6: For Sat
day day of the week
Dial 0 or 1.For AM: Dial 0. For PM: Dial 1.
0
Enter the minute (00 through 59).
0 1orminuteAUTO DIAL
STORE
• The STORE indicator light turns on.
• Be sure the handset is on the cradle and the SP-PHONE button is off.• To program, set the MEMORY switch on the proprietary telephone to “PROGRAM”.• After programming, return the MEMORY switch to the “SET” position.
• See the Installation Manual, Section 3, “Date and Time Setting”.
!!
☞
PSQX1709ZA-07.QX 99.10.15 9:59 AM Page 90
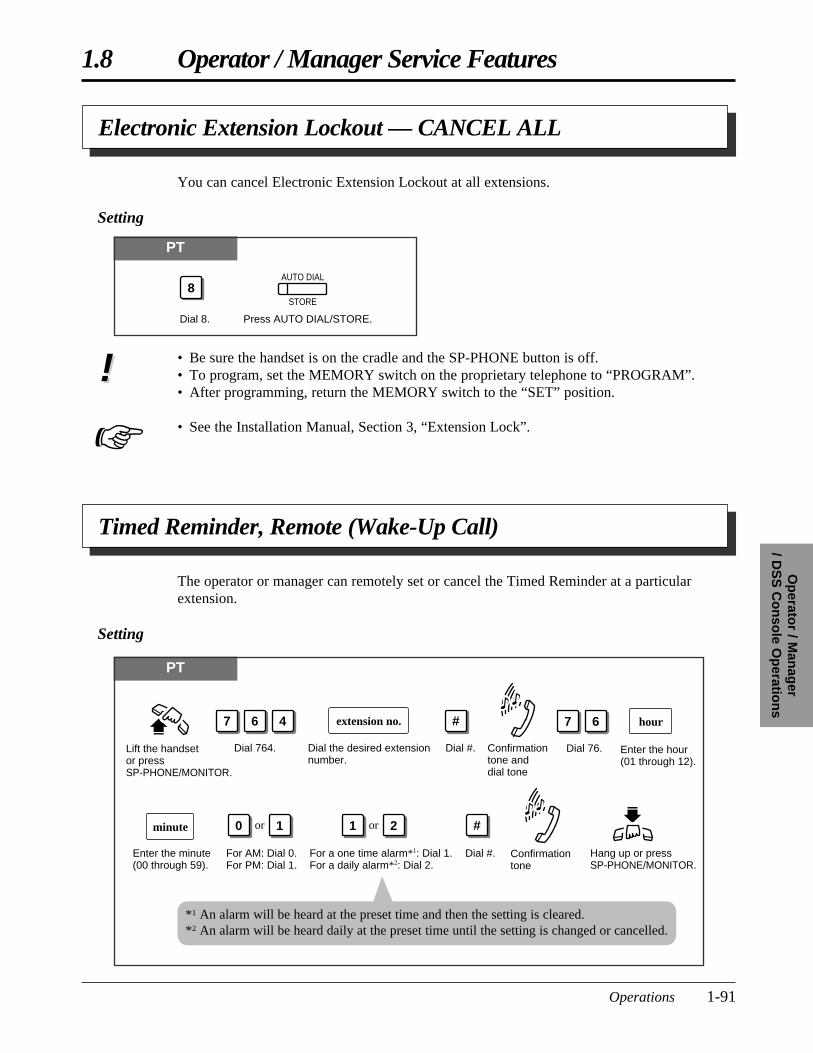
1.8 Operator / Manager Service Features
Operations 1-91
Op
erator / M
anag
er / D
SS
Co
nso
le Op
eration
s
Electronic Extension Lockout — CANCEL ALL
You can cancel Electronic Extension Lockout at all extensions.
Setting
PT
8
Dial 8. Press AUTO DIAL/STORE.
AUTO DIAL
STORE
Timed Reminder, Remote (Wake-Up Call)
The operator or manager can remotely set or cancel the Timed Reminder at a particularextension.
Setting
PT
Lift the handset or press SP-PHONE/MONITOR.
Dial 764. Dial the desired extension number.
Dial #.
7 6 4
Dial 76.
Hang up or press SP-PHONE/MONITOR.
Enter the minute (00 through 59).
Dial #.
hour
minute
For AM: Dial 0. For PM: Dial 1.
7 6
0 1or
For a one time alarm*1: Dial 1. For a daily alarm*2: Dial 2.
1 2or
Confirmation tone
Confirmation tone and dial tone
extension no.
Enter the hour (01 through 12).
#
#
*1 An alarm will be heard at the preset time and then the setting is cleared.*2 An alarm will be heard daily at the preset time until the setting is changed or cancelled.
• Be sure the handset is on the cradle and the SP-PHONE button is off.• To program, set the MEMORY switch on the proprietary telephone to “PROGRAM”.• After programming, return the MEMORY switch to the “SET” position.
• See the Installation Manual, Section 3, “Extension Lock”.
!!
☞
PSQX1709ZA-07.QX 99.10.15 9:59 AM Page 91
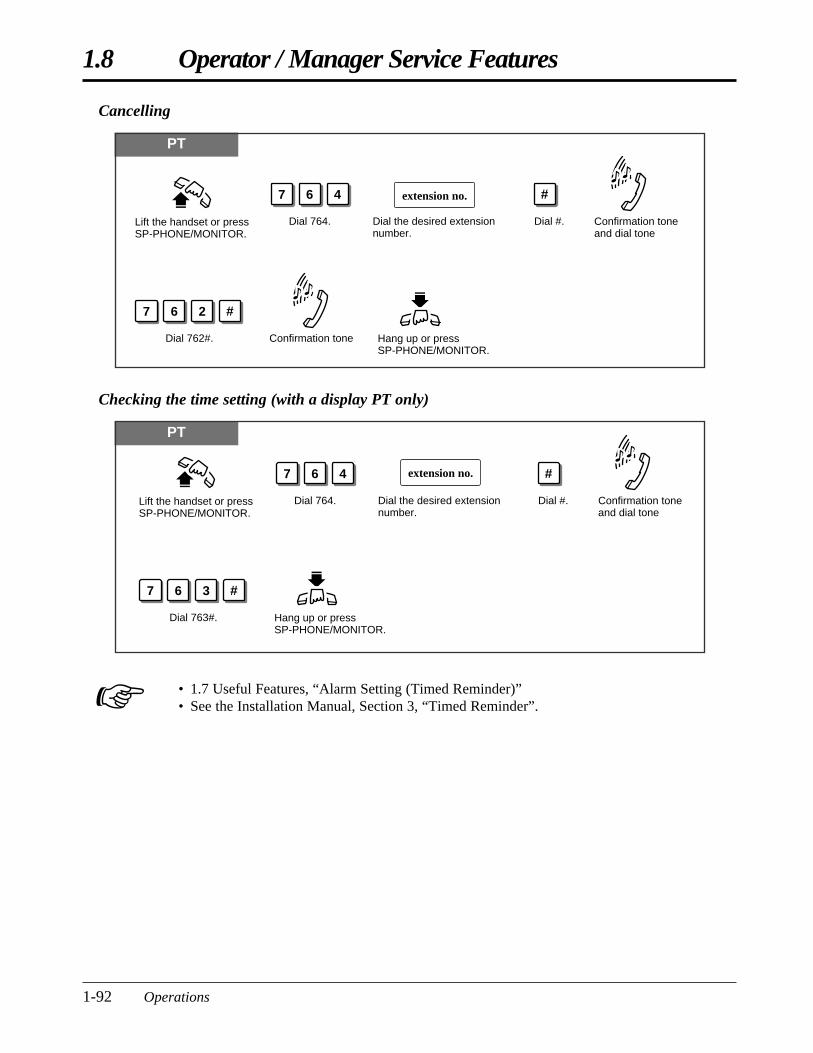
1.8 Operator / Manager Service Features
1-92 Operations
PT
Lift the handset or press SP-PHONE/MONITOR.
Dial 764. Dial the desired extension number.
Dial #.
7 6 4
Hang up or press SP-PHONE/MONITOR.
Confirmation tone
Confirmation tone and dial tone
Dial 762#.
7 6 2
extension no. #
#
Cancelling
Checking the time setting (with a display PT only)
PT
Lift the handset or press SP-PHONE/MONITOR.
Dial 764. Dial the desired extension number.
Dial #.
7 6 4
Hang up or press SP-PHONE/MONITOR.
Confirmation tone and dial tone
Dial 763#.
7 6 3
extension no. #
#
• 1.7 Useful Features, “Alarm Setting (Timed Reminder)”• See the Installation Manual, Section 3, “Timed Reminder”.☞
PSQX1709ZA-07.QX 99.10.15 9:59 AM Page 92
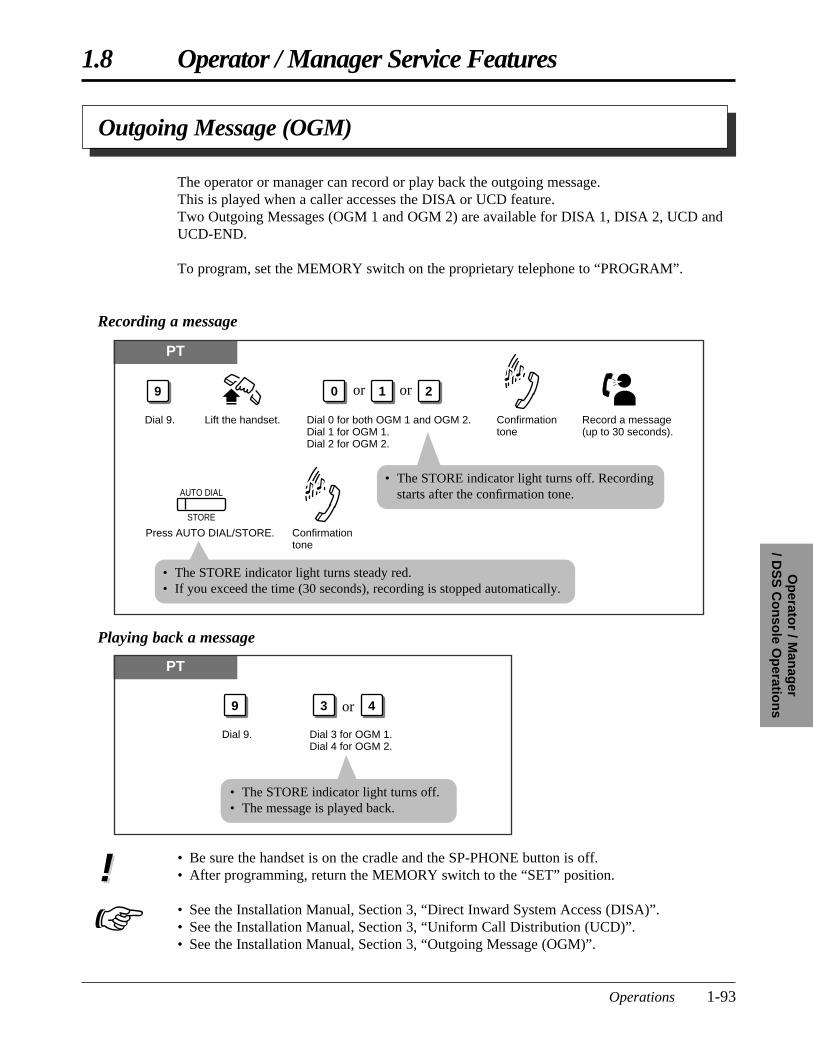
• Be sure the handset is on the cradle and the SP-PHONE button is off.• After programming, return the MEMORY switch to the “SET” position.
• See the Installation Manual, Section 3, “Direct Inward System Access (DISA)”.• See the Installation Manual, Section 3, “Uniform Call Distribution (UCD)”.• See the Installation Manual, Section 3, “Outgoing Message (OGM)”.
1.8 Operator / Manager Service Features
Operations 1-93
Op
erator / M
anag
er / D
SS
Co
nso
le Op
eration
s
☞!!
Outgoing Message (OGM)
The operator or manager can record or play back the outgoing message.This is played when a caller accesses the DISA or UCD feature.Two Outgoing Messages (OGM 1 and OGM 2) are available for DISA 1, DISA 2, UCD andUCD-END.
To program, set the MEMORY switch on the proprietary telephone to “PROGRAM”.
Recording a message
PT
Dial 9.
9
Lift the handset. Dial 0 for both OGM 1 and OGM 2.Dial 1 for OGM 1.Dial 2 for OGM 2.
Record a message(up to 30 seconds).
Press AUTO DIAL/STORE.
AUTO DIAL
STORE
Confirmation tone
Confirmation tone
10 or 2or
• The STORE indicator light turns off. Recordingstarts after the confirmation tone.
• The STORE indicator light turns steady red.• If you exceed the time (30 seconds), recording is stopped automatically.
PT
Dial 9.
9
Dial 3 for OGM 1.Dial 4 for OGM 2.
3 4or
Playing back a message
• The STORE indicator light turns off.• The message is played back.
PSQX1709ZA-07.QX 99.10.15 9:59 AM Page 93
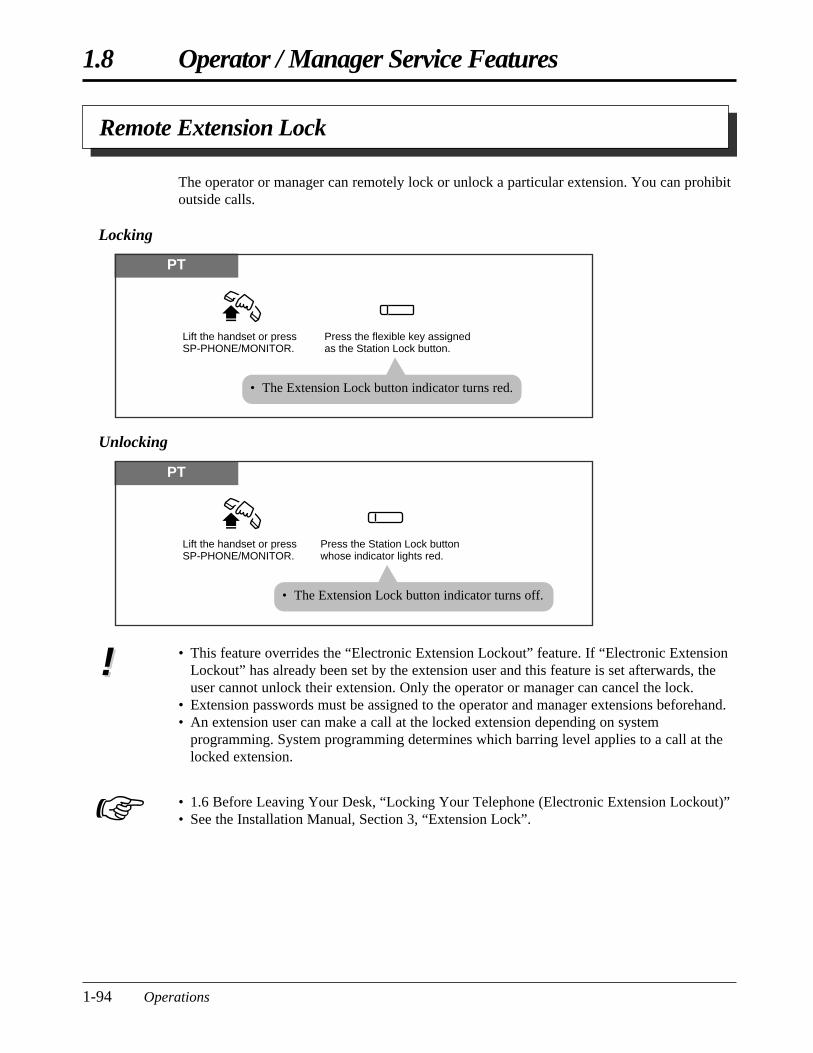
1.8 Operator / Manager Service Features
1-94 Operations
• This feature overrides the “Electronic Extension Lockout” feature. If “Electronic ExtensionLockout” has already been set by the extension user and this feature is set afterwards, theuser cannot unlock their extension. Only the operator or manager can cancel the lock.
• Extension passwords must be assigned to the operator and manager extensions beforehand.• An extension user can make a call at the locked extension depending on system
programming. System programming determines which barring level applies to a call at thelocked extension.
• 1.6 Before Leaving Your Desk, “Locking Your Telephone (Electronic Extension Lockout)”• See the Installation Manual, Section 3, “Extension Lock”.
The operator or manager can remotely lock or unlock a particular extension. You can prohibitoutside calls.
Locking
PT
Lift the handset or press SP-PHONE/MONITOR.
Press the flexible key assigned as the Station Lock button.
• The Extension Lock button indicator turns red.
Remote Extension Lock
PT
Lift the handset or press SP-PHONE/MONITOR.
Press the Station Lock button whose indicator lights red.
• The Extension Lock button indicator turns off.
Unlocking
!!
☞
PSQX1709ZA-07.QX 99.10.15 9:59 AM Page 94
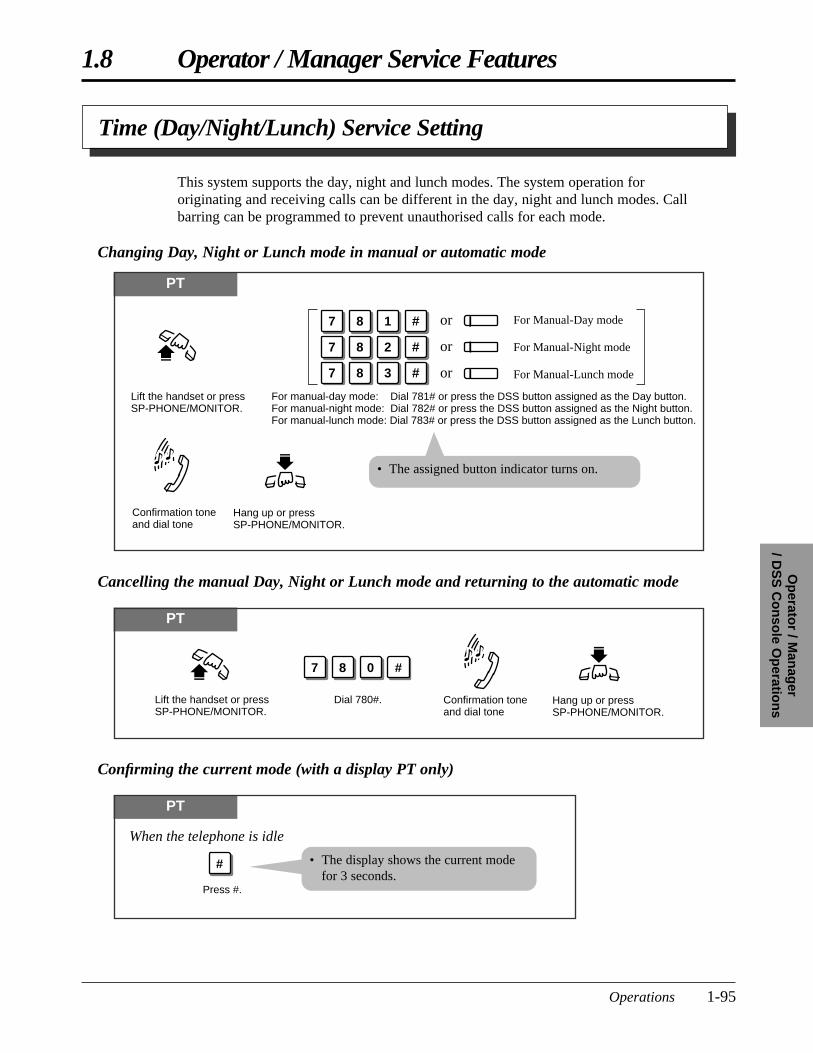
1.8 Operator / Manager Service Features
Operations 1-95
Op
erator / M
anag
er / D
SS
Co
nso
le Op
eration
s
Time (Day/Night/Lunch) Service Setting
This system supports the day, night and lunch modes. The system operation fororiginating and receiving calls can be different in the day, night and lunch modes. Callbarring can be programmed to prevent unauthorised calls for each mode.
Changing Day, Night or Lunch mode in manual or automatic mode
PT
Lift the handset or press SP-PHONE/MONITOR.
For manual-day mode: Dial 781# or press the DSS button assigned as the Day button.For manual-night mode: Dial 782# or press the DSS button assigned as the Night button.For manual-lunch mode: Dial 783# or press the DSS button assigned as the Lunch button.
Hang up or press SP-PHONE/MONITOR.
Confirmation tone and dial tone
For Manual-Day mode
For Manual-Night mode
For Manual-Lunch mode
7 8 1 # or
7 8 2 # or
7 8 3 # or
• The assigned button indicator turns on.
Confirming the current mode (with a display PT only)
Cancelling the manual Day, Night or Lunch mode and returning to the automatic mode
PT
#
Press #.
When the telephone is idle
• The display shows the current modefor 3 seconds.
PT
Lift the handset or press SP-PHONE/MONITOR.
Dial 780#. Hang up or press SP-PHONE/MONITOR.
Confirmation tone and dial tone
7 8 0 #
PSQX1709ZA-07.QX 99.10.15 9:59 AM Page 95
1.8 Operator / Manager Service Features
1-96 Operations
• The day/night/lunch mode can be changed either automatically at a predetermined time(default: 9:00 a.m. for every day, 5:30 p.m. for every night) or manually at any time bySystem Programming.
• Even if the automatic mode has been selected by System Programming, the operator ormanager can change the day, night and lunch modes manually.
• The following programs have separate day, night and lunch programming.1) Delayed Ringing Assignment2) Door Opener Assignment3) Doorphone Ringing Assignment4) Flexible Outward Dialling Assignment5) Flexible Ringing Assignment6) Exchange Line Mode7) Call Barring – Class of Service (COS) Assignment
• If the lunch mode is set using feature number 783# in the automatic mode, the mode will notbe changed until the lunch mode is cancelled using feature number 780#. The day and nightmodes are automatically changed at the programmed time even if feature number 780# isnot entered.
• Feature number 780# is not accepted in the manual mode.• One of the day, night or lunch button indicators on the DSS console lights red to display the
current mode.• If the day, night or lunch mode is changed manually when the system is set to automatic
mode and the manager starts System Programming, the manual setting will be cancelledafter System Programming is completed. It will return to the automatic day, night or lunchmode.
• 1.7 Useful Features, “Doorphone Call”• 1.7 Useful Features, “Door Opener”• See the Installation Manual, Section 3, “Direct In Line (DIL)”.• See the Installation Manual, Section 3, “Call Barring”.• See the Installation Manual, Section 3, “Time (Day/Night/Lunch) Service”.
!!
☞
PSQX1709ZA-07.QX 99.10.15 9:59 AM Page 96

1.8 Operator / Manager Service Features
Operations 1-97
Op
erator / M
anag
er / D
SS
Co
nso
le Op
eration
s
• Be sure the handset is on the cradle and the SP-PHONE button is off.• To program, set the MEMORY switch on the proprietary telephone to “PROGRAM”.• After programming, return the MEMORY switch to the “SET” position.• The extension number is displayed in the order of the port number when you press the
NEXT or PREV button.• To erase an incorrect entry, press the CLEAR (TRANSFER) button and enter a new
number.
• 1.7 Useful Features, “Calling Using Your Privileges from Another Extension (WalkingCOS)”
• See the Installation Manual, Section 3, “Extension Password/System Password”.• See the Installation Manual, Section 3, “Walking COS”.
!!
☞
Extension Password Set (Manager only)
The manager can assign a password to each extension. The assigned password can be used forthe Walking COS feature.
Setting
PT
Dial 7. Enter the system password (4 digits).
7 password
Press AUTO DIAL/STORE.
AUTO DIAL
STORE
SP-PHONE
Press SP-PHONE (NEXT).
Enter the password (4 digits).
password
Press AUTO DIAL/STORE.
AUTO DIAL
STORE
Press SP-PHONE (NEXT) or REDIAL (PREV) and select the extension you want to assign.
Repeat these steps.SP-PHONE
REDIAL
• You may enter the pre-set extensionpassword (4 digits) of extension port 01instead of the system password.
PSQX1709ZA-07.QX 99.10.15 9:59 AM Page 97
1.9 DSS Console Features
1-98 Operations
PF buttons are provided with no default settings, while each DSS button has a default settingas follows.
DSS 01–24: extension numbers 201–224DSS 25–32: no default settings
To meet your various needs, DSS buttons can be changed to other function buttons.Every DSS or PF button can be assigned to another extension number, telephone number orfeature number.
• Be sure the handset is on the cradle and the SP-PHONE button is off.• To program, set the MEMORY switch on the proprietary telephone to “PROGRAM”.• After programming, return the MEMORY switch to the “SET” position.• As to the buttons on your DSS Console, please refer to your DSS Console manual.
Initial Settings
!!
With a Direct Station Selection (DSS) Console, model KX-T7040, you can make or transfercalls and access system features with the touch of a button. The DSS Console must beconnected to a Panasonic Advanced Hybrid System and paired with a PT. SystemProgramming is required to designate the extension ports of the DSS Console. With a pairedtelephone, you can carry out the following operations using the DSS Console.
• Direct access to an extension (Direct Extension Dialling)• Quick access to an external party (One-Touch Dialling)• Quick access to a system feature (One-Touch Access for System Features)• Easy transfer to an extension (Call Transfer)• Quick access to the day mode (Time (Day/Night/Lunch) Service)
(Operator/Manager only)• Quick access to the night mode (Time (Day/Night/Lunch) Service)
(Operator/Manager only)• Quick access to the lunch mode (Time (Day/Night/Lunch) Service)
(Operator/Manager only)• Quick setting of the Remote Extension Lock Control (Remote Extension Lock Control)
(Operator/Manager only)
• The KX-T7040 and Proprietary Telephone (PT) should be placed side by side on your desk.• A single line telephone cannot be paired with the KX-T7040.• For System Programming, please refer to the Installation Manual.
!!
PSQX1709ZA-07.QX 99.10.15 9:59 AM Page 98
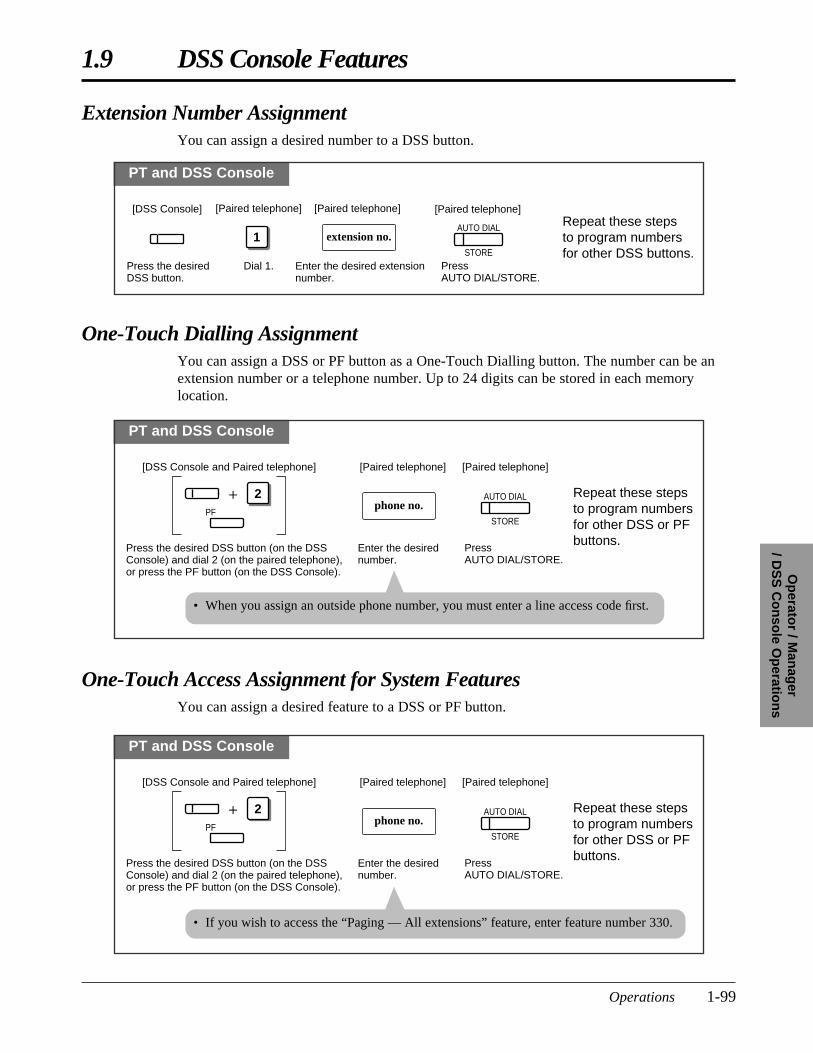
1.9 DSS Console Features
Operations 1-99
Op
erator / M
anag
er / D
SS
Co
nso
le Op
eration
s
PT and DSS Console
Enter the desired number.
phone no.
Press the desired DSS button (on the DSS Console) and dial 2 (on the paired telephone), or press the PF button (on the DSS Console).
Press AUTO DIAL/STORE.
AUTO DIAL
STORE
[DSS Console and Paired telephone] [Paired telephone] [Paired telephone]
Repeat these steps to program numbers for other DSS or PF buttons.
2PF
+
One-Touch Dialling AssignmentYou can assign a DSS or PF button as a One-Touch Dialling button. The number can be anextension number or a telephone number. Up to 24 digits can be stored in each memorylocation.
• When you assign an outside phone number, you must enter a line access code first.
PT and DSS Console
Dial 1. Enter the desired extension number.
1 extension no.
Press the desired DSS button.
Press AUTO DIAL/STORE.
AUTO DIAL
STORE
[DSS Console] [Paired telephone] [Paired telephone] [Paired telephone]Repeat these steps to program numbers for other DSS buttons.
Extension Number AssignmentYou can assign a desired number to a DSS button.
One-Touch Access Assignment for System FeaturesYou can assign a desired feature to a DSS or PF button.
PT and DSS Console
Enter the desired number.
phone no.
Press the desired DSS button (on the DSS Console) and dial 2 (on the paired telephone), or press the PF button (on the DSS Console).
Press AUTO DIAL/STORE.
AUTO DIAL
STORE
[DSS Console and Paired telephone] [Paired telephone] [Paired telephone]
Repeat these steps to program numbers for other DSS or PF buttons.
2PF
+
• If you wish to access the “Paging — All extensions” feature, enter feature number 330.
PSQX1709ZA-07.QX 99.10.15 9:59 AM Page 99
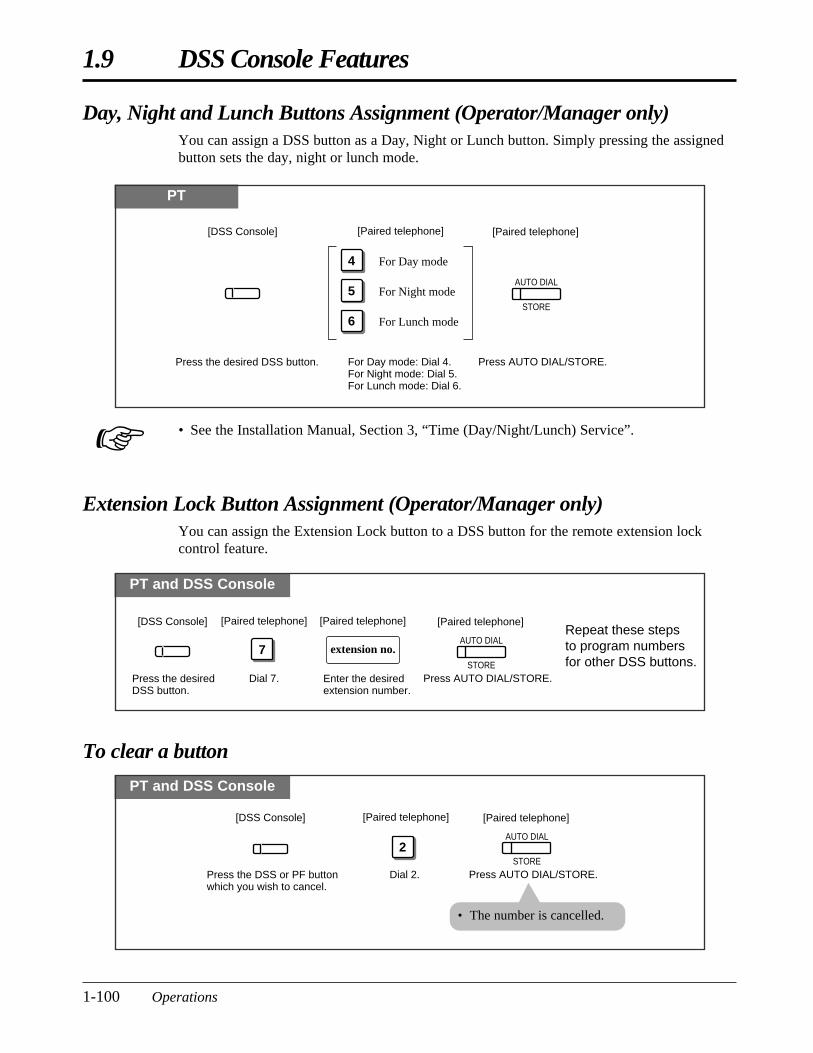
1.9 DSS Console Features
1-100 Operations
PT and DSS Console
Dial 2.
2
Press the DSS or PF button which you wish to cancel.
Press AUTO DIAL/STORE.
AUTO DIAL
STORE
[DSS Console] [Paired telephone] [Paired telephone]
• The number is cancelled.
To clear a button
Day, Night and Lunch Buttons Assignment (Operator/Manager only)You can assign a DSS button as a Day, Night or Lunch button. Simply pressing the assignedbutton sets the day, night or lunch mode.
PT
For Day mode: Dial 4.For Night mode: Dial 5.For Lunch mode: Dial 6.
4
Press the desired DSS button. Press AUTO DIAL/STORE.
AUTO DIAL
STORE
[DSS Console] [Paired telephone] [Paired telephone]
For Day mode
5 For Night mode
6 For Lunch mode
PT and DSS Console
Dial 7. Enter the desired extension number.
7 extension no.
Press the desired DSS button.
Press AUTO DIAL/STORE.
AUTO DIAL
STORE
[DSS Console] [Paired telephone] [Paired telephone] [Paired telephone]Repeat these steps to program numbers for other DSS buttons.
Extension Lock Button Assignment (Operator/Manager only)You can assign the Extension Lock button to a DSS button for the remote extension lockcontrol feature.
• See the Installation Manual, Section 3, “Time (Day/Night/Lunch) Service”.☞
PSQX1709ZA-07.QX 99.10.15 9:59 AM Page 100

1.9 DSS Console Features
Operations 1-101
Op
erator / M
anag
er / D
SS
Co
nso
le Op
eration
s
• DSS buttons can be changed to any of the following function buttons.a) Another DSS Button (Every DSS button can be assigned to another extension number.)b) One-Touch Dialling Buttonc) Day Button (Operator/Manager only)d) Night Button (Operator/Manager only)e) Lunch Button (Operator/Manager only)f) Extension Lock Button (Operator/Manager only)
• PF buttons can be changed to One-Touch Dialling buttons.• When the STORE button is pressed after programming, you will hear beep tones as follows.
— 1 beep: The entry is different from the one that was stored previously.— 2 beeps: The entry is the same as the previously stored one.
• You can check the stored data in the following way.1. Set the MEMORY switch to “PROGRAM”.2. Press the desired button while on-hook.
The data will be displayed. After checking the data return the MEMORY switch to the“SET” position.
• 1.2 Proprietary Telephone Settings, “Customising the Buttons on Your Telephone”, DSS Button, One-Touch Dialling Button
!!
☞
An extension can be called and accessed by simply pressing a DSS button. The BLF shows ifthe extension is engaged.
PT and DSS Console
Press the desired DSS button.
[DSS Console]
Lift the handset or pressSP-PHONE/MONITOR.
[Paired Telephone]
PT and DSS Console
Press the desired DSS or PF button.
[DSS Console]
Lift the handset or press SP-PHONE/MONITOR.
[Paired Telephone]
The stored number is dialled automatically by pressing a programmed DSS or PF button.
One-Touch Dialling
Direct Extension Dialling
• By System Programming you can press a DSS button directly to make an intercom callwithout going off-hook.!!
PSQX1709ZA-07.QX 99.10.15 9:59 AM Page 101
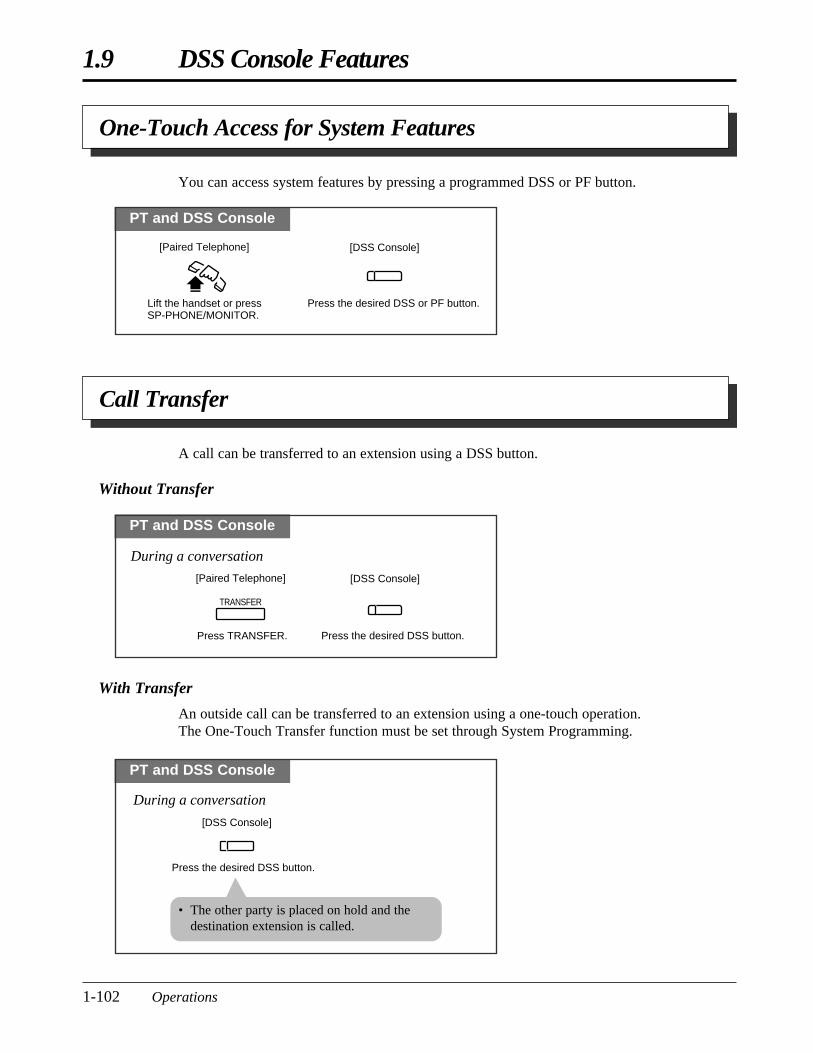
1.9 DSS Console Features
1-102 Operations
A call can be transferred to an extension using a DSS button.
Without Transfer
PT and DSS Console
Press the desired DSS button.
[DSS Console]
Press TRANSFER.
[Paired Telephone]
During a conversation
TRANSFER
With Transfer
An outside call can be transferred to an extension using a one-touch operation. The One-Touch Transfer function must be set through System Programming.
PT and DSS Console
Press the desired DSS button.
[DSS Console]
During a conversation
• The other party is placed on hold and thedestination extension is called.
Call Transfer
PT and DSS Console
Press the desired DSS or PF button.
[DSS Console]
Lift the handset or press SP-PHONE/MONITOR.
[Paired Telephone]
You can access system features by pressing a programmed DSS or PF button.
One-Touch Access for System Features
PSQX1709ZA-07.QX 99.10.15 9:59 AM Page 102

Ap
pen
dix
Section 2
Appendix
PSQX1709ZA-08.QX 99.10.15 10:00 AM Page 1
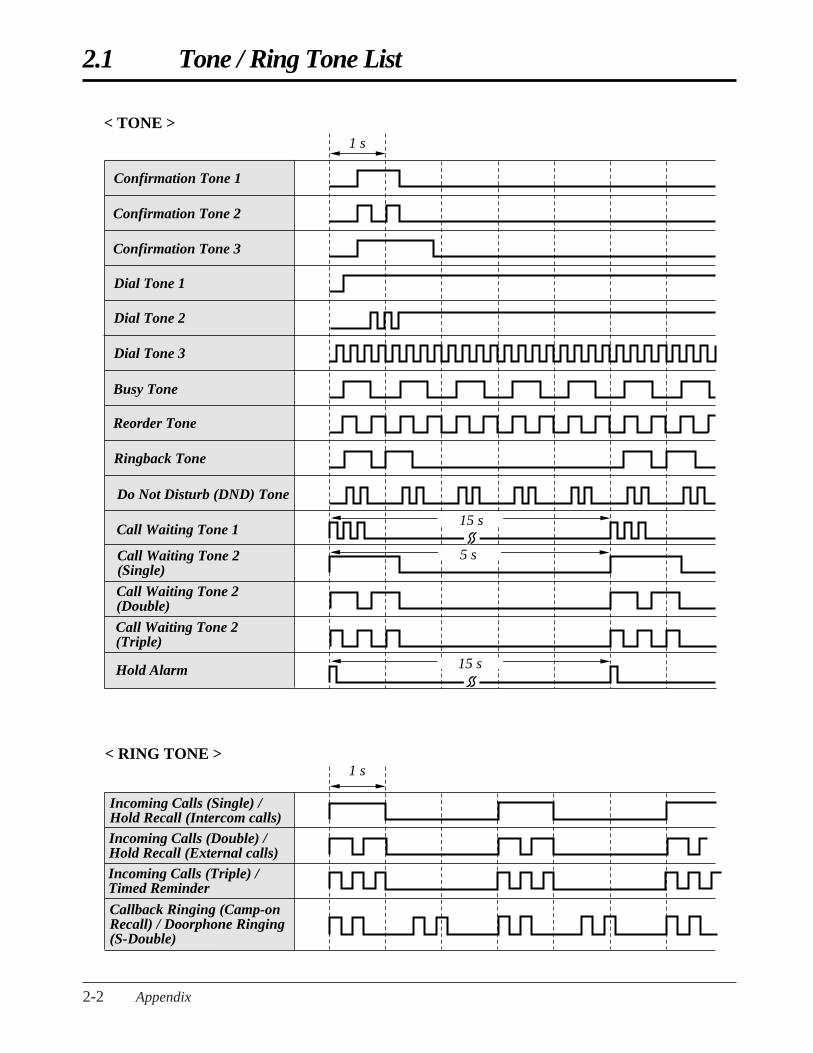
2.1 Tone / Ring Tone List
2-2 Appendix
1 s
Confirmation Tone 1
Confirmation Tone 2
Confirmation Tone 3
Dial Tone 1
Dial Tone 2
Dial Tone 3
Busy Tone
Reorder Tone
Ringback Tone
< TONE >
Do Not Disturb (DND) Tone
Call Waiting Tone 1
Call Waiting Tone 2(Single)
5 s
Call Waiting Tone 2(Double)
Call Waiting Tone 2(Triple)
Hold Alarm 15 s
15 s
1 s
Incoming Calls (Single) /Hold Recall (Intercom calls)
Callback Ringing (Camp-on Recall) / Doorphone Ringing (S-Double)
< RING TONE >
Incoming Calls (Double) /Hold Recall (External calls)Incoming Calls (Triple) / Timed Reminder
PSQX1709ZA-08.QX 99.10.15 10:00 AM Page 2
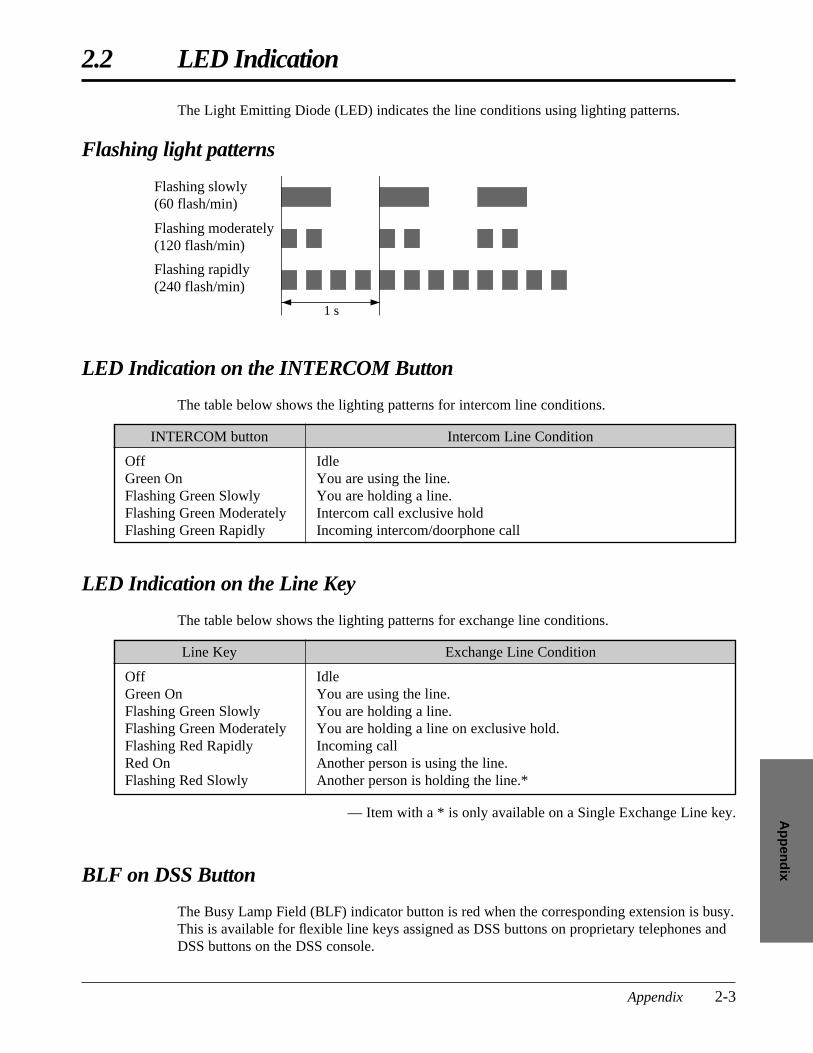
Ap
pen
dix
2.2 LED Indication
Appendix 2-3
INTERCOM button
OffGreen OnFlashing Green SlowlyFlashing Green ModeratelyFlashing Green Rapidly
Intercom Line Condition
IdleYou are using the line.You are holding a line.Intercom call exclusive holdIncoming intercom/doorphone call
LED Indication on the INTERCOM Button
The table below shows the lighting patterns for intercom line conditions.
BLF on DSS Button
The Busy Lamp Field (BLF) indicator button is red when the corresponding extension is busy.This is available for flexible line keys assigned as DSS buttons on proprietary telephones andDSS buttons on the DSS console.
The Light Emitting Diode (LED) indicates the line conditions using lighting patterns.
Flashing light patterns
Line Key
OffGreen OnFlashing Green SlowlyFlashing Green ModeratelyFlashing Red RapidlyRed OnFlashing Red Slowly
Exchange Line Condition
IdleYou are using the line.You are holding a line.You are holding a line on exclusive hold.Incoming callAnother person is using the line.Another person is holding the line.*
LED Indication on the Line Key
The table below shows the lighting patterns for exchange line conditions.
— Item with a * is only available on a Single Exchange Line key.
1 s
Flashing slowly(60 flash/min)
Flashing moderately(120 flash/min)
Flashing rapidly(240 flash/min)
PSQX1709ZA-08.QX 99.10.15 10:00 AM Page 3
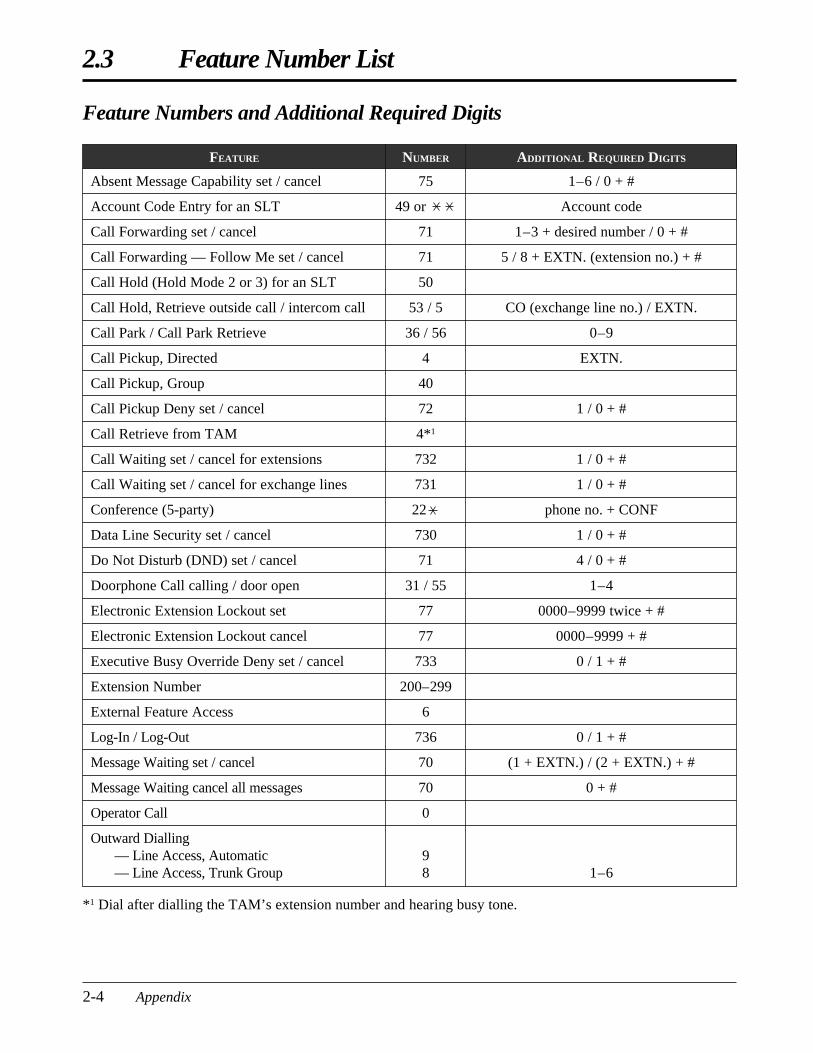
2.3 Feature Number List
2-4 Appendix
ADDITIONAL REQUIRED DIGITSNUMBERFEATURE
Feature Numbers and Additional Required Digits
Absent Message Capability set / cancel
Account Code Entry for an SLT
Call Forwarding set / cancel
Call Forwarding — Follow Me set / cancel
Call Hold (Hold Mode 2 or 3) for an SLT
Call Hold, Retrieve outside call / intercom call
Call Park / Call Park Retrieve
Call Pickup, Directed
Call Pickup, Group
Call Pickup Deny set / cancel
Call Retrieve from TAM
Call Waiting set / cancel for extensions
Call Waiting set / cancel for exchange lines
Conference (5-party)
Data Line Security set / cancel
Do Not Disturb (DND) set / cancel
Doorphone Call calling / door open
Electronic Extension Lockout set
Electronic Extension Lockout cancel
Executive Busy Override Deny set / cancel
Extension Number
External Feature Access
Log-In / Log-Out
Message Waiting set / cancel
Message Waiting cancel all messages
Operator Call
Outward Dialling— Line Access, Automatic— Line Access, Trunk Group
75
49 or
71
71
50
53 / 5
36 / 56
4
40
72
4*1
732
731
22
730
71
31 / 55
77
77
733
200–299
6
736
70
70
0
98
1–6 / 0 + #
Account code
1–3 + desired number / 0 + #
5 / 8 + EXTN. (extension no.) + #
CO (exchange line no.) / EXTN.
0–9
EXTN.
1 / 0 + #
1 / 0 + #
1 / 0 + #
phone no. + CONF
1 / 0 + #
4 / 0 + #
1–4
0000–9999 twice + #
0000–9999 + #
0 / 1 + #
0 / 1 + #
(1 + EXTN.) / (2 + EXTN.) + #
0 + #
1–6
*1 Dial after dialling the TAM’s extension number and hearing busy tone.
PSQX1709ZA-08.QX 99.10.15 10:00 AM Page 4
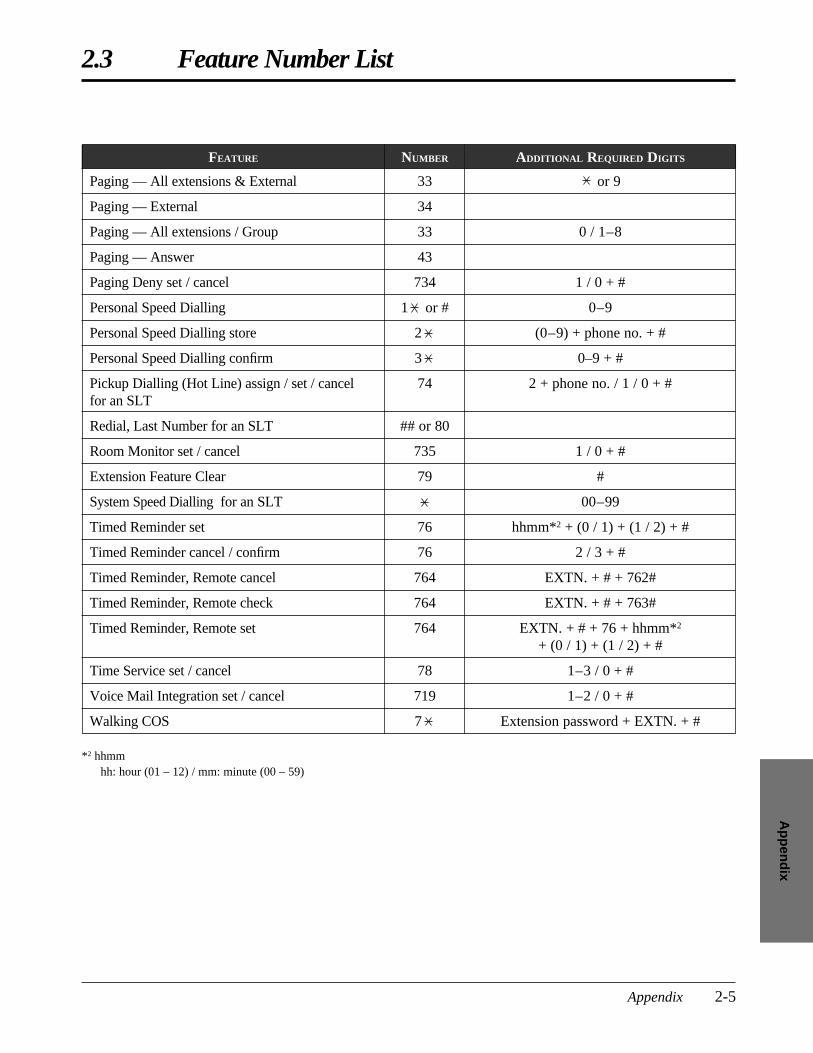
2.3 Feature Number List
Appendix 2-5
Ap
pen
dix
ADDITIONAL REQUIRED DIGITSNUMBERFEATURE
33
34
33
43
734
1 or #
2
3
74
## or 80
735
79
76
76
764
764
764
78
719
7
Paging — All extensions & External
Paging — External
Paging — All extensions / Group
Paging — Answer
Paging Deny set / cancel
Personal Speed Dialling
Personal Speed Dialling store
Personal Speed Dialling confirm
Pickup Dialling (Hot Line) assign / set / cancel for an SLT
Redial, Last Number for an SLT
Room Monitor set / cancel
Extension Feature Clear
System Speed Dialling for an SLT
Timed Reminder set
Timed Reminder cancel / confirm
Timed Reminder, Remote cancel
Timed Reminder, Remote check
Timed Reminder, Remote set
Time Service set / cancel
Voice Mail Integration set / cancel
Walking COS
or 9
0 / 1–8
1 / 0 + #
0–9
(0–9) + phone no. + #
0–9 + #
2 + phone no. / 1 / 0 + #
1 / 0 + #
#
00–99
hhmm*2 + (0 / 1) + (1 / 2) + #
2 / 3 + #
EXTN. + # + 762#
EXTN. + # + 763#
EXTN. + # + 76 + hhmm*2
+ (0 / 1) + (1 / 2) + #
1–3 / 0 + #
1–2 / 0 + #
Extension password + EXTN. + #
*2 hhmmhh: hour (01 – 12) / mm: minute (00 – 59)
PSQX1709ZA-08.QX 99.10.15 10:00 AM Page 5
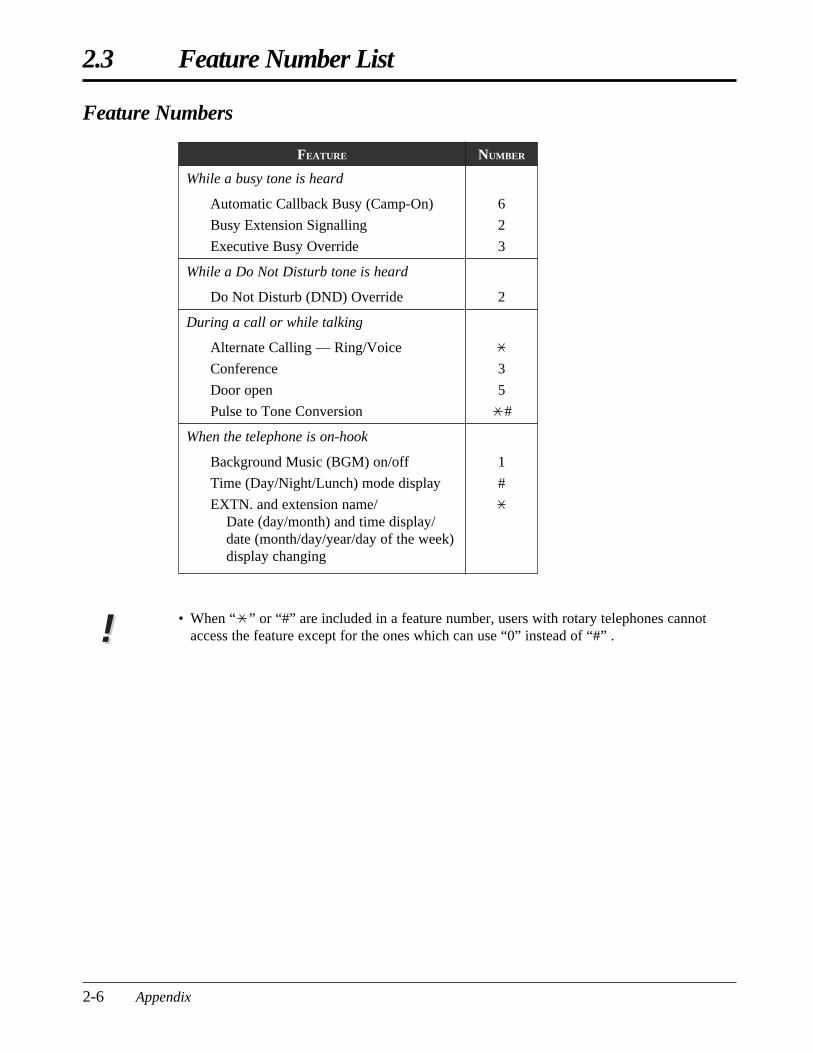
2.3 Feature Number List
2-6 Appendix
NUMBERFEATURE
Feature Numbers
• When “ ” or “#” are included in a feature number, users with rotary telephones cannotaccess the feature except for the ones which can use “0” instead of “#” .
While a busy tone is heard
Automatic Callback Busy (Camp-On)
Busy Extension Signalling
Executive Busy Override
While a Do Not Disturb tone is heard
Do Not Disturb (DND) Override
During a call or while talking
Alternate Calling — Ring/Voice
Conference
Door open
Pulse to Tone Conversion
When the telephone is on-hook
Background Music (BGM) on/off
Time (Day/Night/Lunch) mode display
EXTN. and extension name/Date (day/month) and time display/date (month/day/year/day of the week)display changing
6
2
3
2
3
5
#
1
#
!!
PSQX1709ZA-08.QX 99.10.15 10:00 AM Page 6
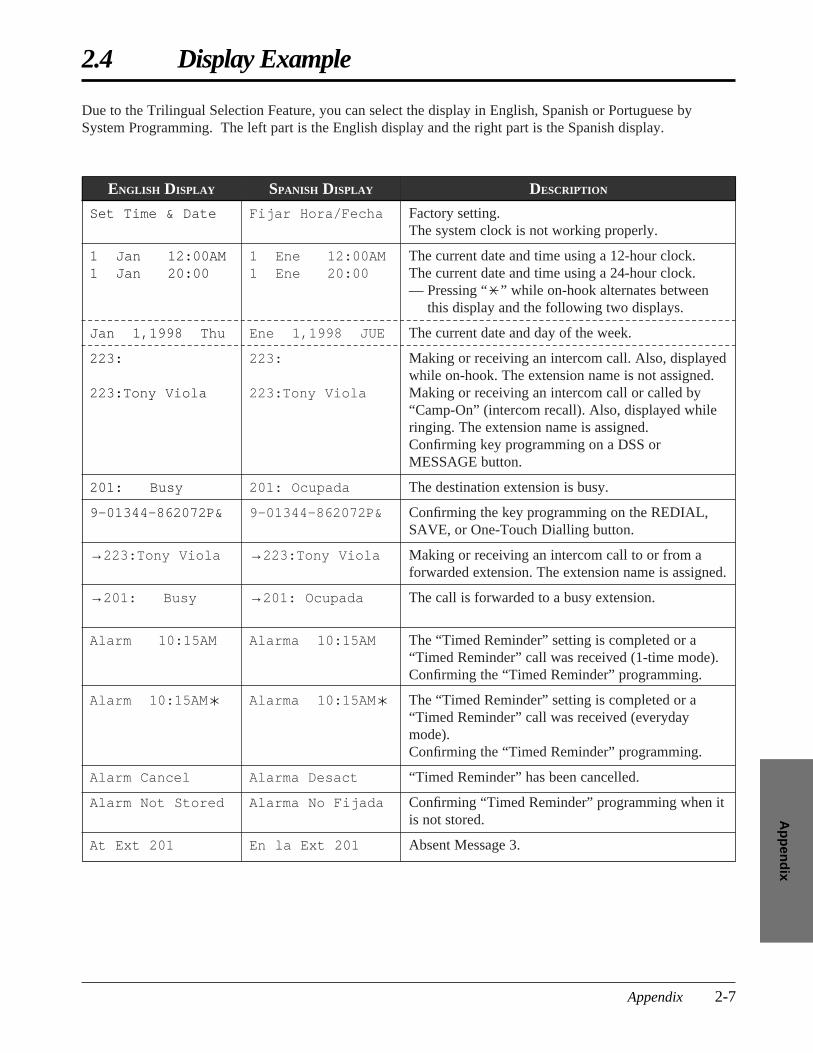
2.4 Display Example
Appendix 2-7
Ap
pen
dix
SPANISH DISPLAY DESCRIPTIONENGLISH DISPLAY
Set Time & Date
1 Jan 12:00AM1 Jan 20:00
Jan 1,1998 Thu
223:
223:Tony Viola
201: Busy
9-01344-862072P&
→223:Tony Viola
→201: Busy
Alarm 10:15AM
Alarm 10:15AM
Alarm Cancel
Alarm Not Stored
At Ext 201
Factory setting. The system clock is not working properly.
The current date and time using a 12-hour clock.The current date and time using a 24-hour clock.— Pressing “ ” while on-hook alternates between
this display and the following two displays.
The current date and day of the week.
Making or receiving an intercom call. Also, displayedwhile on-hook. The extension name is not assigned.Making or receiving an intercom call or called by“Camp-On” (intercom recall). Also, displayed whileringing. The extension name is assigned.Confirming key programming on a DSS orMESSAGE button.
The destination extension is busy.
Confirming the key programming on the REDIAL,SAVE, or One-Touch Dialling button.
Making or receiving an intercom call to or from aforwarded extension. The extension name is assigned.
The call is forwarded to a busy extension.
The “Timed Reminder” setting is completed or a“Timed Reminder” call was received (1-time mode).Confirming the “Timed Reminder” programming.
The “Timed Reminder” setting is completed or a“Timed Reminder” call was received (everydaymode). Confirming the “Timed Reminder” programming.
“Timed Reminder” has been cancelled.
Confirming “Timed Reminder” programming when itis not stored.
Absent Message 3.
Due to the Trilingual Selection Feature, you can select the display in English, Spanish or Portuguese bySystem Programming. The left part is the English display and the right part is the Spanish display.
Fijar Hora/Fecha
1 Ene 12:00AM1 Ene 20:00
Ene 1,1998 JUE
223:
223:Tony Viola
201: Ocupada
9-01344-862072P&
→223:Tony Viola
→201: Ocupada
Alarma 10:15AM
Alarma 10:15AM
Alarma Desact
Alarma No Fijada
En la Ext 201
PSQX1709ZA-08.QX 99.10.15 10:00 AM Page 7
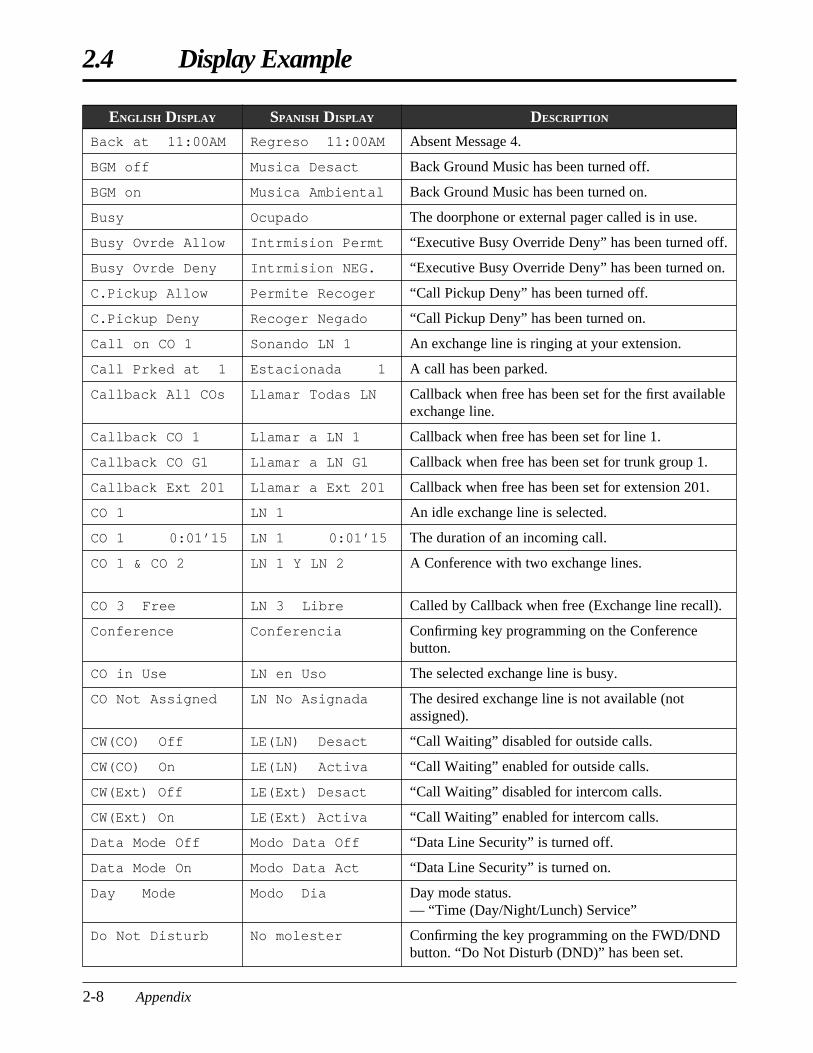
2.4 Display Example
2-8 Appendix
ENGLISH DISPLAY SPANISH DISPLAY DESCRIPTION
Back at 11:00AM
BGM off
BGM on
Busy
Busy Ovrde Allow
Busy Ovrde Deny
C.Pickup Allow
C.Pickup Deny
Call on CO 1
Call Prked at 1
Callback All COs
Callback CO 1
Callback CO G1
Callback Ext 201
CO 1
CO 1 0:01’15
CO 1 & CO 2
CO 3 Free
Conference
CO in Use
CO Not Assigned
CW(CO) Off
CW(CO) On
CW(Ext) Off
CW(Ext) On
Data Mode Off
Data Mode On
Day Mode
Do Not Disturb
Regreso 11:00AM
Musica Desact
Musica Ambiental
Ocupado
Intrmision Permt
Intrmision NEG.
Permite Recoger
Recoger Negado
Sonando LN 1
Estacionada 1
Llamar Todas LN
Llamar a LN 1
Llamar a LN G1
Llamar a Ext 201
LN 1
LN 1 0:01’15
LN 1 Y LN 2
LN 3 Libre
Conferencia
LN en Uso
LN No Asignada
LE(LN) Desact
LE(LN) Activa
LE(Ext) Desact
LE(Ext) Activa
Modo Data Off
Modo Data Act
Modo Dia
No molester
Absent Message 4.
Back Ground Music has been turned off.
Back Ground Music has been turned on.
The doorphone or external pager called is in use.
“Executive Busy Override Deny” has been turned off.
“Executive Busy Override Deny” has been turned on.
“Call Pickup Deny” has been turned off.
“Call Pickup Deny” has been turned on.
An exchange line is ringing at your extension.
A call has been parked.
Callback when free has been set for the first availableexchange line.
Callback when free has been set for line 1.
Callback when free has been set for trunk group 1.
Callback when free has been set for extension 201.
An idle exchange line is selected.
The duration of an incoming call.
A Conference with two exchange lines.
Called by Callback when free (Exchange line recall).
Confirming key programming on the Conferencebutton.
The selected exchange line is busy.
The desired exchange line is not available (notassigned).
“Call Waiting” disabled for outside calls.
“Call Waiting” enabled for outside calls.
“Call Waiting” disabled for intercom calls.
“Call Waiting” enabled for intercom calls.
“Data Line Security” is turned off.
“Data Line Security” is turned on.
Day mode status.— “Time (Day/Night/Lunch) Service”
Confirming the key programming on the FWD/DNDbutton. “Do Not Disturb (DND)” has been set.
PSQX1709ZA-08.QX 99.10.15 10:00 AM Page 8
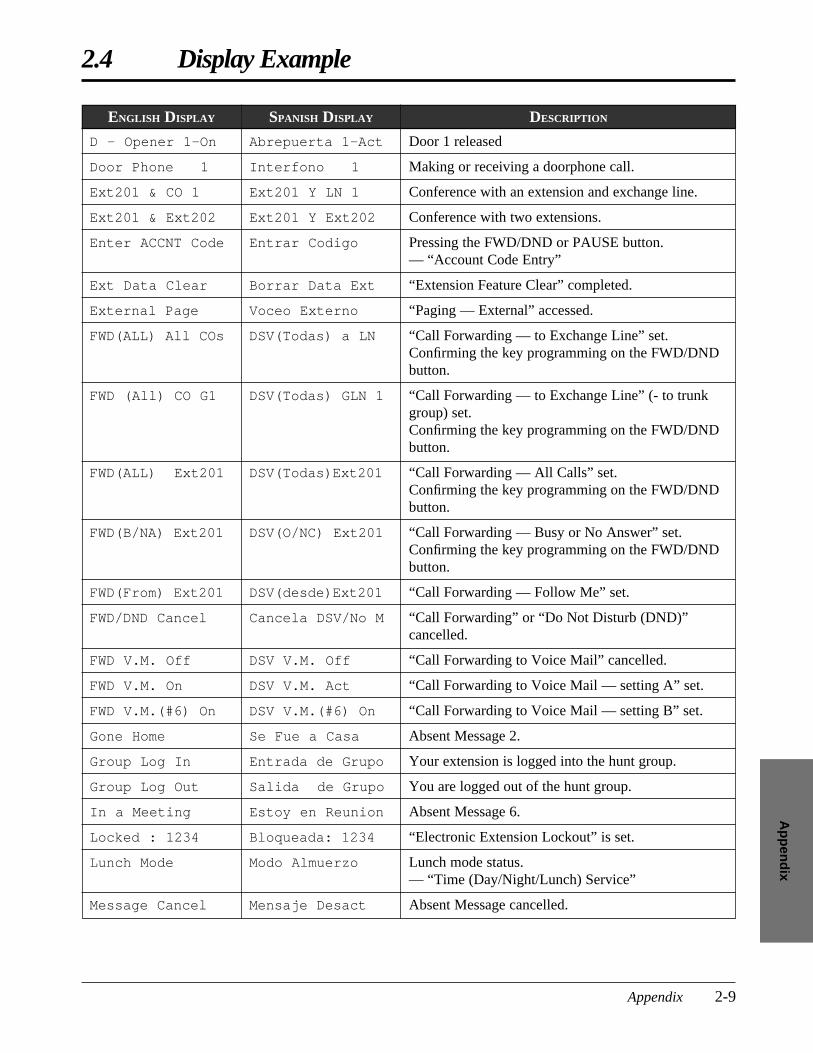
2.4 Display Example
Appendix 2-9
Ap
pen
dix
ENGLISH DISPLAY SPANISH DISPLAY DESCRIPTION
D - Opener 1-On
Door Phone 1
Ext201 & CO 1
Ext201 & Ext202
Enter ACCNT Code
Ext Data Clear
External Page
FWD(ALL) All COs
FWD (All) CO G1
FWD(ALL) Ext201
FWD(B/NA) Ext201
FWD(From) Ext201
FWD/DND Cancel
FWD V.M. Off
FWD V.M. On
FWD V.M.(#6) On
Gone Home
Group Log In
Group Log Out
In a Meeting
Locked : 1234
Lunch Mode
Message Cancel
Abrepuerta 1-Act
Interfono 1
Ext201 Y LN 1
Ext201 Y Ext202
Entrar Codigo
Borrar Data Ext
Voceo Externo
DSV(Todas) a LN
DSV(Todas) GLN 1
DSV(Todas)Ext201
DSV(O/NC) Ext201
DSV(desde)Ext201
Cancela DSV/No M
DSV V.M. Off
DSV V.M. Act
DSV V.M.(#6) On
Se Fue a Casa
Entrada de Grupo
Salida de Grupo
Estoy en Reunion
Bloqueada: 1234
Modo Almuerzo
Mensaje Desact
Door 1 released
Making or receiving a doorphone call.
Conference with an extension and exchange line.
Conference with two extensions.
Pressing the FWD/DND or PAUSE button.— “Account Code Entry”
“Extension Feature Clear” completed.
“Paging — External” accessed.
“Call Forwarding — to Exchange Line” set.Confirming the key programming on the FWD/DNDbutton.
“Call Forwarding — to Exchange Line” (- to trunkgroup) set.Confirming the key programming on the FWD/DNDbutton.
“Call Forwarding — All Calls” set.Confirming the key programming on the FWD/DNDbutton.
“Call Forwarding — Busy or No Answer” set.Confirming the key programming on the FWD/DNDbutton.
“Call Forwarding — Follow Me” set.
“Call Forwarding” or “Do Not Disturb (DND)”cancelled.
“Call Forwarding to Voice Mail” cancelled.
“Call Forwarding to Voice Mail — setting A” set.
“Call Forwarding to Voice Mail — setting B” set.
Absent Message 2.
Your extension is logged into the hunt group.
You are logged out of the hunt group.
Absent Message 6.
“Electronic Extension Lockout” is set.
Lunch mode status. — “Time (Day/Night/Lunch) Service”
Absent Message cancelled.
PSQX1709ZA-08.QX 99.10.15 10:00 AM Page 9
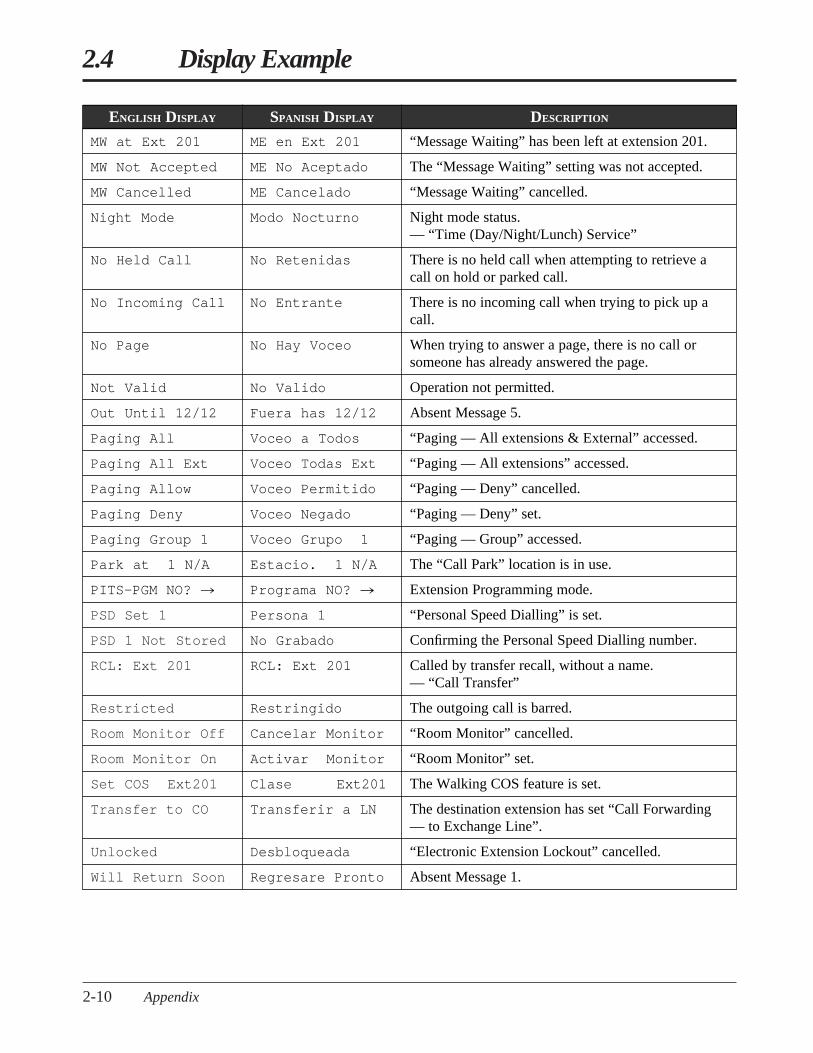
MW at Ext 201
MW Not Accepted
MW Cancelled
Night Mode
No Held Call
No Incoming Call
No Page
Not Valid
Out Until 12/12
Paging All
Paging All Ext
Paging Allow
Paging Deny
Paging Group 1
Park at 1 N/A
PITS-PGM NO? r
PSD Set 1
PSD 1 Not Stored
RCL: Ext 201
Restricted
Room Monitor Off
Room Monitor On
Set COS Ext201
Transfer to CO
Unlocked
Will Return Soon
2.4 Display Example
2-10 Appendix
ENGLISH DISPLAY SPANISH DISPLAY DESCRIPTION
ME en Ext 201
ME No Aceptado
ME Cancelado
Modo Nocturno
No Retenidas
No Entrante
No Hay Voceo
No Valido
Fuera has 12/12
Voceo a Todos
Voceo Todas Ext
Voceo Permitido
Voceo Negado
Voceo Grupo 1
Estacio. 1 N/A
Programa NO? r
Persona 1
No Grabado
RCL: Ext 201
Restringido
Cancelar Monitor
Activar Monitor
Clase Ext201
Transferir a LN
Desbloqueada
Regresare Pronto
“Message Waiting” has been left at extension 201.
The “Message Waiting” setting was not accepted.
“Message Waiting” cancelled.
Night mode status. — “Time (Day/Night/Lunch) Service”
There is no held call when attempting to retrieve acall on hold or parked call.
There is no incoming call when trying to pick up acall.
When trying to answer a page, there is no call orsomeone has already answered the page.
Operation not permitted.
Absent Message 5.
“Paging — All extensions & External” accessed.
“Paging — All extensions” accessed.
“Paging — Deny” cancelled.
“Paging — Deny” set.
“Paging — Group” accessed.
The “Call Park” location is in use.
Extension Programming mode.
“Personal Speed Dialling” is set.
Confirming the Personal Speed Dialling number.
Called by transfer recall, without a name.— “Call Transfer”
The outgoing call is barred.
“Room Monitor” cancelled.
“Room Monitor” set.
The Walking COS feature is set.
The destination extension has set “Call Forwarding— to Exchange Line”.
“Electronic Extension Lockout” cancelled.
Absent Message 1.
PSQX1709ZA-08.QX 99.10.15 10:00 AM Page 10
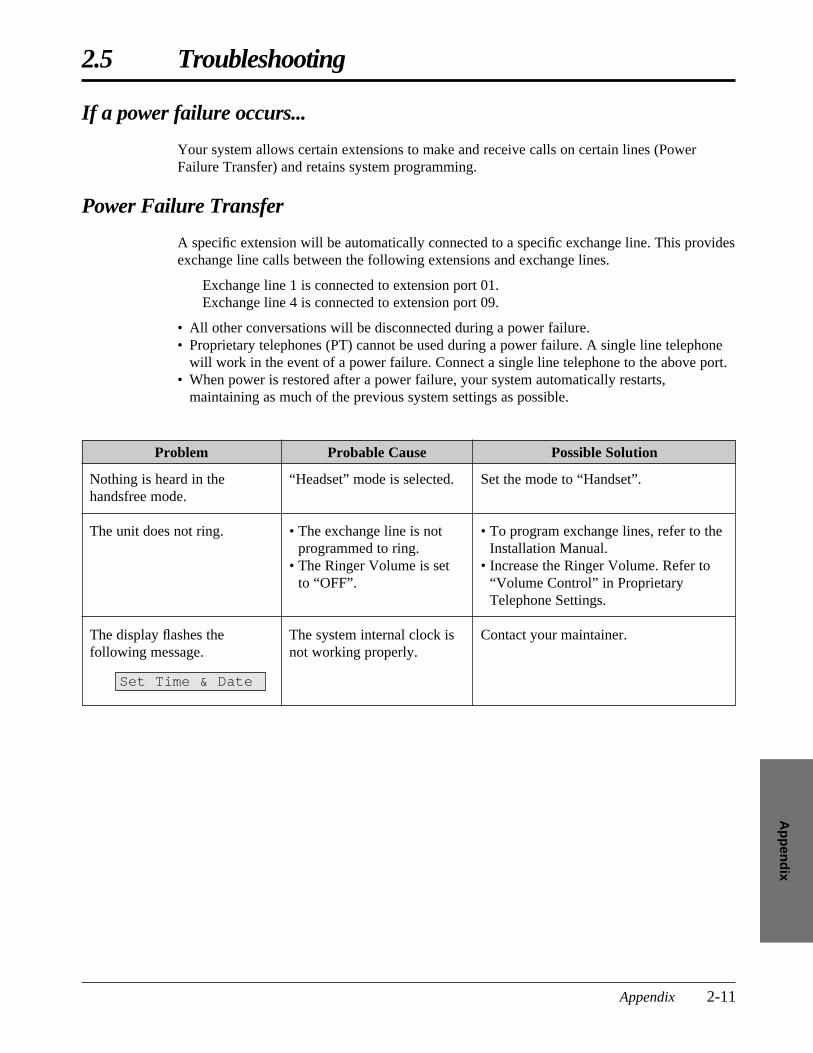
2.5 Troubleshooting
Appendix 2-11
Ap
pen
dix
Problem Probable Cause Possible Solution
Nothing is heard in thehandsfree mode.
The unit does not ring.
The display flashes thefollowing message.
Set Time & Date
“Headset” mode is selected.
• The exchange line is notprogrammed to ring.
• The Ringer Volume is setto “OFF”.
The system internal clock isnot working properly.
Set the mode to “Handset”.
• To program exchange lines, refer to theInstallation Manual.
• Increase the Ringer Volume. Refer to“Volume Control” in ProprietaryTelephone Settings.
Contact your maintainer.
If a power failure occurs...
Your system allows certain extensions to make and receive calls on certain lines (PowerFailure Transfer) and retains system programming.
Power Failure Transfer
A specific extension will be automatically connected to a specific exchange line. This providesexchange line calls between the following extensions and exchange lines.
Exchange line 1 is connected to extension port 01.Exchange line 4 is connected to extension port 09.
• All other conversations will be disconnected during a power failure.• Proprietary telephones (PT) cannot be used during a power failure. A single line telephone
will work in the event of a power failure. Connect a single line telephone to the above port.• When power is restored after a power failure, your system automatically restarts,
maintaining as much of the previous system settings as possible.
PSQX1709ZA-08.QX 99.10.15 10:00 AM Page 11

2-12 Appendix
PSQX1709ZA-08.QX 99.10.15 10:00 AM Page 12

Index
Index-1
A Absent Message Capability .......................... 1-58Account Code Entry .................................... 1-67Adjustment → ControlAlarm Setting (Timed Reminder) ................ 1-72Alternate Calling — Ring/Voice .................. 1-82Answering → Receiving CallsAutomatic Callback Busy — Camp-On ...... 1-30
B Background Music (BGM) .......................... 1-80Busy Extension Signalling............................ 1-29Busy Lamp Field (BLF) ................................ 2-3Button
CONF (Conference).................................. 1-11Day.......................................................... 1-100DSS (Direct Station Selection) ................ 1-10Extension Button Confirmation ................ 1-81Extension Lock ...................................... 1-100Flexible DSS .............................................. 1-8Flexible Line .............................................. 1-8Flexible MESSAGE.................................... 1-8FWD/DND (Forward/Do Not Disturb) ....1-12Line Access ................................................ 1-9Log-In/Log-Out ........................................ 1-12Lunch ...................................................... 1-100MESSAGE................................................ 1-13Night ...................................................... 1-100One-Touch Dialling .................................. 1-11Other Exchange Lines (O-CO) .................. 1-9PROGRAM ................................................ 1-4SAVE........................................................ 1-12Single Exchange Line (S-CO) .................... 1-9Trunk Group (G-CO)................................ 1-10VOLUME control .................................... 1-15
C Call Forwarding ............................................ 1-52Call Hold ...................................................... 1-38Call Hold Retrieve ........................................ 1-40Calling → Making CallsCall Park ...................................................... 1-41Call Pickup.................................................... 1-36
Denying/allowing .................................... 1-37Directed .................................................... 1-36Group ........................................................ 1-36Retrieving Calls Answered by a TAM .... 1-37
Call Pickup Deny.......................................... 1-37Call Splitting ................................................ 1-47
Call Transfer .............................................. 1-102Call Transfer – to Exchange Line ................ 1-44Call Transfer – to Extension ........................ 1-42Call Waiting.................................................. 1-45Call Waiting Tone Selection .......................... 1-7Camp-On (Automatic Callback Busy) ........ 1-30Cancelling
Alarm Setting (Timed Reminder) ............ 1-72Automatic Callback Busy — Camp-On .... 1-30BGM ........................................................ 1-80Call Forwarding ........................................ 1-56Call Pickup Deny...................................... 1-37Call Waiting.............................................. 1-45Data Line Security .................................... 1-77Do Not Disturb (DND) ............................ 1-69Electronic Extension Lockout .................. 1-91Executive Busy Override Deny ................ 1-33Extension Feature Clear............................ 1-82Handsfree Answerback ............................ 1-35Message Waiting ...................................... 1-65Microphone Mute .................................... 1-51Pickup Dialling ........................................ 1-26Room Monitor .......................................... 1-76Time (Day/Night/Lunch) Service Setting .. 1-95Timed Reminder, Remote ........................ 1-92Voice Mail Integration.............................. 1-86
CheckingAlarm Setting (Timed Reminder) ............ 1-73Extension Button ...................................... 1-81Message Waiting ...................................... 1-66Personal Speed Dialling............................ 1-25Self-Extension Number ............................ 1-80Time (Day/Night/Lunch) Service ............ 1-74Time (Day/Night/Lunch) Service Setting .. 1-95Timed Reminder, Remote ........................ 1-92
ClearingExtension Feature Clear............................ 1-82Message Waiting ...................................... 1-66
CONF (Conference) Button.......................... 1-11Conference (3-party) .................................... 1-59Conference (5-party) .................................... 1-62Confirmation → CheckingControl
Display Contrast ...................................... 1-14Handset receiver volume .......................... 1-14Ringer volume .......................................... 1-15Speaker volume ........................................ 1-15
Customising .................................................... 1-5
PSQX1709ZA-09.QX 99.10.15 10:00 AM Page 1
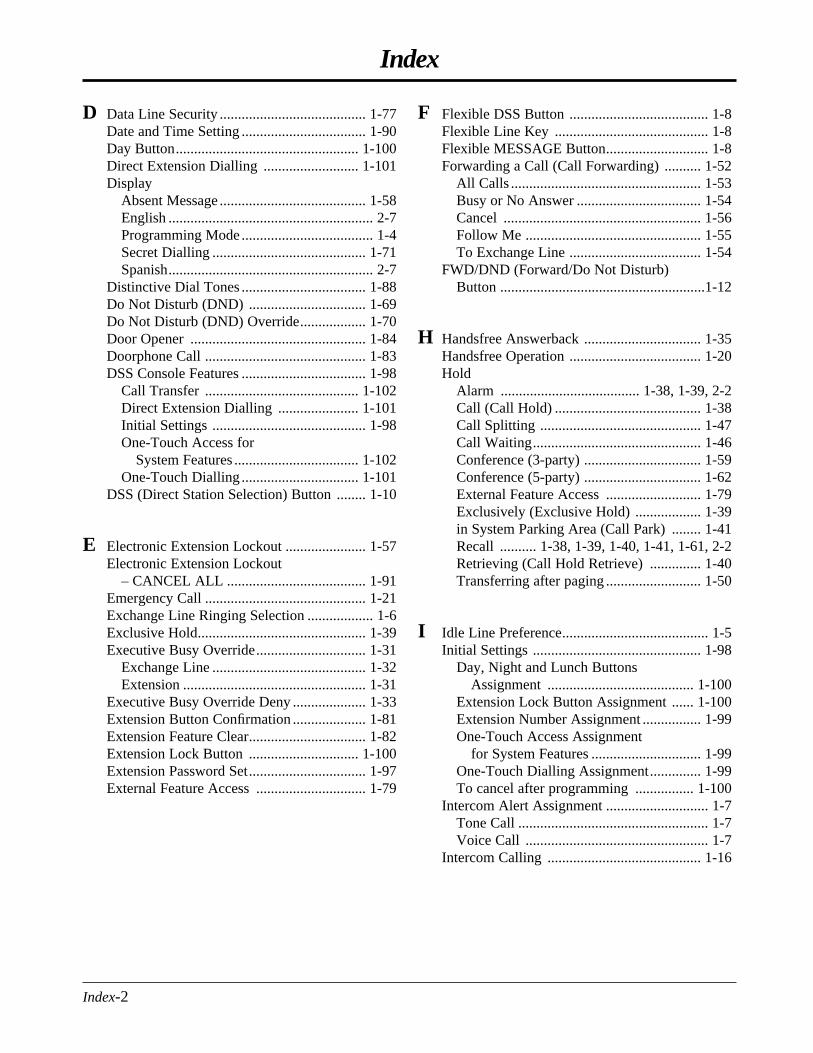
Index
Index-2
D Data Line Security ........................................ 1-77Date and Time Setting .................................. 1-90Day Button.................................................. 1-100Direct Extension Dialling .......................... 1-101Display
Absent Message ........................................ 1-58English ........................................................ 2-7Programming Mode .................................... 1-4Secret Dialling .......................................... 1-71Spanish........................................................ 2-7
Distinctive Dial Tones .................................. 1-88Do Not Disturb (DND) ................................ 1-69Do Not Disturb (DND) Override.................. 1-70Door Opener ................................................ 1-84Doorphone Call ............................................ 1-83DSS Console Features .................................. 1-98
Call Transfer .......................................... 1-102Direct Extension Dialling ...................... 1-101Initial Settings .......................................... 1-98One-Touch Access for
System Features .................................. 1-102One-Touch Dialling ................................ 1-101
DSS (Direct Station Selection) Button ........ 1-10
E Electronic Extension Lockout ...................... 1-57Electronic Extension Lockout
– CANCEL ALL ...................................... 1-91Emergency Call ............................................ 1-21Exchange Line Ringing Selection .................. 1-6Exclusive Hold.............................................. 1-39Executive Busy Override.............................. 1-31
Exchange Line .......................................... 1-32Extension .................................................. 1-31
Executive Busy Override Deny .................... 1-33Extension Button Confirmation .................... 1-81Extension Feature Clear................................ 1-82Extension Lock Button .............................. 1-100Extension Password Set................................ 1-97External Feature Access .............................. 1-79
F Flexible DSS Button ...................................... 1-8Flexible Line Key .......................................... 1-8Flexible MESSAGE Button............................ 1-8Forwarding a Call (Call Forwarding) .......... 1-52
All Calls .................................................... 1-53Busy or No Answer .................................. 1-54Cancel ...................................................... 1-56Follow Me ................................................ 1-55To Exchange Line .................................... 1-54
FWD/DND (Forward/Do Not Disturb) Button ........................................................1-12
H Handsfree Answerback ................................ 1-35Handsfree Operation .................................... 1-20Hold
Alarm ...................................... 1-38, 1-39, 2-2Call (Call Hold) ........................................ 1-38Call Splitting ............................................ 1-47Call Waiting.............................................. 1-46Conference (3-party) ................................ 1-59Conference (5-party) ................................ 1-62External Feature Access .......................... 1-79Exclusively (Exclusive Hold) .................. 1-39in System Parking Area (Call Park) ........ 1-41Recall .......... 1-38, 1-39, 1-40, 1-41, 1-61, 2-2Retrieving (Call Hold Retrieve) .............. 1-40Transferring after paging .......................... 1-50
I Idle Line Preference........................................ 1-5Initial Settings .............................................. 1-98
Day, Night and Lunch Buttons Assignment ........................................ 1-100
Extension Lock Button Assignment ...... 1-100Extension Number Assignment ................ 1-99One-Touch Access Assignment
for System Features .............................. 1-99One-Touch Dialling Assignment.............. 1-99To cancel after programming ................ 1-100
Intercom Alert Assignment ............................ 1-7Tone Call .................................................... 1-7Voice Call .................................................. 1-7
Intercom Calling .......................................... 1-16
PSQX1709ZA-09.QX 99.10.15 10:00 AM Page 2
Index
Index-3
L Last Number Redial...................................... 1-27LED Indication .............................................. 2-3
Line Key .................................................... 2-3INTERCOM Button.................................... 2-3
LeverCONTRAST ............................................ 1-14RINGER volume ...................................... 1-15VOLUME control .................................... 1-15
LineCall Transfer – to Exchange Line ............ 1-44Data Line Security .................................... 1-77Exchange Line Ringing Selection .............. 1-6Forwarding a Call (Call Forwarding) –
To Exchange Line ................................ 1-54Idle Line Preference.................................... 1-5Line Access Keys ...................................... 1-9Making Outside Calls Using
Automatic Line Access ........................ 1-18Making Outside Calls Using
Individual Line Access ........................ 1-18Making Outside Calls Using Individual
Trunk Group Access ............................ 1-19No Line Preference ..............................1-5, 1-6Preferred Line Assignment — Incoming.... 1-6Preferred Line Assignment — Outgoing.... 1-5Prime Line Preference ..........................1-5, 1-6Ringing Line Preference ............................ 1-6
Line Access Keys .......................................... 1-9Lockout ........................................................ 1-89Log-In/Log-Out ............................................ 1-75Log-In/Log-Out Button ................................ 1-12Lunch Button .............................................. 1-100
M Making CallsAccount Codes (Account Code Entry) .... 1-67Automatic Line Access ............................ 1-18Doorphone Call ........................................ 1-83Emergency Call ........................................ 1-21Handsfree Operation ................................ 1-20Individual Line Access ............................ 1-18Individual Trunk
Group Access........................................ 1-19Intercom.................................................... 1-16
Operator Call ............................................ 1-17Outside ...................................................... 1-17Personal Speed Dialling............................ 1-24Redialling Automatically
(Automatic Redial) .............................. 1-27Redialling the Last Number Dialled
(Last Number Redial) .......................... 1-27Redialling the Saved Number
(Saved Number Redial) ........................ 1-28Simply Going Off-Hook
(Pickup Dialling) ................................ 1-26Simply Pressing a Button
(One-Touch Dialling) .......................... 1-22System Speed Dialling.............................. 1-23Your Privileges from Another Extension
(Walking COS) .................................... 1-87Manager Service Features ............................ 1-90
Date and Time Setting .............................. 1-90Electronic Extension Lockout
– CANCEL ALL .................................. 1-91Extension Password Set............................ 1-97Outgoing Message (OGM) ...................... 1-93Remote Extension Lock............................ 1-94Time (Day/Night/Lunch)
Service Setting ...................................... 1-95Timed Reminder, Remote
(Wake-Up Call) .................................... 1-91MEMORY switch .......................................... 1-4Message
Absent ...................................................... 1-58Button ...................................................... 1-13Notification (Message Waiting)................ 1-65Outgoing .................................................. 1-93Voice Mail ................................................ 1-85
MESSAGE Button........................................ 1-13Message Waiting .......................................... 1-65Microphone Mute ........................................ 1-51Mixed Extension Dialling ............................ 1-78Mode
Automatic ................................................ 1-95Day .................................................. 1-74, 1-95Forced ...................................................... 1-67Lunch .............................................. 1-74, 1-95Manual ...................................................... 1-95Night................................................ 1-74, 1-95Option ...................................................... 1-67Verify-All ................................................ 1-67Verify-Toll (Call Barring) ........................ 1-67Without Transfer ...................................... 1-43With Transfer............................................ 1-43
PSQX1709ZA-09.QX 99.10.15 10:00 AM Page 3
Index
Index-4
N Night Button .............................................. 1-100No Line Preference.................................. 1-5, 1-6
O One-Touch Access for System Features ............................ 1-13, 1-102
One-Touch Dialling .......................... 1-22, 1-101One-Touch Dialling Button .......................... 1-11Operator Call ................................................ 1-17Operator Service Features ............................ 1-90
Date and Time Setting .............................. 1-90Electronic Extension Lockout
– CANCEL ALL .................................. 1-91Outgoing Message (OGM) ...................... 1-93Remote Extension Lock............................ 1-94Time (Day/Night/Lunch)
Service Setting ...................................... 1-95Timed Reminder, Remote
(Wake-Up Call) .................................... 1-91Other Exchange Lines (O-CO) Key .............. 1-9Outgoing Message (OGM) .......................... 1-93Outside Calling ............................................ 1-17
Automatic Line Access ............................ 1-18Individual Line Access ............................ 1-18Individual Trunk Group Access .............. 1-19
P Paging .......................................................... 1-48All extensions .......................................... 1-48All extensions & External ........................ 1-49Answering ................................................ 1-49Deny.......................................................... 1-51External .................................................... 1-48Group ........................................................ 1-48Transferring .............................................. 1-50
Parallelled Telephone Connection................ 1-78Personal Speed Dialling................................ 1-24Pickup Dialling ............................................ 1-26Power Failure Transfer........................ 1-89, 2-11Preferred Line Assignment — Incoming ...... 1-6
No Line Preference .................................... 1-6Prime Line Preference ................................ 1-6Ringing Line Preference ............................ 1-6
Preferred Line Assignment — Outgoing........ 1-5Idle Line Preference.................................... 1-5No Line Preference .................................... 1-5Prime Line Preference ................................ 1-5
Prime Line Preference ............................ 1-5, 1-6Programming Mode ........................................ 1-4Proprietary Telephone Setting
Data Default Set.......................................... 1-7Pulse to Tone Conversion ............................ 1-81
R Recall ............................................................ 1-19Receiving Calls ............................................ 1-34
Automatic Callback Busy — Camp-On.......................................... 1-30
Call Pickup................................................ 1-36Call Waiting .................................... 1-45, 1-46Doorphone Call ........................................ 1-83Handsfree Answerback ............................ 1-35Paging ...................................................... 1-49
RedialLast Number ............................................ 1-27Saved Number .......................................... 1-28
Remote Extension Lock................................ 1-94Restoring the MESSAGE Button ................ 1-13Ringing Line Preference ................................ 1-6Ringing Pattern Selection ............................ 1-88Ring Tone ...................................................... 2-2
Callback Ringing (Camp-on Recall) .......... 2-2Doorphone Ringing .................................... 2-2Hold Recall .... 1-38, 1-39, 1-40, 1-41, 1-61, 2-2Incoming Calls............................................ 2-2Timed Reminder ........................................ 2-2
Room Monitor .............................................. 1-76
PSQX1709ZA-09.QX 99.10.15 10:00 AM Page 4
Index
Index-5
S SAVE Button ................................................ 1-12Saved Number Redial .................................. 1-28Secret Dialling .............................................. 1-71Self-Extension Number Confirmation .......... 1-80Single Exchange Line (S-CO) Key ................ 1-9Storing
Personal Speed Dialling............................ 1-24Pickup Dialling ........................................ 1-26Saved Number Redial .............................. 1-28System Speed Dialling.............................. 1-23
Symbol ............................................................ 1-2System Speed Dialling.................................. 1-23
T Telephone .............................................. 1-2, 1-78Timed Reminder (Alarm Setting) ................ 1-72Timed Reminder, Remote
(Wake-Up Call) ........................................ 1-91Time (Day/Night/Lunch) Service Setting .... 1-95Tone ................................................................ 2-2
Alarm .......................................................... 1-4Busy .................................................. 1-16, 2-2Call Waiting................................................ 2-2Call Waiting Tone Selection ...................... 1-7Confirmation .............................. 1-4, 1-16, 2-2Dial .................................................... 1-88, 2-2Distinctive Dial Tone................................ 1-88Do Not Disturb (DND)...................... 1-16, 2-2Hold Alarm .............................. 1-38, 1-39, 2-2Pulse to Tone Conversion ........................ 1-81Reorder ...................................................... 2-2Ringback............................................ 1-16, 2-2Tone Call .................................................... 1-7
Tone Call ........................................................ 1-7Transferring
after paging (Paging and Transfer) .......... 1-50One-Touch Transfer.................................. 1-43Power Failure .................................. 1-89, 2-11Screened.................................................... 1-42to an Exchange Line ................................ 1-44to an Extension ........................................ 1-42Unscreened .............................................. 1-42Using a DSS button .................................. 1-43Without Transfer .......................... 1-43, 1-102With Transfer ................................ 1-43, 1-102
Trunk Group (G-CO) Key ............................ 1-10
V Voice Call ...................................................... 1-7Voice Mail Integration for KX-TVP100 ...... 1-85Volume Control (VOLUME) ...................... 1-14
Ringer volume .......................................... 1-15Speaker volume ........................................ 1-15
VOLUME Control Button ............................ 1-15
W Wake-Up CallAlarm Setting............................................ 1-72Timed Reminder, Remote ........................ 1-91
Walking COS................................................ 1-87
PSQX1709ZA-09.QX 99.10.15 10:00 AM Page 5

Memo
PSQX1709ZA-09.QX 99.10.15 10:00 AM Page 6

PSQX1709ZA-09.QX 99.10.15 10:00 AM Page 7
Panasonic Business Systems U.K.Panasonic House, Willoughby Road, Bracknell, Berkshire RG12 8FP
Printed in the United Kingdom PSQX1709YB CM1129SM
Copyright:
This manual is copyrighted by Kyushu Matsushita Electric Co., Ltd. (KME). Under the copyright laws, thismanual may not be reproduced in any form, in whole or part, without the prior written consent of KME and itslicensee.
C Kyushu Matsushita Electric Co., Ltd. 1999
PSQX1709ZA-09.QX 99.10.15 2:26 PM Page 8
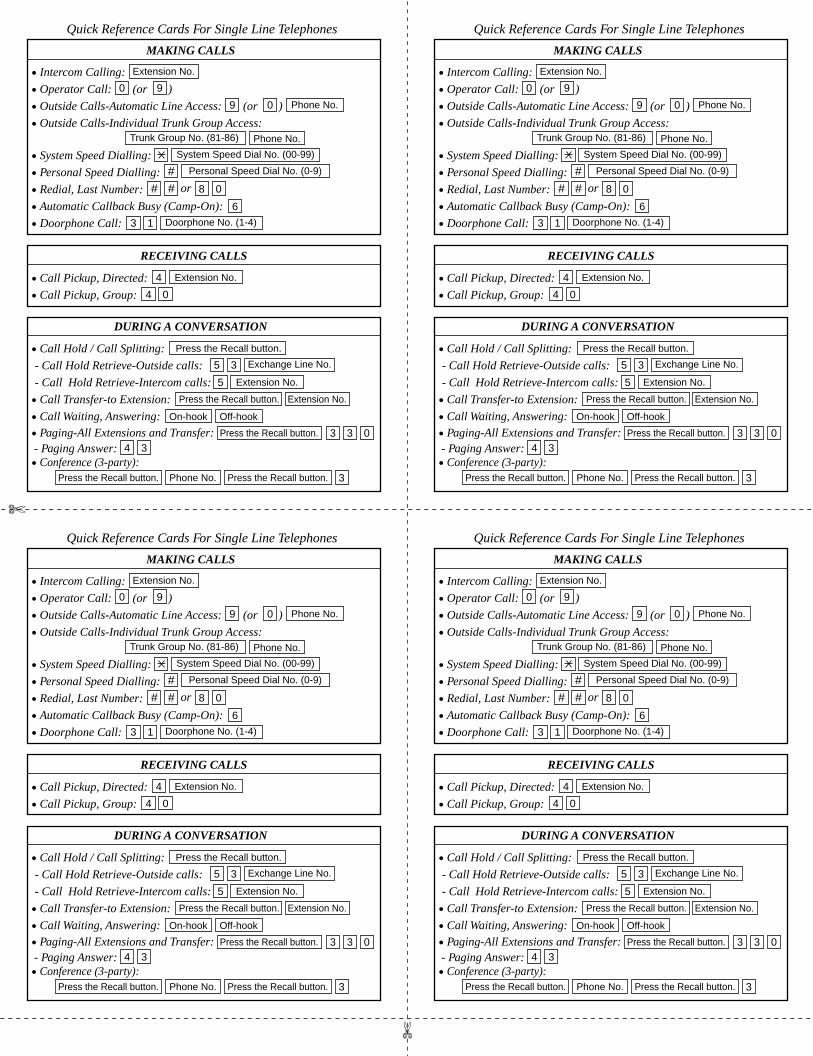
MAKING CALLS
Quick Reference Cards For Single Line Telephones
RECEIVING CALLS
• Intercom Calling: Extension No.
9
• Outside Calls-Individual Trunk Group Access:Trunk Group No. (81-86) Phone No.
• System Speed Dialling: System Speed Dial No. (00-99)
• Redial, Last Number: or 8 0
• Automatic Callback Busy (Camp-On): 6
• Doorphone Call: 3 1 Doorphone No. (1-4)
• Call Pickup, Directed: 4 Extension No.
• Call Pickup, Group: 4 0
• Operator Call: 0 (or )9
• Outside Calls-Automatic Line Access: Phone No.(or )0
• Personal Speed Dialling: Personal Speed Dial No. (0-9)#
# #
DURING A CONVERSATION
• Call Hold / Call Splitting: Press the Recall button.
- Call Hold Retrieve-Outside calls: Exchange Line No.5 3
- Call Hold Retrieve-Intercom calls: Extension No.5
• Call Transfer-to Extension: Press the Recall button. Extension No.
• Call Waiting, Answering: On-hook Off-hook
• Conference (3-party):Press the Recall button. Press the Recall button.Phone No. 3
• Paging-All Extensions and Transfer: 3 3 0Press the Recall button.
- Paging Answer: 4 3
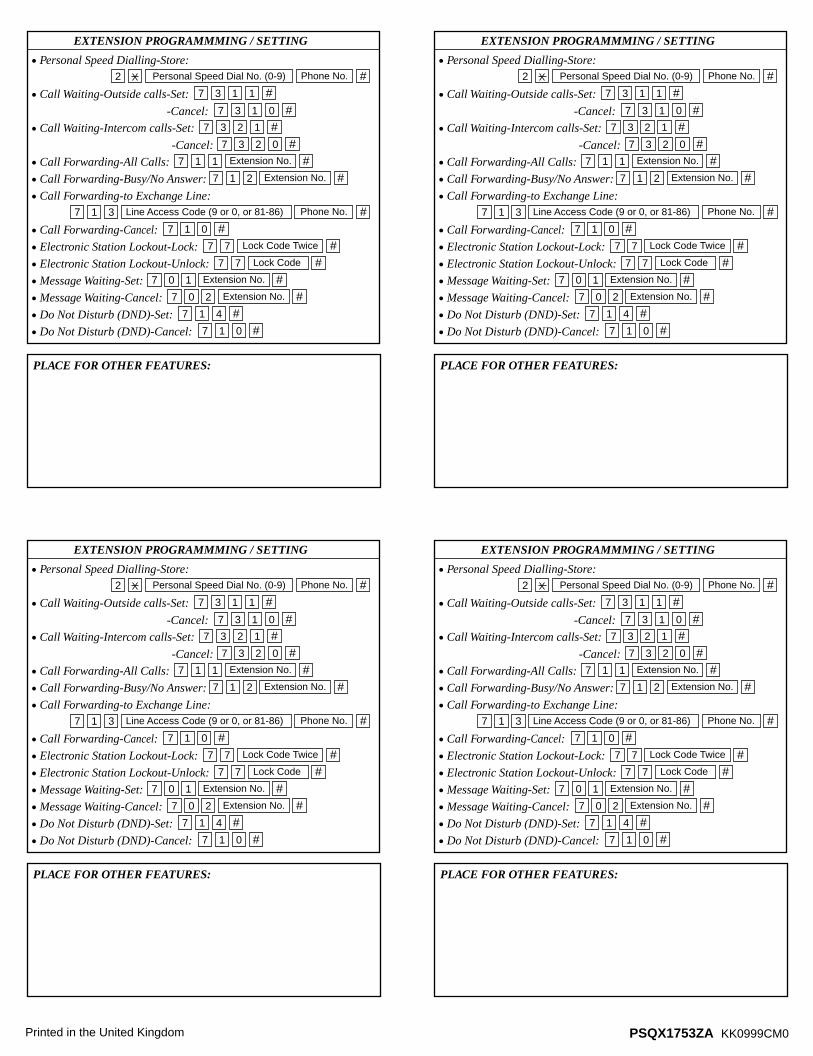
EXTENSION PROGRAMMMING / SETTING
• Call Forwarding-All Calls: 7 1 1 Extension No.
• Call Forwarding-Busy/No Answer: 7 1 2 Extension No.
• Message Waiting-Set: 7 0 1 Extension No.
• Message Waiting-Cancel: 7 0 2 Extension No.
• Call Forwarding-Cancel: 7 1 0
• Do Not Disturb (DND)-Set: 7 1 4
• Do Not Disturb (DND)-Cancel: 7 1 0
-Cancel:• Call Waiting-Outside calls-Set: 37 1 1
37 1 0
• Call Waiting-Intercom calls-Set:
-Cancel:
37 2 1
37 2 0
• Personal Speed Dialling-Store:2 Personal Speed Dial No. (0-9) Phone No.
• Electronic Station Lockout-Unlock: 7 7 Lock Code
• Call Forwarding-to Exchange Line:7 1 3 Line Access Code (9 or 0, or 81-86) Phone No.
• Electronic Station Lockout-Lock: 7 7 Lock Code Twice
PLACE FOR OTHER FEATURES:
#
#
##
##
##
##
##
##
#
Printed in the United Kingdom PSQX1753ZA KK0999CM0
To expand the sub-menu, left click themouse on the symbol, located to the left ofthe selected text.
for version 3 Adobe Reader
for version 4 Adobe Reader


![1].pdfModel No. KX-TDA50/KX-TDA100 KX-TDA200/KX-TDA600 Hybrid IP-PBX Operating Manual Thank you for purchasing a Panasonic Hybrid IP-PBX. Please read this manual carefully before using](https://img.pdfslide.us/doc/110x75/5ea72f88c6b46f57ee1a0265/1pdf-model-no-kx-tda50kx-tda100-kx-tda200kx-tda600-hybrid-ip-pbx-operating.jpg)