Embed Size (px)
Citation preview
Cisco Aironet Wireless LAN Adapters InstallatioOL-1377-01
C H A P T E R 6
Advanced Configuration on Mac OS XThis chapter describes the client utility used with a Cisco Aironet Wireless LAN Adapter running on the Mac OS X operating system.
The following topics are covered in this chapter:
• Using the Client Utility on Mac OS X, page 6-2
• Obtaining Software Version Information, page 6-21
• Getting Help, page 6-22
• Exiting the Client Utility, page 6-23
6-1n and Configuration Guide for Mac OS
Chapter 6 Advanced Configuration on Mac OS XUsing the Client Utility on Mac OS X
Using the Client Utility on Mac OS XThis section explains how to use the client utility to load new firmware and to configure your client adapter for use in a wireless network. This section also explains how you can use the client utility to set parameters that govern how the adapter transmits or receives data, and controls the adapter’s operation within an infrastructure or ad hoc network.
Opening the Client UtilityTo open the client utility, follow the steps below.
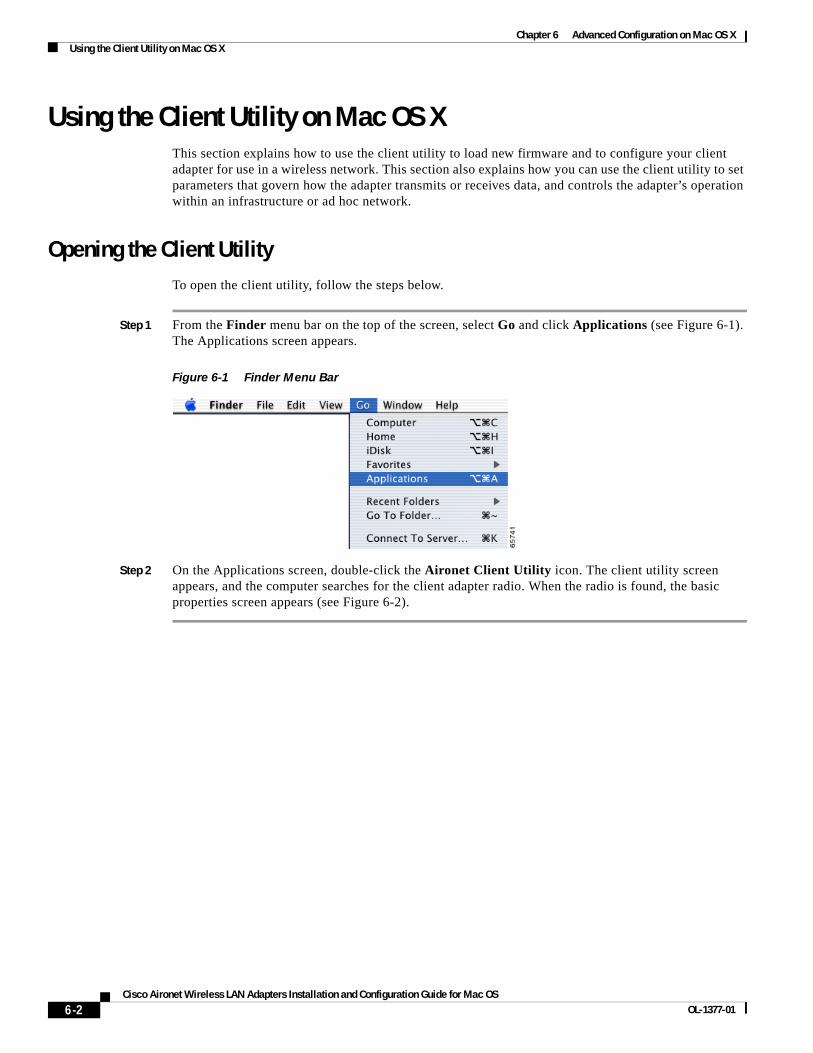
Step 1 From the Finder menu bar on the top of the screen, select Go and click Applications (see Figure 6-1). The Applications screen appears.
Figure 6-1 Finder Menu Bar
Step 2 On the Applications screen, double-click the Aironet Client Utility icon. The client utility screen appears, and the computer searches for the client adapter radio. When the radio is found, the basic properties screen appears (see Figure 6-2).
6-2Cisco Aironet Wireless LAN Adapters Installation and Configuration Guide for Mac OS
OL-1377-01
Chapter 6 Advanced Configuration on Mac OS XUsing the Client Utility on Mac OS X
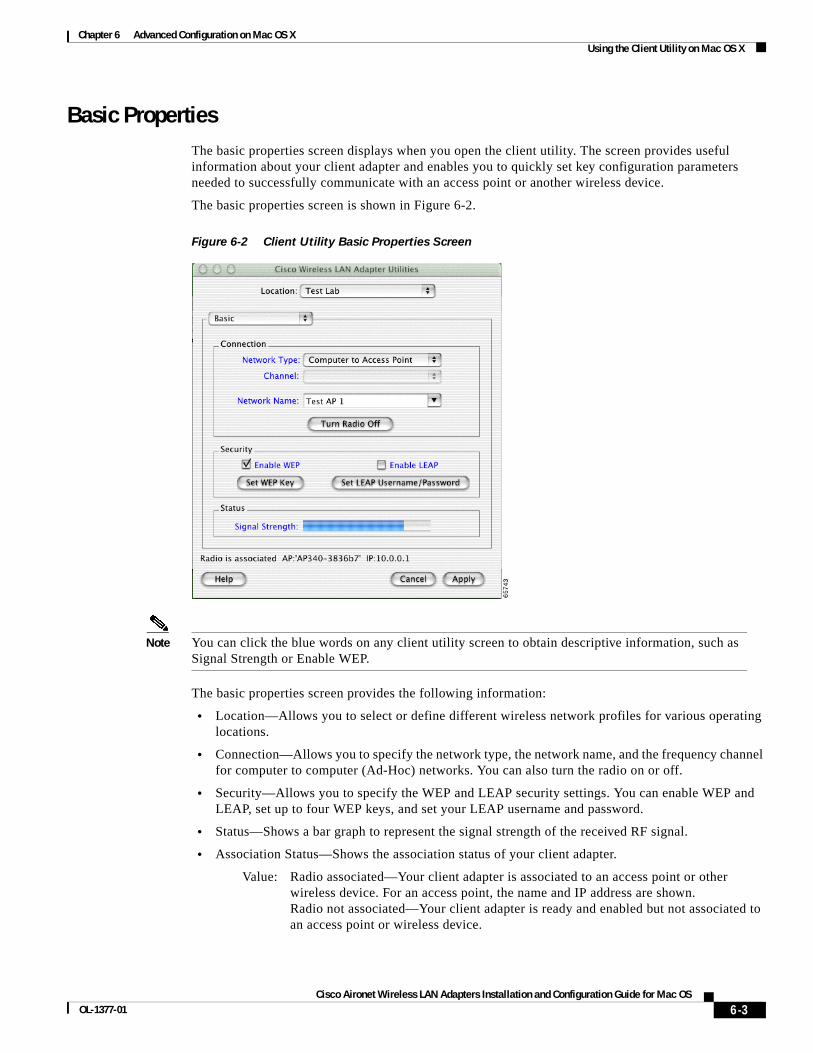
Basic PropertiesThe basic properties screen displays when you open the client utility. The screen provides useful information about your client adapter and enables you to quickly set key configuration parameters needed to successfully communicate with an access point or another wireless device.
The basic properties screen is shown in Figure 6-2.
Figure 6-2 Client Utility Basic Properties Screen
Note You can click the blue words on any client utility screen to obtain descriptive information, such as Signal Strength or Enable WEP.
The basic properties screen provides the following information:
• Location—Allows you to select or define different wireless network profiles for various operating locations.
• Connection—Allows you to specify the network type, the network name, and the frequency channel for computer to computer (Ad-Hoc) networks. You can also turn the radio on or off.
• Security—Allows you to specify the WEP and LEAP security settings. You can enable WEP and LEAP, set up to four WEP keys, and set your LEAP username and password.
• Status—Shows a bar graph to represent the signal strength of the received RF signal.
• Association Status—Shows the association status of your client adapter.
Value: Radio associated—Your client adapter is associated to an access point or other wireless device. For an access point, the name and IP address are shown.Radio not associated—Your client adapter is ready and enabled but not associated toan access point or wireless device.
6-3Cisco Aironet Wireless LAN Adapters Installation and Configuration Guide for Mac OS
OL-1377-01
Chapter 6 Advanced Configuration on Mac OS XUsing the Client Utility on Mac OS X
Table 6-1 lists and describes the parameters that can be set from the basic properties screen. Follow the instructions in the table to initially set or change any parameter. Click Apply at the bottom of the basic properties screen to save any changes you make.
Table 6-1 Basic Properties Parameters
Parameter Description
Location Specifies different radio network profile settings used in various locations, such as your office, your home, the factory, or the airport. For each profile, you can specify unique connection and security settings. Click the up and down arrows to select a different profile. For additional information see the “Location Profiles” section on page 6-6.
Range: (number of profiles supported is limited by available disk space)
Default: Default
Network Type Specifies the type of network in which your client adapter is installed.
Default: Computer to Access Point
Network Type Description
Computer to Access Point Also referred to as infrastructure. Used to set up a connection to a wired Ethernet network (through an access point).
Computer to Computer Also referred to as ad hoc or peer to peer. Used to set up a small network between two or more wireless devices. For example, an ad hoc network could be set up between computers in a conference room so users can share information in a meeting.
Channel Specifies which frequency your client adapter uses as the channel for communications. These channels conform to the IEEE 802.11 Standard for your regulatory domain.
• In infrastructure mode, this parameter is set automatically and cannot be changed. The client adapter listens to the entire spectrum, selects the best access point to associate to, and uses the same frequency as that access point.
• In ad hoc mode, the channel of the client adapter must be set to match the channel used by the other clients with which you wish to communicate.
Range: Dependent on regulatory domainExample: 1 to 11 (2412 to 2462 MHz) in North America
Note Refer to Appendix D, “Channels and Antenna Settings,” for a list of channel identifiers, channel center frequencies, and regulatory domains for each channel.
6-4Cisco Aironet Wireless LAN Adapters Installation and Configuration Guide for Mac OS
OL-1377-01
Chapter 6 Advanced Configuration on Mac OS XUsing the Client Utility on Mac OS X
Table 6-2 describes the buttons on the basic properties screen.
Network Name Network name is the same as service set identifier (SSID) and it identifies the wireless network that you want to access.
Range: Up to 32 characters (case sensitive)
Note If you leave this parameter blank, your client adapter can associate to any access point or wireless device on the network that is configured to allow broadcast SSIDs. If the access points or wireless devices with which you wish to communicate are not configured to allow broadcast SSIDs, the value of this parameter must exactly match their SSID or network name. Otherwise, you will not be able to access the access point or wireless device.
Enable WEP Enables or disables Wired Equivalent Privacy (WEP) for your client adapter.
If you want to enable WEP for your client adapter, you must select this check box and create a WEP key. This check box can also be used to disable WEP. Refer to Chapter 4, “Security Features” for more information on WEP and instructions on setting a WEP key.
Note If you enable LEAP for your client adapter, this check box is automatically selected (check marked) to indicate the use of dynamic WEP keys.
Default: Deselected
Enable LEAP Enables or disables LEAP (also referred to as EAP - Cisco Wireless) for your client adapter.
If you want to enable LEAP for your client adapter, you must select this check box and set a LEAP username and password. Refer to Chapter 4, “Security Features” for more information about LEAP and instructions on setting a LEAP username and password.
Default: Deselected
Table 6-1 Basic Properties Parameters (continued)
Parameter Description
Table 6-2 Buttons on the Basic Properties Screen
Button Description
Turn Radio On
Turn Radio Off
Turns the client adapter radio on or off. The button changes to indicate the operation to be performed; for example: Turn Radio On indicates the radio is turned on when you click the button and Turn Radio Off indicates the radio is turned off when you click the button.
Set WEP Key Allows you to set up to four WEP keys (for additional information see Chapter 4, “Security Features”).
Set LEAP Username/Password
Allows you to set your LEAP username and password (for additional information see Chapter 4, “Security Features”).
6-5Cisco Aironet Wireless LAN Adapters Installation and Configuration Guide for Mac OS
OL-1377-01
Chapter 6 Advanced Configuration on Mac OS XUsing the Client Utility on Mac OS X
Location ProfilesThe client utility allows you to specify different wireless network profile settings used in up to 16 operating locations, such as your office, your home, the factory, or the airport. You can specify unique connection and security settings for each location profile. These unique settings are stored in your Macintosh and recalled when you select each location.
To configure a location profile involves the following operations:
• Select a location profile or add a new profile. See “Selecting a Location Profile” section on page 6-6.
• Specify unique connection parameters on the basic properties screen (see Figure 6-2) or the advanced properties screen (see Figure 6-8).
– Set the network type
– Set the network name or SSID
• Specify security parameters on the basic properties screen (see Figure 6-2) or the advanced properties screen (see Figure 6-8). Refer to Chapter 4, “Security Features” for information on LEAP and WEP and instructions on setting these security features.
– Enable or disable WEP
– If WEP is enabled, set up to four WEP keys
– Enable or disable LEAP
– If LEAP is enabled, set your LEAP username and password
• Click the Apply button on the basic properties screen (see Figure 6-2) or the advanced properties screen (see Figure 6-8) to set and store the parameters for the specified profile.
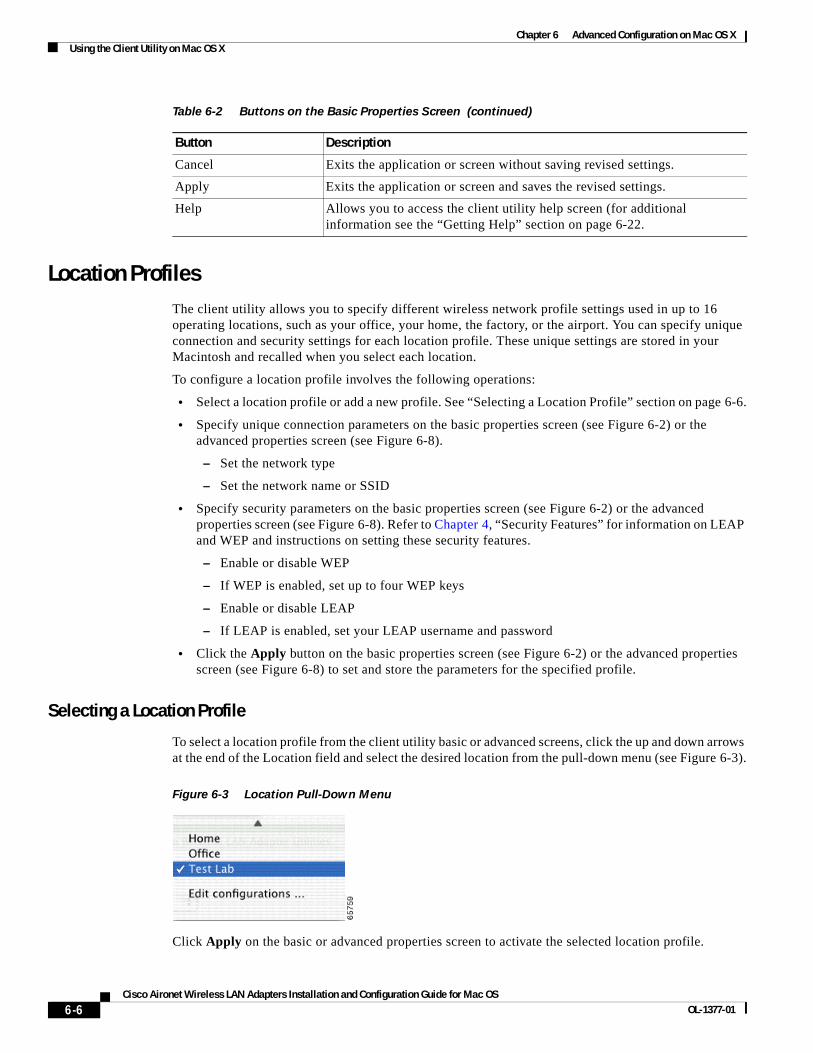
Selecting a Location Profile
To select a location profile from the client utility basic or advanced screens, click the up and down arrows at the end of the Location field and select the desired location from the pull-down menu (see Figure 6-3).
Figure 6-3 Location Pull-Down Menu
Click Apply on the basic or advanced properties screen to activate the selected location profile.
Cancel Exits the application or screen without saving revised settings.
Apply Exits the application or screen and saves the revised settings.
Help Allows you to access the client utility help screen (for additional information see the “Getting Help” section on page 6-22.
Table 6-2 Buttons on the Basic Properties Screen (continued)
Button Description
6-6Cisco Aironet Wireless LAN Adapters Installation and Configuration Guide for Mac OS
OL-1377-01
Chapter 6 Advanced Configuration on Mac OS XUsing the Client Utility on Mac OS X
Editing a Location Profile
To add a new location profile name or to rename, delete, or select an existing location profile, click Edit Configurations from the location pull-down menu (see Figure 6-3). The Edit Configurations screen appears (see Figure 6-4).
Figure 6-4 Edit Configurations Screen
Use the buttons on the Edit Configurations screen to perform the following operations:
• To add a new location profile name, click New and enter a new name in the drop-down screen. Click OK to add the new name or click Cancel to return to the basic or advanced screen without setting a new name. When you create a new location profile name, you should enter the specific connection and security settings for that location on the basic or advanced screens.
• To rename an existing location profile, click Rename and enter the revised name in the drop-down screen. Click OK to revise the name or click Cancel to return to the basic or advanced screen without changing the name.
• To delete an existing location profile, select the profile to delete from the Edit Configuration screen and click Delete. The basic or advanced screen appears.
• To select an existing location profile as the client utility default location, select the profile from the Edit Configuration screen and click Select. The basic or advanced screen appears.
• To exit the Edit Configuration screen without making changes, click Cancel. The basic or advanced screen appears.
Table 6-3 lists and describes the buttons on the Edit Configurations screen.
Table 6-3 Buttons on the Edit Configurations Screen
Button Description
New Allows you to specify a name for a new location profile.
Rename Allows you to rename an existing location profile name.
Delete Allows you to delete an existing location profile name.
Select Allows you to select the location profile name to be used as the client utility default.
Cancel Exits the application or screen without saving revised settings.
6-7Cisco Aironet Wireless LAN Adapters Installation and Configuration Guide for Mac OS
OL-1377-01

Chapter 6 Advanced Configuration on Mac OS XUsing the Client Utility on Mac OS X
Loading New FirmwareYour client adapter firmware is contained in the adapter’s Flash memory, where it can be easily updated. The current version of the firmware is displayed on the Status screen. See the “Obtaining Software Version Information” section on page 6-21 for instructions on accessing this screen.
You can find the latest firmware version for your client adapter at the following URL: http://www.cisco.com/public/sw-center/sw-wireless.shtml. Under “Wireless Software Products,” select your client adapter series (such as Cisco Aironet 350 Series) and copy the radio firmware image file to a directory on your computer’s hard drive.
Follow the instructions below to expand the compressed file and load the new firmware into your client adapter.
Note If a power failure occurs while you are loading new firmware, your client adapter can become inoperable. If this occurs, start the procedure again.
Step 1 To obtain the latest client adapter radio firmware from the Cisco Web site, follow these steps:
a. Use your web browser to access the following URL:
http://www.cisco.com/public/sw-center/sw-wireless.shtml.
b. Click on the link for your client adapter’s series (such as Cisco Aironet 350 Series).
c. Click on the radio firmware filename.
Note The firmware image file (*.exe) is a compressed file. You can use Stuffit Expander to expand (uncompress) this file.
d. Read and accept the terms and conditions of the Software License Agreement.
e. Select the Cisco server from which to download the file.
f. Save the file to your hard drive then exit the web browser.
Step 2 Locate and use the Stuffit Expander program on your hard drive to expand (uncompress) the radio firmware image file (*.exe) you copied to your hard drive. This creates an image file (filename.img) in the folder where the compressed file is located.
Step 3 Make sure your client adapter is installed in your computer (refer to “Inserting the Client Adapter into a Computing Device” section on page 3-8).
6-8Cisco Aironet Wireless LAN Adapters Installation and Configuration Guide for Mac OS
OL-1377-01
Chapter 6 Advanced Configuration on Mac OS XUsing the Client Utility on Mac OS X
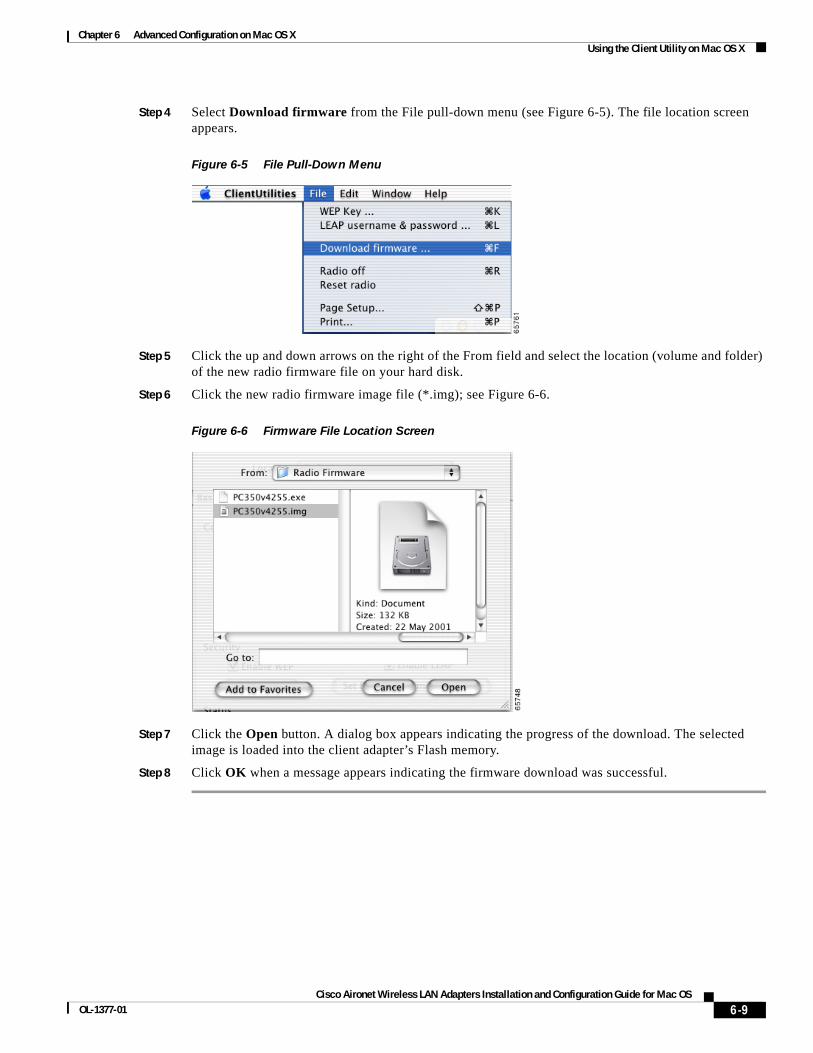
Step 4 Select Download firmware from the File pull-down menu (see Figure 6-5). The file location screen appears.
Figure 6-5 File Pull-Down Menu
Step 5 Click the up and down arrows on the right of the From field and select the location (volume and folder) of the new radio firmware file on your hard disk.
Step 6 Click the new radio firmware image file (*.img); see Figure 6-6.
Figure 6-6 Firmware File Location Screen
Step 7 Click the Open button. A dialog box appears indicating the progress of the download. The selected image is loaded into the client adapter’s Flash memory.
Step 8 Click OK when a message appears indicating the firmware download was successful.
6-9Cisco Aironet Wireless LAN Adapters Installation and Configuration Guide for Mac OS
OL-1377-01
Chapter 6 Advanced Configuration on Mac OS XUsing the Client Utility on Mac OS X
Advanced PropertiesThe advanced properties screen is similar to the basic properties screen but provides additional screen tabs to configure advanced settings and to provide status information for the wireless network.
To access the advanced properties screen perform the following steps:
Step 1 Click the up and down arrows to the right of the basic properties field (see Figure 6-2).
Step 2 Select Advanced on the pull-down menu and the advanced properties screen appears.
The following tabs are provided on the advanced properties screen (see Figure 6-7):
• Connection—allows you to specify the network type and the network name for your wireless network. You can also turn the radio on or off.
• RF Settings—allow you to specify RF (radio) parameters.
• Status—allows you to view client adapter status information.
• Scanner—allows you to view information on detected access points.
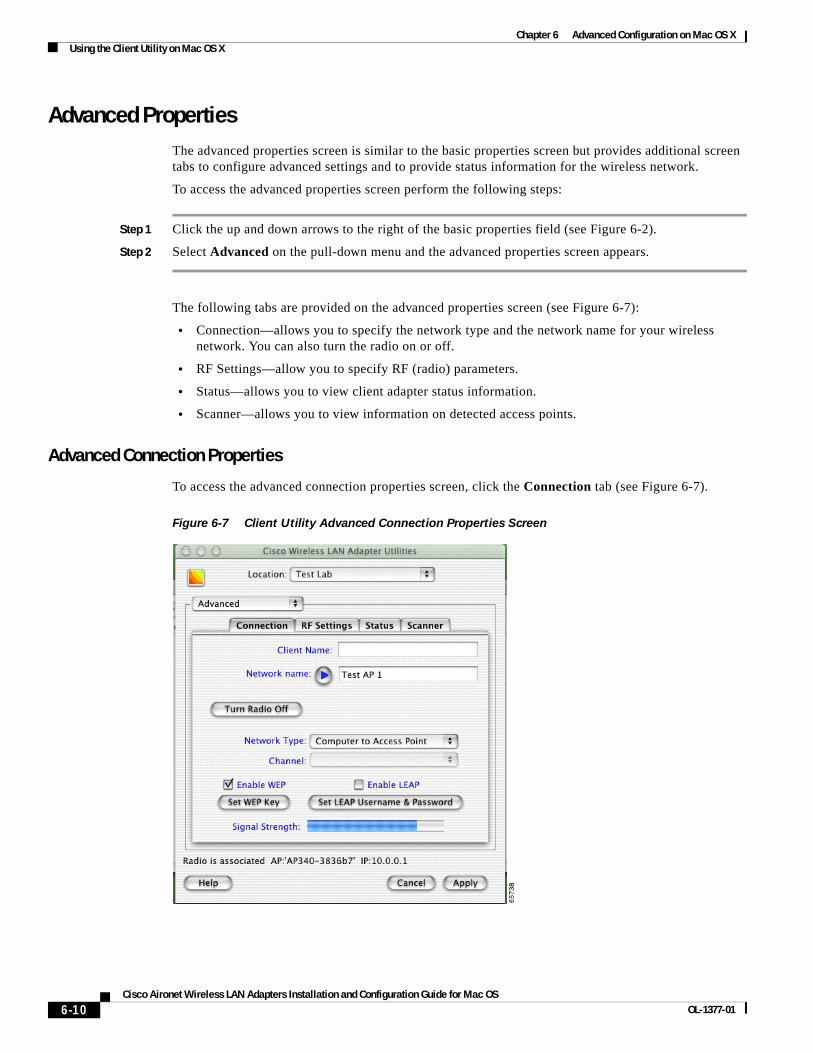
Advanced Connection Properties
To access the advanced connection properties screen, click the Connection tab (see Figure 6-7).
Figure 6-7 Client Utility Advanced Connection Properties Screen
6-10Cisco Aironet Wireless LAN Adapters Installation and Configuration Guide for Mac OS
OL-1377-01
Chapter 6 Advanced Configuration on Mac OS XUsing the Client Utility on Mac OS X
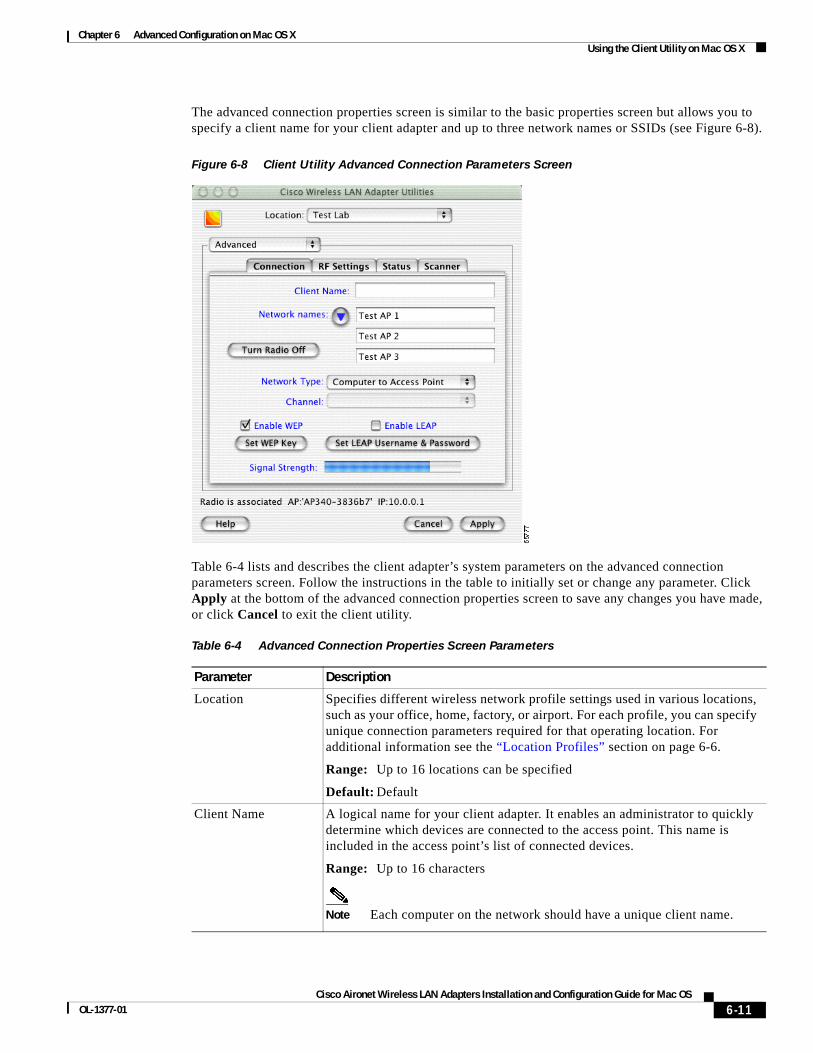
The advanced connection properties screen is similar to the basic properties screen but allows you to specify a client name for your client adapter and up to three network names or SSIDs (see Figure 6-8).
Figure 6-8 Client Utility Advanced Connection Parameters Screen
Table 6-4 lists and describes the client adapter’s system parameters on the advanced connection parameters screen. Follow the instructions in the table to initially set or change any parameter. Click Apply at the bottom of the advanced connection properties screen to save any changes you have made, or click Cancel to exit the client utility.
Table 6-4 Advanced Connection Properties Screen Parameters
Parameter Description
Location Specifies different wireless network profile settings used in various locations, such as your office, home, factory, or airport. For each profile, you can specify unique connection parameters required for that operating location. For additional information see the “Location Profiles” section on page 6-6.
Range: Up to 16 locations can be specified
Default: Default
Client Name A logical name for your client adapter. It enables an administrator to quickly determine which devices are connected to the access point. This name is included in the access point’s list of connected devices.
Range: Up to 16 characters
Note Each computer on the network should have a unique client name.
6-11Cisco Aironet Wireless LAN Adapters Installation and Configuration Guide for Mac OS
OL-1377-01
Chapter 6 Advanced Configuration on Mac OS XUsing the Client Utility on Mac OS X
Network Name Network name is the same as service set identifier (SSID) and it identifies the wireless network that you want to access. Up to three names can be specified for different wireless networks by pressing the arrow on the right of the Network Name field (see Figure 6-7).
Range: Up to 32 characters (case sensitive) for each name
Note If you leave this parameter blank, your client adapter can associate to any access point or wireless device on the network that is configured to allow broadcast SSIDs. If the access points or wireless devices with which you wish to communicate are not configured to allow broadcast SSIDs, the value of this parameter must exactly match their SSID or network name. Otherwise, you cannot access the access point or wireless device.
Network Type Specifies the type of network in which your client adapter is installed.
Default: Computer to Access Point
Network Type Description
Computer to Computer Also referred to as ad hoc or peer to peer. Used to set up a small network between two or more wireless devices. For example, an ad hoc network could be set up between computers in a conference room so users can share information in a meeting.
Computer to Access Point Also referred to as infrastructure. Used to set up a connection to a wired Ethernet network (through an access point).
Channel Specifies which frequency your client adapter uses as the channel for communications. These channels conform to the IEEE 802.11 Standard for your regulatory domain.
• In infrastructure mode, this parameter is set automatically and cannot be changed. The client adapter listens to the entire spectrum, selects the best access point to associate to, and uses the same frequency as that access point.
• In ad hoc mode, the channel of the client adapter must be set to match the channel used by the other clients with which you wish to communicate.
Range: Dependent on regulatory domainExample: 1 to 11 (2412 to 2462 MHz) in North America
Note Refer to Appendix D, “Channels and Antenna Settings” for a list of channel identifiers, channel center frequencies, and regulatory domains for each channel.
Table 6-4 Advanced Connection Properties Screen Parameters (continued)
Parameter Description
6-12Cisco Aironet Wireless LAN Adapters Installation and Configuration Guide for Mac OS
OL-1377-01
Chapter 6 Advanced Configuration on Mac OS XUsing the Client Utility on Mac OS X
Table 6-5 describes the buttons on the advanced connection properties screen.
Enable WEP Enables or disables Wired Equivalent Privacy (WEP) for your client adapter.
• If you want to enable WEP for your client adapter, you must select this check box and create a WEP key. Refer to Chapter 4, “Security Features” for more information on WEP and instructions on setting a WEP key.
Note This check box can also be used to disable WEP. If you enable LEAP for your client adapter, this check box is selected automatically.
Default: Deselected
Enable LEAP Enables or disables LEAP (also referred to as EAP - Cisco Wireless) for your client adapter.
If you want to enable LEAP for your client adapter, you must select this check box and set a LEAP username and password. Refer to Chapter 4, “Security Features,” for more information about LEAP and instructions on setting a LEAP username and password.
Default: Deselected
Table 6-4 Advanced Connection Properties Screen Parameters (continued)
Parameter Description
Table 6-5 Buttons on the Advanced Connection Properties Screen
Button Description
Network Name Right Arrow or Down Arrow
Allows you to specify one or up to three network names. The right arrow indicates one network name can be entered. When you click the right arrow, it changes to a down arrow to indicate three network names can be entered and Network Name changes to Network Names.
Turn Radio OnTurn Radio Off
Turns the client adapter radio on or off. The button changes to indicate the operation to be performed; for example: Turn Radio On indicates the radio is turned on when you click the button and Turn Radio Off indicates the radio is turned off when you click the button.
Set WEP Key Allows you to set up to four WEP keys (for additional information refer to Chapter 4, “Security Features”).
Set LEAP Username/Password
Allows you to set your LEAP username and password (for additional information refer to Chapter 4, “Security Features”).
Cancel Exits the application or screen without saving revised settings.
Apply Exits the application or screen and saves the revised settings.
Help Allows you to access the client utility help screen (for additional information see “Getting Help” section on page 6-22.
6-13Cisco Aironet Wireless LAN Adapters Installation and Configuration Guide for Mac OS
OL-1377-01

Chapter 6 Advanced Configuration on Mac OS XUsing the Client Utility on Mac OS X
Setting RF Parameters
The advanced RF settings screen (see Figure 6-9) enables you to set parameters that control how your client adapter transmits and receives data. To access this screen, click the RF Settings tab on the advanced properties screen.
Figure 6-9 Client Utility Advanced RF Settings Screen
The advanced RF settings screen allows you to specify advanced radio parameters and also provides the following information:
• Location – Allows you to define up to 16 different wireless network profiles for various operating locations. In each profile you can specify a network type, network name, plus WEP and LEAP security settings for that operating location. For additional information, see the “Location Profiles” section on page 6-6.
• Radio Status – Shows the operational mode of your client adapter. If your client adapter is associated to an access point or wireless device, the name and IP address are displayed.
Value: “Radio associated” – Your client adapter is associated to an access point or other wireless device. The access point or wireless device name and IP address areshown. “Radio not associated” – Your client adapter is ready and enabled but not associatedto an access point or wireless device.
6-14Cisco Aironet Wireless LAN Adapters Installation and Configuration Guide for Mac OS
OL-1377-01
Chapter 6 Advanced Configuration on Mac OS XUsing the Client Utility on Mac OS X
Table 6-6 lists and describes the parameters on the Client Utility Advanced RF Network Settings screen. Follow the instructions in the table to initially set or change any parameters. Click Apply at the bottom of the screen to save any changes you make.
Table 6-6 Client Utility Advanced RF Settings Screen Parameters
Parameter Description
Location Allows you to define up to 16 different wireless network profiles for various operating locations. For each profile you can specify unique RF network parameters required for that operating location. For additional information see the “Location Profiles” section on page 6-6.
Range: Up to 16 locations
Default: Default
Receive Antenna Specifies the antenna that your client adapter uses to receive data.
• PC card – The PC card’s integrated, permanently attached antenna operates best when used in Antennas 1 and 2 mode (also referred to as diversity mode). Diversity mode allows the card to use the better signal from its two antenna ports.
Range: Left Antenna, Right Antenna, Both Antennas
Default: Both Antennas
• LM card – The LM card is shipped without an antenna; however, an antenna can be connected through the card’s external connector. If a snap-on antenna is used, diversity mode is recommended. Otherwise, select the mode that corresponds to the antenna port to which the antenna is connected.
Range: Left Antenna, Right Antenna, Both Antennas
Default: Both Antennas
• PCI client adapter – The PCI client adapter must use the Right Antenna.
Default: Right Antenna
Transmit Antenna Specifies the antenna that your client adapter uses to transmit data. See the Receive Antenna parameter above for information on the options available for your client adapter.
6-15Cisco Aironet Wireless LAN Adapters Installation and Configuration Guide for Mac OS
OL-1377-01
Chapter 6 Advanced Configuration on Mac OS XUsing the Client Utility on Mac OS X
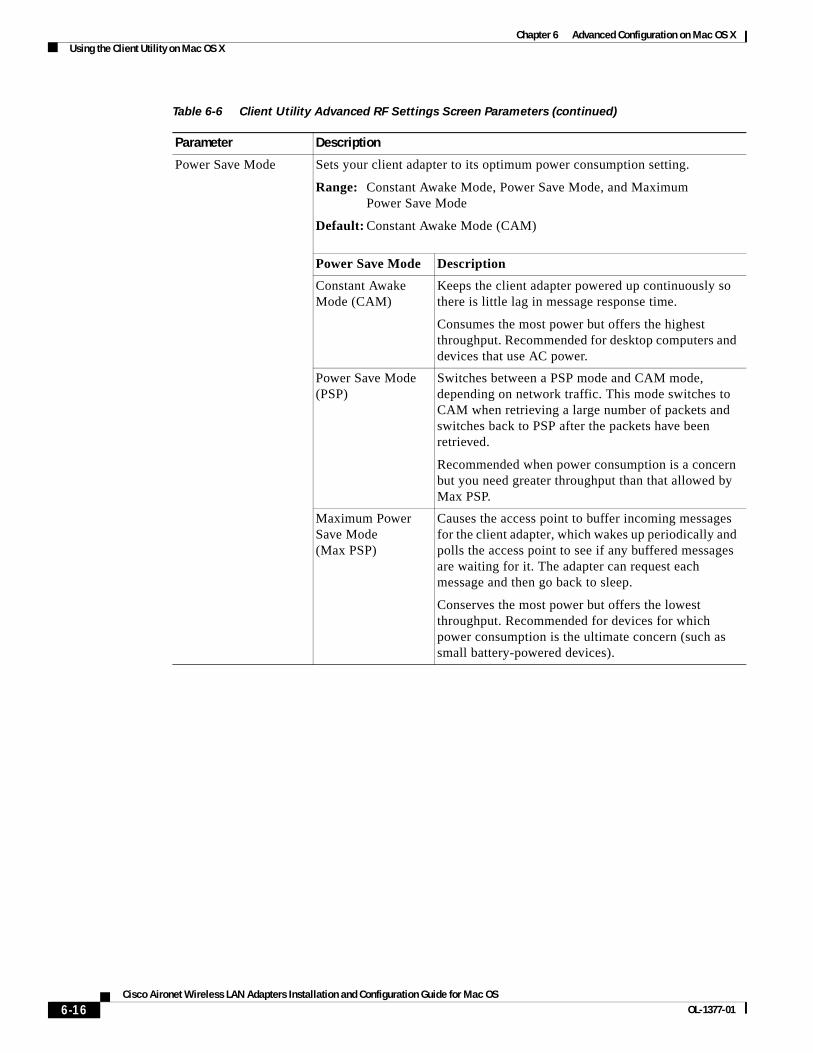
Power Save Mode Sets your client adapter to its optimum power consumption setting.
Range: Constant Awake Mode, Power Save Mode, and Maximum Power Save Mode
Default: Constant Awake Mode (CAM)
Power Save Mode Description
Constant Awake Mode (CAM)
Keeps the client adapter powered up continuously so there is little lag in message response time.
Consumes the most power but offers the highest throughput. Recommended for desktop computers and devices that use AC power.
Power Save Mode (PSP)
Switches between a PSP mode and CAM mode, depending on network traffic. This mode switches to CAM when retrieving a large number of packets and switches back to PSP after the packets have been retrieved.
Recommended when power consumption is a concern but you need greater throughput than that allowed by Max PSP.
Maximum Power Save Mode (Max PSP)
Causes the access point to buffer incoming messages for the client adapter, which wakes up periodically and polls the access point to see if any buffered messages are waiting for it. The adapter can request each message and then go back to sleep.
Conserves the most power but offers the lowest throughput. Recommended for devices for which power consumption is the ultimate concern (such as small battery-powered devices).
Table 6-6 Client Utility Advanced RF Settings Screen Parameters (continued)
Parameter Description
6-16Cisco Aironet Wireless LAN Adapters Installation and Configuration Guide for Mac OS
OL-1377-01
Chapter 6 Advanced Configuration on Mac OS XUsing the Client Utility on Mac OS X
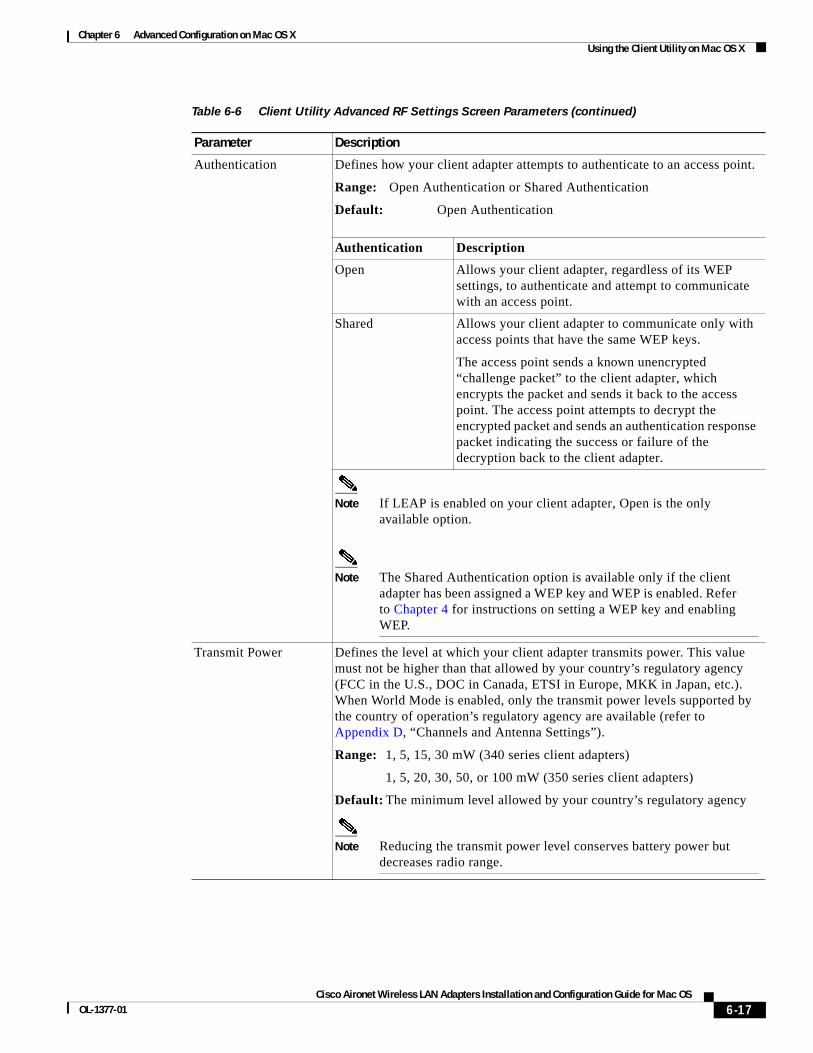
Authentication Defines how your client adapter attempts to authenticate to an access point.
Range: Open Authentication or Shared Authentication
Default: Open Authentication
Authentication Description
Open Allows your client adapter, regardless of its WEP settings, to authenticate and attempt to communicate with an access point.
Shared Allows your client adapter to communicate only with access points that have the same WEP keys.
The access point sends a known unencrypted “challenge packet” to the client adapter, which encrypts the packet and sends it back to the access point. The access point attempts to decrypt the encrypted packet and sends an authentication response packet indicating the success or failure of the decryption back to the client adapter.
Note If LEAP is enabled on your client adapter, Open is the only available option.
Note The Shared Authentication option is available only if the client adapter has been assigned a WEP key and WEP is enabled. Refer to Chapter 4 for instructions on setting a WEP key and enabling WEP.
Transmit Power Defines the level at which your client adapter transmits power. This value must not be higher than that allowed by your country’s regulatory agency (FCC in the U.S., DOC in Canada, ETSI in Europe, MKK in Japan, etc.). When World Mode is enabled, only the transmit power levels supported by the country of operation’s regulatory agency are available (refer to Appendix D, “Channels and Antenna Settings”).
Range: 1, 5, 15, 30 mW (340 series client adapters)
1, 5, 20, 30, 50, or 100 mW (350 series client adapters)
Default: The minimum level allowed by your country’s regulatory agency
Note Reducing the transmit power level conserves battery power but decreases radio range.
Table 6-6 Client Utility Advanced RF Settings Screen Parameters (continued)
Parameter Description
6-17Cisco Aironet Wireless LAN Adapters Installation and Configuration Guide for Mac OS
OL-1377-01

Chapter 6 Advanced Configuration on Mac OS XUsing the Client Utility on Mac OS X
Turning Your Client Adapter Radio On or OffYour client adapter radio can be turned on or off. Turning the radio off prevents the adapter from transmitting RF energy. You might want to turn off the client adapter radio when you are not transmitting data and want to conserve battery power or when you are using a laptop on an airplane and want to prevent the adapter’s transmissions from potentially interfering with electronic devices.
If the radio is not turned off, it periodically sends out inquiry packets even if it is not associated to an access point, as required by the 802.11 specification. Therefore, it is important to turn it off around devices that are susceptible to RF interference.
Note Your client adapter is not associated while the radio is off.
World Mode Selecting this check box enables the client adapter to assume the legal transmit power level and channel set of the access point to which it is associated. This parameter is available only in computer to access point (infrastructure) mode and is designed for users who travel between countries because it allows the adapter to be used in different regulatory domains.
Default: Deselected
Note When World Mode is enabled, only the transmit power levels supported by the country of operation’s regulatory agency are available.
Allow Association To Mixed Cells
If your network’s access points are set to communicate with either WEP-enabled or WEP-disabled clients (that is, if the Use of Data Encryption by Stations parameter on the AP Radio Data Encryption screen is set to Optional), you must select this check box, even if your client adapter is not using WEP. If this setting is not enabled, your client adapter cannot establish a connection with the access point.
Default: Deselected
Note For security reasons, Cisco recommends that both WEP-enabled and WEP-disabled clients not be allowed in the same cell because broadcast packets will be sent unencrypted, even to clients running WEP.
Table 6-6 Client Utility Advanced RF Settings Screen Parameters (continued)
Parameter Description
6-18Cisco Aironet Wireless LAN Adapters Installation and Configuration Guide for Mac OS
OL-1377-01
Chapter 6 Advanced Configuration on Mac OS XUsing the Client Utility on Mac OS X
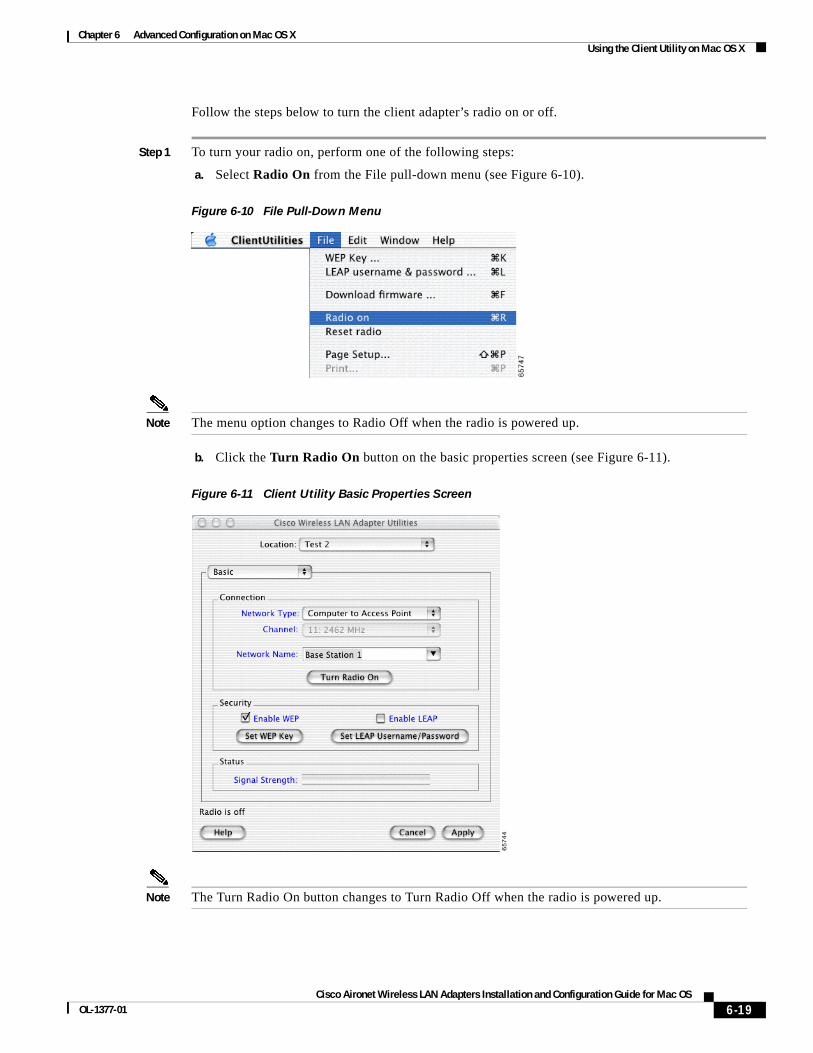
Follow the steps below to turn the client adapter’s radio on or off.
Step 1 To turn your radio on, perform one of the following steps:
a. Select Radio On from the File pull-down menu (see Figure 6-10).
Figure 6-10 File Pull-Down Menu
Note The menu option changes to Radio Off when the radio is powered up.
b. Click the Turn Radio On button on the basic properties screen (see Figure 6-11).
Figure 6-11 Client Utility Basic Properties Screen
Note The Turn Radio On button changes to Turn Radio Off when the radio is powered up.
6-19Cisco Aironet Wireless LAN Adapters Installation and Configuration Guide for Mac OS
OL-1377-01
Chapter 6 Advanced Configuration on Mac OS XUsing the Client Utility on Mac OS X
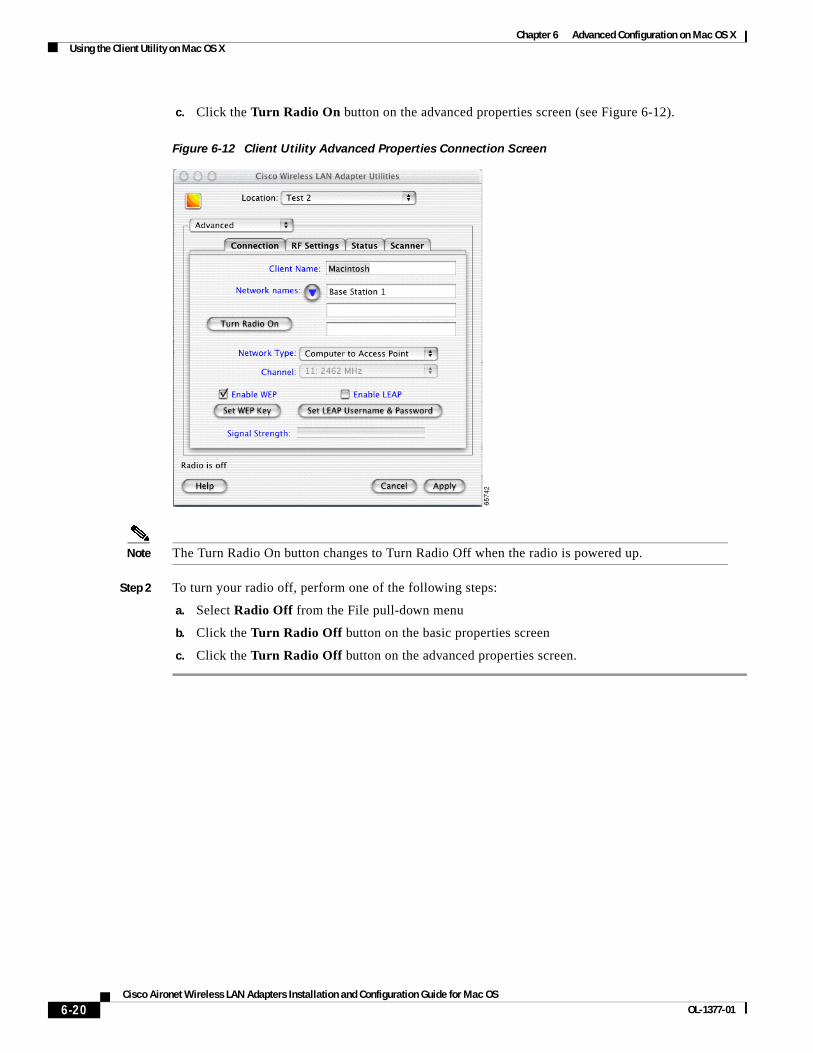
c. Click the Turn Radio On button on the advanced properties screen (see Figure 6-12).
Figure 6-12 Client Utility Advanced Properties Connection Screen
Note The Turn Radio On button changes to Turn Radio Off when the radio is powered up.
Step 2 To turn your radio off, perform one of the following steps:
a. Select Radio Off from the File pull-down menu
b. Click the Turn Radio Off button on the basic properties screen
c. Click the Turn Radio Off button on the advanced properties screen.
6-20Cisco Aironet Wireless LAN Adapters Installation and Configuration Guide for Mac OS
OL-1377-01
Chapter 6 Advanced Configuration on Mac OS XObtaining Software Version Information
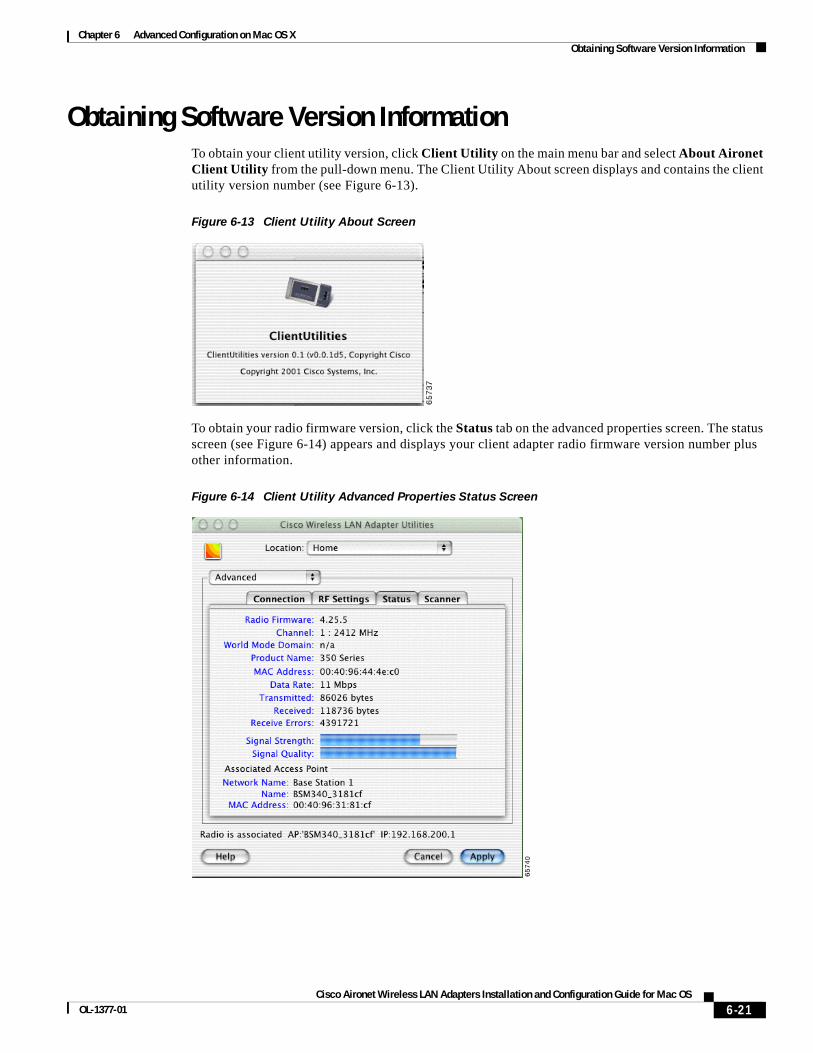
Obtaining Software Version InformationTo obtain your client utility version, click Client Utility on the main menu bar and select About Aironet Client Utility from the pull-down menu. The Client Utility About screen displays and contains the client utility version number (see Figure 6-13).
Figure 6-13 Client Utility About Screen
To obtain your radio firmware version, click the Status tab on the advanced properties screen. The status screen (see Figure 6-14) appears and displays your client adapter radio firmware version number plus other information.
Figure 6-14 Client Utility Advanced Properties Status Screen
6-21Cisco Aironet Wireless LAN Adapters Installation and Configuration Guide for Mac OS
OL-1377-01
Chapter 6 Advanced Configuration on Mac OS XGetting Help
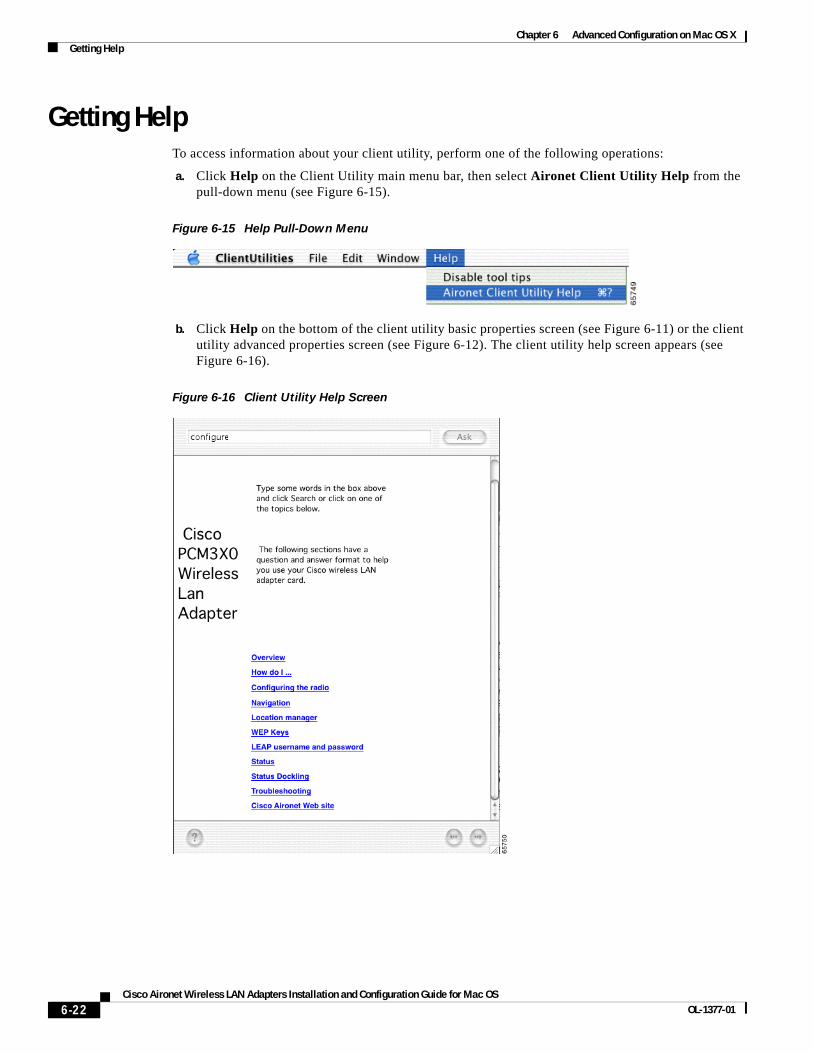
Getting HelpTo access information about your client utility, perform one of the following operations:
a. Click Help on the Client Utility main menu bar, then select Aironet Client Utility Help from the pull-down menu (see Figure 6-15).
Figure 6-15 Help Pull-Down Menu
b. Click Help on the bottom of the client utility basic properties screen (see Figure 6-11) or the client utility advanced properties screen (see Figure 6-12). The client utility help screen appears (see Figure 6-16).
Figure 6-16 Client Utility Help Screen
6-22Cisco Aironet Wireless LAN Adapters Installation and Configuration Guide for Mac OS
OL-1377-01
Chapter 6 Advanced Configuration on Mac OS XExiting the Client Utility
From the client utility help screen, you can access information on the client utility.
• To search for a specific word or phrase, enter the word or phrase in the Search box at the top of the screen and click Ask.
• To access information on an indicated topic, click the desired topic in the middle of the screen, such as Navigation or Status.
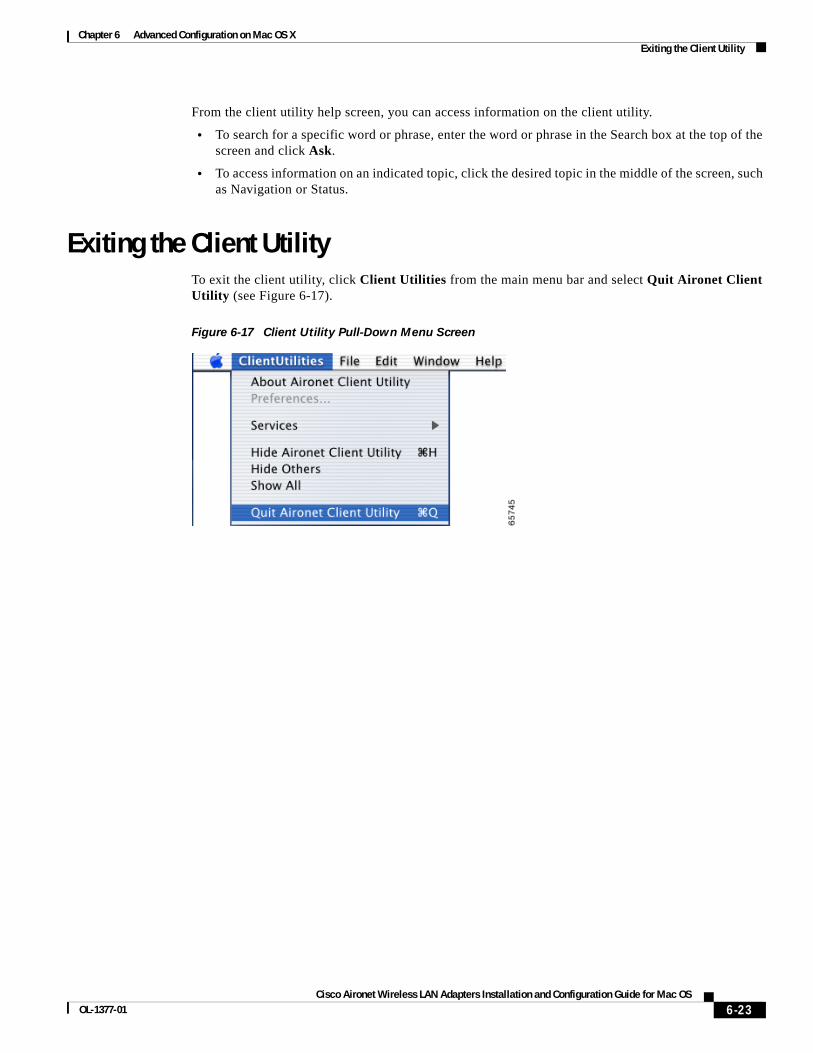
Exiting the Client UtilityTo exit the client utility, click Client Utilities from the main menu bar and select Quit Aironet Client Utility (see Figure 6-17).
Figure 6-17 Client Utility Pull-Down Menu Screen
6-23Cisco Aironet Wireless LAN Adapters Installation and Configuration Guide for Mac OS
OL-1377-01

Chapter 6 Advanced Configuration on Mac OS XExiting the Client Utility
6-24Cisco Aironet Wireless LAN Adapters Installation and Configuration Guide for Mac OS
OL-1377-01