Embed Size (px)
Citation preview

Advanced ActionScript 3 with Design Patterns, 1/e
By Joey Lott, Danny Patterson
...............................................
Publisher: Adobe Press
Pub Date: November 02, 2006
Print ISBN-10: 0-321-42656-8
Print ISBN-13: 978-0-321-42656-7
Pages: 304
Table of Contents | Index
Today's ActionScript-based applications require increasingly sophisticated architectures andcode. This book aids intermediate and advanced ActionScript developers in learning how toplan and build applications more effectively. You'll learn how to apply design patterns assolutions to common programming scenarios. Beyond a reference, Advanced ActionScript withDesign Patterns is a practical guide complete with sample mini-applications illustrating eachdesign pattern. The accompanying CD includes a trial version of Flash 8 along with all thelesson files needed to work with the text. Table of Contents: Part I - Successful Projects 1.How to Design Applications 2. Programming to Interfaces Part II - Patterns 3. MVC 4.Singleton 5. Factory (Abstract Factory and Factory Method) 6. Proxy 7. Iterator 8.Composite 9. Decorator 10. Command 11. Memento 12. State Part III -Advanced ActionScript Topics 13. Working with Events 14. Sending and Loading Data 15.E4X (XML) 16. Regular Expressions

Advanced ActionScript 3 with Design Patterns, 1/e
By Joey Lott, Danny Patterson
...............................................
Publisher: Adobe Press
Pub Date: November 02, 2006
Print ISBN-10: 0-321-42656-8
Print ISBN-13: 978-0-321-42656-7
Pages: 304
Table of Contents | Index
Copyright
Acknowledgments
Introduction
About This Book
Part I: Successful Projects
Chapter 1. Designing Applications
The Analysis Phase
The Design Phase
The Implementation Phase
Testing
Summary
Chapter 2. Programming to Interfaces
Defining Interfaces
Using Polymorphism
Summary
Part II: Patterns
Chapter 3. Model View Controller Pattern
Understanding MVC Elements
Building a Simple Example
Enabling Multiple Views for One Model
Modifying Model Implementation
Adding A Controller
Summary
Chapter 4. Singleton Pattern
Object Instantiation
Singleton Versus Static Members
Building a Simple Singleton
Building a Settings Framework
Summary
Chapter 5. Factory and Template Method Patterns
Abstract Classes
Template Method
Factory Method
Summary
Chapter 6. Proxy Pattern
Virtual Proxy

Remote Proxy
Adapter and Façade Patterns
Summary
Chapter 7. Iterator Pattern
Understanding the Problems with Iteration
Understanding Iterator Elements
Using Iterators
Using Null Iterators
Summary
Chapter 8. Composite Pattern
Understanding the Element Interface
Understanding Leaf Elements
Understanding Composite Elements
Building a File System Example
Summary
Chapter 9. Decorator Pattern
Understanding the Decorator Pattern
Building Reader Decorators
Building Visual and Commutative Decorators
Summary
Chapter 10. Command Pattern
Understanding the Command Pattern
Building a Simple Command Application
Making Commands Undoable and Keeping Command Histories
Building an Undoable Application
Building a Redoable Application
Using Commands to Build a Proximity Game
Summary
Chapter 11. Memento Pattern
Using Mementos to Make Actions Undoable in the Proximity Game
Using Mementos to Make Actions Redoable in the Proximity Game
Summary
Chapter 12. State Pattern
Simple State Example
Encapsulating the States
Using Abstract Classes
Transitions
Summary
Part III: Advanced ActionScript Topics
Chapter 13. Working with Events
Understanding Events
Using Events
Creating Event Dispatchers
An Example Working with Events
Summary
Chapter 14. Sending and Loading Data
Loading Text
Sending and Loading Variables
Sending and Loading XML
Using Web Services

Using Flash Remoting
Optimizing Data Communication
Summary
Chapter 15. E4X (XML)
Creating XML Objects
Property Accessors
XML Filtering
Iterating Through an XMLList
Namespaces
Sending and Loading XML Data
Simple Soap Example
Summary
Chapter 16. Regular Expressions
Introducing the RegExp Class
Working with Regular Expressions
Using Regular Expression Flags
Understanding Metacharacters and Metasequences
Using Regular Expression Groups
Building a Mad Libs Application Using Regular Expressions
Summary
Index

CopyrightAdvanced ActionScript 3 with Design Patterns
Joey Lott and Danny Patterson
Peachpit Press1249 Eighth StreetBerkeley, CA 94710510/524-2178800/283-9444510/524-2221 (fax)
Find us on the World Wide Web at: www.peachpit.com
To report errors, please send a note to [email protected]
Peachpit Press is a division of Pearson Education
Copyright © 2007 by Joey Lott and Danny Patterson
Project Editor: Matt PurcellProduction Editor: Becky WinterDevelopment Editor: Alice Martina SmithCopy Editor: Nancy SixsmithTech Editor: Roger Braunstein and Paul NewmanCompositor: Danielle FosterIndexer: Larry SweazyCover design: Charlene Will
Notice of Rights
All rights reserved. No part of this book may be reproduced or transmitted in any form by anymeans, electronic, mechanical, photocopying, recording, or otherwise, without the prior writtenpermission of the publisher. For information on getting permission for reprints and excerpts,contact [email protected].
Notice of Liability
The information in this book is distributed on an "As Is" basis without warranty. While everyprecaution has been taken in the preparation of the book, neither the author nor Peachpit shallhave any liability to any person or entity with respect to any loss or damage caused or allegedto be caused directly or indirectly by the instructions contained in this book or by the computersoftware and hardware products described in it.
TradeMarks
ActionScript is a registered trademark of ActionScript, Inc.
Many of the designations used by manufacturers and sellers to distinguish their products areclaimed as trademarks. Where those designations appear in this book, and Peachpit was awareof a trademark claim, the designations appear as requested by the owner of the trademark. Allother product names and services identified throughout this book are used in editorial fashiononly and for the benefit of such companies with no intention of infringement of the trademark.No such use, or the use of any trade name, is intended to convey endorsement or otheraffiliation with this book.
9 8 7 6 5 4 3 2 1
Printed and bound in the United States of America
Dedication
Joey:
To what is here, always in support.
Danny:
This book is dedicated to Melissa, Adia and Murphy. Thanks for inspiring me to be my best.

AcknowledgmentsBoth Joey and Danny would like to acknowledge the following people for their helpwith this book:
We'd like to thank Matt Purcell for helping with all aspects of this book.
Thanks also go to Angela kozlowski for her initial work coordinating this book project. We wishyou the best in your new career.
We'd like to thank our copy editor, Nancy Sixsmith, and our development editor, Alice MartinaSmith.
Additionally, we'd like to thank our technical editors, Paul Newman and Roger Braunstein.
The Adobe Flash Player and Flex teams are always extremely helpful. Thank you.
And, of course, thanks to the Flash Platform community.
Joey would like to acknowledge the following people:
Thank you, Danny, for co-writing this book.
Thanks to my partner, my family, and my friends for your support, kindness, strength, andencouragement.
Danny would like to acknowledge the following people:
My thanks goes out to Joey. you're an incredible programmer and author and I'm honored towork with you on this book.
Thank you to all the programming influences in my life. There are far to many to list, but youknow who you are.
And finally, my wonderful wife. Thanks for all your support and patience.

IntroductionAs the Flash platform has grown, the size and scope of Flashbased applications has increased.That growth has called for an everincreasing maturity in ActionScript developers. Flashapplications have gained a new stature, and the increasing demand means that moredevelopers must step up to the plate to hone their craft and take steps to evolve theirunderstanding of and relationship with the code they write and the applications they build.Design patterns are a resource to help with just that.
ActionScript itself is really quite simple. It involves memorization of a basic syntax, a good APIreference, and a decent IDE. What is challenging is not the ActionScript, but the architecture foran application. The real challenge is in deciding what classes to write and what the APIs forthose classes should be. yet as you build more and more applications, you'll start to find thatthere are patterns that emerge time and time again. There are certain ways to accomplish tasksand solve common problems that occur frequently. These common solutions are the foundationsof design patterns. Many of these design patterns exist already. If you don't bother to recognizethem and apply them consciously, you will simply be writing applications the hard way. youmight still end up with good results, but you'll be reinventing the wheel each time. Learning thedesign patterns helps you more quickly identify intelligent and effective ways to structure eachnew application.
The design patterns discussed in this book are but a subset of the many patterns thatdevelopers have created over the years. We've selected what we feel are some of the mostuseful and applicable patterns to ActionScript application development. These patternsand whatwe have to say about the patternsis not intended to be held as gospel. It is intended to serve asa guide and an inspiration for your own application development. The patterns we discuss arepatterns that have been identified and recognized by programming experts over the years; bystudying them, you can stand on the shoulders of giants. however, it's important to understandthat these patterns are not rules. Just because an expert found something useful doesn't meanyou are obligated to do so. Read everything with an open and alert, yet critical, mind.
Design patterns run gambit from those that require strict adherence to a specific interface tothose that simply specify a generalized structure. Regardless of the ways in which specificdesign patterns play out or look, the intention is always the same: to solve a design problem.one example of a common design problem is that you need a way to create an object withoutspecifying the concrete type at compile time. For example, a graphing application might need tobe able to create and display a graph where the specific type (bar chart, line graph, and so on)is decided at runtime. If you specify a concrete type at compile time (for example, create a newBarChart object), then you are locked into a rigid structure, and you cannot easily change thetype or add new types later. Because this is a common problem in many applications,developers have had to create solutions many times over the years. The solutions that haveproven to be most useful, most elegant, most flexible, and simple to implement have emergedas design patterns that are learnable. one solution to the concrete type problem just describedis a pattern we call the Factory Method pattern (discussed in Chapter 5.)
One of the fortunate sideeffects of working with design patterns is that they help you build acommon vocabulary to effectively communicate with other developers. Imagine if you didn'thave the word "car" in your vocabulary. Every time you wanted to talk about a car, you'd haveto describe the object, perhaps saying "the object with wheels, an engine, and doors thattypically seats 2 to 5 people and allows one person to conduct it by way of a steeringmechanism." That would obviously make it rather difficult to have a quick and effective

conversation about anything involving a car. having a word for something makescommunication faster and more effective. For this reason, all the design patterns we talk aboutin this book have names. Rather than talking about "the pattern that allows you to capture andset state while maintaining good encapsulation," you can simply say "the Memento pattern."

About This Book
The title of this book says that it is about advanced ActionScript 3.0 with design patterns. It'salways a little misleading to call something advanced. What we mean when we say that thisbook is about advanced ActionScript 3.0 is that it steps beyond the standard introductions andAPI references to discuss topics not normally within the scope of those basic texts. As such, wenecessarily make some assumptions about you, the reader. We assume that you alreadyunderstand basic programming and ActionScript 3.0 principles, including, but not limited to,variables, expressions, statements, objects, inheritance, and how to write basic classes.
In many ways, this book starts where most books leave off in regards to objectoriented ActionScript. Although many books might discuss how to write a class, this book talks about thedifferent ways you can design a class. This book talks about when, why, and how to usecomposition and inheritance, and how classes relate to one another to form patterns.
This book is organized in the following way:
Introduction to application design principals1.
Design pattern descriptions2.
Advanced concepts3.
Throughout the book, we'll present lots of examples, and we encourage you to follow along.
You can find additional information and updates at the official Web site for this book:http://www.rightactionscript.com/aas3wdp. This is also where you'll be able to find theAAS3WDP class library which you can download. Several classes from this library are used invarious examples throughout the book, and you'll want to download the library if you want tofollow along with the examples.

Part I: Successful Projects
Chapter 1 Designing Applications
Chapter 2 Programming to Interfaces
Chapter 1. Designing Applications
In This Chapter
The Analysis Phase 4
The Design Phase 8
The Implementation Phase 14
Testing 25
Summary 32
One of the most frequent questions ActionScript developers ask is, "How do I know whatconstitutes a class?" This question strikes at the heart of a larger dilemma, which is: What arethe steps for building a successful application from start to finishfrom concept to completion?This is a big topic to tackle. Many people dedicate themselves to understanding and improvingmethodologies to answer this question.
The difficulty with teaching someone how to design and build an application from start to finishis that it requires elements that are difficult to talk about much less teach. It requires being ableand willing to look at the big picture as well as looking at things from many perspectives. Itrequires creative thinking as well as abstraction. It requires practice and experience. But thereare steps you can follow to help with the learning process. There are technologies you can useto assist you in developing your ActionScript classes. This chapter outlines some of the stepsand technologies that have proven useful for many ActionScript developers.
Some methodologies say there are five steps for building applications; other methodologies saythere are eight steps; still others can't decide how many steps it takes. In general, mostdevelopers agree that there are at least three phases to building successful applications:
Analysis1.
Design2.
Implementation3.
In addition, most developers also agree that testing is a vital part of the applicationdevelopment process. Although not always considered a core phase we'll also look at testing asa fourth important phase.
As we look at each of these phases, remember that they are not necessarily linear. You can goback to an earlier step at any point if necessary. During the design phase, for example, youmight realize that you forgot about an important use case for your application. At that point,you can return to the analysis phase. However, you should be as thorough as possible at each

step. Don't jump to the design phase too early just because you can. The more thorough andcomplete you are with each phase before moving to the next, the more successful yourapplication is likely to be. Additionally, thoroughness at each phase helps minimize the risk thatyou'll have to make major architectural changes later on, which could severely impact schedulesand project success.

The Analysis Phase
The analysis phase is concerned exclusively with what the application is supposed to do. Thequestion of how the application will accomplish the goal is deferred to the design andimplementation phases. In many ways, the analysis phase can be the most challenging becauseit requires that you take (often vague) ideas and translate them into specific functionalrequirements. You must create a map of what the application looks like from a distance.Although you can get away with a minimal analysis phase for a small project, the analysisphase becomes increasingly important for a project's success as the project increases in sizeand scope. Although you might be able to walk around your neighborhood without a map, if youwanted to cross the country, you'll undoubtedly agree that you need a map. This is true ofapplication development as well.
All too often, the analysis phase is glanced over or deemphasized. Poor analysis leads tofrustration for all parties involved (the developers who have to constantly make guesses andrefector, the managers who have the responsibility to see the project through to a successfulcompletion, the client who wants the working application, customers that have to use theapplication that may suffer from limited feature sets and bugs due to poor analysis, etc.). Thegoal of analysis is to provide a clear specification that outlines the needs of the user. Unlikelater phases, the analysis phase should be as non-technical as possible.
The outcome of the analysis phase is generally a document that outlines the functionalrequirements. However, it's important to understand that there are many ways to approachgathering these requirements, and the resultant document has no one required format. What ismost important is that you, your team, and/or your company uses an approach and documentformat that works best for you while still achieving the goal of clearly defining this map for theapplication you want to build.
Although there's no one required approach or format, we'll present one common approach toanalysis using use cases. If you are new to the idea of doing formalized analysis then you mayfind it useful to try using use cases. We also encourage you to research other techniques anddocument formats to find what works best for you.
Introducing Use Cases
One way to define the functional requirements of an application is simply to list everything thatthe application should be able to do. Although that approach is not necessarily wrong, it is naïvein that it fails to take into account the real-world use of the application. Applications don't existin isolation; they interface with all sorts of users. Therefore, it's much more realistic and usefulto approach the functional requirements from the standpoint of how the application is used. Thisapproach naturally leads to a kind of functional requirement called use cases.
Use cases present the application requirements by showing various ways in which users mightinteract with the application. The following is an example of a simple use case:
Generate Map: The user submits a form with a street address. The system displays aphysical map of the street address, with the map zoomed in at the default level.
Use cases can be formatted in many ways. Generally, use case experts talk about three basic

formats.
Brief: One paragraph outlining the main success scenario. The preceding example was in thebrief format.
Casual: Multiple paragraphs outlining not only the main success scenario, but also alternativescenarios. The following is an example of a casual format use case:
Generate Map
Main success scenario: The user submits a form with a street address. The systemdisplays a physical map of the street address, with the map zoomed in at the defaultlevel.
Alternative scenarios: If the address is invalid, the address form is redisplayed withan error message notifying the user why the operation failed.
If the default zoom level is unavailable for the requested address, display a map atthe greatest zoom level available for the location.
Formal: The most elaborate of the formats for a use case document. This format lists all thesteps for the use case as well as supporting data such as actors and conditions. The formal usecase is discussed in more detail in the next section.
Writing Formal Use Cases
Typically you'll want to create formal use cases for a functional requirements document. In thissection we'll look at how to create a formal use case. A formal use case can include thefollowing sections:
Primary actor: A description of the user who drives the operations outlined by the usecase. The description of the primary actor can include things such as the role of the user(e.g. anonymous, basic, administrator, etc.) as well as characteristics of the user that maybe relevant to how they interact with the application (e.g. age, disabilities, etc.)
Preconditions: Those conditions that must be met for the use case to proceed.
Main success scenario: A more granular, step-based description of the way the applicationworks than is given in the basic or casual formats.
Alternative scenarios: More granular, step-based descriptions of the ways the applicationwill handle alternative uses than are given in the casual format.
Special requirements: A list of requirements for the use case that don't fit as part of themain or alternative scenarios.
Open issues: A list of notes including questions that must be answered to fully implementa solution for the use case.
The following is an example of a formal use case. Note that this example does not have anyopen issues.
Generate Map

Primary actor: Customer
Preconditions: Customer is already viewing the form that allows the user to specify anaddress and click a button to submit the form.
Main success scenario:
Customer fills out address form.1.
Customer submits address data.2.
System requests map data from mapping service.3.
System draws map at default zoom level.4.
Alternative Scenarios:
3a. System detects invalid address format and redisplays form with error message.
3b. Mapping service is unavailable and system displays error message.
4a. Data is not available for default zoom level and system displays map at next highestavailable zoom level.
Special Requirements:
This portion of the application must be accessible (508 compliant).
Now that we've had a chance to see the structure of a formal use case, we'll next look at how tostart writing these use cases for an application.
Forming Use Cases
Now that you've seen how to write a use case, it follows that you'll want to know how to startforming these use cases. For example, what level of granularity is appropriate? Should you haveten uses cases or a hundred? The answer to these questions is subjective. There is no onecorrect set of use cases for an application. However, you will likely find the following guidelinesto be helpful:
Determine the types of users. An application can have many types of users. Each user willhave different use cases. A simple example is one in which an application has a standard,anonymous user type and an administrative user type. The administrative user typicallyexpects additional features that are not enabled for standard users. Your application mighthave additional tiers of users as well. For example, in addition to standard andadministrative users, your application might have registered users who have access tofeatures not available to standard users.
1.
Determine the basic goals each type of user can achieve. For example, all users might beable to generate maps, but only registered users can save maps. Additionally, onlyadministrative users might be able to view the logs and analytics for the application.
2.
3.
4.

2.
Fill out each use case with the appropriate sections.3.
Evaluate the use cases. It's important that you take your time with the use cases to makesure they are correct and appropriate before moving to the design phase. Getting the usecases correct helps ensure the best possible result of the design and implementationphases. It's much easier to make changes to the use cases before you've designed orimplemented the application than to revise them afterward and have to redesign and re-implement the application.
4.
Using UML in Analysis
UML (Unified Modeling Language) is a language in common use for modeling applications.Although UML is perhaps most frequently used during the design phase (as we'll see in the nextsection) it is not uncommon to use UML during analysis as well. One of the three parts of asystem model in UML is what's called the functional model. The functional model allows you tocreate use case diagrams, which can be very helpful. UML use case diagrams generally are notdetailed enough to be used apart from written use cases. However, they are often a niceaddition to written use cases as they provide a visual representation of the uses cases, actors,and systems. Figure 1.1 illustrates actors and uses cases for a common system, a store.
Figure 1.1. An example of use cases in UML.

The Design Phase
After you've completed the analysis phase of an application, you have a map for what theapplication is supposed to do. However, that map is at such a high level that you cannot use itto begin writing code. The result of the analysis phase may be a map, but it doesn't tell you howyou're going to get from point a to point b. For example, are you going to walk, drive, fly, ortake the train? For that you need the next step, which we call the design phase.
In the design phase, you take the functional requirements documentation from the analysisphase and start to look at it from an architectural standpointlooking to identify subsystems andeventually classes. During the design phase you'll parse out the elements that should be writtenas classes. Then you determine the responsibilities for those classes as well as the relationshipsbetween the classes.
The goal of the design phase is to generate some sort of technical document that provides ablueprint of the application you intend to build, including all the specific subsystems and classesthat you will use and the relationships between them. You should expect to use this technicaldocument to help you break up the application development into individual tasks. You shouldalso expect that the technical document clearly identifies dependencies and collaborationsbetween classes.
As with the analysis phase, the design phase has no rule dictating what techniques and toolsyou must employ. There are many ways that different people approach the design phase, andwe encourage you to find the one that works best for you. However, we have found that classresponsibility and collaboration (CRC) cards are a technique that proves very helpful in thedesign phase. In the next section we'll discuss CRC cards in more detail.
Introducing CRC Cards
CRC cards are a low-tech, yet very effective, way to determine exactly what classes you need towrite, what those classes need to be able to do, and how those classes relate.
Typically, you'll find that 3x5 or 4x6 lined index cards work best as CRC cards. At the top of theindex card, write the name of the class. On the left side of the index card, list theresponsibilities for the class. On the right side of the card, list the classes with which the classneeds to collaborate to accomplish those responsibilities. Figure 1.2 illustrates the format for aCRC card.
Figure 1.2. The typical format for a CRC card.

CRC cards are useful because you can draw them up quickly and make changes just as quickly.Using CRC cards, you can rapidly map out the functionality of an application; when you decideto split a single class into two classes, combine two classes, or change a class name, you can dothat with your CRC cards in a few seconds. You can also sit around a table with a team andwork together on the cards.
Now that you know the format of CRC cards, you'll undoubtedly have a few questions regardinghow to decide what constitutes a class, what responsibilities are, how to know what classes arecollaborators, and so forth. The next few sections address each of these questions.
Determining Classes
Deciding what constitutes a class is as much an art as it is a science. Just as every painter hasdifferent ideas about composition, use of color, and so on, so too does every applicationdesigner have different ideas about how to build an application. However, you'll likely findcertain guidelines helpful when you try to determine what classes your application needs.
It's often a good idea to look at your use cases to find classes. Classes are nouns. You can scanuse cases for all the significant nouns and use those as classes in your application. For example,consider the Generate Map use case we described earlier in this chapter. From that use case wecan easily identify these relevant nouns which are natural candidates for classes: "addressform," "address data," "mapping service," "map data," and "map."
When you have selected all the candidates for classes, write them down on your CRC indexcards. The next step is to determine the responsibilities for each class.
Determining Class Responsibilities
After you've decided on the initial candidates for classes, you can assign responsibilities to thoseclasses. Assigning responsibilities is an important step because it helps you determine theviability of the class candidate. If a class candidate doesn't have any responsibilities, it must be
unnecessary, and you can discard it. If the candidate seems to have too many responsibilities, itprobably needs to be divided into two or more classes. There are some schools of thought thatstate that a class should have no more than one responsibility. While we respect thatstandpoint, we find it to be severe. A general rule of thumb that we use is that a class shouldhave between one and three responsibilities.
It's important to understand what a responsibility is (and what it is not). A responsibility isessentially what a class (or an instance of the class) should be able to do or facilitate. Althoughthere is a relationship between a class's methods and its responsibilities, they are not identical.You should not think of a class's responsibilities in terms of methods or method names. A classmay require many methods to accomplish just one responsibility. At this point in the design, it'stoo early to map out the actual methods. Responsibilities are higher-level abstractions thanmethods.
A responsibility is usually something that can be written out in plain language in a few words.The following are examples of possible class responsibilities:
Create user input form
Validate user input
Encapsulate data model for a map
Handle requests and responses to and from server-side service
Draw vector map from data model
As you work on determining the responsibilities for the classes in your application, you will mostlikely drop classes, add classes, and change existing classes. These revisions are a desirablepart of the process, which result in a well-considered design.
Although you can go through each class candidate and try to think of the responsibilities eachclass might have, that approach can be problematic. It encourages you to add responsibilitiesbased on what you think the class candidate ought to do rather than based on what theapplication requires. A better approach is to scan the use cases for verbsboth explicit andimplicit verbs. Explicit verbs are obvious because they are written in the use case steps. Implicitverbs are the verbs that are not written in the steps but are necessary for the successfulcompletion of a step.
Determining Collaborators
Many, if not most, classes cannot fulfill all their responsibilities on their own. They must rely onother classes to assist them. The assisting classes are called collaborators. Collaboratorsgenerally lend a hand either by providing data or by enabling the class to offload functionality.
After you have defined classes and class responsibilities, the next step in the design phase is todetermine what each class's collaborators are. This is extremely helpful in finding additionalclasses that you hadn't previously thought of. For example, consider a Map class whoseresponsibilities include drawing a vector map based on a data model. It might be immediatelyobvious that in such a case a MapData class would be a collaborator since Map would want toquery MapData for the data needed to draw the map. Locating collaborators is useful for us interms of determining relationships between existing classes. In this case, because we likelyalready have a CRC card for the MapData class derived from the "map data" noun we spotted inthe use cases this collaborator did not help us find a new class. However, when we think aboutthe Map class still more, we'll probably realize that drawing all the different types of elements on

a map would probably be far too much for the Map class itself to handle. Instead we can rely oncollaborators that draw the specific map elements, and we realize that these collaboratorsbecome new classes we missed before: Street, Highway, River, and CityMarker.
Elaborating on Relationships Between Classes
Classes have relationships with one another. When finding collaborating classes, you are findingthe classes that have relationships. However, it's possible and necessary to determine what typeof relationship these collaborating classes have. Although every relationship between classeswill be unique, it is possible to generalize those relationships into the following categories:
Association
Aggregation
Inheritance
Association and aggregation are types of relationships that can more generally be calledcomposition. Later in this chapter (in the section titled, "Inheritance and Composition"), we'llcompare and contrast the generalized principals of composition and inheritance as they apply toimplementation.
The Association Relationship
Association is the weakest of these relationships. Association relationships are also sometimescalled dependency relationships. When two classes are related in this way, one of the classesrelies on its collaborator to help with one or more of its responsibilities.
An example of an association relationship is the relationship between a Map and a MapData class.The Map class has a dependency on the MapData class. Without a MapData instance, a Map objectwouldn't be able to draw the map.
Associations are perhaps the most common sort of relationship between classes. You can thinkof associations as "uses" relationships, meaning that Map "uses" MapData.
The Aggregation Relationship
Aggregation is a stronger form of composition relationship than the association relationship.When classes are related by aggregation, the life cycles of the classes are linked. When classesare related by association, one class instance can be created or destroyed without necessarilyaffecting the other. However, when classes are related by aggregation, it implies that one classis the owner of the collaborator class. If the owner class is destroyed, so too are the aggregatecollaborator classes.
An example of an aggregation relationship is that of the Map and Street classes. You can thinkof aggregations as "has a" relationships, meaning that Map "has a" Street. That doesn't meanthat all Street objects are owned by Map objects. But this relationship does state that Mapobjects can have Street objects, and when the Map object is destroyed, so too are the Streetobjects it owns.

The Inheritance Relationship
Inheritance is the strongest sort of relationship between classes. When a class inherits from anexisting class, it initially looks exactly like the class from which it inherits. The entire interfaceand implementation (more on these topics in the next chapter) of the existing class (what wecall the superclass or base class) are passed down to the new class (what we call the subclass.)The relationship is so strong between superclasses and subclasses that subclass instances caneven stand in for superclass instances in many cases. Because of the strength of inheritancerelationships we say that inheritance defines an "is a" relationship such that the subclass "is a"superclass.
Inheritance relationships allow you to create abstractions that are shared by many similarclasses. For example, Street, Highway, River, and CityMarker are all types of map elements. Ifall the classes share common interfaces and implementations, these classes might have a lot ofduplicate and redundant code. You can abstract that code by placing it into a new MapElementclass. Street, Highway, River, and CityMarker can then all inherit from the MapElement class.They will automatically inherit the interface and implementation from MapElement, which willremove the need to repeat that code in each of the subclasses. It also means that you can beginto use polymorphism. Although we'll talk about this topic in more detail in the next chapter, theidea behind polymorphism is that a more specific type can substitute for a more general type.In other words, the Map class can have an aggregation relationship with MapElement rather thanhaving aggregation relationships with Street, Highway, River, and CityMarker. That distinctionis very important because if you later wanted to add a Bridge class, you could simply define itsuch that it inherits from MapElement, and the Map object would automatically work with Bridgeobjects without your having to rewrite any of the Map code.
Although inheritance relationships are very powerful, they also tend to create very rigidrelationships. Inheritance has its place and deserves credit for all that it can do. However, somuch emphasis has been placed on inheritance relationships in many programmingcommunities that it is often overused and misused. Inheritance relationships should generallybe the least frequent type of relationships in your applications. Inheritance enablespolymorphism, which is extremely valuable. However, inheritance is not the only way to enablepolymorphism, as you'll read in the next chapter. We'll compare and contrast inheritance withcomposition relationships in the "Inheritance and Composition" section later in this chapter.
Formalizing Public APIs
By this point, you've decided on the classes your application requires as well as theresponsibilities of each class, the class collaborators, and the relationships each class has withthose collaborators. Although you might be anxious to start coding right now, there are stillsome steps to complete in the design phase.
The next step is to formalize the public APIs (Application Programming Interface, which meansthe public methods) of the classes.
Formalizing the API for a class is a matter of translating the responsibilities into methodsignatures. Not all responsibilities necessarily translate into public methods because some ofwhat a class is responsible for might be private. For example, the AddressForm class might havea responsibility to validate user input. That is probably not something that translates into apublic method. Rather, it is far more likely that this responsibility is handled internally by theclass when the user clicks a button. However, some class responsibilities might translate intoseveral public methods. For example, in the case of our map example, the responsibility "handlerequest and responses to and from server-side service" might translate into the followingmethods (depending on the application requirements):

function getMapDataForAddress(address:AddressData):void;function getSavedMapData(id:uint):void;
Note
In the preceding example, the two methods are purely based on speculation as towhat sorts of methods such an application might require for a server-side serviceproxy (often called a remote proxy). Furthermore, both methods are declared withvoid return types because the assumption is that the class is a proxy to a server-sideservice that works asynchronously with Flash Player, and responses will be handled byevent listeners.
Using UML for Design
We first mentioned UML in relation to analysis. However, one of the most common uses of UMLis during the design phase because you can use UML class diagrams to visually represent all theclasses, their APIs, and the relationships between the classes. UML class diagrams are reallyuseful because they allow you to look at all the classes and there relationships all at one time ina relatively succinct format. Usually a UML class diagram doesn't replace the need for technicaldocumentation. However, UML class diagrams can often supplement technical documentationand serve as a useful tool both during the design phase as well as during the implementationphase when you must actually write all the classes shown in a UML class diagram. Figure 1.3shows a very simple UML class diagram that shows two classes and an interface.
Figure 1.3. A simple UML class diagram.
Note that this figure shows only public class members, yet you can also represent private andprotected members.

Not only does UML provide a nice way to visualize the classes used by an application, but it alsoprovides the possibility to export stub code for all the necessary classes and interfaces. At thetime of this writing there is no known ActionScript 3.0 stub code generator for UML. However,since this is a common feature for many other languages (Java, C#, etc.) it is reasonable tothink that there will be an ActionScript 3.0 generator for UML in the near future.

The Implementation Phase
Following the design phase is the implementation phase. In the implementation phase, youactually write the code you have planned out. If you've had successful analysis and designphases, the implementation of your application should be relatively straightforwardsimply amatter of coloring in the lines, so to speak. By the time you get to the implementation phase,you should already have decided on the classes, their relationships, their responsibilities, andtheir APIs.
Much of the implementation phase simply involves writing ActionScript code, and as the onestep you can't skip, it is the phase with which everyone is familiar. As such, we're not going tofocus on the details of how to write classes. However, there are several topics that bear furtherdiscussion, namely:
Coding conventions
Encapsulation
Composition and inheritance
Coupling
Coding Conventions
There are few rules for naming classes, packages, variables, functions, and interfaces inActionScript. In each case, you can use only letters, numbers, dollar signs ($), and underscores(_) and the first character must not be a number. Although the rules are few, there are stillconventions for naming that you might find useful. At the very least, you will find it useful toknow what conventions we use in this book. You should know that the conventions we usearen't the only conventions, and you aren't obligated to use them. We introduce this topic herebecause consistent and conscious coding conventions are a boon to application development. Byapplying conventions consistently you can expect to write code that is easily read by you andanyone else during team development. Remember that classes can involve hundreds of lines ofcode, and using consistent conventions helps you to more quickly identify parts of the code andtheir purposes.
Variables and Functions
For variables, it is a convention to use initial lowercase letters. Consider this example:
var city:Map;
Generally, it is advisable to use as the name words and phrases that describe the variable. Forexample, city is probably a much better name for a Map variable than m would be. Often times,it's possible to more accurately describe a variable using several words. In such cases, theconvention is to use a style called camel case (sometimes called inter caps) in which the firstletter of each word (except the first) is capitalized, as in this example:

var cityMap:Map;
Class properties are special sorts of variables, and as such they use the same namingconvention as variables. However, to better distinguish between local variables and classproperties, it is a convention to name all private properties with an initial underscore, as in thisexample:
private var _cityMap:Map;
Note
The issue of underscores for private properties is a contentious one among developers.It is our preference to use underscores as we feel they help clearly differentiatebetween private properties and local variables. However, some developers will arguevehemently against the use of underscores as they feel there is no significant benefitin their use.
Functions (and methods) also follow the same naming conventions as variables. Function namesshould start with lowercase letters and use camel case formatting when the function nameconsists of more than one word. Consider this example:
public function getMapDataForAddress(address:AddressData):void;
Parameters are also special variables, and as such they use the same naming conventions asvariables, as you can see in the preceding example.
Unlike private properties it is not common to use underscores for private methods. The logicbehind this is that a method is not generally defined within another method as a local variablemight be defined within a method. Therefore, it's always clear that a method is a methodwithout having to use underscores.
Note
The variable and function/method naming conventions presented here are notintended to be comprehensive of all possible naming conventions. Many developerslike to use additional conventions such as using variable prefixes to denote type. Weare presenting the conventions that we find useful and that we use in this book. Youare always welcome to use whatever conventions you find helpful.
Constants
Constants are special types of fields; you can define them with a value, but you cannot changethe value subsequently. You've likely seen many constants in the Flash Player events API suchas EVENT.COMPLETE and MOUSEEVENT.CLICK . As you can see, constants use all uppercase

characters by convention. If a constant name uses more than one word, the words are delimitedby an underscore, as in MouseEvent.MOUSE_MOVE .
Note
Constants are a new feature in ActionScript 3.0.
Classes and Interfaces
By convention, class names always start with an uppercase character. Class names also usecamel case when necessary. In addition, class names should always be nouns.
Interfaces use the same naming conventions as classes except that they have one additionalconvention: Interface names always start with the letter I (meaning interface.) Additionally,interfaces do not always have to use nouns as names. Although it's not uncommon to name aninterface with a noun (e.g. ICollection ) it's equally common to use an adjective ending in -able. For example, the Flash Player API includes the following ActionScript 3.0 interfaces:IExternalizable and IBitmapDrawable .
Packages
For the most part, package names follow the same conventions as variables: They start withlowercase letters. There are two schools of thought regarding the use of camel case in packagenames. One group uses camel case while the other group uses exclusively lowercase charactersin package names. In this book we do not employ camel case in package names.
There's yet another important convention when it comes to package names. One of thefunctions of packages is to ensure that classes exist within unique namespaces. For example,two classes called Example cannot be created in the same package, but may exist in twoseparate packages. When you decide on package names, try to ensure that the package nameguarantees uniqueness. That way, if you happen to use your Example class in a project with anExample class from an existing library, the two classes can coexist.
By convention, package names can guarantee uniqueness by using subpackages in order ofdescending order of specificity. When a class is part of a library belonging to a company ororganization, the convention is to name the packages starting with the organization's domainname in reverse order. The first part of most package names is the top-level domain such ascom or org . The second part of most package names is the domain such as google or amazon . Ifthe classes are specific to a project, the project name follows the company's domain name. Theclasses themselves are generally placed in subpackages that group them by classification. Forexample, utility classes might go in a utils subpackage and service proxy classes might go in aservices package. As an example, imagine that you're writing a class called LoggingServicethat is specific to a project with a code name of JediKnight for your company calledExampleCompany (with a domain name of examplecompany.com.) You might place that classin the following package:
com.examplecompany.jediknight.services
Encapsulation

One of the rules of good object-oriented design is that all classes should be black boxes: youcan put things in and take things out, but you can't determine how it operates. In other words,the only way to interact with a class instance is to use its public methods. You should never beable to look into an object or change the object's state except by asking the object to tell youabout itself or to change its own state. The object must always maintain sovereignty. Theminute an object is no longer in charge of its own internal world, the entire object-orienteduniverse starts to crumble and fall apart into an unmanageable train wreck.
This idea of classes being black boxes is a fundamental principle of object-oriented design calledencapsulation. Encapsulation is absolutely necessary for an object-oriented design to succeedbecause it enables objects to interact with one another in known and well-defined ways. Thisapproach models the world in which we live in many ways. Every object in the physical worldhas boundaries that define it and its interface with the world around it. Your body interacts withthe air by way of respiration, for example. Without these well-defined interfaces there would bechaos, and it would be impossible to interact with anything in a useful or meaningful way.
Implementing classes so that they adhere to the principle of encapsulation is quite simple. Toachieve this goal, there are just two basic rules:
Don't use any public properties.1.
Don't reference objects outside the class unless the reference was passed to the class as aparameter.
2.
Public Properties
Properties store an object's state. As we've already said, an object must be in control of its ownstate. Public properties allow other objects to directly change an object's state without theobject being in control. The implications of this can be far-reaching, but we can see the problemwith a simple example. Consider a Student class that models a student at a school. One of thefields that comprise a Student object's state is the GPA (grade point average). It might seemlike a good idea to simply define the class with a public gpa property. However, consider thatGPAs are generally constrained to a specific range of values (0 to 4, for example). With a publicproperty, there's no way for the application to guarantee that a student's GPA will always be inthe valid range. If the property is public, you can simply set the value to any numeric valueregardless of whether or not it is within the valid range, as this example does:
student.gpa = 400;
As if that wasn't bad enough, there are further ramifications. What if there are othercollaborating objects that must be updated with a student's GPA changes? For example, aSchoolRecord object might need to know when a GPA changes in general, and a Parent objectmight need to know when the GPA drops below or raises above a certain level. If the Studentobject doesn't even know when its own state changes, it can not very well notify other objectswhen its state changes.
The solution to public properties is to use private properties with accessor methods. InActionScript, we call the accessor methods getter and setter methods, and ActionScript enablestwo types of getters and setters: explicit and implicit. An explicit getter or setter is a normalmethod, typically using the word get or set in the name of the method. For example, ratherthan declaring a public gpa property, you can declare a private _gpa property and then usemethods called getGPA() and setGPA() . Consider this example:

public function getGPA():Number { return _gpa;}public function setGPA(value:Number):void { if(value > 4) { _gpa = 4; } else if(value < 0) { _gpa = 0; } else { _gpa = value; } dispatchEvent(new Event(Event.CHANGE));}
Notice that the setter method uses boundary testing to verify that the value is always in thevalid range between 0 and 4. This example simply corrects values outside the valid range, butanother implementation might throw an error. The method also dispatches an event that cannotify listeners (such as a SchoolRecord or Parent object). When you want to set the GPA for astudent, you can simply call the setGPA() method and pass it the value, as shown here:
student.setGPA(4);
When you want to retrieve the value you can call getGPA() , as in this example:
textfield.text = "GPA: " + student.getGPA();
Implicit getters and setters are similar to explicit getters and setters. In fact, theimplementation of implicit methods can look almost identical to that for explicit getters andsetters. The difference is that implicit getters and setters are defined as methods, but they looklike properties when used. The syntax for implicit getters and setters uses the keywords get andset after the function keyword. The following example rewrites the preceding explicit methodsas implicit methods:
public function get gpa():Number { return _gpa;}public function set gpa(value:Number):void { if(value > 4) { _gpa = 4; } else if(value < 0) { _gpa = 0; } else { _gpa = value; } dispatchEvent(new Event(Event.CHANGE));}
When you want to call the implicit setter method, you use it as part of an assignment

statement. The value you assign to the "property" is passed to the setter method, like this:
student.gpa = 4;
You can call the getter method when you reference the "property" in a context that attempts toread the value, as shown here:
textfield.text = "GPA: " + student.gpa;
External References
A class should never directly reference any object that is outside of itself unless it obtains thatreference through its public interface. A class can declare private properties and local variablesand can reference those objects internally because they exist within the class. A class can alsoreference an outside object if the reference was passed into it via a public method. For example,a Student class might define a method called attendClass() that accepts an AcademicClassparameter. The Student object can then reference that object because it was passed in as partof a method call.
public class Student {
public function _classes:Array; public function Student() { _classes = new Array(); }
public function attendClass(class:AcademicClass):void { _classes.push(class); // Now that the class was passed in as a parameter the // Student instance can store that reference in the array // and use it later. This doesn't break encapsulation // because the reference was passed in via the public API. }
// Remainder of implmentation.
}
Designing for Encapsulation
Encapsulation is an extremely important principle, and it can have far-reaching consequences.Consider a School class that has a private property called _students, an array of all thestudents who attend the school. If you need to make the students available to collaborators withthe School object (for example, a SchoolDistrict class might need to know about all thestudents at all the schools in the district), you can make the array accessible using a gettermethod, as shown here:
public function get students():Array { return _students;}

Even though you aren't using a public property, the design in this example breaks the principleof encapsulation. Consider what happens when you retrieve the _students array and makechanges to it directly:
school.students.splice(10, 5);
The preceding code removes five students from a school, but the school never receivesnotification about the removal of the students. That is obviously not the behavior you wouldwant (a school should always know when students have been removed). You can address thisissue in several ways. One way is to simply return a copy rather than a reference, as shownhere:
public function get students():Array { return _students.concat();}
Another solution is to employ the Iterator pattern (described in Chapter 7 , "Iterator Pattern").Regardless of which solution you use, you are solving the design flaw that broke the principle ofencapsulation.
Most design patterns are solutions to problems relating to encapsulation. In many cases,encapsulation might appear to be in direct opposition to other important design principles. Forexample, many applications need to have globally accessible objects of specific types. Anapplication might need a globally accessible User object that represents the current user of theapplication. As we've already discussed, it would break encapsulation if all the other classes inthe application had hard-coded references to that one specific User object. However, using theSingleton pattern (described in Chapter 4 ), you can achieve the goal of a globally accessibleobject without having to directly reference a specific object.
Inheritance and Composition
One class can leverage the functionality of another class in one of two basic ways: inheritanceor composition. Both are powerful techniques. Inheritance allows you to define a new class sothat it automatically gets the interface and implementation of an existing class. The followingcode declares a class called Employee :
public class Employee { public function Employee() {} public function work():void { trace("working"); }}
The new class, which we call the subclass, can build on the foundation of the existing class,which we call the superclass or base class, without needing to rewrite the original code or writeany new code to use the superclass code. There are different types of employees, and we candefine different subtypes by inheriting from the Employee superclass. For example, the followingExecutive class inherits from Employee by using the extends keyword:
public class Executive extends Employee { public function Executive() {} public function attendMeeting():void {

trace("attending meeting"); }}
Furthermore, inheritance automatically enables polymorphism because the subclass inherits theinterface of the superclass. That means that an Executive object is also an Employee …just amore specific type. An Executive object can be used any time an Employee object is expectedalthough the reverse is not true:an Employee object cannot stand in for an Executive object.Note that the Executive class defines another method called attendMeeting() . BecauseExecutive objects inherit from the Employee superclass, you can call the work() method for anExecutive and you can also call the attendMeeting() method which is specific to Executive .
In contrast with inheritance, composition allows you to write a new class (a front-end class)that has an instance of an existing class (the back-end class). Every time you define a class witha property whose type is another class, you are using composition in some sense. The followingexample is a rewrite of the Executive class example just shown so that it uses compositionrather than inheritance:
public class Executive { private var _employee:Employee; public function Executive() {} public function attendMeeting():void { trace("attend meeting"); } public function work():void { _employee.work(); }}
When you use composition, the new (front-end) class does not automatically inherit theinterface of the existing (back-end) class. The front-end class can use the back-end classinstance only by way of its public interface. If the front-end class needs to have part or all of thesame interface as the back-end class, you must write code that defines the interface as well asits implementation. That is the reason that this rewrite of the Executive class has to define awork() method. Unlike the example that used inheritance, the composition version of theExecutive class does not inherit the work() method. If you want the work() method to be part ofthe Executive interface, you must define it. The preceding example uses a technique calleddelegation to pass along the method call to the composed object.
Because a class that composes an instance of another class does not automatically inherit theobject's interface, composition does not automatically enable polymorphism. In other words,using composition, an Executive object is not an Employee , and it cannot stand in for anEmployee . (The solution to this issue is to use interface constructs as discussed earlier in thischapter.)
In reading the preceding paragraphs, you might think that inheritance sounds like a muchbetter technique for reusing existing functionality. It sounds like composition requires muchmore work with little or no advantage. Yet both inheritance and composition have theiradvantages and disadvantages.
Advantages and Disadvantages of Inheritance
As you've seen already, inheritance has the following advantages:

Simplicity of use: Inheritance is a concept built into the language. All you have to do is usethe extends keyword in order to define one class so that it inherits both the interface andthe implementation of an existing class.
Ability to change inherited implementation: By using the overrides keyword, you canchange the implementation inherited for a particular method.
Yet inheritance also has its disadvantages:
Implementations are fixed at compile-time: For example, if a Chart3D class inherits fromthe BarChart class, then it's impossible at runtime to apply the 3D functionality to aLineGraph object.
Supports weak encapsulation and fragile structures: Subclasses have privileged access toa superclass's implementation. Anything that is marked as public, internal, or protected isaccessible to a subclass. This means that encapsulation is weak in inheritancerelationships. Because of this, it's possible that a change to a superclass implementationcould break subclasses even if the public interface does not change.
Superclass interface changes necessarily change subclasses: If you change the signature ofa superclass method the change will ripple to all subclasses.
ActionScript allows a class to inherit directly from just one class (as opposed to multipleinheritance, a concept utilized by very few languages): Suppose that all Executive objectsshare the functionality of both Employee and DecisionMaker classes. ActionScript allowsExecutive to inherit from just one of those classes, not both.
Advantages and Disadvantages of Composition
Although we haven't yet mentioned the advantages of composition, they are numerous. Some ofthe most prominent advantages are as follows:
Implementations are configurable at runtime: For example, if a Chart3D class operates onan object typed as Chart (of which there are many subtypes such as BarChart andLineGraph ), the Chart3D class can operate on any of those subtypes. The specific subtypecan be set at runtime.
Supports good encapsulation and adaptable structures: Classes that use composition areforced to go through the back-end class public interfaces. That means that they enforcegood encapsulation. That also means that changes in implementation of the back-endclasses are less likely to break classes that use them. As long as the interface remains thesame, the front-end classes won't break.
Interface changes have limited ripple effect: When the interface of a back-end classchanges, it will break front-end classes that rely on the old version of the interface.However, the damage is contained and generally fairly trivial to correct. Because interfacesare not inherited when using composition, the changes affect only the front-end class, butnot classes that in turn compose instances of the front-end class. In other words, ifExecutive is a front-end class for Employee and the interface for Employee changes, you willmost likely have to make changes to Executive . However, the interface for Executive doesnot change. That means that if a Company class composes an Executive object, the Companyclass does not have to change.
Composition allows a front-end class to have relationships with many back-end classes:

Using composition, an Executive class can have both an Employee and a DecisionMakerproperty.
Yet composition is not without its disadvantages:
Frequently requires more code than inheritance: If a front-end class needs to use some orall of a back-end class's interface, it must re-create it.
Often more difficult to read than inheritance: Inheritance establishes a verystraightforward relationship. Composition is often less direct and presents a trail that'smore difficult to follow if you're not familiar with the code.
Which to Use: Inheritance or Composition
Generally, the rule of thumb is to favor object composition over inheritance. The advantages ofobject composition outnumber the disadvantages. Furthermore, the disadvantages ofcomposition are not obstacles as much as they are simply inconveniences. Because inheritanceis so much more straightforward, it's a lot easier to teach and learn in many cases, and it tendsto be overemphasized and overused by many people in the ActionScript developmentcommunity. For this reason, it's often beneficial for ActionScript developers to determinewhether composition is the best option for establishing a relationship between classes.
With that said, it's also worth noting that with the surge of interest in object-oriented designand design patterns in the ActionScript community, inheritance has been maligned in manycircles. It's important to understand several things about this conflict:
Inheritance is not wrong: Just because you should favor composition does not mean thatinheritance is never appropriate. Inheritance is a better solution in some cases. It's difficultto make rules that tell you when to use inheritance and when to use composition.However, as a general guideline, it's advisable to use inheritance in the followingsituations: When a new class really does define a subtype of an existing class, when thenew class is not likely to have subclasses itself (limiting inheritance chains keeps some ofthe disadvantages of inheritance at bay), when the new class would benefit greatly byinheriting part of the existing class's implementation that is hidden from the public, andwhen the new class does not have special requirements (for example, it needs to beadaptable to significant changes at runtime).
Inheritance and composition are not competitors: Although it is true that in almost allcases two classes will be related by either inheritance or composition (and not both), thatdoes not mean that these two types of relationships can not work together. In fact, mostclasses that use inheritance also use composition.
Conventional teaching says that to determine whether two classes should be related byinheritance or composition, you should use the "is a/has a" test. The "is a/has a" test says thatyou should answer the following question: Is (new class) a (existing class) or does (new class)have a (existing class)? If the new class is a more specific version of the existing class, therelationship is inheritance. If the new class simply has an instance of the existing class as aproperty, the relationship is composition. Although that guideline can be useful, it is notdefinitive. Consider an example using an existing class called Student and a new class calledSchool . If we ask whether School is a Student , the answer is obvious: a School is not aStudent . Therefore, the relationship must be composition, not inheritance. Yet just because wecan answer that a new class is a more specific version of an existing class doesn't mean that therelationship should necessarily be inheritance. For example, consider the relationship between aHighSchool class and a School class. If you use only the "is a/has a" test, you might determine

that a HighSchool is a School and therefore the relationship is inheritance. Yet consider whathappens if you need to have a HighSchool object that uses experimental administrationstructure and teaching techniques. We can assume that the implementation for School dealswith traditional school systems and infrastructure and would not meet the needs of anexperimental school. An inheritance relationship between School and HighSchool is rigid. If youuse composition to define the relationship, it's possible to create an experimental high schooltype at compile type by substituting an ExperimentalSchool instance for the School property ofa HighSchool object.
Coupling
Coupling refers to the degree to which two objects must know about one another. When theobjects have to know a great deal about one another to work, we call that tight coupling; whenthey have to know little to nothing about one another, we call that loose coupling. In object-oriented design, we generally strive to have loose coupling among the objects in the system.Loose coupling creates flexible and adaptable systems. If objects are tightly coupled, the systemis rigidone change in one object can cascade and break the entire system. If objects are looselycoupled, changes are much less likely to break things, and even when changes do causemalfunctions, the malfunctions are generally contained.
Many design patterns aim to create loosely coupled systems. For example, if an object needs toask another object to run a behavior, the traditional way to accomplish this goal is for theobject to have a reference to the collaborator and to call a method of that collaborator. Thatway of structuring an application uses tight coupling because the calling object has to have areference to the collaborator and it has to know the signature of the method it wants to call. It'sdifficult to make changes to that structure. The Command pattern described in Chapter 10addresses this issue by completely decoupling the objects. The Command pattern adds anintermediary layer that parameterizes the behavior and allows the calling object to simply havea reference to the intermediary object and know about a standard interface. This is just oneexample of how design patterns can promote loose coupling or decoupling, and you'll see manymore examples throughout the book as you read about each of the patterns.

Testing
Once you've completed the implementation phase the next important phase you need toconsider is the testing phase. Generally testing involves a quality assurance (QA) group thatruns test cases to determine that the application behaves as expected and to try to catch anybugs. This testing phase is iterative. When QA returns a list of bugs the development team mustwork to fix any issues. However, when fixings bugs it's possible to introduce new bugs. If youhave architected the application well, favoring composition over inheritance for building flexiblestructures, then the risk of introducing new bugs during this phase is minimized. However, it'sis almost inevitable that some new bugs will be introduced during bug fixing and old fixed bugswill re-emerge. Because of the possibility of this introduction and re-introduction of bugs testinggenerally involves something called regression testingwhich basically means all tests thatpreviously passed must be run again to ensure that changes didn't cause any of those tests tosuddenly fail.
As you might imagine the introduction and re-introduction of bugs can be quite expensiveduring the testing phase if they go uncaught until the build is regression tested by a QA team. Ifa bug isn't caught until QA runs a regression test then it means that the development teammust fix the bugs again and send yet another build to QA for regression testing.
If possible it's always best for developers to try to find new bugs and regressions before sendingthe build to QA. The difficulty with that strategy is that it requires the development team to beresponsible for testing the application. If developers could handle testing in addition todevelopment and bug fixes then there wouldn't be a need for a QA team in the first place, so itmight almost seem ridiculous to suggest that developers should have to test an application.However, if developers can run automated tests that verify that an application continues towork correctly from a programmatic standpoint then that doesn't require a great deal morework on the part of the developer, and it enables developers to quickly identify errors beforesending a build to QA. These programmatic tests are can be formalized into what is called a unittest .
Unit testing allows the developer to create programmatic tests that ensure that parts of theapplication behave in an expected way. For example, if you have a method that's supposed toconvert a parameter value from radians to degrees and return that value then you want tomake sure that if you pass it a value of Math.PI it returns 180 every time. Using this basicconcept you can create a series of tests where you ensure that results of operations are asexpected (i.e. Math.PI radians is always converted correctly to 180 degrees).
You can create unit tests without a formal unit test framework. However, using a formalframework for unit testing has several advantages. Specifically:
When you use an existing framework you don't have to reinvent the wheel, saving youtime
An existing framework is likely to be tested so that bugs in the unit testing frameworkwon't cause your tests to fail to work (which would negate the value of running unit testsin the first place.)
Although there may be additional unit testing frameworks for ActionScript 3.0 subsequent to thewriting of this book the one existing unit testing framework we know of at this point is called

FlexUnit. As the name implies, you can use FlexUnit for unit testing Flex applications. However,that doesn't mean that FlexUint is limited to unit testing applications that use the Flexframework. Even if you are working on a purely ActionScript 3.0 project you can use FlexUnit.
At the time of this writing FlexUnit is available for download athttp://labs.adobe.com/wiki/index.php/ActionScript_3:resources:apis:libraries . If that URLchanges you may not be able to find the downloads there. In such a case you can look towww.rightactionscript.com/aas3wdp for an updated URL.
Once you've located the correct URL you should download the archive containing the .swc filewhich contains the necessary FlexUnit framework libraries. You will want to extract the .swc filefrom the archive and then make sure that the .swc is included in the library path for yourproject for which you want to use unit tests.
If you want to write custom unit tests that don't rely on FlexUnit then you are welcome to do so.However, for the remainder of this section on unit testing we will be giving specific instructionsfor running unit tests using FlexUnit.
Creating Basic Unit Tests
In FlexUnit basic unit tests require the following elements:
Classes you want to test. These are the classes that comprise your application.
Test cases. Test cases are special classes that you write just for the purposes of unittesting.
Test runner. A test runner is a class (or MXML file) that actually runs all the test cases andreports the results.
The first category of elements isn't specific to unit tests. That category is simply comprised ofthe classes you've already written. They are part of unit testing because you are testing thatthey actually work the way you expect. For the basic test cases we'll test the following class.
package example { public class SimpleConverter { public function SimpleConverter() {} public function convertToRadians(degrees:Number):Number { return (degrees / 180) * Math.PI; } public function convertToDegrees(radians:Number):Number { return (radians / Math.PI) * 180; } }}
Test cases and test runners, on the other hand, are unique to unit testing. Since test cases andtest runners are likely new to you we'll look at how to create them in the next sections.
Writing Test Cases
A FlexUnit test case is an instance of a class that extends flexunit.framework.TestCase . Thetest case class constructor should always accept a string parameter and then call the superconstructor, passing it the parameter value.
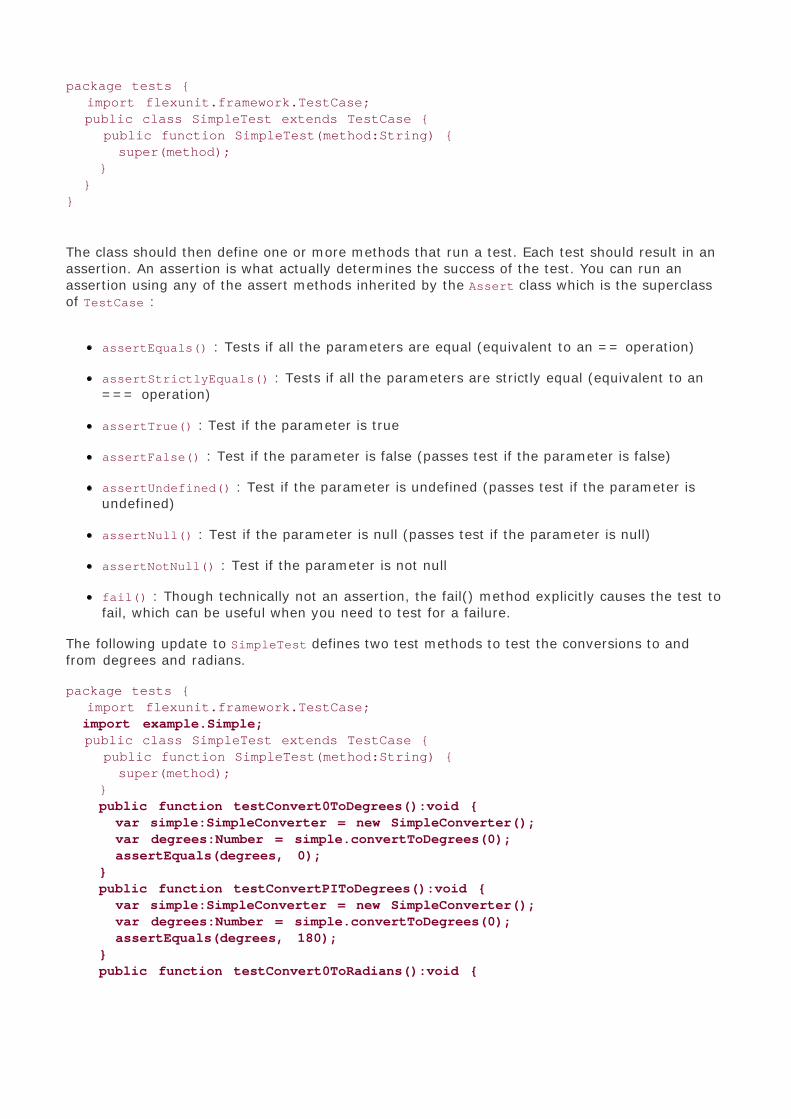
package tests { import flexunit.framework.TestCase; public class SimpleTest extends TestCase { public function SimpleTest(method:String) { super(method); } }}
The class should then define one or more methods that run a test. Each test should result in anassertion. An assertion is what actually determines the success of the test. You can run anassertion using any of the assert methods inherited by the Assert class which is the superclassof TestCase :
assertEquals() : Tests if all the parameters are equal (equivalent to an == operation)
assertStrictlyEquals() : Tests if all the parameters are strictly equal (equivalent to an=== operation)
assertTrue() : Test if the parameter is true
assertFalse() : Test if the parameter is false (passes test if the parameter is false)
assertUndefined() : Test if the parameter is undefined (passes test if the parameter isundefined)
assertNull() : Test if the parameter is null (passes test if the parameter is null)
assertNotNull() : Test if the parameter is not null
fail() : Though technically not an assertion, the fail() method explicitly causes the test tofail, which can be useful when you need to test for a failure.
The following update to SimpleTest defines two test methods to test the conversions to andfrom degrees and radians.
package tests { import flexunit.framework.TestCase; import example.Simple; public class SimpleTest extends TestCase { public function SimpleTest(method:String) { super(method); } public function testConvert0ToDegrees():void { var simple:SimpleConverter = new SimpleConverter(); var degrees:Number = simple.convertToDegrees(0); assertEquals(degrees, 0); } public function testConvertPIToDegrees():void { var simple:SimpleConverter = new SimpleConverter(); var degrees:Number = simple.convertToDegrees(0); assertEquals(degrees, 180); } public function testConvert0ToRadians():void {

var simple:SimpleConverter = new SimpleConverter(); var radians:Number = simple.convertToRadians(0); assertEquals(radians, 0); } public function testConvert180ToRadians():void { var simple:SimpleConverter = new SimpleConverter(); var radians:Number = simple.convertToRadians(180); assertEquals(radians, Math.PI); } }}
Once you've created one or more test cases you next to create a test runner to run the tests andview the results.
Writing a Test Runner
Assuming you're using Flex you can use the FlexUnit test runner to run a suite of unit tests.First, you must create a runnable MXML document that does the following:
Add the flexunit.flexui.* namespace
Add an instance of TestRunnerBase , an MXML component
Create a flexunit.framework.TestSuite instance, and add all the test cases to it.
Assign the TestSuite instance to the test property of the TestRunnerBase instance.
Call the startTest() method of the TestRunnerBase instance.
The following example MXML document runs all the tests from SimpleTest .
[View full width]<?xml version="1.0" encoding="utf-8"?><!-- Notice that the Application tag adds the flexui namespace prefix and maps itto flexunit.flexui.*. Also notice that it registers initializeHandler() as an eventhandler for the initialize event.--><mx:Application xmlns:mx="http://www.adobe.com/2006/mxml" xmlns:flexui="flexunit.flexui.*" initialize="initializeHandler(event)"> <mx:Script> <
testRunner.test = suite; testRunner.startTest(); } ]]> </mx:Script> <flexui:TestRunnerBase id="testRunner" width="100%" height="100%" /></mx:Application>
Notice that each test case is an instance of SimpleTest with one of the test method namespassed to the constructor. When you run the preceding test runner it should show all the testsas passing. If you make the following change to SimpleConverter you'll see that one of the testsfails.
package example { public class SimpleConverter { public function SimpleConverter() {} public function convertToRadians(degrees:Number):Number { return (degrees / 180) * Math.PI; } public function convertToDegrees(radians:Number):Number { return 0; } }}
Note that since convertToDegrees() always returns 0 the testConvertPIToDegrees test will fail.Since the specific test fails you immediately know where the error is occurring, and you can fixthe bug.
Another thing that can be useful when creating test cases is to add a static method to eachTestCase subclass that returns a TestSuite of all the tests for that class. This allows you tosimplify the test runner. The following is an example of such a method you could add toSimpleConverter .
public static function suite():TestSuite { var suite:TestSuite = new TestSuite(); suite.addTest(new SimpleTest("testConvert0ToDegrees")); suite.addTest(new SimpleTest("testConvertPIToDegrees")); suite.addTest(new SimpleTest("testConvert0ToRadians")); suite.addTest(new SimpleTest("testConvert180ToRadians")); return suite;}
The test runner initializeHandler() method would then simplify to the following:
private function initializeHandler(event:Event):void { testRunner.test = SimpleTest.suite(); testRunner.startTest();}

Creating Asynchronous Unit Tests
Many unit tests are synchronousmeaning that you can immediately determine if a test haspassed or failed. For example, the SimpleConverter test in the preceding section passed orfailed a test immediately. However, it's possible that some tests may depend on asynchronousoperations. For example, a class may need to make a request and wait for a response from aservice method before a test can be verified properly. In such cases it's important to be able torun tests asynchronously. For an example consider the following class which loads data from atext file when calling the getdata() method.
package example { import flash.events.EventDispatcher; import flash.net.URLLoader; import flash.events.Event; import flash.net.URLRequest;
public class AsynchronousExample extends EventDispatcher {
private var _loader:URLLoader;
public function get data():String { return _loader.data; }
public function AsynchronousExample() { _loader = new URLLoader(); _loader.addEventListener(Event.COMPLETE, onData); }
public function getData():void { _loader.load(new URLRequest("data.txt")); }
private function onData(event:Event):void { dispatchEvent(new Event(Event.COMPLETE)); }
}}
With a few simple changes it's possible to run FlexUnit tests asynchronously so you can testoperations like getdata() . Asynchronous operations should use events to notify listeners whenthe operation has completed. Typically when you register a listener for a particular event youuse the addEventListener() method, and you pass it a reference to the listener method. Whenwriting test cases for asynchronous operations you should register a listener method to handlethe event that signals a completed operation. However, rather than registering the listenerdirectly, you should use an inherited TestCase method called addAsync() . The addAsync()method allows you to specify a listener method along with a time out in milliseconds. Thisallows you to specify what method should handle the event, but if the event doesn't occur withinthe timeout window then the test will fail. The event listener method should run the assertion.The following example uses these techniques. You'll see that the class extends TestCase just likea basic unit test. Furthermore, this test case class also accepts a method name as a parameterfor the constructor, and it passes the parameter to the super constructor. What differs is thatthe test method registers a listener using addAsync() and defers the assertion to onData() . This

example times out after 2000 milliseconds. That means that if the data loads in 2000milliseconds or less then the assertion will run. However, if the data doesn't load in time thenthe test case assumes that it was due to a failure and the test fails.
package tests { import flexunit.framework.TestCase; import example.AsynchronousExample; import flash.events.Event; import flexunit.framework.TestSuite;
public class AsynchronousTest extends TestCase {
public function AsynchronousTest(method:String):void { super(method); }
public function testGetData():void { var asynchronous:AsynchronousExample = new AsynchronousExample(); asynchronous.addEventListener(Event.COMPLETE, addAsync(onData, 2000)); asynchronous.getData(); } private function onData(event:Event):void { assertNotNull(event.target.data); }
public static function suite():TestSuite { var suite:TestSuite = new TestSuite(); suite.addTest(new AsynchronousTest("testGetData")); return suite; }
}}
The following test runner will run both the simple tests and the asynchronous test.
[View full width]<?xml version="1.0" encoding="utf-8"?><mx:Application xmlns:mx="http://www.adobe.com/2006/mxml" xmlns:flexui="flexunit.flexui.*" initialize="initializeHandler(event)">
<mx:Script> <![CDATA[ import flexunit.framework.TestSuite; import tests.SimpleTest; import tests.AsynchronousTest;
private function initializeHandler(event:Event):void { var suite:TestSuite = new TestSuite(); suite.addTest(SimpleTest.suite()); suite.addTest(AsynchronousTest.suite()); testRunner.test = suite; testRunner.startTest(); } ]]>

</mx:Script> <flexui:TestRunnerBase id="testRunner" width="100%" height="100%"/></mx:Application>

Summary
Although many people think of building applications as exclusively writing the code, in thischapter we have seen that writing code is just one of the phases of building successfulapplications. We've seen that one of the biggest challenges is knowing what to write, and theanalysis and design phases of a project are the time to determine the answer to that question.The third phase, implementation, is the time to actually write the code. Followingimplementation is the testing phase which allows developers to use unit testing to ensure fewerregressions

Chapter 2. Programming to Interfaces
In This Chapter
Defining Interfaces 34
Using Polymorphism 38
Summary 42
Learning and mastering the fundamentals of object-oriented design and applicationdevelopment is no small feat, and you should undoubtedly congratulate yourself for all youraccomplishments so far. And as you know, with every step taken yet another step presentsitself. Our next step involves understanding interfaces in the context of good application designand pattern-based development. Although mastering basic object-oriented concepts enables anevolution in how you build applications, understanding interfaces can rapidly push your codingto take another evolutionary leap. After you've learned about using interfaces, the code youwrite may hardly resemble the code you used to write.
It may surprise you to learn that lurking within every class are at least two distinct layers whichwe call the interface and the implementation. Early on when you're learning how to writeclasses, it can be difficult to distinguish between the two layers. However, as you become moreadept at writing good classes, it becomes easy to differentiate between the interface and theimplementation.
Classes consist of methods and properties. As explained in the previous chapter, propertiesshould never be defined as public. Properties are used by a class to store its state, and goodencapsulation dictates that an instance of a class should always be responsible for managing itsown state. As such, the only public interface that most classes define is comprised of methods.Looking at a class from the outside, you could describe it by its public methods and theirsignatures. In fact, you could even say that two classes look identical from the outside if theyhave the same method names and method signatures. In contrast, those two classes with thesame method names and signatures could have vastly different implementations for thosemethods. This is the basic idea that enables something called polymorphism. Polymorphism isthe idea that if you program to an interface rather than an implementation, the resultant code ismuch more flexible because any instance of any class that uses that interface can stand in forany other object that uses the same interfaceeven if the implementations are totally different.
We'll talk much more about interfaces, implementation, polymorphism, and all sorts of relatedtopics throughout this chapter.
Defining Interfaces
As mentioned in the introduction to this chapter, classes have both an interface and animplementation. The interface is the way in which the outside world can communicate with anobject. The interface simply says what methods are publicly available, what parameters thosemethods accept, and what, if any, types are returned by methods. The interface does not sayanything at all about what a method does or how it does it. For example, theflash.net.LocalConnection and flash.net.NetConnection classes both define methods calledconnect() with identical signatures:
connect(value:String):void
However, notice that although that portion of the interface for both classes is identical, theactual implementations are quite different. LocalConnection objects listen for requests over aspecified channel while NetConnection objects either make a connection to an RTMP server (ifthe parameter uses the RTMP protocol) or simply stores the parameter value for subsequentrequests.
The class implementation is hidden from public view. When you call a method, you always call itby way of the interface, but the implementation is what runs. The implementation consists ofthe actual code that defines the internals of the method.
When you write code you can reference a class by typing variables and properties as the class.While that is not necessarily wrong, it does limit flexibility because it ties the code to a specificimplementationthe concrete class. However, you can create more flexible code if you referencethe interface instead. When you reference an interface rather than the implementation you don'tlock the code into just one implementation. We'll talk more about this later in the chapter. Fornow what's important is to know that referencing interfaces rather than implementation is oftena good strategy for creating flexible code, and we call this technique programming to interfaces.
When you program to an interface, you must write your classes so that they implement aformalized interface (more on what this means in a moment). This is essential for somethingcalled polymorphism, which we'll discuss shortly. To understand what a formal interface is, wecan first look at what it is not. Just a moment ago, we mentioned that the LocalConnection andNetConnection classes have a common interface with the connect() method. However, thatsimilarity is not part of a formalized interface. You can't declare a variable with an interfacetype that is generic enough to work for either LocalConnection or NetConnection. Rather, youmust declare a variable as exactly LocalConnection or exactly NetConnection. This is animportant distinction to make. Up to now we've said that all classes have both an interface andan implementation, and we've said that it's useful to be able to program to the interface ratherthan the implementation. However, unless we take steps to formalize an interface we cannotshare that interface between more than class, which means we cannot polymorphicallysubstitute one class for another in those cases. What we need to look at next is how to create aformal interface that is distinct from the implementation.
There are two ways to define formal interfaces: through inheritance and through explicitinterface constructs. When you define an interface by either of these techniques, you can thendefine classes that implement the interface. This is an important concept that enables many ofthe design patterns discussed throughout this book. When you define a class that implementsan interface, you can then declare variables of the interface type and assign to them instances

of the implementing type. We'll be looking at this in much greater detail later in this chapter.First we'll look at how to define interfaces.
Interfaces Defined by Interface Constructs
ActionScript defines a formal interface construct that you can use to define interfaces. Thesyntax for defining an interface is very similar to that for defining a class, but it is simplifiedbecause it does not require (nor allow) you to provide any implementation. An interfaceconstruct defines only the interface. An interface consists of methods, including getters andsetters. The basic syntax is as follows:
package package { public interface Interface {
function method(parameter:Type):ReturnType;
function get property():ReturnType;
function set property(value:Type):void; }}
The major differences between the syntax for a class and the syntax for an interface are that aninterface uses the interface keyword rather than the class keyword and a semicolon appearsafter the return type for each method, instead of a code block defining the function body.Additionally, interfaces can describe only the public methods for implementing classes. Thatmeans that there is no need for a public/private/protected/internal modifier, and interfaces donot allow those modifiers.
Note
By convention, interface names start with I. For example IExample indicates that thetype is an interface.
The following is an example of an interface called IExample:
package { public interface IExample { function sampleMethod(parameter1:String, parameter2:uint):void; }}
When you want to define a class that implements the interface, you use the implements keywordfollowing the name of the class. For example, the following defines class A as implementing aninterface called IExample:
public class A implements IExample {
If the class extends a superclass, then the implements keyword follows the name of the

superclass:
public class A extends SuperClass implements IExample {
When a class implements an interface, it essentially signs a contract that it will implement themethods defined in the interface. If the implementing class does not define the necessarymethods with exactly the same signatures as described in the interface, the compiler throws anerror. For example, the following class says it implements IExample, but it does not declare thenecessary method sampleMethod():
package { public class A implements IExample { public function A() {} }}
Because A does not correctly define the necessary method, the compiler will throw an error.Also, if A is defined as follows, the compiler will still throw an error because although A definessampleMethod(), it does not use the correct signature:
package { public class A implements IExample { public function A() {} public function sampleMethod(parameter1:String):void { trace("sampleMethod"); } }}
The compiler will approve the class only when the class correctly adheres to the contract anddefines all the necessary methods with the correct signatures, as it does in this example:
package { public class A implements IExample { public function A() {} public function sampleMethod(parameter1:String, parameter2:uint):void { trace("sampleMethod"); } }}
It's also important to note that, unlike inheritance, you can implement more than one interfaceper class. To implement more than one interface, simply use a comma-delimited list. Forexample, the following code defines A so that it implements IExample and ISample:
public class A implements IExample, ISample {
Note that a class signs a contract for each interface it implements. It must implement all themethods for all the interfaces it implements.

Interfaces Defined by Inheritance
As we've already discussed, the basic definition of an interface is the set of public methods(including getters and setter) for a class minus the actual implementation. All classes haveinterfaces (though by default the interfaces are tied together with the implementation), and ifyou define a subclass, it automatically inherits the interface of the superclass (as well as thesuperclass's implementation). This means that you can use inheritance to define interfaces.
Although all classes define interfaces (and can be used as interfaces), when we talk aboutexplicitly defining interfaces using classes, we generally use a specific type of class called anabstract class. An abstract class is one that is not intended for instantiation. For example, ifExample is an abstract class, you would never instantiate an Example object as follows:
var example:Example = new Example();
Rather, abstract classes are designed strictly to be subclassed and to define an interface that isshared among all the subclasses. Classes that subclass abstract classes and fill in theirimplementations are called concrete classes.
Abstract classes generally have little implementation. They defer the majority of implementationto subclasses. However, if you don't intend to add any implementation whatsoever, it isadvisable that you use an interface construct as discussed in the previous section, "InterfacesDefined by Interface Constructs." Abstract classes in ActionScript 3.0 are typically mostappropriate when you want to define a class that formalizes an interface for a set of subclasses,but also define a minimal amount of implementation.
Some programming languages define ways in which you declare abstract classes in an explicitfashion. When you define an abstract class with those languages, safeguards prevent you fromaccidentally instantiating an abstract class (generally, an exception is thrown). However,ActionScript 3.0 does not have a formal abstract class concept. Rather, the responsibility fallson the developer not to attempt to instantiate a class that is conceptually abstract.
There is nothing syntactically unique to abstract classes that sets them apart from standardclasses. That is good news in that you don't have to learn anything new in terms of syntax.
When you want to define a class that implements the interface, you simply subclass the abstractclass or a concrete class that extends the abstract class. Again, this technique of defininginterfaces doesn't require any new syntax. You can simply use standard inheritance.
Deciding How to Define an Interface
How do you decide whether to define an interface through inheritance or through an interfaceconstruct? Generally you should always start with an interface construct. By using an interfaceconstruct you create the greatest degree of flexibility. If you then decide that you need anabstract class (because you want concrete classes to be able to inherit basic implementation)you should create an abstract class that implements the interface. This way you can alwaysprogram to the interface construct, and if you later need to add more classes that implementthe interface but don't inherit from the abstract class you can do that.

Using Polymorphism
Polymorphism is a complex-sounding word. However, the concept it represents is not verycomplex now that you understand what an interface is. The basic idea of polymorphism is thatany class that implements an interface looks a lot like any other class that implements thatsame interface; any object that implements an interface can stand in when that interface isexpected.
If you haven't used interfaces up to now, chances are you haven't leveraged the power ofpolymorphism yet. However, once you understand polymorphism, you'll quickly see how flexibleit makes your code. Here's an example. First the interface is defined as follows:
package { public interface ISearchable { function search(searchTerm:String):Array; }}
Next we can define a class called Library which implements ISearchable:
package { public class Library implements ISearchable { private var _books:Array; public function Library(books:Array) { _books = books; } public function search(searchTerm:String):Array { var results:Array = new Array(); for(var i:int = 0; i < _books.length; i++) { if(_books[i].title.indexOf(searchTerm) != - 1) { // Assume that each item in the array // is a custom Book type that has a // clone() method. results.push(_books[i].clone()); } } return results; } }}
We can also define a Help class that implements the ISearchable interface as well.
package { public class Help implements ISearchable { private var _helpIndex:Object; public function Help() { // Assume the _helpIndex is populated by data loaded // from an XML file, and that each item in

// _helpIndex is an array where the key is // a search term. } public function search(searchTerm:String):Array { if(_helpIndex[searchTerm] != null) { return _helpIndex[searchTerm]; } else { return new Array(); } }
}}
Now, even though Library and Help are different classes with different implementations, eithercan be used any time ISearchable is expected. For example, the following assigns a new Libraryinstance to searchCollection.
var searchCollection:ISearchable = new Library(books);
However, note that you can also substitute a Help instance. And furthermore, you can makethat substitution at runtime.
searchCollection = new Help();
We'll next take a look at this concept in more detail.
Differentiating Between Type and Class
When you've declared a variable in the past, you most likely declared the variable so that thetype was identical to the class for which you planned to instantiate an object to assign to thevariable. For example, if you wanted to declare a variable to which you could assign an instanceof class Vegetable, you probably declared the variable in the following fashion:
var item:Vegetable;
Although there's nothing inherently wrong with the preceding code, there is an inherentinflexibility in that way of declaring a variable. Because you've declared item as type Vegetable,you can assign to it only those objects that are instances of class Vegetable or its subclasses.Even if class Fruit has the exact same interface as class Vegtable, you cannot assign aninstance of class Fruit to item when you declare item as in the preceding example.
To write more flexible code, you have to differentiate between class and type. In the precedingexample, Vegetable is both a class and the type. However, there's a correspondence between atype and an interface and between a (concrete) class and an implementation. Although aconcrete class defines both an interface and implementation, an interface defines just theinterface. Likewise, a class is also a type, but a type does not have to be a class. Types can alsobe interfaces. By declaring variables with interface types, you create greater flexibility in yourcode. Consider the following example:

var item:IProduce;
Now that item is declared as type IProduce, we can assign to item any instance of any class thatimplements IProduce. We're no longer locked into one specific class. If both Fruit andVegetable implement IProduce then you can assign an instance of either class to item now thatit's typed as IProduce.
Making Runtime Decisions
When you declare a variable with a type of a concrete class, you generally are making acompile-time decision as to which implementation to use. That is okay when you knowabsolutely that you want to use only that one implementation. However, consider an example inwhich an application uses a fallback plan for network communications. According to thebusiness rules for the application, it must first attempt to communicate using FlashRemoting/AMF. If that does not work, the application next must attempt the communicationusing an HTTP request that sends and retrieves XML data. And if that does not work, theapplication next must attempt to make a binary socket connection to a server. In this case, youcannot know at compile time which protocol the application will use for networkcommunications. If everything works correctly, the application will use Flash Remoting/AMF, butif that doesn't work, the application will have to fall back on one of the alternatives. Thissituation presents a dilemma if you're not programming to interfaces, but it accepts a fairlytrivial solution if you are.
In order to solve the dilemma presented by this hypothetical network protocol selection issueyou can write three classes (one for each protocol) that implement the same interface that we'llcall INetworkProtocol. You can then program to that interface rather than to any one of thespecific classes. Doing so allows you to plug in an instance of any of the implementing classes.Even though the implementations are all different, they use the same interface and thereforeappear the same from the outside. That allows you to change which protocol you use atruntime.
In order to better understand this concept let's look at some sample code. We'll solve thenetwork protocol issue by creating an interface. Note that this example shows an interface thatextends an existing interface (IEventDispatcher). That means that the implementing classesmust implement both the INetworkProtocol and the IEventDispatcher methods.
package { import flash.events.IEventDispatcher; import flash.net.URLRequest; public interface INetworkProtocol extends IEventDispatcher { function setService(service:String):void; function sendRequest(request:URLRequest):void; function testConnection():void; }}
For this example we'll also assume that the following class defines constants we'll use for eventnames.
package { import flash.events.Event; public class NetworkEvent extends Event { public static const CONNECT:String = "connect";
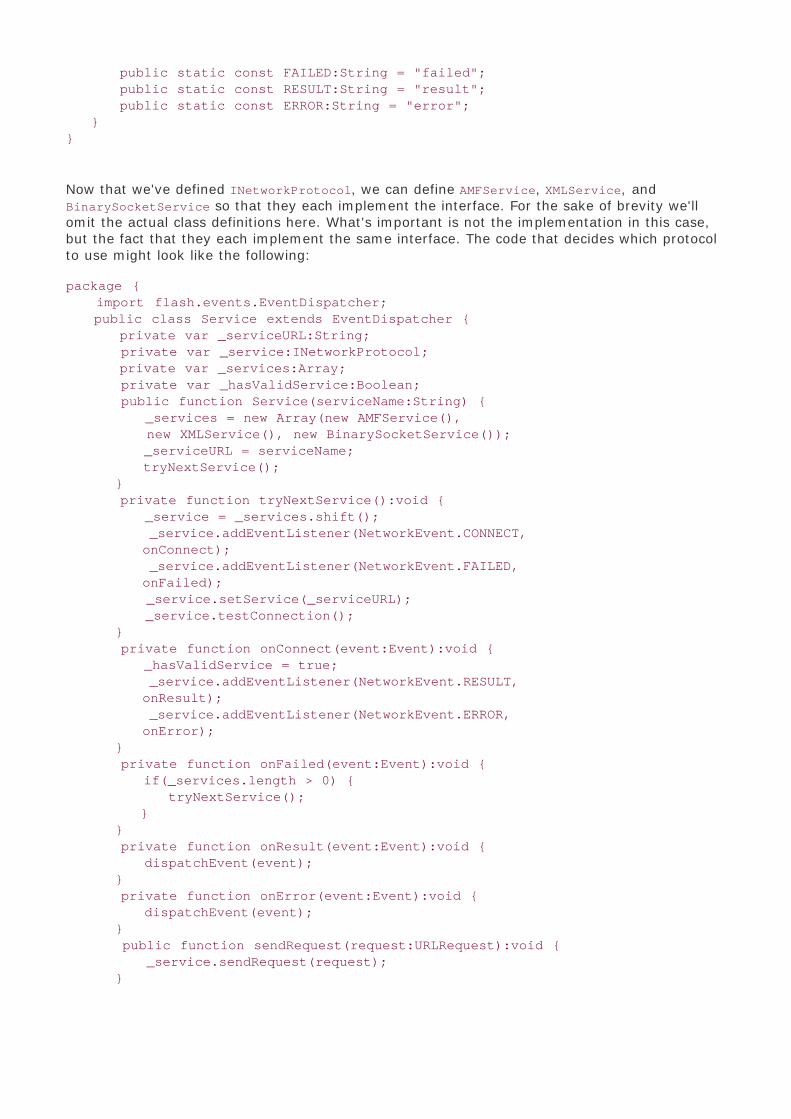
public static const FAILED:String = "failed"; public static const RESULT:String = "result"; public static const ERROR:String = "error"; }}
Now that we've defined INetworkProtocol, we can define AMFService, XMLService, andBinarySocketService so that they each implement the interface. For the sake of brevity we'llomit the actual class definitions here. What's important is not the implementation in this case,but the fact that they each implement the same interface. The code that decides which protocolto use might look like the following:
package { import flash.events.EventDispatcher; public class Service extends EventDispatcher { private var _serviceURL:String; private var _service:INetworkProtocol; private var _services:Array; private var _hasValidService:Boolean; public function Service(serviceName:String) { _services = new Array(new AMFService(), new XMLService(), new BinarySocketService()); _serviceURL = serviceName; tryNextService(); } private function tryNextService():void { _service = _services.shift(); _service.addEventListener(NetworkEvent.CONNECT, onConnect); _service.addEventListener(NetworkEvent.FAILED, onFailed); _service.setService(_serviceURL); _service.testConnection(); } private function onConnect(event:Event):void { _hasValidService = true; _service.addEventListener(NetworkEvent.RESULT, onResult); _service.addEventListener(NetworkEvent.ERROR, onError); } private function onFailed(event:Event):void { if(_services.length > 0) { tryNextService(); } } private function onResult(event:Event):void { dispatchEvent(event); } private function onError(event:Event):void { dispatchEvent(event); } public function sendRequest(request:URLRequest):void { _service.sendRequest(request); }

}}
This example is not intended to show a fully-functional, bullet-proof network communicationmechanism. What it is intended to demonstrate is how programming to interfaces enablespolymorphism. In this case _service is typed as INetworkProtocol. Since AMFService,XMLService, and BinarySocketService all implement INetworkProtocol, it's possible to assigninstance of any of those classes to _service.

Summary
Interfaces are the backbone of good application design. Interfaces emphasize type rather thanimplementation. By programming to interfaces rather than to concrete implementations, youincrease the flexibility in your applications. This flexibility comes about because of the reductionof dependency on implementation. When you program to interfaces, you can change theimplementation of a class as long as you don't change the interface. That means that you canmake significant changes without breaking your application, and even if you introduce an error,the error is generally isolated instead of cascading to other structures in the program. Thisemphasis on programming to interfaces is seen throughout the rest of the book.

Part II: Patterns
Chapter 3 Model View Controller Pattern
Chapter 4 Singleton Pattern
Chapter 5 Factory and Template Method Patterns
Chapter 6 Proxy Pattern
Chapter 7 Iterator Pattern
Chapter 8 Composite Pattern
Chapter 9 Decorator Pattern
Chapter 10 Command Pattern
Chapter 11 Memento Pattern
Chapter 12 State Pattern

Chapter 3. Model View Controller Pattern
In This Chapter
Understanding MVC Elements 46
Building a Simple Example 48
Enabling Multiple Views for one Model 56
Modifying Model Implementation 57
Adding A Controller 59
Summary 63
There was a time when computer programs had very limited user and client interfaces. In 1975,a computer program might interact with a user through a command line. Programs built todayoften have rich graphical user interfaces that make use of windows, mouse, and keyboardinteraction, and that permit the moving and changing of elements. The increased richness of theuser interface presents new challenges, and the Model View Controller (or MVC) patternaddresses those challenges to help create more flexible applications.
Applications consist of user interfaces, business logic, and data models. For example, standardUI components such as lists and combo boxes have user interface elements (clickable regions,scrollable regions, and so on), logic that knows how to respond to user input, and data models(the data that populates the component). Although these are three distinct elements, manydevelopers write code that combines all the elements into one object rather than several objectsworking in combination. When the interface and the data are collapsed into just one object inrich user interfaces, it can lead to some of the following dilemmas:
It is difficult to use the data outside that object. For example, if an object defines a userinput form and also saves the user input within the object, then it is difficult to send thedata to a server. The options in that case are to place the responsibility of client-servercommunication in the same class or to define an interface in the object that allows accessto the data and provides the only means by which to access the data. Either option createsfragile and rigid structures.
You cannot easily change the user interface while keeping the same data. If the userinterface and the data are locked in the same object, to use a new user interface you'dhave to create not only the new user interface, but also transfer all the data from the olduser interface to the new one. Changing the user interface is not an uncommonrequirement. Consider an application in which you want to chart a data set using differenttypes of graphs. The data remains the same in each case, but the graph style changes(line, bar, and so on). If each graph is locked up with the data set, it's difficult to changegraph styles.
Multiple simultaneous views of the same data are difficult. For example, you might want todisplay two or more graph styles of the same data set at the same time. If the data islocked into the user interface, you have to replicate the data for each chart.
Synchronized views are difficult. This is an extension of the previous issue. For example, ifyou not only want to display two or more different graph styles for the same data set atthe same time, but you also want to update those graphs over time as the data changes,then you have to update each data set stored in each user interface.
All the preceding issues are problematic because the data and the user interface are locked intoone object. The MVC pattern presents a manner in which you can create two or more objectsthat work together. This approach enables you to create more flexible applications with morereusable parts.
Note
Some people argue that MVC is not a design pattern, but rather an architecturalpattern. Although there may be merit to that argument, we still feel that MVC is animportant pattern (design or architectural) and we feel that it is extremely useful toActionScript developers. For that reason, we present the pattern here in this book.

Understanding MVC Elements
The MVC pattern is composed of three subsystems as indicated by the name: the model, theview, and the controller. In the next few sections, we'll look at each of these elements. Thenwe'll look at how they work together. When referring to the use of a model, a view, and acontroller together, we call this grouping the MVC triad.
The Model
The model is the element that stores the data that is used in the MVC triad. The model can beas simple as storing one primitive value such as a string, yet it can also store extremelycomplex structures of data. The defining aspects of the model are that it acts as a storehousefor data and that it exists independently of the view and the controller. The model should neverhave a reference to the view or the controller. This is absolutely essential to the functioning ofthe MVC pattern because the model's independence is what creates the flexibility in the MVCpattern. If a model has a reference to a view or controller then it is tightly coupled, and it isspecific to a particular type of controller and/or view. However, if the model communicateswithout having to have references to specific types of controllers or views then it can be usedwith many different types of controllers and views. We'll see how a model can interact withinthe MVC triad in "The Relationships Between Subsystems" section, later in this chapter.
The View
The view is the visual display portion of the user interface subsystem. The view uses the datafrom the model to draw itself. A view can consist of an animation, a user input form, a chart,buttons, an audio player, or any sort of user interface elements you might need in yourapplication.
The key to understanding the view is to understand that it consists only of the visual elementsand the logic necessary to read the model data and use it as required by the user interface.
The Controller
The controller is the subsystem that is responsible for taking input (user input, for example) andupdating the model and view as necessary. For example, if the model needs to update data, thecontroller is responsible for that action.
The Relationships between Elements
Each of the elements has a specific type of relationship with the other elements. The modelelement must always remain independent of the view and the controller. This means that themodel cannot know about any other element. This does not mean that the model does notcommunicate with the other elements. A model can broadcast messages when the datachanges. However, what's important is that the model merely broadcasts the message without

having to know who is listening. This use of events allows the model to be decoupled from theother subsystems, allowing for greater flexibility.
The view always knows about the model. The view interacts with the model in two ways: Itlistens for update messages, and it reads from the model. The view never writes to the model.Every view keeps a reference to its model. Because a view knows about its model but a modeldoesn't know about a view, a single model can act as the model for many views.
The controller also knows about the model. The controller is responsible for updating the modelwhen necessary based on user input or system events.
The relationship between the controller and the view is very tightly coupled. Although it ispossible to have a controller that uses several views, it is far more common that the relationshipbetween view and controller is one-to-one. The view contains all the user interface elementsthrough which the user interacts. Yet the controller is the element that responds to user input.In many, if not most, ActionScript applications, the view and the controller are one class. Thisvariation of the MVC pattern is often called a Document View implementation of MVC.
The most important key to the MVC pattern is that the model must be an independent objectthat does not have a reference to the view or controller. The view updates and redraws itselfbased on changes to the model.

Building a Simple Example
In this example, we'll build a clock model with two viewsanalog and digital. We'll start bybuilding the clock model, which we'll call ClockData. Then we'll build the AnalogClock view. Afterthe analog clock view works in conjunction with the data model, we can build a second view tosee how simple it is to use the same model for two or more views. And, to prove how simple itis to change the model without affecting the views (so long as the model interface remains thesame), we will update ClockData to handle additional responsibilities.
Clock Data Model
The ClockData class stores essentially one piece of datathe time. To store the time, we'llconstruct a simple building-block class called Time which has the accessor getter and settermethods for hour, minute, and second properties. We can define the Time class as follows:
package com.peachpit.aas3wdp.mvcexample.data {
public class Time {
private var _hour:uint; private var _minute:uint; private var _second:uint;
public function get hour():uint { return _hour; }
public function set hour(value:uint):void { _hour = value; }
public function get minute():uint { return _minute; }
public function set minute(value:uint):void { _minute = value; }
public function get second():uint { return _second; }
public function set second(value:uint):void { _second = value; }
public function Time(hour:uint, minute:uint, second:uint) { _hour = hour;

_minute = minute; _second = second; }
public function clone():Time { return new Time(_hour, _minute, _second); }
}}
Note that the Time class also defines a clone() method that returns a new Time object with thesame time value as the original. The clone() method is important so that we can assign clonesof Time objects rather than references to the original.
Next we want to define the ClockData class. We'll modify the ClockData class later so that it ismore robust and takes on more responsibilities. However, to start, the ClockData class willsimply act as a wrapper for a Time object. The following is the definition for ClockData:
package com.peachpit.aas3wdp.mvcexample.data {
import flash.events.Event; import flash.events.EventDispatcher; import com.peachpit.aas3wdp.mvcexample.data.Time;
public class ClockData extends EventDispatcher {
private var _time:Time;
public function get time():Time { if(_time == null) { var date:Date = new Date(); return new Time(date.hours, date.minutes, date.seconds); } else { return _time.clone(); } }
public function set time(value:Time):void { _time = value.clone(); dispatchEvent(new Event(Event.CHANGE)); }
public function ClockData() { }
}}
As you can see in this ClockData class, there is one getter/setter accessor method pair calledtime. The time setter simply allows you to assign a clone of a Time object to the _time property.The getter method returns a clone of the Time object if it's defined. If not, it returns a new Time
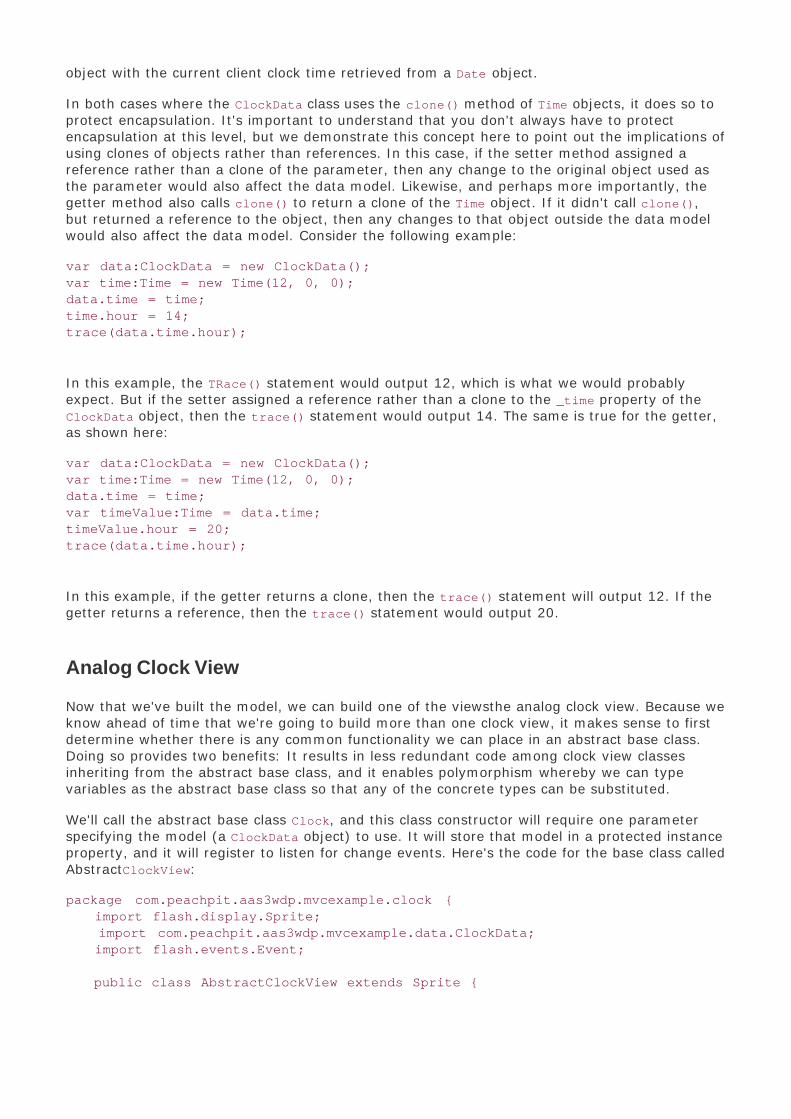
object with the current client clock time retrieved from a Date object.
In both cases where the ClockData class uses the clone() method of Time objects, it does so toprotect encapsulation. It's important to understand that you don't always have to protectencapsulation at this level, but we demonstrate this concept here to point out the implications ofusing clones of objects rather than references. In this case, if the setter method assigned areference rather than a clone of the parameter, then any change to the original object used asthe parameter would also affect the data model. Likewise, and perhaps more importantly, thegetter method also calls clone() to return a clone of the Time object. If it didn't call clone(),but returned a reference to the object, then any changes to that object outside the data modelwould also affect the data model. Consider the following example:
var data:ClockData = new ClockData();var time:Time = new Time(12, 0, 0);data.time = time;time.hour = 14;trace(data.time.hour);
In this example, the TRace() statement would output 12, which is what we would probablyexpect. But if the setter assigned a reference rather than a clone to the _time property of theClockData object, then the trace() statement would output 14. The same is true for the getter,as shown here:
var data:ClockData = new ClockData();var time:Time = new Time(12, 0, 0);data.time = time;var timeValue:Time = data.time;timeValue.hour = 20;trace(data.time.hour);
In this example, if the getter returns a clone, then the trace() statement will output 12. If thegetter returns a reference, then the trace() statement would output 20.
Analog Clock View
Now that we've built the model, we can build one of the viewsthe analog clock view. Because weknow ahead of time that we're going to build more than one clock view, it makes sense to firstdetermine whether there is any common functionality we can place in an abstract base class.Doing so provides two benefits: It results in less redundant code among clock view classesinheriting from the abstract base class, and it enables polymorphism whereby we can typevariables as the abstract base class so that any of the concrete types can be substituted.
We'll call the abstract base class Clock, and this class constructor will require one parameterspecifying the model (a ClockData object) to use. It will store that model in a protected instanceproperty, and it will register to listen for change events. Here's the code for the base class calledAbstractClockView:
package com.peachpit.aas3wdp.mvcexample.clock { import flash.display.Sprite; import com.peachpit.aas3wdp.mvcexample.data.ClockData; import flash.events.Event;
public class AbstractClockView extends Sprite {

protected var _data:ClockData; public function Clock(data:ClockData) { _data = data; _data.addEventListener(Event.CHANGE, draw); } protected function draw(event:Event):void {
}
}}
Notice that _data is declared as protected so that it is accessible to all subclasses. Also note thatbecause the constructor adds a listener to the ClockData object, the class must declare thelistener method, draw(). The draw() method is declared as protected as well because subclassesmust be able to override the method to define the specific implementation.
Next we can define AnalogClock, a concrete subclass of AbstractClockView. The analog clockview consists of a clock face as well as the hour hand, minute hand, and second hand. TheAnalogClock class is defined as follows:
package com.peachpit.aas3wdp.mvcexample.clock { import com.peachpit.aas3wdp.mvcexample.data.ClockData; import com.peachpit.aas3wdp.mvcexample.data.Time; import flash.display.Sprite; import flash.events.Event;
public class AnalogClock extends AbstractClockView {
private var _face:Sprite; private var _hourHand:Sprite; private var _minuteHand:Sprite; private var _secondHand:Sprite;
public function AnalogClock(data:ClockData) {
// Call the super constructor, passing it the // model parameter. super(data);
// Create the clock face, and draw a circle. _face = new Sprite(); _face.graphics.lineStyle(0, 0x000000, 1); _face.graphics.drawCircle(0, 0, 100); addChild(_face);
// Create the hands. _hourHand = new Sprite(); _hourHand.graphics.lineStyle(5, 0x000000, 1); _hourHand.graphics.lineTo(0, -50); addChild(_hourHand); _minuteHand = new Sprite(); _minuteHand.graphics.lineStyle(2, 0x000000, 1);

_minuteHand.graphics.lineTo(0, -80); addChild(_minuteHand); _secondHand = new Sprite(); _secondHand.graphics.lineStyle(0, 0x000000, 1); _secondHand.graphics.lineTo(0, -80); addChild(_secondHand);
// Call the draw() method to draw the initial view. draw(); }
// Override the draw() method. This method gets called once // when the object is constructed, and then it gets called // every time the model dispatches a change event. override protected function draw(event:Event = null):void { var time:Time = _data.time;
// Set the rotation of the hands based on the time // values. _hourHand.rotation = 30 * time.hour + 30 * time.minute / 60; _minuteHand.rotation = 6 * time.minute + 6 * time.second / 60; _secondHand.rotation = 6 * time.second; }
}}
Testing the Analog Clock
The remaining step in the first part of this exercise is to see whether the analog clock reallyworks. For this purpose, we'll create a simple main class that creates an instance of the modeland an instance of the view that uses the model:
package {
import flash.display.Sprite; import flash.display.StageAlign; import flash.display.StageScaleMode; import com.peachpit.aas3wdp.mvcexample.data.ClockData; import com.peachpit.aas3wdp.mvcexample.clock.AbstractClockView; import com.peachpit.aas3wdp.mvcexample.clock.AnalogClock;
public class ClockTest extends Sprite {
private var _clockData:ClockData;
public function ClockTest() {
stage.align = StageAlign.TOP_LEFT; stage.scaleMode = StageScaleMode.NO_SCALE;

_clockData = new ClockData(); var clock:AbstractClockView = new AnalogClock(_clockData); clock.x = 100; clock.y = 100; addChild(clock); }
}}
When you test this application, you'll see an analog clock appear displaying the current time.
Now let's modify the main class slightly so that it uses a timer to update the time property ofthe model after 2 seconds. Updating the model value will cause it to dispatch a change eventwhich will, in turn, cause the view to redraw. The following code initially displays the clock withthe current time, and then 2 seconds later it will display 5 o'clock:
package {
import flash.display.Sprite; import flash.display.StageAlign; import flash.display.StageScaleMode; import com.peachpit.aas3wdp.mvcexample.data.ClockData; import com.peachpit.aas3wdp.mvcexample.clock.AbstractClockView; import com.peachpit.aas3wdp.mvcexample.clock.AnalogClock; import com.peachpit.aas3wdp.mvcexample.data.Time; import flash.utils.Timer; import flash.events.TimerEvent;
public class ClockTest extends Sprite {
private var _clockData:ClockData;
public function ClockTest() {
stage.align = StageAlign.TOP_LEFT; stage.scaleMode = StageScaleMode.NO_SCALE;
_clockData = new ClockData(); var clock:AbstractClockView = new AnalogClock(_clockData); clock.x = 100; clock.y = 100; addChild(clock); var timer:Timer = new Timer(2000, 1); timer.addEventListener(TimerEvent.TIMER, onTimer); timer.start(); }
private function onTimer(event:TimerEvent):void { _clockData.time = new Time(5, 0, 0); }

} }
Digital Clock View
Now that the analog clock view works, the next step is to build a digital clock view. TheDigitalClock class, like the AnalogClock class, is a subclass of AbstractClockView. Define theclass as follows:
package com.peachpit.aas3wdp.mvcexample.clock {
import com.peachpit.aas3wdp.mvcexample.data.ClockData; import com.peachpit.aas3wdp.mvcexample.data.Time; import flash.display.Sprite; import flash.events.Event; import flash.text.TextField; import flash.text.TextFieldAutoSize; public class DigitalClock extends AbstractClockView { private var _frame:Sprite; private var _display:TextField; public function DigitalClock(data:ClockData) {
// Call the super constructor, passing it the // data parameter. super(data);
// Draw a 200 by 50 pixel rectangular frame. _frame = new Sprite(); _frame.graphics.lineStyle(0, 0x000000, 1); _frame.graphics.drawRect(0, 0, 200, 50); addChild(_frame);
// Add a text field. _display = new TextField(); _display.width = 200; _display.height = 50; _display.autoSize = TextFieldAutoSize.RIGHT; _display.x = 195; _display.y = 5; addChild(_display);
// Call draw() when the object is constructed. draw(); } // Override the draw() method. override protected function draw(event:Event = null):void { var time:Time = _data.time;
// Display the hour, minute, and second in the // text field. Use the zeroFill() method to ensure

// that the minute and second values are always // two digits (e.g. 1 displays as 01.) _display.htmlText = "<font face='_typewriter' size='40'>" + time.hour + ":" + zeroFill(time.minute) + ":" + zeroFill(time.second) + "</font>"; } private function zeroFill(value:Number):String { if(value > 9) { return value.toString(); } else { return "0" + value; } } }}
You'll probably notice that DigitalClock is very similar to AnalogClock. The only difference isthat it displays the value using a text field rather than a group of hands. Because DigitalClockextends AbstractClockView, it too automatically receives event notifications when the modelchanges.
Testing the Digital Clock
Because polymorphism is enabled for AnalogClock and DigitalClock on account of theircommon, inherited interface, you can substitute a DigitalClock for an AnalogClock very easily.To test the digital clock view, modify the main class by importing the DigitalClock class andusing a DigitalClock constructor rather than an AnalogClock constructor, as shown here:
package {
import flash.display.Sprite; import flash.display.StageAlign; import flash.display.StageScaleMode; import com.peachpit.aas3wdp.mvcexample.data.ClockData; import com.peachpit.aas3wdp.mvcexample.clock.AbstractClockView; import com.peachpit.aas3wdp.mvcexample.clock.AnalogClock; import com.peachpit.aas3wdp.mvcexample.clock.DigitalClock; import com.peachpit.aas3wdp.mvcexample.data.Time; import flash.utils.Timer; import flash.events.TimerEvent;
public class ClockTest extends Sprite {
private var _clockData:ClockData;
public function ClockTest() { stage.align = StageAlign.TOP_LEFT; stage.scaleMode = StageScaleMode.NO_SCALE;

_clockData = new ClockData(); var clock:AbstractClockView = new DigitalClock(_clockData); clock.x = 100; clock.y = 100; addChild(clock); var timer:Timer = new Timer(2000, 1); timer.addEventListener(TimerEvent.TIMER, onTimer); timer.start(); } private function onTimer(event:TimerEvent):void { _clockData.time = new Time(5, 0, 0); } }}
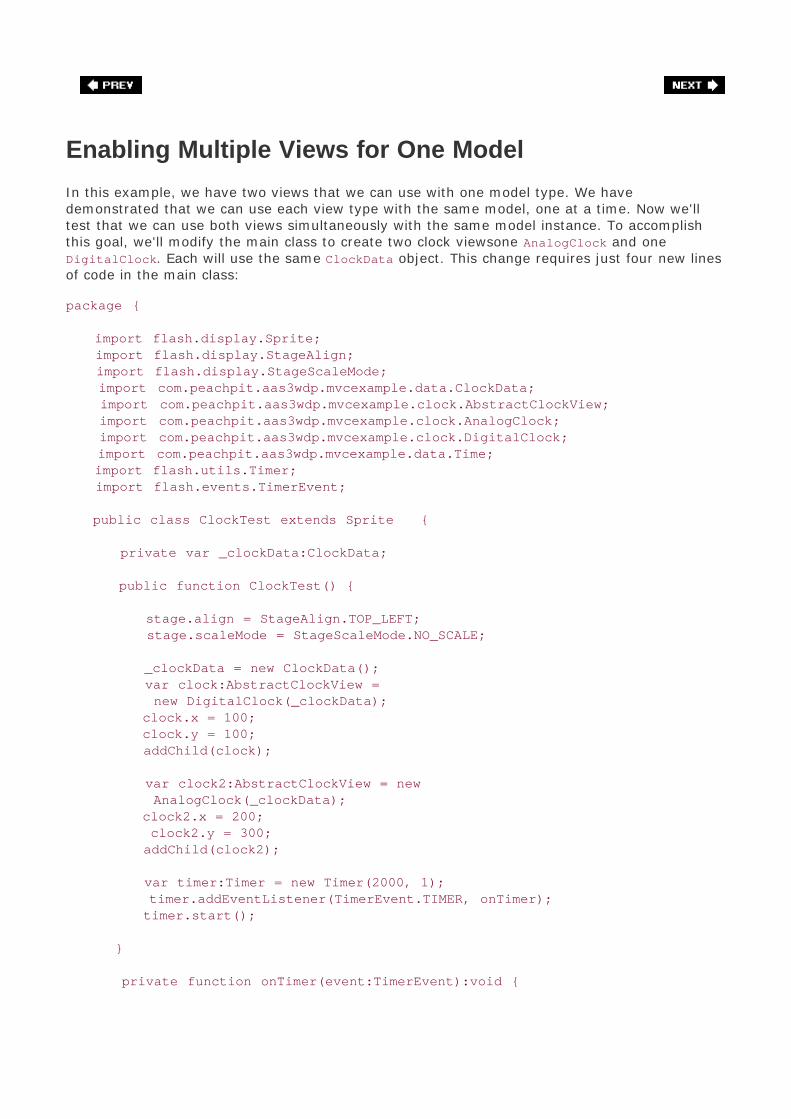
Enabling Multiple Views for One Model
In this example, we have two views that we can use with one model type. We havedemonstrated that we can use each view type with the same model, one at a time. Now we'lltest that we can use both views simultaneously with the same model instance. To accomplishthis goal, we'll modify the main class to create two clock viewsone AnalogClock and oneDigitalClock. Each will use the same ClockData object. This change requires just four new linesof code in the main class:
package {
import flash.display.Sprite; import flash.display.StageAlign; import flash.display.StageScaleMode; import com.peachpit.aas3wdp.mvcexample.data.ClockData; import com.peachpit.aas3wdp.mvcexample.clock.AbstractClockView; import com.peachpit.aas3wdp.mvcexample.clock.AnalogClock; import com.peachpit.aas3wdp.mvcexample.clock.DigitalClock; import com.peachpit.aas3wdp.mvcexample.data.Time; import flash.utils.Timer; import flash.events.TimerEvent;
public class ClockTest extends Sprite {
private var _clockData:ClockData;
public function ClockTest() { stage.align = StageAlign.TOP_LEFT; stage.scaleMode = StageScaleMode.NO_SCALE; _clockData = new ClockData(); var clock:AbstractClockView = new DigitalClock(_clockData); clock.x = 100; clock.y = 100; addChild(clock); var clock2:AbstractClockView = new AnalogClock(_clockData); clock2.x = 200; clock2.y = 300; addChild(clock2); var timer:Timer = new Timer(2000, 1); timer.addEventListener(TimerEvent.TIMER, onTimer); timer.start(); } private function onTimer(event:TimerEvent):void {

_clockData.time = new Time(5, 0, 0); } }}
Because both clock views use the same data model, they update at the same time.

Modifying Model Implementation
Because the view and the model use good encapsulation, we can modify the modelimplementation without breaking anything. To prove this, we'll make the following change tothe ClockData class: enable a real-time feature whereby the model dispatches a change eventevery second.
The new ClockData class looks like this:
package com.peachpit.aas3wdp.mvcexample.data { import flash.events.EventDispatcher; import com.peachpit.aas3wdp.mvcexample.data.Time; import flash.utils.Timer; import flash.events.TimerEvent; import flash.events.Event; import flash.utils.getTimer;
public class ClockData extends EventDispatcher { private var _time:Time; private var _timer:Timer; private var _realTime:Boolean; private var _startTime:uint; public function get time():Time { // Test if the _realTime property is true as well as // if the _time property is null. if(_realTime || _time == null) { var date:Date; // Only use a new Date object representing // the current time and date if the _time // property is null. Otherwise create a Date // object using the _time values and then // add to that the number of milliseconds // since the model was created. if(_time == null) { date = new Date(); } else { date = new Date(null, null, null, _time.hour, _time.minute, _time.second); date.milliseconds = getTimer() _startTime; }
return new Time(date.hours, date.minutes, date.seconds); } else {

return _time.clone(); } } public function set time(value:Time):void { _time = value.clone(); dispatchEvent(new Event(Event.CHANGE)); }
// Setting realTime starts and stops a timer that runs at 1 // second intervals indefinitely. public function set realTime(value:Boolean):void { _realTime = value; if(value) { if(_timer == null) { _timer = new Timer(1000, 0); _timer.addEventListener(TimerEvent.TIMER, onTimer); } if(!_timer.running) { _timer.start(); } } else { if(_timer.running) { _timer.stop(); } } }
public function ClockData() { _startTime = getTimer(); } private function onTimer(event:TimerEvent):void { dispatchEvent(new Event(Event.CHANGE)); } }}
With these changes, you can now run the main class and you'll see exactly the same behavioras before. When you've verified that the application works as it did before, even with thechanges to the model's implementation, you can now use the new functionality with a fewchanges to the main class. In this example, we'll delete the timer code from the main class(ClockTest), and we'll set the realTime property of the ClockData object so that the clocksdisplay the current time as it updates in real time.
package {
import flash.display.Sprite; import flash.display.StageAlign; import flash.display.StageScaleMode; import com.peachpit.aas3wdp.mvcexample.data.ClockData; import com.peachpit.aas3wdp.mvcexample.clock.AbstractClockView; import com.peachpit.aas3wdp.mvcexample.clock.AnalogClock;

import com.peachpit.aas3wdp.mvcexample.clock.DigitalClock; import com.peachpit.aas3wdp.mvcexample.data.Time;
public class ClockTest extends Sprite {
private var _clockData:ClockData;
public function ClockTest() { stage.align = StageAlign.TOP_LEFT; stage.scaleMode = StageScaleMode.NO_SCALE; _clockData = new ClockData(); _clockData.realTime = true; var clock:AbstractClockView = new DigitalClock(_clockData); clock.x = 100; clock.y = 100; addChild(clock); var clock2:AbstractClockView = new AnalogClock(_clockData); clock2.x = 200; clock2.y = 300; addChild(clock2); } }}

Adding A Controller
Up to this point we've only really seen models and views, but no controllers. Next we'll look athow to add a controller. A controller should be the way in which the system or user can changethe view or model.
In our clock example we now have two views and one model. If we want to be able to controlthe views (toggle between views, for instance) or the model (setting the value) then we need toadd a controller. In our example we'll create a controller called Clock. The Clock controllerallows us to specify a model and one or more views. It then adds user interface controls thatallow the user to set the model value and toggle between the views. The Clock class is writtenas follows:
package com.peachpit.aas3wdp.mvcexample.controllers {
import flash.display.Sprite; import flash.text.TextField; import flash.text.TextFieldType; import flash.events.MouseEvent; import flash.events.Event; import com.peachpit.aas3wdp.mvcexample.data.Time; import com.peachpit.aas3wdp.mvcexample.data.ClockData; import com.peachpit.aas3wdp.mvcexample.clock.AbstractClockView;
// Note that you'll need to include the AAS3WDP library to your // project's source path for this class. import com.peachpit.aas3wdp.controls.BasicButton;
public class Clock extends Sprite { private var _hours:TextField; private var _minutes:TextField; private var _seconds:TextField; private var _clockData:ClockData; private var _viewIndex:int; private var _views:Array; private var _toggleView:BasicButton;
// The controller has one model. It listens for updates to // the model. public function set data(value:ClockData):void { _clockData = value; _clockData.addEventListener(Event.CHANGE, onModelUpdate); onModelUpdate(); }
public function Clock() {
// The controller can store references to one or // more views. _views = new Array();

// Create three input text fields. _hours = createField(); _minutes = createField(); _seconds = createField(); _minutes.x = 45; _seconds.x = 90;
// Create a button that will allow the user to // toggle between views. _toggleView = new BasicButton("Toggle View"); _toggleView.addEventListener(MouseEvent.CLICK, toggleView); addChild(_toggleView); _toggleView.x = 135; } // Add AbstractClockView instances to the _views array. public function addView(view:AbstractClockView):void { _views.push(view);
// If this is the first view added then add it to // the display list by default. if(_views.length == 1) { addChild(view); _viewIndex = 0; } // Make sure the view appears just below the input // text fields. view.y = 40view.getBounds(view).top; view.x = -view.getBounds(view).left; }
private function createField():TextField { var field:TextField = new TextField(); field.width = 40; field.height = 22; field.border = true; field.background = true; field.restrict = "0-9"; field.type = TextFieldType.INPUT;
// Listen for focusOut events on each text field. field.addEventListener(FocusEvent.FOCUS_OUT, onFocusChange); addChild(field); return field; }
// When the focus changes for a text field update the model // to correspond to the user input. private function onFocusChange(event:FocusEvent):void { if(event.target.length < 1) { event.target.text = 0; }

var time:Time = new Time(uint(_hours.text), uint(_minutes.text), uint(_seconds.text)); _clockData.time = time; }
// Remove the current view, and add the next view in the // array. private function toggleView(event:MouseEvent):void { removeChild(_views[_viewIndex]); _viewIndex++; if(_viewIndex >= _views.length) { _viewIndex = 0; } addChild(_views[_viewIndex]); }
// When the model changes update the text field values. private function onModelUpdate(event:Event = null):void {
// Use if statements so that the text values don't // change if the user is currently changing the // value in a text field. if(stage != null) { if(stage.focus != _hours) { _hours.text = _clockData.time.hour.toString(); } if(stage.focus != _minutes) { _minutes.text = _clockData.time.minute.toString(); } if(stage.focus != _seconds) { _seconds.text = _clockData.time.second.toString(); } } } } }
Now you can use a Clock instance as follows.
package {
import flash.display.Sprite; import flash.display.StageAlign; import flash.display.StageScaleMode; import com.peachpit.aas3wdp.mvcexample.data.ClockData; import com.peachpit.aas3wdp.mvcexample.clock.AbstractClockView; import com.peachpit.aas3wdp.mvcexample.clock.AnalogClock; import com.peachpit.aas3wdp.mvcexample.clock.DigitalClock; import com.peachpit.aas3wdp.mvcexample.controllers.Clock;
public class ClockTest extends Sprite {
private var _clockData:ClockData;
public function ClockTest() {

stage.align = StageAlign.TOP_LEFT; stage.scaleMode = StageScaleMode.NO_SCALE; _clockData = new ClockData(); _clockData.realTime = true; var clock:Clock = new Clock(); clock.data = _clockData; addChild(clock); var view:AbstractClockView = new DigitalClock(_clockData); clock.addView(view); view = new AnalogClock(_clockData); clock.addView(view); } }}
In this version the Clock instance is the controller by which the user can toggle between viewsand adjust the value of the model.

Summary
In this chapter, you've had an opportunity to learn about the basic concepts of the Model ViewController pattern .The basic principle of this pattern is to distinguish between the data and thepresentation of that data. This approach enables greater flexibility and adaptability in a quite afew ways which were discussed throughout the chapter.

Chapter 4. Singleton Pattern
In This Chapter
object Instantiation 66
Singleton Versus Static Members 69
Building a Simple Singleton 69
Building a Settings Framework 71
Summary 74
The Singleton design pattern is used to limit a class to one instance and provide global access tothat instance. In many cases, you need to limit a class to only one instance. Common examplesinclude classes that manage resources that are intrinsically singular such as selection focus,navigation history, and window depth. Consider the case of a class that manages the state ofthe user's cursor. Because there is only ever one cursor, you shouldn't have more than oneinstance of that class. Another example is a class that loads application settings from an XMLfile and provides access to those settings. You wouldn't want to waste resources by having twoinstances of that class or by loading the XML file more than once.
The dilemma in such cases is how to ensure that only one instance of a class exists and how tomake that one instance globally accessible. The Singleton design pattern is a time-testedsolution to this problem.
Essentially, three features make up a Singleton class:
A private static property that holds the single instance of the class.
A public static method that provides access to the single instance if it's created and createsthe single instance if it hasn't been created yet.
A way of restricting access to instantiating the class. This is usually achieved by makingthe constructor private. However, ActionScript 3.0 doesn't have private constructors. Laterin this chapter, we'll examine an alternative way of restricting instantiation in ActionScript3.0.

Object Instantiation
To create a new instance of a class, you use the new keyword followed by the class name. Thisstatement calls the constructor of the class and returns a new instance, as in this example:
var myObject:MyClass = new MyClass();
This approach is almost undoubtedly a concept with which you are already familiar, but if ourclass uses this type of instantiation, we have no way of controlling its creation. For us to controlthe instantiation, we're going to use a static method called getInstance(). Because it is static, itcan be invoked before an instance of the class exists. The following is an example of a class thatuses this method:
public class MyClass {
public function MyClass() {}
public static function getInstance():MyClass { return new MyClass(); }}
Now we can create our instances of the class by using the static method, like this:
var myObject:MyClass = MyClass.getInstance();
Restricting Instantiation
As long as the instance is always accessed via the static getInstance() method, everythingworks according to plan. However, notice that there is nothing to prevent someone fromconstructing a second instance using the new keyword. In other languages this problem wouldbe solved by making the constructor private, but private constructors aren't supported inActionScript 3.0.
We could just leave the constructor public and put a big comment up at the top of the classtelling other developers that this class should be instantiated only once. However, one of ourgoals in object-oriented programming should be to create a class that cannot be broken byimproper implementation. We'll talk more about convention, as opposed to rules, later in thischapter.
So, we have a few other options at our disposal that allow us to limit instantiation. One featureof ActionScript 3.0 is that all parameters of a method are now required unless a default value isprovided. This feature includes the constructor. Therefore, you can add a parameter to theconstructor that is required and type it to something that is available only from inside the class.

Note
This is not an absolute restriction since someone can get around this by passing nullinto the constructor. However, it is the best we can do without a true privateconstructor.
A second new feature of ActionScript 3.0 is the ability to add multiple class definitions to onefile. You can access only one of the classes from outside the ActionScript file, and that is theclassinside the package definitionwith the same name as the file name. But you can put otherclasses outside the package in the same file, and those classes are available only to the primaryclass. We'll use this feature to create a "private" class and make it our constructor parameter'stype. It's actually easier than it sounds:
package {
public class MyClass {
public function MyClass(enforcer:SingletonEnforcer) {}
public static function getInstance():MyClass { return new MyClass(new SingletonEnforcer()); }
}
}
class SingletonEnforcer {}
You can now create an instance of MyClass using the following code:
var myInstance:MyClass = MyClass.getInstance();
Note that our current implementation doesn't yet enforce a single instance of the class. Eachtime we call getInstance() our class will return a new instance. In the next section we'll look athow to ensure that there's only ever one instance.
Single Instance and Global Access
What can we do to enforce that the class is instantiated only once? Right now, thegetInstance() method can be called multiple times just like a normal public constructor; andwe also need to provide global access to this one instance. By modifying the getInstance()method slightly and adding a static property to hold our single instance, we'll knock out both ofthese requirements at once.
First let's add a private static property to the class that will hold our single instance. We need tomake the property static so that it is available to our getInstance() method. Now when thestatic getInstance() method is called it creates an instance and stores it in the private static_instance property before returning the newly created instance. Here is how our class looksnow:

package {
public class MyClass {
private static var _instance:MyClass;
public function MyClass(enforcer:SingletonEnforcer) {}
public static function getInstance():MyClass { MyClass._instance = new MyClass(new SingletonEnforcer()); return MyClass._instance; }
}
}
class SingletonEnforcer {}
Next, we're going to modify the getInstance() method so that it checks whether this singleinstance has already been created. If it has, then it returns that instance without calling theconstructor again. Check out this modification:
package {
public class MyClass {
private static var _instance:MyClass;
public function MyClass(enforcer:SingletonEnforcer) {}
public static function getInstance():MyClass { if(MyClass._instance == null) { MyClass._instance = new MyClass(new SingletonEnforcer()); } return MyClass._instance; }
}
}
class SingletonEnforcer {}

convention versus rules
If you're new to design patterns, at first glance the Singleton pattern seems a bitlike over engineering. You might be saying to yourself, "If I want only one instanceof a class, then I'll create only one instance; if I need global access, then I'll stick itin some global variable." Although you could certainly do those two thingsand theywould probably workthey 'could pose problems in a team development environment.'You may also have trouble with this approach if you're creating multiple versions ofthe application.
This underscores the importance of following structural rules rather than simpleconventions. The idea of encapsulation in object-oriented programming is that aclass should be self-contained. It should have well-documented inputs in the form ofpublic methods and setters and outputs in the form of events. These inputs andoutputs are commonly known as the API (Application Programming Interface). Aswe mentioned earlier, classes should function like a black box: nothing exposed inthe API should permit improper implementation to "break it." In the case of ourSingleton class, we should not allow another object to create more than oneinstance of the class. (See Chapter 1, "Designing Applications.")

Singleton Versus Static Members
After examining the structure of a Singleton class, you might ask the question, "Why not justmake all the properties and methods of the class static? Why do we need to have an instance atall?" There are a few reasons why a Singleton is the better approach.
The first reason is inheritance. In ActionScript 3.0, you cannot inherit static properties ormethods. Therefore, if all your class's functionality is in static methods, you cannot subclass it.
The second reason to use a Singleton pattern is so that you can refactor the class to allow morethan one instance. A lesser-known design pattern called the Multiton is similar to the Singletonbut allows for a managed number of instances. If you write your original class as a Singleton,you can refactor it to be a Multiton easily. For example, let's say version 1.0 of your applicationhad a connection manager that managed a single connection to the server; but for version 2.0,it has been determined that you need to manage a pool of 10 connections to the server. This iswhere a Multiton could be used.
The third reason is that it can be a waste of resources to have all this logic initialized rightaway. Singletons use the concept of "lazy" instantiation, because the object is created onlywhen the first call to getInstance() is made. Classes that use all static members do what iscalled "eager" instantiation. This is usually a waste of resources and can slow down the startupof your application.
Lastly, objects are just easier to manage. By using static methods instead of a single objectyour code is not created at a specific point in your application. This can cause some strangeinitialization issues that are difficult to debug. This is especially true if your Singleton class hasa dependency on other objects in the application that might not be initialized. For this reason,consider using static members only if your class is 100% self-contained, with no dependencieson outside objects. Even then, your class is locked into this "self-contained" mode and isn'tscalable anymore.
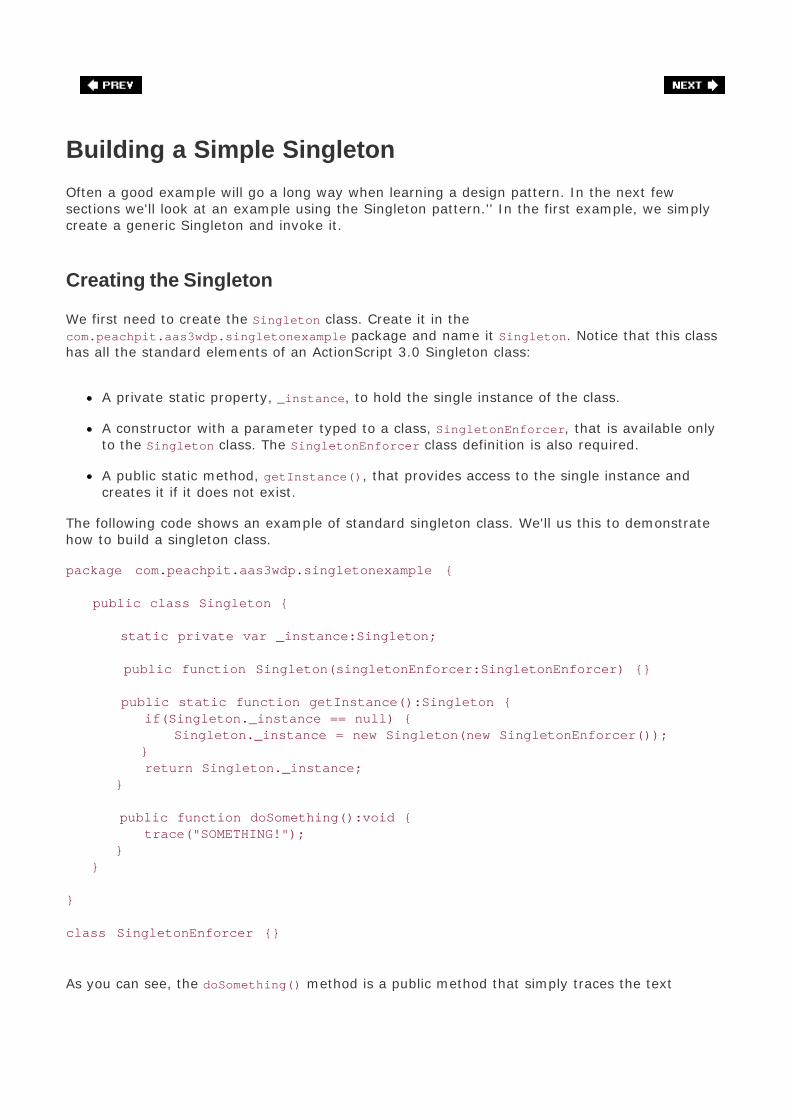
Building a Simple Singleton
Often a good example will go a long way when learning a design pattern. In the next fewsections we'll look at an example using the Singleton pattern.'' In the first example, we simplycreate a generic Singleton and invoke it.
Creating the Singleton
We first need to create the Singleton class. Create it in thecom.peachpit.aas3wdp.singletonexample package and name it Singleton. Notice that this classhas all the standard elements of an ActionScript 3.0 Singleton class:
A private static property, _instance, to hold the single instance of the class.
A constructor with a parameter typed to a class, SingletonEnforcer, that is available onlyto the Singleton class. The SingletonEnforcer class definition is also required.
A public static method, getInstance(), that provides access to the single instance andcreates it if it does not exist.
The following code shows an example of standard singleton class. We'll us this to demonstratehow to build a singleton class.
package com.peachpit.aas3wdp.singletonexample {
public class Singleton {
static private var _instance:Singleton;
public function Singleton(singletonEnforcer:SingletonEnforcer) {}
public static function getInstance():Singleton { if(Singleton._instance == null) { Singleton._instance = new Singleton(new SingletonEnforcer()); } return Singleton._instance; }
public function doSomething():void { trace("SOMETHING!"); } }
}
class SingletonEnforcer {}
As you can see, the doSomething() method is a public method that simply traces the text

"SOMETHING!" to the console. While this example is very simple, it demonstrates the requiredelements of a class that follows the Singleton design pattern in ActionScript. The code in thenext section demonstrates how to invoke a Singleton class.
Note
In order for trace statements to output information to the console you must debug theapplication rather than just run it.
Invoking the Singleton
Inside the main class, we're going to get the instance of the Singleton class and call a methodon that object. We start by importing the Singleton class. Then inside the constructor, we callthe Singleton's static getInstance() method and immediately call the doSomething() method onthe returned instance. The doSomething() method simply traces "SOMETHING!" to the console.
package {
import com.peachpit.aas3wdp.singletonexample.Singleton; import flash.display.Sprite;
public class SimpleSingletonExample extends Sprite {
public function SingletonExample() { Singleton.getInstance().doSomething(); } }
}

Building a Settings Framework
In this next example we'll build a simple application that uses a Singleton class called Settingsto hold global values.
The Settings class loads data from an XML file at runtime and provides access to its values. It'sa simple concept, but it's very useful to be able to change these settings without recompilingthe application.
Creating the XML Document
The XML document for this framework is simple. We have a settings root node that containsmultiple property nodes. Each property node has an id and a value attribute. The Settingsclass does a lookup on the id attribute and returns the value attribute. The following is the XMLdocument, titled config.xml, which we'll use in this example:
<?xml version="1.0" encoding="UTF-8"?><cs:settings xmlns:cs="http://www.dannypatterson.com/2006/ConfigSettings"> <cs:property id="testOne" value="This is the first test value." /> <cs:property id="testTwo" value="This is the second test value." /></cs:settings>
Note that we added a namespace to this document to demonstrate how simple namespaces areto use inside E4X. For more information on XML namespaces, see Chapter 15 , "E4X (XML)."
Creating the Settings Class
Now you'll need to create a new ActionScript class named Settings and put it in thecom.peachpit.aas3wdp.singletonexample package. It has three main responsibilities:
It follows the Singleton design pattern; therefore, it manages its creation and access thesame way as the previous example.
The Settings class also provides access to the values in the XML file through simpleproperty access, like this:
var myString:String = Settings.getInstance().testOne;
Because testOne isn't a property of the Settings class, we have to allow the request tocome in and capture it. To enable this functionality we need to make the class dynamic sothat other classes can call undefined properties. To capture these undefined requests, we'llsubclass the built-in flash.utils.Proxy class and override the getProperty() method.
Extending Proxy

To gain the Proxy functionality we must subclass it and override the getProperty()method. This is a little tricky because the Proxy class' getProperty() method exists insidethe flash_proxy namespace. For more on using the Proxy class, check out Chapter 6 ,"Proxy Pattern."
Because this class loads an external XML file, it must have a method for loading that fileand an event that is dispatched when the file has loaded successfully. To enable the classto dispatch events, we will use the built-in EventDispatcher class.
Adding Eventdispatcher Functionality Through Composition
Because we have to subclass Proxy to use its functionality, and because ActionScript allows onlyfor single inheritance, we must add the Eventdispatcher functionality through composition byimplementing the IEventDispatcher interface. For more on Eventdispatcher andIEventDispatcher , see Chapter 13 , "Working with Events."
[View full width]package com.peachpit.aas3wdp.singletonexample {
import flash.events.Event; import flash.events.EventDispatcher; import flash.events.IEventDispatcher; import flash.net.URLLoader; import flash.net.URLRequest; import flash.utils.Proxy; import flash.utils.flash_proxy;
dynamic public class Settings extends Proxy implements IEventDispatcher {
static private var _instance:Settings; private var _eventDispatcher:EventDispatcher; private var _data:XML; private var _isLoaded:Boolean; private var _urlLoader:URLLoader; static public const INIT:String = "init";
public function get isLoaded():Boolean { return _isLoaded; }
public function Settings(enforcer:SingletonEnforcer) { _eventDispatcher = new EventDispatcher(); _isLoaded = false; }
private function onXMLDataLoaded(event:Event):void { _data = XML(_urlLoader.data); _isLoaded = true; dispatchEvent(new Event(Settings.INIT, true, true)); }

public static function getInstance():Settings { if(Settings._instance == null) { Settings._instance = new Settings(new SingletonEnforcer()); } return Settings._instance; }
flash_proxy override function getProperty(name:*):* { var cs:Namespace = _data.namespace("cs"); var qname:String = String(name); return _data.cs::property.(@id == qname).@value; }
public function loadSettings(url:String):void { var urlRequest:URLRequest = new URLRequest(url); _urlLoader = new URLLoader(); _urlLoader.addEventListener(Event.COMPLETE, onXMLDataLoaded); _urlLoader.load(urlRequest); }
public function addEventListener(type:String, listener:Function, useCapture:Boolean = false, priority:int = 0, weakRef: Boolean = false):void { _eventDispatcher.addEventListener(type, listener, useCapture, priority, weakRef); }
public function dispatchEvent(event:Event):Boolean { return _eventDispatcher.dispatchEvent(event); }
public function hasEventListener(type:String):Boolean { return _eventDispatcher.hasEventListener(type); }
public function removeEventListener(type:String, listener:Function, useCapture:Boolean = false):void { _eventDispatcher.removeEventListener(type, listener, useCapture); }
public function willTrigger(type:String):Boolean { return _eventDispatcher.willTrigger(type); } }
}
class SingletonEnforcer {}

XML Usage (E4X)
Inside the getProperty() method, we used the new E4X functionality to pull the data out of theXML object based on the name of the requested property. For more on E4X, check out Chapter15 , "E4X (XML)."
Invoking the Settings Class
Next, we'll need a main class for the application in order to utilize the Settings class. We'll callthe main class SettingsExample , and define it as follows:
package {
import com.peachpit.aas3wdp.singletonexample.Settings; import flash.events.Event; import flash.display.Sprite;
public class SettingsExample extends Sprite {
public function SettingsExample() { Settings.getInstance().loadSettings("config.xml"); Settings.getInstance().addEventListener(Settings.INIT, onSettingsInit); }
private function onSettingsInit(event:Event):void { trace(Settings.getInstance().testOne); trace(Settings.getInstance().testTwo); }
}
}
This class is the start of the project. It retrieves the singleton instance of Settings , then itdisplays the values from the dynamic properties. In the constructor, we first get a reference tothe single instance using the static getInstance() method. Then we call the loadSettings()method and add the Settings.INIT event listener.
Inside the onSettingsInit() event handler, we trace the value of testOne and testTwo from theSettings instance. These variables are not actually properties of the Settings class. You'll seelater in this example that the Settings class uses a new feature of ActionScript 3.0 called Proxyto handle this request and return the value from the XML document.
Now you can debug the project. You should see the values of properties testOne and testTwobeing displayed in the trace console.

Summary
The Singleton design pattern is a simple yet effective solution for restricting a class to oneinstance and providing a global access point to it. In this chapter, you learned how toimplement this design pattern using ActionScript 3.0. You also learned the importance of theSingleton pattern over simply using static members.

Chapter 5. Factory and Template MethodPatterns
In This Chapter
Abstract Classes 75
Template Method 76
Factory Method 78
Summary 81
When creating groups of related classes, it's important to maintain those relationships duringobject creation. One way to do this is with the Factory Method design pattern. The FactoryMethod pattern is a creational pattern and solves the problem of creating objects withoutspecifying a concrete type. This is most often used in abstract classes that define a method forobject creation. Subclasses can then override this method to define the specific object to becreated.
The Factory Method is most often used in conjunction with another pattern called the TemplateMethod. To better understand the Factory Method and provide more context for this solution,we'll also look at the Template Method in this chapter. Because the Factory Method uses andthen builds on many of the same concepts, we'll look at the Template Method first.

Abstract Classes
Abstract classes play a major role in the Factory and Template Method patterns. AlthoughActionScript 3.0 doesn't natively support them, we can still use the concept of abstract classesand abstract methods. An abstract class is a class that is always extended and neverinstantiated directly. Its use is similar to that of an interface, but there is one major difference:An interface defines only the public method signatures, but an abstract class defines both theinterface and the implementation.
An abstract class uses something called an abstract method, which has no functionality butserves only as a placeholder. In other languages such as C# and Java, you can define theseabstract methods using the abstract keyword that tells subclasses they must override thismethod. Because ActionScript 3.0 does not have an abstract keyword, you might consider theconvention of throwing an exception inside the abstract methods. Such an approach won't throwan error during compilation, but it will during runtime. The bottom line is that there is no sureway to enforce abstract methods in ActionScript 3.0.
You must know about two specific keywords when you're working with abstract classes inActionScript 3.0. The first is the override keyword. Subclasses must use this keyword tooverride an abstract method defined in a base class. The method signature must also matchexactly.
The other keyword is final. This term can be used by abstract classes that define methods itssubclasses cannot override. We'll use the final keyword when we define Template Methodpatterns.

Template Method
A Template Method is defined in an abstract class that sets a general algorithm made up (atleast partially) of abstract methods. The steps of that algorithm are defined when subclassesoverride the abstract methods. The structure of the algorithm is maintained in the TemplateMethod.
Consider the following example in which we have an abstract class that defines the way gamesare initialized:
package com.peachpit.aas3wdp.factoryexample {
public class AbstractGame {
// Template Method public final function initialize():void { createField(); createTeam("red"); createTeam("blue"); startGame(); }
public function createField():void { throw new Error("Abstract Method!"); }
public function createTeam(name:String):void { throw new Error("Abstract Method!"); }
public function startGame():void { throw new Error("Abstract Method!"); } }
}
The initialize() method in the preceding example is the Template Method. It defines how thegame is initialized by first calling the createField() method, then creating the teams with thecreateTeam() method calls, and finally calling the startGame() method. However, the methods itcalls are not functional in this class. It's the responsibility of the subclass to define exactly howthe field and teams are created and how the game is started.
Now we will create a FootballGame class that extends our AbstractGame class. This subclassoverrides the abstract methods that are called from the initialize() Template Method in theabstract base class.
package com.peachpit.aas3wdp.factoryexample {
public class FootballGame extends AbstractGame {

public override function createField():void { trace("Create Football Field"); }
public override function createTeam(name:String):void { trace("Create Football Team Named " + name); }
public override function startGame():void { trace("Start Football Game"); }
}
}
As you can see, our FootballGame class overrides the createField(), createTeam(), andstartGame() methods to make them specific to football. However, the initialization algorithm ismaintained. You can see how this same technique could also be used to build a BaseballGame ora BastketballGame class. We can run the example using the following client code:
package com.peachpit.aas3wdp.factoryexample {
import com.peachpit.aas3wdp.factoryexample.FootballGame; import flash.display.Sprite;
public class FactoryExample extends Sprite {
public function FactoryExample() { // Create an instance of FootballGame var game:FootballGame = new FootballGame(); // Call the template method defined in AbstractGame game.initialize(); }
}
}
The following shows the output from the preceding example. As you can see, the overriddenmethods in the subclass were called by the Template Method. The algorithm was maintained inthe Template Method while the details were deferred to subclass methods.
Create Football FieldCreate Football Team Named redCreate Football Team Named blueStart Football Game

Factory Method
Without too much effort, we can now turn the preceding Template Method example into aFactory Method example. It's very common to implement Factory Methods in a TemplateMethod.
In the preceding Template Method example, our createField() method doesn't returnanything; it just traces out the phrase "Create Football Field." Let's update this so it creates andreturns a field object. Because different games have different field types, we'll create aninterface called IField that all the field classes will implement. Our interface will define a singlemethod called drawField():
package com.peachpit.aas3wdp.factory {
public interface IField {
function drawField():void;
}
}
Now we'll build a FootballField class that implements the IField interface. To keep ourexample focused, we won't actually draw a football field to the stage, but you can fill in theblanks. Here's the basic FootballField class definition:
package com.peachpit.aas3wdp.factoryexample {
import com.peachpit.aas3wdp.factoryexample.IField;
public class FootballField implements IField {
public function drawField():void { trace("Drawing the Football Field"); }
}
}
The purpose of the Factory Method is to link up two or more separate but related classhierarchies. The first hierarchy is the AbstractGame class and its subclasses: FootballGame,BaseballGame, and BastketballGame. Our second class hierarchy is now the IField interface andthe classes that implement it: FootballField, BaseballField, and BasketballField. TheAbstractGame and IField objects are related, but the specific creation of these objects isdetermined by the game subclasses. Figure 5.1 shows how our class hierarchies match up.

Figure 5.1. The hierarchy of classes in the Factory Method example.
[View full size image]
Now we can refactor the createField() and initialize() methods of our AbstractGame class toreflect the existence of an IField object. Our createField() method is now a Factory Methodthat returns an object that implements the IField interface. The initialize() method cannow go one step further and call the drawField() method on the IField object, as shown here:
package com.peachpit.aas3wdp.factoryexample {
import com.peachpit.aas3wdp.factoryexample.IField;
public class AbstractGame {
// Template Method public final function initialize():void { var field:IField = createField(); field.drawField(); createTeam("red"); createTeam("blue"); startGame(); }
// Factory Method public function createField():IField{ throw new Error("Abstract Method!"); }
public function createTeam(name:String):void { throw new Error("Abstract Method!"); }
public function startGame():void { throw new Error("Abstract Method!"); }

}
}
This abstract class and template algorithm are still completely anonymous and the specificobjects created are in the hands of the subclass. Let's refactor the FootballGame class now tocreate and return a FootballField object:
package com.peachpit.aas3wdp.factory {
import com.peachpit.aas3wdp.factory.FootballField; import com.peachpit.aas3wdp.factory.IField;
public class FootballGame extends AbstractGame {
public override function createField():IField { return new FootballField(); }
public override function createTeam(name:String):void { trace("Create Football Team Named " + name); }
public override function startGame():void { trace("Start Football Game"); }
}
}
If we run this example, we'll get the following output:
Drawing the Football FieldCreate Football Team Named redCreate Football Team Named blueStart Football Game

A Simple Factory
The Factory Method is often misunderstood. It's not uncommon to hear peoplemistakenly referring to their code as following the Factory Method pattern; afterexamining the code, we discover that the code isn't actually a Factory Method. Earlyin our careers, we'd make the same mistake: we'd write classes suc as the followingand think it was a Factory Method:
package com.peachpit.aas3wdp.factoryexample {
public class GameFactory { public static function createGame(gameType:String):IGame { switch(gameType){ case "football": return new FootballGame(); case "baseball": return new BaseballGame(); case "basketball": default: return new BasketballGame(); } } }}
If you think this is a Factory Method, purge that bit of information from your head and keepreading because the Factory Method is much more. In fact, the preceding example isn't even adesign pattern at all. It's commonly referred to as a Simple Factory or a Parameterized FactoryMethod. Not to say that it isn't useful; in fact, we use this technique in Chapter 12, "StatePattern", to set the state based on a name.

Summary
Abstract classes are a very important tool in object-oriented design. They are most commonlyused in class libraries and frameworks because they are a solid way to factor out commonbehavior across subclasses.
The Template and Factory Method design patterns are handy when you're working with abstractclasses. The Template Method allows you to create a common algorithm defined generallywhose specific steps will later get defined by concrete subclasses. And the Factory Methodallows you to trigger the creation of objects in an abstract class, but to defer the specific type tothe subclass.
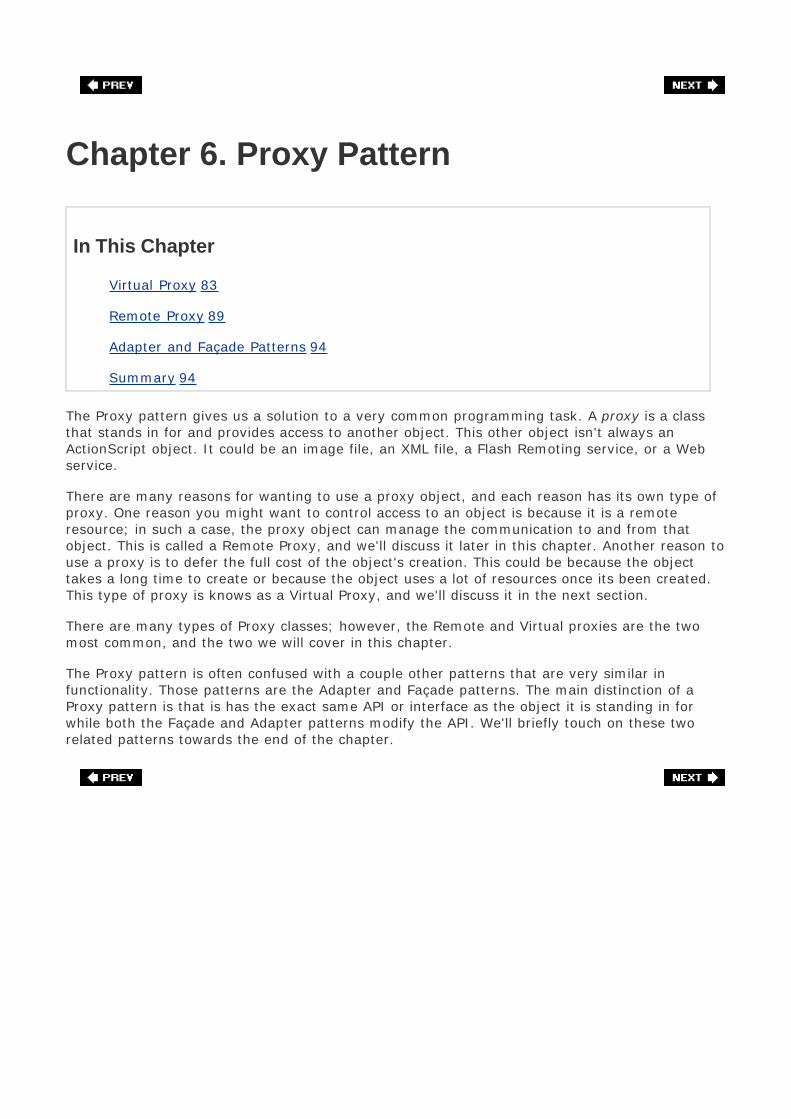
Chapter 6. Proxy Pattern
In This Chapter
Virtual Proxy 83
Remote Proxy 89
Adapter and Façade Patterns 94
Summary 94
The Proxy pattern gives us a solution to a very common programming task. A proxy is a classthat stands in for and provides access to another object. This other object isn't always anActionScript object. It could be an image file, an XML file, a Flash Remoting service, or a Webservice.
There are many reasons for wanting to use a proxy object, and each reason has its own type ofproxy. One reason you might want to control access to an object is because it is a remoteresource; in such a case, the proxy object can manage the communication to and from thatobject. This is called a Remote Proxy, and we'll discuss it later in this chapter. Another reason touse a proxy is to defer the full cost of the object's creation. This could be because the objecttakes a long time to create or because the object uses a lot of resources once its been created.This type of proxy is knows as a Virtual Proxy, and we'll discuss it in the next section.
There are many types of Proxy classes; however, the Remote and Virtual proxies are the twomost common, and the two we will cover in this chapter.
The Proxy pattern is often confused with a couple other patterns that are very similar infunctionality. Those patterns are the Adapter and Façade patterns. The main distinction of aProxy pattern is that is has the exact same API or interface as the object it is standing in forwhile both the Façade and Adapter patterns modify the API. We'll briefly touch on these tworelated patterns towards the end of the chapter.

Virtual Proxy
The Virtual Proxy is used to proxy objects that are expensive to create or that aren't availablefor use right away. The Virtual Proxy can defer the creation or initialization of its subject until itis needed. Before and while the subject is being created, the Virtual Proxy stands in its place.After the creation is complete, it delegates requests directly to the subject.
Image Loader Example
One common example of a Virtual Proxy is an image loader. An image loader is an object thatstands in for an external image while it's being loaded. It's important that this proxy objecthave the same API as the image object itself. This enables us to set the image's position andadd effects to the image before it has completely loaded.
Flash Player 9 has a great example of an image loader Virtual Proxy built right into the player.It's called Loader, and it's found in the flash.display package. This class extendsDisplayObjectContainer , so it has all the properties and methods necessary to add it to adisplay list, change its position, and even add effects.
In the following example, we'll use the Loader class to load an external image.
First create a new ActionScript project called ImageProxyExample .
Loading the Image
Inside the main class for this project, we will create and load the image. In the constructor ofthe ImageProxyExample class, we create the Loader object and load the remote image. Withoutwaiting for the image to load, we add the Loader instance to the display list. We're able to dothis because the Loader class is acting as a proxy to the real image.
package {
import flash.display.Sprite; import flash.display.Loader; import flash.net.URLRequest;
[SWF(backgroundColor="#FFFFFF", width=640, height=480)] public class ImageProxyExample extends Sprite { public function ImageProxyExample () { var image:Loader = new Loader(); image.load(new URLRequest("http://www.communitymx.com/blog/images/dannyp.gif")); addChild(image); }
}
}

Note
The SWF metatag allows us to set the background color, width, and height or the SWFin an ActionScript project. I'm using that in this example to better see the imageplaced on the display list.
Modifying the Image Before It's Loaded
If the Loader class weren't a proxy, we would have had to wait for the image to load before wecould add it to the display list because only display objects can be added to the display list. Inthe next example, we modify the ImageProxyExample class by changing the image's position andadding effects, all before the real image ever loads:
package {
import flash.display.Sprite; import flash.display.Loader; import flash.net.URLRequest; import flash.filters.GlowFilter; import flash.filters.BlurFilter;
[SWF(backgroundColor="#FFFFFF", width=640, height=480)] public class ImageProxyExample extends Sprite {
public function ImageProxyImp() { var image:Loader = new Loader(); image.load(new URLRequest("http://www.communitymx.com/blog/images/dannyp.gif")); addChild(image); var glow:GlowFilter = new GlowFilter(0xff99ff, 2, 6, 6, 2, 1); var blur:BlurFilter = new BlurFilter(4, 4, 1); var filters:Array = new Array(); filters.push(glow); filters.push(blur); image.filters = filters; image.x = 10; image.y = 10; }
}
}
As you can see, a Virtual Proxy can make your code much easier to work with. Without theLoader acting as a proxy to the image, we would have to wait for the image to be successfullyloaded before we could add it to the display list and add effects.
It's important to note here that although the Loader class does stand in for the loaded image,its not a pure form of a virtual proxy. The Loader class doesn't actually proxy modifications to

the image, but instead applies the modifications to itself. The image gets those modificationsbecause it is a child of the Loader class. In the next example, we'll show a true proxy thatpasses its requests directly to the subject.
Lazy Serialization Example
The other use of a Virtual Proxy is to stand in place of an object that is expensive to create. Agreat example of an expensive operation is serialization. Consider an object that models an XMLelement; we have two options for serialization. First, we could pass the data into theconstructor of the model object and parse the values right away into the properties of theobject.
This approach is known as "eager" serialization and with large, complex objects it can be veryexpensive. Our second option is called "lazy" serialization, in which we serialize the propertiesof the object on demand. This second option eliminates unnecessary serialization to unusedproperties and it spreads the serialization process out instead of doing it all up front. Figure6.1 illustrates this process.
Figure 6.1. An example of lazy serialization.
[View full size image]
To get started, create a new ActionScript project called SerializationProxyExample .
Creating the Product Interface
For this example, both our "real" Product class and our "proxy" Product class implement thesame interface. This interface defines the methods that both classes need to implement andallows us to treat the two classes the same. The interface is named IProduct and defines thegetTitle() , getPrice() , setTitle(), and setPrice() methods:
package com.peachpit.aas3wdp.proxyexample {
public interface IProduct {
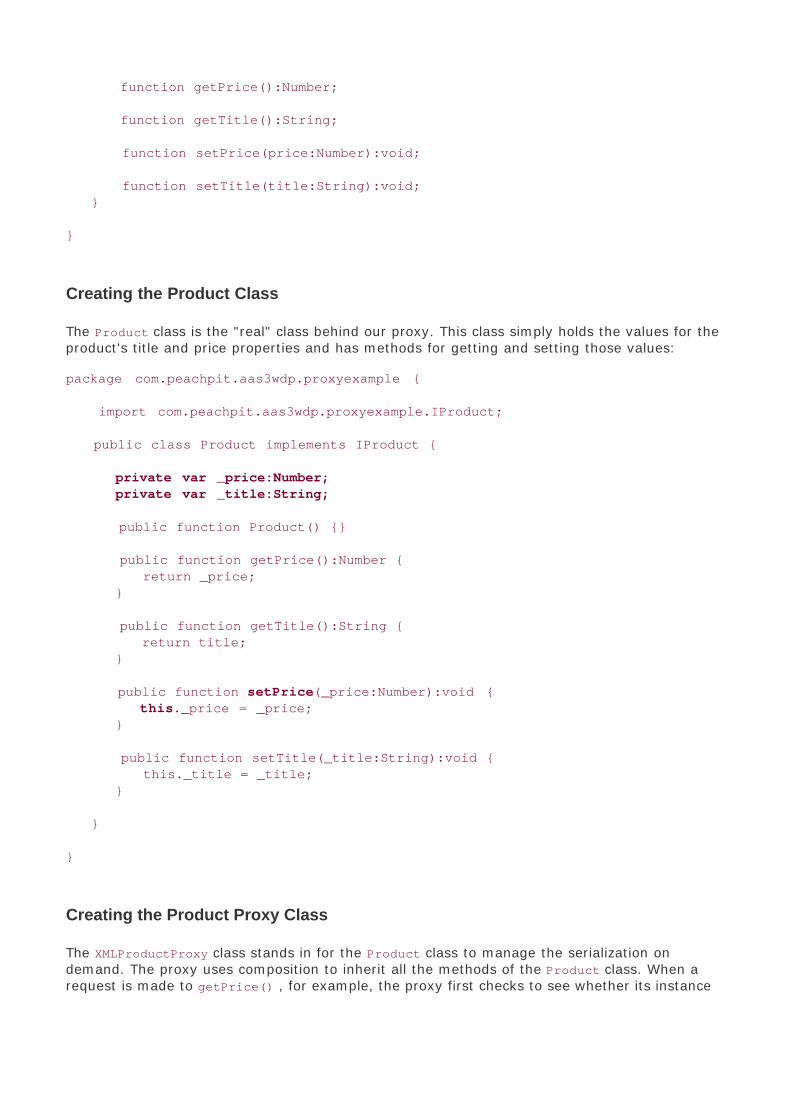
function getPrice():Number;
function getTitle():String;
function setPrice(price:Number):void;
function setTitle(title:String):void; }
}
Creating the Product Class
The Product class is the "real" class behind our proxy. This class simply holds the values for theproduct's title and price properties and has methods for getting and setting those values:
package com.peachpit.aas3wdp.proxyexample {
import com.peachpit.aas3wdp.proxyexample.IProduct;
public class Product implements IProduct {
private var _price:Number; private var _title:String;
public function Product() {}
public function getPrice():Number { return _price; }
public function getTitle():String { return title; }
public function setPrice(_price:Number):void { this._price = _price; }
public function setTitle(_title:String):void { this._title = _title; }
}
}
Creating the Product Proxy Class
The XMLProductProxy class stands in for the Product class to manage the serialization ondemand. The proxy uses composition to inherit all the methods of the Product class. When arequest is made to getPrice() , for example, the proxy first checks to see whether its instance

of the Product class has a value for price . If it does, that value is returned; if not, the proxygrabs the data out of the XML object and sets the value on the "real" product, pbject. This ishow serialization occurs only when a method is invoked. Then the correct value is returned. Bydeferring the serialization to the request, we minimize the amount of serialization that happensup front.
package com.peachpit.aas3wdp.proxyexample {
import com.peachpit.aas3wdp.proxyexample.IProduct; import com.peachpit.aas3wdp.proxyexample.Product;
public class XMLProductProxy implements IProduct { private var _data:XML; private var _product:Product;
public function XMLProductProxy(_data:XML) { this._data = _data; product = new Product(); }
public function getPrice():Number { if(isNaN(_product.getPrice())) { _product.setPrice(Number(_data.price.toString())); } return _product.getPrice(); }
public function getTitle():String { if(_product.getTitle() == null) { _product.setTitle(_data.title.toString()); } return _product.getTitle(); }
public function setPrice(price:Number):void { _data.price = price; _product.setPrice(price); }
public function setTitle(title:String):void { _data.title = title; _product.setTitle(title); }
}}
Using the Proxy
Using the proxy we just created is simple. First we create a sample XML object structured towork with our proxy class. Then we create a new instance of the XMLProductProxy class and passthe sample XML object to the constructor. Now, when we call the getTitle() or getPrice()method on the proxy, it returns the value from the XML object. Subsequent calls to those samemethods will return the values from the product object and no serialization is required.

package {
import com.peachpit.aas3wdp.proxypattern.IProduct; import com.peachpit.aas3wdp.proxypattern.XMLProductProxy; import flash.display.Sprite;
public class SerializationProxyExample extends Sprite { public function SerializationProxyExample () { var data:XML = <product> <title>Widget</title> <price>19.95</price> </product>;
var product:IProduct = new XMLProductProxy(data); trace(product.getTitle() + " -- $" + product.getPrice()); } }}
Even though this is a simple example, the advantages of lazy serialization become clear whenyou introduce a complex data structure with multiple levels of objects. In such a case, lazyserialization can help make your application run smoother by reducing the amount ofserialization that happens up front in an application and by eliminating serialization for itemsthat are never requested.

Remote Proxy
The Remote Proxy also stands in for an object, but in this case the subject is remote. This couldbe a separate SWF file, an XML file, a Flash Remoting service, a SOAP or REST service, or anynumber of other type of services. The Remote Proxy acts as a local representative to this remoteobject. It has the same public methods as the remote resource and delegates requests to thatresource. It also handles the communication with the remote resource.
Flickr Search Proxy Example
Flickr (www.flickr.com ) is a popular online photo-sharing site. In this example, we're going towrite a simple Remote Proxy to Flickr's search API. The proxy will implement a search methodand handle the communication with the Flickr API. It will then broadcast an Event.COMPLETE oran ErrorEvent.ERROR event with the result.
Note
The Flickr examples in this chapter require that you apply for a key to access the FlickrAPI. In the examples, you'll need to replace the text <ADD_YOUR_KEY_HERE> withyour Flickr API key. You can apply for anAPI key at the following URL:http://www.flickr.com/services/api/misc.api_keys.html .
First, create a new ActionScript project called RemoteProxyExample .
Creating the Search Proxy
The PhotoSearchProxy class takes local requests using its search method and relays them to theremote Flickr API. Flickr offers a few different flavors of its API. For our example, we're usingthe REST API. This API is just a simple HTTP GET request that returns an XML result. Theparameters are sent in the query string of the request.
package com.peachpit.aas3wdp.proxypattern {
import flash.events.DataEvent; import flash.events.Event; import flash.events.EventDispatcher; import flash.net.URLLoader; import flash.net.URLRequest;
public class PhotoSearchProxy extends EventDispatcher {
private static const API_KEY:String = "<ADD_YOUR_KEY_HERE>"; private static const FLICKR_URL:String = " http://api.flickr.com/services/rest/";

public function PhotoSearchProxy() {}
private function onComplete(event:Event):void { dispatchEvent(new DataEvent(Event.COMPLETE, false, false, XML(event.target.data)); }
public function search(userId:String, tags:String):void { var loader:URLLoader = new URLLoader(); var request:URLRequest = new URLRequest(PhotoSearchProxy.FLICKR_URL + "?method=flickr.photos.search&user_id=" + userId + "&tags=" + tags + "&api_key=" + PhotoSearchProxy.API_KEY); loader.addEventListener(Event.COMPLETE, onComplete); loader.load(request); }
}
}
Using the Search Proxy
To test the remote search proxy, we just create a new instance of the proxy (PhotoSearchProxy), register the complete and error events, and make a call to the search() method, like this:
package {
import com.peachpit.aas3wdp.proxypattern. PhotoSearchProxy; import flash.display.Sprite; import flash.events.DataEvent; import flash.events.Event; public class RemoteProxyExample extends Sprite {
public function RemoteProxyEmaple() { var flickr:PhotoSearchProxy = new PhotoSearchProxy(); flickr.addEventListener(Event.COMPLETE, onComplete); flickr.search("", "yellow"); } private function onComplete(event:DataEvent):void { trace(event.data); } }}
When you debug this example in Flex Builder, you'll see the XML result from the Flickr RESTrequest output to the debug console.
The flash.utils.Proxy
In ActionScript 1 and 2, there was a method in the built-in Object class called __resolve . Byoverriding this method, you could capture any call made on that object that was undefined,

including both properties and methods. The most common implementation of this feature wasthe Remoting and Web Service frameworks that used __resolve to proxy operations on remotemethods.
This feature has grown up a bit in ActionScript 3.0 and is now encapsulated in theflash.utils.Proxy class. This class is never used directly, but is instead extended and itsmethods overridden. In Chapter 4 , "Singleton Pattern," we used the Proxy class to capture callsto undefined properties and instead return a value from an XML configuration file. This wasachieved by overriding the getProperty() method. To capture calls to undefined methods, weneed to override the callProperty() method. In the next example, we will capture the calls toundefined methods to proxy those calls to the remote Flickr API. This will allow us to create amore flexible proxy.
Note
This chapter isn't a reference about the built-in Proxy class. This example illustratesthe relationship of the Proxy class and the Proxy pattern, not a comprehensivedescription of how to use the Proxy class.
We just created a remote proxy example that calls a remote search method in the Flickr API,but what if we want to implement all the photo operations available in the Flickr API? We couldsystematically add each method to the PhotoSearchProxy class. This would be perfectlyacceptable. But if we didn't know all the remote operations, or Flickr was continuously addingnew operations, the PhotoSearchProxy class would fall short The solution is to use the built-inflash.utils.Proxy class.
Creating the Remote Photo Proxy
By extending the built-in Proxy class, we can catch calls to undefined methods and relay themto the remote Flickr API. This is a fairly simple process:
We must make our class dynamic so that a call to an undefined method is allowed.1.
The class needs to extend flash.utils.Proxy and override the callProperty() method.Each time a call to an undefined method is made on our class, we can catch it incallProperty().
2.
We must implement the IEventDispatcher interface and add the EvenTDispatcherfunctionality through composition. In our first Remote Proxy example, we extendedEventdispatcher , but we can't do that this time because we're extending Proxy andmultiple inheritance is not permitted in ActionScript 3.0.
3.
There is one minor catch: The call to Flickr requires us to format the method parameters in aquery string with name/value pairs. However, ActionScript doesn't have named parameters atruntime, so we need to find out what every parameter's name is. Fortunately, the Flickr API hasa reflection method flickr.reflection.getMethodInfo that allows us to get all the parametersfor a given method in the API. So when a call to an undefined method is made, we can save theparameters and extract the method name. Then we can make a reflection call based on themethod name. When the reflection call is returned, we can match the saved parameters withtheir names from the reflection result to generate the query string needed to make the original

operation. Here's how that logic works:
package com.peachpit.aas3wdp.proxypattern {
import flash.events.DataEvent; import flash.events.Event; import flash.events.EventDispatcher; import flash.events.IEventDispatcher; import flash.net.URLLoader; import flash.net.URLRequest; import flash.utils.flash_proxy; import flash.utils.Proxy;
dynamic public class PhotoProxy extends Proxy implements IEventDispatcher {
private static const API_KEY:String = "<ADD_YOUR_KEY_HERE>"; private static const FLICKR_URL:String = " http://api.flickr.com/services/rest/"; private var eventDispatcher:EventDispatcher; private var pendingArgs:Array;
public function PhotoProxy() { eventDispatcher = new EventDispatcher(); }
// The following event handler is called when the // reflection call is made to the Flickr API. The results // of this call tell us what to name the original request's // parameters and allows us to build a query string with // name/value pairs private function onReflectionComplete(event:Event):void { var queryString:String = ""; var reflection:XML = XML(event.target.data); var methodArguments:XMLList = reflection.arguments.argument; for(var i:Number = 0; i < pendingArgs.length; i++) { if(pendingArgs[i] != null) { queryString += "&" + methodArguments[i][email protected]() + "=" + pendingArgs[i]; } } var loader:URLLoader = new URLLoader(); var request:URLRequest = new URLRequest(PhotoProxy.FLICKR_URL + "?method=" + [email protected]() + queryString); loader.addEventListener(Event.COMPLETE, onComplete); loader.load(request); }
// This event handler is called when the real result is // received from the Flickr API. It simply broadcasts this // data as a DataEvent event. private function onComplete(event:Event):void { dispatchEvent(new DataEvent(Event.COMPLETE, false, false, XML(event.target.data))); } // This is the method that captures the request. It is a // part of the flash.utils.Proxy class.

flash_proxy override function callProperty(methodName:*, ...args):* { pendingArgs = args; pendingArgs.unshift(PhotoProxy.API_KEY); var loader:URLLoader = new URLLoader(); var request:URLRequest = new URLRequest(PhotoProxy.FLICKR_URL + "?method=flickr.reflection.getMethodInfo&method_name=flickr.photos." + methodName.toString() + "&api_key=" + PhotoProxy.API_KEY); loader.addEventListener(Event.COMPLETE, onReflectionComplete); loader.load(request); return methodName.toString(); }
public function addEventListener(type:String, listener:Function, useCapture:Boolean = false, priority:int = 0, weakRef:Boolean = false):void { eventDispatcher.addEventListener(type, listener, useCapture, priority, weakRef); }
public function dispatchEvent(event:Event):Boolean { return eventDispatcher.dispatchEvent(event); }
public function hasEventListener(type:String):Boolean { return eventDispatcher.hasEventListener(type); }
public function removeEventListener(type:String, listener:Function, useCapture:Boolean = false):void { eventDispatcher.removeEventListener(type, listener, useCapture); }
public function willTrigger(type:String):Boolean { return eventDispatcher.willTrigger(type); }
}
}
Using the Photo Proxy
To use this photo proxy, we need to slightly modify the main class from the first remote proxyexample. The only change is the reference to the PhotoProxy class in place of thePhotoSearchProxy class. Also, to show that all the photo operations are now available throughthis proxy, we will now call the getRecent() operation.
package {
import com.peachpit.aas3wdp.proxypattern.FlickrResultEvent; import com.peachpit.aas3wdp.proxypattern.PhotoProxy; import flash.display.Sprite; import flash.events.Event; import flash.events.DataEvent; public class RemoteProxyExample extends Sprite {

public function RemoteProxyExample() { var flickr:PhotoProxy = new PhotoProxy(); flickr.addEventListener(Event.COMPLETE, onComplete); flickr.getRecent(); }
private function onComplete(event:DataEvent):void { trace(event.data); } }
}
Adapter and Façade Patterns
The Adapter and Façade patterns are very similar to the Proxy pattern. The main difference isthat a Proxy class has the same public methods (usually by implementing the same interface)as the object it represents. The Adapter and Façade patterns don't necessarily have the samemethods as the object (or objects) they represent. Although the Adapter and Façade patternsare almost identical, the difference is that an Adapter's purpose is to convert an object's API,whereas the Façade's purpose is to simplify.

Summary
In this chapter, we examined the Proxy pattern and its many uses. The two flavors of Proxypattern we looked at are the Virtual and Remote Proxy patterns. We also went through severalexamples to fully understand the Proxy pattern:
We used the built-in flash.display.Loader class to proxy the loading of an image.
We created a Virtual Proxy to defer serialization of XML to a model object.
We built a simple Remote Proxy for handling Flickr searches.

Chapter 7. Iterator Pattern
In This Chapter
Understanding the Problems with Iteration 95
Understanding Iterator Elements 97
Using Iterators 101
Using Null Iterators 102
Summary 102
Nearly every application uses collections. A collection is simply a group of organized data.ActionScript has lots of collections including standard types such as arrays and associativearrays as well as more sophisticated collections such as multidimensional arrays and customcollection data types. When working with collections, you will naturally need to access theelements of that collection. The Iterator pattern described in this chapter does all that whileavoiding some of the pitfalls that other approaches to data access might present.

Understanding the Problems with Iteration
For the purposes of this early discussion of iterating over collection data, we'll use the followingclass to illustrate points. The customized UIntCollection class is essentially a glorified array.However, although an array can store any sort of data, the UIntCollection stores only data oftype uint.
package com.peachpit.aas3wdp.collections { public class UIntCollection { private var _data:Array;
public function UIntCollection() { _data = new Array(); }
public function addElement(value:uint):void { _data.push(value); }
}}
Iterating over collection data presents several common dilemmas. One dilemma deals with howan object allows access to the collection. One option is to simply expose the collection.
For example, if a class has an array property, it can expose the array using a getter method.Adding the following getter method to the UIntCollection class does just that:
public function get data():Array { return _data;}
The preceding solution enables you to iterate through the collection using a for statement, asfollows:
var collection:UIntCollection = new UIntCollection ();collection.addElement(1);collection.addElement(2);var i:uint;for(i = 0; i < collection.data.length; i++) { // Code that uses collection data. trace(collection.data[i]);}
There are two major related flaws with the preceding solution. The first is that exposing thearray directly breaks encapsulation in a fundamental way. The intention of exposing thecollection by way of a getter method is to enable iteration over the collection elements.However, as a consequence, it's also possible to alter the collection without the object knowing

anything about it. For example, consider the following:
var collection:UIntCollection = new UIntCollection ();collection.data[0] = "one";
In this example, you can see that a value is assigned to the data collection without the objectbeing notified. Furthermore, the example assigns a string value to the collection element eventhough the UIntCollection class expects that the data collection contains only unsignedintegers.
Note
ActionScript does not currently support typed arrays, which is why the precedingexample allows us to assign a string to an element of the array. In a language withtyped arrays, you would have to declare an array of a particular type (for example,uint).
The second flaw in the preceding solution is that it exposes not only the data, but also thestructure of the data. If you want to iterate over the elements of a collection, there's no reasonyou have to know the structure of the collection to accomplish that. In fact, having to know thestructure is a hindrance because it requires different ways to iterate over different structures.
A second dilemma with iterating over collection data deals with the interface. In the precedingexample, we noted that exposing collection data directly is not a good idea because it couldhave unexpected consequences. As a solution, it might seem like a good idea to define an APIfor the collection class that enables you to iterate over the collection data. For example, thefollowing addition to the UIntCollection class enables you to loop through the elements of thecollection while maintaining good encapsulation:
package com.peachpit.aas3wdp.collections { public class UIntCollection { private var _data:Array; private var _index:uint;
public function UIntCollection() { _data = new Array(); _index = 0; }
public function addElement(value:uint):void { _data.push(value); }
public function reset():void { _index = 0; }
public function hasNext():Boolean { return _index < _data.length; }

public function next():uint { return uint(_data[_index++]); }
}}
The downside with the preceding API is that it makes the collection responsible for iteratingover the data. There are at least two major flaws with that: One flaw is that each collectionobject maintains its own cursor (_index) so that you cannot iterate over the collection object'sdata more than once simultaneously. The second flaw is that the collection class has to defineevery possible way to iterate over the data. The preceding example assumes that you alwayswant to iterate over the data in a forward direction, one element at a time, in the order thatelements appear in the array. If you want to add methods for iterating over the collection inascending value order or skipping every other element, you must add a lot of responsibilities tothe collection class itself.

Understanding Iterator Elements
The Iterator pattern is a solution that enables you to iterate over a collection's elements whilemaintaining good encapsulation and not having to expose the structure of the data. The Iteratorpattern offloads the iteration responsibilities to a new object, and as a consequence, thecollection class remains simple, and you can iterate over the collection more than oncesimultaneously.
The Iterator pattern consists of the following elements:
Iterator interface: The interface for iterating over the collection data
Concrete iterator: The implementation of the iterator interface
Collection interface: The interface that defines how to retrieve an iterator
Concrete collection: The implementation of the collection interface
The Iterator Interface
To define an iterator interface, you have to determine how much you want the iterator to beable to do. Initially it may seem important to define an interface that allows for moving forwardor backward through the collection data. However, in practice, you generally don't need theability to move both forward and backward through the collection data. Rather, you generallywant to move through the data in only one direction, one element at a time. The ability to resetan iterator back to the start is also useful. The following interface accomplishes these goals, andit is the one that we use throughout this book.
package com.peachpit.aas3wdp.iterators { public interface IIterator {
function reset():void; function next():Object; function hasNext():Boolean;
}}
The preceding interface allows you to iterate over a collection, one element at a time. Thereset() method simply moves the cursor back to the start of the collection data. The next()method returns the next element and advances the cursor. The hasNext() method returns true ifthere is a next element and false if there is no next element. And the current() method returnsthe current element without advancing the cursor.
Note
It's important to understand that the IIterator interface is merely an interface. It doesnot dictate implementation. Although we might be accustomed to thinking of the wordnext as meaning moving forward, the next() method of an implementing class can justas easily move backward through a collection. For that matter an implementing classcould skip every other element or even return random elements. The interface simplyspecifies what methods an implementing class must define.
The Concrete Iterator
The interface simply determines what methods the concrete iterator must implement. Theconcrete iterator defines the actual functionality. Perhaps one of the most common types ofiterators for ActionScript is an iterator that can iterate over an array one element at a timestarting with index 0. The following ArrayIterator definition accomplishes just that:
package com.peachpit.aas3wdp.iterators { public class ArrayIterator implements IIterator { private var _index:uint = 0; private var _collection:Array;
public function ArrayIterator(collection:Array) { _collection = collection; _index = 0; }
public function hasNext():Boolean { return _index < _collection.length; }
public function next():Object { return _collection[_index++]; }
public function reset():void { _index = 0; }
}}
Of course, you can define many types of iterators depending on the collection data structuresand the way in which you want to iterate over the data. The preceding example iterates over anarray one element at a time with increasing indices. You could also define an iterator thatreturns the elements in reverse order, like this:
package com.peachpit.aas3wdp.iterators { public class ArrayReverseIterator implements IIterator {
private var _index:uint = 0; private var _collection:Array;
public function ArrayIterator(collection:Array) {

_collection = collection; _index = _collection.length - 1; }
public function hasNext():Boolean { return _index >= 0; }
public function next():Object { return _collection[_index--]; }
public function reset():void { _index = _collection.length - 1; }
}}
Obviously, these are just two of the many types of iterators. Every iterator can define its ownunique implementation. What is critical is that every iterator implements the same interface.The different implementations of the IIterator interface might allow access to different types ofcollections (associative arrays, for example). However, even if the collections are different, theiterator interface is the same, meaning you can access the data in the same way.
The Collection Interface
The collection interface defines the way in which you can access the iterator for a collection. Thesimplest interface is as follows:
package com.peachpit.aas3wdp.collections { public interface ICollection { unction iterator():IIterator; }}
However, consider that you might want to enable many types of iterators for a collection. Forexample, you might want to allow a collection to return an iterator that advances one elementat a time forward through the collection, or you might want to return an iterator that skipsevery other element in ascending order. For that reason, it is advantageous to define theinterface as follows:
package com.peachpit.aas3wdp.collections { public interface ICollection { function iterator(type:String = null):IIterator; }}
The implementing collection class can then return a different iterator type depending on theparameter passed to the method. The UIntCollection example in the next section illustrates this.

The Concrete Collection
The concrete collection class implements the collection interface. The following example rewritesthe UIntCollection class so that it implements ICollection:
package com.peachpit.aas3wdp.collections { import com.peachpit.aas3wdp.IIterator; import com.peachpit.aas3wdp.ArrayIterator; public class UIntCollection implements ICollection { private var _data:Array;
public function UIntCollection() { _data = new Array(); }
public function addElement(value:uint):void { _data.push(value); }
public function iterator(type:String = null):IIterator { return new ArrayIterator(_data); }
}}
The preceding implementation returns only one type of iterator. However, if appropriate, youcould enable several types of iterators, and the iterator that is returned would depend on theparameter value, as in the following example:
public function iterator(type:String = null):IIterator { if(type == "ArrayReverseIterator") { return new ArrayReverseIterator(_data); } else { new ArrayIterator(_data); }}
In this example the user can create one UIntCollection object, and from the same interface shecan request several different types of iterators.
var collection:UIntCollection = new UIntCollection();collection.addElement(1);collection.addElement(20);collection.addElement(5);collection.addElement(15);var iteratorAscending:IIterator = collection.iterator();var iteratorDescending:IIterator = collection.iterator("ArrayReverseIterator");

Using Iterators
After you've defined iterators and collections, you can use the iterators as in the followingexample, which adds four elements to a UIntCollection object and then uses an iterator toaccess that data:
var collection:UIntCollection = new UIntCollection();collection.addElement(1);collection.addElement(20);collection.addElement(5);collection.addElement(15);var iterator:IIterator = collection.iterator();while(iterator.hasNext()) { trace(iterator.next());}
The preceding example uses the iterator to loop through each of the elements of the collectionand write it to the debug console. Notice that because the iterator interface is identical for alliterator types, it doesn't matter what concrete type the iterator() method returns. Forexample, the preceding code would continue to function correctly if you specifiedArrayReverseIterator as the parameter for iterator(), thus returning anArrayReverseIterator instead of an ArrayIterator. The only difference would be theoutputwhich would return the collection values in reverse order.
Consider how different this approach is from using the array directly. When you allow directaccess to the array, not only do you break encapsulation, you also create code that is specific tothe implementation. For example, if you wanted to use a for statement to loop through theelements of an array directly, you would have to change the for statement expressions whenyou wanted to change how you loop through the array. But when you use the iterators, youdon't have to make such changes because the implementation is within the iterator itself.

Using Null Iterators
One special iterator type is the null iterator. The null iterator enables you to build classes thatadhere to an interface (they are iterable) but that don't actually have any collection data. Theclassic case for null iterators is the leaf element of a composite object (as discussed in Chapter8, "Composite Pattern"). In such cases, it's necessary that the leaf elements (those containingno collection data) and the composite elements (those that do contain collection data)implement the same interface and be treated in the same way. For recursive traversal purposes,it's necessary that the interface provide access to an iterator for both composite and leafelements. One option is to return null for the leaf element iterator. However, doing so presentsa special case that you must detectnamely, you must add if statements to test whether theiterator is null or not before calling the methods such as hasNext() and next(). A more elegantsolution is to use a special type of iterator that always returns false for hasNext() and returnsnull for next(). That special-case iterator is a null iterator as defined in the following code:
package com.peachpit.aas3wdp.iterators { public class NullIterator implements IIterator { public function NullIterator() {} public function hasNext():Boolean { return false; } public function next():Object { return null; } public function reset():void { } }}
We'll see an example of how to use this iterator type in the next chapter.

Summary
The Iterator pattern enables client code to read a collection's data without exposing thestructure of the data or making the data inadvertently writable. The Iterator pattern is acommon pattern that provides a standard interface for reading collection data.
Although the Iterator pattern is simple, it is very useful. In fact, it is the pattern's simplicity thatmakes it so useful. Because the pattern standardizes the way to access data from collections, itallows you to create interfaces that interact with the IIterator interface rather than with anyspecific implementation. That means that your code is more flexible and adaptable.

Chapter 8. Composite Pattern
In This Chapter
Understanding the Element Interface 103
Understanding Leaf Elements 106
Understanding Composite Elements 107
Building a File System Example 108
Summary 112
The Composite pattern enables you to elegantly deal with recursive or hierarchical datastructures. There are many examples of hierarchical data structures, making the Compositepattern very useful. A common example of such a data structure is one that you encounterevery time you use a computer: the file system. The file system consists of directories and files.Every directory potentially has contents. The contents of a directory might be files, but they alsomight be directories. In this way, the file system of a computer is organized in a recursivestructure. If you want to represent such a data structure programmatically, you can use theComposite pattern.
The Composite pattern has the following elements:
Element interface: An interface for all participating elements.
Leaf: A class representing terminating elements in the data structure. In the file systemexample, files are leaf elements because they don't have child elements. Leaf classes mustimplement the element interface.
Composite: A class for the collections in the data structure. In the file system example,directories are composite elements. Composite classes must implement the elementinterface.

Understanding the Element Interface
All elements within the Composite pattern, whether leaves or composites, should be essentiallyinterchangeable. This means that they must all implement a common interface. It's impossibleto determine what the exact interface ought to look like for every use of the Composite pattern.However, at a minimum, it will likely look much like a collection. The following is an example ofwhat a basic element interface might look like:
package { public interface IElement { function iterator():IIterator; function addItem(item: IElement):void; function removeItem(item: IElement):void; function getParent():IElement; function setParent(parent: IElement):void; }}
Note
The preceding interface uses the IIterator interface as discussed in Chapter 7,"Iterator Pattern." This chapter makes use of the Iterator pattern; if you have not yetread Chapter 7, you might want to consider reading that chapter before continuingwith this one.
Note that this basic element interface example specifies IElement as the type for the addItem(),removeItem(), and setParent() methods. In theory, this means that any class that implementsthe IElement interface can be added to any other object that implements the same interface.This is what enables all elements in the Composite pattern to look identical. Of course, theimplementation will be different for leaf and composite elements. A leaf element cannot actuallycontain other elements, but it must implement the same interface for the pattern to work.
In a practical example, the element interface will probably have more methods than areincluded in the IElement example. Throughout this chapter, we'll be looking at a file systemexample. The following IFileSystemItem interface is the element interface we will use for the filesystem example:
package com.peachpit.aas3wdp.compositeexample.data { // You'll need to ensure that IIterator from Chapter 7 is in your // classpath. import com.peachpit.aas3wdp.iterators.IIterator; public interface IFileSystemItem { function iterator():IIterator; function addItem(item:IFileSystemItem):void; function removeItem(item:IFileSystemItem):void;

function getName():String; function setName(name:String):void; function getParent():IFileSystemItem; function setParent(parent:IFileSystemItem):void;}}
For this example, it's also useful to create a simple implementation in the form of an abstractclass we'll call FileSystemItem. Although an abstract class is not a requirement in this case,we're using one because that way each of the concrete classes can inherit a commonimplementation rather than having redundant code in each of the classes. All our code stillreferences the interface rather than the abstract class to maintain maximum adaptability. Theabstract class looks like the following:
package com.peachpit.aas3wdp.compositeexample.data { import com.peachpit.aas3wdp.iterators.IIterator; public class FileSystemItem implements IFileSystemItem { protected var _parent:IFileSystemItem; protected var _name:String; public function FileSystemItem() { }
public function iterator():IIterator { return null; } public function addItem(item:IFileSystemItem):void { }
public function removeItem(item:IFileSystemItem):void { }
public function getName():String { return _name; }
public function setName(name:String):void { _name = name; }
public function getParent():IFileSystemItem { return _parent; }
public function setParent(parent:IFileSystemItem):void { _parent = parent; } }}

In this case, we're using an abstract class (FileSystemItem) because it provides some basicimplementation that concrete leaf and composite subclasses can inherit. This way the, File andDirectory subclasses don't have to each implement getName(),setName(), getParent(), andsetParent().
Note
The preceding interface and abstract class might seem strange because they requireall concrete classes to implement methods that may or may not appear directlyrelated to all types. For example, leaf elements might not appear to need addItem(),removeItem(), and iterator() methods. Although it's true that, in most cases, it is
inadvisable for an interface to require a concrete type to implement methods thatdon't apply to all types, in the case of the Composite pattern it is essential to thepattern that composite and leaf elements appear to be identical. Therefore the leafelements must implement addItem(), removeItem(), and iterator().

Understanding Leaf Elements
Leaf elements are the terminating elements in the Composite pattern. Leaf elements can beplaced in composite elements, but composite elements cannot be placed in leaf elements. Interms of our file system example, files are leaf elementsyou can place files in directories, butyou cannot place directories in files.
Leaf elements must implement the same interface as composite elements for the pattern towork. This approach might seem odd at first because the element interface always allows foradding and removing elements, yet a leaf element cannot contain elements. In the Compositepattern, the leaf element does include the methods to add, remove, and access elements tosatisfy the requirements of the interface, yet the implementation does not allow you to actuallyadd, remove, or access elements. The following is the implementation for a File class as part ofour file system example. Notice that it inherits from the abstract FileSystemItem class so that itdoesn't need to implement most of the required methods (it inherits the implementations fromits superclass). In particular, it doesn't have to override addItem() or removeItem() because thesuperclass implementations do nothing, which is exactly what we want the leaf classimplementation to do. Although the File class does not need to override iterator(), to simplifyworking with File objects in the Composite pattern, we'll override iterator() so that it returnsa NullIterator instance, as shown here:
package com.peachpit.aas3wdp.compositeexample.data { import com.peachpit.aas3wdp.iterators.IIterator; import com.peachpit.aas3wdp.iterators.NullIterator;
public class File extends FileSystemItem { public function File() {
}
override public function iterator():IIterator { return new NullIterator(); }
}}
We talked about the NullIterator type in Chapter 7. Although the File implementation ofiterator() could simply return null, it's slightly more elegant to return a NullIterator object.The reason is that if iterator() returns null, you might have to test for null values when usingFile objects. Yet if the method returns a NullIterator object, you can use the return valueinterchangeably with the return value from a composite object. Because a NullIterator objectalways returns false for hasNext(), it should allow a leaf object to work just like a compositeobject without ever actually iterating over child elements.
Understanding Composite Elements
Composite elements also implement the element interface, but unlike leaf elements, you canadd child elements to composites. In our file system example, directories are compositeelements.
The following is a Directory class that represents a file system directory in our file systemexample. Notice that the class extends the abstract FileSystemItem class. Because the abstractclass defers the implementation of iterator(), addItem(), and removeItem() to subclasses, theDirectory class must override these methods.
package com.peachpit.aas3wdp.compositeexample.data { import com.peachpit.aas3wdp.iterators.IIterator; import com.peachpit.aas3wdp.iterators.ArrayIterator;
public class Directory extends FileSystemItem {
// The array of child elements private var _items:Array;
public function Directory() { _items = new Array(); }
override public function addItem(item:IFileSystemItem):void { _items.push(item); }
override public function removeItem(item:IFileSystemItem):void { var i:uint; // Loop through all the child elements. for(i = 0; i < _items.length; i++) { // If one of the elements matches the // parameter remove it from the array. if(_items[i] == item) { _items.splice(i, 1); break; } } } override public function iterator():IIterator { // See the "Iterator Pattern" chapter for details on // ArrayIterator return new ArrayIterator(_items); } }}
The Directory class implementation is fairly simple. It must override addItem() to append theelement to the _items array. The class overrides removeItem() to remove the specified item bylooping through all the elements of the _items array until it finds the matching element. And the

class overrides iterator() to return an ArrayIterator instance.

Building a File System Example
The Composite pattern is simple in terms of its implementation, but its usage might be a littleunclear as of yet. We've already discussed the details of how it works, but an example usuallyhelps illustrate the concepts. In this example, we'll build a simple application that uses the file-system metaphor to show how the Composite pattern works.
This example uses the IFileSystemItem interface as well as the FileSystemItem , File , andDirectory classes discussed earlier in this chapter. In addition, we'll create aFileSystemItemView class and a main class (CompositeExample ). The application will load datafrom an XML file and use that data to allow the user to browse a graphical representation of afile system. The directories are represented by folder icons, and files are represented by whiterectangles. The user can click a directory to browse the contents of the directory.
For the purposes of this example, we'll read the data from an XML file called fileSystem.xmlwith the following content:
<fileSystem> <fileSystemItem type="Directory" name="Program Files" bytes="1024"> <fileSystemItem type="Directory" name="Adobe Illustrator"> <fileSystemItem type="File" name="Illustrator.exe" /> </fileSystemItem> </fileSystemItem> <fileSystemItem type="Directory" name="My Documents"> <fileSystemItem type="File" name="Document.txt" /> <fileSystemItem type="File" name="Image.jpg" /> </fileSystemItem></fileSystem>
You can see that the root node is <fileSystem> , and contained within that are nested<fileSystemItem> tags. Each <fileSystemItem> tag is of type Directory or File . Directorynodes can contain nested elements whereas File nodes cannot. Each element has a nameattribute as well. We'll load this XML file into the application and parse it into our compositestructure.
Next we'll need a class that is a view for the File and Directory classes. TheFileSystemItemView constructor accepts a parameter of type IFileSystemItem and then drawsthe correct icon and adds a label. Note that FileSystemItemView extends Sprite because itneeds to be a display object.
package com.peachpit.aas3wdp.compositeexample.views { import flash.display.Sprite; import flash.text.TextField; import flash.text.TextFieldAutoSize; import flash.filters.BevelFilter; import com.peachpit.aas3wdp.compositeexample.data.Directory; import com.peachpit.aas3wdp.compositeexample.data.IFileSystemItem;
public class FileSystemItemView extends Sprite {

// The file or directory to display. private var _item:IFileSystemItem; // The icon for the item - either a white rectangle or // a folder icon private var _icon:Sprite; // The name of the item private var _label:TextField;
// Return a reference to the file or directory public function get data():IFileSystemItem { return _item; }
public function FileSystemItemView(item:IFileSystemItem) { _item = item; _icon = new Sprite(); // Test if the item is a Directory or File. Draw the // appropriate icon for the item type if(item is Directory) { _icon.graphics.lineStyle(); _icon.graphics.beginFill(0xFFFF00); _icon.graphics.drawRect(0, 10, 50, 30); _icon.graphics.endFill(); _icon.graphics.beginFill(0xFFFF00); _icon.graphics.drawRoundRect(0, 0, 25, 15, 5, 5); _icon.graphics.endFill(); _icon.filters = [new BevelFilter()]; } else { _icon.graphics.lineStyle(0, 0x000000, 1); _icon.graphics.beginFill(0xFFFFFF); _icon.graphics.drawRect(0, 0, 40, 50); _icon.graphics.endFill(); } addChild(_icon);
// Add a label text field _label = new TextField(); _label.text = _item.getName(); _label.autoSize = TextFieldAutoSize.LEFT; _label.x = 50; addChild(_label); }
// This method allows you to override the label text // value for special cases such as parent directories // where you want to display a specific label rather than // the name of the item public function overrideLabel(label:String):void { _label.text = label; }
}}

Next we need to define a main class. In this example, the main class is called CompositeExample. The main class loads the XML file, parses it into the composite structure, and displays thecontents of the top-level directory. When the user clicks a directory, the main class dispatchesan event that updates the view.
package { import flash.display.Sprite; import flash.net.URLLoader; import flash.net.URLRequest; import flash.events.Event; import flash.events.MouseEvent; import com.peachpit.aas3wdp.compositeexample.data.Directory; import com.peachpit.aas3wdp.compositeexample.data.File; import com.peachpit.aas3wdp.compositeexample.data.FileSystemItem; import com.peachpit.aas3wdp.iterators.IIterator; import com.peachpit.aas3wdp.compositeexample.views.FileSystemItemView; import com.peachpit.aas3wdp.compositeexample.data.IFileSystemItem;
public class CompositeExample extends Sprite { // The top-level directory which contains all the // child elements private var _fileSystem:Directory;
// An array of all the views currently displayed private var _itemViews:Array; public function CompositeExample() { // Load the XML var loader:URLLoader = new URLLoader(); loader.addEventListener(Event.COMPLETE, onLoadXML); loader.load(new URLRequest("fileSystem.xml"));
// Construct the top-level directory. Set the name, // and set the parent to null. Setting the parent to // null will indicate that there are no parent // composite objects for this directory. _fileSystem = new Directory(); _fileSystem.setName("File System"); _fileSystem.setParent(null);
_itemViews = new Array(); }
// When the XML loads parse the XML into the composite // structure. The parseXmlToFileSystem() method accepts an // XMLList parameter and a Directory parameter. It parses // all the XMLList children into elements within the // directory. private function onLoadXML(event:Event):void { XML.ignoreWhitespace = true; var xml:XML = new XML(event.target.data); parseXmlToFileSystem(xml.children(), _fileSystem);

// Display the contents of the top-level directory updateView(_fileSystem); }
private function updateView(directory:Directory):void { var i:uint; // Loop through all the currently-displayed item // views, and remove them. for(i = 0; i < _itemViews.length; i++) { removeChild(_itemViews[i]); delete _itemViews[i]; } _itemViews = new Array();
// Retrieve the iterator for the current directory var iterator:IIterator = directory.iterator(); var itemY:Number = 0; var item:IFileSystemItem; var view:FileSystemItemView;
// If the directory has a parent, then add a view for // the parent directory and override the label so // it simply says Parent Directory. Add a click // event listener so when the user clicks, it changes // to the parent directory if(directory.getParent() != null) { view = new FileSystemItemView(directory.getParent()); view.overrideLabel("Parent Directory"); view.addEventListener(MouseEvent.CLICK, onClick); addChild(view); _itemViews.push(view); itemY += view.height + 5; }
// Loop through all the items in the directory. Add // a view for each item. If the item is a directory, // add a click event listener. while(iterator.hasNext()) { item = IFileSystemItem(iterator.next()); view = new FileSystemItemView(item); view.y = itemY; itemY += view.height + 5; if(item is Directory) { view.addEventListener(MouseEvent.CLICK, onClick); } addChild(view); _itemViews.push(view); } } private function parseXmlToFileSystem(xml:XMLList, directory:Directory):void { var i:uint; var item:FileSystemItem; // Loop through all the children of the XMLList. // If the item is a directory, then make a new

// directory and call parseXmlToFileSystem() // recursively to populate the directory. Otherwise // construct a file. for(i = 0; i < xml.length(); i++) { if(xml[i].@type == "Directory") { item = new Directory(); parseXmlToFileSystem(xml[i].children(), Directory(item)); } else { item = new File(); } item.setParent(directory); item.setName(xml[i].@name); directory.addItem(item); } }
// When the user clicks an item view, update the view to the // contents of the directory that the user clicked. private function onClick(event:MouseEvent):void { updateView(Directory(event.currentTarget.data)); } }}
When you run the application, you ought to see two folders initially: ProgramFiles andMyDocuments . If you click one of the folders, the view updates to display the contents of thedirectory as well as a folder icon with a ParentDirectory label. An example of the application isshown in Figure 8.1 .
Figure 8.1. The sample application.

Summary
The Composite pattern is an important pattern for creating hierarchical structures in which youwant to be able to treat all the elements in the same way. This chapter uses a file systemexample composed of files and directories to illustrate one case in which the Composite patterncan be useful. In this example, files and directories implement the same interface, which is akey feature of the Composite pattern. By implementing the same interface, you can treat filesand directories in exactly the same way, and you can store either a file or a directory as a childof a directory.

Chapter 9. Decorator Pattern
In This Chapter
Understanding the Decorator Pattern 114
Building Reader Decorators 117
Building Visual and Commutative Decorators 128
Summary 136
The Decorator pattern enables you to apply new behavior to an object at runtime. Traditionally,many developers learn to add behavior by using inheritance rather than composition. Thismeans that if you want to add a move() method to an existing Widget class, you'd extend Widgetto define a new MovableWidget class. Or, if you want to redefine the move() method ofMovableWidget so that it moves only until its fuel is used up, you could extend MovableWidget todefine FuelableMovableWidget.
However, inheritance has two major drawbacks in such cases:
You cannot change an object's behavior at runtime. For example, a Widget is always aWidget. It isn't possible to convert a Widget to a MovableWidget or aFuelableMovableWidget when traditional inheritance is used.
As more permutations become available, the number of classes required becomesunwieldy. For example, if you want to extend a Widget class so that it is scalable, youmight define a ScalableWidget subclass. If you want to extend the class so that it isrotatable, you might define a RotatableWidget subclass. To make a movable widget, youmight define a MovableWidget subclass. However, what if you want to combine some of thebehaviors? Using inheritance, you'd have to define ScalableRotatableWidget,ScalableMovableWidget, RotatableMovableWidget, and ScalableRotatableMovableWidget.Each new behavior increases the number of required classes in a factorial fashion such thatafter just a few behaviors, the number of classes is unmanageable.
The solution to these inheritance drawbacks is the Decorator pattern. The Decorator patternuses composition rather than inheritance to add new behavior to an object. This means that it'spossible to add behavior and change behavior at runtime. Additionally, because the Decoratorpattern uses composition, it's often possible to chain together several new behaviors in amanageable fashion.
It is often useful to visualize how a pattern works. Imagine that the Decorator pattern is like aset of Russian dollsthe type of dolls that stack inside one another. Obviously, this analogy islimited, but it does illustrate the basic nesting relationship between decorator and decoratedobjects. The Decorator pattern starts with a base object that can be decorated. This decoratedobject is analogous to the innermost Russian doll. The decorator objects use composition to addbehavior to the decorated object. The decorator objects are analogous to the larger Russian

dolls within which you place the smaller dolls. After you stack a Russian doll in the next largerdoll, you can then stack that doll in the next larger doll. So too with the Decorator pattern; youcan often use a decorator to add yet more behavior to another decoratorthus treating thedecorator like a decorated object. We'll look at these types and their relationships in more detailthroughout the chapter.

Understanding the Decorator Pattern
The basic idea of the Decorator pattern is that new types of objects (decorators) can add newbehavior or change existing behavior of a decorated object. The decorators and the decoratedobject must implement the same interface. That way, the decorator and decorated objects canbe used interchangeably.
The Decorator pattern consists of the following elements:
Decorator/decorated interface
Concrete decorated class
Abstract decorator class
Concrete decorator class(s)
The following sections look at these elements in more detail.
Decorator/Decorated Interface
Everything about the Decorator pattern hinges on the decorator objects and the decoratedobjects implementing the same interface. This way, they can be treated in exactly the same wayand used interchangeably. The exact interface depends entirely on the required behavior of theobjects. There is no universal interface for all decorator and decorated objects. For the purposeof a simple example, consider the following interface. In the next few sections, we'll show howto implement this interface using the Decorator pattern.
package com.peachpit.aas3wdp.decorator { public interface IWidget { function getDescription():String; function run():void; }}
Tip
The distinction between decorator and decorated objects might not be immediatelyclear. Decorators are objects that use composition to add to or modify the behavior ofanother object at runtime. The object to which the behavior is added or modified isthe decorated object. Because decorator objects themselves can be decorated by otherdecorators, it's essential that both types of objects implement the same interface.

Concrete Decorated Class
The concrete decorated class is the basic type that implements the interface. Continuing theexample from the preceding section, the following Widget class implements IWidget as the basicdecorated type:
package com.peachpit.aas3wdp.decorator { public class Widget implements IWidget { public function Widget() {}
public function getDescription():String { return "Widget"; }
public function run():void { trace("running"); } }}
This simple decorated type is the basis of the pattern (like the innermost Russian doll). Thebase decorated type is the foundation on which all other decorators are applied. This example ispurposefully simple. It merely implements the two methods required by the interface (IWidget).
Abstract Decorator Class
Technically, all that is required of a decorator is that it implements the same interface as thedecorated type. However, practically speaking, most decorators inherit from an abstractdecorator class that implements some of the basic functionality such as compositing thedecorated object and passing through the method calls. The following example illustrates abasic abstract decorator class for the widget example:
package com.peachpit.aas3wdp.decorator { public class AbstractWidgetDecorator implements IWidget { protected var decorated:IWidget; public function AbstractWidgetDecorator(decoratedWidget:IWidget) { decorated = decoratedWidget; } public function getDescription():String { return _decorated.getDescription(); }
public function run():void { _decorated.run(); } }}
The AbstractWidgetDecorator class must implement the IWidget interface because it is the same

interface implemented by the decorated type (Widget). This is the basis of the Decoratorpatternthat both the decorator and the decorated types implement the same interface.
Note that the constructor accepts a parameter of type IWidget. This parameter is the object thatthe decorator will decorate. Although there's no requirement that you pass the decorated objectthrough the constructor (you could use a different method to accomplish this), it is theconvention. It's important that the decorated type is set to the interface rather than a concrete(or abstract) type in order to fully support polymorphism. This approach allows the decorator todecorate not only a concrete decorated type, but also other decorators.
It's also important to note that in this example the decorated property is set as protected. Bysetting the property as protected, it is accessible to subclasses of AbstractWidgetDecorator.
The actual implementation of the methods may vary in every case. In this particular example,each of the methods simply passes through the request to the decorated object. However, it isuseful to have an abstract class in many cases to ensure that the core, common behavior isinheritable.
Concrete Decorator Class(es)
The concrete decorator(s) must implement the same interface as the decorated object type.Normally, this is accomplished by extending the abstract decorator class. The decorator classcan do the following.
Modify existing behavior. Decorators often proxy requests to decorated methods. Althoughit's possible for a decorator to simply pass through requests to the decorated objectexactly as they were made, a decorator can also pre-process or post-process. Decoratorscan also handle the entire request at the decorator level without ever forwarding therequest to the decorated object.
Add new behavior. Decorators must implement the interface, but they can also add newmethods. This is an option and not a requirement. Adding new behavior can beadvantageous because you can add functionality to an object at runtime. However, addingmethods means that you cannot effectively chain decorators as is discussed later in thischapter.
The following code illustrates a concrete decorator for the widget example:
package com.peachpit.aas3wdp.decorator { public class DigitalWidget extends AbstractWidgetDecorator { public function DigitalWidget(decorated:IWidget) { super(decorated); } override public function getDescription():String { var description:String = _decorated.getDescription(); return "digital " + description; } }}
This example declares DigitalWidget to extend AbtractWidgetDecorator. Note that theconstructor accepts a parameter of type IWidget, meaning that it could be either a concrete

decorated type (Widget) or another decorator type. The constructor in this example simplypasses along the parameter to the constructor of the superclass.
This example inherits the default implementation for the run() method, but it overridesgetdescription(). The getdescription() method returns the description from the decoratedobject prepended with the word digital.

Building Reader Decorators
So far, you've had the chance to read about the theory of the Decorator pattern with anextremely simple example. In this section, you'll have the chance to see a slightly moresophisticated and practical example that makes use of the Decorator pattern. We'll build agroup of classes that work together for reading text data in many different ways.
The reader example starts with a concrete decorated type that takes a string value and reads itone character at a time. Then, we'll add decorators that can read from the string by the wordand by the line. We'll then add additional decorated and decorator types to demonstrate howthey can be used interchangeably.
Creating the Decorator/Decorated Interface
To implement the Decorator pattern, we first need an interface. For this example, we'll definean interface called com.peachpit.aas3wdp.decoratorexample.io.IReader . All reader decoratedand decorator classes must implement this interface. For our example, we'll require that allreader types should be capable of dispatching events. For this reason IReader extendsflash.events.IEventDispatcher .
Here's our interface:
package com.peachpit.aas3wdp.decoratorexample.io {
import flash.events.IEventDispatcher; public interface IReader extends IEventDispatcher {
function read():String; function readArray(offset:uint = 0, length:uint = 0):Array; function readString():String; function hasNext():Boolean; function isReady():Boolean; function reset():void; }}
As we've already mentioned, our IReader interface extends IEventDispatcher , which meansany implementing class must implement all of the IEventDispatcher methods in addition to themethods required by IReader . The IEventDispatcher interface requires the following methods:addEventListener() , removeEventListener() , dispatchEvent() , hasEventListener() , andwillTrigger() . As you'll see in the next section, the simplest way to implement the interface inmost cases is simply to extend EvenTDispatcher .
The IReader interface also requires a handful of methods. The read() , readArray() , andreadString() methods each provide a mechanism for accessing an element or elements of text.The actual implementations will differ in concrete classes, but the idea remains the same:read() returns the next element in much the same way an iterator returns the next element.The readArray() method returns an array of elements. The readString() method returns the
original value. The isReady() method returns a Boolean indicating whether or not the reader isready for reading. The hasNext() method returns a Boolean indicating whether or not there areadditional elements. The reset() method resets the reader to the first element.
Defining an Abstract Reader Class
As we've already seen, all implementing classes of IReader must implement quite a fewmethodsboth those from IEventDispatcher and from IReader . In many of the reader classes,the implemented methods look very similar. For that reason, we can simplify those classes byfirst defining an abstract class. In this case, we'll definecom.peachpit.aas3wdp.decoratorexample.io.AbstractReader as an abstract class implementingthe IReader interface. Because the IReader interface extends IEventDispatcher , you can eitherimplement all the required methods or extend a class that already implements those methods.In this case, Reader extends Eventdispatcher , a class that is part of the Flash Player API.
package com.peachpit.aas3wdp.decoratorexample.io {
import flash.events.Event; import flash.events.EventDispatcher;
public class AbstractReader extends EventDispatcher implements IReader { protected var index:uint = 0; public function Reader() { } public function hasNext():Boolean { return false; } public function reset():void { index = 0; }
public function isReady():Boolean { return true; } public function read():String { return null; } public function readArray(offset:uint = 0, length:uint = 0):Array { return null; } public function readString():String { return null; } }}
The preceding code is fairly basic. Most of the methods simply return default values. The only
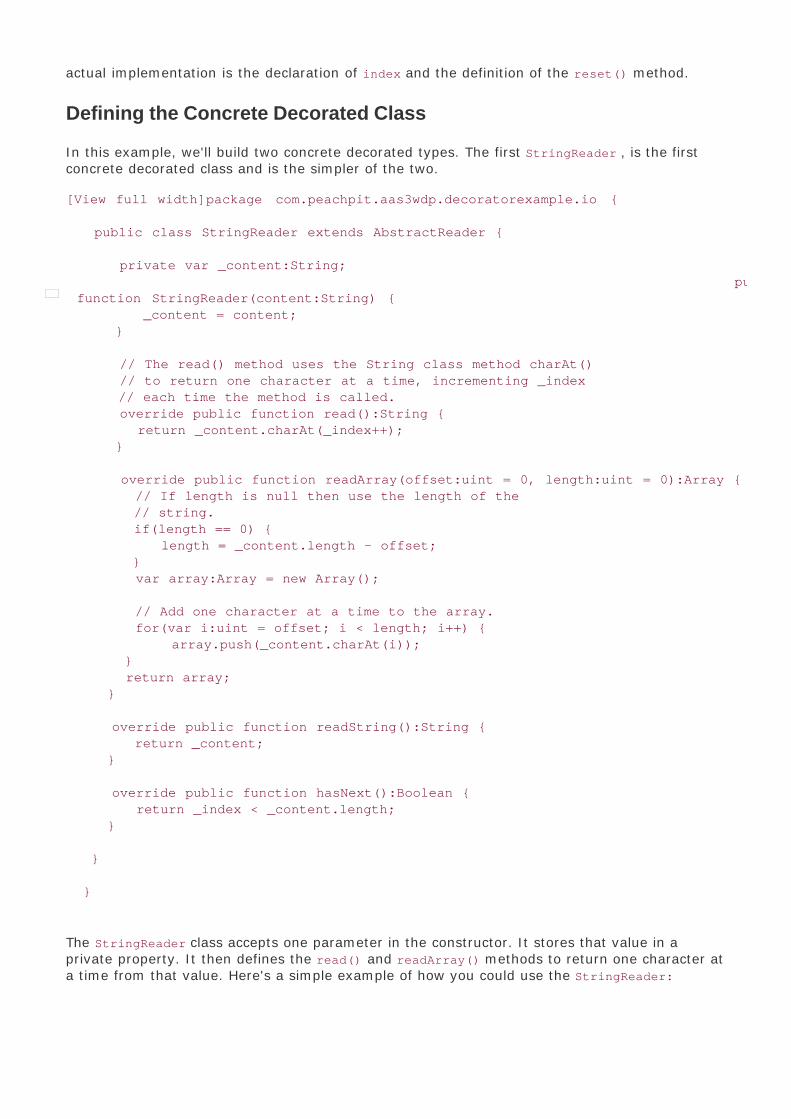
actual implementation is the declaration of index and the definition of the reset() method.
Defining the Concrete Decorated Class
In this example, we'll build two concrete decorated types. The first StringReader , is the firstconcrete decorated class and is the simpler of the two.
[View full width]package com.peachpit.aas3wdp.decoratorexample.io { public class StringReader extends AbstractReader { private var _content:String; public function StringReader(content:String) { _content = content; }
// The read() method uses the String class method charAt() // to return one character at a time, incrementing _index // each time the method is called. override public function read():String { return _content.charAt(_index++); }
override public function readArray(offset:uint = 0, length:uint = 0):Array { // If length is null then use the length of the // string. if(length == 0) { length = _content.length - offset; } var array:Array = new Array(); // Add one character at a time to the array. for(var i:uint = offset; i < length; i++) { array.push(_content.charAt(i)); } return array; } override public function readString():String { return _content; }
override public function hasNext():Boolean { return _index < _content.length; } }
}
The StringReader class accepts one parameter in the constructor. It stores that value in aprivate property. It then defines the read() and readArray() methods to return one character ata time from that value. Here's a simple example of how you could use the StringReader:

var reader:IReader = new StringReader("abcdefg");while(reader.hasNext()) { trace(reader.read());}
This example writes the characters a , b , c , d , e , f , and g one at a time to the console.
Creating the Abstract Decorator Class
Now that we've defined a concrete decorated type, we can look at creating decorators for it. Tosimplify the decorators, we'll create an abstract decorator calledcom.peachpit.aas3wdp.decoratorexample.io.AbstractReaderDecorator . TheAbstractReaderDecorator class extends AbstractReader just like the StringReader class does(all the decorated and decorator classes must implement the same interface). Note that weneed to override several of the methods so that they delegate requests to the decoratedinstance, _content .
package com.peachpit.aas3wdp.decoratorexample.io { import com.peachpit.aas3wdp.decoratorexample.io.IReader; import com.peachpit.aas3wdp.decoratorexample.io.Reader; public class AbstractReaderDecorator extends AbstractReader {
private var _content:IReader; // The constructor accepts a parameter of type IReader // that will be the decorated object. public function ReaderDecorator(reader:IReader) { _content = reader; }
override public function read():String { return _content.read(); } override public function readArray(offset:uint = 0, length:uint = 0):Array { return _content.readArray(offset, length); }
override public function readString():String { return _content.readString(); }
}
}
The abstract decorator class is quite simple. It just delegates requests. Next we'll look atcreating concrete decorators.
Defining the First Concrete Decorator Class

Next, we define the first of the concrete decorator classes, WordReader . Notice that this classextends the abstract decorator class, AbstractReaderDecorator .
package com.peachpit.aas3wdp.decoratorexample.io { import com.peachpit.aas3wdp.decoratorexample.io.IReader; import com.peachpit.aas3wdp.decoratorexample.io.ReaderDecorator; public class WordReader extends ReaderDecorator {
private var _words:Array;
public function WordReader(reader:IReader) { // Call the superclass constructor, passing the // parameter along so that the _content property is // set. super(reader);
// Define a regular expression to find words. var expression:RegExp = /[a-z]+/ig; // Retrieve all the words from the decorated content // by calling readString() and using the match() // method with the regular expression. Note that // readString() is implemented in the abstract // ReaderDecorator class. _words = readString().match(expression); }
// Override read() so it returns the next word from the // _words array. override public function read():String { var word:String = _words[_index++]; return word; } // Override readArray() so it returns a new array // containing part of the _words array. override public function readArray(offset:uint = 0, length:uint = 0):Array { return _words.slice(offset, length); }
override public function hasNext():Boolean { return _index < _words.length; } } }
This decorator allows you to wrap any other object that implements the IReader interface, and itchanges the functionality while keeping the same interface. For example, the following codeillustrates this operation:
var reader:IReader = new StringReader("one two three four");// First display each character one at a time.

while(reader.hasNext()) { trace(reader.read());}reader = new WordReader(reader);// Next display one word at a time.while(reader.hasNext()) { trace(reader.read());}
Testing the Decorator
Next, we'll define a main class to test the example.
package { import flash.display.Sprite; import com.peachpit.aas3wdp.decoratorexample.io.IReader; import com.peachpit.aas3wdp.decoratorexample.io.StringReader; import com.peachpit.aas3wdp.decoratorexample.io.WordReader; public class ReaderDecoratorExample extends Sprite {
public function ReaderDecoratorExample() { var stringReader:StringReader = new StringReader("Lorem ipsum\ndolor sit amet"); var wordReader:WordReader = new WordReader(stringReader); traceReader(stringReader); traceReader(wordReader); } public function traceReader(reader:IReader):void { while(reader.hasNext()) { trace(reader.read()); } }
}}
Debug the application, and you'll see that the first call to traceReader() displays each of thecharacters of the string from the StringReader object. The second call to traceReader() displayseach word using the WordReader object. Because traceReader() is defined to accept an IReaderparameter, either StringReader (decorated) or WordReader (decorator) will work. Each objectimplements the same interface, but they have different behaviors.
Defining an Additional Concrete Decorator Class
One of the advantages of the Decorator pattern is that you can create many decorators.Because each decorator can decorate any other decorator, there is no real limit to how manydecorators you can use. To illustrate this truth, we'll next add a new decorator class calledcom.peachpit.aas3wdp.decoratorexample.io.LineReader . As the name implies, LineReaderreads the content one line at a time.
package com.peachpit.aas3wdp.decoratorexample.io {

import com.peachpit.aas3wdp.decoratorexample.io.IReader; import com.peachpit.aas3wdp.decoratorexample.io.ReaderDecorator;
public class LineReader extends AbstractReaderDecorator { private var _lines:Array;
public function LineReader(reader:IReader) { super(reader); var expression:RegExp = /[\n\r\f]/g; _lines = readString().split(expression); }
override public function read():String { var line:String = _lines[_index++]; return line; }
override public function readArray(offset:uint = 0, length:uint = 0):Array { return _lines.concat(); } override public function hasNext():Boolean { return _index < _lines.length; }
}}
The LineReader class inherits from AbstractReaderDecorator . It accepts any reader type as aparameter to the constructor, and it uses that parameter as the content which it then parsesinto an array of lines.
With the addition of the LinerReader , we can next verify that it works by making a few edits tothe main class as follows:
package { import flash.display.Sprite; import com.peachpit.aas3wdp.decoratorexample.io.IReader; import com.peachpit.aas3wdp.decoratorexample.io.StringReader; import com.peachpit.aas3wdp.decoratorexample.io.WordReader; import com.peachpit.aas3wdp.decoratorexample.io.LineReader; public class ReaderDecoratorExample extends Sprite { public function DecoratorExample() { var stringReader:StringReader = new StringReader("Lorem ipsum\ndolor sit amet"); var wordReader:WordReader = new WordReader(stringReader); var lineReader:LineReader = new LineReader(stringReader); traceReader(stringReader); traceReader(wordReader); traceReader(lineReader); }

public function traceReader(reader:IReader):void { while(reader.hasNext()) { trace(reader.read()); } }
}}
When you debug the application, you'll see that this time the third call to traceReader() outputseach line of text. Because the original text has a newline character (\n), the output displays ontwo lines.
Defining a New Decorated Type
Now that we have a decorated type in place, we've already seen that we can add as manydecorators as we want. However, we can also add more decorated types. All that's required isthat the new decorated type implements the same interface as all the existing decorated typesand decorators. To illustrate this point, we'll next define a new decorated type,com.peachpit.aas3wdp.decoratorexample.io.FileReader . The FileReader class allows you toload the contents of a file. By default, it reads one character at a time similar to theStringReader .
package com.peachpit.aas3wdp.decoratorexample.io {
import flash.net.URLLoader; import flash.net.URLRequest; import flash.events.Event;
public class FileReader extends AbstractReader { private var _content:String; private var _file:URLLoader; private var _canRead:Boolean = false;
public function FileReader(file:String) { // Use a URLLoader object to load the text from a // file specified by the parameter. _file = new URLLoader(); var request:URLRequest = new URLRequest(file); _file.load(request); // Call onData() when the content loads. _file.addEventListener(Event.COMPLETE, onData); } private function onData(event:Event):void { // Set the content to the data loaded from the file. _content = String(_file.data);
// The object is read for reading. _canRead = true;

// Dispatch an event notifying listeners that the // object is ready. dispatchEvent(new Event(Event.COMPLETE)); }
override public function isReady():Boolean { return _canRead; }
override public function read():String { return _content.charAt(_index++); }
override public function readString():String { return _content; } override public function hasNext():Boolean { return _index < _content.length; }
}
}
This class loads text from a URL. Because the data loads asynchronously, the isReady() methodreturns false until the data has been loaded. Otherwise, it functions very similarly to theStringReader class.
With the addition of this new decorated type, we can test it by redefining the main class to usea FileReader instance instead of a StringReader instance. Because FileReader is asynchronous,we'll listen for a COMPLETE event, decorate the object with a WordReader object, and then calltraceReader() .
Note
For this example to work, you'll need a text file called data.txt. You can save a text filein the same directory to which you deploy the .swf from this example. In the text file,you can add text such as the string passed to the StringReader constructor in theearlier example.
package {
import flash.display.Sprite; import com.peachpit.aas3wdp.decoratorexample.io.IReader; import com.peachpit.aas3wdp.decoratorexample.io.FileReader; import com.peachpit.aas3wdp.decoratorexample.io.WordReader; import flash.events.Event; public class ReaderDecoratorExample extends Sprite {
public function ReaderDecoratorExample() {

var fileReader:FileReader = new FileReader("data.txt"); fileReader.addEventListener(Event.COMPLETE, onFile); }
private function onFile(event:Event):void { var wordReader:WordReader = new WordReader(FileReader(event.target)); traceReader(wordReader); }
public function traceReader(reader:IReader):void { while(reader.hasNext()) { trace(reader.read()); }
}
}
}
This code illustrates that the same decorator we used in conjunction with a StringReader objectcan be used with a FileReader object as well.
Decorating Decorators
To illustrate that decorators can potentially decorate decorators, we'll define a new decoratorclass called com.peachpit.aas3wdp.decoratorexample.io.SortedReader . SortedReader allowsyou to access the contents of a decorated reader in a sorted order.
package com.peachpit.aas3wdp.decoratorexample.io { public class SortedReader extends AbstractReaderDecorator { private var _content:Array; public function SortedReader(reader:IReader) { super(reader);
// Read all the content from the decorated reader as // an array. Then sort that content. _content = reader.readArray().concat(); _content.sort(); } override public function read():String { return _content[_index++]; }
override public function readArray(offset:uint = 0, length:uint = 0):Array { var data:Array = new Array(); for(var i:uint = offset; i < length; i++) { data.push(_content[i]); } return data; }

override public function hasNext():Boolean { return _index < _content.length; }
}}
We can see how this new decorator works by editing the main class as follows:
package { import flash.display.Sprite; import com.peachpit.aas3wdp.decoratorexample.io.IReader; import com.peachpit.aas3wdp.decoratorexample.io.FileReader; import com.peachpit.aas3wdp.decoratorexample.io.WordReader; import com.peachpit.aas3wdp.decoratorexample.io.SortedReader; import flash.events.Event; public class ReaderDecoratorExample extends Sprite { public function DecoratorExample2() { var fileReader:FileReader = new FileReader("data.txt"); fileReader.addEventListener(Event.COMPLETE, onFile); } private function onFile(event:Event):void { var wordReader:WordReader = new WordReader(FileReader(event.target)); var sortedReader:SortedReader = new SortedReader(wordReader); traceReader(sortedReader); } public function traceReader(reader:IReader):void { while(reader.hasNext()) { trace(reader.read()); } } }}
When you test the application this time, all the words are traced in alphabetical order.
The SortedReader decorator can decorate any object that implements the IReader interface.That means you can use a SortedReader instance to decorate a WordReader instance as wasdone in this example, but you can also use it to decorate a LineReader or any other object thatimplements IReader .

Building Visual and Commutative Decorators
The preceding example gave you a chance to use the Decorator pattern in a fairly simpleexample. For the most part, the decorators in the preceding example were not chainable; thatis, you couldn't meaningfully composite a WordReader within a LineReader object. Although theSortedReader object does enable you to chain decorators, you must apply the SortedReader as adecorator last in the chain, which means that the decorators are not commutative. Decoratorsare commutative if the following code yields effectively the same behavior, where A and B areboth decorators and decorated is the decorated object:
var a:A = new A(decorated);var b:B = new B(a);b.method(); var b:B = new B(decorated);var a:A = new A(b);a.method();
You can see that SortedReader is not commutative because it matters what order it is applied inthe chain. For example, if you apply a WordReader as a decorator to a SortedReader object, youwill get different results than if you apply a SortedReader to a WordReader . This doesn't makethe preceding example bad or impractical. It simply illustrates that the Decorator pattern isflexible enough to allow for chainable and non-chainable as well as commutative and non-commutative decorators.
In this next example, you'll have a chance to see how to build visual decorators that arechainable and commutative. This example decorates shapes (circles and rectangles) by makingthem draggable and by adding bevels to them.
Defining the Common Interface
Define com.peachpit.aas3wdp.shapes.AbstractBasicShape as an abstract class that serves asthe common interface. In this example, we're using an abstract class with no implementationrather than an interface because we want all the shapes (decorated and decorator) to be asubtype of Sprite so that all the shapes can rely on the Sprite interface. There is no built-ininterface for Sprite or any sort of display object. Normally, it is best to use an actual interfaceconstruct. However, in this case, we're going to use an abstract class in place of an interface fortwo reasons:
The required interface is really long. Although this wouldn't excuse not using a properinterface in a typical scenario, we want to simplify things here rather than occupyingseveral printed pages with the interface code.
1.
All the concrete classes would have to extend Sprite in order to inherit the critical displayobject behavior.
2.
For our purposes, we want to create a unique type that implements the entire Sprite interface.

2.
Therefore, the simplest thing to do is to create an abstract class that merely inherits fromSprite . It doesn't require any further implementation. Again, we're making a minor exceptionto our rule that all abstract classes must have some sort of implementation for this examplebecause of the special case it presents.
package com.peachpit.aas3wdp.shapes { import flash.display.Sprite; public class AbstractBasicShape extends Sprite { public function AbstractBasicShape() { }
}}
Defining Concrete Decorated Classes
Next, we're going to create a few concrete decorated types. First we'll create a Circle class.Define com.peachpit.aas3wdp.shapes.Circle as a class that draws a circle.
package com.peachpit.aas3wdp.shapes { import com.peachpit.aas3wdp.shapes.AbstractBasicShape; import flash.display.Sprite; public class Circle extends AbstractBasicShape {
public function Circle(radius:Number) { var shape:Sprite = new Sprite(); addChild(shape); shape.graphics.lineStyle(0, 0, 0); shape.graphics.beginFill(0xFFFFFF); shape.graphics.drawCircle(radius, radius, radius); shape.graphics.endFill(); }
}}
The second decorated type is the Rectangle class. Definecom.peachpit.aas3wdp.decoratorexample.shapes.Rectangle as a class that draws a rectangle.
package com.peachpit.aas3wdp.shapes {
import com.peachpit.aas3wdp.shapes.AbstractBasicShape; import flash.display.Sprite;
public class Rectangle extends AbstractBasicShape {
public function Rectangle(shapeWidth:Number, shapeHeight:Number, center:Boolean = false) {

var shape:Sprite = new Sprite(); addChild(shape); shape.graphics.lineStyle(0, 0, 0); shape.graphics.beginFill(0xFFFFFF); shape.graphics.drawRect(center ? -shapeWidth / 2 : 0, center ? -shapeHeight / 2 : 0, shapeWidth, shapeHeight); shape.graphics.endFill(); }
}}
Both of these decorated types are fairly straightforward. They are basic shape types we candecorate with the decorators we're about to create. Apart from the fact that each of these typesimplement the same interface (which they inherit from AbstractBasicShape ), there is nothingabout these classes that is unique to the Decorator pattern.
Defining Decorator Classes
Now we can create the decorator classes. Definecom.peachpit.aas3wdp.decoratorexample.shapes.DraggableShape as a decorator class thatwraps a AbstractBasicShape object and makes it draggable.
package com.peachpit.aas3wdp.shapes {
import com.peachpit.aas3wdp.shapes.AbstractBasicShape; import flash.events.MouseEvent; import flash.display.Sprite;
public class DraggableShape extends AbstractBasicShape {
private var _decorated:AbstractBasicShape;
public function DraggableShape(AbstractBasicShape:AbstractBasicShape) { _decorated = AbstractBasicShape; addChild(_decorated); addEventListener(MouseEvent.MOUSE_DOWN, onMouseDown); addEventListener(MouseEvent.MOUSE_UP, onMouseUp); }
private function onMouseDown(event:MouseEvent):void { startDrag(); } private function onMouseUp(event:MouseEvent):void { stopDrag(); }
}}
The constructor for this class accepts an instance of a concrete basic shape and then acts as acontainer for that object. By acting as a container, the drag behaviors added to the

DraggableShape object make the child (the decorated object) draggable by proxy.
Note
The DraggableShape implementation is purposefully simple. It does not take intoaccount the possibility that the user could move the mouse outside of the object whiledragging it. In such a case, the user could inadvertently cause the object to continueto follow the mouse even after releasing the mouse button. We've opted not to showthe code to solve that issue because we want to keep this example as focused aspossible in demonstrating the Decorator pattern.
Next we'll create a second decorator. Our next decorator class is BevelShape , which adds abevel to the object. Define com.peachpit.aas3wdp.decoratorexample.shapes.BevelShape as aclass that wraps a AbstractBasicShape object and applies a bevel filter.
package com.peachpit.aas3wdp.shapes { import flash.filters.BevelFilter;
public class BevelShape extends AbstractBasicShape { public function BevelShape(shape:AbstractBasicShape) { var filters:Array = shape.filters; filters.push(new BevelFilter()); shape.filters = filters; addChild(shape); }
}}
Now we can test that the decorators are commutable and chainable. Define a main class thatadds and decorates shapes.
package {
import flash.display.Sprite; import flash.display.Stage; import flash.display.StageScaleMode; import flash.display.StageAlign; import com.peachpit.aas3wdp.shapes.AbstractBasicShape; import com.peachpit.aas3wdp.shapes.Circle; import com.peachpit.aas3wdp.shapes.Rectangle; import com.peachpit.aas3wdp.shapes.DraggableShape; import com.peachpit.aas3wdp.shapes.BevelShape; public class ShapeDecoratorExample extends Sprite {
public function DecoratorExample() { stage.scaleMode = StageScaleMode.NO_SCALE; stage.align = StageAlign.TOP_LEFT;
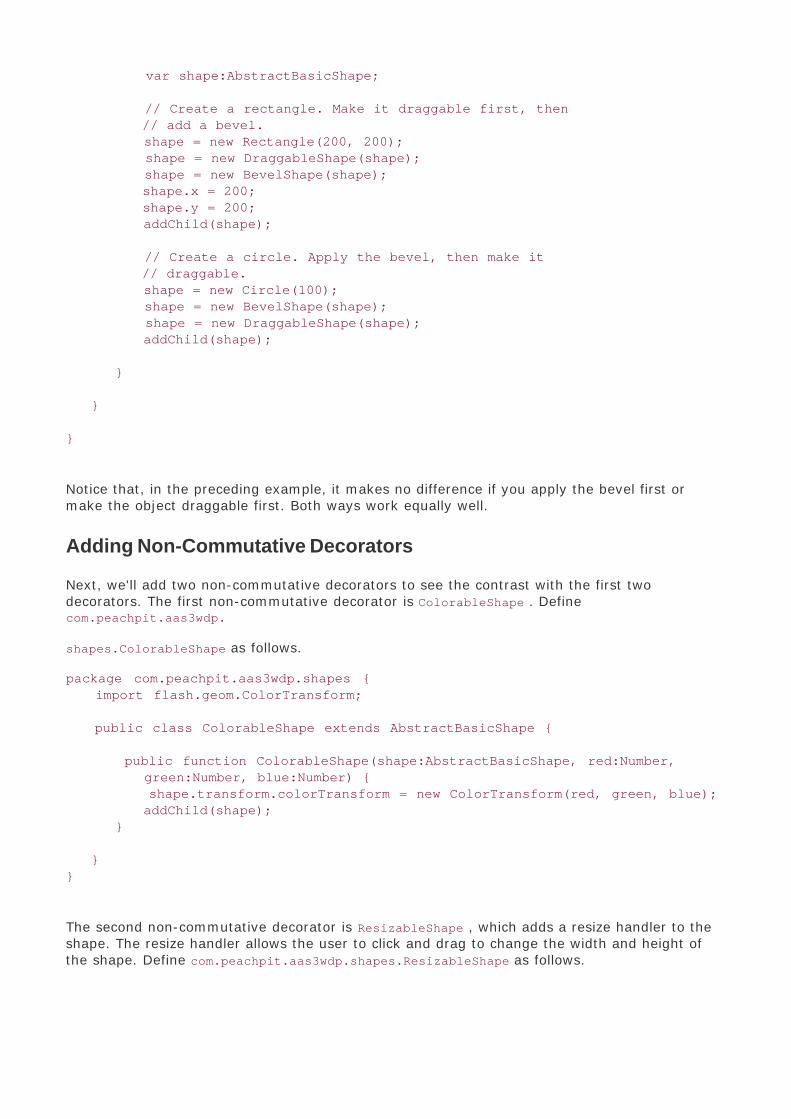
var shape:AbstractBasicShape; // Create a rectangle. Make it draggable first, then // add a bevel. shape = new Rectangle(200, 200); shape = new DraggableShape(shape); shape = new BevelShape(shape); shape.x = 200; shape.y = 200; addChild(shape);
// Create a circle. Apply the bevel, then make it // draggable. shape = new Circle(100); shape = new BevelShape(shape); shape = new DraggableShape(shape); addChild(shape);
} }
}
Notice that, in the preceding example, it makes no difference if you apply the bevel first ormake the object draggable first. Both ways work equally well.
Adding Non-Commutative Decorators
Next, we'll add two non-commutative decorators to see the contrast with the first twodecorators. The first non-commutative decorator is ColorableShape . Definecom.peachpit.aas3wdp.
shapes.ColorableShape as follows.
package com.peachpit.aas3wdp.shapes { import flash.geom.ColorTransform;
public class ColorableShape extends AbstractBasicShape {
public function ColorableShape(shape:AbstractBasicShape, red:Number, green:Number, blue:Number) { shape.transform.colorTransform = new ColorTransform(red, green, blue); addChild(shape); } }}
The second non-commutative decorator is ResizableShape , which adds a resize handler to theshape. The resize handler allows the user to click and drag to change the width and height ofthe shape. Define com.peachpit.aas3wdp.shapes.ResizableShape as follows.

package com.peachpit.aas3wdp.shapes {
import com.peachpit.aas3wdp.shapes.AbstractBasicShape; import com.peachpit.aas3wdp.shapes.ColorableShape; import flash.display.Sprite; import flash.events.MouseEvent; import flash.events.Event;
public class ResizableShape extends AbstractBasicShape { private var _isResizing:Boolean; private var _resizer:AbstractBasicShape; private var _decorated:AbstractBasicShape;
// Override the width and height setters so when you // attempt to set the width and height you set the width // and height of the decorated object and move the resizer // handle appropriately. override public function set width(value:Number):void { _decorated.width = value; _resizer.x = value; }
override public function set height(value:Number):void { _decorated.height = value; _resizer.y = value; }
public function ResizableShape(AbstractBasicShape:AbstractBasicShape) { _decorated = AbstractBasicShape; addChild(_decorated);
// Create a new rectangle that is centered to serve // as the resize handle. Use ColorableShape to make // the rectangle gray. Then move the rectangle to // the lower-right corner of the decorated shape. _resizer = new Rectangle(10, 10, true); _resizer = new ColorableShape(_resizer, .8, .8, .8); _resizer.x = _decorated.width; _resizer.y = _decorated.height; addChild(_resizer); _resizer.addEventListener(MouseEvent.MOUSE_DOWN, onMouseDown); _resizer.addEventListener(MouseEvent.MOUSE_UP, onMouseUp); } // When the user clicks on the resize handle, make it // draggable, start listening for enterFrame events. private function onMouseDown(event:MouseEvent):void { addEventListener(Event.ENTER_FRAME, onEnterFrame); _resizer.startDrag(true); event.stopImmediatePropagation(); } // When the user releases the mouse click, stop making // the resize handle draggable, and stop listening for // enterFrame events. private function onMouseUp(event:MouseEvent):void {

_resizer.stopDrag(); removeEventListener(Event.ENTER_FRAME, onEnterFrame); }
private function onEnterFrame(event:Event):void { // Don't allow the user to move the resize // handle in negative directions. if(_resizer.x < 0) { _resizer.x = 0; } if(_resizer.y < 0) { _resizer.y = 0; }
// Change the width and height of the decorated // object to correspond to the resize handle x // and y coordinate values. _decorated.width = _resizer.x; _decorated.height = _resizer.y; } }}
The ResizableShape object wraps decorated objects much like the other decorators we've seenso far in this example. However, it also draws a resize handle within itself. As the user movesthe resize handle, the ResizableShape instance adjusts the width and height of the decoratedobject.
Now that we've created two additional decorators, let's modify the main class so that it uses thetwo new decorators:
package { import flash.display.Sprite; import flash.display.Stage; import flash.display.StageScaleMode; import flash.display.StageAlign; import com.peachpit.aas3wdp.shapes.AbstractBasicShape; import com.peachpit.aas3wdp.shapes.Circle; import com.peachpit.aas3wdp.shapes.Rectangle; import com.peachpit.aas3wdp.shapes.DraggableShape; import com.peachpit.aas3wdp.shapes.BevelShape; import com.peachpit.aas3wdp.shapes.ColorableShape; import com.peachpit.aas3wdp.shapes.ResizableShape;
public class ShapeDecoratorExample extends Sprite {
public function DecoratorExample() {
stage.scaleMode = StageScaleMode.NO_SCALE; stage.align = StageAlign.TOP_LEFT;
var shape:AbstractBasicShape; shape = new Rectangle(200, 200); shape = new DraggableShape(shape);

shape = new BevelShape(shape); shape = new ColorableShape(shape, 0, 0, 0); shape.x = 200; shape.y = 200; addChild(shape);
shape = new Circle(100); shape = new BevelShape(shape); shape = new DraggableShape(shape); shape = new ResizableShape(shape);
addChild(shape); } }}
When you test this version of the application, you'll notice that although the rectangle is blackasyou'd expect because of the ColorableShape decoratorit no longer displays the bevel becausethe color transform was applied after the bevel. Secondly, you'll notice that as you drag thecircle, the resize handle does not move with it. That is because the ResizableShape decoratorwas applied after the DraggableShape decorator.
Next, we can change the order in which the new decorators are applied to illustrate that theorder affects the behavior:
package { import flash.display.Sprite; import flash.display.Stage; import flash.display.StageScaleMode; import flash.display.StageAlign; import com.peachpit.aas3wdp.shapes.AbstractBasicShape; import com.peachpit.aas3wdp.shapes.Circle; import com.peachpit.aas3wdp.shapes.Rectangle; import com.peachpit.aas3wdp.shapes.DraggableShape; import com.peachpit.aas3wdp.shapes.BevelShape; import com.peachpit.aas3wdp.shapes.ColorableShape; import com.peachpit.aas3wdp.shapes.ResizableShape; public class DecoratorExample extends Sprite { public function DecoratorExample() { stage.scaleMode = StageScaleMode.NO_SCALE; stage.align = StageAlign.TOP_LEFT; var shape:AbstractBasicShape; shape = new Rectangle(200, 200); shape = new DraggableShape(shape); shape = new ColorableShape(shape, 0, 0, 0); shape = new BevelShape(shape); shape.x = 200; shape.y = 200; addChild(shape);

shape = new Circle(100); shape = new BevelShape(shape); shape = new ResizableShape(shape); shape = new DraggableShape(shape); addChild(shape); } }
This time, when you test the application, you'll see that the bevel is preserved and that theresize handle moves with the shape. This is because the decorators have been applied in thecorrect order. The ColorableShape and ResizableShape decorators are perfectly valid, but theyare non-commutative.

Summary
The Decorator pattern allows you to add and modify behavior using composition rather thaninheritance. The key advantages of Decorator patterns are that you can add and changebehavior at runtime, and you can potentially chain together behaviors without having to writenew subclasses for each permutation.

Chapter 10. Command Pattern
In This Chapter
Understanding the Command Pattern 137
Building a Simple Command Application 139
Making Commands Undoable and keeping Command histories 146
Building an Undoable Application 148
Building a Redoable Application 153
Using Commands to Build a Proximity game 154
Summary 168
The Command pattern encapsulates functionality into a class. Although the pattern mightappear simplistic, don't let its simplicity deceive you. The Command pattern is a powerful wayfor enabling a range of features that would be difficult to implement using a different approach.Here are some of the most common uses of the Command pattern:
Building highly reusable components. The Command pattern decouples the functionalityfrom the initiator. Components that use Command pattern objects are highly extensiblebecause they can employ any object that implements the correct interface.
Queuing requests. When operations must occur in sequence, they must be queued.Because the Command pattern encapsulates the request into an object, it's possible toqueue the requests by placing them in an array or similar collection.
Supporting undo and redo. Because Command pattern objects can be stored in memory,it's possible to keep a history of which operations have occurred. By implementing anundo() and/or redo() method, it's possible to add undo and redo features to an applicationwithout difficulty.
Making transactional or "wizard" operations. An operation often consists of many steps. Ifany step fails or if the user cancels at any point, it is necessary to roll back any changesthat have occurred. The Command pattern enables you to defer execution or to roll backoperations by calling the undo() method of a succession of objects.

Understanding the Command Pattern
In its purest form, the Command pattern consists of six elements.
Command interface
Concrete command
Receiver
Client
Invoker
The following sections look at these elements in detail.
The Interface
In the simplest form, the command interface defines just one method, often called execute() byconvention. The execute() method is responsible for running the requested operation. Thatmeans that in the simplest form, the interface looks like this:
package com.peachpit.aas3wdp.commands { public interface ICommand { function execute():void; }}
The command interface is essential to the Command pattern because it allows all implementingcommand types to use the same interface even though they have different implementations.That way, commands can be called without the calling code having to know much (if anything)about the specific command. Just like you can flip a switch to turn on and off an electrical devicewithout having to know the details of how the particular electrical device operates, thecommand interface provides a consistent way to operate programmatic objects that might havedisparate modes of operation behind the scenes.
This ICommand interface is all that is necessary for a basic command. However, sometimes wewant command classes to support the possibility of undoable and redoable commands. For thatreason, we can define two subtypes called IUndoableCommand and IRedoableCommand. Here'sIUndoableCommand.
package com.peachpit.aas3wdp.commands { public interface IUndoableCommand extends ICommand { function undo():void; }}

And now here's the IRedoableCommand interface:
package com.peachpit.aas3wdp.commands { public interface IRedoableCommand extends ICommand { function redo():void; }}
You'll notice that both of these interfaces extend ICommand, meaning that all IUndoableCommandand IRedoableCommand implementing classes also pass the test as implementing ICommand.
We'll start by looking at examples that implement just the ICommand interface. Later in thechapter, we'll look at a sample application that uses IUndoableCommand and IRedoableCommand.
The Concrete Command and Receiver
The concrete command is the class that implements the interface in a useful way by defining theexecute() method so that it actually runs an operation.
The concrete command usually requires a receiver, which is the object that is the target of theoperation. Although it's never strictly necessary, in many cases, the receiver reference is passedto the concrete command constructor. The following is an example of a concrete command thatrotates a display object clockwise. In this case, the display object is the receiver.
package com.peachpit.aas3wdp.commandexample { import com.peachpit.aas3wdp.commands.ICommand;
public class RotateClockwiseCommand implements ICommand {
private var _reveiver:DisplayObject;
public function RotateClockwiseCommand(receiver:DisplayObject) { _receiver = receiver; }
public function execute():void { _receiver.rotation += 20; } }}
The Client and Invoker
The client is the object that instantiates the command object, and the invoker is the object thatcalls the execute() method of the command object. The client might be the main class of anapplication, and the invoker might be a button. There are many possible scenarios, and as you'llsee throughout the examples in this chapter, there are no definitive rules for what types ofobjects can be clients and invokers. In fact, in some cases the client and invoker might be thesame object.


Building a Simple Command Application
Now that you've had a chance to read the theory behind the Command pattern, let's take a lookat a sample application that uses the pattern.
In the sample application in this chapter, you'll use four commands to scale and rotate a displayobject. Each of the commands is then associated with a draggable display object. By draggingthe display objects and dropping them on a button, you'll effectively re-wire the button to applythe new commands associated with the draggable display objects, illustrating the extensibilityand interoperability of commands.
This application uses an interface and classes from the AAS3WDP library. Specifically, theapplication uses the ICommand , IUndoableCommand , and IRedoableCommand interfaces as well asthe BasicButton class, which are defined in the AAS3WDP library. You'll want to add theAAS3WDP library to the classpath for the project you configure for this example application.
Creating the Commands
First we'll create the command classes this application uses. The first of these commands is theRotateClockwiseCommand class. Define thecom.peachpit.aas3wdp.commandexample.commands.RotateClockwiseCommand class as follows:
package com.peachpit.aas3wdp.commandexample.commands {
import com.peachpit.aas3wdp.commands.ICommand; import flash.display.DisplayObject;
public class RotateClockwiseCommand implements ICommand{
private var _receiver:DisplayObject; public function RotateClockwiseCommand(receiver:DisplayObject) { _receiver = receiver; } public function execute():void { _receiver.rotation += 20; } }
}
In this command, the execute() method increments the rotation property of the receiver objectby 20, effectively rotating the object clockwise.
Next, we'll create a command to rotate the object counterclockwise. Define thecom.peachpit.aas3wdp.commandexample.commands.RotateCounterclockwiseCommand class as

follows:
package com.peachpit.aas3wdp.commandexample.commands {
import com.peachpit.aas3wdp.commands.ICommand; import flash.display.DisplayObject;
public class RotateCounterclockwiseCommand implements ICommand {
private var _receiver:DisplayObject;
public function RotateCounterclockwiseCommand(receiver:DisplayObject) { _receiver = receiver; } public function execute():void { _receiver.rotation -= 20; } }}
You'll notice that the RotateCounterclockwiseCommand class looks almost identical to theRotateClockwiseCommand class except that it decrements the receiver object's rotation propertyby 20 rather than incrementing it.
Now we'll create a command class for scaling the receiver object up. Define thecom.peachpit.aas3wdp.commandexample.commands.ScaleUpCommand class as follows:
package com.peachpit.aas3wdp.commandexample.commands {
import com.peachpit.aas3wdp.commands.ICommand; import flash.display.DisplayObject;
public class ScaleUpCommand implements ICommand {
private var _receiver:DisplayObject;
public function ScaleUpCommand(receiver:DisplayObject) { _receiver = receiver; } public function execute():void { _receiver.scaleX += .1; _receiver.scaleY += .1; } }}
In this class, the execute() method increments the scaleX and scaleY properties of the receiverobject by .1, causing the object to scale up.
And now we'll define a command class that scales the object down. Define thecom.peachpit.aas3wdp.commandexample.commands.ScaleDownCommand class as follows:

package com.peachpit.aas3wdp.commandexample.commands {
import com.peachpit.aas3wdp.commands.ICommand; import flash.display.DisplayObject;
public class ScaleDownCommand implements ICommand {
private var _receiver:DisplayObject; public function ScaleDownCommand(receiver:DisplayObject) { _receiver = receiver; }
public function execute():void { _receiver.scaleX -= .1; _receiver.scaleY -= .1; }
}}
This command works just like the ScaleUpCommand except that it decrements the scaleX andscaleY properties.
Creating a Receiver Type
The commands we defined in the preceding section require a receiver object. We'll now create aclass whose instances we can use as receiver objects for the commands. The receiver objectsmust be of type DisplayObject , so our receiver type subclasses flash.display.Shape . We'lldefine com.peachpit.aas3wdp.commandexample.shapes.Rectangle , so that it draws a rectangleyou can use as the receiver for the commands.
package com.peachpit.aas3wdp.commandexample.shapes {
import flash.display.Shape;
public class Rectangle extends Shape {
public function Rectangle(color:uint, side:Number) { graphics.lineStyle(); graphics.beginFill(color, 1); graphics.drawRect(-side / 2, -side / 2, side, side); graphics.endFill(); }
}}
Creating a Button
Our application requires a button that we can wire up with a command. In order to accomplish

this we'll use a subclass of BasicButton from the AAS3WDP library.
Here we define a new subclass of BasicButton calledcom.peachpit.aas3wdp.commandexample.controls.CommandButton . This class accepts a commandand calls the execute() method when clicked.
package com.peachpit.aas3wdp.commandexample.controls {
import com.peachpit.aas3wdp.controls.BasicButton; import com.peachpit.aas3wdp.commands.ICommand; import flash.events.MouseEvent;
public class CommandButton extends BasicButton {
private var _command:ICommand;
public function set command(value:ICommand):void { _command = value; }
public function CommandButton(label:String) { super(label); addEventListener(MouseEvent.CLICK, onClick); }
private function onClick(event:MouseEvent):void { if(_command != null) { _command.execute(); } }
}}
The CommandButton constructor accepts a label parameter just like BasicButton , and it passesthat along to the super constructor. It also automatically listens for mouse clicks. When the userclicks the button, it attempts to call the execute() method of a command object that waspassed to it with a setter method. This means that we can assign different command objects tothe button, and because the button is programmed to an interface (ICommand ) rather than aspecific implementation, the interface can run the commands successfully even if they have verydifferent implementations.
Creating the Command Containers
For this application, we're going to associate instances of each command type with a draggabledisplay object, which we'll call a command container. For this purpose, we'll define a classcalled com.peachpit.aas3wdp.commandcontainers.CommandContainer . This class is a drag-and-drop Sprite subclass that has a command object and applies it to a CommandButton instance if itis dropped over the button.
package com.peachpit.aas3wdp.commandexample.commandcontainers {
import flash.display.Sprite; import flash.events.MouseEvent;

import flash.text.TextField; import flash.display.DisplayObject; import com.peachpit.aas3wdp.commands.ICommand; import com.peachpit.aas3wdp.commandexample.controls.CommandButton;
public class CommandContainer extends flash.display.Sprite {
private var _command:ICommand; private var _x:Number; private var _y:Number; public function CommandContainer(command:ICommand, labelText:String, xValue:Number, yValue:Number) {
// Store a reference to the command object. _command = command;
// Draw a rectangle. graphics.lineStyle(); graphics.beginFill(0xFFFFFF, 1); graphics.drawRect(0, 0, 50, 50); graphics.endFill();
// Create a text field to use as the label. var label:TextField = new TextField(); label.width = 50; label.height = 50; label.multiline = true; label.wordWrap = true; label.text = labelText; label.selectable = false; addChild(label);
// Listen for mouse events to enable the // drag-and-drop behavior. addEventListener(MouseEvent.MOUSE_DOWN, onMouseDown); addEventListener(MouseEvent.MOUSE_UP, onMouseUp);
_x = xValue; _y = yValue; x = _x; y = _y; }
private function onMouseDown(event:MouseEvent):void { startDrag(); }
private function onMouseUp(event:MouseEvent):void { stopDrag(); x = _x; y = _y;
// Get the current drop target using the inherited // dropTarget property. (See ActionScript 3.0

// documentation for details on the property.) var target:DisplayObject = dropTarget;
// The drop target can sometimes be an object within // the object for which you want to test. For // the target in this case could be a label inside // a command button rather than the command button // itself. Use a while statement to get the parent // and assign it to the target variable in those // cases. while(target != null && !(target is CommandButton) && target != root) { target = target.parent; }
// If the target is a command button then set the // command of the button to the command object // associated with this container. if(target is CommandButton) { CommandButton(target).command = _command; } }
}}
The container constructor requires that you associate the container with a command object. Thecontainer is draggable. When the user drops the container on a command button, it then setsthe command property of the button to the associated command object.
Testing the Application
Finally, we'll define the main class such that it adds an instance of Rectangle and CommandButtonas well as four instances of CommandContainer , each with one of the command objects.
package {
import flash.display.Sprite; import com.peachpit.aas3wdp.commandexample.commandcontainers.CommandContainer; import com.peachpit.aas3wdp.commandexample.shapes.Rectangle; import com.peachpit.aas3wdp.commandexample.commands.RotateClockwiseCommand; import com.peachpit.aas3wdp.commandexample.commands.RotateCounterclockwiseCommand; import com.peachpit.aas3wdp.commandexample.commands.ScaleUpCommand; import com.peachpit.aas3wdp.commandexample.commands.ScaleDownCommand; import com.peachpit.aas3wdp.commandexample.controls.CommandButton;
public class CommandExample extends Sprite {
public function CommandExample() {
var rectangle:Rectangle = new Rectangle(0xFFFFFF, 50); rectangle.x = 200; rectangle.y = 200;

addChild(rectangle);
var button:CommandButton = new CommandButton("apply command"); addChild(button); button.y = 250;
var container:CommandContainer = new CommandContainer(new RotateClockwiseCommand(rectangle), "rotate clockwise", 0, 0); addChild(container); container = new CommandContainer(new RotateCounterclockwiseCommand (rectangle), "rotate counter-clockwise", 0, 55); addChild(container); container = new CommandContainer(new ScaleUpCommand(rectangle), "scale up", 0, 110); addChild(container); container = new CommandContainer(new ScaleDownCommand(rectangle), "scale down", 0, 165); addChild(container);
} }}
When you test the sample application, you can drag and drop one of the command containerson the command button instance. That action wires the command button with the correspondingcommand object. Clicking the button then runs the command. For example, if you drag anddrop the rotate clockwise container over the command button and then click the button, therectangle will rotate clockwise.

Making Commands Undoable and Keeping Command
Histories
One of the optional yet powerful features of a command object is that it can enable undoableactions. You'll remember that we've defined the IUndoableCommand interface with an undo()method earlier in this chapter If we have our command classes implement IUndoableCommand,we can define an undo() method.
The undo() method can be simple or complex, depending on the complexity of the operation inthe execute() method and the amount of state (how many properties) that must beremembered. Consider the simplest case in which the operation can be undone by simplynegating the statement in the execute() method. For example, the execute() method of theRotateClockwiseCommand class from the previous section increments the rotation property of thereceiver object by 20. Therefore, the undo() method ought to decrement the rotation propertyby 20. The following code defines the undo() method for an undoable version of theRotateClockwiseCommand class:
public function undo():void { _receiver.rotation -= 20;}
The RotateClockwiseCommand example is fairly straightforward. If the object was rotated 20degrees clockwise, the operation is clearly undone by rotating the object counterclockwise by 20degrees. There is no additional state that the command class has to track. However, consider anexample with more complex state options. For example, a RandomMoveCommand class can move anobject to random coordinates. (For simplicity, we'll define the class so it always selectscoordinates within the range defined by a 400-by-400 rectangle with the upper-left corner at0,0.)
public class RandomMoveCommand implements ICommand {
private var _receiver:DisplayObject;
public function RandomMoveCommand(receiver:DisplayObject) { _receiver = receiver; }
public function execute():void { var x:Number = Math.random() * 400; var y:Number = Math.random() * 400; _receiver.x = x; _receiver.y = y;
}
}
In the RandomMoveCommand example, the command object needs to track the previous x and y

coordinates of the object in order to implement an undo() method. The following code showshow to implement an undoable version of the RandomMoveCommand class:
public class RandomMoveCommand implements IUndoableCommand {
private var _receiver:DisplayObject; private var _x:Number; private var _y:Number;
public function RandomMoveCommand(receiver:DisplayObject) { _receiver = receiver; }
public function execute():void { _x = _object.x; _y = _object.y; var x:Number = Math.random() * 400; var y:Number = Math.random() * 400; _receiver.x = x; _receiver.y = y; }
public function undo():void { _receiver.x = _x; _receiver.y = _y;
}
}
Of course, by itself, an undoable command isn't of much use. You can always store a referenceto the most recent command, and that way you can add one level of undo to an application.However, most frequently you'll want to have more than one level of undo in an application. Toaccomplish that, you'll need to keep track of the command history.
Keeping track of command history isn't difficult. It requires an array and a cursor you can moveto point to a specific command in the history. For that purpose, it's useful to define aCommandStack class. For the CommandStack class, we'll assume that you always want to keep trackof command history globally within an application, and we'll therefore write the class as aSingleton class (described in Chapter 4, "Singleton Pattern"). If you wanted to keep track ofcommand histories within unique areas of an application, you could change the implementationof the CommandStack class slightly. The following is the CommandStack class defined in thecom.peachpit.aas3wdp.commands package:
package com.peachpit.aas3wdp.commands {
import com.peachpit.aas3wdp.commands.ICommand;
public class CommandStack {
private static var _instance:CommandStack; private var _commands:Array; private var _index:uint;
public function CommandStack(parameter:SingletonEnforcer) {

_commands = new Array(); _index = 0; }
public static function getInstance():CommandStack { if(_instance == null) { _instance = new CommandStack(new SingletonEnforcer()); } return _instance; } public function putCommand(command:ICommand):void { _commands[_index++] = command; _commands.splice(_index, _commands.length - _index); }
public function previous():ICommand { return _commands[--_index]; } public function next():ICommand { return _commands[_index++]; }
public function hasPreviousCommands():Boolean { return _index > 0; }
public function hasNextCommands():Boolean { return _index < _commands.length; } }}
class SingletonEnforcer {}

Building an Undoable Application
In this exercise, we'll update the previous sample application so that all the commands areundoable. This requires the following changes:
Edit each of the command classes so that they implement IUndoableCommand .
Edit the command button so that it adds executed commands to a command stack.
Add an undo button to the main class.
Making Undoable Commands
First, all the command classes must now implement IUndoableCommand . We'll start withRotateClockwiseCommand :
package com.peachpit.aas3wdp.commandexample.commands {
import com.peachpit.aas3wdp.commands.IUndoableCommand; import flash.display.DisplayObject;
public class RotateClockwiseCommand implements IUndoableCommand{
private var _receiver:DisplayObject;
public function RotateClockwiseCommand(receiver:DisplayObject) { _receiver = receiver; }
public function execute():void { _receiver.rotation += 20; } public function undo():void { _receiver.rotation -= 20; }
}}
Next we'll make a similar edit to RotateCounterclockwiseCommand :
package com.peachpit.aas3wdp.commandexample.commands {
import com.peachpit.aas3wdp.commands.IUndoableCommand import flash.display.DisplayObject;

public class RotateCounterclockwiseCommand implements IUndoableCommand {
private var _receiver:DisplayObject;
public function RotateCounterclockwiseCommand(receiver:DisplayObject) { _receiver = receiver; }
public function execute():void { _receiver.rotation -= 20; } public function undo():void { _receiver.rotation += 20; } }}
Likewise we'll edit ScaleUpCommand :
package com.peachpit.aas3wdp.commandexample.commands {
import com.peachpit.aas3wdp.commands.IUndoableCommand; import flash.display.DisplayObject;
public class ScaleUpCommand implements IUndoableCommand {
private var _receiver:DisplayObject;
public function ScaleUpCommand(receiver:DisplayObject) { _receiver = receiver; }
public function execute():void { _receiver.scaleX += .1; _receiver.scaleY += .1; }
public function undo():void { _receiver.scaleX -= .1; _receiver.scaleY -= .1; }
}}
And then we'll edit ScaleDownCommand :
package com.peachpit.aas3wdp.commandexample.commands {
import com.peachpit.aas3wdp.commands.IUndoableCommand; import flash.display.DisplayObject;
public class ScaleDownCommand implements IUndoableCommand {

private var _receiver:DisplayObject;
public function ScaleDownCommand(receiver:DisplayObject) { _receiver = receiver; }
public function execute():void { _receiver.scaleX -= .1; _receiver.scaleY -= .1; }
public function undo():void { _receiver.scaleX += .1; _receiver.scaleY += .1; }
}}
Each of the changes in the command classes amounts to the same thing: implementIUndoableCommand rather than ICommand , and add the undo() method so that it reverses theeffect of the execute() method.
Recording Command History
We can next modify the command button so that it records the command history. We'llaccomplish this by using CommandStack . Each time the command button calls the execute()method of a command object, it will also add the command object to the stack.
package com.peachpit.aas3wdp.commandexample.controls {
import com.peachpit.aas3wdp.controls.BasicButton; import com.peachpit.aas3wdp.commands.ICommand; import flash.events.MouseEvent; import com.peachpit.aas3wdp.commands.CommandStack;
public class CommandButton extends BasicButton {
private var _command:ICommand;
public function set command(value:ICommand):void { _command = value; }
public function CommandButton(label:String) { super(label); addEventListener(MouseEvent.CLICK, onClick);
}
private function onClick(event:MouseEvent):void { if(_command != null) { _command.execute();

CommandStack.getInstance().putCommand(_command); } } }}
With this change, we now have a history of the commands that have been executed.
Adding an Undo Button
Next we add an undo button to the main class. The undo button-click event handler retrievesthe last-run command. It then tests to see whether it is an undoable command. If so, it callsundo().
package {
import flash.display.Sprite; import com.peachpit.aas3wdp.commandexample.commandcontainers.CommandContainer; import com.peachpit.aas3wdp.commandexample.shapes.Rectangle; import com.peachpit.aas3wdp.commandexample.commands.RotateClockwiseCommand; import com.peachpit.aas3wdp.commandexample.commands.RotateCounterclockwiseCommand import com.peachpit.aas3wdp.commandexample.commands.ScaleUpCommand; import com.peachpit.aas3wdp.commandexample.controls.CommandButton; import com.peachpit.aas3wdp.controls.BasicButton; import com.peachpit.aas3wdp.commandexample.commands.ScaleDownCommand; import flash.events.MouseEvent; import com.peachpit.aas3wdp.commands.CommandStack; import com.peachpit.aas3wdp.commands.ICommand; import com.peachpit.aas3wdp.commands.IUndoableCommand;
public class CommandExample extends Sprite { public function CommandExample() {
var rectangle:Rectangle = new Rectangle(0xFFFFFF, 50); rectangle.x = 200; rectangle.y = 200; addChild(rectangle); var button:CommandButton = new CommandButton("apply command"); addChild(button); button.y = 250;
var container:CommandContainer = new CommandContainer(new RotateClockwiseCommand(rectangle), "rotate clockwise", 0, 0); addChild(container); container = new CommandContainer(new RotateCounterclockwiseCommand (rectangle), "rotate counter-clockwise", 0, 55); addChild(container); container = new CommandContainer(new ScaleUpCommand(rectangle), "scale up", 0, 110); addChild(container); container = new CommandContainer(new ScaleDownCommand(rectangle),

"scale down", 0, 165); addChild(container);
var undoButton:BasicButton = new BasicButton("undo"); addChild(undoButton); undoButton.y = 280; undoButton.addEventListener(MouseEvent.CLICK, onUndo);
}
private function onUndo(event:MouseEvent):void { var stack:CommandStack = CommandStack.getInstance(); if(stack.hasPreviousCommands()) { var command:ICommand = stack.previous(); if(command is IUndoableCommand) { IUndoableCommand(command).undo(); } } } }}
With this revision, you can now test the application. As you run commands, you can also undothem by clicking the undo button.

Building a Redoable Application
As is true with making commands undoable, making commands redoable is a matter ofimplementing the IRedoableCommand interface. Next we'll make the commands in our exampleapplication redoable. Remember that the redo() method effectively redoes whatever wasundone by the undo() method. In the simplest cases, the redo() method can simply call theexecute() method. For more complex operations, calling the execute() method won't workcorrectly. In those cases, it is necessary to work out what steps are necessary to redo the statechanges and then implement the redo() method accordingly.
To modify our application to support redoable commands, we'll do the following:
Modify the command classes so they implement the IRedoableCommand .
Add a redo button to the main class.
Implementing IRedoableCommand
First we'll implement IRedoableCommand in all the command classes. So that all our commandsare both redoable and undoable, the commands must implement both IUndoableCommand andIRedoableCommand . Here's RotateClockwiseCommand :
package com.peachpit.aas3wdp.commandexample.commands {
import com.peachpit.aas3wdp.commands.IUndoableCommand; import com.peachpit.aas3wdp.commands.IRedoableCommand; import flash.display.DisplayObject;
public class RotateClockwiseCommand implements IUndoableCommand, IRedoableCommand
private var _receiver:DisplayObject; public function RotateClockwiseCommand(receiver:DisplayObject) { _receiver = receiver; }
public function execute():void { _receiver.rotation += 20; }
public function undo():void { _receiver.rotation -= 20; }
public function redo():void { execute(); }

}}
The remaining command classes follow suit. In each case, we import IRedoableCommand , add itto the implements list, and define a redo() method that simply calls execute() .
Adding the Redo Button
Next we'll add a redo button to the main class. We do this by first adding the following code tothe constructor:
var redoButton:BasicButton = new BasicButton("redo");addChild(redoButton);redoButton.y = 310;redoButton.addEventListener(MouseEvent.CLICK, onRedo);
This code adds the redo button. We still have to define the onRedo() method to handle the clickevent. This is our onRedo() method:
private function onRedo(event:MouseEvent):void {
var stack:CommandStack = CommandStack.getInstance(); if(stack.hasNextCommands()) { var command:ICommand = stack.next(); if(command is IRedoableCommand) { IRedoableCommand(command).redo(); }
}}
This code is almost identical to the onUndo() method except that it tests that the class passesthe IRedoableCommand test. Then it calls the redo() method.
With those few edits, the application now implements redoable commands. Clicking the redobutton will re-apply the next command in the command stack.

Using Commands to Build a Proximity Game
The following sample application uses the Command pattern to build a game called Proximity.The game consists of a grid of hexagonal pieces arranged so that each piece is adjacent to 6pieces (unless the piece is on the edge). The game generally requires two or more players. Thegame play is as follows.
A new game piece is displayed for a game player. The game piece has a numeric valueranging from 2 to 20.
1.
The game player clicks on an unoccupied grid space to apply the game piece settings. Thatgrid space then belongs to the game player, and the numeric value is applied to thatspace.
2.
If any of the adjacent grid spaces already belongs to a different player, then a comparisonis run between the newly occupied grid space and the adjacent spaces belonging todifferent players. If the newly occupied space has a higher numeric value than an adjacentspace, the owner of the newly occupied space takes ownership of the adjacent space.
3.
If any of the adjacent spaces belongs to the same game player as the newly occupiedspace, those spaces are fortified by adding 1 to their numeric values.
4.
Steps 1 through 4 repeat until all grid spaces are occupied.5.
The application requires a fair number of classes, which we'll build in the following sections.
Defining the Player Data Class
Every game has two or more players. Therefore, we'll first define the class that will serve as thedata model for each game player. The GamePlayer class basically just stores the color for theplayer (each game player must be represented with a unique color on the board).
package com.peachpit.aas3wdp.proximity.data {
public class GamePlayer {
private var _color:uint;
public function set color(value:uint):void { _color = value; }
public function get color():uint { return _color; }
public function GamePlayer() { _color = 0xEEEEEE;

}
}}
In addition to the standard game player type, we'll also define a null player using NullPlayer .The NullPlayer class extends GamePlayer so that it looks just like a standard player. However, itis a special case we can use in place of an actual player.
package com.peachpit.aas3wdp.proximity.data {
public class NullOwner extends GamePlayer { }}
We'll use NullPlayer objects as the default owners for all pieces on the board until anothergame player takes ownership.
Defining a Collection Class for the Game Players
Every game has a collection of players. To keep track of the game players we'll build a newcollection class called GamePlayers . The following code defines a Singleton class calledcom.peachpit.aas3wdp.proximity.data.GamePlayers to serve as this collection:
package com.peachpit.aas3wdp.proximity.data {
import com.peachpit.aas3wdp.proximity.data.GamePlayers; import com.peachpit.aas3wdp.proximity.data.GamePlayer; import com.peachpit.aas3wdp.iterators.IIterator; import com.peachpit.aas3wdp.iterators.ArrayIterator;
public class GamePlayers {
private var _data:Array; private static var _instance:GamePlayers; private static const COLORS:Array = [0xFFCCCC, 0xCCFFCC, 0xCCCCFF, 0xFFFFCC, 0xCCFFFF, 0xFFCCFF];
public function GamePlayers(parameter:SingletonEnforcer) { _data = new Array(); }
public static function getInstance():GamePlayers { if(_instance == null) { _instance = new GamePlayers(new SingletonEnforcer()); } return _instance; }
public function addGamePlayer(gamePlayer:GamePlayer):void { gamePlayer.color = COLORS[_data.length]; _data.push(gamePlayer);

} public function iterator():IIterator { return new ArrayIterator(_data);
} }}
class SingletonEnforcer {}
Note that this class has just two instance methods: addGamePlayer() to add game playerinstances and iterator() to retrieve an iterator to access the collection.
Defining Game Pieces
Now that we've defined the game player classes and created a collection for them, we next needto define another basic building block of the game: the game pieces. Thecom.peachpit.aas3wdp.proximity.data.PieceData class serves as the data model for gamepieces and grid spaces.
package com.peachpit.aas3wdp.proximity.data {
import flash.events.EventDispatcher; import flash.events.Event; import com.peachpit.aas3wdp.proximity.data.GamePlayer; import com.peachpit.aas3wdp.proximity.data.NullOwner;
public class PieceData extends EventDispatcher { protected var _row:int; protected var _column:int; protected var _count:uint; protected var _owner:GamePlayer; protected var _radius:Number;
// Keep track of the radius to use for the game piece // when it is displayed.
public function set radius(value:Number):void { _radius = value; dispatchEvent(new Event(Event.CHANGE)); }
public function get radius():Number { return _radius; }
// Keep track of the count (the value) for the game piece. public function set count(value:uint):void { _count = value; dispatchEvent(new Event(Event.CHANGE)); }
public function get count():uint {

return _count; }
// Every game piece belongs to a game player. public function set owner(value:GamePlayer):void { _owner = value; dispatchEvent(new Event(Event.CHANGE)); }
public function get owner():GamePlayer { return _owner; }
// Which row is the game piece in? public function set row(value:int):void { _row = value; }
public function get row():int { return _row; }
// Which column is the game piece in? public function set column(value:int):void { _column = value; } public function get column():int { return _column; }
// Use the constructor to set default property values. public function PieceData() { _row = -1; _column = -1; _count = 0; // Use a NullOwner by default. _owner = new NullOwner(); }
}}
This class is yet another basic data model class. This time, however, it's important to note thatPieceData inherits from EvenTDispatcher; when the values change, it dispatches eventsnotifying listeners that the data model has changed.
Defining the Game Board Data Class
The game needs a game board. Our game board data model keeps track of all the pieces,placing them in rows and columns. Because there can be only one game board per game, thegame board data model class is defined as a Singleton class.

package com.peachpit.aas3wdp.proximity.data {
import com.peachpit.aas3wdp.proximity.data.PieceData; import com.peachpit.aas3wdp.proximity.data.GameboardData; import com.peachpit.aas3wdp.iterators.IIterator; import flash.events.EventDispatcher; import flash.events.Event; import com.peachpit.aas3wdp.iterators.ArrayIterator;
public class GameboardData extends EventDispatcher {
private var _pieces:Array; private var _rows:uint; private var _columns:uint; private var _newGamePiece:PieceData; private var _iterator:IIterator;
private static var _instance:GameboardData;
// Set the number of rows in the game board. public function set rows(value:uint):void { _rows = value; update(); }
// Set the number of columns in the garme board. public function set columns(value:uint):void { _columns = value; update(); }
// Request a new game piece. The game board is responsible // for returning the next game piece to play. public function get newGamePiece():PieceData { return _newGamePiece; }
// Set defaults for all the properties. public function GameboardData(parameter:SingletonEnforcer) { _rows = 10; _columns = 10; _newGamePiece = new PieceData(); _newGamePiece.radius = 40; _iterator = GamePlayers.getInstance().iterator(); update(); }
public static function getInstance():GameboardData { if(_instance == null) { _instance = new GameboardData(new SingletonEnforcer()); } return _instance; }
// Re-add the game pieces. This method is called every time

// one of the properties changes (columns, rows, etc.) This // code then creates all the game pieces, sets the rows and // columns, and adds the pieces to the pieces array.
public function update():void { var i:uint; var j:uint; var piece:PieceData; _pieces = new Array(); for(i = 0; i < _rows; i++) { for(j = 0; j < _columns; j++) { piece = new PieceData(); piece.row = i; piece.column = j; piece.radius = 20; addPiece(piece); } } dispatchEvent(new Event(Event.CHANGE)); }
private function addPiece(piece:PieceData):void { if(_pieces[piece.row] == null) { _pieces[piece.row] = new Array(); } _pieces[piece.row][piece.column] = piece;
}
// Return an iterator that allows access to each game // piece. public function iterator():IIterator { var pieces:Array = new Array(); var i:uint; var j:uint; for(i = 0; i < _rows; i++) { for(j = 0; j < _columns; j++) { pieces.push(_pieces[i][j]); } } return new ArrayIterator(pieces); }
// Calculate all the pieces that are adjacent to a given // piece, and return an iterator that allows access to // those pieces. public function getProximityPieces(piece:PieceData):IIterator { var pieces:Array = new Array(); var row:uint = piece.row; var column:uint = piece.column; if(piece.row > 0) { pieces.push(_pieces[row - 1][column]); if(row % 2 == 0 && column > 0) { pieces.push(_pieces[row - 1][column - 1]); } else if(row % 2 != 0 && column < _pieces[row - 1].length - 1) {
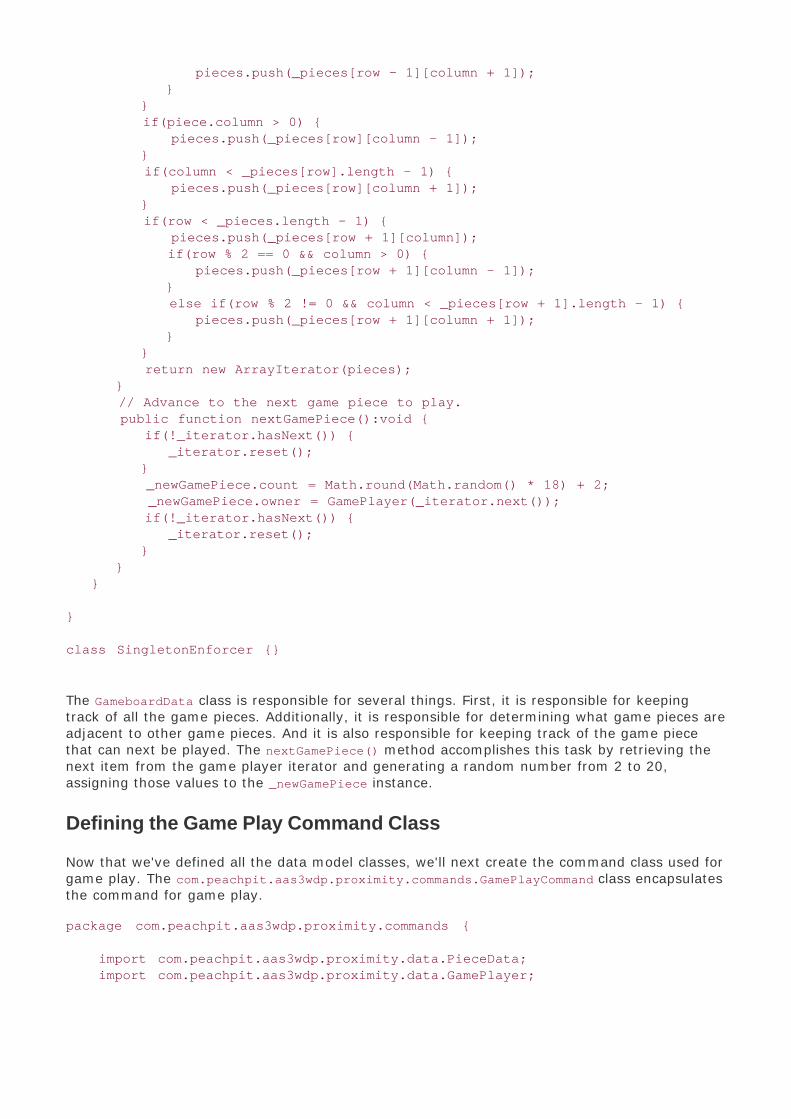
pieces.push(_pieces[row - 1][column + 1]); } } if(piece.column > 0) { pieces.push(_pieces[row][column - 1]); } if(column < _pieces[row].length - 1) { pieces.push(_pieces[row][column + 1]); } if(row < _pieces.length - 1) { pieces.push(_pieces[row + 1][column]); if(row % 2 == 0 && column > 0) { pieces.push(_pieces[row + 1][column - 1]); } else if(row % 2 != 0 && column < _pieces[row + 1].length - 1) { pieces.push(_pieces[row + 1][column + 1]); } } return new ArrayIterator(pieces); } // Advance to the next game piece to play. public function nextGamePiece():void { if(!_iterator.hasNext()) { _iterator.reset(); } _newGamePiece.count = Math.round(Math.random() * 18) + 2; _newGamePiece.owner = GamePlayer(_iterator.next()); if(!_iterator.hasNext()) { _iterator.reset(); } } }
}
class SingletonEnforcer {}
The GameboardData class is responsible for several things. First, it is responsible for keepingtrack of all the game pieces. Additionally, it is responsible for determining what game pieces areadjacent to other game pieces. And it is also responsible for keeping track of the game piecethat can next be played. The nextGamePiece() method accomplishes this task by retrieving thenext item from the game player iterator and generating a random number from 2 to 20,assigning those values to the _newGamePiece instance.
Defining the Game Play Command Class
Now that we've defined all the data model classes, we'll next create the command class used forgame play. The com.peachpit.aas3wdp.proximity.commands.GamePlayCommand class encapsulatesthe command for game play.
package com.peachpit.aas3wdp.proximity.commands {
import com.peachpit.aas3wdp.proximity.data.PieceData; import com.peachpit.aas3wdp.proximity.data.GamePlayer;

import com.peachpit.aas3wdp.proximity.data.GamePlayers; import com.peachpit.aas3wdp.proximity.data.GameboardData; import com.peachpit.aas3wdp.proximity.data.NullOwner; import com.peachpit.aas3wdp.commands.ICommand; import com.peachpit.aas3wdp.iterators.IIterator; public class GamePlayCommand implements ICommand {
protected var _piece:PieceData;
public function GamePlayCommand(piece:PieceData) { _piece = piece; }
public function execute():void { var gameboard:GameboardData = GameboardData.getInstance(); var newGamePiece:PieceData = gameboard.newGamePiece; var currentGamePlayer:GamePlayer = newGamePiece.owner; // If the game piece's owner is a NullOwner (and // only if) then it's a valid click, so apply the //command. if(_piece.owner is NullOwner) {
_piece.owner = currentGamePlayer; _piece.count = newGamePiece.count; // Retrieve all adjacent pieces. var iterator:IIterator = gameboard.getProximityPieces(_piece); var piece:PieceData; while(iterator.hasNext()) { piece = iterator.next() as PieceData;
// If the game piece has the same // owner as the clicked game piece, // increment the count. If they have // different owners (and the owner // isn't NullOwner) then test if the // clicked game piece has a higher // count. If so, make it the new // owner. if(piece.owner == _piece.owner) { piece.count++; } else if(!(piece.owner is NullOwner)) { if(piece.count < _piece.count) { piece.owner = currentGamePlayer; } } }
// Get the next game piece. GameboardData.getInstance().nextGamePiece(); } } }}

In this command type, the game piece is the receiver. When the user triggers the execute()method, the method requests the new game piece from the game board and applies it to thereceiver. The method also requests all the adjacent pieces and uses game play rules todetermine how and if to change those values.
Defining the Game Factory Class
In the next chapter, we'll update the application by adding undo and redo functionality in thecontext of a our discussion of the Memento pattern. To minimize the impact of those futurechanges to the code we're creating now, we'll use a factory (see Chapter 5, "Factory MethodPattern") to make the command objects. Definecom.peachpit.aas3wdp.proximity.commands.CommandFactory as follows:
package com.peachpit.aas3wdp.proximity.commands {
import com.peachpit.aas3wdp.commands.ICommand; import com.peachpit.aas3wdp.proximity.commands.GamePlayCommand; import com.peachpit.aas3wdp.proximity.data.PieceData;
public class CommandFactory {
private static var _type:String = NORMAL;
public static const NORMAL:String = "normal"; public static const UNDOABLE:String = "undoable"; public static const REDOABLE:String = "redoable";
public static function set type(value:String):void { _type = value; }
public static function getGamePlayCommand(data:PieceData):ICommand { if(_type == NORMAL) { return new GamePlayCommand(data); } return null; } }}
This class allows us to globally set the type of commands it should create. Then we can usegetGamePlayCommand() to request the command for a specific receiver. Currently, we're only everreturning one type, but subsequently, we'll enable undoable and redoable versions.
Defining the Game Piece View and Controller Class
The com.peachpit.aas3wdp.proximity.views.Piece class is the view (and controller) for thegame pieces/grid spaces. The Piece class uses a PieceData object as its data model, and itdraws itself based on the data model values. It also stores a command object that it executeswhen the user clicks the object.

package com.peachpit.aas3wdp.proximity.views {
import flash.display.Sprite; import flash.text.TextField; import flash.events.Event; import flash.events.MouseEvent; import flash.text.TextFormat; import flash.text.TextFieldAutoSize; import com.peachpit.aas3wdp.proximity.data.PieceData; import com.peachpit.aas3wdp.proximity.commands.CommandFactory; import com.peachpit.aas3wdp.commands.ICommand;
public class Piece extends Sprite {
private var _background:Sprite; private var _label:TextField; private var _data:PieceData; private var _command:ICommand;
public function set data(value:PieceData):void { _data = value; _data.addEventListener(Event.CHANGE, draw);
// Retrieve the command from the factory. _command = CommandFactory.getGamePlayCommand(_data); draw(); }
public function get data():PieceData { return _data; }
public function Piece() { // Listen for mouse events. addEventListener(MouseEvent.MOUSE_OVER, onMouseOver); addEventListener(MouseEvent.MOUSE_OUT, onMouseOut); addEventListener(MouseEvent.CLICK, onClick);
// Create the background into which to draw the // hexagon. _background = new Sprite(); addChild(_background);
// Create the text field into which to display the // count. _label = new TextField(); addChild(_label); _label.selectable = false; _label.autoSize = TextFieldAutoSize.LEFT; }
// Draw the game piece based on the data model. public function draw(event:Event = null):void { var color:uint = _data.owner.color; var newX:Number; var newY:Number;

var angle:Number = -Math.PI / 6; var angleDelta:Number = Math.PI / 3; _background.graphics.clear(); _background.graphics.lineStyle(0, 0, 0); _background.graphics.beginFill(color, 1); newX = Math.cos(angle) * _data.radius; newY = Math.sin(angle) * _data.radius; _background.graphics.moveTo(newX, newY); for(var i:uint = 0; i < 6; i++) { angle += angleDelta; newX = Math.cos(angle) * _data.radius; newY = Math.sin(angle) * _data.radius; _background.graphics.lineTo(newX, newY); } _background.graphics.endFill(); if(_data.row != -1) { x = (_data.row % 2 == 0 ? 0 : _data.radius) + _data.column * _data.radius * 2; y = _data.row * _data.radius * 2; } _label.text = String(_data.count); _label.x = -_label.width / 2; _label.y = -_label.height / 2; }
private function onMouseOver(event:MouseEvent):void { _background.alpha = .1; }
private function onMouseOut(event:MouseEvent):void { _background.alpha = 1; }
// When the user clicks on the game piece, call the // command's execute() method private function onClick(event:MouseEvent):void { _command.execute(); } } }
The key thing about this class is that it uses a command object to neatly encapsulate itsbehavior. When the user clicks the piece, it executes the command. However, the exactcommand implementation might change because we can simply change what is getting returnedby the factory (as we'll see in subsequent versions of this application).
Defining the Game Board View and Controller
The game board also requires a view and controller, for which we'll definecom.peachpit.aas3wdp.proximity.Gameboard . The Gameboard class uses a GameboardData objectas its data model.
package com.peachpit.aas3wdp.proximity.views {
import flash.display.Sprite;
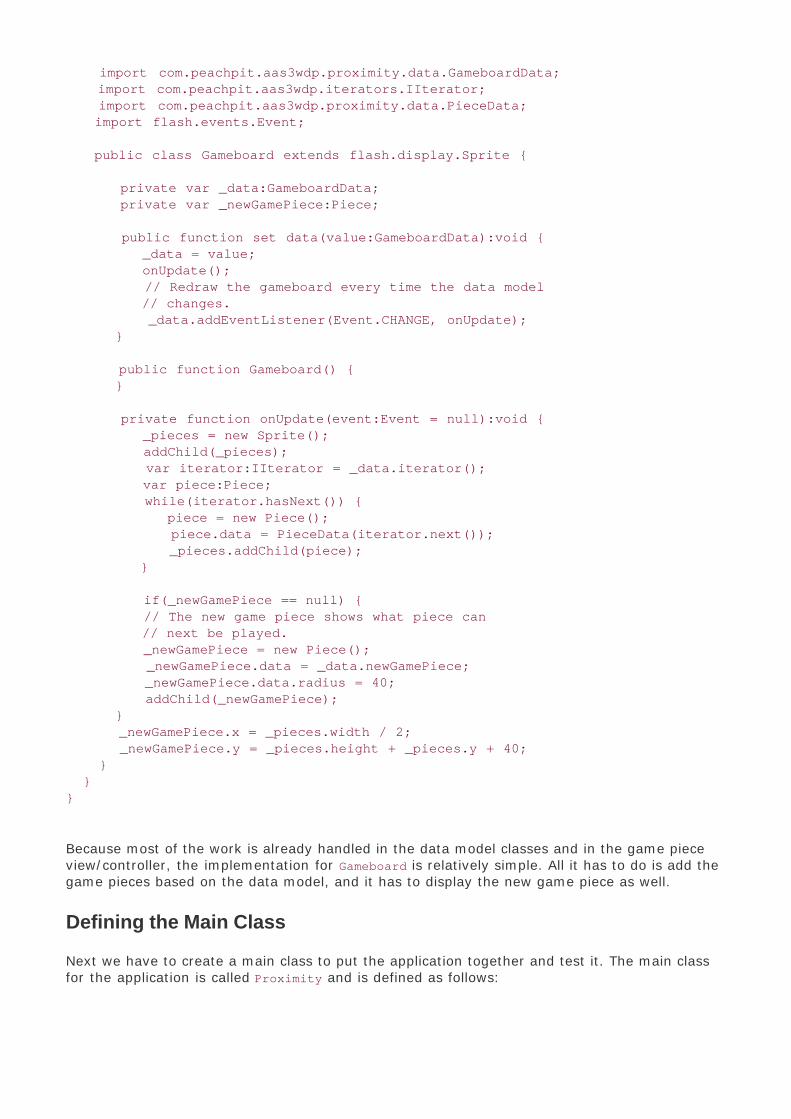
import com.peachpit.aas3wdp.proximity.data.GameboardData; import com.peachpit.aas3wdp.iterators.IIterator; import com.peachpit.aas3wdp.proximity.data.PieceData; import flash.events.Event;
public class Gameboard extends flash.display.Sprite {
private var _data:GameboardData; private var _newGamePiece:Piece;
public function set data(value:GameboardData):void { _data = value; onUpdate(); // Redraw the gameboard every time the data model // changes. _data.addEventListener(Event.CHANGE, onUpdate); } public function Gameboard() { }
private function onUpdate(event:Event = null):void { _pieces = new Sprite(); addChild(_pieces); var iterator:IIterator = _data.iterator(); var piece:Piece; while(iterator.hasNext()) { piece = new Piece(); piece.data = PieceData(iterator.next()); _pieces.addChild(piece); }
if(_newGamePiece == null) { // The new game piece shows what piece can // next be played. _newGamePiece = new Piece(); _newGamePiece.data = _data.newGamePiece; _newGamePiece.data.radius = 40; addChild(_newGamePiece); } _newGamePiece.x = _pieces.width / 2; _newGamePiece.y = _pieces.height + _pieces.y + 40; } }}
Because most of the work is already handled in the data model classes and in the game pieceview/controller, the implementation for Gameboard is relatively simple. All it has to do is add thegame pieces based on the data model, and it has to display the new game piece as well.
Defining the Main Class
Next we have to create a main class to put the application together and test it. The main classfor the application is called Proximity and is defined as follows:

package {
import flash.display.Sprite; import flash.display.StageScaleMode; import flash.display.StageAlign; import flash.events.MouseEvent; import com.peachpit.aas3wdp.commands.ICommandStack; import com.peachpit.aas3wdp.proximity.views.Piece; import com.peachpit.aas3wdp.proximity.data.GameboardData; import com.peachpit.aas3wdp.proximity.data.PieceData; import com.peachpit.aas3wdp.proximity.data.GamePlayer; import com.peachpit.aas3wdp.proximity.data.GamePlayers; import com.peachpit.aas3wdp.proximity.data.NullOwner; import com.peachpit.aas3wdp.proximity.commands.CommandFactory; import com.peachpit.aas3wdp.iterators.IIterator; import com.peachpit.aas3wdp.iterators.NullIterator; import com.peachpit.aas3wdp.commands.ICommand; import com.peachpit.aas3wdp.proximity.views.Gameboard;
public class Proximity extends Sprite {
private var _newGamePiece:Piece;
public function Proximity() { // Set the command type. The valid types are NORMAL, // UNDOABLE, and REDOABLE. This determines // what sort of commands the factory returns. CommandFactory.type = CommandFactory.NORMAL;
// Set the stage scaleMode and align properties. stage.scaleMode = StageScaleMode.NO_SCALE; stage.align = StageAlign.TOP_LEFT; // Add a new gameboard and its datamodel. var gameboard:Gameboard = new Gameboard(); var gameboardData:GameboardData = GameboardData.getInstance();
// Set the number of columns for the gameboard to 20 // (the default is 10). gameboardData.columns = 20; gameboard.data = gameboardData; addChild(gameboard); gameboard.x = 20; gameboard.y = 20; // Add game players. var gamePlayers:GamePlayers = GamePlayers.getInstance(); gamePlayers.addGamePlayer(new GamePlayer()); gamePlayers.addGamePlayer(new GamePlayer());
GameboardData.getInstance().nextGamePiece();
}
}}

When you test the application, you will see an image like the one shown in Figure 10.1 .
Clicking a grid space applies the game piece settings (the player who owns the piece and thevalue of the piece) by calling the command object's execute() method. The execute() methodalso advances the game play to the next player.
Figure 10.1. The Proximity gameboard with 10 rows and 20 columns.

Summary
This chapter discusses the Command pattern, which is a way of encapsulating an action and itsparameters. The Command pattern is useful as a solution to a variety of scenarios such as theneed for transactional behavior or undoable actions. Regardless of the way in which a commandis used, it always implements a known interface that has, at a minimum, a method (execute())that runs the action. In most cases, the command also has a receiver of the action, a client thatinstantiates the command, and an invoker that calls the method that runs the action. As shownby the examples in this chapter, the receiver, client, and invoker for a command change basedon the way in which the command is used. In some cases, the client and invoker are the sameobject.
In the next chapter, we'll look at the Memento pattern, which is often used in conjunction withthe Command pattern. In fact, in the next chapter we'll continue building the Proximity gameapplication to use the Memento pattern.

Chapter 11. Memento Pattern
In This Chapter
Using Mementos to Make Actions Undoable in the Proximity game 173
Using Mementos to Make Actions Redoable in the Proximity game 177
Summary 180
The Memento pattern is a way of recording an object's current state without breaking the rulesof encapsulation. The rules of encapsulation say that an object should manage its own state,and that it should allow external objects to influence its state only through a well-defined API.For example, it is perfectly acceptable for a class to define a setter method that changes thevalue of a private property. However, it would be bad design to use public properties that canbe set without going through a method of the class. Public properties allow external objects tochange the object's state without the object knowing what has occurred.
There are many reasons you might want to record an object's state at a point in time.Frequently you want to record an object's state so that you can return to that point if necessary.For example, an application with panel sets might enable the user to configure the panels bymoving them and resizing them. You might then want to record the configuration so that theuser can make changes but be able to return to the saved configuration. The difficulty is in howto record the state without breaking encapsulation. One option that might jump outimmediately is to add methods that return each of the required values. For example, if you wantto record a panel's state, you might want to record the x and y coordinates as well as the widthand height. That might seem simple enough. However, consider that an object's internal statemight be complex, and it might well be inappropriate to expose certain elements of the internalstate in that way.
The Memento pattern elegantly solves this dilemma. The Memento pattern consists of threebasic elements called the memento, the originator, and the caretaker. The originator is the classthat needs to record a snapshot of its state. It accomplishes that by way of an instance of amemento class. The caretaker is the object that stores the memento until which time it needs torestore it to the originator. The originator class has an API that allows a caretaker class torequest a memento object. The caretaker class stores the memento, and it then passes it backto the originator if requested.
The Memento pattern does not impose a very precise API that must be followed. However, theMemento pattern generally uses at least three classes for a basic implementation: theoriginator, the memento, and the caretaker.
The originator can be any sort of class for which you need to record the state at a point in time.The originator class must define methods to get and set the memento, which is used to saveand restore state. The memento is usually tightly coupled with the originator. Because amemento records state for an originator, the memento must know about the type of state thatthe originator maintains. At this point, a very simple example will be helpful.

Consider the case of a Circle class like the following:
package { import flash.display.Sprite; public class Circle extends Sprite { private var _radius:Number; private var _color:Number;
public function set radius(value:Number):void { _radius = value; draw(); }
public function set color(value:Number):void { _color = value; draw(); }
public function Circle(radiusValue:Number, colorValue:Number) { _radius = radiusValue; _color = colorValue; draw(); }
private function draw():void { graphics.clear(); graphics.lineStyle(1, _color, 1); graphics.beginFill(_color, 1) graphics.drawCircle(0, 0, _radius); graphics.endFill(); }
}
}
This example is purposefully simple. This Circle class simply draws a circle. The only state itneeds to maintain is the radius and the color with which to draw the circle. Here's an example ofcode that creates a new Circle and adds it to the display list:
var circle:Circle = new Circle(10, 0xFFFFFF); addChild(circle);
That code creates a white circle with a radius of 10. If you want, you can change the color tored and the radius to 20, like this:
circle.color = 0xFF0000; circle.radius = 20;
But what happens if you then want to return to the previous state with the white color and theradius of 10? Clearly you must record the state before changing it so that you can restore it at alater time. The Memento pattern says that in order to record the state for the Circle class, wemust create a memento type that we will call CircleMemento . The CircleMemento is capable of

storing the radius and color values.
package { public class CircleMemento { private var _radius:Number; private var _color:Number; public function get radius():Number { return _radius; } public function get color():Number { return _color; } public function CircleMemento(radiusValue:Number, colorValue:Number) { _radius = radiusValue; _color = colorValue; }
}
}
The memento class is a data-only class that simply stores all the values for the state that youwant to record for a particular type. In the case of CircleMemento we want to record the radiusand color values for a Circle instance.
Next, we need a way for the originator (Circle ) to be responsible for saving and restoring itsstate. For that purpose, we add getMemento() and setMemento() methods to Circle .
package { import flash.display.Sprite; public class Circle extends Sprite { private var _radius:Number; private var _color:Number;
public function set radius(value:Number):void { _radius = value; draw(); }
public function set color(value:Number):void { _color = value; draw(); }
public function Circle(radiusValue:Number, colorValue:Number) { _radius = radiusValue; _color = colorValue; draw(); }
private function draw():void { graphics.clear(); graphics.lineStyle(1, _color, 1); graphics.beginFill(_color, 1) graphics.drawCircle(0, 0, _radius);

graphics.endFill(); }
public function getMemento():CircleMemento { return new CircleMemento(_radius, _color);
}
public function setMemento(memento:CircleMemento):void {
_radius = memento.radius; _color = memento.color; draw();
} }
}
You can see that the getMemento() method constructs and returns a new CircleMemento objectthat stores the current state. The setMemento() method accepts a CircleMemento parameter andthen restores the Circle object's state to the state values from the memento.
The only object we haven't yet looked at is the caretaker. The caretaker is the object that callsgetMemento() to retrieve and store the current memento, and it then can pass that mementoback to the object using setMemento() . In this case, the caretaker is whatever object isconstructing the Circle instance. Here's an example that creates a Circle instance: Every timethe user clicks the circle, it changes the state randomly. The caretaker also records the currentstate by retrieving a memento from the Circle instance. Then the user can use the right andleft keys on the keyboard to move backward and forward through the sequence of statechanges.
package { import flash.display.Sprite; import flash.events.KeyboardEvent; import flash.events.MouseEvent; import flash.ui.Keyboard;
public class MementoExample extends Sprite {
private var _circle:Circle; private var _previousMementos:Array; private var _nextMementos:Array;
public function MementoExample() { // Create arrays to store the next and previous states. _previousMementos = new Array(); _nextMementos = new Array();
// Create a circle. _circle = new Circle(10, 0xFFFFFF); addChild(_circle);
// Listen for click events on the circle. Listen for

// keyboard events globally. _circle.addEventListener(MouseEvent.CLICK, onClick); stage.addEventListener(KeyboardEvent.KEY_UP, onKey); }
// When thye user clicks on the circle retrieve the current // memento from the circle, and store it in the _previousMementos // array. Then set the state of the circle to random values. private function onClick(event:MouseEvent):void { _nextMementos = new Array(); _previousMementos.push(_circle.getMemento()); _circle.radius = Math.random() * 40 + 10; _circle.color = Math.random() * (255 * 255 * 255); }
// When the user presses the right and left keys restore the // state of the circle by retrieving a memento from the appropriate // array and passing it to the setMemento() method of the circle. private function onKey(event:KeyboardEvent):void { var memento:CircleMemento; if(event.keyCode == Keyboard.LEFT) { if(_previousMementos.length > 0) { memento = _previousMementos.pop(); _nextMementos.push(memento); _circle.setMemento(memento); } } else if(event.keyCode == Keyboard.RIGHT) { if(_nextMementos.length > 0) { memento = _nextMementos.pop(); _previousMementos.push(memento); _circle.setMemento(memento); } } } } }
This should give you a basic idea of the structure of a relatively simple Memento patternimplementation. Throughout the chapter, we'll look at additional examples.

Using Mementos to Make Actions Undoable in the
Proximity Game
Often, mementos are used in conjunction with commands in order to implement complexundoable and redoable commands. The following application applies mementos to the Proximitygame application you created in the previous chapter, "Command Pattern"; the mementos willmake the commands undoable in the Proximity game.
Defining the Memento Type
The first thing we'll do is define a memento class. The classcom.peachpit.aas3wdp.proximity.mementos.GamePieceMemento serves as the memento type usedto store game piece state.
package com.peachpit.aas3wdp.proximity.mementos {
import com.peachpit.aas3wdp.proximity.data.GamePlayer;
public class GamePieceMemento {
private var _count:uint; private var _owner:GamePlayer;
public function get count():uint { return _count; }
public function get owner():GamePlayer { return _owner; }
public function GamePieceMemento(count:uint, owner:GamePlayer) { _count = count; _owner = owner; }
} }
You can see that the memento in this case stores values for count and owner . These valuesrepresent state for a PieceData object.
Creating the Originator
In the Proximity game, the mementos we want to store are for PieceData objects. Therefore,we'll need to make the PieceData class an originator by adding getMemento() and setMemento()

methods. Here's PieceData with the new methods (we've omitted some of the code here just forthe purposes of saving printed space):
package com.peachpit.aas3wdp.proximity.data {
import flash.events.EventDispatcher; import flash.events.Event; import com.peachpit.aas3wdp.proximity.data.GamePlayer; import com.peachpit.aas3wdp.proximity.data.NullOwner; import com.peachpit.aas3wdp.proximity.mementos.GamePieceMemento;
public class PieceData extends EventDispatcher {
// Existing code goes here.
public function getMemento():GamePieceMemento { return new GamePieceMemento(_count, _owner); } public function setMemento(memento:GamePieceMemento):void { _count = memento.count; _owner = memento.owner; dispatchEvent(new Event(Event.CHANGE)); } } }
You can see that the getMemento() method simply constructs and returns a newGamePieceMemento object. The setMemento() method takes a GamePieceMemento instance, restoresthe PieceData state, and dispatches an event to notify listeners that the data model haschanged.
Defining the Undoable Command Type
Next we'll define an undoable command type. The undoable command should inherit from thestandard command type (GamePlayCommand ). In addition, the command needs to implement theIUndoableCommand interface. The class,com.peachpit.aas3wdp.proximity.commands.UndoableGamePlayCommand is as follows:
package com.peachpit.aas3wdp.proximity.commands {
import com.peachpit.aas3wdp.proximity.data.PieceData; import com.peachpit.aas3wdp.proximity.data.GamePlayer; import com.peachpit.aas3wdp.proximity.data.GamePlayers; import com.peachpit.aas3wdp.proximity.data.GameboardData; import com.peachpit.aas3wdp.proximity.commands.GamePlayCommand; import com.peachpit.aas3wdp.iterators.IIterator; import com.peachpit.aas3wdp.proximity.mementos.GamePieceMemento; import com.peachpit.aas3wdp.proximity.data.GameboardData; import com.peachpit.aas3wdp.proximity.data.NullOwner; import com.peachpit.aas3wdp.proximity.data.PieceData; import com.peachpit.aas3wdp.commands.CommandStack; import com.peachpit.aas3wdp.commands.IUndoableCommand;

public class UndoableGamePlayCommand extends GamePlayCommand implements IUndoableCommand {
protected var _gamePieceMementos:Array; protected var _gameboardMemento:GamePieceMemento;
public function UndoableGamePlayCommand(piece:PieceData) { super(piece); _gamePieceMementos = new Array(); }
override public function execute():void { var gameboard:GameboardData = GameboardData.getInstance(); if(_piece.owner is NullOwner) {
// Get the memento for the clicked game piece. _gamePieceMementos.push({object: _piece, memento: _piece.getMemento()}); var iterator:IIterator = gameboard.getProximityPieces(_piece); var piece:PieceData; while(iterator.hasNext()) { piece = PieceData(iterator.next());
// Add a memento for the adjacent // game piece. _gamePieceMementos.push({object: piece, memento: piece.getMemento()}); }
// Add a memento for the new game piece and for the gameboard. _gameboardMemento = gameboard.getMemento(); } super.execute(); CommandStack.getInstance().putCommand(this); }
public function undo():void { for(var i:uint = 0; i < _gamePieceMementos.length; i++) { _gamePieceMementos[i].object.setMemento(_gamePieceMementos[i].memento); } GameboardData.getInstance().setMemento(_gameboardMemento); }
} }
This class overrides the execute() method so that it can retrieve all the mementos for theaffected game pieces before changing their state. Then the undo() method loops through all themementos and restores the originator state for each affected game piece.
Updating the Command Factory
Next we want to edit CommandFactory so that it returns a UndoableGamePlayCommand instancewhen the option is set correctly. Here's the updated getGamePlayCommand() method:
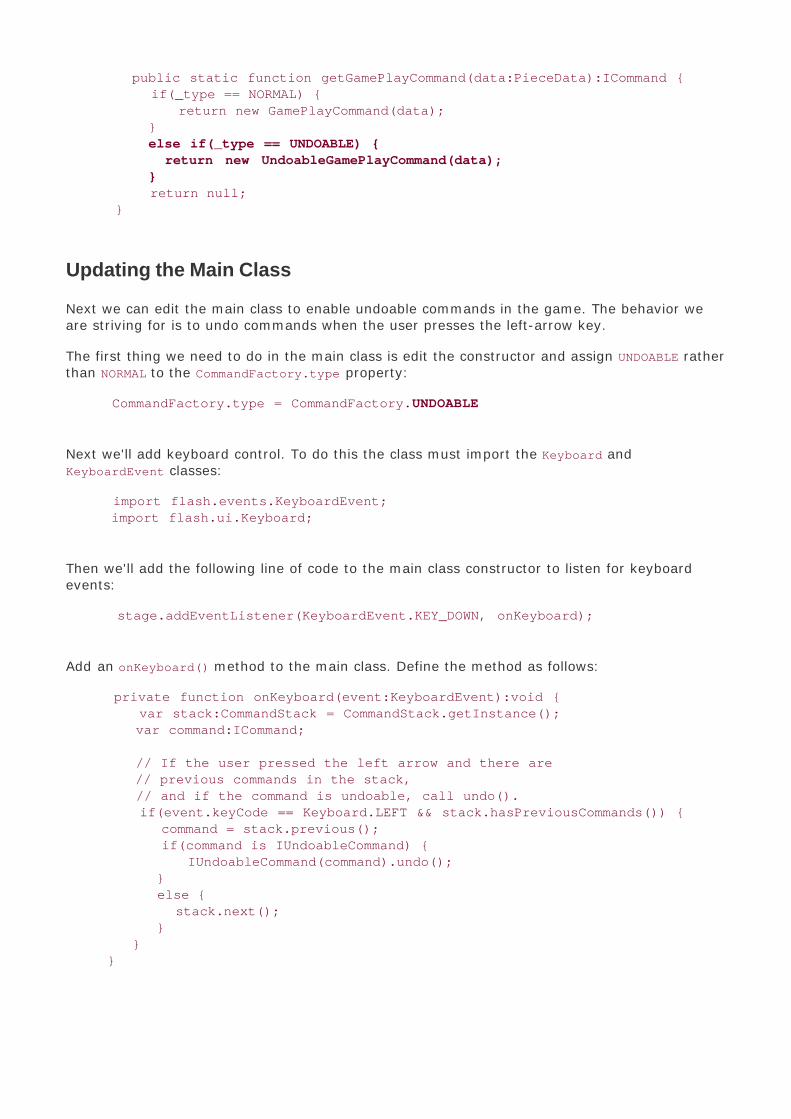
public static function getGamePlayCommand(data:PieceData):ICommand { if(_type == NORMAL) { return new GamePlayCommand(data); } else if(_type == UNDOABLE) { return new UndoableGamePlayCommand(data); } return null; }
Updating the Main Class
Next we can edit the main class to enable undoable commands in the game. The behavior weare striving for is to undo commands when the user presses the left-arrow key.
The first thing we need to do in the main class is edit the constructor and assign UNDOABLE ratherthan NORMAL to the CommandFactory.type property:
CommandFactory.type = CommandFactory.UNDOABLE
Next we'll add keyboard control. To do this the class must import the Keyboard andKeyboardEvent classes:
import flash.events.KeyboardEvent; import flash.ui.Keyboard;
Then we'll add the following line of code to the main class constructor to listen for keyboardevents:
stage.addEventListener(KeyboardEvent.KEY_DOWN, onKeyboard);
Add an onKeyboard() method to the main class. Define the method as follows:
private function onKeyboard(event:KeyboardEvent):void { var stack:CommandStack = CommandStack.getInstance(); var command:ICommand;
// If the user pressed the left arrow and there are // previous commands in the stack, // and if the command is undoable, call undo(). if(event.keyCode == Keyboard.LEFT && stack.hasPreviousCommands()) { command = stack.previous(); if(command is IUndoableCommand) { IUndoableCommand(command).undo(); } else { stack.next(); } } }

Those few changes make the game's play actions undoable. When you test the Proximityapplication now, you can use the left-arrow key to undo the actions you have applied.

Using Mementos to Make Actions Redoable in the
Proximity Game
Now that we have added an undo feature to the Proximity game, we'll complete ourmodifications to the game by adding code that redoes actions we have just undone.
Defining the Redoable Command
The first step in making the commands redoable is to create a redoable command class. Definea class, com.peachpit.aas3wdp.proximity.commands.RedoableGamePlayCommand , that extendsUndoableGamePlayCommand and adds redo functionality by implementing IRedoableCommand .
package com.peachpit.aas3wdp.proximity.commands {
import com.peachpit.aas3wdp.proximity.data.PieceData; import com.peachpit.aas3wdp.proximity.data.GamePlayer; import com.peachpit.aas3wdp.proximity.data.GamePlayers; import com.peachpit.aas3wdp.proximity.data.GameboardData; import com.peachpit.aas3wdp.proximity.commands.UndoableGamePlayCommand; import com.peachpit.aas3wdp.iterators.IIterator; import com.peachpit.aas3wdp.proximity.mementos.GamePieceMemento; import com.peachpit.aas3wdp.commands.IRedoableCommand; import com.peachpit.aas3wdp.proximity.data.NullOwner;
public class RedoableGamePlayCommand extends UndoableGamePlayCommand implements IRedoableCommand {
private var _nextGamePieceMemento:GamePieceMemento;
public function RedoableGamePlayCommand(piece:PieceData) { super(piece); }
override public function undo():void { _nextGamePieceMemento = GameboardData.getInstance().newGamePiece.getMemento(); super.undo(); }
public function redo():void { var gameboard:GameboardData = GameboardData.getInstance(); var newGamePiece:PieceData = gameboard.newGamePiece; var currentGamePlayer:GamePlayer = newGamePiece.owner; _piece.owner = currentGamePlayer; _piece.count = newGamePiece.count;
// Retrieve all adjacent pieces. var iterator:IIterator = gameboard.getProximityPieces(_piece); var piece:PieceData;

while(iterator.hasNext()) { piece = PieceData(iterator.next()); // If the game piece has the same owner as // the clicked game piece, increment the // count. If they have different owners (and // the owner isn't NullOwner) then test if // the clicked game piece has a higher // count. If so, make it the new owner. if(piece.owner == _piece.owner) { piece.count++; } else if(!(piece.owner is NullOwner)) { if(piece.count < _piece.count) { piece.owner = currentGamePlayer; } } } GameboardData.getInstance().setMemento(_nextGamePieceMemento); }
} }
The redoable command redoes a command by essentially replaying based on the new gamepiece. It then uses a memento to restore the next new game piece state.
Editing the Factory Class
Next we'll edit the CommandFactory class so that it returns a RedoableGamePlayCommand objectwhen the type property is set to REDOABLE . Here's the updated getGamePlayCommand() method:
public static function getGamePlayCommand(data:PieceData):ICommand { if(_type == NORMAL) { return new GamePlayCommand(data); } else if(_type == UNDOABLE) { return new UndoableGamePlayCommand(data); } else if(_type == REDOABLE) { return new RedoableGamePlayCommand(data); } return null; }
Editing the Main Class
Now we can edit the main class by assigning a value of REDOABLE rather than UNDOABLE to theCommandFactory.type property .
CommandFactory.type = CommandFactory.REDOABLE;

Add an if clause to the onKeyboard() method so that it calls the redo() method of the nextcommand object in the stack when the user presses the right-arrow key:
private function onKeyboard(event:KeyboardEvent):void { var stack:CommandStack = CommandStack.getInstance(); var command:ICommand;
if(event.keyCode == Keyboard.LEFT && stack.hasPreviousCommands()) { command = stack.previous(); if(command is IUndoableCommand) { IUndoableCommand(command).undo(); } else { stack.next(); } }
// If the user pressed the right arrow key and there are next // commands in the stack, and if the command is redoable, call // redo(). if(event.keyCode == Keyboard.RIGHT && stack.hasNextCommands()) { command = stack.next(); if(command is IRedoableCommand) { IRedoableCommand(command).redo(); } else { stack.previous(); } } }
When you test the application now, you can press the right-arrow key to redo any action thatyou've previously undone.

Summary
This chapter discusses the Memento pattern, which provides an elegant way to store an object'sstate while at the same time breaking no rules of encapsulation. An object for which you need torecord state is called the originator. The originator is responsible for returning a mementoobject that stores the object's current state, and the originator is also responsible to managingits own state by applying a stored state from a memento. The memento objects can be storedby a caretaker object until they are reapplied to the originator.
Chapter 12. State Pattern
In This Chapter
Simple State Example 181
Encapsulating the States 184
Using Abstract Classes 188
Transitions 193
Summary 198
The State pattern is a valuable pattern in ActionScript development. It allows an object tochange its behavior when its internal state changes. Take a toggle button as an example. Thetoggle button must maintain two separate states: one for selected and one for unselected. Thetwo states share the same structure, but they have very different functionality. In addition tothe visual display being different, they most likely handle a click event differently, too. This iswhere the State pattern becomes valuable. The State pattern defines a standard methodologyfor handling encapsulated states.
There are many ways to implement the State pattern, but they all come to the same result: Theobject's class appears to change. Obviously, we aren't talking about changing the object's typeat runtime, but we are talking about changing nearly every operation in a class based on itsinternal state.
The best way to demonstrate the State pattern is with an example. Therefore, we're going tobuild a basketball shooter. Our example will build a shooter object with three different states:lay up, free throw, and three-pointer. Each of these states has characteristics such as accuracyand point value. We'll use this shooter object in the context of a basketball game. When we tellthe shooter to shoot the ball, we can calculate whether the shot was made and for how manypoints based on the internal state of the shooter object.

Simple State Example
Our first attempt at representing the basketball shooter and its various states is very simple. Infact, you've probably built classes just like this before. This shooter class meets all the criteriaof the State pattern but is a naive and inelegant solution that presents further problems. We'lllook at this example first to understand how we can later improve on this.
Create the Simple Shooter Class
The SimpleShooter class holds all the shooter functionality for each state. The state is set in thesetState() method. This method takes a stateName as the parameter. The value of thisparameter is saved in a class property called stateName.
There are three constants defined in this class that represent the three state names:LAY_UP_STATE, FREE_THROW_STATE, and ThrEE_POINTER_STATE. They should be used when callingthe setState() method to ensure accuracy.
The SimpleShooter class also has a getAccuracy() method to determine the percentage of shotsmade from that state. And there is a getPointValue() method that returns the point value of amade shot from that state. Each of these methods has a switch statement that determines thestate in which the object is.
package com.peachpit.aas3wdp.stateexample {
public class SimpleShooter {
private var stateName:String; public static const LAY_UP_STATE:String = "lay_up_state"; public static const FREE_THROW_STATE:String = "free_throw_state"; public static const THREE_POINTER_STATE:String = "three_pointer_state";
public function SimpleShooter() {}
// Returns the shot accuracy percent of the current state public function getAccuracy():Number { switch(stateName) { case LAY_UP_STATE: return 0.9; case FREE_THROW_STATE: return 0.7; case THREE_POINTER_STATE: return 0.4; default: return 0; } }
// Returns the made shot point value of the current state public function getPointValue():Number {

switch(stateName) { case LAY_UP_STATE: return 2; case FREE_THROW_STATE: return 1; case THREE_POINTER_STATE: return 3; default: return 0; } }
// Sets the current state of the object public function setState(stateName:String):void { this.stateName = stateName; } }}
Create the Main Example Class
We'll build a class called SimpleShooterExample, which serves as the starting point for thisexample. This class creates the shooter object, sets the state, initiates ten shots at a constanttime interval, calculates the outcome (whether or not the ball went through the hoop) based onthe accuracy property, and keeps track of the points. After each shot, we output the outcome ofthe shot. The outcome of the shot and the point value are determined by the internal state ofthe shooter object. The following is the code for our implementation class:
package {
import flash.display.Sprite; import flash.utils.Timer; import flash.events.TimerEvent; import com.peachpit.aas3wdp.stateexample.SimpleShooter;
public class SimpleShooterExample extends Sprite {
private var _points:Number; private var _shooter:SimpleShooter;
public function SimpleShooterExample() { // Initially set the points to zero _points = 0; // Create the SimpleShooter instance and set its state _shooter = new SimpleShooter(); _shooter.setState(SimpleShooter.THREE_POINTER_STATE);
var shotInterval:Timer = new Timer(1000, 10); shotInterval.addEventListener(TimerEvent.TIMER, onShot); shotInterval.start(); }
private function calculateShot(accuracy:Number):Boolean { return Math.random() < accuracy;

}
private function onShot(event:TimerEvent):void { if(calculateShot(_shooter.getAccuracy())) { _points += _shooter.getPointValue(); trace("Made the Shot! " + _points + " point(s)"); }else { trace("Missed the Shot!") } } }}
The SimpleShooterExample class has two properties: points and shooter. The points propertyholds the running total of our points across all ten shots; the shooter property holds theinstance of the SimpleShooter object. Inside the constructor, we create that SimpleShooterobject and set the state of it.
The shot is calculated by grabbing the accuracy of the current shot. This is a percentage atwhich shots from that state are typically made. We run that though a simple probability functioncalled calculateShot(). If the accuracy is 80%, the calculateShot() method returns true 80%of the times it is called and false for the remaining 20%.
Problems with This Example
Although the example we just described works and is simple to understand, there are a couplemajor problems with it.
The first problem is scalability. This solution simply will not scale well. Consider an option with100 states and 20 methods per state. The resulting class would be huge. And each time you addor remove a state, you'd have to modify every method.
This transitions us nicely to our second problem: maintainability. If we have to modify massiveamounts of code for each change request, we're opening ourselves up to having a lot of bugs.To prevent this from happening, we should encapsulate each of the states in its own class andclose those states for modification. This makes the application easier to perform QualityAssurance (QA) testing and debugging.

Encapsulating the States
Let's try this again. This time we're going to encapsulate each state into its own class so thatthe code is easier to maintain and scales well. Figure 12.1 shows what our solution looks like.
Figure 12.1. Encapsulating the states.
[View full size image]
The Shooter State Interface
First, we create an interface that all of our state classes implement. All our state objectsimplement the IShooterState interface, therefore, we can treat them interchangeably. This isknown as polymorphism. The IShooterState interface has two methods: getAccuracy() andgetPointValue(). Notice that we typed the state property in the ShooterStateMachine class toIShooterState so that we can store an instance of any object that implements that interface.
package com.peachpit.aas3wdp.stateexample {
public interface IShooterState {
function getAccuracy():Number;
function getPointValue():Number;
}}
State Objects
All our state objects are basically the same. They encapsulate the state-specific information forour application. For example, the LayUpState defines an accuracy of 90% and a point value of 2.By encapsulating all the state specific logic into objects, we make them easier to manage andmore flexible. They're easier to manage because modifications to one state don't affect theother states. It's also easier to add new states.

package com.peachpit.aas3wdp.stateexample {
import com.peachpit.aas3wdp.statepattern.IShooterState;
internal class LayUpState implements IShooterState {
public function getAccuracy():Number { return 0.9; }
public function getPointValue():Number { return 2; }
}
}
package com.peachpit.aas3wdp.stateexample {
import com.peachpit.aas3wdp.statepattern.IShooterState;
internal class FreeThrowState implements IShooterState {
public function getAccuracy():Number { return 0.7; }
public function getPointValue():Number { return 1; }
}
}
package com.peachpit.aas3wdp.stateexample {
import com.peachpit.aas3wdp.stateexample.IShooterState;
internal class ThreePointerState implements IShooterState{
public function getAccuracy():Number { return 0.4; }
public function getPointValue():Number { return 3; }
}
}

The Shooter State Machine Class
The ShooterStateMachine class serves as a proxy to our state objects. It implements the samemethods as our states and delegates the calls to the current state object. It is also responsiblefor switching states.
Tip
State machines are also sometimes referred to as the context in the State pattern.
Much like the SimpleShooter class, ShooterStateMachine has three constants that represent thethree states. One of these three values should be used when calling the setState() method.
The setState() method has a little more functionally in this implementation of the basketballapplication. Instead of putting switch statements in each method, we put it in only thesetState() method. The switch statement is responsible for creating the correct state objectbased on the state name.
package com.peachpit.aas3wdp.stateexample {
import com.peachpit.aas3wdp.stateexample.IShooterState; import com.peachpit.aas3wdp.stateexample.LayUpState; import com.peachpit.aas3wdp.stateexample.FreeThrowState; import com.peachpit.aas3wdp.stateexample.ThreePointerState; public class ShooterStateMachine {
private var _state:IShooterState; public static const LAY_UP_STATE:String = "lay_up_state"; public static const FREE_THROW_STATE:String = "free_throw_state"; public static const THREE_POINTER_STATE:String = "three_pointer_state";
public function ShooterStateMachine() {}
public function getAccuracy():Number { return _state.getAccuracy(); }
public function getPointValue():Number { return _state.getPointValue(); }
public function setState(stateName:String):void { switch(stateName) { case LAY_UP_STATE: _state = new LayUpState(); break; case FREE_THROW_STATE: __state = new FreeThrowState(); break; case THREE_POINTER_STATE: _state = new ThreePointerState();

break; default: _state = null; } }
}
}
The creation of state objects is done inside the setState() method. There are two options forcreating and destroying state objects: The first is what we did in the preceding code. This ispreferable because we create the states only when they are needed and we avoid creatingstates that are never used.
The second option is to create all the state objects in the constructor and simply change thereference to the current state. This second approach is valuable when you have to maintainsome data across state switches. In the preceding example, the LayUpState object is re-createdeach time the state changes to LAY_UP_STATE. This is good for memory management, but what ifwe wanted to count how many lay-ups were made? If we used the same object each time thatstate was set, then a counter at the LayUpState level could persist across state changes. Thesecond approach can also be good if your application has a lot of rapid state changing and youwant to incur the performance hit of creating the objects only once.
Creating the Main Example Class
The main class for this implementation is nearly identical to the one for our firstimplementation. We'll name this class ShooterImp; it will create an instance ofShooterStateMachine instead of SimpleShooter.
package {
import flash.display.Sprite; import flash.utils.Timer; import flash.events.TimerEvent; import com.peachpit.aas3wdp.stateexample.ShooterStateMachine;
public class ShooterExample extends Sprite {
private var _points:Number; private var _shooter:ShooterStateMachine;
public function ShooterExampe() { _points = 0; _shooter = new ShooterStateMachine(); _shooter.setState(ShooterStateMachine.LAY_UP_STATE); var shotInterval:Timer = new Timer(1000, 10); shotInterval.addEventListener(TimerEvent.TIMER, onShot); shotInterval.start(); }
private function calculateShot(accuracy:Number):Boolean { return Math.random() < accuracy;

}
private function onShot(event:TimerEvent):void { if(calculateShot(_shooter.getAccuracy())) { _points += _shooter.getPointValue() trace("Made the Shot! " + _points + " point(s)"); }else { trace("Missed the Shot!") } } }
}
When you debug this implementation (ShooterExample), you'll see that the result is exactly thesame as SimpleShooterExample. However, we now have a design that is both scalable and easyto maintain.

Using Abstract Classes
As mentioned earlier in this chapter, there are many ways to implement a State pattern. In theprevious example, we used an interface to define the methods that each state must implement.But what if we wanted to share a common implementation? One option would be to copy theimplementation to each state class. This would work fine, but it would be difficult to manage asthe number of states grew and change requests came in. A better option would be to use anabstract base class in addition to an interface. An abstract base class allows us to reuse acommon implementation and still define methods that need to be overridden by each stateclass. In the next example, we're going to encapsulate the shooting functionality inside eachstate as a shoot() method. The method is the same across all states; therefore, each stateobject does not override it. Figure 12.2 shows how the design changes to work with an abstractclass in place of an interface.
Figure 12.2. Using abstract classes.
[View full size image]
The Abstract Shooter State
The biggest change between this example and the previous example is that we're now using anabstract base class for all our state objects. We're going to name this classAbstractShooterState .
Tip
It's common convention to start abstract class names with the word Abstract . Thenaming convention is especially important for ActionScript classes because there is noprogrammatic way to enforce an abstract class.
The abstract class implements the private calculateShot() method from our originalimplementation class. This method is called from the shoot() method. The shoot() method usesthe getAccuracy() and getPointValue() methods to calculate whether the shot was made andhow many points the shot was worth. However, the getAccuracy() and getPointValue()

methods are overridden by the state objects.
Note
This is actually an example of the Template Method pattern described in Chapter 5 .
Notice that both the getAccuracy() and getPointValue() methods throw errors in this class (ifthey are not overridden, and someone tries to call one of the methods). And because theshoot() method depends on the results of getAccuray() and getPointValue() , the shoot()method would also throw the error. When these abstract methods are overridden, the errors arenot thrown. This is a nice way to get around the fact that ActionScript 3.0 doesn't officiallysupport abstract classes.
Note
The state classes are made internal because they should be available only inside thecom.peachpit.aas3wdp.stateexample package.
package com.peachpit.aas3wdp.stateexample {
internal class AbstractShooterState {
private function calculateShot(accuracy:Number):Boolean { return Math.random() < accuracy; }
public function getAccuracy():Number { throw new Error("AbstractShooterState.getAccuracy() is an Abstract method and must be overridden."); }
public function getPointValue():Number { throw new Error("AbstractShooterState.getPointValue() is an Abstract method and must be overridden."); }
public function shoot():Number { if(calculateShot(getAccuracy())) { trace("Made the Shot!"); return getPointValue(); } trace("Missed the Shot."); return 0; }
}
}
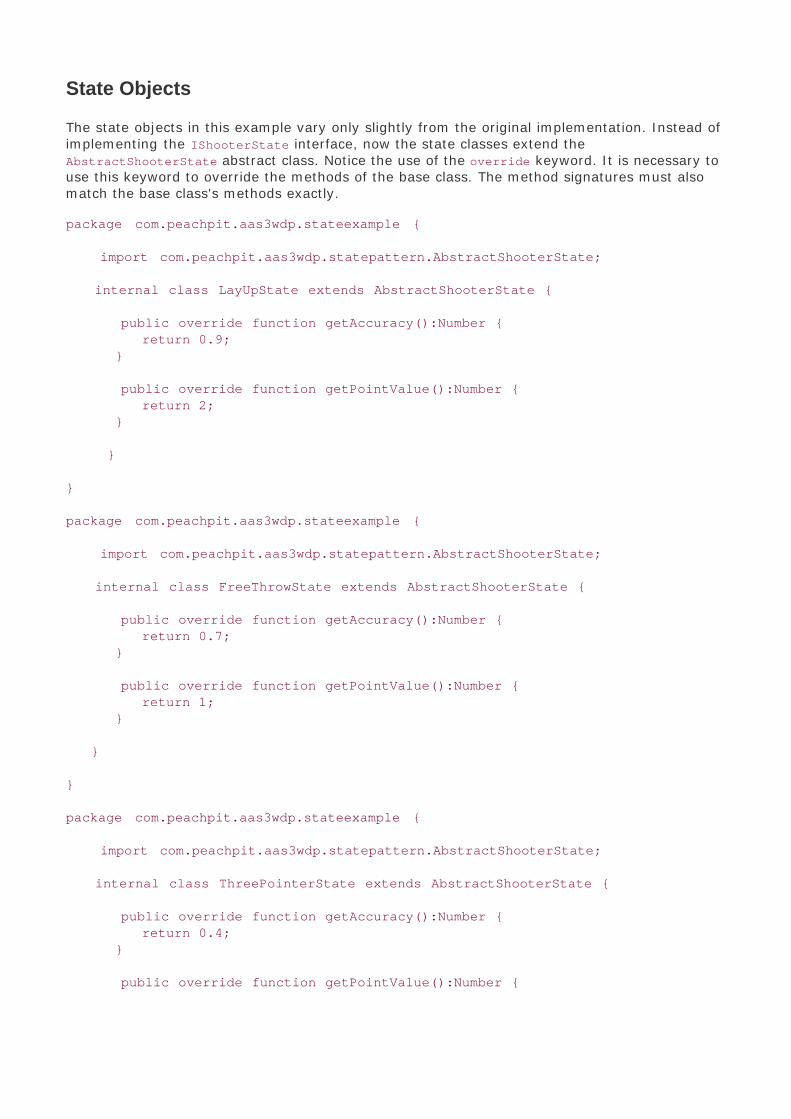
State Objects
The state objects in this example vary only slightly from the original implementation. Instead ofimplementing the IShooterState interface, now the state classes extend theAbstractShooterState abstract class. Notice the use of the override keyword. It is necessary touse this keyword to override the methods of the base class. The method signatures must alsomatch the base class's methods exactly.
package com.peachpit.aas3wdp.stateexample {
import com.peachpit.aas3wdp.statepattern.AbstractShooterState;
internal class LayUpState extends AbstractShooterState {
public override function getAccuracy():Number { return 0.9; }
public override function getPointValue():Number { return 2; }
}
}
package com.peachpit.aas3wdp.stateexample {
import com.peachpit.aas3wdp.statepattern.AbstractShooterState;
internal class FreeThrowState extends AbstractShooterState {
public override function getAccuracy():Number { return 0.7; }
public override function getPointValue():Number { return 1; }
}
}
package com.peachpit.aas3wdp.stateexample {
import com.peachpit.aas3wdp.statepattern.AbstractShooterState;
internal class ThreePointerState extends AbstractShooterState {
public override function getAccuracy():Number { return 0.4; }
public override function getPointValue():Number {

return 3; }
}
}
Although using an interface and an abstract class are both valid ways to implement the Statepattern, each has its own use case. As a rule, you should use interfaces; however, if you havestates that share an implementation, abstract classes are the better option.
The Shooter State Machine
The state machine changes only slightly for this example. We need to type the state property tothe AbstractStateShooter abstract class instead of to the IShooterState interface. And we alsoneed to implement a shoot() method that is delegated to the current state.
package com.peachpit.aas3wdp.stateexample {
import com.peachpit.aas3wdp.stateexample.AbstractShooterState; import com.peachpit.aas3wdp.stateexample.LayUpState; import com.peachpit.aas3wdp.stateexample.FreeThrowState; import com.peachpit.aas3wdp.stateexample.ThreePointerState;
public class ShooterStateMachine {
private var state:AbstractShooterState; public static const LAY_UP_STATE:String = "lay_up_state"; public static const FREE_THROW_STATE:String = "free_throw_state"; public static const THREE_POINTER_STATE:String = "three_pointer_state";
public function ShooterStateMachine() {}
public function getAccuracy():Number { return state.getAccuracy(); }
public function getPointValue():Number { return state.getPointValue(); }
public function shoot():Number { return state.shoot(); }
public function setState(stateDesc:String):void { switch(stateDesc) { case LAY_UP_STATE: state = new LayUpState(); break; case FREE_THROW_STATE: state = new FreeThrowState(); break; case THREE_POINTER_STATE:

state = new ThreePointerState(); break; default: state = null; } }
}
}
Creating the Main Example Class
The main class changes for this implementation because we encapsulated the shoot logic intothe state objects. Therefore, we don't need to calculate whether a shot was madewe only needto call the state object's shoot() method, and that method tells us the points for that shot (0 fora missed shot and 1, 2, or 3 for a made shot).
package {
import flash.display.Sprite; import flash.utils.Timer; import flash.events.TimerEvent; import com.peachpit.aas3wdp.stateexample.ShooterStateMachine;
public class AbstractShooterExample extends Sprite {
private var _points:Number; private var _shooter:ShooterStateMachine;
public function AbstractShooterImp() { _points = 0; _shooter = new ShooterStateMachine(); _shooter.setState(ShooterStateMachine.FREE_THROW_STATE); var shotInterval:Timer = new Timer(1000, 10); shotInterval.addEventListener(TimerEvent.TIMER, onShot); shotInterval.start(); }
private function onShot(event:TimerEvent):void { _points += _shooter.shoot(); trace(_points); }
}
}
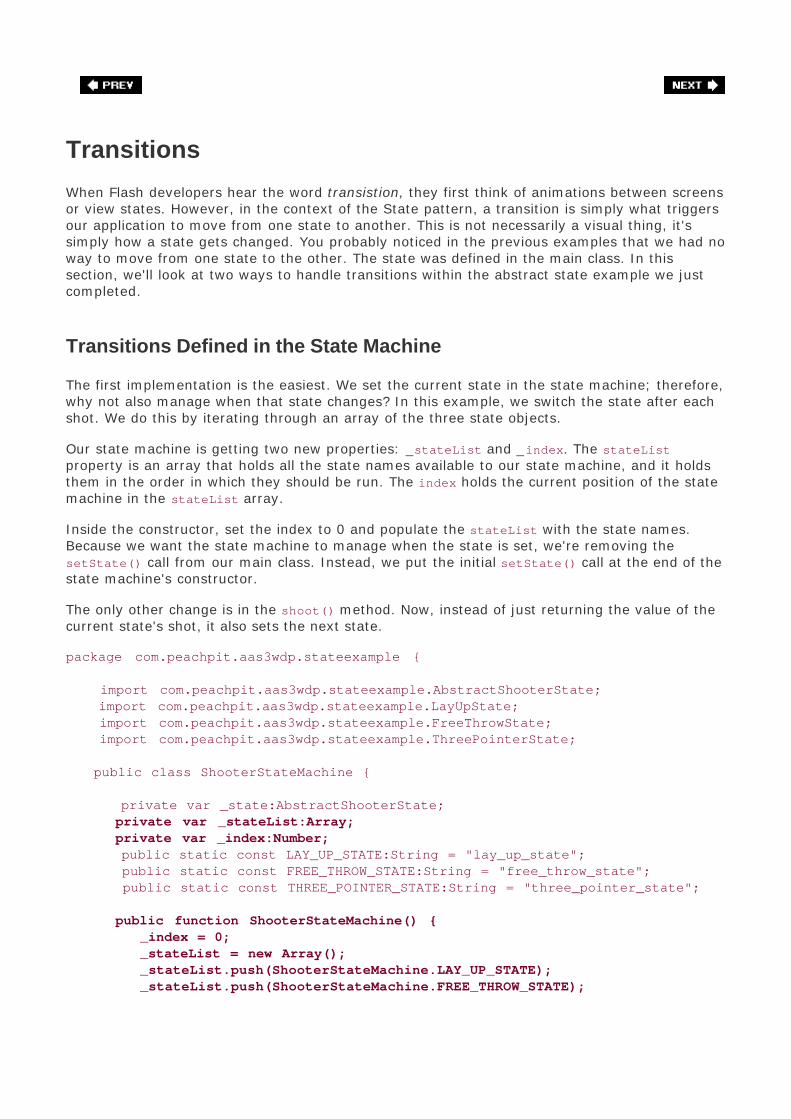
Transitions
When Flash developers hear the word transistion, they first think of animations between screensor view states. However, in the context of the State pattern, a transition is simply what triggersour application to move from one state to another. This is not necessarily a visual thing, it'ssimply how a state gets changed. You probably noticed in the previous examples that we had noway to move from one state to the other. The state was defined in the main class. In thissection, we'll look at two ways to handle transitions within the abstract state example we justcompleted.
Transitions Defined in the State Machine
The first implementation is the easiest. We set the current state in the state machine; therefore,why not also manage when that state changes? In this example, we switch the state after eachshot. We do this by iterating through an array of the three state objects.
Our state machine is getting two new properties: _stateList and _index. The stateListproperty is an array that holds all the state names available to our state machine, and it holdsthem in the order in which they should be run. The index holds the current position of the statemachine in the stateList array.
Inside the constructor, set the index to 0 and populate the stateList with the state names.Because we want the state machine to manage when the state is set, we're removing thesetState() call from our main class. Instead, we put the initial setState() call at the end of thestate machine's constructor.
The only other change is in the shoot() method. Now, instead of just returning the value of thecurrent state's shot, it also sets the next state.
package com.peachpit.aas3wdp.stateexample {
import com.peachpit.aas3wdp.stateexample.AbstractShooterState; import com.peachpit.aas3wdp.stateexample.LayUpState; import com.peachpit.aas3wdp.stateexample.FreeThrowState; import com.peachpit.aas3wdp.stateexample.ThreePointerState;
public class ShooterStateMachine {
private var _state:AbstractShooterState; private var _stateList:Array; private var _index:Number; public static const LAY_UP_STATE:String = "lay_up_state"; public static const FREE_THROW_STATE:String = "free_throw_state"; public static const THREE_POINTER_STATE:String = "three_pointer_state";
public function ShooterStateMachine() { _index = 0; _stateList = new Array(); _stateList.push(ShooterStateMachine.LAY_UP_STATE); _stateList.push(ShooterStateMachine.FREE_THROW_STATE);

_stateList.push(ShooterStateMachine.THREE_POINTER_STATE); setState(_stateList[_index]); }
public function getAccuracy():Number { return _state.getAccuracy(); }
public function getPointValue():Number { return _state.getPointValue(); }
public function shoot():Number { var shotResult:Number = state.shoot(); if(++_index >= _stateList.length) _index = 0; setState(_stateList[_index]); return shotResult; }
public function setState(stateDesc:String):void { switch(stateDesc) { case LAY_UP_STATE: _state = new LayUpState(); break; case FREE_THROW_STATE: _state = new FreeThrowState(); break; case THREE_POINTER_STATE: _state = new ThreePointerState(); break; default: _state = null; } } } }
Transitions Defined in the State Objects
The other option for where to put the transition logic is a little more involved because it requiresputting the transition logic inside the state objects. For this implementation, we'll revert back tothe state machine used in the original abstract state example, with two minor changes. We'regoing to pass a reference to the state machine into each of the state objects' constructors, andwe're going to set the first state in the state machine's constructor.
package com.peachpit.aas3wdp.stateexample {
import com.peachpit.aas3wdp.stateexample.AbstractShooterState; import com.peachpit.aas3wdp.stateexample.LayUpState; import com.peachpit.aas3wdp.stateexample.FreeThrowState; import com.peachpit.aas3wdp.stateexample.ThreePointerState;
public class ShooterStateMachine {

private var _state:AbstractShooterState; public static const LAY_UP_STATE:String = "lay_up_state"; public static const FREE_THROW_STATE:String = "free_throw_state"; public static const THREE_POINTER_STATE:String = "three_pointer_state";
public function ShooterStateMachine() { setState(ShooterStateMachine.LAY_UP_STATE); }
public function getAccuracy():Number { return _state.getAccuracy(); }
public function getPointValue():Number { return _state.getPointValue(); }
public function shoot():Number { return _state.shoot(); }
public function setState(stateDesc:String):void { switch(stateDesc) { case LAY_UP_STATE: _state = new LayUpState(this); break; case FREE_THROW_STATE: _state = new FreeThrowState(this); break; case THREE_POINTER_STATE: _state = new ThreePointerState(this); break; default: _state = null; }
} }
}
The state objects do most of the work for us. Each stores a reference to the state machine andcalls its setState() method when the state object wants to move to the next state. We're stilltriggering that move on the shoot() method call, so we need to override that method. We stillcall the abstract state's shoot() method using the super keyword, but we need to override it sothat we can add the setState() call to it. The following are the new state objects with thesechanges:
package com.peachpit.aas3wdp. stateexample {
import com.peachpit.aas3wdp. stateexample.AbstractShooterState;
internal class LayUpState extends AbstractShooterState {
private var _stateMachine:ShooterStateMachine;

public function LayUpState(_stateMachine:ShooterStateMachine) { this._stateMachine = _stateMachine; }
public override function getAccuracy():Number { return 0.9; }
public override function getPointValue():Number { return 2;
}
public override function shoot():Number { var pointValue:Number = super.shoot(); _stateMachine.setState(ShooterStateMachine.FREE_THROW_STATE); return pointValue; }
}
}
package com.peachpit.aas3wdp.stateexample {
import com.peachpit.aas3wdp.stateexample.AbstractShooterState; import com.peachpit.aas3wdp.stateexample.ShooterStateMachine;
internal class FreeThrowState extends AbstractShooterState {
private var _stateMachine:ShooterStateMachine;
public function FreeThrowState(_stateMachine:ShooterStateMachine) { this._stateMachine = _stateMachine; }
public override function getAccuracy():Number { return 0.7; }
public override function getPointValue():Number { return 1; }
public override function shoot():Number { var pointValue:Number = super.shoot(); _stateMachine.setState(ShooterStateMachine.THREE_POINTER_STATE); return pointValue; }
}
}
package com.peachpit.aas3wdp.stateexample {

import com.peachpit.aas3wdp.stateexample.AbstractShooterState;
internal class ThreePointerState extends AbstractShooterState {
private var _stateMachine:ShooterStateMachine;
public function ThreePointerState(_stateMachine:ShooterStateMachine) { this._stateMachine = _stateMachine; }
public override function getAccuracy():Number { return 0.4;
}
public override function getPointValue():Number { return 3; }
public override function shoot():Number { var pointValue:Number = super.shoot(); _stateMachine.setState(ShooterStateMachine.LAY_UP_STATE); return pointValue; }
}
}
This logic could have gone into the abstract class, but it's left on the state subclasses because itdemonstrates the flexibility of defining the transitions this way. If you're going to treat all thetransitions the same, and you have a set methodology for how you trigger the transitions, thenthe state machine should manage that. However, if each state has different criteria fortriggering a transition, defining the transition on the state object provides the most flexibility.
For example, maybe we want to change the way the LayUpState transitions. We'll require ashooter to make a lay-up before we move on to the free throw. All we need to do is add acondition to the shoot() method. The following code shows the simple change:
package com.peachpit.aas3wdp.stateexample {
import com.peachpit.aas3wdp.stateexample.AbstractShooterState;
internal class LayUpState extends AbstractShooterState {
private var _stateMachine:ShooterStateMachine;
public function LayUpState(stateMachine:ShooterStateMachine) { this._stateMachine = _stateMachine; }
public override function getAccuracy():Number { return 0.9; }

public override function getPointValue():Number { return 2; }
public override function shoot():Number { var pointValue:Number = super.shoot(); if(pointValue > 0) { _stateMachine.setState(ShooterStateMachine.FREE_THROW_STATE); } return pointValue; }
}}

Summary
The State pattern is a great way to manage states within your application. By encapsulating thestates into their own objects, we make the code more scalable and maintainable. There aremany ways to implement the State pattern. In this chapter, we looked at how to build statesusing both an interface and an abstract class; and we discussed when to use each of theseapproaches.
Transitions are the action of switching states. They can be defined in the context or inside thestate objects. Although defining transitions inside the state objects gives you more flexibility,doing so can produce code that is difficult to maintain.

Part III: Advanced ActionScript Topics
Chapter 13 Working with Events
Chapter 14 Sending and Loading Data
Chapter 15 E4X (XML)
Chapter 16 Regular Expressions

Chapter 13. Working with Events
In This Chapter
Understanding Events 201
Using Events 203
Creating Event Dispatchers 210
An Example Working with Events 213
Summary 216
Events drive applications. Nearly everything that happens in an ActionScript 3.0 application istriggered by events. There are two basic types of events: user and system. When a user clicks abutton or types on the keyboard events are fired. These are examples of user events.Systemevents are those which occur because of something based on time or asynchronous operations.For example, loading an external resource might trigger a load complete or a load error event.
In this chapter, we'll look at what events are, what design problems they solve, how theyrelated to known design patterns, and how they are used in ActionScript 3.0.

Understanding Events
Traditional, non-event-driven applications are susceptible to problems that give rise to themotivation for events and a unified event model. There are two primary problems with thetraditional approach:
Tight coupling: In a traditional approach, the object that initiates something and theobject that responds are tightly coupled, typically in a one-to-one relationship. Forexample, in the traditional approach, when a user clicks a button, the button might triggerthe invocation of a callback method. Although this technique might work, it has significantshortcomings. What happens when you want several objects to respond to a button clickrather than just one? What happens if you accidentally override the callback method?These problems highlight some of the reasons we strive for loosely coupled objects whendesigning applications.
Inconsistent manner of responding to operations: In a traditional approach toapplication design, synchronous and asynchronous operations require different ways ofhandling results. It's far more advantageous to use a single consistent way to handleresults. Events provide that.
Earlier versions of ActionScript use many different ways of responding to occurrences within theapplication. However, ActionScript 3.0 has one unified event model used across the board. Atthe core of this event model is the flash.events package of classesnamely the Event class andthe Eventdispatcher class.
The Eventdispatcher class provides all the functionality to allow objects to register for eventnotifications. When an object registers with an event dispatcher for notifications for a particularevent, the event dispatcher adds that object to a queue. When the event occurs, the eventdispatcher notifies all the objects in the queue. The objects in the queue are called listeners, andin ActionScript 3.0 all listeners are functions/methods. When a listener is notified, it gets calledand passed a parameter of type Event (or a subtype specific to the type of event). The eventparameter provides the context for the event, including the type of event and the object thatdispatched the event. This arrangement allows for the event dispatcher and the listener to knowvirtually nothing about one another at compile time, but at runtime, the listener can obtain areference back to the dispatcher using the event parameter. This powerful design means thatthe dispatchers and listeners are loosely coupled. It also means that many listeners can registerfor notifications when an event occurs for just one dispatcher. Figure 13.1 illustrates thisconcept.
Figure 13.1. An event is handled.

In ActionScript 3.0, the event model is closely related to a well-known design pattern called theObserver pattern. Although the Observer pattern is an important pattern, we don't discuss it inany detail in this book because the built-in event model in ActionScript 3.0 already solves all thedesign patterns the Observer pattern is intended to solve.

Using Events
If you're reading this book, we assume that you already know the basics of working with eventsbecause they are so fundamental to ActionScript. However, developers often know how to workwith events without really understanding how they work at a basic level. In this section, we'lllook at the mechanics of events in ActionScript 3.0.
Understanding Event Elements
There are at least three elements required when working with events: event objects, eventdispatchers, and event listeners. We've already talked about each of these briefly, but here we'lldiscuss the mechanics of each.
All event objects are of type flash.events.Event or a subtype. Event subtypes are simply typesthat are specific to a particular sort of behavior. For example, events raised by mouse behaviorare of type MouseEvent while events that occur because of a timer are of type TimerEvent.Usually subtypes define additional properties that provide information about the type of event.For example, MouseEvent defines a property called buttonDown, which indicates whether or notthe mouse button is down at the time the event occurs. This is information that is important forevents related to mouse behavior, but it wouldn't be important for an event that occurs whendata loads. Yet all event objects always have type and target properties that tell the listenerwhat type of event it is and what object dispatched the event.
The second element that is always required is an event dispatcher. An event dispatcher issometimes called a subject and sometimes called a target. The event dispatcher is the objectthat broadcasts an event. In ActionScript 3.0, all event dispatchers are instances ofEvenTDispatcher, the built-in Flash Player class. Event dispatchers must allow listeners toregister for notifications for events. The Eventdispatcher API allows listeners to register. We'lldiscuss this in more detail in the next section.
Event listeners in ActionScript 3.0 are always functions. You must register a listener with anevent dispatcher for a specific event. When that event occurs, the dispatcher notifies thelistener, and the listener gets called with an event parameter.
Registering Listeners
Listener objects register with the dispatcher object by calling the dispatcher'saddEventListener() method. At a minimum, the addEventListener() method requires twoparameters: the name of the event and the listener.
dispatcher.addEventListener(eventName, listener);
ActionScript 3.0 implements proper method closure, which means that functions and methodsalways maintain their original scope. This is a significant change from previous versions ofActionScript which required workarounds to ensure that a listener would be called within theproper scope.

The following example creates a rectangular sprite, and it uses an event listener to move therectangle to a random location each time the user clicks on it.
package { import flash.display.Sprite; import flash.events.MouseEvent; import flash.display.StageScaleMode; import flash.display.StageAlign;
public class Test extends Sprite {
private var _rectangle:Sprite;
public function Test() {
stage.scaleMode = StageScaleMode.NO_SCALE; stage.align = StageAlign.TOP_LEFT;
_rectangle = new Sprite(); _rectangle.graphics.lineStyle(0, 0, 0); _rectangle.graphics.beginFill(0xFFFFFF, 1); _rectangle.graphics.drawRect(0, 0, 100, 50); _rectangle.graphics.endFill(); addChild(_rectangle);
_rectangle.addEventListener(MouseEvent.CLICK, onClick); }
public function onClick(event:MouseEvent):void { event.target.x = Math.random() * 400; event.target.y = Math.random() * 400; } }}
Because the event listener moves the event target to a random location, you can also use thatsame listener for a different target. In this next example, two event dispatchers use the sameevent listener. In this case, both the rectangle and the circle move to random locations whenclicked.
package { import flash.display.Sprite; import flash.events.MouseEvent; import flash.display.StageScaleMode; import flash.display.StageAlign;
public class Test extends Sprite {
private var _rectangle:Sprite; private var _circle:Sprite;
public function Test() {
stage.scaleMode = StageScaleMode.NO_SCALE; stage.align = StageAlign.TOP_LEFT;

_rectangle = new Sprite(); _rectangle.graphics.lineStyle(0, 0, 0); _rectangle.graphics.beginFill(0xFFFFFF, 1); _rectangle.graphics.drawRect(0, 0, 100, 50) _rectangle.graphics.endFill(); addChild(_rectangle);
_circle = new Sprite(); _circle.graphics.lineStyle(0, 0, 0); _circle.graphics.beginFill(0xFFFFFF, 1); _circle.graphics.drawCircle(0, 0, 50); _circle.graphics.endFill(); _circle.x = 100; _circle.y = 100; addChild(_circle);
_rectangle.addEventListener(MouseEvent.CLICK, onClick); _circle.addEventListener(MouseEvent.CLICK, onClick); }
public function onClick(event:MouseEvent):void { event.target.x = Math.random() * 400; event.target.y = Math.random() * 400; } }}
Removing Event Listeners
On the flip side of adding event listeners is removing event listeners. Generally it's advisable toremove event listeners whenever you no longer need to listen for a particular event. You canachieve this by using the removeEventListener() method. The removeEventListener() methodaccepts two parameters: the event name and the listener, and it removes the listener for theparticular event for the dispatcher from which you call the method. The following code removesonClick() as an event listener for the click event.
_circle.removeEventListener(MouseEvent.CLICK, onClick);
Understanding Event Phases
There are two types of event dispatches: display objects on the display list and all other types.When an object that is not on the display list dispatches an event, it notifies only those listenersthat are registered directly with the dispatcher. For example, when a URLLoader objectdispatches a complete event, the only listeners that receive the notification are those registereddirectly with the URLLoader. However, when a display object on the display list dispatchesevents, the event flow is triggered. The event flow consists of three phases: capture, target, andbubble. We'll talk about each of these phases next.
The Capture Phase

The first phase of the event flow is called the capture phase. In this phase, Flash Player islooking for the object that trigged the event. In doing so, it starts at the root display object anduses a drill-down approach through the hierarchy of the display list until it finds the event'starget, meaning the object that actually dispatched the event.
By default, event listeners do not receive notifications during the capture phase. Instead, if youwant to register a listener for the capture phase, you must pass a value of true for the thirdparameter of the addEventListener() method. Otherwise, if the parameter is omitted or false,the listener only receives notifications during the target and bubble phases. Here is an examplethat registers a listener for the capture phase:
object.addEventListener(MouseEvent.CLICK, onClick, true);
The capture phase may seem strange at first. And, in fact, it is not often used. However, it's animportant part of the event flow because it allows the application to trap events before theyreach child targets. When you want to trap events and stop them from propagating to childelements, you must call the stopImmediatePropagation() method of the event object in theevent handler. Here's an example that adds to the previous examples by trapping click eventsso that they are never handled by the listeners for child elements:
package { import flash.display.Sprite; import flash.events.MouseEvent; import flash.display.StageScaleMode; import flash.display.StageAlign;
public class Test extends Sprite {
private var _rectangle:Sprite; private var _circle:Sprite; private var _loader:Loader;
public function Test() {
stage.scaleMode = StageScaleMode.NO_SCALE; stage.align = StageAlign.TOP_LEFT;
_rectangle = new Sprite(); _rectangle.graphics.lineStyle(0, 0, 0); _rectangle.graphics.beginFill(0xFFFFFF, 1); _rectangle.graphics.drawRect(0, 0, 100, 50); _rectangle.graphics.endFill(); addChild(_rectangle);
_circle = new Sprite(); _circle.graphics.lineStyle(0, 0, 0); _circle.graphics.beginFill(0xFFFFFF, 1); _circle.graphics.drawCircle(0, 0, 50); _circle.graphics.endFill(); _circle.x = 100; _circle.y = 100; addChild(_circle);
addEventListener(MouseEvent.CLICK, onStageClick, true);

_rectangle.addEventListener(MouseEvent.CLICK, onClick); _circle.addEventListener(MouseEvent.CLICK, onClick);
}
public function onClick(event:MouseEvent):void { event.target.x = Math.random() * 400; event.target.y = Math.random() * 400; }
public function onStageClick(event:MouseEvent):void { event.stopImmediatePropagation(); } }}
The Target Phase
After the capture phase is the target phase. The target phase occurs when the event target (theevent dispatcher responsible for the event) is reached in the event flow. This is probably themost commonly used phase of the event flow because it is the phase during which listeners thatare registered directly with an event dispatcher are notified. This is the phase illustrated bymost of the examples throughout this chapter and this book.
The Bubble Phase
The last phase of the event flow is the bubble phase. It allows for events to bubble up thedisplay list. The bubble phase occurs in the reverse order of the capture phase: starting fromthe target and moving upward to parent containers until the root is reached.
You don't need to do anything different for event bubbling to work. You can simply register alistener to a container for any event that any child can dispatch, and the event listener willreceive the notification during the bubble phase. For example, the following code achieves thesame effect as an earlier example, but it registers the listener with the container rather thanwith the children:
package { import flash.display.Sprite; import flash.events.MouseEvent; import flash.display.StageScaleMode; import flash.display.StageAlign;
public class Test extends Sprite {
private var _rectangle:Sprite; private var _circle:Sprite; public function Test() {
stage.scaleMode = StageScaleMode.NO_SCALE; stage.align = StageAlign.TOP_LEFT;
_rectangle = new Sprite(); _rectangle.graphics.lineStyle(0, 0, 0);

_rectangle.graphics.beginFill(0xFFFFFF, 1); _rectangle.graphics.drawRect(0, 0, 100, 50); _rectangle.graphics.endFill(); addChild(_rectangle);
_circle = new Sprite(); _circle.graphics.lineStyle(0, 0, 0); _circle.graphics.beginFill(0xFFFFFF, 1); _circle.graphics.drawCircle(0, 0, 50); _circle.graphics.endFill(); _circle.x = 100; _circle.y = 100; addChild(_circle);
addEventListener(MouseEvent.CLICK, onClick);
}
public function onClick(event:MouseEvent):void { event.target.x = Math.random() * 400; event.target.y = Math.random() * 400; } }}
Notice in this example that the event object parameter's target property still references theactual target of the event (the circle or rectangle in this example) rather than the object forwhich the listener is registered (the container). If you want to retrieve a reference to the objectto which the listener is registered, you can use the currentTarget property.
It's also important to note that not all event types can bubble. Only those events for which thebubbles property is set to true can bubble.
Note
When you create a custom event, you can specify whether the event will bubble. Thedefault is true.
Event Priority
Event priority is a little-used concept, but it is important to understand what it can do. Whenyou add an event, you have the ability to set your listener's priority. The higher the prioritysetting, the sooner your listener will get called. You can set the priority for a listener using thefourth parameter of the addEventListener() method.
Two listeners with the same priority level are called in the order they were added. It's importantto note that priorities are relevant only within a phase (capture, target, or bubble). The order ofthe phases of the event flow supersedes the priority level.
Weak References
The concept of weak references is particularly useful when adding listeners to objects. Tounderstand why weak references are so good, you first need to understand a little aboutgarbage collection. Garbage collection is how Flash Player cleans up memory that isn't neededanymore; it's important because otherwise applications would use more and more RAM untilthey required the system to restart. Flash Player 9 uses two systems called reference countingand mark and sweep.
Reference counting is not new to Flash Player. It is the traditional way in which Flash Player hasrun garbage collection. When you create an object in ActionScript, that object exists in memory.However, the object is useful only as long as there are references (such as variables) to thatobject. When no more references exist, it is safe to assume that the object is no longer used andcan be garbage collected. Although this system is efficient, it is not accurate because it ispossible, through circular references, to have references still in existence even though none ofthe references is actually accessible. For example, two objects can have references to oneanother. If the references to those objects are deleted, we would expect that the objectsthemselves would be garbage collected. However, because they have references to one another,they remain in memory.
The mark-and-sweep garbage collection system solves the circular reference problem bytraversing all active (accessible) nodes within an application. Any objects that exist outside ofthe active nodes can be assumed to be no longer in use, and they can be garbage collected.
Although the two garbage collection systems work in conjunction to efficiently and effectivelymanage memory usage, they do not compensate for incorrect programming. It's important thatyou always remove event listeners when you no longer need to use them. If you register anevent listener using normal references, it will not get garbage collected even if you delete thelistener or the object containing the listener because the event dispatcher will still have areference to it. Removing the event listener using removeEventListener() ensures that the eventtarget no longer has a reference to the listener, and that action will allow it to be properlygarbage collected after you've deleted the listener.
However, sometimes we can't remove the listeners because our object is deleted elsewhere.This is where weak references come in handy. They allow for normal event listeningfunctionality, but when the listener object is removed, the listener is removed from memoryproperly because the reference is weak and not counted by the reference counting function ofthe garbage collector.
You can specify that a listener should use a weak reference by registering it using a value oftrue for the fifth parameter to the addEventListener() method.
target.addEventListener(MouseEvent.CLICK, onClick, false, 0, true);

Creating Event Dispatchers
Dispatchers (also known as subjects or targets ) are the source of events. These are the objectsthat fire events. Earlier in this chapter, you saw how to listen for events. Many classes arealready capable of dispatching events. However, now we'll look at how to create custom classesthat dispatch events.
Understanding Event Objects
All events use event objects. In the following sections, we'll look at how to dispatch events, butfirst we need to look at how to create an event object.
All event objects must be instances of the flash.events.Event class (or one of its subclasses).Event objects have properties that store information about the event and methods formanipulating the event.
The simplest way to create an event object is to use the constructor of the Event class or one ofits subclasses in a new statement. The constructor requires that you pass it a string indicatingthe event type. The following example creates a new event object for a change event:
var event:Event = new Event(Event.CHANGE);
Often it is easiest and most effective to use an existing event type (Event , MouseEvent , and soon) when possible. However, when that's not possible, you can create a custom event type bysubclassing Event . The following is an example of a custom event that extends the Event class:
package {
import flash.events.Event;
public class CustomEvent extends Event {
private var _customData:Object;
public function customData(value:Object):void { _customData = value; }
public function get customData():Object { return _customData; }
public function CustomEvent(type:String, bubbles:Boolean = false, cancelable:Boolean = false) { super(type, bubbles, cancelable); }
}

}
Understanding Event Target Properties
Events have both a target and a currentTarget property. This is relevant when an event isbeing dispatched into the event flow. It tells us the difference between the object we registeredwith and the object that dispatched the event. The target is the object that originates theevent, while the currentTarget is the object with which you registered the listener. During thetarget phase, those two properties reference the same object. However, if you get an eventduring the capture or bubble phase, the two properties are different.
Default Behavior of Events
When most events are fired, the responses to those events are defined in the listeners. But insome cases, the responses are so common and predictable that there are default behaviors thatoccur inside Flash Player. A good example of this is the use case of a user typing in a text field.The default behavior is that the keystrokes fire events that populate the text field with thecorresponding characters. However, there may be times when you don't want this defaultbehavior to happen. To stop the default behavior, you simply call the preventDefault() methodof the event object. You can check the status of this behavior by calling theisDefaultPrevented() method. Only events with the cancelable property set to true can becanceled.
Stopping Propagation
In some cases, you might want to stop the event flow dead in its tracks. To accomplish this, youuse the stopPropagation() or stopImmediatePropogation() method of the event object. Themethods are nearly identical and differ only in regards to when the stop is executed. If you callstopPropagation() , the event is not allowed to continue up the display list, but thecurrentTarget is allowed to finish dispatching the event to its listeners. ThestopImmediatePropogation() method stops the event flow completely, and the currentTarget isnot allowed to finish.
Dispatching Events Through Inheritance
The flash.events.EventDispatcher class is at the heart of the event model in ActionScript 3.0.All native Flash Player classes that dispatch events inherit from Eventdispatcher . This is thesimplest and most common way to add event dispatching functionality to a class. You can dothis directly by creating a class that extends Eventdispatcher . Optionally, because MovieClip ,Sprite , and many other core classes already extend Eventdispatcher , you can inherit theevent functionality indirectly by extending those classes as well.
The Eventdispatcher class defines the behavior that adds, queues, and removes event listeners.It also enables the dispatcher to actually dispatch the event to the listeners. We've already seenthe behavior for adding and removing events using addEventListener() andremoveEventListener() . Now we'll look at how to actually dispatch events.
The dispatchEvent() method is a method of EvenTDispatcher , and it is what triggers an eventto be broadcast. When you extend Eventdispatcher , you can call dispatchEvent() within theclass.

Caution
Although the dispatchEvent() method is public, it's a good idea to leave event
dispatching up to the subject objects. Objects triggering events to be dispatched fromother subject objects can lead to un-maintainable code that is difficult for otherdevelopers to read. Subjects should always be responsible for dispatching their ownevents.
The only parameter you need to pass into the dispatchEvent() method is an Event object. We'lltalk more about Event objects and their behavior later in this chapter. However, here is a basicexample:
dispatchEvent(new Event(Event.CHANGE));
This example dispatches a change event to all listeners that are currently registered to receivenotifications for change events for instances of the class within which the dispatchEvent()method appears.
The IEventDispatcher Interface
ActionScript 3.0 supports only single inheritance. This means that if you're already extending aclass that doesn't itself extend the Eventdispatcher class, you must find another way to accessthe event dispatching functionality. For this reason, Flash Player includes an IEventDispatcherinterface. By programming to this interface, you can get the EvenTDispatcher functionality intoyour class through composition instead of through inheritance. The following is an example ofhow you'd implement the IEventDispatcher interface:
package {
import flash.events.Event; import flash.events.IEventDispatcher; import flash.events.EventDispatcher;
public class Dispatcher implements IEventDispatcher {
private var eventDispatcher:EventDispatcher;
public function Dispatcher() { eventDispatcher = new EventDispatcher(this); }
public function addEventListener(type:String, listener:Function, useCapture:Boolean=false, priority:int=0.0, useWeakReference:Boolean=false):void { eventDispatcher.addEventListener(type, listener, useCapture, priority, useWeakReference); }
public function dispatchEvent(event:Event):Boolean { return eventDispatcher.dispatchEvent(event); }

public function hasEventListener(type:String):Boolean { return eventDispatcher.hasEventListener(type); } public function removeEventListener(type:String, listener:Function, useCapture:Boolean=false):void { eventDispatcher.removeEventListener(type, listener, useCapture); }
public function willTrigger(type:String):Boolean { return eventDispatcher.willTrigger(type); }
}
}
Passing a target reference into the Eventdispather constructor is necessary when usingcomposition. The reference tells the EvenTDispatcher which object to use as the target forevents dispatched by your class. This is not necessary for classes that extend Eventdispatcher .

An Example Working with Events
In this example, we're going to create and implement a custom icon button in order to betterunderstand events. The button has three elements: an icon, a text field, and a background.Each of these elements triggers different events. We can examine these events to see exactlyhow the event flow works.
Creating the IconButton Class
The first thing we need to do is create our IconButton class. We will generate all the elementsfor this class inside its constructor. The background will be a Shape object. We'll simply draw agray rectangle on that shape. The next element is our icon. For our example, this icon is asimple square, so we'll use a Sprite . Even though we're still just drawing a shape, we want touse the Sprite class because it allows the icon to dispatch mouseOver and mouseOut events. Thelast element is the label, which is a text field that will hold the button label text.
We'll also add a couple listeners to the icon Sprite so we can have a rollover on that item.When the user rolls over the icon, we'll use a ColorTransform object to make the icon white.When the user rolls off the icon, it will go back to grey.
package {
import flash.display.Shape; import flash.display.Sprite; import flash.events.MouseEvent; import flash.geom.ColorTransform; import flash.text.TextField; import flash.text.TextFieldAutoSize;
public class IconButton extends Sprite { public function IconButton(text:String) {
// Create the button background, drawing a // rectangle. var background:Shape = new Shape(); background.graphics.beginFill(0xEEEEEE, 1); background.graphics.drawRect(0, 0, 100, 20); background.graphics.endFill(); addChild(background);
// Create the icon, and also draw a rectangle // within the icon. var icon:Sprite = new Sprite(); icon.graphics.beginFill(0xAAAAAA, 1); icon.graphics.drawRect(4, 4, 12, 12); icon.graphics.endFill();
// Listen for mouse events on the icon. icon.addEventListener(MouseEvent.MOUSE_OVER, onIconMouseOver, false, 0, true);

icon.addEventListener(MouseEvent.MOUSE_OUT, onIconMouseOut, false, 0, true); addChild(icon);
// Create a text field to use as a label. var label:TextField = new TextField(); label.height = 20; label.x = 22; label.text = text; label.selectable = false; label.autoSize = TextFieldAutoSize.LEFT; addChild(label); }
private function onIconMouseOver(event:MouseEvent):void { var colorTransform:ColorTransform = new ColorTransform(); colorTransform.color = 0xFFFFFF; (event.target as Sprite).transform.colorTransform = colorTransform; }
private function onIconMouseOut(event:MouseEvent):void { var colorTransform:ColorTransform = new ColorTransform(); colorTransform.color = 0xAAAAAA; (event.target as Sprite).transform.colorTransform = colorTransform; }
}
}
The preceding code is fairly basic. When the user moves the mouse over the icon, the iconchanges color using events. Next we'll look at how to use this button.
Creating the Main Class
Now that we have our IconButton class, we need to create a simple main class that uses thebutton We'll do this with a ButtonExample class that will serve as the main class for this project.In the constructor, we create an instance of the IconButton class, add a couple event listeners,and add the IconButton instance to our display list. Notice that we add two listeners that arenearly the same. We're doing this to illustrate the useCapture functionality. The second listenerhas the useCapture parameter set to true. Each of these listeners is treated separately, so ourclass should get the MOUSE_UP event twice: once during the capture phase and the second duringeither the target or bubble phase.
That last statement may seem a bit confusing. What determines whether the MOUSE_UP event willbe dispatched to our ButtonImp class during the target phase versus the bubble phase? Well, itall comes down to which element inside our button is clicked on. If the user clicks on the iconSprite, then the icon is going to be the target of the event. Because our ButtonImp classregistered itself directly to the IconButton class, we wouldn't get that event during the targetphase. However, the MOUSE_OVER and MOUSE_OUT events inside the IconButton class would occurin the target phase because the IconButton registered itself directly to the icon Sprite. Thesame would be true if the user clicked on the TextField. Therefore, the ButtonImp gets thoseevents through bubbling.
Recall that we also have a third element in our button: the background Shape . If the user clicks
on it, the Shape does nothing because Shape doesn't dispatch a MOUSE_UP event. Therefore, theIconButton would dispatch the event and our ButtonImp would get its event during the targetphase.
The following code is our ButtonImp class. Notice the trace statements in the listener function.These trace statements allow you to see the event's phase and the difference between thetarget and currentTarget properties for each event.
package {
import flash.display.Sprite; import flash.events.MouseEvent;
public class ButtonExample extends Sprite {
public function ButtonExample() { var button:IconButton = new IconButton("Test"); button.addEventListener(MouseEvent.MOUSE_UP, onMouseUp, false, 0, true); button.addEventListener(MouseEvent.MOUSE_UP, onMouseUp, true, 0, true); addChild(button); }
private function onMouseUp(event:MouseEvent):void { trace("phase: " + event.eventPhase); trace("target: " + event.target); trace("currentTarget: " + event.currentTarget); }
}
}

Summary
The event framework in ActionScript 3.0 offers a solid and consistent way to handle events. Itimproves on earlier versions of Flash by unifying all events under one standardized system. Thenew event bubbling and weak reference features are also very valuable. Overall, the new eventframework is a great addition to ActionScript 3.0 and will surely play a major part in all yourActionScript projects.
Chapter 14. Sending and Loading Data
In This Chapter
Loading Text 218
Sending and Loading Variables 222
Sending and Loading XML 226
Using Web Services 227
Using Flash Remoting 228
Optimizing Data Communication 231
Summary 235
Flash platform applications almost always use data in one form or another. Generally,applications need to have some form of client-server data communication. In the simplestexample, an application might have to load plain text. For example, an application might haveone responsibility: displaying the day's news post. And some applications might havesignificantly more complex data communication requirements. For example, a moresophisticated version of the news application might need to retrieve an index of all the top newsstories, the contents of news stories, user comments for each news story, and it might evenincorporate live data that broadcasts the transcript of a live commentator.
There are many different types of data you can use with Flash Platform applications, includingthese:
Text (including Unicode support)
XML
AMF (Action Message Format, a binary messaging format)
Binary data
In addition to the many types of data, there are many ways you can transmit that data,including the following:
HTTP
RTMP
XML socket connection

Binary socket connection
In this chapter, we'll look at each of these topics with the exception of the socket connectiontopics, which are outside the scope of this book. Then we'll look at relevant design patterns andhow they apply to sending and loading data.

Loading Text
One of the simplest ways to work with data is to load blocks of text either from a text file orfrom an Internet resource. Although you can certainly embed text in an SWF file, loading text atruntime has the following advantages:
You can manage when the text is loaded. When you embed text in an .SWF, the text loadsas part of the SWF file. However, when you load text at runtime, you can load the text onlywhen the application requires it. For large amounts of text, this can be a significantadvantage.
Editing text files is generally easier than assembling strings with ActionScript. This isespecially true when the text contains HTML elements or lots of non-standard Unicodecharacters.
Loading text at runtime allows you to update the context without having to recompile andredeploy a new .swf. This is especially true when the text is loaded from a dynamicresource such as a ColdFusion page where the content is retrieved from a Web service, adatabase, or some other source that is updated frequently.
Although you can load text with any of the techniques described in this chapter, this sectionfocuses on the simplest mechanism for loading blocks of text. Using the flash.net.URLLoaderclass, you can load data from a URL. When you use URLLoader, you also must use theflash.net.URLRequest class to specify the URL from which you want to load the content. Thefollowing statement constructs a new URLRequest object that points to a text file called data.txtthat is stored in the same directory as the SWF file:
var request:URLRequest = new URLRequest("data.txt");
You must then create a URLLoader object before you can load data using the URLRequest object.The URLLoader constructor does not require any parameters, as you can see here:
var loader:URLLoader = new URLLoader();
Note
Although it is not required, you can optionally pass a URLRequest object to a URLLoader
constructor to begin a data request immediately.
URLLoader objects dispatch complete events when the data loads. For that reason, you'll almostalways want to register a listener for the complete event:
loader.addEventListener(Event.COMPLETE, onData);

You can then use the load() method to load the data. The load() method requires that you passit a URLRequest object specifying the URL of the data to load, like this:
loader.load(request);
The load() method initiates the request for the data and works asynchronously. Flash Playerdoes not wait for the response before continuing to execute the code. It simply makes therequest; when the data loads, the URLLoader object dispatches events, including the completeevent when the data has completely loaded.
When the complete event occurs, the URLLoader object notifies all listeners. The listeners receivean event parameter with a target property that references the URLLoader object dispatching theevent. The URLLoader class defines a data property that contains the data that was loaded. Thefollowing event listener uses trace() to output the data that was loaded:
private function onData(event:Event):void { trace(event.target.data);}
Next, we'll look at a simple example that uses the Model View Controller (MVC) pattern(described in Chapter 3) to load and display four different limericks from text files. This exampleuses four text files called limerick0.txt, limerick1.txt, limerick2.txt, and limerick3.txt.The files contain the following text (each block of text is a different file):
There was an Old Man on a hill,Who seldom, if ever, stood still;He ran up and down,In his Grandmother's gown,Which adorned that Old Man on a hill.- Edward Lear
There was a Young Lady whose chin,Resembled the point of a pin;So she had it made sharp,And purchased a harp,And played several tunes with her chin.- Edward Lear
There was a Young Lady whose eyes,Were unique as to colour and size;When she opened them wide,People all turned aside,And started away in surprise.- Edward Lear
There was a Young Lady of Bute,Who played on a silver-gilt flute;She played several jigs,To her uncle's white pigs,That amusing Young Lady of Bute.- Edward Lear
Creating the LimerickData Class
Next, we'll create a model class called LimerickData that essentially acts as a wrapper for aURLLoader object:
package com.peachpit.aas3wdp.limerickreader.data { import flash.events.EventDispatcher; import flash.net.URLLoader; import flash.net.URLRequest; import flash.events.Event; import flash.net.URLVariables; import flash.net.URLRequestMethod; import flash.net.URLLoaderDataFormat;
public class LimerickData extends EventDispatcher {
private var _loader:URLLoader; private var _limerick:String; private var _ids:Array;
// Retrieve the current limerick string.public function get limerick():String { return _limerick; }
public function LimerickData() { _loader = new URLLoader(); _loader.addEventListener(Event.COMPLETE, onData); _limerick = ""; // Store indices to use to reference each of the // text files. _ids = [0, 1, 2, 3]; }
// Advance to the next limerick.public function next():void { // Retrieve a random element from _ids. var index:uint = uint(_ids[Math.floor(Math.random() * _ids.length)]);
// Load the text from one of the files. var request:URLRequest = new URLRequest("limerick" + index + ".txt"); _loader.load(request); }
// The data has loaded. Set the limerick text, and dispatch// an event to notify listeners.private function onData(event:Event):void { _limerick = _loader.data; dispatchEvent(new Event(Event.CHANGE));
}
}
}

We'll use the LimerickData class as a data model for the application. As the limerick changes, itwill notify listeners.
Creating the LimerickView Class
The LimerickView class listens for change events dispatched by a model object, and it thendraws itself using the data passed into the constructor:
package com.peachpit.aas3wdp.limerickreader.views { import flash.display.Sprite; import com.peachpit.aas3wdp.limerickreader.data.LimerickData; import flash.text.TextField; import flash.text.TextFieldAutoSize; import flash.events.Event;
public class LimerickView extends Sprite {
private var _data:LimerickData; private var _textField:TextField;
// Pass in the data model to use. public function LimerickView(data:LimerickData) { _data = data;
// Listen for change events. _data.addEventListener(Event.CHANGE, draw);
// Create the text field to use to display the // limerick. _textField = new TextField(); _textField.border = true; _textField.autoSize = TextFieldAutoSize.LEFT; addChild(_textField); draw();}
// The data has changed, so display the new text.public function draw(event:Event = null):void { _textField.text = _data.limerick;}
}
}
This class simply creates a text field that displays the current limerick text value from the datamodel.
Creating the Main Class
The main class simply creates an instance of the model and an instance of the view and uses atimer to load a random limerick every five seconds:

package {
import flash.display.Sprite; import com.peachpit.aas3wdp.limerickreader.views.LimerickView; import com.peachpit.aas3wdp.limerickreader.data.LimerickData; import flash.utils.Timer; import flash.events.TimerEvent; import flash.events.Event;
public class LimerickExample extends Sprite {
private var _data:LimerickData;
public function LimerickExmmple() { _data = new LimerickData(); var view:LimerickView = new LimerickView(_data); addChild(view); startTimer(null); }
private function startTimer(event:Event):void { var timer:Timer = new Timer(5000); timer.addEventListener(TimerEvent.TIMER, onTimer); timer.start(); onTimer(); }
private function onTimer(event:TimerEvent = null):void { _data.next();
} }}
This class creates an instance of both the model and the view. It uses a timer to advance themodel to the next limerick every 5 seconds. When you run this code, you should see thelimericks displayed on the screen, changing every 5 seconds.

Sending and Loading Variables
The preceding technique is appropriate when you want to simply load blocks of text from staticURLs. However, often an application requires a greater degree of variability. In such cases, youneed to send and/or load variables either by themselves or in conjunction with loading text.
Although there are lots of ways to send and load variables, the following sections lookspecifically at sending and loading URL-encoded variables using HTTP requests and responsesthrough a URLLoader object, building on what we discussed in the preceding section regardingloading text.
Note
The URL-encoded format serializes values into a string that uses Web-safe characters.Variables are grouped into name/value pairs, which consist of the name of thevariable and the value delimited by an equal sign. For example, a=1 is a name/valuepair for a variable called a with a value of 1 . If there are multiple name/value pairs,they are delimited by ampersands. For example, a=1&b=2 represents two variables:a and b .
Sending Variables
Sending variables requires that the resource receiving the request is capable of receiving thevariables. For example, you can send variables to a PHP or ColdFusion page, but you cannotmeaningfully send variables to a text file.
When you want to send variables, you have two basic options: appending the query string tothe URL in the URLRequest object or using a URLVariables object.
When you construct a URLRequest object, you can simply append a query string to the URL. Thefollowing example constructs a URLRequest object that points to a URL with a query string:
var request:URLRequest = new URLRequest("data.php?index=0");
Sending data using this first technique has the advantage of being relatively simple toimplement when the query string is simple. However, there are two primary disadvantages:
Adding lots of variables with dynamic values to the query string makes the code moredifficult to read.
You can send the data only using HTTP GET .
The second technique uses a flash.net.URLVariables object. The URLVariables constructordoes not require any parameters. After you've constructed a URLVariables object, you can

assign arbitrary properties and values to the instance. Each property corresponds to a variableyou want to send.
var variables:URLVariables = new URLVariables();variables.a = 1;variables.b = 2;
You can then assign the URLVariables object to the data property of the URLRequest object, likethis:
var request:URLRequest = new URLRequest("data.php");request.data = variables;
Regardless of which technique you use to assign the variables, you employ the load() methodof a URLLoader object to send the request just as you would when loading text. The onlydifference occurs when you want to send the variables using POST rather than GET . URLRequestobjects send all requests using GET by default. If you want to specify the method explicitly, youcan use the method property and assign to it either the GET or the POST constant of theflash.net.URLRequestMethod class, like this:
request.method = URLRequestMethod.POST;loader.load(request);
The following revision to the LimerickData class presented earlier in this chapter uses a PHPscript as the request URL, and it sends two variables:
[View full width]package com.peachpit.aas3wdp.limerickreader.data { import flash.events.EventDispatcher; import flash.net.URLLoader; import flash.net.URLRequest; import flash.events.Event; import flash.net.URLVariables; import flash.net.URLRequestMethod; import flash.net.URLLoaderDataFormat;
public class LimerickData extends EventDispatcher {
private var _loader:URLLoader; private var _limerick:String; private var _ids:Array;
public function get limerick():String { return _limerick; }
public function LimerickData() { _loader = new URLLoader(); _loader.addEventListener(Event.COMPLETE, onData); _limerick = ""; _ids = [0, 1, 2, 3]; } public function next():void { var index:uint = uint(_ids[Math.floor(Math.random() * _ids.length)]);

var variables:URLVariables = new URLVariables(); variables.limerickIndex = index; variables.html = 0; var request:URLRequest = new URLRequest("http://www.rightactionscript.com/limerick/limerick.php"); request.method = URLRequestMethod.POST; request.data = variables; _loader.load(request); }
private function onData(event:Event):void { _limerick = _loader.data; dispatchEvent(new Event(Event.CHANGE)); } }}
Now the LimerickData class is configured to send a request with variables to a PHP script. Theresult is the same as before when it was loading data from four text files, but now it is able topoint to a single PHP script.
Loading Variables
Not only can you send variables, you can also load variables. Loading variables differs fromloading text only in how you ask Flash Player to interpret the return value. By default, FlashPlayer treats the data property of the URLLoader object as plain text. However, if you set theURLLoader.dataFormat property, you can specify that you want Flash Player to automaticallyattempt to decode the return value as variables. When that occurs, the data property is aURLVariables object, and you can simply retrieve the variable values by using the variablenames.
To set the dataFormat property, use the VARIABLES constant of theflash.net.URLLoaderDataFormat class, like this:
loader.dataFormat = URLLoaderDataFormat.VARIABLES;
In the preceding examples, we've had to assume that there were four limericks, and we had tohard-code the indices that would return the limericks. In this example, we'll first load variablesfrom a PHP script to retrieve the valid indices. The PHP script returns a string in the followingformat: limerickIds=0,1,2,3 . Next we'll revise the LimerickData class so that it loads the dataand parses it into an array before loading any of the limericks. Because the model cannot loadthe limericks until it has first loaded the variables, that introduces a dilemma: Currently, themain class calls the next() method immediately. There is no guarantee that the limerick IDs willhave loaded before the next() method is called, and that will result in an unhandled error withthe current implementation (because the _ids will be null.) You have two basic options:
Require a change to the main class so that it doesn't call next() until the IDs have loaded.This option entails dispatching and listening for an additional event.
Change the implementation of next() so that it handles requests elegantly if the IDshaven't yet loaded.

We'll opt for the second option. The next() method will test that _ids is not null before tryingto make a request to the server. We'll add a property that keeps track of whether or not thenext() method has been called. If that property is true, then the code will automatically callnext() when the IDs load. Here's the updated class:
package com.peachpit.aas3wdp.limerickreader.data { import flash.events.EventDispatcher; import flash.net.URLLoader; import flash.net.URLRequest; import flash.events.Event; import flash.net.URLVariables; import flash.net.URLRequestMethod; import flash.net.URLLoaderDataFormat; public class LimerickData extends EventDispatcher {
private var _loader:URLLoader; private var _limerick:String; private var _idsLoader:URLLoader; private var _ids:Array; private var _pendingNext:Boolean;
public function get limerick():String { return _limerick; }
public function LimerickData() { _loader = new URLLoader(); _loader.addEventListener(Event.COMPLETE, onData); _limerick = ""; _idsLoader = new URLLoader(); _idsLoader.addEventListener(Event.COMPLETE, setIds); _idsLoader.load(new URLRequest("http://localhost/limerick/limerickIndex.php")); _idsLoader.dataFormat = URLLoaderDataFormat.VARIABLES;
} private function setIds(event:Event):void { _ids = _idsLoader.data.limerickIds.split(","); if(_pendingNext){ next(); } }
public function next():void { if(_ids != null) { var variables:URLVariables = new URLVariables(); variables.limerickIndex = _ids[Math.floor(Math.random() * _ids.length)]; variables.html = 0; var request:URLRequest = new URLRequest("http://localhost/limerick/ limerick.php"); request.method = URLRequestMethod.POST; request.data = variables; _loader.load(request); } else { _pendingNext = true;
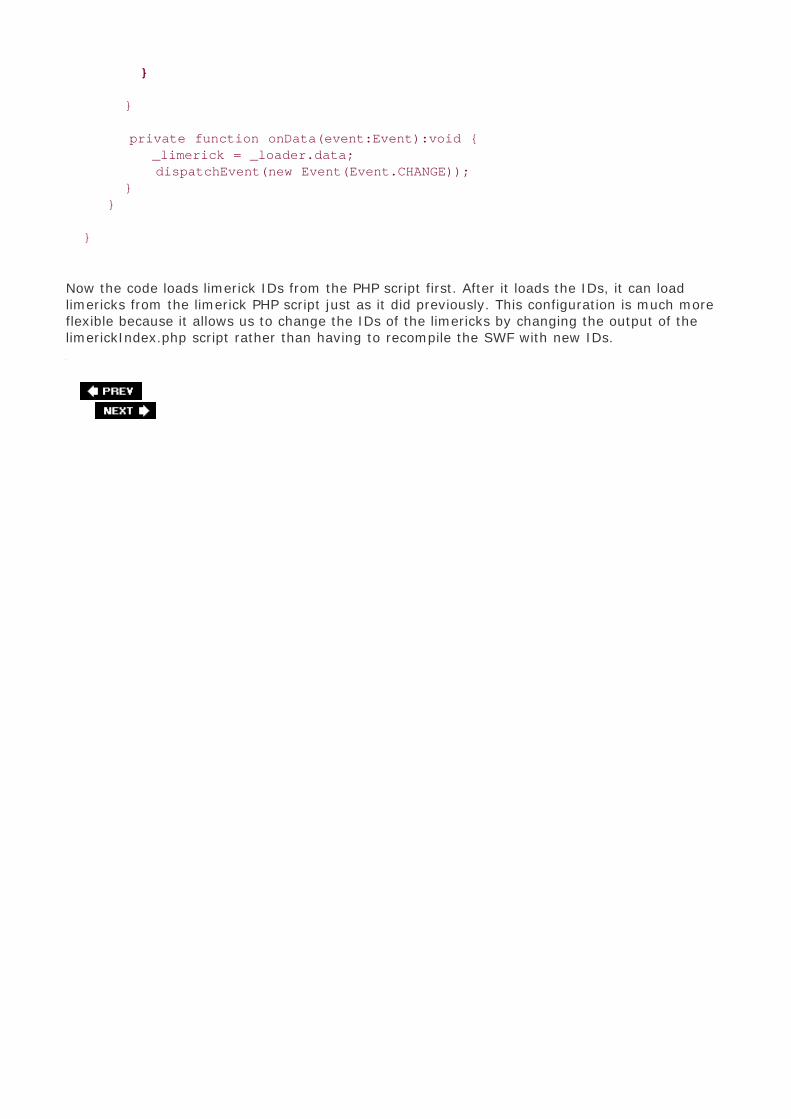
}
}
private function onData(event:Event):void { _limerick = _loader.data; dispatchEvent(new Event(Event.CHANGE)); } }
}
Now the code loads limerick IDs from the PHP script first. After it loads the IDs, it can loadlimericks from the limerick PHP script just as it did previously. This configuration is much moreflexible because it allows us to change the IDs of the limericks by changing the output of thelimerickIndex.php script rather than having to recompile the SWF with new IDs.

Sending and Loading XML
XML (eXtensible Markup Language) is a standard for storing and transferring data. Flash Playerhas built-in support for working with XML data. You can read about working with XML inChapter 15 , "E4X (XML)." In this chapter, we'll focus on how to send and load XML data.
When you send and load XML from Flash Player, it is always converted to a string. That enablesyou to send and load XML data (as a string) using the same techniques you use to send andload text. To send and load XML, you use the same URLLoader and URLRequest classes you usedto send and load text.
Sending XML
When you send XML data, you generally send the raw XML data using HTTP POST . TheActionScript code required to accomplish this task is similar to that for sending variables.However, rather than using a URLVariables object, you simply assign the XML string to the dataproperty of the URLRequest object. You then generally want to set the MIME type of the requestusing the URLRequest.contentType property. The following example sends an XML string to aPHP script:
var loader:URLLoader = new URLLoader();var request:URLRequest = new URLRequest("saveSettings.php");request.contentType = "text/xml";request.method = URLRequestMethod.POST;request.data = "<settings><email>[email protected]</email><phone>555-1212</phone></settings>";loader.load(request);
Loading XML
Loading XML is exactly the same as loading text with one additional step after the data hasloaded. The XML constructor allows you to pass it a string that the constructor will parse intothe XML object. You can simply pass the value from the data property of the URLLoader object.
var xml:XML = new XML(_loader.data);
Note
You can optionally cast the data as XML rather than passing it to an XML constructor.
Some XML you load might have additional whitespace (carriage returns and tabs) added forhuman readability. Unless you tell Flash Player to watch for the extra whitespace, it willinterpret whitespace as XML elements. That's generally not the desired behavior. The simple

solution is to set XML.ignoreWhitespace before parsing the string to the XML object, like this:
XML.ignoreWhitespace = true;var xml:XML = new XML(_loader.data);

Using Web Services
Web services are a popular standard for client-server data communication. However, FlashPlayer has no built-in classes specifically designed for working with Web services. If you areusing the Flex framework, you can employ the mx.rpc.soap.WebService class. In this book,we're concerned primarily with solutions that rely exclusively on the Flash Player API. For adescription of the WebService class, see the Flex documentation.
If you are interested in a Web services solution that does not rely on the Flex framework, youhave two options:
Write your own Web services framework in ActionScript. Although Web services appear inmany forms, one of the most popular uses SOAP, an XML-based protocol that is sent overHTTP. Writing a Web service framework requires sending and loading XML data usingURLLoader along with a custom SOAP parser.
Make standard requests to a server-side script that makes the Web service calls. Theserver-side script can return URL-encoded data or XML data.
Note
Another option is to manually create and parse SOAP requests and responses. This isadvisable for only very simple cases. You can see an example of this in Chapter 15.
The second option is often the best. One obvious reason that server-side Web service proxiesare a good idea is that server-side languages generally have robust Web service capabilitiesthat can work with a variety of protocolsnot just SOAP. Server-side scripts can also generallyparse Web service responses more quickly. They can relay the responses back to the client in aformat that is more compact than SOAP (to limit the bandwidth overhead), and the server caneven cache responses when applicable to limit the number of Web service requests.

Using Flash Remoting
Flash Remoting is a technology for making remote procedure calls from Flash Player to server-side services. The concept is similar to that of Web services: The client makes a request to amethod that's exposed using a server-side service. The request is serialized in a specific format,sent over HTTP (or HTTPS), and the response is likewise serialized and sent back to the client.This approach enables remote clients and services to interact to create integrated applications.Like Web services, Flash Remoting has the advantage of automatically serializing anddeserializing to and from native data types.
However, there are significant differences between Flash Remoting and Web services. Followingare a few of those differences:
Flash Remoting uses AMF (Action Message Format) as the protocol for packaging data.Although this might initially sound like yet another non-standardized, proprietary format,AMF is actually a binary form of SOAP that has a significant advantage over SOAP. SOAPpackets have a lot of overhead that increases the bandwidth requirements. Over time, theextra bandwidth costs can add up. AMF can send the same amount of data in a much morecompact (i.e., binary) format than its SOAP counterparts.
AMF is supported natively by Flash Player. In addition to its use with Flash Remoting, AMFis the format Flash Player uses for shared objects and local connections. Because AMF issupported natively in Flash Player, that means that serializations and deserializations toand from native ActionScript types is automatic and fast.
AMF support is not built into most server technologies. However, adding the necessaryAMF gateway on the server is simple. Gateways are available for most major platformsincluding ColdFusion, Java, Perl, .NET, and PHP. There are even reliable and enterprise-ready open-source options available.
Understanding Flash Remoting Basics
When you want to use Flash Remoting, there are two elements that communicate: a client anda service. The service is generally a class that has been exposed so that it is available to FlashRemoting. Flash Remoting is a request-response model, which means the client must initiate allrequests. The client must make all calls through an intermediary called a gateway. The gatewayis a web-accessible resource on the server that is capable of accepting AMF requests,deserializing them, and delegating the requests to the appropriate services.
There are many Flash Remoting gateway products, including the following:
OpenAMF (www.openamf.org ): an open-source Java gateway
WebORB (www.themidnightcoders.com ): gateway products for .NET, Java, Ruby on Rails,and PHP
AMFPHP (www.amfphp.org ): an open-source PHP gateway
Each gateway has its specific installation instructions. However, after you've installed thegateway, the general instructions to use it are the same. The following section looks at theActionScript required to make Flash Remoting calls. In each case, you'll need to know the URLto the gateway resource for your server. The documentation for the specific gateway you areusing will tell you what you need to know to locate the correct resource. It is always a web-accessible resource such as a page (a PHP page, a .NET page, and so on) or a servlet.
Making Flash Remoting Calls
Although the Flex framework and the Flash Remoting components for Flash provide a high-levelAPI for working with Flash Remoting, at a lower level, all Flash Remoting calls go through aflash.net.NetConnection object. In this section, we'll look exclusively at working directly withNetConnection objects to make Flash Remoting calls.
The first step in making Flash Remoting calls is to construct a NetConnection object using theconstructor. The constructor does not require any parameters, as you can see here:
var netConnection:NetConnection = new NetConnection();
Next, you must specify the gateway URL using the connect() method. Despite its name, theconnect() method does not actually attempt to make a connection to the resource. It simplysets the gateway URL for the object so that subsequent Flash Remoting calls can be routedthrough the correct gateway resource.
netConnection.connect("http://localhost/gateway");
After you've set the gateway URL, you can make calls to methods of available services using thecall() method. The call() method requires at least two parameters: the name of the serviceand method as a string, and an object indicating how to handle responses.
The name of the service and method must be the fully qualified service name and methodname, all in dot notation. That means that if the service is in a package, you must specify thepackage as well as the name of the service. The name of the service and the name of themethod are also separated by a dot. The following statement makes a call to the test method ofthe Example service:
netConnection.call("Example.test", null);
The second parameter can be null (as in the preceding example) if and when you do not needto listen for a response from the service method. However, if you do need to listen for aresponse, you can use a flash.net.Responder object. The Responder constructor requires thatyou specify two functions to handle the possible responses: a result and an error. The followingstatement makes a call to the test method, this time handling the response:
netConnection.call("Example.call", new Responder(onResult, onError));
When the service method returns a valid value, the result method gets called and is passed thereturn value as a parameter. When an error occurs, the error method gets called with an Objectparameter whose properties detail the error.
You can also pass parameters to the service method by adding additional parameters to thecall() method parameter list. For example, the following code passes the parameters 1 , TRue ,

and "a" to the service method:
netConnection.call("Example.call", new Responder(onResult, onError), 1, true, "a");
The following rewrite of the LimerickData class uses Flash Remoting instead of loading datausing URLLoader . For the sake of simplicity, this example does not handle errors. In an actualapplication, you might want to handle errors by bubbling up error events (as described inChapter 13 , "Working with Events").
package com.peachpit.aas3wdp.limerickreader.data { import flash.events.EventDispatcher; import flash.events.Event; import flash.net.NetConnection; import flash.net.Responder;
public class LimerickData extends EventDispatcher {
private var _limerick:String; private var _ids:Array; private var _pendingNext:Boolean; private var _netConnection:NetConnection;
public function get limerick():String { return _limerick; }
public function LimerickData() { _limerick = "";
// Use a NetConnection object rather than the // URLLoader object used previously. _netConnection = new NetConnection(); _netConnection.connect("http://www.rightactionscript.com/limerick/gateway.php"); _netConnection.call("LimerickService.getIds", new Responder(setIds, null)); }
private function setIds(ids:Array _ids = ids; if(_pendingNext) { next(); } } public function next():void { if(_ids != null) { var index:uint = _ids[Math.floor(Math.random() * _ids.length)]; _netConnection.call("LimerickService.getLimerick", new Responder(onData, null), index, false); } else { _pendingNext = true; } }
private function onData(limerick:String _limerick = limerick;

dispatchEvent(new Event(Event.CHANGE)); }
} }
This version accomplishes the same basic tasks as previous versions. However, it now usesFlash Remoting to accomplish these goals.

Optimizing Data Communication
When you work with data, it is frequently important that you optimize the manner in which youwork with the data. The following sections look at several specific ways you can optimize yourwork with data.
Caching Data
When an application makes calls to services, it is typically either submitting or requesting data.When an application requests data, there are two ways it can use that data: temporarily orpersistently. If the data is used temporarily, it can and should be discarded when theapplication no longer needs it. However, when the data is used persistently, it can sometimesbe useful to store that data in a persistent data model rather than discarding it and re-requesting it when the application needs the data again.
The technique of caching persistent data allows you to minimize the number of requests madeto the server when the same data is used over and over. The sample limerick application is agood case in point. The application uses just a handful of pieces of data. The implementationthus far makes requests for each limerick every time the data is needed by the application. Ifthe application displays one of the limericks fifty times, it also makes a request for the data fiftytimes from the server. Yet the cost of making those network requests is expensive, both interms of bandwidth usage and latency in the application. In this particular case, a bettersolution is to store the limerick data client-side rather than making the request to the servereach time.
There are two ways you can handle retrieving persistent data: requesting all the data at once orrequesting the data one piece at a time as the user needs it, but caching the data rather thandiscarding it. The first technique has the advantage of ensuring the immediate availability ofdata when the user requests it. Yet the first technique also requires a potentially large initialdownload, even though the user may or may not be using all the data. The second techniqueallows the application to download data only when it is first requested by the user. Whichtechnique you select depends on the requirements for the application. If the application allowsfor an initial wait for the user but requires low latency and immediate responsiveness after thatinitial wait, then you should download the data as part of an initialization. If the data set is verylarge and the average user of the application is not likely to use all the data every time she usesthe application, it is generally better to download data on demand and cache it for later use.
We'll look at how to rewrite the LimerickData class so that it uses the on-demandtechniquecaching data so the class doesn't have to download the same data twice. For thispurpose, we'll introduce a new class called LimerickItem . This class is a simple data model fora single limerick that stores the limerick text and its index.
package com.peachpit.aas3wdp.limerickreader.data { import flash.events.EventDispatcher; import flash.events.Event;
public class LimerickItem extends EventDispatcher {
private var _index:uint;

private var _text:String;
public function LimerickItem(index:uint) { _index = index; }
public function getIndex():uint { return _index; } public function getText():String { return _text; }
public function setText(value:String):void { _text = value; dispatchEvent(new Event(Event.CHANGE)); }
}}
Next, modify the existing LimerickData class so that it stores LimerickItem objects in an array.When the application requests a limerick that's already been loaded, the data model returns thecached data rather than request it from the server again.
package com.peachpit.aas3wdp.limerickreader.data { import flash.events.EventDispatcher; import flash.events.Event; import flash.net.NetConnection; import flash.net.Responder; public class LimerickData extends EventDispatcher {
private var _limerick:String; private var _ids:Array; private var _pendingNext:Boolean; private var _netConnection:NetConnection; private var _limericks:Array;
public function get limerick():String { return _limerick; }
public function LimerickData() { _limerick = ""; _netConnection = new NetConnection(); _netConnection.connect("http://localhost/limerick/gateway.php"); _netConnection.call("LimerickService.getIds", new Responder(setIds, null));
// This is the array in which the model stores each // of the LimerickItem objects. _limericks = new Array(); }

private function setIds(ids:Array):void { _ids = ids; if(_pendingNext) { next(); } }
public function next():void { if(_ids != null) { var index:uint = _ids[Math.floor(Math.random() * _ids.length)];
// Test if the data has already been // requested. If not, request it. If so, // set current limerick to the cached // value. if(_limericks[index] == undefined) { var item:LimerickItem = new LimerickItem(index); // Listen for the change event that // the item dispatches when the value // is set, and then call onItem(). item.addEventListener(Event.CHANGE, onItem); _limericks[index] = item; // Use item.setText as the result // event handler method. netConnection.call("LimerickService.getLimerick", new Responder (item.setText, null), index, false); } else{ onData(_limericks[index].getText()); } } else { _pendingNext = true; } } // When the data is returned and assigned to the limerick // item, then call onData() wuith the data. private function onItem(event:Event):void { onData(event.target.getText()); }
private function onData(limerick:String):void { _limerick = limerick; dispatchEvent(new Event(Event.CHANGE)); } } }
Queuing and Pooling Requests
When you have lots of service calls, there are two ways you can call them: back to back, or alltogether. The back-to-back technique is what we call queuing . The technique of calling all themethods at once is what we call pooling . Each has advantages and disadvantages.

A novice approach to remote procedure calls is to simply make the calls when it's convenient.This approach means that some calls are queued and some calls are pooled, but neverintentionally. This is not generally a good approach because there are cases in which calls mustbe queued and cases in which it is better if they are pooled. It is better to specifically select themanner in which you make service method calls.
The limerick application has a perfect example of a case in which method calls must be queued.Two service methods are called in the example: getIds() and getLimerick() . It is essentialthat getIds() is called before getLimerick() because getLimerick() requires a parameterwhose value is determined by the result of the getIds() method call. This means you mustqueue the method calls to ensure that getIds() returns a value before getLimerick() is called.In the existing example, this order is achieved by using an if statement to test that the _idsarray (which is populated by the return value from getIds() ) is defined before callinggetLimerick() .
Pooling requests is rarely if ever required. However, pooling does significantly reduce networkoverhead. If there are several method calls that do not have dependencies (which would requirethat they be queued), and if those methods are likely to be called in relatively close successionanyway, it is better to make the requests all at the same time. Flash Player automaticallybundles together all requests made in the same frame (which basically amounts to all requestsmade in the same routine) into a single AMF request packet.

Summary
Working with data is integral to the majority of Flash Platform applications. In this chapter, youlearned how to load text, send and load variables, work with the transfer of XML, and use FlashRemoting. You also learned techniques for optimizing your work with data.

Chapter 15. E4X (XML)
In This Chapter
Creating XML Objects 239
Property Accessors 240
XML Filtering 241
Iterating Through an XMLList 242
Namespaces 243
Sending and Loading XML Data 243
Simple Soap Example 243
Summary 249
XML got a major overhaul with the release of ActionScript 3.0. The much-anticipated E4X hasfinally made its way into Flash Player 9. This makes working with XML in Flash much simplerand reduces the need for complex XML logic. Nearly everything you know about working withXML in Flash has changed with this release.
In this chapter, we examine the new features of E4X, look at how loading external XML files haschanged, review the classic XML API, and create an example application that uses a few of theseadvanced features.
E4X stands for ECMAScript for XML. ECMAScript is the language ActionScript is based on. TheE4X specification was developed by ECMA International and was released in the summer of2004. The goal of E4X is to simplify the way developers use XML inside ECMAScript languages.It also introduces features that were not available in ActionScript 2.0.
New Classes in Actionscript 3.0
Because E4X is not simply an upgrade of the previous XML functionality, the classstructure is not exactly the same. ActionScript 3.0 has the following top-levelclasses for working with E4X functionality: XML, XMLList, QName, and Namespace.
XML

The new XML class is nothing like the XML class in ActionScript 2.0. ActionScript 2.0had two classes that represented the XML structure: XML and XMLNode. The XMLNodeclass was always a little silly because technically each node is a self-contained XMLdocument. Therefore, in ActionScript 3.0, Adobe corrected this confusion byremoving the XMLNode class. Now the XML type represents all elements, attributes,processing instructions, and text.
XMLList
ActionScript 3.0 introduces a new class called XMLList. In ActionScript 2.0, youcould get an array of XMLNode objects by calling the childNodes property of anyXMLNode object. Now, instead of working with a generic Array, you can use theXML.children() method to return an XMLList with the same functionality. A nicefeature of the XMLList class is that if you have a case where there is only one XMLobject in the list, the XMLList delegates calls to that object. It basically functions asthough it is that XML object. In the following example, lines 2 and 3 are identicalbecause there is only one item:
var data:XML = <data><item>Test Value</item.</data>;var value1:String = data.item[0].toString();var value2:String = data.item.toString();
The first line in the preceding example might seem a bit strange if you arecompletely new to E4X. It is a new way to define XML objects in ActionScript 3.0using literals. We'll talk more about literals later in this chapter.
QName
The QName class, also new to ActionScript 3.0, is used to represent the qualifiednames of elements and attributes in an XML object. There are two parts to qualifiednames: The first part is a local name that conforms to XML standards, and thesecond part is a namespace URI (Uniform Resource Identifier). The namespace isoptional.
Namespace
The Namespace class is used to define XML namespaces. Namespace support is a newfeature included in E4X that is also used to define namespaces in your code notrelated to XML. It's important to understand that this class has multiple uses, onlyone of which relates to XML.

Creating XML Objects
ActionScript 3.0 provides two basic ways to create XML objects: using a constructor or usingliteral notation. The constructor works just as you would expect:
var xml:XML = new XML();
Optionally you can pass a string to the constructor that you want to parse into XML:
var xml:XML = new XML("<data><value>a</value></data>");
However, using literal notation is often far easier and more readable. The following exampleshows a simple XML object that is created with literal syntax:
var catalog:XML = <catalog> <product id="0"> <name>Product One</name> <price>50</price> </product> <product id="1"> <name>Product Two</name> <price>35</price> </product></catalog>;
You can see that literal notation is easier and more readable, especially when you compare theliteral notation with the equivalent constructor notation, shown here:
var catalog:XML = new XML('<catalog><product id="0"><name>Product One</name><price>50</price></product><product id="1"><name>Product Two</name><price>35</price></product></catalog>');
You can also use literals to declare XMLList objects. When using XMLList literal notation, youshould use <></> as the root tag. The following example creates two XML objects named productin an XMLList object:
var products:XMLList = <> <product id="0"> <name>Product One</name> <price>50</price> </product> <product id="1"> <name>Product Two</name> <price>35</price> </product></>;

Sometimes you'll have a situation in which you need variable values in your XML object. You canachieve this by using curly braces ({}) to surround the variable within the XML literal. Thefollowing example shows how you can create a XML object named product using variable valuesfor both name and price :
var productName:String = "Product One";var productPrice:Number = 50;var product:XML = <product id="0"> <name>{productName}</name> <price>{productPrice}</price> </product>; var catalog:XML = <catalog> {product} </catalog>;
Note
The name of the variable product is the same as the first element of the XML object.
Although this is not required, we do this for simplicity. If we were to use a differentname for the variable, we would treat that variable name as though it were the nameof the first element of our XML object. By naming them the same, we minimize
confusion.

Property Accessors
E4X syntax reuses and extends the property accessor syntax already familiar to ActionScriptdevelopers. For example, ActionScript developers are already familiar with how to use dot-notation to access a property such as the x or y properties of a display object.
sprite.x = 100;sprite.y = 100;
Because of this familiarity, the learning curve for XML in ActionScript 3.0 is lowered.
For the following discussion we'll use this XML object.
var catalog:XML = <catalog> <product id="0"> <name>Product One</name> <price>50</price> </product> <product id="1"> <name>Product Two</name> <price>35</price> </product></catalog>;
First, we'll access the XMLList that is a child of the root node. Because the child nodes of theroot are called product, you can use dot notation to access a property of that same name whichwill reference the XMLList:
var products:XMLList = catalog.product;
XMLList objects allow you to use array-access notation to access the elements of the list. Forexample, the following code retrieves a reference to the first product XML node.
var firstProduct:XML = catalog.product[0];
Although up to this point the syntax has been familiar, we'll now introduce one new syntax thatuses an @ symbol to reference attributes. By using the @ symbol, you can target attributes of anXML object as shown in the following example. This code retrieves the id attribute value of thefirst product node.
var id:Number = Number(catalog.product[0].@id);
If you use the @ symbol for an XMLList, it will return an XMLList of all the attributes of thatname for all the XMLList elements. Here's an example that retrieves all the id attributes for allthe product nodes:

var allProductIds:XMLList = catalog.product.@id;
You can use an asterisk as a wildcard to get all the items at a given level. For example, thefollowing code retrieves all the product nodes without having to know the name of the nodes:
var firstLevel:XMLList = catalog.*;
You can also use wildcards with attributes. This example retrieves all the attributes of all theproduct nodes:
var firstLevel:XMLList = catalog.product.@*;

XML Filtering
Arguably, the most powerful and useful feature of E4X is its ability to filter data. This newfeature replaces the need for XPath libraries and the loops previously used to search an XMLdocument in earlier versions of ActionScript. Now you can do all this natively in ActionScript 3.0using as little as one line of code.
To use filtering, you can enclose expressions in parentheses as part of an E4X expression. Thefollowing examples show a few uses of filtering. We'll use the same XML object for all ourexamples:
var catalog:XML = <catalog> <product id="0"> <name>Product One</name> <price>50</price> </product> <product id="1"> <name>Product Two</name> <price>35</price> </product></catalog>;
The following line retrieves the product element that has an id attribute equal to 1. Thisexample returns just one XML object, but it would return an XMLList if more than one elementmatches the criteria.
var product1:XML = catalog.product.(@id == 1);
This next line grabs the name of the product element that has a price less than 50. It'simportant to understand that this would return an XMLList if more than one element met thecriteria:
var cheapestProductName:String = catalog.product.(price < 50).name;
This example retrieves the product elements that have a price greater than 35 and less than50:
var productRange:XMLList = catalog.product.(price >= 35 && price <= 50);

Iterating Through an XMLList
Developers must often iterate, or loop, through an XMLList object. ActionScript 3.0 provides afew ways to do this. We'll use the same catalog example to demonstrate three different ways toiterate through the products and add up the price values. Here again is the literal syntax forcreating the catalog object:
var catalog:XML = <catalog> <product id="0"> <name>Product One</name> <price>50</price> </product> <product id="1"> <name>Product Two</name> <price>35</price> </product></catalog>;
The first method of iterating through an XMLList is a simple for loop. We use theXMLList.length() method to get the number of items in the XMLList. Then we simply iteratethat number of times, incrementing the index (i) with each iteration. You use a similar syntaxto loop through an indexed array.
var total:Number = 0;for(var i:int = 0; i < catalog.product.length(); i++) { total += (catalog.product[i].price as Number);
}
The second method is a for...in loop that iterates over the XMLList. This method is commonlyused to loop over an associative array or an object.
var total:Number = 0;for(var i:String in catalog.product) {total += (catalog.product[i].price as Number);}
The third method is new to ActionScript 3,0. It's a for each..in loop and provides a cleanerway to loop over XML.
var total:Number = 0;for each(var product:XML in catalog.product) { total += (product.price as Number);}
It's also possible to use the new for each..in loop structure to iterate over attributes in an XMLobject.

var product:XML = <product id="0" name="Product One" price="50" />;for each(var attribute:XML in product.@*) { trace(attribute.name() + ": " + attribute.toXMLString());}

Namespaces
E4X has the added capability of XML namespaces . Namespaces are used to avoid elementname conflicts. Namespaces are most commonly found in complex XML documents that containXML data from multiple sources. SOAP, the XML format behind many Web services, is one of themost common examples of XML documents that use namespaces. Many developers never usenamespaces in their XML documents, but if you do, there are some new ways to work with themin ActionScript 3.0.
We'll use a simple SOAP envelope to show how you can work with namespaces. The followingcode shows how to create an XML namespace using literals:
var envelope:XML = <soap:envelope xmlns:soap="http://www.w3.org/2003/05/soap-envelope" />;
Next, we'll add a body element to the envelope. The body should have the same namespace asthe envelope. We can do this a few different ways. We can use the literal syntax to create thebody element, as in this example:
envelope.body = <soap:body xmlns:soap="http://www.w3.org/2003/05/soap-envelope" />
We can also create the body element by declaring the namespace and using the :: operator, likethis:
var soap:Namespace = new Namespace("http://www.w3.org/2003/05/soap-envelope");envelope.soap::body = new XML();
Both of these examples create an XML object that looks like the following:
<soap:envelope xmlns:soap="http://www.w3.org/2003/05/soap-envelope"> <soap:body /></soap:envelope>
We can also create an XML object using a default namespace, like this:
default xml namespace = new Namespace("http://www.w3.org/2003/05/soap-envelope");var envelope:XML = <envelope><body /></envelope>;

Sending and Loading XML Data
The two main classes that send or load data in ActionScript 3.0 are URLRequest and URLLoader.The URLRequest class is used to create any HTTP request, and the URLLoader class is used totransfer the request and listen for the response. Chapter 14, "Sending and Loading Data,"explains how to use URLLoader to send and load data. Here in the following sections we'll revisitthis information in the context of sending and loading XML.
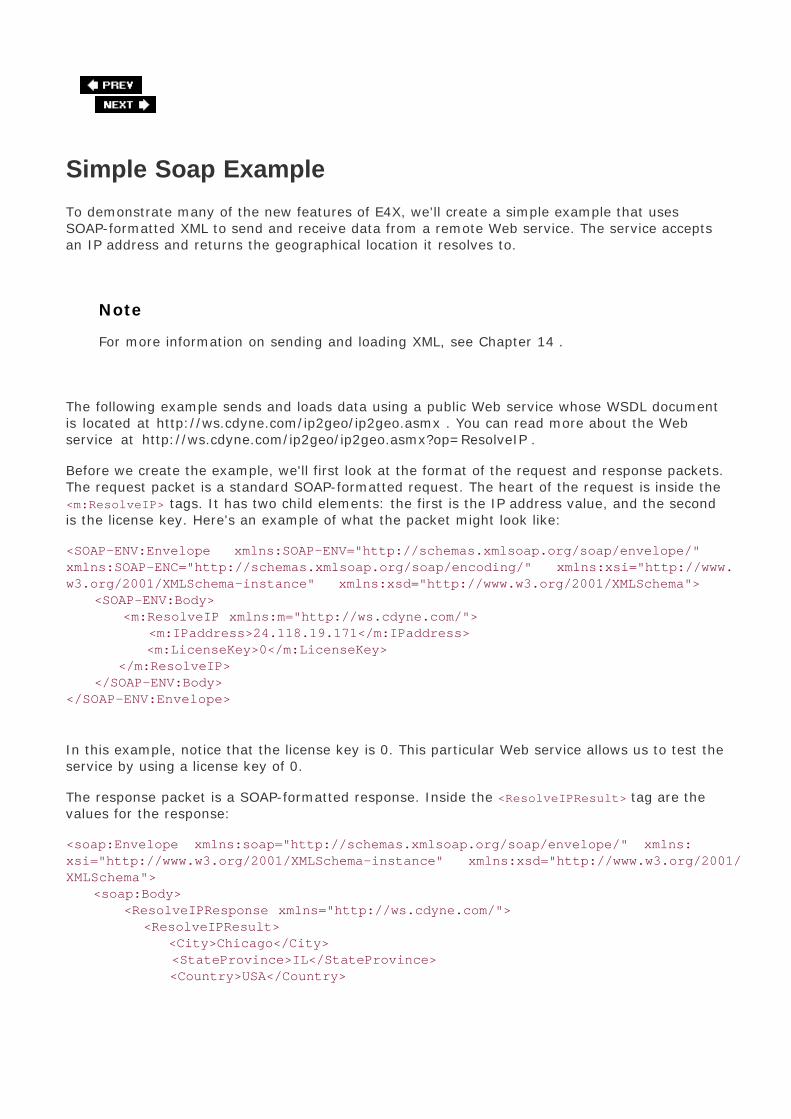
Simple Soap Example
To demonstrate many of the new features of E4X, we'll create a simple example that usesSOAP-formatted XML to send and receive data from a remote Web service. The service acceptsan IP address and returns the geographical location it resolves to.
Note
For more information on sending and loading XML, see Chapter 14 .
The following example sends and loads data using a public Web service whose WSDL documentis located at http://ws.cdyne.com/ip2geo/ip2geo.asmx . You can read more about the Webservice at http://ws.cdyne.com/ip2geo/ip2geo.asmx?op=ResolveIP .
Before we create the example, we'll first look at the format of the request and response packets.The request packet is a standard SOAP-formatted request. The heart of the request is inside the<m:ResolveIP> tags. It has two child elements: the first is the IP address value, and the secondis the license key. Here's an example of what the packet might look like:
<SOAP-ENV:Envelope xmlns:SOAP-ENV="http://schemas.xmlsoap.org/soap/envelope/"xmlns:SOAP-ENC="http://schemas.xmlsoap.org/soap/encoding/" xmlns:xsi="http://www.w3.org/2001/XMLSchema-instance" xmlns:xsd="http://www.w3.org/2001/XMLSchema"> <SOAP-ENV:Body> <m:ResolveIP xmlns:m="http://ws.cdyne.com/"> <m:IPaddress>24.118.19.171</m:IPaddress> <m:LicenseKey>0</m:LicenseKey> </m:ResolveIP> </SOAP-ENV:Body></SOAP-ENV:Envelope>
In this example, notice that the license key is 0. This particular Web service allows us to test theservice by using a license key of 0.
The response packet is a SOAP-formatted response. Inside the <ResolveIPResult> tag are thevalues for the response:
<soap:Envelope xmlns:soap="http://schemas.xmlsoap.org/soap/envelope/" xmlns:xsi="http://www.w3.org/2001/XMLSchema-instance" xmlns:xsd="http://www.w3.org/2001/XMLSchema"> <soap:Body> <ResolveIPResponse xmlns="http://ws.cdyne.com/"> <ResolveIPResult> <City>Chicago</City> <StateProvince>IL</StateProvince> <Country>USA</Country>

<Latitude>41.5000000</Latitude> <Longitude>-87.4100000</Longitude> <HasDaylightSavings>false</HasDaylightSavings> <Certainty>16</Certainty> </ResolveIPResult> </ResolveIPResponse> </soap:Body></soap:Envelope>
You can see that the response includes information such as the city, state, and country to whichthe IP address resolves. This example contains specific data such as Chicago, IL , and USA . Theactual Web service responses will contain data specific to the IP address passed in using therequest.
Now that we've looked at the structure of the request and response packets, we can build thesample application.
Building the Custom Event
The very first thing we'll need to build in this example is a custom event type. Because ourevent has data associated with it, we will create a custom event class called LocationEvent .This class extends the built-in Event class and simply adds five public properties. Theseproperties are later populated from the data returned by the Web service.
package com.peachpit.aas3wdp.e4xexample {
import flash.events.Event;
public class LocationEvent extends Event {
private var _city:String; private var _stateProvince:String; private var _country:String; private var _latitude:String; private var _longitude:String; public function get city():String { return _city; }
public function set city(value:String):void { _city = value; }
public function get stateProvince():String { return _stateProvince; }
public function set stateProvince(value:String):void { _stateProvince = value; }
public function get country():String { return _country;
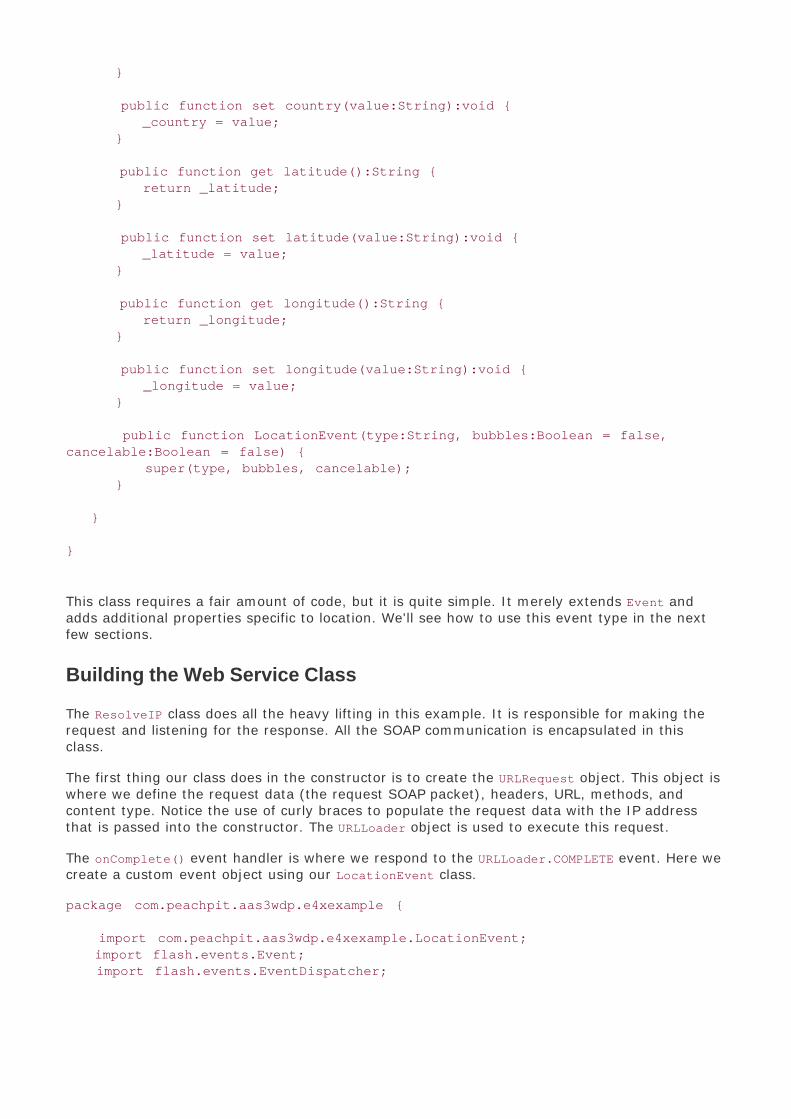
}
public function set country(value:String):void { _country = value; } public function get latitude():String { return _latitude; } public function set latitude(value:String):void { _latitude = value; } public function get longitude():String { return _longitude; }
public function set longitude(value:String):void { _longitude = value; }
public function LocationEvent(type:String, bubbles:Boolean = false,cancelable:Boolean = false) { super(type, bubbles, cancelable); }
}
}
This class requires a fair amount of code, but it is quite simple. It merely extends Event andadds additional properties specific to location. We'll see how to use this event type in the nextfew sections.
Building the Web Service Class
The ResolveIP class does all the heavy lifting in this example. It is responsible for making therequest and listening for the response. All the SOAP communication is encapsulated in thisclass.
The first thing our class does in the constructor is to create the URLRequest object. This object iswhere we define the request data (the request SOAP packet), headers, URL, methods, andcontent type. Notice the use of curly braces to populate the request data with the IP addressthat is passed into the constructor. The URLLoader object is used to execute this request.
The onComplete() event handler is where we respond to the URLLoader.COMPLETE event. Here wecreate a custom event object using our LocationEvent class.
package com.peachpit.aas3wdp.e4xexample {
import com.peachpit.aas3wdp.e4xexample.LocationEvent; import flash.events.Event; import flash.events.EventDispatcher;

import flash.net.URLLoader; import flash.net.URLRequest; import flash.net.URLRequestHeader;
public class ResolveIP extends EventDispatcher {
private var urlLoader:URLLoader;
public function ResolveIP(ipAddress:String) { var urlRequest:URLRequest = new URLRequest(); urlRequest.contentType = "text/xml; charset=utf-8"; urlRequest.method = "POST"; urlRequest.url = "http://ws.cdyne.com/ip2geo/ip2geo.asmx"; var soapAction:URLRequestHeader = new URLRequestHeader("SOAPAction", "http://ws.cdyne.com/ResolveIP"); urlRequest.requestHeaders.push(soapAction); urlRequest.data = <SOAP-ENV:Envelope xmlns:SOAP-ENV="http://schemas.xmlsoap. org/soap/envelope/" xmlns:SOAP-ENC="http://schemas.xmlsoap.org/soap/ encoding/" xmlns:xsi="http://www.w3.org/2001/XMLSchema-instance" xmlns: xsd="http://www.w3.org/2001/XMLSchema"> <SOAP-ENV:Body> <m:ResolveIP xmlns:m="http://ws.cdyne.com/"> <m:IPaddress>{ipAddress}</m:IPaddress> <m:LicenseKey>0</m:LicenseKey> </m:ResolveIP> </SOAP-ENV:Body> </SOAP-ENV:Envelope>;
urlLoader = new URLLoader(); urlLoader.addEventListener(Event.COMPLETE, onComplete); urlLoader.load(urlRequest); }
private function onComplete(event:Event):void { var envelope:XML = XML(urlLoader.data); var soap:Namespace = envelope.namespace("soap"); var response:Namespace = new Namespace("http://ws.cdyne.com/"); var result:XMLList = envelope.soap::Body.response::ResolveIPResponse. response::ResolveIPResult; var locationEvent:LocationEvent = new LocationEvent(Event.COMPLETE, true, true); locationEvent.city = result.response::City.toString(); locationEvent.stateProvince = result.response::StateProvince.toString(); locationEvent.country = result.response::Country.toString(); locationEvent.latitude = result.response::Latitude.toString(); locationEvent.longitude = result.response::Longitude.toString(); dispatchEvent(locationEvent); }
}
}
Creating the Main Class

Invoking the ResolveIP class is simple. Just create a new instance of the class and pass an IPaddress into the constructor during creation. Then register for the complete event and the errorevent. The complete event returns a LocationEvent object. The error events are not actuallythrown by ResolveIP , but instead are thrown by the URLLoader object inside the ResolveIPobject. Because the error events aren't caught by the ResolveIP object, they bubble up to ourWebServiceExample object.
Here's the main class for our SOAP-parsing Web service example:
package {
import com.peachpit.aas3wdp.e4xexample.LocationEvent; import com.peachpit.aas3wdp.e4xexample.ResolveIP; import flash.events.Event; import flash.events.IOErrorEvent; import flash.events.SecurityErrorEvent; import flash.events.KeyboardEvent; import flash.ui.Keyboard; import flash.display.Sprite; import flash.text.TextField; import flash.text.TextFieldType;
public class WebServiceExample extends Sprite {
private var _resolveIP:ResolveIP; private var _text:TextField;
public function WebServiceExample() {
// Create a text field to accept user input and // display the response. _text = new TextField(); _text.type = TextFieldType.INPUT; _text.width = 200; _text.height = 22; _text.background = true; _text.border = true;
// Initially populate the text field with a valid // IP address. This makes it easy to test the // application. You can also change this at runtime // if you want to test a different IP address. _text.text = "24.118.19.171";
// Listen for keyboard events. _text.addEventListener(KeyboardEvent.KEY_UP, onKey); addChild(_text); }
private function onKey(event:KeyboardEvent):void {
// If the user presses the Enter key then createa a // new ResolveIP object, passing it the text from // the text field. Then listen for events. if(event.keyCode == Keyboard.ENTER) { _resolveIP = new ResolveIP(_text.text);

_resolveIP.addEventListener(Event.COMPLETE, onComplete); _resolveIP.addEventListener(IOErrorEvent.IO_ERROR, onError); _resolveIP.addEventListener(SecurityErrorEvent.SECURITY_ERROR, onError); } }
// When the response is returned, display the location // to which the IP address resolves. private function onComplete(locationEvent:LocationEvent):void { _text.text = locationEvent.city + ", " + locationEvent.stateProvince; }
private function onError(event:Event):void { _text.text = "error: " + event.type; }
}
}
You can test this example by entering a valid IP address in the text field and pressing the Enterkey. The Web service will respond shortly, and the result will be displayed in the text field.
Classic XML API
The old way of working with XML still exists in ActionScript 3.0 in the form of the XMLDocumentand XMLNode classes. These classes are included in ActionScript 3.0 mainly for backwardscompatibility. All new projects should use E4X because it is the new standard for working withXML in ActionScript.

Summary
E4X is one of the biggest improvements to ActionScript in years. This enhancement increasesthe power of XML and makes it an even more robust option for ActionScript programmers. Inthis chapter, you learned about the new features of E4X and created a simple Web serviceapplication.
Chapter 16. Regular Expressions
In This Chapter
Introducing the RegExp Class 252
Working with Regular Expressions 252
Using Regular Expression Flags 255
Understanding Metacharacters and Metasequences 258
Using Regular Expression groups 261
Building a Mad Libs Application Using Regular Expressions 263
Summary 272
Regular expressions enable you to look for substrings that match a pattern, making them apowerful way to work with strings. For basic substring searches, you can use String classmethods such as indexOf(). Methods such as indexOf() work when you know the exactsubstring you want to find. For example, if you want to determine whether a string contains thesubstring cog you can use the following code:
var string:String = "Gears and cogs";var index:int = string.indexOf("cog");trace("contains substring? " + (index != -1));
The preceding code determines whether string contains the letters "cog." If the indexOf()method doesn't return -1, then it means that it found an occurrence of the substring.
When writing sophisticated programs, it's entirely likely that you'll want to search for substringsin a more abstract fashion. For example, consider if you wanted to determine whether a stringcontains the substring cog or the substring log. In such a case, you could simply test for bothsubstrings using indexOf(). Yet as the number of possible substrings for which you want to testincreases, so too does the complexity of the code necessary to test for every substring usingindexOf(). If you wanted to test for all substrings that start with a letter followed by og, thenyou have to test for 52 possible substrings. More complex substring possibilities could requiretesting for hundreds, thousands, millions, even billions of substrings. This is where regularexpressions simplify things greatly.
Regular expressions are a way of testing for substrings by using patterns. Regular expressionsuse standard characters such as letters and numbers as well as special metacharacters andmetasequences to form these patterns. In this chapter, we'll look at how to build and work withregular expressions using ActionScript 3.0.

Note
Regular expressions are supported natively in Flash Player 9 with ActionScript 3.0.

Introducing the RegExp Class
ActionScript 3.0 uses the RegExp class to define regular expressions. There are two basic waysto construct a RegExp object. You can use the RegExp constructor or literal notation (that is, youcan type it in directly as you would type a string or a number). Which you choose is mainly amatter of preference and usage. The constructor requires that you pass it at least oneparameter specifying the regular expression pattern as a string. The following exampleconstructs a RegExp object that matches any substring that contains between 4 and 8 lowercasealphabetic characters:
var pattern:RegExp = new RegExp("[a-z]{4,8}");
Note that when you want to define a regular expression pattern at runtime, you ought to usethe constructor because it allows you to use a string value to define the expression. You canbuild this string using code, allowing you to create patterns appropriate for the situation athand.
The literal notation surrounds the regular expression pattern by forward slashes (/). In the caseof literal notation, the pattern is not a string and therefore is not surrounded by quotes. Thefollowing constructs a RegExp object that matches the same substrings as the precedingexample. However, rather than using the constructor, the following example uses literalnotation:
var pattern:RegExp = /[a-z]{4,8}/;
Note that when you want to add a backslash to a pattern that you build with the constructor,you'll have to escape the backslash because the constructor requires that you specify thepattern as a string and the backslash character has special meaning within a string. Manyregular expression metasequences use backslashes. For example, the \d metasequence matchesany digit. The following statement illustrates how to construct a RegExp object that matches anydigit. Because the example uses the constructor, it's necessary to escape the backslash.
var pattern:RegExp = new RegExp("\\d");
Because the backslash character doesn't have special meaning within regular expression literalnotation, the following is the literal notation equivalent of the preceding example:
var pattern:RegExp = /\d/;
However, because forward slashes have special meaning within regular expression literalnotation, you must escape forward slashes. You can escape forward slashes with backslashes.The following matches the literal forward slash character:
var pattern:RegExp = /\//;

Working with Regular Expressions
You can work with regular expressions by way of the RegExp methods or by way of the Stringmethods that accept RegExp parameters. The methods are as follows.
RegExp.test()
RegExp.exec()
String.search()
String.replace()
String.match()
We'll next look at using these methods in the following sections.
Boolean Testing Regular Expressions
The test() method is a method of the RegExp class, and it accepts a string parameter. Thetest() method returns true if the string parameter contains a substring that matches theregular expression pattern. Otherwise it returns false. The following example uses a regularexpression that matches one or more lowercase characters. As you can see from the comments,the test() method returns true or false depending on whether or not the regular expressionmatches a substring in the string parameter.
var pattern:RegExp = /[a-z]+/;var string:String = "abcd";trace(pattern.test(string)); // truestring = "1234";trace(pattern.test(string)); // false
Finding Matching Substring Indices
The search() method is a method of the String class, and it accepts a regular expressionparameter. The search() method returns the index of the first matching substring. Thefollowing example locates the index of the first word that starts with the letter p:
var pattern:RegExp = /\bp[a-z]+/;var string:String = "There is no path to peace. Peace is the path.";trace(string.search(pattern)); // 12
The search() method always starts searching from the start of the string. The global flag andlastIndex property have no effect on search() .

Retrieving Matching Substrings
The RegExp.exec() method and the String.match() method both enable you to retrievematching substrings using regular expressions. However, the two methods operate in differentways.
The exec() method returns an array containing the substring matched. As discussed in thesection, "Using Regular Expression Groups ," later in this chapter, the array returned by exec()can also contain group subpattern matches.
Even when the global flag is set, the exec() method only ever finds one match at a time. Theexec() method sets the lastIndex property of the RegExp object from which it was called to theindex immediately following the most recent matching substring. This arrangement allows youto continue to apply the exec() method to a string, and it finds the next matching substringeach time. The exec() method uses the lastIndex property to determine that index from whichto start the next search. When no more matching substrings are found, exec() returns null andresets lastIndex to 0. The following code illustrates the use of exec() as well as lastIndex .When you run the code, you can see that after null is returned, the lastIndex property is resetto 0. Following that, the method searches from the start of the string once again. The followingexample outputs each word within the string, one at a time, along with the index of the lastcharacter in the string that was previously examined:
var pattern:RegExp = /[a-z]+/ig;var string:String = "There is no path to peace. Peace is the path.";for(var i:uint = 0; i < 12; i++) { trace(pattern.exec(string)); trace(pattern.lastIndex); }
The lastIndex property is a read-write property. That means you can set lastIndex so that itspecifies the starting index from which exec() ought to start searching.
The match() method returns an array of all the substrings that match the pattern. Use theglobal flag to match all substrings. If you don't set the global flag, the match() method returnsan array with only the first matching substring. The following example illustrates the use of thematch() method.
// This expression will match strings that follow the rules of email// address values.var pattern:RegExp = /(?:\w|[_.\-])+@(?:(?:\w|-)+\.)+\w{2,4}/g;var string:String = "emails: [email protected], [email protected], [email protected]";trace(string.match(pattern));// [email protected], [email protected], [email protected]
Replacing Substrings Using Regular Expressions
The replace() method is a String method that enables you to replace substrings using regularexpressions. When using regular expressions with the replace() method, use the global flag ifyou want to replace all instances of a pattern or it will only replace the first instance. Thefollowing example replaces all email address with <email>@<domain>.com .
var pattern:RegExp = /((?:\w|[_.\-])+)@(?:((?:\w|-)+)\.)+\w{2,4}+/;var string:String = "The following was posted by [email protected].";

trace(string.replace(pattern, "<email>@<domain>.com"));// outputs: The following was posted by <email>@<domain>.com.
For more complex replacements, you can specify a function reference for the second parameterin place of the string. That function is then passed the following parameters:
The matching substring
Capturing groups (see "Using Regular Expression Groups ") (Note that if there are nocapturing groups then these parameters are omitted.)
The index of the matching substring
The original string
The function should return a string. The string the function returns is what gets substituted.
The following example uses a replacement function:
package {
import flash.display.Sprite; public class RegularExpressions extends Sprite {
public function RegularExpressions() { // The ?: sequences make the groups non-capturing as discussed in // the sections on groups in this chapter. var pattern:RegExp = /(?:\w|[_.\-])+@(?:(?:\w|-)+\.)+\w{2,4}/; var string:String = "The following was posted by [email protected]."; trace(string.replace(pattern, replacer)); // Prints out: The following was posted by user AT domain DOT com }
// The regular expression doesn't have any capturing groups, so the // function only expects three parameters. private function replacer(match:String, index:int, originalString:String):String { var string:String = match.replace("@", " AT "); string = string.replace(/\./g, " DOT "); return string; }
}
}

Using Regular Expression Flags
ActionScript lets you specify flags that affect how regular expressions work. Table 16.1 is acomprehensive list of those flags.
g
Global
i
Ignore case
m
Multiline
s
Dot matches newlines
x
Extended notation allows spaces in regular expression patterns
Table 16.1. Regular Expression Flags
Flag Description
You can specify flags when you construct a RegExp object. When you use the constructor, youspecify the flags as a second string parameter. The following example matches all substrings of4 to 8 alphabetical characters:
var pattern:RegExp = new RegExp("[a-z]{4,8}", "ig");
You can specify the flags with literal notation by adding the flag characters following the secondforward slash, as shown here:
var pattern:RegExp = /[a-z]{4,8}/ig;
The order in which you specify the flags makes no difference. Specifying igms is the same asspecifying sgim .
The Global Flag
By default, regular expressions match only the first instance of a pattern in a string. Obviously,there are cases in which it's beneficial to be able to match every instance of a pattern, not justthe first instance. The global flag enables just that. Consider the following example. The patternmatches whole words. By default, it finds only one matching substring.
var pattern:RegExp = /\b\w+\b/;var string:String = "There is no path to peace. Peace is the path.";trace(string.match(pattern).toString()); // There
The preceding code finds just the first substring because the global flag is not set. The followingchanges the preceding example simply by setting the global flag. Notice that it then finds everyword.
var pattern:RegExp = /\b\w+\b/g;var string:String = "There is no path to peace. Peace is the path.";trace(string.match(pattern).toString()); // There,is,no,path,to,peace,Peace,is,the,path
Note
Both examples in this section return arrays. Because the first example does not havethe global flag set, it returns only one element in the array.
The Ignore Case Flag
By default, ActionScript regular expressions make a distinction between lowercase anduppercase characters. For example, A and a are not considered the equivalent by default. Thefollowing code illustrates this. The pattern is supposed to match any continuous sequence oflowercase characters bordered by non-word characters (such as a space). Notice that the firstmatching substring it finds is the second word because the first word has an uppercasecharacter.
var pattern:RegExp = /\b[a-z]+\b/;var string:String = "There is no path to peace. Peace is the path.";trace(string.match(pattern)); // is
Setting the i flag causes the regular expression to ignore the distinction between uppercase andlowercase characters. The following regular expression differs from the preceding code only bythe i flag being set. The following regular expression matches the first word in the string.
var pattern:RegExp = /\b[a-z]+\b/i;var string:String = "There is no path to peace. Peace is the path.";trace(string.match(pattern)); // There
The Multiline Flag

The ^ character matches the start of a string, and the $ character matches the end of a string bydefault. Consider the following example in which the pattern looks for any sequence oflowercase and uppercase characters, spaces, and dots in which the substring is at the start ofthe string. Notice that the newline character (\n ) delimits the substring, and even though theglobal flag is set, the regular expression finds only one substring.
var pattern:RegExp = /^[a-zA-Z .]+/g;var string:String = "There is no path to peace.\nPeace is the path.";trace(string.match(pattern)); // There is no path to peace.
The multiline flag causes the ^ character to match both the start of the string and the start ofthe second line, and the $ character to match both the end of the string and the end of the firstline. The following example is identical to the preceding code except that it also sets themultiline flag. Notice that it now matches both lines from the string.
var pattern:RegExp = /^[a-zA-Z .]+/mg;var string:String = "There is no path to peace.\nPeace is the path.";trace(string.match(pattern)); // There is no path to peace.,Peace is the path.
The Dot Matches Newline Flag
The dot (.) character matches any character. However, it does not match the newline characterby default. The following example illustrates the default behavior. The pattern matches one ormore non-newline characters. Note that because the pattern does not match the newlinecharacter, it matches the substring only up until the newline character.
var pattern:RegExp = /.+/;var string:String = "There is no path to peace.\nPeace is the path.";trace(string.match(pattern)); // There is no path to peace.
The s flag causes the dot to match every character including the newline character. Thefollowing example illustrates the difference with the s flag.
var pattern:RegExp = /.+/s;var string:String = "There is no path to peace.\nPeace is the path.";trace(string.match(pattern));/*There is no path to peace.Peace is the path.*/
The Extended Flag
By default, spaces within patterns are interpreted literally. For complex regular expressions,that fact can make the patterns difficult to read by humans. For the purposes of legibility, youmight want to add additional spaces to a pattern. If you want Flash Player to ignore additionalspaces added for the purposes of legibility, you can set the x flag. Consider the followingexample that matches an email address:
var pattern:RegExp = /(\w|[_.\-])+@((\w|-)+\.)+\w{2,4}+/;

var string:String = "[email protected]";trace(pattern.test(string)); // true
The pattern is complex and perhaps difficult to read. You can make it more legible by addingspaces, as follows:
var pattern:RegExp = / ( \w | [_.\-] )+ @ ( ( \w | - )+ \. )+ \w{2,4}+ /;var string:String = "[email protected]";trace(pattern.test(string)); // false
In the preceding example, the x flag is not set, so the spaces are interpreted literally, and thetest evaluates to false. The following example evaluates to true because the x flag is set so thatthe additional spaces are ignored.
var pattern:RegExp = / ( \w | [_.\-] )+ @ ( ( \w | - )+ \. )+ \w{2,4}+ /x;var string:String = "[email protected]";trace(pattern.test(string)); // true
If you want to match a literal space when the x flag is set, you can use a backslash to escapethe space, as shown here:
var pattern:RegExp = /a\ b/x;var string:String = "a b";trace(pattern.test(string)); // true

Understanding Metacharacters and Metasequences
Regular expressions are composed of standard characters such as letters and numbers as wellas special characters and sequences called metacharacters and metasequences. Thesemetacharacters and metasequences are what enable regular expressions to match abstractpatterns. For example, using the metasequence \d, you can match any digit, which is moreabstract than matching a specific digit.
The metacharacters used by regular expressions enable you to match specific parts of a string,group characters, and even perform logical operations. The list of metacharacters used byregular expressions is relatively short. The metacharacters are summarized in Table 16.2.
Table 16.2. Metacharacters Used in Regular Expressions
Metacharacter Description
^ The start of the string or the start of a line when the m flag is set
$ The end of a string or the end of a line when the m flag is set
\ Escape a metacharacter or metasequence so it is interpreted literally
. Any character; includes the newline character only when the s flag is set
* Zero or more occurrences of the preceding item
+ One or more occurrences of the preceding item
? Zero or one occurrences of the preceding item
() A group
[] A character class
| Either the item on the left or the item on the right
The metasequences are sequences of characters that are interpreted in a specific manner byregular expressions. Table 16.3 summarizes the regular expression metasequences.
Table 16.3. Metasequences Used in Regular Expressions
Metasequence Description
{n} n occurrences of the preceding item
{n,} n or more occurrences of the preceding item
{n,m} Between n and m occurrences of the preceding item

Metasequence Description
\A The start of the string
\b The border between a word character (a-z, A-Z, 0-9, or _) and a non-word character including the start and end of a string
\B The border between two word characters or two non-word characters
\d Any digit
\D Any non-digit
\n Newline
\r Return
\s Any whitespace character
\S Any non-whitespace character
\t Tab
\unnnn The Unicode character represented by the character code nnnn
\w Any word character (a-z, A-Z, 0-9, or _)
\W Any non-word character
\xnn The character represented by the ASCII value nn
\z The end of the string including any final newline character
\Z The end of the string excluding any final newline character
Using Character Classes
Character classes are denoted by square brackets ([]), and they enable you to specify a set ofcharacters for one position within a regular expression. For example, the following regularexpression uses a character class to match any substring that starts with b, followed by anyvowel, and ending with a t.
var pattern:RegExp = /b[aeiou]t/g;var string:String = "The bat lost the bet, but he didn't mind a bit.";trace(string.match(pattern)); // bat,bet,but,bit
Most metacharacters and metasequences aren't interpreted as such within a character class. Forexample {5} is interpreted literally as the digit 5 and the right and left curly brace characterswhen placed within a character class. The exceptions are the metasequences \n, \r, \t, \unnnn,and \xnn. In addition, the , ], and \ characters have special meaning within character classes.
The - (hyphen) character within a character class can indicate a range of characters. Forexample, the following code defines a regular expression that matches any lowercasealphabetical character:
var pattern:RegExp = /[a-z]/;
You can define valid ranges of uppercase and lowercase alphabetical characters, digits, and

ASCII character codes. If you use a - character such that it does not define a valid range, thenit will be interpreted literally. For example, the following defines a character class that matchesall lowercase characters, digits, and the - character:
var pattern:RegExp = /[a-z-0-9]/;
The ] character closes a character class. If you want to match the literal ] character within acharacter class, you have to escape it. The backslash character (\) is the escape character. Thefollowing example matches all lowercase characters or the right square bracket character:
var pattern:RegExp = /[a-z\]]/;
If you want to match the literal backslash character, you can escape it with a precedingbackslash character. The following matches any lowercase character or the backslash character:
var pattern:RegExp = /[a-z\\]/;
Working with Quantifiers
The metacharacters and metasequences *, +, ?, {n}, {n,}, and {n,m} are quantifiers. They allowyou to specify repetitions within patterns. Quantifiers are applied to the item preceding them.An item can be a character, metasequence, character class, or group.
The following example uses the + operator to find all the substrings that consist of alphabeticalcharacters:
var pattern:RegExp = /[a-z]+/ig;var string:String = "There is no path to peace. Peace is the path.";trace(string.match(pattern)); // There,is,no,path,to,peace,Peace,is,the,path
The following code matches only the words that are 4 or 5 characters:
var pattern:RegExp = /[a-z]{4,5}/ig;var string:String = "There is no path to peace.\nPeace is the path.";trace(string.match(pattern)); // There,path,peace,Peace,path
Using Regular Expression Groups
Regular expression groups are denoted by parentheses. You can use groups for the followingbasic purposes:
Add quantifiers to more than one character
Add more control to logical or operations
Remember subpattern matches for subsequent use in the code
Quantifiers apply to the preceding item. The preceding item might be a character,metasequence, character code, or group. The following example uses a regular expression thatmatches substrings with an is followed by one or more s characters:
var pattern:RegExp = /iss+/g;var string:String = "Mississippi";trace(string.match(pattern)); // iss,iss
The following example matches all substrings composed of one or more iss sequences:
var pattern:RegExp = /(iss)+/g;var string:String = "Mississippi";trace(string.match(pattern)); // ississ
The | character normally matches the entire pattern on either side of the character. Forexample, the following code uses a regular expression that matches either re or ad :
var pattern:RegExp = /re|ad/g;var string:String = "red is rad";trace(string.match(pattern)); // re,ad
If parentheses are used, then the | operates on just the characters surrounded by theparentheses as shown in the following example:
var pattern:RegExp = /r(e|a)d/g;var string:String = "red is rad";trace(string.match(pattern)); // red,rad
Parentheses also enable you to use backreferences. Backreferences allow you to reference agrouped substring within the regular expression. You can reference each group numericallyfrom 1 to 99. The following illustrates a backreference:
var pattern:RegExp = /(\d) = \1/g;var string:String = "1 = 1, 2 = 1 + 1, 3 = 1 + 1 + 1, 4 = 4";trace(string.match(pattern)); // 1 = 1,4 = 4

In the preceding example, the \1 references the first group in the regular expression: thesubstring matched by (\d ). The following is a similar example. Notice that in this case, thepattern doesn't match 2 = 2 because the grouped substring must consist of two digits:
var pattern:RegExp = /(\d\d) = \1/g;var string:String = "20 = 20, 2 = 2, 3 = 1 + 1 + 1, 40 = 40";trace(string.match(pattern)); // 20 = 20,40 = 40
The following example uses two backreferences:
var pattern:RegExp = /(\d)(\d) = \2\1/g;var string:String = "42 = 24, 2 = 2, 3 = 1 + 1 + 1, 40 = 40";trace(string.match(pattern)); // 42 = 24
You can use $1 tHRough $99 as references to grouped substrings when using theString.replace() method. The following example illustrates how to use these references:
[View full width]var pattern:RegExp = /([a-z]+) function ([a-zA-Z]+)\(\):([a-zA-Z]+)/g;var string:String = "public function example():void";trace(string.replace(pattern, "The function called $2 is declared as $1 with a return type of $3"));
When you call the RegExp.exec() method, it returns an array with the current matchingsubstring as well as any grouped substring.
var pattern:RegExp = /([a-z]+) function ([a-zA-Z]+)\(\):([a-zA-Z]+)/g;var string:String = "public function example():void { trace('example');}";var substrings:Array = pattern.exec(string);trace(substrings[0]); // public function example():Voidtrace(substrings[1]); // publictrace(substrings[2]); // exampletrace(substrings[3]); // void
You can also defined named groups using ?P<groupName> immediately following the openingparenthesis. In this case, RegExp.exec() returns an associative array where the names of thecaptured groups are keys of the array. The entire matched string is still returned in the firstindex. The following example is a rewrite of the preceding code such that it uses named groups:
[View full width]var pattern:RegExp = /(?P<modifier>[a-z]+) function (?P<functionName>[a-zA-Z]+)\(\):(?P<returnType>[a-zA-Z]+)/g;var string:String = "public function example():void {trace('example');}";var substrings:Array = pattern.exec(string);trace(substrings[0]);trace(substrings.modifier);trace(substrings.functionName);trace(substrings.returnType);
You can also instruct the regular expression not to capture a group. For example, you mightwant to use a group with a quantifier, but without capturing the group. In such cases, you can

use ?: immediately following the opening parenthesis. The following example uses a standardcapturing group. Notice that the array returned by exec() has two elements because it capturesthe subpattern.
var pattern:RegExp = /i(s|p){2}/;var string:String = "Mississippi";trace(pattern.exec(string)); // iss,s
The following code rewrites the preceding example such that it uses a non-capturing group. Inthis example, the array returned by exec() has just one element:
var pattern:RegExp = /i(?:s|p){2}/;var string:String = "Mississippi";trace(pattern.exec(string)); // iss
Lookahead groups are non-capturing groups that can be either positive (the subpattern mustappear) or negative (the subpattern must not appear.) Positive lookahead groups are denotedby ?= following the opening parenthesis. A positive lookahead group says that the specifiedsubpattern must appear in that position, but it will not be included in the match. Frequently,positive lookahead groups are used to match patterns that are followed by a specific pattern.For example, consider a string that contains filenames with file extensions. If you want toretrieve the filenames minus the file extensions from the string, you can use a positivelookahead group as in the following example:
var pattern:RegExp = /[a-z]+(?=\.[a-z]+)/g;var string:String = "Copy the program.exe and run.bat files. Move file.txt.";trace(string.match(pattern)); // program,run,file
You can use positive lookahead groups for complex patterns that would be extremely difficult orimpossible to match otherwise. Consider the example of an alphanumeric password that mustbe between 6 and 20 characters and must contain at least 2 digits as well as at least 1lowercase and 1 uppercase character. The following example uses positive lookahead groups toaccomplish that goal:
var pattern:RegExp = /(?=.*\d.*\d)(?=.*[a-z])(?=.*[A-Z])[a-zA-Z0-9]{6,20}/;var string:String = "a1b2cd3e4"; // No uppercasetrace(pattern.test(string)); // falsestring = "aBcdefg"; // No digitstrace(pattern.test(string)); // falsestring = "a1B2cd3e4";trace(pattern.test(string)); // true
Negative lookahead groups are denoted by ?! . Negative lookahead groups work just likepositive lookahead groups, but they define subpatterns that must not appear. The followingexample uses a negative lookahead group to match all filenames (with file extensions) thatdon't have the file extension .txt .
var pattern:RegExp = /[a-z]+(?!\.txt)\.([a-z]+)/g;var string:String = "Copy the program.exe and run.bat files. Move file.txt.";trace(string.match(pattern)); // program.exe,run.bat

The following example rewrites the preceding regular expression slightly so that it matches allfilenames except those that have file extensions of .txt or .bat :
var pattern:RegExp = /[a-z]+(?!\.txt|\.bat)\.([a-z]+)/g;var string:String = "Copy the program.exe and run.bat files. Move file.txt.";trace(string.match(pattern)); // program.exe
Building a Mad Libs Application Using Regular
Expressions
In this example application, we'll use regular expressions to build a Mad Lib application. MadLibs are the fill-in-the-blank word games that prompt the user to specify words without knowingthe context of the words. The words are then used to fill in the blanks of a story, often withhumorous results.
The Mad Lib application we'll build consists of the following elements:
MadLibTextElementData : A data model class for each text element, whether plain text orsubstitutable text.
MadLibInputItemData : A data model class for each of the word blanks that stores both theoriginal value from the text file and the user-provided value that is substituted for theoriginal. MadLibInputItemData is a subclass of MadLibTextElementData .
MadLibData : A data model class for the entire story. The data model consists of severalarrays of MadLibInputItemData and MadLibTextElementData objects. The class loads thedata from a text file; after the data has loaded, it dispatches an event to all listeners.MadLibData is a Singleton class (see Chapter 4 , "Singleton Pattern ," for moreinformation).
MadLibInputItem : A control that allows the user to input a word. MadLibInputItem objectsuse MadLibInputItemData objects as their data models.
FormScreen : A view class that renders the form of MabLibIinputItem controls for each ofthe word blanks from the MadLibData instance.
ResultScreen : A view class that renders the story with the user-substituted words.
MadLibs : The main class that renders a FormScreen and ResultScreen instance, and usesbuttons to allow the user to toggle between the screens.
Additionally, the application has to load text from a file to use as the Mad Libs text. To start,create a file called madlibstory.txt in the deploy directory for the application. Then add thefollowing text to the document.
There was once an old <type of building>, that stood in the middle of a deep gloomy wood, and in the <type of building> lived an old fairy. Now this fairy could take any shape she pleased. All the day long she flew about in the form of a/n <something that flies>, or crept about the country like a/n <something that moves on land>; but at night she always became an old woman again. When any young man came within a hundred paces of her castle, he became quite fixed, and could not move a step till she came and set him free; which she would not do till he had given her his word never to <something you like to do> again: but when any pretty maiden came within that space she was changed into a/n <something that goes in a cage>, and the fairy put her into a cage, and hung her up in a chamber in the castle. There were seven hundred of these cages hanging in the castle, and all with beautiful <something that

goes in a cage> in them.
The words and phrases that appear within <> are the word blanks. The application uses regularexpressions to substitute those values.
Creating the Data Model Classes
As described previously, the Mad Libs application uses several data model classes. The firstclass we'll define is the data model class for each text element used in the application. A textelement could be a substitutable or non-substitutable portion of the application. Define thecom.peachpit.aas3wdp.madlibs.data.MadLibTextElementData class as follows:
package com.peachpit.aas3wdp.madlibs.data { import flash.events.EventDispatcher; import flash.events.Event;
public class MadLibTextElementData extends EventDispatcher {
public static const UPDATE:String = "update";
private var _data:String;
public function get data():String { return _data; }
public function set data(value:String):void { _data = value; dispatchEvent(new Event(UPDATE)); }
public function MadLibTextElementData(value:String = "") { _data = value; } }}
This class simply holds the string value for a text element, whether substitutable or non-substitutable.
Next, we'll create the data model class that is specific to substitutable text. This class is calledMadLibInputItemData , and it extends MadLibTextElementData . This class stores one additionalpiece of data: the label to use for the input. Definecom.peachpit.aas3wdp.madlibs.data.MadLibInputItemData as follows:
package com.peachpit.aas3wdp.madlibs.data {
import flash.events.EventDispatcher; import flash.events.Event;
public class MadLibInputItemData extends MadLibTextElementData {

private var _label:String;
// The default label includes <>. Use a regular expression // to return the value between the <>. public function get labelFormatted():String { var pattern:RegExp = /[a-z ]+/i; return _label.match(pattern)[0]; }
public function get label():String { return _label; }
public function set label(value:String):void { _label = value; }
public function MadLibInputItemData(value:String) { _label = value; }
}}
Next we'll create a class to serve as the data model for the entire Mad Libs application. This isthe most complex of the data model classes. It should store collections of instances of the otherdata model classes. The class should then define an interface that allows access to thosecollections using iterators. Define com.peachpit.aas3wdp.madlibs.data.MadLibData as follows:
package com.peachpit.aas3wdp.madlibs.data {
import com.peachpit.aas3wdp.collections.ICollection; import com.peachpit.aas3wdp.iterators.ArrayIterator; import com.peachpit.aas3wdp.iterators.IIterator;
import flash.events.Event; import flash.events.EventDispatcher; import flash.net.URLLoader; import flash.net.URLRequest;
public class MadLibData extends EventDispatcher {
private var _items:Array; private var _textElements:Array;
private static var _instance:MadLibData;
public static const UPDATE:String = "update"; public static const INPUT_ITEMS:String = "inputItems"; public static const ALL_ITEMS:String = "allItems";
public function MadLibData(enforcer:SingletonEnforcer) { }
public static function getInstance():MadLibData {

if(_instance == null) { _instance = new MadLibData(new SingletonEnforcer()); } return _instance; }
// Load the data from a specified location. public function load(file:String):void { var loader:URLLoader = new URLLoader(); var request:URLRequest = new URLRequest(file); loader.addEventListener(Event.COMPLETE, onData); loader.load(request); }
// Return an iterator of either all the text elements // (inclusive of the input items) or just the input items. public function iterator(type:String = ALL_ITEMS):IIterator { if(type == INPUT_ITEMS) { return new ArrayIterator(_items); } else { return new ArrayIterator(_textElements); } } // The onData() method is the listener that gets called // when the text data loads. private function onData(event:Event):void {
// Retrieve the data from the URLLoader. var text:String = String(event.target.data);
// Define a regular expression that will match all // the substitutable text. var expression:RegExp = /<[a-z0-9 ]+>/ig;
// Match all the substitutable items. var items:Array = text.match(expression);
// The _items array stores references to the // MadLibInputItemData objects. The _textElements // array stores references to all the text elements, // including the input items. _items = new Array(); _textElements = new Array();
// Make an array of all the text element text. var textElementsText:Array = text.split(expression);
var index:uint = 0; var item:MadLibInputItemData; var newItem:Boolean;
// Loop through all the matched items. for(var i:uint = 0; i < items.length; i++) {
// With each iteration initially assume the

// input item is new. newItem = true;
// Create a new MadLibInputItemData object. item = new MadLibInputItemData(String(items[i]));
// Loop through all the items already stored // in the _items array. If the current item // label is equal to that of an existing // item in the array, then use the existing // item, and don't add the new item to the // _items array. for(var j:uint = 0; j < _items.length; j++) { if(item.label == _items[j].label) { item = _items[j]; newItem = false; break; } } if(newItem) { _items.push(item);
// Listen for UPDATE events from the // item. item.addEventListener(MadLibTextElementData.UPDATE, onUpdate); }
// Add the text element for the non- // substitutable text. _textElements[index] = new MadLibTextElementData(String(textElementsText [index]));
// Add the text element for the // substitutable text. _textElements.splice(index + 1, 0, item);
// Increment the index by 2 since each // iteration adds two items to the // _textElements array. index += 2; }
// Notify listeners that the data model has updated. dispatchEvent(new Event(UPDATE)); } private function onUpdate(event:Event):void { dispatchEvent(new Event(UPDATE)); }
}}class SingletonEnforcer {}

Creating the Input Control
Next we'll create a class to use as an input control. The Mad Lib application consists of twoscreens: one that accepts user input and one that displays the results of the input combinedwith the story. The MadLibInputItem class defines the input control elements used on the formscreen. This class uses MadLibInputItemData as a data model. Definecom.peachpit.aas3wdp.madlibs.controls.MadLibInputItem as follows:
package com.peachpit.aas3wdp.madlibs.controls {
import flash.display.Sprite; import flash.text.TextField; import flash.events.TextEvent; import com.peachpit.aas3wdp.madlibs.data.MadLibInputItemData;
public class MadLibInputItem extends Sprite {
private var _label:TextField; private var _value:TextField; private var _data:MadLibInputItemData;
public function MadLibInputItem(data:MadLibInputItemData) { _data = data;
// Add a text field to display the input label. _label = new TextField(); _label.autoSize = "left"; _label.text = data.labelFormatted; addChild(_label);
// Add an input text field for the user value. _value = new TextField(); _value.type = "input"; _value.border = true; _value.background = true; _value.width = 200; _value.height = 20; _value.x = 200; addChild(_value);
// Listen for TEXT_INPUT events. _value.addEventListener(TextEvent.TEXT_INPUT, onText); }
// When the user updates the text, update the value stored // in the data model. private function onText(event:TextEvent):void { _data.data = event.target.text + event.text; }
}}
Creating the View Classes

Now we'll create the two screens used by the application. Each uses MadLibsData as the datamodel. However, each displays the data in different ways. The first class, FormScreen , displaysjust the inputs for substitutable text. Definecom.peachpit.aas3wdp.madlibs.views.screens.FormScreen as follows:
package com.peachpit.aas3wdp.madlibs.views.screens {
import com.peachpit.aas3wdp.iterators.IIterator; import com.peachpit.aas3wdp.madlibs.controls.MadLibInputItem; import com.peachpit.aas3wdp.madlibs.data.MadLibData; import com.peachpit.aas3wdp.madlibs.data.MadLibInputItemData;
import flash.display.Sprite; import flash.events.Event;
public class FormScreen extends Sprite { public function FormScreen(data:MadLibData) { data.addEventListener(MadLibData.UPDATE, onUpdate); }
private function onUpdate(event:Event):void { // If the screen hasn't already drawn itself, then // add input items for each of the elements from the // data model's INPUT_ITEMS iterator. if(numChildren == 0) { var data:MadLibData = MadLibData(event.target); var iterator:IIterator = data.iterator(MadLibData.INPUT_ITEMS); var item:MadLibInputItem; var y:Number = 0; while(iterator.hasNext()) { item = new MadLibInputItem(MadLibInputItemData(iterator.next())); item.y = y; y += 25; addChild(item); } } } } }
Now we'll create the screen that displays the results of the user input. This screen displays boththe non-substitutable text as well as the user input text in place of the substitutable text. Definecom.peachpit.aas3wdp.madlibs.views.screens.ResultScreen as follows.
package com.peachpit.aas3wdp.madlibs.views.screens { import flash.display.Sprite; import com.peachpit.aas3wdp.madlibs.data.MadLibData; import com.peachpit.aas3wdp.madlibs.data.MadLibTextElementData; import com.peachpit.aas3wdp.iterators.IIterator; import flash.text.TextField; import flash.events.Event;

public class ResultScreen extends Sprite {
private var _text:TextField;
public function ResultScreen(data:MadLibData) { data.addEventListener(MadLibData.UPDATE, onUpdate);
// Add a text field to display the story. _text = new TextField(); _text.width = 400; _text.height = 400; _text.multiline = true; _text.wordWrap = true; addChild(_text); }
// When the data model dispatches an UPDATE event, update // the text correspondingly. private function onUpdate(event:Event):void { var data:MadLibData = MadLibData(event.target); _text.text = ""; var iterator:IIterator = data.iterator(MadLibData.ALL_ITEMS); while(iterator.hasNext()) { _text.appendText(MadLibTextElementData(iterator.next()).data); }
}
}
}
Defining the Main Class
We have yet to create the main class that puts the application together. In this class, we createinstances of the two screens and use buttons to toggle between the screens. You'll need toensure that the AAS3WDP library is in your project's class path for this to work. Here's the mainclass.
package {
import flash.display.Sprite; import flash.events.Event; import flash.events.MouseEvent; import com.peachpit.aas3wdp.madlibs.data.MadLibData; import com.peachpit.aas3wdp.controls.BasicButton; import com.peachpit.aas3wdp.madlibs.views.screens.FormScreen; import com.peachpit.aas3wdp.madlibs.views.screens.ResultScreen;
public class MadLibs extends Sprite {
private var _data:MadLibData; private var _formScreen:FormScreen; private var _resultScreen:ResultScreen;

private var _formButton:BasicButton; private var _resultButton:BasicButton;
public function MadLibs() {
// Tell the data model to load the data from the // text file. _data = MadLibData.getInstance(); _data.load("madlibstory.txt");
// Add the two screens. Only add the form screen to // the display list. _formScreen = new FormScreen(_data); _formScreen.y = 25; addChild(_formScreen); _resultScreen = new ResultScreen(_data); _resultScreen.y = 25;
// Add buttons for toggling between the screens. _formButton = new BasicButton("Mad Lib Form"); _formButton.addEventListener(MouseEvent.CLICK, onFormScreen); addChild(_formButton); _resultButton = new BasicButton("Story"); _resultButton.addEventListener(MouseEvent.CLICK, onResultScreen); _resultButton.x = _formButton.width; addChild(_resultButton); }
private function onResultScreen(event:Event):void { if (contains(_resultScreen)) return; removeChild(_formScreen); addChild(_resultScreen); }
private function onFormScreen(event:Event):void { if (contains(_formScreen)) return; removeChild(_resultScreen); addChild(_formScreen); }
}
}
When you test the application, you ought to be presented initially with the form screen withinput controls for each of the substitutable elements from the story. After you've entered avalue for each input control, click the story button to toggle to the ResultScreen view. Then youwill see the story with the new words substituted for the original placeholders.
Because the application uses regular expressions to parse the text data, you can quite easilychange the story and/or the substitutable elements. Regardless of how you edit the text in themadlibstory.txt file, the application will parse it and interpret any text in between the <> assubstitutable text.


Summary
Regular expressions are a powerful way to find substrings that match a pattern. In this chapter,you've seen how to construct RegExp objects and use them to match substrings by using theRegExp and String methods that support regular expressions.

Index
[A] [B] [C] [D] [E] [F] [G] [H] [I] [K] [L] [M] [N] [O] [P] [Q] [R] [S] [T] [U] [V] [W] [X]

Index
[A] [B] [C] [D] [E] [F] [G] [H] [I] [K] [L] [M] [N] [O] [P] [Q] [R] [S] [T] [U] [V] [W] [X]
AAS3WDP library
abstract classes
Composite pattern interfaces
Decorator pattern
Factory/Template Method patterns
State pattern
abstract decorator class, creating
abstract methods
AbstractBasicShape class
AbstractReader class
AbstractReaderDecorator class
AbstractShooterState class
access
Decorator pattern
instances
objects in collections
accessors, E4X properties
actors
primary
UML
Adapter pattern
addEventListener() method 2nd
adding
behavior to objects [See also Decorator pattern.]
bevel shapes
controllers 2nd
decorator classes
getter methods
instances to Command property
multiple class definitions
non-commutative decorators
redo buttons
redo/undo functionality
resize handlers
shapes
static methods
text to Decorator patterns
types to Decorator patterns
undo buttons 2nd
views
addItem() method 2nd
advantages
of composition
of inheritance
aggregation, relationships
alternative scenarios

AMFPHP
analog clocks
analysis phase
APIs (Application Programming Interfaces)
Flikr
formalizing
Application Programming Interfaces [See APIs (Application Programming Interfaces).]
applications
analysis phase
Command pattern
building
testing
composition
coupling
design 2nd
encapsulation
implementation phase
inheritance
Mad Libs
MVC [See also MVC (Model View Controller).]
Singleton pattern [See also Singleton pattern.]
testing
undoable actions
applying
events
Iterator pattern
null iterators
polymorphism
Proxy patterns
regular expressions
search proxy
ArrayIterator instance
arrays
command histories
concrete iterators
defining iterators
exposing
Iterator pattern
queuing requests
Assert class
association
instances
relationships
asynchronous unit tests, creating
Index
[A] [B] [C] [D] [E] [F] [G] [H] [I] [K] [L] [M] [N] [O] [P] [Q] [R] [S] [T] [U] [V] [W] [X]
basic unit tests, creating
BasicButton class
behavior
drawbacks of inheritance
events
State pattern [See also State pattern.]
BevelShape class
Boolean testing, regular expressions
bubble phase, events
building [See also design.]
applications
Command pattern
Mad Libs
undoable actions
commutative decorators
MVC patterns
Proximity game
reader decorators
redoable actions
Singleton patterns
visual decorators
ButtonImp class
buttons
creating
redo
undo 2nd

Index
[A] [B] [C] [D] [E] [F] [G] [H] [I] [K] [L] [M] [N] [O] [P] [Q] [R] [S] [T] [U] [V] [W] [X]
caching data
calculations, State pattern [See also State pattern.]
calling
Flash Remoting
object invokers
capture phase, events
caretakers
Circle class
circular references, troubleshooting
class responsibility and collaboration cards [See CRC cards.]
classes
abstract
Composite pattern interfaces
Decorator pattern
State pattern
AbstractBasicShape
AbstractReader
AbstractReaderDecorator
AbstractShooterState
Assert
BasicButton
BevelShape
ButtonImp
Circle
ColorableShape
commands
CommandStack
concrete collections
concrete decorated
conventions
creating
data model
Decorator pattern
defining
collections
controllers
determining
differentiating between types
Directory 2nd
DraggableShape
EventDispatcher
File
FileSystemItem
Help
IconButton
interfaces

iteration
leaf elements
LimerickData
LimerickView
LineReader
main
creating
E4X
editing
events
loading text
regular expressions
State pattern 2nd
updating
Namespace
null iterators
PhotoSearchProxy
PieceData
Product
properties
QName
redo buttons
RegExp
relationships
ResizableShape
RotateClockwiseCommand
RotateCounterclockwiseCommand
ScaleDownCommand
ScaleUpCommand
Settings
ShooterStateMachine
SimpleShooter
SimpleShooterExample
Singleton patterns [See also Singleton patterns.]
SortedReader
StringReader
Time
UIntCollection
UML
undo buttons 2nd
UnitCollection
view
WordReader
XML
XMLList
clients, instantiation
clocks
analog
data models
testing
views
closure, methods
code
conventions
Factory Method pattern [See also Factory Method pattern.]
collaborators, determining

collections
classes
concrete collection class
cursors
interfaces
iterating
navigating
null iterators
requests
ColorableShape class
Command pattern
applications
implementing
interfaces
Proximity game
redoable actions
undoable actions
CommandButton constructor
CommandFactory, updating 2nd
commands [See also Command pattern.]
classes
concrete
containers
creating
moving
editing
formatting
histories
mementos [See also Memento pattern.]
recording
redoable actions
undoable actions
creating
defining types
CommandStack class
communication, optimizing
commutative decorators, building
COMPLETE event
components, reusable [See also Command pattern.]
Composite pattern
elements
file systems
composition
concrete collection class
concrete command
concrete decorated class 2nd 3rd
concrete decorator class 2nd
concrete iterators
configuring
abstract decorator class
analysis phase
applications
Command pattern
Mad Libs
undoable actions
asynchronous unit tests
basic unit tests
buttons
classes
Decorator pattern
main
commands
classes
undoable actions
commutative decorators
containers
CRC cards
interfaces
MVC patterns
objects
originators
Proximity game
reader decorators
receiver types
redoable actions
search proxy
Settings class
Singleton patterns
state objects
visual decorators
XML documents
constants
conventions
State pattern
constructors
CommandButton
FileSystemItemView
constructs, explicit interfaces
containers
creating
moving
controllers
adding 2nd
classes
MVC
controls, input
conventions
abstract classes
classes
code
constants
functions
interfaces
naming 2nd
packages
Singleton patterns
variables
conversion, testing
counting references
coupling
CRC (class responsibility and collaboration) cards 2nd
createField() method

current() method
cursors
collections
command histories
customizing [See also configuring.]
applications
Command pattern
Mad Libs
undoable actions
commutative decorators
E4X events
MVC patterns
Proximity game
reader decorators
redoable actions
Singleton patterns
visual decorators

Index
[A] [B] [C] [D] [E] [F] [G] [H] [I] [K] [L] [M] [N] [O] [P] [Q] [R] [S] [T] [U] [V] [W] [X]
data model classes
data.txt file
debugging [See also troubleshooting.]
Decorator pattern
State pattern
decorated property
Decorator pattern
abstract classes
access
classes
commutative/visual decorators
debugging
elements
implementing
interfaces
reader decorators
testing 2nd
types
defining
classes
collections
controller
collection interfaces
concrete decorated class 2nd
concrete decorator class
Factory Method pattern
Help class
interfaces 2nd
iterators
types
Memento pattern
undoable actions
degrees, testing
delegating requests
deleting events
deserialization, Flash Remoting
design
abstract decorator class
analysis phase
applications
Command pattern
Mad Libs
undoable actions
asynchronous unit tests
basic unit tests
buttons

classes
Decorator pattern
main
commands
classes
undoable actions
commutative decorators
containers
CRC cards
interfaces
MVC patterns
objects
originators
Proximity game
reader decorators
receiver types
redoable actions
search proxy
Settings class
Singleton patterns
state objects
visual decorators
XML documents
destroying state objects
development [See also design.]
Adapter pattern
Command pattern
applications
implementing
interfaces
Proximity game
redoable actions
undoable actions
Composite pattern
elements
file systems
Decorator pattern
abstract classes
access
classes
commutative/visual decorators
debugging
elements
implementing
interfaces
reader decorators
testing 2nd
Façade pattern
Factory Method 2nd 3rd
Iterator pattern
applying
elements
interfaces 2nd
null iterators
troubleshooting
MVC pattern

adding controllers
building
elements
implementing models
multiple views
Proxy pattern
flash.utils.Proxy
image loaders
Remote Proxy
serialization
Virtual Proxy
Singleton pattern
building
invoking
object instantiation
settings frameworks
static members
State pattern
abstract classes
encapsulation
example of
main class 2nd
objects 2nd
state machines
transitions
troubleshooting
Template Method pattern
digital clocks
testing
views
directories, leaf elements
Directory class 2nd
disadvantages
of composition
of inheritance
dispatchers (events) 2nd
dispatchEvent() method
Document View Implementation (MVC)
documents [See also text.]
analysis phase
XML [See also XML.]
dot matches newline flag
DraggableShape class
dragging and dropping [See also copying; moving.]
drawing
circles
rectangles
Index
[A] [B] [C] [D] [E] [F] [G] [H] [I] [K] [L] [M] [N] [O] [P] [Q] [R] [S] [T] [U] [V] [W] [X]
E4X (ECMAScript for XML)
events
filtering
main class
namespaces
property accessors
SOAP-formatted XML
Web services
ECMAScript for XML [See E4X.]
editing
CommandFactory 2nd
commands
main class
elements
basic unit tests
Command pattern
Composite pattern
implementing
leaf
Decorator pattern
events
Iterator pattern
Memento pattern
MVC
enabling
iterators
polymorphism 2nd
undoable actions
encapsulation
Command pattern [See also Command pattern.]
design 2nd
Memento pattern [See also Memento pattern.]
State pattern 2nd [See also State pattern.]
troubleshooting
errors, throwing
EventDispatcher class
events
applying
behavior
COMPLETE
dispatchers 2nd
E4X
elements
implementing
inheritance
listeners

deleting
registering
main class
MOUSE_UP
objects 2nd
phases
bubble
capture
target
priority
target properties
troubleshooting
weak references
execute() method
existing behavior, modifying
explicit interface constructs
exposing
arrays
collections
expressions, regular [See regular expressions.]
extended flag, regular expressions
extending
abstract decorator class
ICommand interfaces
Extensible Markup Language [See XML.]
external references

Index
[A] [B] [C] [D] [E] [F] [G] [H] [I] [K] [L] [M] [N] [O] [P] [Q] [R] [S] [T] [U] [V] [W] [X]
Façade pattern
Factory Method pattern 2nd 3rd
File class 2nd
file systems, Composite pattern
files
.SWF
data.txt
leaf elements
XML
FileSystemItem class
FileSystemItemView constructor
filtering E4X
flags, regular expressions
Flash Remoting
flash.utils.Proxy
FlexUnit
Flikr
folders [See also files.]
MyDocuments
ProgramFiles
formal interfaces [See also interfaces.]
formal use cases, writing
formatting
abstract decorator class
analysis phase
applications
Command pattern
Mad Libs
undoable actions
asynchronous unit tests
basic unit tests
buttons
classes
Decorator pattern
main
commands
classes
undoable actions
commutative decorators
containers
CRC cards
interfaces
MVC patterns
objects
originators
Proximity game
reader decorators
receiver types
redoable actions
search proxy
Settings class
Singleton patterns
state objects
visual decorators
XML documents
frameworks, Singleton patterns
functionality
Command pattern [See also Command pattern.]
interfaces
redo/undo buttons
State pattern

Index
[A] [B] [C] [D] [E] [F] [G] [H] [I] [K] [L] [M] [N] [O] [P] [Q] [R] [S] [T] [U] [V] [W] [X]
garbage collection
getAccuracy() method
getDescription() method
getInstance() method
getMemento() method
getPointValue() method
getState() method
getter methods, adding
global access, instances
global flag, regular expressions
groups, regular expressions
guidelines [See also conventions.]

Index
[A] [B] [C] [D] [E] [F] [G] [H] [I] [K] [L] [M] [N] [O] [P] [Q] [R] [S] [T] [U] [V] [W] [X]
hasEventListener() method
hasNext() method 2nd
Help class, defining
histories, commands 2nd

Index
[A] [B] [C] [D] [E] [F] [G] [H] [I] [K] [L] [M] [N] [O] [P] [Q] [R] [S] [T] [U] [V] [W] [X]
ICommand interface
IconButton class
IElement interface
IEventDispatcher interface 2nd
IEventDispatcher method
if statements
IField interface
IFileSystem interface
ignore case flag, regular expressions
images
loaders
modifying
implementation phase
implementing
abstract decorator class
analysis phase
applications
Command pattern
Mad Libs
undoable actions
asynchronous unit tests
basic unit tests
buttons
classes
Decorator pattern
main
collection interfaces
Command pattern
commands
classes
undoable actions
commutative decorators
Composite pattern
containers
CRC cards
Decorator pattern
events
interfaces 2nd
Composite pattern
Decorator pattern
IRedoableCommand interfaces
ISearchable interfaces
iterator interfaces
IUndoableCommand interface
models (MVC)
MVC patterns
objects
originators
Proximity game
reader decorators
receiver types
redoable actions
search proxy
Settings class
Singleton patterns
state objects
State pattern 2nd
visual decorators
XML documents
implements keyword
indexes, regular expressions
INetworkProtocol method
inheritance
drawbacks of
events
formal interfaces
interfaces
relationships
Sprite interface
undoable commands
initialize() method
input controls
inserting [See adding.]
instances
ArrayIterator
Command property
commands
composition
global access
NullIterator
instantiation
clients
objects
tight coupling
interaction, use cases
interfaces [See also APIs (Application Programming Interfaces).]
classes
collections 2nd
Command pattern
Composite pattern
conventions
Decorator pattern
defining
formatting
functionality
ICommand
IElement
IEventDispatcher 2nd
IField
IFileSystem
implementing
inheritance

IReader
IRedoableCommand 2nd
IShooterState
Iterator pattern 2nd
IUndoableCommand 2nd 3rd
MVC [See also MVC (Model View Controller).]
polymorphism
programming
Sprite
invokers
invoking
Settings class
Singleton patterns
IReader interface
IRedoableCommand interface 2nd
ISearchable interface [See also interfaces.]
IShooterState interface
isReady() method 2nd
iteration, XMLList class
Iterator pattern
applying
elements
interfaces 2nd
null iterators
troubleshooting
iterator() method 2nd
IUndoableCommand interface 2nd 3rd

Index
[A] [B] [C] [D] [E] [F] [G] [H] [I] [K] [L] [M] [N] [O] [P] [Q] [R] [S] [T] [U] [V] [W] [X]
keywords
implements
override

Index
[A] [B] [C] [D] [E] [F] [G] [H] [I] [K] [L] [M] [N] [O] [P] [Q] [R] [S] [T] [U] [V] [W] [X]
languages, UML [See also Unified Modeling Language.]
leaf elements, Composite pattern
libraries, AAS3WDP
LimerickData class
LimerickView class
LineReader class
listeners
events
deleting
priority
registering
queuing
load() method
loading
images
text
variables
XML 2nd 3rd
loops, undo() method

Index
[A] [B] [C] [D] [E] [F] [G] [H] [I] [K] [L] [M] [N] [O] [P] [Q] [R] [S] [T] [U] [V] [W] [X]
Mad Libs application
main class
creating
E4X
editing
events
loading text
regular expressions
State pattern 2nd
updating
main success scenarios
maintainability, State pattern
managing state objects
mark-and-sweep garbage collection
members, static
Memento pattern
redoable actions
types
undoable actions
metacharacters, regular expressions
methods
abstract
addEventListener() 2nd
adding
addItem() 2nd
closure
concrete iterators
createField()
current()
dispatchEvent()
execute()
getAccuracy()
getDescription()
getInstance()
getMemento()
getPointValue()
getState()
getter
hasEventListener()
hasNext() 2nd
IEventDispatcher
INetworkProtocol
initialize()
isReady() 2nd
iterator() 2nd
load()

next()
onClick()
overriding
public
read()
readArray()
readString()
redo() 2nd
removeEventListener() 2nd
removeItem() 2nd
reset()
search()
setMemento()
setParent()
setState()
signatures
traceReader() 2nd
undo() 2nd
willTrigger()
Model View Controller [See MVC (Model View Controller).]
models
clocks
implementing
multiple views (MVC)
MVC
modifying
abstract decorator class
analysis phase
applications
Command pattern
Mad Libs
undoable actions
asynchronous unit tests
basic unit tests
behavior of objects [See also Decorator pattern.]
buttons
classes
Decorator pattern
main
commands
classes
undoable actions
commutative decorators
containers
CRC cards
functionality
images
interfaces
MVC patterns
objects 2nd
originators
Proximity game
reader decorators
receiver types
redoable actions
search proxy

Settings class
Singleton patterns
state objects
visual decorators
XML documents
mouse events
MOUSE_UP event
moving
command containers
objects 2nd
shapes
multiline flag, regular expressions
multiple class definitions, adding
multiple views
MVC (Model View Controller)
adding controllers
building
elements
implementing models
multiple views
MyDocuments folder

Index
[A] [B] [C] [D] [E] [F] [G] [H] [I] [K] [L] [M] [N] [O] [P] [Q] [R] [S] [T] [U] [V] [W] [X]
Namespace class
namespaces, E4X
naming
abstract classes
conventions
events
navigating collections
networks, polymorphism
new features, instantiation
next() method
non-commutative decorators, adding
notification, event dispatchers
null iterators
NullIterator instance

Index
[A] [B] [C] [D] [E] [F] [G] [H] [I] [K] [L] [M] [N] [O] [P] [Q] [R] [S] [T] [U] [V] [W] [X]
objects
Adapter pattern
client instantiation
collection access
Command pattern
applications
implementing
interfaces
Proximity game
redoable actions
undoable actions
Composite pattern
elements
file systems
Decorator pattern
abstract classes
access
classes
commutative/visual decorators
debugging
elements
implementing
interfaces
reader decorators
testing 2nd
drawbacks of inheritance
events 2nd
Façade pattern
Factory Method pattern 2nd 3rd
instantiation
Iterator pattern
applying
elements
interfaces 2nd
null iterators
troubleshooting
modifying
moving
MVC pattern
adding controllers
building
elements
implementing models
multiple views
NullIterator
Proxy pattern

flash.utils.Proxy
image loaders
Remote Proxy
serialization
Virtual Proxy
receivers [See also receivers.]
recording state
rotating
Singleton pattern
building
invoking
object instantiation
settings frameworks
static members
State pattern
abstract classes
encapsulation
example of
main class 2nd
objects 2nd
state machines
transitions
troubleshooting
Template Method pattern
UIntCollection
XML
onClick() method
open issues
OpenAMF
optimizing
abstract decorator class
analysis phase
applications
Command pattern
Mad Libs
undoable actions
asynchronous unit tests
basic unit tests
buttons
classes
Decorator pattern
main
collection interfaces
Command pattern
commands
classes
undoable actions
communication
commutative decorators
Composite pattern
containers
CRC cards
Decorator pattern
events
interfaces 2nd
Composite pattern

Decorator pattern
IRedoableCommand interfaces
ISearchable interfaces
iterator interfaces
IUndoableCommand interface
models (MVC)
MVC patterns
objects
originators
Proximity game
reader decorators
receiver types
redoable actions
search proxy
Settings class
Singleton patterns
state objects
State pattern 2nd
visual decorators
XML documents
originators 2nd
override keyword
overriding methods

Index
[A] [B] [C] [D] [E] [F] [G] [H] [I] [K] [L] [M] [N] [O] [P] [Q] [R] [S] [T] [U] [V] [W] [X]
packages, conventions
parameters
parsing composite structures
passing receiver references
patterns
Adapter
Command
applications
implementing
interfaces
Proximity game
redoable actions
undoable actions
Composite
elements
file systems
Decorator
abstract classes
access
classes
commutative/visual decorators
debugging
elements
implementing
interfaces
reader decorators
testing 2nd
Façade
Factory Method 2nd 3rd
Iterator
applying
elements
interfaces 2nd
null iterators
troubleshooting
MVC
adding controllers
building
elements
implementing models
multiple views
Proxy
flash.utils.Proxy
image loaders
Remote Proxy
serialization

Virtual Proxy
Singleton
building
invoking
object instantiation
settings frameworks
static members
State
abstract classes
encapsulation
example of
main class 2nd
objects 2nd
state machines
transitions
troubleshooting
Template Method
phases (events)
bubble
capture
target
PhotoSearchProxy class
PieceData class
polymorphism [See inheritance.]
applying
enabling 2nd
runtime decisions
pooling requests
preconditions
primary actors (use cases)
priority, events
procedure calls, Flash Remoting
Product class
ProgramFiles folder
programming interfaces [See also interfaces.]
propagation, stopping
properties
accessors (E4X)
classes
decorated
event targets
public
rotation
scaleX
scaleY
state
static_instance
protocols, polymorphism
Proximity game
building
Memento pattern
Proxy pattern
flash.utils.Proxy
image loaders
Remote Proxy
serialization

Virtual Proxy
public methods
public properties

Index
[A] [B] [C] [D] [E] [F] [G] [H] [I] [K] [L] [M] [N] [O] [P] [Q] [R] [S] [T] [U] [V] [W] [X]
QA (Quality Assurance) testing
QName class
Quality Assurance [See Quality Assurance.]
queuing
listeners
requests 2nd

Index
[A] [B] [C] [D] [E] [F] [G] [H] [I] [K] [L] [M] [N] [O] [P] [Q] [R] [S] [T] [U] [V] [W] [X]
radians, testing
read() method
readArray() method
reader decorators
readString() method
receivers
passing
scaling
types
recording
command histories
Memento pattern [See also Memento pattern.]
rectangles, drawing
redo buttons, adding
redo() method 2nd
redoable actions
references
counting
external
receiver
passing
scaling
state objects
storing
weak
RegExp class
registering
events
listeners
weak references
regular expressions
applying
flags
groups
indexes
Mad Libs application
main class
metacharacters
RegExp class
substrings
testing
relationships
aggregation
association
classes
inheritance

MVC elements
Remote Proxy [See also Proxy pattern.]
removeEventListener() method 2nd
removeItem() method 2nd
requests
arrays
delegating
pooling
queuing 2nd
reset() method
resetting iterator interfaces
ResizableShape class
resize handlers, adding
responsibilities, determining
restoring state
restricting instantiation
results, design
reusable components [See also Command pattern.]
revisions [See editing.]
RotateClockwiseCommand class
RotateCounterclockwiseCommand class
rotation property
rules [See also conventions.]
Memento patterns
Singleton patterns
runners, test
runtime
Decorator pattern [See also Decorator pattern.]
polymorphism

Index
[A] [B] [C] [D] [E] [F] [G] [H] [I] [K] [L] [M] [N] [O] [P] [Q] [R] [S] [T] [U] [V] [W] [X]
saving state
ScaleDownCommand class
scaleX property
scaleY property
scaling
receiver references
State pattern
search() method
searching
regular expressions
Remote Proxy
selecting composition or inheritance
sending
variables
XML 2nd
serialization
Flash Remoting
Proxy pattern
servers, Flash Remoting
setMemento() method
setParent() method
setState() method
Settings class
settings frameworks, Singleton patterns
shapes
adding
moving
ShooterStateMachine class
signatures, methods
SimpleShooter class
SimpleShooterExample class
single instance, global access
Singleton pattern
building
invoking
object instantiation
settings frameworks
static members
SOAP-formatted XML
SortedReader class
special requirements
Sprite interface
stacks, adding commands
state
recording
restoring
State pattern
abstract classes
encapsulation
example of
main class 2nd
objects 2nd
state machines
transitions
troubleshooting
state property
statements, if
static members, Singleton pattern
static methods, adding
static_instance property
stopping propagation
storing
mementos
references
StringReader class
substrings [See also strings.]
support
arrays
typed arrays
.SWF files

Index
[A] [B] [C] [D] [E] [F] [G] [H] [I] [K] [L] [M] [N] [O] [P] [Q] [R] [S] [T] [U] [V] [W] [X]
targets
events
phases
properties
Template Method pattern
terminating leaf elements
testing
analog clocks
Command pattern
Decorator pattern 2nd
digital clocks
regular expressions
State pattern
text
Decorator pattern
loading
throwing errors
tight coupling, events
Time class
traceReader() method 2nd
tracking command histories
transitions, State pattern
troubleshooting
circular references
encapsulation
events
Iterator pattern
State pattern
typed arrays, support
types
Decorator pattern
differentiating between classes
event objects
Memento pattern
receivers
undoable actions

Index
[A] [B] [C] [D] [E] [F] [G] [H] [I] [K] [L] [M] [N] [O] [P] [Q] [R] [S] [T] [U] [V] [W] [X]
UIntCollection class
UML (Unified Modeling Language)
analysis phase
design phase
undo buttons, adding 2nd
undo() method 2nd
undoable actions
applications
Command pattern
commands
creating
defining types
enabling
Memento pattern
Unified Modeling Language [See Unified Modeling Language.]
unit tests
asynchronous
basic
UnitCollection class
updating
CommandFactory
main class
views
use cases
guidelines
writing

Index
[A] [B] [C] [D] [E] [F] [G] [H] [I] [K] [L] [M] [N] [O] [P] [Q] [R] [S] [T] [U] [V] [W] [X]
variables
conventions
loading
sending
viewing test results
views
adding
analog clocks
classes
digital clocks
multiple
MVC
updating
Virtual Proxy [See also Proxy pattern.]
visual decorators, building
Index
[A] [B] [C] [D] [E] [F] [G] [H] [I] [K] [L] [M] [N] [O] [P] [Q] [R] [S] [T] [U] [V] [W] [X]
weak references
Web services 2nd
WebORB
willTrigger() method
WordReader class
writing
test cases
test runners
use cases

Index
[A] [B] [C] [D] [E] [F] [G] [H] [I] [K] [L] [M] [N] [O] [P] [Q] [R] [S] [T] [U] [V] [W] [X]
XML (Extensible Markup Language)
creating documents
creating objects
E4X [See E4X.]
loading 2nd 3rd
sending 2nd
XML class
XMLList class 2nd