Embed Size (px)
Citation preview

~If ============~============
AdValiced Dungeon&ragons®
COMPUTER PRODUCT
Quick Start Instructions
Pool of Radiance
Curse of the Azure Bonds
Secret of the Silver Blades
Dark Queen of Krynn
Death Knights of Krynn
Champions of Krynn
Gateway to the Savage Frontier
Treasures of the Savage Frontier
Pools of Darkness
========---=~~:=---========

IBM and Compatibles Data Card
AdValiced Dungeo~ragons
COMF'UTER f'RODUCT
II flJoL OF R4l>IAnce J System Requirements: This game requires a minimum of 384K available memory. To run the game in EGA mode requires a minimum of 512K available memory. To run the game in TGA (Tandy 16 Color) mode requires a minimum of 640K total memory. The game may be played from hard disk only. The game requires approximately 2.2 megabytes of hard disk space .
Installing the Game: Before beginning play, you must install the game. This installation procedure customizes the game and tailors it to provide optimum performance on your computer system. To install the game, please follow the following installation instructions :
1. Place Disk 1 in the active drive. 2. Access the drive containing Disk 1. 3. Type INSTALL and then press Enter. 4. Follow the on-screen prompts.
Installation Menu: After you type INSTALL, the Installation Menu appears. This program allows you to configure the game for your computer system.
To Load the Game: The install automatically creates a directory called POOLRAD. Call up this directory (if you are not already in it) , type START, and press the Enter/Return key. When two symbols and a path are displayed, find the first symbol on the outside of the translation wheel, and the second symbol on the inside ring of the wheel. Match the two symbols and read the word under the path from inside to outside.
For example if the computer displays :
-··-··-The word is ZOMBIE. After you type in the translation (and press the Enter/Return key) the game loads and displays the Party Creation Menu.
Rev. 9/92
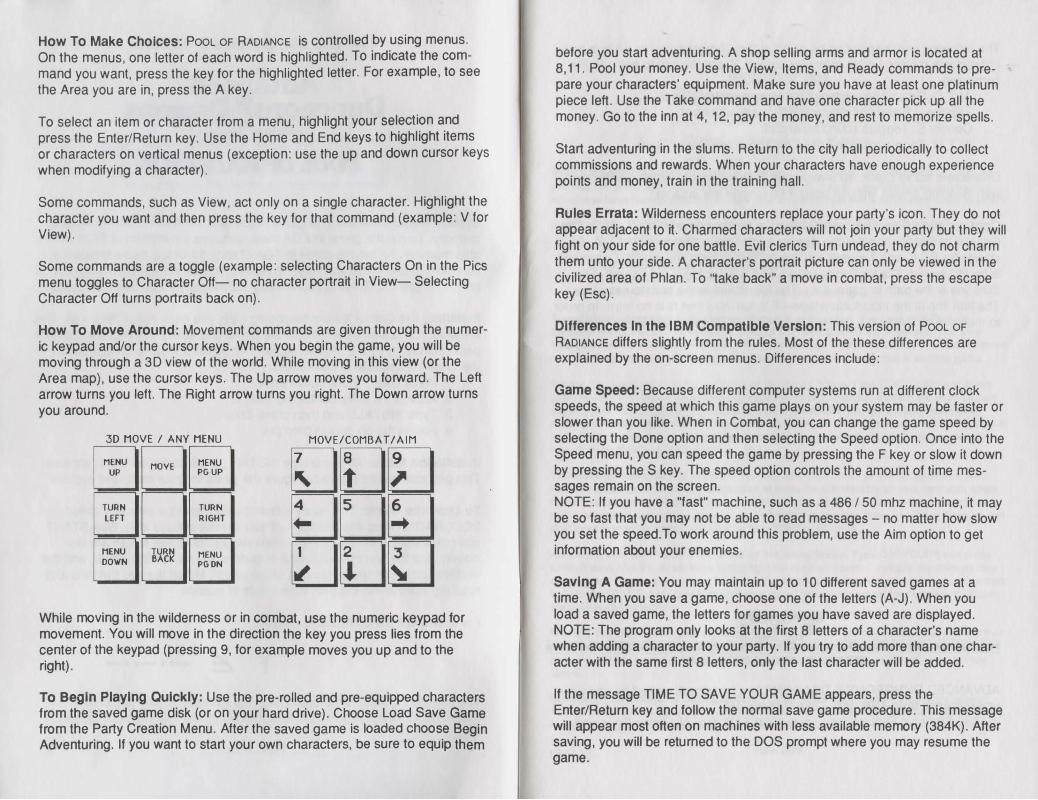
How To Make Choices: PooL OF RADIANCE is controlled by using menus. On the menus, one letter of each word is highlighted. To indicate the command you want, press the key for the highlighted letter. For example, to see the Area you are in , press the A key.
To select an item or character from a menu, highlight your selection and press the Enter/Return key. Use the Home and End keys to highlight items or characters on vertical menus (exception: use the up and down cursor keys when modifying a character) .
Some commands, such as View, act only on a single character. Highlight the character you want and then press the key for that command (example : V for View) .
Some commands are a toggle (example : selecting Characters On in the Pies menu toggles to Character Off- no character portrait in View- Selecting Character Off turns portraits back on) .
How To Move Around: Movement commands are given through the numeric keypad and/or the cursor keys . When you begin the game, you will be moving through a 3D view of the world. While moving in this view (or the Area map), use the cursor keys. The Up arrow moves you forward . The Left arrow turns you left. The Right arrow turns you right. The Down arrow turns you around.
30 MOVE I ANY MENU
~w~ L:JDL.::J ~o TURN w RIGHT
~~~ OLJL:.:J
MOVE/COMBAT I AIM
[][[][] []0[g (][][]
While moving in the wilderness or in combat, use the numeric keypad for movement. You will move in the direction the key you press lies from the center of the keypad (pressing 9, for example moves you up and to the right).
To Begin Playing Quickly: Use the pre-rolled and pre-equipped characters from the saved game disk (or on your hard drive). Choose Load Save Game from the Party Creation Menu. After the saved game is loaded choose Begin Adventuring. If you want to start your own characters, be sure to equip them
before you start adventuring. A shop selling arms and armor is located at 8, 11 . Pool your money. Use the View, Items, and Ready commands to prepare your characters' equipment. Make sure you have at least one platinum piece left . Use the Take command and have one character pick up all the money. Go to the inn at 4, 12, pay the money, and rest to memorize spells .
Start adventuring in the slums. Return to the city hall periodically to collect commissions and rewards. When your characters have enough experience points and money, train in the training hall.
Rules Errata: Wilderness encounters replace your party 's icon. They do not appear adjacent to it. Charmed characters will not join your party but they will fight on your side for one battle. Evil clerics Turn undead, they do not charm them unto your side. A character's portrait picture can only be viewed in the civilized area of Phlan. To '1ake back" a move in combat , press the escape key (Esc).
Differences In the IBM Compatlble Version: This version of PooL OF
RADIANCE differs slightly from the rules . Most of the these differences are explained by the on-screen menus. Differences include :
Game Speed: Because different computer systems run at different clock speeds, the speed at which this game plays on your system may be faster or slower than you like. When in Combat, you can change the game speed by selecting the Done option and then selecting the Speed option. Once into the Speed menu, you can speed the game by pressing the F key or slow it down by pressing the S key. The speed option controls the amount of time messages remain on the screen. NOTE: If you have a "fast" machine, such as a 486 I 50 mhz machine, it may be so fast that you may not be able to read messages - no matter how slow you set the speed.To work around this problem, use the Aim option to get information about your enemies.
Saving A Game: You may maintain up to 1 O different saved games at a time. When you save a game, choose one of the letters (A-J). When you load a saved game, the letters for games you have saved are displayed. NOTE: The program only looks at the first 8 letters of a character's name when adding a character to your party. If you try to add more than one character with the same first 8 letters, only the last character will be added.
If the message TIME TO SAVE YOUR GAME appears, press the Enter/Return key and follow the normal save game procedure. This message will appear most often on machines with less available memory (384K) . After saving, you will be returned to the DOS prompt where you may resume the game.

The following commands can be given at the Combat menu or while a party character is moving under computer control. Press the key to execute the command.
ALT Q: Sets all characters to computer control (Quick) . <Space> : Resets all characters to manual control. Control S: Toggles sound on and off . ALT M: Toggle magic on or off for characters set to Quick.
Characters set to Quick will always use Readied Magic Items. Characters with Readied arrows will use bows if no targets are adjacent.
Configuration Fiie: The configuration file for the game is POOL.CFG. The first line of this file handles the display mode where C stands for CGA, E stands for EGA, and T stands for Tandy. The second line handles sound. P is for PC sound, T is for Tandy sound , and Sis for silent (no sound) . The third line is the path to game data. The fourth line is the path to save files . The fifth line is the introduction type-F is full intro and N is no intro. In order to reconfigure the game, delete the POOL.CFG file and restart the game.
S'IBA1EGIC S1M1J1A11ons. me:
ADVANCED DUNGEONS & DRAGONS is a trademark owned by and used under license from TSR, Inc., Lake Geneva, WI. © 1989 Strategic Simulations, Inc.© 1989 TSR , Inc. All Rights Reserved.
521851
Before Playing the Game: You can have several saved games listed identified by letter. As you play the game, save the game to various letters. By keeping multiple saved games, you will always have backup positions in case your characters get into a particularly nasty situation.
lnstalllng the Game: You must install the game disk(s) before you can begin play. 1. Place Disk 1 in the active drive. 2. Access the drive containing Disk 1. 3. Type INSTALL and then press Enter. 4. Follow the on-screen prompts. 5. Type ST ART and then press Enter to begin playing.
Transferring Characters 11:2.m. POOL OF RADIANCE or HILLSFAR: You need your POOL OF RADIANCE and/or HILLSFAR saved game disks or you need to know the subdirectory on your hard disk where these files are stored. All characters from POOL OF RADIANCE must be removed (not dropped) from their adventuring party before they can be transferred to another game.
Access the directory that contains CURSE OF THE AzURE BoNDS. Type COPYCURS and press Enter/Return. Use the cursor keys to highlight the required transfer. Indicate the drive you are copying your Pool or Hillsfar saved games from and the drive you are copying your Curse saved games to. Use the OTHER drive specification if your saved games are not on the default path. Follow the on-screen instructions. Follow the directions in the rules to load characters from POOL OF RADIANCE or HILLSFAR.
Transferring Characters JQ. HILLSFAR: You will need your CURSE OF THE AzuRE BONDS and HILLSFAR saved game disks or you will need to know the subdirectory on your hard disk where these files are stored. All characters from CURSE OF THE AzURE BoNDS must be removed from their adventuring party before they can be transferred to another game. Paladins, Rangers and dual class human characters may not be transferred to H1LLSFAR.
Access the directory that contains CURSE OF THE AzuRE BoNDS. Type COPYCURS and press Enter/Return. Use the cursor keys to highlight the required transfer. Indicate the drive you are copying your Curse saved games from and the drive you are copying your Curse saved games to. Use the OTHER drive specification if your saved games are not on the default path. Follow the on-screen instructions.
Starting The Game: Boot your computer using DOS 4.01 or greater. Access the directory that contains CURSE OF THE AzuRE BONDS. Type START, and press Enter/Return. Press a key to pass the title and credit screens. After the credits are displayed, press Enter/Return to Play Game.
Selecting Your Computer Configuration: The hardware configuration is set at installation. You can reset the configuration by deleting the CURSE.CFG file from your Curse directory and restarting the game. This creates a new configuration file .
Rev: 9/92

Using The Translation Wheel: After choosing Play Game, two symbols, a path, and a number are displayed. Find the first symbol on the outside of the Translation Wheel, and the second symbol on the inside, moveable part of the wheel. Match the two symbols and type the letter shown in the numbered box under the indicated path. Press Enter/Return. For example, if the computer displays the symbols to the right of this text, type the letter X and press Enter/Return. The game loads and displays the Party Creation Menu.
Making Choices: CURSE OF THE AZURE BONDS is controlled using menus. One command on each menu is highlighted. Use the < and > keys to indicate the command you want and press Enter/Return to select your choice. You can also choose a command by pressing the highlighted first letter of the command. For example, to look at an overhead view of the surrounding area, you can highlight the Area command and press Enter/Return or press the A key.
Some commands, such as View, act only on a single character. Use the Pg UP and Pg On keys to highlight the character you want to be active and then choose the command. For example, to view a character's ability scores, highlight the character's name in the character list and choose the View Command. F
.ll Some commands toggle the program between two states. When you select one of these commands the name on the screen changes to reflect the new state of the program. For example, if you select the Pictures On command in the Pies Menu it will change to Pictures Off. From then on the monster's animated picture is not displayed when you have an encounter.
----- 4
Moving around: In 30 travel the party can move forward, turn right or left, or turn around. In combat you can move in any of eight directions. In combat, the cursor keys default to the Move and Manual Aim commands. In the overland view the party picks its destination and mode of movement off of a menu.
MOVE/COMBAT/AIM
(][]~ []0~ [][]~
To Begin Playing Quickly: A pre-rolled party of adventurers is stored in the game directory. To use the saved party, choose Recall Save Game from the Party Creation Menu. Choose Saved Game A.
After the saved game is loaded, choose Begin Adventuring. Read the Journal Entry on the first page of the Adventurers Journal. Choose the Encamp command from the Adventure menu. Have all of your spellcasters memorize spells, rest, then Exit camp.
Move through the city carefully. Listen to what different NPCs have to say. Move West to the weapons shop and buy each of your characters starting equipment. Visit the temple and talk to the high priest. Visit the bar and listen to the rumors. When you think you have enough information, leave town to find adventure. Things will get hot and heavy from then on!
Tips On Successful Adventuring: The first thing you want to do is to memorize spells. Then you will need to equip all your characters. Move to the weapons shop and Pool your money. Buy your fighters banded mail, a shield, a broad sword, a two handed sword, a long composite bow, and many arrows. Buy your clerics banded mail, a shield, a staff sling, and a flail. Buy your thieves leather armor, a broad sword, a short bow, and many arrows. Buy your magic users a dagger, a staff and a bunch of darts. After you have completed your purchases, use the View, Items, and Ready commands to prepare all your characters' equipment for battle. Once you have bought everything you need, use the SHARE command and pick up all the money.
Visit everyone in town and listen to what they have to say. The bonds and their effects are a mystery to your characters, and information can be as useful as a fireball spell (well, almost as useful!) After you have listened to everything that everyone has to say, leave the city to begin your quest.
As your party fights it will use up spells and lose Hit Points. When you find a safe place to rest use Encamp and use the Fix command to regain Hit Points. Then memorize spells to keep your spellcasters at maximum efficiency.
Once your characters have enough experience points and money, look for places to train. Most cities in the overland have training halls, and training halls may also be hidden in other places. Make sure you have 1 OOO gp worth of coins for each character that wants to train. If your characters need additional Experience Points, search near the cities in the overland or patrol the forest near the Standing Stone.
As you adventure you may hear a dreamlike voice warn you that, "Great danger lies ahead, be fully prepared!" Heed such warnings by saving your game and putting that save aside. Keep that saved game aside until the party is safely back into the overland. Good luck!
Tips on Successful Combat: Identify enemy spell casters at the beginning of each battle. Attack them with spells and missile weapons. Be sure to do damage every round to keep them from casting spells. Concentrate your attacks; it is normally better to eliminate one monster than to wound two monsters. Eliminate helpless monsters before they become active again.
Keep your Paladin near the middle of the front of your party so that his protection from evil can improve the AC and Saving Throws of those adjacent. Keep your party together so that they can concentrate their attacks on the monsters. Protect your party's flanks so that monsters will not be able to get to spell casters and archers.
Learn the range and area of effect of offensive spells like: magic missile, stinking cloud, fireball, cone of cold, and cloudkill. Decide where you will throw a spell before you choose Cast. Use the Aim command to check the range and line of sight to your proposed target. Make sure that the spell will attack the monsters and not the party.
Some spells have special effects that make them especially useful. Stinking clouds last for several rounds and can be used to protect flanks, channel enemy attacks, and to make monsters helpless. Fireballs are larger indoors than they are in the overland. Hold spells can be targeted against several different enemies. Ughtning bolts can bounce off walls and attack targets twice with the same spell.
If your party loses a very tough fight, go back to your last saved game. Just before triggering the fight, prepare your party with spells like: bless, prayer, protection from evil, protection from evil 10' radius, enlarge, invisibility 10' radius, and haste. You can also prepare for a fight with

magic items such as potions of giant strength, potions of invisibility, or dust of disappearance. Cast the spells and use the items just before triggering the fight. Use haste sparingly; it ages your characters 1 year each lime it is used.
Differences In the IBM Version: The IBM version of CURSE OF THE AzuRE BoNos differs slightly from the rules. These differences include:
While moving in combat the ESC key will 'take back' your current move, but it will not erase any damage you have taken during the move.
You may maintain up to 10 saved games on a disk at a time (depending on space available) . Save each game under a letter (A-J) . Use that letter when recalling your save. The following commands can be given at the Combat Menu or while a party character is moving under computer control. Press the key(s) to execute the command.
ALT Q: Set~ all characters to QUICK (computer control) . ALT M: Toggles magic spells on/off for characters set to Quick. <Space> : Resets all characters to manual control. CTRL S: Toggles sound on and off (may be used at any time) .
Characters set to QUICK will use readied magic items. Characters set to QUICK with readied arrows or a sling will use ranged attacks if no enemy is adjacent.
ADVANCED DUNGEONS & DRAGONS is a trademark owned by and used under license from TSR, Inc., Lake Geneva, WI. @ 1989 Strategic Simulations, Inc. e 1989 TSR, Inc. All Rights Reserved.
522061
IBM and Compatibles Data Card
COlllFlJ'IER PRODUCT
System Requirements: A minimum of 512K system memory available, or 640K for mouse or Tandy graphics mode is required. The mouse will not work with Tandy graphics. RAM resident programs may reduce your available system memory below the minimum required for this game. A color graphics card and monitor are also required. A minimwn of two disk drives, either two floppy or one floppy and one hard disk, are required. A hard disk must have a minimum of 1.5 megabytes of available space to install the game.
Installing the Game: The disks that come with the game must be installed before you can begin play. To determine the number of formatted floppy disks you will need to install the game, see the table below .
Installing 5.25" Disks 3.5" Disks From To Needed Needed 5.25" HARD 0 0 3.5" HARD 0 0 5.25" 5.25" 5(6) 0 3.5" 3.5" 0 2(3) 5.25" 3.5" 2(3) 3 3.5" 5.25" 5(6) 1
The nwnber in parentheses indicates the nwnber of disks needed if you want to use the pregenerated saved game.
1. To install the game place your Disk 1 in any drive. Be sure this drive is the active drive.
2 . Type INSTALL and then press the ENTER/RETURN key.
3 . Follow all on-screen prompts.
Starting the Game from Hard Disk
Rev. 6/90

1. Boot your system normally with OOS 2.1 or greater.
2 . Be sure that the drive containing the game is the active drive.
3. Change directory to the game's directory. Example: To change to the default directory type CD\SECRET and press ENTER/RETURN.
4. Type START and press ENTER/RETURN.
Starting the Game from Floppy Disk
1. Boot your system normally with OOS 2.1 or greater.
2. Place your Disk 1 (the one created by the Install process) in the active drive.
3 . Type START and press ENTER/RETURN.
NOTE: Except when saving the game, you must have game disks in both drives.
ALL SYSTEMS
The first time you play the game you will be prompted to configure the game for your system's hardware. You will be asked to set up for graphics card, sound type, input drive type and save path.
Graphics Adapter Type: Enter the correct number for your graphics adapter type (VGA users should enter the EGA number, 2).
Sound Type: Enter the correct number for your sound type. For most people this will be IBM PC or compatible. H you have a Tandy system or one of the sound boards supported by this program, enter the corresponding number. If you do not want sound in your game, enter4.
Alternate Input Type: If you want to play the game using a joystick or mouse, enter 1 or 2 as indicated. To play the game using the keyboard only, enter 3.
The input device (mouse or joystick) may also be selected from the first program menu. The keyboard is always active regardless of how the system is configured.
Path to Save Drive: Most people will want to press ENTER/RETURN here. The default save path is set for the SA YE
subdirectory on your active drive if you are using a hard drive. If using a floppy system, the default path is the SA VE subdirectory on the non-active drive. The SA VE subdirectory is created automatically when you first save a game or character.
If you wish to save to another drive, type that drive letter followed by a colon, a back slash and the subdirectory name. Example: To save to the SAVE subdirectory on drive B, type B:\SA VE and press ENTER/RETURN.
If you wish to reconfigure the game at any time, for a new graphics adapter for example, erase the BLADES.CFO file and then run the game. Use the OOS DELETE command to erase the file.
Mouse: To give commands using the mouse point to the desired command and double-click with the left mouse button.
Keyboard: To select a command using the keyboard, either press the highlighted letter in that command or use the cursor keys to highlight the command and press ENfER/RETURN.
Moving Around: The party will move through the game in 3Dlarea and combat modes. Targeting spells and ranged weapons during combat is similar to moving characters. To move, first select the Move option from the bottom of the screen and then give the appropriate commands.
Keyboard Movement: The following keyboard controls are used for movement and targeting:
30 MOVE I ANY MENU 110VE
UP 11ENU '"'i1EHU PGUP
UP
110VE 110VE I LEFT ~, rEr¥ 11ENU
RIGHT I ~
TURN BACK
11ENU I MENiJ PGDH DOWN -
6 ... 3
~
Mouse Movement: To move in 3D/area mode with a mouse, click the mouse cursor at the edge of the display window in the direction you want to move. To move forward, click at the top of the window. To turn around, click at the bottom. To tum right or left, click on the appropriate side.

To use the mouse for combat targeting and movement, click the mouse cursor over the target square and the cursor will advance towards the target. If the target is off the screen, first select an intermediate square near the edge of the screen. To move in combat click on the square you want to enter. '
Joystick Movement: Joystick movement is similar to using the cursor controls/keypad. Select the Move command and then move the joystick.
JOYSTICK MOVEMENf
30 MOVE FOR'w' ARD
TURN a TURN LEFT RIGHT
MOVE B ACK'w' ARD
COPY PROTECTION
COMBAT
:a~ ~ ... ~
To answer the verification question, find the indicated word in either the Adventurer's Journal or Rule Book. Type the indicated word and press ENTER/RETURN.
VAULT
To deposit items into the Vault, View a character's items, highlight the desired item and use the Deposit command. To deposit specific amounts of money, View the character, highlight the appropriate denomination and use the Deposit command. To deposit all of the party's money choose the Pool command.
IBM Combat Commands: The following is a list of IBM specific commands.
Note: Scrolls can now be Joined into Bundles on the IBM.
ESC: will 'take back' a move. The function will not erase any damage taken during the move.
ALT/Q: sets all characters to QUICK (computer control).
<SPACE>: returns all characters to normal control from QUICK.
ALT/M: Toggles the magic spells on/off for characters set to QUICK. CNTRL/S: Toggles sound on/off (may be used any time).
HINT: If you find combat too easy or difficult, use the LEVEL command (Rule Book page 8).
Transferring Characters from Curse of the Azure Bonds Start Curse of the Azure Bonds, Load the saved game that has the characters you want to transfer, and Remove those characters. Copy the files from your Curse of the Azure Bonds save directory to your Secret of the Silver Blades save directory using one of the methods given below. Start Secret of the Silver Blades and choose the Add Character to Party option and then select Curse . A screen with the names of the Characters that have been transferred will appear.
Copying the Files
Floppy Disk Systems The files will be copied for you if you swap your Curse of the Azure Bonds save disk and your Secret of the Silver Blades save disk as needed. The program will ask you to insert the save game disks after you have chosen the Add option. If you have chosen a non-standard name for your save directory, the automatic copy program may not work for you. This may occur if you named your save directories something other than SA VE (the name automatically assigned by our program. If this is the case, refer to the Non-Standard Save Directories section below).
Hard Disk Systems Most hard disk users will be able to copy the needed files from their Curse of the Azure Bonds save directory to their Secret of the Silver Blades save directory as follows: First, get into the Secret save game directory by typing CINIECRE'J\.SA VE and then press the Enter/Return key. Then copy the files by typing COPY C:'CURSE\SA VE\*.• and then press the Enter/Return key.

If you did not use the defaults for your save directories, (if you typed in your own save directory name or path), follow the instructions for Non-Standard Save Directories.
Non-Standard Save Directories You may copy the needed files from your Curse of the Azure Bonds save directory to your Secret of the Silver Blades directory by using the Copy • . * command that is provided with DOS. To use this command, you must be in your Secret of the Silver Blades save directory. Use the OOS Change Directory command to get there. Your DOS manual will explain how to use these commands. In order to use the copy command, you will have to know the name of your save directory. If you don't remember this, first change to your game directory (CD\ either Curse or Secret). For Curse of the Azure Bonds enter the following command -- TYPE CURSE.CFO and then press the Enter/Return key. The third line that appears will show the path to your save directory. For Secret of the Silver Blades enter the following command-- TYPE BLADES.CFO and then press the Enter/Return key. The fourth line that appears will show the path to your save directory. The name of your save directory is the last word on these lines.
ADY ANCFD DUNGEONS & DRAGONS, AD&D and FORGOTIEN REALMS are trademarks owned by and used under license from TSR, Inc., Lake Geneva, WI. © 1990 Strategic Simulations, Inc. All Rights Reserved. <O 1990 TSR, Inc. All Right Reserved.
IBM and Compatibles Data Card
Advanced Du-w _Q~ • ·~~::ior-asons
~.,.J~IC~ LOOIED COLLECTOR'S EDmON
System Requirements The Dark Queen of Kr:ynn : A minimum of 640K system memory is required. You need at least 540K of free memory to run the program and you need at least 570K of free memory to utilize all the features of the game. The game must be installed on a hard disk from a high density floppy drive, and requires a minimum of 4.2 megabytes of space on the hard drive.
Death Knights of Kr:ynn: A minimum of 640K system memory is required. The mouse will not work with Tandy graphics. The game must be installed on a hard drive from a high density floppy drive and requires a minimum of 1.5 megabytes of available space on the hard drive.
Champions of Kr:ynn : A minimum of 512K system memory is required, or 640K for mouse or Tandy graphics. The mouse will not work with Tandy graphics. The game must be installed on a hard drive from a high density floppy drive, and requires 1.5 megabytes of available space on the hard drive .
Installing the Games: Each of the games in the Dragonlance Limited Collector's Edition must be installed to the hard drive before you can begin play. CHAMPIONS OF KRYNN and DEATH KNIGHTS OF KRYNN have very similar installations. All three games can be installed by following these instructions :
1. To install the game place Disk 1 in any drive. Be sure this drive is the active drive.
2. Type INSTALL and then press Enter. 3. Follow all on-screen prompts.
You may reconfigure game settings at any time by reinstalling the game.
Note: In THE DARK OUEEN OF KRYNN, type INSTALL ·F instead of INSTALL if you are reinstalling over a previously loaded game.

Getting Started Quickly: Use the pregenerated party of characters saved as Save Game A. These characters start at the beginning of the game, but they have already been outfitted with readied weapons , magic, and armor.
Set up the games as described in the sections below (use INSTALL to get the pregenerated party) .
To begin the game, type START. Choose the LOAD SAVED GAME option from the Party Creation menu. The saved game appears after you choose the game you wish to play from the LOAD SAVED GAME menu . Load Save Game A. Choose BEGIN ADVENTURING.
Answer the verification question by finding the indicated word in the journal or rule book. Type the indicated word and press Enter. Do not count the headings when playing CHAMPIONS OF KRYNN and THE DARK QUEEN OF KRYNN. Note that you do count the headings when playing DEATH KNIGHTS OF KRYNN .
Refer to the sections on movement, combat, etc., in this data card or from the rule book or journal as needed .
Starting the Games 1. Boot your system normally with DOS 2.1 or greater. 2. Be sure the hard disk with the game is the active drive . 3. Change directory to the game's directory. Example : To
change to the default directory in THE DARK QuEEN oF KRYNN type CD\DQK and press Enter.
4. Type START and press Enter.
Saving Games: If you are saving games to floppies, you need to format save disks before playing . Use the DOS FORMAT command (refer to your DOS manual for instructions) .
Saved games are identified by letters . To save or recall a game you need only select the desired letter. Ten games may be saved to a standard 360K 5.25" disk or 720K 3.5" disk. High Density disks may also be used.
Transferring Characters: You can transfer characters from CHAMPIONS OF KRYNN to DEATH KNIGHTS OF KRYNN , and from DEATH KNIGHTS OF KRYNN to THE DARK QUEEN OF KRYNN. To transfer characters select the LOAD SAVED GAME option and
then choose the game you wish to transfer from. For example, if you are in THE DARK QUEEN OF KRYNN you would choose DKK to load a save game from DEATH KNIGHTS OF KRYNN into THE DARK QUEEN OF KRYNN. This loads all the characters with their equipment and money.
This same procedure applies to adding individual characters. To add characters choose ADD CHARACTER TO PARTY and then select the game you wish to transfer from. A screen with the name of all of the characters appears and can be loaded into the new party. Note : you must have previously removed ([lot "dropped") the character from the party.
The only difference when using a floppy save game disk in the game is that the program will ask you to insert an appropriate save game disk. When it does, insert your save game disk in the save drive and select YES.
Mouse : To give commands using the mouse , point to the desired command and click with the left mouse button. The mouse is automatically supported if present. Keyboard : To select a command using the keyboard , press the highlighted letter in that command. Joystick : Select INITIALIZE JOYSTICK/MOUSE. You are asked questions concerning your joystick. Answer them and press EXIT to continue.
Moving Around : The party moves through the game in 30, area/wilderness, and combat modes . Targeting spells and ranged weapons is similar to moving characters :
Keyboard Movement : The following keyboard controls are used for movement and targeting :
30 MOVE I ANY MENU
r-::10~ L:JLJL.::.I ~o TURN w RIGHT
~~~ oOL::J
MOVE/COMBAT I AIM
7 8
" t [] 4 s ... [] (][][]
An entry in a vertical list may be highlighted by using the [Menu Up] (7) and (Menu Down] (1) keys on the keypad . If there are more entries in a vertical list than will fit in the window, scroll arrows appear on the right side of the window to move up and down the list a page at a time. The (Menu PgUp] (9) and [Menu PgDn] (3) keys on the keypad also page up and down a list. When altering a character's attribute scores , the Character Display acts as a vertical list.
Mouse Movement: The mouse is active throughout the game, and may be used for all input except to answer the copy protection question or to enter an amount of money.
To move in 30 mode with a mouse, click the mouse cursor at the edge of the display window in the direction you want to move. To move forward , click at the top of the window. To turn around, click at the bottom. To turn right or left, click on the appropriate side. To move in area/wilderness mode , click the location you want to enter and the party goes in that direction.
To use the mouse for combat targeting and movement, click the mouse cursor over the target square and the cursor moves to the target. If the target is off the screen, first select an intermediate square near the edge of the screen. Clicking a mouse button on the edge of the window scrolls the viewing area in the direction of the selected edge.
Mouse Movement Differences in THE DARK QuEEN OF KRYNN : The mouse pointer changes according to its usage. The different formats are : ~: select an option or an entry from a vertical list. ~: show direction for movement/attack in combat , movement, or turning in the 3D mode. Crosshajrs : select targets during combat. ~: used when the mouse is not active.
IBM Combat Commands: Esc: acts as an Exit from any menu. When moving in combat, it '1akes back" the move. The function does not erase any damage taken during the move. Alt/Q: sets all characters to QUICK (computer control). Space: returns characters to normal control from QUICK. Alt/M: toggles spells on/off for characters set to QUICK. Alt/S: toggles sound on/off (may be used any time). Alt/T: toggles music on/off (may be used any time).
1 \
Hint: If you find combat too easy or difficult , use the LEVEL option to alter your difficulty level.
Vault (DEATH KNIGHTS OF KRYNN and THE DARK QUEEN OF KRYNN only): To deposit items into the Vault , view a character's items, highlight the desired item, and use the DEPOSIT command. To deposit specific amounts of money, view the character, highlight the appropriate denomination, and use the DEPOSIT command . To deposit all of the party's money, choose the POOL command.
N.QIE: When transferring characters from DEATH KNIGHTS OF KRYNN, the vault will not transfer. To transfer vault items, give the items to the characters you are transferring.
Spell Memorization: To rememorize spells in Camp, select REST, then rest for the allotted time. If you wish to change the selection of spells to be memorized, choose the MEMORIZE option and do D.Q.1 keep the spells ready for rememorization. Follow the rule book instructions for memorizing spells.
Copy Protection: To answer the verification question, find the indicated word in the Adventurer's Journal. Type the indicated word and press Enter. Do not count the headings when playing CHAMPIONS OF KRYNN and THE DARK QUEEN OF KRYNN . Do count the headings when playing DEATH KNIGHTS OF KRYNN.
Program Changes This is a list of specific program changes to THE DARK QuEEN OF KRYNN that are different from DEATH KNIGHTS OF KRYNN.
In some areas of the game, the REST and FIX options are not available in the ENCAMP menu.
The LOAD option has been added to the ENCAMP menu . This allows you to load saved games at any point in the game. You no longer need to go to town to load a saved game, nor do you have to reboot your system.
There is no MOVE option. This option is no longer necessary.
Use discretion in selecting the races and classes of the characters in your party. Some combinations are at or near their class maximums at the beginning of the adventure.
Magic-users should have an intelligence of 18, and clerics should have a wisdom of 18. Otherwise, they will not be able to use the most powerful spells.
If you have an Adlib sound board , the digitized sound effects will come out of the PC speaker.
If you are using a mouse and you are modifying a character's name, you must use the Esc key to abort the change. The mouse will not work.
This is a specific program change to DEATH KNIGHTS OF KRYNN
that is different from CHAMPIONS OF KRYNN .
The FIX command only heals the party. It no longer increments time to memorize spells. Use the REST command to memorize all spells .
STRA'.l'EGIC SIMUIATIOM. me ADVANCED DUNGEONS & DRAGONS and DRAGONLANCE are trademarks owned by and used under license from TSR, Inc .. Lake Geneva, WI. © 1990, 1991 , 1992 Strategic Simulations, Inc.© 1990, 1991 , 1992 TSR, Inc. All Rights Reserved.
524051
IBM and Compatibles Data Card
Advanced Dungeonsfilic\gonsal
COMPUl't:R PRODUCT
II Gm:WAY ~SAVAGE IROIYTIER 11
System Requirements: To play this game you must have an IBM or compatible computer with at least 640K of system memory; two disk drives, one of which must be either a hard disk or a floppy drive capable of reading 5.25" l.2M disks or 3.5" 720K disks; and a VGA, MCGA, EGA, Tandy 16 color, or CGA graphics adapter. Your hard disk must have at least 1.8 megabytes of available space to install the game. Before beginning play, backup your original Game Disks with the DOS DISKCOPY command. Put your original disks away and install from your copies. Refer to your DOS manual for information on how to use DOS commands.
RAM resident programs may reduce your available system memory below the minimum required for this game. Some memory management software may interfere with the sound effects. The mouse and joystick will not work with Tandy 16 color graphics.
Installing the Game: The game disks must be installed to a hard disk or to floppy disks before play. Refer to the chart below to find the number of blank formatted floppy disks you need to install the game. The number in parentheses indicates the number of disks needed if you want to use the pregenerated characters. During the installation, the disks that you received in the box are called Game Disks, and the disks that you make are called Play Disks. Label each Play Disk with the number(s) shown in the installation.
Installing From 5.25" l.2M 3.5" 720K 5.25" 360K 5.25" l.2M 5.25" l.2M 5.25" l.2M 3.5" 720K 3.5" 720K 3.5" 720K
Blank Formatted Play Disks Required To 5.25" l .2M 3.5" 720K 5.25" 360K HARD HARD HARD 5.25" l.2M 3.5" 720K 5.25" 360K 5.25" l.2M 3.5" 720K 5.25" 360K
0 0 0 0 0 0 0 0 0 3(4) 0 0 1 3(4) 0 1 0 7(8) 3(4) 1 0 0 3(4) 0 0 1 7(8)

To install the game, place Game Disk 1 in a drive, access the drive, type INSTALL and press the ENTER k~y. Fo~low the onscreen prompts. Specify the type of disks you are ~st'.11hng f!om and the type of disks you are installing to. When spec1fymg a directory, press the ENTER key to accept the default directory or backspace and type a new drive and directory and press the ENTER ~ey. Save games must be installed to a subdirectory, even when savmg to a floppy disk. When you are done installing the game to floppies, write protect Play Disks 3, 4, 5, 6, and 7. Whe!1 sav.ing from.floppies, reinsert the play disk as soon as the the game is fimshed savmg.
Starting the Game: Boot your computer with DOS version 2.11 or higher. If you are going to use a mouse, make sure that your mouse driver is loaded before starting the game.
When playing from a hard disk, access the GA TEW~ Y directory, type START and press th~ ENTf:R key. ~en playmg from floppy drives, place your Play Disk 1(2 10 the drive, a~cess the drive, type START, and press !he EN!ER ke:>:. When p~aymg from floppies, you must keep Play Disk 1(2 ':11 the .driye at all times: When the game asks for a disk, insert the reqwred disk m the other drive and press the ENTER key.
The first time you play, configure the game for your system's hardware. Select a sound type, graphics card, save path, and input type. In future play sessions, press the ENTER key at the first prompt to use your current configuration or press the SPACE bar to reconfigure for a new sound/graphics card or input device.
Most people will want to accept the default path to. the SA VE directory. The default save path is set for the SA VE subdirectory on your active drive if you ~e u~in~ a hard driye or th~ SA VE subdirectory on the non-acuve drive if you are usmg floppies. The SA VE subdirectory is created automatically when you first save a game or character. . .
If you wish to save to another drive, type that drive letter followed by a colon, a back slash and the subdirectory name. Example: To save to the SA VE subdirectory on drive B, type B:\5A VE and press the ENTER key.
Copy Protection: To answer the copy protection question at the beginning of the game, type the indicated word in the Adventurer's Journal and press the ENTER key.
Giving Commands: You can play the game from the keyboard, with a mouse, or with a joystick. The keyboard is active even if you configure the system to play with the mouse or the joystick.
To select a command using the keyboard, either press the highlighted letter in that command or use the cursor keys to highlight the command and press the ENTER key. To give commands using the mouse, point to the desired command and double-click with the left mouse button. To give commands with the joystick, highlight the command and press the A Button.
Moving Around: The party will move through the game in 30/Area/Overland and Combat modes. Targeting spells and ranged weaJX>ns during combat is similar to moving characters. To move, select the Move option and give the appropriate commands.
The following keyboard controls are used for movement and targeting:
30 MOVE I ANY MENU
To move in 3D/Area/Overland mode with a mouse, click the mouse cursor at the edge of the display window in the direction you want to move. To move forward, click at the top of the window. To turn around, click at the bottom. To turn right or left, click on the appropriate side.
To use the mouse for combat targeting and movement, click the mouse cursor over the target square and the cursor will advance towards the target. If the target is off the screen, first select an intermediate square near the edge of the screen. To move in combat, click on the adjacent square you want to enter.
Joystick movement is similar to using the cursor controls/keypad. Select the Move command and then move the joystick.

JOYSTICK MOVEMENT
30 MOVE FOR'w' ARD
TURN a TURN LEFT RIGHT
MOVE B ACK'w' ARD
COMBAT
~a: tL .a. ~
Using The Vault: To deposit items into the Vault, View a character's items, highlight the desired item and use the Deposit command. To deposit specific amounts of money, View the character, highlight the appropriate denomination and use the Deposit command. To deposit all of the party's money choose the Pool command.
IBM Combat Commands: The following is a list of IBM specific combat commands.
ESC: will 'take back' a move. The function will not erase any damage taken during the move.
ALT/Q: sets all characters to QUICK (computer control).
SPACE: returns all characters to normal control from QUICK.
ALT/M: Toggles the magic spells on/off for characters set to QUICK.
CNTRL/S: Toggles sound on/off (may be used any time).
HINT: If you find combat too easy or too difficult, use the ALTER and LEVEL command (Rule Book page 8).
ADVANCED DUNGEONS & DRAGONS, AD&D and FORGOTTEN REALMS are trademarks owned by and used under license from TSR, Inc., Lake Geneva, WI. © 1991 Strategic Simulations, Inc. All Rights Reserved. © 1991 TSR, Inc. All Right Reserved.
IBM and Compatibles Data Card
Advanced Dunge~ns·
COMPUTER PRODUCT
11 'IREAsURES ::t'.SAVAGEFROIYTIER 11
System Requirements: A minimum of 640K system memory is required. The mouse will not work with Tandy graphics. RAM resident programs may reduce your available system memory below the minimum required for the game. We recommend at least 560K of free memory to run this program. A TGA, EGA, VGA, or MCGA color video system is also required . One floppy and one hard disk are required. This game must be installed on a hard disk, and needs a minimum of 3,050,000K free to install the game. FILES must be set greater or equal to 20 in your CONFIG.SYS file .
Installing the Game: The disks that come with the game must be installed before you can begin play. 1. Place Disk 1 in any drive. Be sure this is the active drive. 2. Type INSTALL and then press the Enter/Return key. 3. Follow all on-screen prompts.
Starting the Game
1. Boot your system normally with DOS 2.1 or greater. 2. Be sure that the hard disk containing the game is the active drive. 3. Change directory to the game's directory. Example : To change to the default directory type CD\ TREASURE and press Enter/Return. 4. Type START and press Enter/Return.

The first time you play the game you will be prompted to configure the game for your system's hardware. You will be asked to set up for graphics card, sound type, input drive, and save path for both TREASURES OF THE SAVAGE FRONTIER and GATEWAY TO THE SAVAGE FRONTIER (if installed).
Graphic Adapter Type: Enter the correct number for your graphics adapter type.
Sound Type: Enter the correct number for your sound type. For most people this will be IBM PC or compatible. If you have a Tandy system or one of the sound boards supported by this program, enter the corresponding number. If you do not want sound in your game, enter 6.
Alternate Input Type: If you want to play the game using a joystick or mouse, enter 1 or 2 as indicated. To play the game using the keyboard only, enter 3.
The input device (mouse or joystick) may also be selected from the first program menu. The keyboard is always active regardless of how the system is configured.
Path to Save Drive for TREASURES OF THE SAVAGE FRONTIER: Most people will want to press Enter/Return here. The default save path is set for the SAVE subdirectory on your active drive. The SAVE subdirectory is created automatically when you first save a game or character.
If you wish to save to another drive, type that drive letter followed by a colon, a back slash and the subdirectory name, Example: To save to the SAVE subdirectory on drive 8, type B:\SAVE and press Enter/Return .
Path to Save Drive for GATEWAY TO THE SAVAGE FRONTIER : Most people will want to press Enter/Return here. The default save path is set for the \GATEWAY\SAVE subdirectory on your active drive. This selection is important only if you have saved games from GATEWAY TO THE SAVAGE FRONTIER and wish to use them in TREASURES OF THE SAVAGE FRONTIER. You set the drive path to the drive path of your GATEWAY TO THE SAVAGE FRONTIER Save Game disk or subdirectory.
Note: If you do not have (or do not want tc use) your GATEWAY TO THE SAVAGE FRONTIER Save Game Disk, select the default setting when prompted.
Saving Games: If you are saving games to floppies, you will need to format save disks QfilQm playing. Use the DOS FORMAT command (refer to your DOS manual for instructions).
Saved games are identified by letters. To save or recall a game you need only select the desired letter. Ten games may be saved to a standard 360K 5.25" or 720K 3.5" disk.
Getting Started Quickly: Use the pregenerated party of characters saved as Save Game A. These characters start at the very beginning of the game, but they have already memorized spells, and have been outfitted with readied weapons and armor.
To begin the game, type START. Choose GAME, then the LOAD SAVED GAME option from the Party Creation menu. The saved game will appear after you choose the TREASURES option in the LOAD SAVED GAME menu. Load Save Game A. Choose BEGIN ADVENTURING.
Refer to the sections on movement, combat, etc., in this data card , the rule book, or journal as needed.
Mouse: To give commands using the mouse, point to the desired command and double-click with the left mouse button .
Keyboard: To give commands using the keyboard, either press the highlighted letter in that command or use the cursor keys to highlight the command and press Enter/Return .
Joystick : To give commands using the joystick, move the highlight to the appropriate command and press the button .

Keyboard Movement: The following controls are used for movement and targeting :
KEYBOARD MOVEMENT
3D MOVE I ANY MENU
~aOVE ~ L:J L:.J ~o TURN w RIGHT
~~~ OOL::J
MOVE/COMBA I /AIM
[;_][[][] ~D[] (][][]
Mouse Movement: To move in 3D/area mode with a mouse, click the mouse cursor at the edge of the display window in the direction you want to move. To move forward, click at the top of the window. To turn around, click at the bottom. To turn right or left, click on the appropriate side.
Joystick Movement: Joystick movement is similar to using the cursor controls/keypad . Select the MOVE command and then move the joystick.
JOYSTICK MOVEMENT
30 MOVE FOR'w' ARD
TURN a TURN LEFT RIGHT
TURN AROUND
COMBAT
~~ ~ "' ~
Copy Protection : To answer the verification question, find the indicated word in the Adventurer's Journal. Type the indicated word and press Enter/Return. Do not count section headings.
IBM Combat Commands: The following is a list of IBM Specific commands.
ESC: will act as an Ex it from any menu. When moving in combat, ESC will 'take back' a move. The function will not erase any damage taken during the move. AL TIO : sets all characters to QUICK (computer control). <SPACE>: returns all characters to normal control from QUICK. AL TIM: toggles the magic on/off for characters set to QUICK. CTRUS: toggles sound on/off (may be used any time) .
Transferring Characters from GATEWAY TO THE SAVAGE FRONTIER: Set the Save Game subdirectory for GATEWAY TO THE SAVAGE FRONTIER game during the system setup. Select the LOAD SAVED GAME option then GATEWAY. Choose the saved game you wish to transfer to TREASURES OF THE SAVAGE FRONTIER. This will load all of the characters, most of their equipment, and their money.
If you wish to load only a single character from GATEWAY TO THE SAVAGE FRONTIER, boot up GATEWAY TO THE SAVAGE FRONTIER and load the saved game in which the character resides. Choose the REMOVE CHARACTER option and remove the character from the party. Start TREASURES OF THE SAVAGE FRONTIER and choose the ADD CHARACTER TO PARTY option and then select GATEWAY. A screen with the name of the character will appear and can be loaded into the new party.
Program Changes: The FIX command only heals the party. It no longer increments time to memorize spells . Use the REST command to memorize all spells .
The name of a character ready to train is now highlighted in purple.
Developer's Comments: Initially, have your magic users memorize charm person, stinking cloud, and fireball spells. Try to charm enemy clerics and magic users, and stinking cloud the larger monster for occasional quick kills.
The game is set in the middle of a revolution , and the fights are difficult. It is recommended that you save frequently .

The Savage Frontier is a very dangerous place, so try to stay on the trails or rivers when you are hurt or don't want a fight. Be especially wary in the wilderness.
If you are lost or unsure on what to do next, use the Crown of Amanitas or try using the lucky papers. You will need all three colored crystals to decode the lucky papers.
Cure disease, when cast by a cleric, will not restore lost strength points. In order to restore these lost strength points, you must go to a temple and REPAIR, or select HEAL, then cure disease.
Special Thanks To : Forrest Elam, Product Tester, and Dale Palmer, Product Support Representative.
ADVANCED DUNGEONS & DRAGONS, AD&D , and FORGOTTEN REALMS are trademarks owned by and used under license from TSR, Inc. , Lake Geneva, WI.
© 1992 Strategic Simulations, Inc. © 1992 TSR, Inc. All Rights Reserved.
STRAmGIC SIMUIATIONS, me:
IBM and Compatibles Data Card
Advanced Dungeo0Sfiiragons3
COl'fFUTER l"ROOOCT
/I PooLS OP D~ System Requirements: A minirnwn of 640K system memory is required. The mouse will not work with Tandy graphics. RAM resident programs may reduce your available system memory below the minimwn required for this game. We recommend at least S60K of free memory to run this program. A TGA, EGA, VGA, or MCGA color video system is also required. One floppy and one hard disk are required. This game must be installed on a hard disk and it will use a minimum of 3.5 megabytes of available space to install the game. FILES must be set greater than or equal to 20 in your CONFIG.SYS file.
Getting Started Quickly: Use the pregenerated party of characters saved as Save Game A. These characters start at the very beginning of the game, but they have already been outfitted with readied weapons and annor.
Set up the game as described in the sections below (use INST ALL to get the pregenerated party).
To begin the game, type ST ART . Choose the Load Saved Game option from the Party Creation menu. The saved game will appear after you choose the POOLS option in the Load Saved Game menu. Load Save Game A. Choose Begin Adventuring.
Answer the verification question by finding the indicated word in the Adventurer's Journal. Type the indicated word and press ENfER/RETURN. Do not count the headings.
Refer to the sections on movement, combat, etc., in this data card or from the rule book or journal as needed.

Installing the Game: The disks that come with the game must be installed before you can begin play.
1. To install the game place Disk 1 in any drive. Be sure this drive is the active drive.
2. Type INST ALL and then press the ENTER/RETURN key.
3. Follow all on-screen prompts .
Starting the Game
1. Boot your system normally with DOS 2.1 or greater.
2. Be sure that the hard disk containing the game is the active drive.
3. Change directory to the game's directory. Example: To change to the default directory type CD\POD and press ENTER/RETURN.
4. Type START and press ENTER/RETURN.
The first time you play the game you will be prompted to configure the game for your system's hardware. You will be asked to set up for graphics card, sound type, input drive type and save path for both your Pools of Darkness and Secret of the Silver Blades games (if installed).
Graphics Adapter Type: Enter the correct number for your graphics adapter type.
Sound Type: Enter the correct number for your sound type. For most people this will be IBM PC or compatible. If you have a Tandy system or one of the sound boards supported by this program, enter the corresponding number. If you do not want sound in your game, enter 6.
Alternate Input Type: If you want to play the game using a joystick or mouse, enter 1 or 2 as indicated. To play the game using the keyboard only, enter 3.
The input device (mouse or joystick) may also be selected from the first program menu. The keyboard is always active regardless of how the system is configured.
Path to Save Drive for Pools of Darkneu: Most people will want to press ENTER/RETURN here. The default save path is set for the SA VE subdirectory on your active drive. The SA VE subdirectory is created automatically when you first save a game or character.
If you wish to save to another drive, type that drive letter followed by a colon, a back slash and the subdirectory name. Example: To save to the SA VE subdirectory on drive B, type B: \SAVE and press ENTER/RETURN.
If you wish to reconfigure the game at any time, for a new graphics adapter for example, erase the POOlA.CFG and SND.EXE files, and then run the game. Use the DOS DELETE command to erase the file.
Path to Save Drive for Secret of the Silver Blades: Most people will want to press ENTER/RETURN here. The default save path is set for the \SECRE'l\SA VE subdirectory on your active drive. This selection is important only if you have saved games from Secret of the Silver Blades and wish to use them in Pools of Darkness. You set the drive path to the drive path of your Secret of the Silver Blades Save Game disk or subdirectory. Note: If you do not have or do not want to use your Secret of the Silver Blades Save Game Disk. select the default setting when prompted.
Saving Games: If you are saving games to floppies, you will need to format save disks before playing. Use the DOS F 0 RM AT command (refer to your DOS manual for instructions).
Saved games are identified by letters. To save or recall a game you need only select the desired letter. Ten games may be saved to a standard 360K 5.25" disk or 720K 3.5" disk.
Mouse: To give commands using the mouse, point to the desired command and double-dick with the left mouse button.
Keyboard: To select a command using the keyboard, either press the highlighted letter in that command or use the cursor keys to highlight the command and press ENTER/RETURN.
Moving Around: The party will move through the game in 3Dlarea and combat modes. Targeting spells and ranged weapons during combat is similar to moving characters. To move, first select the Move option from the bottom of the screen and then give the appropriate commands.

Keyboard Movement: The following keyboard controls are used for movement and targeting:
KEYBOARD MOVEMENT
30 MOVE I ANY MENU
"°iJE T
MOVE/COMBAT I AIM --- --7 8 9 I\ t ~ 4 5 6 .. ...
Mouse Movement: To move in 3D/area mode with a mouse, click the mouse cursor at the edge of the display window in the direction you want to move. To move forward, click at the top of the window. To tum around, click at the bottom. To turn right or left, click on the appopriate side. To use the mouse for combat targeting and movement, click the mouse cursor over the target square and the cursor will advance towards the target. If the target is off the screen, first select an intermediate square near the edge of the screen. To move in combat, click on the square you want to enter.
Joystick Movement: Joystick movement is similar to using the cursor controls/keypad. Select the Move command and then move the joystick.
JOYSTICK MOVEMENT
30 MOVE FOR'W ARD
TURN a TURN LEFT RIGHT
TURN ARO~D
COMBAT
~*~ tL "' ~
COPY PROTECTION
To answer the verification question, find the indicated word in the Adventurer's Journal. Type the indicated word and press ENTER/RETURN. Do not count section headings.
IBM Combat Commands: The following is a list of IBM specific commands.
ES C: will act as an Exit from any menu. When moving in combat, will 'take back' a move. The function will not erase any damage taken during the move . ALT/Q: sets all characters to QUICK (computer control). <SPACE>: returns all characters to normal control from QUICK. ALT /M: Toggles the magic spells on/off for characters set to QUICK. CNTRL/S: Toggles sound on/off (may be used any time).
HINT: If you find combat too easy or difficult, use the LEVEL command (Rule Book page 7).
Transferring Characters from Secret of the Sliver Blades Set the Save Game subdirectory for Secret of the Silver Blades game during the system setup. Select the Load Saved Game option then SECRET. Choose the saved same you wish to transfer to Pools of Darkness. This will load all of the characters, most of their equipment and their money.
If you wish to load only a single character from Secret of the Silver Blades, boot up Secret of the Silver Blades and load the saved game in which the character resides. Choose the Remove Character option and remove the character from the party. Start Pools of Darkness and choose the Add Character to Party option and then select SECRET. A screen with the name of the Character will appear and can be loaded into the new party.
Spell Memorization To rememorize spells in Camp, select the Rest option, then rest for the preallotted time.
If you wish to change the selection of spells to be memorized, choose the Memorize option and do N..O..I. Keep the spells ready for rememorization. Follow the rule book instructions for memorizing spells.

Program Changes The Fix command only heals the party. It no longer increments time to memoriu spells. Use the Rest command to memoriu all spells.
If the name of a character is highlighted in purple, that character is ready to train up another level.
In some areas of the game, the REST and FIX options will not be available in the CAMP menu.
If you are using a mouse and you are modifying a character's name, you must use the <ESC> key to abort the change. The mouse will not work.
Non-human races have a distinct disadvantage in this game. The base experience for this game will put most non human races at their class maximums, even before you start the game.
Magic-Users should have an intelligence of 18 or they will not be able to use the most powerful spells.
Note: When transferring characters from Secret of the Silver Blades: Bundled scrolls will not transfer. To transfer these scrolls, they must first be \D'lbundled. The vault will not transfer. To transfer over items from the vault, you must first give them to the characters you are transferring.
ADVANCED DUNGEONS & DRAGONS, AD&D and FORGOTI"al! REAIMS are trademarks owned by and used under license from TSR, Inc., Lake Geneva, WI. IC) 1991 Strategic Simulations, Inc. All Rights Reserved. IC) 1991 TSR, Inc. All Right Reserved.
STMTEOIC SIMUl.ATIONS. INC.'

PIN 6052 10/94