Embed Size (px)
Citation preview
Adobe Illustrator CC Advanced
3.
Copy/Paste Objects 1. Select with Selection-Tool2. Hold Alt-Key 3. Drag with Selection-Tool while still holding the Alt-Key (Additionally holding Shift will move straight or in 45/90/180 Degrees)
Align Objects 1. Draw Objects2. Select all wanted objects2. Choose Alignment or Distribution from the Control Panel or the Align-Panel 3. Drag with Selection-Tool
4.
1. 2.
1. 2. 3.
Adobe Illustrator CC Advanced
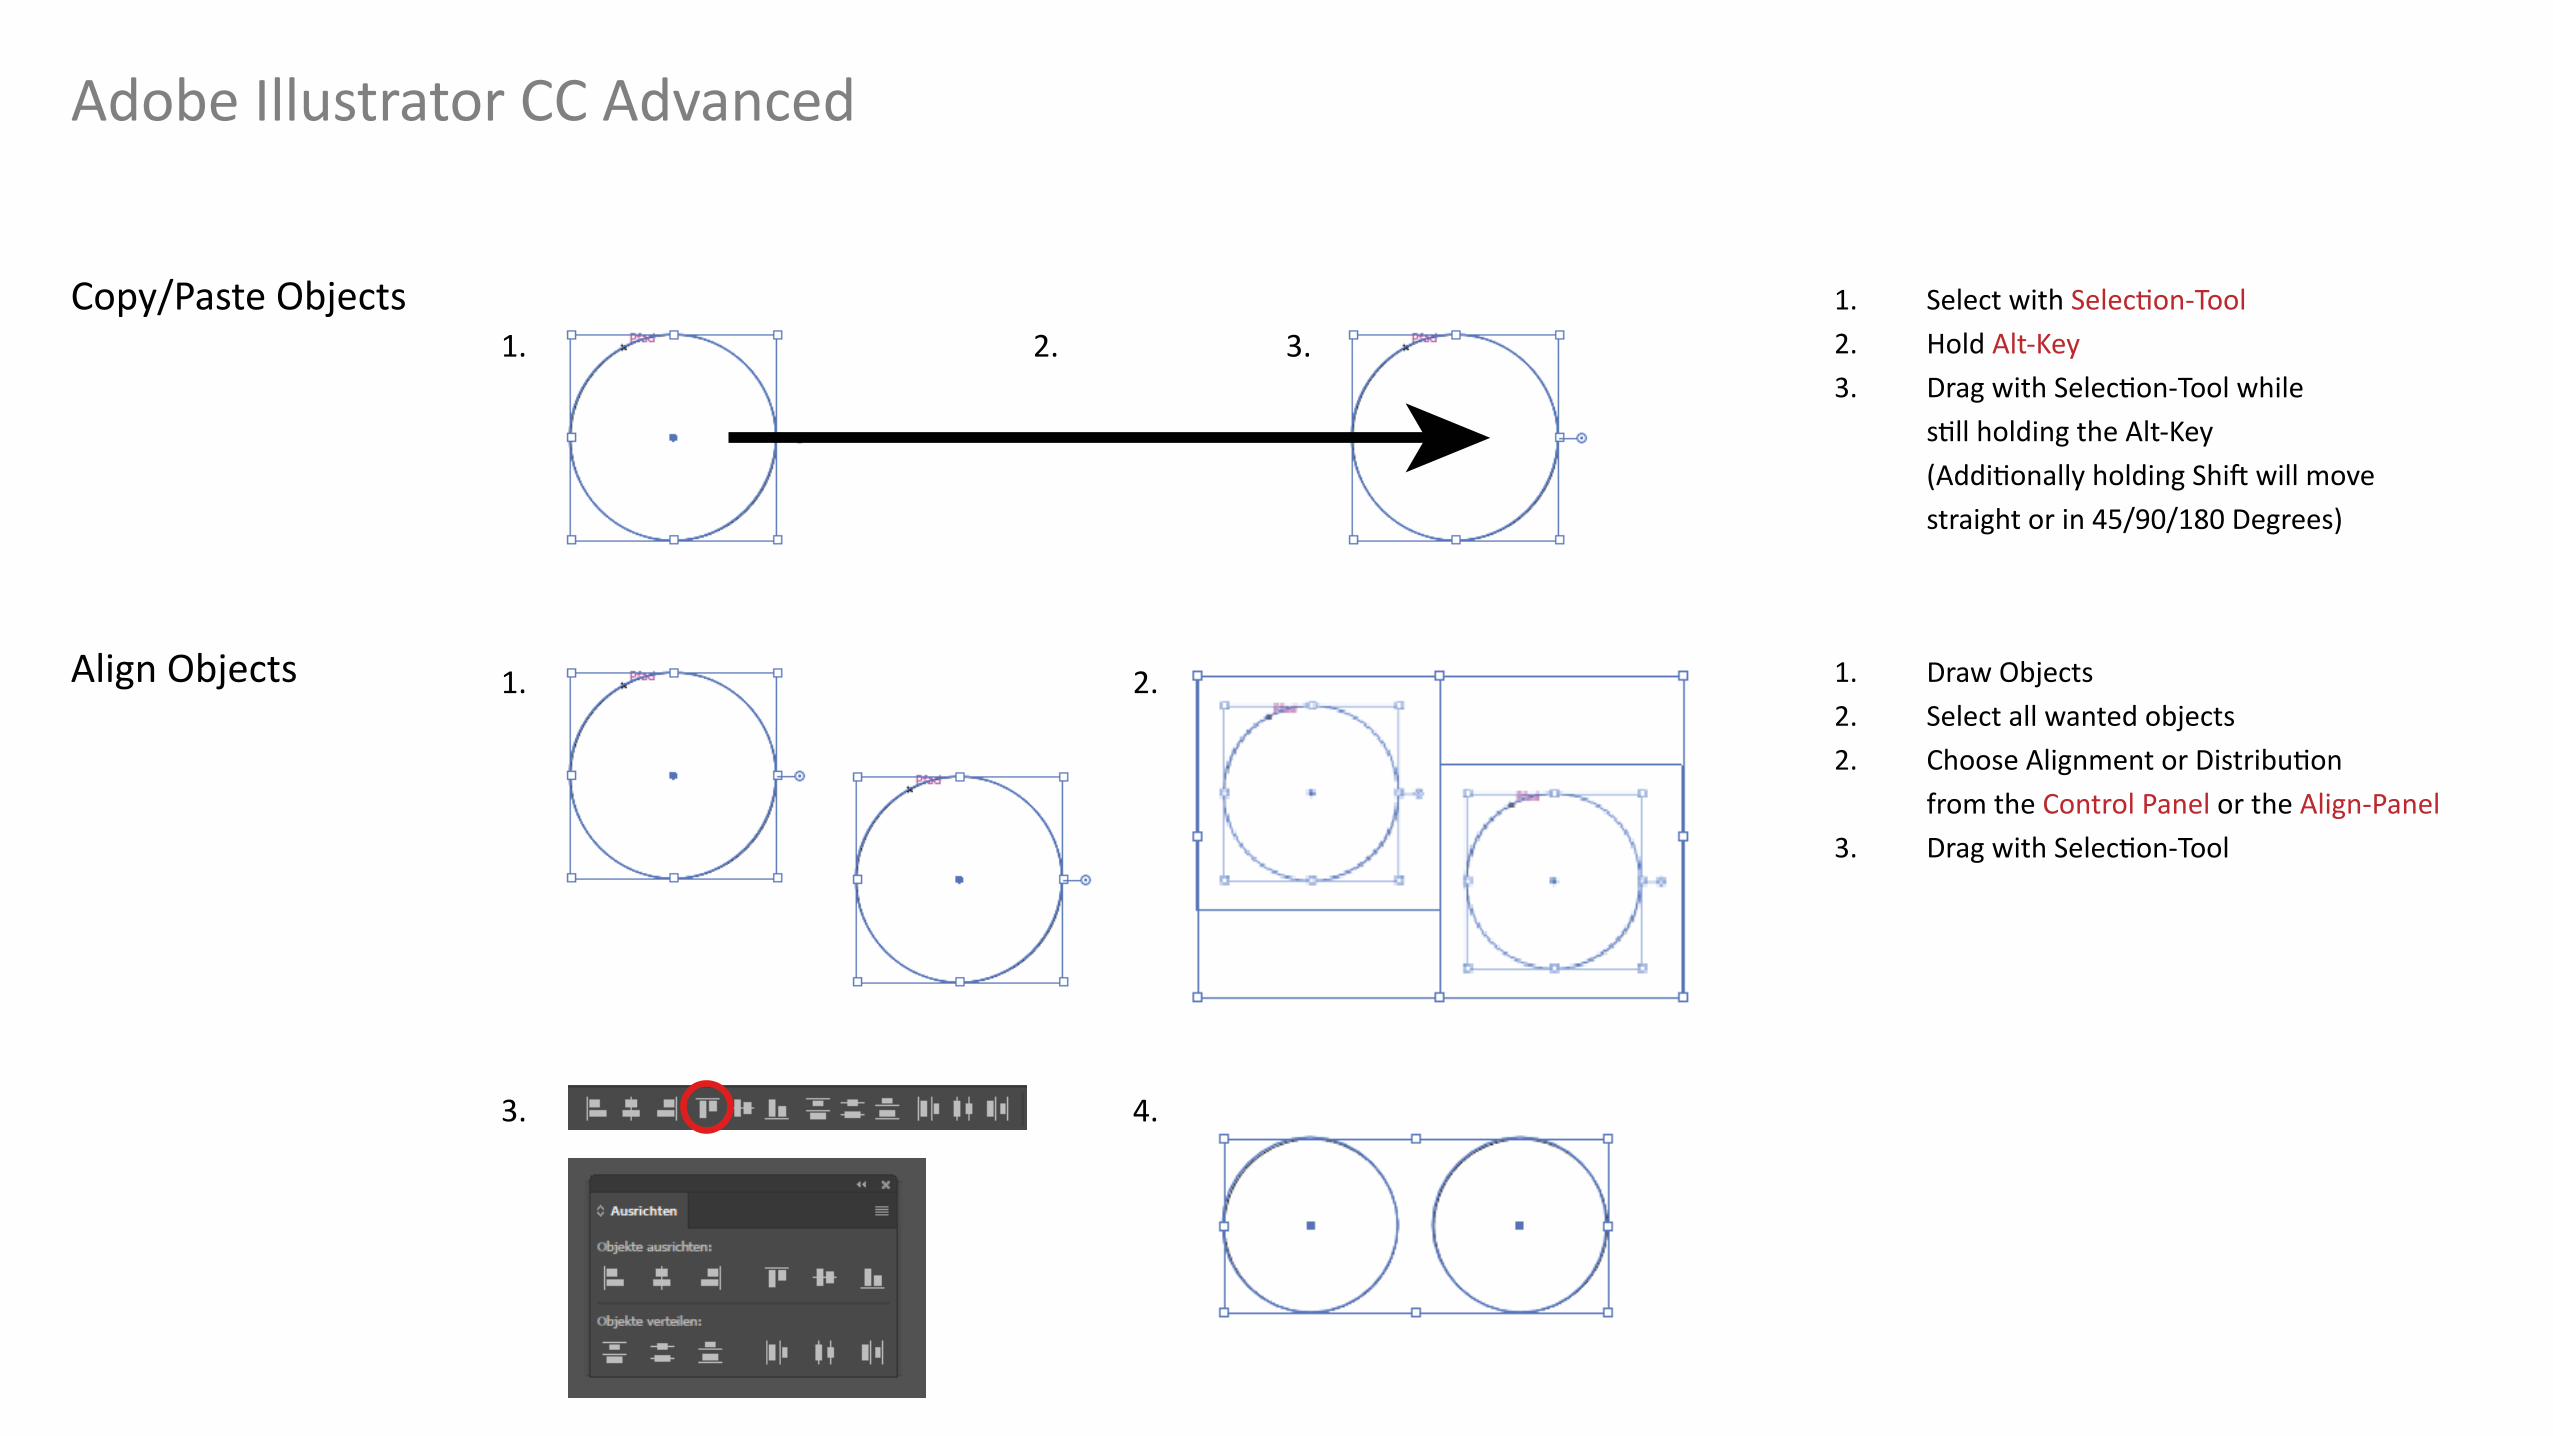
Rotate Objectsaround a point
1. Draw objects2. Touch green graphic, choose Rotate Tool and click to set the rotation center (middle of the orange graphic)3. Hold Alt and Shift and move graphic 10 Degrees (or any angle that fits into 360)4. Duplicate last act by repeating ctrl + d
1. 2.
3. 4.
Adobe Illustrator CC Advanced
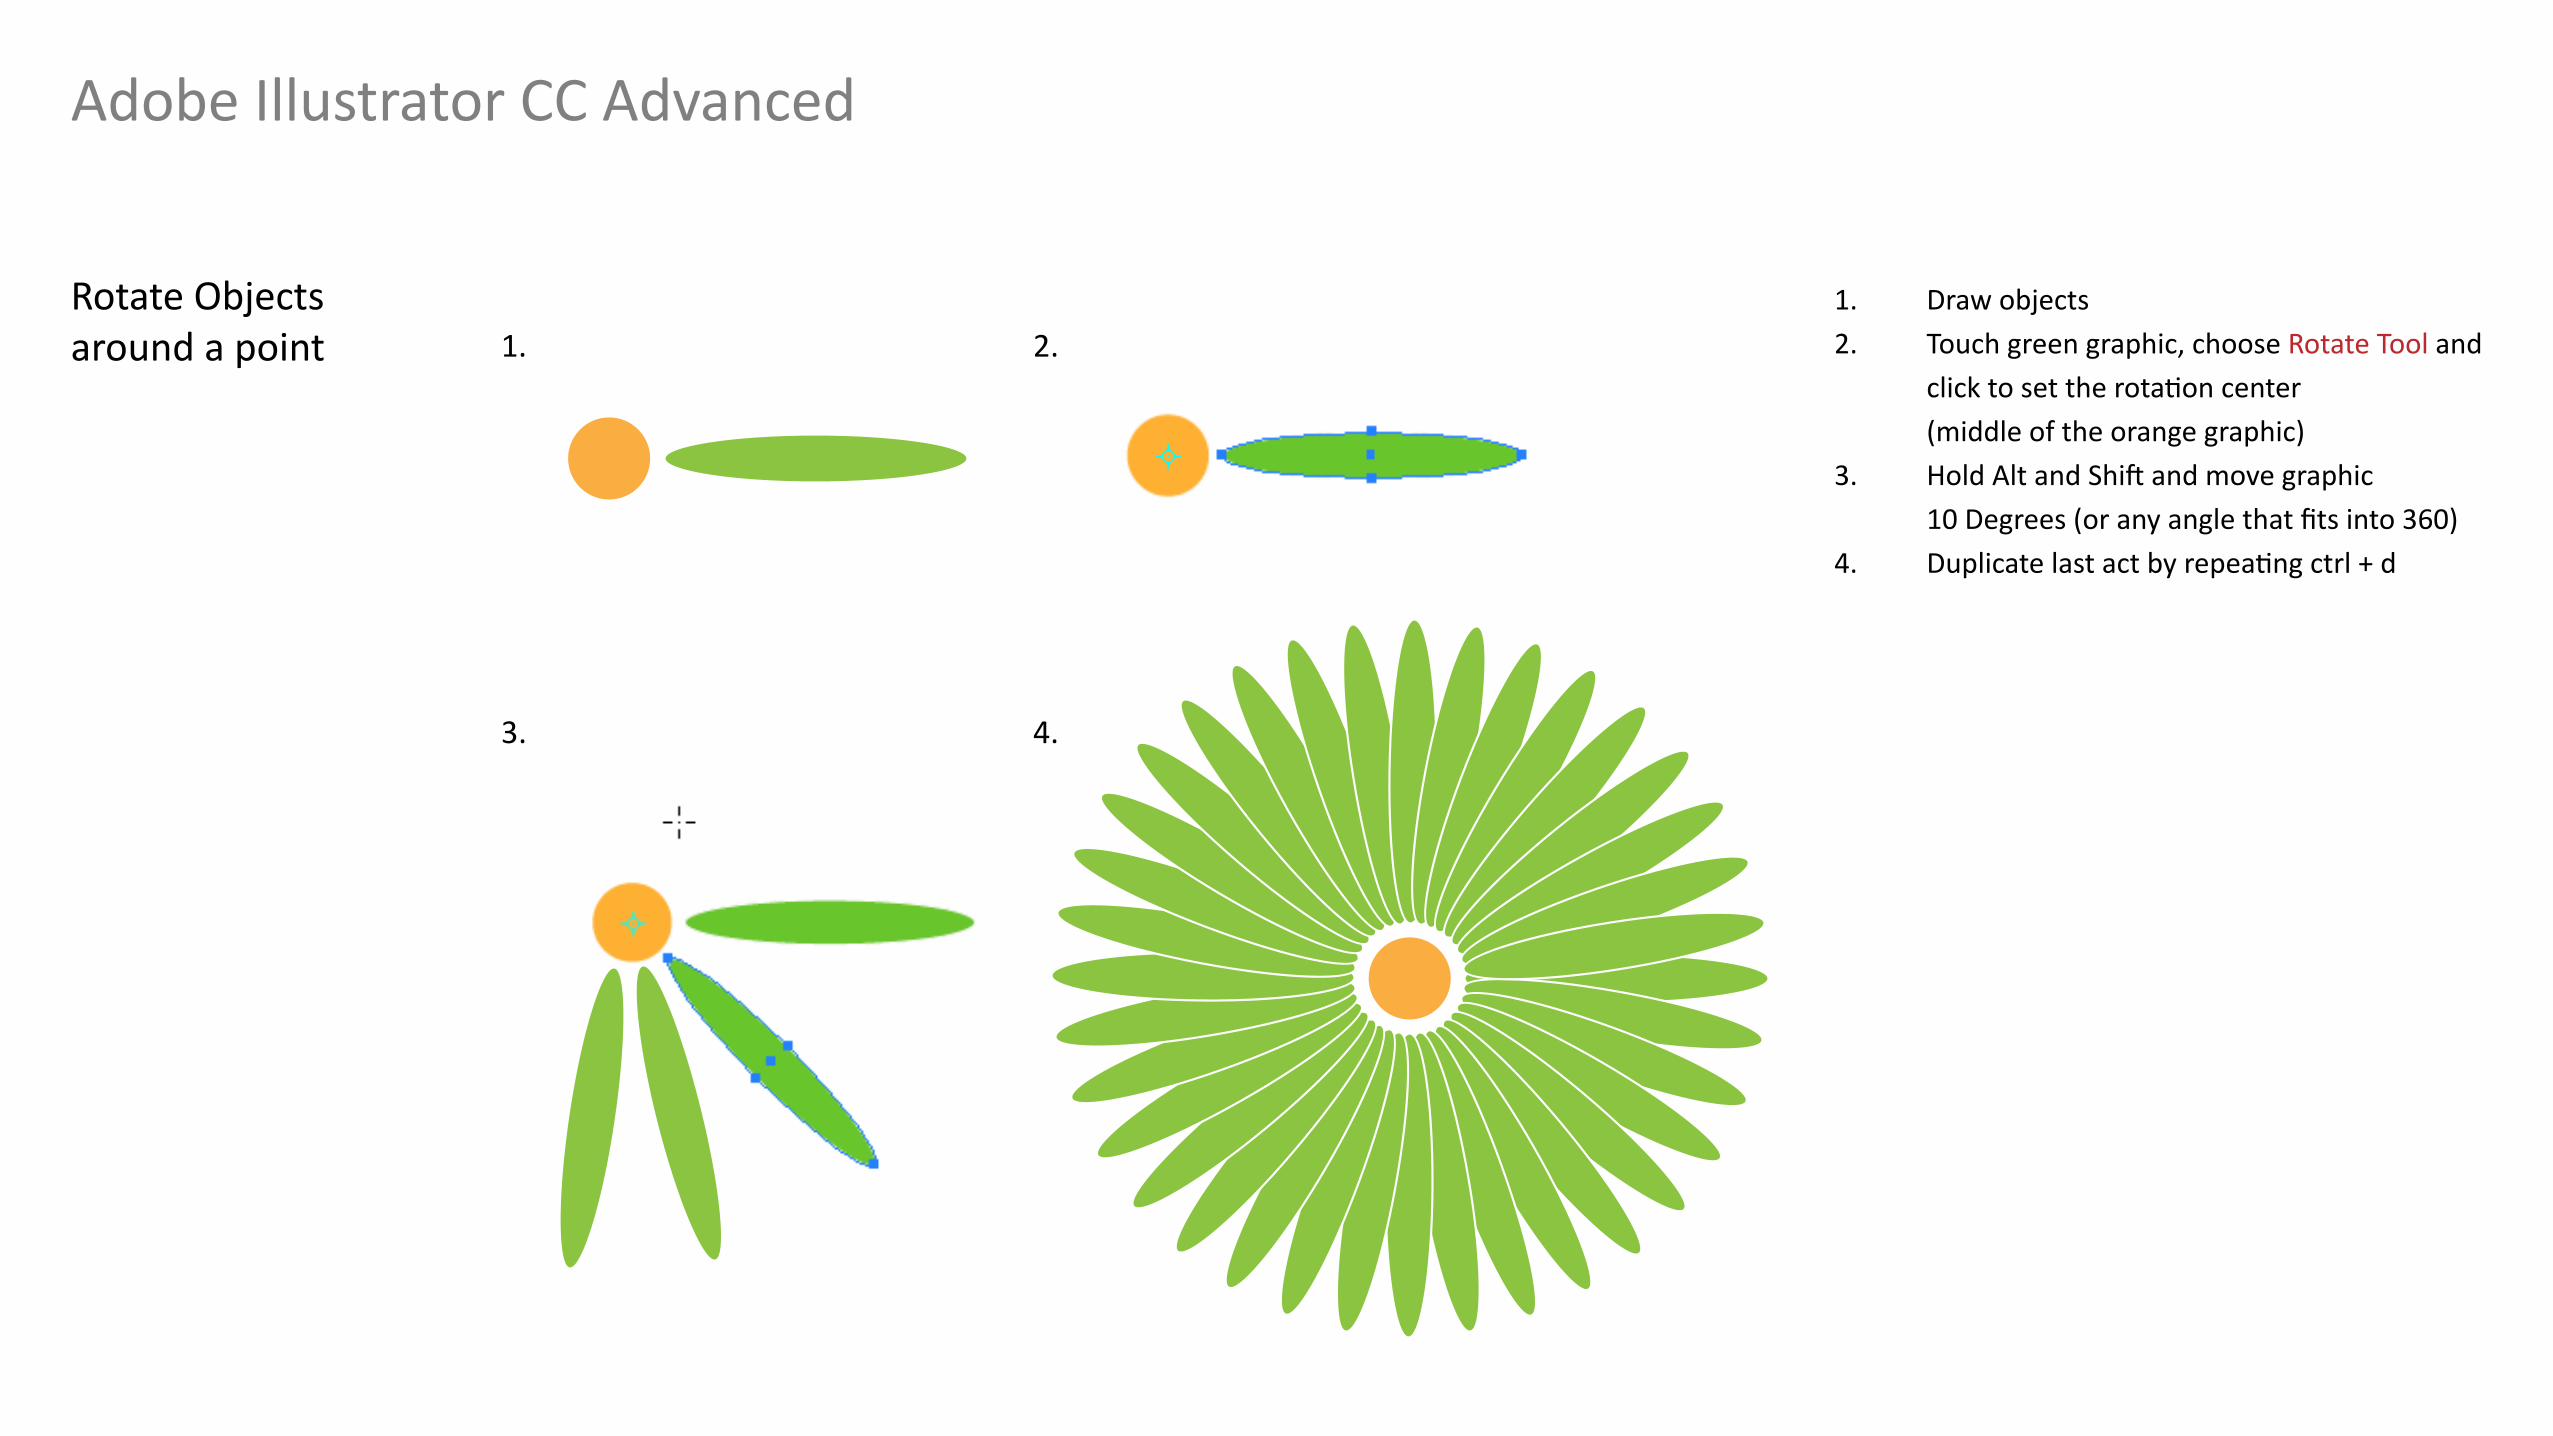
Curvature Tool 1. Choose Curvature Tool Click once to add an anchor point2. Click again to see the preview curve3. Click again to add another anchor point Hold Alt when clicking to avoid curves
1. 2.

Adobe Illustrator CC Advanced
Magic Wand Tool 1. Place Picture2. Trace Image and Expand3. Select Magic Wand Tool Click on any color will select similar colors in the graphic > change color fill4. Double click on tool icon shows settings > change tolerance
1.
3. 4.
2.
Adobe Illustrator CC Advanced
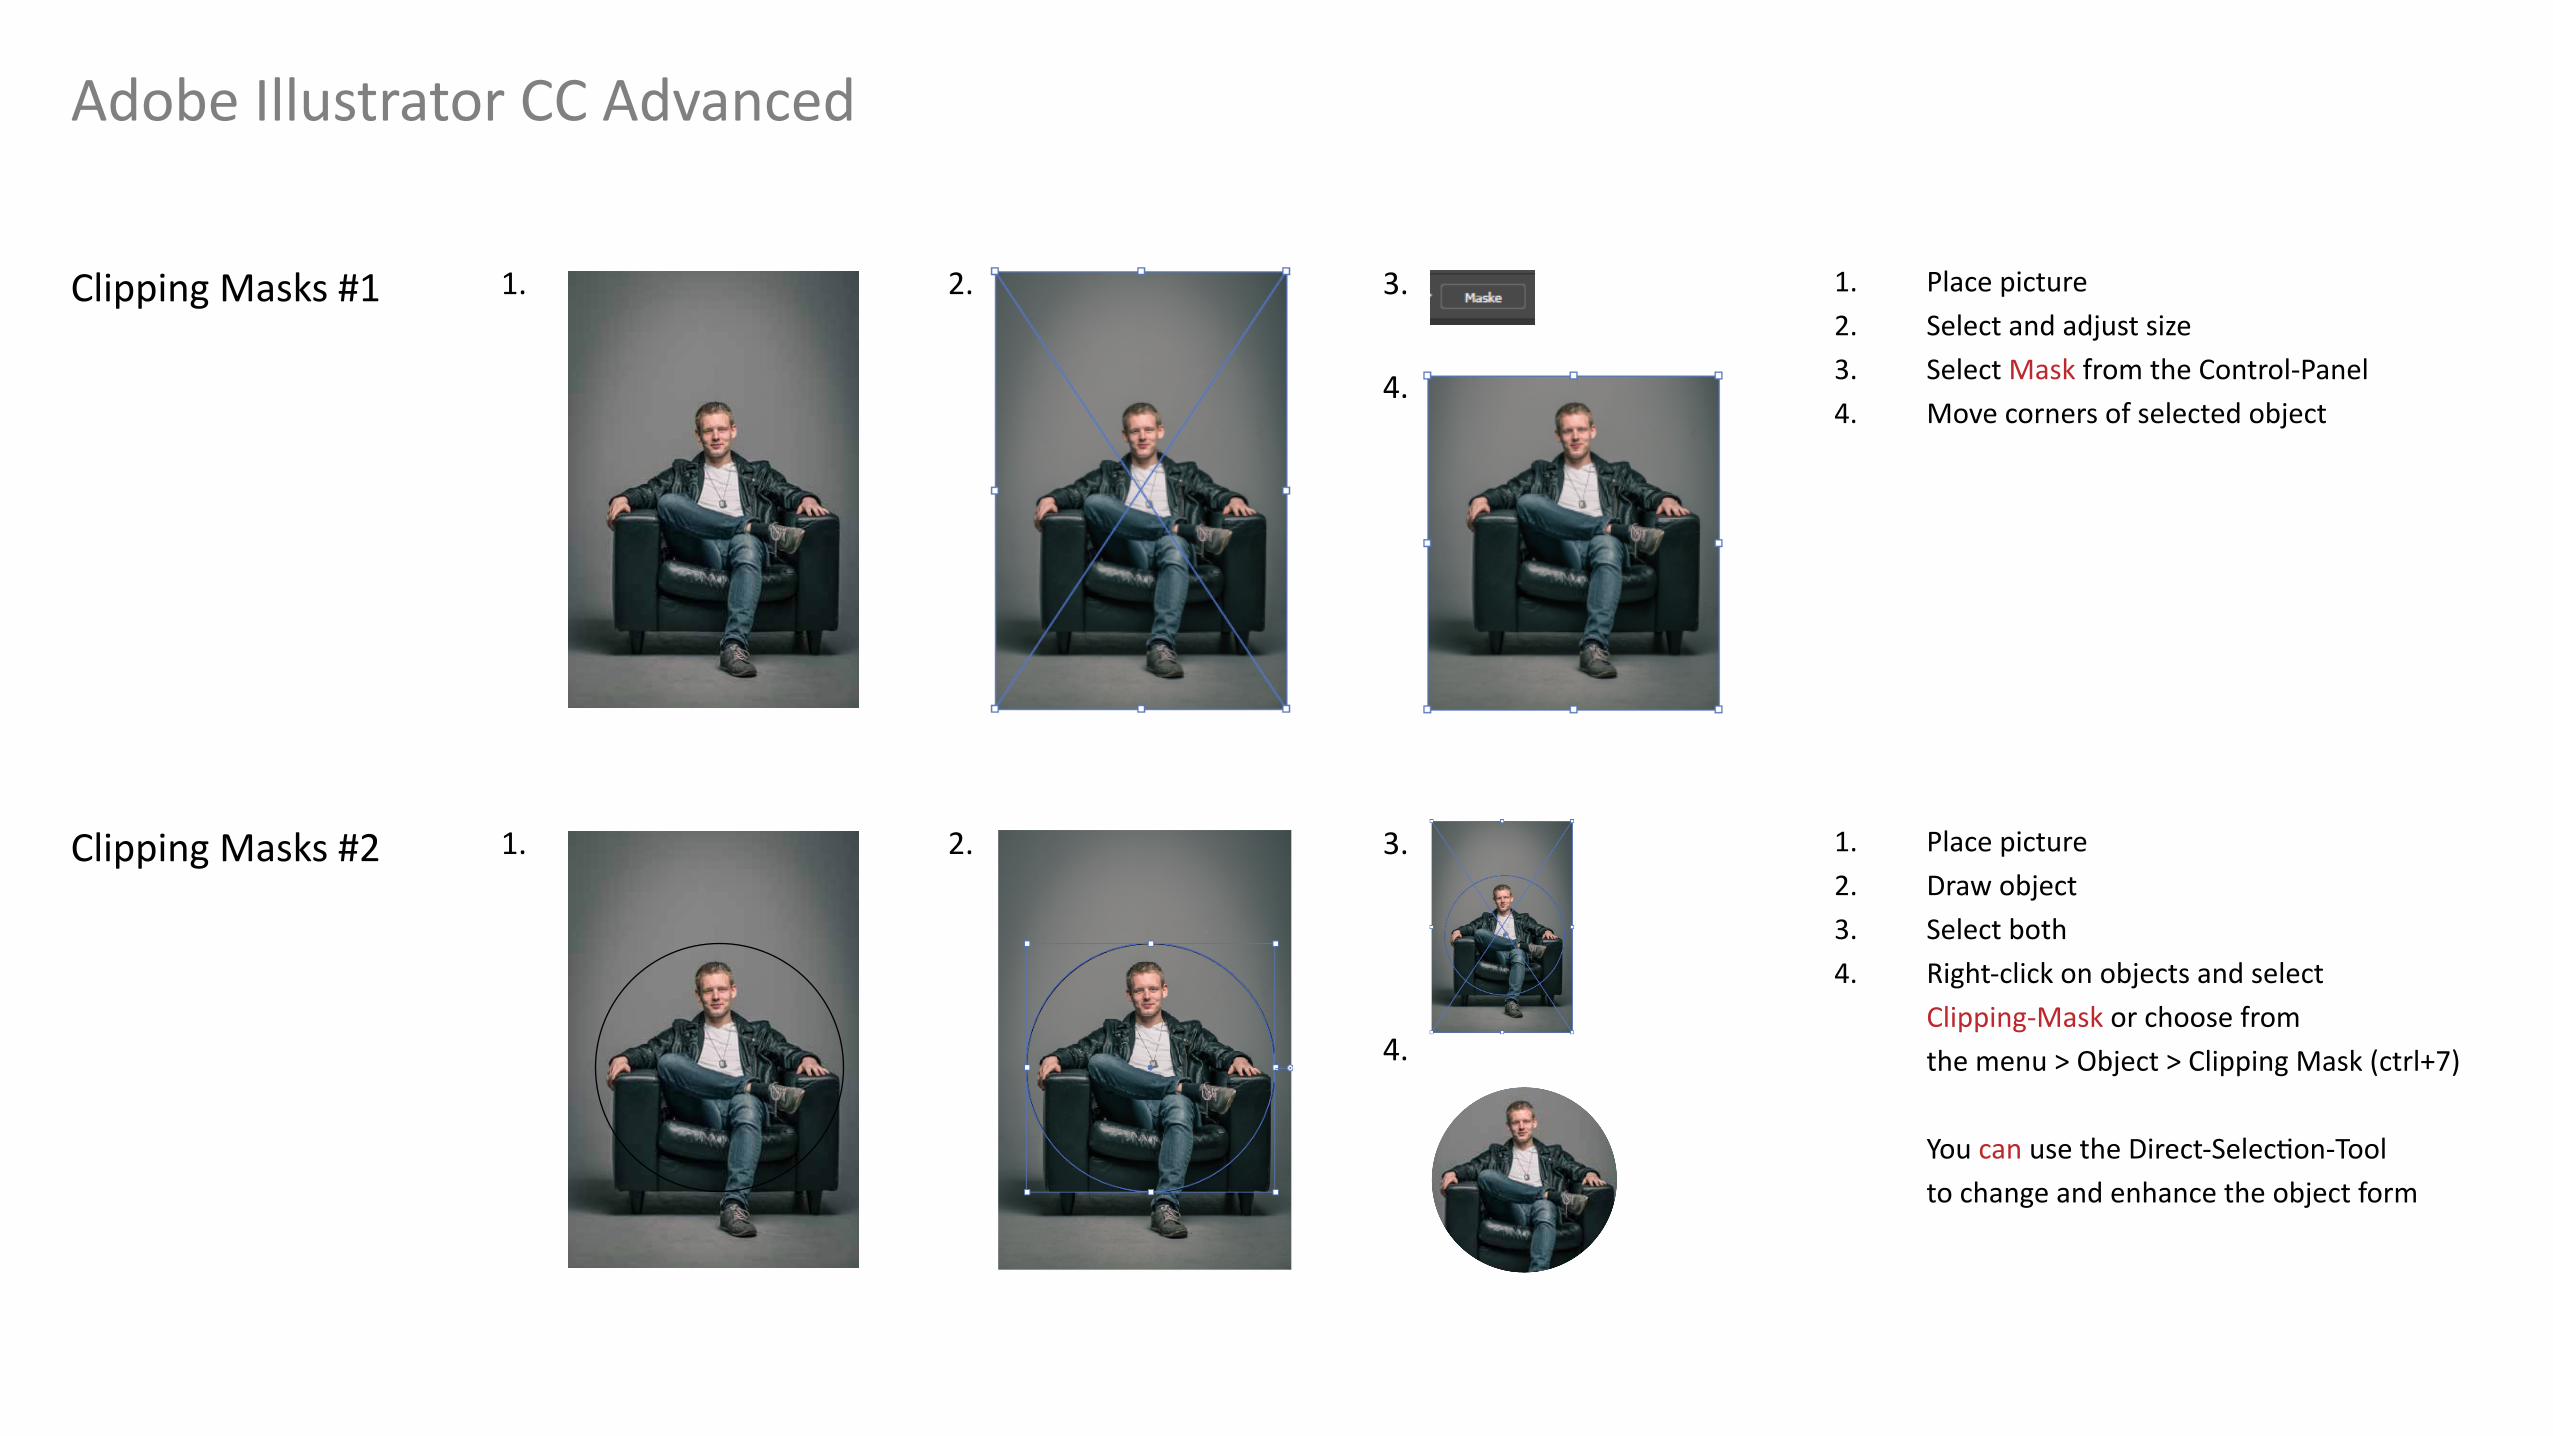
Clipping Masks #1 1. Place picture2. Select and adjust size3. Select Mask from the Control-Panel4. Move corners of selected object
Clipping Masks #2 1. Place picture2. Draw object3. Select both4. Right-click on objects and select Clipping-Mask or choose from the menu > Object > Clipping Mask (ctrl+7)
You can use the Direct-Selection-Tool to change and enhance the object form
1.
2.
1.
2.
2. 3.
4.
3.
4.
Adobe Illustrator CC Advanced
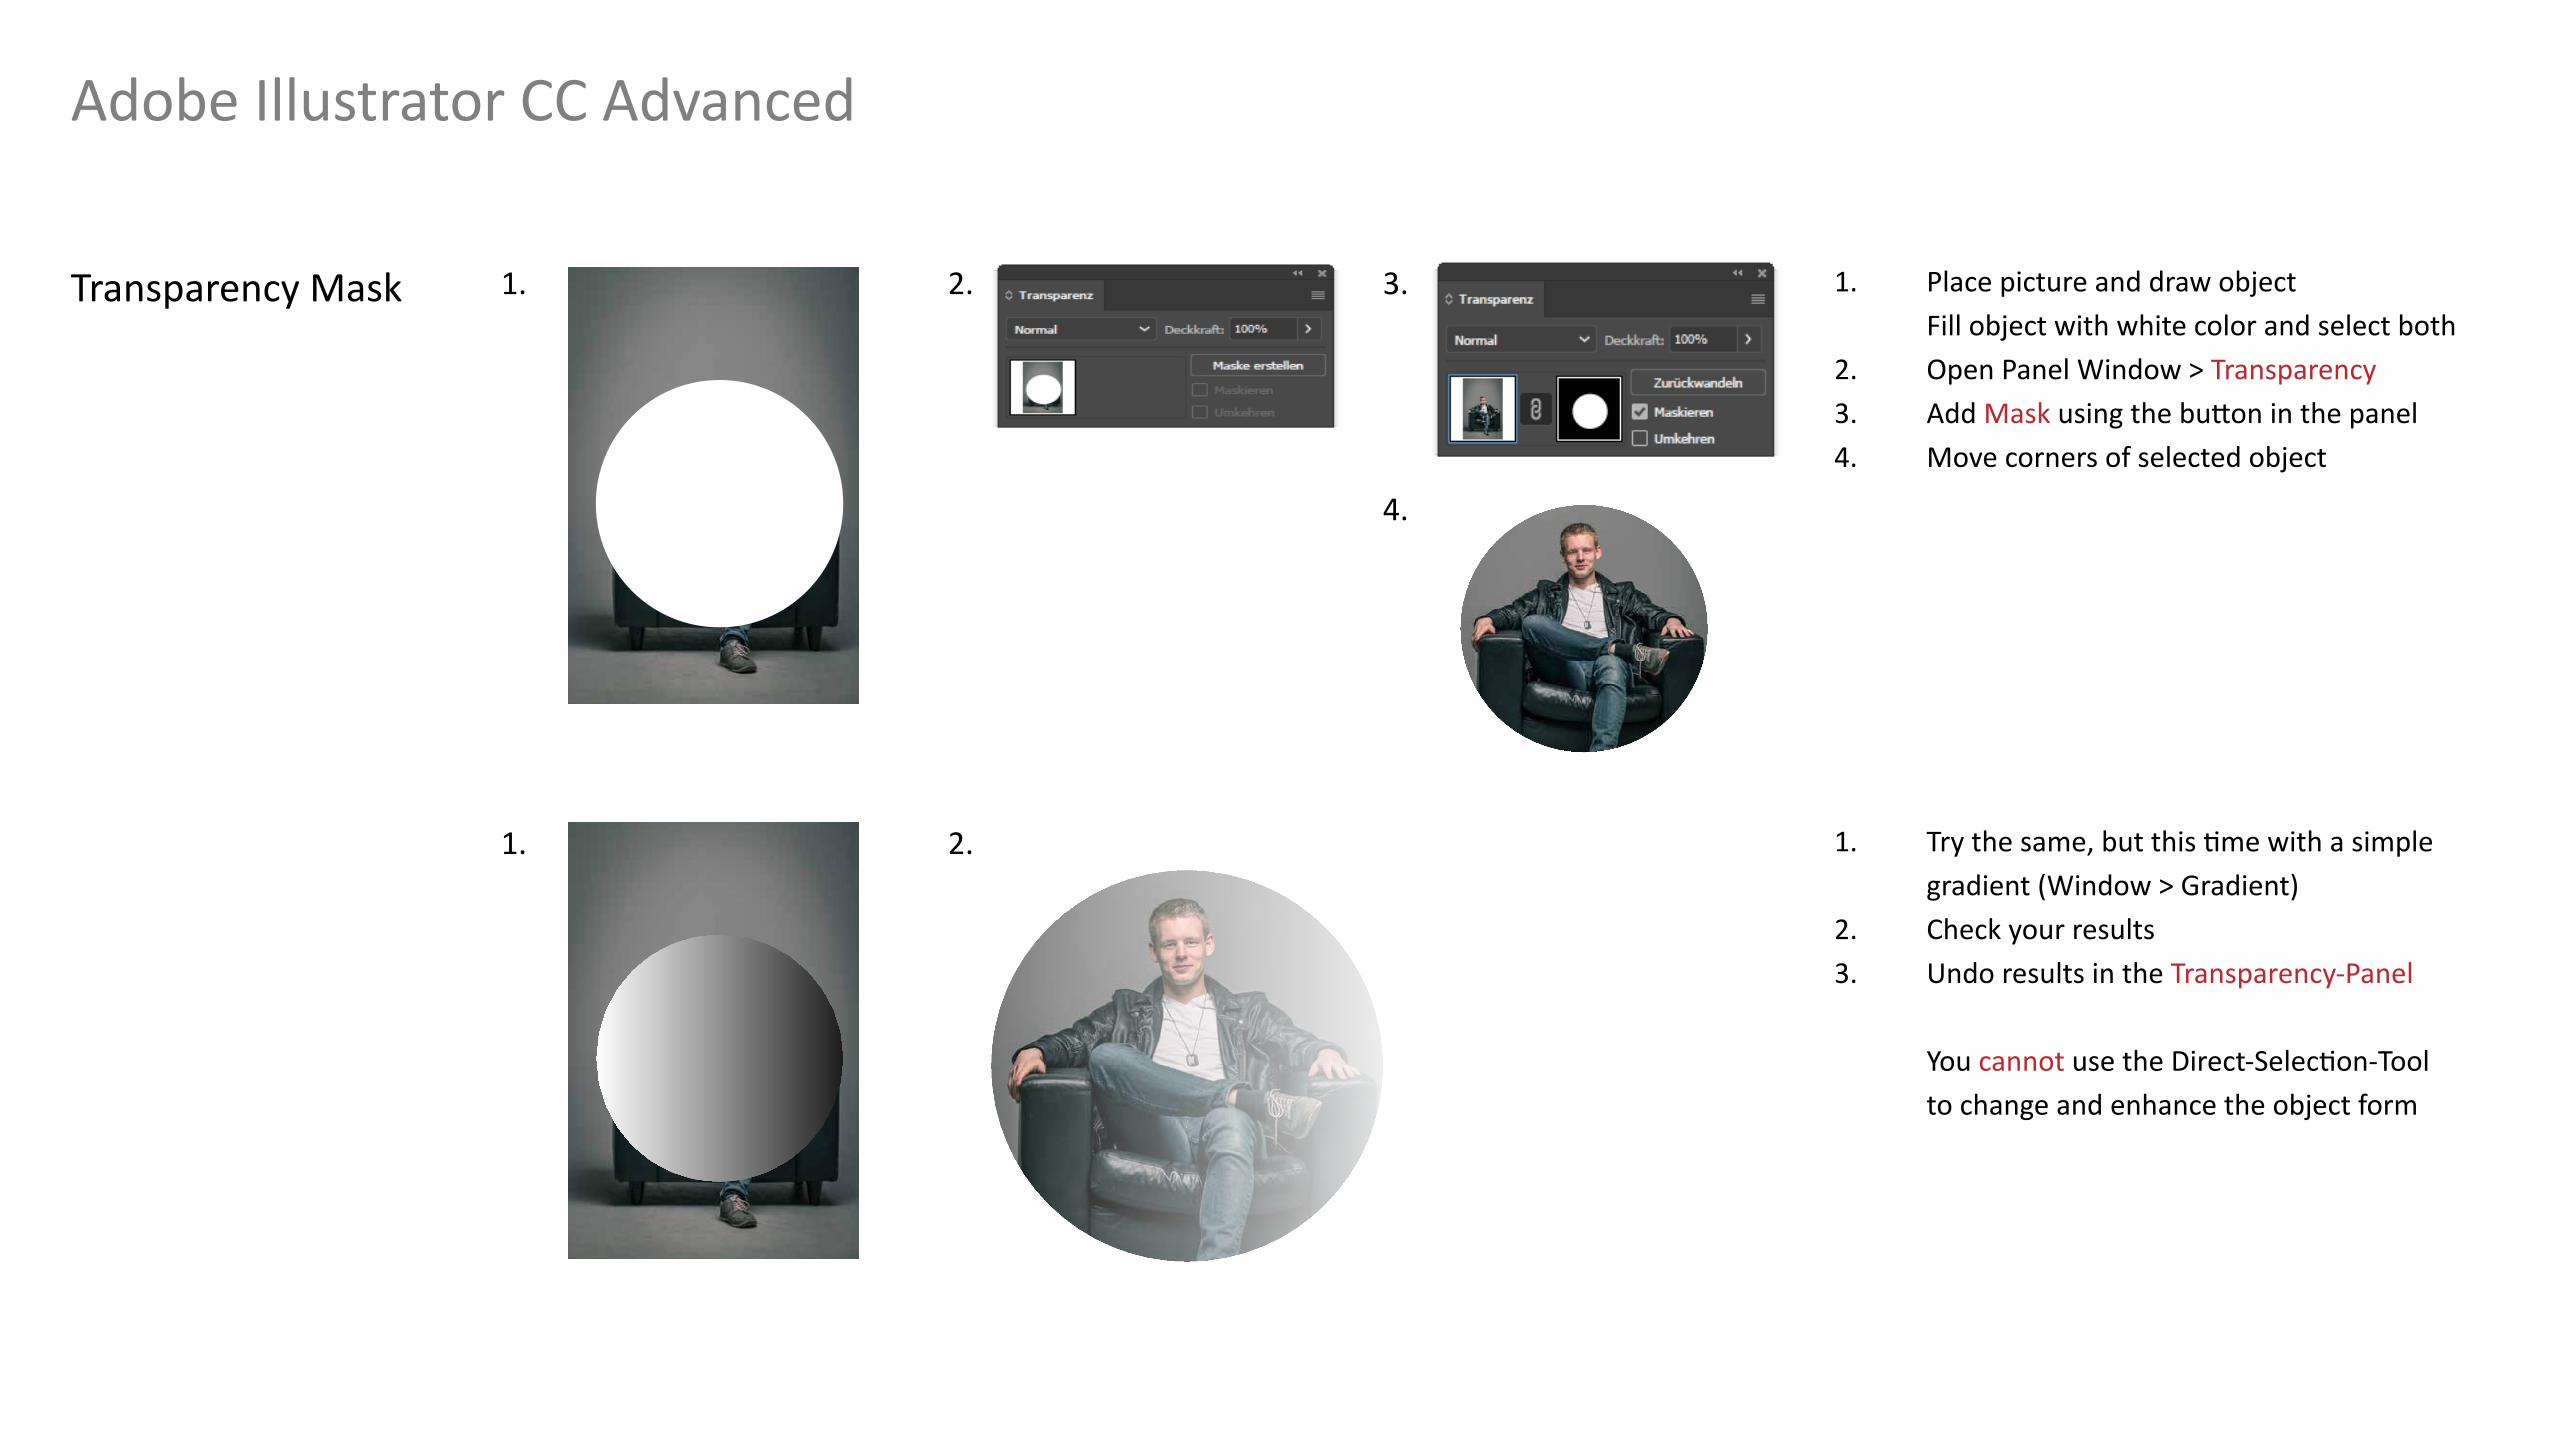
Transparency Mask 1. Place picture and draw object Fill object with white color and select both2. Open Panel Window > Transparency3. Add Mask using the button in the panel4. Move corners of selected object
1.
1.
2.
2.
3.
4.
1. Try the same, but this time with a simple gradient (Window > Gradient)2. Check your results3. Undo results in the Transparency-Panel
You cannot use the Direct-Selection-Tool to change and enhance the object form
Adobe Illustrator CC Advanced
Filter and EffectsIllustrator
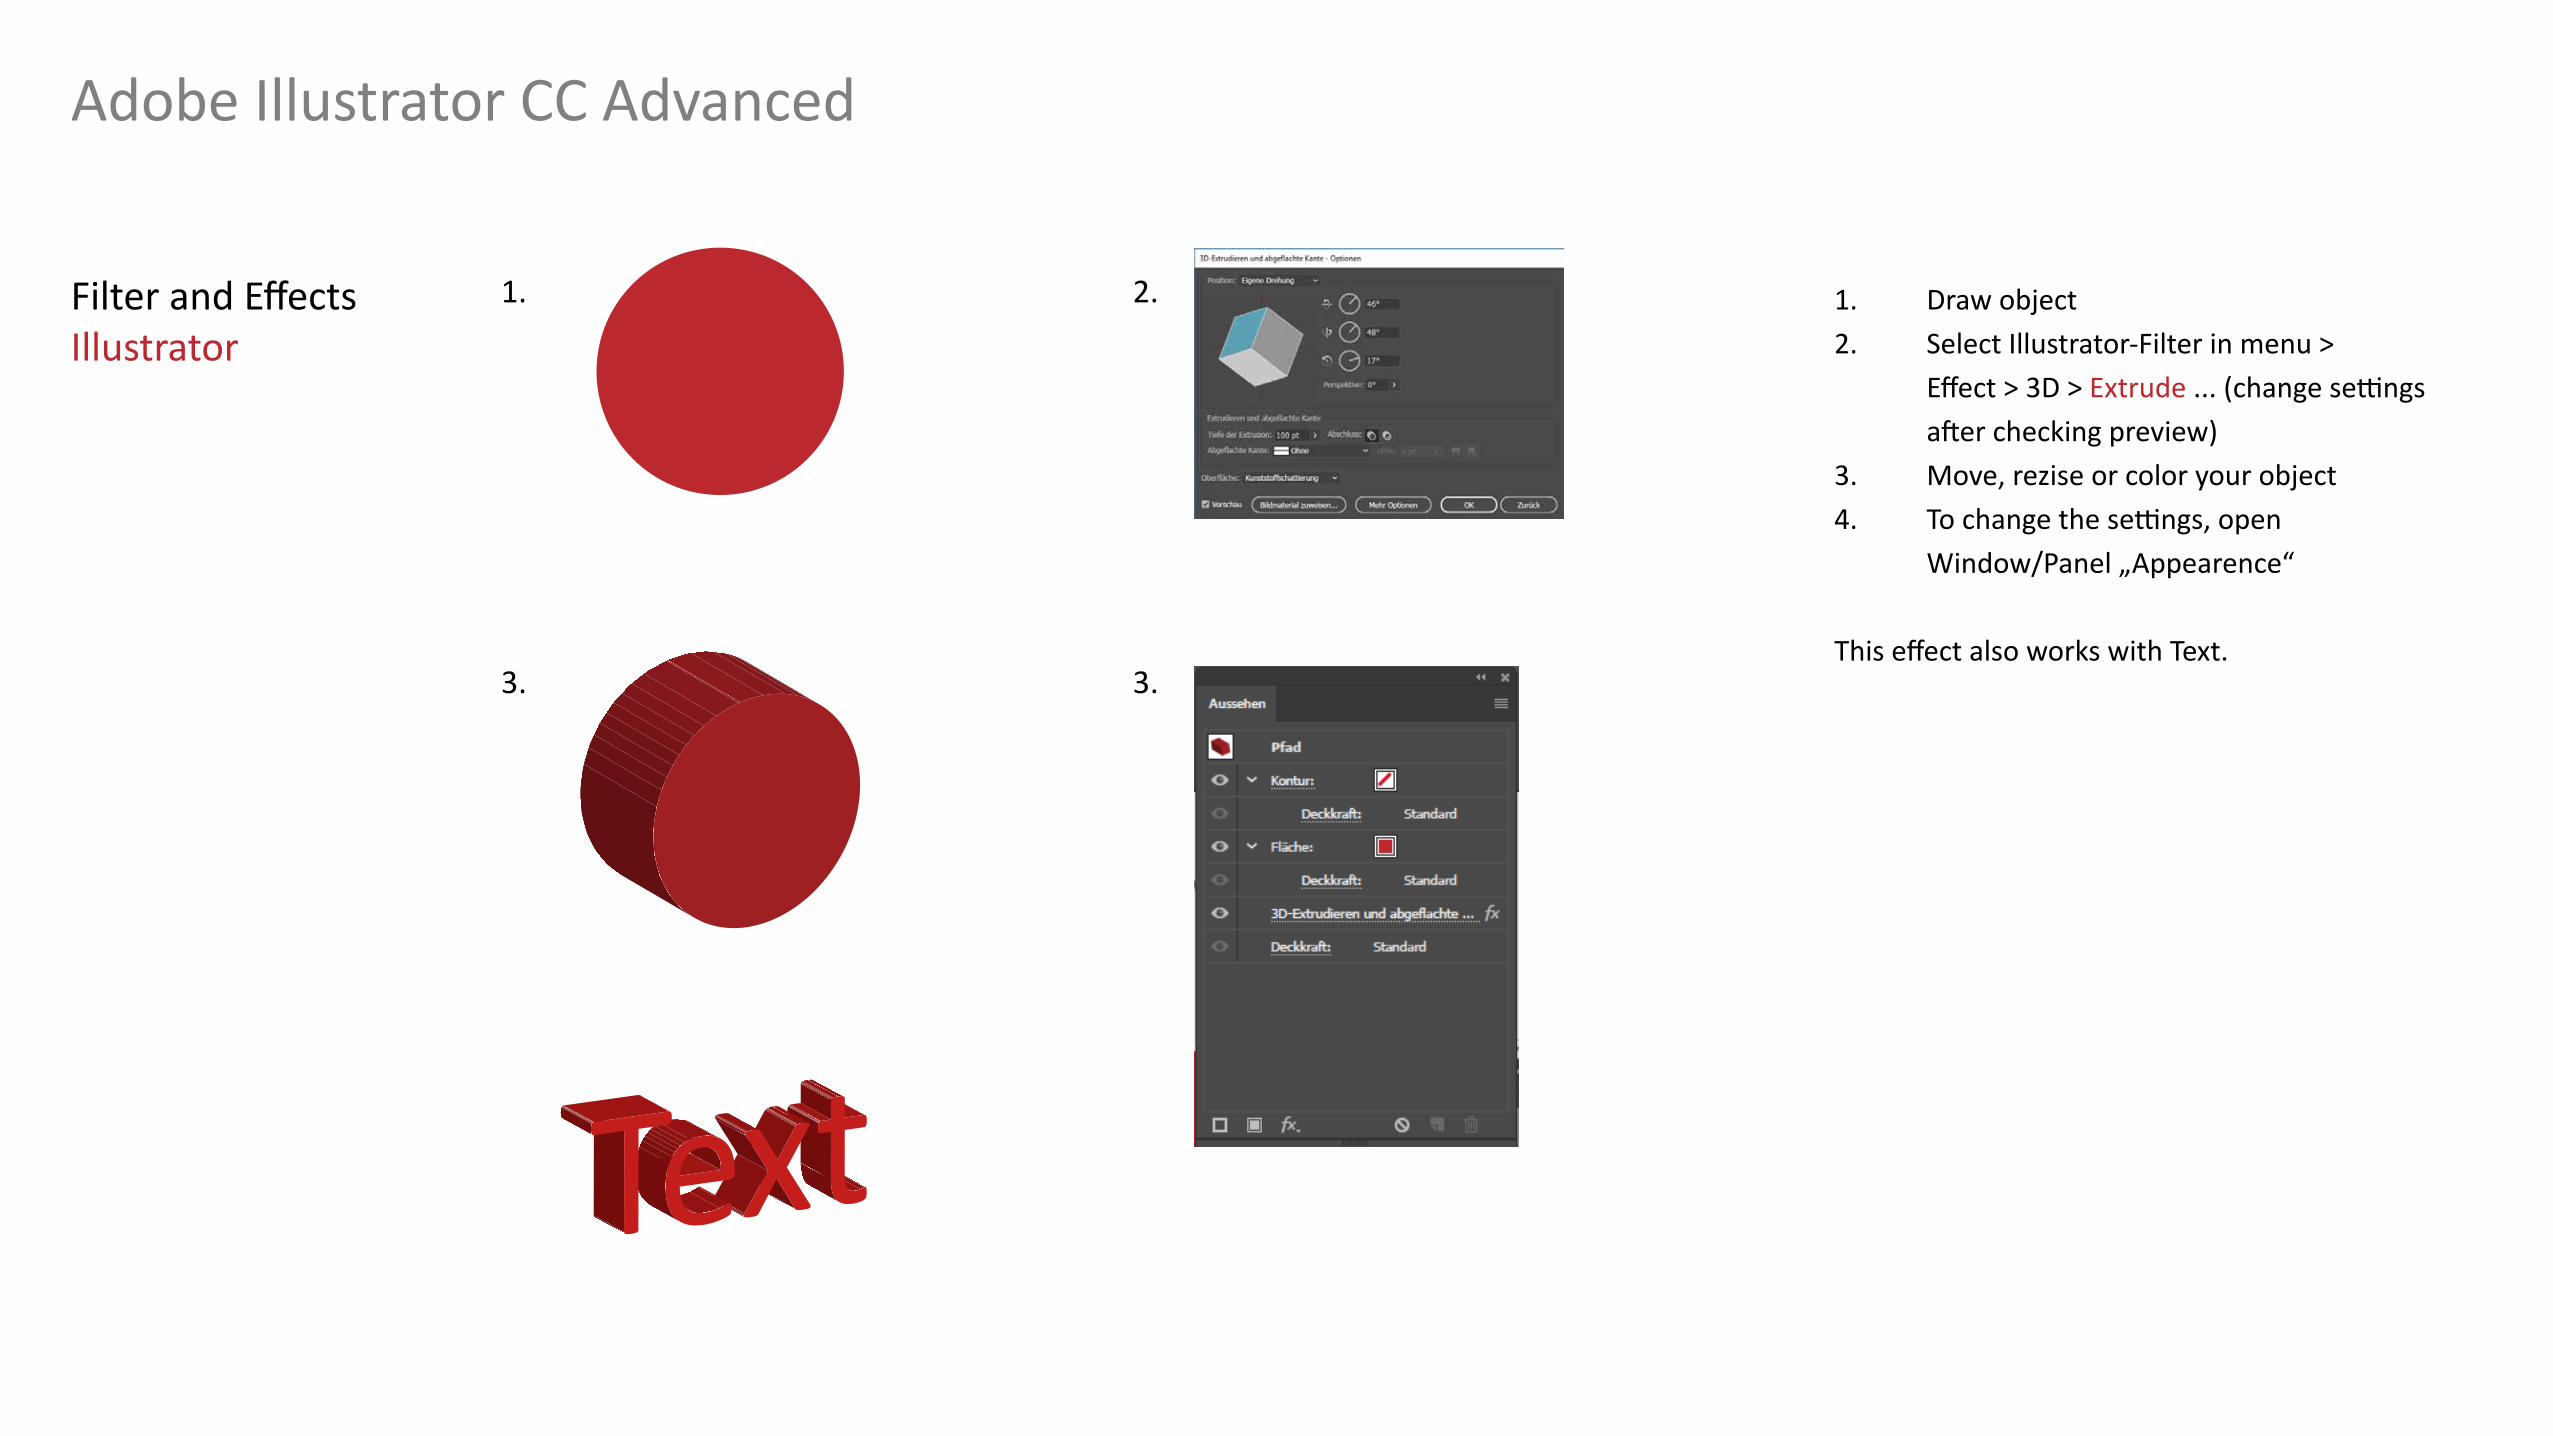
1. Draw object2. Select Illustrator-Filter in menu > Effect > 3D > Extrude ... (change settings after checking preview)3. Move, rezise or color your object4. To change the settings, open Window/Panel „Appearence“
This effect also works with Text.3. 3.
1. 2.
Adobe Illustrator CC Advanced
Filter and EffectsIllustrator 3D
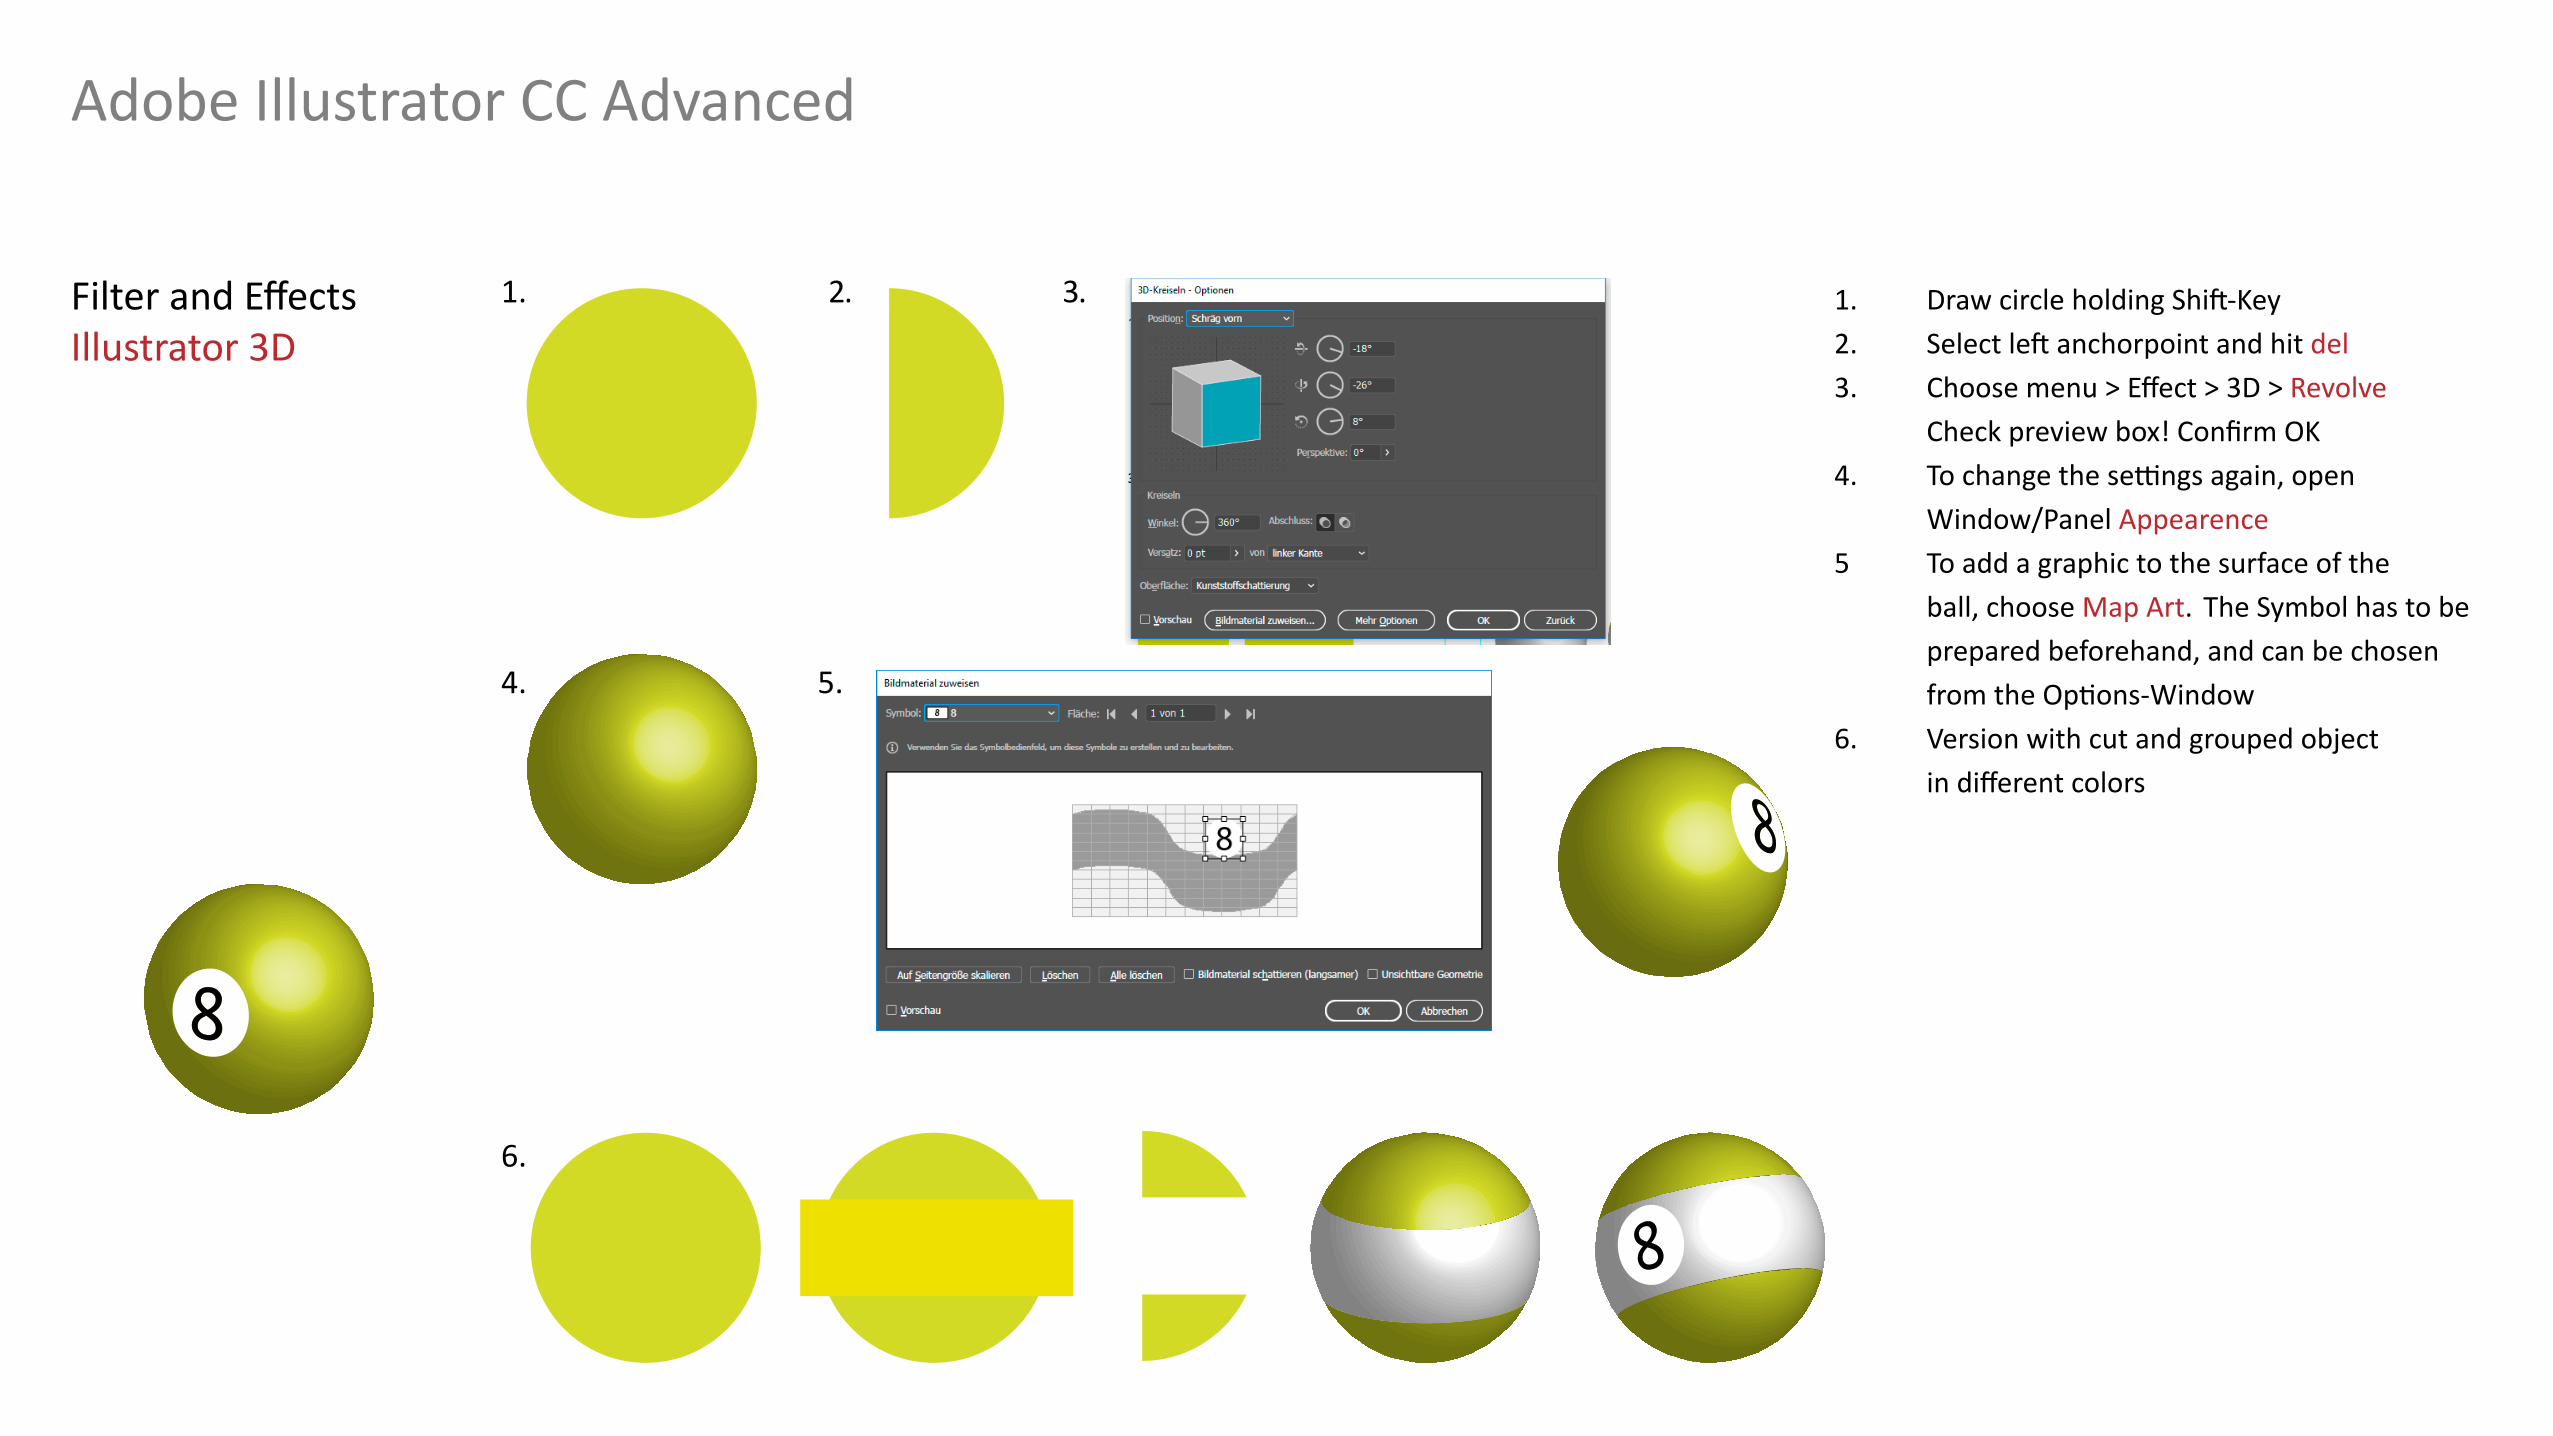
1. Draw circle holding Shift-Key2. Select left anchorpoint and hit del3. Choose menu > Effect > 3D > Revolve Check preview box! Confirm OK4. To change the settings again, open Window/Panel Appearence5 To add a graphic to the surface of the ball, choose Map Art. The Symbol has to be prepared beforehand, and can be chosen from the Options-Window6. Version with cut and grouped object in different colors
4.
6.
5.
1. 3.2.
Adobe Illustrator CC Advanced
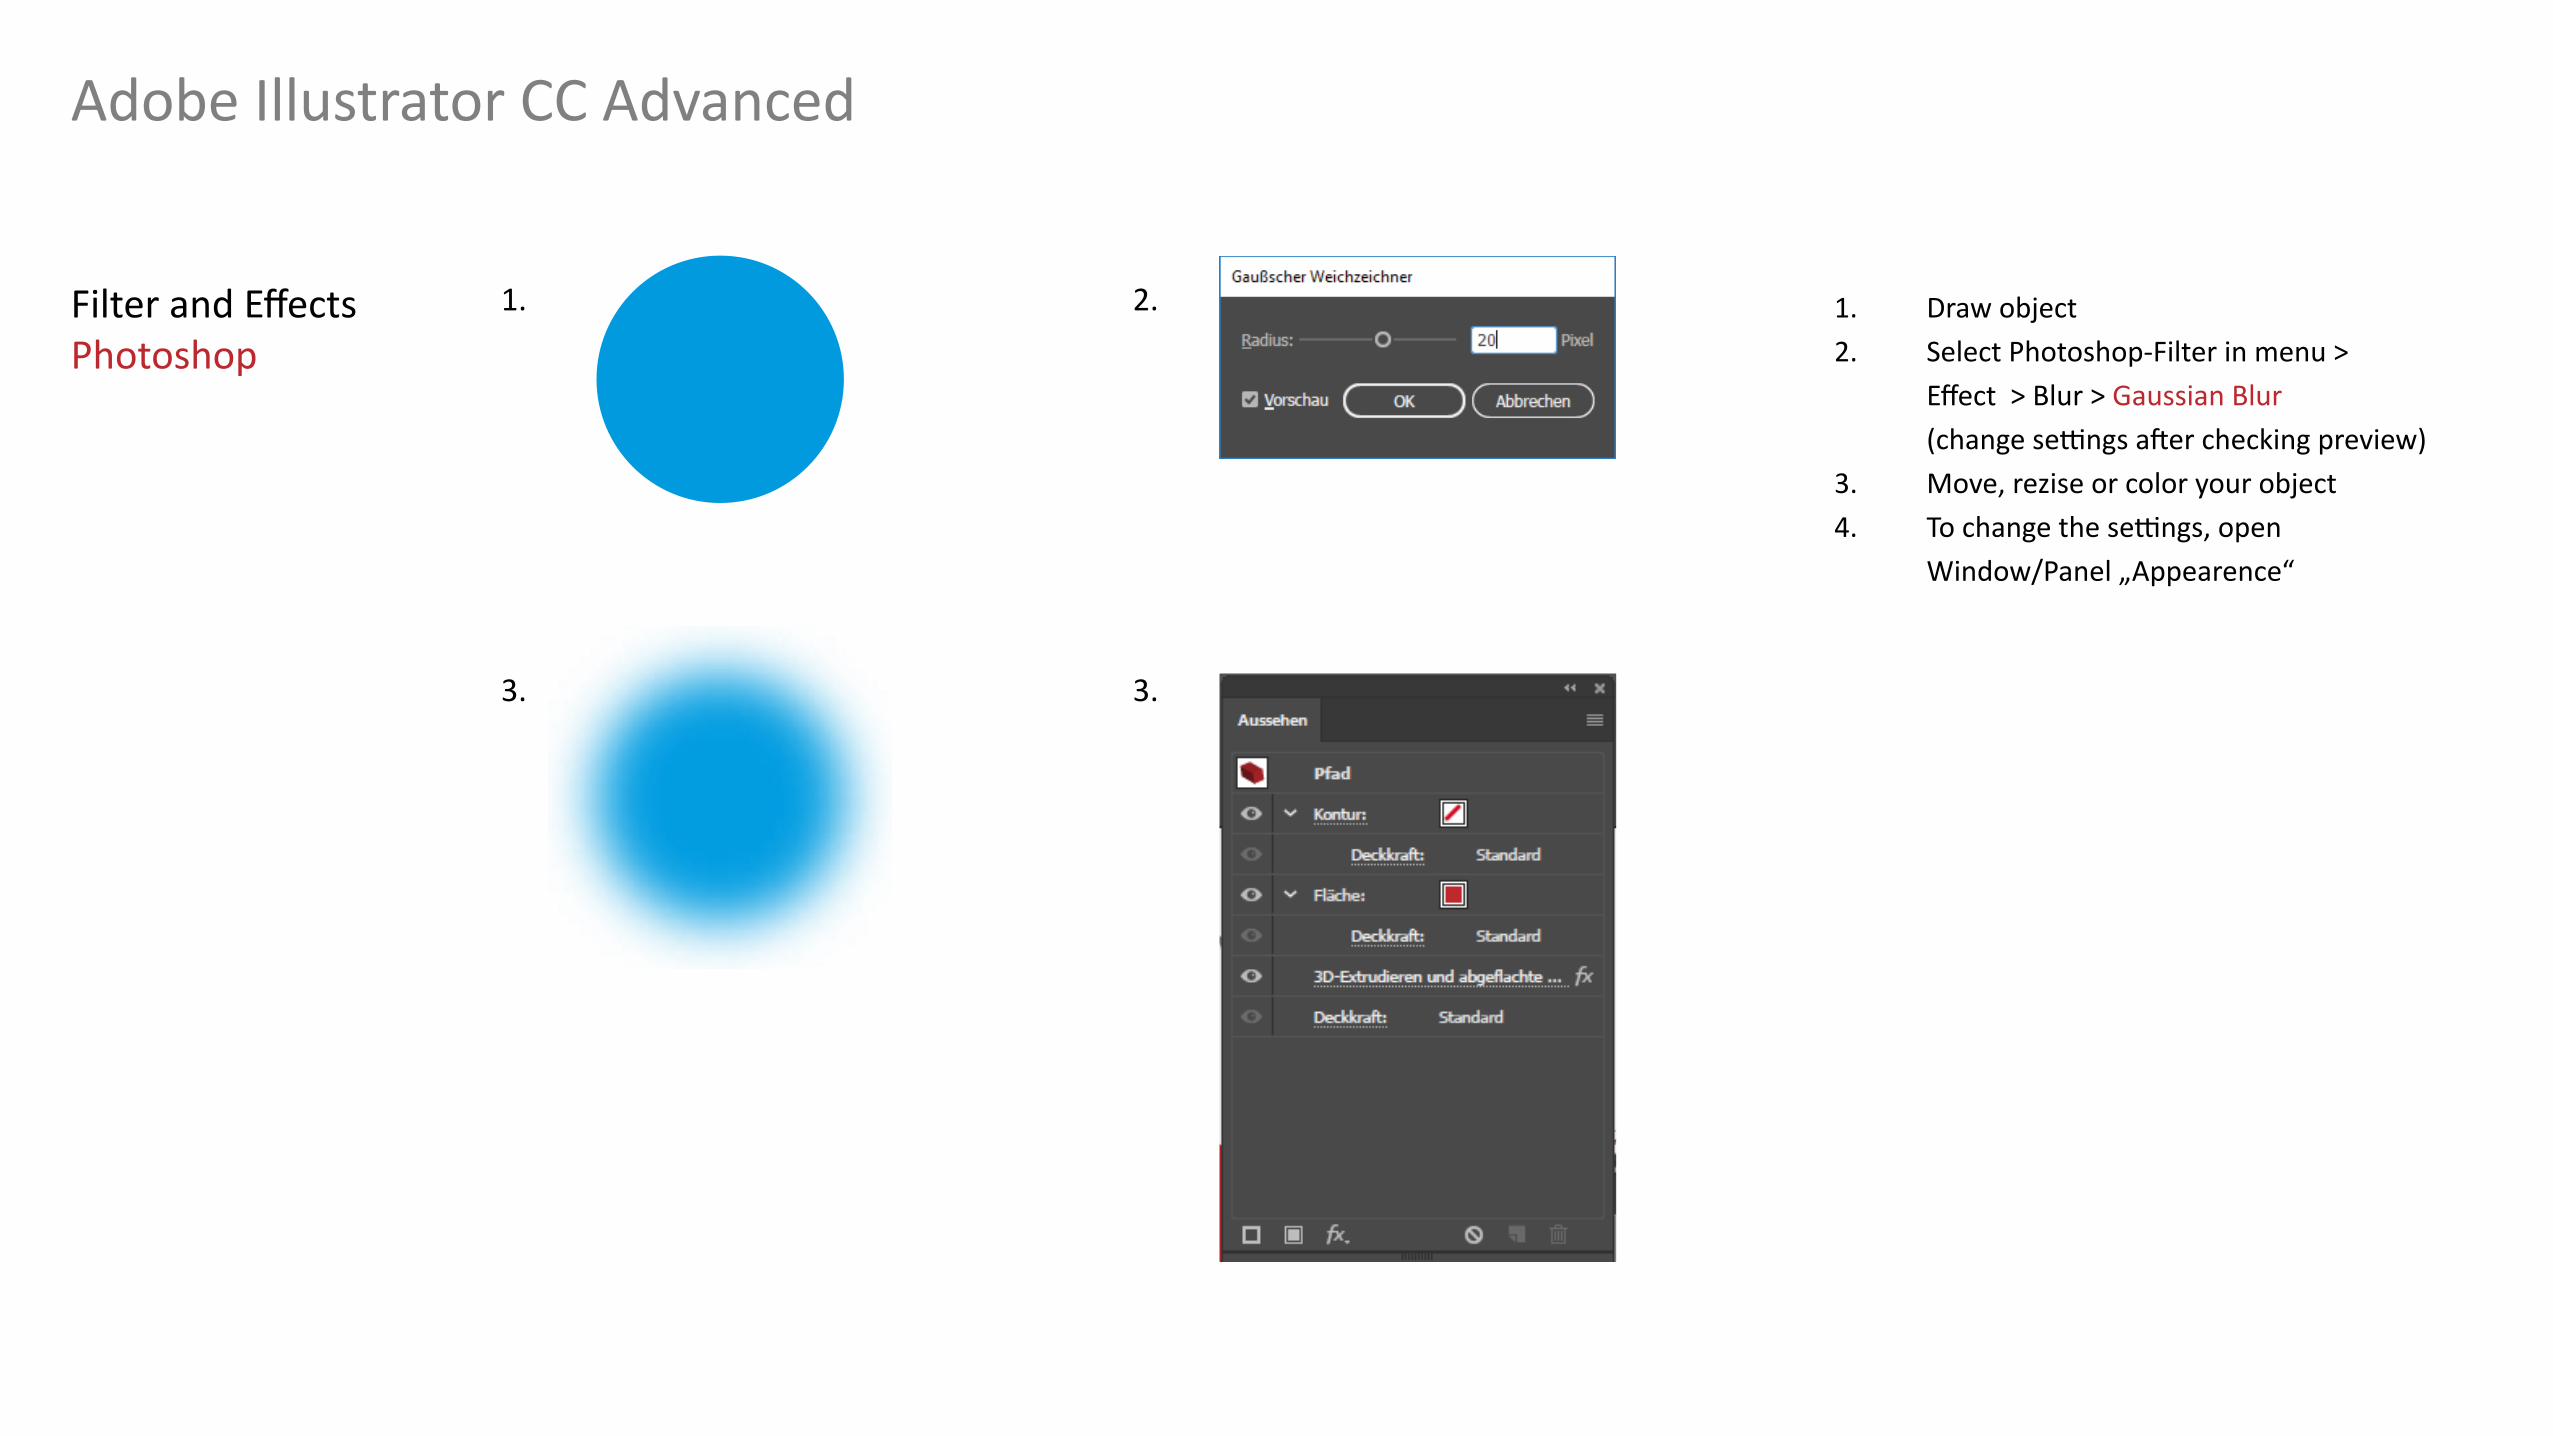
Filter and EffectsPhotoshop
1. Draw object2. Select Photoshop-Filter in menu > Effect > Blur > Gaussian Blur (change settings after checking preview)3. Move, rezise or color your object4. To change the settings, open Window/Panel „Appearence“
3. 3.
1. 2.
Adobe Illustrator CC Advanced
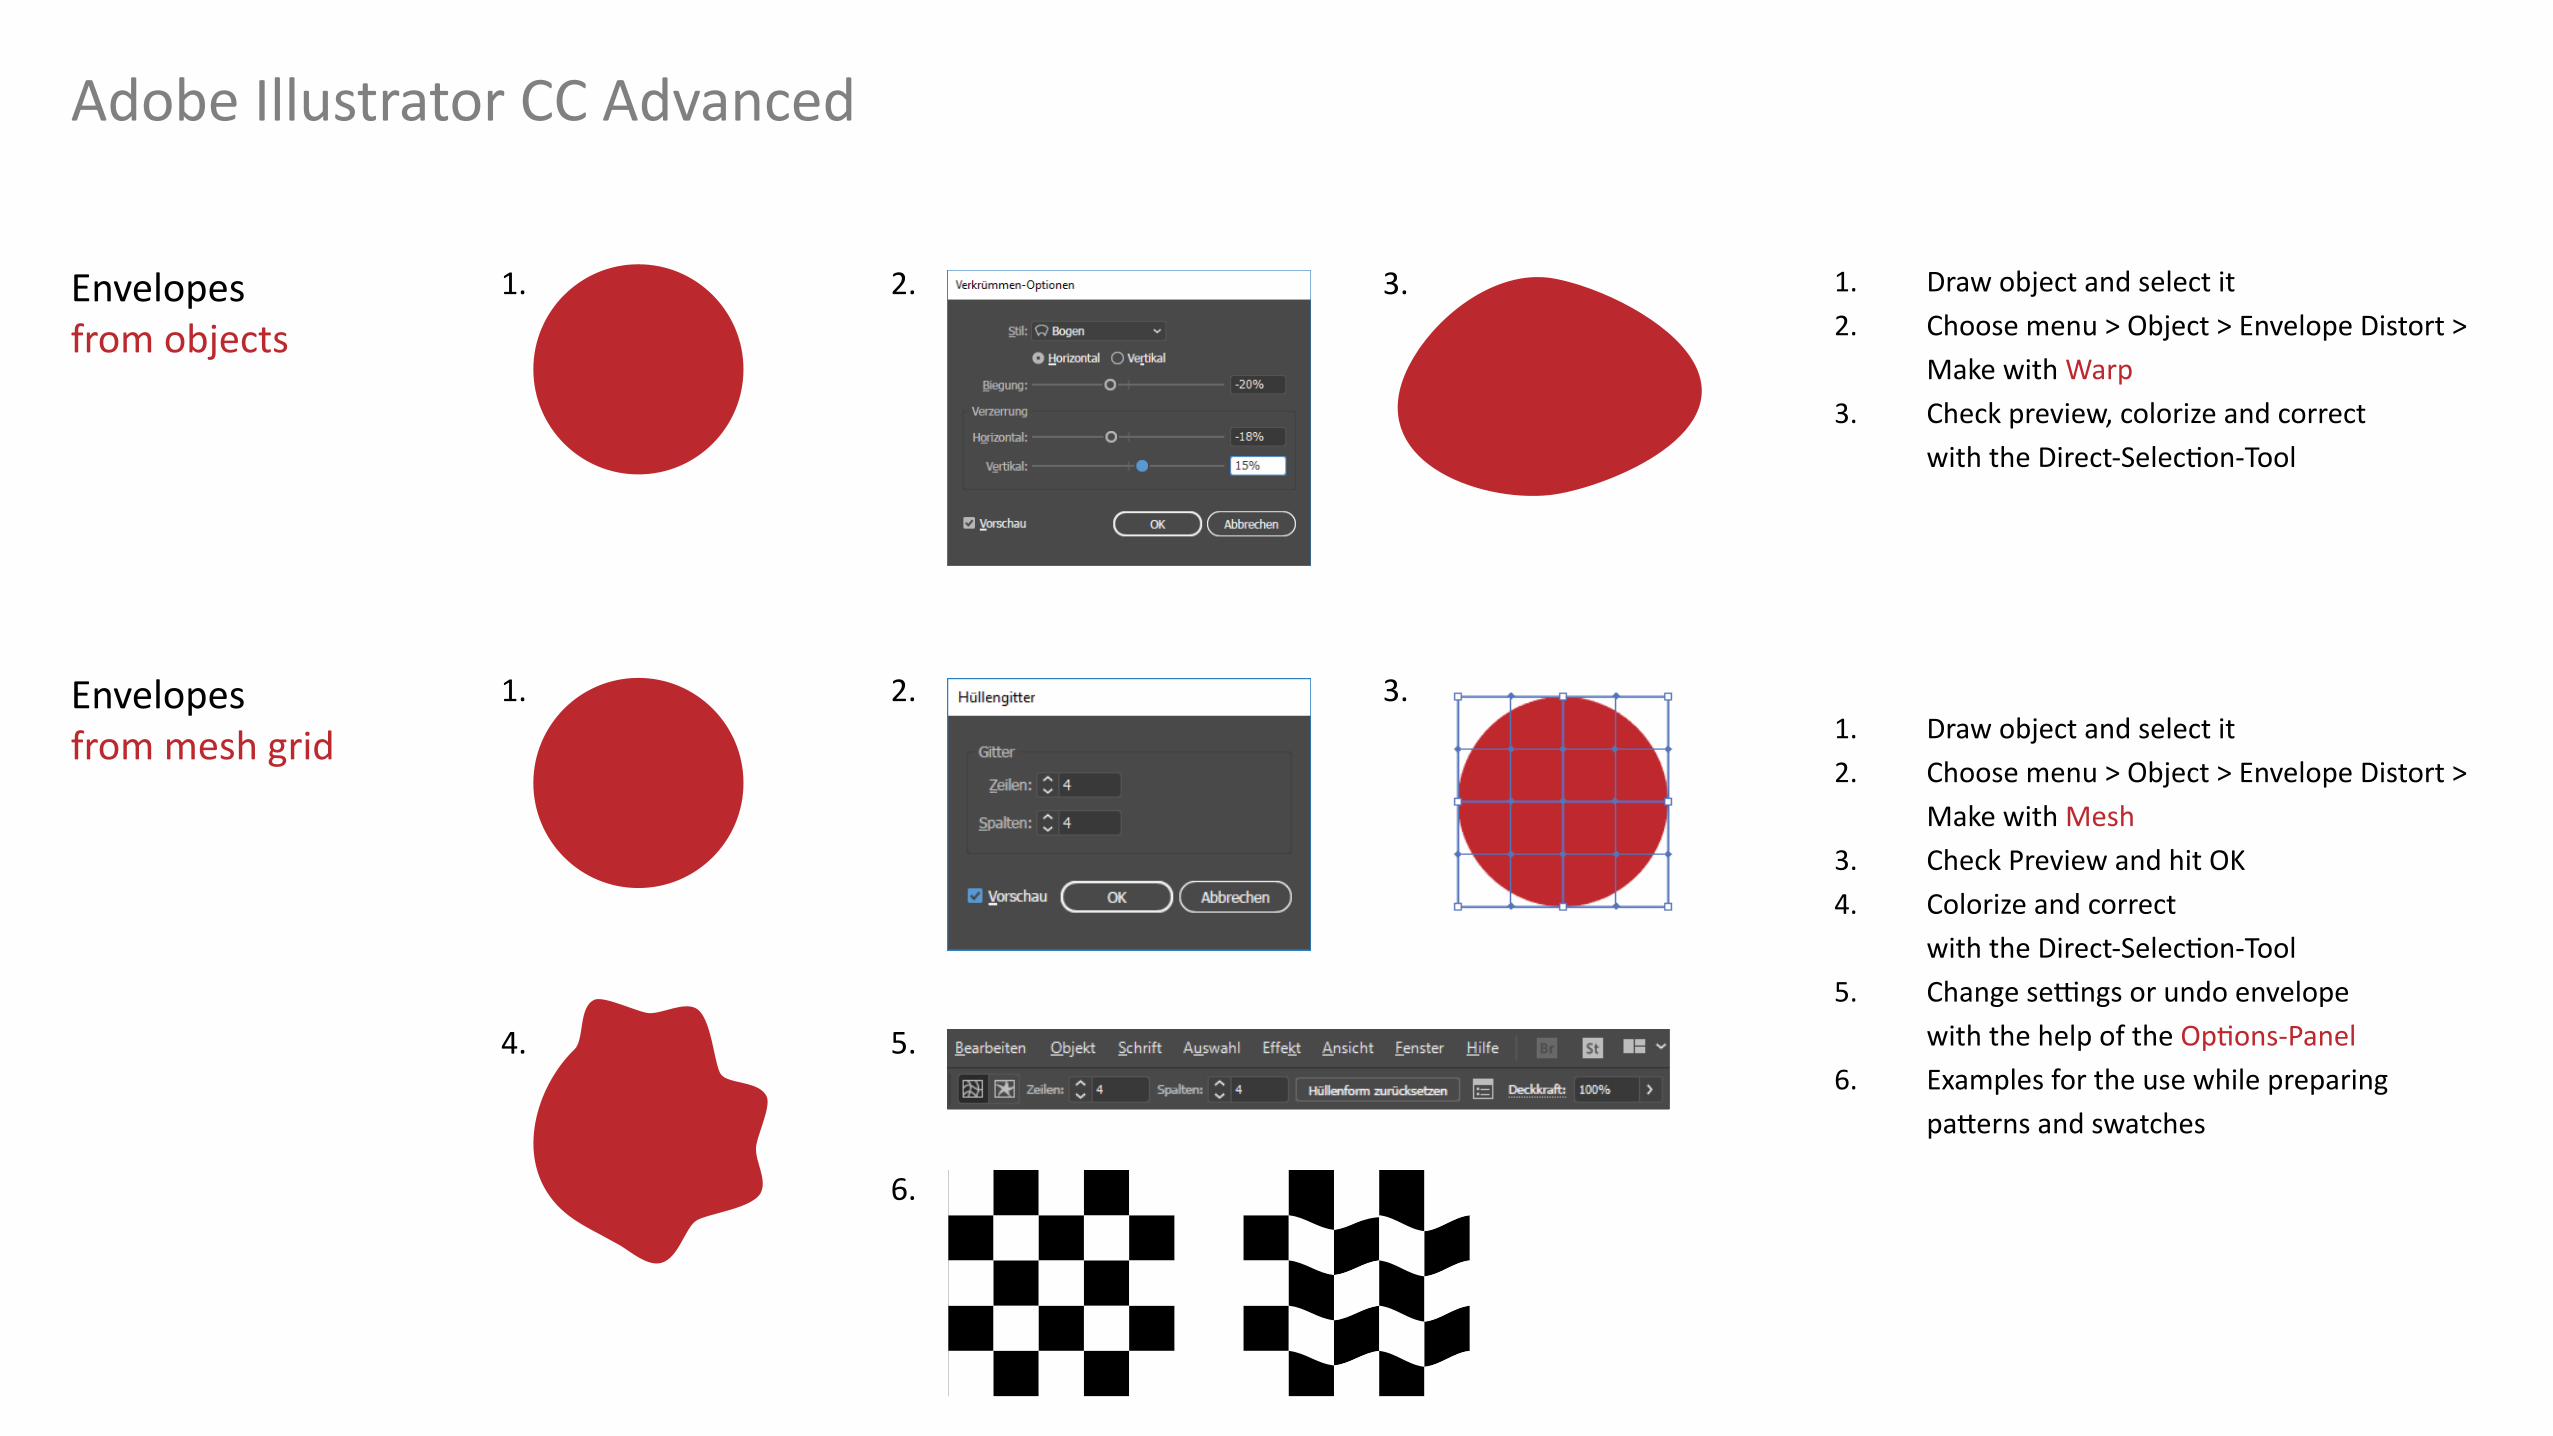
Envelopesfrom objects
1. Draw object and select it2. Choose menu > Object > Envelope Distort > Make with Warp3. Check preview, colorize and correct with the Direct-Selection-Tool
Envelopesfrom mesh grid 1. Draw object and select it
2. Choose menu > Object > Envelope Distort > Make with Mesh3. Check Preview and hit OK4. Colorize and correct with the Direct-Selection-Tool5. Change settings or undo envelope with the help of the Options-Panel6. Examples for the use while preparing patterns and swatches
1.
1.
4.
2.
2.
5.
6.
3.
3.
Adobe Illustrator CC Advanced
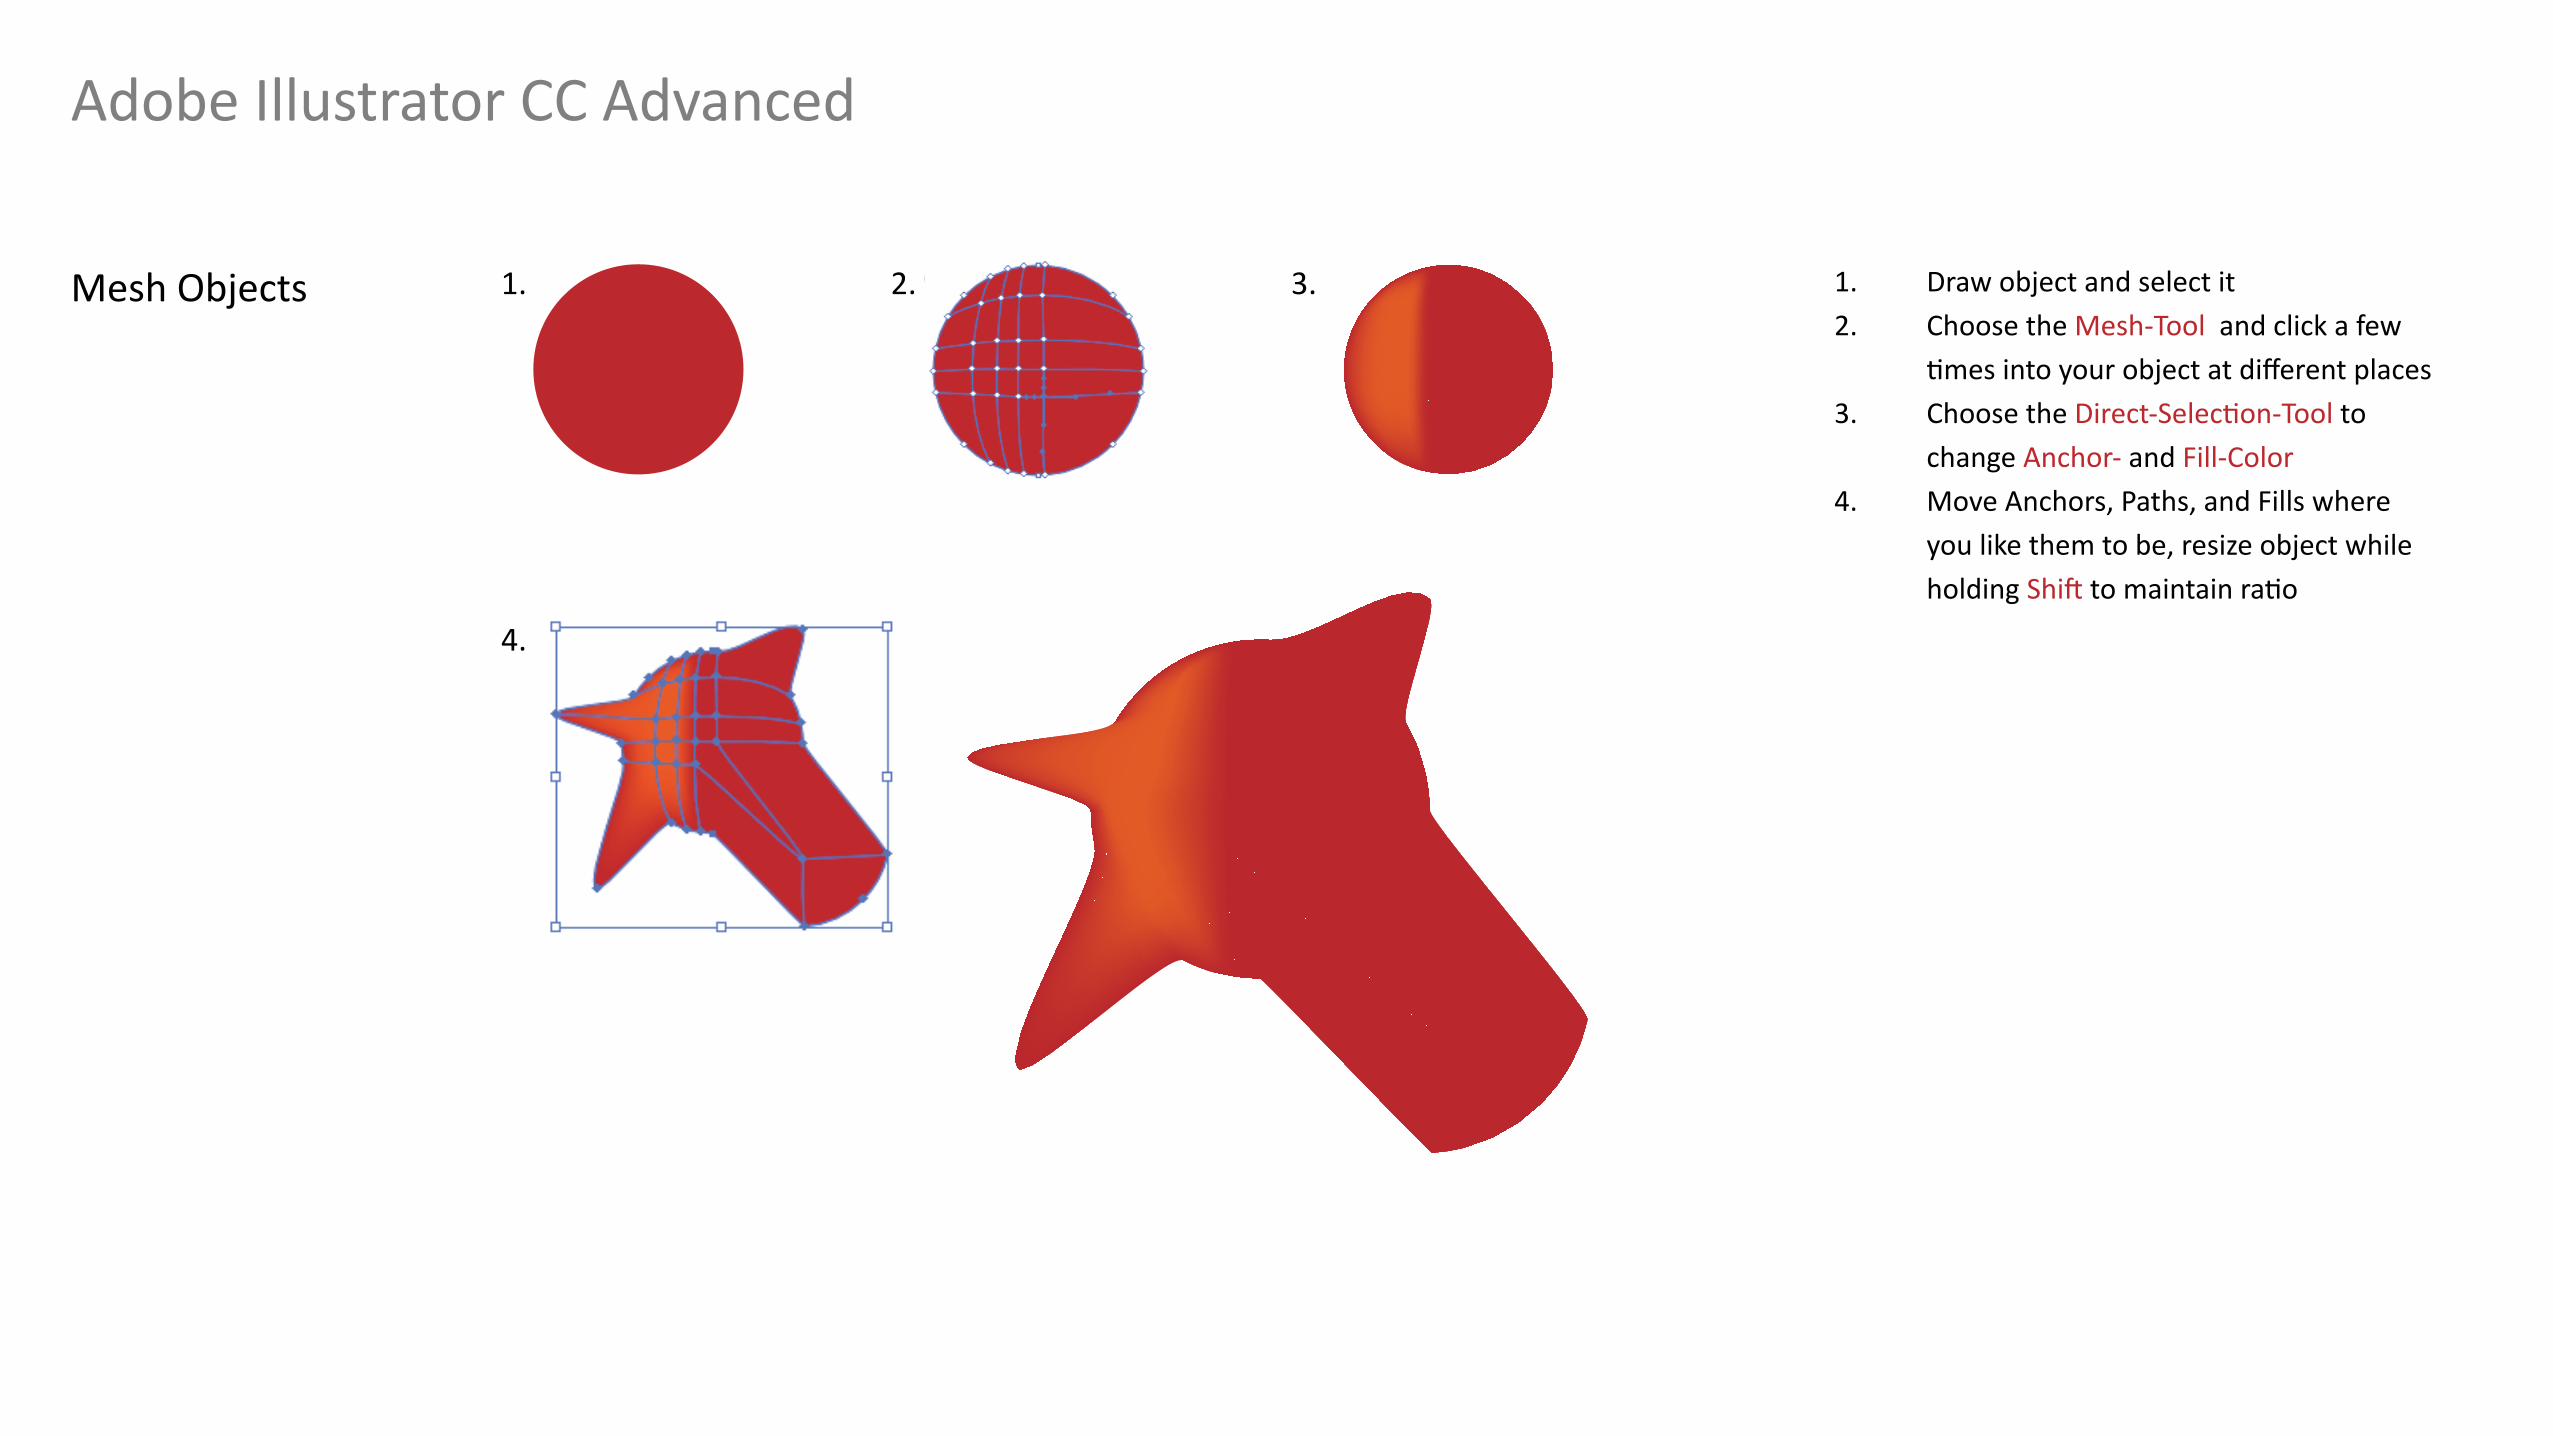
Mesh Objects 1. Draw object and select it2. Choose the Mesh-Tool and click a few times into your object at different places3. Choose the Direct-Selection-Tool to change Anchor- and Fill-Color4. Move Anchors, Paths, and Fills where you like them to be, resize object while holding Shift to maintain ratio
1. 2. 3.
4.
Adobe Illustrator CC Advanced
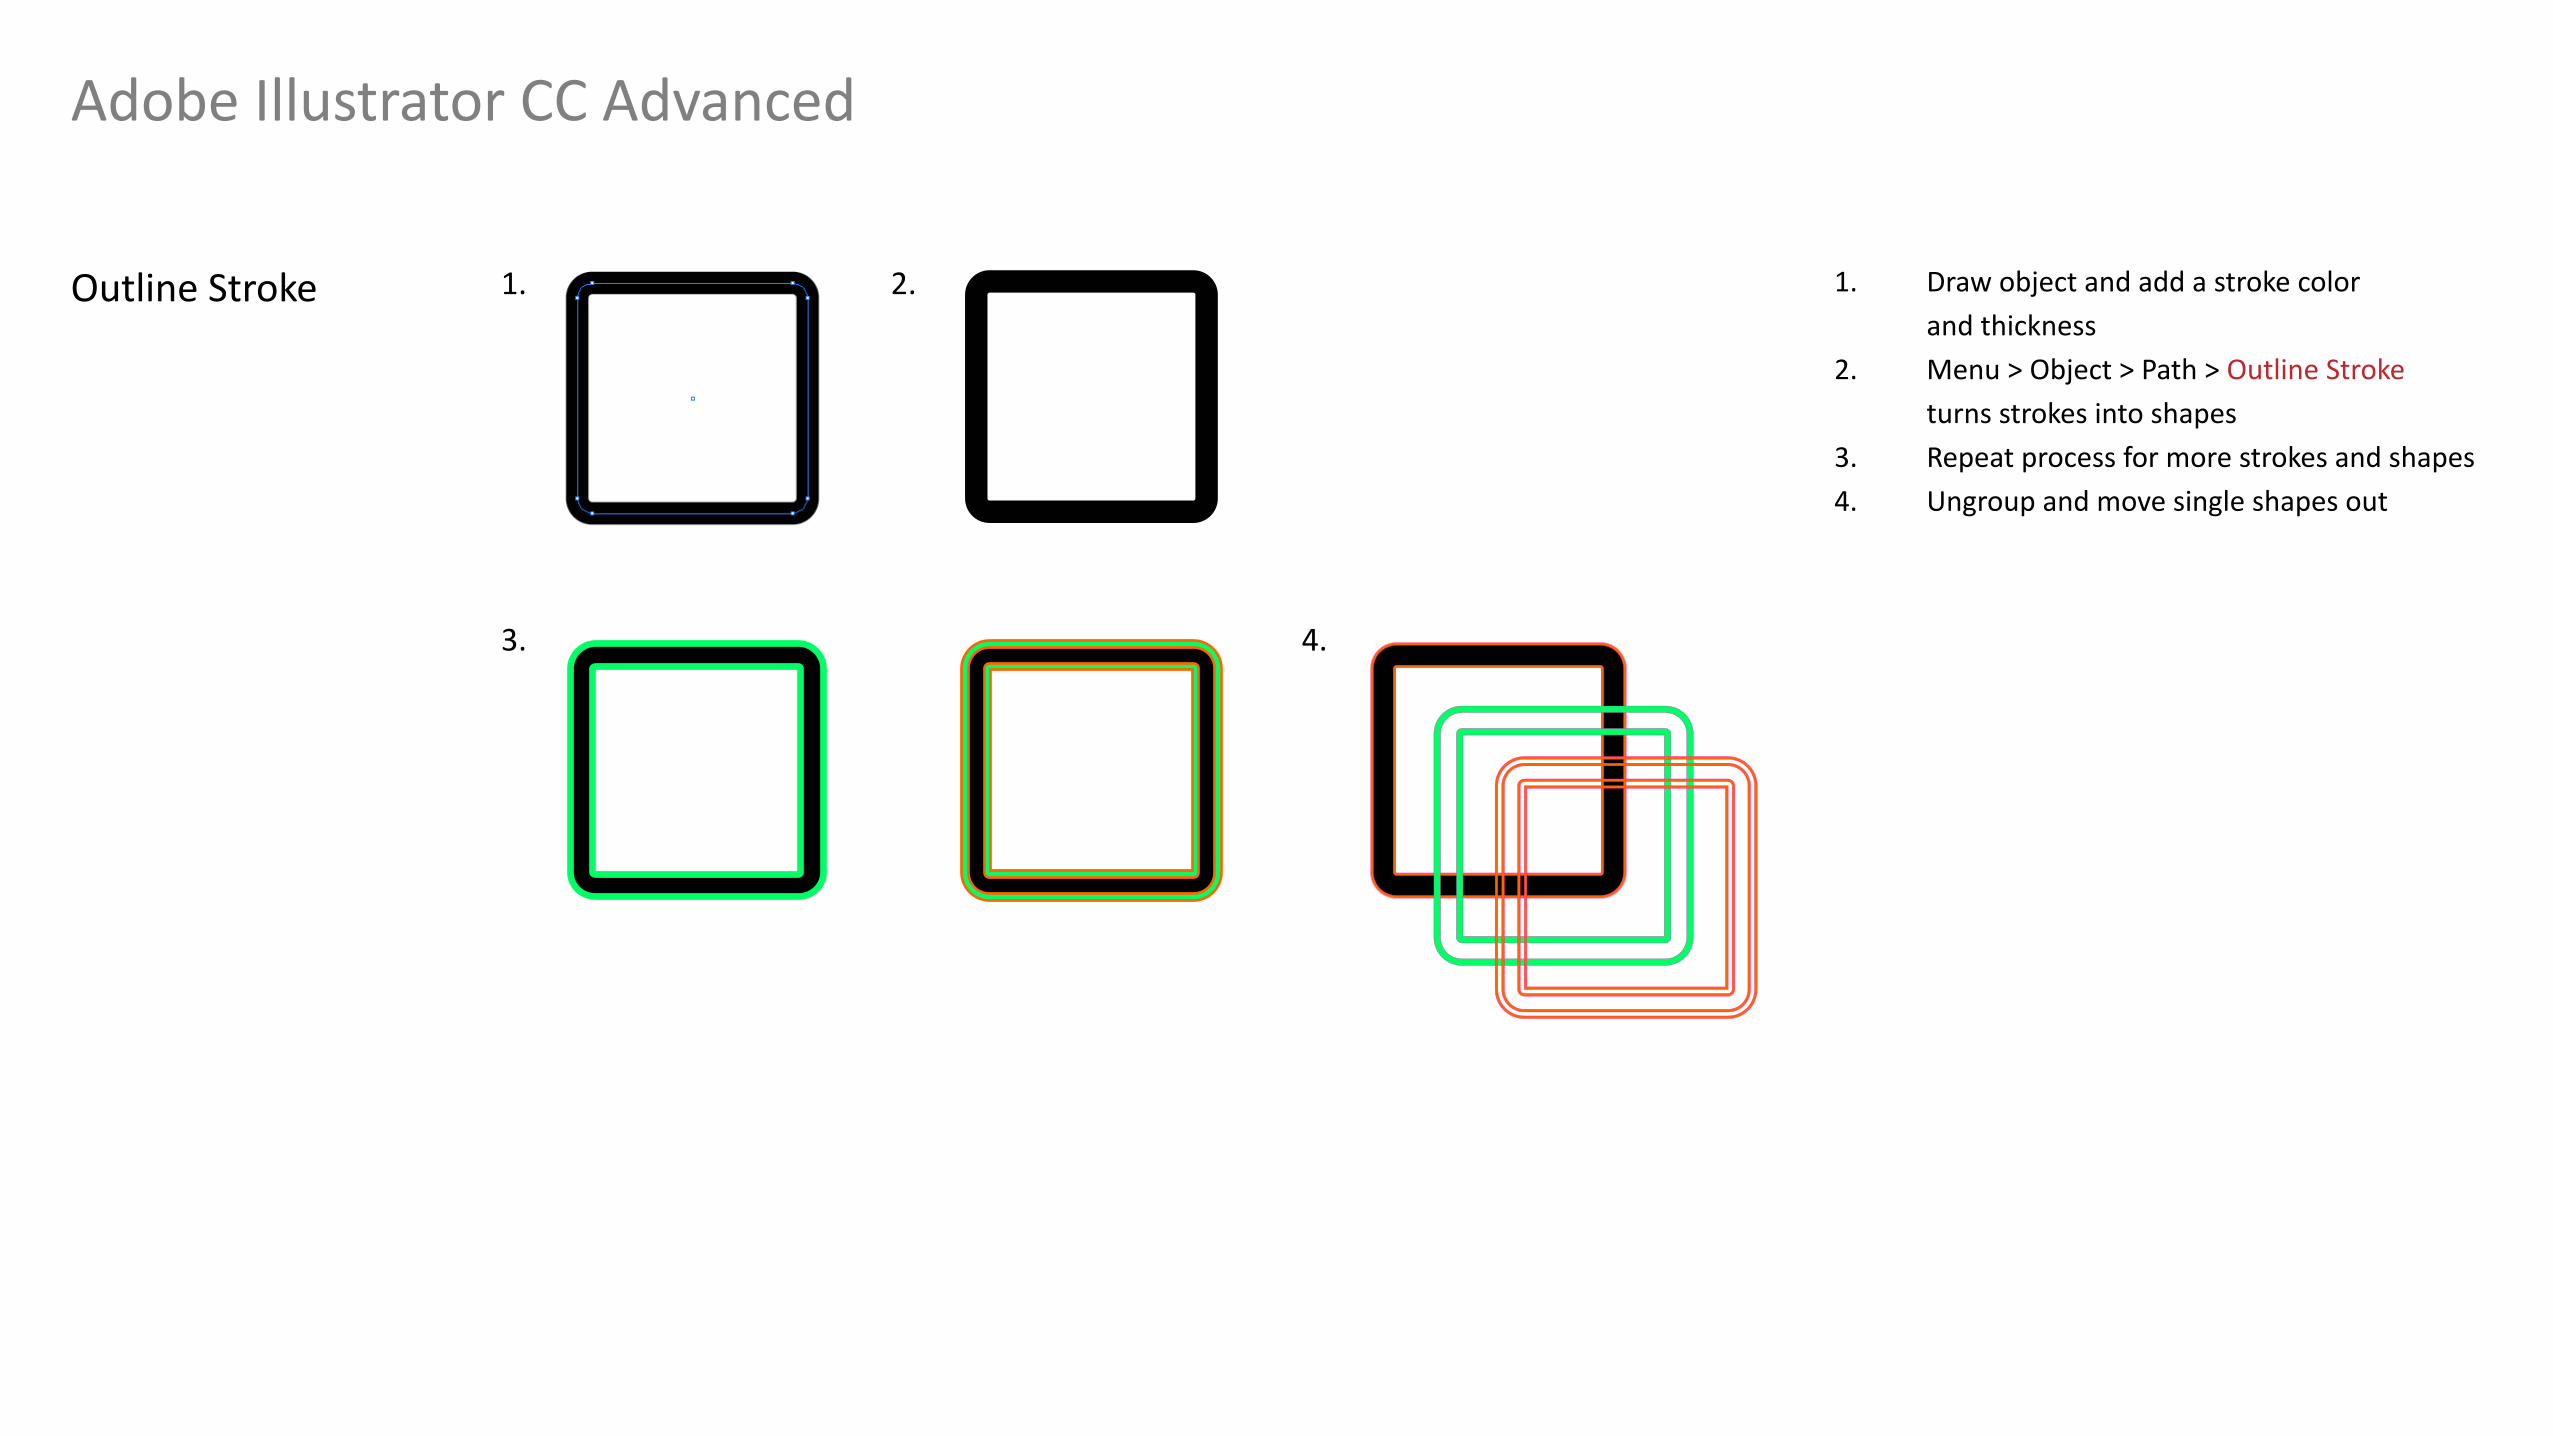
Outline Stroke 1. Draw object and add a stroke color and thickness2. Menu > Object > Path > Outline Stroke turns strokes into shapes3. Repeat process for more strokes and shapes4. Ungroup and move single shapes out
1. 2.
4.3.
Adobe Illustrator CC Advanced
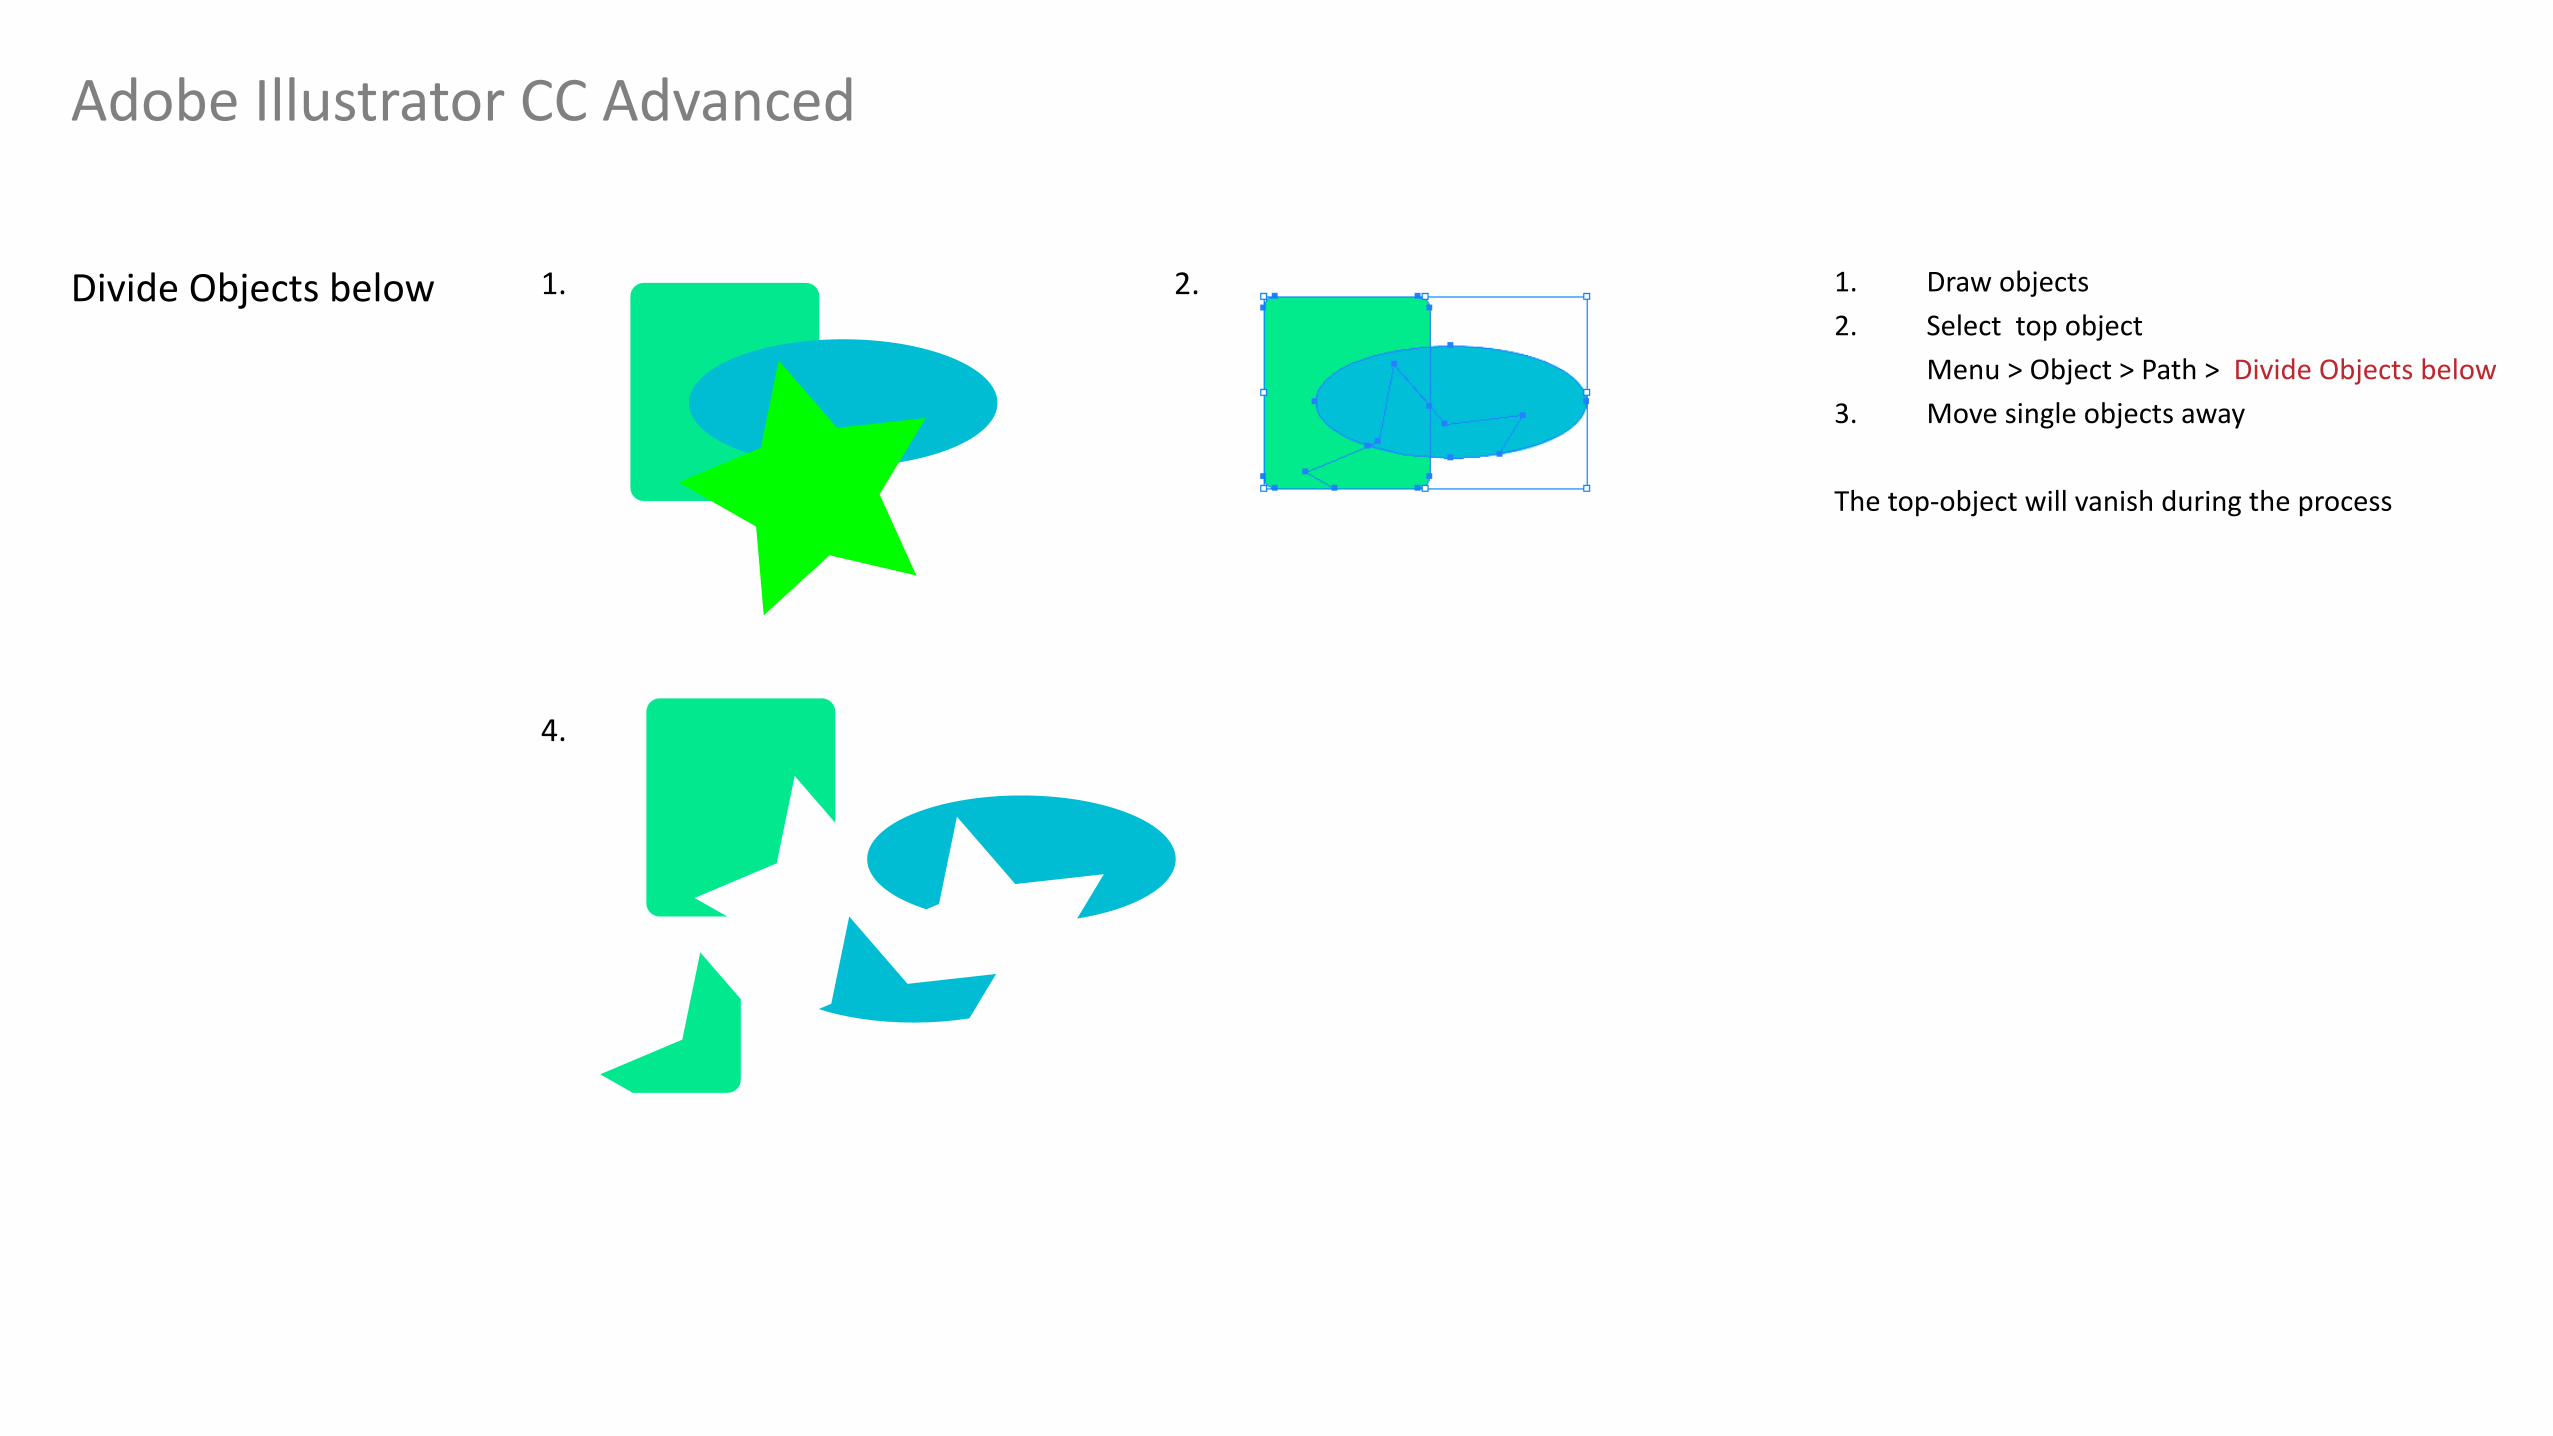
Divide Objects below 1. Draw objects2. Select top object Menu > Object > Path > Divide Objects below3. Move single objects away The top-object will vanish during the process
1. 2.
4.
Adobe Illustrator CC Advanced
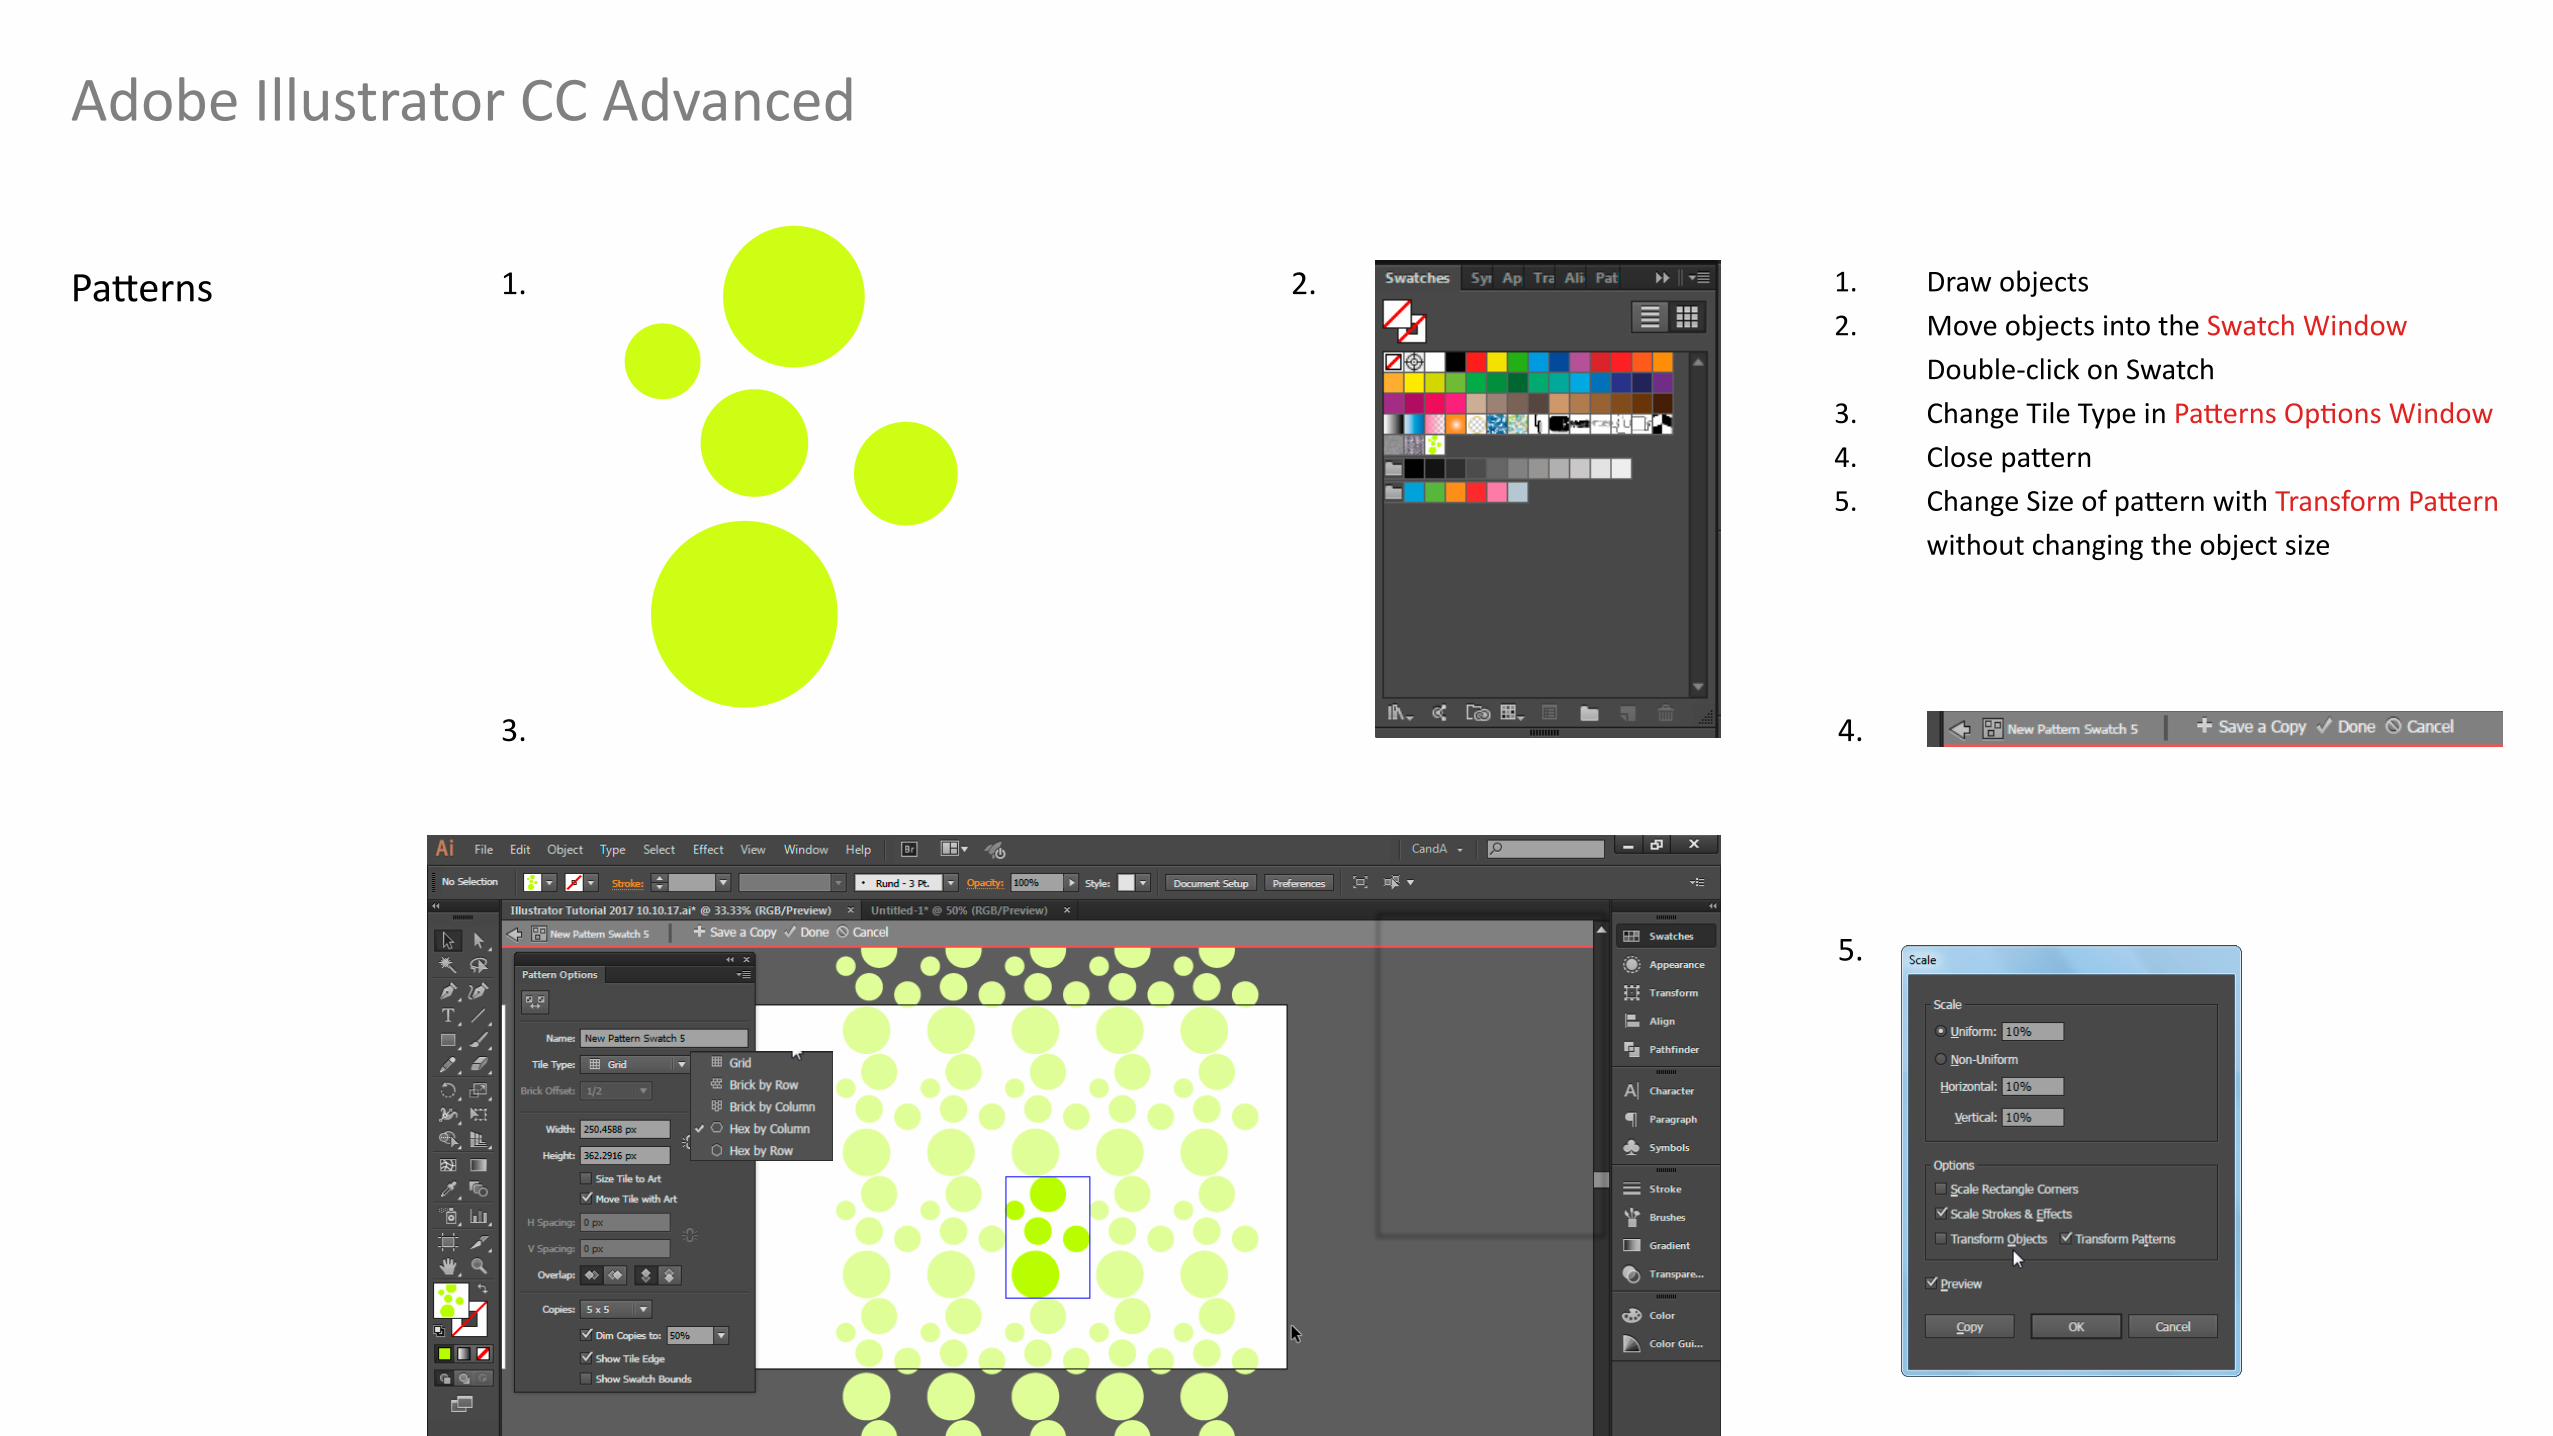
Patterns 1. Draw objects2. Move objects into the Swatch Window Double-click on Swatch3. Change Tile Type in Patterns Options Window4. Close pattern5. Change Size of pattern with Transform Pattern without changing the object size
1. 2.
3. 4.
5.
Adobe Illustrator CC Advanced
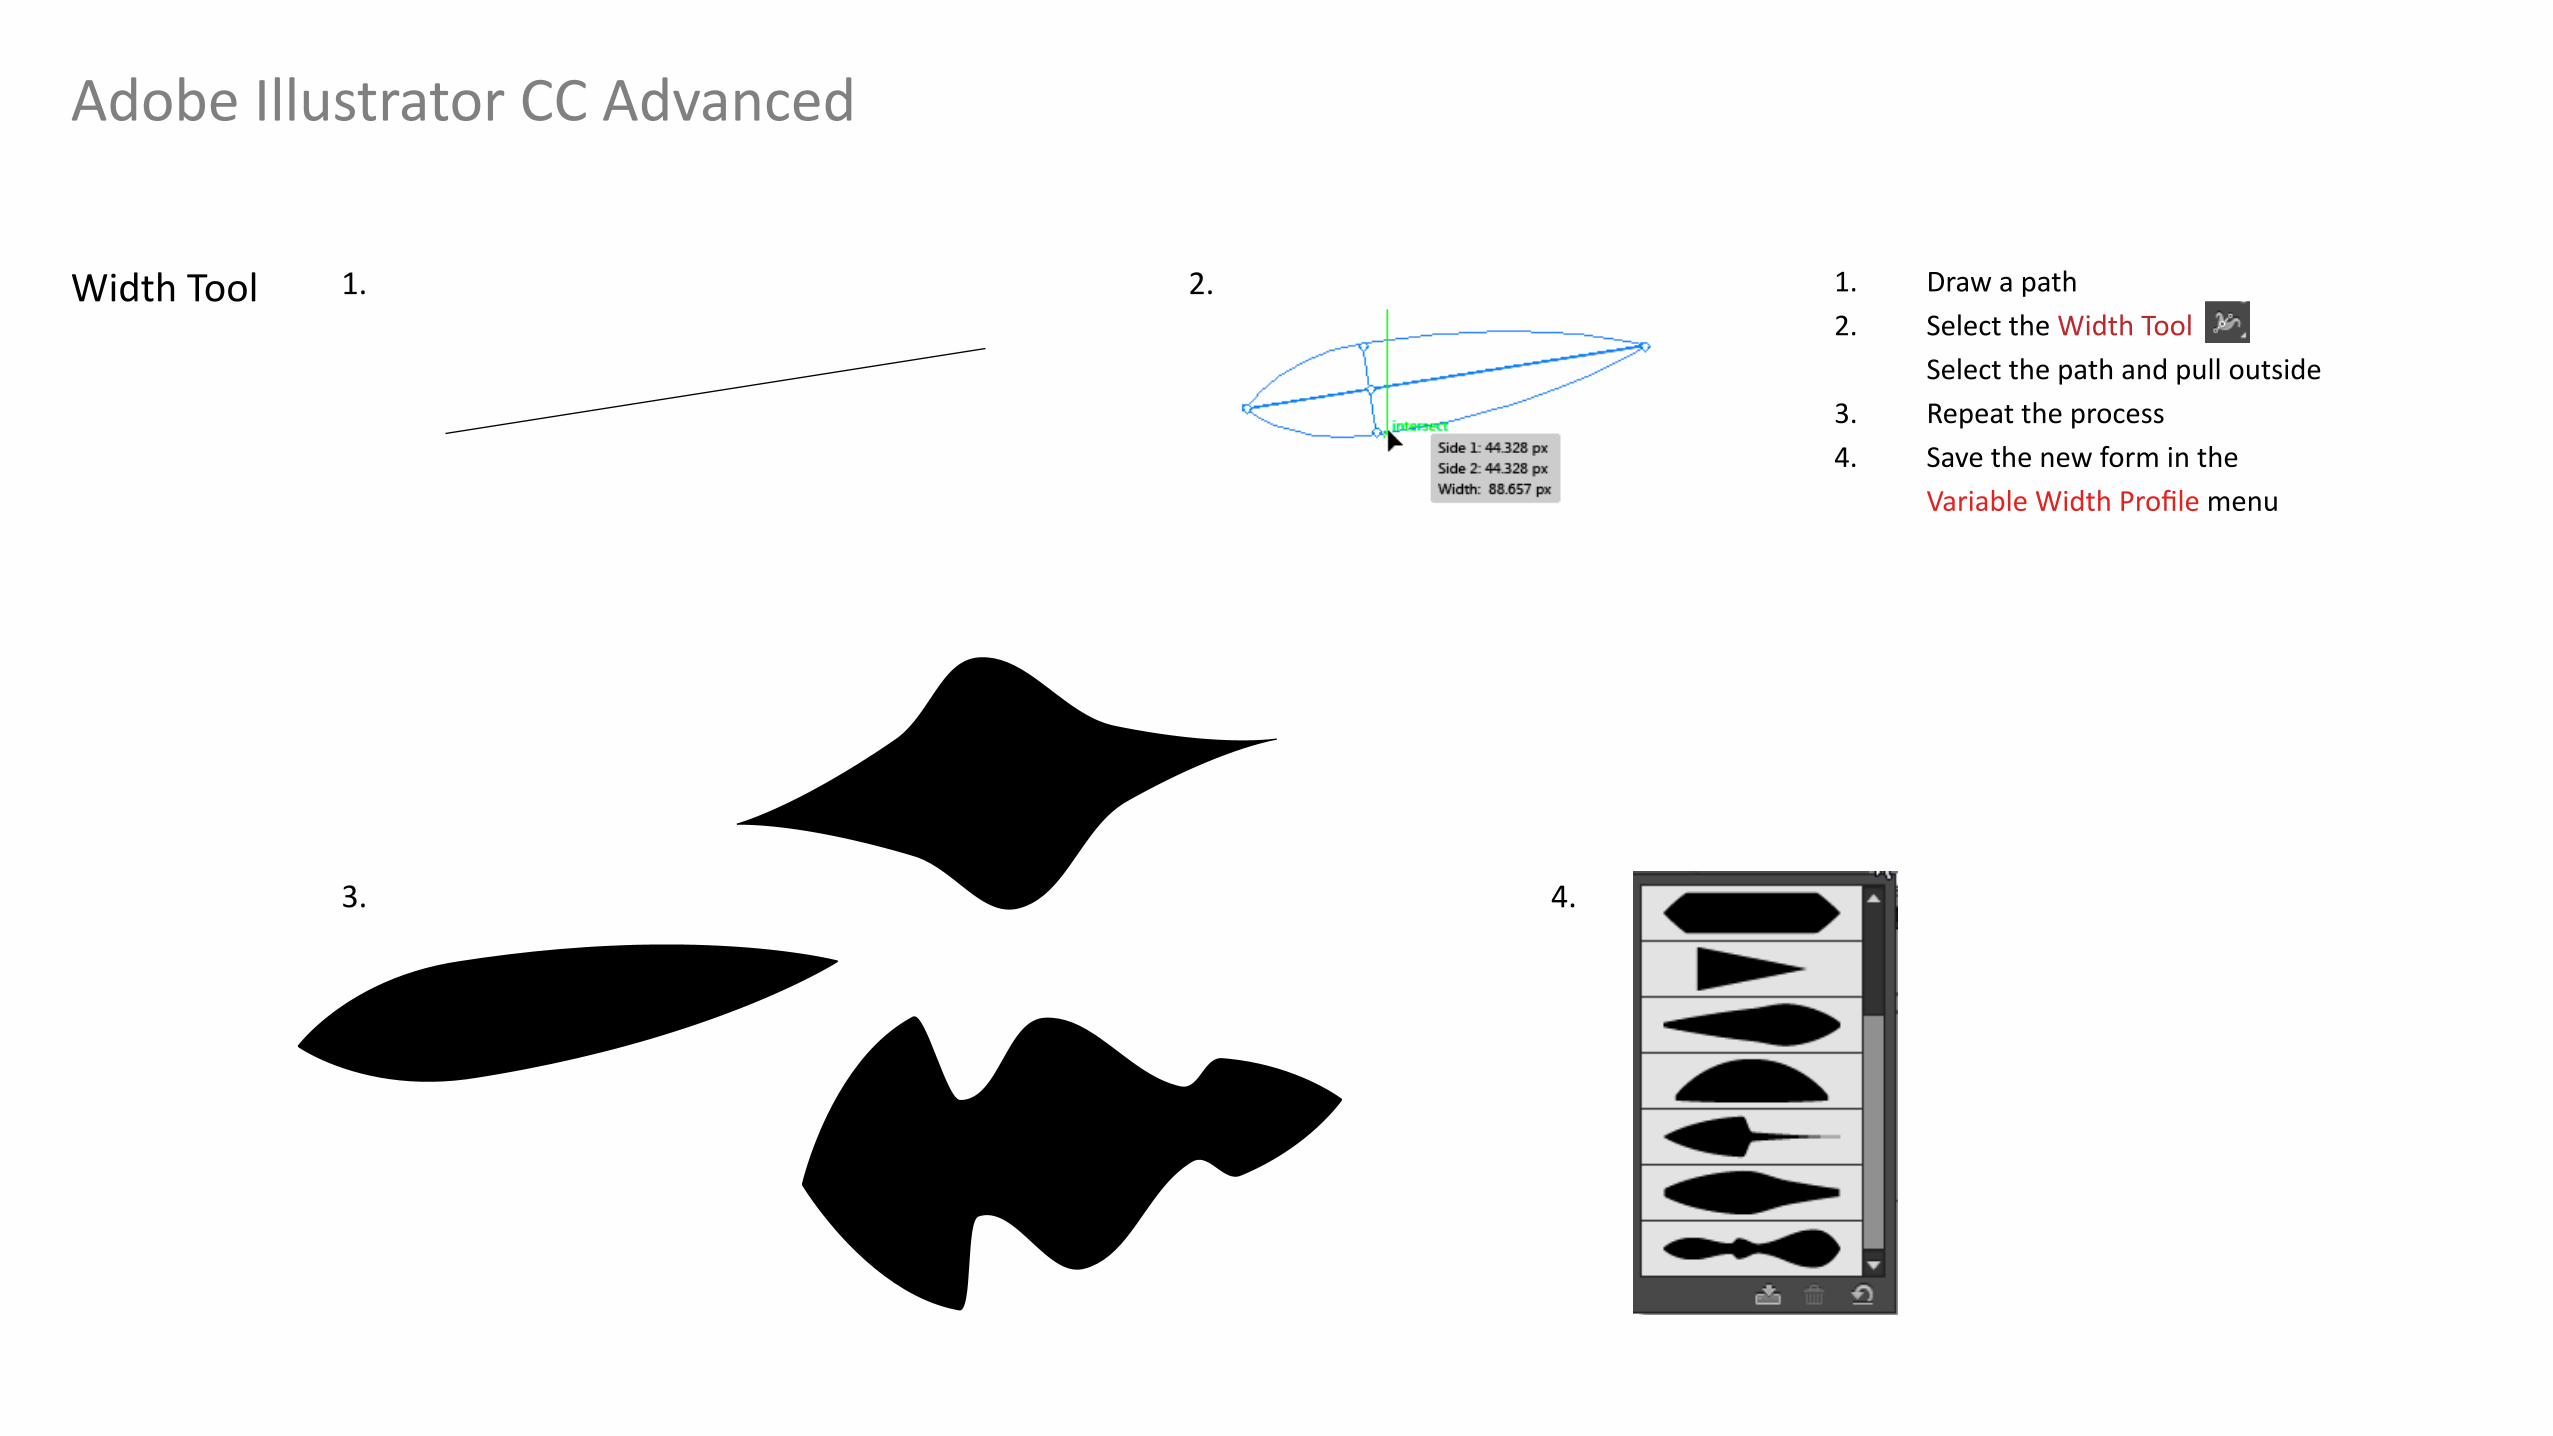
Width Tool 1. Draw a path2. Select the Width Tool Select the path and pull outside3. Repeat the process4. Save the new form in the Variable Width Profile menu
1.
3. 4.
2.
Adobe Illustrator CC Advanced
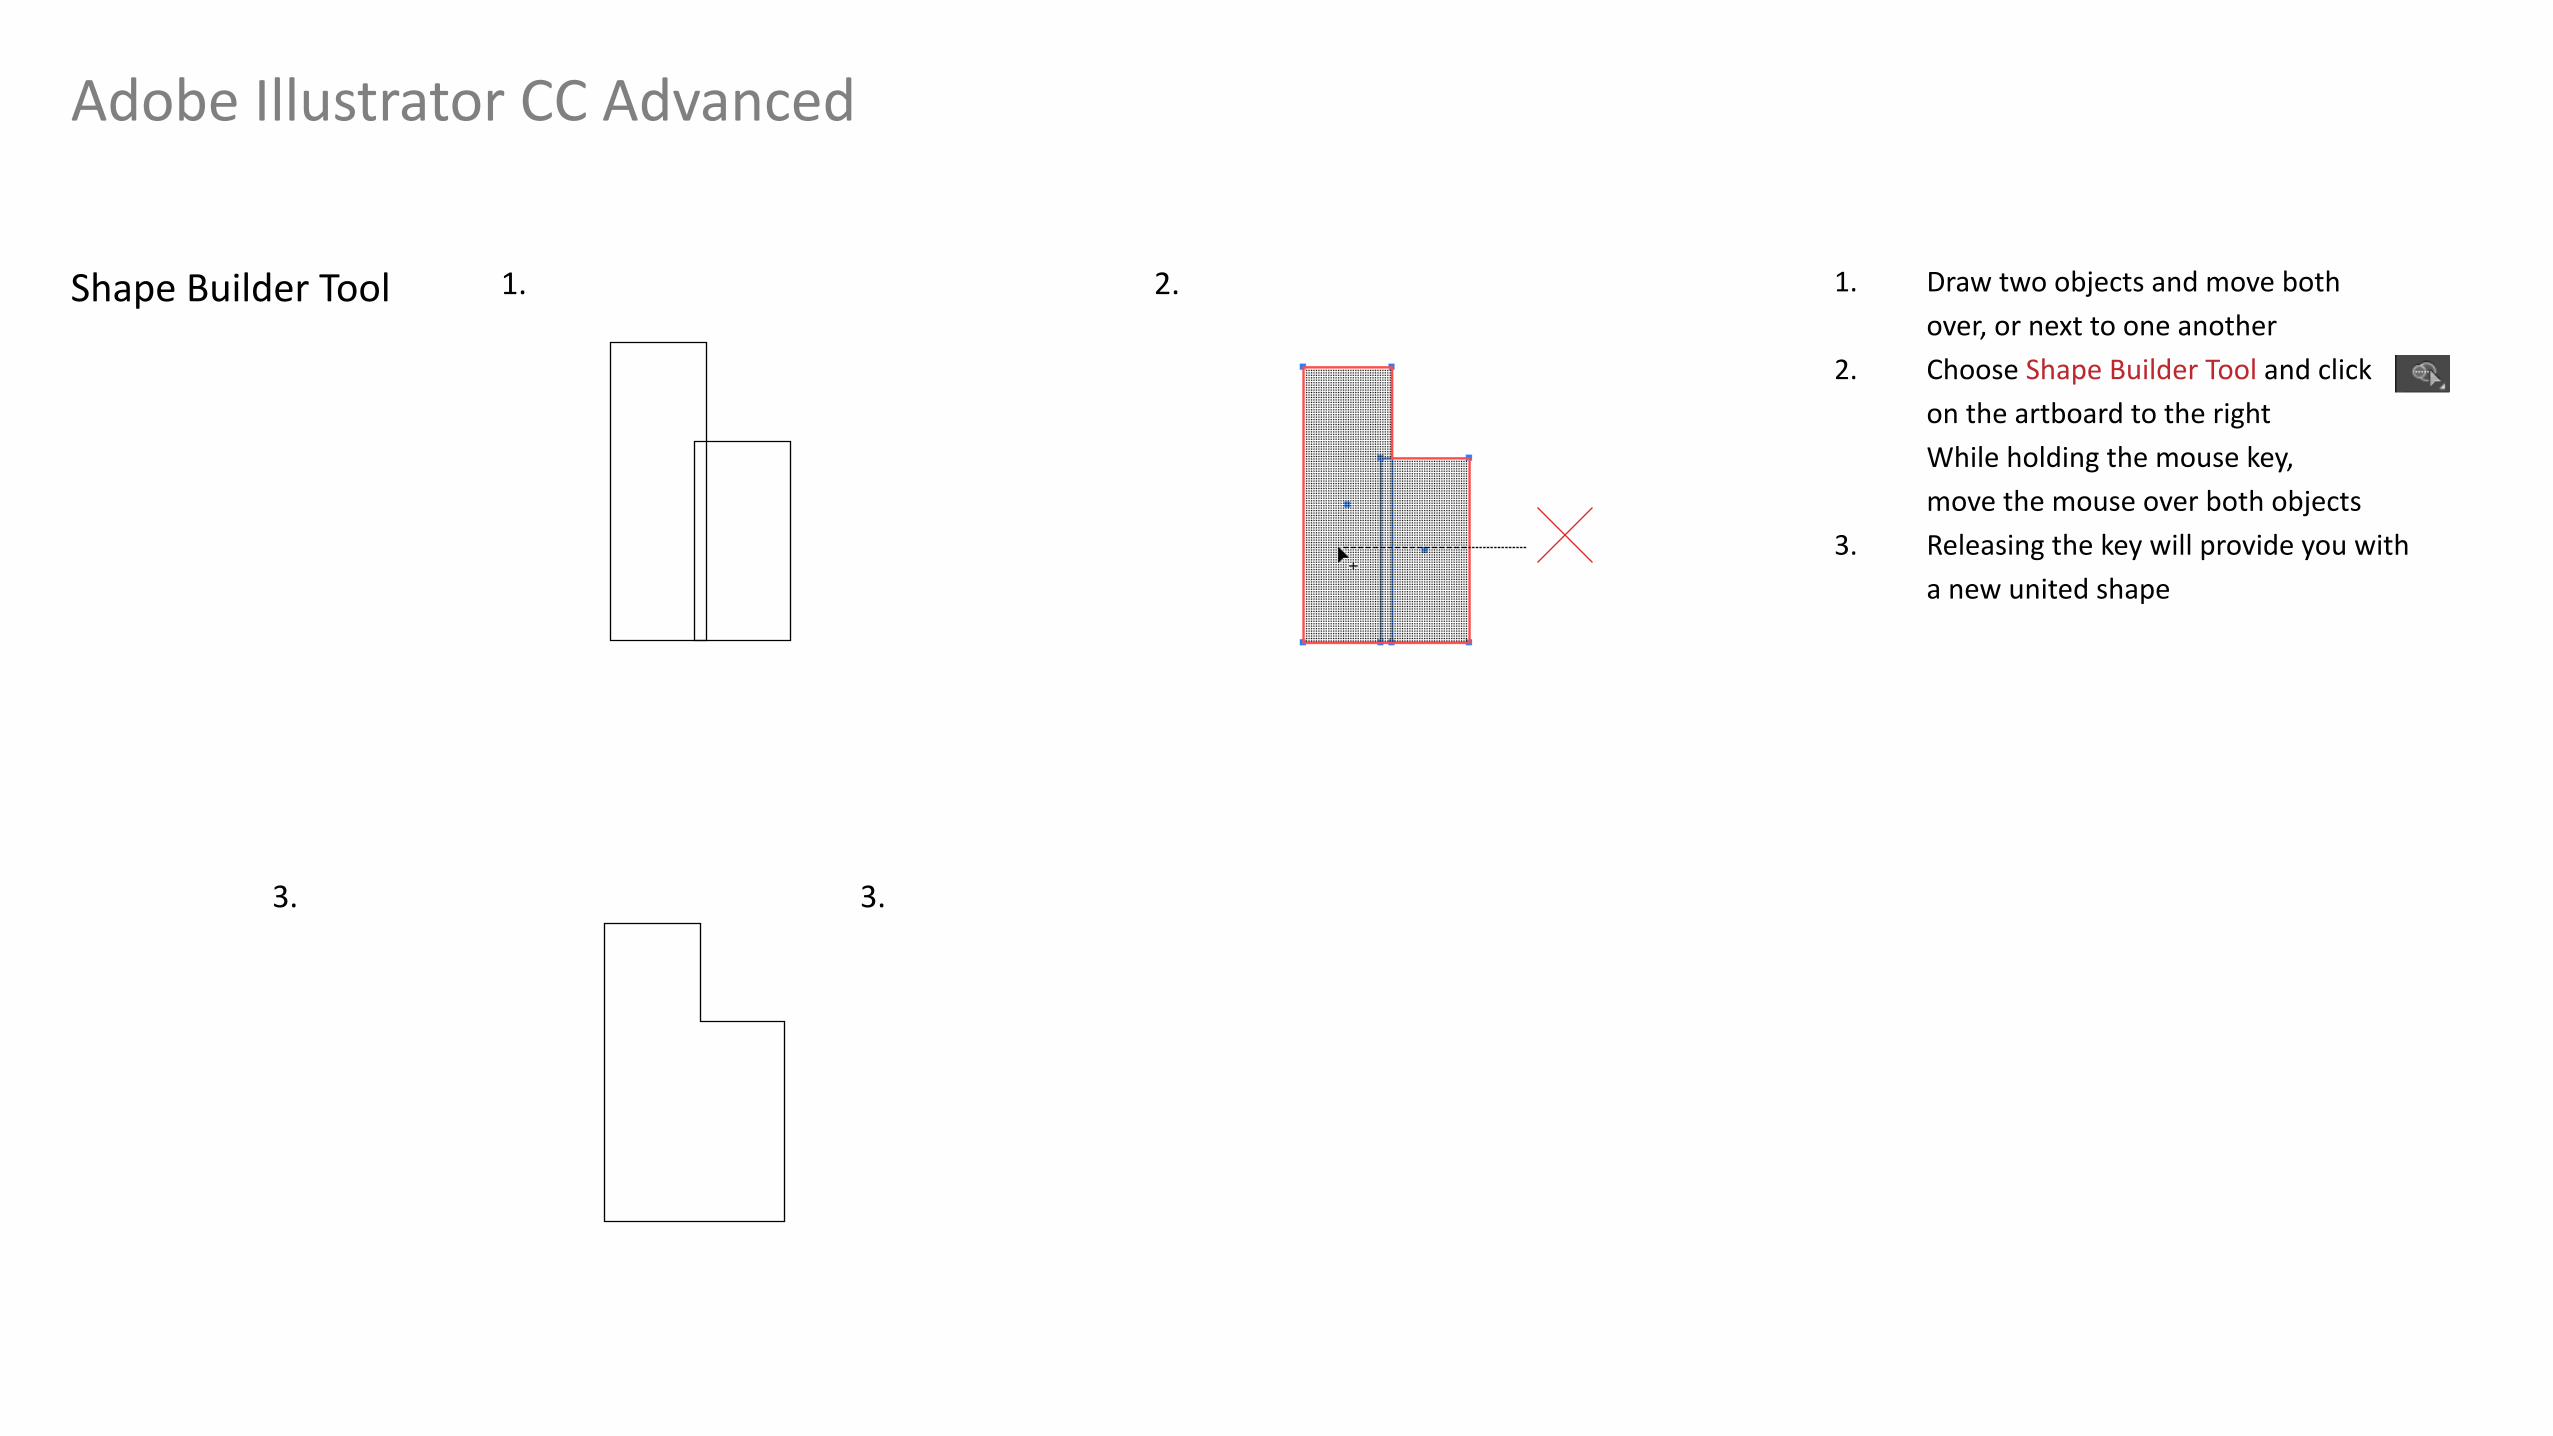
Shape Builder Tool 1. Draw two objects and move both over, or next to one another2. Choose Shape Builder Tool and click on the artboard to the right While holding the mouse key, move the mouse over both objects3. Releasing the key will provide you with a new united shape
1.
3. 3.
2.
Adobe Illustrator CC Advanced
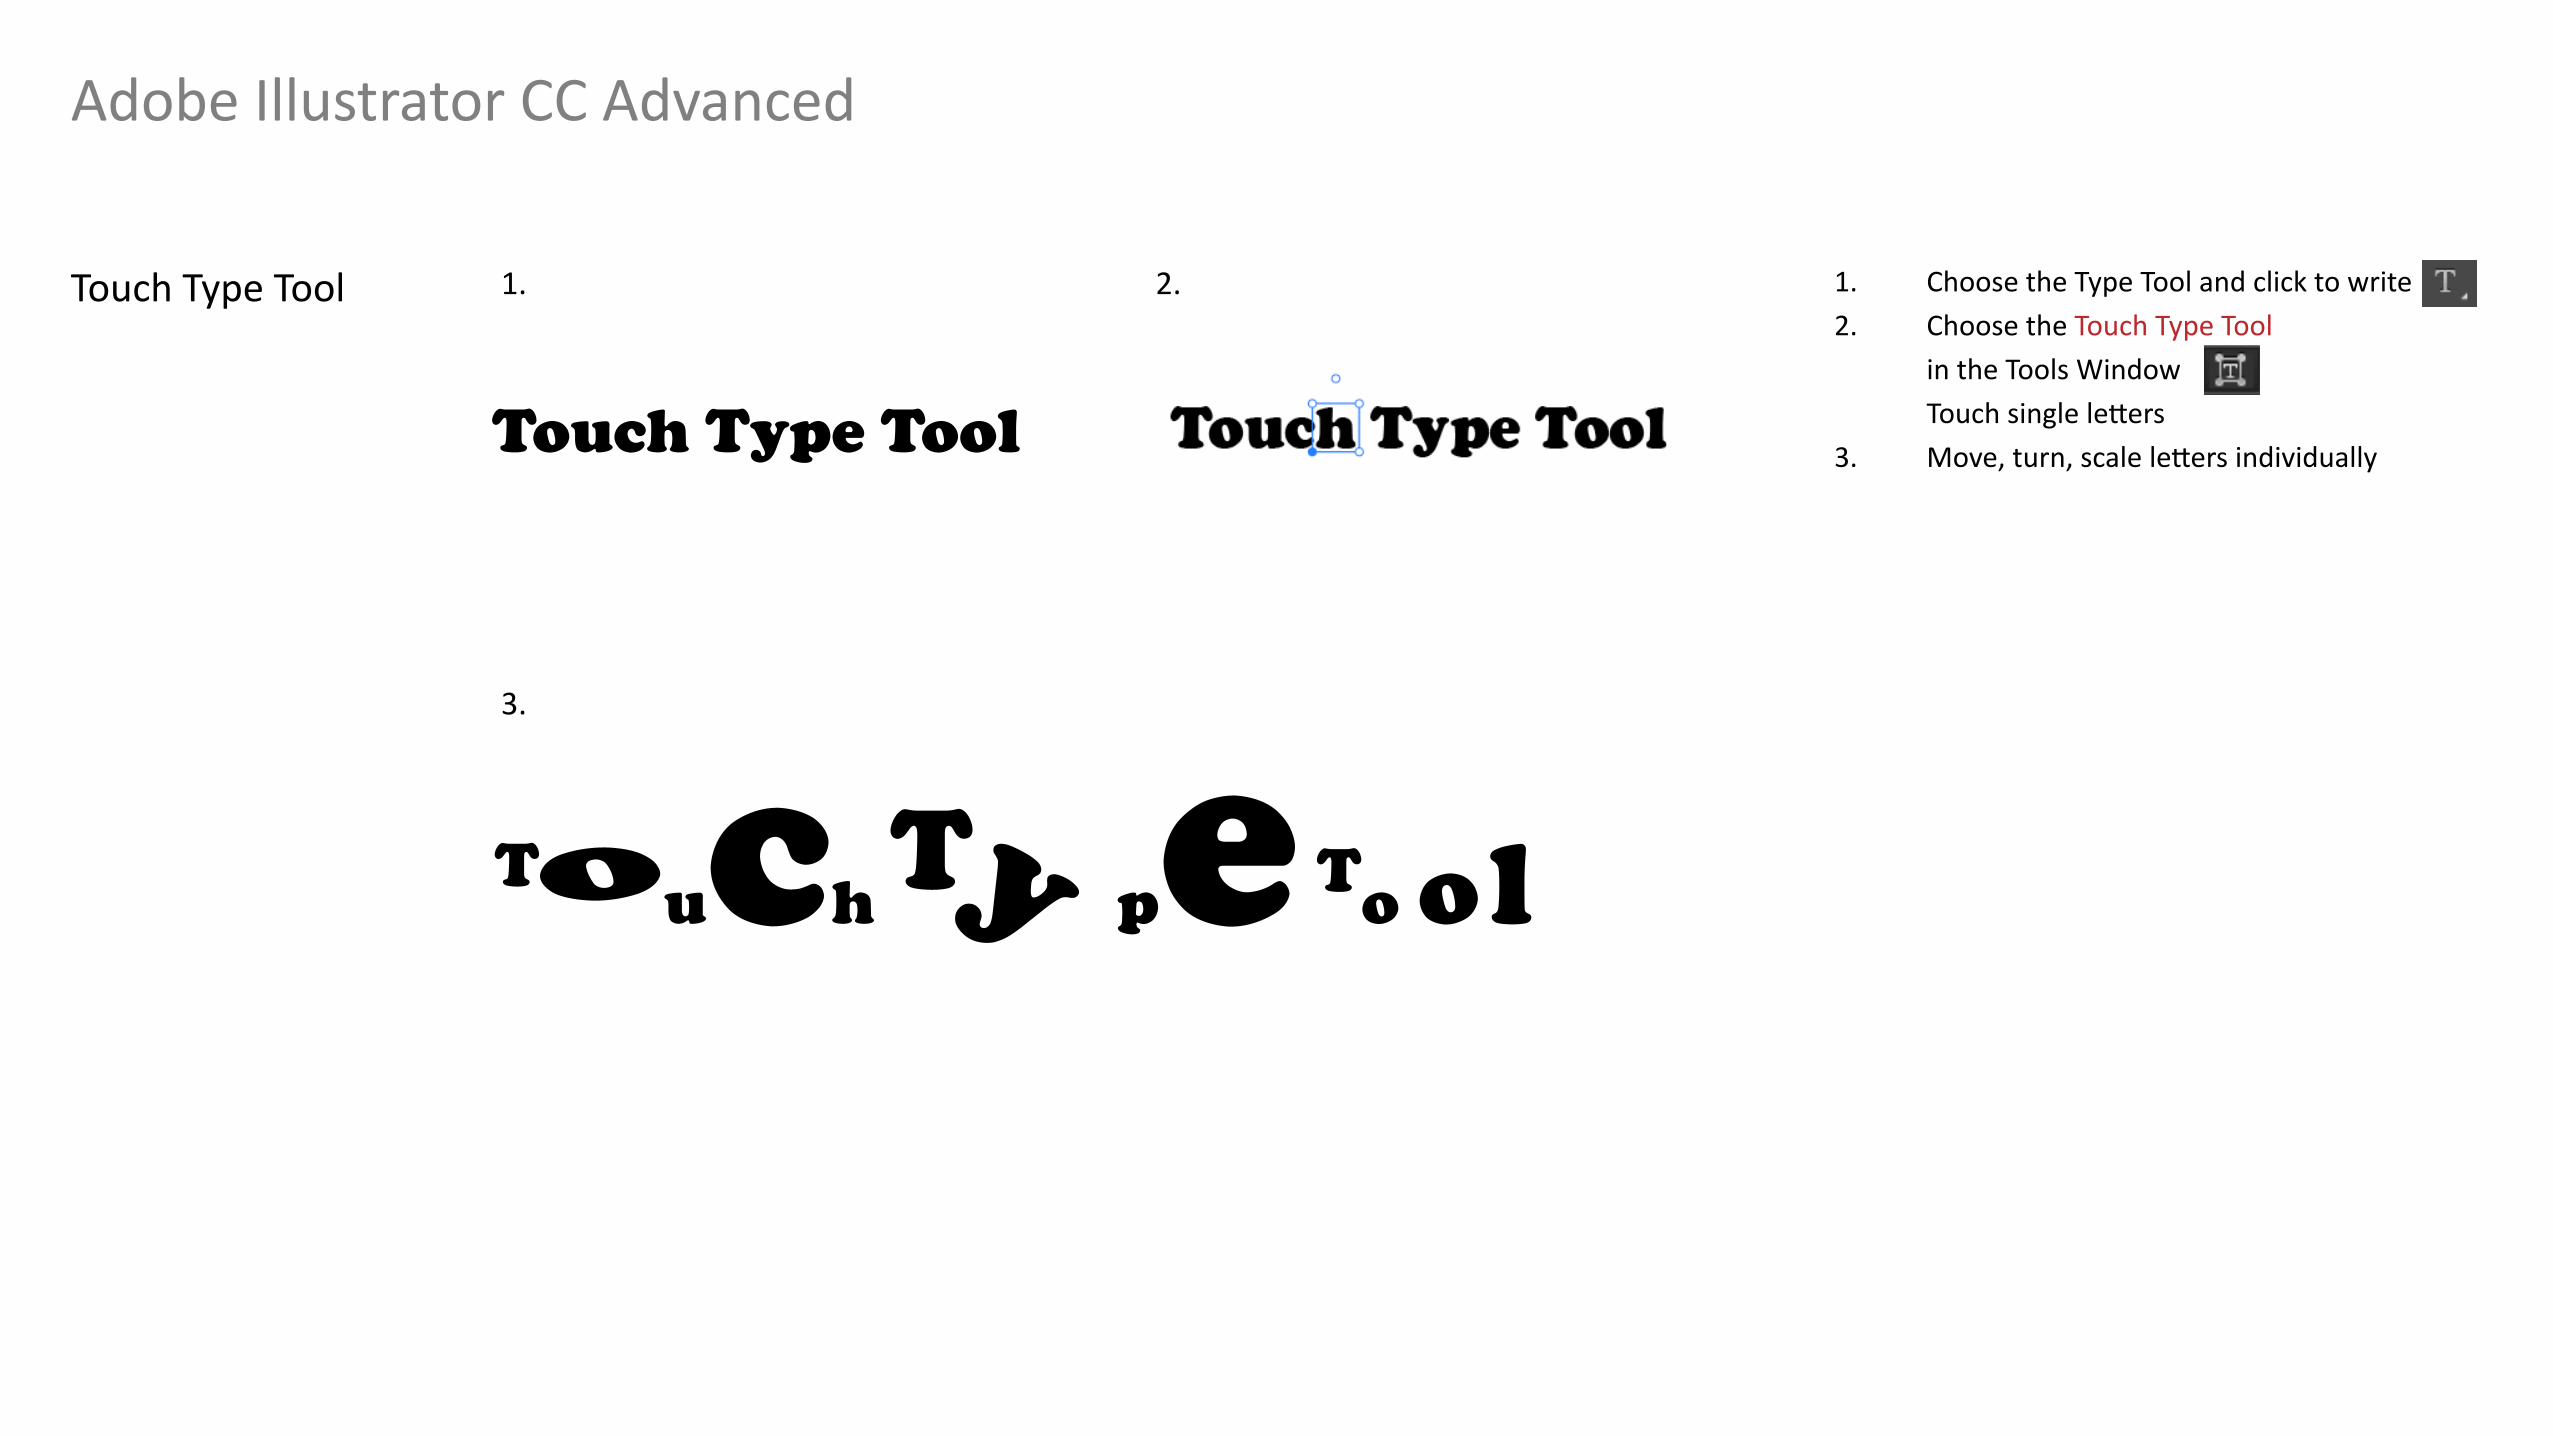
Touch Type Tool 1. Choose the Type Tool and click to write2. Choose the Touch Type Tool in the Tools Window Touch single letters3. Move, turn, scale letters individually
1.
3.
2.
Touch Type Tool
Touch Ty pe To ol
Adobe Illustrator CC Advanced
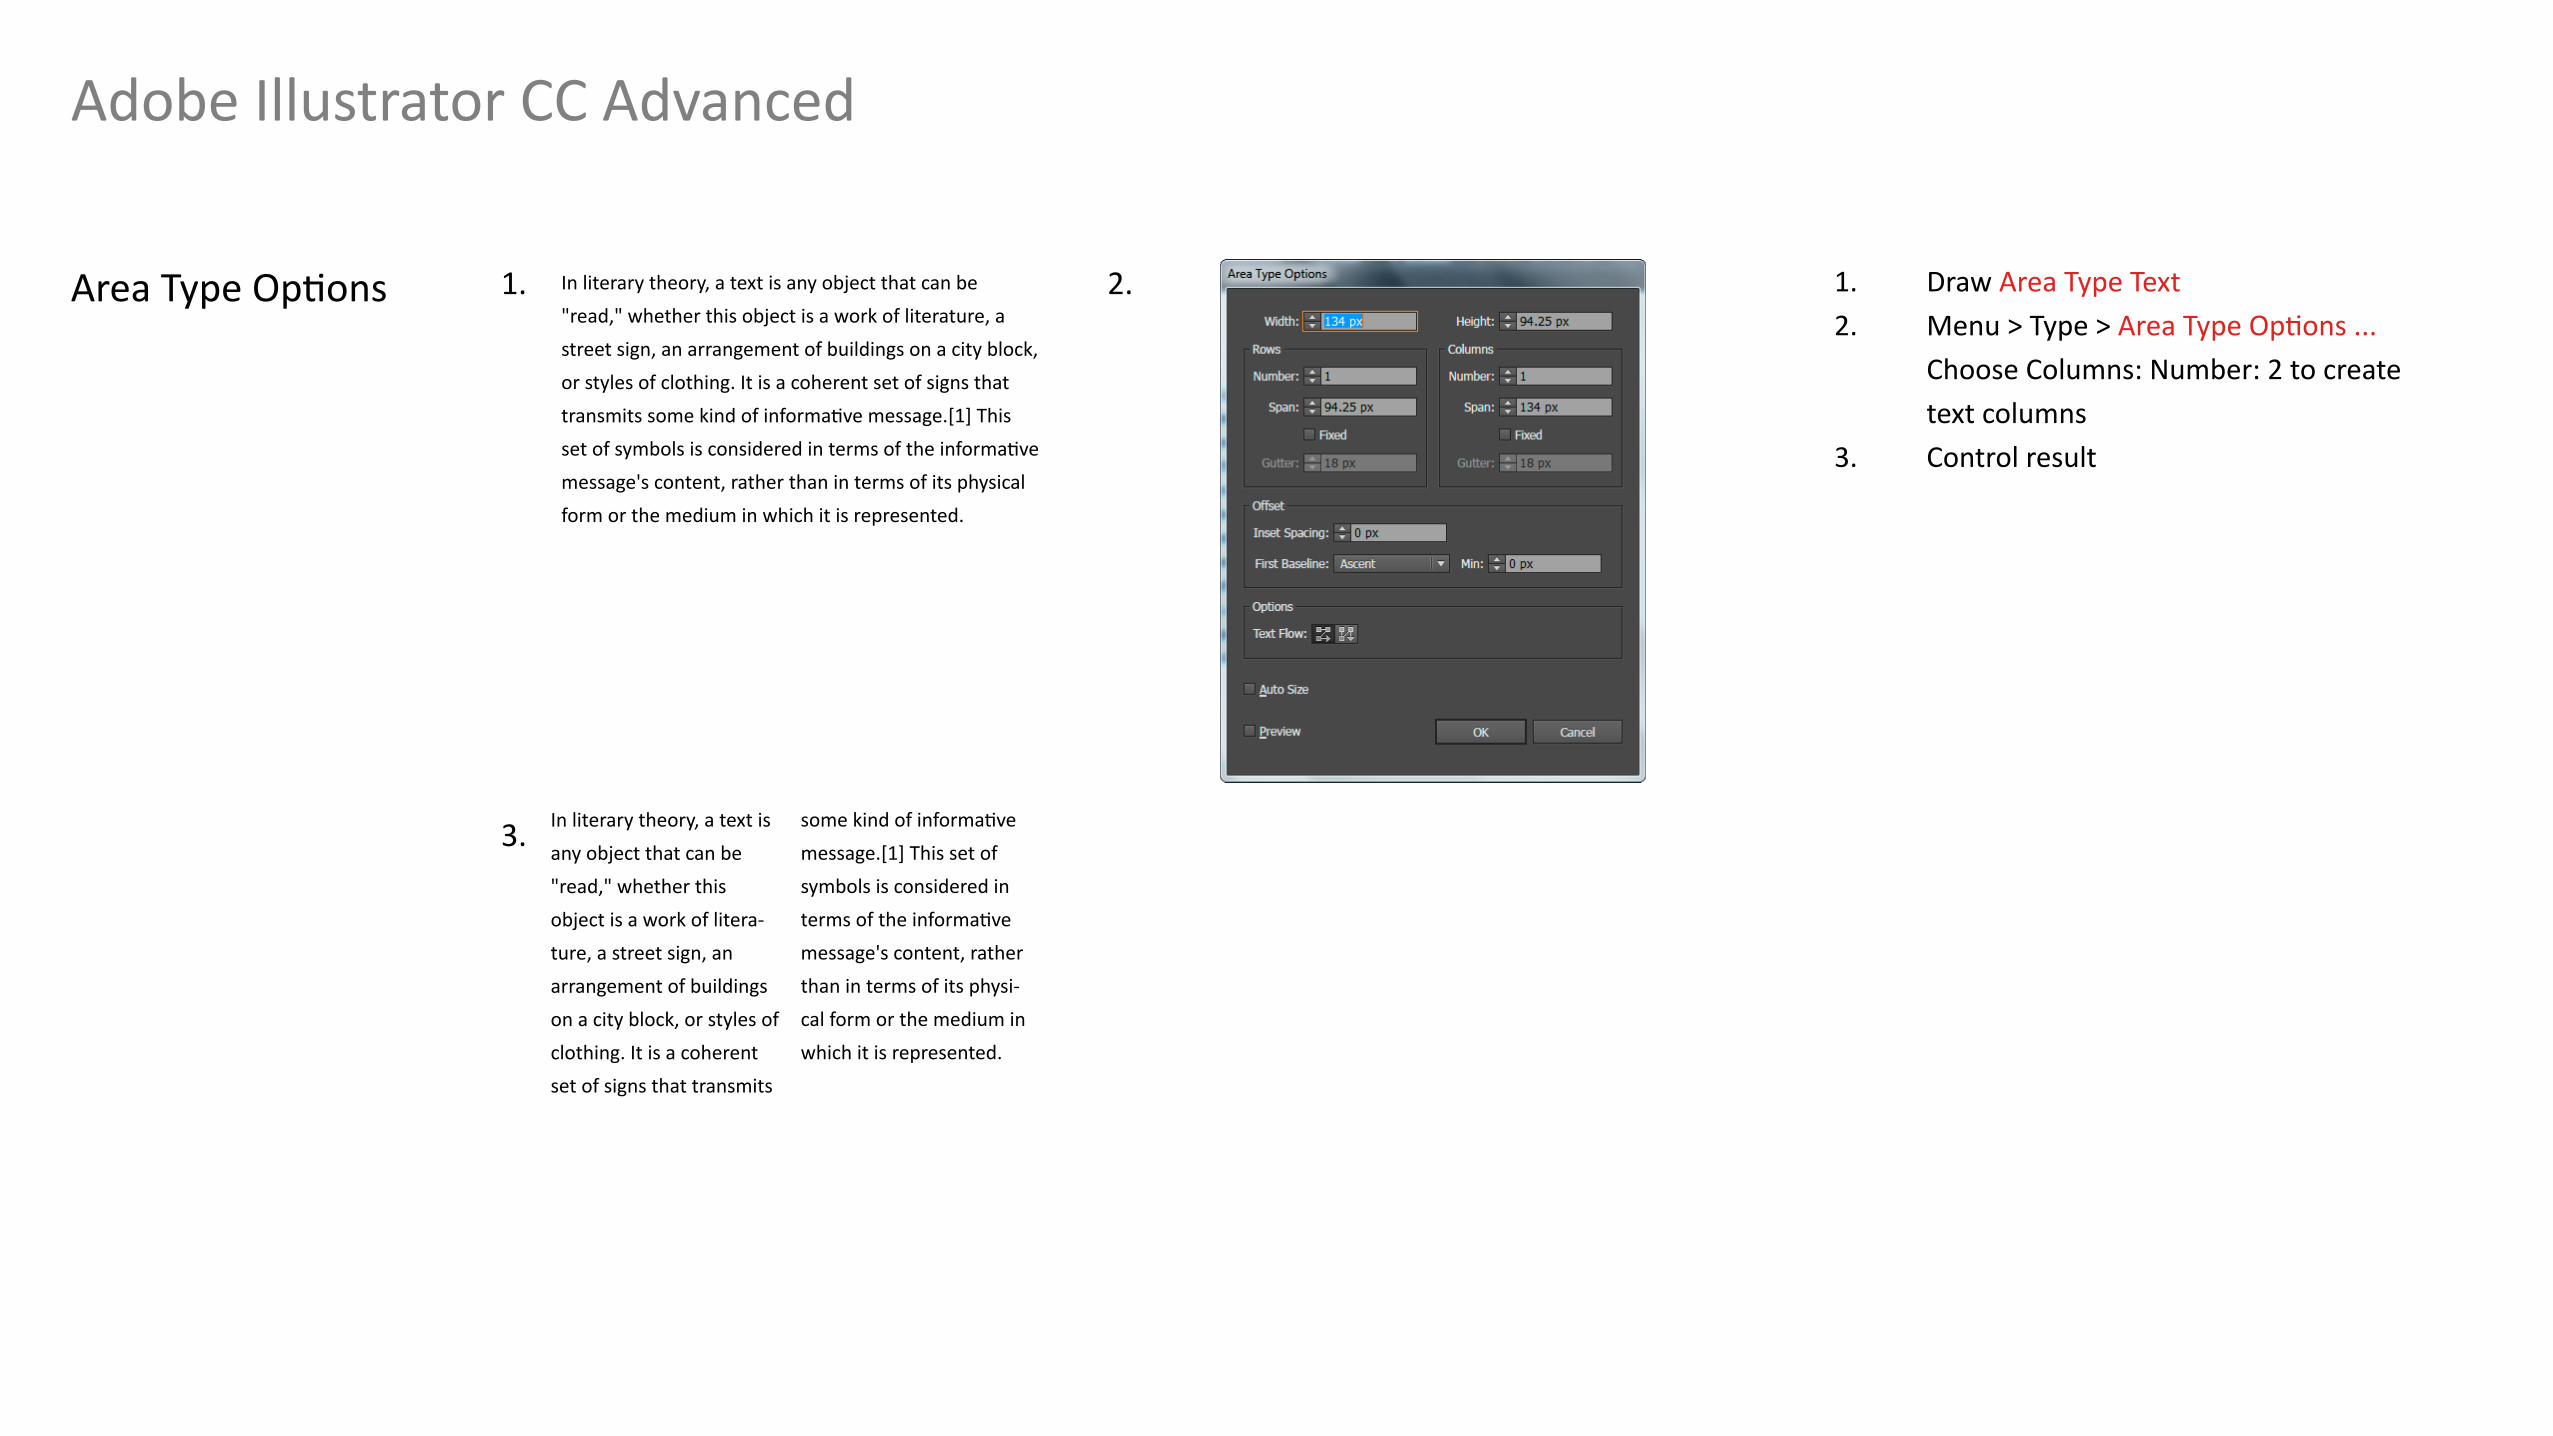
Area Type Options 1. Draw Area Type Text2. Menu > Type > Area Type Options ... Choose Columns: Number: 2 to create text columns3. Control result
1.
3.
2.In literary theory, a text is any object that can be "read," whether this object is a work of literature, a street sign, an arrangement of buildings on a city block, or styles of clothing. It is a coherent set of signs that transmits some kind of informative message.[1] This set of symbols is considered in terms of the informative message's content, rather than in terms of its physical form or the medium in which it is represented.
In literary theory, a text is any object that can be "read," whether this object is a work of litera-ture, a street sign, an arrangement of buildings on a city block, or styles of clothing. It is a coherent set of signs that transmits
some kind of informative message.[1] This set of symbols is considered in terms of the informative message's content, rather than in terms of its physi-cal form or the medium in which it is represented.
Adobe Illustrator CC Advanced
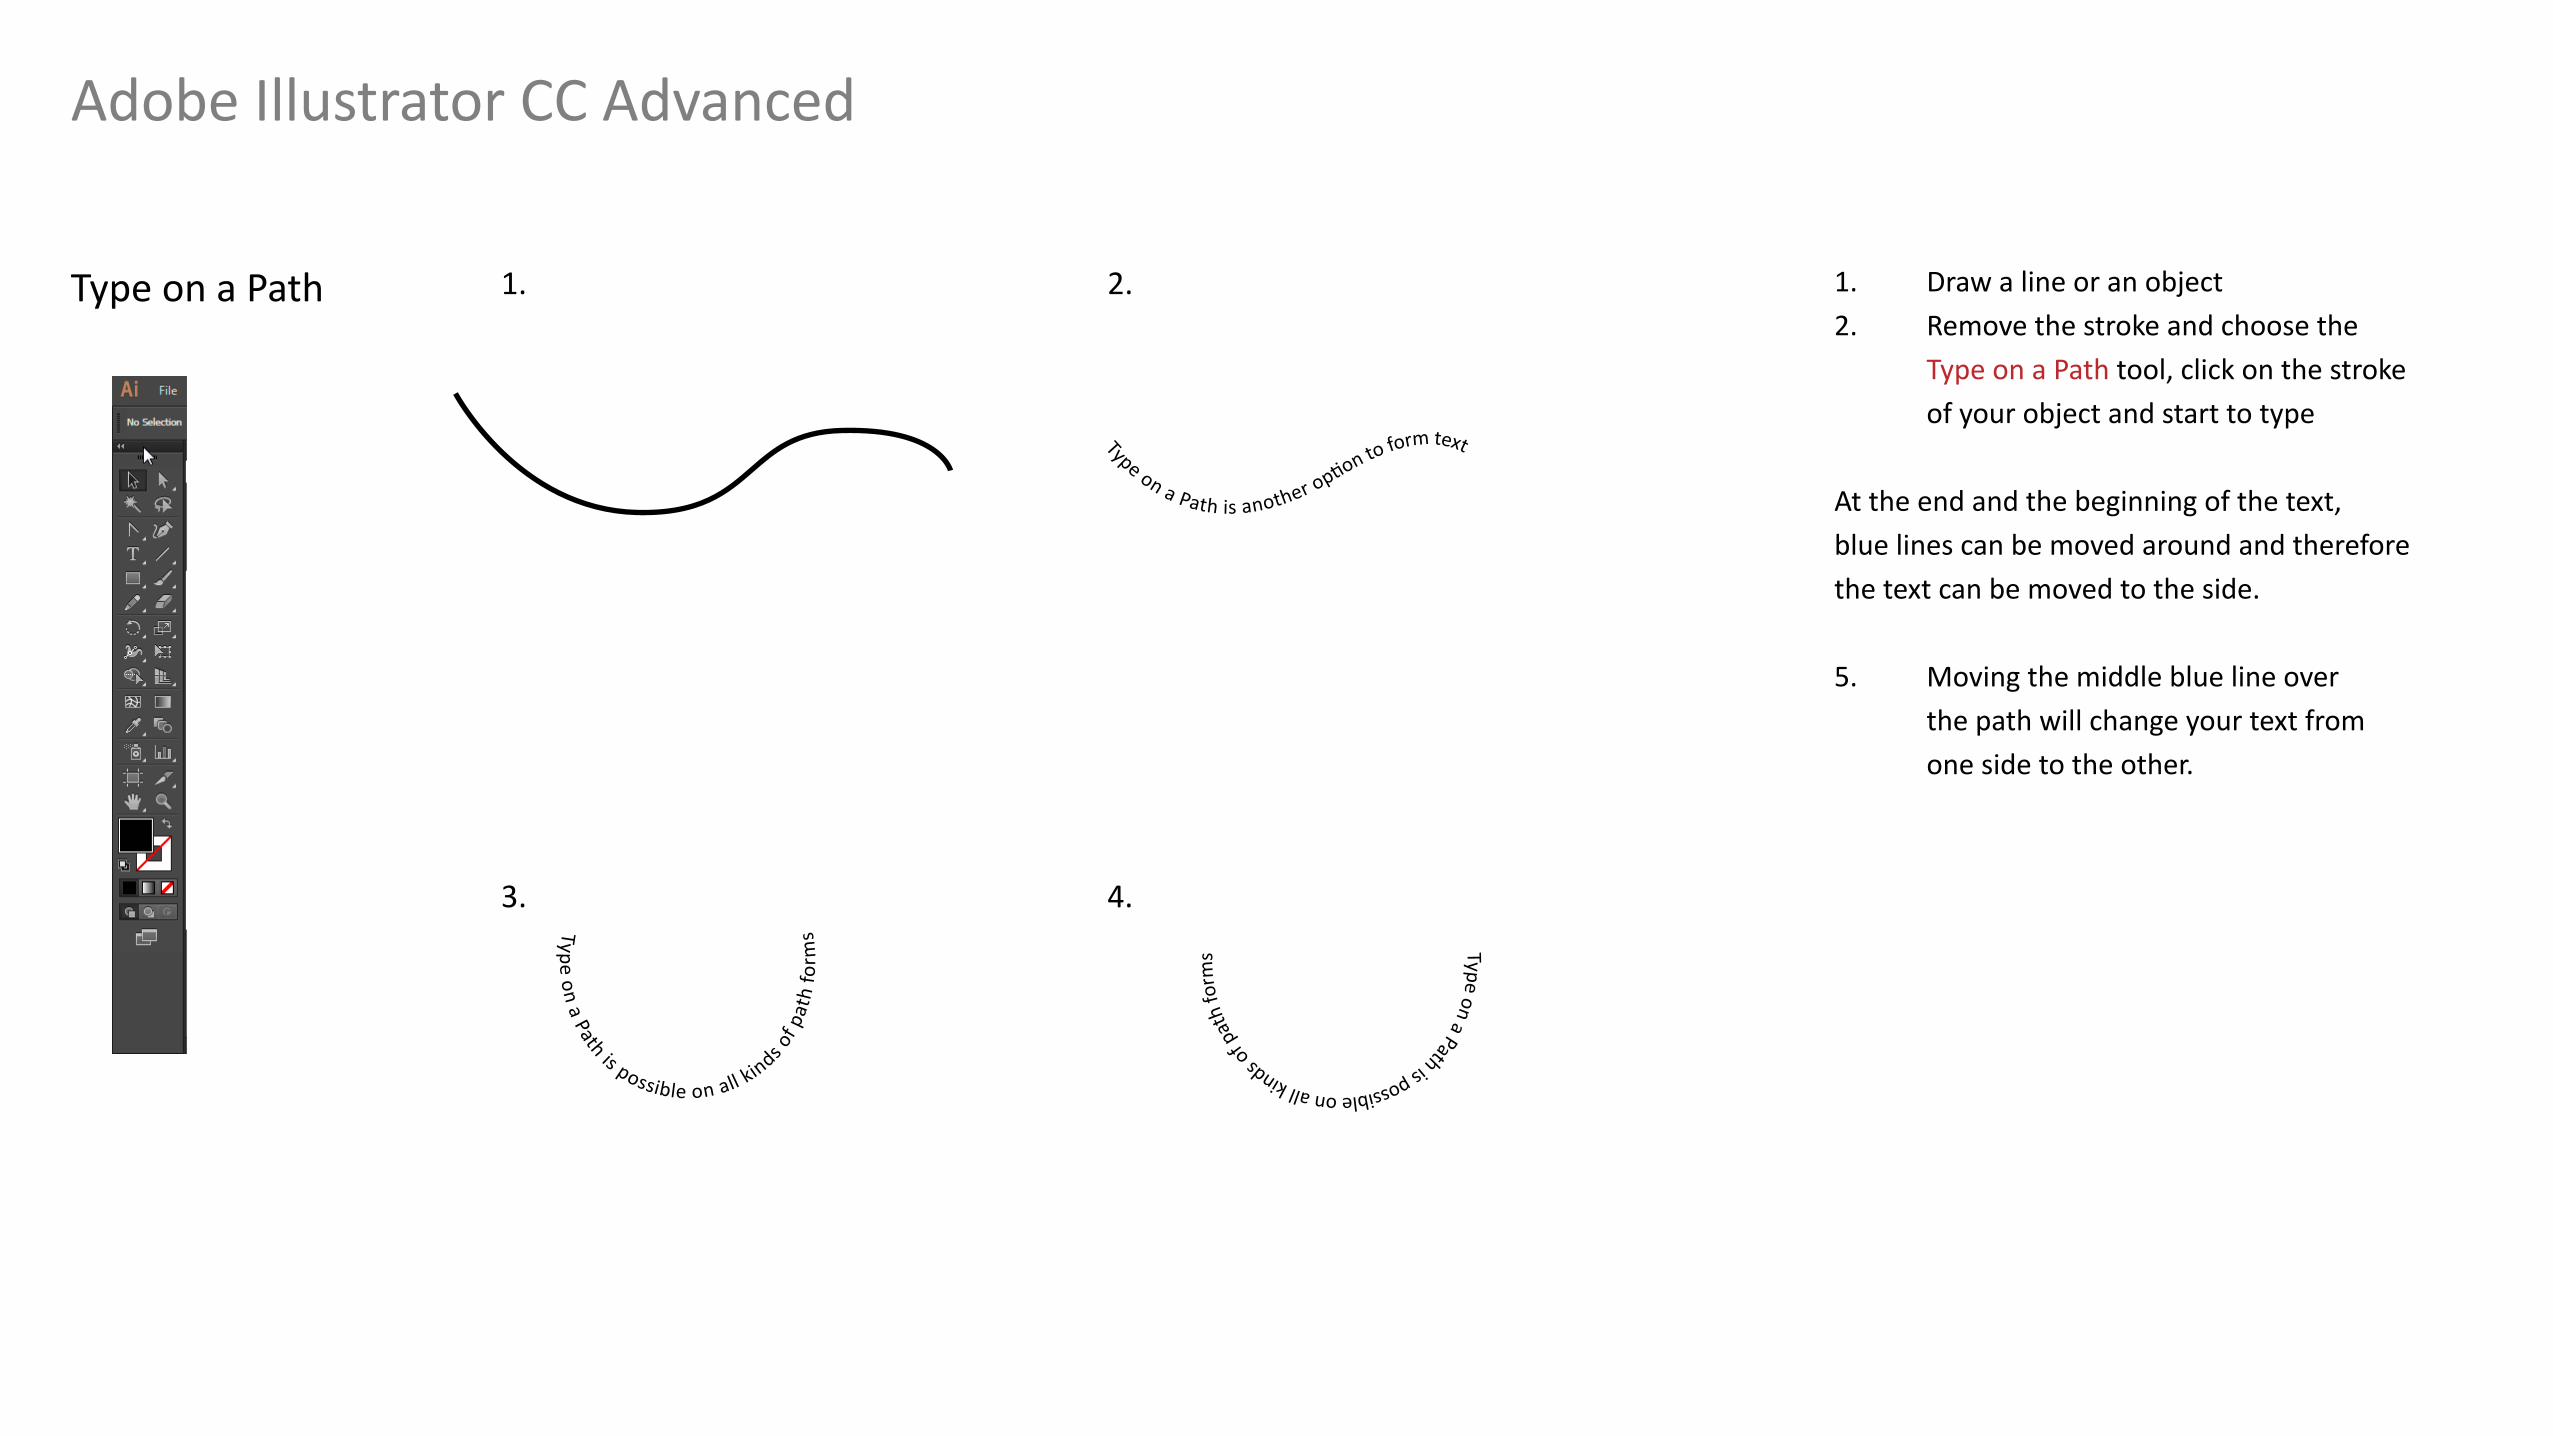
Type on a Path 1. Draw a line or an object2. Remove the stroke and choose the Type on a Path tool, click on the stroke of your object and start to type
At the end and the beginning of the text,blue lines can be moved around and thereforethe text can be moved to the side.
5. Moving the middle blue line over the path will change your text from one side to the other.
1.
3. 4.
2.
Type on a Path is another option to form text
Type on a Path is possible on all kinds of p
ath
form
s Type on a Path is possible on all kinds of p
ath
form
s

Adobe Illustrator CC Advanced
Live Paint Bucket 1. Draw a closed object2. Draw lines3. Color background4. Color fields with Live Paint Bucket using swatches
1.
3. 4.
2.
Adobe Illustrator CC Advanced
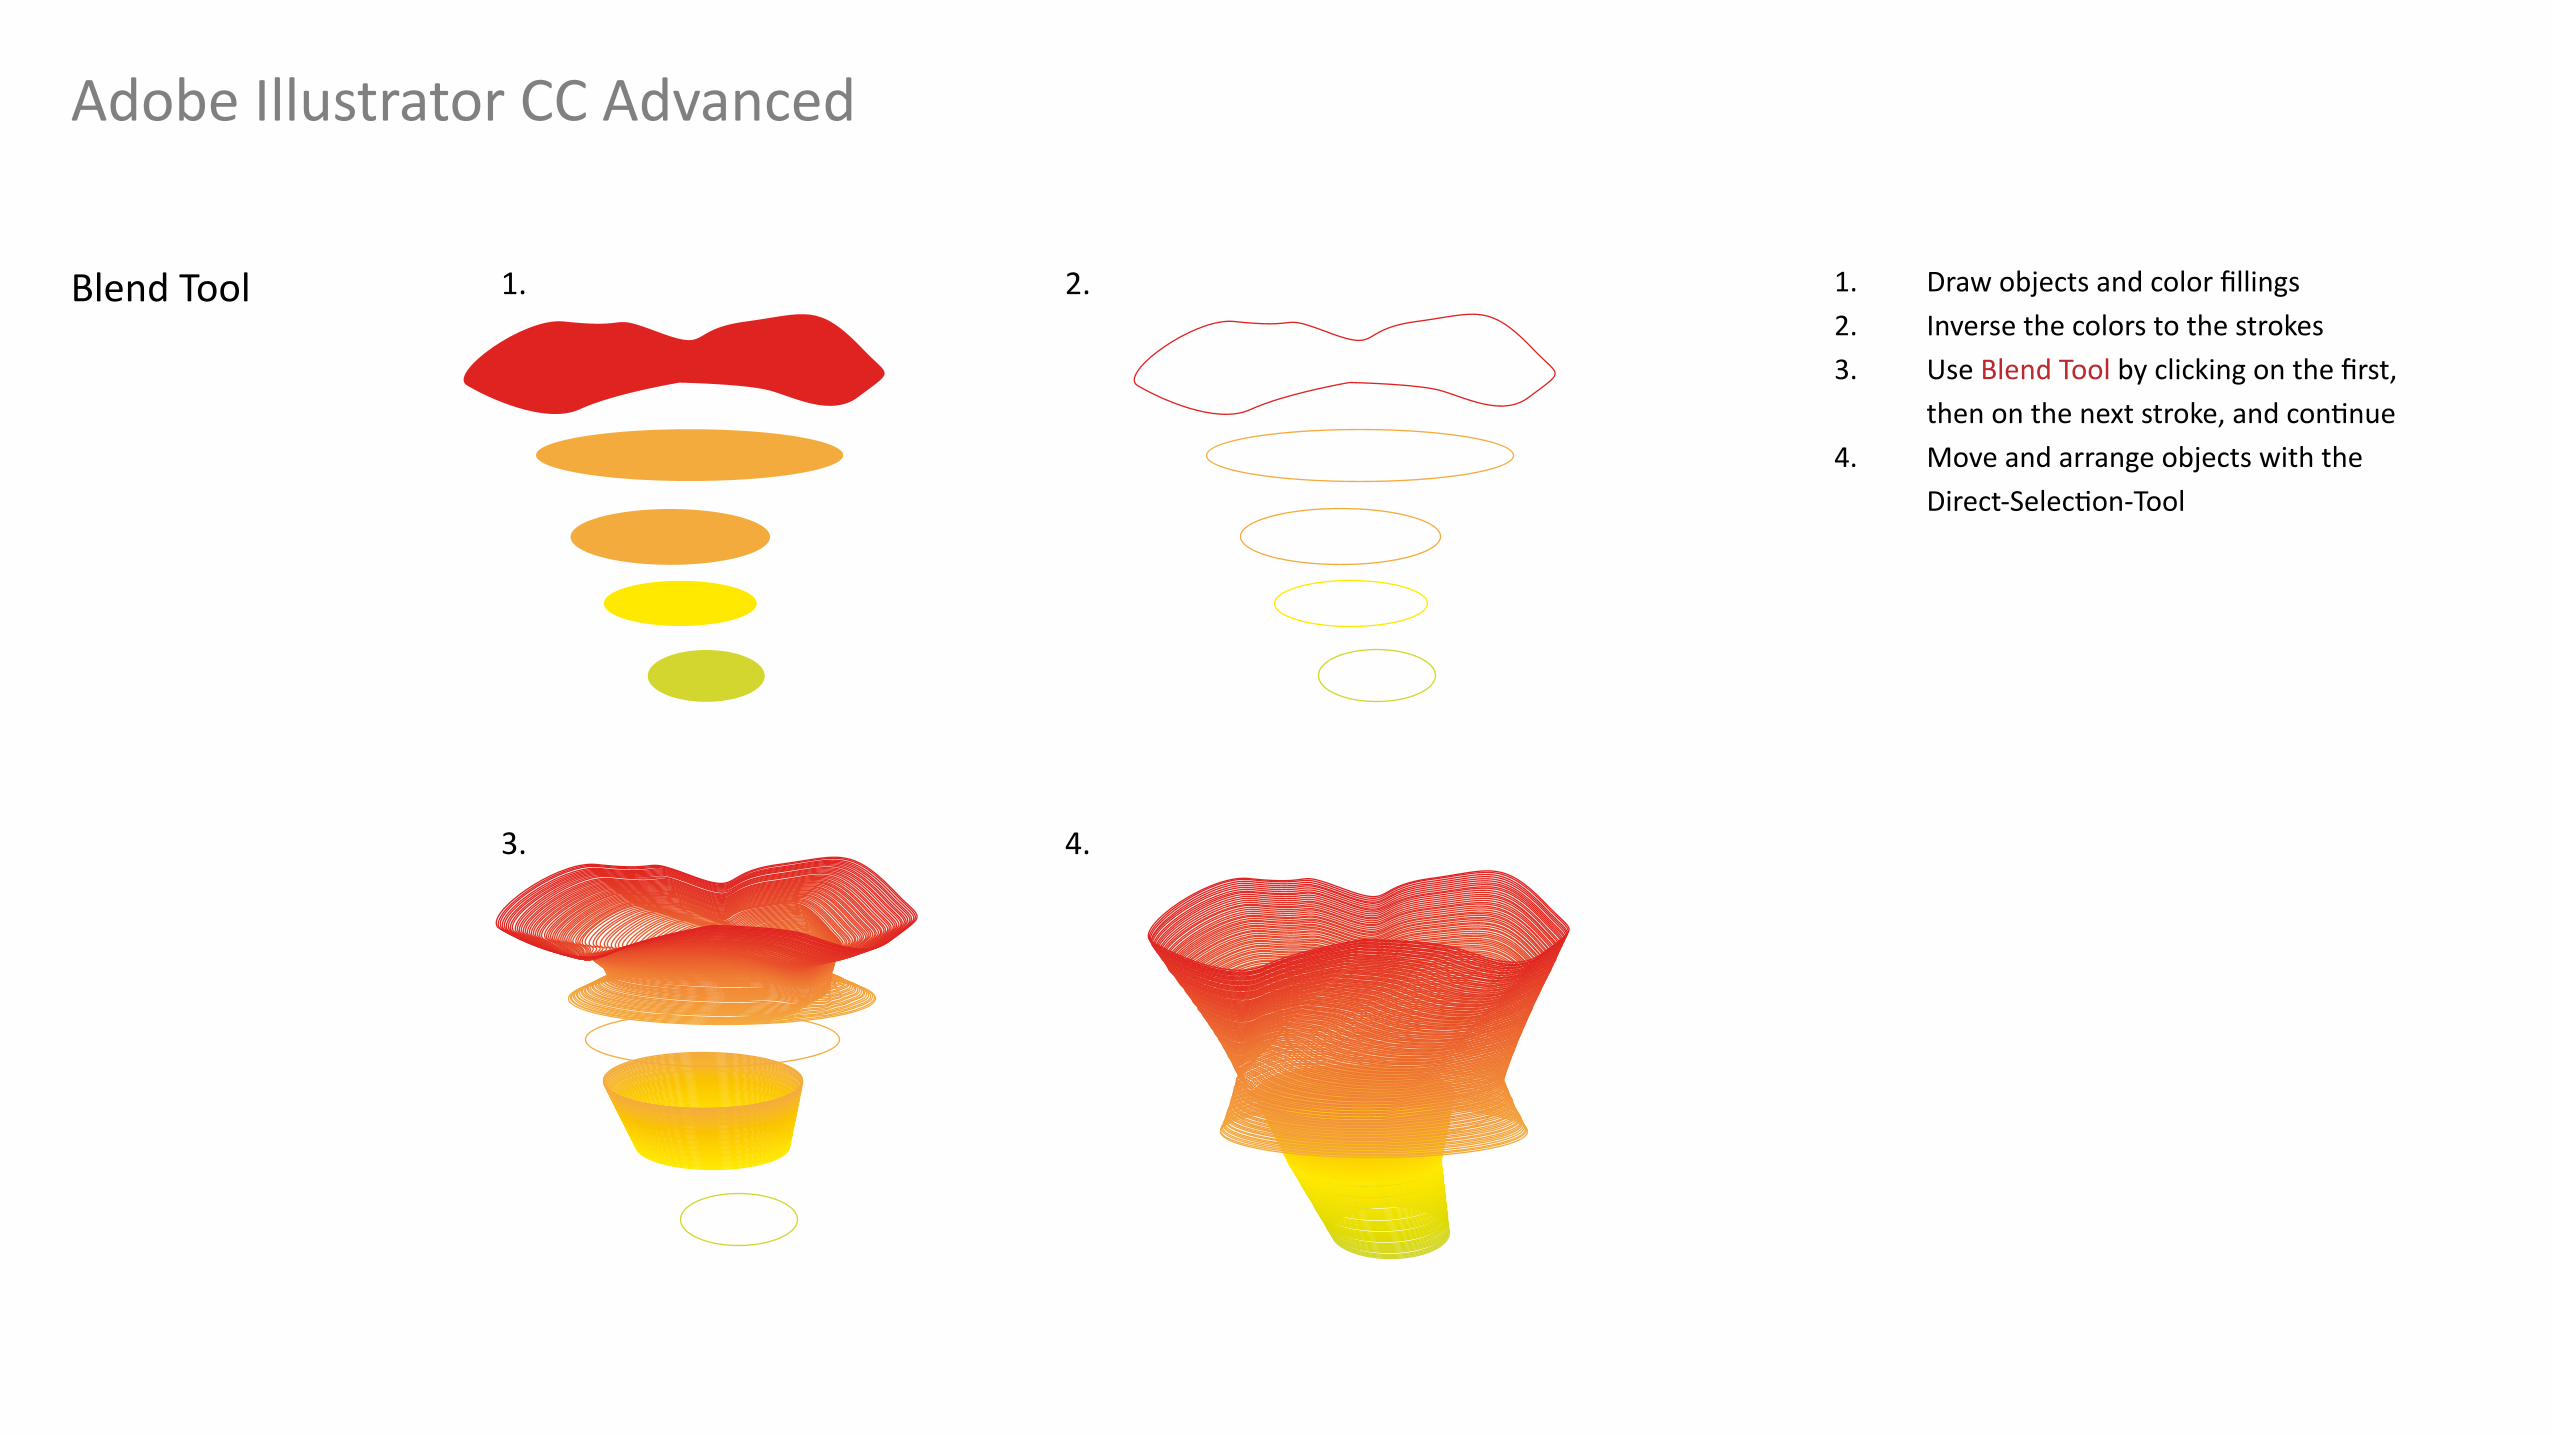
Blend Tool 1. Draw objects and color fillings2. Inverse the colors to the strokes3. Use Blend Tool by clicking on the first, then on the next stroke, and continue4. Move and arrange objects with the Direct-Selection-Tool
1.
3. 4.
2.
Adobe Illustrator CC Advanced
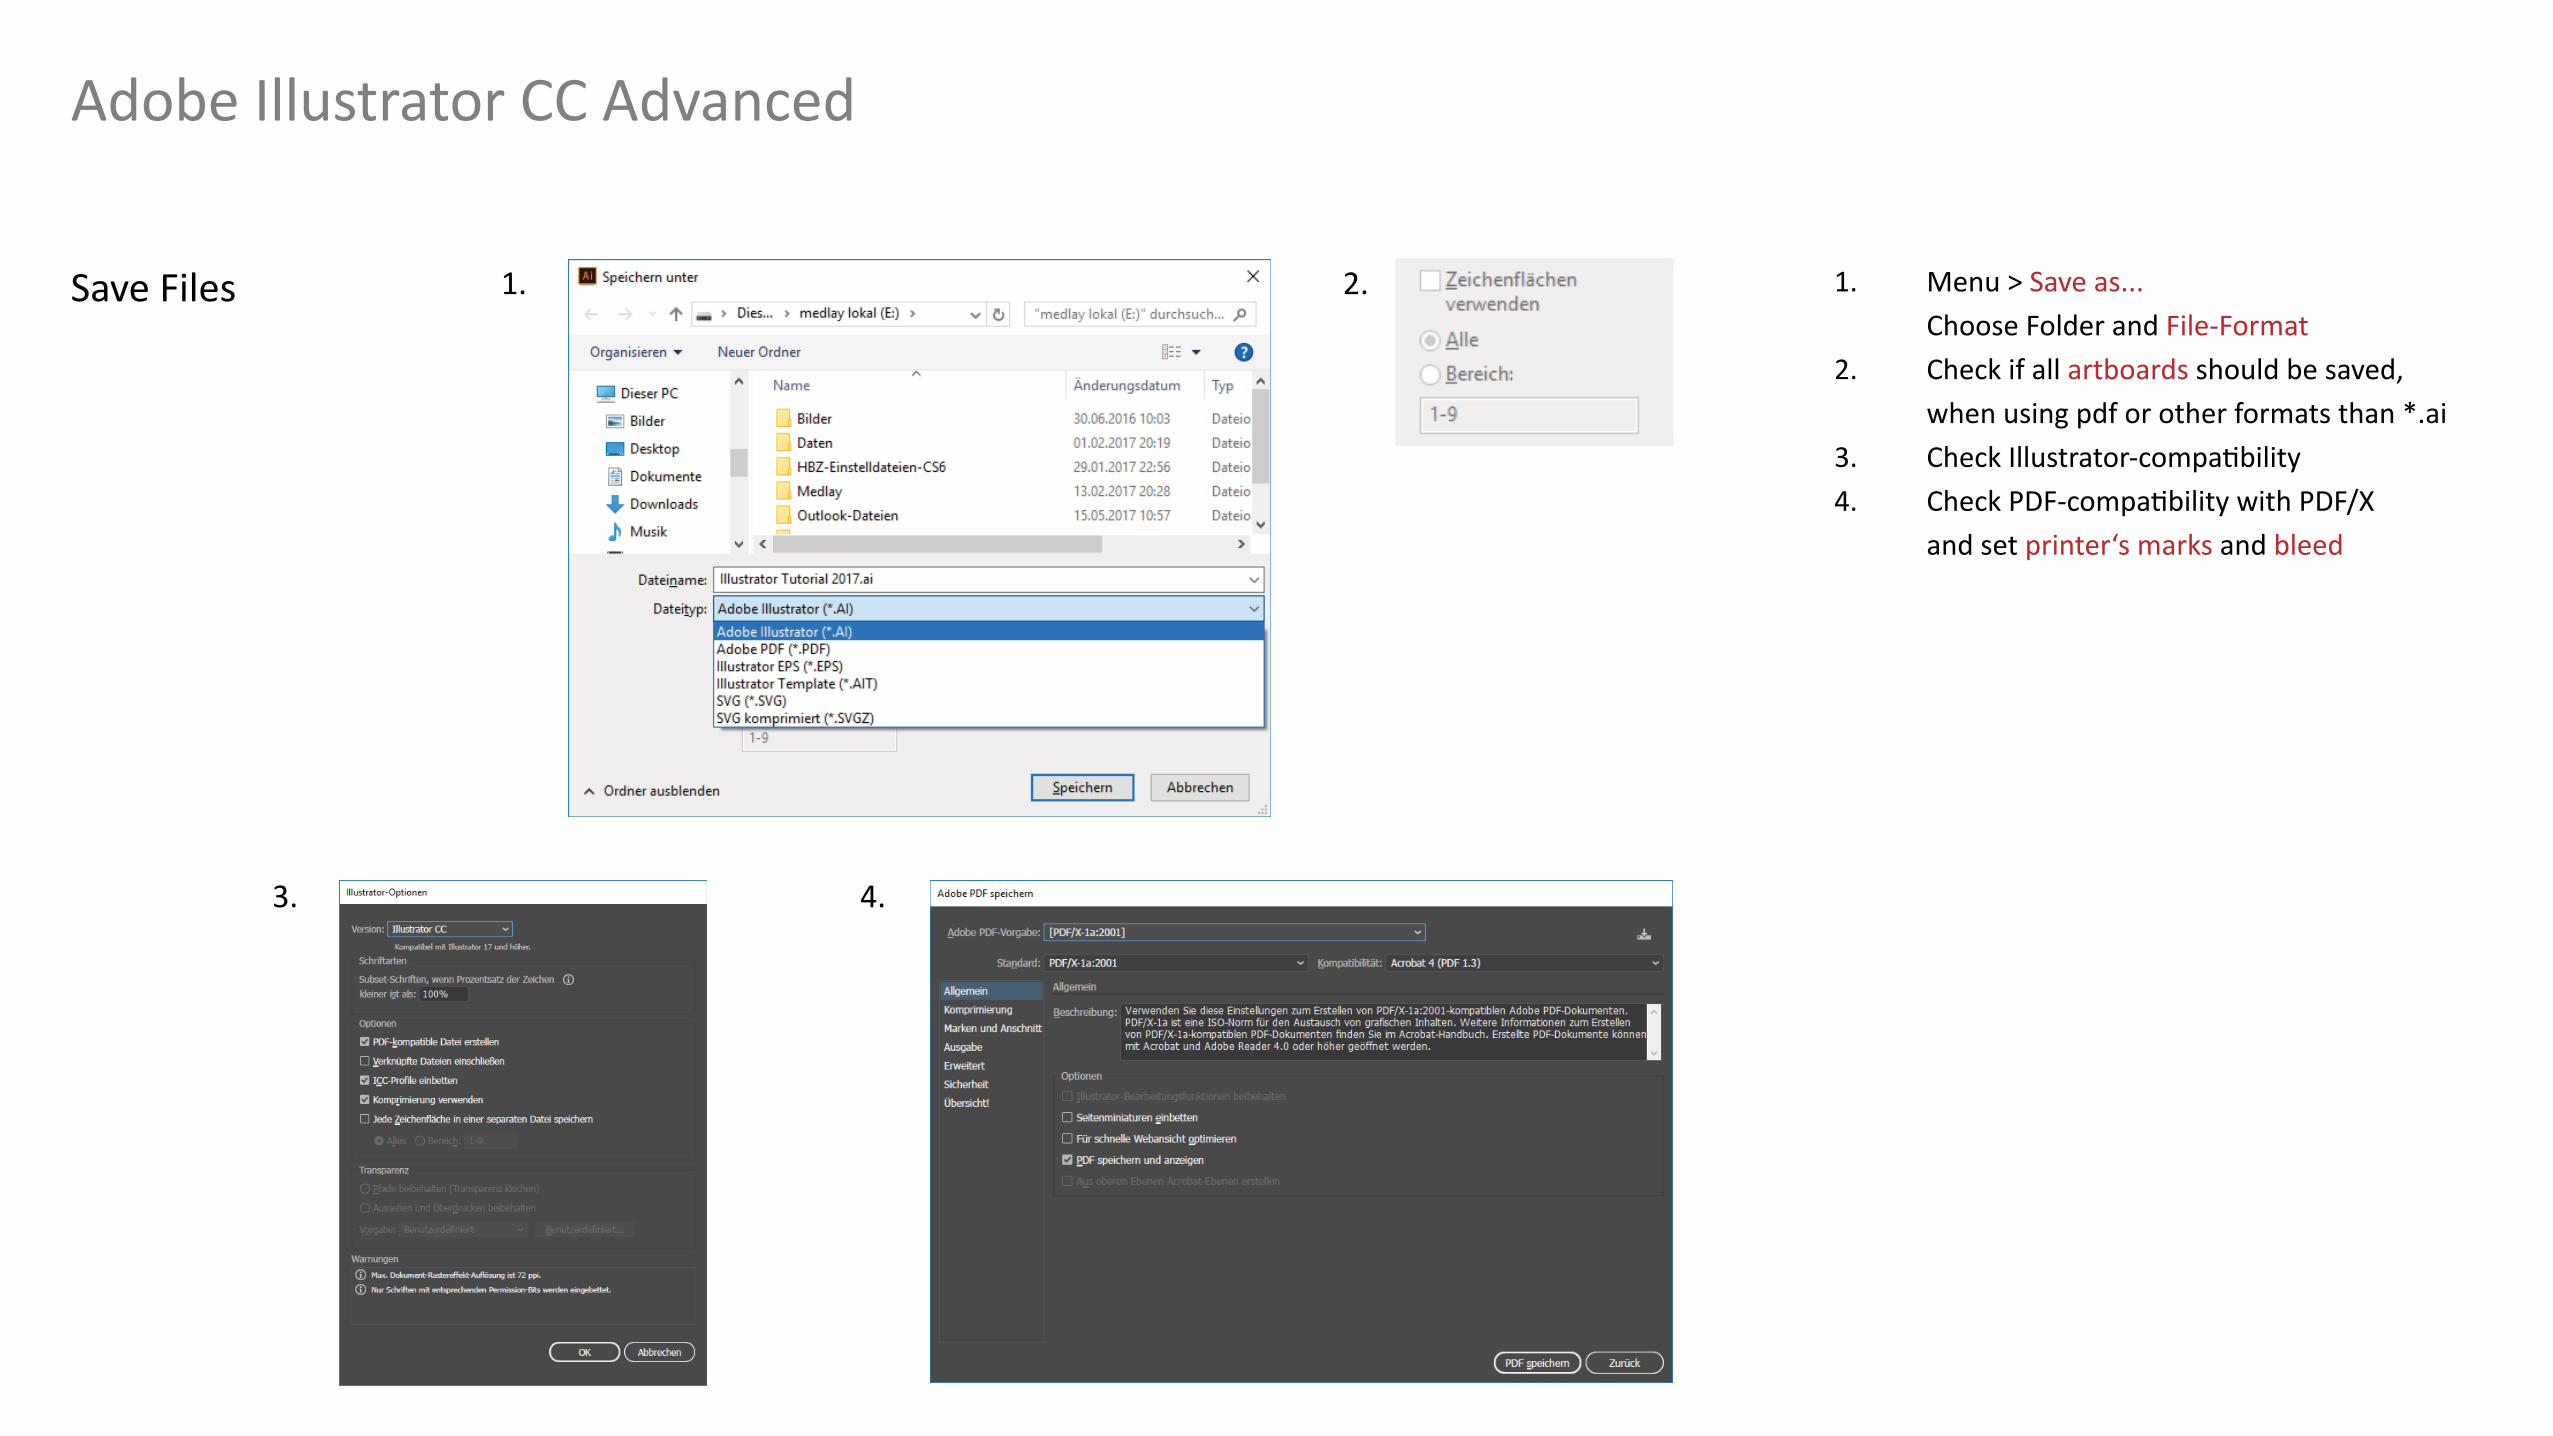
Save Files 1. Menu > Save as... Choose Folder and File-Format2. Check if all artboards should be saved, when using pdf or other formats than *.ai3. Check Illustrator-compatibility4. Check PDF-compatibility with PDF/X and set printer‘s marks and bleed
1.
3. 4.
2.
Adobe Illustrator CC Advanced
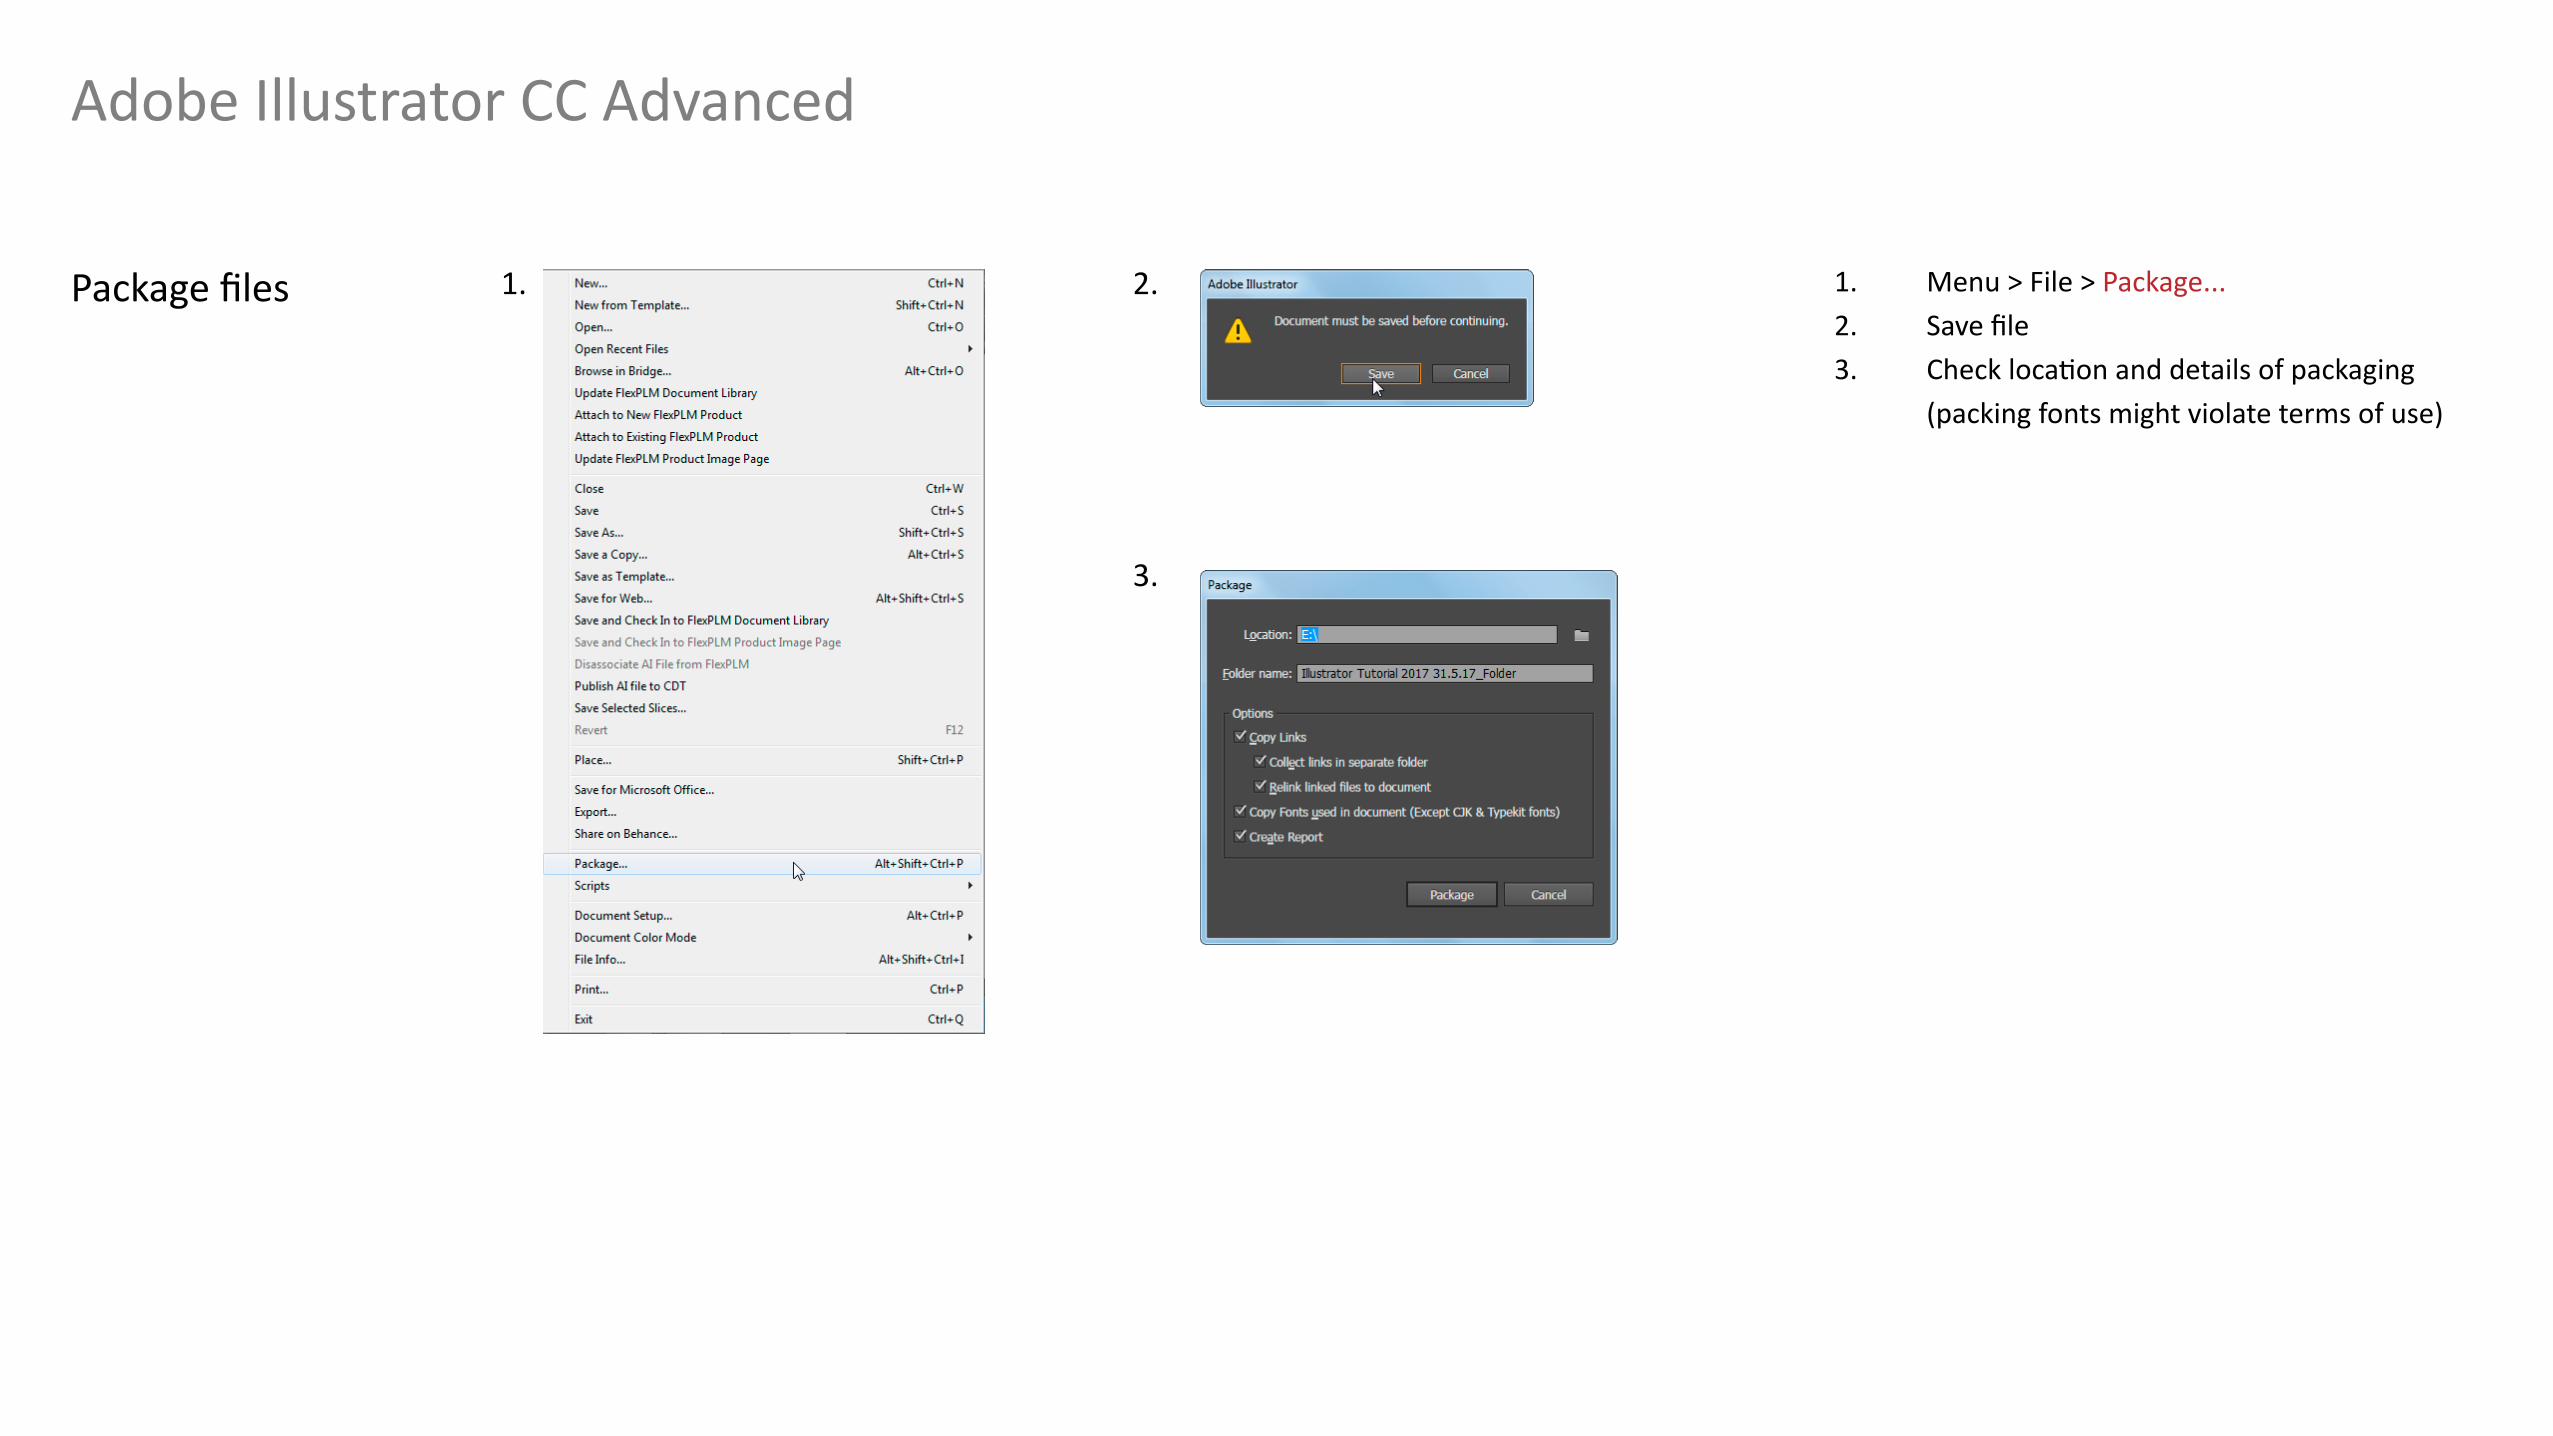
Package files 1. Menu > File > Package... 2. Save file3. Check location and details of packaging (packing fonts might violate terms of use)
1.
3.
4.
2.
Adobe Illustrator CC Advanced
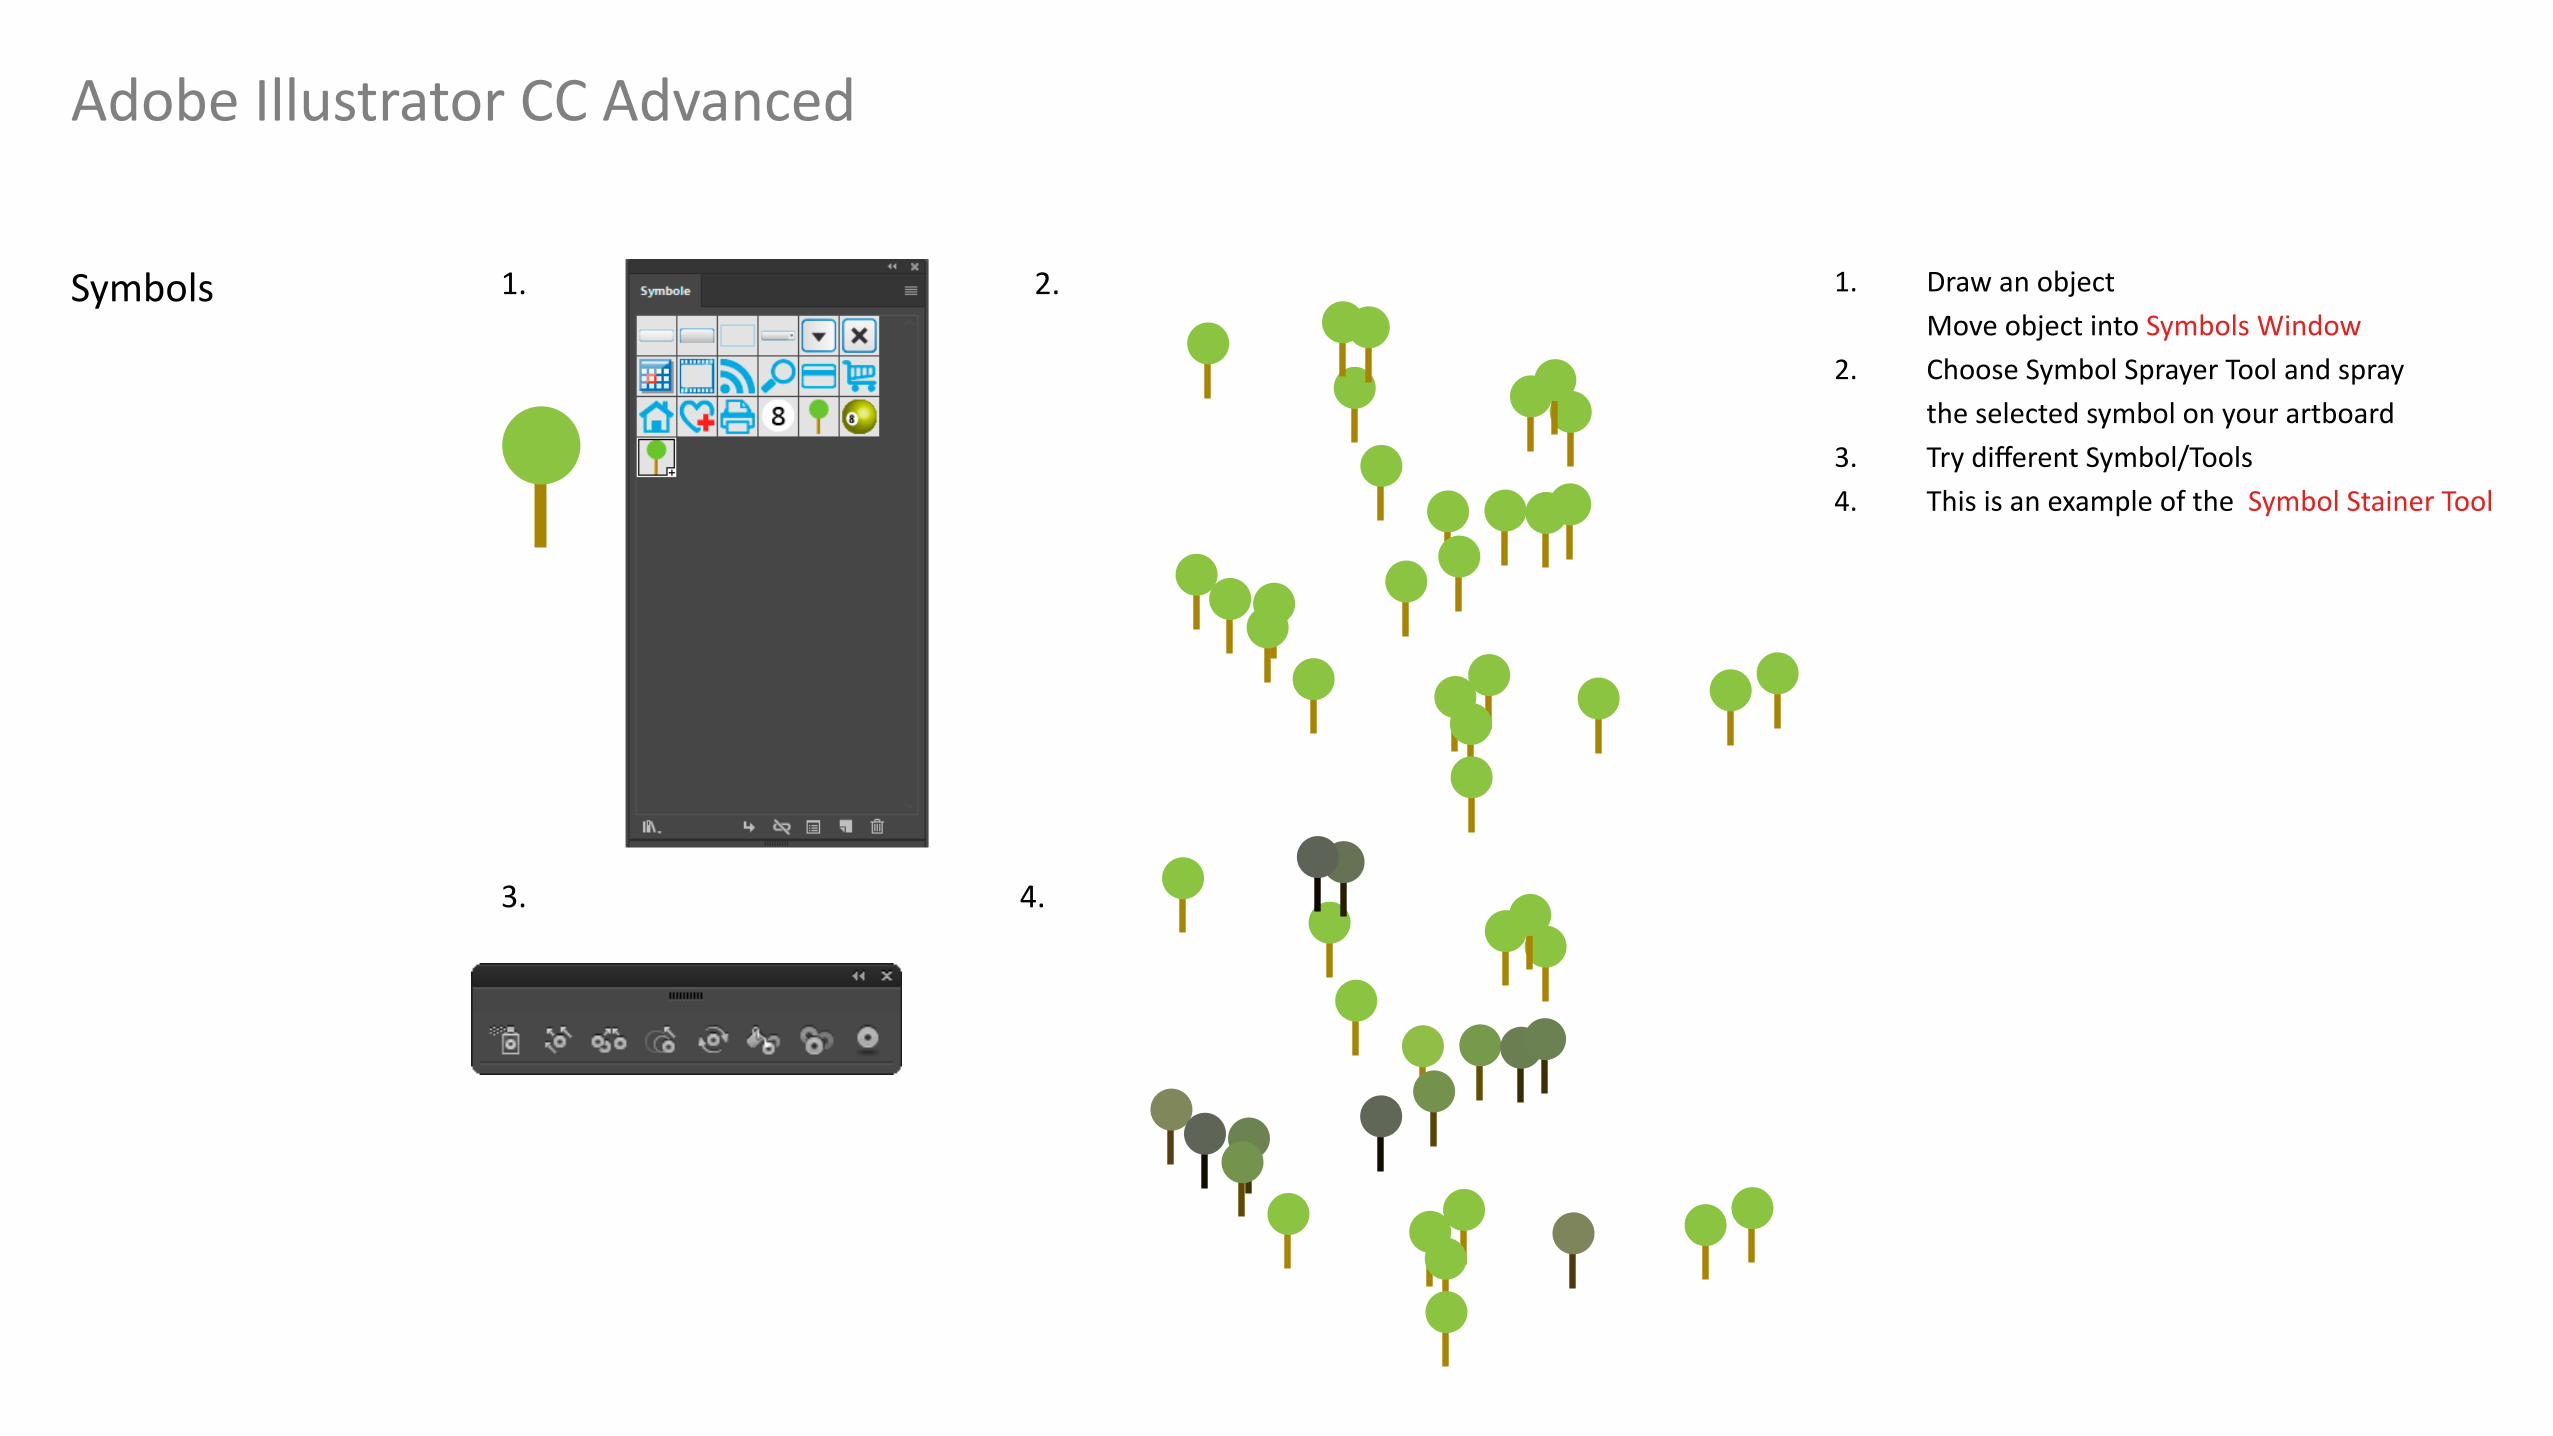
Symbols 1. Draw an object Move object into Symbols Window2. Choose Symbol Sprayer Tool and spray the selected symbol on your artboard3. Try different Symbol/Tools4. This is an example of the Symbol Stainer Tool
1.
4.3.
2.
Adobe Illustrator CC Advanced
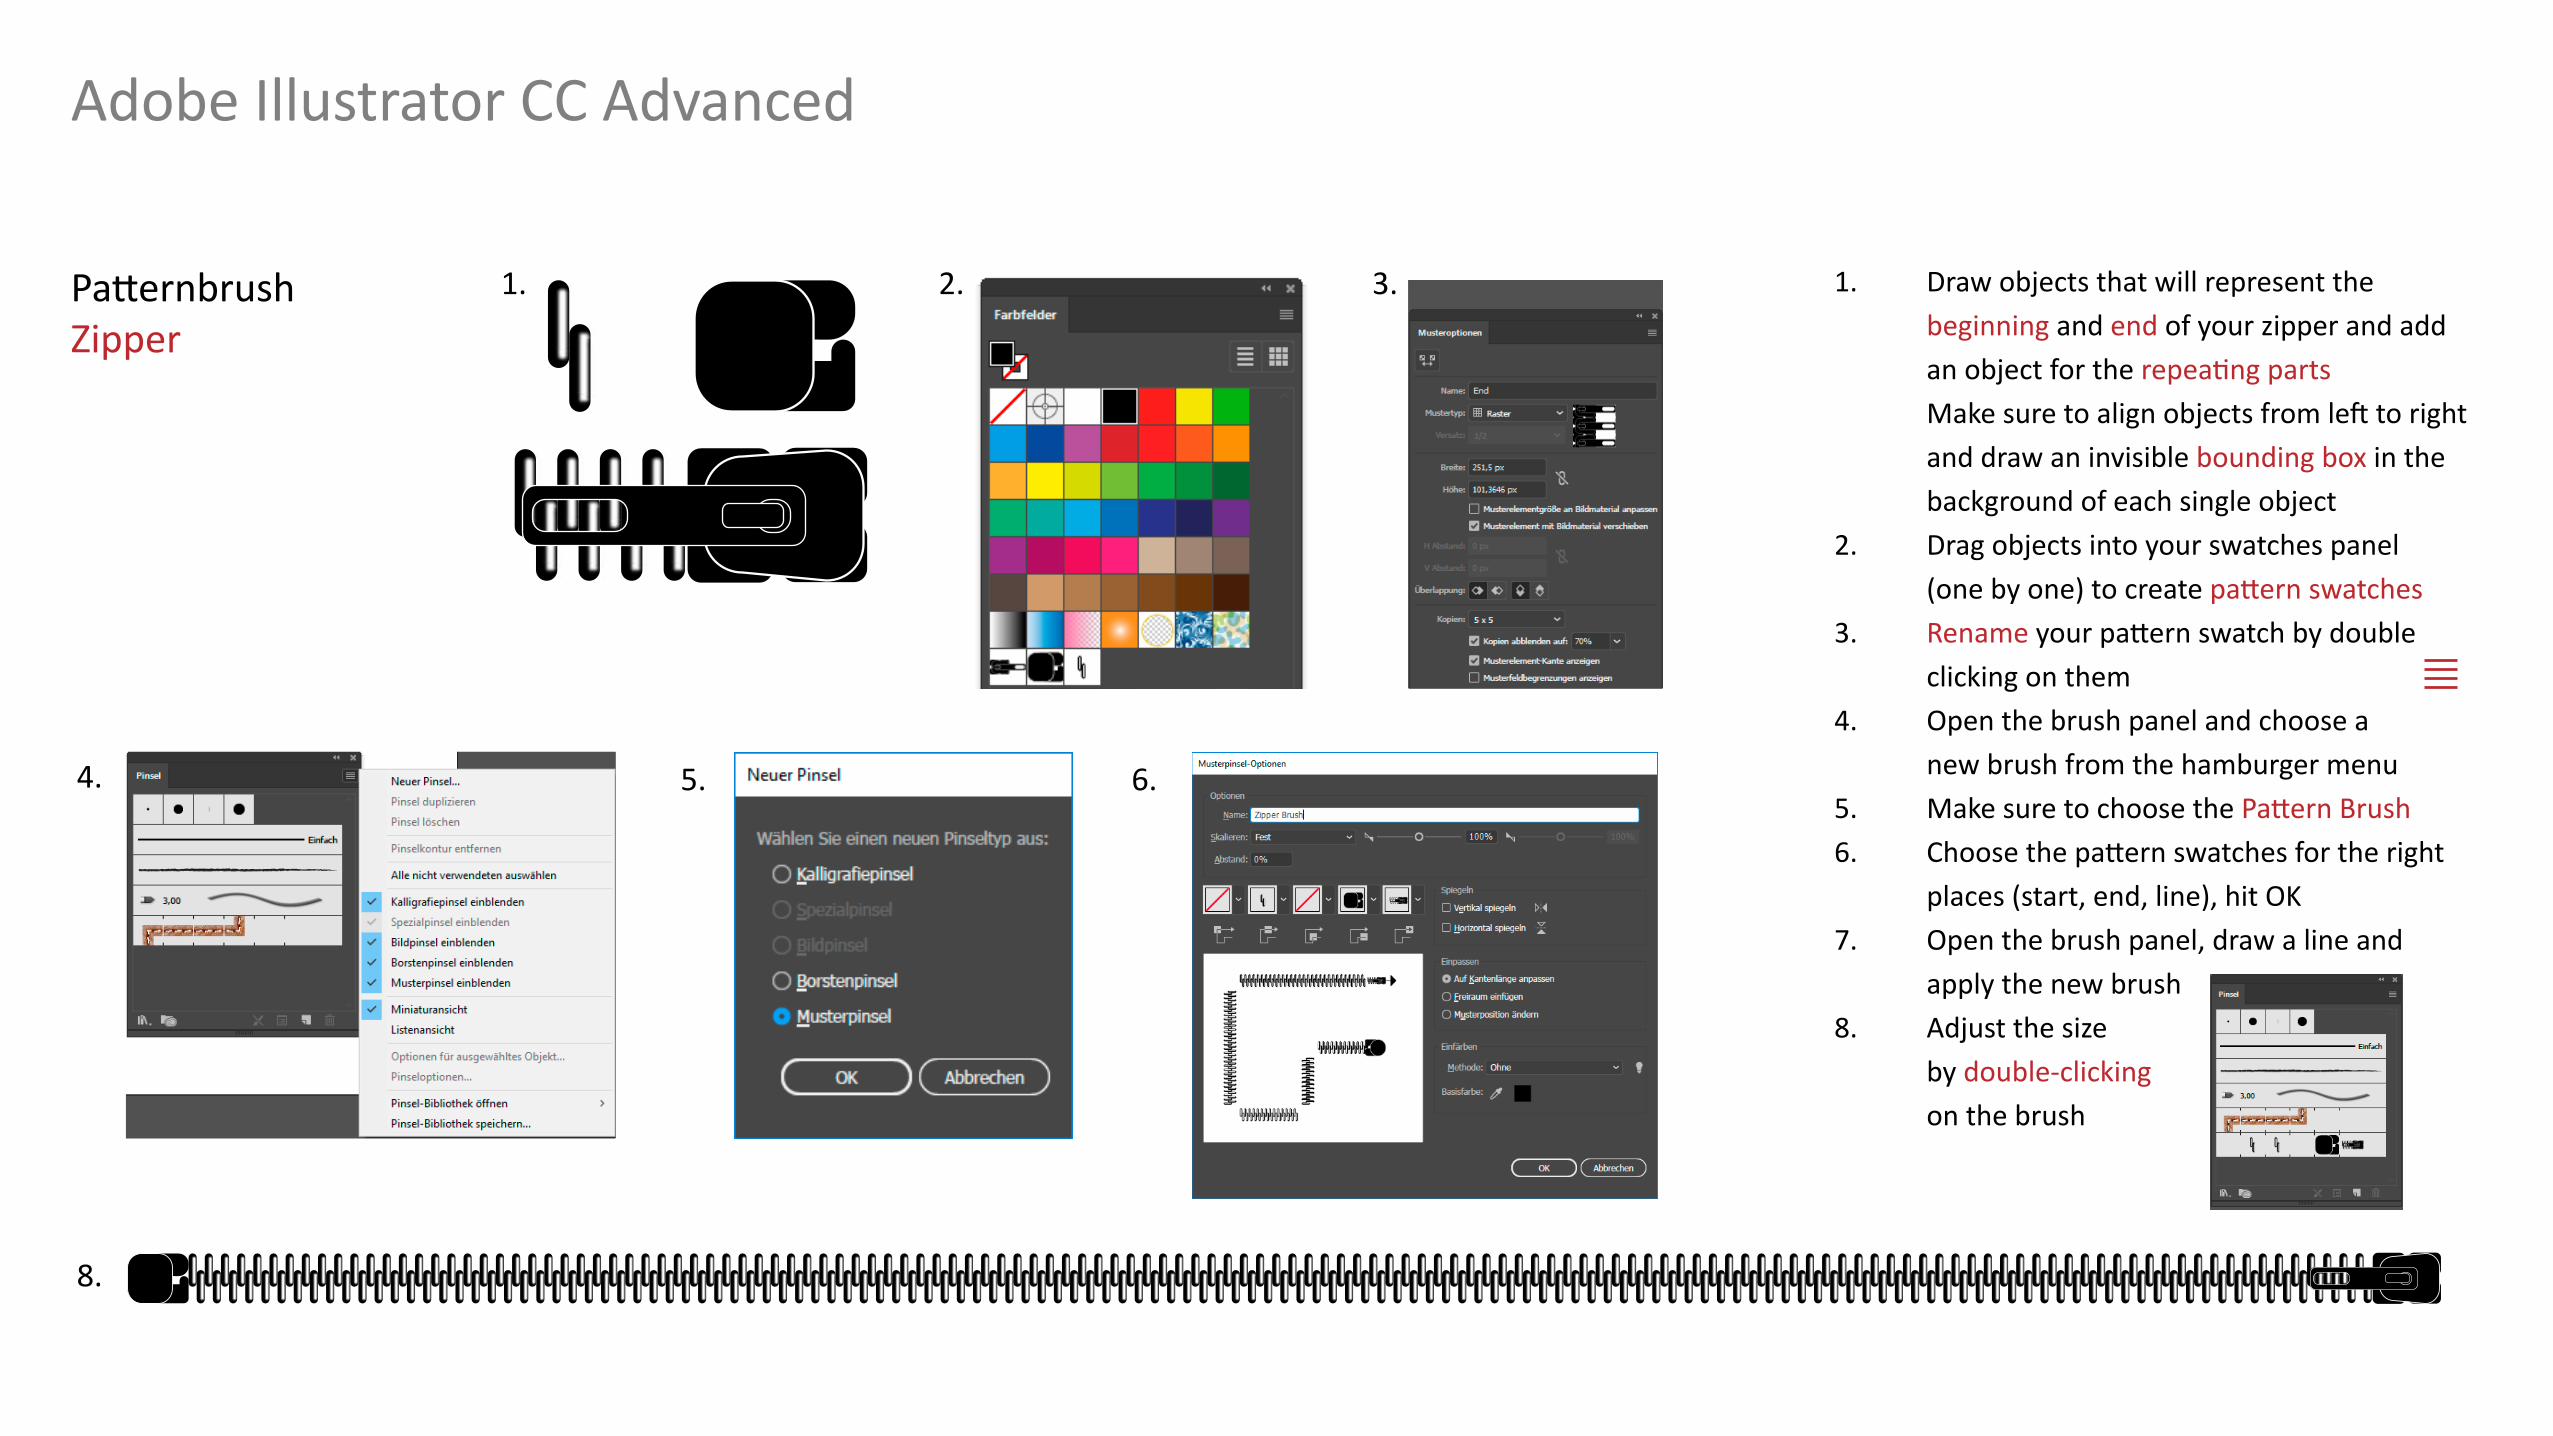
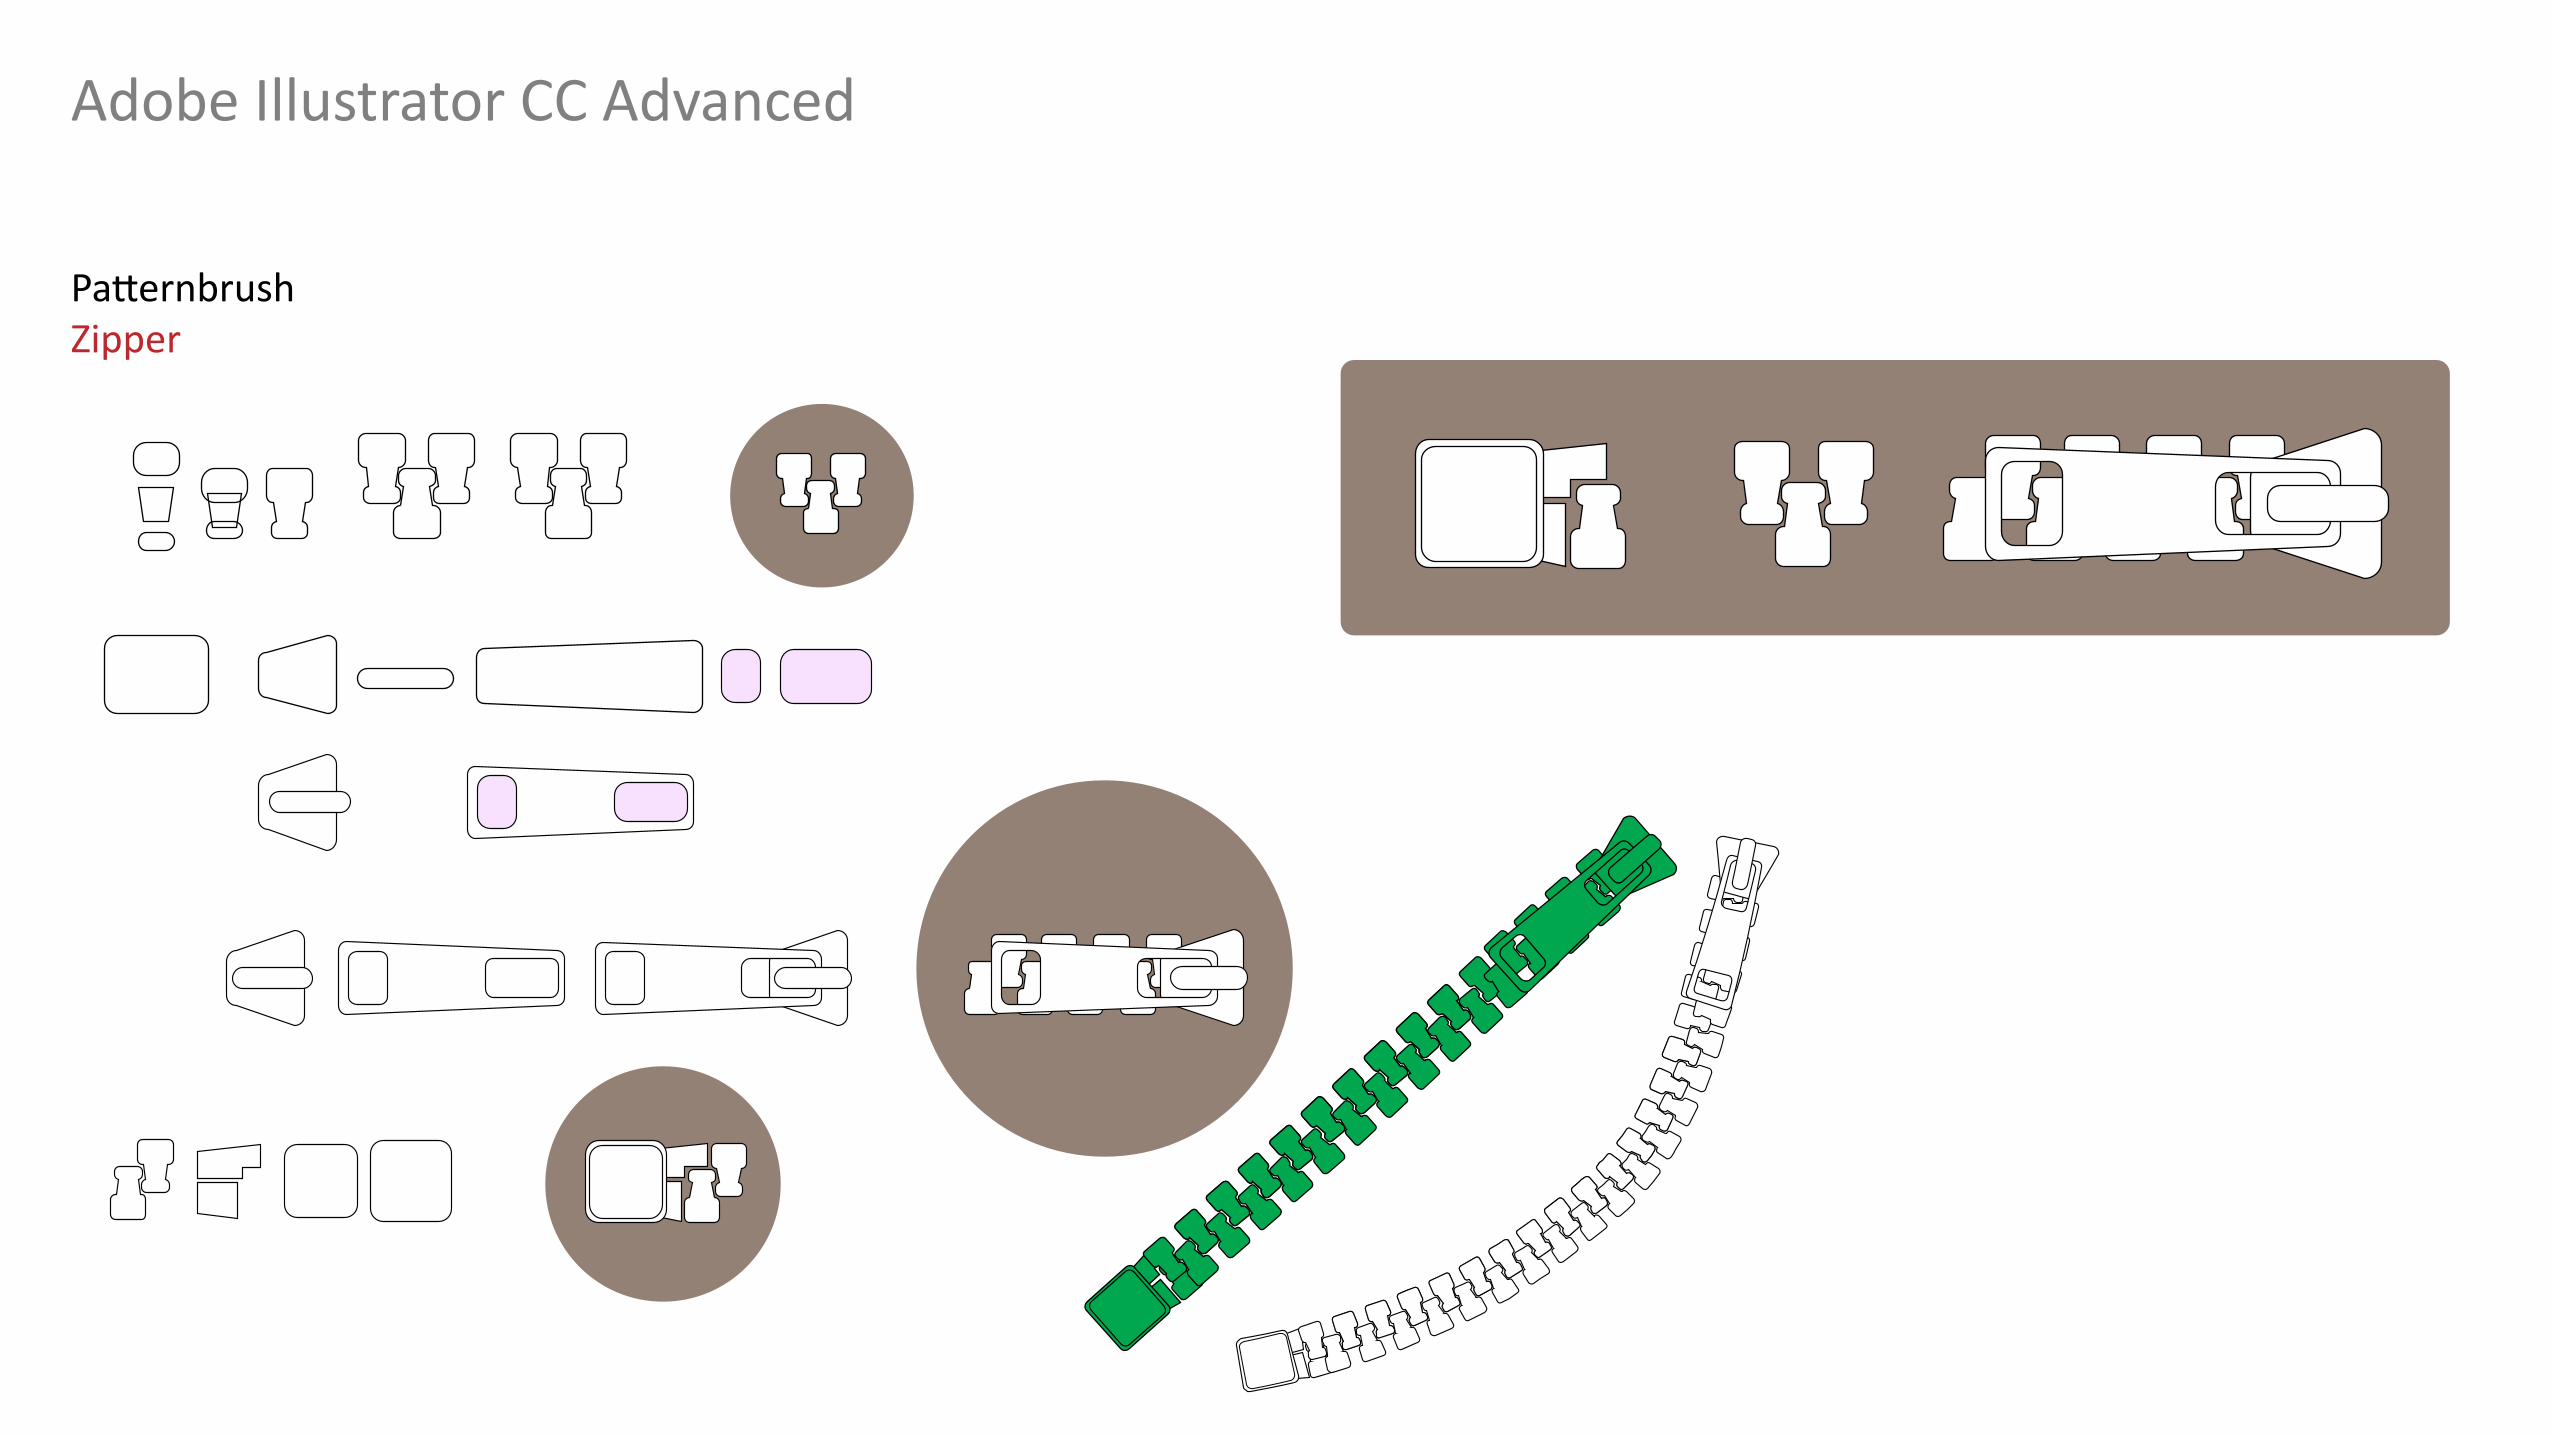
PatternbrushZipper
1. Draw objects that will represent the beginning and end of your zipper and add an object for the repeating parts Make sure to align objects from left to right and draw an invisible bounding box in the background of each single object2. Drag objects into your swatches panel (one by one) to create pattern swatches3. Rename your pattern swatch by double clicking on them4. Open the brush panel and choose a new brush from the hamburger menu 5. Make sure to choose the Pattern Brush6. Choose the pattern swatches for the right places (start, end, line), hit OK7. Open the brush panel, draw a line and apply the new brush8. Adjust the size by double-clicking on the brush
1.
4.
8.
5.
2. 3.
6.
Adobe Illustrator CC Advanced
PatternbrushZipper
Adobe Illustrator CC Advanced
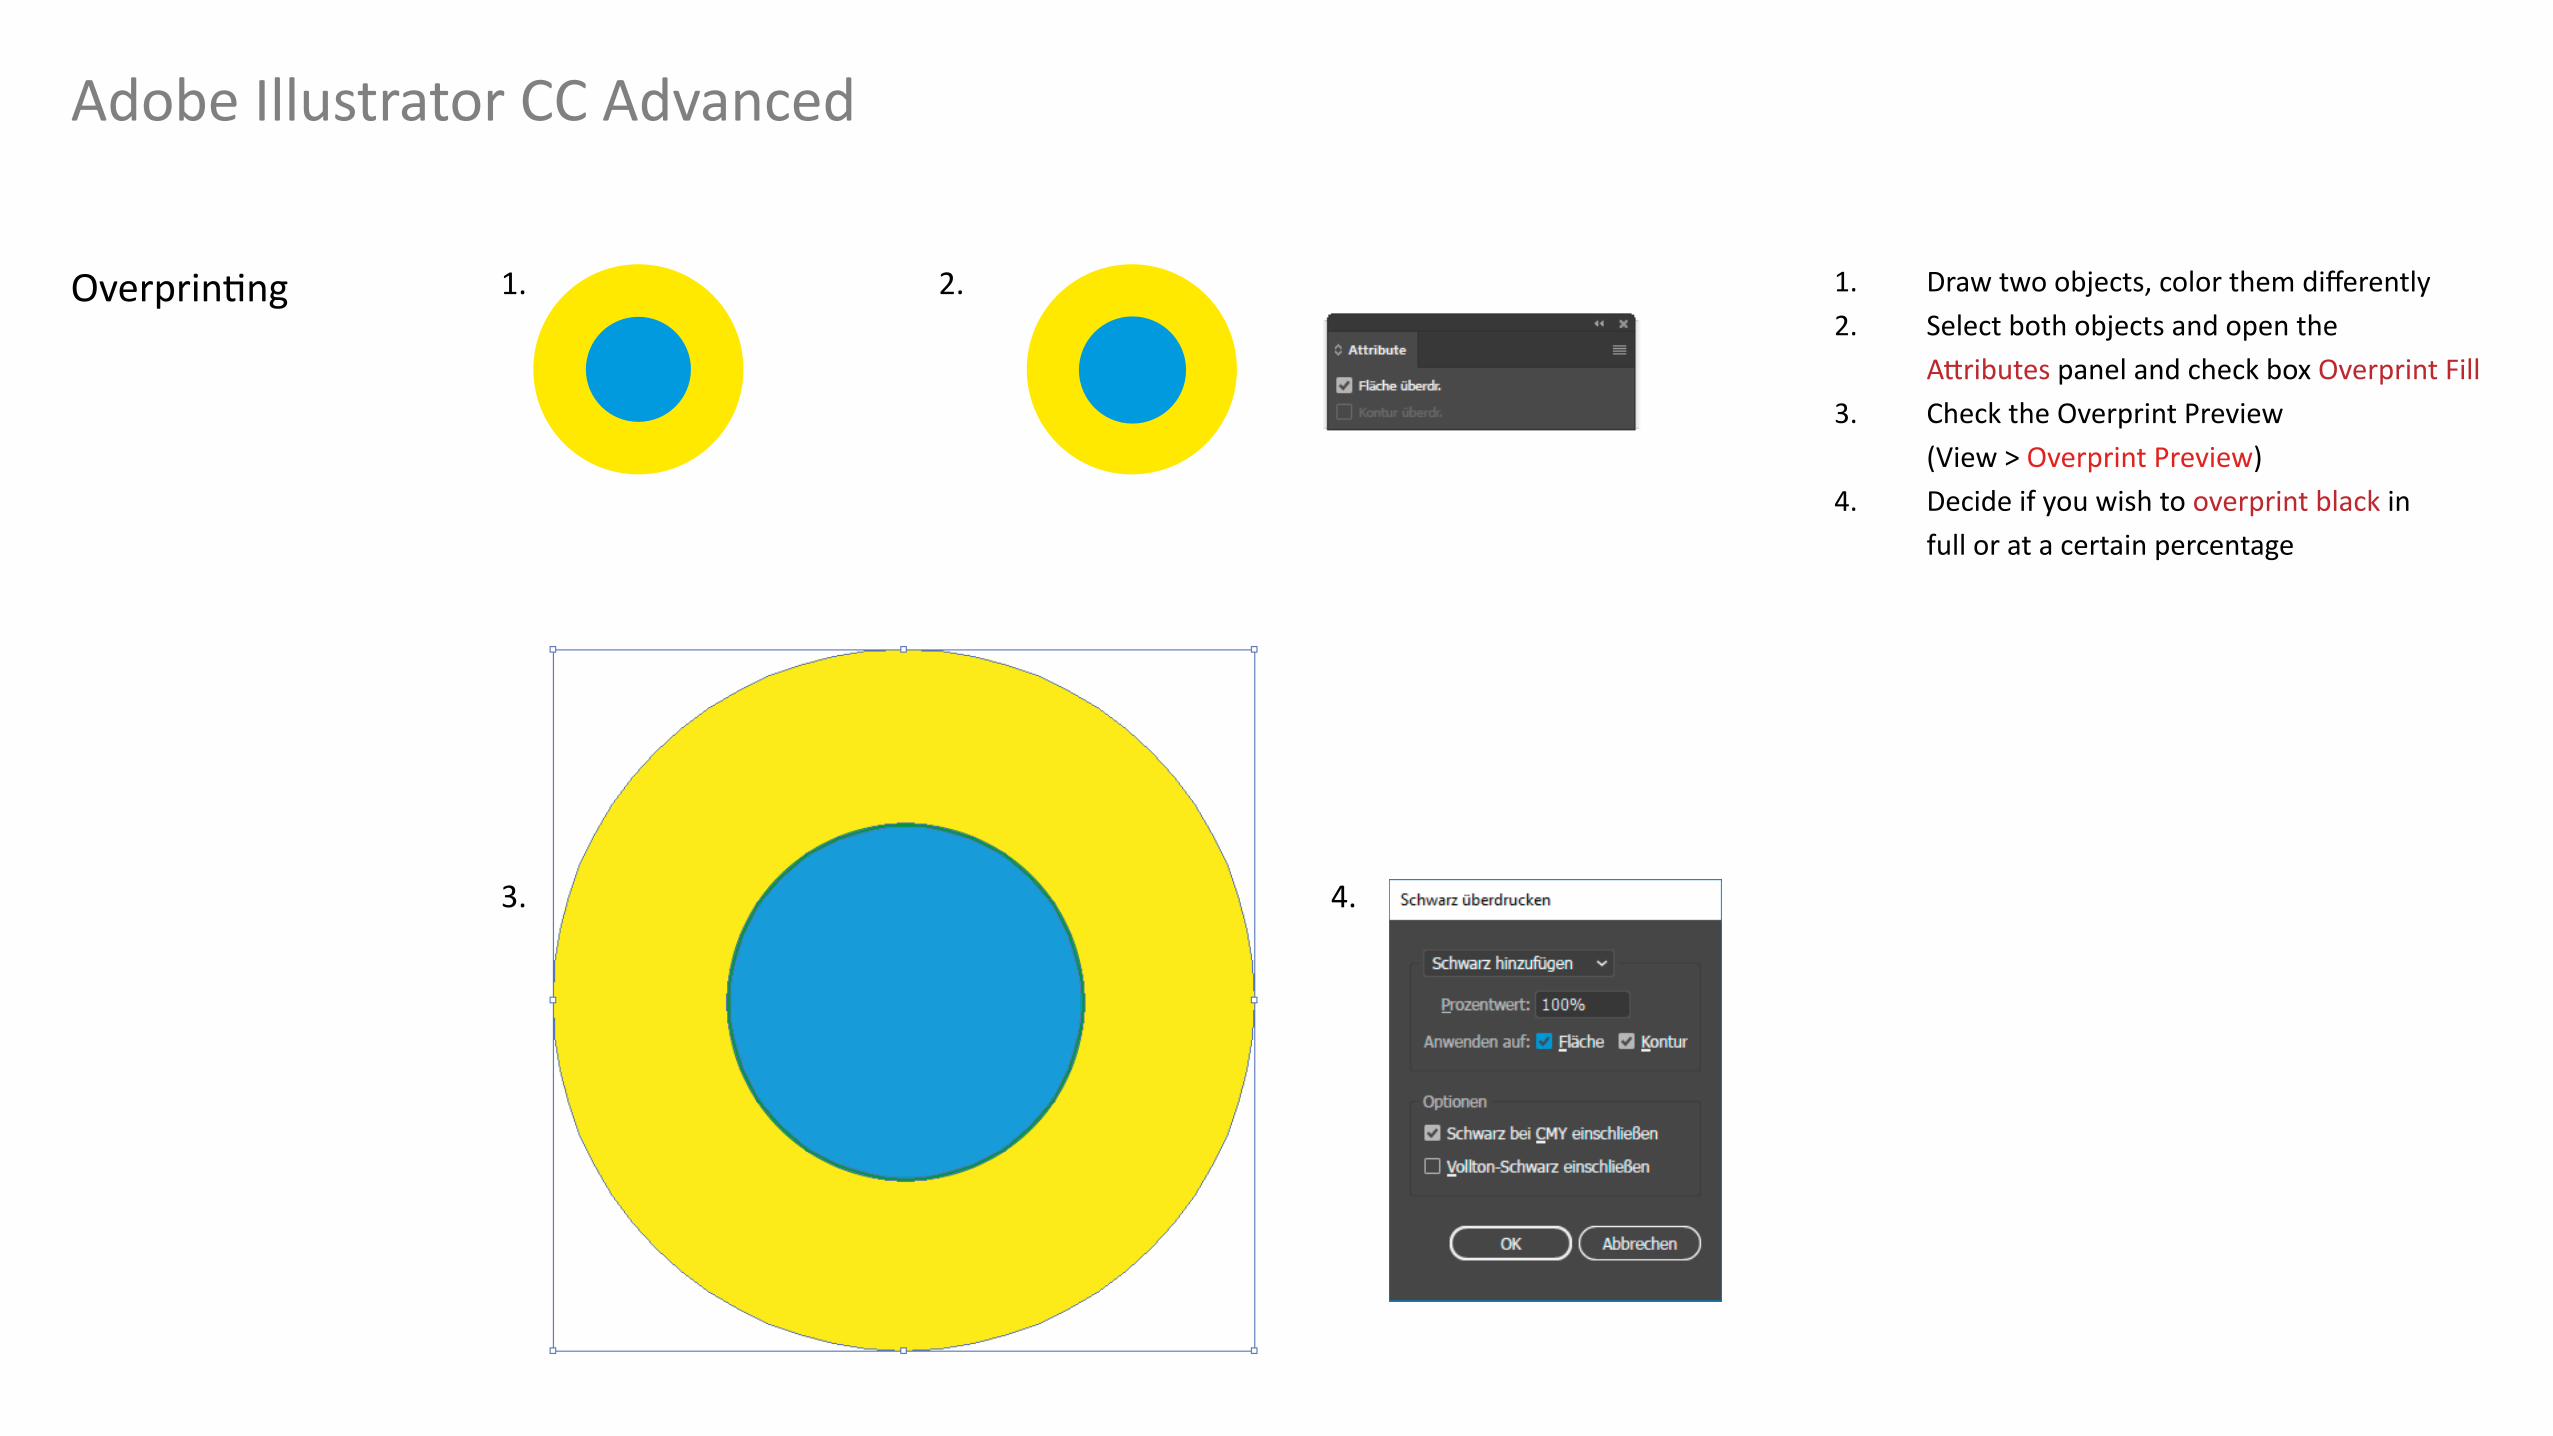
Overprinting 1. Draw two objects, color them differently 2. Select both objects and open the Attributes panel and check box Overprint Fill3. Check the Overprint Preview (View > Overprint Preview)4. Decide if you wish to overprint black in full or at a certain percentage
1.
3. 4.
2.
Adobe Illustrator CC Advanced
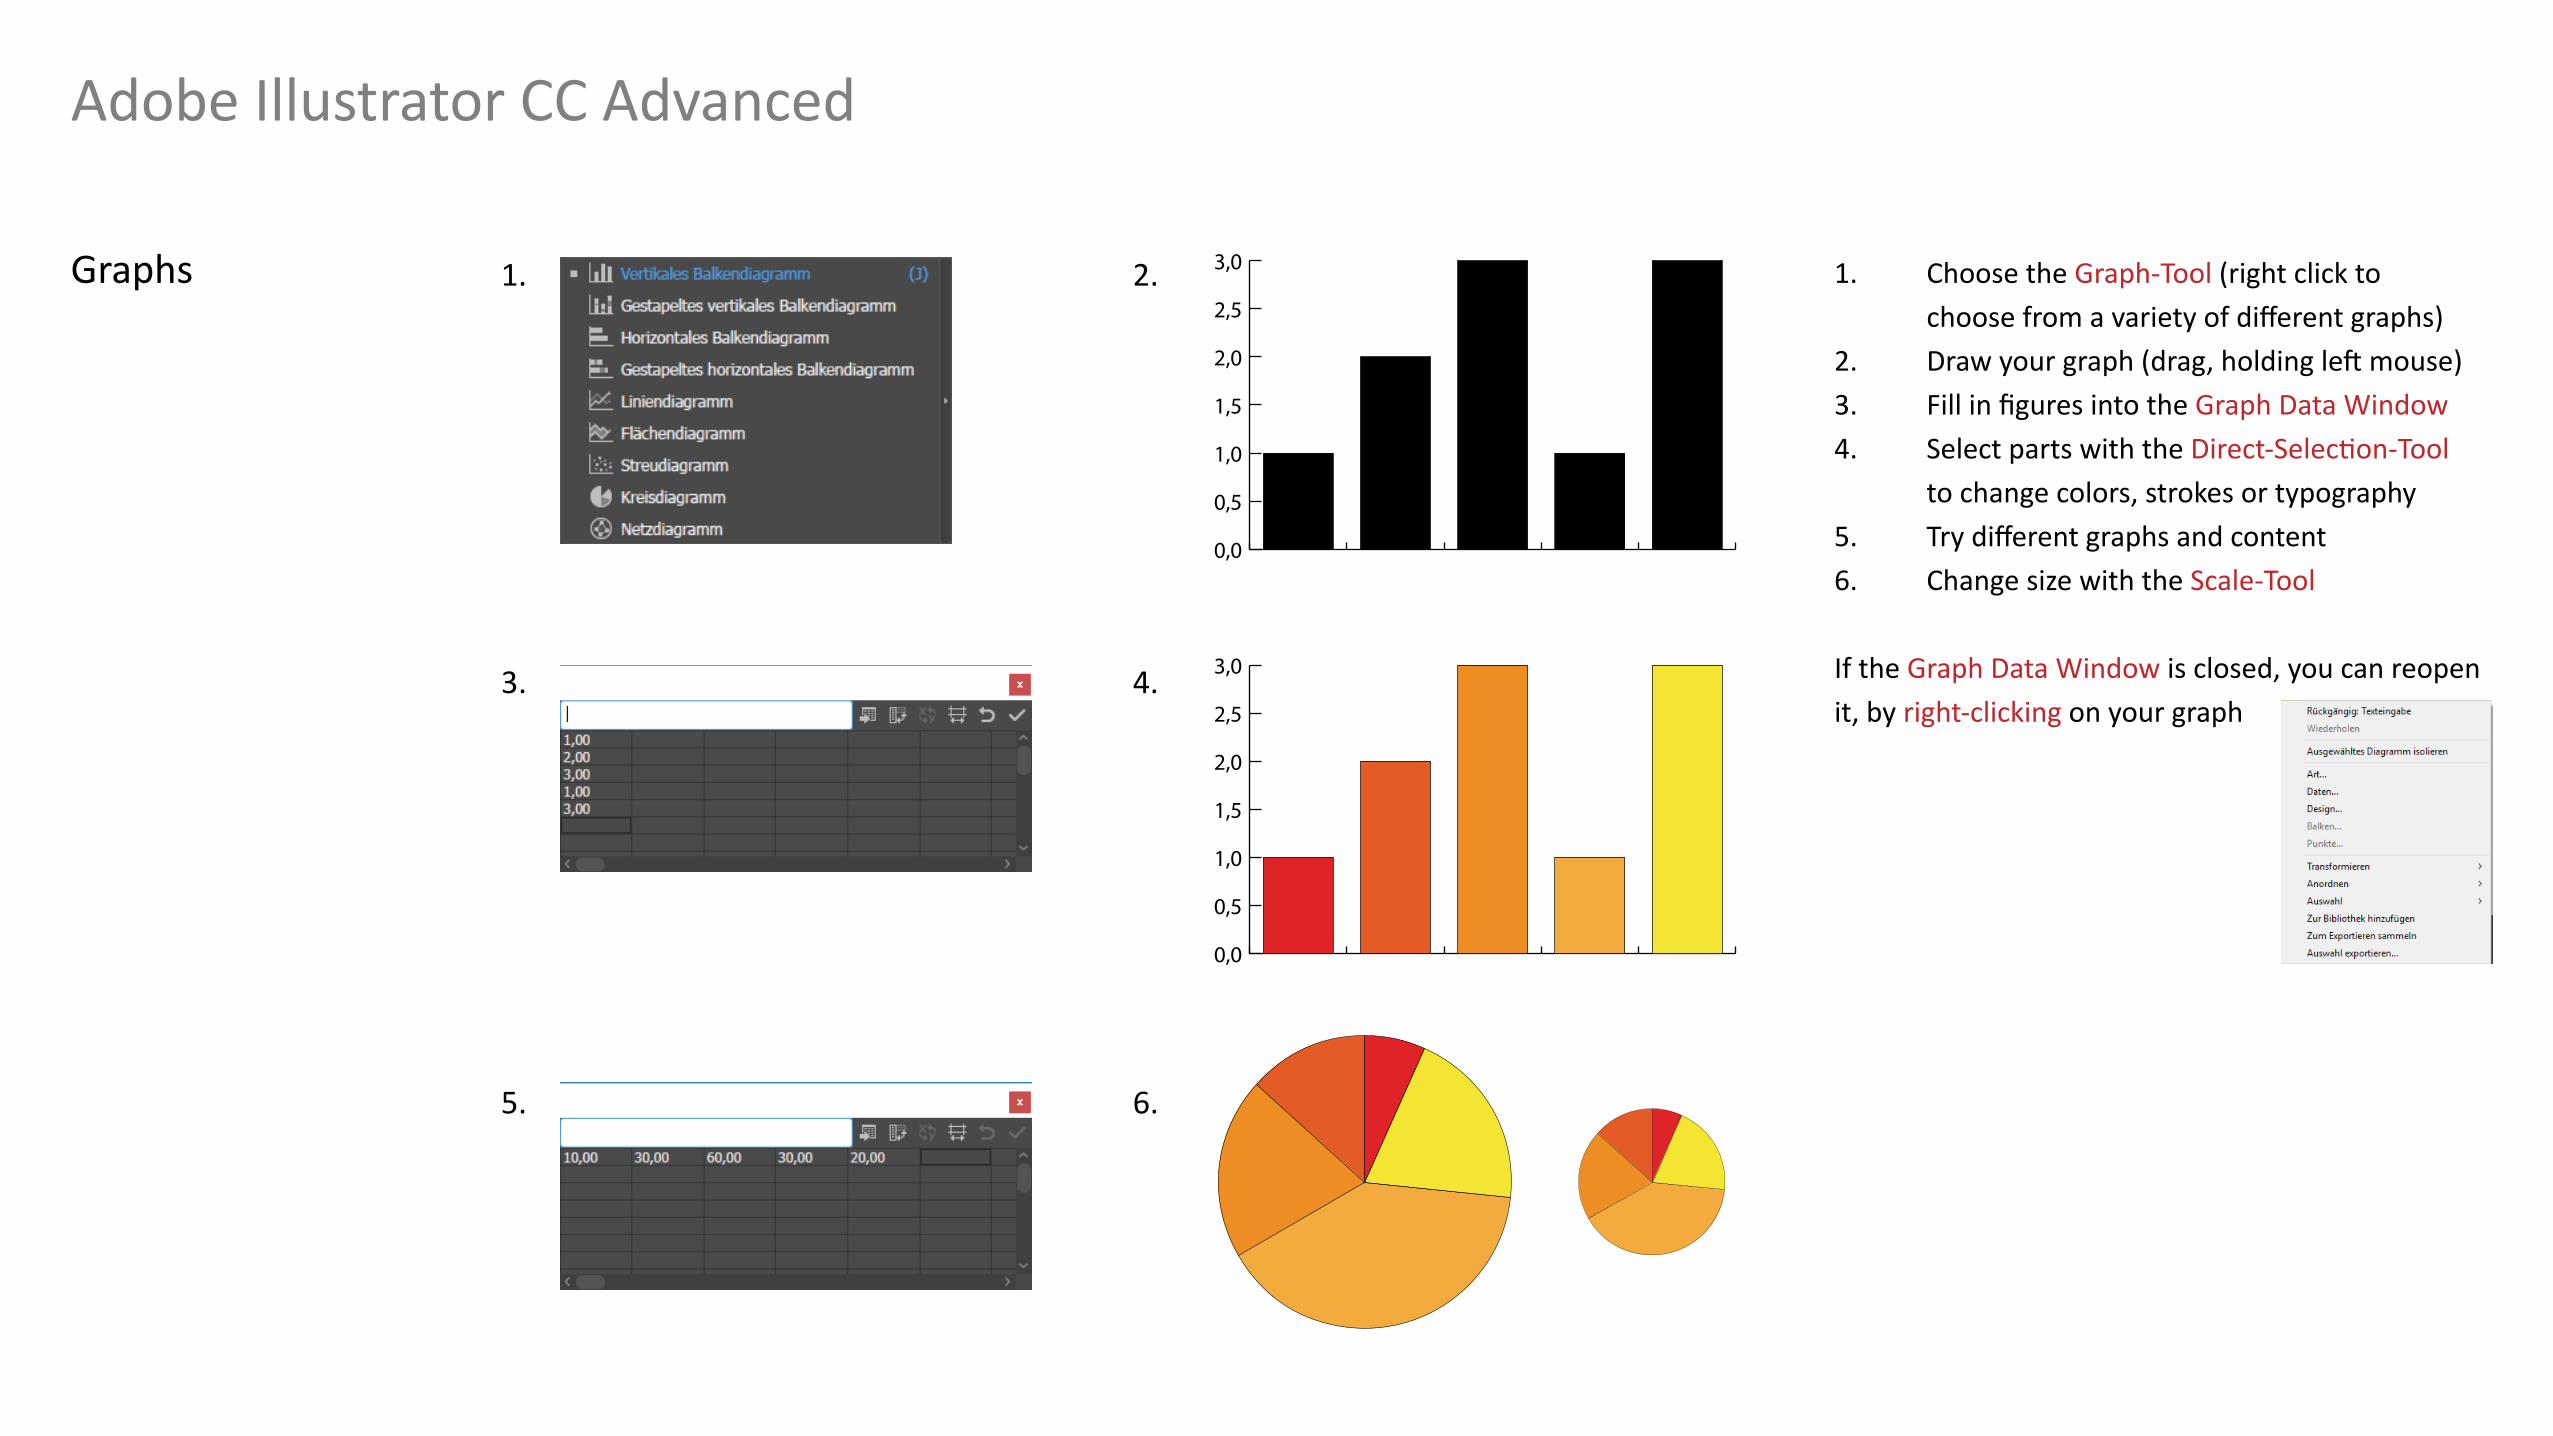
Graphs 1. Choose the Graph-Tool (right click to choose from a variety of different graphs)2. Draw your graph (drag, holding left mouse)3. Fill in figures into the Graph Data Window4. Select parts with the Direct-Selection-Tool to change colors, strokes or typography5. Try different graphs and content6. Change size with the Scale-Tool
If the Graph Data Window is closed, you can reopen it, by right-clicking on your graph
3.
5.
4.
6.
1. 2.
0,0
0,5
1,0
1,5
2,0
2,5
3,0
0,0
0,5
1,0
1,5
2,0
2,5
3,0