Embed Size (px)
Citation preview

1
Adobe CQ5.6 Promotions & Merchandizing
Nick Beljaars/Angela Heemskerk Digital Services
Last update: July, 2016
2
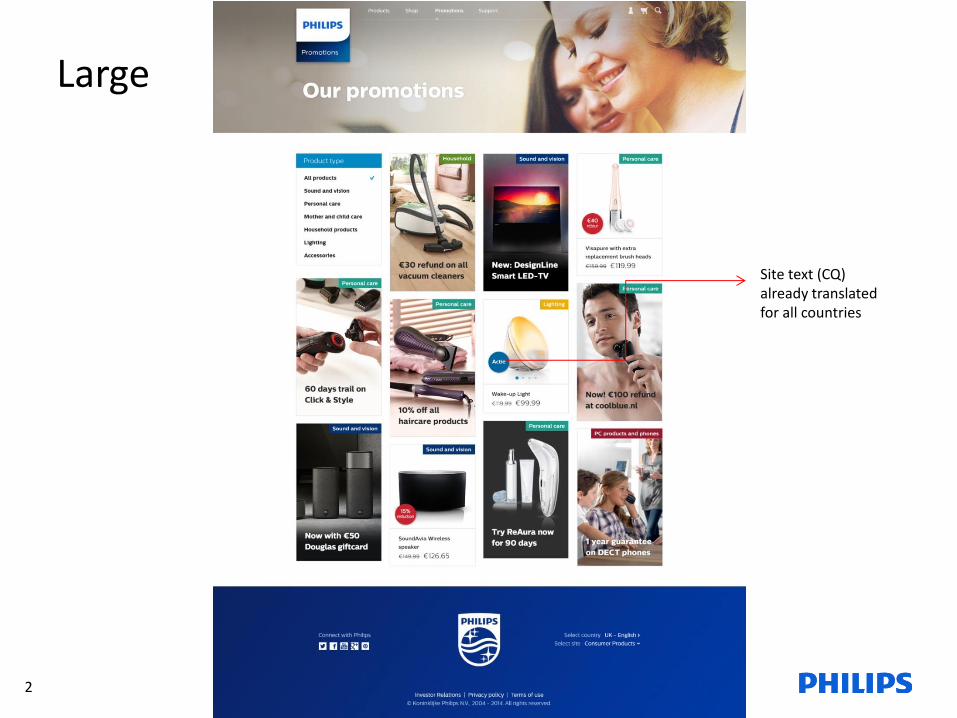
Large
Site text (CQ) already translated for all countries

3
Medium Small Extra Small
4
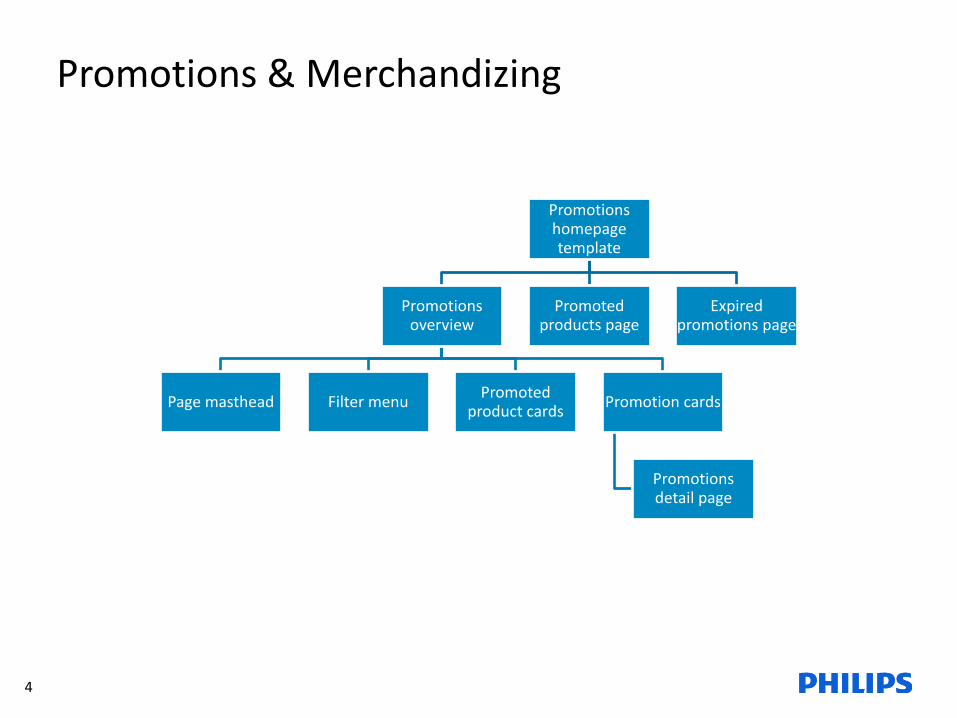
Promotions & Merchandizing
Promotions homepage template
Promotions overview
Page masthead Filter menu Promoted
product cards Promotion cards
Promotions detail page
Promoted products page
Expired promotions page
5
Table of contents
1. Tagging configurations to organize promotions 6 Groups and translations 7 Events 8 Group color configuration 10 Event color configuration 11
2. Start - adding all necessary promotion templates 12
3. Promoted products (PC_05) 22
4. Expired promotions 26
5. Promotions detail page 28 6. Promotion card (PR_01) 35
7. Additional banner locations for merchandizing 39 8. Site Admin level configurations (go live preparations) 48
9. Image guidelines 50
6
1. Tagging
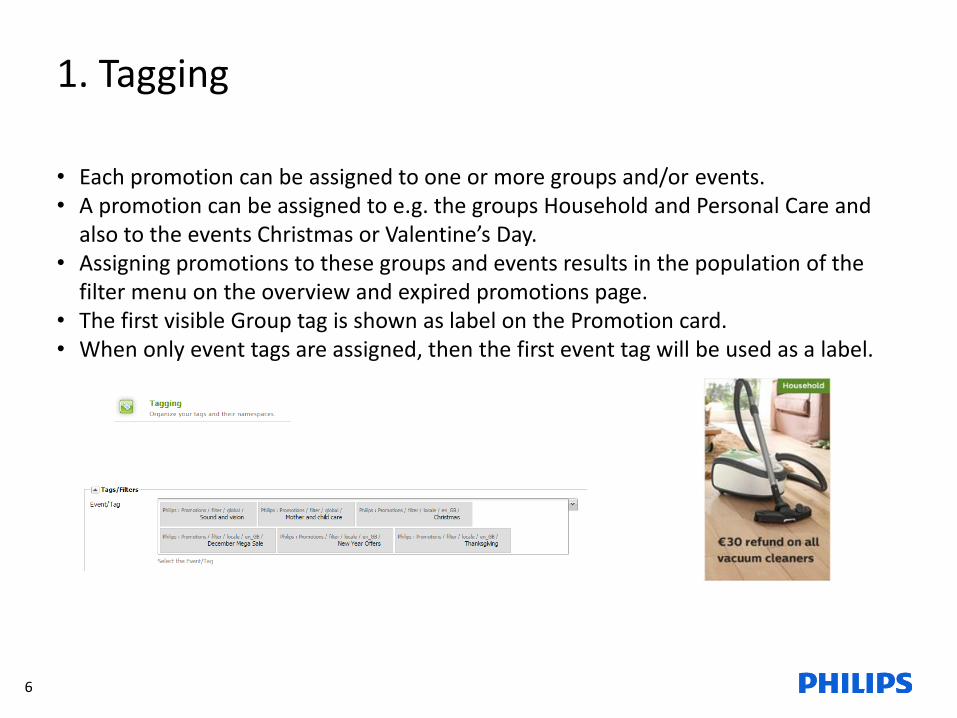
• Each promotion can be assigned to one or more groups and/or events. • A promotion can be assigned to e.g. the groups Household and Personal Care and
also to the events Christmas or Valentine’s Day. • Assigning promotions to these groups and events results in the population of the
filter menu on the overview and expired promotions page. • The first visible Group tag is shown as label on the Promotion card. • When only event tags are assigned, then the first event tag will be used as a label.

7
Filters per locale
There are two kinds of tags/filters for promotions: • Global filters
- Global filters are group filters which can be translated for every locale (Household, lighting, personal care, etc) - It is mandatory to tag every promotion with a global filter. Otherwise the promo ribbon and promotion banners will not be retrieved and shown.
• Locale filters - Per locale is it possible to create tags/filters for (locale) events (for example Mother’s Day, Valentine’s Day, Christmas, etc)
8
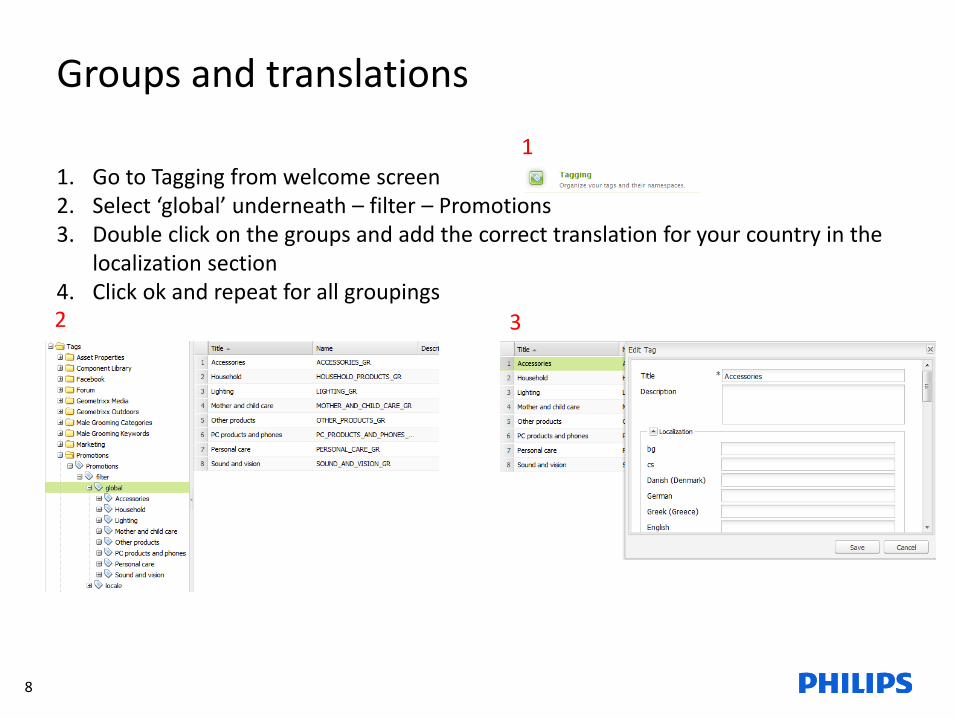
Groups and translations 1. Go to Tagging from welcome screen 2. Select ‘global’ underneath – filter – Promotions 3. Double click on the groups and add the correct translation for your country in the
localization section 4. Click ok and repeat for all groupings
1
2 3
9
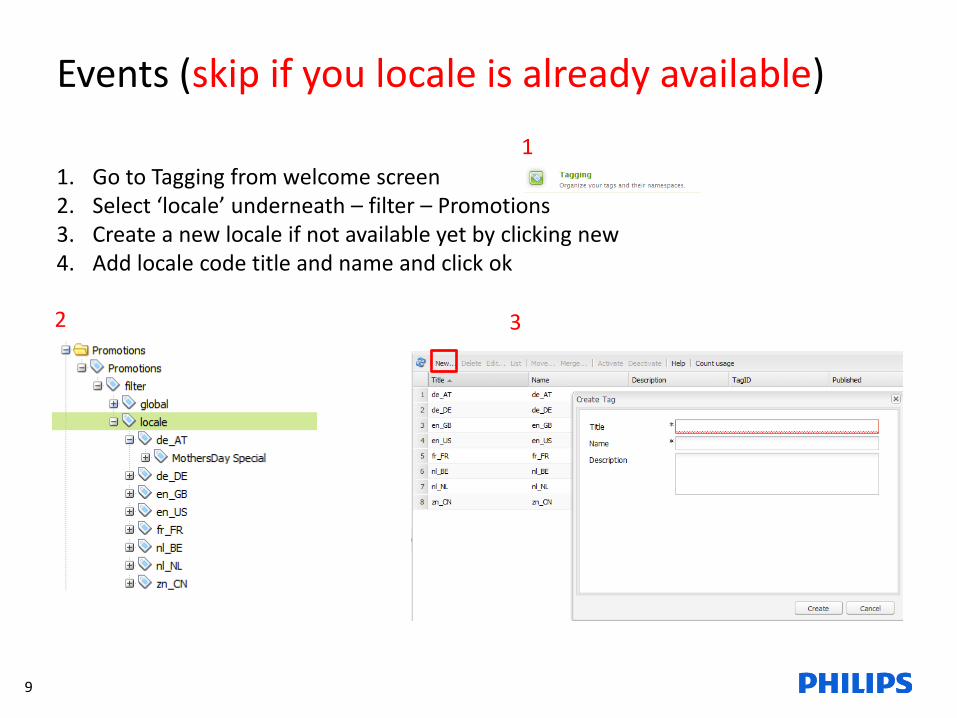
Events (skip if you locale is already available) 1. Go to Tagging from welcome screen 2. Select ‘locale’ underneath – filter – Promotions 3. Create a new locale if not available yet by clicking new 4. Add locale code title and name and click ok
1
2 3
10
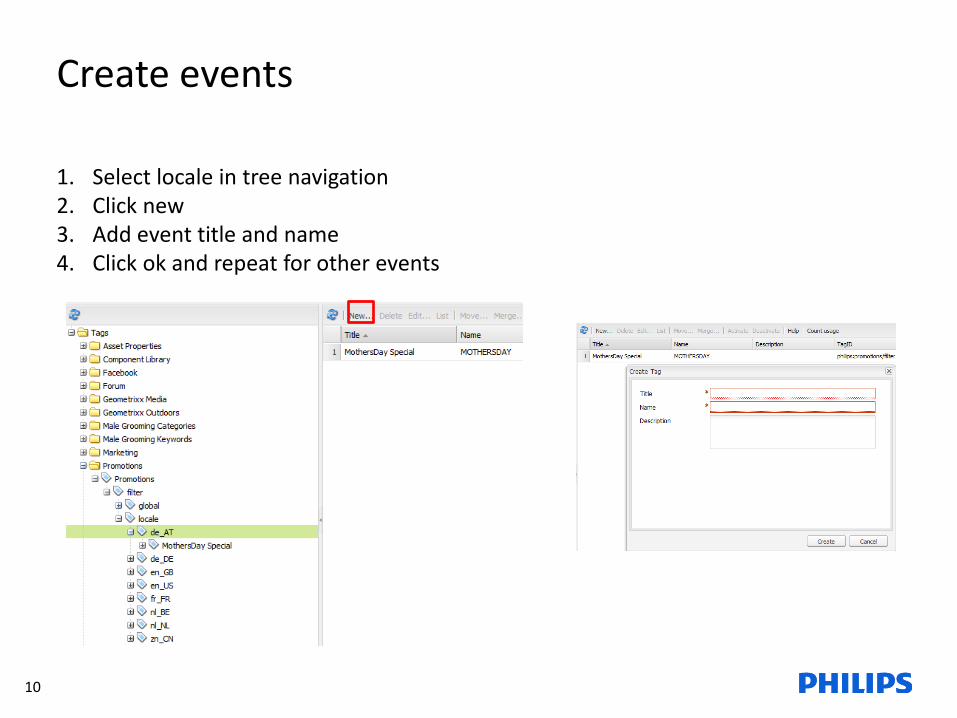
Create events 1. Select locale in tree navigation 2. Click new 3. Add event title and name 4. Click ok and repeat for other events
11
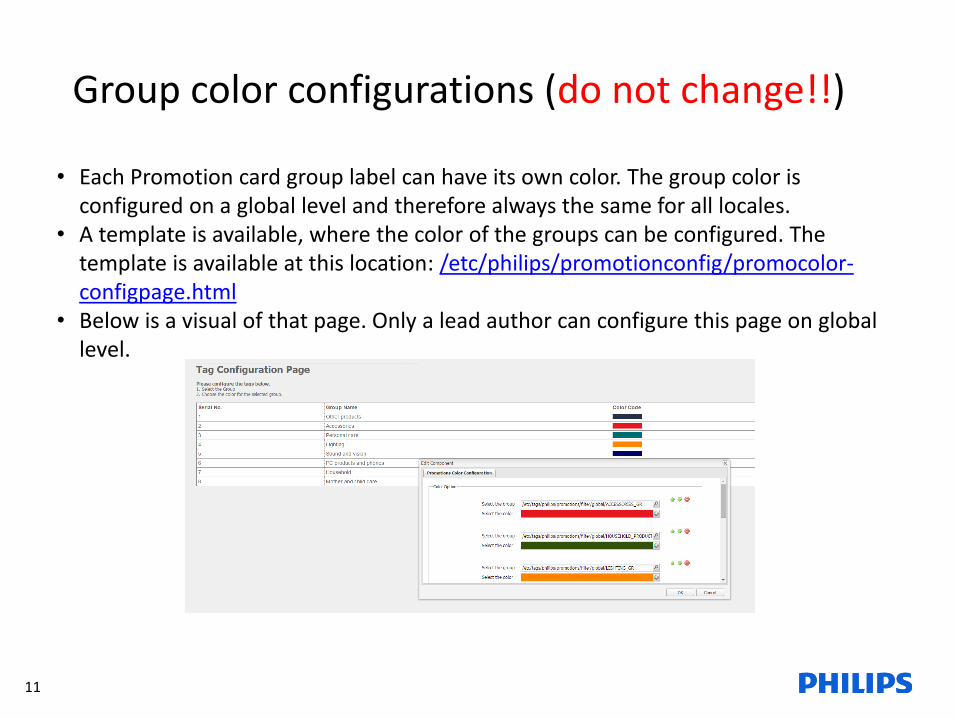
• Each Promotion card group label can have its own color. The group color is configured on a global level and therefore always the same for all locales.
• A template is available, where the color of the groups can be configured. The template is available at this location: /etc/philips/promotionconfig/promocolor-configpage.html
• Below is a visual of that page. Only a lead author can configure this page on global level.
Group color configurations (do not change!!)
12
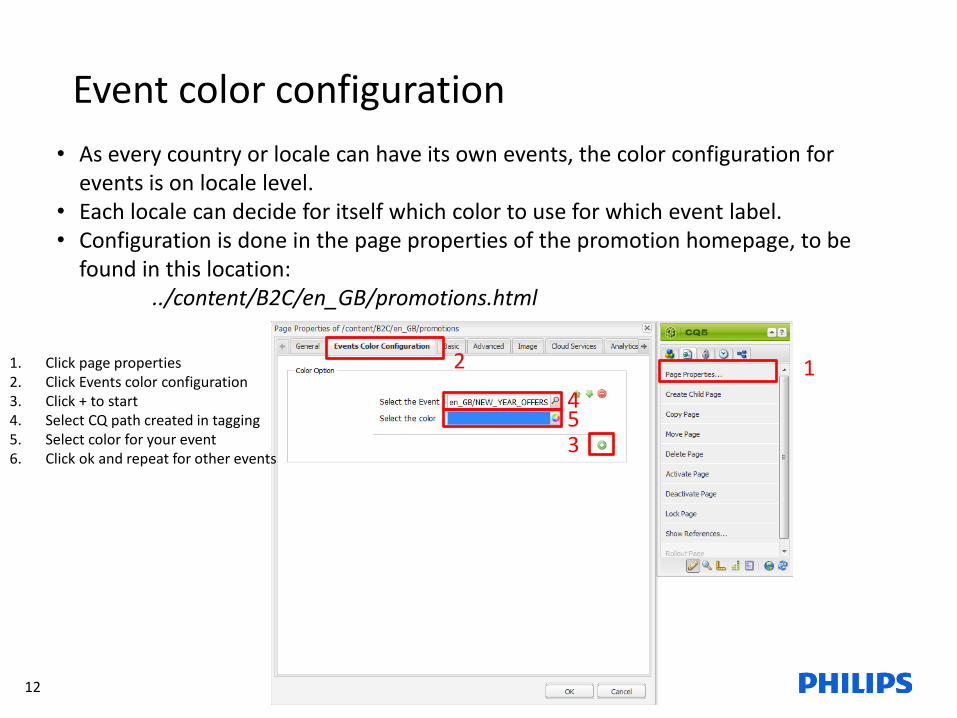
• As every country or locale can have its own events, the color configuration for events is on locale level.
• Each locale can decide for itself which color to use for which event label. • Configuration is done in the page properties of the promotion homepage, to be
found in this location: ../content/B2C/en_GB/promotions.html
Event color configuration
1. Click page properties 2. Click Events color configuration 3. Click + to start 4. Select CQ path created in tagging 5. Select color for your event 6. Click ok and repeat for other events
1 2
3
4 5
13
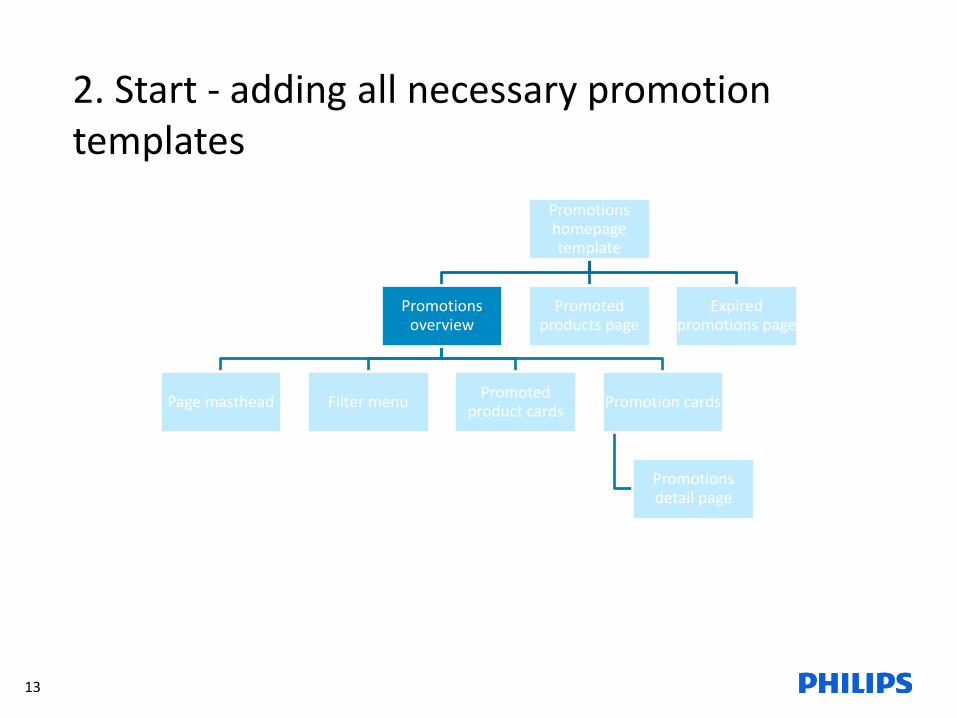
2. Start - adding all necessary promotion templates
Promotions homepage template
Promotions overview
Page masthead Filter menu Promoted
product cards Promotion cards
Promotions detail page
Promoted products page
Expired promotions page

14
Promotions overview (already created for all SUJ locales!!!) 1. Select locale in tree navigation 2. Click New 3. Select Philips – Promotions HomePage template 4. Add Title and Name according to information shared in CQ fundamentals training 5. Click ok
1
2
3
15
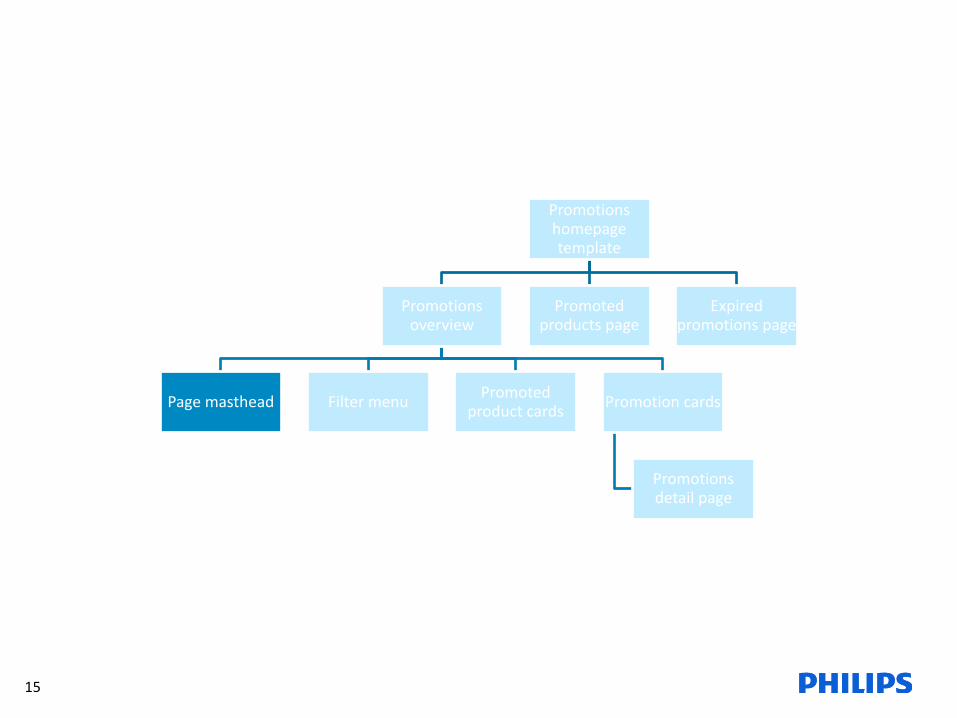
Promotions homepage template
Promotions overview
Page masthead Filter menu Promoted
product cards Promotion cards
Promotions detail page
Promoted products page
Expired promotions page

16
Configure masthead image/title promotions overview 1. Open the properties of the GC30 Rendition Container and select general 2. Add three Items: overview – products – expired (implement like this, no
translation!!) 3. Make top rendition (overview in this example) default. This means 2 things:
a) the masthead you will maintain for the top rendition will be used for the page promotions.html.
b) When products or expired are not mentioned here as renditions, they will be using the same masthead as the top rendition by default.
4. Click ok
2
3
1
4
17
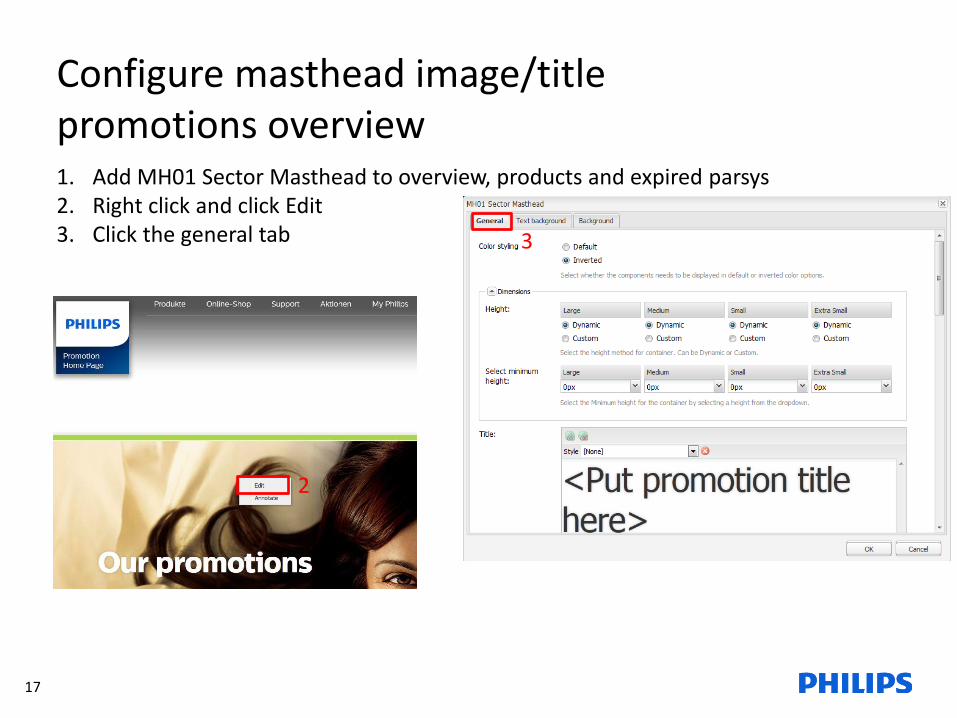
Configure masthead image/title promotions overview 1. Add MH01 Sector Masthead to overview, products and expired parsys 2. Right click and click Edit 3. Click the general tab 3
2

18
Configure masthead image/title promotions overview 1. Change the title with the desired title 2. Add a tagline in the body text
1
2
1
19
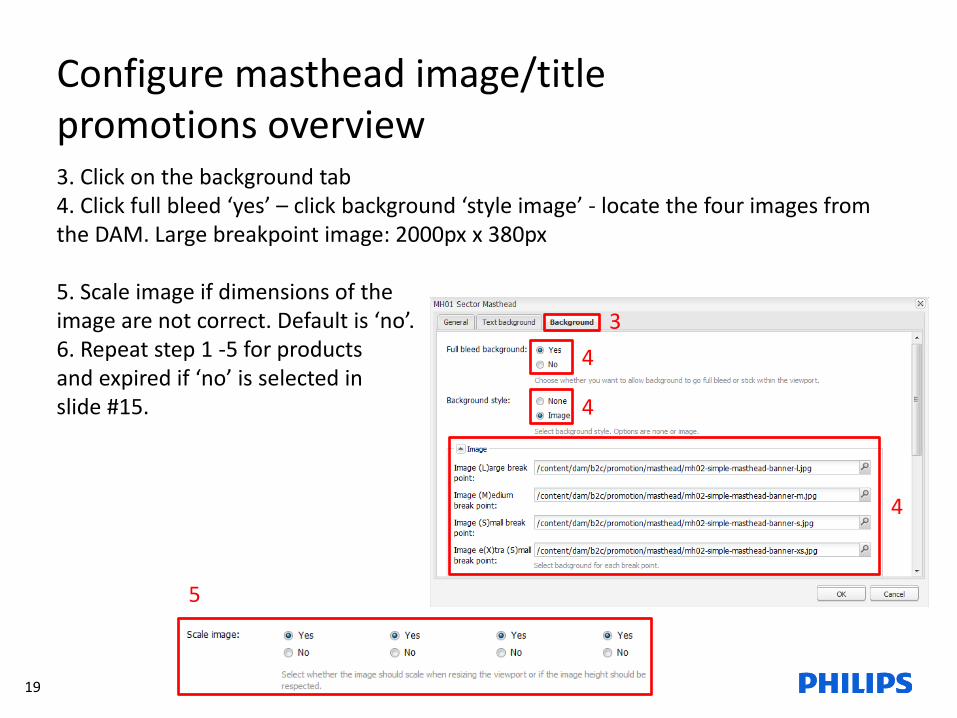
Configure masthead image/title promotions overview 3. Click on the background tab 4. Click full bleed ‘yes’ – click background ‘style image’ - locate the four images from the DAM. Large breakpoint image: 2000px x 380px 5. Scale image if dimensions of the image are not correct. Default is ‘no’. 6. Repeat step 1 -5 for products and expired if ‘no’ is selected in slide #15.
3
4
4
4
5
20
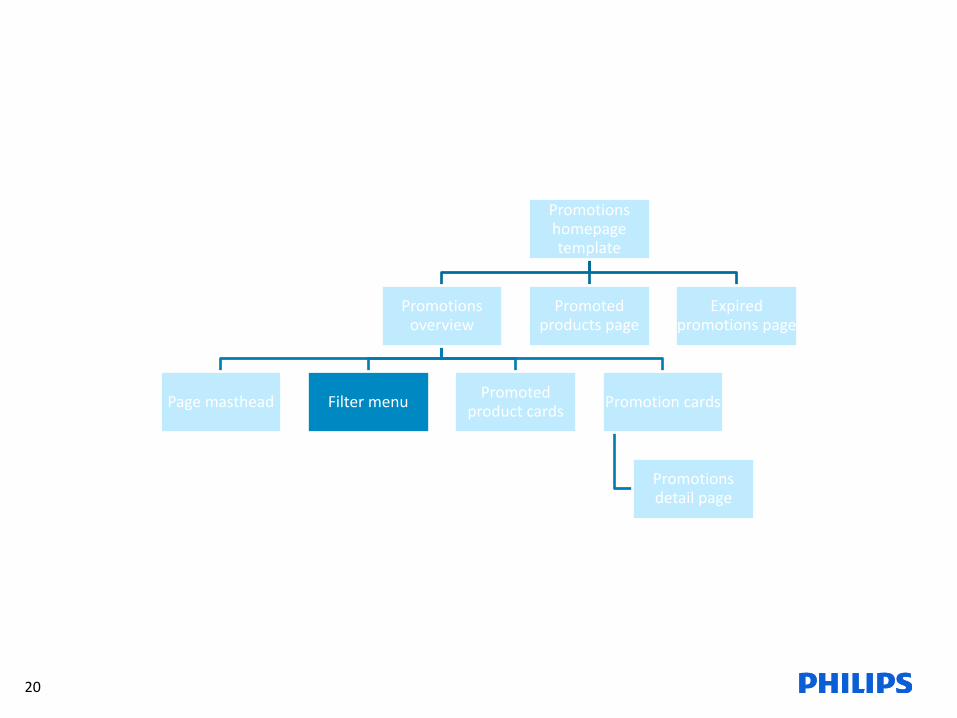
Promotions homepage template
Promotions overview
Page masthead Filter menu Promoted
product cards Promotion cards
Promotions detail page
Promoted products page
Expired promotions page

21
Filter menu
1. The filter menu appears automatically when four or more promotions are created 2. Translations will be loaded automatically if configurations on slide #7 are finished 3. No pagination will appear, but all promotions will be visible by scrolling the page. The filter menu items are displayed in alphabetical order. The custom tags (Father’s day, Christmas, etc.) will be mixed (and alphabetically ordered) with the normal product groups in the menu. In S/XS viewpoint the filter menu collapses (same behavior as on decision pages).
1
2

22
Promotions
homepage template
Promotions overview
Page masthead Filter menu Promoted
product cards Promotion cards
Promotions detail page
Promoted products page
Expired promotions page
23
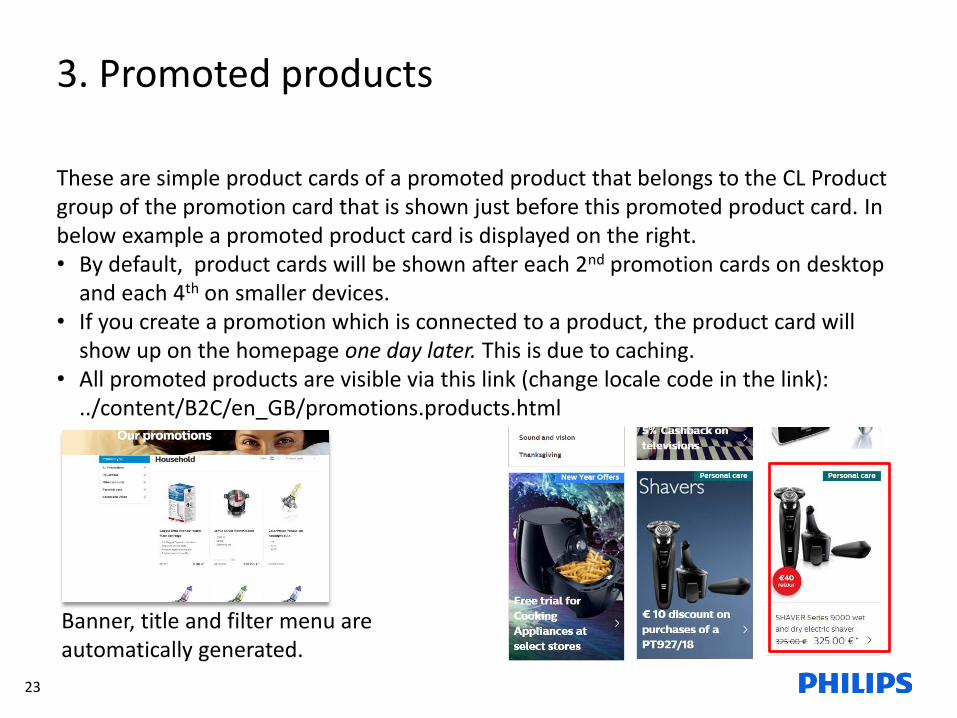
3. Promoted products
These are simple product cards of a promoted product that belongs to the CL Product group of the promotion card that is shown just before this promoted product card. In below example a promoted product card is displayed on the right. • By default, product cards will be shown after each 2nd promotion cards on desktop
and each 4th on smaller devices. • If you create a promotion which is connected to a product, the product card will
show up on the homepage one day later. This is due to caching. • All promoted products are visible via this link (change locale code in the link):
../content/B2C/en_GB/promotions.products.html
Banner, title and filter menu are automatically generated.
24
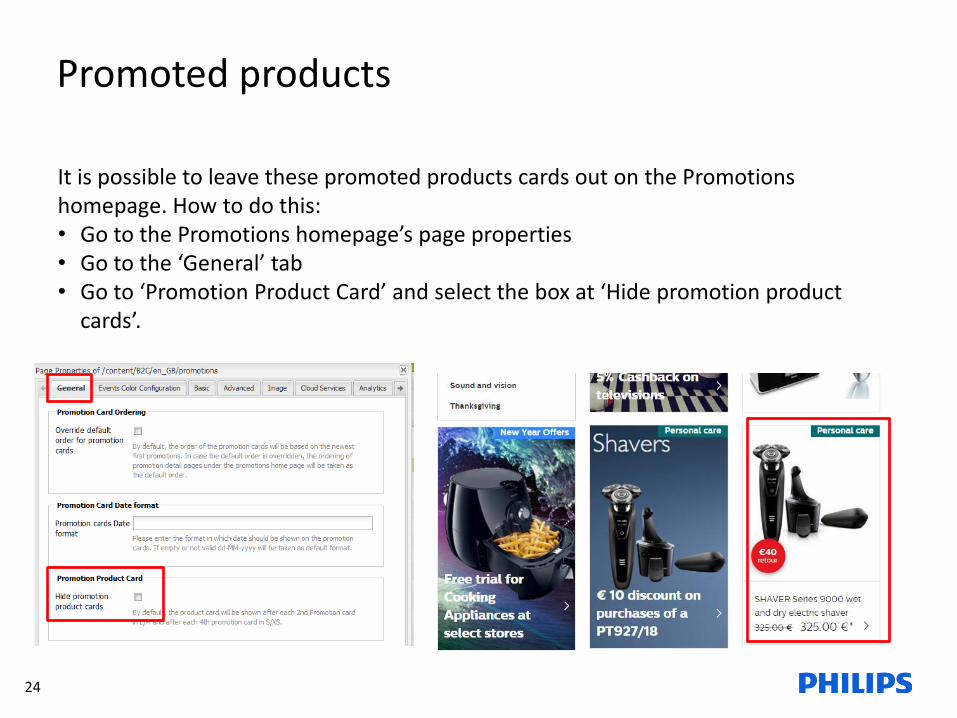
Promoted products
It is possible to leave these promoted products cards out on the Promotions homepage. How to do this: • Go to the Promotions homepage’s page properties • Go to the ‘General’ tab • Go to ‘Promotion Product Card’ and select the box at ‘Hide promotion product
cards’.
25
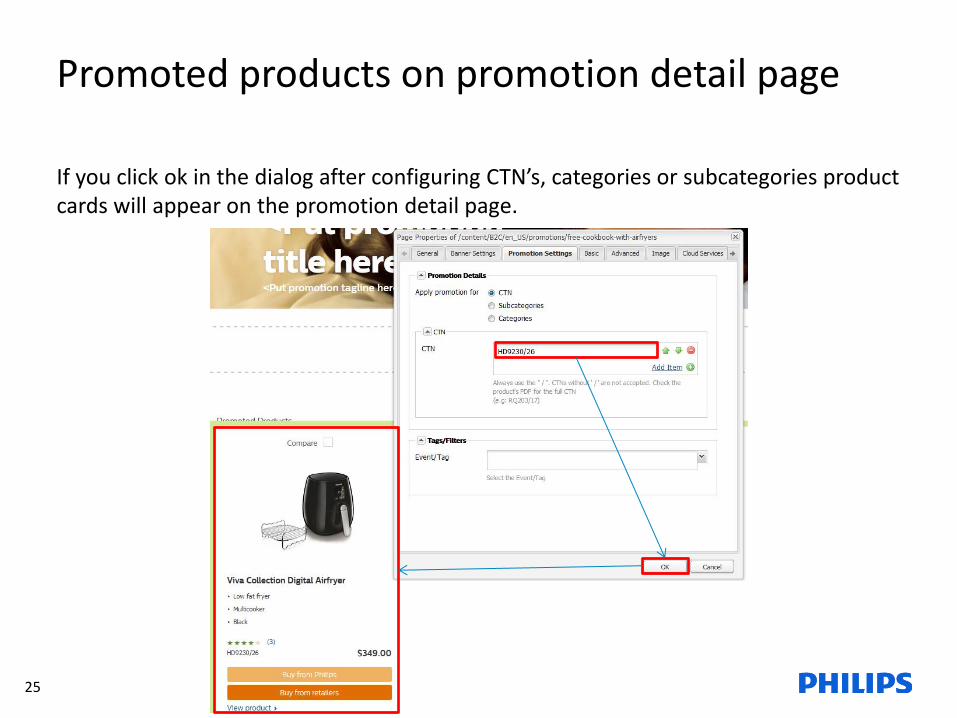
Promoted products on promotion detail page If you click ok in the dialog after configuring CTN’s, categories or subcategories product cards will appear on the promotion detail page.
26
Promoted products
• The promoted product cards are shown between the promotion cards (to enable a Pinterest-look grid). The rhythm is two promotions and then one product card (2-1-2-1 etc.).
• L viewpoint: Each third card is a promoted product card. The product that is promoted is the hero product of the group displayed in the previous promotion card
• M viewpoint: The third card is a promoted product card. The product that is promoted is the hero product of the group displayed in the previous promotion card After that each fifth card is a promoted product card. This is to ensure that in Medium not all promoted product cards are clustered together.
• S/XS viewpoint: all cards are displayed in a list view, where each 3rd card is a promoted product card.
• Promoted product cards are not displayed on the expired promotions page.
27
Promotions homepage template
Promotions overview
Page masthead Filter menu Promoted
product cards Promotion cards
Promotions detail page
Promoted products page
Expired promotions page
28
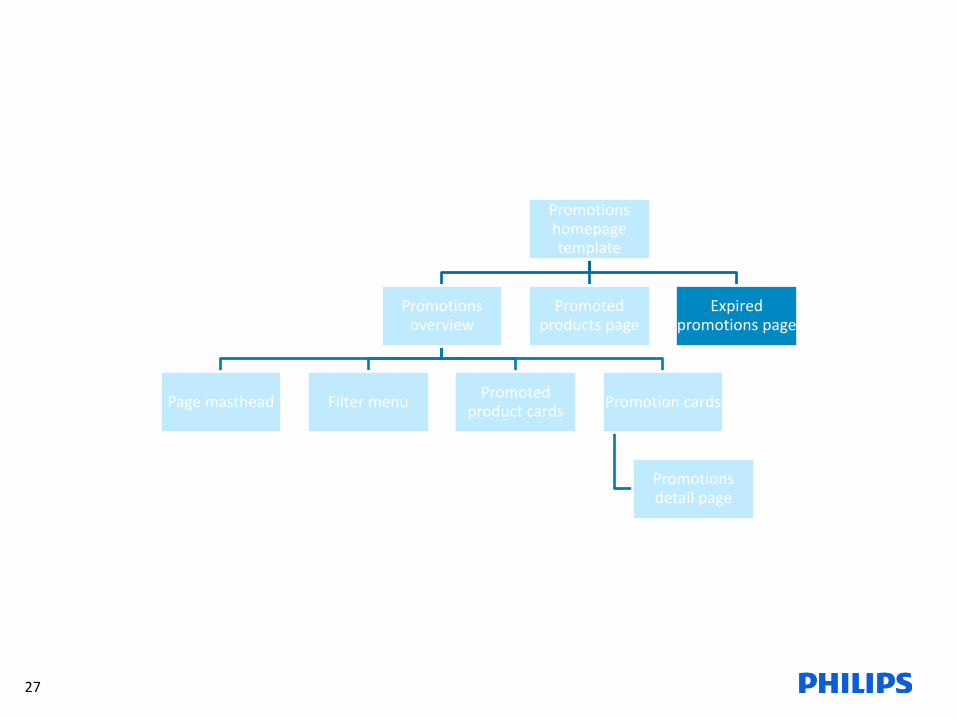
4. Expired promotions
This is the 3rd of 3 landing pages of the promotions site. The page has the same functionality and is visually the same as the promotions overview page. There are 2 differences: 1. On this expired promotions page only the promotions that are already expired are visible. 2. Promoted product cards are not displayed on this page All expired promotions are visible via this link (change locale code in the link): ../content/B2C/en_GB/promotions.expired.html ‘Expired’ Banner, title and filter menu are automatically generated.
29
Promotions homepage template
Promotions overview
Page masthead Filter menu Promoted
product cards Promotion cards
Promotions detail page
Promoted products page
Expired promotions page
30
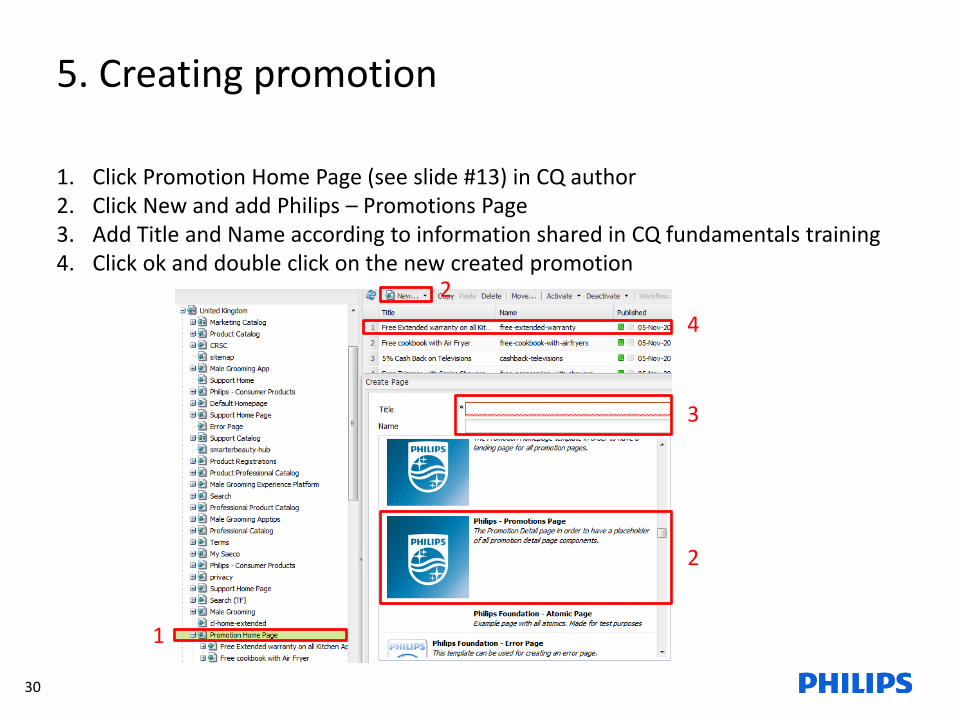
5. Creating promotion
1. Click Promotion Home Page (see slide #13) in CQ author 2. Click New and add Philips – Promotions Page 3. Add Title and Name according to information shared in CQ fundamentals training 4. Click ok and double click on the new created promotion
1
2
2
3
4
31
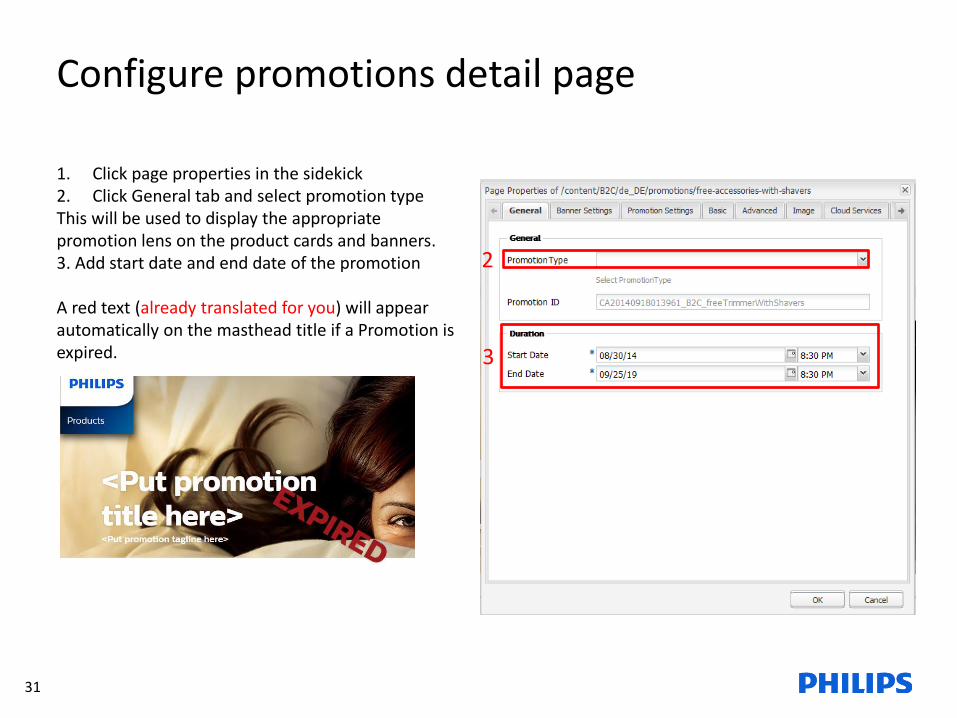
Configure promotions detail page
1. Click page properties in the sidekick 2. Click General tab and select promotion type This will be used to display the appropriate promotion lens on the product cards and banners. 3. Add start date and end date of the promotion A red text (already translated for you) will appear automatically on the masthead title if a Promotion is expired.
2
3
32
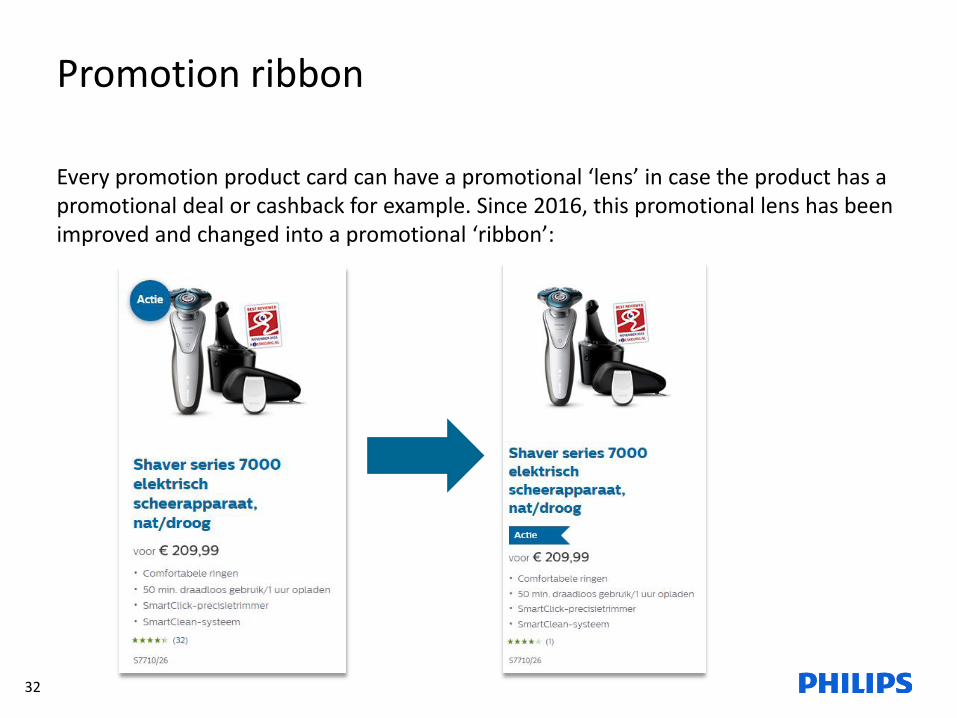
Promotion ribbon
Every promotion product card can have a promotional ‘lens’ in case the product has a promotional deal or cashback for example. Since 2016, this promotional lens has been improved and changed into a promotional ‘ribbon’:
33
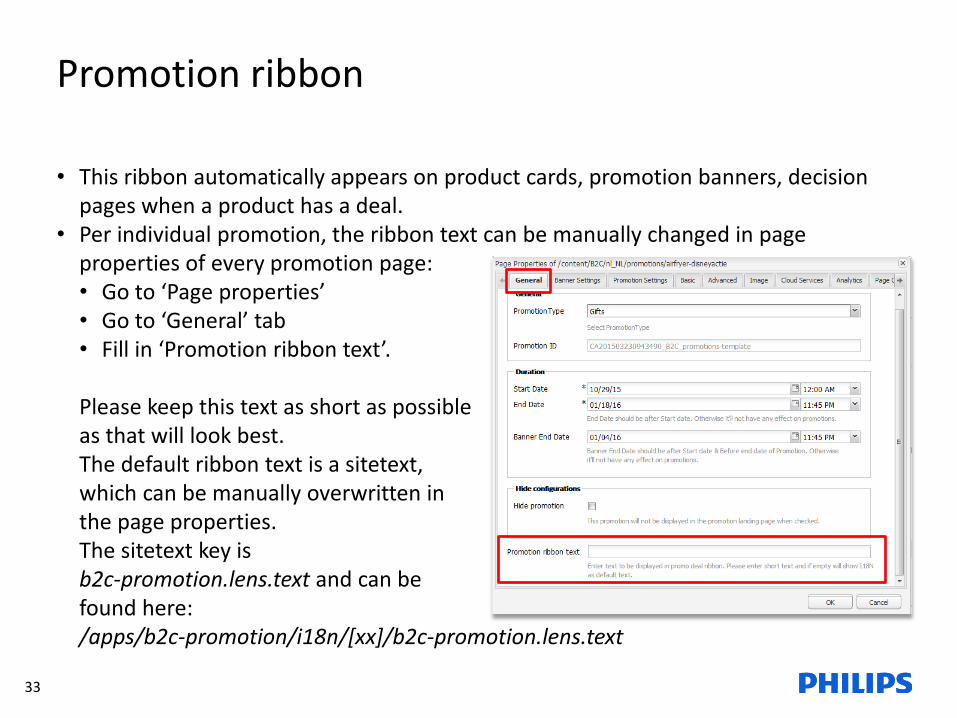
Promotion ribbon
• This ribbon automatically appears on product cards, promotion banners, decision pages when a product has a deal.
• Per individual promotion, the ribbon text can be manually changed in page properties of every promotion page: • Go to ‘Page properties’ • Go to ‘General’ tab • Fill in ‘Promotion ribbon text’. Please keep this text as short as possible as that will look best. The default ribbon text is a sitetext, which can be manually overwritten in the page properties. The sitetext key is b2c-promotion.lens.text and can be found here: /apps/b2c-promotion/i18n/[xx]/b2c-promotion.lens.text

34
Configure promotion
1. Click Banner Settings tab 2. If this is an external promotion, then the box should be checked. Please type the URL of the external page.
A site website visitor who clicks on the promotion card will be directed to this page, instead of the normal promotional detail page.
3. Each promotion has a large and small banner that can be automatically placed on the Category or Decision page that has a promotion assigned. Please select whether the current promotion also needs to be located on category pages and decision pages. The PDP location is based on the business rule: highest ranked promotion of the product will deliver the promotional banner for the PDP.
2
3
35
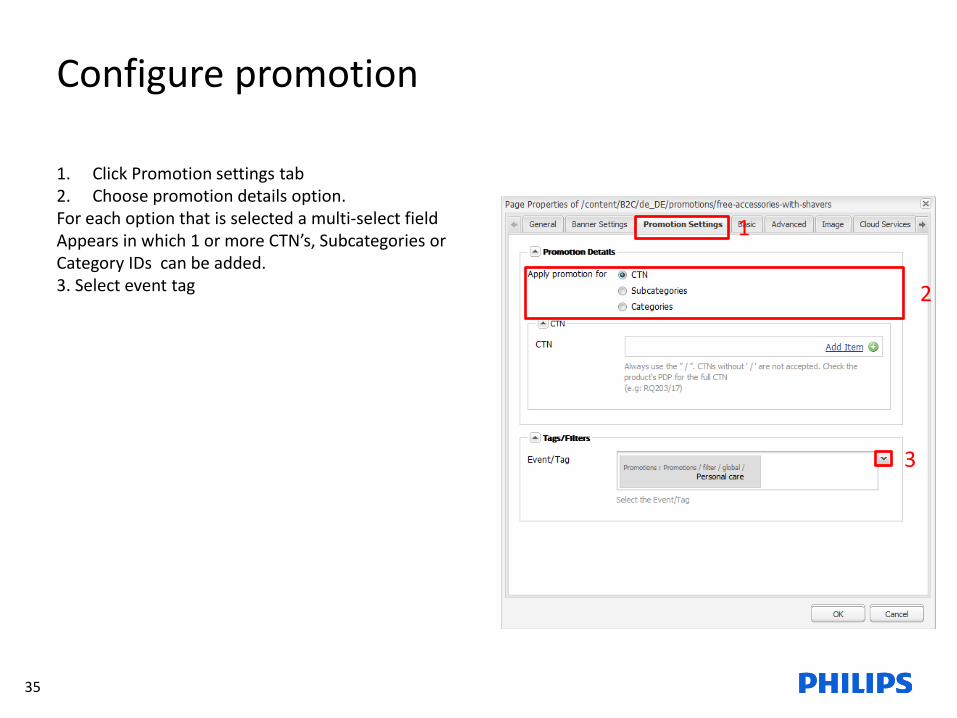
Configure promotion
1. Click Promotion settings tab 2. Choose promotion details option. For each option that is selected a multi-select field Appears in which 1 or more CTN’s, Subcategories or Category IDs can be added. 3. Select event tag
1
2
3

36
4. Locate Promotions tab by clicking on the arrow 5. Select one or more tags by clicking on the grouping or created event underneath locale Assign the group or event to the promotion. This will be used to populate the filter menu and to display as label on the promotion card. The first grouping label overrules the local event name. Personal care in the example underneath.
Translations will be loaded automatically if configured according to slide #7.
4 4
5

37
Configure masthead image/title promotions detail page 1. Open the properties of the MH01 Sector Masthead and select general 2. Change the title with the desired title 3. Add a tagline in the body text
1
1
2
3
38
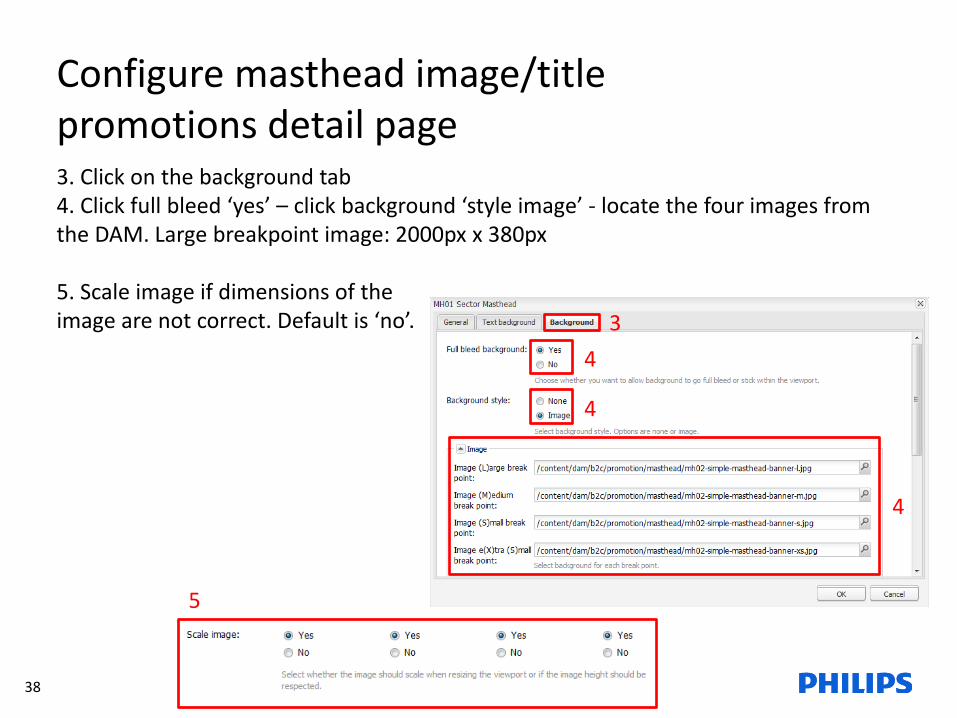
Configure masthead image/title promotions detail page 3. Click on the background tab 4. Click full bleed ‘yes’ – click background ‘style image’ - locate the four images from the DAM. Large breakpoint image: 2000px x 380px 5. Scale image if dimensions of the image are not correct. Default is ‘no’. 3
4
4
4
5
39
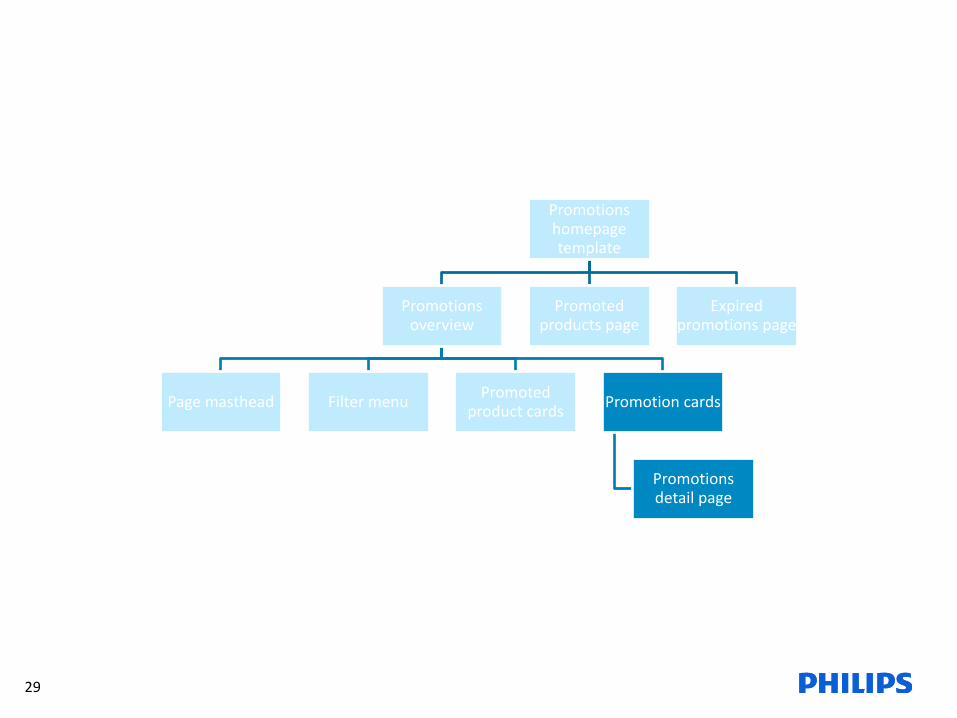
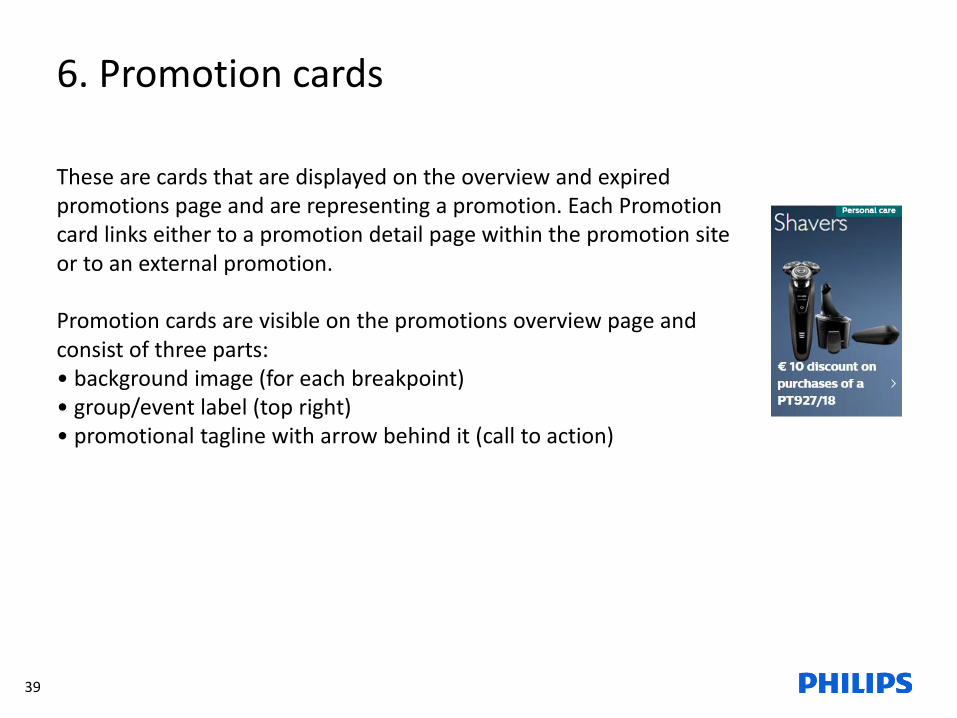
6. Promotion cards
These are cards that are displayed on the overview and expired promotions page and are representing a promotion. Each Promotion card links either to a promotion detail page within the promotion site or to an external promotion. Promotion cards are visible on the promotions overview page and consist of three parts: • background image (for each breakpoint) • group/event label (top right) • promotional tagline with arrow behind it (call to action)
40
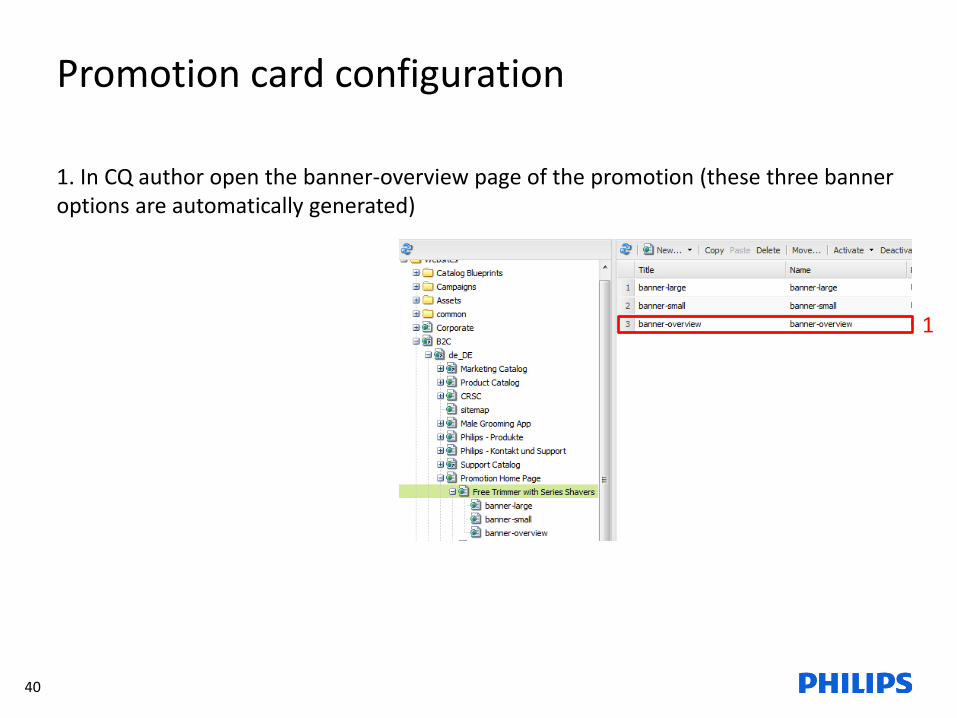
Promotion card configuration 1. In CQ author open the banner-overview page of the promotion (these three banner options are automatically generated)
1
41
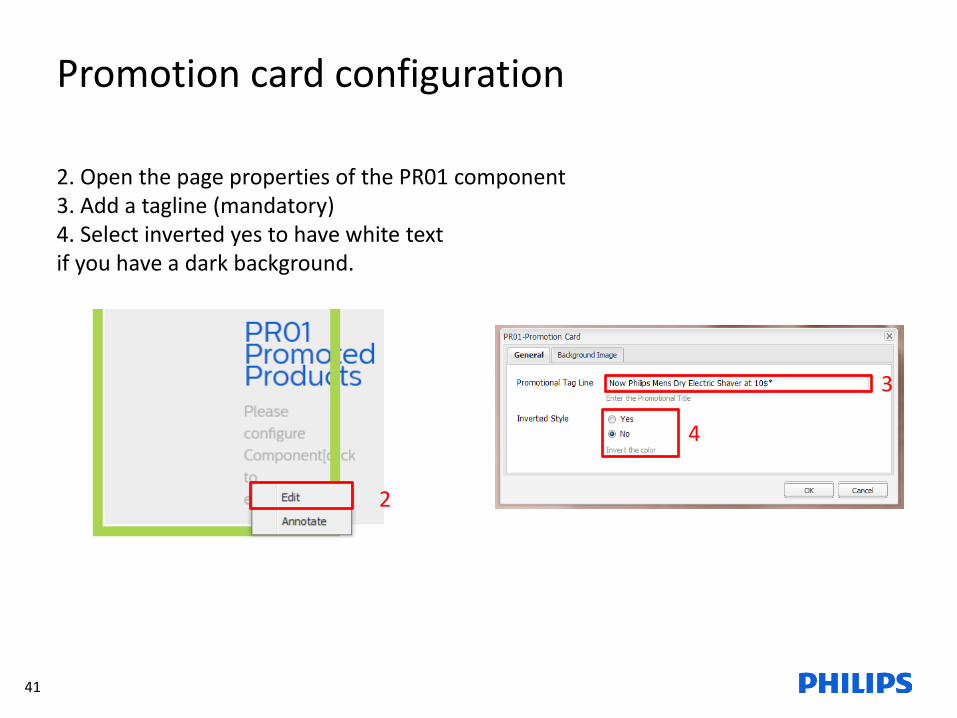
Promotion card configuration
2. Open the page properties of the PR01 component 3. Add a tagline (mandatory) 4. Select inverted yes to have white text if you have a dark background.
3
4
2
42
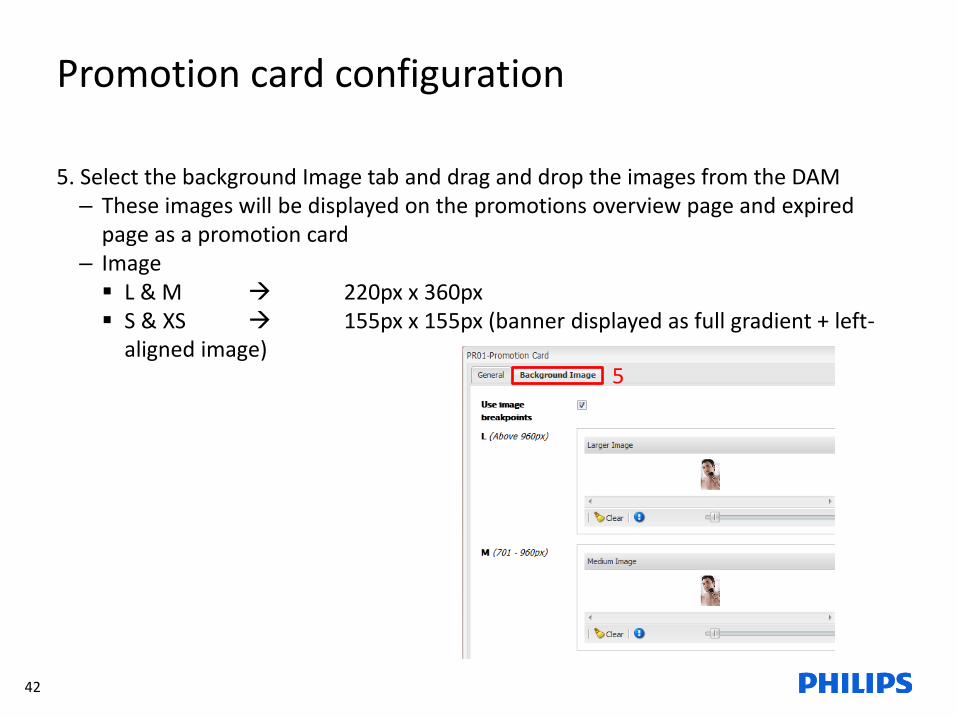
Promotion card configuration 5. Select the background Image tab and drag and drop the images from the DAM – These images will be displayed on the promotions overview page and expired
page as a promotion card – Image L & M 220px x 360px S & XS 155px x 155px (banner displayed as full gradient + left-
aligned image) 5

43
7. Promotional banners for merchandizing
CL Home Product Detail Page
44
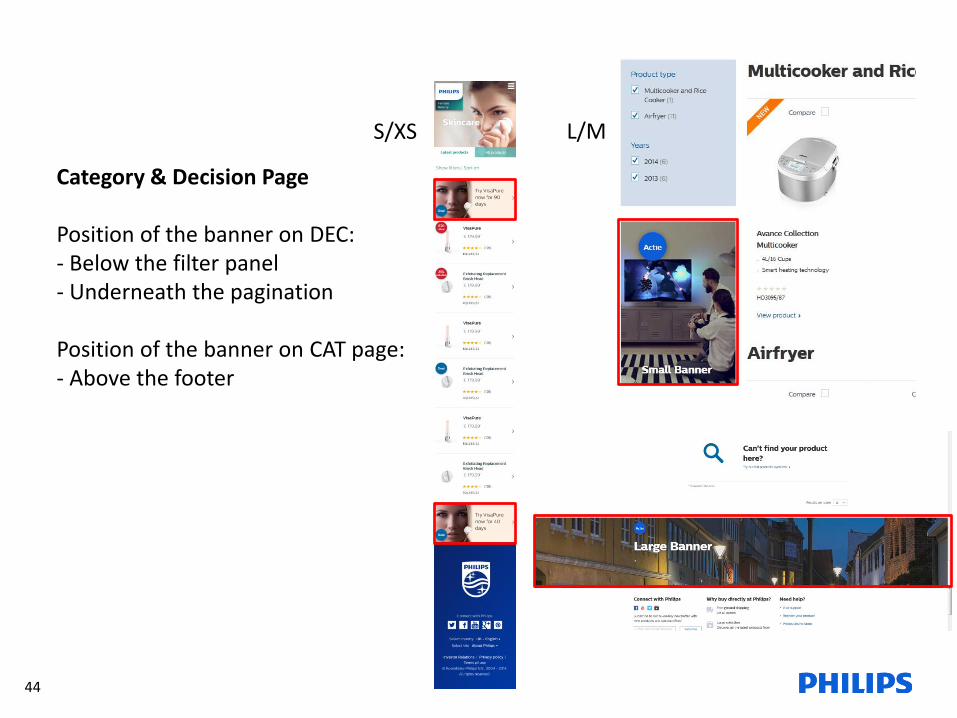
Category & Decision Page Position of the banner on DEC: - Below the filter panel - Underneath the pagination Position of the banner on CAT page: - Above the footer
S/XS L/M
45
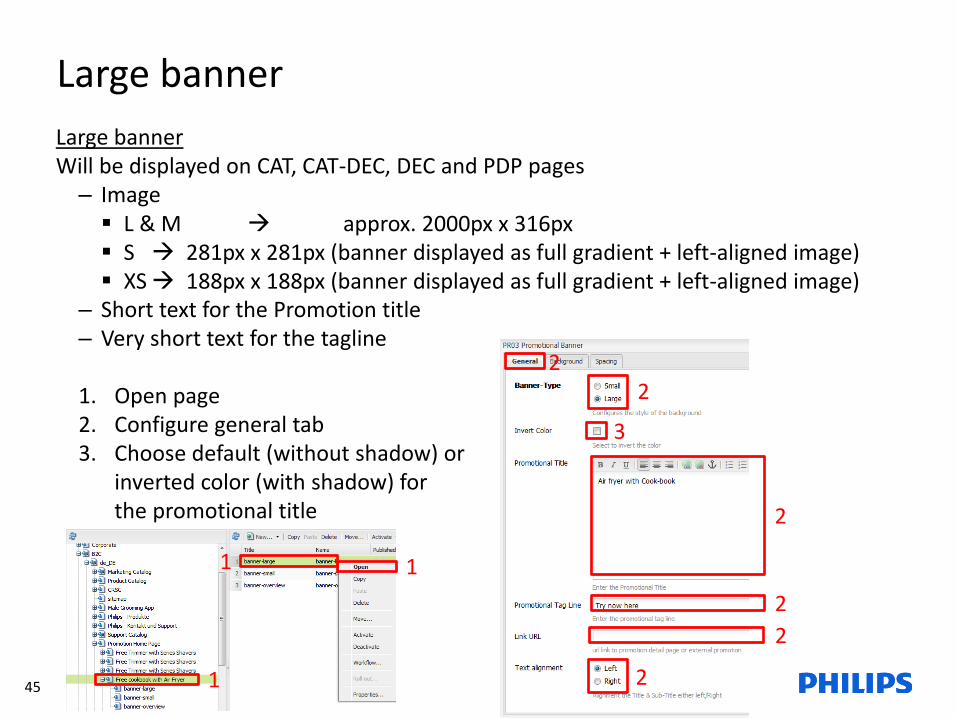
Large banner
Large banner Will be displayed on CAT, CAT-DEC, DEC and PDP pages – Image L & M approx. 2000px x 316px S 281px x 281px (banner displayed as full gradient + left-aligned image) XS 188px x 188px (banner displayed as full gradient + left-aligned image)
– Short text for the Promotion title – Very short text for the tagline 1. Open page 2. Configure general tab 3. Choose default (without shadow) or
inverted color (with shadow) for the promotional title
1
1 1
2 2
2
2
2
2
3

46
Large banner images 4. Click on the background tab 5. Click full bleed ‘yes’ – click background style ‘image’ - locate the four images from the DAM. Image dimensions are provided in slide #41 6. Click ok
4
5
5
6

47
Small banner
Small banner Will be displayed on CAT-DEC and DEC below the filter menu – Image L & M 220px x 360px S & XS 155px x 155px (banner displayed as full gradient + left-
aligned image) – Short text for the Promotion title 1. Open page 2. Configure general tab
1
1 1
2
2
2
2
2
2
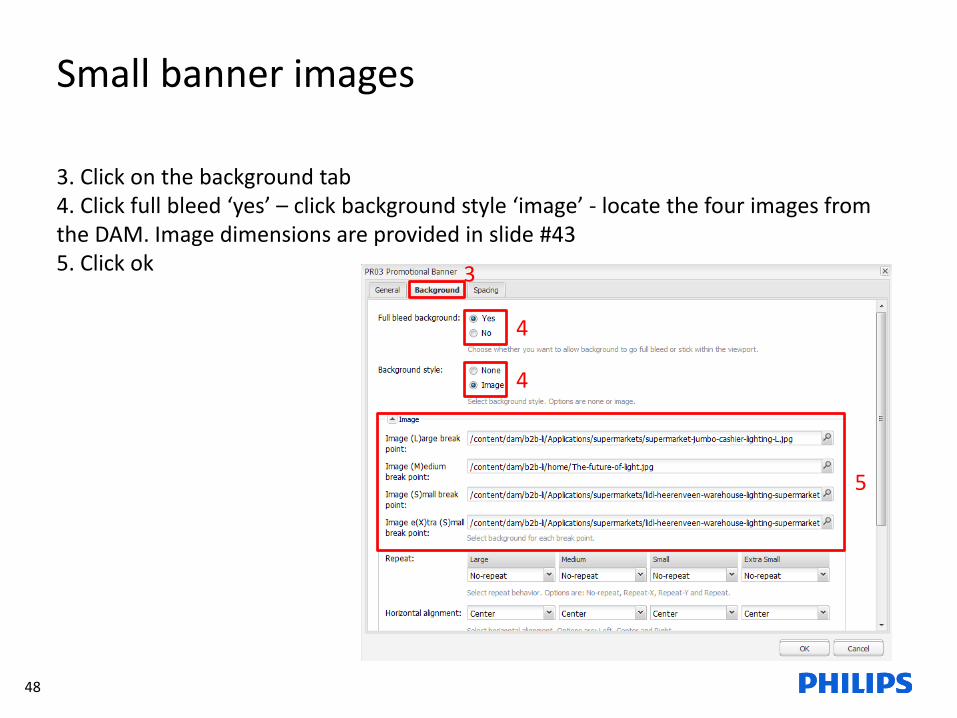
48
Small banner images 3. Click on the background tab 4. Click full bleed ‘yes’ – click background style ‘image’ - locate the four images from the DAM. Image dimensions are provided in slide #43 5. Click ok 3
4
4
5

49
CL Homepage
On several pages a banner will be placed to promote a promotion. Placement of the banners will be done partly manual and partly automatic. CL Homepage is manual. Author adds 1 or more large promotional banners via the page properties dialog of CL Homepage. One random banner is visible each time you visit or refresh the CL homepage. 1. Open properties cl-home 2. Locate promotions tab and select banner-large from the desired promotion
1
1
1
2
50
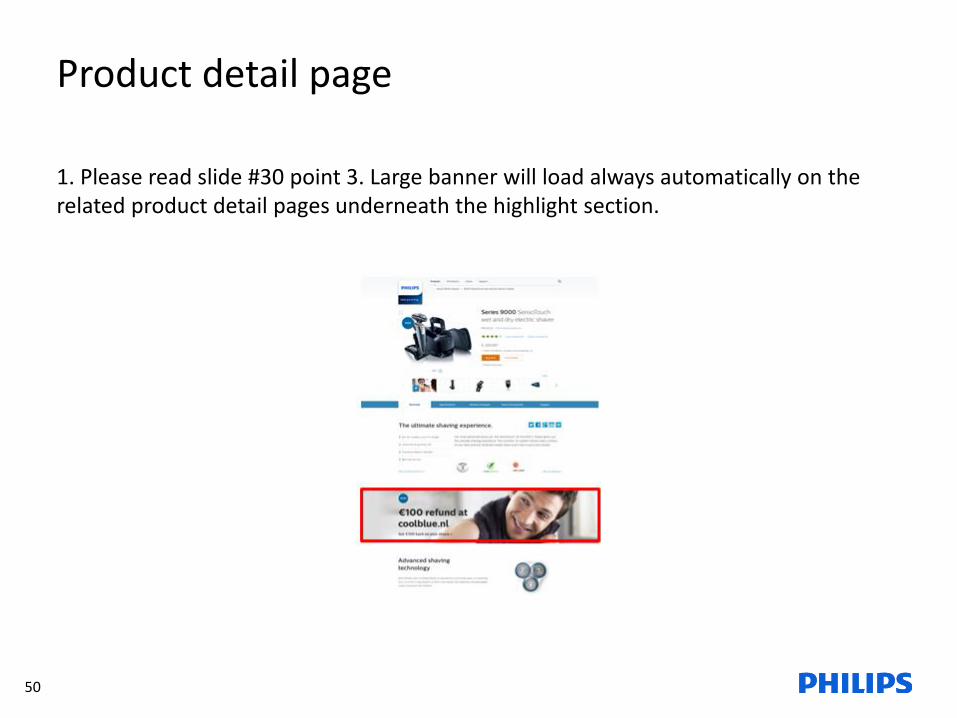
Product detail page
1. Please read slide #30 point 3. Large banner will load always automatically on the related product detail pages underneath the highlight section.
51
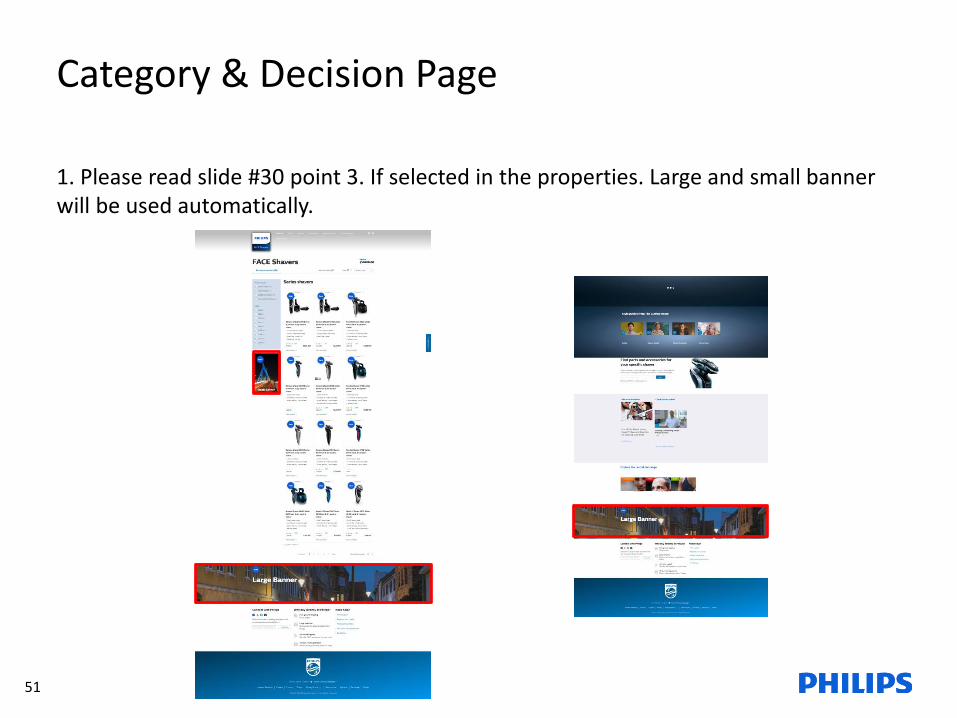
Category & Decision Page
1. Please read slide #30 point 3. If selected in the properties. Large and small banner will be used automatically.

52
Access Promotions validation test: Student login address: https://b.socrative.com/login/student/ Room ID: PGFUT4SL

53