Embed Size (px)
Citation preview
Adobe Connect User Guide
Contents What is Adobe Connect? How to plan an Adobe Connect meeting How to set up a new Adobe Connect meeting How to start the meeting as a Host There are two ways to do audio conferencing Troubleshooting
What is Adobe Connect?
Adobe Connect allows you to host a meeting in a virtual meeting room where content can be shown by a presenter and viewed by participants. It also allows you to do the following:
Audio conference with up to 100 concurrent users remotely either over a separate
phone-based conferencing system (InterCall) or through the service itself via headphones or a headset connected to your computer.
Video conference with others remotely via webcams. Host your meeting, and future meetings from a unique URL. Share your screen with others remotely. Record your meetings in .flv video format and distribute it after the meeting. Recording
has to be started when the meeting starts. After the meeting you can email the URL of where this meeting file is located so people can view the meeting later.
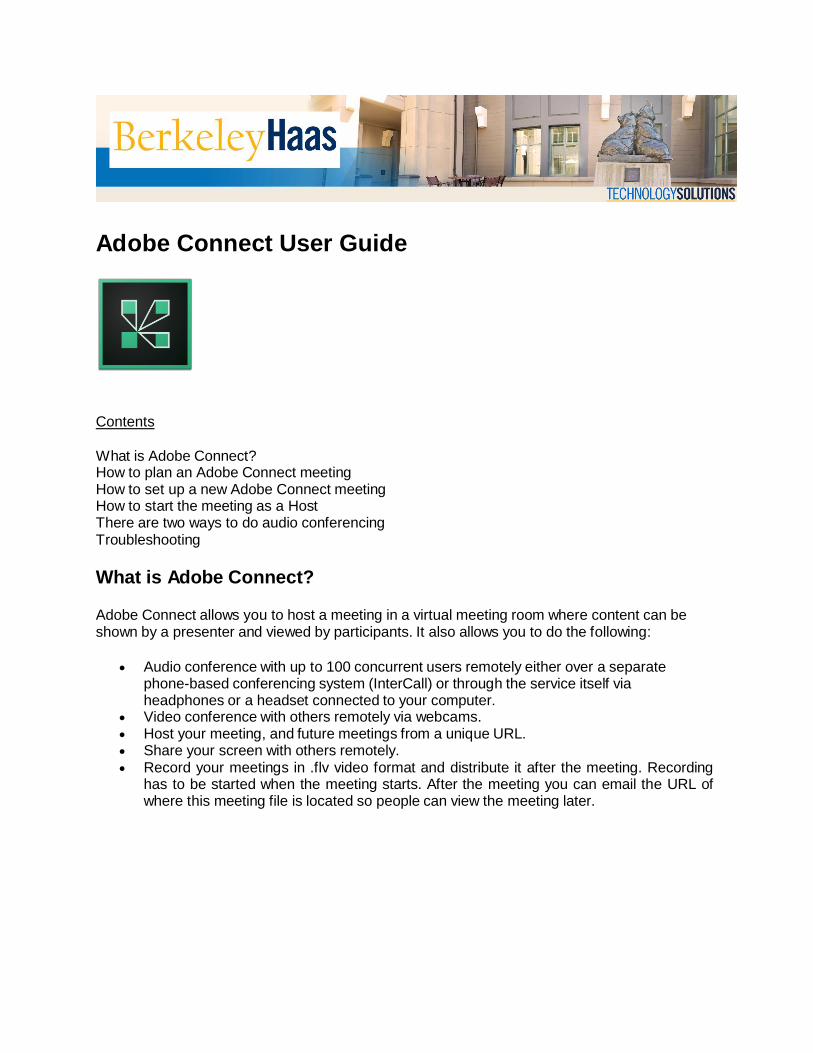
There are three types of Adobe Connect meeting users:
Host
The creator of a meeting is designated as the host by default. The host can specify each attendee’s role, including selecting other attendees to be hosts for the meeting. The Host has full control over all functions of the meeting. They start the session. If you’re a GSI facilitating a meeting for a professor, you’ll be the Host. Hosts can do the following:
Set up a meeting. Invite guests. Promote other participants to the role of meeting room host or presenter or give
enhanced permissions to a participant without promoting the participant. Start, stop, join and leave audio conferences. They can also start and stop broadcasting
audio into a meeting room. Create and manage small group breakout rooms within a meeting. They can also perform all the tasks that a presenter or participant can.
Presenter
The Presenter has "moderate" access to the meeting. They can add, remove and adjust the layout of rooms and perform the following:
Share content. Add or edit layouts in a meeting room. Add content to the library Share their screen with all attendees. Use text chat Broadcast live audio and video. Mute and unmute audio broadcasts on their computers.
Participant Participants are the attendees of the meeting. They attend the presentation of the Host. They have "limited" access. Participants do not have webcam or microphone access unless specifically granted by a host or presenter. They can perform the following:
View the content that the presenter is sharing. Hear and see the presenter’s audio and video broadcast. Raise their “hand” so they can be called on. Use text chat. Mute and unmute audio broadcasts on their computers.
How to plan an Adobe Connect meeting 1) Have you had an Adobe Connect account created?
People who are acting as meeting Hosts and Presenters reach out to Haas Adobe Connect Support to have Adobe Connect accounts created. If Hosts or Presenters are going to be using phone audio conferencing, make sure you have us set you up with an InterCall account in association with the Adobe Connect account (Phone audio is strongly not recommended. See below for details).
2) Do you have a location for the meeting?
If you’re having a portion of the meeting at Haas, make sure you have access to a room that’s quiet with minimal interruptions. If you’re having a meeting remotely, make sure you’re in a quiet place with a reliable internet connection.
3) Are you trained?
Let us know if you have any questions before the meeting session.
4) Who will be facilitating the meeting?
Find out who will facilitate the meeting. Usually GSIs log into Adobe Connect as meeting Hosts to assist the professors, who log into the meeting as Presenters.
5) Inform your meeting participants to procure headphones or headsets For the audio to work as reliably as possible, it’s essential that all attendees use headphones or headsets for the meeting. If they don’t, their computer audio can feed to their mics during the meeting, causing feedback. More on this below.
How to set up a new Adobe Connect meeting 1) Log into Adobe Connect
Log into https://haasberkeley.adobeconnect.com Username: your Haas email address Password: the password you were given when your account was created
2) Set up basic meeting options
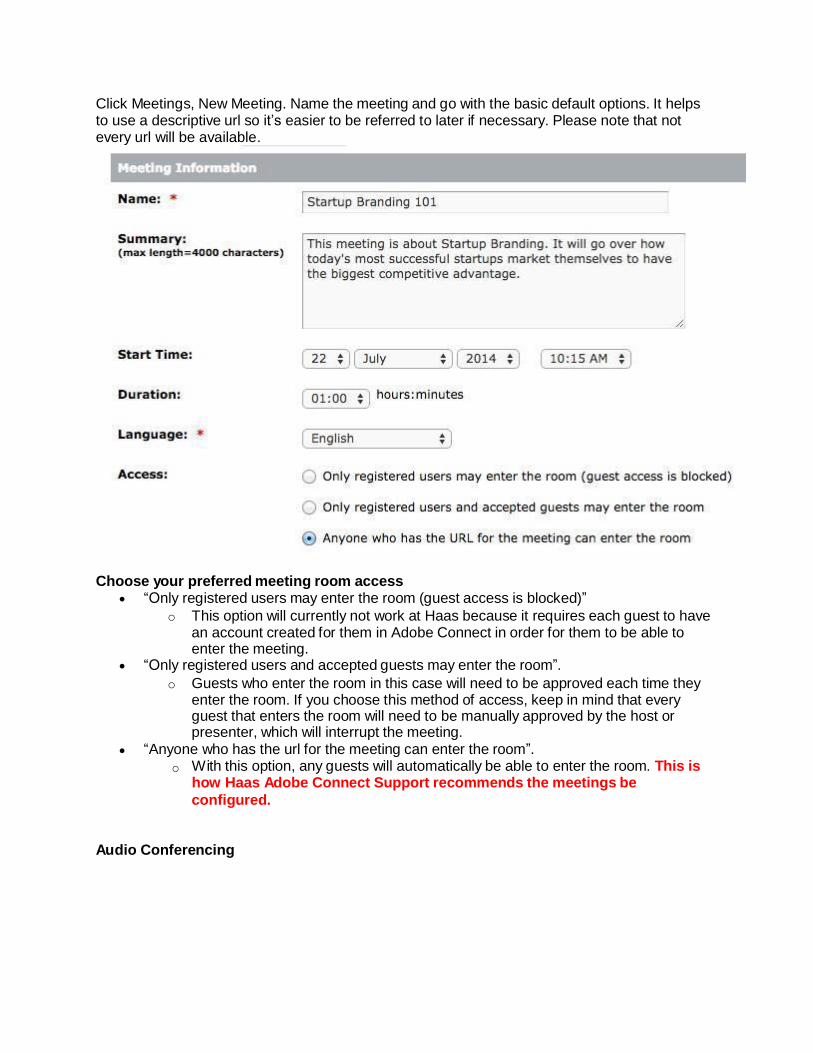
“Anyo ne who has the url for the meeting can enter the room”.
o With this option, any guests will automatically be able to enter the room. This is how Haas Adobe Connect Support recommends the meetings be
configured.
Click Meetings, New Meeting. Name the meeting and go with the basic default options. It helps to use a descriptive url so it’s easier to be referred to later if necessary. Please note that not every url will be available.
Choose your preferred meeting room access
“Only registered users may enter the room (guest access is blocked)”
o This option will currently not work at Haas because it requires each guest to have an account created for them in Adobe Connect in order for them to be able to enter the meeting.
“Only registered users and accepted guests may enter the room”.
o Guests who enter the room in this case will need to be approved each time they enter the room. If you choose this method of access, keep in mind that every guest that enters the room will need to be manually approved by the host or presenter, which will interrupt the meeting.
Audio Conferencing
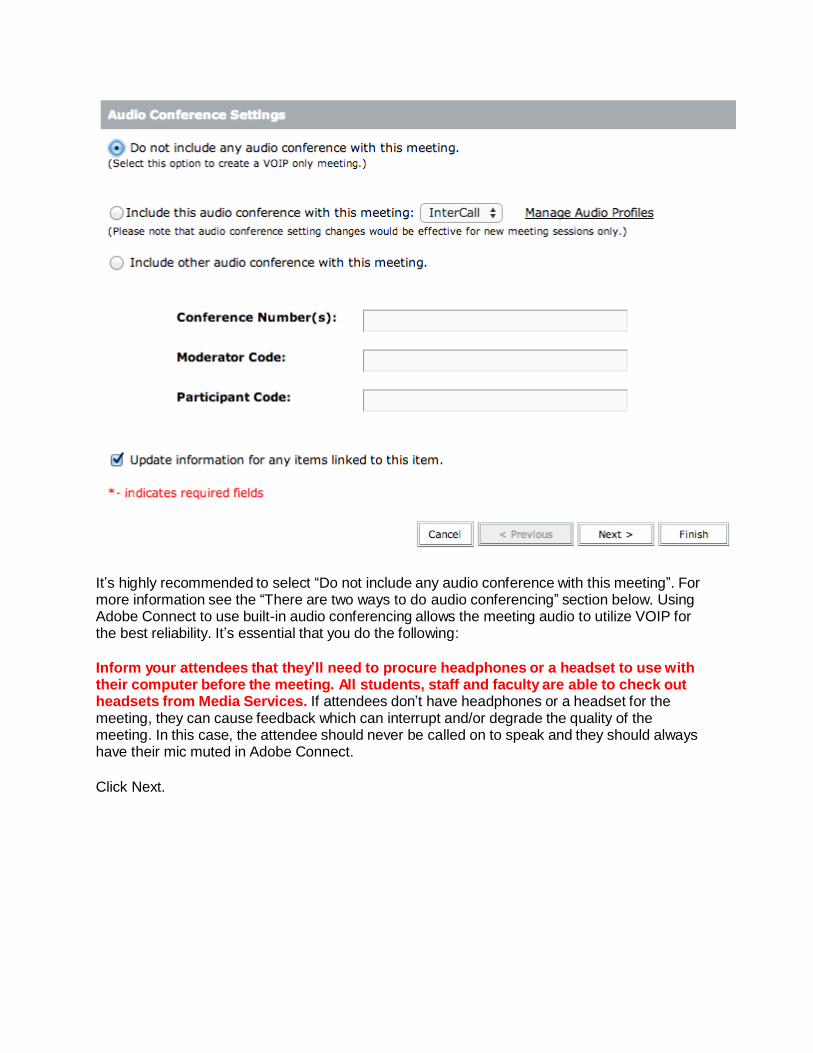
It’s highly recommended to select “Do not include any audio conference with this meeting”. For more information see the “There are two ways to do audio conferencing” section below. Using Adobe Connect to use built-in audio conferencing allows the meeting audio to utilize VOIP for the best reliability. It’s essential that you do the following:
Inform your attendees that they’ll need to procure headphones or a headset to use with their computer before the meeting. All students, staff and faculty are able to check out headsets from Media Services. If attendees don’t have headphones or a headset for the meeting, they can cause feedback which can interrupt and/or degrade the quality of the meeting. In this case, the attendee should never be called on to speak and they should always have their mic muted in Adobe Connect.
Click Next.
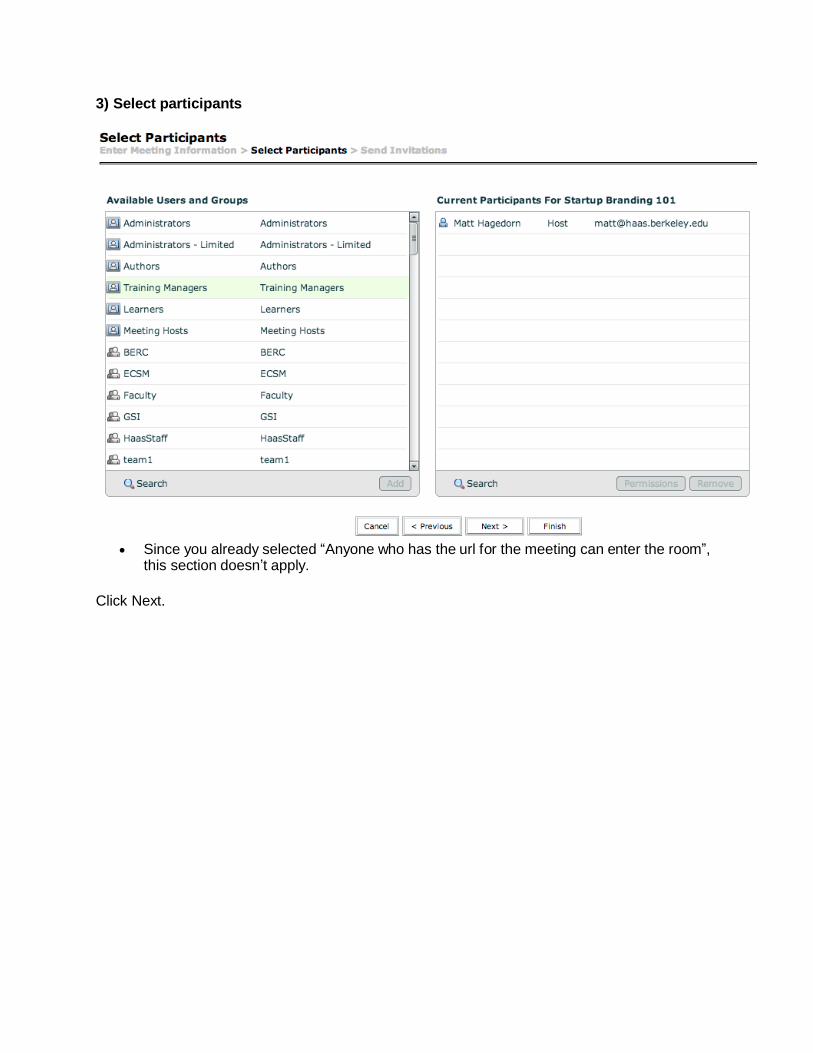
3) Select participants
Since you already selected “Anyone who has the url for the meeting can enter the room”,
this section doesn’t apply.
Click Next.
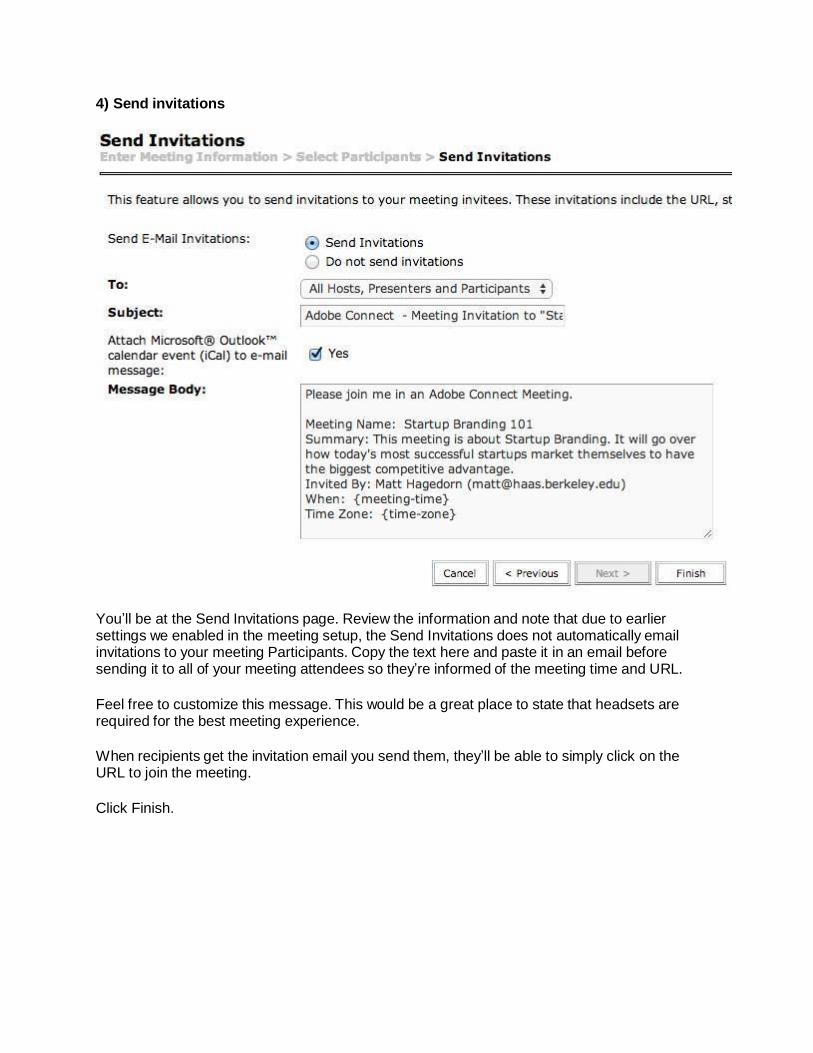
4) Send invitations
You’ll be at the Send Invitations page. Review the information and note that due to earlier settings we enabled in the meeting setup, the Send Invitations does not automatically email invitations to your meeting Participants. Copy the text here and paste it in an email before sending it to all of your meeting attendees so they’re informed of the meeting time and URL.
Feel free to customize this message. This would be a great place to state that headsets are required for the best meeting experience.
When recipients get the invitation email you send them, they’ll be able to simply click on the URL to join the meeting.
Click Finish.
How to start the meeting as a Host 1) Prepare before the meeting It’s highly recommended you and all your attendees use Firefox running latest version of Flash, before you login to the meeting, whether using Mac or PC. If you use a different type of web browser, or you’re not using the latest version of Flash, your meetings might not work as reliably.
It’s also recommended you and all your attendees use a wired internet connection or be in an area with the fastest wireless access possible.
Log into your meeting before it happens and make sure you have all of your meeting materials so you don’t have to worry about preparing it during the meeting.
2) Provide the meeting information to your guests
Provide participants the following if you haven’t done so already. All of this information except the Leader PIN (used with phone audio conferencing only) is in the Invitation Email that you sent out in Step 4 above.
Note that all conference attendants will have to be set up with an InterCall account if they’re using audio conferencing via phone (not recommended). Once they’re set up in InterCall, they get an Leader PIN assigned to them.
The date and time of the call Your dial-in number (if using InterCall) Toll free dial-in number: 866-668-0721 International dial-in number: 845-977-0098 Conference code: 9491190550
3) Log into the meeting URL
Log into the meeting URL you got from the meeting Invitation Email. The meeting host can also retrieve this URL from the meeting you set up at https://haasberkeley.adobeconnect.com
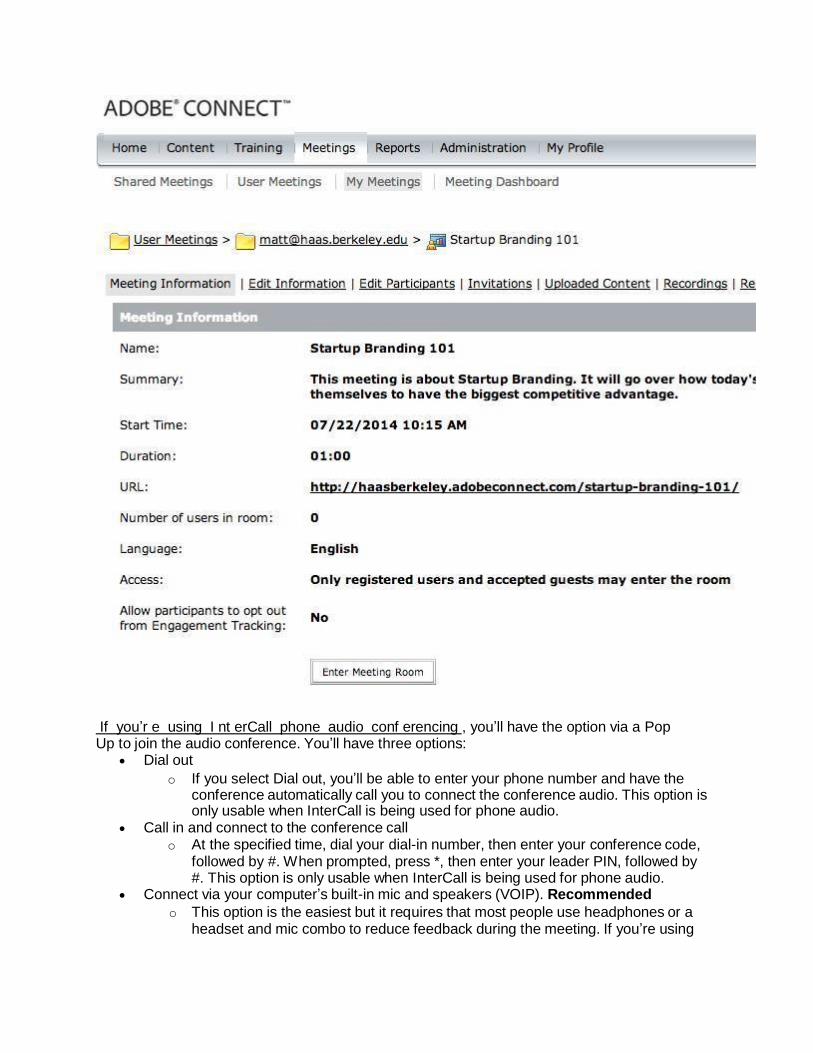
If you’r e using I nt erCall phone audio conf erencing , you’ll have the option via a Pop Up to join the audio conference. You’ll have three options:
Dial out
o If you select Dial out, you’ll be able to enter your phone number and have the conference automatically call you to connect the conference audio. This option is only usable when InterCall is being used for phone audio.
Call in and connect to the conference call o At the specified time, dial your dial-in number, then enter your conference code,
followed by #. When prompted, press *, then enter your leader PIN, followed by #. This option is only usable when InterCall is being used for phone audio.
Connect via your computer’s built-in mic and speakers (VOIP). Recommended
o This option is the easiest but it requires that most people use headphones or a headset and mic combo to reduce feedback during the meeting. If you’re using
this option, InterCall isn’t necessary. This is the recommended option due to simplicity and call quality.
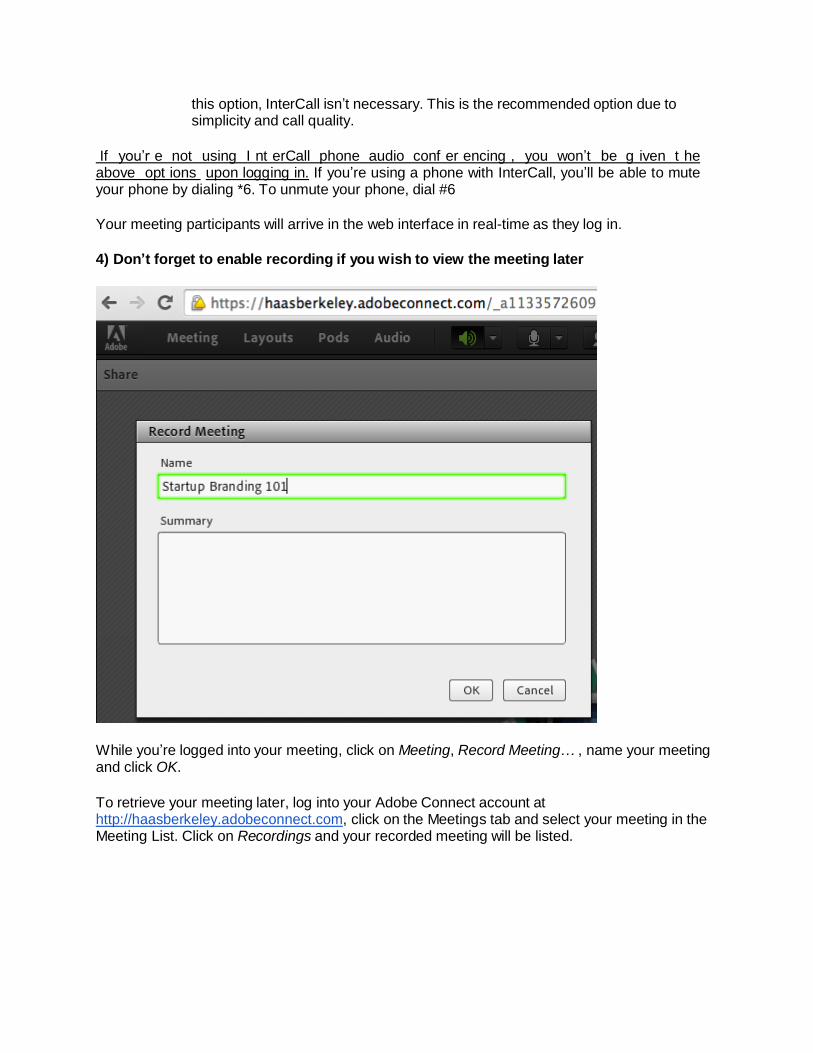
If you’r e not using I nt erCall phone audio conf er encing , you won’t be g iven t he above opt ions upon logging in. If you’re using a phone with InterCall, you’ll be able to mute your phone by dialing *6. To unmute your phone, dial #6
Your meeting participants will arrive in the web interface in real-time as they log in.
4) Don’t forget to enable recording if you wish to view the meeting later
While you’re logged into your meeting, click on Meeting, Record Meeting… , name your meeting and click OK.
To retrieve your meeting later, log into your Adobe Connect account at http://haasberkeley.adobeconnect.com, click on the Meetings tab and select your meeting in the Meeting List. Click on Recordings and your recorded meeting will be listed.
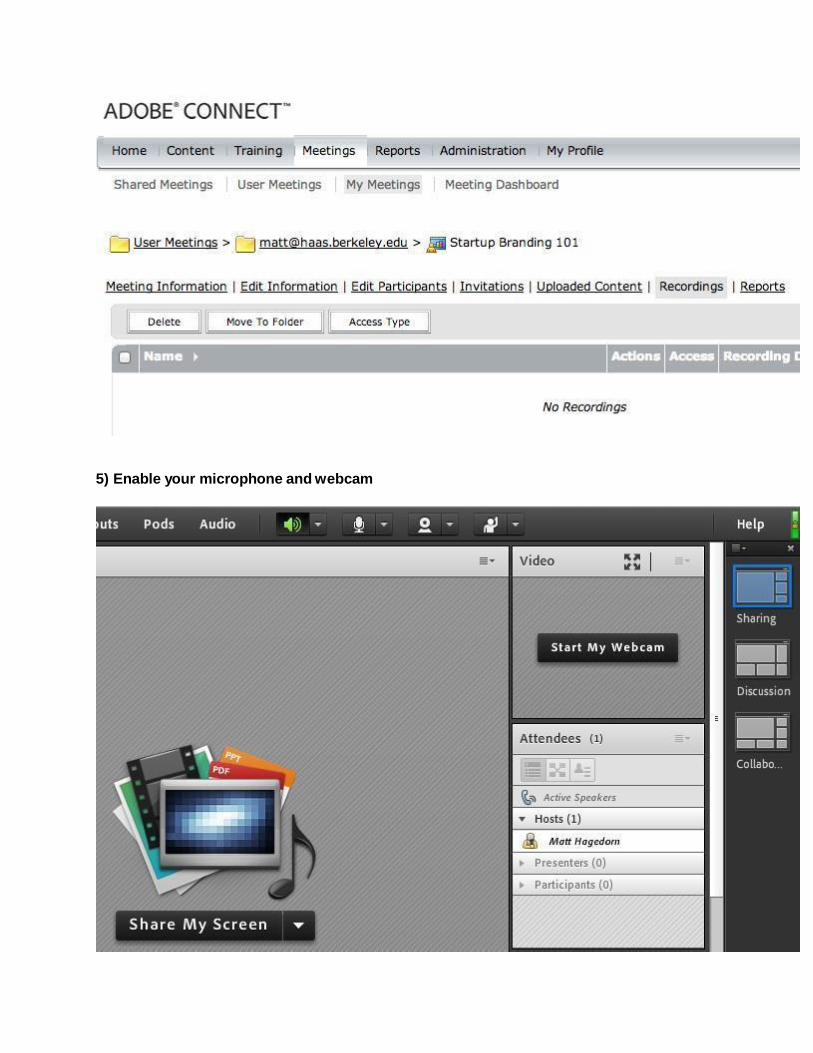
5) Enable your microphone and webcam
Enable your microphone by clicking the microphone icon in the top strip of icons. Enable your webcam by clicking “Start My W ebcam”, then click the “Start Sharing” button on your webcam display window.
If you wish to share your screen during the presentation, enable screen sharing by clicking the “Share My Screen” button in the center of the screen.
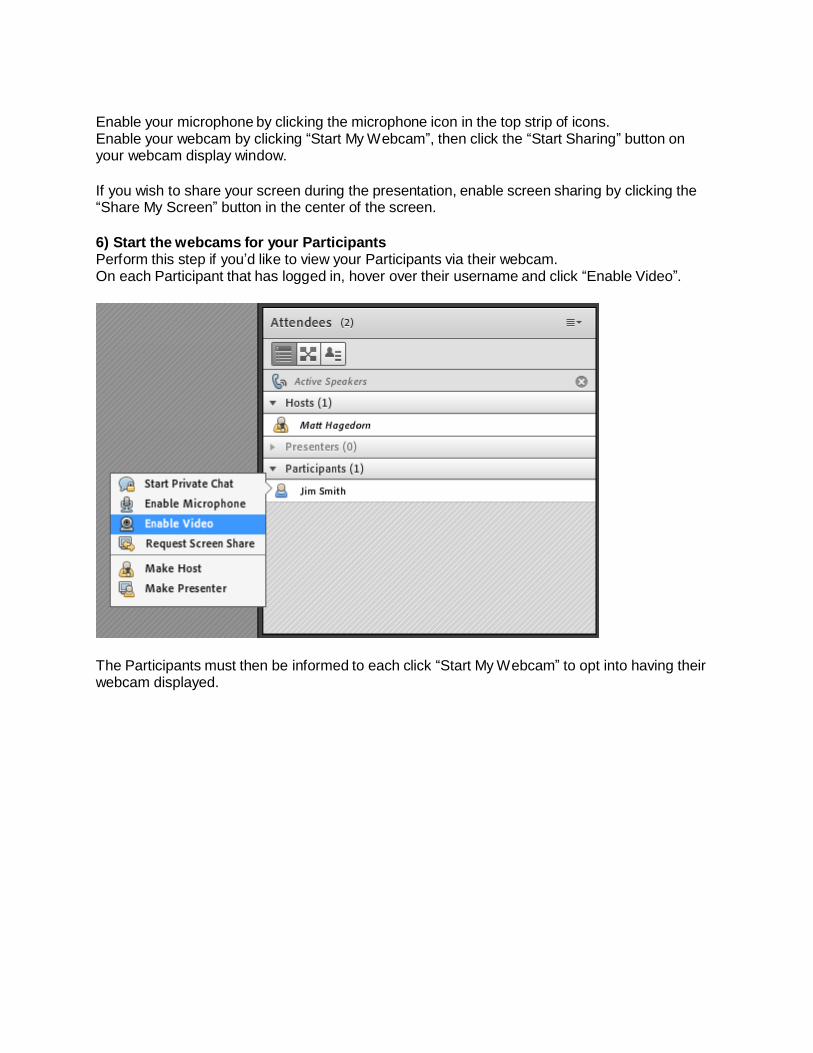
6) Start the webcams for your Participants Perform this step if you’d like to view your Participants via their webcam. On each Participant that has logged in, hover over their username and click “Enable Video”.
The Participants must then be informed to each click “Start My W ebcam” to opt into having their webcam displayed.
There are two ways to do audio conferencing Option 1: Adobe Connect VOIP (using built-in or external mic and speakers on a computer). This is the recommended option.
Using built-in or external mic and speakers for the audio portion is related to here as Adobe Connect VOIP.
Pros:
Usually features clearer and more reliable audio due to it being on the same data connection as the Adobe Connect meeting.
No InterCall setup is required. It’s more simple to have participants join the meeting and not have to worry about using
their phone as an audio device. It’s more affordable. InterCall minutes are billed to your department.
Cons:
Participants must remember to mute their mics or there will be lots of feedback during the meeting. If participants wear headphones or a headset, they don’t have to worry about muting their mics.
If people wish to get audio while on mobile devices, they need to download the Adobe Connect app.
Option 2: Phone-based audio (using the InterCall service)
Intercall is a regular telephone-based voice conferencing system that’s integrated into Adobe Connect.
Pros:
People can dial in if they’re not in front of a computer. Adobe Connect will prompt to call your mobile phone as soon as you enter the meeting. Participants don’t need to worry about muting their mics, as they would if they were
using the built-in computer audio method (VOIP). Note that if the participants are dialing in on speakerphone, mics may need to be disabled to reduce interference and/or background noise.
Cons:
Adobe Connect meetings using phone-based audio almost are almost always severely negatively impacted by audio issues. This is why phone-based audio is not recommended for Adobe Connect.
Requires the meeting host to have an account set up with InterCall before the meeting. InterCall accounts can be costly. InterCall is currently 2 cents per minute, per user.
Since the call goes over mobile phone networks, call quality is only as good as the phone reception.
The host MUST use InterCall if other participants are using phones to dial into the audio portion of the meeting. InterCall bridges the VOIP to the regular analog phone service. If the host uses VOIP, nobody will be able to call in and get audio through InterCall. In this case, participants would need to use the built-in Adobe Connect VOIP which requires a USB or bluetooth headset.
As a meeting host, you have to start the InterCall audio via phone before the meeting. Otherwise, the audio won’t link up to Adobe Connect VOIP.
To set up InterCall
Contact Adobe Connect Support to have them create an InterCall account for the Adobe Connect host.
Toll free dial-in number: 866-668-0721 International dial-in number: 845-977-0098 Conference code: 9491190550 Leader PIN: 40648 InterCall handles all support inquiries with Adobe Connect.
Helpful Keypad Commands when using InterCall
*0 Operator assistance – conference 00 Operator assistance – individual *1 Dial-out to a participant – leader only *2 Begin/end conference record – leader only *3 Change entry/exit method (recorded names, tones, silence) – leader only *4 Private roll call *5/#5 Mute/unmute all participant lines – leader only *6/#6 Mute/unmute your own line *7/#7 Lock/unlock conference (including operator) – leader only *8 Allow/disallow conference continuation – leader only *9 Start/join sub-conferencing 11 Third-party conference start – bypass hold music to start call as leader *51/#51 Lecture mode on/off – leader only #99 Disconnect all lines except leader’s – leader only *# Participant count ** List available keypad commands
Troubleshooting
Use this tool to diagnose your issues: https://na1cps.adobeconnect.com/common/help/en/support/meeting_test.ht m
Problem Solution
People can’t hear me
Is your mic enabled? The mic icon in the top strip of icons in the meeting should be green to indicate enabled. W hite indicates not enabled.
Some computers have multiple mics; ensure the proper one is enabled by clicking on the down-arrow on the mic icon and selecting the proper mic.
I can’t hear anyone
Are your speakers muted? The speaker icon in the top strip of icons in the meeting should be green to indicate enabled. White indicates not enabled.
I hear reverberation
This is usually due to a participant’s mic being on, allowing computer or speakerphone audio to get passed onto the mic. Muting the user’s mic usually resolves this issue. If they’re using a phone in speakerphone mode, have them turn speakerphone off. Using headphones or a headset reduces these issues.
I can’t see anyone
Did you enable your Participants video by hovering over their account and selecting “Enable video”?
If so, they need to click “Start My W ebcam”.