Embed Size (px)
Citation preview
Adobe Acrobat 10 Tutorial
ADOBE ACROBAT
TABLE OF CONTENTS
Adobe Acrobat is a software program used to create forms, manuals, online book pages, maps and drafted images, that can be uploaded to a website, and then downloaded by site visitors. Documents created in Adobe Acrobat can be viewed as Portable Document Files in Adobe Acrobat Reader. After viewing the document, one can create a PDF and possibly make that a part of another file. PDF files are designed to be viewed and edited on both Macs and PCs. PDF’s can be easily printed.This tutorial will not only help you to create Portable Document Files but will also assist you in navigating through your document. Follow the links below to learn how to view and create documents in Adobe Acrobat 10.
In this tutorial, you will learn the following:
1. Getting Started Pg. 3
2. Choosing Toolbar Pg. 3
3. Viewing Pg. 4
4. Zooming Pg. 4
5. Page Layout and Orientation Pg. 6
6. Creating PDF Files Pg. 7
7. Converting Screen Captures Pg. 7
8. Combining Multiple Files into One Pg. 8
9. Using Bookmarks Pg. 8
10. Creating a Form Pg. 9
2
1. GETTING STARTED
2. CHOOSING TOOLBAR
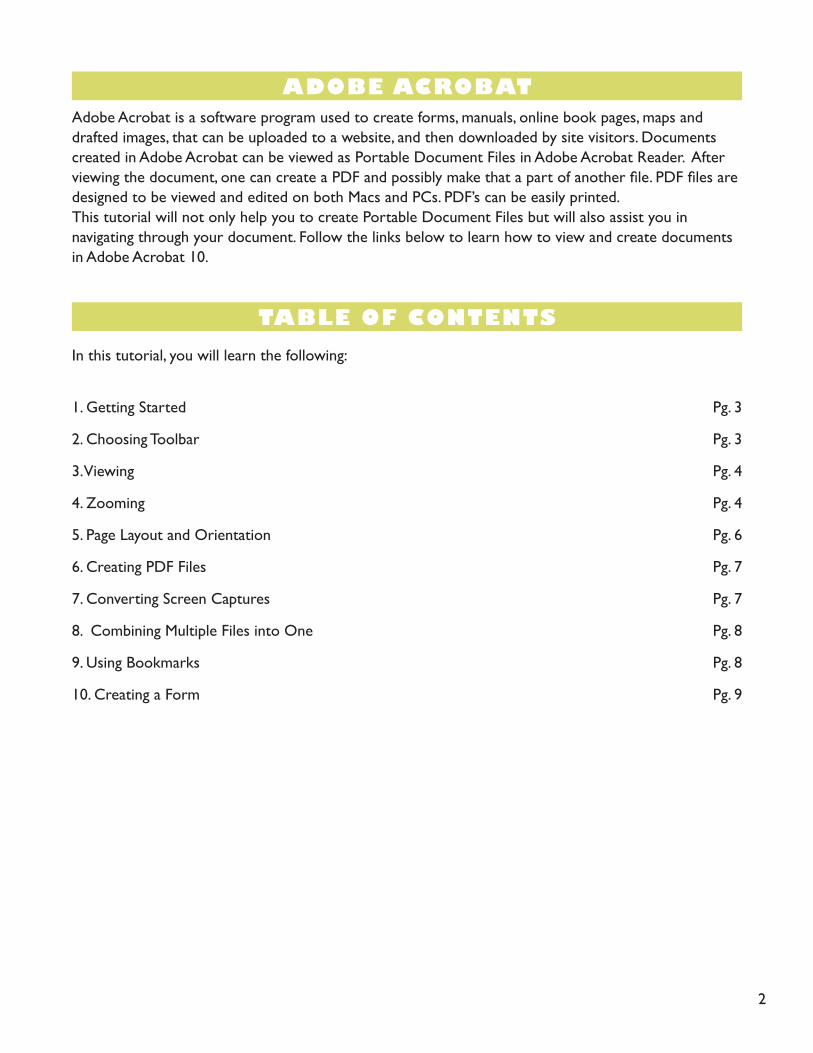
1. The documents that you will bring into this program are called Portable Document Files (PDF). To open a PDF file for viewing, follow these steps:
1. Launch Adobe Acrobat. If you are using a Mac, double-click the Acrobat icon at the bottom of the screen inside the Dock. If you are using a PC, go to Start in the bottom left-hand corner of the screen and find it in the list of programs provided.
2. In the main menu, go to File > Open (Fig. 1).
* Alternatively, you can simply double-click on the document that you wish to open. If Acrobat Reader or Acrobat Pro is installed on your system it will open in the proper program automatically.
Fig.1
Fig. 2
Fig. 3
There are two ways to turn your toolbar options on or off.
METHOD 1: 1. In the menu items across the top of the
screen, click View > Tools (Fig. 2)2. Choose which tool you would like to work
with from the list.
METHOD 2: 1. In the default toolbar set that appears across the top of the document, you will find the word Tools
towards the right-hand side (Fig. 3). Click it and the options will open in their own tray.
3
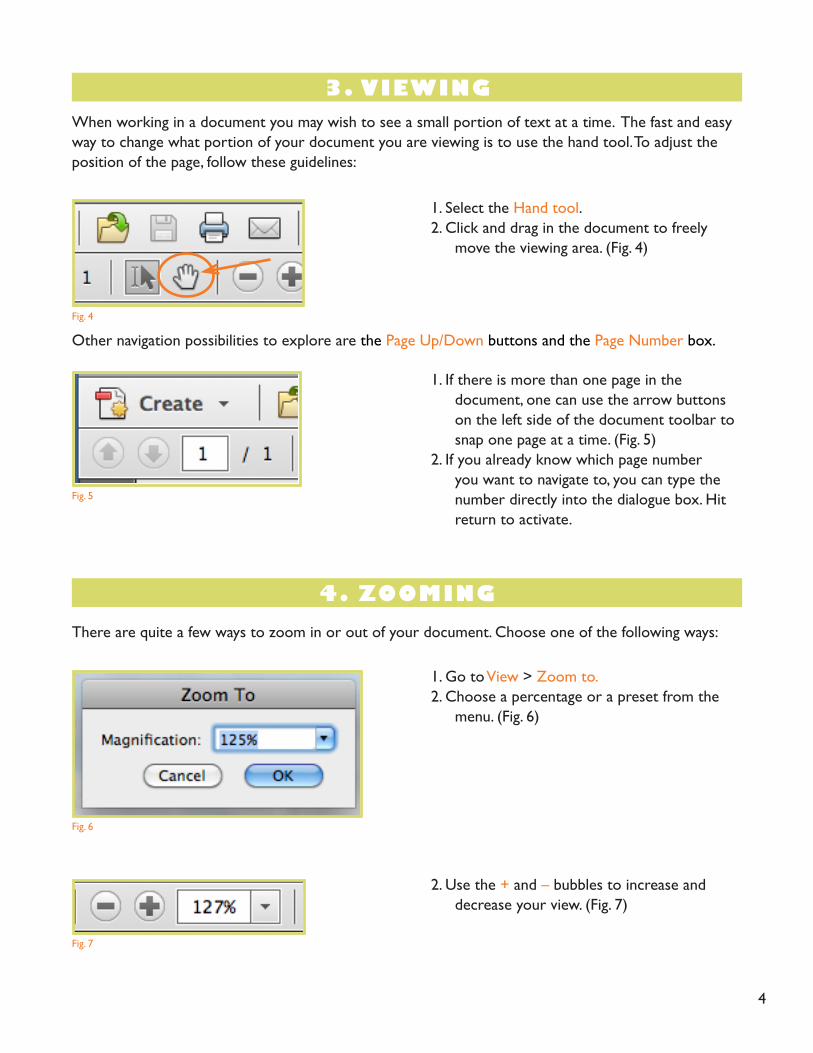
When working in a document you may wish to see a small portion of text at a time. The fast and easy way to change what portion of your document you are viewing is to use the hand tool. To adjust the position of the page, follow these guidelines:
There are quite a few ways to zoom in or out of your document. Choose one of the following ways:
2. Use the + and – bubbles to increase and decrease your view. (Fig. 7)
4
Other navigation possibilities to explore are the Page Up/Down buttons and the Page Number box.
1. Select the Hand tool.2. Click and drag in the document to freely
move the viewing area. (Fig. 4)
1. If there is more than one page in the document, one can use the arrow buttons on the left side of the document toolbar to snap one page at a time. (Fig. 5)
2. If you already know which page number you want to navigate to, you can type the number directly into the dialogue box. Hit return to activate.
3. VIEWING
4. ZOOMING
1. Go to View > Zoom to.2. Choose a percentage or a preset from the
menu. (Fig. 6)
Fig. 4
Fig. 5
Fig. 6
Fig. 7
5
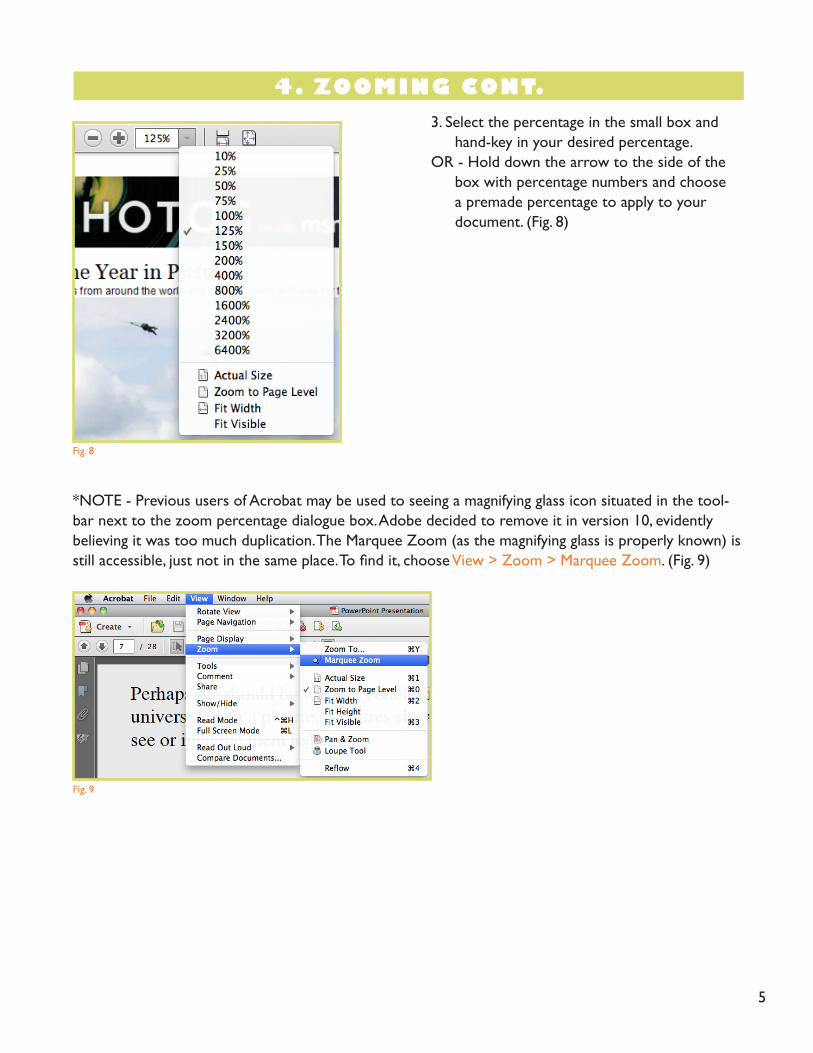
*NOTE - Previous users of Acrobat may be used to seeing a magnifying glass icon situated in the tool-bar next to the zoom percentage dialogue box. Adobe decided to remove it in version 10, evidently believing it was too much duplication. The Marquee Zoom (as the magnifying glass is properly known) is still accessible, just not in the same place. To find it, choose View > Zoom > Marquee Zoom. (Fig. 9)
3. Select the percentage in the small box and hand-key in your desired percentage.
OR - Hold down the arrow to the side of the box with percentage numbers and choose a premade percentage to apply to your document. (Fig. 8)
4. ZOOMING CONT.
Fig. 8
Fig. 9

6
If you need to see more than one page of the document at once, you have a variety of view options.
1. Go to View > Page Display (Fig. 10)2. You can choose from Single Page View (Fig. 11), Single Page with Scrolling, (Fig. 12), Two Page View
(Fig. 13) and Two Page View with Scrolling (Fig. 14)
5. PAGE LAYOUT AND ORIENTATION
Fig. 10
Fig. 11
Fig. 13
Fig. 12
Fig. 14
7
If you are a PC user, you need to launch Adobe Acrobat before you can create a PDF. Any text document from Microsoft Word, Excel, Notepad or Text Edit can be converted to a PDF.
To create a PDF, choose File > Create > PDF from File from the menu and select your document. Two more options that you can explore are Dragging and Dropping your file from the desktop (Mac users only) and Combining Multiple Files. Dragging and Dropping your file is helpful for quickly creating your PDF and Combining Multiple Files helps reduce the amount of files you have by consolidating everything into one.
1. In the main menu, go to File > Create > PDF from File. (Fig. 15)
2. Select the document you wish to convert3. Click Open.4. Adobe Acrobat will convert the document
and open it for viewing.
If you are a Mac user, you do not need to open Adobe Acrobat to create a simple PDF. Just click on a text file, html file, or a picture located on the desktop and drag it to the Adobe Acrobat icon on the Dock. The program will open the converted document for viewing.
6. CREATING PDF FILES
7. CONVERTING SCREEN CAPTURES
If you would like to email someone a picture or snapshot you have made on the desktop you will want to make your file into a PDF so that it can be viewed easily via email. Depending on whether you are working on a PC, you can either use the click and drag option, or launch Adobe Acrobat and use the Create PDF From File option. Converting the picture or screen capture is very simple.
1. On your desktop, click the picture file or screen capture file that you wish to convert.2. Then drag the file to the Adobe Acrobat icon.
* It should open and you can now save your document and later open as a PDF file. This drag and drop option is available to Mac users, however PC users will need to open the file after launching Adobe Acrobat and use the File > Create > PDF from File menu option.
Fig. 15
8
If you need to convert several files, for example a Word document and an Excel chart into one PDF you can use the option Merge Files into a Single PDF. To combine files, follow these steps:
8. COMBINING MULTIPLE FILES
9. USING BOOKMARKS
1.In the main menu, go to File > Create > Combine Files into a Single PDF (Fig. 16) or Click the Create button in the toolbar then Combine Files into a Single PDF. (Fig. 17)
2.Navigate to the file you wish to convert. Select the file. Click Add.
3. Repeat steps 2 and 3 for all the files you need to combine. You will see your files in the Files to Combine box.
4. Once you have all your files, click OK.5. Now save your new document.
If you need to mark a place in a document, Acrobat 10 makes it very easy to do so. To make a Bookmark, follow these steps:
1. Locate the Bookmark icon on the left side of the document, click to open the tray. Here you can see the list of existing bookmarks (if there are any) and here is where you add your own. (Fig. 18)
2. Navigate to the appropriate section in the PDF and highlight a meaningful phrase, such as a chapter title or paragraph heading.
3. Click the Add Bookmark button to add this mark to the tray.
4. Repeat steps 1-3 to place additional bookmarks.
1. Open Bookmark Tray
3. Add Bookmark
2. Highlight text
Fig. 16
Fig. 17
Fig. 18
9
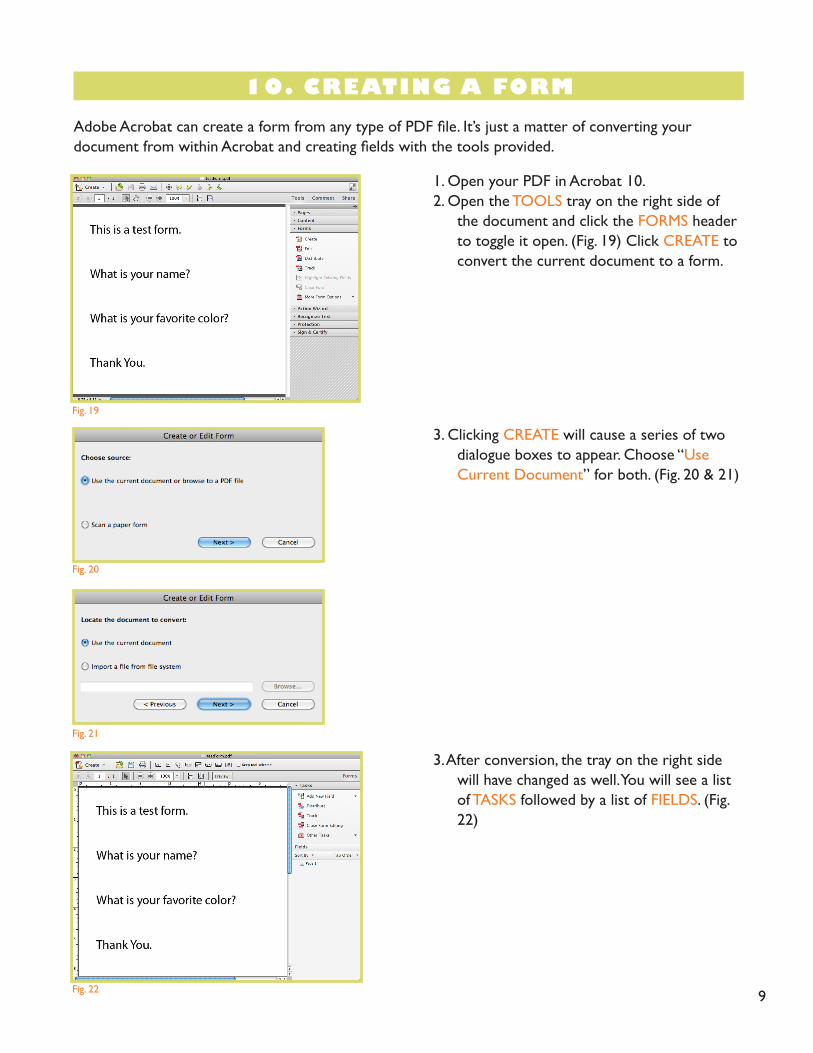
Adobe Acrobat can create a form from any type of PDF file. It’s just a matter of converting your document from within Acrobat and creating fields with the tools provided.
1. Open your PDF in Acrobat 10. 2. Open the TOOLS tray on the right side of
the document and click the FORMS header to toggle it open. (Fig. 19) Click CREATE to convert the current document to a form.
3. Clicking CREATE will cause a series of two dialogue boxes to appear. Choose “Use Current Document” for both. (Fig. 20 & 21)
3. After conversion, the tray on the right side will have changed as well. You will see a list of TASKS followed by a list of FIELDS. (Fig. 22)
10. CREATING A FORM
Fig. 19
Fig. 20
Fig. 21
Fig. 22
10
10. CREATING A FORM (cont.)
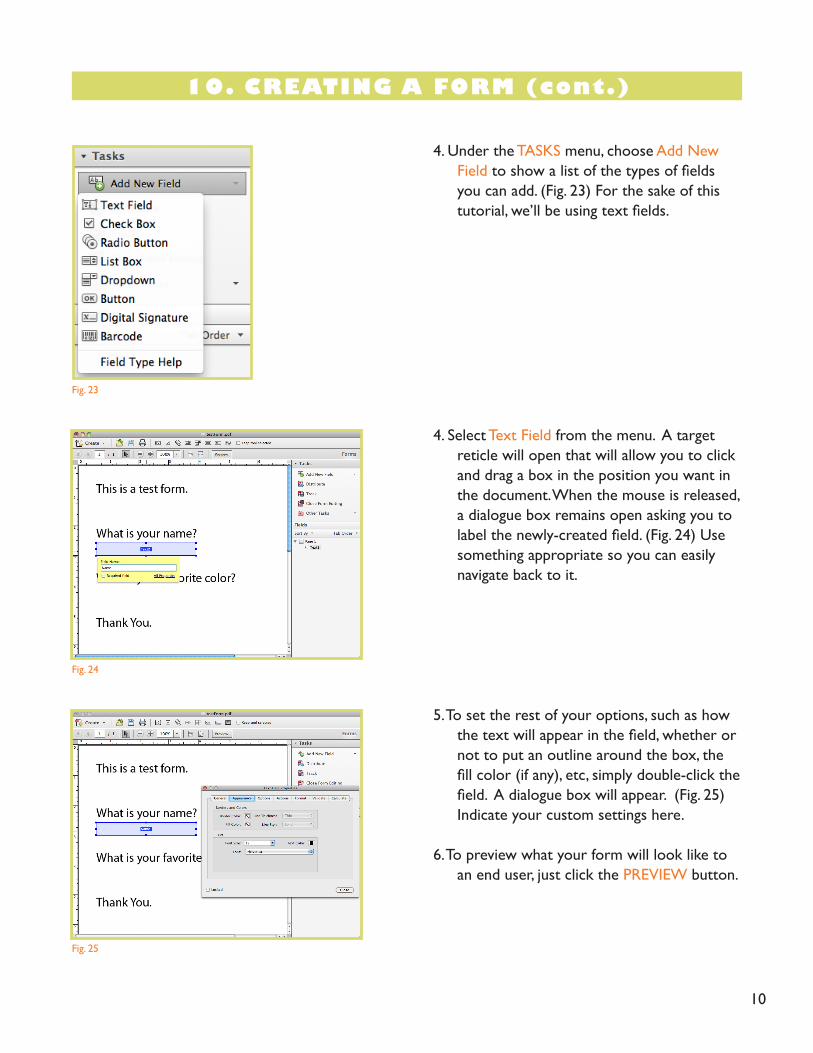
4. Under the TASKS menu, choose Add New Field to show a list of the types of fields you can add. (Fig. 23) For the sake of this tutorial, we’ll be using text fields.
4. Select Text Field from the menu. A target reticle will open that will allow you to click and drag a box in the position you want in the document. When the mouse is released, a dialogue box remains open asking you to label the newly-created field. (Fig. 24) Use something appropriate so you can easily navigate back to it.
5. To set the rest of your options, such as how the text will appear in the field, whether or not to put an outline around the box, the fill color (if any), etc, simply double-click the field. A dialogue box will appear. (Fig. 25) Indicate your custom settings here.
6. To preview what your form will look like to an end user, just click the PREVIEW button.
Fig. 23
Fig. 24
Fig. 25
11
10. CREATING A FORM (cont.)
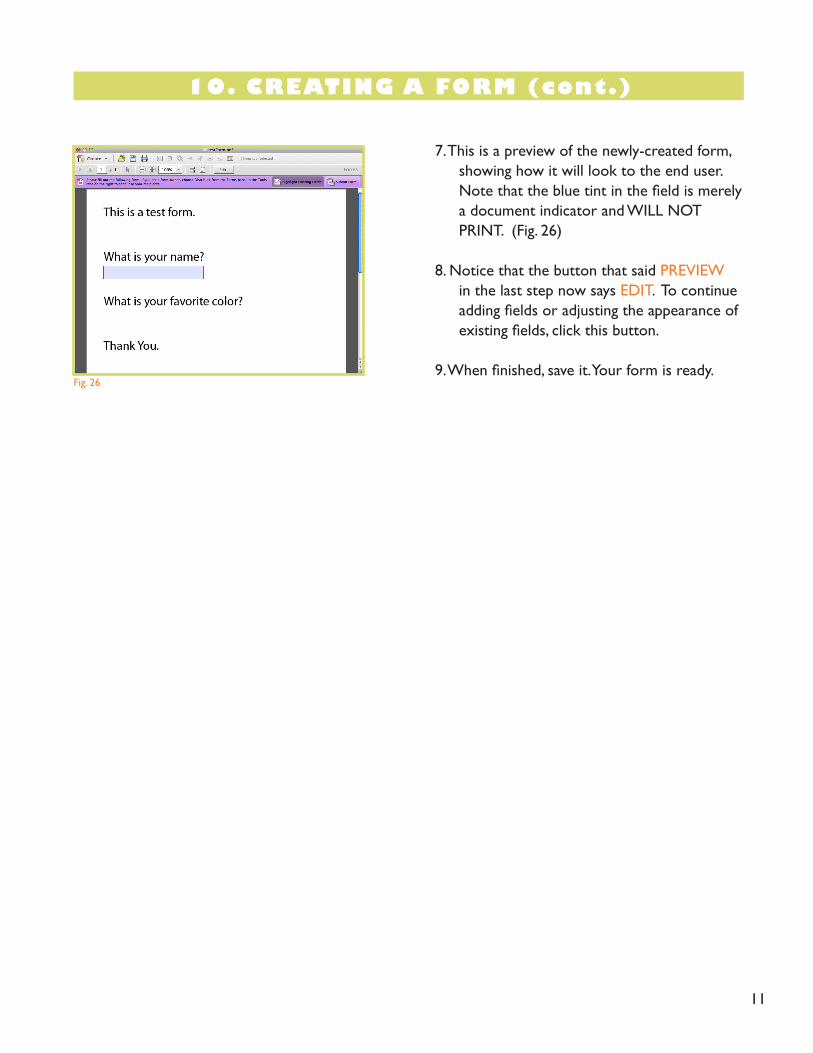
7. This is a preview of the newly-created form, showing how it will look to the end user. Note that the blue tint in the field is merely a document indicator and WILL NOT PRINT. (Fig. 26)
8. Notice that the button that said PREVIEW in the last step now says EDIT. To continue adding fields or adjusting the appearance of existing fields, click this button.
9. When finished, save it. Your form is ready.Fig. 26


![SCANNING TUTORIAL - PARSONS SSCE · SCANNING TUTORIAL. open EPSON scan utility on desktop. select Professional Mode. ... OptiTex Adobe Acrobat Distiller X] Adobe …](https://img.pdfslide.us/doc/110x75/5b7704017f8b9a515a8c24df/scanning-tutorial-parsons-ssce-scanning-tutorial-open-epson-scan-utility.jpg)