Embed Size (px)
Citation preview

8/8/2019 Adobe Ace Study Gui Dev 24158
http://slidepdf.com/reader/full/adobe-ace-study-gui-dev-24158 1/102
Adobe ACE Flex 3 & Air Study GuideBy Jonnie Spratley 1/9/09
Here is all of the tested content that is covered on the ACE Flex 3 & Air Exam.
I have done all of the research for every section and topic that is said to be on the exam. Now it is up to you to study this guide and
pass the test to become a certified Flex 3 & Air Developer.
Exam Structure The following lists the topic areas and percentage of questions delivered in each topic area:
Topic Area % Of Exam # Of Questions
Creating a User Interface (UI) 22 11
Flex system architecture and design 18 9
Programming Flex applications with
ActionScript
24 12
Interacting with data sources and servers 16 8
Using Flex in the Adobe Integrated
Runtime (AIR)
20 10
Number of Questions and Passing Score
• 50 questions
• 67% minimum required to pass
Test Content: Topic Areas and ObjectivesFollowing is a detailed outline of the information covered on the exam.
1. Creating a User Interface (UI)
º 1.1 - Identify and describe the basic UI controls used in a Flex application.
º 1.2 -Identify the purpose of UI containers and when to use them.
º 1.3 - Change the look and feel of a design by using API styles, style sheets, filters, and blends.
º 1.4 - Dynamically change the look of an application by using view states, transitions and effects.
º 1.5 - Position UI elements by using constraint-based layout.
º 1.6 - Position UI elements by using enhanced constraints.
º 1.7 - Implement application navigation by using navigator containers.
º 1.8 - Customize list-based controls.
2. Flex system architecture and design
8/8/2019 Adobe Ace Study Gui Dev 24158
http://slidepdf.com/reader/full/adobe-ace-study-gui-dev-24158 2/102
º 2.1 - Create and use custom components.
º 2.2 - Transfer data between components by using data bindings.
º 2.3 - Create, handle, and dispatch custom events.
º 2.4 - Handle framework events.
º 2.5 - List and describe the differences between model, view, and controller code in a Flex application.
3. Programming Flex applications with ActionScript
º 3.1 - Define and extend an ActionScript class.º 3.2 - Implement an ActionScript interface.
º 3.3 - Use access modifiers with classes and class members.
º 3.4 - Under the purpose of and implement data transfer objects.
º 3.5 - Implement accessor methods in ActionScript.
º 3.6 - Use an ArrayCollection to sort, filter, and provide data.
º 3.7 - Implement data validation.
º 3.8 - Manipulate XML data by using E4X.
4. Interacting with data sources and servers
º 4.1 - Implement simple LiveCycle Data Services (LCDS) messaging and data management.
º 4.2 - Create, connect to, and define a local database.
º 4.3 - Add, update, and remove records from local database.
º 4.4 - Interact with remote data and services by using Remote Procedure Call (RPC) services.
º 4.5 - Upload files to a server.
5. Using Flex in the Adobe Integrated Runtime (AIR)
º 5.1 - Given a scenario, compile and export a release build of an AIR application.
º 5.2 - Create, populate, and delete files and directories on a local file system.
º 5.3 - Create and customize native windows and menus.º 5.4 - Adding drag-and-drop functionality to and from the desktop.
º 5.5 - Install, uninstall, and update an AIR application.
º 5.6 - List and describe the AIR security contexts.
The following is a detailed outline of the information covered on the exam with all of the answers in full detail.
1. Creating a User Interface (UI)
1.1 - Identify and describe the basic UI controls used in a Flex application.
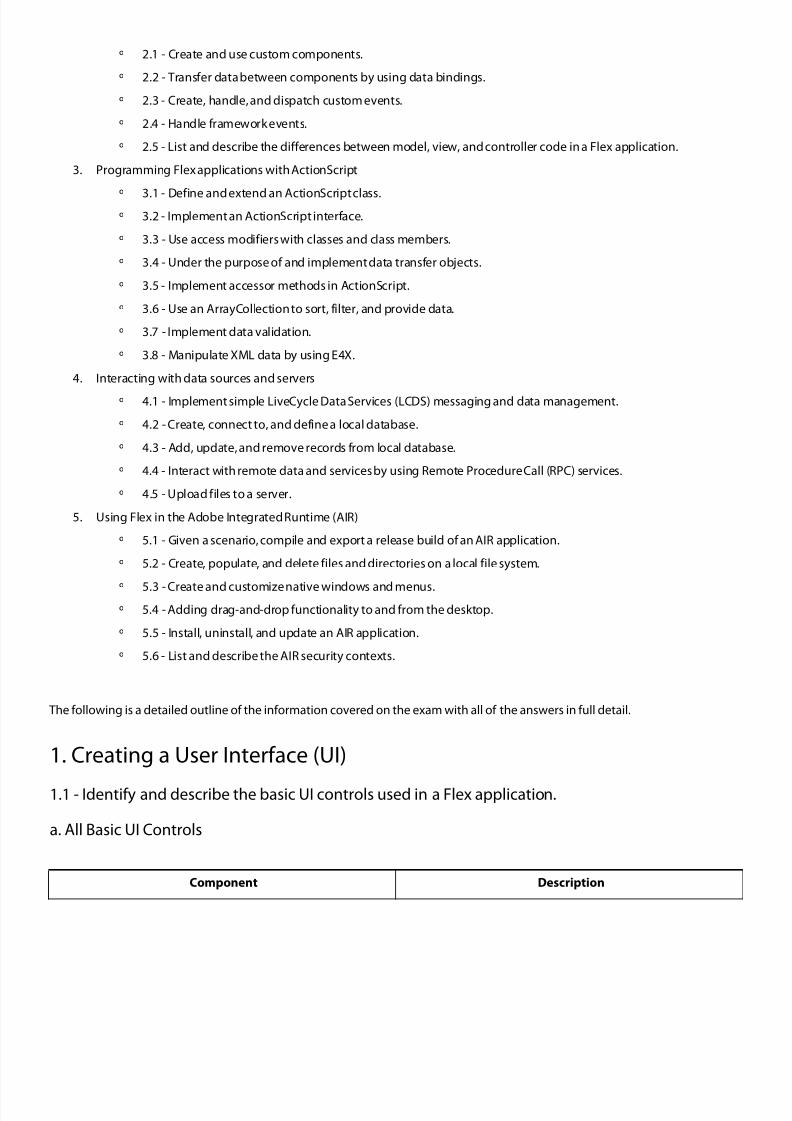
a. All Basic UI Controls
Component Description
8/8/2019 Adobe Ace Study Gui Dev 24158
http://slidepdf.com/reader/full/adobe-ace-study-gui-dev-24158 3/102
Button Buttons typically use event listeners to perform an action
when the user selects the control.
When a user clicks the mouse on a Button control, and the
Button control is enabled, it dispatches a click event and a
buttonDown event.
A button always dispatches events such as themouseMove,
mouseOver, mouseOut, rollOver, rollOut,
mouseDown, and mouseUp events whether enabled or
disabled.
PopUpButton The PopUpButton control consists of two horizontal buttons: a
main button, and a smaller button called the pop-up button,
which only has an icon.
The main button is a Button control. The pop-up button, when
clicked, opens a second control called the pop-up control.
Clicking anywhere outside the PopUpButton control, or in the
pop-up control, closes the pop-up control
ButtonBar and ToggleButtonBar The ButtonBar and ToggleButtonBar controls define a
horizontal or vertical row of related buttons with a common
appearance. The controls define a single event, the itemClick
event, that is dispatched when any button in the control is
selected.
The ButtonBar control defines group of buttons that do not
retain a selected state. When you select a button in a
ButtonBar control, the button changes its appearance to the
selected state; when you release the button, it returns to the
deselected state.
The ToggleButtonBar control defines a group buttons that
maintain their state, either selected or deselected. Only one
button in the ToggleButtonBar control can be in the selected
state.
That means when you select a button in a ToggleButtonBar
control, the button stays in the selected state until you select a
different button.
8/8/2019 Adobe Ace Study Gui Dev 24158
http://slidepdf.com/reader/full/adobe-ace-study-gui-dev-24158 4/102
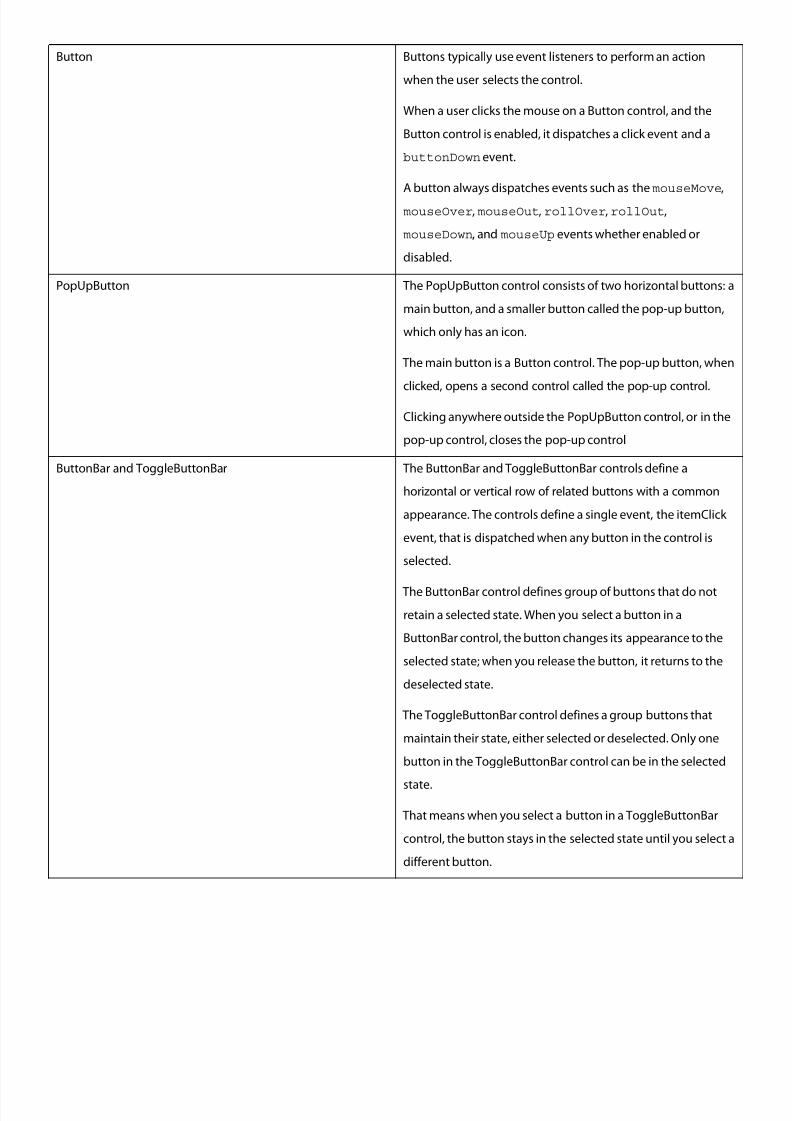
LinkBar A LinkBar control defines a horizontal or vertical row of
LinkButton controls that designate a series of link
desti-nations.
You typically use a LinkBar control to control the active child
container of a ViewStack container, or to create a standalone
set of links.
TabBar As with the LinkBar control, you can use a TabBar control to
control the active child container of a ViewStack container. The
syntax for using a TabBar control to control the active child of
a ViewStack container is the same as for a LinkBar control.
CheckBox The CheckBox control is a commonly used graphical control
that can contain a check mark or be unchecked (empty). You
can use CheckBox controls wherever you need to gather a set
of true or false values that aren’t mutually exclusive. You can
add a text label to a CheckBox control and place it to the left,
right, top, or bottom. Flex clips the label of a CheckBox control
to fit the boundaries of the control.
RadioButton The RadioButton control is a single choice in a set of mutually
exclusive choices.
A RadioButton group is composed of two or more RadioButton
controls with the same group name. Only one member of the
group can be selected at any given time. Selecting an
unselected group member deselects the currently selected
RadioButton control in the group.
NumericStepper You can use the NumericStepper control to select a number
from an ordered set.
The NumericStepper control consists of a single-line input text
field and a pair of arrow buttons for stepping through the valid
values; you can also use the Up Arrow and Down Arrow keys to
cycle through the values.
DateChoose and DateField The DateChooser and DateField controls let users select dates
from graphical calendars. The DateChooser control user
interface is the calendar.
The DateField control has a text field that uses a date chooser
popup to select the date as a result. The DateField properties
are a superset of the DateChooser properties.
8/8/2019 Adobe Ace Study Gui Dev 24158
http://slidepdf.com/reader/full/adobe-ace-study-gui-dev-24158 5/102
LinkButton The LinkButton control creates a single-line hypertext link that
supports an optional icon. You can use a LinkButton control to
open a URL in a web browser.
HSlider and VSlider You can use the slider controls to select a value by moving a
slider thumb between the end points of the slider track.
The current value of the slider is determined by the relative
location of the thumb between the end points of the slider,
corresponding to the slider’s minimum and maximum values.
By default, the minimum value of a slider is 0 and the
maximum value is 10.
The current value of the slider can be any value in a
continuous range between the minimum and maximum
values, or it can be one of a set of discrete values, depending
on how you configure the control.
SWFLoader The SWFLoader control lets you load one Flex application into
another Flex application as a SWF file. It has properties that let
you scale its contents. It can also resize itself to fit the size of its
contents. By default, content is scaled to fit the size of the
SWFLoader control.
The SWFLoader control can also load content on demand
programmatically, and monitor the progress of a load
operation.
The SWFLoader control also lets you load the contents of a GIF,
JPEG, PNG, SVG, or SWF file into your application, where the
SWF file does not contain a Flex application, or a ByteArray
representing a SWF, GIF, JPEG, or PNG.
Image Adobe Flex supports several image formats, including GIF,
JPEG, PNG, SVG, and SWF files.
You can import these images into your applications by using
the Image control.
VideoDisplay Flex supports the VideoDisplay control to incorporate
streaming media into Flex applications.
Flex supports the Flash Video File (FLV) file format with this
control.
8/8/2019 Adobe Ace Study Gui Dev 24158
http://slidepdf.com/reader/full/adobe-ace-study-gui-dev-24158 6/102
ColorPicker The ColorPicker control lets users select a color from a
drop-down swatch panel (palette). It initially appears as a
preview sample with the selected color.
When a user selects the control, a color swatch panel appears.
The panel includes a sample of the selected color and a color
swatch panel.
By default, the swatch panel displays the web-safe colors (216
colors, where each of the three primary colors has a value that
is a multiple of 33, such as #CC0066).
Alert All Flex components can call the staticshow()method of the
Alert class to open a pop-up modal dialog box with a message
and an optional title, buttons, and icons.
ProgressBar The ProgressBar control provides a visual representation of the
progress of a task over time.
There are two types of ProgressBar controls:
Determinate and Indeterminate.
A determinate ProgressBar control is a linear representation of
the progress of a task over time. You can use this when the
user is required to wait for an extended period of time, and the
scope of the task is known.
An indeterminate ProgressBar control represents time-based
processes for which the scope is not yet known. As soon as you
can determine the scope, you should use a determinate
ProgressBar control.
HRule and VRule The HRule (Horizontal Rule) control creates a single horizontal
line and the VRule (Vertical Rule) control creates a single
vertical line.
You typically use these controls to create dividing lines within
a container.
Scrollbar The VScrollBar (vertical ScrollBar) control and HScrollBar
(horizontal ScrollBar) controls let the user control the portion
of data that is displayed when there is too much data to fit in
the display area.
8/8/2019 Adobe Ace Study Gui Dev 24158
http://slidepdf.com/reader/full/adobe-ace-study-gui-dev-24158 7/102
1.2 - Identify the purpose of UI containers and when to use them.
a. All UI Containers And There Purpose
Container Purpose
Canvas A Canvas layout container defines a rectangular region in which you place child
containers and controls. It is the only container that lets you explicitly specify the
location of its children within the container by using the x and y properties of each
child.
Flex sets the children of a Canvas layout container to their preferred width and
preferred height. You may override the value for a child's preferred width by setting
its width property to either a fixed pixel value or a percentage of the container size.
You can set the preferred height in a similar manner.
If you use percentage sizing inside a Canvas container, some of your components
may overlap. If this is not the effect you want, plan your component positions and
sizes carefully.
The Canvas container has the following default sizing characteristics:
Default size: Large enough to hold all its children at the default sizes of the children
Default padding: 0 pixels for the top, bottom, left, and right values
8/8/2019 Adobe Ace Study Gui Dev 24158
http://slidepdf.com/reader/full/adobe-ace-study-gui-dev-24158 8/102
Box, HBox, VBox A Box container lays out its children in a single vertical column or a single horizontal
row. The direction property determines whether to use vertical (default) or
horizontal layout.
The Box class is the base class for the VBox and HBox classes. You use the
<mx:Box> , <mx:VBox>, and <mx:HBox> tags to define Box containers.
A Box container has the following default sizing characteristics:
Default size:
Vertical Box: The height is large enough to hold all its children at the default or
explicit height of the children, plus any vertical gap between the children, plus the
top and bottom padding of the container. The width is the default or explicit width
of the widest child, plus the left and right padding of the container.
Horizontal Box: The width is large enough to hold all of its children at the default
width of the children, plus any horizontal gap between the children, plus the left
and right padding of the container. The height is the default or explicit height of the
tallest child, plus the top and bottom padding for the container.
Default padding: 0 pixels for the top, bottom, left, and right values.
The ControlBar container lets you place controls at the bottom of a Panel or
TitleWindow container. The <mx:ControlBar> tag must be the last child tag of
the enclosing tag for the Panel or TitleWindow container.
The ControlBar is a Box with a background and default style properties.
A ControlBar container has the following default sizing characteristics:
Default size: Height is the default or explicit height of the tallest child, plus the top
and bottom padding of the container. Width is large enough to hold all of its
children at the default or explicit width of the children, plus any horizontal gap
between the children, plus the left and right padding of the container.
Default padding: 10 pixels for the top, bottom, left, and right values.
8/8/2019 Adobe Ace Study Gui Dev 24158
http://slidepdf.com/reader/full/adobe-ace-study-gui-dev-24158 9/102
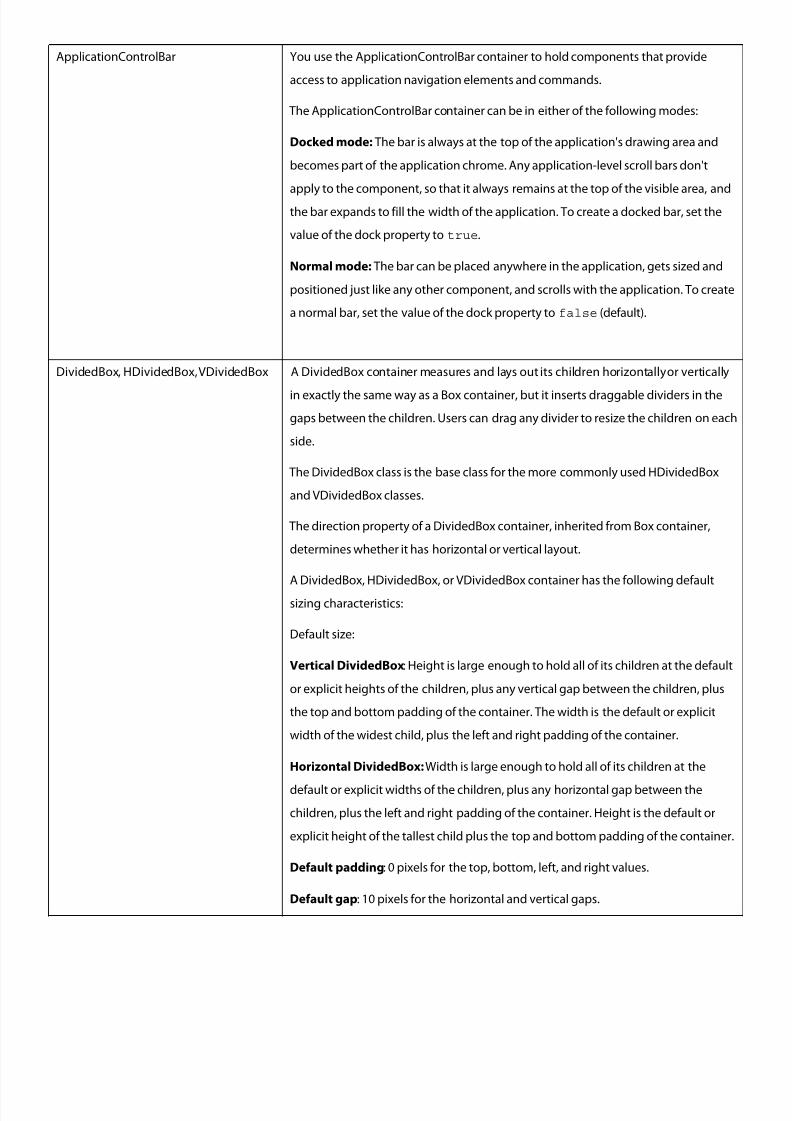
ApplicationControlBar You use the ApplicationControlBar container to hold components that provide
access to application navigation elements and commands.
The ApplicationControlBar container can be in either of the following modes:
Docked mode: The bar is always at the top of the application's drawing area and
becomes part of the application chrome. Any application-level scroll bars don't
apply to the component, so that it always remains at the top of the visible area, and
the bar expands to fill the width of the application. To create a docked bar, set the
value of the dock property to true.
Normal mode: The bar can be placed anywhere in the application, gets sized and
positioned just like any other component, and scrolls with the application. To create
a normal bar, set the value of the dock property to false (default).
DividedBox, HDividedBox, VDividedBox A DividedBox container measures and lays out its children horizontally or vertically
in exactly the same way as a Box container, but it inserts draggable dividers in the
gaps between the children. Users can drag any divider to resize the children on each
side.
The DividedBox class is the base class for the more commonly used HDividedBox
and VDividedBox classes.
The direction property of a DividedBox container, inherited from Box container,
determines whether it has horizontal or vertical layout.
A DividedBox, HDividedBox, or VDividedBox container has the following default
sizing characteristics:
Default size:
Vertical DividedBox: Height is large enough to hold all of its children at the default
or explicit heights of the children, plus any vertical gap between the children, plus
the top and bottom padding of the container. The width is the default or explicit
width of the widest child, plus the left and right padding of the container.
Horizontal DividedBox: Width is large enough to hold all of its children at the
default or explicit widths of the children, plus any horizontal gap between the
children, plus the left and right padding of the container. Height is the default or
explicit height of the tallest child plus the top and bottom padding of the container.
Default padding: 0 pixels for the top, bottom, left, and right values.
Default gap: 10 pixels for the horizontal and vertical gaps.
8/8/2019 Adobe Ace Study Gui Dev 24158
http://slidepdf.com/reader/full/adobe-ace-study-gui-dev-24158 10/102
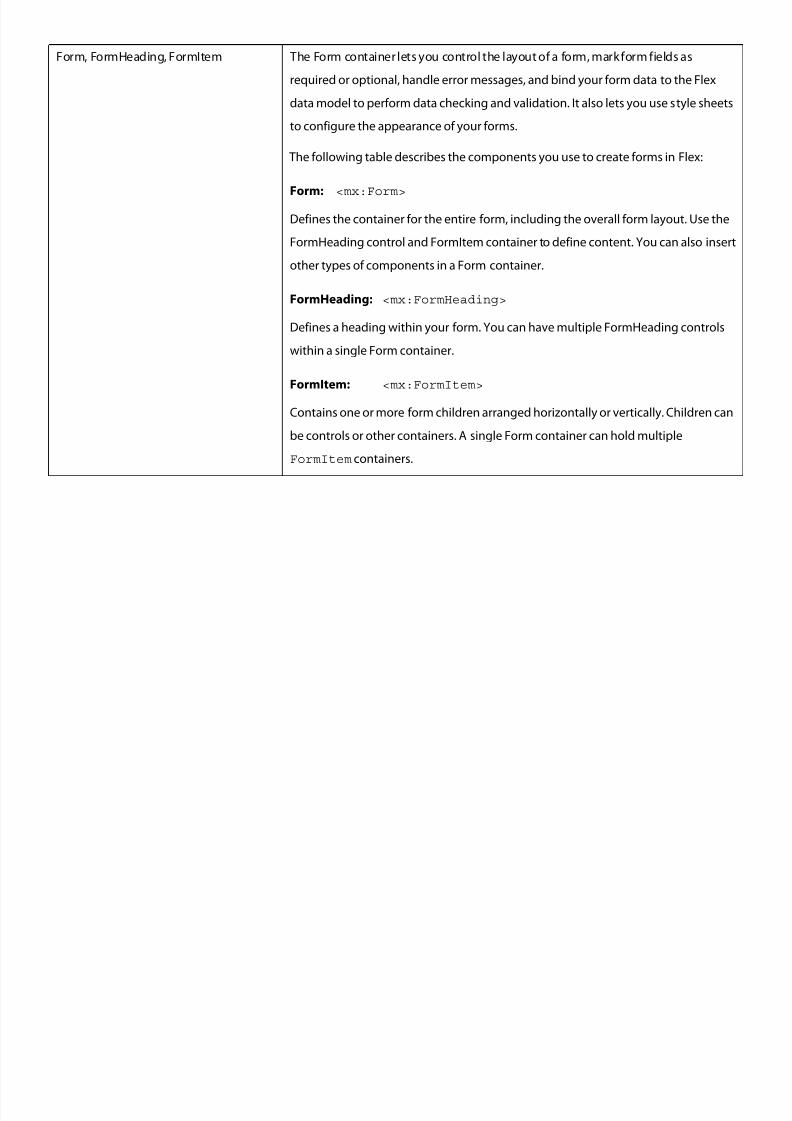
Form, FormHeading, FormItem The Form container lets you control the layout of a form, mark form fields as
required or optional, handle error messages, and bind your form data to the Flex
data model to perform data checking and validation. It also lets you use style sheets
to configure the appearance of your forms.
The following table describes the components you use to create forms in Flex:
Form: <mx:Form>
Defines the container for the entire form, including the overall form layout. Use the
FormHeading control and FormItem container to define content. You can also insert
other types of components in a Form container.
FormHeading: <mx:FormHeading>
Defines a heading within your form. You can have multiple FormHeading controls
within a single Form container.
FormItem: <mx:FormItem>
Contains one or more form children arranged horizontally or vertically. Children can
be controls or other containers. A single Form container can hold multiple
FormItem containers.
8/8/2019 Adobe Ace Study Gui Dev 24158
http://slidepdf.com/reader/full/adobe-ace-study-gui-dev-24158 11/102
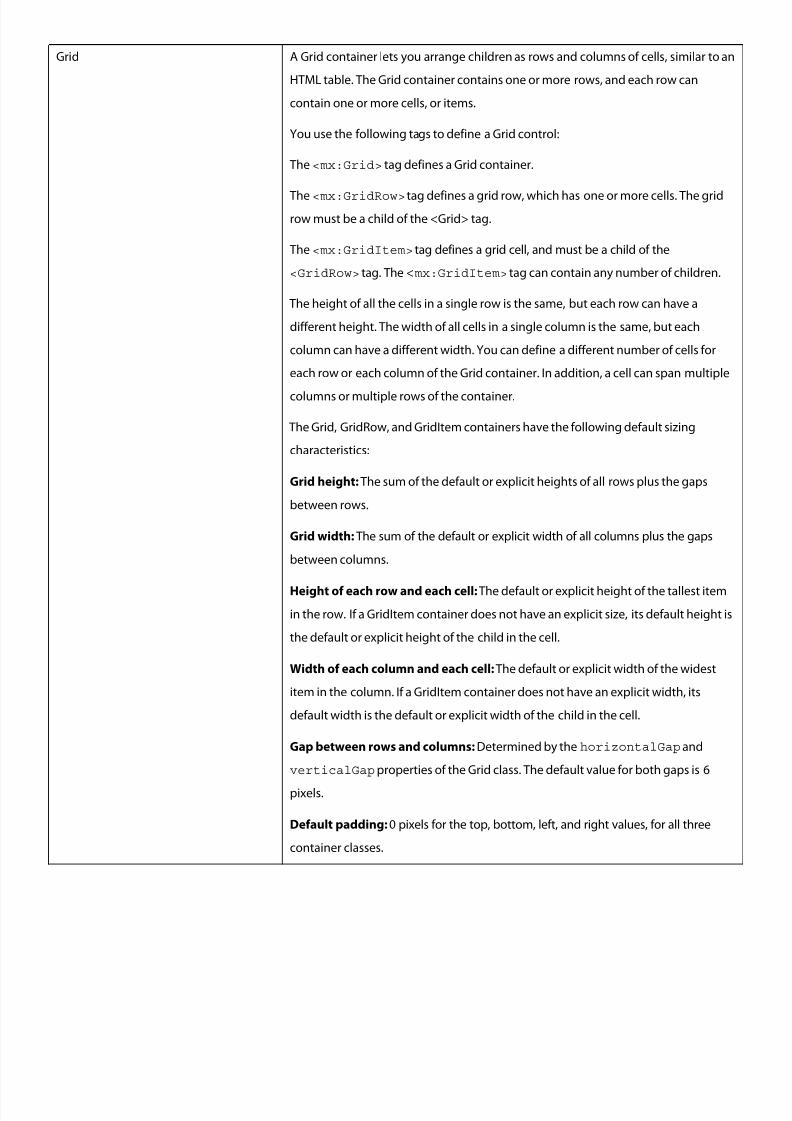
Grid A Grid container lets you arrange children as rows and columns of cells, similar to an
HTML table. The Grid container contains one or more rows, and each row can
contain one or more cells, or items.
You use the following tags to define a Grid control:
The <mx:Grid> tag defines a Grid container.
The <mx:GridRow> tag defines a grid row, which has one or more cells. The grid
row must be a child of the <Grid> tag.
The <mx:GridItem> tag defines a grid cell, and must be a child of the
<GridRow> tag. The <mx:GridItem> tag can contain any number of children.
The height of all the cells in a single row is the same, but each row can have a
different height. The width of all cells in a single column is the same, but each
column can have a different width. You can define a different number of cells for
each row or each column of the Grid container. In addition, a cell can span multiple
columns or multiple rows of the container.
The Grid, GridRow, and GridItem containers have the following default sizing
characteristics:
Grid height: The sum of the default or explicit heights of all rows plus the gaps
between rows.
Grid width: The sum of the default or explicit width of all columns plus the gaps
between columns.
Height of each row and each cell: The default or explicit height of the tallest item
in the row. If a GridItem container does not have an explicit size, its default height is
the default or explicit height of the child in the cell.
Width of each column and each cell: The default or explicit width of the widest
item in the column. If a GridItem container does not have an explicit width, its
default width is the default or explicit width of the child in the cell.
Gap between rows and columns: Determined by the horizontalGap and
verticalGap properties of the Grid class. The default value for both gaps is 6
pixels.
Default padding: 0 pixels for the top, bottom, left, and right values, for all three
container classes.
8/8/2019 Adobe Ace Study Gui Dev 24158
http://slidepdf.com/reader/full/adobe-ace-study-gui-dev-24158 12/102
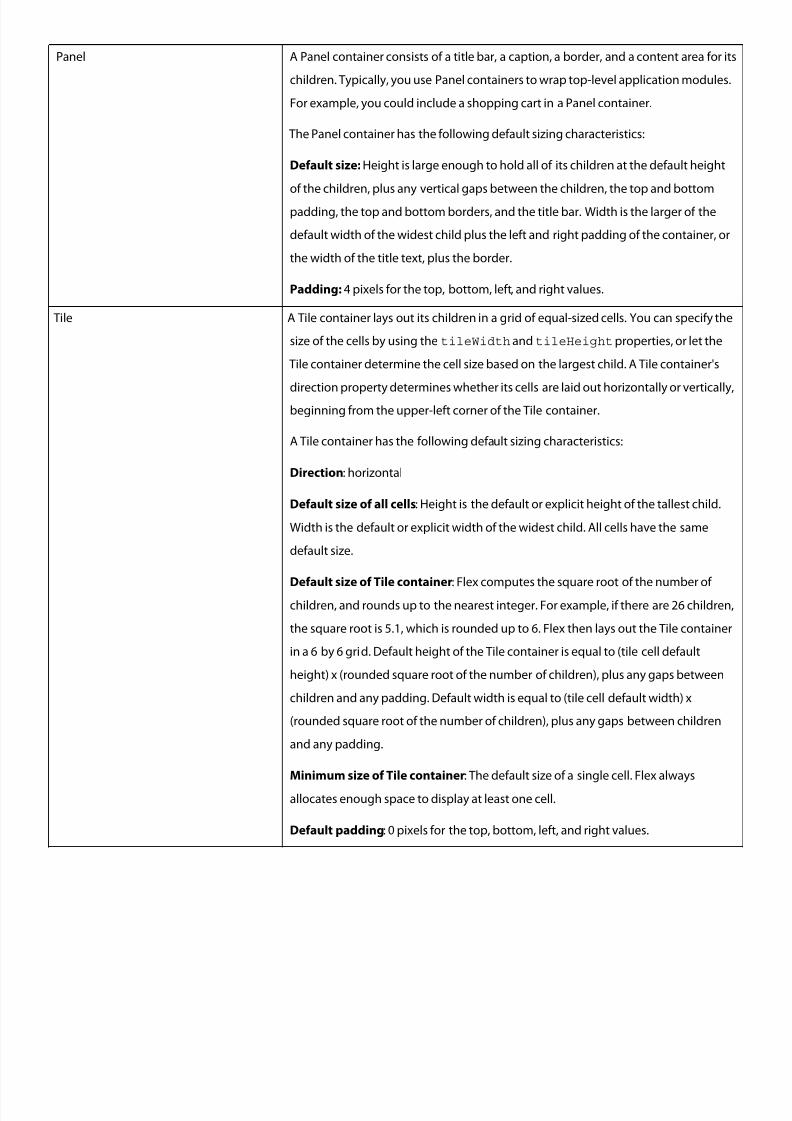
Panel A Panel container consists of a title bar, a caption, a border, and a content area for its
children. Typically, you use Panel containers to wrap top-level application modules.
For example, you could include a shopping cart in a Panel container.
The Panel container has the following default sizing characteristics:
Default size: Height is large enough to hold all of its children at the default height
of the children, plus any vertical gaps between the children, the top and bottom
padding, the top and bottom borders, and the title bar. Width is the larger of the
default width of the widest child plus the left and right padding of the container, or
the width of the title text, plus the border.
Padding: 4 pixels for the top, bottom, left, and right values.
Tile A Tile container lays out its children in a grid of equal-sized cells. You can specify the
size of the cells by using the tileWidth and tileHeight properties, or let the
Tile container determine the cell size based on the largest child. A Tile container's
direction property determines whether its cells are laid out horizontally or vertically,beginning from the upper-left corner of the Tile container.
A Tile container has the following default sizing characteristics:
Direction: horizontal
Default size of all cells: Height is the default or explicit height of the tallest child.
Width is the default or explicit width of the widest child. All cells have the same
default size.
Default size of Tile container: Flex computes the square root of the number of
children, and rounds up to the nearest integer. For example, if there are 26 children,
the square root is 5.1, which is rounded up to 6. Flex then lays out the Tile container
in a 6 by 6 grid. Default height of the Tile container is equal to (tile cell default
height) x (rounded square root of the number of children), plus any gaps between
children and any padding. Default width is equal to (tile cell default width) x
(rounded square root of the number of children), plus any gaps between children
and any padding.
Minimum size of Tile container: The default size of a single cell. Flex always
allocates enough space to display at least one cell.
Default padding: 0 pixels for the top, bottom, left, and right values.
8/8/2019 Adobe Ace Study Gui Dev 24158
http://slidepdf.com/reader/full/adobe-ace-study-gui-dev-24158 13/102
TitleWindow A TitleWindow layout container contains a title bar, a caption, a border, and a
content area for its child. Typically, you use TitleWindow containers to wrap
self-contained application modules. For example, you could include a form in a
TitleWindow container. When the user completes the form, you can close the
TitleWindow container programmatically, or let the user close it by using the Close
button.
The TitleWindow container has the following default sizing characteristics:
Default size: Height is large enough to hold all of the children in the content area at
the default or explicit heights of the children, plus the title bar and border, plus any
vertical gap between the children, plus the top and bottom padding of the
container. Width is the larger of the default or explicit width of the widest child, plus
the left and right container borders padding, or the width of the title text.
Borders: 10 pixels for the left and right values. 2 pixels for the top value. 0 pixels for
the bottom value.
Padding: 4 pixels for the top, bottom, left, and right values.
1.3 - Change the look and feel of a design by using API styles, style sheets, filters, & blends.
a. Local style definitions
Use the <mx:Style> tag to define styles that apply to the current document and its children. You define styles in the
<mx:Style> tag using CSS syntax and can define styles that apply to all instances of a control or to individual controls.
The following example defines a new style and applies it to only themyButton control
<mx:Style>.myFontStyle {
fontSize: 15;color: #9933FF;
}</mx:Style>
<!-- This button has the custom style applied to it. --><mx:Button id="myButton" styleName="myFontStyle" label="Click Me"/>
<!-- This button uses default styles. --><mx:Button id="myButton2" label="Click Me" />
The following example defines a new style that applies to all instances of the Button class:
<mx:Style>Button {
8/8/2019 Adobe Ace Study Gui Dev 24158
http://slidepdf.com/reader/full/adobe-ace-study-gui-dev-24158 14/102
fontSize: 15;color: #9933FF;
}</mx:Style>
<mx:Button id="myButton" label="Click Me"/><mx:Button id="myButton2" label="Click Me" />
b. StyleManager class
Use the StyleManager class to apply styles to all classes or all instances of specified classes.
The following example sets the fontSize style to 15 and the color to 0x9933FF on all Button controls:
public function initApp():void {
StyleManager.getStyleDeclaration("Button").setStyle("fontSize",15);StyleManager.getStyleDeclaration("Button").setStyle("color",0x9933FF);
}
You can also use the CSSStyleDeclarationobject to build run-time style sheets, and then apply them with the
StyleManager’s setStyleDeclaration()method.
c. getStyle() and setStyle() methods
Use the setStyle() and getStyle()methods to manipulate style properties on instances of controls. Using these methods
to apply styles requires a greater amount of processing power on the client than using style sheets but provides more granular
control over how styles are applied.
The following example sets the fontSize to 15 and the color to 0x9933FF on only the myButton instance:
public function initApp():void {
myButton.setStyle("fontSize",15);myButton.setStyle("color",0x9933FF);
}
d. Inline styles
Use attributes of MXML tags to apply style properties. These properties apply only to the instance of the control. This is the mostefficient method of applying instance properties because no ActionScript code blocks or method calls are required.
The following example sets the fontSize to 15 and the color to 0x9933FF on the myButton instance:
<!-- This button uses custom inline styles. --><mx:Button id="myButton" color="0x9933FF" fontSize="15" label="Click Me"/>
<!-- This button uses default styles. --><mx:Button id="myOtherButton" label="Click Me" />
8/8/2019 Adobe Ace Study Gui Dev 24158
http://slidepdf.com/reader/full/adobe-ace-study-gui-dev-24158 15/102
In an MXML tag, you must use the camel-case version of the style property. For example, you must use “fontSize” rather than
“font-size” (the CSS convention) in the previous example.
v. Setting global styles
Most text and color styles, such as fontSize and color, are inheritable. When you apply an inheritable style to a container, all
the children of that container inherit the value of that style property. If you set the color of a Panel container to green, all buttons in
the Panel container are also green, unless those buttons override that color. Many styles, however, are not inheritable. If you apply
them to a parent container, only the container uses that style. Children of that container do not use the values of non-inheritable
styles. By using global styles, you can apply non-inheritable styles to all controls that do not explicitly override that style.
Flex provides the following ways to apply styles globally:
• StyleManager global style
• CSS global selector
e. Creating style declarations with the StyleManager
You can create CSS style declarations by using ActionScript with theCSSStyleDeclaration class. This lets you create and edit
style sheets at run time and apply them to classes in your Flex applications.
To change the definition of the styles or to apply them during run time, you use the setStyle()method.
The StyleManager also includes a setStyleDeclaration()method that lets you apply a CSSStyleDeclarationobject as
a selector, so you can apply a style sheet to all components of a type. The selector can be a class or type selector.
f. Using the setStyle() and getStyle() methods
You cannot get or set style properties directly on a component as you can with other properties. Instead, you set style properties at
run time by using the getStyle() andsetStyle()ActionScript methods.
When you use the getStyle() and setStyle()methods, you can access the style properties of instances of objects or of style
sheets. Every Flex component exposes these methods. When you are instantiating an object and setting the styles for the first
time, you should try to apply style sheets rather than use the setStyle()method because it is computationally expensive. This
method should be used only when you are changing an object’s styles during run time.
g. Setting styles
The getStyle()method has the following signature:
var:return_type componentInstance.getStyle( 'property_name' )
8/8/2019 Adobe Ace Study Gui Dev 24158
http://slidepdf.com/reader/full/adobe-ace-study-gui-dev-24158 16/102
The return_type depends on the style that you access. Styles can be of typeString, Number, Boolean, or, in the case of
skins, Class.
The property_name is a String that indicates the name of the style property—for example, fontSize.
The setStyle()method has the following signature:
componentInstance.setStyle( 'property_name', 'property_value' )
The property_value sets the new value of the specified property.
You can use the getStyle()method to access style properties regardless of how they were set. If you defined a style property
as a tag property inline rather than in an <mx:Style> tag, you can get and set this style. You can override style properties that
were applied in any way, such as in an <mx:Style> tag or in an external style sheet.
h. Loading style sheets at run time
You load a CSS-based SWF file at run time by using the StyleManager’sloadStyleDeclarations()method.
To use this method, you must import the mx.core.StyleManager class.
The following example shows loading a style sheet SWF file:
StyleManager.loadStyleDeclarations("../assets/MyStyles.swf");
The first parameter of the loadStyleDeclarations()method is the location of the style sheet SWF file to load. The locationcan be local or remote.
The second parameter is update. You set this to true or false, depending on whether you want the style sheets to immediately
update in the application.
i. Unloading style sheets at run time
You can unload a style sheet that you loaded at run time.
You do this by using the StyleManager’sunloadStyleDeclarations()method. The result of this method is that all style
properties set by the specified style SWF files are returned to their defaults.
j. Using filters in Flex
8/8/2019 Adobe Ace Study Gui Dev 24158
http://slidepdf.com/reader/full/adobe-ace-study-gui-dev-24158 17/102
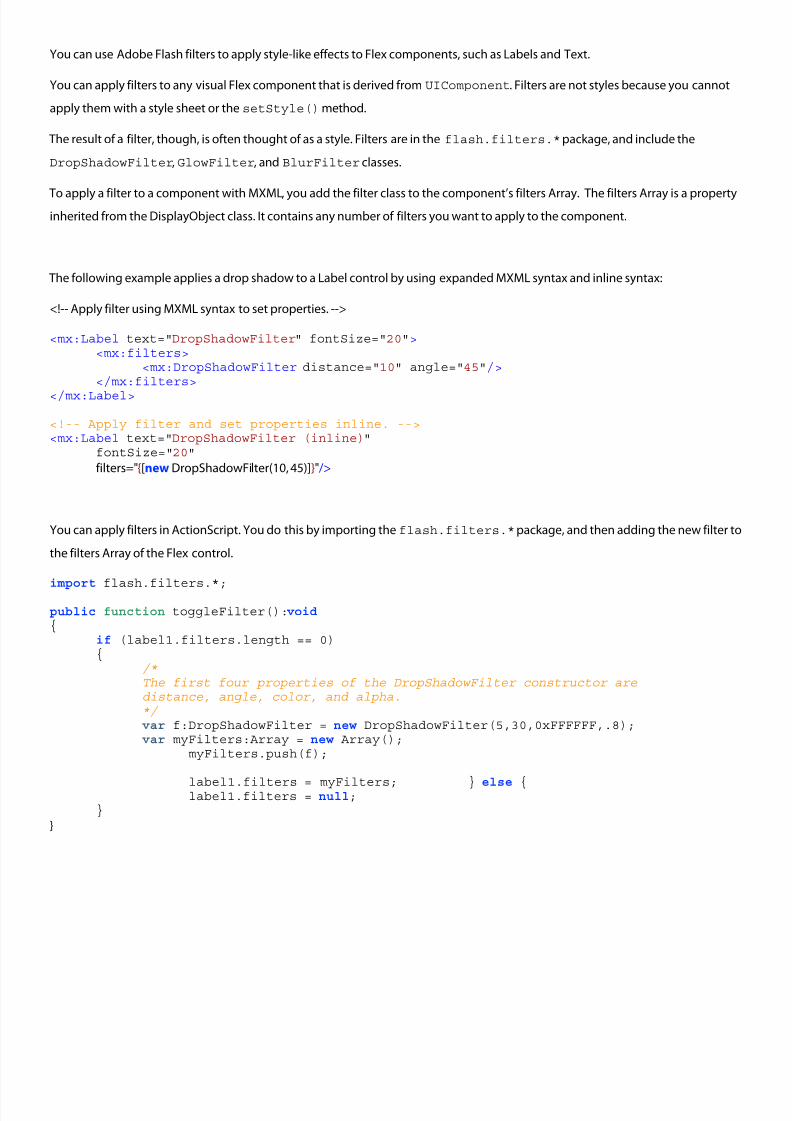
You can use Adobe Flash filters to apply style-like effects to Flex components, such as Labels and Text.
You can apply filters to any visual Flex component that is derived fromUIComponent. Filters are not styles because you cannot
apply them with a style sheet or thesetStyle()method.
The result of a filter, though, is often thought of as a style. Filters are in the flash.filters.*package, and include the
DropShadowFilter, GlowFilter, and BlurFilter classes.
To apply a filter to a component with MXML, you add the filter class to the component’s filters Array. The filters Array is a propertyinherited from the DisplayObject class. It contains any number of filters you want to apply to the component.
The following example applies a drop shadow to a Label control by using expanded MXML syntax and inline syntax:
<!-- Apply filter using MXML syntax to set properties. -->
<mx:Label text="DropShadowFilter" fontSize="20"><mx:filters>
<mx:DropShadowFilter distance="10" angle="45"/></mx:filters>
</mx:Label>
<!-- Apply filter and set properties inline. --><mx:Label text="DropShadowFilter (inline)"
fontSize="20"filters="{[new DropShadowFilter(10, 45)]}" />
You can apply filters in ActionScript. You do this by importing the flash.filters.*package, and then adding the new filter to
the filters Array of the Flex control.
import flash.filters.*;public function toggleFilter():void {
if (label1.filters.length == 0){
/*The first four properties of the DropShadowFilter constructor aredistance, angle, color, and alpha.*/ var f:DropShadowFilter = new DropShadowFilter(5,30,0xFFFFFF,.8);var myFilters:Array = new Array();
myFilters.push(f);
label1.filters = myFilters; } else {label1.filters = null;}
}
8/8/2019 Adobe Ace Study Gui Dev 24158
http://slidepdf.com/reader/full/adobe-ace-study-gui-dev-24158 18/102
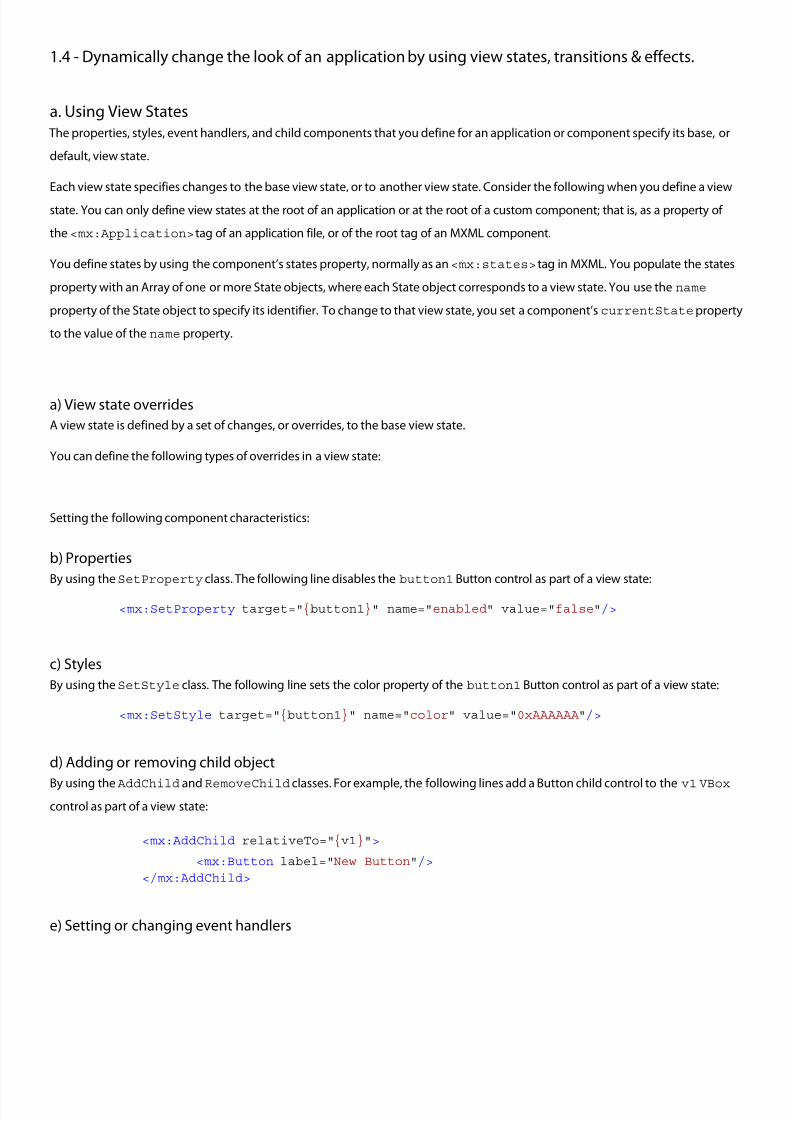
1.4 - Dynamically change the look of an application by using view states, transitions & effects.
a. Using View States
The properties, styles, event handlers, and child components that you define for an application or component specify its base, or
default, view state.
Each view state specifies changes to the base view state, or to another view state. Consider the following when you define a view
state. You can only define view states at the root of an application or at the root of a custom component; that is, as a property of
the <mx:Application> tag of an application file, or of the root tag of an MXML component.
You define states by using the component’s states property, normally as an<mx:states> tag in MXML. You populate the states
property with an Array of one or more State objects, where each State object corresponds to a view state. You use the name
property of the State object to specify its identifier. To change to that view state, you set a component’scurrentState property
to the value of thename property.
a) View state overrides
A view state is defined by a set of changes, or overrides, to the base view state.
You can define the following types of overrides in a view state:
Setting the following component characteristics:
b) Properties
By using theSetProperty class. The following line disables the button1 Button control as part of a view state:
<mx:SetProperty target="{button1}" name="enabled" value="false"/>
c) Styles
By using theSetStyle class. The following line sets the color property of the button1 Button control as part of a view state:
<mx:SetStyle target="{button1}" name="color" value="0xAAAAAA"/>
d) Adding or removing child object
By using the AddChild andRemoveChild classes. For example, the following lines add a Button child control to the v1 VBox
control as part of a view state:
<mx:AddChild relativeTo="{v1}">
<mx:Button label="New Button"/>
</mx:AddChild>
e) Setting or changing event handlers
8/8/2019 Adobe Ace Study Gui Dev 24158
http://slidepdf.com/reader/full/adobe-ace-study-gui-dev-24158 19/102
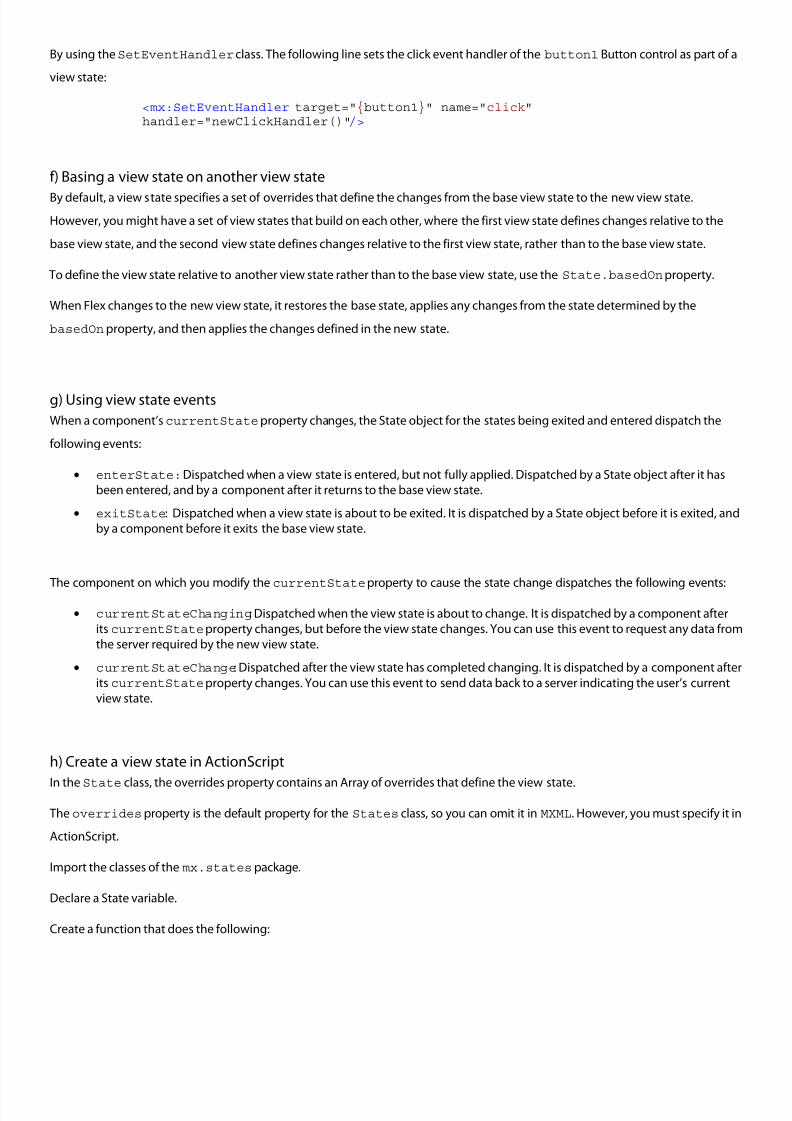
By using theSetEventHandler class. The following line sets the click event handler of the button1 Button control as part of a
view state:
<mx:SetEventHandler target="{button1}" name="click"handler="newClickHandler()"/>
f) Basing a view state on another view state
By default, a view state specifies a set of overrides that define the changes from the base view state to the new view state.
However, you might have a set of view states that build on each other, where the first view state defines changes relative to the
base view state, and the second view state defines changes relative to the first view state, rather than to the base view state.
To define the view state relative to another view state rather than to the base view state, use the State.basedOn property.
When Flex changes to the new view state, it restores the base state, applies any changes from the state determined by the
basedOn property, and then applies the changes defined in the new state.
g) Using view state events
When a component’scurrentState property changes, the State object for the states being exited and entered dispatch the
following events:
• enterState:Dispatched when a view state is entered, but not fully applied. Dispatched by a State object after it has
been entered, and by a component after it returns to the base view state.
• exitState: Dispatched when a view state is about to be exited. It is dispatched by a State object before it is exited, and
by a component before it exits the base view state.
The component on which you modify thecurrentStateproperty to cause the state change dispatches the following events:
• currentStateChanging: Dispatched when the view state is about to change. It is dispatched by a component after
its currentStateproperty changes, but before the view state changes. You can use this event to request any data from
the server required by the new view state.
• currentStateChange: Dispatched after the view state has completed changing. It is dispatched by a component after
its currentStateproperty changes. You can use this event to send data back to a server indicating the user’s current
view state.
h) Create a view state in ActionScript
In the State class, the overrides property contains an Array of overrides that define the view state.
The overrides property is the default property for the States class, so you can omit it in MXML. However, you must specify it in
ActionScript.
Import the classes of the mx.states package.
Declare a State variable.
Create a function that does the following:
8/8/2019 Adobe Ace Study Gui Dev 24158
http://slidepdf.com/reader/full/adobe-ace-study-gui-dev-24158 20/102
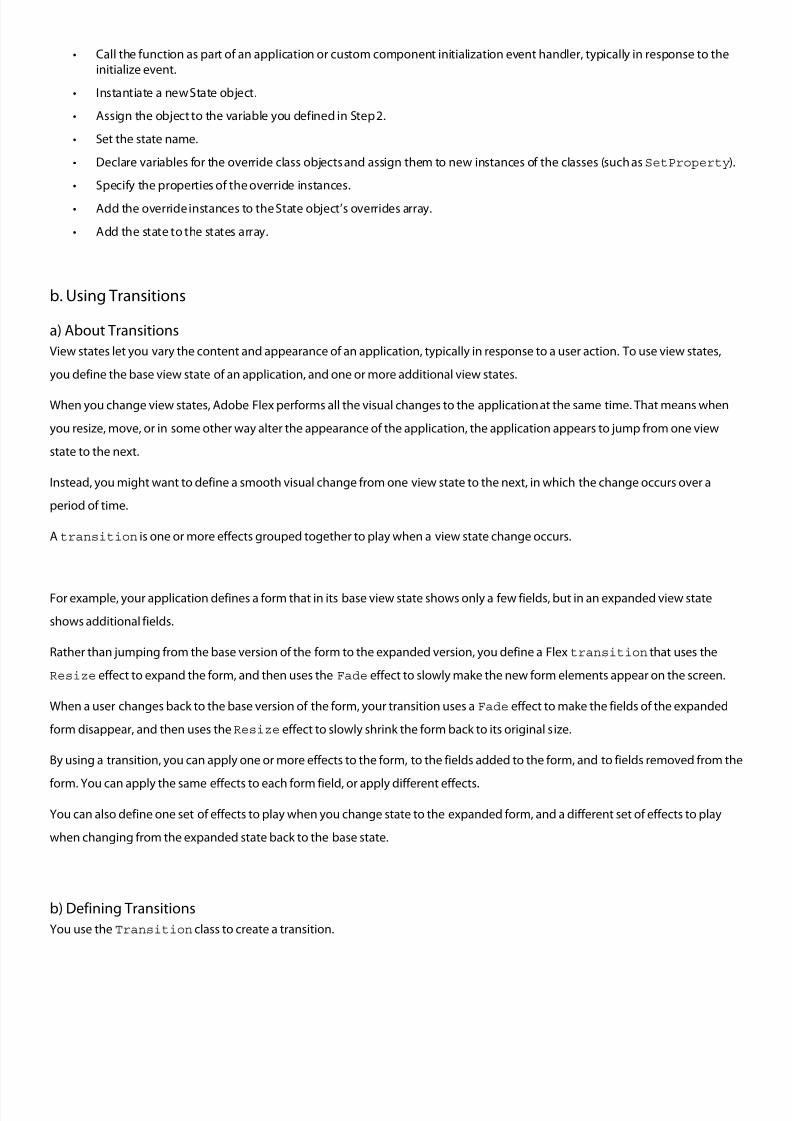
• Call the function as part of an application or custom component initialization event handler, typically in response to the
initialize event.
• Instantiate a new State object.
• Assign the object to the variable you defined in Step 2.
• Set the state name.
• Declare variables for the override class objects and assign them to new instances of the classes (such asSetProperty).
• Specify the properties of the override instances.
• Add the override instances to the State object’s overrides array.
• Add the state to the states array.
b. Using Transitions
a) About Transitions
View states let you vary the content and appearance of an application, typically in response to a user action. To use view states,
you define the base view state of an application, and one or more additional view states.
When you change view states, Adobe Flex performs all the visual changes to the application at the same time. That means when
you resize, move, or in some other way alter the appearance of the application, the application appears to jump from one view
state to the next.
Instead, you might want to define a smooth visual change from one view state to the next, in which the change occurs over a
period of time.
A transition is one or more effects grouped together to play when a view state change occurs.
For example, your application defines a form that in its base view state shows only a few fields, but in an expanded view state
shows additional fields.
Rather than jumping from the base version of the form to the expanded version, you define a Flextransition that uses the
Resize effect to expand the form, and then uses the Fade effect to slowly make the new form elements appear on the screen.
When a user changes back to the base version of the form, your transition uses a Fade effect to make the fields of the expanded
form disappear, and then uses theResize effect to slowly shrink the form back to its original size.
By using a transition, you can apply one or more effects to the form, to the fields added to the form, and to fields removed from the
form. You can apply the same effects to each form field, or apply different effects.
You can also define one set of effects to play when you change state to the expanded form, and a different set of effects to play
when changing from the expanded state back to the base state.
b) Defining Transitions
You use the Transition class to create a transition.
8/8/2019 Adobe Ace Study Gui Dev 24158
http://slidepdf.com/reader/full/adobe-ace-study-gui-dev-24158 21/102
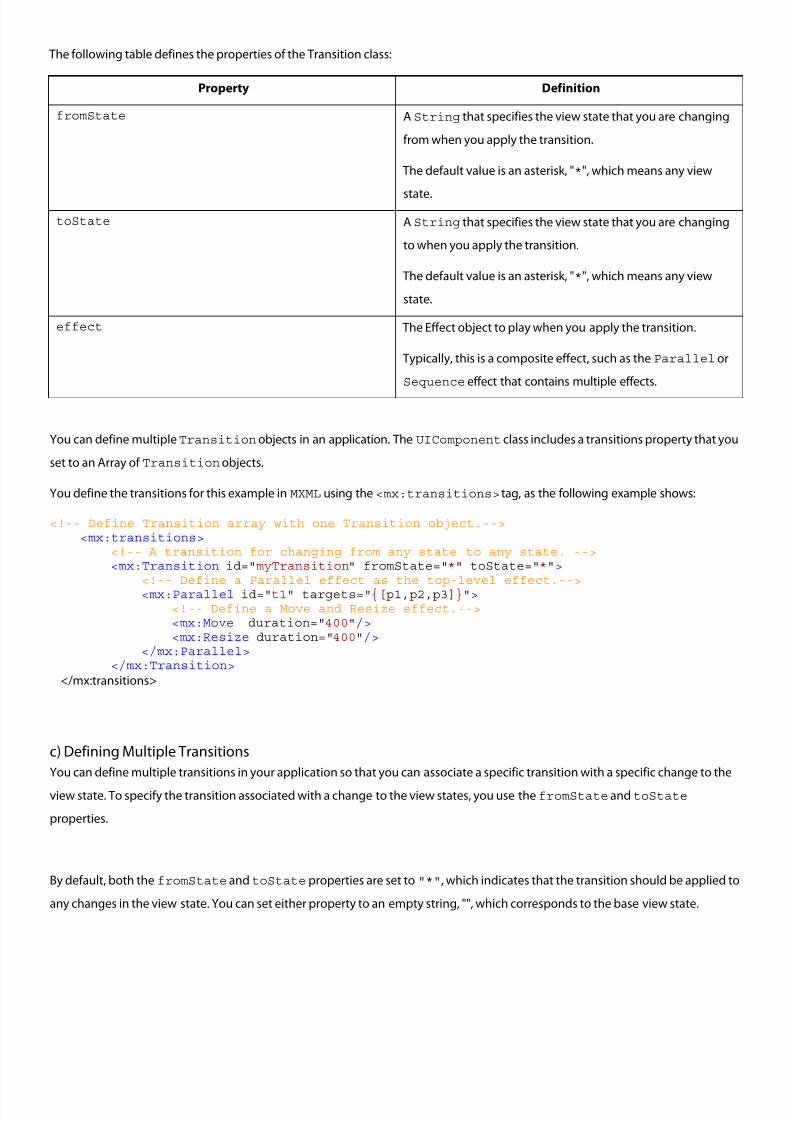
The following table defines the properties of the Transition class:
Property Definition
fromState A String that specifies the view state that you are changing
from when you apply the transition.
The default value is an asterisk, "*", which means any view
state.
toState A String that specifies the view state that you are changing
to when you apply the transition.
The default value is an asterisk, "*", which means any view
state.
effect The Effect object to play when you apply the transition.
Typically, this is a composite effect, such as the Parallelor
Sequence effect that contains multiple effects.
You can define multipleTransition objects in an application. The UIComponent class includes a transitions property that you
set to an Array of Transition objects.
You define the transitions for this example in MXML using the <mx:transitions> tag, as the following example shows:
<!-- Define Transition array with one Transition object.--> <mx:transitions> <!-- A transition for changing from any state to any state. --> <mx:Transition id="myTransition" fromState="*" toState="*"> <!-- Define a Parallel effect as the top-level effect.--> <mx:Parallel id="t1" targets="{[p1,p2,p3]}"> <!-- Define a Move and Resize effect.--> <mx:Move duration="400"/> <mx:Resize duration="400"/> </mx:Parallel> </mx:Transition>
</mx:transitions>
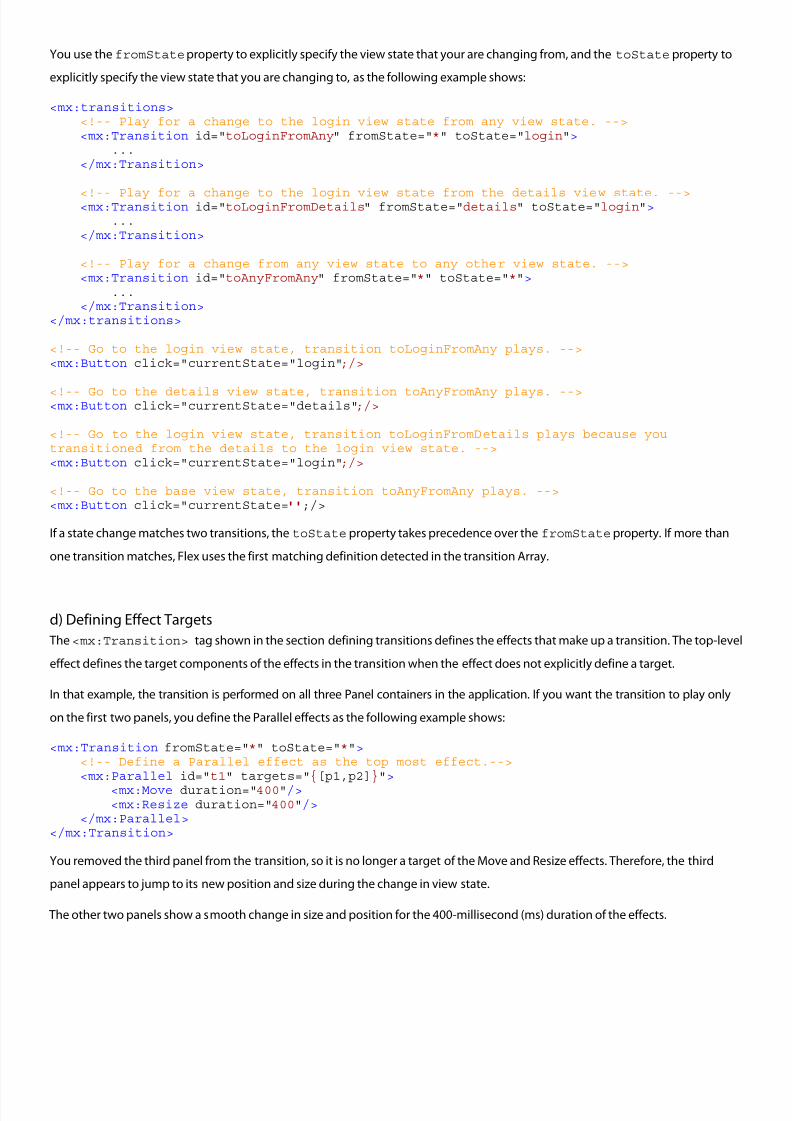
c) Defining Multiple Transitions
You can define multiple transitions in your application so that you can associate a specific transition with a specific change to the
view state. To specify the transition associated with a change to the view states, you use thefromState and toState
properties.
By default, both the fromState andtoState properties are set to "*", which indicates that the transition should be applied to
any changes in the view state. You can set either property to an empty string, "", which corresponds to the base view state.
8/8/2019 Adobe Ace Study Gui Dev 24158
http://slidepdf.com/reader/full/adobe-ace-study-gui-dev-24158 22/102
You use the fromStateproperty to explicitly specify the view state that your are changing from, and the toState property to
explicitly specify the view state that you are changing to, as the following example shows:
<mx:transitions> <!-- Play for a change to the login view state from any view state. --> <mx:Transition id="toLoginFromAny" fromState="*" toState="login">
... </mx:Transition>
<!-- Play for a change to the login view state from the details view state. --> <mx:Transition id="toLoginFromDetails" fromState="details" toState="login">...
</mx:Transition>
<!-- Play for a change from any view state to any other view state. --> <mx:Transition id="toAnyFromAny" fromState="*" toState="*">
... </mx:Transition></mx:transitions>
<!-- Go to the login view state, transition toLoginFromAny plays. --><mx:Button click="currentState="login";/>
<!-- Go to the details view state, transition toAnyFromAny plays. --><mx:Button click="currentState="details";/>
<!-- Go to the login view state, transition toLoginFromDetails plays because youtransitioned from the details to the login view state. --><mx:Button click="currentState="login";/>
<!-- Go to the base view state, transition toAnyFromAny plays. --><mx:Button click="currentState='';/>
If a state change matches two transitions, the toState property takes precedence over the fromState property. If more than
one transition matches, Flex uses the first matching definition detected in the transition Array.
d) Defining Effect Targets
The <mx:Transition> tag shown in the section defining transitions defines the effects that make up a transition. The top-leve
effect defines the target components of the effects in the transition when the effect does not explicitly define a target.
In that example, the transition is performed on all three Panel containers in the application. If you want the transition to play only
on the first two panels, you define the Parallel effects as the following example shows:
<mx:Transition fromState="*" toState="*"> <!-- Define a Parallel effect as the top most effect.--> <mx:Parallel id="t1" targets="{[p1,p2]}"> <mx:Move duration="400"/> <mx:Resize duration="400"/> </mx:Parallel></mx:Transition>
You removed the third panel from the transition, so it is no longer a target of the Move and Resize effects. Therefore, the third
panel appears to jump to its new position and size during the change in view state.
The other two panels show a smooth change in size and position for the 400-millisecond (ms) duration of the effects.
8/8/2019 Adobe Ace Study Gui Dev 24158
http://slidepdf.com/reader/full/adobe-ace-study-gui-dev-24158 23/102
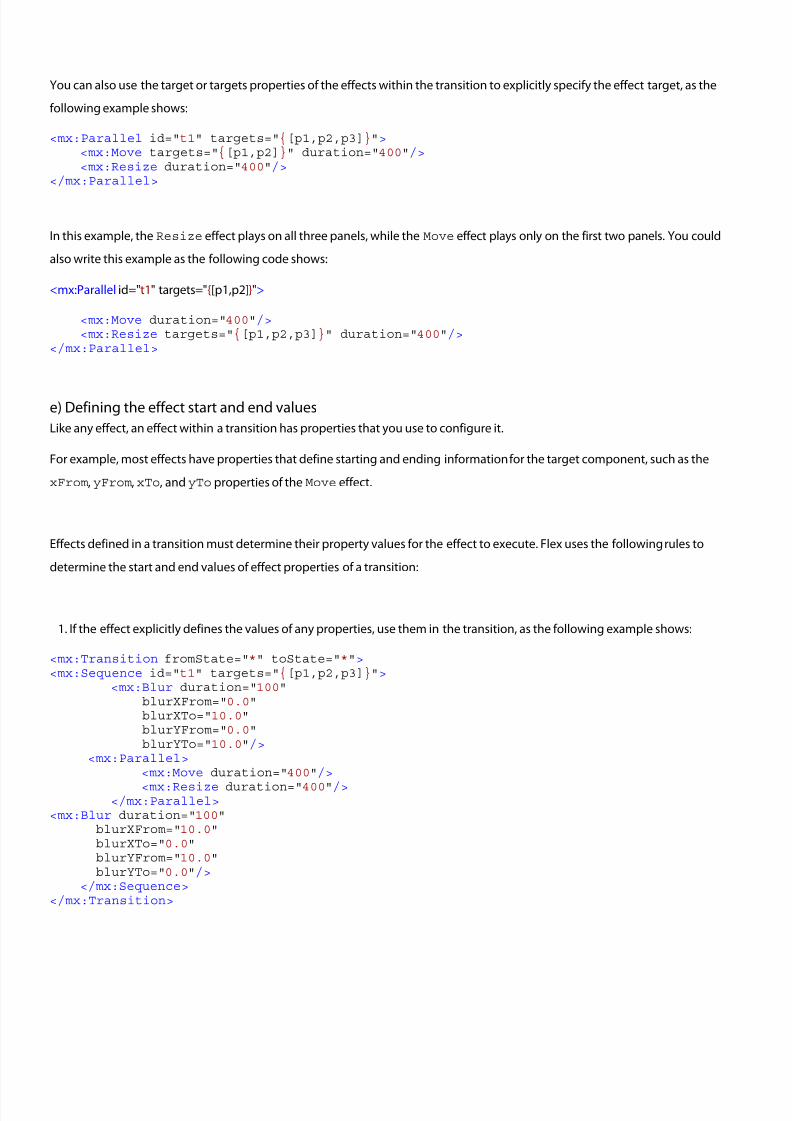
You can also use the target or targets properties of the effects within the transition to explicitly specify the effect target, as the
following example shows:
<mx:Parallel id="t1" targets="{[p1,p2,p3]}"> <mx:Move targets="{[p1,p2]}" duration="400"/>
<mx:Resize duration="400"/></mx:Parallel>
In this example, the Resize effect plays on all three panels, while the Move effect plays only on the first two panels. You could
also write this example as the following code shows:
<mx:Parallel id="t1" targets="{[p1,p2]}">
<mx:Move duration="400"/> <mx:Resize targets="{[p1,p2,p3]}" duration="400"/></mx:Parallel>
e) Defining the effect start and end values
Like any effect, an effect within a transition has properties that you use to configure it.
For example, most effects have properties that define starting and ending information for the target component, such as the
xFrom, yFrom, xTo, and yTo properties of the Move effect.
Effects defined in a transition must determine their property values for the effect to execute. Flex uses the following rules to
determine the start and end values of effect properties of a transition:
1. If the effect explicitly defines the values of any properties, use them in the transition, as the following example shows:
<mx:Transition fromState="*" toState="*"> <mx:Sequence id="t1" targets="{[p1,p2,p3]}">
<mx:Blur duration="100"blurXFrom="0.0"blurXTo="10.0"blurYFrom="0.0"blurYTo="10.0"/>
<mx:Parallel> <mx:Move duration="400"/>
<mx:Resize duration="400"/> </mx:Parallel> <mx:Blur duration="100"
blurXFrom="10.0"blurXTo="0.0"blurYFrom="10.0"blurYTo="0.0"/>
</mx:Sequence></mx:Transition>
8/8/2019 Adobe Ace Study Gui Dev 24158
http://slidepdf.com/reader/full/adobe-ace-study-gui-dev-24158 24/102
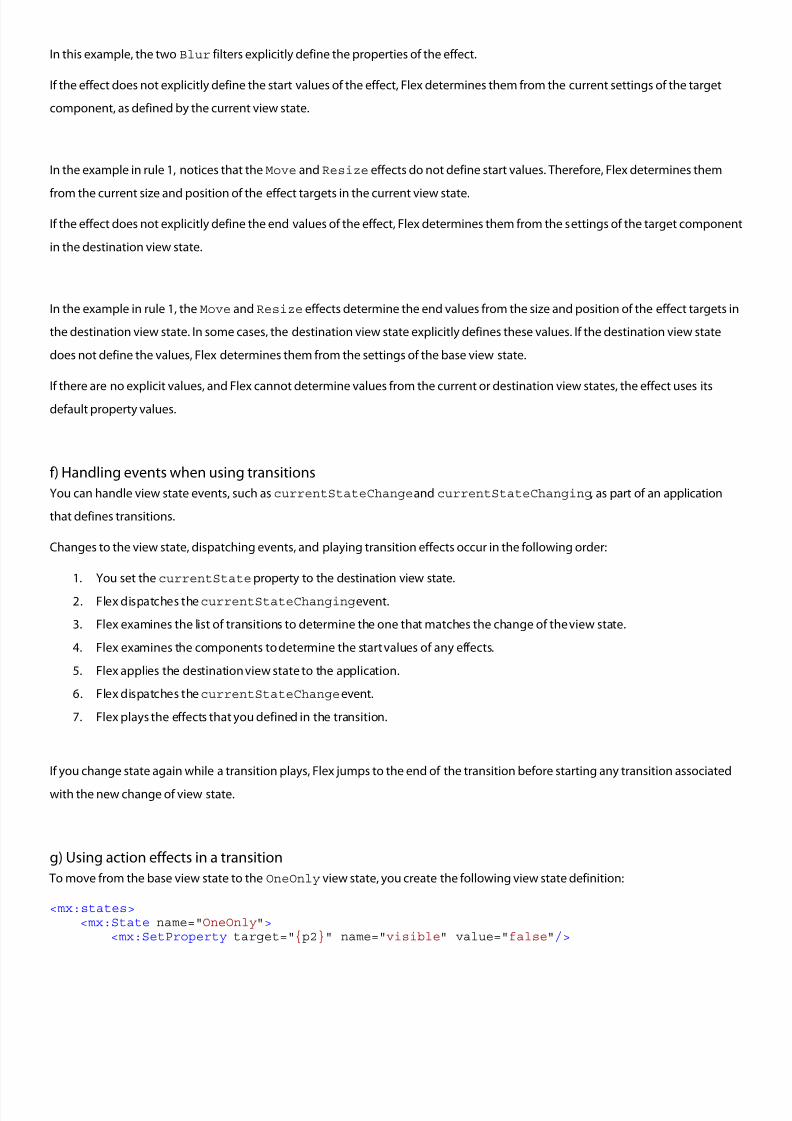
In this example, the two Blur filters explicitly define the properties of the effect.
If the effect does not explicitly define the start values of the effect, Flex determines them from the current settings of the target
component, as defined by the current view state.
In the example in rule 1, notices that theMove and Resize effects do not define start values. Therefore, Flex determines them
from the current size and position of the effect targets in the current view state.
If the effect does not explicitly define the end values of the effect, Flex determines them from the settings of the target component
in the destination view state.
In the example in rule 1, the Move and Resize effects determine the end values from the size and position of the effect targets in
the destination view state. In some cases, the destination view state explicitly defines these values. If the destination view state
does not define the values, Flex determines them from the settings of the base view state.
If there are no explicit values, and Flex cannot determine values from the current or destination view states, the effect uses itsdefault property values.
f) Handling events when using transitions
You can handle view state events, such ascurrentStateChangeand currentStateChanging, as part of an application
that defines transitions.
Changes to the view state, dispatching events, and playing transition effects occur in the following order:
1. You set the currentState property to the destination view state.
2. Flex dispatches thecurrentStateChangingevent.
3. Flex examines the list of transitions to determine the one that matches the change of the view state.
4. Flex examines the components to determine the start values of any effects.
5. Flex applies the destination view state to the application.
6. Flex dispatches thecurrentStateChange event.
7. Flex plays the effects that you defined in the transition.
If you change state again while a transition plays, Flex jumps to the end of the transition before starting any transition associated
with the new change of view state.
g) Using action effects in a transition
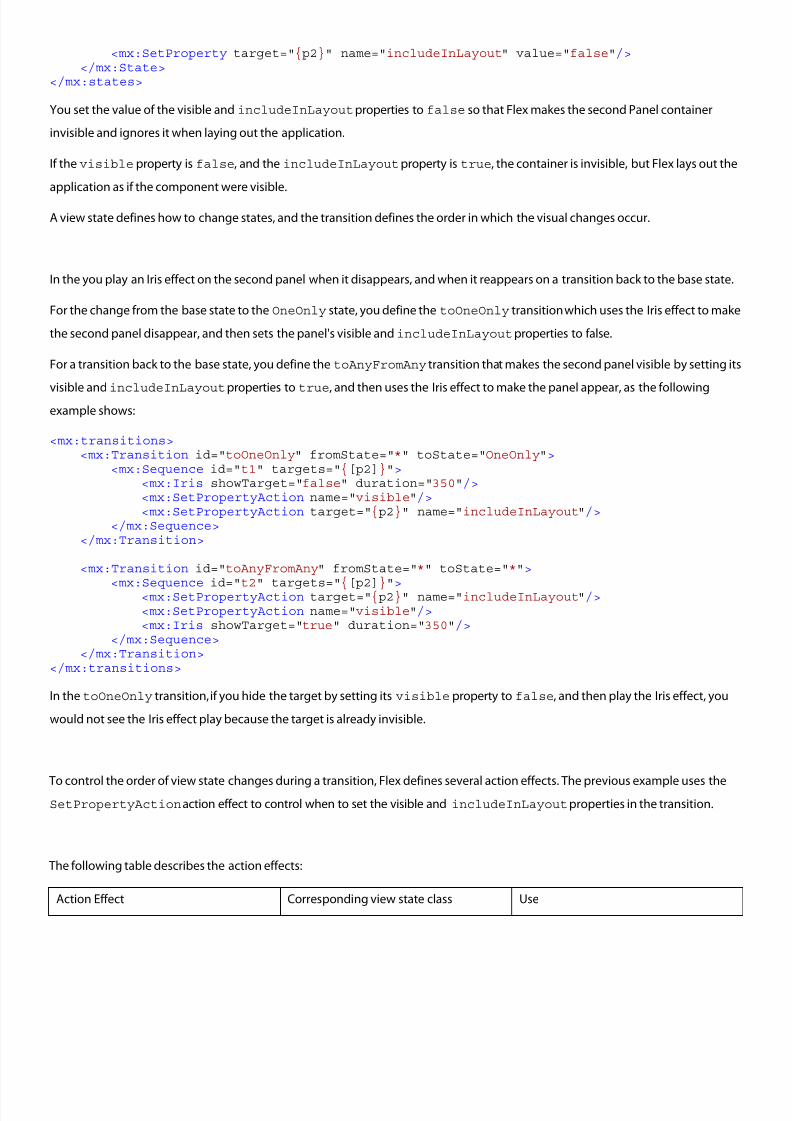
To move from the base view state to the OneOnly view state, you create the following view state definition:
<mx:states> <mx:State name="OneOnly"> <mx:SetProperty target="{p2}" name="visible" value="false"/>
8/8/2019 Adobe Ace Study Gui Dev 24158
http://slidepdf.com/reader/full/adobe-ace-study-gui-dev-24158 25/102
<mx:SetProperty target="{p2}" name="includeInLayout" value="false"/> </mx:State></mx:states>
You set the value of the visible andincludeInLayoutproperties to false so that Flex makes the second Panel container
invisible and ignores it when laying out the application.
If the visible property is false, and the includeInLayout property is true, the container is invisible, but Flex lays out the
application as if the component were visible.
A view state defines how to change states, and the transition defines the order in which the visual changes occur.
In the you play an Iris effect on the second panel when it disappears, and when it reappears on a transition back to the base state.
For the change from the base state to the OneOnly state, you define the toOneOnly transition which uses the Iris effect to make
the second panel disappear, and then sets the panel's visible and includeInLayoutproperties to false.
For a transition back to the base state, you define the toAnyFromAny transition that makes the second panel visible by setting its
visible andincludeInLayoutproperties to true, and then uses the Iris effect to make the panel appear, as the followingexample shows:
<mx:transitions> <mx:Transition id="toOneOnly" fromState="*" toState="OneOnly"> <mx:Sequence id="t1" targets="{[p2]}"> <mx:Iris showTarget="false" duration="350"/> <mx:SetPropertyAction name="visible"/> <mx:SetPropertyAction target="{p2}" name="includeInLayout"/> </mx:Sequence> </mx:Transition>
<mx:Transition id="toAnyFromAny" fromState="*" toState="*">
<mx:Sequence id="t2" targets="{[p2]}"> <mx:SetPropertyAction target="{p2}" name="includeInLayout"/> <mx:SetPropertyAction name="visible"/> <mx:Iris showTarget="true" duration="350"/> </mx:Sequence> </mx:Transition></mx:transitions>
In the toOneOnly transition, if you hide the target by setting its visible property to false, and then play the Iris effect, you
would not see the Iris effect play because the target is already invisible.
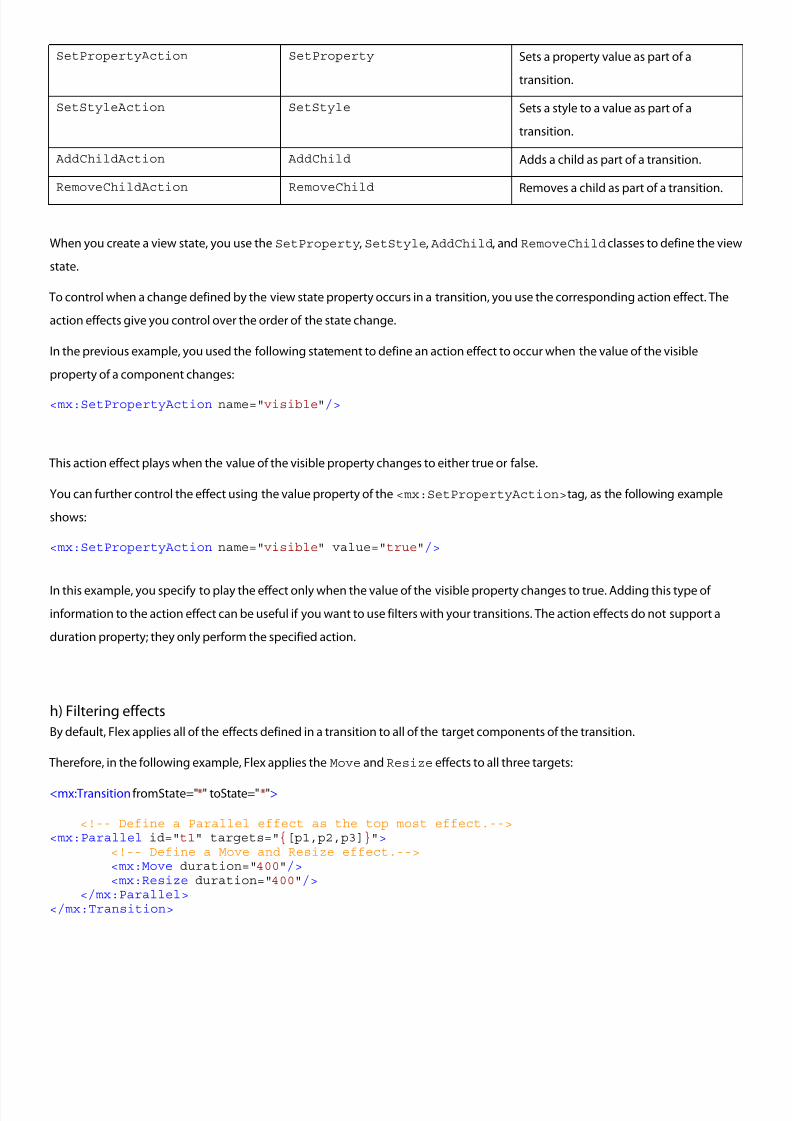
To control the order of view state changes during a transition, Flex defines several action effects. The previous example uses theSetPropertyAction action effect to control when to set the visible and includeInLayoutproperties in the transition.
The following table describes the action effects:
Action Effect Corresponding view state class Use
8/8/2019 Adobe Ace Study Gui Dev 24158
http://slidepdf.com/reader/full/adobe-ace-study-gui-dev-24158 26/102
SetPropertyAction SetProperty Sets a property value as part of a
transition.
SetStyleAction SetStyle Sets a style to a value as part of a
transition.
AddChildAction AddChild Adds a child as part of a transition.
RemoveChildAction RemoveChild Removes a child as part of a transition.
When you create a view state, you use the SetProperty, SetStyle, AddChild, and RemoveChild classes to define the view
state.
To control when a change defined by the view state property occurs in a transition, you use the corresponding action effect. The
action effects give you control over the order of the state change.
In the previous example, you used the following statement to define an action effect to occur when the value of the visible
property of a component changes:
<mx:SetPropertyAction name="visible"/>
This action effect plays when the value of the visible property changes to either true or false.
You can further control the effect using the value property of the<mx:SetPropertyAction> tag, as the following example
shows:
<mx:SetPropertyAction name="visible" value="true"/>
In this example, you specify to play the effect only when the value of the visible property changes to true. Adding this type of
information to the action effect can be useful if you want to use filters with your transitions. The action effects do not support a
duration property; they only perform the specified action.
h) Filtering effects
By default, Flex applies all of the effects defined in a transition to all of the target components of the transition.
Therefore, in the following example, Flex applies the Move and Resize effects to all three targets:
<mx:Transition fromState="*" toState="*">
<!-- Define a Parallel effect as the top most effect.--> <mx:Parallel id="t1" targets="{[p1,p2,p3]}"> <!-- Define a Move and Resize effect.--> <mx:Move duration="400"/> <mx:Resize duration="400"/> </mx:Parallel></mx:Transition>
8/8/2019 Adobe Ace Study Gui Dev 24158
http://slidepdf.com/reader/full/adobe-ace-study-gui-dev-24158 27/102
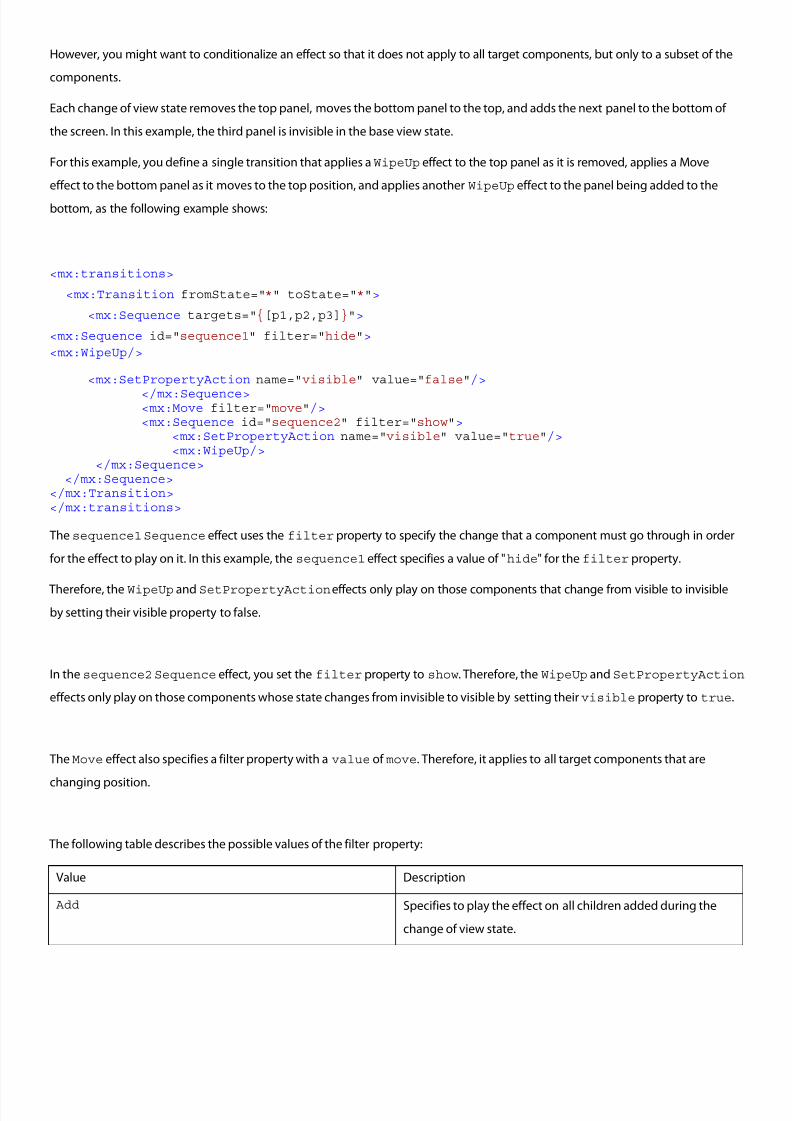
However, you might want to conditionalize an effect so that it does not apply to all target components, but only to a subset of the
components.
Each change of view state removes the top panel, moves the bottom panel to the top, and adds the next panel to the bottom of
the screen. In this example, the third panel is invisible in the base view state.
For this example, you define a single transition that applies aWipeUp effect to the top panel as it is removed, applies a Move
effect to the bottom panel as it moves to the top position, and applies anotherWipeUp effect to the panel being added to the
bottom, as the following example shows:
<mx:transitions>
<mx:Transition fromState="*" toState="*">
<mx:Sequence targets="{[p1,p2,p3]}">
<mx:Sequence id="sequence1" filter="hide">
<mx:WipeUp/>
<mx:SetPropertyAction name="visible" value="false"/>
</mx:Sequence> <mx:Move filter="move"/> <mx:Sequence id="sequence2" filter="show"> <mx:SetPropertyAction name="visible" value="true"/> <mx:WipeUp/>
</mx:Sequence> </mx:Sequence> </mx:Transition></mx:transitions>
The sequence1 Sequence effect uses the filter property to specify the change that a component must go through in order
for the effect to play on it. In this example, thesequence1 effect specifies a value of "hide" for the filter property.
Therefore, the WipeUp and SetPropertyAction effects only play on those components that change from visible to invisible
by setting their visible property to false.
In the sequence2 Sequence effect, you set the filter property to show. Therefore, the WipeUp and SetPropertyAction
effects only play on those components whose state changes from invisible to visible by setting theirvisible property to true.
The Move effect also specifies a filter property with a value of move. Therefore, it applies to all target components that are
changing position.
The following table describes the possible values of the filter property:
Value Description
Add Specifies to play the effect on all children added during the
change of view state.

8/8/2019 Adobe Ace Study Gui Dev 24158
http://slidepdf.com/reader/full/adobe-ace-study-gui-dev-24158 28/102
Hide Specifies to play the effect on all children whose visible
property changes from true to false during the change of view
state.
Move Specifies to play the effect on all children whose x or y
properties change during the change of view state.
Remove Specifies to play the effect on all children removed during the
change of view state.
Resize Specifies to play the effect on all children whose width or
height properties change during the change of view state.
Show Specifies to play the effect on all children whose visible
property changes from false to true during the change of view
state.
c. Using Effects
1.5 - Position UI elements by using constraint-based layout.
a) Absolute positioning
Three containers support absolute positioning:
Application and Panel controls use absolute positioning if you specify the layout property as"absolute"(ContainerLayout.ABSOLUTE).
The Canvas container always uses absolute positioning.
With absolute positioning, you specify the child control position by using its x andy properties, or you specify a constraint-based
layout; otherwise, Flex places the child at position 0,0 of the parent container.
When you specify the x andy coordinates, Flex repositions the controls only when you change the property values.
When you use absolute positioning, you have full control over the locations of the container's children. This lets you overlap
components.
1.6 - Position UI elements by using enhanced constraints.
8/8/2019 Adobe Ace Study Gui Dev 24158
http://slidepdf.com/reader/full/adobe-ace-study-gui-dev-24158 29/102
8/8/2019 Adobe Ace Study Gui Dev 24158
http://slidepdf.com/reader/full/adobe-ace-study-gui-dev-24158 30/102
container as follows:
• numChildren: Contains the number of child containers in the ViewStack container.
The following uses the numChildren property in an ActionScript statement to set the active child container to the last
container in the stack:
myViewStack.selectedIndex = myViewStack.numChildren - 1;
• selectedChild: The currently active container if one or more child containers are defined. The value of this property is
null if no child containers are defined.
Set this property in ActionScript to the identifier of the container that you want active
You can set this property only in an ActionScript statement, not in MXML.
The following example uses ActionScript to set the selectedChild property so that the active child container is the child
container with an identifier of search:
For more information on the selectedChild andselectedIndexproperties, see ViewStack navigator container.
c. Accordion
An Accordion navigator container has a collection of child containers, but only one of them at a time is visible. It creates and
manages navigator buttons (accordion headers), which you use to navigate between the children.
There is one navigator button associated with each child container, and each navigator button belongs to the Accordion container
not to the child. When the user clicks a navigator button, the associated child container is displayed.
The transition to the new child uses an animation to make it clear to the user that one child is disappearing and a different one is
appearing.
The Accordion container does not extend the ViewStack container, but it implements all the properties, methods,
styles, and events of the ViewStack container, such as selectedIndex and selectedChild.
1.8 - Customize list-based controls.
a. List Control
The List control displays a vertical list of items. Its functionality is very similar to that of the SELECT form element in HTML.
If there are more items than can be displayed at once, it can display a vertical scroll bar so the user can access all items in the list.
An optional horizontal scroll bar lets the user view items when the full width of the list items is unlikely to fit. The user can select
8/8/2019 Adobe Ace Study Gui Dev 24158
http://slidepdf.com/reader/full/adobe-ace-study-gui-dev-24158 31/102
one or more items from the list, depending on the value of theallowMultipleSelectionproperty.
Note: The HorizontalList, TileList, DataGrid, Menu, and Tree controls are derived from the List control or its immediate parent, the ListBase
class. As a result, much of the information for the List control applies to these controls .
b. Horizontal List Control
The HorizontalList control displays a horizontal list of items.
If there are more items than can be displayed at once, it can display a horizontal scroll bar so the user can access all items in the list
c. Tile List Control
The TileList control displays a number of items laid out in tiles.
It displays a scroll bar on one of its axes to access all items in the list, depending on the direction property. You can set the size
of the tiles by using rowHeight and columnWidth properties.
Alternatively, Flex measures the item renderer for the first item in the dataProvider and uses that size for all tiles.
d. ComboBox Control
e. DataGrid Control
The DataGrid control is like a List except that it can show more than one column of data making it suited for showing objects
with multiple properties.
The DataGrid control provides the following features:
• Columns of different widths or identical fixed widths
• Columns that the user can resize at runtime
• Columns that the user can reorder at runtime
• Optional customizable column headers
• Ability to use a custom item renderer for any column to display data other than text
• Support for sorting the data by clicking on a column
The DataGrid control is intended for viewing data, and not as a layout tool like an HTML table. The mx.containers package
provides those layout tools.
f. Tree Control
The Tree control lets a user view hierarchical data arranged as an expandable tree.
8/8/2019 Adobe Ace Study Gui Dev 24158
http://slidepdf.com/reader/full/adobe-ace-study-gui-dev-24158 32/102
Each item in a tree can be a leaf or a branch. A leaf item is an end point in the tree. A branch item can contain leaf or branch items,
or it can be empty.
By default, a leaf is represented by a text label next to a file icon.
A branch is represented by a text label next to a folder icon, with a disclosure triangle that a user can open to expose children.
The Tree class uses an ITreeDataDescriptoror ITreeDataDescriptor2object to parse and manipulate the data
provider.
The default tree data descriptor, an object of the DefaultDataDescriptor class, supports XML andObject classes; an
Object class data provider must have all children in children fields.
The Tree control has the following default sizing characteristics:
Characteristic Description
Default Size Wide enough to accommodate the icon, label, and expansion
triangle, if any, of the widest node in the first 7 displayed
(uncollapsed) rows, and seven rows high, where each row is 20
pixels in height. If a scroll bar is required, the width of the scroll
bar is not included in the width calculations.
Minimum size 0 pixels.
Maximum size 5000 by 5000
2. Flex system architecture and design
2.1 Create and use custom components.
Your application might require you to create components, rather than modifying existing ones.
To create components, you typically create them in ActionScript by creating a subclass from the UIComponent class. This class
contains the generic functionality of all Flex components.
You then add the required functionality to your new component to meet your application requirements.
a. User-interface, or visual, components
User-interface components contain both processing logic and visual elements.
You create custom user-interface components to modify existing behavior or add new functionality to the component. These
8/8/2019 Adobe Ace Study Gui Dev 24158
http://slidepdf.com/reader/full/adobe-ace-study-gui-dev-24158 33/102
8/8/2019 Adobe Ace Study Gui Dev 24158
http://slidepdf.com/reader/full/adobe-ace-study-gui-dev-24158 34/102
methods that let you create a data binding to a property implemented as a variable, by using the bindProperty()method, or
to a method, by using thebindSetter()method.
b) Differences between defining bindings in MXML and ActionScript
There are a few differences between defining data bindings in MXML at compile time and in defining them at runtime in
ActionScript:
The arguments to thebindSetter()method specify the following:
The source object
The name of the source property
A method that is called when the source property changes
2.4 Create, Handle, and Dispatch Custom Events.
a. Using an event object
When a Flex component dispatches an event, it creates an event object, where the properties of the event object contain
information describing the event. An event listener takes this event object as an argument and accesses the properties of the
object to determine information about the event.
The base class for all event objects is the flash.events.Event class. All event objects are instances of the Event class, or
instances of a subclass of the Event class.
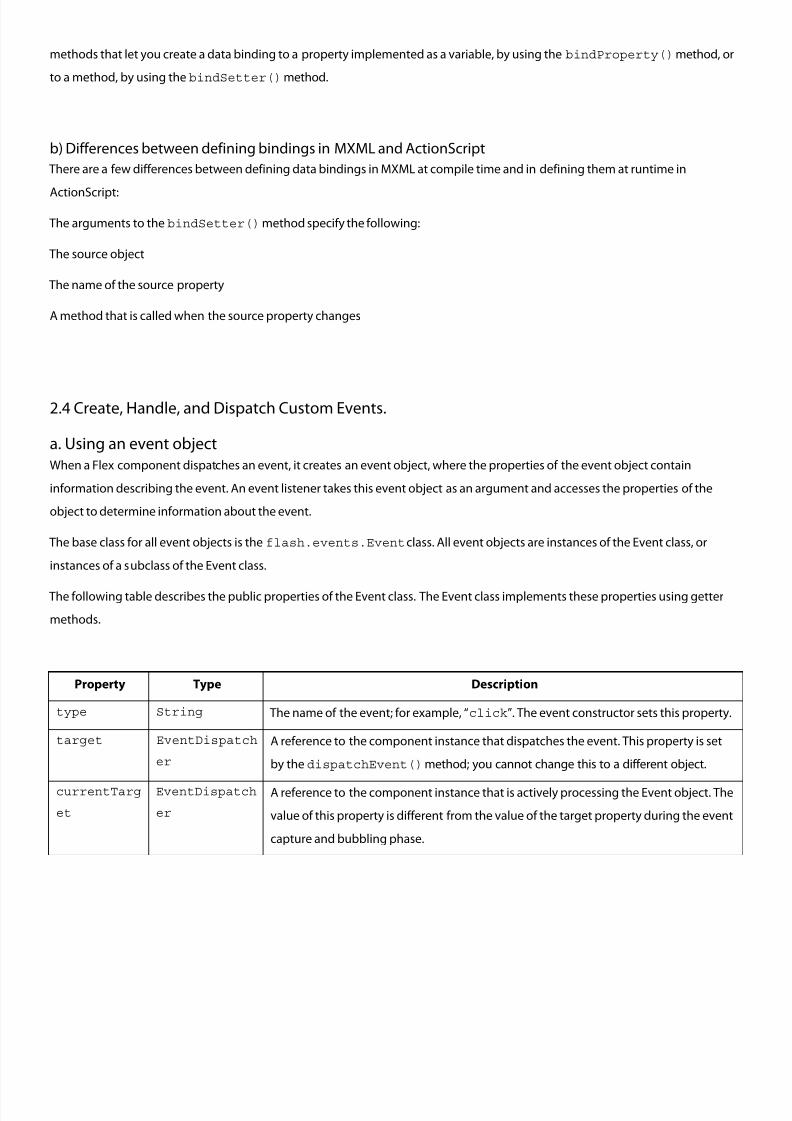
The following table describes the public properties of the Event class. The Event class implements these properties using getter
methods.
Property Type Description
type String The name of the event; for example, “click”. The event constructor sets this property.
target EventDispatch
er
A reference to the component instance that dispatches the event. This property is set
by the dispatchEvent()method; you cannot change this to a different object.
currentTarg
et
EventDispatch
er
A reference to the component instance that is actively processing the Event object. The
value of this property is different from the value of the target property during the event
capture and bubbling phase.

8/8/2019 Adobe Ace Study Gui Dev 24158
http://slidepdf.com/reader/full/adobe-ace-study-gui-dev-24158 35/102
eventPhase uint The current phase in the event flow. The property might contain the following values:
EventPhase.CAPTURING_PHASE: The capture phase
EventPhase.AT_TARGET: The target phase
EventPhase.BUBBLING_PHASE:The bubbling phase
bubbles Boolean Whether an event is a bubbling event. If the event can bubble, the value for this
property is true; otherwise, it is false.
You can optionally pass this property as a constructor argument to the Event class.
By default, most event classes set this property to false.
cancelable Boolean Whether the event can be canceled. If the event can be canceled, the value for this
value is true; otherwise, it is false.
You can optionally pass this property as a constructor argument to the Event class. By
default, most event classes set this property to false.
2.5 Dispatching Custom E vents
Create a subclass from the flash.events.Event class to create an event class that describes the event object.
Flex defines many of the most common events, such as the click event for the Button control; however, your application may
require that you create events. In your custom Flex components, you can dispatch any of the predefined events inherited by the
component from its superclass, and dispatch new events that you define within the component.
To dispatch a new event from your custom component, you must do the following:
(Optional) Use the [Event]metadata tag to make the event public so that the MXML compiler recognizes it.
Dispatch the event using thedispatchEvent() method.
You use the dispatchEvent()method to dispatch an event. The dispatchEvent()method has the following signature:
public dispatchEvent(event:Event):Boolean dispatchEvent(new Event("click"));
This method requires an argument of the Event type, which is the event object. The dispatchEvent()method initializes the
target property of the event object with a reference to the component dispatching the event.
You can create an event object and dispatch the event in a single statement, as the following example shows:
dispatchEvent(new Event("click"));
You can also create an event object, initialize it, and then dispatch it, as the following example shows:
8/8/2019 Adobe Ace Study Gui Dev 24158
http://slidepdf.com/reader/full/adobe-ace-study-gui-dev-24158 36/102
var eventObj:EnableChangeEvent = new EnableChangeEvent("enableChange");eventObj.isEnabled = true;
dispatchEvent(eventObj);
a. Creating static constants for the Event.type property
The constructor of an event class typically takes a single required argument that specifies the value of the event object’s type
property. In the previous section, you passed the stringenableChange to the constructor, as the following example shows:
// Define event object, initialize it, then dispatch it.var eventObj:EnableChangeEvent = new EnableChangeEvent("enableChange");
dispatchEvent(eventObj);
2.6 Handle framework events.
2.7 List and describe the differences between model, view, and controller code in a Flex application.
MVC is a design pattern or software architecture that separates the applications data, user interface, and control logic into three
distinct groupings. The goal is to implement the logic so changes can be made to one portion of the application with a minimal
impact to the others. Short definitions of the key terms are as follows:
• Model: The data the application uses. It manages data elements, responds to queries about its state, and instructions to
change the data.
• View: The user interface. It is responsible for presenting model data to the user and gathering information from the user.
• Controller: Responds to events, typically user events, but also system events. The events are interpreted and the
controller invokes changes on the model and view.
Generally, the flow of MVC is as follows:
• User interacts with the user interface (a view), such as clicking a button to add an item to a shopping cart.
• The controller handles the input event
• The controller accesses the model, maybe by retrieving or altering data.
• The view then uses the model data for appropriate user presentation.
3. Programming Flex applications with ActionScript
3.1 Define and extend an ActionScript class.
8/8/2019 Adobe Ace Study Gui Dev 24158
http://slidepdf.com/reader/full/adobe-ace-study-gui-dev-24158 37/102
a. Classes
A class is an abstract representation of an object. A class stores information about the types of data that an object can hold and the
behaviors that an object can exhibit. The usefulness of such an abstraction may not be apparent when you write small scripts that
contain only a few objects interacting with one another. As the scope of a program grows, however, and the number of objects
that must be managed increases, you may find that classes allow you to better control how objects are created and how they
interact with one another.
As far back as ActionScript 1.0, ActionScript programmers could use Function objects to create constructs that resembled classes.
ActionScript 2.0 added formal support for classes with keywords such as class and extends. ActionScript 3.0 not only continues to
support the keywords introduced in ActionScript 2.0, but also adds some new capabilities, such as enhanced access control with
the protected and internal attributes, and better control over inheritance with the final and override keywords.
b. Class definitions
ActionScript 3.0 class definitions use syntax that is similar to that used in ActionScript 2.0 class definitions. Proper syntax for a class
definition calls for the class keyword followed by the class name.
The class body, which is enclosed by curly braces ({}), follows the class name.
For example, the following code creates a class named Shape that contains one variable, named visible:
public class Shape{
var visible:Boolean = true;
}
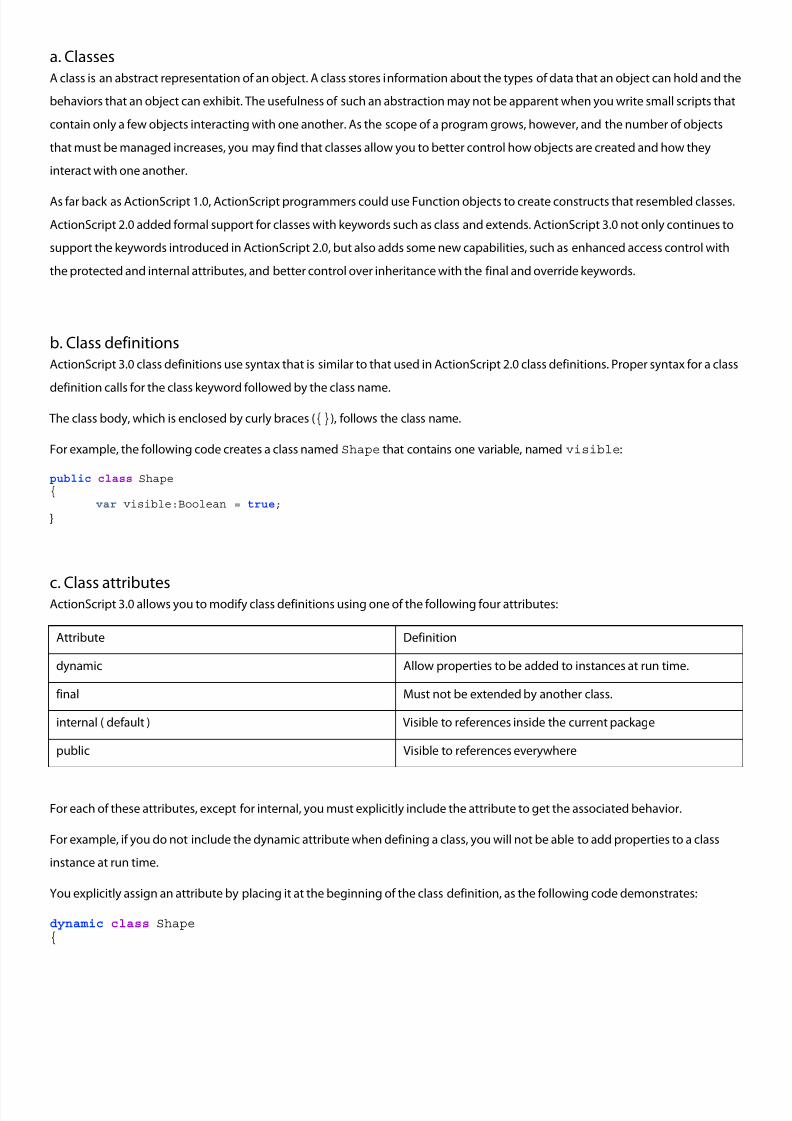
c. Class attributesActionScript 3.0 allows you to modify class definitions using one of the following four attributes:
Attribute Definition
dynamic Allow properties to be added to instances at run time.
final Must not be extended by another class.
internal ( default ) Visible to references inside the current package
public Visible to references everywhere
For each of these attributes, except for internal, you must explicitly include the attribute to get the associated behavior.
For example, if you do not include the dynamic attribute when defining a class, you will not be able to add properties to a class
instance at run time.
You explicitly assign an attribute by placing it at the beginning of the class definition, as the following code demonstrates:
dynamic class Shape{
8/8/2019 Adobe Ace Study Gui Dev 24158
http://slidepdf.com/reader/full/adobe-ace-study-gui-dev-24158 38/102
//...}
Notice that the list does not include an attribute named abstract. This is because abstract classes are not supported in
ActionScript 3.0.
Notice also that the list does not include attributes namedprivate andprotected. These attributes have meaning only inside
a class definition, and cannot be applied to classes themselves. If you do not want a class to be publicly visible outside a package,
place the class inside a package and mark the class with the internal attribute.
Alternatively, you can omit both the internal and public attributes, and the compiler will automatically add the internal attribute
for you. If you do not want a class to be visible outside the source file in which it is defined, place the class at the bottom of your
source file, below the closing curly brace of the package definition.
d. Class body
The class body, which is enclosed by curly braces, is used to define the variables, constants, and methods of your class. The
following example shows the declaration for the Accessibility class in the Adobe Flash Player API:
public final class Accessibility{
public static function get active():Boolean;public static function updateProperties():void;
}
You can also define a namespace inside a class body. The following example shows how a namespace can be defined within a class
body and used as an attribute of a method in that class:
public class SampleClass{
public namespace sampleNamespace;sampleNamespace function doSomething():void;
}
ActionScript 3.0 allows you to include not only definitions in a class body, but also statements. Statements that are inside a class
body, but outside a method definition, are executed exactly once—when the class definition is first encountered and the
associated class object is created.
The following example includes a call to an external function, hello(), and a trace statement that outputs a confirmation
message when the class is defined:
function hello():String{
trace("hola");}
class SampleClass
8/8/2019 Adobe Ace Study Gui Dev 24158
http://slidepdf.com/reader/full/adobe-ace-study-gui-dev-24158 39/102
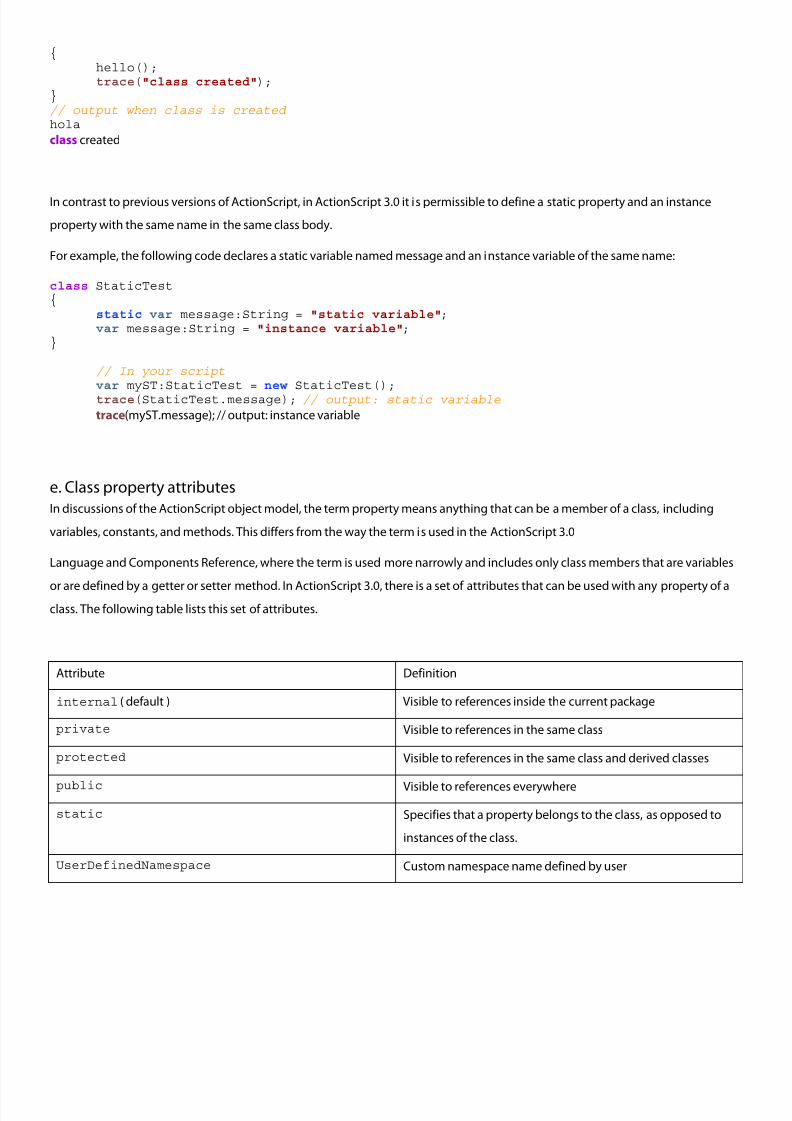
{hello();trace("class created");
}// output when class is created holaclass created
In contrast to previous versions of ActionScript, in ActionScript 3.0 it is permissible to define a static property and an instance
property with the same name in the same class body.
For example, the following code declares a static variable named message and an instance variable of the same name:
class StaticTest{
static var message:String = "static variable";var message:String = "instance variable";
}
// In your scriptvar myST:StaticTest = new StaticTest();trace(StaticTest.message); // output: static variable
trace(myST.message); // output: instance variable
e. Class property attributes
In discussions of the ActionScript object model, the term property means anything that can be a member of a class, including
variables, constants, and methods. This differs from the way the term is used in the ActionScript 3.0
Language and Components Reference, where the term is used more narrowly and includes only class members that are variables
or are defined by a getter or setter method. In ActionScript 3.0, there is a set of attributes that can be used with any property of aclass. The following table lists this set of attributes.
Attribute Definition
internal ( default ) Visible to references inside the current package
private Visible to references in the same class
protected Visible to references in the same class and derived classes
public Visible to references everywhere
static Specifies that a property belongs to the class, as opposed to
instances of the class.
UserDefinedNamespace Custom namespace name defined by user
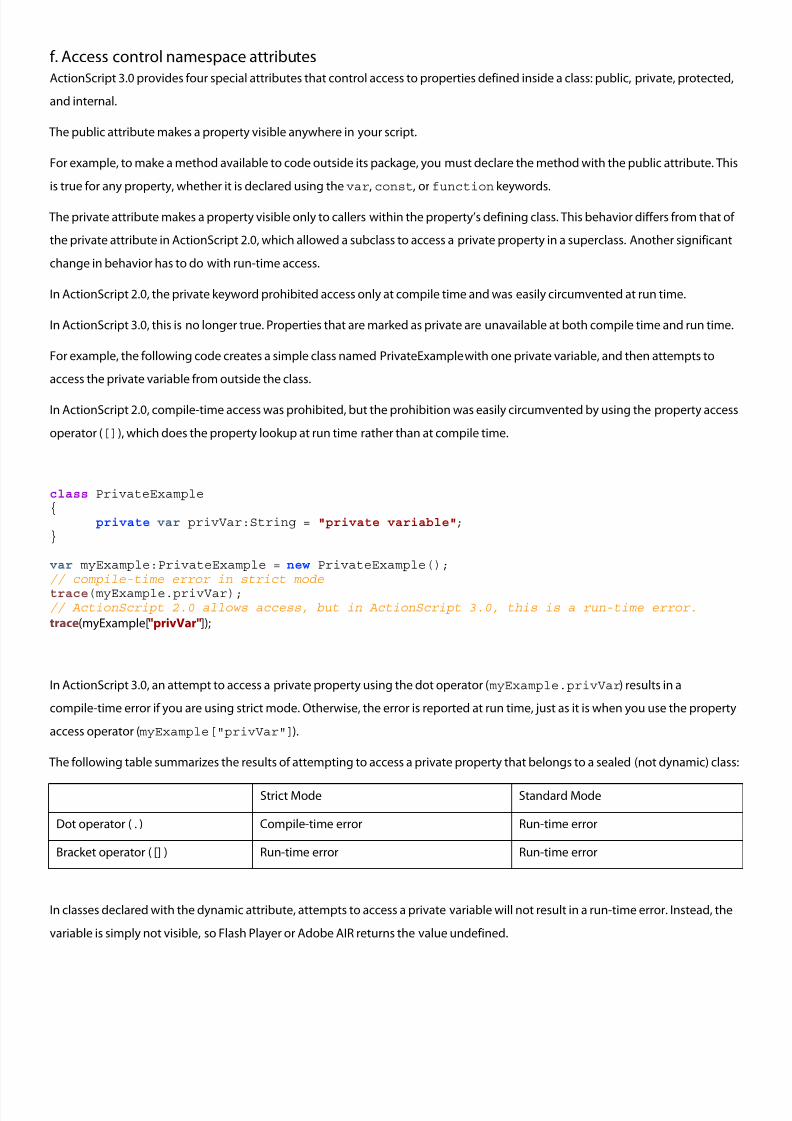
8/8/2019 Adobe Ace Study Gui Dev 24158
http://slidepdf.com/reader/full/adobe-ace-study-gui-dev-24158 40/102
f. Access control namespace attributes
ActionScript 3.0 provides four special attributes that control access to properties defined inside a class: public, private, protected,
and internal.
The public attribute makes a property visible anywhere in your script.
For example, to make a method available to code outside its package, you must declare the method with the public attribute. This
is true for any property, whether it is declared using thevar, const, or function keywords.
The private attribute makes a property visible only to callers within the property’s defining class. This behavior differs from that of
the private attribute in ActionScript 2.0, which allowed a subclass to access a private property in a superclass. Another significant
change in behavior has to do with run-time access.
In ActionScript 2.0, the private keyword prohibited access only at compile time and was easily circumvented at run time.
In ActionScript 3.0, this is no longer true. Properties that are marked as private are unavailable at both compile time and run time.
For example, the following code creates a simple class named PrivateExample with one private variable, and then attempts to
access the private variable from outside the class.
In ActionScript 2.0, compile-time access was prohibited, but the prohibition was easily circumvented by using the property access
operator ([]), which does the property lookup at run time rather than at compile time.
class PrivateExample{
private var privVar:String = "private variable";}
var myExample:PrivateExample = new PrivateExample();// compile-time error in strict mode
trace(myExample.privVar);// ActionScript 2.0 allows access, but in ActionScript 3.0, this is a run-time error.
trace(myExample["privVar"]);
In ActionScript 3.0, an attempt to access a private property using the dot operator (myExample.privVar) results in a
compile-time error if you are using strict mode. Otherwise, the error is reported at run time, just as it is when you use the property
access operator (myExample["privVar"]).
The following table summarizes the results of attempting to access a private property that belongs to a sealed (not dynamic) class:
Strict Mode Standard Mode
Dot operator ( . ) Compile-time error Run-time error
Bracket operator ( [] ) Run-time error Run-time error
In classes declared with the dynamic attribute, attempts to access a private variable will not result in a run-time error. Instead, the
variable is simply not visible, so Flash Player or Adobe AIR returns the value undefined.
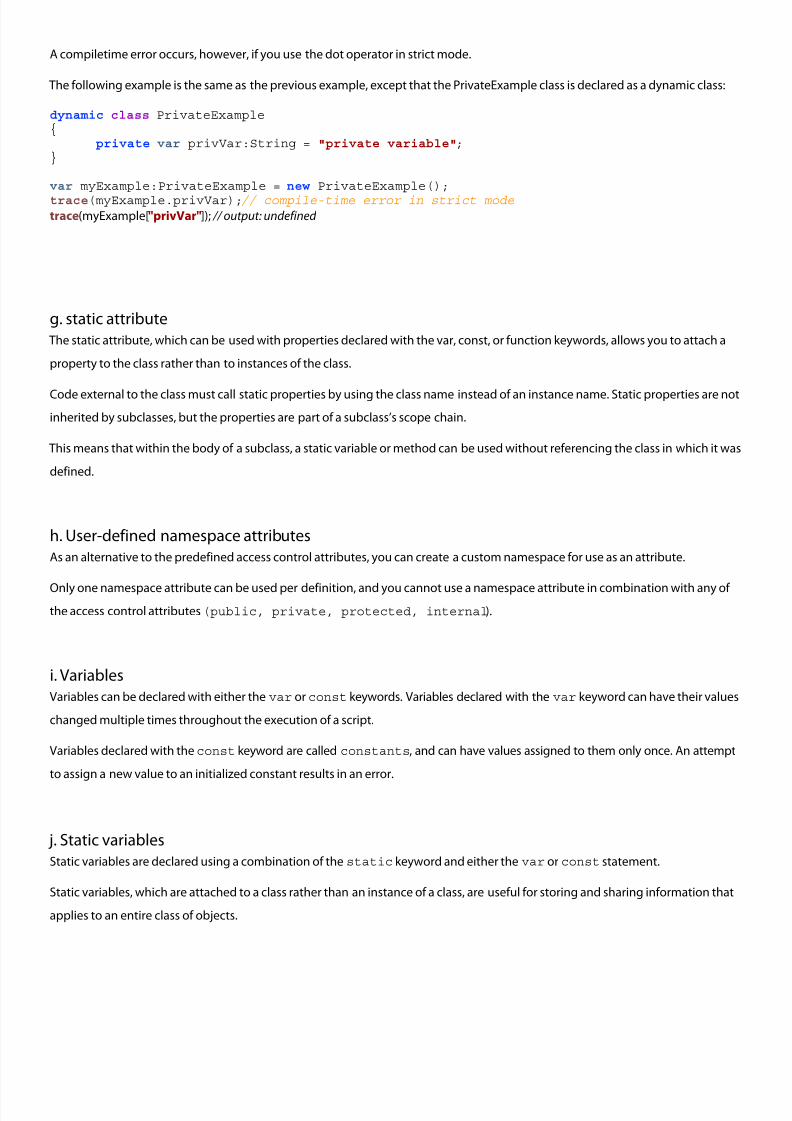
8/8/2019 Adobe Ace Study Gui Dev 24158
http://slidepdf.com/reader/full/adobe-ace-study-gui-dev-24158 41/102
A compiletime error occurs, however, if you use the dot operator in strict mode.
The following example is the same as the previous example, except that the PrivateExample class is declared as a dynamic class:
dynamic class PrivateExample{
private var privVar:String = "private variable";}
var myExample:PrivateExample = new PrivateExample();trace(myExample.privVar);// compile-time error in strict modetrace(myExample["privVar"]); // output: undefined
g. static attribute
The static attribute, which can be used with properties declared with the var, const, or function keywords, allows you to attach a
property to the class rather than to instances of the class.
Code external to the class must call static properties by using the class name instead of an instance name. Static properties are not
inherited by subclasses, but the properties are part of a subclass’s scope chain.
This means that within the body of a subclass, a static variable or method can be used without referencing the class in which it was
defined.
h. User-defined namespace attributes
As an alternative to the predefined access control attributes, you can create a custom namespace for use as an attribute.
Only one namespace attribute can be used per definition, and you cannot use a namespace attribute in combination with any of
the access control attributes(public, private, protected, internal).
i. Variables
Variables can be declared with either the var or const keywords. Variables declared with the var keyword can have their values
changed multiple times throughout the execution of a script.
Variables declared with theconst keyword are called constants, and can have values assigned to them only once. An attempt
to assign a new value to an initialized constant results in an error.
j. Static variables
Static variables are declared using a combination of the static keyword and either the var or const statement.
Static variables, which are attached to a class rather than an instance of a class, are useful for storing and sharing information that
applies to an entire class of objects.
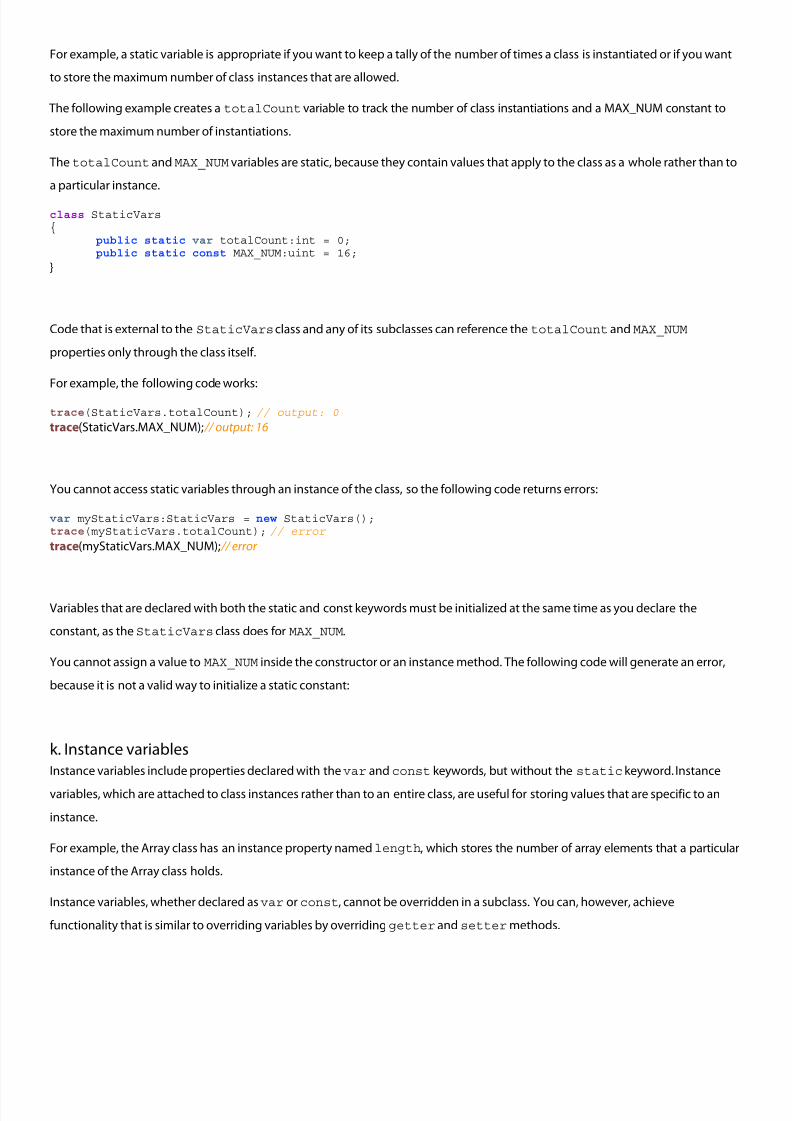
8/8/2019 Adobe Ace Study Gui Dev 24158
http://slidepdf.com/reader/full/adobe-ace-study-gui-dev-24158 42/102
For example, a static variable is appropriate if you want to keep a tally of the number of times a class is instantiated or if you want
to store the maximum number of class instances that are allowed.
The following example creates a totalCount variable to track the number of class instantiations and a MAX_NUM constant to
store the maximum number of instantiations.
The totalCount and MAX_NUM variables are static, because they contain values that apply to the class as a whole rather than to
a particular instance.
class StaticVars{
public static var totalCount:int = 0;public static const MAX_NUM:uint = 16;
}
Code that is external to the StaticVars class and any of its subclasses can reference the totalCount and MAX_NUM
properties only through the class itself.
For example, the following code works:
trace(StaticVars.totalCount); // output: 0
trace(StaticVars.MAX_NUM); // output: 16
You cannot access static variables through an instance of the class, so the following code returns errors:
var myStaticVars:StaticVars = new StaticVars();trace(myStaticVars.totalCount); // error
trace(myStaticVars.MAX_NUM); // error
Variables that are declared with both the static and const keywords must be initialized at the same time as you declare the
constant, as theStaticVars class does for MAX_NUM.
You cannot assign a value to MAX_NUM inside the constructor or an instance method. The following code will generate an error,
because it is not a valid way to initialize a static constant:
k. Instance variables
Instance variables include properties declared with thevar andconst keywords, but without the static keyword. Instance
variables, which are attached to class instances rather than to an entire class, are useful for storing values that are specific to an
instance.
For example, the Array class has an instance property namedlength, which stores the number of array elements that a particular
instance of the Array class holds.
Instance variables, whether declared asvar or const, cannot be overridden in a subclass. You can, however, achieve
functionality that is similar to overriding variables by overridinggetter and settermethods.
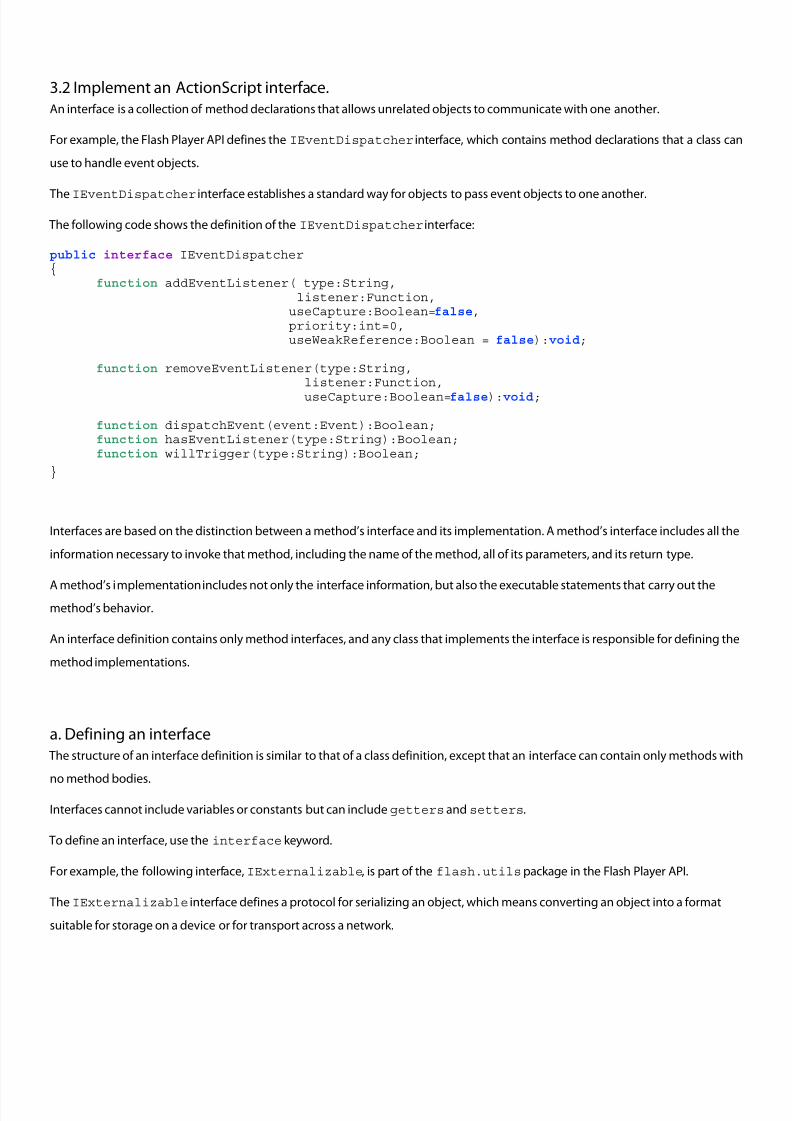
8/8/2019 Adobe Ace Study Gui Dev 24158
http://slidepdf.com/reader/full/adobe-ace-study-gui-dev-24158 43/102
3.2 Implement an ActionScript interface.
An interface is a collection of method declarations that allows unrelated objects to communicate with one another.
For example, the Flash Player API defines the IEventDispatcher interface, which contains method declarations that a class can
use to handle event objects.
The IEventDispatcher interface establishes a standard way for objects to pass event objects to one another.
The following code shows the definition of the IEventDispatcher interface:
public interface IEventDispatcher{
function addEventListener( type:String,listener:Function,
useCapture:Boolean=false,priority:int=0,useWeakReference:Boolean = false):void;
function removeEventListener(type:String,
listener:Function,
useCapture:Boolean=false):void;
function dispatchEvent(event:Event):Boolean;function hasEventListener(type:String):Boolean;function willTrigger(type:String):Boolean;
}
Interfaces are based on the distinction between a method’s interface and its implementation. A method’s interface includes all the
information necessary to invoke that method, including the name of the method, all of its parameters, and its return type.
A method’s implementation includes not only the interface information, but also the executable statements that carry out themethod’s behavior.
An interface definition contains only method interfaces, and any class that implements the interface is responsible for defining the
method implementations.
a. Defining an interface
The structure of an interface definition is similar to that of a class definition, except that an interface can contain only methods with
no method bodies.
Interfaces cannot include variables or constants but can include getters and setters.
To define an interface, use the interface keyword.
For example, the following interface,IExternalizable, is part of the flash.utils package in the Flash Player API.
The IExternalizable interface defines a protocol for serializing an object, which means converting an object into a format
suitable for storage on a device or for transport across a network.
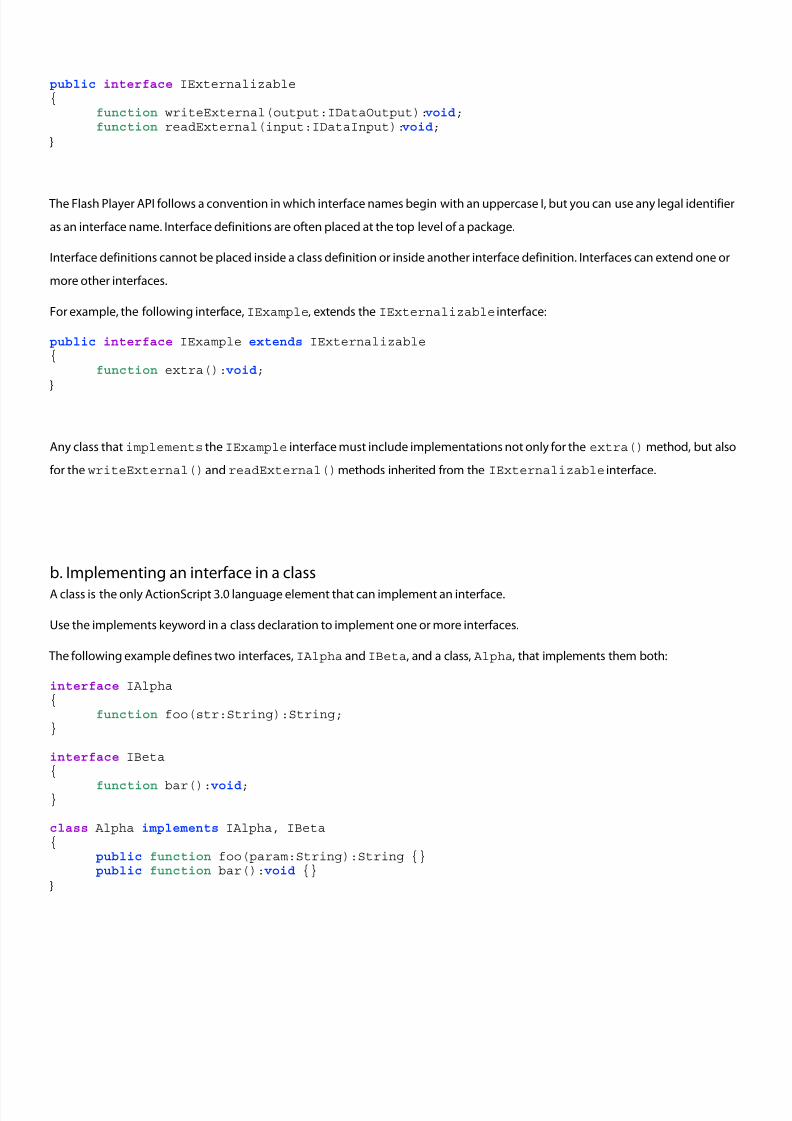
8/8/2019 Adobe Ace Study Gui Dev 24158
http://slidepdf.com/reader/full/adobe-ace-study-gui-dev-24158 44/102
8/8/2019 Adobe Ace Study Gui Dev 24158
http://slidepdf.com/reader/full/adobe-ace-study-gui-dev-24158 45/102
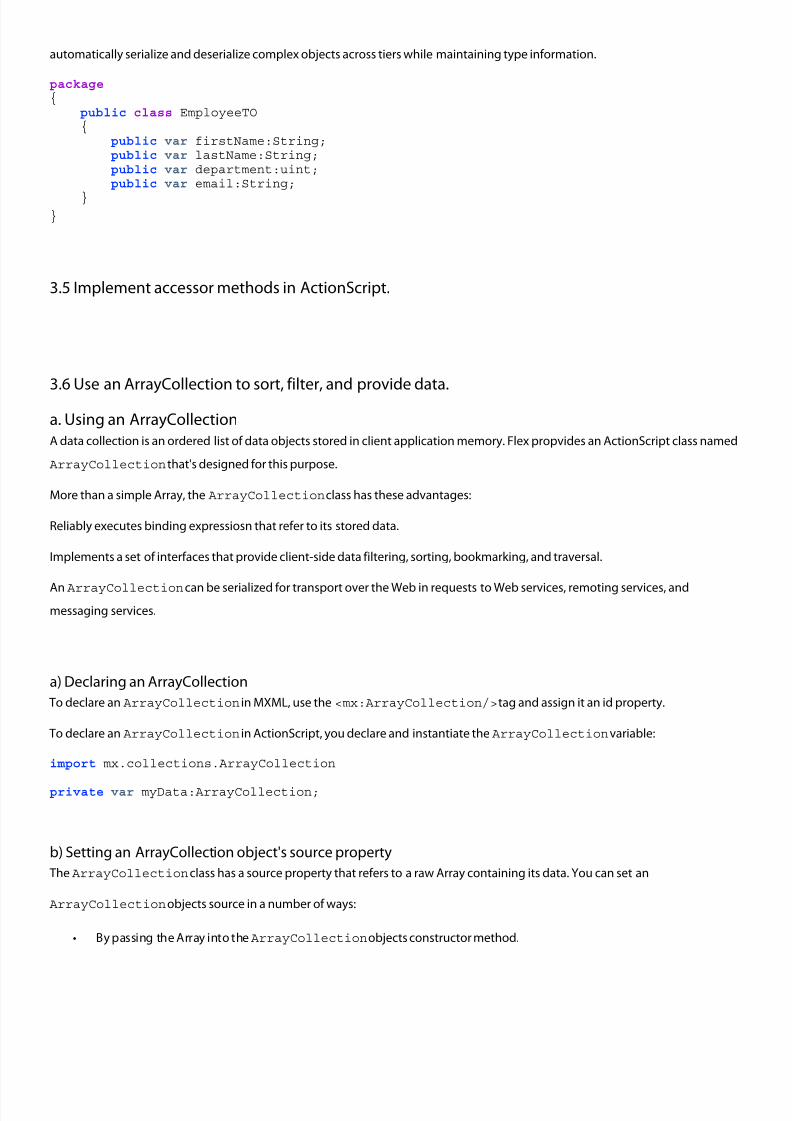
8/8/2019 Adobe Ace Study Gui Dev 24158
http://slidepdf.com/reader/full/adobe-ace-study-gui-dev-24158 46/102
automatically serialize and deserialize complex objects across tiers while maintaining type information.
package{ public class EmployeeTO
{ public var firstName:String; public var lastName:String; public var department:uint; public var email:String;
}}
3.5 Implement accessor methods in ActionScript.
3.6 Use an ArrayCollection to sort, filter, and provide data.
a. Using an ArrayCollection
A data collection is an ordered list of data objects stored in client application memory. Flex propvides an ActionScript class named
ArrayCollection that's designed for this purpose.
More than a simple Array, the ArrayCollection class has these advantages:
Reliably executes binding expressiosn that refer to its stored data.
Implements a set of interfaces that provide client-side data filtering, sorting, bookmarking, and traversal.
An ArrayCollection can be serialized for transport over the Web in requests to Web services, remoting services, and
messaging services.
a) Declaring an ArrayCollection
To declare an ArrayCollection in MXML, use the <mx:ArrayCollection/> tag and assign it an id property.
To declare an ArrayCollection in ActionScript, you declare and instantiate the ArrayCollection variable:
import mx.collections.ArrayCollection
private var myData:ArrayCollection;
b) Setting an ArrayCollection object's source property
The ArrayCollection class has a source property that refers to a raw Array containing its data. You can set an
ArrayCollection objects source in a number of ways:
• By passing the Array into the ArrayCollectionobjects constructor method.
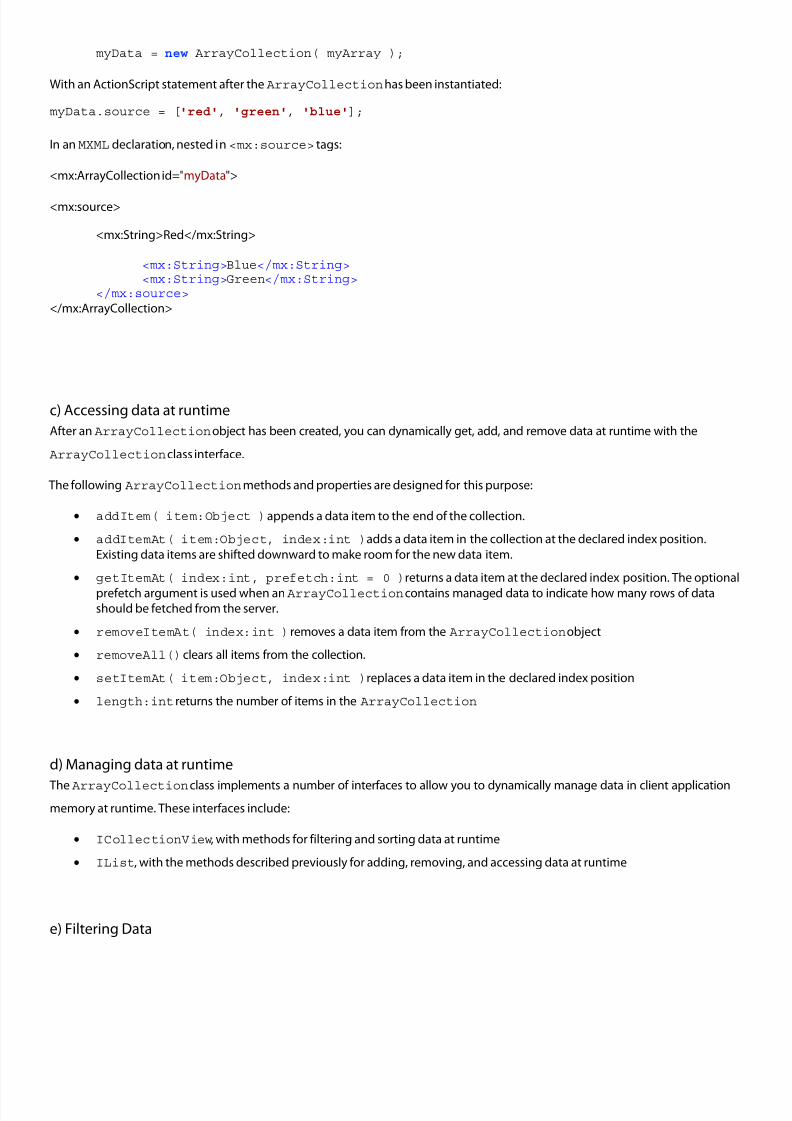
8/8/2019 Adobe Ace Study Gui Dev 24158
http://slidepdf.com/reader/full/adobe-ace-study-gui-dev-24158 47/102
myData = new ArrayCollection( myArray );
With an ActionScript statement after the ArrayCollection has been instantiated:
myData.source = ['red', 'green', 'blue'];
In an MXML declaration, nested in <mx:source> tags:
<mx:ArrayCollection id="myData">
<mx:source>
<mx:String>Red</mx:String>
<mx:String>Blue</mx:String><mx:String>Green</mx:String>
</mx:source></mx:ArrayCollection>
c) Accessing data at runtime
After an ArrayCollection object has been created, you can dynamically get, add, and remove data at runtime with the
ArrayCollection class interface.
The following ArrayCollectionmethods and properties are designed for this purpose:
• addItem( item:Object ) appends a data item to the end of the collection.
• addItemAt( item:Object, index:int ) adds a data item in the collection at the declared index position.
Existing data items are shifted downward to make room for the new data item.
• getItemAt( index:int, prefetch:int = 0 ) returns a data item at the declared index position. The optional
prefetch argument is used when an ArrayCollection contains managed data to indicate how many rows of datashould be fetched from the server.
• removeItemAt( index:int ) removes a data item from the ArrayCollectionobject
• removeAll() clears all items from the collection.
• setItemAt( item:Object, index:int ) replaces a data item in the declared index position
• length:int returns the number of items in the ArrayCollection
d) Managing data at runtime
The ArrayCollection class implements a number of interfaces to allow you to dynamically manage data in client application
memory at runtime. These interfaces include:
• ICollectionView, with methods for filtering and sorting data at runtime
• IList, with the methods described previously for adding, removing, and accessing data at runtime
e) Filtering Data
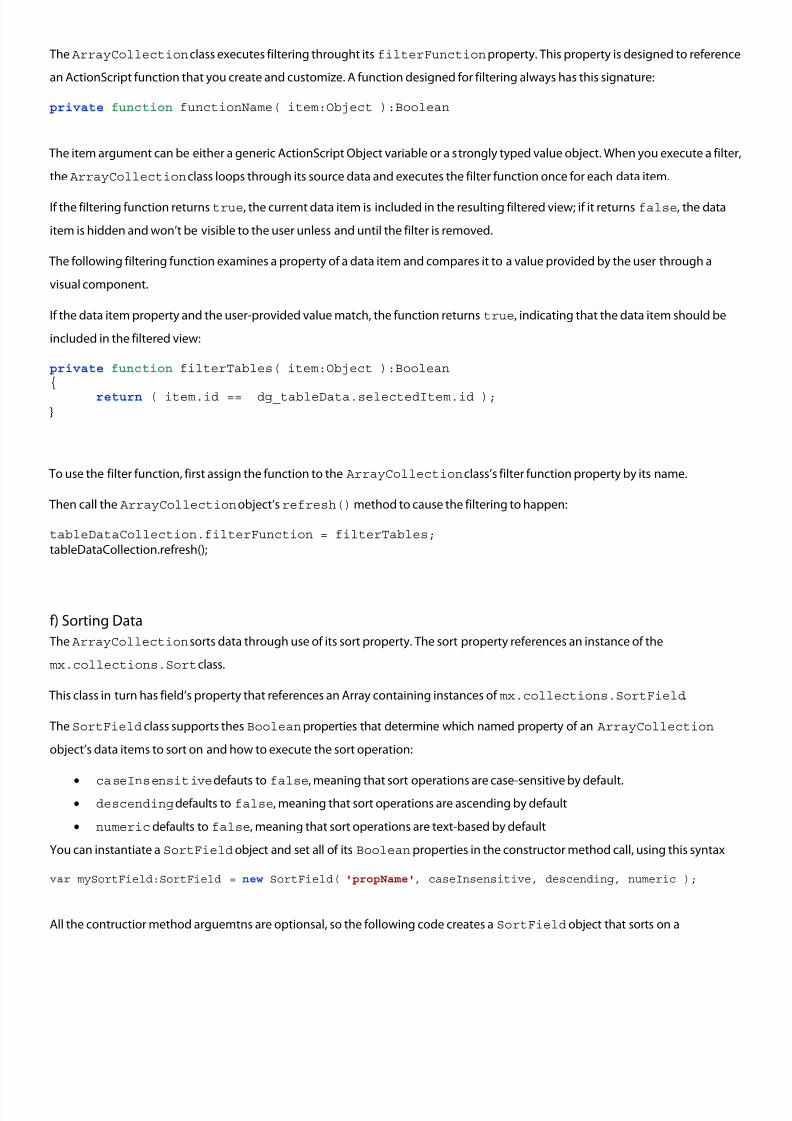
8/8/2019 Adobe Ace Study Gui Dev 24158
http://slidepdf.com/reader/full/adobe-ace-study-gui-dev-24158 48/102
The ArrayCollection class executes filtering throught its filterFunction property. This property is designed to reference
an ActionScript function that you create and customize. A function designed for filtering always has this signature:
private function functionName( item:Object ):Boolean
The item argument can be either a generic ActionScript Object variable or a strongly typed value object. When you execute a filter,
the ArrayCollection class loops through its source data and executes the filter function once for each data item.
If the filtering function returnstrue, the current data item is included in the resulting filtered view; if it returns false, the data
item is hidden and won’t be visible to the user unless and until the filter is removed.
The following filtering function examines a property of a data item and compares it to a value provided by the user through a
visual component.
If the data item property and the user-provided value match, the function returns true, indicating that the data item should be
included in the filtered view:
private function filterTables( item:Object ):Boolean{
return ( item.id == dg_tableData.selectedItem.id );}
To use the filter function, first assign the function to the ArrayCollection class’s filter function property by its name.
Then call the ArrayCollection object’srefresh()method to cause the filtering to happen:
tableDataCollection.filterFunction = filterTables;tableDataCollection.refresh();
f) Sorting Data
The ArrayCollection sorts data through use of its sort property. The sort property references an instance of the
mx.collections.Sort class.
This class in turn has field’s property that references an Array containing instances of mx.collections.SortField.
The SortField class supports thes Booleanproperties that determine which named property of an ArrayCollection
object’s data items to sort on and how to execute the sort operation:
• caseInsensitivedefauts to false, meaning that sort operations are case-sensitive by default.• descendingdefaults to false, meaning that sort operations are ascending by default
• numeric defaults to false, meaning that sort operations are text-based by default
You can instantiate a SortField object and set all of its Boolean properties in the constructor method call, using this syntax
var mySortField:SortField = new SortField( 'propName', caseInsensitive, descending, numeric );
All the contructior method arguemtns are optionsal, so the following code creates aSortField object that sorts on a
8/8/2019 Adobe Ace Study Gui Dev 24158
http://slidepdf.com/reader/full/adobe-ace-study-gui-dev-24158 49/102
8/8/2019 Adobe Ace Study Gui Dev 24158
http://slidepdf.com/reader/full/adobe-ace-study-gui-dev-24158 50/102
• Validating social security numbers
• Validating strings
• Validating ZIP codes
a) About validators
You define validators by using MXML or ActionScript. You declare a validator in MXML by using the<mx:Validator> tag or the
tag for the appropriate validator type.
For example, to declare the standard PhoneNumberValidator validator, you use the <mx:PhoneNumberValidator> tag,
as the following example shows:
<!-- Define the PhoneNumberValidator. --><mx:PhoneNumberValidator id="pnV"
source="{phoneInput}" property="text"/>
<!-- Define the TextInput control for entering the phone number. -->
<mx:TextInput id="phoneInput"/><mx:TextInput id="zipCodeInput"/>
b) About triggering validation
You trigger validation either automatically in response to an event, or programmatically by an explicit call to the
Validator.validate()method of a validator.
When you use events, you can cause the validator to execute automatically in response to a user action.
For example, you can use the click event of a Button control to trigger validation on the fields of a form, or the valueCommit
event of a TextInput control to trigger validation after a user enters information in the control.
You can also trigger a validation programmatically.
For example, you might have to inspect multiple, related input fields to perform a single validation. Or you might have to perform
conditional validation based on a user input.
For example, you may allow a user to select the currency used for payment, such as U.S. dollars or Euros. Therefore, you want to
make sure that you invoke a validator configured for the specified currency. In this case, you can make an explicit call to the
validate()method to trigger the correct validator for the input value.
c) About validating required fields
Flex validators can determine when a user enters an incorrect value into a user-interface control. In addition, all validators support
the required property, which, if true, specifies that a missing or empty value in a user-interface control causes a validation error.
The default value is true. Therefore, a validation error occurs by default if the user fails to enter any required data in a control
8/8/2019 Adobe Ace Study Gui Dev 24158
http://slidepdf.com/reader/full/adobe-ace-study-gui-dev-24158 51/102
associated with a validator. To disable this check, set the required property tofalse.
d) About validation errors
If a validation error occurs, by default Flex draws a red box around the component associated with the failure. If the user moves the
mouse pointer over the component, Flex displays the error message associated with the error. You can customize the look of the
component and the error message associated with the error.
e) About validation events
Validation is event driven. You can use events to trigger validation, programmatically create and configure validators in response
to events, and listen for events dispatched by validators.
For example, when a validation operation completes, a validator dispatches a valid or invalid event, depending on the results of
the validation. You can listen for these events, and then perform any additional processing that your application requires.
Alternatively, Flex components dispatch valid and invalid events, depending on the results of the validation. This lets you listen for
the events being dispatched from the component being validated, rather than listening for events dispatched by the validator.
You are not required to listen for validation events. By default, Flex handles a failed validation by drawing a red box around the
control that is associated with the source of the data binding.
For a successful validation, Flex clears any indicator of a previous failure
f) About custom validation
Although Flex supplies a number of predefined validators, you might find that you have to implement your own validation logic.
The mx.validators.Validator class is an ActionScript class that you can extend to create a subclass that encapsulates your
custom validation logic.
b. Triggering validation programmatically
The Validator class, and all subclasses of Validator, include a validate()method that you can call to invoke a validator
directly, rather than triggering the validator automatically by using an event.
The validate()method has the following signature:
validate(value:Object = null, supressEvents:Boolean = false):ValidationResultEvent
The arguments have the following values:
• value: If value is null, use the source and property properties to specify the data to validate. If value is non-null, it
8/8/2019 Adobe Ace Study Gui Dev 24158
http://slidepdf.com/reader/full/adobe-ace-study-gui-dev-24158 52/102
specifies a field of an object relative to thethis keyword, which means an object in the scope of the document.
You should also set the Validator.listenerproperty when you specify the value argument. When a validation
occurs, Flex applies visual changes to the object specified by the listener property. By default, Flex sets thelistener
property to the value of the source property.
However, because you do not specify thesourceproperty when you pass the value argument, you should set it
explicitly
• supressEvents: If false, dispatch either the valid or invalid event on completion. If true, do not dispatch events.
This method returns an event object containing the results of the validation that is an instance of the
ValidationResultEvent class.
Handling the return value of the validate() method
You may want to inspect the return value from the validate()method to perform some action when the validation succeeds
or fails.
The validate()method returns an event object with a type defined by the ValidationResultEvent class. The
ValidationResultEvent class defines several properties, including the type property.
The type property of the event object contains either ValidationResultEvent.VALIDor
ValidationResultEvent.INVALID, based on the validation results.
Triggering the DateValidator and CreditCardValidator
The DateValidator andCreditCardValidator can validate multiple fields by using a single validator.
A CreditCardValidatorexamines one field that contains the credit card number and a second field that contains the credit
card type.
The DateValidator can examine a single field that contains a date, or multiple fields that together make up a date.
When you validate an object that contains multiple properties that are set independently, you often cannot use events to
automatically trigger the validator because no single field contains all of the information required to perform the validation.
One way to validate a complex object is to call the validate()method of the validator based on some type of user interaction.
Validating required fields
The Validator class, the base class for all Flex validators, contains a required property that when set to true causes
validation to fail when a field is empty.
You use this property to configure the validator to fail when a user does not enter data in a required input field. You typically call
the validate()method to invoke a validator on a required field.
This is often necessary because you cannot guarantee that an event occurs to trigger the validation— an empty input field often
means that the user never gave the input control focus.
8/8/2019 Adobe Ace Study Gui Dev 24158
http://slidepdf.com/reader/full/adobe-ace-study-gui-dev-24158 53/102
Enabling and disabling a validator
The Validator.enabledproperty lets you enable and disable a validator.
When the value of theenabled property is true, the validator is enabled; when the value is false, the validator is disabled.
When a validator is disabled, it dispatches no events, and thevalidate()method returns null.
Using data binding to configure validators
You configure validators to match your application requirements.
For example, theStringValidator lets you specify a minimum and maximum length of a valid string. For a String to be
considered valid, it must be at least the minimum number of characters long, and less than or equal to the maximum number of
characters.
Often, you set validator properties statically, which means that they do not change as your application executes.
For example, the followingStringValidator defines that the input string must be at least one character long and no longer
than 10 characters:
<mx:StringValidator required="true" minlength="1" maxLength="10"/>
Changing the color of the validation error message
By default, the validation error message that appears when you move the mouse pointer over a user-interface control has a red
background.
You can use the ErrorTip style to change the color, as the following example shows:
<!-- Use blue for the error message. --><mx:Style>
.errorTip {
borderColor: #0000FF}
</mx:Style>
Showing a validation error by using errorString The UIComponent class defines the errorString property that you can use to show a validation error for a component,
without actually using a validator class.
When you write a String value to the UIComponent.errorStringproperty, Flex draws a red border around the component
to indicate the validation error, and the String appears in a ToolTip as the validation error message when you move the
mouse over the component, just as if a validator detected a validation error.
To clear the validation error, write an empty String, " ", to the UIComponent.errorStringproperty.

8/8/2019 Adobe Ace Study Gui Dev 24158
http://slidepdf.com/reader/full/adobe-ace-study-gui-dev-24158 54/102
Note: Writing a value to theUIComponent.errorStringproperty does not trigger the valid or invalid events; it only changes the
border color and displays the validation error message.
Clearing a validation error
The errorStringproperty is useful when you want to reset a field that is a source for validation, and prevent a validation error
from occurring when you reset the field.
For example, you might provide a form to gather user input. Within your form, you might also provide a button, or other
mechanism, that lets the user reset the form.
However, clearing form fields that are tied to validators could trigger a validation error.
The following example uses the errorStringproperty as part of resetting the text property of a TextInput control to prevent
validation errors when the form resets:
import mx.events.ValidationResultEvent;
private var vResult:ValidationResultEvent;
// Function to validate data and submit it to the server.private function validateAndSubmit():void {
// Validate the required fields.vResult = zipV.validate();if (vResult.type==ValidationResultEvent.INVALID)
return;// Submit data to server.
}
//Clear the input controls and the errorString property when resetting the form.private function resetForm():void {
zipInput.text = ’’;zipInput.errorString = ’’;
}
Specifying a listener for validation
All validators support a listener property. When a validation occurs, Flex applies visual changes to the object specified by the
listener property. By default, Flex sets thelistener property to the value of the source property.
That means that all visual changes that occur to reflect a validation event occur on the component being validated. However, you
might want to validate one component but have validation results apply to a different component, as the following example
shows:
<mx:ZipCodeValidator id="zipV" source="{zipCodeInput}" property="text"listener="{errorMsg}"/><mx:TextInput id="zipCodeInput"/>
8/8/2019 Adobe Ace Study Gui Dev 24158
http://slidepdf.com/reader/full/adobe-ace-study-gui-dev-24158 55/102
<mx:TextArea id="errorMsg"/>
Working with validation events
• Listen for validation events dispatched by the component being validated.
• Listen for validation events dispatched by validators. Flex gives you two ways to listen for validation events: Flex
components dispatch valid and invalid events, depending on the results of the validation.
This lets you listen for the events being dispatched from the component being validated, and perform any additional
processing on the component based on its validation result.
The event object passed to the event listener is of type Event. All validators dispatch valid or invalid events, depending on
the results of the validation. You can listen for these events, and then perform any additional processing as required by
your validator.
The event object passed to the event listener is of type ValidationResultEvent.
You are not required to listen for validation events. When these events occur, by default, Flex changes the appro-priateborder color of the target component, displays an error message for an invalid event, or hides any previous error message
for a valid event.
3.8 Manipulate XML data by using E4X.
a. About E4X
EcmaScript for XML (E4X) is an expression language that allows you to extract and manipulate data stored in XML objects with
simple expressions. By using E4X, you can eliminate the significantly more verbose ActionScript code that would otherwise be
required.
a) Using dot notation
An ActionScript XML object that’s been created form XML notation refers to the structures root elements, not the XML document
itself.
If an HTTPService component imports the XML document and passes the ResultEvent object to an event handler function,
the expressionevent.result refers to the <invoices> element. You typically save the returned data to a variable typed as
XML and then use E4X expressions to extract data as needed:
[Bindable] private var xInvoices:XML;
private function resultHandler( event:ResultEvent ):void{
xInvoces = event.result as XML;
}
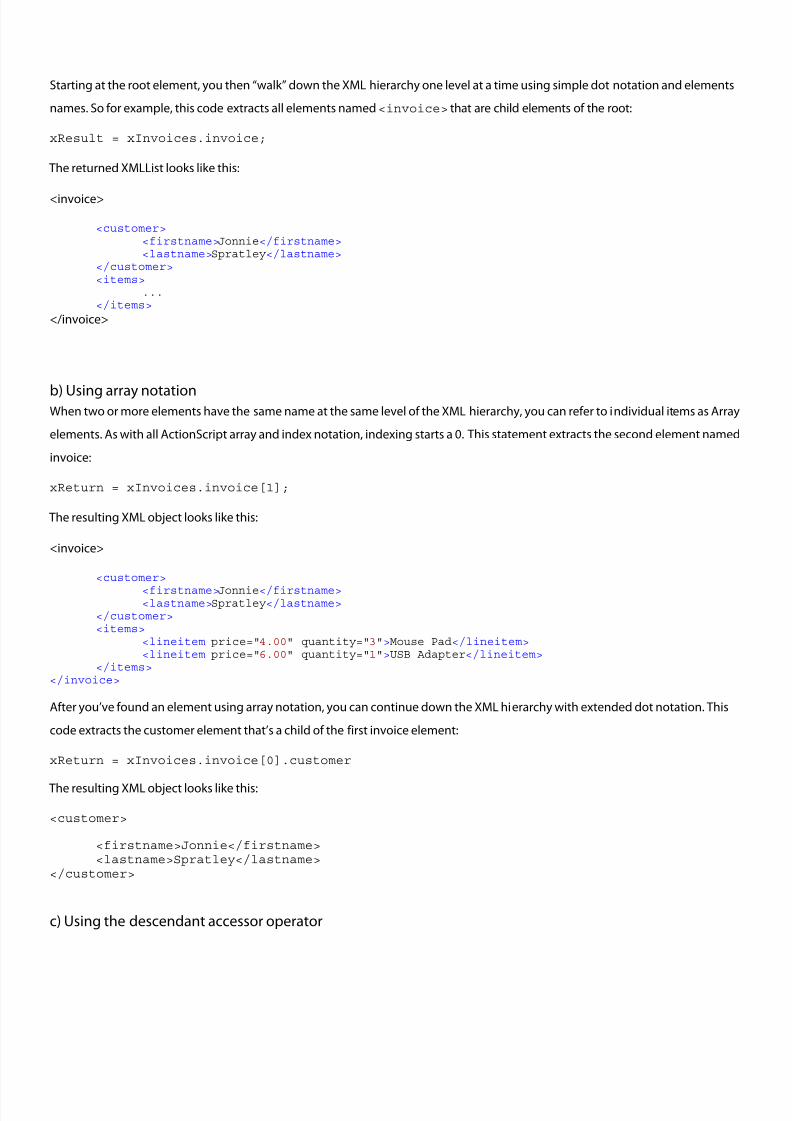
8/8/2019 Adobe Ace Study Gui Dev 24158
http://slidepdf.com/reader/full/adobe-ace-study-gui-dev-24158 56/102
Starting at the root element, you then “walk” down the XML hierarchy one level at a time using simple dot notation and elements
names. So for example, this code extracts all elements named<invoice> that are child elements of the root:
xResult = xInvoices.invoice;
The returned XMLList looks like this:
<invoice>
<customer><firstname>Jonnie</firstname><lastname>Spratley</lastname>
</customer><items>
...</items>
</invoice>
b) Using array notationWhen two or more elements have the same name at the same level of the XML hierarchy, you can refer to individual items as Array
elements. As with all ActionScript array and index notation, indexing starts a 0. This statement extracts the second element named
invoice:
xReturn = xInvoices.invoice[1];
The resulting XML object looks like this:
<invoice>
<customer>
<firstname>Jonnie</firstname><lastname>Spratley</lastname>
</customer><items>
<lineitem price="4.00" quantity="3">Mouse Pad</lineitem><lineitem price="6.00" quantity="1">USB Adapter</lineitem>
</items></invoice>
After you’ve found an element using array notation, you can continue down the XML hierarchy with extended dot notation. This
code extracts the customer element that’s a child of the first invoice element:
xReturn = xInvoices.invoice[0].customer
The resulting XML object looks like this:
<customer>
<firstname>Jonnie</firstname><lastname>Spratley</lastname>
</customer>
c) Using the descendant accessor operator
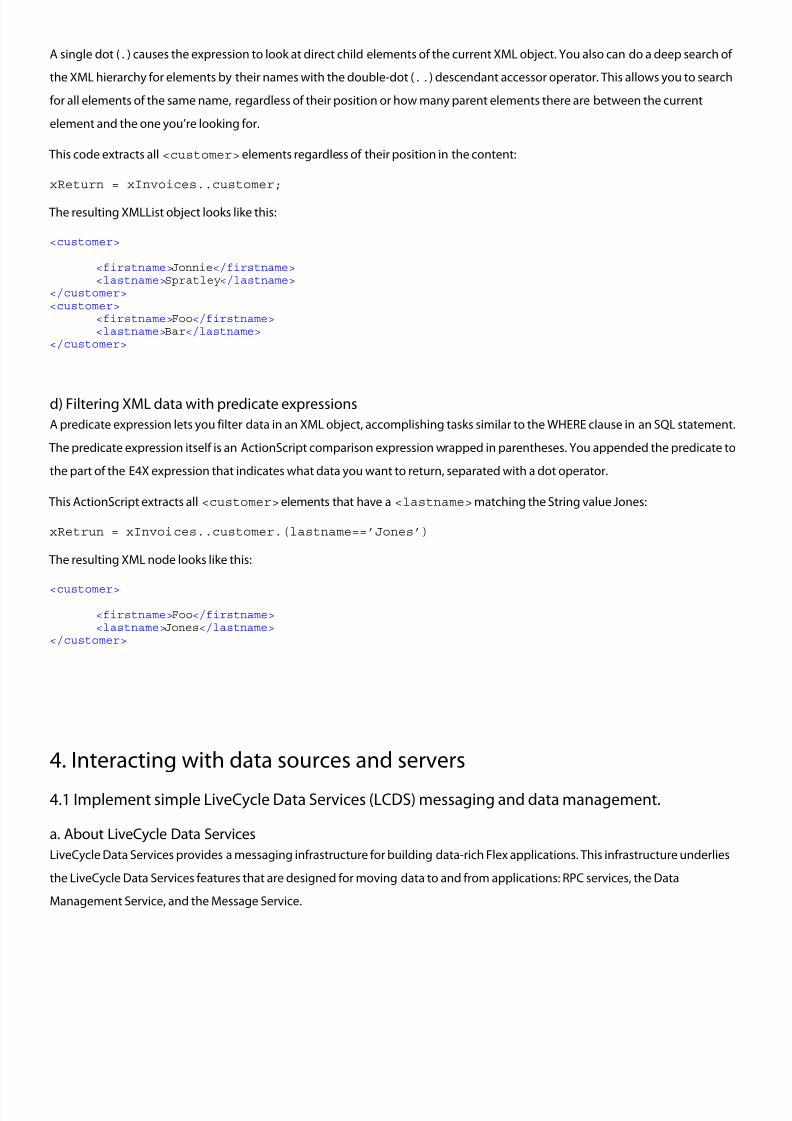
8/8/2019 Adobe Ace Study Gui Dev 24158
http://slidepdf.com/reader/full/adobe-ace-study-gui-dev-24158 57/102
A single dot (.) causes the expression to look at direct child elements of the current XML object. You also can do a deep search of
the XML hierarchy for elements by their names with the double-dot (..) descendant accessor operator. This allows you to search
for all elements of the same name, regardless of their position or how many parent elements there are between the current
element and the one you’re looking for.
This code extracts all <customer> elements regardless of their position in the content:
xReturn = xInvoices..customer;
The resulting XMLList object looks like this:
<customer>
<firstname>Jonnie</firstname><lastname>Spratley</lastname>
</customer><customer>
<firstname>Foo</firstname><lastname>Bar</lastname>
</customer>
d) Filtering XML data with predicate expressions
A predicate expression lets you filter data in an XML object, accomplishing tasks similar to the WHERE clause in an SQL statement.
The predicate expression itself is an ActionScript comparison expression wrapped in parentheses. You appended the predicate to
the part of the E4X expression that indicates what data you want to return, separated with a dot operator.
This ActionScript extracts all <customer> elements that have a <lastname>matching the String value Jones:
xRetrun = xInvoices..customer.(lastname==’Jones’)
The resulting XML node looks like this:
<customer>
<firstname>Foo</firstname><lastname>Jones</lastname>
</customer>
4. Interacting with data sources and servers
4.1 Implement simple LiveCycle Data Services (LCDS) messaging and data management.
a. About LiveCycle Data Services
LiveCycle Data Services provides a messaging infrastructure for building data-rich Flex applications. This infrastructure underlies
the LiveCycle Data Services features that are designed for moving data to and from applications: RPC services, the Data
Management Service, and the Message Service.
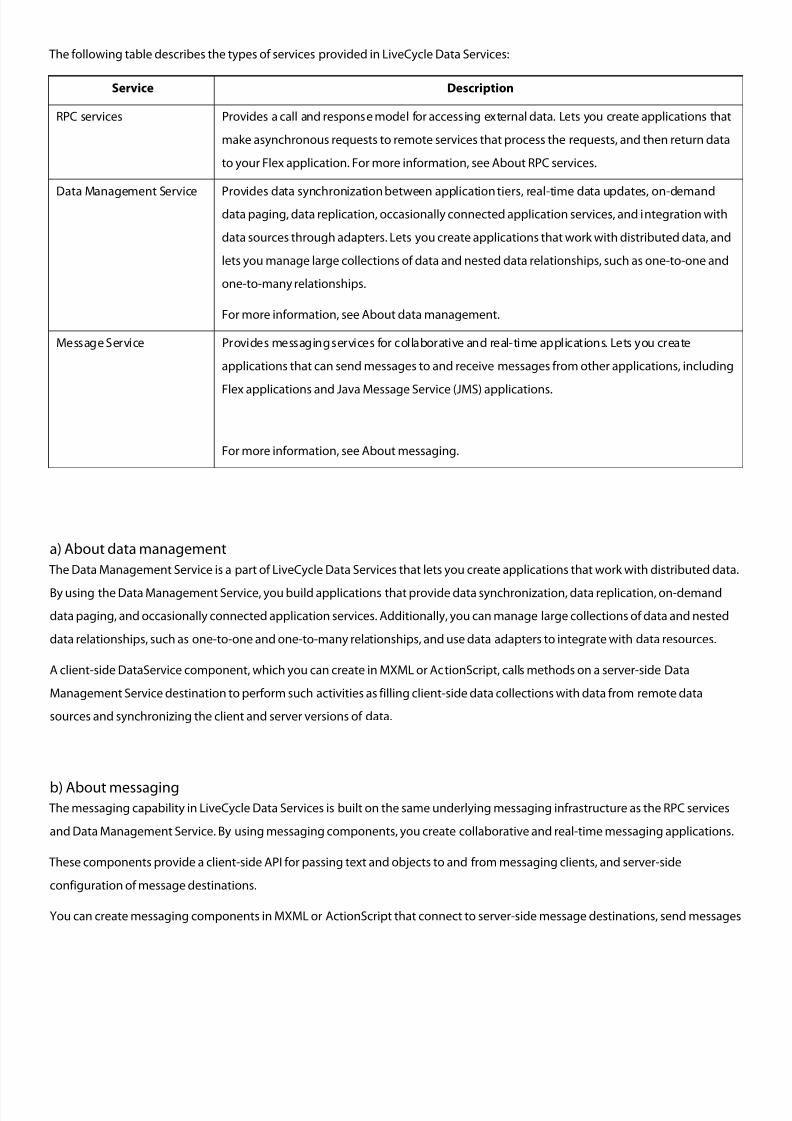
8/8/2019 Adobe Ace Study Gui Dev 24158
http://slidepdf.com/reader/full/adobe-ace-study-gui-dev-24158 58/102
The following table describes the types of services provided in LiveCycle Data Services:
Service Description
RPC services Provides a call and response model for accessing external data. Lets you create applications that
make asynchronous requests to remote services that process the requests, and then return data
to your Flex application. For more information, see About RPC services.
Data Management Service Provides data synchronization between application tiers, real-time data updates, on-demanddata paging, data replication, occasionally connected application services, and integration with
data sources through adapters. Lets you create applications that work with distributed data, and
lets you manage large collections of data and nested data relationships, such as one-to-one and
one-to-many relationships.
For more information, see About data management.
Message Service Provides messaging services for collaborative and real-time applications. Lets you create
applications that can send messages to and receive messages from other applications, including
Flex applications and Java Message Service (JMS) applications.
For more information, see About messaging.
a) About data management
The Data Management Service is a part of LiveCycle Data Services that lets you create applications that work with distributed data.
By using the Data Management Service, you build applications that provide data synchronization, data replication, on-demand
data paging, and occasionally connected application services. Additionally, you can manage large collections of data and nested
data relationships, such as one-to-one and one-to-many relationships, and use data adapters to integrate with data resources.
A client-side DataService component, which you can create in MXML or ActionScript, calls methods on a server-side Data
Management Service destination to perform such activities as filling client-side data collections with data from remote data
sources and synchronizing the client and server versions of data.
b) About messaging The messaging capability in LiveCycle Data Services is built on the same underlying messaging infrastructure as the RPC services
and Data Management Service. By using messaging components, you create collaborative and real-time messaging applications.
These components provide a client-side API for passing text and objects to and from messaging clients, and server-side
configuration of message destinations.
You can create messaging components in MXML or ActionScript that connect to server-side message destinations, send messages
8/8/2019 Adobe Ace Study Gui Dev 24158
http://slidepdf.com/reader/full/adobe-ace-study-gui-dev-24158 59/102
to those destinations, and receive messages from other messaging clients. Components that send messages are called producers,
and those that receive messages are called consumers.
Messages are sent over transport channels, which use specific transport protocols, such as the Realtime Message Protocol (RTMP)
and Action Message Format (AMF). Messaging clients can be Flex applications or other types of applications, such as Java Message
Service (JMS) applications. JMS is a Java API that lets applications create, send, receive, and read messages. JMS applications can
publish and subscribe to the same message destinations as Flex applications. However, you can create a wide variety of messaging
applications using just Flex messaging.
LCDS messaging could originate from the following places:
• Java Message Service (JMS)
• ColdFusion event gateways
• Other Flex clients using the<mx:Producer> tag
Important terms to understand when working with Flex Messaging:
• Message: A piece of data sent from a message producer through the messaging service to a consumer. A message
consists of a header that describes the message and a body that contains the data for the message.
• Consumer: An application that makes use of messages. Dashboard applications that monitor the sales of a site would be
a considered a consumer, because you are subscribing to that data.
• Producer: The sender of a message.
• Destination: An identifier for a place to which a producer sends a message. The LCDS will route the message
appropriately, based on its destination. This architecture makes it possible for the products and consumers to be entirely
decoupled, knowing nothing about each other.
• Channel: A gateway to a message destination. Producers use channels to connect to the destination within Flex Data
Services, and FDS uses channels to connect to the listening consumers.
• Adapter: Elements that translate message between the FDS and external messaging services. LCDS ships with adapters
for JMS, ColdFusion Gateways, and the ActionScript adapter, which is used to send messages to the Flash Clients.
4.1 Create, connect to, and define a local database.
a. Creating a database
To create a new database file, you first create an SQLConnection instance. You call its open()method to open it in
synchronous execution mode, or its openAsync()method to open it in asynchronous execution mode.
The open() and openAsync()methods are used to open a connection to a database. If you pass a File instance that refers to a
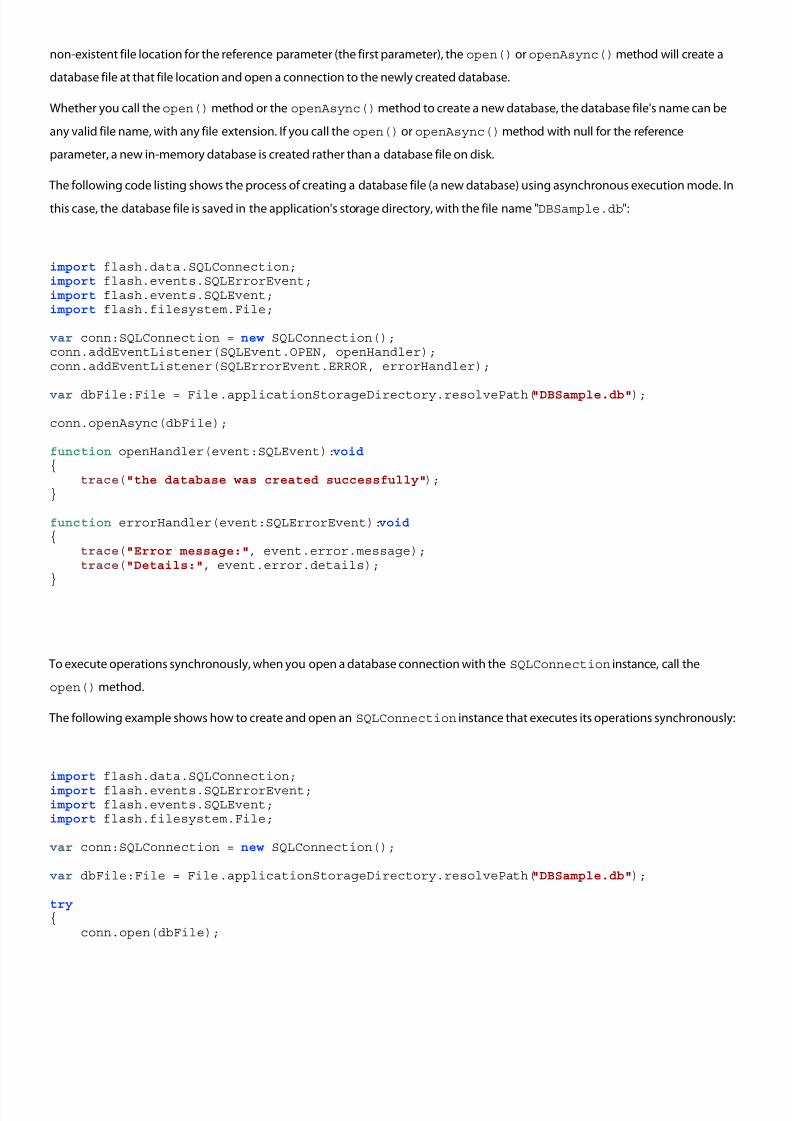
8/8/2019 Adobe Ace Study Gui Dev 24158
http://slidepdf.com/reader/full/adobe-ace-study-gui-dev-24158 60/102
non-existent file location for the reference parameter (the first parameter), the open() or openAsync()method will create a
database file at that file location and open a connection to the newly created database.
Whether you call theopen()method or the openAsync()method to create a new database, the database file's name can be
any valid file name, with any file extension. If you call the open() or openAsync()method with null for the reference
parameter, a new in-memory database is created rather than a database file on disk.
The following code listing shows the process of creating a database file (a new database) using asynchronous execution mode. In
this case, the database file is saved in the application's storage directory, with the file name "DBSample.db":
import flash.data.SQLConnection;import flash.events.SQLErrorEvent;import flash.events.SQLEvent;import flash.filesystem.File;
var conn:SQLConnection = new SQLConnection();conn.addEventListener(SQLEvent.OPEN, openHandler);conn.addEventListener(SQLErrorEvent.ERROR, errorHandler);
var dbFile:File = File.applicationStorageDirectory.resolvePath("DBSample.db");
conn.openAsync(dbFile);
function openHandler(event:SQLEvent):void{ trace("the database was created successfully");}
function errorHandler(event:SQLErrorEvent):void{ trace("Error message:", event.error.message); trace("Details:", event.error.details);}
To execute operations synchronously, when you open a database connection with the SQLConnection instance, call the
open()method.
The following example shows how to create and open an SQLConnection instance that executes its operations synchronously:
import flash.data.SQLConnection;import flash.events.SQLErrorEvent;import flash.events.SQLEvent;import flash.filesystem.File;
var conn:SQLConnection = new SQLConnection();
var dbFile:File = File.applicationStorageDirectory.resolvePath("DBSample.db");
try{
conn.open(dbFile);
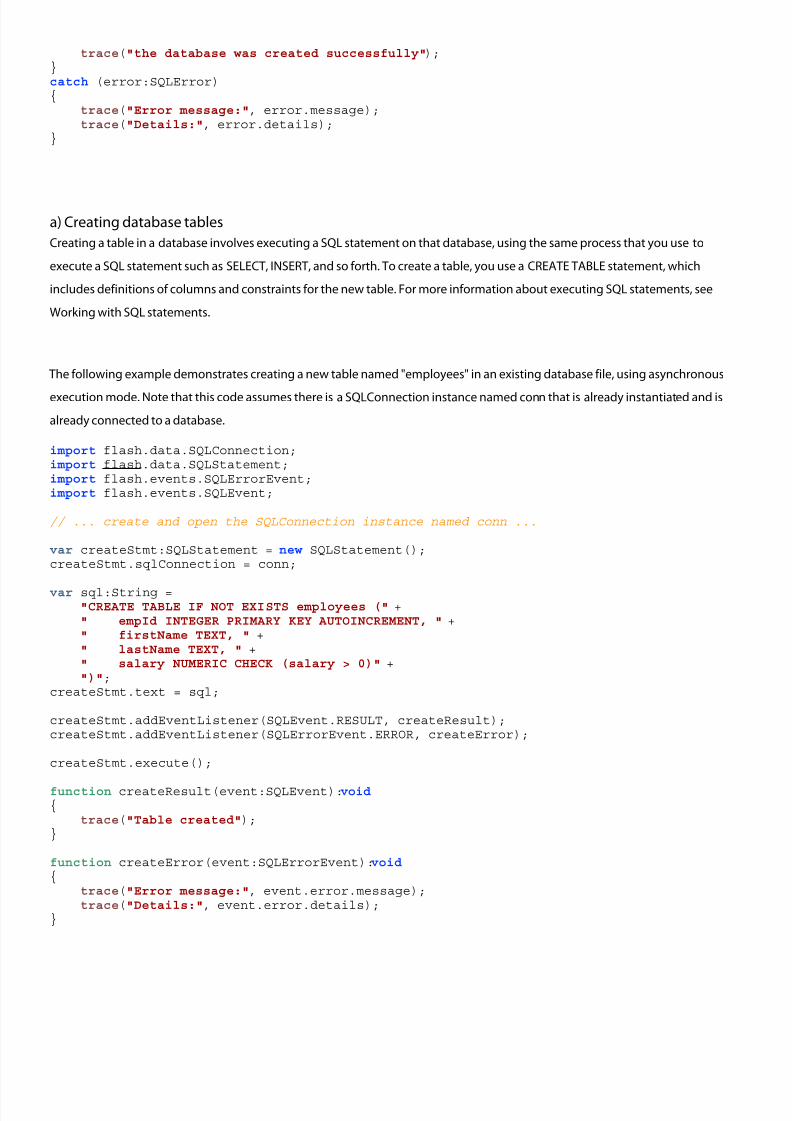
8/8/2019 Adobe Ace Study Gui Dev 24158
http://slidepdf.com/reader/full/adobe-ace-study-gui-dev-24158 61/102
trace("the database was created successfully");}catch (error:SQLError){ trace("Error message:", error.message); trace("Details:", error.details);}
a) Creating database tables
Creating a table in a database involves executing a SQL statement on that database, using the same process that you use to
execute a SQL statement such as SELECT, INSERT, and so forth. To create a table, you use a CREATE TABLE statement, which
includes definitions of columns and constraints for the new table. For more information about executing SQL statements, see
Working with SQL statements.
The following example demonstrates creating a new table named "employees" in an existing database file, using asynchronous
execution mode. Note that this code assumes there is a SQLConnection instance named conn that is already instantiated and is
already connected to a database.
import flash.data.SQLConnection;import flash.data.SQLStatement;import flash.events.SQLErrorEvent;import flash.events.SQLEvent;
// ... create and open the SQLConnection instance named conn ...
var createStmt:SQLStatement = new SQLStatement();createStmt.sqlConnection = conn;
var sql:String ="CREATE TABLE IF NOT EXISTS employees (" +" empId INTEGER PRIMARY KEY AUTOINCREMENT, " +" firstName TEXT, " +" lastName TEXT, " +" salary NUMERIC CHECK (salary > 0)" +")";
createStmt.text = sql;
createStmt.addEventListener(SQLEvent.RESULT, createResult);createStmt.addEventListener(SQLErrorEvent.ERROR, createError);
createStmt.execute();
function createResult(event:SQLEvent):void{ trace("Table created");}
function createError(event:SQLErrorEvent):void{ trace("Error message:", event.error.message); trace("Details:", event.error.details);}
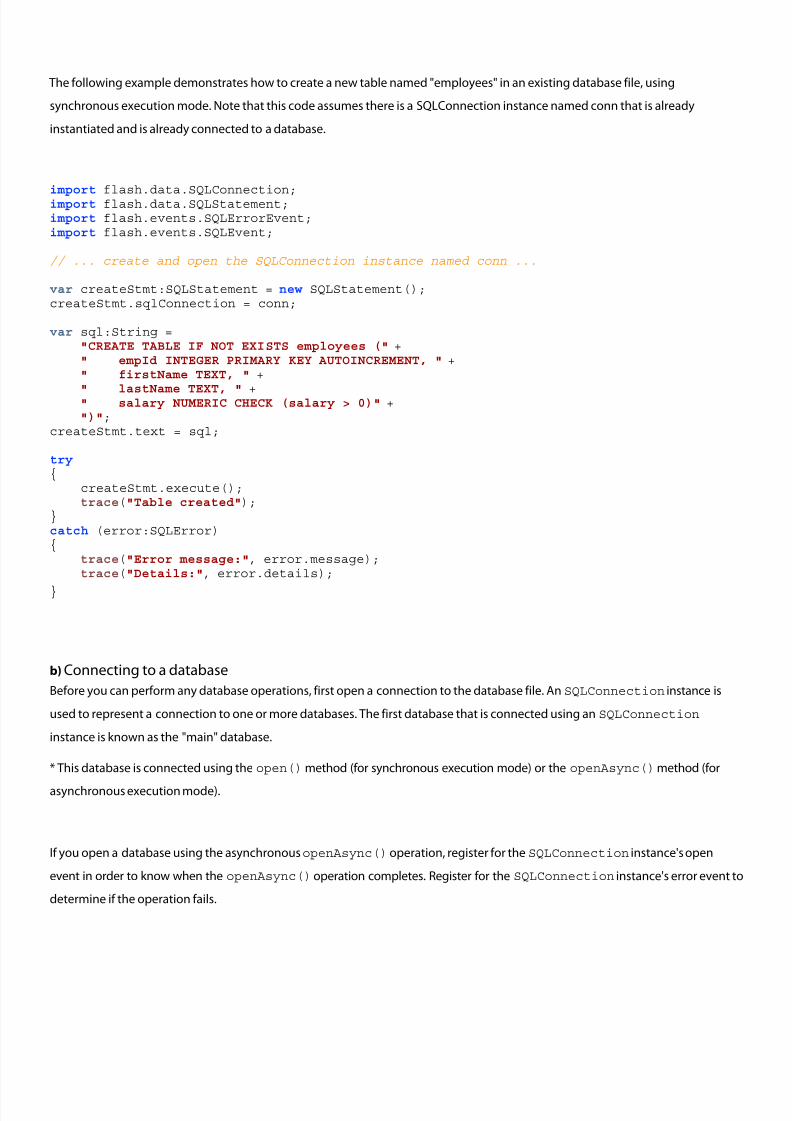
8/8/2019 Adobe Ace Study Gui Dev 24158
http://slidepdf.com/reader/full/adobe-ace-study-gui-dev-24158 62/102
The following example demonstrates how to create a new table named "employees" in an existing database file, using
synchronous execution mode. Note that this code assumes there is a SQLConnection instance named conn that is already
instantiated and is already connected to a database.
import flash.data.SQLConnection;import flash.data.SQLStatement;import flash.events.SQLErrorEvent;import flash.events.SQLEvent;
// ... create and open the SQLConnection instance named conn ...
var createStmt:SQLStatement = new SQLStatement();createStmt.sqlConnection = conn;
var sql:String ="CREATE TABLE IF NOT EXISTS employees (" +" empId INTEGER PRIMARY KEY AUTOINCREMENT, " +" firstName TEXT, " +
" lastName TEXT, " +" salary NUMERIC CHECK (salary > 0)" +")";
createStmt.text = sql;
try{
createStmt.execute(); trace("Table created");}catch (error:SQLError){ trace("Error message:", error.message); trace("Details:", error.details);
}
b) Connecting to a database
Before you can perform any database operations, first open a connection to the database file. AnSQLConnection instance is
used to represent a connection to one or more databases. The first database that is connected using an SQLConnection
instance is known as the "main" database.
* This database is connected using the open()method (for synchronous execution mode) or the openAsync()method (for
asynchronous execution mode).
If you open a database using the asynchronousopenAsync() operation, register for the SQLConnection instance's open
event in order to know when the openAsync() operation completes. Register for the SQLConnection instance's error event to
determine if the operation fails.
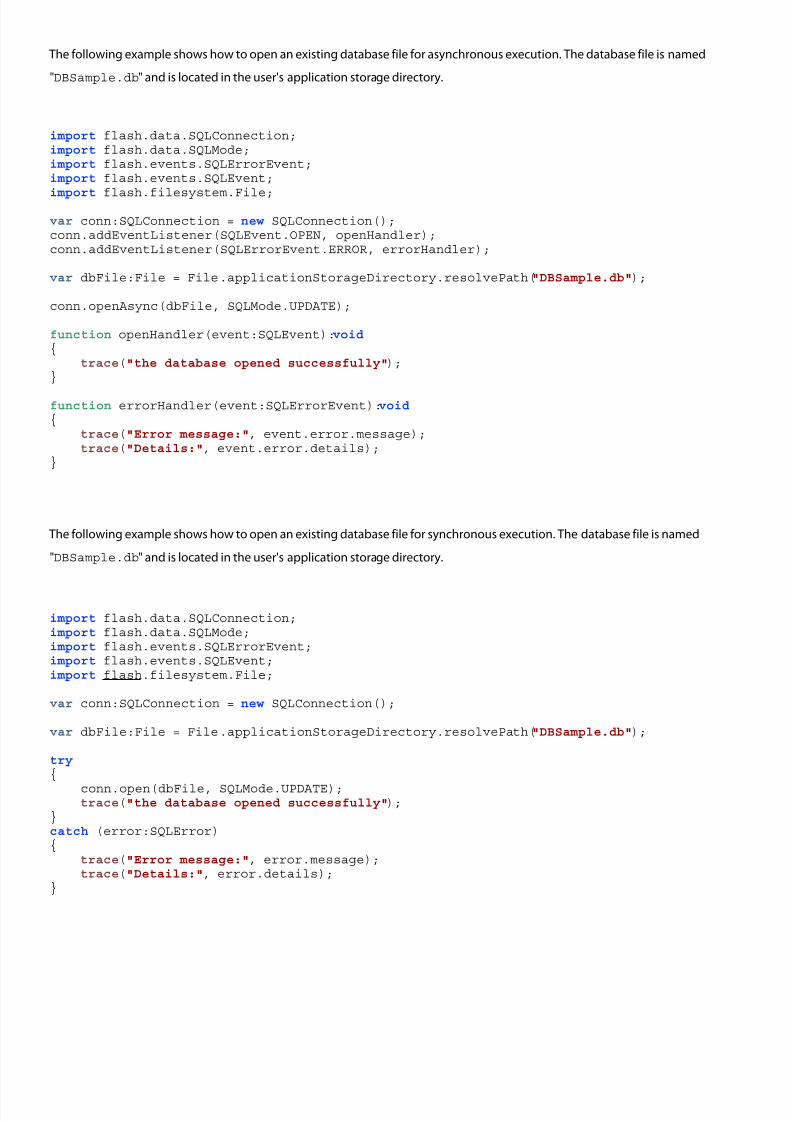
8/8/2019 Adobe Ace Study Gui Dev 24158
http://slidepdf.com/reader/full/adobe-ace-study-gui-dev-24158 63/102
The following example shows how to open an existing database file for asynchronous execution. The database file is named
"DBSample.db" and is located in the user's application storage directory.
import flash.data.SQLConnection;import flash.data.SQLMode;import flash.events.SQLErrorEvent;import flash.events.SQLEvent;
import flash.filesystem.File;
var conn:SQLConnection = new SQLConnection();conn.addEventListener(SQLEvent.OPEN, openHandler);conn.addEventListener(SQLErrorEvent.ERROR, errorHandler);
var dbFile:File = File.applicationStorageDirectory.resolvePath("DBSample.db");
conn.openAsync(dbFile, SQLMode.UPDATE);
function openHandler(event:SQLEvent):void{ trace("the database opened successfully");}
function errorHandler(event:SQLErrorEvent):void{ trace("Error message:", event.error.message); trace("Details:", event.error.details);}
The following example shows how to open an existing database file for synchronous execution. The database file is named
"DBSample.db" and is located in the user's application storage directory.
import flash.data.SQLConnection;import flash.data.SQLMode;import flash.events.SQLErrorEvent;import flash.events.SQLEvent;import flash.filesystem.File;
var conn:SQLConnection = new SQLConnection();
var dbFile:File = File.applicationStorageDirectory.resolvePath("DBSample.db");
try{
conn.open(dbFile, SQLMode.UPDATE); trace("the database opened successfully");}catch (error:SQLError){ trace("Error message:", error.message); trace("Details:", error.details);}
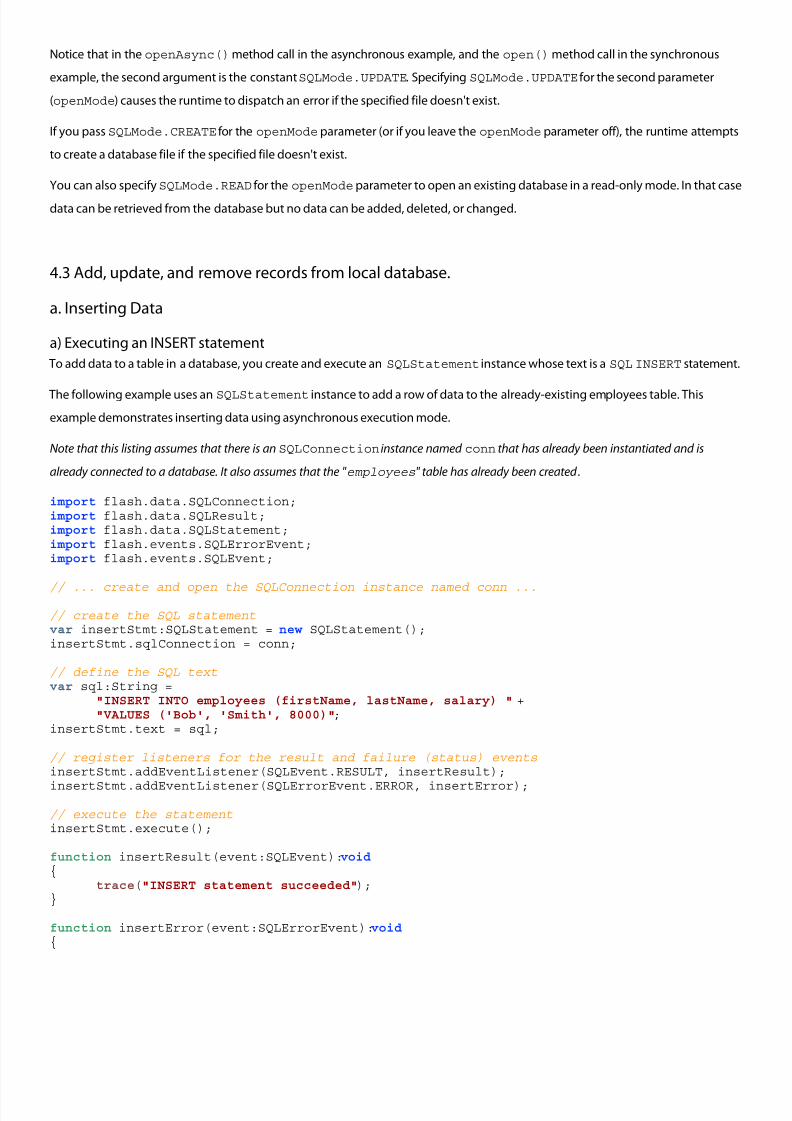
8/8/2019 Adobe Ace Study Gui Dev 24158
http://slidepdf.com/reader/full/adobe-ace-study-gui-dev-24158 64/102
Notice that in the openAsync()method call in the asynchronous example, and the open()method call in the synchronous
example, the second argument is the constantSQLMode.UPDATE. Specifying SQLMode.UPDATE for the second parameter
(openMode) causes the runtime to dispatch an error if the specified file doesn't exist.
If you pass SQLMode.CREATE for the openMode parameter (or if you leave the openMode parameter off), the runtime attempts
to create a database file if the specified file doesn't exist.
You can also specifySQLMode.READ for the openMode parameter to open an existing database in a read-only mode. In that case
data can be retrieved from the database but no data can be added, deleted, or changed.
4.3 Add, update, and remove records from local database.
a. Inserting Data
a) Executing an INSERT statement
To add data to a table in a database, you create and execute an SQLStatement instance whose text is a SQL INSERT statement.
The following example uses an SQLStatement instance to add a row of data to the already-existing employees table. This
example demonstrates inserting data using asynchronous execution mode.
Note that this listing assumes that there is an SQLConnection instance named conn that has already been instantiated and is
already connected to a database. It also assumes that the " employees" table has already been created .
import flash.data.SQLConnection;import flash.data.SQLResult;import flash.data.SQLStatement;import flash.events.SQLErrorEvent;import flash.events.SQLEvent;
// ... create and open the SQLConnection instance named conn ...
// create the SQL statementvar insertStmt:SQLStatement = new SQLStatement();insertStmt.sqlConnection = conn;
// define the SQL textvar sql:String =
"INSERT INTO employees (firstName, lastName, salary) " +"VALUES ('Bob', 'Smith', 8000)";
insertStmt.text = sql;
// register listeners for the result and failure (status) eventsinsertStmt.addEventListener(SQLEvent.RESULT, insertResult);
insertStmt.addEventListener(SQLErrorEvent.ERROR, insertError);
// execute the statementinsertStmt.execute();
function insertResult(event:SQLEvent):void{
trace("INSERT statement succeeded");}
function insertError(event:SQLErrorEvent):void{
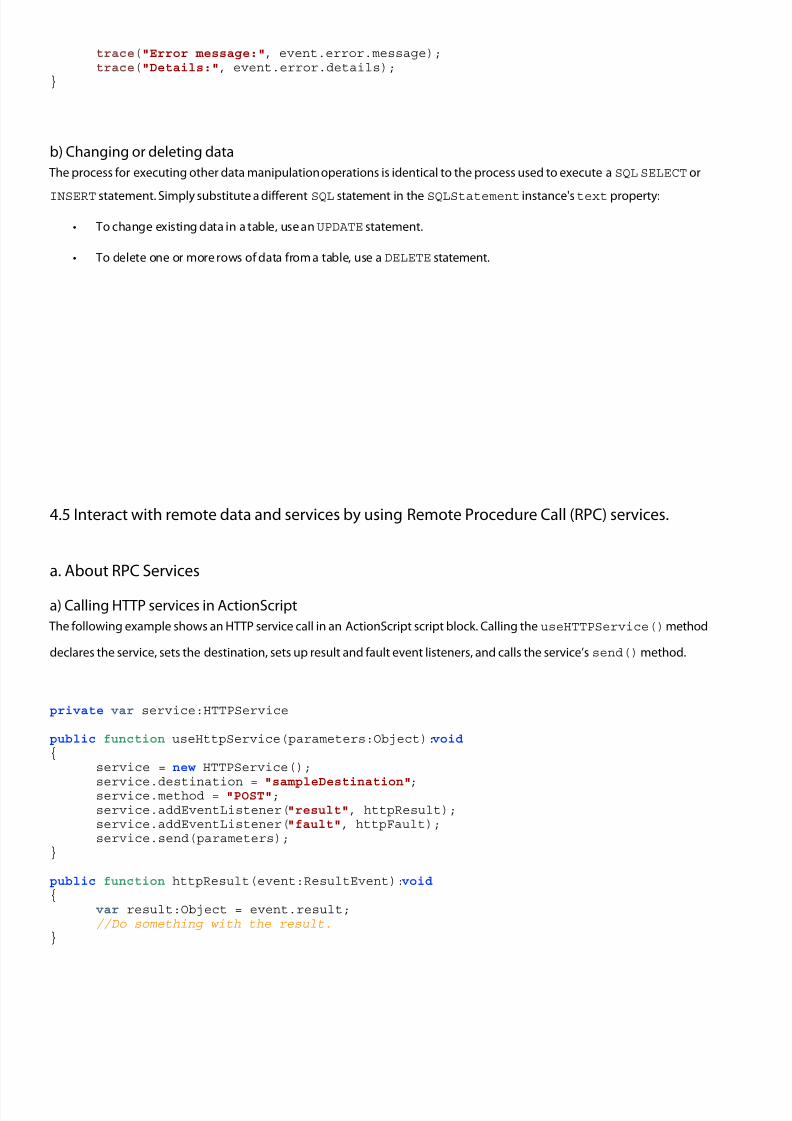
8/8/2019 Adobe Ace Study Gui Dev 24158
http://slidepdf.com/reader/full/adobe-ace-study-gui-dev-24158 65/102
trace("Error message:", event.error.message);trace("Details:", event.error.details);
}
b) Changing or deleting data
The process for executing other data manipulation operations is identical to the process used to execute a SQL SELECT or
INSERT statement. Simply substitute a different SQL statement in the SQLStatement instance'stext property:
• To change existing data in a table, use anUPDATE statement.
• To delete one or more rows of data from a table, use aDELETE statement.
4.5 Interact with remote data and services by using Remote Procedure Call (RPC) services.
a. About RPC Services
a) Calling HTTP services in ActionScript
The following example shows an HTTP service call in an ActionScript script block. Calling theuseHTTPService()method
declares the service, sets the destination, sets up result and fault event listeners, and calls the service’s send()method.
private var service:HTTPService
public function useHttpService(parameters:Object):void {
service = new HTTPService();
service.destination = "sampleDestination";service.method = "POST";service.addEventListener("result", httpResult);service.addEventListener("fault", httpFault);service.send(parameters);
}
public function httpResult(event:ResultEvent):void {
var result:Object = event.result;//Do something with the result.
}
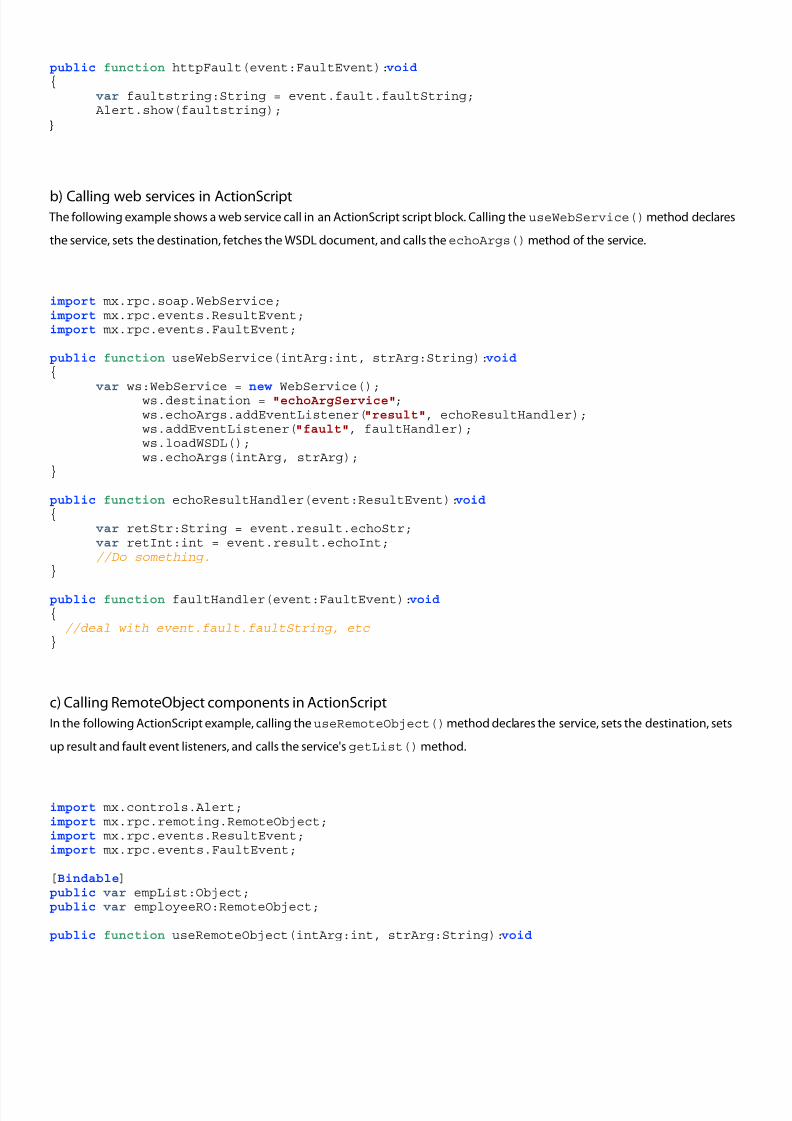
8/8/2019 Adobe Ace Study Gui Dev 24158
http://slidepdf.com/reader/full/adobe-ace-study-gui-dev-24158 66/102
public function httpFault(event:FaultEvent):void {
var faultstring:String = event.fault.faultString; Alert.show(faultstring);
}
b) Calling web services in ActionScript The following example shows a web service call in an ActionScript script block. Calling theuseWebService()method declares
the service, sets the destination, fetches the WSDL document, and calls theechoArgs()method of the service.
import mx.rpc.soap.WebService;import mx.rpc.events.ResultEvent;import mx.rpc.events.FaultEvent;
public function useWebService(intArg:int, strArg:String):void {
var ws:WebService = new WebService();ws.destination = "echoArgService";ws.echoArgs.addEventListener("result", echoResultHandler);ws.addEventListener("fault", faultHandler);ws.loadWSDL();ws.echoArgs(intArg, strArg);
}
public function echoResultHandler(event:ResultEvent):void {
var retStr:String = event.result.echoStr;var retInt:int = event.result.echoInt;
//Do something.}
public function faultHandler(event:FaultEvent):void { //deal with event.fault.faultString, etc}
c) Calling RemoteObject components in ActionScript
In the following ActionScript example, calling theuseRemoteObject()method declares the service, sets the destination, sets
up result and fault event listeners, and calls the service'sgetList()method.
import mx.controls.Alert;import mx.rpc.remoting.RemoteObject;import mx.rpc.events.ResultEvent;import mx.rpc.events.FaultEvent;
[Bindable]public var empList:Object;public var employeeRO:RemoteObject;
public function useRemoteObject(intArg:int, strArg:String):void
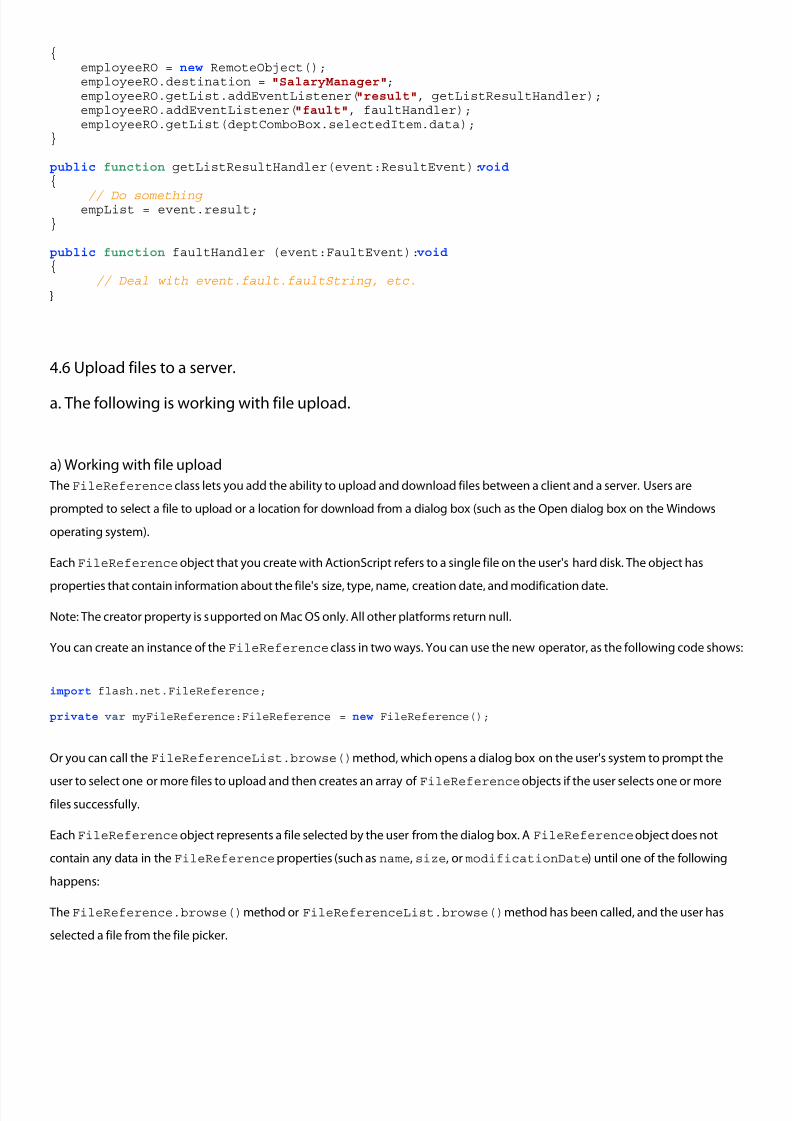
8/8/2019 Adobe Ace Study Gui Dev 24158
http://slidepdf.com/reader/full/adobe-ace-study-gui-dev-24158 67/102
{employeeRO = new RemoteObject();employeeRO.destination = "SalaryManager";employeeRO.getList.addEventListener("result", getListResultHandler);employeeRO.addEventListener("fault", faultHandler);employeeRO.getList(deptComboBox.selectedItem.data);
}
public function getListResultHandler(event:ResultEvent):void {
// Do something empList = event.result;
}
public function faultHandler (event:FaultEvent):void { // Deal with event.fault.faultString, etc.
}
4.6 Upload files to a server.
a. The following is working with file upload.
a) Working with file upload
The FileReference class lets you add the ability to upload and download files between a client and a server. Users are
prompted to select a file to upload or a location for download from a dialog box (such as the Open dialog box on the Windows
operating system).
EachFileReference object that you create with ActionScript refers to a single file on the user's hard disk. The object has
properties that contain information about the file's size, type, name, creation date, and modification date.
Note: The creator property is supported on Mac OS only. All other platforms return null.
You can create an instance of theFileReference class in two ways. You can use the new operator, as the following code shows
import flash.net.FileReference;
private var myFileReference:FileReference = new FileReference();
Or you can call the FileReferenceList.browse()method, which opens a dialog box on the user's system to prompt the
user to select one or more files to upload and then creates an array of FileReference objects if the user selects one or morefiles successfully.
EachFileReference object represents a file selected by the user from the dialog box. A FileReferenceobject does not
contain any data in the FileReference properties (such as name, size, or modificationDate) until one of the following
happens:
The FileReference.browse()method or FileReferenceList.browse()method has been called, and the user has
selected a file from the file picker.
8/8/2019 Adobe Ace Study Gui Dev 24158
http://slidepdf.com/reader/full/adobe-ace-study-gui-dev-24158 68/102
8/8/2019 Adobe Ace Study Gui Dev 24158
http://slidepdf.com/reader/full/adobe-ace-study-gui-dev-24158 69/102
selected multiple files using the FileReferenceList.browse()method, Flash Player creates an array of selected files called
FileReferenceList.fileList. You can then use the FileReference.upload()method to upload each file
individually.
Note: Using theFileReference.browse()method allows you to upload single files only. To allow a user to upload multiple
files, you must use the FileReferenceList.browse()method.
By default, the system file picker dialog box allows users to pick any file type from the local computer, although developers can
specify one or more custom file type filters by using theFileFilter class and passing an array of file filter instances to the
browse()method:
var imageTypes:FileFilter = new FileFilter( "Images (*.jpg, *.png)", "*.jpg; *.png" );var textTypes:FileFilter = new FileFilter( "Text Files (*.txt, *.rtf)", "*.txt; *.rtf" );var allTypes:Array = new Array( imageTypes, textTypes );var fileRef:FileReference = new FileReference();fileRef.browse( allTypes );
When the user has selected the files and clicked the Open button in the system file picker, the Event.SELECT event is
dispatched. If the FileReference.browse()method was used to select a file to upload, the following code is needed to send
the file to a web server:
private function uploadFile():void {
var fileRef:FileReference = new FileReference();fileRef.addEventListener(Event.SELECT, selectHandler);fileRef.addEventListener(Event.COMPLETE, completeHandler);
try {var success:Boolean = fileRef.browse();
} catch (error:Error) {
trace("Unable to browse for files.");}
}
private function selectHandler(event:Event):void {
var request:URLRequest = new URLRequest("http://yourdomain.com/fileupload.cfm" )try {fileRef.upload(request);} catch (error:Error) {
trace("Unable to upload file.");}
}
private function completeHandler(event:Event):void
{ trace("uploaded");
}
You can send data to the server with theFileReference.upload()method by using the URLRequest.method and
URLRequest.dataproperties to send variables using the POST or GETmethods.
When you attempt to upload a file using the FileReference.upload()method, any of the following events may be

8/8/2019 Adobe Ace Study Gui Dev 24158
http://slidepdf.com/reader/full/adobe-ace-study-gui-dev-24158 70/102
8/8/2019 Adobe Ace Study Gui Dev 24158
http://slidepdf.com/reader/full/adobe-ace-study-gui-dev-24158 71/102
URLRequest.methodproperty to either URLRequestMethod.GET or URLRequestMethod.POST, respectively.
ActionScript 3.0 also lets you override the default Filedata upload file field name by providing a second parameter to the
upload()method, as demonstrated in the previous example (which replaced the default value FiledatawithCustom1).
By default, Flash Player will not attempt to send a test upload, although you can override this by passing a value of true as the
third parameter to the upload()method.
The purpose of the test upload is to check whether the actual file upload will be successful and that server authentication, if required, will succeed.
5. Using Flex in the Adobe Integrated Runtime (AIR)
5.1 - Given a scenario, compile and export a release build of an AIR application.
a. Creating a release build of your application in Flex Builder
When you create and run an application in Flex Builder, the Flex compiler includes debug information in that application so thatyou can set breakpoints and view variables and perform other debugging tasks. However, the SWF file that Flex Builder generates
by default includes debugging information that makes it larger than the release build of the SWF file.
To create a release build of your application in Flex Builder, select Project > Export Release Build. This compiles a version of your
application's SWF file that does not contain any debug information in it. This SWF file is smaller than the SWF files you compile
normally. This also compiles any modules that are in the application's project without debug information.
In general, all compiled SWF files that are stored in the project's /bin-debug directory contain debug information. When you export
the application, you choose a new output directory. The default is the /bin-release directory.
To compile a release build on the command line, set the debug compiler option to false. This prevents debug information from
being included in the final SWF file.
a) Enabling accessibility
The Flex accessibility option lets you create applications that are accessible to users with disabilities. By default, accessibility is
disabled.
You enable the accessibility features of Flex components at compile time by using options to a Flex Builder project, setting the
accessible option to true for the command-line compiler, or setting the <accessible> tag in the flex-config.xml file to
true.
b) Preventing users from viewing your source code
Flex lets you publish your source code with your deployed application. You might want to enable this option during the
development process, but disable it for deployment. Or, you might want to include your source code along with your deployed
8/8/2019 Adobe Ace Study Gui Dev 24158
http://slidepdf.com/reader/full/adobe-ace-study-gui-dev-24158 72/102
application.
In Flex Builder, the Export Release Build wizard lets you specify whether to publish your source code.
You can also use the viewSourceURLproperty of the Application class to set the URL of your source code.
5.2 - Create, populate, and delete files and directories on a local file system.
Adobe AIR provides classes that you can use to access, create, and manage both files and folders. These classes,
Classes contained in the flash.filesystempackage, are used as follows:
File Classes Description
File File object represents a path to a file or directory. You use a
file object to create a pointer to a file or folder, initiating
interaction with the file or folder.
FileMode The FileMode class defines string constants used in the
fileMode parameter of the open() andopenAsync()
methods of theFileStream class.
The fileMode parameter of these methods determines the
capabilities available to the FileStreamobject once the file
is opened, which include writing, reading, appending, and
updating.
FileStream FileStream object is used to open files for reading and
writing. Once you’ve created aFile object that points to a
new or existing file, you pass that pointer to theFileStream
object so that you can open and then manipulate data within
the file.
8/8/2019 Adobe Ace Study Gui Dev 24158
http://slidepdf.com/reader/full/adobe-ace-study-gui-dev-24158 73/102
Some methods in the File class have both synchronous and
asynchronous versions:
• File.copyTo()andFile.copyToAsync()
• File.deleteDirectory()and
File.deleteDirectoryAsync()
• File.deleteFile() andFile.deleteFileAsync()
• File.getDirectoryListing()and
File.getDirectoryListingAsync()
• File.moveTo()and File.moveToAsync()
• File.moveToTrash() and
File.moveToTrashAsync()
Also, FileStream operations work synchronously or
asynchronously depending on how the FileStream object
opens the file: by calling the open() method or by calling the
openAsync()method.
The asynchronous versions let you initiate processes that
run in the background and dispatch events when complete (or
when error events occur). Other code can execute while these
asynchronousbackground processes are taking place. With
asynchronous versions of the operations, you must set up
event listener functions, using the addEventListener()
method of the File or FileStream object that calls the
function.
The synchronous versions let you write simpler code that
does not rely on setting up event listeners. However, since
other code cannot execute while a synchronousmethod is
executing, important processes such as display object
rendering and animation may be paused.
a. File Directories
a) Paths of File objects
Each File object has two properties that each defines its path:
8/8/2019 Adobe Ace Study Gui Dev 24158
http://slidepdf.com/reader/full/adobe-ace-study-gui-dev-24158 74/102
8/8/2019 Adobe Ace Study Gui Dev 24158
http://slidepdf.com/reader/full/adobe-ace-study-gui-dev-24158 75/102
The following code sets a File object to point to an AIR Test subdirectory of the documents directory:
e) Pointing to the desktop directory
You can point a File object to the desktop. The following code sets a File object to point to an AIR Test subdirectory of the desktop:
f) Pointing to the application storage directory
You can point a File object to the application storage directory. For every AIR application, there is a unique associated path that
defines the application storage directory.
This directory is unique to each application and user. You may want to use this directory to store user-specific, application-specific
data (such as user data or preferences files).
For example, the following code points a File object to a preferences file,prefs.xml, contained in the application storage
directory:
var file:File = File.applicationStorageDirectory;file = file.resolvePath("prefs.xml");
The application storage directory location is based on the user name, the application ID, and the publisher ID:
On Mac OS—In:
/Users/user name/Library/Preferences/applicationID.publisherID/Local Store/
For example:
/Users/babbage/Library/Preferences/com.example.TestApp.02D88EEED35F8.1/Local Store
On Windows—In the documents and Settings directory, in:
username/Application Data/applicationID.publisherID/Local Store/
For example:
C:\Documents and
Settings\babbage\ApplicationData\com.example.TestApp.02D88EEED35F8.1\Local Store
g) Pointing to the application directory
You can point a File object to the directory in which the application was installed, known as the application directory. You can
reference this directory using the File.applicationDirectoryproperty. You may use this directory to examine the application
descriptor file or other resources installed with the application.
For example, the following code points a File object to a directory named images in the application directory:
8/8/2019 Adobe Ace Study Gui Dev 24158
http://slidepdf.com/reader/full/adobe-ace-study-gui-dev-24158 76/102
var dir:File = File.applicationDirectory;dir = dir.resolvePath("images");
The URL (and url property) for a File object created with File.applicationDirectoryuses the app URL scheme:
var dir:File = File.applicationDirectory;dir = dir.resolvePath("images");trace(dir.url); // app:/images
h) Pointing to the filesystem root
The File.getRootDirectories()method lists all root volumes, such as C: and mounted volumes, on a Windows computer.
On Mac, this method always returns the unique root directory for the machine (the "/" directory).
i) Pointing to an explicit directory
You can point the File object to an explicit directory by setting the nativePath property of the File object, as in the following
example (on Windows):
var file:File = new File();file.nativePath = "C:\\AIR Test\\";
j) Navigating to relative paths
You can use the resolvePath()method to obtain a path relative to another given path.
For example, the following code sets a File object to point to an "AIR Test" subdirectory of the user's home directory:
var file:File = File.userDirectory;file = file.resolvePath("AIR Test");
You can also use the url property of a File object to point it to a directory based on a URL string, as in the following:
var urlStr:String = "file:///C:/AIR Test/";var file:File = new File()file.url = urlStr;
k) Letting the user browse to select a directory
The File class includes the browseForDirectory()method, which presents a system dialog box in which the user can select a
directory to assign to the object. ThebrowseForDirectory()method is asynchronous.
It dispatches aselect event if the user selects a directory and clicks the Open button, or it dispatches a cancel event if the user
clicks the Cancel button.
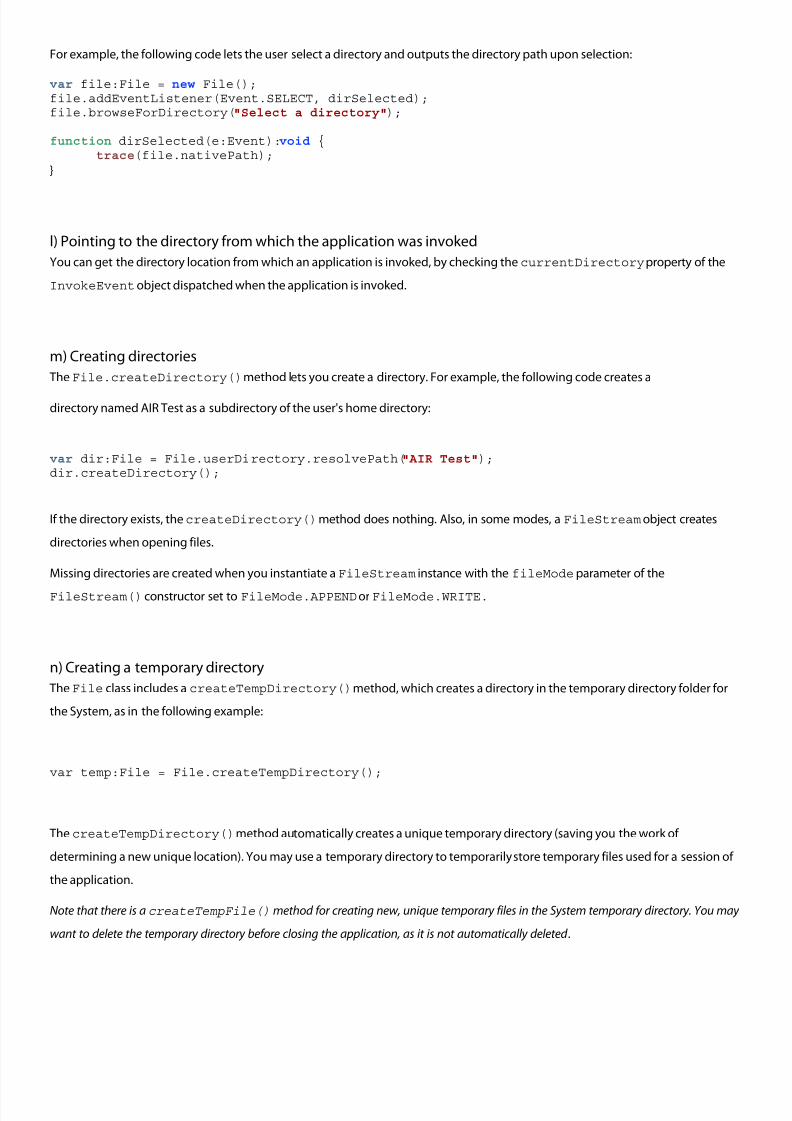
8/8/2019 Adobe Ace Study Gui Dev 24158
http://slidepdf.com/reader/full/adobe-ace-study-gui-dev-24158 77/102
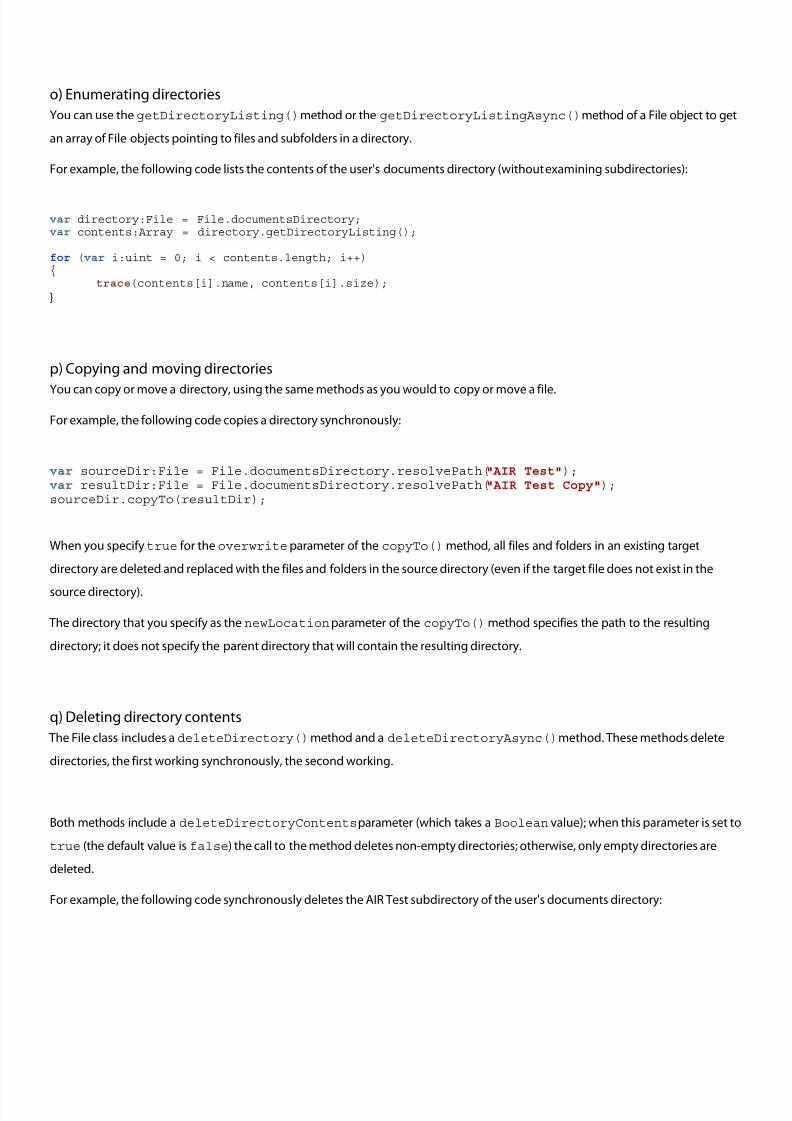
8/8/2019 Adobe Ace Study Gui Dev 24158
http://slidepdf.com/reader/full/adobe-ace-study-gui-dev-24158 78/102
o) Enumerating directories
You can use the getDirectoryListing()method or the getDirectoryListingAsync()method of a File object to get
an array of File objects pointing to files and subfolders in a directory.
For example, the following code lists the contents of the user's documents directory (without examining subdirectories):
var directory:File = File.documentsDirectory;var contents:Array = directory.getDirectoryListing();
for (var i:uint = 0; i < contents.length; i++){
trace(contents[i].name, contents[i].size);
}
p) Copying and moving directories
You can copy or move a directory, using the same methods as you would to copy or move a file.
For example, the following code copies a directory synchronously:
var sourceDir:File = File.documentsDirectory.resolvePath("AIR Test");var resultDir:File = File.documentsDirectory.resolvePath("AIR Test Copy");sourceDir.copyTo(resultDir);
When you specifytrue for the overwrite parameter of the copyTo()method, all files and folders in an existing target
directory are deleted and replaced with the files and folders in the source directory (even if the target file does not exist in the
source directory).
The directory that you specify as the newLocationparameter of the copyTo()method specifies the path to the resulting
directory; it does not specify the parent directory that will contain the resulting directory.
q) Deleting directory contents
The File class includes a deleteDirectory()method and a deleteDirectoryAsync()method. These methods delete
directories, the first working synchronously, the second working.
Both methods include a deleteDirectoryContentsparameter (which takes a Boolean value); when this parameter is set to
true (the default value is false) the call to the method deletes non-empty directories; otherwise, only empty directories are
deleted.
For example, the following code synchronously deletes the AIR Test subdirectory of the user's documents directory:
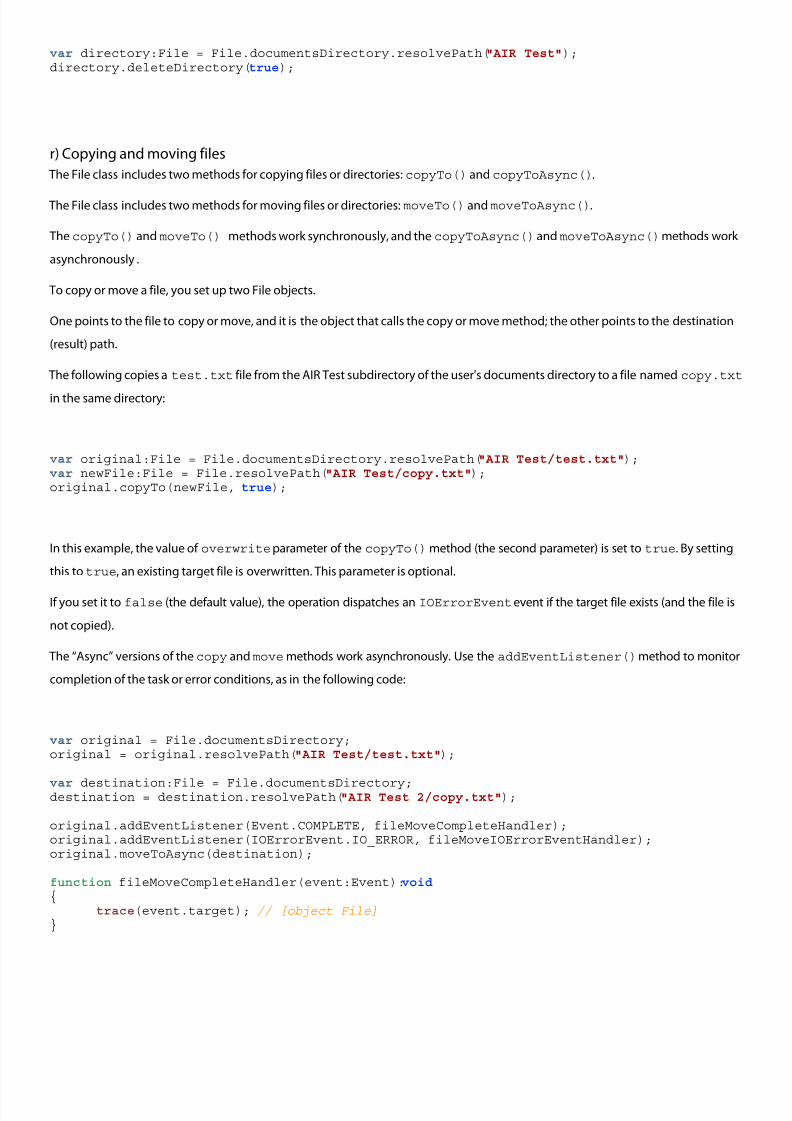
8/8/2019 Adobe Ace Study Gui Dev 24158
http://slidepdf.com/reader/full/adobe-ace-study-gui-dev-24158 79/102
var directory:File = File.documentsDirectory.resolvePath("AIR Test");directory.deleteDirectory(true);
r) Copying and moving files
The File class includes two methods for copying files or directories: copyTo() and copyToAsync().
The File class includes two methods for moving files or directories: moveTo() andmoveToAsync().
The copyTo() andmoveTo() methods work synchronously, and the copyToAsync() andmoveToAsync()methods work
asynchronously .
To copy or move a file, you set up two File objects.
One points to the file to copy or move, and it is the object that calls the copy or move method; the other points to the destination
(result) path.
The following copies a test.txt file from the AIR Test subdirectory of the user's documents directory to a file named copy.txt
in the same directory:
var original:File = File.documentsDirectory.resolvePath("AIR Test/test.txt");var newFile:File = File.resolvePath("AIR Test/copy.txt");original.copyTo(newFile, true);
In this example, the value of overwriteparameter of the copyTo()method (the second parameter) is set to true. By setting
this totrue, an existing target file is overwritten. This parameter is optional.
If you set it to false (the default value), the operation dispatches an IOErrorEvent event if the target file exists (and the file is
not copied).
The “Async” versions of the copy andmovemethods work asynchronously. Use the addEventListener()method to monitor
completion of the task or error conditions, as in the following code:
var original = File.documentsDirectory;original = original.resolvePath("AIR Test/test.txt");
var destination:File = File.documentsDirectory;destination = destination.resolvePath("AIR Test 2/copy.txt");
original.addEventListener(Event.COMPLETE, fileMoveCompleteHandler);original.addEventListener(IOErrorEvent.IO_ERROR, fileMoveIOErrorEventHandler);original.moveToAsync(destination);
function fileMoveCompleteHandler(event:Event):void {
trace(event.target); // [object File]}
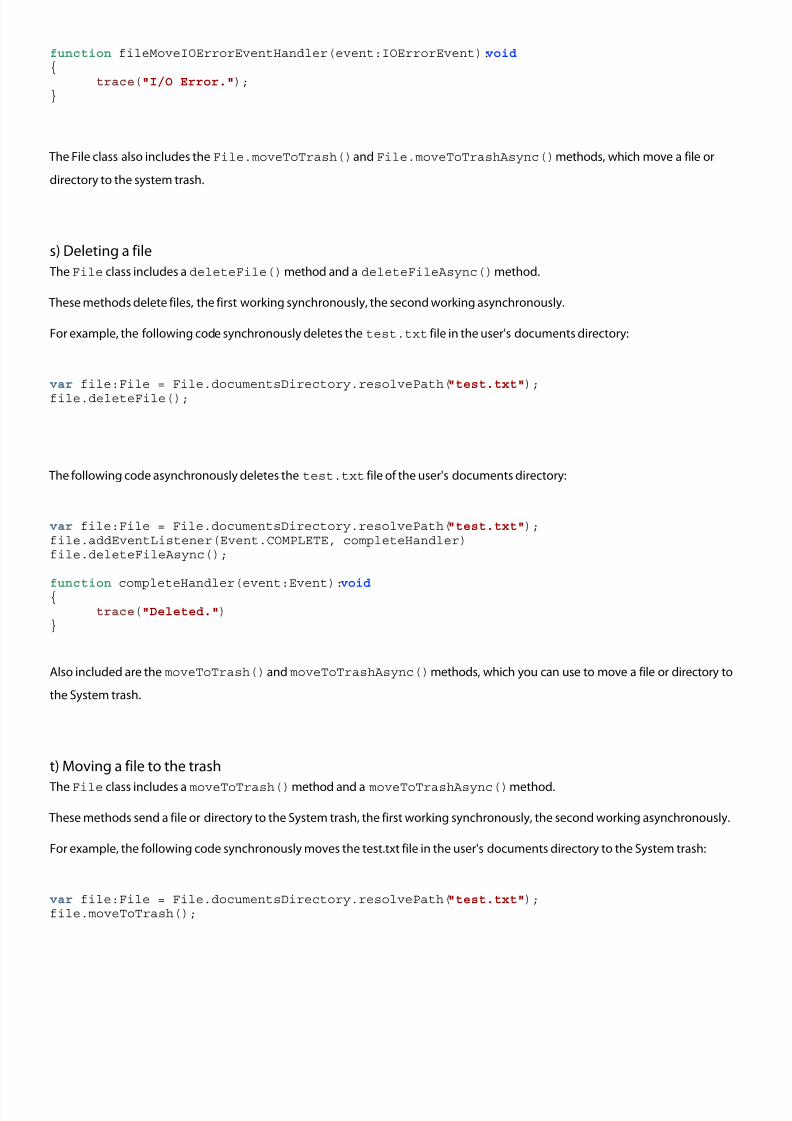
8/8/2019 Adobe Ace Study Gui Dev 24158
http://slidepdf.com/reader/full/adobe-ace-study-gui-dev-24158 80/102
function fileMoveIOErrorEventHandler(event:IOErrorEvent):void {
trace("I/O Error.");}
The File class also includes the File.moveToTrash()and File.moveToTrashAsync()methods, which move a file or
directory to the system trash.
s) Deleting a file
The File class includes a deleteFile()method and a deleteFileAsync()method.
These methods delete files, the first working synchronously, the second working asynchronously.
For example, the following code synchronously deletes the test.txt file in the user's documents directory:
var file:File = File.documentsDirectory.resolvePath("test.txt");file.deleteFile();
The following code asynchronously deletes the test.txt file of the user's documents directory:
var file:File = File.documentsDirectory.resolvePath("test.txt");file.addEventListener(Event.COMPLETE, completeHandler)file.deleteFileAsync();
function completeHandler(event:Event):void {trace("Deleted.")
}
Also included are the moveToTrash() and moveToTrashAsync()methods, which you can use to move a file or directory to
the System trash.
t) Moving a file to the trash
The File class includes a moveToTrash()method and a moveToTrashAsync()method.
These methods send a file or directory to the System trash, the first working synchronously, the second working asynchronously.
For example, the following code synchronously moves the test.txt file in the user's documents directory to the System trash:
var file:File = File.documentsDirectory.resolvePath("test.txt");file.moveToTrash();
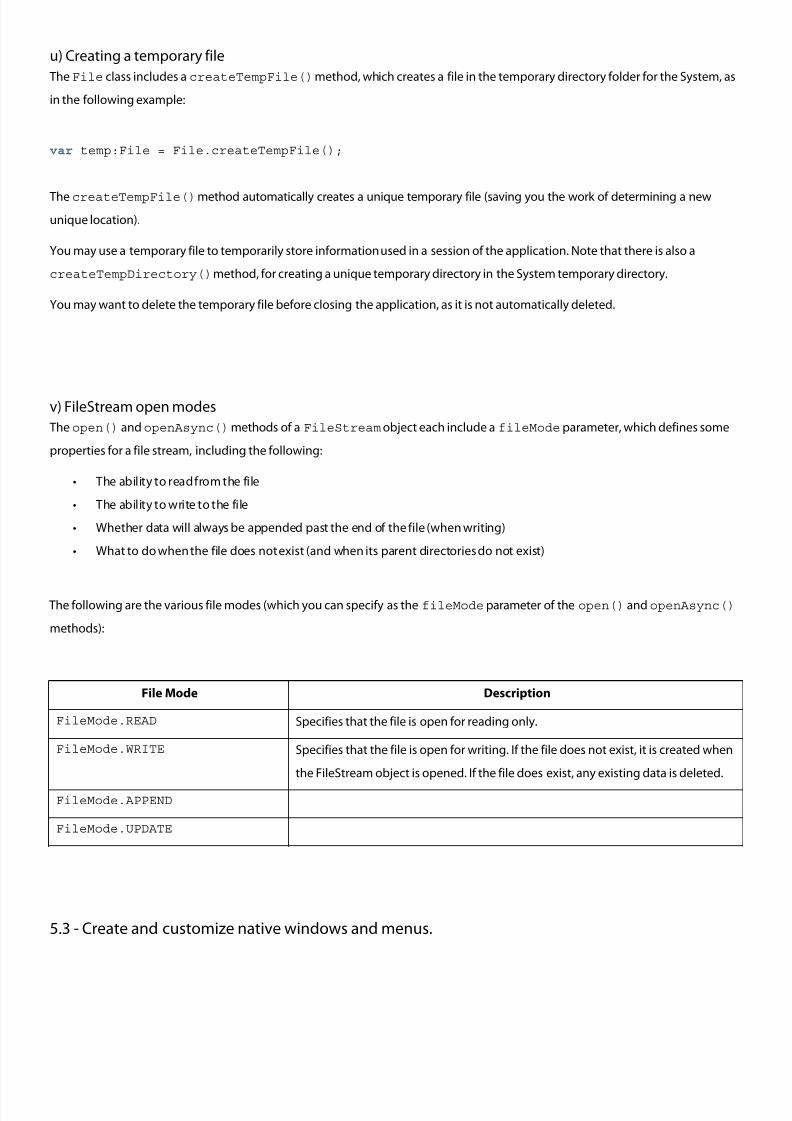
8/8/2019 Adobe Ace Study Gui Dev 24158
http://slidepdf.com/reader/full/adobe-ace-study-gui-dev-24158 81/102
u) Creating a temporary file
The File class includes a createTempFile()method, which creates a file in the temporary directory folder for the System, as
in the following example:
var temp:File = File.createTempFile();
The createTempFile()method automatically creates a unique temporary file (saving you the work of determining a new
unique location).
You may use a temporary file to temporarily store information used in a session of the application. Note that there is also a
createTempDirectory()method, for creating a unique temporary directory in the System temporary directory.
You may want to delete the temporary file before closing the application, as it is not automatically deleted.
v) FileStream open modes
The open() andopenAsync()methods of a FileStream object each include a fileMode parameter, which defines some
properties for a file stream, including the following:
• The ability to read from the file
• The ability to write to the file
• Whether data will always be appended past the end of the file (when writing)
• What to do when the file does not exist (and when its parent directories do not exist)
The following are the various file modes (which you can specify as the fileMode parameter of the open() and openAsync()
methods):
File Mode Description
FileMode.READ Specifies that the file is open for reading only.
FileMode.WRITE Specifies that the file is open for writing. If the file does not exist, it is created when
the FileStream object is opened. If the file does exist, any existing data is deleted.
FileMode.APPEND
FileMode.UPDATE
5.3 - Create and customize native windows and menus.
8/8/2019 Adobe Ace Study Gui Dev 24158
http://slidepdf.com/reader/full/adobe-ace-study-gui-dev-24158 82/102
a. Windows in AIR
AIR supports three distinct APIs for working with windows: the ActionScript-orientedNativeWindow class, the Flex framework
mx:WindowedApplication and mx:Window classes, which "wrap" the NativeWindow class, and, in the HTML environment,
the JavaScript Window class.
a) ActionScript windowsWhen you create windows with the NativeWindow class, you use the Flash stage and display list directly. To add a visual object
to aNativeWindow, you add the object to the display list of the window stage or to another display object on the stage.
b) Flex Framework windows
When you create windows with the Flex framework, you typically use MXML components to populate the window. To add a Flex
component to a window, you add the component element to the window MXML definition.
You can also use ActionScript to add content dynamically. Themx:WindowedApplication and mx:Window components are
designed as Flex containers and so can accept Flex components directly whereasNativeWindow objects cannot.
When necessary,NativeWindowproperties and methods can be accessed through the WindowedApplication and Window
objects using thestage.nativeWindowproperty. See About window containers for more information about these Flex
components.
c) HTML windows
When you create HTML windows, you use HTML, CSS, and JavaScript to display content. To add a visual object to an HTML
window, you add that content to the HTML DOM. HTML windows are a special category of NativeWindow.
The AIR host defines a nativeWindow property in HTML windows that provides access to the underlying NativeWindow
instance. You can use this property to access the NativeWindowproperties, methods, and events described in this section.
Note: The JavaScript Window object also has methods for scripting the containing window, such as moveTo() and close().
Where overlapping methods are available, you can use the method most convenient.
d) The initial application window The first window of your application is automatically created for you by AIR. AIR sets the properties and content of the window
using the parameters specified in theinitialWindow element of the application descriptor file.
If the root content is a SWF file, AIR creates a NativeWindow instance, loads the SWF file, and adds it to the window stage. If the
root content is an HTML file, AIR creates an HTML window and loads the HTML.
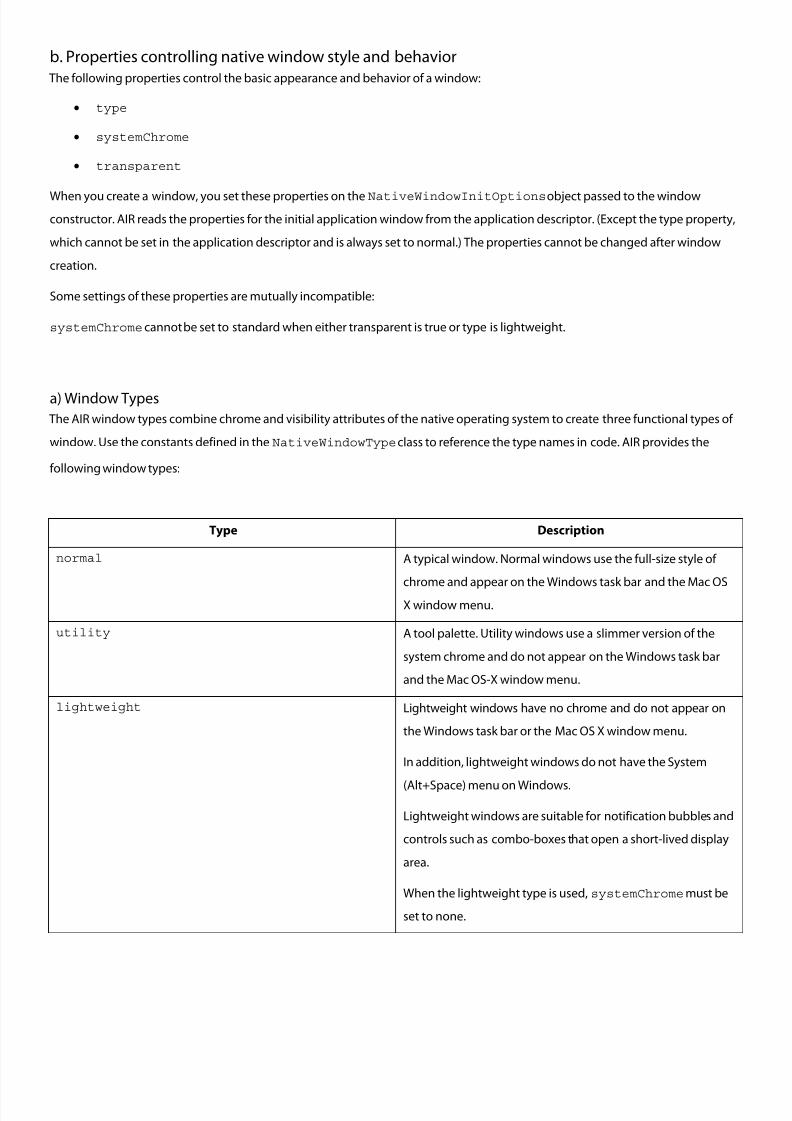
8/8/2019 Adobe Ace Study Gui Dev 24158
http://slidepdf.com/reader/full/adobe-ace-study-gui-dev-24158 83/102
b. Properties controlling native window style and behavior
The following properties control the basic appearance and behavior of a window:
• type
• systemChrome
• transparent
When you create a window, you set these properties on the NativeWindowInitOptions object passed to the window
constructor. AIR reads the properties for the initial application window from the application descriptor. (Except the type property,
which cannot be set in the application descriptor and is always set to normal.) The properties cannot be changed after window
creation.
Some settings of these properties are mutually incompatible:
systemChrome cannot be set to standard when either transparent is true or type is lightweight.
a) Window Types
The AIR window types combine chrome and visibility attributes of the native operating system to create three functional types of
window. Use the constants defined in the NativeWindowType class to reference the type names in code. AIR provides the
following window types:
Type Description
normal A typical window. Normal windows use the full-size style of
chrome and appear on the Windows task bar and the Mac OS
X window menu.
utility A tool palette. Utility windows use a slimmer version of the
system chrome and do not appear on the Windows task bar
and the Mac OS-X window menu.
lightweight Lightweight windows have no chrome and do not appear on
the Windows task bar or the Mac OS X window menu.
In addition, lightweight windows do not have the System
(Alt+Space) menu on Windows.
Lightweight windows are suitable for notification bubbles and
controls such as combo-boxes that open a short-lived display
area.
When the lightweight type is used, systemChromemust be
set to none.

8/8/2019 Adobe Ace Study Gui Dev 24158
http://slidepdf.com/reader/full/adobe-ace-study-gui-dev-24158 84/102
b) Window chrome
Window chrome is the set of controls that allow users to manipulate a window in the desktop environment.
Chrome elements include the title bar, title bar buttons, border, and resize grippers.
c) System chrome
You can set the systemChrome property to standard or none.
Choosestandard system chrome to give your window the set of standard controls created and styled by the user's operating
system.
Choosenone to provide your own chrome for the window (or to use Flex chrome). Use the constants defined in the
NativeWindowSystemChrome class to reference the system chrome settings in code.
System chrome is managed by the system. Your application has no direct access to the controls themselves, but can react to the
events dispatched when the controls are used. When you use standard chrome for a window, the transparent property must be set
to false and the type property must be normal or utility.
d) Flex chrome
When you use the Flex mx:WindowedApplicationor mx:Window components, the window can be use either system chrome
or chrome provided by the Flex framework. To use the Flex chrome, set the systemChrome property used to create the window
to none.
e) Custom chrome
When you create a window with no system chrome and you do not use the Flex mx:WindowedApplicationof mx:Window
components, then you must add your own chrome controls to handle the interactions between a user and the window.
You are also free to make transparent, non-rectangular windows.
f) Window transparency To allow alpha blending of a window with the desktop or other windows, set the windowtransparent property to true.
The transparentproperty must be set before the window is created and cannot be changed.
A transparent window has no default background. Any window area not occupied by a display object will be invisible.
If a display object has an alpha setting of less than one, then anything below the object will show through, including other display
objects in the same window, other windows, and the desktop.
8/8/2019 Adobe Ace Study Gui Dev 24158
http://slidepdf.com/reader/full/adobe-ace-study-gui-dev-24158 85/102
Rendering large alpha-blended areas can be slow, so the effect should be used conservatively.
Transparent windows are useful when you want to create applications with borders that are irregular in shape or that "fade out" or
appear to be invisible.
Transparency cannot be used with windows that have system chrome.
c. Creating windows
AIR automatically creates the first window for an application, but you can create any additional windows you need.
To create a native window, use the NativeWindow constructor method.
To create a Flex window, use the mx:Window class.
To create an HTML window, either use the HTMLLoader.createRootWindow()method or, from an HTML document, call the
JavaScriptwindow.open()method.
a) Specifying window initialization properties
Set the properties for the initial window created by AIR in the application descriptor file.
The main window of an AIR application is always type, normal.
(Additional window properties can be specified in the descriptor file, such as visible, width, and height, but these properties can be
changed at any time.)
When you create a window with the Flex mx:Window class, specify the initialization properties on the window object itself, eitherin the MXML declaration for the window, or in the code that creates the window.
The desktop window is not created until you call the windowopen()method. Once a window is opened, these initialization
properties cannot be changed.
Set the properties for other native and HTML windows created by your application using theNativeWindowInitOptions
class.
When you create a window, you must pass aNativeWindowInitOptions object specifying the window properties to eitherthe NativeWindow constructor function or the HTMLLoader createRootWindow() method.
The following code creates a NativeWindowInitOptionsobject for a utility window:
var options:NativeWindowInitOptions = new NativeWindowInitOptions();options.systemChrome = NativeWindowSystemChrome.STANDARD;options.type = NativeWindowType.UTILITYoptions.transparent = false;options.resizable = false;options.maximizable = false;
8/8/2019 Adobe Ace Study Gui Dev 24158
http://slidepdf.com/reader/full/adobe-ace-study-gui-dev-24158 86/102
SettingsystemChrome to standardwhen transparent is true or type is lightweight is not supported.
b) Creating the initial application window
AIR creates the initial application window based on the properties specified in the application descriptor and loads the file
referenced in the content element. The content must be a SWF or an HTML file.
The initial window can be the main window of your application or it can merely serve to launch one or more other windows. You
do not have to make it visible at all.
c) Creating the initial window with Flex
When creating an AIR application with the Flex framework, use themx:WindowedApplication as the root element of your
main MXML file.
(You can use the mx:Application component, but it does not support all the window features available in AIR.)
The WindowedApplication component serves as the initial entry point for the application.
When you launch the application, AIR creates a native window, initializes the Flex framework, and adds the
WindowedApplicationobject to the window stage.
When the launch sequence finishes, the WindowedApplicationdispatches an applicationComplete event. Access the
desktop window object with thenativeWindow property of the WindowedApplication instance.
d) Creating the initial window with ActionScriptWhen you create an AIR application using the Flex 3 SDK and ActionScript, the main class of your application must extend the
Sprite class (or a subclass of the Sprite class).
This class serves as the main entry point for the application.
When your application launches, AIR creates a window, creates an instance of the main class, and adds the instance to the window
stage.
To access the window, you can listen for the addedToStage event and then use the nativeWindowproperty of the Stage
object to get a reference to the NativeWindow object.
e) Creating a new NativeWindow
To create a new NativeWindow, pass a NativeWindowInitOptionsobject to the NativeWindow constructor:
var options:NativeWindowInitOptions = new NativeWindowInitOptions();options.systemChrome = NativeWindowSystemChrome.STANDARD;options.transparent = false;
8/8/2019 Adobe Ace Study Gui Dev 24158
http://slidepdf.com/reader/full/adobe-ace-study-gui-dev-24158 87/102
var newWindow:NativeWindow = new NativeWindow(options);
The window is not shown until you set the visible property to true or call the activate()method
Once the window is created, you can initialize its properties and load content into the window using the stage property and Flash
display list techniques.
In almost all cases, you should set the stagescaleMode property of a new native window to noScale
(use theStageScaleMode.NO_SCALE constant).
The Flash scale modes are designed for situations in which the application author does not know the aspect ratio of the
application display space in advance.
The scale modes let the author choose the least-bad compromise: clip the content, stretch or squash it, or pad it with empty space.
Since you control the display space in AIR (the window frame), you can size the window to the content or the content to the
window without compromise.
The scale mode for Flex and HTML windows is set to noScale automatically.
var maxOSSize:Point = NativeWindow.systemMaxSize;
var minOSSize:Point = NativeWindow.systemMinSize;
f) Creating a new HTML window
To create a new HTML window, you can either call the JavaScript window.open() function, or you can call the AIR HTMLLoader
class createRootWindow() function.
HTML content in any security sandbox can use the standard JavaScriptWindow.open()
method.
If the content is running outside the application sandbox, theopen()method can only be called in response to user interaction,
such as a mouse click or key press.
Whenopen() is called, a window with system chrome will be created to display the content at the specified URL.
For example:
newWindow = window.open("xmpl.html", "logWindow", "height=600, width=400, top=10, left=10");
g) Adding content to a window
How you add content to an AIR window depends on the type of window.
MXML and HTML let you declaratively define the basic content of the window. You can embed resources in the application SWF or
you can load them from separate application files. Flex, Flash and HTML content can all be created on the fly and added to a
window dynamically.
When you load SWF content, or HTML content containing JavaScript, you must take the AIR security model into consideration.
Any content in the application security sandbox, that is, content installed with your application and loadable with the app: URL
8/8/2019 Adobe Ace Study Gui Dev 24158
http://slidepdf.com/reader/full/adobe-ace-study-gui-dev-24158 88/102
scheme, will have full privileges to access all the AIR APIs.
Any content loaded from outside this sandbox cannot access the AIR APIs. JavaScript content outside the application sandbox will
not be able to use the runtime, nativeWindow or htmlLoader properties of the JavaScript Window object.
To allow safe cross-scripting, you can use a sandbox bridge to provide a limited interface between application content and
non-application content.
In HTML content, you can also map pages of your application into a non-application sandbox to allow the code on that page tocross-script external content. See AIR security.
d. Loading a SWF or image
You can load Flash or images into the display list of a native window using the flash.display.Loaderclass.
package { import flash.display.Sprite; import flash.events.Event; import flash.net.URLRequest;
import flash.display.Loader;
public class LoadedSWF extends Sprite{
public function LoadedSWF(){ var loader:Loader = new Loader();
loader.load(new URLRequest("visual.swf"));loader.contentLoaderInfo.addEventListener(Event.COMPLETE,loadFlash);
}
private function loadFlash(event:Event):void{addChild(event.target.loader);
}}
}
You can load a SWF file that contains library code for use in an HTML-based application. The simplest way to load a SWF in an
HTML window is to use the script tag, but you can also use the Loader API directly.
a) Adding Flash content as an overlay on an HTML window
Because HTML windows are contained within a NativeWindow instance, you can add Flash display objects both above and
below the HTML layer in the display list.
To add a display object above the HTML layer, use the addChild()method of the window.nativeWindow.stageproperty.
The addChild()method will add content layered above any existing content in the window.
To add a display object below the HTML layer, use the addChildAt()method of the window.nativeWindow.stage
property, passing in a value of zero for the index parameter.
Placing an object at the zero index will move existing content, including the HTML display, up one layer and insert the new conten
at the bottom.
8/8/2019 Adobe Ace Study Gui Dev 24158
http://slidepdf.com/reader/full/adobe-ace-study-gui-dev-24158 89/102
8/8/2019 Adobe Ace Study Gui Dev 24158
http://slidepdf.com/reader/full/adobe-ace-study-gui-dev-24158 90/102
Context menus open in response to a right-click or command-click on an interactive object in SWF content or a document element
in HTML content.
You can create a context menu using the AIRNativeMenu class. (You can also use the legacy Flash ContextMenu class.) In
HTML content, you can use the Webkit HTML and JavaScript APIs to add context menus to an HTML element.
d) Dock and system tray icon menus These icon menus are similar to context menus and are assigned to an application icon in the Mac OS X dock or Windows
notification area. Dock and system tray icon menus use the NativeMenu class.
On Mac OS X, the items in the menu are added above the standard operating system items. On Windows, there is no standard
menu.
e) Pop-up menus
An AIR pop-up menu is like a context menu, but is not necessarily associated with a particular application object or component.
Pop-up menus can be displayed anywhere in a window by calling thedisplay()method of any NativeMenuobject.
f) Flex menus
The Flex framework provides a set of Flex menu components. The Flex menus are drawn by the AIR runtime rather than the
operating system and are not native menus.
A Flex menu component can be used for Flex windows that do not have system chrome.
Another benefit of using the Flex menu component is that you can specify menus declaratively in MXML format. If you are using
the Flex Framework, use the Flex menu classes for window menus instead of the native classes.
g) Custom menus
Native menus are drawn entirely by the operating system and, as such, exist outside the Flash and HTML rendering models.
You are of course free to create your own non-native menus using MXML, ActionScript, or JavaScript. The AIR menu classes do not
provide any facility for controlling the drawing of native menus.
h) Default menus
The following default menus are provided by the operating system or the built-in AIR class:
• Application menu on Mac OS X
• Dock icon menu on Mac OS X
• Context menu for selected text and images in HTML content
• Context menu for selected text in aTextFieldobject (or an object that extends TextField)
8/8/2019 Adobe Ace Study Gui Dev 24158
http://slidepdf.com/reader/full/adobe-ace-study-gui-dev-24158 91/102
i) Menu structure
Menus are hierarchical in nature. NativeMenu objects contain child NativeMenuItemobjects. NativeMenuItemobjects
that represent submenus, in turn, can containNativeMenu objects.
The top- or root-level menu object in the structure represents the menu bar for application and window menus. (Context, icon,
and pop-up menus don't have a menu bar).
j) Menu events
NativeMenu andNativeMenuItemobjects both dispatch displaying and select events:
• displaying: Immediately before a menu is displayed, the menu and its menu items will dispatch a displaying event to
any registered listeners.
The displaying event gives you an opportunity to update the menu contents or item appearance before it is shown to the
user.
For example, in the listener for the displaying event of an "Open Recent" menu, you could change the menu items to
reflect the current list of recently viewed documents.
The target property of the event object is always the menu that is about to be displayed. The currentTarget is the
object on which the listener is registered, either the menu itself, or one of its items.
Note: Thedisplaying event is also dispatched whenever the state of the menu or one of its items is accessed .
• select: When a command item is chosen by the user, the item will dispatch a select event to any registered listeners.
Submenu and separator items cannot be selected and so never dispatch a select event.
A select event bubbles up from a menu item to its containing menu, on up to the root menu. You can listen for
select events directly on an item and you can listen higher up in the menu structure.
When you listen for the select event on a menu, you can identify the selected item using the event target property.
As the event bubbles up through the menu hierarchy, thecurrentTarget property of the event object identifies the
current menu object.
Note:ContextMenuand ContextMenuItemobjects dispatch menuItemSelectand menuSelect events as well as
select and displaying events.
k) Menu item state
Menu items have the two state properties, checked andenabled:
• checked: Set to true to display a check mark next to the item label.
8/8/2019 Adobe Ace Study Gui Dev 24158
http://slidepdf.com/reader/full/adobe-ace-study-gui-dev-24158 92/102
• enabled: Toggle the value between true and false to control whether the command is enabled. Disabled items
are visually "grayed-out" and do not dispatchselect events.
b. Creating Menus
a) Creating a root menu object
To create a new NativeMenu object to serve as the root of the menu, use the NativeMenu constructor:
var root:NativeMenu = new NativeMenu();
For application and window menus, the root menu represents the menu bar and should only contain items that open submenus.
Context menu and pop-up menus do not have a menu bar, so the root menu can contain commands and separator lines as well as
submenus.
After the menu is created, you can add menu items. Items appear in the menu in the order in which they are added, unless you add
the items at a specific index using the addItemAt()method of a menu object.
To assign the menu as an application, window, icon, or context menu, or display it as a pop-up menu as shown in the following
sections:
b) Setting the application menu
NativeApplication.nativeApplication.menu = root;
Note: Mac OS X defines a menu containing standard items for every application. Assigning a newNativeMenu object to the
menu property of the NativeApplication object will replace the standard menu. You can also use the standard menu insteadof replacing it.
c) Setting a window menu
nativeWindowObject.menu = root;
d) Setting a context menu on an interactive object
interactiveObject.contextMenu = root;
e) Setting a dock icon menu
DockIcon(NativeApplication.nativeApplication.icon).menu = root;
Note: Mac OS X defines a standard menu for the application dock icon. When you assign a newNativeMenu to the menu
property of theDockIcon object, the items in that menu are displayed above the standard items. You cannot remove, access, or
8/8/2019 Adobe Ace Study Gui Dev 24158
http://slidepdf.com/reader/full/adobe-ace-study-gui-dev-24158 93/102
modify the standard menu items.
f) Setting a system tray icon menu
SystemTrayIcon(NativeApplication.nativeApplication.icon).menu = root;
g) Displaying a menu as a pop-up
root.display(stage, x, y);
h) Creating a submenu
To create a submenu, you add a NativeMenuItem object to the parent menu and then assign the NativeMenu object defining
the submenu to the item's submenu property. AIR provides two ways to create submenu items and their associated menu object:
You can create a new menu item and its related menu object in one step with the addSubmenu()method:
var editMenuItem:NativeMenuItem = root.addSubmenu(new NativeMenu(), "Edit");
You can also create the menu item and assign the menu object to itssubmenuproperty separately:
var editMenuItem:NativeMenuItem = root.addItem("Edit", false);editMenuItem.submenu = new NativeMenu();
i) Creating a menu command
To create a menu command, add a NativeMenuItem object to a menu and add an event listener referencing the function
implementing the menu command:
var copy:NativeMenuItem = new NativeMenuItem("Copy", false);copy.addEventListener(Event.SELECT, onCopyCommand);editMenu.addItem(copy);
You can listen for the select event on the command item itself (as shown in the example), or you can listen for the select event on a
parent menu object.
Note: Menu items that represent submenus and separator lines do not dispatch select events and so cannot be used as commands .
j) Creating a menu separator line
To create a separator line, create a NativeMenuItem, setting the isSeparator parameter to true in the constructor. Then add
the separator item to the menu in the correct location:
8/8/2019 Adobe Ace Study Gui Dev 24158
http://slidepdf.com/reader/full/adobe-ace-study-gui-dev-24158 94/102
8/8/2019 Adobe Ace Study Gui Dev 24158
http://slidepdf.com/reader/full/adobe-ace-study-gui-dev-24158 95/102
For example, an image could be included as image data, a serializedBitmap object, and as a file. Rendering of the data in a format
can be deferred to a rendering function that is not called until the data is read.
Once a drag gesture has started, theClipboard object can only be accessed from within an event handler for the
nativeDragEnter, nativeDragOver, and nativeDragDrop events.
After the drag gesture has ended, theClipboard object cannot be read or reused. An application object can be transferred as a
reference and as a serialized object.
References are only valid within the originating application. Serialized object transfers are valid between AIR applications, but can
only be used with objects that remain valid when serialized and deserialized.
Objects that are serialized are converted into the Action Message Format for ActionScript 3 ( AMF3), a string-based
data-transfer format.
b) Working with the Flex framework
In most cases, it is better to use the Adobe Flex drag-and-drop API when building Flex applications. The Flex framework provides
an equivalent feature set when a Flex application is run in AIR (it uses the AIR NativeDragManager internally).
Flex also maintains a more limited feature set when an application or component is running within the more restrictive browser
environment. AIR classes cannot be used in components or applications that run outside the AIR run-time environment.
c) Starting a drag-out operation
To start a drag operation, call theNativeDragManager.doDrag()method in response to a mouse down event.
The doDrag()method is a static method that takes the following parameters:
d) Completing a drag-out transfer
When a user drops the dragged item by releasing the mouse, the initiator object dispatches anativeDragComplete event. You
can check the dropAction property of the event object and then take the appropriate action.
For example, if the action is NativeDragAction.MOVE, you could remove the source item from its original location. The user
can abandon a drag gesture by releasing the mouse button while the cursor is outside an eligible drop target.
The drag manager sets the dropActionproperty or an abandoned gesture to NativeDragAction.NONE.
e) Supporting the drag-in gesture
To support the drag-in gesture, your application (or, more typically, a visual component of your application) must respond to
nativeDragEnter or nativeDragOverevents. Steps in a typical drop operation
The following sequence of events is typical for a drop operation:
8/8/2019 Adobe Ace Study Gui Dev 24158
http://slidepdf.com/reader/full/adobe-ace-study-gui-dev-24158 96/102
• The user drags a clipboard object over a component.
• The component dispatches anativeDragEnter event.
• The nativeDragEnter event handler examines the event object to check the available data formats and allowed
actions. If the component can handle the drop, it calls NativeDragManager.acceptDragDrop().
• The NativeDragManager changes the mouse cursor to indicate that the object can be dropped.
• The user drops the object over the component.
• The receiving component dispatches anativeDragDrop event.
• The receiving component reads the data in the desired format from theClipboardobject within the event object.
• If the drag gesture originated within an AIR application, then the initiating interactive object dispatches a
nativeDragComplete event. If the gesture originated outside AIR, no feedback is sent.
5.5 - Install, uninstall, and update an AIR application.
a. Installing, Updating and Uninstalling Air Applications
a) Installing
AIR applications are distributed via AIR installer files, which use the air extension. When Adobe AIR is installed and an AIR file is
opened, the runtime administers and manages the application installation process.
Note: Developers can specify a version, and application name, and a publisher source, but the initial application installation workflow
itself cannot be modified .
This restriction is advantageous for users because all AIR applications share a secure, streamlined, and consistent installation
procedure administered by Adobe AIR. If application customization is necessary, it can be provided when the application is first
executed.
The default application installer provides the user with security-related information. AIR displays the publisher name during
installation when the AIR application has been signed with a certificate that is trusted, or which chains to a certificate that is
trusted on the installation computer. Otherwise the publisher name is displayed as “Unknown.” This lets the user make an
informed decision whether to install the application or not:
AIR applications first require the runtime to be installed on a user’s computer, just as SWF files first require the Flash Player browse
plug-in to be installed.
The runtime can be installed in two ways:
• Using the seamless install feature
• Or via a manual installation.
The seamless install feature provides developers with a streamlined installation experience for users who do not have Adobe AIR
installed yet. In the seamless install method, the developer embeds a SWF file in a web page, and that SWF file presents the name
of the AIR application for installation. When a user clicks in the SWF file to install the application, the SWF file checks for the
8/8/2019 Adobe Ace Study Gui Dev 24158
http://slidepdf.com/reader/full/adobe-ace-study-gui-dev-24158 97/102
presence of the runtime. If the runtime cannot be detected it is installed, and the runtime is activated immediately with the
installation process for the developer's application. The user is provided with the option to cancel installation.
Alternatively, the user can manually download and install the runtime before installing an AIR file. The developer can then
distribute an AIR file by different means (for example, via e-mail or an HTML link on a website). When the AIR file is opened, the
runtime is activated and begins to process the application installation.
The AIR security model allows users to decide whether to install an AIR application. The AIR installer provides several
improvements over native application install technologies that make this trust decision easier for users:
The runtime provides a consistent installation experience on all operating systems, even when an AIR application is installed from
a link in a web browser. Most native application install experiences depend upon the browser or other application to provide
security information, if it is provided at all.
The AIR application installer identifies the source of the application (or, if the source cannot be verified, the installer makes this
clear) and it provides information about the privileges that are available to the application if the user allows the installation to
proceed.
The runtime administers the installation process of an AIR application. An AIR application cannot manipulate the installation
process the runtime uses.
In general, users should not install any desktop application (including an AIR application) that comes from a source that they do
not trust, or that cannot be verified. The burden of proof on security for native applications is equally true for AIR applications as it
is for other installable applications
b) Updating AIR applications
Development and deployment of software updates are one of the biggest security challenges facing native code applications.
An installed AIR application can check a remote location for an update AIR file. If an update is appropriate, the AIR file is
downloaded, installed, and the application restarts.
The developer documentation provides details on using this method not only to provide new functionality but also respond to
potential security vulnerabilities.
c) Removing an AIR application
A user can remove an AIR application:
• On Windows: Using the Add/Remove Programs panel to remove the application.
• On Mac OS: Deleting the application file from the install location.
Removing an AIR application removes all files in the application directory. However, it does not remove files that the application
may have written outside the application directory. Removing AIR applications does not revert changes the AIR application has
made to files outside the application directory.
8/8/2019 Adobe Ace Study Gui Dev 24158
http://slidepdf.com/reader/full/adobe-ace-study-gui-dev-24158 98/102
5.6 - List and describe the AIR security contexts.
a. Security Contexts
a) Code Signing
Adobe AIR requires all AIR applications to be digitally signed. Code signing is a process of digitally signing code to ensure integrity
of software and the identity of the publisher. Developers can sign AIR applications with a certificate issued by a Certification
Authority (CA) or by constructing a self-signed certificate.
Digitally signing AIR files with a certificate issued by a recognized certificate authority (CA) provides significant assurance to users
that the application they are installing has not been accidentally or maliciously altered.
Digitally signing AIR files with a certificate issued by a recognized certificate authority (CA) identifies the developer as the signer
(publisher). AIR recognizes code-signing certificates issued by the VeriSign and Thawte certificate authorities.
The AIR application installer displays the publisher name during installation when the developer has signed the AIR file with a
VeriSign or Thawte certificate.
The AIR application installer displays the publisher name during installation when the AIR application has been signed with acertificate that is trusted, or which chains to a certificate that is trusted on the installation computer. The Certification Authority
(CA) verifies the publisher or developer’s identity using established verification processes before issuing a high assurance
certificate.
Developers can also sign AIR applications using a self-signed certificate; one that they create themselves. However, the AIR
application installer presents these applications as originating from an unverified publisher.
When an AIR file is signed, a digital signature is included in the installation file. The signature includes a digest of the package,
which is used to verify that the AIR file has not been altered since it was signed, and it includes information about the signing
certificate, which is used to verify the publisher identity.
AIR uses the public key infrastructure (PKI) supported through the operating system’s certificate store. The computer on which an
AIR application is installed must either directly trust the certificate used to sign the AIR application, or it must trust a chain of
certificates linking the certificate to a trusted certificate authority in order for the publisher information to be verified.
If an AIR file is signed with a certificate that does not chain to one of the trusted root certificates (and normally this includes all
self-signed certificates), then the publisher information cannot be verified. While AIR can determine that the AIR file has not been
altered since it was signed, there is no way to verify who actually created and signed the file.
b) Security sandboxes
AIR provides a comprehensive security architecture that defines permissions for each file in an AIR application. This includes both
those files installed with the application and other files loaded by the application.
Permissions are granted to files according to their origin, and are assigned to logical security groupings called sandboxes.
Files installed with the application are in a directory known as the application directory, and as such, they are, by default, placed in
8/8/2019 Adobe Ace Study Gui Dev 24158
http://slidepdf.com/reader/full/adobe-ace-study-gui-dev-24158 99/102
a security sandbox — known as the application sandbox — that has access to all AIR APIs.
This includes APIs that would pose a great security risk if made available to content from sources other than the application
resource directory (in other words, files that are not installed with the application).
The AIR security model of sandboxes is composed of the Flash Player security model with the addition of the application sandbox.
Files that are not in the application sandbox have security restrictions like those specified by the Flash Player security model.
The runtime uses these security sandboxes to define the range of data that a file may access and the operations it may execute. Tomaintain local security, the files in each sandbox are isolated from the files of other sandboxes.
For example, a SWF file loaded into an AIR application from an external Internet URL is placed into the remote sandbox, and does
not by default have permission to script into files that reside in the application directory, which are assigned to the application
sandbox
c) Accessing the file system
Applications running in a web browser have only limited interaction with the user's local file system. Web browsers implement
security policies that ensure that a user's computer cannot be compromised as a result of loading web content.
For example, SWF files running through Flash Player in a browser cannot directly interact with files already on a user's computer.
Shared objects can be written to a user's computer for the purpose of maintaining user preferences and other data, but this is the
limit of file system interaction.
Because AIR applications are natively installed, they have a different security contract with the end user. This contract between the
application and the end user is made at install time just like native applications, and it includes the capability for the application to
read and write across the local file system.
This freedom comes with a higher degree of responsibility for developers. Accidental application security gaps jeopardize not only
the functionality of the application, but also the integrity of the user’s computer. The developer documentation includes an “AIR
Security” chapter that addresses best practices.
Unless there are administrator restrictions applied to the user’s computer, AIR applications are privileged to write to any location
on the user's hard drive. However, developers are encouraged to use the user- and application-specific application storage
directory that the runtime provides for each application.
The AIR API provides convenient methods for developers to read and write data in the application storage directory. The runtime
also provides an encrypted local data storage area unique to each application and user.
This allows applications to save and retrieve data that is stored on the user’s local hard drive in an encrypted format that cannot be
deciphered by other applications or users. A separate encrypted local store is used for each AIR application, and each AIR
application uses a separate encrypted local store for each user.
Applications may use the encrypted local store-to-store information that must be secured, such as login credentials for web
services. AIR uses DPAPI on Windows and KeyChain on Mac OS to associate encrypted local stores to each user. The encrypted
local store uses AES-CBC 128-bit encryption.
8/8/2019 Adobe Ace Study Gui Dev 24158
http://slidepdf.com/reader/full/adobe-ace-study-gui-dev-24158 100/102
d) Working securely with un-trusted content
Content not assigned to the application sandbox can provide additional scripting functionality to an AIR application, but only if it
meets the security criteria of the runtime. This section explains the AIR security contract with non-application content.
AIR applications restrict scripting access for non-application content more stringently than the Flash Player browser plug-in
restricts scripting access for un-trusted content. For example, in Flash Player in the browser, a SWF file can call theSystem.allowDomain()method to grant scripting access to any SWF content loaded from a specified domain.
Calls to this method are not permitted for content in the AIR application security sandbox, since it would grant unreasonable
access to the non-application file into the user’s file system.
AIR applications that script between application and non-application content have more complex security arrangements. Files that
are not in the application sandbox are only allowed to access the properties and methods of files in the application sandbox
through the use of a sandbox bridge.
A sandbox bridge acts as a gateway between application content and non-application content, providing explicit interaction
between the two files. When used correctly, sandbox bridges provide an extra layer of security, restricting non-application content
from accessing object references that are part of application content.
The benefit of sandbox bridges is best illustrated through example. Suppose an AIR music store application wants to provide an
API to advertisers who want to create their own SWF files, with which the store application can then communicate. The store wants
to provide advertisers with methods to look up artists and CDs from the store, but also wants to isolate some methods and
properties from the third-party SWF file for security reasons.
A sandbox bridge can provide this functionality. By default, content loaded externally into an AIR application at runtime does not
have access to any methods or properties in the main application.
With a custom sandbox bridge implementation, a developer can provide services to the remote content without exposing these
methods or properties. The sandbox bridge provides a limited pathway between trusted and un-trusted content.
The “AIR Security” chapter of the developer documentation provide full details on using sandbox bridges.
e) HTML security
HTML content has different security considerations than SWF-based content, primarily due to the ability of JavaScript to create
dynamically generated code.
Dynamically generated code, such as that which is made when calling theeval() function, could pose a security risk if allowed
within the application sandbox. For example, an application could inadvertently execute a string loaded from a network sandbox,
and that string may contain malicious code, such as code to delete or alter files on the user’s computer or to report back the
contents of a local file to an un-trusted network domain.
Ways to generate dynamic code include the following:
8/8/2019 Adobe Ace Study Gui Dev 24158
http://slidepdf.com/reader/full/adobe-ace-study-gui-dev-24158 101/102
• Calling theeval() function.
• Setting innerHTMLproperties or calling DOM functions to insert script tags to load a script outside the resource directly.
• Setting innerHTMLproperties or calling DOM functions to insert script tags that have inline code (rather than loading a
script via the src).
• Setting the src for script tags for content in the application sandbox to a file that is not in the application resource
directory.
• Using the javascript URL scheme (as inhref="javascript:alert('Test')").
Code in the application security sandbox can only use these methods while content is loading from application directory. This
prevents code in the application sandbox, which has access to the full AIR APIs, from executing scripts from potentially un-trusted
sources.
b. Other security considerations
Although AIR applications are built using web technologies, it is important for developers to note that they are not working within
the browser security model. This means that it is possible to build AIR applications that can do harm to the local system, either
intentionally or unintentionally. AIR attempts to minimize this risk, but there are still ways where vulnerabilities can be introduced.
This section covers important potential insecurities. The developer documentation provides best practices for building
applications that avoid these risks.Risk from importing files into the application security sandbox
Content the application sandbox has the full privileges of the runtime. Developers are advised to consider the following:
• Include a file in an AIR file (in the installed application) only if it is necessary.
• Include a scripting file in an AIR file (in the installed application) only if its behavior is fully understood and trusted.
Do not use data from a network source as parameters to methods of the AIR API that may lead to code execution. Adobe AIR
protects content in the application sandbox from using data from a network source as code, which could lead to inadvertent
execution of malicious code. This includes use of the ActionScriptLoader.loadBytes()method and the JavaScript eval()
function.
a) Risk from using an external source to determine paths
An AIR application can be compromised when using external data or content. For this reason, applications must take special care
when using data from the network or file system. The onus of trust is ultimately up to the developer and the network connections
they make, but loading foreign data is inherently risky, and should not be used for input into sensitive operations. Developers are
advised against the following:
Using data from a network source to determine a filename
Using data from a network source to construct a URL that the application uses to send private information
8/8/2019 Adobe Ace Study Gui Dev 24158
http://slidepdf.com/reader/full/adobe-ace-study-gui-dev-24158 102/102
b) Risk from using, storing, or transmitting unsecured credentials
Storing user credentials on the user's local file system inherently introduces the risk that these credentials may be compromised.
Developers are advised to consider the following:
If credentials must be stored locally, encrypt the credentials when writing to the local file system. Adobe AIR provides an encrypted
storage unique to each installed application, which is described in detail in the developer documentation.
Do not transmit unencrypted user credentials to a network source unless that source is trusted.
Never specify a default password in credential creation — let users create their own. Users who leave the default expose their
credentials to an attacker that already knows the default password.
c) Risk from a downgrade attack
During the application installation process, the runtime checks to ensure that a version of the application is not currently installed.
If an application is already installed, the runtime compares the version string of the existing application against the version that is
being installed. If this string is different, the user can choose to upgrade their installation.
The runtime cannot guarantee that the newly installed version is newer than the older version, only that it is different. An attacker
can distribute an older version to the user to circumvent a security weakness. This risk can be mitigated, and the developer
documentation provides best practices for implementing version schemes and update checks to avoid risks.


![The OpenCV Tutorials · •ffmpeg or libav development packages: libavcodec-dev, libavformat-dev, libswscale-dev; •[optional] libdc1394 2.x; •[optional] libjpeg-dev, libpng-dev,](https://img.pdfslide.us/doc/110x75/6053a6970cae8c6eef1624b2/the-opencv-affmpeg-or-libav-development-packages-libavcodec-dev-libavformat-dev.jpg)