Embed Size (px)
Citation preview

Administrator user guide
myBusiness Essentials Payslip

OverviewLearn how to start
managing your employee
payslips with this guide
01
02
03
Registration and setup
Register and assign the
Adminstrator who will manage
your Payslip subscription.
Managing employee
records
Manage your employee records
and information.
Managing payslips
Issue and manage payslips for
your employees.

2
Registration and setup
Part 1
Register and assign the Administrator who will
manage your Payslip subscription.
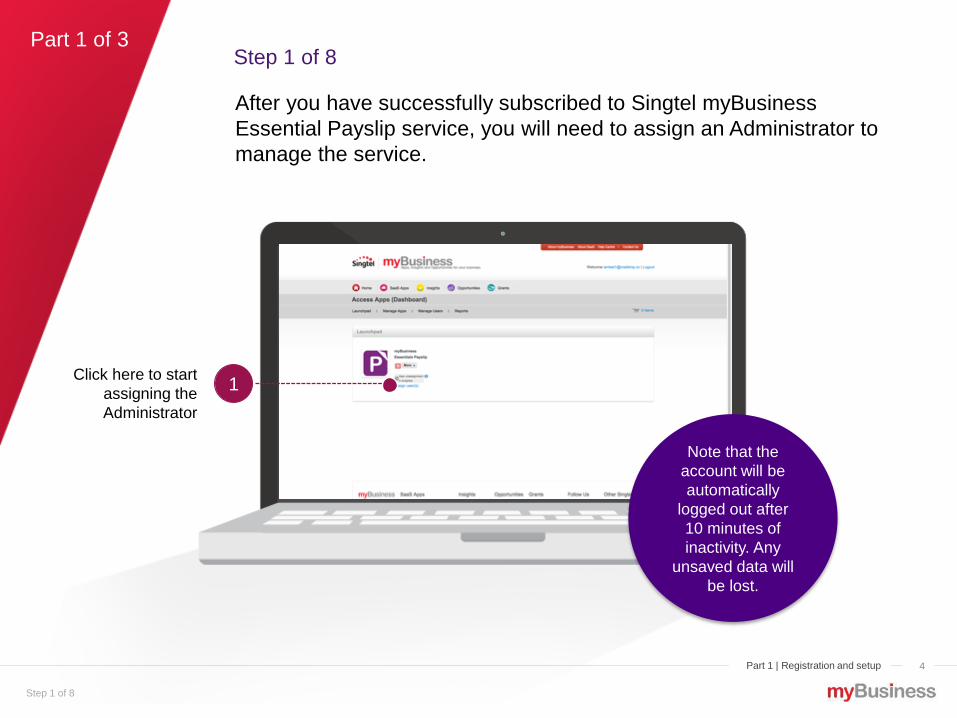
Part 1 of 3
After you have successfully subscribed to Singtel myBusiness
Essential Payslip service, you will need to assign an Administrator to
manage the service.
Click here to start
assigning the
Administrator
Step 1 of 8
1
Step 1 of 8
4Part 1 | Registration and setup
Note that the
account will be
automatically
logged out after
10 minutes of
inactivity. Any
unsaved data will
be lost.
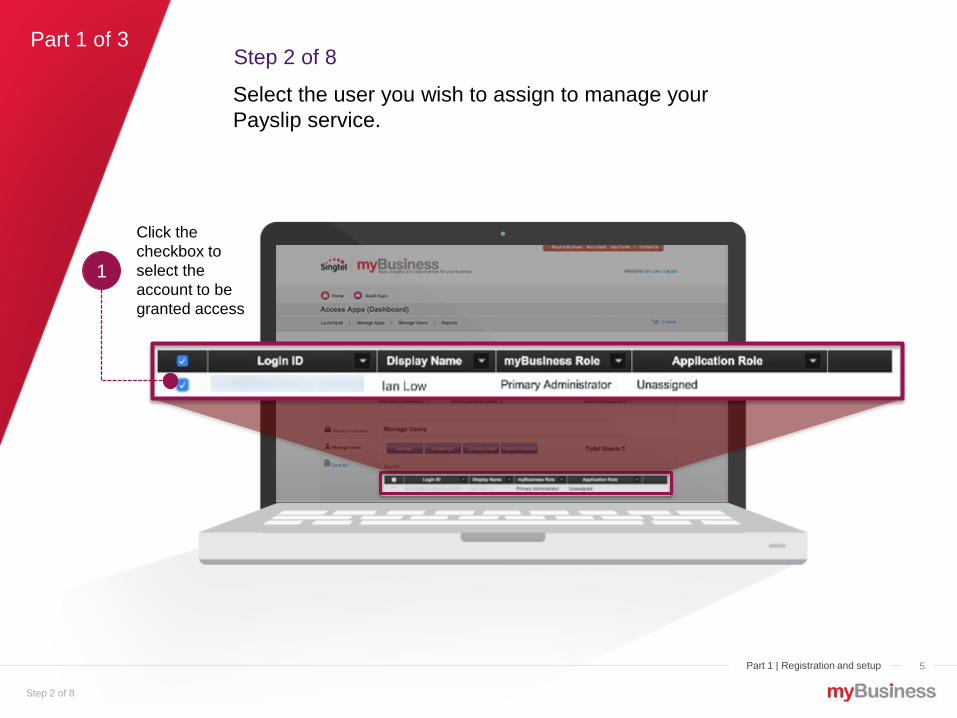
Part 1 of 3
Select the user you wish to assign to manage your
Payslip service.
Step 2 of 8
Click the
checkbox to
select the
account to be
granted access
1
Step 2 of 8
5Part 1 | Registration and setup

Part 1 of 3
Once you have selected the user, click on the button to
assign them.
Click
“Assign”
Step 3 of 8
1
Step 3 of 8
A Singtel
myBusiness
account must be
created for the
user before they
can be assigned
6Part 1 | Registration and setup

Part 1 of 3
This is to confirm the creation of the user who will be
administering the Payslip records.
Step 4 of 8
Step 4 of 8
Click “OK” to
proceed 1
Part 1 | Registration and setup 7

Part 1 of 3
You will then be shown the following screens and the status will be
updated.
A login email will be sent to the administrator shortly.
Step 5 of 8
Step 5 of 8
Click “OK”
The “Application role”
column will show that user
assignment is in progress
1
8Part 1 | Registration and setup

Part 1 of 3
Once the Administrator receives the following email,
he/she can click on the “Login URL” and proceed with the
next part.
Step 6 of 8
Step 6 of 8
9
Click here to
access the
Payslip service
to continue your
setup
1
Part 1 | Registration and setup

Part 1 of 3
As this is the first time you’re accessing the Payslip app,
you will be required to enter some basic requirement for
your company.
Step 7 of 8
Step 7 of 8
10
Enter your registered company name1
Enter your company
registration number2
Enter your company
address and postal
code
3
Click here to upload
your company logo
(.png, .jpeg format,
maximum file size of
1MB)
4
Click here to register
your company
information and
proceed with the next
step
5
Part 1 | Registration and setup
“*” denotes
the
mandatory
fields

Part 1 of 3
You will now be asked to add an employee record. You
can create multiple employee records at the same time.
Step 8 of 8
Step 8 of 8
11
Complete all the
necessary
information for
the employee
1
Click “Next” to complete the setup
process and proceed to the
dashboard
2
Click here to add
another employee
immediately in the
same page
Part 1 | Registration and setup
Make sure you enter the correct email address of your employee as payslip
notifications will be sent to this email address
“*” denotes
the
mandatory
fields

Part 1 of 3
Once you’ve completed the setup process, you will see
the dashboard. There are three main parts of the
dashboard.
The dashboard
12
This is the area for you to
manage your employee
records and payslips
Your company
information
Part 1 | Registration and setup
Navigation menu to the
various functions

Part 1 of 3
As you can see, the dashboard provides you with a quick
summary and easy access to the various functions
described below.
The dashboard
13
Option to manage
employee information
or issued payslips
Click on these
icons to edit the
respective fields
of your company
information
Create or view draft payslips
Edit your employee
information
Number of licences
under your
subscription in use
Part 1 | Registration and setup
Click here to update
your company logo
Click here
to logout
Access the
user guide
Click here to
return to this
dashboard
anytime
Access the contact us page
Connect to E.Workflow App and
manage leave and claims applications
with one seamless login.
Click here to generate report *
* Only paid user can generate reports.
Click here to create Employee
Managing employee records
Create and edit the account information of your employees.
Part 2

Create employeePart 2 of 3
15Part 2 | Managing employee records
Create employee from dashboard
Click “Add New
Employee”

Part 2 of 3
Besides creating new employees during the initial setup, you can
also click on “Create Employee” to create an employee record you
wish to issue payslips to.
Part 2 | Managing employee records
Create employee
16
Click to start creating
employee record
Make sure you enter the correct email
address of your employee as payslip
notifications will be sent to this email address
Click “Submit” to create the
account(s). An email will be
sent to your employee.3
Click here to add
another employee
immediately in the
same page.
Enter the employee
information2
“*” denotes
the
mandatory
fields
1

Part 2 of 3
Click on “Edit” to update the employee information
Edit employee
17
Click here to edit the
employee information1
Part 2 | Managing employee records

Part 2 of 3
Click the fields and start editing the information. Click on “Save” to
save the update and “Back” to cancel the update.
Edit employee
19
Update the employee
information accordingly1
Click here to save
the edits2
Click here to
cancel the edits
Part 2 | Managing employee records
The "End of
Employment" field
should only be
entered when the
employee leaves the
company.
According to MOM,
ex-employee records
must be kept for at
least one year.

Part 2 of 3
Once you have updated the information, you will be brought back to
the dashboard.
Edit employee
20
Message to
indicate that the
employee
information
update has been
saved
Part 2 | Managing employee records
According to
MOM, ex-
employee records
must be kept for
at least one year.

Alternative way to add employeePart 2 of 3
21Part 2 | Managing employee records
You can also add new employees from myBusiness portal.
Click “Select from
myBusiness” 1
Select the user you want to add2
Click “Add”3

Edit employeePart 2 of 3
22
The basic user information is uploaded. Fill in the additional
information required.
The basic employee
information will appear here.
Complete the rest of the fields.
Click “Submit”
2
Part 2 | Managing employee records
1

Part 2 of 3
You can manage, assign and un-assign user licences, through the
myBusiness 'Manage Apps' Dashboard.
Roll over on more
button and click
“Manage App”
1
Manage License
23Part 2 | Managing employee records

After accessing Manage App dashboard, you can view the current
status of your licenses. To access the page, click Manage Licenses
tab on left panel.
Manage LicensePart 2 of 3
Here you can view
the current
availability status
of your licenses
24Part 2 | Managing employee records

Click on Manage User tab on left panel. You can view and manage
users from here.
Manage Users | AssignPart 2 of 3
25Part 2 | Managing employee records
Click the
“Manage Users”
tab on left panel
1
From here you
can view the total
number of user(s)
and manage the
user’s role.

Click the
checkbox to
select the
account to be
assign new role
1
Select the user you wish to assign the license to. You can select
more than one user at one time.
Manage Users | AssignPart 2 of 3
26Part 2 | Managing employee records

Click
“Assign”
1
Once you have selected the user, click on the button to
assign them.
Manage Users | AssignPart 2 of 3
27Part 2 | Managing employee records

Next, you will need to select and confirm the assigned
role for the user. Unless the user is an administrator,
select “End User”.
Click “OK” to
proceed 2
Manage Users | AssignPart 2 of 3
28Part 2 | Managing employee records
Select the role
you want to
assign for the
user
1

After assignment, you will be shown the following screens and the
status will be updated.
Click “OK”
The “Application role”
column will show that user
assignment is in progress
1
29Part 1 | Registration and setup
Manage Users | AssignPart 2 of 3
29Part 2 | Managing employee records

To un-assign the user, select the employee you wish to remove
the access.
Manage Users | UnassignPart 2 of 3
30Part 2 | Managing employee records
Click the
checkbox to
select the
account to be
unassign
1
To un-assign the user, select the employee you wish to remove the
access.

Click
“Unassign”
1
Once you have selected the user, click on the button to
remove their license.
Manage Users | UnassignPart 2 of 3
31Part 2 | Managing employee records
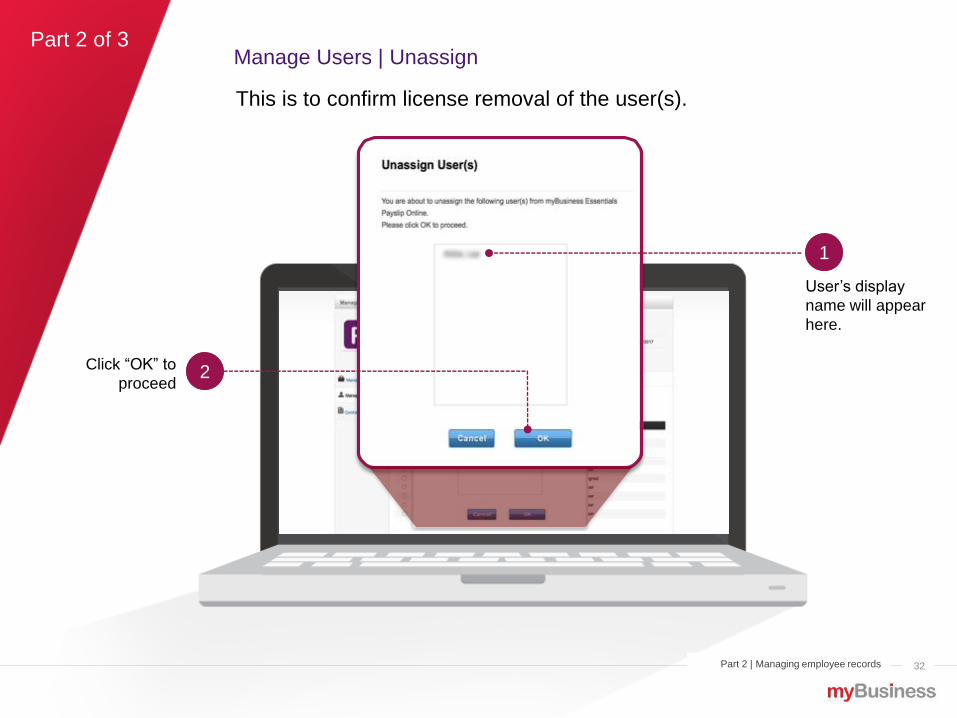
This is to confirm license removal of the user(s).
Click “OK” to
proceed2
Manage Users | UnassignPart 2 of 3
32Part 2 | Managing employee records
1
User’s display
name will appear
here.

The “Application role”
column will show that user
assignment is in progress
1
Manage Users | UnassignPart 2 of 3
33Part 2 | Managing employee records
You will then be shown the following screens and the status will be
updated.
Click “OK”

Manage Users | UnassignPart 2 of 3
34Part 2 | Managing employee records
You can un-assign licence when the employee leaves the company.
Once the user licence is removed, you will not be able to update or
view the ex-employee details from the dashboard.
After the user is
un-assigned, the
previous payslips
can still be viewed
under 'Managed
Payslips' for the
next 2 years.
Button for create and view user
will remove upon license removal

Managing payslips
Issue and manage payslips for your employees.
Part 3

Part 3 of 3
In the Dashboard, click on “Create” to start creating payslips for the
respective employee.
Part 3 | Managing payslips
Create payslips
36
Click here to start creating
payslips for the respective
employee
1
“Approved Claim” and “ Unpaid Leaves” sidebar will only appear if E.Payslip is successfully connected with E.Workflow.

Part 3 of 3
The payslip is split into four parts: the basic pay information, the
additional pay information, the deductions and the CPF calculator.
Create payslips
37
Basic pay
information1
Additional pay
information2
Deductibles3
CPF contribution
for employers and
employees
4
Part 3 | Managing payslips

Part 3 of 3
Enter the basic pay information. Make sure the dates indicated are
in line with your company’s practice.
Basic pay information
38
Select the date the pay will
be deposited or transferred
to the employee
Select the period
of work which the
pay is valid for
Part 3 | Managing payslips

Part 3 of 3
Enter the other additional pay information that the employee will be
receiving. Examples include overtime, allowances and the
commission for sales.
Additional pay information
39
Enter the overtime hourly
rate, the number of hours
worked and the total will be
automatically calculated
Enter the description for
allowance and additional
payment here
Enter the payment
amount for allowance
and other additional
items here
Click “Remove” to
delete the items
should it not be
applicable.
Part 3 | Managing payslips
Tick “Recurring” for
recurrent items to
appear next
payslip.
Click to add approved
claims from E.Workflow.
Click “Add More” to
add more items

Part 3 of 3
Enter the deductibles’ description and amount. The amount will be
automatically calculated and the net value reflected when the
payslip is generated.
Deductions information
40
Enter the
description hereEnter the
amount here
Part 3 | Managing payslips
Tick “Recurring” for
recurrent items to
appear next payslip.
Click “Remove” to
delete the items
should it not be
applicable.
Click to add approved
unpaid leaves deductibles
from E.Workflow.
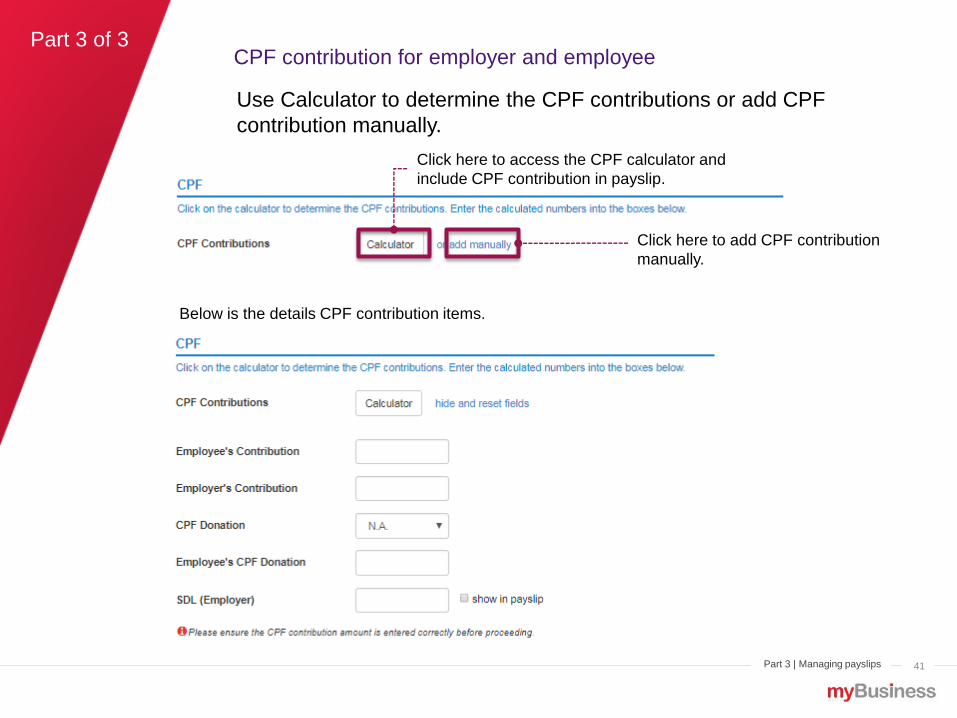
Part 3 of 3
Use Calculator to determine the CPF contributions or add CPF
contribution manually.
CPF contribution for employer and employee
41Part 3 | Managing payslips
Click here to access the CPF calculator and
include CPF contribution in payslip.
Click here to add CPF contribution
manually.
Below is the details CPF contribution items.

Part 3 of 3
You can choose to cancel the payslip, save it as a draft and
continue editing it later or review the payslip before sending it out.
Save draft, preview or cancel the payslip
42
Save and review
the payslip before
sending it out
Save the payslip as a
draft and edit it later
Part 3 | Managing payslips
Cancel the payslip.
The information
entered will not be
saved.

Part 3 of 3
If you saved a draft of the payslip, you can access it from the
dashboard to continue editing it as per the previous instructions.
Managing draft payslips
43
Click on “Edit” to continue
editing the draft payslip
Part 3 | Managing payslips

Part 3 of 3
To manage previously issued payslips, click on the “Issued
Payslips” tab in the dashboard. This is where you can:
• view the payslip;
• create a duplicate to issue another payslip;
• email it again to the employee
• or cancel the payslip altogether
Managing issued payslips
44
Click on this tab to
manage the issued
payslips
Part 3 | Managing payslips
"Click 'Cancel' only if the
payslip is wrong or
invalid. The cancelled
payslip will remain in the
Adminstrator's
dashboard and you will
be asked to enter a
reason for audit
purposes.

Part 3 of 3
You can view the payslip and choose to save a PDF version of it on
to your computer and print it for your employee.
You may also email your employee to notify them to login and
retrieve their payslip.
Managing issued payslips (View)
45
Click here to email the employee to
notify them that the payslip is readyClick here to view and download
payslip in PDF format
Part 3 | Managing payslips
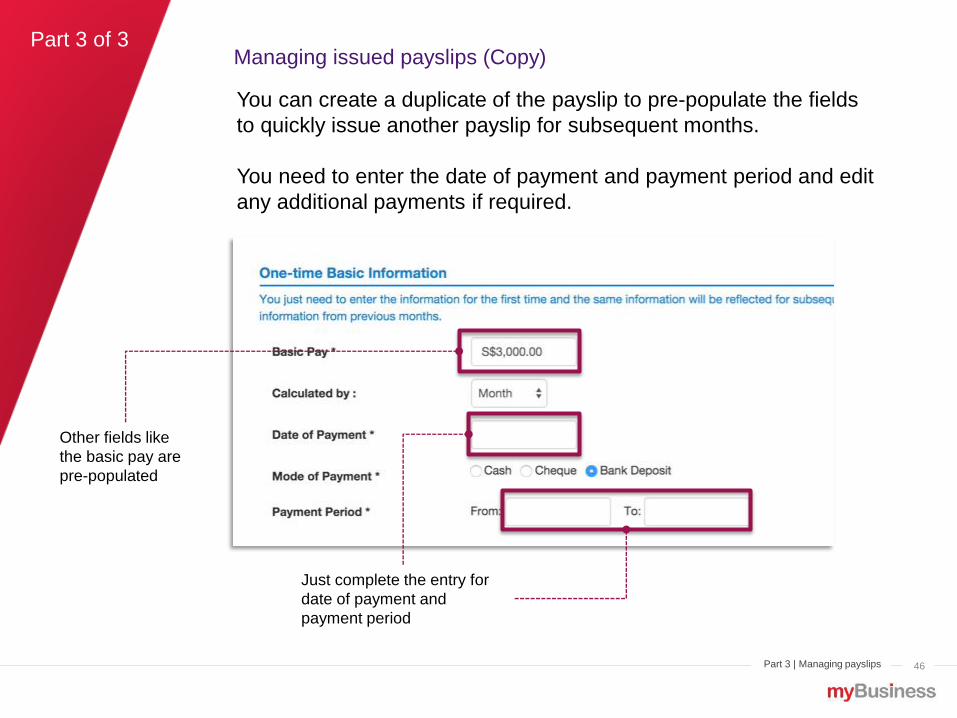
Part 3 of 3
You can create a duplicate of the payslip to pre-populate the fields
to quickly issue another payslip for subsequent months.
You need to enter the date of payment and payment period and edit
any additional payments if required.
Managing issued payslips (Copy)
46Part 3 | Managing payslips
Just complete the entry for
date of payment and
payment period
Other fields like
the basic pay are
pre-populated

Part 3 of 3
To send a payslip to your employee, just click on “Email”. Your
employee will receive a notification to login and retrieve their
payslip.
Managing issued payslips (Email)
47Part 3 | Managing payslips
Click here to send
an email
notification to your
employee.

Part 3 of 3
When you click on “Cancel”, you have to enter the reason for
cancelling the payslip.
Managing issued payslips (Cancel)
48
Enter your reason for cancelling
the payslip1
Click on “Confirm” to confirm the
cancellation or “Back” to not
proceed2
Status of the payslip
will be changed to
“Cancelled” upon
confirmation of
cancellation
Part 3 | Managing payslips
For audit purpose,
no deletion of
payslip is allowed.
Only the
administrator will
see the cancelled
payslip.

You have completed the following:
What we recommend you to do next...
01 02 03Registration and setup
Fast registration of user
accounts that will be used
to manage your Payslip
subscription.
Managing employee
records
Manage your employee
records and information
easily using the dashboard.
Managing payslips
Simple to follow
instructions to issue and
manage payslips for your
employees.
Setup accounts for all your employees to start managing their payslips digitally
Summary
49

Need help?
For assistance...
You can access the online help guide from
You can also contact us through the following:
Call us at 1606 or
Call us from overseas at +65 6221 1606
• Step 1: Hold for English or Press 1 for Mandarin;
• Step 2: Press 2 for Technical Assistance;
• Step 3: Press 5 for Singtel myBusiness & SaaS Apps
Our operating hours are:
Mon – Fri: 8am to 7pm, Sat: 8am to 6pm
Closed on Sun & Public Holidays
https://mybusiness.singtel.com/contact-us
https://mybusiness.singtel.com/support/apps-support/payslip
50