Embed Size (px)
Citation preview
for Kerio MailServer
Administrator Manual
© 2003-2017 Doctor Web. All rights reserved
This document is the property of Doctor Web. No part of this document may be reproduced,
published or transmitted in any form or by any means for any purpose other than the purchaser's
personal use without proper attribution.
Trademarks
Dr.Web, SpIDer Mail, SpIDer Guard, CureIt!, CureNet!, AV-Desk and the Dr.WEB logo are
trademarks and registered trademarks of Doctor Web in Russia and/or other countries. Other
trademarks, registered trademarks and company names used in this document are property of
their respective owners.
Disclaimer
In no event shall Doctor Web and its resellers or distributors be liable for errors or omissions, or
any loss of profit or any other damage caused or alleged to be caused directly or indirectly by this
document, the use of or inability to use information contained in this document.
Dr.Web for Kerio MailServer
Version 6.0.6
Administrator Manual
3/27/2017
Doctor Web Head Office
2-12A, 3rd str. Yamskogo polya
Moscow, Russia
125040
Website: http://www.drweb.com/
Phone: +7 (495) 789-45-87
Refer to the official website for regional and international office information.
Doctor Web
Doctor Web develops and distributes Dr.Web information security solutions which provide
efficient protection from malicious software and spam.
Doctor Web customers can be found among home users from all over the world and in
government enterprises, small companies and nationwide corporations.
Dr.Web antivirus solutions are well known since 1992 for continuing excellence in malware
detection and compliance with international information security standards.
State certificates and awards received by the Dr.Web solutions, as well as the globally widespread
use of our products are the best evidence of exceptional trust to the company products.
We thank all our customers for their support and devotion to the Dr.Web products!
Administrator Manual
4
Table of Contents
1. Introduction 6
1.1. Conventions 7
1.2. Contacting Support 7
2. Licensing 8
2.1. License Key File 8
2.2. Acquire License Key File 9
2.3. Update License 10
2.4. Use License Key File 10
2.5. Licensing Parameters 10
3. Installation and Removal 12
3.1. System Requirements 12
3.2. Compatibility 13
3.3. Install Plug-in 13
3.4. Uninstall Plug-in 14
3.5. Configure Internet Connection for Updater 15
4. Program Integration 16
4.1. Check Settings 16
4.2. Notifications Settings 18
5. Virus Check 20
5.1. Detection Methods 20
5.2. Quarantine 22
6. Web Console 24
6.1. Program Information 25
6.2. Program Statistics 25
7. Update 26
8. Logging 27
8.1. Event Log 27
8.2. Text Log 27
8.3. Debug Log 29
9. Troubleshooting 30
9.1. Check Installation 30
9.2. Check Functionality 31
Administrator Manual
5
10. Appendices 33
10.1. Appendix A. Updater Command Line Parameters 33
10.2. Appendix B. Collect Information for Troubleshooting 36
10.3. Appendix C. Operation in Central Protection Mode 38
Keyword Index 41
Administrator Manual
6Introduction
1. Introduction
Thank you for purchasing Dr.Web for Kerio MailServer. This product is an anti-virus plug-in
designed to protect corporate mail systems against viruses. The plug-in integrates into Kerio mail
servers and checks the attached files of emails.
With the use of the plug-in, Kerio mail server incorporates the latest and most advanced anti-
virus technologies of Doctor Web aimed to detect different types of malicious objects which may
present a threat to mail system operation and information security.
Dr.Web for Kerio MailServer checks the mail traffic for viruses, dialer programs, adware, riskware,
hacktools and joke programs. On detection of a security threat, they are treated according to the
Kerio mail server settings.
Main Features
Dr.Web for Kerio MailServer performs the following functions:
· The anti-virus check of email attachments according to Kerio mail server rules
· Malware detection
· Isolation of the infected objects in Dr.Web quarantine
· Heuristic analysis for additional protection against unknown viruses
· Fast and efficient check
· Automatic update of virus databases
This guide helps administrators of enterprise networks which use Kerio mail server to install and
configure Dr.Web for Kerio MailServer.
For detailed information on Kerio mail servers settings and mail checks, see Kerio official web site
at http://www.kerio.com/products/kerio-connect.
Administrator Manual
7Introduction
1.1. Conventions
The following symbols and text conventions are used in this guide:
Convention Comment
Warning about possible errors or important notes to which you should pay special
attention.
Anti-virus network A new term or an accent on a term in descriptions.
<IP-address> Placeholders.
Save Names of buttons, windows, menu items and other program interface elements.
CTRL Keyboard keys names.
C:\Windows\ Names of files and folders, code examples.
Appendix A Cross-references on the document chapters or internal hyperlinks to web pages.
1.2. Contacting Support
If you encounter any issues installing or using company products, before requesting for the
assistance of the technical support, take advantage of the following options:
· Download and review the latest manuals and guides at https://download.drweb.com/doc/.
· Read the frequently asked questions at http://support.drweb.com/show_faq/.
· Browse the Dr.Web official forum at http://forum.drweb.com/.
If you have not found solution for the problem, you can request direct assistance from Doctor
Web company technical support by one of the following ways:
· Fill in the web from in the corresponding section at http://support.drweb.com/.
· Call by phone in Moscow: +7 (495) 789-45-86.
Refer to the official website at http://company.drweb.com/contacts/offices/ for regional and
international office information of Doctor Web company.
Administrator Manual
8Licensing
2. Licensing
The use rights for the purchased product are regulated by the license key file.
2.1. License Key File
The license key has the .key extension and contains, among other, the following information:
· Licensed period for the product
· List of components the user is allowed to use
· Possibility to use the license on mail servers
· Users number limitation for the license
A valid license key file satisfies the following criteria:
· License period has started and is not expired
· The license applies to all components of the product
· Integrity of the license key file is not violated
If any of the conditions is violated, the license key file becomes invalid, Dr.Web for Kerio
MailServer stops detecting the malicious programs. If the key file became invalid during the
operation of Kerio mail server then the server stops delivering the emails to the recipients. The
delivery without check for viruses can be restored by disabling the use of Dr.Web for Kerio
MailServer. For restoration of the mail anti-virus check the correct key file is required.
License violation is registered in the Windows Event Log and in the text log of plug-in.
See Logging for detailed information about events logging.
Administrator Manual
9Licensing
2.2. Acquire License Key File
You can receive a license key file in one of the following ways:
· By email in an archived attachment
· With the plug-in distribution kit
· On separate media
To acquire a license key file by email
1. Launch an Internet browser and go to the site which is specified on the product registration
card supplied with your copy of the product.
2. Fill in the registration form.
3. Enter the serial number which is typed on the registration card.
4. The license key file is archived and sent to the email address you specified in the registration
form.
5. Extract the license key file and copy it to the computer where Kerio mail server is installed and
the installation of Dr.Web for Kerio MailServer is planned or has been already completed.
For demonstrative purposes you may be provided with a trial license key file. Trial license allows
you to access full functionality of the Dr.Web for Kerio MailServer for a short-term period. No
support is provided during trial period. On the expiration of the trial license, you will need to
purchase a full license to continue working with the product.
To receive a trial license key file by email, fill in the registration form at
https://download.drweb.com/demoreq/biz/v2/.
For more information on licensing and types of license key files, visit the Doctor Web official web
site at http://www.drweb.com.
Administrator Manual
10Licensing
2.3. Update License
When license expires or security of your system is reinforced, you may need to update the
license. The new license then should be registered with the product. Dr.Web for Kerio MailServer
supports hot license update without stopping or reinstalling the plug-in.
To update the license key file
1. To update the license key file, copy the new license key file to the program installation folder
(by default, %ProgramFiles%\DrWeb for Kerio MailServer\).
2. Dr.Web for Kerio MailServer automatically switches to the new license.
For more information on license types, visit the Doctor Web official web site at
http://www.drweb.com.
2.4. Use License Key File
Installation Wizard copies and registers the license key file to the plug-in installation folder
(usually, C:\Program Files\DrWeb for Kerio MailServer).
During the operation of Dr.Web for Kerio MailServer the plug-in searches for the first valid key
file in the folder specified by one of the values of LicenseFile parameter located in
[StandaloneMode] section of the configuration file /etc/drweb/agent.conf(by the *.key
mask) starting with the key file indicated while installing the program. If no valid key is found, the
plug-in stops functioning.
Do not edit or otherwise modify the file to prevent the license from compromise.
2.5. Licensing Parameters
The license key file regulates the use of Dr.Web for Kerio MailServer.
To view license details
1. View the license key file. (For instance, open the file with the Notepad text editor).
The license key file is secured with digital signature. Do not edit or otherwise modify the file
to prevent the license from compromise
2. Review the following licensing parameters (see Table 2).
Administrator Manual
11Licensing
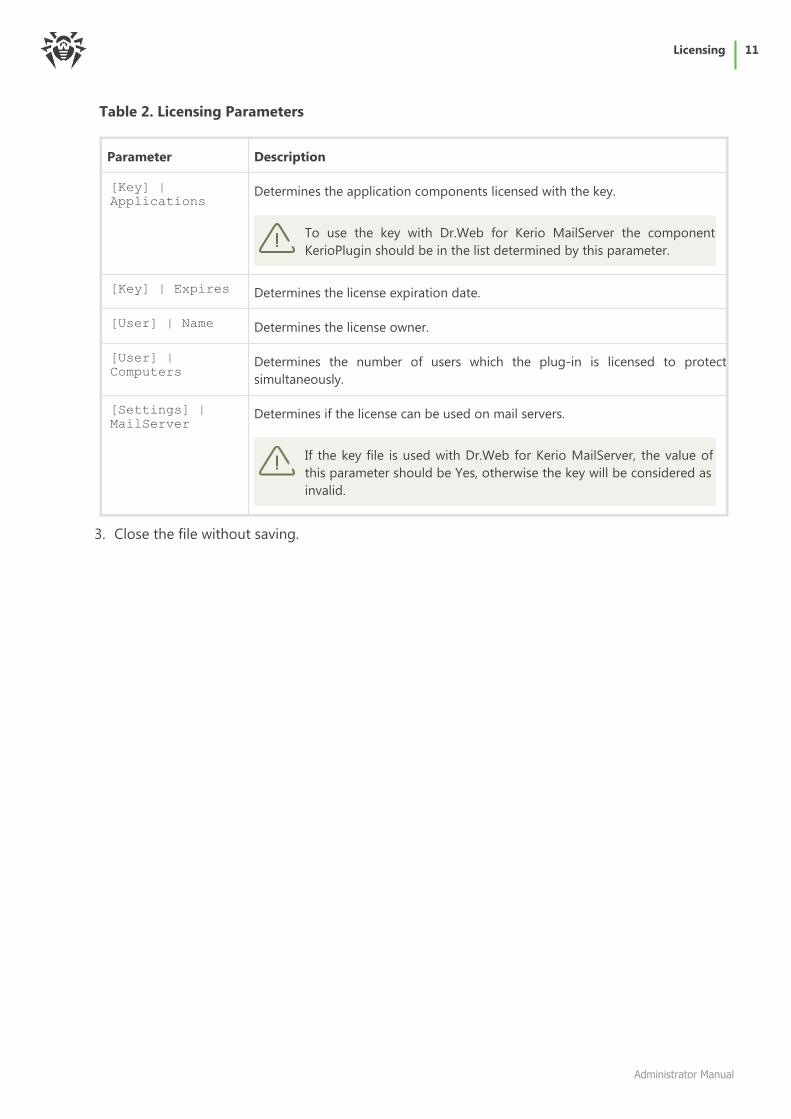
Table 2. Licensing Parameters
Parameter Description
[Key] |Applications
Determines the application components licensed with the key.
To use the key with Dr.Web for Kerio MailServer the component
KerioPlugin should be in the list determined by this parameter.
[Key] | Expires Determines the license expiration date.
[User] | Name Determines the license owner.
[User] |Computers
Determines the number of users which the plug-in is licensed to protect
simultaneously.
[Settings] |MailServer
Determines if the license can be used on mail servers.
If the key file is used with Dr.Web for Kerio MailServer, the value of
this parameter should be Yes, otherwise the key will be considered as
invalid.
3. Close the file without saving.
Administrator Manual
12Installation and Removal
3. Installation and Removal
Dr.Web for Kerio MailServer resides on computers where Kerio mail server is installed. It operates
as an external anti-virus integrated via the plug-in interface.
For more information on use of anti-virus with Kerio mail servers, see the Kerio official web site at
http://www.kerio.com/products/kerio-connect.
3.1. System Requirements
Before beginning installation, review the following system requirements and instructions
(Table 3):
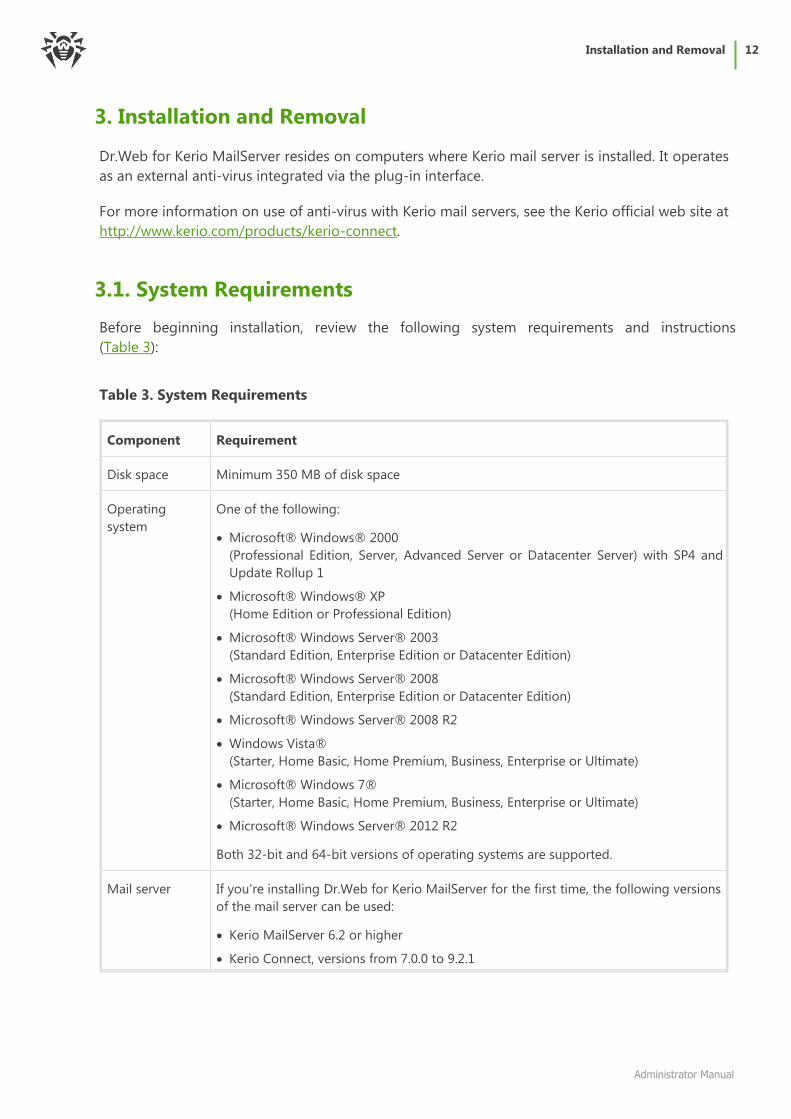
Table 3. System Requirements
Component Requirement
Disk space Minimum 350 MB of disk space
Operating
system
One of the following:
· Microsoft® Windows® 2000
(Professional Edition, Server, Advanced Server or Datacenter Server) with SP4 and
Update Rollup 1
· Microsoft® Windows® XP
(Home Edition or Professional Edition)
· Microsoft® Windows Server® 2003
(Standard Edition, Enterprise Edition or Datacenter Edition)
· Microsoft® Windows Server® 2008
(Standard Edition, Enterprise Edition or Datacenter Edition)
· Microsoft® Windows Server® 2008 R2
· Windows Vista®
(Starter, Home Basic, Home Premium, Business, Enterprise or Ultimate)
· Microsoft® Windows 7®
(Starter, Home Basic, Home Premium, Business, Enterprise or Ultimate)
· Microsoft® Windows Server® 2012 R2
Both 32-bit and 64-bit versions of operating systems are supported.
Mail server If you're installing Dr.Web for Kerio MailServer for the first time, the following versions
of the mail server can be used:
· Kerio MailServer 6.2 or higher
· Kerio Connect, versions from 7.0.0 to 9.2.1
Administrator Manual
13Installation and Removal
Component Requirement
Additional
software
Dr.Web Agent 6.0 or higher (for operation in central protection mode)
Before installation of Dr.Web for Kerio MailServer please review the information on plug-in
compatibility.
This section reflects requirements for the Dr.Web for Kerio MailServer only. See Kerio guides
for mail server requirements. Dr.Web for Kerio MailServer operates successfully on computers
which meet the Kerio mail server requirements.
3.2. Compatibility
Before installation of Dr.Web for Kerio MailServer please review the following information on
product compatibility:
1. The anti-virus Dr.Web for Kerio MailServer of version 6.0.6 is compatible only with Dr.Web
products of version 6.
2. If anti-virus solutions of other vendor are operating in the system besides Dr.Web for Kerio
MailServer the proper operation of the plug-in cannot be guaranteed.
3. In case an anti-virus file guard Spider Guard operates in the system (for example, it is included
in Dr.Web solutions for file servers or Dr.Web Security Space) besides Dr.Web for Kerio
MailServer, it is necessary to add to exclusions the Kerio mail server temporary files upload
directory (by default, %ProgramFiles%\Kerio\MailServer\Store\tmp).
4. All critical updates issued for the operating system should be installed before installation of
Dr.Web for Kerio MailServer.
3.3. Install Plug-in
Before beginning installation, review the system requirements.
To install Dr.Web for Kerio MailServer you must have the Administrator privileges.
To install Dr.Web for Kerio MailServer
1. Stop Kerio MailServer/Kerio Connect.
2. Copy the following files to the computer where Kerio mail server resides:
· Installation file
· License key file
Administrator Manual
14Installation and Removal
3. Depending on the type of operating system run the installation file drweb-6.0.6-av-kerio-
mail-win-x86.exe (if you use the 32-bit operating system) or drweb-6.0.6-av-kerio-mail-
win-x64.exe (if your operating system is 64-bit).
4. On the License Agreement page read the Dr.Web License Agreement, select I accept the
terms in the license agreement and click Next.
5. If you have not stopped Kerio MailServer/Kerio Connect on the Step 1, you will be prompted
to stop it.
6. Specify the path to the license key file. Click Browse to select the file on the License Key
page. Click Next.
7. On the Kerio MailServer Path page specify the path to the Kerio mail server installation
folder (for example: C:\Program Files\Kerio\MailServer\). Click Next.
8. On the Ready to Install the Program page you may choose to update the application during
installation. To do so, select the Run update check box.
9. Click Install to start installation of Dr.Web for Kerio MailServer on your computer.
10.After the installation of Dr.Web for Kerio MailServer is completed, you will be prompted to
restart your computer.
This completes the plug-in installation. You need to configure Kerio mail server to use the plug-
in.
3.4. Uninstall Plug-in
To uninstall Dr.Web for Kerio MailServer you must have the Administrator privileges.
To uninstall Dr.Web for Kerio MailServer
1. Disable the use of anti-virus Dr.Web for Kerio MailServer by Kerio mail server. To do this:
· Launch the administration console for Kerio mail server.
· Open the Configuration -> Content Filter -> Antivirus section.
· In the Antivirus usage group clear the checkbox Use external antivirus for selected anti-
virus Dr.Web for Kerio Mail Servers.
· Click Apply to disable the use of Dr.Web for Kerio MailServer.
2. Use one of the following methods to uninstall Dr.Web for Kerio MailServer:
· On the Control Panel, double-click Add or Remove Programs, then in the programs list
select Dr.Web for Kerio Mail Servers and click Remove. At the prompt, click Yes.
· Launch the installation file drweb-6.0.6-av-kerio-mail-win-x86.exe or drweb-6.0.6-av-
kerio-mail-win-x64.exe depending on your OS version. The Installation wizard will launch.
Click Remove the Program. On the next step, confirm you want to delete the application.
Once the application is removed, you will be prompted to restart your computer.
3. The plug-in files and update task will be removed.
Administrator Manual
15Installation and Removal
The license key, program statistics and log files are not deleted by default. You have to delete
the files manually from the program installation folder (by default, %ProgramFiles%\DrWeb
for Kerio MailServer).
3.5. Configure Internet Connection for Updater
If the computer where Kerio mail server resides connects to the Internet via proxy, you need to
configure Dr.Web for Kerio MailServer Updater to connect to the proxy server.
To configure connection to a proxy server
1. In the Dr.Web for Kerio MailServer installation folder (usually, C:\Program Files\DrWeb for
Kerio MailServer), double-click drwebupw.exe.
2. In the dialog window, click Settings.
3. In the Settings window open the Proxy tab.
4. Enter the IP-address and the port number that the proxy server uses.
5. If required, enter user name and the password needed for connection to the proxy server or
leave blank if the proxy server allows anonymous access.
6. Click OK.
Administrator Manual
16Program Integration
4. Program Integration
Dr.Web for Kerio MailServer can be enabled and operates as an external anti-virus software
integrated into Kerio mail server and checks the email attachments according to the mail server
settings.
To integrate Dr.Web for Kerio MailServer into Kerio mail server:
1. Launch the administration console for Kerio mail server.
2. Open the Configuration -> Content Filter -> Antivirus section.
3. Select the checkbox Use external antivirus and then select Dr.Web for Kerio MailServer in
the drop-down list.
4. Click Options to the right of anti-virus name. The list of options to configure the anti-virus
check, the program logging, the notifications sending and also the port to work with the web
console will open. To change the value of each option, select it in the list and click Edit. In the
window Edit value, specify the value of the selected option and click OK.
5. Click Apply.
If the integration failed and an error is reported, check the installation of the plug-in and check
the error log of Kerio mail server. Consult the Kerio mail server Administrator's Guide as well to
solve the problem.
For detailed information on use of anti-virus software with Kerio mail server and possible errors
of integration, see Kerio mail server Administrator's Guide and Kerio official web site at
http://www.kerio.com/products/kerio-connect.
4.1. Check Settings
The following options allow to configure the check of archives, specify the program actions for
different types of malware and enable the use of quarantine (Table 4).
Table 4. Anti-virus check options
Option Description
Engine: Check
archives (0, 1)
This option enables/disables the scanning of archives. Two values are possible:
· 0 to disable scanning of archives
· 1 to enable scanning of archives
Engine: Detect
adware (0, 1)
Engine: Detect
dialers (0, 1)
These options allow to enable/disable the detection of adware, dialers, hacktools,
jokes and riskware in email attachments. Each parameter may have one of the
following values:
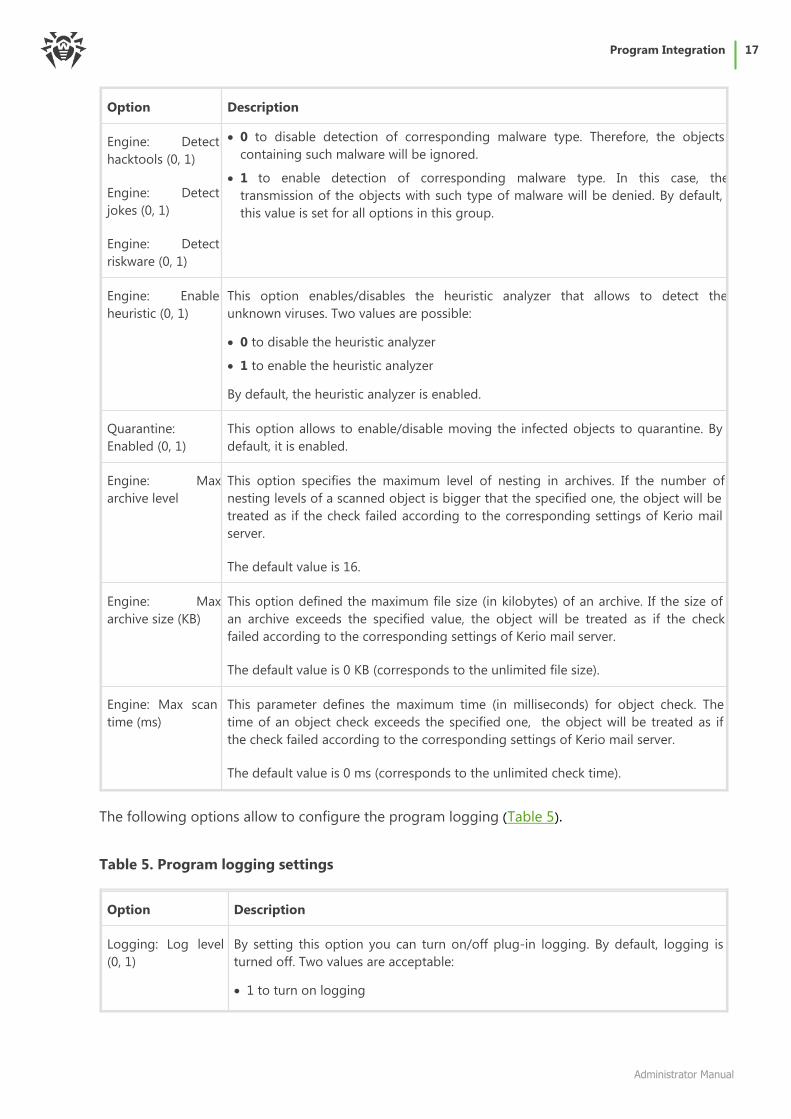
Administrator Manual
17Program Integration
Option Description
Engine: Detect
hacktools (0, 1)
Engine: Detect
jokes (0, 1)
Engine: Detect
riskware (0, 1)
· 0 to disable detection of corresponding malware type. Therefore, the objects
containing such malware will be ignored.
· 1 to enable detection of corresponding malware type. In this case, the
transmission of the objects with such type of malware will be denied. By default,
this value is set for all options in this group.
Engine: Enable
heuristic (0, 1)
This option enables/disables the heuristic analyzer that allows to detect the
unknown viruses. Two values are possible:
· 0 to disable the heuristic analyzer
· 1 to enable the heuristic analyzer
By default, the heuristic analyzer is enabled.
Quarantine:
Enabled (0, 1)
This option allows to enable/disable moving the infected objects to quarantine. By
default, it is enabled.
Engine: Max
archive level
This option specifies the maximum level of nesting in archives. If the number of
nesting levels of a scanned object is bigger that the specified one, the object will be
treated as if the check failed according to the corresponding settings of Kerio mail
server.
The default value is 16.
Engine: Max
archive size (KB)
This option defined the maximum file size (in kilobytes) of an archive. If the size of
an archive exceeds the specified value, the object will be treated as if the check
failed according to the corresponding settings of Kerio mail server.
The default value is 0 KB (corresponds to the unlimited file size).
Engine: Max scan
time (ms)
This parameter defines the maximum time (in milliseconds) for object check. The
time of an object check exceeds the specified one, the object will be treated as if
the check failed according to the corresponding settings of Kerio mail server.
The default value is 0 ms (corresponds to the unlimited check time).
The following options allow to configure the program logging (Table 5).
Table 5. Program logging settings
Option Description
Logging: Log level
(0, 1)
By setting this option you can turn on/off plug-in logging. By default, logging is
turned off. Two values are acceptable:
· 1 to turn on logging
Administrator Manual
18Program Integration
Option Description
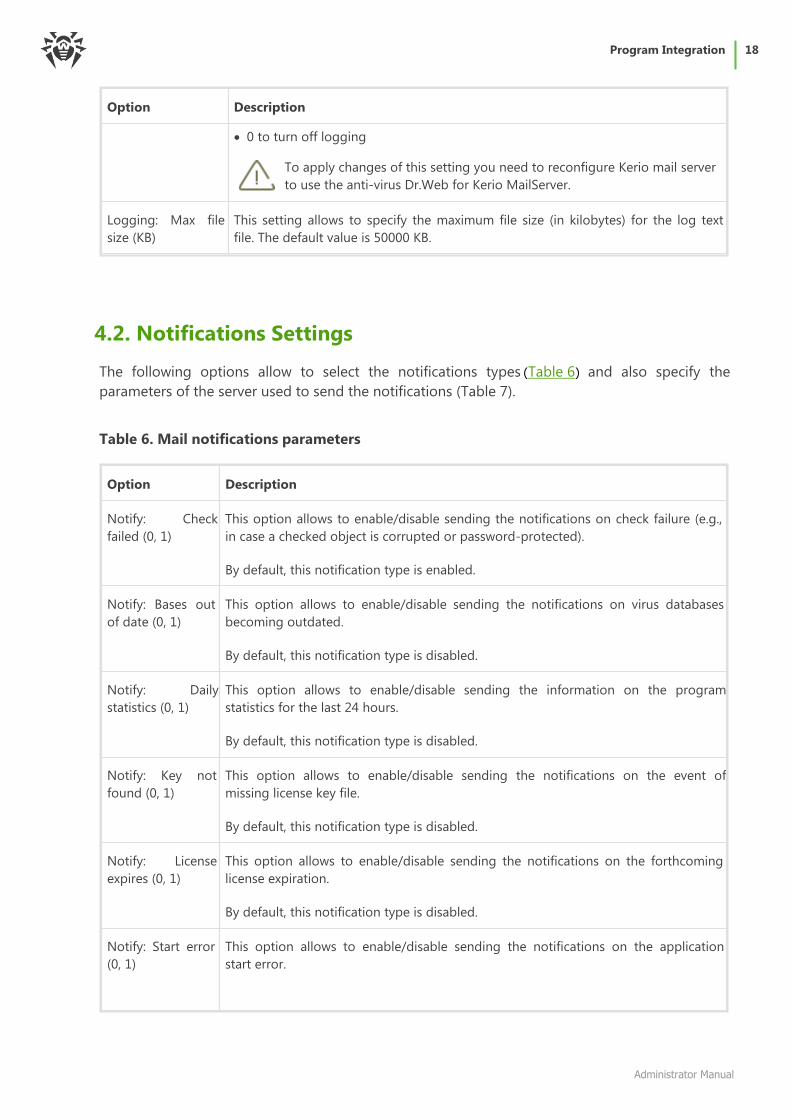
· 0 to turn off logging
To apply changes of this setting you need to reconfigure Kerio mail server
to use the anti-virus Dr.Web for Kerio MailServer.
Logging: Max file
size (KB)
This setting allows to specify the maximum file size (in kilobytes) for the log text
file. The default value is 50000 KB.
4.2. Notifications Settings
The following options allow to select the notifications types (Table 6) and also specify the
parameters of the server used to send the notifications (Table 7).
Table 6. Mail notifications parameters
Option Description
Notify: Check
failed (0, 1)
This option allows to enable/disable sending the notifications on check failure (e.g.,
in case a checked object is corrupted or password-protected).
By default, this notification type is enabled.
Notify: Bases out
of date (0, 1)
This option allows to enable/disable sending the notifications on virus databases
becoming outdated.
By default, this notification type is disabled.
Notify: Daily
statistics (0, 1)
This option allows to enable/disable sending the information on the program
statistics for the last 24 hours.
By default, this notification type is disabled.
Notify: Key not
found (0, 1)
This option allows to enable/disable sending the notifications on the event of
missing license key file.
By default, this notification type is disabled.
Notify: License
expires (0, 1)
This option allows to enable/disable sending the notifications on the forthcoming
license expiration.
By default, this notification type is disabled.
Notify: Start error
(0, 1)
This option allows to enable/disable sending the notifications on the application
start error.
Administrator Manual
19Program Integration
Option Description
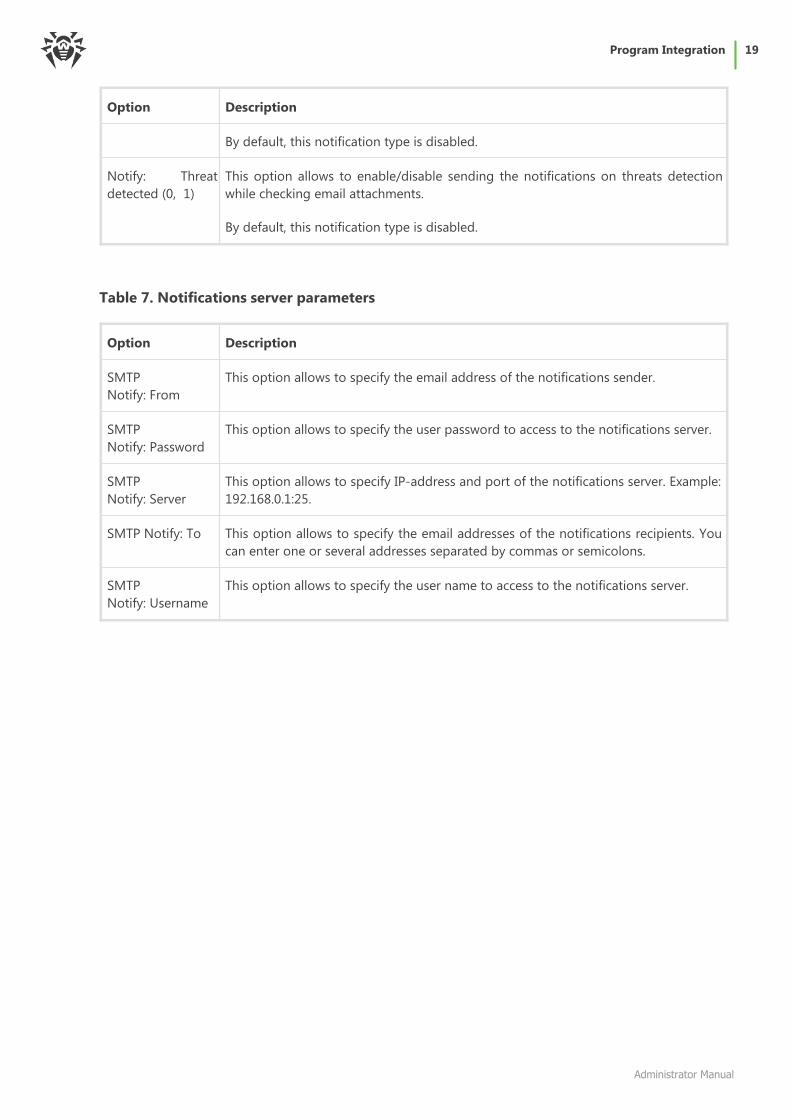
By default, this notification type is disabled.
Notify: Threat
detected (0, 1)
This option allows to enable/disable sending the notifications on threats detection
while checking email attachments.
By default, this notification type is disabled.
Table 7. Notifications server parameters
Option Description
SMTP
Notify: From
This option allows to specify the email address of the notifications sender.
SMTP
Notify: Password
This option allows to specify the user password to access to the notifications server.
SMTP
Notify: Server
This option allows to specify IP-address and port of the notifications server. Example:
192.168.0.1:25.
SMTP Notify: To This option allows to specify the email addresses of the notifications recipients. You
can enter one or several addresses separated by commas or semicolons.
SMTP
Notify: Username
This option allows to specify the user name to access to the notifications server.
Administrator Manual
20Virus Check
5. Virus Check
Dr.Web for Kerio MailServer detects the following malicious objects:
· Infected email attachments including:
· Infected archives
· Bomb viruses in files or archives
· Adware
· Hacktools
· Dialer programs
· Joke programs
· Riskware
You can determine the types of malicious objects to be detected by setting up the anti-
virus options.
Dr.Web for Kerio MailServer uses different detection methods while scanning the attached files of
email messages. In case a virus is detected by Dr.Web for Kerio MailServer it is processed
according to the settings of Kerio mail server.
The actions of Kerio mail server for detected malicious objects or in case the attached file cannot
be scanned are specified by means of administration console for Kerio mail server in the
corresponding groups of options on the Configuration -> Content Filtering -> Antivirus
section or on the Action tab (depends on the version of Kerio mail server).
You can configure server to discard the message with infected attachments, allow the delivery of
the message with removed infected files, forward the initial or filtered message to the
administrator's email, send a warning notification or bounce the message to the sender.
You can also set up the actions of the server in case the attached file cannot be scanned, for
example, when it is encrypted or corrupted. You can configure server to perform the same
actions as for the infected files or to pass the file and append to the message a notification that it
can probably contain a virus.
For detailed information on configuring Kerio mail server to process the checked messages see
the Administrator's Guide of Kerio mail server available on the Kerio official web site at
http://www.kerio.com/supp_kms_manual.html.
5.1. Detection Methods
The Doctor Web anti-viruses simultaneously use several malware detection methods, which allow
them to perform thorough checks on suspicious files and control software behavior:
1. The scans begin with signature analysis, which is performed by comparison of file code
segments to the known virus signatures. A signature is a finite continuous sequence of bytes
Administrator Manual
21Virus Check
which is necessary and sufficient to identify a specific virus. To reduce the size of the signature
dictionary, the Doctor Web anti-viruses use signature checksums instead of using complete
signature sequences. Checksums uniquely identify signatures which preserves correctness of
virus detection and neutralization. The Dr.Web signature databases are composed so that
some entries can be used to detect not just specific viruses, but whole classes of threats.
2. On completion of signature analysis, the Doctor Web anti-viruses use the unique Origins
Tracing method to detect new and modified viruses which use the known infection
mechanisms. Thus the Dr.Web users are protected against such viruses as notorious
blackmailer Trojan.Encoder.18 (also known as gpcode). In addition to detection of new and
modified viruses, the Origins Tracing mechanism allowed to considerably reduce the number
of false triggering of the Dr.Web heuristics analyser.
3. The detection method used by the heuristics analyser is based on certain knowledge about
attributes that characterize malicious code. Each attribute or characteristic has weight
coefficient which determines the level of its severity and reliability. Depending on the sum
weight of a file, the heuristics analyser calculates the probability of unknown virus infection. As
any system of hypothesis testing under uncertainty, the heuristics analyser may commit type I
or type II errors (omit viruses or raise false alarms).
While performing any of the abovementioned checks, the Doctor Web anti-viruses use the most
recent information about known malicious software. As soon as experts of the Doctor Web virus
laboratory discover new threats, the update for virus signatures, behaviour characteristics and
attributes is issued. In some cases updates can be issued several times per hour. Therefore the
automatic update of virus databases provides the detection of even the newest viruses.
Administrator Manual
22Virus Check
5.2. Quarantine
The infected attachments can be moved to Quarantine, where the malicious objects are isolated
from the rest of the system.
By default, the quarantine is enabled. To disable it, set the value 0 for the Quarantine: Enabled
anti-virus parameter. In case quarantine is disabled, the infected objects will be
deleted.Managing Quarantine
The quarantined files can be reviewed and processed using the special utility Dr.Web Quarantine.
To launch the utility, select Start -> Programs -> Dr.Web for Kerio Mail Servers -> Dr.Web
Quarantine. The list of objects in quarantine will be displayed (see Figure 1).
Figure 1. Quarantine
For each object in the list the information on the infected file name and size, the name of the
virus and the path to the storage folder is displayed. You can specify the types of the information
that is displayed in the list. To do this, right-click any column in the table and select Customize
columns. Then select the types of the information you want to be displayed.
You can remove the quarantined objects or restore them. To do this:
· Select one or several objects in the list.
· To delete the selected file(s) click the Delete button.
· To restore the selected file(s) select Restore -> Restore to and then specify the folder the
file(s) will be restored to.
Administrator Manual
23Virus Check
You can also scan the quarantined objects, e.g., the suspicious files, again, after
updating Dr.Web virus databases. To check the files again, click the Rescan button.
The Add button is used to add files from the local or removable disk to quarantine. Then you can
scan these files for viruses. Please take note that in this case the file can be restored to the initial
folder only using the Restore button.
Quarantine properties
To access to quarantine properties click the Properties button in the top part of the
Quarantine window. In the Quarantine properties window (see Figure 2) you can specify the
following settings:
1. You can set up the quarantine size. To do this, specify the amount of the disk space for the
quarantine in the Set quarantine size section (see Figure 2).
2. Before the infected file is cured, its backup is saved in the quarantine to allow restoring the file
in case it is corrupted during its curing. To enable viewing backups in quarantine list, select the
show backup files check box in the View section (see Figure 2).
Figure 2. Quarantine properties
The objects in quarantine are saved on the hard disk section the Kerio mail server is installed on.
If there is no free space for saving the file or the specified maximum quarantine size is exceeded,
the file is not moved to quarantine.
In case Kerio MailServer versions from 6.2 to 6.7.2 inclusive are used, the cyrillic file names
may be displayed incorrectly in logs and quarantine list. If the name of infected file that is
moved to Dr.Web quarantine contains cyrillic symbols, these symbols are deleted from the file
name. However, this error do not influence the messages delivery.

Administrator Manual
24Web Console
6. Web Console
Web console allows viewing the information on the Dr.Web for Kerio MailServer operation,
particularly, on the license and updates, as well as the program statistics (see Figure 3) via
browser.
Figure 3. Web console
Access to web console
To access to the web console, enter the IP address and the port of the Kerio mail server in the
address bar of the browser (e.g., http://127.0.0.1:8089). Port is specified by the Web console:
Port parameter and may fall into the range from 1024 to 65536. The default value is 8089.
Administrator Manual
25Web Console
6.1. Program Information
The About section of web console (see Figure 3) contains the following information on the
program activity, license and virus databases updates:
· Version of the anti-virus engine
· Date and time of the last update of the virus databases
· License number
· Name of the license owner
· Number of the protected stations
· License expiration date
6.2. Program Statistics
The program statistics is displayed in the Statistics section of the web console (see Figure 3). The
following information is compiled in the table of statistics:
· Date and time of the last threat detection and the name of the virus
· Number of checked files and detected threats during different periods of time (the last 24
hours, the last week and all the time since the program installation):
ú Total number of checked objects
ú Number of infected objects
ú Number of detected riskware, adware, dialers, jokes and hacktools
ú Number of errors when checking email attachments
To clear statistics
The statistics is saved in drw-kerio-stat.dat file, located in the program installation folder. If the
plug-in stops functioning, the statistics for the last 24 hours and for the last week is deleted
automatically. To clear the statistics for the whole period of the plug-in operation, you need to
delete the drw-kerio-stat.dat file.
Administrator Manual
26Update
7. Update
The Updater component (drwebupw.exe) may be launched just on the completion of the
plug-in installation by selecting the corresponding checkbox at the last step of installation.
This component updates the scanning engine (drweb32.dll) and virus databases (*.vdb).
Dr.Web for Kerio MailServer uses virus databases to detect malicious software. These databases
contain details and signatures for all viruses and malicious programs known at the moment of
the plug-in release. However modern computer viruses are characterized by the high-speed
evolvement and modification. More than that, within several days and sometimes hours, new
viruses emerge which can infect millions of computers around the world. To mitigate the risk of
infection during the licensed period, Doctor Web provides you with regular updates to virus
databases and plug-in components. The Updater component of Dr.Web for Kerio MailServer
helps you to download the updates via Internet and automatically installs them.
If your computer connects to the Internet via proxy, configure Updater to connect to the
proxy-server.
For computers without access to the Internet, you can configure updates from the central storage
of update files.
When you install Dr.Web for Kerio MailServer, the installation wizard creates a task which
schedules Updater to check for new updates at the Doctor Web global update server. You can
change the schedule using the standard Windows Scheduled Tasks utility. You can also configure
the update process using the command line parameters listed in the Appendix A.
To modify update schedule
1. On the Control Panel, double-click Scheduled Tasks.
2. Right-click Dr.Web Update for Kerio MailServer Plugin and select Properties.
3. On the Schedule tab, modify the task schedule. Click Advanced to set up the task periodicity.
By default, the plug-in checks for updates each 30 minutes.
4. Click OK.
Administrator Manual
27Logging
8. Logging
Dr.Web for Kerio MailServer registers errors and application events in the following logs:
· Windows Event Log
· Debug, error and security protocols of Kerio server
· Text Dr.Web debug log (if the value of the anti-virus parameter Logging: Log level is 1)
By default, the text Dr.Web debug log is stored in the DrWebForKMS.log file located in the %
ProgramFiles%\DrWeb for Kerio MailServer\ folder.
The update information is logged in a separate drwebupw.log file, which is located in the %
AllUsersProfile%\Application Data\Doctor Web\Logs\ folder.
8.1. Event Log
Dr.Web for Kerio MailServer registers the following information in the Windows Event Log:
· Plug-in starts and stops
· License key file parameters including validity, licensed period (information is registered each
time the plug-in checks the license or when the license file changes)
· Parameters of the plug-in components including scanner, core, virus databases (information is
registered when the plug-in starts or components are updated)
· License invalidity notifications if the license key file is missing, some of the plug-in components
are not licensed, license is blocked or license key file is corrupted (information is registered
when the plug-in checks the license)
· License expiration notifications (a message is registered in 30, 15, 7, 3, 2 and 1 days before
expiration)
· Malware detection reports
To view Event Log
1. On the Control Panel, double-click Administrative Tools and then double-click Event
Viewer.
2. In the tree view, select Application.
3. The application Event Log displays in the right pane. The source for the plug-in events is
Dr.Web for Kerio MailServer.
8.2. Text Log
The following information can be registered in the Dr.Web for Kerio MailServer text log:
Administrator Manual
28Logging
· License validity status
· Malware detection reports per each detected malicious object
· Errors while scanning for archives or password-protected files
· Core failures
· License expiration notifications (A message is registered in 30, 15, 7, 3, 2 and 1 days before
expiration)
Enabling the program logging in the Log file decreases server performance, therefore it is
recommended to enable logging only in case of errors occurrence in operation of Dr.Web for
Kerio MailServer.
The text log file is cyclic. When the log size reaches the maximum (defined by the option
Logging: Max file size, the default is 50000 KB), the plug-in creates a new file and deletes the
old one.
Administrator Manual
29Logging
8.3. Debug Log
The debug log of Kerio mail server contains the information that is used for search and analysis
of errors in operation of Dr.Web for Kerio MailServer.
To enable the debug logging
1. Launch the administration console for Kerio mail server.
2. On the Logs section click debug.
3. Right-click the window of debug log, and then click Messages.
4. In the Logging Messages window select the option Antivirus checking and then click OK.

Administrator Manual
30Troubleshooting
9. Troubleshooting
If you're experiencing trouble protecting the Internet traffic from virus threats, follow the steps
below to ensure that Dr.Web for Kerio MailServer is installed and configured properly:
· Check installation
· Check plug-in operation
· Check Updater module
9.1. Check Installation
To check whether the plug-in is correctly installed:
1. Ensure that during the plug-in installation the following folders have been created and contain
all necessary files:
· %ProgramFiles%\DrWeb for Kerio MailServer\
File name Description
drwebupw.exe Executable file of Updater
update.drl List of URLs for updating
drweb32.key License key file
dwqrui.exe Utility to access to Dr.Web quarantine
locale.ini Localization file
drwmsg.dll Service library
WebConsole.exe Executable file of web console
· %ProgramFiles%\DrWeb for Kerio MailServer\html\ with files used by the web console
Administrator Manual
31Troubleshooting
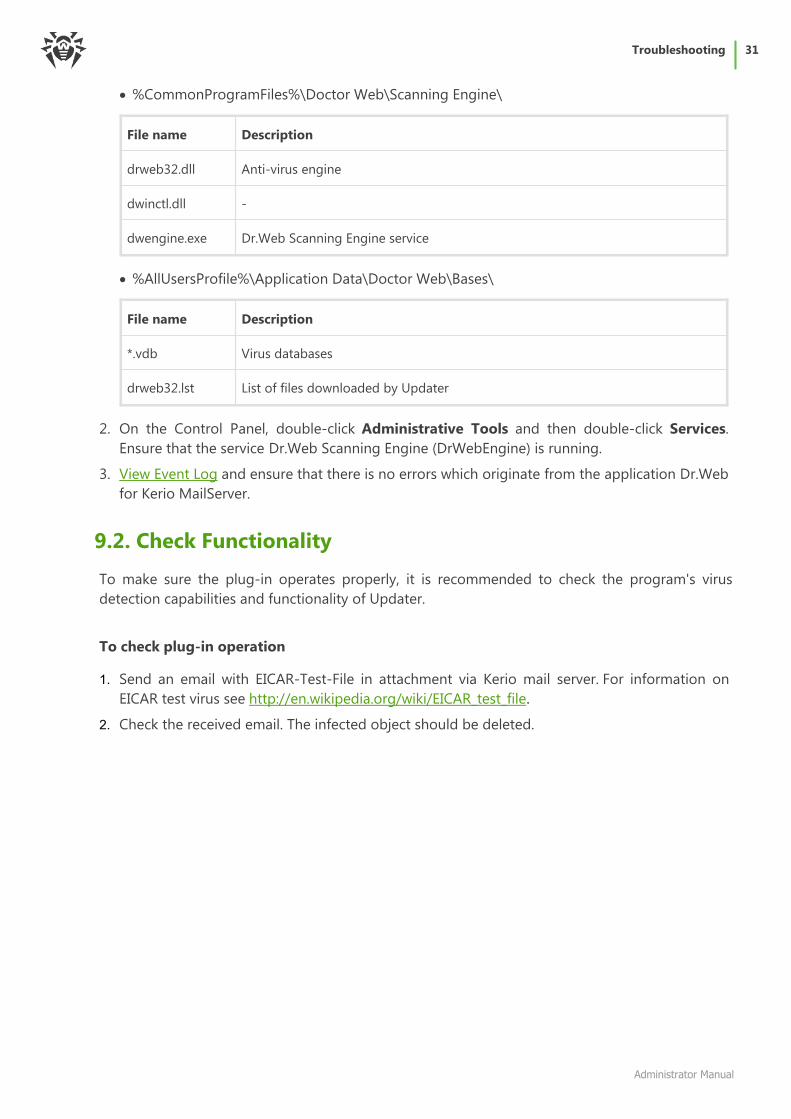
· %CommonProgramFiles%\Doctor Web\Scanning Engine\
File name Description
drweb32.dll Anti-virus engine
dwinctl.dll -
dwengine.exe Dr.Web Scanning Engine service
· %AllUsersProfile%\Application Data\Doctor Web\Bases\
File name Description
*.vdb Virus databases
drweb32.lst List of files downloaded by Updater
2. On the Control Panel, double-click Administrative Tools and then double-click Services.
Ensure that the service Dr.Web Scanning Engine (DrWebEngine) is running.
3. View Event Log and ensure that there is no errors which originate from the application Dr.Web
for Kerio MailServer.
9.2. Check Functionality
To make sure the plug-in operates properly, it is recommended to check the program's virus
detection capabilities and functionality of Updater.
To check plug-in operation
1. Send an email with EICAR-Test-File in attachment via Kerio mail server. For information on
EICAR test virus see http://en.wikipedia.org/wiki/EICAR_test_file.
2. Check the received email. The infected object should be deleted.
Administrator Manual
32Troubleshooting
To check Updater
1. On the Control Panel, double-click Scheduled Tasks and ensure that the Dr.Web Update for
Kerio MailServer Plugin task is created.
2. Check that last update succeeded. The plug-in updates virus databases after installation
completes. If update completes successfully, the ERRORLEVEL environment variable is set to 0.
Other values indicate an error.
3. In the %AllUsersProfile%\Application Data\Doctor Web\Logs\ folder, view the drwebupw.log
update log and ensure that it contains no errors.

Administrator Manual
33Appendices
10. Appendices
10.1. Appendix A. Updater Command Line Parameters
Updater can operate in command line mode. You can use parameters to configure the update
process.
To configure update task
1. On the Control Panel, double-click Scheduled Tasks.
2. Right-click Dr.Web Update for Kerio MailServer Plugin and select Properties.
3. In the Run field add command line parameters.
Available Parameters
Below is the list of command line parameters which can be used to configure the updating
process:
Parameter Description
/DBG Sets detailed logging in the %AllUsersProfile%\Application Data\Doctor
Web\Logs\drwebupw.log file.
/URL:<url> Specifies location of the updates server.
Only UNC-paths are accepted.
/USER:<name> Specifies the user name to use when connecting to the updates server.
/PASS:<passwor
d>
Specifies the password to use when connecting to the updates server.
/UPM:<mode> Configures connection via proxy. You can set one of the following values:
· direct – direct connection without proxy
· ieproxy – connection via proxy, system settings are used
· userproxy – connection via proxy, user-defined settings are used
/PURL:<address> Specifies location of the proxy server.
/PUSER:<name>
Specifies the user name to use when connecting to the proxy server.
/PPASS:<passwo
rd>
Specifies the password to use when connecting to the proxy server.
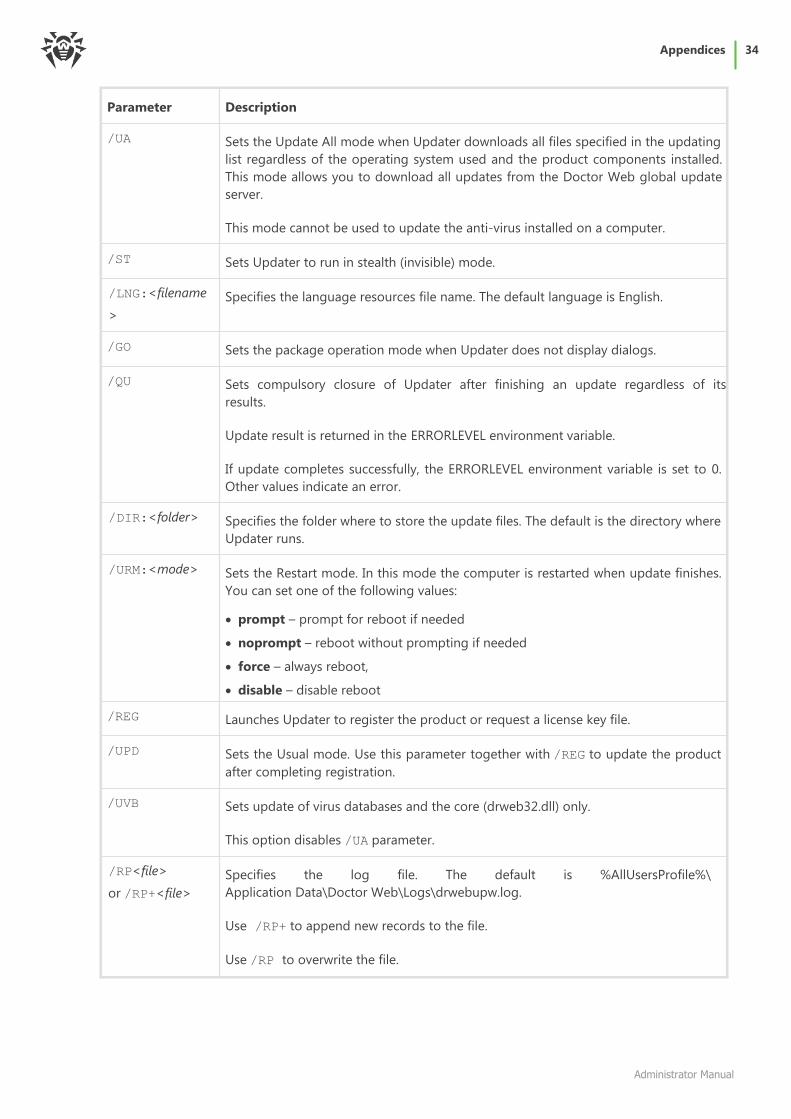
Administrator Manual
34Appendices
Parameter Description
/UA Sets the Update All mode when Updater downloads all files specified in the updating
list regardless of the operating system used and the product components installed.
This mode allows you to download all updates from the Doctor Web global update
server.
This mode cannot be used to update the anti-virus installed on a computer.
/ST Sets Updater to run in stealth (invisible) mode.
/LNG:<filename
>
Specifies the language resources file name. The default language is English.
/GO Sets the package operation mode when Updater does not display dialogs.
/QU Sets compulsory closure of Updater after finishing an update regardless of its
results.
Update result is returned in the ERRORLEVEL environment variable.
If update completes successfully, the ERRORLEVEL environment variable is set to 0.
Other values indicate an error.
/DIR:<folder> Specifies the folder where to store the update files. The default is the directory where
Updater runs.
/URM:<mode> Sets the Restart mode. In this mode the computer is restarted when update finishes.
You can set one of the following values:
· prompt – prompt for reboot if needed
· noprompt – reboot without prompting if needed
· force – always reboot,
· disable – disable reboot
/REG Launches Updater to register the product or request a license key file.
/UPD Sets the Usual mode. Use this parameter together with /REG to update the product
after completing registration.
/UVB Sets update of virus databases and the core (drweb32.dll) only.
This option disables /UA parameter.
/RP<file>
or /RP+<file>
Specifies the log file. The default is %AllUsersProfile%\
Application Data\Doctor Web\Logs\drwebupw.log.
Use /RP+ to append new records to the file.
Use /RP to overwrite the file.
Administrator Manual
35Appendices
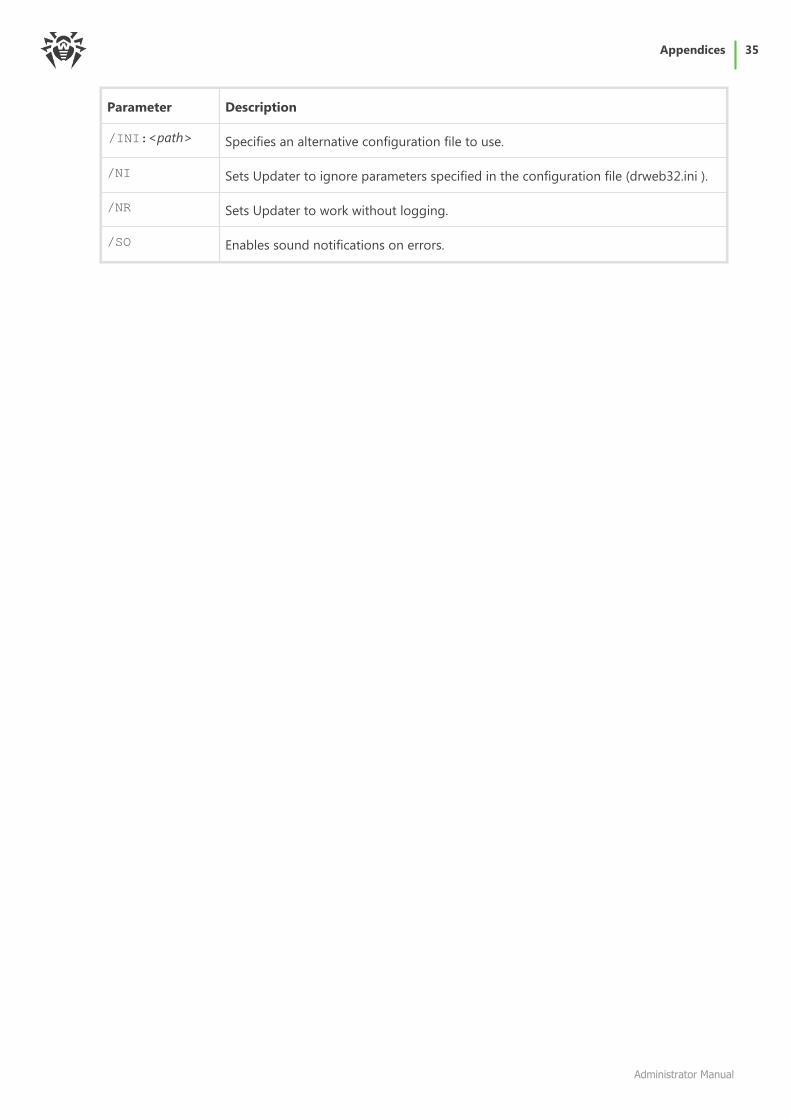
Parameter Description
/INI:<path> Specifies an alternative configuration file to use.
/NI Sets Updater to ignore parameters specified in the configuration file (drweb32.ini ).
/NR Sets Updater to work without logging.
/SO Enables sound notifications on errors.
Administrator Manual
36Appendices
10.2. Appendix B. Collect Information for Troubleshooting
In case you experience problems while using or installing Dr.Web for Kerio MailServer contact
Dr.Web Technical Support.
To help you to fix the problems as soon as possible, please provide to the Doctor Web specialists
the full information on the problem. You can review the recommendations listed below. This
information should be sent with your request to the Technical Support.
Recommendations
1. Save the report file with system information in the .nfo format. To do this:
· Run the msinfo32 command from the Start -> Run menu.
· Select File -> Save.
· Enter the file name and click OK.
2. Include the full version of Kerio mail server (e.g., 6.7 build 6399). To view the version the mail
server do the following:
· Open the Control Panel and select Add or Remove Programs.
· In the Add or Remove Programs window select Kerio MailServer/Kerio Connect.
· Click the link Click here for support information. A window containing the product
information will open. The full product version is also indicated in this window.
3. Save the Application and System logs in the .evt format. To do this:
· Run the eventvwr command from the Start -> Run menu.
· Right-click the Application/System log and select Save log file as.
· Enter the file name and select the Event Log (.evt) file type, then click Save.
4. If the problem persists, enable the Dr.Web debug log end reproduce the problem. Then you
can disable the debug log. By default, the program debug log is created in the %ProgramFiles
%\DrWeb for Kerio MailServer\DrWebForKMS.log folder.
5. Include the Dr.Web update log. To do this:
· Copy the drwebupw.log file from the %AllUsersProfile%\Application Data\Doctor
Web\Logs\ folder.
6. If Dr.Web for Kerio MailServer is installed and operates on a virtual machine, include the full
version of the virtualization system and the report file with system information (.nfo) on the
host virtual machine.
If you experience problems on the program installation or removal:
1. Include the version of the installation file you experience problems with (e.g., 6.00.0.07120). To
view the installation file version do the following:
· Find the program installation file in Windows Explorer (e.g., drweb-KerioMailServer-602-
windows-nt-x86.exe).
· Right-click the installation file name end select Properties.
Administrator Manual
37Appendices
· In the Properties window open the Version tab and select Product version.
2. Verify the digital signature of Dr.Web for Kerio MailServer installation. To do this:
· Find the program installation file in Windows Explorer (e.g., drweb-KerioMailServer-602-
windows-nt-x86.exe).
· Right-click the installation file name and select Properties.
· In the Properties window open the Digital signatures tab, then select the digital signature
in the list and click Details.
· The Digital Signature Details window should contain the string "This digital signature is
OK". If this string is missing, try to reload the installation file from the Doctor Web server
and repeat the digital signature verification procedure.
3. Attach the drweb-kerio-setup.log file located in the temporary folder. To do this:
· Open the temporary folder %Temp% from the Start -> Run menu and copy the drweb-
kerio-setup.log file.
4. Attach the following information on the license key file:
· Applications, Created and Expired parameters' values. Example:
Applications=Update, Scheduler, KerioPlugin
Created=2010-01-05 (12:00) UTC
Expires=2010-07-05 (12:00) UTC
· The [Settings] section. Example:
MailServer=Yes
FileServer=No
InetGateway=No
SpamFilter=No
LotusSpamFilter=No
EmailAddresses=Unlimited
TrafficLimit=Unlimited
Administrator Manual
38Appendices
10.3. Appendix C. Operation in Central Protection Mode
Dr.Web for Kerio MailServer can operate in the central protection mode in a network managed
by Dr.Web Control Center. The central protection helps automate and simplify configuring and
managing information security of computers within logical structures (for example, company
computers that access each other from both inside and outside of company's local networks).
Protected computers are united in one anti-virus network which security is monitored and
managed from central server (Dr.Web Control Center) by administrators. Connection to
centralized anti-virus systems guarantees high level of protection while requiring minimum
efforts from end-users.
Logical Structure of Anti-virus Networks
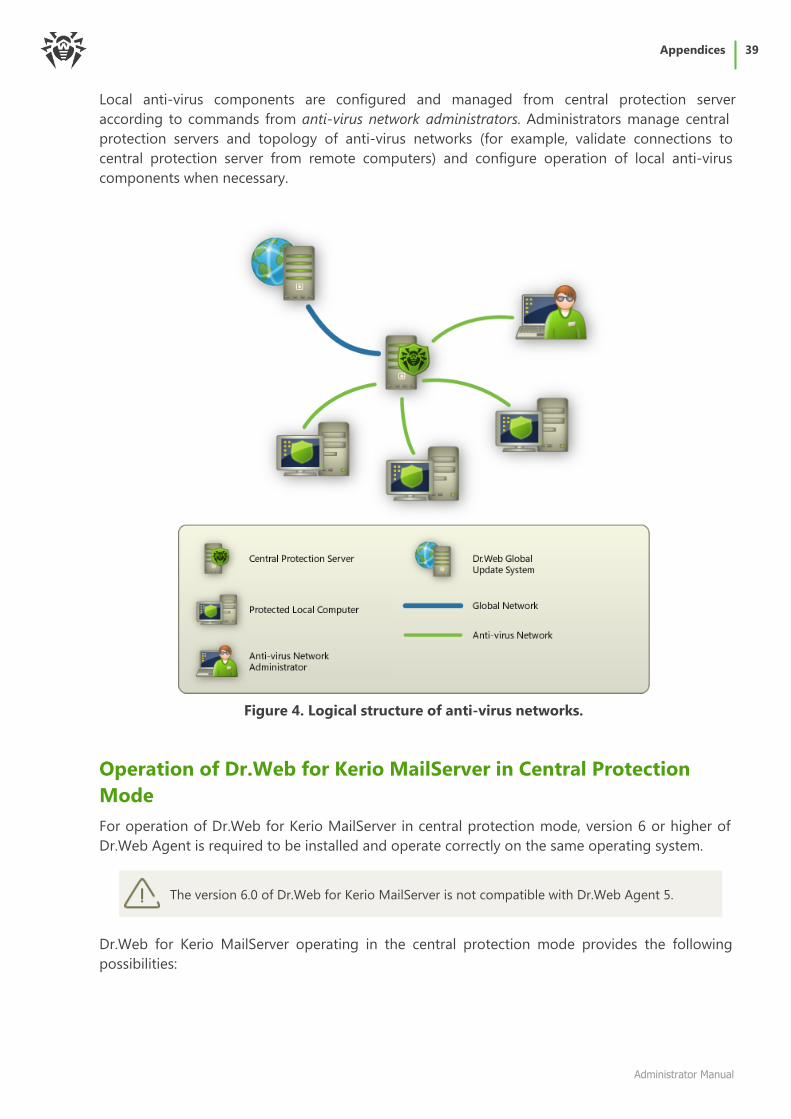
Solutions for central protection from Doctor Web use client-server model (see Figure 4).
Workstations and servers are protected by local anti-virus components (clients; herein, Dr.Web for
Kerio MailServer) installed on them, which provides for anti-virus protection of remote computers
and ensures easy connection to central protection server.
Local computers are updated and configured from central server. The stream of instructions, data
and statistics in the anti-virus network goes also through the central protection server. The
volume of traffic between protected computers and the central server can be quite sizeable,
therefore solutions provide options for traffic compression. To prevent leak of sensitive data or
substitution of software downloaded onto protected computers, encryption is also supported.
All necessary updates are downloaded to central protection server from Dr.Web Global Update
System servers.
Administrator Manual
39Appendices
Local anti-virus components are configured and managed from central protection server
according to commands from anti-virus network administrators. Administrators manage central
protection servers and topology of anti-virus networks (for example, validate connections to
central protection server from remote computers) and configure operation of local anti-virus
components when necessary.
Figure 4. Logical structure of anti-virus networks.
Operation of Dr.Web for Kerio MailServer in Central Protection
Mode
For operation of Dr.Web for Kerio MailServer in central protection mode, version 6 or higher of
Dr.Web Agent is required to be installed and operate correctly on the same operating system.
The version 6.0 of Dr.Web for Kerio MailServer is not compatible with Dr.Web Agent 5.
Dr.Web for Kerio MailServer operating in the central protection mode provides the following
possibilities:

Administrator Manual
40Appendices
· Recording the start events of Kerio mail server with the installed plug-in Dr.Web for Kerio
MailServer. Start events are displayed in the Start/Stop table of Dr.Web Control Center. Stop
time of Kerio server is not recorded.
· Sending statistics of Dr.Web for Kerio MailServer operation. The statistics is displayed in the
Statistics and Summary statistics tables of Dr.Web Control Center.
· Sending notifications on detected viruses with information on the infections and performed
actions. These events are displayed in the Infection table of Dr.Web Control Center.
· Virus databases and anti-virus engine updates from Dr.Web Control Center repositories. This
action allow disabling the standard updater of Dr.Web for Kerio MailServer, which starts by
default according to a schedule. In this case components update starts from Dr.Web Control
Center repositories according to its schedule.
· Using a license key file for Dr.Web for Kerio MailServer that is registered at the anti-virus
network. On the start of Kerio server with the installed plug-in Dr.Web for Kerio MailServer the
license key file for the station in the anti-virus network will be used. If this key is invalid, the
plug-in will use the local key file stored in the program installation folder.
Administrator Manual
41
Keyword Index
Aantivirus check 20
appendix 33, 36, 38
Ccentral protection mode 38
check
detection methods 20
for viruses 20
functionality 31
installation 30
updater 30, 31
command line parameters 33
compatibility 13
configure
anti-virus check 16
internet connection 15
logging 16
notifications 18
proxy 15
server parameters 18
work with Kerio MailServer 16
connect to Internet via proxy 15
contact support 7
Ddebug log 29
detection methods 20
document conventions 7
Dr.Web for Kerio MailServer
check operation 30
detection capabilities 31
install 13
main features 6
options 16, 18
quarantine 22
statistics 25
uninstall 14
update 26
web console 24, 25
Eevent log 27
Gget key file 9
Iinstall Dr.Web for Kerio MailServer 12, 13
check 30
integration 16
internet connection 15
KKerio Connect 12
Kerio MailServer 12
key file 8
format 10
get 9
parameters 10
update 10
use 10
Llicense 25
get 9
parameters 10
update 10
use 10
validity 8
license key file
update 10
validity 8
licensing 8
parameters 10
logging
configure 16
logs 27
debug log 29
event log 27
text log 27
Mmail server 12
Nnotifications 18
Administrator Manual
42
Keyword Index
Ooperating system 12
operation mode 38
options
anti-virus 16, 18
check 16
logging 16
notifications 18
server 18
Pproxy 15
Qquarantine 22
Rrequirements 12
Sstatistics 25
support 7
system requirements 12
Ttechnical support 7
text log 27
troubleshooting 30, 31
information 36
Uuninstall Dr.Web for Kerio MailServer 12, 14
update 26
parameters 33
virus databases 25
update license 10
updater
check 30, 31
Vvirus check 20
Wweb console 24, 25
access 24
license 25
statistics 25
update 25

© 2003-2017 Doctor Web