Embed Size (px)
Citation preview
Administrator Guide
Administrator Guide: Open Build Serviceby Karsten Keil
Publication Date: 12/13/2021
SUSE LLC1800 South Novell PlaceProvo, UT 84606USA
https://documentation.suse.com
Copyright © 2016
Copyright © 2006– 2021 SUSE LLC and contributors. All rights reserved.
Permission is granted to copy, distribute and/or modify this document under the terms of the GNU Free
Documentation License, Version 1.2 or (at your option) version 1.3; with the Invariant Section being this
copyright notice and license. A copy of the license version 1.2 is included in the section entitled “GNU
Free Documentation License”.
For SUSE trademarks, see http://www.suse.com/company/legal/ . All other third-party trademarks are the
property of their respective owners. Trademark symbols (®, ™ etc.) denote trademarks of SUSE and its
aliates. Asterisks (*) denote third-party trademarks.
All information found in this book has been compiled with utmost attention to detail. However, this does
not guarantee complete accuracy. Neither SUSE LLC, its aliates, the authors nor the translators shall be
held liable for possible errors or the consequences thereof.
Contents
About this Guide vi
1 Available Documentation vi
2 Feedback vi
3 Documentation Conventions vii
4 Contributing to the Documentation viii
1 Installation and Configuration 11.1 Planning 1
Resource Planning 1
1.2 Simple Installation 2
Back-end Installation 2 • Front-end Installation 7 • Online
Configuration 9
1.3 Worker Farm 12
1.4 Distributed Setup 13
1.5 Monitoring 16
Endpoint Checks 16 • Common Checks 17 • Other Checks 18
2 File System Overview 20
2.1 Configuration Files 20
Front-end Configuration 20 • Back-end Configuration 29
2.2 Log Files 50
Front-end 50 • Back-end 50
2.3 /srv/obs Tree 51
build Directory 51 • cloudupload Directory 52 • db
Directory 52 • diffcache Directory 52 • events
Directory 52 • info Directory 53 • jobs Directory 53 • log
iii Administrator Guide
Directory 53 • projects Directory 53 • remotecache
Directory 53 • repos Directory 53 • repos_sync
Directory 53 • run Directory 54 • sources Directory 54 • trees
Directory 54 • upload Directory 54 • workers Directory 54
2.4 Metadata 55
OBS Revision Control 55 • Project Metadata 56 • Package
Metadata 58 • Attribute Metadata 58 • Job Files 59
3 Security Concepts 61
3.1 General Paradigm 61
Frontend 61 • Build Environment 62 • Source Revision
System 63 • Permission Handling 63 • Signature Handling 63
3.2 Trust Zones 64
Public Zones 64 • Demilitarized Zone (DMZ) 65 • Internal
Zone 66 • Worker Zone 67 • Signing Server 67
4 Administration 69
4.1 Tools 69
obs_admin 69 • osc 72
4.2 Managing Build Targets 75
Interconnect 75 • Importing Distributions 76
4.3 Source Services 76
Using Services for Validation 77 • Different Modes When Using
Services 77 • Storage of Source Service Definitions 79 • Dropping a
Source Service Again 79
4.4 Source Publisher 79
Configuring Source Publisher 80 • Considerations 80
4.5 Dispatch Priorities 80
The /build/_dispatchprios API Call 81 • dispatch_adjust Array 82
4.6 Publisher Hooks 83
Configuring Publisher Hooks 83 • Example Publisher Scripts 85
iv Administrator Guide
4.7 Unpublisher Hooks 86
Configuring Unpublisher Hooks 87 • Example Unpublisher Scripts 88
4.8 Managing Users and Groups 90
User and Group Roles 90 • Standalone User and Group
Database 90 • Users and Group Maintainers 91 • Gravatar
for Groups 91 • Proxy Mode 91 • LDAP/Active
Directory 92 • Authentication Methods 98
4.9 Message Bus for Event Notifications 101
RabbitMQ 101
4.10 Backup 107
Places to consider 107 • Backup strategies 108
4.11 Restore 108
Check and repair database inconsistencies 108 • Binaries 109
4.12 Repair Data Corruption 109
4.13 Spider Identification 110
4.14 Worker in Kubernetes 111
5 Troubleshooting 116
5.1 General Hints 116
5.2 Debugging Front-end Problems 117
6 Setting Up a Local OBS Instance 118
6.1 Testing OBS on Microsoft Windows Using VMware Player 118
6.2 Installing a Readymade OBS Appliance in a VirtualBox 119
6.3 First Steps with Your New OBS Server 120
A GNU Licenses 122
v Administrator Guide
About this Guide
This guide is part of the Open Build Service documentation. These books are considered tocontain only reviewed content, establishing the reference documentation of OBS.
This guide does not focus on a specic OBS version. It is also not a replacement of thedocumentation inside of the openSUSE Wiki (https://en.opensuse.org/Portal:Build_Service) .However, content from the wiki may be included in these books in a consolidated form.
1 Available DocumentationThe following documentation is available for OBS:
Administrator Guide
This guide oers information about the initial setup and maintenance for running OpenBuild Service instances.
Book “User Guide”
This guide is intended for users of Open Build Service. The rst part describes basicworkows for working with packages on Open Build Service. This includes checking outa package from an upstream project, creating patches, branching a repository, and more.The following parts go into more detail and contain information on backgrounds, settingup your computer for working with OBS, and usage scenarios. The Best Practices part oersstep-by-step instructions for the most common features of the Open Build Service and theopenSUSE Build Service. The last part covers ideas and motivations, concepts and processesof the Open Build Service.
2 FeedbackSeveral feedback channels are available:
Bugs and Enhancement Requests
Help for openSUSE is provided by the community. Refer to https://en.opensuse.org/
Portal:Support for more information.
Bug Reports
To report bugs for Open Build Service, go to https://bugzilla.opensuse.org/ , log in, andclick New.
vi Available Documentation
For feedback on the documentation of this product, you can also send a mail to [email protected] . Make sure to include the document title, the product version and thepublication date of the documentation. To report errors or suggest enhancements, providea concise description of the problem and refer to the respective section number and page(or URL).
3 Documentation ConventionsThe following notices and typographical conventions are used in this documentation:
/etc/passwd : directory names and le names
PLACEHOLDER : replace PLACEHOLDER with the actual value
PATH : the environment variable PATH
ls , --help : commands, options, and parameters
user : users or groups
package name : name of a package
Alt , Alt – F1 : a key to press or a key combination; keys are shown in uppercase as ona keyboard
File, File Save As: menu items, buttons
Dancing Penguins (Chapter Penguins, ↑Another Manual): This is a reference to a chapter inanother manual.
Commands that must be run with root privileges. Often you can also prex thesecommands with the sudo command to run them as non-privileged user.
root # commandgeeko > sudo command
Commands that can be run by non-privileged users.
geeko > command
Notices
vii Documentation Conventions
Warning: Warning NoticeVital information you must be aware of before proceeding. Warns you about securityissues, potential loss of data, damage to hardware, or physical hazards.
Important: Important NoticeImportant information you should be aware of before proceeding.
Note: Note NoticeAdditional information, for example about dierences in software versions.
Tip: Tip NoticeHelpful information, like a guideline or a piece of practical advice.
4 Contributing to the DocumentationThe OBS documentation is written by the community. And you can help too!
Especially as an advanced user or an administrator of OBS, there will be many topics whereyou can pitch in even if your English is not the most polished. Conversely, if you are not veryexperienced with OBS but your English is good: We rely on community editors to improve thelanguage.
This guide is written in DocBook XML which can be converted to HTML or PDF documentation.
To clone the source of this guide, use Git:
git clone https://github.com/openSUSE/obs-docu.git
To learn how to validate and generate the OBS documentation, see the le README .
To submit changes, use GitHub pull requests:
1. Fork your own copy of the repository.
2. Commit your changes into the forked repository.
viii Contributing to the Documentation

3. Create a pull request. This can be done at https://github.com/openSUSE/obs-docu .
It is even possible to host instance-specic content in the ocial Git repository, but itneeds to be tagged correctly. For example, parts of this documentation are tagged as <paraos="opensuse"> . In this case, the paragraph will only become visible when creating theopenSUSE version of a guide.
ix Contributing to the Documentation

1 Installation and Configuration
1.1 Planning
For testing your own OBS instance, or for small setups, such as if you only want to package a fewscripts into RPMS and create proper installation sources from them, the ready-to-use obs-serverappliance images are the easiest way. You can download them from http://openbuildservice.org/
download/ .
However, to use the OBS for large Linux software development with many packages, projectsand users, consider setting up a regular installation. Depending on the number of users, projects,and architectures, you can split up the back-end (called partitioning) and have separate hostsfor the front-end and the database.
For most installations, it is OK to run everything except workers on one host, if it has sucientresources.
For exibility and if you want some kind of high availability it is recommended to usevirtualization for the dierent components.
1.1.1 Resource Planning
Normally, for an small or middle-sized installation, a setup with everything on one host (exceptworkers) is sucient. You should have a separate /srv volume for the back-end data. Werecommend that you use XFS as le system.
For each scheduler architecture, you should add 4 GB RAM and one CPU core. For each builddistribution you should add at least 50GB disk space per architecture.
A medium instance with about 50 users can easily run on a machine with 16GB RAM, 4 coresand 1 TB storage. The storage, of course, depends on the size of your projects and how oftenyou have new versions.
For bigger installations, you can use separate networks for back-end communication, workersand front-end.
1 Planning
As of May 2021, the reference installation on build.opensuse.org, which has a lot of users anddistributions, runs on a partitioned setup with:
a mysql cluster as database
api-server: 16GB RAM, 4 cores, 50GB disk
separate binary back-ends (scheduler, dispatcher, reposerver, publisher, warden)
source server: 11 GB RAM, 4 cores, 3 TB disk. The RAM is used mainly for caching.
main back-end: 62 GB RAM (oversized), 16TB disk
a lot of workers (see - https://build.opensuse.org/monitor )
For build time and performance, the count and performance of available worker hosts is moreimportant than the other parts.
1.2 Simple InstallationIn this document, we call "simple installation" an OBS installation where all OBS services arerunning on the same machine.
ImportantIt is very important that you read the README.SETUP le coming with your OBS versionand follow the instructions there, because it may provide additional, version-specicinformation.
Before you start the installation of the OBS, you should make sure that your hosts have thecorrect fully qualied hostname, and that DNS is working and can resolve all names.
1.2.1 Back-end Installation
The back-end hosts all sources and built packages. It also schedules the jobs. To install it, installthe "obs-server" package. You should check the /usr/lib/obs/server/BSCong.pm le, thoughthe defaults should be good enough for simple cases.
2 Simple Installation
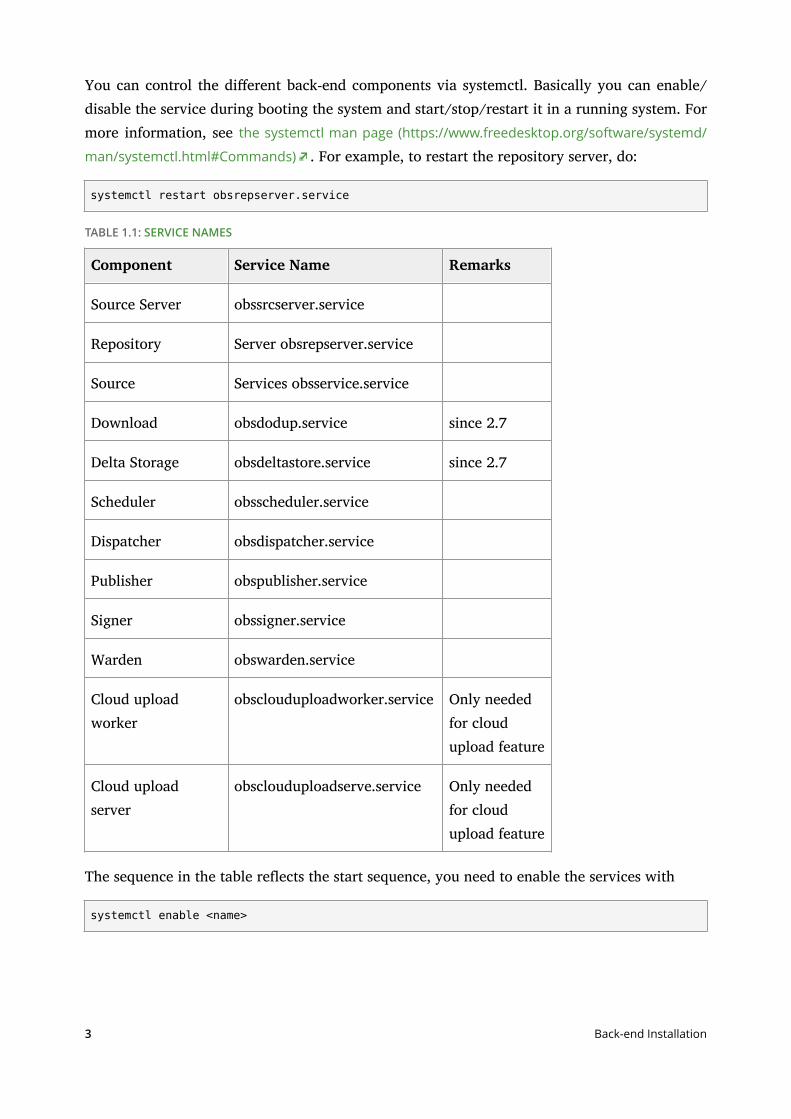
You can control the dierent back-end components via systemctl. Basically you can enable/disable the service during booting the system and start/stop/restart it in a running system. Formore information, see the systemctl man page (https://www.freedesktop.org/software/systemd/
man/systemctl.html#Commands) . For example, to restart the repository server, do:
systemctl restart obsrepserver.service
TABLE 1.1: SERVICE NAMES
Component Service Name Remarks
Source Server obssrcserver.service
Repository Server obsrepserver.service
Source Services obsservice.service
Download obsdodup.service since 2.7
Delta Storage obsdeltastore.service since 2.7
Scheduler obsscheduler.service
Dispatcher obsdispatcher.service
Publisher obspublisher.service
Signer obssigner.service
Warden obswarden.service
Cloud uploadworker
obsclouduploadworker.service Only neededfor cloudupload feature
Cloud uploadserver
obsclouduploadserve.service Only neededfor cloudupload feature
The sequence in the table reects the start sequence, you need to enable the services with
systemctl enable <name>
3 Back-end Installation
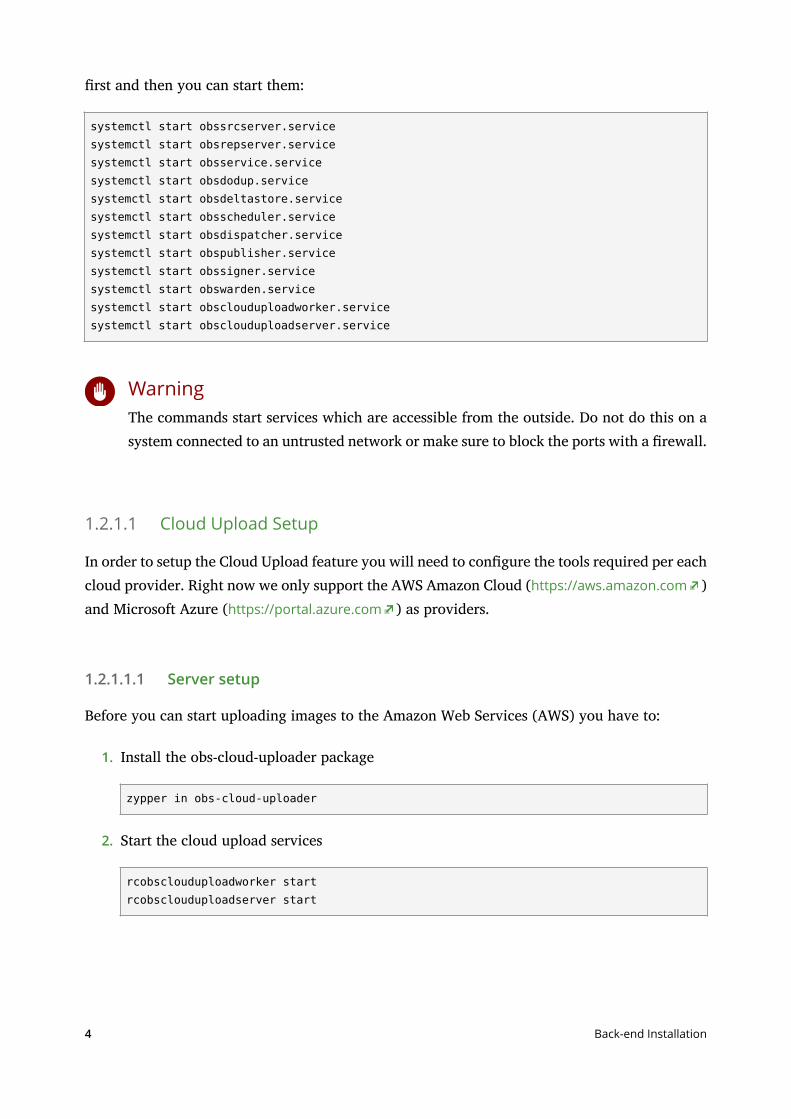
rst and then you can start them:
systemctl start obssrcserver.servicesystemctl start obsrepserver.servicesystemctl start obsservice.servicesystemctl start obsdodup.servicesystemctl start obsdeltastore.servicesystemctl start obsscheduler.servicesystemctl start obsdispatcher.servicesystemctl start obspublisher.servicesystemctl start obssigner.servicesystemctl start obswarden.servicesystemctl start obsclouduploadworker.servicesystemctl start obsclouduploadserver.service
WarningThe commands start services which are accessible from the outside. Do not do this on asystem connected to an untrusted network or make sure to block the ports with a rewall.
1.2.1.1 Cloud Upload Setup
In order to setup the Cloud Upload feature you will need to congure the tools required per eachcloud provider. Right now we only support the AWS Amazon Cloud (https://aws.amazon.com )and Microsoft Azure (https://portal.azure.com ) as providers.
1.2.1.1.1 Server setup
Before you can start uploading images to the Amazon Web Services (AWS) you have to:
1. Install the obs-cloud-uploader package
zypper in obs-cloud-uploader
2. Start the cloud upload services
rcobsclouduploadworker startrcobsclouduploadserver start
4 Back-end Installation
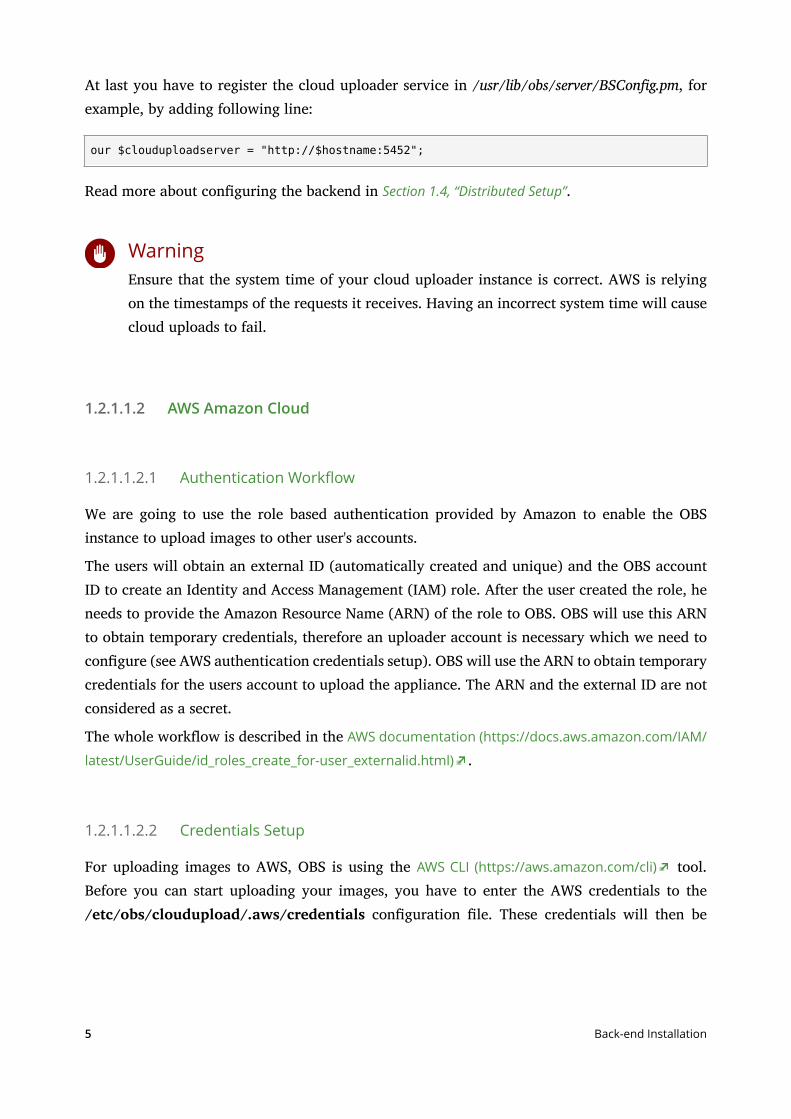
At last you have to register the cloud uploader service in /usr/lib/obs/server/BSCong.pm, forexample, by adding following line:
our $clouduploadserver = "http://$hostname:5452";
Read more about conguring the backend in Section 1.4, “Distributed Setup”.
WarningEnsure that the system time of your cloud uploader instance is correct. AWS is relyingon the timestamps of the requests it receives. Having an incorrect system time will causecloud uploads to fail.
1.2.1.1.2 AWS Amazon Cloud
1.2.1.1.2.1 Authentication Workflow
We are going to use the role based authentication provided by Amazon to enable the OBSinstance to upload images to other user's accounts.
The users will obtain an external ID (automatically created and unique) and the OBS accountID to create an Identity and Access Management (IAM) role. After the user created the role, heneeds to provide the Amazon Resource Name (ARN) of the role to OBS. OBS will use this ARNto obtain temporary credentials, therefore an uploader account is necessary which we need tocongure (see AWS authentication credentials setup). OBS will use the ARN to obtain temporarycredentials for the users account to upload the appliance. The ARN and the external ID are notconsidered as a secret.
The whole workow is described in the AWS documentation (https://docs.aws.amazon.com/IAM/
latest/UserGuide/id_roles_create_for-user_externalid.html) .
1.2.1.1.2.2 Credentials Setup
For uploading images to AWS, OBS is using the AWS CLI (https://aws.amazon.com/cli) tool.Before you can start uploading your images, you have to enter the AWS credentials to the/etc/obs/cloudupload/.aws/credentials conguration le. These credentials will then be
5 Back-end Installation
used by OBS to retrieve the temporary credentials from the ARN provided by users. Moreinformation about IAM role base authorization can be found in the Amazon documentation
(https://docs.aws.amazon.com/IAM/latest/UserGuide/id_roles_create_for-user_externalid.html) ).
1.2.1.1.3 Microsoft Azure
1.2.1.1.3.1 Authentication Workflow
The authentication is done via Microsoft's Active Directory. The user has to create a newapplication and needs to provide those two credentials to OBS:
1. Application IDThe Application ID is a unique ID that represents an Active Directory Application.
2. Application KeyThe Application Key can be generated for every application and is the password.
OBS communicates with the REST API of Microsoft Azure to authenticate and upload images.
1.2.1.1.3.2 Configuration
The Application ID and the Application Key will be stored encrypted in the database. As forthat, it's required to generate an SSL secret and public key that has to be stored on the serverwhere the obs-cloud-uploader package has been installed.
To generate that SSL certicate, execute the following commands:
cd /etc/obs/clouduploadopenssl genrsa -out secret.pemopenssl rsa -in secret.pem -out _pubkey -outform PEM -pubout
1.2.1.1.3.3 Credentials setup
It's important that the public key is named _pubkey and the secret key is named secret.pemand are kept in /etc/obs/cloudupload.
6 Back-end Installation
1.2.2 Front-end Installation
You need to install the "obs-api" package for this and a MySQL server.
1.2.2.1 MySQL Setup
Make sure that the mysql server is started on every system reboot (use "insserv mysql" forpermanent start). You should run mysql_secure_installation and follow the instructions.
Create the empty production databases:
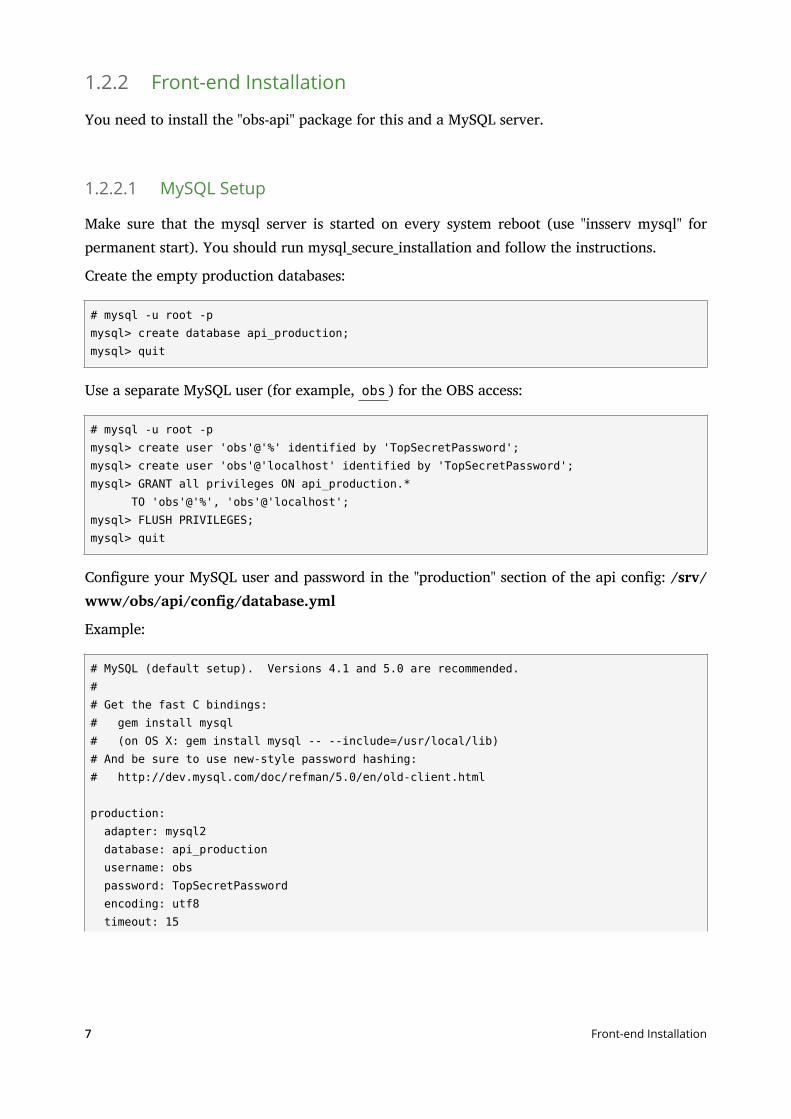
# mysql -u root -pmysql> create database api_production;mysql> quit
Use a separate MySQL user (for example, obs ) for the OBS access:
# mysql -u root -pmysql> create user 'obs'@'%' identified by 'TopSecretPassword';mysql> create user 'obs'@'localhost' identified by 'TopSecretPassword';mysql> GRANT all privileges ON api_production.* TO 'obs'@'%', 'obs'@'localhost';mysql> FLUSH PRIVILEGES;mysql> quit
Congure your MySQL user and password in the "production" section of the api cong: /srv/www/obs/api/cong/database.yml
Example:
# MySQL (default setup). Versions 4.1 and 5.0 are recommended.## Get the fast C bindings:# gem install mysql# (on OS X: gem install mysql -- --include=/usr/local/lib)# And be sure to use new-style password hashing:# http://dev.mysql.com/doc/refman/5.0/en/old-client.html
production: adapter: mysql2 database: api_production username: obs password: TopSecretPassword encoding: utf8 timeout: 15
7 Front-end Installation
pool: 30
Now populate the database
cd /srv/www/obs/api/sudo RAILS_ENV="production" rake db:setupsudo RAILS_ENV="production" rake writeconfigurationsudo chown -R wwwrun.www log tmp
Now you are done with the database setup.
1.2.2.2 Apache Setup
Now we need to congure the Web server. By default, you can reach the familiar web userinterface and also api both on port 443 speaking https. Repositories can be accessed via httpon port 82 (once some packages are built). An overview page about your OBS instance can befound behind 'http://localhost'.
The obs-api package comes with an Apache vhost le, which does not need to get modiedwhen you stay with these defaults: /etc/apache2/vhosts.d/obs.conf
Install the required packages via
zypper in obs-api apache2 apache2-mod_xforward rubygem-passenger-apache2 memcached
Add the following Apache modules in /etc/sysconfig/apache2 :
APACHE_MODULES="... passenger rewrite proxy proxy_http xforward headers socache_shmcb"
Enable SSL in /etc/syscong/apache2 via
APACHE_SERVER_FLAGS="SSL"
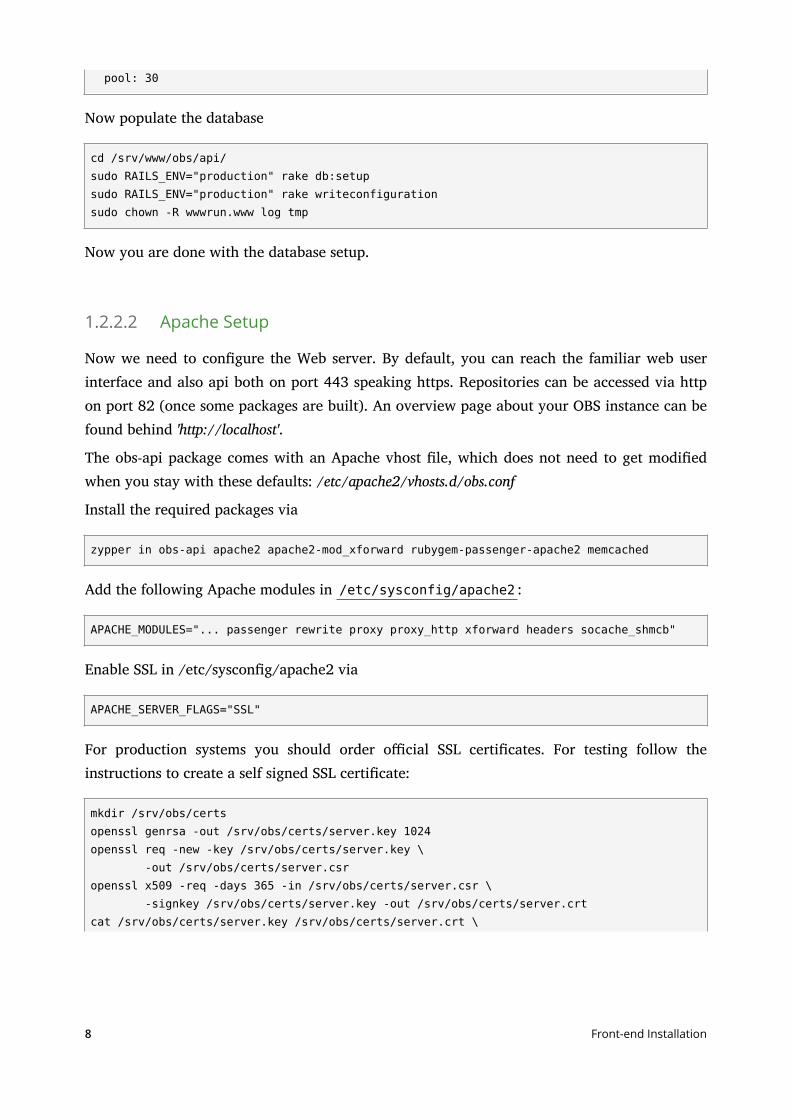
For production systems you should order ocial SSL certicates. For testing follow theinstructions to create a self signed SSL certicate:
mkdir /srv/obs/certsopenssl genrsa -out /srv/obs/certs/server.key 1024openssl req -new -key /srv/obs/certs/server.key \ -out /srv/obs/certs/server.csropenssl x509 -req -days 365 -in /srv/obs/certs/server.csr \ -signkey /srv/obs/certs/server.key -out /srv/obs/certs/server.crtcat /srv/obs/certs/server.key /srv/obs/certs/server.crt \
8 Front-end Installation
> /srv/obs/certs/server.pem
To allow the usage of https API in Web UI code you need to trust your certicate as well:
cp /srv/obs/certs/server.pem /etc/ssl/certs/c_rehash /etc/ssl/certs/
1.2.2.3 API Configuration
Check and edit /srv/www/obs/api/cong/options.yml
If you change the hostnames/ips of the api, you need to adjust frontend_host accordingly. Ifyou want to use LDAP, you need to change the LDAP settings as well. Look at the Section 4.8,
“Managing Users and Groups” for details. You will nd examples and more details in the Section 2.1,
“Configuration Files”.
It is recommended to enable
use_xforward: true
as well here.
Afterwards you can start the OBS web api and make it permanent via
systemctl enable apache2systemctl start apache2
systemctl enable obsapidelayed.servicesystemctl start obsapidelayed.service
systemctl enable memcached.servicesystemctl start memcached.service
Now you have you own empty instance running and you can do some online conguration steps.
1.2.3 Online Configuration
To customize the OBS instance you may need to congure some settings via the OBS API andWeb user interface.
First you should change the password of the Admin account, for this you need rst login as userAdmin in the Web UI with the default password "opensuse". Click on the Admin link (right topof the page), here you can change the password.
9 Online Configuration
After changing the Admin password, set up osc to use the Admin account for more changes.Here an example:
osc -c ~/.obsadmin_osc.rc -A https://api.testobs.org
Follow the instructions on the terminal.
WarningThe password is stored in clear text in this le by default, so you need to give this lerestrictive access rights, only read/write access for your user should be allowed. oscallows to store the password in other ways (in keyrings for example), refer to the oscdocumentation for this.
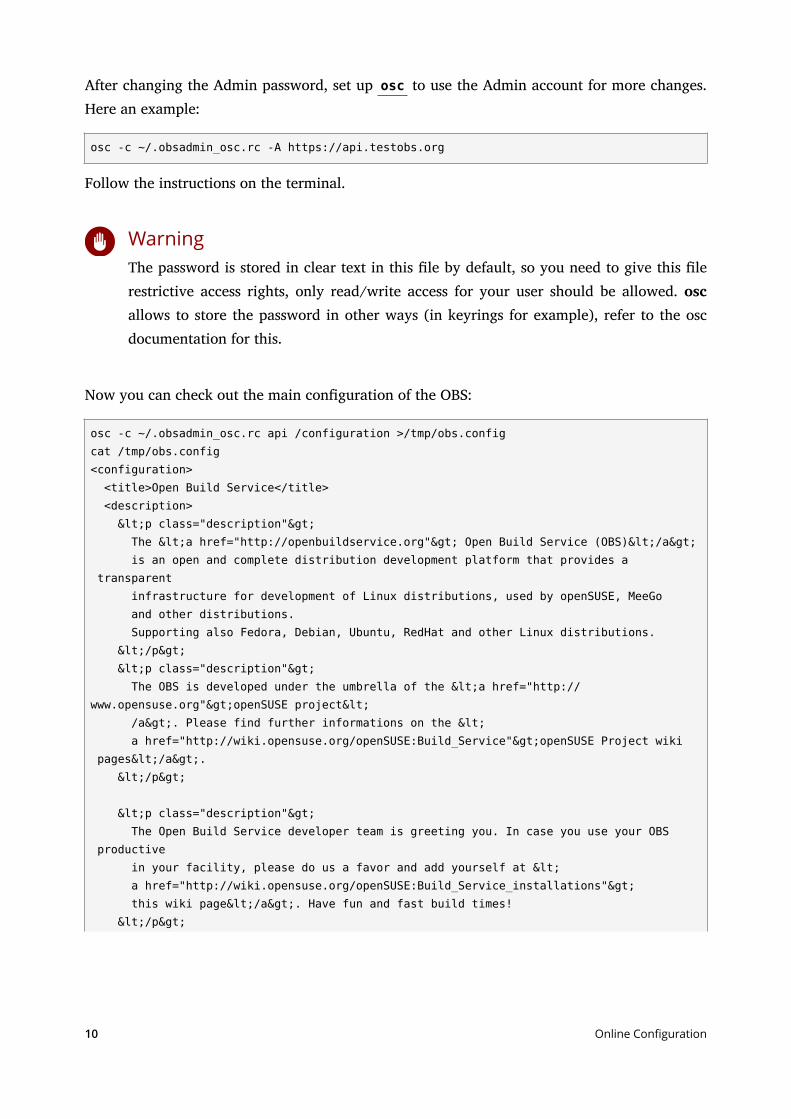
Now you can check out the main conguration of the OBS:
osc -c ~/.obsadmin_osc.rc api /configuration >/tmp/obs.configcat /tmp/obs.config<configuration> <title>Open Build Service</title> <description> <p class="description"> The <a href="http://openbuildservice.org"> Open Build Service (OBS)</a> is an open and complete distribution development platform that provides a transparent infrastructure for development of Linux distributions, used by openSUSE, MeeGo and other distributions. Supporting also Fedora, Debian, Ubuntu, RedHat and other Linux distributions. </p> <p class="description"> The OBS is developed under the umbrella of the <a href="http://www.opensuse.org">openSUSE project< /a>. Please find further informations on the < a href="http://wiki.opensuse.org/openSUSE:Build_Service">openSUSE Project wiki pages</a>. </p>
<p class="description"> The Open Build Service developer team is greeting you. In case you use your OBS productive in your facility, please do us a favor and add yourself at < a href="http://wiki.opensuse.org/openSUSE:Build_Service_installations"> this wiki page</a>. Have fun and fast build times! </p>
10 Online Configuration
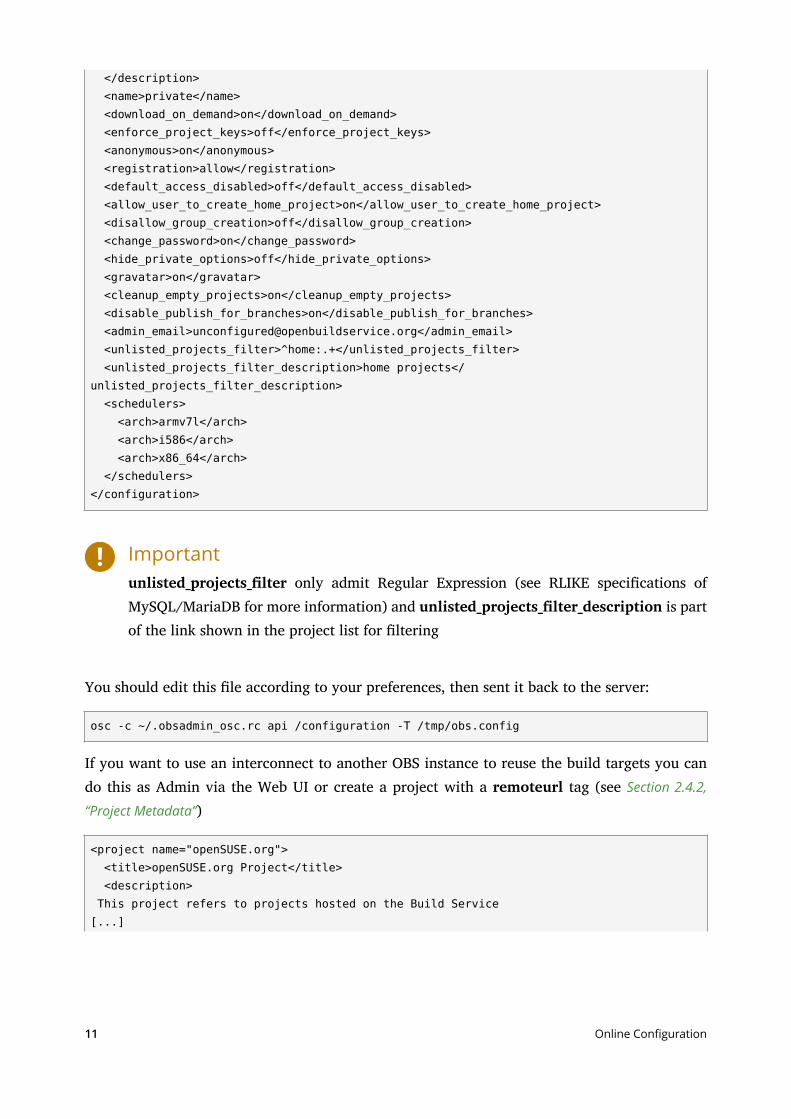
</description> <name>private</name> <download_on_demand>on</download_on_demand> <enforce_project_keys>off</enforce_project_keys> <anonymous>on</anonymous> <registration>allow</registration> <default_access_disabled>off</default_access_disabled> <allow_user_to_create_home_project>on</allow_user_to_create_home_project> <disallow_group_creation>off</disallow_group_creation> <change_password>on</change_password> <hide_private_options>off</hide_private_options> <gravatar>on</gravatar> <cleanup_empty_projects>on</cleanup_empty_projects> <disable_publish_for_branches>on</disable_publish_for_branches> <admin_email>[email protected]</admin_email> <unlisted_projects_filter>^home:.+</unlisted_projects_filter> <unlisted_projects_filter_description>home projects</unlisted_projects_filter_description> <schedulers> <arch>armv7l</arch> <arch>i586</arch> <arch>x86_64</arch> </schedulers></configuration>
Importantunlisted_projects_lter only admit Regular Expression (see RLIKE specications ofMySQL/MariaDB for more information) and unlisted_projects_lter_description is partof the link shown in the project list for ltering
You should edit this le according to your preferences, then sent it back to the server:
osc -c ~/.obsadmin_osc.rc api /configuration -T /tmp/obs.config
If you want to use an interconnect to another OBS instance to reuse the build targets you cando this as Admin via the Web UI or create a project with a remoteurl tag (see Section 2.4.2,
“Project Metadata”)
<project name="openSUSE.org"> <title>openSUSE.org Project</title> <description> This project refers to projects hosted on the Build Service[...]
11 Online Configuration
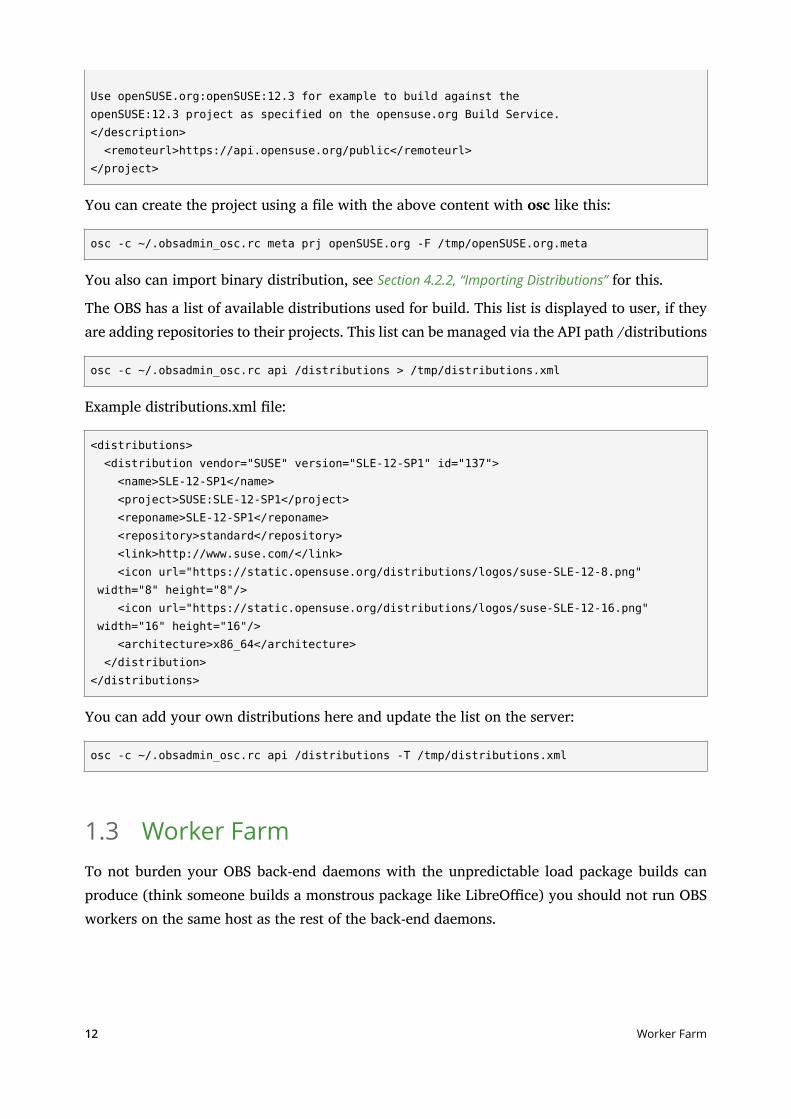
Use openSUSE.org:openSUSE:12.3 for example to build against theopenSUSE:12.3 project as specified on the opensuse.org Build Service.</description> <remoteurl>https://api.opensuse.org/public</remoteurl></project>
You can create the project using a le with the above content with osc like this:
osc -c ~/.obsadmin_osc.rc meta prj openSUSE.org -F /tmp/openSUSE.org.meta
You also can import binary distribution, see Section 4.2.2, “Importing Distributions” for this.
The OBS has a list of available distributions used for build. This list is displayed to user, if theyare adding repositories to their projects. This list can be managed via the API path /distributions
osc -c ~/.obsadmin_osc.rc api /distributions > /tmp/distributions.xml
Example distributions.xml le:
<distributions> <distribution vendor="SUSE" version="SLE-12-SP1" id="137"> <name>SLE-12-SP1</name> <project>SUSE:SLE-12-SP1</project> <reponame>SLE-12-SP1</reponame> <repository>standard</repository> <link>http://www.suse.com/</link> <icon url="https://static.opensuse.org/distributions/logos/suse-SLE-12-8.png" width="8" height="8"/> <icon url="https://static.opensuse.org/distributions/logos/suse-SLE-12-16.png" width="16" height="16"/> <architecture>x86_64</architecture> </distribution></distributions>
You can add your own distributions here and update the list on the server:
osc -c ~/.obsadmin_osc.rc api /distributions -T /tmp/distributions.xml
1.3 Worker FarmTo not burden your OBS back-end daemons with the unpredictable load package builds canproduce (think someone builds a monstrous package like LibreOce) you should not run OBSworkers on the same host as the rest of the back-end daemons.
12 Worker Farm
ImportantYou back-end need to be congured to use the correct hostnames for the repo and sourceserver and the ports need to be reachable by the workers. Also, the IP addresses of theworkers need to be allowed to connect the services. (look at the /usr/lib/obs/server/BSCong.pm::ipaccess array).
You can deploy workers quite simply using the worker appliance. Or install a minimum systemplus the obs-worker package on the hardware.
Edit the /etc/syscong/obs-server le, at least OBS_SRC_SERVER, OBS_REPO_SERVERS andOBS_WORKER_INSTANCES need to be set. More details in the Section 2.1, “Configuration Files”.
start the worker:
systemctl enable obsworkersystemctl start obsworker
1.4 Distributed SetupAll OBS back-end daemons can also be started on individual machines in your network. Also,the front-end Web server and the MySQL server can run on dierent machines. Especially forlarge scale OBS installations this is the recommended setup.
A setup with partitioning is very similar to the steps of the simple setup. Here we are onlymention the dierences to the simple setup.
NoteYou need to make sure that the dierent machines can communicate via the network, itis very recommended to use a separate network for this to isolate it from the public part.
On all back-end hosts you need to install the obs-server package. On the front-end host you needto install the obs-api package.
ImportantOnly one source server instance can be exist on a single OBS installation.
13 Distributed Setup
The binary back-end can be split on project level, this is called partitioning.
On one partition following services needs to be congured and run:
1. repserver
2. schedulers
3. dispatcher
4. warden
5. publisher
You do not need to share any directories on File System level between the partitions.
Here some example for partitioning:
1. A main partition for everything not in the others (host mainbackend)
2. A home partition for all home projects of the users (host homebackend)
3. A release partition for released software projects (host releasebackend)
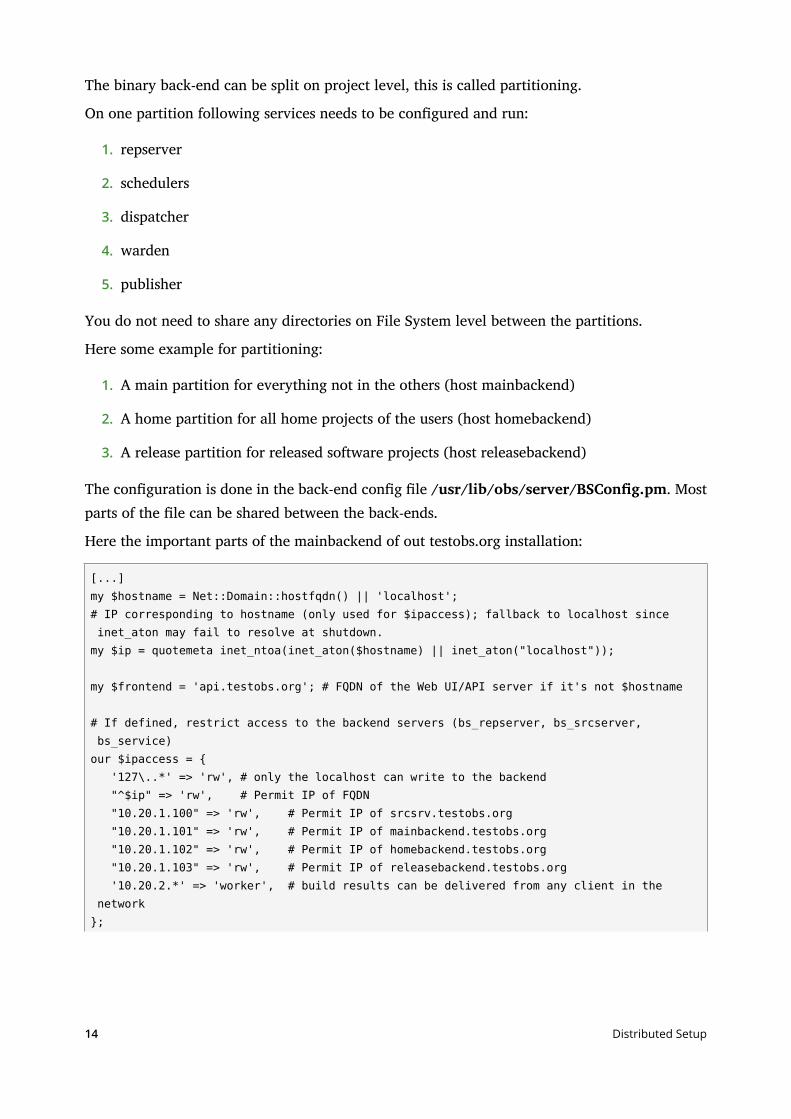
The conguration is done in the back-end cong le /usr/lib/obs/server/BSCong.pm. Mostparts of the le can be shared between the back-ends.
Here the important parts of the mainbackend of out testobs.org installation:
[...]my $hostname = Net::Domain::hostfqdn() || 'localhost';# IP corresponding to hostname (only used for $ipaccess); fallback to localhost since inet_aton may fail to resolve at shutdown.my $ip = quotemeta inet_ntoa(inet_aton($hostname) || inet_aton("localhost"));
my $frontend = 'api.testobs.org'; # FQDN of the Web UI/API server if it's not $hostname
# If defined, restrict access to the backend servers (bs_repserver, bs_srcserver, bs_service)our $ipaccess = { '127\..*' => 'rw', # only the localhost can write to the backend "^$ip" => 'rw', # Permit IP of FQDN "10.20.1.100" => 'rw', # Permit IP of srcsrv.testobs.org "10.20.1.101" => 'rw', # Permit IP of mainbackend.testobs.org "10.20.1.102" => 'rw', # Permit IP of homebackend.testobs.org "10.20.1.103" => 'rw', # Permit IP of releasebackend.testobs.org '10.20.2.*' => 'worker', # build results can be delivered from any client in the network};
14 Distributed Setup
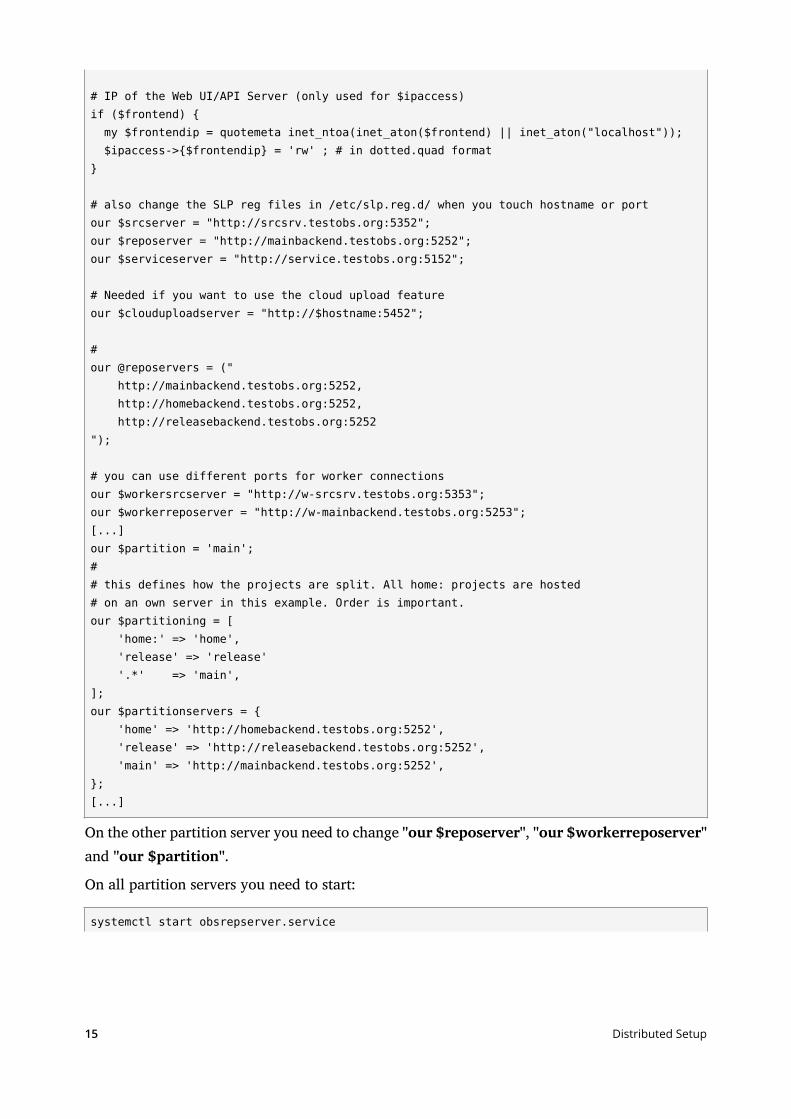
# IP of the Web UI/API Server (only used for $ipaccess)if ($frontend) { my $frontendip = quotemeta inet_ntoa(inet_aton($frontend) || inet_aton("localhost")); $ipaccess->{$frontendip} = 'rw' ; # in dotted.quad format}
# also change the SLP reg files in /etc/slp.reg.d/ when you touch hostname or portour $srcserver = "http://srcsrv.testobs.org:5352";our $reposerver = "http://mainbackend.testobs.org:5252";our $serviceserver = "http://service.testobs.org:5152";
# Needed if you want to use the cloud upload featureour $clouduploadserver = "http://$hostname:5452";
#our @reposervers = (" http://mainbackend.testobs.org:5252, http://homebackend.testobs.org:5252, http://releasebackend.testobs.org:5252");
# you can use different ports for worker connectionsour $workersrcserver = "http://w-srcsrv.testobs.org:5353";our $workerreposerver = "http://w-mainbackend.testobs.org:5253";[...]our $partition = 'main';## this defines how the projects are split. All home: projects are hosted# on an own server in this example. Order is important.our $partitioning = [ 'home:' => 'home', 'release' => 'release' '.*' => 'main',];our $partitionservers = { 'home' => 'http://homebackend.testobs.org:5252', 'release' => 'http://releasebackend.testobs.org:5252', 'main' => 'http://mainbackend.testobs.org:5252',};[...]
On the other partition server you need to change "our $reposerver", "our $workerreposerver"and "our $partition".
On all partition servers you need to start:
systemctl start obsrepserver.service
15 Distributed Setup
systemctl start obsscheduler.servicesystemctl start obsdispatcher.servicesystemctl start obspublisher.servicesystemctl start obswarden.service
On the worker machines you should set of repo servers in the OBS_REPO_SERVERS variable.You can also dene workers with a subset of the repo servers to prioritize partitions.
1.5 MonitoringIn this chapter you will nd some general monitoring instructions for the Open Build Service. Allexamples are based on Nagios plugins, but the information provided should be easily adaptablefor other monitoring solutions.
1.5.1 Endpoint Checks
1.5.1.1 HTTP Checks: Checking Whether the HTTP Server Responds
This check will output a critical if the HTTP server with ip address 172.19.19.19 (-I172.19.19.19) listening on port 80 (-p 80) does not answer and output a warning if the HTTPreturn code is not 200. The server name that will be used is server (-H server) which is importantif dierent virtual hosts are listening on the same port.
check_http -H server -I 172.19.19.19 -p 80 -u http://server
The same check, but this time it will check a ssl enabled HTTP server.
check_http -S -H server -I 172.19.19.19 -p 443 -u https://server
It is also possible to check the presence of a certain string in the HTTP response. In this case itwill check for the string Source Service Server.
check_http -s "Source Service Server" -S -H server -I 172.19.19.19 -p 5152
Open Build Service HTTP endpoints that should be checked:
1. Web Interface / API: port 443
2. Repository Server: port 82
16 Monitoring
3. Package Repository Server: port 5252
4. Source Repository Server: port 5352
5. Source Service Server: port 5152
6. Cloud Upload Server: port 5452
1.5.2 Common Checks
This is a list of common checks that should be run on each individual server.
1.5.2.1 Disk Space: Checking Available Disk Space
This check will output a warning if less than 10 percent disk space is available (-w 10) andoutput a critical if less than 5 percent disk space are available (-c 5). It will check all le systemsexcept le systems with type none (-x none).
check_disk -w 10 -c 5 -x none
1.5.2.2 Memory Usage: Checking Available Memory
This check will output a warning if less than 10 percent memory is available (-w 10) and outputa critical if less than 5 percent memory is available (-c 5). OS caches will be counted as freememory (-C) and it will check the available memory (-f). check_mem.pl is not a standard Nagiosplugin and can be downloaded at https://exchange.nagios.org/ .
check_mem.pl -f -C -w 10 -c 5
1.5.2.3 NTP: Checking Date and Time
This check will compare the local time with the time provided by the NTP server pool.ntp.org(-H pool.ntp.org). It will output a warning if the time diers by 0.5 seconds (-w 0.5) and outputa critical if the time diers by 1 seconds (-c 1).
check_ntp_time -H pool.ntp.org -w 0.5 -c 1
17 Common Checks
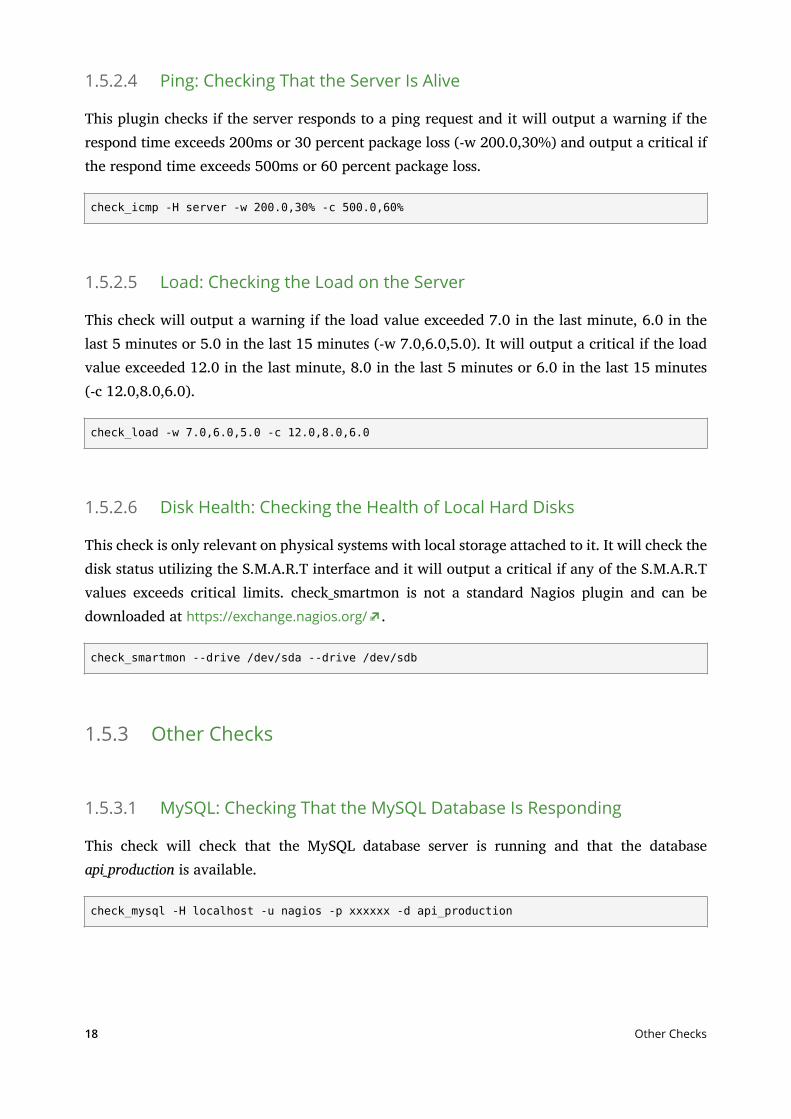
1.5.2.4 Ping: Checking That the Server Is Alive
This plugin checks if the server responds to a ping request and it will output a warning if therespond time exceeds 200ms or 30 percent package loss (-w 200.0,30%) and output a critical ifthe respond time exceeds 500ms or 60 percent package loss.
check_icmp -H server -w 200.0,30% -c 500.0,60%
1.5.2.5 Load: Checking the Load on the Server
This check will output a warning if the load value exceeded 7.0 in the last minute, 6.0 in thelast 5 minutes or 5.0 in the last 15 minutes (-w 7.0,6.0,5.0). It will output a critical if the loadvalue exceeded 12.0 in the last minute, 8.0 in the last 5 minutes or 6.0 in the last 15 minutes(-c 12.0,8.0,6.0).
check_load -w 7.0,6.0,5.0 -c 12.0,8.0,6.0
1.5.2.6 Disk Health: Checking the Health of Local Hard Disks
This check is only relevant on physical systems with local storage attached to it. It will check thedisk status utilizing the S.M.A.R.T interface and it will output a critical if any of the S.M.A.R.Tvalues exceeds critical limits. check_smartmon is not a standard Nagios plugin and can bedownloaded at https://exchange.nagios.org/ .
check_smartmon --drive /dev/sda --drive /dev/sdb
1.5.3 Other Checks
1.5.3.1 MySQL: Checking That the MySQL Database Is Responding
This check will check that the MySQL database server is running and that the databaseapi_production is available.
check_mysql -H localhost -u nagios -p xxxxxx -d api_production
18 Other Checks

MySQL Databases to check:
1. api_production
2. mysql
1.5.3.2 Backup Status: Checking That a Valid Backup Is Available
It is always advisable to check that the last backup run was successful and a recent backup isavailable. The check itself depends on the Backup solution that is used.
19 Other Checks
2 File System Overview
2.1 Configuration Files
2.1.1 Front-end Configuration
The front-end is congured with 4 les:
/srv/www/obs/api/cong/database.yml
/srv/www/obs/api/cong/options.yml
/srv/www/obs/api/cong/feature.yml
/etc/apache2/vhosts.d/obs.conf
2.1.1.1 database.yml
This le has the information needed to access the database. It contain credentials for the databaseaccess and should be only readable by root and the group running the Web server (www).
The le has settings for the production, development and test ruby environment, for productionsystems only the production section is important.
Example production section
production: adapter: mysql2 database: api_production username: obsapiuser password: topsecret encoding: utf8 timeout: 15 pool: 30
TABLE 2.1: DATABASE CONFIGURATION KEYWORDS
keyword Description Remarks
adapter Database driver only MySQL databases are supported
database Database name do not change !
20 Configuration Files

keyword Description Remarks
username MySQL user name database user, not a system user
password password for this user clear text
encoding codetable
timeout wait time in milliseconds
pool number of open connectionsper thread
socket path to the MySQL socket same host only
host IP address or hostname of theMySQL server
for remote servers
port port number of the MySQLserver
for remote servers
2.1.1.2 options.yml
The conguration le /srv/www/obs/api/cong/options.yml is the default conguration lefor the Open Build Service Web UI and API. It contains conguration parameters for examplefor back-end connections and connection to the API. Important are the congurations for sourceand front-end hosts. The conguration for LDAP authentication is also located in this le.
Conguration options can be set per Rails environment (https://guides.rubyonrails.org/
configuring.html#rails-environment-settings) or as generic conguration option dened indefault.
NoteWe've updated the format of the options.yml after the release of OBS 2.9. Old congurationles can be converted via
(cd /srv/www/obs/api/; rake migrate_options_yml)
21 Front-end Configuration
NoteMore and more congurations will be moved to the database and do not longer exist inthis le. The database conguration can be accessed via the API /conguration path.
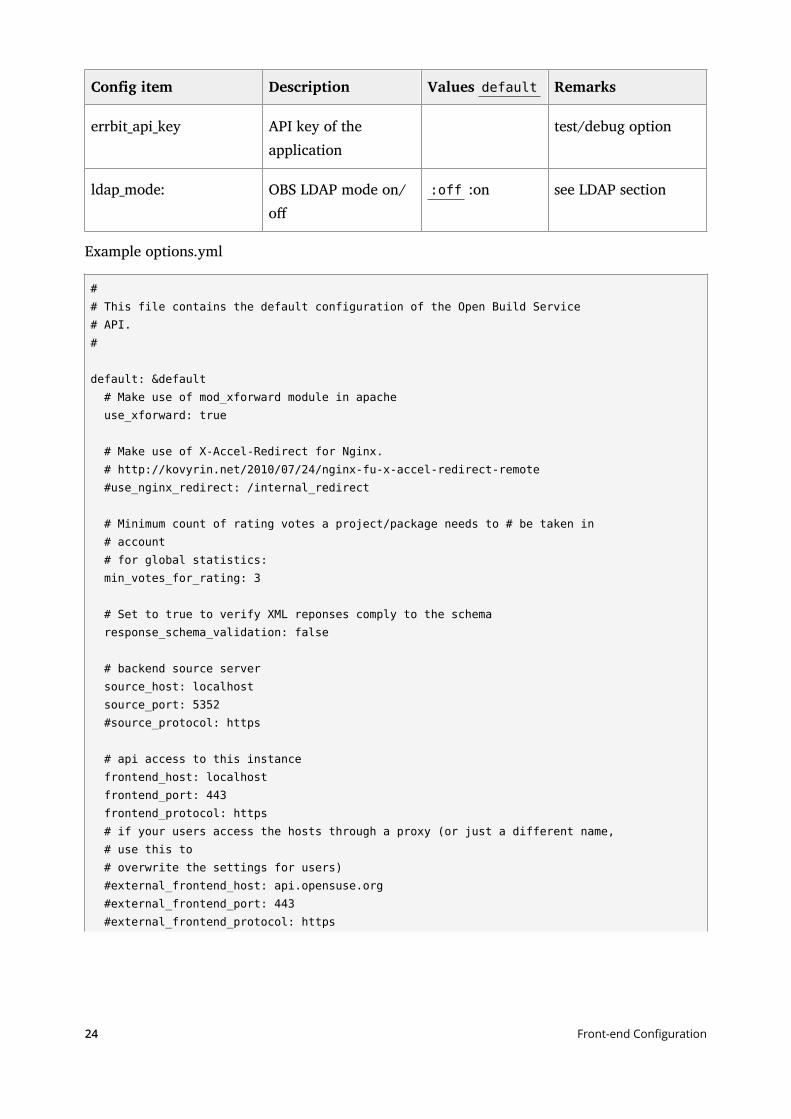
TABLE 2.2: options.yml CONFIGURATION ITEMS
Cong item Description Values default Remarks
use_xforward Use mod_xforwardmodule
true false Apache only, shouldbe true
use_nginx_redirect Use X-Accel-Redirect /
internal_redirect
Nginx only
min_votes_for_rating Minimum votes for arating
integer 3
response_schema_validationSet to true to verifyXML responsescomply to the schema
true false test/debug option
source_host back-end sourceserver host
localhost
source_port back-end sourceserver port
integer 5352
source_protocol back-end sourceserver protocol
http , https
front end_host Front-end host localhost
frontend_port Front-end port integer 443
frontend_protocol Front-end protocol http https
22 Front-end Configuration
Cong item Description Values default Remarks
external_frontend_host External Front-endhost
if your users accessthe hosts through aproxy or dierentname
external_frontend_port External Front-endport
integer 443
external_frontend_protocol External Front-endprotocol
http https
extended_backend_log Extended back-endlog
true false test/debug option
proxy_auth_mode: turn proxy mode on/o
:off :on see LDAP section
proxy_auth_test_user Test user coolguy test/debug option
proxy_auth_test_email Email of Test user coolguy@
example.com
test/debug option
global_write_through if set to false, the APIwill only fake writesto back-end
true false test/debug option
auto_cleanup_after_days not longer used 30 moved to /conguration API
errbit_api_key API key of theapplication
test/debug option
errbit_host installation oferrbit.com a Rubyerror catcher
test/debug option
23 Front-end Configuration
Cong item Description Values default Remarks
errbit_api_key API key of theapplication
test/debug option
ldap_mode: OBS LDAP mode on/o
:off :on see LDAP section
Example options.yml
## This file contains the default configuration of the Open Build Service# API.#
default: &default # Make use of mod_xforward module in apache use_xforward: true
# Make use of X-Accel-Redirect for Nginx. # http://kovyrin.net/2010/07/24/nginx-fu-x-accel-redirect-remote #use_nginx_redirect: /internal_redirect
# Minimum count of rating votes a project/package needs to # be taken in # account # for global statistics: min_votes_for_rating: 3
# Set to true to verify XML reponses comply to the schema response_schema_validation: false
# backend source server source_host: localhost source_port: 5352 #source_protocol: https
# api access to this instance frontend_host: localhost frontend_port: 443 frontend_protocol: https # if your users access the hosts through a proxy (or just a different name, # use this to # overwrite the settings for users) #external_frontend_host: api.opensuse.org #external_frontend_port: 443 #external_frontend_protocol: https
24 Front-end Configuration
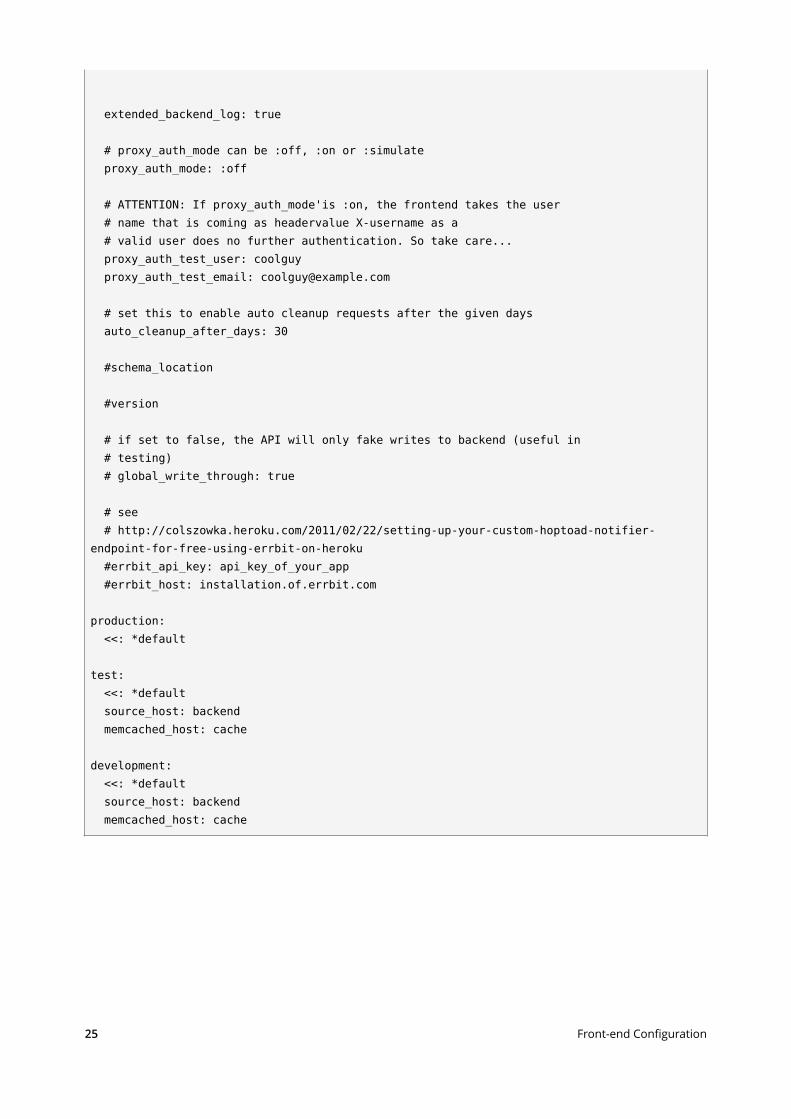
extended_backend_log: true
# proxy_auth_mode can be :off, :on or :simulate proxy_auth_mode: :off
# ATTENTION: If proxy_auth_mode'is :on, the frontend takes the user # name that is coming as headervalue X-username as a # valid user does no further authentication. So take care... proxy_auth_test_user: coolguy proxy_auth_test_email: [email protected]
# set this to enable auto cleanup requests after the given days auto_cleanup_after_days: 30
#schema_location
#version
# if set to false, the API will only fake writes to backend (useful in # testing) # global_write_through: true
# see # http://colszowka.heroku.com/2011/02/22/setting-up-your-custom-hoptoad-notifier-endpoint-for-free-using-errbit-on-heroku #errbit_api_key: api_key_of_your_app #errbit_host: installation.of.errbit.com
production: <<: *default
test: <<: *default source_host: backend memcached_host: cache
development: <<: *default source_host: backend memcached_host: cache
25 Front-end Configuration
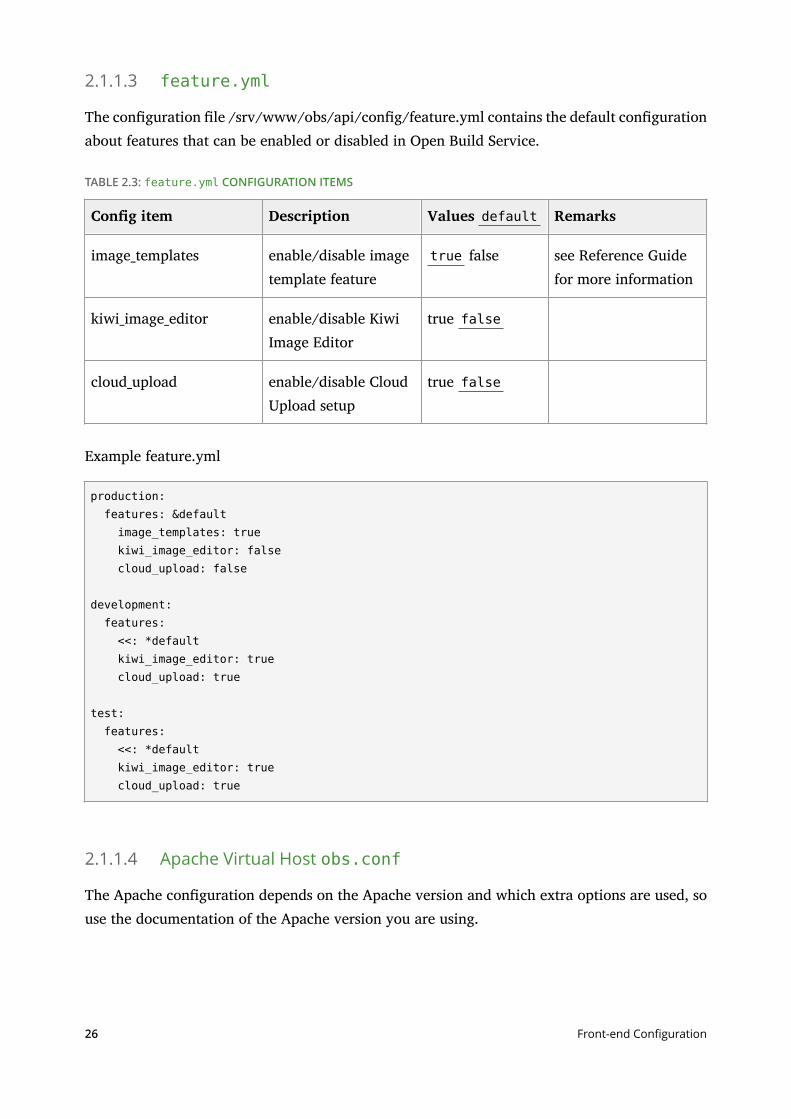
2.1.1.3 feature.yml
The conguration le /srv/www/obs/api/cong/feature.yml contains the default congurationabout features that can be enabled or disabled in Open Build Service.
TABLE 2.3: feature.yml CONFIGURATION ITEMS
Cong item Description Values default Remarks
image_templates enable/disable imagetemplate feature
true false see Reference Guidefor more information
kiwi_image_editor enable/disable KiwiImage Editor
true false
cloud_upload enable/disable CloudUpload setup
true false
Example feature.yml
production: features: &default image_templates: true kiwi_image_editor: false cloud_upload: false
development: features: <<: *default kiwi_image_editor: true cloud_upload: true
test: features: <<: *default kiwi_image_editor: true cloud_upload: true
2.1.1.4 Apache Virtual Host obs.conf
The Apache conguration depends on the Apache version and which extra options are used, souse the documentation of the Apache version you are using.
26 Front-end Configuration
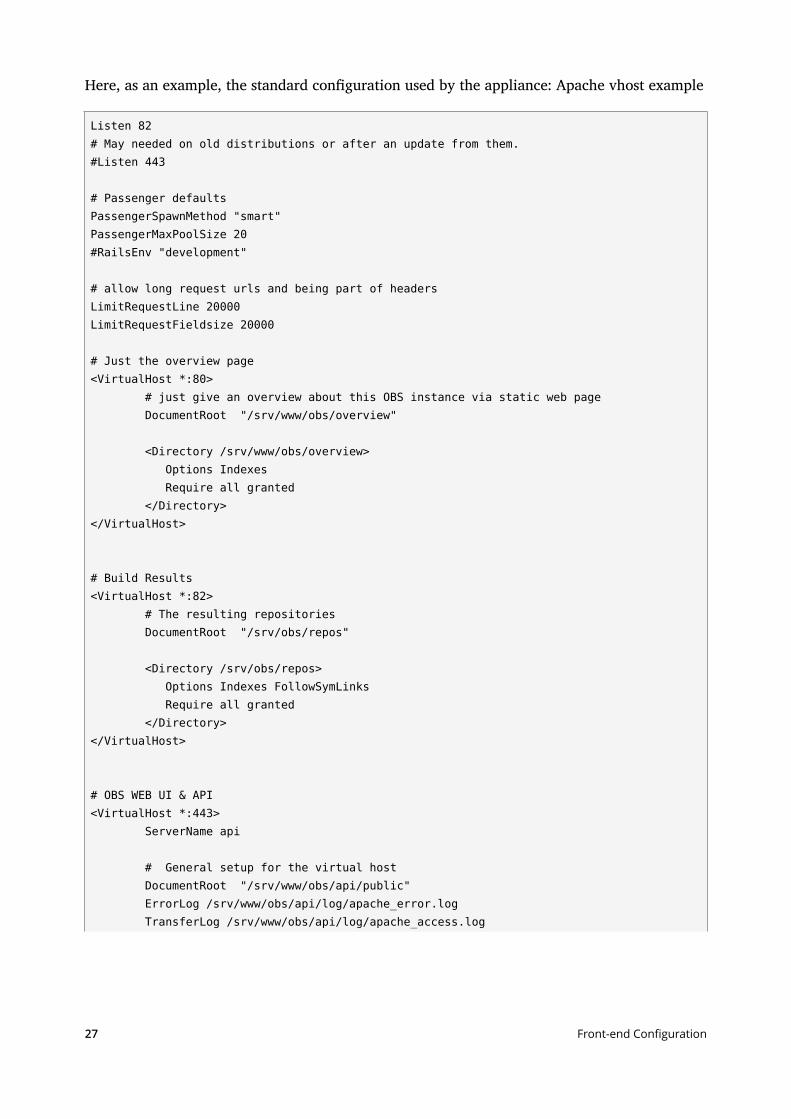
Here, as an example, the standard conguration used by the appliance: Apache vhost example
Listen 82# May needed on old distributions or after an update from them.#Listen 443
# Passenger defaultsPassengerSpawnMethod "smart"PassengerMaxPoolSize 20#RailsEnv "development"
# allow long request urls and being part of headersLimitRequestLine 20000LimitRequestFieldsize 20000
# Just the overview page<VirtualHost *:80> # just give an overview about this OBS instance via static web page DocumentRoot "/srv/www/obs/overview"
<Directory /srv/www/obs/overview> Options Indexes Require all granted </Directory></VirtualHost>
# Build Results<VirtualHost *:82> # The resulting repositories DocumentRoot "/srv/obs/repos"
<Directory /srv/obs/repos> Options Indexes FollowSymLinks Require all granted </Directory></VirtualHost>
# OBS WEB UI & API<VirtualHost *:443> ServerName api
# General setup for the virtual host DocumentRoot "/srv/www/obs/api/public" ErrorLog /srv/www/obs/api/log/apache_error.log TransferLog /srv/www/obs/api/log/apache_access.log
27 Front-end Configuration
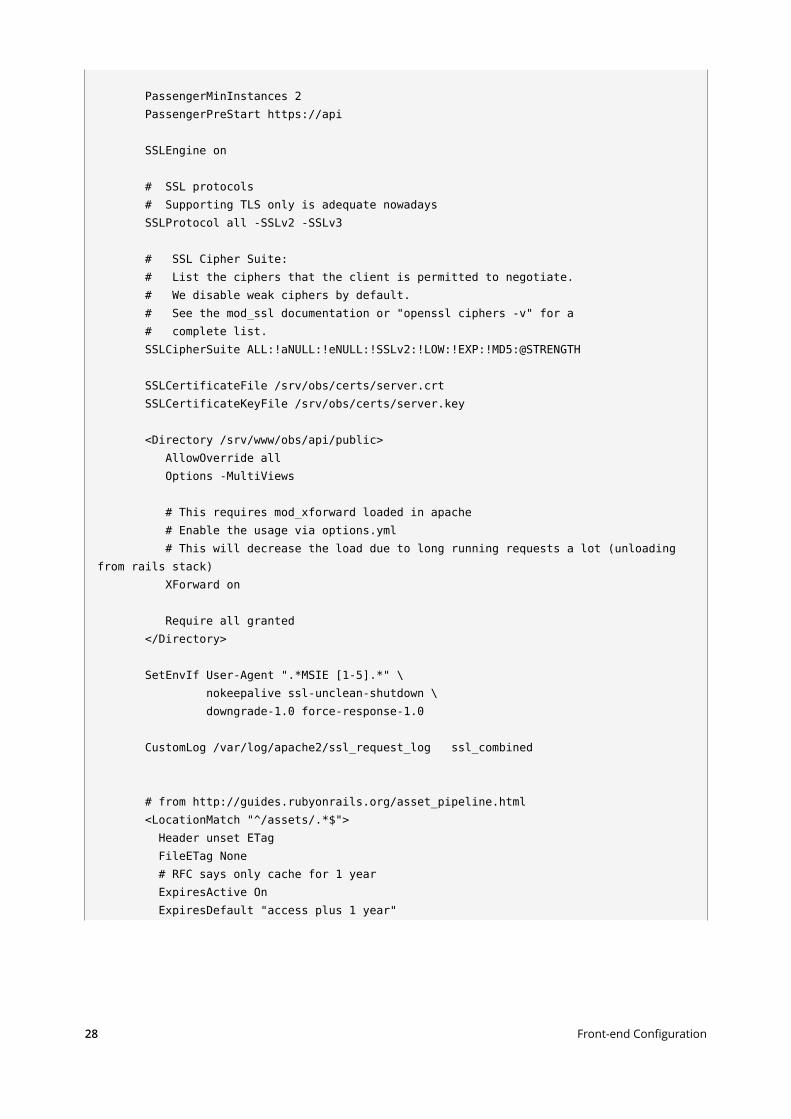
PassengerMinInstances 2 PassengerPreStart https://api
SSLEngine on
# SSL protocols # Supporting TLS only is adequate nowadays SSLProtocol all -SSLv2 -SSLv3
# SSL Cipher Suite: # List the ciphers that the client is permitted to negotiate. # We disable weak ciphers by default. # See the mod_ssl documentation or "openssl ciphers -v" for a # complete list. SSLCipherSuite ALL:!aNULL:!eNULL:!SSLv2:!LOW:!EXP:!MD5:@STRENGTH
SSLCertificateFile /srv/obs/certs/server.crt SSLCertificateKeyFile /srv/obs/certs/server.key
<Directory /srv/www/obs/api/public> AllowOverride all Options -MultiViews
# This requires mod_xforward loaded in apache # Enable the usage via options.yml # This will decrease the load due to long running requests a lot (unloading from rails stack) XForward on
Require all granted </Directory>
SetEnvIf User-Agent ".*MSIE [1-5].*" \ nokeepalive ssl-unclean-shutdown \ downgrade-1.0 force-response-1.0
CustomLog /var/log/apache2/ssl_request_log ssl_combined
# from http://guides.rubyonrails.org/asset_pipeline.html <LocationMatch "^/assets/.*$"> Header unset ETag FileETag None # RFC says only cache for 1 year ExpiresActive On ExpiresDefault "access plus 1 year"
28 Front-end Configuration
</LocationMatch>
SetEnvIf User-Agent ".*MSIE [1-5].*" \ nokeepalive ssl-unclean-shutdown \ downgrade-1.0 force-response-1.0
## Older firefox versions needs this, otherwise it wont cache anything over SSL. Header append Cache-Control "public"
</VirtualHost>
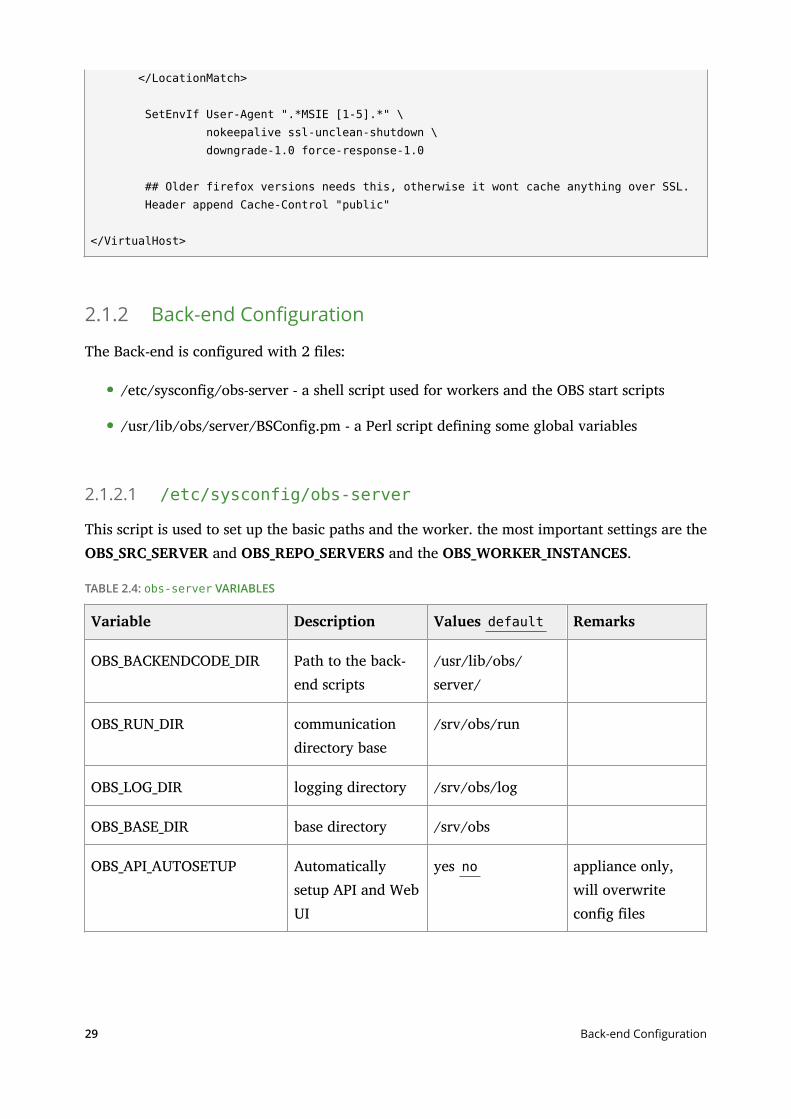
2.1.2 Back-end Configuration
The Back-end is congured with 2 les:
/etc/syscong/obs-server - a shell script used for workers and the OBS start scripts
/usr/lib/obs/server/BSCong.pm - a Perl script dening some global variables
2.1.2.1 /etc/sysconfig/obs-server
This script is used to set up the basic paths and the worker. the most important settings are theOBS_SRC_SERVER and OBS_REPO_SERVERS and the OBS_WORKER_INSTANCES.
TABLE 2.4: obs-server VARIABLES
Variable Description Values default Remarks
OBS_BACKENDCODE_DIR Path to the back-end scripts
/usr/lib/obs/server/
OBS_RUN_DIR communicationdirectory base
/srv/obs/run
OBS_LOG_DIR logging directory /srv/obs/log
OBS_BASE_DIR base directory /srv/obs
OBS_API_AUTOSETUP Automaticallysetup API and WebUI
yes no appliance only,will overwritecong les
29 Back-end Configuration
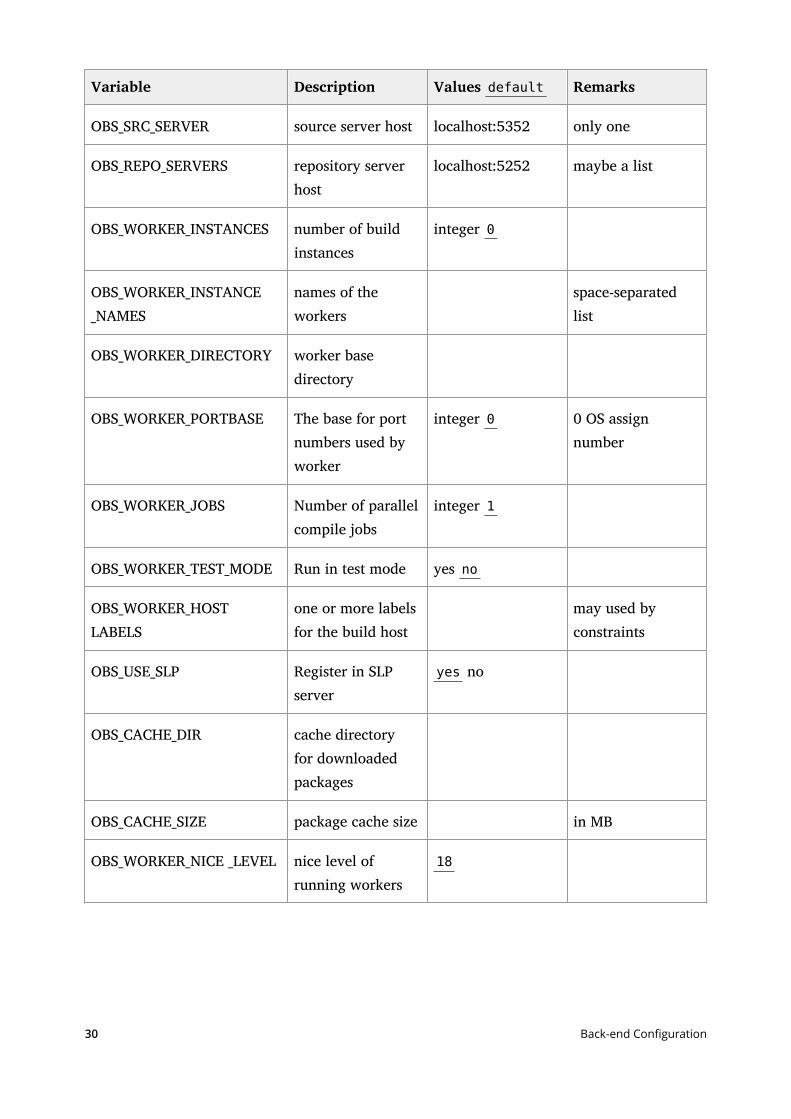
Variable Description Values default Remarks
OBS_SRC_SERVER source server host localhost:5352 only one
OBS_REPO_SERVERS repository serverhost
localhost:5252 maybe a list
OBS_WORKER_INSTANCES number of buildinstances
integer 0
OBS_WORKER_INSTANCE_NAMES
names of theworkers
space-separatedlist
OBS_WORKER_DIRECTORY worker basedirectory
OBS_WORKER_PORTBASE The base for portnumbers used byworker
integer 0 0 OS assignnumber
OBS_WORKER_JOBS Number of parallelcompile jobs
integer 1
OBS_WORKER_TEST_MODE Run in test mode yes no
OBS_WORKER_HOSTLABELS
one or more labelsfor the build host
may used byconstraints
OBS_USE_SLP Register in SLPserver
yes no
OBS_CACHE_DIR cache directoryfor downloadedpackages
OBS_CACHE_SIZE package cache size in MB
OBS_WORKER_NICE _LEVEL nice level ofrunning workers
18
30 Back-end Configuration
Variable Description Values default Remarks
OBS_VM_TYPE VM type auto Xen kvm lxczvm emulator:$arch none
OBS_VM_KERNEL Set kernel used byworker
none (/boot/vmlinuz)
KVM option
OBS_VM_INITRD initrd used byworker
none (/boot/vmlinuz)
KVM option
OBS_VM_DISK_AUTOSETUP_ROOT_FILESIZE
Autosetup disk size 4096 in MB
OBS_VM_DISK_AUTOSETUP_SWAP_FILESIZE
Autosetup swapsize
1024 on MB
OBS_VM_DISK_AUTOSETUP_FILESYSTEM
File System usedwith autosetup
ext3
OBS_VM_DISK_AUTOSETUP_MOUNT_OPTIONS
Special mountoptions
OBS_VM_USE_TMPFS Enable build inmemory
yes no requires muchmemory
OBS_INSTANCE_MEMORY Memory allocatedfor a VM
512
OBS_STORAGE_AUTOSETUP storage autoconguration
yes no may destroy diskcontent
OBS_SETUP_WORKER_PARTITIONS
LVM viaobsstoragesetup
take_alluse_obs_vg none
may destroy diskcontent
OBS_WORKER_CACHE_SIZE LVM partition forcache size
31 Back-end Configuration
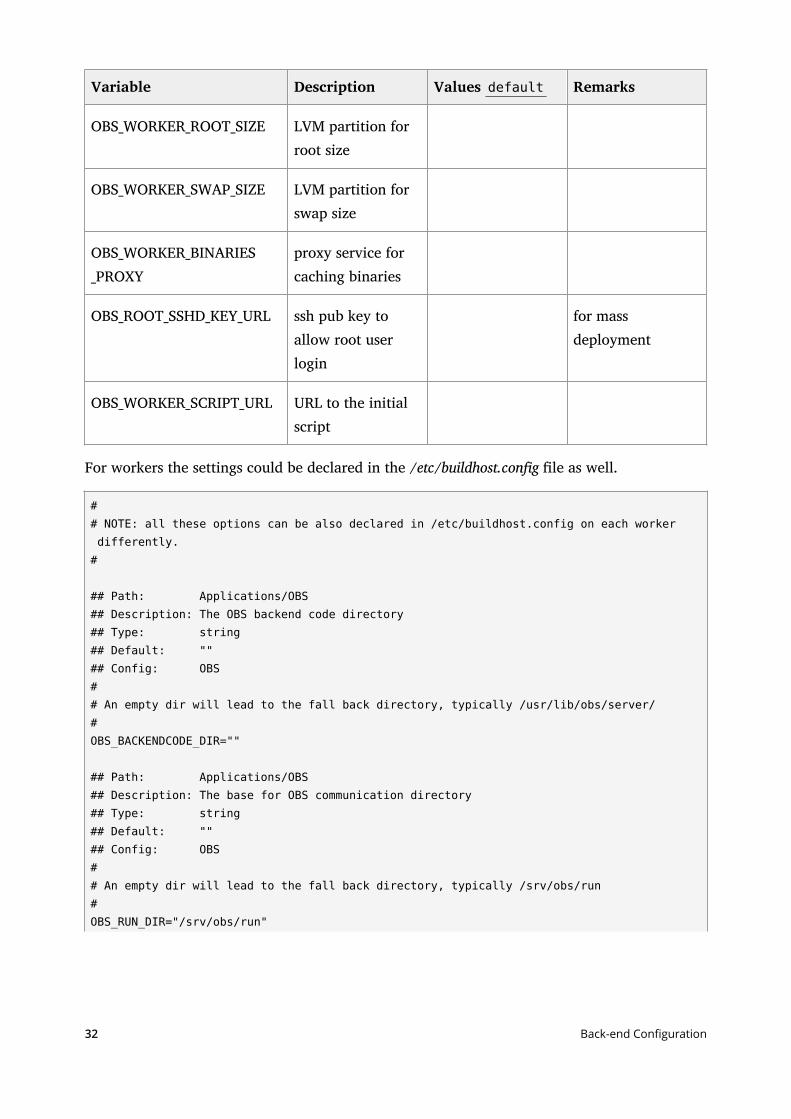
Variable Description Values default Remarks
OBS_WORKER_ROOT_SIZE LVM partition forroot size
OBS_WORKER_SWAP_SIZE LVM partition forswap size
OBS_WORKER_BINARIES_PROXY
proxy service forcaching binaries
OBS_ROOT_SSHD_KEY_URL ssh pub key toallow root userlogin
for massdeployment
OBS_WORKER_SCRIPT_URL URL to the initialscript
For workers the settings could be declared in the /etc/buildhost.cong le as well.
## NOTE: all these options can be also declared in /etc/buildhost.config on each worker differently.#
## Path: Applications/OBS## Description: The OBS backend code directory## Type: string## Default: ""## Config: OBS## An empty dir will lead to the fall back directory, typically /usr/lib/obs/server/#OBS_BACKENDCODE_DIR=""
## Path: Applications/OBS## Description: The base for OBS communication directory## Type: string## Default: ""## Config: OBS## An empty dir will lead to the fall back directory, typically /srv/obs/run#OBS_RUN_DIR="/srv/obs/run"
32 Back-end Configuration
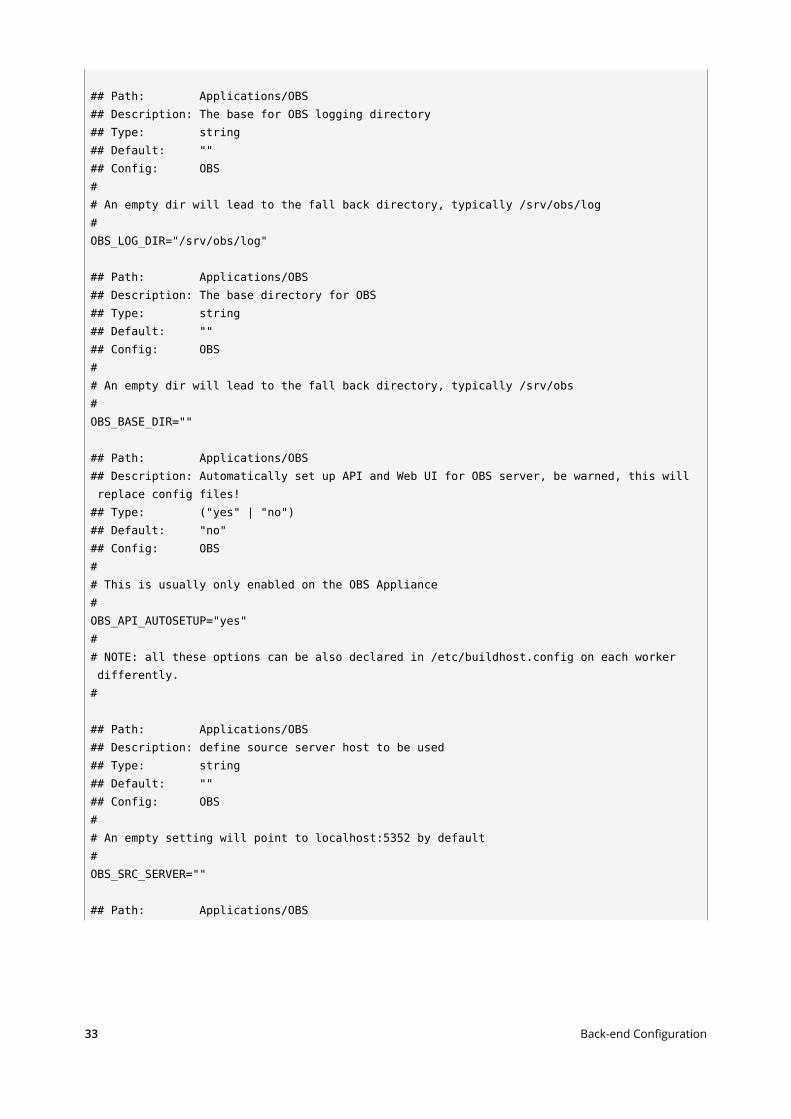
## Path: Applications/OBS## Description: The base for OBS logging directory## Type: string## Default: ""## Config: OBS## An empty dir will lead to the fall back directory, typically /srv/obs/log#OBS_LOG_DIR="/srv/obs/log"
## Path: Applications/OBS## Description: The base directory for OBS## Type: string## Default: ""## Config: OBS## An empty dir will lead to the fall back directory, typically /srv/obs#OBS_BASE_DIR=""
## Path: Applications/OBS## Description: Automatically set up API and Web UI for OBS server, be warned, this will replace config files!## Type: ("yes" | "no")## Default: "no"## Config: OBS## This is usually only enabled on the OBS Appliance#OBS_API_AUTOSETUP="yes"## NOTE: all these options can be also declared in /etc/buildhost.config on each worker differently.#
## Path: Applications/OBS## Description: define source server host to be used## Type: string## Default: ""## Config: OBS## An empty setting will point to localhost:5352 by default#OBS_SRC_SERVER=""
## Path: Applications/OBS
33 Back-end Configuration
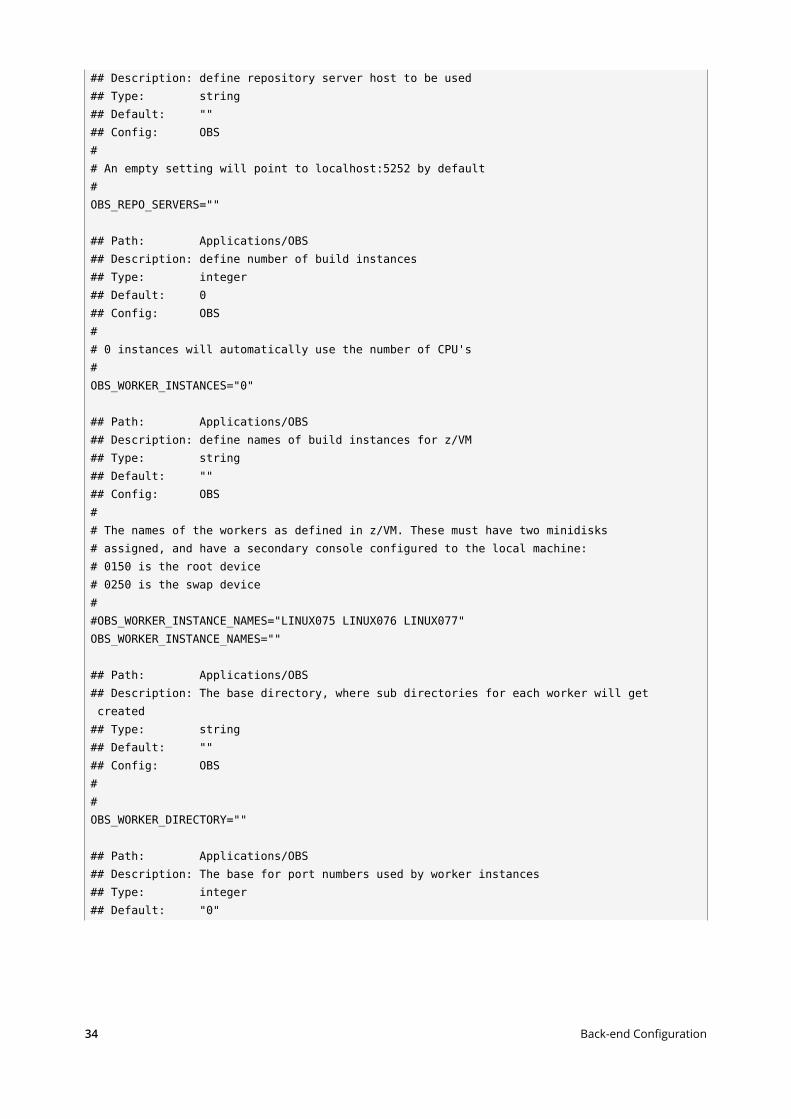
## Description: define repository server host to be used## Type: string## Default: ""## Config: OBS## An empty setting will point to localhost:5252 by default#OBS_REPO_SERVERS=""
## Path: Applications/OBS## Description: define number of build instances## Type: integer## Default: 0## Config: OBS## 0 instances will automatically use the number of CPU's#OBS_WORKER_INSTANCES="0"
## Path: Applications/OBS## Description: define names of build instances for z/VM## Type: string## Default: ""## Config: OBS## The names of the workers as defined in z/VM. These must have two minidisks# assigned, and have a secondary console configured to the local machine:# 0150 is the root device# 0250 is the swap device##OBS_WORKER_INSTANCE_NAMES="LINUX075 LINUX076 LINUX077"OBS_WORKER_INSTANCE_NAMES=""
## Path: Applications/OBS## Description: The base directory, where sub directories for each worker will get created## Type: string## Default: ""## Config: OBS##OBS_WORKER_DIRECTORY=""
## Path: Applications/OBS## Description: The base for port numbers used by worker instances## Type: integer## Default: "0"
34 Back-end Configuration
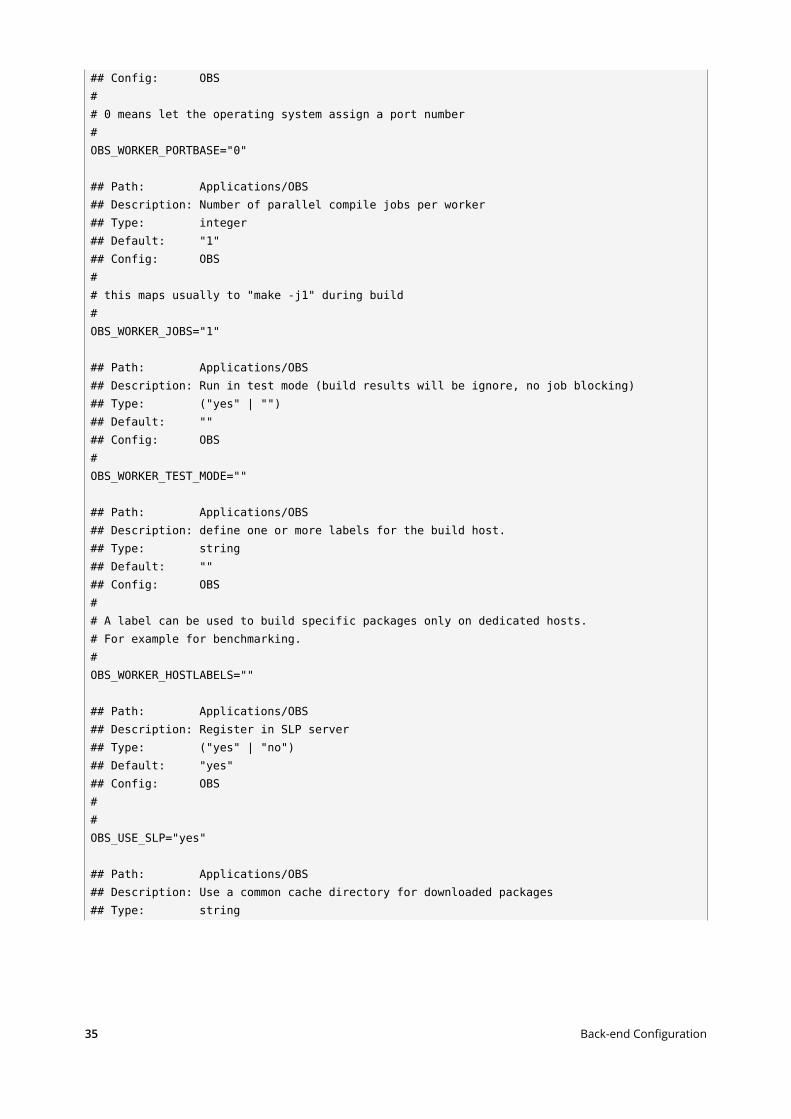
## Config: OBS## 0 means let the operating system assign a port number#OBS_WORKER_PORTBASE="0"
## Path: Applications/OBS## Description: Number of parallel compile jobs per worker## Type: integer## Default: "1"## Config: OBS## this maps usually to "make -j1" during build#OBS_WORKER_JOBS="1"
## Path: Applications/OBS## Description: Run in test mode (build results will be ignore, no job blocking)## Type: ("yes" | "")## Default: ""## Config: OBS#OBS_WORKER_TEST_MODE=""
## Path: Applications/OBS## Description: define one or more labels for the build host.## Type: string## Default: ""## Config: OBS## A label can be used to build specific packages only on dedicated hosts.# For example for benchmarking.#OBS_WORKER_HOSTLABELS=""
## Path: Applications/OBS## Description: Register in SLP server## Type: ("yes" | "no")## Default: "yes"## Config: OBS##OBS_USE_SLP="yes"
## Path: Applications/OBS## Description: Use a common cache directory for downloaded packages## Type: string
35 Back-end Configuration
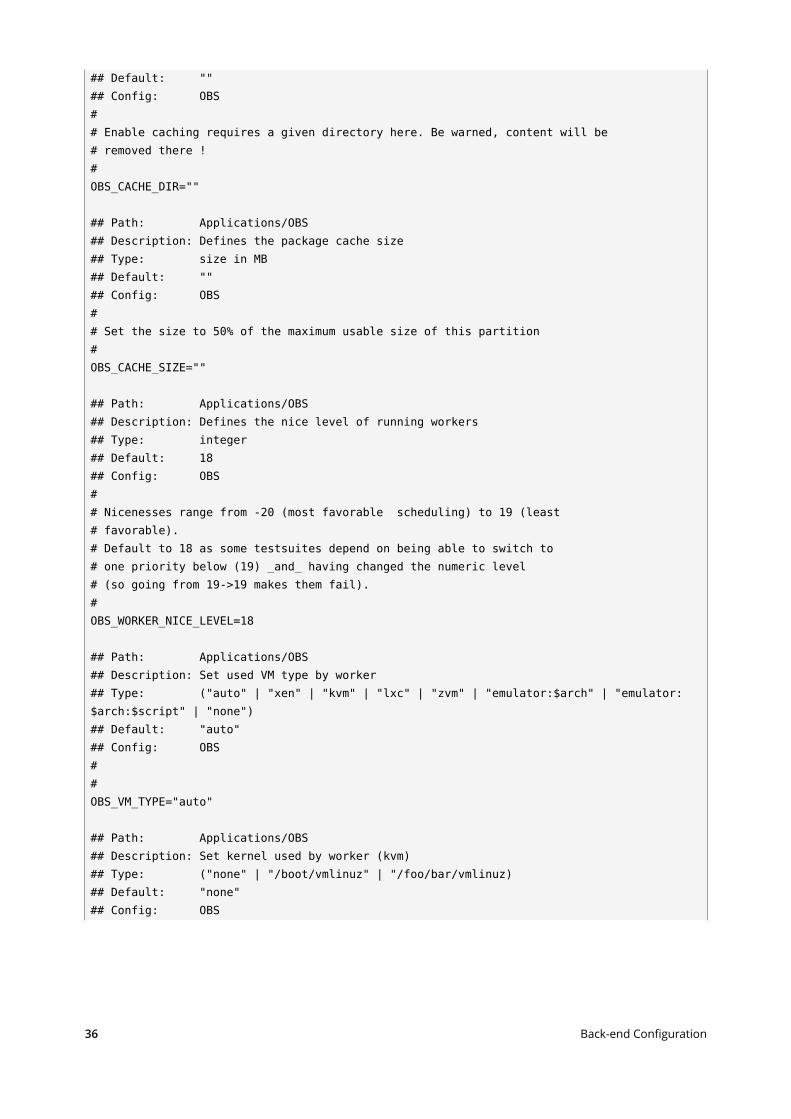
## Default: ""## Config: OBS## Enable caching requires a given directory here. Be warned, content will be# removed there !#OBS_CACHE_DIR=""
## Path: Applications/OBS## Description: Defines the package cache size## Type: size in MB## Default: ""## Config: OBS## Set the size to 50% of the maximum usable size of this partition#OBS_CACHE_SIZE=""
## Path: Applications/OBS## Description: Defines the nice level of running workers## Type: integer## Default: 18## Config: OBS## Nicenesses range from -20 (most favorable scheduling) to 19 (least# favorable).# Default to 18 as some testsuites depend on being able to switch to# one priority below (19) _and_ having changed the numeric level# (so going from 19->19 makes them fail).#OBS_WORKER_NICE_LEVEL=18
## Path: Applications/OBS## Description: Set used VM type by worker## Type: ("auto" | "xen" | "kvm" | "lxc" | "zvm" | "emulator:$arch" | "emulator:$arch:$script" | "none")## Default: "auto"## Config: OBS##OBS_VM_TYPE="auto"
## Path: Applications/OBS## Description: Set kernel used by worker (kvm)## Type: ("none" | "/boot/vmlinuz" | "/foo/bar/vmlinuz)## Default: "none"## Config: OBS
36 Back-end Configuration
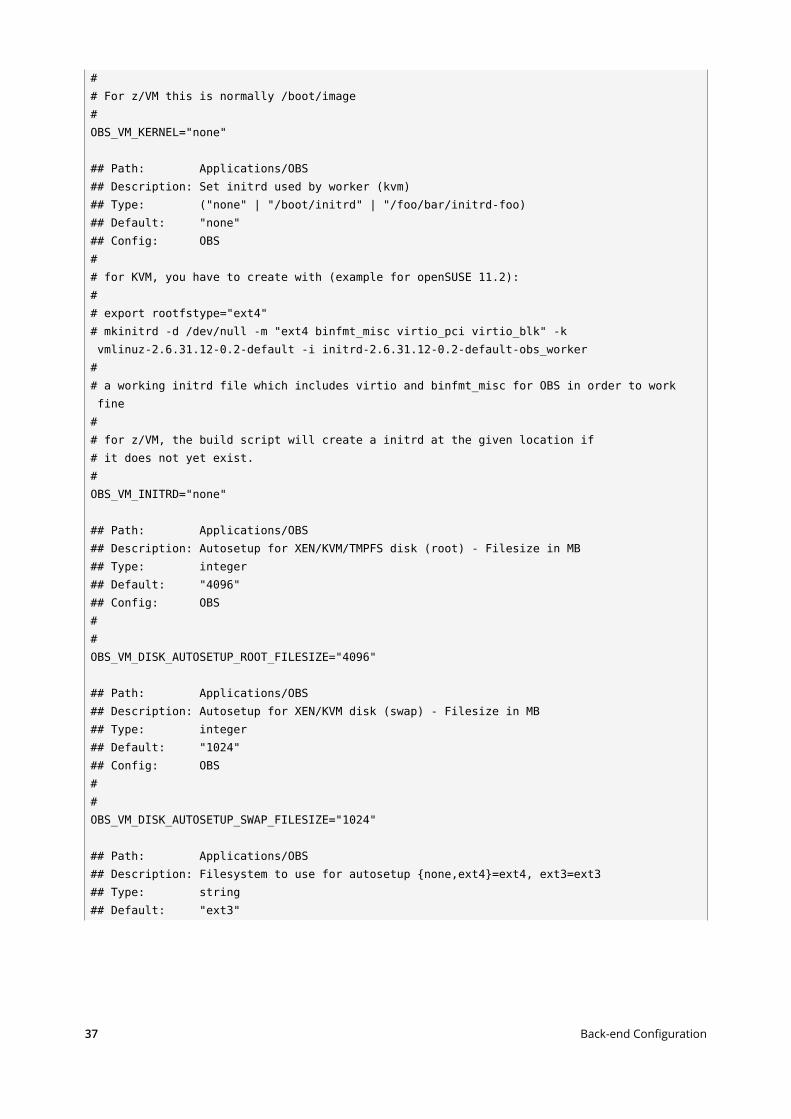
## For z/VM this is normally /boot/image#OBS_VM_KERNEL="none"
## Path: Applications/OBS## Description: Set initrd used by worker (kvm)## Type: ("none" | "/boot/initrd" | "/foo/bar/initrd-foo)## Default: "none"## Config: OBS## for KVM, you have to create with (example for openSUSE 11.2):## export rootfstype="ext4"# mkinitrd -d /dev/null -m "ext4 binfmt_misc virtio_pci virtio_blk" -k vmlinuz-2.6.31.12-0.2-default -i initrd-2.6.31.12-0.2-default-obs_worker## a working initrd file which includes virtio and binfmt_misc for OBS in order to work fine## for z/VM, the build script will create a initrd at the given location if# it does not yet exist.#OBS_VM_INITRD="none"
## Path: Applications/OBS## Description: Autosetup for XEN/KVM/TMPFS disk (root) - Filesize in MB## Type: integer## Default: "4096"## Config: OBS##OBS_VM_DISK_AUTOSETUP_ROOT_FILESIZE="4096"
## Path: Applications/OBS## Description: Autosetup for XEN/KVM disk (swap) - Filesize in MB## Type: integer## Default: "1024"## Config: OBS##OBS_VM_DISK_AUTOSETUP_SWAP_FILESIZE="1024"
## Path: Applications/OBS## Description: Filesystem to use for autosetup {none,ext4}=ext4, ext3=ext3## Type: string## Default: "ext3"
37 Back-end Configuration

## Config: OBS##OBS_VM_DISK_AUTOSETUP_FILESYSTEM="ext3"
## Path: Applications/OBS## Description: Filesystem mount options to use for autosetup## Type: string## Default: ""## Config: OBS##OBS_VM_DISK_AUTOSETUP_MOUNT_OPTIONS=""
## Path: Applications/OBS## Description: Enable build in memory## Type: ("yes" | "")## Default: ""## Config: OBS## WARNING: this requires much memory!#OBS_VM_USE_TMPFS=""
## Path: Applications/OBS## Description: Memory allocated for each VM (512) if not set## Type: integer## Default: ""## Config: OBS##OBS_INSTANCE_MEMORY=""
## Path: Applications/OBS## Description: Enable storage auto configuration## Type: ("yes" | "")## Default: ""## Config: OBS## WARNING: this may destroy data on your hard disk !# This is usually only used on mass deployed worker instances#OBS_STORAGE_AUTOSETUP="yes"
## Path: Applications/OBS## Description: Setup LVM via obsstoragesetup## Type: ("take_all" | "use_obs_vg" | "none")
38 Back-end Configuration
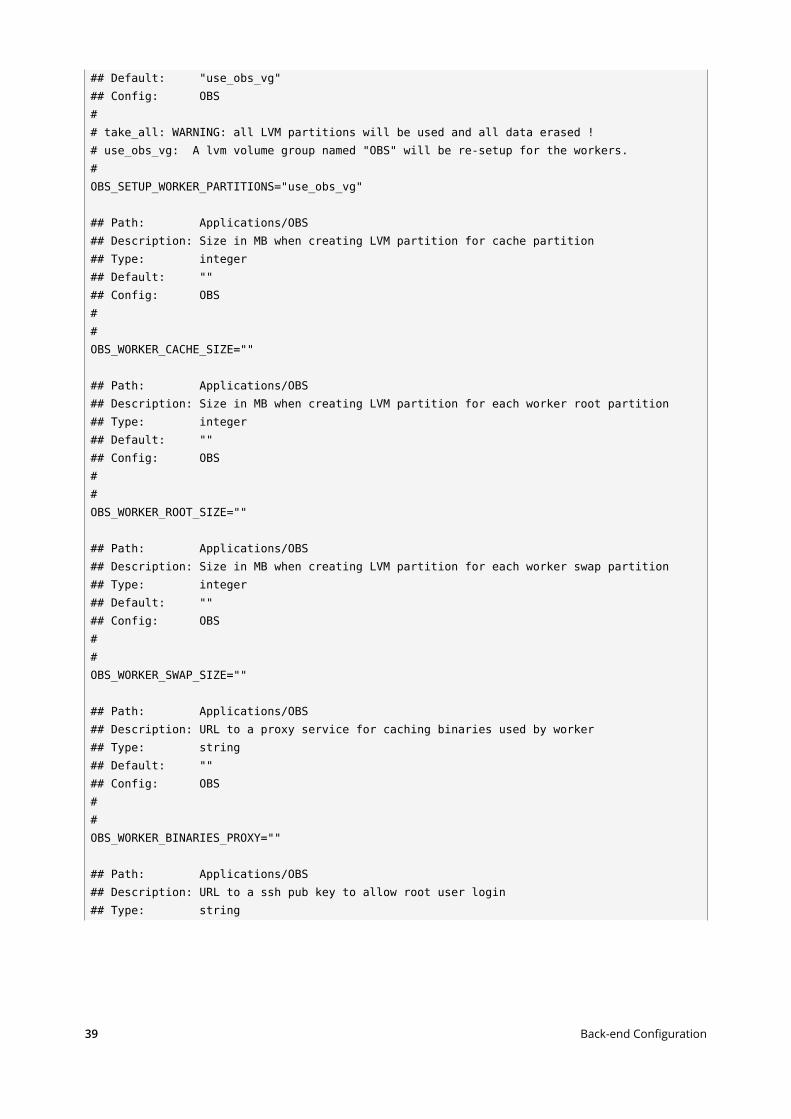
## Default: "use_obs_vg"## Config: OBS## take_all: WARNING: all LVM partitions will be used and all data erased !# use_obs_vg: A lvm volume group named "OBS" will be re-setup for the workers.#OBS_SETUP_WORKER_PARTITIONS="use_obs_vg"
## Path: Applications/OBS## Description: Size in MB when creating LVM partition for cache partition## Type: integer## Default: ""## Config: OBS##OBS_WORKER_CACHE_SIZE=""
## Path: Applications/OBS## Description: Size in MB when creating LVM partition for each worker root partition## Type: integer## Default: ""## Config: OBS##OBS_WORKER_ROOT_SIZE=""
## Path: Applications/OBS## Description: Size in MB when creating LVM partition for each worker swap partition## Type: integer## Default: ""## Config: OBS##OBS_WORKER_SWAP_SIZE=""
## Path: Applications/OBS## Description: URL to a proxy service for caching binaries used by worker## Type: string## Default: ""## Config: OBS##OBS_WORKER_BINARIES_PROXY=""
## Path: Applications/OBS## Description: URL to a ssh pub key to allow root user login## Type: string
39 Back-end Configuration

## Default: ""## Config: OBS## This is usually used on mass (PXE) deployed workers)#OBS_ROOT_SSHD_KEY_URL=""
## Path: Applications/OBS## Description: URL to a script to be downloaded and executed## Type: string## Default: ""## Config: OBS## This is a hook for doing special things in your setup at boot time#OBS_WORKER_SCRIPT_URL=""
2.1.2.2 BSConfig.pm
This le is a perl module used by most back-end scripts, it mainly denes global variables. Sinceit is a perl module, after changes the back-end servers need to be restarted to become awareof the changes.
WarningIf there is a Perl syntax error in this le, the services will not start. Most likely you forgotthe semicolon on the end of a statement.
TABLE 2.5: BSConfig.pm VARIABLES
Variable Description Values default Remarks
$hostname FQDN of the back-end host
leave as it is
$ip IP address of theback-end host
leave as it is
$frontend FQDN of the front-end host
undef set only if the front-end runs on anotherhost
40 Back-end Configuration
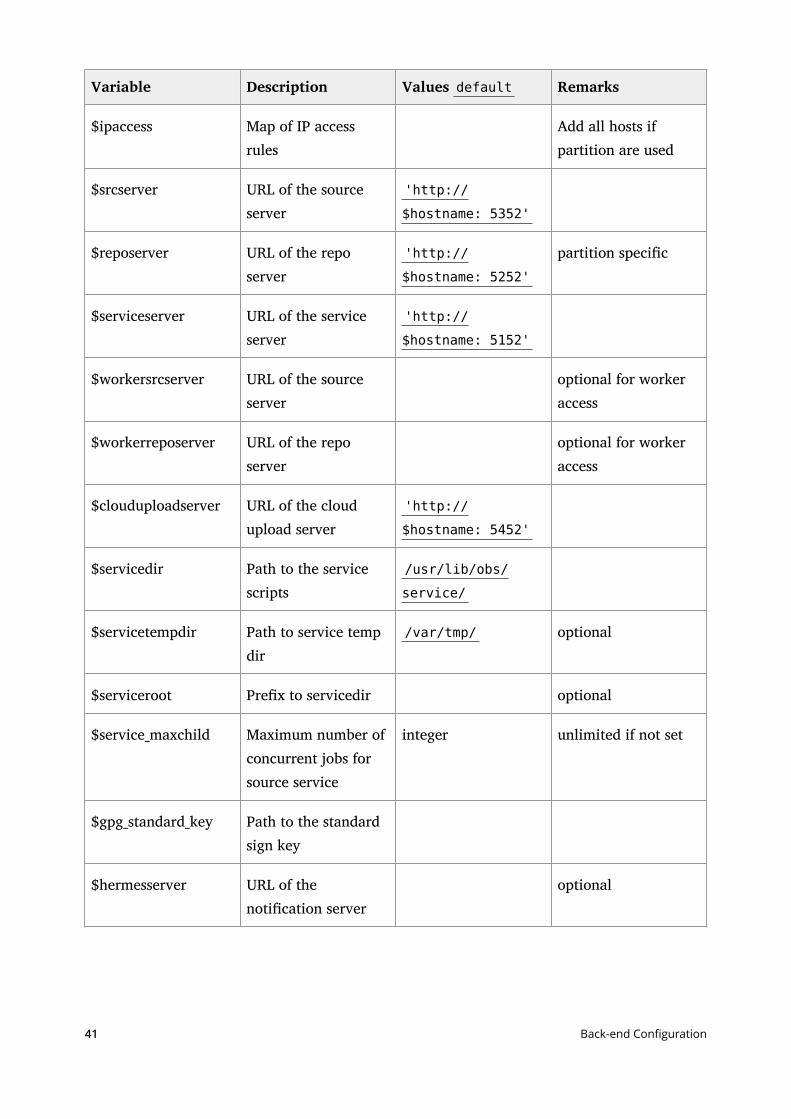
Variable Description Values default Remarks
$ipaccess Map of IP accessrules
Add all hosts ifpartition are used
$srcserver URL of the sourceserver
'http://
$hostname: 5352'
$reposerver URL of the reposerver
'http://
$hostname: 5252'
partition specic
$serviceserver URL of the serviceserver
'http://
$hostname: 5152'
$workersrcserver URL of the sourceserver
optional for workeraccess
$workerreposerver URL of the reposerver
optional for workeraccess
$clouduploadserver URL of the cloudupload server
'http://
$hostname: 5452'
$servicedir Path to the servicescripts
/usr/lib/obs/
service/
$servicetempdir Path to service tempdir
/var/tmp/ optional
$serviceroot Prex to servicedir optional
$service_maxchild Maximum number ofconcurrent jobs forsource service
integer unlimited if not set
$gpg_standard_key Path to the standardsign key
$hermesserver URL of thenotication server
optional
41 Back-end Configuration
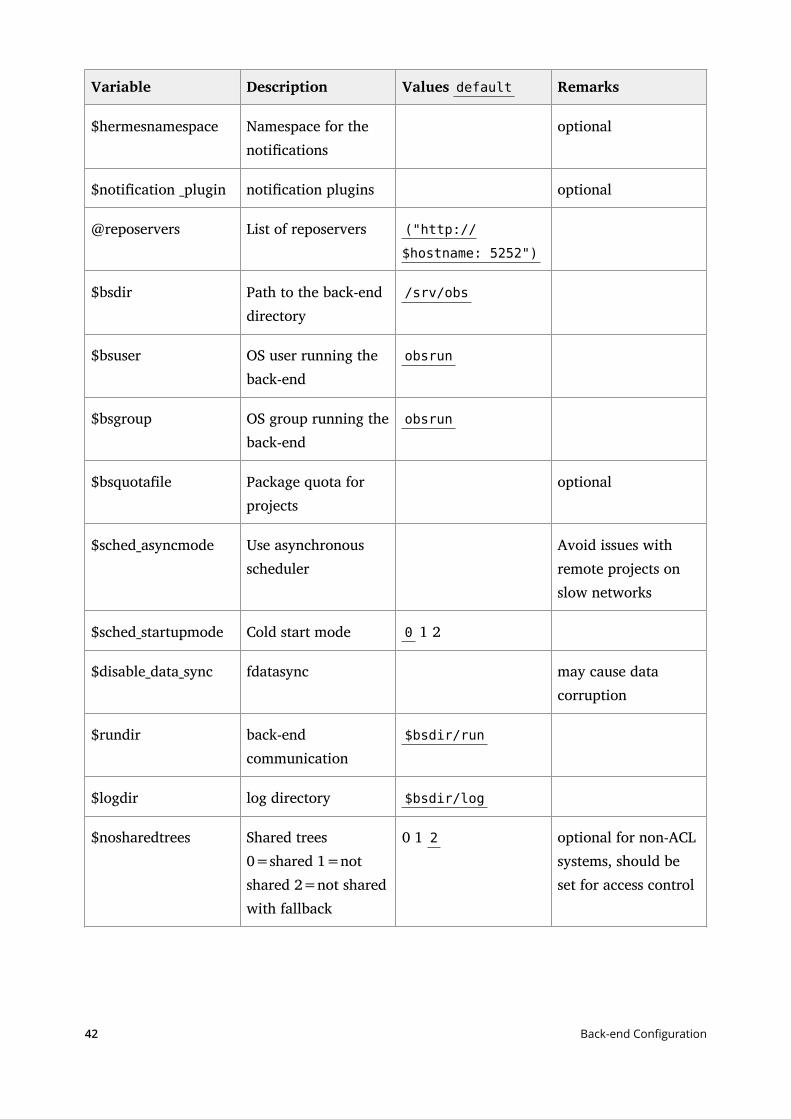
Variable Description Values default Remarks
$hermesnamespace Namespace for thenotications
optional
$notication _plugin notication plugins optional
@reposervers List of reposervers ("http://
$hostname: 5252")
$bsdir Path to the back-enddirectory
/srv/obs
$bsuser OS user running theback-end
obsrun
$bsgroup OS group running theback-end
obsrun
$bsquotale Package quota forprojects
optional
$sched_asyncmode Use asynchronousscheduler
Avoid issues withremote projects onslow networks
$sched_startupmode Cold start mode 0 1 2
$disable_data_sync fdatasync may cause datacorruption
$rundir back-endcommunication
$bsdir/run
$logdir log directory $bsdir/log
$nosharedtrees Shared trees0=shared 1=notshared 2=not sharedwith fallback
0 1 2 optional for non-ACLsystems, should beset for access control
42 Back-end Configuration
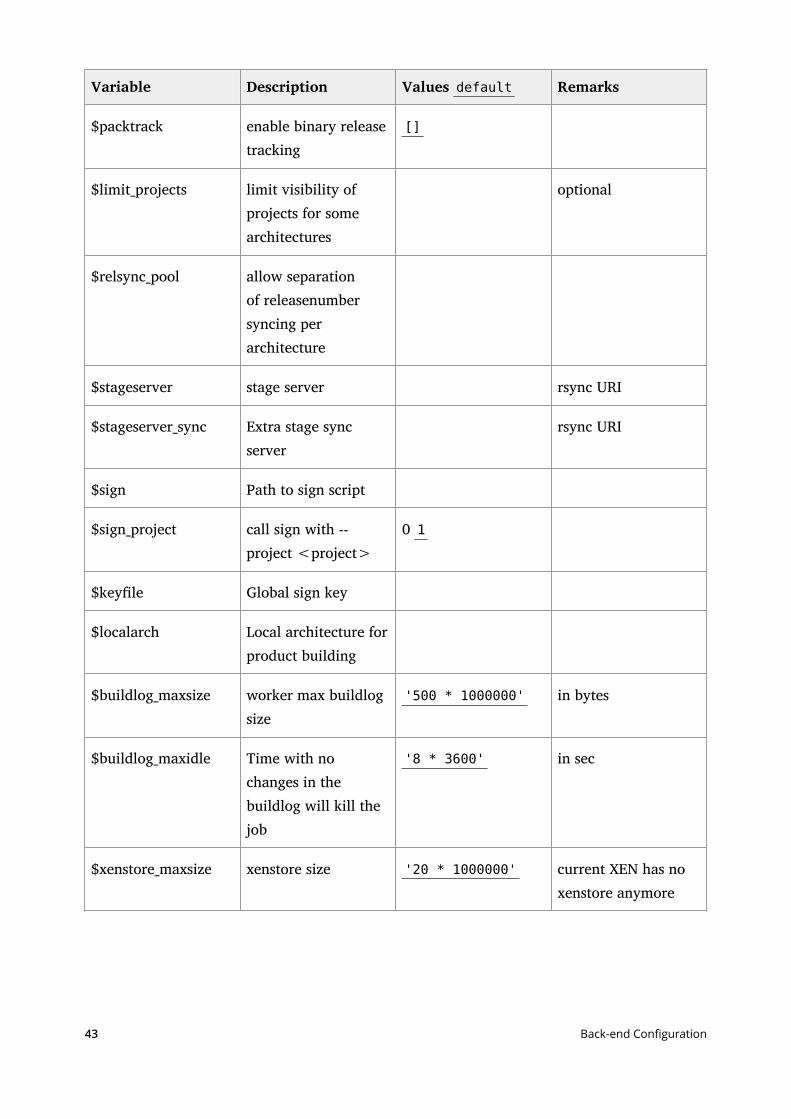
Variable Description Values default Remarks
$packtrack enable binary releasetracking
[]
$limit_projects limit visibility ofprojects for somearchitectures
optional
$relsync_pool allow separationof releasenumbersyncing perarchitecture
$stageserver stage server rsync URI
$stageserver_sync Extra stage syncserver
rsync URI
$sign Path to sign script
$sign_project call sign with --project <project>
0 1
$keyle Global sign key
$localarch Local architecture forproduct building
$buildlog_maxsize worker max buildlogsize
'500 * 1000000' in bytes
$buildlog_maxidle Time with nochanges in thebuildlog will kill thejob
'8 * 3600' in sec
$xenstore_maxsize xenstore size '20 * 1000000' current XEN has noxenstore anymore
43 Back-end Configuration
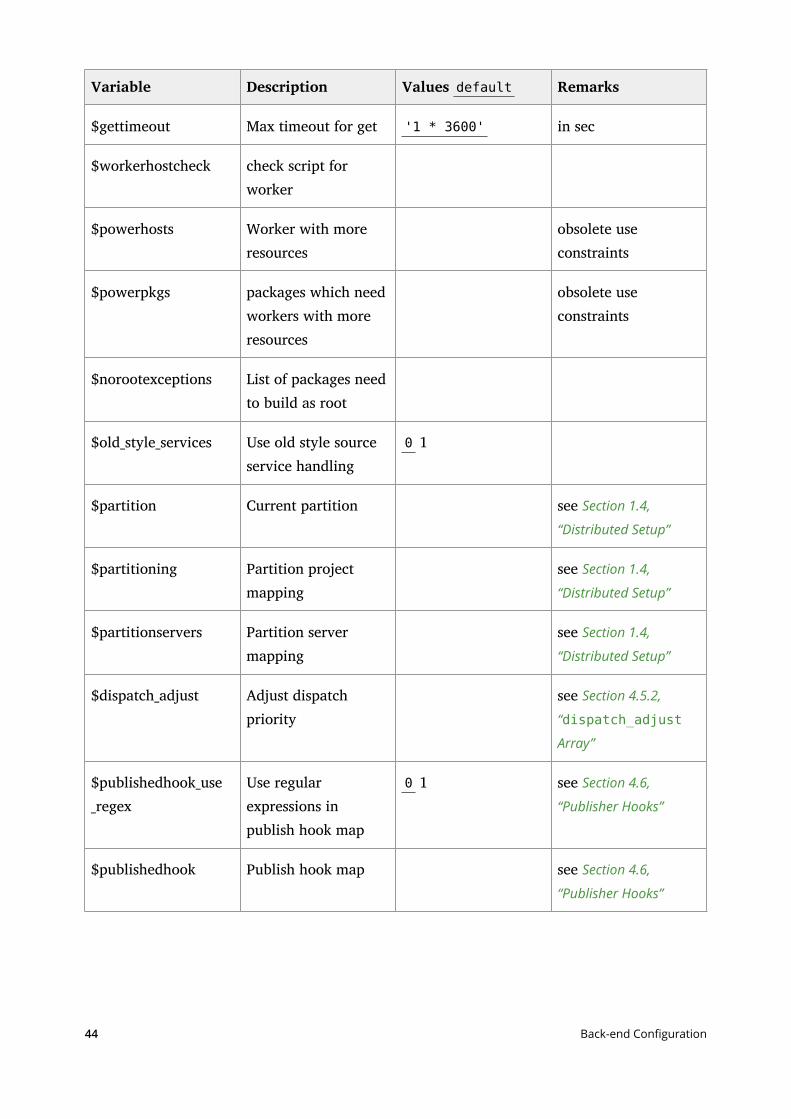
Variable Description Values default Remarks
$gettimeout Max timeout for get '1 * 3600' in sec
$workerhostcheck check script forworker
$powerhosts Worker with moreresources
obsolete useconstraints
$powerpkgs packages which needworkers with moreresources
obsolete useconstraints
$norootexceptions List of packages needto build as root
$old_style_services Use old style sourceservice handling
0 1
$partition Current partition see Section 1.4,
“Distributed Setup”
$partitioning Partition projectmapping
see Section 1.4,
“Distributed Setup”
$partitionservers Partition servermapping
see Section 1.4,
“Distributed Setup”
$dispatch_adjust Adjust dispatchpriority
see Section 4.5.2,
“dispatch_adjust
Array”
$publishedhook_use_regex
Use regularexpressions inpublish hook map
0 1 see Section 4.6,
“Publisher Hooks”
$publishedhook Publish hook map see Section 4.6,
“Publisher Hooks”
44 Back-end Configuration
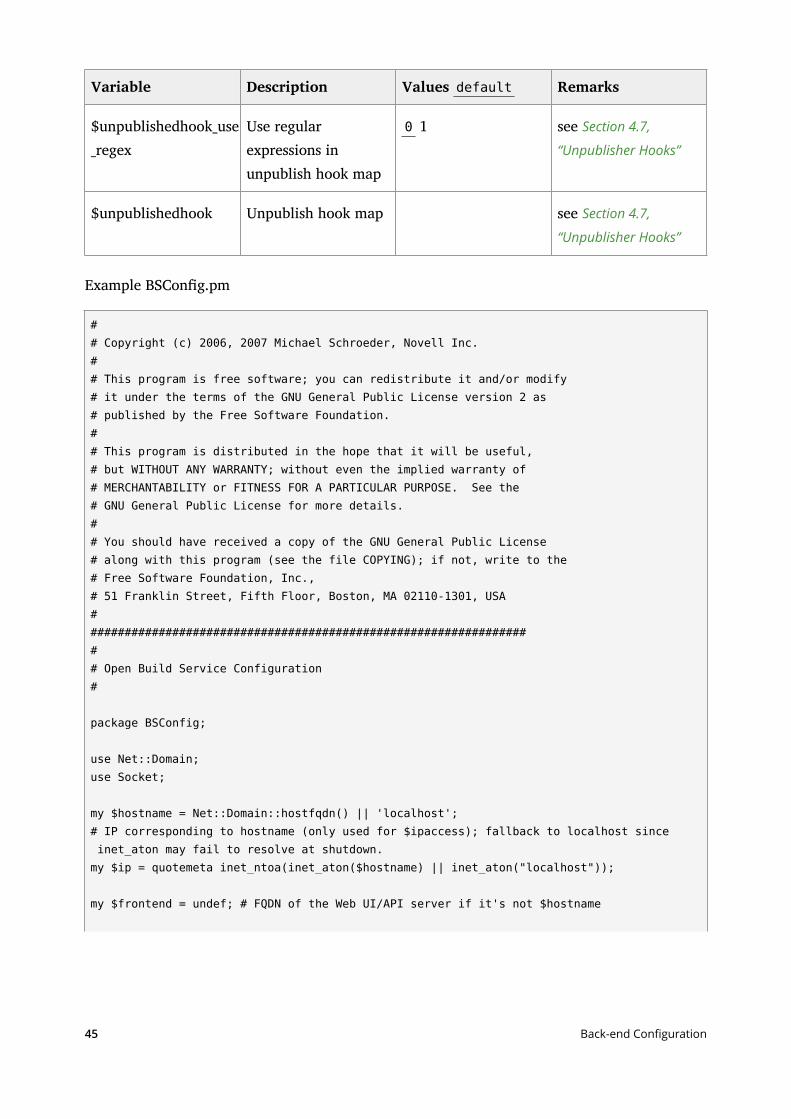
Variable Description Values default Remarks
$unpublishedhook_use_regex
Use regularexpressions inunpublish hook map
0 1 see Section 4.7,
“Unpublisher Hooks”
$unpublishedhook Unpublish hook map see Section 4.7,
“Unpublisher Hooks”
Example BSCong.pm
## Copyright (c) 2006, 2007 Michael Schroeder, Novell Inc.## This program is free software; you can redistribute it and/or modify# it under the terms of the GNU General Public License version 2 as# published by the Free Software Foundation.## This program is distributed in the hope that it will be useful,# but WITHOUT ANY WARRANTY; without even the implied warranty of# MERCHANTABILITY or FITNESS FOR A PARTICULAR PURPOSE. See the# GNU General Public License for more details.## You should have received a copy of the GNU General Public License# along with this program (see the file COPYING); if not, write to the# Free Software Foundation, Inc.,# 51 Franklin Street, Fifth Floor, Boston, MA 02110-1301, USA################################################################### Open Build Service Configuration#
package BSConfig;
use Net::Domain;use Socket;
my $hostname = Net::Domain::hostfqdn() || 'localhost';# IP corresponding to hostname (only used for $ipaccess); fallback to localhost since inet_aton may fail to resolve at shutdown.my $ip = quotemeta inet_ntoa(inet_aton($hostname) || inet_aton("localhost"));
my $frontend = undef; # FQDN of the Web UI/API server if it's not $hostname
45 Back-end Configuration
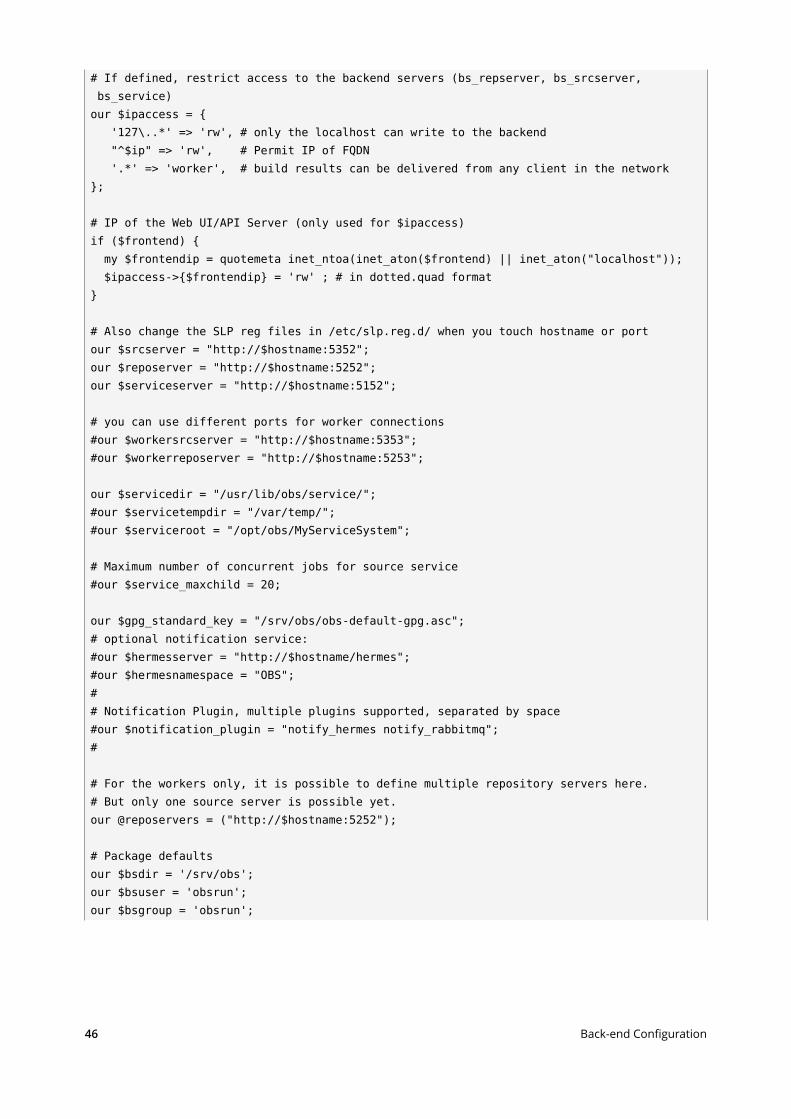
# If defined, restrict access to the backend servers (bs_repserver, bs_srcserver, bs_service)our $ipaccess = { '127\..*' => 'rw', # only the localhost can write to the backend "^$ip" => 'rw', # Permit IP of FQDN '.*' => 'worker', # build results can be delivered from any client in the network};
# IP of the Web UI/API Server (only used for $ipaccess)if ($frontend) { my $frontendip = quotemeta inet_ntoa(inet_aton($frontend) || inet_aton("localhost")); $ipaccess->{$frontendip} = 'rw' ; # in dotted.quad format}
# Also change the SLP reg files in /etc/slp.reg.d/ when you touch hostname or portour $srcserver = "http://$hostname:5352";our $reposerver = "http://$hostname:5252";our $serviceserver = "http://$hostname:5152";
# you can use different ports for worker connections#our $workersrcserver = "http://$hostname:5353";#our $workerreposerver = "http://$hostname:5253";
our $servicedir = "/usr/lib/obs/service/";#our $servicetempdir = "/var/temp/";#our $serviceroot = "/opt/obs/MyServiceSystem";
# Maximum number of concurrent jobs for source service#our $service_maxchild = 20;
our $gpg_standard_key = "/srv/obs/obs-default-gpg.asc";# optional notification service:#our $hermesserver = "http://$hostname/hermes";#our $hermesnamespace = "OBS";## Notification Plugin, multiple plugins supported, separated by space#our $notification_plugin = "notify_hermes notify_rabbitmq";#
# For the workers only, it is possible to define multiple repository servers here.# But only one source server is possible yet.our @reposervers = ("http://$hostname:5252");
# Package defaultsour $bsdir = '/srv/obs';our $bsuser = 'obsrun';our $bsgroup = 'obsrun';
46 Back-end Configuration
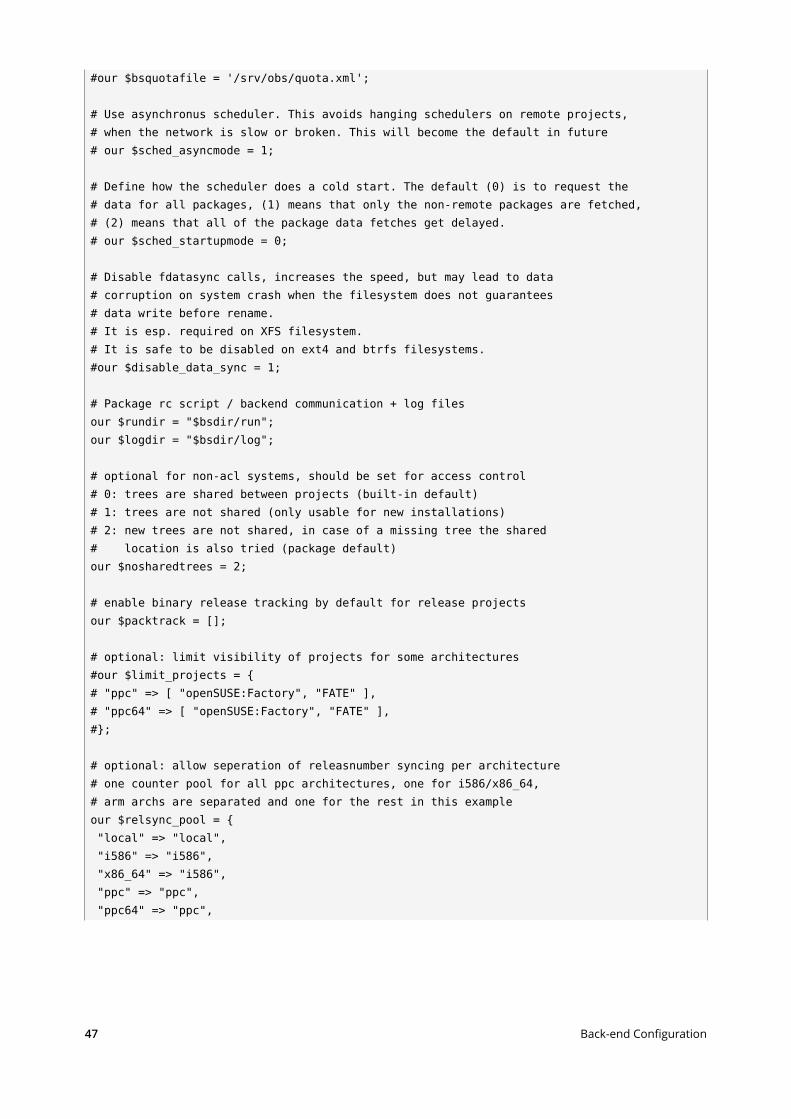
#our $bsquotafile = '/srv/obs/quota.xml';
# Use asynchronus scheduler. This avoids hanging schedulers on remote projects,# when the network is slow or broken. This will become the default in future# our $sched_asyncmode = 1;
# Define how the scheduler does a cold start. The default (0) is to request the# data for all packages, (1) means that only the non-remote packages are fetched,# (2) means that all of the package data fetches get delayed.# our $sched_startupmode = 0;
# Disable fdatasync calls, increases the speed, but may lead to data# corruption on system crash when the filesystem does not guarantees# data write before rename.# It is esp. required on XFS filesystem.# It is safe to be disabled on ext4 and btrfs filesystems.#our $disable_data_sync = 1;
# Package rc script / backend communication + log filesour $rundir = "$bsdir/run";our $logdir = "$bsdir/log";
# optional for non-acl systems, should be set for access control# 0: trees are shared between projects (built-in default)# 1: trees are not shared (only usable for new installations)# 2: new trees are not shared, in case of a missing tree the shared# location is also tried (package default)our $nosharedtrees = 2;
# enable binary release tracking by default for release projectsour $packtrack = [];
# optional: limit visibility of projects for some architectures#our $limit_projects = {# "ppc" => [ "openSUSE:Factory", "FATE" ],# "ppc64" => [ "openSUSE:Factory", "FATE" ],#};
# optional: allow seperation of releasnumber syncing per architecture# one counter pool for all ppc architectures, one for i586/x86_64,# arm archs are separated and one for the rest in this exampleour $relsync_pool = { "local" => "local", "i586" => "i586", "x86_64" => "i586", "ppc" => "ppc", "ppc64" => "ppc",
47 Back-end Configuration

"ppc64le" => "ppc", "mips" => "mips", "mips64" => "mips", "mipsel" => "mipsel", "mips64el" => "mipsel", "aarch64" => "arm", "aarch64_ilp32" => "arm", "armv4l" => "arm", "armv5l" => "arm", "armv6l" => "arm", "armv6hl" => "arm", "armv7l" => "arm", "armv7hl" => "arm", "armv5el" => "armv5el", # they do not exist "armv6el" => "armv6el", "armv7el" => "armv7el", "armv8el" => "armv8el", "sparcv9" => "sparcv9", "sparc64" => "sparcv9",};
#No extra stage server sync#our $stageserver = 'rsync://127.0.0.1/put-repos-main';#our $stageserver_sync = 'rsync://127.0.0.1/trigger-repos-sync';
#No package signing serverour $sign = "/usr/bin/sign";#Extend sign call with project name as argument "--project $NAME"#our $sign_project = 1;#Global sign keyour $keyfile = "/srv/obs/obs-default-gpg.asc";
# Use a special local arch for product building# our $localarch = "x86_64";
# config options for the bs_worker##our buildlog_maxsize = 500 * 1000000;#our buildlog_maxidle = 8 * 3600;#our xenstore_maxsize = 20 * 1000000;#our gettimeout = 1 * 3600;## run a script to check if the worker is good enough for the job#our workerhostcheck = 'my_check_script';## Allow to build as root, exceptions per package# the keys are actually anchored regexes
48 Back-end Configuration
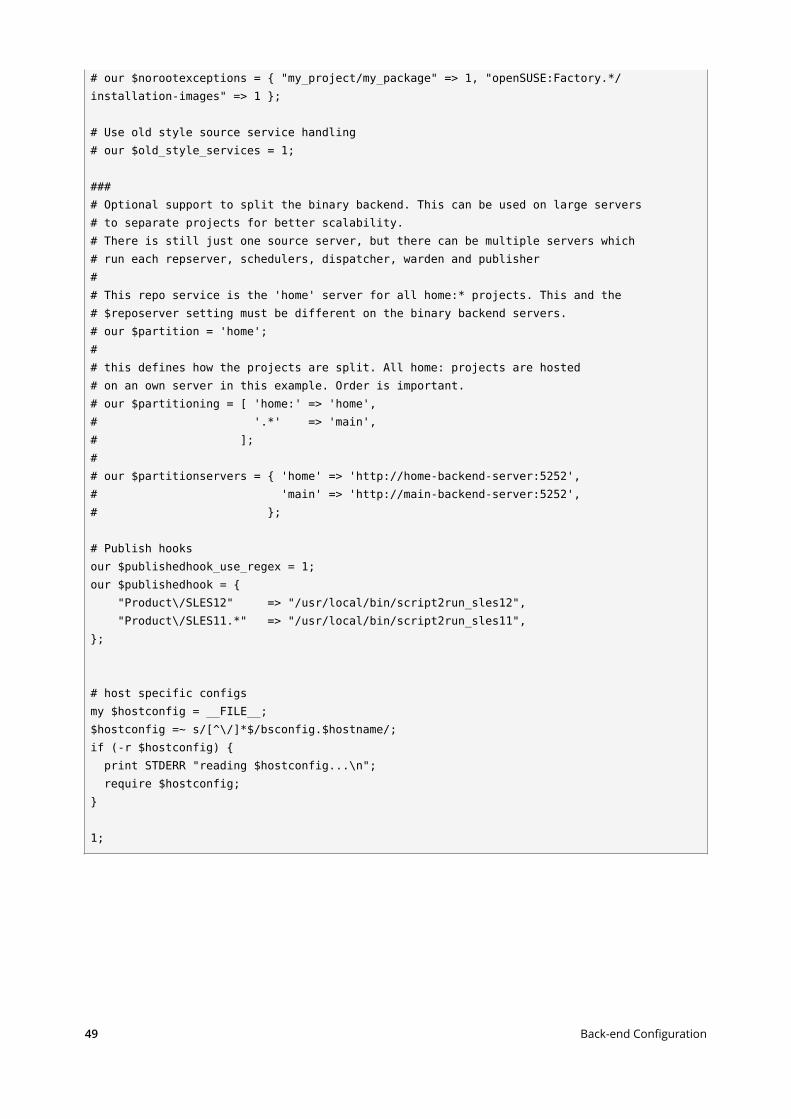
# our $norootexceptions = { "my_project/my_package" => 1, "openSUSE:Factory.*/installation-images" => 1 };
# Use old style source service handling# our $old_style_services = 1;
#### Optional support to split the binary backend. This can be used on large servers# to separate projects for better scalability.# There is still just one source server, but there can be multiple servers which# run each repserver, schedulers, dispatcher, warden and publisher## This repo service is the 'home' server for all home:* projects. This and the# $reposerver setting must be different on the binary backend servers.# our $partition = 'home';## this defines how the projects are split. All home: projects are hosted# on an own server in this example. Order is important.# our $partitioning = [ 'home:' => 'home',# '.*' => 'main',# ];## our $partitionservers = { 'home' => 'http://home-backend-server:5252',# 'main' => 'http://main-backend-server:5252',# };
# Publish hooksour $publishedhook_use_regex = 1;our $publishedhook = { "Product\/SLES12" => "/usr/local/bin/script2run_sles12", "Product\/SLES11.*" => "/usr/local/bin/script2run_sles11",};
# host specific configsmy $hostconfig = __FILE__;$hostconfig =~ s/[^\/]*$/bsconfig.$hostname/;if (-r $hostconfig) { print STDERR "reading $hostconfig...\n"; require $hostconfig;}
1;
49 Back-end Configuration
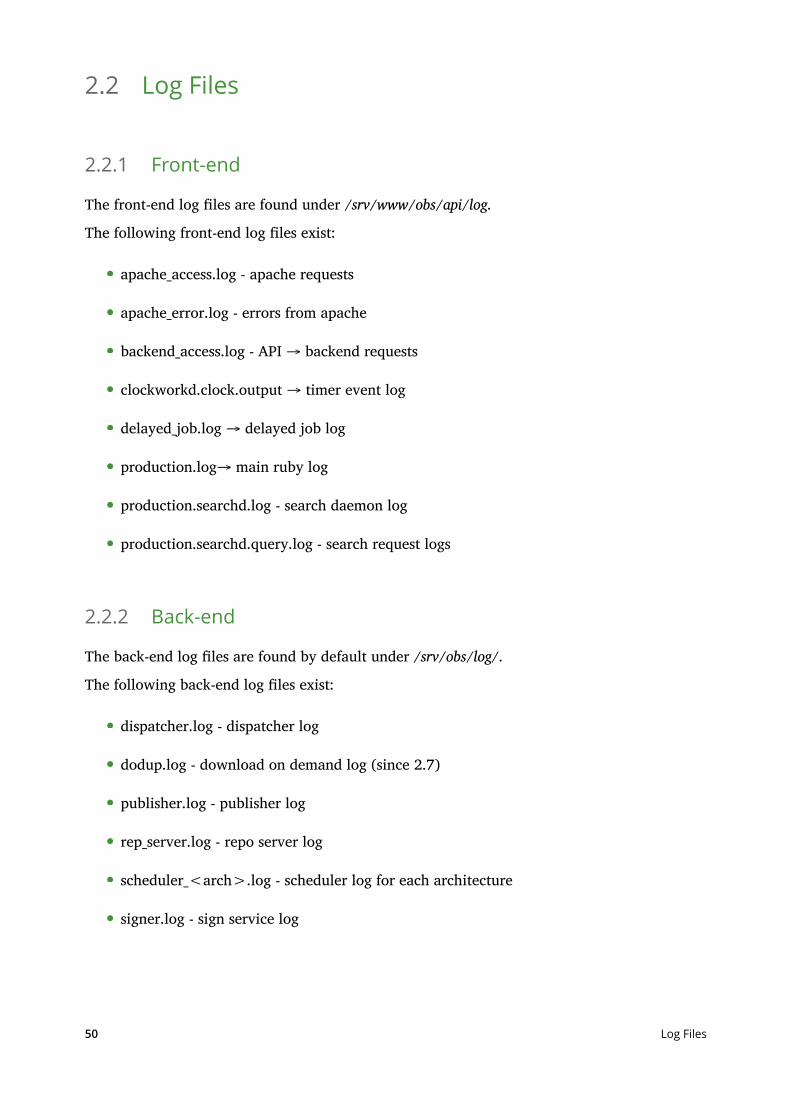
2.2 Log Files
2.2.1 Front-end
The front-end log les are found under /srv/www/obs/api/log.
The following front-end log les exist:
apache_access.log - apache requests
apache_error.log - errors from apache
backend_access.log - API → backend requests
clockworkd.clock.output → timer event log
delayed_job.log → delayed job log
production.log→ main ruby log
production.searchd.log - search daemon log
production.searchd.query.log - search request logs
2.2.2 Back-end
The back-end log les are found by default under /srv/obs/log/.
The following back-end log les exist:
dispatcher.log - dispatcher log
dodup.log - download on demand log (since 2.7)
publisher.log - publisher log
rep_server.log - repo server log
scheduler_<arch>.log - scheduler log for each architecture
signer.log - sign service log
50 Log Files
src_server.log - source server log
src_service.log - source service daemon log
warden.log - warden log
clouduploadserver.log - cloud upload server log
clouduploadworker.log - cloud upload worker log
The following log les for the upload jobs exist inside the /srv/obs/cloudupload directory (alsolinked in /bs/cloudupload):
<job_id>.log - log les for undone upload jobs
done/<job_id>.log - log les for already nished upload jobs
2.3 /srv/obs TreeThe default back-end data directory is located under /srv/obs/. Here are a bunch ofsubdirectories used for communication between the dierent server, to store data, statusinformation and logs. Here is one le conguration.xml in the top directory, which stores theglobal OBS conguration for the back-end. You should not modify this le directly, but usethe API /conguration interface instead, since this information needs to kept in sync with thefront-end.
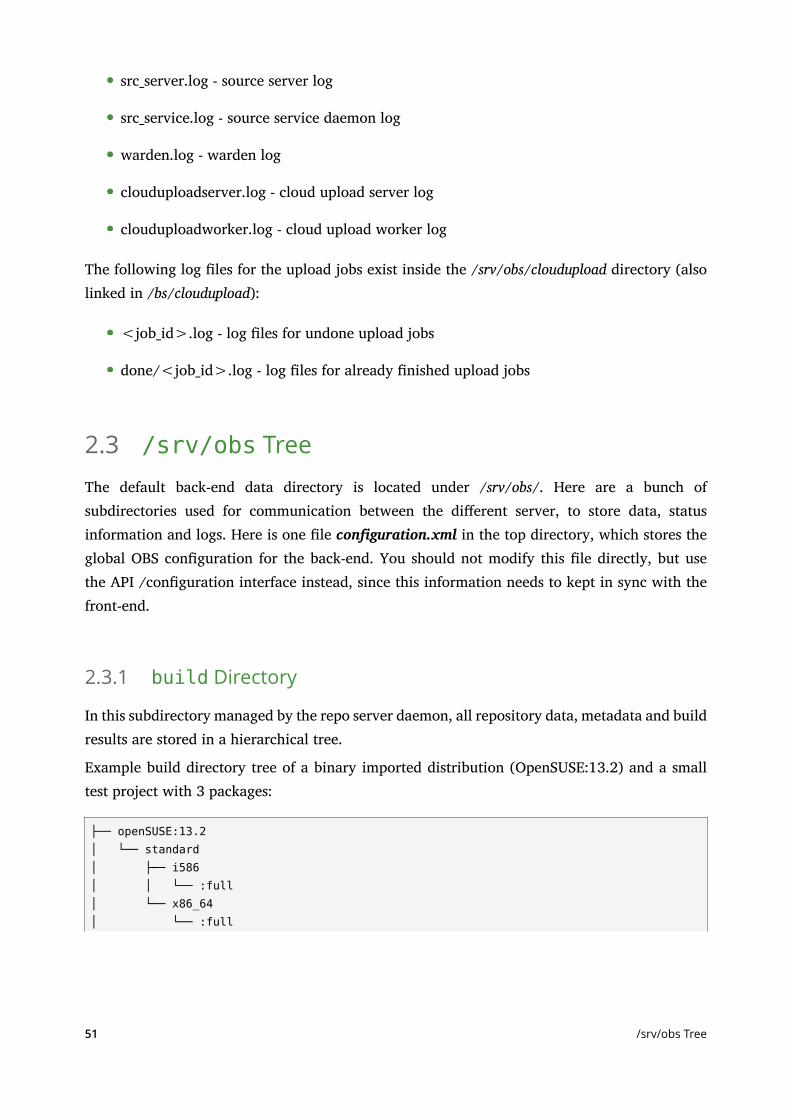
2.3.1 build Directory
In this subdirectory managed by the repo server daemon, all repository data, metadata and buildresults are stored in a hierarchical tree.
Example build directory tree of a binary imported distribution (OpenSUSE:13.2) and a smalltest project with 3 packages:
├── openSUSE:13.2│ └── standard│ ├── i586│ │ └── :full│ └── x86_64│ └── :full
51 /srv/obs Tree
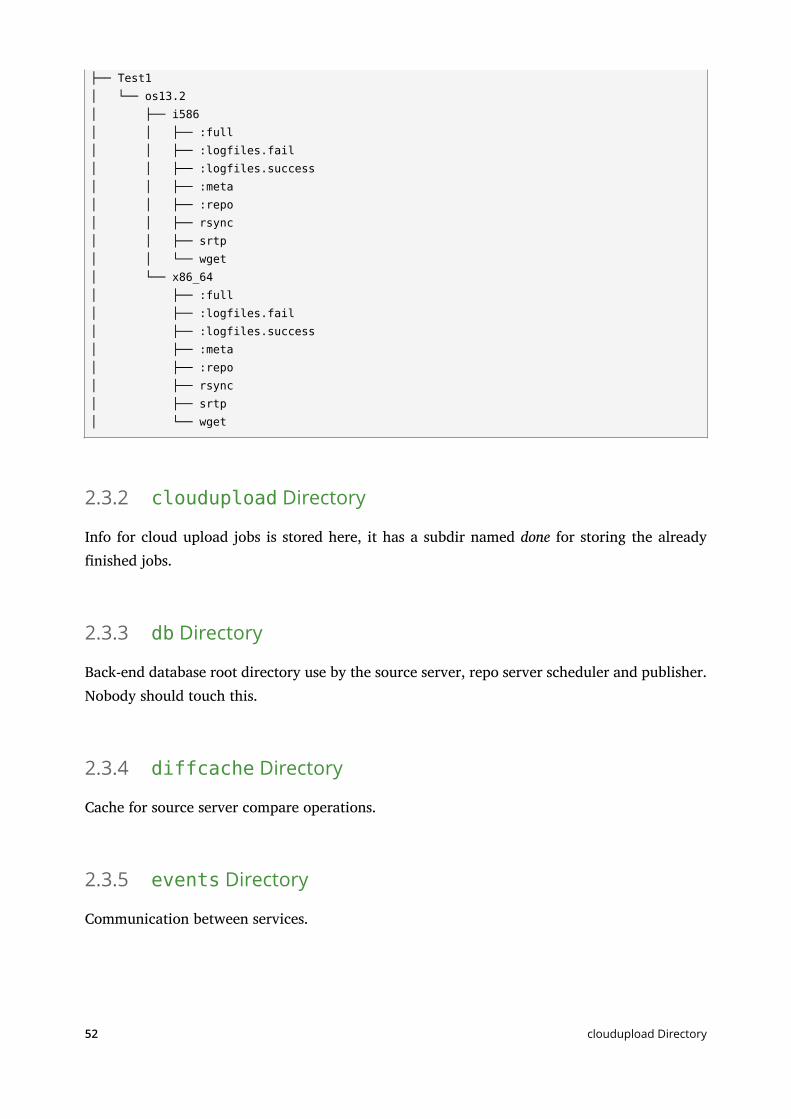
├── Test1│ └── os13.2│ ├── i586│ │ ├── :full│ │ ├── :logfiles.fail│ │ ├── :logfiles.success│ │ ├── :meta│ │ ├── :repo│ │ ├── rsync│ │ ├── srtp│ │ └── wget│ └── x86_64│ ├── :full│ ├── :logfiles.fail│ ├── :logfiles.success│ ├── :meta│ ├── :repo│ ├── rsync│ ├── srtp│ └── wget
2.3.2 cloudupload Directory
Info for cloud upload jobs is stored here, it has a subdir named done for storing the alreadynished jobs.
2.3.3 db Directory
Back-end database root directory use by the source server, repo server scheduler and publisher.Nobody should touch this.
2.3.4 diffcache Directory
Cache for source server compare operations.
2.3.5 events Directory
Communication between services.
52 cloudupload Directory
2.3.6 info Directory
Scheduler information managed by the scheduler and used by the repo server.
2.3.7 jobs Directory
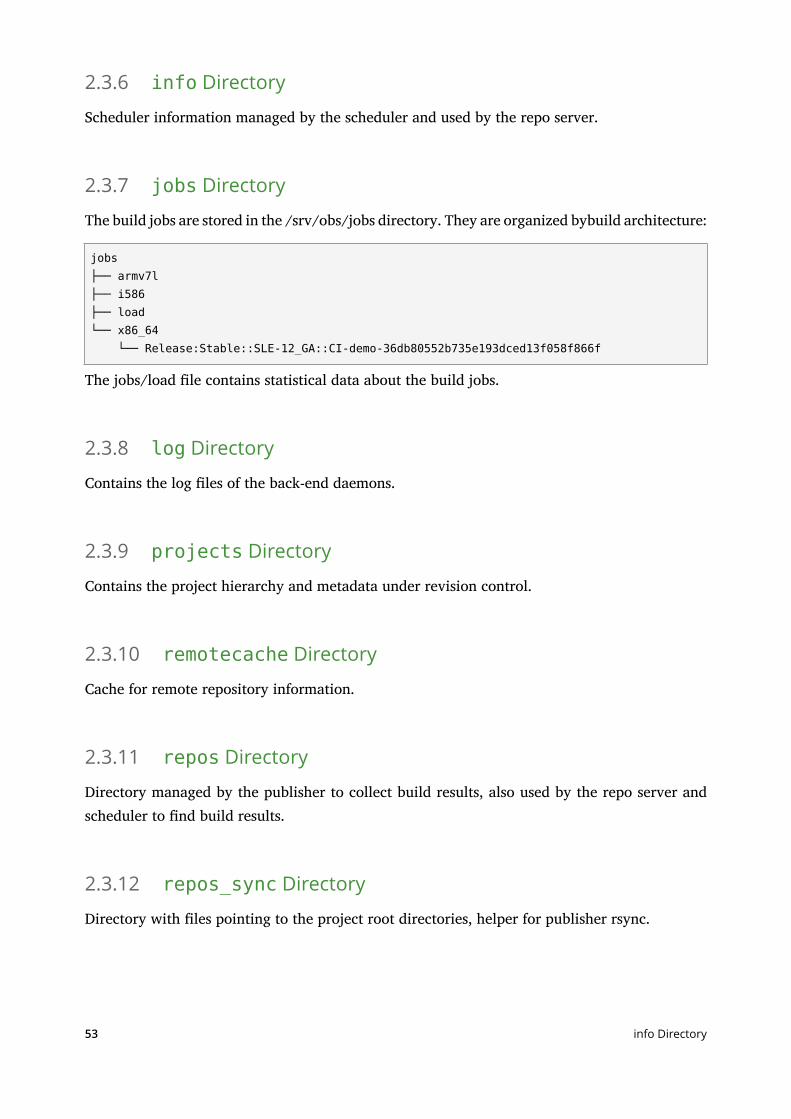
The build jobs are stored in the /srv/obs/jobs directory. They are organized bybuild architecture:
jobs├── armv7l├── i586├── load└── x86_64 └── Release:Stable::SLE-12_GA::CI-demo-36db80552b735e193dced13f058f866f
The jobs/load le contains statistical data about the build jobs.
2.3.8 log Directory
Contains the log les of the back-end daemons.
2.3.9 projects Directory
Contains the project hierarchy and metadata under revision control.
2.3.10 remotecache Directory
Cache for remote repository information.
2.3.11 repos Directory
Directory managed by the publisher to collect build results, also used by the repo server andscheduler to nd build results.
2.3.12 repos_sync Directory
Directory with les pointing to the project root directories, helper for publisher rsync.
53 info Directory
2.3.13 run Directory
State and lock information for the back-end daemons
2.3.14 sources Directory
All package sources under revision control in one directory per package, managed by the sourceserver. Package sources are by default deduplicated across all projects, as long a source le hasthe same MD5 sum, it is only stored once. A pseudo '_project' package exist in the directorycontaining the project metadata revisions. ':service' and ':upload' are temporary directories usedby the source server.
Example sources directory structure:
sources/├── CI-demo[...]├── srtp├── test1├── _project├── :service└── :upload
2.3.15 trees Directory
Revision control data for project and packages, managed by the source server.
2.3.16 upload Directory
Temporary directory for uploading les for other back-end components.
2.3.17 workers Directory
Worker information
54 run Directory
2.4 Metadata
2.4.1 OBS Revision Control
This section gives a short generic overview how the revision information are stored in the OBSback-end for packages and projects. The OBS back-end stores all les in a light weight contentbased hierarchical tree. Each le is hashed (with MD5) and stored with the hash as part ofthe lename under the /srv/obs/tree or /srv/obs/sources directories. The revision information isstored in separate les by the Source Server in the /srv/obs/projects directory.
2.4.1.1 OBS revision control files
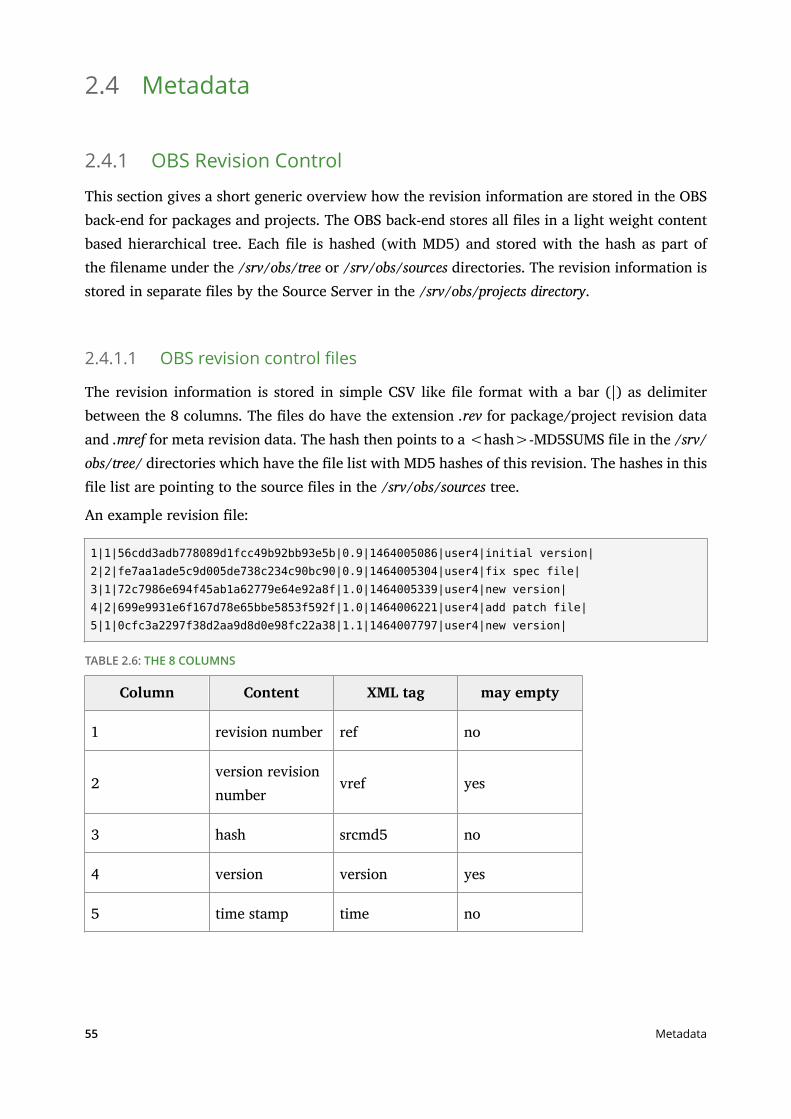
The revision information is stored in simple CSV like le format with a bar (|) as delimiterbetween the 8 columns. The les do have the extension .rev for package/project revision dataand .mref for meta revision data. The hash then points to a <hash>-MD5SUMS le in the /srv/obs/tree/ directories which have the le list with MD5 hashes of this revision. The hashes in thisle list are pointing to the source les in the /srv/obs/sources tree.
An example revision le:
1|1|56cdd3adb778089d1fcc49b92bb93e5b|0.9|1464005086|user4|initial version|2|2|fe7aa1ade5c9d005de738c234c90bc90|0.9|1464005304|user4|fix spec file|3|1|72c7986e694f45ab1a62779e64e92a8f|1.0|1464005339|user4|new version|4|2|699e9931e6f167d78e65bbe5853f592f|1.0|1464006221|user4|add patch file|5|1|0cfc3a2297f38d2aa9d8d0e98fc22a38|1.1|1464007797|user4|new version|
TABLE 2.6: THE 8 COLUMNS
Column Content XML tag may empty
1 revision number ref no
2version revisionnumber
vref yes
3 hash srcmd5 no
4 version version yes
5 time stamp time no
55 Metadata
Column Content XML tag may empty
6 user user no
7 commit message comment yes
8 request id requestid yes
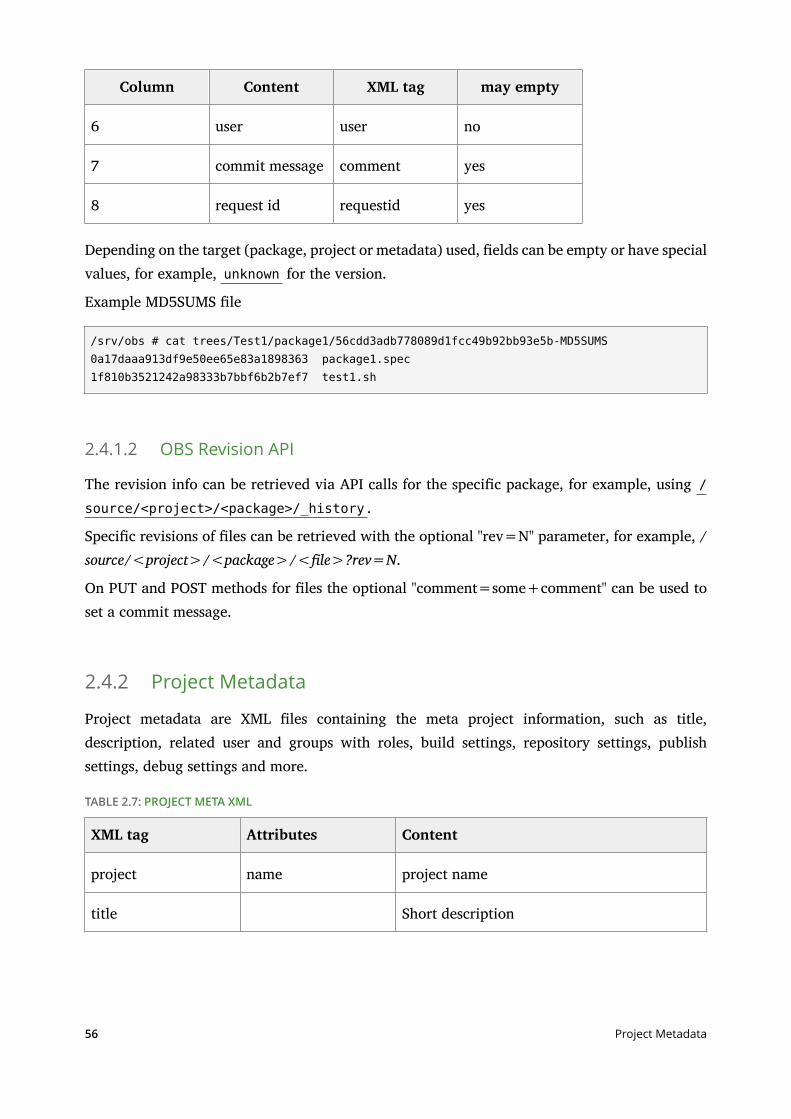
Depending on the target (package, project or metadata) used, elds can be empty or have specialvalues, for example, unknown for the version.
Example MD5SUMS le
/srv/obs # cat trees/Test1/package1/56cdd3adb778089d1fcc49b92bb93e5b-MD5SUMS0a17daaa913df9e50ee65e83a1898363 package1.spec1f810b3521242a98333b7bbf6b2b7ef7 test1.sh
2.4.1.2 OBS Revision API
The revision info can be retrieved via API calls for the specic package, for example, using /source/<project>/<package>/_history .
Specic revisions of les can be retrieved with the optional "rev=N" parameter, for example, /source/<project>/<package>/<le>?rev=N.
On PUT and POST methods for les the optional "comment=some+comment" can be used toset a commit message.
2.4.2 Project Metadata
Project metadata are XML les containing the meta project information, such as title,description, related user and groups with roles, build settings, repository settings, publishsettings, debug settings and more.
TABLE 2.7: PROJECT META XML
XML tag Attributes Content
project name project name
title Short description
56 Project Metadata
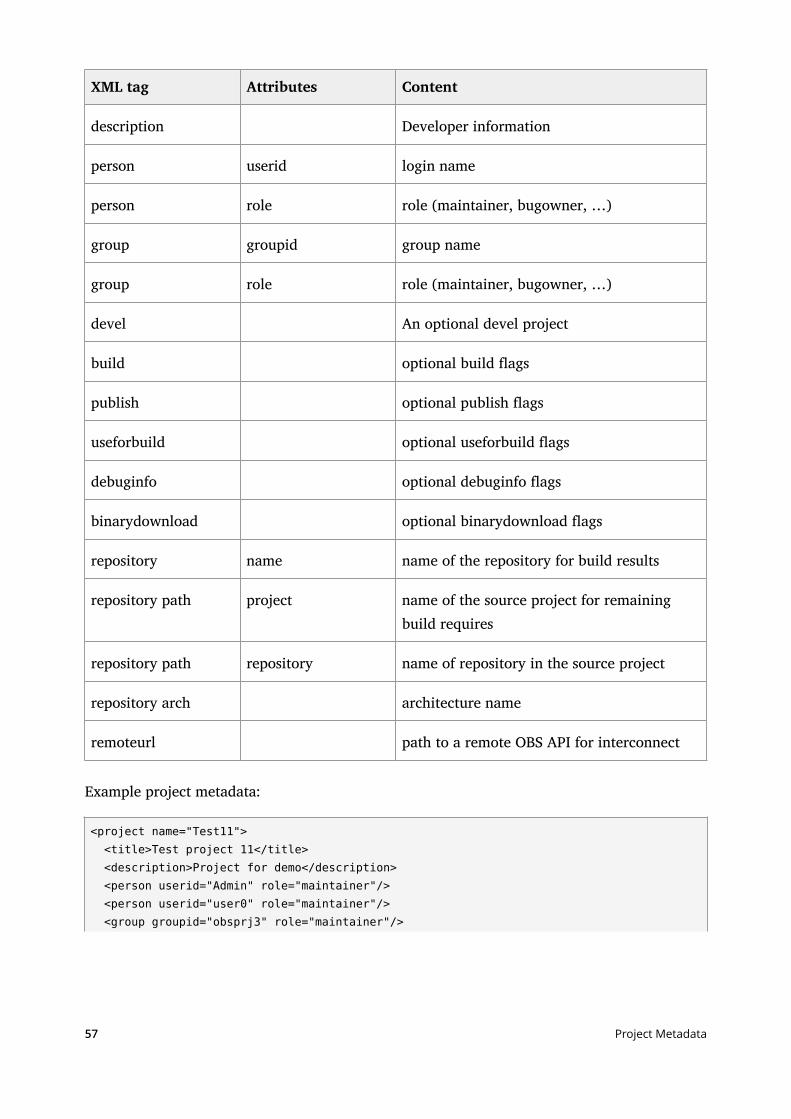
XML tag Attributes Content
description Developer information
person userid login name
person role role (maintainer, bugowner, …)
group groupid group name
group role role (maintainer, bugowner, …)
devel An optional devel project
build optional build ags
publish optional publish ags
useforbuild optional useforbuild ags
debuginfo optional debuginfo ags
binarydownload optional binarydownload ags
repository name name of the repository for build results
repository path project name of the source project for remainingbuild requires
repository path repository name of repository in the source project
repository arch architecture name
remoteurl path to a remote OBS API for interconnect
Example project metadata:
<project name="Test11"> <title>Test project 11</title> <description>Project for demo</description> <person userid="Admin" role="maintainer"/> <person userid="user0" role="maintainer"/> <group groupid="obsprj3" role="maintainer"/>
57 Project Metadata
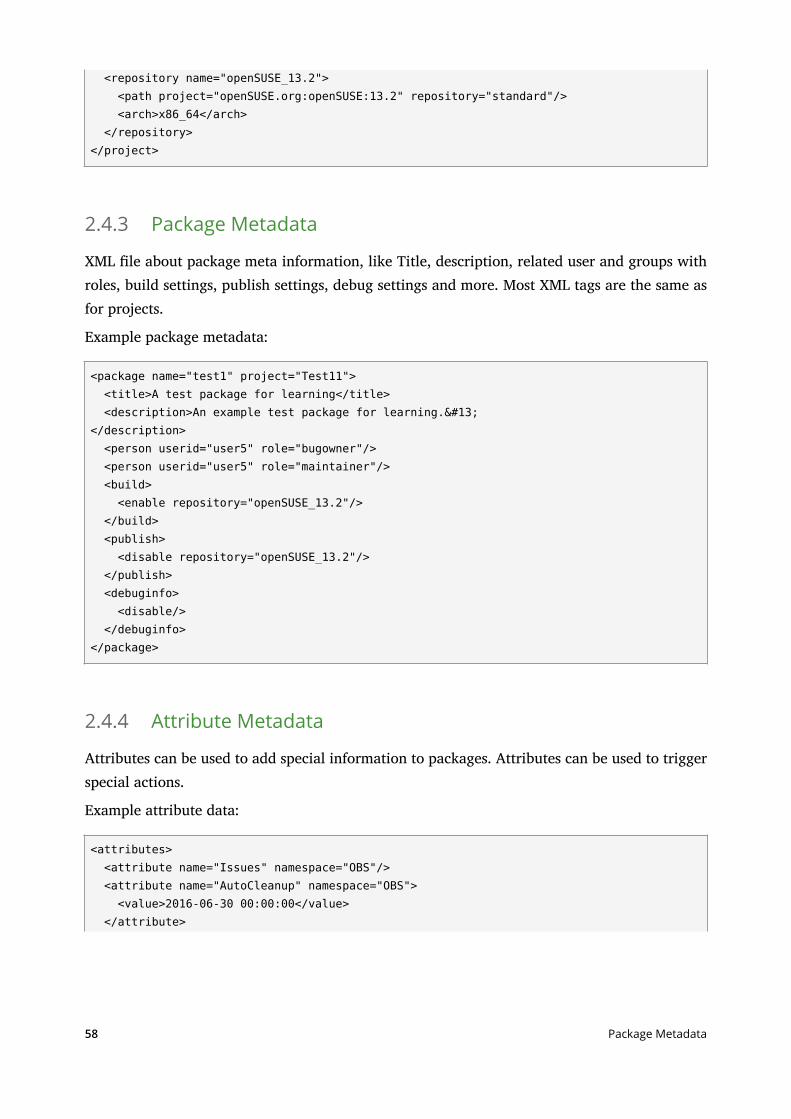
<repository name="openSUSE_13.2"> <path project="openSUSE.org:openSUSE:13.2" repository="standard"/> <arch>x86_64</arch> </repository></project>
2.4.3 Package Metadata
XML le about package meta information, like Title, description, related user and groups withroles, build settings, publish settings, debug settings and more. Most XML tags are the same asfor projects.
Example package metadata:
<package name="test1" project="Test11"> <title>A test package for learning</title> <description>An example test package for learning. </description> <person userid="user5" role="bugowner"/> <person userid="user5" role="maintainer"/> <build> <enable repository="openSUSE_13.2"/> </build> <publish> <disable repository="openSUSE_13.2"/> </publish> <debuginfo> <disable/> </debuginfo></package>
2.4.4 Attribute Metadata
Attributes can be used to add special information to packages. Attributes can be used to triggerspecial actions.
Example attribute data:
<attributes> <attribute name="Issues" namespace="OBS"/> <attribute name="AutoCleanup" namespace="OBS"> <value>2016-06-30 00:00:00</value> </attribute>
58 Package Metadata
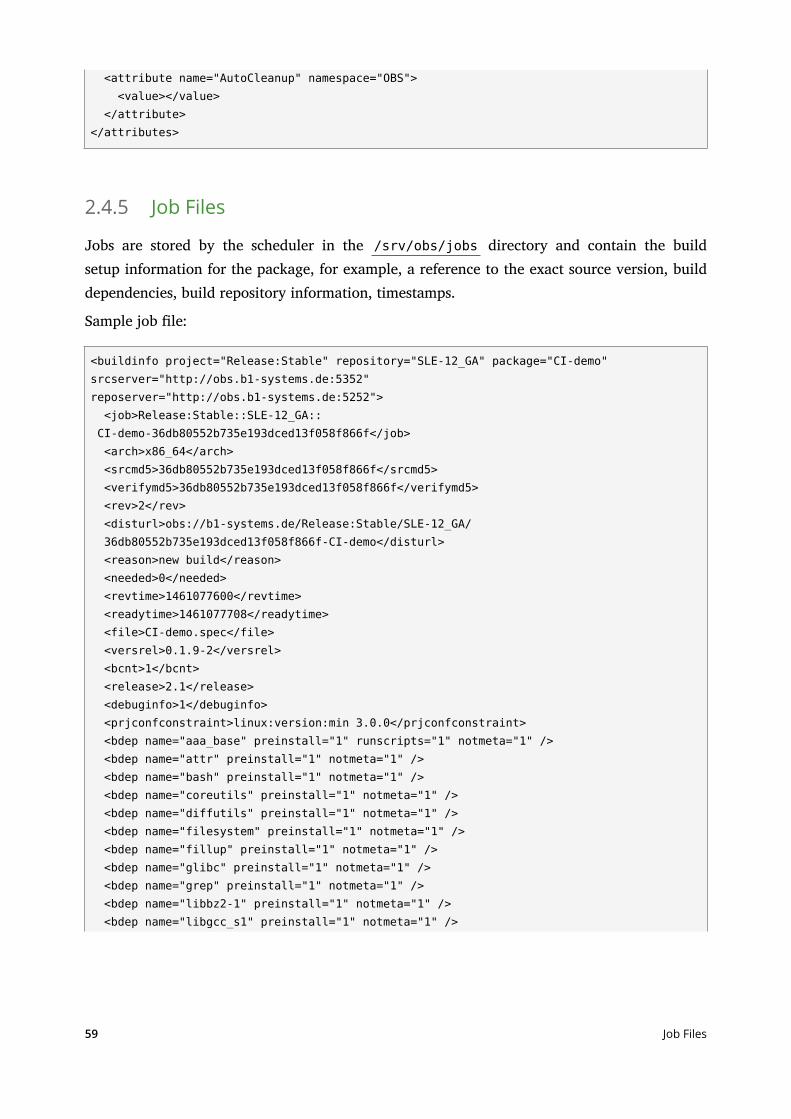
<attribute name="AutoCleanup" namespace="OBS"> <value></value> </attribute></attributes>
2.4.5 Job Files
Jobs are stored by the scheduler in the /srv/obs/jobs directory and contain the buildsetup information for the package, for example, a reference to the exact source version, builddependencies, build repository information, timestamps.
Sample job le:
<buildinfo project="Release:Stable" repository="SLE-12_GA" package="CI-demo"srcserver="http://obs.b1-systems.de:5352"reposerver="http://obs.b1-systems.de:5252"> <job>Release:Stable::SLE-12_GA:: CI-demo-36db80552b735e193dced13f058f866f</job> <arch>x86_64</arch> <srcmd5>36db80552b735e193dced13f058f866f</srcmd5> <verifymd5>36db80552b735e193dced13f058f866f</verifymd5> <rev>2</rev> <disturl>obs://b1-systems.de/Release:Stable/SLE-12_GA/ 36db80552b735e193dced13f058f866f-CI-demo</disturl> <reason>new build</reason> <needed>0</needed> <revtime>1461077600</revtime> <readytime>1461077708</readytime> <file>CI-demo.spec</file> <versrel>0.1.9-2</versrel> <bcnt>1</bcnt> <release>2.1</release> <debuginfo>1</debuginfo> <prjconfconstraint>linux:version:min 3.0.0</prjconfconstraint> <bdep name="aaa_base" preinstall="1" runscripts="1" notmeta="1" /> <bdep name="attr" preinstall="1" notmeta="1" /> <bdep name="bash" preinstall="1" notmeta="1" /> <bdep name="coreutils" preinstall="1" notmeta="1" /> <bdep name="diffutils" preinstall="1" notmeta="1" /> <bdep name="filesystem" preinstall="1" notmeta="1" /> <bdep name="fillup" preinstall="1" notmeta="1" /> <bdep name="glibc" preinstall="1" notmeta="1" /> <bdep name="grep" preinstall="1" notmeta="1" /> <bdep name="libbz2-1" preinstall="1" notmeta="1" /> <bdep name="libgcc_s1" preinstall="1" notmeta="1" />
59 Job Files

<bdep name="m4" preinstall="1" notmeta="1" />[...] <path project="Release:Stable" repository="SLE-12_GA" server="http://obs.b1-systems.de:5252" /> <path project="SUSE:SLE-12:GA" repository="standard" server="http://obs.b1-systems.de:5252" /></buildinfo>
60 Job Files
3 Security Concepts
3.1 General ParadigmThe general paradigm of Open Build Service is to host all content on its own. Every part requiredto rebuild a package is hosted in Open Build Service to guarantee reproducibility. This includesthe ability to rebuild the build environment. However, optional services to integrate remoteresources exist as well. These resources are either mirrored and stored in revision control systemor just cached.
3.1.1 Frontend
The API and web interface frontends is the only part which must be accessible from publicnetwork. A SSL/TLS certicate is highly recommended.
3.1.1.1 Access to Mirror Servers
The following services require access to stage servers. These servers can be used to publishcontent without the need to make Open Build Service server parts public available.
The publisher is used to publish any build results to the stage servers. It needs access forrsync service to the servers.
The source publisher can be used similar to publish sources belonging to published buildresults (optional service).
3.1.1.2 Access to the Public Network
The following services may require access to the public network.
The srcserver when using the interconnect functionality to use content from remote OpenBuild Service instances.
obsdodup when using external repositories (optional service). The obssrcserver would needaccess then as well for downloading content.
61 General Paradigm
obssourceservice when supporting automatic source procession (optional service) fromremote. This service may be used to download content (for example, Git repositories) aspart of the sources.
obsclouduploadworker when publishing to public cloud instances is wanted.
3.1.1.3 Worker network
It is recommended to run the Open Build Service workers in an isolated network. This is anadditional security mechanism in case of a security breach on a worker. This network needsaccess to the source and repository servers of the Open Build Service backend, but nowhere else.
3.1.1.4 Signer network
It is recommended to run the signd on an isolated host. The signer services need to stay on theOpen Build Service backend servers, they are just used for scheduling sign jobs. The signd is thecritical instance which hosts the single instance signature key. All further keys which belong toany project are created by the signd, crypted with the instance key and delivered to the backendservers. That way the signd instance is stateless after initial setup and it is enough to backupthe backend servers. Any sign job sends the encrypted private key to the signd server which isdecrypting it for signing the content. Access to the signd server must be limited to Open BuildService backend server components (source server and publisher).
3.1.2 Build Environment
The build environment is created by obsworker instances via the build script. Inside the buildinstances unveried and potentially harmful code is executed. Given that a user can run also anyprovided kernel the isolation must happen on VM layer. The only supported VM types, whichare considered as secure are KVM and XEN VMs. The VMs prohibit any network access from therunning instances. The build script is always creating a new le system, copies in all requireddata and executes the VM.
The build results get extracted directly from the block device. This is done to avoid mountingit which could be used to breach the host kernel in the le system code by crafting the usedlesystem during build.
62 Build Environment

Every build also stores the used binaries inside of the _buildenv le. This can be used to re-create the build environment later, even when newer updates got released meanwhile. Thisrequires however a maintenance setup to avoid that former releases get removed.
The build tools (like rpmbuild) are running usually as non-root user, but this is not a securityinstrument. It is only a quality mechanic to ensure that source packages are rebuildable withoutroot permissions.
3.1.3 Source Revision System
The source revision storage system is part of Open Build Service. The identication of sourcesstill happens using MD5 sums for historic reasons. MD5 is considered to be still good enough foridentifying a source, but it is known to be attackable. Recent versions of the osc command linetooling is sending therefore also a SHA256 sum in addition which is used to detect collisionsby the source server.
Sources can reference other package sources via _link les. These can be pinned to a revisionor to always using the latest one. That way underlying changes get merged automatically. This isuseful for shared development and automated builds, but it should be avoided for base projects.
3.1.4 Permission Handling
Authorization for write operations is done via the maintainer role on package or project level.On project level the projects are organized in namespaces which are dened via colons insidethe project name. A maintainer role on a higher namespace grants the permission to claimmaintainer role on any deeper project. Ocial projects should therefore be organized undertheir own top level namespaces (for example, openSUSE: namespace in our reference instance).
3.1.5 Signature Handling
Signatures are used to proof the origin of a shipment independent of Open Build Service instance.Once the signd daemon has been enabled by the administrator, any binary result like RPMpackages, images, containers, or meta data gets signed. All Open Build Service instances havea master key to sign results. This master key has two purposes: First, it is used for signing if adedicated signing key can not be found. Second, it is used to encrypt dedicated project signing
63 Source Revision System
keys so that they can be stored inside of the projects instead of on the signing server. If a projectdoes not have a signing key, the build server will search the parent projects. This follows thelogic of the write permission handling.
An Open Build Service user (including the Open Build Service admin user) has only limitedoptions to deal with the key setup. The user can create, delete, or extend the expire time of akey. It is not possible to import an external key. This guarantees that no key can be used outsideof the Open Build Service instance to sign Open Build Service content.
A SSL certicate is derived from the keys when needed (for example, for secure boot).
GPG keypairs are created by the signd daemon. Therefore, it is recommend to run this daemonon a separated and protected host. The master key pair should exist only on this signd host.Any further created keypair is not stored on the signd instance, instead the private part isencrypted with the master key and transferred to the Open Build Service backend. Thus, thesignd instance is stateless and needs no recurring backups after initial setup. All keypairs(public and private parts) are therefore part of the backup of the Open Build Service backendservers. The sign executable is transferring just the hash to be signed (not the entire le content)together with the crypted private key to signd . The daemon decrypts the private key withthe master key, creates the signature, and sends it back to the client. The returned signature isapplied to the binary by the sign executable afterwards.
A compromised backend is still be a serious security incident since any content can be signedwith any project key. The private keys are not compromised themselves though.
3.2 Trust Zones
Open Build Service (OBS) components deal with dierent trust zones. These are separated vianetwork or virtualization mechanics.
3.2.1 Public Zones
Public zones are areas where any code under user control is running.
64 Trust Zones
3.2.1.1 External Network
This can be the public Internet if the Open Build Service instance is a public instance. Requestscan only be triggered via http, secured by SSL to the API instance here. Every developer is usingthis interface to submit changes. However, further components may open connections to theInternet as described below.
3.2.1.2 Untrusted Code
All code which is used to build content is considered to be untrusted code. This includes even theLinux kernel, since users can build and run their own kernels. The security layer here is usuallyeither KVM and XEN virtualization. The instances are running without any network enabled.Build results get copied by reading a simple blocklist directly from the device. A security issuein the le system code can therefore not be used to compromise the worker.
3.2.2 Demilitarized Zone (DMZ)
The Demilitarized Zone contains services which interact with the public zone directly.
3.2.2.1 Open Build Service Frontend
The frontend service is the only service which provides an open port. It implements theauthorization of user requests. The authentication may happen in an external service like a proxyor ldap server. The frontend reads and writes changes to the database and the source server only.
3.2.2.2 Open Build Service Frontend Background Services
Open Build Service frontend background services handle less time critical operations. Thisincludes services which read data from external services like bug trackers, sending noticationsor long running jobs.
3.2.2.3 Stage Server
The stage server is providing the public content of the Open Build Service backends. The servercan be publicly accessible or just an upload server to a mirror infrastructure.
65 Demilitarized Zone (DMZ)
3.2.2.4 Cloud Uploader
The cloud uploader is uploading build results on user request. It reads from the binary serversand sends the content via cloud specic plugins to external instances. This is an optional service.
3.2.2.5 Source Service Server
The source service server is acting based on uploaded sources. The services should be writtenwith security in mind and the administrator can decide which services are trustworthy. Ocialreleases of Open Build Service dene a minimum set of especially trusted services which receiveda security review. A container can be used for additional security for each service run.
3.2.3 Internal Zone
The internal zone is running service which are supposed to work without further externaldependency.
3.2.3.1 Open Build Service Source Server
The source server coordinates changes to package and project conguration. In addition to thatall events between the binary backends and notications to the frontend get synchronized. Anysource change is tracked and stored in the revision history. There can only be a single sourceserver per OBS install.
3.2.3.2 Open Build Service Binary Servers
Binary Servers are hosting all content of build results. They also prepare public repositories anddeliver them to the staging server.
3.2.3.3 External Dependencies
The internal zone has no external dependency. However, the administrator may decide to runthe Open Build Service instance depending on external OBS instances or on external repositories.In that case the internal zone is downloading content from the resources specied by theadministrator.
66 Internal Zone
3.2.4 Worker Zone
The Open Build Service workers are running in an own isolated network. They access only sourceand binary servers from internal zone.
3.2.5 Signing Server
The signing server is supposed to be the most isolated service. It is supposed to be stateless afterinitial setup. Avoid to enable any remote access.
67 Worker Zone
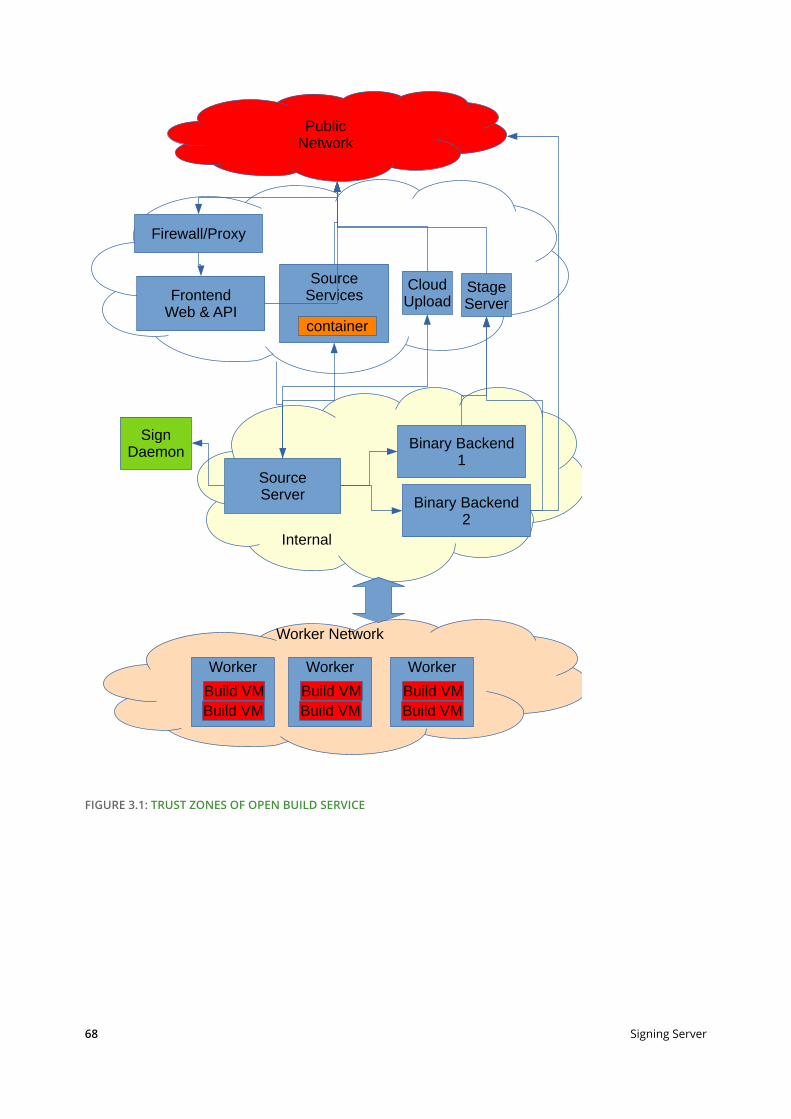
Internal
Worker Network
PublicNetwork
Firewall/Proxy
FrontendWeb & API
SourceServer
Binary Backend1
SourceServices
CloudUpload
Worker
Build VMBuild VM
Binary Backend2
Worker
Build VMBuild VM
Worker
Build VMBuild VM
SignDaemon
StageServer
container
FIGURE 3.1: TRUST ZONES OF OPEN BUILD SERVICE
68 Signing Server
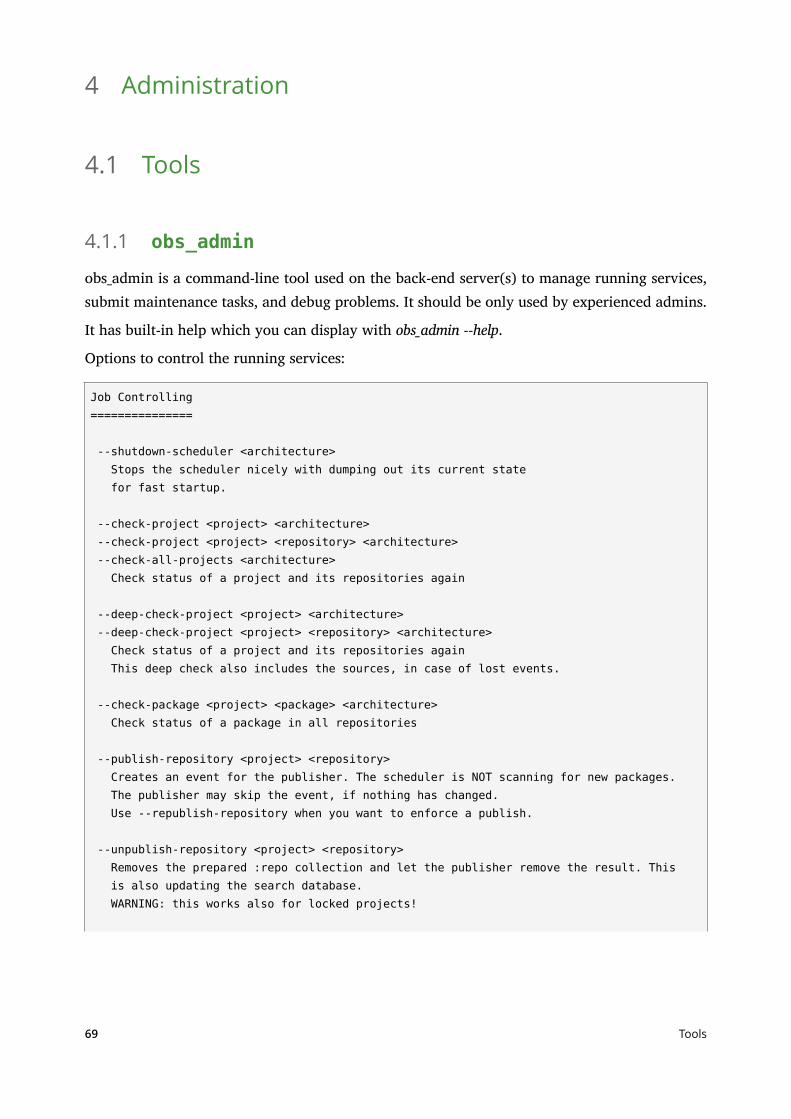
4 Administration
4.1 Tools
4.1.1 obs_admin
obs_admin is a command-line tool used on the back-end server(s) to manage running services,submit maintenance tasks, and debug problems. It should be only used by experienced admins.
It has built-in help which you can display with obs_admin --help.
Options to control the running services:
Job Controlling===============
--shutdown-scheduler <architecture> Stops the scheduler nicely with dumping out its current state for fast startup.
--check-project <project> <architecture> --check-project <project> <repository> <architecture> --check-all-projects <architecture> Check status of a project and its repositories again
--deep-check-project <project> <architecture> --deep-check-project <project> <repository> <architecture> Check status of a project and its repositories again This deep check also includes the sources, in case of lost events.
--check-package <project> <package> <architecture> Check status of a package in all repositories
--publish-repository <project> <repository> Creates an event for the publisher. The scheduler is NOT scanning for new packages. The publisher may skip the event, if nothing has changed. Use --republish-repository when you want to enforce a publish.
--unpublish-repository <project> <repository> Removes the prepared :repo collection and let the publisher remove the result. This is also updating the search database. WARNING: this works also for locked projects!
69 Tools

--prefer-publish-event <name> prefers a publish event to be next. <name> is the file name inside of the publish event directory.
--republish-repository <project> <repository> enforce to publish a repository
--rebuild-full-tree <project> <repository> <arch> rebuild the content of :full/ directory
--clone-repository <source project> <source repository> <destination repository> --clone-repository <source project> <source repository> <destination project> <destination repository> Clone an existing repo into another existing repository. Usefull for creating snapshots.
--rescan-repository <project> <repository> <architecture> Asks the scheduler to scan a repository for new packages and add them to the cache file.
--force-check-project <project> <repository> <architecture> Enforces the check of an repository, even when it is currently blocked due to amount of calculating time.
--create-patchinfo-from-updateinfo creates a patchinfo submission based on an updateinfo information.
Options for maintenance are:
Maintenance Tasks=================
Note: the --update-*-db calls are usually only needed when corrupt data has been created, for example after a file system corruption.
--update-source-db [<project>] Update the index for all source files.
--update-request-db Updates the index for all requests.
--remove-old-sources <days> <y> (--debug) WARNING: this is an experimental feature atm. It may trash your data, but you have anyway a backup, right? remove sources older than <x> days, but keep <y> number of revisions
70 obs_admin
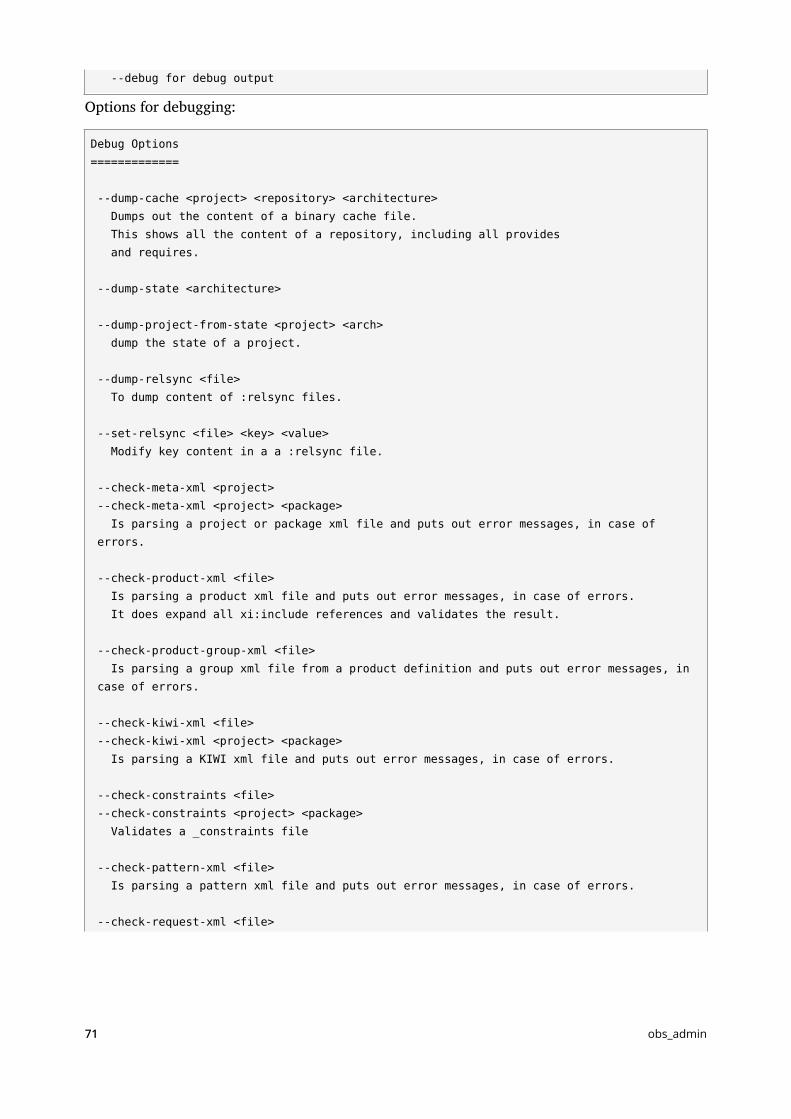
--debug for debug output
Options for debugging:
Debug Options=============
--dump-cache <project> <repository> <architecture> Dumps out the content of a binary cache file. This shows all the content of a repository, including all provides and requires.
--dump-state <architecture>
--dump-project-from-state <project> <arch> dump the state of a project.
--dump-relsync <file> To dump content of :relsync files.
--set-relsync <file> <key> <value> Modify key content in a a :relsync file.
--check-meta-xml <project> --check-meta-xml <project> <package> Is parsing a project or package xml file and puts out error messages, in case of errors.
--check-product-xml <file> Is parsing a product xml file and puts out error messages, in case of errors. It does expand all xi:include references and validates the result.
--check-product-group-xml <file> Is parsing a group xml file from a product definition and puts out error messages, in case of errors.
--check-kiwi-xml <file> --check-kiwi-xml <project> <package> Is parsing a KIWI xml file and puts out error messages, in case of errors.
--check-constraints <file> --check-constraints <project> <package> Validates a _constraints file
--check-pattern-xml <file> Is parsing a pattern xml file and puts out error messages, in case of errors.
--check-request-xml <file>
71 obs_admin
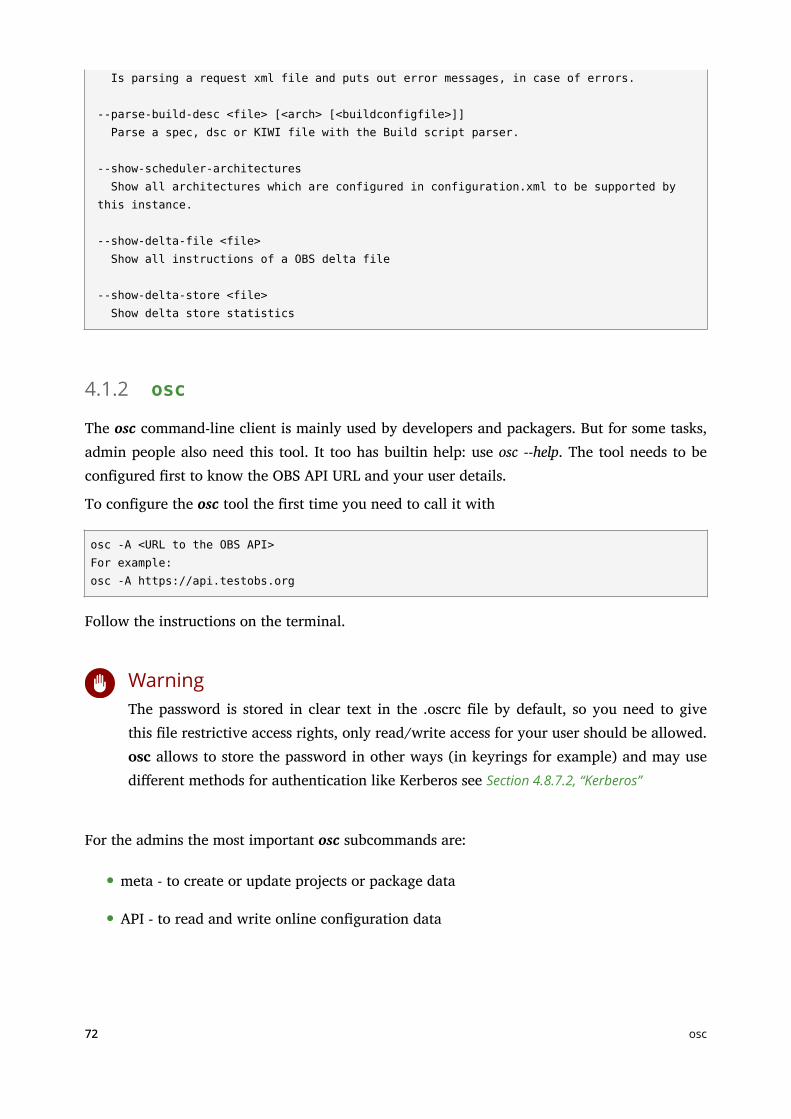
Is parsing a request xml file and puts out error messages, in case of errors.
--parse-build-desc <file> [<arch> [<buildconfigfile>]] Parse a spec, dsc or KIWI file with the Build script parser.
--show-scheduler-architectures Show all architectures which are configured in configuration.xml to be supported by this instance.
--show-delta-file <file> Show all instructions of a OBS delta file
--show-delta-store <file> Show delta store statistics
4.1.2 osc
The osc command-line client is mainly used by developers and packagers. But for some tasks,admin people also need this tool. It too has builtin help: use osc --help. The tool needs to becongured rst to know the OBS API URL and your user details.
To congure the osc tool the rst time you need to call it with
osc -A <URL to the OBS API>For example:osc -A https://api.testobs.org
Follow the instructions on the terminal.
WarningThe password is stored in clear text in the .oscrc le by default, so you need to givethis le restrictive access rights, only read/write access for your user should be allowed.osc allows to store the password in other ways (in keyrings for example) and may usedierent methods for authentication like Kerberos see Section 4.8.7.2, “Kerberos”
For the admins the most important osc subcommands are:
meta - to create or update projects or package data
API - to read and write online conguration data
72 osc
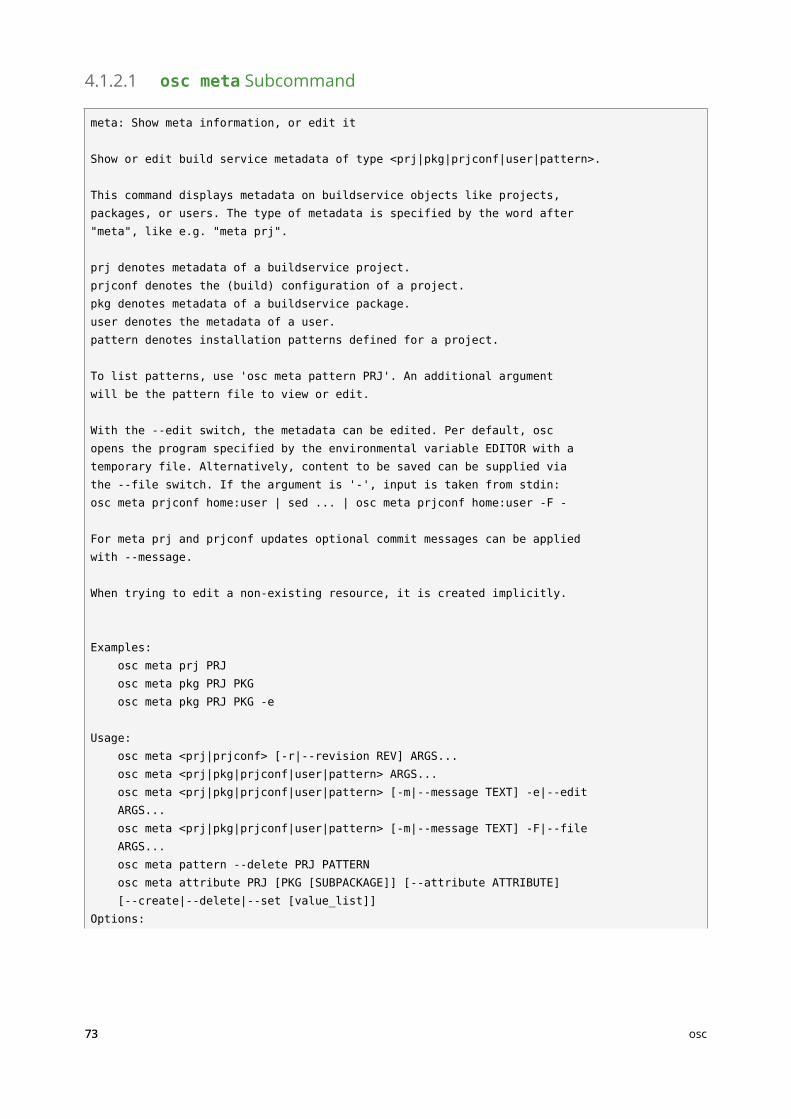
4.1.2.1 osc meta Subcommand
meta: Show meta information, or edit it
Show or edit build service metadata of type <prj|pkg|prjconf|user|pattern>.
This command displays metadata on buildservice objects like projects,packages, or users. The type of metadata is specified by the word after"meta", like e.g. "meta prj".
prj denotes metadata of a buildservice project.prjconf denotes the (build) configuration of a project.pkg denotes metadata of a buildservice package.user denotes the metadata of a user.pattern denotes installation patterns defined for a project.
To list patterns, use 'osc meta pattern PRJ'. An additional argumentwill be the pattern file to view or edit.
With the --edit switch, the metadata can be edited. Per default, oscopens the program specified by the environmental variable EDITOR with atemporary file. Alternatively, content to be saved can be supplied viathe --file switch. If the argument is '-', input is taken from stdin:osc meta prjconf home:user | sed ... | osc meta prjconf home:user -F -
For meta prj and prjconf updates optional commit messages can be appliedwith --message.
When trying to edit a non-existing resource, it is created implicitly.
Examples: osc meta prj PRJ osc meta pkg PRJ PKG osc meta pkg PRJ PKG -e
Usage: osc meta <prj|prjconf> [-r|--revision REV] ARGS... osc meta <prj|pkg|prjconf|user|pattern> ARGS... osc meta <prj|pkg|prjconf|user|pattern> [-m|--message TEXT] -e|--edit ARGS... osc meta <prj|pkg|prjconf|user|pattern> [-m|--message TEXT] -F|--file ARGS... osc meta pattern --delete PRJ PATTERN osc meta attribute PRJ [PKG [SUBPACKAGE]] [--attribute ATTRIBUTE] [--create|--delete|--set [value_list]]Options:
73 osc
-h, --help show this help message and exit --delete delete a pattern or attribute -s ATTRIBUTE_VALUES, --set=ATTRIBUTE_VALUES set attribute values -R, --remove-linking-repositories Try to remove also all repositories building against remove ones. -c, --create create attribute without values -e, --edit edit metadata -m TEXT, --message=TEXT specify log message TEXT. For prj and prjconf meta only -r REV, --revision=REV checkout given revision instead of head revision. For prj and prjconf meta only -F FILE, --file=FILE read metadata from FILE, instead of opening an editor. '-' denotes standard input. -f, --force force the save operation, allows one to ignores some errors like depending repositories. For prj meta only. --attribute-project include project values, if missing in packages --attribute-defaults include defined attribute defaults -a ATTRIBUTE, --attribute=ATTRIBUTE affect only a given attribute
4.1.2.2 osc api Subcommand
api: Issue an arbitrary request to the API
Useful for testing.
URL can be specified either partially (only the path component), or fullywith URL scheme and hostname ('http://...').
Note the global -A and -H options (see osc help).
Examples: osc api /source/home:user osc api -X PUT -T /etc/fstab source/home:user/test5/myfstab osc api -e /configuration
74 osc
Usage: osc api URL
Options: -h, --help show this help message and exit -a NAME STRING, --add-header=NAME STRING add the specified header to the request -T FILE, -f FILE, --file=FILE specify filename to upload, uses PUT mode by default -d STRING, --data=STRING specify string data for e.g. POST -e, --edit GET, edit and PUT the location -X HTTP_METHOD, -m HTTP_METHOD, --method=HTTP_METHOD specify HTTP method to use (GET|PUT|DELETE|POST)
The online API documentation is available at https://build.opensuse.org/apidocs
Some examples for admin stu:
# Read the global configuration file osc api /configuration# Update the global configuration osc api /configuration -T /tmp/configuration.xml
# Read the distributions list osc api /distributions# Udate the distributions list osc api /distributions -T /tmp/distributions.xml
# retrieve statistics osc api /statistics/latest_added
4.2 Managing Build Targets
4.2.1 Interconnect
Using another Open Build Service as source for build targets is the easiest way to start. Theadvantage is, that you save local resources and you do not need to build everything from scratch.The disadvantage is that you depend on the remote instance, if it has a downtime your instancecannot do any builds for these targets, if the remote admins decide to remove some targets youcannot use them anymore.
75 Managing Build Targets
The easiest way to interconnect with some of the public OBS instances is to use the Web UI. Youneed to log in with an administrator account of your instance to do this. On the start page of anadministrator account you will nd a Conguration link. On the Conguration page you ndan Interconnect tab on the top, use this and select the public side you want.
If you want to connect to a not listed instance, you can simple create a remote project usingthe osc meta prj command. A remote project diers from a local project as it has a remoteurltag (see Section 2.4.2, “Project Metadata”).
Example:
<project name="openSUSE.org"> <title>openSUSE.org Project Link</title> <description>This project refers to projects hosted on the openSUSE Build Service</description> <remoteurl>https://api.opensuse.org/public</remoteurl></project>
Sending this via osc to the server:
osc meta prj -m "add openSUSE.org remote" -F /tmp/openSUSE.org.prj
4.2.2 Importing Distributions
FIXME: describe how to do it using DoD
4.3 Source ServicesSource Services are tools to validate, generate or modify sources in a trustable way. They aredesigned as smallest possible tools and can be combined following the powerful idea of theclassic UNIX design.
Design goals of source services were:
server side generated les must be easy to identify and must not be modiable by theuser. This way other users can trust them to be generated in the documented way withoutmodications.
generated les must never create merge conicts
generated les must be a separate commit to the user change
76 Importing Distributions
services must be runnable at any time without user commit
services must be runnable on server and client side in the same way
services must be designed in a safe way. A source checkout and service run must neverharm the system of a user.
services shall be designed in a way to avoid unnecessary commits. This means there shallbe no time-dependent changes. In case the package already contains the same le, thenewly generated le must be dropped.
local services can be added and used by everybody.
server side services must be installed by the admin of the OBS server.
services can be dened per package or project wide.
4.3.1 Using Services for Validation
Source Services may be used to validate sources. This can happen per package, which is usefulwhen the packager wants to validate that downloaded sources are really from the originalmaintainer. Or validation can happen for an entire project to apply general policies. Theseservices cannot get skipped in any package
Validation can happen by validating les (for example using the verify_file orsource_validator service. These services just fail in the error case which leads to the buildstate "broken". Or validation can happen by redoing a certain action and store the result as newle as download_files is doing. In this case the newly generated le will be used instead ofthe committed one during build.
4.3.2 Different Modes When Using Services
Each service can be used in a special mode dening when it should run and how to use theresult. This can be done per package or globally for an entire project.
4.3.2.1 Default Mode
The default mode of a service is to always run after each commit on the server side and locallybefore every local build.
77 Using Services for Validation
4.3.2.2 trylocal Mode
The trylocal mode is running the service locally when using current osc versions. The result getscommitted as standard les and not named with _service: prex. Additionally the service runson the server by default, but usually the service should detect that the result is the same andskip the generated les. If they dier (for example, because the Web UI or API was used), theyare generated and added on the server.
4.3.2.3 localonly Mode
The localonly mode is running the service locally when using current osc versions. The result getscommitted as standard les and not named with _service: prex. The service is never runningon the server side. It is also not possible to trigger it manually.
4.3.2.4 serveronly Mode
The serviceonly mode is running the service on the server only. This can be useful, when theservice is not available or can not work on developer workstations.
4.3.2.5 buildtime Mode
The service is running inside of the build job, for local and server side builds. A side eect isthat the service package is becoming a build dependency and must be available. Every user canprovide and use a service this way in their projects. The generated sources are not part of thesource repository, but part of the generated source packages. Network access is not be availablewhen the workers are running in a secure mode.
4.3.2.6 disabled Mode
The disabled mode is neither running the service locally or on the server side. It can be used totemporarily disable the service but keeping the denition as part of the service denition. Orit can be used to dene the way how to generate the sources and doing so by manually callingosc service runall The result will get committed as standard les again.
78 Different Modes When Using Services
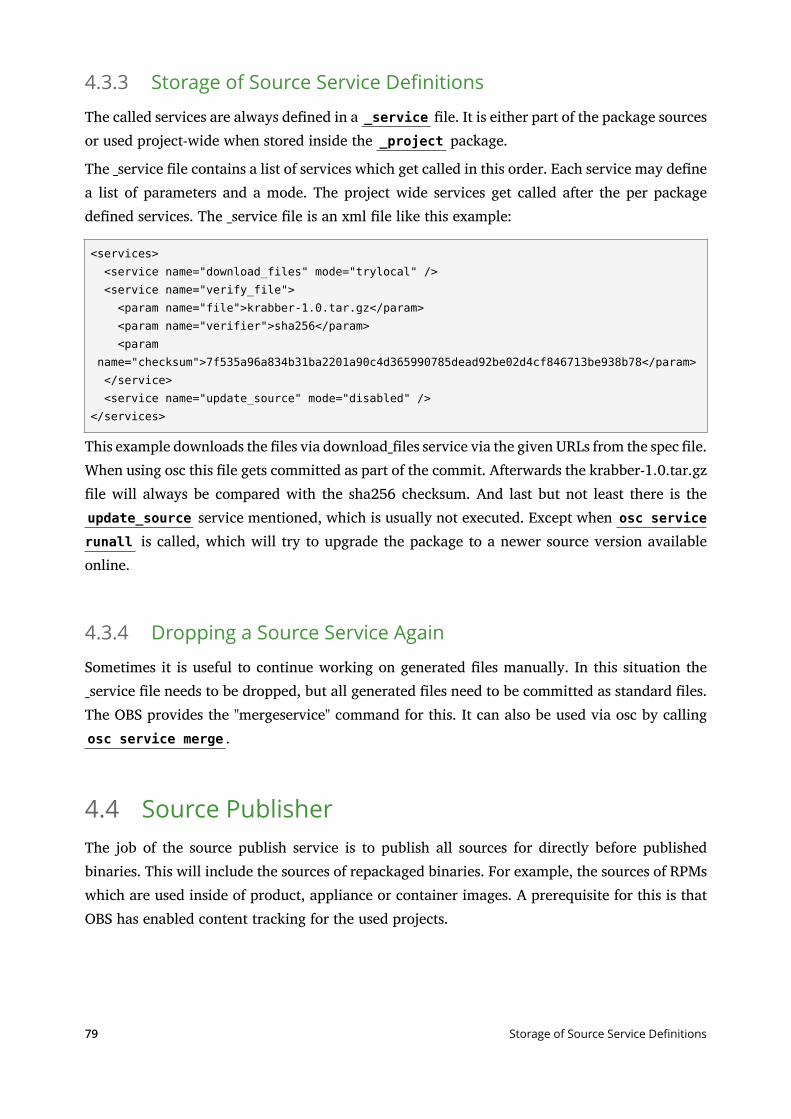
4.3.3 Storage of Source Service Definitions
The called services are always dened in a _service le. It is either part of the package sourcesor used project-wide when stored inside the _project package.
The _service le contains a list of services which get called in this order. Each service may denea list of parameters and a mode. The project wide services get called after the per packagedened services. The _service le is an xml le like this example:
<services> <service name="download_files" mode="trylocal" /> <service name="verify_file"> <param name="file">krabber-1.0.tar.gz</param> <param name="verifier">sha256</param> <param name="checksum">7f535a96a834b31ba2201a90c4d365990785dead92be02d4cf846713be938b78</param> </service> <service name="update_source" mode="disabled" /></services>
This example downloads the les via download_les service via the given URLs from the spec le.When using osc this le gets committed as part of the commit. Afterwards the krabber-1.0.tar.gzle will always be compared with the sha256 checksum. And last but not least there is theupdate_source service mentioned, which is usually not executed. Except when osc servicerunall is called, which will try to upgrade the package to a newer source version availableonline.
4.3.4 Dropping a Source Service Again
Sometimes it is useful to continue working on generated les manually. In this situation the_service le needs to be dropped, but all generated les need to be committed as standard les.The OBS provides the "mergeservice" command for this. It can also be used via osc by callingosc service merge .
4.4 Source PublisherThe job of the source publish service is to publish all sources for directly before publishedbinaries. This will include the sources of repackaged binaries. For example, the sources of RPMswhich are used inside of product, appliance or container images. A prerequisite for this is thatOBS has enabled content tracking for the used projects.
79 Storage of Source Service Definitions
4.4.1 Configuring Source Publisher
The source publishing can be congured via the le /usr/lib/obs/server/BSCong.pm, where itcan be enabled globally or just for some projects. It is possible to use regular expressions here.
Publishing can be enabled by dening the rsync module to push the content:
our $sourcepublish_sync = 'rsync://your_rsync_server/rsync_module';
By default every project get published, but it is possible to dene a whitelist via:
our $sourcepublish_filter = [ "openSUSE:.*", "SUSE:.*" ];
4.4.2 Considerations
The source publishing service is publishing the sources as they are hosted in Open Build Service.This means these are the unprocessed sources and the content is not identical to the content ofsource RPMs for example. Instead these are the sources which are the base for source RPMs.
As a consequence hints like NoSource: tags in spec les are ignored. The only way to disablepublishing for the user is to disable access or sourceaccess via the ags.
The lesystem structure is $project/$package/$srcmd5/. A inside of binary builds can be usedto nd the right sources.
Open Build Service will care for de-duplication on the rsync server. This must get implementedthere.
4.5 Dispatch Priorities
The dispatcher takes a job from the scheduler and assign it to a free worker. It tries toshare the available build time fair between all the project repositories with pending jobs. Toachieve this the dispatcher calculates a load per project repository of the used build time(similar to the system load in Unix operating systems). The dispatcher assigned jobs to buildclients from the repository with the lowest load (thereby increasing its load). It is possibleto tweak this mechanism via dispatching priorities assigned to the repositories via the /build/_dispatchpriosAPI call or via the dispatch_adjust array in the BSCong.pmSection 2.1.2.2,
“BSConfig.pm” conguration le.
80 Configuring Source Publisher
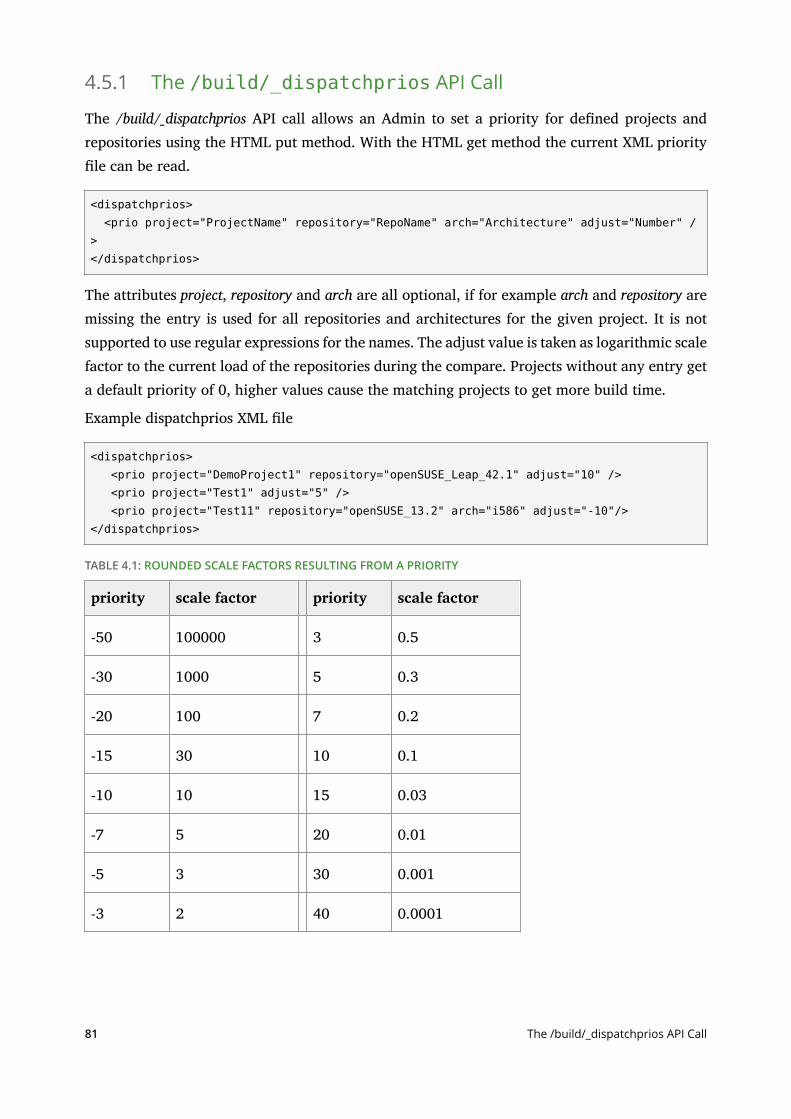
4.5.1 The /build/_dispatchprios API Call
The /build/_dispatchprios API call allows an Admin to set a priority for dened projects andrepositories using the HTML put method. With the HTML get method the current XML priorityle can be read.
<dispatchprios> <prio project="ProjectName" repository="RepoName" arch="Architecture" adjust="Number" /></dispatchprios>
The attributes project, repository and arch are all optional, if for example arch and repository aremissing the entry is used for all repositories and architectures for the given project. It is notsupported to use regular expressions for the names. The adjust value is taken as logarithmic scalefactor to the current load of the repositories during the compare. Projects without any entry geta default priority of 0, higher values cause the matching projects to get more build time.
Example dispatchprios XML le
<dispatchprios> <prio project="DemoProject1" repository="openSUSE_Leap_42.1" adjust="10" /> <prio project="Test1" adjust="5" /> <prio project="Test11" repository="openSUSE_13.2" arch="i586" adjust="-10"/></dispatchprios>
TABLE 4.1: ROUNDED SCALE FACTORS RESULTING FROM A PRIORITY
priority scale factor priority scale factor
-50 100000 3 0.5
-30 1000 5 0.3
-20 100 7 0.2
-15 30 10 0.1
-10 10 15 0.03
-7 5 20 0.01
-5 3 30 0.001
-3 2 40 0.0001
81 The /build/_dispatchprios API Call
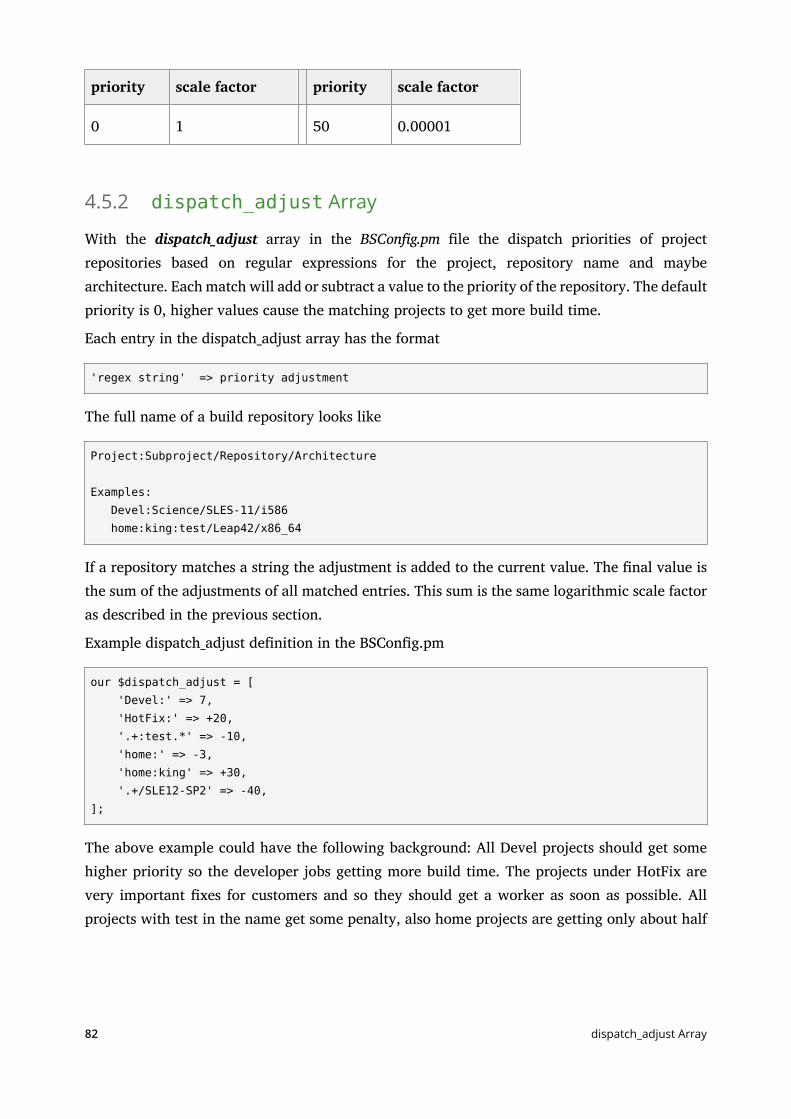
priority scale factor priority scale factor
0 1 50 0.00001
4.5.2 dispatch_adjust Array
With the dispatch_adjust array in the BSCong.pm le the dispatch priorities of projectrepositories based on regular expressions for the project, repository name and maybearchitecture. Each match will add or subtract a value to the priority of the repository. The defaultpriority is 0, higher values cause the matching projects to get more build time.
Each entry in the dispatch_adjust array has the format
'regex string' => priority adjustment
The full name of a build repository looks like
Project:Subproject/Repository/Architecture
Examples: Devel:Science/SLES-11/i586 home:king:test/Leap42/x86_64
If a repository matches a string the adjustment is added to the current value. The nal value isthe sum of the adjustments of all matched entries. This sum is the same logarithmic scale factoras described in the previous section.
Example dispatch_adjust denition in the BSCong.pm
our $dispatch_adjust = [ 'Devel:' => 7, 'HotFix:' => +20, '.+:test.*' => -10, 'home:' => -3, 'home:king' => +30, '.+/SLE12-SP2' => -40,];
The above example could have the following background: All Devel projects should get somehigher priority so the developer jobs getting more build time. The projects under HotFix arevery important xes for customers and so they should get a worker as soon as possible. Allprojects with test in the name get some penalty, also home projects are getting only about half
82 dispatch_adjust Array
of the build time as a normal project, with the exception of the home project from king, theuser account of the boss. The SLES12-SP2 repository is not in real use yet, but if here is nothingelse to do, build for it as well.
ImportantThe dispatcher calculates the values form the 'dispatch_adjust' array rst, if the sameproject and repository also has an entry in the dispatchprios XML le, the XML le entrywill overwrite the calculated priority. The best practice is to only use one of the methods.
4.6 Publisher Hooks
The job of the publisher service is to publish the built packages and/or images by creatingrepositories that are made available through a web server.
It can be congured to use custom scripts to copy the build results to dierent servers or doanything with them that comes to mind. These scripts are called publisher hooks.
4.6.1 Configuring Publisher Hooks
Hooks are congured via the conguration le /usr/lib/obs/server/BSCong.pm, where one scriptper project is linked to the repository that should be run if the project/repository combinationis published. It is possible to use regular expressions here.
The script is called by the user obsrun with the following parameters:
1. information about the project and its repository (for example, training/SLE11-SP1 )
2. path to published repository (for example, /srv/obs/repos/training/SLE11-SP1 )
3. changed packages (for example, x86 64/test.rpm x86 64/utils.rpm )
The hooks are congured by adding a hash reference named $publishedhook to the BSCong.pmconguration le. The key contains the project, and the value references the accompanyingscript. If the value is written as an array reference it is possible to call the hook with self-denedparameters.
83 Publisher Hooks
The publisher will add the 3 listed parameters at the end, after the self-dened parameters (in/usr/lib/obs/server/BSConfig.pm ):
our $publishedhook = { "Product/SLES12" => "/usr/local/bin/script2run_sles12", "Product/SLES11-SP3" => "/usr/local/bin/script2run_sles11", "Product/SLES11-SP4" => "/usr/local/bin/script2run_sles11",};
Regular expressions or substrings can be used to dene a script for more than one repositoryin one project. The use of regular expressions has to be activated by dening $publishedhookuse regex = 1; as follows (in /usr/lib/obs/server/BSConfig.pm ):
our $publishedhook_use_regex = 1;our $publishedhook = { "Product\/SLES12" => "/usr/local/bin/script2run_sles12", "Product\/SLES11.*" => "/usr/local/bin/script2run_sles11",};
With self dened parameters:
our $publishedhook_use_regex = 1;our $publishedhook = { "Product\/SLES11.*" => ["/usr/local/bin/script2run", "sles11", "/srv/www/public_mirror"],};
The conguration is read by the publisher at startup only, so it has to be restarted afterconguration changes have been made. The hook script’s output is not logged by the publisherand should be written to a log le by the script itself. In case of a broken script,this is logged inthe publisher’s log le (/srv/obs/log/publisher.log by default):
Mon Mar 7 14:34:17 2016 publishing Product/SLES12 fetched 0 patterns running createrepo calling published hook /usr/local/bin/script2run_sles12 /usr/local/bin/script2run_sles12 failed: 65280 syncing database (6 ops)
Interactive scripts are not working and will fail immediately.
If you need to do a lot of work in the hook script and do not want to block the publisher all thetime, you should consider using a separate daemon that does all the work and just gets triggeredby the congured hook script.
84 Configuring Publisher Hooks
The scripts are called without a timeout.
4.6.2 Example Publisher Scripts
4.6.2.1 Simple Publisher Hook
The following example script ignores the packages that have changed and copies all RPMs fromthe repository directory to a target directory:
#!/bin/bashOBSHOME="/srv/obs"SRC_REPO_DIR="$OBSHOME/repos"LOGFILE="$OBSHOME/log/reposync.log"$DST_REPO_DIR="/srv/repo-mirror"# Global substitution! To handle strings like Foo:Bar:testing - two#+double-colons!PRJ_PATH=${1//:/:\/}PATH_TO_REPO=$2rsync -a --log-file=$LOGFILE $PATH_TO_REPO/ $DST_REPO_DIR/$PRJ_PATH/
For testing purposes, it can be invoked as follows:
$ sudo -u obsrun /usr/local/bin/publish-hook.sh Product/SLES11-SP1 \ /srv/obs/repos/Product/SLE11-SP1
4.6.2.2 Advanced Publisher Hook
The following example script reads the destination path from a parameter that is conguredwith the hook script:
#!/bin/bashLOGFILE="/srv/obs/log/reposync.log"DST_REPO_DIR=$1# Global substion! To handle strings like Foo:Bar:testing - two#+double-colons!PRJ_PATH=${2//:/:\/}PATH_TO_REPO=$3mkdir -p $DST_REPO_DIR/$PRJ_PATHrsync -a --log-file=$LOGFILE $PATH_TO_REPO/ $DST_REPO_DIR/$PRJ_PATH/
85 Example Publisher Scripts
For testing purposes, it can be invoked as follows:
$ sudo -u obsrun /usr/local/bin/publish-hook.sh \ /srv/www/public_mirror/Product/SLES11-SP1 \ /srv/obs/repos/Product/SLE11SP1
The following example script only copies packages that have changed, but does not deletepackages that have been removed:
#!/bin/bash
DST_REPO_DIR=$1PRJ_PATH=${2//:/:\/}PATH_TO_REPO=$3shift 3
mkdir -p $DST_REPO_DIR/$PRJ_PATH
while [ $# -gt 0 ]do dir=(${1//\// }) if [ ! -d "$DST_REPO_DIR/$PRJ_PATH/$dir" ]; then mkdir -p $DST_REPO_DIR/$PRJ_PATH/$dir fi cp $PATH_TO_REPO/$1 $DST_REPO_DIR/$PRJ_PATH/$1 shiftdone
createrepo $DST_REPO_DIR/$PRJ_PATH/.
For testing purposes, it can be invoked as follows:
$ sudo -o obsrun /usr/local/bin/publish-hook.sh /srv/www/public_mirror \ Product/SLES11-SP1 /srv/obs/repos/Product/SLE11-SP1 \ src/icinga-1.13.3-1.3.src.rpm x86_64/icinga-1.13.3-1.3.x86_64.rpm \ x86_64/icinga-devel-1.13.3-1.3.x86_64.rpm
4.7 Unpublisher HooksThe job of the publisher service is to publish the built packages and/or images by creatingrepositories that are made available through a web server.
The OBS Publisher can be congured to use custom scripts to be called whenever alreadypublished packages get removed. These scripts are called unpublisher hooks. Unpublisherhooks are run before the publisher hooks.
86 Unpublisher Hooks
4.7.1 Configuring Unpublisher Hooks
Hooks are congured via the conguration le /usr/lib/obs/server/BSCong.pm, where one scriptper project is linked to the repository that should be run if the project/repository combinationis removed. It is possible to use regular expressions here.
The script is called by the user obsrun with the following parameters:
1. information about the project and its repository (for example, training/SLE11-SP1)
2. repository path (for example, /srv/obs/repos/training/SLE11-SP1 )
3. removed packages (for example, x86 64/test.rpm x86 64/utils.rpm )
The hooks are congured by adding a hash reference named $unpublishedhook to the BSCong.pmconguration le. The key contains the project and the value references the accompanyingscript. If the value is written as an array reference, it is possible to call the hook with customparameters.
The publisher adds the three listed parameters at the end, directly after the custom parameters(in /usr/lib/obs/server/BSConfig.pm ):
our $unpublishedhook = { "Product/SLES12" => "/usr/local/bin/script2run_sles12", "Product/SLES11-SP3" => "/usr/local/bin/script2run_sles11", "Product/SLES11-SP4" => "/usr/local/bin/script2run_sles11",};
Regular expressions or substrings can be used to dene a script for more than one repository inone project. The use of regular expressions needs to be activated by dening $unpublishedhookuse regex = 1; (in /usr/lib/obs/server/BSConfig.pm ):
our $unpublishedhook_use_regex = 1;our $unpublishedhook = { "Product\/SLES12" => "/usr/local/bin/script2run_sles12", "Product\/SLES11.*" => "/usr/local/bin/script2run_sles11",};
With custom parameters:
our $unpublishedhook_use_regex = 1;our $unpublishedhook = { "Product\/SLES11.*" => [ "/usr/local/bin/script2run", "sles11", "/srv/www/public_mirror" ],};
87 Configuring Unpublisher Hooks
The conguration is read by the publisher at startup only, so it has to be restarted afterconguration changes have been made. The hook script’s output is not logged by the publisherand should be written to a log le by the script itself. In case of a broken script, this is loggedin the publisher’s log le (/srv/obs/log/publisher.log by default):
Mon Mar 7 14:34:17 2016 publishing Product/SLES12 fetched 0 patterns running createrepo calling unpublished hook /usr/local/bin/script2run_sles12 /usr/local/bin/script2run_sles12 failed: 65280 syncing database (6 ops)
Interactive scripts are not working and will fail immediately.
If you need to do a lot of work in the hook script and do not want to block the publisher allthe time, consider using a separate daemon that does all the work and just gets triggered bythe congured hook script.
The scripts are called without a timeout.
NoteReminder: If unpublish hooks and publish hooks are dened, the unpublish hook runs beforethe publish hook.
4.7.2 Example Unpublisher Scripts
4.7.2.1 Simple Unpublisher Hook
The following example script deletes all packages from the target directory that have beenremoved from the repository.
#!/bin/bashOBSHOME="/srv/obs"LOGFILE="$OBSHOME/log/reposync.log"DST_REPO_DIR="/srv/repo-mirror"# Global substitution! To handle strings like Foo:Bar:testing - two#+double-colons!PRJ_PATH=${1//:/:\/}PATH_TO_REPO=$2
shift 2
88 Example Unpublisher Scripts
while [ $# -gt 0 ]do rm -v $DST_REPO_DIR/$PRJ_PATH/$1 >>$LOGFILE 2>&1 shiftdone
For testing purposes, it can be invoked as follows:
$ sudo -u obsrun /usr/local/bin/unpublish-hook.sh \ Product/SLES11-SP1 \ /srv/obs/repos/Product/SLE11-SP1 \ src/icinga-1.13.3-1.3.src.rpm \ x86_64/icinga-1.13.3-1.3.x86_64.rpm \ x86_64/icinga-devel-1.13.3-1.3.x86_64.rpm
4.7.2.2 Advanced Unpublisher Hook
The following example script reads the destination path from a parameter that is conguredvia the hook script:
#!/bin/bashOBSHOME="/srv/obs"LOGFILE="$OBSHOME/log/reposync.log"DST_REPO_DIR=$1# Global substitution! To handle strings like Foo:Bar:testing - two#+double-colons!PRJ_PATH=${1//:/:\/}PATH_TO_REPO=$2
shift 3
while [ $# -gt 0 ]do rm -v $DST_REPO_DIR/$PRJ_PATH/$1 >>$LOGFILE 2>&1 shiftdone
For testing purposes, it can be invoked as follows:
$ sudo -u obsrun /usr/local/bin/unpublish-hook.sh \ /srv/www/public_mirror/Product/SLES11-SP1 \ /srv/obs/repos/Product/SLE11SP1 \ src/icinga-1.13.3-1.3.src.rpm \ x86_64/icinga-1.13.3-1.3.x86_64.rpm \ x86_64/icinga-devel-1.13.3-1.3.x86_64.rpm
89 Example Unpublisher Scripts
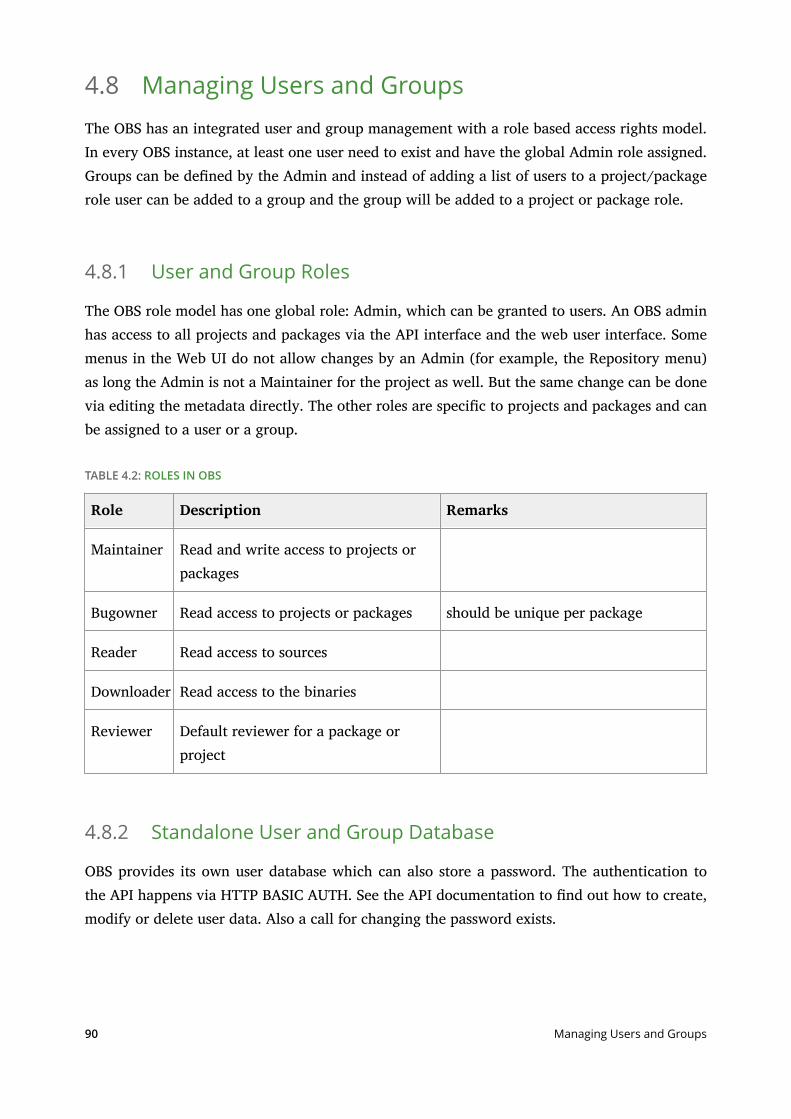
4.8 Managing Users and GroupsThe OBS has an integrated user and group management with a role based access rights model.In every OBS instance, at least one user need to exist and have the global Admin role assigned.Groups can be dened by the Admin and instead of adding a list of users to a project/packagerole user can be added to a group and the group will be added to a project or package role.
4.8.1 User and Group Roles
The OBS role model has one global role: Admin, which can be granted to users. An OBS adminhas access to all projects and packages via the API interface and the web user interface. Somemenus in the Web UI do not allow changes by an Admin (for example, the Repository menu)as long the Admin is not a Maintainer for the project as well. But the same change can be donevia editing the metadata directly. The other roles are specic to projects and packages and canbe assigned to a user or a group.
TABLE 4.2: ROLES IN OBS
Role Description Remarks
Maintainer Read and write access to projects orpackages
Bugowner Read access to projects or packages should be unique per package
Reader Read access to sources
Downloader Read access to the binaries
Reviewer Default reviewer for a package orproject
4.8.2 Standalone User and Group Database
OBS provides its own user database which can also store a password. The authentication tothe API happens via HTTP BASIC AUTH. See the API documentation to nd out how to create,modify or delete user data. Also a call for changing the password exists.
90 Managing Users and Groups
Users can be added by the maintainer or if registration is allowed via the registration menuon the Web UI. It can be congured that a conrmation is needed after registration before theuser may login.
4.8.3 Users and Group Maintainers
Administrators can create groups, add users to them, remove users from them and giveMaintainer rights to users. This way, a maintainer will be able to also add, remove and givemaintainer rights to other users.
osc api -d "<group><title><group-title></title><email><group-email></email><maintainer userid="<user-name>"/><person><person userid="<user_name>"/></person></group>' -X PUT "/group/<group-title>"
4.8.4 Gravatar for Groups
In certain cases, it might be desirable to show a Gravatar for a group, similar to the users. Inorder to show a Gravatar, an email address is needed. Therefore, it is necessary that an adminadds an email address to the group through the API. This can be a achieved by
osc api -X POST "/group/<group-title>?cmd=set_email&email=<groups-email-address>"
4.8.5 Proxy Mode
The proxy mode can be used for specially secured instances, where the OBS web server shall notget connected to the network directly. There are authentication proxy products out there whichdo the authentication and send the user name via an HTTP header to OBS. Originally, this wasdeveloped for IChain - a legacy single login authentication method from Novell. This also hasthe advantage that the user password never reaches OBS.
The proxy mode can also be used for LDAP or Active Directory, but only for authentication.
91 Users and Group Maintainers

ImportantWith enabled proxy mode the OBS trust the username in the http header. Since this wasveried by the Web server and the Web server only forward requests for a veried andauthenticated session, this is safe, as long you make sure that the direct web/API interfaceof the OBS is not reachable from the outside.
With the proxy mode the user still need to be registered in the OBS and all OBS roles and userproperties are managed inside the OBS.
4.8.5.1 OBS Proxy Mode Configuration
Currently the LDAP conguration is in the options.yml le.
TABLE 4.3: OPTIONS FOR PROXY MODE CONFIGURATION
Cong item Description Valuesdefault
Remarks
proxy_auth_mode turn proxy mode on/o
:off :on need to be :o ifldap_mode: is :on
4.8.6 LDAP/Active Directory
NoteThe LDAP support was considered experimental and not ocially supported. It is ociallysupported since 2.8.3 release.
Using LDAP or Active Directory as source for user and optional group information inenvironments which already have such a server has the advantage for the admin people thatthe user related information only need to be maintained in one place. In the following sectionswe are writing LDAP, but this includes Microsoft's Active Directory as well. Only in parts wheredierences exists Active Directory (AD) will be explicit mentioned.
In this mode the OBS contact the LDAP server directly from the OBS API, if the user was foundand provides the correct password the user is added transparently to the OBS user database.The password or password hash is not stored in the OBS database. Because the user database
92 LDAP/Active Directory
password eld is mandatory, a random hash is stored instead. The LDAP interface allows torestrict the access to users which are in a special LDAP group. Optional also groups can bediscovered from the LDAP server. This can be also ltered.
Before anybody can add a user to a package or project with a role, the user need to had loggedin at least one time, since the check for available users is local only. If the LDAP group modeis enabled, LDAP groups are also added transparently, if an existing group on the LDAP serveris added to a project or package.
On bigger installations this mode can result in many search requests to the LDAP server and slowdown access to projects and packages, because on every role check an LDAP search operationwill contact the LDAP server. As alternative method group mirroring was implemented. Thisallows that the internal OBS group database is updated with the group membership informationduring the user authentication. All role test are made local against the OBS database and do notneed additional LDAPoperations.
NoteThe local user group membership in :mirror mode is updated as follows: When theuser logins, the user memberOf attributes are parsed and compared with the global OBSgrouplist, if a group matches, the user is added, if they are no longer a group member,they are removed. since this maybe a costly operation, depending on the group counts,this is only done on a full login. After a full login the user status is cashed for 2 minutes, ifthe user do a login during this time, nothing will be checked or updated. Here is a secondmechanism to update user membership: If somebody adds a new Group in the OBS, themember attributes of the group are parsed and all current users which are in the localdatabase become members.
4.8.6.1 OBS LDAP Configuration
Currently the main OBS LDAP conguration is in the le options.yml . Beside the settings inthat le, the openLDAP conguration le is also evaluated by the Ruby LDAP implementation.This conguration le is usually located at /etc/openldap/ldap.conf . You can set hereadditional TLS/SSL directives like TLS_CACERT , TLS_CACERTDIR and TLS_REQCERT . For moreinformation refer to the openLDAP man page ( man ldap.conf ).
93 LDAP/Active Directory
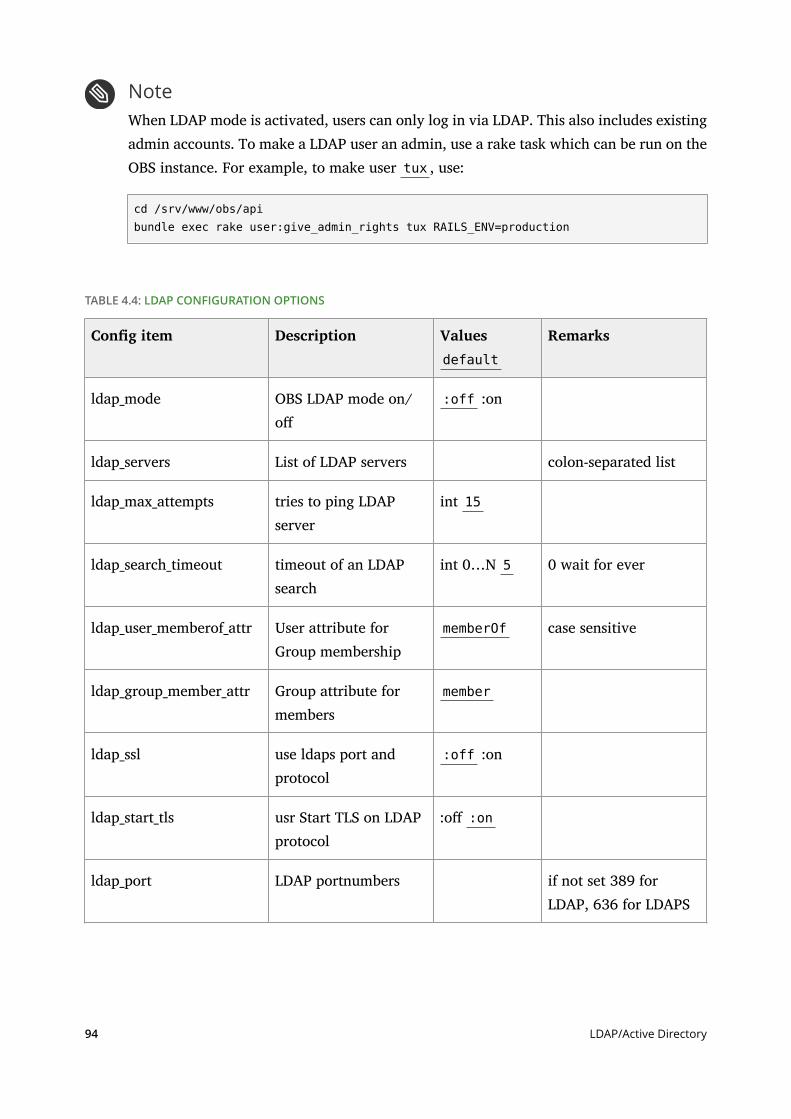
NoteWhen LDAP mode is activated, users can only log in via LDAP. This also includes existingadmin accounts. To make a LDAP user an admin, use a rake task which can be run on theOBS instance. For example, to make user tux , use:
cd /srv/www/obs/apibundle exec rake user:give_admin_rights tux RAILS_ENV=production
TABLE 4.4: LDAP CONFIGURATION OPTIONS
Cong item Description Valuesdefault
Remarks
ldap_mode OBS LDAP mode on/o
:off :on
ldap_servers List of LDAP servers colon-separated list
ldap_max_attempts tries to ping LDAPserver
int 15
ldap_search_timeout timeout of an LDAPsearch
int 0…N 5 0 wait for ever
ldap_user_memberof_attr User attribute forGroup membership
memberOf case sensitive
ldap_group_member_attr Group attribute formembers
member
ldap_ssl use ldaps port andprotocol
:off :on
ldap_start_tls usr Start TLS on LDAPprotocol
:o :on
ldap_port LDAP portnumbers if not set 389 forLDAP, 636 for LDAPS
94 LDAP/Active Directory
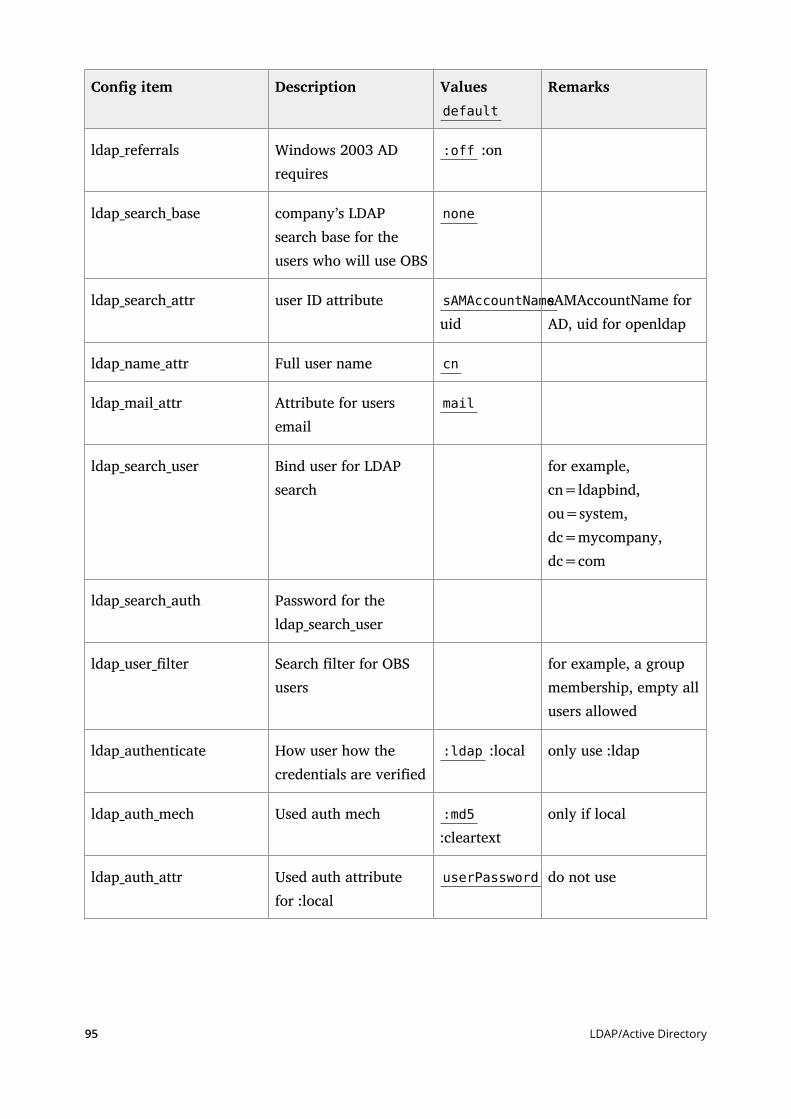
Cong item Description Valuesdefault
Remarks
ldap_referrals Windows 2003 ADrequires
:off :on
ldap_search_base company’s LDAPsearch base for theusers who will use OBS
none
ldap_search_attr user ID attribute sAMAccountName
uidsAMAccountName forAD, uid for openldap
ldap_name_attr Full user name cn
ldap_mail_attr Attribute for usersemail
ldap_search_user Bind user for LDAPsearch
for example,cn=ldapbind,ou=system,dc=mycompany,dc=com
ldap_search_auth Password for theldap_search_user
ldap_user_lter Search lter for OBSusers
for example, a groupmembership, empty allusers allowed
ldap_authenticate How user how thecredentials are veried
:ldap :local only use :ldap
ldap_auth_mech Used auth mech :md5
:cleartextonly if local
ldap_auth_attr Used auth attributefor :local
userPassword do not use
95 LDAP/Active Directory
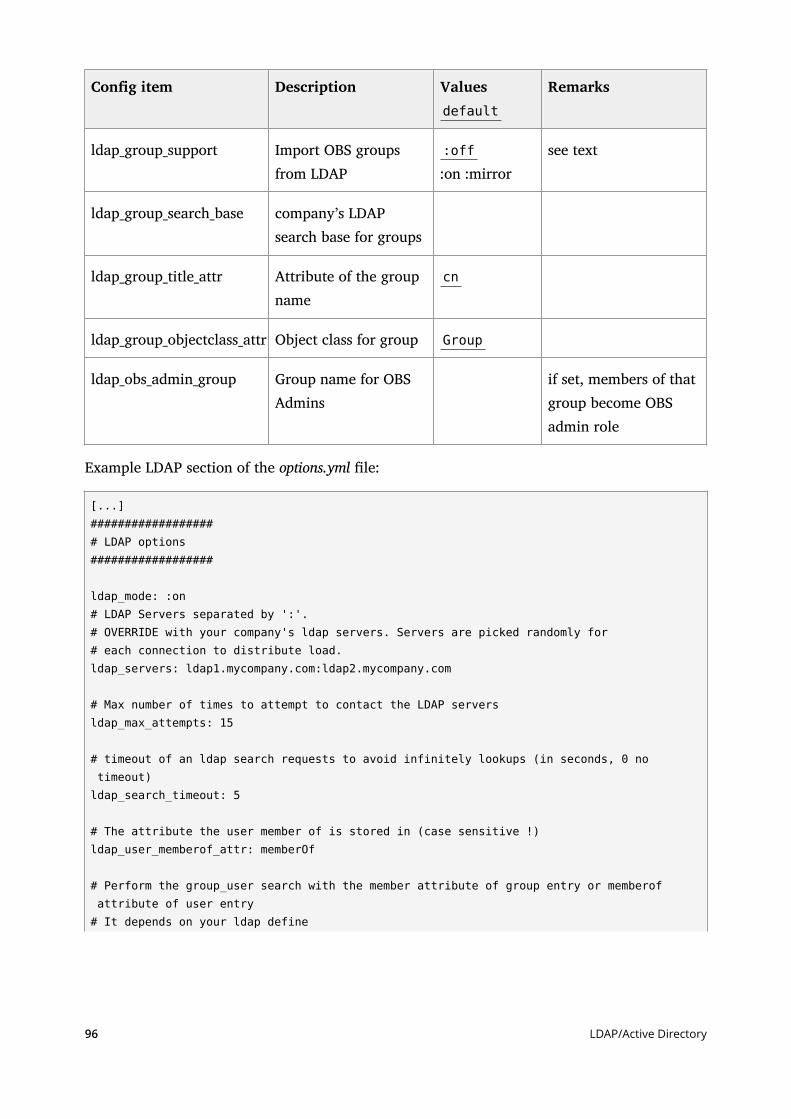
Cong item Description Valuesdefault
Remarks
ldap_group_support Import OBS groupsfrom LDAP
:off
:on :mirrorsee text
ldap_group_search_base company’s LDAPsearch base for groups
ldap_group_title_attr Attribute of the groupname
cn
ldap_group_objectclass_attr Object class for group Group
ldap_obs_admin_group Group name for OBSAdmins
if set, members of thatgroup become OBSadmin role
Example LDAP section of the options.yml le:
[...]################### LDAP options##################
ldap_mode: :on# LDAP Servers separated by ':'.# OVERRIDE with your company's ldap servers. Servers are picked randomly for# each connection to distribute load.ldap_servers: ldap1.mycompany.com:ldap2.mycompany.com
# Max number of times to attempt to contact the LDAP serversldap_max_attempts: 15
# timeout of an ldap search requests to avoid infinitely lookups (in seconds, 0 no timeout)ldap_search_timeout: 5
# The attribute the user member of is stored in (case sensitive !)ldap_user_memberof_attr: memberOf
# Perform the group_user search with the member attribute of group entry or memberof attribute of user entry# It depends on your ldap define
96 LDAP/Active Directory
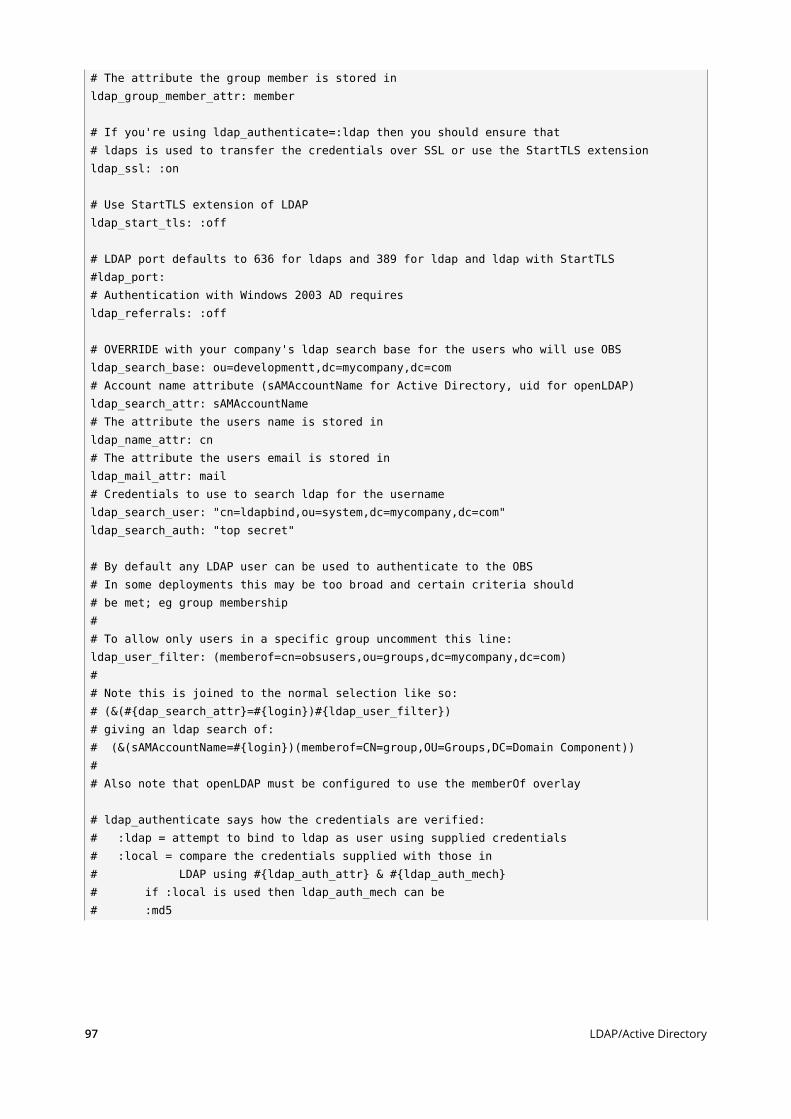
# The attribute the group member is stored inldap_group_member_attr: member
# If you're using ldap_authenticate=:ldap then you should ensure that# ldaps is used to transfer the credentials over SSL or use the StartTLS extensionldap_ssl: :on
# Use StartTLS extension of LDAPldap_start_tls: :off
# LDAP port defaults to 636 for ldaps and 389 for ldap and ldap with StartTLS#ldap_port:# Authentication with Windows 2003 AD requiresldap_referrals: :off
# OVERRIDE with your company's ldap search base for the users who will use OBSldap_search_base: ou=developmentt,dc=mycompany,dc=com# Account name attribute (sAMAccountName for Active Directory, uid for openLDAP)ldap_search_attr: sAMAccountName# The attribute the users name is stored inldap_name_attr: cn# The attribute the users email is stored inldap_mail_attr: mail# Credentials to use to search ldap for the usernameldap_search_user: "cn=ldapbind,ou=system,dc=mycompany,dc=com"ldap_search_auth: "top secret"
# By default any LDAP user can be used to authenticate to the OBS# In some deployments this may be too broad and certain criteria should# be met; eg group membership## To allow only users in a specific group uncomment this line:ldap_user_filter: (memberof=cn=obsusers,ou=groups,dc=mycompany,dc=com)## Note this is joined to the normal selection like so:# (&(#{dap_search_attr}=#{login})#{ldap_user_filter})# giving an ldap search of:# (&(sAMAccountName=#{login})(memberof=CN=group,OU=Groups,DC=Domain Component))## Also note that openLDAP must be configured to use the memberOf overlay
# ldap_authenticate says how the credentials are verified:# :ldap = attempt to bind to ldap as user using supplied credentials# :local = compare the credentials supplied with those in# LDAP using #{ldap_auth_attr} & #{ldap_auth_mech}# if :local is used then ldap_auth_mech can be# :md5
97 LDAP/Active Directory
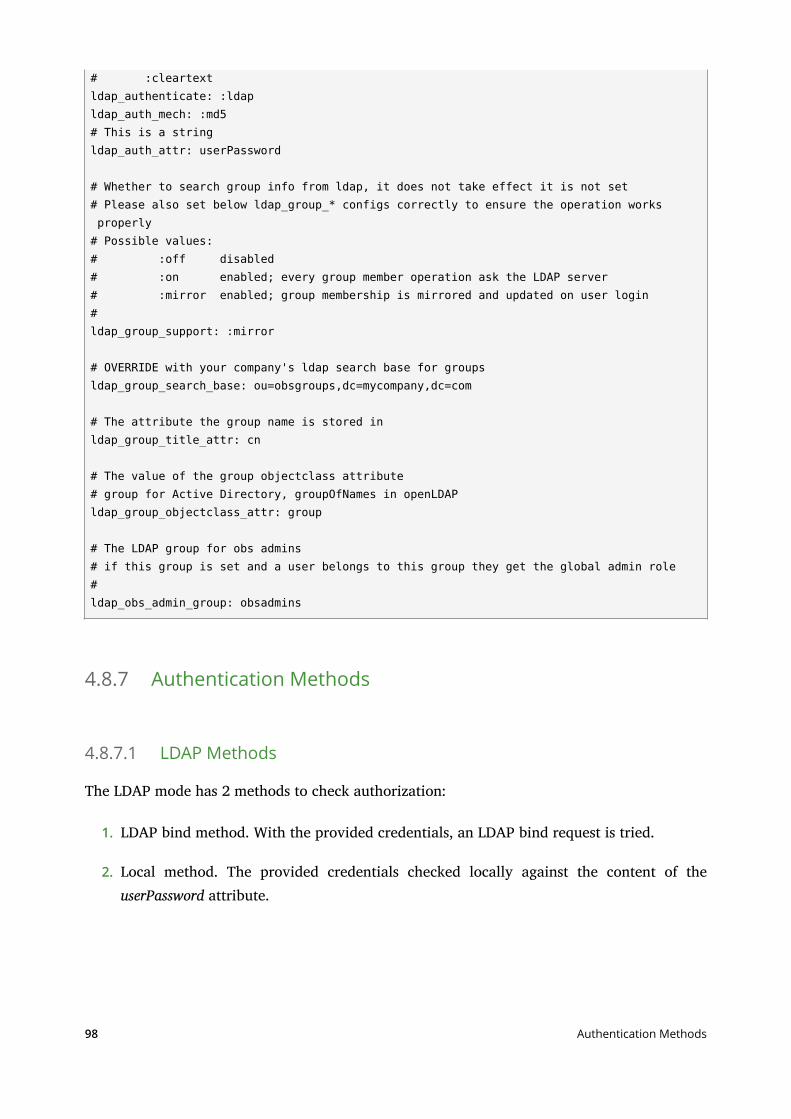
# :cleartextldap_authenticate: :ldapldap_auth_mech: :md5# This is a stringldap_auth_attr: userPassword
# Whether to search group info from ldap, it does not take effect it is not set# Please also set below ldap_group_* configs correctly to ensure the operation works properly# Possible values:# :off disabled# :on enabled; every group member operation ask the LDAP server# :mirror enabled; group membership is mirrored and updated on user login#ldap_group_support: :mirror
# OVERRIDE with your company's ldap search base for groupsldap_group_search_base: ou=obsgroups,dc=mycompany,dc=com
# The attribute the group name is stored inldap_group_title_attr: cn
# The value of the group objectclass attribute# group for Active Directory, groupOfNames in openLDAPldap_group_objectclass_attr: group
# The LDAP group for obs admins# if this group is set and a user belongs to this group they get the global admin role#ldap_obs_admin_group: obsadmins
4.8.7 Authentication Methods
4.8.7.1 LDAP Methods
The LDAP mode has 2 methods to check authorization:
1. LDAP bind method. With the provided credentials, an LDAP bind request is tried.
2. Local method. The provided credentials checked locally against the content of theuserPassword attribute.
98 Authentication Methods
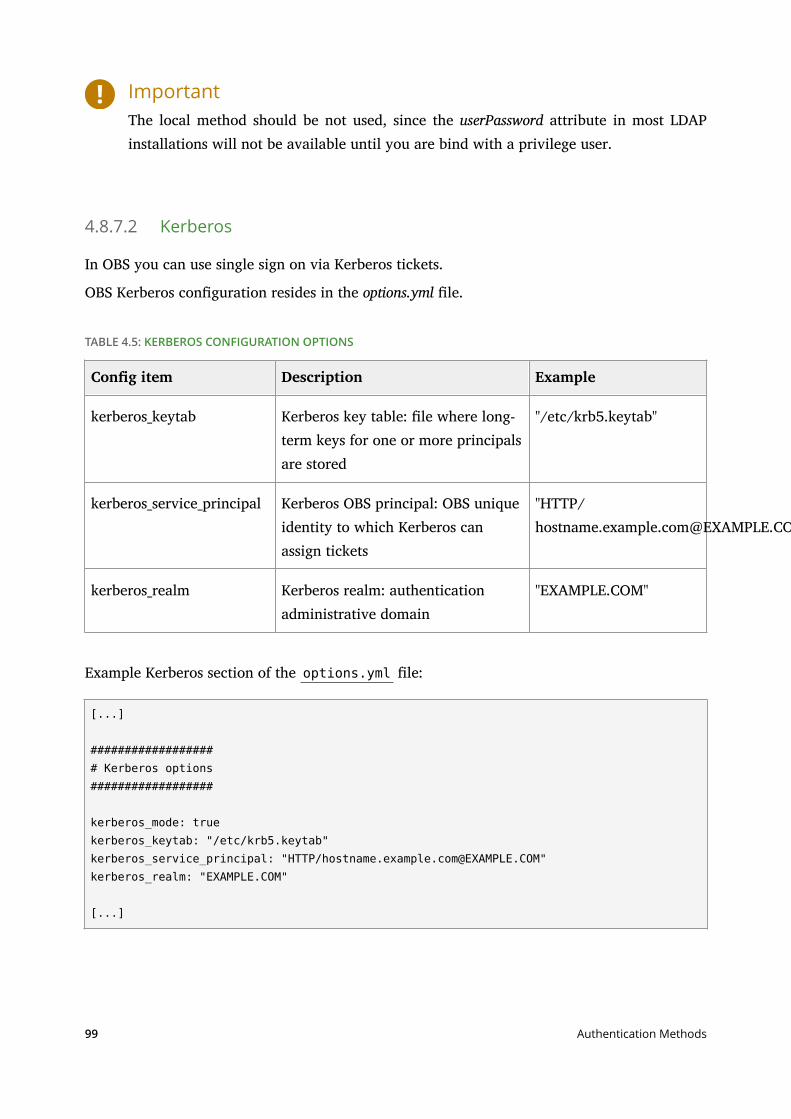
ImportantThe local method should be not used, since the userPassword attribute in most LDAPinstallations will not be available until you are bind with a privilege user.
4.8.7.2 Kerberos
In OBS you can use single sign on via Kerberos tickets.
OBS Kerberos conguration resides in the options.yml le.
TABLE 4.5: KERBEROS CONFIGURATION OPTIONS
Cong item Description Example
kerberos_keytab Kerberos key table: le where long-term keys for one or more principalsare stored
"/etc/krb5.keytab"
kerberos_service_principal Kerberos OBS principal: OBS uniqueidentity to which Kerberos canassign tickets
"HTTP/[email protected]"
kerberos_realm Kerberos realm: authenticationadministrative domain
"EXAMPLE.COM"
Example Kerberos section of the options.yml le:
[...]
################### Kerberos options##################
kerberos_mode: truekerberos_keytab: "/etc/krb5.keytab"kerberos_service_principal: "HTTP/[email protected]"kerberos_realm: "EXAMPLE.COM"
[...]
99 Authentication Methods
NoteOnce Kerberos is enabled, only users with logins that match users known to Kerberos willbe able to authenticate to OBS. It is recommended to give admin rights to a matchinguser before enabling Kerberos mode.
4.8.7.3 OBS Token Authorization
OBS 2.5 provides a mechanism to create tokens for specic operations. This can be used to allowcertain operations in the name of a user to others. This is esp. useful when integrating externalinfrastructure. The create token should be kept secret by default, but it can also be revoked atany time if it became obsolete or leaked.
4.8.7.3.1 Managing Tokens of a User
Tokens belong always to a user. A list of active tokens can received via
osc token
osc token --delete <TOKEN>
4.8.7.3.2 Executing a Source Service
A token can be used to execute a source service. The source service has to be setup for thepackage rst, check the source service chapter for this. A typical example is to update sourcesof a package from git. A source service for that can be setup with
osc add git://....
A token can be registered as generic token, means allowing to execute all source services in OBSif the user has permissions. You can create such a token and execute the operation with
osc token --create
osc token --trigger <TOKEN> <PROJECT> <PACKAGE>
osc api -X POST /trigger/runservice?token=<TOKEN>&project=<PROJECT>&package=<PACKAGE>
100 Authentication Methods
You can also limit the token to a specic package. The advantage is that the operation is limitedto that package, so less bad things can happen when the token leaks. Also you do not need tospecify the package on execution time. Create and execute it with
osc token --create <PROJECT> <PACKAGE>
osc token --trigger <TOKEN>
osc api -X POST /trigger/runservice?token=<TOKEN>
4.9 Message Bus for Event Notifications
The OBS has an integrated notication subsystem for sending events that are happening in ourapp through a message bus. We have chosen RabbitMQ (https://www.rabbitmq.com/) as ourmessage bus server technology based on the AMQP (https://www.amqp.org/) protocol.
4.9.1 RabbitMQ
RabbitMQ claims to be "the most popular open source message broker". Meaning that it can deliverasynchronous messages in many dierent exchange ways (one to one, broadcasting, based ontopics). It also includes a exible routing system based on queues.
RabbitMQ is lightweight and easy to deploy on premises and in the cloud. It supports multiplemessaging protocols too. And can be deployed in distributed and federated congurations tomeet high-scale, high-availability requirements.
4.9.1.1 Configuration
Currently the RabbitMQ conguration is in the le options.yml . All those options there startwith the prex amqp. These conguration items match with some of the calls we do using theBunny (http://rubybunny.info/) gem.
101 Message Bus for Event Notifications
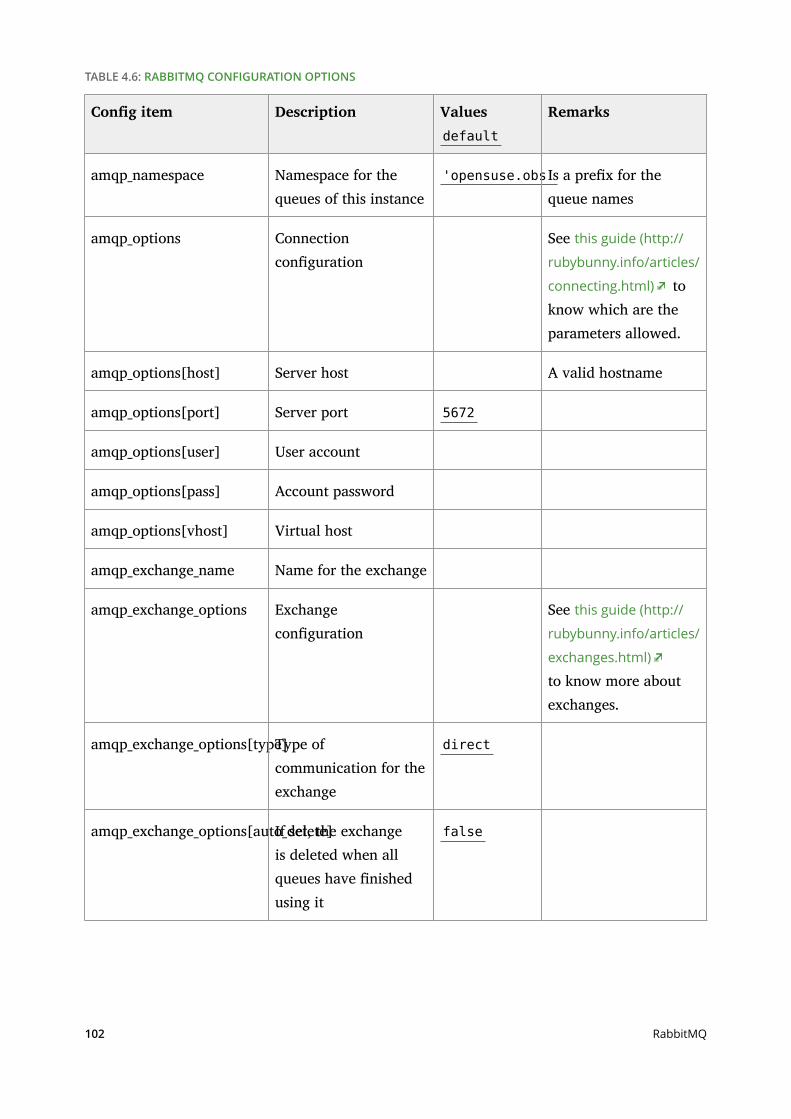
TABLE 4.6: RABBITMQ CONFIGURATION OPTIONS
Cong item Description Valuesdefault
Remarks
amqp_namespace Namespace for thequeues of this instance
'opensuse.obs'Is a prex for thequeue names
amqp_options Connectionconguration
See this guide (http://
rubybunny.info/articles/
connecting.html) toknow which are theparameters allowed.
amqp_options[host] Server host A valid hostname
amqp_options[port] Server port 5672
amqp_options[user] User account
amqp_options[pass] Account password
amqp_options[vhost] Virtual host
amqp_exchange_name Name for the exchange
amqp_exchange_options Exchangeconguration
See this guide (http://
rubybunny.info/articles/
exchanges.html)
to know more aboutexchanges.
amqp_exchange_options[type]Type ofcommunication for theexchange
direct
amqp_exchange_options[auto_delete]If set, the exchangeis deleted when allqueues have nishedusing it
false
102 RabbitMQ
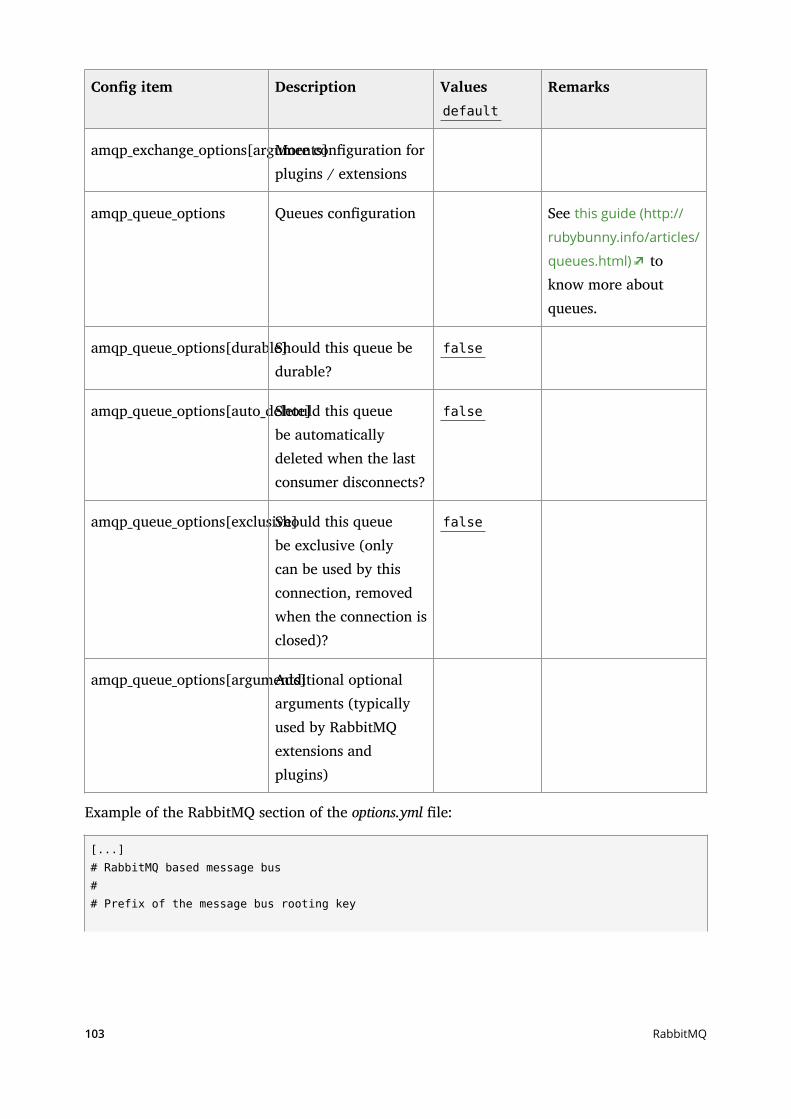
Cong item Description Valuesdefault
Remarks
amqp_exchange_options[arguments]More conguration forplugins / extensions
amqp_queue_options Queues conguration See this guide (http://
rubybunny.info/articles/
queues.html) toknow more aboutqueues.
amqp_queue_options[durable]Should this queue bedurable?
false
amqp_queue_options[auto_delete]Should this queuebe automaticallydeleted when the lastconsumer disconnects?
false
amqp_queue_options[exclusive]Should this queuebe exclusive (onlycan be used by thisconnection, removedwhen the connection isclosed)?
false
amqp_queue_options[arguments]Additional optionalarguments (typicallyused by RabbitMQextensions andplugins)
Example of the RabbitMQ section of the options.yml le:
[...]# RabbitMQ based message bus## Prefix of the message bus rooting key
103 RabbitMQ
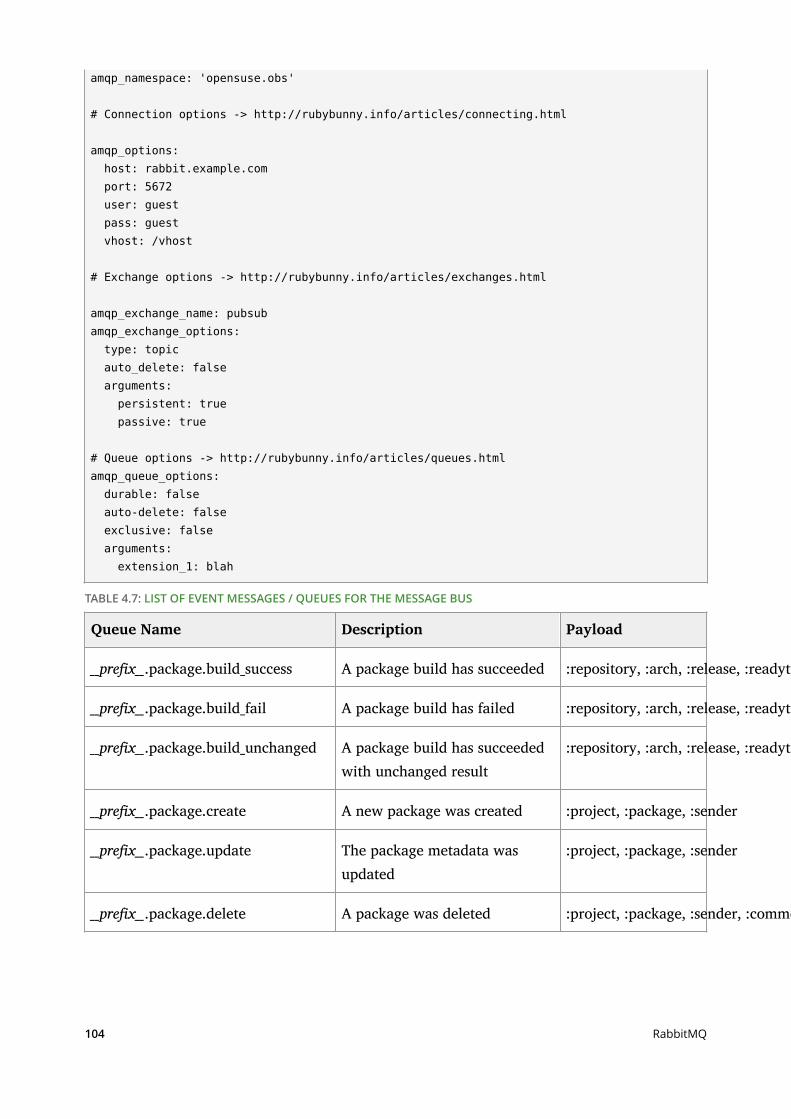
amqp_namespace: 'opensuse.obs'
# Connection options -> http://rubybunny.info/articles/connecting.html
amqp_options: host: rabbit.example.com port: 5672 user: guest pass: guest vhost: /vhost
# Exchange options -> http://rubybunny.info/articles/exchanges.html
amqp_exchange_name: pubsubamqp_exchange_options: type: topic auto_delete: false arguments: persistent: true passive: true
# Queue options -> http://rubybunny.info/articles/queues.htmlamqp_queue_options: durable: false auto-delete: false exclusive: false arguments: extension_1: blah
TABLE 4.7: LIST OF EVENT MESSAGES / QUEUES FOR THE MESSAGE BUS
Queue Name Description Payload
__prex__.package.build_success A package build has succeeded :repository, :arch, :release, :readytime, :srcmd5, :rev, :reason, :bcnt, :verifymd5, :hostarch, :starttime, :endtime, :workerid, :versrel, :previouslyfailed
__prex__.package.build_fail A package build has failed :repository, :arch, :release, :readytime, :srcmd5, :rev, :reason, :bcnt, :verifymd5, :hostarch, :starttime, :endtime, :workerid, :versrel, :previouslyfailed, :faillog
__prex__.package.build_unchanged A package build has succeededwith unchanged result
:repository, :arch, :release, :readytime, :srcmd5, :rev, :reason, :bcnt, :verifymd5, :hostarch, :starttime, :endtime, :workerid, :versrel, :previouslyfailed
__prex__.package.create A new package was created :project, :package, :sender
__prex__.package.update The package metadata wasupdated
:project, :package, :sender
__prex__.package.delete A package was deleted :project, :package, :sender, :comment
104 RabbitMQ
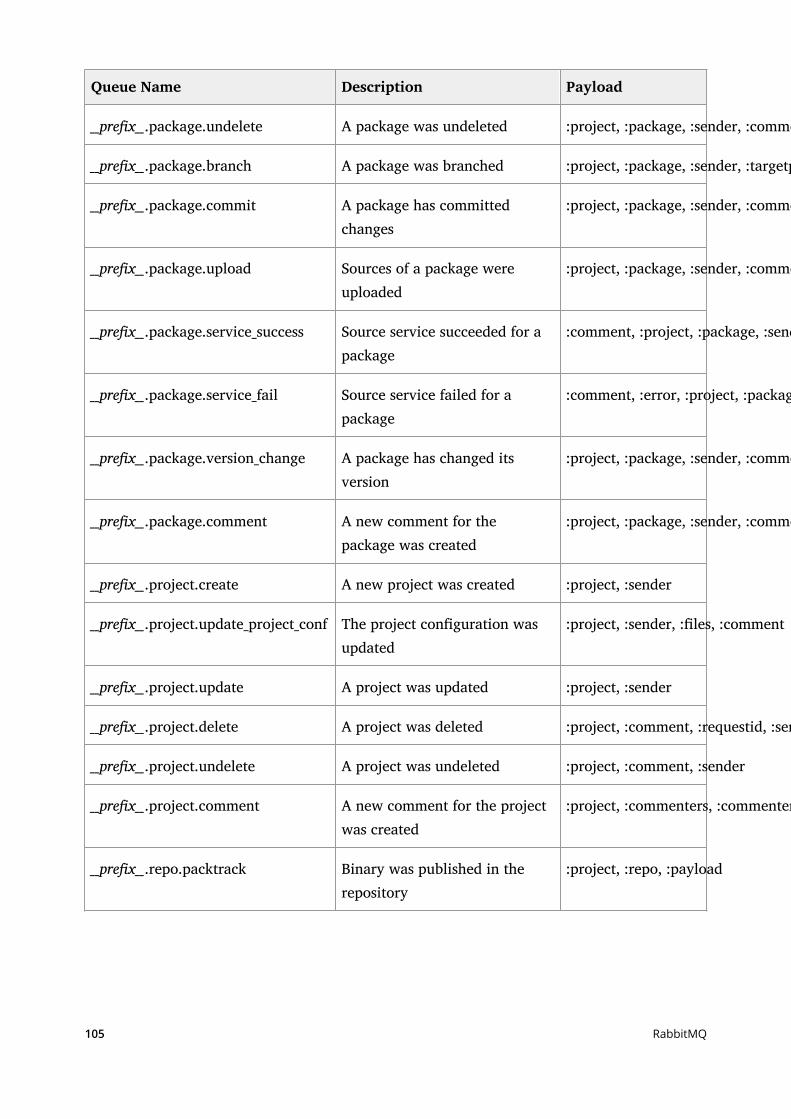
Queue Name Description Payload
__prex__.package.undelete A package was undeleted :project, :package, :sender, :comment
__prex__.package.branch A package was branched :project, :package, :sender, :targetproject, :targetpackage, :user
__prex__.package.commit A package has committedchanges
:project, :package, :sender, :comment, :user, :les, :rev, :requestid
__prex__.package.upload Sources of a package wereuploaded
:project, :package, :sender, :comment, :lename, :requestid, :target, :user
__prex__.package.service_success Source service succeeded for apackage
:comment, :project, :package, :sender, :rev, :user, :requestid
__prex__.package.service_fail Source service failed for apackage
:comment, :error, :project, :package, :sender, :rev, :user, :requestid
__prex__.package.version_change A package has changed itsversion
:project, :package, :sender, :comment, :requestid, :les, :rev, :newversion, :user, :oldversion
__prex__.package.comment A new comment for thepackage was created
:project, :package, :sender, :commenters, :commenter, :comment_body, :comment_title
__prex__.project.create A new project was created :project, :sender
__prex__.project.update_project_conf The project conguration wasupdated
:project, :sender, :les, :comment
__prex__.project.update A project was updated :project, :sender
__prex__.project.delete A project was deleted :project, :comment, :requestid, :sender
__prex__.project.undelete A project was undeleted :project, :comment, :sender
__prex__.project.comment A new comment for the projectwas created
:project, :commenters, :commenter, :comment_body, :comment_title
__prex__.repo.packtrack Binary was published in therepository
:project, :repo, :payload
105 RabbitMQ
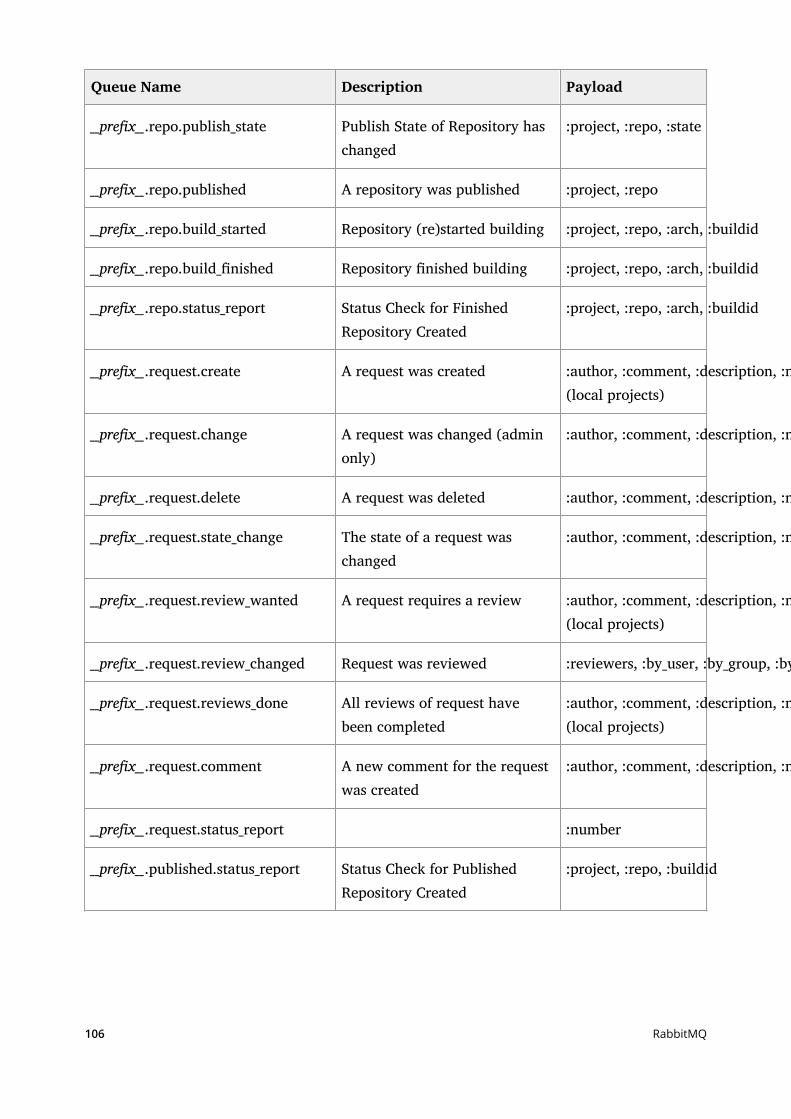
Queue Name Description Payload
__prex__.repo.publish_state Publish State of Repository haschanged
:project, :repo, :state
__prex__.repo.published A repository was published :project, :repo
__prex__.repo.build_started Repository (re)started building :project, :repo, :arch, :buildid
__prex__.repo.build_nished Repository nished building :project, :repo, :arch, :buildid
__prex__.repo.status_report Status Check for FinishedRepository Created
:project, :repo, :arch, :buildid
__prex__.request.create A request was created :author, :comment, :description, :number, :actions, :state, :when, :who, :di(local projects)
__prex__.request.change A request was changed (adminonly)
:author, :comment, :description, :number, :actions, :state, :when, :who
__prex__.request.delete A request was deleted :author, :comment, :description, :number, :actions, :state, :when, :who
__prex__.request.state_change The state of a request waschanged
:author, :comment, :description, :number, :actions, :state, :when, :who, :oldstate
__prex__.request.review_wanted A request requires a review :author, :comment, :description, :number, :actions, :state, :when, :who, :reviewers, :by_user, :by_group, :by_project, :by_package, :di(local projects)
__prex__.request.review_changed Request was reviewed :reviewers, :by_user, :by_group, :by_project, :by_package
__prex__.request.reviews_done All reviews of request havebeen completed
:author, :comment, :description, :number, :actions, :state, :when, :who, :reviewers, :by_user, :by_group, :by_project, :by_package, :di(local projects)
__prex__.request.comment A new comment for the requestwas created
:author, :comment, :description, :number, :actions, :state, :when, :who, :commenters, :commenter, :comment_body, :comment_title, :request_number
__prex__.request.status_report :number
__prex__.published.status_report Status Check for PublishedRepository Created
:project, :repo, :buildid
106 RabbitMQ
4.10 BackupOpen Build Service conguration and content needs usually a backup. The following explainssuggested strategies and places considered for a backup.
4.10.1 Places to consider
The following is pointing to the places with admin congurations or user content. The defaultlocation places are considered here.
4.10.1.1 Frontend Configuration
/srv/www/obs/api/cong
/srv/www/obs/api/log (optional)
The conguration is not changing usually. It is enough to backup it after cong changes.
4.10.1.2 Frontend Database
The MySQL/MariaDB database backup can be done in dierent ways. Please consider thedatabase manual for details. One possible way is to create dumps via mysqldump tool. Thebackup should be done at the same point of time as the source server. Inconsistencies can beresolved using the check_consistency tool.
4.10.1.3 Backend Configuration
The backend has a single conguration le which may got altered. This is by default /usr/lib/obs/server/BSCong.pm . The le is not supposed to be changed usually and it can only be doneby the system root user. A backup after a change is sucient.
4.10.1.4 Backend Content
All backend content is below /srv/obs directory. This include the sources, build results and alsoall conguration changes done by the OBS admin users.
107 Backup

4.10.2 Backup strategies
A backup is ideally taken only from a not running service. In real live this is usually not possible,so it is important to run a backup on a production system.
4.10.2.1 Database
MySQL backup either directly from a non-primary node in the galera cluster (table dump locksthe database during operation) or from a mysql slave attached to the cluster.
4.10.2.2 Sources
The sources are supposed to be backup at the same time as the database. This can get achieved byeither having a dedicated instance for the source server or by having a backup of the followingdirectories.
/srv/obs/projects
/srv/obs/sources
4.10.2.3 Build Results
Full backups via snapshots, either oered by the SAN storage or via LVM snapshot methods.Consistency is normally on repository level. Any inconsistency will be found by the schedulerand content will be retriggered. This is not true for disabled builds like released builds.
4.11 RestoreA restored system might contain inconsistencies if it was taken from a running service. Thesecan be resolved as follows.
4.11.1 Check and repair database inconsistencies
If either database portions or sources got restored there are chances for inconsistencies. Thesecan be found via
geeko > cd /srv/www/obs/api/
108 Backup strategies
geeko > ./bin/rails c geeko > ConsistencyCheckJob.new.perform
Single projects can be either checked with
geeko > cd /srv/www/obs/api/ geeko > ./bin/rake check_project project="YOUR_PROJECT"
or inconsistencies xed via
geeko > cd /srv/www/obs/api/ geeko > ./bin/rake fix_project project="YOUR_PROJECT"
4.11.2 Binaries
All build results are evaluated by the scheduler. Therefore any inconsistency can be detected bythe scheduler. One way is to enforce a cold start, which means that the scheduler would rescanall sources and binaries and trigger builds where needed. This can be achieved by
geeko > rcobsscheduler stop # ensure no scheduler is running geeko > rm /srv/obs/run/*.state # remove all state files geeko > rcobsscheduler start
The scheduler state will be visible as in cold start. It may take a longer time, so it might bemore ecient to check only certain projects or architectures if needed. This can be triggeredin a running system by executing
geeko > obs_admin --check-project PROJECT ARCHITERCTURE
A deep check is necessary in case sources have been restored:
geeko > obs_admin --deep-check-project PROJECT ARCHITERCTURE
4.12 Repair Data CorruptionOn-disk data might be corrupted independent of a restore. For example due to power outage,lesystem or disk errors. A MySQL/Maria database in a cluster should repair itself in that case.Data on disk in the backend parts can be checked and xed using an dedicated tool. See thehelp of the tool for further details or run
geeko > /usr/lib/obs/server/bs_check_consistency --check-all
Data can be repaired using the x options.
109 Binaries
4.13 Spider IdentificationOBS is hiding specic parts/pages of the application from search crawlers (DuckDuckGo, Google,etc.), mostly for performance reasons. Which user-agent strings are identied as crawlerscongured in the le /srv/www/obs/api/config/crawler-user-agents.json .
To update that list, you must run the command bundle exec rakevoight_kampf:import_user_agents in the root directory of your OBS instance. Thisdownloads the current crawler list of user agents as a JSON le into the config/ directory ofthe Rails application.
If you want to extend or edit this list, switch to the config/ directory and open the crawler-user-agents.json le with the editor of your choice. The content can look like this:
[ { "pattern": "Googlebot\\/", "url": "http://www.google.com/bot.html" }, { "pattern": "Googlebot-Mobile" }, { "pattern": "Googlebot-Image" }, [...]]
To add a new bot to this list, a pattern must be dened. This is required to identify a bot. Almostall bots have their own user agent that they are sending to a Web server to identify them. Forexample, the user agent of the Googlebot looks like this:
Mozilla/5.0 (compatible; Googlebot/2.1; +http://www.google.com/bot.html)
To choose the pattern for the new bot, compare the user agent of the bot you want to identifywith others and look for a part that is unique (like in the Googlebot example, the part:Googlebot).
Let's assume we want to add the bot Geekobot to the list of bots and the user agent looks like this:
Mozilla/5.0 (compatible; Geekobot/2.1; +https://www.opensuse.org)
Our unique part would be Geekobot. So we add a new entry to the list of bots:
[
110 Spider Identification
{ "pattern": "Googlebot\\/", "url": "http://www.google.com/bot.html" }, { "pattern": "Googlebot-Mobile" }, { "pattern": "Googlebot-Image" }, [...] { "pattern": "Geekobot" }]
NoteYou can also use regular expressions in the pattern element.
Save the le and restart the Rails application and the bot Geekobot should be identied properly.
4.14 Worker in Kubernetes
Warning: Alpha ImplementationThis is Alpha implementation and not recommended for production.
The Kubernetes device plugin deployed here makes several assumptions about which andhow many containers will have access to KVM device.
The plugin also assumes availability of /dev/kvm on every node where the device-plugin-container is running
The build service worker itself has many backends to run its jobs. One of the preferred backendsis KVM.
This backend allows building inside a VM. This has many advantages from security and isolationperspective.
When a build worker is running inside the containerized environment (for example, usingKubernetes) access to KVM is not available.
111 Worker in Kubernetes
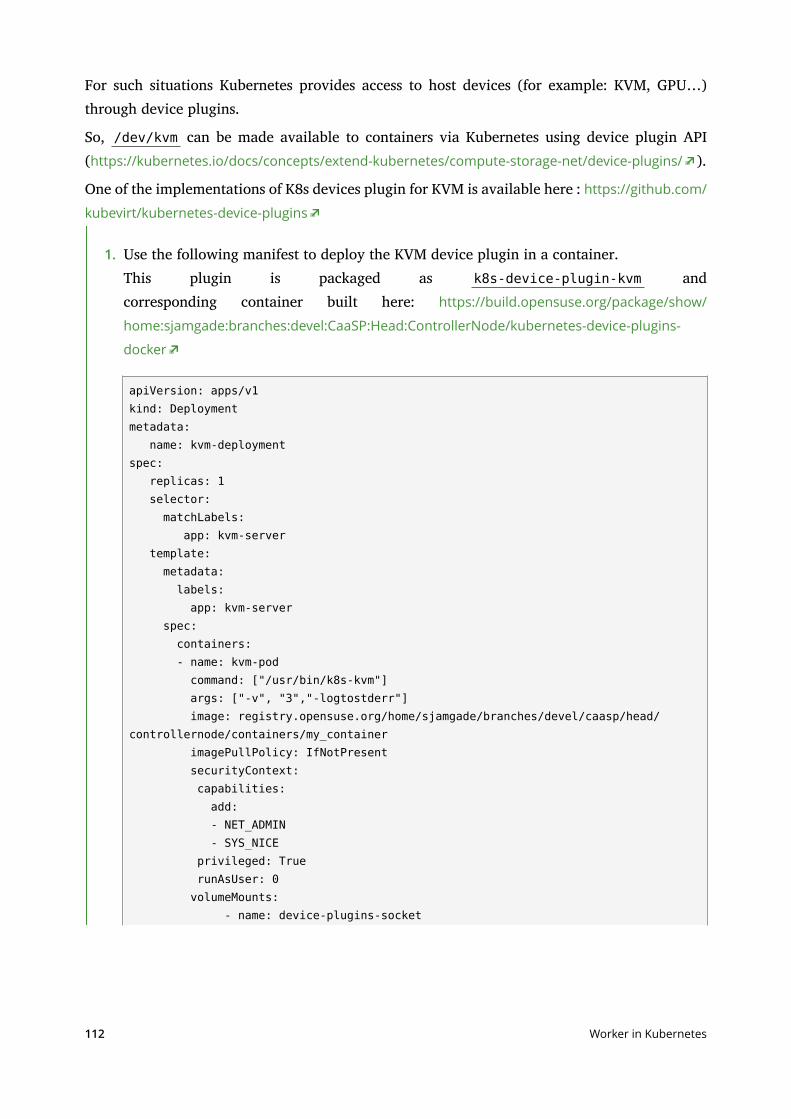
For such situations Kubernetes provides access to host devices (for example: KVM, GPU…)through device plugins.
So, /dev/kvm can be made available to containers via Kubernetes using device plugin API(https://kubernetes.io/docs/concepts/extend-kubernetes/compute-storage-net/device-plugins/ ).
One of the implementations of K8s devices plugin for KVM is available here : https://github.com/
kubevirt/kubernetes-device-plugins
1. Use the following manifest to deploy the KVM device plugin in a container.This plugin is packaged as k8s-device-plugin-kvm andcorresponding container built here: https://build.opensuse.org/package/show/
home:sjamgade:branches:devel:CaaSP:Head:ControllerNode/kubernetes-device-plugins-
docker
apiVersion: apps/v1kind: Deploymentmetadata: name: kvm-deploymentspec: replicas: 1 selector: matchLabels: app: kvm-server template: metadata: labels: app: kvm-server spec: containers: - name: kvm-pod command: ["/usr/bin/k8s-kvm"] args: ["-v", "3","-logtostderr"] image: registry.opensuse.org/home/sjamgade/branches/devel/caasp/head/controllernode/containers/my_container imagePullPolicy: IfNotPresent securityContext: capabilities: add: - NET_ADMIN - SYS_NICE privileged: True runAsUser: 0 volumeMounts: - name: device-plugins-socket
112 Worker in Kubernetes
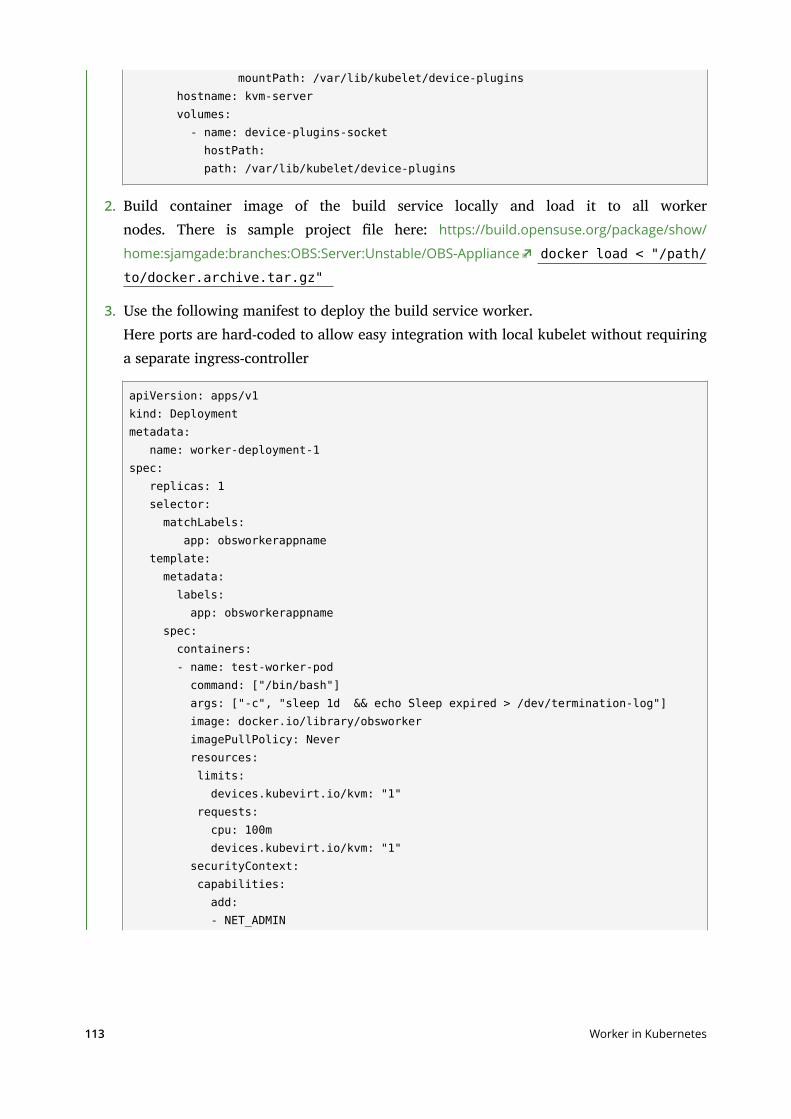
mountPath: /var/lib/kubelet/device-plugins hostname: kvm-server volumes: - name: device-plugins-socket hostPath: path: /var/lib/kubelet/device-plugins
2. Build container image of the build service locally and load it to all workernodes. There is sample project le here: https://build.opensuse.org/package/show/
home:sjamgade:branches:OBS:Server:Unstable/OBS-Appliance docker load < "/path/to/docker.archive.tar.gz"
3. Use the following manifest to deploy the build service worker.Here ports are hard-coded to allow easy integration with local kubelet without requiringa separate ingress-controller
apiVersion: apps/v1kind: Deploymentmetadata: name: worker-deployment-1spec: replicas: 1 selector: matchLabels: app: obsworkerappname template: metadata: labels: app: obsworkerappname spec: containers: - name: test-worker-pod command: ["/bin/bash"] args: ["-c", "sleep 1d && echo Sleep expired > /dev/termination-log"] image: docker.io/library/obsworker imagePullPolicy: Never resources: limits: devices.kubevirt.io/kvm: "1" requests: cpu: 100m devices.kubevirt.io/kvm: "1" securityContext: capabilities: add: - NET_ADMIN
113 Worker in Kubernetes
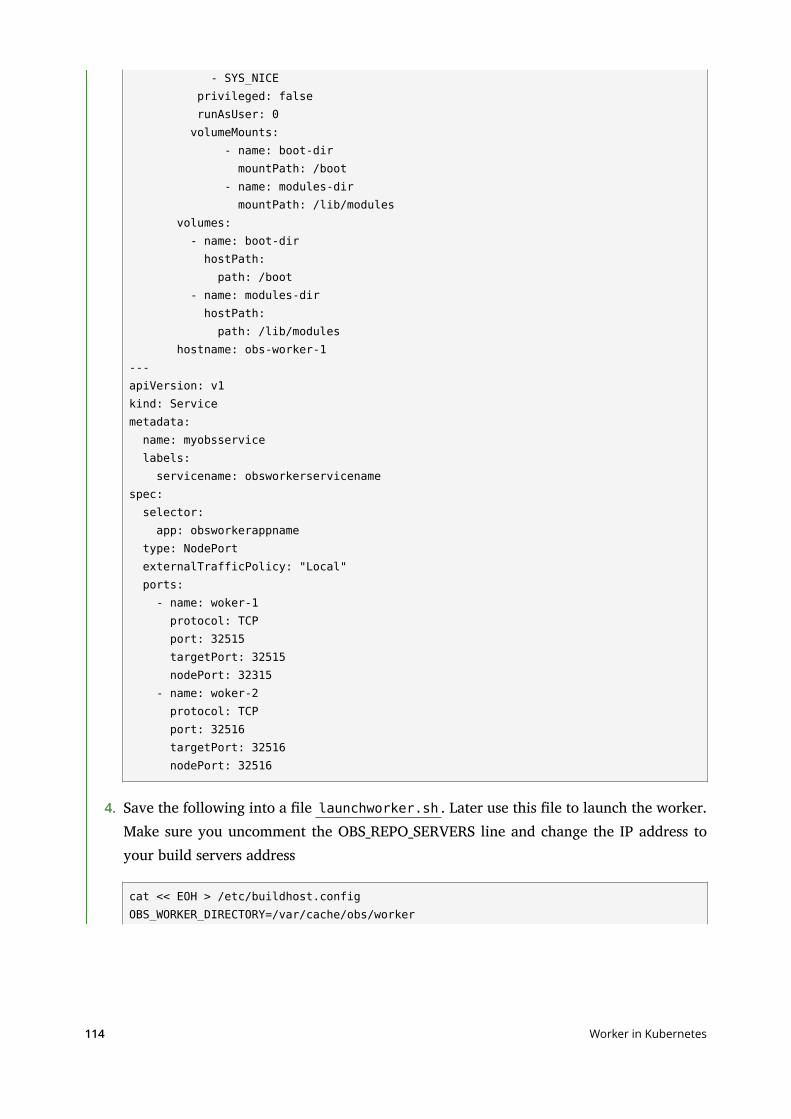
- SYS_NICE privileged: false runAsUser: 0 volumeMounts: - name: boot-dir mountPath: /boot - name: modules-dir mountPath: /lib/modules volumes: - name: boot-dir hostPath: path: /boot - name: modules-dir hostPath: path: /lib/modules hostname: obs-worker-1---apiVersion: v1kind: Servicemetadata: name: myobsservice labels: servicename: obsworkerservicenamespec: selector: app: obsworkerappname type: NodePort externalTrafficPolicy: "Local" ports: - name: woker-1 protocol: TCP port: 32515 targetPort: 32515 nodePort: 32315 - name: woker-2 protocol: TCP port: 32516 targetPort: 32516 nodePort: 32516
4. Save the following into a le launchworker.sh . Later use this le to launch the worker.Make sure you uncomment the OBS_REPO_SERVERS line and change the IP address toyour build servers address
cat << EOH > /etc/buildhost.configOBS_WORKER_DIRECTORY=/var/cache/obs/worker
114 Worker in Kubernetes
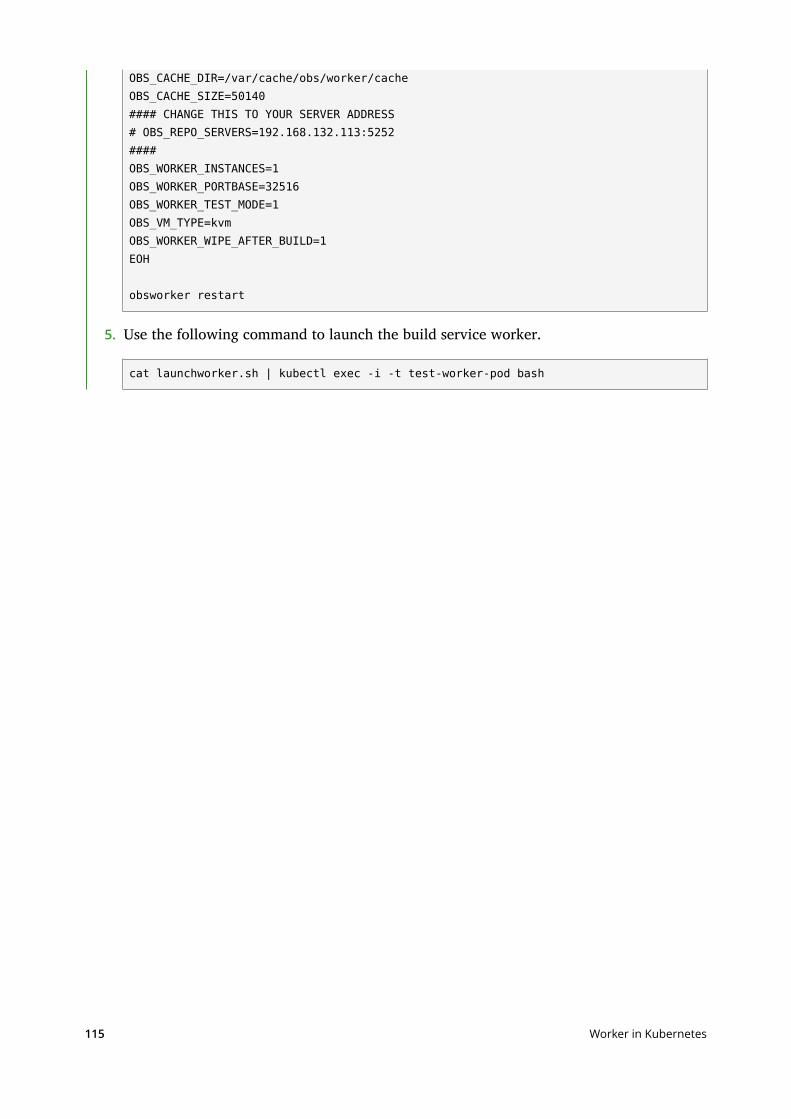
OBS_CACHE_DIR=/var/cache/obs/worker/cacheOBS_CACHE_SIZE=50140#### CHANGE THIS TO YOUR SERVER ADDRESS# OBS_REPO_SERVERS=192.168.132.113:5252####OBS_WORKER_INSTANCES=1OBS_WORKER_PORTBASE=32516OBS_WORKER_TEST_MODE=1OBS_VM_TYPE=kvmOBS_WORKER_WIPE_AFTER_BUILD=1EOH
obsworker restart
5. Use the following command to launch the build service worker.
cat launchworker.sh | kubectl exec -i -t test-worker-pod bash
115 Worker in Kubernetes
5 Troubleshooting
Here are two major classes of problems regarding the Open Build Service:
1. Normal package build errors
2. Bugs, resource shortage or cong issues caused issues
The rst category are errors like missing dependent packages in the build environment, errorsduring compiling or linking, errors in the build description and so on. Most of them should nothappen if the packager does test the build locally before committing it to the OBS. This type ofproblems is not covered by this chapter.
5.1 General Hints
If you detect unexpected behavior of the open build service, you should follow some rules tolocate the problem:
1. Consult the log les, for the back-end look at /srv/obs/log for the back-end log les and /srv/www/obs/api/log for the front-end log les. See the Log les Section 2.2, “Log Files” formore details.
2. Consult the normal OS system logs and the kernel log (dmesg) if here are reported systemor HW problems.
3. Check if all services are running on the back-end and front-end. See the OBS Architecturein reference book for details.
4. Try to nd an easy way to reproduce the problem.
5. To check whether this issue was already reported, see https://github.com/openSUSE/open-
build-service .
6. Use search machines (Google) to nd out if others did also run into this problem. If youare lucky, you will nd a x or workaround as well.
7. If you create a new bug report, include all information to reproduce the problem and thecomplete error message/error log if here are any.
116 General Hints
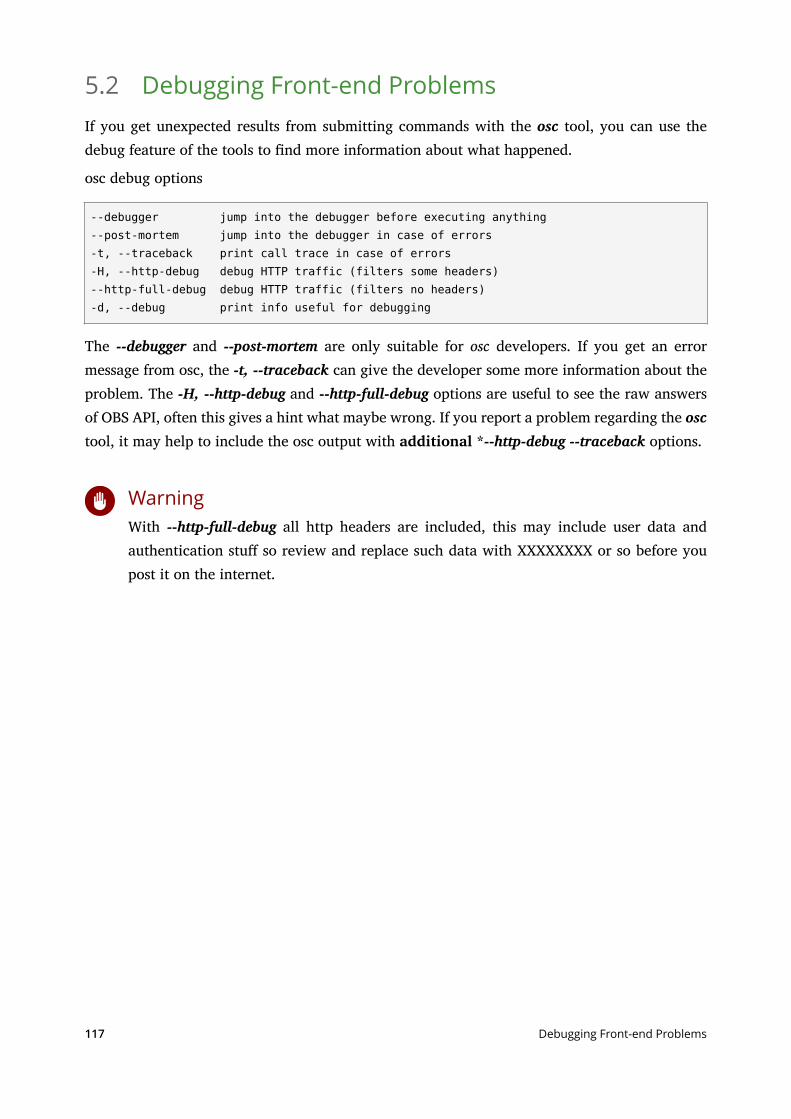
5.2 Debugging Front-end ProblemsIf you get unexpected results from submitting commands with the osc tool, you can use thedebug feature of the tools to nd more information about what happened.
osc debug options
--debugger jump into the debugger before executing anything--post-mortem jump into the debugger in case of errors-t, --traceback print call trace in case of errors-H, --http-debug debug HTTP traffic (filters some headers)--http-full-debug debug HTTP traffic (filters no headers)-d, --debug print info useful for debugging
The --debugger and --post-mortem are only suitable for osc developers. If you get an errormessage from osc, the -t, --traceback can give the developer some more information about theproblem. The -H, --http-debug and --http-full-debug options are useful to see the raw answersof OBS API, often this gives a hint what maybe wrong. If you report a problem regarding the osctool, it may help to include the osc output with additional *--http-debug --traceback options.
WarningWith --http-full-debug all http headers are included, this may include user data andauthentication stu so review and replace such data with XXXXXXXX or so before youpost it on the internet.
117 Debugging Front-end Problems
6 Setting Up a Local OBS Instance
This chapter explains how you could setup/Install/test OBS in your system. This chapter iswritten for those who are not so familiar with Linux and OBS. So in case you are condent toset up OBS, skip this chapter. Following would be explained in this chapter.
OBS 1 click install, then manual setup in openSUSE 13.1;
OBS 1 click install, then manual setup in SLES11;
OBS test run on Microsoft Windows using VMware player;
OBS appliance installed manually in a VirtualBox.
Unfortunately, didn't have a chance to install OBS in other Linux distribution yet. The last sectionwill explain your rst steps with the new OBS server.
How you could install and purchase openSUSE 13.1 and SLES12 will not be explained in thischapter. VMware player install and purchase also will not be explained. For these topics, youcould visit for help:
http://software.opensuse.org/131/en
http://www.suse.com/products/server/
http://my.vmware.com/web/vmware/free#desktop_end_user_computing/
vmware_player/6_0
6.1 Testing OBS on Microsoft Windows Using VMwarePlayerThose who are not familiar with Linux can run and test OBS. To run and test OBS in Windows,you could use a virtual machine program such as VMware or VirtualBox, etc. This chapterexplains, how you can run OBS using VMware player. To check and test with VirtualBox oranother virtual machine, check in below.
After you are done installing VMware player on Windows, you need to download the OBSappliance program. You could get OBS appliance le by visiting http://openbuildservice.org/
download/other/ and clicking on VirtualBox/VMware Image. After downloading, uncompresswith some Windows archiving program that understands the .tar.bz2 le format.
118 Testing OBS on Microsoft Windows Using VMware Player
Now, open VMware Player application and select File Open a Virtual Machine, or you couldpress Ctrl – O directly. Open the decompressed virtual machine in Open Virtual Machine dialogbox. Click on Play virtual machine icon or hyper link in VMware player.
At the Linux prompt, you can login using "root" as a login name and "opensuse" as a password.Now, OBS local instance should be already loaded and running in your system. To make surethat the OBS Web UI is successfully up and running, open the OBS Web UI.
To access OBS Web user interface, open your web browser and try the address http://vm.ip.address . You can check the virtual machine's IP address by using ifconfig Linuxcommand. Now, you probably could see a screen like the one below in your window:
To login your local OBS instance, you could use default login name as "Admin" and passwordas "opensuse". Check if you could login properly by clicking Login on your local OBS instanceWeb UI.
6.2 Installing a Readymade OBS Appliance in aVirtualBox
This method is slightly less easy than the method using the readymade vmdk VMware disk,but it enables you to determine the size of your virtual disks to your convenience. It could alsowork with a real computer with two disks. It requires some knowledge of command line andpartitioning.
1. Download the OBS appliance installer. Visit: http://www.openbuildservice.org/download
and press the Download the OBS Appliance Installer button. It will start downloading anISO image.
2. In VirtualBox, create a virtual machine with:
4 GB memory
1 virtual hard disk of 20 G for / and /var/cache/obs
1 virtual hard disk of 50 G for /srv/obs
a virtual CD-ROM driver pointing to the downloaded ISO image
network bridging with real Ethernet card
119 Installing a Readymade OBS Appliance in a VirtualBox
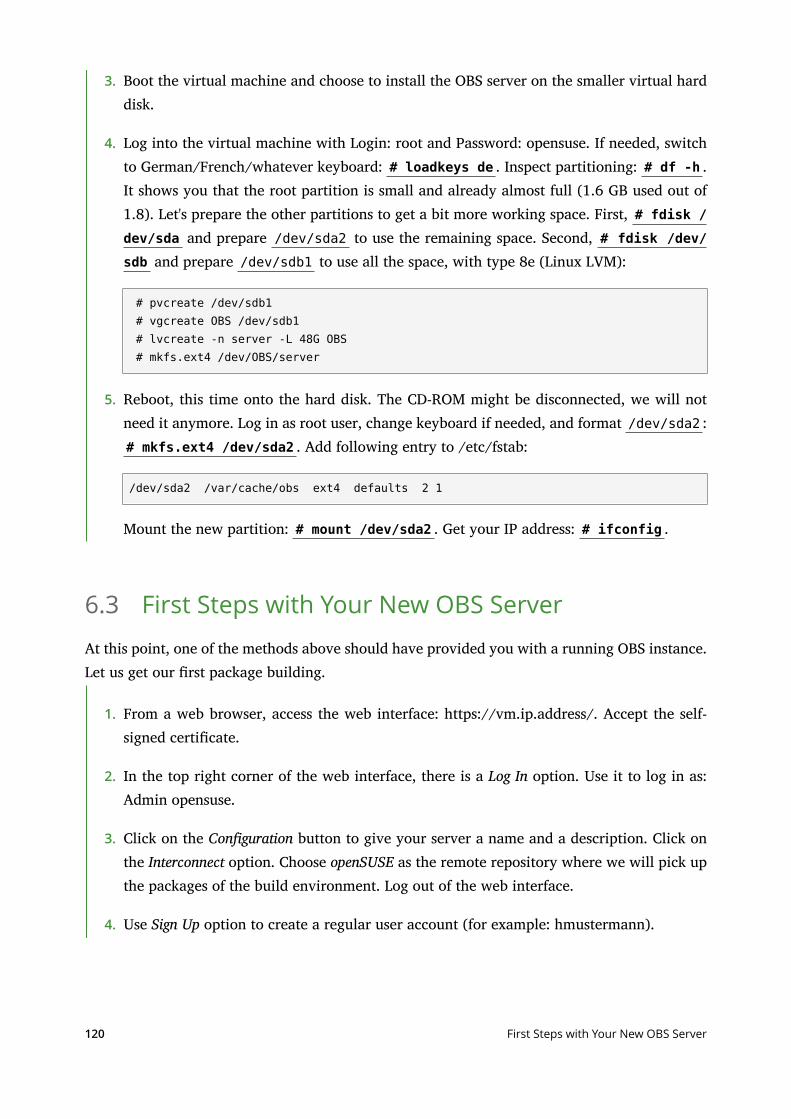
3. Boot the virtual machine and choose to install the OBS server on the smaller virtual harddisk.
4. Log into the virtual machine with Login: root and Password: opensuse. If needed, switchto German/French/whatever keyboard: # loadkeys de . Inspect partitioning: # df -h .It shows you that the root partition is small and already almost full (1.6 GB used out of1.8). Let's prepare the other partitions to get a bit more working space. First, # fdisk /dev/sda and prepare /dev/sda2 to use the remaining space. Second, # fdisk /dev/sdb and prepare /dev/sdb1 to use all the space, with type 8e (Linux LVM):
# pvcreate /dev/sdb1 # vgcreate OBS /dev/sdb1 # lvcreate -n server -L 48G OBS # mkfs.ext4 /dev/OBS/server
5. Reboot, this time onto the hard disk. The CD-ROM might be disconnected, we will notneed it anymore. Log in as root user, change keyboard if needed, and format /dev/sda2 :# mkfs.ext4 /dev/sda2 . Add following entry to /etc/fstab:
/dev/sda2 /var/cache/obs ext4 defaults 2 1
Mount the new partition: # mount /dev/sda2 . Get your IP address: # ifconfig .
6.3 First Steps with Your New OBS Server
At this point, one of the methods above should have provided you with a running OBS instance.Let us get our rst package building.
1. From a web browser, access the web interface: https://vm.ip.address/. Accept the self-signed certicate.
2. In the top right corner of the web interface, there is a Log In option. Use it to log in as:Admin opensuse.
3. Click on the Conguration button to give your server a name and a description. Click onthe Interconnect option. Choose openSUSE as the remote repository where we will pick upthe packages of the build environment. Log out of the web interface.
4. Use Sign Up option to create a regular user account (for example: hmustermann).
120 First Steps with Your New OBS Server
5. As this normal user, click on the Home Project option and create your home project (thatwould be: "home:hmustermann").
6. Go to this home project, and click on Create package to create your rst package (let's say:"mypackage").
7. Go back to your home project, and click the Repositories button. Choose to add a newrepository and pick openSUSE 13.1 (for example).
8. Reboot the virtual machine to ensure all projects are rescanned.
9. From outside the virtual machine and as a normal user, declare in ~/.oscrc your newOBS user:
[https://vm.ip.address]user=hmustermannpass=bond007
then checkout your new package: $ osc -A https://vm.ip.address cohome:hmustermann . go to your rst package: $ cd home:hmustermann/mypackage . andadd some sources there (tarball, spec le, changelog, patches). Check them in, then triggera remote build:
$ osc add *$ osc commit$ osc rebuild
10. The built packages can be seen at: http://vm.ip.address:82/
121 First Steps with Your New OBS Server
A GNU LicensesThis appendix contains the GNU GeneralPublic License version 2 and the GNU FreeDocumentation License version 1.2.
GNU General Public License
Version 2, June 1991
Copyright (C) 1989, 1991 Free Software Foundation, Inc. 59 Temple Place - Suite 330, Boston,MA 02111-1307, USA
Everyone is permitted to copy and distribute verbatim copies of this license document, butchanging it is not allowed.
Preamble
The licenses for most software are designed to take away your freedom to share and change it.By contrast, the GNU General Public License is intended to guarantee your freedom to shareand change free software--to make sure the software is free for all its users. This General PublicLicense applies to most of the Free Software Foundation’s software and to any other programwhose authors commit to using it. (Some other Free Software Foundation software is coveredby the GNU Library General Public License instead.) You can apply it to your programs, too.
When we speak of free software, we are referring to freedom, not price. Our General PublicLicenses are designed to make sure that you have the freedom to distribute copies of freesoftware (and charge for this service if you wish), that you receive source code or can get itif you want it, that you can change the software or use pieces of it in new free programs; andthat you know you can do these things.
To protect your rights, we need to make restrictions that forbid anyone to deny you these rightsor to ask you to surrender the rights. These restrictions translate to certain responsibilities foryou if you distribute copies of the software, or if you modify it.
For example, if you distribute copies of such a program, whether gratis or for a fee, you mustgive the recipients all the rights that you have. You must make sure that they, too, receive orcan get the source code. And you must show them these terms so they know their rights.
We protect your rights with two steps: (1) copyright the software, and (2) oer you this licensewhich gives you legal permission to copy, distribute and/or modify the software.
Also, for each author’s protection and ours, we want to make certain that everyoneunderstands that there is no warranty for this free software. If the software is modied bysomeone else and passed on, we want its recipients to know that what they have is not theoriginal, so that any problems introduced by others will not reect on the original authors’reputations.
Finally, any free program is threatened constantly by software patents. We wish to avoid thedanger that redistributors of a free program will individually obtain patent licenses, in eectmaking the program proprietary. To prevent this, we have made it clear that any patent mustbe licensed for everyone’s free use or not licensed at all.
The precise terms and conditions for copying, distribution and modication follow.
GNU GENERAL PUBLIC LICENSE TERMS AND CONDITIONS FOR
COPYING, DISTRIBUTION AND MODIFICATION
0. This License applies to any program or other work which contains a notice placed by
the copyright holder saying it may be distributed under the terms of this General Public
License. The “Program”, below, refers to any such program or work, and a “work based on the
Program” means either the Program or any derivative work under copyright law: that is to say,
a work containing the Program or a portion of it, either verbatim or with modications and/
or translated into another language. (Hereinafter, translation is included without limitation
in the term “modication”.) Each licensee is addressed as “you”.
Activities other than copying, distribution and modication are not covered by this License;they are outside its scope. The act of running the Program is not restricted, and the outputfrom the Program is covered only if its contents constitute a work based on the Program(independent of having been made by running the Program). Whether that is true dependson what the Program does.
1. You may copy and distribute verbatim copies of the Program’s source code as you receive
it, in any medium, provided that you conspicuously and appropriately publish on each copy
an appropriate copyright notice and disclaimer of warranty; keep intact all the notices that
refer to this License and to the absence of any warranty; and give any other recipients of the
Program a copy of this License along with the Program.
You may charge a fee for the physical act of transferring a copy, and you may at your optionoer warranty protection in exchange for a fee.
2. You may modify your copy or copies of the Program or any portion of it, thus forming
a work based on the Program, and copy and distribute such modications or work under the
terms of Section 1 above, provided that you also meet all of these conditions:
a). You must cause the modied les to carry prominent notices stating that you changed
the les and the date of any change.
b). You must cause any work that you distribute or publish, that in whole or in part contains
or is derived from the Program or any part thereof, to be licensed as a whole at no charge to
all third parties under the terms of this License.
c). If the modied program normally reads commands interactively when run, you must
cause it, when started running for such interactive use in the most ordinary way, to print
or display an announcement including an appropriate copyright notice and a notice that
there is no warranty (or else, saying that you provide a warranty) and that users may
redistribute the program under these conditions, and telling the user how to view a copy of
this License. (Exception: if the Program itself is interactive but does not normally print such an
announcement, your work based on the Program is not required to print an announcement.)
These requirements apply to the modied work as a whole. If identiable sections of thatwork are not derived from the Program, and can be reasonably considered independent andseparate works in themselves, then this License, and its terms, do not apply to those sectionswhen you distribute them as separate works. But when you distribute the same sections aspart of a whole which is a work based on the Program, the distribution of the whole must beon the terms of this License, whose permissions for other licensees extend to the entire whole,and thus to each and every part regardless of who wrote it.
Thus, it is not the intent of this section to claim rights or contest your rights to work writtenentirely by you; rather, the intent is to exercise the right to control the distribution ofderivative or collective works based on the Program.
In addition, mere aggregation of another work not based on the Program with the Program(or with a work based on the Program) on a volume of a storage or distribution medium doesnot bring the other work under the scope of this License.
3. You may copy and distribute the Program (or a work based on it, under Section 2) in
object code or executable form under the terms of Sections 1 and 2 above provided that you
also do one of the following:
122

a). Accompany it with the complete corresponding machine-readable source code, which
must be distributed under the terms of Sections 1 and 2 above on a medium customarily used
for software interchange; or,
b). Accompany it with a written oer, valid for at least three years, to give any third party,
for a charge no more than your cost of physically performing source distribution, a complete
machine-readable copy of the corresponding source code, to be distributed under the terms
of Sections 1 and 2 above on a medium customarily used for software interchange; or,
c). Accompany it with the information you received as to the oer to distribute corresponding
source code. (This alternative is allowed only for noncommercial distribution and only if you
received the program in object code or executable form with such an oer, in accord with
Subsection b above.)
The source code for a work means the preferred form of the work for making modicationsto it. For an executable work, complete source code means all the source code for all modulesit contains, plus any associated interface denition les, plus the scripts used to controlcompilation and installation of the executable. However, as a special exception, the sourcecode distributed need not include anything that is normally distributed (in either source orbinary form) with the major components (compiler, kernel, and so on) of the operating systemon which the executable runs, unless that component itself accompanies the executable.
If distribution of executable or object code is made by oering access to copy from a designatedplace, then oering equivalent access to copy the source code from the same place countsas distribution of the source code, even though third parties are not compelled to copy thesource along with the object code.
4. You may not copy, modify, sublicense, or distribute the Program except as expressly
provided under this License. Any attempt otherwise to copy, modify, sublicense or distribute
the Program is void, and will automatically terminate your rights under this License. However,
parties who have received copies, or rights, from you under this License will not have their
licenses terminated so long as such parties remain in full compliance.
5. You are not required to accept this License, since you have not signed it. However, nothing
else grants you permission to modify or distribute the Program or its derivative works. These
actions are prohibited by law if you do not accept this License. Therefore, by modifying or
distributing the Program (or any work based on the Program), you indicate your acceptance
of this License to do so, and all its terms and conditions for copying, distributing or modifying
the Program or works based on it.
6. Each time you redistribute the Program (or any work based on the Program), the recipient
automatically receives a license from the original licensor to copy, distribute or modify the
Program subject to these terms and conditions. You may not impose any further restrictions
on the recipients’ exercise of the rights granted herein. You are not responsible for enforcing
compliance by third parties to this License.
7. If, as a consequence of a court judgment or allegation of patent infringement or for
any other reason (not limited to patent issues), conditions are imposed on you (whether by
court order, agreement or otherwise) that contradict the conditions of this License, they do
not excuse you from the conditions of this License. If you cannot distribute so as to satisfy
simultaneously your obligations under this License and any other pertinent obligations, then
as a consequence you may not distribute the Program at all. For example, if a patent license
would not permit royalty-free redistribution of the Program by all those who receive copies
directly or indirectly through you, then the only way you could satisfy both it and this License
would be to refrain entirely from distribution of the Program.
If any portion of this section is held invalid or unenforceable under any particularcircumstance, the balance of the section is intended to apply and the section as a whole isintended to apply in other circumstances.
It is not the purpose of this section to induce you to infringe any patents or other propertyright claims or to contest validity of any such claims; this section has the sole purpose ofprotecting the integrity of the free software distribution system, which is implemented bypublic license practices. Many people have made generous contributions to the wide range ofsoftware distributed through that system in reliance on consistent application of that system;it is up to the author/donor to decide if he or she is willing to distribute software through anyother system and a licensee cannot impose that choice.
This section is intended to make thoroughly clear what is believed to be a consequence ofthe rest of this License.
8. If the distribution and/or use of the Program is restricted in certain countries either by
patents or by copyrighted interfaces, the original copyright holder who places the Program
under this License may add an explicit geographical distribution limitation excluding those
countries, so that distribution is permitted only in or among countries not thus excluded. In
such case, this License incorporates the limitation as if written in the body of this License.
9. The Free Software Foundation may publish revised and/or new versions of the General
Public License from time to time. Such new versions will be similar in spirit to the present
version, but may dier in detail to address new problems or concerns.
Each version is given a distinguishing version number. If the Program species a versionnumber of this License which applies to it and “any later version”, you have the option offollowing the terms and conditions either of that version or of any later version publishedby the Free Software Foundation. If the Program does not specify a version number of thisLicense, you may choose any version ever published by the Free Software Foundation.
10. If you wish to incorporate parts of the Program into other free programs whose
distribution conditions are dierent, write to the author to ask for permission. For software
which is copyrighted by the Free Software Foundation, write to the Free Software Foundation;
we sometimes make exceptions for this. Our decision will be guided by the two goals of
preserving the free status of all derivatives of our free software and of promoting the sharing
and reuse of software generally.
NO WARRANTY
11. BECAUSE THE PROGRAM IS LICENSED FREE OF CHARGE, THERE IS NO WARRANTY
FOR THE PROGRAM, TO THE EXTENT PERMITTED BY APPLICABLE LAW. EXCEPT
WHEN OTHERWISE STATED IN WRITING THE COPYRIGHT HOLDERS AND/OR OTHER
PARTIES PROVIDE THE PROGRAM “AS IS” WITHOUT WARRANTY OF ANY KIND, EITHER
123
EXPRESSED OR IMPLIED, INCLUDING, BUT NOT LIMITED TO, THE IMPLIED WARRANTIES
OF MERCHANTABILITY AND FITNESS FOR A PARTICULAR PURPOSE. THE ENTIRE RISK AS
TO THE QUALITY AND PERFORMANCE OF THE PROGRAM IS WITH YOU. SHOULD THE
PROGRAM PROVE DEFECTIVE, YOU ASSUME THE COST OF ALL NECESSARY SERVICING,
REPAIR OR CORRECTION.
12. IN NO EVENT UNLESS REQUIRED BY APPLICABLE LAW OR AGREED TO IN
WRITING WILL ANY COPYRIGHT HOLDER, OR ANY OTHER PARTY WHO MAY MODIFY
AND/OR REDISTRIBUTE THE PROGRAM AS PERMITTED ABOVE, BE LIABLE TO YOU
FOR DAMAGES, INCLUDING ANY GENERAL, SPECIAL, INCIDENTAL OR CONSEQUENTIAL
DAMAGES ARISING OUT OF THE USE OR INABILITY TO USE THE PROGRAM (INCLUDING
BUT NOT LIMITED TO LOSS OF DATA OR DATA BEING RENDERED INACCURATE OR
LOSSES SUSTAINED BY YOU OR THIRD PARTIES OR A FAILURE OF THE PROGRAM TO
OPERATE WITH ANY OTHER PROGRAMS), EVEN IF SUCH HOLDER OR OTHER PARTY HAS
BEEN ADVISED OF THE POSSIBILITY OF SUCH DAMAGES.
END OF TERMS AND CONDITIONS
How to Apply These Terms to Your New Programs
If you develop a new program, and you want it to be of the greatest possible use to the public,the best way to achieve this is to make it free software which everyone can redistribute andchange under these terms.
To do so, attach the following notices to the program. It is safest to attach them to the startof each source le to most eectively convey the exclusion of warranty; and each le shouldhave at least the “copyright” line and a pointer to where the full notice is found.
one line to give the program’s name and an idea of what it does. Copyright (C) yyyy name of author
This program is free software; you can redistribute it and/or modify it under the terms of the GNU General Public License as published by the Free Software Foundation; either version 2 of the License, or (at your option) any later version.
This program is distributed in the hope that it will be useful, but WITHOUT ANY WARRANTY; without even the implied warranty of MERCHANTABILITY or FITNESS FOR A PARTICULAR PURPOSE. See the
GNU General Public License for more details.
You should have received a copy of the GNU General Public License along with this program; if not, write to the Free Software Foundation, Inc., 59 Temple Place - Suite 330, Boston, MA 02111-1307, USA.
Also add information on how to contact you by electronic and paper mail.
If the program is interactive, make it output a short notice like this when it starts in aninteractive mode:
Gnomovision version 69, Copyright (C) year name of author Gnomovision comes with ABSOLUTELY NO WARRANTY; for details type `show w’. This is free software, and you are welcome to redistribute it under certain conditions; type `show c’ for details.
The hypothetical commands `show w’ and `show c’ should show the appropriate parts of theGeneral Public License. Of course, the commands you use may be called something other than`show w’ and `show c’; they could even be mouse-clicks or menu items--whatever suits yourprogram.
You should also get your employer (if you work as a programmer) or your school, if any, tosign a “copyright disclaimer” for the program, if necessary. Here is a sample; alter the names:
Yoyodyne, Inc., hereby disclaims all copyright interest in the program `Gnomovision’ (which makes passes at compilers) written by James Hacker.
signature of Ty Coon, 1 April 1989 Ty Coon, President of Vice
This General Public License does not permit incorporating your program into proprietaryprograms. If your program is a subroutine library, you may consider it more useful to permitlinking proprietary applications with the library. If this is what you want to do, use the GNU
Lesser General Public License (http://www.fsf.org/licenses/lgpl.html) instead of this License.
GNU Free Documentation License
Version 1.2, November 2002
Copyright (C) 2000,2001,2002 Free Software Foundation, Inc. 59 Temple Place, Suite 330,Boston, MA 02111-1307 USA
Everyone is permitted to copy and distribute verbatim copies of this license document, butchanging it is not allowed.
124
PREAMBLE
The purpose of this License is to make a manual, textbook, or other functional and usefuldocument “free” in the sense of freedom: to assure everyone the eective freedom to copyand redistribute it, with or without modifying it, either commercially or noncommercially.Secondarily, this License preserves for the author and publisher a way to get credit for theirwork, while not being considered responsible for modications made by others.
This License is a kind of “copyleft”, which means that derivative works of the document mustthemselves be free in the same sense. It complements the GNU General Public License, whichis a copyleft license designed for free software.
We have designed this License in order to use it for manuals for free software, because freesoftware needs free documentation: a free program should come with manuals providing thesame freedoms that the software does. But this License is not limited to software manuals; itcan be used for any textual work, regardless of subject matter or whether it is published as aprinted book. We recommend this License principally for works whose purpose is instructionor reference.
APPLICABILITY AND DEFINITIONS
This License applies to any manual or other work, in any medium, that contains a notice placedby the copyright holder saying it can be distributed under the terms of this License. Such anotice grants a world-wide, royalty-free license, unlimited in duration, to use that work underthe conditions stated herein. The “Document”, below, refers to any such manual or work. Anymember of the public is a licensee, and is addressed as “you”. You accept the license if youcopy, modify or distribute the work in a way requiring permission under copyright law.
A “Modied Version” of the Document means any work containing the Document or a portionof it, either copied verbatim, or with modications and/or translated into another language.
A “Secondary Section” is a named appendix or a front-matter section of the Document thatdeals exclusively with the relationship of the publishers or authors of the Document to theDocument’s overall subject (or to related matters) and contains nothing that could fall directlywithin that overall subject. (Thus, if the Document is in part a textbook of mathematics, aSecondary Section may not explain any mathematics.) The relationship could be a matterof historical connection with the subject or with related matters, or of legal, commercial,philosophical, ethical or political position regarding them.
The “Invariant Sections” are certain Secondary Sections whose titles are designated, as beingthose of Invariant Sections, in the notice that says that the Document is released under thisLicense. If a section does not t the above denition of Secondary then it is not allowed to bedesignated as Invariant. The Document may contain zero Invariant Sections. If the Documentdoes not identify any Invariant Sections then there are none.
The “Cover Texts” are certain short passages of text that are listed, as Front-Cover Texts orBack-Cover Texts, in the notice that says that the Document is released under this License. AFront-Cover Text may be at most 5 words, and a Back-Cover Text may be at most 25 words.
A “Transparent” copy of the Document means a machine-readable copy, represented in aformat whose specication is available to the general public, that is suitable for revisingthe document straightforwardly with generic text editors or (for images composed of pixels)generic paint programs or (for drawings) some widely available drawing editor, and thatis suitable for input to text formatters or for automatic translation to a variety of formatssuitable for input to text formatters. A copy made in an otherwise Transparent le formatwhose markup, or absence of markup, has been arranged to thwart or discourage subsequentmodication by readers is not Transparent. An image format is not Transparent if used forany substantial amount of text. A copy that is not “Transparent” is called “Opaque”.
Examples of suitable formats for Transparent copies include plain ASCII without markup,Texinfo input format, LaTeX input format, SGML or XML using a publicly available DTD,and standard-conforming simple HTML, PostScript or PDF designed for human modication.Examples of transparent image formats include PNG, XCF and JPG. Opaque formats includeproprietary formats that can be read and edited only by proprietary word processors, SGML orXML for which the DTD and/or processing tools are not generally available, and the machine-generated HTML, PostScript or PDF produced by some word processors for output purposesonly.
The “Title Page” means, for a printed book, the title page itself, plus such following pagesas are needed to hold, legibly, the material this License requires to appear in the title page.For works in formats which do not have any title page as such, “Title Page” means the textnear the most prominent appearance of the work’s title, preceding the beginning of the bodyof the text.
A section “Entitled XYZ” means a named subunit of the Document whose title eitheris precisely XYZ or contains XYZ in parentheses following text that translates XYZ inanother language. (Here XYZ stands for a specic section name mentioned below, such as“Acknowledgements”, “Dedications”, “Endorsements”, or “History”.) To “Preserve the Title”of such a section when you modify the Document means that it remains a section “EntitledXYZ” according to this denition.
The Document may include Warranty Disclaimers next to the notice which states that thisLicense applies to the Document. These Warranty Disclaimers are considered to be includedby reference in this License, but only as regards disclaiming warranties: any other implicationthat these Warranty Disclaimers may have is void and has no eect on the meaning of thisLicense.
VERBATIM COPYING
You may copy and distribute the Document in any medium, either commercially ornoncommercially, provided that this License, the copyright notices, and the license noticesaying this License applies to the Document are reproduced in all copies, and that you addno other conditions whatsoever to those of this License. You may not use technical measuresto obstruct or control the reading or further copying of the copies you make or distribute.However, you may accept compensation in exchange for copies. If you distribute a largeenough number of copies you must also follow the conditions in section 3.
You may also lend copies, under the same conditions stated above, and you may publiclydisplay copies.
COPYING IN QUANTITY
If you publish printed copies (or copies in media that commonly have printed covers) of theDocument, numbering more than 100, and the Document’s license notice requires Cover Texts,you must enclose the copies in covers that carry, clearly and legibly, all these Cover Texts:Front-Cover Texts on the front cover, and Back-Cover Texts on the back cover. Both coversmust also clearly and legibly identify you as the publisher of these copies. The front covermust present the full title with all words of the title equally prominent and visible. You mayadd other material on the covers in addition. Copying with changes limited to the covers, aslong as they preserve the title of the Document and satisfy these conditions, can be treatedas verbatim copying in other respects.
If the required texts for either cover are too voluminous to t legibly, you should put therst ones listed (as many as t reasonably) on the actual cover, and continue the rest ontoadjacent pages.
If you publish or distribute Opaque copies of the Document numbering more than 100, youmust either include a machine-readable Transparent copy along with each Opaque copy,or state in or with each Opaque copy a computer-network location from which the generalnetwork-using public has access to download using public-standard network protocols acomplete Transparent copy of the Document, free of added material. If you use the latteroption, you must take reasonably prudent steps, when you begin distribution of Opaque copiesin quantity, to ensure that this Transparent copy will remain thus accessible at the statedlocation until at least one year after the last time you distribute an Opaque copy (directly orthrough your agents or retailers) of that edition to the public.
It is requested, but not required, that you contact the authors of the Document well beforeredistributing any large number of copies, to give them a chance to provide you with anupdated version of the Document.
MODIFICATIONS
You may copy and distribute a Modied Version of the Document under the conditions ofsections 2 and 3 above, provided that you release the Modied Version under precisely thisLicense, with the Modied Version lling the role of the Document, thus licensing distributionand modication of the Modied Version to whoever possesses a copy of it. In addition, youmust do these things in the Modied Version:
A. Use in the Title Page (and on the covers, if any) a title distinct from that of the Document,
and from those of previous versions (which should, if there were any, be listed in the History
section of the Document). You may use the same title as a previous version if the original
publisher of that version gives permission.
B. List on the Title Page, as authors, one or more persons or entities responsible for authorship
of the modications in the Modied Version, together with at least ve of the principal authors
of the Document (all of its principal authors, if it has fewer than ve), unless they release
you from this requirement.
125
C. State on the Title page the name of the publisher of the Modied Version, as the publisher.
D. Preserve all the copyright notices of the Document.
E. Add an appropriate copyright notice for your modications adjacent to the other copyright
notices.
F. Include, immediately after the copyright notices, a license notice giving the public
permission to use the Modied Version under the terms of this License, in the form shown
in the Addendum below.
G. Preserve in that license notice the full lists of Invariant Sections and required Cover Texts
given in the Document’s license notice.
H. Include an unaltered copy of this License.
I. Preserve the section Entitled “History”, Preserve its Title, and add to it an item stating at
least the title, year, new authors, and publisher of the Modied Version as given on the Title
Page. If there is no section Entitled “History” in the Document, create one stating the title,
year, authors, and publisher of the Document as given on its Title Page, then add an item
describing the Modied Version as stated in the previous sentence.
J. Preserve the network location, if any, given in the Document for public access to a
Transparent copy of the Document, and likewise the network locations given in the Document
for previous versions it was based on. These may be placed in the “History” section. You may
omit a network location for a work that was published at least four years before the Document
itself, or if the original publisher of the version it refers to gives permission.
K. For any section Entitled “Acknowledgements” or “Dedications”, Preserve the Title of the
section, and preserve in the section all the substance and tone of each of the contributor
acknowledgements and/or dedications given therein.
L. Preserve all the Invariant Sections of the Document, unaltered in their text and in their
titles. Section numbers or the equivalent are not considered part of the section titles.
M. Delete any section Entitled “Endorsements”. Such a section may not be included in the
Modied Version.
N. Do not retitle any existing section to be Entitled “Endorsements” or to conict in title
with any Invariant Section.
O. Preserve any Warranty Disclaimers.
If the Modied Version includes new front-matter sections or appendices that qualify asSecondary Sections and contain no material copied from the Document, you may at youroption designate some or all of these sections as invariant. To do this, add their titles to thelist of Invariant Sections in the Modied Version’s license notice. These titles must be distinctfrom any other section titles.
You may add a section Entitled “Endorsements”, provided it contains nothing butendorsements of your Modied Version by various parties--for example, statements of peerreview or that the text has been approved by an organization as the authoritative denitionof a standard.
You may add a passage of up to ve words as a Front-Cover Text, and a passage of up to 25words as a Back-Cover Text, to the end of the list of Cover Texts in the Modied Version. Onlyone passage of Front-Cover Text and one of Back-Cover Text may be added by (or througharrangements made by) any one entity. If the Document already includes a cover text for thesame cover, previously added by you or by arrangement made by the same entity you areacting on behalf of, you may not add another; but you may replace the old one, on explicitpermission from the previous publisher that added the old one.
The author(s) and publisher(s) of the Document do not by this License give permission to usetheir names for publicity for or to assert or imply endorsement of any Modied Version.
COMBINING DOCUMENTS
You may combine the Document with other documents released under this License, underthe terms dened in section 4 above for modied versions, provided that you include in thecombination all of the Invariant Sections of all of the original documents, unmodied, andlist them all as Invariant Sections of your combined work in its license notice, and that youpreserve all their Warranty Disclaimers.
The combined work need only contain one copy of this License, and multiple identicalInvariant Sections may be replaced with a single copy. If there are multiple Invariant Sectionswith the same name but dierent contents, make the title of each such section unique byadding at the end of it, in parentheses, the name of the original author or publisher of thatsection if known, or else a unique number. Make the same adjustment to the section titles inthe list of Invariant Sections in the license notice of the combined work.
In the combination, you must combine any sections Entitled “History” in the various originaldocuments, forming one section Entitled “History”; likewise combine any sections Entitled“Acknowledgements”, and any sections Entitled “Dedications”. You must delete all sectionsEntitled “Endorsements”.
COLLECTIONS OF DOCUMENTS
You may make a collection consisting of the Document and other documents released underthis License, and replace the individual copies of this License in the various documents with asingle copy that is included in the collection, provided that you follow the rules of this Licensefor verbatim copying of each of the documents in all other respects.
You may extract a single document from such a collection, and distribute it individually underthis License, provided you insert a copy of this License into the extracted document, and followthis License in all other respects regarding verbatim copying of that document.
AGGREGATION WITH INDEPENDENT WORKS
A compilation of the Document or its derivatives with other separate and independentdocuments or works, in or on a volume of a storage or distribution medium, is called an“aggregate” if the copyright resulting from the compilation is not used to limit the legal rightsof the compilation’s users beyond what the individual works permit. When the Document isincluded in an aggregate, this License does not apply to the other works in the aggregatewhich are not themselves derivative works of the Document.
If the Cover Text requirement of section 3 is applicable to these copies of the Document, thenif the Document is less than one half of the entire aggregate, the Document’s Cover Textsmay be placed on covers that bracket the Document within the aggregate, or the electronicequivalent of covers if the Document is in electronic form. Otherwise they must appear onprinted covers that bracket the whole aggregate.
TRANSLATION
Translation is considered a kind of modication, so you may distribute translations of theDocument under the terms of section 4. Replacing Invariant Sections with translations requiresspecial permission from their copyright holders, but you may include translations of someor all Invariant Sections in addition to the original versions of these Invariant Sections. Youmay include a translation of this License, and all the license notices in the Document, andany Warranty Disclaimers, provided that you also include the original English version of thisLicense and the original versions of those notices and disclaimers. In case of a disagreementbetween the translation and the original version of this License or a notice or disclaimer, theoriginal version will prevail.
If a section in the Document is Entitled “Acknowledgements”, “Dedications”, or “History”,the requirement (section 4) to Preserve its Title (section 1) will typically require changingthe actual title.
126
TERMINATION
You may not copy, modify, sublicense, or distribute the Document except as expresslyprovided for under this License. Any other attempt to copy, modify, sublicense or distribute theDocument is void, and will automatically terminate your rights under this License. However,parties who have received copies, or rights, from you under this License will not have theirlicenses terminated so long as such parties remain in full compliance.
FUTURE REVISIONS OF THIS LICENSE
The Free Software Foundation may publish new, revised versions of the GNU FreeDocumentation License from time to time. Such new versions will be similar in spirit to thepresent version, but may dier in detail to address new problems or concerns. See http://www.gnu.org/copyleft/.
Each version of the License is given a distinguishing version number. If the Document speciesthat a particular numbered version of this License “or any later version” applies to it, youhave the option of following the terms and conditions either of that specied version or ofany later version that has been published (not as a draft) by the Free Software Foundation. Ifthe Document does not specify a version number of this License, you may choose any versionever published (not as a draft) by the Free Software Foundation.
ADDENDUM: How to use this License for your documents
To use this License in a document you have written, include a copy of the License in thedocument and put the following copyright and license notices just after the title page:
Copyright (c) YEAR YOUR NAME. Permission is granted to copy, distribute and/or modify this document under the terms of the GNU Free Documentation License, Version 1.2 or any later version published by the Free Software Foundation; with no Invariant Sections, no Front-Cover Texts, and no Back-Cover Texts. A copy of the license is included in the section entitled “GNU Free Documentation License”.
If you have Invariant Sections, Front-Cover Texts and Back-Cover Texts, replace the“with...Texts.” line with this:
with the Invariant Sections being LIST THEIR TITLES, with the Front-Cover Texts being LIST, and with the Back-Cover Texts being LIST.
If you have Invariant Sections without Cover Texts, or some other combination of the three,merge those two alternatives to suit the situation.
If your document contains nontrivial examples of program code, we recommend releasingthese examples in parallel under your choice of free software license, such as the GNU GeneralPublic License, to permit their use in free software.
127