Embed Size (px)
Citation preview
1
Administration / Setup Users
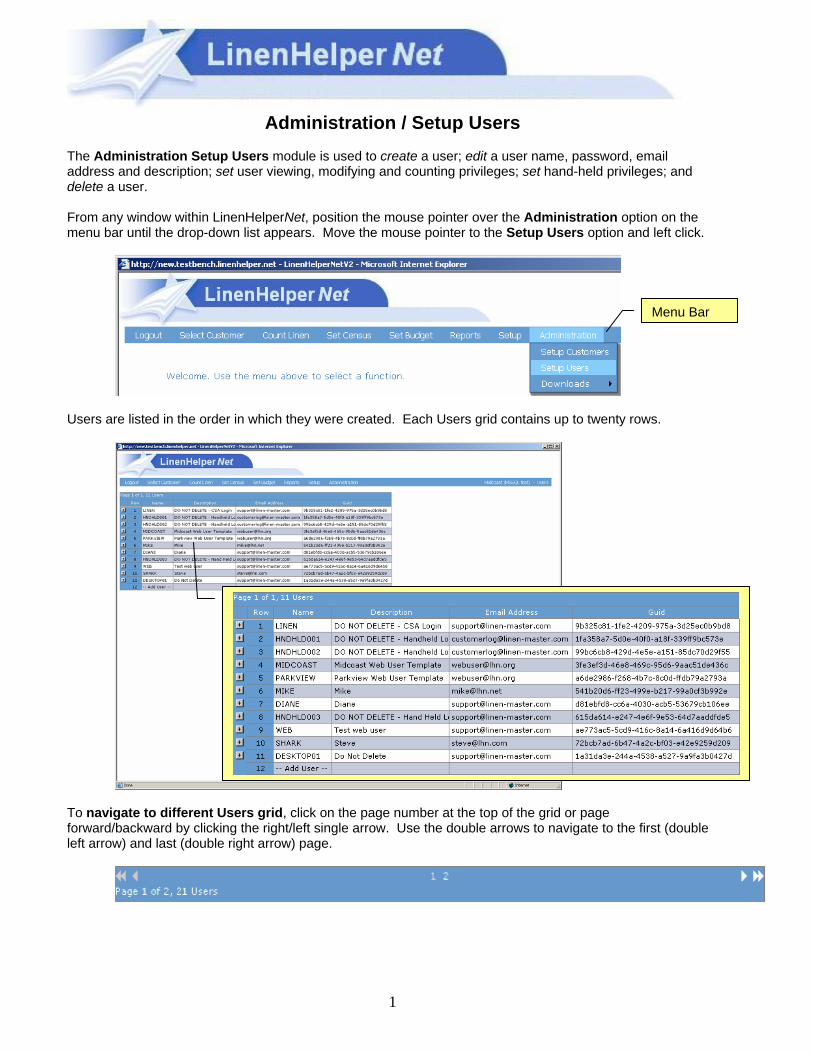
The Administration Setup Users module is used to create a user; edit a user name, password, email address and description; set user viewing, modifying and counting privileges; set hand-held privileges; and delete a user. From any window within LinenHelperNet, position the mouse pointer over the Administration option on the menu bar until the drop-down list appears. Move the mouse pointer to the Setup Users option and left click.
Menu Bar
Users are listed in the order in which they were created. Each Users grid contains up to twenty rows.
To navigate to different Users grid, click on the page number at the top of the grid or page forward/backward by clicking the right/left single arrow. Use the double arrows to navigate to the first (double left arrow) and last (double right arrow) page.

2
To add a new user, navigate to the last row on the last page of users. Double click on this row, which reads “Add User”.
-- Add User --
A detail form will be displayed.
In the detail form, type the new user name, password, email address and description and select the appropriate privileges. General User Information
The Name field indicates the name that the user will enter into the User Name field when logging in to the LinenHelperNet application. This is a required field and will hold a maximum of 10 alphanumeric characters. Type the user name and use the tab key or the mouse to move to the next field.
3
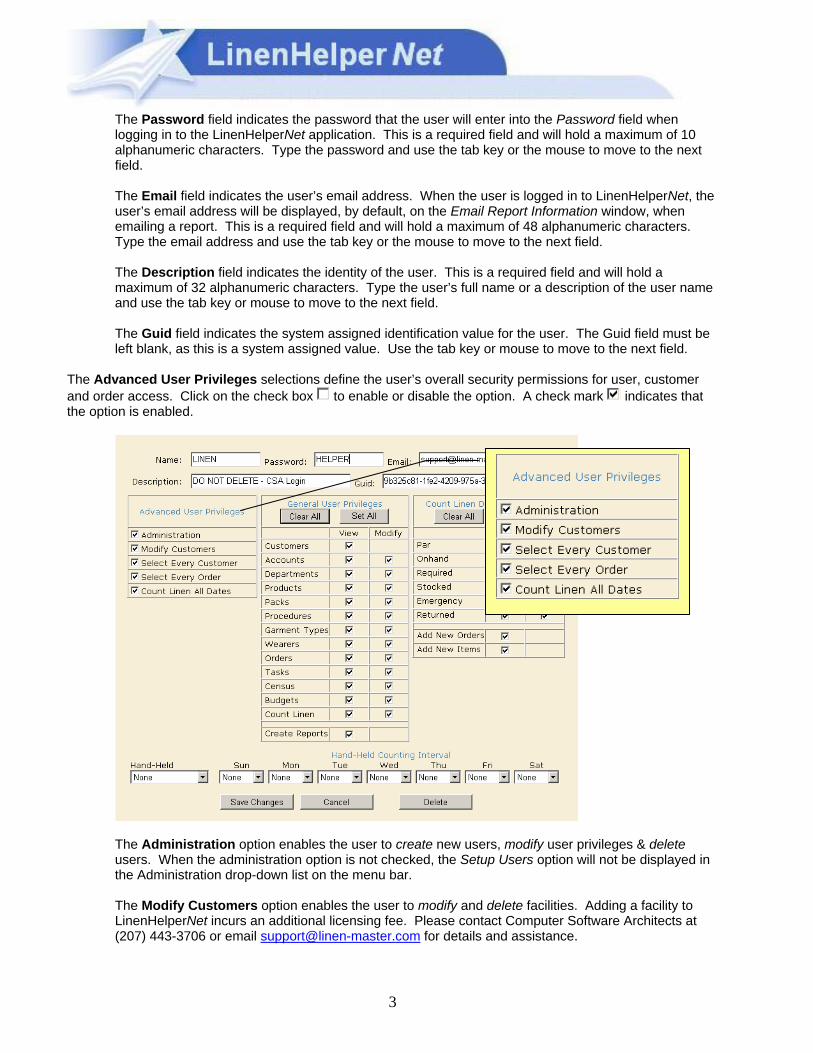
The Password field indicates the password that the user will enter into the Password field when logging in to the LinenHelperNet application. This is a required field and will hold a maximum of 10 alphanumeric characters. Type the password and use the tab key or the mouse to move to the next field. The Email field indicates the user’s email address. When the user is logged in to LinenHelperNet, the user’s email address will be displayed, by default, on the Email Report Information window, when emailing a report. This is a required field and will hold a maximum of 48 alphanumeric characters. Type the email address and use the tab key or the mouse to move to the next field. The Description field indicates the identity of the user. This is a required field and will hold a maximum of 32 alphanumeric characters. Type the user’s full name or a description of the user name and use the tab key or mouse to move to the next field. The Guid field indicates the system assigned identification value for the user. The Guid field must be left blank, as this is a system assigned value. Use the tab key or mouse to move to the next field.
The Advanced User Privileges selections define the user’s overall security permissions for user, customer and order access. Click on the check box to enable or disable the option. A check mark indicates that the option is enabled.
The Administration option enables the user to create new users, modify user privileges & delete users. When the administration option is not checked, the Setup Users option will not be displayed in the Administration drop-down list on the menu bar. The Modify Customers option enables the user to modify and delete facilities. Adding a facility to LinenHelperNet incurs an additional licensing fee. Please contact Computer Software Architects at (207) 443-3706 or email [email protected] for details and assistance.

4
The Select Every Customer option enables the user to view all facilities within the database. To define specific facilities to which the user has access, see Add a specific customer access for a user later in this document. The Select Every Order option enables the user to view all orders within all facilities for which the user has viewing privileges. To define specific orders to which the user has access, see Add a specific order access for a user later in this document. The Count Linen All Dates option enables the user to count linen on all dates. To define specific dates on which the user can count linen, see Add a specific order access for a user later in this document.
The General User Privileges selections define the view and modify privileges for the fundamental setup and data entry options. If an option is not checked, the corresponding menu option will not be displayed on the menu bar. The modify option can not be enabled if the view option is not enabled. Click on the check box to enable or disable the options. A check mark indicates that the option is enabled.
The Customers View option enables the user to view the Select Customer menu option. The Select Customer menu option gives access to the list of customers accessible to the user. From here, the user can select the customer with which to work. The Accounts View option enables the user to view the Setup Accounts menu option. The Setup Accounts menu option gives access to the customer account, department account, item account, and production account grids, displaying each exiting account. The Accounts Modify option enables the user to add, modify, and delete customer, department, item, and production accounts.

5
The Departments View option enables the user to view the Setup Departments menu option. The Setup Departments menu option gives access to the department grid, displaying the department name, type and cost account. The Departments Modify option enables the user to add, modify, and delete departments. The Products View option enables the user to view the Setup Products menu option. The Setup Products menu option gives access to the product grid, displaying the product name, weight and pricing information. The Products Modify option enables the user to add, modify and delete products.
The Packs View option enables the user to view the Setup Packs menu option. The Setup Packs menu option gives access to the packs grid, displaying the pack’s name, weight, and pricing information, as well as the product names and quantities within the pack. The Packs Modify option enables the user to add, modify and delete packs and add, modify and delete products within the pack. The Procedures View option enables the user to view the Setup Procedures menu option. The Setup Procedures menu option gives access to the procedures grid, displaying the procedure’s name, weight, and pricing information, as well as the product names and quantities within the procedure. The Procedures Modify option enables the user to add, modify and delete procedures and add, modify and delete products within the procedure. The Garment Types View option enables the user to view the Setup Garment / Garment Types menu option. The Setup Garment / Garment Types menu option gives access to the garment type grid, displaying the garment type description, parent product, sterile status, maximum cycles and testing schedule. The Garment Types Modify option enables the user to add, modify, and delete garment types. The Wearers View option enables the user to view the Setup Garment / Wearers menu option. The Setup Garment / Wearers menu option gives access to the wearer grid, displaying the wearer name, label garment mark, order and allocation status. The Wearers Modify option enables the user to add, modify, and delete wearers; and add and delete garment types associated with the wearer. The Orders View option enables the user to view the Setup Orders menu option. The Setup Orders menu option gives access to the orders grid, displaying the order’s name, department, and stocking information, as well as, the product names and stocking levels for products within the order. The Orders Modify option enables the user to add, modify and delete orders and add, modify and delete products within the orders. The Tasks View option enables the user to view the Setup Tasks menu option. The Setup Tasks menu option gives access to the workcenter grid displaying: the workcenter description, laundry, type, units of production, machines, time type, account, start time, and stop time. The Tasks Modify option enables the user to add, modify, and delete workcenters and add, modify, and delete tasks associated with the workcenters. The Census View option enables the user to view the Set Census menu option. The Set Census menu option gives access to the census grids, displaying the period, department and census quantities. The Census Modify option enables the user to add and modify monthly census quantities by department. The Budgets View option enables the user to view the Set Budget menu option. The Set Budget menu option gives access to the budget grids, displaying the period, department and budget amounts. The Budget Modify option enables the user to add and modify monthly budget amounts by department.

6
The Count Linen View option enables the user to view the Count Linen menu option. The Count Linen menu option gives access to the count linen grids, showing the stocking information. The Count Linen Modify option enables the user to enter and edit stocking quantities.
Note: See Count Linen Default Privileges section below for additional user privilege setup for count linen.
The Create Reports View option enables the user to view the Reports menu option. The Reports menu option gives access to the list of reports accessible by the user. From here, the user can select reports to be generated for viewing, emailing, printing and graphing.
7
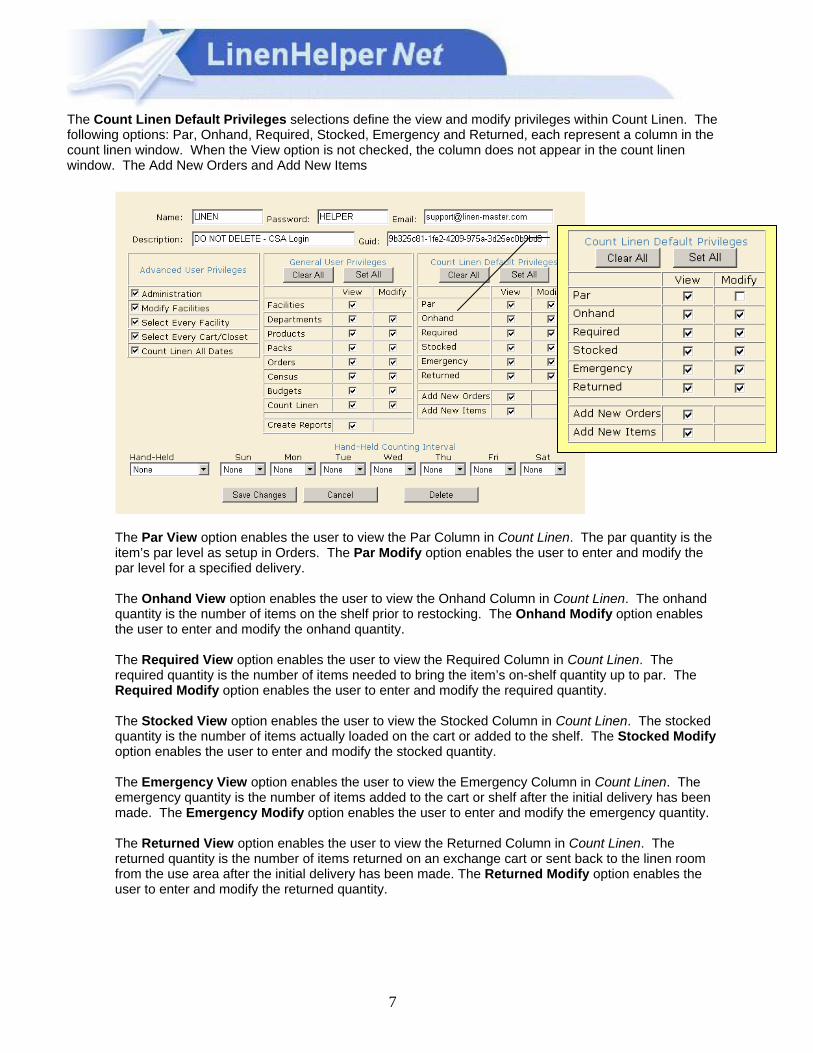
The Count Linen Default Privileges selections define the view and modify privileges within Count Linen. The following options: Par, Onhand, Required, Stocked, Emergency and Returned, each represent a column in the count linen window. When the View option is not checked, the column does not appear in the count linen window. The Add New Orders and Add New Items
The Par View option enables the user to view the Par Column in Count Linen. The par quantity is the item’s par level as setup in Orders. The Par Modify option enables the user to enter and modify the par level for a specified delivery.
The Onhand View option enables the user to view the Onhand Column in Count Linen. The onhand quantity is the number of items on the shelf prior to restocking. The Onhand Modify option enables the user to enter and modify the onhand quantity. The Required View option enables the user to view the Required Column in Count Linen. The required quantity is the number of items needed to bring the item’s on-shelf quantity up to par. The Required Modify option enables the user to enter and modify the required quantity. The Stocked View option enables the user to view the Stocked Column in Count Linen. The stocked quantity is the number of items actually loaded on the cart or added to the shelf. The Stocked Modify option enables the user to enter and modify the stocked quantity. The Emergency View option enables the user to view the Emergency Column in Count Linen. The emergency quantity is the number of items added to the cart or shelf after the initial delivery has been made. The Emergency Modify option enables the user to enter and modify the emergency quantity. The Returned View option enables the user to view the Returned Column in Count Linen. The returned quantity is the number of items returned on an exchange cart or sent back to the linen room from the use area after the initial delivery has been made. The Returned Modify option enables the user to enter and modify the returned quantity.
8
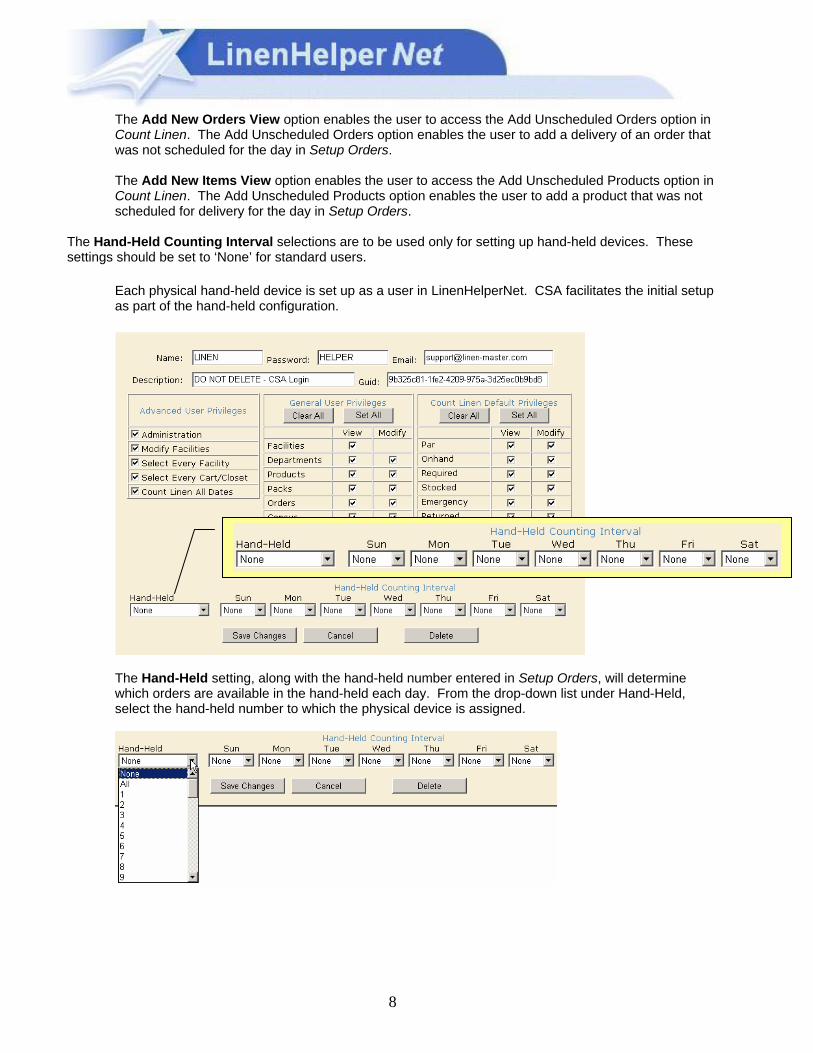
The Add New Orders View option enables the user to access the Add Unscheduled Orders option in Count Linen. The Add Unscheduled Orders option enables the user to add a delivery of an order that was not scheduled for the day in Setup Orders. The Add New Items View option enables the user to access the Add Unscheduled Products option in Count Linen. The Add Unscheduled Products option enables the user to add a product that was not scheduled for delivery for the day in Setup Orders.
The Hand-Held Counting Interval selections are to be used only for setting up hand-held devices. These settings should be set to ‘None’ for standard users.
Each physical hand-held device is set up as a user in LinenHelperNet. CSA facilitates the initial setup as part of the hand-held configuration.
The Hand-Held setting, along with the hand-held number entered in Setup Orders, will determine which orders are available in the hand-held each day. From the drop-down list under Hand-Held, select the hand-held number to which the physical device is assigned.
9
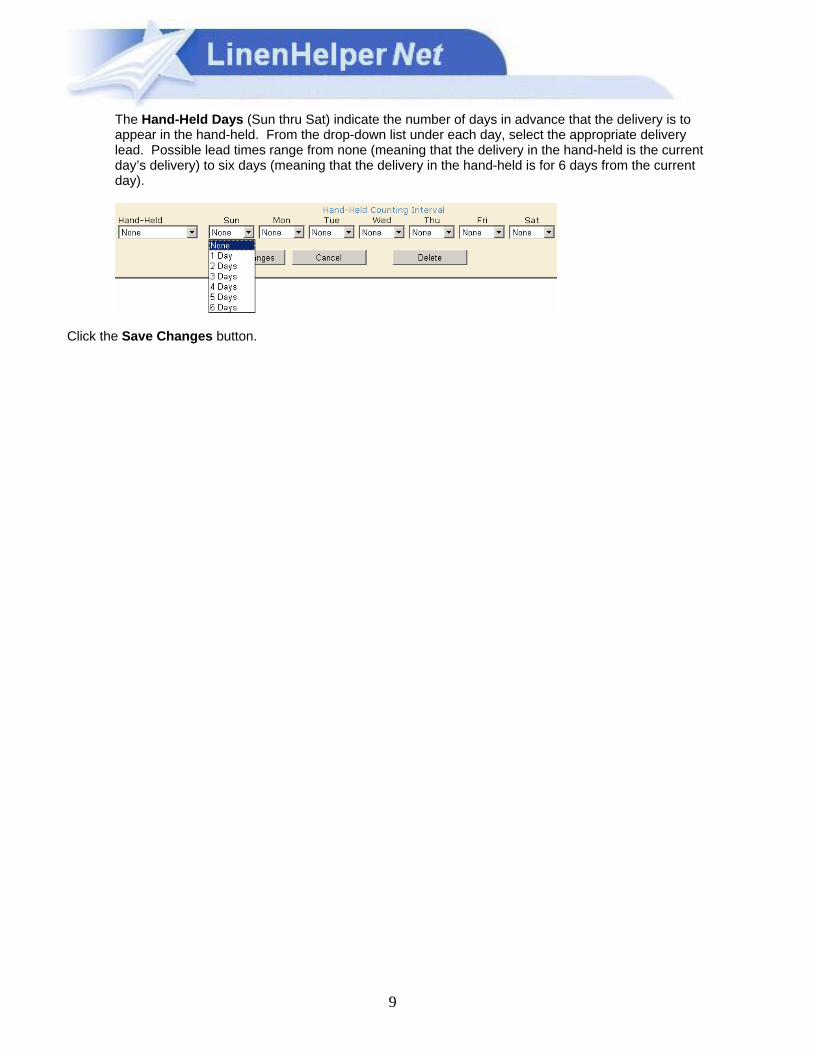
The Hand-Held Days (Sun thru Sat) indicate the number of days in advance that the delivery is to appear in the hand-held. From the drop-down list under each day, select the appropriate delivery lead. Possible lead times range from none (meaning that the delivery in the hand-held is the current day’s delivery) to six days (meaning that the delivery in the hand-held is for 6 days from the current day).
Click the Save Changes button.

10
To grant the user specific Customer Access, verify that the Select Every Customer option on the user privileges window is NOT checked.
Click on the plus sign at the left of the grid row in which the user name is located.
Then click on the plus sign at the left of the grid row which reads Customer Access. Navigate to the last row in the customers list of the grid.
Double click the row which reads -- Add Customer --.
Scroll through the customer list, click on the customer(s) to be accessed by the user and click the Add Customers button.

11
Note: To select multiple customers, hold down the CTRL key while clicking each customer. Or, to select a group of consecutive customers, click on the first customer, hold down the shift key and then click on the last customer.
To grant the user specific Order Access, click on the plus sign at the left of the grid row in which the user name is located.
Then click on the plus sign at the left of the grid row which reads Orders. Navigate to the last row in the orders list of the grid.
Double click the row which reads -- Add Order --.
Scroll through the order list, click on the order(s) to be accessed by the user and then click the Add Orders button.

12
To Edit or Delete an existing user, double click on the appropriate user row of the grid.
To Edit the user privileges, make the appropriate changes on the detail form and click the Save Changes button.
Note: User Name, Password, email address and Description are all required fields.
To delete the user, click the Delete button.
Click the OK button.

13
To remove Customer Access to a specific customer, verify that the Select Every Customer option on the user privileges window is NOT checked.
Click on the plus sign at the left of the grid row in which the user name is located.
Then click on the plus sign at the left of the grid row which reads Customer Access.

14
Double click on the customer name to be removed.
A new window will be displayed with the customer name.
Click the Delete button.

15
To edit or delete specific order privileges for a user, double click on the appropriate user row of the grid
In the detail form, select the appropriate privileges and count linen schedule. Click the Save Changes button. The Count Linen Schedule is used to indicate how far in advance the user may access to the day’s delivery. The Cutoff Time is used to indicate the time until which the user may enter linen counts into count linen on any given day. To delete the order, click the Delete button.
Click OK.