Embed Size (px)
Citation preview

© 2019 OpenText Repository Systems. All Rights Reserved.
877.557.4273catalystsecure.com
ADMIN GUIDE

Insight Administrator Guide
Introduction to Administration . . . . . . . . . . . . . . . . . . . . . . . . . . . . . . . . . . . . . . . . . . . . . . . . . . . 8
Insight Dashboard . . . . . . . . . . . . . . . . . . . . . . . . . . . . . . . . . . . . . . . . . . . . . . . . . . . . . . . . . . . 10
User Management . . . . . . . . . . . . . . . . . . . . . . . . . . . . . . . . . . . . . . . . . . . . . . . . . . . . . . . . . . . 12
Users...................................................................................................................................... 12
Add and Edit Users............................................................................................................ 12
Roles and Permissions .......................................................................................................... 14
Add and Edit Roles............................................................................................................ 17
Security Groups ..................................................................................................................... 19
Add and Edit Security Groups ........................................................................................... 19
Review Tools . . . . . . . . . . . . . . . . . . . . . . . . . . . . . . . . . . . . . . . . . . . . . . . . . . . . . . . . . . . . . . . 21
Linked Documents ................................................................................................................. 21
Lookup Admin ........................................................................................................................ 23
Add and Edit Lookups ....................................................................................................... 24
Extension Types..................................................................................................................... 24
Add and Edit Extension Types .......................................................................................... 25
Redaction Settings ................................................................................................................. 26
Add and Edit Redaction Labels ......................................................................................... 26
Add and Edit Redaction Sets............................................................................................. 28
Static Highlights ..................................................................................................................... 30
Add and Edit Highlights ..................................................................................................... 30
Site Configuration . . . . . . . . . . . . . . . . . . . . . . . . . . . . . . . . . . . . . . . . . . . . . . . . . . . . . . . . . . . 32
Site Creation .......................................................................................................................... 32
Settings .................................................................................................................................. 35
v.28-09302016 i

Insight Administrator Guide
Fields Administration.............................................................................................................. 37
Insight Field Categories..................................................................................................... 37
Search Existing Fields....................................................................................................... 38
Create a New Field............................................................................................................ 39
Viewers .................................................................................................................................. 41
Collections or Matters ............................................................................................................ 42
Add and Edit Collections ................................................................................................... 43
Search Fields ......................................................................................................................... 45
Dynamic Folders .................................................................................................................... 46
Create Dynamic Folder Structures......................................................................................... 47
Search Aliases and Groups ................................................................................................... 48
Field Aliases........................................................................................................................... 51
Forms Administration . . . . . . . . . . . . . . . . . . . . . . . . . . . . . . . . . . . . . . . . . . . . . . . . . . . . . . . . . 55
Forms Admin Options Menu .................................................................................................. 55
Add or Edit Forms.............................................................................................................. 55
Add Fields to a Form.............................................................................................................. 56
Form Settings......................................................................................................................... 58
Duplicate Existing Forms ....................................................................................................... 59
Delete Form ........................................................................................................................... 60
Arrange the Fields in a Form.................................................................................................. 61
Shortcuts (Macros)................................................................................................................. 62
Create a New Form................................................................................................................ 65
Field Options Menu ................................................................................................................ 65
v.28-09302016 ii

Insight Administrator Guide
Field Rules for Forms............................................................................................................. 66
Add and Edit Rules............................................................................................................ 67
Review Projects Administration . . . . . . . . . . . . . . . . . . . . . . . . . . . . . . . . . . . . . . . . . . . . . . . . . 71
Why Use Review Projects?.................................................................................................... 71
Project Planning ..................................................................................................................... 72
Create a Project ..................................................................................................................... 73
Creating Stages ..................................................................................................................... 74
Add Users .............................................................................................................................. 76
Self-Assignment Options........................................................................................................ 78
Stage Rules............................................................................................................................ 82
Stage Settings........................................................................................................................ 85
Other Options......................................................................................................................... 86
Review Administration Actions............................................................................................... 87
Review Project Reports.......................................................................................................... 88
Productivity Report ............................................................................................................ 88
Coding Distribution Report ................................................................................................ 89
Insight Predict . . . . . . . . . . . . . . . . . . . . . . . . . . . . . . . . . . . . . . . . . . . . . . . . . . . . . . . . . . . . . . 91
How Insight Predict Works ..................................................................................................... 91
Ranking ............................................................................................................................. 92
Continuous Active Learning (CAL) .................................................................................... 92
Insight Predict—Why It Is Different ........................................................................................ 93
Permission ............................................................................................................................. 93
Workflow ................................................................................................................................ 94
v.28-09302016 iii

Insight Administrator Guide
Create a Predict Project ......................................................................................................... 94
Create a Collection ............................................................................................................ 95
Create a New Predict Project ............................................................................................ 96
Review and Training Predict .................................................................................................. 97
Review = Training.............................................................................................................. 97
Review Module and Prioritized Review ............................................................................. 98
Predict Module Overview................................................................................................. 100
Manage the QC and Systematic Random Stages ............................................................... 102
QC Stage......................................................................................................................... 102
Systematic Random Stage.............................................................................................. 105
Report and Charts................................................................................................................ 107
Review Statistics Tab ...................................................................................................... 107
Progress Tab................................................................................................................... 110
High Ranked Positive Terms Tab.................................................................................... 112
Top Ranked Docs by Custodian Tab............................................................................... 113
Yield Curve...................................................................................................................... 113
Productivity and Coding Distribution Reports .................................................................. 119
Send Documents to a Review Project.................................................................................. 120
Predict Options Menu........................................................................................................... 121
Reports . . . . . . . . . . . . . . . . . . . . . . . . . . . . . . . . . . . . . . . . . . . . . . . . . . . . . . . . . . . . . . . . . . 124
Document Audit Trail Reports .............................................................................................. 124
User Audit Trail Reports....................................................................................................... 127
Summary View ................................................................................................................ 127
v.28-09302016 iv

Insight Administrator Guide
Detailed View................................................................................................................... 129
Production Module . . . . . . . . . . . . . . . . . . . . . . . . . . . . . . . . . . . . . . . . . . . . . . . . . . . . . . . . . . 131
Create Production Folders ................................................................................................... 131
Configure Placeholders........................................................................................................ 132
Provide Production Specifications........................................................................................ 134
Basic Information............................................................................................................. 134
Status .............................................................................................................................. 135
Input/Output..................................................................................................................... 136
Placeholder Rules ........................................................................................................... 138
Configure Endorsements ..................................................................................................... 139
Rule-Based Endorsements.............................................................................................. 140
Text-Based Endorsements .............................................................................................. 141
Watermarks ..................................................................................................................... 143
Provide Load File Specifications .......................................................................................... 143
Add Fields to Load Files .................................................................................................. 144
Reorder Fields................................................................................................................. 145
Set QC Rules ....................................................................................................................... 147
Provide Delivery Instructions................................................................................................ 148
Copy Documents to the Production Folder .......................................................................... 148
Run Productions................................................................................................................... 149
Clone, Edit and Delete Production Folders .......................................................................... 153
v.28-09302016 v

Insight Admin Guide
Introduction to Administration
Insight users with rights to administrative features, will see the Administration (cogs) button in
the left navigation bar. Most administrative features are available here. However, Forms
administration is carried out within an opened document. Predict and Review Projects
administration takes place in the dashboards of those modules. Auditing of document changes
and user activity can be found at Reports. Typically, high-level user commands are also given to
administrative users. Details can be found in the Insight User Guide.
The site Dashboard is the home page for Insight administrators.
The sections available when you click the Administration button may include: User
Management, Review Tools and Site Configuration. Each of these sections contains features
that are also controlled by permissions.
v.28-09302016 8

Insight Admin Guide
All users in your site are set up in a Security Group and associated with a Role. The Role
contains permissions to the options and the forms that users assigned to the Role need. As an
administrator, your Role may have rights to create Search and Field Aliases or customize Search
Fields, manage Collections or Matters and Create New Sites.
The User Management section is available to administrators with rights to manage Users, Roles
and Security Groups. When your site is set up, there is at least one Security Group associated
with the site, typically the default Group. If your site is a multi-matter site or a joint defense
repository, you may have several Security Groups associated with your site. The administrative
structure of your site is, therefore, Security Groups, Roles (containing permissions and forms),
and Users. As an administrative user, you are set up in your Security Group and then assigned to
a Role that contains the rights you need.
v.28-09302016 9

Insight Admin Guide
Insight Dashboard
Insight's Dashboard page provides real-time information about the documents in your site. Those
who have the UseDashboard permission will see the Dashboard when they log into Insight (for
most users, Insight opens in the Search page).
Each chart on the Dashboard is interactive. Click on any of the items within these charts to view
those documents in the Results page.
• Document Population Overview:
Top Collections: Displays the number of documents in the top collections. This chart
will not show collections not assigned to you. Administrators typically have access to all
collections.
Non-Indexed Documents: Lists the indexing errors and provides links to retrieve those
documents.
• Document Population Over Time: Displays the number of documents uploaded by the
month of the upload.
Orange bars represent new uploads.
Blue bars represent existing uploads.
• Top Custodians: Provides a list of the custodians who have the most documents on your
site.
• Top DocTypes: Displays the types of documents that comprise the majority of your
documentation population (information often useful in native file review).
• Review Projects Breakdown: Displays the projects with the most documents, as well as
the number of documents currently unassigned to a project.
• Most Recent Jobs: Displays snapshot reports about uploads, processing and production
jobs carried out on your site. Select the appropriate option from the menu at the top of the
chart. Click view all to access detailed information regarding uploads, processing, and
production jobs.
v.28-09302016 10

Insight Admin Guide
• Review Metrics: Enables you to chart the number of documents on your site based on the
values of the field you select from the menu at the top of the chart.
• Production Metrics: Displays the number of pages and documents produced.
v.28-09302016 11

Insight Admin Guide
User Management
Users, Roles and Security Groups commands are controlled at User Management.
Your site has at least one Security Group (typically the default group), but there may be more
than one. From all the available fields on your site, fields are assigned to a Security Group based
upon the fields the users in that group should see. Roles are created within a Security Group and
contain users, permissions and forms; in other words, Roles contain users who should see the
same forms and have the same permissions.
Insight Global Administrators (designated OpenText staff) with permissions to work in more
than one Security Group are the highest-level administrators on the site and can set up new
Security Groups. Most administrators do not have permissions to more than one Security
Group within a site.
Users
If you have the UseAdminUserAdmin permission, you can add and edit users to your site. Click
the Administration button to display the Administration menu. At User Management, click
Users.
A list of current users is displayed. Search for a user by their name, user name, or email address
by using the appropriate filter and type the first few letters into the Search box.
Add and Edit Users
To add a new user:
v.28-09302016 12

Insight Admin Guide
1. Click Add User and enter a user name and the email address in the Add User dialog
box. The user name must be in lowercase letters and can include numbers.
When you click Next, the system will let you know if this email address or user name has
already been used in your site.
2. In Step 2 of the Add User dialog box, enter the user’s first and last names, and if you pre-
fer, you can also include the organization and phone number.
3. Create a temporary password for the user and enter it into the required Password boxes.
Passwords must be at least eight characters long and contain one uppercase and one
lowercase letter, one number, and one special character. The system will tell you the
password is secure and allow you continue to add the user. The Add User button is not
enabled until you create a secure password. Weak and normal passwords are not
allowed.
4. At Role, use the menu to select the Role to associate with this user.
5. Select the appropriate Collections (Matters on multi-matter sites) checkboxes to give
this user access to appropriate sets of documents.
6. Click Add User to associate this user with this site.
7. To display user information, click the View (magnifying glass) button in the row. Remove
the user from the site by clicking the Delete (X) button.
8. To change a user’s information, click the Edit (pencil) button in the user’s row. If a user
forgets their password, you can create a new temporary password in the Edit User dialog
box. You will not be able to see or retrieve the current password; enter a new password
for the user, and ask the user to recreate a new personal password.
You can also reassign the user to a different Role and other Collections/Matters or update
personal information in the Edit User dialog box.
v.28-09302016 13

Insight Admin Guide
Roles and Permissions
In Insight, user permissions are associated with Roles, and when users are added to the site (in
the appropriate Security Group), they are given specific permissions to actions and to forms by
their association to a specific Role.
Insight is flexible, allowing administrators to set up different Roles for users and limit or grant
Actions (permissions) based upon your site’s needs. Most sites are set up with these standard
Roles.
Basic User: Basic Users have limited rights on the site. Typically they can review and code their
documents, run searches, use folders and compare folders and convert native files to PDF. They
can also create custom display forms for their own use in the Results page, view the history of
changes to the document while on the site and download native files for native file review.
Basic Users may have permissions to:
• Can Use More Like This
• Compare Folders
• Convert to PDF
• Copy to Folder
• Dowload Native
• Edit Display Forms (user’s personal Results page displays)
• Redact
• Tag Previous
• Use Dynamic Folders
• Use Folders
• Use Fail Print Job on Conversion
• Use Private Folders
v.28-09302016 14

Insight Admin Guide
• Use Public Folders
• Use Review Module
• Use Search
• Use Shared Folders
• Use Translation
• View Doc History
• View Non-indexed Documents
Senior User: Senior Users have all the rights of the Basic User as well as more advanced
permissions. Typically, Senior Users can bulk update, bulk print and export documents on the
site, lock folders and create production folders. Advanced Rights available for Senior Users
include:
• Batch Print
• Bulk Convert
• Bulk Updates
• Can Resubmit Failed Jobs
• Export
• Lock/Unlock Folders
Review Administrator: The Review Administrator has the rights of a Senior User and has the
rights to administrative permissions. If the site is using the Review Projects module, the
administrator can manage the review, compile reports about the project's status, reviewers'
heuristics, etc. Rights available to Review Administrators include:
• Administer Review Module
• Batch Documents
v.28-09302016 15

Insight Admin Guide
• Bulk OCR
• Create Predict Database
• Edit Display Forms (when given with the UseAdmin permission, can create and edit default
Results page displays for the site).
• Edit Review Forms
• Lock Documents
• Manage Other Users Jobs
• Override Check Text for OCR
• Override Locked Documents
• Replace PDF
• Update Subcollections
• UseAdmin Field Aliases
• UseAdmin Folder Views
• UseAdmin Highlight Words
• UseAdmin Lookup Admin
• UseAdmin Redaction Admin
• UseAdmin Search Aliases
• UseAdmin Search Fields
• UseAdmin User Admin
• Use AutoRotate for OCR
• Use Color for OCR
• View Audit Trail Reports
v.28-09302016 16

Insight Admin Guide
Case Administrator: The Case Administrator is the lead person who is in charge of the site and
has access to all administrative functions. The Case Administrator can overwrite PDF files,
delete or edit any folder on the site, regardless of who created it. Only Case Administrators have
the ability to add and edit Roles in User Administration. Refer to the Permissions List for more
information.
Rights available to Case Administrators include:
• Manage Public Folders
• Overwrite PDF for Conversion
• Overwrite PDF for OCR
• Remove Shared Folder Permissions
• Replace Body Text from Converted PDF
• UseAdmin Case Admin
• UseAdmin Collections
• UseAdmin Extension Types
• UseAdmin Roles Admin
To manage Roles, click Roles in the Administration menu. Ensure you are in the appropriate
Security Group or click Change to select the group. Existing Roles are listed.
Add and Edit Roles
To add a new role:
1. Click the Add Role button.
2. Add Users, Forms, and Actions to a Role by moving items from the left Available list to
the right Selected list. Use the Triangle buttons to move items from one list to the other.
3. Click Add Role.
v.28-09302016 17

Insight Admin Guide
4. To view the users, forms, and permissions (actions) associated with an existing role,
select the role in the list, so that it is highlighted in orange. You can use the Search box at
the top of each section to search for a value if your list is large.
5. To add or remove users, forms, and permissions from a role by moving items between the
Available and Selected lists using the Arrow and Triangle buttons. Click Update to save
your changes.
v.28-09302016 18

Insight Admin Guide
Security Groups
If you are a global administrator with rights to all the Security Groups on your site, you will have
the ability to add new Security Groups and change the fields that members of each Security
Group can see.
To add or edit groups, click Security Groups in the Administration menu. In the Security
Groups page, you can add new groups and associate fields with that group or edit and change
fields to an existing group.
Add and Edit Security Groups
To add a new group:
1. Click Add Security Group and provide an appropriate name for the Security Group. Use
the Arrow or Triangle buttons to associate fields with the group by moving fields from the
Available Fields list to the Selected Fields list. You can type in the first few letters of a
field name in the Search (magnifying glass) box to focus the list if it is large. Click Add
Group.
2. To edit an existing group, click the group name so that it is highlighted in orange, and then
move fields between the Available Fields and Selected Fields list, and click the Update
Group button when finished. If you have rights to more than one Security Group, ensure
you are in the appropriate group when you make changes to these administrative fea-
tures:
• Users
• Roles
• Highlights
• Search Fields
• Dynamic Folders
• Search Aliases
• Field Aliases
v.28-09302016 19

Insight Admin Guide
v.28-09302016 20

Insight Admin Guide
Review Tools
If your admin rights give you access to the Review Tools section of Administration, you can
customize your site. You may have permissions to one or more of the Tools features, which
include the ability to create links to associated documents (e.g., family relationships, duplicates,
email threads) and manage lookup tables (add, edit or delete fields and values). Extension
Types allows you to set the type of viewer to be used to display a specific file based upon its
extension (for example, using the Excel viewer for all .xls and .xlsx files).
Review Tools also allows administrators to manage redaction sets and redaction labels and
static (persistent) highlights on your site.
Click the Administration button in the main navigation bar to display the Review Tools to which
you have access.
Linked Documents
Manage the display of relationship documents in the Review form at Linked Documents. When
a site is cloned, typically Related and Duplicate sections are created automatically at Linked
Documents in the Review form, but you can edit, create or delete relationships and their
properties.
1. Click Linked Documents in the Administration menu.
If document associations have already been linked, you will see the list.
2. Use the Edit (pencil) button to make changes to an existing linked relationship or the
Delete (trash can) button to remove the relationship.
For example, if you were to delete the Duplicate relationship, then reviewers would not
see the links to duplicate documents in the Review form. That section is no longer dis-
played in the form. It is important to note this is not removing duplicate documents on
your site; it is simply removing this relationship in the Review form of an opened docu-
ment.
v.28-09302016 21

Insight Admin Guide
3. To add a new association of linked documents, click the Add Linked Document button.
4. Provide the name. The description becomes the name of the link in the document form.
You can then set several characteristics.
v.28-09302016 22

Insight Admin Guide
• Display Fields: Establish how the documents are identified in the linked relationship.
The BegControl field is often used.
• Linked Fields: Highlight the field that determines the association.
• Sort Order: Set the order of the documents appear under the link.
• Review Lock: To include locked documents locked documents in the link.
• Tag All in Detail Checked: Select this option if you want the Tag All checkbox in the
document form for your link to be enabled and selected by default.
• Tag All in Detail Enabled: Select this option if you’d like Tag All enabled, but not
selected by default
• Honor Collections (named Honor Matters in multi-matter sites): Select this option if
you want the linked relationship to place the documents in the relationship in the same
collection and not span different collections.
Lookup Admin
Lookup tables are used to conform (normalize) data. Administrators can associate the lookup
table values to the database fields (the fields used on the site). You can create, edit and delete
values for fields by clicking Lookup Admin in the Administration menu. Each lookup table on
your site can only be associated to one field. See Fields for more information.
In the Lookup Admin page, a list of your site’s fields is on the left at Lookup Names. Click a
field name to see the list of values associated with the field. In the below example, the values for
the Issue field are listed at Lookup Values.
v.28-09302016 23

Insight Admin Guide
Add and Edit Lookups
To add a new lookup table:
1. Click the Add Lookup button and enter the name.
2. Find the name in the list and click it to enable it.
You can now add values by clicking the Add Lookup Value button.
3. Type or copy your values into the Lookup Values box. If you are adding more than one
value, select the Delimiter option for the way you are separating your entries in the
Lookup Values box.
Be aware of your delimiter. For example, if you enter several values separated by com-
mas but you leave the Semicolon option selected, the system will view all the text as one
value.
The field values you enter will display in alphabetical order in the Lookup Values list and,
most importantly, when the field is displayed in a document form.
4. If you want to override the alphabetical order, use numbers to place your values in your
specified order.
For example, perhaps your matter requires several value choices in the Issues field, but
you’d like certain values to be displayed first because they will be used most often.
The values will appear numerically and then alphabetically, if available, in descending
order.
5. To delete values, select their checkboxes and click the Delete Selected Lookup Values
button. To delete just one value, click the Minus (-) button associated with the value. To
delete a lookup table entirely, select the Minus (-) button in the field’s row.
Extension Types
More than 350 different file types can be uploaded and viewed in Insight. Extension types are
typically designated during site setup.
v.28-09302016 24

Insight Admin Guide
Add and Edit Extension Types
To add or edit extension types:
1. Access the Extension Types page from the Administration menu.
You will see a list of other extensions used in your site, and you can add new ones.
2. Click the Delete (trash can) button to remove an extension type from the site.
3. Use the Edit (pencil) button to make changes to an existing extension type.
4. If you have a file type that does not already have a viewer designated for it, click the Add
Extension Type button.
The information you enter in the Extension box must begin with a period/dot (.); you will
receive a warning if this is not included. Next use the Viewer Name menu to select the
type of viewer Insight will use to display the file. Typically, extensions are entered this
way:
• Video files, such as .wav, .mp3, .mp4, are set to Media
• Image files, such as .png or .bmp, are set to Image
• Excel is used for all versions of Excel files
• PDF is used for documents uploaded as PDFs
5. You can enter a description or explanation in the Description box.
6. If you want the viewer to be the default for the file type, select the Default checkbox.
When a reviewer opens a document of this particular file type, the first viewer to display
will be the one you have designated as the default. If other views are available, such as a
PDF version, the reviewer will still be able to change views.
7. Click Add.
The extension type is added to your site, is now displayed in the list, and the settings you
have selected will be applied to the file extension.
v.28-09302016 25

Insight Admin Guide
Redaction Settings
To manage redaction boxes and redaction sets available to users who are redacting documents,
click Redaction Settings in the Administration menu.
The redaction labels already available on your site are displayed at the top of the screen. The
redaction sets are listed at the bottom. The redaction label is the name of the redaction button,
which when selected allows users to place a redaction box over text they wish to remove in the
document. You can create more than one redaction set for your site. Typically, you will have a
default set, but if you need reviewers to redact the same record different ways for different
productions, you can instruct them to save a redacted version to the appropriate set.
Add and Edit Redaction Labels
To add a new redaction label:
1. Click the Add New Redaction Label button at the top of the Redaction Settings page
and complete the appropriate fields.
v.28-09302016 26

Insight Admin Guide
2. In the Add Redaction Label dialog box, enter the name for the button at Label Text.
3. Create the wording for the redaction box at Redaction Text. This is the information on the
redaction box placed by the reviewer and that will be seen when viewing the redacted
version of a record.
4. Expand the Font Name and Font Size menus to select the font and size. Use the color
palette to select the font color at Font Color. If you want the text to be bolded, select the
Is Bold checkbox.
5. If you want to include a tooltip that appears when a user points at the button, include the
information at Tooltip. You can leave this blank if you don’t need a tooltip.
6. Opt to have the text on the redaction box left aligned, centered or right aligned at Label
Text Alignment.
7. You can select the box color and the border color using the color palettes at Box Color
and Box Border Color.
8. If you would like this redaction box to be the default choice, select the Is Default check-
box.
v.28-09302016 27

Insight Admin Guide
9. All users with permissions to redact will be able to adjust the font of the redaction labels
so that the redaction text will fit into the box they are drawing. If you would like to allow the
users to edit the look of the redaction text (font, bold, size, color, etc.) and the actual text
of the redaction box, select the Allow User Edit checkbox. Use this checkbox with care.
You typically do not want your redaction team to be able to edit anything but the font size.
10.Click the Add button.
The new redaction button will not be available for users in the redaction module and will
appear in the Redaction Labels list.
11.To edit an existing redaction label, click its Edit (pencil) button to open the Edit Redac-
tion Label dialog box.
12.Click the Delete (trash can) button to remove the redaction label, so that it is no longer
available for reviewers to use when redacting.
Add and Edit Redaction Sets
To add a new redaction set:
1. Click the Add New Redaction Set button at the top of the Redaction Settings page and
complete the appropriate fields.
v.28-09302016 28

Insight Admin Guide
2. Enter a name for the set in the Add New Set Name box.
3. If you would like a tool tip for the set, enter this at Description.
4. If you want this set to be the default set that users will store redacted versions to, select
the Is Default checkbox. This set will be used to store redacted versions until a user
selects a different set.
5. Click Add.
6. This set will be used to store redacted versions until a user selects a different set.
7. To edit an existing redaction set, click its Edit (pencil) button to open the Edit Redaction
Set dialog box.
8. Click the Delete (trash can) button to remove the redaction set, so that it is no longer
available for reviewers to use when redacting.
9. To display the redacted versions stored within a redaction set, click the View (magnifying
glass) button. The Redacted Documents list is sortable by column headers.
For example, if you’d like to see a redacted version created by a particular user, use the
Redacted By to sort. To open the redacted document, click the View (magnifying glass)
button in the document row.
v.28-09302016 29

Insight Admin Guide
Static Highlights
If you have permission to access Highlights in the Administration Review tools, you can
designate certain words to appear highlighted in the document preview. Using this static or
persistent highlighting feature, you can also select the highlighting color. Perhaps you want all
static highlights to be green. Or you want one color for all responsive terms and another for all
privileged terms. Terms found by a search query will be highlighted in yellow, so you might want
to use colors other than yellow for the static highlights.
Add and Edit Highlights
To add and edit highlights:
1. Click Highlights in the Administration menu.
If you have rights to administer more than one security group on your site, ensure you are
working in the correct group or click Change to select your group and make your high-
lights available to the appropriate users.
2. To assign highlighting to a new terms, click Create Highlight Set. Name your highlight
set, select a color to highlight these terms, and click Create Highlight Set.
3. Once the set is created, click Add Highlight Terms(s), enter the terms in the text box,
and click Add. If you enter more than one term at a time, separate the terms with com-
mas, semi-colons or hard returns. Select the appropriate delimiter.
Note: Highlight terms are not case sensitive and can include wildcards. For example,
mar* will highlight both marked and Mary within a document. Avoid using other search
syntax characters (quotation marks, parentheses, or brackets). Do not use proximity
v.28-09302016 30

Insight Admin Guide
search syntax (john near/2 doe), as search functionality is not available within highlight
sets.
4. To add or remove terms from a highlight set, click on the set name. If you added more
than one term to your set, you will see each term listed separately by row. To remove an
entire set or a specific term from the highlight set, click Delete.
5. To change the properties of a set or to change a highlight term, click the Edit button.
v.28-09302016 31

Insight Admin Guide
Site Configuration
Site Configuration allows administrators to manage Collections (Matters on multi-matter sites),
the Filtered List of fields available in the Search Assist, and create and manage Search and
Field Aliases, and Dynamic Folders. The options you see are based upon the permissions
given to your role. Administrators with the highest level of permissions can also manage fields.
Site Creation
As an Insight Administrator, you may be given the permission to create (clone) new sites.
Consult your OpenText Project Consultant if you need this permission.
To create a site:
1. Click the Create Site button in the Administration menu, which will also available in your
Site List.
2. Acknowledge the cost warning by clicking the Continue button.
v.28-09302016 32

Insight Admin Guide
3. In the Create Site Wizard, enter the site name and select the site properties.
4. The information you enter in the Name field will be the site name displayed in the Insight
interface. It can contain spaces and upper and lowercase characters.
5. Expand the Site Template menu and select the site that will be cloned.
All sites created within Insight are cloned either from your model site or another site
already created for you.
6. The Tokenized Language menu is set to English by default.
When the language cannot be detected in a document, the default language you select
here will be used for searching purposes.
7. Expand the Time Zone menu and select the appropriate time.
By default, when an email is converted to PDF, the time zone used is based upon the time
settings of the OpenText servers in Denver (Mountain Time Zone). This can lead to dis-
crepancies between what is displayed in the opened document and what was extracted
during processing. The time zone can be overwritten and set to a preferred time zone dis-
played in the PDF view of a document.
8. Click the Select the Groups and Users button to copy Security Groups and users to
your new site. If no checkboxes are selected at Choose Security Groups to Copy, a
default Security Group will be created with the default properties.
Cloning Security Groups also clones the Roles and Permissions of the groups you select.
After you select the Security Group, a list of users associated to that group or groups
appears in the User List. You can copy specific users or all users from this list. To copy all
users from the original site to the cloned site, click the Right Arrow button to move the
users from the Available Users to the Users to Copy list. You can select individual users
by clicking the Arrow at the user name. Click the Save button when you’ve made your
selections.
v.28-09302016 33

Insight Admin Guide
9. Expand the Other Settings to Copy menu and select other properties to copy to your
new site. By default, all options are selected. Clear any checkboxes for properties you do
not wish to be copied to your new site. It is easy to create new collections and folder
structures within the site if you do not clone them here, but cloning things like collections,
Dynamic Folders structures, redaction sets and labels, forms, and lookups, can be a
great time saver, when appropriate.
If you choose not to clone collections to your new site, a default collection is created.
Keep in mind that the documents associated with collections on the original site are not
copied to the new site, just the names of the collections.
If you copy Dynamic Folders, the folder structures of all selected Security Groups will be
copied into the appropriate Security Group on the new site. This is also the way the Doc-
ument forms are cloned—for use in the appropriate Security Group. If you clear the Copy
Forms checkbox, a default set of forms is created.
10. Click the Create Site button.
The site creation process starts. Note that all fields from the site modeled are cloned to
the new site, and facets are created for the fields that have facets. You will see the site in
your list of sites when you log in to Insight, but you will not be able to access it until you
receive a site completion email from OpenText.
v.28-09302016 34

Insight Admin Guide
After you receive the email, you will be able to access the Automated FTP folders and add
documents for loading. You will also be able access the site itself and customize it, as necessary.
A sample document is automatically loaded to the site, which will enable you to access the
Forms Administration section of Insight.
To download a sample zipped file of documents. go to the Downloadable Documents page and
select the Sample Docs for Upload link, or download the files from here: Sample Docs for
Upload. Then, copy the file into your P2 dropbox on the FTP. We recommend that you put these,
or any other sample documents, into a separate collection on the site so they do not become
mixed in with your site documents. You can remove them later.
Settings
As a case administrator, you may have access to the Site Configuration Settings page. Most
settings were determined at site setup, and typically, it will not be necessary to change them
once the matter is underway.
To make changes:
1. Click Settings in the Admin menu and click the Edit Site button to enable changes.
2. You can rename the user interface name for the site at Display Name. This name can
include case and spaces, such as Insight Demo.
3. If your site requires a landing page your users must read and acknowledge before
accessing the site, select the Use Agreement checkbox. Add the URL for your landing
page at the Agreement Page text box.
The Partner Reference field is set up during site setup. It should not be changed here.
The Default Language field is a legacy field that does not function in this page.
4. The Time Zone ID field allows you to normalize the sent/received times of emails viewed
in the document page. Options include all time zones world wide. Expand the menu and
highlight your new setting.
The Search Engine URL is set at site setup, and should not be changed.
v.28-09302016 35

Insight Admin Guide
At Tokenized Language, you can see the language used for indexing. Generally, this
should not be changed in this page, as it is typically determined at site setup.
The Matter Number is determined and populated at site setup and should not be
changed.
5. You can make your site a Private Fields site in this page by selecting this checkbox. This
is originally determined at site setup, but can be selected at this page. If it were made a
Private Fields site, you cannot clear the checkbox and change this to a non-private field
site.
The Use Token checkbox is not active. This would require users to access the site with
an extra level of security, but you cannot designate the higher-access level in this page.
The Debug checkbox should only be selected by developers when changes to the code
are required. Once they have completed the code changes, they clear the checkbox, and
the site will operate normally.
6. Select the Fast Track checkbox to receive FTP and access to other functions that allow
you to use Fast Track processing and uploading.
7. Select the Enterprise checkbox to make the site a multi-matter site.
v.28-09302016 36

Insight Admin Guide
Sites are not typically designated as multi-matter, so please speak with your
OpenText Project Consultant if you need a multi-matter site.
The Site Logo field is an inactive legacy field. Logos are associated to partner sites in
Global Administration.
8. To change the amount of time between when a user is idle and when the site logs off the
idle user, expand the Session Timeout (Minutes) menu. Options available are between
15 minutes and 24 hours.
9. Click the Save Site button at the top of the page to save your changes.
Fields Administration
Insight offers approximately 200 fields to be used in conjunction with your site.
Insight Field Categories
Insight fields are categorized in this way:
• Control Fields: These fields are used as an identifier to group, link or track your
documents.
• Doc Status: Fields used to track information about a document. Other fields can be added
or edited, but again, do this before documents are loaded to the site if at all possible.
• eDoc: Fields that contain data about electronic documents.
v.28-09302016 37

Insight Admin Guide
• Email: Fields containing data associated with emails.
• Equivio: Fields populated by Equivio processing.
• Name: Fields containing names identified in electronic documents or emails.
• Production: Fields used specifically for production of documents.
• Review Fields: Review fields are typically user editable fields that are made available in
document forms.
• Spare: Fields that can be used for a specific purposes relating to the case.
• System: System fields are used by the application and are not editable.
• Upload: Fields populated by and/or only used by the upload process or fields populated at
upload time.
• Virtual: System fields are used for specific purposes within the application.
Fields that are editable have an Edit (pencil) button. Clicking it allows you to change certain
properties.
Single-value fields can be edited to multi-value fields, but multi-value fields cannot be edited to
single-value fields.
Search Existing Fields
To search for existing fields, use the filters appearing on the left side of the page.
• All: Displays all fields associated with your site; selected by default.
• Default Fields: Displays only the fields created automatically for your site.
• Custom Fields: Narrows the page content to those fields that were customized for the site.
• Category: Displays fields by category.
If, for example, you wanted to see all fields categorized as email fields, select the Email
checkbox, and the list will automatically refresh to limit the list to only those fields.
• Find Fields: Allows you to search for fields containing the text entered.
v.28-09302016 38

Insight Admin Guide
If you need to add or change fields, click the Edit Fields button at the top of the page. This button
may temporarily be disabled if processes involving fields are being carried out on the site. Certain
existing field names and properties might not be editable because they are already written to the
XML record for existing documents.
Create a New Field
To create a new field:
1. Click the Create Custom Field button.
2. In the Create Custom Field dialog box, enter a name for your field (the system will inform
you if the name doesn’t match the system requirements).
3. At Data Type, expand the menu and select the database type.
4. Choose Date/Time to create a field that will be populated with date and time information.
Date fields will only contain date information.
5. Most fields are Text fields, which mean they do not have to meet specific criteria. If the
field will contain numbers that are not dates, select Number. Once a custom field has
been saved in the database, the Data Type menu is no longer enabled. You cannot
change the type of data for a field once it is stored.
6. The next field properties you can set include:
v.28-09302016 39

Insight Admin Guide
• Multi-Value: Select this checkbox to allow the field to contain more than one value.
Multi-value fields typically have Lookup tables associated with them. If a field is added
as a multi-value field, this checkbox will no longer be enabled. You cannot take a field
from multi- to single-value. You can change a field to multi-value if it were added as a
single-value field.
• Private: Select this checkbox to ensure the field can only be assigned to one Security
Group. This checkbox is not available for editing after the field is saved.
• Search Fields: Select this checkbox to make the field available in Search Fields
administration. The field can then be made available in the Field Name menu of Search
Assist.
• Lookup List: If you need to associate a lookup table to your field, expand the
Lookup List menu, and select the lookup table. A table can only be associated to one
field. Lookups in use are not available for selection in the menu.
• Default Value: If the field needs to be populated with a default value, enter this at the
Default Value text box. This only affects futures document uploads. If documents are
already on the site, the field will not be automatically updated with the value.
• Bulk Updatable: Select this checkbox to make the field available for updating in the
Bulk Update Wizard.
• Printable: Select this checkbox to make the field available for selecting in the Batch
Print Wizard.
• Exportable: Select this checkbox to make the field available to use in the Export
Wizard.
• Group By: This checkbox is not enabled for custom fields. Fields with this property can
be used to group documents.
• Batch By: Select this checkbox to make the field available for updating with batch
numbers in the Batch Wizard.
7. Click the Add to Pending Changes button.
v.28-09302016 40

Insight Admin Guide
The Save Changes button is enabled.
8. Click this button to instruct the system to carry out all the field changes you have made.
Any edits you made in the field dialog boxes will not be captured if you do not click Save
Changes.
Viewers
Viewers allow you to select the mode of displaying a record based on the record file type.
1. Click the Viewers button in the Administration menu.
2. Click the Edit (pencil) button to change a viewer’s settings. Make your changes and click
Update.
3. Click the Delete (trash can) button to remove a viewer.
v.28-09302016 41

Insight Admin Guide
Collections or Matters
Collections or Matters are used in Insight to group documents and to provide appropriate users
access to those documents.
• If your site is a standard site, the groups are Collections of documents.
• If your site is a multi-matter site, the groups are called Matters.
In sites designated as multi-matter, a single document can be used across multiple mat-
ters, enabling your site to accommodate an enterprise-scale workflow for multiple legal
matters. The flexibility of Insight’s XML-based technology allows for single-instance stor-
age across multiple matters. The XML database links individual documents and their cod-
ing to multiple cases without creating duplicate data sets, and eliminates coding conflicts.
v.28-09302016 42

Insight Admin Guide
For purposes of documentation, groups of documents will be called Collections, but the same
instructions apply to managing matters in a multi-matter site.
Add and Edit Collections
To add a new collection or edit an existing one:
1. Click Collections under Site Configuration in the Administration menu.
The table includes a list of the collections and an up-to-date count of the documents
residing in each collection.
2. To add a new collection, click Create New Collection and enter the name of your collec-
tion in the Display Name box.
This is the collection name that appears in the interface. Notice that if you enter upper-
case letters or spaces or special characters, the system removes the spaces/special
characters and uses only lowercase letters as it automatically populates the Internal
Name box, which is the database name of the collection not seen by users.
3. Click the Edit (pencil) button to change the name of a collection.
v.28-09302016 43

Insight Admin Guide
Users are given rights to collections in their profile at User Management. You can also
add or remove users (assign or remove their rights to see the collection) by clicking the
Manage User button in the collection row.
4. Search for a user in the Available Users list by expanding the menu and selecting the
Role at Show Available User Assigned to.
• Use the Arrow buttons to move a user between the Available Users list and the
Assigned Users list.
• Use the center Triangle buttons between the two lists to move all users.
5. Click the Update Assigned User button to complete your user changes.
6. You can remove a collection from the site by clicking the Delete (trash can) button.
v.28-09302016 44

Insight Admin Guide
If there are documents in the collection, you will be prompted to update the documents to
another collection before you can delete the collection. Collections can only be deleted
when the DocCount is 0. Remember that you are not removing the documents from the
site when you delete a collection; you are simply removing that grouping. For information
about adding or removing documents in the collection, see Collections or Matters.
Search Fields
When constructing a search using the Search Assist, users can click options at Field Name
and select the Entire List (which displays all the searchable fields to which the user has rights)
or the Filtered List (a customized, narrowed list) to find the field to search.
If you have permissions to Search Fields in the Administration menu at Case Configuration,
you can manage the Filtered List.
1. Click the Search Fields link to display the fields currently in use, as well as the list of
fields available.
v.28-09302016 45

Insight Admin Guide
Fields appearing in the Filtered List are not removed from the Entire List. The Filtered
List typically contains commonly used fields that are easier to find in this smaller list.
2. To show a field in the Field Name Filtered List, move it from Available Fields to
Selected Fields using the right arrow button.
3. You can type the first letter or letters of the field name into the Search box to find the field
in the list. Use the Left Arrow button to remove a field from the filtered list. The Triangle
buttons between the lists will move all the fields from one list to the other.
4. Click Update Search Fields to implement your changes.
Dynamic Folders
Dynamic Folders allow reviewers quick access to batches of documents based upon searches of
selected database fields. When reviewers open a Dynamic Folder, they are implementing a
specific search set up in the Dynamic Folders; in essence, the Dynamic Folder is a virtual folder
that is actually a shortcut for running a specific search, and the documents in the folders satisfy
the searches. As records are coded and saved, the documents move dynamically into
appropriate folders based on the coding changes.
v.28-09302016 46

Insight Admin Guide
Create Dynamic Folder Structures
Dynamic Folder structures can be managed directly through the Insight interface. Click the
Dynamic Folders button in the Administration menu to display your Dynamic Folders list.
To create a new top-level Dynamic Folder:
1. Select Add Dynamic Folder and enter the folder name in the Dynamic Folder Name
field. This will be the name of the Dynamic Folder structure.
You can base a Dynamic Folder structure on fields or search queries by selecting either
option. To base a level on a field, select the field from the Field Name menu.
2. Select the new structure and click Expand/Collapse to continue to add fields or search
queries as sub-level folders within the structure.
3. Click the Edit (pencil) button to rename the folder, change its level within the structure, or
change the field or query on which it is based. Click the Delete (trash can) button to
remove it.
As documents are tagged and saved, the documents virtually move to folders based upon
the coding. Because Insight is XML based, there are no latency issues, meaning the doc-
uments will immediately move based upon the appropriate changes.
If a folder level is based upon a search, reviewers see the label in the folder directory.
v.28-09302016 47

Insight Admin Guide
If a Dynamic Folder is based on a faceted field, it displays all of the facet values as sub-
folders when opened. If a Dynamic Folder is based on a non-faceted field, it displays the
lookup values from the lookup list associated with that field as sub-folders when opened.
• Faceted or non-faceted fields not containing values appear as <empty> folders.
• Non-faceted fields containing values other than those in the associated lookup list
appear in an <other> folder within the folder structure.
Search Aliases and Groups
Create combinations of values to search using Search Aliases. Perhaps you know that users will
be searching for all variations of a name, for example: John Baker, [email protected],
[email protected], [email protected], Jack Baker. Setting up a Search Alias allows users to
use a shortcut to populate all the values into their search query.
You may also want to create groups to facilitate searching. Perhaps you want to group all
defense attorneys, so that users can quickly create a search for all the names in the Defense
Attorneys group. A Search Group is made up of Search Aliases. You may have a Defense
Attorney group that includes aliases for all the variations of each defense attorney’s name or
email addresses, etc.
To access Search Aliases:
v.28-09302016 48

Insight Admin Guide
1. Click Search Aliases in the Administration menu. Change the Security Group, if nec-
essary. Existing aliases appear in the list.
2. To create a new alias, click Add Search Alias. Provide a name for the alias and click
Submit.
You can now find the values you want to include for this alias. Use the Lookup, Search
Entry or Delimited Entry tabs (this works identically to adding multiple values to a
search in the Search Assist).
3. Click a value to move it to the right.
v.28-09302016 49

Insight Admin Guide
4. Click Add to apply the values to the Search Alias.
5. You can edit the alias as necessary. Add more values, remove just one value by pointing
to it and selecting the red X or remove all the values by clicking Clear List.
6. To add this alias to a larger group, click the Edit Groups button.
7. If an appropriate group is not available, enter the new group name and select Add
Group. Your new group now appears and is selected in the list. You can select more than
one group.
v.28-09302016 50

Insight Admin Guide
8. You can also edit groups or add new ones by clicking Modify Groups at the top of the
Search Aliases page. Enter the name of your new group and click the Add Group but-
ton. Edit its name or remove it using the buttons at the bottom of the Modify Groups dia-
log box.
9. To edit an existing alias, click the Edit (pencil) button to open the alias. (You can remove
an alias from the list using the Delete (trash can) button.)
Field Aliases
Create combinations of fields to use in searching using Field Aliases. Perhaps you know that
users would like to search by names that may appear in email author, recipient, CC and BCC
fields. You can create a field alias, so that users can search all these fields in one simple query.
Field Aliases are displayed at the top of the Field Name drop-down list in the Search Assist.
v.28-09302016 51

Insight Admin Guide
To access Field Aliases:
1. Click Field Aliases in the Administration menu. Change the Security Group if neces-
sary. Existing aliases appear in the list.
Use the Edit (pencil) button to change an existing alias or the Delete (trash can) button to
remove it.
2. Click Add Field Alias to create a new alias. Then enter a name for the alias and click
Submit.
v.28-09302016 52

Insight Admin Guide
It is important to consider what types of fields you are adding or combining to this alias.
Are you making an alias for several date field, text or number fields? Do some of these
fields have facets built upon them? You cannot create an alias that combines different
field types, such as date and text fields.
3. Make your selection at Field Type and then click Add Fields.
The list of fields you can add to this alias is determined by the Field Type you selected.
4. Select the checkboxes to apply your desired fields (you can use the buttons to select or
clear all) and then click Update.
v.28-09302016 53

Insight Admin Guide
The fields selected now appear at Selected Fields.
5. You can remove one field by pointing to it and clicking the red X. You can also continue to
add fields, remove all fields or edit the name of the alias.
v.28-09302016 54

Insight Admin Guide
Forms Administration
Administrators with rights to add, edit and delete document forms are associated to a Role with
the EditReviewForms permission.
Most sites have standard forms, which were cloned and edited during site creation. Forms are
assigned to a Role, and a form can be assigned to more than one Role.
It is best practiced to create an outline of the fields you need in the form. Fields stack from bottom
to top, chronologically, with the oldest added field at the bottom. You can drag and drop fields to
rearrange their order on the form. Adding fields to a form should be completed before you create
rules for associated (dependent) fields or include form shortcuts (macro buttons for reviewers
that code forms automatically).
Forms administration is accessible in an opened document on your site.
Forms Admin Options Menu
The Options menu, which appears at the top right corner of the forms pane, allows you to create
new forms, edit existing forms, view coding history, and view common keyboard shortcuts.
Add or Edit Forms
1. Expand the Options menu. All sites are cloned from model sites and have forms associ-
ated at site setup.
2. To create a new form, select Create Form. Name your new form, associate it with the
appropriate roles, and click Submit.
3. To edit an existing form, open the form.
v.28-09302016 55

Insight Admin Guide
If the form you need to edit is not displayed, expand the Form Name menu to change
forms. As a forms administrator, you can access all of the forms associated to the Secu-
rity Groups to which you belong.
4. From here, you can add new fields to the form, change the settings (form name and role
access), delete the form, or duplicate (clone) it. You can also create rules, shortcuts and
view coding history.
Users without Forms Administration permissions can be provided with access to view
the coding history for a document.
Add Fields to a Form
To include a new field on a form:
1. Click Add Field in the Tools menu.
2. Expand the Add Field menu and select your field. (Fields already added to the form are
not available.)
The field you select is a specific type within your site’s database. The selections at Con-
trol Type available to you are based on that type. The selection you make appears in
orange.
v.28-09302016 56

Insight Admin Guide
Control Types include:
• Read-Only: This is available for all control types. It will display as a non-editable, label
field in the form.
• Radio Button List: Available for single-value fields. Values are displayed with round
option buttons. Only one selection by the reviewer is allowed.
• Dropdown List: Available for single-value fields. Values are displayed by expanding the
menu and highlighting one selection.
• Single Line Text: Available for fields that do not have an associated Lookup List. This
allows for inputting a limited number of characters.
• Paragraph Text: Available for fields that do not have an associated Lookup List. This
allows for inputting a large number of characters.
• Checkbox List: Available for multi-value fields. Values are displayed with checkboxes.
More than one value by the reviewer is allowed.
• Multi-Value Dropdown List: Available for multi-value fields. The field is displayed as a
multi-value lookup table. Reviewers can select more than one value.
• Date: Available for the DocDate field. Does not include time.
• Date/Time: Available for Date fields. Includes time.
v.28-09302016 57

Insight Admin Guide
3. If the field you are adding is associated with a lookup table, the Lookup List icon
appears. (This is the list of values available for reviewers to select).
4. Use the Edit (pencil) button to view or change values in the list.
The new items will immediately appear in your form.
5. You can rearrange the order in which the field’s values will appear in the form by selecting
a value and then moving it to the new location in the list. Values that have not been cho-
sen or used by reviewers in the database can be deleted using the X.
6. To make a field required, select the Make this field required checkbox so that users can-
not save the document unless they populate the field. Required fields appear in the form
shaded in red with an asterisk.
7. When you are ready to place the new field in your form, click Submit.
Form Settings
To edit the name of a form or add or remove Roles with rights to the form:
1. Click Settings in the expanded Options menu. In the Settings dialog box, change the
name of the form by typing directly into the Name box.
v.28-09302016 58
Insight Admin Guide
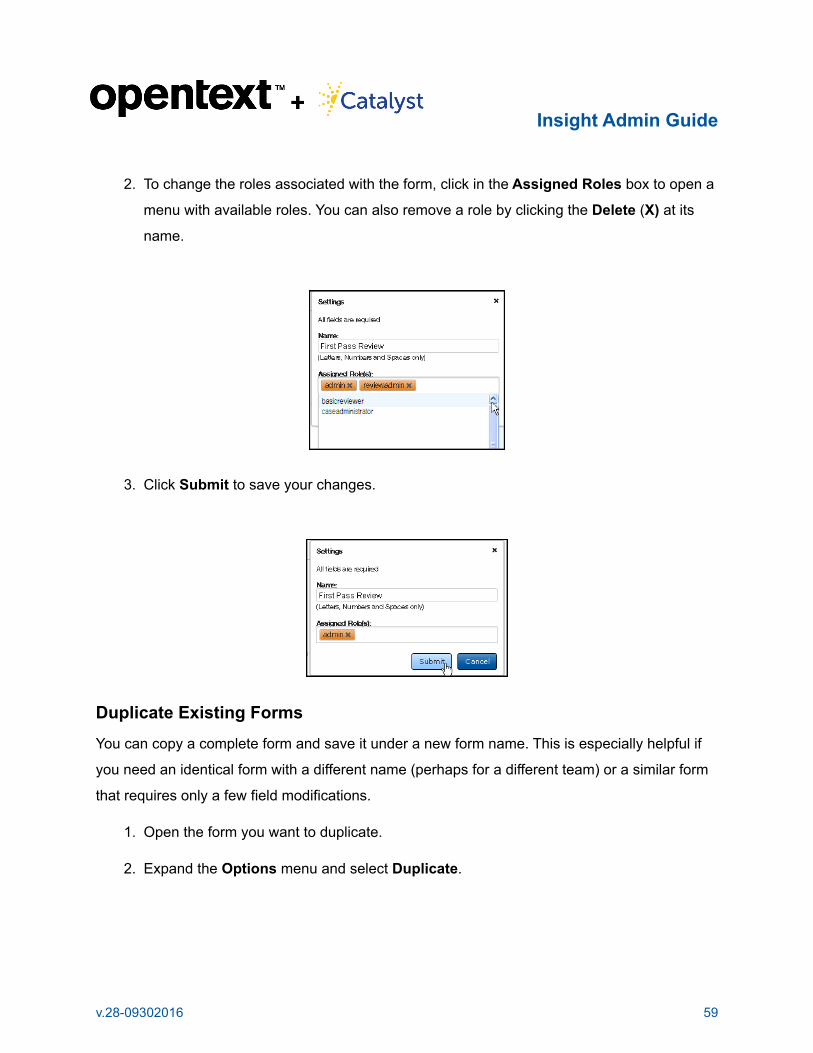
2. To change the roles associated with the form, click in the Assigned Roles box to open a
menu with available roles. You can also remove a role by clicking the Delete (X) at its
name.
3. Click Submit to save your changes.
Duplicate Existing Forms
You can copy a complete form and save it under a new form name. This is especially helpful if
you need an identical form with a different name (perhaps for a different team) or a similar form
that requires only a few field modifications.
1. Open the form you want to duplicate.
2. Expand the Options menu and select Duplicate.
v.28-09302016 59

Insight Admin Guide
3. In the Duplicate dialog box, name your form and then click in the Assigned Roles box to
expand the menu. You can associate more than one role to a form, but you do need to
select each one individually. (You can also associate forms to roles in the Roles page.)
4. Click Submit.
The system creates the duplicated form and switches to it in the form pane.
5. Use the Options button to edit fields and make any other form changes.
Delete Form
To delete a form, so that it cannot be assigned to any roles, ensure you are displaying the form to
delete.
1. Then, expand the Options menu and select Delete.
v.28-09302016 60

Insight Admin Guide
2. Confirm the deletion by clicking Delete in the Delete Form dialog box.
Arrange the Fields in a Form
Typically, you will want fields to appear in the form in a specific order. It is often useful to order the
fields correctly before designing rules and shortcuts as well. When you add fields to a form, the
fields display with the first added field at the bottom and the newest field at the top.
To rearrange the order:
1. Click and hold the top of the field box to undock the field and move it to its new place.
A new docking box is displayed.
2. Drop the field into the box. The field will remain in its new place.
v.28-09302016 61

Insight Admin Guide
Shortcuts (Macros)
You can create shortcut buttons to automatically code a form (changing as many fields as
necessary). These buttons allow fast, one-click coding of a form (and saving when designated).
Reviewers can execute a shortcut by clicking a button, or you can also designate a keyboard
combination for them to use.
Remember you need to have all the fields displayed in the form that you want to use in the
shortcut. Any Rules already establish for fields in the form will take effect when you instruct the
shortcut to carry out commands that meet the Rule. If the reviewer codes the document
inconsistently with a Rule, a Warning displays, and when the document is saved, the Rule will
take precedence and save the coding according to the Rule.
To create a shortcut:
1. Click the Tool (cog) button next to the form name and select Create Coding Shortcut.
v.28-09302016 62

Insight Admin Guide
A new display of the form appears in the Create Shortcut dialog box.
2. Code the fields—these are the changes the shortcut will make when the reviewer
chooses this shortcut.
If there are any required fields in the form, such as Hotfile , do not select the Perform
Save & Next checkbox unless you make a change to this field in the shortcut. The sys-
tem will not save the record and go to the next record if a required field is not coded.
3. Give the shortcut a name. This is the name of the button in the form.
4. You can assign a keyboard shortcut (this allows the reviewer to use the keyboard rather
than click the button). There are 10 total. If a keyboard shortcut is assigned to another
Shortcut button, it is not available for use again.
v.28-09302016 63

Insight Admin Guide
5. Click Submit.
The Shortcut button displays in the form. Reviewers can point to the information (i) but-
ton to see the coding changes the shortcut will make.
6. You can edit or remove the shortcut button by expanding the menu and making the selec-
tion. Selecting Edit opens the Edit Shortcut dialog box, which is identical to the Create
Shortcut dialog box, shown above.
v.28-09302016 64

Insight Admin Guide
Create a New Form
To create a completely new form:
1. Open a document and with any form displayed expand the Options menu and select
New Form.
2. Name your new form, select the roles of users who should have access to the new form,
and click Submit.
The new form is created and displayed in the form pane. You can add fields, create rules,
and make additional changes to the form.
Field Options Menu
Point in a field box to display the Field Options menu to edit or delete a field and to create a rule
for the field. The Edit Field dialog box allows you to change the Control Type and select or clear
v.28-09302016 65

Insight Admin Guide
the Make this field required checkbox. You cannot change the field name or the Lookup List if
one has already been associated. Click Submit to save your changes.
Field Rules for Forms
Rules can be used to make one field’s coding dependent on another field (mark one field with a
certain value or values based on reviewer selections in the parent field). Rules can also hide or
show fields on a form.
The parent and the associated or dependent fields must be in the form to create a Rule. Expand
the Field Options menu of the parent field and select Rules. (The actions taken by the user in
this field signal the Rule(s) to take effect). In the following example, the Responsive field is the
parent field.
v.28-09302016 66

Insight Admin Guide
Add and Edit Rules
To add a rule:
1. Click Add Rule in the Rules dialog box.
An IF query is created at Add Rule. You are telling the system that IF certain things are
made true at this field, the system will automatically carry out your specified commands to
other fields.
2. At Choose a Comparison, select one of the following options:
• Is: Works as equals
• Is Not: Does not equal
• Contains: The parent field coding must have the value you specify, but the field could
also have other values
• Does Not Contain: The parent field coding cannot have the value but can have other
values
• Has Any Value Selected: The parent field cannot be null
• Is Cleared: The parent field must be null
v.28-09302016 67

Insight Admin Guide
If you select Is, Is Not, Contains and Does Not Contain, the Choose a Value menu
becomes available. This lists the values available for coding in the parent field.
Selecting Has No Value Selected or Is Cleared does not require you to specify values.
Making a selection at Choose a Value, completes your IF query, which in the above
example states: IF the Responsive value is selected in the Responsive field.
If the parent field is a multi-value field, you can select more than one value in the Choose
a Value field.
3. Now, design the change statement that will take effect when the IF statement is true.
Expand the Choose a Field menu.
v.28-09302016 68

Insight Admin Guide
The list contains only fields available in the form. If you need to change a field not shown
in the list, you need to add the field to the form.
4. Expand the Choose an Action menu. Options include:
• Show: The dependent field is not displayed in the form unless the IF statement is true
• Hide: The dependent field will be hidden when the IF statement is true
• Change: The dependent field will be changed to the specified value(s)
• Append To: The dependent field is a multi-value field, and the specified value(s) are
added to it (other values might already be selected and will not be affected)
• Replace Value: The dependent field is a multi-value field, and the specified value in the
dependent field will be replaced with another value
• Make Empty: Clears all coding in the dependent field making it null
If the dependent field is a multi-value field, you can select more than one value by clicking
again in the Choose an Action field. Remove a value by clicking the X.
v.28-09302016 69

Insight Admin Guide
Remove the IF or Change statements by clicking the corresponding Delete (X) button.
Create more statements by clicking the corresponding Add (+) button.
5. To edit rules, add additional rules, or delete them in the parent field, Expand the Fields
Options menu and select Rules.
Fields with Rules display the Rules symbol to forms administrators.
Remember, rules will take precedence over any inconsistent coding with the rule when
the record is saved.
v.28-09302016 70

Insight Admin Guide
Review Projects Administration
Insight’s Review Projects offers a flexible yet powerful environment for both simple and complex
review workflows. Reviewer and system-based actions combine to move documents from stage
to stage and reviewer to reviewer.
Administrators with rights to manage review projects are assigned to a Role given the
AdministerReviewModule permission.
You can set up a simple, linear review project or a review project that has multiple stages of
review and has rules to dictate where documents go next in the review project. You will also be
able to monitor the overall progress of the review and the activities of individual reviewers.
Why Use Review Projects?
Structuring your review using Review Projects is especially useful if your matter requires
specialized teams of reviewers, multiple stages of a review project, and detailed reports on the
review progress and individual reviewers.
Your OpenText Project Consultant can help you determine which review method works best for
your needs. Using Review Projects, you can ensure that the right reviewers get the right
documents in the correct sequence.
As the Review Administrator, you are typically responsible for adding and removing reviewers,
copying documents into the project/stages, establishing rules for the document workflow and
creating reports.
Perhaps your review uses contract attorneys and paralegals for the first level of review who will
code for privilege and responsiveness. If there are multi-language documents, those documents
may need to be reviewed by foreign-language attorneys who will code for privilege and
responsiveness of the foreign documents. The responsive documents may then need to be
reviewed for specific issues requiring analysis by experts knowledgeable in the facts of the case.
You may decide to have a QC stage after all documents have been routed through the first level
of review and then a QC stage prior to production. Once your projects and stages and rules are
completed, your reviewers can begin their review.
v.28-09302016 71

Insight Admin Guide
Reviewers simply log in to the site, click the Review Projects button and the stage in which they
need to work. As they work through their documents, the coding they apply dictates where the
documents go next within the project; therefore, the right teams of reviewers get the right
documents, because the system automatically routes documents to subsequent review teams or
considers them completed if no conditions exist to send them to another stage of review.
Project Planning
Your first step is to define your workflow and determine how documents need to be reviewed and
distributed. This is an important step in the process. Next, you will create your project and stages
of the review. Following this, you will need to set up the rules for stages, so that the system
knows how to route each document after the reviewer analyzes and codes it.
The coding applied to the documents dictates how the documents move. Different groups of
reviewers will have different coding objectives, and this may require you to create different coding
forms. Based on what you want the reviewers to do and the forms you have created for them,
decide what conditions need to be met in order for a document to move from one stage (review
team) to another.
Set up the rules to make sure all documents are routed to the proper reviewers (refer to Stage
Rules). If applicable, establish rules to check for inconsistent coding and consider if and how you
want to use Default Rules. After setting up the rules, use the Dashboard flowchart to confirm that
all coding calls are being considered and that the workflow makes sense.
v.28-09302016 72

Insight Admin Guide
The next step is to assign the documents to the project in order to start the review. The system
does the rest.
Create a Project
The Review Project is the container for a group of stages, assigned reviewers, documents and
reports. A site can have as many projects as your case needs; generally, only one project will be
required for a review. The project can have as many stages as necessary.
A document cannot be assigned to more than one project at a time.
To create a project:
1. Click the Review Projects (binoculars) button in the left navigation bar, and then click
Create New Project.
2. In the Create New Project dialog box, use the Name box to give the project a title.
You can also enter more information about the project in the Description box. If you want
to clone an already established project, which copies the stages, rules and users into
your new project, expand the menu and select the existing project; otherwise, leave it
blank.
3. By default, the Keep Related Docs Together checkbox is selected. Leaving it selected
ensures related documents are kept together so that a reviewer receives the entire family
of documents.
Once a project is created, the Keep Related Docs Together checkbox cannot be
changed. Projects that keep related documents together can exceed the Maximum Docu-
ments count when a reviewer gets more documents. Families are treated as one docu-
ment; if a parent document is assigned as the threshold document, all members of the
family will be added to a user’s self-assign options, ensuring families will always be kept
together for review. When a project does not maintain families, the maximum documents
limit will be enforced.
v.28-09302016 73

Insight Admin Guide
4. Clicking the Create Project button displays the Get Started page at the Dashboard tab.
If you chose to clone an existing project, the cloned stages are displayed. The project is
also now listed in the Review Projects menu.
5. Expand Options to add stages, change the project’s settings, archive the project or print
the flowchart of the project.
6. At History, you can view a log of stages created, edited, and deleted in your project.
Creating Stages
Stages are used to implement your workflow design. You can have as many stages in a project
as necessary; in most instances, you will want the fewest possible to carry out your review. The
v.28-09302016 74

Insight Admin Guide
rules associated with stages determine the flow of documents. A document does not need to go
to each stage. It can remain in a stage after it is reviewed and released and can move to other
stages, based upon the defined rules.
To add reviewers to stages and to route documents from one stage to another, the stages must
first exist. For example, if you have created an Initial Review stage and want documents coded
for Privilege to go to a Privilege stage and remaining documents to move by default to another
stage, those stages must first be created.
To create stages for your project:
1. Expand Options and click New Stage.
2. In the New Stage dialog box, enter a title for the stage in the Name box.
3. At Type, select Review for a typical review stage. Select QC If the stage will be used for
quality control purposes.
The system assigns a color to the stage in the flowchart based upon the type of stage you
selected.
4. If you would like to enter more information or notes, use the Description box. This infor-
mation will be available when you or other review administrators point to the stage.
v.28-09302016 75

Insight Admin Guide
5. Click the Create Stage button.
The stage appears in the Dashboard. You can continue to add stages in the same way.
6. Point to the stage, and then click the Edit (pencil) button to add users, rules and establish
properties for your stage. You can remove a stage using the Delete (x) button.
If you try to remove a stage which has documents, you will be prompted to move the doc-
uments before you can delete the stage.
7. To move a stage on the screen, point to the stage.
The pointer becomes a four-sided arrow and you can move the stage in the screen.
Add Users
Users must be added to the appropriate stages in order to access their documents.
To add or remove users in a stage:
v.28-09302016 76

Insight Admin Guide
1. Point to the stage and click the Edit (pencil) button.
2. In the Users tab, click the Add User button.
3. You can display a list of available users based on all users in the site or by role. Move a
user or users from the Available Users list to the Selected Users.
4. Clicking the Add Users button returns you to the Users tab.
Your users now appear in the list. By default, the Self Assign checkbox is selected for
each user. This allows the user to access documents in this stage. In most instances, you
v.28-09302016 77

Insight Admin Guide
will leave this selected. Once a reviewer obtains and codes documents, the numbers will
be reflected in the Assigned/Reviewed column.
5. Remove a user from the stage by clicking the Delete (x) button.
This button will not be enabled if the user has documents. You will need to reassign the
documents to another user before you can remove the user from the stage.
Self-Assignment Options
As a Review Administrator, you have the ability to set parameters for documents that reviewers
access within their assigned stage. After documents are copied to a stage, they go into the
Unassigned category of the stage. Reviewers assign documents to themselves using the Get
More Documents button. They then review, code and release those documents.
In this section, you are establishing the parameters for the number of documents they can have
in the stage, the way the documents are grouped and sorted, and the order in which they are
assigned.
To set these parameters:
1. Click the Edit button of the stage and then click the Self-Assignment Options tab.
v.28-09302016 78

Insight Admin Guide
2. The Maximum Documents menu allows you to select the number of documents a
reviewer can have in this stage. This number includes all the documents allowed.
If the Keep Related Docs Together option was enabled for the project, this number is an
approximation. Families will always be maintained when the Keep Related Docs
Together was selected for the project.
When a reviewer begins to work in the stage, the reviewer will click the Get More Docu-
ments button to load documents for review.
As the documents are saved, they are identified and changed from Not Reviewed to
Reviewed. The reviewer still has the same number of documents until the reviewed doc-
uments are released. Therefore, if a reviewer codes and saves documents but does not
release them, the Get More Documents button is not enabled. You can choose to
increase the maximum number reviewers can have by entering a number between 1 and
250 at Maximum Documents.
3. Use the Filter by feature to set filters to ensure certain documents are assigned before
other documents in the stage.
In the below example, as reviewers assign themselves documents, the documents first
accessed will meet the criterion that the Issues field is not empty.
v.28-09302016 79

Insight Admin Guide
4. To design the queries for the filters, type directly into the box, or expand the Field Name
menu to select a field.
The Operator and Value menus appear. Make your selections, and then add your query
to the Search box. Designing filter queries works similarly to using Insight’s Free-Form
Search.
5. Use the Group By menu to select the fields upon which to group the documents. You can
also choose to leave this option blank.
Grouping documents means you are keeping documents together based upon a similar
field value, such as Custodian or Language.
6. You can sort the results by up to three fields in ascending or descending order at Order
By. Choose a field from the Order By menu and then select whether to use Ascending
or Descending order. Select the Add More link to add up to three total fields, and select
Remove to delete the last added field.
For example, perhaps documents from several custodians are copied to a stage. You
want to keep custodian documents together and you need documents of John Doe’s to be
reviewed first. You can set up a filter to feed those documents where John Doe is the cus-
todian to reviewers first, and when the documents are displayed, they are grouped by
custodian and the sorted by Begcontrol number.
7. Click Save Changes to implement your assignment parameters.
v.28-09302016 80

Insight Admin Guide
When a reviewer clicks the Get More Documents button, the filters and other information
will appear.
It is important to remember to monitor the stage if you’ve set filters. Once all documents
that meet the filters are assigned, other documents cannot be accessed by reviewers until
the filters are removed.
In the image below, 148 documents are Unassigned in the Initial Review stage. Only
four out of the 148 meet the filters. The # / ## in an Unassigned stage is a good way to
see quickly whether filters are applied and to monitor when it would be appropriate to
remove the filters.
v.28-09302016 81

Insight Admin Guide
Stage Rules
Once documents are reviewed and saved, they are routed through the project according to the
stage rules. These rules are applied after the documents are released by reviewers. It is
important to understand your document collection and the needs of your review as you create
rules for stages.
You can allow the documents to remain in a stage (released documents that remain in a stage
but are no longer available to the reviewer). Rules can move documents to other stages based
upon the coding applied, and you can set up a Default Rule so that if no other rules apply, the
Default Rule tells the system where to move the documents. As you begin setting up rules, refer
often to the project flowchart in the Dashboard to ensure you are designing your project
correctly.
You can create specific rules that will apply in certain cases. These rules will be applied before
the stage’s Default Rule, and they will be applied in the order in which they appear on the Rules
tab. Thus, if the criterion for the first rule is met for a particular document, that document will
move upon release in accordance with that rule. No other rule will be applied at that point.
To add, edit or remove rules in a stage:
1. Point to the stage, click the Edit (pencil) button and then the Rules tab.
2. To create custom rules, click the Add Rules button, and design your rule by creating a
query to be met.
3. Select the stage the documents will be moved to if your query is met.
v.28-09302016 82

Insight Admin Guide
4. Click Add Rule.
Your rule will be listed at the Rules tab. You can continue to add rules by clicking the Add
Rules button and setting up additional queries.
Remember that a document moves based upon the first rule that is true. You can reorder
the rules if necessary by pointing to a rule and using the two-sided arrow, moving your
rule in the hierarchy.
5. Click the Edit (pencil) button to change a rule, and the Delete (x) button to remove it from
the stage. Rules can contain operators more than one clause (see rule 3 below).
6. To establish a Default Rule, expand the Move remaining documents to menu and
select the stage.
v.28-09302016 83

Insight Admin Guide
7. To quickly view a snapshot of a rule in the Dashboard, click the number:
8. If you decide to allow certain documents to remain in a stage after they have been
released by reviewers, you can do this by not setting up a Default Rule.
This is especially useful if you want documents to be coded by reviewers but not sent to
other stages of the review. You can monitor the documents that do not meet any rules.
Click to bring back those documents in the Results page if you’d like to remove them
from the project or carry out other actions.
v.28-09302016 84

Insight Admin Guide
Family Relationships
When the Keep Related Docs Together checkbox is selected at the creation of a project, Insight
treats the family as a unit. If a document is coded and saved, and this document meets the first
rule, the entire family meets this rule. Any other rules are irrelevant at this point. It does not
matter the order of the documents saved in the relationship.
So, if a reviewer codes an attachment, and this attachment meets the rule, the entire family,
including the parent moves with the rule met.
Example:
Rule 1: If Privileged is Privileged, send to Priv QC stage.
Rule 2: If Privileged is Not Privileged send to Final QC stage.
In a family of perhaps three documents, the reviewer selects Not Privileged for the first
document, but the second document is coded as Privileged and in the third document the
Privileged field is not coded, null in other words. This family of documents will go to the Priv QC
Stage because that is the first rule that is met by the whole family.
Stage Settings
You can change a stage’s name, type and description (this can be done even when the review
project is in process).
1. Point to the stage, and click the Edit (pencil) button and then the Stage Settings tab.
2. Use the fields to make any changes and then click Save Changes.
v.28-09302016 85

Insight Admin Guide
Other Options
The Options menu in the dashboard allows you to:
Create new stages by clicking New Stage.
• Change your project name and description by clicking Project Settings.
• Create a printable version of your project’s workflow chart by clicking Print Map.
• Review an audit trail of the changes made to the stages of the project, along with the
administrator who made the change and the date and time the change went into effect, by
selecting History.
• Archive the project by selecting Archive Project. If you try to archive a project that still
contains documents, you will get a warning. You must move all documents out of the
project in order to archive the project.
v.28-09302016 86
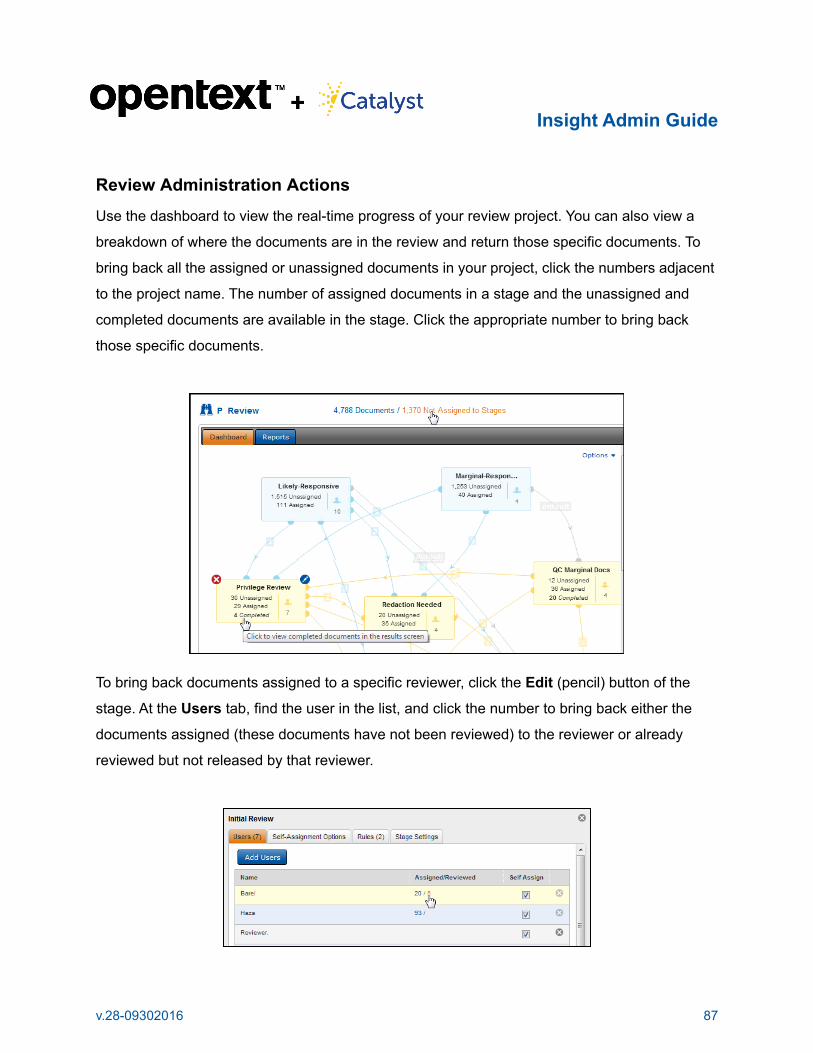
Insight Admin Guide
Review Administration Actions
Use the dashboard to view the real-time progress of your review project. You can also view a
breakdown of where the documents are in the review and return those specific documents. To
bring back all the assigned or unassigned documents in your project, click the numbers adjacent
to the project name. The number of assigned documents in a stage and the unassigned and
completed documents are available in the stage. Click the appropriate number to bring back
those specific documents.
To bring back documents assigned to a specific reviewer, click the Edit (pencil) button of the
stage. At the Users tab, find the user in the list, and click the number to bring back either the
documents assigned (these documents have not been reviewed) to the reviewer or already
reviewed but not released by that reviewer.
v.28-09302016 87

Insight Admin Guide
As the administrator, there are other actions you can take to the documents to facilitate the
review. To move, release, or remove documents from the review project, select them from the
Results page and select the appropriate option from the Actions menu:
• Move Documents in the Review: If you want to move the documents to another stage in
your review, click Move to, and then select the new stage of your project. Your options will
include the stages of this project. You cannot use this feature to move to other projects but
rather to other stages in this project
• Administrator Release: You can force a release of the documents by clicking Release.
The rules of the stage will take effect and move the documents automatically.
• Remove Documents: To remove documents from the project, expand the More Actions
menu and select Remove Docs from Project.
Review Project Reports
You can access reports on reviewer productivity and coding breakdowns by clicking Reports at
your project in the Review Projects menu or clicking the Reports tab in the right pane.
Productivity Report
The default report displayed is the Productivity report. You can click Stages to create a report
for a specific stage or leave it set to All - Entire Project to see the details of every stage.
This report gives you a breakdown of user activity, including:
v.28-09302016 88

Insight Admin Guide
• Docs Updated—the number of documents a reviewer saved
• Time Spent —this is calculated from the time a user opens a document until the time the
document is saved; if the reviewer reopens the document and re-saves it, that time is also
included in the calculation
• Average Rate—the number of documents updated divided by the time spent
• Total Docs Including Related—total number of documents updated plus their related
documents
If a reviewer reopens a document and does not re-save the document, that time spent is not
figured into the calculation. When a reviewer uses the Tag All checkbox to code and save all
documents in a relationship, the documents saved as part of the Tag All are not figured into the
Time Spent calculation.
Create a printable version of the report by clicking the Print button.
Coding Distribution Report
You can build a report based upon the way fields are coded within the documents.
1. Expand the menu at Productivity and select Coding Distribution.
2. At Stages, you can limit the report by a specific stage, or you can leave it set to All -
Entire Project.
v.28-09302016 89

Insight Admin Guide
3. Click Fields to select the field or fields you want to build your coding report around (you
can choose up to three).
If you want to group the coding distribution by a particular field, you can make that selec-
tion as well using Group Fields By.
v.28-09302016 90

Insight Admin Guide
Insight Predict
Insight Predict is Catalyst's engine for Technology Assisted Review (TAR). It is based on a
learning protocol called Continuous Active Learning (CAL).
How Insight Predict Works
In the simplest terms, a set of documents is sent to Insight Predict. Some of them are reviewed
by reviewers. Those reviewed documents are sent to a process (Predict’s algorithm), and that
process helps to categorize the non-reviewed documents. Those non-reviewed documents are
ordered (or ranked) from most likely relevant to least likely relevant, based on the decisions
made on reviewed documents. The goal is to send the documents that are likely relevant to the
review team, which will reduce the time and expense of reviewing non-relevant documents.
The initial review process is typically focused on locating responsive documents, but Insight
Predict can identify other decisions such as issues, hot documents, privilege, or other
information. For purposes of this guide, we will use “relevant” and “responsive” interchangeably,
and assume that our goal is to find responsive documents.
There are several steps involved in this process. There is a continuous training stage, where the
system is trained by reviewer decisions. The system ranks and re-ranks the collection of non-
reviewed documents based on those decisions. Along the way, there are Quality Control (QC)
v.28-09302016 91

Insight Admin Guide
steps in place to review contradictory coding calls, and real-time charts and statistics available to
monitor progress. Decisions are made after systematic samples are taken and the ranking is
verified.
Ranking
Ranking is the key to Insight Predict and is the method used to predict which documents are
likely to be relevant. To rank documents, Insight Predict takes the coding information from the
decision field (typically responsiveness) from a set of reviewed documents and puts the
remainder of the document population in order, based on its likelihood of being relevant. Highly-
ranked documents are likely to be relevant, while lower-ranked documents are not as likely to be
relevant.
The system is trained by each reviewed document. As documents are reviewed, they are sent
directly to the ranking algorithm, which re-ranks the collection of documents not yet reviewed.
The system builds relationships between every word in every document, and every word in every
other document in the collection.
So for example, if the word “contaminate” is a highly-ranked word in the documents designated
as responsive, Insight Predict highly-ranks other documents that contain the word. It also finds
other common words within the highly-ranked documents, which helps it identify key words in the
population that might be meaningful and lead to other interesting documents.
Insight Predict continuously ranks the entire document collection.
Continuous Active Learning (CAL)
CAL differs from older TAR methods because it uses continuous learning throughout the entire
review, rather than the one-time training that many systems use. Research shows that CAL is far
more effective at finding relevant documents than earlier TAR protocols, which results in even
bigger savings by dramatically reducing review costs and review time.
Continuous Active Learning means that the training is continuous, rather than limited to discrete
stages, and the learning approach is active rather than passive. The system does not rely on
randomly selected documents for training.
v.28-09302016 92
Insight Admin Guide
In contrast, earlier versions of TAR required an expert, often a senior lawyer, to train the system
themselves by clicking through thousands of documents to locate relevant ones, wasting a lot of
time on non-relevant documents.
Insight Predict—Why It Is Different
Reasons Insight Predict produces superior results include:
• Continuous Active Learning (CAL): Early TAR systems employed one-time or limited
training. With Insight Predict, training is continuous and ongoing, allowing the engine to
constantly get smarter about the documents.
• An end to random training documents: CAL doesn’t require that an expert click through
thousands of randomly-selected documents.
• Subject Matter Experts (SMEs) not required: CAL doesn’t require that a SME train the
system before review can begin. Review teams can do the training just as effectively,
particularly with an expert performing QC steps along the way.
• Rolling uploads are not a problem: With CAL, the system integrates new documents as
they are received, and actively selects training documents for the reviewers to fill in any
gaps.
• Excels at low richness collections: CAL excels when there are only a few relevant
documents in the collection. Earlier TAR systems had issues with low richness.
• Integration: Predict is Catalyst’s TAR system within Insight, and the algorithm is trained
any time documents are reviewed. Predict is not separate from the search and review
platform. As a result, you don’t have to worry about importing or exporting data into
different systems. Review Projects are integrated with Predict.
Permission
Insight Predict must be enabled for your site in order to use it. To manage Predict projects, you
must be assigned to a role with the PredictCreateDatabase permission.
v.28-09302016 93

Insight Admin Guide
Workflow
The first step in any Predict project is training the system to rank the documents properly. We
give you flexibility to decide how to train the system. If you have documents that are already
reviewed, they will be automatically sent to the system to teach Predict what is relevant and not.
This allows Predict to rank the remaining documents. If you do not have documents already
reviewed, you can start review with any documents you like. As documents are reviewed, Predict
is trained.
As the review progresses, we provide reports so that you can analyze progress. You are
provided with the top-ranked terms, review statistics, custodian ranks, and progress charts. You
can make decisions based on the information within these reports.
The QC stage gives you the opportunity to check documents that have potentially false positive
or false negative coding. You can check the documents where the system ranking differs from the
coded values – in other words, these are documents that the system thinks should have been
tagged as positive, even though they were by tagged by reviewers as negative, and vice versa.
At this point, we recommend that you use your expert to review these documents, and correct
mistakes or confirm opposing decisions.
As the ranking continues and documents are reviewed, analyze the Progress Chart for stability
of the collection. Stability is represented when little or no change occurs with the ranked list. In
other words, the average document has not moved up or down the ranked list very much.
We provide a stage in Predict where you can evaluate the ranked documents. This produces a
Yield Curve. By examining the Yield Curve, you can determine if there is a point at which you can
discard a portion of the population as non-relevant.
Create a Predict Project
To use Predict, start by creating a collection and then creating a new Predict project.
v.28-09302016 94
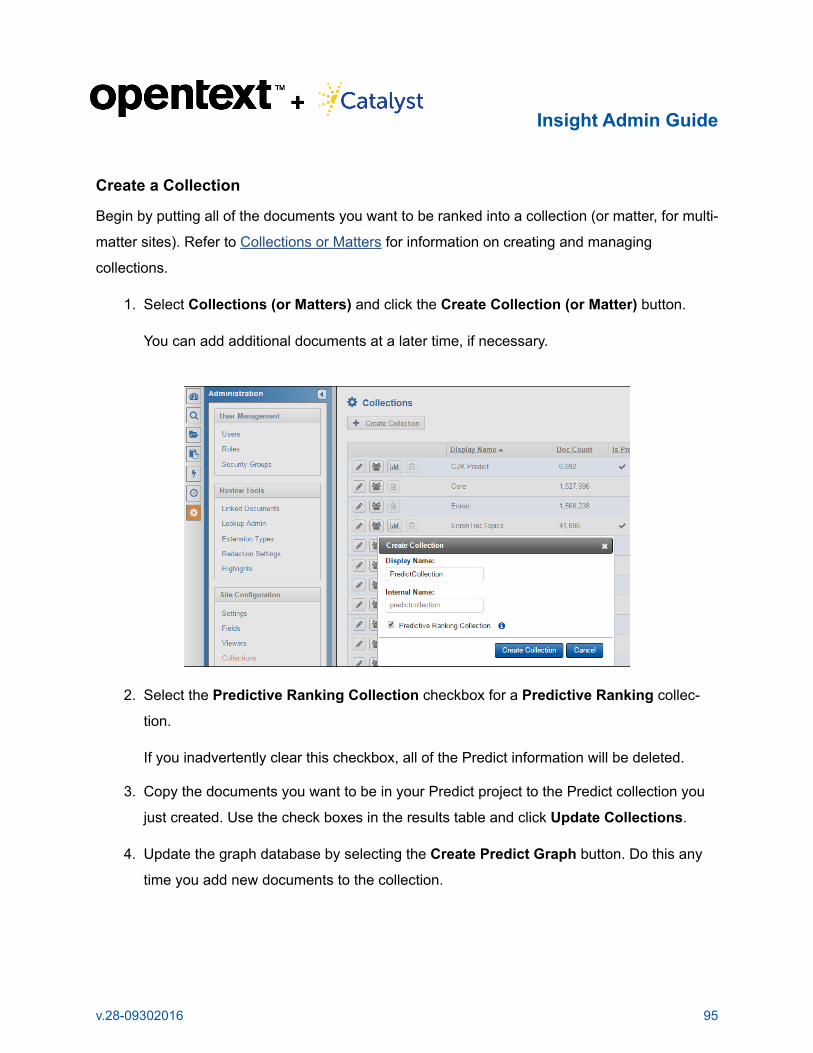
Insight Admin Guide
Create a Collection
Begin by putting all of the documents you want to be ranked into a collection (or matter, for multi-
matter sites). Refer to Collections or Matters for information on creating and managing
collections.
1. Select Collections (or Matters) and click the Create Collection (or Matter) button.
You can add additional documents at a later time, if necessary.
2. Select the Predictive Ranking Collection checkbox for a Predictive Ranking collec-
tion.
If you inadvertently clear this checkbox, all of the Predict information will be deleted.
3. Copy the documents you want to be in your Predict project to the Predict collection you
just created. Use the check boxes in the results table and click Update Collections.
4. Update the graph database by selecting the Create Predict Graph button. Do this any
time you add new documents to the collection.
v.28-09302016 95

Insight Admin Guide
Create a New Predict Project
To create a new project:
1. Navigate to Predict. Click the Create New Project button in the Predict menu, name
your project, and determine which field will be used as the Decision Field–this is the field
used for the truth value.
Each possible value in the field is given a weight for ranking purposes. For example, if
your goal is to rank for responsiveness and the field holding that value is the ReviewSta-
tus field, you would make that the Decision Field. The values for ReviewStatus are typ-
ically Responsive, NonResponsive and NotReviewed. You would make Responsive a
positive weight of +1, while NonResponsive would receive -1 and NotReviewed remains
at 0.
v.28-09302016 96

Insight Admin Guide
2. Click Submit to save your changes.
We do not recommend changing the weights after you start your review. If your review is
underway and you decide you want to change the values within the decision field or the
weights of the values, speak to your OpenText Consultant.
3. Select the Predictive Ranking Collection that was created for this project
Note that once the project is created, you cannot change the information that appears in
the Decision Field or the Predictive Ranking Collection field. If you decide that you
want to do predictive ranking on a different decision field, you will have to create a new
project. Speak to your OpenText Consultant to discuss details.
Review and Training Predict
Review = Training
What do we mean by review equals training? Review means that a human reviewer makes a
decision and codes the decision field of a document based on that decision. Training means that
throughout this review process, we teach Predict what is positive (for example, Responsive) and
what is negative (Not Responsive) based on those human decisions. Then, Predict will examine
the contents of the documents, find others similar to them, and rank the non-reviewed documents
based on those human decisions. Training relies on review, and therefore all review is training.
v.28-09302016 97

Insight Admin Guide
All TAR systems need people to make decisions. With Insight, any reviewed document, meaning
any document reviewed by any method in Insight, will be submitted to Predict to help rank the
rest of the population. There is no need to select a random set to get started.
The only thing Predict verifies is whether:
• The document is in the Predict collection, and
• The decision field has a coded value
Many cases start with documents that have already been reviewed. If these documents are part
of the collection you have already created, they will automatically be sent to Predict to help rank
the non-reviewed documents. This happens when you add them to the collection and Create the
Graph database.
If no documents in the collection have been reviewed (do not contain coding on the decision
field), you can send them to a reviewer by any review method you choose (through Dynamic
Folders, Static Folders, the Review Module, or by running a search and coding the document).
All review in Predict trains the Predict engine how to rank documents within a collection.
Review Module and Prioritized Review
Many reviews in Insight take place via Review Projects. As the documents are reviewed, Predict
ranks the rest of the non-reviewed population. It doesn’t matter what stage the reviewers are
reviewing in, and it doesn’t matter how the Review Project workflow is set up.
With Review Projects, you can create a stage of the review that works directly with Insight
Predict, so that the documents fed to the reviewers come from the ranked population, in ranked
order. We call this Prioritized Review because the most relevant documents are the highest
ranked and pulled by the reviewers first.
To review documents in rank order, the stage in the Review Project has to be set up as a
Predict stage.
v.28-09302016 98

Insight Admin Guide
On the Self-Assignment Options tab, select the Insight Predict radio button and the name of
the Predict project. Only documents that are assigned to the stage and in the designated Predict
project collection will be given to the reviewer. The majority of these documents will be highly-
ranked documents, but Insight Predict will also select some contextually diverse documents.
Contextually diverse documents are documents that are different from documents that Predict is
familiar with. These documents contain new words (for the most part) and therefore, they are
more difficult to rank. By pulling samples of contextually diverse documents, Predict not only
learns faster, but it might also discover important documents that otherwise would not have been
found.
If you want only highly ranked documents to be sent to the review team, select High Ranking
Documents Only, which will exclude contextually diverse documents.
All documents in the project collection that are reviewed are immediately fed to Predict for
continuous learning and ranking.
v.28-09302016 99

Insight Admin Guide
Predict Module Overview
In the Predict module, you can manage the validation stage, add users to a stage, and set self-
assignment options.
Manage the Validation Stages
Within the Predict module, there are two validation stages:
• The QC stage: Provides a sample of coded documents for validation. In this stage,
reviewers determine whether documents were coded correctly or incorrectly. If a document
is coded incorrectly, they will change the coding decision.
• The Systematic Random stage: Used to make decisions on a sample of ranked
documents selected by the system. This sample is used to generate a yield curve.
Similar to the Review Projects module, these stages of Predict have a user list and self-
assignment options associated with them. These stages are outside of the Review Project so the
review will take place from the Predict section of Insight. Click the Edit button for the stage.
See Manage the QC and Systematic Stages for details.
Add Users to a Stage
To add users to a stage:
1. Click Add Users.
v.28-09302016 100

Insight Admin Guide
2. Move people from the Available Users List to the Selected Users list by selecting their
names and clicking the right-facing arrow.
Those in the Selected Users list will be able to retrieve and review documents in the
stage.
Set Self-Assignment Options
On the Self-Assignment Options tab of the stage:
1. Select the maximum number of documents that a user can have assigned to them at one
time from the Maximum Documents menu.
2. If you want to group documents together by a field value, select the field from the Group
By menu.
For example, if you choose to group documents by custodian, select Custodian from the
Group By menu. Your reviewers will be assigned documents with the same custodian
instead of documents with a variety of different custodians.
3. The Order By option will assign documents based on the sort order of the selected field.
Select either Ascending or Descending to specify sort order.
v.28-09302016 101

Insight Admin Guide
To see a Predict project from the reviewers’ perspective, see Reviewing in a Predict or Review
Project section of the User Guide.
Manage the QC and Systematic Random Stages
QC Stage
The QC Stage of the project is used to assign documents already reviewed for quality control
purposes. The documents in this stage have been ranked by the system one way, but coded by
reviewers in a different way (i.e., the most false positives and most false negatives according to
the system).
To select documents for this stage:
1. Click the Get Documents button.
v.28-09302016 102

Insight Admin Guide
2. Select the desired sample size.
The default is 100. There is also a filter to exclude documents. For example, if you want to
exclude Excel files, you would use the syntax below.
Additional reports are available in this stage of the project and are helpful in identifying
user coding and coding decisions that were overturned.
3. Choose a sample type. Mixture is the default. This means that the documents pulled are
a mix of potentially false positive and potentially false negative. False positive documents
are those the system believed would be coded as non-relevant (because they were
ranked low) but the reviewer coded them as relevant. False negative documents are
v.28-09302016 103

Insight Admin Guide
those the system believed would be coded as relevant (because they were highly ranked)
but the reviewer coded them as non-relevant. Choosing either of those options will give
you 100% false negative or positive, rather than a mixture of both.
4. To access the QC Reports, click the Reports button.
The QC Report is similar to the Insight Document Audit Trail report but includes only
the records in your project. It lists the fields that have been changed, the values changed
in the field, and the user who made the change.
The date range is set to the current date, and all users are selected.
5. You can change the date range and select individual users or search for a specific user.
v.28-09302016 104

Insight Admin Guide
After documents go through the QC Stage, those coded in a different way, meaning that
the decision was overturned by the QC reviewer, go back into the ranking engine. If there
is no change in the Decision field, the document does not go back to ranking.
Systematic Random Stage
The Systematic Random stage of the project is used to determine a richness estimate and also
to verify the training of the Predict algorithm. If this stage is used for verification, the results of the
decisions in the stage produce a yield curve, which allows you to determine a cutoff point for the
review.
When the Systematic Random sample is taken, you are presented with the question “Is this
sample going to be used for final validation?” If you answer “yes,” the ranking engine stops and
no additional ranking takes place. Review can continue in the Review Module with no
interruption. If you answer “no,” the ranking continues to happen. Answer “no” if you are using the
sample for a richness estimate.
The documents pulled for the Systematic Random sample are selected by the system from the
population of all non-reviewed documents in the project collection. Starting from the highest
ranked document, the system identifies every Nth document to the lowest ranked. The set of
documents used for this stage is taken from every point in the ranked set. The goal is to see if the
system is correctly predicting whether or not the documents are accurately ranked.
After the Systematic stage is complete, meaning all the documents pulled are reviewed, a yield
curve is created, which will help you see how well the documents were ranked. If appropriate, it
will also help you determine where cutoff is appropriate for your situation. Consider using your
expert reviewer in this stage. See Yield Curve for additional information.
Note that if you have not finished the Systematic sample of documents, the system will not allow
you to create a yield curve and will ask you to finish the sample. And if the documents have been
reviewed and are currently in the process of being ranked, the message will notify you that you
cannot yet proceed with this stage until ranking is complete.
v.28-09302016 105

Insight Admin Guide
You will also generate a richness estimate from this stage. The richness estimate is based on
your desired confidence level and margin of error.
To take a Systematic Random sample:
1. Answer the question when prompted: “Is this sample going to be used for final valida-
tion?” Then, select the desired sample size.
The default is 100.
2. Enter the Confidence Level and Margin of Error in order to help determine what your
sample size should be.
The Predict Population Size is based on the number of documents in your Predict col-
lection. If the number of documents changes over time due to rolling uploads or you add-
ing or removing documents from your collection, these numbers will adjust.
The Confidence Level is defaulted to 95%. The Margin of Error is defaulted to 5%.
3. The number of documents in the Recommended Sample Size is based on your input.
You can accept the number at the Sample Size field, or change it to another value. Until
this full set is reviewed and released, the Get Documents is disabled because the docu-
ments need to be reviewed and ranked before the next sample can be obtained. Once
reviewed and ranked, it will be enabled again.
The richness estimate appears in your reports at Richness Estimate.
If you add documents to your Predict collection, you will be notified to take another sys-
tematic random sample and another richness estimate. The richness estimate is only
accurate for the body of documents in the collection at the time you took the Systematic
Random sample.
4. If you select the Copy sample to folder check box, the documents will be copied to a
folder, rather than to the Systematic Random stage in Predict. If you use this option and
review documents in a static folder, a yield curve will not be generated.
v.28-09302016 106

Insight Admin Guide
Report and Charts
After each ranking operation, the Predict Dashboard and associated reports and charts are
automatically updated and available for your review. Once coding decisions are made, the
documents go through the ranking algorithm, which locates words within the documents. The
words (terms) are ordered from high-ranking to low-ranking. The remainder of the document
population order is based on the words within the documents.
Because Predict automatically finds reviewed documents in Insight, there can be hundreds of
ranking operations on a project. Predict can rank these documents with amazing speed -- it can
rank more than one million documents in less than five minutes.
Open your project and click Dashboard to view overall project statistics. Information is available
on each of the tabs.
Note: The number of documents in the collection is at the top of the page next to the project
name. If this number is highlighted in yellow, the number is new, and the graph must be rebuilt by
going to Collections and selecting Create Predict Graph. Point to the number to see the new
information.
Review Statistics Tab
The information at the Review Statistics tab includes:
• Seeds Submitted for Ranking: This first section includes the documents (i.e. seeds) that
have been sent to Predict so that Predict is trained on what is relevant and not-relevant.
• Manual: The number of documents submitted to Predict from outside the ranked list.
v.28-09302016 107

Insight Admin Guide
• Relevance: The number of reviewed documents assigned to reviewers from the ranked
list.
• Contextual Diversity: The total number of reviewed seeds assigned by Predict using
Contextual Diversity to find unknown pockets of documents.
• Related: The reviewed seeds not assigned by Predict but reviewed because they were
related to the documents assigned by Predict. (Many Review Projects are set up to keep
families together, so reviewers see the entire relationship of documents when they review.
Predict projects do not need to be set up to keep families together but many managers
prefer to display the whole family to the reviewer at the same time.)
• Systematic Random: The number of documents reviewed after having been selected at
the Systematic Random stage of Predict.
• Tag Values for Seeds Submitted: The possible values in the Decision field and the
number of documents tagged with each value.
• Estimated Richness: The number of documents in the collection likely to be relevant. This
number is based on the Confidence Level and Margin of Error established after running
the richness estimate in the Systematic Random stage.
In this example, the system estimates that:
• Approximately 23,540 documents (22% of the collection containing 107,000 documents)
are relevant.
• With a margin of error of plus or minus 5%, these 23,540 documents will appear in a
range between 22,363 (95%) to 24,717 (105%).
v.28-09302016 108

Insight Admin Guide
• Quality Control: The total number of documents reviewed in the QC stage and the number
of decisions overturned.
Daily Richness
This report is used to help review managers manage their review teams and know when to stop
the review based on the richness observation. The richness is calculated on a daily basis so the
manager can compare current richness against the historical high-water mark.
As Predict feeds the most likely relevant documents to the review team first, the richness
percentage will be high because the reviewers are reviewing mostly relevant documents. As the
project progresses, the manager will notice the richness percentage will start to decrease
because the reviewers are running out of relevant documents. This chart helps them follow the
pattern and make educated decisions on when to stop a review.
The calculation table shows the number of documents reviewed, how many are relevant and the
calculated richness. This is shown for each day of the review.
Below the table is the bar chart, which is an illustration of the increasing and decreasing richness
percentage per day.
v.28-09302016 109
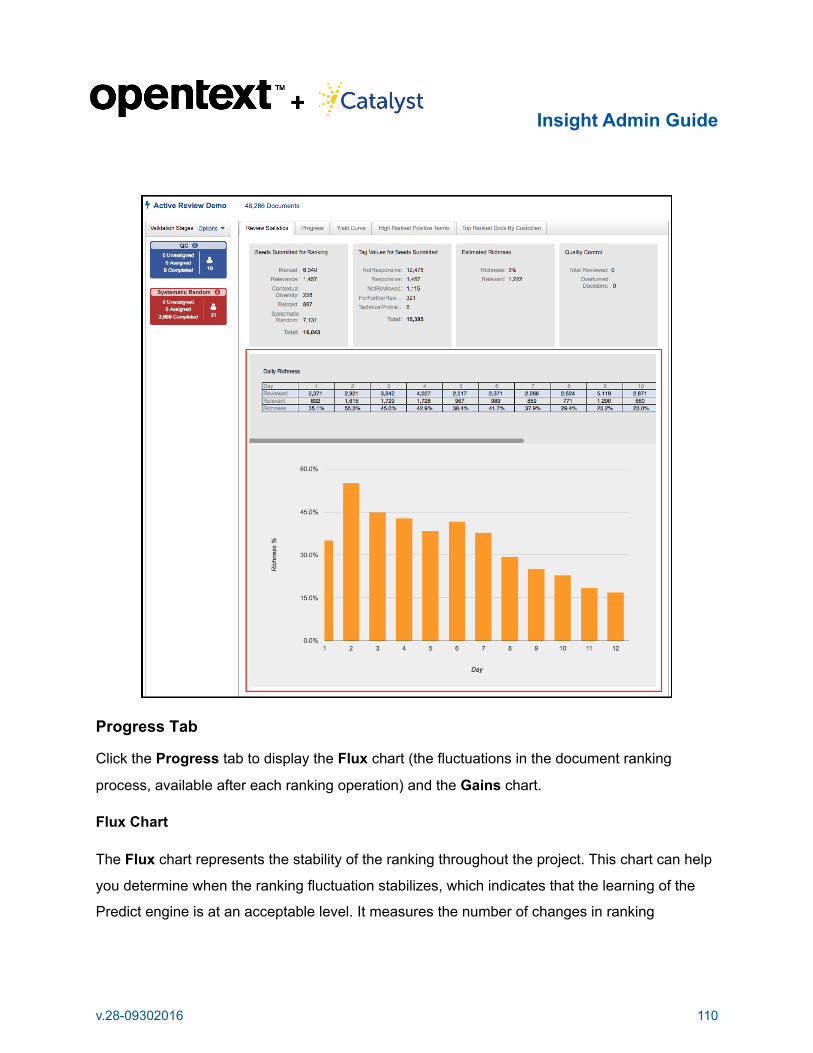
Insight Admin Guide
Progress Tab
Click the Progress tab to display the Flux chart (the fluctuations in the document ranking
process, available after each ranking operation) and the Gains chart.
Flux Chart
The Flux chart represents the stability of the ranking throughout the project. This chart can help
you determine when the ranking fluctuation stabilizes, which indicates that the learning of the
Predict engine is at an acceptable level. It measures the number of changes in ranking
v.28-09302016 110
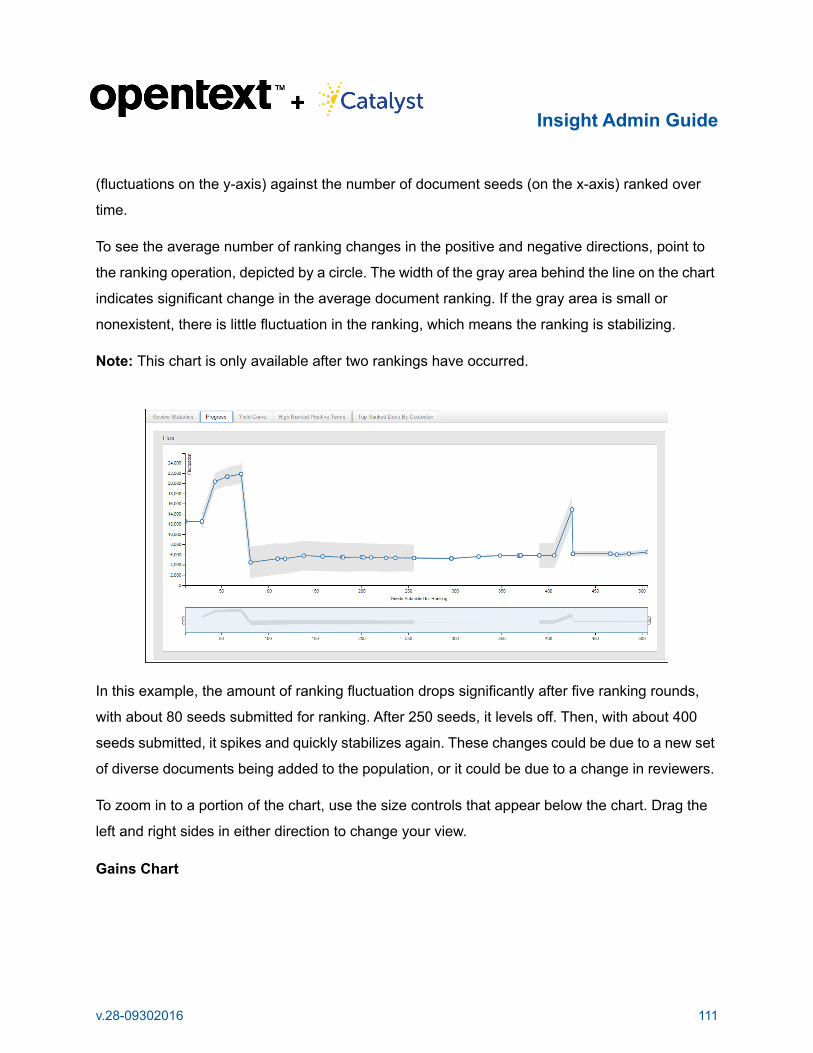
Insight Admin Guide
(fluctuations on the y-axis) against the number of document seeds (on the x-axis) ranked over
time.
To see the average number of ranking changes in the positive and negative directions, point to
the ranking operation, depicted by a circle. The width of the gray area behind the line on the chart
indicates significant change in the average document ranking. If the gray area is small or
nonexistent, there is little fluctuation in the ranking, which means the ranking is stabilizing.
Note: This chart is only available after two rankings have occurred.
In this example, the amount of ranking fluctuation drops significantly after five ranking rounds,
with about 80 seeds submitted for ranking. After 250 seeds, it levels off. Then, with about 400
seeds submitted, it spikes and quickly stabilizes again. These changes could be due to a new set
of diverse documents being added to the population, or it could be due to a change in reviewers.
To zoom in to a portion of the chart, use the size controls that appear below the chart. Drag the
left and right sides in either direction to change your view.
Gains Chart
v.28-09302016 111

Insight Admin Guide
The Gains chart (also referred to as a Cumulative Yield Chart) appears beneath the Flux chart.
The y-axis displays the Cumulative Total of Relevant Documents (positive seeds) and the x-
axis displays the total number of documents in the collection.
In this example, the number of relevant documents begins to taper off after about 9,700 seeds
have been reviewed. There are fewer relevant documents in the 9,700 and 12,000 document
range. If the trend continues, we can estimate that a majority of the relevant documents have
been reviewed.
Click the Include Related Docs button to update the chart to include the related documents.
Click it again so the chart only reflects the documents the Predict engine assigned to the review
team in the review project. To zoom into a portion of the chart, use the size controls that appear
below the chart.
High Ranked Positive Terms Tab
Click the High Ranked Positive Terms tab to review a list of the top 10,000 highest-ranked
terms in the document collection. This list can be useful when you are looking for key words in
your data. Notice that the terms might change dramatically when you compare earlier rankings to
later ones, especially if new types of documents are introduced into the collection and ranked.
v.28-09302016 112

Insight Admin Guide
Top Ranked Docs by Custodian Tab
Click the Top Ranked Docs By Custodian tab to display this chart, which shows the custodians
with the most highly ranked documents.
Yield Curve
Click the Yield Curve tab to see the results of the review.
The Yield Curve is only available after the documents are released from the Systematic
Random stage. Use this information to determine when you want to cut off your review. You want
to review as few documents as possible, while locating as many relevant documents as possible.
In the following chart, responsiveness appears on the y-axis, and percentage of documents
reviewed appears on the x-axis.
v.28-09302016 113

Insight Admin Guide
In Insight Predict, the Yield Curve looks like this:
Select a cutoff point by using the slider bar under the chart. The Documents To Review number
will change, depending on where you select the cutoff. To zoom into a portion of the chart, use
the size controls that appear below the chart.
v.28-09302016 114

Insight Admin Guide
The gray areas on the left and right ends of the chart represent the reviewed documents. The red
line represents the yield curve of a linear review. This allows you to compare the difference
between using Predict and running a linear review project.
The blue line is the yield curve for the current project, after the Systematic Random stage is
complete.
Use the slide bar at the bottom of the chart to determine an appropriate cutoff point. You can
calculate costs associated with reviewing the left side of the cutoff and the right side of the cutoff.
The left side of the cutoff represents the documents you will likely review, and the right side
represents documents you will likely not review.
The numbers in these charts will help you to make these important decisions and determine the
appropriate cutoff point. Typically, you will continue to review the documents that appear on the
left side of the curve with the goal of reviewing fewer, but more relevant documents. Those
documents that appear on the right side of the curve are documents that you will likely not
produce; you might choose to discard them completely.
Left of Cutoff
v.28-09302016 115

Insight Admin Guide
The numbers that appear in the Left of Cutoff section of the page will change, based on your
selected cutoff point.
• Number of Documents: The number of documents that appear on the left side of the
curve. The previous example shows that from the entire project population, we have
selected that the cutoff be 13% of the population. This is the percentage of the collection
that we intend to review.
• # of Reviewed Docs: The number of documents that have been reviewed and appear to
the left of the cutoff point.
• # of Unreviewed Docs: The number of documents that are not yet reviewed and appear to
the left of the cutoff point.
• Estimated Relevant: The estimated number of relevant documents of those to be
reviewed and appear to the left of the cutoff point.
• Precision: The percentage of relevant documents, from the documents that have been
retrieved for the Systematic Random sample. This is a measure of accuracy or correctness
(the number of documents relevant, divided by the number of documents retrieved in the
Systematic sample). It answers the question, “How much of what I retrieved was relevant?”
Higher precision means that less time is spent on “false positives.”
• Recall: The percentage of relevant documents that have been reviewed in the stage and is
a measure of completeness (the number of documents reviewed, divided by the number of
relevant documents from the Systematic sample). Recall answers the question, “How
many of the responsive documents did I find?” If this number is low, too many relevant
documents might have been missed.
• # Docs per Relevant: The number of documents divided by the estimated relevant for the
left side.
• Cost per Relevant: This is the total review cost that you will incur for every relevant
document. For example, if the irrelevant-to-relevant ratio is 3:1. You pay to review three
v.28-09302016 116

Insight Admin Guide
documents for every one that is relevant. You can adjust this figure by clicking Update
Cost Variables.
• Total Review Cost: The cost to review all of the documents that appear on the left of the
curve. You can adjust this figure by clicking Update Cost Variables.
• Total Review Time: The time it will take to review the documents that appear on the left of
the curve. Total Review time is the calculated by taking the number of documents on the
left, dividing it by the documents per hour, multiplied by the number of reviewers, multiplied
by the number of hours worked per day.
Update Cost Variables
Select this link to change the cost variables from the defaults. A dialog box will open and you can
change the information for the number of reviewers, docs per hour, hours worked per day and the
cost per document. If you change any of these, it will store the information you input so you can
use it again.
Right of Cutoff
The information presented in this chart allows you to see the cost and time associated with the
documents you choose to be on the right side of the Yield Curve and are usually the documents
that you choose not to review. Use the slide bar to change the cutoff and see the difference in
cost.
v.28-09302016 117

Insight Admin Guide
The information tracked here is similar to the information tracked in the Left of Cutoff section of
the page, but it pertains to the documents that appear on the right side of the curve.
These two calculations are different:
• # Docs to Next Relevant: The number of documents you would have to review before
getting to the next relevant document (the number of documents that appear on the right
side of the curve, divided by the number of estimated relevant documents that appear on
the right side of the curve).
• Cost of Additional Relevant: This is the cost of reviewing documents to get to the next
relevant document (the number of documents to next relevant times the cost per
document).
This figure is similar to the Cost Per Relevant figure from Left of Cutoff, but the number of
relevant documents on the right should be sparse. Therefore, the irrelevant-to-relevant ratio
should be high. For example, if the irrelevant-to-relevant ratio is 100:1, you pay for reviewing 100
documents for every one relevant document.
If there is one relevant document in every 100, and the cost for reviewing each document is $3,
then the cost per relevant document is $300. So, you can see that it is an exorbitant cost to
review all of the non-relevant documents just to get to the next relevant one. It is better to exclude
the right side documents from review and production.
Not Ranked Documents
The Not Ranked field, which appears in the upper right corner of the Yield Curve chart, shows
the number of documents not reflected in the chart and excluded from the ranking process.
Documents might not be ranked for a variety of reasons, including file size and document content
(e.g. - empty documents, documents with just numbers, documents greater than 10MB of text),
are excluded from the process completely.
The % of Collection field, which appears under the Not Ranked field, displays he percentage of
the collection that is excluded from the Yield Curve.
v.28-09302016 118

Insight Admin Guide
Rejecting the Yield Curve
After the Systematic Stage is complete and all documents have been reviewed and released,
you determine whether to accept or reject the Yield Curve.
• If you believe that additional sampling and system training is needed, click the Continue
Ranking button located above the curve.
• If you choose to reject the Yield Curve and continue to train the system, the Yield Curve
will disappear from the screen, and the other stages of the project will be enabled once
again. The documents that were coded in the Systematic stage will be automatically sent
to ranking as document seeds.
Productivity and Coding Distribution Reports
Additional reports are available to track productivity and coding distribution.
1. To open the Productivity Report, click Reports in the left panel.
You can customize the report by selecting all stages or by selecting just one stage, such
as the QC stage or the Systematic Random stage.
2. Click Coding Distribution to see the decision field on which the project is based.
v.28-09302016 119

Insight Admin Guide
Send Documents to a Review Project
When you are satisfied with the yield curve calculations, you might choose to send the
documents to a review project and use the workflow of the Review Projects Module. You can also
copy the documents to a folder.
1. Either click on the Assign Document For Review button or use the Copy Documents
link from the Options menu.
v.28-09302016 120

Insight Admin Guide
2. To assign all documents to the left of the cutoff, select the radio button that displays the
document count.
You can also select some of the documents by selecting the Top radio button and typing
in the number of documents you want to assign in the text box. This method is useful if
you want to start with a fewer amount of documents and see how the review progresses
before you assign more documents to the review project.
3. Select Exclude documents reviewed during this project to avoid those that have
already been through the Predict review.
4. You can also filter by different criteria to exclude documents from going to the project or
folder.
For example, you can hold a particular custodian’s documents for the first round, and
remove the filter later when you are ready to send those documents to review.
5. Choose a destination - either a review project or a folder.
6. Progress through the steps outlined in the wizard. Select the project and bring in related
documents if you like.
Predict Options Menu
Expand the Options menu to view the options available only to Predict administrators.
v.28-09302016 121

Insight Admin Guide
• Project Settings: To view the original settings selected for your project. This setting
information includes the project Name, Description, Decision Field and Predictive Ranking
Collection. The Name, Description, and the weights of the Decision Field are editable, but
please speak with a OpenText Consultant before changing this information.
• Export Ranked List: You can export a list of all document IDs and their rank by selecting
this option. Simply name the job and Create Export Job. As with all exports on Insight, go
to the Monitors & Reports tab to find your export. Your export will be under the Export link.
The file will be a simple text (.txt) file with the docIDs and Ranks, sorted by rank.
• View Docs From Ranked List: As an administrator, you might find it helpful to view
documents from the ranked population. Enter the range of documents you want to view in
the text boxes. For example, if the documents are ranked from 1 to 500 and you want to
view the 100 highest-ranked documents, enter 1 in the From field and 100 in the To field.
After the documents are retrieved, they will be displayed in the table view of the Results
page.
You will then need to select a folder or create a folder to copy the documents into. If you
do not see the folder you like, select Other Folders under My Folders, Shared Folders or
Public Folders. You can create a new folder by using the drop-down arrow next to those
top level folders. Then, follow the steps to create the folder and copy the documents into
it. Navigate to your folders under the Folders tab of Insight to find the documents.
• Copy Documents: Select this option to copy documents to a review project or to a folder.
See Send Documents to a Review Project for additional information.
v.28-09302016 122

Insight Admin Guide
• Delete Project: Select this option to entirely delete a Predict project. Be aware this will
delete any ranking information about the project.
• Project Setup Information: The date the project was created appears at the bottom of the
Options menu. To review information about the project, such as when the last ranking
operation occurred, and the last time the graph database was built, point to the project
name at the top of the page.
v.28-09302016 123

Insight Admin Guide
Reports
Administrators in a Role with the ViewAuditReports permission have access to the site’s
reports. These reports provide a roll up of user activity and an audit trail of changes to
documents.
Click the Monitors & Reports button and expand the Reports menu.
Document Audit Trail Reports
Document Audit Trail reports provide an audit trail of changes to documents.
1. Click Document Audit Trail in the Reports menu.
When opened, the Document Audit Trail page displays the current date’s information,
and the Date Range fields are automatically defaulted to today’s date.
The following information appears on the page:
• Doc ID: The unique document identification number assigned by OpenText
• BegControl: The beginning control number of the document
• Date and Time: The date and time the change was made
• User Name: The user name assigned to the user in the system
• First Name: The user’s first name
• Last Name: The user’s last name
• Action: The specific action taken by the user: update (saving the document after
making field changes), redaction, conversion, update with no changes (saving the
document without making field changes)
• Fieldname: The name of the field changed, if changed
• Old Value: The original field value, if the field was changed
• New Value: The new field value, if the field was changed
• Audit ID: A unique auditing identifier assigned by Catalyt
v.28-09302016 124

Insight Admin Guide
2. If you’d like to change the dates of your report, type into the fields using the International
Standard Date format YYYY-MM-DD; you can also use the calendar to populate the field.
When using the calendar, expand the menus to select the Date and Year, and then click
the specific day in the calendar. Your chosen date is placed in the Date field. Change the
To Date field in the same way. The Date Range filter is inclusive of the dates in the boxes
(greater than/equal to the beginning date and less than/equal to the ending date).
3. You can limit the report to specific DocID or BegControl number(s). Enter the number
(separate multiple numbers with commas), and then click outside the box. This signals
the system to apply your filter.
The system dynamically refreshes to display the results based upon your filters.
4. Using the selections in the Set Filters panel to create the report you need.
By default, all Fields and all Review Projects checkboxes are selected.
v.28-09302016 125

Insight Admin Guide
5. If you want to narrow your report to certain fields and/or by specific projects, clear any
unnecessary checkboxes. You can also click Clear to remove all selections and then go
back and select only the ones you need.
The system refreshes automatically to display the new table of information.
6. Click Hide Filters at the top of the page to maximize the grid.
By default, the information in the grid is sorted by Date and Time in descending order
(denoted by the down triangle).
7. To sort by another column, click the header. Clicking again will change the order from
descending to ascending (up triangle). Navigation buttons at the bottom of the table allow
you to change the grid page displayed.
Each change to a document is listed as a separate entry.
8. To reset the grid information to the original display when you opened the page, select the
Reset button at the bottom of the Filters panel.
The Filters reset state is:
• Date Range: Current date range
• DocID(s): Empty
v.28-09302016 126

Insight Admin Guide
• BegControl(s): Empty
• Fields: All fields are displayed, but cleared
• Review Projects: All review projects are displayed, but cleared
9. If you would like to save the data, you can export the report. Click the Export button.
10.Enter the name of your job export, ensure your email address is correct, and click the
Create Export Job button. You will be notified when the export is complete.
The exported file will be in delimited text file format. You can easily save the file into Excel
to manipulate the rows and columns. The downloadable file is located in the Monitors &
Reports section of the site at Export.
User Audit Trail Reports
User Audit Trail reports provide information about user activity in a site. You can view this
information in either a summary view or a detailed view.
Summary View
To access User Audit Trail reports in a summary view:
1. Click User Audit Trail in the Reports menu.
The User Audit Trail Report page opens to the Summary tab page, which is defaulted
to the current date’s information, and the Date Range fields are automatically populated
with today’s date. By default, all Roles and Users are selected, but you can narrow your
report as needed. The information in the report includes:
• User Name: The user name assigned to the user in the system
v.28-09302016 127

Insight Admin Guide
• First Name: The first name of user
• Last Name: The last name of user
• Login: The number of times the user logged in to the site
• Views: The number of times a user viewed (opened) documents
• Searches: The sum of searches a user has run
• Updates: The number of times a user updated and saved documents
• Redactions: The number of redactions a user performed
• Delete Redactions: The number of redactions a user deleted
• Foldering: The sum of the number of times a user foldered documents in bulk, foldered
a single document and batched documents to folders
• Bulk Updates: The number of times a user carried out bulk updates using the Bulk
Update Wizard
• Uploads: The number of uploads performed by the user
• Batch Prints: The number of times a user batched documents into a printable PDF or a
zipped folder using the Batch Print Wizard.
2. If you’d like to change the dates of your report (creating a different time range for your
report), type into the fields using the International Standard Date format YYYY-MM-DD;
you can also use the calendar to populate the field.
When using the calendar, use the menus to select the Date and Year, and then click the
day in the calendar. Your chosen date is placed in the Date field. Change the To Date
field in the same way.
3. You can limit the Summary page to view selected actions performed by specific Roles
and Users. Clear the checkboxes at Roles to remove them, but keep at least one Role
selected.
v.28-09302016 128

Insight Admin Guide
4. You can also limit the information to specific users. The system refreshes automatically to
display the new table of information based upon your selections. Use the Clear buttons to
clear all checkboxes. If you’d like to quickly set the filters back to today’s date and all
users, click Reset.
5. Use the scroll bar at the bottom of the table to see all the columns.
6. Click Hide Filters at the top of the page to maximize the grid.
By default, the information in the grid is sorted by User Name in descending order
(denoted by the down triangle).
7. To sort by another column, click the header. Clicking again will change the order from
ascending to descending (up triangle). Navigation buttons at the bottom of the table allow
you to change the grid page displayed.
Detailed View
The Detail view provides a breakdown of specific user actions.
1. Click the Details tab.
2. The Date Range, Roles, and Users are still available to filter your results, but you can
use the User Actions hierarchy to report on granular levels of user activities.
The information in the report includes:
• Date and Time: The date and time the action was taken
• User Name: The user name assigned to the user in the system
• First Name: The first name of user
• Last Name: The last name of user
• Action: The action performed by the user
• DocID: The unique document identification number assigned by OpenText
• Time Spent: The total time the user spent performing the action
v.28-09302016 129

Insight Admin Guide
• Description: A system description of the action
• Audit ID: A unique auditing identifier assigned by OpenText
3. Scroll down to the User Actions section. Use the checkboxes or expand the category
structure to select specific actions on which to report.
The category represents the area of the site where the action took place; for example,
Bulk Actions are activities performed from the Results page.
The system refreshes the report automatically as you clear and select checkboxes.
4. Click Hide Filters to display more of the report on your screen. Use the navigation con-
trols to change report pages.
5. To return to the default of today’s date with all Users, Roles and User Actions selected,
click Reset at the bottom of the Filters panel.
By default, the information in the grid is sorted by User Name in descending order
(denoted by the down triangle).
6. To sort by another column, click the header. Clicking again will change the order from
ascending to descending (up triangle). Navigation buttons at the bottom of the table allow
you to change the grid page displayed.
v.28-09302016 130

Insight Admin Guide
Production Module
When it is time to run your productions, use the integrated Production Module within Insight. With
the Production Module you simply fill out the specifications, copy the documents to a folder, and
run the production. Productions can be cloned so when another production needs to be run, you
can use the same specifications as the previous one.
If you have the Use Productions permission, you will see Production Folders in your folder list
and be able to run productions.
You’ll start by entering your production specifications into the system, including delivery
instructions. Then, you’ll folder the documents you want to produce and run the production.
To ensure you do not produce something you shouldn’t, you can create quality control rules, so
that documents identified by criteria you define are flagged for review before they are produced.
For example, you can set up a rule to flag documents coded as Privileged in the Privileged
field. You can then review the documents and determine whether you want to produce them.
Important: Whenever you make changes to the production information, click the Save button at
the top of the page. You can add and edit production information at any point prior to running your
production, but the changes will not save automatically -- you must click Save.
Create Production Folders
The first step in running a production is to create a folder for your documents.
v.28-09302016 131

Insight Admin Guide
1. Click the Folders button and then expand Production Folders to see the existing folders on
your site. If no productions exist, you will not see any folders in the hierarchy.
2. To create a new folder, point to the top-level Production Folders, and click New.
3. Enter the name for your folder in Folder Name field.
If you include information in the Folder Description box, it will become a tool tip when
users point to the folder.
Configure Placeholders
You can configure (create and manage) placeholders for documents you will not produce. These
placeholders can be used for all productions run on your site. For example, you might want to
insert placeholders to replace documents that would not convert for production, or to show that a
file is out of order because it is being produced in a native format. In these instances, inserting a
placeholder will show opposing counsel you intentionally removed the file from the production.
It is important to note the Department of Justice (DOJ) requires placeholders be used for
privileged documents, and the placeholders can be established here.
To create a placeholder:
1. Point to the top-level Production Folders and select Configure Placeholders.
If placeholders already exist, you will see them in the table.
2. To create a new one, click the Add Placeholder button in the right frame.
Your site may have several placeholders, used for different circumstances as needed.
v.28-09302016 132

Insight Admin Guide
3. Enter a name for the placeholder, and at Placeholder Text, and create the explanation
you want to appear on the placeholder page.
You can also use the Second Text and Third Text sections to enter more information on
the placeholder page.
4. Select Text or Field to type text into the box or place a field’s data in the placeholder
page.
5. At Comments, enter any other information or reminders for you and others who run pro-
ductions on your site. This information does not appear in the produced documents.
6. Click Save.
v.28-09302016 133

Insight Admin Guide
The placeholder will display in the Placeholder page. Use the appropriate buttons to
remove or edit a placeholder.
Note: If you opt to include placeholders in the production but fail to configure them before
running the production, the system will ask you to resolve the conflict and re-save the production.
Provide Production Specifications
To specify how you want the production run, point to your new production folder and click Show
Detail, where you'll add your specifications and review production activity in the following
sections of the form:
• Basic Information
• Status
• Input/Output
• Placeholder Rules
You’ll also provide endorsement and load file specifications, and delivery instructions in this form,
and be able to set QC rules to flag documents that meet criteria you define so you can review
them before you produce them.
Basic Information
Complete the fields on the section of the page, as appropriate.
• The Production Name, Production ID, Created By and Create Date are informational
fields to track who created the production and when. The Production Name is the name
you created for the folder.
• The Contact Email is the email of the user who created the production. This can be
changed.
• Provide an appropriate name in the Volume field.
• Enter reminders or additional information you’d like to include in the Comments field.
v.28-09302016 134

Insight Admin Guide
• The Date Format is set to Month, Day, Year on a 12-hour clock. This determines how
information in date fields is displayed. Change this, if needed, by expanding the date and
clock menus and selecting the appropriate date and time.
• If you are producing redacted documents, indicate which redaction set you will use for the
production in the Redaction Set field before you copy any documents into the folder. The
set you select instructs the system to replace the original records with the redacted files.
Status
This section reflects the activity of the conversion process after you add the documents to the
production folder. Review the information in this section to monitor production activity. You’ll see
the number of pages and documents produced, flagged for QC, and the number of documents
converted and not yet converted into PDF documents.
All documents must be converted to PDF before productions are run. When you copy documents
into the production folder, the system checks each document to see if a PDF version already
v.28-09302016 135
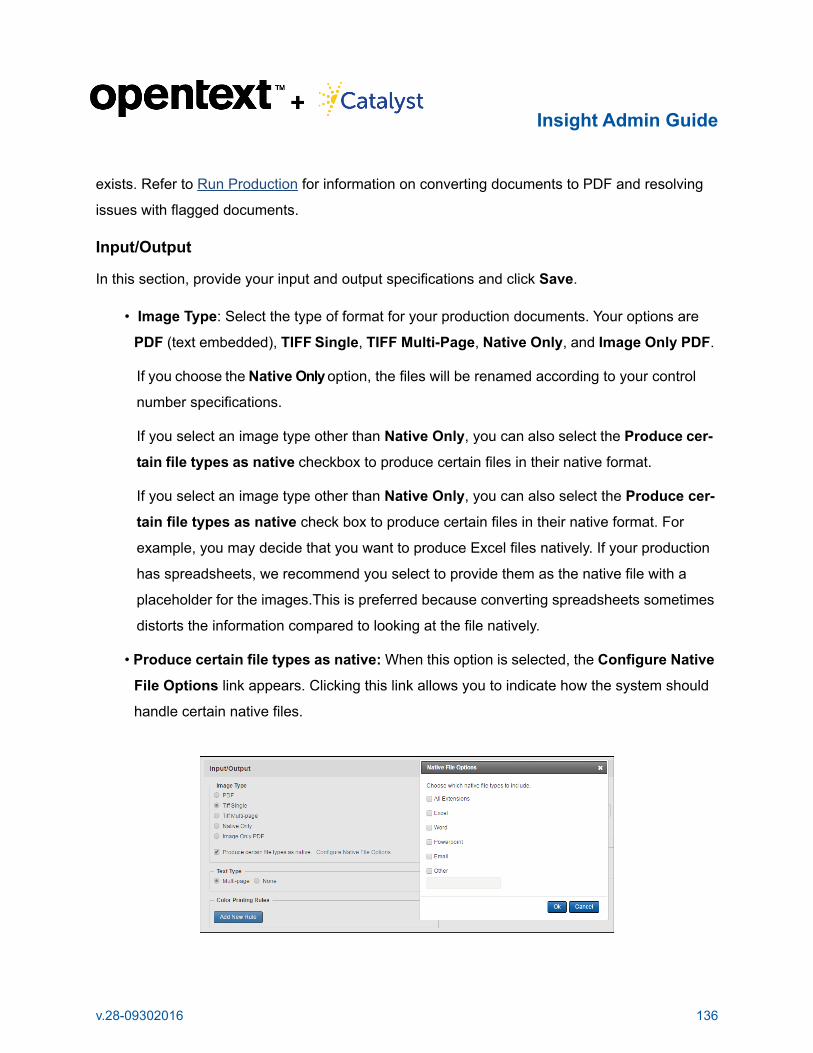
Insight Admin Guide
exists. Refer to Run Production for information on converting documents to PDF and resolving
issues with flagged documents.
Input/Output
In this section, provide your input and output specifications and click Save.
• Image Type: Select the type of format for your production documents. Your options are
PDF (text embedded), TIFF Single, TIFF Multi-Page, Native Only, and Image Only PDF.
If you choose the Native Only option, the files will be renamed according to your control
number specifications.
If you select an image type other than Native Only, you can also select the Produce cer-
tain file types as native checkbox to produce certain files in their native format.
If you select an image type other than Native Only, you can also select the Produce cer-
tain file types as native check box to produce certain files in their native format. For
example, you may decide that you want to produce Excel files natively. If your production
has spreadsheets, we recommend you select to provide them as the native file with a
placeholder for the images.This is preferred because converting spreadsheets sometimes
distorts the information compared to looking at the file natively.
• Produce certain file types as native: When this option is selected, the Configure Native
File Options link appears. Clicking this link allows you to indicate how the system should
handle certain native files.
v.28-09302016 136

Insight Admin Guide
Select the type of file you want to configure using the checkboxes. Use Other to enter any
other file types by extension, such as gpg.
Upon selecting a checkbox, you can indicate how these types of files should be produced:
Native +Images, Native + 1st 5 Pages, or Native + Placeholder.
If you select Native + Placeholder, a menu appears and you can select your placeholder.
If there is a text file associated with the record, you have the option of using the existing
text of a document instead of placeholder text.
• Text Type: If you want to produce text files, select the format for the text files that you want
to produce. Your options are Multi-page or None. The most common selection for
productions that will be loaded to internal systems is multi-page text with single-page TIFF
images.
• Color Printing Rules: Use color printing rules if you want documents to be printed in color.
The easiest way is to have reviewers code a field to indicate that the file should be
produced in color. Adding a simple field called “Color” with Yes/No options might be the
best option. At the color printing section, Add new Rule and create a rule so that the
documents that should be produced in color are pulled (e.g. color=yes). Specify the output
format.
• Numbering: Use the Prefix and Starting Number boxes to provide the production
endorsements. See Endorsements for information on placing these numbers on the
production documents.
The character maximum for the production number (Bates Number) is 20. The Prefix char-
acter limit is 1 to 15 alphanumeric or unicode characters. No special characters are
allowed, and you will receive a prompt if you enter invalid information. The maximum char-
acters you can enter at Starting Number is 10, and they must be numeric characters.
• Sort by: Select a field to sort your production. Expand the Sort by menu and select a field,
and then select the Order: Ascending or Descending. Click More Sort Options to include
additional fields to sort by. You can have up to five fields in your sorting instructions. Click
Fewer Sort Options to collapse additional field menus.
v.28-09302016 137

Insight Admin Guide
Placeholder Rules
Placeholders can be inserted to replace documents in the production. They are often used to
take the place of files that are produced natively because native files are not endorsed. You
configured placeholders earlier in the process.
To add a placeholder rule, click Add New Rule. Specify the rule and the placeholder and click
Add.
Selecting the Automatically replace conversion error files with placeholder? checkbox
signals the system to replace all documents that encounter conversion errors with the placeholder
you designate. When the checkbox is selected, you can expand the Placeholder menu and
select the appropriate placeholder.
v.28-09302016 138

Insight Admin Guide
Note: Rules are executed in the following order: Rule-based placeholders, native, and then
conversion placeholders. Once a rule executes, no further rules are applied.
Configure Endorsements
At the Endorsement section, you can set up:
• Rule-based endorsements
• Text-based endorsements
• Watermarks
To set up an endorsement or watermark, begin by:
1. Selecting the Position using the Position Guide by clicking one of the endorsement
numbers (1 – 12) or Watermark numbers (1 or 2).
2. Once a position is selected, you can change the font. Expand the menus to select a differ-
ent font or size.
v.28-09302016 139

Insight Admin Guide
3. At Endorsement Type, indicate whether you want a rule-based endorsement or a text-
based endorsement.
Rule-Based Endorsements
To create rule-based endorsements:
1. Select the Rule Based option and click New Rule and select the field, operator, and
value.
Rules are created in a way that is similar to a search. For example, if you want to create a
rule based on the Confidential field, select that field from the menu. Select the Equals (=)
operator and enter the value. Then enter the text to be added to the documents. In the fol-
lowing image, the rule translates to: If the Confidential field equals confidential, put the
word Confidential into the 6th position.
2. You can also select the Use Field option to enter fielded information if the rule is met.
In the following example, if the Confidential field equals notconfidential and data from
the Comments field will be placed in position 4.
v.28-09302016 140

Insight Admin Guide
3. Use the Plus (+) button to add additional criteria to the query.
For example, if you wanted a two-part query, such as if the Confidential field equals
Confidential OR the Confidential field equals Highly Confidential then put Confiden-
tial into position 7.
4. Click Save to capture your rule and then select the Save Position button to save the infor-
mation to the position.
During the endorsement stage of the production, the rules are implemented in order (rule-
based placeholders, native placeholders, and then conversion placeholders).
If any of the rules are met, the endorsement will be added. Once a rule executes, no fur-
ther rules are applied to a document.
Create as many rules as you need. If none of the rules is met, no endorsement will
appear on the documents. This will not affect production numbers or watermarks.
5. Click the position number to edit the information or click Clear Position to delete the
endorsement at this position.
Text-Based Endorsements
To create text-based endorsements:
1. Select the Text Based option and enter the text you want to appear on the documents.
v.28-09302016 141

Insight Admin Guide
At Text Type, you can select Plain Text and then in the Text to Use box, enter the infor-
mation, as shown below.
Selecting Field Value allows you to choose a field from the Field to Use menu, as shown
below.
If you select the Production Number option, the system does not require more informa-
tion from you. It simply indicates where the production number should appear on the doc-
ument.
2. Select the Save Position button to save the endorsement information.
3. Click the position number to edit the information or click Clear Position to delete the
endorsement at this position.
v.28-09302016 142

Insight Admin Guide
You must confirm your decision to clear a position before the change is made.
Watermarks
To place watermarks on the documents:
1. Select the Watermark 1 or the Watermark 2 button.
2. Select the transparency of the watermark text at Opacity. If you choose to include two
watermarks, the setting affects both (the lower the number, the more transparent the
text).
3. Expand the Font Size menu to select how large the text should be. Watermarks will
appear diagonally from the bottom left to the top right on your production documents.
4. Review the rule-based and text-based endorsement instructions to learn how to manage
rule-and text-based watermarks.
Provide Load File Specifications
You can establish the load file that will be sent with the production. Load files are typically
provided with all productions. You can also add fields to load files and reorder the fields.
1. At Image Load File(s), select the appropriate option.
v.28-09302016 143

Insight Admin Guide
2. You can leave the Load File Format set to None or expand the menu to select the Con-
cordance, Custom, Access, or Excel format.
If you choose Concordance, Access or Excel, we will apply the standard information at
Field Delimiter and Text Qualifier. If you choose Custom, you need to select the delim-
iters.
3. At File Name, enter the name. The Extn field is automatically populated based upon the
format you select.
4. You can enter more information at Description.
Add Fields to Load Files
You can add fields to the load file from the fields on your site, from the production fields or you
can create custom fields.
1. To add a field to a load file, move a field from the Available Fields list and the Produc-
tion Fields list to the Selected Fields lists.
2. To add a custom field, click Add New Custom Field to create a new field and then move
it from the Custom Fields list to the Selected Fields list.
v.28-09302016 144

Insight Admin Guide
Creating a custom field does not add the field to the document records, it just adds the
information to the load file. You can use this if you want to provide a specific bit of infor-
mation to each record in the load file.
Reorder Fields
Once you have your selected fields, you can reorder them.
1. Click the Configure Field Order link above the Fields boxes.
2. In the Configure Field Order dialog box, click your field and drag it to the new position.
3. Click Save to capture the new field order.
v.28-09302016 145

Insight Admin Guide
4. You can also rename the field for the production by clicking the Configure Field Aliases
link. In the dialog box, find the field and enter the new name at Alias Names and then
click Save.
v.28-09302016 146
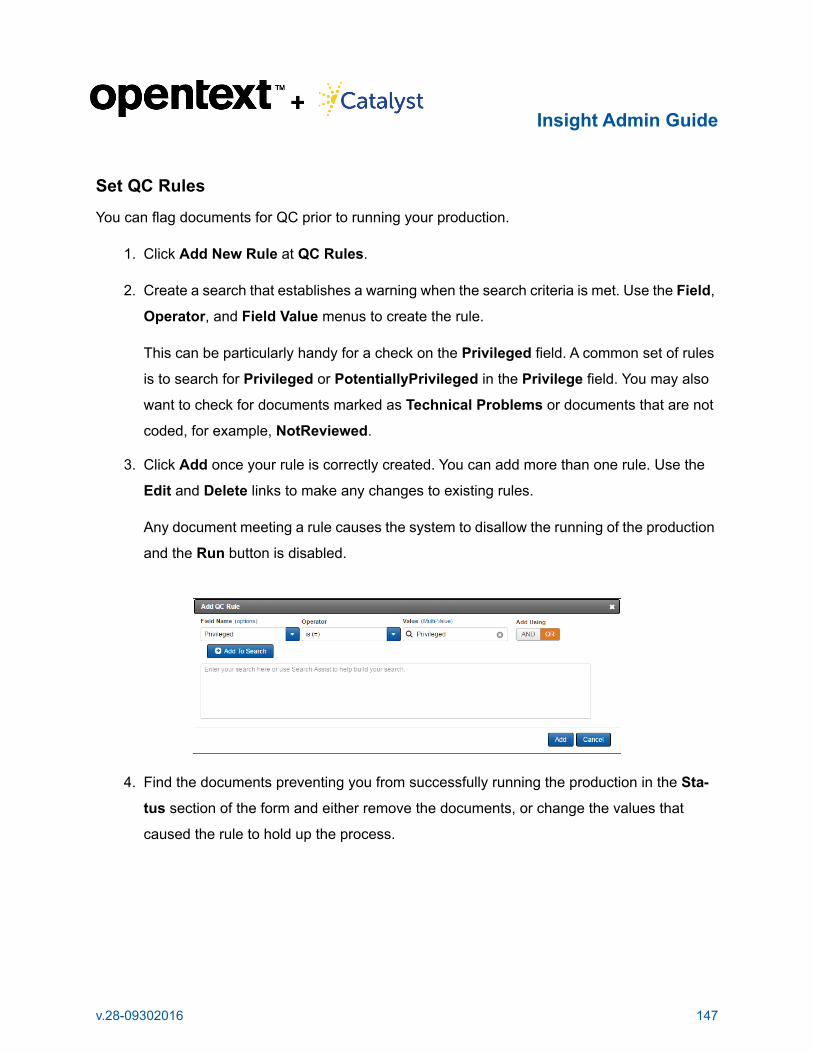
Insight Admin Guide
Set QC Rules
You can flag documents for QC prior to running your production.
1. Click Add New Rule at QC Rules.
2. Create a search that establishes a warning when the search criteria is met. Use the Field,
Operator, and Field Value menus to create the rule.
This can be particularly handy for a check on the Privileged field. A common set of rules
is to search for Privileged or PotentiallyPrivileged in the Privilege field. You may also
want to check for documents marked as Technical Problems or documents that are not
coded, for example, NotReviewed.
3. Click Add once your rule is correctly created. You can add more than one rule. Use the
Edit and Delete links to make any changes to existing rules.
Any document meeting a rule causes the system to disallow the running of the production
and the Run button is disabled.
4. Find the documents preventing you from successfully running the production in the Sta-
tus section of the form and either remove the documents, or change the values that
caused the rule to hold up the process.
v.28-09302016 147

Insight Admin Guide
Provide Delivery Instructions
Complete the fields on the section of the page, as appropriate.
1. Enter any unique information at Instructions.
2. Click Add Shipping Information if you need to include an address or phone number.
3. Expand the Method menu to select the delivery method.
4. Click Update and Save.
Copy Documents to the Production Folder
Either open a folder or run a search to retrieve the documents you need to produce.
1. In your Results page, use the checkboxes to select your documents and then click Copy
to…. from the drop-down menu.
v.28-09302016 148

Insight Admin Guide
2. In the Copy to Folder dialog box, select your folder under Production Folders and click
the Next button.
Refer to the Copy to Folder for additional information.
Important: You do not have to set up all of the production details prior to adding documents to
the folder. Because the documents start converting to PDF when you associate them to the
folder, it can save time by copying them to the production folder first. You might want to set up the
project, copy documents into the folder and then set up the production specifications.
You should, however, complete the Basic Information section of the form and select the
redaction set you will use for the production, if you're using one, prior to copying documents into
the folder. The set you select instructs the system to replace the original records with the
redacted files.
Run Productions
Once you have selected and foldered the documents you need to produce, you completed the
specifications, resolved any rules and documents that are not converted, you can run the
production.
1. Click the Folders button and expand Production Folders to find your folder.
Clicking the folder brings back the documents in the Results page.
v.28-09302016 149

Insight Admin Guide
2. Check to see that all of your documents are in the folder. Point to the folder and click the
Tools (wrench) button to see the Tools menu.
3. Click Show Detail to edit the properties of the production, resolve any issues, and run the
production.
4. Click Save to capture any changes.
5. Click the Run button when you are ready to start the production.
This button is not enabled until you remove or change the coding of documents meeting
QC Rules and/or when documents are not converted to PDF. All Production documents
must be converted to PDF.
6. If you encounter issues, go to the Status section, and click the number(s) in red.
If the issue is that documents are Not Converted, bulk convert them to PDF. Click the
number (9 in this example), and bring back those documents in the Results page.
Select all the documents using the checkboxes. Then, expand the menu and select Bulk
Convert.
v.28-09302016 150

Insight Admin Guide
You can monitor your bulk conversion job by clicking the Monitors & Reports button and
then selecting Conversion. If you bulk converted several documents, change the filter to
Bulk at Conversion Type to see your job in the table. (See Monitors and Reports for
more information.)
7. Before you can run a production, you must also resolve any documents that were flagged
by a QC Rule.
v.28-09302016 151

Insight Admin Guide
You have three options:
• You can click the number (3 in the above example) and bring back the document(s) in
the Results page. Upon QCing the document, you may determine it was coded
incorrectly. Change the coding and save the record.
• Your second option is to remove the documents from the production entirely. Perhaps
the QC Rule flagged documents that should not be produced. In the Results page, click
Actions, and use the checkboxes to select your documents. Click Remove From so
that the document or documents are not pointed to from your Production folder and,
therefore, not produced. You can monitor folder changes by clicking the Monitors &
Reports button and then selecting Folder/Field Updates. (See Monitors and Reports
for more information.)
• Your third option is to just remove the rule once you have looked at the flagged
documents and determined they can be produced. Go to the QC Rule section and click
Delete. Remember to click Save at the bottom of the Show Details page. This signals
the system to reload the page with your changes implemented.
v.28-09302016 152

Insight Admin Guide
8. At Status, you can also see the number of documents that will not convert at Conversion
Errors. These documents cannot be converted based on your production details and will
be replaced by placeholders if you have designated a placeholder. These documents do
not have to be resolved or removed to run the production. To view the documents, click
the number.
When all documents are converted to PDFs and all QC Rules are resolved, the Run but-
ton is enabled.
9. Click the Run button to run the production.
10. To monitor production details, click the Monitors & Reports button.
A list of the productions run on your site appear in the table. You can click the Status
(clock) button to review the job. The Create Date is the date the production folder was
created and may not be the same date as the production run date.
Clone, Edit and Delete Production Folders
To change information in the Production page:
• Point to the folder and click Show Detail.
v.28-09302016 153

Insight Admin Guide
You can make changes even if you did not create the folder.
• Selecting Clone signals the system to copy the details of a production folder to a new
folder.
You also have the option of including the documents (associating the documents from the
original folder to the new folder).
You may find that setting up a project as a template will save you time. Rather than setting
up new projects, just clone the template project and change the necessary criteria, associ-
ate your documents to that folder and run the production.
• To remove a production folder, select Delete. You will be prompted at Delete Folder to
confirm. Clicking Delete signals the system to remove the folder,
You do not need to first remove documents before deleting the folder. If you created the
folder, select Edit in the menu to change the name or the description of the folder. The Edit
command is only available if you created the folder.
v.28-09302016 154